Progress is often best appreciated in retrospect. It is often the case that a steady stream of incremental improvements over a long period of time ultimately adds up to a significant level of change. Today, ten years after we first launched the Provisioned IOPS feature for Amazon Elastic Block Store (EBS), I strongly believe that to be the case.
All About the IOPS Let’s start with a quick review of IOPS, which is short for Input/Output Operations per Second. This is a number which is commonly used to characterize the performance of a storage device, and higher numbers mean better performance. In many cases, applications that generate high IOPS values will use threads, asynchronous I/O operations, and/or other forms of parallelism.
The Road to Provisioned IOPS When we launched Amazon Elastic Compute Cloud (Amazon EC2) back in 2006 (Amazon EC2 Beta), the m1.small instances had a now-paltry 160 GiB of local disk storage. This storage had the same lifetime as the instance, and disappeared if the instance crashed or was terminated. In the run-up to the beta, potential customers told us that they could build applications even without persistent storage. During the two years between the EC2 beta and the 2008 launch of Amazon EBS, those customers were able to gain valuable experience with EC2 and to deploy powerful, scalable applications. As a reference point, these early volumes were able to deliver an average of about 100 IOPS, with bursting beyond that on a best-effort basis.
Evolution of Provisioned IOPS As our early customers gained experience with EC2 and EBS, they asked us for more I/O performance and more flexibility. In my 2012 post (Fast Forward – Provisioned IOPS for EBS Volumes), I first told you about the then-new Provisioned IOPS (PIOPS) volumes and also introduced the concept of EBS-Optimized instances. These new volumes found a ready audience and enabled even more types of applications.
Over the years, as our customer base has become increasingly diverse, we have added new features and volume types to EBS, while also pushing forward on performance, durability, and availability. Here’s a family tree to help put some of this into context:
Today, EBS handles trillions of input/output operations daily, and supports seven distinct volume types each with a specific set of performance characteristics, maximum volume sizes, use cases, and prices. From that 2012 starting point where a single PIOPS volume could deliver up to 1000 IOPS, today’s high-end io2 Block Express volumes can deliver up to 256,000 IOPS.
Inside io2 Block Express Let’s dive in a bit and take a closer look at io2 Block Express. These volumes make use of multiple Nitro System components including AWS Nitro SSD storage and the Nitro Card for EBS. The io2 Block Express volumes can be as large as 64 TiB, and can deliver up to 256,000 IOPS with 99.999% durability and up to 4,000 MiB/s of throughput. This performance makes them suitable for the most demanding mission-critical workloads, those that require sustained high performance and sub-millisecond latency. On the network side, the io2 Block Express volumes make use of a Scalable Reliable Datagram (SRD) protocol that is designed to deliver consistent high performance on complex, multipath networks (read A Cloud-Optimized Transport Protocol for Elastic and Scalable HPC to learn a lot more). You can use these volumes with X2idn, X2iedn, R5b, and C7g instances today, with support for additional instance types in the works.
Your Turn Here are some resources to help you to learn more about EBS and Provisioned IOPS:
Amazon CloudFront is a content delivery network (CDN) service, a network of interconnected servers that is geographically closer to the users and reaches their computers much faster. Amazon CloudFront reduces latency by delivering data through 410+ globally dispersed Points of Presence (PoPs) with automated network mapping and intelligent routing.
With Amazon CloudFront, content, API requests and responses or applications can be delivered over Hypertext Transfer Protocol (HTTP) version 1.1, and 2.0 over the latest version of Transport Layer Security (TLS) to encrypt and secure communication between the user client and CloudFront.
Today we are adding HTTP version 3.0 (HTTP/3) support for Amazon CloudFront. HTTP/3 uses QUIC, a user datagram protocol-based, stream-multiplexed, and secure transport protocol that combines and improves upon the capabilities of existing transmission control protocol (TCP), TLS, and HTTP/2. Now, you can enable HTTP/3 for end user connections in all new and existing CloudFront distributions on all edge locations worldwide, and there is no additional charge for using this feature.
What is HTTP/3? HTTP/3 uses QUIC and overcomes many of TCP’s limitations and bring those benefits to HTTP. When using existing HTTP/2 over TCP and TLS, TCP needs a handshake to establish a session between a client and server, and TLS also needs its own handshake to ensure that the session is secured. Each handshake has to make the full round trip between client and server, which can take a long time when client and server and far apart, network-wise. But, QUIC only needs a single handshake to establish a secure session.
Also, TCP is understood and manipulated by a myriad of different middleboxes, such as firewalls and network address translation (NAT) devices. QUIC uses UDP as its basis to allow packet flows in an enterprise or public network and is fully encrypted, including the metadata, which makes middleboxes unable to inspect or manipulate its details.
HTTP/3 streams are multiplexed independently to eliminate head-of-line blocking between requests and responses. This is possible because stream multiplexing occurs in the transport layer as opposed to the application layer like HTTP/2 over TCP. This enables web applications to perform faster, especially over slow networks and latency-sensitive connections.
Benefits of HTTP/3 on CloudFront Our customers always want to provide faster, more responsive and secure experience on the web for end users. HTTP/3 provides benefits to all CloudFront customers in the form of faster connection times, stream multiplexing, client-side connection migration, and fewer round trips in the handshake process to reduce error rates.
QUIC connections over UDP support connection reuse with a connection ID independent from IP address/port tuples so users have no interruption or impact. Customers operating in countries with low network connectivity will see improved performance from their applications.
CloudFront’s HTTP/3 support provides enhanced security built on top of s2n-quic, an open-source Rust implementation of the QUIC protocol added to our set of AWS encryption open-source libraries, both with a strong emphasis on efficiency and performance.
If you enable HTTP/3 in CloudFront distributions, the users can make HTTP/3 viewer request to CloudFront edge locations. Past the edge location, we have highly reliable networks within AWS Cloud and CloudFront will continue to use HTTP/1.1 for origin fetches. So, you don’t need to make any server-side changes in order to make your content accessible via HTTP/3.
For some types of applications, like those requiring an HTTP client library to make HTTP requests, customers may need to update their HTTP client library to a version that supports HTTP/3. But if for some operational reason clients cannot establish a QUIC connection, they can fall back to another supported protocol such as HTTP/1.1 or HTTP/2.
How to Enable HTTP/3 To enable HTTP/3 connection, you can edit the distribution configuration through the CloudFront console. You can select HTTP/3 in Supported HTTP versions on an existing distribution or create a new distribution without any changes to origin. You can use the UpdateDistribution API or use the CloudFormation template.
After deploying your distribution, you can connect with a browser that supports HTTP/3, such as the latest version of Google Chrome, Mozilla Firefox, and Microsoft Edge, and Apple Safari after turning it on manually. To learn more about web browser support, see the Can I Use – HTTP/3 Support page.
From web developer tools in your browser, you can see the HTTP/3 requests made when a page is loaded from the CloudFront. The image below is an example of Mozilla Firefox.
Customer Stories Several AWS customers including Snap, Zillow, AC3/Movember, Audible, Skyscanner have already enabled HTTP/3 on their CloudFront distributions. Here are some of their voices:
Snap Inc is a social media company that offers Snapchat, an app that offers a fast and fun way to connect with close friends to its community around the world. On AWS, Snap now supports more than 306 million Snapchat users sending over 5.4 billion Snaps daily with 20 percent less latency than its prior architecture.
Mahmoud Ragab, Software Engineering Manager at Snapchat said:
“Snapchat helps millions of people around the world to share moments with friends. At Snapchat, we strive to be the fastest way to communicate. This is why we have been partnering with Amazon Cloudfront for fast, high-performance, low latency content delivery, leveraging QUIC on Cloudfront.
It offers significant advantages while sending and receiving content, especially in networks with lossy signals and intermittent connectivity. Improvements offered by QUIC, like zero round-trip time (0-RTT) connection setup and improved congestion control enables an average of 10% reduction in time to first byte (TTFB) while lowering overall error rates. Lower network latencies and errors make Snapchat better for people all over the world.
With early access to QUIC, we’ve been able to experiment and quickly iterate and improve server-side implementation and optimize integration between the client and the server. Both companies will continue to collaborate together as QUIC is made more widely available.”
Zillow is a real estate tech company that offer its customers an on-demand experience for selling, buying, renting and financing with transparency and nearly seamless end-to-end service. Since 2015, Zillow has increased the availability of its imaging system by using Amazon S3 and Amazon CloudFront.
Craig Link, Chief Cloud Architect at Zillow said:
“We are excited about the launch of HTTP/3 support for Amazon CloudFront. Enabling HTTP/3 on CloudFront was a seamless transition and our synthetic test and ad-hoc usage continued working without issue.”
AC3 is an Australia-based AWS Managed Services partner and has supported our customer, Movember Foundation, one of the leading charities for men’s health. Running an international charity that handles donations, data, events, and localized websites in 21 countries can pose some technical challenges. Born in the cloud, Movember has leveraged AWS technology in adopting new working models, ensuring a flexible IT platform, and innovating faster.
Greg Cockburn, Head of Hyperscale Cloud at AC3 said:
“AC3 is excited to work with their longtime partner Movember enabling HTTP3 on their CloudFront distributions serving web and API frontends and is encouraged by the performance improvements seen in the initial results.”
Now Available The HTTP/3 support for Amazon CloudFront is now available in all 410+ CloudFront edge locations worldwide with no additional charge for using this feature. To learn more, see the FAQ and Developer Guide of Amazon CloudFront. Please send feedback to AWS re:Post for Amazon CloudFront or through your usual AWS support contacts.
Are you looking for a simpler way to manage permissions across all your AWS accounts? Perhaps you federate your identity provider (IdP) to each account and divide permissions and authorization between cloud and identity teams, but want a simpler administrative model. Maybe you use AWS IAM Identity Center (successor to AWS Single Sign-On) but are running out of room in your permission set policies; or need a way to keep the role models you have while tailoring the policies in each account to reference their specific resources. Or perhaps you are considering IAM Identity Center as an alternative to per-account federation, but need a way to reuse the customer managed policies that you have already created. Great news! Now you can use customer managed policies (CMPs) and permissions boundaries (PBs) to help with these more advanced situations.
In this blog post, we explain how you can use CMPS and PBs with IAM Identity Center to address these considerations. We describe how IAM Identity Center works, how these types of policies work with IAM Identity Center, and how to best use CMPs and PBs with IAM Identity Center. We also show you how to configure and use CMPs in your IAM Identity Center deployment.
IAM Identity Center background
With IAM Identity Center, you can centrally manage access to multiple AWS accounts and business applications, while providing your workplace users a single sign-on experience with your choice of identity system. Rather than manage identity in each account individually, IAM Identity Center provides one place to connect an existing IdP, Microsoft Active Directory Domain Services (AD DS), or workforce users that you create directly in AWS. Because IAM Identity Center integrates with AWS Organizations, it also provides a central place to define your roles, assign them to your users and groups, and give your users a portal where they can access their assigned accounts.
With AWS Identity Center, you manage access to accounts by creating and assigning permission sets. These are AWS Identity and Access Management (IAM) role templates that define (among other things) which policies to include in a role. If you’re just getting started, you can attach AWS managed policies to the permission set. These policies, created by AWS service teams, enable you to get started without having to learn how to author IAM policies in JSON.
For more advanced cases, where you are unable to express policies sufficiently using inline policies, you can create a custom policy in the permission set. When you assign a permission set to users or groups in a specified account, IAM Identity Center creates a role from the template and then controls single sign-on access to the role. During role creation, IAM Identity Center attaches any specified AWS managed policies, and adds any custom policy to the role as an inline policy. These custom policies must be within the 10,240 character IAM quota of inline policies.
IAM provides two other types of custom policies that increase flexibility when managing access in AWS accounts. Customer managed policies (CMPs) are standalone policies that you create and can attach to roles in your AWS accounts to grant or deny access to AWS resources. Permissions boundaries (PBs) provide an advanced feature that specifies the maximum permissions that a role can have. For both CMPs and PBs, you create the custom policy in your account and then attach it to roles. IAM Identity Center now supports attaching both of these to permission sets so you can handle cases where AWS Managed Policies and inline policies may not be enough.
How CMPs and PBs work with IAM Identity Center
Although you can create IAM users to manage access to AWS accounts and resources, AWS recommends that you use roles instead of IAM users for this purpose. Roles act as an identity (sometimes called an IAM principal), and you assign permissions (identity-based policies) to the role. If you use the AWS Management Console or the AWS Command Line Interface to assume a role, you get the permissions of the role that you assumed. With its simpler way to maintain your users and groups in one AWS location and its ability to centrally manage and assign roles, AWS recommends that you use IAM Identity Center to manage access to your AWS accounts.
With this new IAM Identity Center release, you have the option to specify the names of CMPs and one PB in your permission set (role definition). Doing so modifies how IAM Identity Center provisions roles into accounts. When you assign a user or group to a permission set, IAM Identity Center checks the target account to verify that all specified CMPs and the PB are present. If they are all present, IAM Identity Center creates the role in the account and attaches the specified policies. If any of the specified CMPs or the PB are missing, IAM Identity Center fails the role creation.
This all sounds simple enough, but there are important implications to consider.
If you modify the permission set, IAM Identity Center updates the corresponding roles in all accounts to which you assigned the permission set. What is different when using CMPs and PBs is that IAM Identity Center is uninvolved in the creation or maintenance of the CMPs or PBs. It’s your responsibility to make sure that the CMPs and PBs are created and managed in all of the accounts to which you assign permission sets that use the CMPs and PBs. This means that you must be careful in how you name, create, and maintain these policies in your accounts, to avoid unintended consequences. For example, if you do not apply changes to CMPs consistently across all your accounts, the behavior of an IAM Identity Center created role will vary between accounts.
What CMPs do for you
By using CMPs with permission sets, you gain four main benefits:
If you federate to your accounts directly and have CMPs already, you can reuse your CMPs with permission sets in IAM Identity Center. We describe exceptions later in this post.
If you are running out of space in your permission set inline policies, you can add permission sets to increase the aggregate size of your policies.
Policies often need to refer to account-specific resources by Amazon Resource Name (ARN). Designing an inline policy that does this correctly across all your accounts can be challenging and, in some cases, may not be possible. By specifying a CMP in a permission set, you can tailor the CMPs in each of your accounts to reference the resources of the account. When IAM Identity Center creates the role and attaches the CMPs of the account, the policies used by the IAM Identity Center–generated role are now specific to the account. We highlight this example later in this post.
You get the benefit of a central location to define your roles, which gives you visibility of all the policies that are in use across the accounts where you assigned permission sets. This enables you to have a list of CMP and PB names that you should monitor for change across your accounts. This helps you ensure that you are maintaining your policies correctly.
Considerations and best practices
Start simple, avoid complex – If you’re just starting out, try using AWS managed policies first. With managed policies, you don’t need to know JSON policy to get started. If you need more advanced policies, start by creating identity-based inline custom policies in the permission set. These policies are provisioned as inline policies, and they will be identical in all your accounts. If you need larger policies or more advanced capabilities, use CMPs as your next option. In most cases, you can accomplish what you need with inline and customer managed policies. When you can’t achieve your objective using CMPs, use PBs. For information about intended use cases for PBs, see the blog post When and where to use IAM permissions boundaries.
Permissions boundaries don’t constrain IAM Identity Center admins who create permission sets – IAM Identity Center administrators (your staff) that you authorize to create permission sets can create inline policies and attach CMPs and PBs to permission sets, without restrictions. Permissions boundary policies set the maximum permissions of a role and the maximum permissions that the role can grant within an account through IAM only. For example, PBs can set the maximum permissions of a role that uses IAM to create other roles for use by code or services. However, a PB doesn’t set maximum permissions of the IAM Identity Center permission set creator. What does that mean? Suppose you created an IAM Identity Center Admin permission set that has a PB attached, and you assigned it to John Doe. John Doe can then sign in to IAM Identity Center and modify permission sets with any policy, regardless of what you put in the PB. The PB doesn’t restrict the policies that John Doe can put into a permission set.
In short, use PBs only for roles that need to create IAM roles for use by code or services. Don’t use PBs for permission sets that authorize IAM Identity Center admins who create permission sets.
Create and use a policy naming plan – IAM Identity Center doesn’t consider the content of a named policy that you attach to a permission set. If you assign a permission set in multiple accounts, make sure that all referenced policies have the same intent. Failure to do this will result in unexpected and inconsistent role behavior between different accounts. Imagine a CMP named “S3” that grants S3 read access in account A, and another CMP named “S3” that grants S3 administrative permissions over all S3 buckets in account B. A permission set that attaches the S3 policy and is assigned in accounts A and B will be confusing at best, because the level access is quite different in each of the accounts. It’s better to have more specific names, such as “S3Reader” and “S3Admin,” for your policies and ensure they are identical except for the account-specific resource ARNs.
Use automation to provision policies in accounts – Using tools such as AWS CloudFormation stacksets, or other infrastructure-as-code tools, can help ensure that naming and policies are consistent across your accounts. It also helps reduce the potential for administrators to modify policies in undesirable ways.
Policies must match the capabilities of IAM Identity Center – Although IAM Identity Center supports most IAM semantics, there are exceptions:
If you use an identity provider as your identity source, IAM Identity Center passes only PrincipalTag attributes that come through SAML assertions to IAM. IAM Identity Center doesn’t process or forward other SAML assertions to IAM. If you have CMPs or PBs that rely on other information from SAML assertions, they won’t work. For example, IAM Identity Center doesn’t provide multi-factor authentication (MFA) context keys or SourceIdentity.
Resource policies that reference role names or tags as part of trust policies don’t work with IAM Identity Center. You can use resource policies that use attribute-based access control (ABAC). IAM Identity Center role names are not static, and you can’t tag the roles that IAM Identity Center creates from its permission sets.
How to use CMPs with permission sets
Now that you understand permission sets and how they work with CMPs and PBs, let’s take a look at how you can configure a permission set to use CMPs.
In this example, we show you how to use one or more permission sets that attach a CMP that enables Amazon CloudWatch operations to the log group of specified accounts. Specifically, the AllowCloudWatch_permission set attaches a CMP named AllowCloudWatchForOperations. When we assign the permission set in two separate accounts, the assigned users can perform CloudWatch operations against the log groups of the assigned account only. Because the CloudWatch operations policies are in CMPs rather than inline policies, the log groups can be account specific, and you can reuse the CMPs in other permission sets if you want to have CloudWatch operations available through multiple permission sets.
Note: For this blog post, we demonstrate using CMPs by utilizing the IAM Management Console to create policies and assignments. We recommend that after you learn how to do this, you create your policies through automation for production environments. For example, use AWS CloudFormation. The intent of this example is to demonstrate how you can have a policy in two separate accounts that refer to different resources; something that is harder to accomplish using inline policies. The use case itself is not that advanced, but the use of CMPs to have different resources referenced in each account is a more advanced idea. We kept this simple to make it easier to focus on the feature than the use case.
Prerequisites
In this example, we assume that you know how to use the AWS Management Console, create accounts, navigate between accounts, and create customer managed policies. You also need administrative privileges to enable IAM Identity Center and to create policies in your accounts.
Configure an IAM Identity Center permission set to use a CMP
Follow these four procedures to use a CMP with a permission set:
Create CMPs with consistent names in your target accounts
Create a permission set that references the CMP that you created
Assign groups or users to the permission set in accounts where you created CMPs
Test your assignments
Step 1: Create CMPs with consistent names in your target accounts
In this step, you create a customer managed policy named AllowCloudWatchForOperations in two member accounts. The policy allows your cloud operations users to access a predefined CloudWatch log group in the account.
To create CMPs in your target accounts
Sign into AWS.
Note: You can sign in to IAM Identity Center if you have existing permission sets that enable you to create policies in member accounts. Alternatively, you can sign in using IAM federation or as an IAM user that has access to roles that enable you to navigate to other accounts where you can create policies. Your sign-in should also give you access to a role that can administer IAM Identity Center permission sets.
Navigate to an AWS Organizations member account.
Note: If you signed in through IAM Identity Center, use the user portal page to navigate to the account and role. If you signed in by using IAM federation or as an IAM user, choose your sign-in name that is displayed in the upper right corner of the AWS Management Console and then choose switch role, as shown in Figure 1.
Figure 1: Switch role for IAM user or IAM federation
In the upper right of the page, choose Create policy.
On the Create Policy page, choose the JSON tab.
Paste the following policy into the JSON text box. Replace <account-id> with the ID of the account in which the policy is created.
Tip: To copy your account number, choose your sign-in name that is displayed in the upper right corner of the AWS Management Console, and then choose the copy icon next to the account ID, as shown in Figure 2.
On the Create Policy/Review Policy page, in the Name field, enter AllowCloudWatchForOperations. This is the name that you will use when you attach the CMP to the permission set in the next procedure (Step 2).
Repeat steps 1 through 7 in at least one other member account. Be sure to replace the <account-id> element in the policy with the account ID of each account where you create the policy. The only difference between the policies in each account is the <account-id> in the policy.
Step 2: Create a permission set that references the CMP that you created
At this point, you have at least two member accounts containing the same policy with the same policy name. However, the ResourceARN in each policy refers to log groups that belong to the respective accounts. In this step, you create a permission set and attach the policy to the permission set. Importantly, you attach only the name of the policy to the permission set. The actual attachment of the policy to the role that IAM Identity Center creates, happens when you assign the permission set to a user or group in Step 3.
To create a permission set that references the CMP
Sign in to the Organizations management account or the IAM Identity Center delegated administration account.
On the Select Permission set type screen, select Custom permission Set and choose Next.
Figure 3: Select custom permission set
On the Specify policies and permissions boundary page, expand the Customer managed policies option, and choose Attach policies.
Figure 4: Specify policies and permissions boundary
For Policy names, enter the name of the policy. This name must match the name of the policy that you created in Step 1. In our example, the name is AllowCloudWatchForOperations. Choose Next.
On the Permission set details page, enter a name for your permission set. In this example, use AllowCloudWatch_PermissionSet. You can alspecify additional details for your permission sets, such as session duration and relay state (these are a link to a specific AWS Management Console page of your choice).
Figure 5: Permission set details
Choose Next, and then choose Create.
Step 3: Assign groups or users to the permission set in accounts where you created your CMPs
In the preceding steps, you created a customer managed policy in two or more member accounts, and a permission set with the customer managed policy attached. In this step, you assign users to the permission set in your accounts.
To assign groups or users to the permission set
Sign in to the Organizations management account or the IAM Identity Center delegated administration account.
For testing purposes, in the AWS Organization section, select all the accounts where you created the customer managed policy. This means that any users or groups that you assign during the process will have access to the AllowCloudWatch_PermissionSet role in each account. Then, on the top right, choose Assign users or groups.
Choose the Users or Groups tab and then select the users or groups that you want to assign to the permission set. You can select multiple users and multiple groups in this step. For this example, we recommend that you select a single user for which you have credentials, so that you can sign in as that user to test the setup later. After selecting the users or groups that you want to assign, choose Next.
Figure 7: Assign users and groups to AWS accounts
Select the permission set that you created in Step 2 and choose Next.
Review the users and groups that you are assigning and choose Submit.
You will see a message that IAM Identity Center is configuring the accounts. In this step, IAM Identity Center creates roles in each of the accounts that you selected. It does this for each account, so it looks in the account for the CMP that you specified in the permission set. If the name of the CMP that you specified in the permission set matches the name that you provided when creating the CMP, IAM Identity Center creates a role from the permission set. If the names don’t match or if the CMP isn’t present in the account to which you assigned the permission set, you see an error message associated with that account. After successful submission, you will see the following message: We reprovisioned your AWS accounts successfully and applied the updated permission set to the accounts.
Step 4: Test your assignments
Congratulations! You have successfully created CMPs in multiple AWS accounts, created a permission set and attached the CMPs by name, and assigned the permission set to users and groups in the accounts. Now it’s time to test the results.
Copy the user portal URL, and then paste the user portal URL into your browser.
At the sign-in prompt, sign in as one of the users that you assigned to the permission set.
The IAM Identity Center user portal shows the accounts and roles that you can access. In the example shown in Figure 8, the user has access to the AllowCloudWatch_PermissionSet created in two accounts.
Figure 8: User portal
If you choose AllowCloudWatch_PermissionSet in the member-account, you will have access to the CloudWatch log group in the member-account account. If you choose the role in member-account-1, you will have access to CloudWatch Log group in member-account-1.
Test the access by choosing Management Console for the AllowCloudWatch_PermissionSet in the member-account.
In the navigation pane, choose Log groups. You should be able to access log groups, as shown in Figure 9.
Figure 9: CloudWatch log groups
Open the IAM console. You shouldn’t have permissions to see the details on this console, as shown in figure 10. This is because AllowCloudWatch_PermissionSet only provided CloudWatch log access.
Figure 10: Blocked access to the IAM console
Return to the IAM Identity Center user portal.
Repeat steps 4 through 8 using member-account-1.
Answers to key questions
What happens if I delete a CMP or PB that is attached to a role that IAM Identity Center created? IAM prevents you from deleting policies that are attached to IAM roles.
How can I delete a CMP or PB that is attached to a role that IAM Identity Center created? Remove the CMP or PB reference from all your permission sets. Then re-provision the roles in your accounts. This detaches the CMP or PB from IAM Identity Center–created roles. If the policies are unused by other IAM roles in your account or by IAM users, you can delete the policy.
What happens if I modify a CMP or PB that is attached to an IAM Identity Center provisioned role? The IAM Identity Center role picks up the policy change the next time that someone assumes the role.
Conclusion
In this post, you learned how IAM Identity Center works with customer managed policies and permissions boundaries that you create in your AWS accounts. You learned different ways that this capability can help you, and some of the key considerations and best practices to succeed in your deployments. That includes the principle of starting simple and avoiding unnecessarily complex configurations. Remember these four principles:
In most cases, you can accomplish everything you need by starting with custom (inline) policies.
Use customer managed policies for more advanced cases.
Use permissions boundary policies only when necessary.
Use CloudFormation to manage your customer managed policies and permissions boundaries rather than having administrators deploy them manually in accounts.
To learn more about this capability, see the IAM Identity Center User Guide. If you have feedback about this post, submit comments in the Comments section below. If you have questions about this post, start a new thread on the AWS IAM re:Post or contact AWS Support.
Want more AWS Security news? Follow us on Twitter.
AWS is excited to announce the launch of the AWS Wickr ATAK Plugin, which makes it easier for ATAK users to maintain secure communications.
The Android Team Awareness Kit (ATAK)—also known as Android Tactical Assault Kit (ATAK) for military use—is a smartphone geospatial infrastructure and situational awareness application. It provides mapping, messaging, and geofencing capabilities to enable safe collaboration over geography.
ATAK users, referred to as operators, can view the location of other operators and potential hazards—a major advantage over relying on hand-held radio transmissions. While ATAK was initially designed for use in combat zones, the technology has been adapted to fit the missions of local, state, and federal agencies.
ATAK is currently in use by over 40,000 US Department of Defense (DoD) users—including the Air Force, Army, Special Operations, and National Guard—along with the Department of Justice (DOJ), the Department of Homeland Security (DHS), and 32,000 nonfederal users.
Using AWS Wickr with ATAK
AWS Wickr is a secure collaboration service that provides enterprises and government agencies with advanced security and administrative controls to help them meet security and compliance requirements. The AWS Wickr service is now in preview.
With AWS Wickr, communication mechanisms such as one-to-one and group messaging, audio and video calling, screen sharing, and file sharing are protected with 256-bit end-to-end encryption (E2EE). Encryption takes place locally, on the endpoint. Every message, call, and file is encrypted with a new random key, and no one but the intended recipients can decrypt them. Flexible administrative features enable organizations to deploy at scale, and facilitate information governance.
AWS Wickr supports many agencies that use ATAK. However, until now, ATAK operators have had to leave the ATAK application in order to use AWS Wickr, which creates operational risk.
AWS Wickr ATAK Plugin
AWS Wickr has developed a plugin that enhances ATAK with secure communications features. ATAK operators are provided with a Wickr Enterprise or Wickr Pro account, so they can use AWS Wickr within ATAK for secure messaging, calling, and file transfer. This helps reduce interruptions, and the complexity of configuration with ATAK chat features.
Use cases
The AWS Wickr ATAK Plugin has multiple use cases.
Military
The military uses ATAK for blue force tracking to locate team members, red force tracking to locate enemies, terrain and weather analysis, and to visually communicate their movements to friendly forces.
The AWS Wickr ATAK Plugin enhances the ability of military personnel to maintain the situational awareness ATAK provides, while quickly receiving and reacting to Wickr communications. Ephemeral messaging options allow unit leaders to send mission plans, GPS points of interest, and set burn-on-read and expiration timers. Information can be deleted from the device, while being retained on the AWS Wickr service to help meet compliance requirements, and facilitate the creation of after-action reports.
Law enforcement
ATAK is a powerful tool for team tracking and mission planning that promotes a safer and better response to critical law enforcement and public-safety events.
The AWS Wickr ATAK Plugin adds to the capabilities of ATAK by supporting secure communications between tactical, negotiation, and investigative teams.
First responders
ATAK aids in search-and-rescue and multi-jurisdictional natural disaster responses, such as hurricane relief efforts.
The AWS Wickr ATAK Plugin provides secure, uninterrupted communication between all levels of first responders to help them get oriented quickly, and support complex coordination needs.
To help users focus on the notifications that are most important to
them, Android 13 introduces a new notifications runtime
permission. Apps now need to request the notification permission
from the user before posting notifications.
Amazon Redshift provides resiliency in the event of a single point of failure in a cluster, including automatically detecting and recovering from drive and node failures. The Amazon Redshift relocation feature adds an additional level of availability, and this post is focused on explaining this automatic recovery feature.
When the cluster relocation feature is enabled on an RA3 cluster, Amazon Redshift automatically relocates the cluster in situations where issues at the Availability Zone level prevent optimal cluster operation, or in case of large-scale failures impacting cluster resources in a data center within an Availability Zone. Relocation is done by creating the cluster’s compute resources in another Availability Zone. After a cluster is relocated to another Availability Zone, there is no loss of data and no application changes are required because the cluster endpoint doesn’t change. This provides a resilient architecture to maintain application availability. When a failover is initiated, the actual time to recover is dependent on the size of a cluster, with the average time under 15 minutes. Note that the ability to relocate is subject to capacity availability. Cluster relocation is offered at no charge.
The cluster relocation feature also helps you build a demonstratable Availability Zone recovery plan as well as address capacity shortages while expanding resources in a given Availability Zone. You can manually move the cluster to another Availability Zone to test your disaster recovery plan. In cases where a cluster can’t be resized or resumed due to capacity shortages in an Availability Zone, you can relocate the cluster to an Availability Zone with more capacity. If the relocation isn’t successful, the existing cluster is left unchanged. The existing cluster isn’t removed until the new cluster is successfully created as part of this process.
Solution overview
Amazon Redshift customers with operationally sensitive applications require application resiliency in the event of an outage in an Availability Zone. The Amazon Redshift relocation feature provides application resiliency through an easy-to-use architecture with zero loss of data and no application modifications.
The following diagram illustrates the architecture before failover
After failover, we have the following architecture
In this post, we demonstrate how to enable cluster relocation using either the AWS Management Console or AWS Command Line Interface (AWS CLI). We walk through examples of automatic and manual relocation, also show how to create a custom relocation solution using additional AWS services.
To enable cluster relocation on the console, complete the following steps:
On the Amazon Redshift console, choose Clusters.
Edit your cluster.
Under Backup, for Cluster relocation, select Enable.
Enable cluster relocation using the AWS CLI
The relocation feature requires port 5439. If your current cluster is using a different port, you must modify it to use 5439 before modifying it to enable relocation. The following command modifies the port in case your cluster doesn’t use 5439:
When using relocation in Amazon Redshift, you enable Amazon Redshift to move a cluster to another Availability Zone without any loss of data or changes to your applications. With relocation, you can resume operations when there is an interruption of service on your cluster with minimal impact. The new cluster will have the same endpoint so that applications can continue operations without modification.
This feature doesn’t require any action from the user besides the one-time configuration to enable the relocation feature. When the recovery feature is activated, the destination Availability Zone used is defined in the cluster subnet group.
Manual Availability Zone relocation
You can trigger the relocation manually, relocating a cluster to another Availability Zone. Complete the following steps:
On the Amazon Redshift console, choose Clusters in the navigation pane.The clusters for your account in the current Region are listed. A subset of properties of each cluster is displayed in columns in the list.
Choose the cluster you want to relocate.
On the Actions menu, choose Relocate.If the Relocate option is greyed out, that indicates the cluster isn’t configured to use the Availability Zone relocation feature, or the cluster doesn’t meet the requirements for the relocation feature. For more details, refer to Limitations.
In the Relocate cluster section, for Subnet group, choose an Availability Zone.The Availability Zone list is derived from the cluster subnet group. If you don’t choose an Availability Zone, Amazon Redshift chooses one for you.
Choose Relocate.
After relocation is initiated, Amazon Redshift starts the relocation and displays the cluster status as Relocating. When the relocation complete, the cluster status changes to Available.
The following screenshot confirms the cluster has relocated to the correct Availability Zone.
Custom Availability Zone relocation solution
In this section, we simulate an automatic cluster failover to another Availability Zone with a reboot. Our event-based relocation solution involves setting up an alarm with an Amazon Simple Notification Service (Amazon SNS) topic, and creating an AWS Lambda function to trigger the relocation.
Create an alarm
To set up the alarm, complete the following steps:
On the Amazon Redshift console, choose Clusters in the navigation pane.
Choose your cluster.
On the Cluster performance tab, expand the Alarms section and choose Create alarm.
Configure the alarm for the HealthStatus metric and provide an alarm name and description.
In the Alarm actions section, for Notifications¸ select Enabled.
For Notify SNS topic, choose an existing SNS topic or create a new one.This topic receives a notification if the leader node isn’t healthy or is unavailable.
Choose Create alarm.
Create a Lambda function
To set up a Lambda function to trigger Availability Zone relocation in case of cluster failure, complete the following steps:
On the Lambda console, in the navigation pane, choose Functions.
Open the Lambda function created by the CloudFormation stack.
Edit the function code and modify the following snippet, updating the cluster ID and the destination Availability Zone:
From the JSON output, look for the attribute AvailabilityZone.
On the cluster detail page, on the Actions menu, choose Reboot.
Choose Reboot cluster. This triggers the alarm, and changes the alarm state to ALARM. Amazon SNS receives a message and triggers the Lambda function to perform the cluster relocation to the Availability Zone configured in the code. The cluster relocation takes several minutes.
In CloudShell, run the following AWS CLI command to find the modified Availability Zone of the cluster:
The cluster relocation feature provides the following benefits:
You can recover your cluster to another Availability Zone where failover can be done in minutes to ensure business continuity and high availability (HA). In addition, Availability Zones are physically separated resources that allow you to create a configuration for HA.
Amazon Redshift cluster recovery is a one-step process that may also be automated, as opposed to the manual process required to restore a cluster from a snapshot.
Because Amazon Redshift managed storage already includes the ability to replicate to two other Availability Zones using Amazon Simple Storage Service (Amazon S3), the cost of the additional copies is covered. There are no additional charges to use this feature.
The cluster relocation capability allows you to support business-critical use cases on your data warehouse requiring HA capabilities. This reduces the chance of an outage impacting your business operations.
You can benefit from automatic recovery to a failover Availability Zone when there are issues in optimal performance.
Relocation is provided free of charge and is subject to capacity availability.
Conclusion
In this post, we walked you through how the automated Availability Zone recovery feature in Amazon Redshift helps you build a resilient modern data architecture. The post also described how to perform a manual relocation through the AWS management console. Lastly, we discussed how to implement an event-based relocation using Amazon SNS and Lambda. These various techniques can help you plan your failover strategies based on your business needs.
About the authors
Kevin Burandt is a Senior Manager, Solutions Architecture at AWS. He is passionate about building and leading technical teams that help customers and partners use technology to achieve business outcomes and deliver value to their customers. Outside of work, he enjoys home renovation projects and working on classic cars.
Indira Balakrishnan is a Principal Solutions Architect in the AWS Analytics Specialist SA Team. She is passionate about helping customers build cloud-based analytics solutions to solve their business problems using data-driven decisions. Outside of work, she volunteers at her kids’ activities and spends time with her family.
Ramkumar Nottath is a Sr. Solutions Architect at AWS focusing on Analytics services. He enjoys working with various customers to help them build scalable, reliable big data and analytics solutions. His interests extend to various technologies such as analytics, data warehousing, streaming, and machine learning. He loves spending time with his family and friends.
Tahir Aziz is an Analytics Solution Architect at AWS. He has worked with building data warehouses and big data solutions for over 13 years. He loves to help customers design end-to-end analytics solutions on AWS. Outside of work, he enjoys traveling and cooking.
I love the AWS Twitch channel for watching interesting online live shows such as AWS On Air, Containers from the Couch, and Serverless Office Hours.
Last week, AWS Storage Day 2022was hosted virtually on the AWS Twitch channel and covered recent announcements and insights that address customers’ needs to reduce and optimize storage costs and build data resiliency into their organization. For example, we pre-announced Amazon File Cache, an upcoming new service on AWS that accelerates and simplifies hybrid cloud workloads. To learn more, watch the on-demand recording.
Last Week’s Launches Here are some launches that caught my eye last week:
AWS Private 5G – With the general availability of AWS Private 5G, you can easily make your own private mobile networks with a powerful box of hardware and software for 4G/LTE mobile networks. This cool new service lets you easily install, operate, and scale high reliability and low latency of a private cellular network in a matter of days and does not require any specialized expertise. You pay only for the network coverage and capacity that you need.
AWS DeepRacer Student Community Races – Educators and event organizers can now create their own private virtual autonomous racing league for students by powering a 1/18th scale race car driven by reinforcement learning. They can select their own track, race date, and time and invite students to participate through a unique link for their event. To learn more, see the AWS DeepRacer Developer Guide.
AWS Partner Program Updates – We announce the new AWS Transfer Family Delivery Program for AWS Partners that helps customers build sophisticated Managed File Transfer (MFT) and business-to-business (B2B) file exchange solutions with AWS Transfer Family. Also, we introduce the new AWS Supply Chain Competency, featuring top AWS Partners who provide professional services and cloud-native supply chain solutions on AWS.
Other AWS News Here are some other news items that you may find interesting:
AWS CDK for Terraform – Two years ago, AWS began collaborating with HashiCorp to develop Cloud Development Kit for Terraform (CDKTF), an open-source tool that provides a developer-friendly workflow for deploying cloud infrastructure with Terraform in their preferred programming language. The CDKTF is now generally available, so try CDK for Terraform and AWS CDK.
Smithy Interface Definition Language (IDL) 2.0 – Smithy is Amazon’s next-generation API modeling language, based on our experience building tens of thousands of services and generating SDKs. This release focuses on improving the developer experience of authoring Smithy models and using code generated from Smithy models.
Serverless Snippets Collection – The AWS Serverless Developer Advocate team introduces the snippets collection to enable reusable, tested, and recommended snippets driven and maintained by the community. Builders can use serverless snippets to find and integrate tools and code examples to help with their development workflow. I recommend searching other useful resources such as Serverless patterns and workflows collection to get started on your serverless application.
Upcoming AWS Events Check your calendars and sign up for these AWS events:
AWS Summit – Registration is open for upcoming in-person AWS Summits that might be close to you in August and September: Anaheim (August 18), Chicago (August 28), Canberra (August 31), Ottawa (September 8), New Delhi (September 9), and Mexico City (September 21–22).
AWS Innovate – Data Edition – On August 23, learn how a modern data strategy can support your present and future use cases, including steps to build an end-to-end data solution to store and access, analyze and visualize, and even predict.
AWS Innovate – For Every Application Edition – On August 25, learn about a wide selection of AWS solutions across compute, storage, networking, hybrid, and edge infrastructure to help you scale application resources seamlessly and optimally.
Although these two Innovate events will be held in the Asia Pacific and Japan time zones, you can view on-demand videos for two months following your registration.
Also, we are preparing 16 upcoming online tech talks on August 15–26 to cover a range of topics and expertise levels and feature technical deep dives, demonstrations, customer examples, and live Q&A with AWS experts.
That’s all for this week. Check back next Monday for another Week in Review!
Of all the cybersecurity conferences that fill up our summertime schedules, Hacker Summer Camp — the weeklong series of security events in Las Vegas that includes BSides, Black Hat, and DEF CON — holds a special place in our hearts. When else do so many members of the cybersecurity community come together to share their work, their challenges, and some quality face-to-face time? (We’re particularly in need of that last one after missing out on so many-full scale events in 2020 and 2021.)
Black Hat is the centerpiece of this jam-packed lineup of cybersecurity sessions and meet-ups, both in terms of its timing at the middle of the week and the fact that it hosts the greatest number of speakers, presentations, and gatherings. There’s a lot to recap each year from this one event alone, so we asked three of our Rapid7 team members who attended the event— Meaghan Donlon, Director of Product Marketing; Spencer McIntyre, Manager of Security Research; and Stephen Davis, Lead Sales Technical Advisor — to tell us about their experience. Here’s a look at their highlights from Black Hat 2022.
What was it like being in Vegas and back at full-scale in-person conferences after two years?
What was your favorite presentation from Black Hat? What insights did the speaker offer that will change the way you think about security?
Linus Torvalds released
6.0-rc1 and closed the merge window on
August 14, as expected; by then, 13,543 non-merge changesets
had found their way into the mainline repository. Just over half of those
were pulled after our first 6.0 merge-window
summary was written. The latter part of the merge window tends to be
more focused on fixes than new features, but there were still a number of
interesting changes added during this time.
Resiliency of applications surpasses everything else in building customer trust. Because of this, it cannot be an afterthought. Instead of simply reacting to a failure, why not be proactive?
As your system expands, you’ll likely encounter issues that can hinder your ability to scale, like security and cost. So, it’s necessary to think about the correct architectural patterns beforehand to minimize your chances of enduring a failure without a recovery plan.
In this multi-part blog series, we’ll show you how to take a multi-dimensional approach to ensure your applications, infrastructure, and operational processes can detect points of failure and can gracefully react if (and inevitably when) a failure occurs.
In each part of the series, we recommend resiliency architecture patterns and managed services to apply across all layers of your distributed system to create a production-ready, resilient application. This post, Part 1, examines how to create application layer resiliency.
Example use case
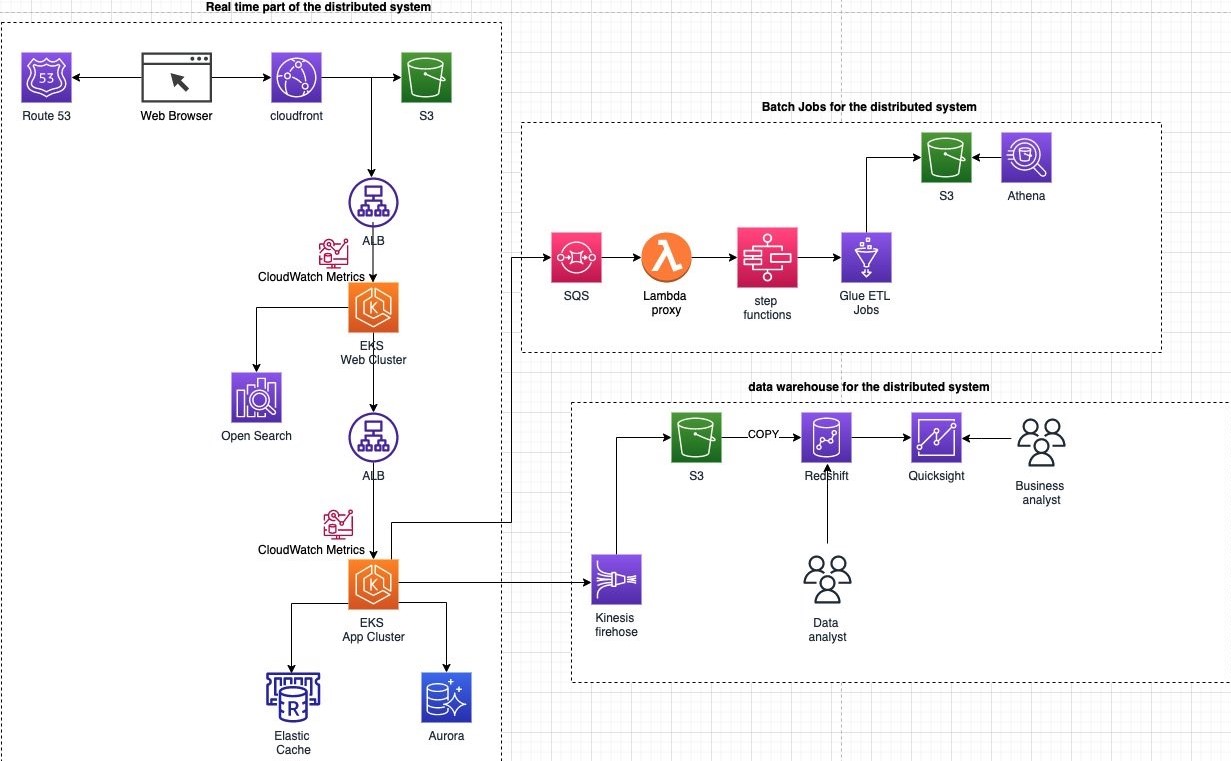
To illustrate our recommendations for building an effective distributed system, we’ll consider a simple order payment system. Figure 1 shows our base implementation. The real-time part of the distributed system is built with:
An Amazon Route 53 DNS server resolves the website IP address and forwards the request to an Amazon CloudFront cloud delivery network (CDN)
Figure 1. Architecture components of a distributed system
Next, let’s look into distributed architectural patterns we could apply to the base implementation to bolster resiliency and common tradeoffs you need to consider for each.
Pattern 1: Microservices
Microservices are building blocks for smaller, domain-specific services. As shown in the Microservices on AWS whitepaper, microservices offer many benefits. They reduce the blast radius of any failure, require smaller teams to manage them, and simplify deployment pipelines to get them into production.
Tradeoffs and their workarounds
If your distributed system is comprised of several smaller services, a failure or inability to respond to failures in one service might affect other services in the chain.
To help with this, consider implementing one or more of the following patterns.
Circuit breaker pattern
Like an electrical circuit breaker, the circuit breaker pattern stops cascading failures. You can implement it as an orchestrator, at an individual microservice level, and/or in a service mesh across multiple services to detect timeouts and track failures across services, which prevents a distributed system from getting overwhelmed.
Retries with exponential backoff and jitter
A common way to handle database timeouts is to implement retries. However, if all the transactions retry at the same interval, it might choke the network bandwidth and throttle the database.
We recommend introducing exponential backoff and jitter to the retries and to introduce an element of randomness in the retry interval.
Let’s see this in action. Consider the backend implementation of the order payment system in our example use case, as shown in Figure 2.
Figure 2. Backend processing of order payment system
For incoming orders, the payment process must succeed for the order to be processed. To ensure latency in the payments database writes does not affect the transactions that read from the database for the order processing UI:
Isolate reads and writes with a read-replica
Use an Amazon RDS Proxy to handle connection pools and use throttling to help with preventing database congestion and locking
Introduce exponential backoff to increase the time between subsequent retries of failed requests. Combine this approach with “jitter” to prevent large bursts of retries
Figure 3 compares recovery time with exponential backoff to exponential backoff combined with jitter:
Figure 3. Recovery time graph for exponential backoff with and without jitter
Health checks and feature flags
If you’ve deployed new functionality in production and it doesn’t work as expected, use feature flags to turn it off rather than roll back the deployment. This helps you reduce operational complexity and downtime. See the Automating safe, hands-off deployments article for more information.
The load balancer uses periodic automatic health checks to determine if the backend service is healthy and can serve traffic. Figure 4 shows you where to use shallow and deep health checks:
Use shallow health checks to probe for host/local failures on a server resource (for example, liveliness checks).
Probing for dependency failures needs a deep health check. Deep health checks will give you a better understanding of the health of the system, but they’re expensive, and a dependency check failure can cause cascading failure throughout the system.
Figure 4. Shallow vs deep health checks
Pattern 2: Saga pattern
A saga pattern keeps your data consistent across microservices when a transaction spans multiple services. It updates each service with a message or event to prompt the service to move to the next transaction step.
For example, in our order payment system, a transaction is considered successful if the payment for that order is processed.
Tradeoffs and their workarounds
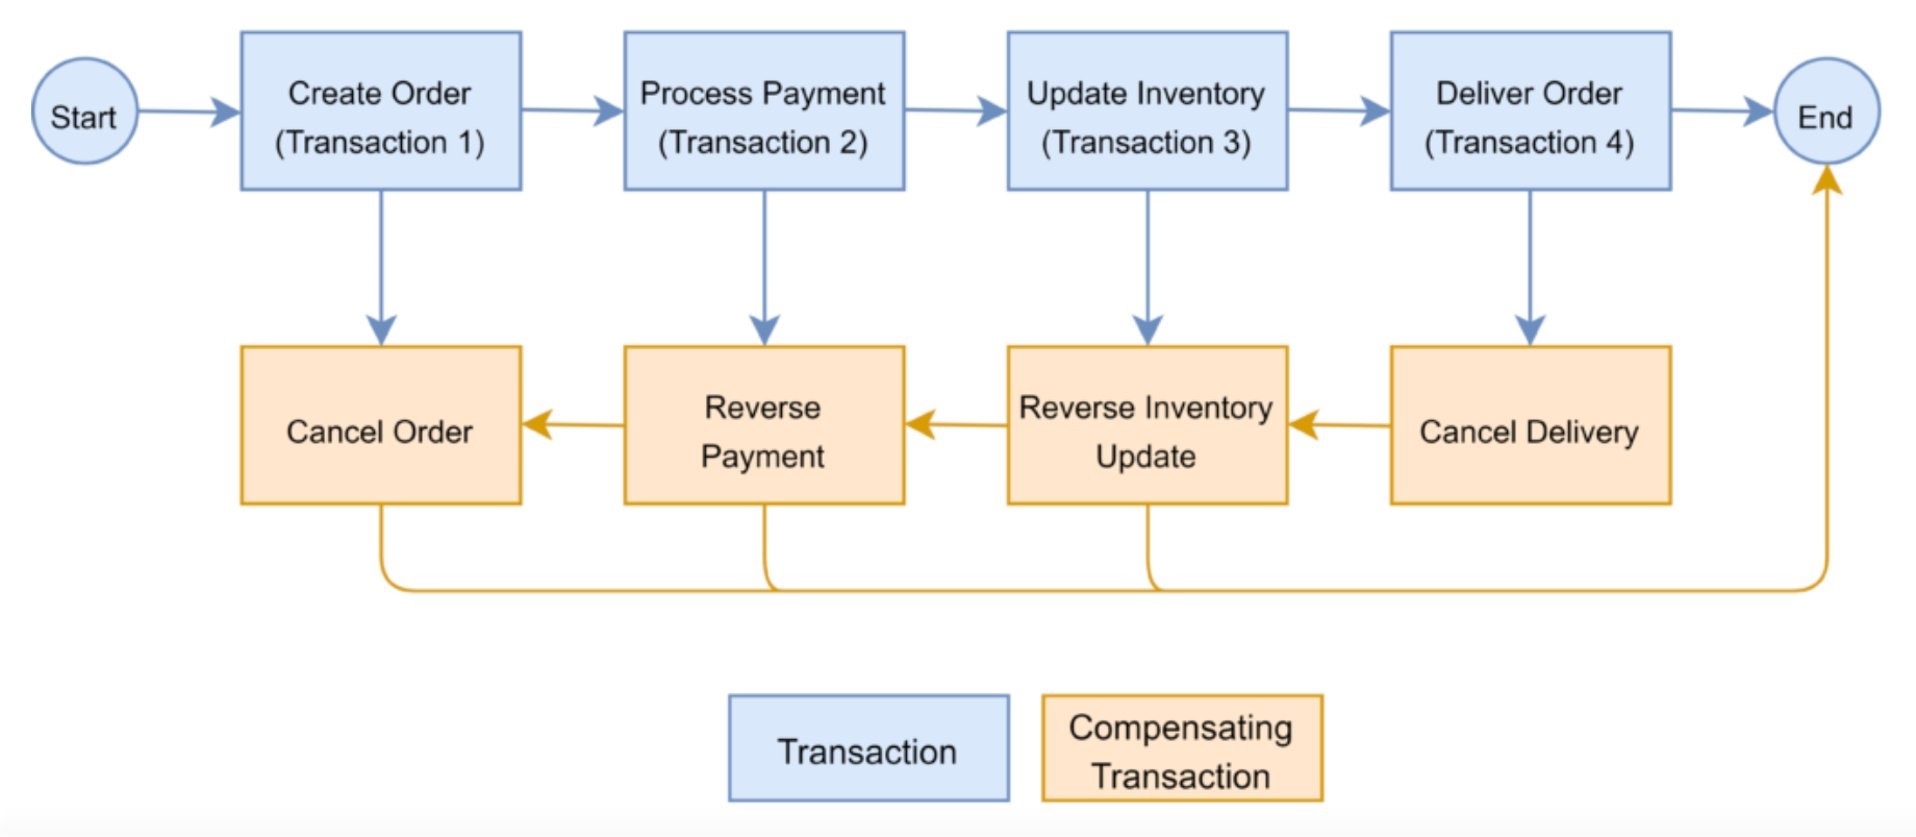
The saga pattern is great for long transactions. However, if a step in the process cannot complete, you’ll need compensating transactionsin place to undo any changes from previous steps. For example, as shown in Figure 5, if the payment fails, the customer’s order must be canceled.
Figure 5. The saga pattern coordinates transactions across a system of microservices
Consider implementing the following pattern to set up compensating transactions.
Serverless saga pattern with Step Functions
We recommend using a serverless orchestrator in Step Functions to roll back to a previous step in an order. Figure 6 shows the serverless orchestrator and how its lightweight, centralized control service coordinates the flow across microservices. It performs compensating transactions during failure scenarios to ensure that if one microservice fails, the others will not.
Figure 6. Step Functions as serverless orchestrators
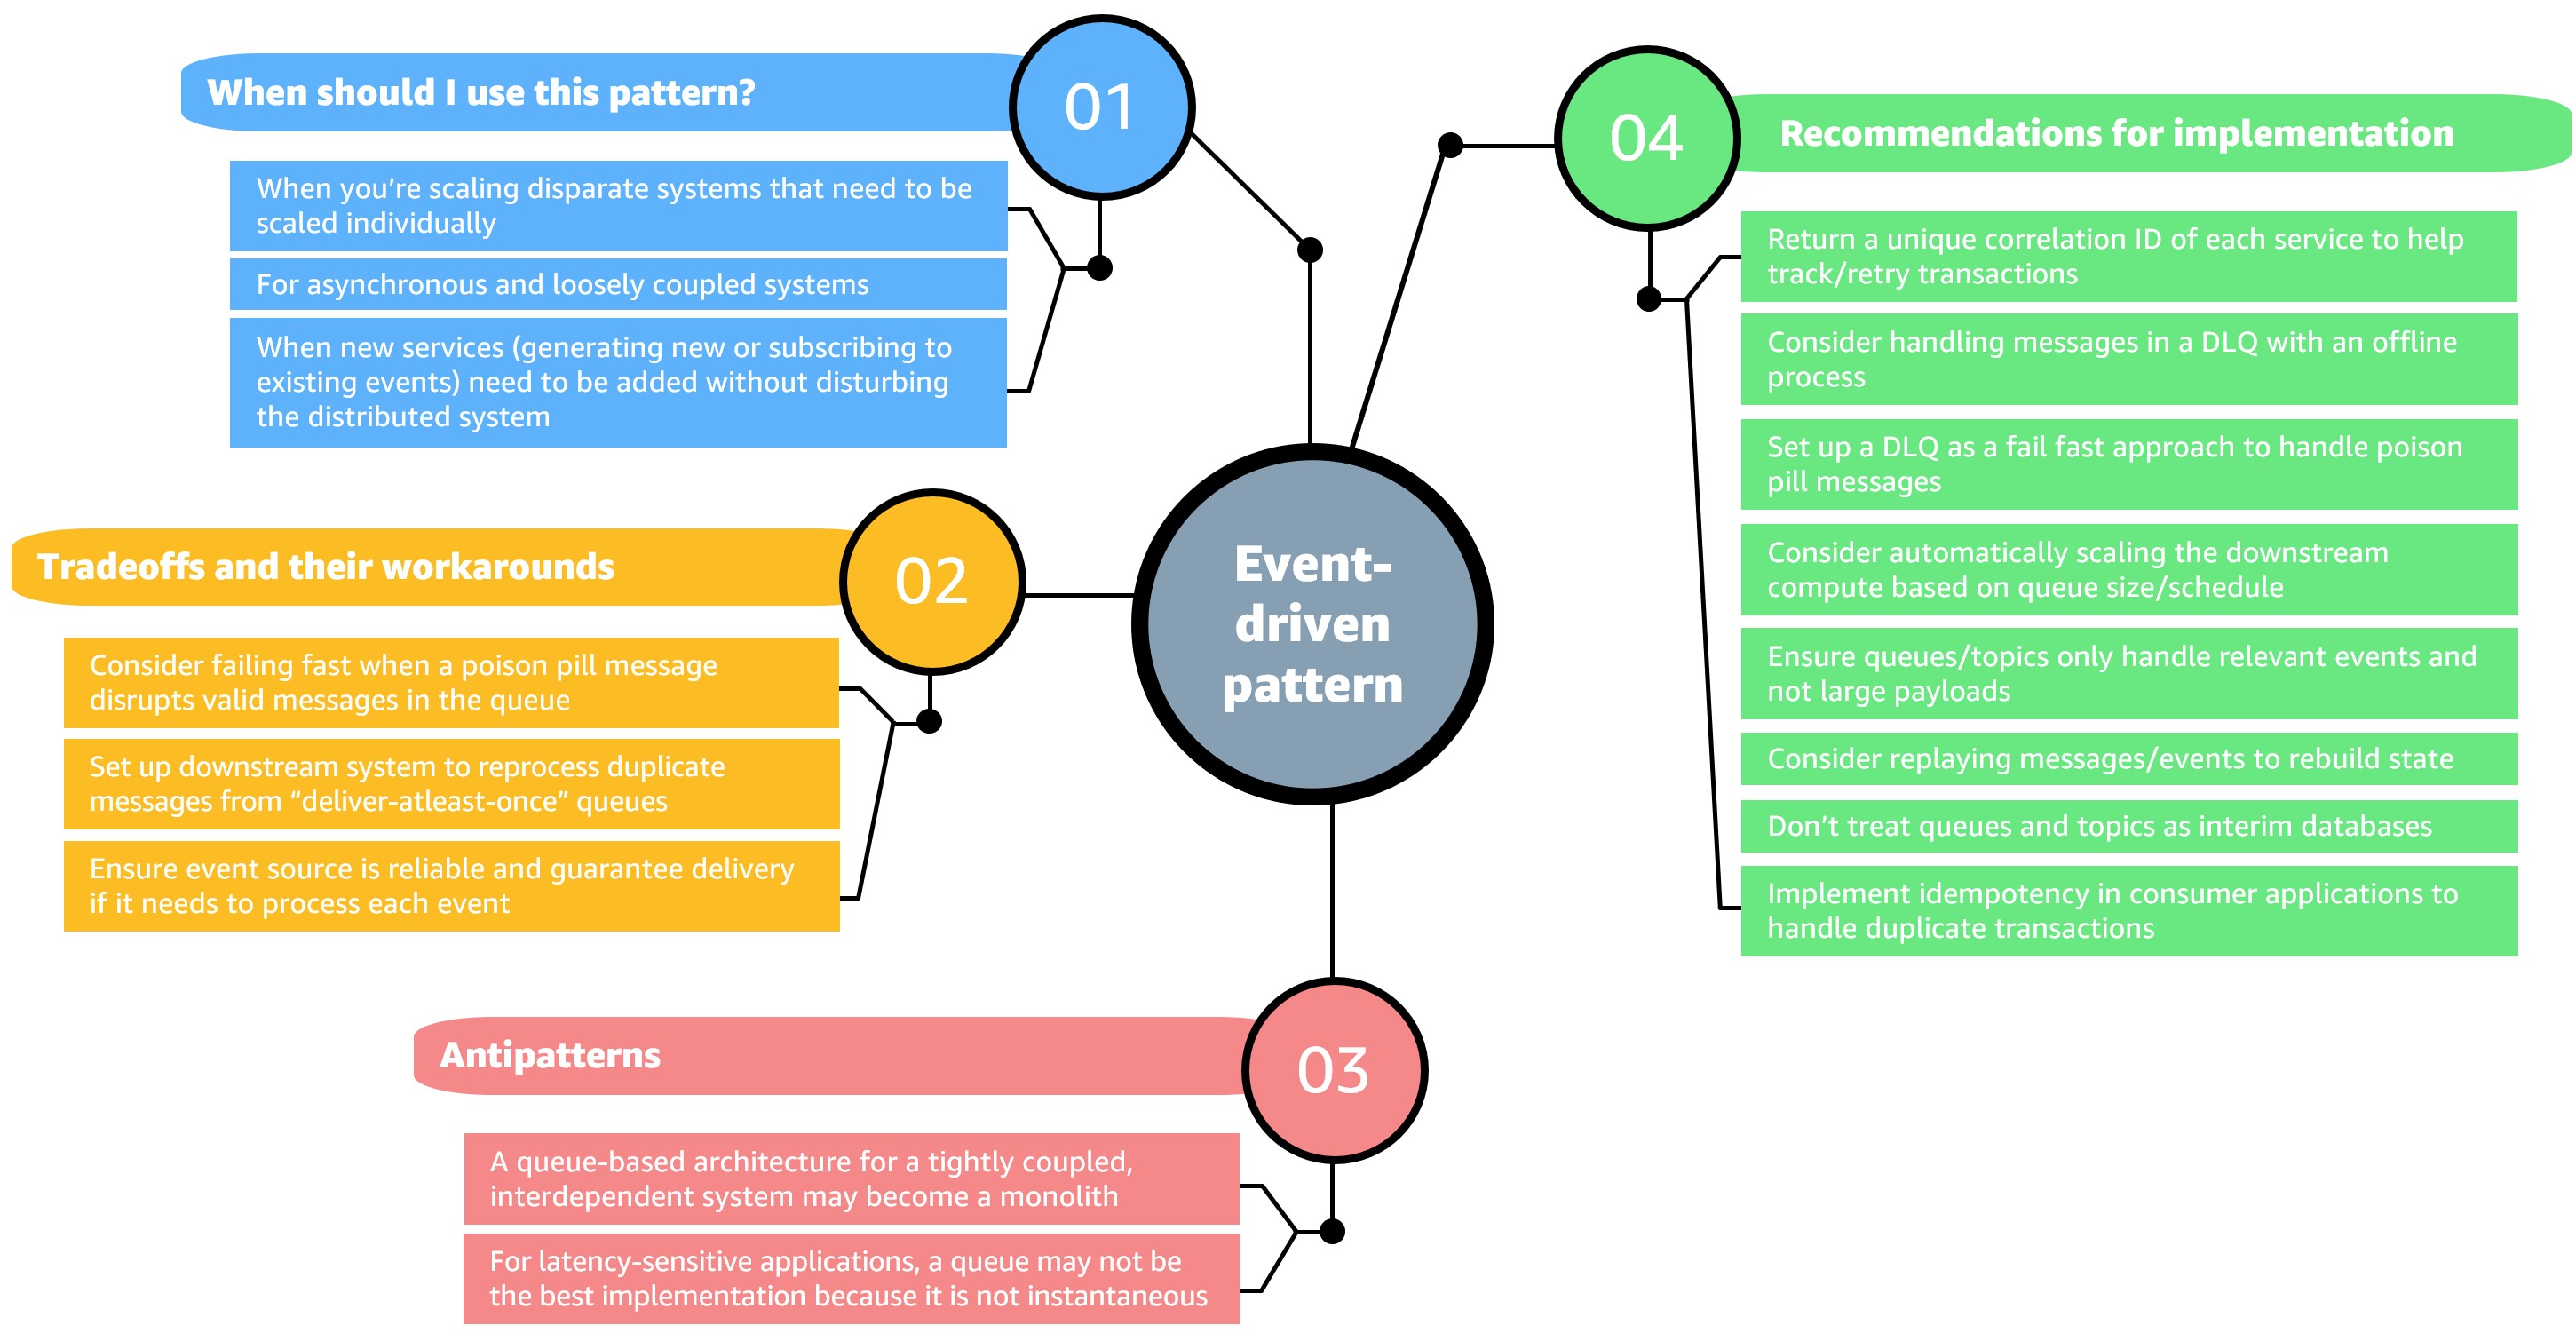
Pattern 3: Event-driven architecture
An event-driven architecture uses events to communicate between decoupled services. By decoupling your services, they are only aware of the event router, not each other. This means that your services are interoperable, but if one service has a failure, the rest will keep running. The event router acts as an elastic buffer that will accommodate surges in workloads.
Tradeoffs and their workarounds
An event-driven architecture provides multiple implementation options. Carefully consider your system’s distinct attributes and scaling and performance needs to decide on a suitable approach.
The mind map in Figure 7 shows when to use an event-driven pattern, our recommendations for implementation, tradeoffs and their workarounds, and anti-patterns:
Figure 7. Decision criteria for event-driven architecture pattern (click the image to enlarge)
Pattern 4: Cache pattern
Deploying stateless redundant copies of your application components, along with using distributed caches, can improve the availability of your system. This allows your infrastructure to scale in response to user requests.
Tradeoffs and their workarounds
Caches have multiple configuration options. Carefully consider your system’s distinct attributes and scaling and performance needs to decide on a suitable approach.
The mind map in Figure 8 shows when to use a cache pattern, our recommendations for implementation, tradeoffs and their workarounds, and anti-patterns:
Figure 8. Decision criteria for cache pattern (click the image to enlarge)
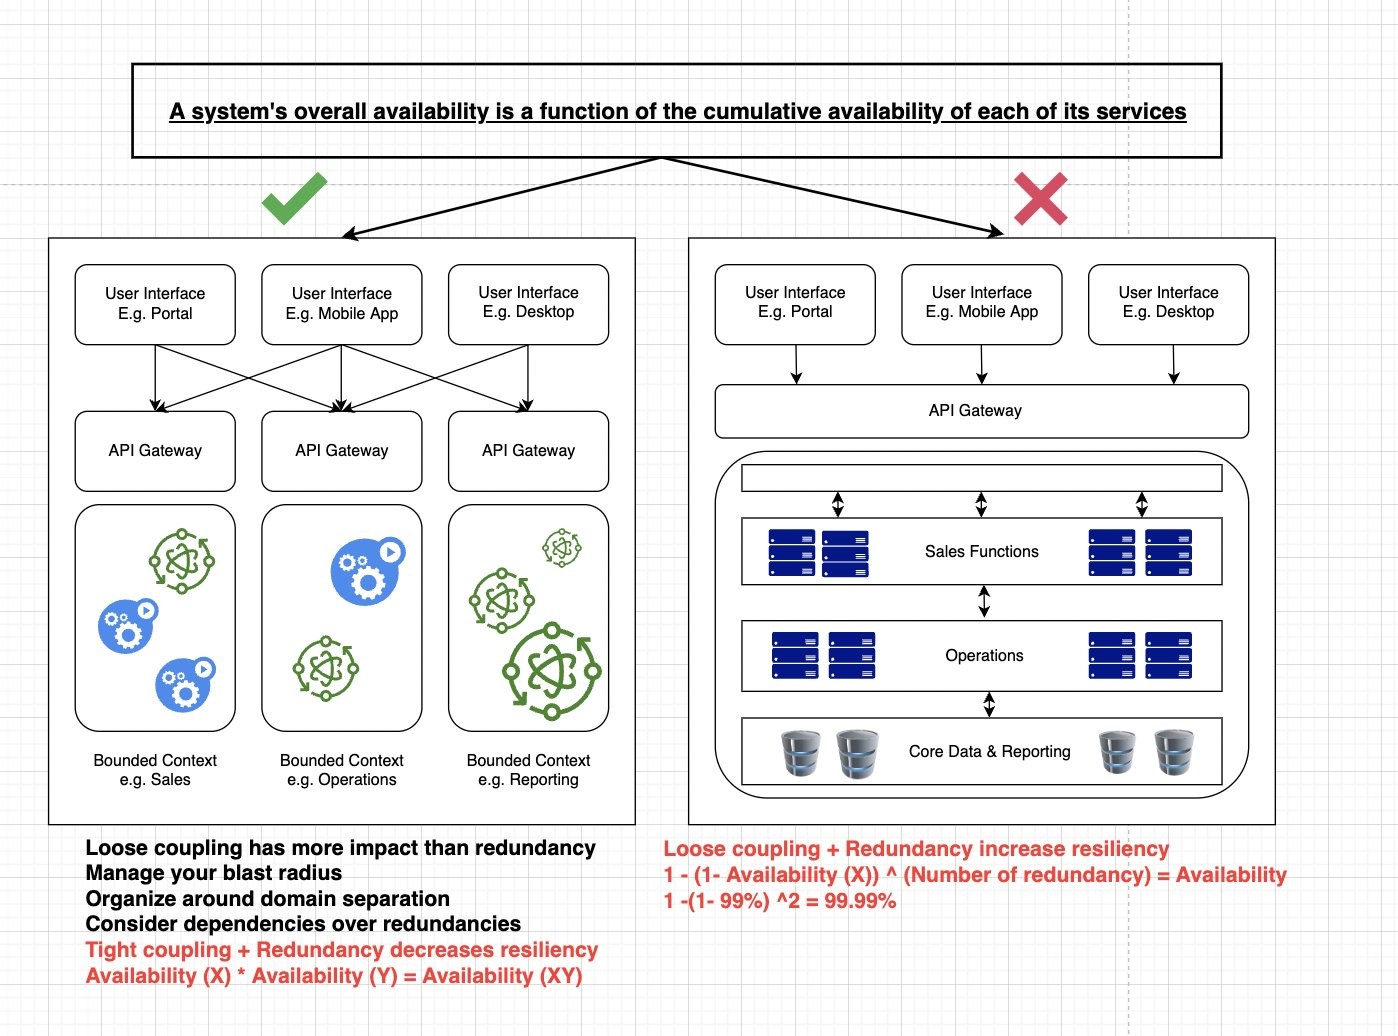
Improving application resiliency with bounded contexts
Loosely coupled services improve availability more than only creating redundant copies of your applications. Figure 9 shows the benefits of a loosely coupled system versus a tightly coupled system.
Figure 9. Relationship between loose coupling and availability
Conclusion
In this post, we learned about various architecture patterns and their tradeoffs, and provided recommendations on how to gracefully mitigate failures before they happen.
Distributed systems can use all of these patterns, which helps improve resiliency at the application layer. Applying these patterns, along with the Infrastructure and Operations improvements discussed in parts 2 and 3, will provide frameworks for resilient applications.
Scammers were able to convince YouTube that other peoples’ music was their own. They successfully stole $23 million before they were caught.
No one knows how common this scam is, and how much money total is being stolen in this way. Presumably this is not an uncommon fraud.
While the size of the heist and the breadth of the scheme may be very unique, it’s certainly a situation that many YouTube content creators have faced before. YouTube’s Content ID system, meant to help creators, has been weaponized by bad faith actors in order to make money off content that isn’t theirs. While some false claims are just mistakes caused by automated systems, the MediaMuv case is a perfect example of how fraudsters are also purposefully taking advantage of digital copyright rules.
YouTube attempts to be cautious with who it provides CMS and Content ID tool access because of how powerful these systems are. As a result, independent creators and artists cannot check for these false copyright claims nor do they have the power to directly act on them. They need to go through a digital rights management company that does have access. And it seems like thieves are doing the same, falsifying documents to gain access to these YouTube tools through these third parties that are “trusted” with these tools by YouTube.
In the real world, after a passenger places a GrabFood order from the Grab App, the merchant-partner will prepare the order. A driver-partner will then collect the food and deliver it to the passenger. Have you ever wondered what happens in the backend system? The Grab Order Platform is a distributed system that processes millions of GrabFood or GrabMart orders every day. This post aims to share the journey of how we designed the database solution that powers the order platform.
Background
What are the design goals when building the database solution? We collected the requirements by analysing query patterns and traffic patterns.
Query patterns
Here are some important query examples that the Order Platform supports:
Write queries:
a. Create an order.
b. Update an order.
Read queries:
a. Get order by id.
b. Get ongoing orders by passenger id.
c. Get historical orders by various conditions.
d. Get order statistics (for example, get the number of orders)
We can break down queries into two categories: transactional queries and analytical queries. Transactional queries are critical to online order creation and completion, including the write queries and read queries such as 2a or 2b. Analytical queries like 2c and 2d retrieves historical orders or order statistics on demand. Analytical queries are not essential to the oncall order processing.
Traffic patterns
Grab’s Order Platform processes a significant amount of transaction data every month.
During peak hours, the write Queries per Second (QPS) is three times of primary key reads; whilst the range Queries per Second are four times of the primary key reads.
Design goals
From the query and traffic patterns, we arrived at the following three design goals:
Stability – the database solution must be able to handle high read and write QPS. Online order processing queries must have high availability. Even when some part of the system is down, we must be able to provide a degraded experience to the end users allowing them to still be able to create and complete an order.
Scalability and cost – the database solution must be able to support fast evolution of business requirements, given now we handle up to a million orders per month. The solution must also be cost effective at a large scale.
Consistency – strong consistency for transactional queries, and eventually consistency for analytical queries.
Solution
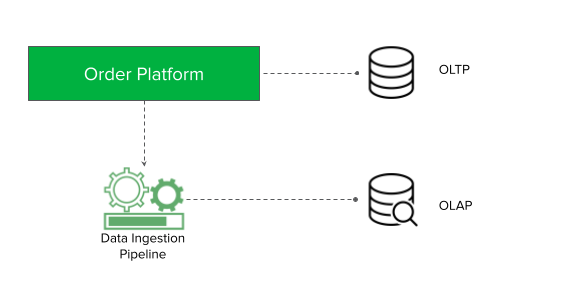
The first design principle towards a stable and scalable database solution is to use different databases to serve transactional and analytical queries, also known as OLTP and OLAP queries. An OLTP database serves queries critical to online order processing. This table keeps data for only a short period of time. Meanwhile, an OLAP database has the same set of data, but serves our historical and statistical queries. This database keeps data for a longer time.
What are the benefits from this design principle? From a stability point of view, we can choose different databases which can better fulfil our different query patterns and QPS requirements. An OLTP database is the single source of truth for online order processing; any failure in the OLAP database will not affect online transactions. From a scalability and cost point of view, we can choose a flexible database for OLAP to support our fast evolution of business requirements. We can maintain less data in our OLTP database while keeping some older data in our OLAP database.
To ensure that the data in both databases are consistent, we introduced the second design principle – data ingestion pipeline. In Figure 1, Order Platform writes data to the OLTP database to process online orders and asynchronously pushes the data into the data ingestion pipeline. The data ingestion pipeline ensures that the OLAP database data is eventually consistent.
Figure 1: Order Platform database solution overview
Architecture details
OLTP database
There are two categories of OLTP queries, the key-value queries (for example, load by order id) and the batch queries (for example, Get ongoing orders by passenger id). We use DynamoDB as the database to support these OLTP queries.
Why DynamoDB?
Scalable and highly available: the tables of DynamoDB are partitioned and each partition is three-way replicated.
Support for strong consistent reads by primary key.
DynamoDB has a mechanism called adaptive capacity to handle hotkey traffic. Internally, DynamoDB will distribute higher capacity to high-traffic partitions, and isolate frequently accessed items to a dedicated partition. This way, the hotkey can utilise the full capacity of an entire partition, which is up to 3000 read capacity units and 1000 write capacity units.
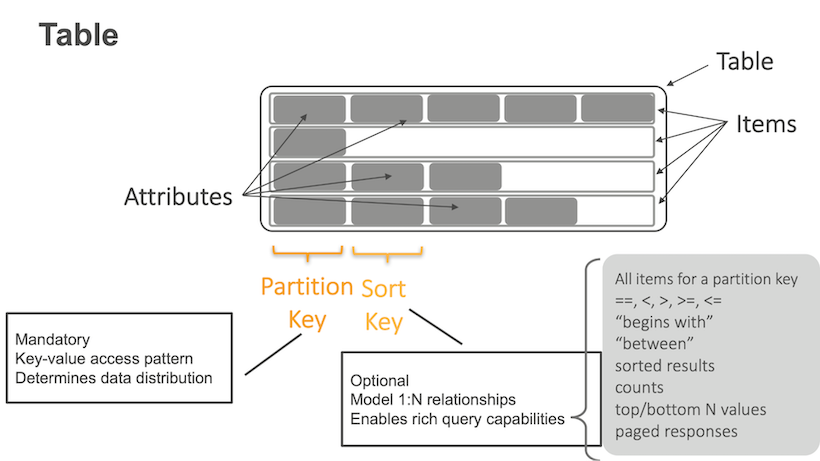
In each DynamoDB table, it has many items with attributes. In each item, it has a partition key and sort key. The partition key is used for key-value queries, and the sort key is used for range queries. In our case, the table contains multiple order items. The partition key is order ID. We can easily support key-value queries by the partition key.
order_id (PK)
state
pax_id
created_at
pax_id_gsi
order1
Ongoing
Alice
9:00am
order2
Ongoing
Alice
9:30am
order3
Completed
Alice
8:30am
Batch queries like ‘Get ongoing orders by passenger id’ are supported by DynamoDB Global Secondary Index (GSI). A GSI is like a normal DynamoDB table, which also has keys and attributes.
In our case, we have a GSI table where the partition key is the pax_id_gsi. The attribute pax_id_gsi is linked to the main table. It is eventually consistent with the main table that is maintained by DynamoDB. If the Order Platform queries ongoing orders for Alice, two items will be returned from the GSI table.
pax_id_gsi (PK)
created_at (SK)
order_id
Alice
9:00am
order1
Alice
9:30am
order2
We also make use of an advanced feature of GSI named sparse index to support ongoing order queries. When we update order status from ongoing to completed, at the same time, we set the pax_id_gsi to empty, so that the linked item in the GSI will be automatically deleted by DynamoDB. At any time, the GSI table only stores the ongoing orders. We use a sparse index mechanism to control our table size for better performance and to be more cost effective.
The next problem is data retention. This is achieved with the DynamoDB Time To Live (TTL) feature. DynamoDB will auto-scan expired items and delete them. But the challenge is when we add TTL to big tables, it will bring a heavy load to the background scanner and might result in an outage. Our solution is to only add a TTL attribute to the new items in the table. Then, we manually delete the items without TTL attributes, and run a script to delete items with TTL attributes that are too old. After this process, the table size will be quite small, so we can enable the TTL feature on the TTL attribute that we previously added without any concern. The retention period of our DynamoDB data is three months.
Costwise, DynamoDB is charged by storage size and the provision of the read write capability. The provision capability is actually auto scalable. The cost is on-demand. So it’s generally cheaper than RDS.
OLAP database
We use MySQL RDS as the database to support historical and statistical OLAP queries.
Why not Aurora? We choose RDS mainly because it is a mature database solution. Even if Aurora can provide better high-availability, RDS is enough to support our less critical use cases. Costwise, Aurora charges by data storage and the number of requested Input/Output Operations per Second (IOPS). RDS charges only by data storage. As we are using General Purpose (SSD) storage, IOPS is free and supports up to 16k IOPS.
We use MySQL partitioning for data retention. The order table is partitioned by creation time monthly. Since the data access pattern is mostly by month, the partition key can reduce cross-partition queries. Partitions older than six months are dropped at the beginning of each month.
Data ingestion pipeline
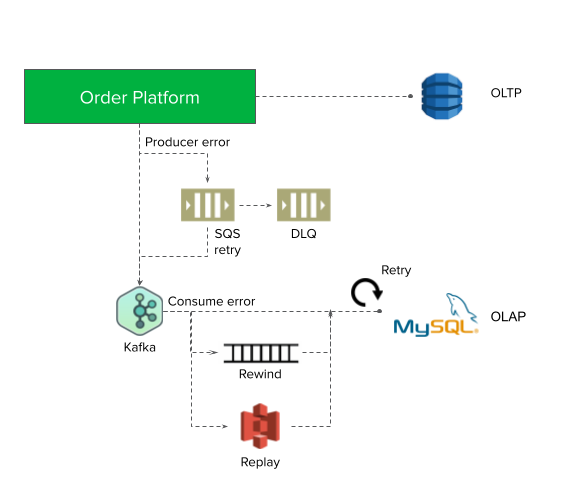
Figure 3: Data Ingestion Pipeline Architecture.
A Kafka stream is used to process data in the data ingestion pipeline. We choose the Kafka stream, because it has 99.95% SLA. It is not restricted by the OLTP and OLAP database types.
Even if Kafka can provide 99.95% SLA, there is still the chance of stream producer failures. When the producer fails, we will store the message in an Amazon Simple Queue Service (SQS) and retry. If the retry also fails, it will be moved to the SQS dead letter queue (DLQ), to be consumed at a later time.
On the stream consumer side, we use back-off retry at both stream and database levels to ensure consistency. In a worst-case scenario, we can rewind the stream events from Kafka.
It is important for the data ingestion pipeline to handle duplicate messages and out-of-order messages.
Duplicate messages are handled by the database level unique key (for example, order ID + creation time).
For the out-of-order messages, we implemented the following two mechanisms:
Version update: we only update the most recently updated data. The precision of the update time is in microseconds, which is enough for most of the use cases.
Upsert: if the update events occur before the create events, we simulate an upsert operation.
Impact
After launching our solution this year, we have saved significantly on cloud costs. In the earlier solution, Order Platform synchronously writes to DynamoDB and Aurora and the data is kept forever.
Conclusion
In terms of stability, we use DynamoDB as the critical OLTP database to ensure high availability for online order processing. Scalability wise, we use RDS as the OLAP database to support our quickly evolving business requirements by using a rich, multiple index. Cost efficiency is achieved by data retention in both databases. For consistency, we built a single source of truth OLTP database and an OLAP database that is eventually consistent with the help of the data ingestion pipeline.
What’s next?
Currently, the database solution is running on the production environment. Even though the database solution is proven to be stable, scalable and consistent, we still see some potential areas of improvement.
We use MySQL RDS for OLAP data storage. Even though MySQL is stable and cost effective, it is difficult to serve more complicated queries like free text search. Hence, we plan to explore other NoSQL databases like ElasticSearch.
We hope this post helps you understand how we store Grab orders and fulfil the queries from the Grab Order Platform.
Grab is the leading superapp platform in Southeast Asia, providing everyday services that matter to consumers. More than just a ride-hailing and food delivery app, Grab offers a wide range of on-demand services in the region, including mobility, food, package and grocery delivery services, mobile payments, and financial services across 428 cities in eight countries.
Powered by technology and driven by heart, our mission is to drive Southeast Asia forward by creating economic empowerment for everyone. If this mission speaks to you, join our team today!
Linus has released 6.0-rc1 and closed the
merge window for this release.
I actually was hoping that we’d get some of the first rust
infrastructure, and the multi-gen LRU VM, but neither of them
happened this time around. There’s always more releases. But
there’s a lot of continued development pretty much all over the
place.
The codename has also been changed to “Hurr durr I’ma ninja sloth”.
В полунощ беше публикувано решението на ЦИК за автоматично отваряне на секции в чужбина на база активността от предходни избори. Изброени са 734 секции, но това няма да е окончателният списък. Дали на тези места ще има секции въобще зависи не само от това дали чуждестранните власти разрешат, но най-вече дали местната българска организация намери място и събере доброволци за комисията и организацията.
Малко се е променило в последните три десетилетия и българската диаспора все още изнася цялата информационна кампания и голяма част от организацията на изборите на свой гръб и за своя сметка. Докато немалко секции се създават в консулства и посолства по подразбиране, огромна част от тях имат много малко гласоподаватели, защото са дипломатически мисии далеч от диаспорите ни.
Затова е важно подаването на заявления за гласуване в чужбина. Благодарение на усилията за промяна на Изборния кодекс след падането на кабинета на ГЕРБ, вече се отварят автоматично секции на база активност от предходни избори. Това означава, че не се налага да се борим за всяка отделна секция и конкретна бройка. Помага и при страни като Германия, където разрешение за секциите следва да се иска преди да завърши кампанията по събиране на заявления, т.е. да се знае къде българите искаме да гласуваме.
Все пак заявленията са важни, за да се отварят допълнителни секции например там, където на на одобреното място, село или град, не е възможно най-вече по логистични причини. Също така ускорява гласуването, тъй като името ви вече ще присъства в избирателните списъци и не се налага да се вписва всичко наново. Не на последно място е лакмус за активността на българите в чужбина, макар честите промени на условията за отваряне на секции да правят сравнението между различни кампании безпредметно.
Очакваме електронният формуляр за заявление за гласуване да бъде пуснат още утре на страницата на ЦИК. Веднага след това ще започна да събирам данните в Glasuvam.org, както правя в последните 10 години. Данните от предишната кампания ще намерите тук като карта и като таблица.
To provide the best experiences, we use technologies like cookies to store and/or access device information. Consenting to these technologies will allow us to process data such as browsing behavior or unique IDs on this site. Not consenting or withdrawing consent, may adversely affect certain features and functions.
Functional
Always active
The technical storage or access is strictly necessary for the legitimate purpose of enabling the use of a specific service explicitly requested by the subscriber or user, or for the sole purpose of carrying out the transmission of a communication over an electronic communications network.
Preferences
The technical storage or access is necessary for the legitimate purpose of storing preferences that are not requested by the subscriber or user.
Statistics
The technical storage or access that is used exclusively for statistical purposes.The technical storage or access that is used exclusively for anonymous statistical purposes. Without a subpoena, voluntary compliance on the part of your Internet Service Provider, or additional records from a third party, information stored or retrieved for this purpose alone cannot usually be used to identify you.
Marketing
The technical storage or access is required to create user profiles to send advertising, or to track the user on a website or across several websites for similar marketing purposes.
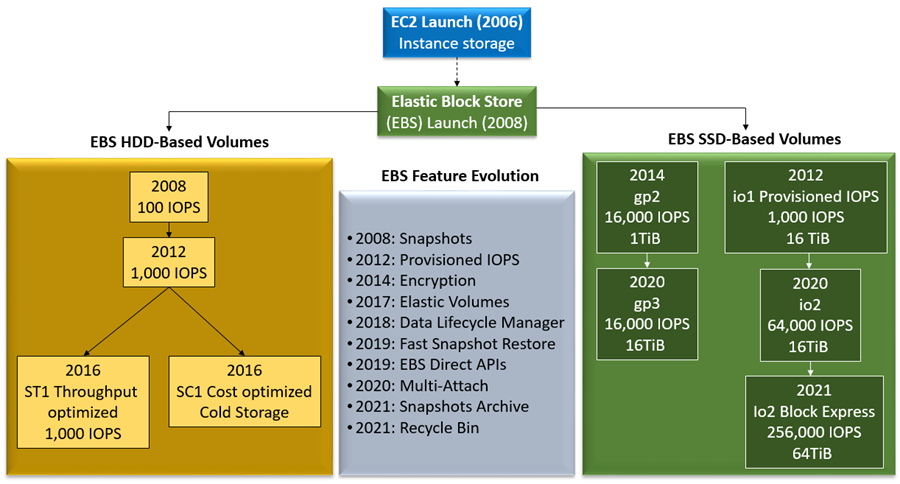
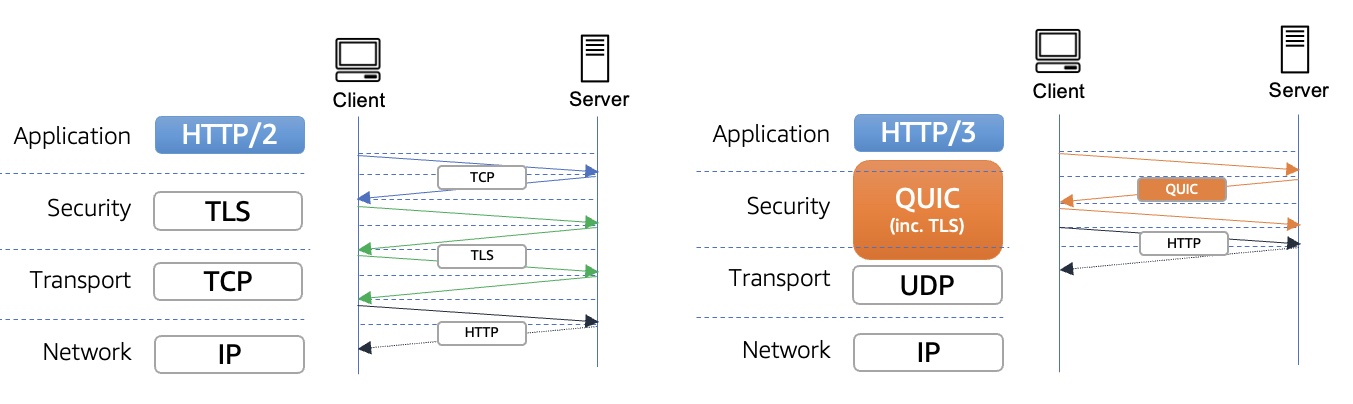
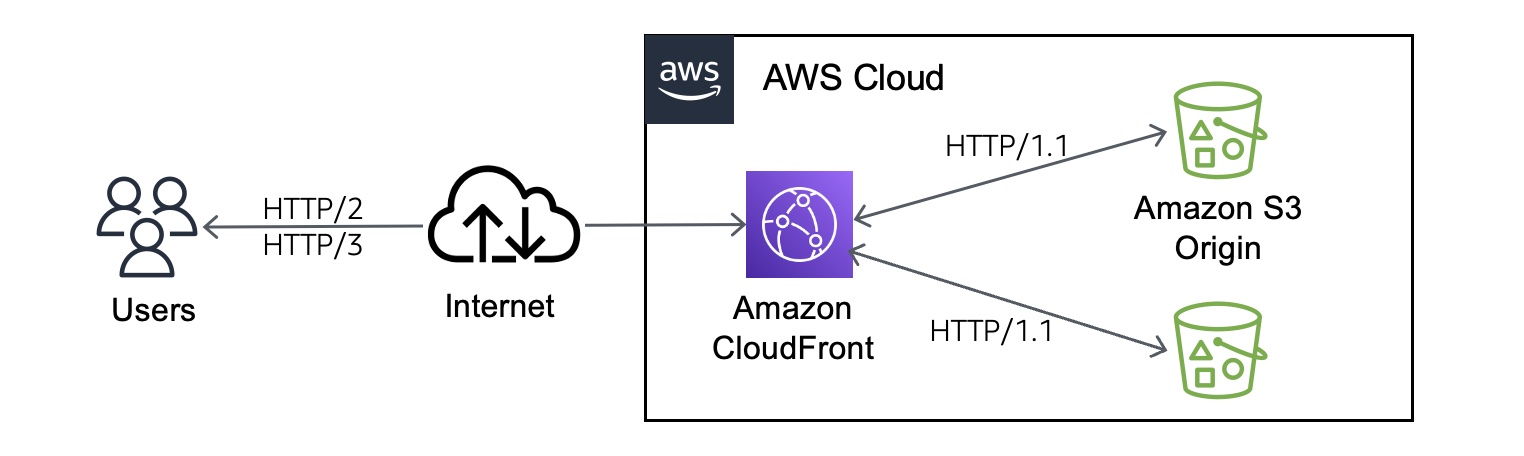
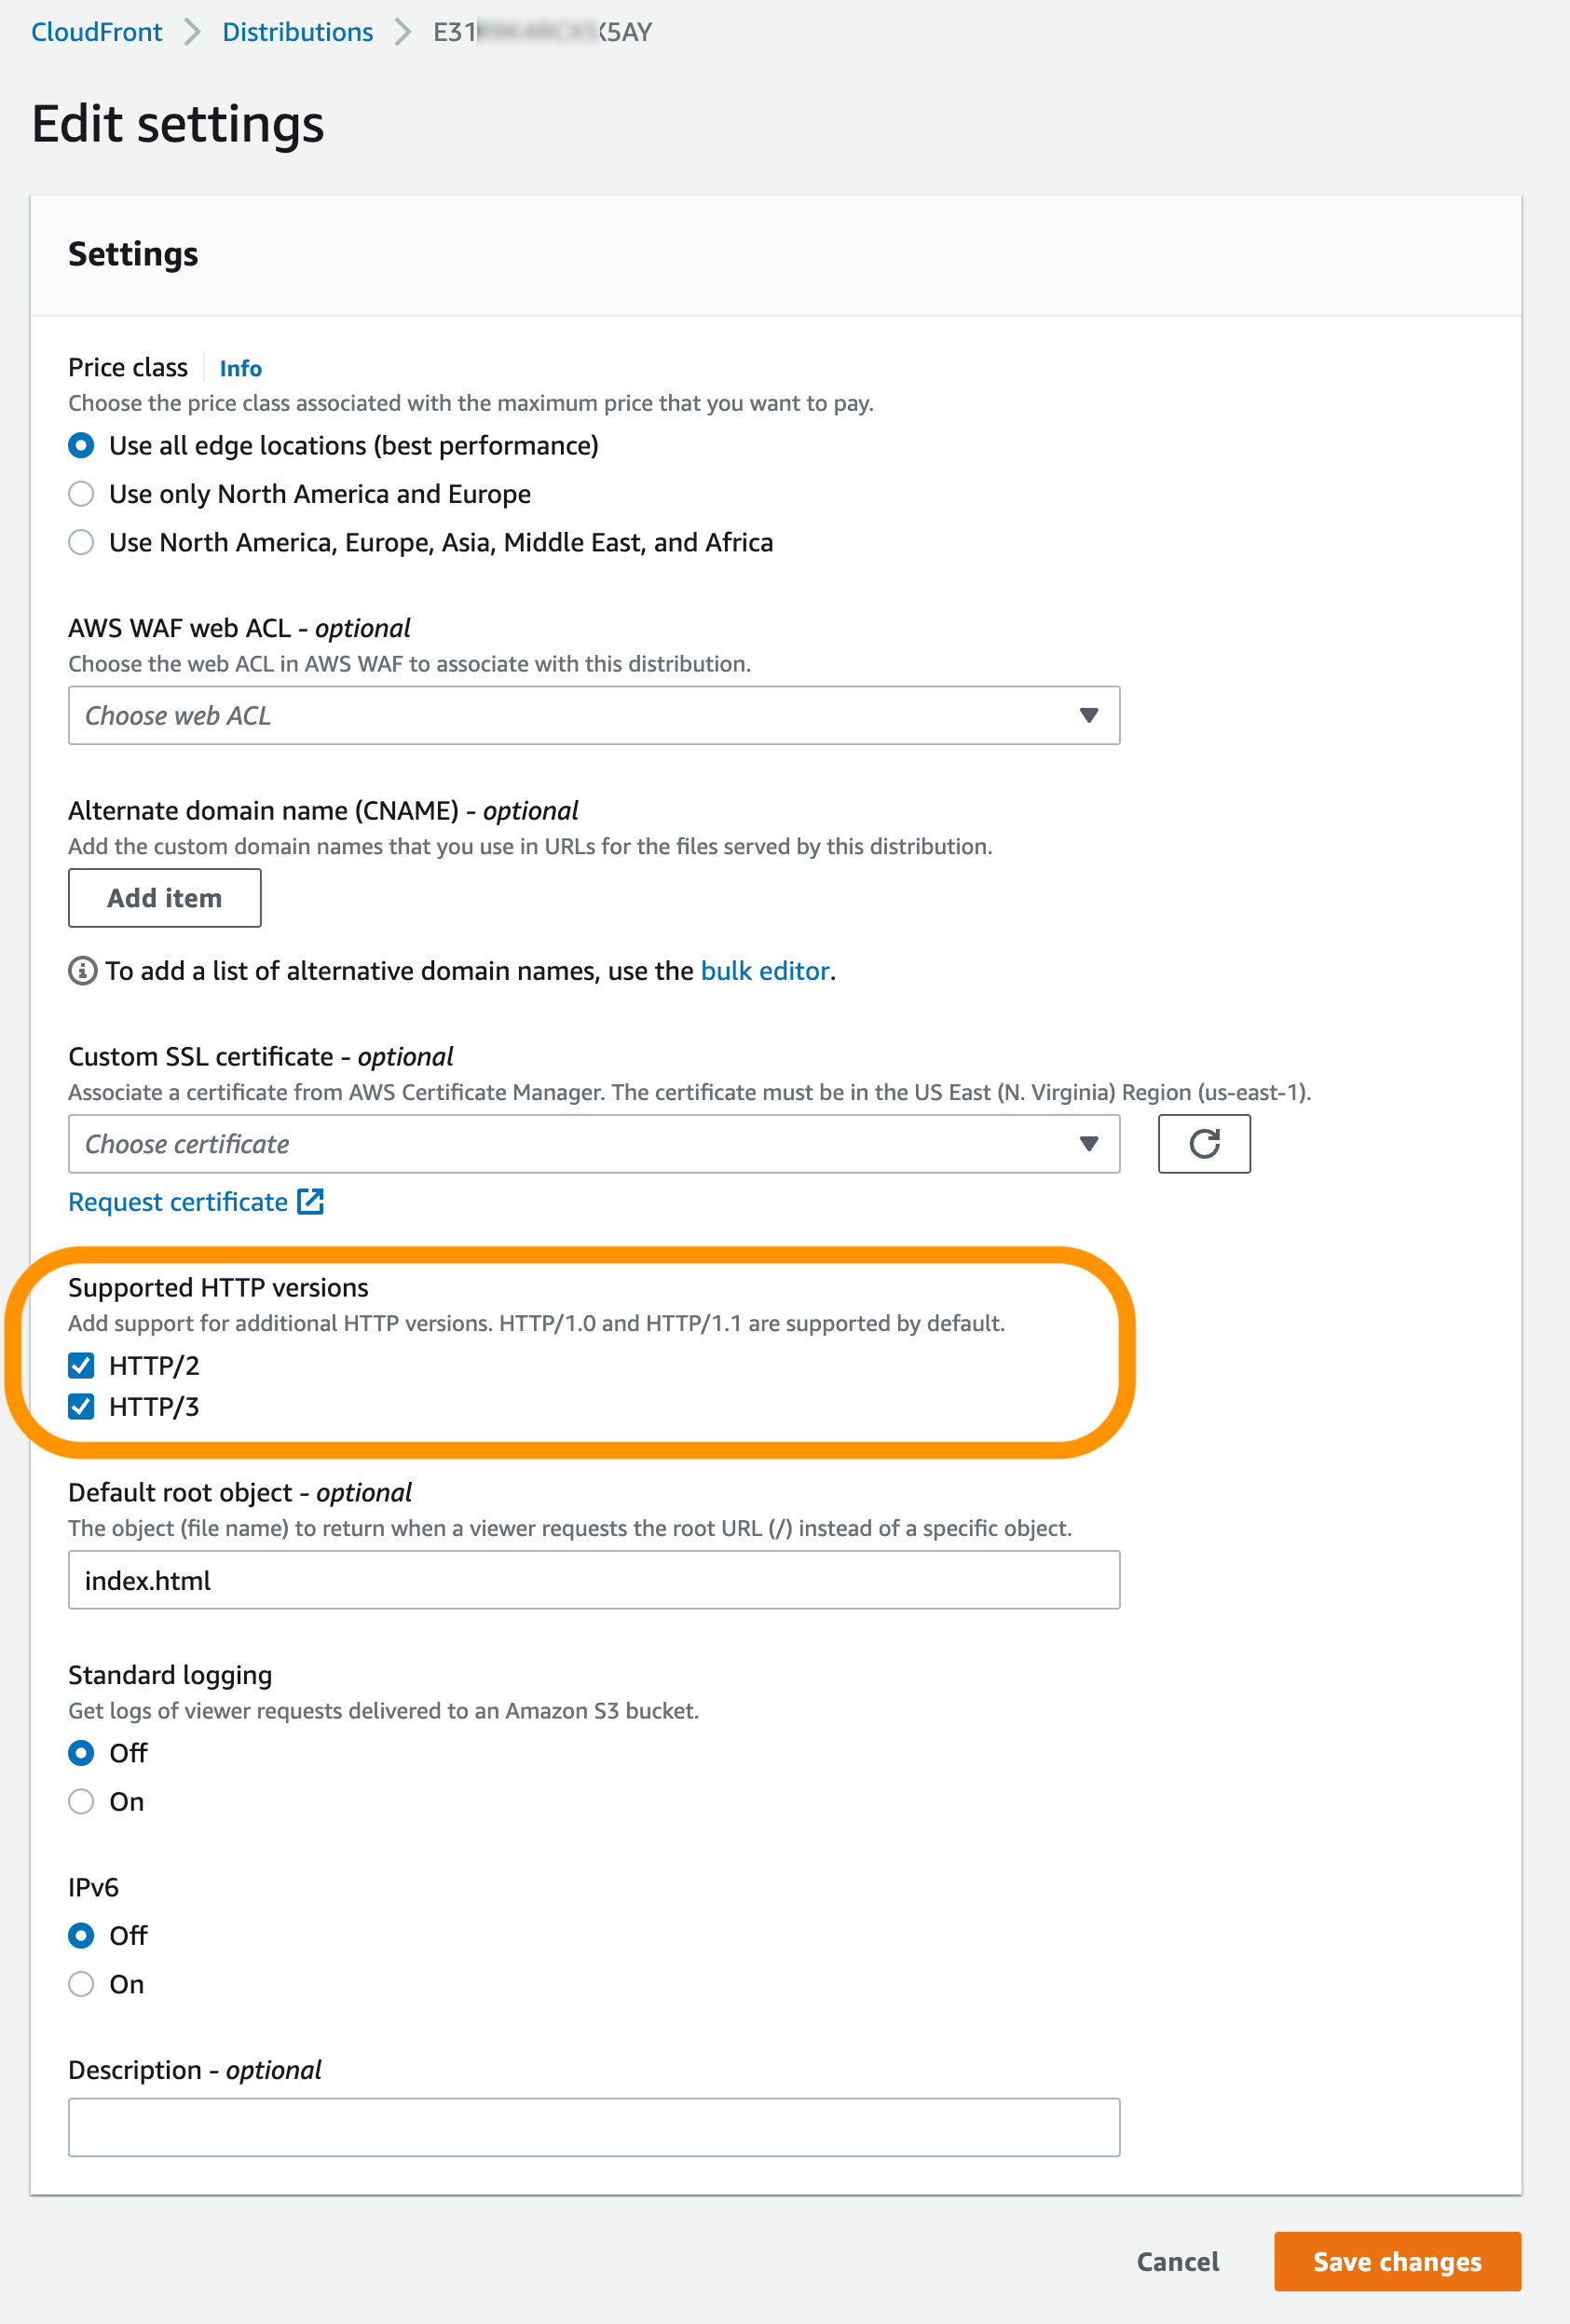
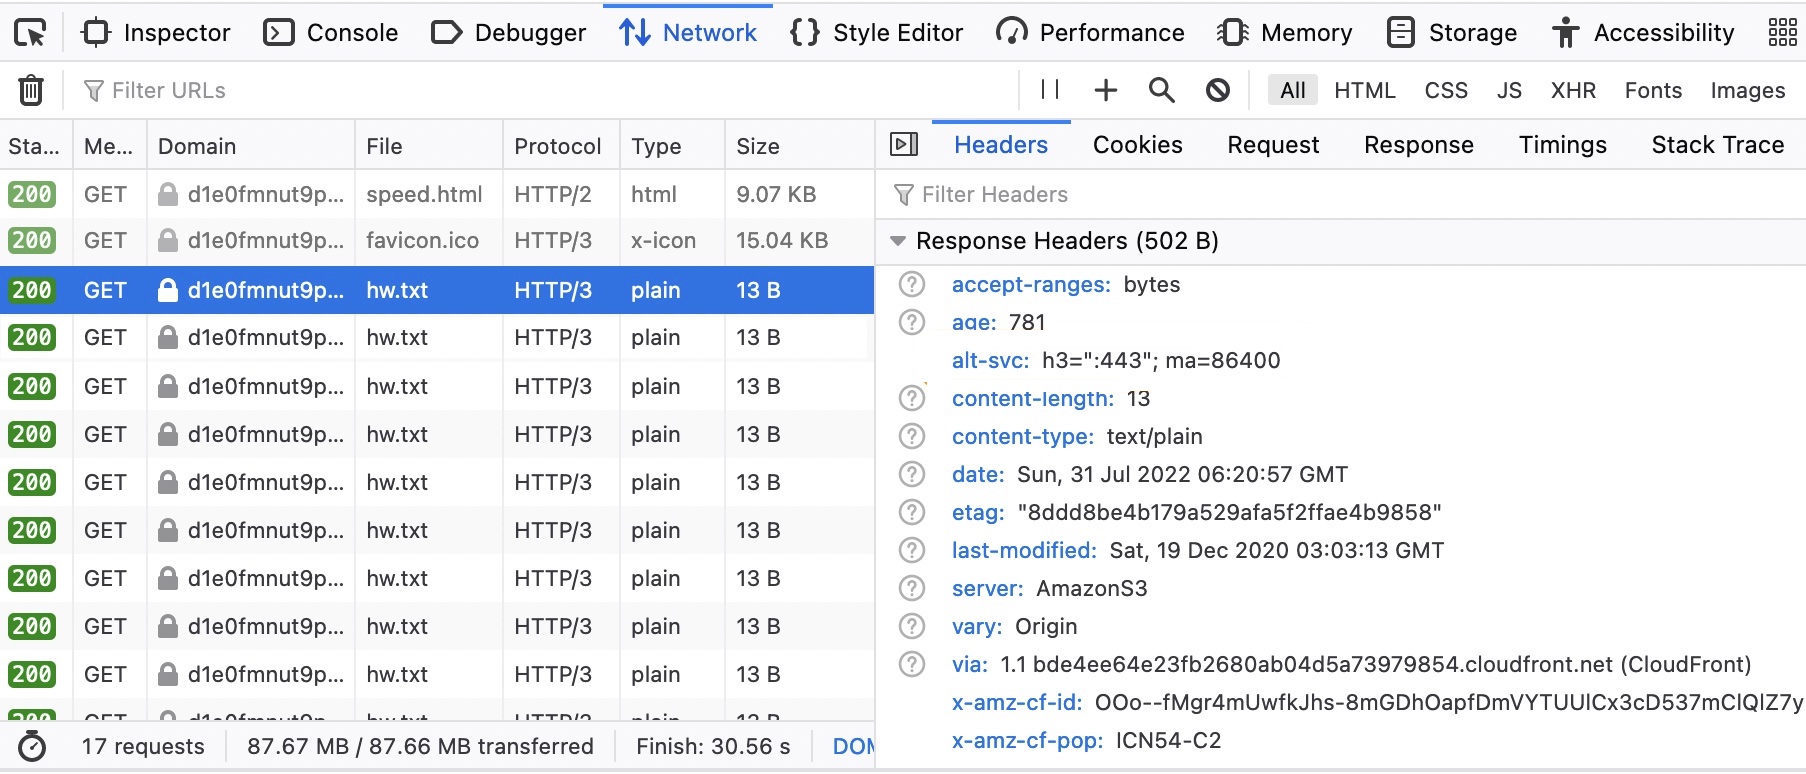


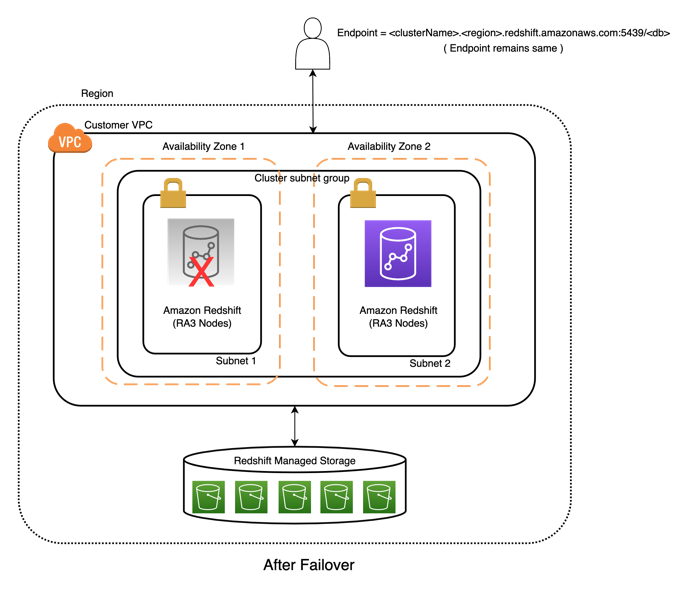

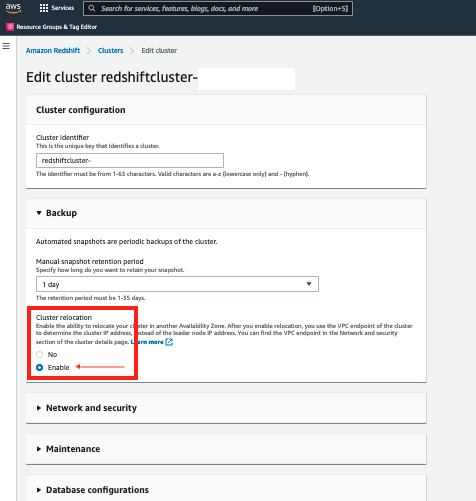


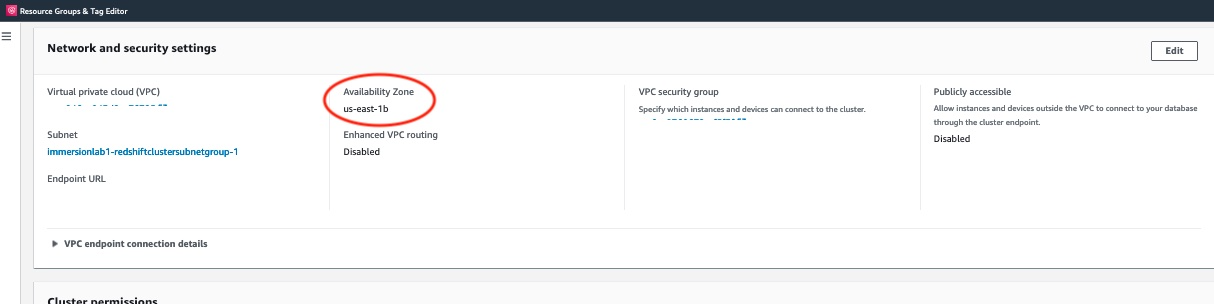

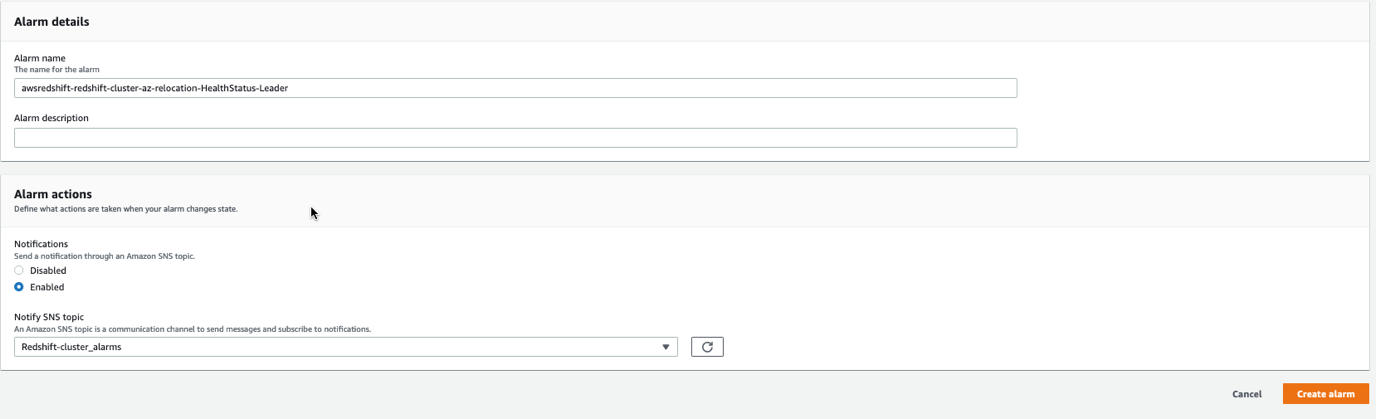
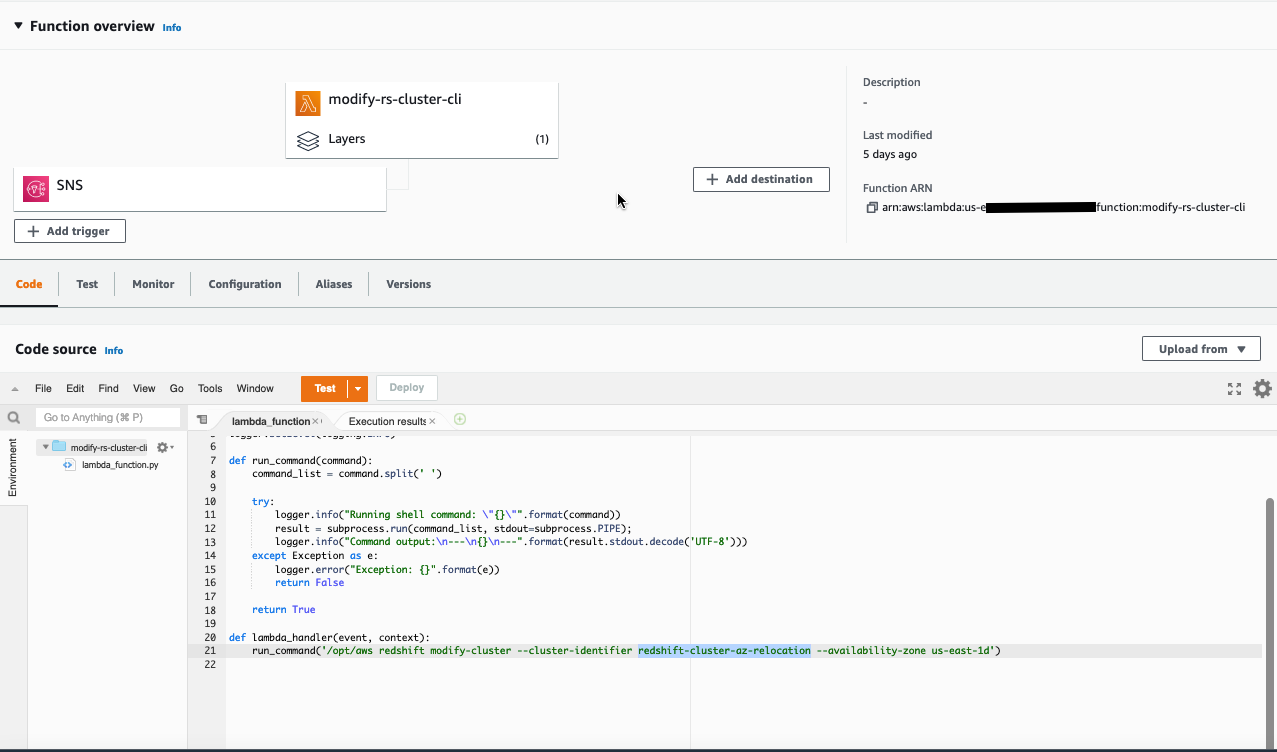










 Also, we are preparing 16 upcoming