You can read the details of Operation Spiderweb elsewhere. What interests me are the implications for future warfare:
If the Ukrainians could sneak drones so close to major air bases in a police state such as Russia, what is to prevent the Chinese from doing the same with U.S. air bases? Or the Pakistanis with Indian air bases? Or the North Koreans with South Korean air bases? Militaries that thought they had secured their air bases with electrified fences and guard posts will now have to reckon with the threat from the skies posed by cheap, ubiquitous drones that can be easily modified for military use. This will necessitate a massive investment in counter-drone systems. Money spent on conventional manned weapons systems increasingly looks to be as wasted as spending on the cavalry in the 1930s.
There’s a balance between the cost of the thing, and the cost to destroy the thing, and that balance is changing dramatically. This isn’t new, of course. Here’s an article from last year about the cost of drones versus the cost of top-of-the-line fighter jets. If $35K in drones (117 drones times an estimated $300 per drone) can destroy $7B in Russian bombers and other long-range aircraft, why would anyone build more of those planes? And we can have this discussion about ships, or tanks, or pretty much every other military vehicle. And then we can add in drone-coordinating technologies like swarming.
Clearly we need more research on remotely and automatically disablingdrones.
Rapid7’s Q1 2025 incident response data highlights several key initial access vector (IAV) trends, shares salient examples of incidents investigated by the Rapid7 Incident Response (IR) team, and digs into threat data by industry as well as some of the more commonly seen pieces of malware appearing in incident logs.
Is having no MFA solution in place still one of the most appealing vulnerabilities for threat actors? Will you see the same assortment of malware regardless of whether you work in business services or media and communications? And how big a problem could one search engine query possibly be, anyway?
The answer to that last question is “very,” as it turns out. As for the rest…
Initial access vectors
Below, we highlight the key movers and shakers for IAVs across cases investigated by Rapid7’s IR team. While you’ll notice a fairly even split among several vectors such as exposed remote desktop protocol (RDP) services and SEO poisoning, one in particular is clearly the leader of the pack where compromising organizations is concerned: stolen credentials to valid/active accounts with no multi-factor authentication (MFA) enabled.
Valid account credentials — with no MFA in place to protect the organization should they be misused — are still far and away the biggest stumbling block for organizations investigated by the Rapid7 IR team, occurring in 56% of all incidents this first quarter.
Exposed RDP services accounted for 6% of incidents as the IAV, yet they were abused by attackers more generally in 44% of incidents. This tells us that third parties remain an important consideration in an organization’s security hygiene.
Valid accounts / no MFA: Top of the class
Rapid7 regularly bangs the drum for tighter controls where valid accounts and MFA are concerned. As per the key findings, 56% of all incidents in Q1 2025 involved valid accounts / no MFA as the initial access vector. In fact, there’s been very little change since Q3 2024, and as good as no difference between the last two quarters:
Vulnerability exploitation: Cracks in the armor
Rapid7’s IR services team observed several vulnerabilities used, or likely to have been used, as an IAV in Q1 2025. CVE-2024-55591 for example, the IAV for an incident in manufacturing, is a websocket-based race condition authentication bypass affecting Fortinet’s FortiOS and FortiProxy flagship appliances. Successful exploitation results in the ability to execute arbitrary CLI console commands as the super_admin user. The CVE-2024-55591 advisory was published at the beginning of 2025, and it saw widespread exploitation in the wild.
One investigation revealed attackers using the above flaw to exploit vulnerable firewall devices and create local and administrator accounts with legitimate-looking names (e.g., references to “Admin”, “I.T.”, “Support”). This allowed access to firewall dashboards, which may have contained useful information about the devices’ users, configurations, and network traffic. Policies were created which allowed for leveraging of remote VPN services, and the almost month-long dwell time observed in similar incidents may suggest initial access broker (IAB) activity, or a possible intended progression to data exfiltration and ransomware.
Exposed RMM tooling: A path to ransomware
As noted above, 6% of IAV incidents were a result of exposed remote monitoring and management (RMM) tooling. RMMs, used to remotely manage and access devices, are often used to gain initial access, or form part of the attack chain leading to ransomware.
One investigation revealed a version of SimpleHelp vulnerable to several critical privilege escalation and remote code execution vulnerabilities, which included CVE-2024-57726, CVE-2024-57727, and CVE-2024-57728.
These CVEs target the SimpleHelp remote access solution. Exploiting CVE-2024-57727 permits an unauthenticated attacker to leak SimpleHelp “technician” password hashes. If one is cracked, the attacker can log-in as a remote-access technician. Lastly, the attacker can exploit CVE-2024-57726 and CVE-2024-57728 to elevate to SimpleHelp administrator and trigger remote code execution, respectively. CVE-2024-57727 was added to CISA KEV in February 2025.
The vulnerable RMM solution was used to gain initial access and threat actors used PowerShell to create Windows Defender exclusions, with the ultimate goal of deploying INC Ransomware on target systems.
SEO poisoning: When a quick search leads to disaster
SEO poisoning, once the scourge of search engines everywhere, may not be high on your list of priorities. However, it still has the potential to wreak havoc on a network. Here, the issue isn’t so much rogue entries in regular search results, but instead the paid sponsored ads directly above typical searches. Note how many sponsored results sit above the genuine site related to this incident:
Multiple sponsored searches above the official (and desired) search result
This investigation revealed a tale of two search results, where one led to a genuine download of a tool designed to monitor virtual environments, and the other led to malware. When faced with both options, a split-second decision went with the latter and what followed was an escalating series of intrusion, data exfiltration and—eventually—ransomware.
An imitation website offering malware disguised as genuine software
On the same day of initial compromise, the attacker moved laterally using compromised credentials via RDP, installing several RMM tools such as AnyDesk and SplashTop. It is likely that the threat actor searched for insecurely stored password files and targeted password managers. They also attempted to modify and/or disable various security tools in order to evade detection, and create a local account to enable persistence and avoid domain-wide password resets.
An unauthorized version of WinSCP was used to exfiltrate a few hundred GB of sensitive company data from several systems, and with this mission accomplished only a few tasks remained. The first: attempting to inhibit system recovery by tampering with the Volume Shadow Copy Service (VSS), clearing event logs, deleting files, and also attempting to target primary backups for data destruction. The second: deployment of Qilin ransomware and a blackmail note instructing the victim to communicate via a TOR link lest the data be published to their leak site.
Qilin ranked 7 in our top ransomware groups of Q1 2025 for leak post frequency, racking up 111 posts from January through March. Known for double-extortion attacks across healthcare, manufacturing, and financial sectors, Qilin (who, despite their name, are known not to be Chinese speakers, but rather Russian-speaking) has also recently been seen deployed by North Korean threat actors Moonstone Sleet.
Attacker behavior observations
Bunnies everywhere: Tracking a top malware threat
BunnyLoader, the Malware as a Service (MaaS) loader possessing a wealth of capabilities including clipboard and credential theft, keylogging, and the ability to deploy additional malware, is one of the most prolific presences Rapid7 has seen this first quarter of 2025. In many cases, it’s also daisy-chained to many of the other payloads and tactics which make repeated appearances.
To really drive this message home: BunnyLoader is the most observed payload across almost every industry we focused on. Whether we’re talking manufacturing, healthcare, business services or finance, it’s typically well ahead of the rest of the pack. Here are our findings across the 5 most targeted industries of Q1:
BunnyLoader is in pole position not only for the 5 industries shown above, but across 12 of 13 industries overall, with 40% of all incidents observed involving this oft-updated malware.
Just over half of that 40% total involved a fake CAPTCHA (commonly used for the purpose of victims executing malicious code), with malicious / compromised sites appearing in a quarter of BunnyLoader cases. Rogue documents, which may be booby-trapped with malware or pave the way for potential phishing attacks, bring up the rear at just 9% of all BunnyLoader appearances recorded. First offered for sale in 2023 for a lifetime-use cost of $250, its continued development and large range of features make it an attractive proposition for rogues operating on a budget.
Targeted organizations: The manufacturing magnet
Manufacturing organizations were targeted in more than 24% of incidents the Rapid7 IR team observed, by far the most targeted industry in Q1 based on both Rapid7’s ransomware analytics and IR team observations. The chart below compares Rapid7’s industry-wide data (comprising a wide range of payloads and tactics) with ransomware leak post specific data. In both cases, manufacturing is a fair way ahead of other industries; this reflects its status as one of the most popular targets for ransomware groups over the last couple of years.
The manufacturing industry is an attack vector for nation states because it is an important component of global trade. It is also an area that has many legacy and older, operational technologies (OT). Combine unpatched legacy systems with complicated supply chains, and you have a risk that nation state actors will find an attractive target. This is especially the case when considering that many manufacturing organizations have critical contracts with governments, and attacks can cause severe disruption if they’re not speedily resolved.
Conclusion
Q1 2025 resembles a refinement of successful tactics, as opposed to brand new innovations brought to the table. Our Q1 ransomware analytics showed threat actors making streamlined tweaks to a well-oiled machine, and we find many of the same “evolution, not revolution” patterns occurring here.
This progression is particularly applicable in the case of initial access via valid accounts with no MFA protection. We expect to see no drop in popularity while businesses continue to leave easy inroads open and available to skilled (and unskilled) attackers.
In addition, the risk of severe compromise stemming from seemingly harmless online searches underscores the necessity for organizations to reexamine basic security best practices, alongside deploying robust detection and response capabilities. Businesses addressing these key areas for concern will be better equipped to defend against what should not be an inevitable slide into data exfiltration and malware deployment.
Today Broadcom is launching its next-generation of switch ASICs with the Broadcom Tomahawk 6 series. This is a new 102.4Tbps switch that can handle up to 64 ports of 1.6TbE. Yes, we are now replacing the “Gigabit” with the “Terabit” Ethernet port era. The two new ASICs, the Broadcom BCM78910 and BCM78914 offer two different […]
Today we’re publishing a position paper setting out five arguments for why we think that kids still need to learn to code in the age of artificial intelligence.
Generated using ChatGPT.
Just like every wave of technological innovation that has come before, the advances in artificial intelligence (AI) are raising profound questions about the future of human work. History teaches us that technology has the potential to both automate and augment human effort, destroying some jobs and creating new ones. The only thing we know for sure is that it is impossible to predict the precise nature and pace of the changes that are coming.
One of the fastest-moving applications of generative AI technologies are the systems that can generate code. What started as the coding equivalent of autocomplete has quickly progressed to tools that can generate increasingly complex code from natural language prompts.
This has given birth to the notion of “vibe-coding” and led some commentators to predict the end of the software development industry as we know it. It shouldn’t be a surprise then that there is a vigorous debate about whether kids still need to learn to code.
In the position paper we put forward five arguments for why we think the answer is an unequivocal yes.
First, we argue that even in a world where AI can generate code, we need skilled human programmers who can think critically, solve problems, and make ethical decisions. The large language models that underpin these tools are probabilistic systems designed to provide statistically acceptable outputs and, as any skilled software engineer will tell you, simply writing more code faster isn’t necessarily a good thing.
Learning to code is an essential part of learning to program
Learning to code is the most effective way we know for a young person to develop the mental models and fluency to become a skilled human programmer. The hard cognitive work of reading, modifying, writing, explaining, and testing code is precisely how young people develop a deep understanding of programming and computational thinking.
Learning to code will open up even more opportunities in the age of AI
While there’s no doubt that AI is going to reshape the labour market, the evidence from history suggests that it will increase the reach of programming and computational approaches across the economy and into new domains, creating demand for humans who are skilled programmers. We also argue that coding is no longer just for software engineers, it’s becoming a core skill that enables people to work effectively and think critically in a world shaped by intelligent machines. From healthcare to agriculture, we are already seeing demand for people who can combine programming with domain-specific skills and craft knowledge.
Coding is a literacy that helps young people have agency in a digital world
Alongside the arguments for coding as a route to opening up economic opportunities, we argue that coding and programming gives young people a way to express themselves, to learn, and to make sense of the world.
And perhaps most importantly, that learning to code is about power. Providing young people with a solid grounding in computational literacy, developed through coding, helps ensure that they have agency. Without it, they risk being manipulated by systems they don’t understand. As Rushkoff said: “Program, or be programmed”.
The kids who learn to code will shape the future
Finally, we argue that the power to create with technology is already concentrated in too small and homogenous a group of people. We need to open up the opportunity to learn to code to all young people because it will help us mobilise the full potential of human talent, will lead to more inclusive and effective digital solutions to the big global challenges we face, and will help ensure that everyone can share in the societal and economic benefits of technological progress.
The work we need to do
We end the paper with a call to action for all of us working in education. We need to challenge the false narrative that AI is removing the need for kids to learn to code, and redouble our efforts to ensure that all young people are equipped to take advantage of the opportunities in a world where AI is ubiquitous.
The cartoon image for this blog was created using ChatGPT-4o, which was prompted to produce a “whimsical cartoon that expresses some of the key ideas in the position paper”. It took several iterations.
Every night, right around midnight (mainly UTC), a horde of zombies wakes up and clamors for … digital certificates!
The zombies in question are abandoned or misconfigured Internet servers and ACME clients that have been set to request certificates from Let’s Encrypt. As our certificates last for at most 90 days, these zombie clients’ software knows that their certificates are out-of-date and need to be replaced. What they don’t realize is that their quest for new certificates is doomed! These devices are cursed to seek certificates again and again, never receiving them.
But they do use up a lot of certificate authority resources in the process.
The Zombie Client Problem
Unlike a human being, software doesn’t give up in frustration, or try to modify its approach, when it repeatedly fails at the same task. Our emphasis on automation means that the vast majority of Let’s Encrypt certificate renewals are performed by automated software. This is great when those renewals succeed, but it also means that forgotten clients and devices can continue requesting renewals unsuccessfully for months, or even years.
How might that happen? Most often, it happens when a device no longer has a domain name pointed to it. The device itself doesn’t know that this has changed, so it treats renewal failures as transient even though they are actually permanent. For instance:
An organization may have allowed a domain name registration to lapse because it is no longer needed, but its servers are still configured to request certs for it.
Or, a home user stopped using a particular dynamic-DNS domain with a network-attached storage device, but is still using that device at home. The device doesn’t realize that the user no longer expects to use the name, so it keeps requesting certs for it.
Or, a web hosting or CDN customer migrated to a different service provider, but never informed the old service provider. The old service provider’s servers keep requesting certs unsuccessfully. If the customer was in a free service tier, there might not be invoices or charges reminding the customer to cancel the service.
Or any number of other, subtler changes in a subscriber’s infrastructure, such as changing a firewall rule or some webserver configuration.
At the scale of Let’s Encrypt, which now covers hundreds of millions of names, scenarios like these have become common, and their impact has become substantial. In 2024, we noticed that about half of all certificate requests to the Let’s Encrypt ACME API came from about a million accounts that never successfully complete any validations. Many of these had completed validations and issued certificates sometime in the past, but nowadays every single one of their validation attempts fails, and they show no signs that this will change anytime soon.
Unfortunately, trying to validate those futile requests still uses resources. Our CA software has to generate challenges, reach out and attempt to validate them over the Internet, detect and report failures, and record all of the associated information in our databases and audit logs. And over time, we’ve seen more and more recurring failures: accounts that always fail their issuance requests have been growing at around 18% per year.
In January, we mentioned that we had been addressing the zombie client problem through our rate limit system. This post provides more detail on that progress.
Our Rate Limit Philosophy
If you’ve used Let’s Encrypt as a subscriber, you may have run into one of our rate limits at some point, maybe during your initial setup process. We have eight different kinds of rate limits in place now; as our January post describes, they’ve become more algorithmically sophisticated and grown to address a wider range of problems. A key principle for Let’s Encrypt is that our rate limiting is not a punishment. We don’t think of rate limits as a way of retaliating against a client for misbehavior. Rate limits are simply a tool to maximize the efficient use of our limited resources and prevent people and programs from using up those resources for no constructive purpose.
We’ve consistently tried to design our rate limit mechanisms in line with that philosophy. So if a misconfiguration or misunderstanding has caused excessive requests in the past, we’re still happy to welcome the user in question back and start issuing them certificates again—once the problem has been addressed. We want the rate limits to put a brake on wasteful use of our systems, but not to frustrate users who are actively trying to make Let’s Encrypt work for them.
In addition, we’ve always implemented our rate limits to err on the side of permissiveness. For example, if the Redis instances where rate limits are tracked have an outage or lose data, the system is designed to permit more issuance rather than less issuance as a result.
We wanted to create additional limits that would target zombie clients, but in a correspondingly non-punitive way that would avoid any disruption to valid issuance, and welcome subscribers back quickly if they happened to notice and fix a long-time problem with their setups.
Our Zombie-Related Rate Limits and Their Impact
In planning a new zombie-specific response, we decided on a “pausing” approach, which can temporarily limit an account’s ability to proceed with certificate requests. The core idea is that, if a particular account consistently fails to complete validation for a particular hostname, we’ll pause that account-hostname pair. The pause means that any new order requests from that account for that hostname will be rejected immediately, before we get to the resource-intensive validation phase.
This approach is more finely targeted than pausing an entire account. Pausing account-hostname pairs means that your ability to issue certs for a specific name could be paused due to repeated failures, but you can still get all of your other certs like normal. So a large hosting provider doesn’t have to fear that its certificate issuance on behalf of one customer will be affected by renewal failures related to a problem with a different customer’s domain name. The account-specificity of the pause, in turn, means that validation failures from one subscriber or device won’t prevent a different subscriber or device from attempting to validate the same name, as long as the devices in question don’t share a single Let’s Encrypt account.
In September 2024, we began applying our zombie rate limits manually by pausing about 21,000 of the most recurrently-failing account-hostname pairs, those which were consistently repeating the same failed requests many times per day, every day. After implementing that first round of pauses, we immediately saw a significant impact on our failed request rates. As we announced at that time, we also began using a formula to automatically pause other zombie client account-hostname pairs from December 2024 onward. The associated new rate limit is called “Consecutive Authorization Failures per Hostname Per Account” (and is independent of the existing “Authorization Failures per Hostname Per Account” limit, which resets every hour).
This formula relates to the frequency of successive failed issuance requests for the same domain name by the same Let’s Encrypt account. It applies only to failures that happen again and again, with no successful issuances at all in between: a single successful validation immediately resets the rate limit all the way to zero. Like all of our rate limits, this is not a punitive measure but is simply intended to reduce the waste of resources. So, we decided to set the thresholds rather high in the expectation that we would catch only the most disruptive zombie clients, and ultimately only those clients that were extremely unlikely to succeed in the future based on their substantial history of failed requests. We don’t hurry to block requesters as zombies: according to our current formula, client software following the default established by EFF’s Certbot (two renewal attempts per day) would be paused as a zombie only after about ten years of constant failures. More aggressive failed issuance attempts will get a client paused sooner, but clients will generally have to fail hundreds or thousands of attempts in a row before they are paused.
Most subscribers using mainstream client applications with default configurations will never encounter this rate limit, even if they forget to deactivate renewal attempts for domains that are no longer pointed at their servers. As described below, our current limit is already providing noticeable benefits with minimal disruption, and we’re likely to tighten it a bit in the near future, so it will trigger after somewhat fewer consecutive failures.
Self-Service Unpausing
A key feature in our zombie issuance pausing mechanism is self-service unpausing. Whenever an account-hostname pair is paused, any new certificate requests for that hostname submitted by that account are immediately rejected. But this means that the “one successful validation immediately resets the rate limit counter” feature can no longer come into effect: once they’re paused, they can’t even attempt validation anymore.
So every rejection comes with an error message explaining what has happened and a custom link that can be used to immediately unpause that account-hostname pair and remove any other pauses on the same account at the same time. The point of this is that subscribers who notice at some point that issuance is failing and want to intervene to get it working again have a straightforward option to let Let’s Encrypt know that they’re aware of the recurring failures and are still planning to use a particular account. As soon as subscribers notify us via the self-service link, they’ll be able to issue certificates again.
Currently, the user interface for an affected subscriber looks like this:
This link would be provided via an ACME error message in response to any request that was blocked due to a pause account-hostname pair.
As it’s turned out, the unpause option shown above has only been used by about 3% of affected accounts! This goes to show that most of the zombies we’ve paused were, in fact, well and truly forgotten about.
However, the unpause feature is there for whenever it’s needed, and there may be cases when it will become more important. A very large integration could trigger the zombie-related rate limits if a newly-introduced software bug causes what looks like a very high volume of zombie requests in a very short time. In that case, once that bug has been noticed and fixed, an integrator may need to unpause its issuance on behalf of lots of customers at once. Our unpause feature permits unpausing 50,000 domain names on a single account at a time, so even the largest integrators can get themselves unpaused expeditiously in this situation.
Conclusion
We’ve been very happy with the results of our zombie mitigation measures, and, as far as we can tell, there’s been almost no impact for subscribers! Our statistics indicate that we’ve managed to reduce the load on our infrastructure while causing no detectable harm or inconvenience to subscribers’ valid issuance requests.
Since implementing the manual pauses in September and the automated pauses in December, we’ve seen:
Over 100,000 account-hostname pairs have been paused for excessive failures.
We received zero (!) associated complaints or support requests.
About 3,200 people manually unpaused issuance.
Failed certificate orders fell by about 30% so far, and should continue to fall over time as we fine-tune the rate limit formula and catch more zombie clients.
The new rate limit and the self-service unpause system are also ready to deal with circumstances that might produce more zombie clients in the future. For instance, we’ve announced that we’re going to be discontinuing renewal reminder emails soon. If some subscribers overlook failed renewals in the future, we might see more paused clients that result from unintentional renewal failures. We think taking advantage of the existing self-service unpause feature will be straightforward in that case. But it’s much better to notice problems and get them fixed up front, so please remember to set up your own monitoring to avoid unnoticed renewal failures in the future.
If you’re a subscriber who’s had occasion to use the self-service unpause feature, we’d love your feedback on the Community Forum about your experience using the feature and the circumstances that surrounded your account’s getting paused.
Also, if you’re a Let’s Encrypt client developer, please remember to make renewal requests at a random time (not precisely at midnight) so that the load on our infrastructure is smoothed out. You can also reduce the impact of zombie renewals by repeating failed requests somewhat less frequently over time (a “back-off” strategy), especially if the failure reason makes it look like a domain name may no longer be in use at all.
Amazon Athena makes it simple to analyze data without having to set up and manage data processing infrastructure. However, traditionally, you needed to set up an Amazon Simple Storage Service (Amazon S3) bucket to store query results before they could run queries with Athena. The need arose to make it even simpler to start using Athena, with fewer setup steps.
That’s why we’re thrilled to introduce managed query results, a new Athena feature that automatically stores, secures, and manages the lifecycle of query result data for you at no additional cost. Managed query results simplifies your user experience by removing the need to create or choose an S3 bucket in your account to hold results before you run queries. It helps reduce your monthly cost by shifting temporary storage of query results from your S3 bucket to Athena, and eliminates the need for separate processes to delete query result data from your S3 bucket after it’s no longer needed. Now, Athena offers both service managed, temporary result storage and customer managed Amazon S3 storage options to meet different needs.
What’s more, using managed query results doesn’t require complex changes to applications that read query results from existing Athena interfaces, and increases data security. Access to managed query result data is now associated with AWS Identity and Access Management (IAM) permissions scoped to individual Athena workgroups, instead of S3 buckets. Additionally, you can automatically encrypt result data with AWS Key Management Service (AWS KMS) using AWS owned or customer managed keys.
In this post, we demonstrate how to get started with managed query results and, by removing the undifferentiated effort spent on query result management, how Athena helps you get insights from your data in fewer steps than before.
Solution overview
When you use managed query results, you no longer need to create and choose S3 buckets to store query results, or manage lifecycle rules to make sure the result data is eventually cleaned up. The following are some scenarios where this is beneficial:
Financial analysts working in teams analyzing market data, each covering different investment areas or financial instruments, might use different workgroups for different kinds of analyses or projects. Now, analysts don’t need to spend time setting up S3 buckets or worry about cleaning up query results when their work is done.
Compliance teams can run audit queries on transaction data for regulatory reporting while making sure only authorized team members can access sensitive query results through IAM permissions. Because query results are cleaned up automatically, the compliance team no longer requires separate processes to delete query result data.
Data and analytics and platform automation teams who are responsible for streamlined onboarding of new users and teams no longer need to configure individual S3 buckets and permissions for different users and teams, simplifying their automation code.
The following are some of the key features of managed query results in Athena:
It removes the need to choose an S3 bucket location before you run queries.
There is no additional cost to store your query results, and query results are automatically deleted after a period of time, reducing management overhead from separate bucket cleanup processes.
It’s straightforward to get started: new and preexisting workgroups can be seamlessly configured to use managed query results. You can have a mix of Athena managed and customer managed query results in your AWS account.
You can use streamlined IAM permissions with access to read results using GetQueryResults and GetQueryResultsStream tied to individual workgroups.
Query results are automatically encrypted with your choice of AWS owned or customer managed KMS keys.
Let’s walk through how to get started with managed query results.
Configure your workgroup
Complete the following steps to configure your workgroup:
On the Athena console, choose Workgroups in the navigation pane.
Choose Create workgroup.
Alternatively, you can select an existing workgroup and choose Edit.
For Query result configuration, select Athena managed.
Navigate to the Athena console. To create a new workgroup, in the Workgroups page select the Create Workgroup button. To edit an existing workgroup, select a workgroup from the list and in the workgroup detail page, select the Edit button. Under Query result configuration section, you will see the option for Athena managed:
For Encrypt query results, choose your preferred encryption method
Figure 1: Query result configuration
Step 2: Configure Encryption
Choose your preferred encryption method for query results:
Encrypt using an AWS owned key – This is the default option. It indicates that you want query results to be encrypted and decrypted by an AWS owned key.
Encrypt using a customer managed key – Choose this option if you want to encrypt and decrypt query results with your own key. To have Athena use your customer managed key, specify the Athena service in the Principal elements of the key policy. For more information, see Setup an AWS KMS key policy for managed storage. To run queries, the user querying data needs permission to access your key.
Query your data
After you’ve configured your workgroup for managed query results, you can immediately start running queries. Let’s run a sample query against the AWS Cost and Usage Report.
The Athena console banner indicates that our workgroup, demo-workgroup, was updated to use managed query results. Our query ran successfully, and we didn’t need to set up an S3 bucket. To download these results, choose Download results CSV.
Figure 2: Running a query against the Cost and Usage report in the Athena console
You can access these results through the Athena console and using the Athena APIs.
Figure 3: Accessing the query results via the Athena API
Conclusion
In this post, we introduced managed query results, a new Athena feature that streamlines the query experience through automated storage of query results, provides automatic cleanup, and limits query result access with IAM permissions. Managed query results reduces operational overhead, empowering both data analysts running interactive queries and teams building complex analytics pipelines to focus on deriving insights rather than managing infrastructure. We demonstrated how to configure workgroups for managed storage and effectively use this feature in query scenarios.
To start using managed query results with Athena, simply configure your workgroups through the Athena console or APIs. For more information, see Managed query results.
About the Authors
Guy Bachar is a Sr. Solutions Architect at AWS. He specializes in assisting capital markets and FinTech customers with their cloud transformation journeys. His expertise encompasses identity management, security, and unified communication.
Sayan Chakraborty is a Sr. Solutions Architect at AWS. He helps large enterprises build secure, scalable, and performant solutions on AWS. With a background in enterprise and technology architecture, he has experience delivering large-scale digital transformation programs across a wide range of industry verticals.
Darshit Thakkar is a Technical Product Manager at AWS and works out of Boston, Massachusetts. He works closely with customers to understand how they use data, and drives product innovations that make data more actionable at scale.
Effective API management and routing capabilities are crucial for organizations managing complex application architectures. Whether you’re a technology company rolling out new API versions to millions of users, or a financial services organization conducting A/B tests to optimize customer experiences, the ability to route API traffic dynamically and efficiently is essential.
Today, Amazon API Gateway announces support for dynamic routing rules for custom domain names in all supported AWS Regions. This new capability enables you to route API requests based on HTTP header values, either independently or in combination with URL paths. In this post, you will learn how to use this new capability to implement routing strategies such as API versioning and gradual rollouts without modifying your API endpoints.
Dynamic Routing Rules Overview
Many organizations require dynamic API routing capabilities to support their evolving business needs. As a line-of-business persona, you want to be able to test new user experiences with specific customer segments, while maintaining their existing flows intact. As an engineer, you want to be able to maintain multiple API versions across different client applications while ensuring regulatory compliance. Prior to this launch, developers using API Gateway implemented dynamic routing by using different URL paths, such as “/v1/products” and “/v2/products”.
With this new launch, you can implement dynamic routing logic with a simple declarative configuration within the custom domain name settings. The new routing rule mechanism allows you to make routing decisions based on HTTP headers, base paths, or a combination of both. Developers are no longer required to create new or alter existing paths to smoothly transition between API versions, they can simply specify the desired value in the request HTTP header. Among other possibilities, you can implement cell-based architecture routing, A/B testing, or dynamic backend selection based on hostname, tenant ID, accepted response media type, or cookie value. By implementing routing logic directly within the API Gateway, you can eliminate proxy layers and complex URL structures while maintaining fine-grained control over your API traffic. This new feature seamlessly integrates with existing API Gateway capabilities and supports both public and private REST APIs. The following diagram shows how you can use routing rules for header and base-path based routing. This example uses a single level resource /products to show path matching, however depending on your use-case you could also use multi-level paths like /products/items.
Figure 1. Using routing rules for header and base-path based routing
In the following section you’ll learn how to implement header-based routing, use the new routing rules construct for common scenarios like API versioning and A/B testing, and configure rules with different routing conditions and priorities to achieve the desired behavior.
What is a routing rule
A routing rule is a new resource type uniquely associated with a single custom domain. It represents a collection of conditions that, when matched, cause the incoming request to be forwarded to a specific API and stage. Routing rules have three configuration properties:
The Conditions property defines the criteria that must be met for actions to be taken. A rule can include up to two header conditions and one base path condition, and all specified conditions must be met to trigger the action. If no conditions are defined for a rule, it serves as a catch-all rule matching all requests.
The Actions property defines what actions will be taken when rule conditions are met. At the time of this launch the supported action is invoking any stage of any REST API within the same account and region boundaries.
The Priority property defines the order that rules are evaluated in, with 1 being highest priority and 1,000,000 the lowest. You cannot reuse same priority value for more than one rule. AWS recommends you leave ample space between sequential rules to make it easy to add new rules in future, for example use 100, 200, 300 instead of 1, 2, 3.
Header conditions, specified via a MatchHeaders property, are used to match HTTP request header values, such as x-version=v1. Conforming to RFC 7230, header names are not case sensitive, while header values are. You can also use wildcards in header values for prefix, suffix, and contains match. See the following examples using AWS CloudFormation templates:
Matches x-version=alpha-v2-latest and x-version=beta-v2-test, but not x-version=alpha-v1
Base path condition, specified via MatchBasePaths property, is used to match the incoming request path. The matching is case sensitive.
- MatchBasePaths:
	AnyOf:
		- "products"
You can have up to two MatchHeaders and one MatchBasePaths conditions per routing rule. Conditions are evaluated using the AND operator, meaning all conditions must be met for the action to be taken. Both condition types support a single comparison value under AnyOf property. The following snippet illustrates a sample routing rule with two MatchHeaders conditions and a single MatchBasePaths condition.
This rule matches requests to https://example.com/products when both header conditions are met – x-version=v2 and x-user-cohort=beta-testers. This rule does not match requests to any other base path, such as https://example.com/orders, or requests that do not match at least one header condition.
For scenarios like API versioning, you can create rules that evaluate headers such as “accept” or “version” to route traffic to different API implementations. For example, to route requests containing “x-version: api-beta” to your beta API, you would create a rule specifying this header condition and set the action to route to your beta API deployment.
Header-based routing also simplifies A/B testing by allowing you to define client cohorts based on custom headers, allowing controlled experiments with different configurations. You can create rules that check for a custom header like “x-test-group” to route specific users to different API implementations. The priority system ensures predictable routing behavior – when multiple rules match a request, the rule with the lowest priority number (highest precedence) determines the routing. Combining header and path conditions within a single rule enables complex routing scenarios such as version-specific routing for specific API resources instead of the entire API, as illustrated in the following diagram.
Figure 2. A routing configuration with two header and one path conditions in API Gateway Console.
Review the API Gateway documentation for detailed guide on creating routing rules.
Configuring Routing Mode
Before you begin creating routing rules, you must first create at least one API, stage, and a custom domain name. You can configure your custom domain name with the new routing mode setting.
API mappings only. This is the default mode. When using this mode, you can continue to use base path mappings to route requests to different APIs, and not use Routing Rules at all. This mode maintains the current behavior, where requests are routed based on base path mappings only.
Routing rules then API mappings. With this mode you can use Routing Rules while continuing to keep base path mappings as a fallback. When you use this mode, the Routing Rules always take precedence, and unmatched requests are evaluated against base path mappings. This mode is useful for gradually transitioning your APIs to Routing Rules.
Routing rules only. This mode gives you the flexibility to use routing rules only, and not rely on the base paths that you may have previously created on the domain using API mappings. This is the recommended routing mode; it is helpful when you are starting off with a new custom domain or finished transitioning from API mappings to Routing Rules for an existing custom domain.
When switching from one routing mode to another, always test your new configuration in non-production environments first. For example, when switching mode from API mappings only to routing rules only, your traffic will only be routed with routing rules; existing API mappings will no longer take effect.
Onboarding to Header-Based Routing
You can adopt the new Header-Based Routing for your existing API Gateway custom domains with zero-downtime, risk-minimized approach. The first step is to configure your custom domain to use the Routing rules then API mappings mode using the API Gateway console, AWS CLI, or your infrastructure-as-code (IaC) tool. This configuration ensures that while you gradually create Routing Rules, your existing base path mappings continue to function as fallback routes. Since Routing Rules are evaluated before base path mappings, and in the absence of any matching rules, requests automatically fall back to your existing base path mappings, your current API traffic remains unaffected during this transition.
Once you’ve configured the routing mode, you can progressively introduce Routing Rules alongside your existing setup. For example, you might start by creating a rule with a specific test header that routes to a new API version, allowing you to validate the routing behavior with controlled test traffic while production traffic continues flowing through your existing base path mappings. As you gain confidence in the new routing configuration, you can gradually expand your rules, adjust priorities, and optionally migrate away from base path mappings entirely. This incremental approach, combined with API Gateway’s observability capabilities described in the next section, enables you to validate each change and ensure your API consumers experience no disruption during the transition.
Observability
API Gateway provides comprehensive visibility into how your routing rules are processing requests through access logging. Each request now includes additional context variables that help you understand the routing decision process. The $context.customDomain.routingRuleIdMatched variable identifies which rule was matched and applied to the request, while existing variables like $context.domainName, $context.apiId, and $context.stage provide the complete routing context. By analyzing these access logs, you can verify routing behavior, troubleshoot unexpected routes, and gather insights about traffic patterns across different API versions or test variants.
End-to-end example
Consider a real-world scenario where a team needs to gradually migrate users to a new API version, such as an e-commerce platform updating its checkout API from v1 to v2. First, the team creates two different REST APIs – one for each version. Then, they set up a Routing Rule with priority 100 that checks for the header x-version=v2 and routes matching requests to the v2 API. They also create another rule with priority 200 that routes all requests with paths starting with /checkout to v1 API as a fallback.
Figure 3. Gradually transitioning clients from v1 to v2 API.
In the application code they add the x-version header for a small percentage of users. They monitor the performance and error rates using API Gateway’s telemetry capabilities by tracking the access and execution logs, along with emitted metrics. As their confidence grows, they gradually increase the percentage of users sending the v2 header. This approach ensures a controlled migration with minimal risk and ability to quickly rollback by simply removing the header from requests or changing a routing rule.
Sample
Follow the instructions in this GitHub repository to provision the sample in your AWS account. The project illustrates using dynamic routing with API Gateway.
Conclusion
Header-based routing brings significant advantages to API Gateway users. The feature’s backward compatibility ensures a smooth transition path – you can maintain existing base path mappings while gradually adopting Routing Rules, or use both mechanisms simultaneously with the fallback option. This flexibility allows you to migrate at your own pace without disrupting existing applications. The solution is cost-effective, with no additional charges for using Routing Rules on REST APIs. It reduces requirements to leverage extra service and infrastructure for dynamic routing. The priority-based evaluation system provides deterministic routing behavior, making it easier to understand and troubleshoot routing decisions.
In the ever-evolving landscape of cyber threat actors, the lines between ideologically driven hacktivism and financially motivated cybercriminals have become increasingly blurred. Originally fueled by political, social, or ethical causes, hacktivist groups have historically engaged in digital protest through website defacements, data leaks, and distributed denial of service (DDoS) attacks.
However, in recent years, a noticeable trend has emerged. Some hacktivist groups are evolving into ransomware operations and even becoming ransomware affiliates. This transformation is driven by a mix of ideological fatigue, opportunity for financial gain, access to sophisticated tools, and the growing profitability of extortion-based attacks. The result is a new hybrid threat actor—one that merges the disruptive zeal of hacktivism with the ruthless efficiency of cybercrime.
Understanding this shift is crucial for defenders, as it represents a convergence of motives that complicates attribution, response, and mitigation strategies. To this end, we have examined three prominent examples of relevant threat actors, namely FunkSec, KillSec, and GhostSec, identifying the drivers behind their transition to financially motivated campaigns and exploring the shift in their modus operandi.
Threat actor analysis
FunkSec
The FunkSec ransomware group emerged within the cybercrime ecosystem as a rising star in December 2024. The ransomware-as-a-service (RaaS) group has claimed at least 172 victims to date. The group proudly promotes itself as an AI-driven ransomware group, with their encryptor, FunkLocker, and some of the malware’s source code allegedly generated using generative AI tools.
The group targets organizations from various sectors and regions, such as government, education, automotive, energy, IT, and manufacturing, located in countries like the United States, Israel, France, Italy, Germany, India, and Australia.
FunkSec started as a politically motivated hacking (hacktivist) group, specifically interested in targeting the United States (Figure 1). The group was known to be aligned with the “Free Palestine” movement (Figure 2), and associated itself with other hacktivist groups, such as Ghost Algeria and Cyb3r Fl00d. Among its affiliates are Scorpion (AKA DesertStorm, a suspected Algeria-based hacker), El_farado, XTN, Blako, and Bjorka (an alleged Indonesian hacktivist). In its early days, the group offered tools commonly associated with hacktivist activities, including services for DDoS and defacement attacks.
Figure 1 – FunkSec’s activities as a hacktivistFigure 2 – FunkSec’s statement against the USA and Israel
At some point, the group transitioned its focus from politically motivated attacks to a RaaS model, offering customizable tools to its affiliates. Its victimology also changed from government entities to organizations across various sectors, such as education, technology, telecommunications, and agriculture (Figure 3).
Figure 3 – FunkSec’s latest active DLS
FunkSec’s reliance on relatively simple malware development using AI-based tools also explains the fast transition of the group from targeted hacktivism campaigns to broader, financially-motivated activities, with a large number of victims in a short period of time (Figure 4).
Figure 4 – FunkSec’s victims on their DLS
The group’s transition has also been referenced on a Russian-speaking dark web forum, where the author mentioned a cybersecurity vendor’s article on FunkSec (Figure 5).
Figure 5 – FunkSec’s transition being referenced on a Russian-speaking dark web forum
KillSec
The KillSec hacktivist group (AKA Kill Security) has been active since at least 2021. The Russia-aligned group targets organizations from various sectors, such as government, finance, transportation, electronics, manufacturing, travel and recreation, retail, and consumer services, located in countries like India, Bangladesh, Romania, Poland, and Brazil. The group considers itself a “prominent hacktivist group operating in the cyber realm, with a focus on both disruption and digital activism.”
KillSec initially emerged as a hacktivist group aligned with the Anonymous collective, with its operations primarily including DDoS attacks and website defacements, before pivoting to ransomware operations in October 2023. KillSec’s ransomware variants, namely KillSecurity 2.0 and KillSecurity 3.0, are designed to encrypt files and demand ransom payments for decryption.
In June 2024, KillSec introduced a RaaS operation, advertising a locker for Windows environments written in C++ and a dashboard, enabling affiliates to observe detailed statistics, conduct chat communications, and customize ransomware configurations using a builder tool. In November 2024, the group launched an additional locker for ESXi environments, expanding the breadth of its operations (Figure 6).
Figure 6 – KillSec launches locker for ESXi environments
The group’s shift is aligned with the overall proliferation of RaaS programs, enabling less technically skilled individuals to conduct ransomware attacks with relative ease in exchange for a fee. The group has been advertising its RaaS offering in an attempt to attract cybercriminals and further broaden its affiliate network (Figure 7).
Figure 7 – KillSec looking for affiliates
Although in certain incidents, KillSec leveraged solely stolen data to extort the victims, the group appears to adopt mainly double extortion tactics, exfiltrating data in addition to encrypting it and demanding a ransom payment to prevent it from being leaked. The group operates an active dedicated leak site (DLS) to which it uploads the data of victims who refuse to pay the ransom. The group also uses its DLS to advertise its services, which include penetration testing, data gathering, and its RaaS program (Figure 8).
Figure 8 – KillSec’s services
It should be noted that KillSec’s DLS also features a “For Sale” section, offering data allegedly exfiltrated from the targeted companies for sale, with the prices ranging between $5,000 and $350,000 (Figure 9). The group likely introduced this section in an attempt to further monetize the exfiltrated data. This offering of stolen data and additional services further suggests the financially motivated nature of the group’s activity.
Figure 9 – “For Sale” section on KillSec’s DLS
GhostSec
The GhostSec hacktivist group (AKA Ghost Security, GhostSecMafia, and GSM) has been active since at least 2015. The Anonymous-affiliated group gained prominence with the #OpIsis and #OpParis campaigns, in which various hacktivist groups took down thousands of ISIS websites and social media accounts using defacement and DDoS attacks. Since then, GhostSec has participated in campaigns, such as #OpLebanon, #OpNigeria, #OpMyanmar, #OpEcuador, and #OpColombia. The group has also continuously launched cyberattacks on Israel in response to alleged war crimes, primarily defacing their websites to spread “Free Palestine” messages.
GhostSec’s shift towards financially motivated operations overlaps with the group’s collaboration with cybercriminals. In July 2023, GhostSec announced that they formed a partnership with the Stormous ransomware group to target organizations in Cuba (Figure 10). Following this announcement, Stormous and GhostSec jointly claimed extortion attacks against three Cuban government ministries, and GhostSec also expressed the potential for future joint operations against other countries. In August 2023, GhostSec, together with ThreatSec, Stormous, Blackforums, and SiegedSec, collectively formed a unified collective, naming themselves “The Five Families” (Figure 11). This collective attempted to extort the presidential website of Cuba and the Brazilian organization Alfa Comercial.
Figure 10 – Announcement of the alliance between GhostSec and Stormous on their Telegram channelFigure 11 – Announcement of the “Five Families” formation on their Telegram channel
GhostSec solidified its presence in the cybercriminal ecosystem with the launch of its RaaS program “GhostLocker” in October 2023, which was shortly followed by the release of its infostealer tool, GhostStealer (Figure 12). In January 2024, the updated “REWRITE” (aka GhostLocker 2.0) version of GhostLocker was released, with a fully featured management panel allowing affiliates to track campaigns and payouts. The threat actor promoted its malware-as-a-service (MaaS) tools heavily on its Telegram channels, demonstrating its intention to attract affiliates and, in turn, maximize its profits.
Figure 12 – GhostLocker’s release announcement
On May 15, 2024, GhostSec announced its retirement from cybercriminal activities and its return to hacktivism. The group stated that it reached this decision after having obtained enough funding to support its hacktivist operations. GhostSec further mentioned that Stormous would remain in charge of the management and operation of GhostLocker (Figure 13).
Figure 13 – GhostSec’s retirement from cybercriminal activities
It should be noted that Stormous seemingly had already incorporated GhostLocker into its operations, even before GhostSec’s retirement. As of May 2025, the group is still active and operates the Stormous RaaS program, which appears to be a continuation of GhostLocker. This development signifies the mutual assistance and influence among united threat groups, as collectives like the Five Families allow them to maximize the impact and breadth of their operations by sharing resources, audience, and knowledge.
Two sides of the same coin?
This analysis shows that the threat actors in scope, FunkSec, KillSec, and GhostSec, have followed a similar trajectory, pivoting from politically motivated, disruptive campaigns to financial extortion. This transition is likely facilitated by the public availability of leaked ransomware builders, such as LockBit 3.0, which threat actors can leverage to develop their payloads.
The groups specifically appear to have adopted double extortion tactics, exfiltrating data from their victims and then encrypting it, in an attempt to pressure them to comply with their ransom demands. However, despite their seeming ability to conduct ransomware operations, these groups appear to lack the level of sophistication and specialization that characterize top-tier cybercriminal groups, such as Cl0p and LockBit, which are mentioned in the Rapid7 Q1 2025 ransomware report.
Interestingly enough, all three groups embraced RaaS as their business model while pivoting towards cybercrime. This evolution is aligned with the overall current status of the ransomware ecosystem, as RaaS programs have become increasingly more common. Such programs, demonstrating the financial nature of their activities, enable threat actors to maximize their profits by allowing affiliates to use their ransomware kit for a fee and a percentage of the collected ransom.
This transition of FunkSec, KillSec, and GhostSec has also affected and amplified the victimology of their operations. While these groups once operated as hacktivists that primarily targeted government entities, their scope of activities broadened significantly as they shifted to ransomware attacks. Along this process, their attacks shifted from targeted to opportunistic, against organizations of different sizes, operating in diverse sectors and geographies, that could be relatively easily compromised.
While all of these groups follow the pattern, shifting from hacktivism to cybercrime, and specifically financially motivated RaaS operations, the reason behind this transition remains unclear. As an exception, GhostSec appears to have embraced cybercrime in an attempt to gather funding for its hacktivist operations, according to its exit message. It should be noted that other threat actors, such as CyberVolk, have also launched RaaS programs to fund their operations, but these efforts remain scarce.
Finally, other hacktivist groups, such as Ikaruz Red Team and their affiliates, also operate ransomware, but they do so to cause disruption and make political statements. Thus, the scope of their operations differs from financial gain and is not comparable to that of the groups included in this analysis.
Conclusion
The evolution of FunkSec, KillSec, and GhostSec from hacktivist collectives to RaaS operations highlights a recent trend of a shift in motivations, driving cybercriminal behavior. Initially, these groups were propelled by political and ideological aims, targeting governments and organizations in alignment with their perceived causes. However, over time, their focus has clearly shifted towards financial gain, as evidenced by their adoption of RaaS models that prioritize profit over ideology. As cybercriminals adapt to “market demands,” it becomes clear that financial motivation has come to dominate their activities, leaving behind the ideological roots of their earlier campaigns.
IP addresses: 82[.]147[.]84[.]98, 77[.]91[.]77[.]187, 93[.]123[.]39[.]65
Rapid7 customers
InsightIDR and Managed Detection and Response (MDR) customers have existing detection coverage through Rapid7’s expansive library of detection rules. Below is a non-exhaustive list of detections that are deployed and will alert on behavior related to the FunkSec, KillSec, and GhostSec ransomware activity. We will also continue to iterate detections as new variants emerge, giving customers continuous detection without manual tuning:
Suspicious Process – Malicious Hash On Asset
While this specific detection directly covers malicious binaries linked to ransomware operations, customers also benefit from a comprehensive suite of detections that alert on post-exploitation behavior often observed prior to ransomware deployment. These include detections for lateral movement, privilege escalation, and suspicious persistence mechanisms, providing layered defense even when the specific ransomware payload is novel or obfuscated.
Controlling access to your privileged and sensitive resources is critical for all AWS customers. Preventing direct human interaction with services and systems through automation is the primary means of accomplishing this. For those infrequent times when automation is not yet possible or implemented, providing a secure method for temporary elevated access is the next best option. In a privileged access management solution, there are several elements that should be included:
User access should follow the principle of least privileged
Users should be granted only the minimum amount of access required to perform their job duties
Access granted should persist only for the time necessary to perform the assigned tasks
The solution should include:
An eligibility process for granting access
An approval process for granting access
Auditing of the access grants and activities taken
Entra Privileged Identity Management (PIM) is a third-party solution that provides dynamic group management, access control, and audit capabilities that integrate with AWS IAM Identity Center.
In this post, we show you how to configure just-in-time access to AWS using Entra PIM’s integration with IAM Identity Center.
Just-in-time privileged access with Entra PIM and IAM Identity Center
Privileged Identity Management is a Microsoft Entra ID feature that enables management, control, and access monitoring of your important cloud resources. There are many different configuration options when it comes to eligibility and assignment to privileged security groups, including time-bound access with start and end dates, multi-factor authentication (MFA) enforcement, justification tracking, and so on. You can read more about those options in Microsoft’s product documentation.
Figure 1 shows the just-in-time access solution powered by Entra PIM group activation requests. In this solution, Entra PIM is integrated with IAM Identity Center to provide temporary, limited access to AWS resources based on user requests and approvals. Entra ID users can submit requests for specific access to specific AWS permissions sets, which are then automatically granted for a set duration.
Figure 1 – Entra PIM solution integrated with IAM Identity Center
Prerequisites
To try the solution described in this post, you need to have the following in place:
An AWS account with an organization instance of IAM Identity Center enabled. For more information, see What is IAM Identity Center.
An Azure account subscription with Entra ID P1 or P2 licensing.
In the following steps, you create configurations to enable Entra PIM for Groups to automatically assign users to groups based on approval criteria. The groups will be Entra ID security groups that use direct assignment. Note that, at the time of this writing, dynamic groups and groups that you have synchronized from a self-managed Active Directory cannot be used with Microsoft Entra PIM. While it might be possible to also populate these groups using a third-party synchronization tool, for the purposes of this exercise, we assume that administration is occurring solely within Entra ID.
In the example scenario, the role corresponds to a specific job function within your organization. We use a group called AWS – Amazon EC2 Admin, which corresponds to a DevOps on-call site reliability engineer (SRE) lead.
Step 1: Create a group representing a specific privilege level.
Create a group in Entra ID that represents a specific privilege level that your employees can request for access to the AWS Management Console.
When the initial sync completes, the AWS – Amazon EC2 Admin group will be ready for configuration in IAM Identity Center.
Step 3: Create permission sets in IAM Identity Center
As you prepare to configure your permission set, let’s consider session duration from both the AWS and Entra PIM perspectives. There are two session durations on the AWS side: AWS access portal session duration and permission set session duration. The AWS access portal session duration defines the maximum length of time that a user can be signed in to the AWS access portal without reauthenticating. The default session duration is 8 hours but can be configured anywhere between 15 minutes and 7 days.
Note: Entra does not pass the SessionNotOnOrAfter attribute to IAM Identity Center as part of the SAML assertion. Meaning the duration of the AWS access portal session is controlled by the duration set in IAM Identity Center.
The session duration defined within a permission set specifies the length of time that a user can have a session for an AWS account. The default and minimum value is 1 hour (with a maximum value of 12). Entra PIM allows you to configure an activationmaximum duration. The activation maximum duration is the length of time that the specified group will contain the activated user account. The activation maximum duration has a default value of 8 hours but can be configured between 30 minutes and 24 hours.
You should carefully consider the values that you provide for each of these durations. The AWS access portal will display permission sets that the user had access to at the time that they signed in for the duration of the active AWS access portal session.
When you set the permission set session duration, you need to keep in mind that active sessions are not terminated when the Entra PIM activation maximum duration has been reached. Let’s look at an example:
Session duration defined in the permission set: 1 hour
Entra PIM group activation maximum duration: 1 hour
You might be inclined to think that an hour after being added to the group in Entra, the user would no longer have access to AWS resources. This is not necessarily the case. A user could authenticate to the AWS access portal, wait up to 8 hours, and still successfully access AWS through the permission set link. Their session would be active for the duration of the session setting defined in the permission set, which is 1 hour in this case. In this example, we have a potential window of access of 10 hours, as shown in Figure 2 that follows.
Figure 2 – Calculating session duration
With this in mind, configure your test environment with the default setting of 8 hours for the AWS access portal and 1 hour for the permission set session duration value.
Under Multi-account permissions, choose Permission sets.
Choose Create permission set.
On the Select permission set type page, under Permission set type, select Custom permission set, and then choose Next.
On the Specify policies and permissions boundary page, expand AWS managed policies.
Search for and select AmazonEC2FullAccess policy, and then choose Next.
On the Specify permission set details page, enter EC2AdminAccess for the Permission set name and choose Next.
On the Review and create page, review the selections, and choose Create.
Step 4: Assign group access in your organization
At this point, you’re ready to assign the Microsoft Entra group to the corresponding permission set in IAM Identity Center. This allows users who are members of the group to be granted the appropriate access level in AWS.
In the navigation pane, under Multi-account permissions, choose AWS accounts.
On the AWS accounts page, select the check box next to one or more AWS accounts to which you want to assign access.
Choose Assign users or groups.
On the Groups tab, select AWS – Amazon EC2 Admin and choose Next
On the Assign permission sets to “<AWS-account-name>” page, select the EC2AdminAccess permission set.
Check that the correct permission set was selected and choose Next.
On the Review and submit page, verify that the correct group and permission set are selected, and choose Submit.
Step 5: Configure Entra PIM
To use this Microsoft Entra group with Entra PIM, you bring the group under the management of PIM by using the Entra admin console to activate the group. You can read more about group management with PIM in the Microsoft documentation. Begin by activating the Entra group that you created.
Select Privileged Identity Management under the Activity menu list.
Choose Enable PIM for this group.
Figure 4 – Enable PIM for this group
Now, you will configure the PIM settings for the group. These settings define Member or Owner properties and requirements. It’s here that you can establish MFA requirements, configure notifications, conditional access, approvals, durations, and so on. The Owner role can elevate their permissions using just-in-time access to manage a group, while the Member role is limited to requesting just-in-time membership within the group. In this example, you use the Member properties to demonstrate group membership level temporary elevated access and set a 1-hour duration for the group assignment.
Select Identity Governance, Privileged Identity Management, and then Groups.
Select the AWS – Amazon EC2 Admin group.
Figure 5 – Selecting groups for PIM configuration
From the Manage menu select Settings.
Choose Member to view the default role setting details.
Figure 6 – Settings option for the Member role
Review the default settings. The activation maximum duration should be set to 1 hour and require a justification from the user.
Close the Role setting details – Member blade.
Figure 7 – Closing the Role setting details – Member blade
From the Manage menu select Assignments and choose + Add assignments.
Figure 8 – Adding eligibility assignments to the PIM enabled groups
Select Member from the Select role dropdown menu and choose No member selected. Select the test account, Rich Roe in this example, and then choose Select.
Figure 9 – Adding the test user as an eligible identity for PIM activation to the group
Choose Next and leave the default setting of 1 year of eligibility. Duration eligibility defines the period that the user can request activation for the group. Depending on your use case, you will define this as permanent or for a set period. For testing purposes, keep the default setting. Choose Assign.
Figure 10 – Completing the eligibility assignment
Test the configuration
You should now have a test configuration of Entra PIM and IAM Identity Center. Use the test account to verify just-in-time access.
Select Identity Governance, Privileged Identity Management, and then My roles.
Figure 11 – Browsing to the My Roles section of the Entra admin center
From the Activate menu list, select Groups. Your eligible group assignments should be listed.
Choose Activate for the AWS – Amazon EC2 Admin group.
Figure 12 – Activating the just-in-time group membership
In the Activate – Member blade, enter a justification for the access request and choose Activate.
Figure 13 – Providing a justification for access
In this example, there are no approval workflow processes configured for the group, so Entra validates the eligibility requirements and adds the test account to the AWS – Amazon EC2 Admin group. If you want to dive deeper into the approval workflow process, you can read more about it on the Configure PIM for Groups settings page. Because the group is assigned to the enterprise application and configured for provisioning, the updated group membership is automatically synchronized using the SCIM protocol with the connected IAM Identity Center instance. The provisioning time can vary based on the number of PIM enabled users that are activating their memberships within a given 10-second period. In most situations, group memberships are synchronized within 2–10 minutes, but can revert to the standard 40-minute interval if activity runs up against Entra PIM throttling limits. IAM Identity Center responds to SCIM requests as they arrive from Entra ID.
To test access with the newly activated group assignment, use a separate browser or a private window.
Sign in to the My Apps portal with the test user credentials and select the IAM Identity Center app that you created for testing. If you experience an error or don’t see the expected permission set, wait a few minutes until the group membership has synchronized to IAM Identity Center and try again.
Figure 14 – Accessing IAM Identity Center through the My apps portal
Expand the associated AWS account and confirm the EC2ReadOnly permission set has been granted.
Close the AWS tab. Wait for the access to be revoked, which has been set to 60 minutes in this example.
Figure 15 – Just-in-time access to the EC2AdminAccess permission set
Sign back in to the My Apps portal and select the AWS IAM Identity Center app. Notice that the EC2ReadOnly permission set has been revoked.
Conclusion
The combination of AWS IAM Identity Center and Entra PIM provides a robust solution for managing just-in-time elevated access to AWS. By using security groups in Entra and mapping them to permission sets in IAM Identity Center, you can automate the provisioning and deprovisioning of privileged access based on defined policies and approval workflows. This approach helps to make sure the principle of least privilege is enforced, with access granted only for the duration required to complete a task. The detailed auditing capabilities of both services also provide comprehensive visibility into privileged access activities.
For AWS customers seeking a comprehensive, secure, and scalable privileged access management solution, the Entra PIM and IAM Identity Center integration is a common option that’s worth investigating to see if it’s a good fit for your use case.
If you have feedback about this post, submit comments in the Comments section below. If you have questions about this post, contact AWS Support.
Monitoring and troubleshooting Apache Spark applications become increasingly complex as companies scale their data analytics workloads. As data processing requirements grow, enterprises deploy these applications across multiple Amazon EMR on EKS clusters to handle diverse workloads efficiently. However, this approach creates a challenge in maintaining comprehensive visibility into Spark applications running across these separate clusters. Data engineers and platform teams need a unified view to effectively monitor and optimize their Spark applications.
Although Spark provides powerful built-in monitoring capabilities through Spark History Server (SHS), implementing a scalable and secure observability solution across multiple clusters requires careful architectural considerations. Organizations need a solution that not only consolidates Spark application metrics but extends its features by adding other performance monitoring and troubleshooting packages while providing secure access to these insights and maintaining operational efficiency.
This post demonstrates how to build a centralized observability platform using SHS for Spark applications running on EMR on EKS. We showcase how to enhance SHS with performance monitoring tools, with a pattern applicable to many monitoring solutions such as SparkMeasure and DataFlint. In this post, we use DataFlint as an example to demonstrate how you can integrate additional monitoring features. We explain how to collect Spark events from multiple EMR on EKS clusters into a central Amazon Simple Storage Service (Amazon S3) bucket; deploy SHS on a dedicated Amazon Elastic Kubernetes Service (Amazon EKS) cluster; and configure secure access using AWS Load Balancer Controller, AWS Private Certificate Authority, Amazon Route 53, and AWS Client VPN. This solution provides teams with a single, secure interface to monitor, analyze, and troubleshoot Spark applications across multiple clusters.
Overview of solution
Consider DataCorp Analytics, a data-driven enterprise running multiple business units with diverse Spark workloads. Their Financial Analytics team processes time-sensitive trading data requiring strict processing times and dedicated resources, and their Marketing Analytics team handles customer behavior data with flexible requirements, requiring multiple EMR on EKS clusters to accommodate these distinct workload patterns. As their Spark applications grow in number and complexity across these clusters, data and platform engineers struggle to maintain comprehensive visibility while maintaining secure access to monitoring tools.
This scenario presents an ideal use case for implementing a centralized observability platform using SHS and DataFlint. The solution deploys SHS on a dedicated EKS cluster, configured to read events from multiple EMR on EKS clusters through a centralized S3 bucket. Access is secured through Load Balancer Controller, AWS Private CA, Route 53, and Client VPN, and DataFlint enhances the monitoring capabilities with additional insights and visualizations. The following architecture diagram illustrates the components and their interactions.
The solution workflow is as follows:
Spark applications on EMR on EKS use a custom EMR Docker image that includes DataFlint JARs for enhanced metrics collection. These applications generate detailed event logs containing execution metrics, performance data, and DataFlint-specific insights. The logs are written to a centralized Amazon S3 location through the following configuration (note especially the configurationOverrides section). For additional information, explore the StartJobRun guide to learn how to run Spark jobs and review the StartJobRun API reference.
A dedicated SHS deployed on Amazon EKS reads these centralized logs. The Amazon S3 location is configured in the SHS to read from the central Amazon S3 location through the following code:
Familiarity with Kubernetes, Spark, Amazon EKS, and EMR on EKS
Set up a common infrastructure
Complete the following steps to set up the infrastructure:
Clone the repository to your local machine and set the two environment variables. Replace <AWS_REGION> with the AWS Region where you want to deploy these resources.
git clone [email protected]:aws-samples/sample-centralized-spark-history-server-emr-on-eks.git
cd sample-centralized-spark-history-server-emr-on-eks
export REPO_DIR=$(pwd)
export AWS_REGION=<AWS_REGION>
Execute the following script to create the common infrastructure. The script creates a secure virtual private cloud (VPC) networking environment with public and private subnets and an encrypted S3 bucket to store Spark application logs.
cd ${REPO_DIR}/infra
./deploy_infra.sh
To verify successful infrastructure deployment, open the AWS CloudFormation console, choose your stack, and check the Events, Resources, and Outputs tabs for completion status, details, and list of resources created.
Set up EMR on EKS clusters
This section covers building a custom EMR on EKS Docker image with DataFlint integration, launching two EMR on EKS clusters (datascience-cluster-v and analytics-cluster-v), and configuring the clusters for job submission. Additionally, we set up the necessary IAM roles for service accounts (IRSA) to enable Spark jobs to write events to the centralized S3 bucket. Complete the following steps:
Deploy two EMR on EKS clusters:
cd ${REPO_DIR}/emr-on-eks
./deploy_emr_on_eks.sh
To verify successful creation of the EMR on EKS clusters using the AWS CLI, execute the following command:
Execute the following command for the datascience-cluster-v and analytics-cluster-v clusters to verify their respective states, container provider information, and associated EKS cluster details. Replace <VIRTUAL-CLUSTER-ID> with the ID of each cluster obtained from the list-virtual-clusters output.
Configure and execute Spark jobs on EMR on EKS clusters
Complete the following steps to configure and execute Spark jobs on the EMR on EKS clusters:
Generate custom EMR on EKS image and StartJobRun request JSON files to run Spark jobs:
cd ${REPO_DIR}/jobs
./configure_jobs.sh
The script performs the following tasks:
Prepares the environment by uploading the sample Spark application spark_history_demo.py to a designated S3 bucket for job execution.
Creates a custom Amazon EMR container image by extending the base EMR 7.2.0 image with the DataFlint JAR for additional insights and publishing it to an Amazon Elastic Container Registry (Amazon ECR) repository.
Generates cluster-specific StartJobRun request JSON files for datascience-cluster-v and analytics-cluster-v.
Review start-job-run-request-datascience-cluster-v.json and start-job-run-request-analytics-cluster-v.json for additional details.
Execute the following commands to submit Spark jobs on the EMR on EKS virtual clusters:
Verify the successful generation of the logs in the S3 bucket:
aws s3 ls s3://emr-spark-logs-<AWS_ACCOUNT_ID>-<AWS_REGION>/spark-events/
You have successfully set up an EMR on EKS environment, executed Spark jobs, and collected the logs in the centralized S3 bucket. Next, we will deploy SHS, configure its secure access, and visualize the logs using it.
Set up AWS Private CA and create a Route 53 private hosted zone
Use the following code to deploy AWS Private CA and create a Route 53 private hosted zone. This will provide a user-friendly URL to connect to SHS over HTTPS.
cd ${REPO_DIR}/ssl
./deploy_ssl.sh
Set up SHS on Amazon EKS
Complete the following steps to build a Docker image containing SHS with DataFlint, deploy it on an EKS cluster using a Helm chart, and expose it through a Kubernetes service of type LoadBalancer. We use a Spark 3.5.0 base image, which includes SHS by default. However, although this simplifies deployment, it results in a larger image size. For environments where image size is critical, consider building a custom image with just the standalone SHS component instead of using the complete Spark distribution.
Deploy SHS on the spark-history-server EKS cluster:
cd ${REPO_DIR}/shs
./deploy_shs.sh
Verify the deployment by listing the pods and viewing the pod logs:
kubectl get pods --namespace spark-history
kubectl logs <SHS-PODNAME> --namespace spark-history
Review the logs and confirm there are no errors or exceptions.
You have successfully deployed SHS on the spark-history-server EKS cluster, and configured it to read logs from the emr-spark-logs-<AWS_ACCOUNT_ID>-<AWS_REGION> S3 bucket.
Deploy Client VPN and add entry to Route 53 for secure access
Complete the following steps to deploy Client VPN to securely connect your client machine (such as your laptop) to SHS and configure Route 53 to generate a user-friendly URL:
Deploy the Client VPN:
cd ${REPO_DIR}/vpn
./deploy_vpn.sh
Add entry to Route 53:
cd ${REPO_DIR}/dns
./deploy_dns.sh
Add certificates to local trusted stores
Complete the following steps to add the SSL certificate to your operating system’s trusted certificate stores for secure connections:
For macOS users, using Keychain Access (GUI):
Open Keychain Access from Applications, Utilities, choose the System keychain in the navigation pane, and choose File, Import Items.
Browse to and choose ${REPO_DIR}/ssl/certificates/ca-certificate.pem, then choose the imported certificate.
Expand the Trust section and set When using this certificate to Always Trust.
Close and enter your password when prompted and save.
Alternatively, you can execute the following command to include the certificate in Keychain and trust it:
Choose (right-click) ca-certificate.crt and choose Install Certificate.
Choose Local Machine (admin rights required).
Select Place all certificates in the following store.
Choose Browse and choose Trusted Root Certification Authorities.
Complete the installation by choosing Next and Finish.
Set up Client VPN on your client machine for secure access
Complete the following steps to install and configure Client VPN on your client machine (such as your laptop) and create a VPN connection to the AWS Cloud:
Download, install, and launch the Client VPN application from the official download page for your operating system.
Create your VPN profile:
Choose File in the menu bar, choose Manage Profiles, and choose Add Profile.
Enter a name for your profile. Example: SparkHistoryServerUI
Browse to ${REPO_DIR}/vpn/client_vpn_certs/client-config.ovpn, choose the certificate file, and choose Add Profile to save your configuration.
Select your newly created profile, choose Connect, and wait for the connection confirmation to establish the VPN connection.
When you’re connected, you will have secure access to the AWS resources in your environment.
Securely access the SHS URL
Complete the following steps to securely access SHS using a web browser:
Execute the following command to get the SHS URL:
https://spark-history-server.example.internal/
Copy this URL and enter it into your web browser to access the SHS UI.
The following screenshot shows an example of the UI.
Choose an App ID to view its detailed execution information and metrics.
Choose the DataFlint tab to view detailed application insights and analytics.
DataFlint displays various helpful metrics, including alerts, as shown in the following screenshot.
Clean up
To avoid incurring future charges from the resources created in this tutorial, clean up your environment after completing the steps. To remove all provisioned resources:
Disconnect from the Client VPN.
Run the cleanup.sh script:
cd ${REPO_DIR}/
./cleanup.sh
Conclusion
In this post, we demonstrated how to build a centralized observability platform for Spark applications using SHS and enhance SHS with performance monitoring tools like DataFlint. The solution aggregates Spark events from multiple EMR on EKS clusters into a unified monitoring interface, providing comprehensive visibility into your Spark applications’ performance and resource utilization. By using a custom EMR image with performance monitoring tool integration, we enhanced the standard Spark metrics to gain deeper insights into application behavior. If your environment uses a mix of EMR on EKS, Amazon EMR on EC2, or Amazon EMR Serverless, you can seamlessly extend this architecture to aggregate the logs from EMR on EC2 and EMR Serverless in a similar way and visualize them using SHS.
Although this solution provides a robust foundation for Spark monitoring, production deployments should consider implementing authentication and authorization. SHS supports custom authentication through javax servlet filters and fine-grained authorization through access control lists (ACLs). We encourage you to explore implementing authentication filters for secure access control, configuring user- and group-based ACLs for view and modify permissions, and setting up group mapping providers for role-based access. For detailed guidance, refer to Spark’s web UI security documentation and SHS security features.
While AWS endeavors to apply best practices for security within this example, each organization has its own policies. Please make sure to use the specific policies of your organization when deploying this solution as a starting point for implementing centralized Spark monitoring in your data processing environment.
About the authors
Sri Potluri is a Cloud Infrastructure Architect at AWS. He is passionate about solving complex problems and delivering well-structured solutions for diverse customers. His expertise spans across a range of cloud technologies, providing scalable and reliable infrastructures tailored to each project’s unique challenges.
Suvojit Dasgupta is a Principal Data Architect at AWS. He leads a team of skilled engineers in designing and building scalable data solutions for AWS customers. He specializes in developing and implementing innovative data architectures to address complex business challenges.
The collective thoughts of the interwebz
Manage Consent
To provide the best experiences, we use technologies like cookies to store and/or access device information. Consenting to these technologies will allow us to process data such as browsing behavior or unique IDs on this site. Not consenting or withdrawing consent, may adversely affect certain features and functions.
Functional
Always active
The technical storage or access is strictly necessary for the legitimate purpose of enabling the use of a specific service explicitly requested by the subscriber or user, or for the sole purpose of carrying out the transmission of a communication over an electronic communications network.
Preferences
The technical storage or access is necessary for the legitimate purpose of storing preferences that are not requested by the subscriber or user.
Statistics
The technical storage or access that is used exclusively for statistical purposes.The technical storage or access that is used exclusively for anonymous statistical purposes. Without a subpoena, voluntary compliance on the part of your Internet Service Provider, or additional records from a third party, information stored or retrieved for this purpose alone cannot usually be used to identify you.
Marketing
The technical storage or access is required to create user profiles to send advertising, or to track the user on a website or across several websites for similar marketing purposes.


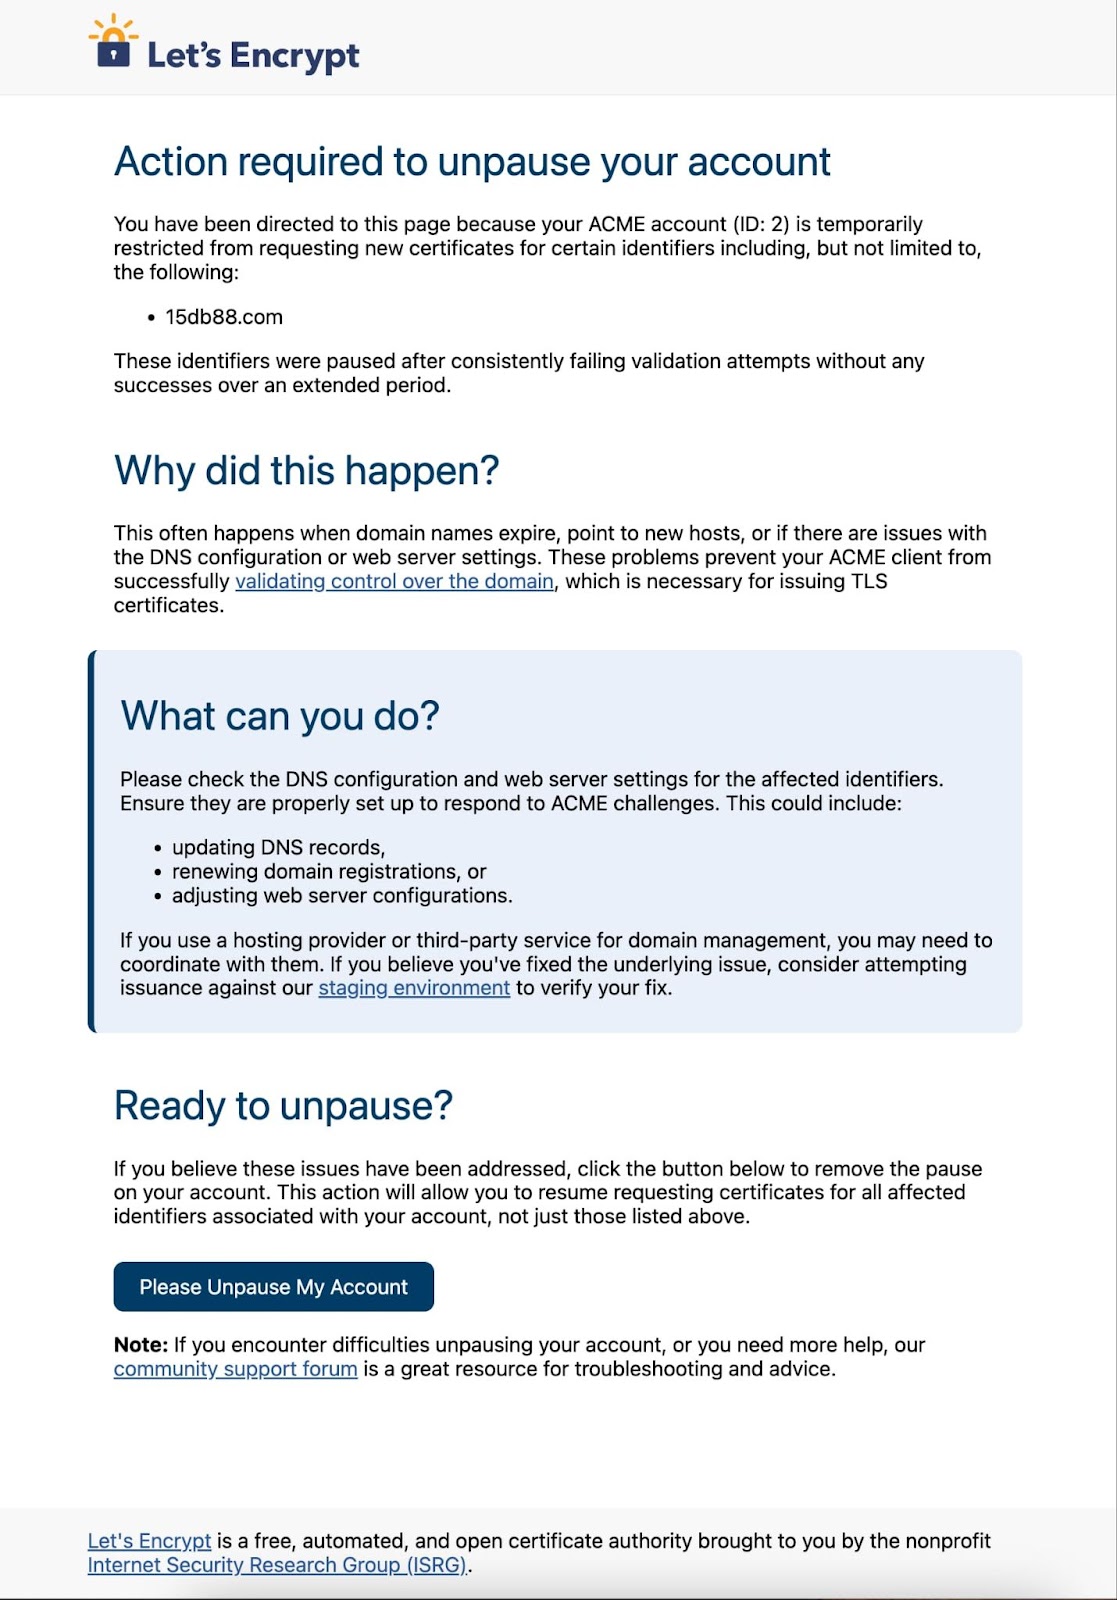


 Guy Bachar is a Sr. Solutions Architect at AWS. He specializes in assisting capital markets and FinTech customers with their cloud transformation journeys. His expertise encompasses identity management, security, and unified communication.
 Sayan Chakraborty is a Sr. Solutions Architect at AWS. He helps large enterprises build secure, scalable, and performant solutions on AWS. With a background in enterprise and technology architecture, he has experience delivering large-scale digital transformation programs across a wide range of industry verticals.
 Darshit Thakkar is a Technical Product Manager at AWS and works out of Boston, Massachusetts. He works closely with customers to understand how they use data, and drives product innovations that make data more actionable at scale.


 Sri Potluri is a Cloud Infrastructure Architect at AWS. He is passionate about solving complex problems and delivering well-structured solutions for diverse customers. His expertise spans across a range of cloud technologies, providing scalable and reliable infrastructures tailored to each project’s unique challenges.
 Suvojit Dasgupta is a Principal Data Architect at AWS. He leads a team of skilled engineers in designing and building scalable data solutions for AWS customers. He specializes in developing and implementing innovative data architectures to address complex business challenges.