SK hynix Produces HBM4 Faster than JEDEC Specs Entering Mass Production

Post Syndicated from Rohit Kumar original https://www.servethehome.com/sk-hynix-produces-hbm4-faster-than-jedec-specs-entering-mass-production/

SK hynix says that it has completed its HBM4 development with 10Gbps per-pin speeds (JEDEC is 8Gbps) and is perparing for mass production

The post SK hynix Produces HBM4 Faster than JEDEC Specs Entering Mass Production appeared first on ServeTheHome.

Announcing Amazon EC2 M4 and M4 Pro Mac instances

Post Syndicated from Sébastien Stormacq original https://aws.amazon.com/blogs/aws/announcing-amazon-ec2-m4-and-m4-pro-mac-instances/

As someone who has been using macOS since 2001 and Amazon EC2 Mac instances since their launch 4 years ago, I’ve helped numerous customers scale their continuous integration and delivery (CI/CD) pipelines on AWS. Today, I’m excited to share that Amazon EC2 M4 and M4 Pro Mac instances are now generally available.

Development teams building applications for Apple platforms need powerful computing resources to handle complex build processes and run multiple iOS simulators simultaneously. As development projects grow larger and more sophisticated, teams require increased performance and memory capacity to maintain rapid development cycles.

Apple M4 Mac mini at the core
EC2 M4 Mac instances (known as mac-m4.metal in the API) are built on Apple M4 Mac mini computers and are built on the AWS Nitro System. They feature Apple silicon M4 chips with 10-core CPU (four performance and six efficiency cores), 10-core GPU, 16-core Neural Engine, and 24 GB unified memory, delivering enhanced performance for iOS and macOS application build workloads. When building and testing applications, M4 Mac instances deliver up to 20 percent better application build performance compared to EC2 M2 Mac instances.

EC2 M4 Pro Mac (mac-m4pro.metal in the API) instances are powered by Apple silicon M4 Pro chips with 14-core CPU, 20-core GPU, 16-core Neural Engine, and 48 GB unified memory. These instances offer up to 15 percent better application build performance compared to EC2 M2 Pro Mac instances. The increased memory and computing power make it possible to run more tests in parallel using multiple device simulators.

Each M4 and M4 Pro Mac instance now comes with 2 TB of local storage, providing low-latency storage for improved caching and build and test performance.

Both instance types support macOS Sonoma version 15.6 and later as Amazon Machine Images (AMIs). The AWS Nitro System provides up to 10 Gbps of Amazon Virtual Private Cloud (Amazon VPC) network bandwidth and 8 Gbps of Amazon Elastic Block Store (Amazon EBS) storage bandwidth through high-speed Thunderbolt connections.

Amazon EC2 Mac instances integrate seamlessly with AWS services, which means you can:

Let me show you how to get started
You can launch an EC2 M4 or M4 Pro Mac instances through the AWS Management Console, AWS Command Line Interface (AWS CLI), or AWS SDKs.

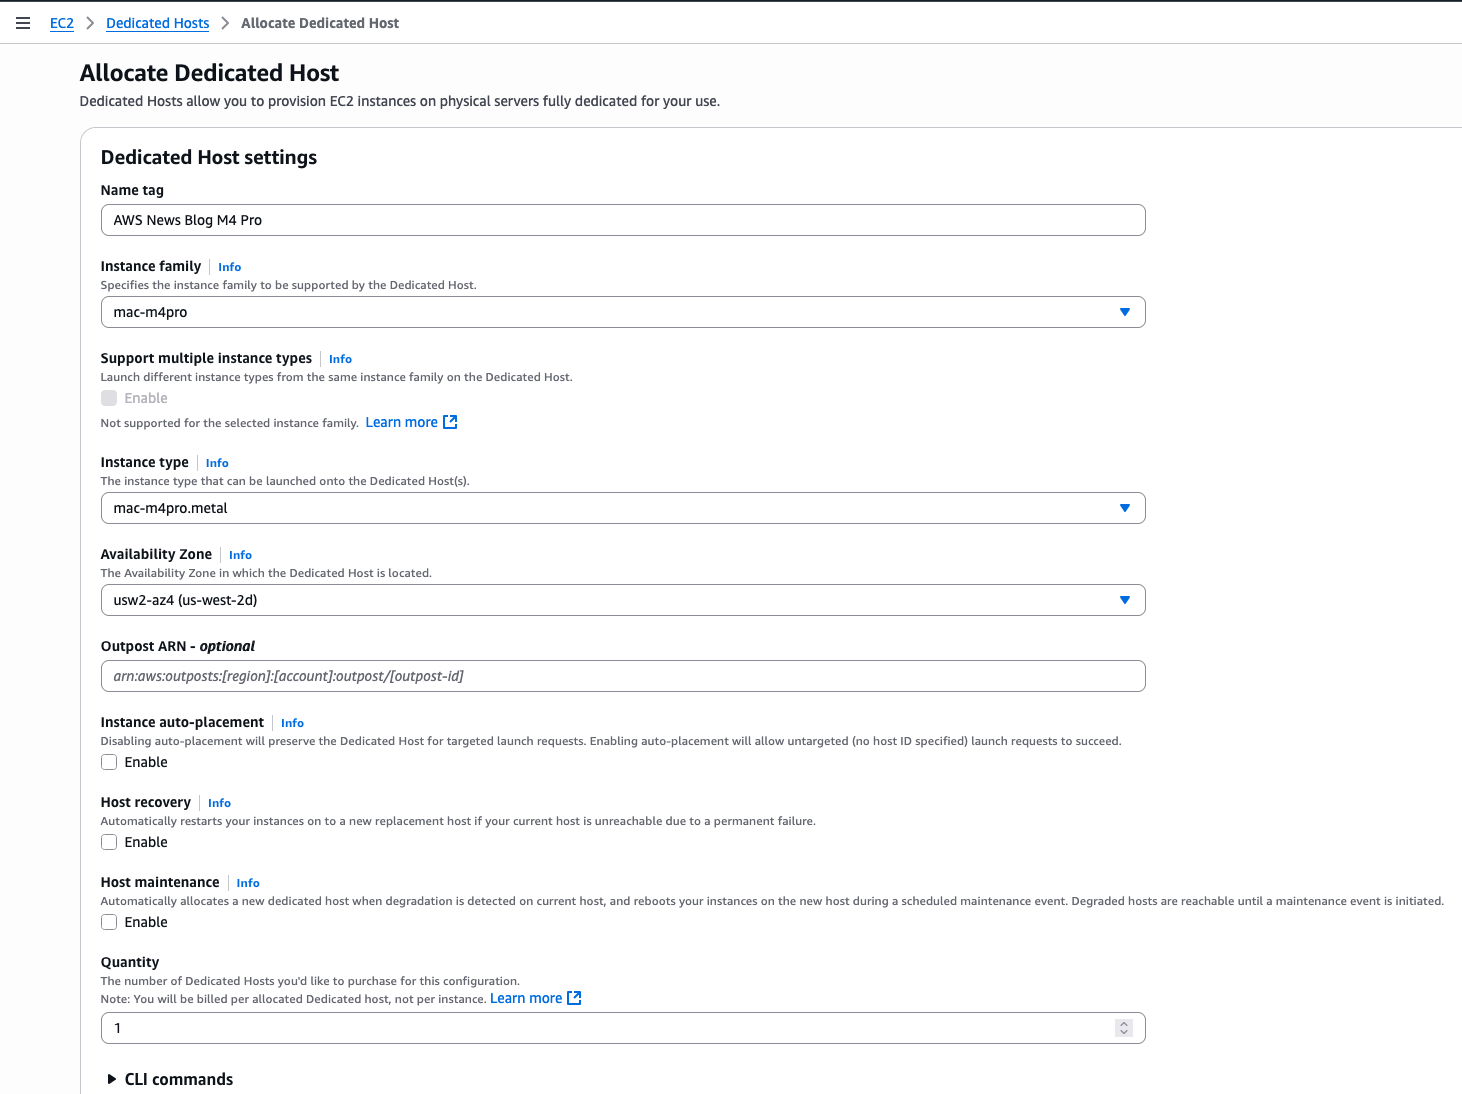
For this demo, let’s start an M4 Pro instance from the console. I first allocate a dedicated host to run my instances. On the AWS Management Console, I navigate to EC2, then Dedicated Hosts, and I select Allocate Dedicated Host.

Then, I enter a Name tag and I select the Instance family (mac-m4pro) and an Instance type (mac-m4pro.metal). I choose one Availability Zone and I clear Host maintenance.

EC2 Mac M$ - Dedicated hosts

Alternatively, I can use the command line interface:

aws ec2 allocate-hosts                          \
        --availability-zone-id "usw2-az4"       \
        --auto-placement "off"                  \
        --host-recovery "off"                   \
        --host-maintenance "off"                \
        --quantity 1                            \
        --instance-type "mac-m4pro.metal"

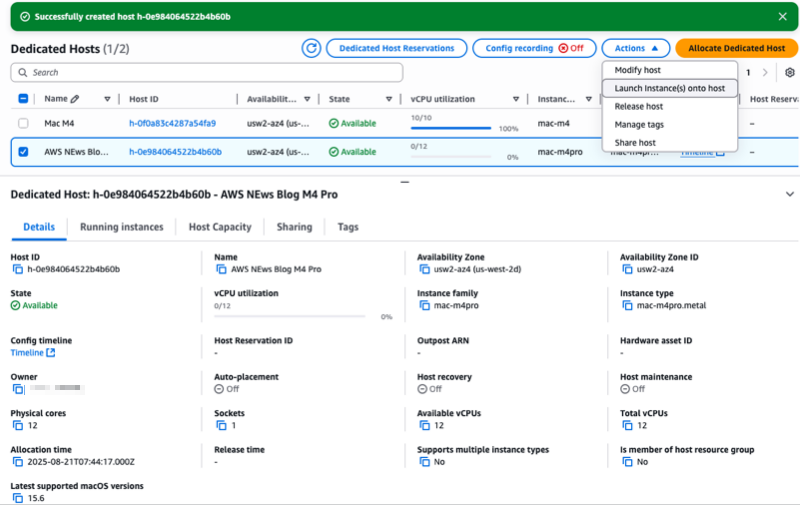
After the dedicated host is allocated to my account, I select the host I just allocated, then I select the Actions menu and choose Launch instance(s) onto host.

Notice the console gives you, among other information, the Latest supported macOS versions for this type of host. In this case, it’s macOS 15.6.

EC2 Mac M4 - Dedicated hosts Launch 

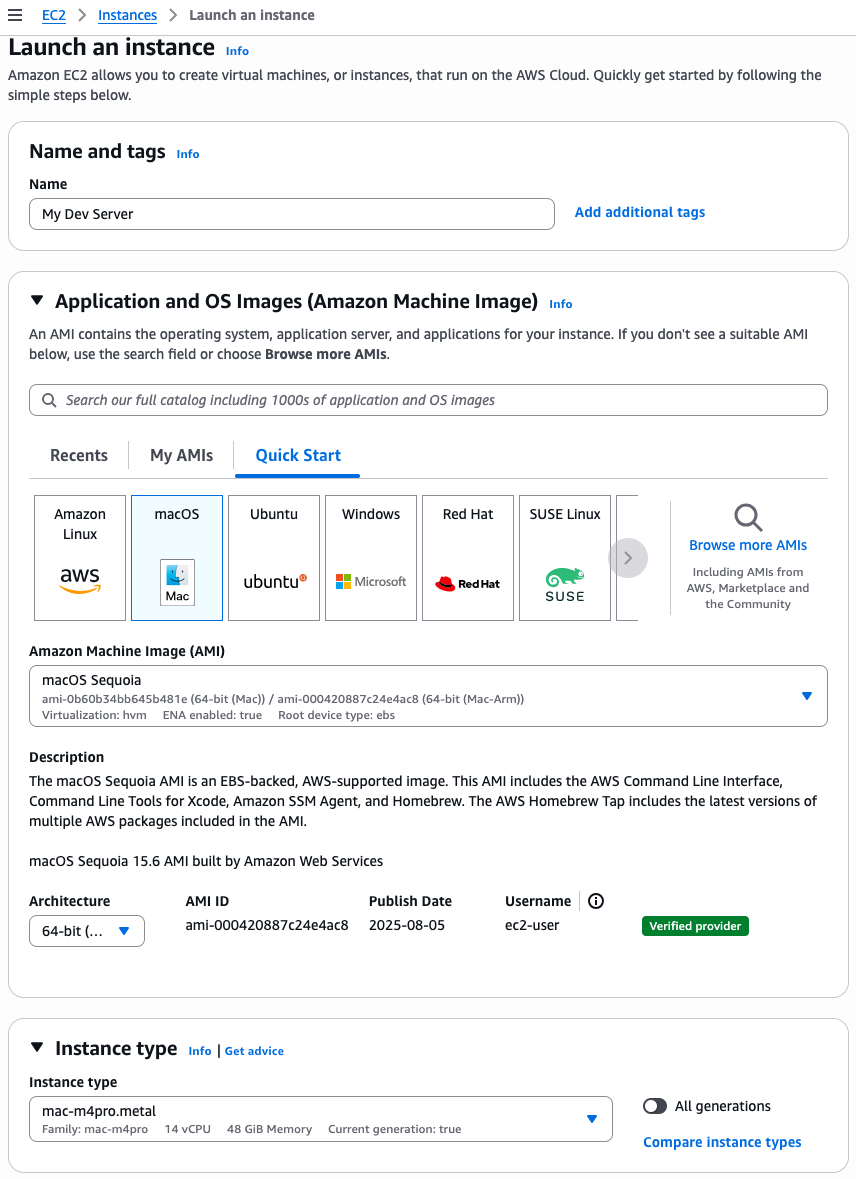
On the Launch an instance page, I enter a Name. I select a macOS Sequoia Amazon Machine Image (AMI). I make sure the Architecture is 64-bit Arm and the Instance type is mac-m4pro.metal.

The rest of the parameters arn’t specific to Amazon EC2 Mac: the network and storage configuration. When starting an instance for development use, make sure you select a volume with minimum 200 Gb or more. The default 100 Gb volume size isn’t sufficient to download and install Xcode.

EC2 Mac M4 - Dedicated hosts Launch DetailsWhen ready, I select the Launch instance orange button on the bottom of the page. The instance will rapidly appear as Running in the console. However, it might take up to 15 minutes to allow you to connect over SSH.

Alternatively, I can use this command:

aws ec2 run-instances \
    --image-id "ami-000420887c24e4ac8"  \ # AMI ID depends on the region !
    --instance-type "mac-m4pro.metal"   \
    --key-name "my-ssh-key-name"        \
    --network-interfaces '{"AssociatePublicIpAddress":true,"DeviceIndex":0,"Groups":["sg-0c2f1a3e01b84f3a3"]}' \ # Security Group ID depends on your config
    --tag-specifications '{"ResourceType":"instance","Tags":[{"Key":"Name","Value":"My Dev Server"}]}' \
    --placement '{"HostId":"h-0e984064522b4b60b","Tenancy":"host"}' \ # Host ID depends on your config 
    --private-dns-name-options '{"HostnameType":"ip-name","EnableResourceNameDnsARecord":true,"EnableResourceNameDnsAAAARecord":false}' \
    --count "1" 

Install Xcode from the Terminal
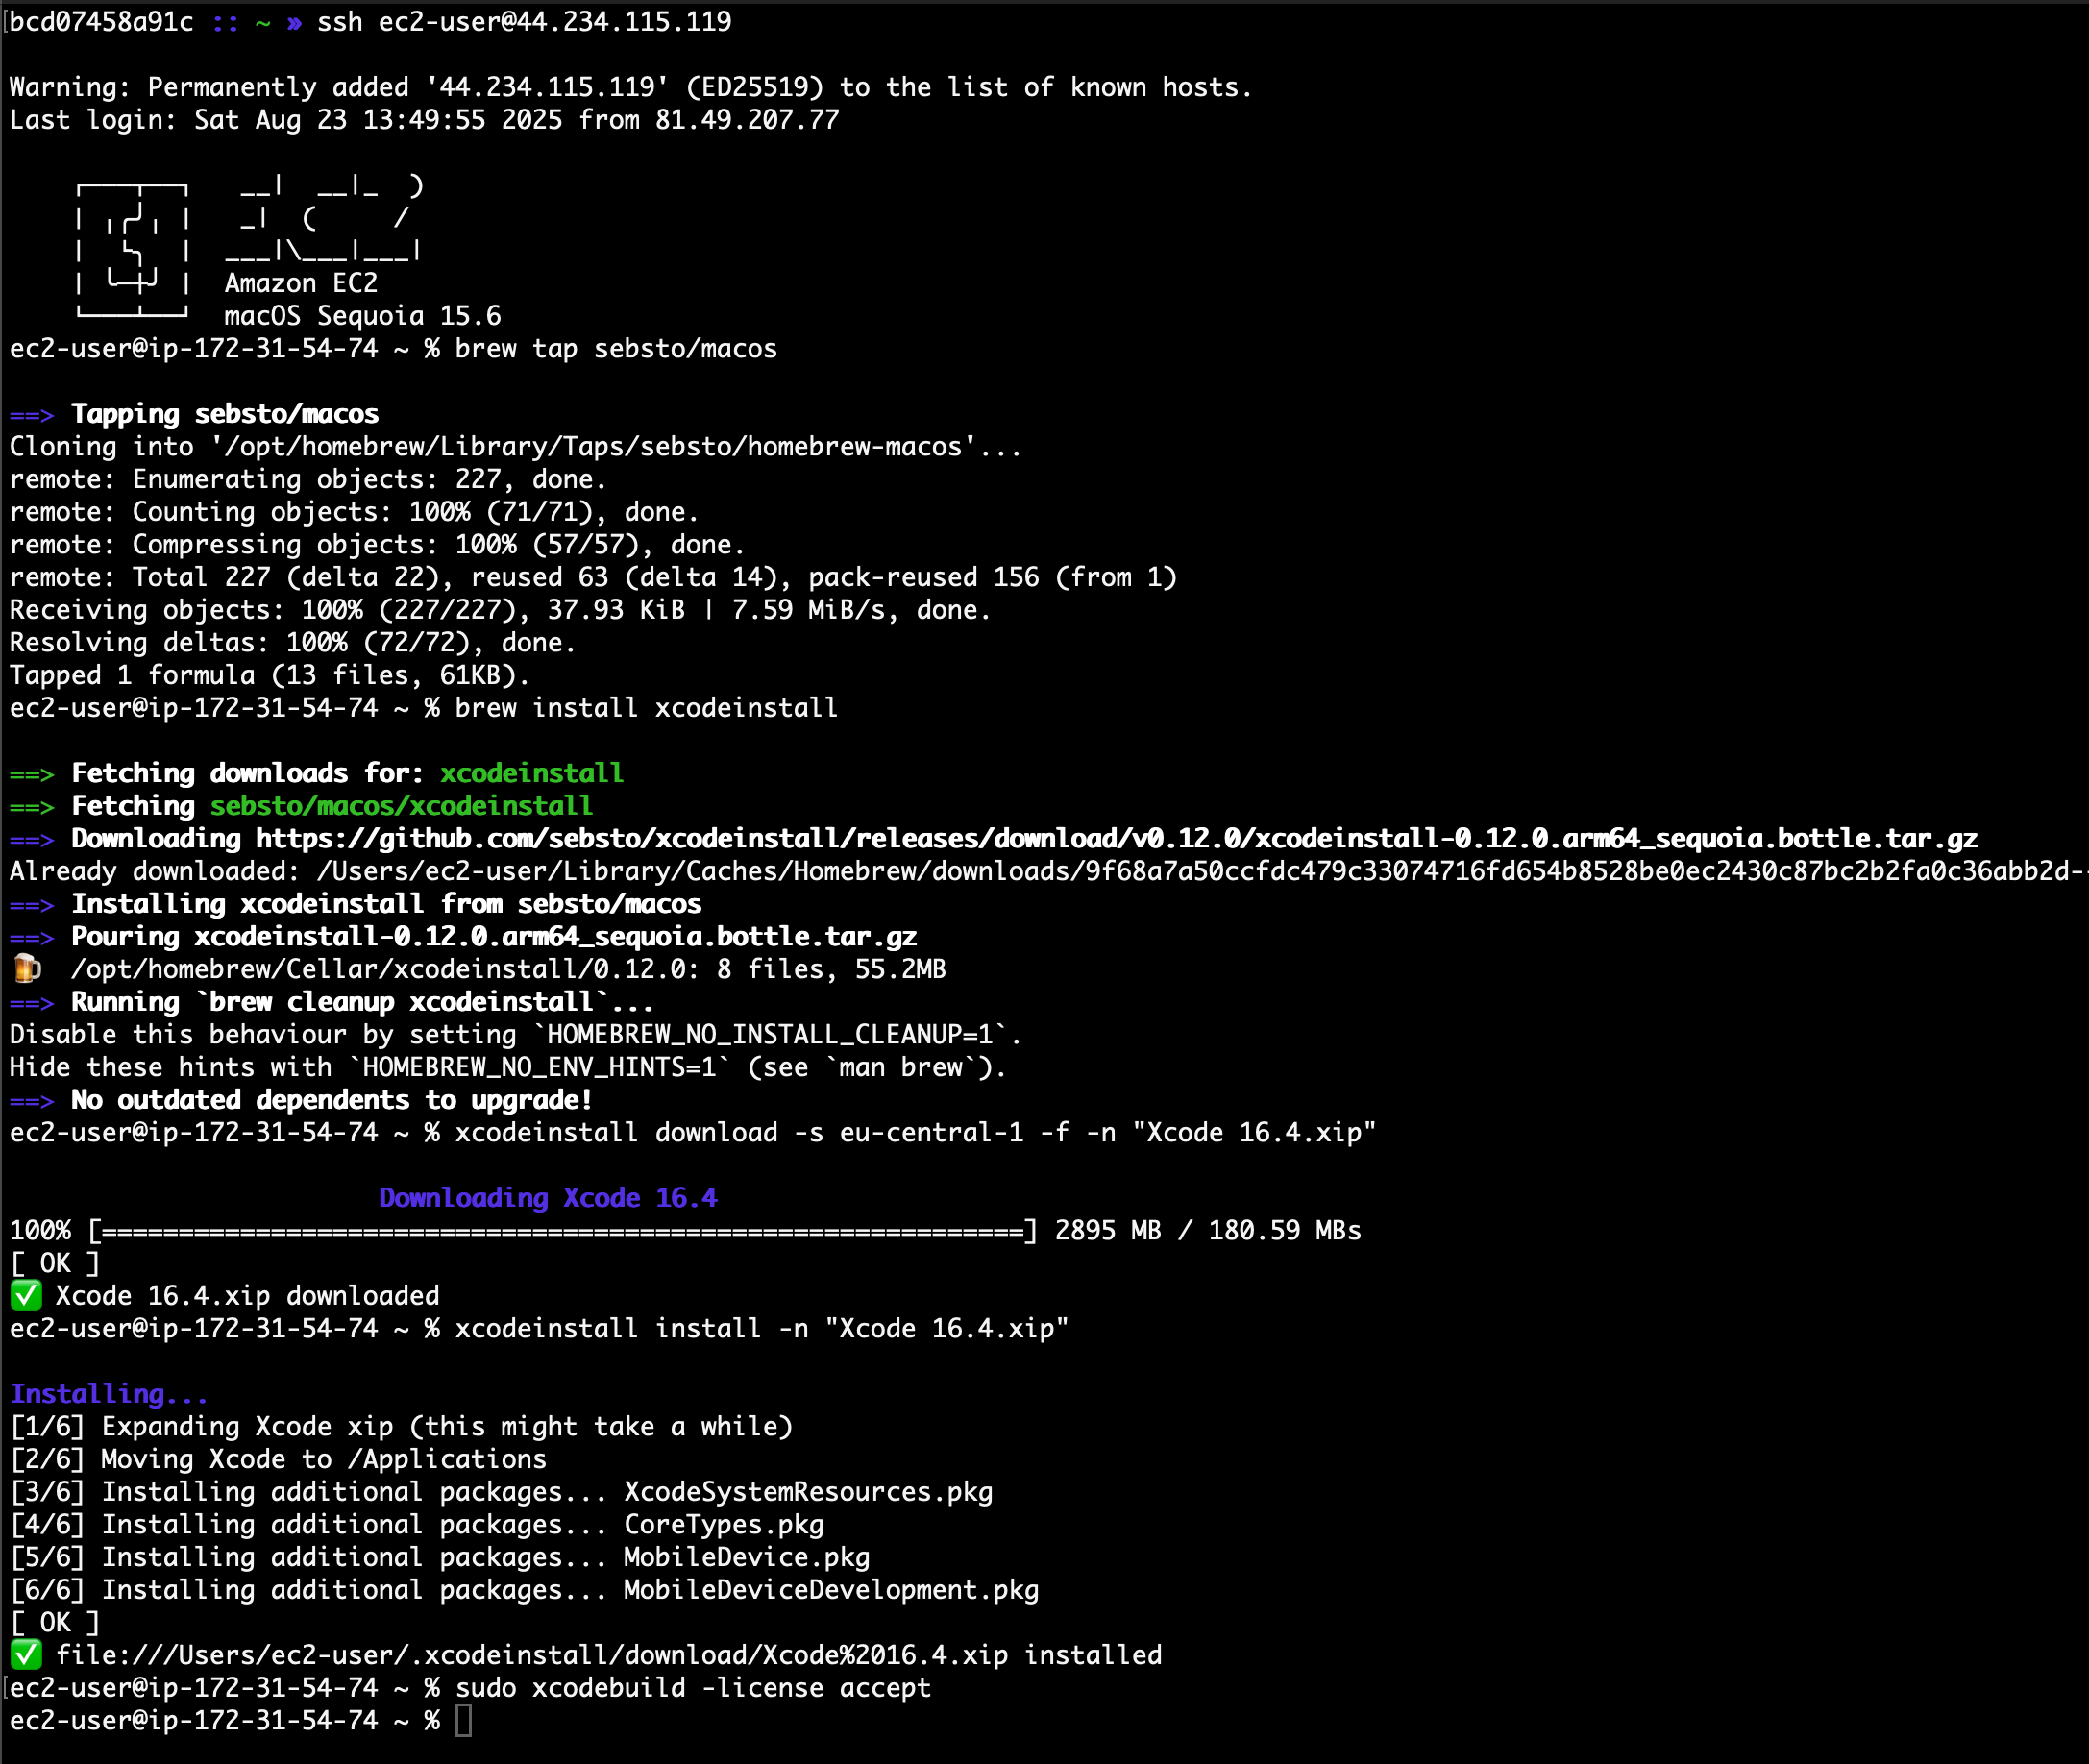
After the instance is reachable, I can connect using SSH to it and install my development tools. I use xcodeinstall to download and install Xcode 16.4.

From my laptop, I open a session with my Apple developer credentials:

# on my laptop, with permissions to access AWS Secret Manager
» xcodeinstall authenticate -s eu-central-1                                                                                               

Retrieving Apple Developer Portal credentials...
Authenticating...
🔐 Two factors authentication is enabled, enter your 2FA code: 067785
✅ Authenticated with MFA.

I connect to the EC2 Mac instance I just launched. Then, I download and install Xcode:

» ssh [email protected]                                                                                                                                                                   

Warning: Permanently added '44.234.115.119' (ED25519) to the list of known hosts.
Last login: Sat Aug 23 13:49:55 2025 from 81.49.207.77

    ┌───┬──┐   __|  __|_  )
    │ ╷╭╯╷ │   _|  (     /
    │  └╮  │  ___|\___|___|
    │ ╰─┼╯ │  Amazon EC2
    └───┴──┘  macOS Sequoia 15.6

ec2-user@ip-172-31-54-74 ~ % brew tap sebsto/macos
==> Tapping sebsto/macos
Cloning into '/opt/homebrew/Library/Taps/sebsto/homebrew-macos'...
remote: Enumerating objects: 227, done.
remote: Counting objects: 100% (71/71), done.
remote: Compressing objects: 100% (57/57), done.
remote: Total 227 (delta 22), reused 63 (delta 14), pack-reused 156 (from 1)
Receiving objects: 100% (227/227), 37.93 KiB | 7.59 MiB/s, done.
Resolving deltas: 100% (72/72), done.
Tapped 1 formula (13 files, 61KB).

ec2-user@ip-172-31-54-74 ~ % brew install xcodeinstall 
==> Fetching downloads for: xcodeinstall
==> Fetching sebsto/macos/xcodeinstall
==> Downloading https://github.com/sebsto/xcodeinstall/releases/download/v0.12.0/xcodeinstall-0.12.0.arm64_sequoia.bottle.tar.gz
Already downloaded: /Users/ec2-user/Library/Caches/Homebrew/downloads/9f68a7a50ccfdc479c33074716fd654b8528be0ec2430c87bc2b2fa0c36abb2d--xcodeinstall-0.12.0.arm64_sequoia.bottle.tar.gz
==> Installing xcodeinstall from sebsto/macos
==> Pouring xcodeinstall-0.12.0.arm64_sequoia.bottle.tar.gz
🍺  /opt/homebrew/Cellar/xcodeinstall/0.12.0: 8 files, 55.2MB
==> Running `brew cleanup xcodeinstall`...
Disable this behaviour by setting `HOMEBREW_NO_INSTALL_CLEANUP=1`.
Hide these hints with `HOMEBREW_NO_ENV_HINTS=1` (see `man brew`).
==> No outdated dependents to upgrade!

ec2-user@ip-172-31-54-74 ~ % xcodeinstall download -s eu-central-1 -f -n "Xcode 16.4.xip"
                        Downloading Xcode 16.4
100% [============================================================] 2895 MB / 180.59 MBs
[ OK ]
✅ Xcode 16.4.xip downloaded

ec2-user@ip-172-31-54-74 ~ % xcodeinstall install -n "Xcode 16.4.xip"
Installing...
[1/6] Expanding Xcode xip (this might take a while)
[2/6] Moving Xcode to /Applications
[3/6] Installing additional packages... XcodeSystemResources.pkg
[4/6] Installing additional packages... CoreTypes.pkg
[5/6] Installing additional packages... MobileDevice.pkg
[6/6] Installing additional packages... MobileDeviceDevelopment.pkg
[ OK ]
✅ file:///Users/ec2-user/.xcodeinstall/download/Xcode%2016.4.xip installed

ec2-user@ip-172-31-54-74 ~ % sudo xcodebuild -license accept

ec2-user@ip-172-31-54-74 ~ % 

EC2 Mac M4 - install xcode

Things to know
Select an EBS volume with minimum 200 Gb for development purposes. The 100 Gb default volume size is not sufficient to install Xcode. I usually select 500 Gb. When you increase the EBS volume size after the launch of the instance, remember to resize the APFS filesystem.

Alternatively, you can choose to install your development tools and framework on the low-latency local 2 Tb SSD drive available in the Mac mini. Pay attention that the content of that volume is bound to the instance lifecycle, not the dedicated host. This means that everything will be deleted from the internal SSD storage when you stop and restart the instance.

Themac-m4.metal and mac-m4pro.metal instances support macOS Sequoia 15.6 and later.

You can migrate your existing EC2 Mac instances when the migrated instance runs macOS 15 (Sequoia). Create a custom AMI from your existing instance and start an M4 or M4 Pro instance from this AMI.

Finally, I suggest checking the tutorials I wrote to help you to get started with Amazon EC2 Mac:

Pricing and availability
EC2 M4 and M4 Pro Mac instances are currently available in US East (N. Virginia) and US West (Oregon), with additional Regions planned for the future.

Amazon EC2 Mac instances are available for purchase as Dedicated Hosts through the On-Demand and Savings Plans pricing models. Billing for EC2 Mac instances is per second with a 24-hour minimum allocation period to comply with the Apple macOS Software License Agreement. At the end of the 24-hour minimum allocation period, the host can be released at any time with no further commitment

As someone who works closely with Apple developers, I’m curious to see how you’ll use these new instances to accelerate your development cycles. The combination of increased performance, enhanced memory capacity, and integration with AWS services opens new possibilities for teams building applications for iOS, macOS, iPadOS, tvOS, watchOS, and visionOS platforms. Beyond application development, Apple silicon’s Neural Engine makes these instances cost-effective candidates for running machine learning (ML) inference workloads. I’ll be discussing this topic in detail at AWS re:Invent 2025, where I’ll share benchmarks and best practices for optimizing ML workloads on EC2 Mac instances.

To learn more about EC2 M4 and M4 Pro Mac instances, visit the Amazon EC2 Mac Instances page or refer to the EC2 Mac documentation. You can start using these instances today to modernize your Apple development workflows on AWS.

— seb

Жокерът на политическия сезон

Post Syndicated from Емилия Милчева original https://www.toest.bg/zhokerut-na-politicheskiya-sezon/

Жокерът на политическия сезон

Политическият сезон започна с предвидими сюжети – вот на недоверие, подготовка на първи бюджет в евро и продължаващо окомплектоване по схемата Борисов–Пеевски. 

Но на масата има и жокер, който може да промени играта. 

Протестите, растящи на гърба на институционалното недоверие и провалите на МВР, могат да раздрусат властта, която не изглежда особено застрашена от разноликата опозиция.

Истинската опасност за стабилността на управляващите идва не от пленарната зала и предстоящия пети вот на недоверие, а от улицата. Там недоверието е избуяло в гняв – заради безводието, заради поръчковата „антикорупция“, заради безсрамните назначения на послушни некадърници в регулатори и институции, заради страховете от смяната на лева с евро и пълзящите цени. 

А какво прави МВР? Пази гърбовете на „своите“, на властта и на престъпници. Родната полиция ги пази, както показа случаят с Георги Семерджиев, с „чадър“, осигуряван от 40 полицаи, от които трима началници. 

Ами тишината, настъпила след скандала около канала за контрабанда на цигари в Пловдив и прочутата реплика заповед на шеф към местното звено на ГДБОП: 

Колеги, прибирайте се!

Протестите не са в сметките на властта, но могат да ѝ объркат сметките. Опозицията може да помогне, като се качи на този влак, който бездруго вече е тръгнал, но не знае къде ще спре.

МВР се превръща в декор

Когато структурата, призвана да пази реда и сигурността, загуби доверието на обществото, ефектът е двоен. От една страна, властта остава без щит – полицията е последната бариера между гнева на гражданите и институциите, а е с имидж на мутра от Прехода. От друга страна, разпада се самото усещане за държава: ако МВР не е легитимно, законът престава да изглежда справедлив, а редът – задължителен и зачестяват репресиите.

Случаят в Русе, при който среднощна разпра завършва със сутрешни арести на четирима младежи и с прием на полицейски шеф в болница, щеше да е поредното замазване на следи от МВР, ако не беше самият вътрешен министър Даниел Митов. Подкокоросан с неуместни съвети и подведен с информация, той се изправи с патетичното изявление, че „посегателството срещу българския полицай е посегателство срещу държавата“. 

Това е посегателство не просто срещу един човек, това е посегателство срещу институцията, призвана да гарантира върховенството на закона. Във всяка демокрация посегателството срещу полицай се приема като посегателство срещу държавата.

Посегателството срещу всеки български гражданин би следвало да е нападение срещу държавата. А всъщност е откровена истина: МВР и държавата много си приличат – не им му пука особено за правата на гражданите. 

Не би могло да е другояче. Кучето прилича на стопанина си.

От самото начало русенската полиция спести информация, тъй като едно от главните действащи лица в инцидента от 4 септември е началникът ѝ – главен комисар Николай Кожухаров. Цялата вина бе прехвърлена върху четиримата младежи на възраст от 15 до 18 години, представени с всички средства на пропагандата като побойници, „днешните млади“, какви чудовища е отгледало обществото и семействата им и т.н. Изтеклите записи от камери показаха, че не е точно така и че във версията на МВР има доста пробойни – което не оневинява момчетата, но също и Кожухаров и спътника му Георги Димитров. 

Историята съвсем не е черно-бяла, обвиненията срещу младежите са силно опростени и манипулирани, а отговорност носи и полицейският началник, който все още е в болница. Прокуратурата обаче е образувала досъдебно производство за две престъпления: 

За квалифицирано хулиганство, за което се предвижда наказание лишаване от свобода до пет години, и за нанасянето на средна телесна повреда по хулигански подбуди, за което се предвижда от две до десет години.

В социалните мрежи започнаха анализи на записите, публикувани от ΒG Elves – онлайн общност, която се занимава с борба с дезинформацията и пропагандата. Последваха и много въпроси без адекватни отговори. 

  • Кой е започнал боя и кога се е легитимирал Кожухаров?
  • Имало ли е „дрифтове“ с автомобила, в който са били младежите? 
  • Защо на следващия ден след инцидента на мястото на сблъсъка се появява знак за ограничение на скоростта до 30 км/ч? 
  • Защо пристигналите първоначално линейка и полицейски автомобил си тръгват, както разкри разследващият сайт ΒIRD? 
  • Защо четирите момчета са арестувани в 10 сутринта, а не при инцидента? 
  • Взети ли са проби за алкохол и наркотици от всички замесени, включително от Кожухаров и спътника му Георги Димитров? 
  • Защо при първото си отиване до болницата с полицейска кола, както посочва съпругата му, а не с дошлата на мястото линейка, Кожухаров се е прибрал у дома си, а лекарите нищо не са констатирали? При следващото той е оставен за лечение в интензивно отделение, без опасност за живота, но от УМБАЛ „Канев“ е съобщено, че му е извършена животоспасяваща операция.
  • Как са протекли разпитите на младежите? 
  • Къде са записите от бодикамерите на полицаите, отишли на място, които могат да покажат дали Кожухаров и Димитров са били пияни (връщали са се от ресторант), или на по една бира, както твърди вторият?
  • Защо случаят липсва от полицейския бюлетин (както впрочем бе спестена и информацията за обезобразената в Стара Загора 18-годишна Дебора Михайлова)?

Русенци излязоха на протест пред Съдебната палата с искания за освобождаването на младежите от ареста, пълен достъп до общинските видеокамери и оставки на ръководителите на МВР. В София сдружение БОЕЦ също организира протест пред сградата на МВР, замеряйки нея и кордона полицаи с тоалетна хартия. 

Апелативният съд във Велико Търново пусна под домашен арест Жулиен Кязъмов, един от четиримата обвинени за побоя над Кожухаров. Предстои да се произнесе и по мерките на останалите трима [до редакционното приключване на статията това не беше станало – б.р.].

За „честта“ на МВР и кожата на Митов

След случая в Русе в своя защита машината на властта мобилизира тръбачите на призиви за ред, справедливост, безкомпромисност на държавата срещу разхайтената младеж – полицаи герои срещу брутални побойници. Депутатът от ГЕРБ–СДС Любен Дилов-син в дълъг пост във Facebook, харесан от вътрешния министър, се размечта полицията да започне да бие като знак, че държавността се възвръща. 

Ама тя не е спирала да бие – на протестите в края на тоталитарната държава, на 10 януари 1997 г., на протестите #ДАНСwithme в „Нощта на белия автобус“, зад колоните на Министерския съвет на протеста на 10 юли 2021 г. и на много други. Само че Дилов-син го е нямало там.

Вътрешният министър пресоли случая в Русе, като го политизира, а последвалите реакции наляха още бензин. Информационното затъмнение от страна на МВР предизвика критиките на политици и искане за оставката на Митов от „Да, България“ (ПП–ДБ), заявена от съпредседателя Ивайло Мирчев.

Очевидно Министерството се е превърнало във фасада на един неформален кръг, който управлява МВР. Има само една достойна стъпка оттук нататък – бърза, моментална оставка на министъра на МВР. 

Според другия съпредседател Божидар Божанов, по данни на Евростат, от години МВР е вътрешното министерство в Европа с най-ниско доверие, а „неформалният кръг начело с Пеевски е установил пълен контрол [над Министерството – б.а.]“.

Главата на вътрешния министър е „на дръвника“, заяви по БНТ и Атанас Атанасов, лидер на ДСБ (ПП–ДБ).

Няма невинни в тази история. Говори доста агресивно вътрешният министър, това показва, че е много изнервен, говори за непровокирана агресия. Аз виждам, че има агресия от страна на тези младежи, но тя е провокирана… Опитът е бил да бъде прикрит този, който е придружавал директора. Най-малко виновен е самият директор, неговият спътник е предизвикал хулиганското поведение.

Няма невинни. Въпросът е чия вина е по-голяма, а в България обикновено по-силните/високопоставените успяват да се измъкнат, оставяйки слабите да носят тежестта на последствията. 

Въпросът за бодикамерите, които полицаите трябва да носят, отново излиза на дневен ред след смъртта на 36-годишния Явор Георгиев от Варна. Въпреки че две последователни експертизи оневиниха двамата полицаи, които са го задържали и закарали в психиатрия, случаят предизвика обществено напрежение и протести в града. Според експертите смъртта е настъпила от смесване на кокаин и етанол в големи количества, което довело до сърдечносъдова и дихателна недостатъчност. Кадри от охранителна камера обаче показаха, че при ареста на Явор полицаите го удрят на няколко пъти дори когато е на земята. А вътрешният министър коментира тогава, че са превишили правата си.

След смъртта на Явор от „Демократична България“ отново внесоха в парламента законопроекта, с който бодикамерите да станат задължителни за полицаите. Но не станаха.

Главният секретар на МВР Мирослав Рашков обаче, който е професионалното, а не политическото лице в ръководството на Министерството, запазва мълчание по русенския случай. Затова пък говорят непрофесионалисти, като кадъра на БСП Филип Попов, назначен за заместник вътрешен министър. По „Нова телевизия“ той заяви, че „няма касателство“ дали Кожухаров и Димитров са били пияни, когато се е случило сбиването.

Хипотетично да приемем, че целият инцидент е предизвикан от съседа на старши комисар Кожухаров, това с какво променя обстоятелството, че един полицай, за да изпълни служебните си задължения, е бил жестоко пребит?

Очаквано, управляващата коалиция зае страната на МВР и вкупом депутатите от ГЕРБ–СДС, БСП, „Има такъв народ“ и ДПС – Ново начало не допуснаха изслушване на премиера Росен Желязков в парламента по темата. Във Facebook лидерът на ИТН Слави Трифонов нападна ПП–ДБ заради позицията им за случилото се в Русе.

Аз ги разбирам ППДБ – те момчетата са били провокирани. Трябвало е да го пребият. Най-добре да го бяха убили, за да не се мъчи, да зарадва ръководството на ППДБ, а не сега да ги кара да организират протести и да дават брифинги в парламента.

Но всичко това не значи, че Даниел Митов може да е спокоен за креслото си. Едва ли ще бъде принуден да си подаде оставката сега, когато я искат от ПП–ДБ. Но от една страна, е застрашен заради напрежение, което проличава между „атовете“ на коалицията – Борисов и Пеевски. Eдна от конфликтните им точки е въпросът за разпродажбата на държавни имоти, която Пеевски поиска да спре. Проекторешението за одобрение на тези действия е внесено от правителството преди повече от месец и още не е влязло в дневния ред на парламента. Самият Борисов беше лаконичен в публичния си коментар по темата с думите, че тази позиция на Пеевски не е съгласувана с ГЕРБ и си е лично негова. Техните възгледи се различават и по отношение на Комисията за борба с корупцията, която Пеевски поиска да бъде закрита.

От друга страна, министърът е застрашен и заради натрупаното в последните години срещу МВР значимо обществено недоволство. През 2024 г. на няколко пъти граждани протестираха с искания за оставки на полицейски шефове, недоволни от разследването на смъртта на 24-годишния мотоциклетист Момчил Георгиев. Граждани се разгневиха на служебния министър на МВР Атанас Илков заради прикриване на изборни манипулации. 

Но не само Вътрешното министерство предизвиква протестите на гражданите. Десетки пъти пред съдилищата близки на загинали излизаха с призиви за справедливо правораздаване и напоследък те зачестиха.

Серията от „малки“ бунтове в различни градове показва, че под повърхността кипи недоволство, което няма централен организатор, но има натрупан заряд. Социалното напрежение може да се превърне в спойка за различни недоволства и да изведе хората на улицата. Несправедливост, прикриване на истини, фасадни институции, демонстративно безнаказан висш ешелон и унижени обикновени граждани – това са съставките на една експлозивна смес. 

Жокерът е на улицата.

Accelerate your data and AI workflows by connecting to Amazon SageMaker Unified Studio from Visual Studio Code

Post Syndicated from Lauren Mullennex original https://aws.amazon.com/blogs/big-data/accelerate-your-data-and-ai-workflows-by-connecting-to-amazon-sagemaker-unified-studio-from-visual-studio-code/

Developers and machine learning (ML) engineers can now connect directly to Amazon SageMaker Unified Studio from their local Visual Studio Code (VS Code) editor. With this capability, you can maintain your existing development workflows and personalized integrated development environment (IDE) configurations while accessing Amazon Web Services (AWS) analytics and artificial intelligence and machine learning (AI/ML) services in a unified data and AI development environment. This integration provides seamless access from your local development environment to scalable infrastructure for running data processing, SQL analytics, and ML workflows. By connecting your local IDE to SageMaker Unified Studio, you can optimize your data and AI development workflows without disrupting your established development practices.

In this post, we demonstrate how to connect your local VS Code to SageMaker Unified Studio so you can build complete end-to-end data and AI workflows while working in your preferred development environment.

Solution overview

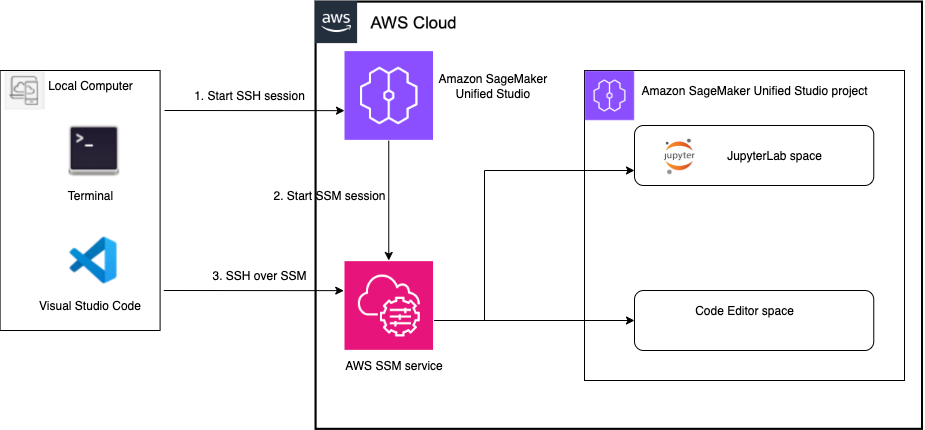
The solution architecture consists of three main components:

  • Local computer – Your development machine running VS Code with AWS Toolkit for Visual Studio Code and Microsoft Remote SSH installed. You can connect through the Toolkit for Visual Studio Code extension in VS Code by browsing available SageMaker Unified Studio spaces and selecting their target environment.
  • SageMaker Unified Studio – Part of the next generation of Amazon SageMaker, SageMaker Unified Studio is a single data and AI development where you can find and access your data and act on it using familiar AWS tools for SQL analytics, data processing, model development, and generative AI application development.
  • AWS Systems Manager – A secure, scalable remote access and management service that enables seamless connectivity between your local VS Code and SageMaker Unified Studio spaces to streamline data and AI development workflows.

The following diagram shows the interaction between your local IDE and SageMaker Unified Studio spaces.
Architecture diagram showing the connection between VS Code, SageMaker Unified Studio, and AWS SSM

Prerequisites

To try the remote IDE connection, you must have the following prerequisites:

  • Access to a SageMaker Unified Studio domain with connectivity to the internet. For domains set up in virtual private cloud (VPC)-only mode, your domain should have a route out to the internet through a proxy or a NAT gateway. If your domain is completely isolated from the internet, refer to the documentation for setting up the remote connection. If you don’t have a SageMaker Unified Studio domain, you can create one using the quick setup or manual setup option.
  • A user with SSO credentials through IAM Identity Center is required. To configure SSO user access, review the documentation.
  • Access to or can create a SageMaker Unified Studio project.
  • A JupyterLab or Code Editor compute space with a minimum instance type requirement of 8 GB of memory. In this post, we use an ml.t3.large instance. SageMaker Distribution image version 2.8 or later is supported.
  • You have the latest stable VS Code with Microsoft Remote SSH (version 0.74.0 or later), and AWS Toolkit (version 3.74.0) extension installed on your local machine.

Solution implementation

To enable remote connectivity and connect to the space from VS Code, complete the following steps. To connect to a SageMaker Unified Studio space remotely, the space must have remote access enabled.

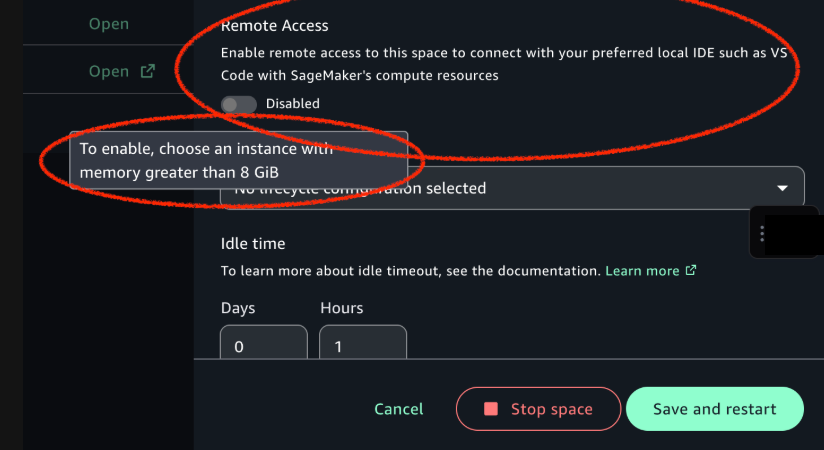
  1. Navigate to your JupyterLab or Code Editor space. If it’s running, stop the space and choose Configure space to enable remote access, as shown in the following screenshot.
    Shows how to configure space in SageMaker Unified Studio
  2. Turn on Remote access to enable the feature and choose Save and restart, as shown in the following screenshot.
    Enable the remote access toggle in SageMaker Unified Studio space
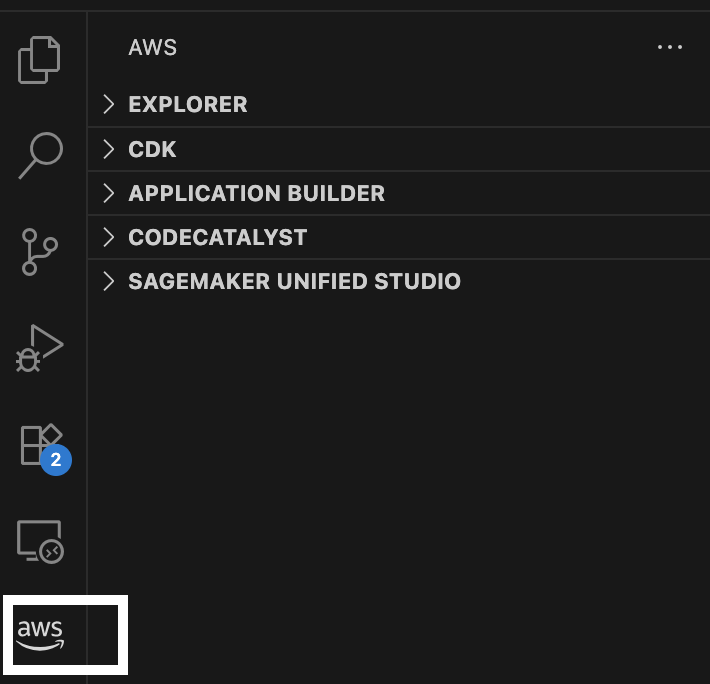
  3. Navigate to AWS Toolkit in your local VS Code installation.
    Navigating to AWS Toolkit in VS Code
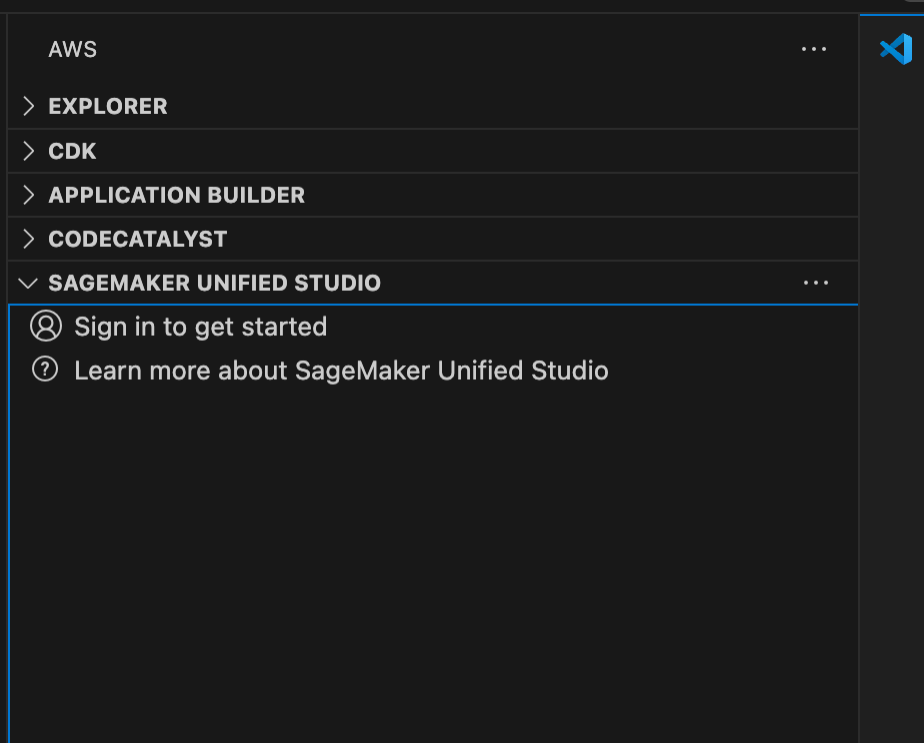
  4. On the SageMaker Unified Studio tab, choose Sign in to get started and provide your SageMaker Unified Studio domain URL, that is, https://<domain-id>.sagemaker.<region>.on.aws.
    SageMaker Unified Studio sign-in in VS Code
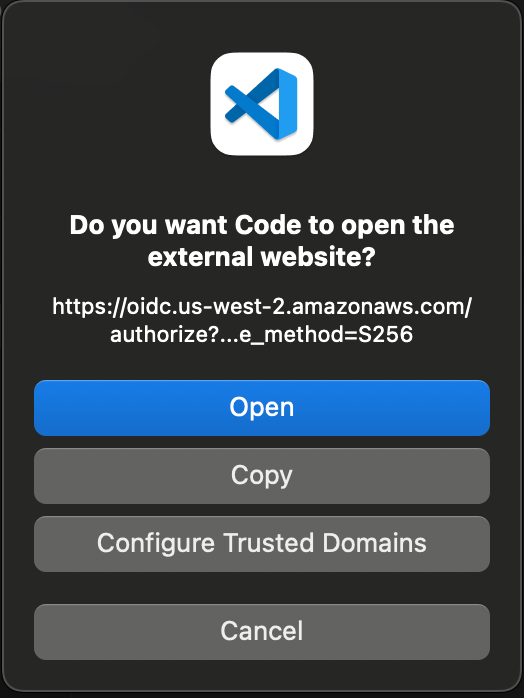
  5. You will be prompted to be redirected to your web browser to allow access to AWS IDE extensions. Choose Open to open a new web browser tab.
    Notification to sign-in to SageMaker Unified Studio domain
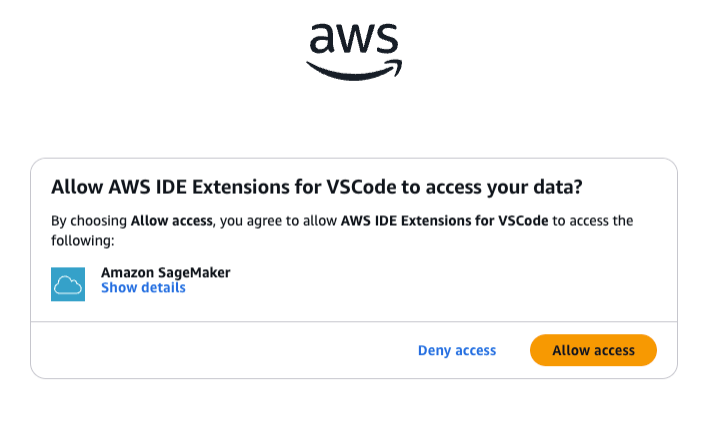
  6. Choose Allow access to connect to the project through VS Code.
    Allow access to the SageMaker Unified Studio project from VS Code
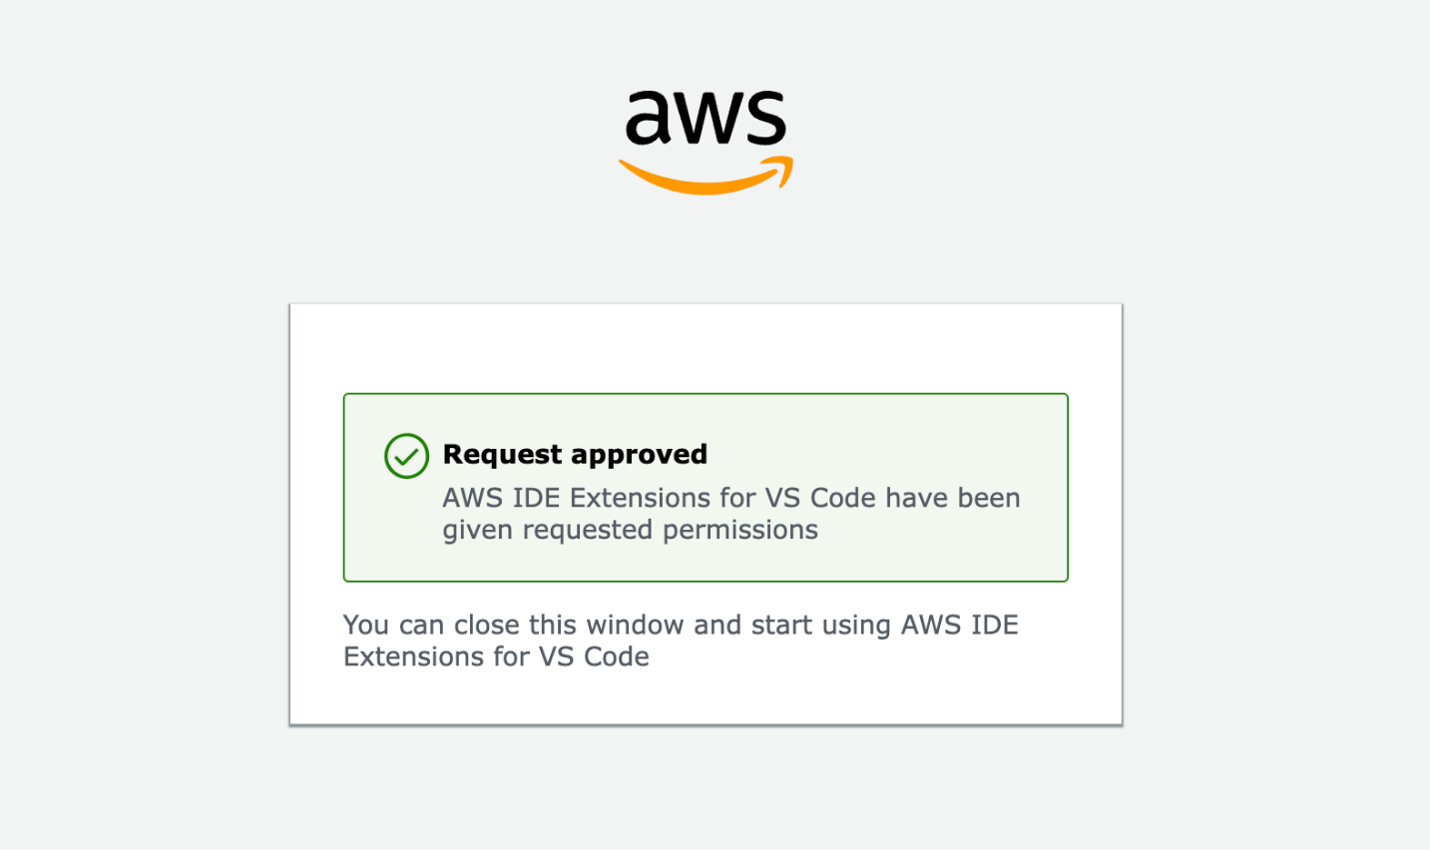
  7. You’ll receive a Request approved notification, indicating that you now have permissions to access the domain remotely.
    Approval that VS Code has access to the SageMaker Unified Studio domain

You can now navigate back to your local VS Code to access your project to continue building ETL jobs and data pipelines, training and deploying ML models, or building generative AI applications. To connect to the project for data processing and ML development, follow these steps:

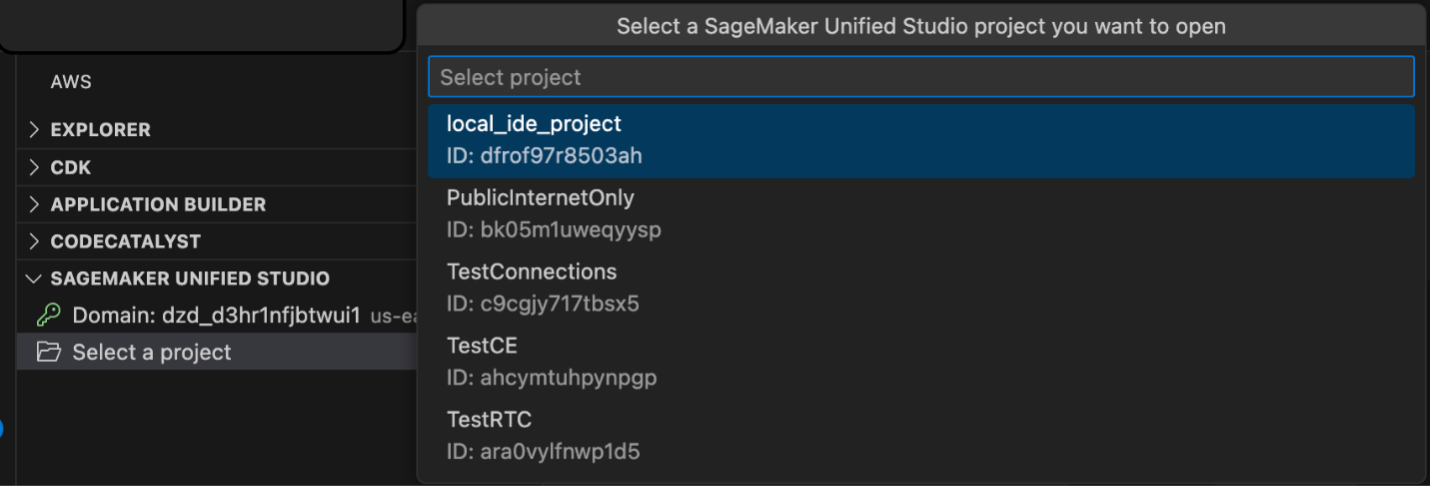
  1. Choose Select a project to view your data and compute resources. All projects in the domain are listed, but you’re only allowed access to projects where you’re a project member.

    Select a project in your local VS Code

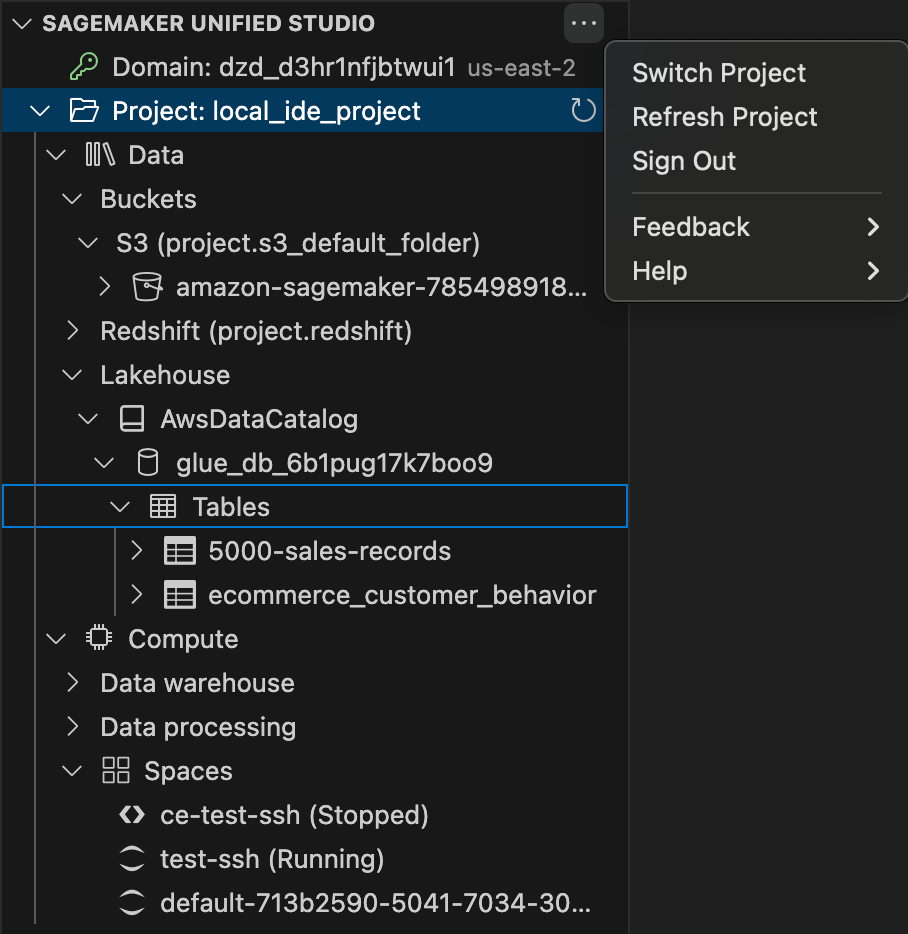
    You can only view one domain and one project at a time. To switch projects or sign out of a domain, choose the ellipsis icon.

    Viewing data and compute resources and switching projects in local VS Code

    You can also view compute and data resources that you created previously.

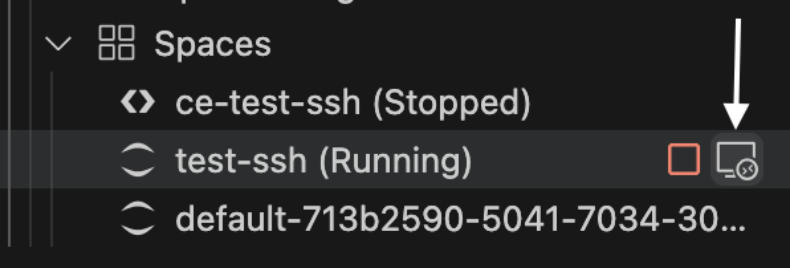
  2. Connect your JupyterLab or Code Editor space by selecting the connectivity icon, as shown in the following image. Note: If this option does not show as available, then you may have remote access disabled in the space. If the space is in “Stopped” state, hover over the space and choose the connect button. This should enable remote access, start the space and connect to it. If the space is in “Running” state, the space must be restarted with remote access enabled. You can do this by stopping the space and connecting to it as shown below from the toolkit.
    Connectivity icon in local VS Code

    Another VS Code window will open that is connected to your SageMaker Unified Studio space using remote SSH.

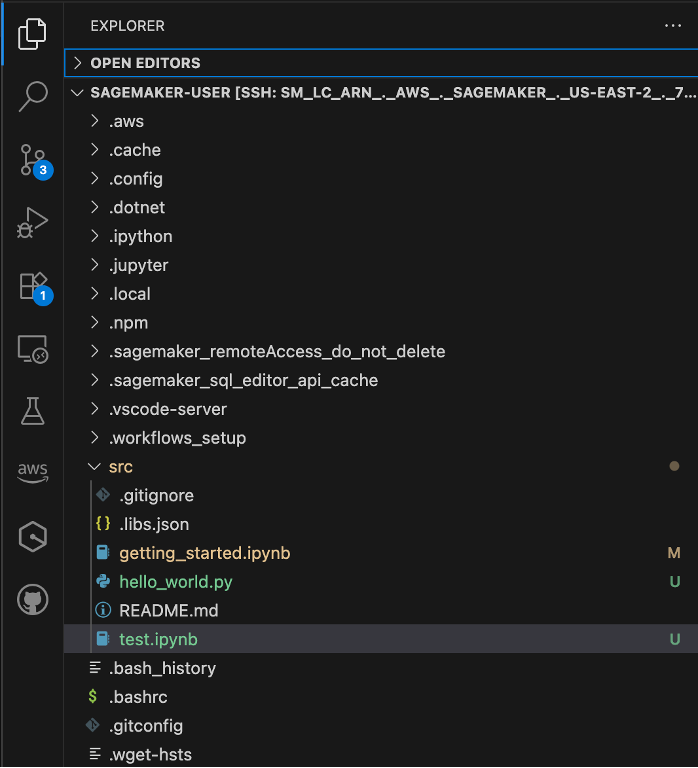
  3. Navigate to the Explorer to view your space’s notebooks, files, and scripts. From the AWS Toolkit, you can also view your data sources.
    Explorer in local VS Code after remote SSH connection showing connectivity to SageMaker Unified Studio space

Use your custom VS Code setup with SageMaker Unified Studio resources

When you connect VS Code to SageMaker Unified Studio, you keep all your personal shortcuts and customizations. For example, if you use code snippets to quickly insert common analytics and ML code patterns, these continue to work with SageMaker Unified Studio managed infrastructure.

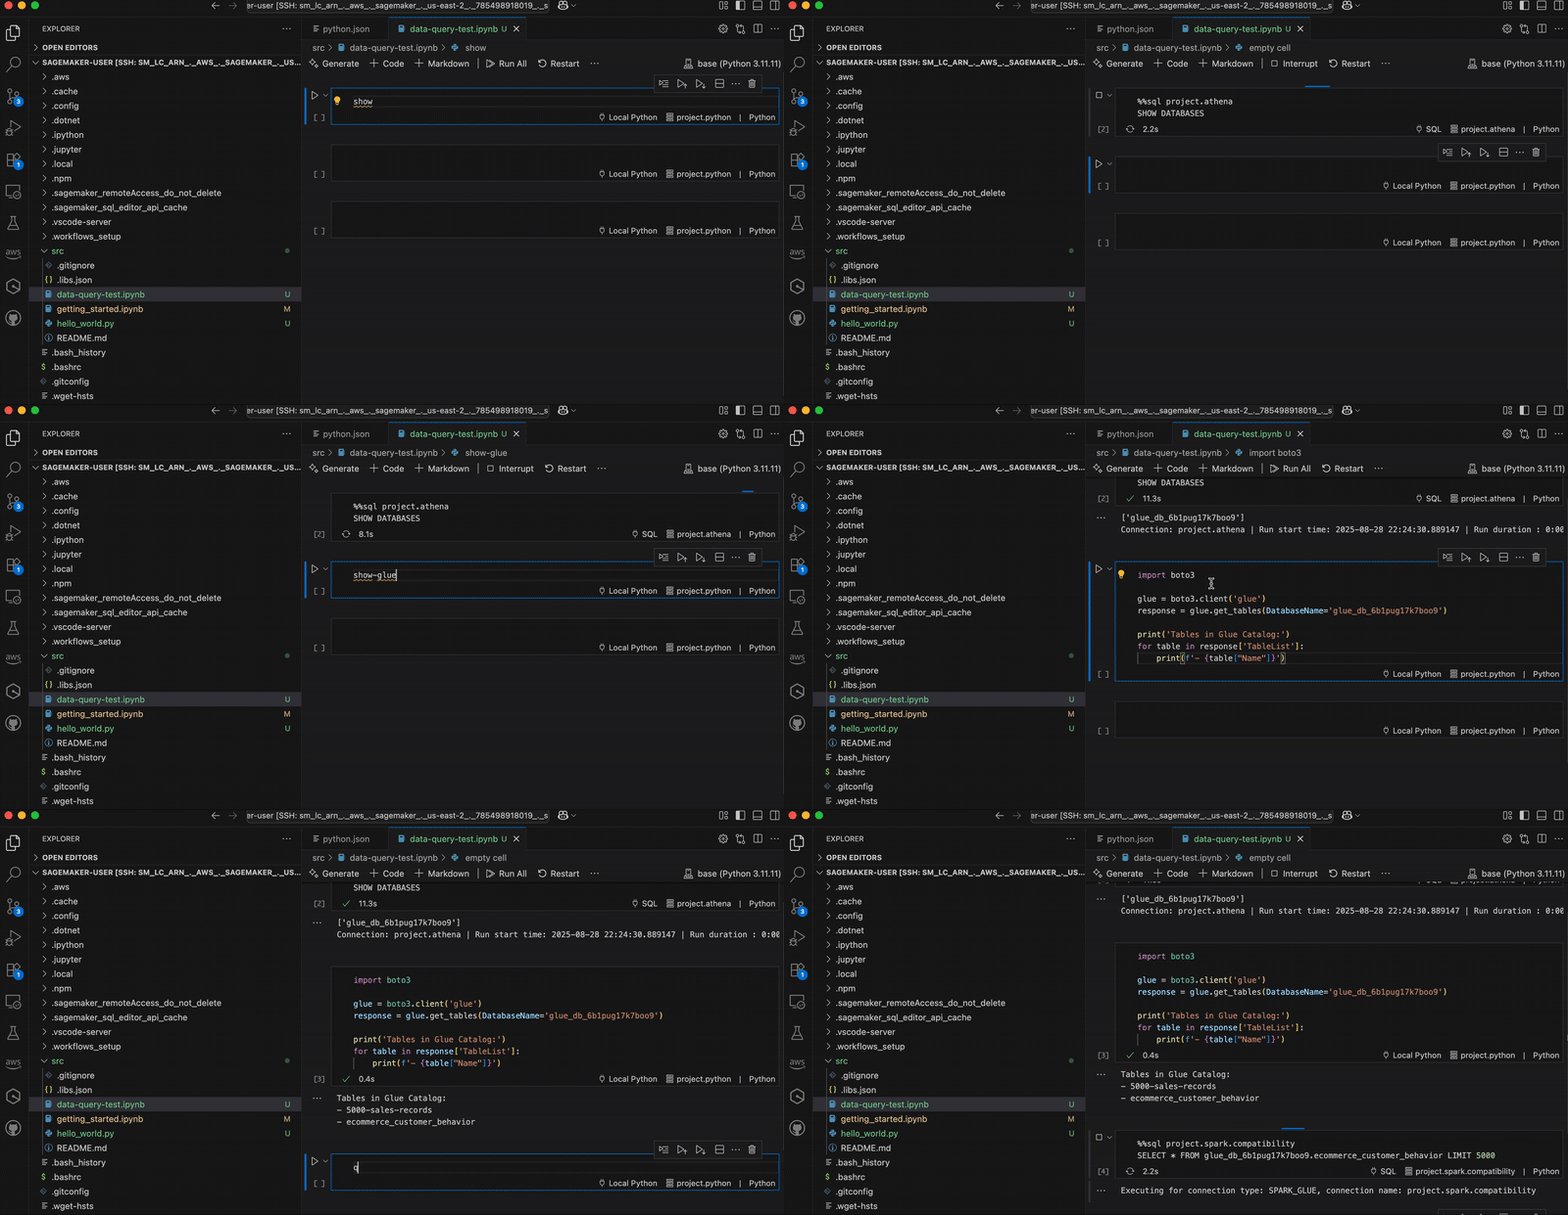
In the following graphic, we demonstrate using analytics workflow shortcuts. The “show-databases” code snippet queries Athena to show available databases, “show-glue-tables” lists tables in AWS Glue Data Catalog, and “query-ecommerce” retrieves data using Spark SQL for analysis.

Graphic showing how to use code snippets in local VS Code to query data resources in SageMaker Unified Studio

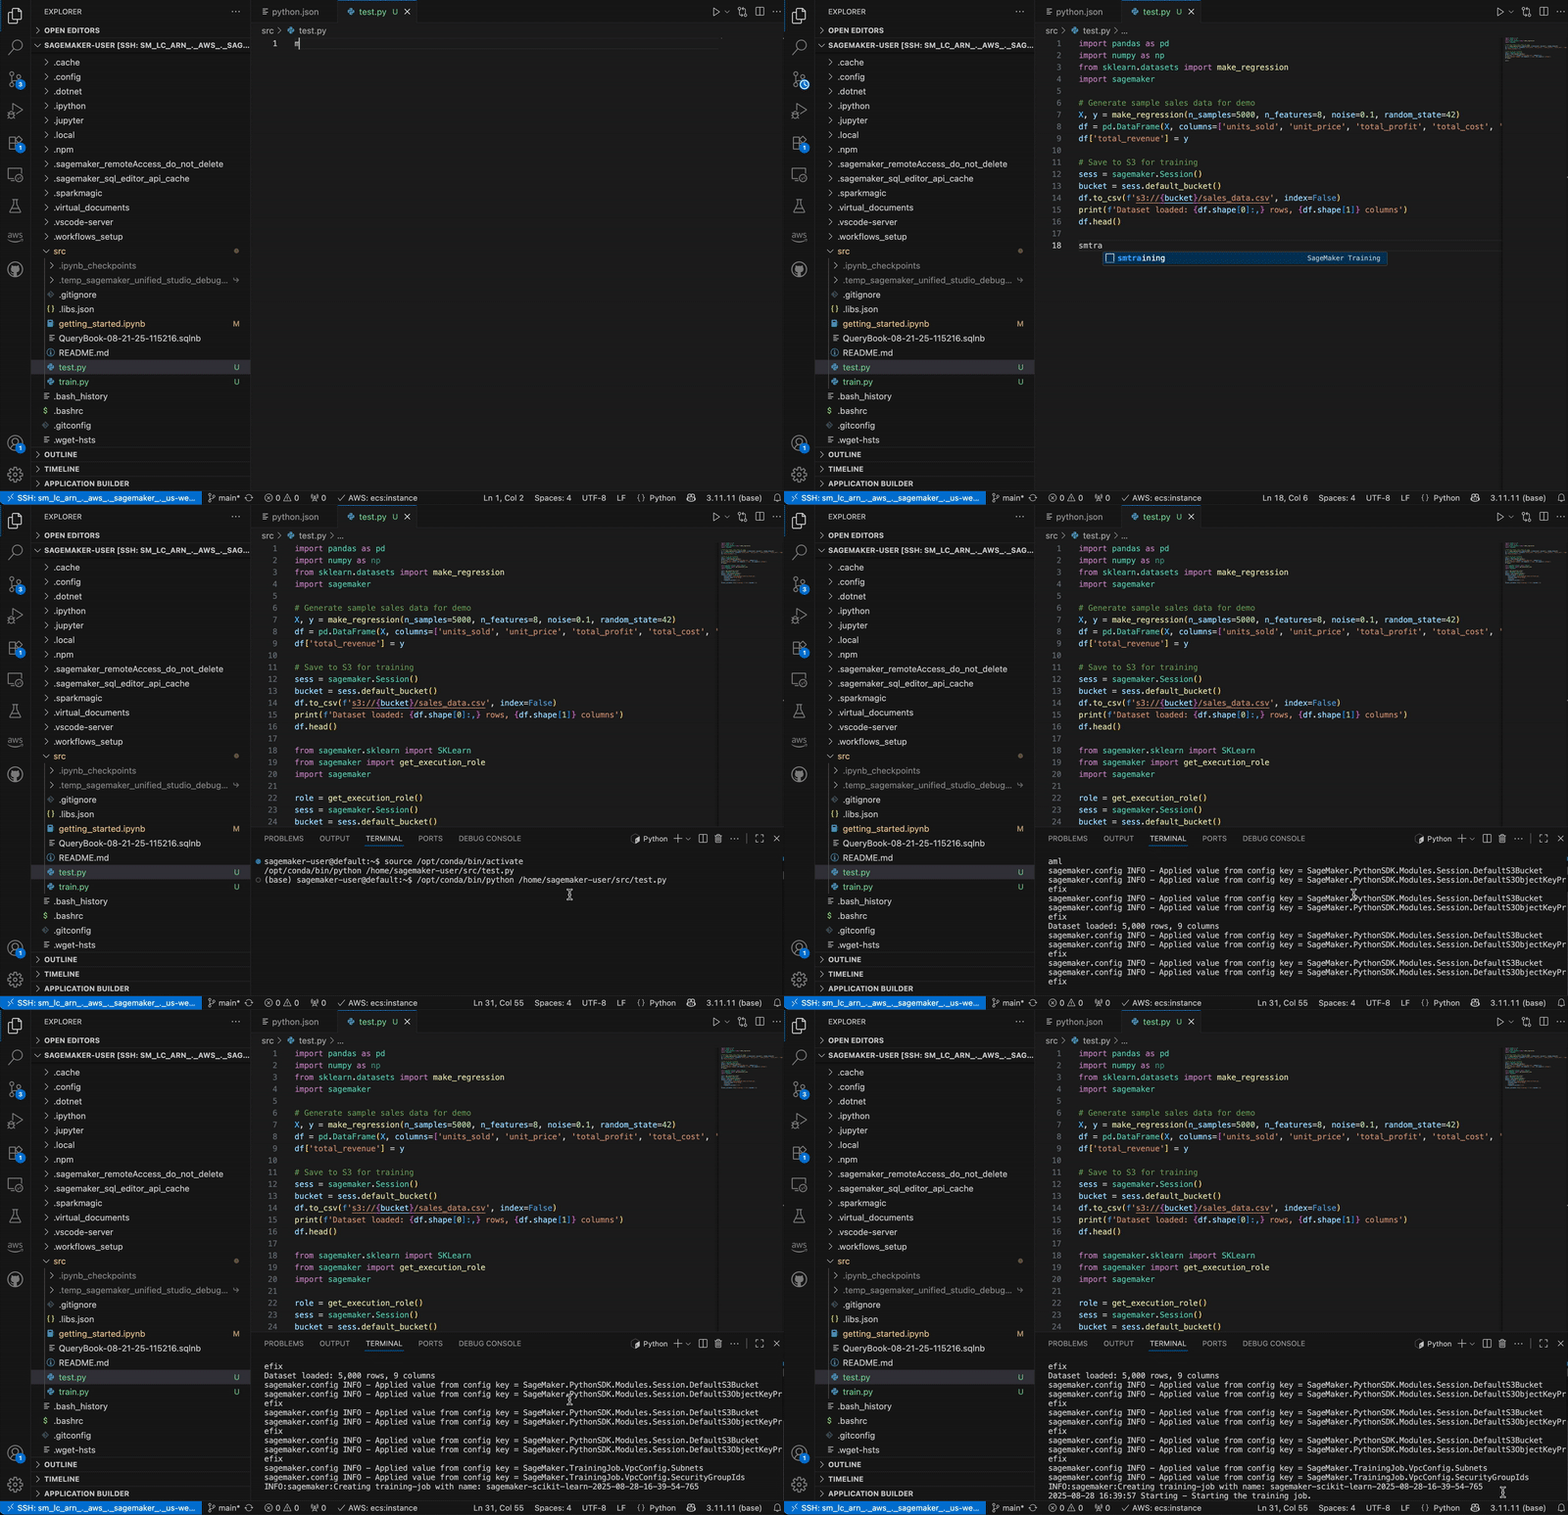
You can also use shortcuts to automate building and training an ML model on SageMaker AI. In the below graphic, the code snippets show data processing, configuring, and launching a SageMaker AI training job. This approach demonstrates how data practitioners can maintain their familiar development setup while using managed data and AI resources in SageMaker Unified Studio.

Graphic showing how to do data processing and train a SageMaker AI job remotely in VS Code using code snippets

Disabling remote access in SageMaker Unified Studio

As an administrator, if you want to disable this feature for your users, you can enforce it by adding the following policy to your project’s IAM role:

{
    "Version": "2012-10-17",
    "Statement": [
        {
            "Sid": "DenyStartSessionForSpaces",
            "Effect": "Deny",
            "Action": [
                "sagemaker:StartSession"
            ],
            "Resource": "arn:aws:sagemaker:*:*:space/*/*"
        }
    ]
}

Clean up

SageMaker Unified Studio by default shuts down idle resources such as JupyterLab and Code Editor spaces after 1 hour. If you’ve created a SageMaker Unified Studio domain for the purposes of this post, remember to delete the domain.

Conclusion

Connecting directly to Amazon SageMaker Unified Studio from your local IDE reduces the friction of moving between local development and scalable data and AI infrastructure. By maintaining your personalized IDE configurations, this reduces the need to adapt between different development environments. Whether you’re processing large datasets, training foundation models (FMs), or building generative AI applications, you can now work from your local setup while accessing the capabilities of SageMaker Unified Studio. Get started today by connecting your local IDE to SageMaker Unified Studio to streamline your data processing workflows and accelerate your ML model development.


About the authors

Lauren Mullennex

Lauren Mullennex

Lauren is a Senior GenAI/ML Specialist Solutions Architect at AWS. She has over a decade of experience in ML, DevOps, and infrastructure. She is a published author of a book on computer vision. Outside of work, you can find her traveling and hiking with her two dogs.

Bhargava Varadharajan

Bhargava Varadharajan

Bhargava is a Senior Software Engineer at Amazon Web Services, where he develops AI & ML products like SageMaker Studio, Studio Lab, and Unified Studio. Over five years, he’s focused on transforming complex AI & ML workflows into seamless experiences. When not architecting systems at scale, Bhargava pursues his goal of exploring all 63 U.S. National Parks and seeks adventures through climbing, football, and snowboarding. His downtime is split between tinkering with DIY projects and feeding his curiosity through books

Anagha Barve

Anagha Barve

Anagha is a Software Development Manager on the Amazon SageMaker Unified Studio team.

Anchit Gupta

Anchit Gupta

Anchit is aSenior Product Manager for Amazon SageMaker Unified Studio. She focuses on delivering products that make it easier to build machine learning solutions. In her spare time, she enjoys cooking, playing board/card games, and reading.

[$] Creating a healthy kernel subsystem community

Post Syndicated from jake original https://lwn.net/Articles/1036908/

Creating welcoming communities within open-source projects is a recurring
topic at conferences; those projects rely on contributions from others, so
making them welcome is important. The kernel has, rather infamously
over the years, been an oft-cited example of an unwelcoming project, though
there have been (and are) multiple efforts to change that with varying
degrees of success. Hans de Goede talked about such efforts within his
corner of the kernel project in a talk (YouTube video) at
Open
Source Summit Europe
.

Гласовете на Америка – брой 7

Post Syndicated from Йоанна Елми original https://www.toest.bg/glasovete-na-amerika-broy-7/

Гласовете на Америка – брой 7

На снимката десният американски активист Чарли Кърк е с бяла тениска, върху която с черни букви пише „свобода“. Хвърля червени шапки на публиката в университета „Юта Вали“. От онези червени шапки – „Да направим Америка велика отново“. 

Скоро Кърк ще се качи на сцената и ще започне своите разгорещени дебати с публиката. В тях наяве излиза талантът му, с който печели милиони последователи в САЩ и по света – да убеждава и да защитава пламенно тезите си, служейки си понякога с манипулации и невярна информация, за да постигне победа. 

Чарли Кърк е политик по рождение – в това не може и да има съмнение

Едва на 31, вече повече от десетилетие променя из основи начина, по който неоконсервативното движение привлича нови последователи. Заедно с красивата си съпруга, съюзничка в политиката, и двете им деца са идеалната картина на „традиционното“ семейство, което защитават и за което се борят: бели, християни, „патриоти“. 

Гледам снимката: как изглежда човек минути преди да умре; как прекарва това последно оставащо време; дали в момента на смъртта настъпва някакво осъзнаване на случващото се, дали наистина всичко минава на лента, дали времето се забавя, или всичко приключва бързо, без дори да се усетиш; разбира се, най-баналното – дали боли; въпрос, който съм си задавала и преди – дали тялото усеща, че краят идва, с някакъв зверски инстинкт, дали в деня на смъртта си човек се събужда с някакво особено предчувствие, че нещо не е както трябва. Все още не е ясно дали съпругата на Кърк и децата им, на една и на три години, са били в публиката. Мисълта за това е ужасяваща. 

Ситуацията е литература, ужасяваща литература: Кърк и участник от публиката говорят за масовите престрелки в САЩ. 

Кърк получава въпрос за точния брой на масовите престрелки. Отговаря спокойно и самоуверено, в типичния си стил, вкопавайки се в детайли – в числа, лесно огъваеми и трудно проверими в рамките на разговора, който, както всички останали, цели да убеди, да привлече към каузата: в най-добрия случай – с дебат, който уважава опонента, в най-лошия – с разпалване на огъня и с лъжи. 

Чуват се изстрели. От гърлото на Кърк руква кръв върху бялата тениска, свободата се облива в кръв, той се наклонява на една страна и се свлича от стола. В тълпата настава паника. Няколко души се спускат да помагат. 

За помощ е твърде късно 

В ерата на интернет смъртта на Кърк бързо се поема от кошерния ум на Америка и света. „Лекар съм, няма начин да е оцелял след такава травма и такъв изстрел“, пише потребител в Reddit. 

Видеото се разпространява мълниеносно. Хората се съветват един друг да не гледат и въпреки всичко човекът винаги е изпитвал привличане към жестокостта и бедствието, подобно на мушица, блъскаща се в запалена крушка. 

Видеото се качва, после се сваля от платформите, после се появява отново. Проблемът на времето на свръхинформацията е, че всяка трагедия се превръща в зрелище за отрицателно време. А след това – в конспирация, в закана за отмъщение, в оправдание за още жестокост, в шега, в меме или в най-страшния случай – в апатия. 

Откриването на убиеца на Кърк ще бъде изпитание за ФБР под ръководството на Каш Пател и първи тест какво произвежда назначаването на лоялните за сметка на компетентните (макар със сигурност двете да не са взаимно изключващи се, нито назначаването на лоялисти да е прецедент). Властите задържат някого, после го освобождават. Организират пресконференция, после я отменят. 

В този първичен хаос всъщност няма нищо неочаквано, но всичко се следи отблизо и е повод както за критика, така и за конспирация. Зрителите на риалитито на света са в готовност зад екраните си, зад личните си мегафони и желаят действието да се развива бързо. 

Тези, които знаят как се прави добра телевизия и добра история, ще ви кажат, че в такива ситуации дупката в сюжета е фатална; зрителят няма нужда от разум или от истина – той се нуждае от екшън и шоу. 

В XXI век всичко е Breaking News – затова и новините са счупени. 

Какво друго е Доналд Тръмп, ако не кулминацията, еманацията на ерата на свръхинформацията, най-телевизионният президент, политикът туит, човекът шоу. 

Броени часове след убийството и при липса на всякаква информация, президентът обвинява „либералното ляво“ и се заканва, че справедливостта няма да се размине никому. Никой не е очаквал от този президент да призове към спокойствие и разум. По време на опит за покушение срещу него Тръмп се изправя триумфално над тълпата и призовава към бой. Самият той, разбира се, няма да се бие с никого. Но какво по-добро шоу и признание за личността ти от гражданска война в твоя чест?

Добрият лидер храни човешкото в човека, а другият храни звяра 

Кошерът на интернет жужи. Републиканци, които допреди месеци са се шегували с убийството на демократите от Минесота Мелиса Хортън и съпруга ѝ в леглото им, с нападението на съпруга на Нанси Пелоси с чук в дома му или с подпалването на резиденцията на губернатора на Пенсилвания Джош Шапиро (демократ), наричат опонентите си „изроди“. 

Опонентите, чието кредо са призивите за емпатия и състрадание към най-онеправданите, бълват кратки видеа и цитати на Чарли Кърк, в които Кърк говори за други раси като за подчовеци, за либералните жени като за хора, желаещи да умрат в бездетна самота, и за емпатията като измислица, която само вреди на обществото. Според тях Кърк, който заявява, че хората, загинали от огнестрелни оръжия, са необходима жертва в името на правото на притежание на оръжие, си е получил заслуженото. Ирония на съдбата. 

Успоредно в Денвър, Колорадо, се съобщава за поредна престрелка в училище. 

Консервативният събредит изобилства от потребители, които казват, че демократите най-сетне са показали истинското си лице; че партията и всичките ѝ последователи трябва да бъдат забранени; че убийството на Чарли Кърк е пожарът в Райхстага; че е време опонентите да бъдат прочистени веднъж завинаги, защото са нечовеци, убийци, уроди. Както демократите, така и консерваторите говорят за аморфна маса хора, за „другите“, които вече нямат човешко лице. 

Да бъдеш част от тях вече е присъда. Смъртна.

Президентът Тръмп и консервативните информационни канали изброяват атаки над консервативни политици, без да споменават атаките над демократи. Различни експерти се тревожат, че ситуацията в САЩ все повече се приближава до гражданска война. Обществото живее в две – ако не и в три – паралелни реалности, които не просто не могат да намерят обща точка помежду си; всяка е убедена, че съществуването на другата представлява екзистенциална заплаха. 

„Другите“ трябва да бъдат елиминирани. 

Журналистът Рийд Епщайн коментира в „Ню Йорк Таймс“:

[…] ако съществува момент в съвремието ни, в който политическото насилие започна да се толерира в американското ежедневие, той със сигурност е бил след 6 януари 2021 г., когато тълпа от поддръжниците на г-н Тръмп влезе в Капитолия в знак на протест срещу резултатите от изборите през 2020 г. Почти веднага г-н Тръмп и съюзниците му от Републиканската партия започнаха да пренаписват историята, което кулминира в помилването на 1600 души, осъдени или обвинени в престъпления, свързани с насилие. Самият г-н Тръмп, разбира се, бе обвинен във връзка със събитията от 6 януари и огромните му усилия да подмени изборите през 2020 г., но обвиненията бяха свалени, след като той спечели изборите през 2024 г. 

„Насилието срещу политици беше нещо, което се случваше в нестабилни демокрации някъде другаде – пише Епщайн. – Но сега е просто част от американската действителност – точно както престрелките в училище, които шокират нацията.“ Доколко това твърдение е вярно, е въпрос на интерпретация и скептицизъм към чувството за американска изключителност, поради което текстът на Епщайн завършва с аргумент, който де факто оборва началото: 

По-далечната история на страната е пълна със случаи на политическо насилие, макар че епизодите са по-отдалечени един от друг през XIX и XX век. Президентите Ейбрахам Линкълн, Джеймс Гарфилд, Уилям Маккинли и Джон Ф. Кенеди са застреляни, докато изпълняват задълженията си. През 1968 г. са убити Мартин Лутър Кинг и Робърт Ф. Кенеди. Роналд Рейгън е прострелян във Вашингтон по време на първия си мандат. Теодор Рузвелт оцелява след атентат по време на кампанията си в Милуоки. 

Когато става въпрос за война и насилие, търсенето на вина е добър начин да се разсеем от зверствата, извършени в името на идеята за първопричина и справедливост; оправданото насилие помага да се помирим с ужаса, на който ставаме свидетели, да живеем с него. Може би дори да го извършим. 

Когато общественият разговор деградира до дебат кой заслужава да умре и кой – не; когато правосъдието се раздава от демагози, тълпи и снайперисти; когато политическата идеология запълва вакуума, оставен от религията – тогава сме достигнали етапа на пълно институционално разлагане, на тотално преобръщане на хуманистичния и просвещенски модел, към който уж се стремят обществата ни. 

Един убиец, въдворяващ справедливост, е финален акорд във фалшивата симфония на времената ни: растящи неравенства; влошаващо се психично здраве, самота, изолация; липса на регулация на новите информационни технологии, за които вече е доказано, че работят на принципа на лудостта като печалба; разпадането на социалните норми, на които едно общество неминуемо разчита, за да живее в мир. Чарли Кърк е както архитект и продукт на това време, така и негова жертва. И в това няма никаква справедливост. Това е трагедия. 

Ако има исторически урок, който е важен, той е, че насилието рядко спира с призиви за справедливост, изискващи още насилие. След смъртта на Кърк не се вижда тенденция към отрезвяване. Минутата мълчание в Конгреса бързо се превърна във война на думи. А заплахите на президента показват, че убийството на Кърк и превръщането му в „мъченик“ вероятно ще бъдат използвани за смачкване на опозицията с всички възможни средства, както и досега. Business as usual. 

Задават се мрачни времена както за САЩ, така и за света 

Свободата отново е омазана в кръв, свободата отново е разбирана като неотменимото право да мачкаш другия, свободата отново е идеология, маркетинг, кампания, а не реалност, свободата отново е правото да убиеш онзи, с когото не си съгласен. „Едно време е било елементарно – един куршум и готово“, казвал е президентът Доналд Тръмп неколкократно в свои речи, имитирайки изстрел с пушка. 

В свят, в който свободата е реалност, а Америка е велика отново, куршумите не могат да бъдат решения, нито справедливост. За никого. Омразата към едно малцинство, към един човек, към една идеология неизбежно е омраза към всички в обществото. Точно както убийството на един е потенциален куршум за всички.

Страхувам се от такава свобода. 

Страхувам се от такъв свят. 

Но най-вече се страхувам от хората, които са сигурни, че насилието на думите и на куршумите е необходимо. И може да бъде оправдано. 


Абонирайте се, за да получавате този бюлетин на електронната си поща в момента, в който излезе!

Вече сте регистриран потребител на Toest.bg? Може директно от настройките на бюлетините в своя профил да изберете „Гласовете на Америка“ или да натиснете бутона по-долу:

Още нямате профил в Toest.bg? Регистрирайте се само с няколко клика:
Security updates for Friday

Post Syndicated from daroc original https://lwn.net/Articles/1037919/

Security updates have been issued by Debian (cups, imagemagick, libcpanel-json-xs-perl, and libjson-xs-perl), Fedora (checkpointctl, chromium, civetweb, glycin, kernel, libssh, ruff, rust-secret-service, snapshot, and uv), Mageia (curl), Red Hat (kernel), SUSE (cups, curl, perl-Cpanel-JSON-XS, regionServiceClientConfigAzure, regionServiceClientConfigEC2, regionServiceClientConfigGCE, trivy, and xen), and Ubuntu (cups, node-cipher-base, and qemu).

Кого конкретно обслужва законопроектът на ИТН за повече небостъргачи в София?

Post Syndicated from Боян Юруков original https://yurukov.net/blog/2025/itn-zakonoproekt/

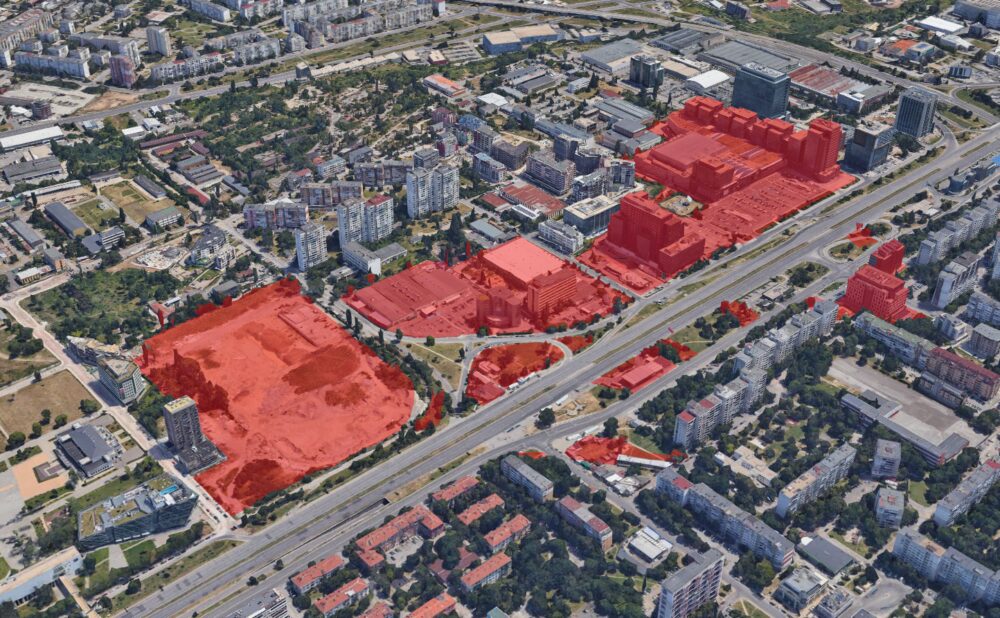
На 7-ми септември в. Сега писа за законопроект на трима депутати от ИТН, с което се вдига ограничението на височина на застрояване на конкретни части в София. Предложението е внесено на 5-ти септември от Венцислав Асенов, Христинка Иванова и Танер Тюркоглу. Първият се бори активно в последно време с „меренето на средната скорост“ видимо като част от лобизма срещу мярката. Втората стана известна със скандали и изтекли записи показващи разцепването на партията. Третият се споменава с това, че има спорни бизнес връзки с други в партията и дъщеря му има задължения към НАП. Тримата искат да се изключат от ограниченията за височина урегулираните поземлени имоти с лице към Цариградско шосе и позволената височина да се вдигне на 125 метра. Законопроектът е едно изречение, но с голям ефект.

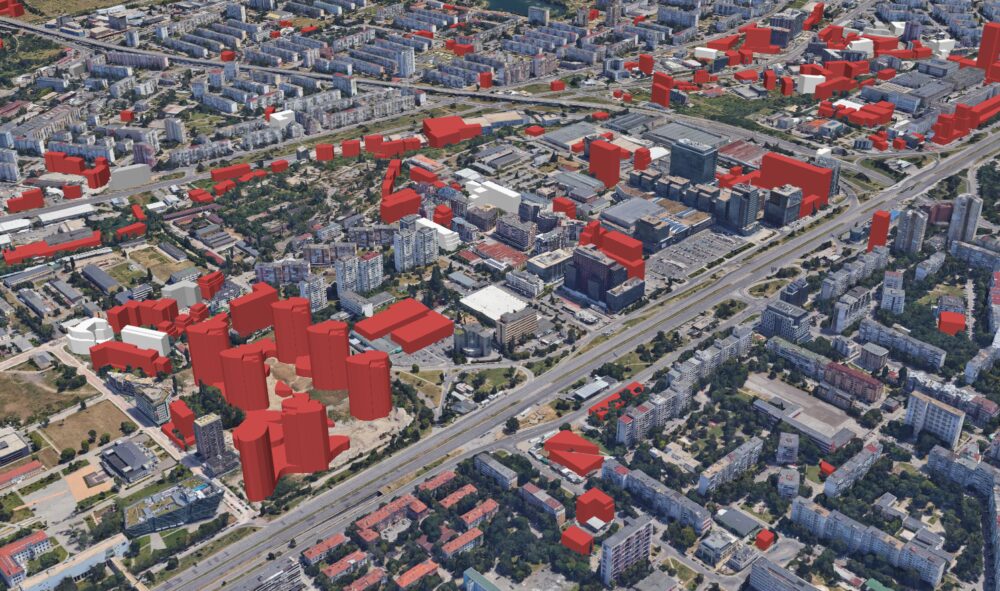
Сегашното положение на ЗУЗСО посочва в точка 5.3 на приложението към чл. 3, ал. 2, че в урегулирани поземлени имоти в СМФ зони с лице към голяма улица и които са на 400 м. от метроспирка може да се застрояват до 100 метра. Има обаче изключение изрично за райони Триадица, Лозенец, Младост и Изгрев, където ограничението е както във всички други СМФ зони – 75 метра. Затова кулите на Артекс, тази на 4-ти км. на Булфарма със огромния билборд със спорна законност, както и останалите в Младост, по булевардите Симеоновско, Черни връх и България са до 75 метра. Визуализация на тези зони и колко високо стигат над сегашните сгради може да видите на картата с ПУП-овете на Столична община. Натиснете бутонът с картата вляво, за да смените изгледа.

Какво точно се променя и къде?

Първо, предложението на ИТН е объркано – искат да променят точка 5.1 от приложението, а там не се споменава Младост. Т.е. в този си вид дори да се приеме няма да може да се приложи. Ако се споразумеят с НН ГЕРБ/ДПС да мине в зала, лесно може да го коригират като техническа грешка. Първо ще влиза в комисия с председател от ГЕРБ и където Асенов сам е зам. председател. Не изглежда да е бил обсъждан на заседанието на 10-ти септември.

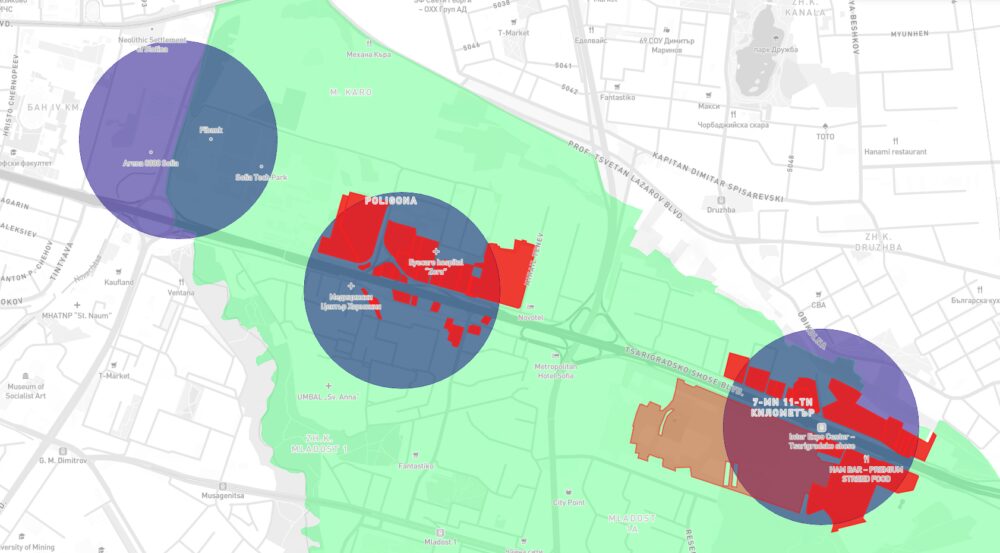
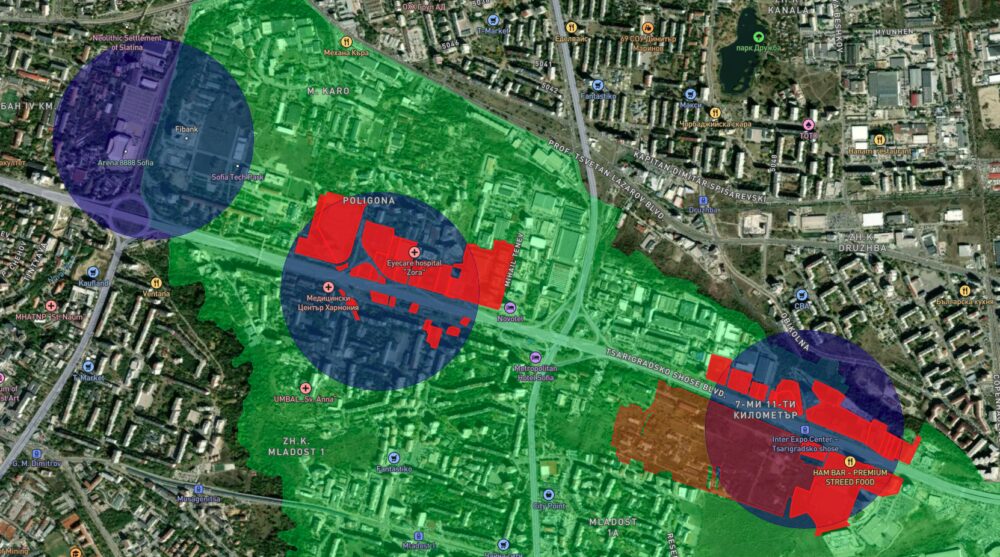
По-важното обаче е, че освен да вдига от 100 на 125 метра ограничението за тези СМФ зони около метро спирки, маха от изключението конкретни имоти с лице към Цариградско шосе. С други думи, в цяла Младост ще може до 75 метра, но за определени имоти ще може до 125. Стана ми интересно кои са те и кой ги държи. Открих 46 имоти, които са частни, в регулация, с лице към Цариградско, в Младост (в зелено), на 400 метра от метроспирка (в синьо) и в СМФ зона. Отбелязал съм ги в червено. Има един в светло червено, който е собственост на БАН. Не е в списъка с имотите на Желязков за продаване, но от опита с паркове и градини на други места в София може да съдим, че институтът борави с държавната собственост повече като строителна компания, отколкото като средище за науката.

Тук виждате същата карта, но със сателитна снимка. Около метро спирката на арена София от страната на Младост има само държавни и общински имоти.

Кои са облагодетелстваните?

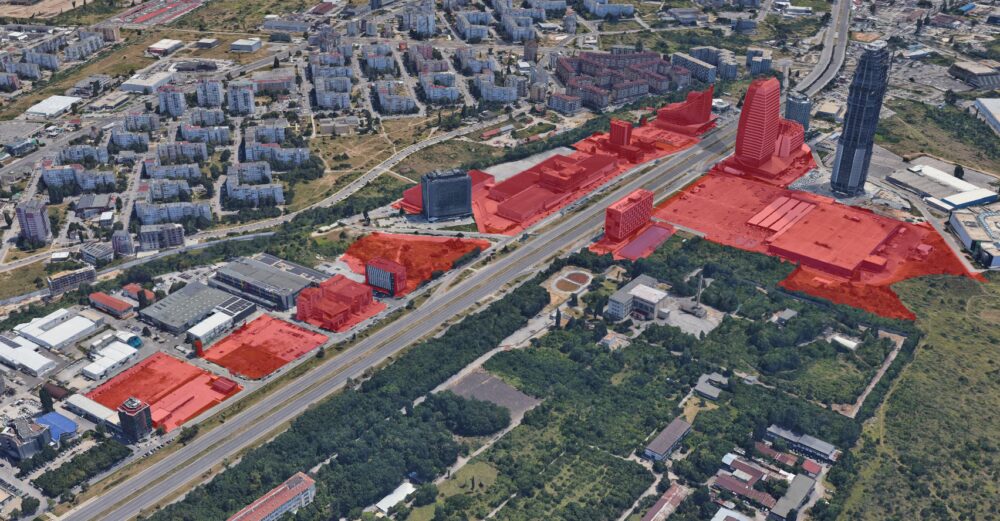
Фокусирайки се върху конкретните имоти виждаме, че повечето са малки или вече имат построени сгради. На спирка ИЕЦ/Цариградско се виждат няколко парцела, които с малко въображение и овладяване на СОС може да се прокарат изключения за разгърната площ и да се стигнат 125 метра. Това обаче е малко вероятно. Единствено първият вляво има по-голям шанс и е подал документи за ОВОС за собствен водоизточник описвайки сграда с подземни гаражи. Разбира се, имотът където се намира Метро има най-голям потенциал за комплекс с множество сгради от 125 метра. Макар да не стигат така височината на Скай Форд, ще уплътнят значително пейзажа с подобни на Капитал Форт. Няма индикации за такова желание към този момент, но промяната ще го направи напълно възможна.

Сред имотите до новата спирка след 4-ти километър попада The Mall и офис сградите около него, Бриколаж и складовете наоколо. Не се забелязват планове за по-сериозни строежи там, с изключение на една кула до паркинга на мола.

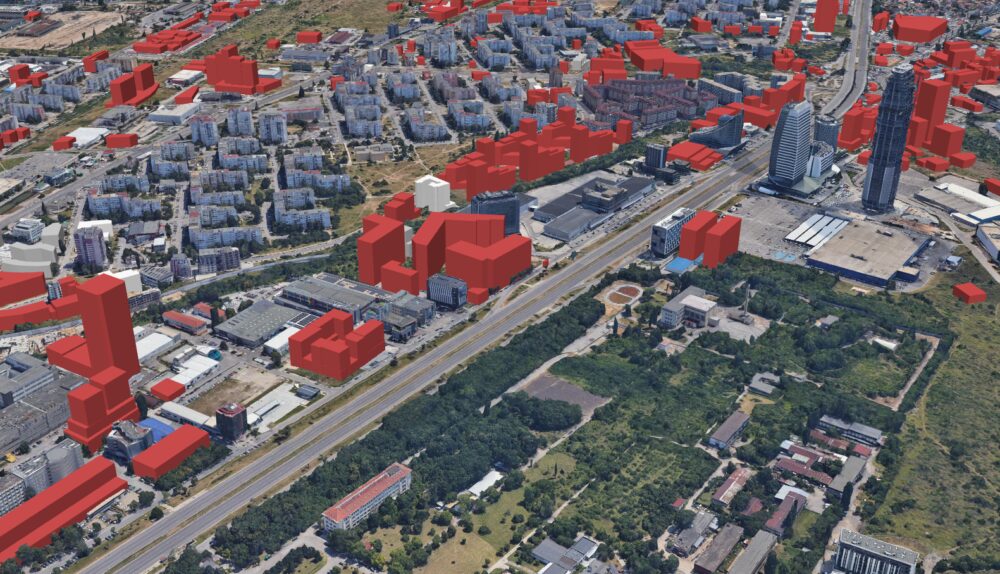
Тук попадаме на най-големия печеливш от тази схема – новият жилищен и търговски комплекс на мястото на ИПК Родина. Той беше от първите, които добавих на картата ми със застрояването още когато беше в пилотна фаза преди почти две години. Повече за него и историята му свързана с Пеевски, източването на КТБ и прочие може да прочетете в Капитал, които споделят визуализацията ми. Виждате го отново на втората снимка с височината му до 75 метра – колкото и другия проект на собствениците Булфарма отсреща на булеварда. Доколкото не може да твърдим, че има връзка между тях и законопроектът на ИТН, безспорно от всички имоти, които видях, те се облагодетелстват най-много в краткосрочен план. Достатъчно е само да изчакат да излезе в Държавен вестник и да внесат промени по проекта, които НАГ няма да може да откаже поради волята на законодателя. По принцип по каналния ред не могат да увеличат застроената площ от вече прекомерната заложената още през 2017, но дори само вдигането на височината увеличава печалбата на кв.м. драстично.

В горните снимки се фокусирам върху имотите около Цариградско шосе, защото в едното изречение на законопроекта личи, че там се целят. Тази промяна ще вдигне максималната височина и за строителство в Люлин, Надежда, Левски, Овча купел, Дружба, около летището и дори на отделни места в Слатина. В СМФ зоните там обаче вече е разрешено до 100 метра и промяната не е толкова драстична като обсъжданите горе. Все пак, ще се опитам да разглеждам и другите райони дали ще изскочи нещо.

Защо се прави това и какво да направим?

Законопроектът на тримата от ИТН е без реална аргументация. Според тях не влияе на околните, не предвижда „разходи за държавата и гражданите“ или административна тежест. Разбира се, не споменават тежестта на община София за инфраструктура и драстичното сваляне на цената на околните имоти. Доколкото естетиката е въпрос на лично мнение, в комбинация с останалата част от нормативната уредба ще доведе до влошаване на градската среда.

Всъщност, опитват се да изтъкнат, че бъдещите сгради щели да бъдат естествена преграда за шумовото и праховото замърсяване на Цариградско. Това не е подкрепено с каквито и да е източници. Най-малкото логиката говори за точно обратното – ако иска някой преграда, трябва да има ниски и дълги сгради, които да създават стена по продължението на булеварда. Също както виждаме в момента да се случва по Черни връх, където се позволиха долепена поредица от сгради с надвишени параметри благодарение на решения на Фандъкова, ГЕРБ в СОС и тогавашния главен архитект Здравков сега наместен в софийската РДНСК да контролира собствените си заповеди и да одобрява проектите, които е уредил. Има сведения обаче, че шумово и прахово замърсяване се намалява със зелени площи и особено гъста дървесна растителност. В проекта си обаче ИТН не увеличава тези изисквания за много конкретно подбраните имоти. Така или иначе контролирането на изпълнението и поддържането на задължителното озеленяване страда сериозно.

В аргументите им многократно се обяснява, че нечестно се ограничавали „възможностите“ на тези имоти. На база думите им, съмнения изтъкнати в медиите години наред за търговия с постове и влияние на партията им и така типичната за нас българите циничност, лесно може да се направи извод за реалните цели на предложението. Със сигурност един конкретен инвеститор ще спечели и от това определено няма да се намали замърсяването на булеварда. Предвид сигналите, че не е изпълнил дори задължителното озеленяване на другата си кула отсреща, надали може да разчитаме на нещо различно и тук.

Ако искате да спрете тази откровена злоупотреба, свържете се с депутатът, за който сте гласували във вашия район. Свържете се най-вече с депутатите от ИТН, чиито колети са пуснали този проект, да ги питате как е позволено това. Обърнете внимание и на темата с продажбата на държавни имоти – тя също ще се гласува скоро в парламента и ще има значение и в този контекст.

The post Кого конкретно обслужва законопроектът на ИТН за повече небостъргачи в София? first appeared on Блогът на Юруков.

How to build resilient SMS delivery with AWS End User Messaging

Post Syndicated from Tyler Holmes original https://aws.amazon.com/blogs/messaging-and-targeting/how-to-build-resilient-sms-delivery-with-aws-end-user-messaging/

Reliable SMS delivery is a critical requirement for many businesses. However, SMS communications can be impacted by factors outside your direct control, such as carrier availability and delivery challenges.

In this post, we explore strategies for building resilient SMS architectures using AWS End User Messaging. We discuss how to architect your SMS communications at the originator, account, and Regional levels to support high availability and seamless failover, even in the face of disruptions. This includes implementing best practices like using phone pools, dedicated originators, and multi-Region redundancy.

By understanding these strategies, you can create a resilient messaging system that keeps your mission-critical SMS flowing reliably to your customers and stakeholders, regardless of external service interruptions or carrier-specific issues.

How SMS delivery works

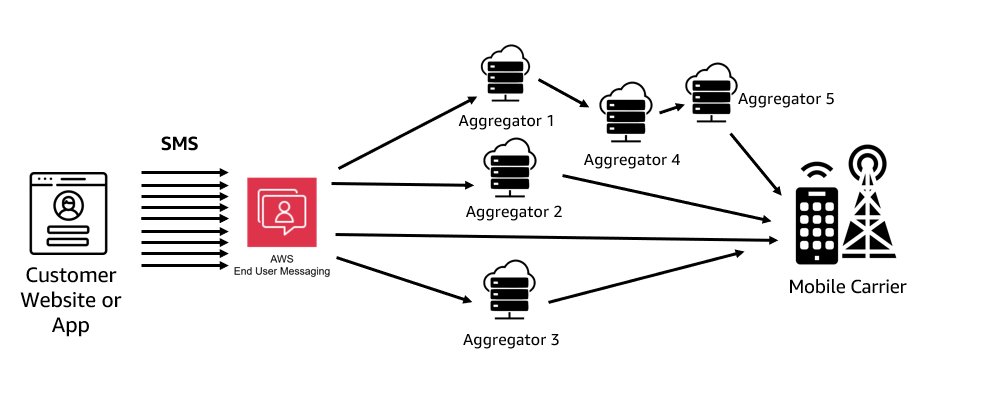
The process of delivering an SMS message involves a complex chain of interconnected systems. The message needs to be routed to the appropriate mobile network operator (carrier) based on the recipient’s phone number, and there are many paths the message could take. When a user sends an SMS through AWS End User Messaging, the message is routed appropriately based on the country, carrier, and originator type being used.

The inherent complexity of SMS delivery means there are numerous potential service degradation points, such as issues with an aggregator, carrier configurations, and filtering. The general availability of a mobile device can also be a factor, because it’s dependent on the current health of the network the device uses. Things as simple as weather changes or location (such as parking garages) can impact the delivery of messages and illustrates why alternate channels should be provided.

Understanding this underlying architecture is crucial for building resilient SMS systems that can withstand disruptions at different stages of the process. The following diagram shows a simplified version of how an SMS is delivered to a handset.

The need for SMS resiliency

Given the complex dependencies and potential points of degradation in the SMS delivery chain, it’s critical to architect your SMS communications for resilience. This helps make sure your messages can be delivered reliably, even when facing Regional service disruptions, carrier challenges, or other potential communication barriers.

Levels of resiliency for SMS

The following are the three levels of resiliency to consider for SMS and some potential reasons for disruption:
  • Originator-level resiliency – Carriers and other downstream entities can sometimes block or filter specific origination numbers, causing delivery issues. Originators must be configured with these downstream entities, so downstream misconfigurations might occur.
  • Account resiliency – Your primary AWS account might experience a disruption, preventing you from sending messages through that account. Account-level issues, such as reaching an account SMS spending limit or throughput, might limit your ability to send from a specific account.
  • AWS Region resiliency – Regions can experience degradation of service, and originators are tied to an account and Region when they are configured and can’t be moved.

General best practices for SMS resiliency

A phone pool, also known as a pool, is a collection of originators that share the same settings. When you send messages through a phone pool, it selects an appropriate origination identity to use for sending the message based on the country code. In general, pools will select the highest throughput originator in the pool for the country being sent to. This means that the order from first to last will be short codes, long codes, sender ID, toll-free, and finally shared routes. If one of the origination identities in the phone pool is unable to send the message, the phone pool will automatically fail over to another origination identity, which is part of the same phone pool, for that same country if there is one available.

Having a dedicated originator for each country you send to improves deliverability and allows for two-way communication if the originator supports it. Pools have a setting for shared routes in some countries, which is a pool of shared origination identities that AWS maintains. When you activate shared routes on a pool and don’t have a dedicated originator, AWS End User Messaging SMS attempts to deliver your message using one of the shared identities. The origination identity could be a sender ID, long code, or short code, and could vary within each country. These shared routes are not capable of two-way communication so they are not eligible for any use cases that require it. Deliverability on these shared routes also varies; it’s always a best practice to use a shared route as a last resort option. Using at least one dedicated originator for each destination and use case you support will improve your deliverability and the experience of your end-users. Refer to How to Manage Global Sending of SMS with AWS End User Messaging for more details on getting ready to send SMS. The post includes a template for organizing use cases and selecting originators.

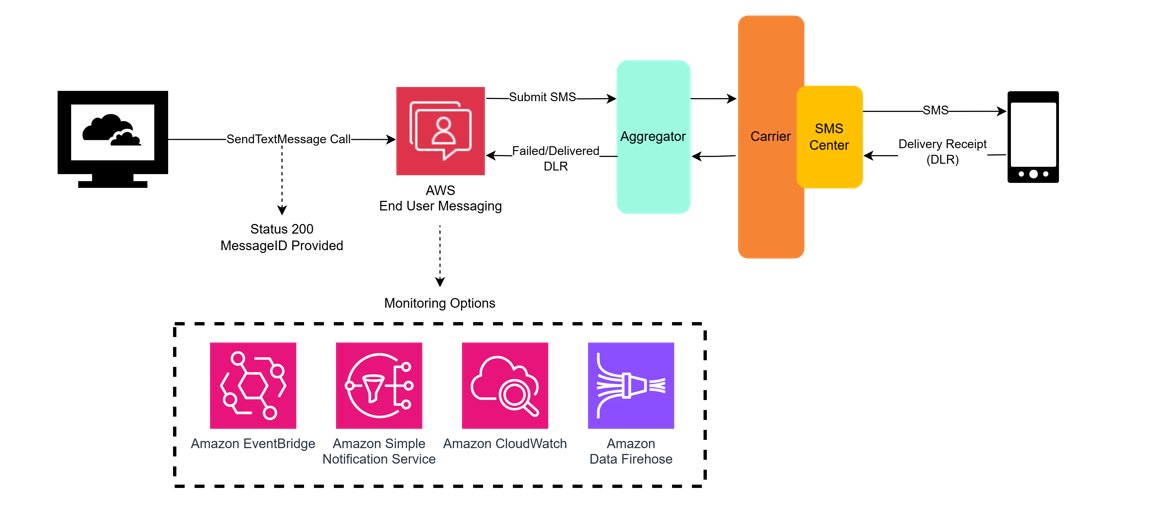
AWS End User Messaging provides several options for sending Delivery Receipts (DLRs), as shown in the following diagram, including Amazon Simple Notification Service (Amazon SNS), Amazon CloudWatch Logs, and Amazon Data Firehose. If you are using a multi-Region or multi-account architecture, it’s important to centralize this data. The following GitHub repo provides a solution as a deployable starter project that builds on top of an Amazon S3 storage location and combines channel engagement and conversational data into a centralized data store. You can also optionally deploy an Amazon QuickSight dashboard to visualize the engagement data.

Using the message feedback feature of AWS End User Messaging also allows for more visible and finite message statuses. You can use signals from customers to determine if they have received the message and set the message feedback status record as delivered. Using message feedback means you don’t have to wait for the DLR to be returned and you can set your message as received and update your message metrics. Message feedback can be used for typical user actions, such as completing a workflow, clicking a link, verifying a one-time password.

When choosing a repository for your DLRs, make sure to consider your data requirements related to data consistency, tolerance for latency, performance requirements, and your unique access patterns.

Strategies for resiliency at each level

Each level at which SMS operates provides layered resiliency. You don’t need to implement all the layers; this will depend on your comfort level for complexity and increased cost. In this section, we review the resiliency strategies at each level.

Originator-level resiliency

AWS recommends provisioning a minimum of two origination number types per country in each Region you are using to provide redundancy. Different originator types often use different paths to send, so if one sending is degraded on one path, you can switch to the other. The implementation itself will depend on the countries you are sending to and the level of complexity and cost you are willing to incur, because some originators have costs associated with owning them.If you decide to have multiple originators, we recommend communicating with your end-users about the methods by which you might communicate with them. This reduces the chance of spam complaints if you need to deliver SMS with an unfamiliar originator.

Let’s explore an example of designing originator-level resiliency for the US (the general pattern is the same across different countries).The US options for originators, in order of highest to lowest throughput, are short codes, 10DLC, and toll-free numbers (TFNs). Each requires registration to be completed. Depending on your throughput needs, there are a few things we recommend when implementing resiliency in the US.

If you’re using 10DLC, we recommend getting at least one other 10DLC number that you don’t use. If you encounter a filtering or blocking event by US carriers, you can use this number to swap into your pool to continue to be able to send while you solve the problem on the blocked or filtered number. This might give you more time to fix an issue while still maintaining your ability to send. The other option, and another layer of redundancy, is to register a TFN that you could swap into your pool. Although TFNs have lower throughput, this can help you continue some level of sending while solving for the blocking issue.

If you’re using a short code, you have an added layer of redundancy because carriers don’t generally block those codes without warning. You will receive an audit and be given a chance to fix whatever issue the carriers have found with your sending. Having a second short code or using a lower throughput backup such as a 10DLC or TFN is also an option.

Account-level resiliency

There is always the chance that your primary account could be degraded in some way. Issues such as an inaccessible account or hitting a spending limit can take time to mitigate. For example, Artificially Inflated Traffic (AIT), also known as SMS pumping fraud, can cause your spending limit to be hit, shutting off your ability to send from that account. To learn more, refer to Defending Against SMS Pumping: New AWS Features to Help Combat Artificially Inflated Traffic.

You can mitigate these issues by having a secondary account in the same Region that you share your originators, pools, and opt-out lists with by using AWS Resource Access Manager (AWS RAM) to enable resource sharing. You can use AWS RAM to share some AWS End User Messaging SMS resources with other AWS accounts or through AWS Organizations. The accounts being shared to must be in the same Region as the account that owns the resources. Configuring this sharing makes it possible to send from a secondary account using the same resources in the primary account. Billing on the volume is attributed to the sending account, whereas charges for the originators are billed to the account that owns them.

Region-level resiliency

There is always the possibility of a Regional degradation of services or a downstream misconfiguration for a particular originator or Region. The only way to protect your sending against this is to configure origination numbers in at least one other Region. This way, you can fail over to a secondary Region if the primary Region experiences a degradation of service. When implementing this approach, keep the following considerations in mind:

  • If a country requires registration for SMS sending, you must complete that registration separately in each Region where you plan to use an originator for that country. You can submit the same registration for each Region, or for some originators you can specify multiple Regions at the time of registration, rather than applying twice.
  • Many countries support sender IDs, and as long as they don’t require a registration, the same sender ID can be configured in multiple Regions. This simplifies the multi-Region setup. If you need to configure many sender IDs, refer to Automating Sender ID Configuration for SMS with AWS End User Messaging APIs to learn how to automate the process of configuring sender IDs across Regions.
  • Carrier availability can also be a point of failure, so it’s important to have multiple origination numbers provisioned in each Region to avoid a single point of failure.

Although this post focuses specifically on SMS resiliency, as a general best practice for your messaging system, you should also enable alternative channels as failover or primary channels. Channels such as WhatsApp, push, voice, or email offer increased resiliency in the event of a degradation of SMS service.

Automating failover

AWS End User Messaging provides DLR data for your sent messages, which is a key piece of information you can use to automate retries and handle failures. As a protocol, SMS doesn’t guarantee delivery. Depending on the country being sent to, DLRs might take up to 72 hours to be returned or in some cases might not be returned at all. For this reason, relying on DLRs alone is not enough. You might also want to monitor the health of your Region or the AWS End User Messaging service, which can be done through the AWS Health Dashboard.

For a deep dive on managing SMS deliverability, refer to A Guide to Optimizing SMS Delivery and Best Practices, which goes into more detail on the complexities of SMS delivery and how to effectively monitor your message performance.

When it comes to automating your failover process, the DLR data provided by AWS End User Messaging can be a powerful tool. By analyzing the delivery statuses and error codes, you can build logic to automatically retry messages that fail on the first attempt. The key is to build in this automation proactively, rather than relying on manual intervention. Building your failover logic ahead of time can provide for a seamless recovery when delivery issues occur, minimizing disruption to your users.

It’s also important to remember that DLRs are fallible and might take up to 72 hours to arrive. The message feedback feature will give you more insight into message status, and you don’t have to wait for the DLR to be returned. You can set your message as received and update your message metrics based on expected user actions.

The goal is to create a resilient messaging architecture that can withstand the inevitable complexities of SMS delivery. Automating your failover process is a crucial component of that strategy.

Pros and cons of multi-Region SMS redundancy

Although implementing multi-Region redundancy can increase the reliability and resilience of your SMS communications, there are both advantages and trade-offs to consider. Evaluating the specific needs of your use cases against the added complexity and costs is important in determining the optimal approach.

The following are key benefits of having a resilient SMS architecture:

  • Increased reliability and availability of SMS communications – Having redundant originators and routing across multiple Regions strengthens your ability to withstand Regional disruptions or carrier-specific issues, so you can continue sending SMS reliably.
  • Seamless failover during outages – The ability to automatically fail over to a secondary Region when issues occur in the primary Region minimizes disruptions and keeps your SMS flowing.
  • Reduced impact of carrier-specific problems – By diversifying your origination numbers across AWS accounts and Regions, you can avoid being heavily impacted by a problem with a single carrier or originator.

However, consider the following important trade-offs:

  • Increased complexity in configuration and management – Maintaining redundant resources (originators, phone pools, opt-out lists, and so on) across multiple Regions adds complexity to your SMS architecture. A multi-Region setup requires additional configuration and ongoing maintenance.
  • Additional costs – Provisioning origination numbers, short codes, and so on in multiple Regions can incur additional costs compared to a single-Region setup. There might also be costs for cross-Region data transfers if centralizing delivery logs and event data. Centralizing DLR data from multiple Regions likely requires additional storage and processing costs.
  • Potential reputation and deliverability challenges – When failing over to a different Region, your SMS messages might come from new originators. If customers aren’t prepared for this change, they might mistake legitimate messages for spam. These spam reports can harm your overall SMS deliverability rates.

Overall, the pros of increased reliability and resilience must be weighed against the cons of higher complexity and costs. The optimal approach will depend on the criticality of the SMS use cases and your organization’s risk tolerance.

Conclusion

By implementing the layered resiliency strategies outlined in this post, you can significantly improve the reliability of your critical SMS communications. Whether you start with originator-level redundancy using phone pools or build a fully Regional-resilient architecture, proactively investing in your setup helps your messages reach your customers, even in the face of unexpected challenges.

To get started, consider the following next steps:

  • Evaluate your current SMS workloads and determine what level of resiliency is right for your business needs and risk tolerance.
  • As a first step, implement phone pools in your primary Region to protect against single-originator filtering or blocking.
  • For critical applications, set up a secondary account and use AWS RAM to share your primary originators, providing a robust layer of account-level redundancy.

To learn more, explore the AWS End User Messaging documentation and the AWS RAM User Guide. For personalized guidance, work with your AWS account team to design the optimal SMS architecture for your business.


About the author

Migrating from API keys to service account tokens in Grafana dashboards using Terraform

Post Syndicated from Majdoulina Makbal original https://aws.amazon.com/blogs/big-data/migrating-from-api-keys-to-service-account-tokens-in-grafana-dashboards-using-terraform/

With the release of Grafana 9.4, Amazon Managed Grafana added support for service accounts, which have become the recommended authentication method for applications interacting with Amazon Managed Grafana, replacing the previous API key system.

While API keys are created with a specific role that determines their level of access, service accounts offer a more flexible and maintainable approach. They support multiple tokens, can be enabled or disabled independently, and aren’t tied to individual users, allowing applications to remain authenticated even if a user is deleted. Permissions can be assigned directly to service accounts using role-based access control, simplifying management of long-lived access for non-human entities like applications or scripts.

In this blog post, we walk through how to migrate from API keys to service account tokens when automating Amazon Managed Grafana resource management. We will also show how to securely store tokens using AWS Secrets Manager and automate token rotation with AWS Lambda. All infrastructure is deployed using Terraform, though the pattern can be adapted to your infrastructure-as-code framework of choice.

What are service accounts and tokens?

A service account is designed to authenticate automated tools and systems with Amazon Managed Grafana and is intended for programmatic access. A service account token is a secure credential issued to a service account and can be used to authenticate requests to the Amazon Managed Grafana HTTP API. Multiple tokens can be associated with a single service account, and tokens can be individually revoked or rotated without affecting other services or requiring changes to user accounts.

For a deeper understanding, see the Grafana service account documentation.

Solution overview

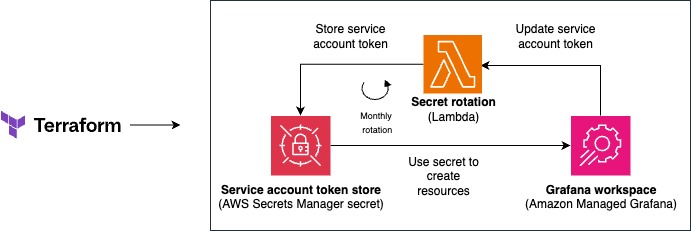
In this solution, we show you how to create a service account, reference it in your Terraform stack, and then implement rotation of the token associated with it using Lambda and Secrets Manager as shown in the following diagram:

Workflow diagram showing automated secret management between Terraform, AWS Secrets Manager, and Grafana workspace with Lambda rotation

Architecture diagram illustrating the integration between Terraform, AWS Secrets Manager secret store, and an Amazon Managed Grafana workspace, with secret rotation functionality.

The following are the basic steps to set up the solution.

  1. Set up Amazon Managed Grafana with service accounts.
  2. Update the secret in Secrets Manager with the token value.
  3. Automate resource creation in Amazon Managed Grafana using service account tokens in Terraform.
  4. Create a service account and token in your Amazon Managed Grafana workspace.
  5. Store the token securely using Secrets Manager.
  6. Use Terraform to automate Amazon Managed Grafana resource creation with the token.
  7. Automate the rotation of the service account token.

GitHub repo for cloning the code and deploying the Terraform stack.

Prerequisites

Before starting this walkthrough, make sure that you have the following:

Solution walkthrough

Use the following steps to set up and configure the solution.

Provision resources using the Terraform stack

The full source code of the solution is in sample-migrate-from-apikeys-grafana and is deployed using Terraform.

  1. Clone the repository.
git clone https://github.com/aws-samples/sample-migrate-from-apikeys-grafana.git
  1. Initialise a Terraform project.
terraform init
  1. Create infrastructure for the secrets and the Amazon Managed Grafana instance.
terraform apply —target=aws_secretsmanager_secret.token —target=aws_grafana_workspace.grafana

This step creates the Amazon Managed Grafana workspace and the Secrets Manager secret. In the next step, you bind the workspace with AWS IAM Identity Center and generate the service account token.

Retrieve service account token from the Amazon Managed Grafana workspace

You must have administrative privileges in your Amazon Managed Grafana workspace to perform this step. This applies whether you’re using IAM Identity Center or an external identity provider for authentication.

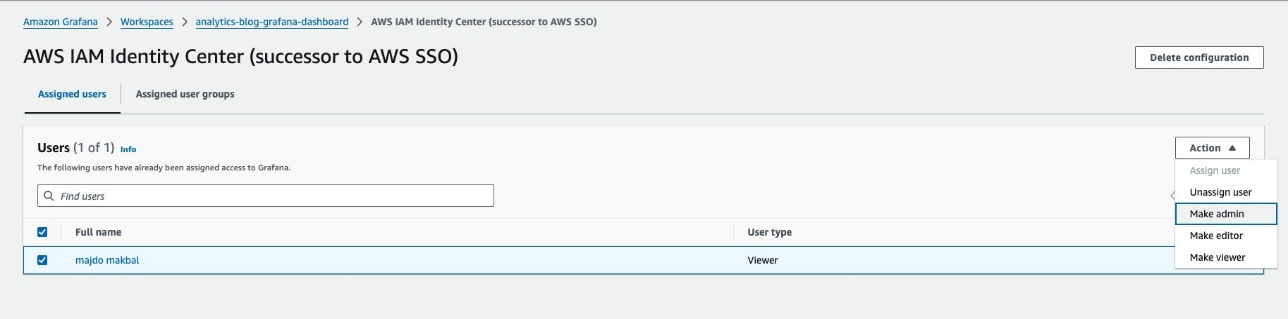
  1. To change a user’s role in AWS IAM Identity Center (console)
    1. Open the Amazon Managed Grafana console.
    2. In the navigation pane, choose Workspaces.
    3. Select the workspace you want to manage.
    4. On the AWS IAM Identity Center, choose the Assigned users tab.
    5. Select the row of the user that you want to modify.
    6. For Action, choose the following:
      • Make admin
    7. Confirm the role change.

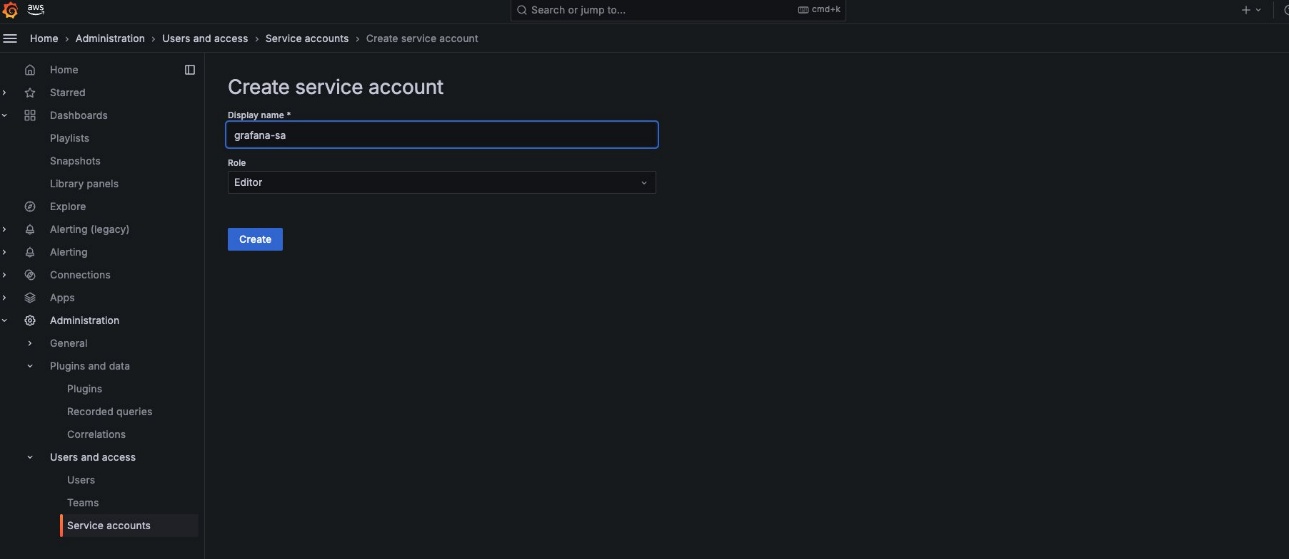
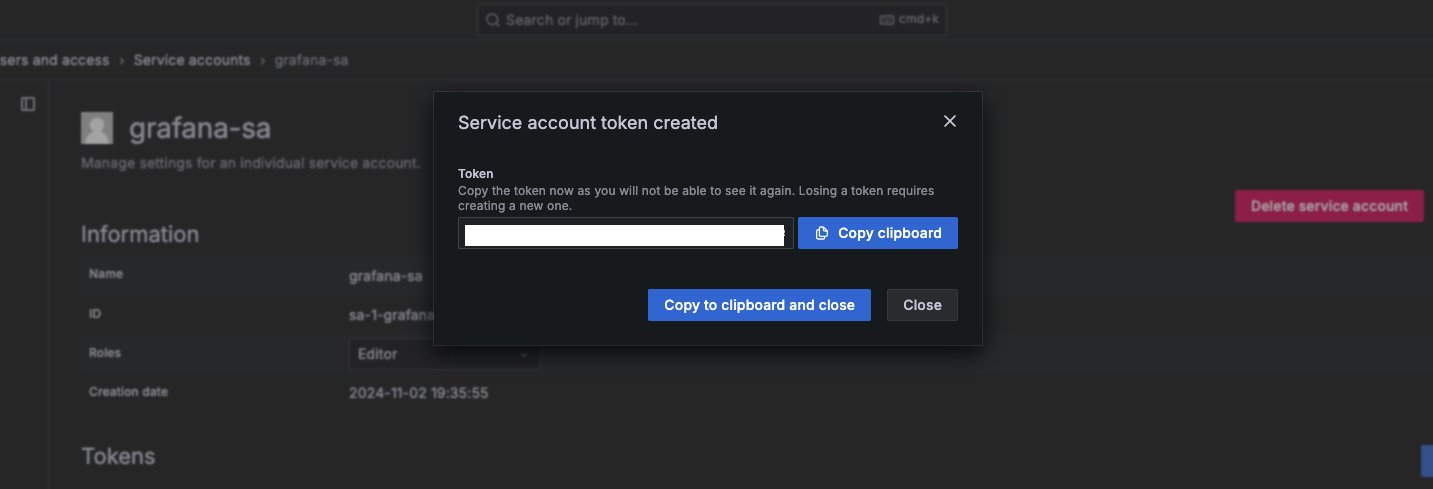
  1. Select the workspace URL and sign in using your credentials, you should be able to create a service account under the name grafana-sa (or the name of the variable defined in /variables.tf).

  1. Assign the Editor role to the service account to allow it to create dashboards and folders. Learn more about service account roles in the Assign roles to a service account in Grafana.
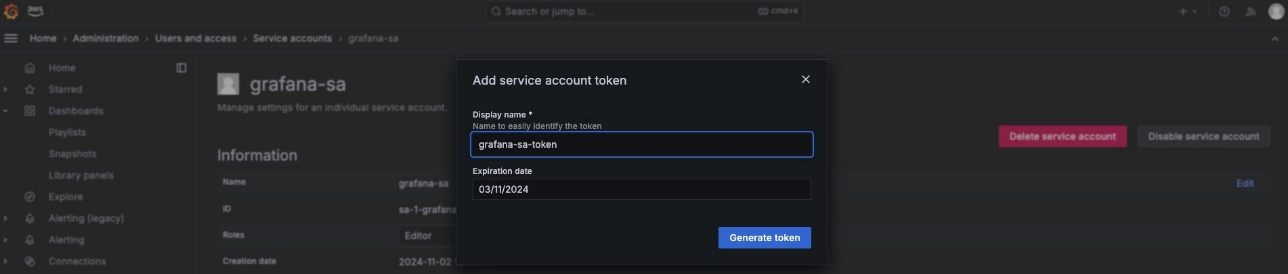
  2. After the service account is created, add a service account token to it, again the name should be similar to the one defined in /variables.tf.

Add the token to Secrets Manager and create the rest of the resources

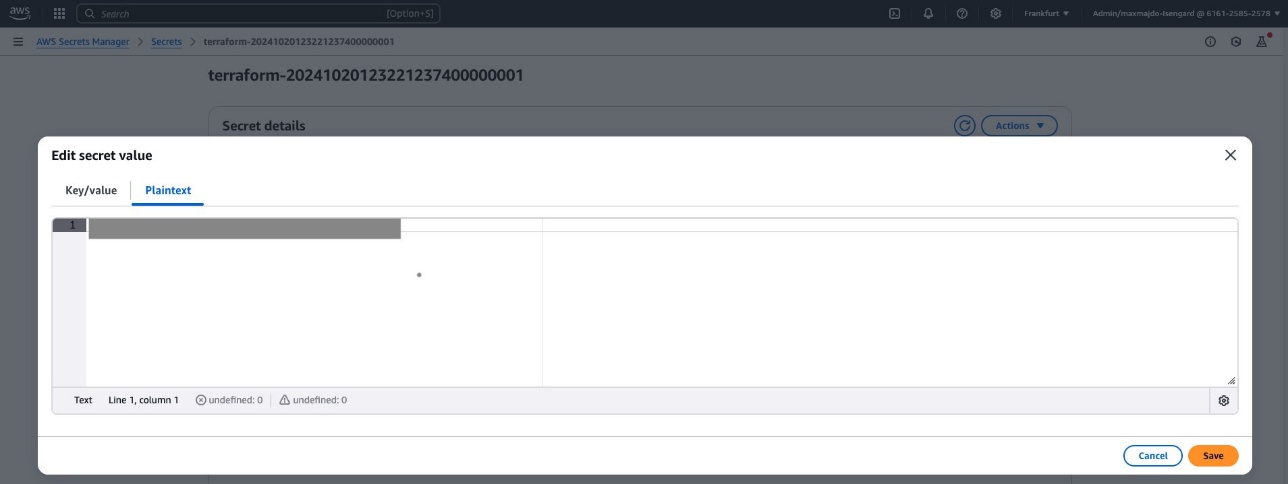
After you complete this step, the access token will be stored in Secrets Manager and will automatically be used in the provider definition during future runs of terraform apply.

  1. Copy the service account token.

  1. Paste it into the plaintext section of the Secrets Manager secret created in the previous section

  1. With the access token stored in Secrets Manager, there is no longer a need to restrict the apply operation to the rotation module using the --target flag. Use the following code to remove the restriction.
    provider "grafana" {
      url  = "https://${aws_grafana_workspace.grafana.endpoint}"
      auth = module.grafana_sa_key_automation.grafana_sa_token
    }

Clean up

To avoid incurring future charges, use the following command to delete unused Amazon Managed Grafana service accounts and Terraform-managed resources run the cli command terraform destroy.

Security notes

To protect the security of your organization, we recommend the following best practices:

  • Always follow least privilege principles. Grant the minimum permissions needed to the service account (for example, Editor instead of Admin).
  • Make sure that Amazon Simple Queue Service (Amazon SQS) queues, Secrets Manager secrets, and Amazon CloudWatch Logs are encrypted with a customer-managed KMS key if required by your organization.
  • Rotate secrets regularly to minimize exposure.

Conclusion

In this post, we demonstrated how to migrate from API keys to Amazon Managed Grafana service account tokens using Terraform, with secure storage in AWS Secrets Manager and optional automated token rotation via AWS Lambda.This modern approach improves security, scalability, and auditing in your automation pipelines.

For more information, see the Amazon Managed Grafana service account documentation.


About the authors

Majdoulina

Majdoulina Makbal

Majdoulina is a Delivery Consultant in AWS Professional Services, specialising in AI and ML solutions. With a strong background in industrial connected services, she brings extensive experience helping organisations across diverse industries transform their business vision into technological reality. Based in Munich, she’s mastering the art of explaining transformer architectures and federated learning over a Maß at Oktoberfest.

Use the Amazon DataZone upgrade domain to Amazon SageMaker and expand to new SQL analytics, data processing, and AI uses cases

Post Syndicated from David Victoria original https://aws.amazon.com/blogs/big-data/use-the-amazon-datazone-upgrade-domain-to-amazon-sagemaker-and-expand-to-new-sql-analytics-data-processing-and-ai-uses-cases/

Amazon DataZone and Amazon SageMaker announced a new feature that allows an Amazon DataZone domain to be upgraded to the next generation of SageMaker, making the investment customers put into developing Amazon DataZone transferable to SageMaker. All content created and curated through Amazon DataZone such as assets, metadata forms, glossaries, subscriptions, and so on are available to users through Amazon SageMaker Unified Studio after the upgrade.

As an Amazon DataZone administrator, you can choose which of your domains to upgrade to SageMaker through a user interface driven experience. You can use the upgraded domain to use your existing Amazon DataZone implementation in the new SageMaker environment and expand to new SQL analytics, data processing and AI uses cases. Additionally, after the upgrade, both Amazon DataZone and SageMaker portals remain accessible. This provides administrators flexibility with user rollout of SageMaker while providing business continuity for users operating within Amazon DataZone. By upgrading to SageMaker, users can build on their investment from Amazon DataZone by using the SageMaker unified platform, which serves as a central hub for all data, analytics, and AI needs.

SageMaker delivers an integrated experience for analytics and AI with unified access to all your data. Collaborate and build faster from a unified studio using familiar Amazon Web Services (AWS) tools for model development, generative AI, data processing, and SQL analytics, accelerated by Amazon Q Developer, the most capable generative AI assistant for software development. Access all your data whether it’s stored in data lakes, data warehouses, or third-party or federated data sources, with governance built in to meet enterprise security needs.

What we hear from customers

Customers have successfully used Amazon DataZone, enabling data analysts, data engineers, and machine learning teams to collaborate around a shared data catalog. With generative AI moving to center stage, these organizations now aim to address a wider range of use cases, from interactive notebook exploration to prompt engineering for generative-AI projects. Upgrading their Amazon DataZone domains to SageMaker Unified Studio brings everyone together in one place. Data analysts, data engineers, machine learning (ML) specialists, and AI innovators can create integrated solutions on the same governed data while using the tools that best match their work. For example, one of our customers, HEMA, uses Amazon DataZone as a single solution for cataloging, discovery, sharing, and governance of their enterprise data across business domains. They are moving to SageMaker to enable more machine learning and generative AI use cases.

“The launch of the domain upgrade feature allows us to take the investment from our production Amazon DataZone deployment and utilize it in Amazon SageMaker. Organizationally, we are doing more in the generative AI space and with Amazon SageMaker we can accomplish new use cases that leverage the assets curated through Amazon DataZone. With this feature we also love that both portals remain open at the same time so that we can thoughtfully transition user populations to Amazon SageMaker.”

– Tommaso Paracciani, Head of Data & Cloud Platforms at HEMA.

“We’ve invested a lot in building our data management platform for production and logistics, using Amazon DataZone, to accelerate our digital transformation. Evolving our data management solution to use Amazon SageMaker Unified Studio means Data Analysis, Data Engineering, Machine Learning & Generative AI features can now be done from the same place. With the domain upgrade feature, it allows us to onboard to Amazon SageMaker faster by utilizing the work done from Amazon DataZone“

– Volkswagen AG

Upgrade your Amazon DataZone domain to SageMaker Unified Studio

  1. On your Amazon DataZone domain home page, a banner appears at the top announcing the new domain upgrade feature. Choose Get started on this banner to open the upgrade wizard.

  1. A summary page explains the actions the upgrade wizard will perform and what to expect while it runs. Read the information carefully, then choose Start to begin the upgrade.

  1. On the configuration screen, specify the AWS Identity and Access Management (IAM) roles and ownership for your new SageMaker Unified Studio domain:
    1. Domain execution role – The runtime role the domain assumes for SageMaker operations.
    2. Domain service role – Authorizes the service to create and manage domain resources.
    3. Root domain owner (optional) – Designates the administrators of the upgraded root domain. IAM roles cannot sign in to the SageMaker Unified Studio UI. It is helpful to have a root domain owner who can sign in to the UI to modify authorization policies for the root domain.

After selecting the appropriate roles—and, if applicable, a root owner—choose Upgrade domain to launch the upgrade.

  1. When the upgrade finishes, a confirmation banner appears at the top of the domain detail page with two items:
    1. The Amazon DataZone portal URL
    2. The Manage Amazon DataZone upgrade button. Here you can see the Amazon DataZone URL, information about the upgrade, and an option to roll back the upgrade to Amazon DataZone.

  1. Scroll to the Users section of the SageMaker Unified Studio console. All identities that belonged to your original Amazon DataZone domain—along with the root domain owner you assigned in Step 3—now appear in the new domain automatically. No additional setup is required.

  1. Use the URL provided in Step 4 to open SageMaker Unified Studio, then sign in with your existing credentials. You’ll land on the SageMaker Unified Studio home page, confirming that you’re now working in your upgraded domain.

  1. In the Projects list, choose a project that existed in your original Amazon DataZone domain and that the current user can access. Select its name to open it and confirm that every asset and permission transferred correctly to SageMaker Unified Studio.

  1. Inside the project, you can view two key areas:
    • Project Environments – Verify that every environment linked to the project has been migrated.
    • Overview – Confirm the project’s general information, including owner, description, and status.

Checking both sections helps ensure that the project moved to SageMaker Unified Studio as expected.

Conclusion

In this post, we discussed the new capability in Amazon DataZone that allows a domain to be upgraded to the next generation of Amazon SageMaker. The investment customers put into developing Amazon DataZone is now transferable to SageMaker. All content created and curated through Amazon DataZone such as assets, metadata forms, glossaries, subscriptions, and so on are available to users through SageMaker Unified Studio after the upgrade. By upgrading to SageMaker, customers build on their investment from Amazon DataZone by using the SageMaker unified platform.

To learn more, visit the domain upgrade documentation.


About the authors

David Victoria is a Senior Technical Product Manager with Amazon SageMaker at AWS. He focuses on improving administration and governance capabilities needed for customers to support their analytics systems. He is passionate about helping customers realize the most value from their data in a secure, governed manner.

Leonardo David Gomez Virahonda is a Principal Analytics Specialist Solutions Architect at AWS, with a strong focus on data governance. He helps organizations across industries implement effective governance strategies using AWS services like Amazon DataZone, AWS Glue, Lake Formation, and SageMaker Catalog. Leonardo’s work spans metadata management, data lineage, access control, and compliance—empowering customers to make their data secure, discoverable, and ready for analytics and AI. He regularly shares best practices through technical blogs, enablement content, and sessions at AWS events like re:Invent and regional Summits.
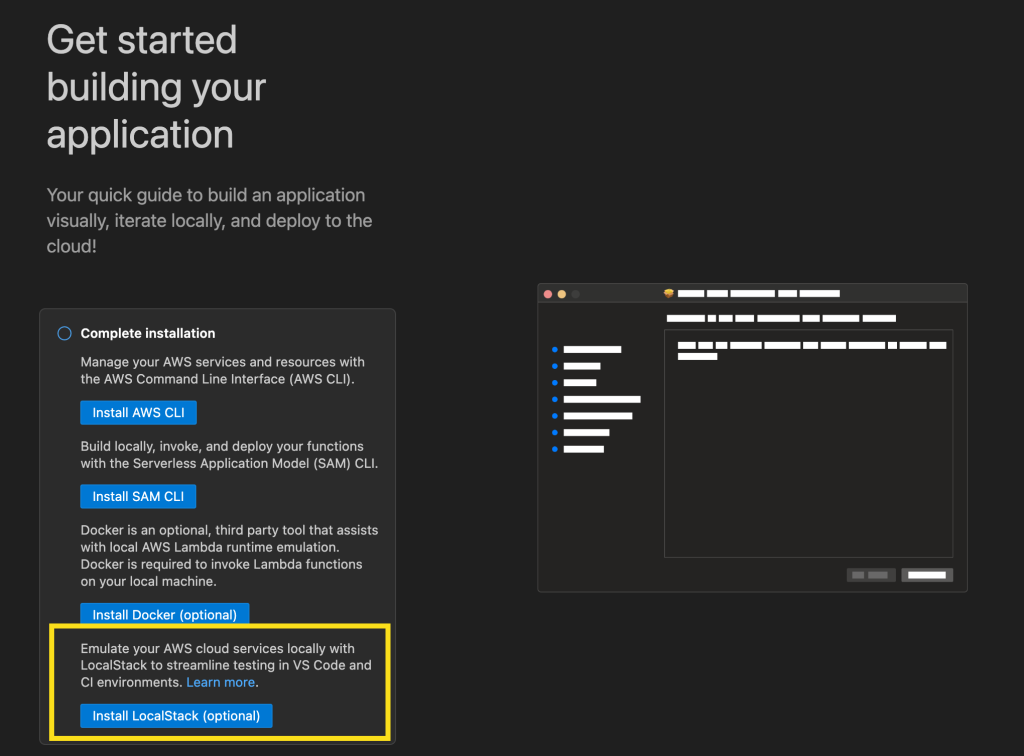
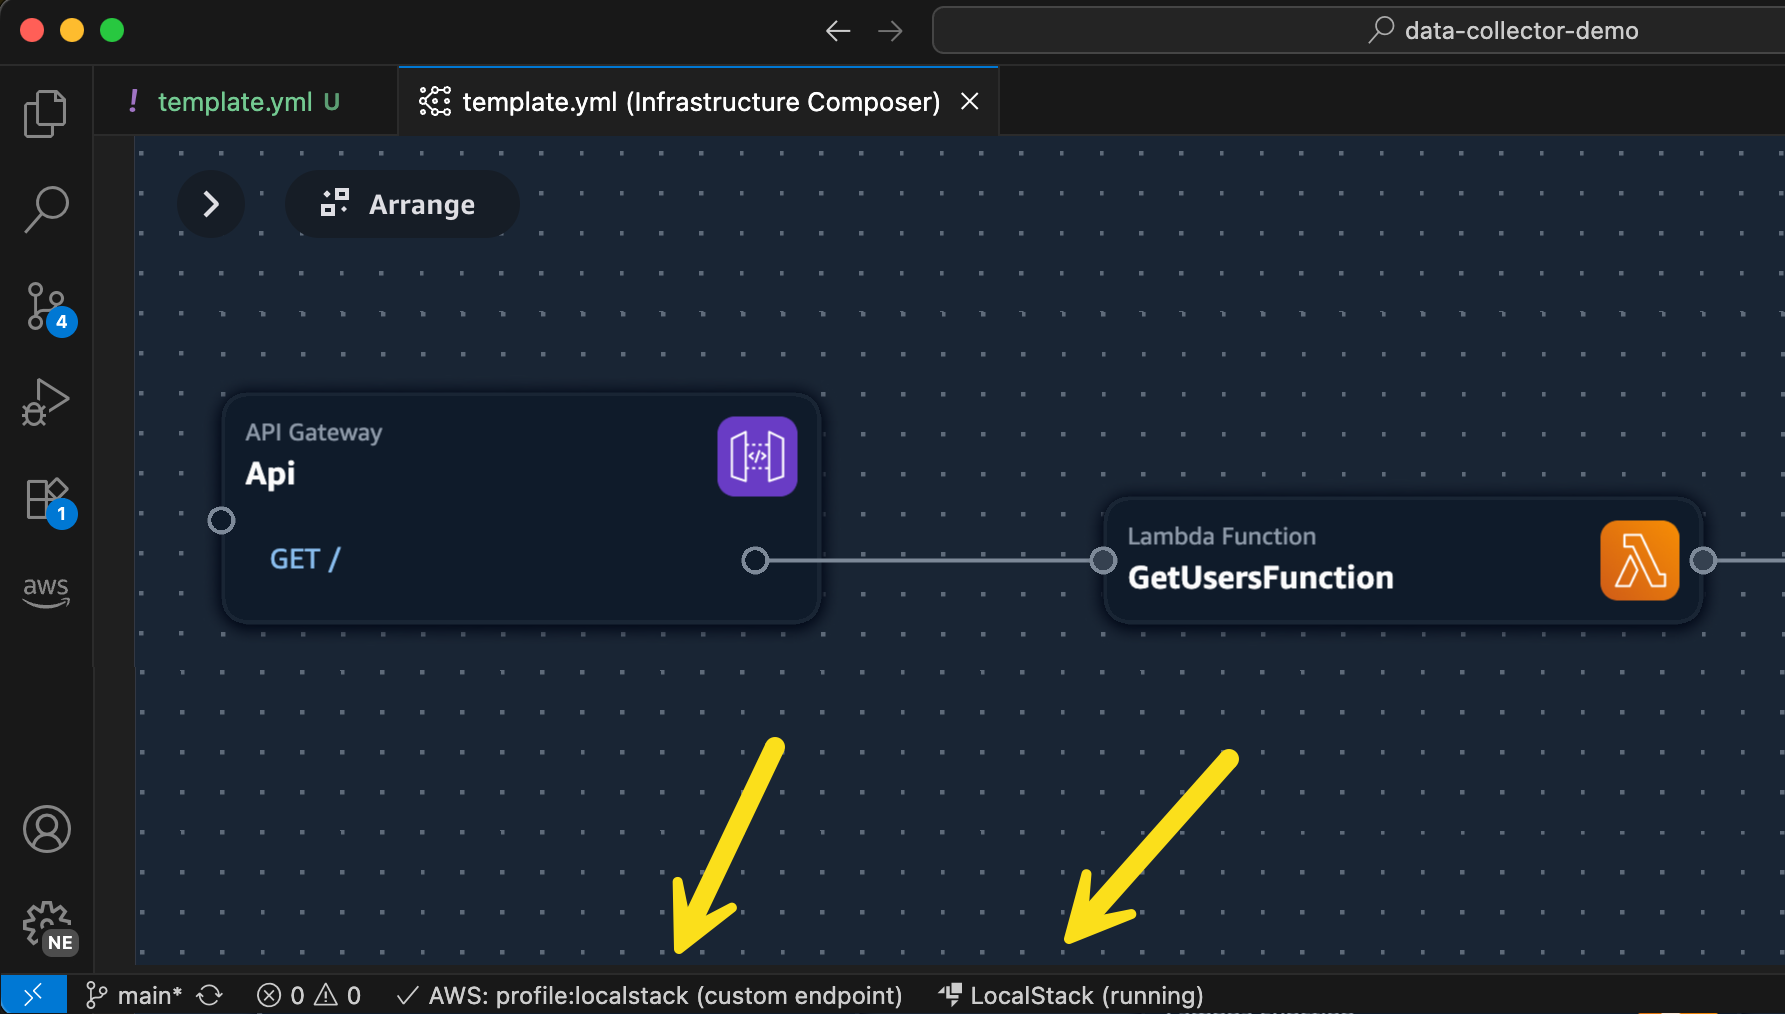
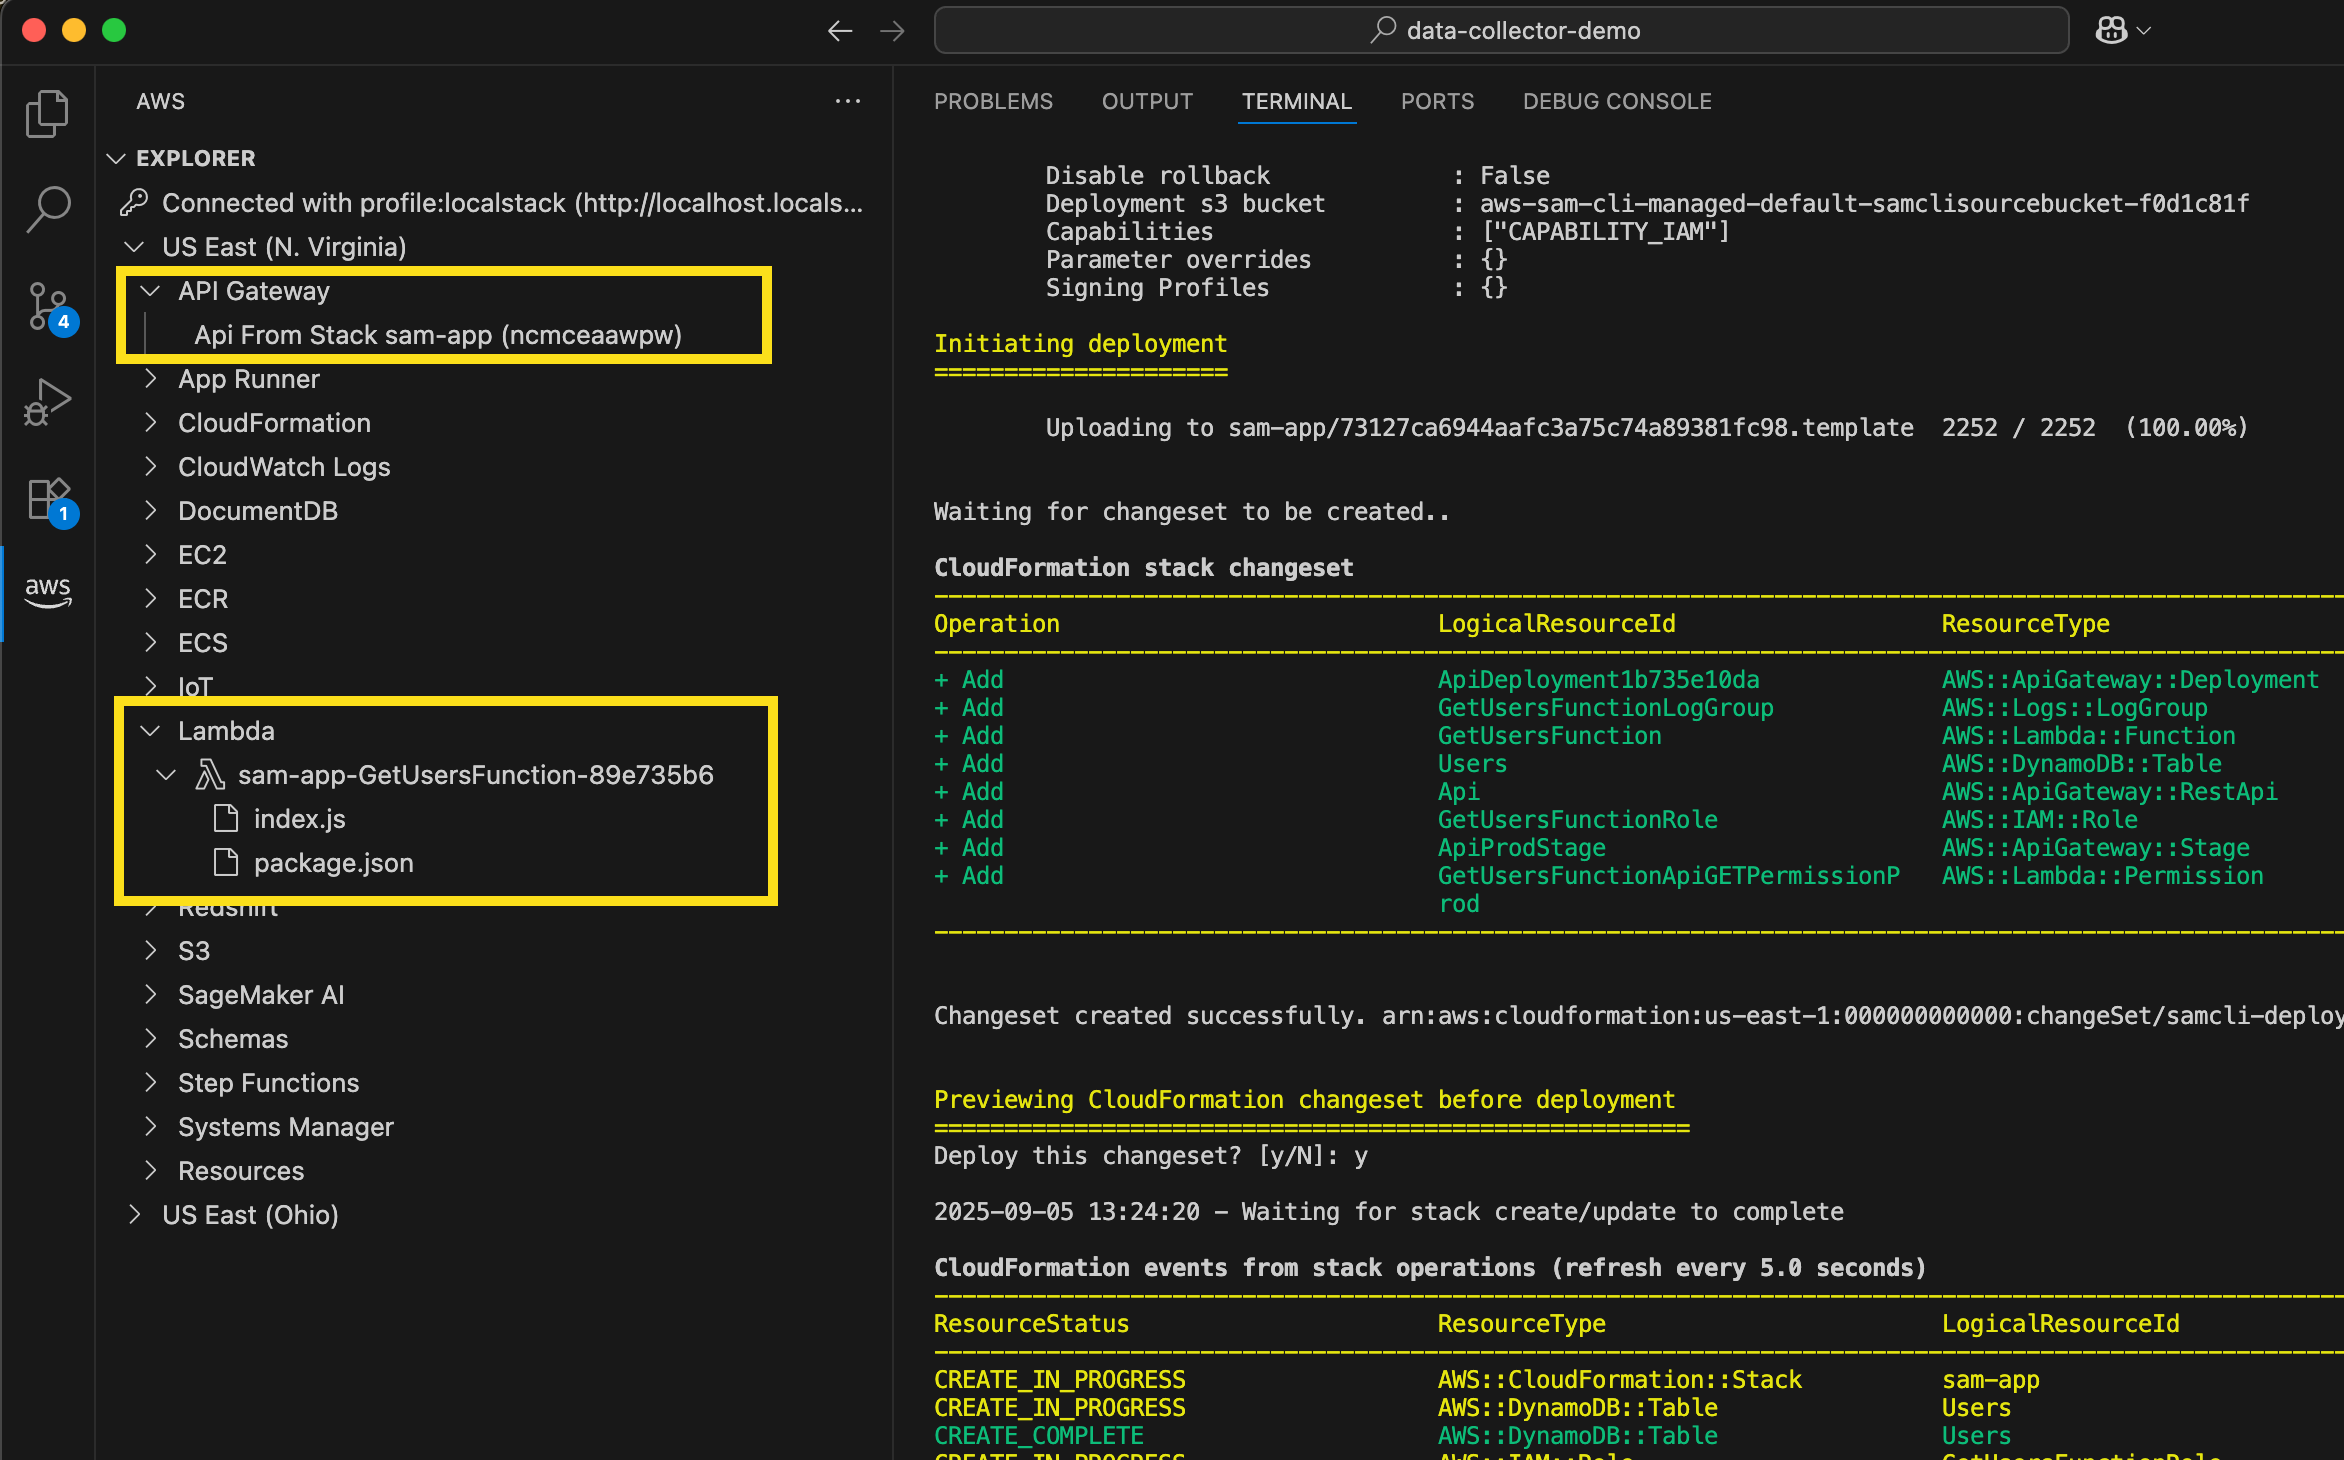
Introducing universal installers for AWS CLI v2 on macOS

Post Syndicated from Andrew Asseily original https://aws.amazon.com/blogs/devops/introducing-universal-installers-for-aws-cli-v2-on-macos/

Amazon Web Services (AWS) is announcing the availability of universal macOS installers for the AWS Command Line Interface (AWS CLI) v2.

What’s new

Starting with AWS CLI v2 version 2.30.0, the AWS CLI installers will provide universal binary support for macOS that works natively on both Apple silicon and Intel processors with a single download. This eliminates the need for Rosetta translation, a compatibility layer that enables Intel-based applications to run on Apple silicon Macs.

Updating existing AWS CLI installations

If you’re using AWS CLI v2 on an Apple-silicon Mac, we recommend you upgrade to the latest version to install native binaries.

These changes only affect the official AWS CLI installers—building the AWS CLI from source will continue to natively support the host architecture.

Have questions or feedback? Contact us on GitHub.

Andrew Asseily

Andrew is a Software Development Engineer on the AWS CLI team. Outside of work, he’s an avid Brazilian Jiu-Jitsu practitioner.

Accelerate serverless testing with LocalStack integration in VS Code IDE

Post Syndicated from Micah Walter original https://aws.amazon.com/blogs/aws/accelerate-serverless-testing-with-localstack-integration-in-vs-code-ide/

Today, we’re announcing LocalStack integration in the AWS Toolkit for Visual Studio Code that makes it easier than ever for developers to test and debug serverless applications locally. This enhancement builds upon our recent improvements to the AWS Lambda development experience, including the console to IDE integration and remote debugging capabilities we launched in July 2025, continuing our commitment to simplify serverless development on Amazon Web Services (AWS).

When building serverless applications, developers typically focus on three key areas to streamline their testing experience: unit testing, integration testing, and debugging resources running in the cloud. Although AWS Serverless Application Model Command Line Interface (AWS SAM CLI) provides excellent local unit testing capabilities for individual Lambda functions, developers working with event-driven architectures that involve multiple AWS services, such as Amazon Simple Queue Service (Amazon SQS), Amazon EventBridge, and Amazon DynamoDB, need a comprehensive solution for local integration testing. Although LocalStack provided local emulation of AWS services, developers had to previously manage it as a standalone tool, requiring complex configuration and frequent context switching between multiple interfaces, which slowed down the development cycle.

LocalStack integration in AWS Toolkit for VS Code
To address these challenges, we’re introducing LocalStack integration so developers can connect AWS Toolkit for VS Code directly to LocalStack endpoints. With this integration, developers can test and debug serverless applications without switching between tools or managing complex LocalStack setups. Developers can now emulate end-to-end event-driven workflows involving services such as Lambda, Amazon SQS, and EventBridge locally, without needing to manage multiple tools, perform complex endpoint configurations, or deal with service boundary issues that previously required connecting to cloud resources.

The key benefit of this integration is that AWS Toolkit for VS Code can now connect to custom endpoints such as LocalStack, something that wasn’t possible before. Previously, to point AWS Toolkit for VS Code to their LocalStack environment, developers had to perform manual configuration and context switching between tools.

Getting started with LocalStack in VS Code is straightforward. Developers can begin with the LocalStack Free version, which provides local emulation for core AWS services ideal for early-stage development and testing. Using the guided application walkthrough in VS Code, developers can install LocalStack directly from the toolkit interface, which automatically installs the LocalStack extension and guides them through the setup process. When it’s configured, developers can deploy serverless applications directly to the emulated environment and test their functions locally, all without leaving their IDE.

Let’s try it out
First, I’ll update my copy of the AWS Toolkit for VS Code to the latest version. Once, I’ve done this, I can see a new option when I go to Application Builder and click on Walkthrough of Application Builder. This allows me to install LocalStack with a single click.

Once I’ve completed the setup for LocalStack, I can start it up from the status bar and then I’ll be able to select LocalStack from the list of my configured AWS profiles. In this illustration, I am using Application Composer to build a simple serverless architecture using Amazon API Gateway, Lambda, and DynamoDB. Normally, I’d deploy this to AWS using AWS SAM. In this case, I’m going to use the same AWS SAM command to deploy my stack locally.

I just do `sam deploy –guided –profile localstack` from the command line and follow the usual prompts. Deploying to LocalStack using AWS SAM CLI provides the exact same experience I’m used to when deploying to AWS. In the screenshot below, I can see the standard output from AWS SAM, as well as my new LocalStack resources listed in the AWS Toolkit Explorer.

I can even go in to a Lambda function and edit the function code I’ve deployed locally!

Over on the LocalStack website, I can login and take a look at all the resources I have running locally. In the screenshot below, you can see the local DynamoDB table I just deployed.

Enhanced development workflow
These new capabilities complement our recently launched console-to-IDE integration and remote debugging features, creating a comprehensive development experience that addresses different testing needs throughout the development lifecycle. AWS SAM CLI provides excellent local testing for individual Lambda functions, handling unit testing scenarios effectively. For integration testing, the LocalStack integration enables testing of multiservice workflows locally without the complexity of AWS Identity and Access Management (IAM) permissions, Amazon Virtual Private Cloud (Amazon VPC) configurations, or service boundary issues that can slow down development velocity.

When developers need to test using AWS services in development environments, they can use our remote debugging capabilities, which provide full access to Amazon VPC resources and IAM roles. This tiered approach frees up developers to focus on business logic during early development phases using LocalStack, then seamlessly transition to cloud-based testing when they need to validate against AWS service behaviors and configurations. The integration eliminates the need to switch between multiple tools and environments, so developers can identify and fix issues faster while maintaining the flexibility to choose the right testing approach for their specific needs.

Now available
You can start using these new features through the AWS Toolkit for VS Code by updating to v3.74.0. The LocalStack integration is available in all commercial AWS Regions except AWS GovCloud (US) Regions. To learn more, visit the AWS Toolkit for VS Code and Lambda documentation.

For developers who need broader service coverage or advanced capabilities, LocalStack offers additional tiers with expanded features. There are no additional costs from AWS for using this integration.

These enhancements represent another significant step forward in our ongoing commitment to simplifying the serverless development experience. Over the past year, we’ve focused on making VS Code the tool of choice for serverless developers, and this LocalStack integration continues that journey by providing tools for developers to build and test serverless applications more efficiently than ever before.

The collective thoughts of the interwebz