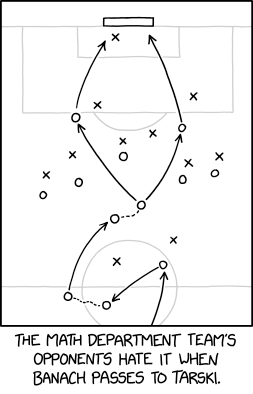
Post Syndicated from xkcd.com original https://xkcd.com/3282/
Post Syndicated from xkcd.com original https://xkcd.com/3282/
Post Syndicated from Vic A original https://www.servethehome.com/amd-to-acquire-taalas-for-model-specific-ai-inference-chips/
AMD announced that it will acquire Taalas to build future model-specific AI inference chips that are purpose built to accelerate single models
The post AMD to Acquire Taalas for Model Specific AI Inference Chips appeared first on ServeTheHome.
Post Syndicated from Sébastien Stormacq original https://aws.amazon.com/blogs/aws/runtime-instances-persistent-compute-for-production-ai-agents-on-amazon-bedrock-agentcore/
When you move AI agents from prototype to production, the infrastructure challenges multiply. Your agents need to persist state across multi-step workflows that run for hours or days. They need to coordinate with other agents, share context, and sometimes access GPUs for specialized tasks. Amazon Bedrock AgentCore runtime microVMs provide a fully managed environment for invocations that can run for up to 8 hours and support stateful workflows through managed session storage. Some workloads also benefit from dedicated, larger-capacity environments — for example, when agents need to run continuously for multiple days, access GPUs or the underlying OS, or run multiple collaborating agents on the same host.
Today, I’m happy to announce runtime instances, a new complementary compute option in Amazon Bedrock AgentCore Runtime that gives your agents persistent, managed infrastructure purpose-built for complex agent workloads.
What you get
Runtime instances provides AWS-managed EC2 infrastructure where you deploy multiple agents in a single runtime, each with their own dependencies and artifact types. Your agents can collaborate on the same host within shared sessions that persist for up to 14 days. The service supports GPU acceleration for compute-intensive tasks, session stop/restart to save costs during idle periods, and containerized deployments for teams that want to ship independently. For knowledge that needs to survive beyond a session, runtime instances pairs naturally with Amazon Elastic Block Store (Amazon EBS) and AgentCore Memory, which gives your agents long-term recall across sessions and environments.
Before today, if you wanted to keep your agents running for days or they needed GPU access, or multi-agent coordination, you had to build and manage that infrastructure yourself. You provisioned EC2 instances, configured networking, set up session management, handled scaling, and stitched together monitoring. Runtime instances handles all of that for you while integrating with the same AgentCore APIs, identity controls, and observability you already use with AgentCore Runtime microVMs.
A few things that should make agent developers smile: your agents can call each other as tools within a shared session, iterating autonomously until the job is done. You bring any framework (CrewAI, LangGraph, LlamaIndex, Strands) and any model. Packaging is minimal, a @app.entrypoint decorator and a zip file or container image. And if your workflow spans days, hibernate Monday night and resume Wednesday morning with everything intact.
Runtime microVMs and runtime instances are complementary compute options that you can use independently or together through the same AgentCore runtime APIs. A lightweight orchestrator agent on runtime microVM can coordinate and dispatch work to specialized worker agents running on instances. The orchestrator handles API calls, task routing, and result aggregation using runtime microVM’s fast scaling, while workers on Instances perform compute-intensive tasks like code compilation, security scanning, or GUI automation that require persistent state and direct OS access.
Let me show you how it works
I built two agents for this demo: a code writer agent that generates Python code from natural language descriptions, and a code reviewer agent that analyzes the generated code for bugs, security issues, and style improvements. Both agents share the same file system, so the reviewer can read whatever the writer produces without any data transfer or API calls between them.
Here is the code writer (simplified, no error handling):
writer = Agent(
    model="us.anthropic.claude-sonnet-4-5-20250929-v1:0",
    system_prompt=(
        "You are a senior Python engineer. "
        "Given a task, return ONLY a single Python code block — no prose."
    ),
)

@app.entrypoint
def handler(event, context):
    task = event.get("task") or event.get("prompt")
    session_id = getattr(context, "session_id", None) or event.get("session_id")
    session_dir = SHARED_DIR / session_id
    session_dir.mkdir(parents=True, exist_ok=True)

    code = str(writer(task))
    (session_dir / "code.py").write_text(code)

    return {"agent": "writer", "wrote": str(session_dir / "code.py"), "code": code}
Here is the code reviewer agent (simplified, no error handling):
reviewer = Agent(
    model="us.anthropic.claude-sonnet-4-5-20250929-v1:0",
    system_prompt=(
        "You are a strict Python code reviewer. "
        "Given code, return 3 bullet points: bugs, style, suggestions."
    ),
)

@app.entrypoint
def handler(event, context):
    session_id = getattr(context, "session_id", None) or event.get("session_id")
    code_path = SHARED_DIR / session_id / "code.py"
    code = code_path.read_text()
    review = str(reviewer(f"Review this code:\n\n{code}"))

    return {"agent": "reviewer", "read": str(code_path), "review": review}
Each agent is a Python application using Strands Agents with an @app.entrypoint decorator and a model of its choice. I package each one as a zip file. For this demo, I use the AWS Management Console. You can also use the AgentCore CLI, the AWS Command Line Interface (AWS CLI) or infrastructure as code.
Step 1: Create a capacity provider.
A capacity provider defines the EC2 infrastructure your agents run on. In the AgentCore console, I select Runtime in the left navigation, then select the Capacity providers tab and Create capacity provider.
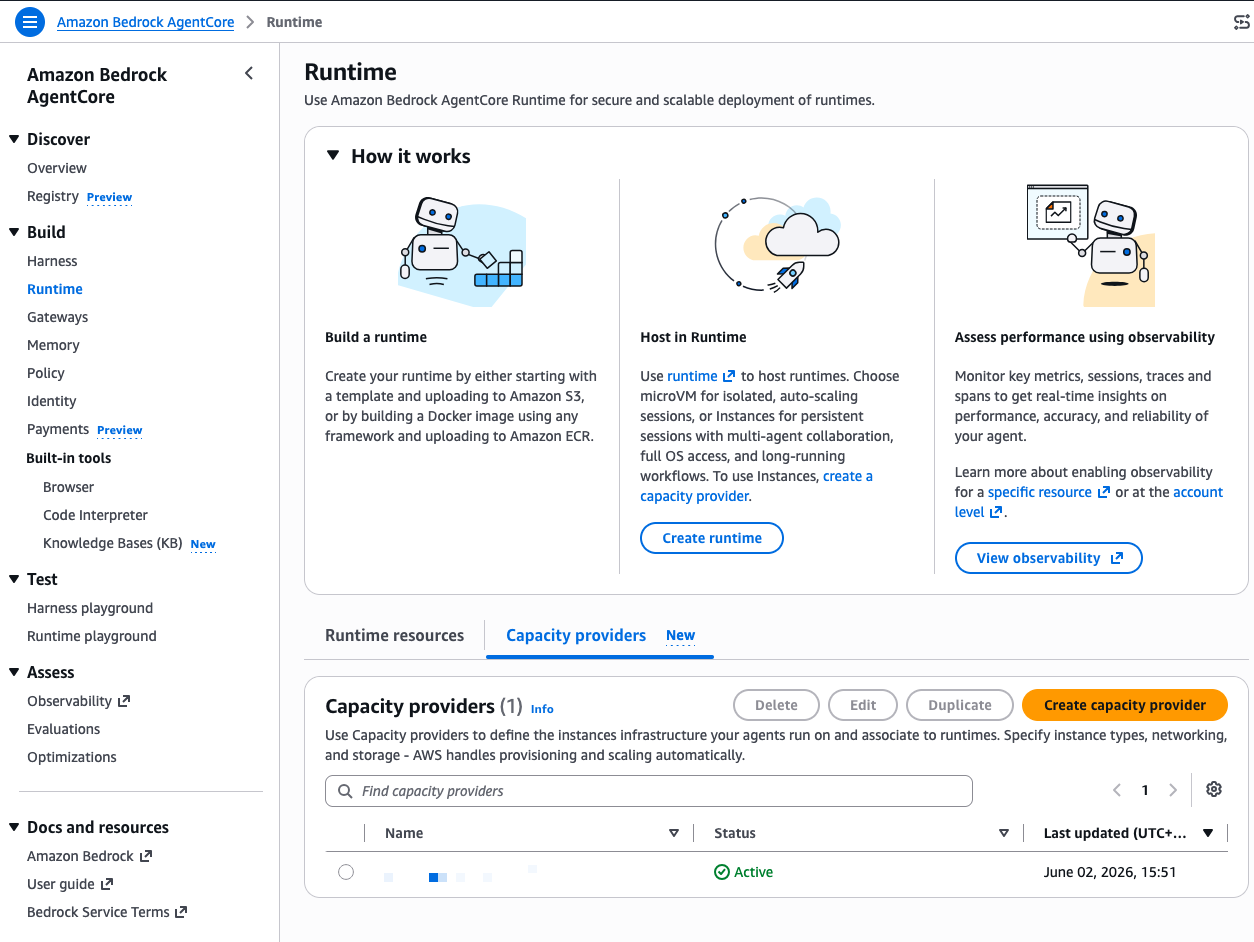
I give it a Name, select Linux (64-bit ARM) as the Operating system, and choose c7g.2xlarge as the Allowed instance types. This gives me 8 vCPUs and 16 GiB of memory, enough for both agents to run comfortably side by side.
Further down, I configure the VPC, subnets, and security groups for network access. Under Storage configuration, I keep the default gp3 volume. Under Service access, I select Create a new service role and let the console create the infrastructure role that manages EC2 instances on my behalf.
I select Create capacity provider and wait a few seconds. The status moves to Active.
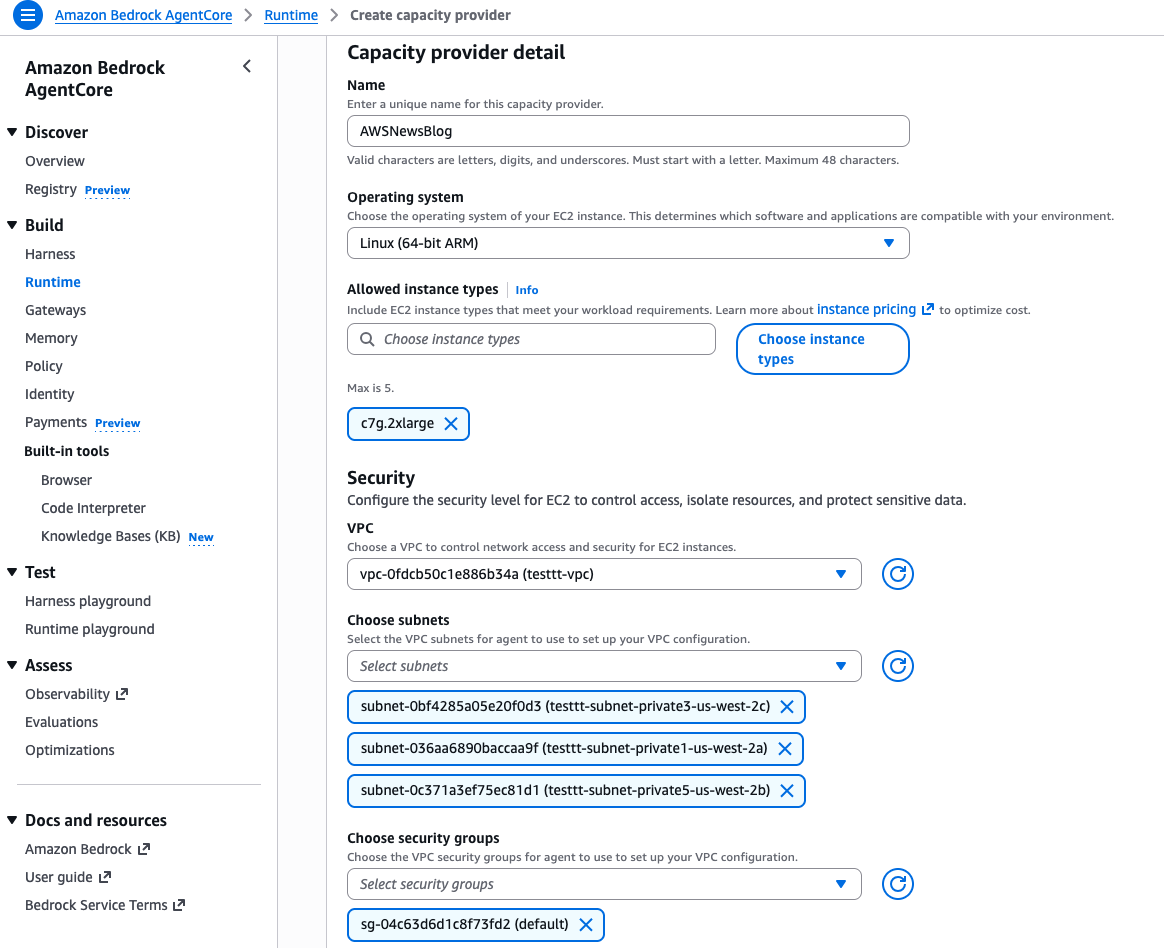
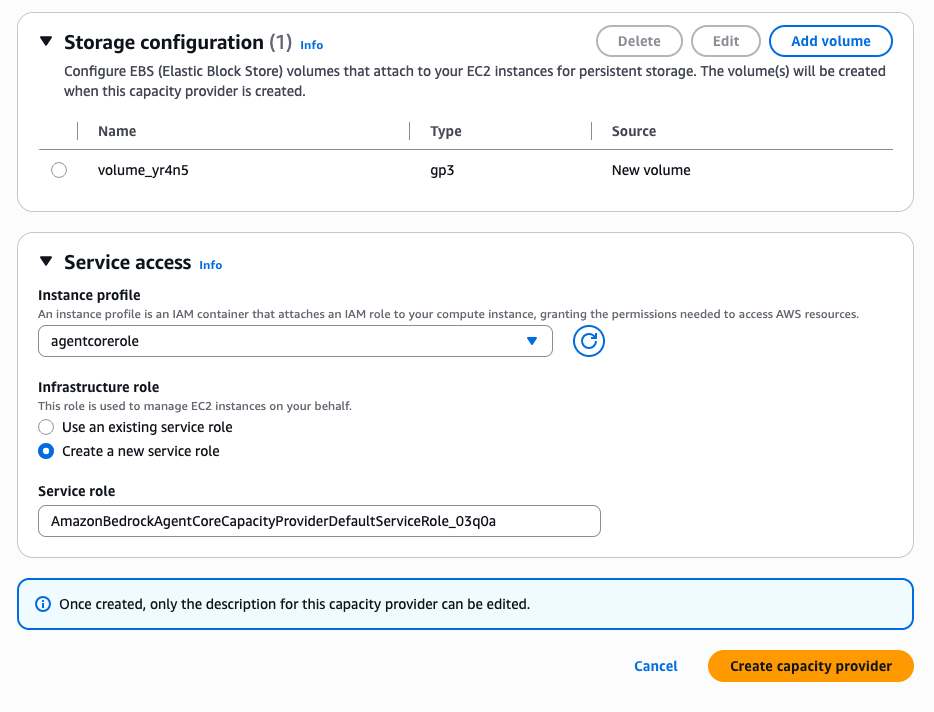
Note the capacity provider configuration summary: operating system, instance type, subnets, security group, instance profile, and infrastructure role. Once created, only the description can be edited, so verify your settings before you proceed.
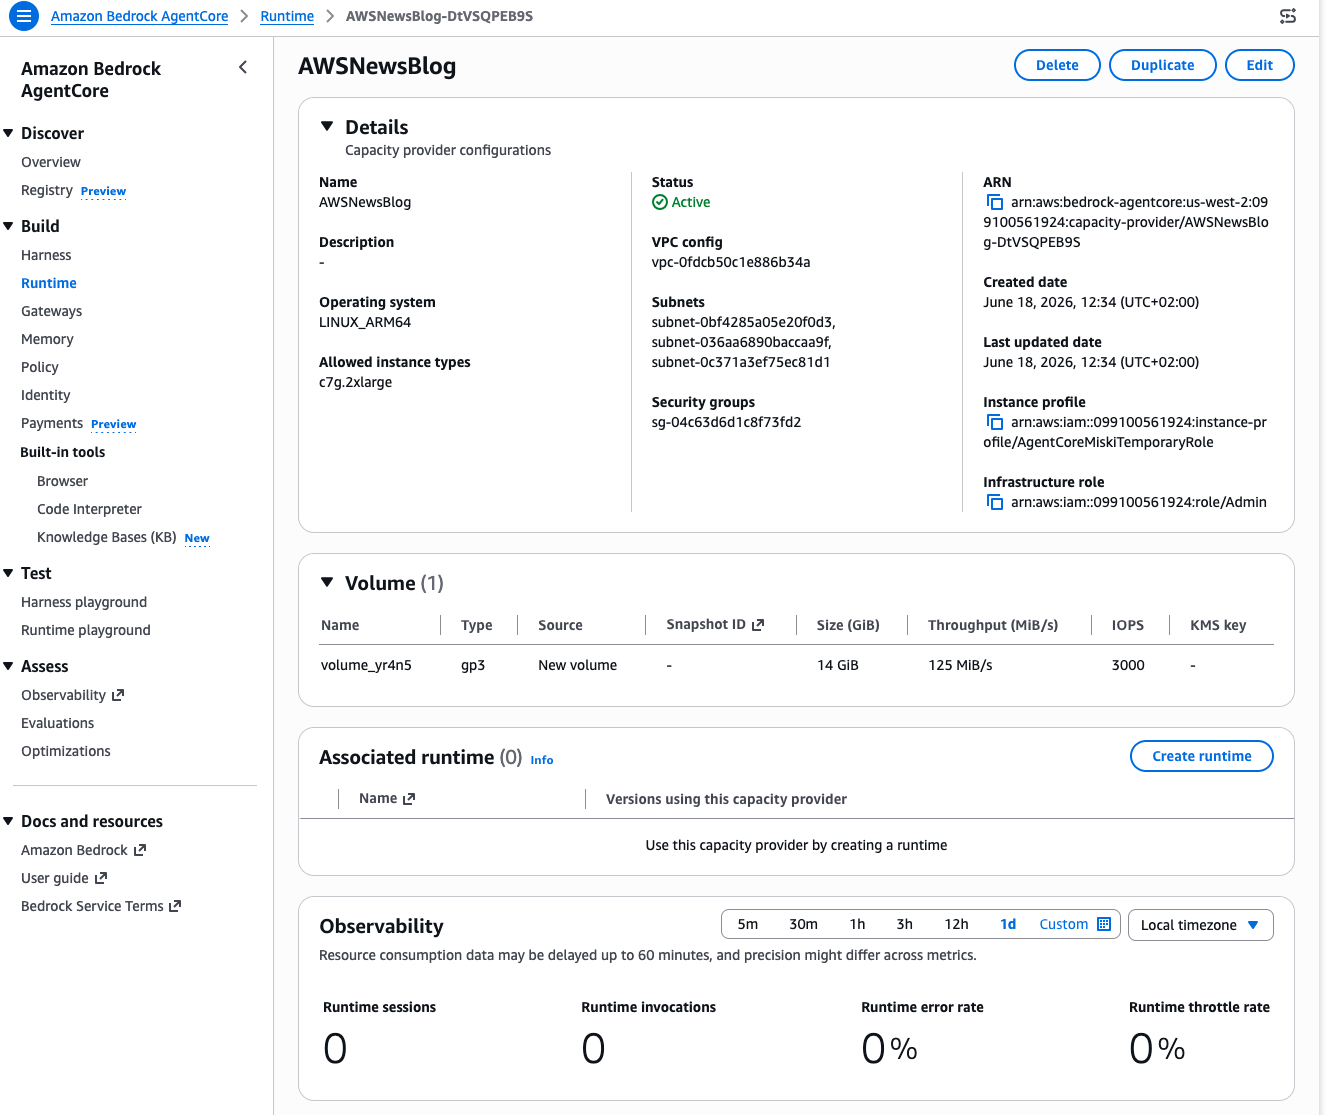
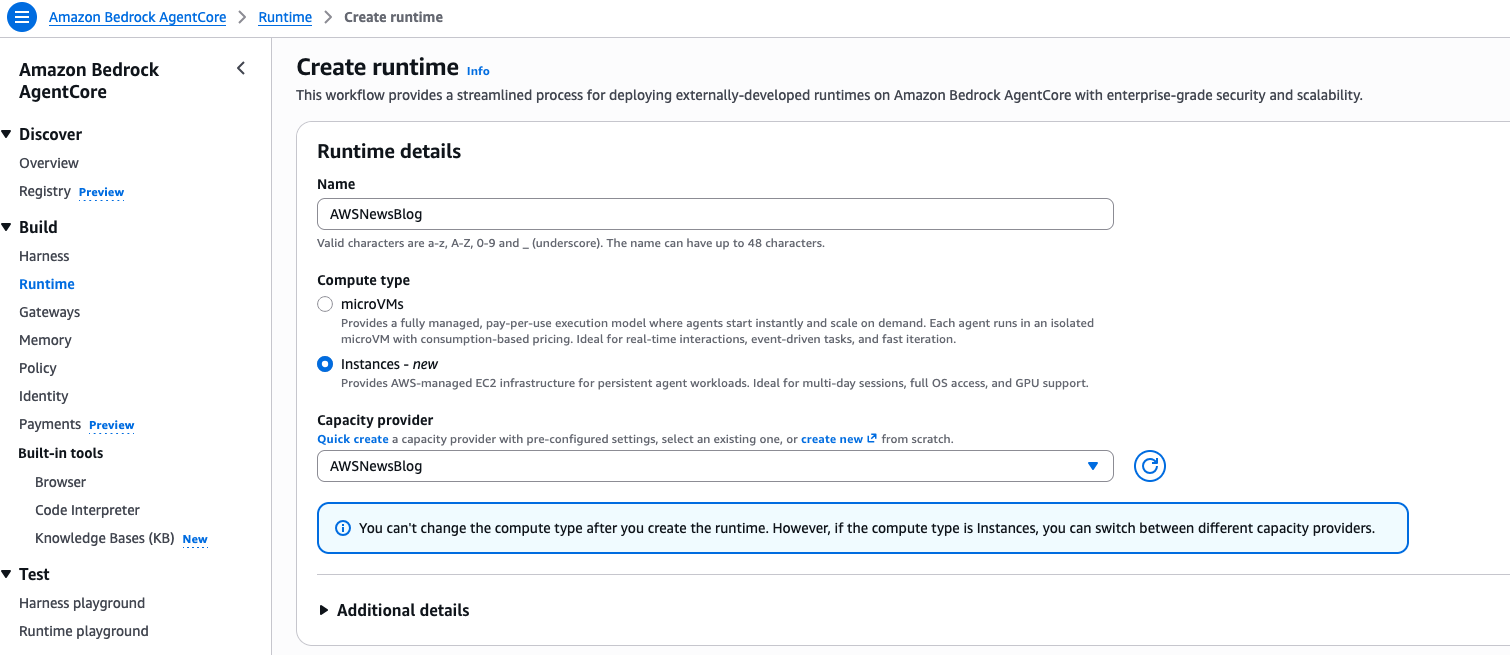
Step 2: Create a runtime and deploy the first agent.
Back on the Runtime page, I select Create runtime. I give it a Name, select Instances as the Compute type, and choose the Capacity provider I created in the previous step.
Under Agent source, I select S3 Source, then Upload to S3. I choose my agent zip file (ACIDemoWriter.zip), set the Language runtime to Python 3.13, and specify agent.py as the Agent entry point. This is the file that contains my @app.entrypoint decorated function. Under Permissions, I select Create default role to let the console provision the IAM role my agent needs.
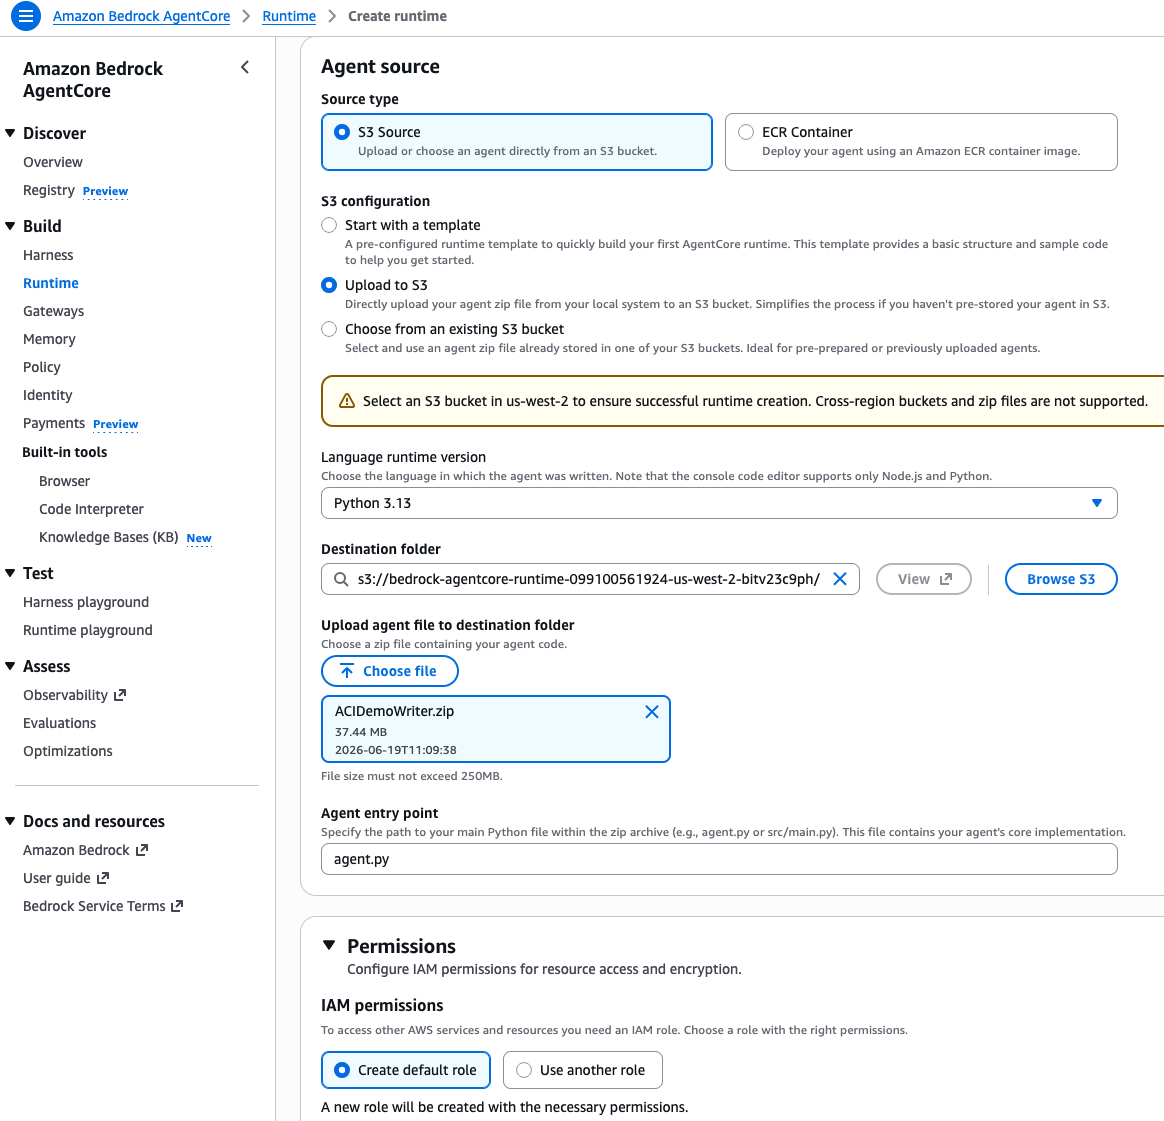
I select Create runtime and wait for the status to become Ready.
I repeat the same process for my code reviewer agent. I create a second runtime, select the same capacity provider, upload my reviewer agent zip file, and wait for it to become Ready. Both agents now share the same underlying EC2 infrastructure.
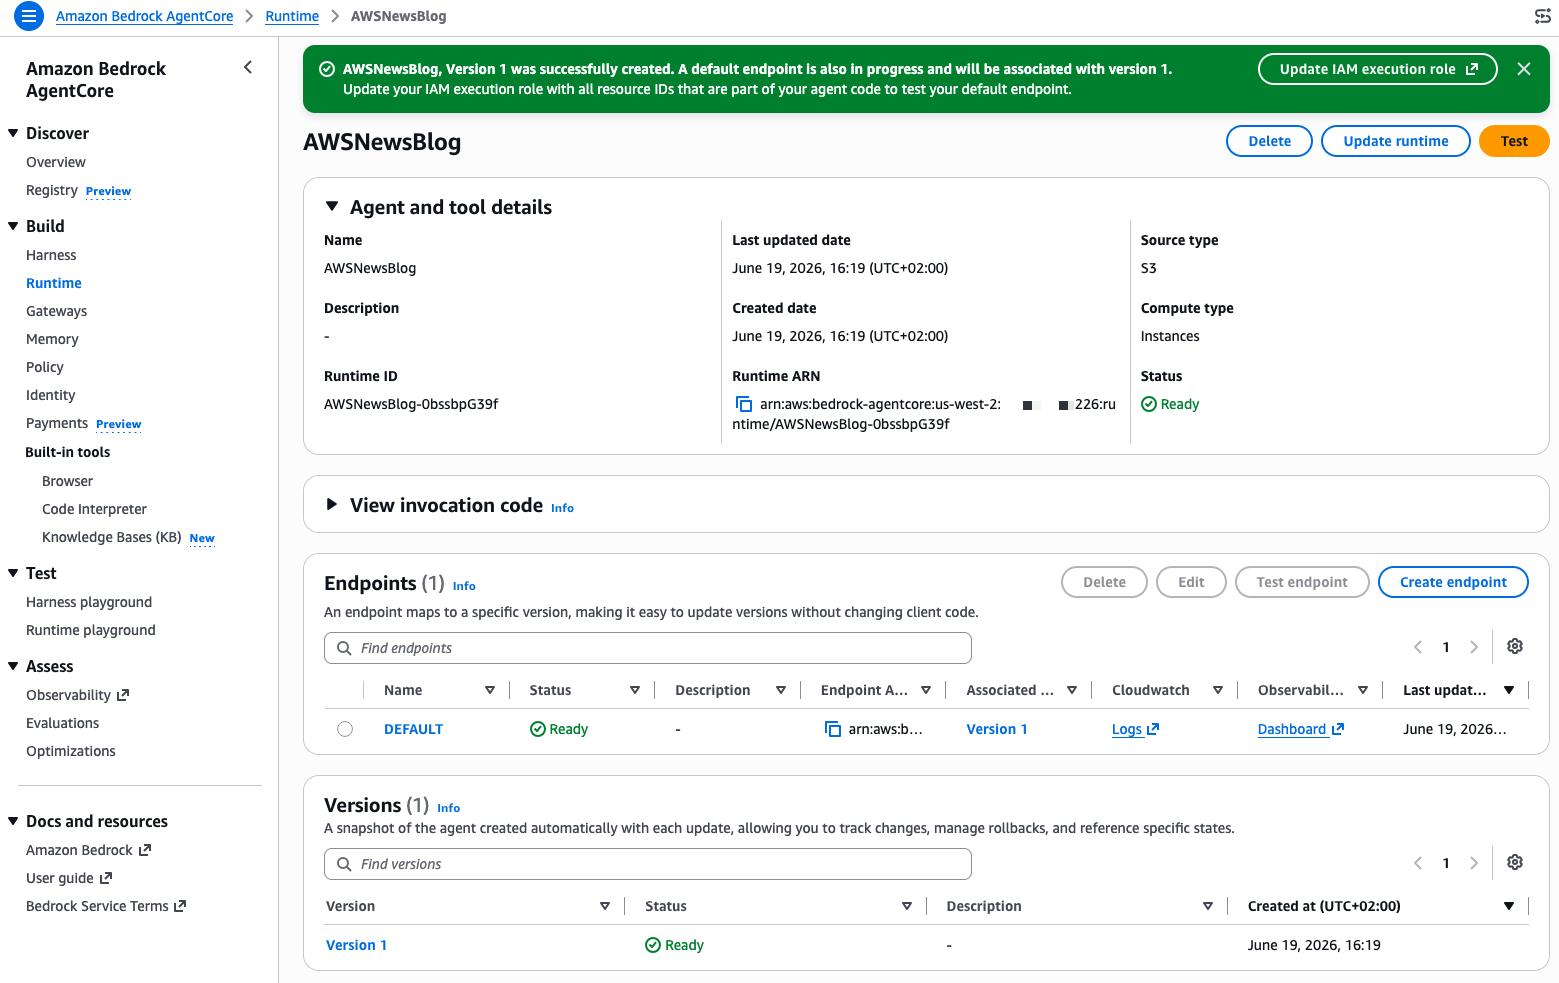 The console shows me a View invocation code section with ready-to-use Python, TypeScript, and JavaScript snippets to invoke my agent programmatically. But for this demo, I use the built-in test feature. I select Test on the writer agent’s page.
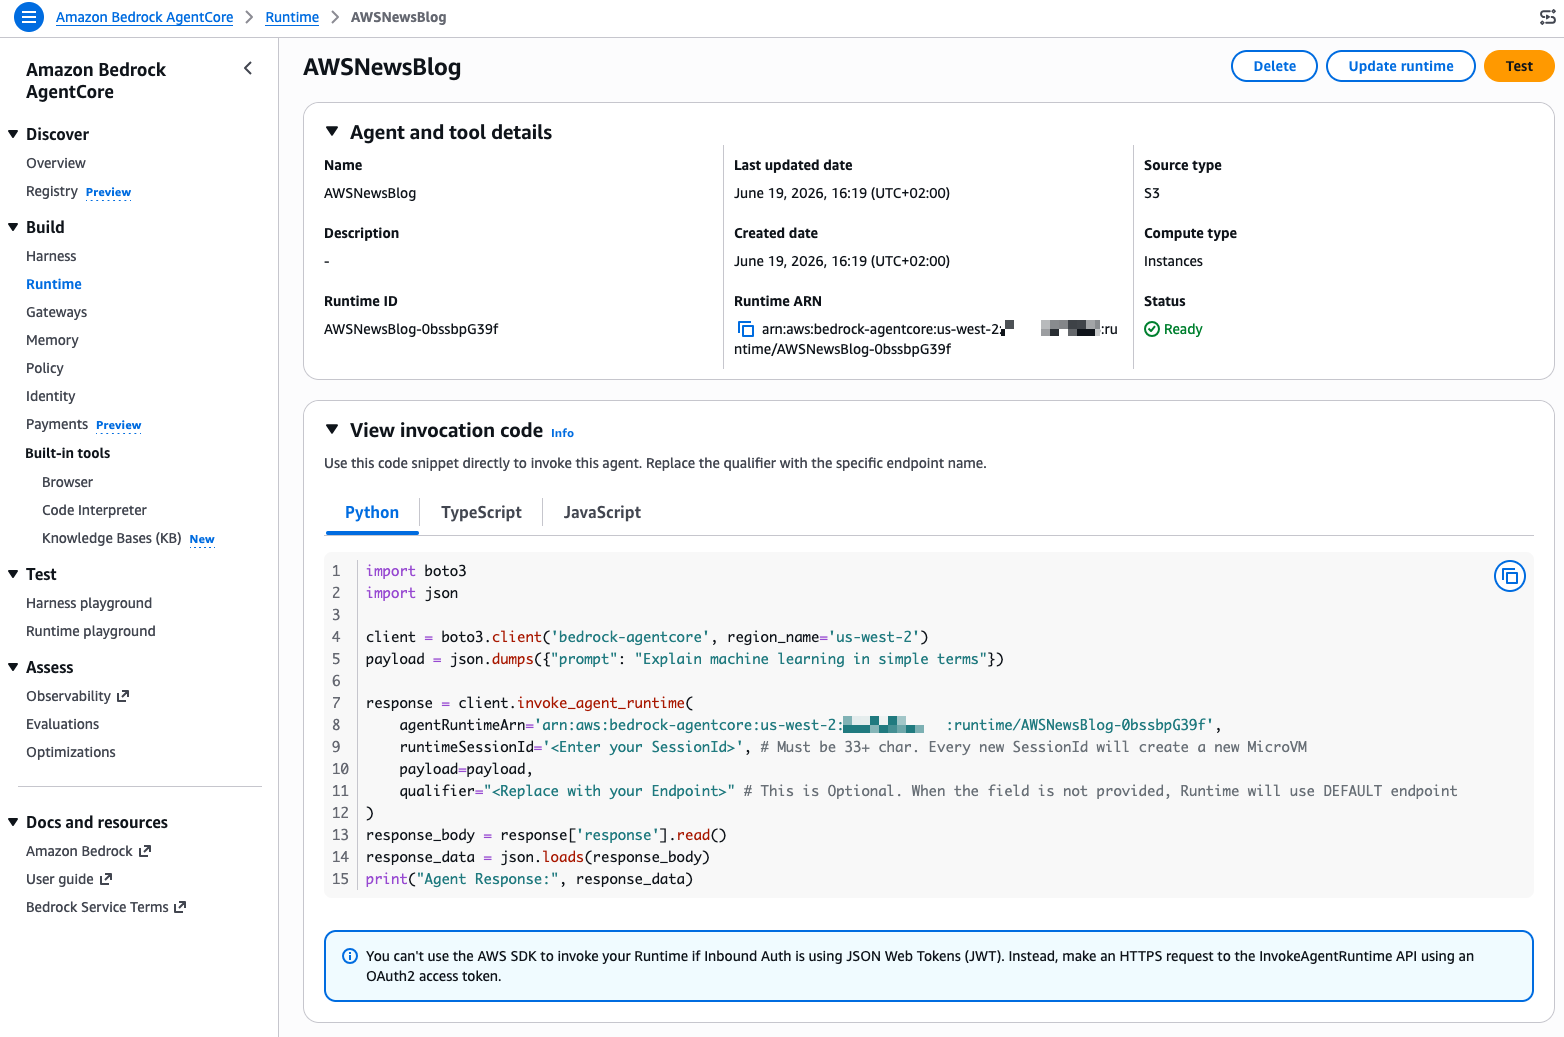 Step 3: Invoke agents and observe collaboration.
The Runtime playground opens. At the top, I see three fields: Runtime agent, Endpoint, and Session ID. The console generates a session ID automatically. I take note of it because I will reuse it with the reviewer agent.
In the Input field, I type a JSON payload asking the writer agent to generate code:
{"prompt": "write a fibonacci suite"}I select Run. After a few seconds, the Output panel shows the agent’s response. The writer agent generated a Python module with two implementations of a Fibonacci sequence (a list-based function and a generator) and wrote it to /tmp/agentcore-session/ca5ec24d-07f5-4eeb-add1-5ba416bf9eb2/code.py. Notice the session ID in the file path. That directory is the shared file system for this session.
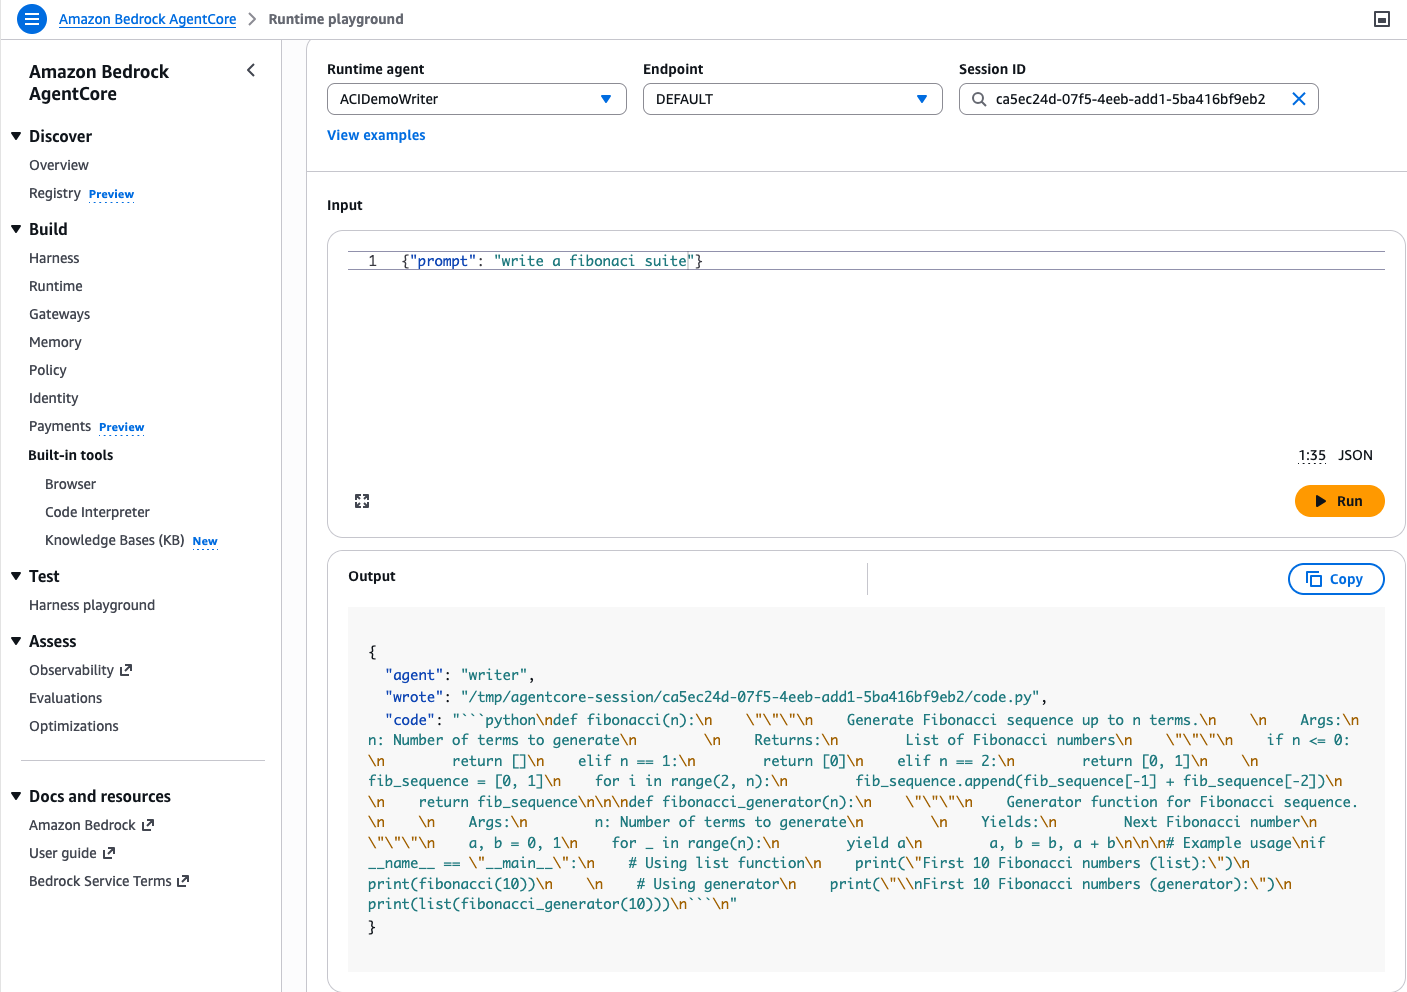
Step 4: Invoke the reviewer agent in the same session.
Now I switch the Runtime agent dropdown to ACIDemoReviewer. The important part: I paste the same session ID (ca5ec24d-07f5-4eeb-add1-5ba416bf9eb2) in the Session ID field. This is what connects the two agents.
I type a simple prompt:
{"prompt": "review the code"}I select Run. The reviewer agent reads the file the writer produced from the shared session directory and returns a detailed code review. It finds no critical bugs but suggests adding type hints, input validation, and simplifying the edge case handling.
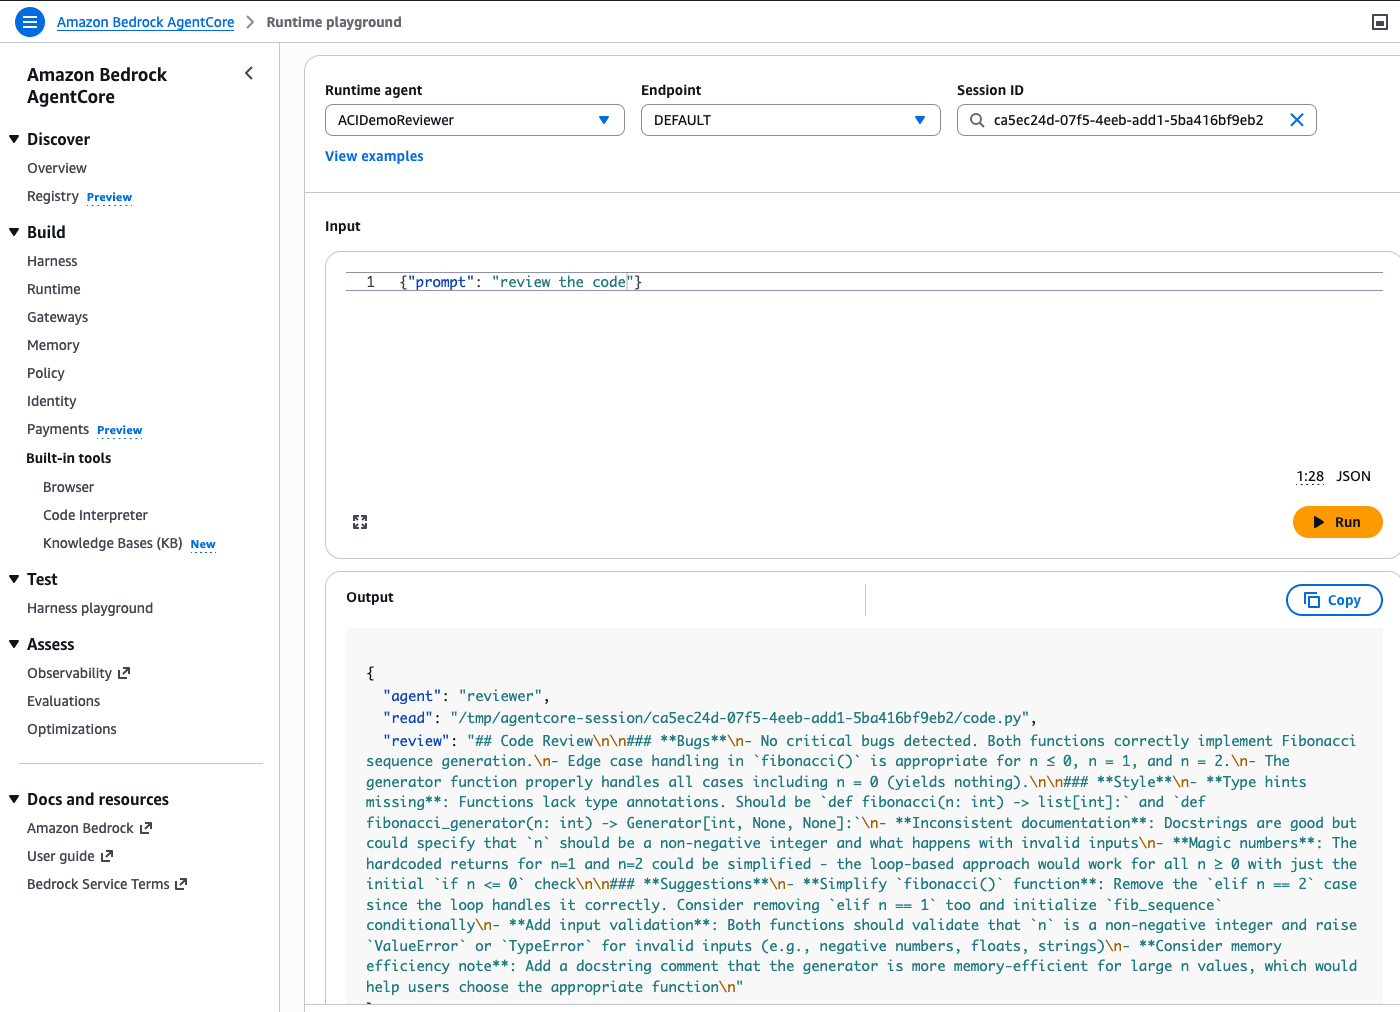 The two agents never exchanged messages or called each other’s APIs. They collaborated through the shared file system that runtime instances provide within a session. You can extend this pattern to any number of agents: a test agent that runs the code, a documentation agent that generates README files, a security agent that scans for vulnerabilities, all sharing the same working directory.
Key details
Here are a few things to know as you get started:
To get started, visit the runtime instance in Amazon Bedrock AgentCore documentation and create your first capacity provider.
Post Syndicated from Anthony Harvey original https://aws.amazon.com/blogs/security/automate-certificates-with-acme-support-in-aws-certificate-manager/
Customers tell us that managing TLS certificates at scale is one of their biggest operational concerns. The Certification Authority Browser Forum (CA/Browser Forum) has mandated a phased reduction in maximum certificate validity for public certificates. By March 2027, the maximum validity drops to 100 days. By March 2029, it lasts for 47 days. For an organization managing 1,000 certificates, the final transition means roughly 30 renewal events every day. Renewal and rotations of renewed certificates at that cadence isn’t something manual processes or ticket-driven workflows can sustain at scale.
We recently announced Automated Certificate Management Environment (ACME) protocol support in AWS Certificate Manager (ACM). With this launch, you can use the ACME clients your teams already know, including popular open source tools like certbot, cert-manager, acme.sh, and win-acme, to automate public certificate issuance and renewal for your infrastructure. Customers that are using third-party certificate authorities (CAs) can point their existing ACME-compatible clients at ACM instead of their current CA, with minimal reconfiguration. This applies whether it’s running on Amazon Web Services (AWS), on premises, or in a hybrid environment. Certificates created through ACME are registered in ACM, giving you a unified view of your entire certificate inventory.
This post covers how the feature works, how to get started, and the controls and best practices to help you manage certificate issuance at scale.
ACME is an open source protocol that automates the process of verifying domain ownership and issuing certificates and has become a standard mechanism for certificate automation. While ACM has long provided managed certificate issuance and renewal for AWS-integrated services such as Elastic Load Balancing (ELB), Amazon CloudFront, and Amazon API Gateway, many customers also need to automate certificates for their own infrastructure, including servers they manage in their data centers, Kubernetes clusters, Internet of Things (IoT) fleets, and hybrid environments. Until now, those customers had to turn to external providers. This launch brings the ACM automation model to that same infrastructure, using the standard ACME protocol with AWS managed certificate endpoints.
The feature introduces a new centrally provisioned and managed resource type: the ACME endpoint. Each endpoint is an AWS resource with a unique ACME directory URL and AWS Identity and Access Management (IAM)-based access controls. You create and manage endpoints through the ACM API or AWS Management Console, and point your existing ACME clients at the endpoint URL. Certificates issued through your endpoint are automatically registered with ACM, appearing in your certificate inventory alongside certificates created by the RequestCertificate and ImportCertificate API calls.
The architecture separates into two planes. In the control plane, PKI administrators use ACM APIs to create ACME endpoints, pre-approve the domains an endpoint is allowed to issue for, and generate external account binding (EAB) credentials. In the data plane, ACME clients register with an endpoint using EAB credentials and request certificates for domains the administrator has already validated. This architecture is how we provide customers the ability to scale. Instead of each client proving domain ownership on every request, a principal with appropriate ACM permissions (typically your PKI administrator) validates domains once at the endpoint level, and then application owners don’t need DNS credentials to get a certificate.
Adding to the data plane, EABs control client access to the endpoints. Each EAB is bound to an IAM role that controls what certificate operations the ACME client can perform, and credentials you generate in ACM are distributed to authorized ACME clients. An ACME client authorized for one endpoint can’t use a different endpoint. This creates security boundaries between environments. For example, a client authorized for your development endpoint can’t obtain certificates from your production endpoint.
Figure 1 shows the ACME request flow through ACM. An ACME client authenticates to an ACME endpoint using EAB credentials. The endpoint routes certificate orders to Amazon Trust Services for issuance. Issued certificates are registered in ACM inventory, where Amazon EventBridge and AWS CloudTrail provide expiration alerting and audit logging.
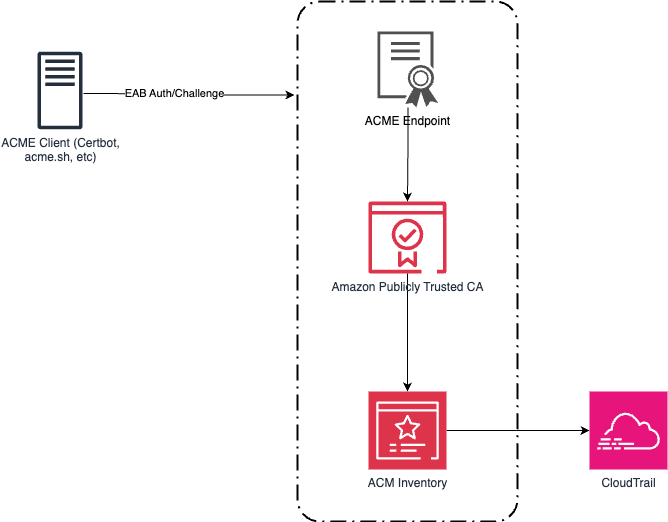
Figure 1: An ACME architecture and workflow
Getting started with the new ACME feature in ACM is straightforward. Use the following steps to create your first ACME-generated certificate.
Before you can use ACME clients with ACM, you need to create an ACME endpoint. This endpoint provides the URL that your ACME clients will use to request certificates.
EndpointUrl:
Before ACME clients can request a certificate, the administrator validates the domain using DNS once at the endpoint level. Use DomainScope to control exactly which certificate patterns are allowed:
ExactDomain restricts clients to that specific name,Subdomains enabled allows names like api.example.com,Wildcards enabled allows *.example.com.Leave a scope disabled to block that pattern outright, even if an otherwise-valid ACME request asks for it. For a production endpoint, consider enabling only ExactDomain and Subdomains and leaving Wildcards disabled for a stricter posture.
If your domain is hosted in Route 53, specifying HostedZoneId lets ACM create the required CNAME record automatically. If your domain is hosted elsewhere, omit it and create the provided CNAME record manually with your DNS provider. Validation typically completes within a few seconds after the record is in place.
You will receive the following response back:
EAB credentials authenticate your ACME clients to your endpoint. Generate a unique set of credentials for each client or environment to maintain security boundaries.
KeyId and MacKey for the next step.
With your endpoint URL and EAB credentials ready, you can now configure your preferred ACME client. The following examples show configuration for two popular clients. As a reminder, the server information was retrieved in step 1, part 4 as the EndpointUrl.
acme.sh:
Certbot:
After the initial registration, your ACME client handles renewals.
Other ACME alternatives can provide certificates but don’t give the same amount of control and governance for customers that need to scale their certificate environment. The following controls are available to help reduce risk across your organization.
Customers managing large numbers of domains told us they need a way to prevent unauthorized certificate issuance across their domain space. Domain validation gives you this control. For each domain you validate, you enable the certificate patterns it should be allowed to issue, whether it’s ExactDomain, Subdomains, or Wildcards. For example, if you validate internal.example.com and enable only Wildcards, an ACME client can request *.internal.example.com but a request for internal.example.com itself or api.internal.example.com is rejected. This enforcement happens at the endpoint level, before requests reach the ACM certificate authority, and you can validate multiple domains under a single endpoint, each with its own scope.
Certificates issued through your ACME endpoints are registered with ACM. You can use the aws acm list-certificates command to see all your issued certificates.
Endpoint management operations are authorized through IAM and logged to CloudTrail. You can use IAM policies to control which principals can create endpoints, generate EAB credentials, and manage domain constraints.
For customers implementing ACME certificates for the first time, consider the following best practices for your organizations.
The endpoint serves as a useful method of isolation for larger organizations. A large enterprise can create one endpoint per organizational boundary (business unit, subsidiary, or environment) instead of a single shared endpoint company-wide. Each endpoint has its own pre-approved domains and its own set of EABs, so a compromised credential in one business unit has no path to certificates in another.
However, weigh this against your operational overhead as well. A reasonable starting point is one endpoint per environment (dev, staging, andprod) within a business unit, expanding to per-business-unit endpoints only where compliance or organizational requirements call for it.
Anyone holding a validKeyIdandMacKeyfor an endpoint can obtain certificates for any domain pre-approved on that endpoint, so these credentials deserve the same handling you’d give an access key.
MacKeywhere possible by using a secret store such as AWS Secrets Manager. Distribute it only to the ACME clients that you authorize to use the endpoint.CreateAcmeExternalAccountBinding and GetAcmeExternalAccountBindingCredentials calls in CloudTrail separately. Because retrieving the actual key material is a distinct API call from creating the binding, alerting on retrieval events is a stronger signal of real credential distribution than binding creation alone.Generate a unique set of EAB credentials for each client or environment rather than sharing one binding across multiple ACME clients. As you begin to scale with multiple endpoints, usesome of the following patterns to reduce operational toil.
DescribeAcmeExternalAccountBinding output alone, without cross-referencing a spreadsheet.KeyId and MacKey under a secrets path scoped to that client (for example, a Secrets Manager path per team and environment), and let the client’s provisioning pipeline retrieve its own credentials.ACME’s power is through automation, and organizations should monitor their ACME usage for anomalies.
ACME support in AWS Certificate Manager is available today in all commercial AWS Regions and will be available in AWS GovCloud (US), the China Regions, and the AWS European Sovereign Cloud partitions at a later date. See the ACM pricing page for more information on ACME pricing.
The phased reduction in certificate validity can’t easily be solved without automation. ACME support in ACM gives you that automation through a standard protocol and standard tooling, while keeping the visibility and governance controls your security teams rely on from ACM.
To get started, see the AWS Certificate Manager documentation or follow the getting started guide.
If you have feedback about this post, submit comments in the Comments section below.
Post Syndicated from The Atlantic original https://www.youtube.com/watch?v=0wfewQ8fiQc
Post Syndicated from Jack Hwang original https://aws.amazon.com/blogs/devops/scaling-autonomous-operations-with-aws-devops-agent-and-servicenow/
This post is co-written with Govind Menon, Head of MCP Product at ServiceNow.
Enterprise teams managing applications on AWS often rely on ServiceNow as their IT service management (ITSM) system for incident tracking, change management, and configuration management. When incidents occur, engineers must context-switch between AWS, third party observability tools and ServiceNow, manually correlating data across those sources before updating ServiceNow incident records. This fragmented workflow delays resolution, increases mean time to resolution (MTTR), and introduces the risk of missed signals.
AWS DevOps Agent is a frontier agent that resolves and proactively helps prevent incidents, continuously improving reliability and performance of applications in AWS, and hybrid environments. In this post, we demonstrate how to integrate AWS DevOps Agent with ServiceNow using the Model Context Protocol (MCP) and ServiceNow Action Fabric, enabling autonomous incident investigation and resolution workflows that are governed by ServiceNow and that execute and record authorized actions directly on the application.
By the end of this post, you will be able to:
The integration between ServiceNow MCP Server and AWS DevOps Agent connects ITSM workflows with automated incident response through the Model Context Protocol (MCP), an open standard for AI agent-to-tool communication.
ServiceNow MCP Server Console lets you create a ServiceNow MCP Server and configure the tools it exposes, capabilities such as incident management, CMDB queries, and change requests as discoverable tools. The console governs what the agent can see and do through tool-level scoping, access control lists, and role masking. It is the access channel for ServiceNow Action Fabric, the application’s governed action layer: ServiceNow does not merely store the agent’s output, it controls and executes the actions the agent is authorized to perform.
AWS DevOps Agent acts as an MCP client that dynamically discovers available ServiceNow tools at runtime. You can create tools based on existing capabilities, such as ServiceNow NowAssist Skills.
When a ServiceNow incident triggers AWS DevOps Agent, the following happens:
Security is built into every interaction. Communication uses OAuth 2.0 authentication with scoped
Permissions. The ServiceNow MCP Server Console governs which tools the agent can access and what actions it can perform, with every invocation authenticated, authorized at the tool and skill level, and recorded in an auditable trail that ServiceNow AI Control Tower can observe.
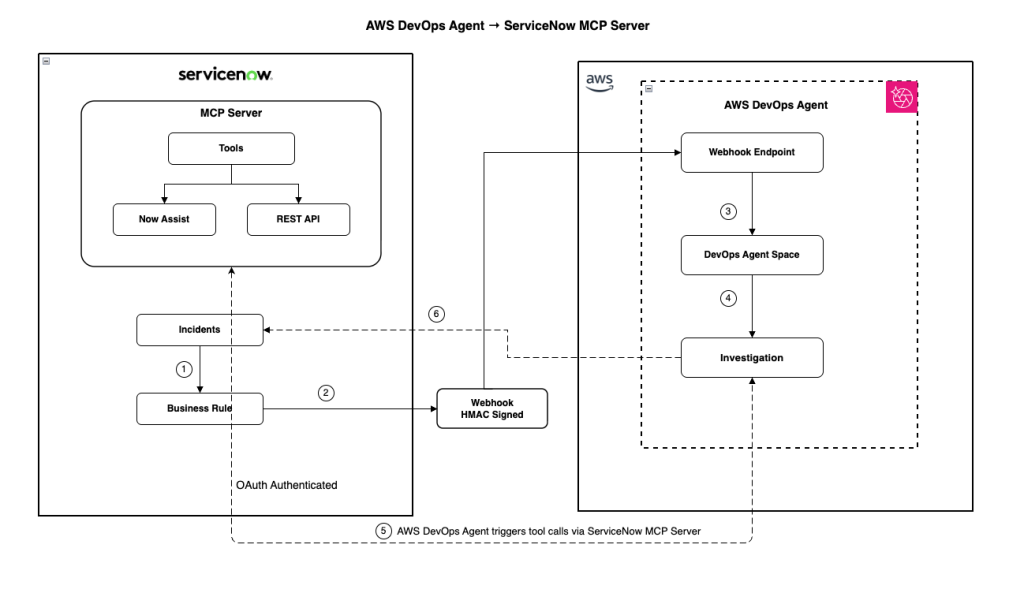
Figure 1: Integration architecture showing AWS DevOps Agent connecting to ServiceNow via MCP Server
Before you begin, make sure you have access to and understanding of the following:
As first step, configure the ServiceNow instance to expose capabilities through the MCP Server:
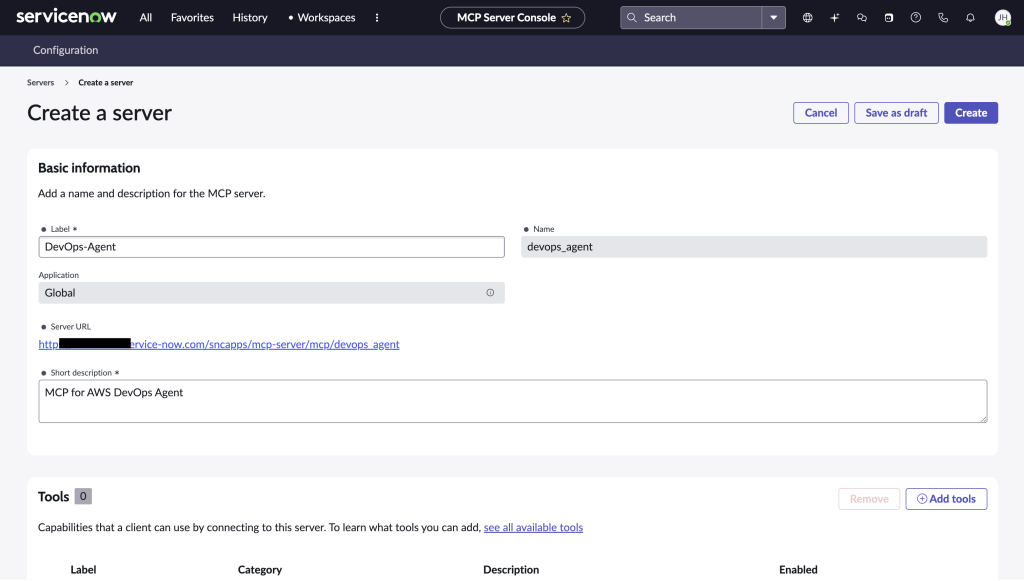
Figure 2: MCP Server Console in ServiceNow Instance
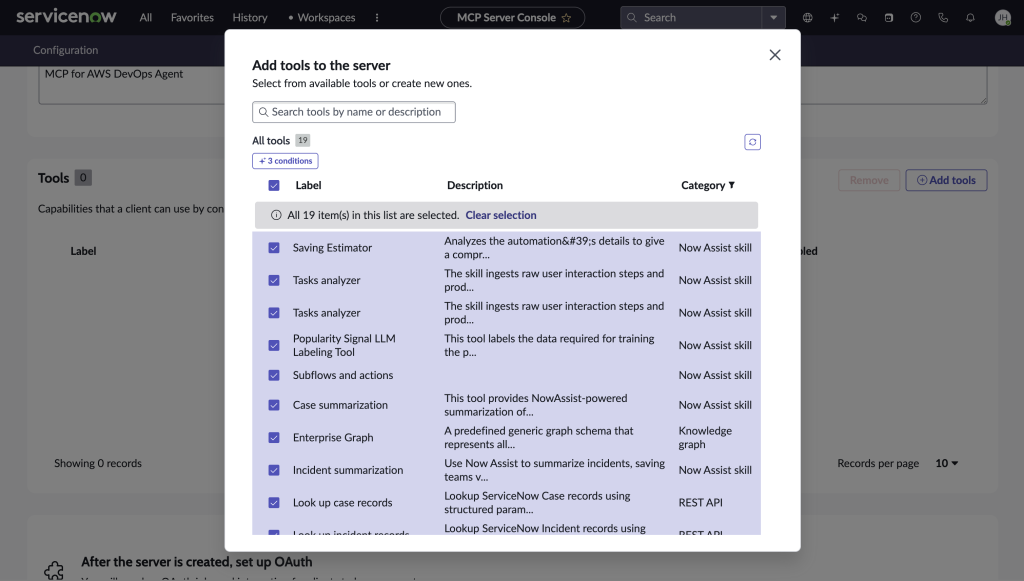
Figure 3: Tool selection in ServiceNow MCP Server
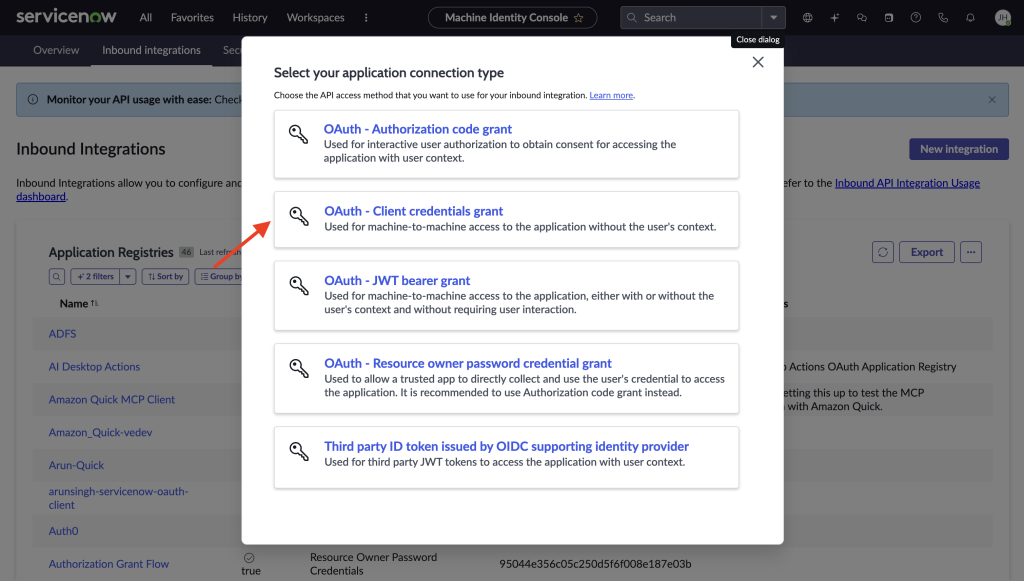
Figure 4: Create Inbound Integration – OAuth Client Credentials grant
Create an AWS DevOps Agent Space in your AWS account to define the scope of resources the agent will monitor and investigate:
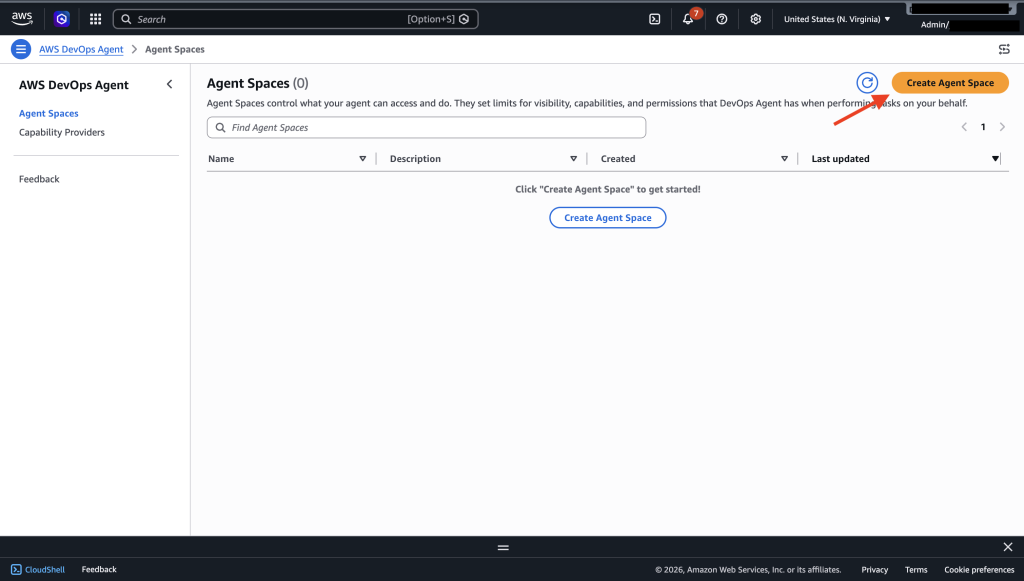
Figure 5: Creating an Agent Space in the AWS DevOps Agent console
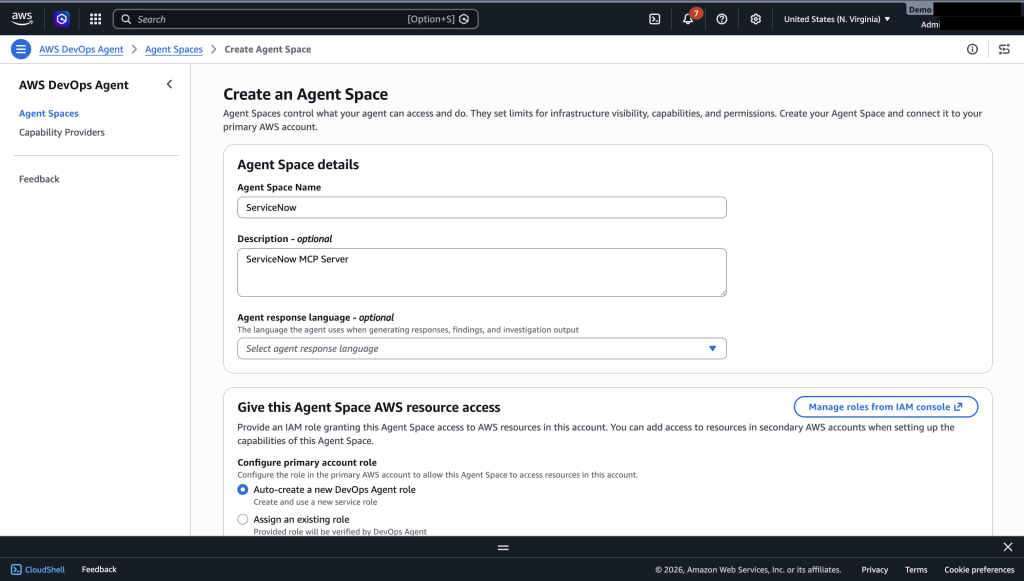
Figure 6: Agent Space Name and IAM role configuration
Register your ServiceNow MCP Server connection to enable tool discovery in the AWS DevOps Agent console.
https://<instance>.service-now.com/sncapps/mcp-server/mcp/<server_label>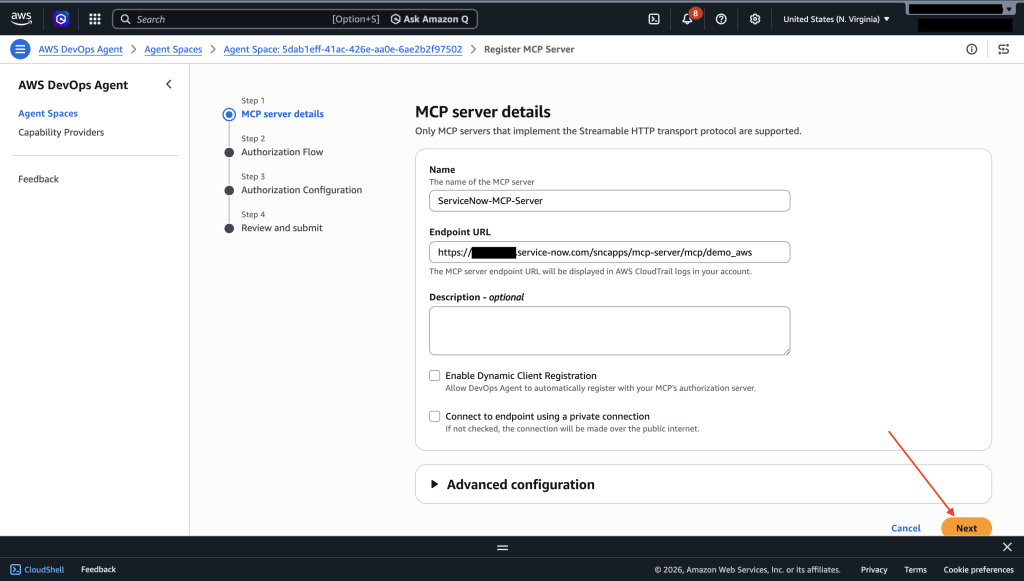
Figure 7: Entering the ServiceNow MCP Server endpoint URL
https://<instance>.service-now.com/oauth_token.do) from Step 1.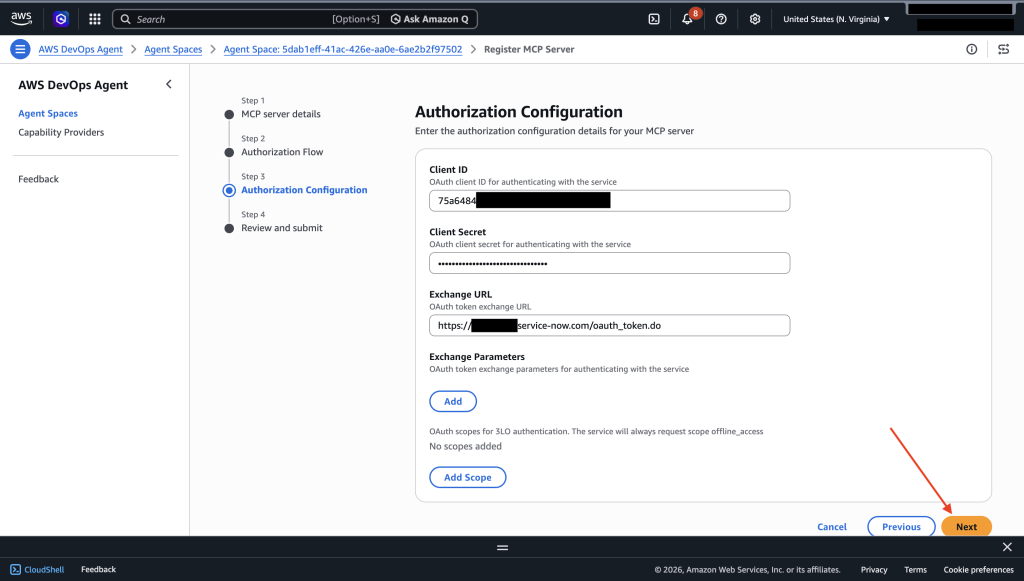
Figure 8: OAuth Client Credentials configuration for the ServiceNow MCP Server
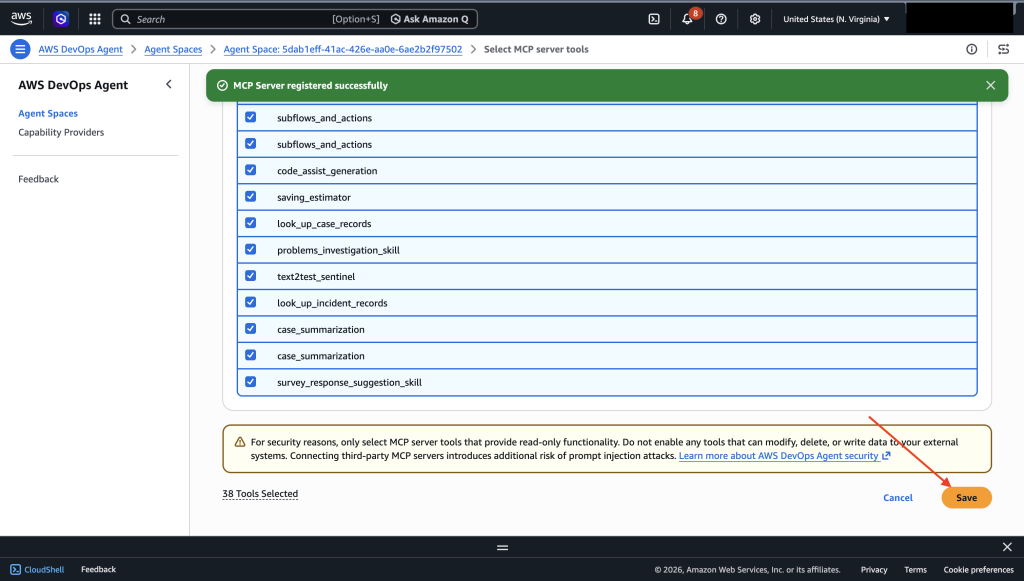
Figure 9: Selecting ServiceNow MCP tools to add to the Agent Space
Once the setup is complete, we need to make sure the connection is working.
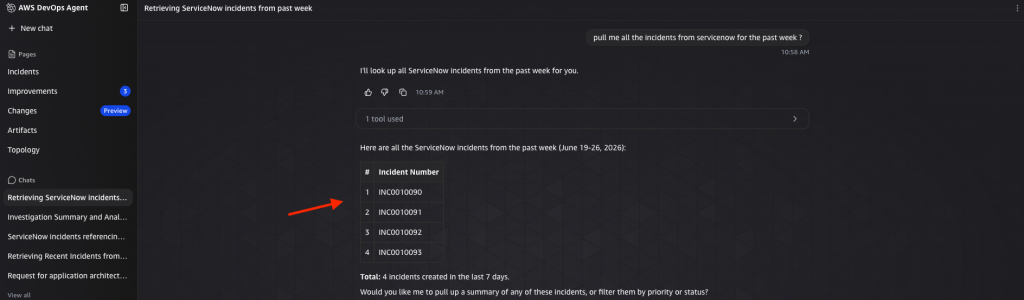
Figure 10: Test the ServiceNow MCP connection from AWS DevOps Agent
You can also configure your environment so that the creation of an incident in ServiceNow automatically triggers the AWS DevOps Agent. To set up this integration, follow the AWS documentation to establish the connection between AWS DevOps Agent and your ServiceNow instance. Then, create a Business Rule in ServiceNow. This enables incident creation to seamlessly trigger the DevOps Agent without manual intervention.
Once this setup is complete, here’s how the workflow comes together: when an incident is created, the DevOps Agent automatically investigates and adds relevant context such as root cause analysis, related changes, and affected resources directly back into the incident record. This means that by the time your Operations or SRE team picks up the incident, they already have the context they need to begin resolution, significantly reducing triage time and accelerating mean time to recovery (MTTR).
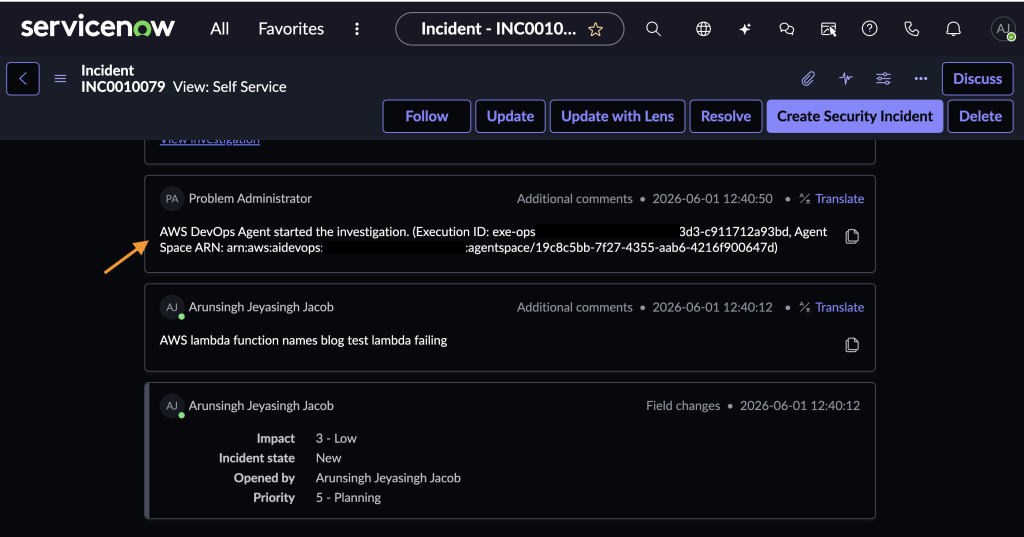
Figure 11: AWS DevOps Agent initiating an automated investigation on the ServiceNow incident
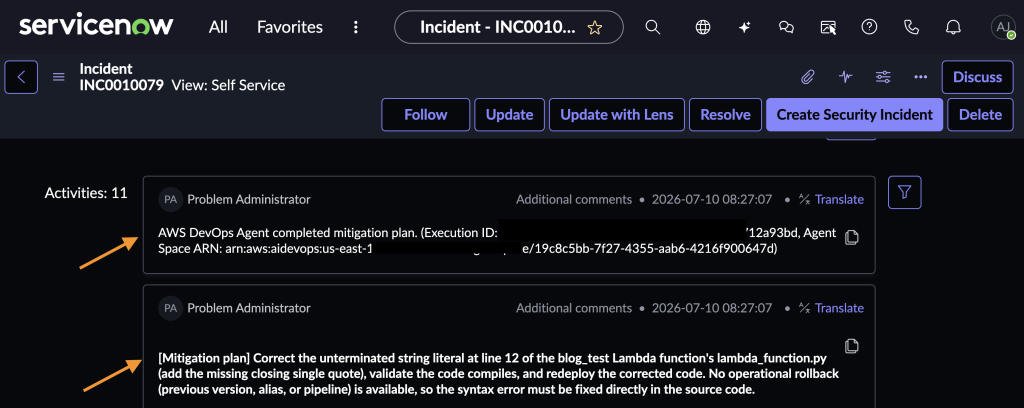
Figure 12: AWS DevOps Agent mitigation plan posted to the ServiceNow incident
To avoid incurring ongoing costs, clean up your resources when you are done using the integration. For details on pricing, visit the AWS DevOps Agent pricing page.
When you are done using the integration, clean up your resources:
For organizations running workloads on AWS and managing operations through ServiceNow, incident response has long meant toggling between systems and racing to document findings before context fades. The integration between AWS DevOps Agent and ServiceNow through MCP and Action Fabric alleviates that gap. The agent investigates autonomously, correlates telemetry with operational context, and documents root cause and mitigation directly in the incident record, compressing resolution times from hours to minutes.
And because the connection is built on MCP, an open protocol for agent-to-tool communication, what you configure today continues to expand as your ServiceNow workflows evolve. New tools exposed through Action Fabric are discovered and available to the agent immediately. To get started, visit the AWS DevOps Agent product page and ServiceNow MCP Server Console page.
Post Syndicated from Dhananjay Karanjkar original https://aws.amazon.com/blogs/security/route-amazon-bedrock-guardrails-interventions-to-amazon-security-lake/
Security teams investigating AI-related incidents need guardrail intervention data alongside their existing security telemetry. Routing Amazon Bedrock Guardrails violations to Amazon Security Lake makes this possible. With this integration, you can query guardrail events alongside identity, network, and application security data in a single layer. When a guardrail blocks a prompt injection attempt or redacts sensitive data, that intervention carries investigative value comparable to a failed sign-in or a network intrusion alert. Amazon Bedrock publishes this telemetry to Amazon CloudWatch metrics and model invocation logs for operational monitoring. By using Security Lake, organizations can extend this telemetry into their security data lake for unified correlation.
In this post, I show you how to build an automated pipeline that transforms Amazon Bedrock Guardrails intervention events into Open Cybersecurity Schema Framework (OCSF) records and delivers them to Security Lake as a custom source. You can query the data using Amazon Athena or any Security Lake subscriber.
Consider a financial services organization deploying Amazon Bedrock across multiple business units. Each unit uses guardrails to enforce content policies (blocking harmful content), topic policies (preventing off-topic queries about competitors), sensitive information policies (redacting personally identifiable information (PII) such as account numbers), and prompt injection detection.
The security team needs to:
With guardrail events routed to Security Lake, a single Athena query covers all three.
The pipeline architecture routes Amazon Bedrock security events to Security Lake as OCSF-compliant records. The same infrastructure—subscription filter, AWS Lambda transformation, Parquet writer, Amazon Simple Storage Service (Amazon S3) partitioning—supports multiple event types by changing the filter pattern and OCSF mapping:
| Guardrail interventions (this post) | DETECTION_FINDING | 2004 |
| Model invocation API calls | API_ACTIVITY | 6003 |
| Agent guardrail traces | DETECTION_FINDING | 2004 |
| Token consumption anomalies | DETECTION_FINDING | 2004 |
This post demonstrates the guardrail interventions implementation as a working example. The solution captures Amazon Bedrock model invocation logs that contain guardrail trace data and filters for intervention events. It transforms matching events into OCSF-compliant Detection Finding records (class_uid 2004) and delivers them to Security Lake as Parquet files. Guardrail interventions are detection events: the guardrail detected and blocked prohibited content, so OCSF class 2004 (Detection Finding) under the Findings category is the appropriate classification.
The following diagram shows the end-to-end pipeline from guardrail intervention to Security Lake ingestion.
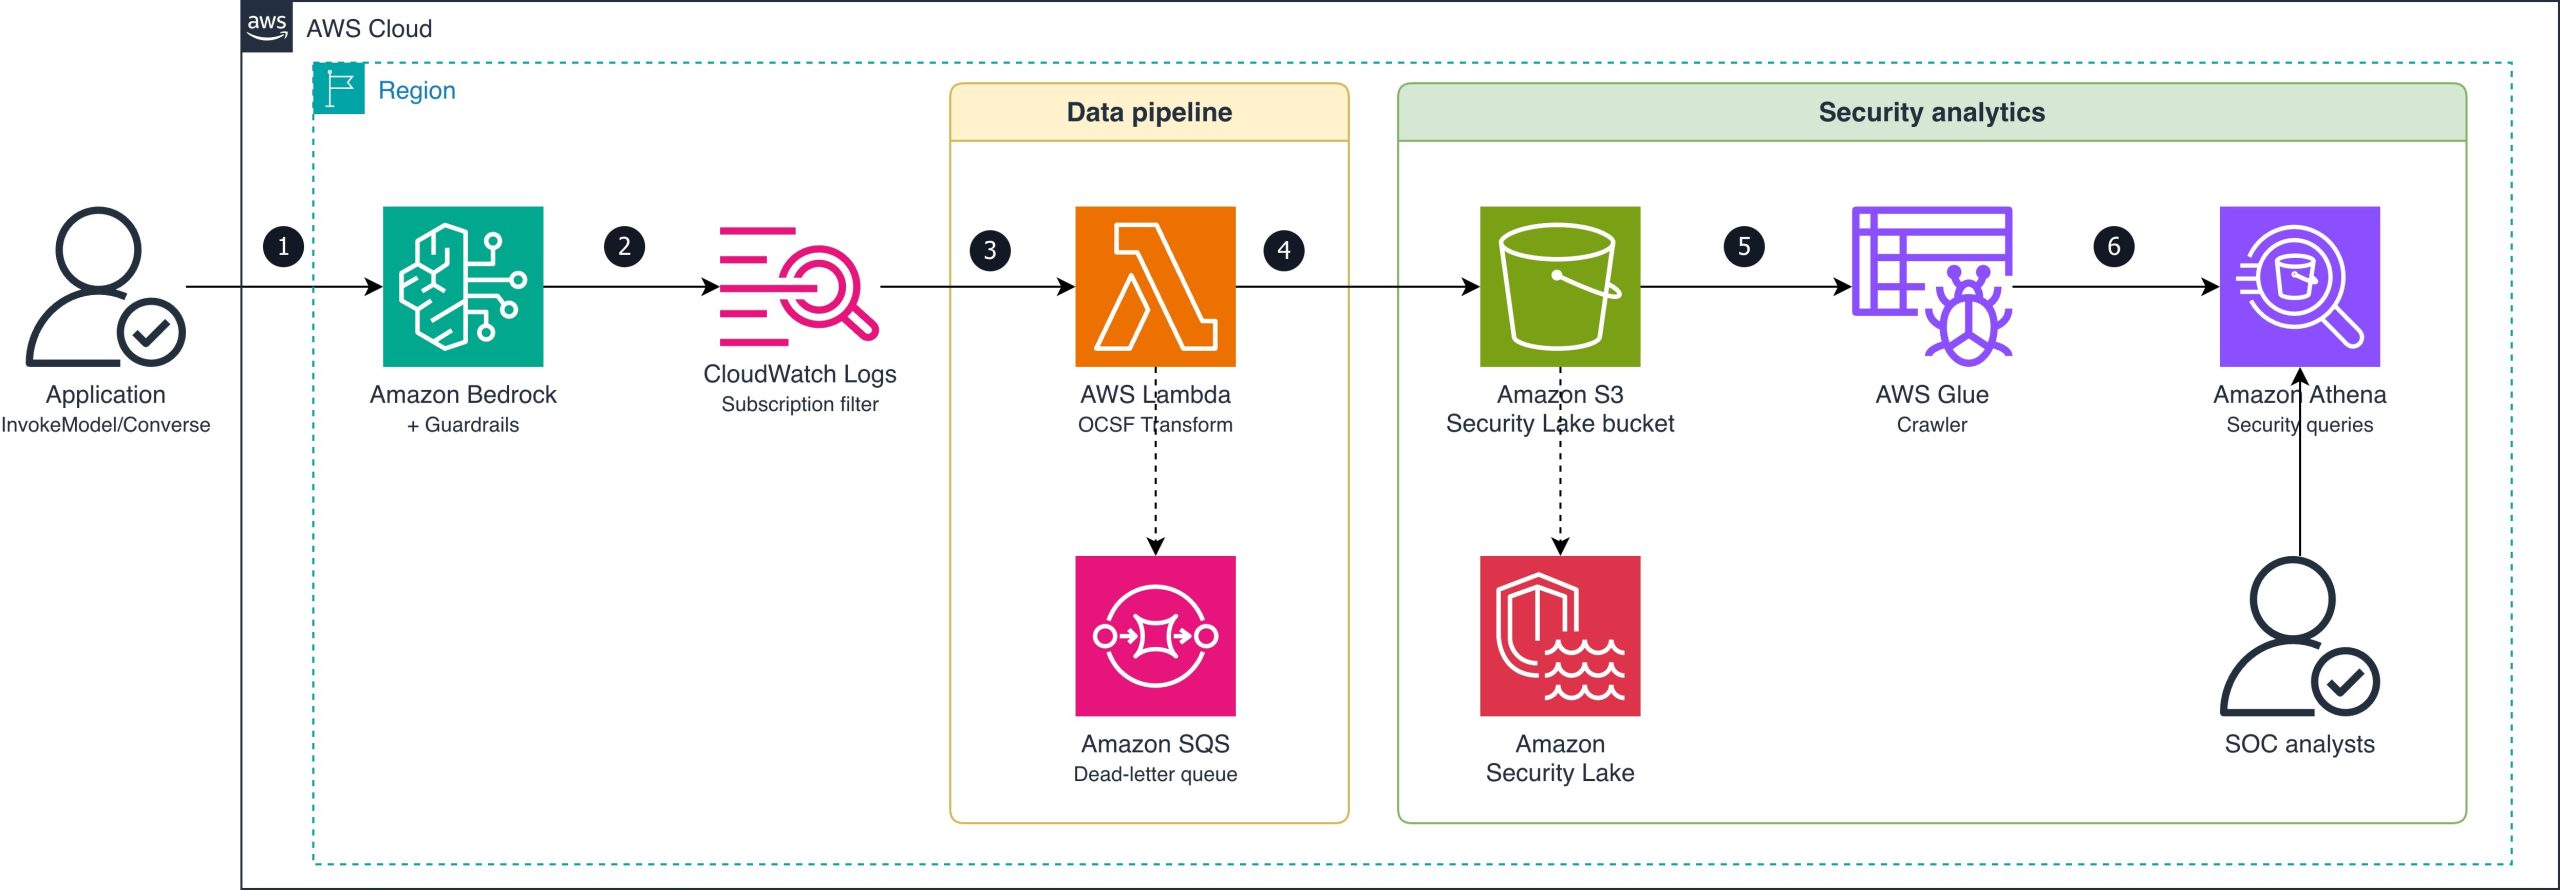
Figure 1: Guardrail intervention routing
The data flow consists of the following steps:
INTERVENED (blocked or masked content).ext/BedrockGuardrails/region=/accountId=/eventDay=/). If the Lambda function fails to process a record, the message routes to an Amazon Simple Queue Service (Amazon SQS) dead-letter queue for later analysis and redrive.The following table shows how Amazon Bedrock Guardrails intervention fields map to OCSF Detection Finding (class_uid 2004) attributes.
| OCSF field | Source | Example value |
class_uid |
Static | 2004 (Detection Finding) |
category_uid |
Static | 2 (Findings) |
severity_id |
Derived from policy type | 3 (Medium) for content/topic; 4 (High) for prompt injection |
activity_id |
Static | 1 (Create) |
time |
Invocation log timestamp |
1721001600000 |
cloud.provider |
Static | AWS |
cloud.region |
Invocation log region |
us-east-1 |
cloud.account.uid |
Invocation log accountId |
123456789012 |
actor.user.uid |
Invocation log identity.arn |
arn:aws:sts::123456789012:assumed-role/AppRole/session |
finding_info.title |
Derived from policy type | ContentPolicy Intervention |
finding_info.desc |
Guardrail trace action/topic | Blocked: HATE content detected on INPUT |
resource.uid |
Model ARN | arn:aws:bedrock:us-east-1::foundation-model/anthropic.claude-sonnet-4-6-20250514-v1:0 |
resource.type |
Static | AwsBedrock:Model |
metadata.product.name |
Static | Amazon Bedrock Guardrails |
metadata.product.vendor_name |
Static | AWS |
metadata.version |
Static | 1.3.0 |
unmapped.guardrail_id |
Guardrail trace guardrailId |
my-content-guardrail |
unmapped.guardrail_arn |
Guardrail trace guardrailArn |
arn:aws:bedrock:us-east-1:123456789012:guardrail/abc123 |
unmapped.guardrail_version |
Guardrail trace guardrailVersion |
3 |
unmapped.guardrail_content_source |
Guardrail trace | INPUT or OUTPUT |
unmapped.guardrail_policy_type |
Guardrail trace | ContentPolicy, TopicPolicy, SensitiveInformationPolicy, WordPolicy, ContextualGroundingPolicy, PromptAttack |
The following prerequisites are needed to deploy the reference implementation. Before you begin, clone the repository:
Verify you have the following:
The reference implementation deploys three CloudFormation stacks: SecurityLakeSourceStack, TransformPipelineStack and MonitoringStack. The following commands deploy the stacks in dependency order:
Model invocation logging captures the guardrail trace data you need. Turn on full request and response logging to a CloudWatch Logs log group. Configure textDataDeliveryEnabled to capture text request and response bodies, which include the guardrail trace output when a guardrail is attached to the invocation.
Register BedrockGuardrails as a custom source with Security Lake using the DETECTION_FINDING event class. Security Lake creates the Amazon S3 prefix and IAM role for your source. The stack configures the AWS Glue crawler role for partition discovery.
Create a CloudWatch Logs subscription filter on your model invocation log group with the filter pattern { $.output.guardrailAction = “INTERVENED” }. This captures only the events where a guardrail blocked or modified content, not the successful pass-through events. This reduces Lambda invocations and cost.
The Lambda function performs three operations: parse the CloudWatch Logs event, transform each intervention to an OCSF Detection Finding record (class_uid 2004), and write batched records as Parquet files. The files are written to the Security Lake S3 bucket using the required partition path (ext/BedrockGuardrails/region=<region>/accountId=<accountId>/eventDay=<YYYYMMDD>/).
The transformation maps guardrail trace fields to OCSF attributes as described in the OCSF mapping table. Severity is set to High for prompt injection interventions and Medium for content, topic, or sensitive information interventions. For a concrete before-and-after example, see the sample invocation log and corresponding OCSF output in the companion repository.
Scaling considerations: At low intervention volumes (tens of events per hour), direct Lambda writes produce acceptably sized Parquet files. For higher volumes, consider buffering through Amazon Data Firehose with its native Parquet conversion and 5-minute buffering interval to produce fewer, larger files that optimize Athena query performance.
Multi-account deployment: The partition scheme (accountId=<account>) already supports multi-account environments. Deploy the subscription filter and transform pipeline in each workload account where model invocation logging is enabled. Each pipeline writes cross-account to the delegated-administrator Security Lake bucket. Distribute the pipeline using CloudFormation StackSets across the organization.
After deployment, guardrail violations typically appear in your Security Lake tables within 5–10 minutes, depending on the AWS Glue crawler schedule. You can then run cross-service correlation queries. The following example identifies users who trigger both prompt injection interventions and unusual IAM activity:
You can also track violation trends by policy type over time to establish baselines and detect spikes. The following query shows the 30-day trend:
The OCSF mapping has been validated against schema version 1.3.0, and the Security Lake AWS Glue crawler correctly detects the partitioned Parquet files for querying.
Alternative for teams not yet using Security Lake: If your organization hasn’t adopted Security Lake, you can query guardrail intervention events directly in CloudWatch Logs Insights using the same subscription filter log group. CloudWatch Logs Insights supports cross-log-group queries, so you can correlate guardrail events with other CloudWatch log sources without the OCSF transformation step. Security Lake adds value when you need to join with non-CloudWatch sources in a single query layer. Examples include Amazon VPC Flow Logs, Amazon Route 53 DNS logs, and third-party findings.
To avoid ongoing charges, destroy the stacks in reverse dependency order:
In this post, you learned how to route Amazon Bedrock Guardrails intervention events to Amazon Security Lake as OCSF-compliant Detection Finding records. This integration extends guardrail telemetry from Amazon CloudWatch into your security data lake. Security analysts can then run cross-service correlation of AI intervention events with IAM, network, and application telemetry.
The pipeline filters for intervention events only, keeping costs low while capturing the security-relevant signals. The records use OCSF event class 2004 (Detection Finding), which integrates with supported Security Lake subscribers such as Amazon OpenSearch Service and third-party SIEM tools.
Clone the reference implementation and adapt the OCSF mapping and subscription filter to your organization’s guardrail configuration.
If you have feedback about this post, submit comments in the Comments section below.
Post Syndicated from jzb original https://lwn.net/Articles/1087567/
Greg Kroah-Hartman has announced the release of the 7.1.7, 6.18.43, 6.6.149, 6.1.181, 5.15.214, and 5.10.263 stable kernels. These kernels
fix a single
security vulnerability (CVE-2026-68480)
that could allow data leakage through speculative execution. Users of
those kernels are advised to upgrade.
Post Syndicated from Chintan Agrawal original https://aws.amazon.com/blogs/big-data/scaling-fine-grained-access-control-for-enterprise-lakehouse-using-sagemaker-unified-studio-and-aws-lake-formation/
As enterprise lakehouses grow to thousands of tables across multiple business domains and regions, scaling fine-grained access control becomes a critical governance challenge. Data governance teams spend significant time manually granting table-level permissions, only to face permission drift, inconsistent enforcement, and limited auditability. Without a scalable approach, each new dataset requires manual policy updates, increasing the risk of unauthorized access and slowing time-to-insight for analysts and data scientists.
In this post, we show you how to solve this problem by combining AWS IAM Identity Center, AWS Lake Formation tag-based access control (TBAC), and trusted identity propagation in Amazon SageMaker Unified Studio. You deploy a complete governance architecture using AWS Cloud Development Kit (AWS CDK) that classifies data with LF-Tags, maps IAM Identity Center groups to tag-based policies, and enforces permissions at query time across analytics engines. The solution uses Apache Iceberg tables stored in Amazon Simple Storage Service (Amazon S3) and registered in the AWS Glue Data Catalog.
As organizations mature their lakehouse environments, governance complexity increases with each new dataset. Several challenges commonly emerge:
To address these challenges, enterprise lakehouse governance must satisfy several criteria:
TBAC addresses each of these challenges directly. Instead of granting permissions on individual tables, you define tag-based policies that automatically apply to any resource matching the tag expression. New datasets inherit access rules through tag inheritance, eliminating manual policy updates (solving explosive dataset growth). Domain and region tags enforce strict isolation between business units (solving multi-domain ownership and regional sovereignty). Sensitivity tags control access within domains without role proliferation (solving sensitivity-based controls and role explosion). The following sections describe the architecture that implements this model and walk you through deploying it end to end.
The governance model integrates identity, metadata, and lakehouse services into a unified access architecture that enforces fine-grained permissions consistently across analytics and machine learning (ML) workloads. The architecture consists of five layers, each handling a distinct responsibility in the access control flow.
The following diagram illustrates the end-to-end architecture, showing how user identity flows from IAM Identity Center through SageMaker Unified Studio to Lake Formation for tag-based policy evaluation against the AWS Glue Data Catalog and Amazon S3 storage layer.
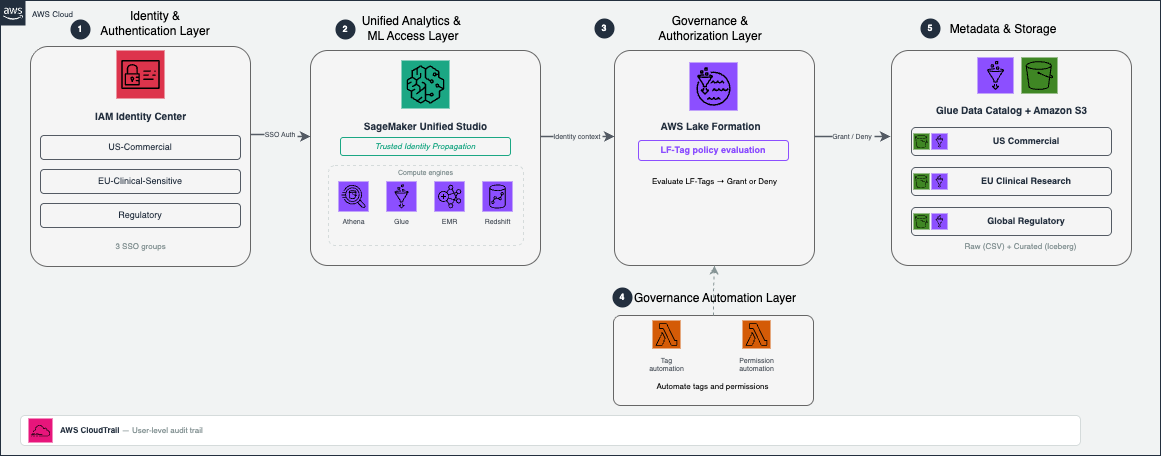
Figure 1: End-to-end governance architecture for the enterprise lakehouse
1. Identity and authentication layer: IAM Identity Center manages user identities and group memberships, integrates with corporate identity providers, and provides centralized lifecycle management for enterprise users. IAM Identity Center groups represent business roles and serve as the principals that receive Lake Formation permissions.
2. Unified analytics and ML access layer: Amazon SageMaker Unified Studio serves as the primary interface where analysts, data scientists, and ML engineers discover datasets, run queries, and build ML workflows. Because SageMaker Unified Studio integrates with multiple compute engines, including Amazon Athena, AWS Glue, Amazon EMR, and Amazon Redshift, users can access data using their preferred analytics tools while maintaining consistent governance.
3. Governance and authorization layer: AWS Lake Formation provides fine-grained access control across AWS Glue catalog resources using LF-Tags. Instead of granting permissions directly on databases and tables, Lake Formation evaluates LF-Tag policies dynamically and grants or denies access at query time. Governance teams define access rules once, and Lake Formation automatically applies them to new datasets as they are onboarded.
4. Governance automation layer: Two AWS Lambda functions automate tag assignment and permission provisioning. JSON metadata configuration files drive both pipelines, so governance teams manage access control through configuration rather than manual console operations.
5. Metadata and storage layer: Apache Iceberg tables stored in Amazon S3 form the foundation of the lakehouse. You register these tables in the AWS Glue Data Catalog, which provides centralized metadata management and interoperability across analytics services. Lake Formation evaluates governance decisions at the catalog level rather than independently by each analytics engine.
When a user queries a dataset from SageMaker Unified Studio, the following sequence occurs:
Because authorization decisions are centralized in Lake Formation, governance remains consistent regardless of which analytics engine the user employs.
The governance model combines identity context from IAM Identity Center with metadata-driven classification using LF-Tags. The following table summarizes how each layer contributes to the overall governance workflow.
| Governance capability | IAM Identity Center contribution | Lake Formation LF-Tag contribution | Governance outcome |
| Identity context | Organizes users into groups aligned with business roles | Evaluates permissions using group membership | Role-aligned access boundaries |
| Data classification | Provides role eligibility for data access | Classifies datasets by domain, region, sensitivity, and layer | Attribute-aware authorization |
| Scalability | Simplifies user lifecycle management | Automatically applies policies to newly tagged datasets | Governance that scales with dataset growth |
| Operational model | Centralizes role lifecycle operations | Enables metadata-driven policy automation | Reduced administrative overhead |
IAM Identity Center defines who can request access, LF-Tags define what datasets are eligible, and Lake Formation enforces policies dynamically at query time.
A structured tagging strategy is the foundation of scalable Lake Formation governance. In this solution, the solution classifies datasets across four governance dimensions.
| Tag Key | Tag Values | Purpose | Example Usage |
| region | us, eu, global | Geographic data location | Enforce GDPR compliance for EU data |
| domain | commercial, clinical_research, regulatory | Business domain | Separate commercial from clinical data |
| data_class | standard, sensitive, regulated | Data sensitivity level | Restrict access to sensitive pricing data |
| layer | raw, curated, conformed | Data processing stage | Grant analysts access to curated data only |
Together, these dimensions enable multi-dimensional authorization policies that reflect both organizational structure and regulatory requirements.
LF-Tags can be applied at three resource levels within the Glue Data Catalog: database, table, and column. In this implementation, database-level tags define broad governance attributes (domain, region, layer), table-level tags capture dataset-specific sensitivity (data_class), and column-level tags can further restrict access to individual fields. Lake Formation evaluates the effective tag set at query time by combining inherited and explicitly assigned tags.
For example, a database tagged domain=commercial, region=us, layer=raw automatically applies those tags to all tables within it. A table-level data_class=sensitive tag supplements the inherited tags to distinguish sensitive pricing data from standard sales data. This inheritance model means new tables automatically receive governance coverage without manual tag assignment. To learn more, refer to Lake Formation tag-based access control best practices.
Before deploying the solution, complete the following setup in the us-east-1 Region. Use the same AWS Region throughout all steps.
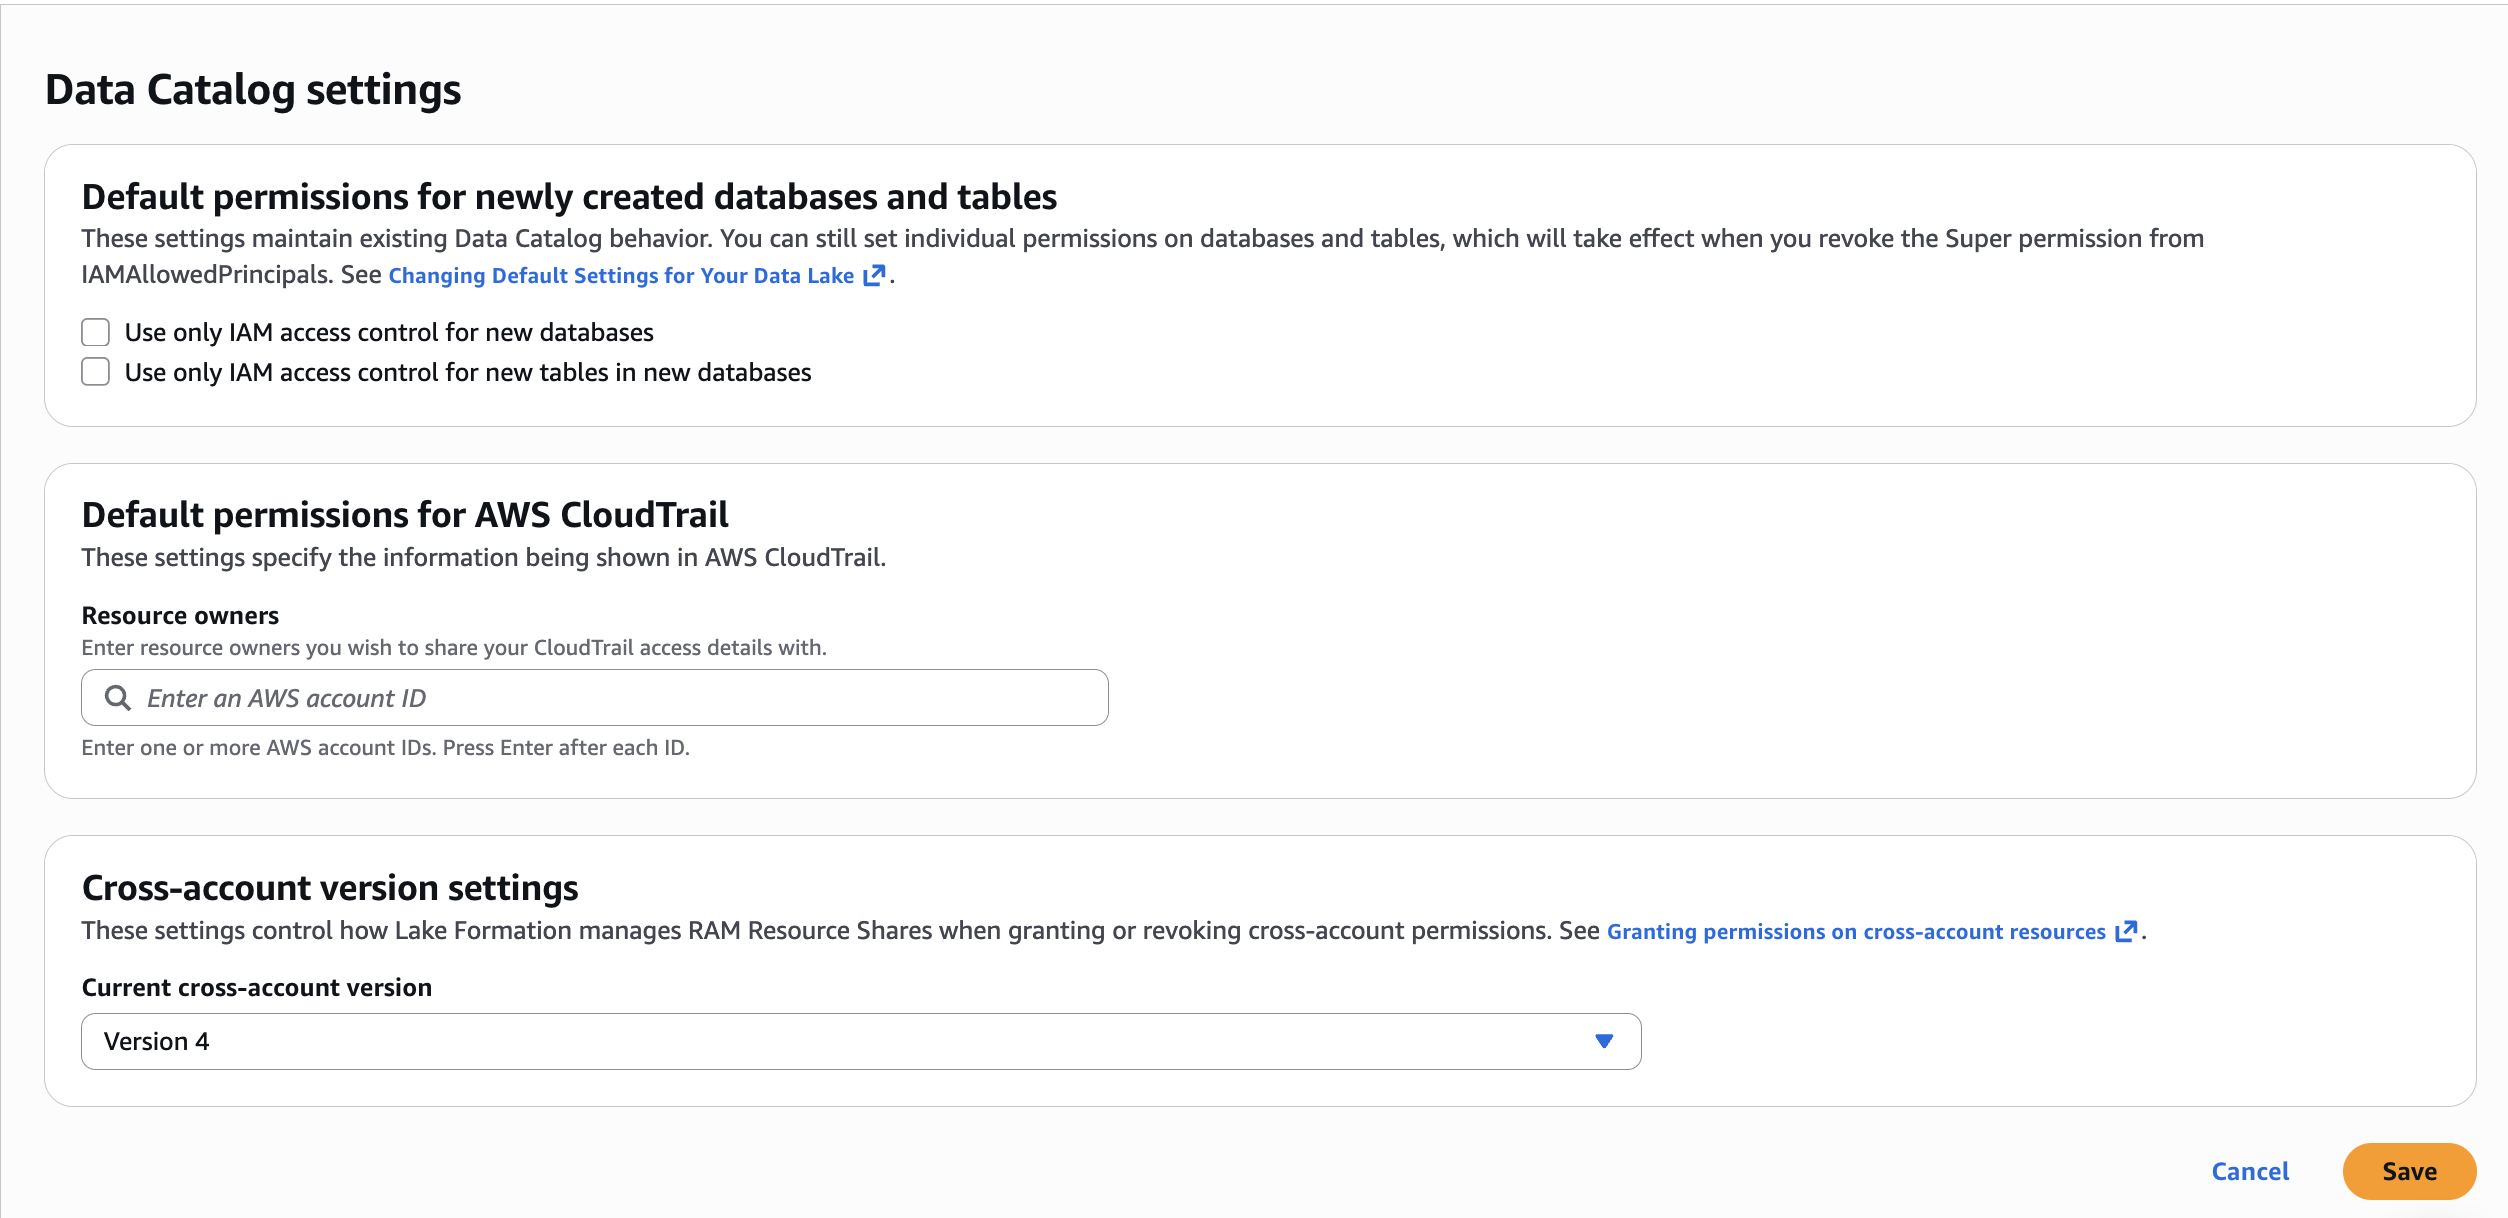
Figure 2: Lake Formation Data Catalog settings with both IAM-only access control checkboxes unchecked
2.2. Integrate with IAM Identity Center. Complete the prerequisites for IAM Identity Center integration with Lake Formation, including enabling trusted identity propagation.You don’t need to manually create a Lake Formation administrator. The CDK deployment in Step 2: Deploy all stacks automatically registers the required administrators via the LfAdminStack (see lf-admin-stack.ts). S3 data location registration is a post-deployment console step covered after the CDK creates the buckets.
npm install -g aws-cdk), and Git.Now that you understand the governance model and tag taxonomy, the following section walks you through deploying the complete infrastructure and configuring access control.
The deployment uses AWS CDK (TypeScript) and consists of seven stacks that create the complete governance infrastructure. The CDK app manages stack dependencies automatically, so a single cdk deploy --all command deploys everything in the correct order.
The architecture uses a two-layer data lake pattern. The raw layer stores data as CSV files in Amazon S3, registered as external tables in the AWS Glue Data Catalog. The curated layer uses Apache Iceberg v2 tables for ACID transactions and schema evolution. Three business domains (US Commercial, EU Clinical Research, and Global Regulatory) each have one representative table per layer, giving six tables total.
Lake Formation tag-based access control (TBAC) governs all access using four tag dimensions:
| Tag Key | Values | Purpose |
| domain | commercial, clinical_research, regulatory | Business domain isolation |
| region | us, eu | Geographic data boundary |
| data_class | standard, sensitive, regulated | Sensitivity classification |
| layer | raw, curated | Data layer identification |
Clone the accompanying repository and install the CDK project dependencies:
The CDK project is written in TypeScript and uses aws-cdk-lib v2. The lib/ directory contains seven stack definitions, and bin/app.ts wires them together with explicit dependency ordering.
If this is your first CDK deployment in this account and Region, bootstrap the CDK environment. Bootstrapping provisions an S3 bucket and IAM roles that CDK uses to deploy assets:
Deploy the entire infrastructure with a single command. Pass your IAM Identity Center Identity Store ID as a CDK context variable:
CDK will prompt for IAM permission changes on each stack. The --require-approval never flag auto-approves these so the deployment runs unattended.
CDK deploys the seven stacks in dependency order:
domain, region, data_class, layer)DataLake-US-Commercial, DataLake-EU-Clinical-Research-Sensitive, DataLake-Regulatory)The three groups map to specific tag combinations that control data access:
domain=commercial, region=us, data_class=standard.domain=clinical_research, region=eu, data_class=sensitive,regulated.domain=regulatory (all regions, all data classes within regulatory).The following table summarizes the user personas, their group assignments, and the data access each group provides:
After deployment completes, review the CloudFormation stack outputs. They include S3 bucket names, database names, SSO group IDs, and Lambda function ARNs.
The following figure shows all seven CDK stacks deployed successfully in the CloudFormation console.
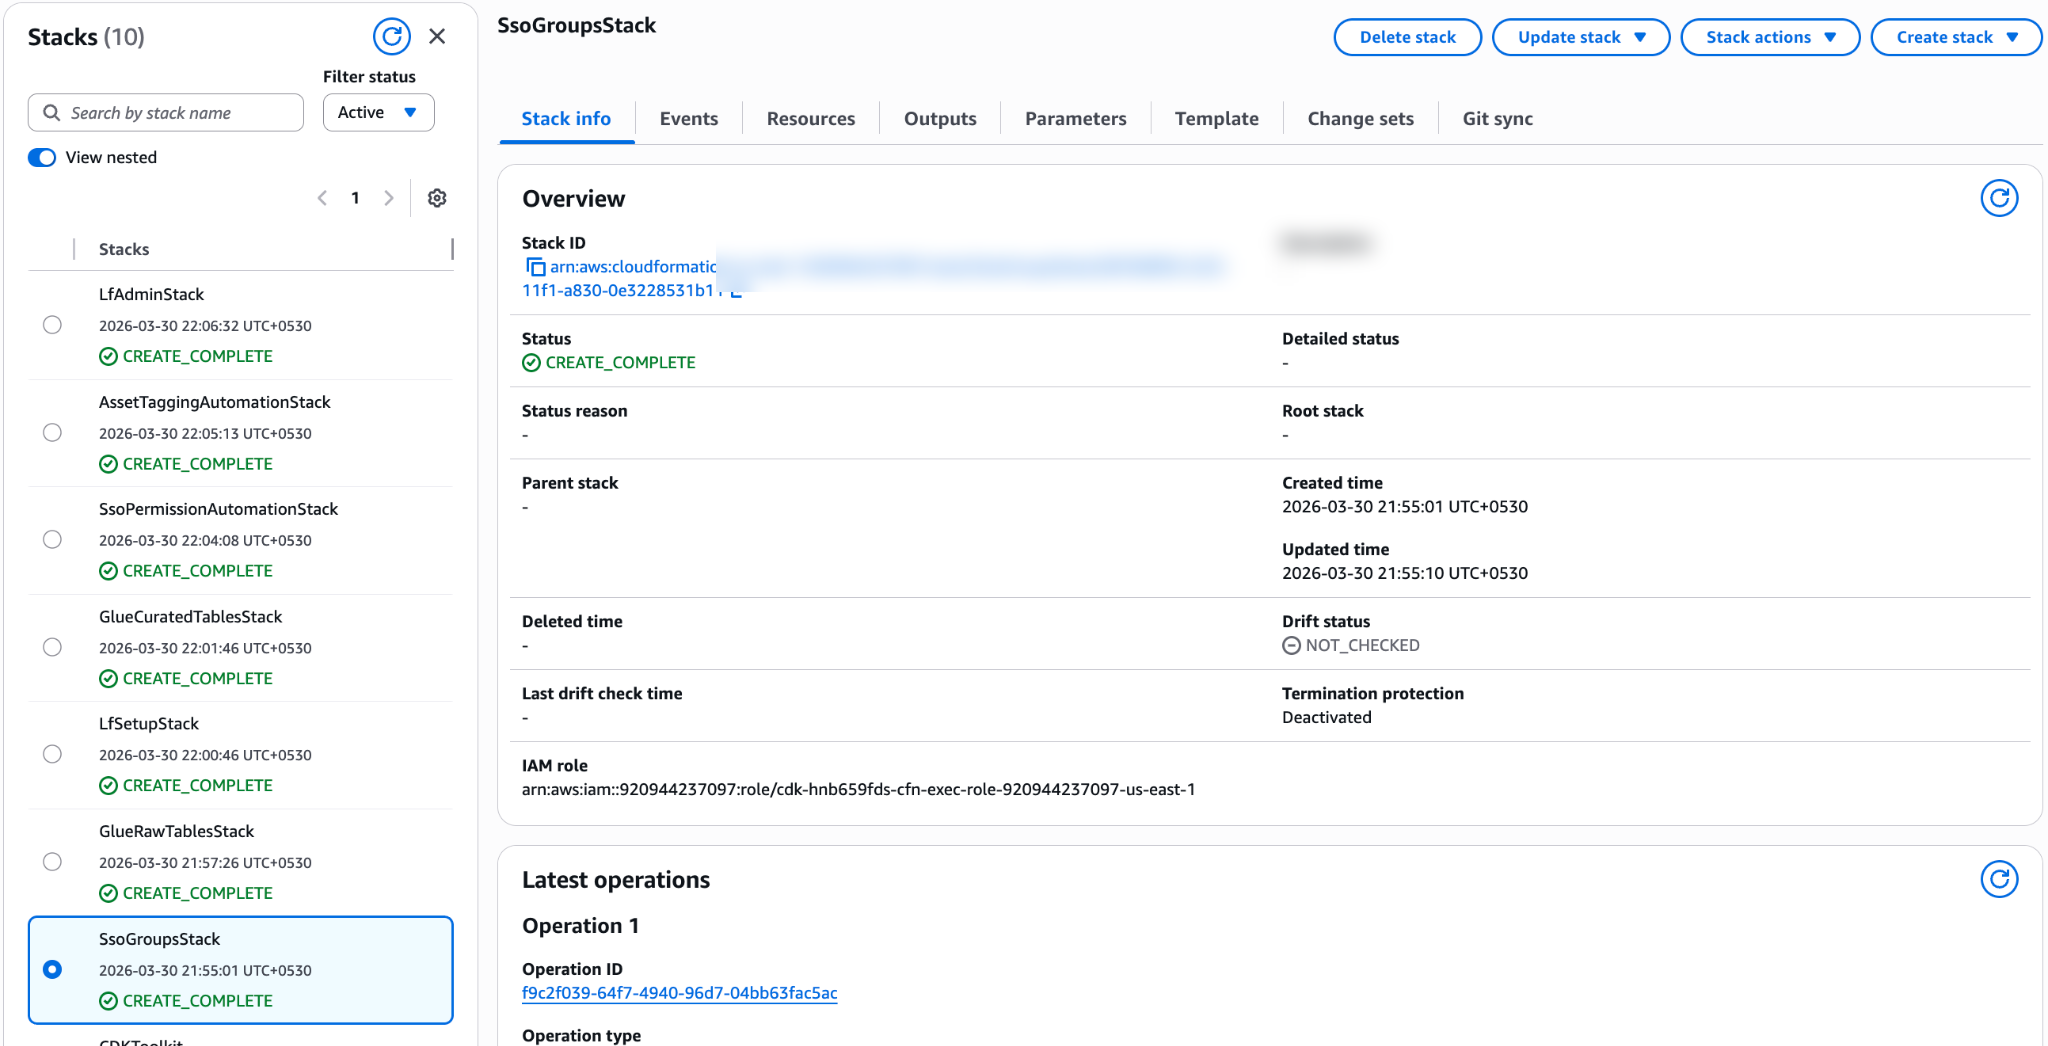
Figure 3: CloudFormation console showing all seven CDK stacks in CREATE_COMPLETE status
Register S3 data locations with Lake Formation: Now that the S3 buckets exist, register them with Lake Formation. In the Lake Formation console, under Administration, choose Data lake locations, then choose Register location. Register both buckets from the stack outputs (for example, s3://datalake-raw-data-<ACCOUNT_ID>-us-east-1 and s3://datalake-curated-data-<ACCOUNT_ID>-us-east-1). For IAM role, use the default AWSServiceRoleForLakeFormationDataAccess and choose Lake Formation as the permission mode. See Registering an Amazon S3 location for step-by-step instructions.
The following figure shows both data lake S3 locations registered in the Lake Formation console.

Figure 4: Lake Formation Data lake locations page with raw and curated S3 buckets registered
The scripts use Amazon Athena to insert sample data. Athena stores query results under the athena-results/ prefix in the shared governance metadata bucket (lf-governance-metadata-<ACCOUNT_ID>-<REGION>) created by the CDK deployment.
Populate the raw and curated tables:
Each script executes INSERT INTO statements through the Athena StartQueryExecution API and waits for completion. You should see success messages for all six tables (three raw, three curated).
After populating the tables, you can verify the data in the Glue Data Catalog. The following figure shows the six tables across the three raw and three curated databases.
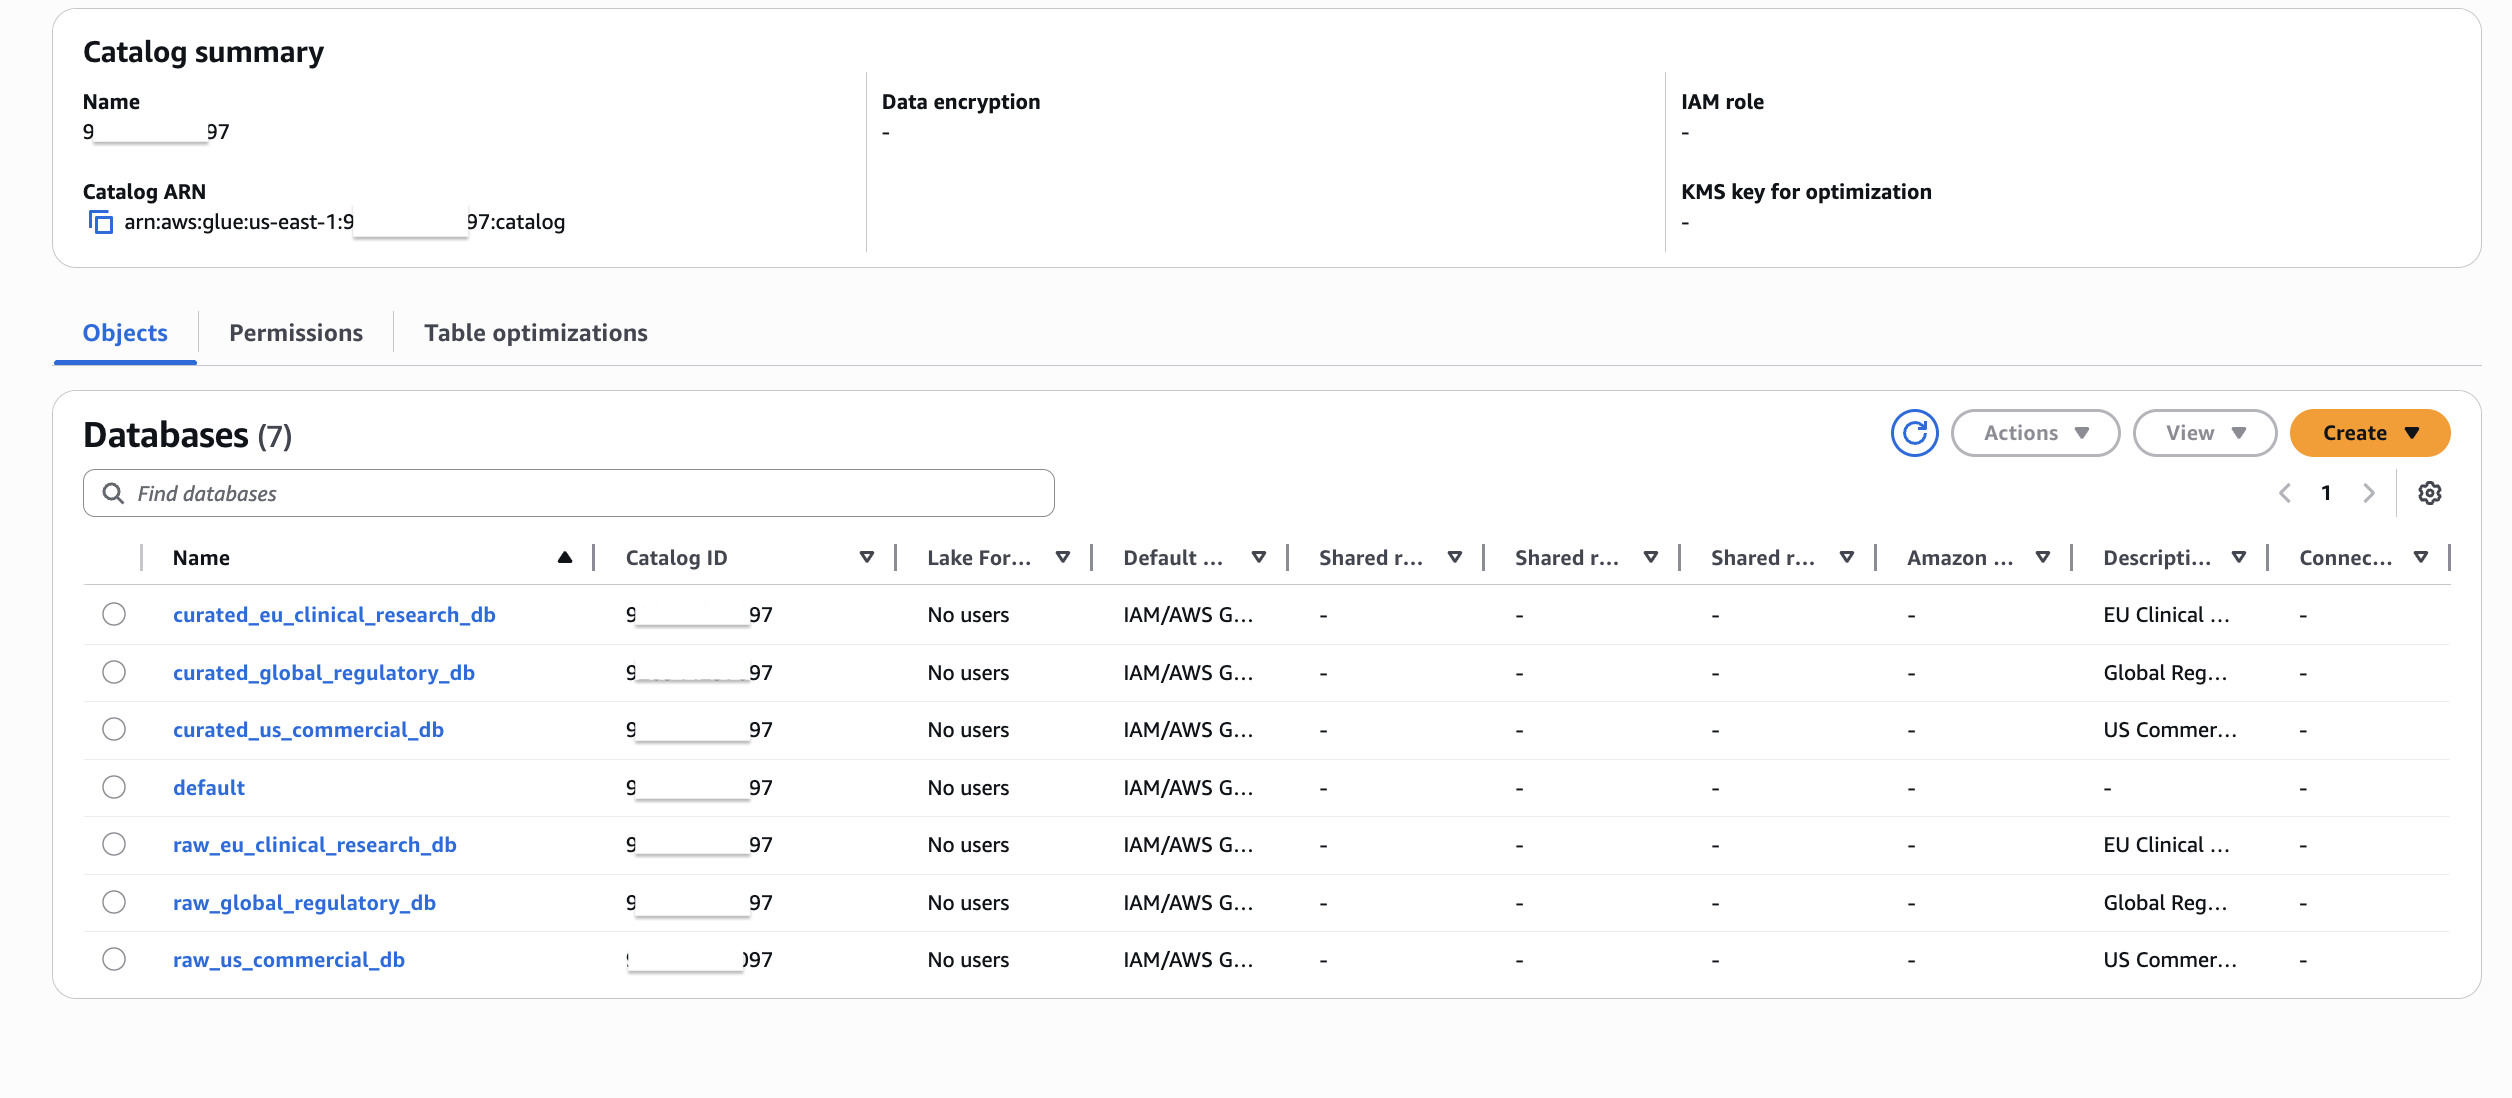
Figure 5: AWS Glue Data Catalog showing the six databases and tables created by the CDK deployment
You can also preview the data by querying a table. The following figure shows sample data from the us_sales_summary table.
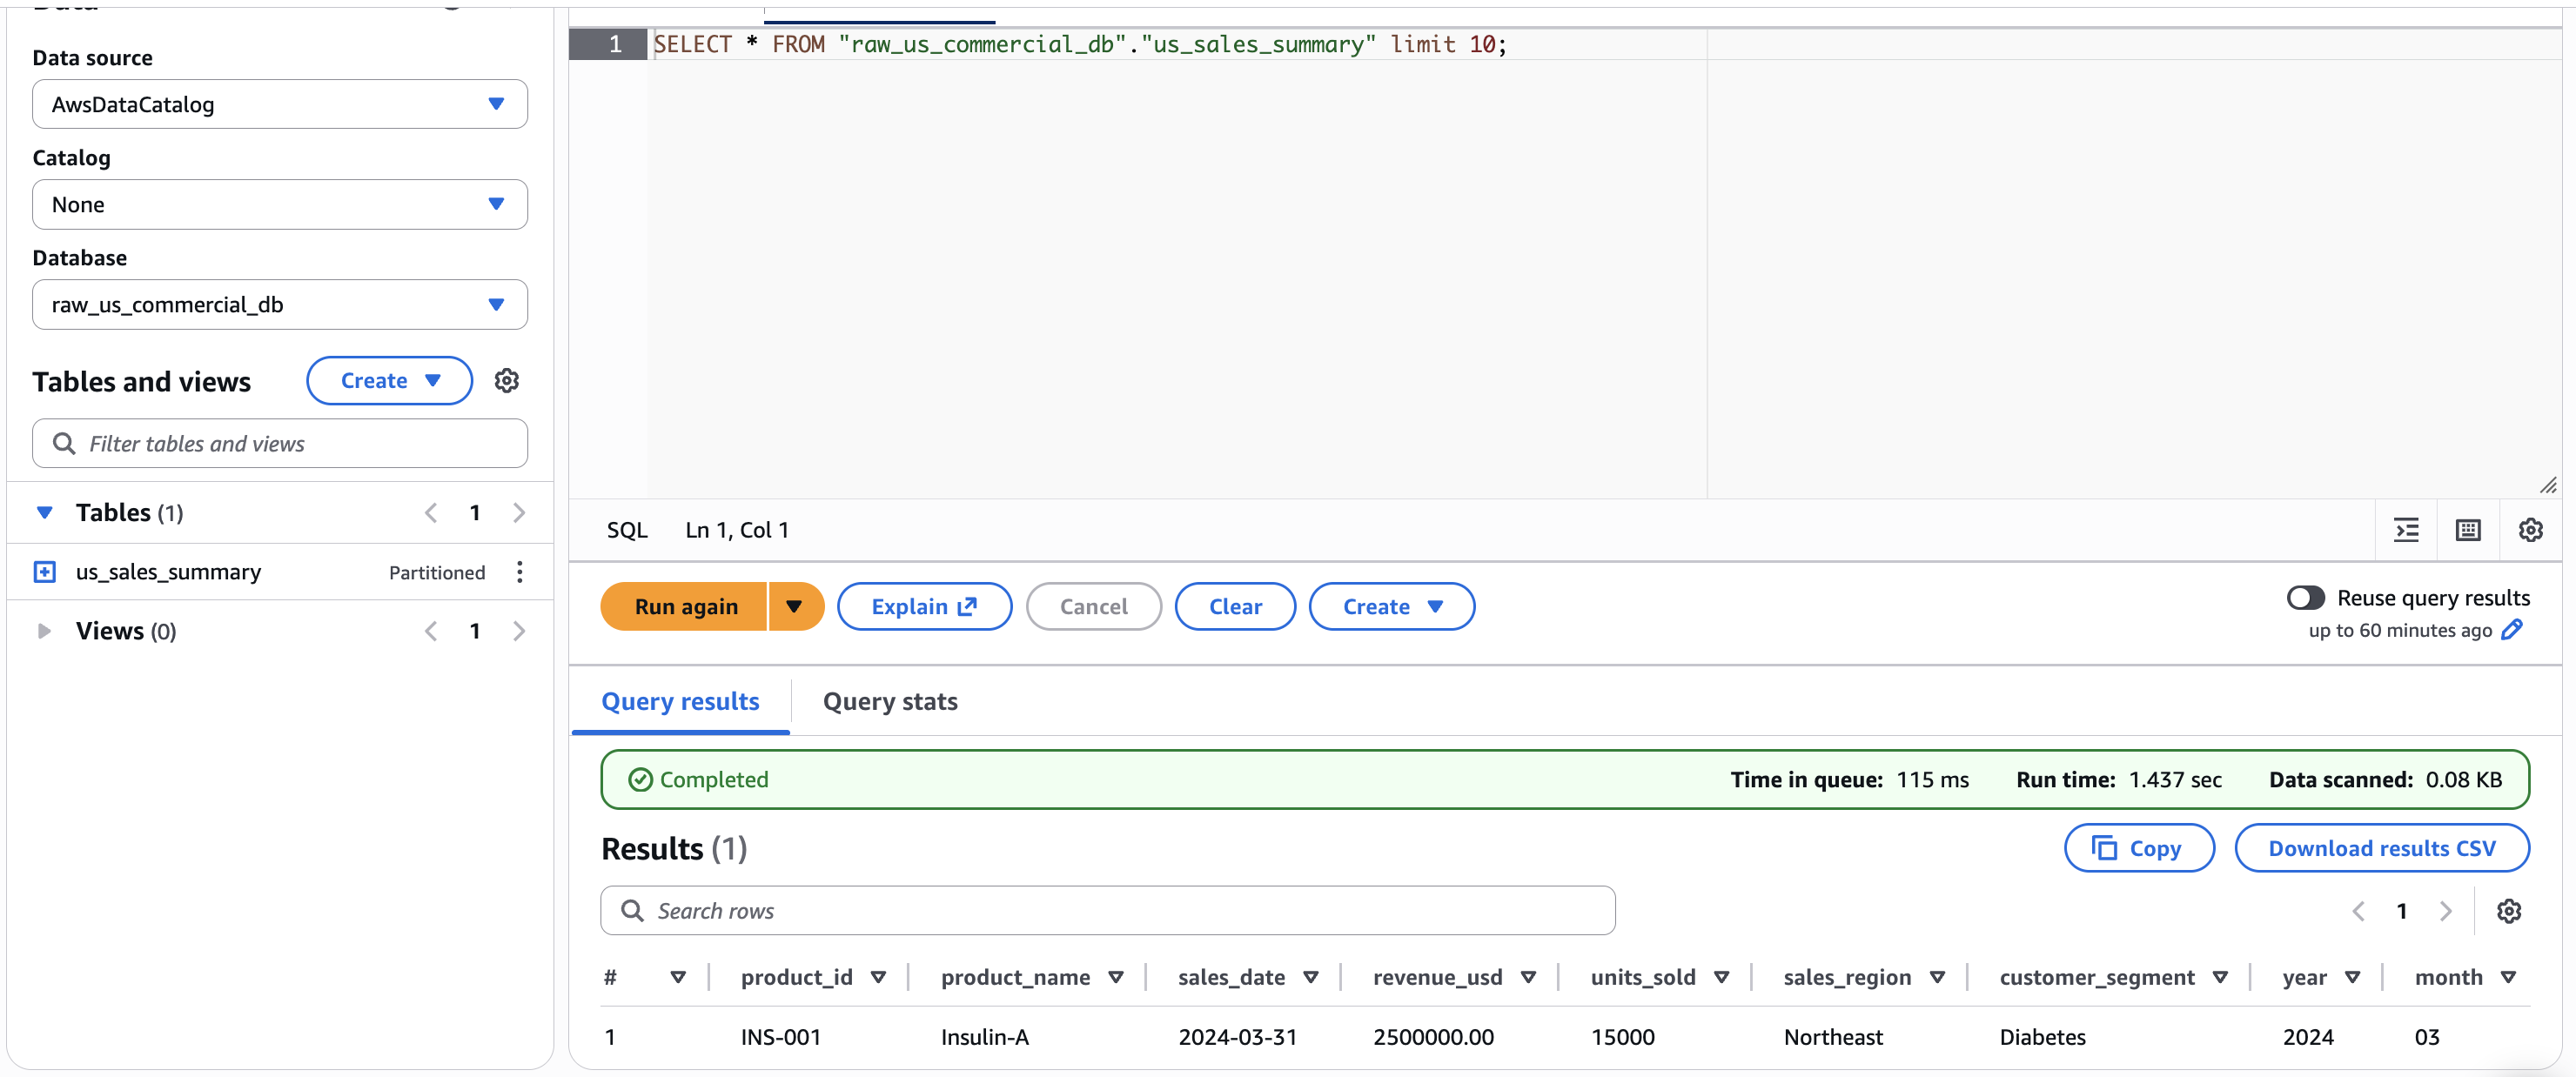
Figure 6: Query results for the us_sales_summary table with sample commercial data
The following diagram illustrates the governance automation flow, showing how metadata JSON configuration files drive the two Lambda pipelines for asset tagging and SSO permission management.
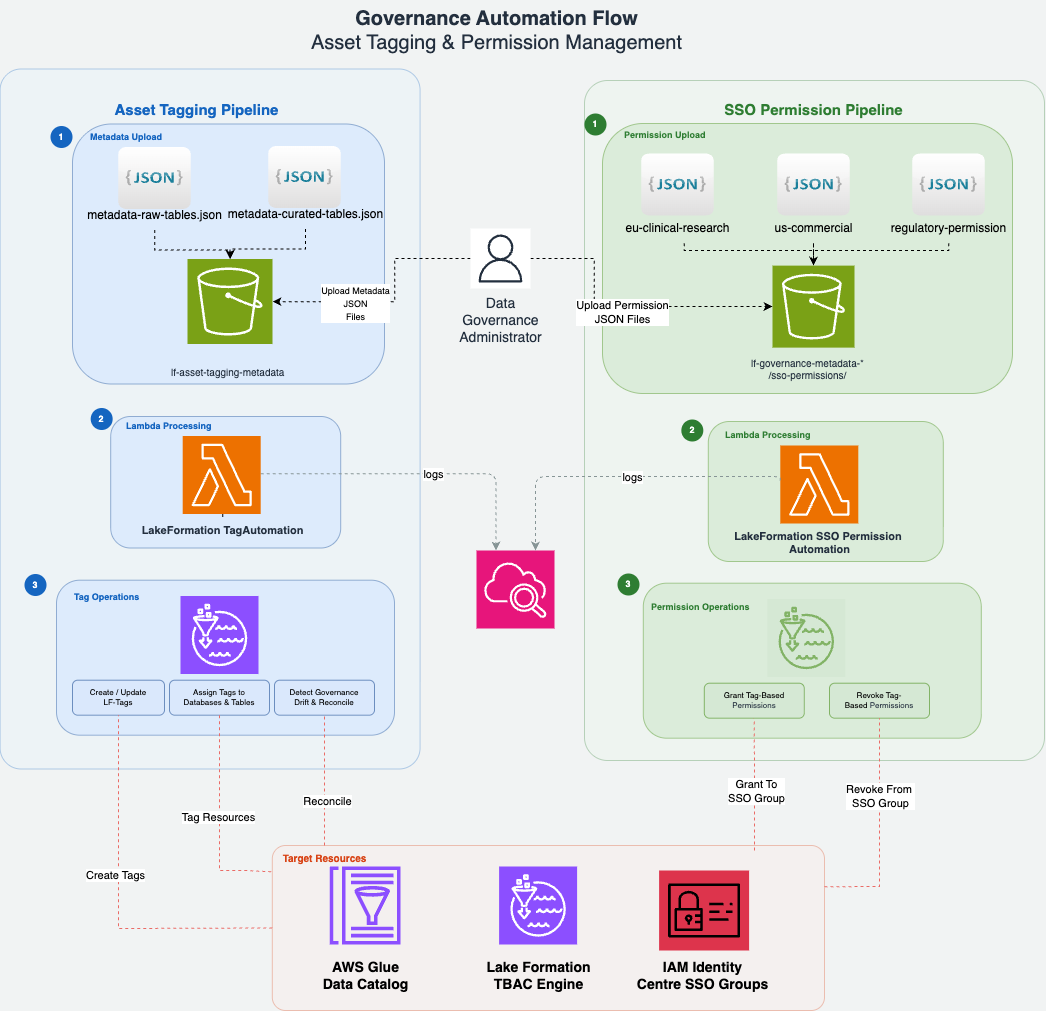
Figure 7: Governance automation flow showing the asset tagging and SSO permission Lambda pipelines
The diagram shows two parallel pipelines, each following three steps:
Asset tagging pipeline (left):
metadata-raw-tables.json and metadata-curated-tables.json) to the asset-tagging/ prefix in the shared S3 governance metadata bucket. These files define which LF-Tags to assign to each AWS Glue database and table.LakeFormationTagAutomation Lambda function, which reads the metadata and calls the Lake Formation API.SSO permission pipeline (right):
sso-permissions/ prefix. These files define the LF-Tag policy expressions that control data access.LakeFormationSSOPermissionAutomation Lambda function.Both pipelines log execution details to Amazon CloudWatch for monitoring and troubleshooting.
Two metadata JSON configuration files drive the asset tagging Lambda that declaratively define which LF-Tags to apply to each AWS Glue resource:
metadata-raw-tables.json: Tag definitions for the three raw layer databases and tables.metadata-curated-tables.json: Tag definitions for the three curated layer databases and tables.Each entry in these files specifies the following fields:
| Field | Description | Example |
| catalog_id | Your AWS account ID (Glue Data Catalog ID) | 123456789012 |
| resource_type | DATABASE or TABLE | DATABASE |
| database_name | AWS Glue database name | raw_us_commercial_db |
| table_name | AWS Glue table name (only for TABLE entries) | us_sales_summary |
| lf_tags | Array of LF-Tag key/value pairs to assign | [{“TagKey”:“domain”,“TagValues”:[“commercial”]}] |
| access_type | Action to perform (GRANT) | GRANT |
Parameters you must update before invoking: Replace the catalog_id value in every entry of both files with your own AWS account ID. The database and table names match the resources created by the CDK stacks, so those should not be changed unless you customized the stack parameters.
The following snippet from metadata-raw-tables.json shows a database-level entry and a table-level entry:
The Lambda applies tags at two levels: database-level entries assign domain, region, and layer tags, while table-level entries assign the data_class tag (standard, sensitive, or regulated). Because of two-level tagging, new tables added to a tagged database automatically inherit the database-level tags. Only the table-specific data_class tag needs explicit assignment. To learn more about this pattern, refer to Lake Formation tag-based access control best practices.
Invoke the Lambda for both layers:
Verify tag assignment using the GetResourceLFTags API:
You should see domain=commercial, region=us, layer=raw, and data_class=standard in the response.
The following figure shows the LF-Tags assigned to the us_sales_summary table in the Lake Formation console, confirming that both database-level inherited tags and table-level tags are applied correctly.
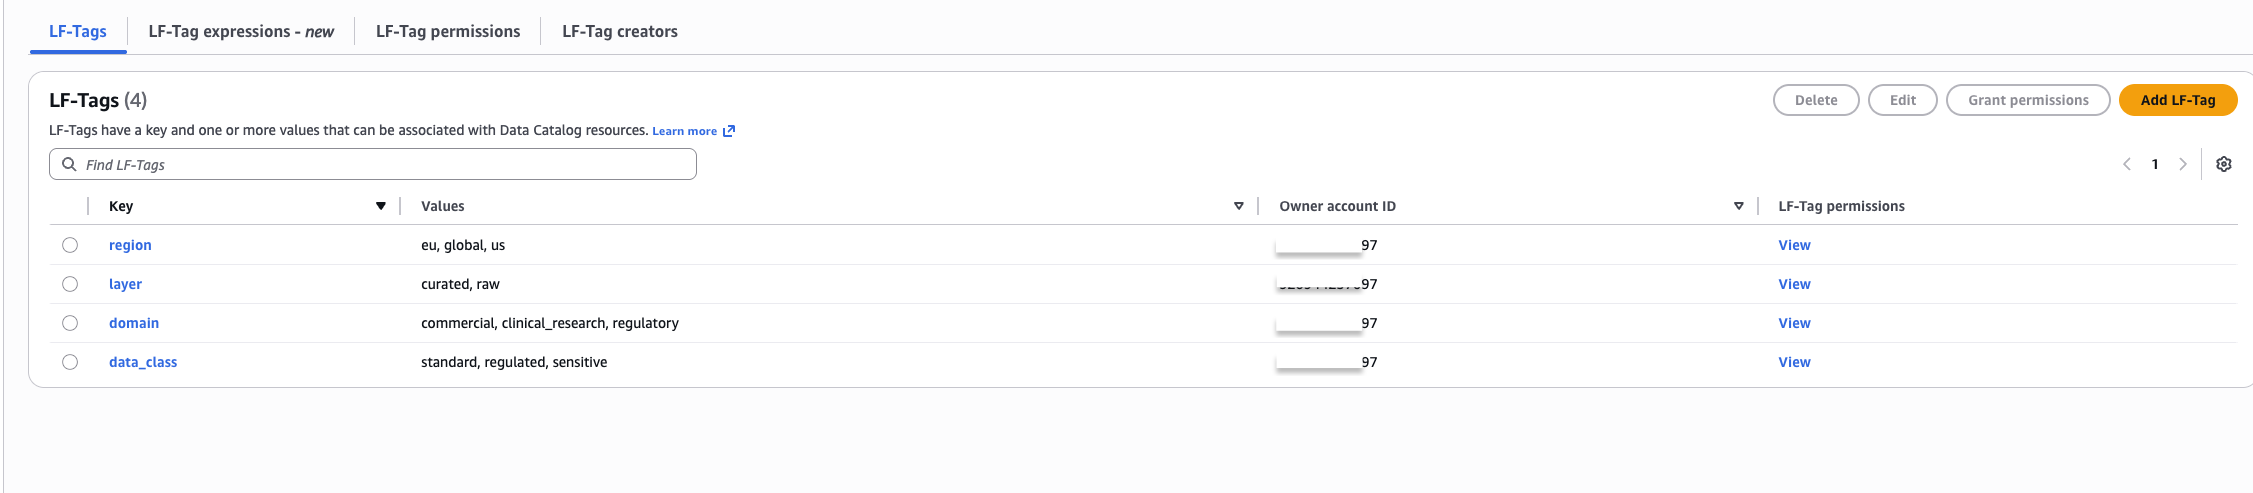
Figure 8: LF-Tags on the us_sales_summary table showing inherited and table-level tags
Three permission JSON files (one per IAM Identity Center group) define the LF-Tag policy expressions. Update sso_group with the group UUID from the SsoGroupsStack outputs and identity_center_account_id with your AWS account ID. For detailed configuration, see the repository README.
Apply permissions for each group:
With all permissions in place, validate that Lake Formation TBAC enforces the correct access boundaries by signing in to SageMaker Unified Studio as different IAM Identity Center users.
Test as Sarah (US Commercial Analyst) — Sarah belongs to DataLake-US-Commercial, which grants access to standard commercial data only.
Sarah sees all rows and columns successfully:
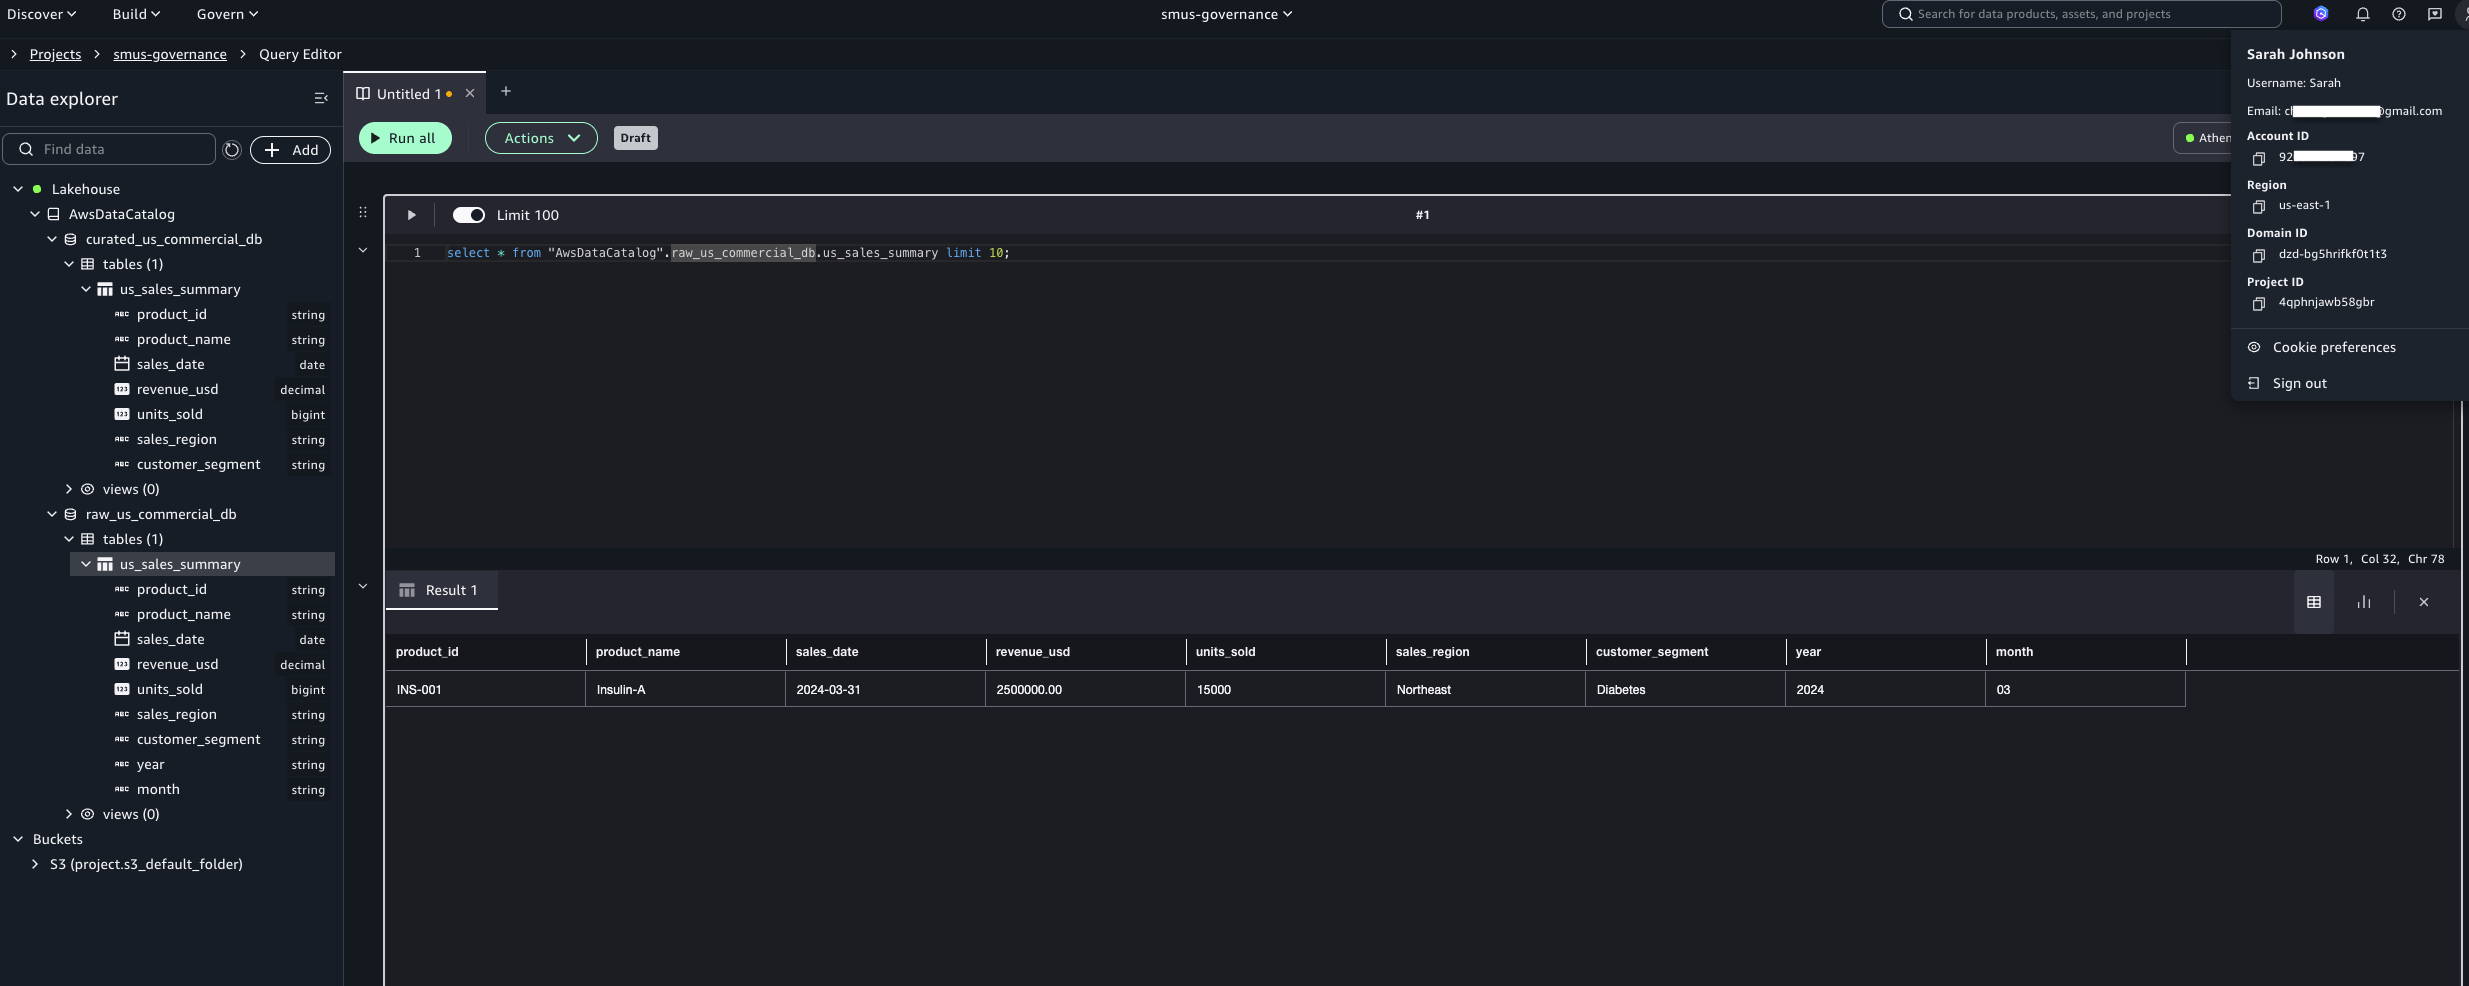
Figure 9: Sarah’s successful query on us_sales_summary in SageMaker Unified Studio
Querying outside her authorized domain returns an access denied error:
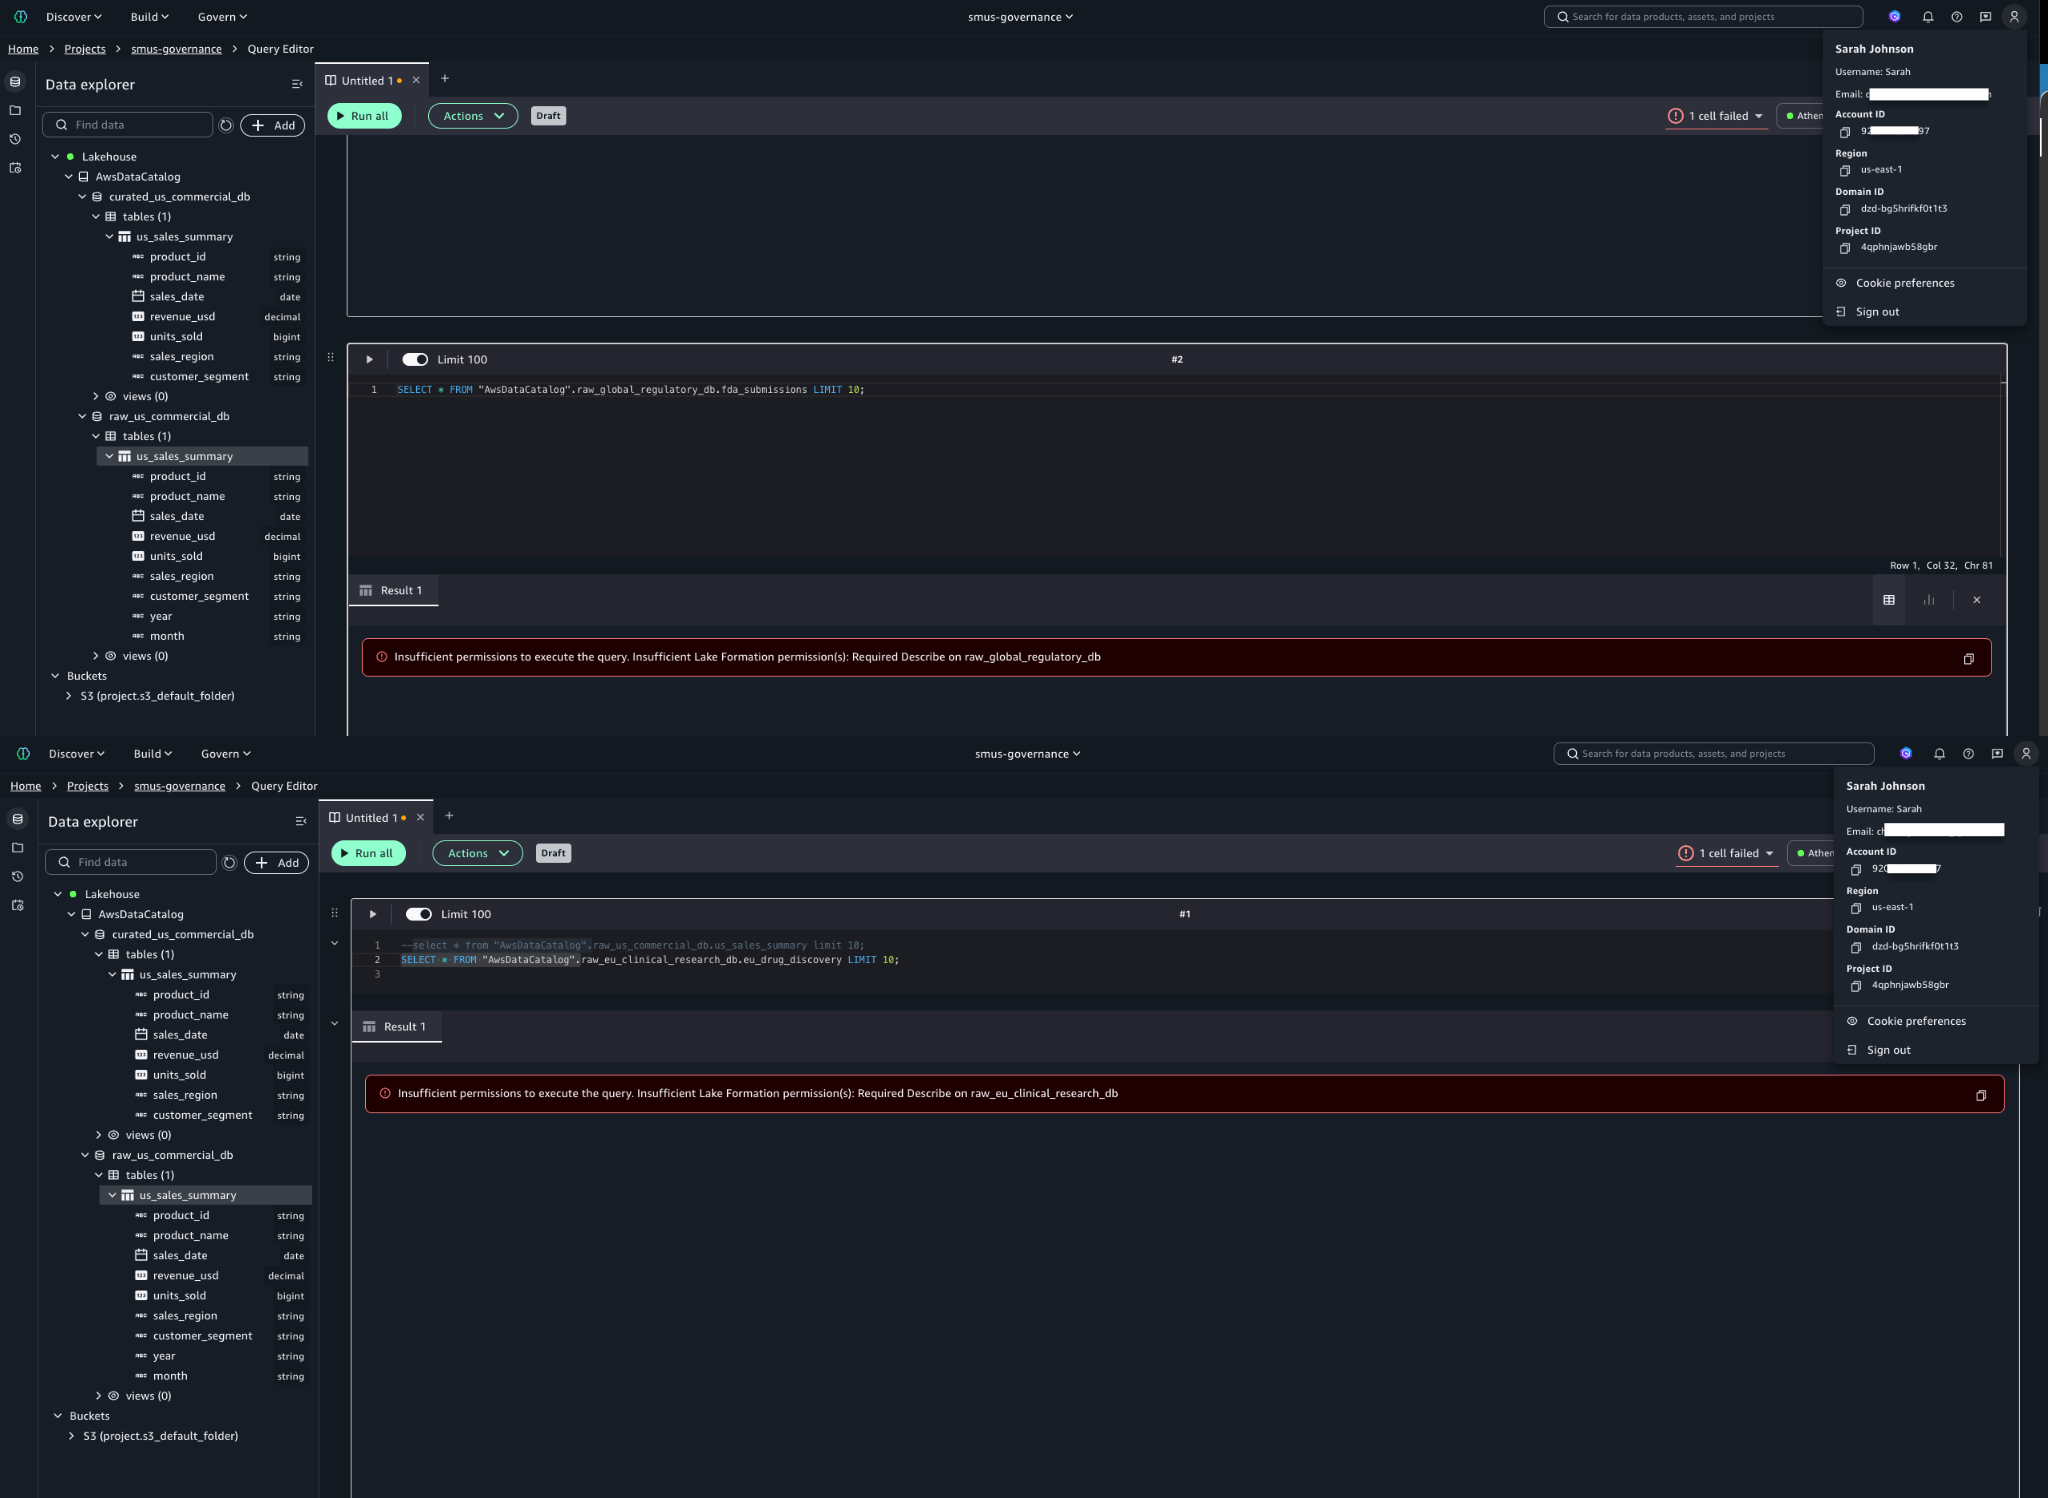
Figure 10: Access denied when Sarah queries eu_drug_discovery, confirming TBAC enforcement
Test as Dr. Chen (EU Clinical Research Lead) — Dr. Chen can access sensitive and regulated EU clinical research data (eu_drug_discovery) but is denied access to US commercial data (us_sales_summary), confirming regional and domain isolation.
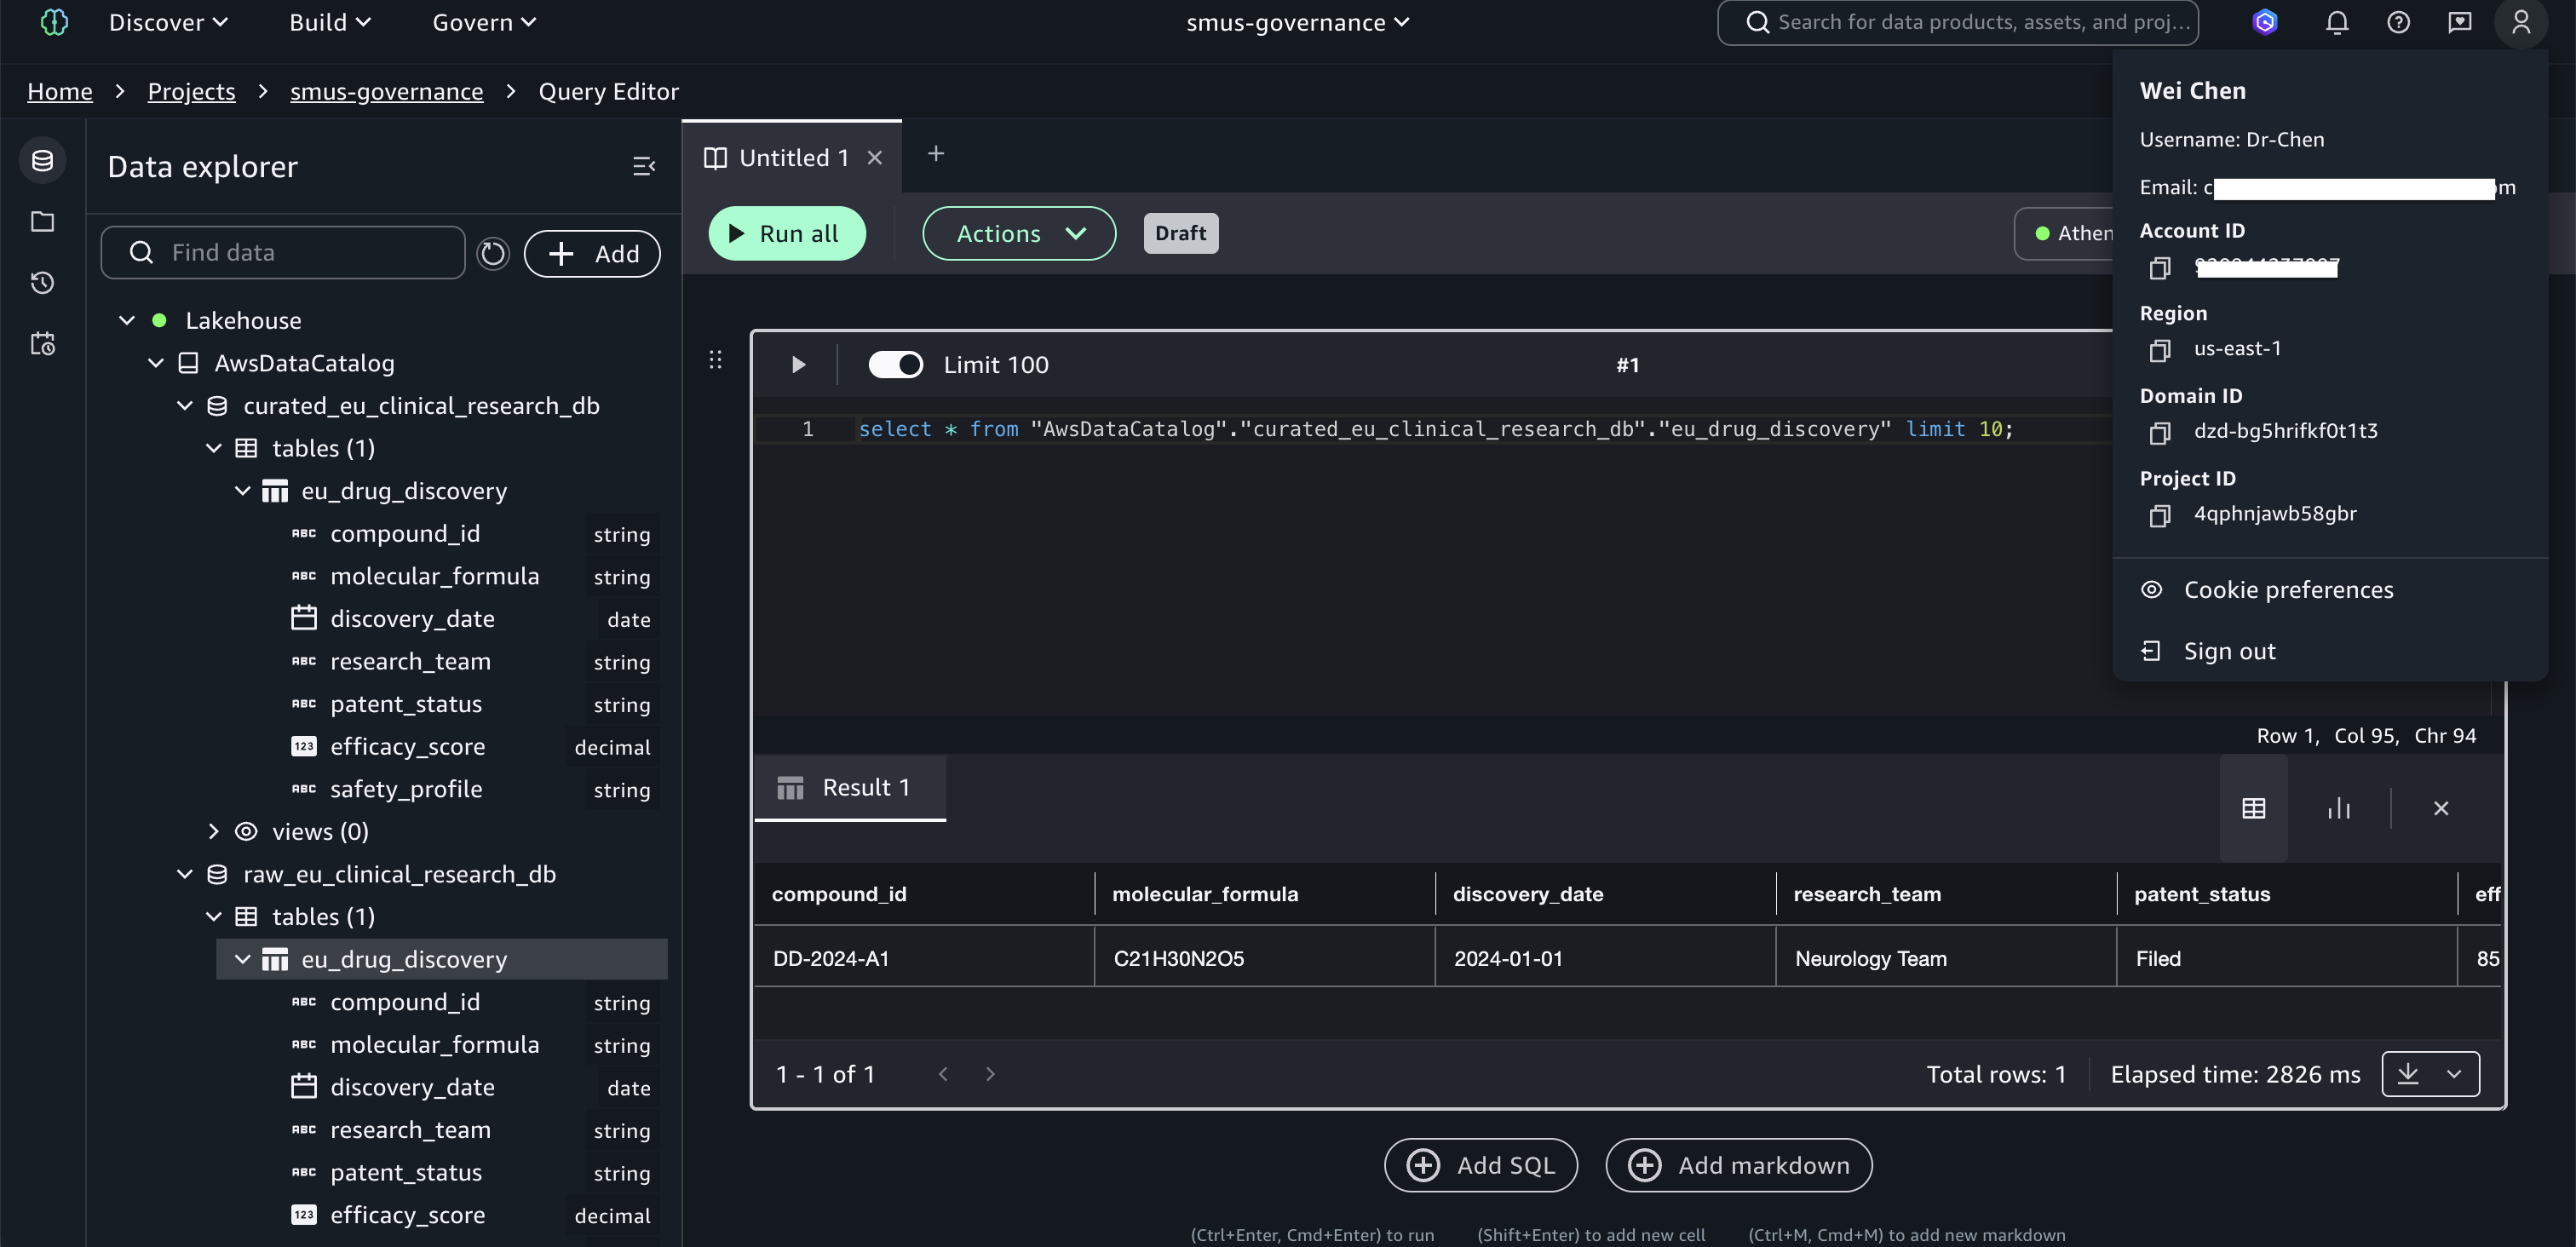
Figure 11: Dr. Chen’s successful query on eu_drug_discovery
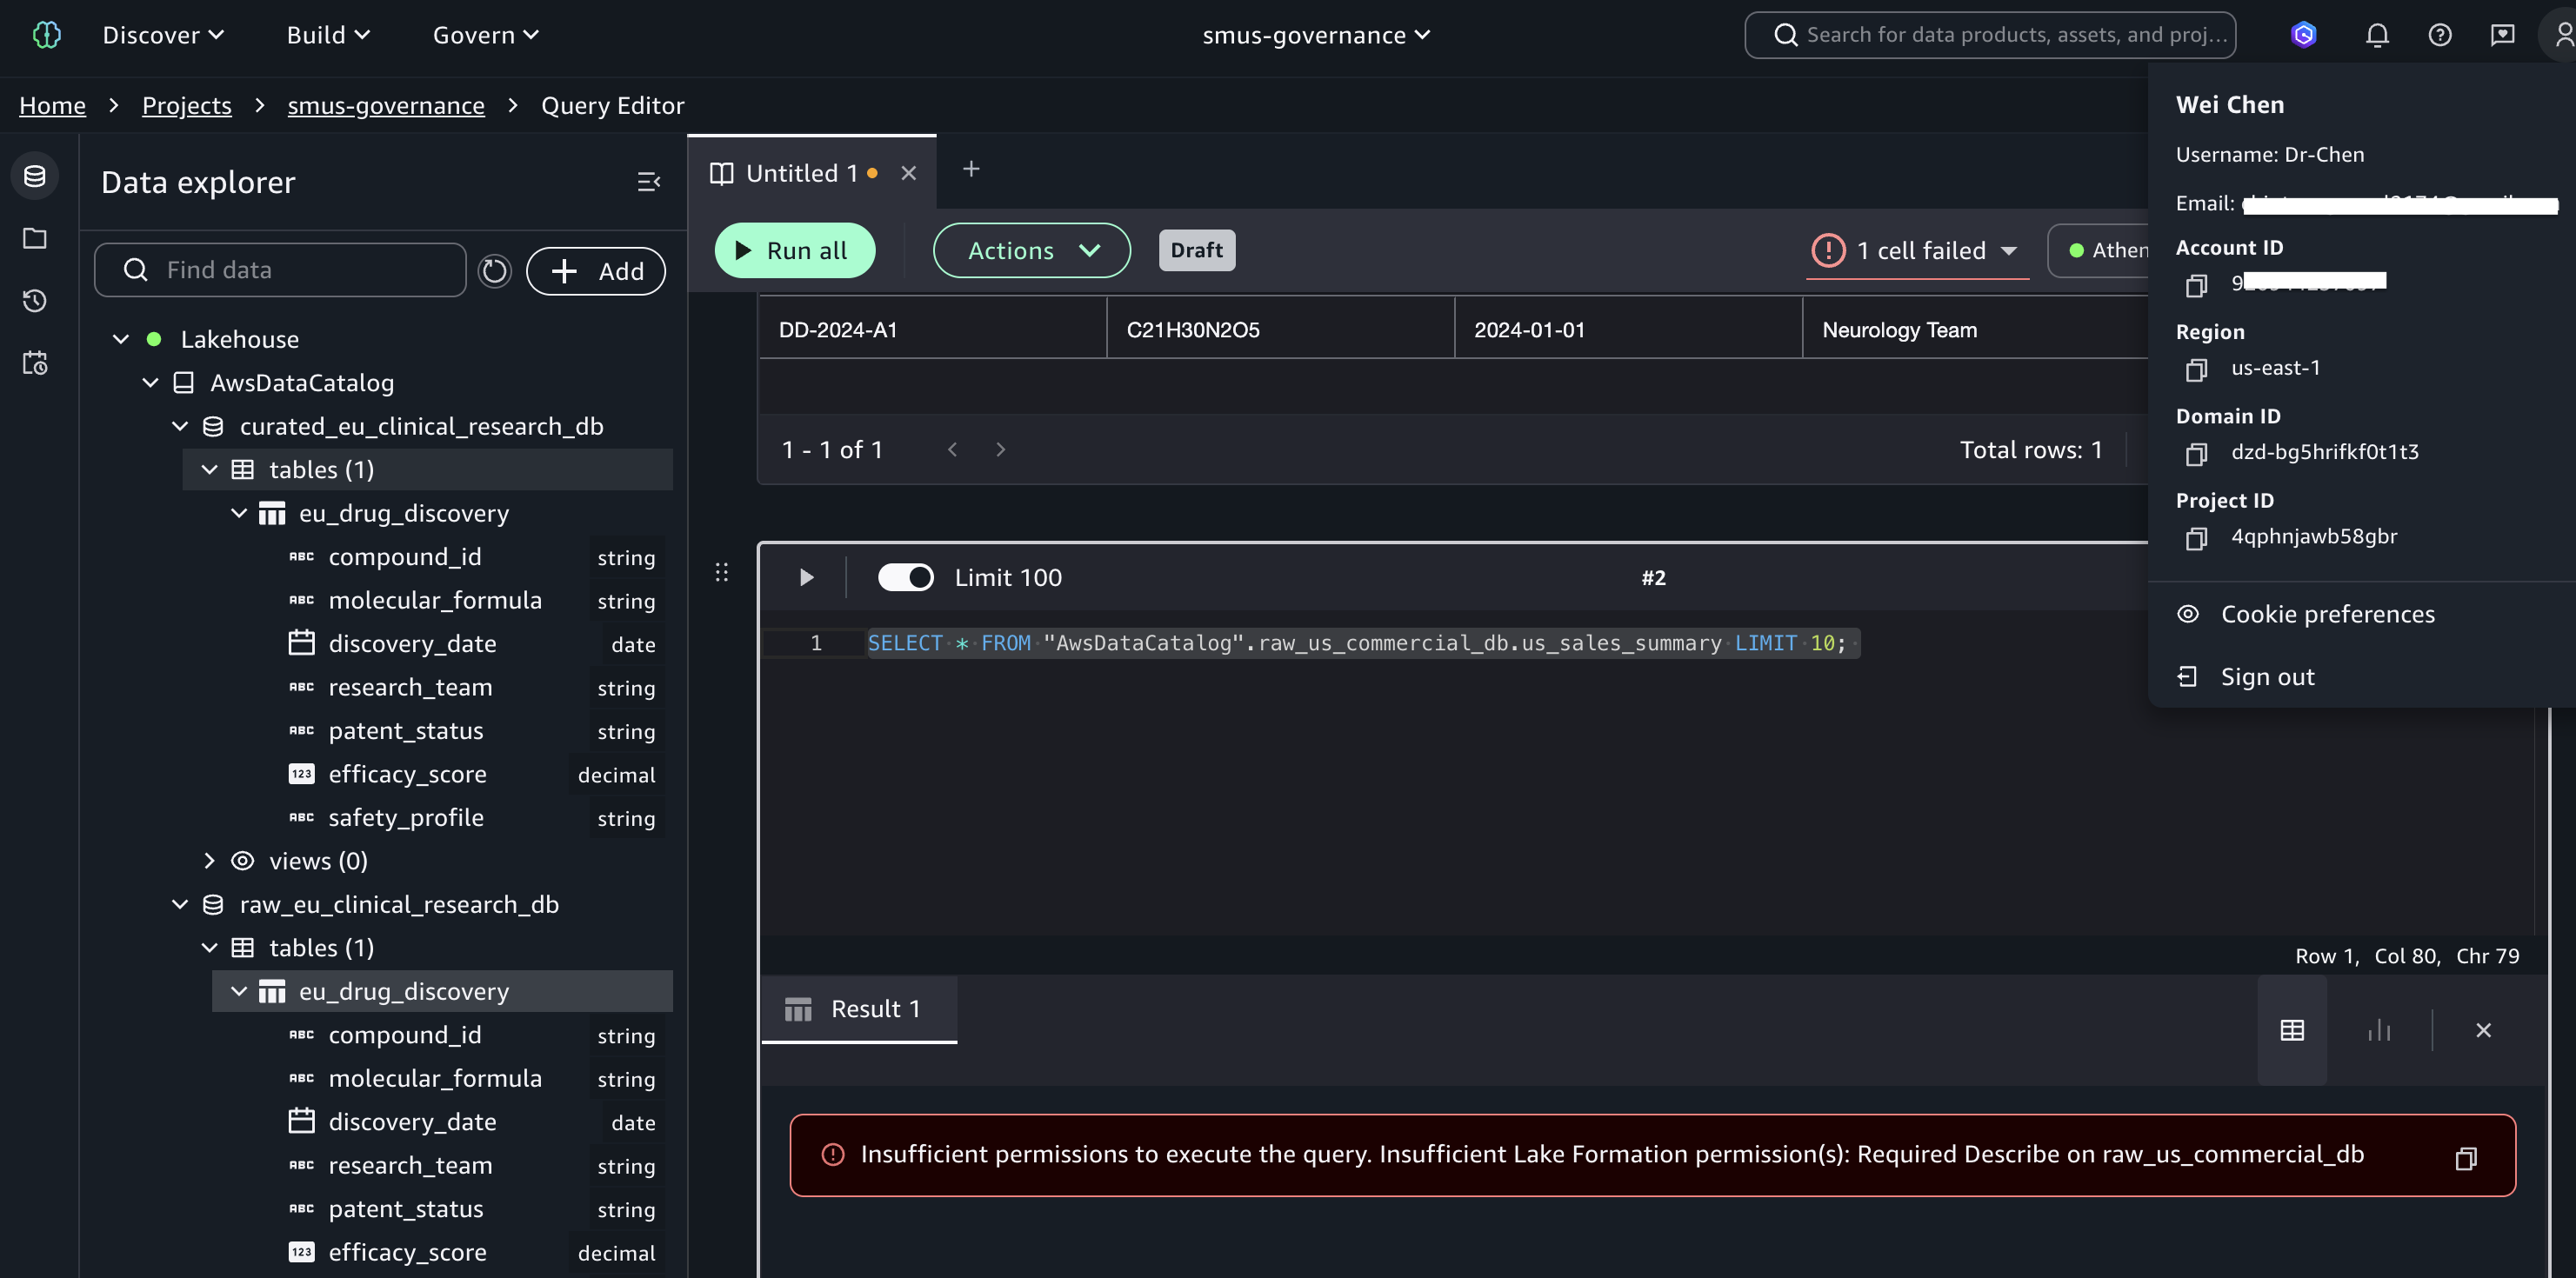
Figure 12: Access denied when Dr. Chen queries us_sales_summary
Test as Alex (Regulatory Affairs Specialist) — Alex’s tag expression uses only domain=regulatory without a region constraint, granting cross-regional access to regulatory data while maintaining strict isolation from commercial and clinical research domains.
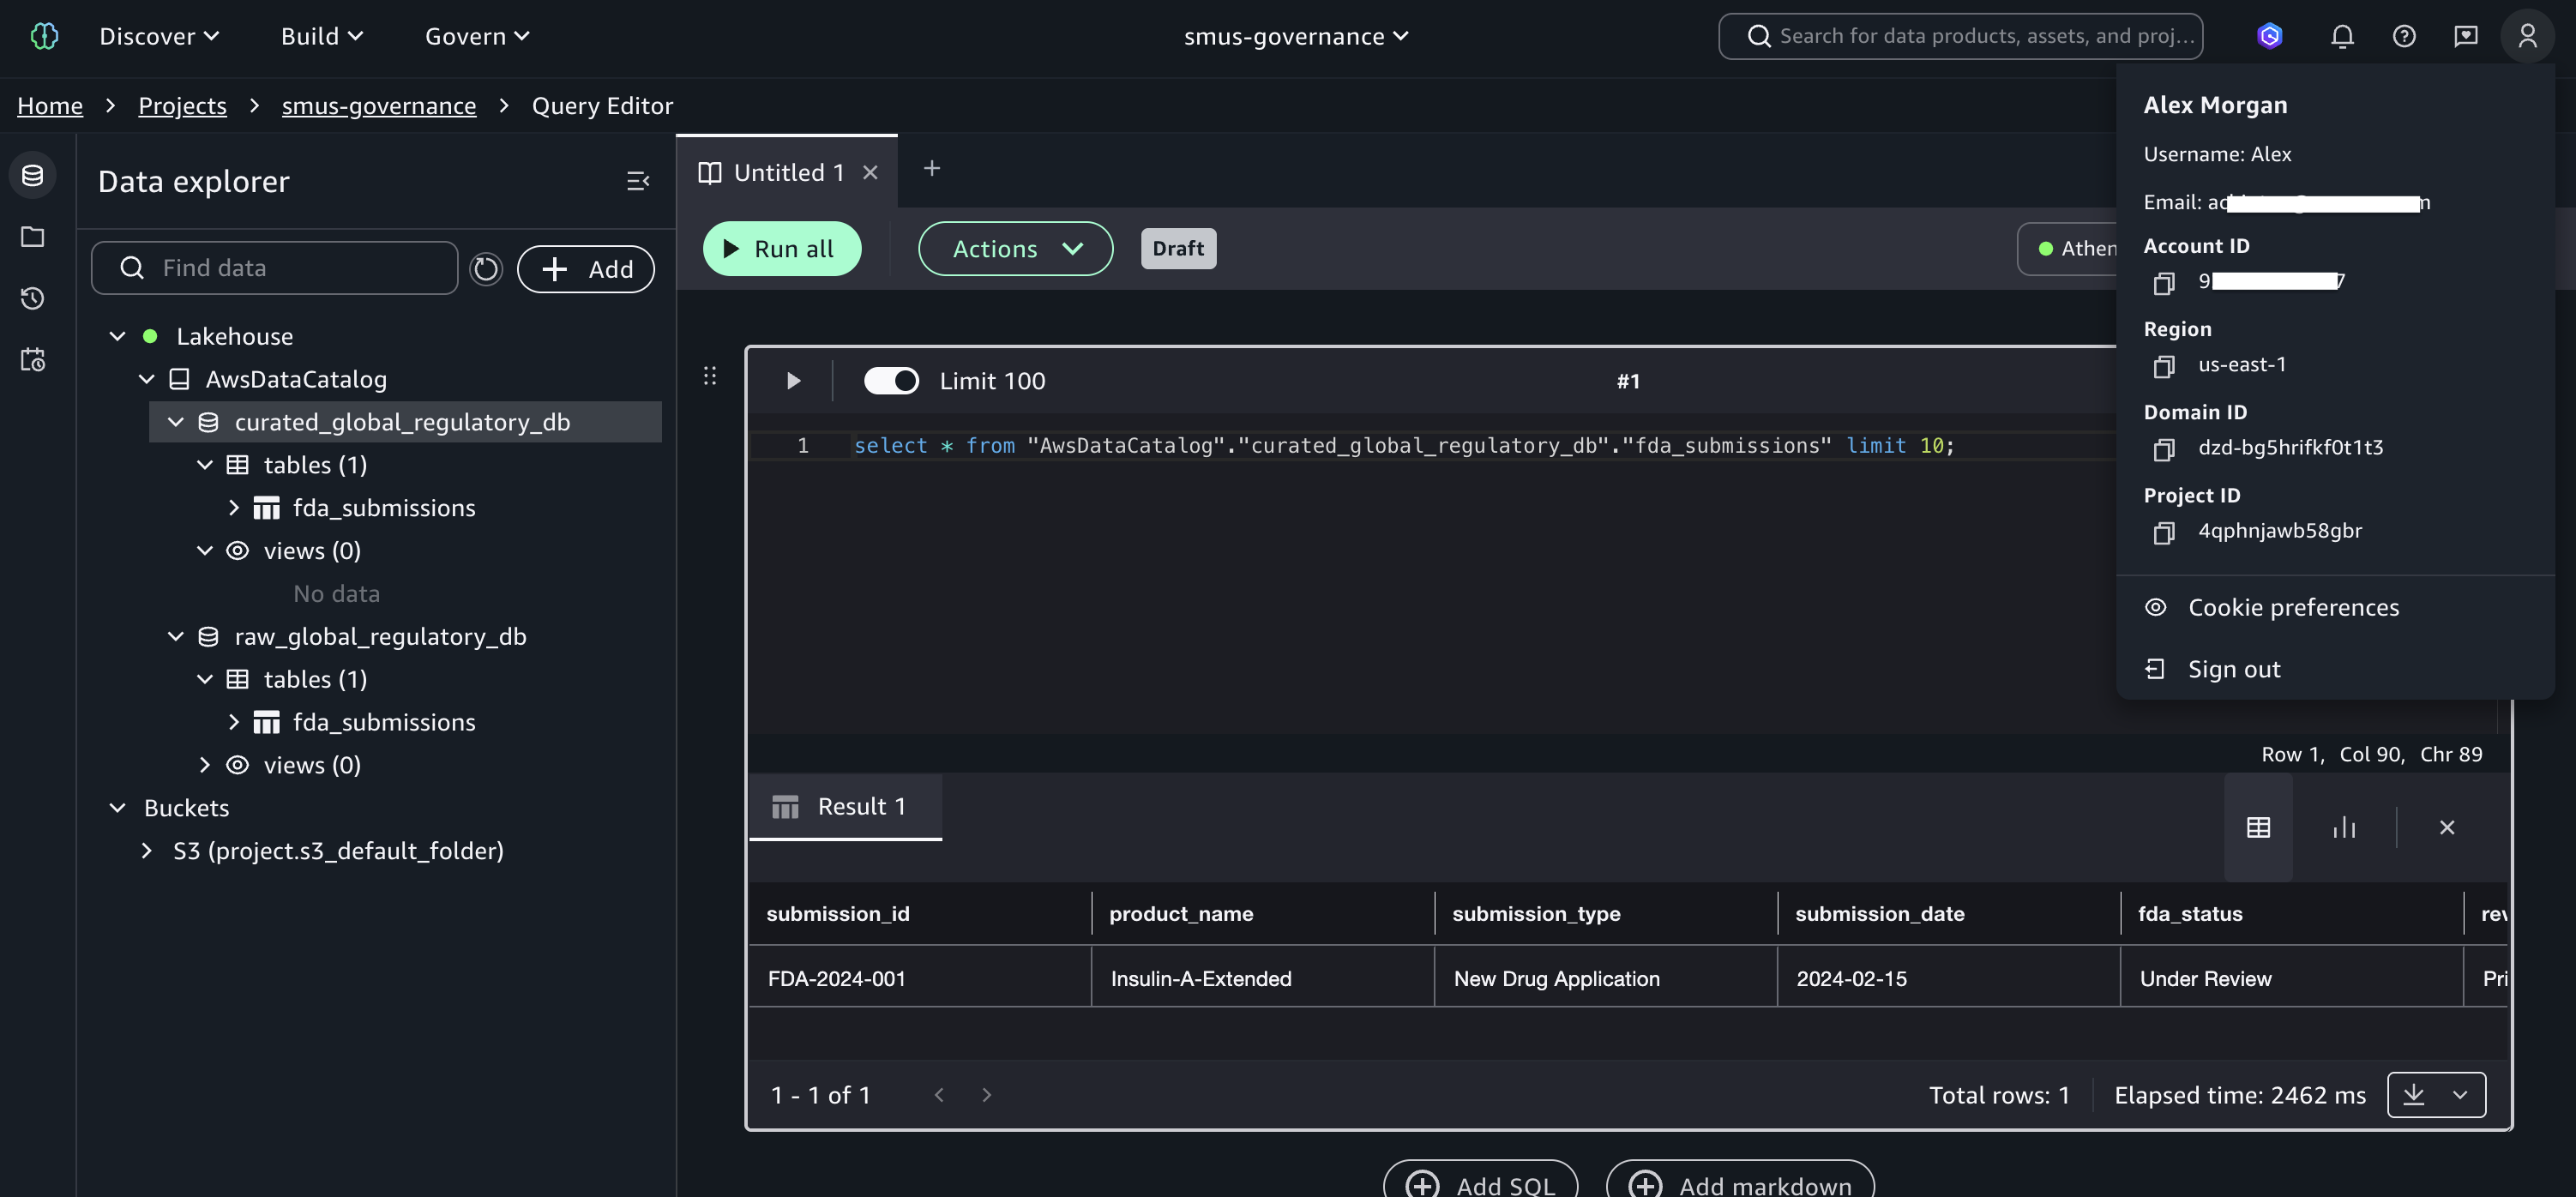
Figure 13: Alex’s successful query on fda_submissions
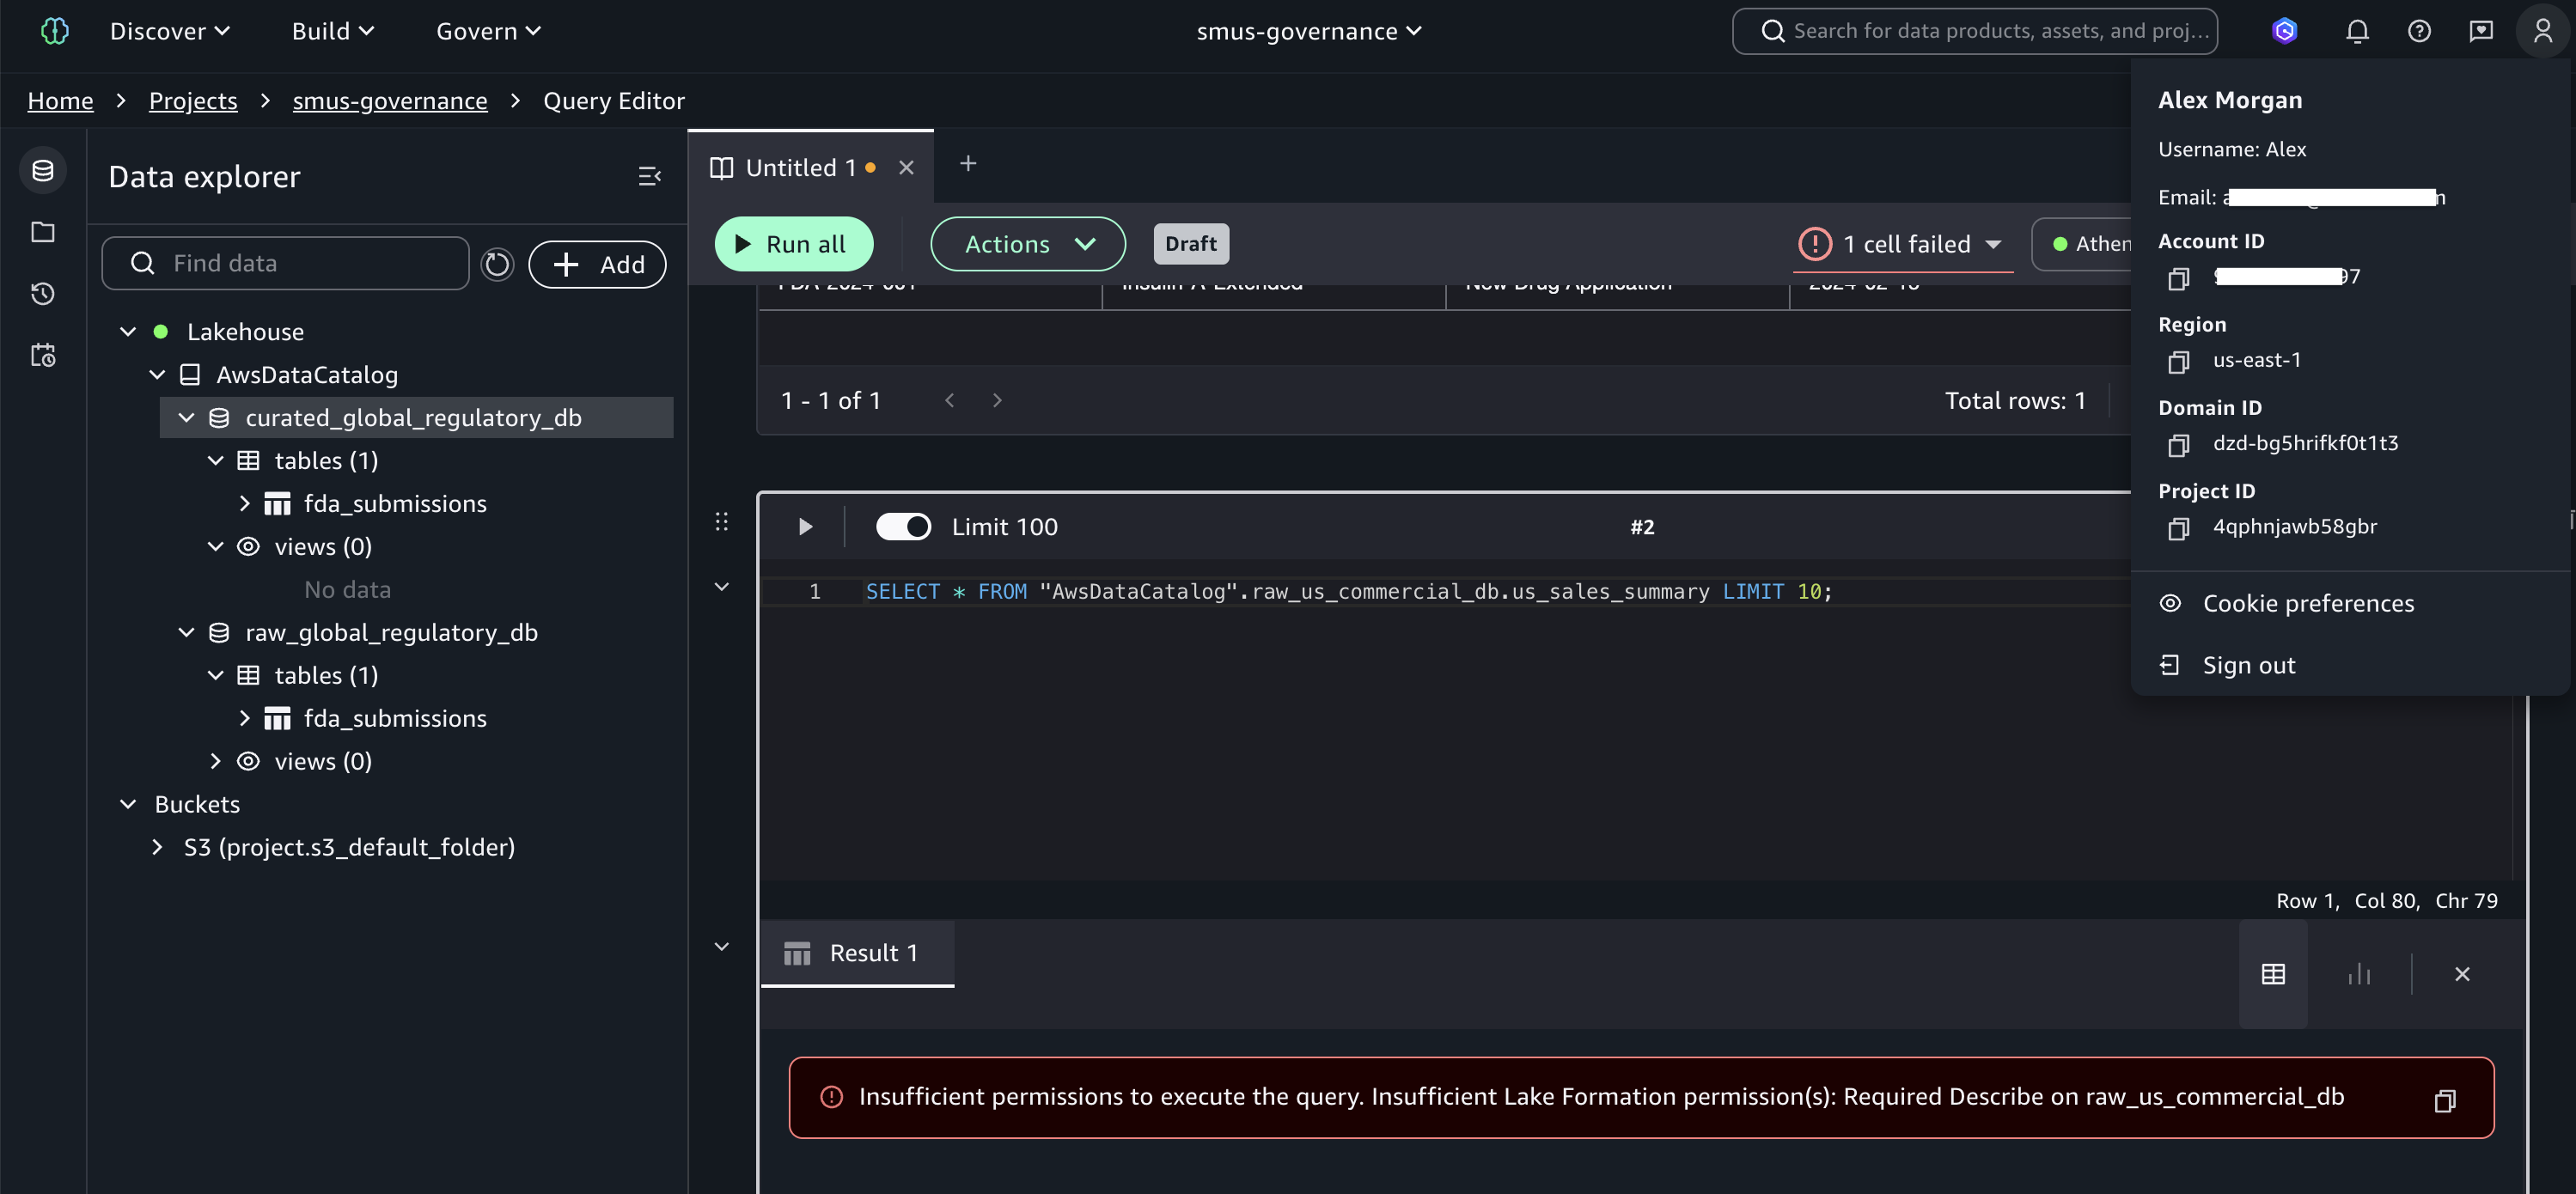
Figure 14: Access denied when Alex queries us_sales_summary
These tests demonstrate that TBAC enforces fine-grained permissions based on user identity, data classification, regional boundaries, and domain separation, without per-table permission grants. As new tables are added and tagged, existing groups automatically gain or are denied access based on their tag expressions. This is the core advantage of TBAC over named resource permissions.
A key benefit of integrating Lake Formation with IAM Identity Center is the detailed audit trail available through AWS CloudTrail. Filter Event history by Event name GetDataAccess to see every data access event. Each record includes the IAM Identity Center user UUID (userIdentity.onBehalfOf.userId), the specific table accessed (requestParameters.tableArn), and confirmation that trusted identity propagation was used (additionalEventData.LakeFormationTrustedCallerInvocation: true).
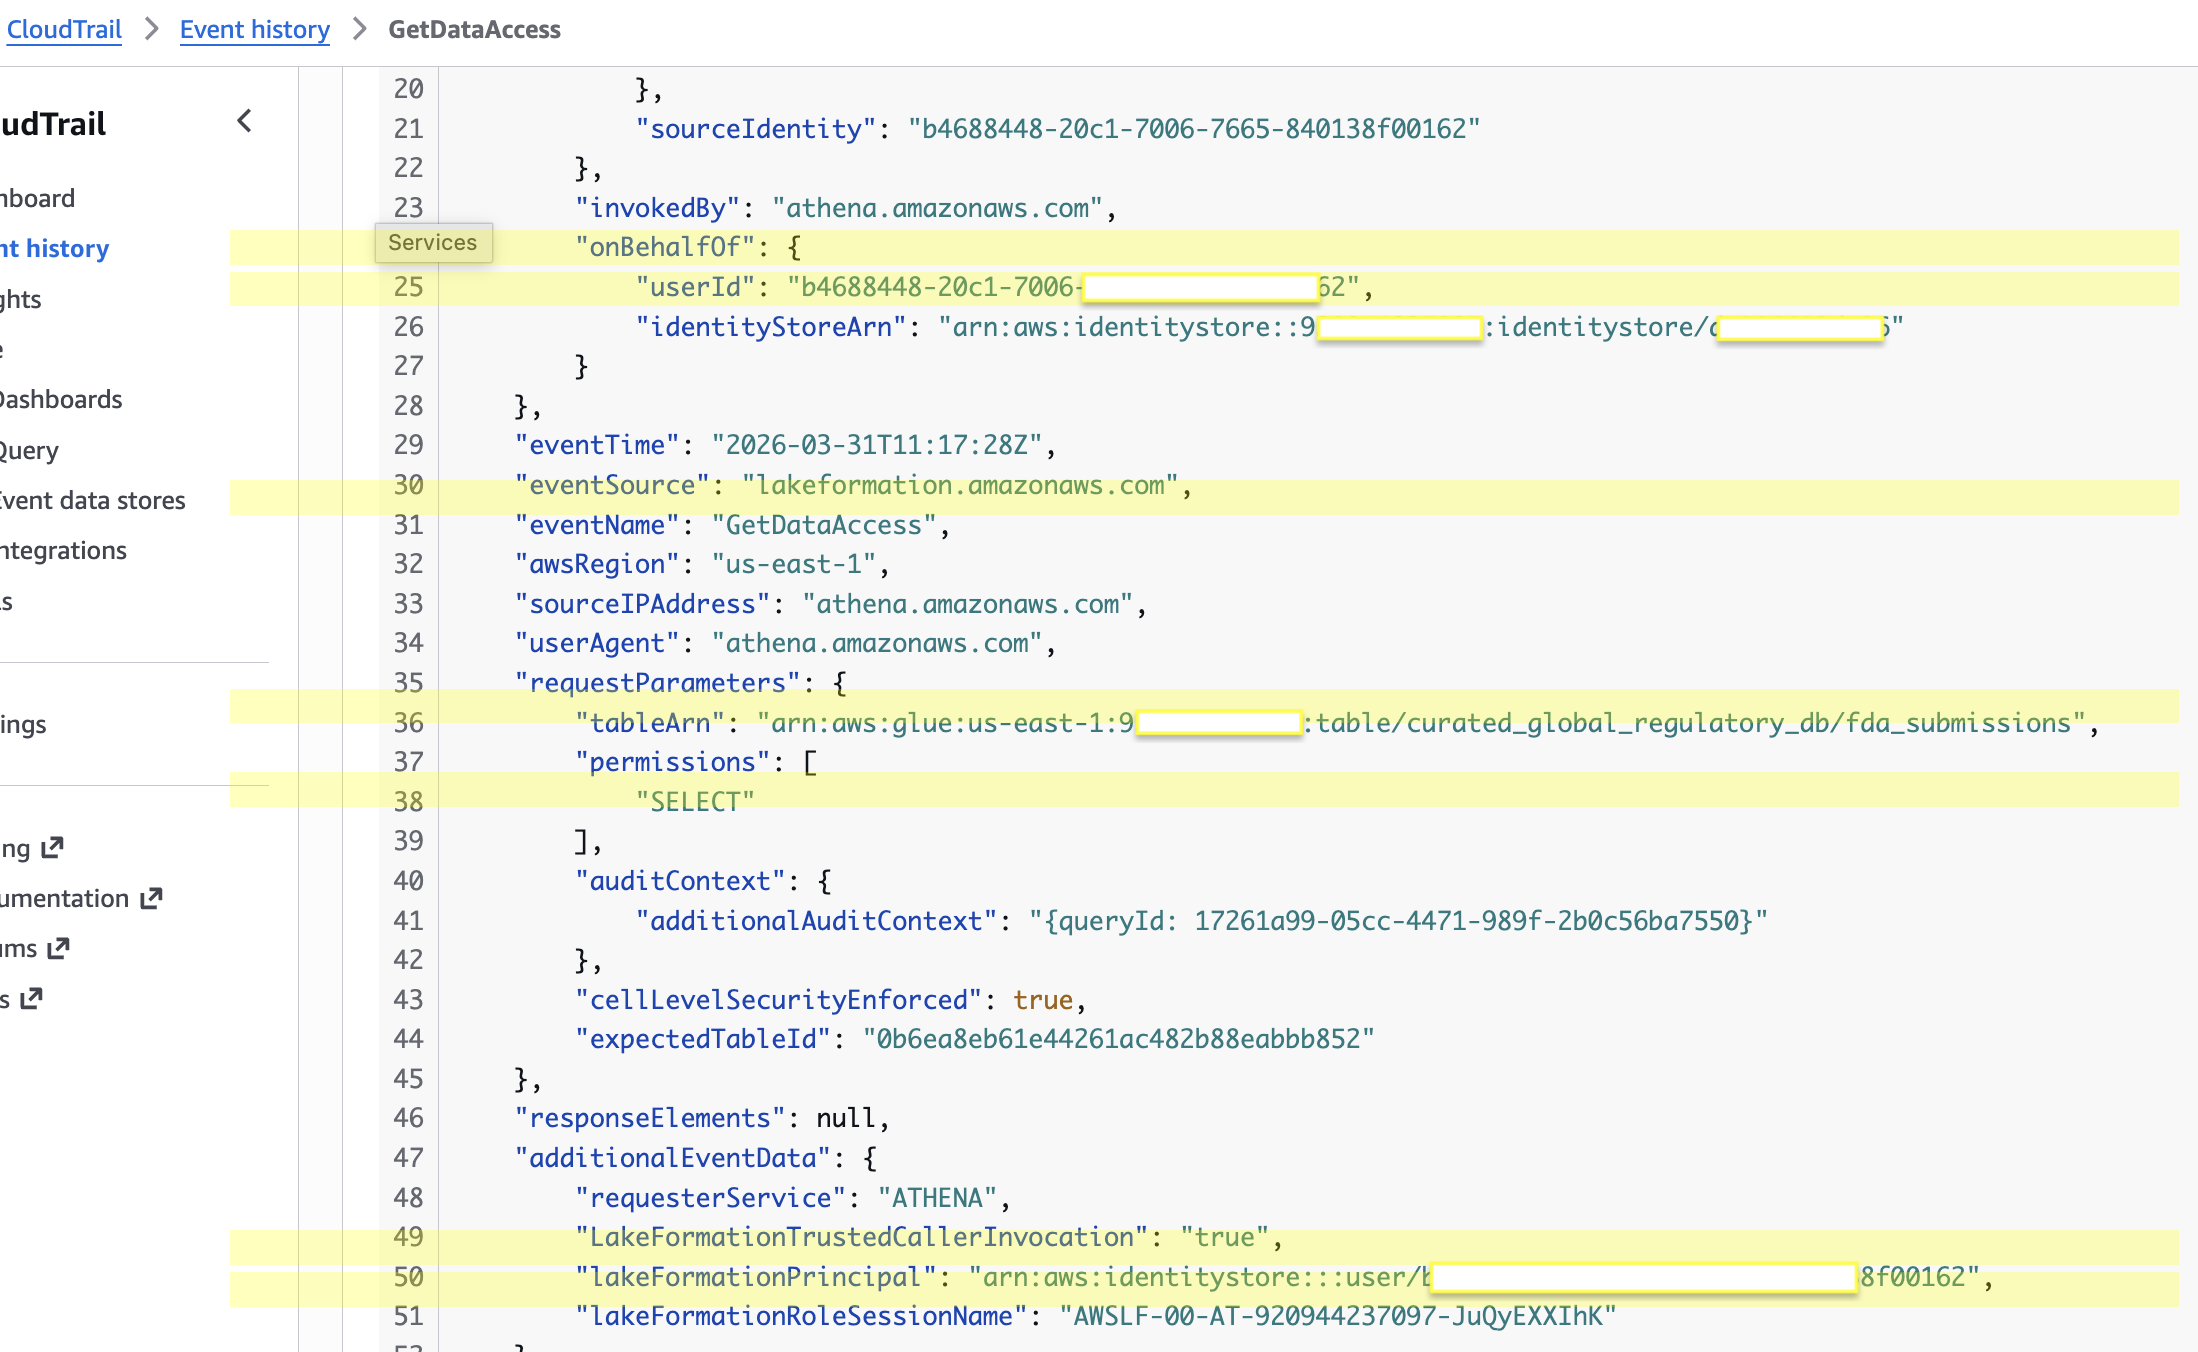
Figure 15: CloudTrail GetDataAccess event showing Identity Center user identity and table access details
To resolve the user UUID to a human-readable name, query the Identity Store:
This audit capability provides the detailed access logs required for HIPAA, GDPR, and FDA compliance, showing exactly which users accessed which data and when. Learn about configuring CloudTrail for Lake Formation in Logging Lake Formation API calls with CloudTrail.
Run cdk destroy --all to remove all stacks. Manually delete the retained S3 data buckets (datalake-raw-data-* and datalake-curated-data-*) and revoke any remaining Lake Formation permissions. For detailed cleanup steps, see the repository README.
In this post, we showed you how to implement scalable fine-grained access control for an enterprise lakehouse by combining AWS Lake Formation tag-based access control, IAM Identity Center, and trusted identity propagation in SageMaker Unified Studio. The four-dimension LF-Tag taxonomy, hybrid RBAC + ABAC governance model, and metadata-driven Lambda automation together create a governance architecture where new datasets automatically inherit access policies through tag inheritance, permissions scale without per-table grants, and every data access event is auditable to the individual user through CloudTrail.
To extend this solution, consider adding new business domains, implementing column-level security with LF-Tags, scaling to multi-account architectures with Lake Formation cross-account sharing, or integrating additional analytics services such as Amazon Redshift Spectrum or Amazon EMR.
Get started by deploying the CDK stacks from the accompanying repository. To learn more:
Post Syndicated from Satya Chikkala original https://aws.amazon.com/blogs/big-data/event-driven-pipeline-orchestration-with-amazon-mwaa-and-airflow-3-0/
Data engineering teams running Apache Airflow across multiple AWS accounts face a persistent coordination problem. They have no built-in way to coordinate workflows between their separate Amazon Managed Workflows for Apache Airflow (Amazon MWAA) environments, where each team or business unit manages its own isolated environment. Cross-environment orchestration has traditionally relied on time-based polling, complex custom sensors, or API-based triggers that introduce latency and reliability concerns. The Apache Airflow Datasets feature (introduced in version 2.4) added data-aware scheduling of Directed Acyclic Graphs (DAGs, the workflow definitions that specify tasks and their execution order) within a single Amazon MWAA environment. However, teams running Airflow across multiple accounts still had no way to coordinate workflows between environments.
With Apache Airflow 3.0, now available on Amazon MWAA 3.0, you get event-driven cross-account orchestration that responds to upstream events as they happen, without polling overhead or tight environment coupling. Using Amazon Simple Queue Service (Amazon SQS) as the message broker, Asset Watchers replace polling-based sensors with event-driven triggers. This approach reduces orchestration latency from minutes to seconds and reclaims worker resources previously consumed by polling sensors. It also improves message reliability, because Amazon SQS retains coordination signals even when the consumer environment is temporarily unavailable.
In this post, you learn how to design and deploy cross-account orchestration patterns using asset-based scheduling in Airflow 3.0 with Amazon SQS integration. You learn about Asset Watchers, how to publish asset events from producer DAGs, and how to trigger dependent workflows in downstream Amazon MWAA environments, creating responsive, decoupled pipelines that span multiple accounts.
If you use AI coding assistants to build and deploy infrastructure, the solution repository includes an agent skill built on the Agent Skills standard that encodes the architecture and best practices from this post.
This solution demonstrates a multi-MWAA orchestration architecture where:
This event-driven approach offers several advantages over traditional polling:
The following architecture shows how you can connect separate Amazon MWAA environments across AWS accounts so that a completed pipeline in one environment automatically triggers dependent workflows in another, without direct environment coupling or polling overhead.
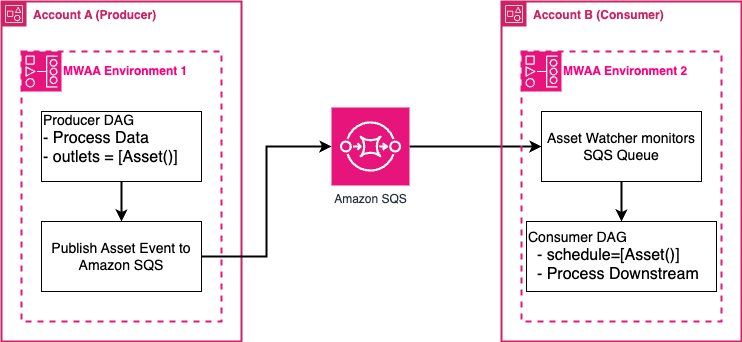
Figure 1: Cross-account event-driven orchestration between Amazon MWAA environments using Amazon SQS
The architecture has four main components. The producer DAG defines assets as outlets and publishes events to an Amazon SQS queue when tasks complete successfully. The Amazon SQS queue acts as a durable message broker between accounts, with AWS Identity and Access Management (IAM) policies granting the producer permission to send messages and the consumer permission to receive them. On the consumer side, an Asset Watcher monitors the queue and updates asset state when messages arrive, which automatically triggers the consumer DAG scheduled on that asset.
Before implementing this solution, you need:
The post includes a GitHub repository where you can deploy the solution described in this post. You will follow the implementation steps from setting up Amazon MWAA environments and cross-account Amazon SQS queues to deploying producer and consumer DAGs with Asset Watchers. This post provides the code samples, including the DAG files, IAM policies, and requirements configuration, for demonstration purposes only. Before deploying to production, verify that you conduct thorough testing, security reviews, and validation against the specific requirements and compliance standards.
MessageRetentionPeriod based on recovery requirements.VisibilityTimeout higher than the expected time for the Asset Watcher to process a message. If the timeout is too short, messages might be redelivered and trigger duplicate DAG runs. Review the Amazon SQS visibility timeout documentation when tuning this value.schedule parameter. A mismatch, even in casing or trailing characters, will prevent the consumer DAG from being triggered. Define assets in a single DAG file to avoid inconsistencies.apache-airflow-providers-amazon and apache-airflow-providers-common-messaging to versions compatible with Airflow. Incompatible versions might cause import errors that prevent the triggerer from starting. Use a constraints file as described in this post to avoid dependency conflicts.AI coding assistants are most useful when they have context about your specific architecture and constraints, not only general programming patterns. Agent Skills, originally developed by Anthropic and released as a public standard in December 2025, provides a portable format for this need. SKILL.md files encode procedural knowledge, best practices, and workflows so that compatible AI coding agents can discover and apply them on demand. The standard is now supported by Kiro, Strands Agents, Anthropic Claude Code, OpenAI Codex, Cursor, Gemini CLI, and other tools. The solution provided here includes an agent skill (agent-skill/) built on this standard that encodes the cross-account orchestration architecture and operational best practices from this post. When you tell the AI coding assistant something like “Write cross-account Amazon MWAA DAGs for my orders pipeline”, the skill guides the agent through the complete workflow:
The skill doesn’t require you to provide AWS account IDs or Amazon MWAA environment names upfront. Instead, it auto-discovers your environments by running aws mwaa list-environments and aws sts get-caller-identity using the locally configured AWS CLI credentials, then asks you to confirm which environment is the producer and which is the consumer.
The skill works in two modes:
Beyond code generation, the skill includes an auto-deploy flow. This flow discovers existing Amazon MWAA environments, runs pre-flight checks (Amazon Virtual Private Cloud (Amazon VPC) networking, provider versions, triggerer health, and Amazon SQS queue accessibility), uploads DAGs to the correct Amazon Simple Storage Service (Amazon S3) buckets, and verifies end-to-end readiness. Each step that modifies infrastructure requires explicit user confirmation. Also refer to the GitHub repository for instructions on using it.
Airflow Asset Watchers with Amazon SQS are not always the right fit. When they are, they introduce operational considerations that differ from sensor-based polling approaches.
This section covers how to choose the right cross-environment orchestration pattern, how to configure the infrastructure that Asset Watchers depend on (IAM, Amazon VPC, dependencies), and how to design producer and consumer DAGs that are reliable in production.
sqs:SendMessage and sqs:GetQueueUrl scoped to the specific queue ARN to avoid sqs:*.sqs:SendMessage and consumer role for sqs:ReceiveMessage, sqs:DeleteMessage, sqs:GetQueueAttributes, and sqs:GetQueueUrl.airflow-<ENV>-Triggerer CloudWatch logs for ClientError, QueueDoesNotExist, or ImportError.ApproximateNumberOfMessagesVisible and the depth of your dead-letter queue (DLQ), which captures messages that fail processing after the maximum number of receive attempts.requirements_install_ip log stream after updates. If networking was unavailable at creation, force reinstall with a new requirements-s3-object-version.requirements.txt to avoid version conflicts.Not every cross-environment dependency warrants an Asset Watcher. Airflow 3.0 offers three main orchestration patterns: Asset Watchers with Amazon SQS, the MwaaTriggerDagRunOperator, and sensor-based polling, each with different trade-offs in response time, coupling, and resource consumption. Use the following table to match your use case to the right pattern before committing to an implementation.
| Pattern | How it works | Response time | Coupling | Occupies a worker? | Good fit | |
| 1 | Asset Watchers + SQS (this post) | Consumer’s triggerer listens on SQS, triggers DAG on message arrival | Seconds | Loose | No | Cross-account pipelines. Fan-out. Independent release cycles |
| 2 | MwaaTriggerDagRunOperator | Producer calls MWAA API to start a DAG in another environment | Seconds | Tight | Yes (with wait_for_completion) |
Same-account one-to-one triggers |
| 3 | Sensors (polling) | Consumer periodically checks for a condition | Poll interval | Medium | Yes (unless deferrable) | Persistent-state conditions. Intra-environment dependencies |
S3KeyTrigger) into Asset Watchers. They fire continuously because the condition never clears.aws_conn_id) instead.python your_dag.py before uploading to S3.dags reserialize.dag_id, run_id, logical_date, and dataset-specific context in Amazon SQS messages so consumers can route without calling back.SqsHook instead of the raw boto3 package. It respects aws_conn_id and integrates with Airflow logging.triggering_asset_events, not by reading the queue directly. The Asset Watcher has already consumed the Amazon SQS messages.To avoid ongoing AWS charges, delete the resources you created as part of this solution when you are done. The GitHub repository includes step-by-step cleanup instructions for removing the Amazon SQS queue, Amazon MWAA environments, IAM roles and policies, and Amazon S3 buckets.
Refer to the cleanup instructions in the GitHub repository to remove the provisioned resources.
Asset-based scheduling in Apache Airflow 3.0, with Asset Watchers, gives you a practical way to coordinate workflows across Amazon MWAA environments without polling overhead or tight coupling. By using Amazon SQS as a reliable message broker, you can build responsive, decoupled data pipelines that span multiple Amazon MWAA environments and AWS accounts without the operational overhead of traditional polling mechanisms.
This approach reduces cross-environment orchestration latency from minutes to seconds, replaces custom sensors with declarative asset-based scheduling, and gives you and your team the flexibility to maintain independent Amazon MWAA environments while still coordinating complex workflows. Amazon SQS durable message delivery reduces the risk of lost signals, even during temporary environment outages.
To get started:
As you scale data operations across multiple accounts and AWS Regions, asset-based scheduling with Asset Watchers provides the foundation for building modern, event-driven data architectures on AWS. Start with basic producer-consumer patterns and gradually evolve to complex multi-asset dependencies as orchestration requirements grow.
For more information, refer to
Post Syndicated from Maria Gutovsky original https://aws.amazon.com/blogs/security/caching-kms-data-keys-in-multi-thread-environments-per-tenant-encryption-for-event-driven-systems-at-scale/
This post assumes familiarity with envelope encryption and the AWS Encryption SDK.
When your encryption system generates millions of duplicate API calls per hour, costs spiral and performance degrades. That’s exactly the challenge NICE Actimize faced while operating their global-scale, event-driven financial crime detection platform on Amazon Web Services (AWS).
NICE Actimize, a leading provider of financial crime, risk, and compliance solutions, processes millions of encrypted messages daily across hundreds of tenants. By rethinking how they cache encryption keys, they reduced their AWS Key Management Service (AWS KMS) costs by 77% while maintaining strict security guarantees and per-tenant encryption isolation.
In this post, we explore the cache stampede problem that emerges when envelope encryption meets high-concurrency, multi-tenant architectures. We walk through two solutions: the AWS-recommended hierarchical keyring pattern and a custom caching approach that NICE Actimize built for their regulated environment. These patterns apply to multi-tenant software as a service (SaaS) environments and high-throughput systems where per-tenant encryption generates significant KMS API volume.
Financial services systems operate under strict regulatory requirements. You must encrypt data at rest and in transit. For multi-tenant SaaS providers, this requirement might go further: each tenant’s data must be encrypted with separate keys to provide complete cryptographic isolation. If one tenant’s key is compromised, no other tenant’s data is at risk.
Consider an enterprise SaaS environment built on an event-driven architecture using Amazon Managed Streaming for Apache Kafka (Amazon MSK), with many different databases for storing data and Amazon Simple Queue Service (Amazon SQS) for messaging. Messages flow continuously between producers and consumers, and each message must be encrypted with the correct tenant-specific key. At scale with millions of messages daily across hundreds of tenants, this creates a massive volume of encryption and decryption operations.
To handle this volume efficiently, the standard approach is envelope encryption: a two-tier model where an AWS KMS key encrypts short-lived data keys, and those data keys encrypt the actual data. Your application can encrypt large volumes of data locally without calling AWS KMS for every operation, reducing latency and costs.
Envelope encryption reduces AWS KMS calls, but it doesn’t eliminate them. Each encrypt operation still requires a data key, either generated fresh using GenerateDataKey or retrieved from a cache, and each decrypt operation must unwrap an encrypted data key (EDK) by calling Decrypt. In high-throughput systems processing millions of messages, these calls add up quickly.
The AWS Encryption SDK provides a built-in solution for this: the CachingCryptoMaterialsManager. This component caches data encryption materials (data keys) locally, so your application can reuse them across multiple operations without calling AWS KMS each time. You configure a time-to-live (TTL), a maximum message-use limit, and a local cache, and the SDK handles the rest.
This approach works well under moderate load when you partition the cache by tenant AWS KMS key Amazon Resource Name (ARN) so that each tenant’s encryption materials remain cryptographically isolated. However, a critical problem emerges as concurrency scales to hundreds of threads processing millions of encrypted messages in parallel: the cache stampede, also known as the thundering herd problem.
The CachingCryptoMaterialsManager caches the result of the SDK’s internal getMaterialsForEncrypt and decryptMaterials calls at the materials level. The cache stampede, however, happens at the KMS API call level. When a cached data key expires or a new, previously-unseen EDK arrives, the following sequence unfolds:
encrypt() for the same tenant. Each thread finds the cache entry expired and independently calls GenerateDataKey against AWS KMS. Instead of one thread generating a data key while others wait, N threads create N distinct data keys. Each new data key produces a unique EDK, which inflates the EDK cardinality across the system.Decrypt call to AWS KMS because the cache has no coordination mechanism to make competing threads wait for a single in-flight request.At enterprise SaaS scale, this compounding effect can generate millions of redundant AWS KMS GenerateDataKey and Decrypt calls per hour, even with the SDK’s built-in caching enabled. The following figure shows the pattern leading to a stampede.
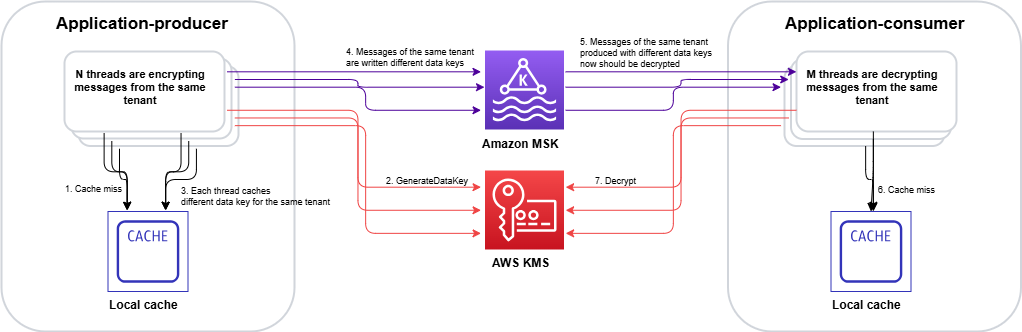
Figure 1: Cache stampede – multiple threads independently calling AWS KMS for the same encrypted data key, creating duplicate requests
The stampede follows this sequence on the encrypt side:
encrypt() for the same tenant concurrently.GenerateDataKey.On the decrypt side, the inflated EDK cardinality compounds the problem:
Decrypt call. AWS KMS returns the same plaintext data key N times, doing redundant work.We evaluated two approaches to solve the cache stampede problem. Each fits different architectural requirements and regulatory constraints.
AWS addresses the cache stampede challenge through the hierarchical keyring pattern, which introduces an additional level of key hierarchy that significantly reduces how often cache stampedes occur.
In this architecture, branch keys serve as intermediate wrapping keys stored in a DynamoDB table. This DynamoDB table acts as a shared cache layer that coordinates across all instances in your distributed fleet.
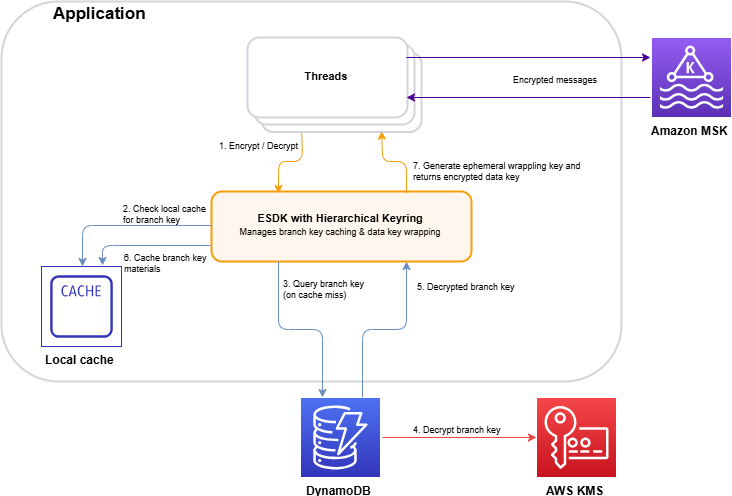
Figure 2: Hierarchical keyring architecture – branch keys in DynamoDB coordinating across distributed instances
The architecture (shown in Figure 2) works as follows:
The key insight is that the cache is thread-aware. When the cache expires, threads coordinate to make a single request to refresh the cache. Only a single thread is used to make a call to the branch key, rather than all the threads acting independently. Additionally, by adding an additional key into the key hierarchy, branch keys don’t live within AWS KMS. This means cache misses and the stampedes they trigger interact with the branch key, and don’t make as many calls to the AWS KMS service at the top of the hierarchy:
The DynamoDB table acts as a coordination point. The first thread to request a missing branch key retrieves it from AWS KMS and stores it in DynamoDB (the Key Store table). Subsequent requests from instances in the fleet retrieve the cached branch key from DynamoDB instead of making duplicate AWS KMS calls.
Beyond reducing cache miss frequency, the hierarchical keyring provides built-in stampede protection within its local cache implementation. The SDK offers multiple cache types, and the Default cache, designed for heavily multi-threaded environments, prevents multiple threads from calling AWS KMS on cache expiry by notifying a single thread that the branch key materials entry is about to expire 10 seconds in advance. That one thread refreshes the cache while all other threads continue serving requests using the still-valid entry.
This solution integrates with the AWS Encryption SDK and requires minimal code changes to existing applications. For event-driven architectures processing encrypted Kafka streams, this approach reduces KMS call volume by orders of magnitude while preserving per-tenant cryptographic isolation.
While the hierarchical keyring (Option A) addresses the stampede by reducing how often cache misses occur, there’s a complementary approach: eliminating the stampede at its source by caching KMS API responses directly, using atomic, single-flight cache loading that prevents concurrent threads from issuing duplicate calls. This is the path NICE Actimize took.
The IClientSupplier extension point in AWS Encryption SDK v3
In the AWS Encryption SDK v2, decorating the AWS KMS client on a per-request basis was possible through the RegionalClientSupplier interface, but it was an advanced and undocumented use case. Without explicit guidance or a supported pattern, caching strategies typically operated above the SDK layer, making it difficult to prevent duplicate KMS calls at their source. The AWS Encryption SDK v3 introduced the IClientSupplier interface, which the AwsKmsMrkMultiKeyring accepts at construction time. This interface is called by the SDK whenever it needs a KMS client for a given AWS Region, and you control what it returns, making it possible to insert a caching layer between the SDK and AWS KMS.
Architecture: A decorated KMS client with two Caffeine caches
The solution is a CachedKmsClient—a decorator that wraps the standard AWS SDK KmsClient and interposes two Caffeine LoadingCache instances between the application and AWS KMS:
| Cache | Key | Value | Purpose |
| GenerateDataKey cache | GenerateDataKeyRequest (tenant KMS key ARN and key spec) | GenerateDataKeyResponse (EDK and plaintext data key) | Ensures encrypt operations on the same node reuse the same data key for a given tenant KMS key during the cache window |
| Decrypt cache | DecryptRequest (EDK and key ARN) | DecryptResponse (plaintext data key) | Ensures decrypt operations for the same EDK share a single KMS call result |
Both caches are configured with refreshAfterWrite (default: 1 hour, configurable), which means:
LoadingCache.get() guarantees that exactly one thread executes the loader function (the actual KMS API call), while all other concurrent threads block and wait for that single result. This is the atomic, single-flight property that eliminates the stampede.Security consideration: Caching plaintext data keys in memory means the keys exist in process memory for the duration of the cache TTL. The TTL acts as a security control: shorter TTLs reduce the window of exposure in the event of a memory dump, while longer TTLs reduce KMS call volume. Choose a TTL that balances your security requirements with your cost and performance goals. Key rotation at the KMS key level remains unaffected by the cache, because rotated keys produce new data keys on the next cache refresh.
Integration with the AWS Encryption SDK v3
The integration is minimal. The IClientSupplier AWS Lambda function returns a CachedKmsClient singleton for each AWS Region, this singleton is passed into the AwsKmsMrkMultiKeyring at keyring construction time. From that point forward, each GenerateDataKey and Decrypt call the SDK makes flows through the caching decorator transparently, with no changes to the encrypt or decrypt call sites.
The CachedKmsClient is a singleton per Region (managed using a ConcurrentHashMap), so all tenants on the same node share the same caching layer but their data keys remain fully isolated because the cache keys include the tenant-specific AWS KMS key ARN.
Why Caffeine?
Caffeine is a high-performance, near-optimal Java caching library well-suited for this pattern for several reasons:
LoadingCache.get() guarantees that on a cache miss, only one thread executes the loader while others wait. This is the core property that eliminates the stampede.expireAfterWrite (which blocks all threads during refresh), refreshAfterWrite allows one thread to asynchronously reload the entry while other threads continue to serve the stale-but-valid cached value. This eliminates latency spikes during key rotation.The hierarchical keyring with DynamoDB (Option A) is a production-ready, AWS-recommended solution that reduces stampede frequency by introducing longer-lived branch keys. It’s the best choice for most organizations. Particularly when starting fresh or when the operational overhead of an additional data store is acceptable.
NICE Actimize chose the custom caching approach (Option B) for a pragmatic reason: it avoided introducing a new infrastructure dependency into the encryption critical path. Their platform already operated at scale across hundreds of tenants, and adding a DynamoDB table as a key coordination layer would have meant taking on additional operational responsibility: provisioning, monitoring, backup, access control, and ensuring high availability for a component that sits directly in the encrypt/decrypt hot path. In a regulated financial services environment, each new stateful component in the security chain requires its own resilience planning, failure-mode analysis, and compliance review. The Caffeine cache used in Option B, by contrast, is an in-process library (a JAR on the classpath). It is stateless, requires no network calls, no provisioning and no operational overhead. It makes a lighter dependency than a managed cloud resource in the critical path. There is no shared state to lose, no additional infrastructure to protect, and no new failure mode beyond what already exists with AWS KMS itself. If a node restarts, the cache rebuilds on the next KMS call.
By implementing a rotation policy with the optimized caching approach, NICE Actimize achieved the following results:
The cache stampede problem compounds in multi-tenant encryption systems: excess data key generation on the encrypt side degrades cache hit ratios on the decrypt side, creating a feedback loop of redundant KMS calls. The AWS-recommended hierarchical keyring pattern with DynamoDB provides a production-ready solution that integrates with the AWS Encryption SDK with minimal code changes. For regulated environments requiring additional control, a custom caching approach can deliver similar results.
If you operate a multi-tenant SaaS platform or a high-throughput system with per-tenant encryption requirements, consider these patterns to optimize your encryption costs and performance.
To get started, explore the following resources:
If you have questions or feedback about this post, leave a comment in the Comments section.
Post Syndicated from LastWeekTonight original https://www.youtube.com/watch?v=ikFe0NcKv2c
Post Syndicated from LastWeekTonight original https://www.youtube.com/shorts/XLYRtsRUezQ
Post Syndicated from corbet original https://lwn.net/Articles/1086947/
The kernel is able to run a few types of executable files, including native
binaries in the ELF format and interpreted programs that begin with the
#! marker. It also, however, has a mechanism, called binfmt_misc,
that can be configured from user space to enable the transparent execution
of programs in just about any format. This feature has been relatively
static for years, but it seems likely to receive some significant updates
in the near future, including the ability to load BPF programs that can
decide how to run a given program.
Post Syndicated from Maddie Presland original https://www.backblaze.com/blog/90-of-enterprise-data-is-unstructured-and-genai-cant-use-it-without-better-storage/

At GTC this year, Jensen Huang put a number on a problem that most enterprise AI teams already feel but struggle to articulate: about 90% of what gets generated every year is unstructured data. This includes PDFs, emails, video, contracts, support tickets, and voice recordings.
Until recently, that data was, in his words, almost entirely useless. You could store it or search it by keyword, but machines couldn’t read it, understand what it meant, or draw any connections between it and other content.
GenAI has changed that. RAG pipelines, vector databases, and embedding workflows give machines a way to process unstructured content, comprehend its meaning, and synthesize information across the entire enterprise.
The problem is that these tools put a completely different set of demands on storage than anything that came before them. And most enterprise storage wasn’t built for it.
The access pattern no one planned for
Traditional enterprise storage assumes that data gets written and then occasionally retrieved. The architecture for it was built with hierarchical file systems and tiered storage (hot archives for data that gets accessed regularly, cold archives for anything that hasn’t been touched in a while). It worked well for decades, until RAG pipelines broke it.
A RAG pipeline works by reading your documents and converting them into a format the AI can search. But that conversion process is not a one-time event. It has to be run repeatedly as you test, adjust, and update. Every adjustment means re-reading the same content, re-processing it, and re-writing the results back to storage.
For example, the pipeline breaks documents into chunks because the AI can only search effectively when content is divided into manageable pieces. The size of those chunks directly affects how well the AI answers questions. Too large, and the AI retrieves too much irrelevant content. Too small, and it loses context.
Whenever you have to update your underlying documents, the pipeline has to re-read and re-process everything affected by the change. The same is true when upgrading to a newer AI model, because the new model produces different representations of the same content and requires everything to be re-converted.
While the pipeline is reading, it’s also saving converted content, updated search indices, and checkpoints. And what it saves is tiny. Embeddings, vector chunks, and metadata objects are often just a few kilobytes each, but a production RAG pipeline generates millions of them. Legacy storage treats every save operation the same regardless of file size, so saving a million tiny files costs nearly as much as saving a million large ones.
Tiered storage exacerbates this even more. These systems judge which data is still needed and which can be moved to cheaper, slower storage based on how recently something was accessed. But a RAG pipeline might go quiet for weeks between runs and then suddenly need everything at once. Or it might re-index documents on a schedule that the storage system doesn’t recognize as regular access. Either way, the tiered system sees cold data and moves it to a slower tier. When the pipeline needs that data back, it waits and pays a retrieval fee before it can proceed. That cost and delay compounds across millions of objects and dozens of pipeline runs.
The governance problem hiding inside your index
When a RAG pipeline indexes documents into a vector database, it takes a snapshot of your data at that moment in time. The embeddings it generates reflect the content of those documents as they existed when the pipeline ran. When the original documents are updated or changed, the snapshot doesn’t change with them. The vector index keeps pointing to the old version, and the AI keeps retrieving it and presenting it as current fact.
To a user, that looks like hallucination. The model is confidently citing a document that no longer says what the model thinks it says. But the failure isn’t happening inside the model; it’s happening at the storage layer. Specifically, in the gap between when source documents change and when the index gets updated.
Most enterprises running RAG pipelines today have no systematic way to close that gap. Document management systems aren’t built to notify downstream AI pipelines when content changes. Vector databases aren’t built to automatically invalidate and re-index affected embeddings. The result is an AI system that’s architecturally incapable of knowing when its knowledge has gone stale, so it presents outdated information with the same confidence as current information.
What GenAI storage actually requires
Closing the gap between what RAG pipelines demand and what legacy storage delivers requires three things:
The storage layer that doesn’t get in the way
Backblaze B2 Overdrive is built around exactly these requirements. It is always-hot object storage with no tiering, no retrieval delays, and no waiting for data to be promoted before a pipeline can run. Every document is always available, regardless of how recently it was written, which means when the pipeline needs to re-index, storage never slows it down.
At up to 1Tbps sustained throughput, it keeps high-volume RAG pipelines fed continuously through the constant mixed traffic of reads and writes they generate. Because egress is free, teams can move data between storage and compute across regions and providers without a cost penalty. And S3 compatibility lets B2 Overdrive drop into existing LangChain, LlamaIndex, and vector database pipelines without rewrites.
Ninety percent of enterprise data is sitting in formats that, until recently, machines couldn’t do anything useful with. The tools to unlock it now exist. How well they perform and what they cost to run depends largely on the storage underneath them.
Ready to build a RAG pipeline that doesn’t stall on storage? Learn more about Backblaze B2 Overdrive.
The post 90% of Enterprise Data Is Unstructured, and GenAI Can’t Use It Without Better Storage appeared first on Backblaze Blog | Cloud Storage & Cloud Backup
Post Syndicated from Matt Granger original https://www.youtube.com/watch?v=5IxWzfNno5k
Post Syndicated from jzb original https://lwn.net/Articles/1087490/
Version
0.10 of the uutils project’s Rust Coreutils has been released. This
release focused on compatibility with the GNU Core Utilities suite,
with Rust Coreutils now passing 645 of 690 tests, up from 625 with version 0.9.0. Notable
changes in this release include addition of the mv --exchange
option, an OpenSSL backend for checksum utilities, applying SELinux labels at
creation when using mkdir, mkfifo, and mknod, as well
as a number of performance and security improvements.
The project has an
online playground that runs the
Rust Coreutils directly in the browser via WebAssembly for those who would like
to try the utilities without installing them. LWN covered the uutils project in
February 2025.
Post Syndicated from jzb original https://lwn.net/Articles/1087489/
Security updates have been issued by Debian (7zip, kernel, libde265, and p7zip), Mageia (tomcat), Oracle (fence-agents, frr10, kernel, ldns, libgcrypt, mingw-glib2, nodejs24, osbuild-composer, p11-kit, php8.4, sg3_utils, and thunderbird), Red Hat (libXfont2), and SUSE (containerd, evince, libXfont2, nginx, openssl-3, pcp, php7, php8, python-Django, python-httplib2, python-nltk, rrdtool, vifm, and wireshark).
Post Syndicated from Nelson Duarte original https://blog.cloudflare.com/ai-search-easier/
Today, we’re excited to announce a few developer experience improvements to Cloudflare AI Search to make it easy to manage a search solution out of the box. Previously, you had to stitch together components of the Cloudflare primitives (Workers AI, AI Gateway, Vectorize, R2, Browser Run) but now, AI Search can do this automatically — and better. Our goal is to give your agents their own search engine, where they can easily find data to provide better answers for themselves and their humans.
We’re also sharing an early preview of pricing for customers of AI Search so you can learn how this scales. We modeled pricing in a way that makes it predictable and scalable: embedding and reranking are free when you use the default models, so no need to worry about predicting token count.
In AI Search, users can now:
/search and /mcp endpoint that can search through multiple instances or websites at once without authentication, so you can share easily with your customers./search and /mcp endpoints (e.g., search.example.com/mcp). You can also add Cloudflare Access to create private search instances.Finally, we will also share examples of how AI Search is used across our own platform including Cloudflare.com, our Developer Docs, with EmDash, in Cloudflare Dev Stack MCP — and even the blog post you’re reading right now (try cmd+K).
One of the ways we use AI Search is in our new Cloudflare Dev Stack MCP, which you can try today in our AI Playground. It gives coding agents current, cited docs from across the Cloudflare developer ecosystem, so they build on the latest features and fixes instead of stale training data.
Here's how we built it using the features available today in AI Search:
We created one AI Search instance per Cloudflare-owned surface: Docs, Blog, API Docs, Community, Astro, Vite, Vitest, Hono, Replicate, OpenNext. (Each of these is Cloudflare-owned.)
They span different domains, but, because Cloudflare owns the website data, AI Search is able to treat them as a single set and ingest them all the same way. Point AI Search at a site, or set of sites, and it handles crawling, ingestion, embedding, and retrieval. Creating an instance is a single command, and for a site without a sitemap you add –parse-type discover to find pages by following links (powered by /crawl from Browser Run):
Now the interesting part: answering a single query across all 10 instances. There are two ways to do it.
Option A: in a Worker (what we did for Cloudflare Stack MCP)
We bound the namespace to a Worker to create a remote MCP server and made one multi-instance call across all 10 instances. We took this path because we're adding the stack search into Cloudflare's MCP server, so it ships as a tool alongside the Cloudflare tools agents already connect to.
The binding, in wrangler.jsonc:
Then a single tool makes one call that fans out across the instances you name:
Option B: flip on public endpoints (no code)
If you'd rather not write a Worker at all, enable public URLs on the namespace. You immediately get /search and /mcp endpoints that query every instance, with no auth and nothing to deploy.
Reach for the Worker when you're folding search into an existing app or MCP server, as we are. Or reach for the public endpoint when you just want a shareable search endpoint in one click.
Public endpoints come with a default public URL, but you can put your own custom domain over them to brand the endpoint (e.g., search.example.com/mcp).
If the search should be private, add Cloudflare Access in front of the domain. The endpoint now requires a login, so only authorized people (or agents) can query it.
With the Cloudflare Dev Stack MCP Server, you can ask about any tool, or describe an app you want to build, and you'll get back current, cited answers on how best to build it on the Cloudflare stack.
The AI Playground is worth checking out, but the real magic is wiring the MCP into your coding agent, so the stack's current docs are one tool call away. That replaces the usual fallback (web search then fetching full pages), which is slow, token-heavy, and often lands on the wrong or stale source. To use with your agent of choice, drop the Dev Stack MCP URL into your MCP configuration. For example:
We build with AI Search the same way our customers would: Cloudflare Blog's search already runs on it, and today Developer Docs and Cloudflare.com join it. All of it uses hybrid search, semantic and keyword together in one query, so it handles both open-ended "what does this do" questions and exact lookups of names or keywords. We recently rebuilt the Blog on EmDash, our new open-source CMS, and our new
EmDash AI Search integration is what powers that search now. You can also add it to your own EmDash site and get the same search over your content out of the box.
AI Search is powered by Browser Run /crawl in the background, but goes a step further to identify itself with its own bot identity: Cloudflare-AI-Search. Just like Browser Run, it follows robots.txt, identifies itself with an immutable, public user agent, and will respect whatever bot controls a site has in place.
AI Search is currently free while in beta, and billing is not yet enabled; we'll email you with plenty of notice before it starts. As we move toward general availability, here's a preview of pricing across ingestion, storage, and queries, plus embedding and reranking (preview prices are subject to change before billing begins):
† A single pool of 5M ingestion tokens per month, covering any file type currently supported (e.g., text, images). ‡ A single pool of 2,000 queries per month, shared across both query types.
Our goal is to provide pricing you can predict, starting with the models your search leans on. Embedding turns your text into the vectors that search matches on, and reranking reorders results so the most relevant come first. Both run free with AI Search defaults or when using select models from the Workers AI catalog, so the models behind indexing and every search are not a cost you have to worry about. Answer generation and query rewriting are optional steps that run on a model you choose, billed as Workers AI usage, or you can use AI Gateway credits with any model/provider.
Here's a sample monthly bill on the Workers Paid plan for creating a new AI Search instance for a 20,000-document data source (about 20M tokens of text) plus 1,000 images (assume about 1,000 tokens each), with 30,000 semantic queries a month using the default AI Search embedding and reranking model. Ingestion is chunked with roughly 10% overlap, which shows up as the × 1.1 below:
Images count toward base ingestion and also incur the image add-on cost. Storage assumes about 10 KB per document and 1 MB per image. Indexing is largely a one-time cost, so later months are mostly queries, closer to $21.
AI Search is available to enable and use today. Point it at your site, turn on hybrid search for both semantic and keyword matching, and you have a search engine for your own data, ready for your agents. Spin one up with one command:
From there, query it, wire it into an agent over /mcp, or put a custom domain on a public /search endpoint to share it with your users. Check out the AI Search docs for more information.
Post Syndicated from Matthew Conroy original https://blog.cloudflare.com/aeo/
Your next customer may not find you through a search engine. Instead, they'll ask an AI assistant: "how do I do X?"; "which option is best for someone like me?"; "just handle it for me" and an agent will find the answer, weigh the options, and act on their behalf. Increasingly, the moment that determines whether a customer chooses you happens inside a model's response — before a human ever sees your homepage.
This agentic audience is already here: by our count, fewer than half of all HTML page requests now come from a human. Not all of those machines are agents acting for a person, but that share is growing fast, and answer engines, shopping assistants, and research tools will shape which businesses are found and recommended. Discoverability used to mean ranking on a results page. Now it means being found, read, and confidently recommended by the agents that guide your customers.
The old metrics, human clicks and page views, no longer paint the full picture. We spent time talking to site owners who were staring at access logs full of AI bots, completely blind to whether those bots were capable of using their site or recommending their products and services to their users. We heard two main questions:
To help site owners answer these questions, we have integrated our previous work on Agent Readiness into the Cloudflare dashboard, and added our new Answer Engine Optimization (AEO) tool as well. These tools treat agents as a core user base for your site, showing you how an agent will see it, and how often you get recommended.
The opportunity is big, and the bar is low, because most sites aren't built for this user yet. Just as early SEO rewarded the sites built for search engines, the sites built for agents will be rewarded now. The ones that are easy to find, read, and trust are the ones agents will recommend.
Diagnostics is the technical checkup within Agent Readiness. It scans your site the way an agent reads it: it works out whether it's allowed in and whether it can discover your content, fetches a clean machine-readable copy, and finds the interfaces it can call.
While a person just loads your homepage, an agent leans on your robots.txt, your sitemap, your response headers, a Markdown version of your content, and published metadata for authentication and tools.
Diagnostics runs those checks against a hostname and rolls the results into a single agent-readiness view, from "Not Ready" to fully agent-native. Every check comes back as pass, fail, or neutral, with a note on why it matters, and an evidence trail showing the exact request and response we saw.
The checks are grouped by effort, so you know where to start:
Every suggested improvement comes with a next step. When there’s a Cloudflare feature that can help, there's a "Set up in Cloudflare" link straight to the setting, such as switching on Markdown for Agents or managed robots.txt. For everything else, there’s a "Copy Agent Prompt" button that proposes what your coding agent needs to build. Make the change, re-scan, and watch the checkmark turn green.
Diagnostics tells you whether agents can read your site. The AEO tab tells you what happens next: when a customer asks an AI assistant a question in your category, does it recommend you or a competitor? You can't look this up like a search ranking. There's no impression count and no missed-click report, so when a competitor gets named instead of you, the sale is gone and nothing tells you it happened.
We infer your industry (e.g. health and fitness) and category (e.g. sports apparel) from your site, and we probe the leading assistants (today, Anthropic's Claude and OpenAI's GPT) with likely customer prompts to see how they respond. We structure these prompts to mimic real-world discovery, asking for recommendations, product comparisons, and general advice within your category. By observing how models answer these realistic queries, you get metrics such as:
To evaluate how an AI model perceives your market presence, we build a benchmark across each industry and category before scoring a specific site. We query AI assistants with likely prompts in that category — without specifying your brand — and record which sites are cited, where they appear, and how prominently they feature.
Rather than re-querying models every time a site owner runs a scan, we run this panel once per category and reuse the baseline across all accounts in that domain. Pre-computing this dataset provides three main benefits:
AI assistants rarely answer the same question the exact same way twice. To account for this variance, we use Cloudflare AI Gateway to prompt each assistant multiple times across different models. We then read the responses a customer would see — the answer text alongside the sources each assistant cited — and extract multiple signals from it.
We evaluate not just whether your site was mentioned, but whether you were cited as a source, how early your citations appear in the answer, and how much of the final answer's substance is attributed to you. Where genuine judgment is required, Workers AI does the heavy lifting, running natively on our own infrastructure to read each reply and score how your citations and mentions appear. We also use exact text analysis rather than a model grading its own output. Together, this folds dozens of one-off replies into actionable metrics. By abstracting the multimodel query and evaluation pipeline, the tool provides metrics without requiring you to build your own evaluation framework.
Alongside the answers, an AI Operator Activity shows the real crawl and referral traffic on your site, per operator (OpenAI, Google, and so on): who reads your content, who sends visitors back, and the errors they hit on the way (403 blocked, 404 dead link). The pattern worth acting on is the operator that crawls thousands of your pages but refers no one, using your work without sending customers back.
Because these numbers are specific to your site, you can experiment, re-run the scan, and measure the impact on the exact questions that bring you business.
Until now, sizing up agents meant guesswork: grepping your logs to infer who visited, or feeding a chatbot a prompt and eyeballing whether it mentioned you. But with Agent Readiness and AEO, you can get the data you need to act. And because the requests actually pass through Cloudflare, these tools measure rather than estimate where possible, and will improve over time.
Helping you see who's reaching your site and decide how to engage on your own terms is what we've always done. Agents are just the newest audience, and the businesses that make themselves easy for agents to find, understand, and trust are the ones that get recommended. Agent Readiness is where you find out whether you're one of them, and what to do if you're not yet.
Ready to find out if AI agents are sending customers your way? Head over to the Overview tab in your dashboard to get your site Agent Ready and request early access to AEO Visibility.
Building on the open, agent-ready web? Open the Agent Readiness tab in your Cloudflare dashboard and tell us what you're building on the Cloudflare Developer Discord.