[$] The odd saga of CVE-2012-5639

Post Syndicated from jake original https://lwn.net/Articles/957219/

A new release
for any project with a fix for a 12-year old CVE is going to stand
out pretty
obviously; a recent release has a fix of that nature, but the trail of CVE-2012-5639 is
rather elusive. The Apache
OpenOffice
project made its 4.1.15
release
with fixes for four CVEs, including one for
CVE-2012-5639 (“Loading internal / external resources without
warning”)
, on December 22. But nearly everything about that CVE
seems rather murky, and it is difficult to get a clear picture of what,
exactly, was done in OpenOffice to address the problem.

A re-introduction to mkosi — A Tool for Generating OS Images

Post Syndicated from Lennart Poettering original https://0pointer.net/blog/a-re-introduction-to-mkosi-a-tool-for-generating-os-images.html

This is a guest post written by Daan De Meyer, systemd and mkosi
maintainer

Almost 7 years ago, Lennart first
wrote
about mkosi on this blog. Some years ago, I took over development and
there’s been a huge amount of changes and improvements since then. So I
figure this is a good time to re-introduce mkosi.

mkosi stands for Make Operating
System Image
. It generates OS images that can be used for a variety of
purposes.

If you prefer watching a video over reading a blog post, you can also
watch my presentation on
mkosi at All Systems Go 2023.

What is mkosi?

mkosi was originally written as a tool to simplify hacking on systemd
and for experimenting with images using many of the new concepts being
introduced in systemd at the time. In the meantime, it has evolved into
a general purpose image builder that can be used in a multitude of
scenarios.

Instructions to install mkosi can be found in its
readme. We
recommend running the latest version to take advantage of all the latest
features and bug fixes. You’ll also need bubblewrap and the package
manager of your favorite distribution to get started.

At its core, the workflow of mkosi can be divided into 3 steps:

  1. Generate an OS tree for some distribution by installing a set of
    packages.
  2. Package up that OS tree in a variety of output formats.
  3. (Optionally) Boot the resulting image in qemu or systemd-nspawn.

Images can be built for any of the following distributions:

  • Fedora Linux
  • Ubuntu
  • OpenSUSE
  • Debian
  • Arch Linux
  • CentOS Stream
  • RHEL
  • Rocky Linux
  • Alma Linux

And the following output formats are supported:

  • GPT disk images built with systemd-repart
  • Tar archives
  • CPIO archives (for building initramfs images)
  • USIs (Unified System Images which are full OS images packed in a UKI)
  • Sysext, confext and portable images
  • Directory trees

For example, to build an Arch Linux GPT disk image and boot it in
qemu, you can run the following command:

$ mkosi -d arch -p systemd -p udev -p linux -t disk qemu

To instead boot the image in systemd-nspawn, replace qemu with boot:

$ mkosi -d arch -p systemd -p udev -p linux -t disk boot

The actual image can be found in the current working directory named
image.raw. However, using a separate output directory is recommended
which is as simple as running mkdir mkosi.output.

To rebuild the image after it’s already been built once, add -f to the
command line before the verb to rebuild the image. Any arguments passed
after the verb are forwarded to either systemd-nspawn or qemu
itself. To build the image without booting it, pass build instead of
boot or qemu or don’t pass a verb at all.

By default, the disk image will have an appropriately sized root
partition and an ESP partition, but the partition layout and contents
can be fully customized using systemd-repart by creating partition
definition files in mkosi.repart/. This allows you to customize the
partition as you see fit:

  • The root partition can be encrypted.
  • Partition sizes can be customized.
  • Partitions can be protected with signed dm-verity.
  • You can opt out of having a root partition and only have a /usr
    partition instead.
  • You can add various other partitions, e.g. an XBOOTLDR partition or a
    swap partition.
  • …

As part of building the image, we’ll run various tools such as
systemd-sysusers, systemd-firstboot, depmod, systemd-hwdb and
more to make sure the image is set up correctly.

Configuring mkosi image builds

Naturally with extended use you don’t want to specify all settings on
the command line every time, so mkosi supports configuration files
where the same settings that can be specified on the command line can be
written down.

For example, the command we used above can be written down in a
configuration file mkosi.conf:

[Distribution]
Distribution=arch

[Output]
Format=disk

[Content]
Packages=
        systemd
        udev
        linux

Like systemd, mkosi uses INI configuration files. We also support
dropins which can be placed in mkosi.conf.d. Configuration files can
also be conditionalized using the [Match] section. For example, to
only install a specific package on Arch Linux, you can write the
following to mkosi.conf.d/10-arch.conf:

[Match]
Distribution=arch

[Content]
Packages=pacman

Because not everything you need will be supported in mkosi, we support
running scripts at various points during the image build process where
all extra image customization can be done. For example, if it is found,
mkosi.postinst is called after packages have been installed. Scripts
are executed on the host system by default (in a sandbox), but can be
executed inside the image by suffixing the script with .chroot, so if
mkosi.postinst.chroot is found it will be executed inside the image.

To add extra files to the image, you can place them in mkosi.extra in
the source directory and they will be automatically copied into the
image after packages have been installed.

Bootable images

If the necessary packages are installed, mkosi will automatically
generate a UEFI/BIOS bootable image. As mkosi is a systemd project, it
will always build
UKIs
(Unified Kernel Images), except if the image is BIOS-only (since UKIs
cannot be used on BIOS). The initramfs is built like a regular image by
installing distribution packages and packaging them up in a CPIO archive
instead of a disk image. Specifically, we do not use dracut,
mkinitcpio or initramfs-tools to generate the initramfs from the
host system. ukify is used to assemble all the individual components
into a UKI.

If you don’t want mkosi to generate a bootable image, you can set
Bootable=no to explicitly disable this logic.

Using mkosi for development

The main requirements to use mkosi for development is that we can
build our source code against the image we’re building and install it
into the image we’re building. mkosi supports this via build scripts.
If a script named mkosi.build (or mkosi.build.chroot) is found,
we’ll execute it as part of the build. Any files put by the build script
into $DESTDIR will be installed into the image. Required build
dependencies can be installed using the BuildPackages= setting. These
packages are installed into an overlay which is put on top of the image
when running the build script so the build packages are available when
running the build script but don’t end up in the final image.

An example mkosi.build.chroot script for a project using meson could
look as follows:

#!/bin/sh
meson setup "$BUILDDIR" "$SRCDIR"
ninja -C "$BUILDDIR"
if ((WITH_TESTS)); then
    meson test -C "$BUILDDIR"
fi
meson install -C "$BUILDDIR"

Now, every time the image is built, the build script will be executed
and the results will be installed into the image.

The $BUILDDIR environment variable points to a directory that can be
used as the build directory for build artifacts to allow for incremental
builds if the build system supports it.

Of course, downloading all packages from scratch every time and
re-installing them again every time the image is built is rather slow,
so mkosi supports two modes of caching to speed things up.

The first caching mode caches all downloaded packages so they don’t have
to be downloaded again on subsequent builds. Enabling this is as simple
as running mkdir mkosi.cache.

The second mode of caching caches the image after all packages have been
installed but before running the build script. On subsequent builds,
mkosi will copy the cache instead of reinstalling all packages from
scratch. This mode can be enabled using the Incremental= setting.
While there is some rudimentary cache invalidation, the cache can also
forcibly be rebuilt by specifying -ff on the command line instead of
-f.

Note that when running on a btrfs filesystem, mkosi will automatically
use subvolumes for the cached images which can be snapshotted on
subsequent builds for even faster rebuilds. We’ll also use reflinks to
do copy-on-write copies where possible.

With this setup, by running mkosi -f qemu in the systemd repository,
it takes about 40 seconds to go from a source code change to a root
shell in a virtual machine running the latest systemd with your change
applied. This makes it very easy to test changes to systemd in a safe
environment without risk of breaking your host system.

Of course, while 40 seconds is not a very long time, it’s still more
than we’d like, especially if all we’re doing is modifying the kernel
command line. That’s why we have the KernelCommandLineExtra= option to
configure kernel command line options that are passed to the container
or virtual machine at runtime instead of being embedded into the image.
These extra kernel command line options are picked up when the image is
booted with qemu’s direct kernel boot (using -append), but also when
booting a disk image in UEFI mode (using SMBIOS). The same applies to
systemd credentials (using the Credentials= setting). These settings
allow configuring the image without having to rebuild it, which means
that you only have to run mkosi qemu or mkosi boot again afterwards
to apply the new settings.

Building images without root privileges and loop devices

By using newuidmap/newgidmap and systemd-repart, mkosi is able to
build images without needing root privileges. As long as proper subuid
and subgid mappings are set up for your user in /etc/subuid and
/etc/subgid, you can run mkosi as your regular user without having
to switch to root.

Note that as of the writing of this blog post this only applies to the
build and qemu verbs. Booting the image in a systemd-nspawn
container with mkosi boot still needs root privileges. We’re hoping to
fix this in an future systemd release.

Regardless of whether you’re running mkosi with root or without root,
almost every tool we execute is invoked in a sandbox to isolate as much
of the build process from the host as possible. For example, /etc and
/var from the host are not available in this sandbox, to avoid host
configuration inadvertently affecting the build.

Because systemd-repart can build disk images without loop devices,
mkosi can run from almost any environment, including containers. All
that’s needed is a UID range with 65536 UIDs available, either via
running as the root user or via /etc/subuid and newuidmap. In a
future systemd release, we’re hoping to provide an alternative to
newuidmap and /etc/subuid to allow running mkosi from all
containers, even those with only a single UID available.

Supporting older distributions

mkosi depends on very recent versions of various systemd tools (v254 or
newer). To support older distributions, we implemented so called tools
trees. In short, mkosi can first build a tools image for you that
contains all required tools to build the actual image. This can be
enabled by adding ToolsTree=default to your mkosi configuration.
Building a tools image does not require a recent version of systemd.

In the systemd mkosi configuration, we automatically use a tools tree if
we detect your distribution does not have the minimum required systemd
version installed.

Configuring variants of the same image using profiles

Profiles can be defined in the mkosi.profiles/ directory. The profile
to use can be selected using the Profile= setting (or --profile=) on
the command line. A profile allows you to bundle various settings behind
a single recognizable name. Profiles can also be matched on if you want
to apply some settings only to a few profiles.

For example, you could have a bootable profile that sets
Bootable=yes, adds the linux and systemd-boot packages and
configures Format=disk to end up with a bootable disk image when
passing --profile bootable on the kernel command line.

Building system extension images

System extension
images may – dynamically at runtime — extend the base system with an
overlay containing additional files.

To build system extensions with mkosi, we need a base image on top of
which we can build our extension.

To keep things manageable, we’ll make use of mkosi‘s support for
building multiple images so that we can build our base image and system
extension in one go.

We start by creating a temporary directory with a base configuration
file mkosi.conf with some shared settings:

[Output]
OutputDirectory=mkosi.output
CacheDirectory=mkosi.cache

Now let’s continue with the base image definition by writing the
following to mkosi.images/base/mkosi.conf:

[Output]
Format=directory

[Content]
CleanPackageMetadata=no
Packages=systemd
         udev

We use the directory output format here instead of the disk output
so that we can build our extension without needing root privileges.

Now that we have our base image, we can define a sysext that builds on
top of it by writing the following to mkosi.images/btrfs/mkosi.conf:

[Config]
Dependencies=base

[Output]
Format=sysext
Overlay=yes

[Content]
BaseTrees=%O/base
Packages=btrfs-progs

BaseTrees= point to our base image and Overlay=yes instructs mkosi
to only package the files added on top of the base tree.

We can’t sign the extension image without a key. We can generate one
by running mkosi genkey which will generate files that are
automatically picked up when building the image.

Finally, you can build the base image and the extensions by running
mkosi -f. You’ll find btrfs.raw in mkosi.output which is the
extension image.

Various other interesting features

  • To sign any generated UKIs for secure boot, put your secure boot key
    and certificate in mkosi.key and mkosi.crt and enable the
    SecureBoot= setting. You can also run mkosi genkey to have mkosi
    generate a key and certificate itself.
  • The Ephemeral= setting can be enabled to boot the image in an
    ephemeral copy that is thrown away when the container or virtual
    machine exits.
  • ShimBootloader= and BiosBootloader= settings are available to
    configure shim and grub installation if needed.
  • mkosi can boot directory trees in a virtual using virtiofsd. This
    is very useful for quickly rebuilding an image and booting it as the
    image does not have to be packed up as a disk image.
  • …

There’s many more features that we won’t go over in detail here in this
blog post. Learn more about those by reading the
documentation.

Conclusion

I’ll finish with a bunch of links to more information about mkosi and
related tooling:

AWS named as a Leader in 2023 ISG Provider Lens report for Multi Public Cloud Services – Sovereign Cloud Infrastructure Services (EU)

Post Syndicated from Marta Taggart original https://aws.amazon.com/blogs/security/aws-named-as-a-leader-in-2023-isg-provider-lens-report-for-multi-public-cloud-services-sovereign-cloud-infrastructure-services-eu/

Amazon Web Services (AWS) is named as a Leader in the 2023 ISG Provider Lens Quadrant Report for Multi Public Cloud Services – Sovereign Cloud Infrastructure Services (EU), published on January 8, 2024. This first-ever Information Services Group (ISG) report evaluates providers of sovereign cloud infrastructure services in the multi public cloud environment and examines how they address the key challenges that confront enterprise clients in the European Union (EU). ISG defines Leaders as representing innovative strength and competitive stability.

AWS received the highest score among the providers that ISG evaluated on portfolio attractiveness, which was assessed on multiple factors, including:

  • Scope of portfolio – breadth and depth of offering
  • Portfolio quality – technology and skills, customer satisfaction, and security
  • Strategy and vision – product roadmap, thought leadership, and investments
  • Local characteristics – product support and infrastructure

According to ISG, “AWS’ network of data centers across the EU provides sovereign cloud services that are highly scalable. The AWS Nitro System, the foundation of AWS’ cloud services, ensures data residency, privacy, and sovereignty.”

Read the report to:

  • Gain perspective on the factors that ISG believes will influence the sovereign cloud market in the EU.
  • Discover some of the considerations that enterprises in the EU should consider when evaluating sovereign cloud infrastructure services.
  • Learn how the AWS Cloud is sovereign-by-design and how we continue to innovate without compromising on the full power of AWS.

The recognition of AWS as a Leader in this report highlights the work that we have undertaken to help address the complexity that European customers are facing in the evolving sovereignty landscape. AWS continues to deliver on the AWS Digital Sovereignty Pledge by investing in a comprehensive and ambitious roadmap of capabilities of data residency, granular access restriction, encryption, and resilience to provide customers with more choice in meeting their unique needs. Our recent innovations to help customers address their local regulatory requirements and sovereignty needs include AWS Dedicated Local Zones and the announcement of plans to launch the AWS European Sovereign Cloud. Download the full 2023 ISG Provider Lens Quadrant Report for Multi Public Cloud Services – Sovereign Cloud Infrastructure Services (EU) from AWS.

If you have feedback about this post, submit comments in the Comments section below.

Author

Marta Taggart

Marta is a Seattle-native and Principal Product Marketing Manager in AWS Security Product Marketing, where she focuses on data protection services and digital sovereignty. Outside of work, you’ll find her trying to convince Jack, her rescue dog, not to chase squirrels (with limited success).

Patch Tuesday – January 2024

Post Syndicated from Adam Barnett original https://blog.rapid7.com/2024/01/09/patch-tuesday-january-2024/

Patch Tuesday - January 2024

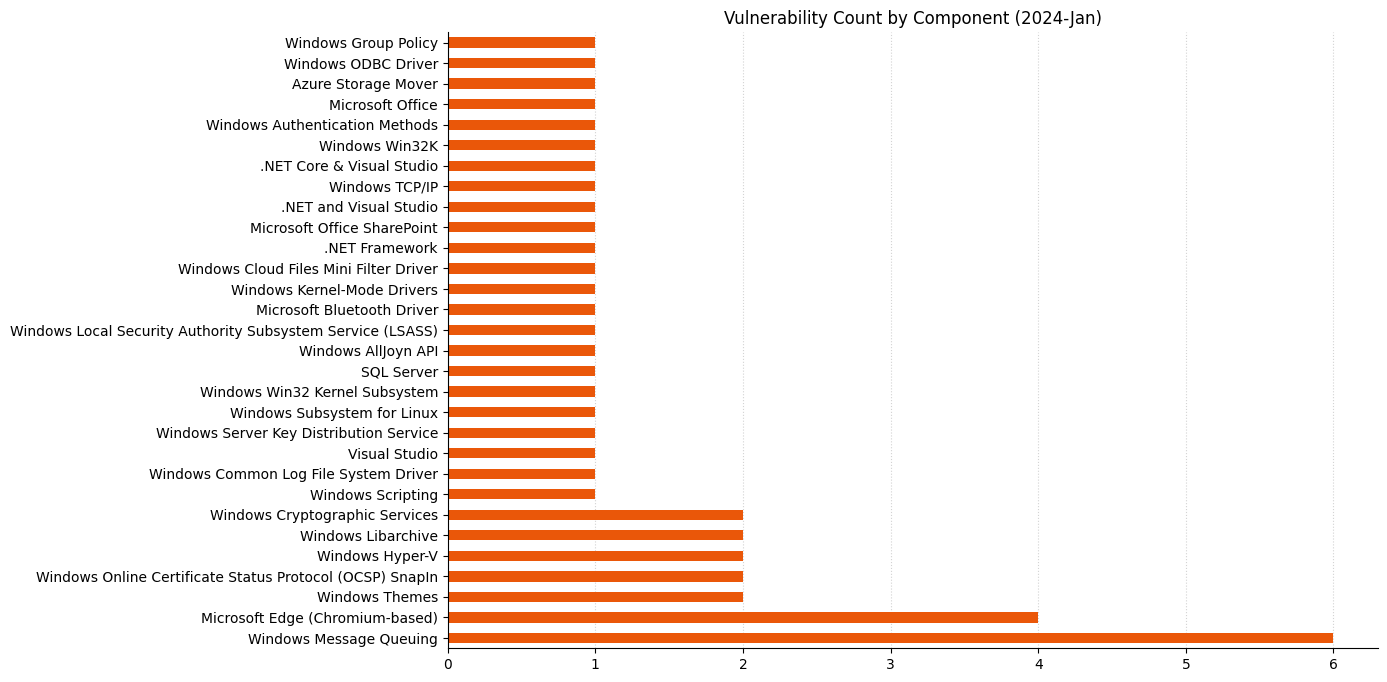
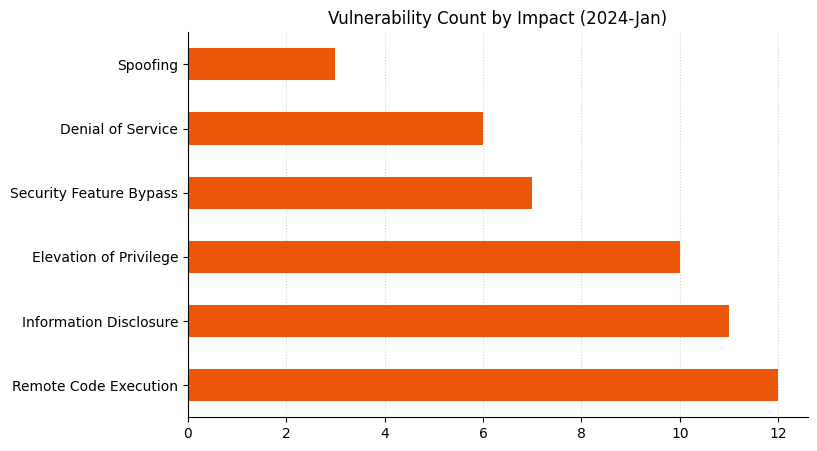
Microsoft is addressing 49 vulnerabilities this January 2024 Patch Tuesday, including a single critical remote code execution vulnerability. Four browser vulnerabilities were published separately this month, and are not included in the total. No zero-day vulnerabilities are published or patched today.

Hyper-V: critical remote code execution

CVE-2024-20700 describes a remote code execution vulnerability in the Windows Hyper-V hardware virtualization service. Microsoft ranks this vulnerability as critical under its own proprietary severity scale. However, the CVSS 3.1 base score of 7.5 equates only to high severity, reflecting the high attack complexity — attackers must win a race condition — and the requirement for the attack to be launched from the restricted network. The advisory is light on detail, so it isn’t clear exactly where the attacker must be located — the LAN on which the hypervisor resides, or a virtual network created and managed by the hypervisor — or in what context the remote code execution would occur. However, since Microsoft ranks the vulnerability as more severe than the CVSS score would suggest, defenders should assume that exploitation is possible from the same subnet as the hypervisor, and that code execution will occur in a SYSTEM context on the Hyper-V host.

FBX 3D models in Office: arbitrary code execution

A patch for Microsoft Office disables the ability to insert 3D models from FBX (Filmbox) files into Office documents to guard against exploitation of CVE-2024-20677, which Microsoft describes as an arbitrary code execution. Exploitation would involve an Office user interacting with a malicious FBX file, and could lead to information disclosure or downtime. Models already present in documents will continue to function as before, unless the “Link to File” option was chosen upon insertion. In a related blog post, Microsoft recommends avoiding FBX and instead making use of the GLB 3D file format from now on. The blog post also provides instructions on a registry modification which re-enables the ability to insert FBX files into Office documents, although Microsoft strongly recommends against this. Silver lining: the Preview Pane is not a vector for CVE-2024-20677. Both the Windows and Mac editions of Office are vulnerable until patched.

SharePoint: remote code execution

SharePoint admins should take note of CVE-2024-21318. Successful exploitation allows an attacker with existing Site Owner permissions to execute code in the context of the SharePoint Server. Many SharePoint RCE vulnerabilities require only Site Member privileges, so the requirement for Site Owner here does provide some small comfort, but the potential remains that CVE-2024-21318 could be abused either by a malicious insider or as part of an exploit chain. The advisory does mention that exploitation requires that an attacker must already be authenticated as “at least a Site Owner,” although it’s not clear what level of privilege above Site Owner is implicated here; a user with SharePoint Administrator or Microsoft 365 Global Administrator role could certainly assign themselves the Site Owner role.

Windows Kerberos: MitM security feature bypass

All current versions of Windows receive a patch for CVE-2024-20674, which describes a flaw in the Windows implementation of Kerberos. By establishing a machine-in-the-middle (MitM), an attacker could trick a client into thinking it is communicating directly with the Kerberos authentication server, and subsequently bypass authentication and impersonate the client user on the network. Although exploitation requires an existing foothold on the local network, both the CVSS 3.1 base score of 9.1 and Microsoft’s proprietary severity ranking of critical reflect that there is no requirement for user interaction or prior authentication. Microsoft also notes that it considers exploitation of this vulnerability more likely.

Exchange: no security patches two months in a row

Exchange admins bracing themselves for extra security patches this month after the lack of Exchange security patches last month are once again given a reprieve: there are no security patches for Exchange released today.

Microsoft products lifecycle update

A number of Microsoft products transition from mainstream support to extended support as of today: Exchange Server 2019, Hyper-V Server 2019, SharePoint Server 2019, Skype for Business 2019 (both client and server), as well as various facets of Windows 10: Enterprise LTSC 2019, IoT Core LTSC, IoT Enterprise LTSC 2019, IoT LTSC 2019 Core, Windows Server 2019, Windows Server IoT 2019, and Windows Server IoT 2019 for Storage. Also moving to extended support: Dynamics SL 2018 and Project Server 2019. During the extended support lifecycle phase, Microsoft continues to provide security updates, but does not typically release new features. Extended support is not available for Microsoft consumer products.

Today marks the end of the road for Microsoft Dynamics CRM 2013, which moves past the end of extended support. No ESU program is available, so admins must move to a newer version of Dynamics CRM to continue receiving security updates.

Summary Charts

Patch Tuesday - January 2024
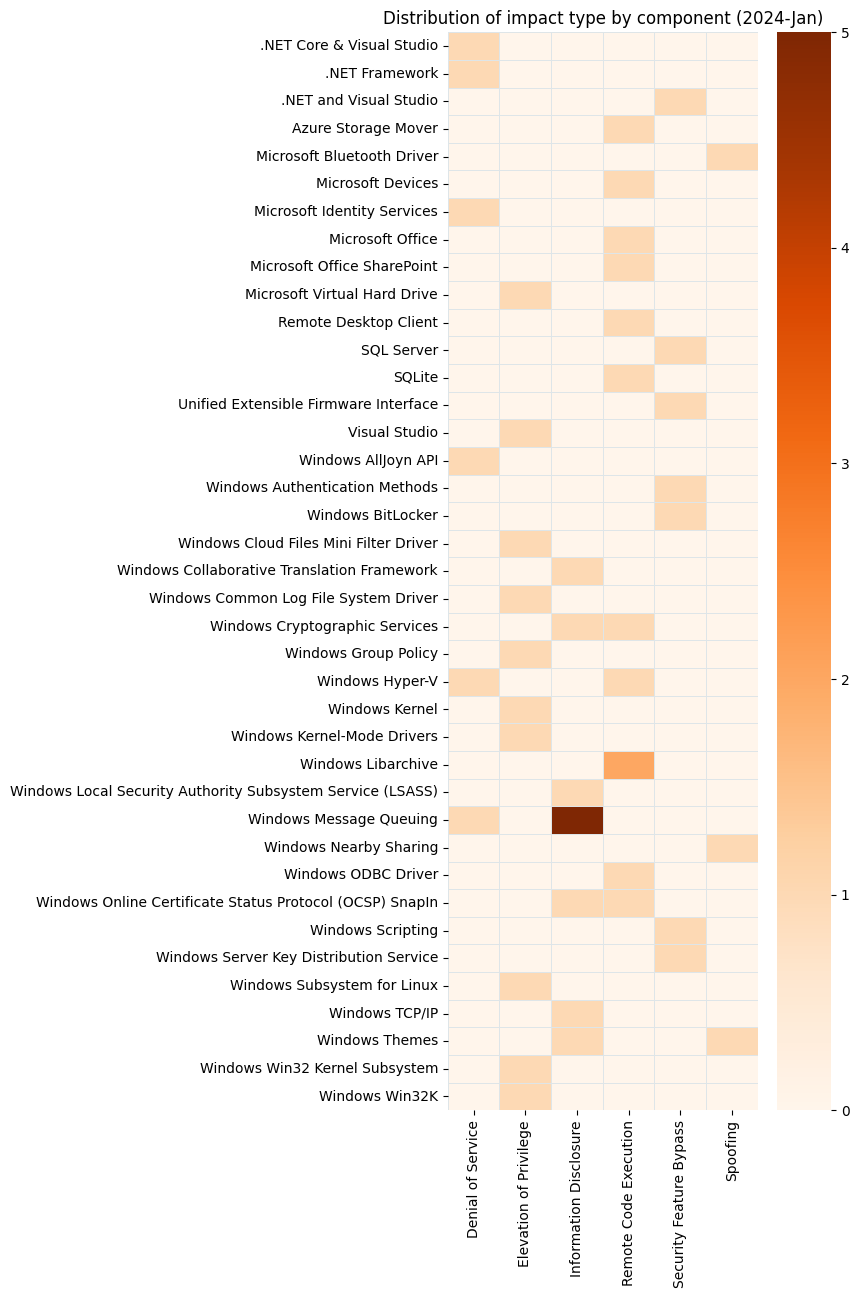
Hyper-V always worth defender attention.
Patch Tuesday - January 2024
Remote Code Execution reclaims the top spot.
Patch Tuesday - January 2024
WIndows Message Queuing is now a perennial feature of Patch Tuesday.

Summary Tables

Azure vulnerabilities

CVE Title Exploited? Publicly disclosed? CVSSv3 base score
CVE-2024-20676 Azure Storage Mover Remote Code Execution Vulnerability No No 8

Browser vulnerabilities

CVE Title Exploited? Publicly disclosed? CVSSv3 base score
CVE-2024-0225 Chromium: CVE-2024-0225 Use after free in WebGPU No No N/A
CVE-2024-0224 Chromium: CVE-2024-0224 Use after free in WebAudio No No N/A
CVE-2024-0223 Chromium: CVE-2024-0223 Heap buffer overflow in ANGLE No No N/A
CVE-2024-0222 Chromium: CVE-2024-0222 Use after free in ANGLE No No N/A

Developer Tools vulnerabilities

CVE Title Exploited? Publicly disclosed? CVSSv3 base score
CVE-2024-0057 NET, .NET Framework, and Visual Studio Security Feature Bypass Vulnerability No No 9.1
CVE-2024-20656 Visual Studio Elevation of Privilege Vulnerability No No 7.8
CVE-2024-21312 .NET Framework Denial of Service Vulnerability No No 7.5
CVE-2024-20672 .NET Core and Visual Studio Denial of Service Vulnerability No No 7.5

Developer Tools Azure vulnerabilities

CVE Title Exploited? Publicly disclosed? CVSSv3 base score
CVE-2024-21319 Microsoft Identity Denial of service vulnerability No No 6.8

Developer Tools SQL Server vulnerabilities

CVE Title Exploited? Publicly disclosed? CVSSv3 base score
CVE-2024-0056 Microsoft.Data.SqlClient and System.Data.SqlClient SQL Data Provider Security Feature Bypass Vulnerability No No 8.7

ESU Windows vulnerabilities

CVE Title Exploited? Publicly disclosed? CVSSv3 base score
CVE-2024-20674 Windows Kerberos Security Feature Bypass Vulnerability No No 9
CVE-2024-20654 Microsoft ODBC Driver Remote Code Execution Vulnerability No No 8
CVE-2024-20682 Windows Cryptographic Services Remote Code Execution Vulnerability No No 7.8
CVE-2024-20683 Win32k Elevation of Privilege Vulnerability No No 7.8
CVE-2024-20658 Microsoft Virtual Hard Disk Elevation of Privilege Vulnerability No No 7.8
CVE-2024-20653 Microsoft Common Log File System Elevation of Privilege Vulnerability No No 7.8
CVE-2024-20652 Windows HTML Platforms Security Feature Bypass Vulnerability No No 7.5
CVE-2024-21307 Remote Desktop Client Remote Code Execution Vulnerability No No 7.5
CVE-2024-20661 Microsoft Message Queuing Denial of Service Vulnerability No No 7.5
CVE-2024-20657 Windows Group Policy Elevation of Privilege Vulnerability No No 7
CVE-2024-20655 Microsoft Online Certificate Status Protocol (OCSP) Remote Code Execution Vulnerability No No 6.6
CVE-2024-21320 Windows Themes Spoofing Vulnerability No No 6.5
CVE-2024-20680 Windows Message Queuing Client (MSMQC) Information Disclosure No No 6.5
CVE-2024-20663 Windows Message Queuing Client (MSMQC) Information Disclosure No No 6.5
CVE-2024-20660 Microsoft Message Queuing Information Disclosure Vulnerability No No 6.5
CVE-2024-20664 Microsoft Message Queuing Information Disclosure Vulnerability No No 6.5
CVE-2024-21314 Microsoft Message Queuing Information Disclosure Vulnerability No No 6.5
CVE-2024-20692 Microsoft Local Security Authority Subsystem Service Information Disclosure Vulnerability No No 5.7
CVE-2024-21311 Windows Cryptographic Services Information Disclosure Vulnerability No No 5.5
CVE-2024-21313 Windows TCP/IP Information Disclosure Vulnerability No No 5.3
CVE-2024-20662 Windows Online Certificate Status Protocol (OCSP) Information Disclosure Vulnerability No No 4.9
CVE-2024-20691 Windows Themes Information Disclosure Vulnerability No No 4.7

Microsoft Office vulnerabilities

CVE Title Exploited? Publicly disclosed? CVSSv3 base score
CVE-2024-21318 Microsoft SharePoint Server Remote Code Execution Vulnerability No No 8.8
CVE-2024-20677 Microsoft Office Remote Code Execution Vulnerability No No 7.8

Windows vulnerabilities

CVE Title Exploited? Publicly disclosed? CVSSv3 base score
CVE-2024-20681 Windows Subsystem for Linux Elevation of Privilege Vulnerability No No 7.8
CVE-2024-21309 Windows Kernel-Mode Driver Elevation of Privilege Vulnerability No No 7.8
CVE-2024-20698 Windows Kernel Elevation of Privilege Vulnerability No No 7.8
CVE-2024-21310 Windows Cloud Files Mini Filter Driver Elevation of Privilege Vulnerability No No 7.8
CVE-2024-20686 Win32k Elevation of Privilege Vulnerability No No 7.8
CVE-2024-20700 Windows Hyper-V Remote Code Execution Vulnerability No No 7.5
CVE-2024-20687 Microsoft AllJoyn API Denial of Service Vulnerability No No 7.5
CVE-2024-20696 Windows Libarchive Remote Code Execution Vulnerability No No 7.3
CVE-2024-20697 Windows Libarchive Remote Code Execution Vulnerability No No 7.3
CVE-2024-20666 BitLocker Security Feature Bypass Vulnerability No No 6.6
CVE-2024-20690 Windows Nearby Sharing Spoofing Vulnerability No No 6.5
CVE-2024-21316 Windows Server Key Distribution Service Security Feature Bypass No No 6.1
CVE-2024-21306 Microsoft Bluetooth Driver Spoofing Vulnerability No No 5.7
CVE-2024-20699 Windows Hyper-V Denial of Service Vulnerability No No 5.5
CVE-2024-20694 Windows CoreMessaging Information Disclosure Vulnerability No No 5.5
CVE-2024-21305 Hypervisor-Protected Code Integrity (HVCI) Security Feature Bypass Vulnerability No No 4.4
CVE-2024-21325 Microsoft Printer Metadata Troubleshooter Tool Remote Code Execution Vulnerability No No N/A

Windows Mariner vulnerabilities

CVE Title Exploited? Publicly disclosed? CVSSv3 base score
CVE-2022-35737 MITRE: CVE-2022-35737 SQLite allows an array-bounds overflow No No N/A

AWS Certificate Manager will discontinue WHOIS lookup for email-validated certificates

Post Syndicated from Lerna Ekmekcioglu original https://aws.amazon.com/blogs/security/aws-certificate-manager-will-discontinue-whois-lookup-for-email-validated-certificates/

AWS Certificate Manager (ACM) is a managed service that you can use to provision, manage, and deploy public and private TLS certificates for use with Amazon Web Services (AWS) and your internal connected resources. Today, we’re announcing that ACM will be discontinuing the use of WHOIS lookup for validating domain ownership when you request email-validated TLS certificates.

WHOIS lookup is commonly used to query registration information for a given domain name. This information includes details such as when the domain was originally registered, and contact information for the domain owner and the technical and administrative contacts. Domain owners create and maintain domain registration information outside of ACM in WHOIS, which is a publicly available directory that contains information about domains sponsored by domain registrars and registries. You can use WHOIS lookup to view information about domains that are registered with Amazon Route 53.

Starting June 2024, ACM will no longer send domain validation emails by using WHOIS lookup for new email-validated certificates that you request. Starting October 2024, ACM will no longer send domain validation emails to mailboxes associated with WHOIS lookup for renewal of existing email-validated certificates. ACM will continue to send validation emails to the five common system addresses for the requested domain—we provide a list of these common system addresses in the next section of this post.

In this blog post, we share important details about this change and how you can prepare. Note that if you currently use DNS validation for your certificates requested from ACM, this change doesn’t affect you. These changes only apply to certificates that use email validation.

Background

When you request public certificates through ACM, you need to prove that you own or control the domain before ACM can issue the public certificate. ACM provides two options to validate ownership of a domain: DNS validation and email validation.

AWS recommends that you use DNS validation whenever possible so that ACM can automatically renew certificates that are requested from ACM without requiring action on your part. Email validation is another option that you can use to prove ownership of the domain, but you must manually validate ownership of the domain by using a link provided in an email. Figure 1 is a sample validation email from ACM for the AWS account 111122223333 and AWS US West (Oregon) Region (us-west-2) to validate ownership of the example.com domain.

Figure 1: Sample validation email for example.com domain

Figure 1: Sample validation email for example.com domain

How does ACM know where to send the validation email? Today, as part of the email validation process, ACM sends domain validation emails to the three contact addresses associated with the domain listed in the WHOIS database. These contact addresses are the domain registrant, technical contact, and administrative contact. You create and maintain domain registration information, including these contact addresses, outside of ACM—in the WHOIS database that your domain registrar provides.

Note: If you use Route53, see Updating contact information for a domain to update the contact information for your domain.

ACM also sends validation emails to the following five common system addresses for each domain: 

  • administrator@your_domain_name
  • hostmaster@your_domain_name
  • postmaster@your_domain_name
  • webmaster@your_domain_name
  • admin@your_domain_name

To prove that you own the domain, you must select the validation link included in these emails. ACM also sends validation emails to these same addresses to renew the certificate when the certificate is 45 days from expiry.

What’s changing?

If you currently use email validation for certificates requested from ACM, there are two important dates that you should be aware of:

  1. Starting June 2024, ACM will no longer send domain validation emails by using WHOIS lookup for new email-validated certificates that you request. ACM will continue to send validation emails to the three WHOIS lookup contact addresses for renewal of existing certificates, until October 2024.
  2. Starting October 2024, ACM will no longer send the validation emails to mailboxes associated with WHOIS lookup for existing certificates. After this date, ACM will not send validation emails to the three WHOIS lookup addresses for new or existing certificates.

ACM will continue to send validation emails to the five common system addresses that we listed in the previous section of this post.

Why are we making this change?

We’re making this change to mitigate a potential availability risk for ACM customers. A TLS certificate that ACM issues is valid for up to 395 days, and if you want to keep using it, you need to renew it prior to expiry. To renew an email-validated certificate, you must approve an email that ACM sends. ACM sends the first renewal email 45 days prior to certificate renewal, and if you don’t respond to this email, ACM sends additional reminders prior to expiry. If a certificate bound to one of your AWS resources—such as an Application Load Balancer—expires without being renewed, this could cause an outage for your application.

Some domain registrars that support WHOIS have made changes to the data that they publish to support their compliance with various privacy laws and recommended practices. Over the past several years, we’ve observed that the WHOIS lookup success rate has declined to less than 5 percent. If you rely on the contact addresses listed in the WHOIS database provided by your domain registrar to validate your domain ownership, this might create an availability risk. With a 5 percent success rate for WHOIS lookup, you might not receive validation emails for renewals of your certificates around 95 percent of the time. To provide a consistent mechanism for validating domain ownership when renewing certificates, ACM will only send validation emails to the five common system addresses that we listed in the Background section of this post.

What should you do to prepare?

If you currently monitor one of the five common system addresses (listed previously) for your domains, you don’t need to take any action. Otherwise, we strongly recommend that you create new DNS-validated certificates rather than creating and using email-validated certificates. ACM can automatically renew a DNS-validated certificate, without you taking any action, as long as the CNAME is accurately configured.

Alternatively, if you want to continue using email-validated certificates, we recommend that you monitor at least one of the five common email addresses listed previously. ACM sends the validation emails during certificate issuance for new ACM-issued certificates and during renewal of existing certificates. You can use the ACM describe-certificate API or check the certificate details on the ACM console to see if ACM previously sent validation emails to the relevant system addresses.

In addition, we strongly recommend that you use ACM Certificate Approaching Expiration events to monitor your certificates for expiry and help ensure that you’re notified about certificates that require an action from you to renew. For additional guidance, see How to manage certificate lifecycles using ACM event-driven workflows.

Conclusion

In this blog post, we outlined the changes coming to the email validation process when requesting and renewing certificates from ACM. We also shared the steps that you can take to prepare for this change, including monitoring at least one of the five relevant email addresses for your domains. Remember that these changes only apply to certificates that use email validation, not certificates that use DNS validation. For more information about certificate management on AWS, see the ACM documentation or get started using ACM today in the AWS Management Console.

If you have questions, contact AWS Support or your technical account manager (TAM), or start a new thread on the AWS re:Post ACM Forum. If you have feedback about this post, submit comments in the Comments section below.

 
Want more AWS Security news? Follow us on Twitter.

Lerna Ekmekcioglu

Lerna Ekmekcioglu

Lerna is a Senior Solutions Architect at AWS where she helps customers build secure, scalable, and highly available workloads. She has over 19 years of platform engineering experience including authentication systems, distributed caching, and multi-Region deployments using IaC and CI/CD to name a few. In her spare time, she enjoys hiking, sightseeing, and backyard astronomy.

Zach Miller

Zach Miller

Zach is a Senior Worldwide Security Specialist Solutions Architect at AWS. His background is in data protection and security architecture, focused on a variety of security domains, including cryptography, secrets management, and data classification. Today, he’s focused on helping enterprise AWS customers adopt and operationalize AWS security services to increase security effectiveness and reduce risk.

Georgy Sebastian

Georgy Sebastian

Georgy is a Senior Software Development Engineer at AWS Cryptography. He has a background in secure system architecture, PKI management, and key distribution. In his free time, he’s an amateur gardener and tinkerer.

Khyati Makim

Khyati Makim

Khyati is a Software Development Manager at AWS Cryptography where she’s focused on building secure solutions with cryptographic best practices. She has 25 years of experience building secure solutions in financial and retail businesses in distributed systems. In her spare time, she enjoys traveling, reading, painting, and spending time with family.

Vcc: a Clang compiler for Vulkan

Post Syndicated from corbet original https://lwn.net/Articles/957269/

The Vcc compiler has been
announced
.

It’s exactly what the name implies: a clang-based compiler that
outputs code that runs on Vulkan.

Vcc can be thought of as a GLSL and HLSL competitor, but the true
intent of this project is to retire the concept of shading
languages entirely. Unlike existing shading languages, Vcc makes a
honest attempt to bring the entire C/C++ language family to Vulkan,
which means implementing a number of previously unseen features in
Vulkan shaders

How to use AWS Secrets Manager and ABAC for enhanced secrets management in Amazon EKS

Post Syndicated from Nima Fotouhi original https://aws.amazon.com/blogs/security/how-to-use-aws-secrets-manager-and-abac-for-enhanced-secrets-management-in-amazon-eks/

In this post, we show you how to apply attribute-based access control (ABAC) while you store and manage your Amazon Elastic Kubernetes Services (Amazon EKS) workload secrets in AWS Secrets Manager, and then retrieve them by integrating Secrets Manager with Amazon EKS using External Secrets Operator to define more fine-grained and dynamic AWS Identity and Access Management (IAM) permission policies for accessing secrets.

It’s common to manage numerous workloads in an EKS cluster, each necessitating access to a distinct set of secrets. You can verify adherence to the principle of least privilege by creating separate permission policies for each workload to restrict their access. To scale and reduce overhead, Amazon Web Services (AWS) recommends using ABAC to manage workloads’ access to secrets. ABAC helps reduce the number of permission policies needed to scale with your environment.

What is ABAC?

In IAM, a traditional authorization approach is known as role-based access control (RBAC). RBAC sets permissions based on a person’s job function, commonly known as IAM roles. To enforce RBAC in IAM, distinct policies for various job roles are created. As a best practice, only the minimum permissions required for a specific role are granted (principle of least privilege), which is achieved by specifying the resources that the role can access. A limitation of the RBAC model is its lack of flexibility. Whenever new resources are introduced, you must modify policies to permit access to the newly added resources.

Attribute-based access control (ABAC) is an approach to authorization that assigns permissions in accordance with attributes, which in the context of AWS are referred to as tags. You create and add tags to your IAM resources. You then create and configure ABAC policies to permit operations requested by a principal when there’s a match between the tags of the principal and the resource. When a principal uses temporary credentials to make a request, its associated tags come from session tags, incoming transitive sessions tags, and IAM tags. The principal’s IAM tags are persistent, but session tags, and incoming transitive session tags are temporary and set when the principal assumes an IAM role. Note that AWS tags are attached to AWS resources, whereas session tags are only valid for the current session and expire with the session.

How External Secrets Operator works

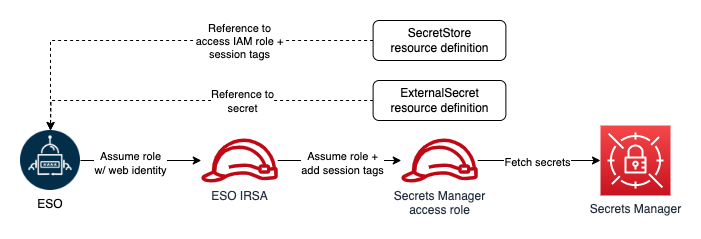
External Secrets Operator (ESO) is a Kubernetes operator that integrates external secret management systems including Secrets Manager with Kubernetes. ESO provides Kubernetes custom resources to extend Kubernetes and integrate it with Secrets Manager. It fetches secrets and makes them available to other Kubernetes resources by creating Kubernetes Secrets. At a basic level, you need to create an ESO SecretStore resource and one or more ESO ExternalSecret resources. The SecretStore resource specifies how to access the external secret management system (Secrets Manager) and allows you to define ABAC related properties (for example, session tags and transitive tags).

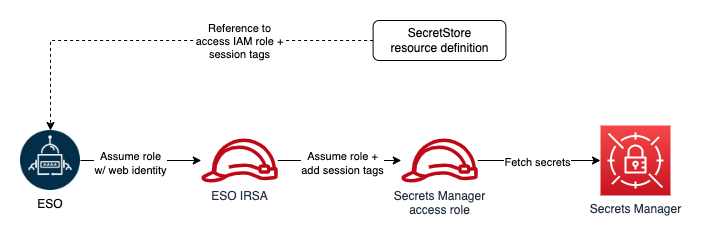
You declare what data (secret) to fetch and how the data should be transformed and saved as a Kubernetes Secret in the ExternalSecret resource. The following figure shows an overview of the process for creating Kubernetes Secrets. Later in this post, we review the steps in more detail.

Figure 1: ESO process

Figure 1: ESO process

How to use ESO for ABAC

Before creating any ESO resources, you must make sure that the operator has sufficient permissions to access Secrets Manager. ESO offers multiple ways to authenticate to AWS. For the purpose of this solution, you will use the controller’s pod identity. To implement this method, you configure the ESO service account to assume an IAM role for service accounts (IRSA), which is used by ESO to make requests to AWS.

To adhere to the principle of least privilege and verify that each Kubernetes workload can access only its designated secrets, you will use ABAC policies. As we mentioned, tags are the attributes used for ABAC in the context of AWS. For example, principal and secret tags can be compared to create ABAC policies to deny or allow access to secrets. Secret tags are static tags assigned to secrets symbolizing the workload consuming the secret. On the other hand, principal (requester) tags are dynamically modified, incorporating workload specific tags. The only viable option to dynamically modifying principal tags is to use session tags and incoming transitive session tags. However, as of this writing, there is no way to add session and transitive tags when assuming an IRSA. The workaround for this issue is role chaining and passing session tags when assuming downstream roles. ESO offers role chaining, meaning that you can refer to one or more IAM roles with access to Secrets Manager in the SecretStore resource definition, and ESO will chain them with its IRSA to access secrets. It also allows you to define session tags and transitive tags to be passed when ESO assumes the IAM roles with its primary IRSA. The ability to pass session tags allows you to implement ABAC and compare principal tags (including session tags) with secret tags every time ESO sends a request to Secrets Manager to fetch a secret. The following figure shows ESO authentication process with role chaining in one Kubernetes namespace.

Figure 2: ESO AWS authentication process with role chaining (single namespace)

Figure 2: ESO AWS authentication process with role chaining (single namespace)

Architecture overview

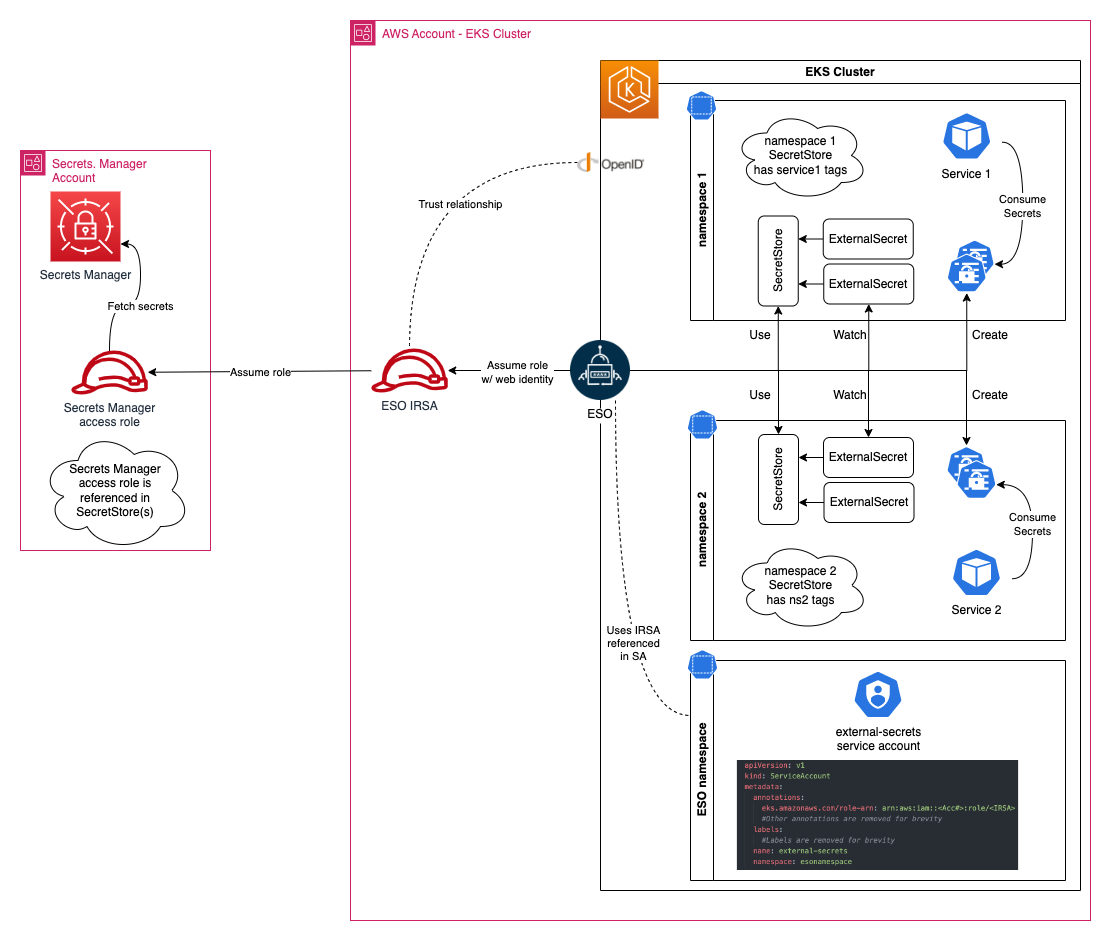
Let’s review implementing ABAC with a real-world example. When you have multiple workloads and services in your Amazon EKS cluster, each service is deployed in its own unique namespace, and service secrets are stored in Secrets Manager and tagged with a service name (key=service, value=service name). The following figure shows the required resources to implement ABAC with EKS and Secrets Manager.

Figure 3: Amazon EKS secrets management with ABAC

Figure 3: Amazon EKS secrets management with ABAC

Prerequisites

Deploy the solution

Begin by installing ESO:

  1. From a terminal where you usually run your helm commands, run the following helm command to add an ESO helm repository.
    helm repo add external-secrets https://charts.external-secrets.io
    

  2. Install ESO using the following helm command in a terminal that has access to your target Amazon EKS cluster:
    helm install external-secrets \
       external-secrets/external-secrets \
        -n external-secrets \
        --create-namespace \
       --set installCRDs=true 
    

  3. To verify ESO installation, run the following command. Make sure you pass the same namespace as the one you used when installing ESO:
    kubectl get pods -n external-secrets
    

See the ESO Getting started documentation page for more information on other installation methods, installation options, and how to uninstall ESO.

Create an IAM role to access Secrets Manager secrets

You must create an IAM role with access to Secrets Manager secrets. Start by creating a customer managed policy to attach to your role. Your policy should allow reading secrets from Secrets Manager. The following example shows a policy that you can create for your role:

{
	"Version": "2012-10-17",
	"Statement": [
		{
			"Effect": "Allow",k
			"Action": [
				"kms:ListKeys",
				"kms:ListAliases",
				"secretsmanager:ListSecrets"
			],
			"Resource": "*"
		},
		{
			"Effect": "Allow",
			"Action": [
				"kms:Decrypt",
				"kms:DescribeKey"
			],
			"Resource": <KMS Key ARN>
		},
		{
			"Effect": "Allow",
			"Action": [ 
				"secretsmanager:GetSecretValue",
				"secretsmanager:DescribeSecret",
				"secretsmanager:ListSecretVersionIds"
			],
			"Resource": "*",
			"Condition": {
				"StringEquals": {
					"secretsmanager:ResourceTag/ekssecret": "${aws:PrincipalTag/ekssecret}"
				}
			}
		}
	]
}

Consider the following in this policy:

  • Secrets Manager uses an AWS managed key for Secrets Manager by default to encrypt your secrets. It’s recommended to specify another encryption key during secret creation and have separate keys for separate workloads. Modify the resource element of the second policy statement and replace <KMS Key ARN> with the KMS key ARNs used to encrypt your secrets. If you use the default key to encrypt your secrets, you can remove this statement.
  • The policy statement conditionally allows access to all secrets. The condition element permits access only when the value of the principal tag, identified by the key service, matches the value of the secret tag with the same key. You can include multiple conditions (in separate statements) to match multiple tags.

After you create your policy, follow the guide for Creating IAM roles to create your role, attaching the policy you created. Use the default value for your role’s trust relationship for now, you will update the trust relationship in the next step. Note the role’s ARN after creation.

Create an IAM role for the ESO service account

Use eksctl to create the IAM role for the ESO service account (IRSA). Before creating the role, you must create an IAM policy. ESO IRSA only needs permission to assume the Secrets Manager access role that you created in the previous step.

  1. Use the following example of an IAM policy that you can create. Replace <Secrets Manager Access Role ARN> with the ARN of the role you created in the previous step and follow creating a customer managed policy to create the policy. After creating the policy, note the policy ARN.
    {
        "Version": "2012-10-17",
        "Statement": [
            {
                "Effect": "Allow",
                "Action": [
                    "sts:AssumeRole",
                    "sts:TagSession"
                ],
                "Resource": "<Secrets Manager Access Role ARN>"
            }
        ]
    }
    

  2. Next, run the following command to get the account name of the ESO service. You will see a list of service accounts, pick the one that has the same name as your helm release, in this example, the service account is external-secrets.
    kubectl get serviceaccounts -n external-secrets
    

  3. Next, create an IRSA and configure an ESO service account to assume the role. Run the following command to create a new role and associate it with the ESO service account. Replace the variables in brackets (<example>) with your specific information:
    eksctl create iamserviceaccount --name <ESO service account> \
    --namespace <ESO namespace> --cluster <cluster name> \
    --role-name <IRSA name> --override-existing-serviceaccounts \
    --attach-policy-arn <policy arn you created earlier> --approve
    

    You can validate the operation by following the steps listed in Configuring a Kubernetes service account to assume an IAM role. Note that you had to pass the ‑‑override-existing-serviceaccounts argument because the ESO service account was already created.

  4. After you’ve validated the operation, run the following command to retrieve the IRSA ARN (replace <IRSA name> with the name you used in the previous step):
    aws iam get-role --role-name <IRSA name> --query Role.Arn
    

  5. Modify the trust relationship of the role you created previously and limit it to your newly created IRSA. The following should resemble your trust relationship. Replace <IRSA Arn> with the IRSA ARN returned in the previous step:
    {
        "Version": "2012-10-17",
        "Statement": [
            {
                "Effect": "Allow",
                "Principal": {
                    "AWS": "arn:aws:iam::<AWS ACCOUNT ID>:root"
                },
                "Action": "sts:AssumeRole",
                "Condition": {
                    "ArnEquals": {
                        "aws:PrincipalArn": "<IRSA Arn>"
                    }
                }
            },
            {
                "Effect": "Allow",
                "Principal": {
                    "AWS": "<IRSA Arn>"
                },
                "Action": "sts:TagSession",
                "Condition": {
                    "StringLike": {
                        "aws:RequestTag/ekssecret": "*"
                    }
                }
            }
        ]
    }
    

Note that you will be using session tags to implement ABAC. When using session tags, trust policies for all roles connected to the identity provider (IdP) passing the tags must have the sts:TagSession permission. For roles without this permission in the trust policy, the AssumeRole operation fails.

Moreover, the condition block of the second statement limits ESO’s ability to pass session tags with the key name ekssecret. We’re using this condition to verify that the ESO role can only create session tags used for accessing secrets manager, and doesn’t gain the ability to set principal tags that might be used for any other purpose. This way, you’re creating a namespace to help prevent further privilege escalations or escapes.

Create secrets in Secrets Manager

You can create two secrets in Secrets Manager and tag them.

  1. Follow the steps in Create an AWS Secrets Manager secret to create two secrets named service1_secret and service2_secret. Add the following tags to your secrets:
    • service1_secret:
      • key=ekssecret, value=service1
    • service2_secret:
      • key=ekssecret, value=service2
  2. Run the following command to verify both secrets are created and tagged properly:
    aws secretsmanager list-secrets --query 'SecretList[*].{Name:Name, Tags:Tags}'
    

Create ESO objects in your cluster

  1. Create two namespaces in your cluster:
    ❯ kubectl create ns service1-ns
    ❯ kubectl create ns service2-ns
    

Assume that service1-ns hosts service1 and service2-ns hosts service2. After creating the namespaces for your services, verify that each service is restricted to accessing secrets that are tagged with a specific key-value pair. In this example the key should be ekssecret and the value should match the name of the corresponding service. This means that service1 should only have access to service1_secret, while service2 should only have access to service2_secret. Next, declare session tags in SecretStore object definitions.

  1. Edit the following command snippet using the text editor of your choice and replace every instance of <Secrets Manager Access Role ARN> with the ARN of the IAM role you created earlier to access Secrets Manager secrets. Copy and paste the edited command in your terminal and run it to create a .yaml file in your working directory that contains the SecretStore definitions. Make sure to change the AWS Region to reflect the Region of your Secrets Manager.
    cat > secretstore.yml <<EOF
    apiVersion: external-secrets.io/v1beta1
    kind: SecretStore
    metadata:
      name: aws-secretsmanager
      namespace: service1-ns
    spec:
      provider:
        aws:
          service: SecretsManager
          role: <Secrets Manager Access Role ARN>
          region: us-west-2
          sessionTags:
            - key: ekssecret
              value: service1
    ---
    apiVersion: external-secrets.io/v1beta1
    kind: SecretStore
    metadata:
      name: aws-secretsmanager
      namespace: service2-ns
    spec:
      provider:
        aws:
          service: SecretsManager
          role: <Secrets Manager Access Role ARN>
          region: us-west-2
          sessionTags:
            - key: ekssecret
              value: service2
    EOF
    

  2. Create SecretStore objects by running the following command:
    kubectl apply -f secretstore.yml
    

  3. Validate object creation by running the following command:
    kubectl describe secretstores.external-secrets.io -A
    

  4. Check the status and events section for each object and make sure the store is validated.
  5. Next, create two ExternalSecret objects requesting service1_secret and service2_secret. Copy and paste the following command in your terminal and run it. The command will create a .yaml file in your working directory that contains ExternalSecret definitions.
    cat > exrternalsecret.yml <<EOF
    apiVersion: external-secrets.io/v1beta1
    kind: ExternalSecret
    metadata:
      name: service1-es1
      namespace: service1-ns
    spec:
      refreshInterval: 1h
      secretStoreRef:
        name: aws-secretsmanager
        kind: SecretStore
      target:
        name: service1-ns-secret1
        creationPolicy: Owner
      data:
      - secretKey: service1_secret
        remoteRef:
          key: "service1_secret"
    ---
    apiVersion: external-secrets.io/v1beta1
    kind: ExternalSecret
    metadata:
      name: service2-es2
      namespace: service2-ns
    spec:
      refreshInterval: 1h
      secretStoreRef:
        name: aws-secretsmanager
        kind: SecretStore
      target:
        name: service1-ns-secret2
        creationPolicy: Owner
      data:
      - secretKey: service2_secret
        remoteRef:
          key: "service2_secret"
    EOF
    

  6. Run the following command to create objects:
    kubectl apply -f exrternalsecret.yml
    

  7. Verify the objects are created by running following command:
    kubectl get externalsecrets.external-secrets.io -A
    

  8. Each ExternalSecret object should create a Kubernetes secret in the same namespace it was created in. Kubernetes secrets are accessible to services in the same namespace. To demonstrate that both Service A and Service B has access to their secrets, run the following command.
    kubectl get secrets -A
    

You should see service1-ns-secret1 created in service1-ns namespace which is accessible to Service 1, and service1-ns-secret2 created in service2-ns which is accessible to Service2.

Try creating an ExternalSecrets object in service1-ns referencing service2_secret. Notice that your object shows SecretSyncedError status. This is the expected behavior, because ESO passes different session tags for ExternalSecret objects in each namespace, and when the tag where key is ekssecret doesn’t match the secret tag with the same key, the request will be rejected.

What about AWS Secrets and Configuration Provider (ASCP)?

Amazon offers a capability called AWS Secrets and Configuration Provider (ASCP), which allows applications to consume secrets directly from external stores, including Secrets Manager, without modifying the application code. ASCP is actively maintained by AWS, which makes sure that it remains up to date and aligned with the latest features introduced in Secrets Manager. See How to use AWS Secrets & Configuration Provider with your Kubernetes Secrets Store CSI driver to learn more about how to use ASCP to retrieve secrets from Secrets Manager.

Today, customers who use AWS Fargate with Amazon EKS can’t use the ASCP method due to the incompatibility of daemonsets on Fargate. Kubernetes also doesn’t provide a mechanism to add specific claims to JSON web tokens (JWT) used to assume IAM roles. Today, when using ASCP in Kubernetes, which assumes IAM roles through IAM roles for service accounts (IRSA), there’s a constraint in appending session tags during the IRSA assumption due to JWT claim restrictions, limiting the ability to implement ABAC.

With ESO, you can create Kubernetes Secrets and have your pods retrieve secrets from them instead of directly mounting secrets as volumes in your pods. ESO is also capable of using its controller pod’s IRSA to retrieve secrets, so you don’t need to set up IRSA for each pod. You can also role chain and specify secondary roles to be assumed by ESO IRSA and pass session tags to be used with ABAC policies. ESO’s role chaining and ABAC capabilities help decrease the number of IAM roles required for secrets retrieval. See Leverage AWS secrets stores from EKS Fargate with External Secrets Operator on the AWS Containers blog to learn how to use ESO on an EKS Fargate cluster to consume secrets stored in Secrets Manager.

Conclusion

In this blog post, we walked you through how to implement ABAC with Amazon EKS and Secrets Manager using External Secrets Operator. Implementing ABAC allows you to create a single IAM role for accessing Secrets Manager secrets while implementing granular permissions. ABAC also decreases your team’s overhead and reduces the risk of misconfigurations. With ABAC, you require fewer policies and don’t need to update existing policies to allow access to new services and workloads.

If you have feedback about this post, submit comments in the Comments section below.

Nima Fotouhi

Nima Fotouhi

Nima is a Security Consultant at AWS. He’s a builder with a passion for infrastructure as code (IaC) and policy as code (PaC) and helps customers build secure infrastructure on AWS. In his spare time, he loves to hit the slopes and go snowboarding.

Sandeep Singh

Sandeep is a DevOps Consultant at AWS Professional Services. He focuses on helping customers in their journey to the cloud and within the cloud ecosystem by building performant, resilient, scalable, secure, and cost-efficient solutions.

Data-Driven Decisions With Snowflake and Backblaze B2

Post Syndicated from Pat Patterson original https://www.backblaze.com/blog/data-driven-decisions-wwith-snowflake-and-backblaze-b2/

A decorative image showing the Backblaze and Snowflake images superimposed over a cloud.

Since its launch in 2014 as a cloud-based data warehouse, Snowflake has evolved into a broad data-as-a-service platform addressing a wide variety of use cases, including artificial intelligence (AI), machine learning (ML), collaboration across organizations, and data lakes. Last year, Snowflake introduced support for S3 compatible cloud object stores, such as Backblaze B2 Cloud Storage. Now, Snowflake customers can access unstructured data such as images and videos, as well as structured and semi-structured data such as CSV, JSON, Parquet, and XML files, directly in the Snowflake Platform, served up from Backblaze B2.

Why access external data from Snowflake, when Snowflake is itself a data as a service (DaaS) platform with a cloud-based relational database at its core? To put it simply, not all data belongs in Snowflake. Organizations use cloud object storage solutions such as Backblaze B2 as a cost-effective way to maintain both master and archive data, with multiple applications reading and writing that data. In this situation, Snowflake is just another consumer of the data. Besides, data storage in Snowflake is much more expensive than in Backblaze B2, raising the possibility of significant cost savings as a result of optimizing your data’s storage location.

Snowflake Basics

At Snowflake’s core is a cloud-based relational database. You can create tables, load data into them, and run SQL queries just as you can with a traditional on-premises database. Given Snowflake’s origin as a data warehouse, it is currently better suited to running analytical queries against large datasets than as an operational database serving a high volume of transactions, but Snowflake Unistore’s hybrid tables feature (currently in private preview) aims to bridge the gap between transactional and analytical workloads.

As a DaaS platform, Snowflake runs on your choice of public cloud—currently Amazon Web Services (AWS), Microsoft Azure, and Google Cloud Platform—but insulates you from the details of managing storage, compute, and networking infrastructure. Having said that, sometimes you need to step outside the Snowflake box to access data that you are managing in your own cloud object storage account. I’ll explain exactly how that works in this blog post, but, first, let’s take a quick look at how we classify data according to its degree of structure, as this can have a big impact on your decision of where to store it.

Structured and Semi-Structured Data

Structured data conforms to a rigid data model. Relational database tables are the most familiar example—a table’s schema describes required and optional fields and their data types, and it is not possible to insert rows into the table that contain additional fields not listed in the schema. Aside from relational databases, file formats such as Apache Parquet, Optimized Row Columnar (ORC), and Avro can all store structured data; each file format specifies a schema that fully describes the data stored within a file. Here’s an example of a schema for a Parquet file:

% parquet meta customer.parquet

File path:  /data/customer.parquet
...
Schema:
message hive_schema {
  required int64 custkey;
  required binary name (STRING);
  required binary address (STRING);
  required int64 nationkey;
  required binary phone (STRING);
  required int64 acctbal;
  optional binary mktsegment (STRING);
  optional binary comment (STRING);
}

Semi-structured data, as its name suggests, is more flexible. File formats such as CSV, XML and JSON need not use a formal schema, since they can be self-describing. That is, an application can infer the structure of the data as it reads the file, a mechanism often termed “schema-on-read.” 

This simple JSON example illustrates the principle. You can see how it’s possible for an application to build the schema of a product record as it reads the file:

{
  "products" : [
    {
      "name" : "Paper Shredder",
      "description" : "Crosscut shredder with auto-feed"
    },
    {
      "name" : "Stapler",
      "color" : "Red"
    },
    {
      "name" : "Sneakers",
      "size" : "11"
    }
  ]
}

Accessing Structured and Semi-Structured Data Stored in Backblaze B2 from Snowflake

You can access data located in cloud object storage external to Snowflake, such as Backblaze B2, by creating an external stage. The external stage is a Snowflake database object that holds a URL for the external location, as well as configuration (e.g., credentials) required to access the data. For example:

CREATE STAGE b2_stage
  URL = 's3compat://your-b2-bucket-name/'
  ENDPOINT = 's3.your-region.backblazeb2.com'
  REGION = 'your-region'
  CREDENTIALS = (
    AWS_KEY_ID = 'your-application-key-id'
    AWS_SECRET_KEY = 'your-application-key'
  );

You can create an external table to query data stored in an external stage as if the data were inside a table in Snowflake, specifying the table’s columns as well as filenames, file formats, and data partitioning. Just like the external stage, the external table is a database object, located in a Snowflake schema, that stores the metadata required to access data stored externally to Snowflake, rather than the data itself.

Every external table automatically contains a single VARIANT type column, named value, that can hold arbitrary collections of fields. An external table definition for semi-structured data needs no further column definitions, only metadata such as the location of the data. For example:

CREATE EXTERNAL TABLE product
  LOCATION = @b2_stage/data/
  FILE_FORMAT = (TYPE = JSON)
  AUTO_REFRESH = false;

When you query the external table, you can reference elements within the value column, like this:

SELECT value:name
  FROM product
  WHERE value:color = ‘Red’;
+------------+
| VALUE:NAME |
|------------|
| "Stapler"  |
+------------+

Since structured data has a more rigid layout, you must define table columns (technically, in Snowflake, these are referred to as “pseudocolumns”), corresponding to the fields in the data files, in terms of the value column. For example:

CREATE EXTERNAL TABLE customer (
    custkey number AS (value:custkey::number),
    name varchar AS (value:name::varchar),
    address varchar AS (value:address::varchar),
    nationkey number AS (value:nationkey::number),
    phone varchar AS (value:phone::varchar),
    acctbal number AS (value:acctbal::number),
    mktsegment varchar AS (value:mktsegment::varchar),
    comment varchar AS (value:comment::varchar)
  )
  LOCATION = @b2_stage/data/
  FILE_FORMAT = (TYPE = PARQUET)
  AUTO_REFRESH = false;

Once you’ve created the external table, you can write SQL statements to query the data stored externally, just as if it were inside a table in Snowflake:

SELECT phone
  FROM customer
  WHERE name = ‘Acme, Inc.’;
+----------------+
| PHONE          |
|----------------|
| "111-222-3333" |
+----------------+

The Backblaze B2 documentation includes a pair of technical articles that go further into the details, describing how to export data from Snowflake to an external table stored in Backblaze B2, and how to create an external table definition for existing structured data stored in Backblaze B2.

Accessing Unstructured Data Stored in Backblaze B2 from Snowflake

The term “unstructured”, in this context, refers to data such as images, audio, and video, that cannot be defined in terms of a data model. You still need to create an external stage to access unstructured data located outside of Snowflake, but, rather than creating external tables and writing SQL queries, you typically access unstructured data from custom code running in Snowflake’s Snowpark environment.

Here’s an excerpt from a Snowflake user-defined function, written in Python, that loads an image file from an external stage:

from snowflake.snowpark.files import SnowflakeFile

# The file_path argument is a scoped Snowflake file URL to a file in the 
# external stage, created with the BUILD_SCOPED_FILE_URL function. 
# It has the form
# https://abc12345.snowflakecomputing.com/api/files/01b1690e-0001-f66c-...
def generate_image_label(file_path):

  # Read the image file 
  with SnowflakeFile.open(file_path, 'rb') as f:
    image_bytes = f.readall()

  ...

In this example, the user-defined function reads an image file from an external stage, then runs an ML model on the image data to generate a label for the image according to its content. A Snowflake task using this user-defined function can insert rows into a table of image names and labels as image files are uploaded into a Backblaze B2 Bucket. You can learn more about this use case in particular, and loading unstructured data from Backblaze B2 into Snowflake in general, from the Backblaze Tech Day ‘23 session that I co-presented with Snowflake Product Manager Saurin Shah:

Choices, Choices: Where Should I Store My Data?

Given that, currently, Snowflake charges at least $23/TB/month for data storage on its platform compared to Backblaze B2 at $6/TB/month, it might seem tempting to move your data wholesale from Snowflake to Backblaze B2 and create external tables to replace tables currently residing in Snowflake. There are, however, a couple of caveats to mention: performance and egress costs.

The same query on the same dataset will run much more quickly against tables inside Snowflake than the corresponding external tables. A comprehensive analysis of performance and best practices for Snowflake external tables is a whole other blog post, but, as an example, one of my queries that completes in 30 seconds against a table in Snowflake takes three minutes to run against the same data in an external table.

Similarly, when you query an external table located in Backblaze B2, Snowflake must download data across the internet. Data formats such as Parquet can make this very efficient, organizing data column-wise and compressing it to minimize the amount of data that must be transferred. But, some amount of data still has to be moved from Backblaze B2 to Snowflake. Downloading data from Backblaze B2 is free of charge for up to 3x your average monthly data footprint, then $0.01/GB for additional egress, so there is a trade-off between data storage cost and data transfer costs for frequently-accessed data.

Some data naturally lives on one platform or the other. Frequently-accessed tables should probably be located in Snowflake. Media files, that might only ever need to be downloaded once to be processed by code running in Snowpark, belong in Backblaze B2. The gray area is large datasets that will only be accessed a few times a month, where the performance disparity is not an issue, and the amount of data transferred might fit into Backblaze B2’s free egress allowance. By understanding how you access your data, and doing some math, you’re better able to choose the right cloud storage tool for your specific tasks.

The post Data-Driven Decisions With Snowflake and Backblaze B2 appeared first on Backblaze Blog | Cloud Storage & Cloud Backup.

Amazon OpenSearch Service search enhancements: 2023 roundup

Post Syndicated from Dagney Braun original https://aws.amazon.com/blogs/big-data/amazon-opensearch-service-search-enhancements-2023-roundup/

What users expect from search engines has evolved over the years. Just returning lexically relevant results quickly is no longer enough for most users. Now users seek methods that allow them to get even more relevant results through semantic understanding or even search through image visual similarities instead of textual search of metadata. Amazon OpenSearch Service includes many features that allow you to enhance your search experience. We are excited about the OpenSearch Service features and enhancements we’ve added to that toolkit in 2023.

2023 was a year of rapid innovation within the artificial intelligence (AI) and machine learning (ML) space, and search has been a significant beneficiary of that progress. Throughout 2023, Amazon OpenSearch Service invested in enabling search teams to use the latest AI/ML technologies to improve and augment your existing search experiences, without having to rewrite your applications or build bespoke orchestrations, resulting in unlocking rapid development, iteration, and productization. These investments include the introduction of new search methods as well as functionality to simplify implementation of the methods available, which we review in this post.

Background: Lexical and semantic search

Before we get started, let’s review lexical and semantic search.

Lexical search

In lexical search, the search engine compares the words in the search query to the words in the documents, matching word for word. Only items that have words the user typed match the query. Traditional lexical search, based on term frequency models like BM25, is widely used and effective for many search applications. However, lexical search techniques struggle to go beyond the words included in the user’s query, resulting in highly relevant potential results not always being returned.

Semantic search

In semantic search, the search engine uses an ML model to encode text or other media (such as images and videos) from the source documents as a dense vector in a high-dimensional vector space. This is also called embedding the text into the vector space. It similarly codes the query as a vector and then uses a distance metric to find nearby vectors in the multi-dimensional space to find matches. The algorithm for finding nearby vectors is called k-nearest neighbors (k-NN). Semantic search doesn’t match individual query terms—it finds documents whose vector embedding is near the query’s embedding in the vector space and therefore semantically similar to the query. This allows you to return highly relevant items even if they don’t contain any of the words that were in the query.

OpenSearch has provided vector similarity search (k-NN and approximate k-NN) for several years, which has been valuable for customers who adopted it. However, not all customers who have the opportunity to benefit from k-NN have adopted it, due to the significant engineering effort and resources required to do so.

2023 releases: Fundamentals

In 2023 several features and improvements were launched on OpenSearch Service, including new features which are fundamental building blocks for continued search enhancements.

The OpenSearch Compare Search Results tool

The Compare Search Results tool, generally available in OpenSearch Service version 2.11, allows you to compare search results from two ranking techniques side by side, in OpenSearch Dashboards, to determine whether one query produces better results than the other. For customers who are interested in experimenting with the latest search methods powered by ML-assisted models, the ability to compare search results is critical. This can include comparing lexical search, semantic search, and hybrid search techniques to understand the benefits of each technique against your corpus, or adjustments such as field weighting and different stemming or lemmatization strategies.

The following screenshot shows an example of using the Compare Search Results tool.


To learn more about semantic search and cross-modal search and experiment with a demo of the Compare Search Results tool, refer to Try semantic search with the Amazon OpenSearch Service vector engine.

Search pipelines

Search practitioners are looking to introduce new ways to enhance search queries as well as results. With the general availability of search pipelines, starting in OpenSearch Service version 2.9, you can build search query and result processing as a composition of modular processing steps, without complicating your application software. By integrating processors for functions such as filters, and with the ability to add a script to run on newly indexed documents, you can make your search applications more accurate and efficient and reduce the need for custom development.

Search pipelines incorporate three built-in processors: filter_query, rename_field, and script request, as well as new developer-focused APIs to enable developers who want to build their own processors to do so. OpenSearch will continue adding additional built-in processors to further expand on this functionality in the coming releases.

The following diagram illustrates the search pipelines architecture.

Byte-sized vectors in Lucene

Until now, the k-NN plugin in OpenSearch has supported indexing and querying vectors of type float, with each vector element occupying 4 bytes. This can be expensive in memory and storage, especially for large-scale use cases. With the new byte vector feature in OpenSearch Service version 2.9, you can reduce memory requirements by a factor of 4 and significantly reduce search latency, with minimal loss in quality (recall). To learn more, refer to Byte-quantized vectors in OpenSearch.

Support for new language analyzers

OpenSearch Service previously supported language analyzer plugins such as IK (Chinese), Kuromoji (Japanese), and Seunjeon (Korean), among several others. We added support for Nori (Korean), Sudachi (Japanese), Pinyin (Chinese), and STConvert Analysis (Chinese). These new plugins are available as a new package type, ZIP-PLUGIN, along with the previously supported TXT-DICTIONARY package type. You can navigate to the Packages page of the OpenSearch Service console to associate these plugins to your cluster, or use the AssociatePackage API.

2023 releases: Ease-of-use enhancements

The OpenSearch Service also made improvements in 2023 to enhance ease of use within key search features.

Semantic search with neural search

Previously, implementing semantic search meant that your application was responsible for the middleware to integrate text embedding models into search and ingest, orchestrating the encoding the corpus, and then using a k-NN search at query time.

OpenSearch Service introduced neural search in version 2.9, enabling builders to create and operationalize semantic search applications with significantly reduced undifferentiated heavy lifting. Your application no longer needs to deal with the vectorization of documents and queries; semantic search does that, and invokes k-NN during query time. Semantic search via the neural search feature transforms documents or other media into vector embeddings and indexes both the text and its vector embeddings in a vector index. When you use a neural query during search, neural search converts the query text into a vector embedding, uses vector search to compare the query and document embeddings, and returns the closest results. This functionality was initially released as experimental in OpenSearch Service version 2.4, and is now generally available with version 2.9.

AI/ML connectors to enable AI-powered search features

With OpenSearch Service 2.9, you can use out-of-the-box AI connectors to AWS AI and ML services and third-party alternatives to power features like neural search. For instance, you can connect to external ML models hosted on Amazon SageMaker, which provides comprehensive capabilities to manage models successfully in production. If you want to use the latest foundation models via a fully managed experience, you can use connectors for Amazon Bedrock to power use cases like multimodal search. Our initial release includes a connector to Cohere Embed, and through SageMaker and Amazon Bedrock, you have access to more third-party options. You can configure some of these integrations on your domains through the OpenSearch Service console integrations (see the following screenshot), and even automate model deployment to SageMaker.

Integrated models are cataloged in your OpenSearch Service domain, so that your team can discover the variety of models that are integrated and readily available for use. You even have the option to enable granular security controls on your model and connector resources to govern model and connector level access.

To foster an open ecosystem, we created a framework to empower partners to easily build and publish AI connectors. Technology providers can simply create a blueprint, which is a JSON document that describes secure RESTful communication between OpenSearch and your service. Technology partners can publish their connectors on our community site, and you can immediately use these AI connectors—whether for a self-managed cluster or on OpenSearch Service. You can find blueprints for each connector in the ML Commons GitHub repository.

Hybrid search supported by score combination

Semantic technologies such as vector embeddings for neural search and generative AI large language models (LLMs) for natural language processing have revolutionized search, reducing the need for manual synonym list management and fine-tuning. On the other hand, text-based (lexical) search outperforms semantic search in some important cases, such as part numbers or brand names. Hybrid search, the combination of the two methods, gives 14% higher search relevancy (as measured by NDCG@10—a measure of ranking quality) than BM25 alone, so customers want to use hybrid search to get the best of both. For more information about detailed benchmarking score accuracy and performance, refer to Improve search relevance with hybrid search, generally available in OpenSearch 2.10.

Until now, combining them has been challenging given the different relevancy scales for each method. Previously, to implement a hybrid approach, you had to run multiple queries independently, then normalize and combine scores outside of OpenSearch. With the launch of the new hybrid score combination and normalization query type in OpenSearch Service 2.11, OpenSearch handles score normalization and combination in one query, making hybrid search easier to implement and a more efficient way to improve search relevance.

New search methods

Lastly, OpenSearch Service now features new search methods.

Neural sparse retrieval

OpenSearch Service 2.11 introduced neural sparse search, a new kind of sparse embedding method that is similar in many ways to classic term-based indexing, but with low-frequency words and phrases better represented. Sparse semantic retrieval uses transformer models (such as BERT) to build information-rich embeddings that solve for the vocabulary mismatch problem in a scalable way, while having similar computational cost and latency to lexical search. This new sparse retrieval functionality with OpenSearch offers two modes with different advantages: a document-only mode and a bi-encoder mode. The document-only mode can deliver low-latency performance more comparable to BM25 search, with limitations for advanced syntax as compared to dense methods. The bi-encoder mode can maximize search relevance while performing at higher latencies. With this update, you can now choose the method that works best for your performance, accuracy, and cost requirements.

Multi-modal search

OpenSearch Service 2.11 introduces text and image multimodal search using neural search. This functionality allows you to search image and text pairs, like product catalog items (product image and description), based on visual and semantic similarity. This enables new search experiences that can deliver more relevant results. For instance, you can search for “white blouse” to retrieve products with images that match that description, even if the product title is “cream colored shirt.” The ML model that powers this experience is able to associate semantics and visual characteristics. You can also search by image to retrieve visually similar products or search by both text and image to find the products most similar to a particular product catalog item.

You can now build these capabilities into your application to connect directly to multimodal models and run multimodal search queries without having to build custom middleware. The Amazon Titan Multimodal Embeddings model can be integrated with OpenSearch Service to support this method. Refer to Multimodal search for guidance on how to get started with multimodal semantic search, and look out for more input types to be added in future releases. You can also try out the demo of cross-modal textual and image search, which shows searching for images using textual descriptions.

Summary

OpenSearch Service offers an array of different tools to build your search application, but the best implementation will depend on your corpus and your business needs and goals. We encourage search practitioners to begin testing the search methods available in order to find the right fit for your use case. In 2024 and beyond, you can expect to continue to see this fast pace of search innovation in order to keep the latest and greatest search technologies at the fingertips of OpenSearch search practitioners.


About the Authors

Dagney Braun is a Senior Manager of Product at Amazon Web Services OpenSearch Team. She is passionate about improving the ease of use of OpenSearch, and expanding the tools available to better support all customer use-cases.

Stavros Macrakis is a Senior Technical Product Manager on the OpenSearch project of Amazon Web Services. He is passionate about giving customers the tools to improve the quality of their search results.

Dylan Tong is a Senior Product Manager at Amazon Web Services. He leads the product initiatives for AI and machine learning (ML) on OpenSearch including OpenSearch’s vector database capabilities. Dylan has decades of experience working directly with customers and creating products and solutions in the database, analytics and AI/ML domain. Dylan holds a BSc and MEng degree in Computer Science from Cornell University.

The OpenWrt One project

Post Syndicated from corbet original https://lwn.net/Articles/957255/

OpenWrt developer John Crispin says:
“In 2024 the OpenWrt project turns 20 years! Let’s celebrate this
anniversary by launching our own first and fully upstream supported
hardware design.
” The rest of the message describes the proposed
OpenWrt-native network-routing system, based Banana Pi boards; the project is
being organized through the Software Freedom Conservancy. (Thanks to Dave
Täht).

Leemhuis: Regression tracking: state of the union early 2024

Post Syndicated from corbet original https://lwn.net/Articles/957252/

Thorsten Leemhuis writes
about his plans
for improving the kernel’s regression handling in the
coming year.

Top-priority will be “make regzbot more useful for kernel subsystem
maintainers” from now on. My tracking efforts of course will
continue, but everything except regressions in the current and the
previous mainline cycle might not see much attention from my
side. This refocusing also means that I won’t work much on
resolving some ambiguities around “how regressions are supposed to
be handled” which lead to tension quite a few times. But all that
should be for the best in the long term.

Building a generative AI Marketing Portal on AWS

Post Syndicated from Tristan Nguyen original https://aws.amazon.com/blogs/messaging-and-targeting/building-a-generative-ai-marketing-portal-on-aws/

Introduction

In the preceding entries of this series, we examined the transformative impact of Generative AI on marketing strategies in “Building Generative AI into Marketing Strategies: A Primer” and delved into the intricacies of Prompt Engineering to enhance the creation of marketing content with services such as Amazon Bedrock in “From Prompt Engineering to Auto Prompt Optimisation”. We also explored the potential of Large Language Models (LLMs) to refine prompts for more effective customer engagement.

Continuing this exploration, we will articulate how Amazon Bedrock, Amazon Personalize, and Amazon Pinpoint can be leveraged to construct a marketer portal that not only facilitates AI-driven content generation but also personalizes and distributes this content effectively. The aim is to provide a clear blueprint for deploying a system that crafts, personalizes, and distributes marketing content efficiently. This blog will guide you through the deployment process, underlining the real-world utility of these services in optimizing marketing workflows. Through use cases and a code demonstration, we’ll see these technologies in action, offering a hands-on perspective on enhancing your marketing pipeline with AI-driven solutions.

The Challenge with Content Generation in Marketing

Many companies struggle to streamline their marketing operations effectively, facing hurdles at various stages of the marketing operations pipeline. Below, we list the challenges at three main stages of the pipeline: content generation, content personalization, and content distribution.

Content Generation

Creating high-quality, engaging content is often easier said than done. Companies need to invest in skilled copywriters or content creators who understand not just the product but also the target audience. Even with the right talent, the process can be time-consuming and costly. Moreover, generating content at scale while maintaining quality and compliance to industry regulations is the key blocker for many companies considering adopting generative AI technologies in production environments.

Content Personalization

Once the content is created, the next hurdle is personalization. In today’s digital age, generic content rarely captures attention. Customers expect content tailored to their needs, preferences, and behaviors. However, personalizing content is not straightforward. It requires a deep understanding of customer data, which often resides in siloed databases, making it difficult to create a 360-degree view of the customer.

Content Distribution

Finally, even the most captivating, personalized content is ineffective if it doesn’t reach the right audience at the right time. Companies often grapple with choosing the appropriate channels for content distribution, be it email, social media, or mobile notifications. Additionally, ensuring that the content complies with various regulations and doesn’t end up in spam folders adds another layer of complexity to the distribution phase. Sending at scale requires paying attention to deliverability, security and reliability which often poses significant challenges to marketers.

By addressing these challenges, companies can significantly improve their marketing operations and empower their marketers to be more effective. But how can this be achieved efficiently and at scale? The answer lies in leveraging the power of Amazon Bedrock, Amazon Personalize, and Amazon Pinpoint, as we will explore in the following solution.

The Solution In Action

Before we dive into the details of the implementation, let’s take a look at the end result through the linked demo video.

Use Case 1: Banking/Financial Services Industry

You are a relationship manager working in the Consumer Banking department of a fictitious company called AnyCompany Bank. You are assigned a group of customers and would like to send out personalized and targeted communications to the channel of choice to every members of this group of customer.

Behind the scene, the marketer is utilizing Amazon Pinpoint to create the segment of customers they would like to target. The customers’ information and the marketer’s prompt are then fed into Amazon Bedrock to generate the marketing content, which is then sent to the customer via SMS and email using Amazon Pinpoint.

  • In the Prompt Iterator page, you can employ a process called “prompt engineering” to further optimize your prompt to maximize the effectiveness of your marketing campaigns. Please refer to this blog on the process behind engineering the prompt as well as how to apply an additional LLM model for auto-prompting. To get started, simply copy the sample banking prompt which has gone through the prompt engineering process in this page.
  • Next, you can either upload your customer group by uploading a .csv file (through “Importing a Segment”) or specify a customer group using pre-defined filter criteria based on your current customer database using Amazon Pinpoint.

UseCase1Segment

E.g.: The screenshot shows a sample filtered segment named ManagementOrRetired that only filters to customers who are management or retirees.

  • Once done, you can log into the marketer portal and choose the relevant segment that you’ve just created within the Amazon Pinpoint console.

PinpointSegment

  • You can then preview the customers and their information stored in your Amazon Pinpoint’s customer database. Once satisfied, we’re ready to start generating content for those customers!
  • Click on 1:1 Content Generator tab, your content is automatically generated for your first customer. Here, you can cycle through your customers one by one, and depending on the customer’s preferred language and channel, an email or SMS in the preferred language is automatically generated for them.
    • Generated SMS in English

PostiveSMS

    • A negative example showing proper prompt-engineering at work to moderate content. This happens if we try to insert data that does not make sense for the marketing content generator to output. In this case, the marketing generator refuses to output (justifiably) an advertisement for a 6-year-old on a secured instalment loan.

NegativeSMS

  • Finally, we choose to send the generated content via Amazon Pinpoint by clicking on “Send with Amazon Pinpoint”. In the back end, Amazon Pinpoint will orchestrate the sending of the email/SMS through the appropriate channels.
    • Alternatively, if the auto-generated content still did not meet your needs and you want to generate another draft, you can Disagree and try again.

Use Case 2: Travel & Hospitality

You are a marketing executive that’s working for an online air ticketing agency. You’ve been tasked to promote a specific flight from Singapore to Hong Kong for AnyCompany airline. You’d first like to identify which customers would be prime candidates to promote this flight leg to and then send out hyper-personalized message to them.

Behind the scene, instead of using Amazon Pinpoint to manually define the segment, the marketer in this case is leveraging AIML capabilities of Amazon Personalize to define the best group of customers to recommend the specific flight leg to them. Similar to the above use case, the customers’ information and LLM prompt are fed into the Amazon Bedrock, which generates the marketing content that is eventually sent out via Amazon Pinpoint.

  • Similar to the above use case, you’d need to go through a prompt engineering process to ensure that the content the LLM model is generating will be relevant and safe for use. To get started quickly, go to the Prompt Iterator page, you can use the sample airlines prompt and iterate from there.
  • Your company offers many different flight legs, aggregated from many different carriers. You first filter down to the flight leg that you want to promote using the Filters on the left. In this case, we are filtering for flights originating from Singapore (SRCCity) and going to Hong Kong (DSTCity), operated by AnyCompany Airlines.

PersonalizeInstructions

  • Now, let’s choose the number of customers that you’d like to generate. Once satisfied, you choose to start the batch segmentation job.
  • In the background, Amazon Personalize generates a group of customers that are most likely to be interested in this flight leg based on past interactions with similar flight itineraries.
  • Once the segmentation job is finished as shown, you can fetch the recommended group of customers and start generating content for them immediately, similar to the first use case.

Setup instructions

The setup instructions and deployment details can be found in the GitHub link.

Conclusion

In this blog, we’ve explored the transformative potential of integrating Amazon Bedrock, Amazon Personalize, and Amazon Pinpoint to address the common challenges in marketing operations. By automating the content generation with Amazon Bedrock, personalizing at scale with Amazon Personalize, and ensuring precise content distribution with Amazon Pinpoint, companies can not only streamline their marketing processes but also elevate the customer experience.

The benefits are clear: time-saving through automation, increased operational efficiency, and enhanced customer satisfaction through personalized engagement. This integrated solution empowers marketers to focus on strategy and creativity, leaving the heavy lifting to AWS’s robust AI and ML services.

For those ready to take the next step, we’ve provided a comprehensive guide and resources to implement this solution. By following the setup instructions and leveraging the provided prompts as a starting point, you can deploy this solution and begin customizing the marketer portal to your business’ needs.

Call to Action

Don’t let the challenges of content generation, personalization, and distribution hold back your marketing potential. Deploy the Generative AI Marketer Portal today, adapt it to your specific needs, and watch as your marketing operations transform. For a hands-on start and to see this solution in action, visit the GitHub repository for detailed setup instructions.

Have a question? Share your experiences or leave your questions in the comment section.

About the Authors

Tristan (Tri) Nguyen

Tristan (Tri) Nguyen

Tristan (Tri) Nguyen is an Amazon Pinpoint and Amazon Simple Email Service Specialist Solutions Architect at AWS. At work, he specializes in technical implementation of communications services in enterprise systems and architecture/solutions design. In his spare time, he enjoys chess, rock climbing, hiking and triathlon.

Philipp Kaindl

Philipp Kaindl

Philipp Kaindl is a Senior Artificial Intelligence and Machine Learning Solutions Architect at AWS. With a background in data science and
mechanical engineering his focus is on empowering customers to create lasting business impact with the help of AI. Outside of work, Philipp enjoys tinkering with 3D printers, sailing and hiking.

Bruno Giorgini

Bruno Giorgini

Bruno Giorgini is a Senior Solutions Architect specializing in Pinpoint and SES. With over two decades of experience in the IT industry, Bruno has been dedicated to assisting customers of all sizes in achieving their objectives. When he is not crafting innovative solutions for clients, Bruno enjoys spending quality time with his wife and son, exploring the scenic hiking trails around the SF Bay Area.

Shaw: Python 3.13 gets a JIT

Post Syndicated from corbet original https://lwn.net/Articles/957239/

Anthony Shaw describes
the new copy-and-patch JIT
that has been proposed for Python 3.13.

Copy-and-patch was selected because the compilation from bytecodes
to machine code is done as a set of “templates” that are then
stitched together and patched at runtime with the correct
values. This means that your average Python user isn’t running this
complex JIT compiler architecture inside their Python
runtime. Python writing it’s own IL and JIT would also be
unreasonable since so many are available off-the-shelf like LLVMs
and ryuJIT. But a full-JIT would require those being bundled with
Python and all the added overheads. A copy-and-patch JIT only
requires the LLVM JIT tools be installed on the machine where
CPython is compiled from source, and for most people that means the
machines of the CI that builds and packages CPython for python.org.

The collective thoughts of the interwebz