На 25 февруари, ден след като руската армия нахлу в Украйна, бившият министър-председател Кирил Петков се обърна към българския народ след извънредно заседание на Европейския съвет. В опита си да внесе яснота за изхода от конфликта Петков погрешно предрече, че съпротивата на Киев вероятно ще падне до дни. Междувременно само през първото денонощие от войната над 82 000 украинци вече търсеха спасение извън страната. А премиерът призова българите за гостоприемност в очакване на бежанската криза:
Това са европейци, интелигентни, образовани хора. Ние, както и всички други, сме готови да ги посрещнем. Това не е обичайната бежанска вълна от хора с неясно минало. Никоя от европейските страни не се притеснява от тях.
Вместо да стопли сърцата на българите, сравнението на Петков с мигрантите от Близкия изток му донесе обвинения в расизъм. И ако в първите седмици на войната страните от Централна и Източна Европа приветстваха бежанците с оптимизъм, то следващите месеци постепенно опровергаха втората неточна прогноза на Петков. Грижата за милионите новодошли предизвика разногласия между България и европейските ѝ партньори, а криворазбраната стратегия на четворната коалиция рязко промени публичния им образ. Някои украинци откриха кирка, забита в автомобила си, а други – бележка с обиди. През това време буря от фалшиви новини и дезинформация в социалните мрежи превърна търсещите закрила във врагове на обществото.
Митът за богатите украинци
Правителството на Петков отвърна на бежанската криза с програма за хуманитарна помощ в синхрон с Европейския съюз. Но подвеждащо изказване на тогавашната началничка на кабинета Лена Бориславова при представянето на мерките за социално подпомагане сложи началото на продължителна атака срещу властите. На брифинг през март Бориславова съобщи, че в рамките на три месеца на украински граждани ще се предоставя помощ „в размер на до 40 лв. на ден“. Тези средства не се раздаваха в брой на самите бежанци, а трябваше да осигурят тяхното изхранване и настаняване в хотели. Важната подробност обаче остана изгубена в превода. Журналисти се опитаха да поправят комуникационната грешка на правителството, но това не предотврати острата реакция на обществото.
За украинец – 1200 лв. на месец. За български пенсионер – 400 лв. Това заблуждаващо сравнение започна да очертава демоничния образ на разселените от войната. Бежанците наистина може да кандидатстват за помощ на стойност 375 лв., но тя е еднократна, и то на семейство, а не на човек. Публикации в интернет разпалиха несъществуващо противопоставяне между грижата за гражданите със статут на временна закрила и тази за бедните жители на България. Първата до голяма степен беше осигурена благодарение на средства от кохезионните фондове на ЕС, от които се възползваха и други европейски държави. Подкрепата за украинците не спира повишаването на пенсиите у нас.
В несъответствие с първоначалния си призив за съпричастност, в края на май самият премиер Петков подхрани вече популярния образ на твърде обгрижвания бежанец, като се обяви против „луксозното пребиваване в България“. Думите му дойдоха в защита на бившата вицепремиерка по ефективно управление Калина Константинова, която беше разкритикувана за назидателния тон в противоречивото си видеообръщение предишния ден. Впоследствие Константинова се извини на бежанците, но този епизод затвърди пропастта между търсещите убежище и част от българското население.
Застрашеното българско общество
Освен като неудобна тежест, украинските бежанци многократно бяха обрисувани и като заплаха за обществото. Миналата седмица новината за въоръжен грабеж от инкасо автомобил окупира заглавията в пресата. Извършителите са управлявали коли с украински регистрационни табели. Въпреки че табелите се оказаха фалшиви, инцидентът беше използван, за да подсили тезата, че у нас тайно влизат престъпници, прикрити като бежанци.
Наративът за опасните мигранти от Украйна започна да набира скорост още през април с публикации като зле направения, но доста споделян колаж на измислено оскверняване на Паметника на свободата на Шипка. Вандалският стереотип обаче не изглежда толкова популярен в България, колкото в други държави от Централна и Източна Европа. Мащабно разследване на украинската медия „Детектор“ разкрива, че в социалните мрежи на 11 страни бежанците най-често са обвинявани в корупция, неблагодарност и дестабилизиране на обществото.
През април полското издание за проверка на факти „Демагог“ публикува задълбочен анализ на основните типове дезинформация в Полша, Словакия, Унгария и Румъния. Тези държави са приели общо над 1,7 млн. бежанци. В анализа централно място заемат примери за фалшиви новини от Полша и Унгария за агресивни украинци, които нападат местното население и повишават нивата на насилие. Проучването на „Демагог“ показва, че източници на подобни слухове основно са анонимни потребители в Twitter, сайтове с псевдонаучно съдържание, крайнодесни политици или профили, имитиращи реални личности. Чрез тях в полското интернет пространство се разпространяват и разкази за предполагаеми случаи на кражби или изнасилвания, извършени от мигранти от Африка или Близкия изток, пресекли границата с Украйна. Междувременно украинският народ често е представян и като враждебен спрямо малцинства.
Според анализ на Factcheck.bg над един милион потребители в България вероятно са попаднали на неверни твърдения, че българите в Украйна са системно тормозени и дори убивани. Антимигрантската реторика обаче не се изчерпва със заплахата от насилие. Като продължение на дезинформационната вълна от времето на пандемията сред потребители във Facebook и в сайтове с неясна собственост се заговори за наплив от ХИВ-позитивни украински бежанци. Тази теория беше отречена от Factcheck.bg и БНР. Общественото радио изобличи и друго невярно твърдение в сферата на здравеопазването, а именно че Специализираната болница в Панчарево е спряла животоспасяващи рехабилитации, за да настани украинци.
Опасен чар
Атмосферата на безпокойство от бежанския наплив у нас беше подплатена и с митове за покваряващото влияние на неустоимата украинска красота. Седмици преди началото на летния сезон мрежата се напълни с предупреждения за млади разкрепостени украинки, които предлагат „масаж с освобождаване“ по Черноморието. Статията е публикувана в Lupa.bg и препечатана в други сайтове, търсещи сензация, като Bradva.bg и Skafeto.com. В нея няма нито един конкретен източник или легитимни данни. Анализ с платформата Crowdtangle показва, че над половин милион потребители във Facebook са попаднали на този текст.
Друг материал в сайта „Флагман“предупреждава, че „горещите украинки“ са подбили цените на българските еротични танцьорки в Слънчев бряг. Статията се позовава на разказ на анонимно „разгневено момиче от балет на водеща дискотека по морето“. Този текст също намира място и в други медии с подобен профил, като например сайта „Втори фронт“. Двете публикации са генерирали общо почти 10 000 реакции във Facebook. Страховете на българските жени пък бяха разпалени от статия на вестник „Стандарт“, че родните ергени са „пощурели по украинките“. Публикацията се позовава на „статистиката на сключените граждански бракове с украински граждани у нас от началото на войната“. В същото време цитираната статистика в самата статия не дава категорични доказателства в подкрепа на тази теория.
Разследване на киевската медия „Детектор“ показва, че стереотипът за украинските сексуални работнички също изобщо не се ограничава до България, а се превръща в основа на дезинформационни кампании в Централна и Източна Европа. Според изданието проруски източници се опитват да дискредитират украинските бежанки, като твърдят, че масово предават полови болести и се интересуват само от пари.
Кампания за очерняне на украински жени имаше и в Полша. В чат приложението Signal някои потребители получиха линк към статия, която предупреждава, че повечето бежанки са „в детеродна възраст“ и ще бъдат щастливи да получат „постоянен статут на полски съпруги“. Митът за крадящите мъже украинки беше подсилен от история за британец, напуснал семейството си заради млада жена, избягала от Лвов. Разказ на полски за тази афера предизвика хиляди реакции във Facebook.
В сянката на войната
Разнообразието от слухове и конспиративни теории за злите намерения на бежанците не спря множеството граждански инициативи за подкрепа на пострадалите от войната на Русия в Украйна. Доброволци съдействаха на търсещи закрила да намерят работа и събираха средства за медицинска помощ. Но съпричастността може да отстъпи на агресията в дългосрочен план под натиска на продължаващата война и вълната от дезинформация.
В по-широк план насаждането на омраза срещу украинските бежанци е още един инструмент за оправдаване на руската агресия и за влияние върху обществените нагласи в България спрямо инвазията на Владимир Путин в Украйна. Медии и публични фигури насърчават умишленото демонизиране на бежанците с цел да ограничат подкрепата за Киев, а предстоящият скъп отоплителен сезон допълнително подхранва опитите за характеризиране на украинските граждани като нацисти, терористи или неблагодарни гости. В ситуация на продължаваща политическа криза с неясен изход потърсилите убежище в България може да се окажат жертви не само на войната, но и на борбата за власт.
„Тоест“ е официален партньор за публикуването на материалите от поредицата „Хроники на инфодемията“, реализирана от АЕЖ-България съвместно с Фондация „Фридрих Науман“.
This year, 768 teams made up of 3086 young people from 23 countries sent us their ideas for experiments to run on board the International Space Station (ISS) for Astro Pi Mission Space Lab.
Mission Space Lab is part of the European Astro Pi Challenge, an ESA Education programme run in collaboration with us at the Raspberry Pi Foundation. Mission Space Lab teams can choose between ‘Life on Earth’ and ‘Life in space’ for their experiment idea. As in previous years, ‘Life on Earth’ was the most popular experiment theme: three quarters of the teams chose to submit an idea with this theme, for experiments using one of the Astro Pi’s High Quality Cameras. Half of these experiments involved using the near-infrared sensitive camera to investigate topics such as deforestation. Across both themes, over 40% of teams expressed an interest in using machine learning in their experiment.
Mission Space Lab teams are now getting ready to write and test their code
A panel of 25 judges from the Raspberry Pi Foundation and ESA Education assessed the submitted ideas. We are restricted in how many teams we can accommodate, as time to run experiments on board the ISS is limited, especially for ‘Life on Earth’ experiments which need time in a nadir window. The standard of the submitted ideas was higher than ever, making this the toughest judging yet. We are delighted to announce that 486 teams will move on to Phase 2 of Mission Space Lab: writing the code for their experiments.
A Mark II Astro Pi in the NODE window on the ISS. Credit: ESA/NASA
If your experiment idea was unsuccessful this time, we understand that this will be disappointing news for your team. We encourage them to submit a new experiment idea in next year’s Mission Space Lab. We will let you know when Mission Space Lab 23/24 will be launching.
All the teams whose experiment ideas we’ve selected will receive a special Astro Pi hardware kit, customised to their idea, to help them write and test the Python programs to execute their experiments. Once the teams of young people have received their kits, they can familiarise themselves with the Astro Pi hardware and then create and test (and re-test!) their programs.
Young people’s Mission Space Lab code will run in space next year
The deadline for Mission Space Lab teams to submit the code for their experiments to us is Thursday 24 February 2023. Once their program code has been through our rigorous checks and tests, it will be ready to run on the Astro Pis on board the ISS during April/May 2023.
The Mark I and Mark II Astro Pi computers on board the ISS earlier this year. Credit: ESA/NASA
Congratulations to the successful teams, and thank you to everyone who sent us their ideas for Mission Space Lab this year. And a special thank you to all the teachers, educators, club volunteers, and other wonderful people who are acting as mentors for Mission Space Lab teams. You are helping your young people do something remarkable that they will remember for the rest of their lives, and the Astro Pi Challenge would not happen without you.
Welcome back, Ed and Izzy!
Every year since 2015, thanks to our annual Astro Pi Challenge, teams of young people have written computer programs to run scientific experiments on two Astro Pi computers on the ISS.
Mark I Astro Pi computers Ed and Izzy back on Earth after five years on board the International Space Station. Credit: ESA
This is the second year that experiments will run on the Mark II Astro Pi computers, named after Nikola Tesla and Marie Curie, but lots of people have been wondering what would happen to their predecessors. After running over 50,000 young people’s computer programs, the Mark I Astro Pi computers, Ed and Izzy, have safely returned to Earth for a well-earned rest.
Young people can take part in Astro Pi Mission Zero
Astro Pi Mission Zero is a one-hour beginners’ programming activity. In Mission Zero, young people, in teams or as individuals, write a program to display an image or series of images of their own design on one of the Astro Pi computers, to remind the astronauts on the ISS of home.
ESA astronaut Samantha Cristoforetti with an Astro Pi computer. Credit: ESA/NASA
In their Mission Zero programs, young people get to use a reading from the Astro Pi’s colour and luminosity sensor to set the colour of their image background. Young people up to age 19 from eligible countries can take part in Mission Zero 2022/23 until 17 March. Visit the Astro Pi website for more details.
Cloudflare is raising prices for the first time in the last 12 years. Beginning January 15, 2023, new sign ups will be charged \$25 per month for our Pro Plan (up from \$20 per month) and \$250 per month for our Business Plan (up from \$200 per month). Any paying customers who sign up before January 15, 2023, including any currently paying customers who signed up at any point over the last 12 years, will be grandfathered at the old monthly price until May 14, 2023.
We are also introducing an option to pay annually, rather than monthly, that we hope most customers will choose to switch to. Annual plans are available today and discounted from the new monthly rate to \$240 per year for the Pro Plan (the equivalent of \$20 per month, saving \$60 per year) and \$2,400 per year for the Business Plan (the equivalent of \$200 per month, saving \$600 per year). In other words, if you choose to pay annually for Cloudflare you can lock in our old monthly prices.
After not raising prices in our history, this was something we thought carefully about before deciding to do. While we have over a decade of network expansion and innovation under our belts, what may not be intuitive is that our goal is not to increase revenue from this change. We need to invest up front in building out our network, and the main reason we’re making this change is to more closely map our business with the timing of our underlying costs. Doing so will enable us to further accelerate our network expansion and pace of innovation — which all of our customers will benefit from. Since this is a big change for us, I wanted to take the time to walk through how we came to this decision.
Cloudflare’s history
Cloudflare launched on September 27, 2010. At the time we had two plans: one Free Plan that was free, and a Pro Plan that cost $20 per month. Our network at the time consisted of “four and a half” data centers: Chicago, Illinois; Ashburn, Virginia; San Jose, California; Amsterdam, Netherlands; and Tokyo, Japan. The routing to Tokyo was so flaky that we’d turn it off for half the day to not mess up routing around the rest of the world. The biggest difference for the first couple years between our Free and Pro Plans was that only the latter included HTTPS support.
In June 2012, we introduced our Business Plan for $200 per month and our Enterprise Plan which was customized for our largest customers. By then we’d not only gotten Tokyo to work reliably but added 18 more data centers around the world for a total of 23. Our Business plan added DDoS mitigation as the primary benefit, something prior to then we’d been terrified to offer.
Our strategy has always been to roll features out, limit them at first to higher tiers of paying customers, but, over time, roll them down through our plans and eventually to even our Free Plan customers. We believe everyone should be fast, reliable, and secure online regardless of their budget. And we believe our continued success should be primarily driven by new innovation, not by milking old features for revenue.
And we’ve delivered on that promise, accelerating our roll out of new features across our platform and bundling them into our existing plans without increasing prices. What you get for our Free, Pro, and Business Plans today is orders of magnitude more valuable across every dimension — performance, reliability, and security — than those plans were when they launched.
And yet we know we are our customers’ infrastructure. You rely on us. And therefore we have been very reluctant to ever raise prices just to take price and capture more revenue.
Annual plans for even faster innovation
Early on, we only charged monthly because we were an unproven service we knew customers were taking a risk on. Today, that’s no longer the case. The majority of our customers have been using us for years and, from our conversations with them, plan to continue using us for the foreseeable future. In fact, one of the top requests we receive is from customers who want to pay once per year rather than getting billed every month.
While I’m proud of our pace of innovation, one of the challenges we have is managing the cash flow to fund those investments as quickly as we’d like. We invest up front in building out our network or developing a new feature, but then only get paid monthly by our customers. That, inherently, is a governor on our pace of innovation. We can invest even faster — hire more engineers, deploy more servers — if those customers who know they’re going to use us for the next year pay for us up front. We have no shortage of things we know customers want us to build, so by collecting revenue earlier we know we can unlock even faster innovation.
In other words, we are making this change hoping most of you won’t pay us anything more than you did before. Instead, our hope is that most of you will adopt our annual plans — you’ll get to lock in the existing pricing, and you’ll help us further accelerate our network growth and pace of innovation.
Finally, I wanted to mention that something isn’t changing: our Free Plan. It will still be free. It will still have all the features it has today. And we’re still committed to, over time, rolling many more features that are only available in paid plans today down to the Free Plan over time. Our mission is to help build a better Internet. We want to win by being the most innovative company in the world. And that means making our services available to as many people as possible, even those who can’t afford to pay us right now.
But, for those of you who can pay: thank you. You’ve funded our innovation to date. And I hope you’ll opt to switch to our annual billing, so we can further accelerate our network expansion and pace of innovation.
Today, we announced the preview of AWS Verified Access, a new secure connectivity service that allows enterprises to enable local or remote secure access for their corporate applications without requiring a VPN.
Traditionally, remote access to applications when on the road or working from home is granted by a VPN. Once the remote workforce is authenticated on the VPN, they have access to a broad range of applications depending on multiple policies defined in siloed systems, such as the VPN gateway, the firewalls, the identity provider, the enterprise device management solution, etc. These policies are typically managed by different teams, potentially creating overlaps, making it difficult to diagnose application access issues. Internal applications often rely on older authentication protocols, like Kerberos, that were built with the LAN in mind, instead of modern protocols, like OIDC, that are better tuned to modern enterprise patterns. Customers told us that policy updates can take months to roll out.
Verified Access is built using the AWS Zero Trust security principles. Zero Trust is a conceptual model and an associated set of mechanisms that focus on providing security controls around digital assets that do not solely or fundamentally depend on traditional network controls or network perimeters.
Verified Access improves your organization’s security posture by leveraging multiple security inputs to grant access to applications. It grants access to applications only when users and their devices meet the specified security requirements. Examples of inputs are the user identity and role or the device security posture, among others. Verified Access validates each application request, regardless of user or network, before granting access. Having each application access request evaluated allows Verified Access to adapt the security posture based on changing conditions. For example, if the device security signals that your device posture is out of compliance, then Verified Access will not allow you to access the application anymore.
In my opinion, there are three main benefits when adopting Verified Access:
It is easy to use for IT administrators. As an IT Administrator, you can now easily set up applications for secure remote access. It provides a single configuration point to manage and enforce a multisystem security policy to allow or deny access to your corporate applications.
It provides an open ecosystem that allows you to retain your existing identity provider and device management system. I listed all our partners at the end of this post.
It is easy to use for end users. This is my preferred one. Your workforce is not required to use a VPN client anymore. A simple browser plugin is enough to securely grant access when the user and the device are identified and verified. As of today, we support Chrome and Firefox web browsers. This is something about which I can share my personal experience. Amazon adopted a VPN-less strategy a few years ago. It’s been a relief for my colleagues and me to be able to access most of our internal web applications without having to start a VPN client and keep it connected all day long.
Let’s See It in Action I deployed a web server in a private VPC and exposed it to my end users through a private application load balancer (https://demo.seb.go-aws.com). I created a TLS certificate for the application external endpoint (secured.seb.go-aws.com). I also set up AWS Identity Center (successor of AWS SSO). In this demo, I will use it as a source for user identities. Now I am ready to expose this application to my remote workforce.
Creating a Verified Access endpoint is a four-step process. To get started, I navigate to the VPC page of the AWS Management Console. I first create the trust provider. A trust provider maintains and manages identity information for users and devices. When an application request is made, the identity information sent by the trust provider will be evaluated by Verified Access before allowing or denying the application request. I select Verified Access trust provider on the left-side navigation pane.
On the Create Verified Access trust provider page, I enter a Name and an optional Description. I enter the Policy reference name, an identifier that will be used when working with policy rules. I select the source of trust: User trust provider. For this demo, I select IAM Identity Center as the source of trust for user identities. Verified Access also works with other OpenID Connect-compliant providers. Finally, I select Create Verified Access trust provider.
I may repeat the operation when I have multiple trust providers. For example, I might have an identity-based trust provider to verify the identity of my end users and a device-based trust provider to verify the security posture of their devices.
I then create the Verified Identity instance. A Verified Access instance is a Regional AWS entity that evaluates application requests and grants access only when your security requirements are met.
On the Create Verified Access instance page, I enter a Name and an optional Description. I select the trust provider I just created. I can add additional trust provider types once the Verified Access instance is created.
Third, I create a Verified Access group.
A Verified Access group is a collection of applications that have similar security requirements. Each application within a Verified Access group shares a group-level policy. For example, you can group together all applications for “finance” users and use one common policy. This simplifies your policy management. You can use a single policy for a group of applications with similar access needs.
On the Create Verified Access group page, I enter a Name only. I will enter a policy at a later stage.
The fourth and last step before testing my setup is to create the endpoint.
A Verified Access endpoint is a regional resource that specifies the application that Verified Access will be providing access to. This is where your end users connect to. Each endpoint has its own DNS name and TLS certificate. After having evaluated incoming requests, the endpoint forwards authorized requests to your internal application, either an internal load balancer or a network interface. Verified Access supports network-level and application-level load balancers.
On the Create Verified Access endpoint page, I enter a Name and Description. I reference the Verified Access group that I just created.
In the Application details section, under Application domain, I enter the DNS name end users will use to access the application. For this demo, I use secured.seb.go-aws.com. Under Domain certificate ARN, I select a TLS certificate matching the DNS name. I created the certificate using AWS Certificate Manager.
On the Endpoint details section, I select VPC as Attachment type. I select one or multiple Security groups to attach to this endpoint. I enter awsnewsblog as Endpoint domain prefix. I select load balancer as Endpoint type. I select the Protocol (HTTP), then I enter the Port (80). I select the Load balancer ARN and the private Subnets where my load balancer is deployed.
Again, I leave the Policy details section empty. I will define a policy in the group instead. When I am done, I select Create Verified Access endpoint. It might take a few minutes to create.
Now it is time to grab a coffee and stretch my legs. When I return, I see the Verified Access endpoint is Active. I copy the Endpoint domain and add it as a CNAME record to my application DNS name (secured.seb.go-aws.com). I use Amazon Route 53 for this, but you can use your existing DNS server as well.
Then, I point my favorite browser to https://secured.seb.go-aws.com. The browser is redirected to IAM Identity Center (formerly AWS SSO). I enter the username and password of my test user. I am not adding a screenshot for this. After the redirection, I receive the error message : Unauthorized. This is expected because there is no policy defined on the Verified Access endpoint. It denies every request by default.
On the Verified Access groups page, I select the Policy tab. Then I select the Modify Verified Access endpoint policy button to create an access policy.
I enter a policy allowing anybody authenticated and having an email address ending with @amazon.com. This is the email address I used for the user defined in AWS Identity Center. Note that the name after context is the name I entered as Policy reference name when I created the Verified Access trust provider. The documentation page has the details of the policy syntax, the attributes, and the operators I can use.
permit(principal, action, resource)
when {
    context.awsnewsblog.user.email.address like "*@amazon.com"
};
After a few minutes, Verified Access updates the policy and becomes Active again. I force my browser to refresh, and I see the internal application now available to my authenticated user.
Pricing and Availability
AWS Verified Access is now available in preview in 10 AWS Regions: US East (Ohio, N. Virginia), US West (N. California, Oregon), Asia Pacific (Sydney), Canada (Central), Europe (Ireland, London, Paris), and South America (São Paulo).
As usual, pricing is based on your usage. There is no upfront or fixed price. We charge per application (Verified Access endpoint) per hour, with tiers depending on the number of applications. Prices start in US East (N. Virginia) Region at $0.27 per verified Access endpoint and per hour. This price goes down to $0.20 per endpoint per hour when you have more than 200 applications.
On top of this, there is a charge of $0.02 per GB for data processed by Verified Access. You also incur standard AWS data transfer charges for all data transferred using Verified Access.
This billing model makes it easy to start small and then grow at your own pace.
QuickSight Q is powered by machine learning (ML), providing self-service analytics by allowing you to query your data using plain language and therefore eliminating the need to fiddle with dashboards, controls, and calculations. With last year’s announcement of QuickSight Q, you can ask simple questions like “who had the highest sales in EMEA in 2021” and get your answers (with relevant visualizations like graphs, maps, or tables) in seconds.
Data used for analytics is often stored in a data warehouse like Amazon Redshift, and these unfortunately tend to be optimized for programmatic access via SQL rather than for natural language interaction. Furthermore, BI teams, understandably, tend to optimize data sources for consumption by dashboard authors, BI engineers, and other data teams, therefore using technical naming conventions that are optimized for dashboards (for example, “CUST_ID” instead of “Customer”) and SQL queries. These technical naming conventions are not intuitive to be used by business users. To solve this, BI teams spend hours manually translating technical names into commonly used business language names to prepare the data for natural language questions.
Today, I’m excited to announce automated data preparation for Amazon QuickSight Q. Automated data preparation utilizes machine learning to infer semantic information about data and adds it to datasets as metadata about the columns (fields), making it faster for you to prepare data in order to support natural language questions.
A Quick Overview of Topics in QuickSight Q Topics became available with the introduction of QuickSight Q. Topics are a collection of one or more datasets that represent a subject area that your business users can ask questions about. Looking at the example mentioned earlier (“who had the highest sales in EMEA in 2021”), one or more datasets (for example, a Sales/Regional Sales dataset) would be selected during the creation of this Topic.
As the author, once the Topic is created:
You would spend time selecting the most relevant columns from the dataset to add to the Topic (for example, excluding time_stamp, date_stamp columns, etc.). This can be challenging because without visibility to usage data of columns in dashboards and reports, you can find it hard to objectively decide which columns are most relevant to your business users to include in a Topic.
You would then spend hours reviewing the data and manually curating it to set configurations that are specific to natural language (for example, add “Area” as a synonym for the “Region” column).
Lastly, you would spend time formatting the data in order to ensure that it is more useful when presented.
QuickSight Q Topic
How Does Automated Data Preparation for Amazon QuickSight Q Work? Creating from Analysis: The new automated data preparation for Amazon QuickSight Q saves time by enabling the capability to create a Topic from analysis and therefore saving you the hours that you would spend doing all the translation by automatically choosing user-friendly names and synonyms based on ML-trained models that seek to find synonyms and common terms for the data field in question. Moreover, instead of you selecting the most relevant columns, automated data preparation for Amazon QuickSight Q automatically selects high-value columns based on how they are used in the analysis. It then binds the Topic to this existing analysis’ dataset and prepares an index of unique string values within the data to enable natural language search.
Automated Field Selection and Classification: I mentioned earlier that automated data preparation for Amazon QuickSight Q selects high value columns, but how does it know which columns are high-value? Automated data preparation for Amazon QuickSight Q automates column selection based on signals from existing QuickSight assets, such as reports or dashboards, to help you create a Topic that is relevant to your business users. In addition to selecting high-value fields from a dataset, automated data preparation for Amazon QuickSight Q also imports new calculated fields that the author has created in the analysis, thereby not requiring them to recreate these in a Topic.
Automated Language Settings: At the beginning of this article, I talked about technical naming conventions that are not intuitive for business users. Now, instead of you spending time translating these technical names, column names are automatically updated with friendly names and synonyms using common terms. Looking at our Sales dataset example, CUST_ID has been assigned a friendly name, “Customer”, and a number of synonyms. Synonyms will now be added automatically to columns (with the option to customize further) to support a wide vocabulary that may be relevant to your business users.
Friendly Names & Synonyms for Columns
Automated Metadata Settings: Automated data preparation for Amazon QuickSight Q detects Semantic Type of a column based on the column values and updates the corresponding configuration automatically. Formats for values will now be set to be used if a particular column is presented in the answer. These formats are derived from formats that you may have defined in an analysis.
Semantic Type Settings
Available Today Automated Data Preparation for Amazon QuickSight Q is available today in all AWS Regions where QuickSight Q is available. To learn more, visit the Amazon QuickSight Q page. Join the QuickSight Community to ask, answer, and learn with others in the QuickSight Community.
Modern applications are built using modular and distributed components. Each component is a service that implements its own subset of functionalities. To make these services communicate with each other, you need a way to let them discover where they are, authorize access, and route traffic. When troubleshooting issues, you need to keep communication configurations under control so that you can quickly understand what is happening at the application, service, and network levels. This can take a lot of your time.
Today, we are making available in preview Amazon VPC Lattice, a new capability of Amazon Virtual Private Cloud (Amazon VPC) that gives you a consistent way to connect, secure, and monitor communication between your services. With VPC Lattice, you can define policies for traffic management, network access, and monitoring so you can connect applications in a simple and consistent way across AWS compute services (instances, containers, and serverless functions). VPC Lattice automatically handles network connectivity between VPCs and accounts and network address translation between IPv4, IPv6, and overlapping IP addresses. VPC Lattice integrates with AWS Identity and Access Management (IAM) to give you the same authentication and authorization capabilities you are familiar with when interacting with AWS services today, but for your own service-to-service communication. With VPC Lattice, you have common controls to route traffic based on request characteristics and weighted routing for blue/green and canary-style deployments. For example, VPC Lattice allows you to mix and match compute types for a given service, which helps you modernize a monolith application architecture to microservices.
VPC Lattice is designed to be noninvasive, allowing teams across your organization to incrementally opt in over time. In this way, you are able to deliver applications faster by focusing on your application logic, while VPC Lattice handles service-to-service networking, security, and monitoring requirements.
How Amazon VPC Lattice Works With VPC Lattice, you create a logical application layer network, called a service network, that connects clients and services across different VPCs and accounts, abstracting network complexity. A service network is a logical boundary that is used to automatically implement service discovery and connectivity as well as apply access and observability policies to a collection of services. It offers inter-application connectivity over HTTP/HTTPS and gRPC protocols within a VPC.
Once a VPC has been enabled for a service network, clients in the VPC will automatically be able to discover the services in the service network through DNS and will direct all inter-application traffic through VPC Lattice. You can use AWS Resource Access Manager (RAM) to control which accounts, VPCs, and applications can establish communication via VPC Lattice.
A service is an independently deployable unit of software that delivers a specific task or function. In VPC Lattice, a service is a logical component that can live in any VPC or account and can run on a mixture of compute types (virtual machines, containers, and serverless functions). A service configuration consists of:
One or two listeners that define the port and protocol that the service is expecting traffic on. Supported protocols are HTTP/1.1, HTTP/2, and gRPC, including HTTPS for TLS-enabled services.
Listeners have rules that consist of a priority, which specifies the order in which rules should be processed, one or more conditions that define when to apply the rule, and actions that forward traffic to target groups. Each listener has a default rule that takes effect when no additional rules are configured, or no conditions are met.
A target group is a collection of targets, or compute resources, that are running a specific workload you are trying to route toward. Targets can be Amazon Elastic Compute Cloud (Amazon EC2) instances, IP addresses, and Lambda functions. For Kubernetes workloads, VPC Lattice can target services and pods via the AWS Gateway Controller for Kubernetes. To have access to the AWS Gateway Controller for Kubernetes, you can join the preview.
To configure service access controls, you can use access policies. An access policy is an IAM resource policy that can be associated with a service network and individual services. With access policies, you can use the “PARC” (principal, action, resource, and condition) model to enforce context-specific access controls for services. For example, you can use an access policy to define which services can access a service you own. If you use AWS Organizations, you can limit access to a service network to a specific organization.
VPC Lattice also provides a service directory, a centralized view of the services that you own or have been shared with you via AWS RAM.
Using Amazon VPC Lattice We expect people with different roles can use VPC Lattice. For example:
The service network administrator can:
Create and manage a service network.
Define access and monitoring for the service network.
Associate client and services.
Share the service network with other AWS accounts.
The service owner can:
Create and manage a service, including access and monitoring.
Define routing, for example, configuring listeners and rules that point to the target groups where the service is running.
Associate a service to service networks.
Let’s see how this works in practice. In this quick walkthrough, I am covering both roles.
Creating Two Backend Services There is nothing specific to VPC Lattice in this section. I am just creating a couple of services, one running on Amazon EC2 and one on AWS Lambda, that I’ll use later when I configure networking with VPC Lattice.
In an Amazon Linux EC2 instance, I create a web app that replies “Hello from the instance” to HTTP requests. To allow access to the instance from clients coming via VPC Lattice, I add an inbound rule to the security group to allow TCP traffic on port 8080 from the VPC Lattice AWS-managed prefix list.
Here’s the app.py file. I am using Python and Flask for this app, but you don’t need to know them to follow along with the post.
from flask import Flask

app = Flask(__name__)

@app.route('/')
def index():
  return 'Hello from the instance'

@app.route('/<path>')
def somePath(path):
  return 'Hello from the instance at path "{}"'.format(path)

app.run(host='0.0.0.0', port=8080)
Here’s the requirements.txt file with the Python dependencies. There’s only one line because the only module I need is flask:
flask
I install the dependencies:
pip3 install -r requirements.txt
Then, I start the web app using the nohup command to keep it running in case I log out of the instance:
nohup flask run --host=0.0.0.0 --port 8080 &
On the EC2 instance, the web service is now listening to HTTP traffic on port 8080.
In the Lambda console, I create a simple function using the Node.js 18.x runtime that replies “Hello from the function” to all invocations.
The two services are now both ready. Let’s use VPC Lattice to configure networking.
Creating VPC Lattice Target Groups I start by creating two target groups, one for the EC2 instance and one for the Lambda function. In the VPC console, there is a new VPC Lattice section in the navigation pane. There, I choose Target groups and then Create target group.
For the first target group, I choose the Instances target type and enter a name.
I choose the protocol (HTTP) and port (8080) used by the web app running on the instance. I select the VPC where the instance is running and the protocol version (HTTP1).
Now I can configure the health check that will be used to test the target status. In this case, I use the default values proposed by the console.
In the next step, I can register the targets. I select the instance on which the web app is running from the list and choose to include it.
I review the selected targets (one instance in this case) and choose Submit.
In a similar way, I create a target group for the Lambda function. This time, I select the function from the list. I can choose which function version or function alias to use. For simplicity, I use the $LATEST version.
Creating VPC Lattice Services Now that the target groups are ready, I choose Services in the navigation pane and then Create service. I enter a name and a description.
Now, I can choose the authentication type. If I choose None, the service network does not authenticate or authorize client access, and the auth policy, if present, is not used. I select AWS IAM and then, from the Apply policy template dropdown, the template that allows both authenticated and unauthenticated access.
In the next step, I define routing for the service. I choose Add listener. For the protocol, I configure the service to listen using HTTPS. In the default action, I choose to send two-thirds (Weight20) of the requests to the instance target group and one-third (Weight10) to the function target group.
Then, I add two additional rules. The first rule (Priority10) sends all requests where the path is /to-instance to the instance target group.
The second rule (Priority20) sends all traffic where the path is /to-function to the function target group.
In the next step, I am asked to associate the service with one or more service networks. I didn’t create a service network yet, so I skip this step for now and choose Next. I review the configuration and create the service.
Creating VPC Lattice Service Networks Now, I create the service network so that I can associate the service and the VPCs I want to use. I choose Service network from the navigation pane and then Create service network. I enter a name and a description for the service network.
In the Associate services, I select the service I just created.
In the VPC associations, I select the VPC used by the instance where the web app runs. This can help in the future because it allows the web app to call other services associated with the service network.
Then, I select a second VPC where I have another EC2 instance that I want to use to run some tests.
For simplicity, in the Access section, I select the None auth type.
In the Monitoring section, I choose to send the access logs for the whole service network to an S3 bucket.
I review the summary of the configuration and create the service network. After a few seconds all service and VPC associations are active, and I can start using the service.
I write down the domain name of the service from the list of service associations.
Testing Access to the Service Using VPC Lattice I look at the Routing tab of the service to find a nice recap of how the listener is handling routing towards the different target groups.
Then, I log into the EC2 instance in my second VPC and use curl to call the service domain name. As expected, I get about two-thirds of the responses from the instance and one-third from the function.
curl https://my-service-03e92ee54968d87ca.7d67968.vpc-lattice-svcs.us-west-2.on.aws
Hello from the instance

curl https://my-service-03e92ee54968d87ca.7d67968.vpc-lattice-svcs.us-west-2.on.aws
Hello from the instance

curl https://my-service-03e92ee54968d87ca.7d67968.vpc-lattice-svcs.us-west-2.on.aws
"Hello from the function"
When I call the /to-instance and /to-function paths, the additional rules forward the requests to the instance and the function, respectively.
curl https://my-service-03e92ee54968d87ca.7d67968.vpc-lattice-svcs.us-west-2.on.aws/to-instance
Hello from the instance "to-instance" path

curl https://my-service-03e92ee54968d87ca.7d67968.vpc-lattice-svcs.us-west-2.on.aws/to-function
"Hello from the function"
I can now review access to my service using the access log subscriptions I configured before.
For the service, I look in the CloudWatch Log group. There, I find a log stream containing detailed access information about the service.
The access log for all services associated with the service network is on the S3 bucket. I have only one service for now, but more are coming.
VPC Lattice provides deployment consistency across AWS compute types so that you can connect your services across instances, containers, and serverless functions. You can use VPC Lattice to apply granular and rich traffic controls, such as policy-based routing and weighted targets to support blue/green and canary-style deployments.
VPC Lattice allows monitoring and troubleshooting service-to-service communication with detailed access logs and metrics that capture request type, volume of traffic, error rates, response time, and more. In this blog post, I only scratched the surface of what you can do with VPC Lattice.
You can earn the digital badge by scoring at least 80 percent on the assessment associated with the Learning Plan. The badge proves your knowledge and skills for AWS Lambda, Amazon API Gateway, and designing serverless applications. You can celebrate your achievement on your resume, social media, and AWS re:Post with the verifiable badge distributed and managed by Credly. The badge includes metadata to verify the issuer and skills demonstrated by the holder. The Serverless Learning Plan and digital badge assessment are now available, for free.
Ready to get started or want to jump immediately to the assessment? Start here. Continue reading to learn more about the details of AWS Skill Builder and our Serverless Learning Plan.
The Serverless Learning Plan
Our Serverless Learning Plan has been designed to help you get started building with Serverless technology. AWS experts designed the content to provide a clear learning path to help you develop the skills you need quickly.
The Learning Plan starts with an introduction to the “Serverless Mindset” and introduces key concepts to help you design architectures and applications. It discusses how to best take advantage of the event-driven orientation of serverless computing.
Next, the course “AWS Lambda Foundations” covers the fundamentals of AWS Lambda, an event-driven compute service that lets you run code without provisioning or managing servers. You’ll learn foundational concepts, including how Lambda works, security and permission models, and best practices for writing Lambda functions.
The Learning Plan also includes four courses that span the lifecycle of building Lambda-based applications. In “Architecting Serverless Applications,” you learn about common architectures and patterns for serverless applications. We explore how to build microservices, data processing workloads, Alexa skills, mobile backends, and automate tasks in your AWS account. The course also discusses the trade-offs in selecting from the various compute options available to you.
The “Scaling Serverless Architectures” course discusses concepts such as Lambda concurrency and how Lambda-based applications scale. We briefly explore optimization opportunities for Lambda functions and trade-offs. While this course is not a deep dive in optimization across all supported runtimes, it offers a starting point.
In “Security and Observability for Serverless Applications,” you’ll learn how to use services such as AWS CloudTrail, AWS Config, and AWS X-Ray in concert with Lambda-based applications. We also discuss the built-in logging to Amazon CloudWatch and considerations. This course also touches on how the Lambda service creates isolation and a security boundary between functions.
There are a number of popular options for deploying and managing serverless applications. In “Deploying Serverless Applications,” we explore the AWS Serverless Application Model (AWS SAM) and the AWS suite of developer tools. You’ll learn best practices for deployment, including how to automate deployment using a CI/CD pipeline. This course also covers concepts such as Lambda versions and aliases, Lambda environment variables, and other deployment features.
Serverless is more than Lambda. During the Learning Plan, you also learn how to use Amazon API Gateway to create and deploy serverless APIs. “Amazon API Gateway for Serverless Applications” discusses REST and WebSocket options available from API Gateway and how to integrate with Lambda and other backends. The course also discusses the rich set of API Gateway features available, including caching, various authorization modes, usage plans, API keys, and deployment stages.
To complete the Learning Plan, we also provide an introduction to event-driven architectures built using services such as AWS Step Functions and Amazon Simple Queue Service (SQS). This course compliments the “Serverless Mindset” course to help you think about how asynchronous processing can improve the resiliency and scalability of your serverless applications.
All courses are available in a variety of languages.
After completing the Learning Plan, take the online assessment and score over 80 percent to earn the digital badge. Our badge assessments are linked to curriculum standards and have been developed by field subject matter experts (SMEs) and content/curriculum SMEs. If you are already familiar with AWS Serverless, you can also jump right to the assessment. If you don’t pass, you’ll be guided on how to fill knowledge gaps and can retake the assessment after 24 hours.
Our Learning Plan has been designed for you to move at your own pace, from wherever you are. It’s a great opportunity to build new skills or refresh your knowledge. Employers seeking to build knowledge in Serverless can also use the Learning Plan and digital badge to build critical knowledge in the space.
AWS Skill Builder
Beyond our recommended Serverless curriculum, Skill Builder offers a bevy of digital courses developed for different roles (e.g., developer, architect, data engineer) and domains (e.g., storage, databases). Skill Builder offers free learning content as well as subscription plans for individuals and teams. Skill Builder is a great way to advance your skills in areas that often touch serverless applications, including security, observability / monitoring, and DevOps.
We encourage you to check out these other expert-designed courses to help advance your knowledge of AWS. Subscription plans include hands-on labs and certification practice exams. The free content includes over 500 courses and learning plans, all available on-demand so that you can learn at your own pace.
Dive deeper with the AWS Serverless Ramp-up Guide
If you want to dive deeper after completing the AWS Serverless Learning Plan, download the AWS Ramp-Up Guide for Serverless. The guide includes a listing of courses, hands-on workshops, classroom training, and other resources to enrich your serverless knowledge.
Think of the Ramp-Up Guide as a menu of options. Pick and choose the topics that are most interesting to you and move at your own pace. We’ve included digital courses, reading, videos, and workshops to help you learn however is most effective for you.
We’re working to continually update the Ramp-up Guide so that you can easily find up-to-date content to deepen your skills. Check back for updates.
Conclusion
We’re excited to share the newly updated Serverless Learning Plan and all-new digital badge with you. To our knowledge, this is one of the first ways (if not the first) that Serverless builders can verifiably demonstrate their knowledge to the community and employers. Our team of SMEs across AWS Serverless and Training & Certification are excited to hear your feedback on the Learning Plan as well as where you would like to see us develop training next.
The AWS Serverless Learning Plan and digital badge are available now. All courses are available on-demand. Both the learning plan courses and the assessment are free for everyone.
Written by Mark Sailes, Senior Serverless Solutions Architect, AWS.
At AWS re:Invent 2022, AWS announced SnapStart for AWS Lambda functions running on Java Corretto 11. This feature enables customers to achieve up to 10x faster function startup performance for Java functions, at no additional cost, and typically with minimal or no code changes.
Overview
Today, for Lambda’s function invocations, the largest contributor to startup latency is the time spent initializing a function. This includes loading the function’s code and initializing dependencies. For interactive workloads that are sensitive to start-up latencies, this can cause suboptimal end user experience.
To address this challenge, customers either provision resources ahead of time, or spend effort building relatively complex performance optimizations, such as compiling with GraalVM native-image. Although these workarounds help reduce the startup latency, users must spend time on some heavy lifting instead of focusing on delivering business value. SnapStart addresses this concern directly for Java-based Lambda functions.
How SnapStart works
With SnapStart, when a customer publishes a function version, the Lambda service initializes the function’s code. It takes an encrypted snapshot of the initialized execution environment, and persists the snapshot in a tiered cache for low latency access.
When the function is first invoked and then scaled, Lambda resumes the execution environment from the persisted snapshot instead of initializing from scratch. This results in a lower startup latency.
Lambda function lifecycle
A function version activated with SnapStart transitions to an inactive state if it remains idle for 14 days, after which Lambda deletes the snapshot. When you try to invoke a function version that is inactive, the invocation fails. Lambda sends a SnapStartNotReadyException and begins initializing a new snapshot in the background, during which the function version remains in Pending state. Wait until the function reaches the Active state, and then invoke it again. To learn more about this process and the function states, read the documentation.
Using SnapStart
Application frameworks such as Spring give developers an enormous productivity gain by reducing the amount of boilerplate code they write to accomplish common tasks. When first created, frameworks didn’t have to consider startup time because they run on application servers, which run for long periods of time. The startup time is minimal compared to the running duration. You often only restart them when there is an application version change.
If the functionality that these frameworks bring is implemented at runtime, then they often contribute to latency in startup time. SnapStart allows you to use frameworks like Spring and not compromise tail latency.
To demonstrate SnapStart, I use a sample application that saves records into Amazon DynamoDB. This Spring Boot application (TODO Link) uses a REST controller to handle CRUD requests. This sample includes infrastructure as code to deploy the application using the AWS Serverless Application Model (AWS SAM). You must install the AWS SAM CLI to deploy this example.
To deploy:
Clone the git repository and change to project directory:
git clone https://github.com/aws-samples/serverless-patterns.git
cd serverless-patterns/apigw-lambda-snapstart
Use the AWS SAM CLI to build the application:
sam build
Use the AWS SAM CLI to deploy the resources to your AWS account:
sam deploy -g
This project deploys with SnapStart already enabled. To enable or disable this functionality in the AWS Management Console:
Navigate to your Lambda function.
Select the Configuration tab.
Choose Edit and change the SnapStart attribute to PublishedVersions.
Choose Save.
Lambda Console confoguration
Select the Versions tab and choose Publish new.
Choose Publish.
Once you’ve enabled SnapStart, Lambda publishes all subsequent versions with snapshots. The time to run your publish version depends on your init code. You can run init up to 15 minutes with this feature.
Considerations
Stale credentials
Using SnapStart and restoring from a snapshot often changes how you create functions. With on-demand functions, you might access one time data in the init phase, and then reuse it during future invokes. If this data is ephemeral, a database password for example, then there might be a time between fetching the secret and using it, that the password has changed leading to an error. You must write code to handle this error case.
With SnapStart, if you follow the same approach, your database password is persisted in an encrypted snapshot. All future execution environments have the same state. This can be days, weeks, or longer after the snapshot is taken. This makes it more likely that your function has the incorrect password stored. To improve this, you could move the functionality to fetch the password to the post-snapshot hook. With each approach, it is important to understand your application’s needs and handle errors when they occur.
Demo application architecture
A second challenge in sharing the initial state is with randomness and uniqueness. If random seeds are stored in the snapshot during the initialization phase, then it may cause random numbers to be predictable.
Cryptography
AWS has changed the managed runtime to help customers handle the effects of uniqueness and randomness when restoring functions.
Lambda has already incorporated updates to Amazon Linux 2 and one of the commonly used cryptographic libraries, OpenSSL (1.0.2), to make them resilient to snapshot operations. AWS has also validated that Java runtime’s built-in RNG java.security.SecureRandom maintains uniqueness when resuming from a snapshot.
Software that always gets random numbers from the operating system (for example, from /dev/random or /dev/urandom) is already resilient to snapshot operations. It does not need updates to restore uniqueness. However, customers who prefer to implement uniqueness using custom code for their Lambda functions must verify that their code restores uniqueness when using SnapStart.
These pre- and post-hooks give developers a way to react to the snapshotting process.
For example, a function that must always preload large amounts of data from Amazon S3 should do this before Lambda takes the snapshot. This embeds the data in the snapshot so that it does not need fetching repeatedly. However, in some cases, you may not want to keep ephemeral data. A password to a database may be rotated frequently and cause unnecessary errors. I discuss this in greater detail in a later section.
The Java managed runtime uses the open-source Coordinated Restore at Checkpoint (CRaC) project to provide hook support. The managed Java runtime contains a customized CRaC context implementation that calls your Lambda function’s runtime hooks before completing snapshot creation and after restoring the execution environment from a snapshot.
The following function example shows how you can create a function handler with runtime hooks. The handler implements the CRaC Resource and the Lambda RequestHandler interface.
SnapStart and runtime hooks give you new ways to build your Lambda functions for low startup latency. You can use the pre-snapshot hook to make your Java application as ready as possible for the first invoke. Do as much as possible within your function before the snapshot is taken. This is called priming.
When you upload your zip file of Java code to Lambda, the zip contains .class files of bytecode. This can be run on any machine with a JVM. When the JVM executes your bytecode, it is initially interpreted, then compiled into native machine code. This compilation stage is relatively CPU intensive and happens just in time (JIT Compiler).
You can use the before snapshot hook to run code paths before the snapshot is taken. The JVM compiles these code paths and the optimization is kept for future restores. For example, if you have a function that integrates with DynamoDB, you can make a read operation in your before snapshot hook.
This means that your function code, the AWS SDK for Java, and any other libraries used in that action are compiled and kept within the snapshot. The JVM then won’t need to compile this code when your function is invoked, meaning your latency is less the first time an execution environment is invoked.
Priming requires that you understand your application code and the consequences of executing it. The sample application includes a before snapshot hook, which primes the application by making a read operation from DynamoDB. (TODO Link)
Metrics
The following chart reflects invoking the sample application Lambda function 100 times per second for 10 minutes. This test is based on this function, both with and without SnapStart.
p50
p99.9
On-demand
7.87ms
5,114ms
SnapStart
7.87ms
488ms
Conclusion
This blog shows how SnapStart reduces startup (cold-start) latencies times for Java-based Lambda functions. You can configure SnapStart using AWS SDK, AWS CloudFormation, AWS SAM, and CDK.
To learn more, see Configuring function options in the AWS documentation. This functionality may require some minimal code changes. In most cases, the existing code is already compatible with SnapStart. You can now bring your latency-sensitive Java-based workloads to Lambda and run with improved tail latencies.
This feature allows developers to use the on-demand model in Lambda with low-latency response times, without incurring extra cost. To read more about how to use SnapStart with partner frameworks, find out more from Quarkus and Micronaut. To read more about this and other features, visit Serverless Land.
As of late, concerns about the future of Twitter have caused many of its
users to seek alternatives. Amid this upheaval, an open-source
microblogging service called Mastodon has received a great deal of
attention. Mastodon is not reliant on any single company or central
authority to run its servers; anyone can run their own. Servers communicate
with each other, allowing people on different servers to send each other
messages and follow each other’s posts. Mastodon doesn’t just talk to
itself, though; it can exchange messages with anything that speaks the ActivityPub protocol.
There are many such implementations, so someone who wants to deploy their own
microblogging service enjoys a variety of choices.
It has been an action-packed day at AWS re:Invent. For security professionals, one of the most exciting announcements has to be the launch of Amazon Security Lake. We see a lot of potential for this new service, which is why Rapid7 is proud to announce the immediate availability of an integration between InsightIDR and Security Lake. Read on to learn more!
What Is Amazon Security Lake?
Amazon Security Lake gives AWS customers a security data lake that centralizes AWS and third-party security logs. What’s more, all data sent to Security Lake is formatted using the recently-launched OCSF standard. That means even if logs come from different services or different vendors, all logs for a given activity (e.g. all cloud activity logs, all network activity logs, etc.) will have the same format in Security Lake. This will make it easy for customers and their third-party vendors to make use of the data in Security Lake without first having to normalize data.
Another big feature in Security Lake is the granular control it offers. Customers can choose which users and third-party integrations can access which data sources and determine the duration of data that is available to each. For example, a customer might give their developers the ability to view CloudTrail data from the past five days so they can troubleshoot issues, but give InsightIDR the ability to view CloudTrail data from the past year.
InsightIDR’s Integration With Amazon Security Lake
InsightIDR’s new integration allows it to ingest log data from Security Lake. At the moment, InsightIDR will only ingest logs from AWS CloudTrail. Over time, we plan to add support for additional OCSF log types, which will allow customers to send data from multiple AWS and third-party services to InsightIDR through one Amazon Security Lake integration. This will give us the potential ability to immediately ingest and parse logs from any new third-party solution that gets introduced, as long as that solution can export its logs to Security Lake. Another customer benefit is that by consolidating the ingestion of multiple logs via Moose, onboarding and ongoing maintenance will be greatly reduced.
If you are an existing InsightIDR customer and want to take advantage of the new integration with Amazon Security Lake, instructions for setup are here.
Customers have an increasing need to collect, store, and process data within their AWS environments for application modernization, reporting, and predictive analytics. AWS Well-Architected security pillar, general data privacy and compliance regulations require that you appropriately identify and secure sensitive information. Knowing where your data is allows you to implement the appropriate security controls which help support meeting a range of objectives including compliance & data privacy.
With Amazon Macie, you can detect sensitive information stored in your organization’s Amazon Simple Storage Service (Amazon S3) storage. Macie provides sensitive data findings and additional metadata to help you protect your data in Amazon S3.
If you have many accounts with a lot of S3 buckets and data, you might find it complex, expensive, and time consuming to discover sensitive data in each bucket and account, and to evaluate the large number of findings. As your applications continue to scale you want to have confidence that you continue to understand where the data is in your environment.
To help discover sensitive data across your entire S3 storage, you can now use a new feature in Macie—automated sensitive data discovery—to automatically build sensitive data profiles on S3 buckets and uncover the presence of sensitive data. The new feature continually and cost-efficiently samples data across your S3 storage. This reduces the data scanning needed to locate sensitive data so that you can focus your time, effort, and resources on additional investigation and remediation if sensitive data is found. This broad visibility can help you develop scalable, repeatable processes for ongoing and proactive protection of data.
In this blog post, we show you how to set up Macie automated sensitive data discovery in your AWS environment and walk you through the insights that it generates. We also share some common patterns on how you can use the findings to improve your data security posture.
Prerequisites
To get started, you’ll need the following prerequisites:
Activate Amazon Macie in your accounts for the AWS Regions of your choosing. Macie is a regional service, so it scans S3 buckets only in the Regions where it’s turned on.
Set up a delegated Macie administrator account, also referred to as the Macie admin account, for these Regions. A Macie admin account has visibility into the S3 buckets of member accounts. It also allows you to restrict access to automated sensitive data discovery results to the appropriate teams, without providing access into the management account.
To set up the delegated Macie administrator to centrally manage multiple Macie accounts, do one of the following:
Configure a S3 bucket for sensitive data results in the Macie admin account to access the results and allow for long-term storage and retention.
Activate automated sensitive data discovery in the delegated Macie administrator account
In this section, we walk you through how to activate automated sensitive data discovery in Macie.
For new Macie admin accounts, automated sensitive data discovery is turned on by default. For existing Macie accounts, you need to activate automated sensitive data discovery in the existing Macie admin accounts.
To activate automated sensitive data discovery in the existing Macie admin accounts
For Status, choose Enable, and then edit the following sections according to your needs:
S3 buckets – By default, Macie selects and inspects samples of objects across all S3 buckets in your organization. For example, you might want to exclude an S3 bucket that stores AWS CloudTrail logs.
Managed data identifiers – You can select managed data identifiers to include or exclude during automated sensitivity data discovery. By default, Macie inspects and samples objects by using a set of managed data identifiers that AWS recommends. This includes most of the managed data identifiers that AWS supports, but excludes some that can potentially cause a high volume of alerts in buckets where you might not expect them. If you know specific data types that could exist within your environment, you can add those managed data identifiers specifically. If you want Macie to exclude detections that aren’t sensitive in your deployment, you can exclude them. For more details, see the Macie administrator user guide.
Custom data identifiers – You can select custom data identifiers to include or exclude during automated sensitive data discovery.
Allow lists – You can select allow lists to define specific text or a text pattern that you want Macie to exclude from automated sensitive data discovery.
Figure 1: Settings page for Macie automated sensitive data discovery
Note: When you make changes to the inclusion or exclusion of managed or custom data identifiers for S3 buckets managed by the Macie admin account, those changes apply only to new S3 objects that are discovered. The changes do not apply to detections for existing S3 objects that were previously scanned with automated sensitive data discovery.
How Macie samples data and assigns scores
Macie automated sensitive data discovery analyzes objects in the S3 buckets in your accounts where Macie is turned on. It organizes objects with similar S3 metadata, such as bucket names, object-key prefixes, file-type extensions, and storage class, into groups that are likely to have similar content. It then selects small, but representative, samples from each identified group of objects and scans them to detect the presence of sensitive data. Macie has a feedback loop that uses the results of previously scanned samples to prioritize the next set of samples to inspect.
This systematic exploration of your S3 storage can help identify the presence of unknown sensitive data for a fraction of the cost of targeted sensitive data discovery jobs. A single sample might not be conclusive, so Macie continues sampling to build a security-relevant, interactive map of your S3 buckets. It automatically detects new buckets in your accounts, and keeps track of the previously scanned objects that get deleted from existing buckets to make sure that your map stays up to date.
Review data sensitivity scoring
When you first activate automated sensitive data discovery, Macie assigns each of your S3 buckets a sensitivity score of 50. Then, Macie begins to continually select and scan a sample of objects in your S3 buckets across each member account. Based on the results, Macie adjusts the sensitivity score for each bucket, assigning new scores that range from 1–99. Macie increases the score if sensitive data is found, and decreases the score if sensitive data isn’t found.
Macie calculates this score based on the amount of data inspected, number of sensitive data types discovered, number of occurrences of each sensitive data type, and the nature of the sensitive data. The score can help you identify potential security risks, but it does not indicate the criticality that a given bucket, and its contents, might have for your organization.
Figure 2 shows an example Summary page for the delegated Macie administrator. This page summarizes the results of automated sensitive data discovery for the delegated administrator account and each member account.
From the Summary page, you can choose statistics, such as Publicly accessible or Sensitive, to investigate. When you choose a statistic, you will be redirected to the S3 buckets page that displays a filtered view based on the selected data.
On the S3 buckets page shown in Figure 3, Macie displays a heat map of consolidated information, grouped by account, on whether a bucket is sensitive, not sensitive, or not analyzed yet. Each square in the heat map represents an S3 bucket. In the figure, account 111122223333 has 79 buckets, including 4 buckets with sensitive data findings, 34 buckets that were scanned with no sensitive data found, and 41 buckets that are pending scanning.
Figure 3: Heat map of automated sensitive data discovery in Macie
For more information about an S3 bucket, select one of the squares in the heat map. This will show you the sensitivity score and other details, such as types of sensitive data, names of sensitive objects, and profiling statistics.
The following table summarizes Macie sensitivity score categories and how to interpret the heat map.
Data sensitivity score
Data sensitivity status
Data sensitivity heat map
-1
Unable to analyze
Macie was unable to analyze a S3 object(s) due to a permission issue.
1-49
Not sensitive
A darker shade of blue, and a lower sensitivity score, indicates that a greater proportion of objects in the bucket were scanned and fewer occurrences of sensitive data were found.
A score closer to 1 indicates that Macie scanned most of the objects in the bucket and did not find occurrences of objects with sensitive data.
A score closer to 49 indicates that Macie scanned a smaller proportion of objects in the bucket and did not find occurrences of objects with sensitive data.
50
Not analyzed
White shading indicates that Macie hasn’t analyzed objects yet.
51-99
Sensitive
A darker shade of red, and a higher sensitivity score, indicates that a greater proportion of objects in the bucket were scanned and more occurrences of sensitive data were found.
A score closer to 99 indicates that Macie scanned a greater proportion of objects in the bucket, and found several occurrences of objects with sensitive data.
A score closer to 51 indicates that Macie scanned a smaller proportion of objects and found some occurrences of objects with sensitive data.
100
Maximum score
A solid shade of red. Macie doesn’t assign this score, but you can manually assign it.
Common use cases for Macie automated sensitive data discovery
In this section, we discuss how you can use automated sensitive data discovery in Macie to implement the following common patterns:
Activate continuous monitoring for broad visibility into the presence of sensitive data in your S3 buckets, including existing buckets where sensitive data was not found before.
Manually identify and prioritize a subset of S3 buckets so that you can conduct a full scan based on the sensitivity score.
Build automation that scans S3 buckets by using the sensitivity score and takes actions, such as sending notifications or performing remediation, so that buckets with sensitive data have proper guardrails.
Continuous monitoring of S3 buckets for sensitive data
The dynamic nature of applications and the speed of innovation increases the type and amount of data generated, stored, and processed over time. While development teams work on developing new features for your applications, security teams help the application teams understand where they should take action to protect data.
Discovering sensitive data is an ongoing activity that requires a continuous search for sensitive data in S3 buckets in each account that the Macie admin accounts manage. Macie continually searches for sensitive data and updates the information found on the Summary and S3 buckets pages in the Macie admin accounts.
To help you gain visibility across your S3 storage at an affordable cost, automated sensitive data discovery establishes a baseline profile of the sensitivity of each bucket, while analyzing only a fraction of S3 data for each account in a given month. After you activate this feature in the Macie admin accounts, Macie starts constructing an S3 bucket baseline within 48 hours.
Macie continues to refine bucket profiles and prioritizes those that it has the least information on. For example, Macie might prioritize buckets that were recently created in the monitored accounts or existing buckets from a member account that recently joined your organization. This provides continual visibility that achieves greater fidelity over time while scanning data at a predictable monthly rate.
Automated discovery uses the results of the automated data inspection to create a profile for each bucket. It also tracks previously scanned objects to make sure that each bucket profile is up to date. This means that if a previously scanned object is removed, Macie updates the profile of the bucket to make sure that you have the most current information.
You can also include or exclude specific managed and custom data identifiers from specific S3 buckets or from each S3 bucket that the Macie admin accounts manages. For example, to make sure that the sensitivity score is as accurate as possible, you can exclude specific data identifiers on select S3 buckets where you expect those identifiers.
Let’s walk through an example of how to exclude specific data identifiers on an S3 bucket. Imagine that your company has an S3 bucket where data scientists store a test dataset of fictitious names and addresses. The appropriate teams have verified that the test dataset isn’t sensitive and can be used to create test data models. You want to exclude name and address detections for this bucket while keeping these detections for the rest of your S3 storage.
To exclude the name and address identifiers, navigate to the specific S3 bucket, choose the identifiers to exclude (in this case, NAME and ADDRESS), and choose Exclude from score, as shown in Figure 4. Macie automatically excludes these identifiers from the sensitivity score for that S3 bucket only, for existing and new objects.
Figure 4: Macie S3 bucket list view with sensitivity scores and detections
Note: When you change the included or excluded managed or custom data identifiers for an S3 bucket, Macie automatically updates existing detections and sensitivity scores. Macie also applies these changes to new S3 objects that it scans with automated sensitive data discovery.
You can prioritize S3 buckets that need additional review by manually assigning them a maximum sensitivity score. When you select Assign maximum score on an S3 bucket, Macie sets the score to 100, regardless of the sensitive data detections that it found through automated sensitive data discovery. Automated sensitive data discovery continues to scan the bucket and create sensitive data detections unless you select Exclude from automated discovery.
You might want to assign maximum scores for S3 buckets that are publicly accessible, shared across multiple internal or external customers, or part of an environment where sensitive data shouldn’t be present. By assigning a maximum score to an S3 bucket, you can help ensure that your security and privacy teams regularly review high-priority buckets. You can decide whether to assign maximum scores based on your organization’s use cases and security policies.
Identify a subset of S3 buckets to conduct a full scan based on the sensitivity score
You can use sensitivity scores to prioritize specific S3 buckets for full Macie scanning jobs. By running full scanning jobs on specific buckets, you can focus your efforts on buckets where sensitive data could have the greatest impact on your organization. Because full scanning occurs on only a subset of your buckets, this strategy can help lower your overall costs for Macie.
To create a Macie job that scans S3 buckets based on the sensitivity score
If you leave the To field blank, Macie returns a list of buckets with a score greater than or equal to the value in the From field.
Note: Sensitivity scores can vary based on the objects analyzed and whether you have the settings configured for Assign maximum score, Automatically discover sensitive data, or both.
After you add the filter, you will see the S3 bucket results for the Sensitivity values that you entered, grouped by account. To view the buckets in list view, choose the list view icon (). To view the buckets in group view, choose the group view icon ().
Note: You can’t create Macie scan jobs from group view. To run Macie scan jobs, switch to list view.
Make sure that you are in list view, select the specific S3 buckets that you want to scan based on the Sensitivity score, and then choose Create Jobs.
Figure 5: List view of sensitivity scores for S3 buckets
Review the S3 buckets that you selected. To exclude specific buckets, choose Remove for each bucket. After you review your selection, choose Next.
Select managed data identifiers, custom data identifiers, allow lists, and general settings according to your needs.
Confirm the Macie job details and choose Submit to start scanning the S3 buckets based on the sensitivity score. When this job is complete, you will receive findings on sensitive data discovered from the job.
When you are considering whether to run a scheduled job or a one-time job, remember that S3 bucket sensitivity scores can change based on new objects, managed or custom identifiers, and allow lists used by Macie automated sensitive data discovery. If you run a scheduled job on buckets that meet certain sensitivity score criteria, the configurations for the job are immutable in order to support data privacy and protection audits or investigations. If a new bucket meets the sensitivity score criteria, you need to create a new scheduled job to include that bucket.
Use automation to scan S3 buckets by sensitivity score and take actions based on findings
You can use the GetResourceProfile API to query specific S3 buckets and return sensitivity profiling information. With the information returned from the API, you can develop custom automation to take specific actions on buckets based on their sensitivity scores. For example, you can use Amazon EventBridge and AWS Lambda functions to create Macie jobs based on the sensitivity scores of the S3 buckets managed by Macie, as shown in the following architecture.
Figure 6: Example architecture for automated jobs based on sensitivity scores
This architecture has the following steps:
An EventBridge rule runs periodically to invoke a Lambda function that invokes the GetResourceProfile API for S3 buckets managed by the Macie admin accounts.
The Lambda function takes the following actions:
Creates a list of S3 buckets with maximum sensitivity scores, or with automated sensitivity profiling scores that exceed a threshold value, and then stores the results in an Amazon DynamoDB table.
Creates a Macie job by using items in the DynamoDB table to conduct a one-time scan with 100% sampling depth of those S3 buckets. Upon job submission, you can add a last-scanned date to the table for tracking purposes, to help avoid the creation of multiple one-time jobs on the same bucket.
The delegated Macie administrator job starts scan jobs for S3 buckets in member accounts.
After you conduct your Macie scans either manually or with automation, you can implement semi- or fully automated response and remediation actions based on the sensitive data findings. The following are examples of automated response and remediation actions that you can take:
In this blog post, we showed you how to turn on Macie automated sensitive data discovery in your AWS environment and how to use the findings to continually manage your data security posture. This new feature can help you prioritize your remediation efforts and identify buckets on which to run full scans for sensitive data discovery. We also shared a design pattern to build automation by using Macie APIs for automated remediation of Macie findings.
If you have feedback about this post, submit comments in the Comments section below. If you have questions about this post, start a new thread on Amazon Macie re:Post.
Want more AWS Security news? Follow us on Twitter.
This blog written by Tarun Rai Madan, Sr. Product Manager, AWS Lambda, and Mike Danilov, Sr. Principal Engineer, AWS Lambda.
AWS Lambda SnapStart is a new performance optimization developed by AWS that can significantly improve the startup time for applications. Announced at AWS re:Invent 2022, the first capability to feature SnapStart is Lambda SnapStart for Java. This feature delivers up to 10x faster function startup times for latency-sensitive Java applications at no extra cost, and with minimal or no code changes.
Overview
When applications start up, whether it’s an app on your phone, or a serverless Lambda function, they go through initialization. The initialization process can vary based on the application and the programming language, but even the smallest applications written in the most efficient programming languages require some kind of initialization before they can do anything useful. For a Lambda function, the initialization phase involves downloading the function’s code, starting the runtime and any external dependencies, and running the function’s initialization code. Ordinarily, for a Lambda function, this initialization happens every time your application scales up to create a new execution environment.
With SnapStart, the function’s initialization is done ahead of time when you publish a function version. Lambda takes a Firecracker microVM snapshot of the memory and disk state of the initialized execution environment, encrypts the snapshot, and caches it for low-latency access. When your application starts up and scales to handle traffic, Lambda resumes new execution environments from the cached snapshot instead of initializing them from scratch, improving startup performance.
The following diagram compares a cold start request lifecycle for a non-SnapStart function and a SnapStart function. The time it takes to initialize the function, which is the predominant contributor to high startup latency, is replaced by a faster resume phase with SnapStart.
Diagram of a non-SnapStart function versus a SnapStart function
Request lifecycle for a non-SnapStart function versus a SnapStart function
Front loading the initialization phase can significantly improve the startup performance for latency-sensitive Lambda functions, such as synchronous microservices that are sensitive to initialization time. Because Java is a dynamic language with its own runtime and garbage collector, Lambda functions written in Java can be amongst the slowest to initialize. For applications that require frequent scaling, the delay introduced by initialization, commonly referred to as a cold start, can lead to a suboptimal experience for end users. Such applications can now start up faster with SnapStart.
AWS’ work in Firecracker makes it simple to use SnapStart. Because SnapStart uses micro Virtual Machine (microVM) snapshots to checkpoint and restore full applications, the approach is adaptable and general purpose. It can be used to speed up many kinds of application starts. While microVMs have long been used for strong secure isolation between applications and environments, the ability to front-load initialization with SnapStart means that microVMs can also augment performance savings at scale.
SnapStart and uniqueness
Lambda SnapStart speeds up applications by re-using a single initialized snapshot to resume multiple execution environments. As a result, unique content included in the snapshot during initialization is reused across execution environments, and so may no longer remain unique. A class of applications where uniqueness of state is a key consideration is cryptographic software, which assumes that the random numbers are truly random (both random and unpredictable). If content such as a random seed is saved in the snapshot during initialization, it is re-used when multiple execution environments resume and may produce predictable random sequences.
To maintain uniqueness, you must verify before using SnapStart that any unique content previously generated during the initialization now gets generated after that initialization. This includes unique IDs, unique secrets, and entropy used to generate pseudo-randomness.
Multiple execution environments resumed from a shared snapshot
SnapStart life cycle
However, we have implemented a few things to make it easier for customers to maintain uniqueness.
First, it is not common or a best practice for applications to generate these unique items directly. Still, it’s worth confirming that your application handles uniqueness correctly. That’s usually a matter of checking for any unique IDs, keys, timestamps, or “homemade” entropy in the initializer methods for your function.
Lambda offers a SnapStart scanning tool that checks for certain categories of code that assume uniqueness, so customers can make changes as required. The SnapStart scanning tool is an open-source SpotBugs plugin that runs static analysis against a set of rules and reports “potential SnapStart bugs”. We are committed to engaging with the community to expand these set of rules against which the scanning tool checks the code.
As an example, the following Lambda function creates a unique log stream for each execution environment during initialization. This unique value is re-used across execution environments when they re-use a snapshot.
public class LambdaUsingUUID {

    private AWSLogsClient logs;
    private final UUID sandboxId;

    public LambdaUsingUUID() {
       sandboxId = UUID.randomUUID(); // <-- unique content created
       logs = new AWSLogsClient();
    }
    @Override
    public String handleRequest(Map<String,String> event, Context context) {
       CreateLogStreamRequest request = new CreateLogStreamRequest(
         "myLogGroup", sandboxId + ".log9.txt");
         logs.createLogStream(request);
         return "Hello world!";
    }
}
When you run the scanning tool on the previous code, the following message helps identify a potential implementation that assumes uniqueness. One way to address such cases is to move the generation of the unique ID inside your function’s handler method.
H C SNAP_START: Detected a potential SnapStart bug in Lambda function initialization code. At LambdaUsingUUID.java: [line 7]
A best practice used by many applications is to rely on the system libraries and kernel for uniqueness. These have long-handled other cases where keys and IDs may be inadvertently duplicated, such as when forking or cloning processes. AWS has worked with upstream kernel maintainers and open source developers so that the existing protection mechanisms use the open standard VM Generation ID (vmgenid) that SnapStart supports. vmgenid is an emulated device, which exposes a 128-bit, cryptographically random integer value identifier to the kernel, and is statistically unique across all resumed microVMs.
Lambda’s included versions of Amazon Linux 2, OpenSSL (1.0.2), and java.security.SecureRandom all automatically re-initialize their randomness and secrets after a SnapStart. Software that always gets random numbers from the operating system (for example, from /dev/random or /dev/urandom) does not need any updates to maintain randomness. Because Lambda always reseeds /dev/random and /dev/urandom when restoring a snapshot, random numbers are not repeated even when multiple execution environments resume from the same snapshot.
Lambda’s request IDs are already unique for each invocation and are available using the getAwsRequestId() method of the Lambda request object. Most Lambda functions should require no modification to run with SnapStart enabled. It’s generally recommended that for SnapStart, you do not include unique state in the function’s initialization code, and use cryptographically secure random number generators (CSPRNGs) when needed.
Second, if you do want to create unique data directly in a Lambda function initialization phase, Lambda supports two new runtime hooks. Runtime hooks are available as part of the open-source Coordinated Restore at Checkpoint (CRaC) project. You can use the beforeCheckpoint hook to run code immediately before a snapshot is taken, and use the afterRestore hook to run code immediately after restoring a snapshot. This helps you delete any unique content before the snapshot is created, and restore any unique content after the snapshot is restored. For an example of how to use CRaC with a reference application, see the CRaC GitHub repository.
Conclusion
This blog describes how SnapStart optimizes startup performance under the hood, and outlines considerations around uniqueness. We also introduce the new interfaces that AWS Lambda provides (via scanning tool and runtime hooks) to customers to maintain uniqueness for their SnapStart functions.
SnapStart is made possible by several pieces of open-source work, including Firecracker, Linux, CraC, OpenSSL and more. AWS is grateful to the maintainers and developers who have made this possible. With this work, we’re excited to launch Lambda SnapStart for Java as what we hope is the first amongst many other capabilities to benefit from the performance savings and enhanced security that SnapStart microVMs provide.
For more serverless learning resources, visit Serverless Land.
I am excited to announce the availability of AWS Key Management Service (AWS KMS)External Key Store. Customers who have a regulatory need to store and use their encryption keys on premises or outside of the AWS Cloud can now do so. This new capability allows you to store AWS KMS customer managed keys on a hardware security module (HSM) that you operate on premises or at any location of your choice.
At a high level, AWS KMS forwards API calls to securely communicate with your HSM. Your key material never leaves your HSM. This solution allows you to encrypt data with external keys for the vast majority of AWS services that support AWS KMS customer managed keys, such as Amazon EBS, AWS Lambda, Amazon S3, Amazon DynamoDB, and over 100 more services. There is no change required to your existing AWS services’ configuration parameters or code.
This helps you unblock use cases for a small portion of regulated workloads where encryption keys should be stored and used outside of an AWS data center. But this is a major change in the way you operate cloud-based infrastructure and a significant shift in the shared responsibility model. We expect only a small percentage of our customers to enable this capability. The additional operational burden and greater risks to availability, performance, and low latency operations on protected data will exceed—for most cases—the perceived security benefits from AWS KMS External Key Store.
Let me dive into the details.
A Brief Recap on Key Management and Encryption When an AWS service is configured to encrypt data at rest, the service requests a unique encryption key from AWS KMS. We call this the data encryption key. To protect data encryption keys, the service also requests that AWS KMS encrypts that key with a specific KMS customer managed key, also known as a root key. Once encrypted, data keys can be safely stored alongside the data they protect. This pattern is called envelope encryption. Imagine an envelope that contains both the encrypted data and the encrypted key that was used to encrypt these data.
But how do we protect the root key? Protecting the root key is essential as it allows the decryption of all data keys it encrypted.
The root key material is securely generated and stored in a hardware security module, a piece of hardware designed to store secrets. It is tamper-resistant and designed so that the key material never leaves the secured hardware in plain text. AWS KMS uses HSMs that are certified under the NIST 140-2 Cryptographic Module certification program.
You can choose to create root keys tied to data classification, or create unique root keys to protect different AWS services, or by project tag, or associated to each data owner, and each root key is unique to each AWS Region.
The XKS Proxy Solution When configuring AWS KMS External Key Store (XKS), you are replacing the KMS key hierarchy with a new, external root of trust. The root keys are now all generated and stored inside an HSM you provide and operate. When AWS KMS needs to encrypt or decrypt a data key, it forwards the request to your vendor-specific HSM.
All AWS KMS interactions with the external HSM are mediated by an external key store proxy (XKS proxy), a proxy that you provide, and you manage. The proxy translates generic AWS KMS requests into a format that the vendor-specific HSMs can understand.
The HSMs that XKS communicates with are not located in AWS data centers.
To provide customers with a broad range of external key manager options, AWS KMS developed the XKS specification with feedback from several HSM, key management, and integration service providers, including Atos, Entrust, Fortanix, HashiCorp, Salesforce, Thales, and T-Systems. For information about availability, pricing, and how to use XKS with solutions from these vendors, consult the vendor directly.
In addition, we will provide a reference implementation of an XKS proxy that can be used with SoftHSM or any HSM that supports a PKCS #11 interface. This reference implementation XKS proxy can be run as a container, is built in Rust, and will be available via GitHub in the coming weeks.
Once you have completed the setup of your XKS proxy and HSM, you can create a corresponding external key store resource in KMS. You create keys in your HSM and map these keys to the external key store resource in KMS. Then you can use these keys with AWS services that support customer keys or your own applications to encrypt your data.
Each request from AWS KMS to the XKS proxy includes meta-data such as the AWS principal that called the KMS API and the KMS key ARN. This allows you to create an additional layer of authorization controls at the XKS proxy level, beyond those already provided by IAM policies in your AWS accounts.
The XKS proxy is effectively a kill switch you control. When you turn off the XKS proxy, all new encrypt and decrypt operations using XKS keys will cease to function. AWS services that have already provisioned a data key into memory for one of your resources will continue to work until either you deactivate the resource or the service key cache expires. For example, Amazon S3 caches data keys for a few minutes when bucket keys are enabled.
The Shift in Shared Responsibility Under standard cloud operating procedures, AWS is responsible for maintaining the cloud infrastructure in operational condition. This includes, but is not limited to, patching the systems, monitoring the network, designing systems for high availability, and more.
When you elect to use XKS, there is a fundamental shift in the shared responsibility model. Under this model, you are responsible for maintaining the XKS proxy and your HSM in operational condition. Not only do they have to be secured and highly available, but also sized to sustain the expected number of AWS KMS requests. This applies to all components involved: the physical facilities, the power supplies, the cooling system, the network, the server, the operating system, and more.
Depending on your workload, AWS KMS operations may be critical to operating services that require encryption for your data at rest in the cloud. Typical services relying on AWS KMS for normal operation include Amazon Elastic Block Store (Amazon EBS), Lambda, Amazon S3, Amazon RDS, DynamoDB, and more. In other words, it means that when the part of the infrastructure under your responsibility is not available or has high latencies (typically over 250 ms), AWS KMS will not be able to operate, cascading the failure to requests that you make to other AWS services. You will not be able to start an EC2 instance, invoke a Lambda function, store or retrieve objects from S3, connect to your RDS or DynamoDB databases, or any other service that relies on AWS KMS XKS keys stored in the infrastructure you manage.
As one of the product managers involved in XKS told me while preparing this blog post, “you are running your own tunnel to oxygen through a very fragile path.”
We recommend only using this capability if you have a regulatory or compliance need that requires you to maintain your encryption keys outside of an AWS data center. Only enable XKS for the root keys that support your most critical workloads. Not all your data classification categories will require external storage of root keys. Keep the data set protected by XKS to the minimum to meet your regulatory requirements, and continue to use AWS KMS customer managed keys—fully under your control—for the rest.
Some customers for which external key storage is not a compliance requirement have also asked for this feature in the past, but they all ended up accepting one of the existing AWS KMS options for cloud-based key storage and usage once they realized that the perceived security benefits of an XKS-like solution didn’t outweigh the operational cost.
What Changes and What Stays the Same? I tried to summarize the changes for you.
The way to protect access and monitor access from the AWS side is unchanged. XKS uses the same IAM policies and the same key policies. API calls are logged in AWS CloudTrail, and AWS CloudWatch has the usage metrics.
The pricing is the same as other AWS KMS keys and API operations.
XKS does not support asymmetric or HMAC keys managed in the HSM you provide.
You now own the concerns of availability, durability, performance, and latency boundaries of your encryption key operations.
You can implement another layer of authorization, auditing, and monitoring at XKS proxy level. XKS resides in your network.
While the KMS price stays the same, your expenses are likely to go up substantially to procure an HSM and maintain your side of the XKS-related infrastructure in operational condition.
An Open Specification For those strictly regulated workloads, we are developing XKS as an open interoperability specification. Not only have we collaborated with the major vendors I mentioned already, but we also opened a GitHub repository with the following materials:
The XKS proxy API specification. This describes the format of the generic requests KMS sends to an XKS proxy and the responses it expects. Any HSM vendor can use the specification to create an XKS proxy for their HSM.
A reference implementation of an XKS proxy that implements the specification. This code can be adapted by HSM vendors to create a proxy for their HSM.
An XKS proxy test client that can be used to check if an XKS proxy complies with the requirements of the XKS proxy API specification.
Other vendors, such as SalesForce, announced their own XKS solution allowing their customers to choose their own key management solution and plug it into their solution of choice, including SalesForce.
Pricing and Availability External Key Store is provided at no additional cost on top of AWS KMS. AWS KMS charges $1 per root key per month, no matter where the key material is stored, on KMS, on CloudHSM, or on your own on-premises HSM.
For a full list of Regions where AWS KMS XKS is currently available, visit our technical documentation.
If you think XKS will help you to meet your regulatory requirements, have a look at the technical documentation and the XKS FAQ.
Ten years ago, just a few months after I joined AWS, Amazon Redshift was launched. Over the years, many features have been added to improve performance and make it easier to use. Amazon Redshift now allows you to analyze structured and semi-structured data across data warehouses, operational databases, and data lakes. More recently, Amazon Redshift Serverless became generally available to make it easier to run and scale analytics without having to manage your data warehouse infrastructure.
To process data as quickly as possible from real-time applications, customers are adopting streaming engines like Amazon Kinesis and Amazon Managed Streaming for Apache Kafka. Previously, to load streaming data into your Amazon Redshift database, you’d have to configure a process to stage data in Amazon Simple Storage Service (Amazon S3) before loading. Doing so would introduce a latency of one minute or more, depending on the volume of data.
Today, I am happy to share the general availability of Amazon Redshift Streaming Ingestion. With this new capability, Amazon Redshift can natively ingest hundreds of megabytes of data per second from Amazon Kinesis Data Streams and Amazon MSK into an Amazon Redshift materialized view and query it in seconds.
Streaming ingestion benefits from the ability to optimize query performance with materialized views and allows the use of Amazon Redshift more efficiently for operational analytics and as the data source for real-time dashboards. Another interesting use case for streaming ingestion is analyzing real-time data from gamers to optimize their gaming experience. This new integration also makes it easier to implement analytics for IoT devices, clickstream analysis, application monitoring, fraud detection, and live leaderboards.
Let’s see how this works in practice.
Configuring Amazon Redshift Streaming Ingestion Apart from managing permissions, Amazon Redshift streaming ingestion can be configured entirely with SQL within Amazon Redshift. This is especially useful for business users who lack access to the AWS Management Console or the expertise to configure integrations between AWS services.
You can set up streaming ingestion in three steps:
Create or update an AWS Identity and Access Management (IAM) role to allow access to the streaming platform you use (Kinesis Data Streams or Amazon MSK). Note that the IAM role should have a trust policy that allows Amazon Redshift to assume the role.
Create an external schema to connect to the streaming service.
Create a materialized view that references the streaming object (Kinesis data stream or Kafka topic) in the external schemas.
After that, you can query the materialized view to use the data from the stream in your analytics workloads. Streaming ingestion works with Amazon Redshift provisioned clusters and with the new serverless option. To maximize simplicity, I am going to use Amazon Redshift Serverless in this walkthrough.
To prepare my environment, I need a Kinesis data stream. In the Kinesis console, I choose Data streams in the navigation pane and then Create data stream. For the Data stream name, I use my-input-stream and then leave all other options set to their default value. After a few seconds, the Kinesis data stream is ready. Note that by default I am using on-demand capacity mode. In a development or test environment, you can choose provisioned capacity mode with one shard to optimize costs.
Now, I create an IAM role to give Amazon Redshift access to the my-input-stream Kinesis data streams. In the IAM console, I create a role with this policy:
In the Amazon Redshift console, I choose Redshift serverless from the navigation pane and create a new workgroup and namespace, similar to what I did in this blog post. When I create the namespace, in the Permissions section, I choose Associate IAM roles from the dropdown menu. Then, I select the role I just created. Note that the role is visible in this selection only if the trust policy allows Amazon Redshift to assume it. After that, I complete the creation of the namespace using the default options. After a few minutes, the serverless database is ready for use.
In the Amazon Redshift console, I choose Query editor v2 in the navigation pane. I connect to the new serverless database by choosing it from the list of resources. Now, I can use SQL to configure streaming ingestion. First, I create an external schema that maps to the streaming service. Because I am going to use simulated IoT data as an example, I call the external schema sensors.
CREATE EXTERNAL SCHEMA sensors
FROM KINESIS
IAM_ROLE 'arn:aws:iam::123412341234:role/redshift-streaming-ingestion';
To access the data in the stream, I create a materialized view that selects data from the stream. In general, materialized views contain a precomputed result set based on the result of a query. In this case, the query is reading from the stream, and Amazon Redshift is the consumer of the stream.
Because streaming data is going to be ingested as JSON data, I have two options:
Leave all the JSON data in a single column and use Amazon Redshift capabilities to query semi-structured data.
Extract JSON properties into their own separate columns.
Let’s see the pros and cons of both options.
The approximate_arrival_timestamp, partition_key, shard_id, and sequence_number columns in the SELECT statement are provided by Kinesis Data Streams. The record from the stream is in the kinesis_data column. The refresh_time column is provided by Amazon Redshift.
To leave the JSON data in a single column of the sensor_data materialized view, I use the JSON_PARSE function:
CREATE MATERIALIZED VIEW sensor_data AUTO REFRESH YES AS
    SELECT approximate_arrival_timestamp,
           partition_key,
           shard_id,
           sequence_number,
           refresh_time,
           JSON_PARSE(kinesis_data, 'utf-8') as payload
      FROM sensors."my-input-stream";
CREATE MATERIALIZED VIEW sensor_data AUTO REFRESH YES AS
SELECT approximate_arrival_timestamp,
partition_key,
shard_id,
sequence_number,
refresh_time,
JSON_PARSE(kinesis_data) as payload
FROM sensors."my-input-stream";
Because I used the AUTO REFRESH YES parameter, the content of the materialized view is automatically refreshed when there is new data in the stream.
To extract the JSON properties into separate columns of the sensor_data_extract materialized view, I use the JSON_EXTRACT_PATH_TEXT function:
CREATE MATERIALIZED VIEW sensor_data_extract AUTO REFRESH YES AS
    SELECT approximate_arrival_timestamp,
           partition_key,
           shard_id,
           sequence_number,
           refresh_time,
           JSON_EXTRACT_PATH_TEXT(FROM_VARBYTE(kinesis_data, 'utf-8'),'sensor_id')::VARCHAR(8) as sensor_id,
           JSON_EXTRACT_PATH_TEXT(FROM_VARBYTE(kinesis_data, 'utf-8'),'current_temperature')::DECIMAL(10,2) as current_temperature,
           JSON_EXTRACT_PATH_TEXT(FROM_VARBYTE(kinesis_data, 'utf-8'),'status')::VARCHAR(8) as status,
           JSON_EXTRACT_PATH_TEXT(FROM_VARBYTE(kinesis_data, 'utf-8'),'event_time')::CHARACTER(26) as event_time
      FROM sensors."my-input-stream";
Loading Data into the Kinesis Data Stream To put data in the my-input-stream Kinesis Data Stream, I use the following random_data_generator.py Python script simulating data from IoT sensors:
import datetime
import json
import random
import boto3

STREAM_NAME = "my-input-stream"


def get_random_data():
    current_temperature = round(10 + random.random() * 170, 2)
    if current_temperature > 160:
        status = "ERROR"
    elif current_temperature > 140 or random.randrange(1, 100) > 80:
        status = random.choice(["WARNING","ERROR"])
    else:
        status = "OK"
    return {
        'sensor_id': random.randrange(1, 100),
        'current_temperature': current_temperature,
        'status': status,
        'event_time': datetime.datetime.now().isoformat()
    }


def send_data(stream_name, kinesis_client):
    while True:
        data = get_random_data()
        partition_key = str(data["sensor_id"])
        print(data)
        kinesis_client.put_record(
            StreamName=stream_name,
            Data=json.dumps(data),
            PartitionKey=partition_key)


if __name__ == '__main__':
    kinesis_client = boto3.client('kinesis')
    send_data(STREAM_NAME, kinesis_client)
I start the script and see the records that are being put in the stream. They use a JSON syntax and contain random data.
Querying Streaming Data from Amazon Redshift To compare the two materialized views, I select the first ten rows from each of them:
In the sensor_data materialized view, the JSON data in the stream is in the payload column. I can use Amazon Redshift JSON functions to access data stored in JSON format.
In the sensor_data_extract materialized view, the JSON data in the stream has been extracted into different columns: sensor_id, current_temperature, status, and event_time.
Now I can use the data in these views in my analytics workloads together with the data in my data warehouse, my operational databases, and my data lake. I can use the data in these views together with Redshift ML to train a machine learning model or use predictive analytics. Because materialized views support incremental updates, the data in these views can be efficiently used as a data source for dashboards, for example, using Amazon Redshift as a data source for Amazon Managed Grafana.
Availability and Pricing Amazon Redshift streaming ingestion for Kinesis Data Streams and Managed Streaming for Apache Kafka is generally available today in all commercial AWS Regions.
There are no additional costs for using Amazon Redshift streaming ingestion. For more information, see Amazon Redshift pricing.
It’s never been easier to use low-latency streaming data in your data warehouse and in your data lake. Let us know what you build with this new capability!
With the release of Amazon Verified Permissions, developers of custom applications can implement access control logic based on caller and resource information; group membership, hierarchy, and relationship; and session context, such as device posture, location, time, or method of authentication. With Amazon Verified Permissions, you can focus on building simple authorization policies and your applications—instead of, for example, building an authorization engine for your multi-tenant consumer applications.
Amazon Verified Permissions uses the Cedar policy language, which simplifies the implementation, review, and maintenance of large and complex access control strategies.
Amazon Verified Permissions includes schema definitions, policy statement grammar, and automated reasoning that scales across millions of permissions, which enables you to enforce the principles of default deny and of least privilege. These features facilitate the deployment of an in-depth fine-grained authorization model to support your Zero-Trust objectives.
In this blog post, we’ll discuss how you can use Amazon Verified Permissions to create authorization policies that are an improvement over traditional access control models, and we provide some best practices for the use of this feature.
What is fine-grained authorization? Is it a role-based or an attribute-based access control mechanism?
Traditionally, customers deploy access control strategies based on roles or attributes.
Role-based access control (RBAC) is an approach of granting access to resources through group memberships instead of individual users. This approach, although it simplifies the definition of entitlements, can become very complex when you scale out groups’ memberships, hierarchies, and nestings.
Consider a photo sharing application that allows users to upload photos and share those photos with friends. We have a user Alice who uploads their vacation photos to a folder named Austin2022. Alice decides to share these photos with friends.
Alice provides a link to their vacation photos to a friend named Bob. Using the link, Bob is able to view photos in the folder Austin2022, because Bob is in the user group Alice/Friends. That is, Bob has the role of Alice/Friends. If Bob were removed as Alice’s friend, Bob would not be able to view Alice’s photos. This is an example of how role-based access control works.
Attribute-based access control (ABAC) deviates from the static nature of RBAC by introducing access rules based on the characteristics of the following: the requestor identity; the attributes of the resources targeted; or contextual elements such as the request time, where the request originated, or the device used to make the request.
Let’s consider who can delete photos in the example photo sharing application. We want to make sure that only Alice can delete their photos. That is, we make an authorization decision based on the attribute owner of the resource photo.
Fine-grained authorization (FGA) is a model that combines the advantages of both RBAC and ABAC, so that customers can find the right balance between each approach for their individual use case. Understanding the FGA approach is key to writing policy statements in Amazon Verified Permissions.
How does permissions policy statement language work?
To define a policy statement, Amazon Verified Permissions uses a policy language based on the PARC model, as AWS Identity and Access Management (IAM) does for IAM policies. PARC refers to the four objects in the policy language: principal, action, resource, and condition, and these are defined as follows:
The principal is the entity taking the action. Often this will be a human user, but it could also be another service or a device.
The action is the operation being performed, for which permission must be granted. Often the action will map to an API call.
The resource is the target of the call.
The condition limits when or where the principal can make the action on the resource.
Using this language, you can create a policy that allows user Alice (the principal) to call deletePhoto (the action) on VacationPhoto_1.jpg (the resource) when Alice is logged in by using multi-factor authentication (the condition). After the Amazon Verified Permissions policy is authored, you will store it in your Amazon Verified Permissions policy store instance.
Policy statements are divided into two sections:
The policy head, which defines the targets of the policy (principal, action, resource) and whether the policy permits or forbids the action.
The Conditions section, which allows you to place conditions that authorize API actions only when specified criteria are met.
You can use the structure of the policy statements to tell at a glance whether a policy follows an RBAC, an ABAC, or an FGA approach, as shown in the following three examples.
// This style of policy can be used to implement a RBAC approach
permit(
  principal in UserGroup::"Alice/Friends",
  action in [
    Action::"readFile",
    Action::"writeFile"
  ],
  resource in Folder::"Playa del Sol 2021"
);
// This style of policy can be used to implement an ABAC approach
permit(principal, action, resource)
when {
  principal.permitted_access_level >= resource.access_level
};
// This style of policy can be used to implement a hybrid approach
permit(
  principal in UserGroup::"Alice/Friends",
  action in [
    Action::"readFile",
    Action::"writeFile"
  ],
  resource in Folder::"Playa del Sol 2021"
)
when {
  principal.permitted_access_level >= resource.access_level
};
Let’s go back to our example of Alice and Bob. Now, Alice can define a policy that allows their friends to view photos in their folder Austin2022, as follows.
permit(
    principal in UserGroup::"Alice/Friends",
    action == Action::"viewPhoto",
    resource in Folder::"Austin2022"
);
The policy head says to permit the viewPhoto action to be performed on resources in the folder Austin2022 for principals in user group Alice/Friends. There is no condition section for this policy. With the preceding policy, Bob can access the photos in Alice’s Austin2022 album as long as Bob is a member of the group Alice/Friends.
We can go back to the photo deletion workflow for a more complex scenario. To delete photos, you want to ensure that the requestor owns the photo. Additionally, you might require the user to be logged in via multi-factor authentication (MFA). This policy can be written as follows.
The policy head permits a user to call the action deletePhoto on photos. The condition section limits the policy to permit photo deletion only when the resource’s owner attribute is the same as the principal’s name attribute and the context object’s MFA attribute equals true.
Designing well-architected policy statements
In this section, we cover six best practices that help customers scale out efficiently.
Use immutable identifiers to reduce risk of collision
The policy statements in this blog post and in Amazon Verified Permissions documentation intentionally use human-readable values such as Bob for a Principal entity, or Alice/Friends for a Group entity. This is useful when discussing general concepts, but in production systems, customers should utilize unique and immutable values for entities. As an example, what would happen if Alice wants to change their user name?
Instead of creating a user named Alice, you should use an autogenerated and unique identifier such as a Universally Unique Identifier (UUID). Those are generally available from your user directory, JSON Web Token, or file system. That way, you can create a user object with the ID a1b2c3d4-5678-90ab-cdef-EXAMPLE11111 and the name attribute Alice. This would allow you to update Alice’s user name without needing to recreate the user object.
Reduce the number of policies that use entity grouping
Policy statements can only contain a single principal entity and a single resource entity. If you want the same policy to apply to multiple principals or resources, you can group common entities and use an in statement.
In this example, Bob’s user account could be stored as the following object.
The parent relationship defined in Bob’s user account object is what makes Bob a member of the group Alice/Friends.
Now you can define a policy that allows Bob to gain access to Alice’s vacation photos because he is in the group Alice/Friends, as follows.
permit(
    principal in UserGroup::"Alice/Friends",
    action == Action::"viewPhoto",
    resource in Folder::"Austin2022"
);
Use namespaces to remove ambiguity
You can use namespaces to remove ambiguity. Returning to our application, let’s say that you want to give users the ability to delete their photos. But your moderators also need the ability to delete inappropriate photos. How can you distinguish between the user action deletePhoto and the administrator action deletePhoto? Namespaces give you this flexibility.
When creating your entities, you can add namespaces in the EntityType field, as in the following example.
You then use the namespace in your permit policy, as follows.
permit(
  principal,
  action == Admin::Action::"deletePhoto",
  resource == File::"Photo")
when {
  principal.role == Moderator
};
This policy requires a user to have the role Moderator to successfully use the administrator deletePhoto action.
Set permission guardrails with forbid statements
The Amazon Verified Permissions policy engine denies any action that is not explicitly allowed with a permit policy. But you might want to establish permission guardrails to ensure that an action will be never allowed. You can create forbid policies for this purpose.
Returning to our photo sharing application, suppose that you want to ensure that no user can delete a photo unless the user has been authenticated with MFA. You could use the following policy.
This permission guardrail will help prevent the accidental grant of overly permissive deletePhoto permissions.
Simplify statements with unless conditions
When you define complex conditions for a policy statement, you might face situations where a policy needs multiple negative conditions. Amazon Verified Permissions provides an alternative keyword for the conditional expression: unless. For example, you might deny moderators the ability to delete photos unless they have flagged the photo as inappropriate, are authenticated using MFA, and are on the company’s network, in order to simplify policy statements.
Unless behaves the same as when, except that using unless requires all conditions to evaluate as false. With this additional expression, you can create statement that are less complex to review and maintain. The following example shows how you can simplify a condition with multiple parameters by using the unless expression.
// Allow access unless a resource was deleted more than 7 days ago
permit(
  principal in Group::"Alice/Friends",
  action == Action::"readPhoto",
  resource in Folder::"Playa del Sol 2021"
)
when {
  !(resource.status == "deleted"
   && resource.deletion_date < (context.time.now - 604800)) //7 days ago
}
The following example shows how you can simplify the previous policy by using an unless expression.
// Allow access unless a resource was deleted more than 7 days ago
permit(
  principal in Group::"Alice/Friends",
  action == Action::"readPhoto",
  resource in Folder::"Playa del Sol 2021"
)
unless {
  (resource.status == "deleted"
   && resource.deletion_date < (context.time.now - 604800)) //7 days ago
}
Rationalize policies with a template
You might face a situation where you are repeatedly creating the same rule for different contexts. In the following example, we demonstrate a policy that permits Alice to describe the folder Alice’s Org. Then we replicate the same policy for Bob and the folder Bob’s Org.
permit(
    principal == "Alice",
    action == Action::"describeFolder",
    resource == Folder::"Alice's Org"
)
when {
    resource.owner == principal.username
};

permit(
    principal == "Bob",
    action == Action::"describeFolder",
    resource == Folder::"Bob's Org"
)
when {
    resource.owner == principal.username
};
In this case, we recommend that you use a policy template to simplify the evaluation, as in the following example.
permit(
    principal == ?principal,
    action == Action::"describeFolder",
    resource == ?resource
)
when {
    resource.owner == principal.username
};
With a policy template, the statement inherits from a placeholder (in this example, ?principal and ?resource) and will be evaluated dynamically for each policy evaluation request, based on context that the application will provide.
Conclusion: Start authorizing with Amazon Verified Permissions
With Amazon Verified Permissions, you can create permission policies with expressiveness, performance, and readability in mind.
Using the best practices described in this post, you are ready to author policies with Amazon Verified Permissions. When combined with services like Amazon Cognito, Amazon API Gateway, an AWS Lambda authorizer, or AWS AppSync, Amazon Verified Permissions allows you to unlock in-depth and explicit access control logic securely using native AWS services.
Over the next months, AWS will release more resources to support our customers in their implementation of Amazon Verified Permissions. Learn more about Amazon Verified Permissions. Stay tuned and happy building.
If you have feedback about this post, submit comments in the Comments section below. If you have questions about this post, contact AWS Support.
Want more AWS Security news? Follow us on Twitter.
The collective thoughts of the interwebz
Manage Consent
To provide the best experiences, we use technologies like cookies to store and/or access device information. Consenting to these technologies will allow us to process data such as browsing behavior or unique IDs on this site. Not consenting or withdrawing consent, may adversely affect certain features and functions.
Functional
Always active
The technical storage or access is strictly necessary for the legitimate purpose of enabling the use of a specific service explicitly requested by the subscriber or user, or for the sole purpose of carrying out the transmission of a communication over an electronic communications network.
Preferences
The technical storage or access is necessary for the legitimate purpose of storing preferences that are not requested by the subscriber or user.
Statistics
The technical storage or access that is used exclusively for statistical purposes.The technical storage or access that is used exclusively for anonymous statistical purposes. Without a subpoena, voluntary compliance on the part of your Internet Service Provider, or additional records from a third party, information stored or retrieved for this purpose alone cannot usually be used to identify you.
Marketing
The technical storage or access is required to create user profiles to send advertising, or to track the user on a website or across several websites for similar marketing purposes.


![Spacetime Soccer, known outside the United States as '4D Football' is a now-defunct sport. Infamous for referee decisions hinging on inconsistent definitions of simultaneity, it is also known for the disappearance of many top players during... [more]](https://imgs.xkcd.com/comics/spacetime_soccer.png "Spacetime Soccer, known outside the United States as '4D Football' is a now-defunct sport. Infamous for referee decisions hinging on inconsistent definitions of simultaneity, it is also known for the disappearance of many top players during... [more]")


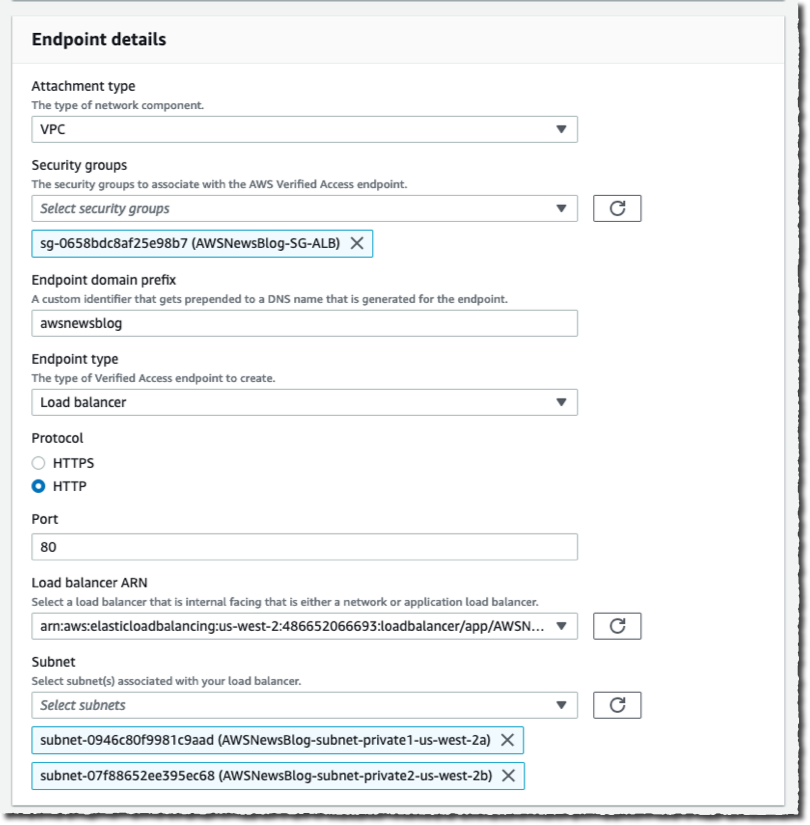
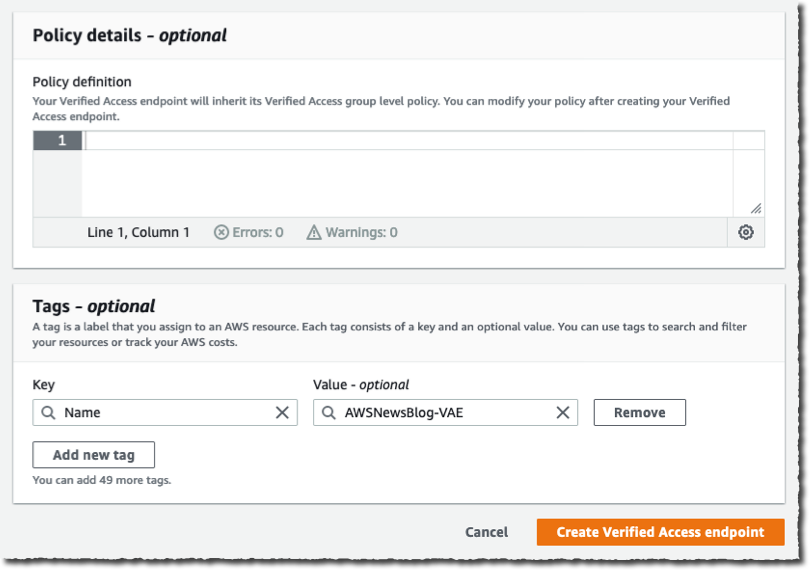


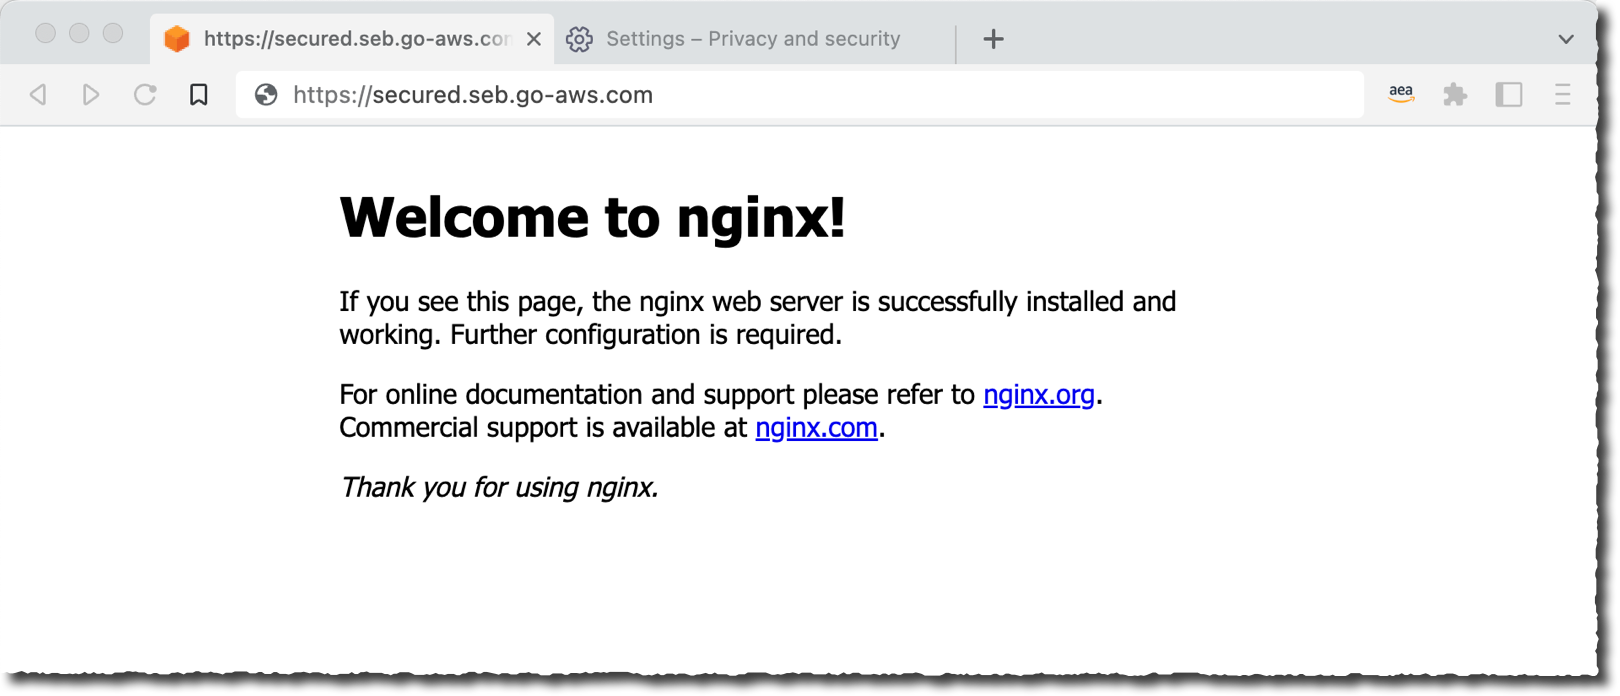


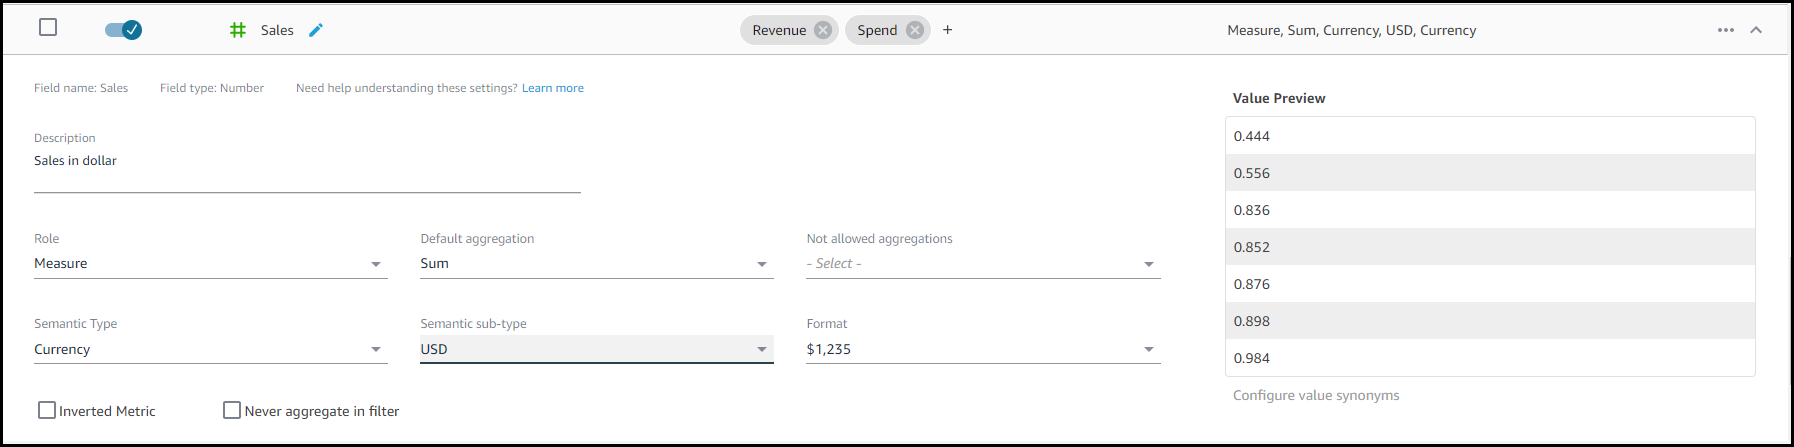
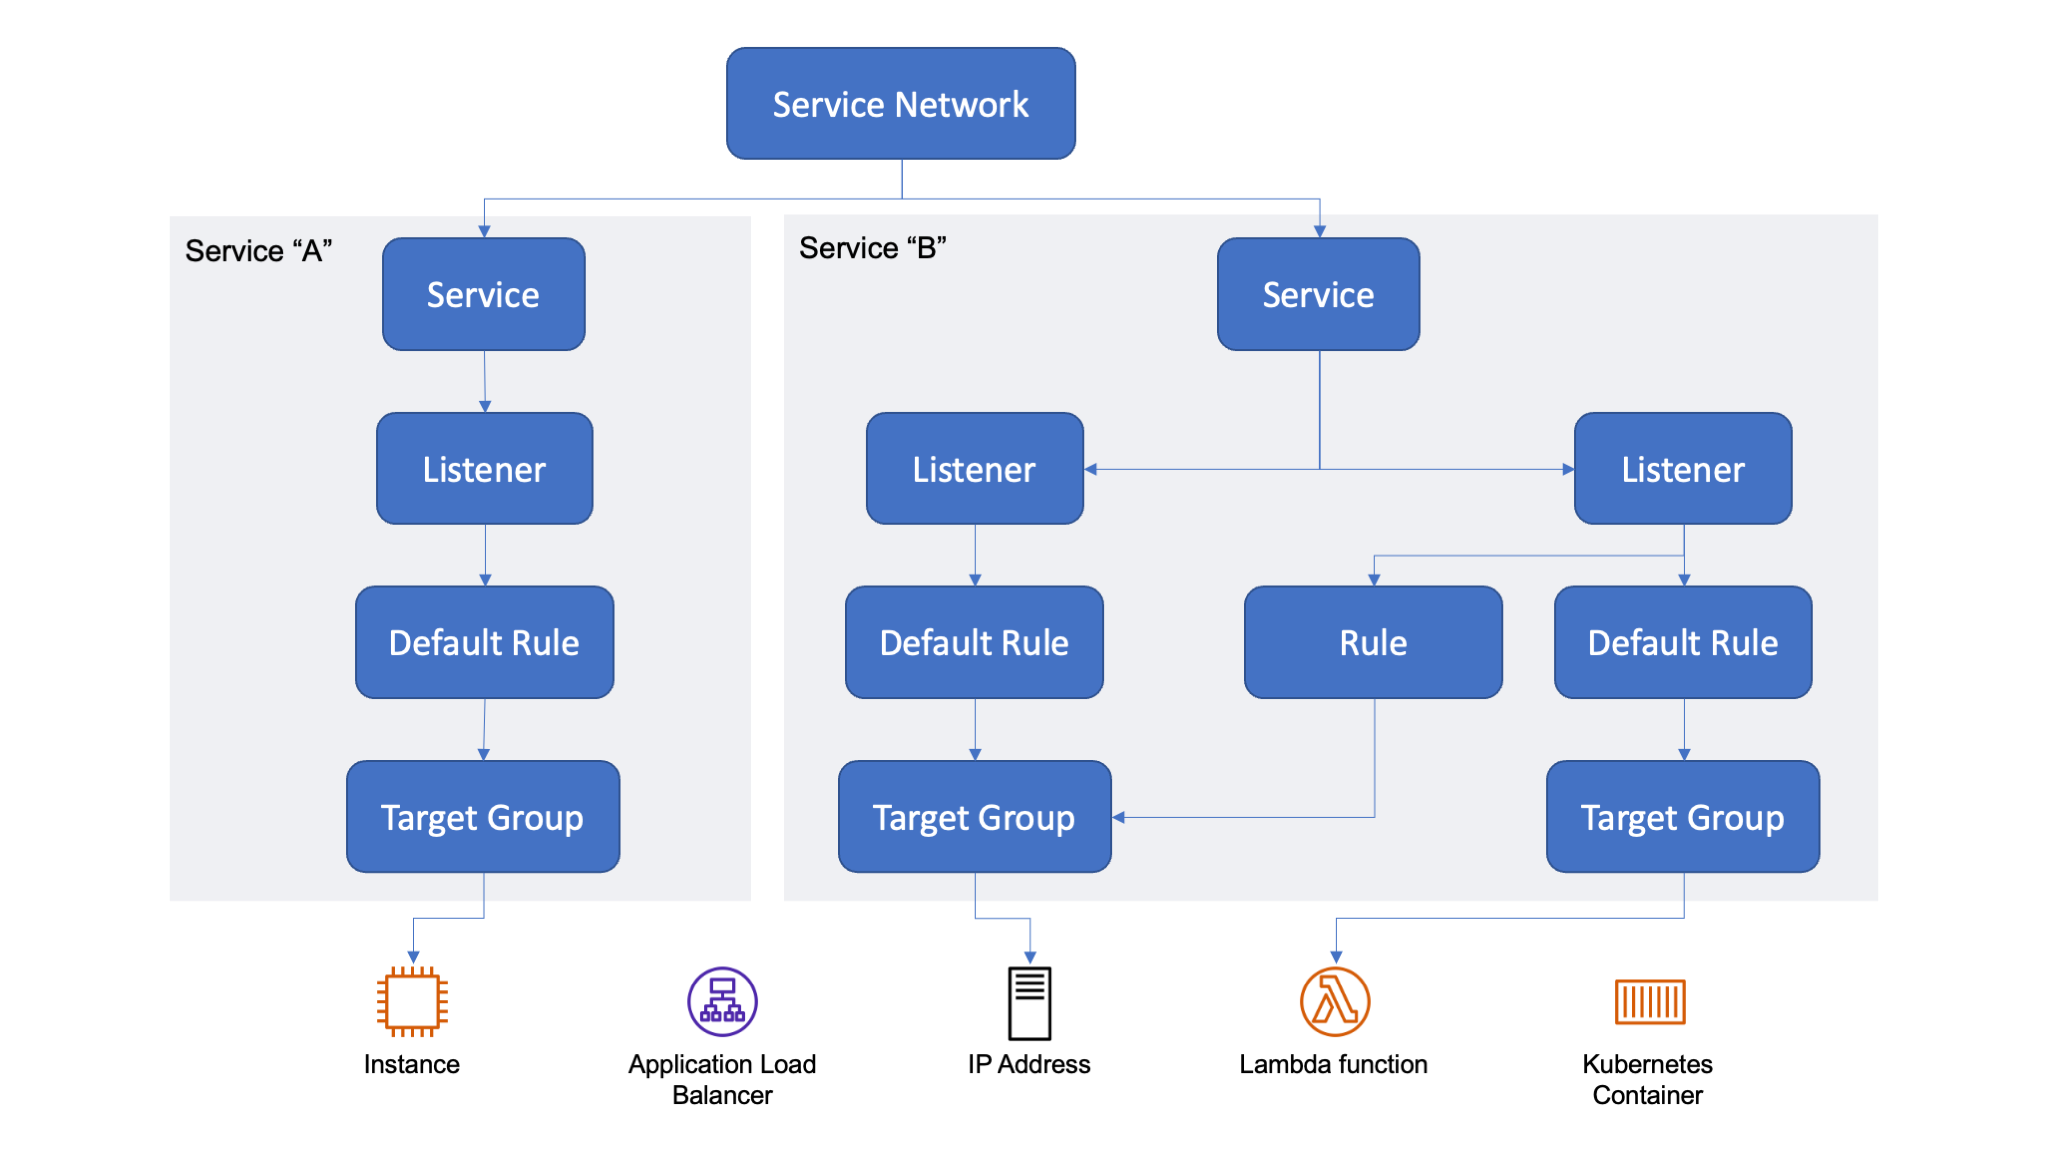
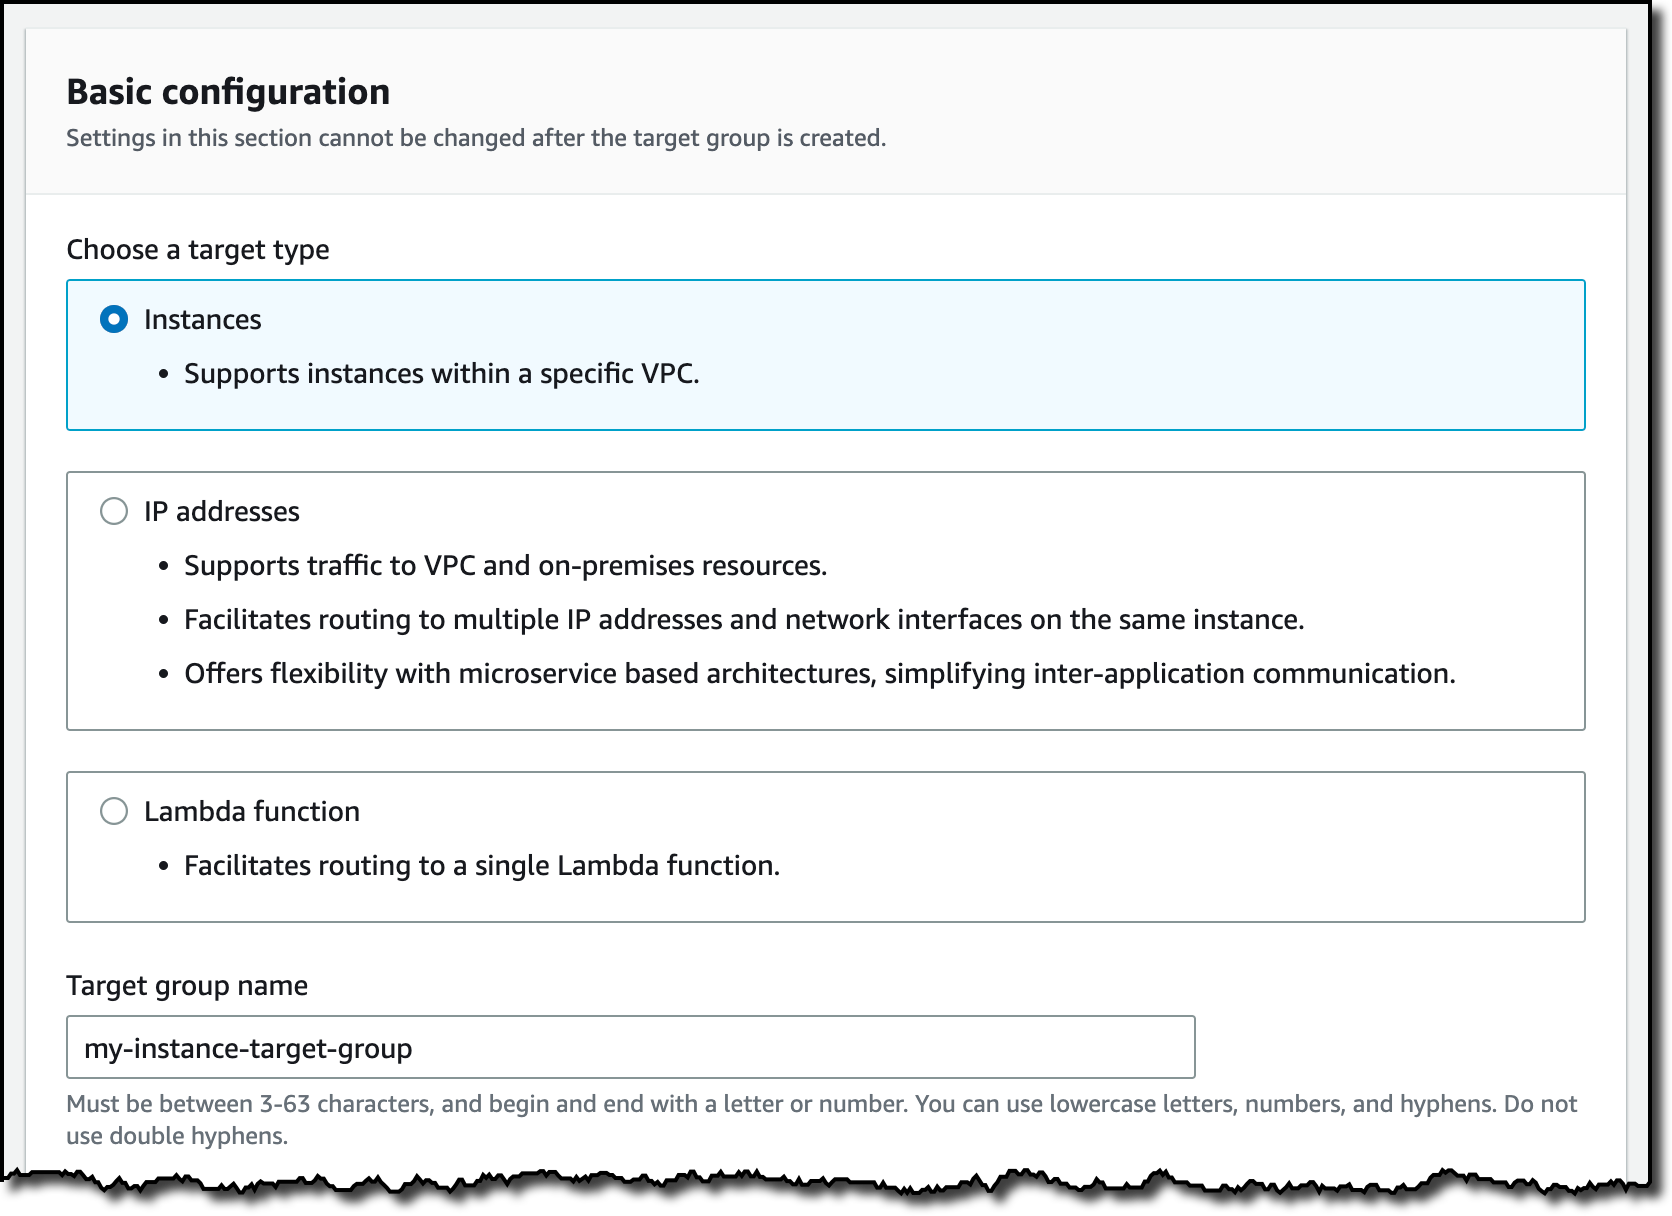


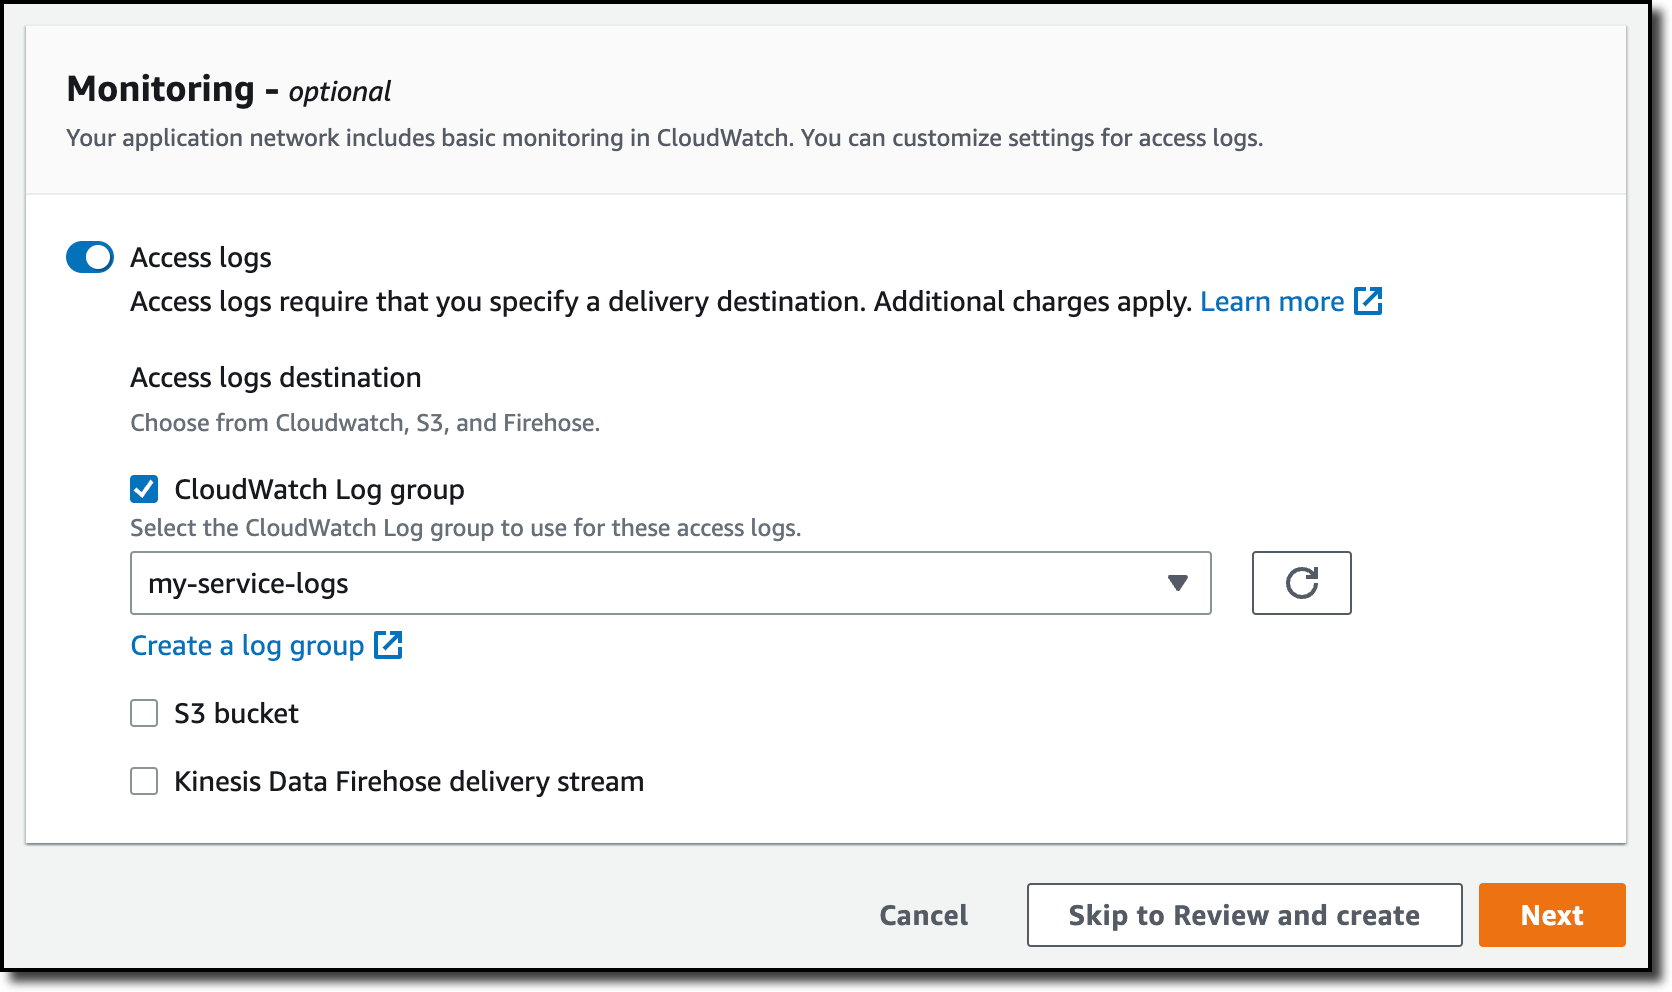


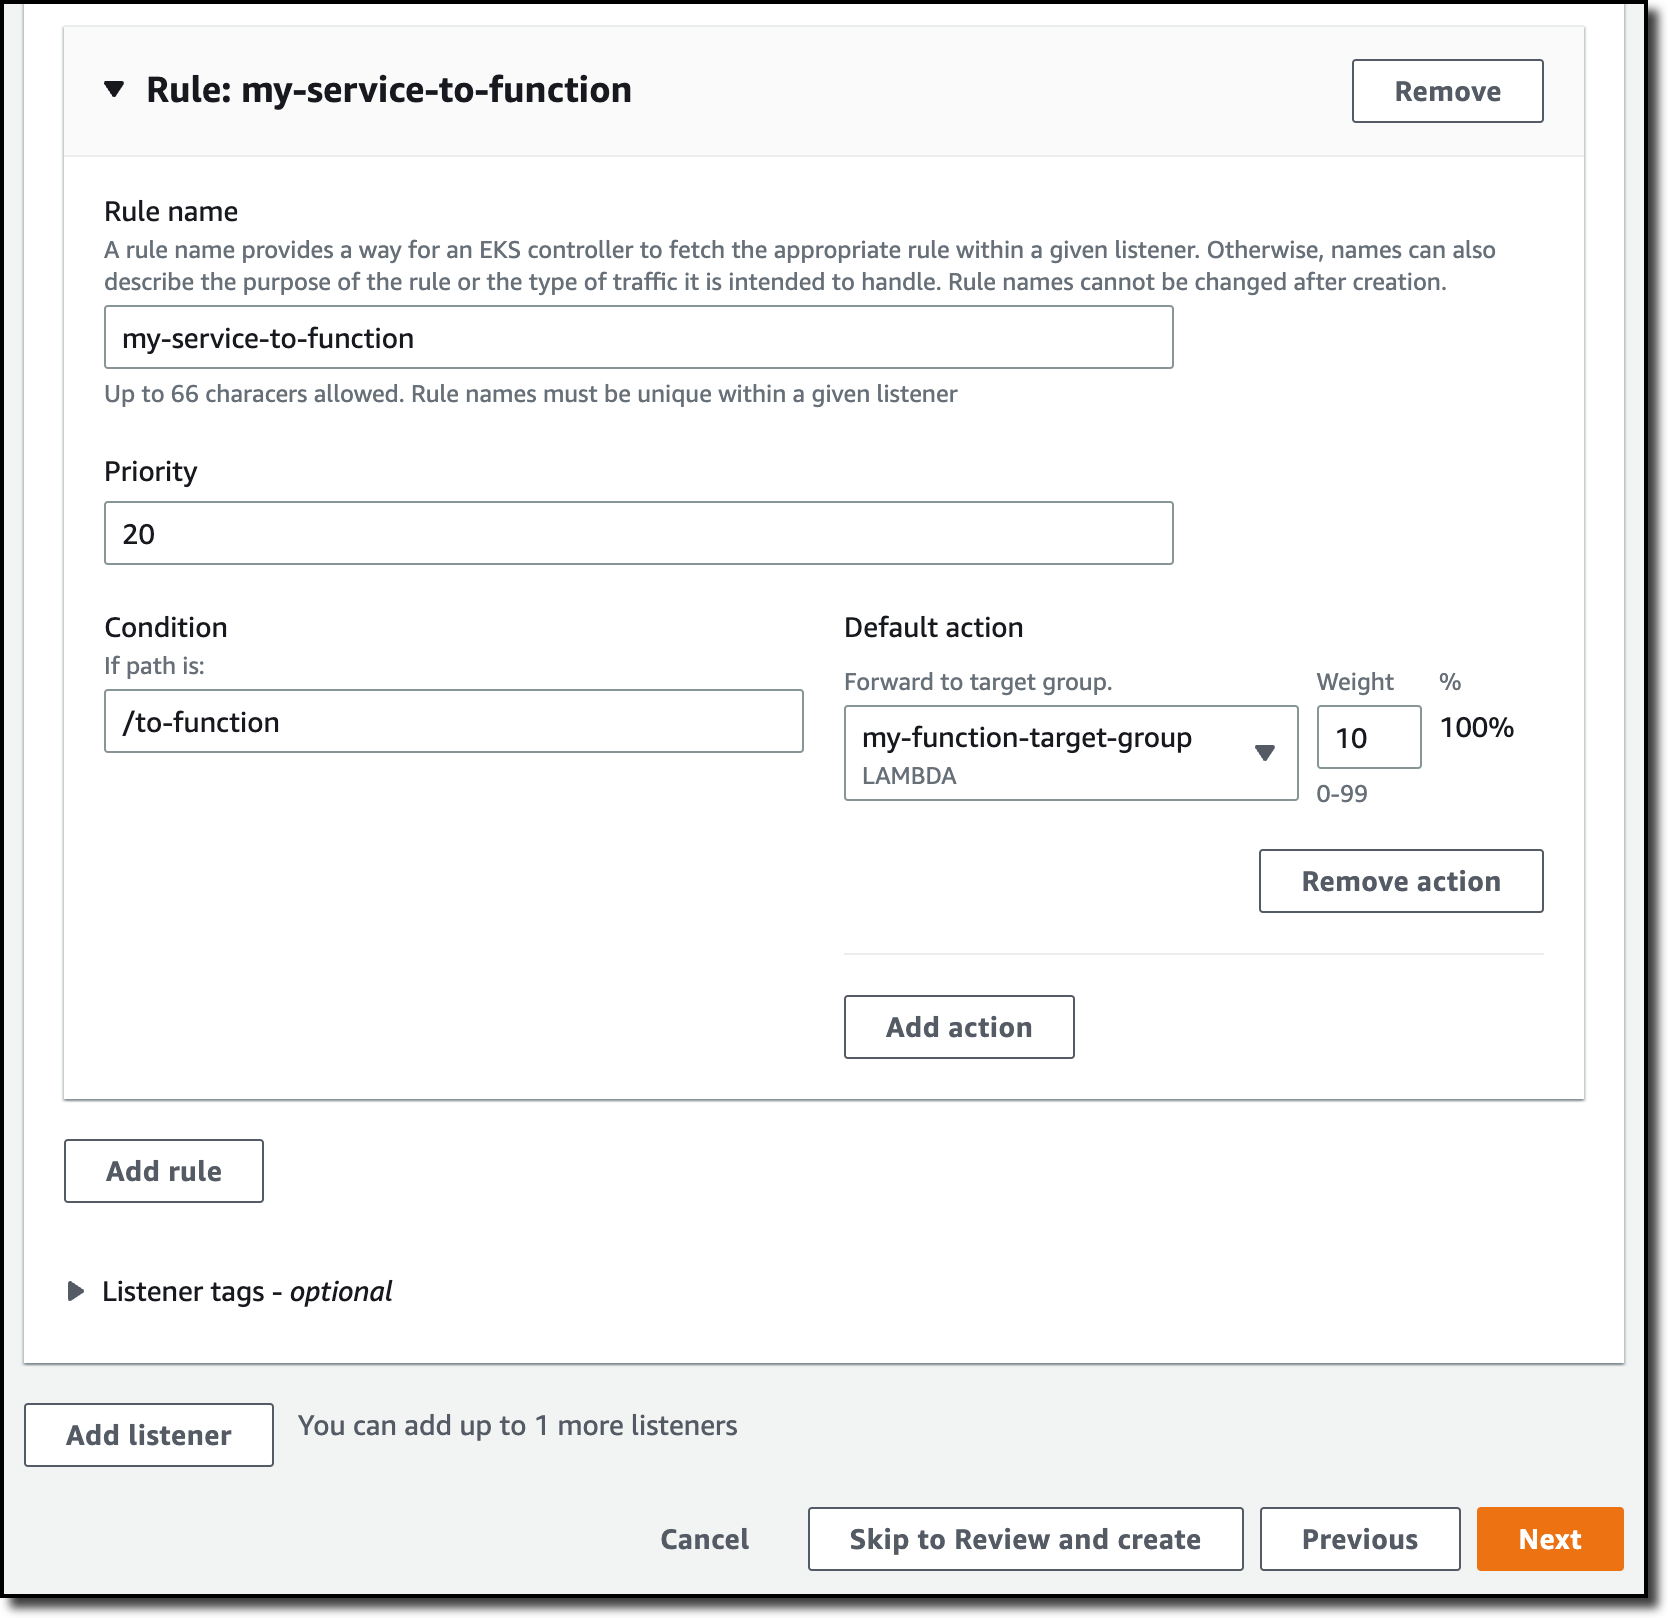
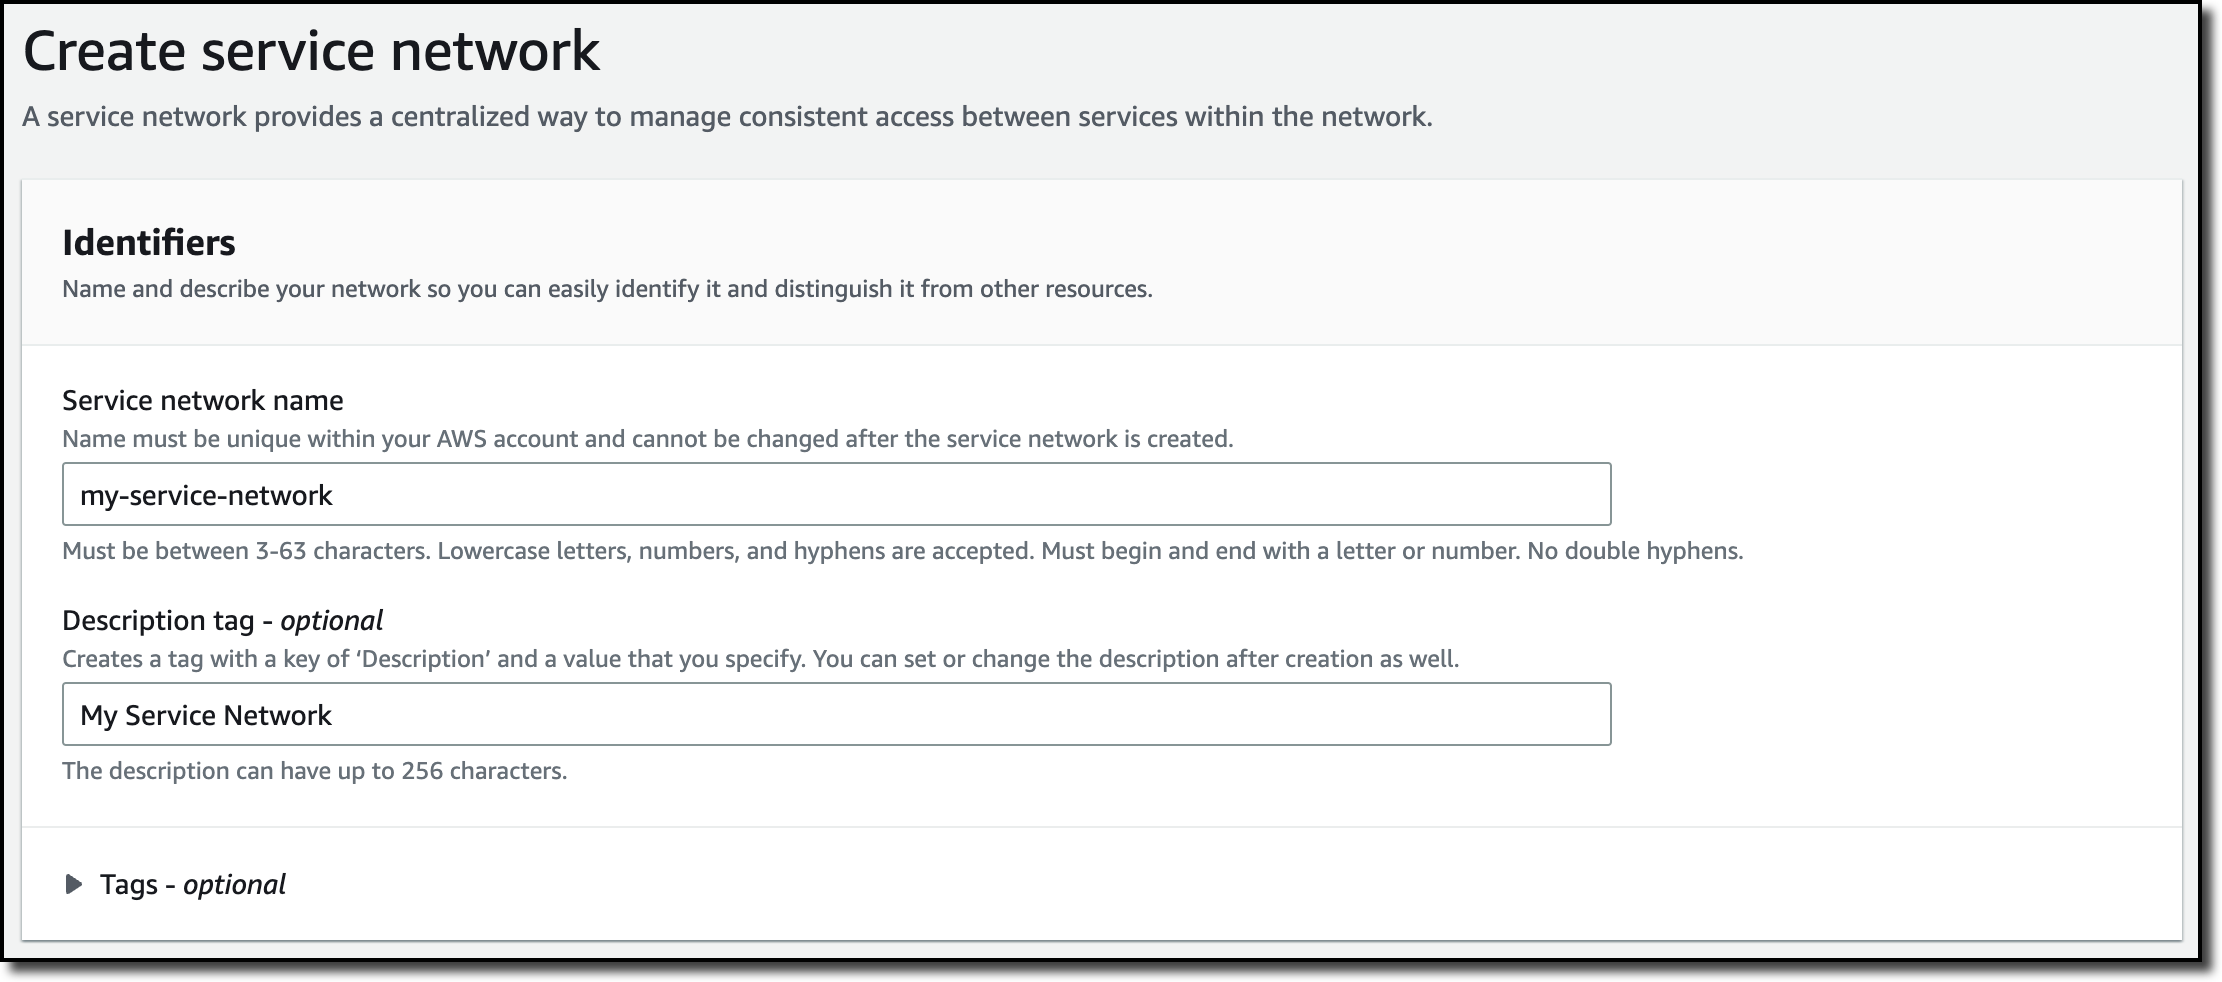
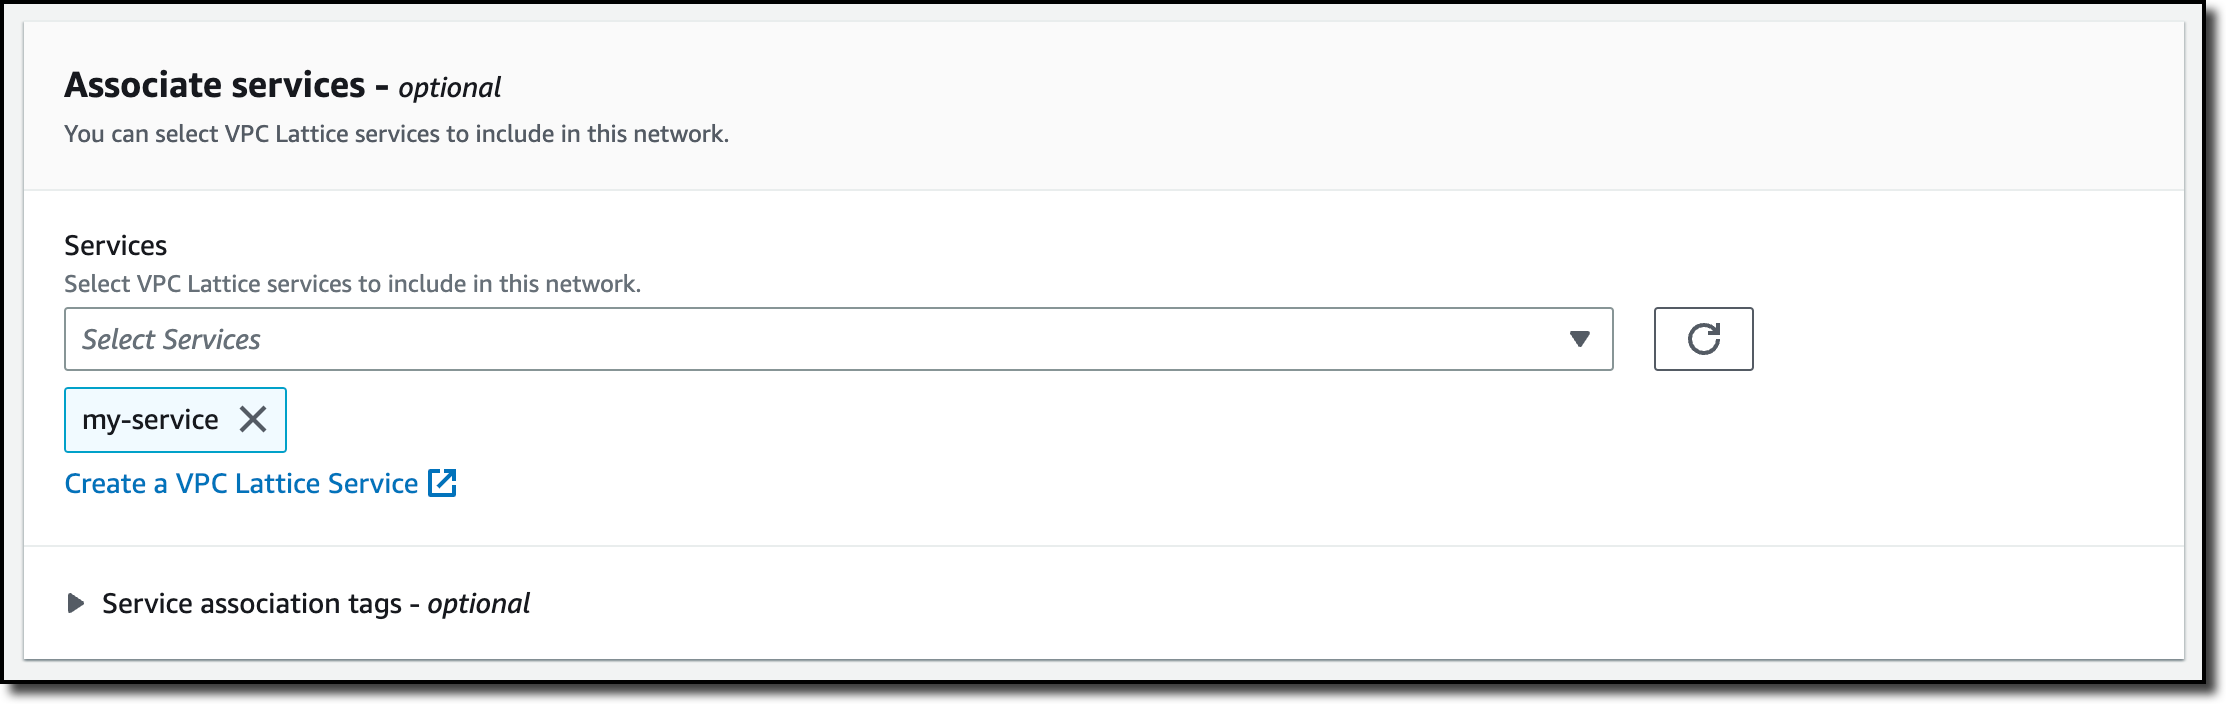


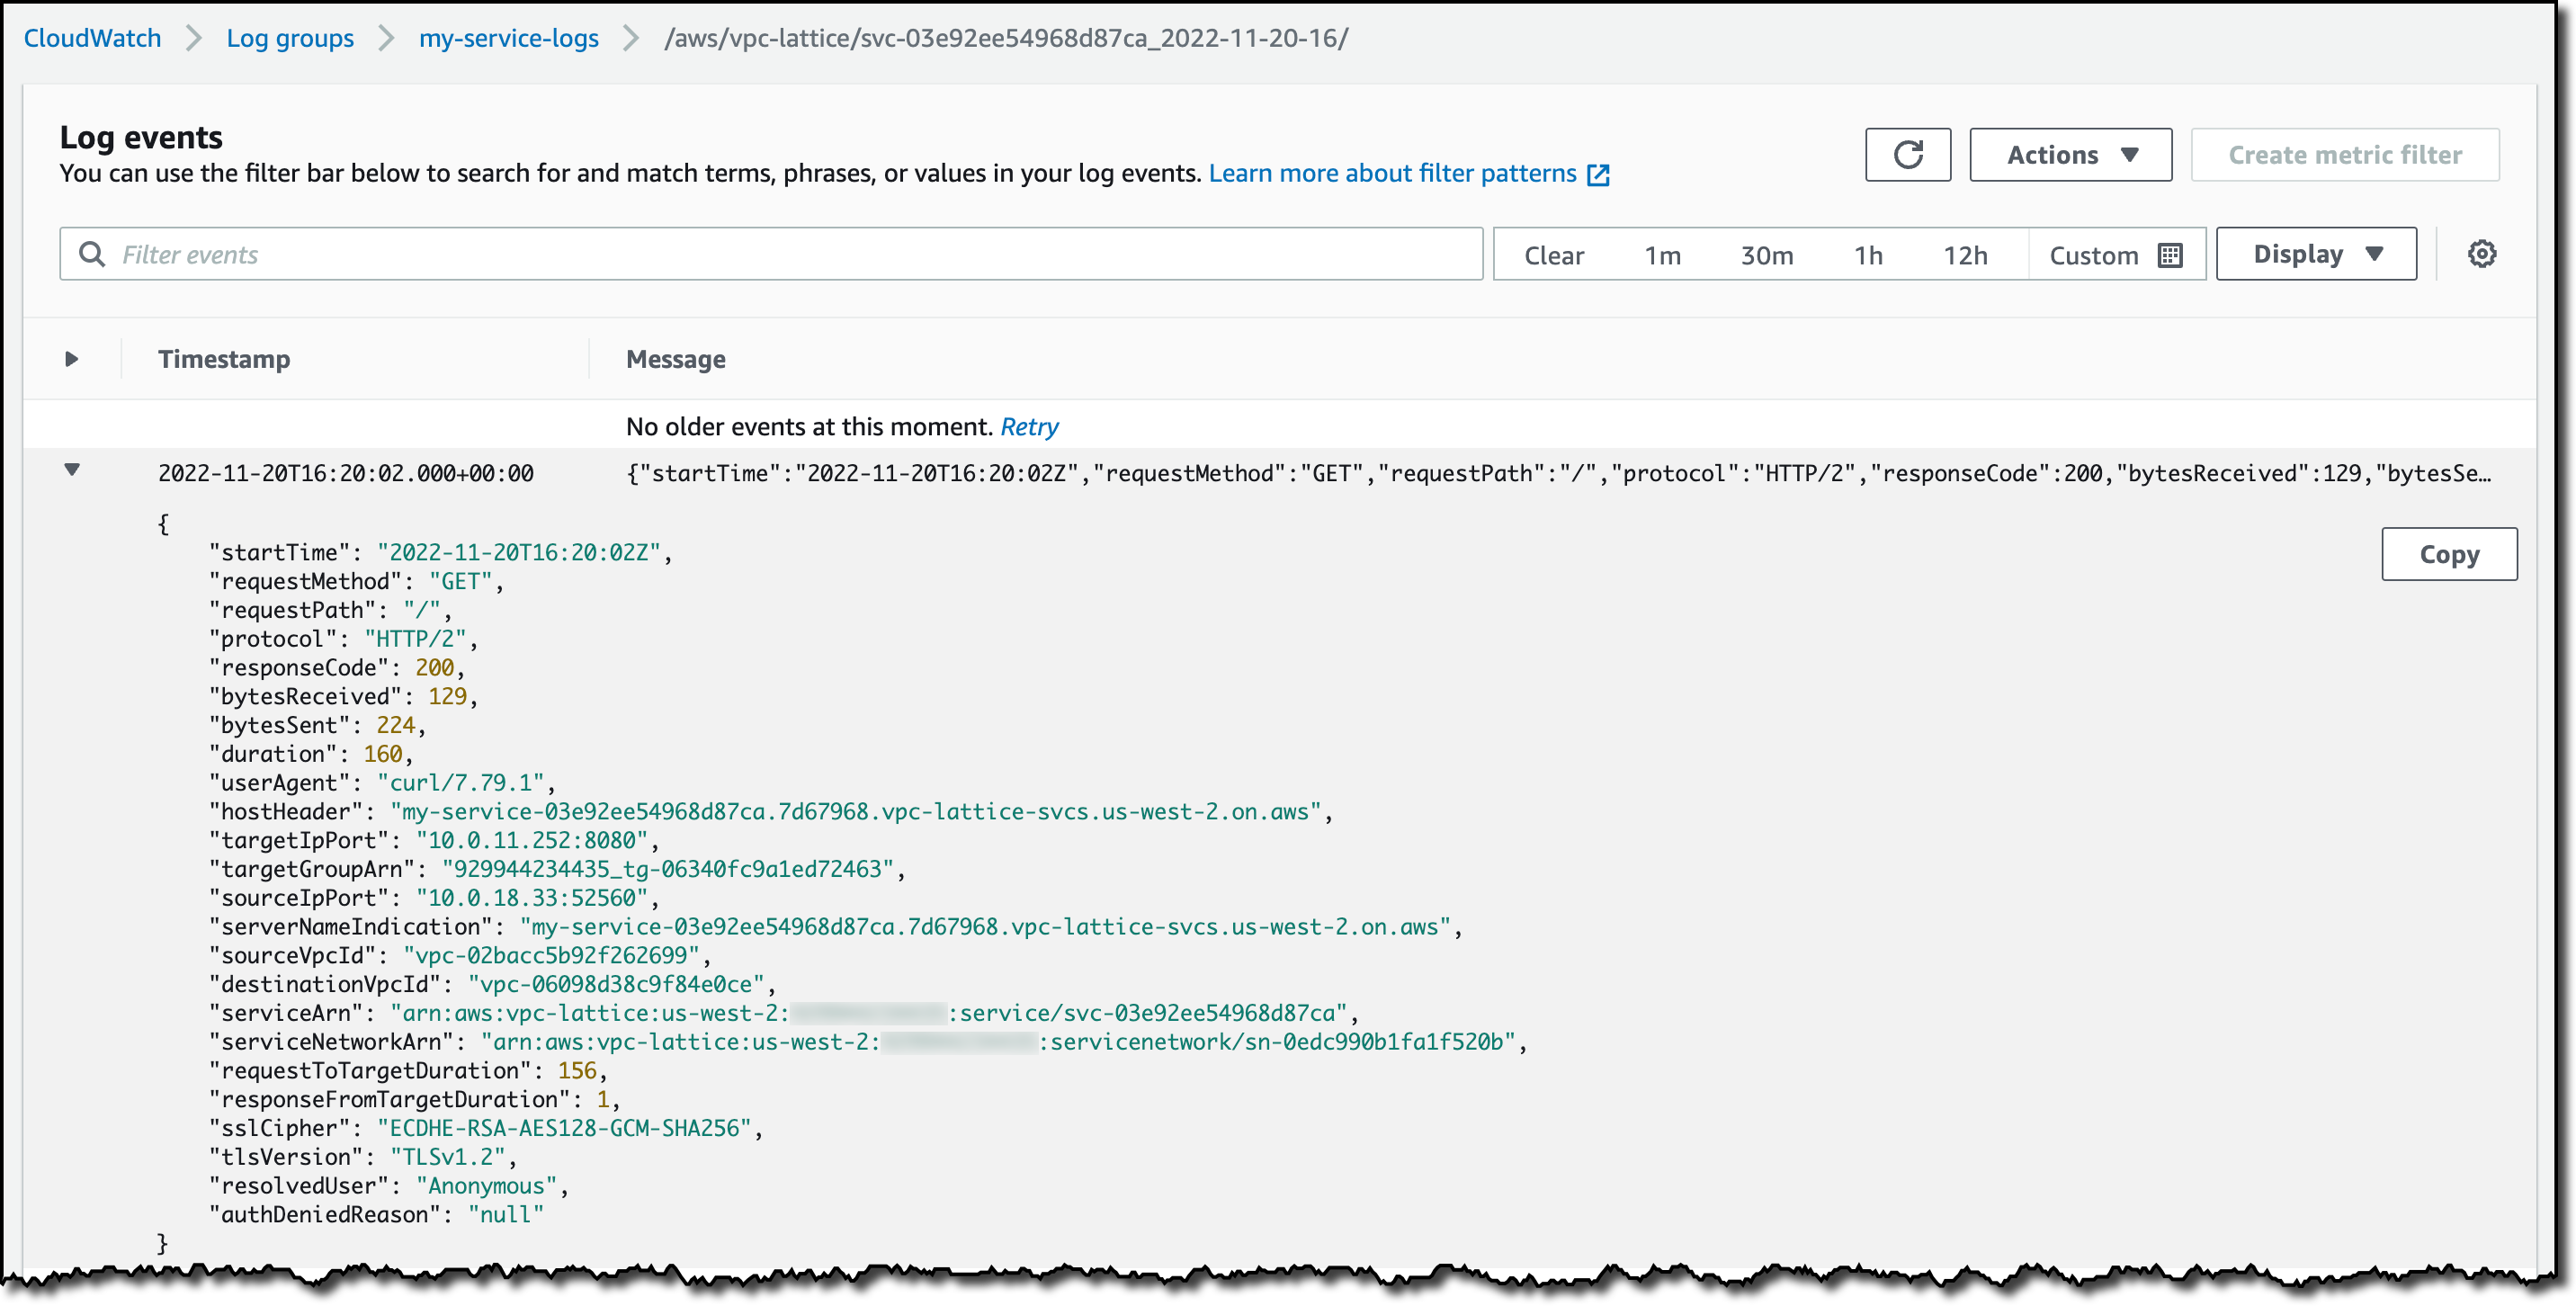


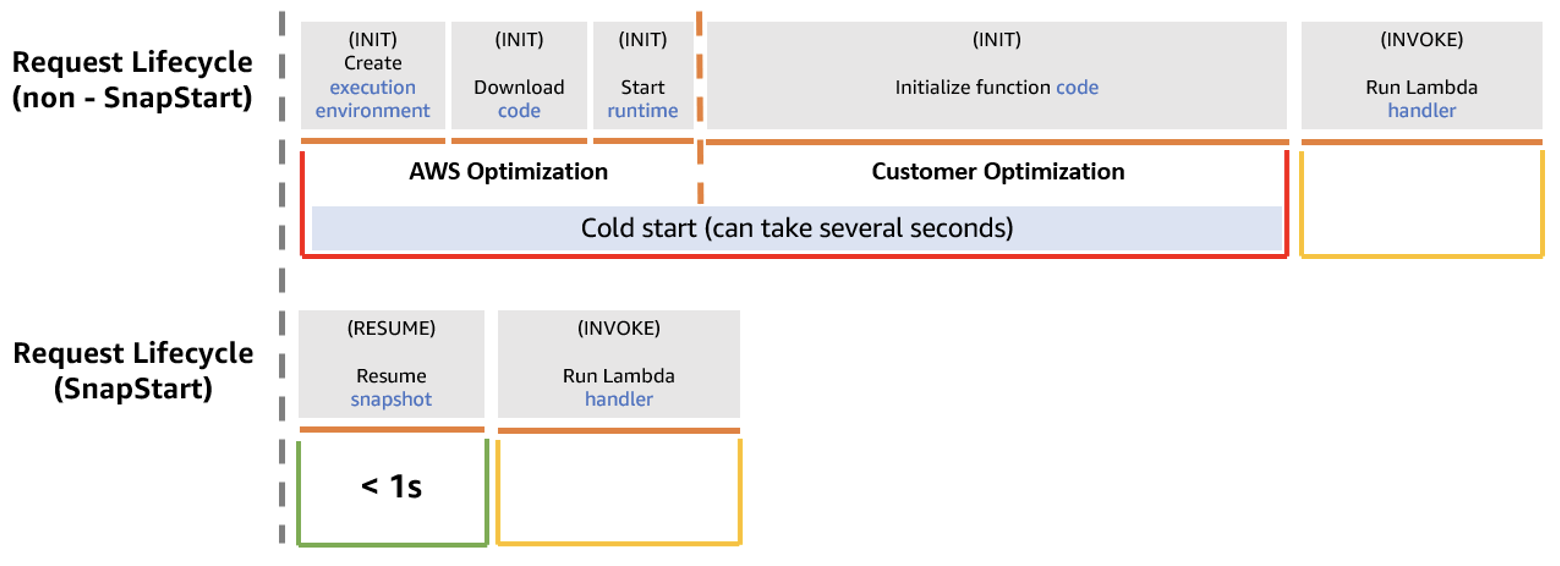
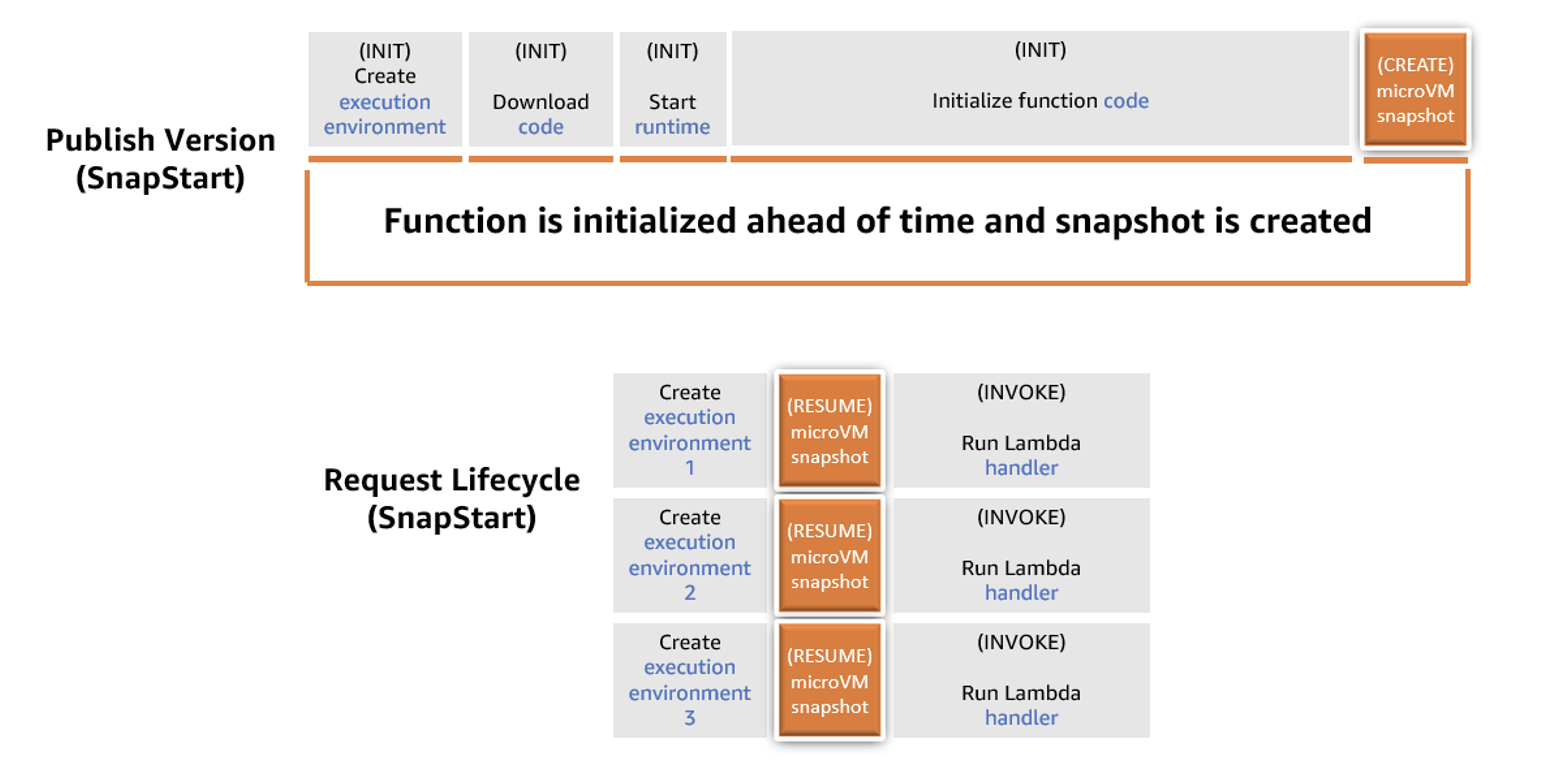


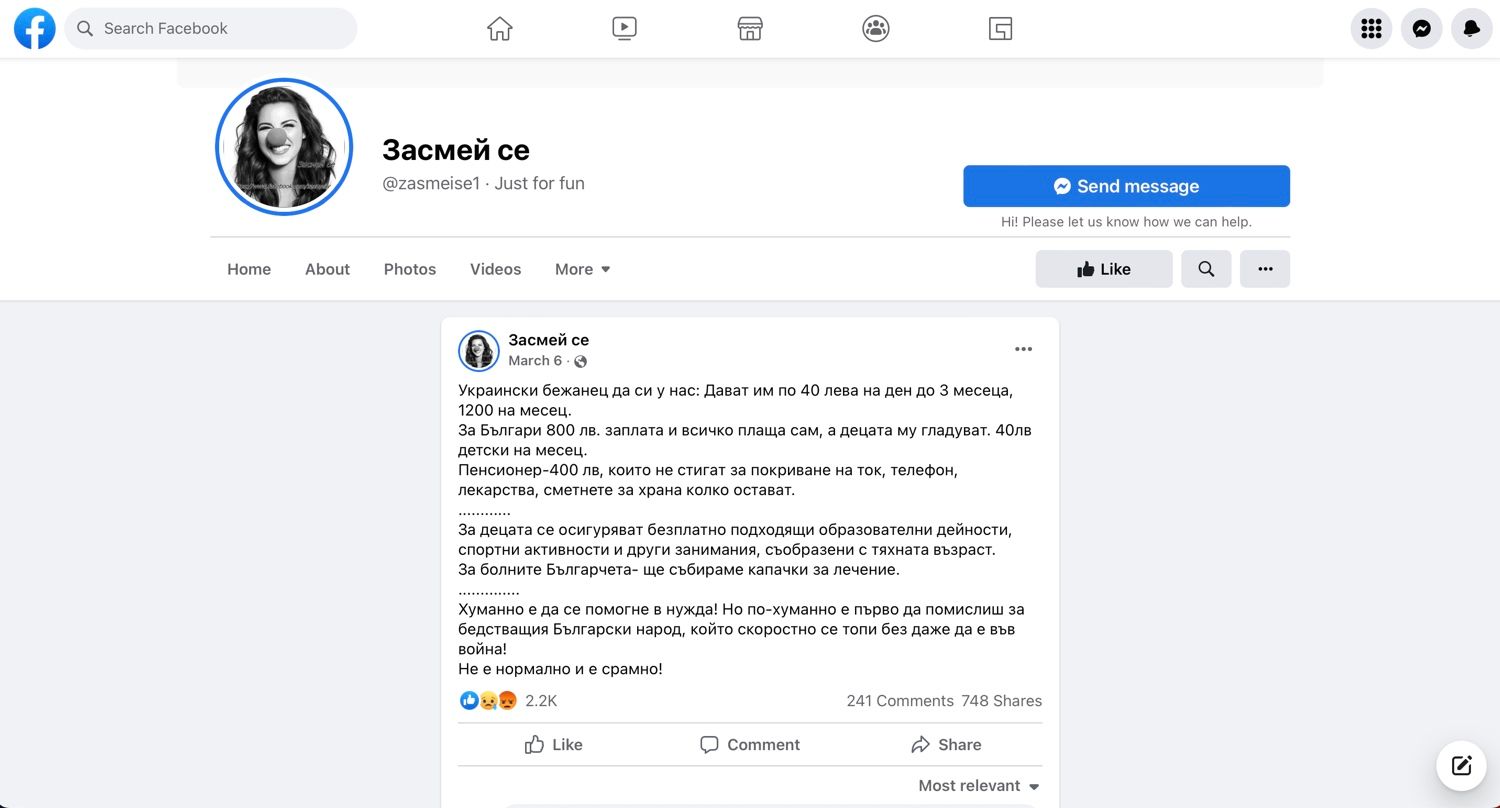
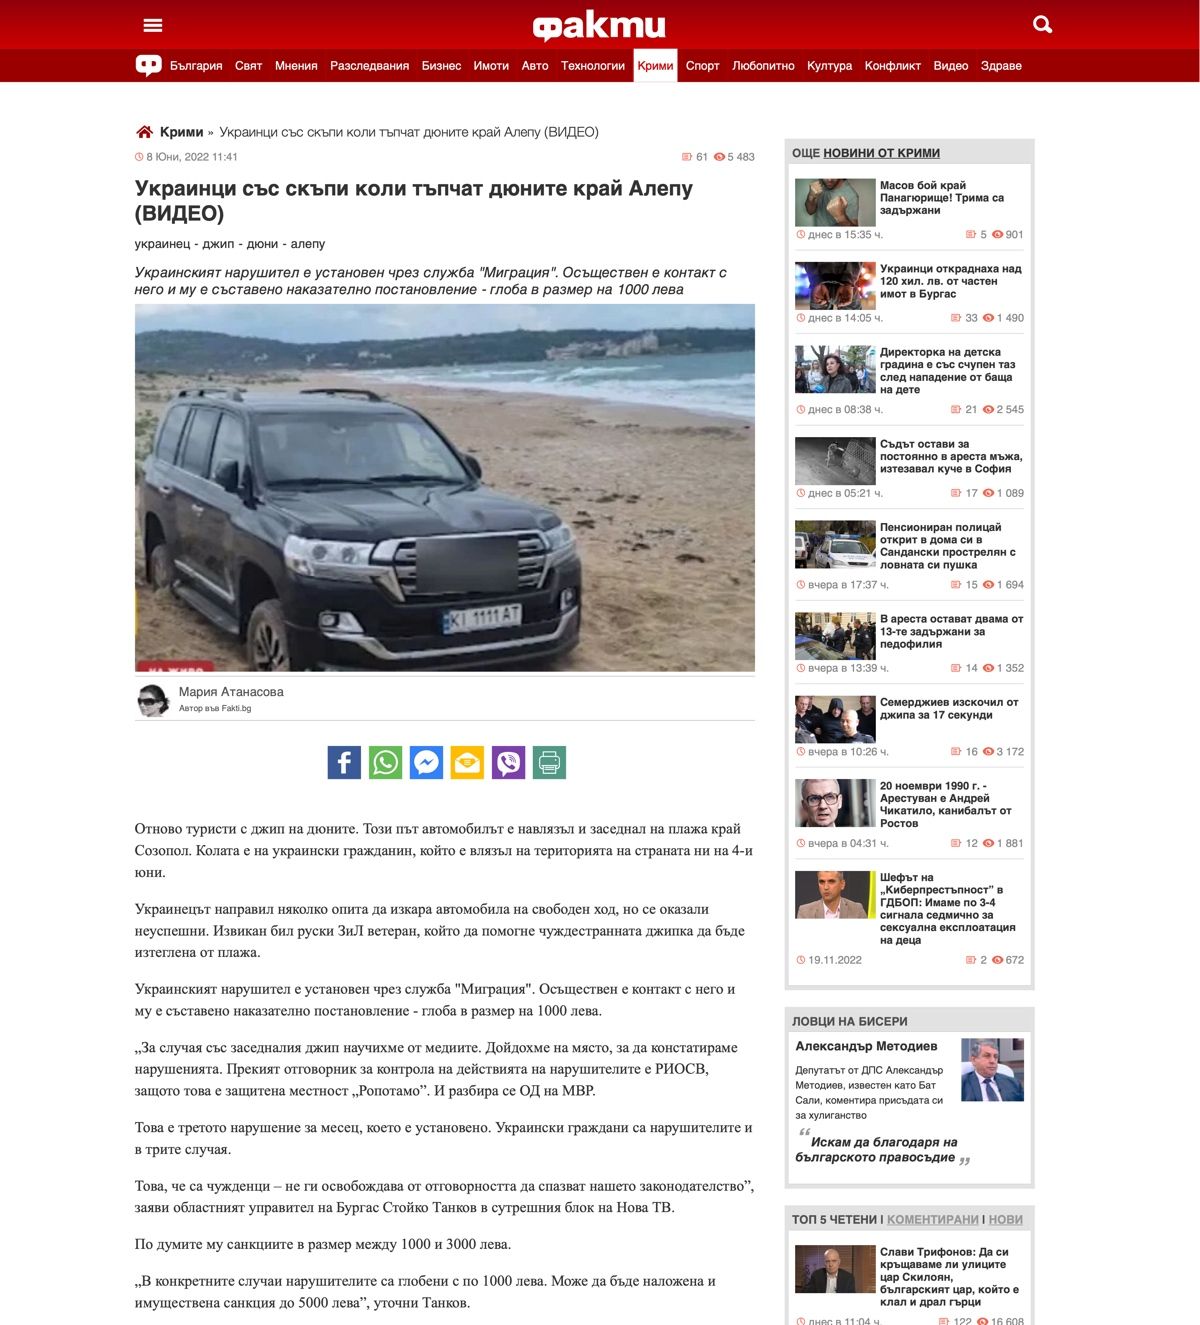
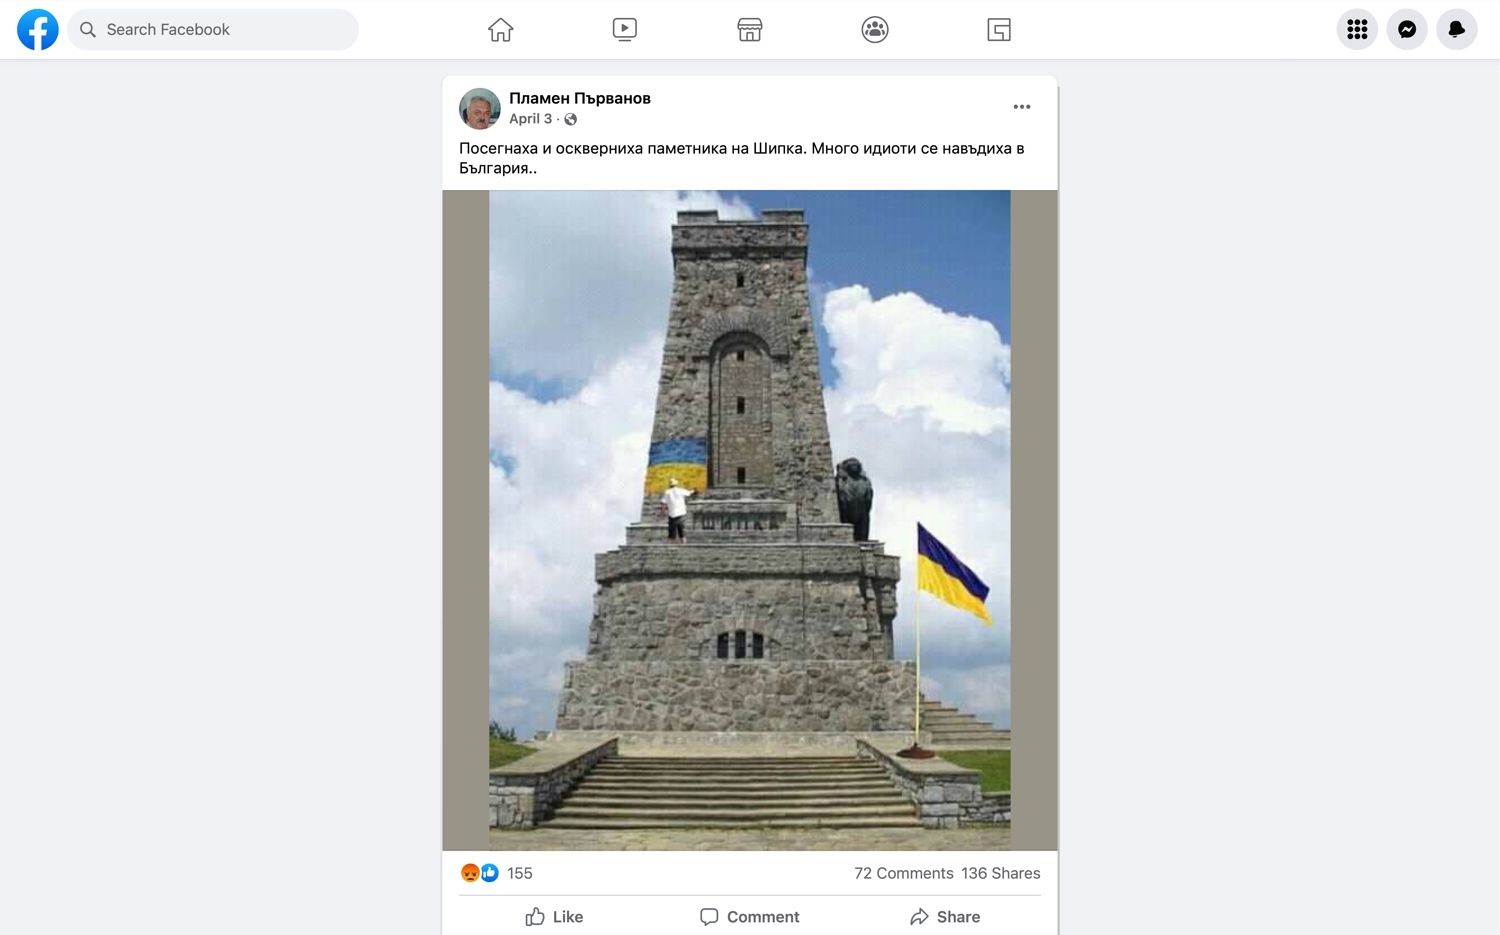
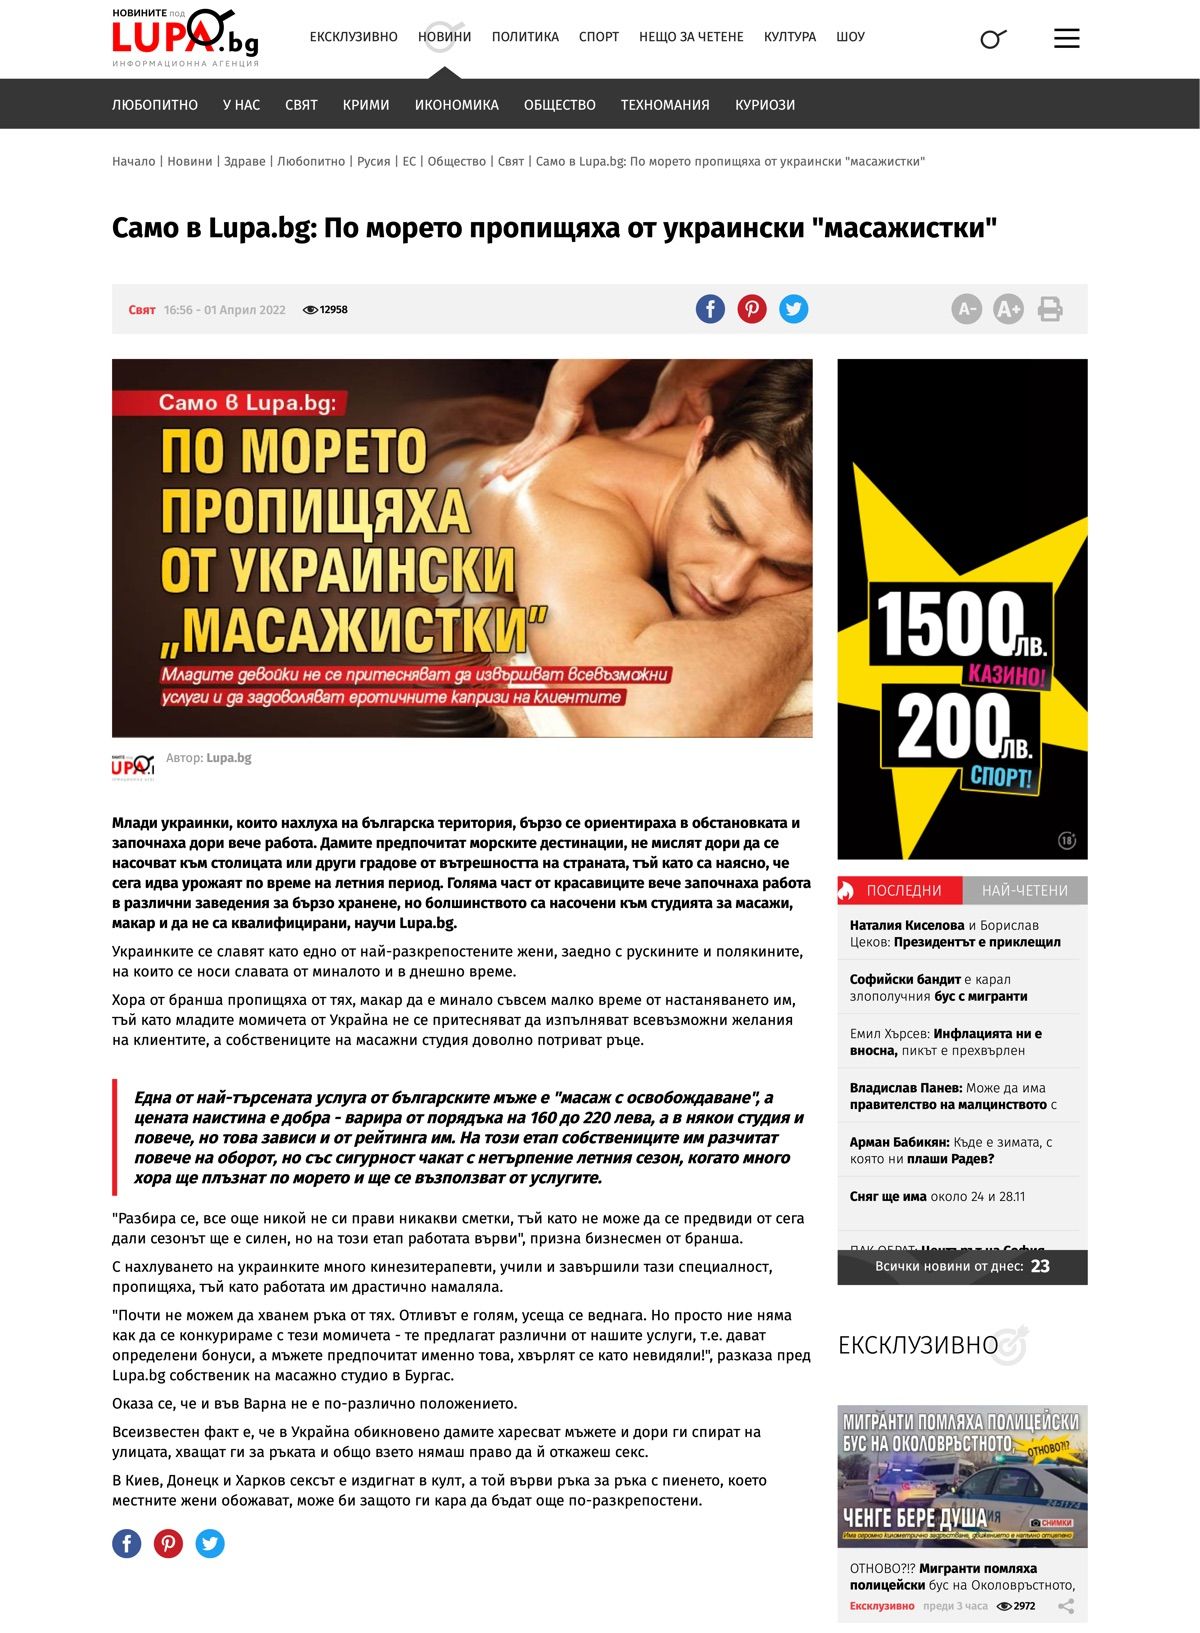
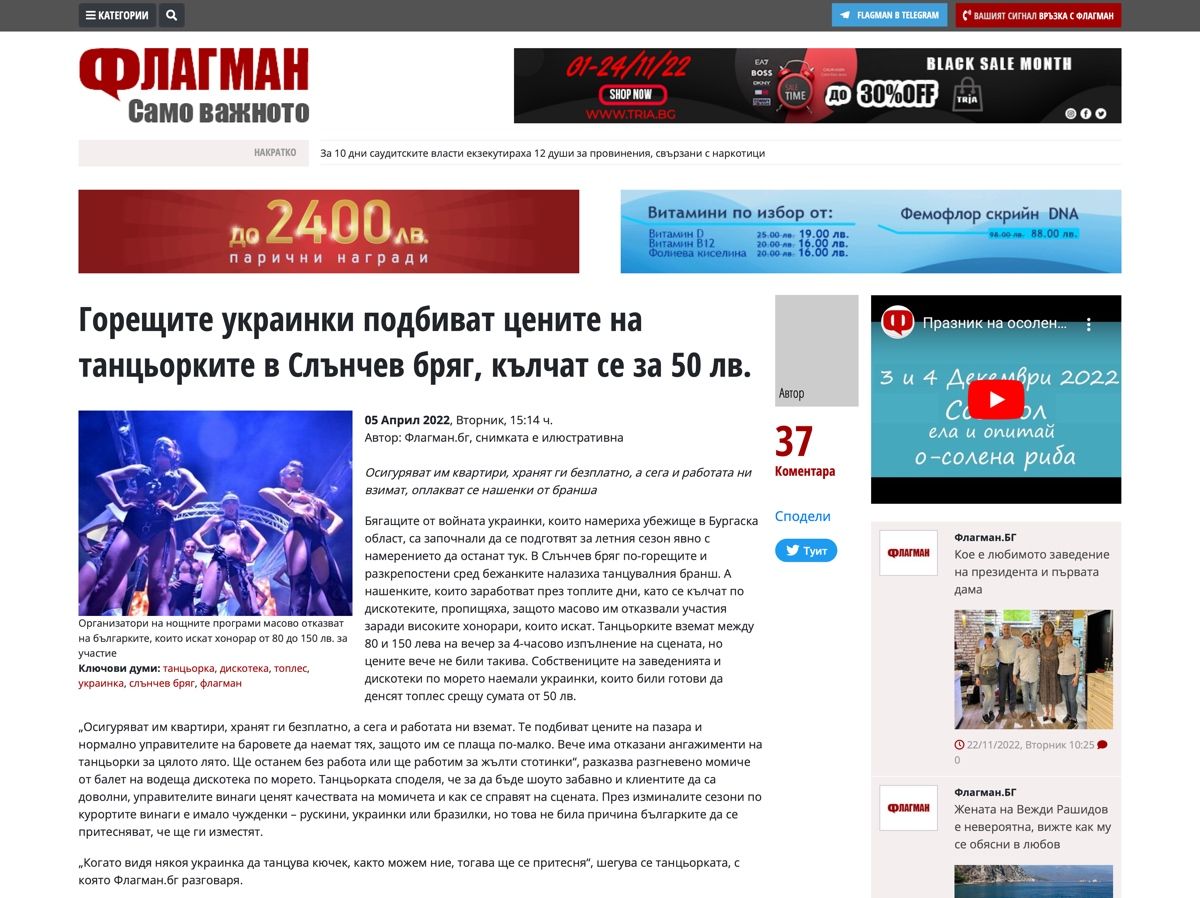