Tag Archives: Amazon OpenSearch Service

Accelerate your migration to Amazon OpenSearch Service with Reindexing-from-Snapshot

Post Syndicated from Hang Zuo original https://aws.amazon.com/blogs/big-data/accelerate-your-migration-to-amazon-opensearch-service-with-reindexing-from-snapshot/

It is appealing to migrate from self-managed OpenSearch and Elasticsearch clusters in legacy versions to Amazon OpenSearch Service to enjoy the ease of use, native integration with AWS services, and rich features from the open-source environment (OpenSearch is now part of Linux Foundation). However, the data migration process can be daunting, especially when downtime and data consistency are critical concerns for your production workload.

In this post, we will introduce a new mechanism called Reindexing-from-Snapshot (RFS), and explain how it can address your concerns and simplify migrating to OpenSearch.

Key concepts

To understand the value of RFS and how it works, let’s look at a few key concepts in OpenSearch (and the same in Elasticsearch):

  1. OpenSearch index: An OpenSearch index is a logical container that stores and manages a collection of related documents. OpenSearch indices are composed of multiple OpenSearch shards, and each OpenSearch shard contains a single Lucene index.
  2. Lucene index and shard: OpenSearch is built as a distributed system on top of Apache Lucene, an open-source high-performance text search engine library. An OpenSearch index can contain multiple OpenSearch shards, and each OpenSearch shard maps to a single Lucene index. Each Lucene index (and, therefore, each OpenSearch shard) represents a completely independent search and storage capability hosted on a single machine. OpenSearch combines many independent Lucene indices into a single higher-level system to extend the capability of Lucene beyond what a single machine can support. OpenSearch provides resilience by creating and managing replicas of the Lucene indices as well as managing the allocation of data across Lucene indices and combining search results across all Lucene indices.
  3. Snapshots: Snapshots are backups of an OpenSearch cluster’s indexes and state in an off-cluster storage location (snapshot repository) such as Amazon Simple Storage Service (Amazon S3). As a backup strategy, snapshots can be created automatically in OpenSearch, or users can create a snapshot manually for restoring it on to a different domain or for data migration.

For example, when a document is added to the OpenSearch index, the distributed system layer picks a specific shard to host the document, and the document is ingested into that shard’s Lucene index. Operations on that document are then routed to the same shard (though the shard might have replicas). Search operations are performed across the shards in OpenSearch index individually and then a combined result is returned. A snapshot can be created to backup the cluster’s indexes and state, including cluster settings, node information, index settings and shard allocation, so that the snapshot can be used for data migration.

Why RFS?

RFS can transfer data from OpenSearch and Elasticsearch clusters at high throughput without impacting the performance of the source cluster. This is achieved by using the shard-level codependency and snapshots:

  1. Minimized performance impact to source clusters: Instead of retrieving data directly from the source cluster, RFS can use a snapshot of the source cluster for data migration. Documents are parsed from the snapshot and then reindexed to the target cluster, so that performance impact to the source clusters is minimized during migration. This maintains a smooth transition and minimal performance impact to end users, especially for production workloads.
  2. High throughput: Because shards are separate entities, RFS can retrieve, parse, extract and reindex the documents from each shard in parallel, to achieve high data throughput.
  3. Multi-version upgrades: RFS supports migrating data across multiple major versions (for example, from Elasticsearch 6.8 to OpenSearch 2.x), which can be a significant challenge with other data migration approaches. This is because the data indexed into OpenSearch (and Lucene) is only backward compatible for one major version. By incorporating reindexing as the core mechanism of the migration process, RFS can migrate data across multiple versions in one hop and make sure the data is fully updated and readable in the target cluster’s version, so that you don’t need to worry about the hidden technical debt imposed by having previous-version Lucene files in the new OpenSearch cluster.

How RFS works

OpenSearch and Elasticsearch snapshots are a directory tree that contains both data and metadata. Each index has its own sub-directory, and each shard has its own sub-directory under the directory of its parent index. The raw data for a given shard is stored in its corresponding shard sub-directory as a collection of Lucene files, which OpenSearch and Elasticsearch lightly obfuscates. Metadata files exist in the snapshot to provide details about the snapshot as a whole, the source cluster’s global metadata and settings, each index in the snapshot, and each shard in the snapshot.

The following is an example for the structure of an Elasticsearch 7.10 snapshot, along with a breakdown of its contents:

/snapshot/root
├── index-0 <-------------------------------------------- [1]
├── index.latest
├── indices
│   ├── DG4Ys006RDGOkr3_8lfU7Q <------------------------- [2]
│   │   ├── 0 <------------------------------------------ [3]
│   │   │   ├── __iU-NaYifSrGoeo_12o_WaQ <--------------- [4]
│   │   │   ├── __mqHOLQUtToG23W5r2ZWaKA <--------------- [4]
│   │   │   ├── index-gvxJ-ifiRbGfhuZxmVj9Hg 
│   │   │   └── snap-eBHv508cS4aRon3VuqIzWg.dat <-------- [5]
│   │   └── meta-tDcs8Y0BelM_jrnfY7OE.dat <-------------- [6]
│   └── _iayRgRXQaaRNvtfVfRdvg
│       ├── 0
│       │   ├── __DNRvbH6tSxekhRUifs35CA
│       │   ├── __NRek2UuKTKSBOGczcwftng
│       │   ├── index-VvqHYPQaRcuz0T_vy_bMyw
│       │   └── snap-eBHv508cS4aRon3VuqIzWg.dat
│       └── meta-tTcs8Y0BelM_jrnfY7OE.dat
├── meta-eBHv508cS4aRon3VuqIzWg.dat <-------------------- [7]
└── snap-eBHv508cS4aRon3VuqIzWg.dat <-------------------- [8]

The structure includes the following elements:

  1. Repository metadata file: JSON encoded and contains a mapping between the snapshots within the repository and the OpenSearch or Elasticsearch indices and shards stored within it.
  2. Index directory: Contains the data and metadata for a specific OpenSearch or Elasticsearch index.
  3. Shard directory: Contains the data and metadata for a specific shard of an OpenSearch or Elasticsearch index
  4. Lucene Files: Lucene index files, lightly obfuscated by the snapshotting process. Large files from the source file system are split into multiple parts.
  5. Shard metadata file: SMILE encoded and contains details about all the Lucene files in the shard and a mapping between their in-snapshot representation and their original representation on the source machine they were pulled from (including the original file name and other details).
  6. Index metadata file: SMILE encoded and contains things such as the index aliases, settings, mappings, and number of shards.
  7. Global metadata file: SMILE encoded and contains things such as the legacy, index, and component templates.
  8. Snapshot metadata file: SMILE encoded and contains things such as whether the snapshot succeeded, the number of shards, how many shards succeeded, the OpenSearch or Elasticsearch version, and the indices in the snapshot.

RFS works by retrieving a local copy of a shard-level directory, unpacking its contents and de-obfuscating them, reading them as a Lucene index, and extracting the documents within. This is enabled because OpenSearch and Elasticsearch store the original format of documents added to an OpenSearch or Elasticsearch index in Lucene using the _source field; this feature is enabled by default and is what allows the standard _reindex REST API to work (among other things).

The user workflow for performing a document migration with RFS using the Migration Assistant is shown in the following figure:

The workflow is:

  1. The operator shells into the Migration Assistant console
  2. The operator uses the console command line interface (CLI) to initiate a snapshot on their source cluster. The source cluster stores the snapshot in an S3 Bucket.
  3. The operator starts the document migration with RFS using the console CLI. This creates a single RFS Worker, which is a Docker container running in AWS Fargate.
  4. Each RFS worker provisioned pulls down an un-migrated shard from the snapshot bucket and reindexes its documents against the target cluster. Once finished, it proceeds to the next shard until all shards are completed.
  5. The operator monitors the progress of the migration using the console CLI, which reports both the number of shards yet to be migrated and the number that have been completed. The operator can scale the RFS worker fleet up or down to increase or reduce the rate of indexing on the target cluster.
  6. After all shards have been migrated to the target cluster, the operator scales the RFS worker fleet down to zero.

As previously mentioned, the RFS workers operate at the shard-level, so that you can provision one RFS worker for every shard in the snapshot to achieve maximum throughput. If a RFS worker stops unexpectedly in the middle of migrating a shard, another RFS worker will restart its migration from the beginning. The original document identifiers are preserved in the migration process, so that the restarted migration will be able to over-write the failed attempt. RFS workers coordinate amongst themselves using metadata that they store in an index on the target cluster.

How RFS performs

To highlight the performance of RFS, let’s consider the following scenario: you have an Elasticsearch 7.10 source cluster containing 5 TiB (3.9 billion documents) and wants to migrate to OpenSearch 2.15. With RFS, you can perform this migration in approximately 35 minutes, spending approximately $10 in Amazon Elastic Container Service (Amazon ECS) usage to run the RFS workers during the migration.

To demonstrate this capability, we created an Elasticsearch 7.10 source cluster in Amazon OpenSearch Service, with 1,024 shards and 0 replicas. We used AWS Glue to bulk-load sample data into the source cluster with the AWS Public Blockchain Dataset, and repeated the bulk-load process until 5 TiB of data (3.9 billion documents) was stored. We created an OpenSearch 2.15 cluster as the target cluster in Amazon OpenSearch Service, with 15 r7gd.16xlarge data nodes and 3 m7g.large master nodes, and used Sigv4 for authentication. Using the Migration Assistant solution, we created a snapshot of the source cluster, stored it in S3, and performed a metadata migration so that the indices on the source were recreated on the target cluster with the same shard and replica counts. We then ran console backfill start and console backfill scale 200 to begin the RFS migration with 200 workers. RFS indexed data into the target cluster at 2,497 MiB per second. The migration was completed in approximately 35 minutes. We metered approximately $10 in ECS cost for running the RFS workers.

To better highlight the performance, the following figures show metrics from the OpenSearch target cluster during this process (presented below).

In the preceding figures, you can see the cyclical variation in the document index rate and target cluster resource utilization as the 200 RFS workers pick up shards, complete a shard, and then pick up a new shard. At peak RFS indexing, we see the target cluster nodes maxing their CPU and begin queuing writes. The queue is cleared as shards complete and more workers transition to the downloading state. In general, we find that RFS performance is limited by the ability of the target cluster to absorb the traffic it generates. You can tune the RFS worker fleet to match what your target cluster can reliably ingest.

Conclusion

This blog post is designed to be a starting point for teams seeking guidance on how to use Reindexing-from-Snapshot as a straightforward, high throughput, and low-cost solution for data migration from self-managed OpenSearch and Elasticsearch clusters to Amazon OpenSearch Service. RFS is now part of the Migration Assistant solution and available from the AWS Solution Library. To use RFS to migrate to Amazon OpenSearch Service, try the Migration Assistant solution. To experience OpenSearch, try the OpenSearch Playground. To use the managed implementation of OpenSearch in the AWS Cloud, see Getting started with Amazon OpenSearch Service.


About the authors

Hang (Arthur) Zuo is a Senior Product Manager with Amazon OpenSearch Service. Arthur leads the core experience in the next-gen OpenSearch UI and data migration to Amazon OpenSearch Service. Arthur is passionate about cloud technologies and building data products that help users and businesses gain actionable insights and achieve operational excellence.

Chris Helma is a Senior Engineer at Amazon Web Services based in Austin, Texas. He is currently developing tools and techniques to enable users to shift petabyte-scale data workloads into OpenSearch. He has extensive experience building highly-scalable technologies in diverse areas such as search, security analytics, cryptography, and developer productivity. He has functional domain expertise in distributed systems, AI/ML, cloud-native design, and optimizing DevOps workflows. In his free time, he loves to explore specialty coffee and run through the West Austin hills.

Andre Kurait is a Software Development Engineer II at Amazon Web Services, based in Austin, Texas. He is currently working on Migration Assistant for Amazon OpenSearch Service. Prior to joining Amazon OpenSearch, Andre worked within Amazon Health Services. In his free time, Andre enjoys traveling, cooking, and playing in his church sport leagues. Andre holds Bachelor of the Science degrees from the University of Kansas in Computer Science and Mathematics.

Prashant Agrawal is a Sr. Search Specialist Solutions Architect with Amazon OpenSearch Service. He works closely with customers to help them migrate their workloads to the cloud and helps existing customers fine-tune their clusters to achieve better performance and save on cost. Before joining AWS, he helped various customers use OpenSearch and Elasticsearch for their search and log analytics use cases. When not working, you can find him traveling and exploring new places. In short, he likes doing Eat → Travel → Repeat.

Introducing Point in Time queries and SQL/PPL support in Amazon OpenSearch Serverless

Post Syndicated from Jagadish Kumar original https://aws.amazon.com/blogs/big-data/introducing-point-in-time-queries-and-sql-ppl-support-in-amazon-opensearch-serverless/

Today we announced support for three new features for Amazon OpenSearch Serverless: Point in Time (PIT) search, which enables you to maintain stable sorting for deep pagination in the presence of updates, and Piped Processing Language (PPL) and Structured Query Language (SQL), which give you new ways to query your data. Querying with SQL or PPL is useful if you’re already familiar with the language or want to integrate your domain with an application that uses them.

OpenSearch Serverless is a powerful and scalable search and analytics engine that enables you to store, search, and analyze large volumes of data while reducing the burden of manual infrastructure provisioning and scaling as you ingest, analyze, and visualize your time series and search data, simplifying data management and enabling you to derive actionable insights from data. The vector engine for OpenSearch Serverless also makes it easy for you to build modern machine learning (ML) augmented search experiences and generative artificial intelligence (generative AI) applications without needing to manage the underlying vector database infrastructure.

PIT search

Point in Time (PIT) search lets you run different queries against a dataset that’s fixed in time. Typically, when you run the same query on the same index at different points in time, you receive different results because documents are constantly indexed, updated, and deleted. With PIT, you can query against a state of your dataset for a point in time. Although OpenSearch still supports other ways of paginating results, PIT search provides superior capabilities and performance because it isn’t bound to a query and supports consistent pagination. When you create a PIT for a set of indexes, OpenSearch creates contexts to access data at that point in time and when you use a query with a PIT ID, it searches the contexts that are frozen in time to provide consistent results.

Using PIT involves the following high-level steps:

  1. Create a PIT.
  2. Run search queries with a PIT ID and use the search_after parameter for the next page of results.
  3. Close the PIT.

Create a PIT

When you create a PIT, OpenSearch Serverless provides a PIT ID, which you can use to run multiple queries on the frozen dataset. Even though the indexes continue to ingest data and modify or delete documents, the PIT references the data that hasn’t changed since the PIT creation.

Run a search query with the PIT ID

PIT search isn’t bound to a query, so you can run different queries on the same dataset, which is frozen in time.

When you run a query with a PIT ID, you can use the search_after parameter to retrieve the next page of results. This gives you control over the order of documents in the pages of results.

The following response contains the first 100 documents that match the query. To get the next set of documents, you can run the same query with the last document’s sort values as the search_after parameter, keeping the same sort and pit.id. You can use the optional keep_alive parameter to extend the PIT time.

Close the PIT

When your queries on the dataset are complete, you can delete the PIT using the DELETE operation. PITs automatically expire after the keep_alive duration.

Considerations and limitations

Keep in mind the following limitations when using this feature:

SQL and PPL support

OpenSearch Serverless provides a primary query interface called query DSL that you can use to search your data. Query DSL is a flexible language with a JSON interface. In addition to DSL, you can now extract insights out of OpenSearch Serverless using the familiar SQL query syntax.

You can use the SQL and PPL API, the /plugins/_sql and /plugins/_ppl endpoints respectively, to search the data. You can use aggregations, group by, and where clauses to investigate your data and read your data as JSON documents or CSV tables, so you have the flexibility to use the format that works best for you. By default, queries return data in JDBC format. You can specify the response format as JDBC, standard OpenSearch JSON, CSV, or raw.

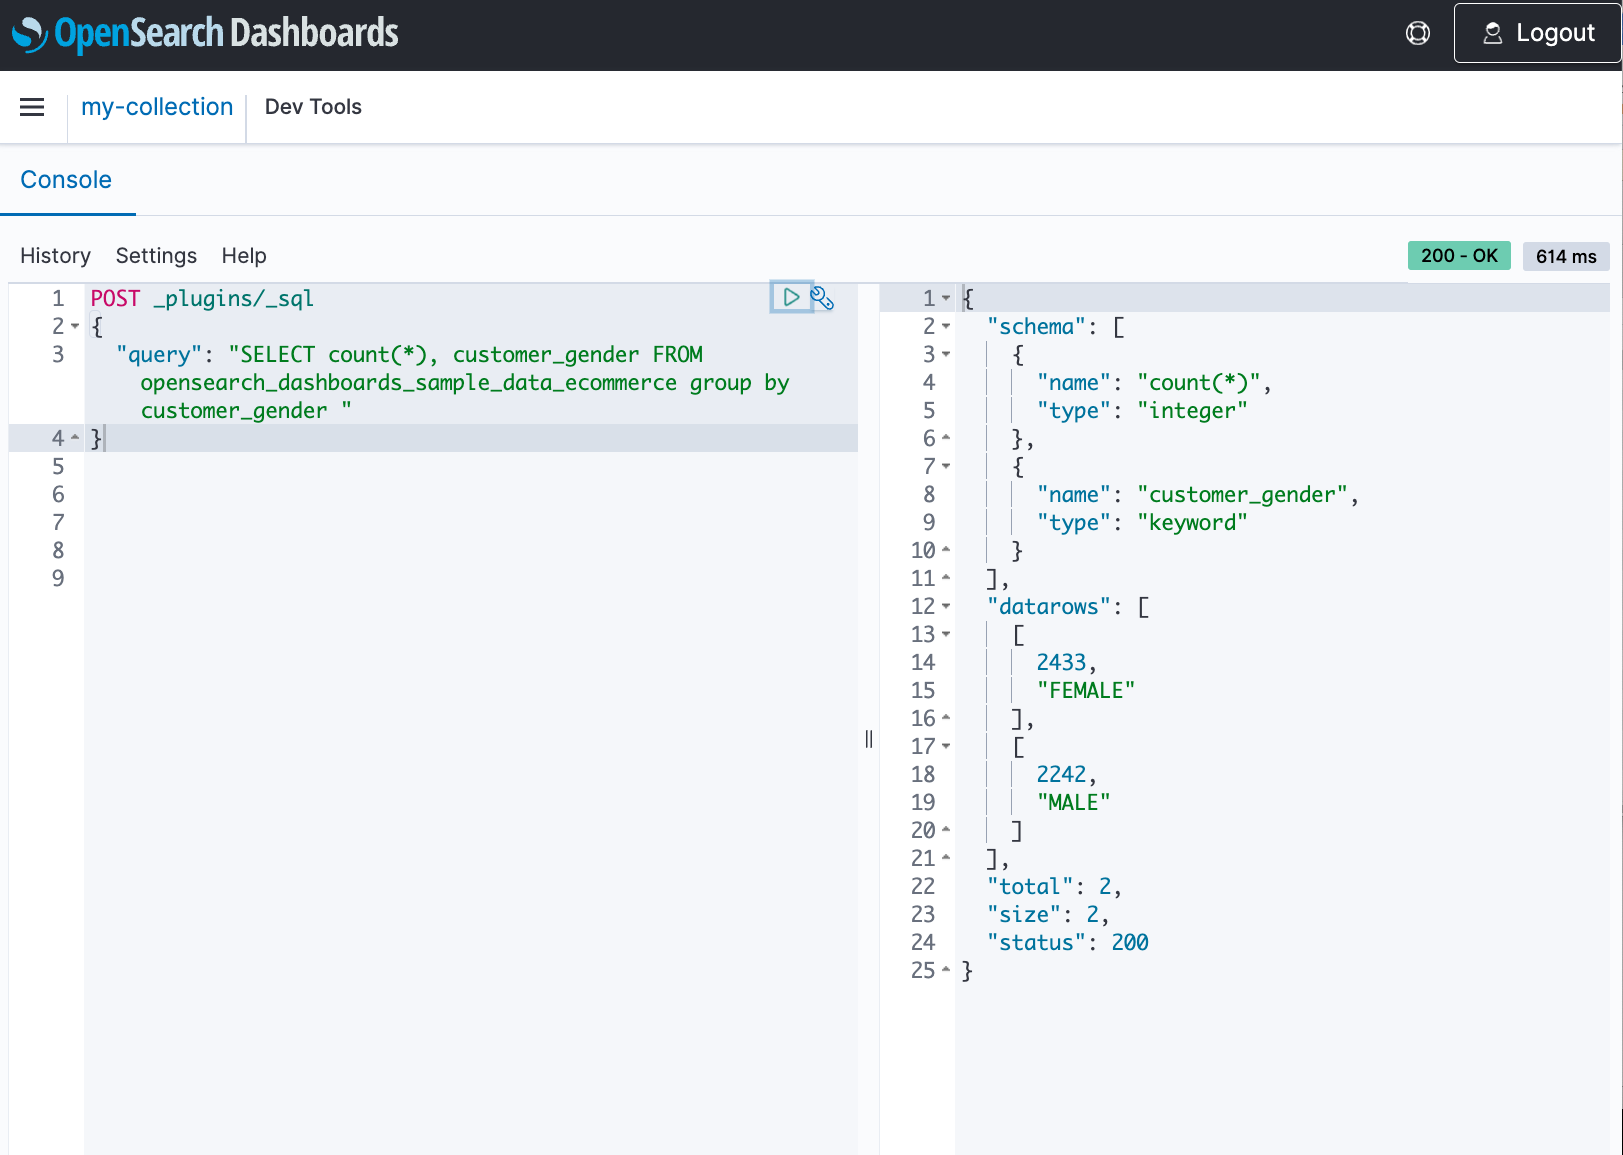
Use the /plugins/_sql endpoint to send SQL queries to the SQL plugin, as shown in the following example.

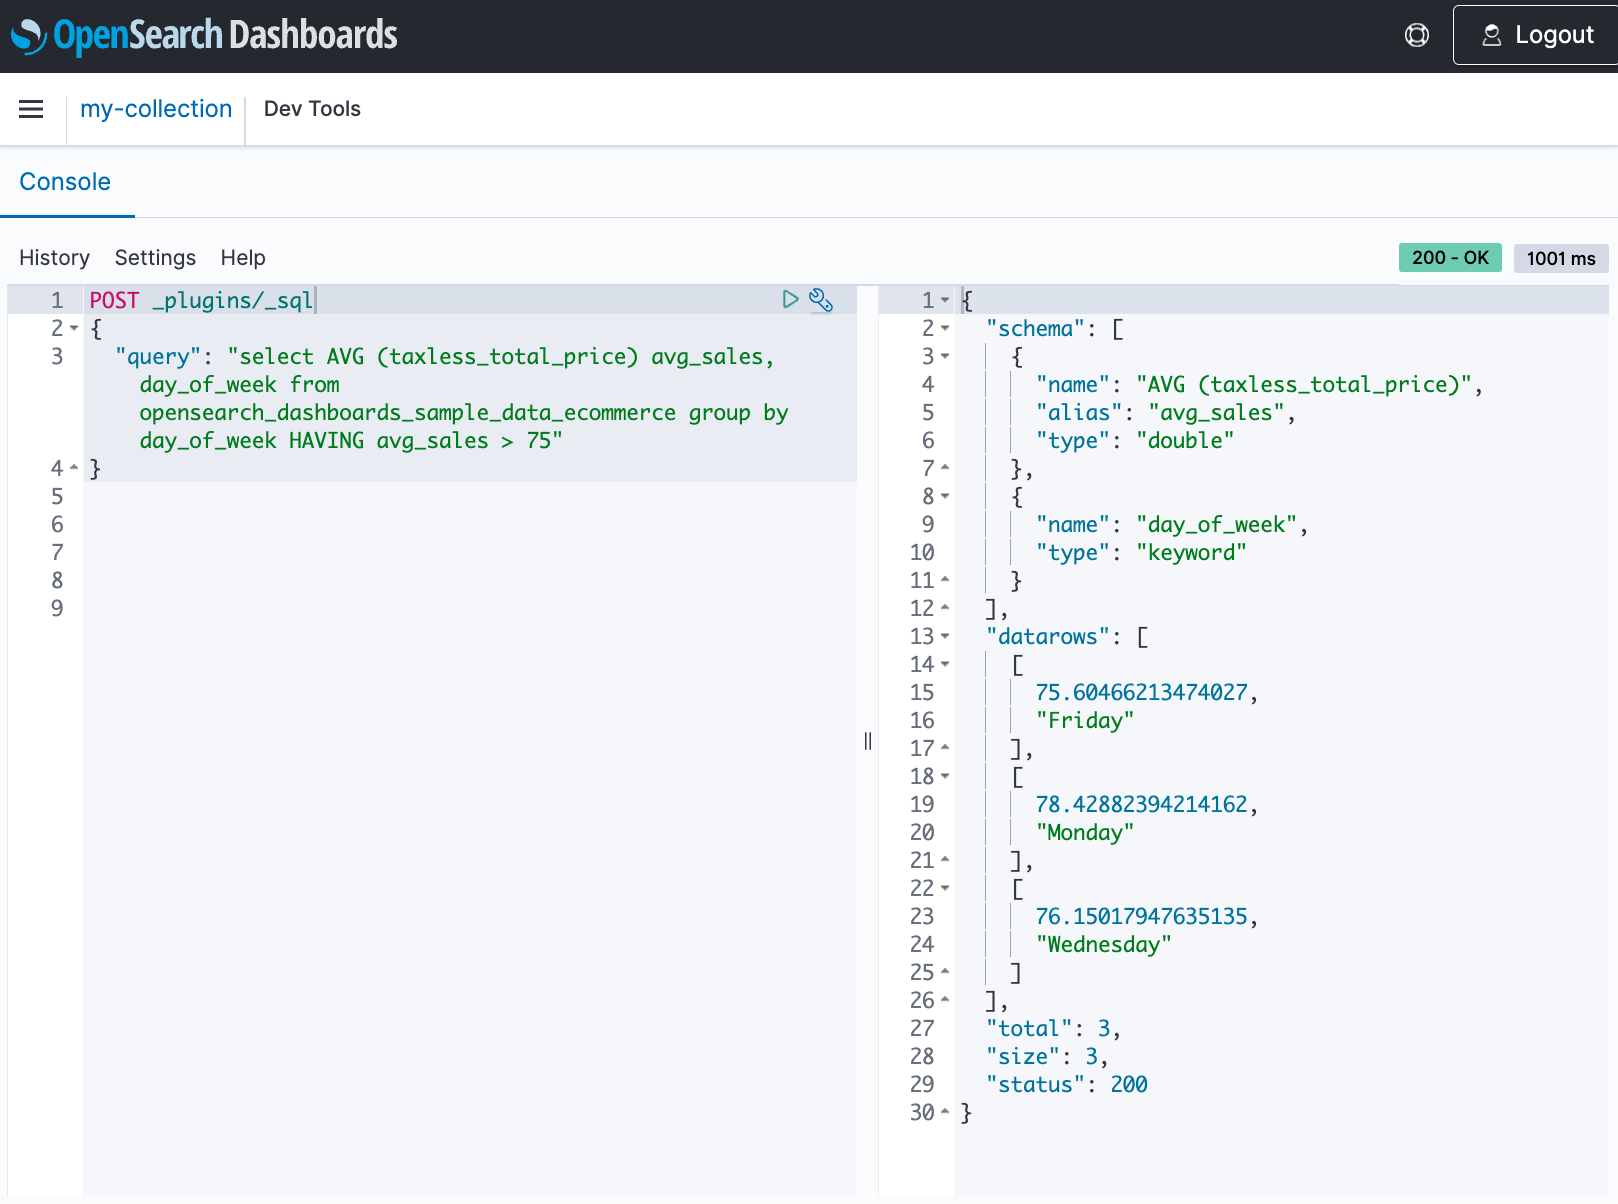
Besides basic filtering and aggregation, OpenSearch SQL also supports complex queries, such as querying semi-structured data, set operations, sub-queries and limited JOINs. Beyond the standard functions, OpenSearch functions are provided for better analytics and visualization.

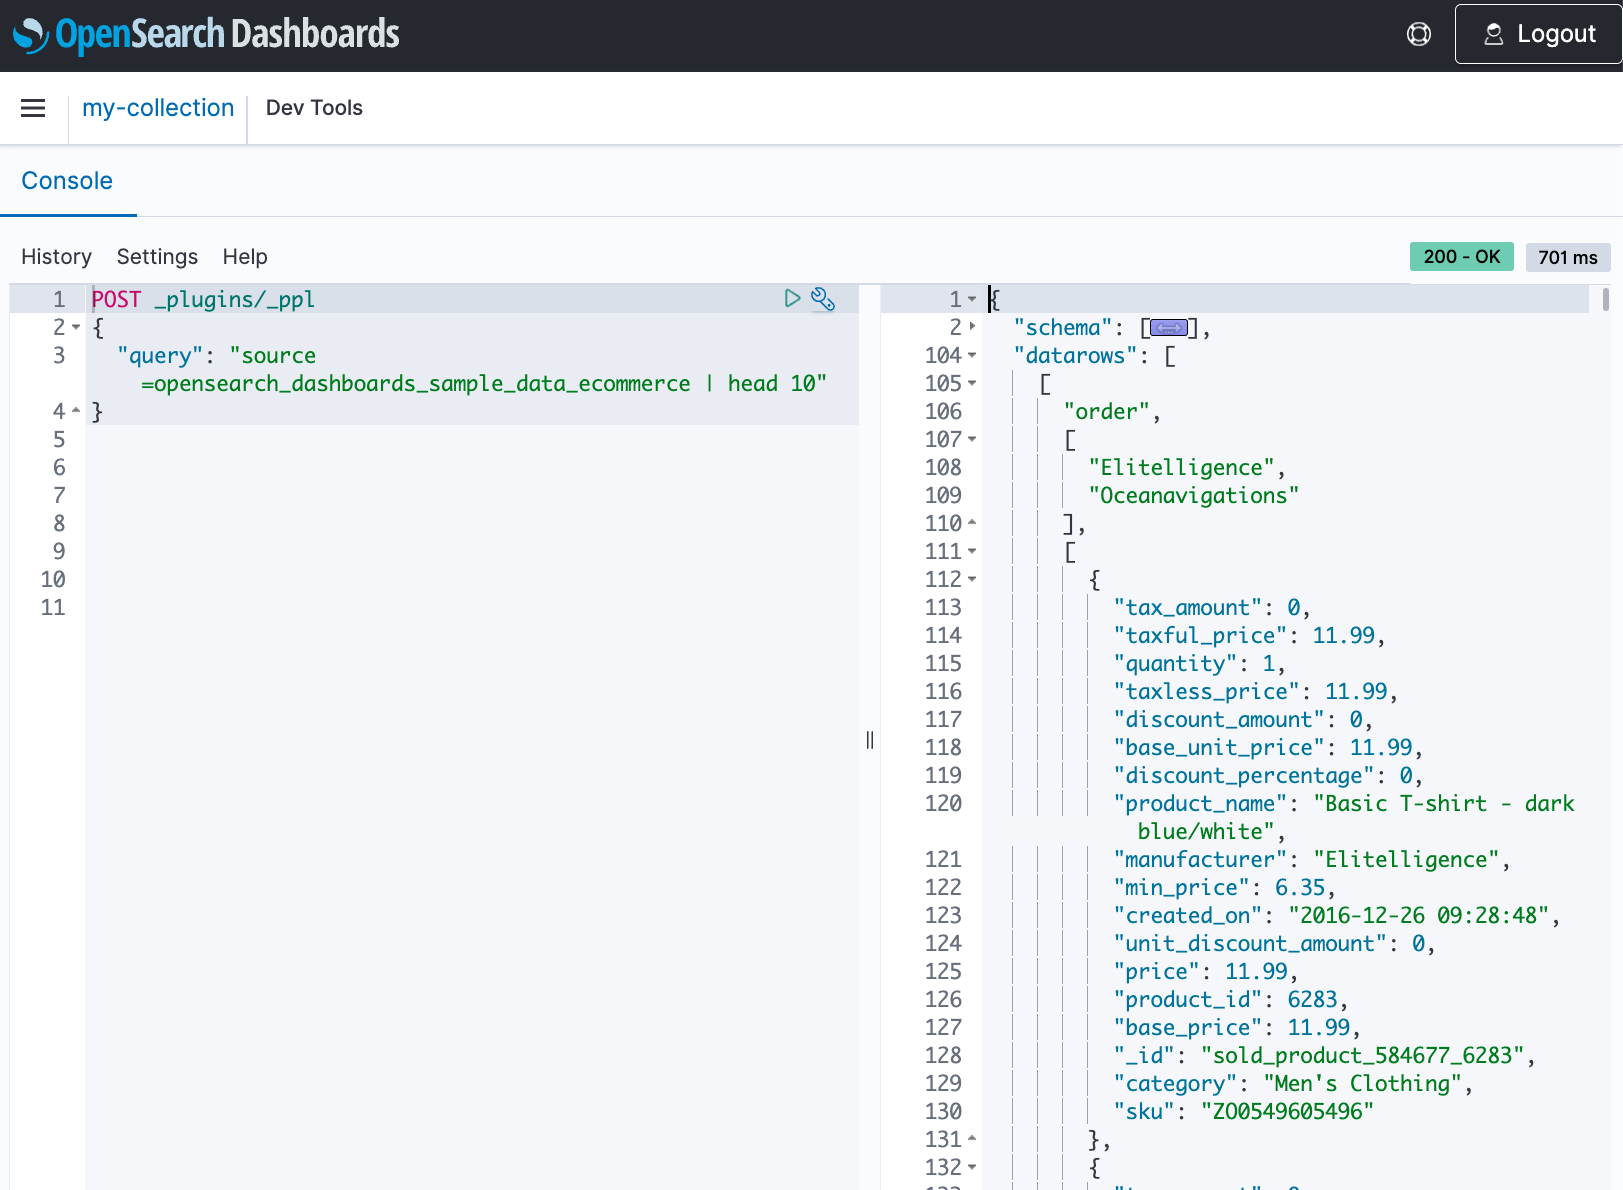
For PPL queries, use the /plugins/_ppl endpoint to send queries to the SQL plugin.

Considerations and limitations

Keep in mind the following:

  • Query Workbench is not supported for SQL and PPL queries
  • The SQL and PPL CLI is supported and can be used to issue SQL and PPL queries
  • DELETE statements are not supported
  • SQL plugin data sources are not supported
  • The SQL query stats API is not supported

Summary

In this post, we discussed new features in OpenSearch Serverless. PIT is a useful feature when you need to maintain a consistent view of your data for pagination during search operations. SQL in OpenSearch Service bridges the gap between traditional relational database concepts and the flexibility of OpenSearch’s document-oriented data storage. You can send SQL and PPL queries to the _sql and _ppl endpoints, respectively, and use aggregations, group by, and where clauses to analyze their data.

For more information, refer to :


About the Authors

Jagadish Kumar (Jag) is a Senior Specialist Solutions Architect at AWS focused on Amazon OpenSearch Service. He is deeply passionate about Data Architecture and helps customers build analytics solutions at scale on AWS.

Frank Dattalo is a Software Engineer with Amazon OpenSearch Service. He focuses on the search and plugin experience in Amazon OpenSearch Serverless. He has an extensive background in search, data ingestion, and AI/ML. In his free time, he likes to explore Seattle’s coffee landscape.

Milav Shah is an Engineering Leader with Amazon OpenSearch Service. He focuses on the search experience for OpenSearch customers. He has extensive experience building highly scalable solutions in databases, real-time streaming, and distributed computing. He also possesses functional domain expertise in verticals like Internet of Things, fraud protection, gaming, and ML/AI. In his free time, he likes to ride his bicycle, hike, and play chess.

Manage access controls in generative AI-powered search applications using Amazon OpenSearch Service and Amazon Cognito

Post Syndicated from Karim Akhnoukh original https://aws.amazon.com/blogs/big-data/manage-access-controls-in-generative-ai-powered-search-applications-using-amazon-opensearch-service-and-aws-cognito/

Organizations of all sizes and types are using generative AI to create products and solutions. A common adoption pattern is to introduce document search tools to internal teams, especially advanced document searches based on semantic search. In semantic search, documents are stored as vectors, a numeric representation of the document content, in a vector database such as Amazon OpenSearch Service, and are retrieved by performing similarity search with a vector representation of the search query.

In a real-world scenario, organizations want to make sure their users access only documents they are entitled to access. They are looking for a reliable and scalable solution to implement robust access controls to make sure these documents are only accessible to individuals who have a legitimate business need and the appropriate level of authorization. The permission mechanism has to be secure, built on top of built-in security features, and scalable for manageability when the user base scales out. Maintaining proper access controls for these sensitive assets is paramount, because unauthorized access could lead to severe consequences, such as data breaches, compliance violations, and reputational damage.

In this post, we show you how to manage user access to enterprise documents in generative AI-powered tools according to the access you assign to each persona.

Common use cases

The following are industry-specific use cases for document access management across different departments:

  • In R&D and engineering, access to product design documents evolves from restricted to broader as development progresses
  • HR maintains open access to general policies while limiting access to sensitive employee information
  • Finance and accounting documents require varying levels of access for auditing and executive decision-making
  • Sales and marketing teams carefully manage customer data and strategies, implementing tiered access for different roles and departments

These examples demonstrate the need for dynamic, role-based access control to balance information sharing with confidentiality in various business contexts.

Solution overview

By combining the powerful vector search capabilities of OpenSearch Service with the access control features provided by Amazon Cognito, this solution enables organizations to manage access controls based on custom user attributes and document metadata.

This approach simplifies the management of access rights, making sure only authorized users can access and interact with specific documents based on their roles, departments, and other relevant attributes. Following this approach, you can manage the access to your organization’s documents at scale. The following diagram depicts the solution architecture.

Solution diagram

The solution workflow consists of the following steps:

  1. The user accesses a smart search portal and lands on a web interface deployed on AWS Amplify.
  2. The user authenticates through an Amazon Cognito user pool and an access token is returned to the client. This access token will be used to retrieve the key pair custom attributes assigned to the user. In our case, we created two custom attributes (custom:department and custom:access_level).
  3. For each user query, an API is invoked on Amazon API Gateway to process the request. Each invocation includes the user access token in the header.
  4. The API is integrated with AWS Lambda, which processes the user query and generates the answers based on available documents and user access using retrieval augmented generation (RAG). The process starts by creating a vector based on the question (embedding) by invoking the embedding model.
  5. A query is sent to OpenSearch Service that includes the following:
    1. The embedding vector generated.
    2. User custom attributes retrieved by Lambda based on their access token, by calling the Amazon Cognito GetUser API.
    3. The query relies on the support of an efficient k-NN filter in OpenSearch Service to perform the search.
  6. Pre-filtered documents that relate to the user query are included in the prompt of the large language model (LLM) that summarizes the answer. Then, Lambda replies back to the web interface with the LLM completion (reply).
  7. If the user’s access needs to be modified (assigned attributes), an API call is made through API Gateway to a Lambda function that processes the request to add or update the custom attributes’ value for a specific user.
  8. New attributes are reflected in the user’s profile in Amazon Cognito.

Our solution is implemented and wrapped within AWS Cloud Development Kit (AWS CDK) stacks, which are available in the GitHub repo.

Our sample documents assume a fictional manufacturing company called Unicorn Robotics Factory, which develops robotic unicorns. The dataset contains over 900 documents that are a mix of engineering, roadmap, and business reporting documents. The following is an example of a document’s content:

**CONFIDENTIAL - UNICORNS ROBOTICS INTERNAL DOCUMENT**

**Project: "Galactic Unicorn"**

Unicorns Robotics is proud to announce the development of our latest project, the "Galactic Unicorn". 
This top-secret project aims to create a robotic unicorn that can travel through space and time, bringing magic and joy to children and adults alike.....

The associated metadata file for this document consists of the following:

{ "department": "research", "access_level": "confidential" }

Our solution in the GitHub repo takes care of loading the documents with associated metadata tags. For illustration purposes, we used the following mapping for the users and document access.

user access mapping

This solution is meant to delegate access management to the application tier, to simplify the implementation of use cases like generative AI-powered document search tools. However, if your use case requires a stricter approach to control document access, like multi-tenant environments or field-level security, you might want to use the fine-grained access control feature in OpenSearch Service. In our solution, we manage the access on the document level according to the assigned metadata.

Prerequisites

To deploy the solution, you need the following prerequisites:

Deploy the solution

To deploy the solution to your AWS account, refer to the Readme file in our GitHub repo.

Query documents with different personas

Now let’s test the application using different personas. In this example, we use the same users with their corresponding custom attributes as illustrated in the solution overview.

To start, let’s log in using the researcher account and run the search around a confidential document.

We ask, “What is the projected profit margin of the Galactic Unicorn project?” and get the result as shown in the following screenshot.

search using researcher access

The question invokes a query to OpenSearch Service using the custom attributes assigned to the researcher. The following code illustrates how the query is structured:

for attr, values in user_attributes.items():
        must_conditions.append(
            {
                "bool": {
                    "should": [{"term": {attr: value}} for value in values],
                    "minimum_should_match": 1,
                }
            }
        )

query = {
        "size": 5,
        "query": {
            "knn": {
                "doc_embedding": {
                    "vector": query_vector,
                    "k": 10,
                    "filter": {"bool": {"must": must_conditions}},
                }
            }
        },
    }

Let’s sign out and log in again with an engineer profile to test the same query. Based on the assigned attributes and document metadata, the result should look like that in the following screenshot.

search using engineer access

If you tried to query some support documents, you will get the desired answer, as shown in the following screenshot.

tech question by engineer

Modify user access

As depicted in the solution diagram, we’ve added a feature in the web interface to allow you to modify user access, which you could use to perform further tests. To do so, log in as a tool admin and choose Manage Attributes. Then modify the custom attribute value for a given user, as shown in the following screenshot.

access modification

Clean up

When deleting a stack, most resources will be deleted upon stack deletion, but that’s not the case for all resources. The Amazon Simple Storage Service (Amazon S3) bucket, Amazon Cognito user pool, and OpenSearch Service domain will be retained by default. However, our AWS CDK code altered this default behavior by setting the RemovalPolicy to DESTROY for the mentioned resources. If you want to retain them, you can adjust the RemovalPolicy in the AWS CDK code for the different resources.

You can use the following command to clean up the resources deployed to your AWS account:

make destroy

Conclusion

This post illustrated how to build a document search RAG solution that makes sure only authorized users can access and interact with specific documents based on their roles, departments, and other relevant attributes. It combines OpenSearch Service and Amazon Cognito custom attributes to make a tag-based access control mechanism that makes it straightforward to manage at scale.

For demonstration purposes, the following points weren’t included in the AWS CDK code. However, they’re still applicable and you might want to work on them before deploying for production purposes:


About the Authors

Karim Akhnoukh is a Solutions Architect at AWS working with manufacturing customers in Germany. He is passionate about applying machine learning and generative AI to solve customers’ business challenges. Besides work, he enjoys playing sports, aimless walks, and good quality coffee.

Ahmed Ewis is a Senior Solutions Architect at AWS GenAI Labs. He helps customers build generative AI-based solutions to solve business problems. When not collaborating with customers, he enjoys playing with his kids and cooking.

Fortune Hui is a Solutions Architect at AWS Hong Kong, working with conglomerate customers. He helps customers and partners build big data platform and generative AI applications. In his free time, he plays badminton and enjoys whisky.

Use Amazon Kinesis Data Streams to deliver real-time data to Amazon OpenSearch Service domains with Amazon OpenSearch Ingestion

Post Syndicated from M Mehrtens original https://aws.amazon.com/blogs/big-data/use-amazon-kinesis-data-streams-to-deliver-real-time-data-to-amazon-opensearch-service-domains-with-amazon-opensearch-ingestion/

In this post, we show how to use Amazon Kinesis Data Streams to buffer and aggregate real-time streaming data for delivery into Amazon OpenSearch Service domains and collections using Amazon OpenSearch Ingestion. You can use this approach for a variety of use cases, from real-time log analytics to integrating application messaging data for real-time search. In this post, we focus on the use case for centralizing log aggregation for an organization that has a compliance need to archive and retain its log data.

Kinesis Data Streams is a fully managed, serverless data streaming service that stores and ingests various streaming data in real time at any scale. For log analytics use cases, Kinesis Data Streams enhances log aggregation by decoupling producer and consumer applications, and providing a resilient, scalable buffer to capture and serve log data. This decoupling provides advantages over traditional architectures. As log producers scale up and down, Kinesis Data Streams can be scaled dynamically to persistently buffer log data. This prevents load changes from impacting an OpenSearch Service domain, and provides a resilient store of log data for consumption. It also allows for multiple consumers to process log data in real time, providing a persistent store of real-time data for applications to consume. This allows the log analytics pipeline to meet Well-Architected best practices for resilience (REL04-BP02) and cost (COST09-BP02).

OpenSearch Ingestion is a serverless pipeline that provides powerful tools for extracting, transforming, and loading data into an OpenSearch Service domain. OpenSearch Ingestion integrates with many AWS services, and provides ready-made blueprints to accelerate ingesting data for a variety of analytics use cases into OpenSearch Service domains. When paired with Kinesis Data Streams, OpenSearch Ingestion allows for sophisticated real-time analytics of data, and helps reduce the undifferentiated heavy lifting of creating a real-time search and analytics architecture.

Solution overview

In this solution, we consider a common use case for centralized log aggregation for an organization. Organizations might consider a centralized log aggregation approach for a variety of reasons. Many organizations have compliance and governance requirements that have stipulations for what data needs to be logged, and how long log data must be retained and remain searchable for investigations. Other organizations seek to consolidate application and security operations, and provide common observability toolsets and capabilities across their teams.

To meet such requirements, you need to collect data from log sources (producers) in a scalable, resilient, and cost-effective manner. Log sources may vary between application and infrastructure use cases and configurations, as illustrated in the following table.

Log Producer Example Example Producer Log Configuration
Application Logs AWS Lambda Amazon CloudWatch Logs
Application Agents FluentBit Amazon OpenSearch Ingestion
AWS Service Logs Amazon Web Application Firewall Amazon S3

The following diagram illustrates an example architecture.

You can use Kinesis Data Streams for a variety of these use cases. You can configure Amazon CloudWatch logs to send data to Kinesis Data Streams using a subscription filter (see Real-time processing of log data with subscriptions). If you send data with Kinesis Data Streams for analytics use cases, you can use OpenSearch Ingestion to create a scalable, extensible pipeline to consume your streaming data and write it to OpenSearch Service indexes. Kinesis Data Streams provides a buffer that can support multiple consumers, configurable retention, and built-in integration with a variety of AWS services. For other use cases where data is stored in Amazon Simple Storage Service (Amazon S3), or where an agent writes data such as FluentBit, an agent can write data directly to OpenSearch Ingestion without an intermediate buffer thanks to OpenSearch Ingestion’s built-in persistent buffers and automatic scaling.

Standardizing logging approaches reduces development and operational overhead for organizations. For example, you might standardize on all applications logging to CloudWatch logs when feasible, and also handle Amazon S3 logs where CloudWatch logs are unsupported. This reduces the number of use cases that a centralized team needs to handle in their log aggregation approach, and reduces the complexity of the log aggregation solution. For more sophisticated development teams, you might standardize on using FluentBit agents to write data directly to OpenSearch Ingestion to lower cost when log data doesn’t need to be stored in CloudWatch.

This solution focuses on using CloudWatch logs as a data source for log aggregation. For the Amazon S3 log use case, see Using an OpenSearch Ingestion pipeline with Amazon S3. For agent-based solutions, see the agent-specific documentation for integration with OpenSearch Ingestion, such as Using an OpenSearch Ingestion pipeline with Fluent Bit.

Prerequisites

Several key pieces of infrastructure used in this solution are required to ingest data into OpenSearch Service with OpenSearch Ingestion:

  • A Kinesis data stream to aggregate the log data from CloudWatch
  • An OpenSearch domain to store the log data

When creating the Kinesis data stream, we recommend starting with On-Demand mode. This will allow Kinesis Data Streams to automatically scale the number of shards needed for your log throughput. After you identify the steady state workload for your log aggregation use case, we recommend moving to Provisioned mode, using the number of shards identified in On-Demand mode. This can help you optimize long-term cost for high-throughput use cases.

In general, we recommend using one Kinesis data stream for your log aggregation workload. OpenSearch Ingestion supports up to 96 OCUs per pipeline, and 24,000 characters per pipeline definition file (see OpenSearch Ingestion quotas). This means that each pipeline can support a Kinesis data stream with up to 96 shards, because each OCU processes one shard. Using one Kinesis data stream simplifies the overall process to aggregate log data into OpenSearch Service, and simplifies the process for creating and managing subscription filters for log groups.

Depending on the scale of your log workloads, and the complexity of your OpenSearch Ingestion pipeline logic, you may consider more Kinesis data streams for your use case. For example, you may consider one stream for each major log type in your production workload. Having log data for different use cases separated into different streams can help reduce the operational complexity of managing OpenSearch Ingestion pipelines, and allows you to scale and deploy changes to each log use case separately when required.

To create a Kinesis Data Stream, see Create a data stream.

To create an OpenSearch domain, see Creating and managing Amazon OpenSearch domains.

Configure log subscription filters

You can implement CloudWatch log group subscription filters at the account level or log group level. In both cases, we recommend creating a subscription filter with a random distribution method to make sure log data is evenly distributed across Kinesis data stream shards.

Account-level subscription filters are applied to all log groups in an account, and can be used to subscribe all log data to a single destination. This works well if you want to store all your log data in OpenSearch Service using Kinesis Data Streams. There is a limit of one account-level subscription filter per account. Using Kinesis Data Streams as the destination also allows you to have multiple log consumers to process the account log data when relevant. To create an account-level subscription filter, see Account-level subscription filters.

Log group-level subscription filters are applied on each log group. This approach works well if you want to store a subset of your log data in OpenSearch Service using Kinesis Data Streams, and if you want to use multiple different data streams to store and process multiple log types. There is a limit of two log group-level subscription filters per log group. To create a log group-level subscription filter, see Log group-level subscription filters.

After you create your subscription filter, verify that log data is being sent to your Kinesis data stream. On the Kinesis Data Streams console, choose the link for your stream name.

Choose a shard with Starting position set as Trim horizon, and choose Get records.

You should see records with a unique Partition key column value and binary Data column. This is because CloudWatch sends data in .gzip format to compress log data.

Configure an OpenSearch Ingestion pipeline

Now that you have a Kinesis data stream and CloudWatch subscription filters to send data to the data stream, you can configure your OpenSearch Ingestion pipeline to process your log data. To begin, you create an AWS Identity and Access Management (IAM) role that allows read access to the Kinesis data stream and read/write access to the OpenSearch domain. To create your pipeline, your manager role that is used to create the pipeline will require iam:PassRole permissions to the pipeline role created in this step.

  1. Create an IAM role with the following permissions to read from your Kinesis data stream and access your OpenSearch domain:
    {
        "Version": "2012-10-17",
        "Statement": [
            {
                "Sid": "allowReadFromStream",
                "Effect": "Allow",
                "Action": [
                    "kinesis:DescribeStream",
                    "kinesis:DescribeStreamConsumer",
                    "kinesis:DescribeStreamSummary",
                    "kinesis:GetRecords",
                    "kinesis:GetShardIterator",
                    "kinesis:ListShards",
                    "kinesis:ListStreams",
                    "kinesis:ListStreamConsumers",
                    "kinesis:RegisterStreamConsumer",
                    "kinesis:SubscribeToShard"
                ],
                "Resource": [
                    "arn:aws:kinesis:{{region}}:{{account-id}}:stream/{{stream-name}}"
                ]
            },
            {
                "Sid": "allowAccessToOS",
                "Effect": "Allow",
                "Action": [
                    "es:DescribeDomain",
                    "es:ESHttp*"
                ],
                "Resource": [
                    "arn:aws:es:{region}:{account-id}:domain/{domain-name}",
                    "arn:aws:es:{region}:{account-id}:domain/{domain-name}/*"
                ]
            }
        ]
    }

  2. Give your role a trust policy that allows access from osis-pipelines.amazonaws.com:
    {
        "Version": "2012-10-17",
        "Statement": [
            {
                "Sid": "",
                "Effect": "Allow",
                "Principal": {
                    "Service": [
                        "osis-pipelines.amazonaws.com"
                    ]
                },
                "Action": "sts:AssumeRole",
                "Condition": {
                    "StringEquals": {
                        "aws:SourceAccount": "{account-id}"
                    },
                    "ArnLike": {
                        "aws:SourceArn": "arn:aws:osis:{region}:{account-id}:pipeline/*"
                    }
                }
            }
        ]
    }

For a pipeline to write data to a domain, the domain must have a domain-level access policy that allows the pipeline role to access it, and if your domain uses fine-grained access control, then the IAM role needs to be mapped to a backend role in the OpenSearch Service security plugin that allows access to create and write to indexes.

  1. After you create your pipeline role, on the OpenSearch Service console, choose Pipelines under Ingestion in the navigation pane.
  2. Choose Create pipeline.
  3. Search for Kinesis in the blueprints, select the Kinesis Data Streams blueprint, and choose Select blueprint.
  4. Under Pipeline settings, enter a name for your pipeline, and set Max capacity for the pipeline to be equal to the number of shards in your Kinesis data stream.

If you’re using On-Demand mode for the data stream, choose a capacity equal to the current number of shards in the stream. This use case doesn’t require a persistent buffer, because Kinesis Data Streams provides a persistent buffer for the log data, and OpenSearch Ingestion tracks its position in the Kinesis data stream over time, preventing data loss on restarts.

  1. Under Pipeline configuration, update the pipeline source settings to use your Kinesis data stream name and pipeline IAM role Amazon Resource Name (ARN).

For full configuration information, see . For most configurations, you can use the default values. By default, the pipeline will write batches of 100 documents every 1 second, and will subscribe to the Kinesis data stream from the latest position in the stream using enhanced fan-out, checkpointing its position in the stream every 2 minutes. You can adjust this behavior as desired to tune how frequently the consumer checkpoints, where it begins in the stream, and use polling to reduce costs from enhanced fan-out.

  source:
    kinesis-data-streams:
      acknowledgments: true
      codec:
        # JSON codec supports parsing nested CloudWatch events into
        # individual log entries that will be written as documents to
        # OpenSearch
        json:
          key_name: "logEvents"
          # These keys contain the metadata sent by CloudWatch Subscription Filters
          # in addition to the individual log events:
          # https://docs.aws.amazon.com/AmazonCloudWatch/latest/logs/SubscriptionFilters.html#DestinationKinesisExample
          include_keys: ['owner', 'logGroup', 'logStream' ]
      streams:
        # Update to use your Kinesis Stream name used in your Subscription Filters:
        - stream_name: "KINESIS_STREAM_NAME"
          # Can customize initial position if you don't want OSI to consume the entire stream:
          initial_position: "EARLIEST"
          # Compression will always be gzip for CloudWatch, but will vary for other sources:
          compression: "gzip"
      aws:
        # Provide the Role ARN with access to KDS. This role should have a trust relationship with osis-pipelines.amazonaws.com
        # This must be the same role used below in the Sink configuration.
        sts_role_arn: "PIPELINE_ROLE_ARN"
        # Provide the region of the Data Stream.
        region: "REGION"
  1. Update the pipeline sink settings to include your OpenSearch domain endpoint URL and pipeline IAM role ARN.

The IAM role ARN must be the same for both the OpenSearch Servicer sink definition and the Kinesis Data Streams source definition. You can control what data gets indexed in different indexes using the index definition in the sink. For example, you can use metadata about the Kinesis data stream name to index by data stream (${getMetadata("kinesis_stream_name")), or you can use document fields to index data depending on the CloudWatch log group or other document data (${path/to/field/in/document}). In this example, we use three document-level fields (data_stream.type, data_stream.dataset, and data_stream.namespace) to index our documents, and create these fields in our pipeline processor logic in the next section:

  sink:
    - opensearch:
        # Provide an AWS OpenSearch Service domain endpoint
        hosts: [ "OPENSEARCH_ENDPOINT" ]
        # Route log data to different target indexes depending on the log context:
        index: "ss4o_${data_stream/type}-${data_stream/dataset}-${data_stream/namespace}"
        aws:
          # Provide a Role ARN with access to the domain. This role should have a trust relationship with osis-pipelines.amazonaws.com
          # This role must be the same as the role used above for Kinesis.
          sts_role_arn: "PIPELINE_ROLE_ARN"
          # Provide the region of the domain.
          region: "REGION"
          # Enable the 'serverless' flag if the sink is an Amazon OpenSearch Serverless collection
          serverless: false

Finally, you can update the pipeline configuration to include processor definitions to transform your log data before writing documents to the OpenSearch domain. For example, this use case adopts Simple Schema for Observability (SS4O) and uses the OpenSearch Ingestion pipeline to create the desired schema for SS4O. This includes adding common fields to associate metadata with the indexed documents, as well as parsing the log data to make data more searchable. This use case also uses the log group name to identify different log types as datasets, and uses this information to write documents to different indexes depending on their use cases.

  1. Rename the CloudWatch event timestamp to mark the observed timestamp when the log was generated using the rename_keys processor, and add the current timestamp as the processed timestamp when OpenSearch Ingestion handled the record using the date processor:
      #  Processor logic is used to change how log data is parsed for OpenSearch.
      processor:
        - rename_keys:
            entries:
            # Include CloudWatch timestamp as the observation timestamp - the time the log
            # was generated and sent to CloudWatch:
            - from_key: "timestamp"
              to_key: "observed_timestamp"
        - date:
            # Include the current timestamp that OSI processed the log event:
            from_time_received: true
            destination: "processed_timestamp"

  2. Use the add_entries processor to include metadata about the processed document, including the log group, log stream, account ID, AWS Region, Kinesis data stream information, and dataset metadata:
        - add_entries:
            entries:
            # Support SS4O common log fields (https://opensearch.org/docs/latest/observing-your-data/ss4o/)
            - key: "cloud/provider"
              value: "aws"
            - key: "cloud/account/id"
              format: "${owner}"
            - key: "cloud/region"
              value: "us-west-2"
            - key: "aws/cloudwatch/log_group"
              format: "${logGroup}"
            - key: "aws/cloudwatch/log_stream"
              format: "${logStream}"
            # Include default values for the data_stream:
            - key: "data_stream/namespace"
              value: "default"
            - key: "data_stream/type"
              value: "logs"
            - key: "data_stream/dataset"
              value: "general"
            # Include metadata about the source Kinesis message that contained this log event:
            - key: "aws/kinesis/stream_name"
              value_expression: "getMetadata(\"stream_name\")"
            - key: "aws/kinesis/partition_key"
              value_expression: "getMetadata(\"partition_key\")"
            - key: "aws/kinesis/sequence_number"
              value_expression: "getMetadata(\"sequence_number\")"
            - key: "aws/kinesis/sub_sequence_number"
              value_expression: "getMetadata(\"sub_sequence_number\")"

  3. Use conditional expression syntax to update the data_stream.dataset fields depending on the log source, to control what index the document is written to, and use the delete_entries processor to delete the original CloudWatch document fields that were renamed:
        - add_entries:
            entries:
            # Update the data_stream fields based on the log event context - in this case
            # classifying the log events by their source (CloudTrail or Lambda).
            # Additional logic could be added to classify the logs by business or application context:
            - key: "data_stream/dataset"
              value: "cloudtrail"
              add_when: "contains(/logGroup, \"cloudtrail\") or contains(/logGroup, \"CloudTrail\")"
              overwrite_if_key_exists: true
            - key: "data_stream/dataset"
              value: "lambda"
              add_when: "contains(/logGroup, \"/aws/lambda/\")"
              overwrite_if_key_exists: true
            - key: "data_stream/dataset"
              value: "apache"
              add_when: "contains(/logGroup, \"/apache/\")"
              overwrite_if_key_exists: true
        # Remove the default CloudWatch fields, as we re-mapped them to SS4O fields:
        - delete_entries:
            with_keys:
              - "logGroup"
              - "logStream"
              - "owner"

  4. Parse the log message fields to allow structured and JSON data to be more searchable in the OpenSearch indexes using the grok and parse_json

Grok processors use pattern matching to parse data from structured text fields. For examples of built-in Grok patterns, see java-grok patterns and dataprepper grok patterns.

    # Use Grok parser to parse non-JSON apache logs
    - grok:
        grok_when: "/data_stream/dataset == \"apache\""
        match:
          message: ['%{COMMONAPACHELOG_DATATYPED}']
        target_key: "http"
    # Attempt to parse the log data as JSON to support field-level searches in the OpenSearch index:
    - parse_json:
        # Parse root message object into aws.cloudtrail to match SS4O standard for SS4O logs
        source: "message"
        destination: "aws/cloudtrail"
        parse_when: "/data_stream/dataset == \"cloudtrail\""
        tags_on_failure: ["json_parse_fail"]
    - parse_json:
        # Parse root message object as JSON when possible for Lambda function logs - can also set up Grok support
        # for Lambda function logs to capture non-JSON logging function data as searchable fields
        source: "message"
        destination: "aws/lambda"
        parse_when: "/data_stream/dataset == \"lambda\""
        tags_on_failure: ["json_parse_fail"]
    - parse_json:
        # Parse root message object as JSON when possible for general logs
        source: "message"
        destination: "body"
        parse_when: "/data_stream/dataset == \"general\""
        tags_on_failure: ["json_parse_fail"]

When it’s all put together, your pipeline configuration will look like the following code:

version: "2"
kinesis-pipeline:
  source:
    kinesis-data-streams:
      acknowledgments: true
      codec:
        # JSON codec supports parsing nested CloudWatch events into
        # individual log entries that will be written as documents to
        # OpenSearch
        json:
          key_name: "logEvents"
          # These keys contain the metadata sent by CloudWatch Subscription Filters
          # in addition to the individual log events:
          # https://docs.aws.amazon.com/AmazonCloudWatch/latest/logs/SubscriptionFilters.html#DestinationKinesisExample
          include_keys: ['owner', 'logGroup', 'logStream' ]
      streams:
        # Update to use your Kinesis Stream name used in your Subscription Filters:
        - stream_name: "KINESIS_STREAM_NAME"
          # Can customize initial position if you don't want OSI to consume the entire stream:
          initial_position: "EARLIEST"
          # Compression will always be gzip for CloudWatch, but will vary for other sources:
          compression: "gzip"
      aws:
        # Provide the Role ARN with access to KDS. This role should have a trust relationship with osis-pipelines.amazonaws.com
        # This must be the same role used below in the Sink configuration.
        sts_role_arn: "PIPELINE_ROLE_ARN"
        # Provide the region of the Data Stream.
        region: "REGION"
        
  #  Processor logic is used to change how log data is parsed for OpenSearch.
  processor:
    - rename_keys:
        entries:
        # Include CloudWatch timestamp as the observation timestamp - the time the log
        # was generated and sent to CloudWatch:
        - from_key: "timestamp"
          to_key: "observed_timestamp"
    - date:
        # Include the current timestamp that OSI processed the log event:
        from_time_received: true
        destination: "processed_timestamp"
    - add_entries:
        entries:
        # Support SS4O common log fields (https://opensearch.org/docs/latest/observing-your-data/ss4o/)
        - key: "cloud/provider"
          value: "aws"
        - key: "cloud/account/id"
          format: "${owner}"
        - key: "cloud/region"
          value: "us-west-2"
        - key: "aws/cloudwatch/log_group"
          format: "${logGroup}"
        - key: "aws/cloudwatch/log_stream"
          format: "${logStream}"
        # Include default values for the data_stream:
        - key: "data_stream/namespace"
          value: "default"
        - key: "data_stream/type"
          value: "logs"
        - key: "data_stream/dataset"
          value: "general"
        # Include metadata about the source Kinesis message that contained this log event:
        - key: "aws/kinesis/stream_name"
          value_expression: "getMetadata(\"stream_name\")"
        - key: "aws/kinesis/partition_key"
          value_expression: "getMetadata(\"partition_key\")"
        - key: "aws/kinesis/sequence_number"
          value_expression: "getMetadata(\"sequence_number\")"
        - key: "aws/kinesis/sub_sequence_number"
          value_expression: "getMetadata(\"sub_sequence_number\")"
    - add_entries:
        entries:
        # Update the data_stream fields based on the log event context - in this case
        # classifying the log events by their source (CloudTrail or Lambda).
        # Additional logic could be added to classify the logs by business or application context:
        - key: "data_stream/dataset"
          value: "cloudtrail"
          add_when: "contains(/logGroup, \"cloudtrail\") or contains(/logGroup, \"CloudTrail\")"
          overwrite_if_key_exists: true
        - key: "data_stream/dataset"
          value: "lambda"
          add_when: "contains(/logGroup, \"/aws/lambda/\")"
          overwrite_if_key_exists: true
        - key: "data_stream/dataset"
          value: "apache"
          add_when: "contains(/logGroup, \"/apache/\")"
          overwrite_if_key_exists: true
    # Remove the default CloudWatch fields, as we re-mapped them to SS4O fields:
    - delete_entries:
        with_keys:
          - "logGroup"
          - "logStream"
          - "owner"
    # Use Grok parser to parse non-JSON apache logs
    - grok:
        grok_when: "/data_stream/dataset == \"apache\""
        match:
          message: ['%{COMMONAPACHELOG_DATATYPED}']
        target_key: "http"
    # Attempt to parse the log data as JSON to support field-level searches in the OpenSearch index:
    - parse_json:
        # Parse root message object into aws.cloudtrail to match SS4O standard for SS4O logs
        source: "message"
        destination: "aws/cloudtrail"
        parse_when: "/data_stream/dataset == \"cloudtrail\""
        tags_on_failure: ["json_parse_fail"]
    - parse_json:
        # Parse root message object as JSON when possible for Lambda function logs - can also set up Grok support
        # for Lambda function logs to capture non-JSON logging function data as searchable fields
        source: "message"
        destination: "aws/lambda"
        parse_when: "/data_stream/dataset == \"lambda\""
        tags_on_failure: ["json_parse_fail"]
    - parse_json:
        # Parse root message object as JSON when possible for general logs
        source: "message"
        destination: "body"
        parse_when: "/data_stream/dataset == \"general\""
        tags_on_failure: ["json_parse_fail"]

  sink:
    - opensearch:
        # Provide an AWS OpenSearch Service domain endpoint
        hosts: [ "OPENSEARCH_ENDPOINT" ]
        # Route log data to different target indexes depending on the log context:
        index: "ss4o_${data_stream/type}-${data_stream/dataset}-${data_stream/namespace}"
        aws:
          # Provide a Role ARN with access to the domain. This role should have a trust relationship with osis-pipelines.amazonaws.com
          # This role must be the same as the role used above for Kinesis.
          sts_role_arn: "PIPELINE_ROLE_ARN"
          # Provide the region of the domain.
          region: "REGION"
          # Enable the 'serverless' flag if the sink is an Amazon OpenSearch Serverless collection
          serverless: false
  1. When your configuration is complete, choose Validate pipeline to check your pipeline syntax for errors.
  2. In the Pipeline role section, optionally enter a suffix to create a unique service role that will be used to start your pipeline run.
  3. In the Network section, select VPC access.

For a Kinesis Data Streams source, you don’t need to select a virtual private cloud (VPC), subnets, or security groups. OpenSearch Ingestion only requires these attributes for HTTP data sources that are located within a VPC. For Kinesis Data Streams, OpenSearch Ingestion uses AWS PrivateLink to read from Kinesis Data Streams and write to OpenSearch domains or serverless collections.

  1. Optionally, enable CloudWatch logging for your pipeline.
  2. Choose Next to review and create your pipeline.

If you’re using account-level subscription filters for CloudWatch logs in the account where OpenSearch Ingestion is running, this log group should be excluded from the account-level subscription. This is because OpenSearch Ingestion pipeline logs could cause a recursive loop with the subscription filter that could lead to high volumes of log data ingestion and cost.

  1. In the Review and create section, choose Create pipeline.

When your pipeline enters the Active state, you’ll see logs begin to populate in your OpenSearch domain or serverless collection.

Monitor the solution

To maintain the health of the log ingestion pipeline, there are several key areas to monitor:

  • Kinesis Data Streams metrics – You should monitor the following metrics:
    • FailedRecords – Indicates an issue in CloudWatch subscription filters writing to the Kinesis data stream. Reach out to AWS Support if this metric stays at a non-zero level for a sustained period.
    • ThrottledRecords – Indicates your Kinesis data stream needs more shards to accommodate the log volume from CloudWatch.
    • ReadProvisionedThroughputExceeded – Indicates your Kinesis data stream has more consumers consuming read throughput than supplied by the shard limits, and you may need to move to an enhanced fan-out consumer strategy.
    • WriteProvisionedThroughputExceeded – Indicates your Kinesis data stream needs more shards to accommodate the log volume from CloudWatch, or that your log volume is being unevenly distributed to your shards. Make sure the subscription filter distribution strategy is set to random, and consider enabling enhanced shard-level monitoring on the data stream to identify hot shards.
    • RateExceeded – Indicates that a consumer is incorrectly configured for the stream, and there may be an issue in your OpenSearch Ingestion pipeline causing it to subscribe too often. Investigate your consumer strategy for the Kinesis data stream.
    • MillisBehindLatest – Indicates the enhanced fan-out consumer isn’t keeping up with the load in the data stream. Investigate the OpenSearch Ingestion pipeline OCU configuration and make sure there are sufficient OCUs to accommodate the Kinesis data stream shards.
    • IteratorAgeMilliseconds – Indicates the polling consumer isn’t keeping up with the load in the data stream. Investigate the OpenSearch Ingestion pipeline OCU configuration and make sure there are sufficient OCUs to accommodate the Kinesis data stream shards, and investigate the polling strategy for the consumer.
  • CloudWatch subscription filter metrics – You should monitor the following metrics:
    • DeliveryErrors – Indicates an issue in CloudWatch subscription filter delivering data to the Kinesis data stream. Investigate data stream metrics.
    • DeliveryThrottling – Indicates insufficient capacity in the Kinesis data stream. Investigate data stream metrics.
  • OpenSearch Ingestion metrics – For recommended monitoring for OpenSearch Ingestion, see Recommended CloudWatch alarms.
  • OpenSearch Service metrics – For recommended monitoring for OpenSearch Service, see Recommended CloudWatch alarms for Amazon OpenSearch Service.

Clean up

Make sure you clean up unwanted AWS resources created while following this post in order to prevent additional billing for these resources. Follow these steps to clean up your AWS account:

  1. Delete your Kinesis data stream.
  2. Delete your OpenSearch Service domain.
  3. Use the DeleteAccountPolicy API to remove your account-level CloudWatch subscription filter.
  4. Delete your log group-level CloudWatch subscription filter:
    1. On the CloudWatch console, select the desired log group.
    2. On the Actions menu, choose Subscription Filters and Delete all subscription filter(s).
  5. Delete the OpenSearch Ingestion pipeline.

Conclusion

In this post, you learned how to create a serverless ingestion pipeline to deliver CloudWatch logs in real time to an OpenSearch domain or serverless collection using OpenSearch Ingestion. You can use this approach for a variety of real-time data ingestion use cases, and add it to existing workloads that use Kinesis Data Streams for real-time data analytics.

For other use cases for OpenSearch Ingestion and Kinesis Data Streams, consider the following:

To continue improving your log analytics use cases in OpenSearch, consider using some of the pre-built dashboards available in Integrations in OpenSearch Dashboards.


About the authors

M Mehrtens has been working in distributed systems engineering throughout their career, working as a Software Engineer, Architect, and Data Engineer. In the past, M has supported and built systems to process terrabytes of streaming data at low latency, run enterprise Machine Learning pipelines, and created systems to share data across teams seamlessly with varying data toolsets and software stacks. At AWS, they are a Sr. Solutions Architect supporting US Federal Financial customers.

Arjun Nambiar is a Product Manager with Amazon OpenSearch Service. He focuses on ingestion technologies that enable ingesting data from a wide variety of sources into Amazon OpenSearch Service at scale. Arjun is interested in large-scale distributed systems and cloud-centered technologies, and is based out of Seattle, Washington.

Muthu Pitchaimani is a Search Specialist with Amazon OpenSearch Service. He builds large-scale search applications and solutions. Muthu is interested in the topics of networking and security, and is based out of Austin, Texas.

Achieve data resilience using Amazon OpenSearch Service disaster recovery with snapshot and restore

Post Syndicated from Samir Patel original https://aws.amazon.com/blogs/big-data/achieve-data-resilience-using-amazon-opensearch-service-disaster-recovery-with-snapshot-and-restore/

Amazon OpenSearch Service is a fully managed service offered by AWS that enables you to deploy, operate, and scale OpenSearch domains effortlessly. OpenSearch is a distributed search and analytics engine, which is an open-source project. OpenSearch Service seamlessly integrates with other AWS offerings, providing a robust solution for building scalable and resilient search and analytics applications in the cloud.

Disaster recovery is vital for organizations, offering a proactive strategy to mitigate the impact of unforeseen events like system failures, natural disasters, or cyberattacks.

In Disaster Recovery (DR) Architecture on AWS, Part I: Strategies for Recovery in the Cloud, we introduced four major strategies for disaster recovery (DR) on AWS. These strategies enable you to prepare for and recover from a disaster. By using the best practices provided in the AWS Well-Architected Reliability Pillar to design your DR strategy, your workloads can remain available despite disaster events such as natural disasters, technical failures, or human actions. OpenSearch Service provides various DR solutions, including active-passive and active-active approaches. This post focuses on introducing an active-passive approach using a snapshot and restore strategy.

Snapshot and restore in OpenSearch Service

The snapshot and restore strategy in OpenSearch Service involves creating point-in-time backups, known as snapshots, of your OpenSearch domain. These snapshots capture the entire state of the domain, including indexes, mappings, and settings. In the event of data loss or system failure, these snapshots will be used to restore the domain to a specific point in time. Implementing a snapshot and restore strategy helps organizations meet Recovery Point Objectives (RPOs) and Recovery Time Objectives (RTOs), providing minimal data loss and rapid system recovery in case of disasters.

Snapshot and restore results in longer downtimes and greater loss of data between when the disaster event occurs and recovery. However, backup and restore can still be the right strategy for your workload because it is the most straightforward and least expensive strategy to implement. Additionally, not all workloads require RTO and RPO in minutes or less.

Solution overview

The following architecture diagram illustrates how manual snapshots are taken from the OpenSearch Service domain in the primary AWS Region and stored in an Amazon Simple Storage Service (Amazon S3) bucket in the secondary Region.

We walk through each step and discuss scenarios for failing over to the OpenSearch Service domain in the secondary Region in the event of a disaster in the primary Region, as well as how to fail back to the OpenSearch Service domain to resume operations in the primary Region.

bdb-4227-Arch1.1

The workflow consists of the following initial steps:

  1. OpenSearch Service is hosted in the primary Region, and all the active traffic is routed to the OpenSearch Service domain in the primary Region.
  2. The manual snapshots from the OpenSearch Service domain in the primary Region are transferred to the S3 bucket in the secondary Region on a predefined schedule.

This process can be programmatically scheduled using an AWS Lambda function, as described in Unleash the power of Snapshot Management to take automated snapshots using Amazon OpenSearch Service. This gives you the most effective protection from disasters of any scope of impact. In the event of a disaster in the primary Region, in addition to OpenSearch data recovery from backup, you must also be able to restore your infrastructure in the secondary Region. Infrastructure as code (IaC) methods such as using AWS CloudFormation or the AWS Cloud Development Kit (AWS CDK) enable you to deploy consistent infrastructure across Regions.

The following diagram illustrates the architecture in the event of a disaster.

bdb-4227-Arch1.2

The workflow consists of the following steps:

  1. In the event of a disaster making the OpenSearch Service domain in the primary Region unavailable, all active traffic routed to the primary Region’s OpenSearch Service domain will cease.
  2. When the OpenSearch Service domain becomes unavailable, the manual snapshots to Amazon S3 will no longer be taken at the predefined intervals.
  3. To fail over, launch the OpenSearch Service domain in the secondary Region using IaC. Restore manual snapshots from the S3 bucket in the secondary Region to the OpenSearch Service domain in the secondary domain. For log workloads, restore only recent or relevant logs to save time and use this opportunity to purge unnecessary documents or indexes.
  4. Update the DNS controller (Amazon Route 53) to redirect traffic to the OpenSearch Service domain in the secondary Region.
  5. When the primary Region becomes available, set up manual snapshots from the OpenSearch Service domain in the secondary Region to the S3 bucket in the primary Region.

The following diagram illustrates the architecture after the primary Region becomes available.

bdb-4227-Arch1.3

The workflow consists of the following steps:

  1. When the primary Region becomes available again, destroy the existing OpenSearch domain in the primary Region. Launch a new OpenSearch Service domain in the primary Region.
  2. Restore manual snapshots from the S3 bucket in the primary Region to the new OpenSearch Service domain created in the previous step.
  3. Update Route 53 to redirect traffic to the new OpenSearch Service domain in the primary Region.
  4. Set up manual snapshots from the new OpenSearch Service domain in the primary Region to a new prefix in the S3 bucket in the secondary Region.
  5. After successfully failing back to the OpenSearch Service domain in the primary Region, destroy the OpenSearch Service domain in the secondary Region.

In this post, we demonstrate how to launch an OpenSearch Service domain in the primary Region and set up manual snapshots to an S3 bucket in the secondary Region. Then we simulate a failover to resume operations using the OpenSearch Service domain in the secondary Region in the event of a disaster. Finally, we illustrate the failback mechanism by reverting to the OpenSearch Service domain in the primary Region.

Regular operations

In this section, we discuss the regular operations to set up the solution architecture.

Launch an OpenSearch Service domain in the primary Region

Create an OpenSearch Service domain in the primary Region by following the instructions in Creating and managing Amazon OpenSearch Service domains with fine-grained access control enabled. Do not enable standby mode. Create indexes and populate them with documents.

Create an S3 bucket in the secondary Region

To store OpenSearch snapshots in the secondary Region, you need to create S3 buckets in that Region. For instructions, see Creating a bucket.

Create the snapshot IAM role

The snapshot AWS Identity and Access Management (IAM) role is necessary to grant permissions specifically for managing snapshots within the OpenSearch Service domain. For instructions, see Creating an IAM role (console). We refer to this role as TheSnapshotRole in this post.

  1. Attach the following IAM policy to TheSnapshotRole:
    {
      "Version": "2012-10-17",
      "Statement": [{
          "Action": [
            "s3:ListBucket"
          ],
          "Effect": "Allow",
          "Resource": [
            "arn:aws:s3:::s3-bucket-name"
          ]
        },
        {
          "Action": [
            "s3:GetObject",
            "s3:PutObject",
            "s3:DeleteObject"
          ],
          "Effect": "Allow",
          "Resource": [
            "arn:aws:s3:::s3-bucket-name/*"
          ]
        }
      ]
    }

  2. Edit the trust relationship of TheSnapshotRole to specify OpenSearch Service in the Principal statement, as shown in the following example:
{
  "Version": "2012-10-17",
  "Statement": [{
    "Sid": "",
    "Effect": "Allow",
    "Principal": {
      "Service": "es.amazonaws.com"
    },
    "Action": "sts:AssumeRole"
  }]
}

To register the snapshot repository, you need to be able to pass TheSnapshotRole to OpenSearch Service. You also need access to the es:ESHttpPut action.

  1. To grant both of these permissions, attach the following policy to the IAM role whose credentials are being used to sign the request:
{
  "Version": "2012-10-17",
  "Statement": [
    {
      "Effect": "Allow",
      "Action": "iam:PassRole",
      "Resource": "arn:aws:iam::123456789012:role/TheSnapshotRole"
    },
    {
      "Effect": "Allow",
      "Action": "es:ESHttpPut",
      "Resource": "arn:aws:es:region:123456789012:domain/domain-name/*"
    }
  ]
}

Associate the IAM role or user to the OpenSearch security role for manual snapshots

Fine-grained access control introduces an additional step when registering a repository. Even if you use HTTP basic authentication for all other purposes, you need to map the manage_snapshots role to your IAM role that has iam:PassRole permissions to pass TheSnapshotRole. Snapshots can only be taken by a process or user associated with an IAM identity. This makes sure only authorized entities can create, manage, or restore snapshots.

One such method is to use Amazon Cognito. With Amazon Cognito, users can sign in with IAM credentials indirectly, either using proxy mapping with SAML or through user pool credentials. This setup provides a secure way to manage access while using the capabilities of IAM. The preferred method is to use a process that signs requests with AWS SigV4. This approach involves programmatically signing each request to OpenSearch with the appropriate IAM credentials, making sure only authorized processes can manage snapshots. This method is recommended because it provides a higher level of security and can be automated using Lambda functions as part of your backup and DR workflows.

  1. On OpenSearch Dashboards, navigate to the main menu and choose Security.
  2. Choose Roles and search for the manage_snapshots
  3. Choose Mapped users and choose Manage mappings.
  4. Add the Amazon Resource Name (ARN) of TheSnapshotRole to the backend roles.

bdb-4227-AssociateRole

Register a snapshot repository on the OpenSearch Service domain

To register a snapshot repository, send a signed PUT request to the OpenSearch Service domain endpoint using Curl; integrated development environments (IDEs) like PyCharm or VS Code, Postman; or another method. Using a PUT request in OpenSearch Dashboards for repository registration is not supported. For more details, see Using OpenSearch Dashboards with Amazon OpenSearch Service.

The curl command is as follows:

curl —aws-sigv4 "aws:amz:us-east-1:es" —user "ACCESS_KEY:SECRET_KEY" -XPUT "https://DOMAIN_ENDPOINT/_snapshot/REPOSITORY_NAME" -H 'Content-Type: application/json' -d '{ "type": "s3", "settings": { "bucket": "BUCKET_NAME", "endpoint": "s3.amazonaws.com", "role_arn": "ROLE_ARN" }}'

Use the curl command to register a snapshot repository in the OpenSearch Service domain in the primary Region pointing to the S3 bucket in the secondary Region.

To verify the snapshot repository creation, run the following query:

GET /_snapshot/os-snapshot-repo

bdb-4227-GetSnapshot

Take manual snapshots

To take a manual snapshot, perform the following steps from OpenSearch Dashboards. To include or exclude certain indexes and specify other settings, add a request body. For the request structure, see Take snapshots in the OpenSearch documentation.

  1. To create a manual snapshot, use the following query. In this query, the repository name is os-snapshot-repo and the snapshot name is 2023-11-18.

PUT /_snapshot/os-snapshot-repo/2023-11-18

bdb-4227-PutSnapshot

  1. Verify the snapshot has been created and indexes for which snapshot was taken:

GET /_snapshot/os-snapshot-repo/_all

bdb-4227-GetAllSnapshots

  1. Schedule your manual snapshot at a defined interval (for example, every 1 hour) based on your RPO requirements.

You can schedule this by creating an Amazon EventBridge rule to invoke a Lambda function every hour. For instructions, see Tutorial: Create an EventBridge scheduled rule for AWS Lambda functions. The Lambda function will transfer incremental manual snapshots into Amazon S3. For more information, see Unleash the power of Snapshot Management to take automated snapshots using Amazon OpenSearch Service.

Failover scenario

In a disaster, if your OpenSearch Service domain in the primary Region goes down, you can fail over to a domain in the secondary Region. This provides business continuity and minimizes downtime during unexpected Region failures.

To maintain business continuity during a disaster, you can use message queues like Amazon Simple Queue Service (Amazon SQS) and streaming solutions like Apache Kafka or Amazon Kinesis. These tools buffer incoming data in the primary Region, allowing you to replay traffic on a predefined period in the secondary Region when you fail over, to keep the OpenSearch Service domain up to date with all recent changes.

Launch an OpenSearch Service domain in the Secondary Region

Create an OpenSearch Service domain in the secondary Region by following the instructions in Creating and managing Amazon OpenSearch Service domains with fine-grained access control enabled. Do not enable standby mode.

Depending on your RTO requirements, you can keep the OpenSearch Service domain in the secondary Region up and running if you have an RTO of less than 1 hour. However, it will incur additional costs. If you have an RTO of more than 1 hour, you can launch a new OpenSearch Service domain in the secondary Region during the failover activity to reduce operational costs.

Associate the IAM role or user to the OpenSearch security role for manual snapshots

Follow the instructions in the previous section to associate the IAM role with the OpenSearch security role.

Register a snapshot repository on the OpenSearch Service domain

To make sure your data is available for failover, you need to register a snapshot repository on the OpenSearch Service domain in the secondary Region. The snapshots taken from your OpenSearch Service domain in the primary Region can be restored. Use the following command:

curl —aws-sigv4 "aws:amz:us-west-2:es" —user "ACCESS_KEY:SECRET_KEY" -XPUT "https://DOMAIN_ENDPOINT/_snapshot/REPOSITORY_NAME" -H 'Content-Type: application/json' -d '{ "type": "s3", "settings": { "bucket": "BUCKET_NAME", "endpoint": "s3.amazonaws.com", "role_arn": "ROLE_ARN" }}'

The S3 bucket should be the bucket created in the secondary Region where the snapshots from your OpenSearch Service domain in the primary Region are stored.

Restore snapshots

Before you restore a snapshot, make sure that the destination domain doesn’t use Multi-AZ with standby.

After you register the snapshot repository on your OpenSearch Service domain in the secondary Region, the next step is to restore the desired indexes from the snapshot repository. This step makes sure your data is available in the OpenSearch Service domain in the secondary Region. This step allows you to selectively restore specific index from your snapshot, providing flexibility to recover only the necessary data. Use the following command:

POST /_snapshot/<REPOSITORY_NAME>/<SNAPSHOT_NAME>/_restore
{
"indices": "movie-index"
}

bdb-4227-Restore

Verify the snapshots for all the necessary indexes are stored in the OpenSearch Service domain in the secondary Region.

Update Route 53 to redirect traffic to the OpenSearch Service domain in the secondary Region

After you restore the snapshots to the OpenSearch Service domain in the secondary Region, update the DNS settings (Route 53) with the new OpenSearch Service domain endpoint to redirect indexing traffic to the OpenSearch Service domain in the secondary Region. Route 53, a scalable DNS service, can seamlessly redirect traffic to the new OpenSearch endpoint by updating its DNS records.

A Route 53 resource record set directs internet traffic to specific resources, such as an OpenSearch Service domain. It includes a domain name, a record type (for example, CNAME), and the DNS name or IP address of the endpoint. To redirect traffic to a new endpoint, update or create a new record set.

Set up manual snapshots from the OpenSearch Service domain in the secondary Region to the Amazon S3 bucket in the primary Region

Complete the following steps to set up manual snapshots from the OpenSearch Service domain in the secondary Region to the S3 bucket in the primary Region:

  1. Create S3 bucket in the primary Region, following the steps from earlier in this post.
  2. Associate the IAM role or user to the OpenSearch security role for taking manual snapshots in your OpenSearch Service domain in the secondary Region. For instructions, refer to the earlier section in this post.
  3. Register a snapshot repository on the OpenSearch Service domain in the secondary Region pointing to the S3 bucket in the primary Region. For instructions, refer to the earlier section in this post.
  4. Take manual snapshots of the OpenSearch Service domain in the secondary Region to the S3 bucket in the primary Region, following the instructions from earlier in this post.
  5. Schedule your manual snapshot from the OpenSearch Service domain in the secondary Region to the S3 bucket in the primary Region at a defined interval (for example, every 1 hour) based on your RPO requirements.

Failback scenario

When the primary Region becomes available again, you can seamlessly revert to the OpenSearch Service domain in the primary Region. This failback process involves the following steps.

Destroy an existing OpenSearch Service domain in the primary Region

When the primary Region becomes available again, destroy the existing OpenSearch Service domain in the primary Region from the OpenSearch Service console. In the following screenshot, the primary Region is US East (N. Virginia).

bdb-4227-DestroyDomain

Launch a new OpenSearch Service domain in the primary Region

Create an OpenSearch Service domain in the primary Region by following the instructions in Creating and managing Amazon OpenSearch Service domains with fine-grained access control. Do not enable standby mode.

Associate the IAM role or user to the OpenSearch security role for restoring manual snapshots

Follow the instructions from earlier in this post to associate the IAM role or user to the OpenSearch security role.

Register a snapshot repository on the OpenSearch Service domain

To make sure your data is available for failover, you need to register a snapshot repository on the new OpenSearch Service domain in the primary Region. The snapshots taken from your OpenSearch Service domain in the secondary Region can be restored. Use the following command:

curl —aws-sigv4 "aws:amz:us-west-2:es" —user "ACCESS_KEY:SECRET_KEY" -XPUT "https://DOMAIN_ENDPOINT/_snapshot/REPOSITORY_NAME" -H 'Content-Type: application/json' -d '{ "type": "s3", "settings": { "bucket": "BUCKET_NAME", "endpoint": "s3.amazonaws.com", "role_arn": "ROLE_ARN" }}'

The S3 bucket should be the bucket created in the primary Region where the snapshots from your OpenSearch Service domain in the secondary Region are stored.

Restore manual snapshots from the S3 bucket in the primary Region to the new OpenSearch Service domain in the primary Region

To restore the manual snapshots, complete the following steps:

  1. Use the following code to restore the manual snapshots from the S3 bucket in the primary Region to the new OpenSearch Service domain in the primary Region:

POST /_snapshot/os-snapshot-repo/2023-11-18/_restore
{
"indices": "movie-index"
}

bdb-4227-Restore

  1. Verify data integrity and make sure the primary domain is up to date by checking the document count of the index:

GET movie-index/_count

bdb-4227-IndexCount

  1. Update Route 53 to redirect traffic to the new OpenSearch Service domain in the primary Region.
  2. Set up manual snapshots from the new OpenSearch Service domain in the primary Region to a new prefix in the S3 bucket in the secondary Region.

Destroy the OpenSearch Service domain in the secondary Region

After you have successfully failed back to the OpenSearch Service domain in the primary Region, destroy the OpenSearch Service domain in the secondary Region. In the following screenshot, the secondary Region is US West (Oregon).

bdb-4227-DestroyDomain2

Conclusion

In this post, we explained how you can implement a DR pattern on OpenSearch Service using a snapshot and restore strategy. It’s highly recommended to define your RPO and RTO for your workload and choose an appropriate DR strategy. Then, using AWS services, you can design an architecture that achieves the RTO and RPO for your business needs.


About the Authors

Samir Patel is a Senior Data Architect at Amazon Web Services, where he specializes in OpenSearch, data analytics, and cutting-edge generative AI technologies. Samir works directly with enterprise customers to design and build customized solutions catered to their data analytics and cybersecurity needs. When not immersed in technical work, Samir pursues his passion for outdoor activities, including hiking, pickleball, and grilling with family and friends.

Sesha Sanjana Mylavarapu is an Associate Data Lake Consultant at AWS Professional Services. She specializes in cloud-based data management and collaborates with enterprise clients to design and implement scalable data lakes. She has a strong interest in data analytics and enjoys assisting customers solve their business and technical challenges. Beyond her professional pursuits, Sanjana enjoys hiking, playing guitar, and is passionate about teaching yoga.

Vivek Gautam is a Senior Data Architect with specialization in data analytics at AWS Professional Services. He works with enterprise customers building data products, analytics platforms, streaming, and search solutions on AWS. When not building and designing data products, Vivek is a food enthusiast who also likes to explore new travel destinations and go on hikes.

AWS Weekly Roundup: 20 years of AWS News Blog, Express brokers for Amazon MSK, Windows Server 2025 images on EC2, and more (Nov 11, 2024)

Post Syndicated from Channy Yun (윤석찬) original https://aws.amazon.com/blogs/aws/aws-weekly-roundup-20-years-of-aws-news-blog-express-brokers-for-amazon-msk-windows-server-2025-images-on-ec2-and-more-nov-11-2024/

Happy 20th Anniversary of the AWS News Blog! 🎉🥳🎊 On November 9, 2004, Jeff Barr published his first blog post. At the time, he started a personal blog site using TypePad. He wanted to speak to his readers with his personal voice, not the company or team.

On April 29, 2014, we created a new AWS blog site and migrated all posts to that page. There are currently over 4,300 posts on the AWS News Blog, with Jeff contributing over 3,200 of them.

Since December 2016, the AWS News Blog has added new writers, but we are still following Jeff’s leadership principals for AWS News Bloggers in accordance with Day One. What’s unique about the AWS News Blog is that the blog writers get to use the features of the product team in advance, following the Customer Obsession leadership principle, and focus on walk-throughs of how customers can quickly use them to save time, with the Frugality principle.

I am very grateful for Jeff’s fundamental and pivotal role over the past 20 years, and I look forward to the next 20 years!

Last week’s launches
Here are some launches that got my attention:

New Express brokers for Amazon MSK – Express brokers are a new broker type for Amazon MSK Provisioned designed to deliver up to three times more throughput per broker, scale up to 20 times faster, and reduce recovery time by 90 percent as compared to standard Apache Kafka brokers. Express brokers come preconfigured with Kafka best practices by default, support all Kafka APIs, and provide the same low-latency performance, so you can continue using existing client applications without any changes.

New Amazon Kinesis Client Library 3.0 – You can now reduce compute costs to process streaming data by up to 33 percent with Kinesis Client Library (KCL) 3.0, compared to previous KCL versions. KCL 3.0 introduces an enhanced load balancing algorithm that continuously monitors resource utilization of the stream processing workers and automatically redistributes the load from overutilized workers to other underutilized workers. To learn more, read the AWS Big Data Blog post.

Microsoft Windows Server 2025 images on Amazon EC2 – We now support Microsoft Windows Server 2025 with License Included (LI) Amazon Machine Images (AMIs), providing customers with an easy and flexible way to launch the latest version of Windows Server. By running Windows Server 2025 on Amazon EC2, customers can take advantage of the security, performance, and reliability of AWS with the latest Windows Server features. To learn more about running Windows Server 2025 on Amazon EC2, visit Windows Workloads on AWS.

Anthropic’s Claude 3.5 Haiku model in Amazon Bedrock – Claude 3.5 Haiku is the next generation of Anthropic’s fastest model, combining rapid response times with improved reasoning capabilities, making it ideal for tasks that require both speed and intelligence. Claude 3.5 Haiku improves across every skill set and surpasses even Claude 3 Opus, the largest model in Anthropic’s previous generation, on many intelligence benchmarks—including coding. To learn more, read the AWS News Blog post.

Amazon Bedrock Prompt Management GA – You can simplify the creation, testing, versioning, and sharing of prompts in Amazon Bedrock Prompt Management. At general availability, we added new features that provide enhanced options for configuring your prompts and enabling seamless integration for invoking them in your generative AI applications, such as structured prompts and Converse and InvokeModel API integration. To learn more, read the AWS Machine Learning blog post.

Six new synthetic generative voices for Amazon Polly – The generative engine is Amazon Polly’s most advanced text-to-speech (TTS) model leveraging the generative AI technology. We added six new synthetic female-sounding generative voices: Ayanda (South African English), Léa (French), Lucia (European Spanish), Lupe (American Spanish), Mía (Mexican Spanish), and Vicki (German). This extends thirteen voices and nine locales to provide you with more options of highly expressive and engaging voices.

Amazon OpenSearch Service Extended Support – We announce the end of Standard Support and Extended Support timelines for legacy Elasticsearch versions and OpenSearch Versions. Standard Support ends on Nov 7, 2025, for legacy Elasticsearch versions up to 6.7, Elasticsearch versions 7.1 through 7.8, OpenSearch versions from 1.0 through 1.2, and OpenSearch versions 2.3 through 2.9. With Extended Support, for an incremental flat fee over regular instance pricing, you continue to get critical security updates beyond the end of Standard Support. To learn more, read the AWS Big Data Blog post.

For a full list of AWS announcements, be sure to keep an eye on the What’s New at AWS page.

Other AWS news
Here are some additional news items that you might find interesting:

CEO’s visiting at AWS data center – Matt Garman, CEO of AWS, had a great time visiting one of our AWS data centers recently, and was able to get a look at the continuous innovation delivered by the team. Of course, it’s no surprise that Amazon’s senior executives visit fulfillment centers, contact centers, and data centers, to do real work for customers. AWS data centers are designed for customers in every aspect, for maximum resilience, performance, and energy efficiency.

AWS supports small businesses, creates jobs, sets up sustainability initiatives, and develops educational programs near AWS data centers. Get the latest updates – AWS in your community: Here’s what’s happening near data centers across the US on About Amazon News.

Amazon Q Business at Amazon – I introduced an Amazon story to use Code transformation in Amazon Q Developer to migrate more than old 30,000 Java applications to Java 17 version. It saved over 4,500 developer years of effort compared to previous manual jobs and saved the company $260 million in annual by moving to the latest Java version.

Here is another dogfooding story of Amazon Q Business at Amazon. Amazon built an internal chatbot with Amazon Q Business and it has resolved over 1 million internal Amazon developer questions, reducing time spent churning on manual technical investigations by more than 450,000 hours.

Our team onboarded Amazon Q Business with millions of internal documents and integrated Q Business into the tools our team use every day. Now, instead of waiting hours for responses to complex technical questions on Q&A boards or Slack channels, developers can get answers in seconds.

TOURCast at PGA TOUR – If you enjoy golf, this news will be of interest to you. The PGA TOUR debuted TOURCast in Japan at the 2024 ZOZO Championship to capture and disseminate better statistical data and bring fans closer to the game based on new scoring system called ShotLink, powered by CDW. This marks the first time the PGA TOUR has been able to bring this technology to Asia, leveraging the flexibility and scalability of AWS to overcome unique challenges.


PGA TOUR volunteer setting up GPS equipment on the fairway at ZOZO championship that will input specific shot data and feed back to Shotlink Select Plus. [IMAGE: PGA TOUR]

They’ve completely rebuilt their scoring system over the past two years on a new cloud stack. With AWS cloud, whether data comes from high-tech radar systems, cameras, or manual input, the system processes it all seamlessly.

Upcoming AWS events
Check your calendars and sign up for these AWS events:

AWS GenAI LoftsAWS GenAI Lofts are about more than just the tech, they bring together startups, developers, investors, and industry experts. Whether you’re looking to gain deep insights, or get your questions answered by generative AI pros, our GenAI Lofts have you covered, and provide everything you need to start building your next innovation. Join events in São Paulo (through November 20), and Paris (through November 25).

AWS Community Days – Join community-led conferences that feature technical discussions, workshops, and hands-on labs led by expert AWS users and industry leaders from around the world: Jakarta, Indonesia (November 23), Kochi, India (December 14).

AWS re:Invent – You can still register for the annual learning event, taking place December 2–6 in Las Vegas. Surprisingly Andy Jassy, CEO of Amazon said he will come back and participate in AWS re:Invent this year. He said “As always, the priority is to make this a learning event so customers can take nuggets back and change their own customer experiences and businesses. We’ll also have a bunch of goodies for you that we’ll announce and that we think folks will like.” Let’s meet there!

You can browse all upcoming in-person and virtual events.

That’s all for this week. Check back next Monday for another Weekly Roundup!

Channy

This post is part of our Weekly Roundup series. Check back each week for a quick roundup of interesting news and announcements from AWS!

Amazon OpenSearch Service announces Standard and Extended Support dates for Elasticsearch and OpenSearch versions

Post Syndicated from Arvind Mahesh original https://aws.amazon.com/blogs/big-data/amazon-opensearch-service-announces-standard-and-extended-support-dates-for-elasticsearch-and-opensearch-versions/

Amazon OpenSearch Service supports 19 versions of Elasticsearch opensource, and 11 versions of OpenSearch. Over the years, we have added several stability, resiliency, and security features to recent engine versions, helping customers derive better value from OpenSearch Service. As software versions grow older, we need to make sure that these versions continue to meet high security and compliance standards. Many of the legacy versions supported on OpenSearch Service, such as Elasticsearch versions 1.5 and 2.3, depend on third-party dependencies that are no longer actively supported. By moving to the latest engine versions, customers can derive maximum benefit from the new features, improved price-performance, and security improvements we make to OpenSearch.

Today, we’re announcing timelines for end of Standard Support and Extended Support for legacy Elasticsearch versions up to 6.7, Elasticsearch versions 7.1 through 7.8, OpenSearch versions from 1.0 through 1.2, and OpenSearch versions 2.3 through 2.9 available on Amazon OpenSearch Service. Versions that are under Standard Support receive regular bug fixes and security fixes, and versions in Extended Support receive critical security fixes and operating system patches for an additional flat fee per normalized instance hour. With Extended Support, we want to make sure that our customers continue to receive critical security fixes for an adequate time, while they plan to upgrade to more recent engine versions. For more details on Extended Support please see the FAQs.

End of Standard Support and Extended Support for Elasticsearch versions

See Table 1 that follows for end of Standard Support and Extended Support dates for legacy Elasticsearch versions available on OpenSearch Service. We recommend that customers running Elasticsearch versions upgrade to the latest OpenSearch versions. All Elasticsearch versions will receive at least 12 months of Extended Support, and version 5.6 will receive 36 months of Extended Support. After Extended Support ends for a version, domains running the specific version will not receive bug fixes or security updates.

Software version End of Standard Support End of Extended Support
Elasticsearch versions 1.5 and 2.3 11/7/2025 11/7/2026
Elasticsearch versions 5.1 to 5.5 11/7/2025 11/7/2026
Elasticsearch version 5.6 11/7/2025 11/7/2028
Elasticsearch versions 6.0 to 6.7 11/7/2025 11/7/2026
Elasticsearch version 6.8 Not announced Not announced
Elasticsearch versions 7.1 to 7.8 11/7/2025 11/7/2026
Elasticsearch version 7.9 Not announced Not announced
Elasticsearch version 7.10 Not announced Not announced

End of Standard Support and Extended Support for OpenSearch versions

For OpenSearch versions running on Amazon OpenSearch Service, we will provide at least 12 months of Standard Support after the end of support date for the corresponding upstream open source OpenSearch version, or 12 months of Standard Support after the release of the next minor version on OpenSearch Service, whichever is longer. All OpenSearch versions will receive at least 12 months of Extended Support after the end of Standard Support date. For more details, check the open source OpenSearch maintenance policy.

See Table 2 that follows for end of Standard Support and Extended Support dates for various OpenSearch versions available on OpenSearch Service. For future updates on versions in Standard Support and Extended Support, follow supported versions.

Software Version End of Standard Support End of Extended Support
OpenSearch versions 1.0 to 1.2 11/7/2025 11/7/2026
OpenSearch version 1.3 Not announced Not announced
OpenSearch versions 2.3 to 2.9 11/7/2025 11/7/2026
OpenSearch versions 2.11 and higher versions Not announced Not announced

Upgrading OpenSearch Service domains: We recommend that you update your domains to the latest available OpenSearch version to derive maximum value out of OpenSearch Service. Minor version upgrades on OpenSearch tend to be seamless because they don’t contain breaking changes, and we recommend moving to the latest minor version, or a version for which end of support has not yet been announced. For example, if you are on OpenSearch version 1.2, you can move to OpenSearch version 1.3, because it’s the last minor version of the 1.x series and because presently it continues to be supported by the open source community and AWS. If you want to choose an Elasticsearch version, and you are running an older 6.x or 7.x version, you can move to version 6.8, or 7.10.

There are various ways to upgrade your cluster to a newer version, and the steps vary depending on the version your domain is running and the version you want to upgrade to. See Upgrading OpenSearch Service domains for detailed instructions on upgrading your domain to a new version. You can also use the Migration Assistant for Amazon OpenSearch Service for upgrading to newer versions

Calculating Extended Support charges: Domains running versions under Extended Support will be charged a flat additional fee per normalized instance hour (NIH). For example, $0.0065 per NIH in the US East (North Virginia) AWS Region. See the pricing page for exact pricing by Region.

NIH is computed as a factor of the instance size (for example, medium or large), and the number of instance hours. For example, if you’re running an m7g.medium.search instance for 24 hours in the US EAST (North Virginia) Region, which is priced at $0.068 per instance hour (on-demand), you will typically pay $1.632 ($0.068×24). If you’re running a version that is in Extended Support, you will pay an additional $0.0065 per NIH, which is computed as $0.0065 x 24 (number of instance hours) x 2 (size normalization factor, which is 2 for medium-sized instances), which comes to $0.312 for Extended Support for 24 hours. The total amount that you will pay for 24 hours will be a sum of the standard instance usage cost and the Extended Support cost, which is $1.944 ($1.632+$0.312, excluding storage cost). The following table shows the normalization factor for various instance sizes in OpenSearch Service.

Instance size Normalization Factor
nano 0.25
micro 0.5
small 1
medium 2
large 4
xlarge 8
2xlarge 16
4xlarge 32
8xlarge 64
9xlarge 72
10xlarge 80
12xlarge 96
16xlarge 128
18xlarge 144
24xlarge 192
32xlarge 256

Summary

We add new capabilities across various vectors to the latest OpenSearch versions, which include new features, performance and resiliency improvements, and security improvements. We recommend that you update to recent OpenSearch versions to get the most benefit out of OpenSearch Service. For any questions on Standard and Extended Support options, see the FAQs. For further questions, contact AWS Support.


About the authors

Arvind Mahesh is a Senior Manager-Product at Amazon Web Services for Amazon OpenSearch Service. He has close to two decades of technology experience across a variety of domains such as Analytics, Search, Cloud, Network Security, and Telecom.

Kuldeep Yadav is a Senior Technical Program Manager at Amazon Web Services who is passionate about driving innovation and complex problem solving. He works closely with teams and customers in ensuring operational excellence and achieving more with less. Outside of work he enjoys trekking and all sports

Jon Handler is a Senior Principal Solutions Architect at Amazon Web Services based in Palo Alto, CA. Jon works closely with OpenSearch and Amazon OpenSearch Service, providing help and guidance to a broad range of customers who have search and log analytics workloads that they want to move to the AWS Cloud. Prior to joining AWS, Jon’s career as a software developer included 4 years of coding a large-scale, ecommerce search engine. Jon holds a Bachelor of the Arts from the University of Pennsylvania, and a Master of Science and a PhD in Computer Science and Artificial Intelligence from Northwestern University.

Amazon OpenSearch Service launches the next-generation OpenSearch UI

Post Syndicated from Hang Zuo original https://aws.amazon.com/blogs/big-data/amazon-opensearch-service-launches-the-next-generation-opensearch-ui/

Amazon OpenSearch Service launches a modernized operational analytics experience that can provide comprehensive observability spanning multiple data sources, so that you can gain insights from OpenSearch and other integrated data sources in one place. The launch also introduces OpenSearch Workspaces that provides tailored experience for popular use cases and supports access control, so that you can create a private space for your use case and share it only to your collaborators. With the next-generation user interface (UI), the Discover experience has been improved to simplify interactive analysis, so that you can easily utilize features such as natural language query generation to gain insights from your data.

Multiple Data Source: You might have already used OpenSearch Dashboards to provide an operational analytics experience for your OpenSearch clusters. OpenSearch Dashboards is co-located with a cluster, so that each OpenSearch Dashboards can only work with one cluster. And as you scale up your workload across multiple clusters, there is not a unified experience to analyze your data in one place. In comparison, the next-generation OpenSearch UI is designed to work across multiple OpenSearch clusters to aggregate the comprehensive insights in one place. An OpenSearch application is an instance of the next-generation OpenSearch UI. Currently, OpenSearch applications can be associated with multiple OpenSearch clusters (above version 1.3), Amazon OpenSearch Service Serverless collections, and integrated data sources such as Amazon S3. Each OpenSearch cluster can be associated with multiple OpenSearch applications, in addition to its co-located OpenSearch Dashboards that will remain functional.

Workspace: With workspaces, you can easily create your use case specific contents in a private space and manage the permissions in team collaboration. Workspace provide curated experiences for popular use cases such as Observability, Security Analytics and Search, so that you can find it straightforward to build contents for your use case. Workspace supports collaborator management, so that you can share your workspace only to your intended collaborators, and manage the permissions for each collaborator.

Discover: The improved Discover feature now provides a unified log exploration experience that adds the support for SQL and Piped Processing Language (PPL), in addition to the existing support for DQL and Lucene. Discover features a new data selector to support multiple data sources, a new visual design, query autocomplete and natural language query generation for improved usability. With the enhanced Discover interface, you can now analyze data from multiple sources without switching tools, reducing complexity and improving efficiency.

Solution Overview

The following diagram illustrates architecture of the OpenSearch Dashboards.

The following diagram illustrates the next-generation OpenSearch UI architecture.

In the following sections, we discuss the following topics

  1. The process of creating an application
  2. Setting up and using the new Workspaces functionality
  3. The enhanced Discover experience

We’ll demonstrate how these improvements streamline data analysis, foster collaboration, and empower you to extract insights more efficiently across various use cases.

Create an application:

To begin using the next-generation OpenSearch UI, you can first create an application. An application is an instance of the OpenSearch UI (Dashboards), and you have the flexibility to create multiple applications within a single account. To create a new application, complete the following steps:

  1. On the Amazon OpenSearch Service console, choose OpenSearch UI (Dashboards)under Central management in the navigation panel.
  2. Choose Create application.
  3. For application name, enter a descriptive name for your new application.
  4. AWS Identity and Access Management (IAM) is the default authentication mechanism. Optionally, you can select Authentication with IAM Identity Center (IDC), so that you can use credentials and access management from your existing identity providers to manage user access.
  5. For OpenSearch application admins, specify the IAM principals or IDC users that will have permissions to update or delete the application configuration. You will automatically be set as the first admin.

This page lists all the existing applications under your account in the current AWS region. You can create new application from this page.

This page is the create application workflow. You can specify the application name, enable/disable IDC and define application admins to create an application.

After you configured these settings and created an application, your new OpenSearch application will be ready for you to associate data sources and start using the enhanced UI capabilities.

Associating data sources:

After you create your new OpenSearch application, the next step is to associate the relevant data sources. This allows you to connect the application to the necessary OpenSearch domains, collections, and other data sources.

  1. On the application details page, choose Manage data sources.

You will be presented with a list of all the OpenSearch data sources you have access to, including managed domains and serverless collections.

  1. Select the data sources you want to associate with this application.

OpenSearch domains below version v1.3 will not be compatible with the next-generation UI, and will be grayed out in the list. Additionally, if you need to connect to a domain within a virtual private cloud (VPC), you will need to authorize OpenSearch application as a new principal under its security configurations. If you need to connect to a collection within a VPC, you will need to configure its network policy to Private, enable AWS service private access with OpenSearch application.

  1. Choose Save to finalize the data source association.

Your OpenSearch application is now ready to use, with access to the connected data.

Working with the OpenSearch application:

To access your new OpenSearch application, you can either choose the application URL or choose Launch application on the application details page. After you’ve successfully logged in either with IAM or IDC, you’ll be directed to the application’s homepage. From here, you can choose to create a new workspace or navigate to an existing one that you have access to.

Creating a new workspace:

A workspace is a tailored experience for your use case and team collaboration. There are five types of workspaces: Observability, Security Analytics, Search, Essentials, and Analytics. You can click on the info button to learn more about each workspace type. Existing workspaces will be listed on the homepage. To create a new workspace, complete the following steps:

  1. Choose Create workspace.
  2. Enter a name for your workspace.
  3. Optionally, you can select a different color for the workspace icon for easier identification.
  4. Select the type of workspace you want to create: Observability, Security Analytics, Search, Essentials, or Analytics
  5. Add at least one data source for this workspace (from the list of data sources you previously associated with the application).

For this post, we create an Observability workspace named MyWorkspace and associate it with one Amazon OpenSearch Serverless collection and one Amazon OpenSearch Service managed cluster. You can always manage the data sources associated with a workspace, even after it has been created.

Invite Collaborators

After you create your new workspace, you can add users or groups as collaborators. Workspace collaborators are the users you want to invite to work with you in this workspace, and there are three available permission levels for collaborators: admin, read/write, and read-only. Read/write permission allows a collaborator to create, edit and delete the dashboards, visualizations, and saved queries within the workspace, whereas collaborators with read-only access can only view the results. Admin level gives a collaborator the same permissions as you to not only read/write but also update the configurations of the workspace or delete it.

To add collaborators to your workspace, complete the following steps:

  1. Choose Collaborators in the navigation panel.
  2. Choose Add collaborators.
  3. Choose the type of users you want to add as collaborators. You can add collaborators by their IAM Amazon Resource Name (ARN) or IDC username.
  4. Select a permission level for the collaborator from the three options: Read only, Read and write, and Admin

If you do not know the ARN of your intended collaborator, follow the instruction to check for their ARN, for example.

Improved navigation:

The improved navigation in workspaces provides a more contextual and purpose-built interface, ensuring that each workspace includes only the tools and features relevant to its use case. With enhanced clarity and better organization, the new navigation system is tailored to help you find the features you need quickly, improving overall productivity and minimizing time spent searching through menus.

Revamped Discover experience

Discover is now revamped to offer improved usability and efficiency. You can access multiple data sources, natural language query generation, a new data selector, and polished design with optimized data density, allowing you to effortlessly navigate and analyze your data:

  • Unified language selector – Discover now offers a unified language selector, allowing users to choose from SQL, PPL, Dashboards Query Language (DQL), or Lucene, making it convenient to work with your preferred query languages in one place.

  • Natural language query generation – Discover now supports natural language query building for PPL. Enter your questions in plain language, and Discover converts them to PPL syntax, making data exploration simpler and more accessible. This new feature empowers users of different skill levels to get insights without needing to fully understand the PPL syntax.

  • Powerful query autocomplete – The enhanced query bar includes autocomplete functionality and natural language query generation support, simplifying query building by offering relevant suggestions as you type, making it faster and more efficient to write complex queries

  • New data selector– The new data selector makes it straightforward to connect to multiple data sources, bringing data from Amazon OpenSearch Service domains and serverless collections, and Amazon S3 into a unified view.

Conclusion

In this post, we discussed the features of the next-generation OpenSearch UI. These improvements streamline data analytics, foster collaboration, and empower you to extract insights more efficiently across various use cases.

You can create your own OpenSearch UI applications today in the US East (N. Virginia), US West (N. California, Oregon), Asia Pacific (Mumbai, Singapore, Sydney, Tokyo), South America (São Paulo), Europe (Frankfurt, Ireland, London, Paris) and Canada (Central) Regions.


About the Authors

Hang (Arthur) Zuo is a Senior Product Manager with Amazon OpenSearch Service. Arthur leads the core experience in the next-gen OpenSearch UI and data migration to Amazon OpenSearch Service. Arthur is passionate about cloud technologies and building data products that help users and businesses gain actionable insights and achieve operational excellence.

Rushabh Vora is a Principal Product Manager for the OpenSearch project of Amazon Web Services. Rushabh leads core experiences in data exploration, dashboards, visualizations, reporting, and data management to help organizations unlock insights at scale. Rushabh is passionate about cloud technologies and building products that enable businesses to make data-driven decisions and achieve operational excellence.

Sohaib Katariwala is a Senior Specialist Solutions Architect at AWS focused on Amazon OpenSearch Service based out of Chicago, IL. His interests are in all things data and analytics. More specifically he loves to help customers use AI in their data strategy to solve modern day challenges.

Arun Lakshmanan is a Search Specialist with Amazon OpenSearch Service based out of Chicago, IL. He works closely with customers on their OpenSearch journey across various use cases including vector search, observability, and security analytics.

Xenia Tupitsyna is a UX Designer at OpenSearch. She is working on user experiences across security analytics solutions, anomaly detection, alerting, and core dashboards.

Improve OpenSearch Service cluster resiliency and performance with dedicated coordinator nodes

Post Syndicated from Akshay Zade original https://aws.amazon.com/blogs/big-data/improve-opensearch-service-cluster-resiliency-and-performance-with-dedicated-coordinator-nodes/

Today, we are announcing dedicated coordinator nodes for Amazon OpenSearch Service domains deployed on managed clusters. When you use Amazon OpenSearch Service to create OpenSearch domains, the data nodes serve dual roles of coordinating data-related requests like indexing requests, and search requests, and of doing the work of processing the requests – indexing documents and responding to search queries. Additionally, data nodes also serve the OpenSearch Dashboards. Because of these multiple responsibilities, data nodes can become a hot spot in the OpenSearch Service domain, leading to resource scarcity, and ultimately node failures. Dedicated coordinator nodes help you mitigate this problem by limiting the request coordination and Dashboards to the coordinator nodes, and request processing to the data nodes. This leads to more resilient, scalable domains.

Amazon OpenSearch Service is a managed service that you can use to secure, deploy, and operate OpenSearch clusters at scale in the AWS Cloud. The service allows you to configure clusters with different types of nodes such as data nodes, dedicated cluster manager nodes, and UltraWarm nodes. When you send requests to your OpenSearch Service domain, the request is broadcast to the nodes with shards that will process that request. By assigning roles through deploying dedicated nodes, like dedicated cluster manager nodes, you concentrate the processing of those kinds of requests and remove that processing from nodes in other roles.

OpenSearch Service has recently expanded its node type options to include dedicated coordinator nodes, alongside data nodes, dedicated cluster manager nodes, and UltraWarm nodes. These dedicated coordinator nodes offload coordination tasks and dashboard hosting from data nodes, freeing up CPU and memory resources. By provisioning dedicated coordinator nodes, you can improve a cluster’s overall performance and resiliency. Dedicated coordinator nodes also let you scale the coordination capacity of your cluster independently of the data storage capacity. Dedicated coordinator nodes are available in Amazon OpenSearch Service for all OpenSearch engine versions. See the documentation for engine and version support.

A brief introduction to coordination

OpenSearch operates as a distributed system, where data is stored in multiple shards across various nodes. Consequently, a node handling a request must coordinate with several other nodes to store or retrieve data.

Here are a few examples of coordination operations performed to successfully serve different user requests:

  • A bulk indexing request might contain data that belongs to multiple shards. The coordination process splits such a request into multiple shard-specific subrequests and routes them to the corresponding shards for indexing.
  • A search request might require querying various shards that are present in different nodes. The coordination process splits the request into multiple shard level search requests and sends those requests to the corresponding data nodes holding the data. Each of those data nodes processes the data locally and returns a shard-level response. The coordination process gathers these responses and builds the final response.
  • For queries with aggregations, the coordination process performs the additional computation of re-aggregating the aggregation responses from data nodes.

In OpenSearch Service, each data node is implicitly capable of coordination. In the absence of dedicated coordinator nodes, the data node receiving the request will perform the coordinating duties, though it might not have the relevant shards for the request. By adding dedicated coordinator nodes to a cluster, you can reduce the burden on data nodes. The following sections walk through some of the improvements.

Higher indexing and search throughput

In an OpenSearch cluster, each indexing request goes through three broad phases: coordination, primary, and replica. With coordination responsibilities offloaded to dedicated coordinators, the data nodes have more resources at their disposal for the primary and replica phases. By adding coordinator nodes, we observed as much as 15% higher indexing throughput in workloads such as Stack Overflow and Big5.

A search request in OpenSearch can involve something as trivial as looking up a single document by ID or something complex, such as bucketing a large amount of data and performing aggregations on each of the buckets. The impact of adding dedicated coordinator nodes can vary widely depending on the query. In a query workload containing date histograms with multiple aggregations such as average, p50, p99, and so on, we were able to achieve about 20% higher throughput. The term and multi-term aggregations also benefit from the addition of coordinator nodes. Depending on the key composition throughput improvement of 15% to 20% was observed.

More resilient clusters

Dedicated coordinator nodes provide a separation of responsibilities that prevents data nodes from being overwhelmed by complex queries or sudden spikes in request volume. In the case of complex aggregations, the coordinator nodes absorb the CPU impact ensuring that the data nodes focus on filtering, matching, scoring, sorting, and returning the search response, and maintaining the integrity of the data. In addition to coordination responsibilities, coordinator nodes also serve the OpenSearch Dashboards frontend. This ensures that the dashboards stay responsive even during high loads, ensuring a smooth user experience.

Complex aggregations consume a lot of memory. Memory intensive operations can lead to out of memory (OOM) errors causing node crashes and data loss. By adding dedicated coordinator nodes in a cluster, you can isolate the impact away from the data nodes. Coordinator nodes can greatly improve performance by significantly reducing or even completely eliminating query-induced OOM errors on data nodes. Because coordinator nodes don’t hold any data, the cluster still remains functional even if one of the coordinator nodes fails.

Efficient scaling

Dedicated coordinator nodes separate a cluster’s coordination capacity from data storage capacity. This allows you to choose the amount of memory and CPU required for your workload without impacting the stored data. For example, a cluster with high throughput might require a lot of lightweight nodes while a cluster with complex aggregations should have fewer but larger nodes.

Having a dedicated coordinator node allows you to adjust the number of nodes according to anticipated traffic patterns. For example, you can scale up the number of coordinators in high traffic hours and scale them down during low traffic hours.

Smaller IP reservations for VPC domains

With dedicated coordinator nodes, you can achieve up to 90% reduction in the number of IP addresses reserved by the service in your VPC. This reduction allows deployments of larger clusters that might otherwise face resource constraints.

When you create a virtual private cloud (VPC) domain without dedicated coordinator nodes, OpenSearch Service places an elastic network interface (ENI) in the VPC for each data node. Each ENI is assigned an IP address. At the time of domain creation, the service reserves three IP addresses for each data node. See Architecture for more information. When dedicated coordinator nodes are used, the ENIs are attached to the coordinator nodes instead of the data nodes. Because there are typically fewer coordinator nodes than data nodes fewer IP addresses are reserved. The following diagram shows the domain architecture of a VPC domain with dedicated coordinator nodes.

Picking the right configuration

OpenSearch Service offers two key parameters for managing dedicated coordinator nodes:

  1. Instance type, which determines the memory and compute capacity of each coordinator node.
  2. Instance count, which specifies the number of coordinator nodes.

Identify your use case

To get the most benefits out of coordinator nodes, you must pick the right type as well as the right count. As a general rule, we recommend that you set the count to 10% of the number of data nodes and choose a size that’s similar to the size of the data nodes. See the documentation to find out the supported instance types for dedicated coordinator nodes. The following guidelines should help tailor the configuration further to specific workloads:

  • Indexing: Indexing requires compute power to split the bulk upload request payload into shard-specific chunks. We recommend using CPU optimized instances of a size similar to that of the data nodes. While the count is dependent on the indexing throughput that you want to achieve, 10% of the number of data nodes is a good starting point.
  • High search throughput: Achieving high search throughput requires a lot of network capacity. Increasing the number of coordinator nodes will sustain the traffic load while providing high availability. We recommend setting the coordinator node count at from 10% to 15% of the number of data nodes.
  • Complex aggregations: Aggregations are memory intensive. For example, to calculate a p50 value, a coordinator node must first gather the entire dataset in memory. Moreover, crunching these numbers requires CPU cycles. We recommend that you use general purpose coordinator nodes that are one size larger than the data nodes. While the node count can be tuned by the use case, 8% to 10% of the number of data nodes is a good start.

Coordinator metrics

While the guidelines above are a good start, every use case is unique. To arrive at an optimal configuration, you must experiment with your own workload, observe the performance, and identify the bottlenecks. OpenSearch Service provides some key metrics and APIs to observe how coordinator nodes are doing.

  • CoordinatorCPUUtilization metric: This metric provides information about how much CPU is being consumed on the coordinator nodes. This metric is available at both the node and the cluster levels. If you see CPU consistently breaching the 80% mark, it might be a time to use larger coordinator nodes.
  • CoordinatorJVMMemoryPressure, CoordinatorJVMGCOldCollectionCount and CoordinatorJVMGCOldCollectionTime metrics: The CoordinatorJVMMemoryPressure metric indicates the percentage of JVM memory used by the OpenSearch process. This metric is available at both the cluster and node levels. Consistently high JVM memory pressure suggests that coordination tasks are using memory efficiently. It’s important to assess this metric alongside the JVM garbage collection (GC) metrics, which show how many old generation GC runs have been triggered and how long they lasted. In a properly scaled cluster, GC runs should be infrequent and short. If GC runs occur too often, they might also negatively impact CPU performance.
  • CoordinatingWriteRejected metric: This metric should be evaluated alongside other metrics, such as PrimaryWriteRejected and ReplicaWriteRejected. An increase in primary or replica write rejections suggests that the data nodes are underscaled and unable to process requests quickly enough. However, if the CoordinatingWriteRejected metric rises independently of the other two, it indicates that the coordinating node is struggling to handle the indexing coordination process, preventing it from processing queued requests. Indexing requires many resources, any of which could be a bottleneck. You can alleviate indexing pressure where the CPU is the bottleneck with more or larger instances that have more vCPUs.
  • Circuit breaker statistics API: Circuit breakers prevent OpenSearch from causing a Java OutOfMemoryError. The circuit breaker statistics for coordinator nodes can be retrieved with following API:
    _nodes/coordinating_only:true/stats/breaker
    Every time a circuit breaker trips for a request the client receives a 429 error with the circuit_breaking_exception message. These indicate that the result size of the request was too big to fit on a coordinator node. To avoid these errors, it’s recommended to use an instance with more memory.

Provision a dedicated coordinator node

You can add one or more dedicated coordinator nodes by updating the domain configuration with the appropriate options for coordinator nodes. This will trigger a blue/green deployment, and the domain will have dedicated coordinator nodes once the deployment is complete. Alternatively, you can create a new domain with dedicated coordinator nodes.

In either scenario, you can expand or reduce the number of coordinator nodes without requiring a blue/green deployment, giving you the flexibility to experiment.

Conclusion

In real-world production environments, dedicated coordinator nodes in Amazon OpenSearch Service provide an effective way to separate coordination tasks from data processing. This shift enhances resource efficiency, often delivering up to a 15% increase in indexing throughput and a 20% improvement in query performance, depending on workload demands. By offloading coordination tasks, you reduce the risk of node overloads, improve system stability, and gain better cost control by scaling coordination and data tasks independently.

For workloads with complex queries and high traffic, dedicated coordinator nodes help ensure that your cluster maintains optimal performance and is prepared to handle future growth with greater resilience. Start experimenting with dedicated coordinator nodes today to unlock more efficient resource management and enhanced performance in your OpenSearch clusters.


About the author

Akshay Zade is a Senior SDE working for Amazon OpenSearch Service, passionate about solving real-world problems with the power of large-scale distributed systems. Outside of work, he enjoys drawing, painting, and diving into fantasy books.

Infor’s Amazon OpenSearch Service Modernization: 94% faster searches and 50% lower costs

Post Syndicated from Allan Pienaar original https://aws.amazon.com/blogs/big-data/infors-amazon-opensearch-service-modernization-94-faster-searches-and-50-lower-costs/

This post is cowritten by Arjan Hammink from Infor.

Robust storage and search capabilities are critical components of Infor’s enterprise business cloud software. Infor’s Intelligent Open Network (ION) OneView platform provides real-time reporting, dashboards, and data visualization to help customers access and analyze information across their organization. To enhance the search functionality within ION OneView, Infor used Amazon OpenSearch Service to improve their software products and offer better service to their customers by providing real-time visibility. By modernizing their use of OpenSearch Service, Infor has been able to deliver a 94% improvement in search performance for customers, along with a 50% reduction in storage costs.

In this post, we’ll explore Infor’s journey to modernize its search capabilities, the key benefits they achieved, and the technologies that powered this transformation. We’ll also discuss how Infor’s customers are now able to more effectively search through business messages, documents, and other critical data within the ION OneView platform.

Where Infor started

Infor’s ION OneView was built on top of Elasticsearch v5.x on Amazon OpenSearch Service, hosted across eight AWS Regions. This architecture enabled users to track business documents from a consolidated view, search using various criteria, and correlate messages while viewing content based on user roles. Over time, Infor expanded its functionality to include “Enrich” and “Archive” capabilities, which added significant complexity. The Enrich process would build searchable messages by aggregating related events, requiring constant document updates to the OpenSearch indices. The Archive process would then move these messages and events to Amazon Simple Storage Service (Amazon S3), while using a delete_by_query to remove the corresponding documents from OpenSearch Service. These read-update-write-delete workloads, coupled with large all-encompassing indices with shard sizes of over 100GB, resulted in high volumes of deleted documents and exponential data growth that the system struggled to keep up with. To address increasing performance needs, Infor continually horizontally scaled out their OpenSearch Service domain.

Challenges 

The key challenges Infor faced underscored the need for a more scalable, resilient, and cost-effective search capability that could seamlessly integrate with their cloud environment. These included the inability to effectively archive data because of high ingestion rates, resulting in longer upgrade and recovery times. Escalating costs from scaling the solution and the need for custom development to enable newer OpenSearch Service features created significant operational burdens. Additionally, Infor was seeing increasing search latency, with CPU utilization peaking at 75% and occasionally spiking above 90% (as shown in the following figures), demonstrating the performance limitations of Infor’s existing infrastructure. Collectively, these issues drove Infor’s need for a modernized search solution.

SearchLatency Pre-Modernization

Screenshot shows CloudWatch metric SearchLatency before Modernization

CPUUtilization Pre-Modernization

Screenshot shows CloudWatch metric CPUUtilization before Modernization

Infor’s journey to modernize search with OpenSearch Service

To address the growing challenges with ION OneView, Infor partnered with AWS to undertake a comprehensive modernization effort. This involved optimizing operational processes, storage configurations, and instance selections, while also upgrading to the later versions within OpenSearch Service.

Operational review and enhancements

As a collaborative effort between Infor and AWS, a comprehensive operational review of Infor’s OpenSearch Service cluster was undertaken. With the help of slow logs and adjusting the logging thresholds, the review was able to identify long-running queries and the archival process consuming the largest amount of CPU capacity. Infor rewrote the long-running queries that used high cardinality fields, reducing the average query time.

Next, the team turned their attention to redesigning Infor’s archival process to reduce stress on the CPU. Instead of a single large index, we implemented independent indices based on customer license types. This improved delete performance by allowing the team to target old indices, using index aliases to manage the transition. We also replaced the delete_by_query approach where a query is sent to locate documents prior to a delete with a standard delete passing document IDs directly, because all the document IDs to be archived were known ahead of time. This reduced round-trip time and CPU stress compared to the sequential search requests performed by delete_by_query. This was followed by the tuning of the refresh interval based on the workload requirements, improving the indexing performance, and memory and CPU utilization.

Storage optimization

The team switched from GP2 to GP3 storage, provisioning additional input/output operations per second (IOPS) and throughput only when needed. This resulted in a 9% reduction in storage costs for most of Infor’s workloads. In all use cases where IOPS was a bottleneck, the team was able to provision additional IOPS and throughput independent of the volume size using GP3, further reducing Infor’s overall storage costs. Additionally, we implemented a shard size-based rollover strategy that provided a sharding strategy where total shards were divisible by the number of nodes to reduce the shard size to the recommended number of less than 50 GiB. This helped ensure an even distribution of data and workloads across the nodes for each index, and the performance improvements indicated that more vCPU would be beneficial given the thread pool queues and latencies. Appropriate master and data node instance types were chosen based on the new storage requirements. To support the reindexing process, the team also temporarily scaled up the storage and compute resources.

Upgrading OpenSearch Service

After optimizing the storage and compute configurations based on best practices, the Infor ION team turned their attention to using the latest features of OpenSearch Service. With the shards now at an appropriate boundary and the memory and CPU utilization at the right levels, the team was able to seamlessly upgrade from Elasticsearch version 5.x to 6.x and then to 7.x in OpenSearch Service. Each major version upgrade required careful testing and client-side code changes to make sure that the appropriate compatible client libraries were used, and the team took the necessary time after each upgrade to thoroughly validate the system and provide a smooth transition for Infor’s customers. This commitment to a methodical upgrade process allowed Infor to take advantage of the latest OpenSearch Service features, such as Graviton support, performance improvements, bug fixes, and security posture improvements, while minimizing disruption to their users.

Optimizing instance selection for performance

In collaboration with the AWS team, Infor carefully evaluated local non-volatile memory express (NVMe)-backed instance types for their ION OneView search cluster, comparing options such as i3 and R6gd instances to balance memory, latency, and storage requirements. For write-heavy workloads, the team found that using NVMe storage provided better performance and price compared to Amazon Elastic Block Store (Amazon EBS) volumes because of the high IOPS requirement of the workload, allowing them to be less reliant on off-heap memory usage. By selecting the most appropriate instance types, the ION OneView search cluster was able to resize and scale down the number of data nodes by 63% while still achieving improved throughput and reduced latency. Staying on the latest AWS instance families was also a key consideration, and the team further optimized costs by purchasing Reserved Instances after establishing a good baseline for their performance and compute consumption, with discounts ranging from 30% to 50% depending on the commitment term.

Results

The following figures show the improvements of the modernization.

New indices with the correct shard size can be seen in the increase in shards, shown in the following figure.

Figure showing increase in shards with new indices and correct shard size

The updated shard strategy combined with a version upgrade led to a ten-fold increase in the volume of traffic and efficient archiving as shown in the following figure.

Figure illustrates 10x increase in traffic volume and improved archiving due to updated shard strategy and version upgrade

The SearchRate increase is shown in the following figure.

Figure shows increase in SearchRate

The following figure shows that the CPU increase was minimal compared to the traffic increase.

Figure demonstrates CPU increase was minimal compared to traffic increase

The SearchLatency reduction post upgrade and implementation of the new indexing and shard strategy is shown in the following figure.

Figure illustrates reduction in CloudWatch metric SearchLatency after upgrade and new indexing/shard strategy implementation

The following figure shows the monthly spend over the past 4 quarters for two Infor ION products.

Figure shows the monthly spend over 4 quarters for two Infor ION products.

Conclusion

Through their careful modernization of the OpenSearch Service infrastructure, Infor was able to achieve 50% reduction in infrastructure costs coupled with a 94% improvement in cluster performance. The optimized clusters are now healthier and more resilient, enabling faster blue/green deployments to process even greater data volumes.

This successful transformation was driven by Infor’s close collaboration with the AWS team, using deep technical expertise and best practices to accelerate the optimization process and unlock the full potential of OpenSearch Service. Infor’s OpenSearch Service modernization has empowered the company to provide an improved, high-performing search experience for their customers at a significantly lower cost, positioning their ION OneView platform for continued growth and success.

Every workload is unique, with its own distinct characteristics. While the best practices outlined in the Amazon OpenSearch Service developer guide serve as a valuable guide, the most important step is to deploy, test, and continuously tune your own domains to find the optimal configuration, stability, and cost for your specific needs.


About the Authors

Author image of Allan PiennarAllan Pienaar is an OpenSearch SME and Customer Success Engineer at AWS. He works closely with enterprise customers in ensuring operational excellence, maintaining production stability and optimizing cost using the Amazon OpenSearch Service.

Author image of Gokul Sarangaraju Gokul Sarangaraju is a Senior Solutions Architect at AWS. He helps customers adopt AWS services and provides guidance in AWS cost and usage optimization. His areas of expertise include building scalable and cost-effective data analytics solutions using AWS services and tools.

Author image of Arjan Hammink Arjan Hammink is a Senior Director of Software Development at Infor, bringing over 25 years of expertise in software development and team management. He currently oversees Infor ION, a project he has been integral to since its inception in 2010 when he began as a Software Engineer. Infor ION is a robust middleware designed to streamline software integration, a key component of Infor OS, Infor’s cloud technology platform.

AWS Weekly Roundup: Agentic workflows, Amazon Transcribe, AWS Lambda insights, and more (October 21, 2024)

Post Syndicated from Antje Barth original https://aws.amazon.com/blogs/aws/aws-weekly-roundup-agentic-workflows-amazon-transcribe-aws-lambda-insights-and-more-october-21-2024/

Agentic workflows are quickly becoming a cornerstone of AI innovation, enabling intelligent systems to autonomously handle and refine complex tasks in a way that mirrors human problem-solving. Last week, we launched Serverless Agentic Workflows with Amazon Bedrock, a new short course developed in collaboration with Dr. Andrew Ng and DeepLearning.AI.

Serverless Agentic Workflows with Amazon Bedrock

This hands-on course, taught by my colleague Mike Chambers, teaches how to build serverless agents that can handle complex tasks without the hassle of managing infrastructure. You will learn everything you need to know about integrating tools, automating workflows, and deploying responsible agents with built-in guardrails on Amazon Web Services (AWS) with Amazon Bedrock. The hands-on labs provided with the course let you apply your knowledge directly in an AWS environment, hosted by AWS Partner Vocareum. Find more information and enroll for free on the DeepLearning.AI course page.

Now, let’s turn our attention to other exciting news in the AWS universe from last week.

Last week’s launches
Here are some launches that got my attention:

Amazon Transcribe now supports streaming transcription in 30 additional languagesAmazon Transcribe has expanded its support to include 30 additional languages, bringing the total number of supported languages to 54. This enhancement helps you reach a broader global audience and improves accessibility across various industries, including contact centers, broadcasting, and e-learning. The expanded language support allows for more efficient content moderation, improved agent productivity, and automatic subtitling for live events and meetings.

AWS Lambda console now surfaces key function insights and supports real-time log analytics – The AWS Lambda console now features a built-in Amazon CloudWatch Metrics Insights dashboard and supports CloudWatch Logs Live Tail, providing instant visibility into critical function metrics and real-time log streaming. You can now identify and troubleshoot errors or performance issues for your Lambda functions without leaving the console, as well as view and analyze logs in real time as they become available. You can reduce context switching and accelerate the development and troubleshooting processes for serverless applications. Check out the launch post for more details.

Amazon Bedrock Model Evaluation now supports evaluating custom model import models – You can now evaluate custom models you’ve imported to Amazon Bedrock using the model evaluation feature. This helps you to complete the full cycle of selecting, customizing, and evaluating models before deploying them. To evaluate an imported model, select the custom model from the list of models to evaluate in the model selector tool when creating an evaluation job.

Amazon Q in AWS Supply Chain – You can now use Amazon Q, an interactive AI assistant, to analyze your supply chain data in AWS Supply Chain and get insights to operate your supply chain more efficiently. Amazon Q can answer your supply chain questions by diving into your data. This reduces the time spent searching for information and streamlines finding answers to improve your supply chain operations.

For a full list of AWS announcements, be sure to keep an eye on the What’s New at AWS page.

Other AWS news
Here are some additional news items and posts that you might find interesting:

New Amazon OpenSearch Service YouTube channel – The channel offers bite-sized tutorials, curated content, and organized playlists on topics such as log analytics, semantic search, vector databases, and operational best practices. You can also provide feedback to influence future channel content and the OpenSearch Service roadmap. Check out the launch post for more details and subscribe to the Amazon OpenSearch Service YouTube channel.

Deploying Generative AI Applications with NVIDIA NIM Microservices on Amazon Elastic Kubernetes Service (Amazon EKS) – This post shows you how to use Amazon EKS to orchestrate the deployment of pods containing NVIDIA NIM microservices, to enable quick-to-setup and optimized large-scale large language model (LLM) inference on Amazon EC2 G5 instances. It also demonstrates how to scale (both pod and cluster) by monitoring for custom metrics through Prometheus, and how you can load balance using an Application Load Balancer.

Instant Well-Architected CDK Resources with Solutions Constructs Factories – You can now create well-architected AWS resources such as Amazon Simple Storage Service (Amazon S3) buckets and AWS Step Functions state machines with a single function call using the new AWS Solutions Constructs Factories. These factories handle all the best practices configuration for you while still allowing customization. Try using a Constructs factory the next time you need to deploy one of the supported resources.

Upcoming AWS events
Check your calendars and sign up for these AWS events:

AWS GenAI LoftsAWS GenAI LoftsAWS GenAI Lofts are about more than just the tech, they bring together startups, developers, investors, and industry experts. Whether you’re looking to gain deep insights, or get your questions answered by generative AI pros, our GenAI Lofts have you covered and provide everything you need to start building your next innovation. Join events in London (through October 25), Seoul (October 30–November 6), São Paulo (through November 20), and Paris (through November 25).

AWS Community DaysAWS Community Days – Join community-led conferences that feature technical discussions, workshops, and hands-on labs led by expert AWS users and industry leaders from around the world: Malta (November 8), Chile (November 9), and Kochi, India (December 14).

AWS re:Invent 2024AWS re:InventRegistration is now open for the annual tech extravaganza, taking place December 2–6 in Las Vegas. At re:Invent 2024, you’ll get a front row seat to hear real stories from customers and AWS leaders about navigating pressing topics, such as generative AI. Learn about new product launches, watch demos, and get behind-the-scenes insights during five headline-making keynotes.

You can browse all upcoming in-person and virtual events.

That’s all for this week. Check back next Monday for another Weekly Roundup!

— Antje

This post is part of our Weekly Roundup series. Check back each week for a quick roundup of interesting news and announcements from AWS!

A customer’s journey with Amazon OpenSearch Ingestion pipelines

Post Syndicated from Navnit Shukla original https://aws.amazon.com/blogs/big-data/a-customers-journey-with-amazon-opensearch-ingestion-pipelines/

This is a guest post co-written with Mike Mosher, Sr. Principal Cloud Platform Network Architect at a multi-national financial credit reporting company.

I work for a multi-national financial credit reporting company that offers credit risk, fraud, targeted marketing, and automated decisioning solutions. We are an AWS early adopter and have embraced the cloud to drive digital transformation efforts. Our Cloud Center of Excellence (CCoE) team operates a global AWS Landing Zone, which includes a centralized AWS network infrastructure. We are also an AWS PrivateLink Ready Partner and offer our E-Connect solution to allow our B2B customers to connect to a range of products through private, secure, and performant connectivity.

Our E-Connect solution is a platform comprised of multiple AWS services like Application Load Balancer (ALB), Network Load Balancer (NLB), Gateway Load Balancer (GWLB), AWS Transit Gateway, AWS PrivateLink, AWS WAF, and third-party security appliances. All of these services and resources, as well as the large amount of network traffic across the platform, create a large number of logs, and we needed a solution to aggregate and organize these logs for quick analysis by our operations teams when troubleshooting the platform.

Our original design consisted of Amazon OpenSearch Service, selected for its ability to return specific log entries from extensive datasets in seconds. We also complemented this with Logstash, allowing us to use multiple filters to enrich and augment the data before sending to the OpenSearch cluster, facilitating a more comprehensive and insightful monitoring experience.

In this post, we share our journey, including the hurdles we faced, the solutions we thought about, and why we went with Amazon OpenSearch Ingestion pipelines to make our log management smoother.

Overview of the initial solution

We originally wanted to store and analyze the logs in an OpenSearch cluster, and decided to use the AWS-managed service for OpenSearch called Amazon OpenSearch Service. We also wanted to enrich these logs with Logstash, but there was no AWS-managed service for this, so we needed to deploy the application on an Amazon Elastic Compute Cloud (Amazon EC2) server. This setup meant that we had to implement a lot of maintenance of the server, including using AWS CodePipeline and AWS CodeDeploy to push new Logstash configurations to the server and restart the service. We also needed to perform server maintenance tasks such as patching and updating the operating system (OS) and the Logstash application, and monitor server resources such as Java heap, CPU, memory, and storage.

The complexity extended to validating the network path from the Logstash server to the OpenSearch cluster, incorporating checks on Access Control Lists (ACLs) and security groups, as well as routes in the VPC subnets. Scaling beyond a single EC2 server introduced considerations for managing an auto scaling group, Amazon Simple Queue Service (Amazon SQS) queues, and more. Maintaining the continuous functionality of our solution became a significant effort, diverting focus from the core tasks of operating and monitoring the platform.

The following diagram illustrates our initial architecture.

Possible solutions for us:

Our team looked at multiple options to manage the logs from this platform. We possess a Splunk solution for storing and analyzing logs, and we did assess it as a potential competitor to OpenSearch Service. However, we opted against it for several reasons:

  • Our team is more familiar with OpenSearch Service and Logstash than Splunk.
  • Amazon OpenSearch Service, being a managed service in AWS, facilitates a smoother log transfer process compared to our on-premises Splunk solution. Also, transporting logs to the on-premises Splunk cluster would incur high costs, consume bandwidth on our AWS Direct Connect connections, and introduce unnecessary complexity.
  • Splunk’s pricing structure, based on storage in GBs, proved cost-prohibitive for the volume of logs we intended to store and analyze.

Initial designs for an OpenSearch Ingestion pipeline solution

The Amazon team approached me about a new feature they were launching: Amazon OpenSearch Ingestion. This feature offered a great solution to the problems we were facing with managing EC2 instances for Logstash. First, the new feature removed all the heavy lifting from our team of managing multiple EC2 instances, scaling the servers up and down based on traffic, and monitoring the ingestion of logs and the resources of the underlying servers. Second, Amazon OpenSearch Ingestion pipelines supported most if not all of the Logstash filters we were using in our current solution, which allowed us to use the same functionality of our current solution for enriching the logs.

We were thrilled to be accepted into the AWS beta program, emerging as one of its earliest and largest adopters. Our journey began with ingesting VPC flow logs for our internet ingress platform, alongside Transit Gateway flow logs connecting all VPCs in the AWS Region. Handling such a substantial volume of logs proved to be a significant task, with Transit Gateway flow logs alone reaching upwards of 14 TB per day. As we expanded our scope to include other logs like ALB and NLB access logs and AWS WAF logs, the scale of the solution translated to higher costs.

However, our enthusiasm was somewhat dampened by the challenges we faced initially. Despite our best efforts, we encountered performance issues with the domain. Through collaborative efforts with the AWS team, we uncovered misconfigurations within our setup. We had been using instances that were inadequately sized for the volume of data we were handling. Consequently, these instances were constantly operating at maximum CPU capacity, resulting in a backlog of incoming logs. This bottleneck cascaded into our OpenSearch Ingestion pipelines, forcing them to scale up unnecessarily, even as the OpenSearch cluster struggled to keep pace.

These challenges led to a suboptimal performance from our cluster. We found ourselves unable to analyze flow logs or access logs promptly, sometimes waiting days after their creation. Additionally, the costs associated with these inefficiencies far exceeded our initial expectations.

However, with the assistance of the AWS team, we successfully addressed these issues, optimizing our setup for improved performance and cost-efficiency. This experience underscored the importance of proper configuration and collaboration in maximizing the potential of AWS services, ultimately leading to a more positive outcome for our data ingestion processes.

Optimized design for our OpenSearch Ingestion pipelines solution

We collaborated with AWS to enhance our overall solution, building a solution that is both high performing, cost-effective, and aligned with our monitoring requirements. The solution involves selectively ingesting specific log fields into the OpenSearch Service domain using an Amazon S3 Select pipeline in the pipeline source; alternative selective ingestion can also be done by filtering within pipelines. You can use include_keys and exclude_keys in your sink to filter data that’s routed to destination. We also used the built-in Index State Management feature to remove logs older than a predefined period to reduce the overall cost of the cluster.

The ingested logs in OpenSearch Service empower us to derive aggregate data, providing insights into trends and issues across the entire platform. For additional detailed analysis of these logs including all original log fields, we use Amazon Athena tables with partitioning to quickly and cost-effectively query Amazon Simple Storage Service (Amazon S3) for logs stored in Parquet format.

This comprehensive solution significantly enhances our platform visibility, reduces overall monitoring costs for handling a large log volume, and expedites our time to identify root causes when troubleshooting platform incidents.

The following diagram illustrates our optimized architecture.

Performance comparison

The following table compares the performance of the initial design with Logstash on Amazon EC2, the original OpenSearch Ingestion pipeline solution, and the optimized OpenSearch Ingestion pipeline solution.

  Initial Design with Logstash on Amazon EC2 Original Ingestion Pipeline Solution Optimized Ingestion Pipeline Solution
Maintenance Effort High: Solution required the team to manage multiple services and instances, taking effort away from managing and monitoring our platform. Low: OpenSearch Ingestion managed most of the undifferentiated heavy lifting, leaving the team to only maintain the ingestion pipeline configuration file. Low: OpenSearch Ingestion managed most of the undifferentiated heavy lifting, leaving the team to only maintain the ingestion pipeline configuration file.
Performance High: EC2 instances with Logstash could scale up and down as needed in the auto scaling group. Low: Due to insufficient resources on the OpenSearch cluster, the ingestion pipelines were constantly at max OpenSearch Compute Units (OCUs), causing log delivery to be delayed by multiple days. High: Ingestion pipelines can scale up and down in OCUs as needed.
Real-time Log Availability Medium: In order to pull, process, and deliver the large number of logs in Amazon S3, we needed a large number of EC2 instances. To save on cost, we ran fewer instances, which led to slower log delivery to OpenSearch. Low: Due to insufficient resources on the OpenSearch cluster, the ingestion pipelines were constantly at max OCUs, causing log delivery to be delayed by multiple days. High: The optimized solution was able to deliver a large number of logs to OpenSearch to be analyzed in near real time.
Cost Saving Medium: Running multiple services and instances to send logs to OpenSearch increased the cost of the overall solution. Low: Due to insufficient resources on the OpenSearch cluster, the ingestion pipelines were constantly at max OCUs, increasing the cost of the service. High: The optimized solution was able to scale the ingestion pipeline OCUs up and down as needed, which kept the overall cost low.
Overall Benefit Medium Low High

Conclusion

In this post, we highlighted my journey to build a solution using OpenSearch Service and OpenSearch Ingestion pipelines. This solution allows us to focus on analyzing logs and supporting our platform, without needing to support the infrastructure to deliver logs to OpenSearch. We also highlighted the need to optimize the service in order to increase performance and reduce cost.

As our next steps, we aim to explore the recently announced Amazon OpenSearch Service zero-ETL integration with Amazon S3 (in preview) feature within OpenSearch Service. This step is intended to further reduce the solution’s costs and provide flexibility in the timing and number of logs that are ingested.


About the Authors

Navnit Shukla serves as an AWS Specialist Solutions Architect with a focus on analytics. He possesses a strong enthusiasm for assisting clients in discovering valuable insights from their data. Through his expertise, he constructs innovative solutions that empower businesses to arrive at informed, data-driven choices. Notably, Navnit Shukla is the accomplished author of the book titled “Data Wrangling on AWS.” He can be reached via LinkedIn.

Mike Mosher is s Senior Principal Cloud Platform Network Architect at a multi-national financial credit reporting company. He has more than 16 years of experience in on-premises and cloud networking and is passionate about building new architectures on the cloud that serve customers and solve problems. Outside of work, he enjoys time with his family and traveling back home to the mountains of Colorado.

Single sign-on SSO for Amazon OpenSearch Service using SAML and Keycloak

Post Syndicated from Sajeev Attiyil Bhaskaran original https://aws.amazon.com/blogs/big-data/single-sign-on-sso-for-amazon-opensearch-service-using-saml-and-keycloak/

A standard use case for customers is to integrate existing identity providers (IdPs) with Amazon OpenSearch Service. OpenSearch Service offers built-in support for single sign-on (SSO) authentication for OpenSearch Dashboards, and uses SAML protocol. The SAML authentication for OpenSearch Service lets you integrate your existing third-party IdPs, such as Okta, Ping Identity, OneLogin, Auth0, ADFS, Azure Active Directory, and Keycloak, with OpenSearch Service dashboards.

In this post, we walk you through how to configure service provider-initiated authentication for OpenSearch Dashboards by using OpenSearch Service and Keycloak. We also discuss how to set up users, groups, and roles in Keycloak and configure their access to OpenSearch Dashboards.

Solution overview

The following diagram illustrates the SAML authentication flow for this solution.

image1

The sign-in flow consists of the following steps.

  1. The user opens a browser to navigate to the OpenSearch Dashboards endpoint of OpenSearch Service in a virtual private cloud (VPC), for example https://vpc-abc123.us-east-1.es.amazonaws.com/_dashboards.
  2. The service provider (OpenSearch Service) uses the information about the IdP (Keycloak) to generate a SAML authentication request. The service provider redirects SAML authentication requests back to the browser.
  3. The browser relays the SAML authentication request to Keycloak. Keycloak parses the SAML authentication request and asks for the user to insert their login and password to authenticate.
  4. After a successful authentication, Keycloak generates a SAML authentication response that includes authenticated user details from Keycloak and sends the encoded SAML response to the browser.
  5. The browser relays the SAML response to OpenSearch Service Assertion Consumer Service (ACS) URL.
  6. OpenSearch Service validates the SAML response. If the validation checks are passed, the user is redirected to the front page of OpenSearch Dashboards. The authorization is performed according to the roles mapped to the user.

Prerequisites

To complete this walkthrough, you should have the following set up:

  • An OpenSearch Service domain running OpenSearch or Elasticsearch version 6.7 or later with fine-grained access control enabled within a VPC.
  • Keycloak installed and configured. In this post, we created the IdP in the same VPC of the OpenSearch domain. There is no need for a direct connection between the IdP and the service provider, so you can have the IdP in a different network as well.
  • A properly configured security group for OpenSearch Service and Keycloak IdP server to receive inbound traffic from users.
  • A browser with network connectivity to both Keycloak and OpenSearch Dashboards.

Enable SAML authentication for OpenSearch Service

The first step is to enable SAML authentication for OpenSearch Service. Complete the following steps:

  1. On the OpenSearch Service console, open the details page for your OpenSearch Service domain.
  2. On the Security configuration tab, choose Edit.
  3. Select Enable SAML authentication.

image2

Enabling this option automatically populates different IdP URLs, which is required to configure SAML support in the Keycloak IdP. Note down the values under Service provider entity ID and SP-initiated SSO URL. The OpenSearch Dashboards login flow can be configured either as service provider-initiated or IdP-initiated. The service provider-initiated login flow is initiated by OpenSearch Service, and the IdP-initiated login flow is initiated by the IdP (for example, Keycloak). In this post, we use a service provider-initiated login flow.

image3

Configure Keycloak as IdP

During the SAML authentication process, when the user is authenticated, the browser receives a SAML assertion token from Keycloak and forwards it to OpenSearch Service. The OpenSearch Service domain authorizes the user with backend roles according to the attributes presented in the token.

To configure Keycloak as IdP, complete the following steps:

  1. Log in to the Keycloak IdP admin console with admin user privileges (for example, https://<Keycloak server>:8081/admin/).
  2. Choose Create Realm.
  3. For Realm name, enter a name (for example, Amazon_OpenSearch) and choose Create.

For managing OpenSearch Service specific roles, users, and groups, you first create a separate client realm that provides a logical space to manage objects.

  1. In the navigation pane, choose your realm, then choose Clients.
  2. Choose Create client.
  3. In the General Settings window, for Client type, choose SAML
  4. For Client ID, use the service provider entity ID you copied earlier, then choose Next
    image6
  5. Under Login settings, enter the service provider-initiated SSO URL copied from earlier (for example, https://vpc-abc123.us-east-1.es.amazonaws.com/_dashboards/_opendistro/_security/saml/acs) and choose Save.image7
  6. On the client settings tab, under Signature and Encryption, turn on Sign Assertions and keep all other options as default, then choose Save.
    image8
  7. On the Keys tab, under Signing keys config, turn Client signature required off.

image9

Configure Keycloak users, roles, and groups

After you have configured the Keycloak IdP client for OpenSearch Service, you can create roles, groups, and users on the IdP side. For this post, we create two roles, two groups, and two users, as listed in the following table.

Users Groups Roles
super_user_1 super_user_group super_user_role
readonly_user_1 readonly_user_group readonly_user_role

Complete the following steps:

  1. In the navigation pane for your realm, choose Realm roles.
  2. Choose Create role.image10
  3. For Role name, enter a name (for this post, super_user_role) and choose Save.image11
  4. Repeat these steps to create a second role, readonly_user_role.

Now let’s create groups, assign the roles to the groups, and map the users to the groups.

  1. Under your realm, choose Groups in the navigation pane.
  2. Choose Create group.
  3. For Name, enter a group name (for example, super_user_group) and choose Save.image12
  4. Repeat these steps to create a second group, readonly_user_group.

When the new groups are created, they will be listed on the Groups page.

image13

  1. On the details page for each group, on the Role mapping tab, choose Assign role.image14
  2. For the group super_user_group, select the role super_user_role and choose Assign.

image15

  1. Repeat these steps to assign the role readonly_user_role to the group readonly_user_group.

The last step is to create users and assign them to groups so they automatically inherit group privileges. For this post, we create two users, super_user_1 and readonly_user_1, with dashboard admin and dashboard read-only privileges, respectively.

  1. Under your realm, choose Users in the navigation pane.
  2. Choose Create new user.
  3. Under General, configure the user details, including user name, first name, last name, and email, then choose Create.

  1. Set a temporary password on the Credentials tab after you create the user.
  2. Choose Add user and repeat these steps to add your second user, readonly_user_1.
  3. To join a user to a specific group, choose Join Group on the Groups tab of the respective user.

image17

  1. Select the group the user is joining and choose Join. For example, the user super_user_1 is joining the group super_user_group.

  1. Repeat these steps for the user readonly_user_1 to join the group readonly_user_group.

Next, you can remove the default role mapping for the users because you already assigned the roles to their respective groups.

  1. On the Role Mapping tab, select the default role.
  2. Unassign the default role for the user by choosing Unassign and then Remove.
  3. Repeat these steps for the other user.

image19

  1. Choose Client scopes in the navigation pane.
  2. In the Name column, choose role_list.

image20

  1. On the Mappers tab, choose role list.

image21

  1. Turn on Single Role Attribute and choose Save.

Download SAML metadata from Keycloak

The configuration of Keycloak is now complete, so you can download the SAML metadata file from Keycloak. The SAML metadata is in XML format and is needed to configure SAML in the OpenSearch Service domain.

  1. Under your realm, choose Realm settings in the navigation pane.
  2. On the General tab, choose SAML 2.0 Identify Provider Metadata under Endpoints.image23

This will generate an IdP metadata file in another window. This XML file contains information on the provider, such as a TLS certificate, SSO endpoints, and the IdP entity ID.

  1. Download this XML file locally so you can upload this file on the OpenSearch Service console in later steps.

Integrate OpenSearch Service SAML with Keycloak

To integrate OpenSearch Service with the Keycloak IDP, you need to upload the IdP metadata XML file on the OpenSearch Service console.

  1. On the OpenSearch Service console, navigate to your domain.
  2. Choose Security configuration, then choose Edit.
  3. Under Metadata from IdP, choose Import from XML file to import the file and auto-populate the IdP entity ID.

Alternatively, you can copy and paste the contents of the entity ID property from the metadata file.

image24

  1. For SAML master backend role, enter super_user_role.

This means that a user with this role is provided manager user privileges to the cluster, but can only use permissions within OpenSearch Dashboards.

image25

  1. Expand the Additional settings section
  2. For Roles key, enter an attribute from the assertion (in our case, Role) and choose Save Changes.image26

Test the OpenSearch Dashboards SAML authentication with Keycloak

You’re now ready to test the SAML integration with Keycloak as an IdP.

  1. Choose the OpenSearch Dashboards URL provided on OpenSearch Service console.

It will automatically redirect you to the Keycloak sign-in page for authentication.

  1. Enter the admin user name (super_user_1) and password and choose Sign In.

Upon successful authentication, it will redirect you to the home page of OpenSearch Dashboards. If you encounter issues at this step, refer to SAML troubleshooting for common issues.

Internally, the security plugin maps the backend role super_user_role to the reserved security roles all_access and security_manager. Therefore, Keycloak users with the backend role super_user_role are authorized with the privileges of the manager user in the domain. To grant read-only dashboard access to user readonly_user_1, log in to OpenSearch Dashboards as the user super_user_1. Then map the role readonly_user_role as a backend role for the reserved security role opensearch_dashboards_read_only.

When establishing access control for the cluster, it’s crucial to carefully manage the permissions granted to users, adhering to the principle of least privilege. By having both super_user_role with administrative capabilities and read-only readonly_user_role, you can strike a balance. This approach allows a small number of trusted users to have full administrative access within OpenSearch Dashboards, while also enabling read-only access for other stakeholders who require visibility but don’t need more access.

At the time of writing, if you specify the <SingleLogoutService /> details in the Keycloak metadata XML, when you sign out from OpenSearch Dashboards, it will call Keycloak directly and try to sign the user out. This doesn’t work currently with some of the versions of OpenSearch Service, because Keycloak expects the sign-out request to be signed with a certificate that OpenSearch Service doesn’t currently support. If you remove <SingleLogoutService /> from the metadata XML file, OpenSearch Service will use its own internal sign-out mechanism and sign the user out on the OpenSearch Service side. No calls will be made to Keycloak for signing out.

Clean up

If you don’t want to continue using the solution, delete the resources you created:

  • OpenSearch Service domain
  • VPN and Keycloak instance

Conclusion

In this post, you learned how to configure Keycloak as an IdP to access OpenSearch Dashboards using SAML. To learn more about OpenSearch Service and SAML integration, refer to SAML authentication for OpenSearch Dashboards. Stay tuned for a series of posts focusing on SAML integrations with OpenSearch Service and Amazon OpenSearch Serverless.


About the Author

image27Sajeev is a Senior Cloud Engineer (Big Data & Analytics) and a Subject Matter Expert for Amazon OpenSearch Service. He works closely with AWS customers to provide them architectural and engineering assistance and guidance. He dives deep into big data technologies and streaming solutions and leads onsite and online sessions for customers to design the best solutions for their use cases.

Elevate your search and analytics skills with the new Amazon OpenSearch Service YouTube channel

Post Syndicated from Jagadish Kumar original https://aws.amazon.com/blogs/big-data/elevate-your-search-and-analytics-skills-with-the-new-amazon-opensearch-service-youtube-channel/

Attention all developers, architects, and IT professionals! We’re thrilled to announce the launch of the official Amazon OpenSearch Service YouTube channel—a comprehensive resource for anyone looking to master Amazon OpenSearch Service. Whether you’re just getting started with searches , vectors, analytics, or you’re looking to optimize large-scale implementations, our channel can be your go-to resource to help you unlock the full potential of OpenSearch Service.

OpenSearch is a distributed search and analytics suite that is open source, community-driven, Apache License v2 licensed, and governed by the OpenSearch Software Foundation, under the Linux Foundation.

Amazon OpenSearch Service is a managed service that makes it straightforward to deploy, operate, and scale OpenSearch domains in AWS. OpenSearch Service offers a robust set of features that can transform the way you handle log analytics, real-time monitoring, vector search, and advanced search workloads. But to truly unlock its full potential, you need more than just the basics. That’s where our new YouTube channel comes in.

Dive into a world of practical expertise

We’ve carefully curated a collection of videos that are designed to provide you with the tools, techniques, and insights you need to navigate OpenSearch Service with confidence. The channel also offers a direct line of communication between you and the AWS team. By leaving comments on our videos, you can share your feedback, ideas, and pain points. We’ll be closely monitoring these comments and using them to shape the content we create and influence the future roadmap of OpenSearch Service.

Here’s what sets our channel apart:

  • Bite-sized learning – Our videos are short and concise—each one packed with practical information that you can consume in under 15 minutes. Whether you’re looking for a quick tutorial or a deep-dive into advanced features, we make it effortless for you to learn on the go.
  • Curated content – We hand-pick the most important topics around OpenSearch Service and break them down into simple-to-follow, informative videos. From configuring clusters to scaling for petabyte-scale analytics, we cover the most relevant use cases to help you build, manage, and optimize your OpenSearch environment.
  • Organized playlists – The channel is organized into playlists based on workloads and features of OpenSearch Service such as log analytics, observability, lexical search, vector search, generative AI, and more.
  • Influence the AWS team – You can leave comments on our videos, and your feedback will be reviewed by the AWS team. This input allows us to work backward from your feedback to influence the content we create and feed into the product roadmap.

What you’ll learn

On the OpenSearch Service YouTube channel, you can expect new content regularly, including:

  1. Log Analytics and Observability

    Learn how to ingest, search, and visualize logs at scale with OpenSearch, making log analytics efficient and powerful for enterprises of all sizes. Gain deep insights into using OpenSearch Service for observability, including infrastructure monitoring, application performance management (APM), and more.

  2. Lexical and Semantic Search

    Discover the key differences between lexical and semantic search, and learn how to implement both in OpenSearch Service. We’ll cover optimizing search relevancy, handling complex queries, using machine learning models for semantic understanding and much more.

  3. Vector Database & GenAI

    Explore OpenSearch Service’s vector database capabilities to power advanced semantic search and AI-driven applications. Learn how generative AI models can enhance your search solutions.

  4. Operational Best Practices

    Learn the best practices for running OpenSearch Service in production, covering everything from security and scaling to performance tuning and cost management.

  5. And More

    Expect a wide array of content, including deep dives into new features, architecture best practices, how to demo videos, use case showcases, and interviews with industry experts.

Subscribe to stay ahead

Whether you’re a beginner looking to get started or an experienced professional seeking to optimize your workflows, make sure to subscribe to the OpenSearch Service YouTube channel so you don’t miss out on the latest tutorials, insights, and updates. Get ready to elevate your search and analytics skills and be part of shaping the future of this channel and powerful service.


About the Authors

Jagadish Kumar (Jag) is a Senior Specialist Solutions Architect at AWS focused on Amazon OpenSearch Service. He is deeply passionate about Data Architecture and helps customers build analytics solutions at scale on AWS.

Sohaib Katariwala is a Senior Specialist Solutions Architect at AWS focused on Amazon OpenSearch Service. He has over 14 years of experience helping organizations derive insights from their data.

Wendy Neu is a Senior Manager at AWS focused on leading the NoSQL Specialist Solutions Architecture team worldwide. She is passionate about Data Services and leverages her extensive expertise to help customers optimize their data storage, management, and analytics strategies, enabling them to drive innovation and achieve their business goals.

Take manual snapshots and restore in a different domain spanning across various Regions and accounts in Amazon OpenSearch Service

Post Syndicated from Madhan Kumar Baskaran original https://aws.amazon.com/blogs/big-data/take-manual-snapshots-and-restore-in-a-different-domain-spanning-across-various-regions-and-accounts-in-amazon-opensearch-service/

Snapshots are crucial for data backup and disaster recovery in Amazon OpenSearch Service. These snapshots allow you to generate backups of your domain indexes and cluster state at specific moments and save them in a reliable storage location such as Amazon Simple Storage Service (Amazon S3).

Snapshots play a critical role in providing the availability, integrity and ability to recover data in OpenSearch Service domains. By implementing a robust snapshot strategy, you can mitigate risks associated with data loss, streamline disaster recovery processes and maintain compliance with data management best practices.

This post provides a detailed walkthrough about how to efficiently capture and manage manual snapshots in OpenSearch Service. It covers the essential steps for taking snapshots of your data, implementing safe transfer across different AWS Regions and accounts, and restoring them in a new domain. This guide is designed to help you maintain data integrity and continuity while navigating complex multi-Region and multi-account environments in OpenSearch Service.

Refer to this developer guide to understand more about index snapshots

Understanding manual snapshots

Manual snapshots are point-in-time backups of your OpenSearch Service domain that are initiated by the user. Contrary to automated snapshots, which are taken on a regular basis in accordance with the specified retention policy by OpenSearch Service, manual snapshots give you the ability to take backups whenever required, whether for the full cluster or for individual indices. This is particularly useful when you want to preserve a specific state of your data for future reference or before implementing significant changes to your domain.

Snapshots are not instantaneous. They take time to complete and don’t represent perfect point-in-time views of the domain. While a snapshot is in progress, you can still index documents and make other requests to the domain, but new documents and updates to existing documents generally aren’t included in the snapshot. The snapshot includes primary shards as they existed when you initiate the snapshot process.

The following are some scenarios where manual snapshots play an important role:

  • Data recovery – The primary purpose of snapshots, whether manual or automated, is to provide a means of data recovery in the event of a failure or data loss. If something goes wrong with your domain, you can restore it to a previous state using a snapshot.
  • Migration – Manual snapshots can be useful when you want to migrate data from one domain to another. You can create a snapshot of the source domain and then restore it on the target domain.
  • Testing and development – You can use snapshots to create copies of your data for testing or development purposes. This allows you to experiment with your data without affecting the production environment.
  • Backup control – Manual snapshots give you more control over your backup process. You can choose exactly when to create a snapshot, which can be useful if you have specific requirements that are not met by automated snapshots.
  • Long-term archiving – Manual snapshots can be kept for as long as you want, which can be useful for long-term archiving of data. Automated snapshots, on the other hand, are often deleted after a certain period of time.

Solution overview

The following sections outline the procedure for taking a manual snapshot and then restoring it in a different domain, spanning across various Regions and accounts. The high-level steps are as follows:

  1. Create an AWS Identity and Access Management (IAM) role and user.
  2. Register a manual snapshot repository.
  3. Take manual snapshots.
  4. Set up S3 bucket replication.
  5. Create an IAM role and user in the target account.
  6. Add a bucket policy.
  7. Register the repository and restore snapshots in the target domain.

Prerequisite

This post assumes you have the following resources set up:

  • An active and running OpenSearch Service domain.
  • An S3 bucket to store the manual snapshots of your OpenSearch Service domain. The bucket has to be in the same Region where the OpenSearch Service domain is hosted.

Create an IAM role and user

Complete the following steps to create your IAM role and user:

  1. Create an IAM role to grant permissions to OpenSearch Service. For this post, we name the role TheSnapshotRole.
  2. Create a new policy using the following code and attach it to the role to allow access to the S3 bucket.
{
  "Version": "2012-10-17",
  "Statement": [
    {
      "Action": [
        "s3:ListBucket"
      ],
      "Effect": "Allow",
      "Resource": [
        "arn:aws:s3:::s3-bucket-name"
      ]
    },
    {
      "Action": [
        "s3:GetObject",
        "s3:PutObject",
        "s3:DeleteObject",
        "iam:PassRole"
      ],
      "Effect": "Allow",
      "Resource": [
        "arn:aws:s3:::s3-bucket-name/*"
      ]
    }
  ]
}
  1. Edit the trust relationship of TheSnapshotRole to specify OpenSearch Service in the Principal statement, as shown in the following example. Under the Condition block, we recommend that you use the aws:SourceAccount and aws:SourceArn condition keys to protect yourself against the confused deputy problem. The source account is the owner and the source ARN is the ARN of the OpenSearch Service domain.
{
  "Version": "2012-10-17",
  "Statement": [
    {
      "Sid": "",
      "Effect": "Allow",
      "Principal": {
        "Service": "es.amazonaws.com"
      },
      "Action": "sts:AssumeRole",
      "Condition": {
        "StringEquals": {
          "aws:SourceAccount": "account-id"
        },
        "ArnLike": {
          "aws:SourceArn": "arn:aws:es:region:account-id:domain/domain-name"
        }
      }
    }
  ]
}
  1. Generate an IAM user to register the snapshot repository. For this post, we name the user TheSnapUser.
  2. To register a snapshot repository, you need to pass TheSnapshotRole to OpenSearch Service. You also need access to the es:ESHttpPut To grant both of these permissions, attach the following policy to the IAM role whose credentials are being used to sign the request.
{
  "Version": "2012-10-17",
  "Statement": [
    {
      "Effect": "Allow",
      "Action": "iam:PassRole",
      "Resource": "arn:aws:iam::123456789012:role/TheSnapshotRole"
    },
    {
      "Effect": "Allow",
      "Action": "es:ESHttpPut",
      "Resource": "arn:aws:es:region:123456789012:domain/domain-name/*"
    }
  ]
}

Register a manual snapshot repository

Complete the following steps to map the snapshot role and the user in OpenSearch Dashboards (if using fine-grained access control):

  1. Navigate to the OpenSearch Dashboards endpoint connected to your OpenSearch Service domain.
  2. Sign in with the admin user or a user with the security_manager role
  3. From the main menu, choose Security, Roles, and select the manage_snapshots role
  4. Choose Mapped users, then choose Manage mapping.
  5. Add the ARN of TheSnapshotRole for Backend role and the ARN of TheSnapUser for User:
    1. arn:aws:iam::123456789123:role/TheSnapshotRole
    2. arn:aws:iam::123456789123:user/TheSnapUser
  6. Choose Map and confirm the user and role shows up under Mapped users.
  7. To register a snapshot repository, send a PUT request to the OpenSearch Service domain endpoint through an API platform like Postman or Insomnia. For more details, see Registering a manual snapshot repository.

Note: While using Postman or Insomnia to run the API calls mentioned throughout this blog, choose AWS IAM v4 as the authentication method and input your IAM credentials in the Authorization section. Ensure you use the credentials of an OpenSearch user who has the ‘all_access’ OpenSearch role assigned on the domain.

curl -XPUT domain-endpoint/_snapshot/my-snapshot-repo-name
{
  "type": "s3",
  "settings": {
    "bucket": "s3-bucket-name",
    "region": "region",
    "role_arn": "arn:aws:iam::123456789012:role/TheSnapshotRole"
  }
}

If your domain resides within a virtual private cloud (VPC), you must be connected to the VPC for the request to successfully register the snapshot repository. Accessing a VPC varies by network configuration, but likely involves connecting to a VPN or corporate network. To check that you can reach the OpenSearch Service domain, navigate to https://<your-vpc-domain.region>.es.amazonaws.com in a web browser and verify that you receive the default JSON response.

Take manual snapshots

Taking a snapshot isn’t possible if another snapshot is currently in progress. The Ultrawarm storage tier migration process also utilizes snapshots to move data between hot and warm storage, running this process in the background. Additionally, automated snapshots are taken based on the schedule configured for the cluster by the service. See Protecting data with encryption for protecting your Amazon S3 data.

  1. To verify, run the following command
curl -XGET 'domain-endpoint/_snapshot/_status
  1. After you confirm no snapshot is running, run the following command to take a manual snapshot
curl -XPUT 'domain-endpoint/_snapshot/repository-name/snapshot-name

  1. Run the following command to verify the state of all snapshots of your domain
curl -XGET 'domain-endpoint/_snapshot/repository-name/_all?pretty

Set up S3 bucket replication

Before you start, have the following in place:

  1. Locate the destination bucket where the data will be replicated. If you don’t have one, create a new S3 bucket in a distinct region, separate from the region of the source bucket.
  2. To allow access to objects in this bucket by other AWS accounts (because the destination OpenSearch Service domain is in a different account), you need to enable access control lists (ACLs) on the bucket. ACLs will be used to specify and manage access permissions for the bucket and its objects.

Complete the following steps to set up S3 bucket replication. For more information, see Walkthroughs: Examples for configuring replication.

  1. On the Amazon S3 console, choose Buckets in the navigation pane.
  2. Choose the bucket you want to replicate (the source bucket with snapshots).
  3. On the Management tab, choose Create replication rule.
  4. Replication requires versioning to be enabled for the source bucket, so choose Enable bucket versioning and enable versioning.
  5. Specify the following details:
    1. For Rule ID, enter a name for your rule.
    2. For Status, choose Enabled.
    3. For Rule scope, specify the data to be replicated.
    4. For Destination S3 bucket, enter the target bucket name where the data will be replicated.
    5. For IAM role, choose Create new role.
  6. Choose Save.
  7. In the Replicate existing objects pop-up window, select Yes, replicate existing objects to start replication.
  8. Choose Submit.

You will see a new active replication rule in the replication table on the Management tab of the source S3 bucket.

Create an IAM role and user in the target account

Complete the following steps to create your IAM role and user in the target account.

  1. Create an IAM role to grant permissions to the target OpenSearch Service. For this post, name the role DestinationSnapshotRole.
  2. Create a new policy using the following code and attach it to the role DestinationSnapshotRole to allow access to the target S3 bucket
{
  "Version": "2012-10-17",
  "Statement": [
    {
      "Action": [
        "s3:ListBucket"
      ],
      "Effect": "Allow",
      "Resource": [
        "arn:aws:s3:::s3-bucket-name" -> Replicated s3 bucket
      ]
    },
    {
      "Action": [
        "s3:GetObject",
        "s3:PutObject",
        "s3:DeleteObject",
        "iam:PassRole"
      ],
      "Effect": "Allow",
      "Resource": [
        "arn:aws:s3:::s3-bucket-name/*" -> Replicated s3 bucket 
      ]
    }
  ]
}
  1. Edit the trust relationship of DestinationSnapshotRole to specify OpenSearch Service in the Principal statement as shown in the following example.
{
  "Version":"2012-10-17",
  "Statement":[
    {
      "Sid":"",
      "Effect":"Allow",
      "Principal":{
        "Service":"es.amazonaws.com"
      },
      "Action":"sts:AssumeRole",
      "Condition":{
        "StringEquals":{
          "aws:SourceAccount":"account-id" -> Target Account
        },
        "ArnLike":{
          "aws:SourceArn":"arn:aws:es:region:account-id:domain/domain-name/*" -> Target OpenSearch Domain
        }
      }
    }
  ]
}
  1. Generate an IAM user to register the snapshot repository. For this post, name the user DestinationSnapUser.
  2. To register a snapshot repository, you need to pass DestinationSnapshotRole to OpenSearch Service. You also need access to the es:ESHttpPut To grant both of these permissions, attach the following policy to the IAM role whose credentials are being used to sign the request
{
  "Version":"2012-10-17",
  "Statement":[
    {
      "Effect":"Allow",
      "Action":"iam:PassRole",
      "Resource":"arn:aws:iam::123456789012:role/DestinationSnapshotRole"
    },
    {
      "Effect":"Allow",
      "Action":"es:ESHttpPut",
      "Resource":"arn:aws:es:region:123456789012:domain/domain-name/*" -> Target OpenSearch Domain
    }
  ]
}

Complete the following steps to map the snapshot role and user in the target OpenSearch Dashboards (if using fine-grained access control).

  1. Navigate to the OpenSearch Dashboard’s endpoint connected with your OpenSearch Service domain.
  2. Sign in with the admin user or a user with the security_manager role
  3. From the main menu, choose Security, Roles, and choose the manage_snapshots role
  4. Choose Mapped users, then choose Manage mapping.
  5. Add the ARN of TheSnapshotRole for Backend role and the ARN of TheSnapUser for User:
    1. arn:aws:iam::123456789123:role/DestinationSnapshotRole
    2. arn:aws:iam::123456789123:user/DestinationSnapUser
  6. Choose Map and confirm the user and role shows up under Mapped users.

Add a bucket policy

In the destination S3 bucket details page, on the Permissions tab, choose Edit, then add the following bucket policy. This policy allows the target OpenSearch Service domain from another AWS account to access the snapshot created by a different AWS account.

{
  "Version":"2012-10-17",
  "Id":"Policy1568001010746",
  "Statement":[
    {
      "Sid":"Stmt1568000712531",
      "Effect":"Allow",
      "Principal":{
        "AWS":"arn:aws:iam::Account B:role/cross" -> DestinationSnapshotRole
      },
      "Action":"s3:*",
      "Resource":"arn:aws:s3:::snapshot"
    },
    {
      "Sid":"Stmt1568001007239",
      "Effect":"Allow",
      "Principal":{
        "AWS":"arn:aws:iam::Account B:role/cross" -> DestinationSnapshotRole
      },
      "Action":[
        "s3:GetObject",
        "s3:PutObject",
        "s3:DeleteObject"
      ],
      "Resource":"arn:aws:s3:::snapshot/*"
    }
  ]
}

Register the repository and restore snapshots in the target domain

To complete this step, you need an active and running OpenSearch Service domain in the target account.

Identify the snapshot you want to restore. Make sure all settings for this index, such as custom analyzer packages or allocation requirement settings, and data are compatible with the domain. Then complete the following steps

  1. To register the repository in the target OpenSearch Service domain, run the following command.
curl -XPUT domain-endpoint/_snapshot/my-snapshot-repo-name
{
  "type": "s3",
  "settings": {
    "bucket": "s3-bucket-name",
    "region": "region",
    "role_arn": "arn:aws:iam::123456789012:role/DestinationSnapshotRole"
  }
}
  1. After you register the repository, run the following command to see all snapshots.
curl -XGET 'domain-endpoint/_snapshot/repository-name/_all?pretty
  1. To restore a snapshot, run the following command.
curl -XPOST 'domain-endpoint/_snapshot/repository-name/snapshot-name/_restore
  1. Alternately, you might want to restore all indexes except the dashboards and fine-grained access control indexes.
curl -XPOST 'domain-endpoint/_snapshot/repository-name/snapshot-name/_restore' \
-d '{"indices": "-.kibana*,-.opendistro*"}' \
-H 'Content-Type: application/json'
  1. Sign in to OpenSearch Dashboards connected to the target OpenSearch Service domain and run the following command to check if the data is getting restored.
curl -XGET _cat/indices?v
  1. Run the following recovery command to check the progress of the restore operation.
curl -XGET _cat/recovery?v

Troubleshooting

This re:Post article addresses the majority of common errors that arise when attempting to restore a manual snapshot, along with effective solutions to resolve them.

Conclusion

In this post, we presented a procedure for taking manual snapshots and restoring them in OpenSearch Service. With manual snapshots, you have the power to manage your data backups, preserving key moments in time, confidently experimenting with domain modifications, and protecting against any data loss. Additionally, being able to restore snapshots across various domains, Regions, and accounts enables a new degree of data portability and flexibility, giving you the freedom to better manage and optimize your domains.

With great data protection comes great innovation. Now that you’re equipped with this knowledge, you can explore the endless possibilities that OpenSearch Service offers, confident in your ability to secure, restore, and thrive in the dynamic world of cloud-based data analytics and management.

See blog post to understand how to use snapshot management policies to manage automated snapshot in OpenSearch Service.

If you have feedback about this post, submit it in the comments section. If you have questions about this post, start a new thread on the Amazon OpenSearch Service forum or contact AWS Support.

Stay tuned for more exciting updates and new features in Amazon OpenSearch Service.


About the authors

Madhan Kumar Baskaran works as a Search Engineer at AWS, specializing in Amazon OpenSearch Service. His primary focus involves assisting customers in constructing scalable search applications and analytics solutions. Based in Bellevue, Washington, Madhan has a keen interest in data engineering and DevOps.

Priyanshi Omer is a Customer Success Engineer at AWS OpenSearch, based in Bengaluru. Her primary focus involves assisting customers in constructing scalable search applications and analytics solutions. She works closely with customers to help them migrate their workloads and aids existing customers in fine-tuning their clusters to achieve better performance and cost savings. Outside of work, she enjoys spending time with her cats and playing video games

Extract insights in a 30TB time series workload with Amazon OpenSearch Serverless

Post Syndicated from Satish Nandi original https://aws.amazon.com/blogs/big-data/extract-insights-in-a-30tb-time-series-workload-with-amazon-opensearch-serverless/

In today’s data-driven landscape, managing and analyzing vast amounts of data, especially logs, is crucial for organizations to derive insights and make informed decisions. However, handling large data while extracting insights is a significant challenge, prompting organizations to seek scalable solutions without the complexity of infrastructure management.

Amazon OpenSearch Serverless reduces the burden of manual infrastructure provisioning and scaling while still empowering you to ingest, analyze, and visualize your time-series data, simplifying data management and enabling you to derive actionable insights from data.

We recently announced a new capacity level of 30TB for time series data per account per AWS Region. The OpenSearch Serverless compute capacity for data ingestion and search/query is measured in OpenSearch Compute Units (OCUs), which are shared among various collections with the same AWS Key Management Service (AWS KMS) key. To accommodate larger datasets, OpenSearch Serverless now supports up to 500 OCUs per account per Region, each for indexing and search respectively, more than double from the previous limit of 200. You can configure the maximum OCU limits on search and indexing independently, giving you the reassurance of managing costs effectively. You can also monitor real-time OCU usage with Amazon CloudWatch metrics to gain a better perspective on your workload’s resource consumption. With the support for 30TB datasets, you can analyze data at the 30TB level to unlock valuable operational insights and make data-driven decisions to troubleshoot application downtime, improve system performance, or identify fraudulent activities.

This post discusses how you can analyze 30TB time series datasets with OpenSearch Serverless.

Innovations and optimizations to support larger data size and faster responses

Sufficient disk, memory, and CPU resources are crucial for handling extensive data effectively and conducting thorough analysis. These resources are not just beneficial but crucial for our operations. In time series collections, the OCU disk typically contains older shards that are not frequently accessed, referred to as warm shards. We have introduced a new feature called warm shard recovery prefetch. This feature actively monitors recently queried data blocks for a shard. It prioritizes them during shard movements, such as shard balancing, vertical scaling, and deployment activities. More importantly, it accelerates auto-scaling and provides faster readiness for varying search workloads, thereby significantly improving our system’s performance. The results provided later in this post provide details on the improvements.

A few select customers worked with us on early adoption prior to General Availability. In these trials, we observed up to 66% improvement in warm query performance for some customer workloads. This significant improvement shows the effectiveness of our new features. Additionally, we have enhanced the concurrency between coordinator and worker nodes, allowing more requests to be processed as the OCUs increases through auto scaling. This enhancement has resulted in up to a 10% improvement in query performance for hot and warm queries.

We have enhanced our system’s stability to handle time-series collections of up to 30 TB effectively. Our team is committed to improving system performance, as demonstrated by our ongoing enhancements to the auto-scaling system. These improvements comprised of enhanced shard distribution for optimal placement after rollover, auto-scaling policies based on queue length, and a dynamic sharding strategy that adjusts shard count based on ingestion rate.

In the following section we share an example test setup of a 30TB workload that we used internally, detailing the data being used and generated, along with our observations and results. Performance may vary depending on the specific workload.

Ingest the data

You can use the load generation scripts shared in the following workshop, or you can use your own application or data generator to create a load. You can run multiple instances of these scripts to generate a burst in indexing requests. As shown in the following screenshot, we tested with an index, sending approximately 30 TB of data over a period of 15 days. We used our load generator script to send the traffic to a single index, retaining data for 15 days using a data life cycle policy.

Test methodology

We set the deployment type to ‘Enable redundancy’ to enable data replication across Availability Zones. This deployment configuration will lead to 12-24 hours of data in hot storage (OCU disk memory) and the rest in Amazon Simple Storage Service (Amazon S3). With a defined set of search performance and the preceding ingestion expectation, we set the max OCUs to be 500 for both indexing and search.

As part of the testing, we observed auto-scaling behavior and graphed it. The indexing took around 8 hours to get stabilized at 80 OCU.

On the Search side, it took around 2 days to get stabilized at 80 OCU.

Observations:

Ingestion

The ingestion performance achieved was consistently over 2 TB per day

Search

Queries were of two types, with time ranging from 15 minutes to 15 days.

{"aggs":{"1":{"cardinality":{"field":"carrier.keyword"}}},"size":0,"query":{"bool":{"filter":[{"range":{"@timestamp":{"gte":"now-15m","lte":"now"}}}]}}}

For example

{"aggs":{"1":{"cardinality":{"field":"carrier.keyword"}}},"size":0,"query":{"bool":{"filter":[{"range":{"@timestamp":{"gte":"now-1d","lte":"now"}}}]}}}

The following chart provides the various percentile performance on the aggregation query

The second query was

{"query":{"bool":{"filter":[{"range":{"@timestamp":{"gte":"now-15m","lte":"now"}}}],"should":[{"match":{"originState":"State"}}]}}}

For example

{"query":{"bool":{"filter":[{"range":{"@timestamp":{"gte":"now-15m","lte":"now"}}}],"should":[{"match":{"originState":"California"}}]}}}

The following chart provides the various percentile performance on the search query

The following chart summarizes the time range for different queries

Time-range Query P50 (ms) P90 (ms) P95 (ms) P99 (ms)
15 minutes {“aggs”:{“1”:{“cardinality”:{“field”:”carrier.keyword”}}},”size”:0,”query”:{“bool”:{“filter”:[{“range”:{“@timestamp”:{“gte”:”now-15m”,”lte”:”now”}}}]}}} 325 403.867 441.917 514.75
1 day {“aggs”:{“1”:{“cardinality”:{“field”:”carrier.keyword”}}},”size”:0,”query”:{“bool”:{“filter”:[{“range”:{“@timestamp”:{“gte”:”now-1d”,”lte”:”now”}}}]}}} 7,693.06 12,294 13,411.19 17,481.4
1 hour {“aggs”:{“1”:{“cardinality”:{“field”:”carrier.keyword”}}},”size”:0,”query”:{“bool”:{“filter”:[{“range”:{“@timestamp”:{“gte”:”now-1h”,”lte”:”now”}}}]}}} 1,061.66 1,397.27 1,482.75 1,719.53
1 year {“aggs”:{“1”:{“cardinality”:{“field”:”carrier.keyword”}}},”size”:0,”query”:{“bool”:{“filter”:[{“range”:{“@timestamp”:{“gte”:”now-1y”,”lte”:”now”}}}]}}} 2,758.66 10,758 12,028 22,871.4
4 hour {“aggs”:{“1”:{“cardinality”:{“field”:”carrier.keyword”}}},”size”:0,”query”:{“bool”:{“filter”:[{“range”:{“@timestamp”:{“gte”:”now-4h”,”lte”:”now”}}}]}}} 3,870.79 5,233.73 5,609.9 6,506.22
7 day {“aggs”:{“1”:{“cardinality”:{“field”:”carrier.keyword”}}},”size”:0,”query”:{“bool”:{“filter”:[{“range”:{“@timestamp”:{“gte”:”now-7d”,”lte”:”now”}}}]}}} 5,395.68 17,538.12 19,159.18 22,462.32
15 minutes {“query”:{“bool”:{“filter”:[{“range”:{“@timestamp”:{“gte”:”now-15m”,”lte”:”now”}}}],”should”:[{“match”:{“originState”:”California”}}]}}} 139 190 234.55 6,071.96
1 day {“query”:{“bool”:{“filter”:[{“range”:{“@timestamp”:{“gte”:”now-1d”,”lte”:”now”}}}],”should”:[{“match”:{“originState”:”California”}}]}}} 678.917 1,366.63 2,423 7,893.56
1 hour {“query”:{“bool”:{“filter”:[{“range”:{“@timestamp”:{“gte”:”now-1h”,”lte”:”now”}}}],”should”:[{“match”:{“originState”:”Washington”}}]}}} 259.167 305.8 343.3 1,125.66
1 year {“query”:{“bool”:{“filter”:[{“range”:{“@timestamp”:{“gte”:”now-1y”,”lte”:”now”}}}],”should”:[{“match”:{“originState”:”Washington”}}]}}} 2,166.33 2,469.7 4,804.9 9,440.11
4 hours {“query”:{“bool”:{“filter”:[{“range”:{“@timestamp”:{“gte”:”now-4h”,”lte”:”now”}}}],”should”:[{“match”:{“originState”:”Washington”}}]}}} 462.933 653.6 725.3 1,583.37
7 days {“query”:{“bool”:{“filter”:[{“range”:{“@timestamp”:{“gte”:”now-7d”,”lte”:”now”}}}],”should”:[{“match”:{“originState”:”Washington”}}]}}} 1,353 2,745.1 4,338.8 9,496.36

Conclusion

OpenSearch Serverless not only supports a larger data size than prior releases but also introduces performance improvements like warm shard pre-fetch and concurrency optimization for better query response. These features reduce the latency of warm queries and improve auto-scaling to handle varied workloads. We encourage you to take advantage of the 30TB index support and put it to the test! Migrate your data, explore the improved throughput, and take advantage of the enhanced scaling capabilities.

To get started, refer to Log analytics the easy way with Amazon OpenSearch Serverless. To get hands-on experience with OpenSearch Serverless, follow the Getting started with Amazon OpenSearch Serverless workshop, which has a step-by-step guide for configuring and setting up an OpenSearch Serverless collection.

If you have feedback about this post, share it in the comments section. If you have questions about this post, start a new thread on the Amazon OpenSearch Service forum or contact AWS Support.


About the authors

Satish Nandi is a Senior Product Manager with Amazon OpenSearch Service. He is focused on OpenSearch Serverless and has years of experience in networking, security and AI/ML. He holds a Bachelor’s degree in Computer Science and an MBA in Entrepreneurship. In his free time, he likes to fly airplanes and hang gliders and ride his motorcycle.

Milav Shah is an Engineering Leader with Amazon OpenSearch Service. He focuses on search experience for OpenSearch customers. He has extensive experience building highly scalable solutions in databases, real-time streaming and distributed computing. He also possesses functional domain expertise in verticals like Internet of Things, fraud protection, gaming and AI/ML. In his free time, he likes to ride cycle, hike, and play chess.

Qiaoxuan Xue is a Senior Software Engineer at AWS leading the search and benchmarking areas of the Amazon OpenSearch Serverless Project. His passion lies in finding solutions for intricate challenges within large-scale distributed systems. Outside of work, he enjoys woodworking, biking, playing basketball, and spending time with his family and dog.

Prashant Agrawal is a Sr. Search Specialist Solutions Architect with Amazon OpenSearch Service. He works closely with customers to help them migrate their workloads to the cloud and helps existing customers fine-tune their clusters to achieve better performance and save on cost. Before joining AWS, he helped various customers use OpenSearch and Elasticsearch for their search and log analytics use cases. When not working, you can find him traveling and exploring new places. In short, he likes doing Eat → Travel → Repeat.
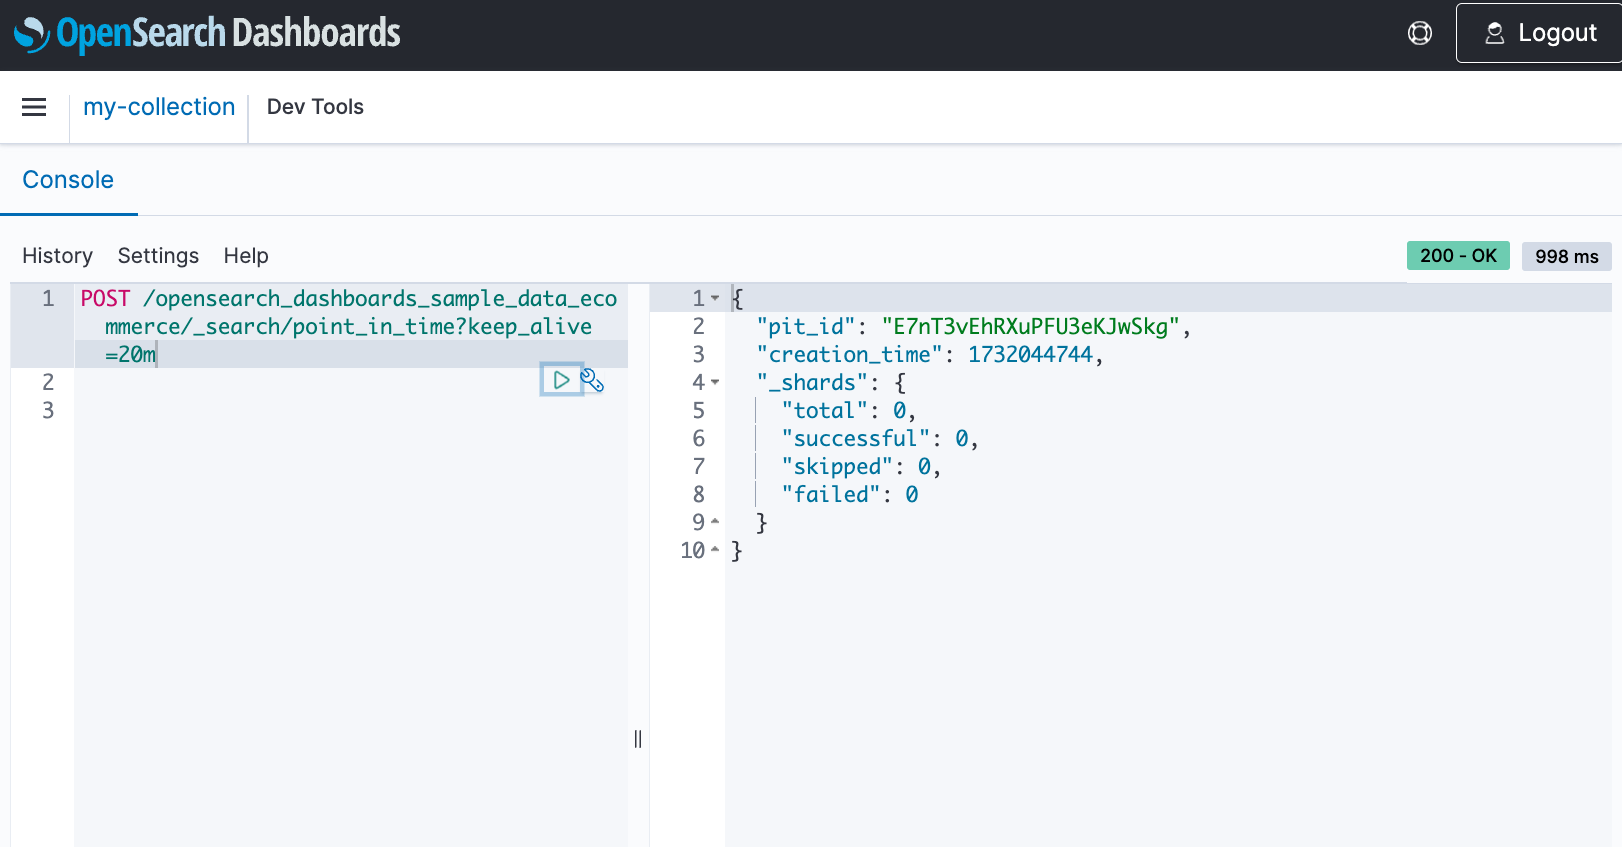
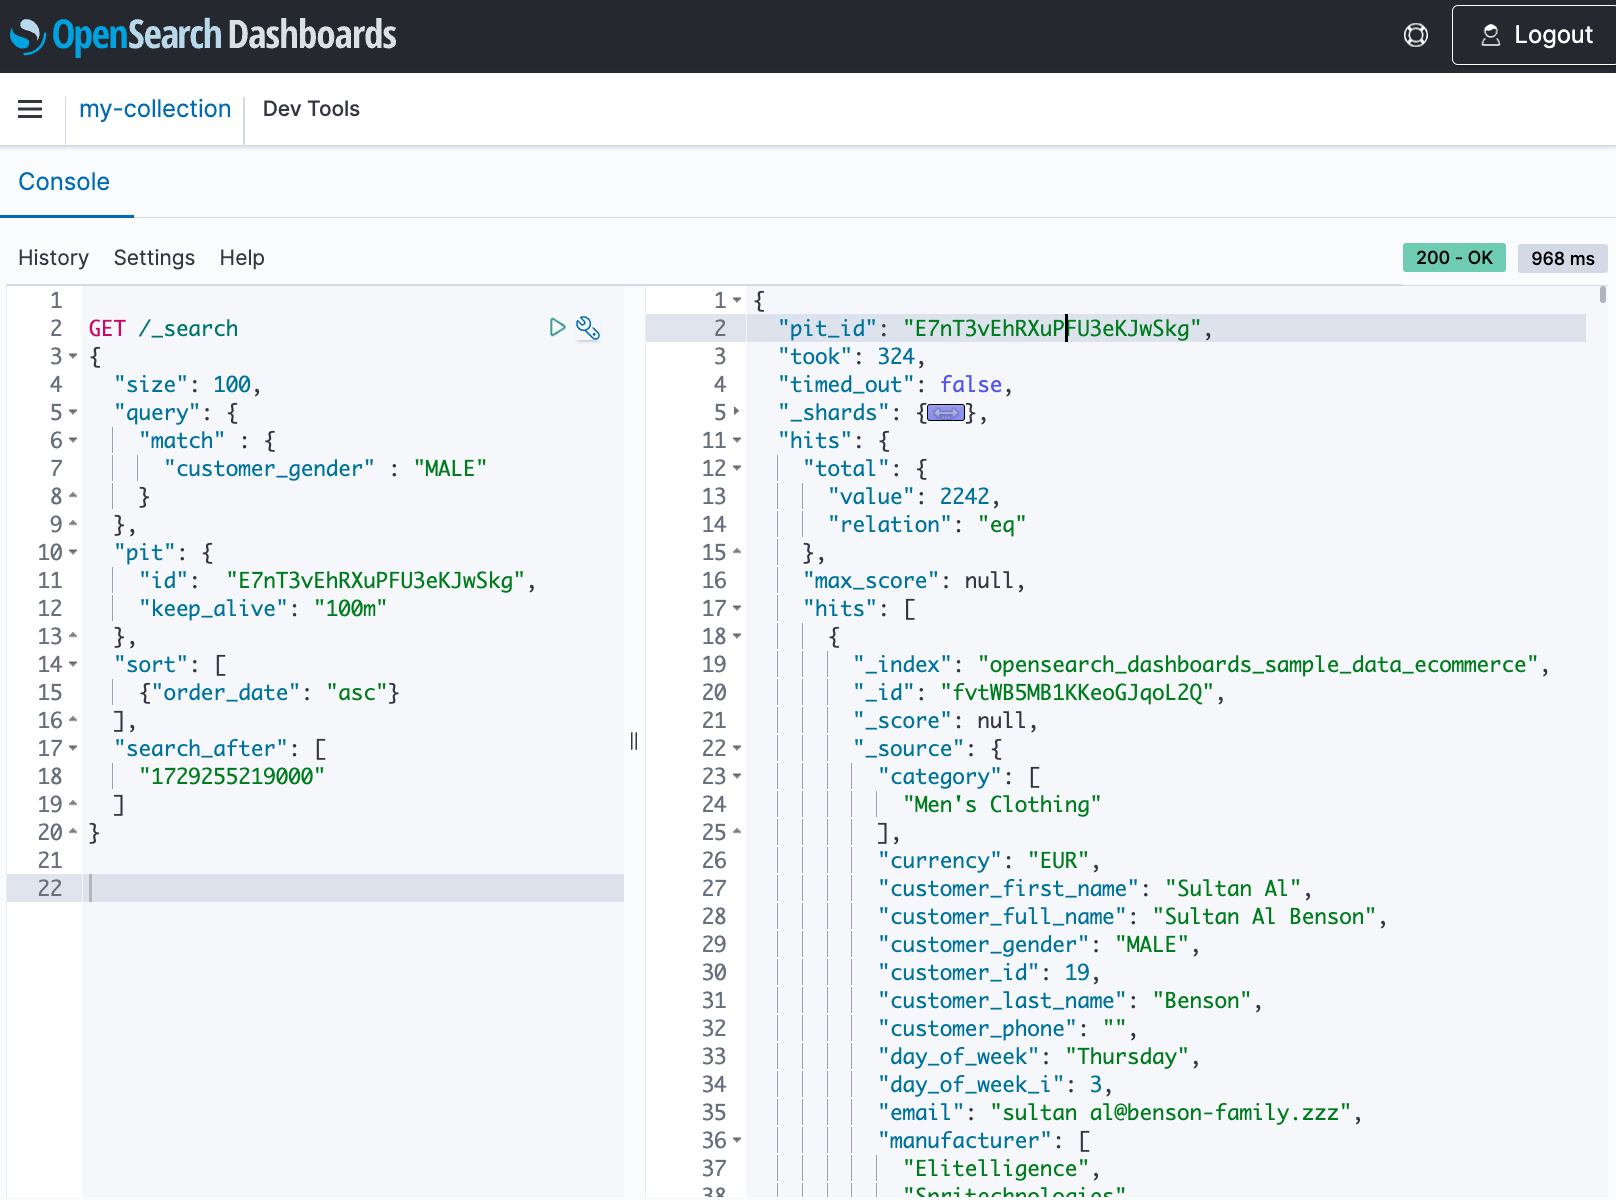
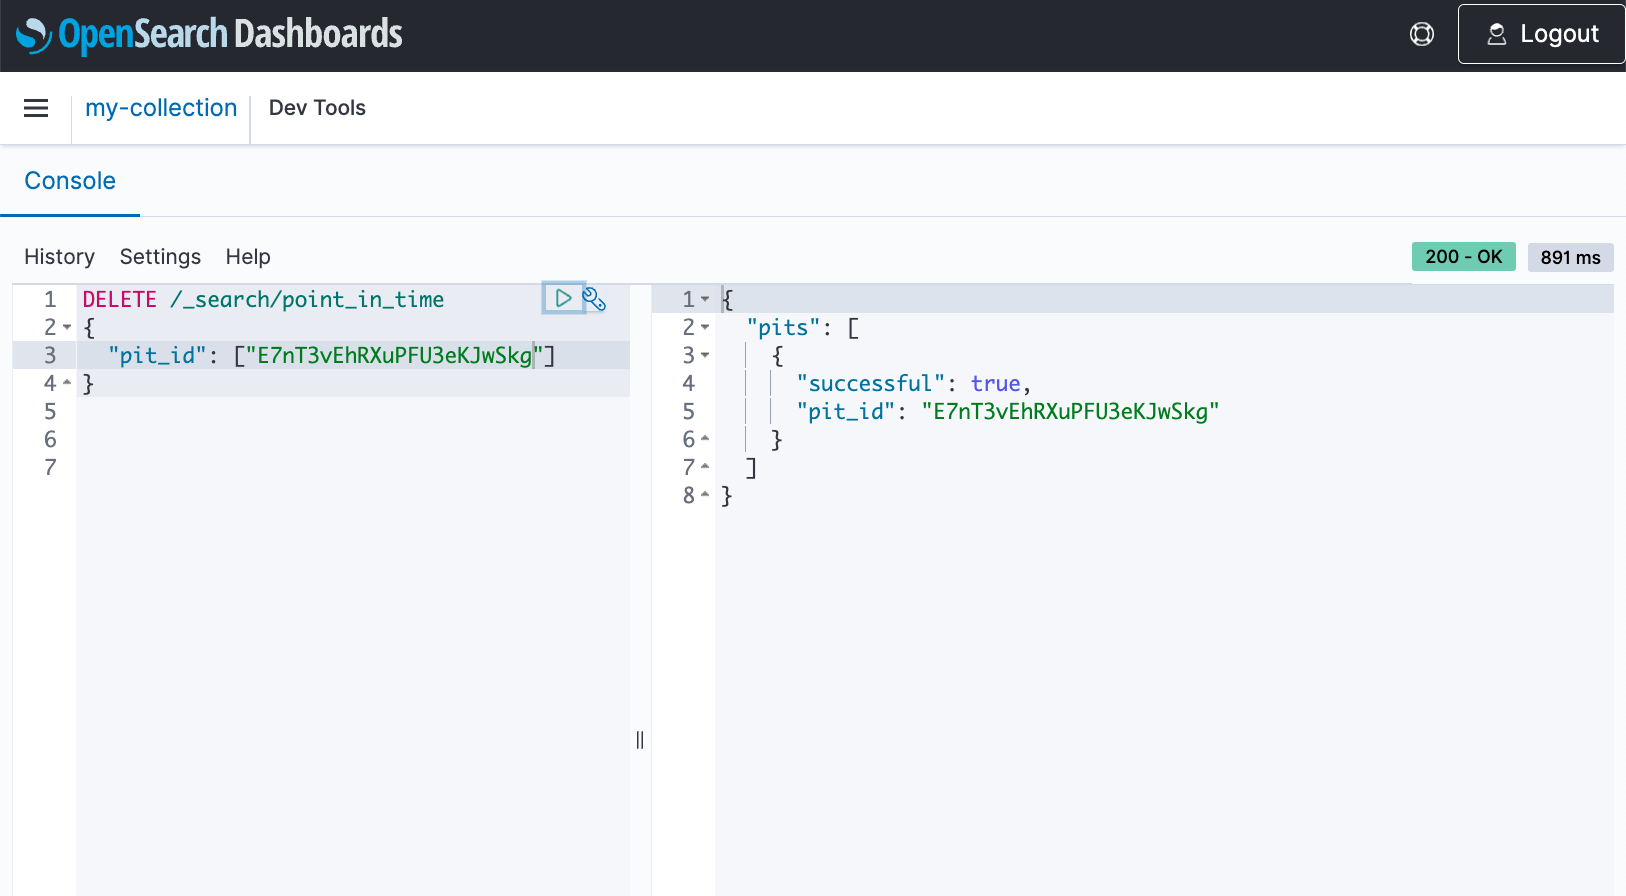
Achieve cross-Region resilience with Amazon OpenSearch Ingestion

Post Syndicated from Muthu Pitchaimani original https://aws.amazon.com/blogs/big-data/achieve-cross-region-resilience-with-amazon-opensearch-ingestion/

Cross-Region deployments provide increased resilience to maintain business continuity during outages, natural disasters, or other operational interruptions. Many large enterprises, design and deploy special plans for readiness during such situations. They rely on solutions built with AWS services and features to improve their confidence and response times. Amazon OpenSearch Service is a managed service for OpenSearch, a search and analytics engine at scale. OpenSearch Service provides high availability within an AWS Region through its Multi-AZ deployment model and provides Regional resiliency with cross-cluster replication. Amazon OpenSearch Serverless is a deployment option that provides on-demand auto scaling, to which we continue to bring in many features.

With the existing cross-cluster replication feature in OpenSearch Service, you designate a domain as a leader and another as a follower, using an active-passive replication model. Although this model offers a way to continue operations during Regional impairment, it requires you to manually configure the follower. Additionally, after recovery, you need to reconfigure the leader-follower relationship between the domains.

In this post, we outline two solutions that provide cross-Region resiliency without needing to reestablish relationships during a failback, using an active-active replication model with Amazon OpenSearch Ingestion (OSI) and Amazon Simple Storage Service (Amazon S3). These solutions apply to both OpenSearch Service managed clusters and OpenSearch Serverless collections. We use OpenSearch Serverless as an example for the configurations in this post.

Solution overview

We outline two solutions in this post. In both options, data sources local to a region write to an OpenSearch ingestion (OSI) pipeline configured within the same region. The solutions are extensible to multiple Regions, but we show two Regions as an example as Regional resiliency across two Regions is a popular deployment pattern for many large-scale enterprises.

You can use these solutions to address cross-Region resiliency needs for OpenSearch Serverless deployments and active-active replication needs for both serverless and provisioned options of OpenSearch Service, especially when the data sources produce disparate data in different Regions.

Prerequisites

Complete the following prerequisite steps:

  1. Deploy OpenSearch Service domains or OpenSearch Serverless collections in all the Regions where resiliency is needed.
  2. Create S3 buckets in each Region.
  3. Configure AWS Identity and Access Management (IAM) permissions needed for OSI. For instructions, refer to Amazon S3 as a source. Choose Amazon Simple Queue Service (Amazon SQS) as the method for processing data.

After you complete these steps, you can create two OSI pipelines one in each Region with the configurations detailed in the following sections.

Use OpenSearch Ingestion (OSI) for cross-Region writes

In this solution, OSI takes the data that is local to the Region it’s in and writes it to the other Region. To facilitate cross-Region writes and increase data durability, we use an S3 bucket in each Region. The OSI pipeline in the other Region reads this data and writes to the collection in its local Region. The OSI pipeline in the other Region follows a similar data flow.

While reading data, you have choices: Amazon SQS or Amazon S3 scans. For this post, we use Amazon SQS because it helps provide near real-time data delivery. This solution also facilitates writing directly to these local buckets in the case of pull-based OSI data sources. Refer to Source under Key concepts to understand the different types of sources that OSI uses.

The following diagram shows the flow of data.

The data flow consists of the following steps:

  1. Data sources local to a Region write their data to the OSI pipeline in their Region. (This solution also supports sources directly writing to Amazon S3.)
  2. OSI writes this data into collections followed by S3 buckets in the other Region.
  3. OSI reads the other Region data from the local S3 bucket and writes it to the local collection.
  4. Collections in both Regions now contain the same data.

The following snippets shows the configuration for the two pipelines.

#pipeline config for cross region writes
version: "2"
write-pipeline:
  source:
    http:
      path: "/logs"
  processor:
    - parse_json:
  sink:
    # First sink to same region collection
    - opensearch:
        hosts: [ "https://abcdefghijklmn.us-east-1.aoss.amazonaws.com" ]
        aws:
          sts_role_arn: "arn:aws:iam::1234567890:role/pipeline-role"
          region: "us-east-1"
          serverless: true
        index: "cross-region-index"
    - s3:
        # Second sink to cross region S3 bucket
        aws:
          sts_role_arn: "arn:aws:iam::1234567890:role/pipeline-role"
          region: "us-east-2"
        bucket: "osi-cross-region-bucket"
        object_key:
          path_prefix: "osi-crw/%{yyyy}/%{MM}/%{dd}/%{HH}"
        threshold:
          event_collect_timeout: 60s
        codec:
          ndjson:

The code for the write pipeline is as follows:

#pipeline config to read data from local S3 bucket
version: "2"
read-write-pipeline:
  source:
    s3:
      # S3 source with SQS 
      acknowledgments: true
      notification_type: "sqs"
      compression: "none"
      codec:
        newline:
      sqs:
        queue_url: "https://sqs.us-east-1.amazonaws.com/1234567890/my-osi-cross-region-write-q"
        maximum_messages: 10
        visibility_timeout: "60s"
        visibility_duplication_protection: true
      aws:
        region: "us-east-1"
        sts_role_arn: "arn:aws:iam::123567890:role/pipe-line-role"
  processor:
    - parse_json:
  route:
  # Routing uses the s3 keys to ensure OSI writes data only once to local region 
    - local-region-write: "contains(/s3/key, \"osi-local-region-write\")"
    - cross-region-write: "contains(/s3/key, \"osi-cross-region-write\")"
  sink:
    - pipeline:
        name: "local-region-write-cross-region-write-pipeline"
    - pipeline:
        name: "local-region-write-pipeline"
        routes:
        - local-region-write
local-region-write-cross-region-write-pipeline:
  # Read S3 bucket with cross-region-write
  source:
    pipeline: 
      name: "read-write-pipeline"
  sink:
   # Sink to local-region managed OpenSearch service 
    - opensearch:
        hosts: [ "https://abcdefghijklmn.us-east-1.aoss.amazonaws.com" ]
        aws:
          sts_role_arn: "arn:aws:iam::12345678890:role/pipeline-role"
          region: "us-east-1"
          serverless: true
        index: "cross-region-index"
local-region-write-pipeline:
  # Read local-region write  
  source:
    pipeline: 
      name: "read-write-pipeline"
  processor:
    - delete_entries:
        with_keys: ["s3"]
  sink:
     # Sink to cross-region S3 bucket 
    - s3:
        aws:
          sts_role_arn: "arn:aws:iam::1234567890:role/pipeline-role"
          region: "us-east-2"
        bucket: "osi-cross-region-write-bucket"
        object_key:
          path_prefix: "osi-cross-region-write/%{yyyy}/%{MM}/%{dd}/%{HH}"
        threshold:
          event_collect_timeout: "60s"
        codec:
          ndjson:

To separate management and operations, we use two prefixes, osi-local-region-write and osi-cross-region-write, for buckets in both Regions. OSI uses these prefixes to copy only local Region data to the other Region. OSI also creates the keys s3.bucket and s3.key to decorate documents written to a collection. We remove this decoration while writing across Regions; it will be added back by the pipeline in the other Region.

This solution provides near real-time data delivery across Regions, and the same data is available across both Regions. However, although OpenSearch Service contains the same data, the buckets in each Region contain only partial data. The following solution addresses this.

Use Amazon S3 for cross-Region writes

In this solution, we use the Amazon S3 Region replication feature. This solution supports all the data sources available with OSI. OSI again uses two pipelines, but the key difference is that OSI writes the data to Amazon S3 first. After you complete the steps that are common to both solutions, refer to Examples for configuring live replication for instructions to configure Amazon S3 cross-Region replication. The following diagram shows the flow of data.

The data flow consists of the following steps:

  1. Data sources local to a Region write their data to OSI. (This solution also supports sources directly writing to Amazon S3.)
  2. This data is first written to the S3 bucket.
  3. OSI reads this data and writes to the collection local to the Region.
  4. Amazon S3 replicates cross-Region data and OSI reads and writes this data to the collection.

The following snippets show the configuration for both pipelines.

version: "2"
s3-write-pipeline:
  source:
    http:
      path: "/logs"
  processor:
    - parse_json:
  sink:
    # Write to S3 bucket that has cross region replication enabled
    - s3:
        aws:
          sts_role_arn: "arn:aws:iam::1234567890:role/pipeline-role"
          region: "us-east-2"
        bucket: "s3-cross-region-bucket"
        object_key:
          path_prefix: "pushedlogs/%{yyyy}/%{MM}/%{dd}/%{HH}"
        threshold:
          event_collect_timeout: 60s
          event_count: 2
        codec:
          ndjson:

The code for the write pipeline is as follows:

version: "2"
s3-read-pipeline:
  source:
    s3:
      acknowledgments: true
      notification_type: "sqs"
      compression: "none"
      codec:
        newline:
      # Configure SQS to notify OSI pipeline
      sqs:
        queue_url: "https://sqs.us-east-2.amazonaws.com/1234567890/my-s3-crr-q"
        maximum_messages: 10
        visibility_timeout: "15s"
        visibility_duplication_protection: true
      aws:
        region: "us-east-2"
        sts_role_arn: "arn:aws:iam::1234567890:role/pipeline-role"
  processor:
    - parse_json:
  # Configure OSI sink to move the files from S3 to OpenSearch Serverless
  sink:
    - opensearch:
        hosts: [ "https://abcdefghijklmn.us-east-1.aoss.amazonaws.com" ]
        aws:
          # Role must have access to S3 OpenSearch Pipeline and OpenSearch Serverless
          sts_role_arn: "arn:aws:iam::1234567890:role/pipeline-role"
          region: "us-east-1"
          serverless: true
        index: "cross-region-index"

The configuration for this solution is relatively simpler and relies on Amazon S3 cross-Region replication. This solution makes sure that the data in the S3 bucket and OpenSearch Serverless collection are the same in both Regions.

For more information about the SLA for this replication and metrics that are available to monitor the replication process, refer to S3 Replication Update: Replication SLA, Metrics, and Events.

Impairment scenarios and additional considerations

Let’s consider a Regional impairment scenario. For this use case, we assume that your application is powered by an OpenSearch Serverless collection as a backend. When a region is impaired, these applications can simply failover to the OpenSearch Serverless collection in the other Region and continue operations without interruption, because the entirety of the data present before the impairment is available in both collections.

When the Region impairment is resolved, you can failback to the OpenSearch Serverless collection in that Region either immediately or after you allow some time for the missing data to be backfilled in that Region. The operations can then continue without interruption.

You can automate these failover and failback operations to provide a seamless user experience. This automation is not in scope of this post, but will be covered in a future post.

The existing cross-cluster replication solution, requires you to manually reestablish a leader-follower relationship, and restart replication from the beginning once recovered from an impairment. But the solutions discussed here automatically resume replication from the point where it last left off. If for some reason only Amazon OpenSearch service that is collections or domain were to fail, the data is still available in a local buckets and it will be back filled as soon the collection or domain becomes available.

You can effectively use these solutions in an active-passive replication model as well. In those scenarios, it’s sufficient to have minimum set of resources in the replication Region like a single S3 bucket. You can modify this solution to solve different scenarios using additional services like Amazon Managed Streaming for Apache Kafka (Amazon MSK), which has a built-in replication feature.

When building cross-Region solutions, consider cross-Region data transfer costs for AWS. As a best practice, consider adding a dead-letter queue to all your production pipelines.

Conclusion

In this post, we outlined two solutions that achieve Regional resiliency for OpenSearch Serverless and OpenSearch Service managed clusters. If you need explicit control over writing data cross Region, use solution one. In our experiments with few KBs of data majority of writes completed within a second between two chosen regions. Choose solution two if you need simplicity the solution offers. In our experiments replication completed completely in a few seconds. 99.99% of objects will be replicated within 15 minutes.  These solutions also serve as an architecture for an active-active replication model in OpenSearch Service using OpenSearch Ingestion.

You can also use OSI as a mechanism to search for data available within other AWS services, like Amazon S3, Amazon DynamoDB, and Amazon DocumentDB (with MongoDB compatibility). For more details, see Working with Amazon OpenSearch Ingestion pipeline integrations.


About the Authors

Muthu Pitchaimani is a Search Specialist with Amazon OpenSearch Service. He builds large-scale search applications and solutions. Muthu is interested in the topics of networking and security, and is based out of Austin, Texas.

Aruna Govindaraju is an Amazon OpenSearch Specialist Solutions Architect and has worked with many commercial and open source search engines. She is passionate about search, relevancy, and user experience. Her expertise with correlating end-user signals with search engine behavior has helped many customers improve their search experience.

AWS Weekly Roundup: Amazon EC2 X8g Instances, Amazon Q generative SQL for Amazon Redshift, AWS SDK for Swift, and more (Sep 23, 2024)

Post Syndicated from Abhishek Gupta original https://aws.amazon.com/blogs/aws/aws-weekly-roundup-amazon-ec2-x8g-instances-amazon-q-generative-sql-for-amazon-redshift-aws-sdk-for-swift-and-more-sep-23-2024/

AWS Community Days have been in full swing around the world. I am going to put the spotlight on AWS Community Day Argentina where Jeff Barr delivered the keynote, talks and shared his nuggets of wisdom with the community, including a fun story of how he once followed Bill Gates to a McDonald’s!

I encourage you to read about his experience.

Last week’s launches
Here are the launches that got my attention, starting off with the GA releases.

Amazon EC2 X8g Instances are now generally availableX8g instances are powered by AWS Graviton4 processors and deliver up to 60% better performance than AWS Graviton2-based Amazon EC2 X2gd instances. These instances offer larger sizes with up to 3x more vCPU (up to 48xlarge) and memory (up to 3TiB) than Graviton2-based X2gd instances.

Amazon Q generative SQL for Amazon Redshift is now generally available – Amazon Q generative SQL in Amazon Redshift Query Editor is an out-of-the-box web-based SQL editor for Amazon Redshift. It uses generative AI to analyze user intent, query patterns, and schema metadata to identify common SQL query patterns directly within Amazon Redshift, accelerating the query authoring process for users and reducing the time required to derive actionable data insights.

AWS SDK for Swift is now generally availableAWS SDK for Swift provides a modern, user-friendly, and native Swift interface for accessing Amazon Web Services from Apple platforms, AWS Lambda, and Linux-based Swift on Server applications. Now that it’s GA, customers can use AWS SDK for Swift for production workloads. Learn more in the AWS SDK for Swift Developer Guide.

AWS Amplify now supports long-running tasks with asynchronous server-side function calls – Developers can use AWS Amplify to invoke Lambda function asynchronously for operations like generative AI model inferences, batch processing jobs, or message queuing without blocking the GraphQL API response. This improves responsiveness and scalability, especially for scenarios where immediate responses are not required or where long-running tasks need to be offloaded.

Amazon Keyspaces (for Apache Cassandra) now supports add-column for multi-Region tables – With this launch, you can modify the schema of your existing multi-Region tables in Amazon Keyspaces (for Apache Cassandra) to add new columns. You only have to modify the schema in one of its replica Regions and Keyspaces will replicate the new schema to the other Regions where the table exists.

Amazon Corretto 23 is now generally availableAmazon Corretto is a no-cost, multi-platform, production-ready distribution of OpenJDK. Corretto 23 is an OpenJDK 23 Feature Release that includes an updated Vector API, expanded pattern matching and switch expression, and more. It will be supported through April, 2025.

Use OR1 instances for existing Amazon OpenSearch Service domains – With OpenSearch 2.15, you can leverage OR1 instances for your existing Amazon OpenSearch Service domains by simply updating your existing domain configuration, and choosing OR1 instances for data nodes. This will seamlessly move domains running OpenSearch 2.15 to OR1 instances using a blue/green deployment.

Amazon S3 Express One Zone now supports AWS KMS with customer managed keys – By default, S3 Express One Zone encrypts all objects with server-side encryption using S3 managed keys (SSE-S3). With S3 Express One Zone support for customer managed keys, you have more options to encrypt and manage the security of your data. S3 Bucket Keys are always enabled when you use SSE-KMS with S3 Express One Zone, at no additional cost.

Use AWS Chatbot to interact with Amazon Bedrock agents from Microsoft Teams and Slack – Before, customers had to develop custom chat applications in Microsoft Teams or Slack and integrate it with Amazon Bedrock agents. Now they can invoke their Amazon Bedrock agents from chat channels by connecting the agent alias with an AWS Chatbot channel configuration.

AWS CodeBuild support for managed GitLab runners – Customers can configure their AWS CodeBuild projects to receive GitLab CI/CD job events and run them on ephemeral hosts. This feature allows GitLab jobs to integrate natively with AWS, providing security and convenience through features such as IAM, AWS Secrets Manager, AWS CloudTrail, and Amazon VPC.

We launched existing services in additional Regions:

Other AWS news
Here are some additional projects, blog posts, and news items that you might find interesting:

Secure Cross-Cluster Communication in EKS – It demonstrates how you can use Amazon VPC Lattice and Pod Identity to secure cross-EKS-cluster application communication, along with an example that you can use as a reference to adapt to your own microservices applications.

Improve RAG performance using Cohere Rerank – This post focuses on improving search efficiency and accuracy in RAG systems using Cohere Rerank.

AWS open source news and updates – My colleague Ricardo Sueiras writes about open source projects, tools, and events from the AWS Community; check out Ricardo’s page for the latest updates.

Upcoming AWS events
Check your calendars and sign up for upcoming AWS events:

AWS Community Days – Join community-led conferences that feature technical discussions, workshops, and hands-on labs led by expert AWS users and industry leaders from around the world. Upcoming AWS Community Days are in Italy (Sep. 27), Taiwan (Sep. 28), Saudi Arabia (Sep. 28)), Netherlands (Oct. 3), and Romania (Oct. 5).

Browse all upcoming AWS led in-person and virtual events and developer-focused events.

That’s all for this week. Check back next Monday for another Weekly Roundup!

— Abhishek

This post is part of our Weekly Roundup series. Check back each week for a quick roundup of interesting news and announcements from AWS!