In Finland, where I live, spring has arrived. The snow has melted, and the trees have grown their first buds. But I don’t get my hopes high, as usually around Easter we have what is called takatalvi. Takatalvi is a Finnish world that means that the winter returns unexpectedly in the spring.
Last Week’s Launches Here are some launches that got my attention during the previous week.
AWS Batch – AWS Batch now allows you to configure ephemeral storage up to 200GiB on AWS Fargate type jobs. With this launch, you no longer need to limit the size of your data sets or the size of the Docker images to run machine learning inference.
Application Load Balancer – Application Load Balancer (ALB) now supports Transport Layer Security (TLS) protocol version 1.3, enabling you to optimize the performance of your application while keeping it secure. TLS 1.3 on ALB works by offloading encryption and decryption of TLS traffic from your application server to the load balancer.
Other AWS News Some other updates and news that you may have missed:
I read the post Implementing an event-driven serverless story generation application with ChatGPT and DALL-E a few days ago, and since then I have been reading my child a lot of AI-generated stories. In this post, David Boyne, explains step by step how you can create an event-driven serverless story generation application. This application produces a brand-new story every day at bedtime with images, which can be played in audio format.
Podcast Charlas Técnicas de AWS – If you understand Spanish, this podcast is for you. Podcast Charlas Técnicas is one of the official AWS podcasts in Spanish, and every other week there is a new episode. The podcast is meant for builders, and it shares stories about how customers have implemented and learned AWS services, how to architect applications, and how to use new services. You can listen to all the episodes directly from your favorite podcast app or at AWS Podcasts en español.
AWS open-source news and updates – The open source newsletter is curated by my colleague Ricardo Sueiras to bring you the latest open-source projects, posts, events, and more.
Upcoming AWS Events Check your calendars and sign up for the AWS Summit closest to your city. AWS Summits are free events that bring the local community together, where you can learn about different AWS services.
Unstructured data can make up to 80 percent of data in the day-to-day business of financial organizations. For example, these organizations typically store and read PDFs and images for claim processing, underwriting, and know your customer (KYC). Organizations need to make this ingested data accessible and searchable across different entities while logically separating data access according to role requirements.
In this two-part series, we use AWS services to build an end-to-end content repository for storing and processing unstructured data with the following features:
Dynamic access control-based logic over unstructured data
Multilingual semantic search capabilities
In part 1, we build the architectural foundation for the content repository, including the resource access control logic and a web UI to upload and list documents.
Solution overview
The content repository includes four building blocks:
Frontend and interaction: For this function, we use AWS Amplify, which is a set of purpose-built tools and features to help frontend web and mobile developers quickly build full-stack applications on AWS. The React application uses the AWS Amplify authentication feature to quickly set up a complete authentication flow integrated into Amazon Cognito. Amplify also hosts the frontend application.
Authentication and authorization: Implementing dynamic resource access control with a combination of roles and attributes is fundamental to your content repository security. Amazon Cognito provides a managed, scalable user directory, user sign-up and sign-in flows, and federation capabilities through third-party identity providers. We use Amazon Cognito user pools as the source of user identity for the content repository. You can work with user pool groups to represent different types of user collection, and you can manage their permissions using a group-associated AWS Identity and Access Management (IAM) role.
Users authenticate against the Amazon Cognito user pool. The web app will exchange the user pool tokens for AWS credentials through an Amazon Cognito identity pool in the content repository. You can complement the IAM role-based authorization model by mapping your relevant attributes to principal tags that will be evaluated as part of IAM permission policies. This allows a dynamic and flexible authorization strategy. For use cases that need federation with third-party identity providers, you can base your user collection on existing user group attributes, such as Active Directory group membership.
Backend and business logic: Authenticated users are redirected to the Amazon API Gateway. API Gateway provides managed publishing for application programming interfaces (APIs) that act as the repository’s “front door.” API Gateway also interacts with the repository’s backend through RESTful APIs. This makes the business logic of the content repository extensible for future use cases, such as transcription and translation. We use AWS Lambda as a serverless, event-driven compute service to run specific business logic code, such as uploading a document to the content repository.
Content storage: Amazon Simple Storage Service (Amazon S3) provides virtually unlimited scalability and high durability. With Amazon S3, you can cost-effectively store unstructured documents in their native formats and make it accessible in a secure and scalable way. Enriching the uploaded documents with tags simplifies data governance with fine-grained access control.
Technical architecture
The technical architecture of the content repository with these four components can be found in Figure 1.
Figure 1. Technical architecture of the content repository
Let’s explore the architecture step by step.
The frontend uses the Amplify JS library to add the authentication UI component to your React app, allowing authenticated users to sign in.
Once the user provides their sign-in credentials, they are redirected to Amazon Cognito user pools to be authenticated.
Once the authentication is successful, Amazon Cognito invokes a pre-token generation Lambda function. This function customizes the identity (ID) token with a new claim called department. This new claim is the Amazon Cognito group name from the cognito:preferred_role claim.
Amazon Cognito returns the identity, access, and refresh token in JSON format to the frontend.
The Amplify client library stores the tokens and handles refreshes using the refresh token while the React frontend application calls the API Gateway with the ID token. Note: Usually, you would use the access token to grant access to authorized resources. For this architecture, we use the ID token because we have enriched it with the custom claim during step 3.
API Gateway uses its native integration with Amazon Cognito and validates the ID token’s signature and expiration using Amazon Cognito user pool authorizer. For more complex authorization scenarios, you can use API Gateway Lambda authorizer with the AWS JSON Web Token (JWT) Verify library for verifying JWTs signed by Amazon Cognito.
After successful validation, API Gateway passes the ID token to the backend Lambda function, which can verify and authorize upon it for access control.
Upon document upload action, the backend Lambda function calls the Amazon Cognito identity pool to exchange the ID token for the temporary AWS credentials associated with the cognito:preferred_role claim.
The document upload Lambda function returns a pre-signed URL with the custom department claim in the Amazon S3 path prefix as well as the object tag. The Amazon S3 pre-signed URL is used for the document upload from the frontend application directly to Amazon S3.
Upon document list action, similar to step 8, the backend Lambda function exchanges the ID token for the temporary AWS credentials. The Lambda function returns only the documents based on the user’s preferred group and associated custom department claim.
Prerequisites
You must have the following prerequisites for this solution:
Once you deploy the CDK stacks in your AWS account, follow these steps:
1. Access the frontend application:
a. Copy the amplifyHostedAppUrl value shown in the AWS CDK output from the content-repo-stack.
b. Use the URL with your web browser to access the frontend application.
c. A temporary page displays until the automated build and deployment of the React application completes after 4-5 minutes.
2. Application sign-in and role-based access control (RBAC):
a. The React webpage prompts you to sign in and then change the temporary password.
b. The content repository provides two demo users with credentials as part of the demo-data-stack in the AWS CDK output. In this walkthrough, we use the sales-user user, which belongs to the sales department group to validate RBAC.
3. Upload a document to the content repository:
a. Authenticate as sales-user.
b. Select upload to upload your first document to the content repository.
c. The repository provides sample documents in the assets sub-folder.
4. List your uploaded document:
a. Select list to show the uploaded sales content.
b. To verify the dynamic access control, repeat steps 2 and 3 for the marketing-user user, which belongs to the marketing department group.
c. Sign-in to the AWS Management Console and navigate to the Amazon S3 bucket with the prefix content-repo-stack-s3sourcebucket to confirm that all the uploaded content exists.
Implementation notes
Frontend deployment and cross-origin access
The content-repo-stack contains an AwsCustomResource construct. This construct uses the Amplify API to start the release job of the Amplify hosted frontend application. The preBuild step of the Amplify application build specification dynamically configures its backend for the Amazon Cognito-based authentication. The required Amazon Cognito configuration parameters are retrieved from the AWS Systems Manager Parameter Store during build time. Similarly, the Amplify application postBuild step updates the Amazon S3 cross-origin resource sharing (CORS) rule for the Amazon S3 bucket to only allow cross-origin access from the Amplify-hosted URL of the frontend application.
Application sign-in and access control
The Amazon Cognito identity pool configuration is set to Choose role from token for authenticated users, as in Figure 2. This setup permits authenticated users to pass the roles in the ID token that the Amazon Cognito user pool assigned. Backend Lambda functions use the roles that appear in the cognito:roles and cognito:preferred_role claims in the ID token for RBAC.
Figure 2. Amazon Cognito identity pool configuration – using tokens to assign roles to authenticated users
In the attributes for access control section, we configured a custom mapping from the augmented department token claim to a tag key, as in Figure 3. The backend logic uses the tag key to match the PrincipalTag condition in IAM policies to control access to AWS resources.
Figure 3. Amazon Cognito identity pool configuration – custom mapping from claim names to tag keys
Document upload
The presigned_url.py Lambda function generates a pre-signed Amazon S3 URL using the department token claim as the key. This function automatically organizes the uploaded document into a logical structure in the Amazon S3 source bucket. Accordingly, the cognito:preferred_role used for the Amazon S3 client credentials in the Lambda function has a permission policy using the PrincipalTag department to dynamically limit access to the Amazon S3 key, as in Figure 4.
Figure 4. Permission policy using PrincipalTag to upload documents to Amazon S3
Document listing
The list functionality only shows the uploaded content belonging to the preferred group of authenticated Amazon Cognito user pool user. To only list the files that a specific user (for example, sales-user) has access to, use the PrincipalTag s3:prefix condition, as in Figure 5.
Figure 5. Permission policy using s3:prefix condition with session tags to list documents
Cleanup
In the backend-cdk subdirectory, delete the deployed resources:
cdk destroy --all
Conclusion
In this blog, we demonstrated how to build a content repository with an easy-to-use web application for unstructured data that ingests documents while maintaining dynamic access control for users within departments. These steps provide a foundation to build your own content repository to store and process documents. As next steps, based on your organization’s security requirements, you can implement more complex access control use cases by balancing IAM role and principal tags. For example, you can use Amazon Cognito user pool custom attributes for additional dimensions such as document “clearance” with optional modification in the pre-token generation Lambda.
In the next part of this blog series, we will enrich the content repository with multi-lingual semantic search features while maintaining the access control fundamentals we’ve already implemented. For additional information on how you can build a solution to search for information across multiple scanned documents, PDFs, and images with compliance capabilities, please refer our Document Understanding Solution from AWS Solutions Library.
In this post, we continue with our recommendations for using AWS Identity and Access Management (IAM) APIs. In part 1 of this two-part series, we described how you could create IAM resources and use them soon after for authorization decisions. We also described options for monitoring and responding to IAM resource changes for entire accounts. Now, in part 2 of this post, we’ll cover the API throttling behavior of IAM and AWS Security Token Service (AWS STS) and how you can effectively plan your usage of these APIs. We’ll also cover the features of IAM that enable you to right-size the permissions granted to principals in your organization and assess external access to your resources.
Increase your usage of IAM APIs
If you’re a developer or a security engineer, you might find yourself writing more and more automation that interacts with IAM APIs. Other engineers, teams, or applications might also call the IAM APIs within the same account or cross-account. Over time, anyone calling the APIs in your account incrementally increases the number of requests per second. If so, IAM might send a “Rate exceeded” error that indicates you have exceeded a certain threshold of API calls per second. This is called API throttling.
Understand IAM API throttling
API throttling occurs when you exceed the call rate limits for an API. AWS uses API throttling to limit requests to a service. Like many AWS services, IAM limits API requests to maintain the performance of the service, and to ensure fair usage across customers. IAM and AWS STS independently implement a token bucket algorithm for throttling, in which a bucket of virtual tokens is refilled every second. Each token represents a non-throttled API call that you can make. The number of tokens that a bucket holds and the refill rate depends on the API. For each IAM API, a number of token buckets might apply.
We refer to this simply as rate-limiting criteria. Essentially, there are several rate-limiting criteria that are considered when evaluating whether a customer is generating more traffic than the service allows. The following are some examples of these criteria:
The account where the API is called
The account for read or write APIs (depending on whether the API is a read or write operation)
The account from which AssumeRole was called prior to the API call (for example, third-party cross-account calls)
The account from which AssumeRole was called prior to the API call for read APIs
The API and organization where the API is called
Understand STS API throttling
Although IAM has criteria pertaining to the account from which AssumeRole was called, IAM has its own API rate limits that are distinct from AWS STS. Therefore, the preceding criteria are IAM-specific and are separate from the throttling that can occur if you call STS APIs. IAM is also a global service, and the limits are not Region-aware. In contrast, while STS has a single global endpoint, every Region has its own STS endpoint with its own limits.
The STS rate-limiting criteria pertain to each account and endpoint for API calls. For example, if you call the AssumeRole API against the sts.ap-northeast-1.amazonaws.com endpoint, STS will evaluate the rate-limiting criteria associated with that account and the ap-northeast-1 endpoint. Other STS API requests that you perform under the same account and endpoint will also count towards these criteria. However, if you make a request from the same account to a different regional endpoint or the global endpoint, that request will count against different criteria.
Note: AWS recommends that you use the STS regional endpoints instead of the STS global endpoint. Regional endpoints have several benefits, including redundancy and reduced latency. To learn more about other benefits, see Managing AWS STS in an AWS Region.
How multiple criteria affect throttling
The preceding examples show the different ways that IAM and STS can independently limit requests. Limits might be applied at the account level and across read or write APIs. More than one rate-limiting criterion is typically associated with an API call, with each request counted against each rate-limiting criterion independently. This means that if the requests-per-second exceeds the applicable criteria, then API throttling occurs and returns a rate-limiting error.
How to address IAM and STS API throttling
In this section, we’ll walk you through some strategies to reduce IAM and STS API throttling.
Query for top callers
With AWS CloudTrail Lake, your organization can aggregate, store, and query events recorded by CloudTrail for auditing, security investigation, and operational troubleshooting. To monitor API throttling, you can run a simple query that identifies the top callers of IAM and STS.
For example, you can make a SQL-based query in the CloudTrail console to identify the top callers of IAM, as shown in Figure 1. This query includes the API count, API event name, and more that are made to IAM (shown under eventSource). In this example, the top result is a call to GetServiceLastAccessedDetails, which occurred 163 times. The result includes the account ID and principal ID that made those requests.
To reduce call throttling, you need to know when you exceed a rate limit. You can identify when you are being throttled by catching the RateLimitExceeded exception in your API calls. Or, you can send your application logs to Amazon CloudWatch Logs and then configure a metric filter to record each time that throttling occurs, for later analysis or notification. Ideally, you should do this across your applications, and log this information centrally so that you can investigate whether calls from a specific account (such as your central monitoring account) are affecting API availability across your other accounts by exceeding a rate-limiting criterion in those accounts.
Call your APIs with a less aggressive retry strategy
In the AWS SDKs, you can use the existing retry library and provide a custom base for the initial sleep done between API calls. For example, you can set a custom configuration for the backoff or edit the defaults directly. The default SDK_DEFAULT_THROTTLED_BASE_DELAY is 500 milliseconds (ms) in the relevant Java SDK file, but if you’re experiencing throttling consistently, we recommend a minimum 1000 ms for the throttled base delay. You can change this value or implement a custom configuration through the PredefinedBackoffStrategies.SDKDefaultBackoffStrategy() class, which is referenced in the same file. As another example, in the Javascript SDK, you can edit the base retry of the retryDelayOptions configuration in the AWS.Config class, as described in the documentation.
The difference between making these changes and using the SDK defaults is that the custom base provides a less aggressive retry. You shouldn’t retry multiple requests that are throttled during the same one-second window. If the API has other applicable rate-limiting criteria, you can potentially exceed those limits as well, preventing other calls in your account from performing requests. Lastly, be careful that you don’t implement your own retry or backoff logic on top of the SDK retry or backoff logic because this could make throttling worse — instead, you should override the SDK defaults.
Reduce the number of requests by using max items
For some APIs, you can increase the number of items returned by a single API call. Consider the example of the GetServiceLastAccessedDetails API. This API returns a lot of data, but the results are truncated by default to 100 items, ordered alphabetically by the service namespace. If the number of items returned is greater than 100, then the results are paginated, and you need to make multiple requests to retrieve the paginated results individually. But if you increase the value of the MaxItems parameter, you can decrease the number of requests that you need to make to obtain paginated results.
AWS has hundreds of services, so you should set the value of the MaxItems parameter no higher than your application can handle (the response size could be large). At the time of our testing, the results were no longer truncated when this value was 300. For this particular API, IAM might return fewer results, even when more results are available. This means that your code still needs to check whether the results are paginated and make an additional request if paginated results are available.
Consistent use of the MaxItems parameter across AWS APIs can help reduce your total number of API requests. The MaxItems parameter is also available through the GetOrganizationsAccessReport operation, which defaults to 100 items but offers a maximum of 1000 items, with the same caveat that fewer results might be returned, so check for paginated results.
Smooth your high burst traffic
In the table from part 1 of this post, we stated that you should evaluate IAM resources every 24 hours. However, if you use a simple script to perform this check, you could initiate a throttling event. Consider the following fictional example:
As a member of ExampleCorp’s Security team, you are working on a task to evaluate the company’s IAM resources through some custom evaluation scripts. The scripts run in a central security account. ExampleCorp has 1000 accounts. You write automation that assumes a role in every account to run the GetAccountAuthorizationDetails API call. Everything works fine during development on a few accounts, but you later build a dashboard to graph the data. To get the results faster for the dashboard, you update your code to run concurrently every hour. But after this change, you notice that many requests result in the throttling error “Rate exceeded.” Other security teams see “Rate exceeded” errors in their application logs, too.
Can you guess what happened? When you tried to make the requests faster, you used concurrency to make the requests run in parallel. By initiating this large number of requests simultaneously, you exceeded the rate-limiting criteria for the security account from which the sts:AssumeRole action was called prior to the GetAccountAuthorizationDetails API call.
To address scenarios like this, we recommend that you set your own client-side limitations when you need to make a large number of API requests. You can spread these calls out so that they happen sequentially and avoid large spikes. For example, if you run checks every 24 hours, make sure that the calls don’t happen at exactly midnight. Figure 2 shows two different ways to distribute API volume over time:
Figure 2: Call volume that periodically spikes compared to evenly-distributed call volume
The graph on the left represents a large, recurring API call volume, with calls occurring at roughly the same time each day—such as 1000 requests at midnight every 24 hours. However, if you intend to make these 1000 requests consistently every 24 hours, you can spread them out over the 24-hour period. This means that you could make about 41 requests every hour, so that 41 accounts are queried at 00:00 UTC, another 41 the next hour, and so on. By using this strategy, you can make these requests blend into your other traffic, as shown in the graph on the right, rather than create large spikes. In summary, your automation scheduler should avoid large spikes and distribute API requests evenly over the 24-hour period. Using queues such as those provided by Amazon Simple Queue Service (Amazon SQS) can also help, and when errors are identified, you can put them in a dead letter queue to try again later.
Some IAM APIs have rate-limiting criteria for API requests made from the account from which the AssumeRole was called prior to the call. We recommend that you serially iterate over the accounts in your organization to avoid throttling. To continue with our example, you should iterate the 41 accounts one-by-one each hour, rather than running 41 calls at once, to reduce spikes in your request rates.
Recommendations specific to STS
You can adjust how you use AWS STS to reduce your number of API calls. When you write code that calls the AssumeRole API, you can reuse the returned credentials for future requests because the credentials might still be valid. Imagine that you have an event-driven application running in a central account that assumes a role in a target account and does an API call for each event that occurs in that account. You should consider reusing the credentials returned by the AssumeRole call for each subsequent call in the target account, especially if calls in the central accounts are being throttled. You can do this for AssumeRole calls because there is no service-side limit to the number of credentials that you can create and use. Whether it’s one credential or many, you need to use and store these carefully. You can also adjust the role session duration, which determines how long the role’s credentials are valid. This value can be up to 12 hours, depending on the maximum session duration configured on the role. If you reuse short-term credentials or adjust the session duration, make sure that you evaluate these changes from a security perspective as you optimize your use of STS to reduce API call volume.
Use case #3: Pare down permissions for least-privileged access
Let’s assume that you want to evaluate your organization’s IAM resources with some custom evaluation scripts. AWS has native functionality that can reduce your need for a custom solution. Let’s take a look at some of these that can help you accomplish these goals.
Identify unintended external sharing
To identify whether resources in your accounts, such as IAM roles and S3 buckets, have been shared with external entities, you can use IAM Access Analyzer instead of writing your own checks. With IAM Access Analyzer, you can identify whether resources are accessible outside your account or even your entire organization. Not only can you identify these resources on-demand, but IAM Access Analyzer proactively re-analyzes resources when their policies change, and reports new findings. This can help you feel confident that you will be notified of new external sharing of supported resources, so that you can act quickly to investigate. For more details, see the IAM Access Analyzer user guide.
Right-size permissions
You can also use IAM Access Analyzer to help right-size the permissions policies for key roles in your accounts. IAM Access Analyzer has a policy generation feature that allows you to generate a policy by analyzing your CloudTrail logs to identify actions used from over 140 services. You can compare this generated policy with the existing policy to see if permissions are unused, and if so, remove them.
You can perform policy generation through the API or the IAM console. For example, you can use the console to navigate to the role that you want to analyze, and then choose Generate policy to start analyzing the actions used over a specified period. Actions that are missing from the generated policy are permissions that can be potentially removed from the existing policy, after you confirm your changes with those who administer the IAM role. To learn more about generating policies based on CloudTrail activity, see IAM Access Analyzer makes it easier to implement least privilege permissions by generating IAM policies based on access activity.
Conclusion
In this two-part series, you learned more about how to use IAM so that you can test and query IAM more efficiently. In this post, you learned about the rate-limiting criteria for IAM and STS, to help you address API throttling when increasing your usage of these services. You also learned how IAM Access Analyzer helps you identify unintended resource sharing while also generating policies that serve as a baseline for principals in your account. In part 1, you learned how to quickly create IAM resources and use them when refining permissions. You also learned how to get information about IAM resources and respond to IAM changes through the various services integrated with IAM. Lastly, when calling IAM directly, you learned about bulk APIs, which help you efficiently retrieve the state of your principals and policies. We hope these posts give you valuable insights about IAM to help you better monitor, review, and secure access to your AWS cloud environment!
In this two-part blog post, we’ll provide recommendations for using AWS Identity and Access Management (IAM) APIs, and we’ll share useful details on how IAM works so that you can use it more effectively. For example, you might be creating new IAM resources such as roles and policies through automation and notice a delay for resource propagations. Or you might be building a custom cloud security monitoring solution that uses IAM APIs to evaluate the security and compliance of your AWS accounts, and you want to know how to do that without exceeding limits. Although these are just a few example use cases, the insights described in this post are intended to help you avoid anti-patterns when building scalable cloud services that use IAM APIs.
In this post, we describe how to create IAM resources and use them soon after for authorization decisions. We also describe options for monitoring and responding to IAM resource changes for entire accounts. In part 2, we’ll cover the API throttling behavior of IAM and AWS Security Token Service (AWS STS) and how you can effectively plan your usage of these APIs. Let’s dive in!
Use case 1: Create IAM resources and attempt to use them immediately
If you’re a cloud developer, you create and use IAM resources when you develop applications on AWS. For your application to interact with AWS services, you need to grant IAM permissions to your application. Your application—whether it runs on AWS Lambda, Amazon Elastic Compute Cloud (Amazon EC2), or another service—will need an associated IAM role and policy that provide the necessary permissions.
Imagine that you want to create least privilege policies for your application. You begin by deploying new or updated IAM resources, such as roles and policies, along with your application updates, and you automate this process to speed up testing and development.
During development, you begin removing unnecessary policy permissions, with your automation testing the updated permissions. However, you notice that some of your updates do not immediately take effect. The following sections address why this occurs and provide insights to help you architect for other scenarios.
Understand the IAM control plane and data plane
Let’s first learn more about the control plane and data plane in IAM. The control plane involves operations to create, read, update, and delete IAM resources, and it’s how you get the current state of IAM. When you invoke IAM APIs, you interact with the control plane. This includes any API that falls under the iam:* namespace. The data plane, in contrast, consists of the authorization system that is used at scale to grant access to the broader set of AWS services and resources. This includes the AWS STS APIs, which have their own sts:* namespace.
When you call the IAM control plane APIs to create, update, or delete resources, you can expect a read-after-write consistent response. This means that you can retrieve (read) the resource and its latest updates immediately after it’s written. In contrast, the IAM data plane, where authorizations occur, is eventually consistent. This means that there will be a delay for IAM resource changes, such as updates to roles and policies, to propagate and reflect in the authorizations that follow. The delay can be several seconds or longer. Because of this, you need to allow for propagation time when you test changes to IAM resources. To learn more about the control plane and data plane of IAM, see Resilience in AWS Identity and Access Management.
Note: Because calls to AWS APIs rely on IAM to check permissions, the availability and scalability of the data plane are paramount. In 2011, the “can the caller do this?” function handled a couple of thousand requests per second. Today, as new services continue to launch and the number of AWS customers increases, AWS Identity handles over half a billion API calls per second worldwide, and the number is growing. Eventually consistent design enables the IAM data plane to maintain the high availability and low latency needed to evaluate permissions on AWS.
This is why when architecting your application, we recommend that you don’t depend on control plane actions such as resource updates for critical parts of your application’s workflow. Instead, you should architect to take advantage of the data plane, which includes STS and the authorization system of IAM. In the next section, we describe how you can do this.
Test permissions with STS scope-down policies
IAM role sessions have a feature called a session policy, which takes effect immediately when a role is assumed. This is an optional policy that you can provide to scope down the role’s existing identity policies, with the permissions being the intersection of the role’s identity-based policies and the session policy. By using session policies, you get specific, scoped-down credentials from a single pre-existing role without having to create new roles or identity policies for each particular session’s use case. You can use session policies for your application or when you test which least privilege policies are best for your application.
Let’s walk through an example of when to use session policies for permissions testing. Imagine that you need permissions that require very specific, fine-grained conditions to attain your ideal least privilege policy. You might iterate on the policy several times, making updates and testing the changes over and over again. If you update a policy attached to a role, you need to wait for these changes to propagate to the IAM data plane. But if you instead specify a scope-down policy when assuming the pre-existing role prior to testing, you can immediately test and observe the effects of your permissions changes. Immediate testing is possible because your role and its original policy have already propagated to the data plane, enabling you to iterate over various scoped-down session policies that operate against the IAM data plane.
Use STS session policies to assume a role with the AWS CLI
There are two ways to provide a session policy during the AssumeRole process: you can provide an inline policy document or the Amazon Resource Names (ARNs) of managed session policies. The following example shows how to do this through the AWS Command Line Interface (AWS CLI), by passing in a policy document along with the AssumeRole call. If you use this example policy, make sure to replace <123456789012> and <DOC-EXAMPLE-BUCKET> with your own information.
In this example, we provide a previously created role ARN named s3-full-access, which provides full access to Amazon Simple Storage Service (Amazon S3). We can further restrict the role’s permissions by supplying a policy with the optional --policy option. The inline policy document only allows the GetObject request against the S3 bucket named <DOC-EXAMPLE-BUCKET>. The effective permissions for the returned session are the intersection of the role’s identity-based policies and our provided session policy. Therefore, the role session’s permissions are limited to only performing the GetObject request against the <DOC-EXAMPLE-BUCKET>.
Note: The combined size of the passed inline policy document and all passed managed policy ARN characters cannot exceed 2,048 characters. You can reduce the size of the JSON policy document by removing unnecessary whitespace and shortening or removing tags associated with your session.
Use case 2: Monitor and respond to IAM resources for entire accounts
You might need to periodically audit the state of your IAM resources, such as roles and policies, including whether these IAM resources have changed, in a single account or across your entire organization. For example, you might want to check whether roles have overly broad access to actions and resources. Or you might want to monitor IAM resource creation and updates to respond to security-relevant permission changes. In this section, you will learn how to choose the right tool for auditing and monitoring IAM resources across accounts. You will learn about the AWS services that support this use case, the benefits of polling compared to event-based architectures, and powerful APIs that aggregate common information.
Respond to configuration changes with an event-driven approach
Sometimes you might need to perform actions relatively quickly based on IAM changes. For example, you might need to check if a trust policy for a newly created or updated role allows cross-account access. In cases like this, you can use AWS Config rules, AWS CloudTrail, or Amazon EventBridge to detect state changes and perform actions based on these state changes. You can use AWS Config rules to evaluate whether a resource complies with the conditions that you specify. If it doesn’t comply, you can provide a workflow to remediate the non-compliance. With CloudTrail, you can monitor your account’s API calls, and log API calls for your accounts with AWS Organizations integration. EventBridge works closely with CloudTrail and helps you create rules that match incoming events and send them to targets, such as Lambda, where your code can perform analysis or automated remediation. You can even filter out events from your accounts and send them to a central account’s event bus for processing. For an example of how to use EventBridge with IAM Access Analyzer to remediate cross-account access in a role’s trust policy, see Automate resolution for IAM Access Analyzer cross-account access findings on IAM roles. Which feature you choose depends on whether you need to monitor one account or all accounts in your organization, as well as which solution you are more comfortable building with.
One caveat to an event-driven approach is that if many events occur over a short period and your application responds to each event with an IAM API call of its own, you could eventually be throttled by IAM. To address this, you can queue up your responding API calls, distribute them over a longer period, or aggregate them to reduce API call volume. For example, if some of your calls are write APIs (such as UpdateAssumeRolePolicy or CreatePolicyVersion) or read APIs (such as GetRole or GetRolePolicy), you can call them serially with a delay between calls. If you need the latest status on a large number of principals and policies, you can call IAM bulk APIs such as GetAccountAuthorizationDetails, which will return data to you for principals and policies and their relationships in your organization. This approach helps you avoid throttling and querying the IAM control plane with unnecessary and redundant API calls. You will learn more about throttling and how to address it in part two of this post.
Retrieve point-in-time resource information with AWS Config
AWS Config helps you assess, audit, and evaluate the configuration of your AWS resources. It also offers multi-account, multi-Region data aggregation and is integrated with AWS Organizations. With AWS Config, you can create rules that detect and respond to changes. AWS Config also keeps an inventory of AWS resource configurations that you can query through its API, so that you don’t need to make direct API calls to each resource’s service. AWS Config also offers the ability to return the status of resources from multiple accounts and AWS Regions. As shown in Figure 1, you can use the AWS Config console to run a simple SQL-like statement for details on the IAM roles in your entire organization.
Figure 1: Run a query on IAM roles in AWS Config
The preceding results also show associated resources, such as the inline and attached policies for the IAM roles. Alternatively, you can obtain these results from the SDK or CLI. The following query that uses the CLI is equivalent to the preceding query that uses the console. If you use this query, make sure to replace DOC-EXAMPLE-CONFIG-AGGREGATOR> with your AWS Config aggregator.
The preceding command returns the details of roles in your organization’s accounts, including the full policy document for the associated inline policy. It also returns the customer-managed policy names and their ARNs, for which you can view the policy documents and versions by using the BatchGetResourceConfig API. Note that AWS Config doesn’t provide the AWS-managed policy documents. However, these are common across accounts, and we will show you how to query that data later in this section.
To query the status of roles in your organization, you need to have AWS Config enabled in each account. You also need an aggregator to monitor your accounts with your organization’s management account or a delegated administrator account. For more details on how to set up AWS Config, see the AWS Config developer guide. After you set up AWS Config, you can periodically call the AWS Config APIs to get a snapshot of the current or prior state of your resources. Furthermore, you can periodically pull the snapshot records and evaluate this information in other tools outside of AWS Config. So before you directly use the IAM APIs to get IAM information, consider using AWS Config—this is what it’s for!
Retrieve IAM resource information directly from IAM
As previously noted, AWS Config can give you a bulk view of your AWS and IAM resources. Additionally, CloudTrail and EventBridge can detect AWS and IAM resource changes and help you act on them. If you need data from IAM beyond what these services offer, you can query the IAM APIs directly to get the latest information on your resources.
A few key APIs can help you audit IAM resources more efficiently, especially in bulk. The first is GetAccountAuthorizationDetails, which enables you to retrieve the principals in your account, their associated inline policy documents (if any), attached managed policies, and their relationships to each other. This API reduces the need to individually call ListRolePolicies and ListAttachedRolePolicies for each role in an account. GetAccountAuthorizationDetails also returns the role trust policy document for roles in the results. Finally, GetAccountAuthorizationDetails allows you to filter the result set. For example, if you don’t need information relating to groups or AWS managed policies, you can exclude these from the API response. You can do this by using the filter parameter to only include the details that you need at the time.
Another useful API is GenerateServiceLastAccessedDetails. This API gives you details about when an IAM resource (user, group, role, or policy) was last used in an attempt to access AWS services. You can use this API to identify roles that are unused and remove them if you don’t need them. IAM Access Analyzer, which you will learn about later in this post, also uses the same information.
The following table summarizes the key APIs that you can use, rather than building your own code that loops for this information individually.
Submit a job through the GenerateServiceLastAccessedDetails API which returns a JobId; then retrieve the results after the job completes. Pass ACTION_LEVEL as the required Granularity parameter.
Spread total number of requests evenly across 24 hours
Note: In the table, we suggest that you perform some of these API requests once every 24 hours as a starting point. You might prefer to perform your own analysis at a longer time interval, such as every 48 hours, but we don’t recommend requesting it more often than every 24 hours because these resources (and therefore the details in the responses) don’t change often. These APIs are suitable for periodic, point-in-time collection of information. If you need faster detection of information from GetAccountAuthorizationDetails, consider whether AWS Config rules or EventBridge will fit your needs. For GetServiceLastAccessedDetails, recent activity usually appears within four hours, so more frequent requests are unlikely to provide much value.
Use of these APIs can help you avoid writing code that loops through results to make individual read API calls for each principal, policy, and policy version in an account, which could result in tens of thousands of API requests and call throttling. Instead of iterating over each resource, you should use solutions that return bulk data, such as GetAccountAuthorizationDetails, AWS Config, or an AWS Partner Network solution. However, if you’re experiencing throttling, you will learn some practical considerations on how to handle that later in this post.
Inspect IAM resources across multiple accounts and organizations
Your use case might require that you inspect IAM resources across multiple accounts in your organization. Or perhaps you are an independent software vendor and need to build a software-as-a-service tool to evaluate IAM resources across many organizations. The following considerations can help you address use cases like these.
AWS Organizations integration
Previously, you learned of the benefits of the “service last accessed data” that the GenerateServiceLastAccessedDetails and GetServiceLastAccessedDetails APIs provide. But what if you want to pull this data for multiple accounts in your organization? IAM has bulk APIs that support querying this data across your entire organization, so you don’t need to assume a role in each account to generate the request. To generate a report for entities (organization root, organizational unit, or account) or policies in your organization, use the GenerateOrganizationsAccessReport operation, which returns a JobId that is passed as a parameter to the GetOrganizationsAccessReport operation to check if the report has been generated. When the job status is marked complete, you can retrieve the report.
AWS managed policies
Many customers use AWS managed policies because they align to common job functions. AWS creates and administers these policies, which have their own ARNs, such as arn:aws:iam::aws:policy/AWSCodeCommitPowerUser. AWS managed policies are available for every account, and they are the same for every account. AWS updates them when new services and API operations are introduced. Updated policies are recorded and visible as a new version, so you only need to query for the current AWS managed policies once per evaluation cycle, rather than once per account. Therefore, if you’re evaluating hundreds or thousands of accounts, you shouldn’t include the AWS managed policies and their policy versions in your query. Doing so would result in thousands of redundant API requests and could cause throttling. Instead, you can query the AWS managed policies once and then reuse the results across your analysis and evaluation by caching the results for a period of time (for example, every 24 hours) in your application before requesting them again to check for updates. Because AWS managed policies are available through the GetAccountAuthorizationDetails API, you don’t need to query for the AWS managed policies or their versions as a separate action.
Multi-account limits
The preceding table lists the frequency of API requests as “per account” in many places. If you’re calling IAM APIs by assuming a role in other accounts from a central account, some IAM APIs have rate-limiting criteria that apply to API requests performed from the assuming account (the central account). To query data from multiple accounts, we recommend that you serially iterate over the accounts one-by-one to avoid throttling. You’ll learn more about this strategy, as well as throttling, in part 2 of this blog post.
Conclusion
In this post, you learned about different aspects of IAM and best practices to test and query IAM efficiently. With STS session policies, you can test different policies to help achieve least privilege access. With AWS Config, EventBridge, CloudTrail, and CloudTrail Lake, you can audit your IAM resources and respond to changes while reducing the number of IAM API calls that you make. If you need to call IAM directly, you can use IAM bulk APIs for more efficient retrieval of your resource state. You can learn more about IAM and best practices in part 2 of blog post: How to monitor and query IAM resources at scale – Part 2.
A new week starts, and the News Blog team is getting ready for AWS re:Invent! Many of us will be there next week and it would be great to meet in person. If you’re coming, do you know about PeerTalk? It’s an onsite networking program for re:Invent attendees available through the AWS Events mobile app (which you can get on Google Play or Apple App Store) to help facilitate connections among the re:Invent community.
Amazon EventBridge – With these additional filtering capabilities, you can now filter events by suffix, ignore case, and match if at least one condition is true. This makes it easier to write complex rules when building event-driven applications.
AWS Controllers for Kubernetes (ACK) – The ACK for Amazon Elastic Compute Cloud (Amazon EC2) is now generally available and lets you provision and manage EC2 networking resources, such as VPCs, security groups and internet gateways using the Kubernetes API. Also, the ACK for Amazon EMR on EKS is now generally available to allow you to declaratively define and manage EMR on EKS resources such as virtual clusters and job runs as Kubernetes custom resources. Learn more about ACK for Amazon EMR on EKS in this blog post.
Amazon HealthLake – New analytics capabilities make it easier to query, visualize, and build machine learning (ML) models. Now HealthLake transforms customer data into an analytics-ready format in near real-time so that you can query, and use the resulting data to build visualizations or ML models. Also new is Amazon HealthLake Imaging (preview), a new HIPAA-eligible capability that enables you to easily store, access, and analyze medical images at any scale. More on HealthLake Imaging can be found in this blog post.
Amazon RDS – You can now transfer files betweenAmazon Relational Database Service (RDS) for Oracle and an Amazon Elastic File System (Amazon EFS) file system. You can use this integration to stage files like Oracle Data Pump export files when you import them. You can also use EFS to share a file system between an application and one or more RDS Oracle DB instances to address specific application needs.
AWS Fargate – Adds the ability to monitor the utilization of the ephemeral storage attached to an Amazon ECS task. You can track the storage utilization with Amazon CloudWatch Container Insights and ECS Task Metadata endpoint.
Amazon ElastiCache – You can now use IAM authentication to access Redis clusters. With this new capability, IAM users and roles can be associated with ElastiCache for Redis users to manage their cluster access.
Amazon CloudWatch RUM – You can now send custom events (in addition to predefined events) for better troubleshooting and application specific monitoring. In this way, you can monitor specific functions of your application and troubleshoot end user impacting issues unique to the application components.
AWS AppSync – You can now define GraphQL API resolvers using JavaScript. You can also mix functions written in JavaScript and Velocity Template Language (VTL) inside a single pipeline resolver. To simplify local development of resolvers, AppSync released two new NPM libraries and a new API command. More info can be found in this blog post.
AWS Console – With the new Applications widget on the Console home, you have one-click access to applications in AWS Systems Manager Application Manager and their resources, code, and related data. From Application Manager, you can view the resources that power your application and your costs using AWS Cost Explorer.
Other AWS News A few more stuff you might have missed:
Introducing our final AWS Heroes of the year – As the end of 2022 approaches, we are recognizing individuals whose enthusiasm for knowledge-sharing has a real impact with the AWS community. Please meet them here!
The Distributed Computing Manifesto – Werner Vogles, VP & CTO at Amazon.com, shared the Distributed Computing Manifesto, a canonical document from the early days of Amazon that transformed the way we built architectures and highlights the challenges faced at the end of the 20th century.
AWS re:Post – To make this community more accessible globally, we expanded the user experience to support five additional languages. You can now interact with AWS re:Post also using Traditional Chinese, Simplified Chinese, French, Japanese, and Korean.
For AWS open-source news and updates, here’s the latest newsletter curated by Ricardo to bring you the most recent updates on open-source projects, posts, events, and more.
Upcoming AWS Events As usual, there are many opportunities to meet:
That’s all from me for this week. Next week we’ll focus on re:Invent, and then we’ll take a short break. We’ll be back with the next Week in Review on December 12!
Previously, if a step needed access to a specific S3 bucket and another step needed access to a specific DynamoDB table, the AWS Identity and Access Management (IAM) policy attached to the instance profile had to allow access to both the S3 bucket and the DynamoDB table. This meant that the IAM policies you assigned to the instance profile had to contain a union of all the permissions for every step that ran on an EMR cluster.
We’re happy to introduce runtime roles for EMR steps. A runtime role is an IAM role that you associate with an EMR step, and jobs use this role to access AWS resources. With runtime roles for EMR steps, you can now specify different IAM roles for the Spark and the Hive jobs, thereby scoping down access at a job level. This allows you to simplify access controls on a single EMR cluster that is shared between multiple tenants, wherein each tenant can be easily isolated using IAM roles.
In this post, we dive deeper into runtime roles for EMR steps, helping you understand how the various pieces work together, and how each step is isolated on an EMR cluster.
Solution overview
In this post, we walk through the following:
Create an EMR cluster enabled to use the new role-based access control with EMR steps.
Create two IAM roles with different permissions in terms of the Amazon S3 data and Lake Formation tables they can access.
Allow the IAM principal submitting the EMR steps to use these two IAM roles.
See how EMR steps running with the same code and trying to access the same data have different permissions based on the runtime role specified at submission time.
See how to monitor and control actions using source identity propagation.
Set up EMR cluster security configuration
Amazon EMR security configurations simplify applying consistent security, authorization, and authentication options across your clusters. You can create a security configuration on the Amazon EMR console or via the AWS CLI or AWS SDK. When you attach a security configuration to a cluster, Amazon EMR applies the settings in the security configuration to the cluster. You can attach a security configuration to multiple clusters at creation time, but can’t apply them to a running cluster.
To enable runtime roles for EMR steps, we have to create a security configuration as shown in the following code and enable the runtime roles property (configured via EnableApplicationScopedIAMRole). In addition to the runtime roles, we’re enabling propagation of the source identity (configured via PropagateSourceIdentity) and support for Lake Formation (configured via LakeFormationConfiguration). The source identity is a mechanism to monitor and control actions taken with assumed roles. Enabling Propagate source identity allows you to audit actions performed using the runtime role. Lake Formation is an AWS service to securely manage a data lake, which includes defining and enforcing central access control policies for your data lake.
Create a file called step-runtime-roles-sec-cfg.json with the following content:
On the Amazon EMR console, choose Security configurations in the navigation pane.
Choose Create.
Choose Create.
For Security configuration name, enter a name.
For Security configuration setup options, select Choose custom settings.
For IAM role for applications, select Runtime role.
Select Propagate source identity to audit actions performed using the runtime role.
For Fine-grained access control, select AWS Lake Formation.
Complete the security configuration.
The security configuration appears in your security configuration list. You can also see that the authorization mechanism listed here is the runtime role instead of the instance profile.
The following code provides the AWS CLI command for launching an EMR cluster with the appropriate security configuration. Note that this cluster is launched on the default VPC and public subnet with the default IAM roles. In addition, the cluster is launched with one primary and one core instance of the specified instance type. For more details on how to customize the launch parameters, refer to create-cluster.
If the default EMR roles EMR_EC2_DefaultRole and EMR_DefaultRole don’t exist in IAM in your account (this is the first time you’re launching an EMR cluster with those), before launching the cluster, use the following command to create them:
aws emr create-default-roles
Create the cluster with the following code:
#Change with your Key Pair
KEYPAIR=<MY_KEYPAIR>
INSTANCE_TYPE="r4.4xlarge"
#Change with your Security Configuration Name
SECURITY_CONFIG="iamconfig-with-iam-lf"
#Change with your S3 log URI
LOG_URI="s3://mybucket/logs/"

aws emr create-cluster \
--name "iam-passthrough-cluster" \
--release-label emr-6.7.0 \
--use-default-roles \
--security-configuration $SECURITY_CONFIG \
--ec2-attributes KeyName=$KEYPAIR \
--instance-groups InstanceGroupType=MASTER,InstanceCount=1,InstanceType=$INSTANCE_TYPE  InstanceGroupType=CORE,InstanceCount=1,InstanceType=$INSTANCE_TYPE \
--applications Name=Spark Name=Hadoop Name=Hive \
--log-uri $LOG_URI
When the cluster is fully provisioned (Waiting state), let’s try to run a step on it with runtime roles for EMR steps enabled:
After launching the command, we receive the following as output:
An error occurred (ValidationException) when calling the AddJobFlowSteps operation: Runtime roles are required for this cluster. Please specify the role using the ExecutionRoleArn parameter.
The step failed, asking us to provide a runtime role. In the next section, we set up two IAM roles with different permissions and use them as the runtime roles for EMR steps.
Set up IAM roles as runtime roles
Any IAM role that you want to use as a runtime role for EMR steps must have a trust policy that allows the EMR cluster’s EC2 instance profile to assume it. In our setup, we’re using the default IAM role EMR_EC2_DefaultRole as the instance profile role. In addition, we create two IAM roles called test-emr-demo1 and test-emr-demo2 that we use as runtime roles for EMR steps.
The following code is the trust policy for both of the IAM roles, which lets the EMR cluster’s EC2 instance profile role, EMR_EC2_DefaultRole, assume these roles and set the source identity and LakeFormationAuthorizedCaller tag on the role sessions. The TagSession permission is needed so that Amazon EMR can authorize to Lake Formation. The SetSourceIdentity statement is needed for the propagate source identity feature.
Create a file called trust-policy.json with the following content (replace 123456789012 with your AWS account ID):
Use that policy to create the two IAM roles, test-emr-demo1 and test-emr-demo2:
aws iam create-role \
--role-name test-emr-demo1 \
--assume-role-policy-document file://trust-policy.json

aws iam create-role \
--role-name test-emr-demo2 \
--assume-role-policy-document file://trust-policy.json
Set up permissions for the principal submitting the EMR steps with runtime roles
The IAM principal submitting the EMR steps needs to have permissions to invoke the AddJobFlowSteps API. In addition, you can use the Condition key elasticmapreduce:ExecutionRoleArn to control access to specific IAM roles. For example, the following policy allows the IAM principal to only use IAM roles test-emr-demo1 and test-emr-demo2 as the runtime roles for EMR steps.
Create the job-submitter-policy.json file with the following content (replace 123456789012 with your AWS account ID):
aws iam create-policy \
--policy-name emr-runtime-roles-submitter-policy \
--policy-document file://job-submitter-policy.json
Assign this policy to the IAM principal (IAM user or IAM role) you’re going to use to submit the EMR steps (replace 123456789012 with your AWS account ID and replace john with the IAM user you use to submit your EMR steps):
aws iam attach-user-policy \
--user-name john \
--policy-arn "arn:aws:iam::123456789012:policy/emr-runtime-roles-submitter-policy"
IAM user john can now submit steps using arn:aws:iam::123456789012:role/test-emr-demo1 and arn:aws:iam::123456789012:role/test-emr-demo2 as the step runtime roles.
Use runtime roles with EMR steps
We now prepare our setup to show runtime roles for EMR steps in action.
Set up Amazon S3
To prepare your Amazon S3 data, complete the following steps:
Create a CSV file called test.csv with the following content:
1,a,1a
2,b,2b
Upload the file to Amazon S3 in three different locations:
#Change this with your bucket name
BUCKET_NAME="emr-steps-roles-new-us-east-1"

aws s3 cp test.csv s3://${BUCKET_NAME}/demo1/
aws s3 cp test.csv s3://${BUCKET_NAME}/demo2/
aws s3 cp test.csv s3://${BUCKET_NAME}/nondemo/
For our initial test, we use a PySpark application called test.py with the following contents:
from pyspark.sql import SparkSession
spark = SparkSession.builder.appName("my app").enableHiveSupport().getOrCreate()

#Change this with your bucket name
BUCKET_NAME="emr-steps-roles-new-us-east-1"

try:
  spark.read.csv("s3://" + BUCKET_NAME + "/demo1/test.csv").show()
  print("Accessed demo1")
except:
  print("Could not access demo1")

try:
  spark.read.csv("s3://" + BUCKET_NAME + "/demo2/test.csv").show()
  print("Accessed demo2")
except:
  print("Could not access demo2")

try:
  spark.read.csv("s3://" + BUCKET_NAME + "/nondemo/test.csv").show()
  print("Accessed nondemo")
except:
  print("Could not access nondemo")
spark.stop()
In the script, we’re trying to access the CSV file present under three different prefixes in the test bucket.
Upload the Spark application inside the same S3 bucket where we placed the test.csv file but in a different location:
#Change this with your bucket name
BUCKET_NAME="emr-steps-roles-new-us-east-1"
aws s3 cp test.py s3://${BUCKET_NAME}/scripts/
Set up runtime role permissions
To show how runtime roles for EMR steps works, we assign to the roles we created different IAM permissions to access Amazon S3. The following table summarizes the grants we provide to each role (emr-steps-roles-new-us-east-1 is the bucket you configured in the previous section).
S3 locations \ IAM Roles
test-emr-demo1
test-emr-demo2
s3://emr-steps-roles-new-us-east-1/*
No Access
No Access
s3://emr-steps-roles-new-us-east-1/demo1/*
Full Access
No Access
s3://emr-steps-roles-new-us-east-1/demo2/*
No Access
Full Access
s3://emr-steps-roles-new-us-east-1/scripts/*
Read Access
Read Access
Create the file demo1-policy.json with the following content (substitute emr-steps-roles-new-us-east-1 with your bucket name):
aws iam create-policy \
--policy-name test-emr-demo1-policy \
--policy-document file://demo1-policy.json

aws iam create-policy \
--policy-name test-emr-demo2-policy \
--policy-document file://demo2-policy.json
Assign to each role the related policy (replace 123456789012 with your AWS account ID):
aws iam attach-role-policy \
--role-name test-emr-demo1 \
--policy-arn "arn:aws:iam::123456789012:policy/test-emr-demo1-policy"

aws iam attach-role-policy \
--role-name test-emr-demo2 \
--policy-arn "arn:aws:iam::123456789012:policy/test-emr-demo2-policy"
To use runtime roles with Amazon EMR steps, we need to add the following policy to our EMR cluster’s EC2 instance profile (in this example EMR_EC2_DefaultRole). With this policy, the underlying EC2 instances for the EMR cluster can assume the runtime role and apply a tag to that runtime role.
Create the file runtime-roles-policy.json with the following content (replace 123456789012 with your AWS account ID):
aws iam create-policy \
--policy-name emr-runtime-roles-policy \
--policy-document file://runtime-roles-policy.json
Assign the created policy to the EMR cluster’s EC2 instance profile, in this example EMR_EC2_DefaultRole:
aws iam attach-role-policy \
--role-name EMR_EC2_DefaultRole \
--policy-arn "arn:aws:iam::123456789012:policy/emr-runtime-roles-policy"
Test permissions with runtime roles
We’re now ready to perform our first test. We run the test.py script, previously uploaded to Amazon S3, two times as Spark steps: first using the test-emr-demo1 role and then using the test-emr-demo2 role as the runtime roles.
Let’s submit a step specifying test-emr-demo1 as the runtime role:
#Change with your EMR cluster ID
CLUSTER_ID=j-XXXXXXXXXXXXX
#Change with your AWS Account ID
ACCOUNT_ID=123456789012
#Change with your Bucket name
BUCKET_NAME=emr-steps-roles-new-us-east-1

aws emr add-steps \
--cluster-id $CLUSTER_ID \
--steps '[{
            "Type": "CUSTOM_JAR",
            "ActionOnFailure": "CONTINUE",
            "Jar": "command-runner.jar",
            "Name": "Spark Example",
            "Args": [
              "spark-submit",
              "s3://'"${BUCKET_NAME}"'/scripts/test.py"
            ]
        }]' \
--execution-role-arn arn:aws:iam::${ACCOUNT_ID}:role/test-emr-demo1
This command returns an EMR step ID. To check our step output logs, we can proceed two different ways:
From the Amazon EMR console – On the Steps tab, choose the View logs link related to the specific step ID and select stdout.
From Amazon S3 – While launching our cluster, we configured an S3 location for logging. We can find our step logs under $(LOG_URI)/steps/<stepID>/stdout.gz.
The logs could take a couple of minutes to populate after the step is marked as Completed.
The following is the output of the EMR step with test-emr-demo1 as the runtime role:
+---+---+---+
|_c0|_c1|_c2|
+---+---+---+
|  1|  a| 1a|
|  2|  b| 2b|
+---+---+---+

Accessed demo1
Could not access demo2
Could not access nondemo
As we can see, only the demo1 folder was accessible by our application.
Diving deeper into the step stderr logs, we can see that the related YARN application application_1656350436159_0017 was launched with the user 6GC64F33KUW4Q2JY6LKR7UAHWETKKXYL. We can confirm this by connecting to the EMR primary instance using SSH and using the YARN CLI:
Please note that in your case, the YARN application ID and the user will be different.
Now we submit the same script again as a new EMR step, but this time with the role test-emr-demo2 as the runtime role:
#Change with your EMR cluster ID
CLUSTER_ID=j-XXXXXXXXXXXXX
#Change with your AWS Account ID
ACCOUNT_ID=123456789012
#Change with your Bucket name
BUCKET_NAME=emr-steps-roles-new-us-east-1

aws emr add-steps \
--cluster-id $CLUSTER_ID \
--steps '[{
            "Type": "CUSTOM_JAR",
            "ActionOnFailure": "CONTINUE",
            "Jar": "command-runner.jar",
            "Name": "Spark Example",
            "Args": [
              "spark-submit",
              "s3://'"${BUCKET_NAME}"'/scripts/test.py"
            ]
        }]' \
--execution-role-arn arn:aws:iam::${ACCOUNT_ID}:role/test-emr-demo2
The following is the output of the EMR step with test-emr-demo2 as the runtime role:
Could not access demo1
+---+---+---+
|_c0|_c1|_c2|
+---+---+---+
|  1|  a| 1a|
|  2|  b| 2b|
+---+---+---+

Accessed demo2
Could not access nondemo
As we can see, only the demo2 folder was accessible by our application.
Diving deeper into the step stderr logs, we can see that the related YARN application application_1656350436159_0018 was launched with a different user 7T2ORHE6Z4Q7PHLN725C2CVWILZWYOLE. We can confirm this by using the YARN CLI:
Each step was able to only access the CSV file that was allowed by the runtime role, so the first step was able to only access s3://emr-steps-roles-new-us-east-1/demo1/test.csv and the second step was only able to access s3://emr-steps-roles-new-us-east-1/demo2/test.csv. In addition, we observed that Amazon EMR created a unique user for the steps, and used the user to run the jobs. Please note that both roles need at least read access to the S3 location where the step scripts are located (for example, s3://emr-steps-roles-demo-bucket/scripts/test.py).
Now that we have seen how runtime roles for EMR steps work, let’s look at how we can use Lake Formation to apply fine-grained access controls with EMR steps.
Use Lake Formation-based access control with EMR steps
You can use Lake Formation to apply table- and column-level permissions with Apache Spark and Apache Hive jobs submitted as EMR steps. First, the data lake admin in Lake Formation needs to register Amazon EMR as the AuthorizedSessionTagValue to enforce Lake Formation permissions on EMR. Lake Formation uses this session tag to authorize callers and provide access to the data lake. The Amazon EMR value is referenced inside the step-runtime-roles-sec-cfg.json file we used earlier when we created the EMR security configuration, and inside the trust-policy.json file we used to create the two runtime roles test-emr-demo1 and test-emr-demo2.
We can do so on the Lake Formation console in the External data filtering section (replace 123456789012 with your AWS account ID).
On the IAM runtime roles’ trust policy, we already have the sts:TagSession permission with the condition “aws:RequestTag/LakeFormationAuthorizedCaller": "Amazon EMR". So we’re ready to proceed.
To demonstrate how Lake Formation works with EMR steps, we create one database named entities with two tables named users and products, and we assign in Lake Formation the grants summarized in the following table.
IAM Roles \ Tables
entities (DB)
users (Table)
products (Table)
test-emr-demo1
Full Read Access
No Access
test-emr-demo2
Read Access on Columns: uid, state
Full Read Access
Prepare Amazon S3 files
We first prepare our Amazon S3 files.
Create the users.csv file with the following content:
00005678,john,pike,england,london,Hidden Road 78
00009039,paolo,rossi,italy,milan,Via degli Alberi 56A
00009057,july,finn,germany,berlin,Green Road 90
Create the products.csv file with the following content:
Upload these files to Amazon S3 in two different locations:
#Change this with your bucket name
BUCKET_NAME="emr-steps-roles-new-us-east-1"

aws s3 cp users.csv s3://${BUCKET_NAME}/entities-database/users/
aws s3 cp products.csv s3://${BUCKET_NAME}/entities-database/products/
Prepare the database and tables
We can create our entities database by using the AWS Glue APIs.
Create the entities-db.json file with the following content (substitute emr-steps-roles-new-us-east-1 with your bucket name):
To access our tables data in Amazon S3, Lake Formation needs read/write access to them. To achieve that, we have to register Amazon S3 locations where our data resides and specify for them which IAM role to obtain credentials from.
Let’s create our IAM role for the data access.
Create a file called trust-policy-data-access-role.json with the following content:
aws iam create-policy \
--policy-name data-access-role-policy \
--policy-document file://data-access-role-policy.json
Assign to our emr-demo-lf-data-access-role the created policy (replace 123456789012 with your AWS account ID):
aws iam attach-role-policy \
--role-name emr-demo-lf-data-access-role \
--policy-arn "arn:aws:iam::123456789012:policy/data-access-role-policy"
We can now register our data location in Lake Formation.
On the Lake Formation console, choose Data lake locations in the navigation pane.
Here we can register our S3 location containing data for our two tables and choose the created emr-demo-lf-data-access-role IAM role, which has read/write access to that location.
To be sure we’re using Lake Formation permissions, we should confirm that we don’t have any grants set up for the principal IAMAllowedPrincipals. The IAMAllowedPrincipals group includes any IAM users and roles that are allowed access to your Data Catalog resources by your IAM policies, and it’s used to maintain backward compatibility with AWS Glue.
To confirm Lake Formations permissions are enforced, navigate to the Lake Formation console and choose Data lake permissions in the navigation pane. Filter permissions by “Database”:“entities” and remove all the permissions given to the principal IAMAllowedPrincipals.
Configure AWS Glue and Lake Formation grants for IAM runtime roles
To allow our IAM runtime roles to properly interact with Lake Formation, we should provide them the lakeformation:GetDataAccess and glue:Get* grants.
Lake Formation permissions control access to Data Catalog resources, Amazon S3 locations, and the underlying data at those locations. IAM permissions control access to the Lake Formation and AWS Glue APIs and resources. Therefore, although you might have the Lake Formation permission to access a table in the Data Catalog (SELECT), your operation fails if you don’t have the IAM permission on the glue:Get* API.
aws iam create-policy \
--policy-name emr-runtime-roles-lake-formation-policy \
--policy-document file://emr-runtime-roles-lake-formation-policy.json
Assign this policy to both IAM runtime roles (replace 123456789012 with your AWS account ID):
aws iam attach-role-policy \
--role-name test-emr-demo1 \
--policy-arn "arn:aws:iam::123456789012:policy/emr-runtime-roles-lake-formation-policy"

aws iam attach-role-policy \
--role-name test-emr-demo2 \
--policy-arn "arn:aws:iam::123456789012:policy/emr-runtime-roles-lake-formation-policy"
Set up Lake Formation permissions
We now set up the permission in Lake Formation for the two runtime roles.
Create the file users-grants-test-emr-demo1.json with the following content to grant SELECT access to all columns in the entities.users table to test-emr-demo1:
Create the file users-grants-test-emr-demo2.json with the following content to grant SELECT access to the uid and state columns in the entities.users table to test-emr-demo2:
Create the file products-grants-test-emr-demo2.json with the following content to grant SELECT access to all columns in the entities.products table to test-emr-demo2:
Check the permissions we defined on the Lake Formation console on the Data lake permissions page by filtering by “Database”:“entities”.
Test Lake Formation permissions with runtime roles
For our test, we use a PySpark application called test-lake-formation.py with the following content:
from pyspark.sql import SparkSession

spark = SparkSession.builder.appName("Pyspark - TEST IAM RBAC with LF").enableHiveSupport().getOrCreate()

try:
    print("== select * from entities.users limit 3 ==\n")
    spark.sql("select * from entities.users limit 3").show()
except Exception as e:
    print(e)

try:
    print("== select * from entities.products limit 3 ==\n")
    spark.sql("select * from entities.products limit 3").show()
except Exception as e:
    print(e)

spark.stop()
In the script, we’re trying to access the tables users and products. Let’s upload our Spark application in the same S3 bucket that we used earlier:
#Change this with your bucket name
BUCKET_NAME="emr-steps-roles-new-us-east-1"

aws s3 cp test-lake-formation.py s3://${BUCKET_NAME}/scripts/
We’re now ready to perform our test. We run the test-lake-formation.py script first using the test-emr-demo1 role and then using the test-emr-demo2 role as the runtime roles.
Let’s submit a step specifying test-emr-demo1 as the runtime role:
#Change with your EMR cluster ID
CLUSTER_ID=j-XXXXXXXXXXXXX
#Change with your AWS Account ID
ACCOUNT_ID=123456789012
#Change with your Bucket name
BUCKET_NAME=emr-steps-roles-new-us-east-1

aws emr add-steps \
--cluster-id $CLUSTER_ID \
--steps '[{
            "Type": "CUSTOM_JAR",
            "ActionOnFailure": "CONTINUE",
            "Jar": "command-runner.jar",
            "Name": "Spark Lake Formation Example",
            "Args": [
              "spark-submit",
              "s3://'"${BUCKET_NAME}"'/scripts/test-lake-formation.py"
            ]
        }]' \
--execution-role-arn arn:aws:iam::${ACCOUNT_ID}:role/test-emr-demo1
The following is the output of the EMR step with test-emr-demo1 as the runtime role:
== select * from entities.users limit 3 ==

+--------+-----+-------+-------+------+--------------------+
|     uid| name|surname|  state|  city|             address|
+--------+-----+-------+-------+------+--------------------+
|00005678| john|   pike|england|london|      Hidden Road 78|
|00009039|paolo|  rossi|  italy| milan|Via degli Alberi 56A|
|00009057| july|   finn|germany|berlin|       Green Road 90|
+--------+-----+-------+-------+------+--------------------+

== select * from entities.products limit 3 ==

Insufficient Lake Formation permission(s) on products (...)
As we can see, our application was only able to access the users table.
Submit the same script again as a new EMR step, but this time with the role test-emr-demo2 as the runtime role:
#Change with your EMR cluster ID
CLUSTER_ID=j-XXXXXXXXXXXXX
#Change with your AWS Account ID
ACCOUNT_ID=123456789012
#Change with your Bucket name
BUCKET_NAME=emr-steps-roles-new-us-east-1

aws emr add-steps \
--cluster-id $CLUSTER_ID \
--steps '[{
            "Type": "CUSTOM_JAR",
            "ActionOnFailure": "CONTINUE",
            "Jar": "command-runner.jar",
            "Name": "Spark Lake Formation Example",
            "Args": [
              "spark-submit",
              "s3://'"${BUCKET_NAME}"'/scripts/test-lake-formation.py"
            ]
        }]' \
--execution-role-arn arn:aws:iam::${ACCOUNT_ID}:role/test-emr-demo2
The following is the output of the EMR step with test-emr-demo2 as the runtime role:
As we can see, our application was able to access a subset of columns for the users table and all the columns for the products table.
We can conclude that the permissions while accessing the Data Catalog are being enforced based on the runtime role used with the EMR step.
Audit using the source identity
The source identity is a mechanism to monitor and control actions taken with assumed roles. The Propagate source identity feature similarly allows you to monitor and control actions taken using runtime roles by the jobs submitted with EMR steps.
We already configured EMR_EC2_defaultRole with "sts:SetSourceIdentity" on our two runtime roles. Also, both runtime roles let EMR_EC2_DefaultRole to SetSourceIdentity in their trust policy. So we’re ready to proceed.
We now see the Propagate source identity feature in action with a simple example.
Configure the IAM role that is assumed to submit the EMR steps
We configure the IAM role job-submitter-1, which is assumed specifying the source identity and which is used to submit the EMR steps. In this example, we allow the IAM user paul to assume this role and set the source identity. Please note you can use any IAM principal here.
Create a file called trust-policy-2.json with the following content (replace 123456789012 with your AWS account ID):
Use it as the trust policy to create the IAM role job-submitter-1:
aws iam create-role \
--role-name job-submitter-1 \
--assume-role-policy-document file://trust-policy-2.json
We use now the same emr-runtime-roles-submitter-policy policy we defined before to allow the role to submit EMR steps using the test-emr-demo1 and test-emr-demo2 runtime roles.
Assign this policy to the IAM role job-submitter-1 (replace 123456789012 with your AWS account ID):
aws iam attach-role-policy \
--role-name job-submitter-1 \
--policy-arn "arn:aws:iam::123456789012:policy/emr-runtime-roles-submitter-policy"
Test the source identity with AWS CloudTrail
To show how propagation of source identity works with Amazon EMR, we generate a role session with the source identity test-ad-user.
With the IAM user paul (or with the IAM principal you configured), we first perform the impersonation (replace 123456789012 with your AWS account ID):
We use the temporary AWS security credentials of the role session, to submit an EMR step along with the runtime role test-emr-demo1:
export AWS_ACCESS_KEY_ID="<ACCESS_KEY_ID>"
export AWS_SECRET_ACCESS_KEY="<SECRET_ACCESS_KEY>"
export AWS_SESSION_TOKEN="<SESSION_TOKEN>"

#Change with your EMR cluster ID
CLUSTER_ID=j-XXXXXXXXXXXXX
#Change with your AWS Account ID
ACCOUNT_ID=123456789012
#Change with your Bucket name
BUCKET_NAME=emr-steps-roles-new-us-east-1

aws emr add-steps \
--cluster-id $CLUSTER_ID \
--steps '[{
            "Type": "CUSTOM_JAR",
            "ActionOnFailure": "CONTINUE",
            "Jar": "command-runner.jar",
            "Name": "Spark Lake Formation Example",
            "Args": [
              "spark-submit",
              "s3://'"${BUCKET_NAME}"'/scripts/test-lake-formation.py"
            ]
        }]' \
--execution-role-arn arn:aws:iam::${ACCOUNT_ID}:role/test-emr-demo1
In a few minutes, we can see events appearing in the AWS CloudTrail log file. We can see all the AWS APIs that the jobs invoked using the runtime role. In the following snippet, we can see that the step performed the sts:AssumeRole and lakeformation:GetDataAccess actions. It’s worth noting how the source identity test-ad-user has been preserved in the events.
Clean up
You can now delete the EMR cluster you created.
On the Amazon EMR console, choose Clusters in the navigation pane.
Select the cluster iam-passthrough-cluster, then choose Terminate.
Choose Terminate again to confirm.
Alternatively, you can delete the cluster by using the Amazon EMR CLI with the following command (replace the EMR cluster ID with the one returned by the previously run aws emr create-cluster command):
In this post, we discussed how you can control data access on Amazon EMR on EC2 clusters by using runtime roles with EMR steps. We discussed how the feature works, how you can use Lake Formation to apply fine-grained access controls, and how to monitor and control actions using a source identity. To learn more about this feature, refer to Configure runtime roles for Amazon EMR steps.
About the authors
Stefano Sandona is an Analytics Specialist Solution Architect with AWS. He loves data, distributed systems and security. He helps customers around the world architecting their data platforms. He has a strong focus on Amazon EMR and all the security aspects around it.
Sharad Kala is a senior engineer at AWS working with the EMR team. He focuses on the security aspects of the applications running on EMR. He has a keen interest in working and learning about distributed systems.
This post written by Kurt Tometich, Senior Solutions Architect, AWS.
Developers have been using the AWS Serverless Application Model (AWS SAM) to streamline the development of serverless applications with AWS since late 2018. Besides making it easier to create, build, test, and deploy serverless applications, AWS SAM now further simplifies permission management between serverless components with AWS SAM Connectors.
AWS SAM policy templates are an existing feature that helps builders deploy serverless applications with minimally scoped IAM policies. Because there are a finite number of templates, they’re a good fit when a template exists for the services you’re using. Connectors are best for those getting started and who want to focus on modeling the flow of data and events within their applications. Connectors will take the desired relationship model and create the permissions for the relationship to exist and function as intended.
In this blog post, I show you how to speed up serverless development while maintaining secure best practices using AWS SAM connector. Defining a connector in an AWS SAM template requires a source, destination, and a permission (for example, read or write). From this definition, IAM policies with minimal privileges are automatically created by the connector.
“LambdaDynamoDbWriteConnector” is the name of the connector, while the “Type” designates it as an AWS SAM connector. “Properties” contains the source and destination logical ID for our serverless resources found within our template. Finally, the “Permissions” property defines a read or write relationship between the components.
This basic example shows how easy it is to define permissions between components. No specific role or policy names are required, and this syntax is consistent across many other serverless components, enforcing standardization.
Example
AWS SAM connectors save you time as your applications grow and connections between serverless components become more complex. Manual creation and management of permissions become error prone and difficult at scale. To highlight the breadth of support, we’ll use an AWS Step Functions state machine to operate with several other serverless components. AWS Step Functions is a serverless orchestration workflow service that integrates natively with other AWS services.
Solution overview
Architectural overview
This solution implements an image catalog moderation pipeline. Amazon Rekognition checks for inappropriate content, and detects objects and text in an image. It processes valid images and stores metadata in an Amazon DynamoDB table, otherwise emailing a notification for invalid images.
Clone the repository and navigate to the solution directory:
git clone https://github.com/aws-samples/step-functions-workflows-collection
cd step-functions-workflows-collection/moderated-image-catalog
Open the template.yaml file located at step-functions-workflows-collection/moderated-image-catalog and replace the “ImageCatalogStateMachine:” section with the following snippet. Ensure to preserve YAML formatting.
You have removed the existing inline policies for the state machine and replaced them with AWS SAM connector definitions, except for the Amazon Rekognition policy. At the time of publishing this blog, connectors do not support Amazon Rekognition. Take some time to review each of the connector’s syntax.
Deploy the application using the following command:
sam deploy --guided
Provide a stack name, Region, and moderators’ email address. You can accept defaults for the remaining prompts.
Verifying permissions
Once the deployment has completed, you can verify the correct role and policies.
Navigate to the Step Functions service page within the AWS Management Console and ensure you have the correct Region selected.
Select State machines from the left menu and then the moderated-image-catalog-workflow state machine.
Select the “IAM role ARN” link, which will take you to the IAM role and policies created.
You should see a list of policies that correspond to the AWS SAM connectors in the template.yaml file with the actions and resources.
Permissions list in console
You didn’t need to supply the specific policy actions: Use Read or Write as the permission and the service handles the rest. This results in improved readability, standardization, and productivity, while retaining security best practices.
Testing
Upload a test image to the Amazon S3 bucket created during the deployment step. To find the name of the bucket, navigate to the AWS CloudFormation console. Select the CloudFormation stack via the name entered as part of “sam deploy –guided.” Select the Outputs tab and note the IngestionBucket name.
After uploading the image, navigate to the AWS Step Functions console and select the “moderated-image-catalog-workflow” workflow.
Select Start Execution and observe the execution of the workflow.
Depending on the image selected, it will either add to the image catalog, or send a content moderation email to the email address provided. Find out more about content considered inappropriate by Amazon Rekognition.
Cleanup
To delete any images added to the Amazon S3 bucket, and the resources created by this template, use the following commands from the same project directory.
aws s3 rm s3://< bucket_name_here> --recursive
sam delete
Conclusion
This blog post shows how AWS SAM connectors simplify connecting serverless components. View the Developer Guide to find out more about AWS SAM connectors. For further sample serverless workflows like the one used in this blog, see Serverless Land.
AWS Identity and Access Management (IAM) Access Analyzer provides many tools to help you set, verify, and refine permissions. One part of IAM Access Analyzer—policy validation—helps you author secure and functional policies that grant the intended permissions. Now, I’m excited to announce that AWS has updated the IAM console experience for role trust policies to make it simpler for you to author and validate the policy that controls who can assume a role. In this post, I’ll describe the new capabilities and show you how to use them as you author a role trust policy in the IAM console.
Overview of changes
A role trust policy is a JSON policy document in which you define the principals that you trust to assume the role. The principals that you can specify in the trust policy include users, roles, accounts, and services. The new IAM console experience provides the following features to help you set the right permissions in the trust policy:
An interactive policy editor prompts you to add the right policy elements, such as the principal and the allowed actions, and offers context-specific documentation.
As you author the policy, IAM Access Analyzer runs over 100 checks against your policy and highlights issues to fix. This includes new policy checks specific to role trust policies, such as a check to make sure that you’ve formatted your identity provider correctly. These new checks are also available through the IAM Access Analyzer policy validation API.
Before saving the policy, you can preview findings for the external access granted by your trust policy. This helps you review external access, such as access granted to a federated identity provider, and confirm that you grant only the intended access when you create the policy. This functionality was previously available through the APIs, but now it’s also available in the IAM console.
In the following sections, I’ll walk you through how to use these new features.
Example scenario
For the walkthrough, consider the following example, which is illustrated in Figure 1. You are a developer for Example Corp., and you are working on a web application. You want to grant the application hosted in one account—the ApplicationHost account—access to data in another account—the BusinessData account. To do this, you can use an IAM role in the BusinessData account to grant temporary access to the application through a role trust policy. You will grant a role in the ApplicationHost account—the PaymentApplication role—to access the BusinessData account through a role—the ApplicationAccess role. In this example, you create the ApplicationAccess role and grant cross-account permissions through the trust policy by using the new IAM console experience that helps you set the right permissions.
Figure 1: Visual explanation of the scenario
Create the role and grant permissions through a role trust policy with the policy editor
In this section, I will show you how to create a role trust policy for the ApplicationAccess role to grant the application access to the data in your account through the policy editor in the IAM console.
To create a role and grant access
In the BusinessData account, open the IAM console, and in the left navigation pane, choose Roles.
Choose Create role, and then select Custom trust policy, as shown in Figure 2.
Figure 2: Select “Custom trust policy” when creating a role
In the Custom trust policy section, for 1. Add actions for STS, select the actions that you need for your policy. For example, to add the action sts:AssumeRole, choose AssumeRole.
Figure 3: JSON role trust policy
For 2. Add a principal, choose Add to add a principal.
In the Add principal box, for Principal type, select IAM roles. This populates the ARN field with the format of the role ARN that you need to add to the policy, as shown in Figure 4.
Figure 4: Add a principal to your role trust policy
Update the role ARN template with the actual account and role information, and then choose Add principal. In our example, the account is ApplicationHost with an AWS account number of 111122223333, and the role is PaymentApplication role. Therefore, the role ARN is arn:aws:iam:: 111122223333: role/PaymentApplication. Figure 5 shows the role trust policy with the action and principal added.
Figure 5: Sample role trust policy
(Optional) To add a condition, for 3. Add a condition, choose Add, and then complete the Add condition box according to your needs.
Author secure policies by reviewing policy validation findings
As you author the policy, you can see errors or warnings related to your policy in the policy validation window, which is located below the policy editor in the console. With this launch, policy validation in IAM Access Analyzer includes 13 new checks focused on the trust relationship for the role. The following are a few examples of these checks and how to address them:
Role trust policy unsupported wildcard in principal – you can’t use a * in your role trust policy.
Invalid federated principal syntax in role trust policy – you need to fix the format of the identity provider.
Missing action for condition key – you need to add the right action for a given condition, such as the sts:TagSession when there are session tag conditions.
In the policy validation window, do the following:
Choose the Security tab to check if your policy is overly permissive.
Choose the Errors tab to review any errors associated with the policy.
Choose the Warnings tab to review if aspects of the policy don’t align with AWS best practices.
Choose the Suggestions tab to get recommendations on how to improve the quality of your policy.
Figure 6: Policy validation window in IAM Access Analyzer with a finding for your policy
For each finding, choose Learn more to review the documentation associated with the finding and take steps to fix it. For example, Figure 6 shows the error Mismatched Action For Principal. To fix the error, remove the action sts:AssumeRoleWithWebIdentity.
Preview external access by reviewing cross-account access findings
IAM Access Analyzer also generates findings to help you assess if a policy grants access to external entities. You can review the findings before you create the policy to make sure that the policy grants only intended access. To preview the findings, you create an analyzer and then review the findings.
To preview findings for external access
Below the policy editor, in the Preview external access section, choose Go to Access Analyzer, as shown in Figure 7.
Note: IAM Access Analyzer is a regional service, and you can create a new analyzer in each AWS Region where you operate. In this situation, IAM Access Analyzer looks for an analyzer in the Region where you landed on the IAM console. If IAM Access Analyzer doesn’t find an analyzer there, it asks you to create an analyzer.
Figure 7: Preview external access widget without an analyzer
On the Create analyzer page, do the following to create an analyzer:
For Name, enter a name for your analyzer.
For Zone of trust, select the correct account.
Choose Create analyzer.
Figure 8: Create an analyzer to preview findings
After you create the analyzer, navigate back to the role trust policy for your role to review the external access granted by this policy. The following figure shows that external access is granted to PaymentApplication.
Figure 9: Preview finding
If the access is intended, you don’t need to take any action. In this example, I want the PaymentApplication role in the ApplicationHost account to assume the role that I’m creating.
If the access is unintended, resolve the finding by updating the role ARN information.
Select Next and grant the required IAM permissions for the role.
Name the role ApplicationAccess, and then choose Save to save the role.
Now the application can use this role to access the BusinessData account.
Conclusion
By using the new IAM console experience for role trust policies, you can confidently author policies that grant the intended access. IAM Access Analyzer helps you in your least-privilege journey by evaluating the policy for potential issues to make it simpler for you to author secure policies. IAM Access Analyzer also helps you preview external access granted through the trust policy to help ensure that the granted access is intended. To learn more about how to preview IAM Access Analyzer cross-account findings, see Preview access in the documentation. To learn more about IAM Access Analyzer policy validation checks, see Access Analyzer policy validation. These features are also available through APIs.
If you have feedback about this post, submit comments in the Comments section below. If you have questions about this post, start a new thread at AWS IAM re:Post or contact AWS Support.
It looks like my travel schedule is coupled with this Week In Review series of blog posts. This week, I am traveling to Fort-de-France in the French Caribbean islands to meet our customers and partners. I enjoy the travel time when I am offline. It gives me the opportunity to reflect on the past or plan for the future.
Last Week’s Launches Here are some of the launches that caught my eye last week:
Amazon SageMaker Autopilot – has added a new Ensemble training mode powered by AutoGluon that is 8X faster than the current Hyper parameter Optimization Mode and supports a wide range of algorithms, including LightGBM, CatBoost, XGBoost, Random Forest, Extra Trees, linear models, and neural networks based on PyTorch and FastAI.
Amazon Corretto 19 – Corretto is a no-cost, multiplatform, production-ready distribution of OpenJDK. Corretto is distributed by Amazon under an open source license. This version supports the latest OpenJDK feature release and is available on Linux, Windows, and macOS. You can download Corretto 19 from our downloads page.
Amazon CloudWatch Evidently – Evidently is a fully-managed service that makes it easier to introduce experiments and launches in your application code. Evidently adds support for Client Side Evaluations (CSE) for AWS Lambda, powered by AWS AppConfig. Evidently CSE allows application developers to generate feature evaluations in single-digit milliseconds from within their own Lambda functions. Check the client-side evaluation documentation to learn more.
Amazon S3on AWS Outposts – S3 on Outposts now supports object versioning. Versioning helps you to locally preserve, retrieve, and restore each version of every object stored in your buckets. Versioning objects makes it easier to recover from both unintended user actions and application failures.
Amazon Polly – Amazon Polly is a service that turns text into lifelike speech. This week, we announced the general availability of Hiujin, Amazon Polly’s first Cantonese-speaking neural text-to-speech (NTTS) voice. With this launch, the Amazon Polly portfolio now includes 96 voices across 34 languages and language variants.
X in Y – We launched existing AWS services in additional Regions:
Other AWS News Introducing the Smart City Competency program – The AWS Smart City Competency provides best-in-class partner recommendations to our customers and the broader market. With the AWS Smart City Competency, you can quickly and confidently identify AWS Partners to help you address Smart City focused challenges.
An update to IAM role trust policy behavior – This is potentially a breaking change. AWS Identity and Access Management (IAM) is changing an aspect of how role trust policy evaluation behaves when a role assumes itself. Previously, roles implicitly trusted themselves. AWS is changing role assumption behavior to always require self-referential role trust policy grants. This change improves consistency and visibility with regard to role behavior and privileges. This blog post shares the details and explains how to evaluate if your roles are impacted by this change and what to modify. According to our data, only 0.0001 percent of roles are impacted. We notified by email the account owners.
Upcoming AWS Events Check your calendar and sign up for an AWS event in your Region and language:
AWS re:Invent – Learn the latest from AWS and get energized by the community present in Las Vegas, Nevada. Registrations are open for re:Invent 2022 which will be held from Monday, November 28 to Friday, December 2.
AWS Summits – Come together to connect, collaborate, and learn about AWS. Registration is open for the following in-person AWS Summits: Bogotá (October 4), and Singapore (October 6).
Natural Language Processing (NLP) Summit – The AWS NLP Summit 2022 will host over 25 sessions focusing on the latest trends, hottest research, and innovative applications leveraging NLP capabilities on AWS. It is happening at our UK headquarters in London, October 5–6, and you can register now.
AWS Innovate for every app – This regional online conference is designed to inspire and educate executives and IT professionals about AWS. It offers dozens of technical sessions in eight languages (English, Spanish, French, German, Italian, Japanese, Korean, and Indonesian). Register today: Americas, September 28; Europe, Middle-East, and Africa, October 6; Asia Pacific & Japan, October 20.
AWS Fest – This third-party event will feature AWS influencers, community heroes, industry leaders, and AWS customers, all sharing AWS optimization secrets (this week on Wednesday, September). You can register for AWS Fest here.
Stay Informed That is my selection for this week! To better keep up with all of this news, please check out the following resources:
AWS on Air – Join us every Friday on Twitch, Twitter, and LinkedIn.
The Official AWS Podcast – Listen each week for updates on the latest AWS news and deep dives into exciting use cases. There are also official AWS podcasts in your local languages. Check the ones in Spanish, French, Italian, and German.
AWS Identity and Access Management (IAM) is changing an aspect of how role trust policy evaluation behaves when a role assumes itself. Previously, roles implicitly trusted themselves from a role trust policy perspective if they had identity-based permissions to assume themselves. After receiving and considering feedback from customers on this topic, AWS is changing role assumption behavior to always require self-referential role trust policy grants. This change improves consistency and visibility with regard to role behavior and privileges. This change allows customers to create and understand role assumption permissions in a single place (the role trust policy) rather than two places (the role trust policy and the role identity policy). It increases the simplicity of role trust permission management: “What you see [in the trust policy] is what you get.”
Therefore, beginning today, for any role that has not used the identity-based behavior since June 30, 2022, a role trust policy must explicitly grant permission to all principals, including the role itself, that need to assume it under the specified conditions. Removal of the role’s implicit self-trust improves consistency and increases visibility into role assumption behavior.
Most AWS customers will not be impacted by the change at all. Only a tiny percentage (approximately 0.0001%) of all roles are involved. Customers whose roles have recently used the previous implicit trust behavior are being notified, beginning today, about those roles, and may continue to use this behavior with those roles until February 15, 2023, to allow time for making the necessary updates to code or configuration. Or, if these customers are confident that the change will not impact them, they can opt out immediately by substituting in new roles, as discussed later in this post.
The first part of this post briefly explains the change in behavior. The middle sections answer practical questions like: “why is this happening?,” “how might this change impact me?,” “which usage scenarios are likely to be impacted?,” and “what should I do next?” The usage scenario section is important because it shows that, based on our analysis, the self-assuming role behavior exhibited by code or human users is very likely to be unnecessary and counterproductive. Finally, for security professionals interested in better understanding the reasons for the old behavior, the rationale for the change, as well as its possible implications, the last section reviews a number of core IAM concepts and digs in to additional details.
What is changing?
Until today, an IAM role implicitly trusted itself. Consider the following role trust policy attached to the role named RoleA in AWS account 123456789012.
This role trust policy grants role assumption access to the role named RoleB in the same account. However, if the corresponding identity-based policy for RoleA grants the sts:AssumeRole action with respect to itself, then RoleA could also assume itself. Therefore, there were actually two roles that could assume RoleA: the explicitly permissioned RoleB, and RoleA, which implicitly trusted itself as a byproduct of the IAM ownership model (explained in detail in the final section). Note that the identity-based permission that RoleA must have to assume itself is not required in the case of RoleB, and indeed an identity-based policy associated with RoleB that references other roles is not sufficient to allow RoleB to assume them. The resource-based permission granted by RoleA’s trust policy is both necessary and sufficient to allow RoleB to assume RoleA.
Although earlier we summarized this behavior as “implicit self-trust,” the key point here is that the ability of Role A to assume itself is not actually implicit behavior. The role’s self-referential permission had to be explicit in one place or the other (or both): either in the role’s identity-based policy (perhaps based on broad wildcard permissions), or its trust policy. But unlike the case with other principals and role trust, an IAM administrator would have to look in two different policies to determine whether a role could assume itself.
As of today, for any new role, or any role that has not recently assumed itself while relying on the old behavior, IAM administrators must modify the previously shown role trust policy as follows to allow RoleA to assume itself, regardless of the privileges granted by its identity-based policy:
This change makes role trust behavior clearer and more consistent to understand and manage, whether directly by humans or as embodied in code.
How might this change impact me?
As previously noted, most customers will not be impacted by the change at all. For those customers who do use the prior implicit trust grant behavior, AWS will work with you to eliminate your usage prior to February 15, 2023. Here are more details for the two cases of customers who have not used the behavior, and those who have.
If you haven’t used the implicit trust behavior since June 30, 2022
Beginning today, if you have not used the old behavior for a given role at any time since June 30, 2022, you will now experience the new behavior. Those existing roles, as well as any new roles, will need an explicit reference in their own trust policy in order to assume themselves. If you have roles that are used only very occasionally, such as once per quarter for a seldom-run batch process, you should identify those roles and if necessary either remove the dependency on the old behavior or update their role trust policies to include the role itself prior to their next usage (see the second sample policy above for an example).
If you have used the implicit trust behavior since June 30, 2022
If you have a role that has used the implicit trust behavior since June 30, 2022, then you will continue to be able to do so with that role until February 15, 2023. AWS will provide you with notice referencing those roles beginning today through your AWS Health Dashboard and will also send an email with the relevant information to the account owner and security contact. We are allowing time for you to make any necessary changes to your existing processes, code, or configurations to prepare for removal of the implicit trust behavior. If you can’t change your processes or code, you can continue to use the behavior by making a configuration change—namely, by updating the relevant role trust policies to reference the role itself. On the other hand, you can opt out of the old behavior at any time by creating a new role with a different Amazon Resource Name (ARN) with the desired identity-based and trust-policy-based permissions and substituting it for any older role that was identified as using the implicit trust behavior. (The new role will not be allow-listed, because the allow list is based on role ARNs.) You can also modify an existing allow-listed role’s trust policy to explicitly deny access to itself. See the “What should I do next?” section for more information.
Notifications and retirement
As we previously noted, starting today, accounts with existing roles that use the implicit self-assume role assumption behavior will be notified of this change by email and through their AWS Health Dashboard. Those roles have been allow-listed, and so for now their behavior will continue as before. After February 15, 2023, the old behavior will be retired for all roles and all accounts. IAM Documentation has been updated to make clear the new behavior.
After the old behavior is retired from the allow-listed roles and accounts, role sessions that make self-referential role assumption calls will fail with an Access Denied error unless the role’s trust policy explicitly grants the permission directly through a role ARN. Another option is to grant permission indirectly through an ARN to the root principal in the trust policy that acts as a delegation of privilege management, after which permission grants in identity-based policies determine access, similar to the typical cross-account case.
Which usage scenarios are likely to be impacted?
Users often attach an IAM role to an Amazon Elastic Compute Cloud (Amazon EC2) instance, an Amazon Elastic Container Service (Amazon ECS) task, or AWS Lambda function. Attaching a role to one of these runtime environments enables workloads to use short-term session credentials based on that role. For example, when an EC2 instance is launched, AWS automatically creates a role session and assigns it to the instance. An AWS best practice is for the workload to use these credentials to issue AWS API calls without explicitly requesting short-term credentials through sts:AssumeRole calls.
However, examples and code snippets commonly available on internet forums and community knowledge sharing sites might incorrectly suggest that workloads need to call sts:AssumeRole to establish short-term sessions credentials for operation within those environments.
We analyzed AWS Security Token Service (AWS STS) service metadata about role self-assumption in order to understand the use cases and possible impact of the change. What the data shows is that in almost all cases this behavior is occurring due to unnecessarily reassuming the role in an Amazon EC2, Amazon ECS, Amazon Elastic Kubernetes Services (EKS), or Lambda runtime environment already provided by the environment. There are two exceptions, discussed at the end of this section under the headings, “self-assumption with a scoped-down policy” and “assuming a target compute role during development.”
There are many variations on this theme, but overall, most role self-assumption occurs in scenarios where the person or code is unnecessarily reassuming the role that the code was already running as. Although this practice and code style can still work with a configuration change (by adding an explicit self-reference to the role trust policy), the better practice will almost always be to remove this unnecessary behavior or code from your AWS environment going forward. By removing this unnecessary behavior, you save CPU, memory, and network resources.
Common mistakes when using Amazon EKS
Some users of the Amazon EKS service (or possibly their shell scripts) use the command line interface (CLI) command aws eks get-token to obtain an authentication token for use in managing a Kubernetes cluster. The command takes as an optional parameter a role ARN. That parameter allows a user to assume another role other than the one they are currently using before they call get-token. However, the CLI cannot call that API without already having an IAM identity. Some users might believe that they need to specify the role ARN of the role they are already using. We have updated the Amazon EKS documentation to make clear that this is not necessary.
Common mistakes when using AWS Lambda
Another example is the use of an sts:AssumeRole API call from a Lambda function. The function is already running in a preassigned role provided by user configuration within the Lambda service, or else it couldn’t successfully call any authenticated API action, including sts:AssumeRole. However, some Lambda functions call sts:AssumeRole with the target role being the very same role that the Lambda function has already been provided as part of its configuration. This call is unnecessary.
AWS Software Development Kits (SDKs) all have support for running in AWS Lambda environments and automatically using the credentials provided in that environment. We have updated the Lambda documentation to make clear that such STS calls are unnecessary.
Common mistakes when using Amazon ECS
Customers can associate an IAM role with an Amazon ECS task to give the task AWS credentials to interact with other AWS resources.
We detected ECS tasks that call sts:AssumeRole on the same role that was provided to the ECS task. Amazon ECS makes the role’s credentials available inside the compute resources of the ECS task, whether on Amazon EC2 or AWS Fargate, and these credentials can be used to access AWS services or resources as the IAM role associated with the ECS talk, without being called through sts:AssumeRole. AWS handles renewing the credentials available on ECS tasks before the credentials expire. AWS STS role assumption calls are unnecessary, because they simply create a new set of the same temporary role session credentials.
AWS SDKs all have support for running in Amazon ECS environments and automatically using the credentials provided in that ECS environment. We have updated the Amazon ECS documentation to make clear that calling sts:AssumeRole for an ECS task is unnecessary.
Common mistakes when using Amazon EC2
Users can configure an Amazon EC2 instance to contain an instance profile. This instance profile defines the IAM role that Amazon EC2 assigns the compute instance when it is launched and begins to run. The role attached to the EC2 instance enables your code to send signed requests to AWS services. Without this attached role, your code would not be able to access your AWS resources (nor would it be able to call sts:AssumeRole). The Amazon EC2 service handles renewing these temporary role session credentials that are assigned to the instance before they expire.
We have observed that workloads running on EC2 instances call sts:AssumeRole to assume the same role that is already associated with the EC2 instance and use the resulting role-session for communication with AWS services. These role assumption calls are unnecessary, because they simply create a new set of the same temporary role session credentials.
AWS SDKs all have support for running in Amazon EC2 environments and automatically using the credentials provided in that EC2 environment. We have updated the Amazon EC2 documentation to make clear that calling sts:AssumeRole for an EC2 instance with a role assigned is unnecessary.
For information on creating an IAM role, attaching that role to an EC2 instance, and launching an instance with an attached role, see “IAM roles for Amazon EC2” in the Amazon EC2 User Guide.
Other common mistakes
If your use case does not use any of these AWS execution environments, you might still experience an impact from this change. We recommend that you examine the roles in your account and identify scenarios where your code (or human use through the AWS CLI) results in a role assuming itself. We provide Amazon Athena and AWS CloudTrail Lake queries later in this post to help you locate instances where a role assumed itself. For each instance, you can evaluate whether a role assuming itself is the right operation for your needs.
Self-assumption with a scoped-down policy
The first pattern we have observed that is not a mistake is the use of self-assumption combined with a scoped-down policy. Some systems use this approach to provide different privileges for different use cases, all using the same underlying role. Customers who choose to continue with this approach can do so by adding the role to its own trust policy. While the use of scoped-down policies and the associated least-privilege approach to permissions is a good idea, we recommend that customers switch to using a second generic role and assume that role along with the scoped-down policy rather than using role self-assumption. This approach provides more clarity in CloudTrail about what is happening, and limits the possible iterations of role assumption to one round, since the second role should not be able to assume the first. Another possible approach in some cases is to limit subsequent assumptions is by using an IAM condition in the role trust policy that is no longer satisfied after the first role assumption. For example, for Lambda functions, this would be done by a condition checking for the presence of the “lambda:SourceFunctionArn” property; for EC2, by checking for presence of “ec2:SourceInstanceARN.”
Assuming an expected target compute role during development
Another possible reason for role self-assumption may result from a development practice in which developers attempt to normalize the roles that their code is running in between scenarios in which role credentials are not automatically provided by the environment, and scenarios where they are. For example, imagine a developer is working on code that she expects to run as a Lambda function, but during development is using her laptop to do some initial testing of the code. In order to provide the same execution role as is expected later in product, the developer might configure the role trust policy to allow assumption by a principal readily available on the laptop (an IAM Identity Center role, for example), and then assume the expected Lambda function execution role when the code is initializing. The same approach could be used on a build and test server. Later, when the code is deployed to Lambda, the actual role is already available and in use, but the code need not be modified in order to provide the same post-role-assumption behavior that existing outside of Lambda: the unmodified code can automatically assume what is in this case the same role, and proceed. While this approach is not illogical, as with the scope-down policy case we recommend that customers configure distinct roles for assumption both in development and test environments as well as later production environments. Again, this approach provides more clarity in CloudTrail about what is happening, and limits the possible iterations of role assumption to one round, since the second role should not be able to assume the first.
What should I do next?
If you receive an email or AWS Health Dashboard notification for an account, we recommend that you review your existing role trust policies and corresponding code. For those roles, you should remove the dependency on the old behavior, or if you can’t, update those role trust policies with an explicit self-referential permission grant. After the grace period expires on February 15, 2023, you will no longer be able to use the implicit self-referential permission grant behavior.
If you currently use the old behavior and need to continue to do so for a short period of time in the context of existing infrastructure as code or other automated processes that create new roles, you can do so by adding the role’s ARN to its own trust policy. We strongly encourage you to treat this as a temporary stop-gap measure, because in almost all cases it should not be necessary for a role to be able to assume itself, and the correct solution is to change the code that results in the unnecessary self-assumption. If for some reason that self-service solution is not sufficient, you can reach out to AWS Support to seek an accommodation of your use case for new roles or accounts.
If you make any necessary code or configuration changes and want to remove roles that are currently allow-listed, you can also ask AWS Support to remove those roles from the allow list so that their behavior follows the new model. Or, as previously noted, you can opt out of the old behavior at any time by creating a new role with a different ARN that has the desired identity-based and trust-policy–based permissions and substituting it for the allow-listed role. Another stop-gap type of option is to add an explicit deny that references the role to its own trust policy.
If you would like to understand better the history of your usage of role self-assumption in a given account or organization, you can follow these instructions on querying CloudTrail data with Athena and then use the following Athena query against your account or organization CloudTrail data, as stored in Amazon Simple Storage Services (Amazon S3). The results of the query can help you understand the scenarios and conditions and code involved. Depending on the size of your CloudTrail logs, you may need to follow the partitioning instructions to query subsets of your CloudTrail logs sequentially. If this query yields no results, the role self-assumption scenario described in this blog post has never occurred within the analyzed CloudTrail dataset.
SELECT eventid, eventtime, userIdentity.sessioncontext.sessionissuer.arn as RoleARN, split_part(userIdentity.principalId, ':', 2) as RoleSessionName from cloudtrail_logs t CROSS JOIN UNNEST(t.resources) unnested (resources_entry) where eventSource = 'sts.amazonaws.com' and eventName = 'AssumeRole' and userIdentity.type = 'AssumedRole' and errorcode IS NULL and substr(userIdentity.sessioncontext.sessionissuer.arn,12) = substr(unnested.resources_entry.ARN,12)
As another option, you can follow these instructions to set up CloudTrail Lake to perform a similar analysis. CloudTrail Lake allows richer, faster queries without the need to partition the data. As of September 20, 2022, CloudTrail Lake now supports import of CloudTrail logs from Amazon S3. This allows you to perform a historical analysis even if you haven’t previously enabled CloudTrail Lake. If this query yields no results, the scenario described in this blog post has never occurred within the analyzed CloudTrail dataset.
SELECT eventid, eventtime, userIdentity.sessioncontext.sessionissuer.arn as RoleARN, userIdentity.principalId as RoleIdColonRoleSessionName from $EDS_ID where eventSource = 'sts.amazonaws.com' and eventName = 'AssumeRole' and userIdentity.type = 'AssumedRole' and errorcode IS NULL and userIdentity.sessioncontext.sessionissuer.arn = element_at(resources,1).arn
Understanding the change: more details
To better understand the background of this change, we need to review the IAM basics of identity-based policies and resource-based policies, and then explain some subtleties and exceptions. You can find additional overview material in the IAM documentation.
The structure of each IAM policy follows the same basic model: one or more statements with an effect (allow or deny), along with principals, actions, resources, and conditions. Although the identity-based and resource-based policies share the same basic syntax and semantics, the former is associated with a principal, the latter with a resource. The main difference between the two is that identity-based policies do not specify the principal, because that information is supplied implicitly by associating the policy with a given principal. On the other hand, resource policies do not specify an arbitrary resource, because at least the primary identifier of the resource (for example, the bucket identifier of an S3 bucket) is supplied implicitly by associating the policy with that resource. Note that an IAM role is the only kind of AWS object that is both a principal and a resource.
In most cases, access to a resource within the same AWS account can be granted by either an identity-based policy or a resource-based policy. Consider an Amazon S3 example. An identity-based policy attached to an IAM principal that allows the s3:GetObject action does not require an equivalent grant in the S3 bucket resource policy. Conversely, an s3:GetObject permission grant in a bucket’s resource policy is all that is needed to allow a principal in the same account to call the API with respect to that bucket; an equivalent identity-based permission is not required. Either the identity-based policy or the resource-based policy can grant the necessary permission. For more information, see IAM policy types: How and when to use them.
However, in order to more tightly govern access to certain security-sensitive resources, such as AWS Key Management Service (AWS KMS) keys and IAM roles, those resource policies need to grant access to the IAM principal explicitly, even within the same AWS account. A role trust policy is the resource policy associated with a role that specifies which IAM principals can assume the role by using one of the sts:AssumeRole* API calls. For example, in order for RoleB to assume RoleA in the same account, whether or not RoleB’s identity-based policy explicitly allows it to assume RoleA, RoleA’s role trust policy must grant access to RoleB. Within the same account, an identity-based permission by itself is not sufficient to allow assumption of a role. On the other hand, a resource-based permission—a grant of access in the role trust policy—is sufficient. (Note that it’s possible to construct a kind of hybrid permission to a role by using both its resource policy and other identity-based policies. In that case, the role trust policy grants permission to the root principal ARN; after that, the identity-based policy of a principal in that account would need to explicitly grant permission to assume that role. This is analogous to the typical cross-account role trust scenario.)
Until now, there has been a nonintuitive exception to these rules for situations where a role assumes itself. Since a role is both a principal (potentially with an identity-based policy) and a resource (with a resource-based policy), it is in the unique position of being both a subject and an object within the IAM system, as well as being an object owned by itself rather than its containing account. Due to this ownership model, roles with identity-based permission to assume themselves implicitly trusted themselves as resources, and vice versa. That is to say, roles that had the privilege as principals to assume themselves implicitly trusted themselves as resources, without an explicit self-referential Allow in the role trust policy. Conversely, a grant of permission in the role trust policy was sufficient regardless of whether there was a grant in the same role’s identity-based policy. Thus, in the self-assumption case, roles behaved like most other resources in the same account: only a single permission was required to allow role self-assumption, either on the identity side or the resource side of their dual-sided nature. Because of a role’s implicit trust of itself as a resource, the role’s trust policy—which might otherwise limit assumption of the role with properties such as actions and conditions—was not applied, unless it contained an explicit deny of itself.
The following example is a role trust policy attached to the role named RoleA in account 123456789012. It grants explicit access only to the role named RoleB.
Assuming that the corresponding identity-based policy for RoleA granted the sts:AssumeRole action with regard to RoleA, this role trust policy provided that there were two roles that could assume RoleA: RoleB (explicitly referenced in the trust policy) and RoleA (assuming it was explicitly referenced in its identity policy). RoleB could assume RoleA only if it had the principal tag project:BlueSkyProject because of the trust policy condition. (The sts:TagSession permission is needed here in case tags need to be added by the caller as parted of the RoleAssumption call.) RoleA, on the other hand, did not need to meet that condition because it relied on a different explicit permission—the one granted in the identity-based policy. RoleA would have needed the principal tag project:BlueSkyProject to meet the trust policy condition if and only if it was relying on the trust policy to gain access through the sts:AssumeRole action; that is, in the case where its identity-based policy did not provide the needed privilege.
As we previously noted, after considering feedback from customers on this topic, AWS has decided that requiring self-referential role trust policy grants even in the case where the identity-based policy also grants access is the better approach to delivering consistency and visibility with regard to role behavior and privileges. Therefore, as of today, role assumption behavior requires an explicit self-referential permission in the role trust policy, and the actions and conditions within that policy must also be satisfied, regardless of the permissions expressed in the role’s identity-based policy. (If permissions in the identity-based policy are present, they must also be satisfied.)
Requiring self-reference in the trust policy makes role trust policy evaluation consistent regardless of which role is seeking to assume the role. Improved consistency makes role permissions easier to understand and manage, whether through human inspection or security tooling. This change also eliminates the possibility of continuing the lifetime of an otherwise temporary credential without explicit, trackable grants of permission in trust policies. It also means that trust policy constraints and conditions are enforced consistently, regardless of which principal is assuming the role. Finally, as previously noted, this change allows customers to create and understand role assumption permissions in a single place (the role trust policy) rather than two places (the role trust policy and the role identity policy). It increases the simplicity of role trust permission management: “what you see [in the trust policy] is what you get.”
Continuing with the preceding example, if you need to allow a role to assume itself, you now must update the role trust policy to explicitly allow both RoleB and RoleA. The RoleA trust policy now looks like the following:
Without this new principal grant, the role can no longer assume itself. The trust policy conditions are also applied, even if the role still has unconditioned access to itself in its identity-based policy.
Conclusion
In this blog post we’ve reviewed the old and new behavior of role assumption in the case where a role seeks to assume itself. We’ve seen that, according to our analysis of service metadata, the vast majority of role self-assumption behavior that relies solely on identity-based privileges is totally unnecessary, because the code (or human) who calls sts:AssumeRole is already, without realizing it, using the role’s credentials to call the AWS STS API. Eliminating that mistake will improve performance and decrease resource consumption. We’ve also explained in more depth the reasons for the old behavior and the reasons for making the change, and provided Athena and CloudTrail Lake queries that you can use to examine past or (in the case of allow-listed roles) current self-assumption behavior in your own environments. You can reach out to AWS Support or your customer account team if you need help in this effort.
If you currently use the old behavior and need to continue to do so, your primary option is to create an explicit allow for the role in its own trust policy. If that option doesn’t work due to operational constraints, you can reach out to AWS Support to seek an accommodation of your use case for new roles or new accounts. You can also ask AWS Support to remove roles from the allow-list if you want their behavior to follow the new model.
If you have feedback about this post, submit comments in the Comments section below. If you have questions about this post, start a new IAM-tagged discussion on AWS re:Post or contact AWS Support.
AWS would like to thank several customers and partners who highlighted this behavior as something they found surprising and unhelpful, and asked us to consider making this change. We would also like to thank independent security researcher Ryan Gerstenkorn who engaged with AWS on this topic and worked with us prior to this update.
Want more AWS Security news? Follow us on Twitter.
ROSA is a fully managed service, jointly supported by AWS and Red Hat. It is managed by Red Hat Site Reliability Engineers and provides a pay-as-you-go pricing model, as well as a unified billing experience on AWS.
With this, customers do not manage the lifecycle of Red Hat OpenShift Container Platform clusters. Instead, they are free to focus on developing new solutions and innovating faster, using IBM’s integrated data and artificial intelligence platform on AWS, to differentiate their business and meet their ever-changing enterprise needs.
CP4D can also be deployed from the AWS Marketplace with self-managed OpenShift clusters. This is ideal for customers with requirements, like Red Hat OpenShift Data Foundation software defined storage, or who prefer to manage their OpenShift clusters.
In this post, we discuss how to deploy CP4D on ROSA using IBM-provided Terraform automation.
Cloud Pak for data architecture
Here, we install CP4D in a highly available ROSA cluster across three availability zones (AZs); with three master nodes, three infrastructure nodes, and three worker nodes.
This is a public ROSA cluster, accessible from the internet via port 443. When deploying CP4D in your AWS account, consider using a private cluster (Figure 1).
Next, let’s create an IAM user from the AWS IAM console, which will be used for the CP4D installation: a. Specify a name, like ibm-cp4d-bastion. b. Set the credential type to Access key – Programmatic access. c. Attach the IAM policy created in Step 3. d. Download the .csv credentials file.
Launch an Amazon EC2 instance from which the CP4D installer is launched: a. Specify a name, like ibm-cp4d-bastion. b. Select an instance type, such as t3.medium. c. Select the EC2 key pair created in Step 4. d. Select the Red Hat Enterprise Linux 8 (HVM), SSD Volume Type for 64-bit (x86)Amazon Machine Image. e. Create a security group with an inbound rule that allows connection. Restrict access to your own IP address or an IP range from your organization. f. Leave all other values as default.
Connect to the EC2 instance via SSH using its public IP address. The remaining installation steps will be initiated from it.
$ cd ~/cp4d-deployment/managed-openshift/aws/terraform/
For the purpose of this post, we enabled Watson Machine Learning, Watson Studio, and Db2 OLTP services on CP4D. Use the example in this step to create a Terraform variables file for CP4D installation. Enable CP4D services required for your use case:
The installation runs for 4 or more hours. Once installation is complete, the output includes (as in Figure 3): a. Commands to get the CP4D URL and the admin user password b. CP4D admin user c. Login command for the ROSA cluster
Figure 3. CP4D installation output
Validation steps
Let’s verify the installation!
Log in to your ROSA cluster using your cluster-admin credentials.
Initiate the following command to get the cluster’s console URL (Figure 4):
$ oc whoami --show-console
Figure 4. ROSA console URL
Run the commands in this step to retrieve the CP4D URL and admin user password (Figure 5).
$ oc extract secret/admin-user-details \
  --keys=initial_admin_password --to=- -n zen
$ oc get routes -n zen
Figure 5. Retrieve the CP4D admin user password and URL
Initiate the following commands to have the CP4D workloads in your ROSA cluster (Figure 6):
$ oc get pods -n zen
$ oc get deployments -n zen
$ oc get svc -n zen
$ oc get pods -n ibm-common-services
$ oc get deployments -n ibm-common-services
$ oc get svc -n ibm-common-services
$ oc get subs -n ibm-common-services
Figure 6. Checking the CP4D pods running on ROSA
Log in to your CP4D web console using its URL and your admin password.
Expand the navigation menu. Navigate to Services > Services catalog for the available services (Figure 7).
Figure 7. Navigating to the CP4D services catalog
Notice that the services set as “enabled” correspond with your Terraform definitions (Figure 8).
Figure 8. Services enabled in your CP4D catalog
Congratulations! You have successfully deployed IBM CP4D on Red Hat OpenShift on AWS.
Post installation
Refer to the IBM documentation on setting up services, if you need to enable additional services on CP4D.
Connect to your bastion host, and run the following steps to delete the CP4D installation, including ROSA. This step avoids incurring future charges on your AWS account.
$ cd ~/cp4d-deployment/managed-openshift/aws/terraform/
$ terraform destroy -var-file="cp4d-rosa-3az-new-vpc.tfvars"
If you’ve experienced any failures during the CP4D installation, run these next steps:
In summary, we explored how customers can take advantage of a fully managed OpenShift service on AWS to run IBM CP4D. With this implementation, customers can focus on what is important to them, their workloads, and their customers, and less on managing the day-to-day operations of managing OpenShift to run CP4D.
When building serverless applications using AWS Lambda, there are a number of considerations regarding security, governance, and compliance. This post highlights how Lambda, as a serverless service, simplifies cloud security and compliance so you can concentrate on your business logic. It covers controls that you can implement for your Lambda workloads to ensure that your applications conform to your organizational requirements.
The Shared Responsibility Model
The AWS Shared Responsibility Model distinguishes between what AWS is responsible for and what customers are responsible for with cloud workloads. AWS is responsible for “Security of the Cloud” where AWS protects the infrastructure that runs all the services offered in the AWS Cloud. Customers are responsible for “Security in the Cloud”, managing and securing their workloads. When building traditional applications, you take on responsibility for many infrastructure services, including operating systems and network configuration.
Traditional application shared responsibility
One major benefit when building serverless applications is shifting more responsibility to AWS so you can concentrate on your business applications. AWS handles managing and patching the underlying servers, operating systems, and networking as part of running the services.
Serverless application shared responsibility
For Lambda, AWS manages the application platform where your code runs, which includes patching and updating the managed language runtimes. This reduces the attack surface while making cloud security simpler. You are responsible for the security of your code and AWS Identity and Access Management (IAM) to the Lambda service and within your function.
Lambda functions run in separate isolated AWS accounts that are dedicated to the Lambda service. Lambda invokes your code in a secure and isolated runtime environment within the Lambda service account. A runtime environment is a collection of resources running in a dedicated hardware-virtualized Micro Virtual Machines (MVM) on a Lambda worker node.
Lambda workers are bare metalEC2 Nitro instances, which are managed and patched by the Lambda service team. They have a maximum lease lifetime of 14 hours to keep the underlying infrastructure secure and fresh. MVMs are created by Firecracker, an open source virtual machine monitor (VMM) that uses Linux’s Kernel-based Virtual Machine (KVM) to create and manage MVMs securely at scale.
MVMs maintain a strong separation between runtime environments at the virtual machine hardware level, which increases security. Runtime environments are never reused across functions, function versions, or AWS accounts.
Isolation model for AWS Lambda workers
Network security
Lambda functions always run inside secure Amazon Virtual Private Cloud (Amazon VPCs) owned by the Lambda service. This gives the Lambda function access to AWS services and the public internet. There is no direct network inbound access to Lambda workers, runtime environments, or Lambda functions. All inbound access to a Lambda function only comes via the Lambda Invoke API, which sends the event object to the function handler.
You can configure a Lambda function to connect to private subnets in a VPC in your account if necessary, which you can control with IAM condition keys . The Lambda function still runs inside the Lambda service VPC but sends all network traffic through your VPC. Function outbound traffic comes from your own network address space.
AWS Lambda service VPC with VPC-to-VPC NAT to customer VPC
To give your VPC-connected function access to the internet, route outbound traffic to a NAT gateway in a public subnet. Connecting a function to a public subnet doesn’t give it internet access or a public IP address, as the function is still running in the Lambda service VPC and then routing network traffic into your VPC.
All internal AWS traffic uses the AWS Global Backbone rather than traversing the internet. You do not need to connect your functions to a VPC to avoid connectivity to AWS services over the internet. VPC connected functions allow you to control and audit outbound network access.
You can use security groups to control outbound traffic for VPC-connected functions and network ACLs to block access to CIDR IP ranges or ports. VPC endpoints allow you to enable private communications with supported AWS services without internet access.
You can use VPC Flow Logs to audit traffic going to and from network interfaces in your VPC.
Runtime environment re-use
Each runtime environment processes a single request at a time. After Lambda finishes processing the request, the runtime environment is ready to process an additional request for the same function version. For more information on how Lambda manages runtime environments, see Understanding AWS Lambda scaling and throughput.
Data can persist in the local temporary filesystem path, in globally scoped variables, and in environment variables across subsequent invocations of the same function version. Ensure that you only handle sensitive information within individual invocations of the function by processing it in the function handler, or using local variables. Do not re-use files in the local temporary filesystem to process unencrypted sensitive data. Do not put sensitive or confidential information into Lambda environment variables, tags, or other freeform fields such as Name fields.
AWS recommends using multiple accounts to isolate your resources because they provide natural boundaries for security, access, and billing. Use AWS Organizations to manage and govern individual member accounts centrally. You can use AWS Control Tower to automate many of the account build steps and apply managed guardrails to govern your environment. These include preventative guardrails to limit actions and detective guardrails to detect and alert on non-compliance resources for remediation.
Lambda access controls
Lambda permissions define what a Lambda function can do, and who or what can invoke the function. Consider the following areas when applying access controls to your Lambda functions to ensure least privilege:
Execution role
Lambda functions have permission to access other AWS resources using execution roles. This is an AWS principal that the Lambda service assumes which grants permissions using identity policy statements assigned to the role. The Lambda service uses this role to fetch and cache temporary security credentials, which are then available as environment variables during a function’s invocation. It may re-use them across different runtime environments that use the same execution role.
Ensure that each function has its own unique role with the minimum set of permissions..
Identity/user policies
IAM identity policies are attached to IAM users, groups, or roles. These policies allow users or callers to perform operations on Lambda functions. You can restrict who can create functions, or control what functions particular users can manage.
Resource policies
Resource policies define what identities have fine-grained inbound access to managed services. For example, you can restrict which Lambda function versions can add events to a specific Amazon EventBridge event bus. You can use resource-based policies on Lambda resources to control what AWS IAM identities and event sources can invoke a specific version or alias of your function. You also use a resource-based policy to allow an AWS service to invoke your function on your behalf. To see which services support resource-based policies, see “AWS services that work with IAM”.
Attribute-based access control (ABAC)
With attribute-based access control (ABAC), you can use tags to control access to your Lambda functions. With ABAC, you can scale an access control strategy by setting granular permissions with tags without requiring permissions updates for every new user or resource as your organization scales. You can also use tag policies with AWS Organizations to standardize tags across resources.
Permissions boundaries
Permissions boundaries are a way to delegate permission management safely. The boundary places a limit on the maximum permissions that a policy can grant. For example, you can use boundary permissions to limit the scope of the execution role to allow only read access to databases. A builder with permission to manage a function or with write access to the applications code repository cannot escalate the permissions beyond the boundary to allow write access.
Service control policies
When using AWS Organizations, you can use Service control policies (SCPs) to manage permissions in your organization. These provide guardrails for what actions IAM users and roles within the organization root or OUs can do. For more information, see the AWS Organizations documentation, which includes example service control policies.
Code signing
As you are responsible for the code that runs in your Lambda functions, you can ensure that only trusted code runs by using code signing with the AWS Signer service. AWS Signer digitally signs your code packages and Lambda validates the code package before accepting the deployment, which can be part of your automated software deployment process.
Auditing Lambda configuration, permissions and access
You should audit access and permissions regularly to ensure that your workloads are secure. Use the IAM console to view when an IAM role was last used.
IAM last used
IAM access advisor
Use IAM access advisor on the Access Advisor tab in the IAM console to review when was the last time an AWS service was used from a specific IAM user or role. You can use this to remove IAM policies and access from your IAM roles.
You can validate policies using IAM Access Analyzer, which provides over 100 policy checks with security warnings for overly permissive policies. To learn more about policy checks provided by IAM Access Analyzer, see “IAM Access Analyzer policy validation”.
You can also generate IAM policies based on access activity from CloudTrail logs, which contain the permissions that the role used in your specified date range.
IAM Access Analyzer
AWS Config
AWS Config provides you with a record of the configuration history of your AWS resources. AWS Config monitors the resource configuration and includes rules to alert when they fall into a non-compliant state.
For Lambda, you can track and alert on changes to your function configuration, along with the IAM execution role. This allows you to gather Lambda function lifecycle data for potential audit and compliance requirements. For more information, see the Lambda Operators Guide.
Lambda makes cloud security simpler by taking on more responsibility using the AWS Shared Responsibility Model. Lambda implements strict workload security at scale to isolate your code and prevent network intrusion to your functions. This post provides guidance on assessing and implementing best practices and tools for Lambda to improve your security, governance, and compliance controls. These include permissions, access controls, multiple accounts, and code security. Learn how to audit your function permissions, configuration, and access to ensure that your applications conform to your organizational requirements.
For more serverless learning resources, visit Serverless Land.
AWS re:Inforce returned to Boston last week, kicking off with a keynote from Amazon Chief Security Officer Steve Schmidt and AWS Chief Information Security officer C.J. Moses:
Be sure to take some time to watch this video and the other leadership sessions, and to use what you learn to take some proactive steps to improve your security posture.
Last Week’s Launches Here are some launches that caught my eye last week:
AWS Wickr uses 256-bit end-to-end encryption to deliver secure messaging, voice, and video calling, including file sharing and screen sharing, across desktop and mobile devices. Each call, message, and file is encrypted with a new random key and can be decrypted only by the intended recipient. AWS Wickr supports logging to a secure, customer-controlled data store for compliance and auditing, and offers full administrative control over data: permissions, ephemeral messaging options, and security groups. You can now sign up for the preview.
AWS Marketplace Vendor Insights helps AWS Marketplace sellers to make security and compliance data available through AWS Marketplace in the form of a unified, web-based dashboard. Designed to support governance, risk, and compliance teams, the dashboard also provides evidence that is backed by AWS Config and AWS Audit Manager assessments, external audit reports, and self-assessments from software vendors. To learn more, read the What’s New post.
GuardDuty Malware Protection protects Amazon Elastic Block Store (EBS) volumes from malware. As Danilo describes in his blog post, a malware scan is initiated when Amazon GuardDuty detects that a workload running on an EC2 instance or in a container appears to be doing something suspicious. The new malware protection feature creates snapshots of the attached EBS volumes, restores them within a service account, and performs an in-depth scan for malware. The scanner supports many types of file systems and file formats and generates actionable security findings when malware is detected.
Amazon Neptune Global Database lets you build graph applications that run across multiple AWS Regions using a single graph database. You can deploy a primary Neptune cluster in one region and replicate its data to up to five secondary read-only database clusters, with up to 16 read replicas each. Clusters can recover in minutes in the result of an (unlikely) regional outage, with a Recovery Point Objective (RPO) of 1 second and a Recovery Time Objective (RTO) of 1 minute. To learn a lot more and see this new feature in action, read Introducing Amazon Neptune Global Database.
Amazon Detective now Supports Kubernetes Workloads, with the ability to scale to thousands of container deployments and millions of configuration changes per second. It ingests EKS audit logs to capture API activity from users, applications, and the EKS control plane, and correlates user activity with information gleaned from Amazon VPC flow logs. As Channy notes in his blog post, you can enable Amazon Detective and take advantage of a free 30 day trial of the EKS capabilities.
AWS SSO is Now AWS IAM Identity Center in order to better represent the full set of workforce and account management capabilities that are part of IAM. You can create user identities directly in IAM Identity Center, or you can connect your existing Active Directory or standards-based identify provider. To learn more, read this post from the AWS Security Blog.
AWS Config Conformance Packs now provide you with percentage-based scores that will help you track resource compliance within the scope of the resources addressed by the pack. Scores are computed based on the product of the number of resources and the number of rules, and are reported to Amazon CloudWatch so that you can track compliance trends over time. To learn more about how scores are computed, read the What’s New post.
Amazon Macie now lets you perform one-click temporary retrieval of sensitive data that Macie has discovered in an S3 bucket. You can retrieve up to ten examples at a time, and use these findings to accelerate your security investigations. All of the data that is retrieved and displayed in the Macie console is encrypted using customer-managed AWS Key Management Service (AWS KMS) keys. To learn more, read the What’s New post.
AWS Control Tower was updated multiple times last week. CloudTrail Organization Logging creates an org-wide trail in your management account to automatically log the actions of all member accounts in your organization. Control Tower now reduces redundant AWS Config items by limiting recording of global resources to home regions. To take advantage of this change you need to update to the latest landing zone version and then re-register each Organizational Unit, as detailed in the What’s New post. Lastly, Control Tower’s region deny guardrail now includes AWS API endpoints for AWS Chatbot, Amazon S3 Storage Lens, and Amazon S3 Multi Region Access Points. This allows you to limit access to AWS services and operations for accounts enrolled in your AWS Control Tower environment.
Other AWS News Here are some other news items and customer stories that you may find interesting:
AWS Open Source News and Updates – My colleague Ricardo Sueiras writes a weekly open source newsletter and highlights new open source projects, tools, and demos from the AWS community. Read installment #122 here.
Growy Case Study – This Netherlands-based company is building fully-automated robot-based vertical farms that grow plants to order. Read the case study to learn how they use AWS IoT and other services to monitor and control light, temperature, CO2, and humidity to maximize yield and quality.
Cutting Cardboard Waste – Bin packing is almost certainly a part of every computer science curriculum! In the linked article from the Amazon Science site, you can learn how an Amazon Principal Research Scientist developed PackOpt to figure out the optimal set of boxes to use for shipments from Amazon’s global network of fulfillment centers. This is an NP-hard problem and the article describes how they build a parallelized solution that explores a multitude of alternative solutions, all running on AWS.
Upcoming Events Check your calendar and sign up for these online and in-person AWS events:
AWS Global Summits – AWS Global Summits are free events that bring the cloud computing community together to connect, collaborate, and learn about AWS. Registrations are open for the following AWS Summits in August:
IMAGINE 2022 – The IMAGINE 2022 conference will take place on August 3 at the Seattle Convention Center, Washington, USA. It’s a no-cost event that brings together education, state, and local leaders to learn about the latest innovations and best practices in the cloud. You can register here.
That’s all for this week. Check back next Monday for another Week in Review!
A few weeks ago, we hosted the first EMEA AWS Heroes Summit in Milan, Italy. This past week, I had the privilege to join the Americas AWS Heroes Summit in Seattle, Washington, USA. Meeting with our community experts is always inspiring and a great opportunity to learn from each other. During the Summit, AWS Heroes from North America and Latin America shared their thoughts with AWS developer advocates and product teams on topics such as serverless, containers, machine learning, data, and DevTools. You can learn more about the AWS Heroes program here.
Last Week’s Launches Here are some launches that got my attention during the previous week:
Cloudscape Design System – Cloudscape is an open source design system for creating web applications. It was built for and is used by AWS products and services. We created it in 2016 to improve the user experience across web applications owned by AWS services and also to help teams implement those applications faster. If you’ve ever used the AWS Management Console, you’ve seen Cloudscape in action. If you are building a product that extends the AWS Management Console, designing a user interface for a hybrid cloud management system, or setting up an on-premises solution that uses AWS, have a look at Cloudscape Design System.
AWS re:Post introduces community-generated articles – AWS re:Post gives you access to a vibrant community that helps you become even more successful on AWS. Expert community members can now share technical guidance and knowledge beyond answering questions through the Articles feature. Using this feature, community members can share best practices and troubleshooting processes and address customer needs around AWS technology in greater depth. The Articles feature is unlocked for community members who have achieved Rising Star status on re:Post or subject matter experts who built their reputation in the community based on their contributions and certifications. If you have a Rising Star status on re:Post, start writing articles now! All other members can unlock Rising Star status through community contributions or simply browse available articles today on re:Post.
AWS Lambda announces support for attribute-based access control (ABAC) and new IAM condition key – You can now use attribute-based access control (ABAC) with AWS Lambda to control access to functions within AWS Identity and Access Management (IAM) using tags. ABAC is an authorization strategy that defines access permissions based on attributes. In AWS, these attributes are called tags. With ABAC, you can scale an access control strategy by setting granular permissions with tags without requiring permissions updates for every new user or resource as your organization scales. Read this blog post by Julian Wood and Chris McPeek to learn more.
AWS Lambda also announced support for lambda:SourceFunctionArn, a new IAM condition key that can be used for IAM policy conditions that specify the Amazon Resource Name (ARN) of the function from which a request is made. You can use the Condition element in your IAM policy to compare the lambda:SourceFunctionArn condition key in the request context with values that you specify in your policy. This allows you to implement advanced security controls for the AWS API calls taken by your Lambda function code. For more details, have a look at the Lambda Developer Guide.
Amazon Fraud Detector launches Account Takeover Insights (ATI) – Amazon Fraud Detector now supports an Account Takeover Insights (ATI) model, a low-latency fraud detection machine learning model specifically designed to detect accounts that have been compromised through stolen credentials, phishing, social engineering, or other forms of account takeover. The ATI model is designed to detect up to four times more ATI fraud than traditional rules-based account takeover solutions while minimizing the level of friction for legitimate users. To learn more, have a look at the Amazon Fraud Detector documentation.
Amazon EMR on EC2 clusters (EMR Clusters) introduces more fine-grained access controls – Previously, all jobs running on an EMR cluster used the IAM role associated with the EMR cluster’s EC2 instances to access resources. This role is called the EMR EC2 instance profile. With the new runtime roles for Amazon EMR Steps, you can now specify a different IAM role for your Apache Spark and Hive jobs, scoping down access at a job level. This simplifies access controls on a single EMR cluster that is shared between multiple tenants, wherein each tenant is isolated using IAM roles. You can now also enforce table and column permissions based on your Amazon EMR runtime role to manage your access to data lakes with AWS Lake Formation. For more details, read the What’s New post.
Other AWS News Here are some additional news and customer stories you may find interesting:
AWS open-source news and updates – My colleague Ricardo Sueiras writes this weekly open-source newsletter in which he highlights new open-source projects, tools, and demos from the AWS Community. Read edition #121 here.
AI Use Case Explorer – If you are interested in AI use cases, have a look at the new AI Use Case Explorer. You can search over 100 use cases and 400 customer success stories by industry, business function, and the business outcome you want to achieve.
Bayer centralizes and standardizes data from the carbon program using AWS – To help Brazilian farmers adopt climate-smart agricultural practices and reduce carbon emissions in their activities, Bayer created the Carbon Program, which aims to build carbon-neutral agriculture practices. Learn how Bayer uses AWS to centralize and standardize the data received from the different partners involved in the project in this Bayer case study.
Upcoming AWS Events Check your calendars and sign up for these AWS events:
AWS Global Summits – AWS Global Summits are free events that bring the cloud computing community together to connect, collaborate, and learn about AWS. Registrations are open for the following AWS Summits in August:
IMAGINE 2022 – The IMAGINE 2022 conference will take place on August 3 at the Seattle Convention Center, Washington, USA. It’s a no-cost event that brings together education, state, and local leaders to learn about the latest innovations and best practices in the cloud. You can register here.
I’ll be speaking at Data Con LA on August 13–14 in Los Angeles, California, USA. Feel free to say “Hi!” if you’re around. And if you happen to be at Ray Summit on August 23–24 in San Francisco, California, USA, stop by the AWS booth. I’ll be there to discuss all things Ray on AWS.
That’s all for this week. Check back next Monday for another Week in Review!
This blog post is written by Chris McPeek, Principal Solutions Architect.
AWS Lambda now supports attribute-based access control (ABAC), allowing you to control access to Lambda functions within AWS Identity and Access Management (IAM) using tags. With ABAC, you can scale an access control strategy by setting granular permissions with tags without requiring permissions updates for every new user or resource as your organization scales.
This blog post shows how to use tags for conditional access to Lambda resources. You can control access to Lambda resources using ABAC by using one or more tags within IAM policy conditions. This can help you scale permissions in rapidly growing environments. To learn more about ABAC, see What is ABAC for AWS, and AWS Services that work with IAM.
Each tag in AWS is a label comprising a user-defined key and value. Customers often use tags with Lambda functions to define keys such as cost center, environment, project, and teams, along with values that map to these keys. This helps with discovery and cost allocation, especially in accounts that may have many Lambda functions. AWS best practices for tagging are included in Tagging AWS resources.
You can now use these same tags, or create new ones, and use them to grant conditional IAM access to Lambda functions more easily. As projects start and finish, employees move to different teams, and applications grow, maintaining access to resources can become cumbersome. ABAC helps developers and security administrators work together to maintain least privilege access to their resources more effectively by using the same tags on IAM roles and Lambda functions. Security administrators can allow or deny access to Lambda API actions when the IAM role tags match the tags on a Lambda function, ensuring least privilege. As developers add additional Lambda functions to the project, they simply apply the same tag when they create a new Lambda function, which grants the same security credentials.
ABAC in Lambda
Using ABAC with Lambda is similar to developing ABAC policies when working with other services. To illustrate how to use ABAC with Lambda, consider a scenario where two new developers join existing projects called Project Falcon and Project Eagle. Project Falcon uses ABAC for authorization using the tag key project-name and value falcon. Project Eagle uses the tag key project-name and value eagle.
Projects Falcon and Eagle tags
The two new developers need access to the Lambda console. The security administrator creates the following policy to allow the developers to list the existing functions that are available using ListFunction. The GetAccountSettings permission allows them to retrieve Lambda-specific information about their account.
The developers then need access to Lambda actions that are part of their projects. The Lambda actions are API calls such as InvokeFunction or PutFunctionConcurrency (see the following table). IAM condition keys are then used to refine the conditions under which an IAM policy statement applies.
Lambda supports the existing global context key:
"aws:PrincipalTag/${TagKey}": Control what the IAM principal (the person making the request) is allowed to do based on the tags that are attached to their IAM user or role.
As part of ABAC support, Lambda now supports three additional condition keys:
"aws:ResourceTag/${TagKey}": Control access based on the tags that are attached to Lambda functions.
"aws:RequestTag/${TagKey}": Require tags to be present in a request, such as when creating a new function.
"aws:TagKeys": Control whether specific tag keys can be used in a request.
When using condition keys in IAM policies, each Lambda API action supports different tagging condition keys. The following table maps each condition key to its Lambda actions.
Condition keys supported
Description
Lambda actions
aws:ResourceTag/${TagKey}
Set this tag value to allow or deny user actions on resources with specific tags.
Set this tag value to allow or deny user requests to add or update tags.
lambda:TagResource
aws:ResourceTag/${TagKey}
 aws:TagKeys
Set this tag value to allow or deny user requests to remove tags.
lambda:UntagResource
Security administrators create conditions that only permit the action if the tag matches between the role and the Lambda function. In this example, the policy grants access to all Lambda function API calls when a project-name tag exists and matches on both the developer’s IAM role and the Lambda function.
In this policy, Resource is wild-carded as "*" for all Lambda functions. The condition limits access to only resources that have the same project-name key and value, without having to list each individual Amazon Resource Name (ARN).
The security administrator creates an IAM role for each developer’s project, such as falcon-developer-role or eagle-developer-role. Since the policy references both the function tags and the IAM role tags, she can reuse the previous policy and apply it to both of the project roles. Each role should have the tag key project-name with the value set to the project, such as falcon or eagle. The following shows the tags for Project Falcon:
Tags for Project Falcon
The developers now have access to the existing Lambda functions in their respective projects. The developer for Project Falcon needs to create additional Lambda functions for only their project. Since the project-name tag also authorizes who can access the function, the developer should not be able to create a function without the correct tags. To enforce this, the security administrator applies a new policy to the developer’s role using the RequestTag condition key to specify that a project-name tag exists:
To create the functions, the developer must add the key project-name and value falcon to the tags. Without the tag, the developer cannot create the function.
Project Falcon tags
Because Project Falcon is using ABAC, by tagging the Lambda functions during creation, they did not need to engage the security administrator to add additional ARNs to the IAM policy. This provides flexibility to the developers to support their projects. This also helps scale the security administrators’ function by no longer needing to coordinate which resources need to be added to IAM policies to maintain least privilege access.
The project must then add a manager who requires read access to projects as long as they are also in the organization labeled birds and cost-center : it.
Organization and Cost Center tags
The security administrator creates a new IAM policy called manager-policy with the following statements:
The security administrator attaches the policy to the manager’s role along with the tag organization:birds, and cost-center:it. If any of the projects change organization, the manager no longer has access, even if the cost-center remains IT.
In this policy, the condition ensures both the cost-center and organization tags exist for the function and the values are equal to the tags in the manager’s role. Even if the cost-center tag matches for both the Lambda function and the manager’s role, yet the manager’s organization tag doesn’t match, IAM denies access to the Lambda function. Tags themselves are only a key:value pair with no relationship to other tags. You can use multiple tags, as in this example, to more granularly define Lambda function permissions.
Conclusion
You can now use attribute-based access control (ABAC) with Lambda to control access to functions using tags. This allows you to scale your access controls by simplifying the management of permissions while still maintaining least privilege security best practices. Security administrators can coordinate with developers on a tagging strategy and create IAM policies with ABAC condition keys. This then gives freedom to developers to grow their applications by adding tags to functions, without needing a security administrator to update individual IAM policies.
In France, we know summer has started when you see the Tour de France bike race on TV or in a city nearby. This year, the tour stopped in the city where I live, and I was blocked on my way back home from a customer conference to let the race pass through.
It’s Monday today, so let’s make another tour—a tour of the AWS news, announcements, or blog posts that captured my attention last week. I selected these as being of interest to IT professionals and developers: the doers, the builders that spend their time on the AWS Management Console or in code.
Last Week’s Launches Here are some launches that got my attention during the previous week:
Amazon EC2 Mac M1 instances are generally available – this new EC2 instance type allows you to deploy Mac mini computers with M1 Apple Silicon running macOS using the same console, API, SDK, or CLI you are used to for interacting with EC2 instances. You can start, stop them, assign a security group or an IAM role, snapshot their EBS volume, and recreate an AMI from it, just like with Linux-based or Windows-based instances. It lets iOS developers create full CI/CD pipelines in the cloud without requiring someone in your team to reinstall various combinations of macOS and Xcode versions on on-prem machines. Some of you had the chance the enter the preview program for EC2 Mac M1 instances when we announced it last December. EC2 Mac M1 instances are now generally available.
A streamlined deployment experience for .NET applications –the new deployment experience focuses on the type of application you want to deploy instead of individual AWS services by providing intelligent compute recommendations. You can find it in the AWS Toolkit for Visual Studio using the new “Publish to AWS” wizard. It is also available via the .NET CLI by installing AWS Deploy Tool for .NET. Together, they help easily transition from a prototyping phase in Visual Studio to automated deployments. The new deployment experience supports ASP.NET Core, Blazor WebAssembly, console applications (such as long-lived message processing services), and tasks that need to run on a schedule.
Other AWS News This week, I also learned from these blog posts:
TLS 1.2 to become the minimum TLS protocol level for all AWS API endpoints – this article was published at the end of June, and it deserves more exposure. Starting in June 2022, we will progressively transition all our API endpoints to TLS 1.2 only. The good news is that 95 percent of the API calls we observe are already using TLS 1.2, and only five percent of the applications are impacted. If you have applications developed before 2014 (using a Java JDK before version 8 or .NET before version 4.6.2), it is worth checking your app and updating them to use TLS 1.2. When we detect your application is still using TLS 1.0 or TLS 1.1, we inform you by email and in the AWS Health Dashboard. The blog article goes into detail about how to analyze AWS CloudTrail logs to detect any API call that would not use TLS 1.2.
How to implement automated appointment remindersusing Amazon Connect and Amazon Pinpoint – this blog post guides you through the steps to implement a system to automatically call your customers to remind them of their appointments. This automated outbound campaign for appointment reminders checked the campaign list against a “do not call” list before making an outbound call. Your customers are able to confirm automatically or reschedule by speaking to an agent. You monitor the results of the calls on a dashboard in near real time using Amazon QuickSight. It provides you with AWS CloudFormation templates for the parts that can be automated and detailed instructions for the manual steps.
Using Amazon CloudWatch metrics math to monitor and scale resources – AWS Auto Scaling is one of those capabilities that may look like magic at first glance. It uses metrics to take scale-out or scale-in decisions. Most customers I talk with struggle a bit at first to define the correct combination of metrics that allow them to scale at the right moment. Scaling out too late impacts your customer experience while scaling out too early impacts your budget. This article explains how to use metric math, a way to query multiple Amazon CloudWatch metrics, and use math expressions to create new time series based on these metrics. These math metrics may, in turn, be used to trigger scaling decisions. The typical use case would be to mathematically combine CPU, memory, and network utilization metrics to decide when to scale in or to scale out.
How to use Amazon RDS and Amazon Aurora with a static IP address – in the cloud, it is better to access network resources by referencing their DNS name instead of IP addresses. IP addresses come and go as resources are stopped, restarted, scaled out, or scaled in. However, when integrating with older, more rigid environments, it might happen, for a limited period of time, to authorize access through a static IP address. You have probably heard that scary phrase: “I have to authorize your IP address in my firewall configuration.” This new blog post explains how to do so for Amazon Relational Database Service (Amazon RDS) database. It uses a Network Load Balancer and traffic forwarding at the Linux-kernel level to proxy your actual database server.
Customers running Oracle databases on Amazon Elastic Compute Cloud (Amazon EC2) often take database and schema backups using Oracle native tools, like Data Pump and Recovery Manager (RMAN), to satisfy data protection, disaster recovery (DR), and compliance requirements. A priority is to reduce backup time as the data grows exponentially and recover sooner in case of failure/disaster.
In situations where RMAN backup is used as a DR solution, using AWS Backup to backup the file system and using RMAN to backup the archive logs are an efficient method to perform Oracle database point-in-time recovery in the event of a disaster.
Sample use cases:
Quickly build a copy of production database to test bug fixes or for a tuning exercise.
Recover from a user error that removes data or corrupts existing data.
A complete database recovery after a media failure.
There are two options to backup the archive logs using RMAN:
This is Part 1 of this two-part series, we provide a mechanism to use AWS Backup to create a full backup of the EC2 instance, including the OS image, Oracle binaries, logs, and data files. In this post, we will use Oracle RMAN to perform archived redo log backup to an Amazon S3 bucket. Then, we demonstrate the steps to restore a database to a specific point-in-time using AWS Backup and Oracle RMAN.
Solution overview
Figure 1 demonstrates the workflow:
Oracle database on Amazon EC2 configured with Oracle Secure Backup (OSB)
AWS Backup service to backup EC2 instance at regular intervals.
S3 bucket for storing Oracle RMAN archive log backups
Figure 1. Oracle Database in Amazon EC2 using AWS Backup and S3 for backup and restore
Prerequisites
For this solution, the following prerequisites are required:
An AWS account
Oracle database and AWS CLI in an EC2 instance
Access to configure AWS Backup
Acces to S3 bucket to store the RMAN archive log backup
1. Configure AWS Backup
You can choose AWS Backup to schedule daily backups of the EC2 instance. AWS Backup efficiently stores your periodic backups using backup plans. Only the first EBS snapshot performs a full copy from Amazon Elastic Block Storage (Amazon EBS) to Amazon S3. All subsequent snapshots are incremental snapshots, copying just the changed blocks from Amazon EBS to Amazon S3, thus, reducing backup duration and storage costs. Oracle supports Storage Snapshot Optimization, which takes third-party snapshots of the database without placing the database in backup mode. By default, AWS Backup now creates crash-consistent backups of Amazon EBS volumes that are attached to an EC2 instance. Customers no longer have to stop their instance or coordinate between multiple Amazon EBS volumes attached to the same EC2 instance to ensure crash-consistency of their application state.
You can create daily scheduled backup of EC2 instances. Figures 2, 3, and 4 are sample screenshots of the backup plan, associating an EC2 instance with the backup plan.
Figure 2. Configure backup rule using AWS Backup
Figure 3. Select EC2 instance containing Oracle Database for backup
Figure 4. Summary screen showing the backup rule and resources managed by AWS Backup
Oracle RMAN archive log backup
While AWS Backup is now creating a daily backup of the EC2 instance, we also want to make sure we backup the archived log files to a protected location. This will let us do point-in-time restores and restore to other recent times than just the last daily EC2 backup. Here, we provide the steps to backup archive log using RMAN to S3 bucket.
Backup/restore archive logs to/from Amazon S3 using OSB
Backing-up the Oracle archive logs is an important part of the process. In this section, we will describe how you can backup their Oracle Archive logs to Amazon S3 using OSB. Note: OSB is a separately licensed product from Oracle Corporation, so you will need to be properly licensed for OSB if you use this approach.
2. Setup S3 bucket and IAM role
Oracle Archive log backups can be scheduled using cron script to run at regular interval (for example, every 15 minutes). These backups are stored in an S3 bucket.
a. Create an S3 bucket with lifecycle policy to transition the objects to S3 Standard-Infrequent Access. b. Attach the following policy to the IAM Role of EC2 containing Oracle database or create an IAM role (ec2access) with the following policy and attach it to the EC2 instance. Update bucket-name with the bucket created in previous step.
After we have configured the backup of EC2 instance using AWS Backup, we setup OSB in the EC2 instance. In these steps, we show the mechanism to configure OSB.
a. Verify hardware and software prerequisites for OSB Cloud Module. b. Login to the EC2 instance with User ID owning the Oracle Binaries. c. Download Amazon S3 backup installer file (osbws_install.zip) d. Create Oracle wallet directory.
mkdir $ORACLE_HOME/dbs/osbws_wallet
e. Create a file (osbws.sh) in the EC2 instance with the following commands. Update IAM role with the one created/updated in Step 2b.
chmod 700 osbws.sh
./osbws.sh

Sample output: AWS credentials are valid.
Oracle Secure Backup Web Service wallet created in directory /u01/app/oracle/product/19.3.0.0/db_1/dbs/osbws_wallet.
Oracle Secure Backup Web Service initialization file /u01/app/oracle/product/19.3.0.0/db_1/dbs/osbwsoratst.ora created.
Downloading Oracle Secure Backup Web Service Software Library from file osbws_linux64.zip.
Download complete.
g. Set ORACLE_SID by executing below command:
. oraenv
h. Running the script – osbws.sh installs OSB libraries and creates a file called osbws<ORACLE_SID>.ora. i. Add/modify below with S3 bucket(bucket-name) and region(ex:us-west-2) created in Step 2a.
With OSB installed in the EC2 instance, you can backup Oracle archive logs to S3 bucket. These backups can be used to perform database point-in-time recovery in case of database crash/corruption . oratst is used as an example in below commands.
a. Configure RMAN repository. Example below uses Oracle 19c and Oracle Sid – oratst.
RMAN> configure channel device type sbt parms='SBT_LIBRARY=/u01/app/oracle/product/19.3.0.0/db_1/lib/libosbws.so,SBT_PARMS=(OSB_WS_PFILE=/u01/app/oracle/product/19.3.0.0/db_1/dbs/osbwsoratst.ora)';
b. Create a script (for example, rman_archive.sh) with below commands, and schedule using crontab (example entry: */5 * * * * rman_archive.sh) to run every 5 minutes. This will makes sure Oracle Archive logs are backed up to Amazon S3 frequently, thus ensuring an recovery point objective (RPO) of 5 minutes.
dt=`date +%Y%m%d_%H%M%S`

rman target / log=rman_arch_bkup_oratst_${dt}.log <<EOF

RUN
{
	allocate channel c1_s3 device type sbt
	parms='SBT_LIBRARY=/u01/app/oracle/product/19.3.0.0/db_1/lib/libosbws.so,SBT_PARMS=(OSB_WS_PFILE=/u01/app/oracle/product/19.3.0.0/db_1/dbs/osbwsoratst.ora)' MAXPIECESIZE 10G;

	BACKUP ARCHIVELOG ALL delete all input;
	Backup CURRENT CONTROLFILE;

release channel c1_s3;

}

EOF
c. Copy RMAN logs to S3 bucket. These logs contain the database identifier (DBID) that is required when we have to restore the database using Oracle RMAN.
In the event of a database crash/corruption, we can use AWS Backup service and Oracle RMAN Archive log backup to recover database to a specific point-in-time.
a. Typically, you would pick the most recent recovery point completed before the time you wish to recover. Using AWS Backup, identify the recovery point ID to restore by following the steps on restoring an Amazon EC2 instance. Note: when following the steps, be sure to set the “User data” settings as described in the next bullet item.
After the EBS volumes are created from the snapshot, there is no need to wait for all of the data to transfer from Amazon S3 to your EBS volume before your attached instance can start accessing the volume. Amazon EBS snapshots implement lazy loading, so that you can begin using them right away.
b. Be sure the database does not start automatically after restoring the EC2 instance, by renaming /etc/oratab. Use the following command in “User data” section while restoring EC2 instance. After database recovery, we can rename it back to /etc/oratab.
#!/usr/bin/sh
sudo su -
mv /etc/oratab /etc/oratab_bk
c. Login to the EC2 instance once it is up, and execute the RMAN recovery commands mentioned. Identify the DBID from RMAN logs saved in the S3 bucket. These commands use database oratst as an example:
rman target /

RMAN> startup nomount

RMAN> set dbid DBID

# Below command is to restore the controlfile from autobackup

RMAN> RUN
{
    allocate channel c1_s3 device type sbt
	parms='SBT_LIBRARY=/u01/app/oracle/product/19.3.0.0/db_1/lib/libosbws.so,SBT_PARMS=(OSB_WS_PFILE=/u01/app/oracle/product/19.3.0.0/db_1/dbs/osbwsoratst.ora)';

    RESTORE CONTROLFILE FROM AUTOBACKUP;
    alter database mount;

    release channel c1_s3;
}


#Identify the recovery point (sequence_number) by listing the backups available in catalog.

RMAN> list backup;
In Figure 5, the most recent archive log backed up is 380, so you can use this sequence number in the next set of RMAN commands.
Figure 5. Sample output of Oracle RMAN “list backup” command
RMAN> RUN
{
    allocate channel c1_s3 device type sbt
	parms='SBT_LIBRARY=/u01/app/oracle/product/19.3.0.0/db_1/lib/libosbws.so,SBT_PARMS=(OSB_WS_PFILE=/u01/app/oracle/product/19.3.0.0/db_1/dbs/osbwsoratst.ora)';

    recover database until sequence sequence_number;
    ALTER DATABASE OPEN RESETLOGS;
    release channel c1_s3;
}
d. To avoid performance issues due to lazy loading, after the database is open, run the following command to force a faster restoration of the blocks from S3 bucket to EBS volumes (this example allocates two channels and validates the entire database).
RMAN> RUN
{
  ALLOCATE CHANNEL c1 DEVICE TYPE DISK;
  ALLOCATE CHANNEL c2 DEVICE TYPE DISK;
  VALIDATE database section size 1200M;
}
e. This completes the recovery of database, and we can let the database automatically start by renaming file back to /etc/oratab.
mv /etc/oratab_bk /etc/oratab
6. Backup retention
Ensure that the AWS Backup lifecycle policy matches the Oracle Archive log backup retention. Also, follow documentation to configure Oracle backup retention and delete expired backups. This is a sample command for Oracle backup retention:
CONFIGURE BACKUP OPTIMIZATION ON;
CONFIGURE RETENTION POLICY TO RECOVERY WINDOW OF 31 DAYS;

RMAN> RUN
{
    allocate channel c1_s3 device type sbt
	parms='SBT_LIBRARY=/u01/app/oracle/product/19.3.0.0/db_1/lib/libosbws.so,SBT_PARMS=(OSB_WS_PFILE=/u01/app/oracle/product/19.3.0.0/db_1/dbs/osbwsoratst.ora)';

            crosscheck backup;
            delete noprompt obsolete;
            delete noprompt expired backup;

    release channel c1_s3;
}
Cleanup
Follow below instructions to remove or cleanup the setup:
Delete/Update IAM role (ec2access) to remove access from the S3 bucket used to store archive logs.
Remove the cron entry from the EC2 instance configured in Step 4b.
Delete the S3 bucket that was created in Step 2a to store Oracle RMAN archive log backups.
Conclusion
In this post, we demonstrate how to use AWS Backup and Oracle RMAN Archive log backup of Oracle databases running on Amazon EC2 can restore and recover efficiently to a point-in-time, without requiring an extra-step of restoring data files. Data files are restored as part of the AWS Backup EC2 instance restoration. You can leverage this solution to facilitate restoring copies of your production database for development or testing purposes, plus recover from a user error that removes data or corrupts existing data.
In Part 1 of this two-part series, we shared an overview of some of the most important 2021 Amazon Web Services (AWS) Security service and feature launches. In this follow-up, we’ll dive deep into additional launches that are important for security professionals to be aware of and understand across all AWS services. There have already been plenty in the first half of 2022, so we’ll highlight those soon, as well.
AWS Identity
You can use AWS Identity Services to build Zero Trust architectures, help secure your environments with a robust data perimeter, and work toward the security best practice of granting least privilege. In 2021, AWS expanded the identity source options, AWS Region availability, and support for AWS services. There is also added visibility and power in the permission management system. New features offer new integrations, additional policy checks, and secure resource sharing across AWS accounts.
AWS Single Sign-On
For identity management, AWS Single Sign-On (AWS SSO) is where you create, or connect, your workforce identities in AWS once and manage access centrally across your AWS accounts in AWS Organizations. In 2021, AWS SSO announced new integrations for JumpCloud and CyberArk users. This adds to the list of providers that you can use to connect your users and groups, which also includes Microsoft Active Directory Domain Services, Okta Universal Directory, Azure AD, OneLogin, and Ping Identity.
For access management, there have been a range of feature launches with AWS Identity and Access Management (IAM) that have added up to more power and visibility in the permissions management system. Here are some key examples.
IAM made it simpler to relate a user’s IAM role activity to their corporate identity. By setting the new source identity attribute, which persists through role assumption chains and gets logged in AWS CloudTrail, you can find out who is responsible for actions that IAM roles performed.
IAM added support for policy conditions, to help manage permissions for AWS services that access your resources. This important feature launch of service principal conditions helps you to distinguish between API calls being made on your behalf by a service principal, and those being made by a principal inside your account. You can choose to allow or deny the calls depending on your needs. As a security professional, you might find this especially useful in conjunction with the aws:CalledVia condition key, which allows you to scope permissions down to specify that this account principal can only call this API if they are calling it using a particular AWS service that’s acting on their behalf. For example, your account principal can’t generally access a particular Amazon Simple Storage Service (Amazon S3) bucket, but if they are accessing it by using Amazon Athena, they can do so. These conditions can also be used in service control policies (SCPs) to give account principals broader scope across an account, organizational unit, or organization; they need not be added to individual principal policies or resource policies.
Another very handy new IAM feature launch is additional information about the reason for an access denied error message. With this additional information, you can now see which of the relevant access control policies (for example, IAM, resource, SCP, or VPC endpoint) was the cause of the denial. As of now, this new IAM feature is supported by more than 50% of all AWS services in the AWS SDK and AWS Command Line Interface, and a fast-growing number in the AWS Management Console. We will continue to add support for this capability across services, as well as add more features that are designed to make the journey to least privilege simpler.
IAM Access Analyzer also launched the ability to generate fine-grained policies based on analyzing past AWS CloudTrail activity. This feature provides a great new capability for DevOps teams or central security teams to scope down policies to just the permissions needed, making it simpler to implement least privilege permissions. IAM Access Analyzer launched further enhancements to expand policy checks, and the ability to generate a sample least-privilege policy from past activity was expanded beyond the account level to include an analysis of principal behavior within the entire organization by analyzing log activity stored in AWS CloudTrail.
AWS Resource Access Manager
AWS Resource Access Manager (AWS RAM) helps you securely share your resources across unrelated AWS accounts within your organization or organizational units (OUs) in AWS Organizations. Now you can also share your resources with IAM roles and IAM users for supported resource types. This update enables more granular access using managed permissions that you can use to define access to shared resources. In addition to the default managed permission defined for each shareable resource type, you now have more flexibility to choose which permissions to grant to whom for resource types that support additional managed permissions. Additionally, AWS RAM added support for global resource types, enabling you to provision a global resource once, and share that resource across your accounts. A global resource is one that can be used in multiple AWS Regions; the first example of a global resource is found in AWS Cloud WAN, currently in preview as of this publication. AWS RAM helps you more securely share an AWS Cloud WAN core network, which is a managed network containing AWS and on-premises networks. With AWS RAM global resource sharing, you can use the Cloud WAN core network to centrally operate a unified global network across Regions and accounts.
AWS Directory Service
AWS Directory Service for Microsoft Active Directory, also known as AWS Managed Microsoft Active Directory (AD), was updated to automatically provide domain controller and directory utilization metrics in Amazon CloudWatch for new and existing directories. Analyzing these utilization metrics helps you quantify your average and peak load times to identify the need for additional domain controllers. With this, you can define the number of domain controllers to meet your performance, resilience, and cost requirements.
Amazon Cognito
Amazon Cognitoidentity pools (federated identities) was updated to enable you to use attributes from social and corporate identity providers to make access control decisions and simplify permissions management in AWS resources. In Amazon Cognito, you can choose predefined attribute-tag mappings, or you can create custom mappings using the attributes from social and corporate providers’ access and ID tokens, or SAML assertions. You can then reference the tags in an IAM permissions policy to implement attribute-based access control (ABAC) and manage access to your AWS resources. Amazon Cognito also launched a new console experience for user pools and now supports targeted sign out through refresh token revocation.
Governance, control, and logging services
There were a number of important releases in 2021 in the areas of governance, control, and logging services.
This approach provides a powerful new middle ground between the older security models of prevention (which provide developers only an access denied message, and often can’t distinguish between an acceptable and an unacceptable use of the same API) and a detect and react model (when undesired states have already gone live). The Cfn-Guard 2.0 model gives builders the freedom to build with IaC, while allowing central teams to have the ability to reject infrastructure configurations or changes that don’t conform to central policies—and to do so with completely custom error messages that invite dialog between the builder team and the central team, in case the rule is unnuanced and needs to be refined, or if a specific exception needs to be created.
For example, a builder team might be allowed to provision and attach an internet gateway to a VPC, but the team can do this only if the routes to the internet gateway are limited to a certain pre-defined set of CIDR ranges, such as the public addresses of the organization’s branch offices. It’s not possible to write an IAM policy that takes into account the CIDR values of a VPC route table update, but you can write a Cfn-Guard 2.0 rule that allows the creation and use of an internet gateway, but only with a defined and limited set of IP addresses.
AWS Systems Manager Incident Manager
An important launch that security professionals should know about is AWS Systems Manager Incident Manager. Incident Manager provides a number of powerful capabilities for managing incidents of any kind, including operational and availability issues but also security issues. With Incident Manager, you can automatically take action when a critical issue is detected by an Amazon CloudWatch alarm or Amazon EventBridge event. Incident Manager runs pre-configured response plans to engage responders by using SMS and phone calls, can enable chat commands and notifications using AWS Chatbot, and runs automation workflows with AWS Systems Manager Automation runbooks. The Incident Manager console integrates with AWS Systems Manager OpsCenter to help you track incidents and post-incident action items from a central place that also synchronizes with third-party management tools such as Jira Service Desk and ServiceNow. Incident Manager enables cross-account sharing of incidents using AWS RAM, and provides cross-Region replication of incidents to achieve higher availability.
Amazon Simple Storage Service (Amazon S3) is one of the most important services at AWS, and its steady addition of security-related enhancements is always big news. Here are the 2021 highlights.
Access Points aliases
Amazon S3 introduced a new feature, Amazon S3 Access Points aliases. With Amazon S3 Access Points aliases, you can make the access points backwards-compatible with a large amount of existing code that is programmed to interact with S3 buckets rather than access points.
To understand the importance of this launch, we have to go back to 2019 to the launch of Amazon S3 Access Points. Access points are a powerful mechanism for managing S3 bucket access. They provide a great simplification for managing and controlling access to shared datasets in S3 buckets. You can create up to 1,000 access points per Region within each of your AWS accounts. Although bucket access policies remain fully enforced, you can delegate access control from the bucket to its access points, allowing for distributed and granular control. Each access point enforces a customizable policy that can be managed by a particular workgroup, while also avoiding the problem of bucket policies needing to grow beyond their maximum size. Finally, you can also bind an access point to a particular VPC for its lifetime, to prevent access directly from the internet.
With the 2021 launch of Access Points aliases, Amazon S3 now generates a unique DNS name, or alias, for each access point. The Access Points aliases look and acts just like an S3 bucket to existing code. This means that you don’t need to make changes to older code to use Amazon S3 Access Points; just substitute an Access Points aliases wherever you previously used a bucket name. As a security team, it’s important to know that this flexible and powerful administrative feature is backwards-compatible and can be treated as a drop-in replacement in your various code bases that use Amazon S3 but haven’t been updated to use access point APIs. In addition, using Access Points aliases adds a number of powerful security-related controls, such as permanent binding of S3 access to a particular VPC.
S3 Bucket Keys were launched at the end of 2020, another great launch that security professionals should know about, so here is an overview in case you missed it. S3 Bucket Keys are data keys generated by AWS KMS to provide another layer of envelope encryption in which the outer layer (the S3 Bucket Key) is cached by S3 for a short period of time. This extra key layer increases performance and reduces the cost of requests to AWS KMS. It achieves this by decreasing the request traffic from Amazon S3 to AWS KMS from a one-to-one model—one request to AWS KMS for each object written to or read from Amazon S3—to a one-to-many model using the cached S3 Bucket Key. The S3 Bucket Key is never stored persistently in an unencrypted state outside AWS KMS, and so Amazon S3 ultimately must always return to AWS KMS to encrypt and decrypt the S3 Bucket Key, and thus, the data. As a result, you still retain control of the key hierarchy and resulting encrypted data through AWS KMS, and are still able to audit Amazon S3 returning periodically to AWS KMS to refresh the S3 Bucket Keys, as logged in CloudTrail.
Returning to our review of 2021, S3 Bucket Keys gained the ability to use Amazon S3 Inventory and Amazon S3 Batch Operations automatically to migrate objects from the higher cost, slightly lower-performance SSE-KMS model to the lower-cost, higher-performance S3 Bucket Keys model.
To understand this launch, we need to go in time to the origins of Amazon S3, which is one of the oldest services in AWS, created even before IAM was launched in 2011. In those pre-IAM days, a storage system like Amazon S3 needed to have some kind of access control model, so Amazon S3 invented its own: Amazon S3 access control lists (ACLs). Using ACLs, you could add access permissions down to the object level, but only with regard to access by other AWS account principals (the only kind of identity that was available at the time), or public access (read-only or read-write) to an object. And in this model, objects were always owned by the creator of the object, not the bucket owner.
After IAM was introduced, Amazon S3 added the bucket policy feature, a type of resource policy that provides the rich features of IAM, including full support for all IAM principals (users and roles), time-of-day conditions, source IP conditions, ability to require encryption, and more. For many years, Amazon S3 access decisions have been made by combining IAM policy permissions and ACL permissions, which has served customers well. But the object-writer-is-owner issue has often caused friction. The good news for security professionals has been that a deny by either type of access control type overrides an allow by the other, so there were no security issues with this bi-modal approach. The challenge was that it could be administratively difficult to manage both resource policies—which exist at the bucket and access point level—and ownership and ACLs—which exist at the object level. Ownership and ACLs might potentially impact the behavior of only a handful of objects, in a bucket full of millions or billions of objects.
With the features released in 2021, Amazon S3 has removed these points of friction, and now provides the features needed to reduce ownership issues and to make IAM-based policies the only access control system for a specified bucket. The first step came in 2020 with the ability to make object ownership track bucket ownership, regardless of writer. But that feature applied only to newly-written objects. The final step is the 2021 launch we’re highlighting here: the ability to disable at the bucket level the evaluation of all existing ACLs—including ownership and permissions—effectively nullifying all object ACLs. From this point forward, you have the mechanisms you need to govern Amazon S3 access with a combination of S3 bucket policies, S3 access point policies, and (within the same account) IAM principal policies, without worrying about legacy models of ACLs and per-object ownership.
Additional database and storage service features
AWS Backup Vault Lock
AWS Backup added an important new additional layer for backup protection with the availability of AWS Backup Vault Lock. A vault lock feature in AWS is the ability to configure a storage policy such that even the most powerful AWS principals (such as an account or Org root principal) can only delete data if the deletion conforms to the preset data retention policy. Even if the credentials of a powerful administrator are compromised, the data stored in the vault remains safe. Vault lock features are extremely valuable in guarding against a wide range of security and resiliency risks (including accidental deletion), notably in an era when ransomware represents a rising threat to data.
ACM Private CA achieved FedRAMP authorization for six additional AWS Regions in the US.
Additional certificate customization now allows administrators to tailor the contents of certificates for new use cases, such as identity and smart card certificates; or to securely add information to certificates instead of relying only on the information present in the certificate request.
Additional capabilities were added for sharing CAs across accounts by using AWS RAM to help administrators issue fully-customized certificates, or revoke them, from a shared CA.
Integration with Kubernetes provides a more secure certificate authority solution for Kubernetes containers.
Online Certificate Status Protocol (OCSP) provides a fully-managed solution for notifying endpoints that certificates have been revoked, without the need for you to manage or operate infrastructure yourself.
Network and application protection
We saw a lot of enhancements in network and application protection in 2021 that will help you to enforce fine-grained security policies at important network control points across your organization. The services and new capabilities offer flexible solutions for inspecting and filtering traffic to help prevent unauthorized resource access.
AWS WAF
AWS WAF launched AWS WAF Bot Control, which gives you visibility and control over common and pervasive bots that consume excess resources, skew metrics, cause downtime, or perform other undesired activities. The Bot Control managed rule group helps you monitor, block, or rate-limit pervasive bots, such as scrapers, scanners, and crawlers. You can also allow common bots that you consider acceptable, such as status monitors and search engines. AWS WAF also added support for custom responses, managed rule group versioning, in-line regular expressions, and Captcha. The Captcha feature has been popular with customers, removing another small example of “undifferentiated work” for customers.
AWS Shield Advanced
AWS Shield Advanced now automatically protects web applications by blocking application layer (L7) DDoS events with no manual intervention needed by you or the AWS Shield Response Team (SRT). When you protect your resources with AWS Shield Advanced and enable automatic application layer DDoS mitigation, Shield Advanced identifies patterns associated with L7 DDoS events and isolates this anomalous traffic by automatically creating AWS WAF rules in your web access control lists (ACLs).
Amazon CloudFront
In other edge networking news, Amazon CloudFront added support for response headers policies. This means that you can now add cross-origin resource sharing (CORS), security, and custom headers to HTTP responses returned by your CloudFront distributions. You no longer need to configure your origins or use custom Lambda@Edge or CloudFront Functions to insert these headers.
Following Route 53 Resolver’s much-anticipated launch of DNS logging in 2020, the big news for 2021 was the launch of its DNS Firewall capability. Route 53 Resolver DNS Firewall lets you create “blocklists” for domains you don’t want your VPC resources to communicate with, or you can take a stricter, “walled-garden” approach by creating “allowlists” that permit outbound DNS queries only to domains that you specify. You can also create alerts for when outbound DNS queries match certain firewall rules, allowing you to test your rules before deploying for production traffic. Route 53 Resolver DNS Firewall launched with two managed domain lists—malware domains and botnet command and control domains—enabling you to get started quickly with managed protections against common threats. It also integrated with Firewall Manager (see the following section) for easier centralized administration.
AWS Network Firewall and Firewall Manager
Speaking of AWS Network Firewall and Firewall Manager, 2021 was a big year for both. Network Firewall added support for AWS Managed Rules, which are groups of rules based on threat intelligence data, to enable you to stay up to date on the latest security threats without writing and maintaining your own rules. AWS Network Firewall features a flexible rules engine enabling you to define firewall rules that give you fine-grained control over network traffic. As of the launch in late 2021, you can enable managed domain list rules to block HTTP and HTTPS traffic to domains identified as low-reputation, or that are known or suspected to be associated with malware or botnets. Prior to that, another important launch was new configuration options for rule ordering and default drop, making it simpler to write and process rules to monitor your VPC traffic. Also in 2021, Network Firewall announced a major regional expansion following its initial launch in 2020, and a range of compliance achievements and eligibility including HIPAA, PCI DSS, SOC, and ISO.
Elastic Load Balancing now supports forwarding traffic directly from Network Load Balancer (NLB) to Application Load Balancer (ALB). With this important new integration, you can take advantage of many critical NLB features such as support for AWS PrivateLink and exposing static IP addresses for applications that still require ALB.
The AWS Networking team also made Amazon VPC private NAT gateways available in both AWS GovCloud (US) Regions. The expansion into the AWS GovCloud (US) Regions enables US government agencies and contractors to move more sensitive workloads into the cloud by helping them to address certain regulatory and compliance requirements.
Compute
Security professionals should also be aware of some interesting enhancements in AWS compute services that can help improve their organization’s experience in building and operating a secure environment.
Amazon Elastic Compute Cloud (Amazon EC2) launched the Global View on the console to provide visibility to all your resources across Regions. Global View helps you monitor resource counts, notice abnormalities sooner, and find stray resources. A few days into 2022, another simple but extremely useful EC2 launch was the new ability to obtain instance tags from the Instance Metadata Service (IMDS). Many customers run code on Amazon EC2 that needs to introspect about the EC2 tags associated with the instance and then change its behavior depending on the content of the tags. Prior to this launch, you had to associate an EC2 role and call the EC2 API to get this information. That required access to API endpoints, either through a NAT gateway or a VPC endpoint for Amazon EC2. Now, that information can be obtained directly from the IMDS, greatly simplifying a common use case.
Amazon EC2 launched sharing of Amazon Machine Images (AMIs) with AWS Organizations and Organizational Units (OUs). Previously, you could share AMIs only with specific AWS account IDs. To share AMIs within AWS Organizations, you had to explicitly manage sharing of AMIs on an account-by-account basis, as they were added to or removed from AWS Organizations. With this new feature, you no longer have to update your AMI permissions because of organizational changes. AMI sharing is automatically synchronized when organizational changes occur. This feature greatly helps both security professionals and governance teams to centrally manage and govern AMIs as you grow and scale your AWS accounts. As previously noted, this feature was also added to EC2 Image Builder. Finally, Amazon Data Lifecycle Manager, the tool that manages all your EBS volumes and AMIs in a policy-driven way, now supports automatic deprecation of AMIs. As a security professional, you will find this helpful as you can set a timeline on your AMIs so that, if the AMIs haven’t been updated for a specified period of time, they will no longer be considered valid or usable by development teams.
Looking ahead
In 2022, AWS continues to deliver experiences that meet administrators where they govern, developers where they code, and applications where they run. We will continue to summarize important launches in future blog posts. If you’re interested in learning more about AWS services, join us for AWS re:Inforce, the AWS conference focused on cloud security, identity, privacy, and compliance. AWS re:Inforce 2022 will take place July 26–27 in Boston, MA. Registration is now open. Register now with discount code SALxUsxEFCw to get $150 off your full conference pass to AWS re:Inforce. For a limited time only and while supplies last. We look forward to seeing you there!
To stay up to date on the latest product and feature launches and security use cases, be sure to read the What’s New with AWS announcements (or subscribe to the RSS feed) and the AWS Security Blog.
If you have feedback about this post, submit comments in the Comments section below. If you have questions about this post, contact AWS Support.
Want more AWS Security news? Follow us on Twitter.
To streamline and expedite migrations, automate reusable migration patterns that work for a wide range of applications. Application Migration Service is the recommended migration service to lift-and-shift your applications to AWS.
In this blog post, we explore key variables that contribute to server replication speed when using Application Migration Service. We will also look at tests you can run to identify these bottlenecks and, where appropriate, include remediation steps.
Overview of migration using Application Migration Service
Figure 1 depicts the end-to-end data replication flow from source servers to a target machine hosted on AWS. The diagram is designed to help visualize potential bottlenecks within the data flow, which are denoted by a black diamond.
Figure 1. Data flow when using AWS Application Migration Service (black diamonds denote potential points of contention)
Baseline testing
To determine a baseline replication speed, we recommend performing a control test between your target AWS Region and the nearest Region to your source workloads. For example, if your source workloads are in a data center in Rome and your target Region is Paris, run a test between eu-south-1 (Milan) and eu-west-3 (Paris). This will give a theoretical upper bandwidth limit, as replication will occur over the AWS backbone. If the target Region is already the closest Region to your source workloads, run the test from within the same Region.
Network connectivity
There are several ways to establish connectivity between your on-premises location and AWS Region:
This section pertains to options 1 and 2. If facing replication speed issues, the first place to look is at network bandwidth. From a source machine within your internal network, run a speed test to calculate your bandwidth out to the internet; common test providers include Cloudflare, Ookla, and Google. This is your bandwidth to the internet, not to AWS.
Next, to confirm the data flow from within your data center, run a traceroute (Windows) or tracert (Linux). Identify any network hops that are unusual or potentially throttling bandwidth (due to hardware limitations or configuration).
To measure the maximum bandwidth between your data center and the AWS subnet that is being used for data replication, while accounting for Security Sockets Layer (SSL) encapsulation, use the CloudEndure SSL bandwidth tool (refer to Figure 1).
Source storage I/O
The next area to look for replication bottlenecks is source storage. The underlying storage for servers can be a point of contention. If the storage is maxing-out its read speeds, this will impact the data-replication rate. If your storage I/O is heavily utilized, it can impact block replication by Application Migration Service. In order to measure storage speeds, you can use the following tools:
Windows: WinSat (or other third-party tooling, like AS SSD Benchmark)
Linux: hdparm
We suggest reducing read/write operations on your source storage when starting your migration using Application Migration Service.
Application Migration Service EC2 replication instance size
The size of the EC2 replication server instance can also have an impact on the replication speed. Although it is recommended to keep the default instance size (t3.small), it can be increased if there are business requirements, like to speed up the initial data sync. Note: using a larger instance can lead to increased compute costs.
Common replication instance changes include:
Servers with <26 disks: change the instance type to m5.large. Increase the instance type to m5.xlarge or higher, as needed.
Servers with <26 disks (or servers in AWS Regions that do not support m5 instance types): change the instance type to m4.large. Increase to m4.xlarge or higher, as needed.
Note: Changing the replication server instance type will not affect data replication. Data replication will automatically pick up where it left off, using the new instance type you selected.
Application Migration Service Elastic Block Store replication volume
By default, disks <500GiB use Magnetic HDD volumes. AWS best practice suggests not change the default Amazon EBS volume type, unless there is a business need for doing so. However, as we aim to speed up the replication, we actively change the default EBS volume type.
There are two options to choose from:
The lower cost, Throughput Optimized HDD (st1) option utilizes slower, less expensive disks.
Consider this option if you(r):
Want to keep costs low
Large disks do not change frequently
Are not concerned with how long the initial sync process will take
The faster, General Purpose SSD (gp2) option utilizes faster, but more expensive disks.
Consider this option if you(r):
Source server has disks with a high write rate, or if you need faster performance in general
Want to speed up the initial sync process
Are willing to pay more for speed
Source server CPU
The Application Migration Service agent that is installed on the source machine for data replication uses a single core in most cases (agent threads can be scheduled to multiple cores). If core utilization reaches a maximum, this can be a limitation for replication speed. In order to check the core utilization:
Windows: Launch the Task Manger application within Windows, and click on the “CPU” tab. Right click on the CPU graph (this is currently showing an average of cores) > select “Change graph to” > “Logical processors”. This will show individual cores and their current utilization (Figure 2).
Figure 2. Logical processor CPU utilization
Linux: Install htop and run from the terminal. The htop command will display the Application Migration Service/CE process and indicate the CPU and memory utilization percentage (this is of the entire machine). You can check the CPU bars to determine if a CPU is being maxed-out (Figure 3).
Figure 3. AWS Application Migration Service/CE process to assess CPU utilization
Conclusion
In this post, we explored several key variables that contribute to server replication speed when using Application Migration Service. We encourage you to explore these key areas during your migration to determine if your replication speed can be optimized.
Many customers already manage user identities through identity providers (IdPs) for single sign-on access. With an IdP such as Active Directory Federation Services (AD FS), you can set up federated access to Amazon Redshift clusters as a mechanism to control permissions for the database objects by business groups. This provides a seamless user experience, and centralizes the governance of authentication and permissions for end-users. For more information, refer to the blog post series “Federate access to your Amazon Redshift cluster with Active Directory Federation Services (AD FS)” (part 1, part 2).
Due to the differences in the implementation of Amazon Web Services in China, customers have to adjust the configurations accordingly. For example, AWS China Regions (Beijing and Ningxia) are in a separate AWS partition, therefore all the Amazon Resource Names (ARNs) include the suffix -cn. AWS China Regions are also hosted at a different domain: www.amazonaws.cn.
This post introduces a step-by-step procedure to set up federated access to Amazon Redshift in AWS China Regions. It pinpoints the key differences you should pay attention to and provides a troubleshooting guide for common errors.
Solution overview
The following diagram illustrates the process of Security Assertion Markup Language 2.0 (SAML)-based federation access to Amazon Redshift in AWS China Regions. The workflow includes the following major steps:
The SQL client provides a user name and password to AD FS.
AWS STS authenticates the SAML response based on the mutual trust and returns temporary credentials if successful.
The SQL client communicates with Amazon Redshift to get back a database user with temporary credentials, then uses it to join database groups and connect to the specified database.
We organize the walkthrough in the following high-level steps:
Configure an AD FS relying party trust for AWS China Regions and define basic claim rules.
Configure an AD FS relying party trust and define claim rules
A relying party trust allows AWS and AD FS to communicate with each other. It is possible to configure two relying party trusts for both AWS China Regions and AWS Regions in the same AD FS at the same time. For AWS China Regions, we need to use a different SAML metadata document at https://signin.amazonaws.cn/static/saml-metadata.xml. The relying party’s identifier for AWS China Regions is urn:amazon:webservices:cn-north-1, whereas that for AWS Global Regions is urn:amazon:webservices. Note down this identifier to use later in this post.
Add AD groups and users
With SAML-based federation, end-users assume an IAM role and use it to join multiple database (DB) groups. The permissions on such roles and DB groups can be effectively managed by AD groups. We use different prefixes in AD group names to distinguish them, which help map to roles and DB group claim rules. It’s important to distinguish correctly the two types of AD groups because they’re mapped to different AWS resources.
We continue our walkthrough with an example. Suppose in business there are two roles: data scientist and data engineer, and two DB groups: oncology and pharmacy. Data scientists can join both groups, and data engineers can only join the pharmacy group. On the AD side, we define one AD group for each role and group. On the AWS side, we define one IAM role for each role and one Amazon Redshift DB group for each DB group. Suppose Clement is a data scientist and Jimmy is a data engineer, and both are already managed by AD. The following diagram illustrates this relationship.
Follow substeps a to o of Step 2 in Setting up JDBC or ODBC Single Sign-on authentication with AD FS to set up the relying party with the correct SAML metadata document for AWS China Regions and define the first three claim rules (NameId, RoleSessionName, and Get AD Groups). We resume after the IAM identity provider and roles are provisioned.
Provision an IAM identity provider and roles
You establish the trust for AD with AWS by provisioning an IAM identity provider. The IAM identity provider and assumed roles should be in one AWS account, otherwise you get the following error message during federated access: “Principal exists outside the account of the Role being assumed.” Follow these steps to provision the resources:
Download the metadata file at https://yourcompany.com/FederationMetadata/2007-06/FederationMetadata.xml from your AD FS server.
The AWS CDK version should be 2.0 or newer. For testing purposes, you may use the AdministratorAccess managed policy for the deployment. For production usage, use a profile with least privilege.
The following table summarizes the resources that the AWS CDK package provisions.
Service
Resource
Count
Notes
Amazon VPC
VPC
1
.
Subnet
2
.
Internet gateway
1
.
Route table
1
.
Security group
1
.
IAM
SAML Identity provider
1
.
Role
3
1 service role for cluster 2 federated roles
Amazon Redshift
Cluster
1
1 node, dc2.large
AWS Secrets Manager
Secret
1
.
In this example, the Publicly Accessible setting of the Amazon Redshift cluster is set to Enabled for simplicity. However, in a production environment, you should disable this setting and place the cluster inside a private subnet group. Refer to How can I access a private Amazon Redshift cluster from my local machine for more information.
Configure a security group
Add an inbound rule for your IP address to allow connection to the Amazon Redshift cluster.
Find the security group named RC Default Security Group.
Obtain the pubic IP address of your machine.
Add an inbound rule for this IP address and the default port for Amazon Redshift 5439.
Complete the remaining claim rules
After you provision the IAM identity provider and roles, add a claim rule to define SAML roles. We add a customer claim rule with the name Roles. It finds AD groups with the prefix role_ and replaces it with a combined ARN string. Pay attention to the ARNs of the resources where the partition is aws-cn. Replace AWS_ACCOUNT with your AWS account ID. The following table demonstrates how the selected AD groups are transformed to IAM role ARNs.
To add the claim rule, open the AD FS management console in your Windows Server and complete the following steps:
Choose Relying Party Trusts, then choose the relying party for AWS China.
Choose Edit Claim Issuance Policy, then choose Add Role.
On the Claim rule template menu, choose Send Claims Using a Custom Rule.
For Claim rule name, enter Roles.
In the Custom rule section, enter the following:
c:[Type == "http://temp/variable", Value =~ "(?i)^role_"]
=> issue(Type = "https://aws.amazon.com/SAML/Attributes/Role",
Value = RegExReplace(c.Value, "role_",
"arn:aws-cn:iam::AWS_ACCOUNT:saml-provider/rc-provider,arn:aws-cn:iam::AWS_ACCOUNT:role/rc_"));
The optional parameters of DbUser, AutoCreate, and DbGroups can be provided via either JDBC connection parameters or SAML attribute values. The benefit of user federation is to manage users in one place centrally. Therefore, the DbUser value should be automatically provided by the SAML attribute. The AutoCreate parameter should always be true, otherwise you have to create DB users beforehand. Finally, the DbGroups parameter could be provided by SAML attributes provided that such relationship is defined in AD.
To summarize, we recommend to provide at least DbUser and AutoCreate in SAML attributes, such that the end-user can save time by composing shorter connection strings. In our example, we provide all three parameters via SAML attributes.
Add a customer claim rule named DbUser. We use an email address as the value for DbUser:
You can also choose a Security Accounts Manager (SAM) account name, which is usually the user name of the email address. Using an email address plays an important role in IAM role policy setting. We revisit this issue later.
Add the custom claim rule named AutoCreate:
=> issue(type = "https://redshift.amazon.com/SAML/Attributes/AutoCreate", value = "true");
Add a customer claim rule named DbGroups. It finds all AD groups with the prefix group_ and lists them as values for DbGroups:
c:[Type == "http://temp/variable", Value =~ "(?i)^group_"]
=> issue(Type = "https://redshift.amazon.com/SAML/Attributes/DbGroups", Value = c.Value);
Visit https://yourcompany.com/adfs/ls/IdpInitiatedSignOn.aspx on your Windows Server, log in with user clement, and check that the following SAML attributes exist. For user jimmy, the role is rc_data_engineer and the DB group contains only group_pharmacy.
The preceding SAML attribute names are verified valid for AWS China Regions. The URLs end with amazon.com. It’s incorrect to change them to amazonaws.cn or amazon.cn.
Connect to Amazon Redshift with a SQL client
We use JDBC-based SQL Workbench/J (SQL client) to connect to the Amazon Redshift cluster. Amazon Redshift uses a DB group to collect DB users. The database privileges are managed collectively at group level. In this post, we don’t dive deep into privilege management. However, you need to create the preceding two DB groups.
Connect to the provisioned cluster and create the groups. You can connect on the AWS Management Console via the query editor with temporary credentials, or via a SQL client with database user admin and password. The password is stored in AWS Secrets Manager. You may need proper permissions for the above operations.
create group group_oncology;
create group group_pharmacy;
Test that the cluster is connectable via its endpoint. The primary user name is admin. You retrieve the secret value of the cluster’s password via Secrets Manager. Specify DSILogLevel and LogPath to collect driver logs and help diagnosis. The connection string looks like the following code. Replace CLUSTER_ENDPOINT with the correct value and delete all line breakers. We split the line for readability.
For AWS China Regions, one extra JDBC driver option loginToRp must be set as you set up a separate relying party trust for the AWS China Regions. If an AD user is mapped to more than one AWS role, in the connection string, use preferred_role to specify the exact role to assume for federated access.
Copy the role ARN directly and pay attention to the aws-cn partition.
If the user is mapped to only one role, this option can be omitted.
Replace CLUSTER_ID with the correct cluster identifier. For the user name, enter yourcompany\clement; for the password, enter the credential from AD:
When you’re connected, run the SQL statement as shown in the following screenshot.
The user prefixed with IAMA indicates that the user connected with federated access and was auto-created.
As an optional step, in the connection string, you can set the DbUser, AutoCreate, and DbGroups parameters.
Parameters from the connection string are before those from SAML attributes. We recommend you set at least DbUser and AutoCreate via SAML attributes. If it’s difficult to manage DB groups in AD users or you want flexibility, specify DbGroups in the connection string. See the following code:
The role policy follows the example policy for using GetClusterCredentials. It further allows redshift:DescribeClusters on the cluster because the role queries the cluster endpoint and port based on its identifier and Region. To make sure that the DB user is the same as the AD user, in this post, we use the following condition to check, where ROLE_ID is the unique identifier of the role:
The difference is apparent. The aws:userid contains the RoleSessionName, which is the email address. The SAM account name is the string before @ in the email address. Because the connection string parameter is before the SAML attribute parameter, we summarize the possible cases as follows:
If SAML attributes contain DbUser:
If the condition value contains a domain suffix:
If the DbUser SAML attribute value is an email address, DbUser must be in the connection string without the domain suffix.
If the DbUser SAML attribute value is a SAM account name, DbUser can be omitted in the connection string. Otherwise, the value must not contain a domain suffix.
If the condition value doesn’t contain a domain suffix:
If the DbUser SAML attribute value is an email address, DbUser can be omitted in the connection string. Otherwise, the value must contain a domain suffix.
If the DbUser SAML attribute value is a SAM account name, DbUser must be in the connection string with a domain suffix.
If SAML attributes don’t contain DbUser:
If the condition value contains a domain suffix, DbUser must be in the connection string without a domain suffix.
If the condition value doesn’t contain a domain suffix, DbUser can be omitted in the connection string, because RoleSessionName value which is the email address acts as DbUser. Otherwise, the value must contain a domain suffix.
Troubleshooting
Federated access to Amazon Redshift is a non-trivial process. However, it consists of smaller steps that we can divide and conquer when problems occur. Refer to the access diagram in the solution overview. We can split the process into three phrases:
Is SAML-based federation successful? Verify this by visiting the single sign-on page of AD FS and make sure you can sign in to the console with the federated role. Do you configure the relying party with the AWS China specific metadata document? Obtain the SAML response and check if the destination is https://signin.amazonaws.cn/saml. Are the SAML provider ARN and IAM role ARNs correct? Check if the role’s trust relationship contains the correct value for SAML:aud. For other possible checkpoints, refer to Troubleshooting SAML 2.0 federation with AWS.
Are the role policies correct? If SAML-based federation is successful, check the role policies are correct. Compare yours with those provided by this post. Did you use aws where aws-cn should be used? If the policy condition contains a domain suffix, is it the correct domain suffix? You can obtain the domain suffix in use if you get the error that the assumed role isn’t authorized to perform an action.
Is the SQL client connecting successfully? Is the cluster identifier correct? Make sure that your connection string contains the loginToRp option and points to the AWS China relying party. If multiple IAM roles are mapped, make sure preferred_role is one of them with the correct role ARN. You can get the list of roles in the SAML response. Try to set ssl_insecure to true temporarily for debugging. Check the previous subsection and make sure the DbUser is properly used or set according to the DbUser SAML attribute and condition value for aws:user. Turn on the driver logs and get debug hints there. Sometimes you may need to restart the SQL client to clear the cache and retry.
Security concerns
In a production environment, we suggest applying the following security settings, which aren’t used in this post.
For the Amazon Redshift cluster, complete the following:
Disable the publicly accessible option and place the cluster inside a private or isolated subnet group
Specify the exact DB groups for action redshift:JoinGroup. If you want to use a wildcard, make sure it doesn’t permit unwanted DB groups.
Check StringEquals for aws:user against the role ID along with the Amazon Redshift DB user. This condition can be checked for GetClusterCredentials, CreateClusterUser, and JoinGroup actions. Refer to the sample code for detailed codes.
In Amazon Redshift, the DB group is used to manage privileges for a collection of DB users. A DB user joins some DB groups during a login session and is granted the privileges associated to the groups. As we discussed before, you can use either the SAML attribute value or the connection property to specify the DB groups. The Amazon Redshift driver prefers the value from the connection string to that from the SAML attribute. As a result, the end-user can override the DB groups in the connection string. Therefore, to confine the privileges a DB user can be granted, the IAM role policy must restrict which DB groups the DB user is allowed to join safely, otherwise there might be a security risk. The following policy snippet shows such a risk. Always follow the least privilege principle when defining permission policies.
Run the following command to destroy the resources and stop incurring charges:
cdk destroy redshift-cn --force
Remove the users and groups created in the AD FS. Finally, remove the relying party trust for AWS China Regions in your AD FS if you don’t need it anymore.
Conclusion
In this post, we walked you through how to connect to Amazon Redshift in China with federated access based on AD FS. AWS China Regions are in a partition different from other AWS Regions, so you must pay special attention during the configuration. In summary, you need to check AWS resources ARNs with the aws-cn partition, SAML-based federation with the AWS China specific metadata document, and an Amazon Redshift JDBC driver with extra connecting options. This post also discusses different usage scenarios for the redshift:Dbuser parameter and provides common troubleshooting suggestions.
Wenjun Yuan is a Cloud Infra Architect in AWS Professional Services based in Chengdu, China. He works with various customers, from startups to international enterprises, helping them build and implement solutions with state-of-the-art cloud technologies and achieve more in their cloud explorations. He enjoys reading poetry and traveling around the world in his spare time.
Khoa Nguyen is a Big Data Architect in AWS Professional Services. He works with large enterprise customers and AWS partners to accelerate customers’ business outcomes by providing expertise in Big Data and AWS services.
Yewei Li is a Data Architect in AWS Professional Services based in Shanghai, China. He works with various enterprise customers to design and build data warehousing and data lake solutions on AWS. In his spare time, he loves reading and doing sports.
The collective thoughts of the interwebz
Manage Consent
To provide the best experiences, we use technologies like cookies to store and/or access device information. Consenting to these technologies will allow us to process data such as browsing behavior or unique IDs on this site. Not consenting or withdrawing consent, may adversely affect certain features and functions.
Functional
Always active
The technical storage or access is strictly necessary for the legitimate purpose of enabling the use of a specific service explicitly requested by the subscriber or user, or for the sole purpose of carrying out the transmission of a communication over an electronic communications network.
Preferences
The technical storage or access is necessary for the legitimate purpose of storing preferences that are not requested by the subscriber or user.
Statistics
The technical storage or access that is used exclusively for statistical purposes.The technical storage or access that is used exclusively for anonymous statistical purposes. Without a subpoena, voluntary compliance on the part of your Internet Service Provider, or additional records from a third party, information stored or retrieved for this purpose alone cannot usually be used to identify you.
Marketing
The technical storage or access is required to create user profiles to send advertising, or to track the user on a website or across several websites for similar marketing purposes.


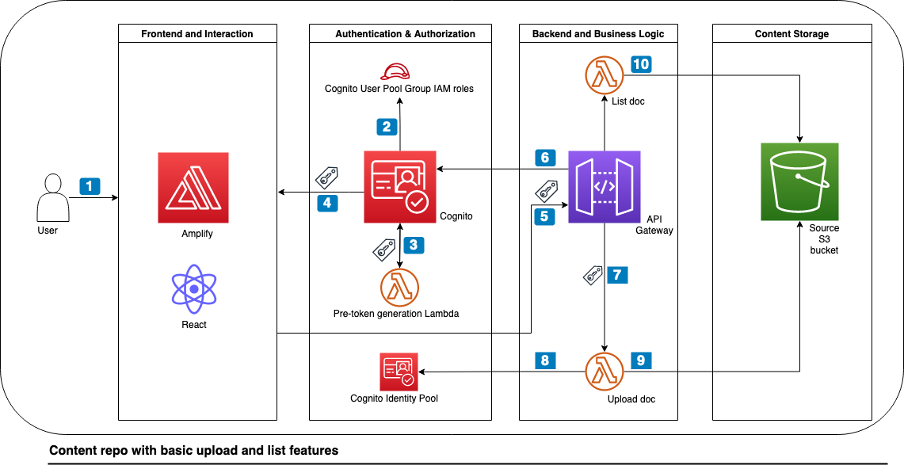
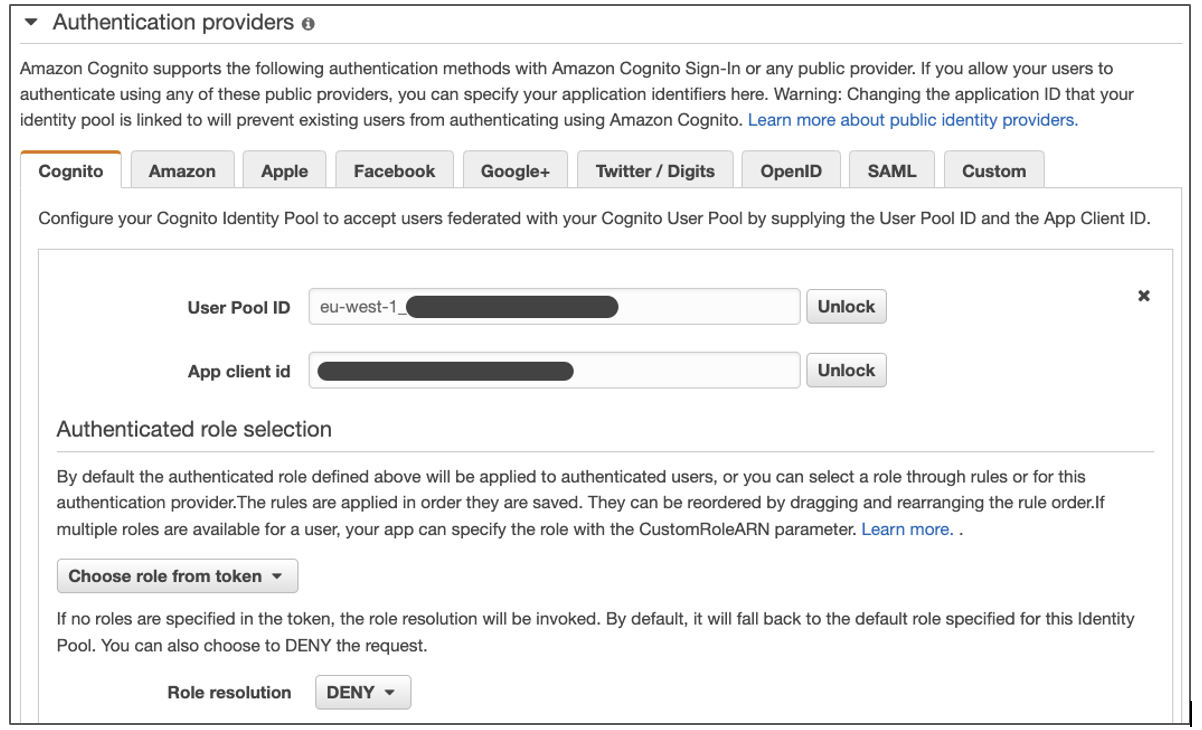

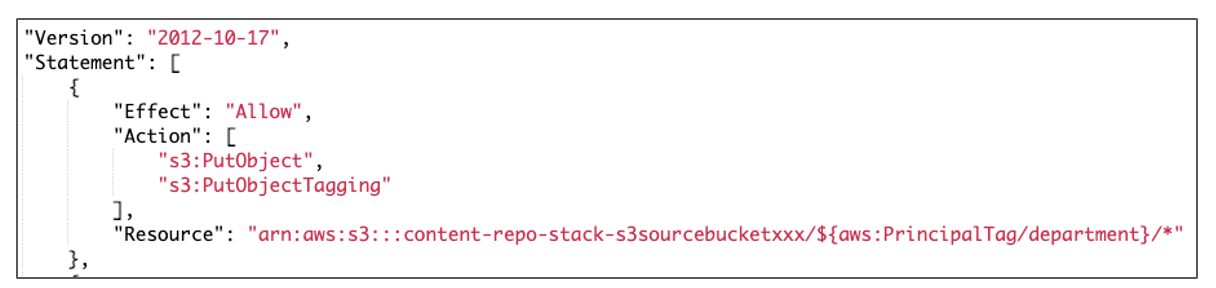

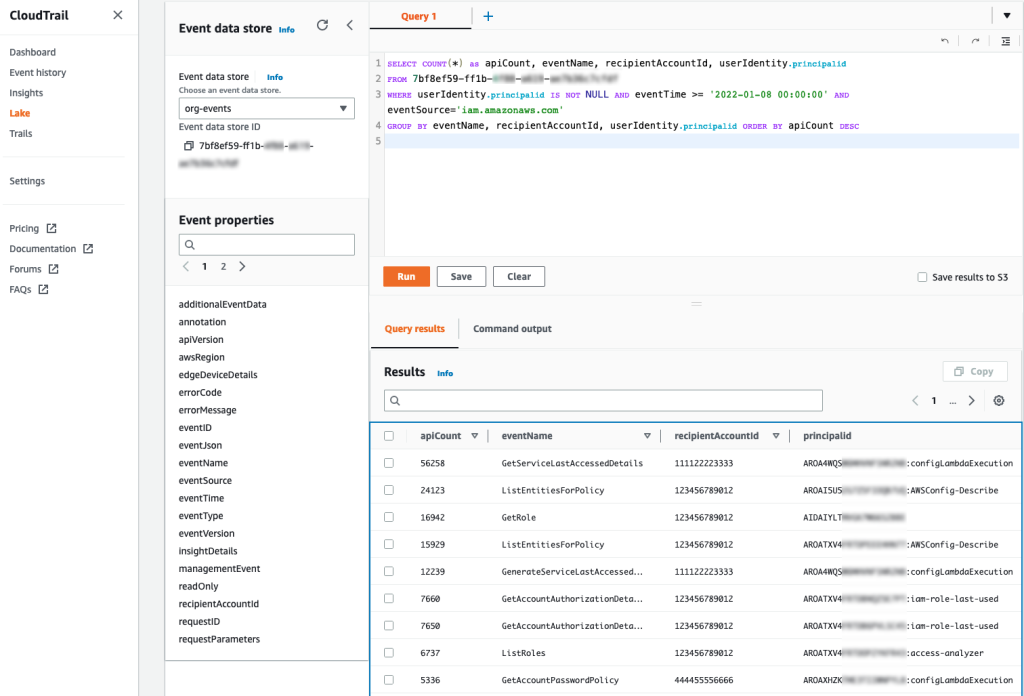
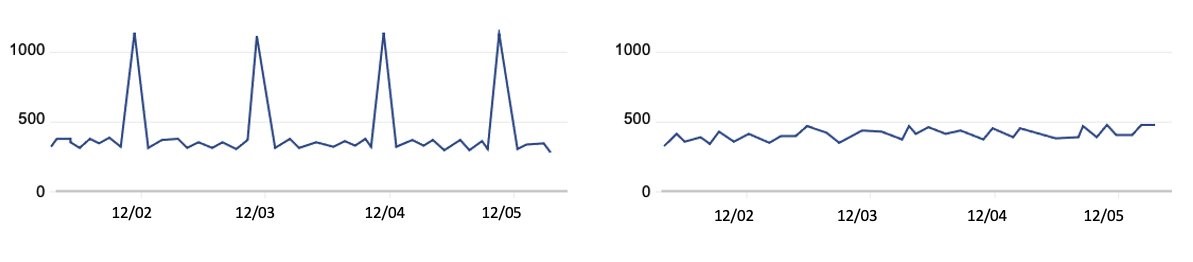


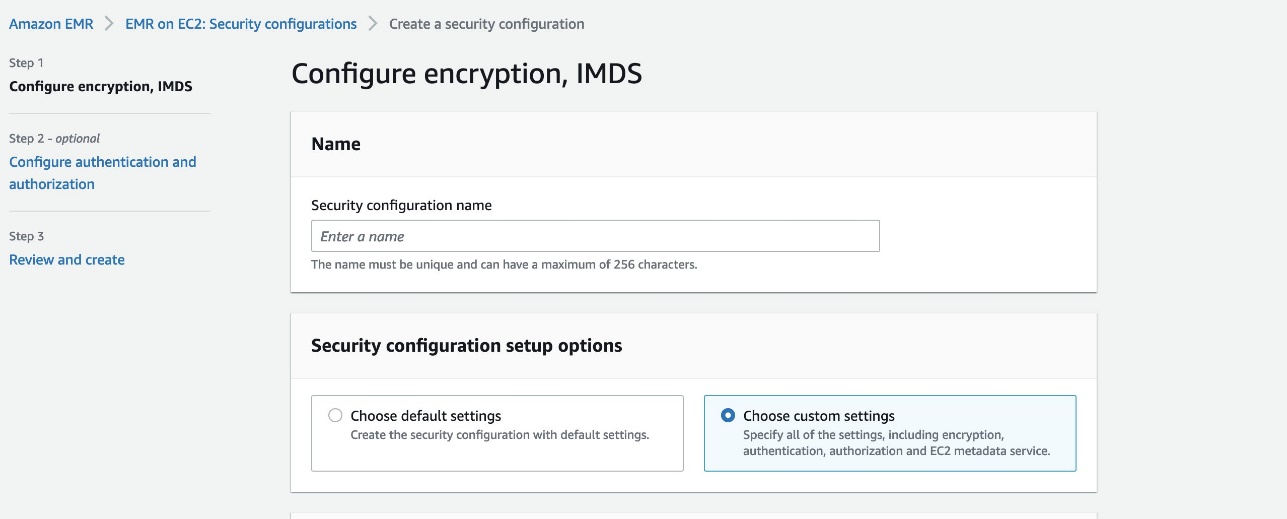


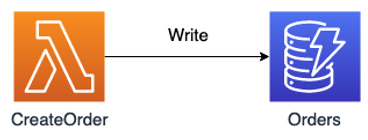
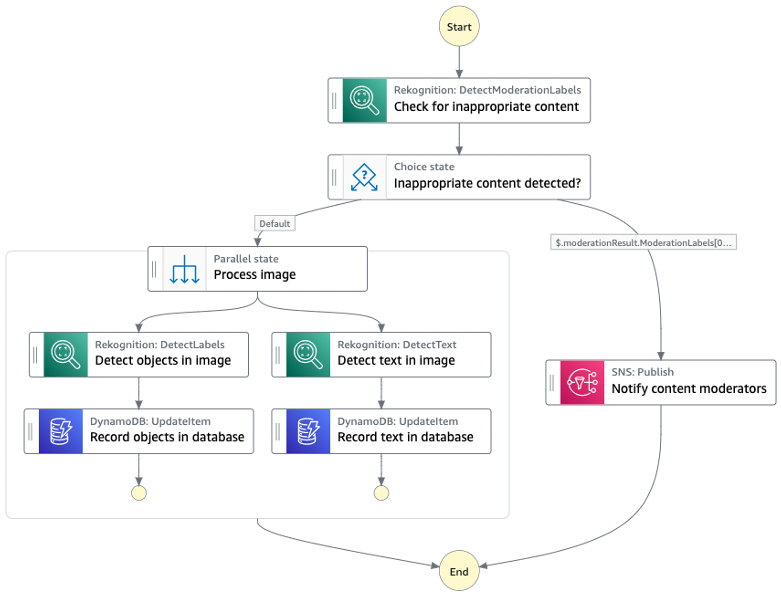
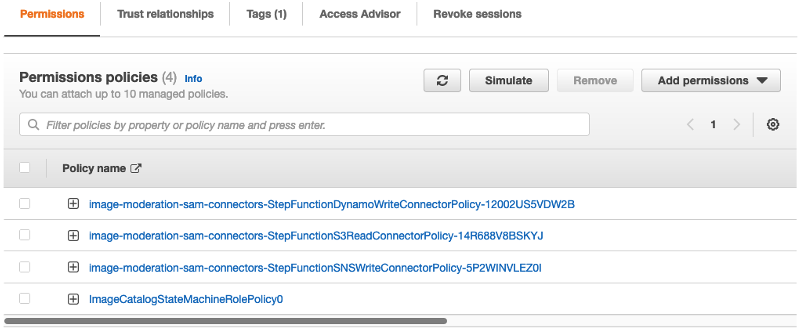


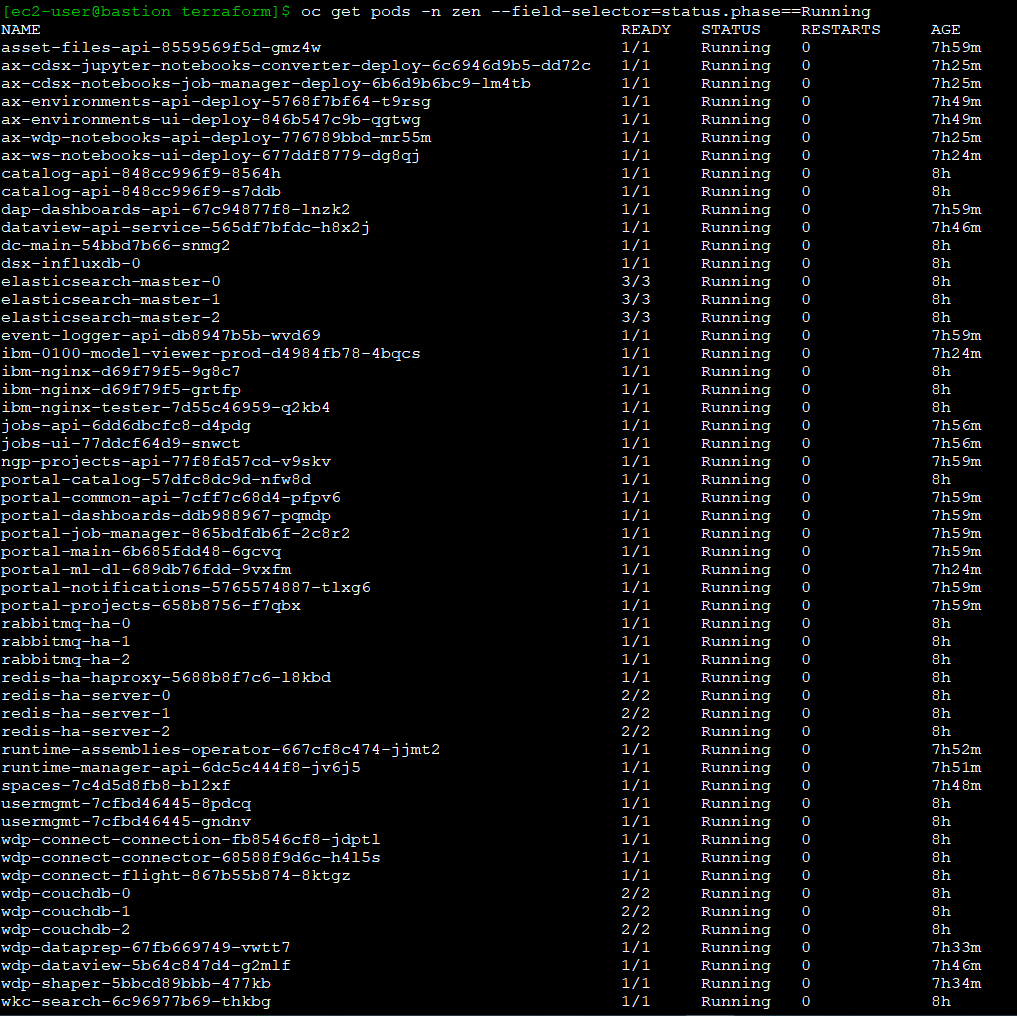
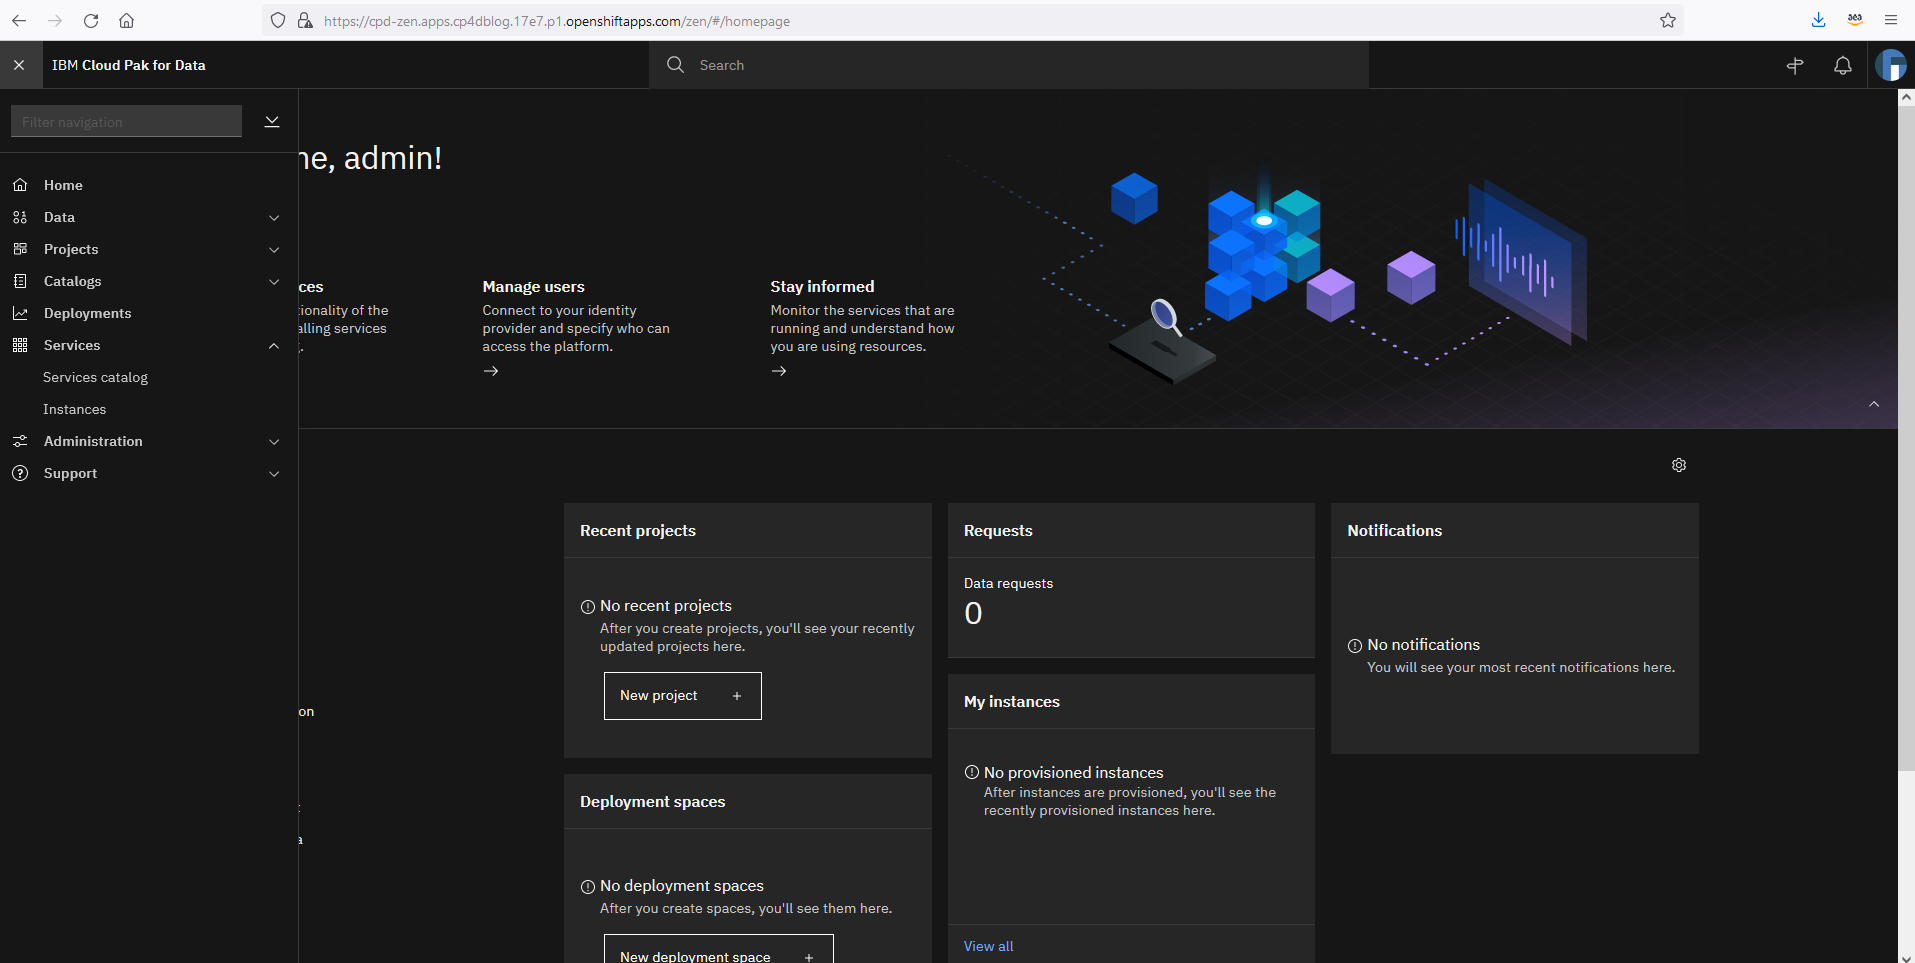
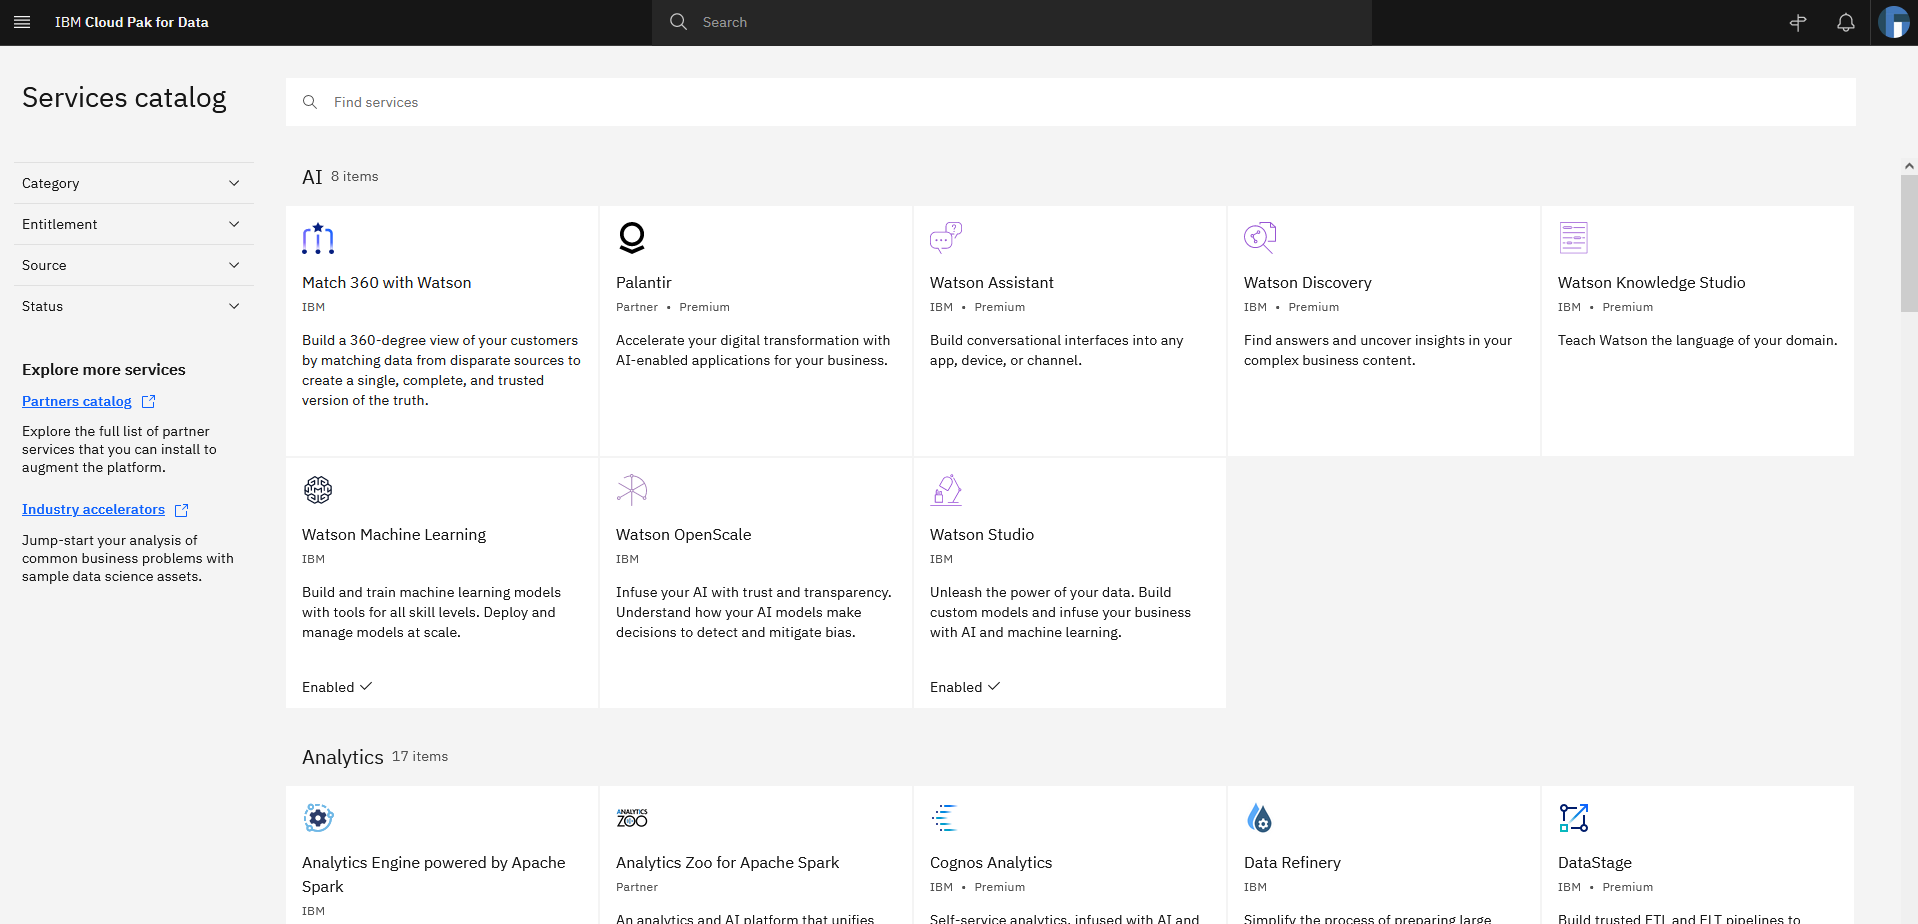


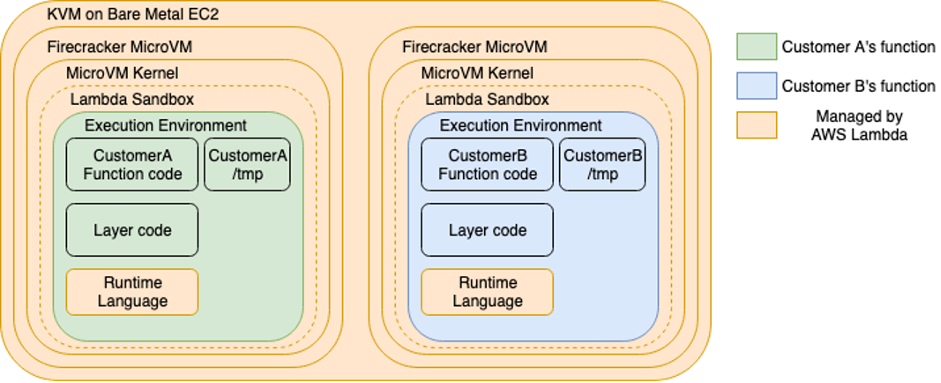


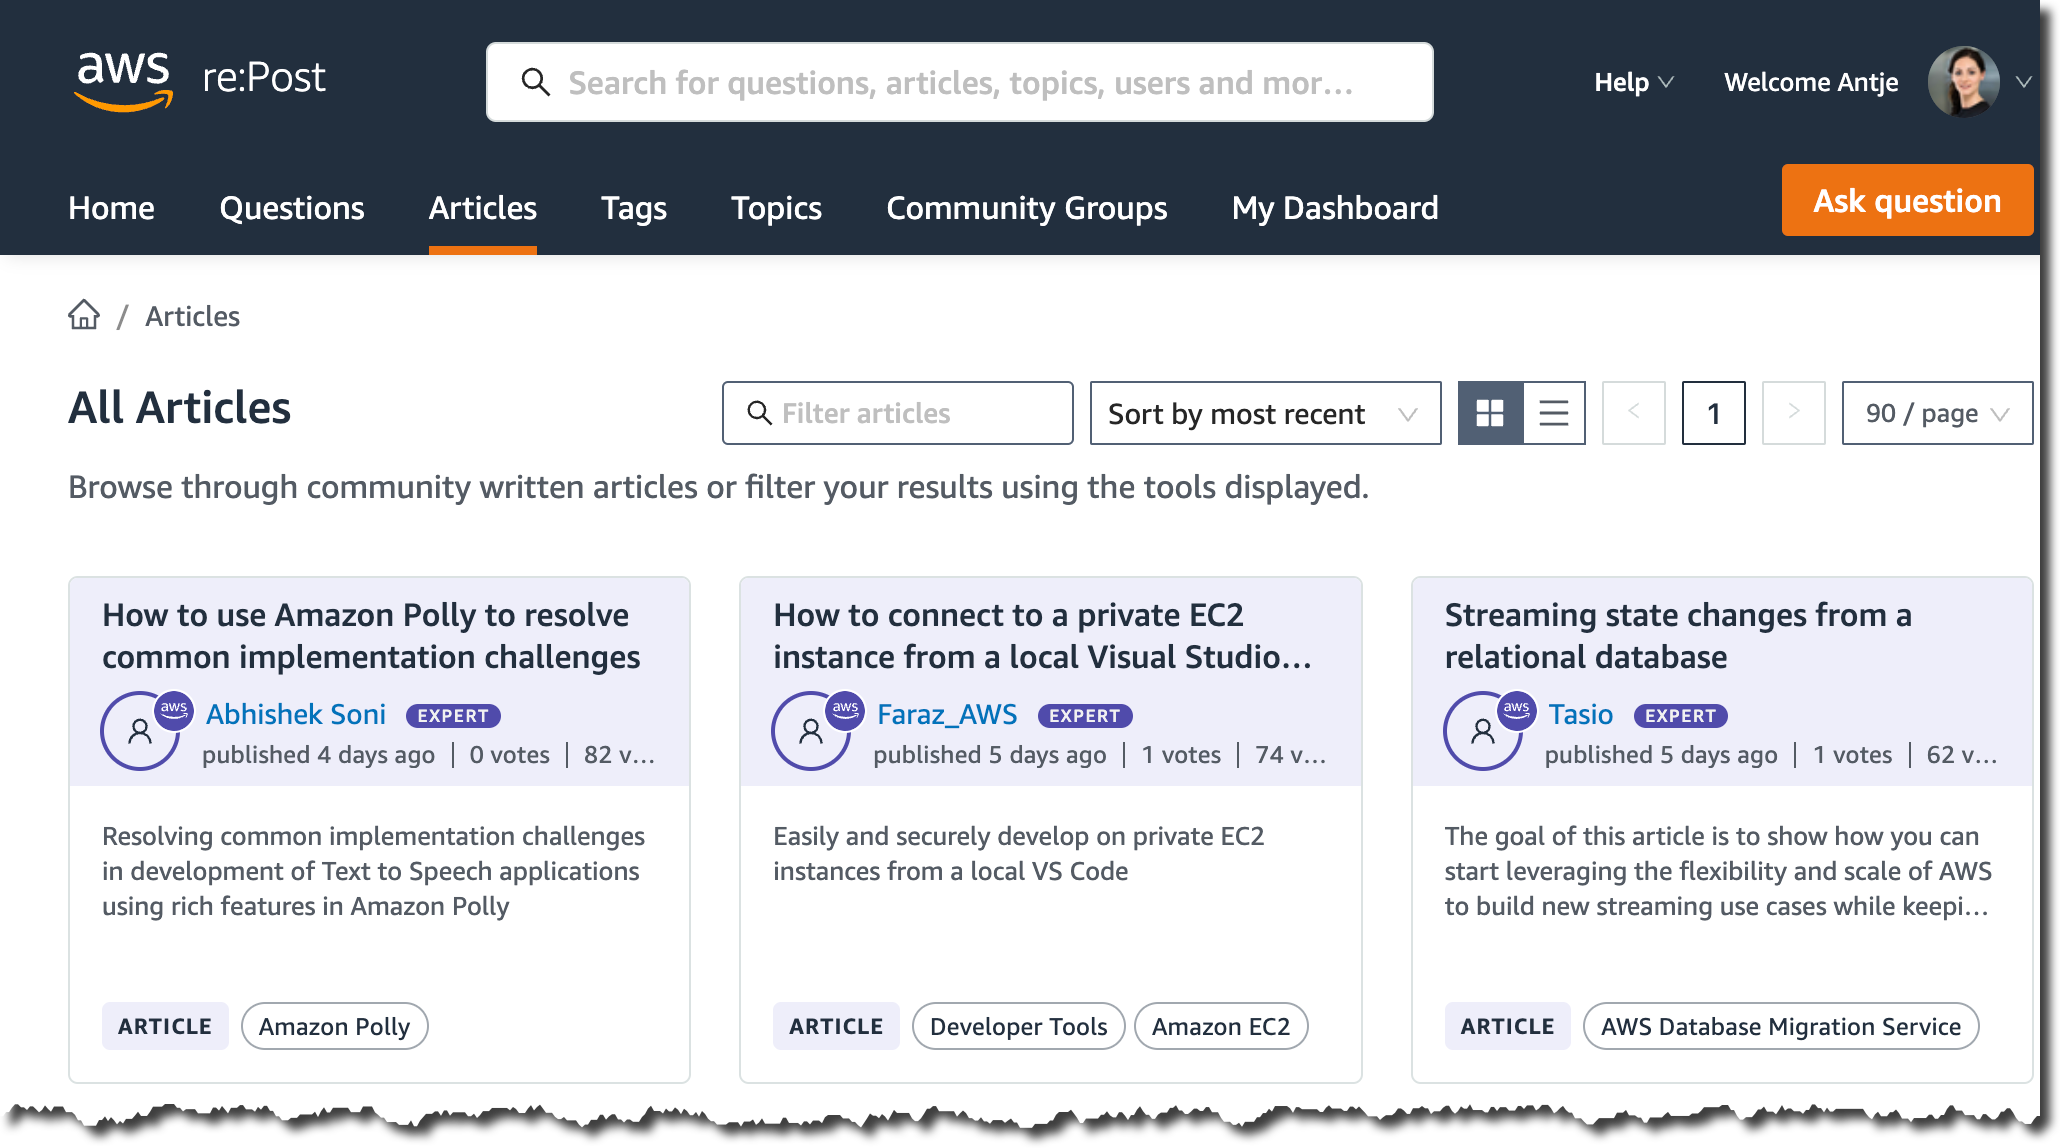
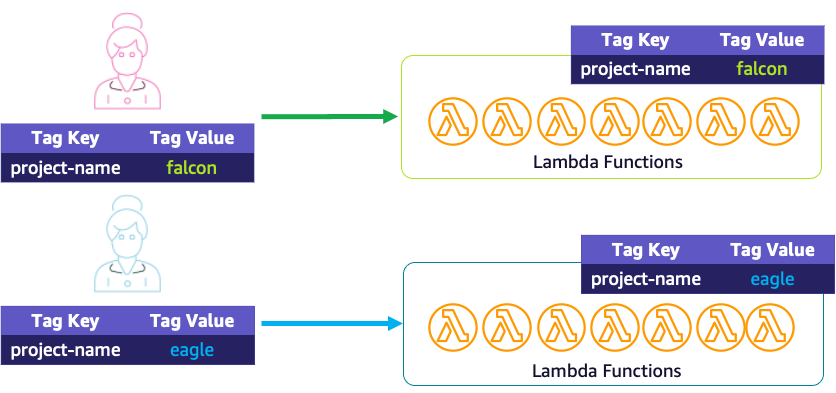


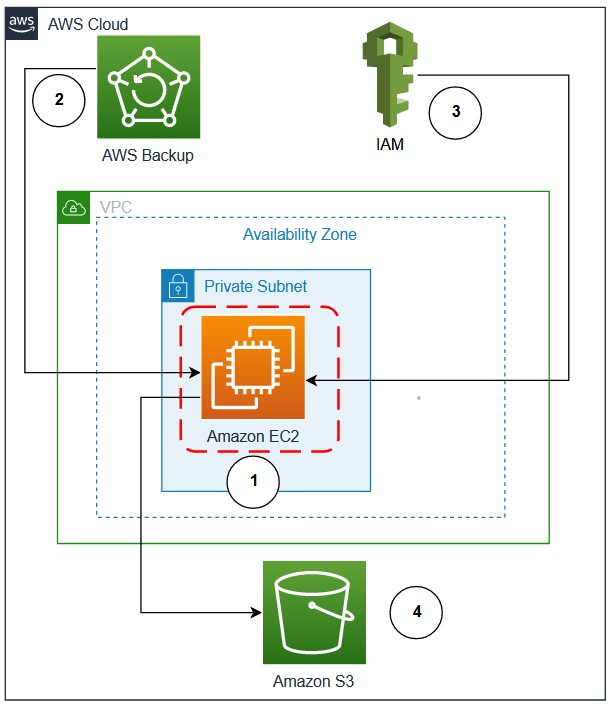
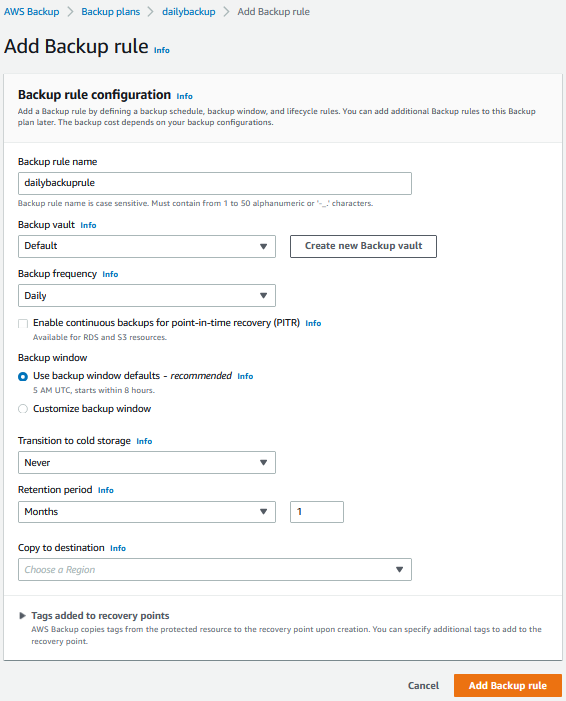
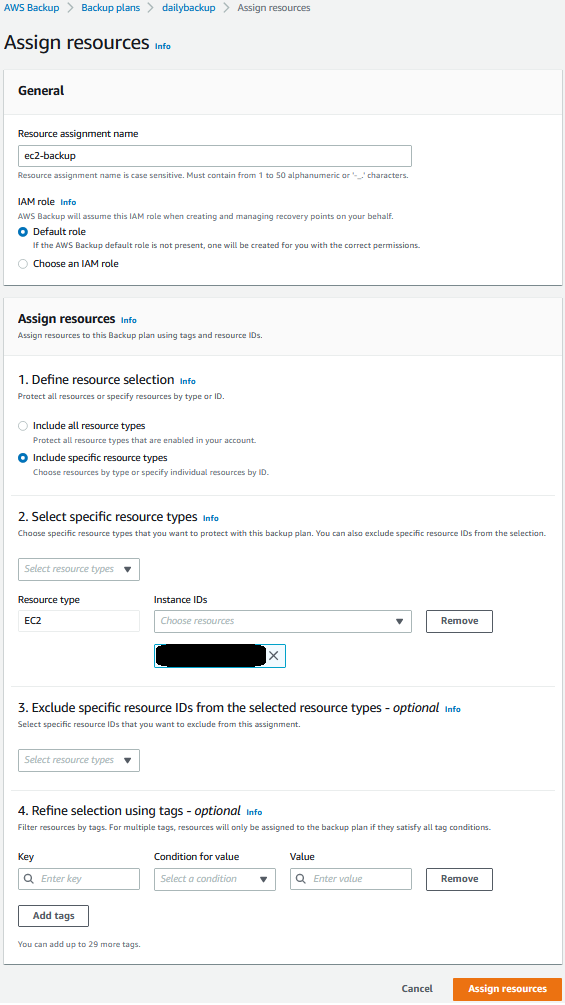
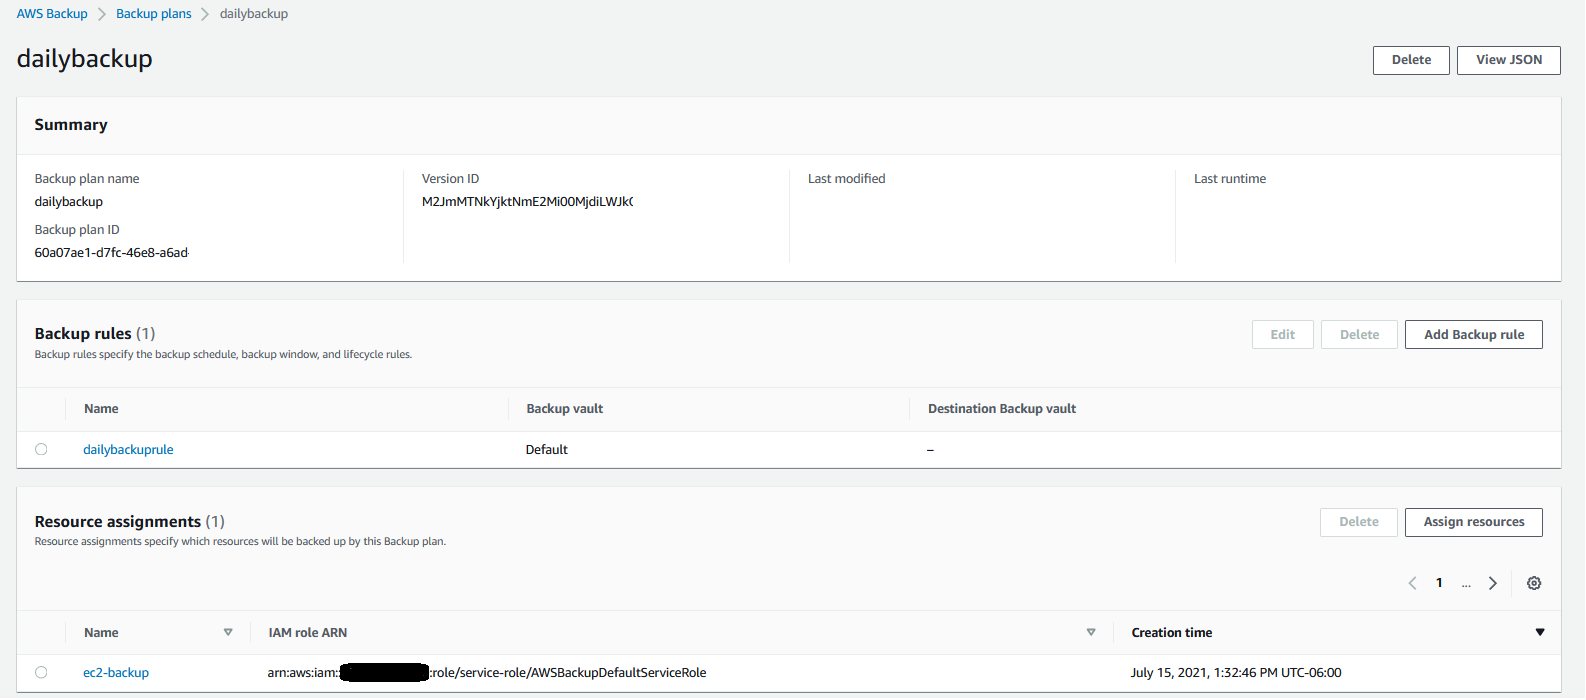
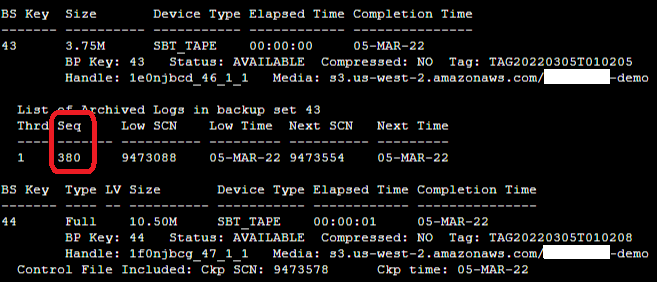
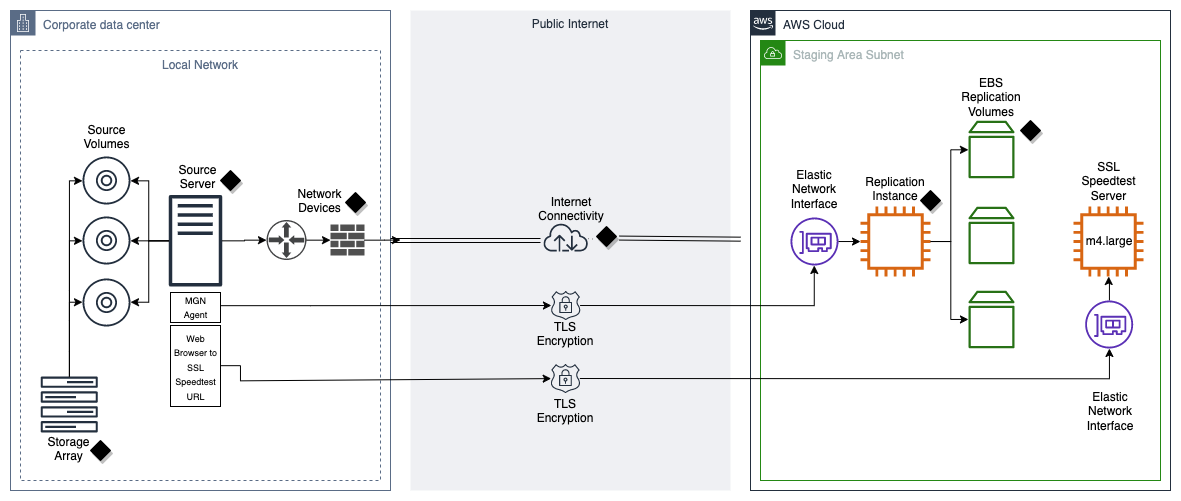


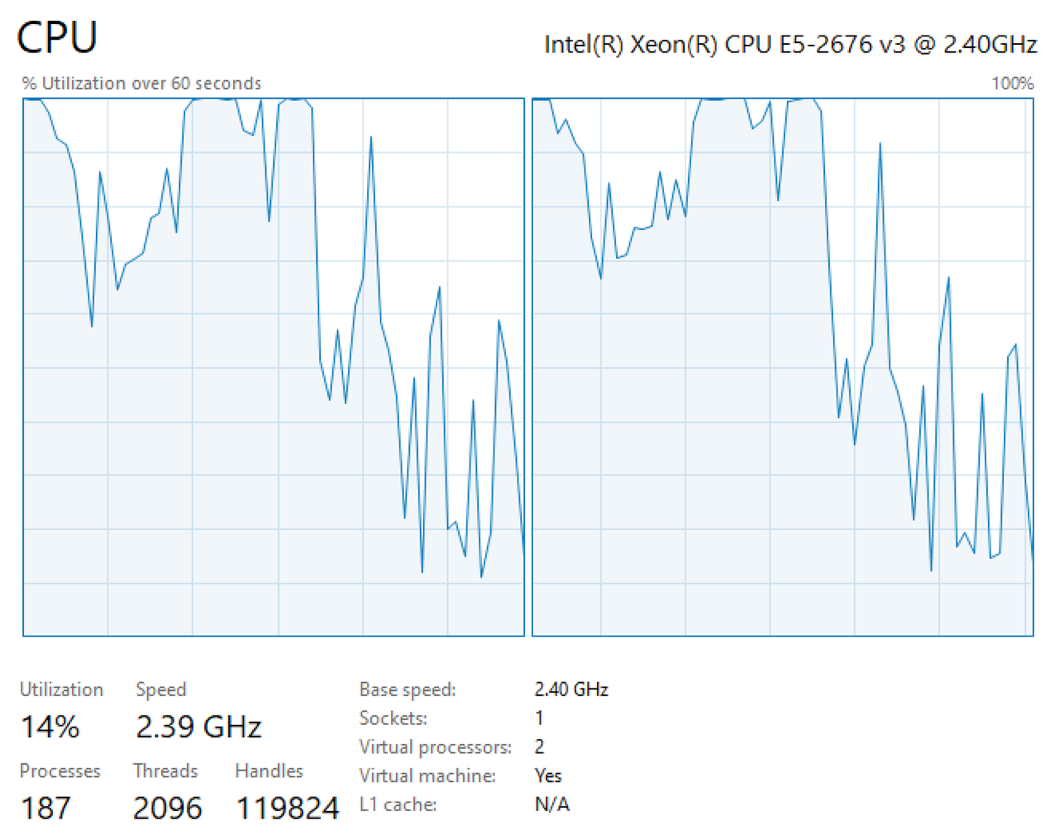


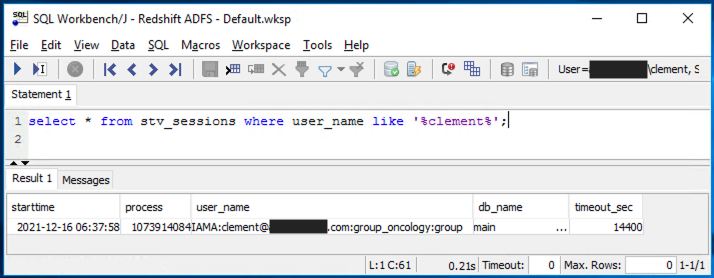


