Post Syndicated from Vikas Bajaj original https://aws.amazon.com/blogs/big-data/multi-tenancy-apache-kafka-clusters-in-amazon-msk-with-iam-access-control-and-kafka-quotas-part-2/
Kafka quotas are integral to multi-tenant Kafka clusters. They prevent Kafka cluster performance from being negatively affected by poorly behaved applications overconsuming cluster resources. Furthermore, they enable the central streaming data platform to be operated as a multi-tenant platform and used by downstream and upstream applications across multiple business lines. Kafka supports two types of quotas: network bandwidth quotas and request rate quotas. Network bandwidth quotas define byte-rate thresholds such as how much data client applications can produce to and consume from each individual broker in a Kafka cluster measured in bytes per second. Request rate quotas limit the percentage of time each individual broker spends processing client applications requests. Depending on your configuration, Kafka quotas can be set for specific users, specific client IDs, or both.
In Part 1 of this two-part series, we discussed the concepts of how to enforce Kafka quotas in Amazon Managed Streaming for Apache Kafka (Amazon MSK) clusters while using AWS Identity and Access Management (IAM) access control.
In this post, we walk you through the step-by-step implementation of setting up Kafka quotas in an MSK cluster while using IAM access control and testing them through sample client applications.
Solution overview
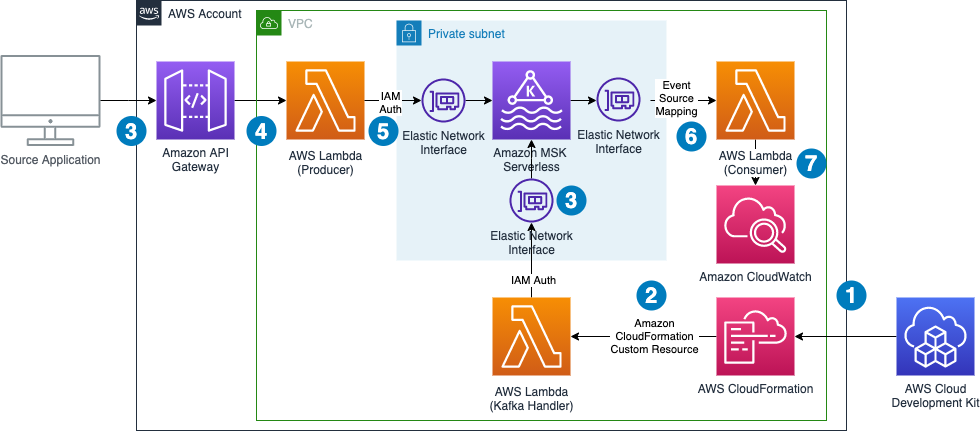
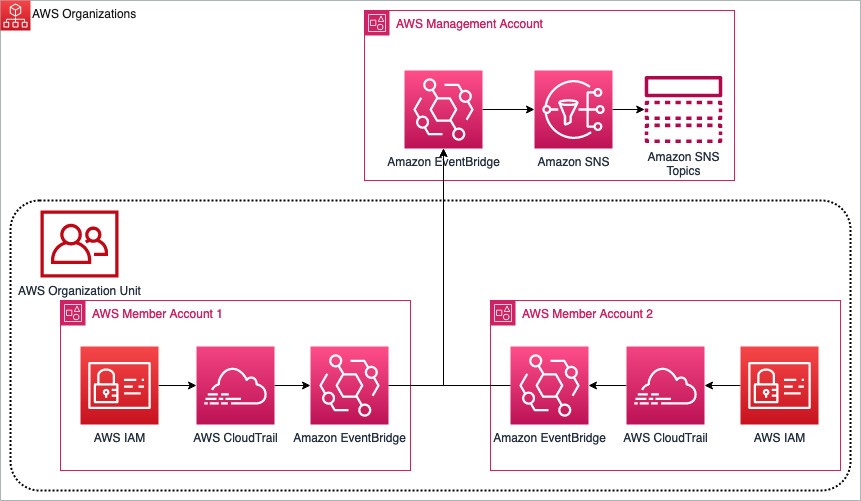
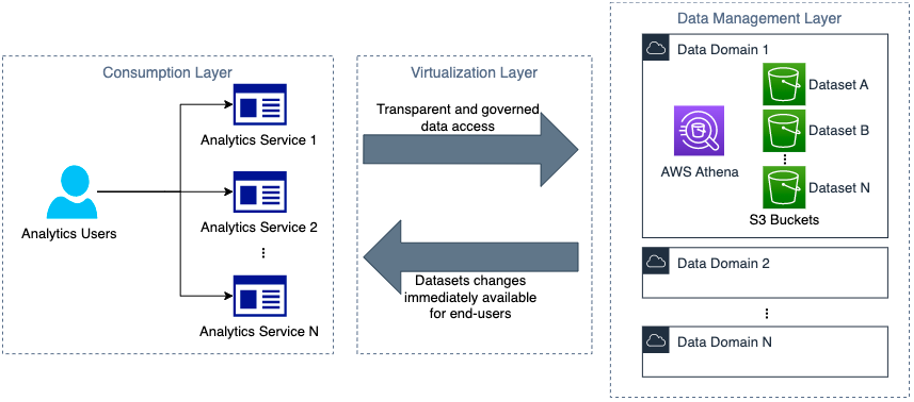
The following figure, which we first introduced in Part 1, illustrates how Kafka client applications (ProducerApp-1, ConsumerApp-1, and ConsumerApp-2) access Topic-B in the MSK cluster by assuming write and read IAM roles. Each producer and consumer client application has a quota that determines how much data they can produce or consume in bytes/second. The ProducerApp-1 quota allows it to produce up to 1024 bytes/second per broker. Similarly, the ConsumerApp-1 and ConsumerApp-2 quotas allow them to consume 5120 and 1024 bytes/second per broker, respectively. The following is a brief explanation of the flow shown in the architecture diagram:
- P1 –
ProducerApp-1 (via its ProducerApp-1-Role IAM role) assumes the Topic-B-Write-Role IAM role to send messages to Topic-B
- P2 – With the
Topic-B-Write-Role IAM role assumed, ProducerApp-1 begins sending messages to Topic-B
- C1 –
ConsumerApp-1 (via its ConsumerApp-1-Role IAM role) and ConsumerApp-2 (via its ConsumerApp-2-Role IAM role) assume the Topic-B-Read-Role IAM role to read messages from Topic-B
- C2 – With the
Topic-B-Read-Role IAM role assumed, ConsumerApp-1 and ConsumerApp-2 start consuming messages from Topic-B

Note that this post uses the AWS Command Line Interface (AWS CLI), AWS CloudFormation templates, and the AWS Management Console for provisioning and modifying AWS resources, and resources provisioned will be billed to your AWS account.
The high-level steps are as follows:
- Provision an MSK cluster with IAM access control and Amazon Elastic Compute Cloud (Amazon EC2) instances for client applications.
- Create
Topic-B on the MSK cluster.
- Create IAM roles for the client applications to access
Topic-B.
- Run the producer and consumer applications without setting quotas.
- Configure the produce and consume quotas for the client applications.
- Rerun the applications after setting the quotas.
Prerequisites
It is recommended that you read Part 1 of this series before continuing. In order to get started, you need the following:
- An AWS account that will be referred to as the demo account in this post, assuming that its account ID is
1111 1111 1111
- Permissions to create, delete, and modify AWS resources in the demo account
Provision an MSK cluster with IAM access control and EC2 instances
This step involves provisioning an MSK cluster with IAM access control in a VPC in the demo account. Additionally, we create four EC2 instances to make configuration changes to the MSK cluster and host producer and consumer client applications.
Deploy CloudFormation stack
- Clone the GitHub repository to download the CloudFormation template files and sample client applications:
git clone https://github.com/aws-samples/amazon-msk-kafka-quotas.git
- On the AWS CloudFormation console, choose Stacks in the navigation pane.
- Choose Create stack.
- For Prepare template, select Template is ready.
- For Template source, select Upload a template file.
- Upload the
cfn-msk-stack-1.yaml file from amazon-msk-kafka-quotas/cfn-templates directory, then choose Next.
- For Stack name, enter
MSKStack.
- Leave the parameters as default and choose Next.
- Scroll to the bottom of the Configure stack options page and choose Next to continue.
- Scroll to the bottom of the Review page, select the check box I acknowledge that CloudFormation may create IAM resources, and choose Submit.
It will take approximately 30 minutes for the stack to complete. After the stack has been successfully created, the following resources will be created:
- A VPC with three private subnets and one public subnet
- An MSK cluster with three brokers with IAM access control enabled
- An EC2 instance called
MSKAdminInstance for modifying MSK cluster settings as well as creating and modifying AWS resources
- EC2 instances for
ProducerApp-1, ConsumerApp-1, and ConsumerApp-2, one for each client application
- A separate IAM role for each EC2 instance that hosts the client application, as shown in the architecture diagram
- From the stack’s Outputs tab, note the
MSKClusterArn value.
Create a topic on the MSK cluster
To create Topic-B on the MSK cluster, complete the following steps:
- On the Amazon EC2 console, navigate to your list of running EC2 instances.
- Select the
MSKAdminInstance EC2 instance and choose Connect.
- On the Session Manager tab, choose Connect.
- Run the following commands on the new tab that opens in your browser:
sudo su - ec2-user

# Add Kafka binaries to the path
sed -i 's|HOME/bin|HOME/bin:~/kafka/bin|' .bash_profile

# Set your AWS region
aws configure set region <AWS Region>
- Set the environment variable to point to the MSK Cluster brokers IAM endpoint:
MSK_CLUSTER_ARN=<Use the value of MSKClusterArn that you noted earlier>
echo "export BOOTSTRAP_BROKERS_IAM=$(aws kafka get-bootstrap-brokers --cluster-arn $MSK_CLUSTER_ARN | jq -r .BootstrapBrokerStringSaslIam)" >> .bash_profile
source .bash_profile
echo $BOOTSTRAP_BROKERS_IAM
- Take note of the value of
BOOTSTRAP_BROKERS_IAM.
- Run the following Kafka CLI command to create
Topic-B on the MSK cluster:
kafka-topics.sh --bootstrap-server $BOOTSTRAP_BROKERS_IAM \
--create --topic Topic-B \
--partitions 3 --replication-factor 3 \
--command-config config_iam.properties
Because the MSK cluster is provisioned with IAM access control, the option --command-config points to config_iam.properties, which contains the properties required for IAM access control, created by the MSKStack CloudFormation stack.
The following warnings may appear when you run the Kafka CLI commands, but you may ignore them:
The configuration 'sasl.jaas.config' was supplied but isn't a known config.
The configuration 'sasl.client.callback.handler.class' was supplied but isn't a known config.
- To verify that
Topic-B has been created, list all the topics:
kafka-topics.sh --bootstrap-server $BOOTSTRAP_BROKERS_IAM \
--command-config config_iam.properties --list
Create IAM roles for client applications to access Topic-B
This step involves creating Topic-B-Write-Role and Topic-B-Read-Role as shown in the architecture diagram. Topic-B-Write-Role enables write operations on Topic-B, and can be assumed by the ProducerApp-1 . In a similar way, the ConsumerApp-1 and ConsumerApp-2 can assume Topic-B-Read-Role to perform read operations on Topic-B. To perform read operations on Topic-B, ConsumerApp-1 and ConsumerApp-2 must also belong to the consumer groups specified during the MSKStack stack update in the subsequent step.
Create the roles with the following steps:
- On the AWS CloudFormation console, choose Stacks in the navigation pane.
- Select
MSKStack and choose Update.
- For Prepare template, select Replace current template.
- For Template source, select Upload a template file.
- Upload the
cfn-msk-stack-2.yaml file from amazon-msk-kafka-quotas/cfn-templates directory, then choose Next.
- Provide the following additional stack parameters:
-
- For Topic B ARN, enter the
Topic-B ARN.
The ARN must be formatted as arn:aws:kafka:region:account-id:topic/msk-cluster-name/msk-cluster-uuid/Topic-B. Use the cluster name and cluster UUID from the MSK cluster ARN you noted earlier and provide your AWS Region. For more information, refer to the IAM access control for Amazon MSK.
-
- For ConsumerApp-1 Consumer Group name, enter
ConsumerApp-1 consumer group ARN.
It must be formatted as arn:aws:kafka:region:account-id:group/msk-cluster-name/msk-cluster-uuid/consumer-group-name
-
- For ConsumerApp-2 Consumer Group name, enter
ConsumerApp-2 consumer group ARN.
Use a similar format as the previous ARN.
- Choose Next to continue.
- Scroll to the bottom of the Configure stack options page and choose Next to continue.
- Scroll to the bottom of the Review page, select the check box I acknowledge that CloudFormation may create IAM resources, and choose Update stack.
It will take approximately 3 minutes for the stack to update. After the stack has been successfully updated, the following resources will be created:
- Topic-B-Write-Role – An IAM role with permission to perform write operations on
Topic-B. Its trust policy allows the ProducerApp-1-Role IAM role to assume it.
- Topic-B-Read-Role – An IAM role with permission to perform read operations on
Topic-B. Its trust policy allows the ConsumerApp-1-Role and ConsumerApp-2-Role IAM roles to assume it. Furthermore, ConsumerApp-1 and ConsumerApp-2 must also belong to the consumer groups you specified when updating the stack to perform read operations on Topic-B.
- From the stack’s Outputs tab, note the
TopicBReadRoleARN and TopicBWriteRoleARN values.
Run the producer and consumer applications without setting quotas
Here, we run ProducerApp-1, ConsumerApp-1, and ConsumerApp-2 without setting their quotas. From the previous steps, you will need BOOTSTRAP_BROKERS_IAM value, Topic-B-Write-Role ARN, and Topic-B-Read-Role ARN. The source code of client applications and their packaged versions are available in the GitHub repository.
Run the ConsumerApp-1 application
To run the ConsumerApp-1 application, complete the following steps:
- On the Amazon EC2 console, select the
ConsumerApp-1 EC2 instance and choose Connect.
- On the Session Manager tab, choose Connect.
- Run the following commands on the new tab that opens in your browser:
sudo su - ec2-user

# Set your AWS region
aws configure set region <aws region>

# Set BOOTSTRAP_BROKERS_IAM variable to MSK cluster's IAM endpoint
BOOTSTRAP_BROKERS_IAM=<Use the value of BOOTSTRAP_BROKERS_IAM that you noted earlier>

echo "export BOOTSTRAP_BROKERS_IAM=$(echo $BOOTSTRAP_BROKERS_IAM)" >> .bash_profile

# Clone GitHub repository containing source code for client applications
git clone https://github.com/aws-samples/amazon-msk-kafka-quotas.git

cd amazon-msk-kafka-quotas/uber-jars/
- Run the
ConsumerApp-1 application to start consuming messages from Topic-B:
java -jar kafka-consumer.jar --bootstrap-servers $BOOTSTRAP_BROKERS_IAM \
--assume-role-arn <Topic-B-Read-Role-ARN> \
--topic-name <Topic-Name> \
--region <AWS Region> \
--consumer-group <ConsumerApp-1 consumer group name> \
--role-session-name <role session name for ConsumerApp-1 to use during STS assume role call> \
--client-id <ConsumerApp-1 client.id> \
--print-consumer-quota-metrics Y \
--cw-dimension-name <CloudWatch Metrics Dimension Name> \
--cw-dimension-value <CloudWatch Metrics Dimension Value> \
--cw-namespace <CloudWatch Metrics Namespace>
You can find the source code on GitHub for your reference. The command line parameter details are as follows:
- –bootstrap-servers – MSK cluster bootstrap brokers IAM endpoint.
- –assume-role-arn –
Topic-B-Read-Role IAM role ARN. Assuming this role, ConsumerApp-1 will read messages from the topic.
- –region – Region you’re using.
- –topic-name – Topic name from which
ConsumerApp-1 will read messages. The default is Topic-B.
- –consumer-group – Consumer group name for
ConsumerApp-1, as specified during the stack update.
- –role-session-name –
ConsumerApp-1 assumes the Topic-B-Read-Role using the AWS Security Token Service (AWS STS) SDK. ConsumerApp-1 will use this role session name when calling the assumeRole function.
- –client-id – Client ID for
ConsumerApp-1 .
- –print-consumer-quota-metrics – Flag indicating whether client metrics should be printed on the terminal by
ConsumerApp-1.
- –cw-dimension-name – Amazon CloudWatch dimension name that will be used to publish client throttling metrics from
ConsumerApp-1.
- –cw-dimension-value – CloudWatch dimension value that will be used to publish client throttling metrics from
ConsumerApp-1.
- –cw-namespace – Namespace where
ConsumerApp-1 will publish CloudWatch metrics in order to monitor throttling.
- If you’re satisfied with the rest of parameters, use the following command and change
--assume-role-arn and --region as per your environment:
java -jar kafka-consumer.jar --bootstrap-servers $BOOTSTRAP_BROKERS_IAM \
--assume-role-arn arn:aws:iam::111111111111:role/MSKStack-TopicBReadRole-xxxxxxxxxxx \
--topic-name Topic-B \
--region <AWS Region> \
--consumer-group consumerapp-1-cg \
--role-session-name consumerapp-1-role-session \
--client-id consumerapp-1-client-id \
--print-consumer-quota-metrics Y \
--cw-dimension-name ConsumerApp \
--cw-dimension-value ConsumerApp-1 \
--cw-namespace ConsumerApps

The fetch-throttle-time-avg and fetch-throttle-time-max client metrics should display 0.0, indicating no throttling is occurring for ConsumerApp-1. Remember that we haven’t set the consume quota for ConsumerApp-1 yet. Let it run for a while.
Run the ConsumerApp-2 application
To run the ConsumerApp-2 application, complete the following steps:
- On the Amazon EC2 console, select the
ConsumerApp-2 EC2 instance and choose Connect.
- On the Session Manager tab, choose Connect.
- Run the following commands on the new tab that opens in your browser:
sudo su - ec2-user

# Set your AWS region
aws configure set region <aws region>

# Set BOOTSTRAP_BROKERS_IAM variable to MSK cluster's IAM endpoint
BOOTSTRAP_BROKERS_IAM=<Use the value of BOOTSTRAP_BROKERS_IAM that you noted earlier>

echo "export BOOTSTRAP_BROKERS_IAM=$(echo $BOOTSTRAP_BROKERS_IAM)" >> .bash_profile

# Clone GitHub repository containing source code for client applications
git clone https://github.com/aws-samples/amazon-msk-kafka-quotas.git

cd amazon-msk-kafka-quotas/uber-jars/
- Run the
ConsumerApp-2 application to start consuming messages from Topic-B:
java -jar kafka-consumer.jar --bootstrap-servers $BOOTSTRAP_BROKERS_IAM \
--assume-role-arn <Topic-B-Read-Role-ARN> \
--topic-name <Topic-Name> \
--region <AWS Region> \
--consumer-group <ConsumerApp-2 consumer group name> \
--role-session-name <role session name for ConsumerApp-2 to use during STS assume role call> \
--client-id <ConsumerApp-2 client.id> \
--print-consumer-quota-metrics Y \
--cw-dimension-name <CloudWatch Metrics Dimension Name> \
--cw-dimension-value <CloudWatch Metrics Dimension Value> \
--cw-namespace <CloudWatch Metrics Namespace>
The code has similar command line parameters details as ConsumerApp-1 discussed previously, except for the following:
- –consumer-group – Consumer group name for
ConsumerApp-2, as specified during the stack update.
- –role-session-name –
ConsumerApp-2 assumes the Topic-B-Read-Role using the AWS STS SDK. ConsumerApp-2 will use this role session name when calling the assumeRole function.
- –client-id – Client ID for
ConsumerApp-2 .
- If you’re satisfied with the rest of parameters, use the following command and change
--assume-role-arn and --region as per your environment:
java -jar kafka-consumer.jar --bootstrap-servers $BOOTSTRAP_BROKERS_IAM \
--assume-role-arn arn:aws:iam::111111111111:role/MSKStack-TopicBReadRole-xxxxxxxxxxx \
--topic-name Topic-B \
--region <AWS Region> \
--consumer-group consumerapp-2-cg \
--role-session-name consumerapp-2-role-session \
--client-id consumerapp-2-client-id \
--print-consumer-quota-metrics Y \
--cw-dimension-name ConsumerApp \
--cw-dimension-value ConsumerApp-2 \
--cw-namespace ConsumerApps
The fetch-throttle-time-avg and fetch-throttle-time-max client metrics should display 0.0, indicating no throttling is occurring for ConsumerApp-2. Remember that we haven’t set the consume quota for ConsumerApp-2 yet. Let it run for a while.
Run the ProducerApp-1 application
To run the ProducerApp-1 application, complete the following steps:
- On the Amazon EC2 console, select the
ProducerApp-1 EC2 instance and choose Connect.
- On the Session Manager tab, choose Connect.
- Run the following commands on the new tab that opens in your browser:
sudo su - ec2-user

# Set your AWS region
aws configure set region <aws region>

# Set BOOTSTRAP_BROKERS_IAM variable to MSK cluster's IAM endpoint
BOOTSTRAP_BROKERS_IAM=<Use the value of BOOTSTRAP_BROKERS_IAM that you noted earlier>

echo "export BOOTSTRAP_BROKERS_IAM=$(echo $BOOTSTRAP_BROKERS_IAM)" >> .bash_profile

# Clone GitHub repository containing source code for client applications
git clone https://github.com/aws-samples/amazon-msk-kafka-quotas.git

cd amazon-msk-kafka-quotas/uber-jars/
- Run the
ProducerApp-1 application to start sending messages to Topic-B:
java -jar kafka-producer.jar --bootstrap-servers $BOOTSTRAP_BROKERS_IAM \
--assume-role-arn <Topic-B-Write-Role-ARN> \
--topic-name <Topic-Name> \
--region <AWS Region> \
--num-messages <Number of events> \
--role-session-name <role session name for ProducerApp-1 to use during STS assume role call> \
--client-id <ProducerApp-1 client.id> \
--producer-type <Producer Type, options are sync or async> \
--print-producer-quota-metrics Y \
--cw-dimension-name <CloudWatch Metrics Dimension Name> \
--cw-dimension-value <CloudWatch Metrics Dimension Value> \
--cw-namespace <CloudWatch Metrics Namespace>
You can find the source code on GitHub for your reference. The command line parameter details are as follows:
- –bootstrap-servers – MSK cluster bootstrap brokers IAM endpoint.
- –assume-role-arn –
Topic-B-Write-Role IAM role ARN. Assuming this role, ProducerApp-1 will write messages to the topic.
- –topic-name –
ProducerApp-1 will send messages to this topic. The default is Topic-B.
- –region – AWS Region you’re using.
- –num-messages – Number of messages the
ProducerApp-1 application will send to the topic.
- –role-session-name –
ProducerApp-1 assumes the Topic-B-Write-Role using the AWS STS SDK. ProducerApp-1 will use this role session name when calling the assumeRole function.
- –client-id – Client ID of
ProducerApp-1 .
- –producer-type –
ProducerApp-1can be run either synchronously or asynchronously. Options are sync or async.
- –print-producer-quota-metrics – Flag indicating whether the client metrics should be printed on the terminal by ProducerApp-1.
- –cw-dimension-name – CloudWatch dimension name that will be used to publish client throttling metrics from ProducerApp-1.
- –cw-dimension-value – CloudWatch dimension value that will be used to publish client throttling metrics from ProducerApp-1.
- –cw-namespace – The namespace where ProducerApp-1 will publish CloudWatch metrics in order to monitor throttling.
- If you’re satisfied with the rest of parameters, use the following command and change
--assume-role-arn and --region as per your environment. To run a synchronous Kafka producer, it uses the option --producer-type sync:
java -jar kafka-producer.jar --bootstrap-servers $BOOTSTRAP_BROKERS_IAM \
--assume-role-arn arn:aws:iam::111111111111:role/MSKStack-TopicBWriteRole-xxxxxxxxxxxx \
--topic-name Topic-B \
--region <AWS Region> \
--num-messages 10000000 \
--role-session-name producerapp-1-role-session \
--client-id producerapp-1-client-id \
--producer-type sync \
--print-producer-quota-metrics Y \
--cw-dimension-name ProducerApp \
--cw-dimension-value ProducerApp-1 \
--cw-namespace ProducerApps
Alternatively, use --producer-type async to run an asynchronous producer. For more details, refer to Asynchronous send.
The produce-throttle-time-avg and produce-throttle-time-max client metrics should display 0.0, indicating no throttling is occurring for ProducerApp-1. Remember that we haven’t set the produce quota for ProducerApp-1 yet. Check that ConsumerApp-1 and ConsumerApp-2 can consume messages and notice they are not throttled. Stop the consumer and producer client applications by pressing Ctrl+C in their respective browser tabs.
Set produce and consume quotas for client applications
Now that we have run the producer and consumer applications without quotas, we set their quotas and rerun them.
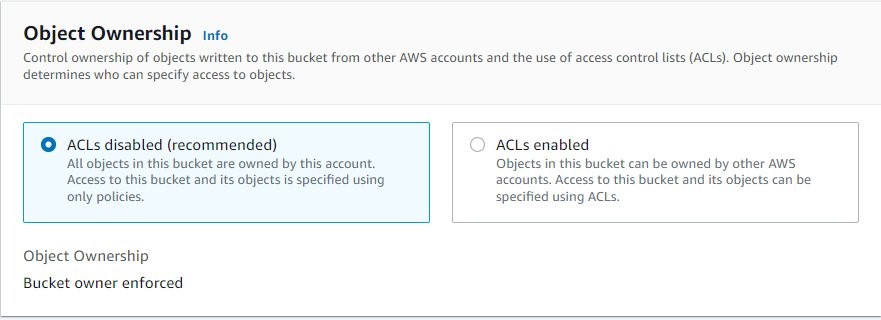
Open the Sessions Manager terminal for the MSKAdminInstance EC2 instance as described earlier and run the following commands to find the default configuration of one of the brokers in the MSK cluster. MSK clusters are provisioned with the default Kafka quotas configuration.
# Describe Broker-1 default configurations
kafka-configs.sh --bootstrap-server $BOOTSTRAP_BROKERS_IAM \
--command-config config_iam.properties \
--entity-type brokers \
--entity-name 1 \
--all --describe > broker1_default_configurations.txt
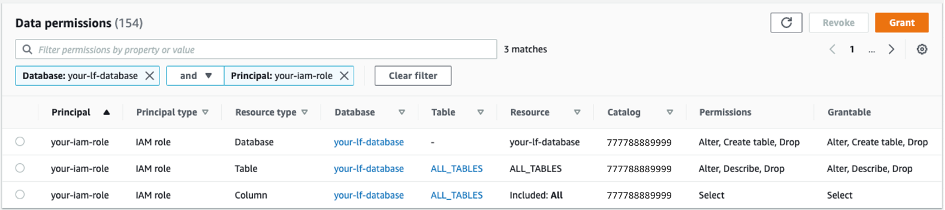
cat broker1_default_configurations.txt | grep quota.consumer.default
cat broker1_default_configurations.txt | grep quota.producer.default

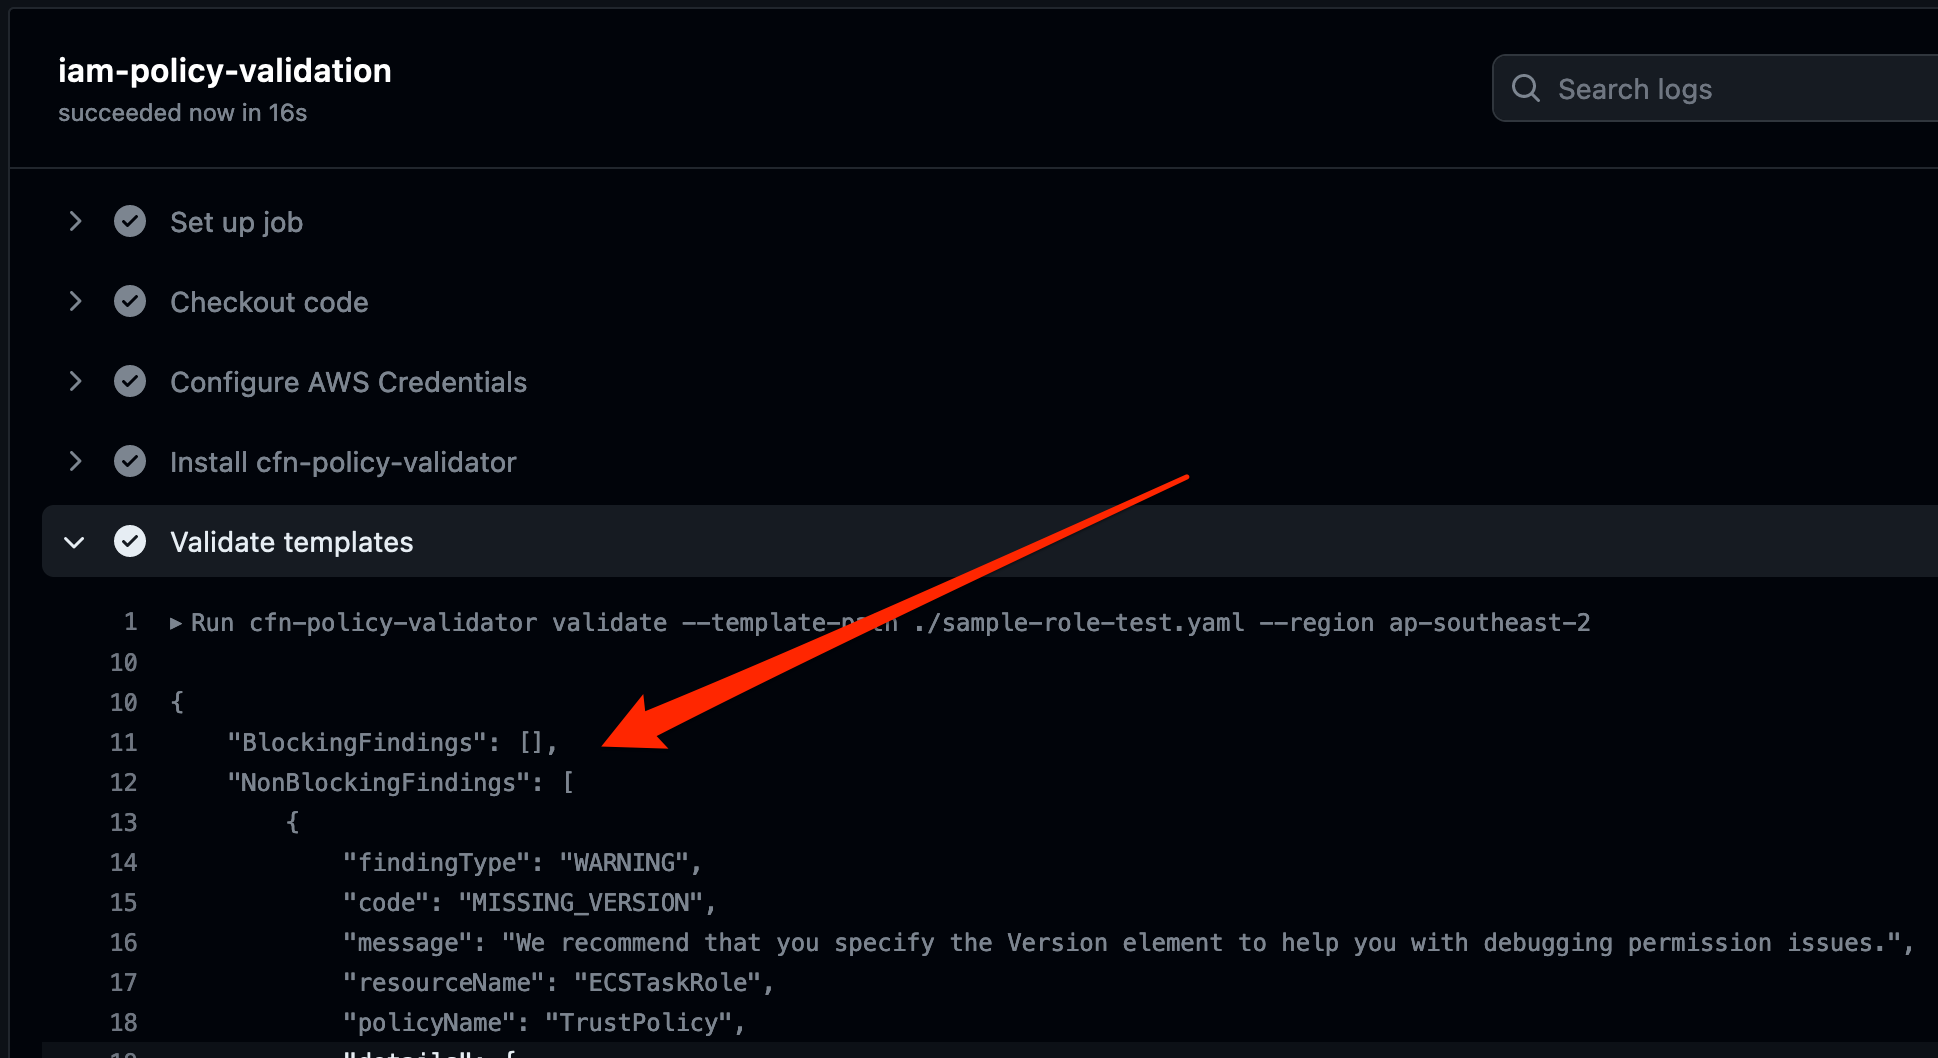
The following screenshot shows the Broker-1 default values for quota.consumer.default and quota.producer.default.
ProducerApp-1 quota configuration
Replace placeholders in all the commands in this section with values that correspond to your account.
According to the architecture diagram discussed earlier, set the ProducerApp-1 produce quota to 1024 bytes/second. For <ProducerApp-1 Client Id> and <ProducerApp-1 Role Session>, make sure you use the same values that you used while running ProducerApp-1 earlier (producerapp-1-client-id and producerapp-1-role-session, respectively):
kafka-configs.sh --bootstrap-server $BOOTSTRAP_BROKERS_IAM \
--command-config config_iam.properties \
--alter --add-config 'producer_byte_rate=1024' \
--entity-type clients --entity-name <ProducerApp-1 Client Id> \
--entity-type users --entity-name arn:aws:sts::<AWS Account Id>:assumed-role/MSKStack-TopicBWriteRole-xxxxxxxxxxx/<ProducerApp-1 Role Session>

Verify the ProducerApp-1 produce quota using the following command:
kafka-configs.sh --bootstrap-server $BOOTSTRAP_BROKERS_IAM \
--command-config config_iam.properties \
--describe \
--entity-type clients --entity-name <ProducerApp-1 Client Id> \
--entity-type users --entity-name arn:aws:sts::<AWS Account Id>:assumed-role/MSKStack-TopicBWriteRole-xxxxxxxxxxx/<ProducerApp-1 Role Session>

You can remove the ProducerApp-1 produce quota by using the following command, but don’t run the command as we’ll test the quotas next.
kafka-configs.sh --bootstrap-server $BOOTSTRAP_BROKERS_IAM \
--command-config config_iam.properties \
--alter --delete-config producer_byte_rate \
--entity-type clients --entity-name <ProducerApp-1 Client Id> \
--entity-type users --entity-name arn:aws:sts::<AWS Account Id>:assumed-role/MSKStack-TopicBWriteRole-xxxxxxxxxxx/<ProducerApp-1 Role Session>

ConsumerApp-1 quota configuration
Replace placeholders in all the commands in this section with values that correspond to your account.
Let’s set a consume quota of 5120 bytes/second for ConsumerApp-1. For <ConsumerApp-1 Client Id> and <ConsumerApp-1 Role Session>, make sure you use the same values that you used while running ConsumerApp-1 earlier (consumerapp-1-client-id and consumerapp-1-role-session, respectively):
kafka-configs.sh --bootstrap-server $BOOTSTRAP_BROKERS_IAM \
--command-config config_iam.properties \
--alter --add-config 'consumer_byte_rate=5120' \
--entity-type clients --entity-name <ConsumerApp-1 Client Id> \
--entity-type users --entity-name arn:aws:sts::<AWS Account Id>:assumed-role/MSKStack-TopicBReadRole-xxxxxxxxxxx/<ConsumerApp-1 Role Session>
Verify the ConsumerApp-1 consume quota using the following command:
kafka-configs.sh --bootstrap-server $BOOTSTRAP_BROKERS_IAM \
--command-config config_iam.properties \
--describe \
--entity-type clients --entity-name <ConsumerApp-1 Client Id> \
--entity-type users --entity-name arn:aws:sts::<AWS Account Id>:assumed-role/MSKStack-TopicBReadRole-xxxxxxxxxxx/<ConsumerApp-1 Role Session>
You can remove the ConsumerApp-1 consume quota, by using the following command, but don’t run the command as we’ll test the quotas next.
kafka-configs.sh --bootstrap-server $BOOTSTRAP_BROKERS_IAM \
--command-config config_iam.properties \
--alter --delete-config consumer_byte_rate \
--entity-type clients --entity-name <ConsumerApp-1 Client Id> \
--entity-type users --entity-name arn:aws:sts::<AWS Account Id>:assumed-role/MSKStack-TopicBReadRole-xxxxxxxxxxx/<ConsumerApp-1 Role Session>
ConsumerApp-2 quota configuration
Replace placeholders in all the commands in this section with values that correspond to your account.
Let’s set a consume quota of 1024 bytes/second for ConsumerApp-2. For <ConsumerApp-2 Client Id> and <ConsumerApp-2 Role Session>, make sure you use the same values that you used while running ConsumerApp-2 earlier (consumerapp-2-client-id and consumerapp-2-role-session, respectively):
kafka-configs.sh --bootstrap-server $BOOTSTRAP_BROKERS_IAM \
--command-config config_iam.properties \
--alter --add-config 'consumer_byte_rate=1024' \
--entity-type clients --entity-name <ConsumerApp-2 Client Id> \
--entity-type users --entity-name arn:aws:sts::<AWS Account Id>:assumed-role/MSKStack-TopicBReadRole-xxxxxxxxxxx/<ConsumerApp-2 Role Session>
Verify the ConsumerApp-2 consume quota using the following command:
kafka-configs.sh --bootstrap-server $BOOTSTRAP_BROKERS_IAM \
--command-config config_iam.properties \
--describe \
--entity-type clients --entity-name <ConsumerApp-2 Client Id> \
--entity-type users --entity-name arn:aws:sts::<AWS Account Id>:assumed-role/MSKStack-TopicBReadRole-xxxxxxxxxxx/<ConsumerApp-2 Role Session>
As with ConsumerApp-1, you can remove the ConsumerApp-2 consume quota using the same command with ConsumerApp-2 client and user details.
Rerun the producer and consumer applications after setting quotas
Let’s rerun the applications to verify the effect of the quotas.
Rerun ProducerApp-1
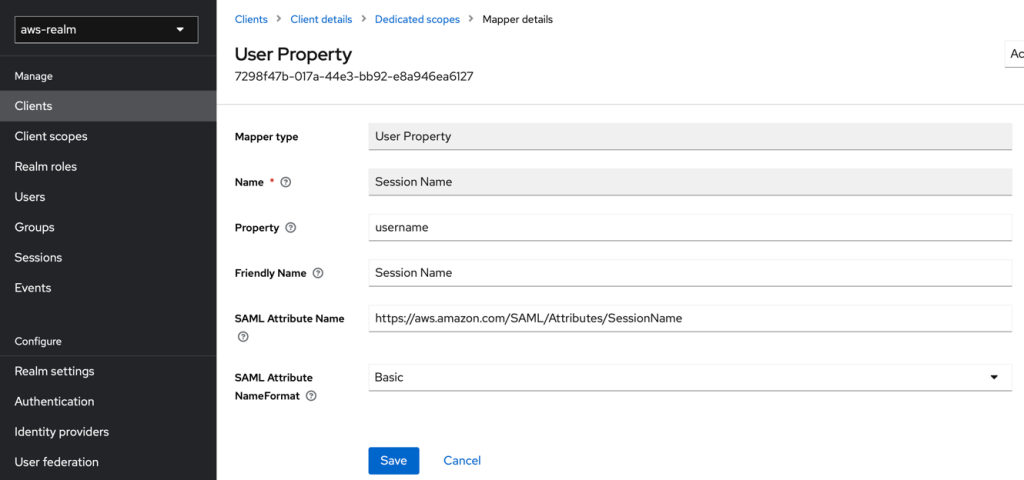
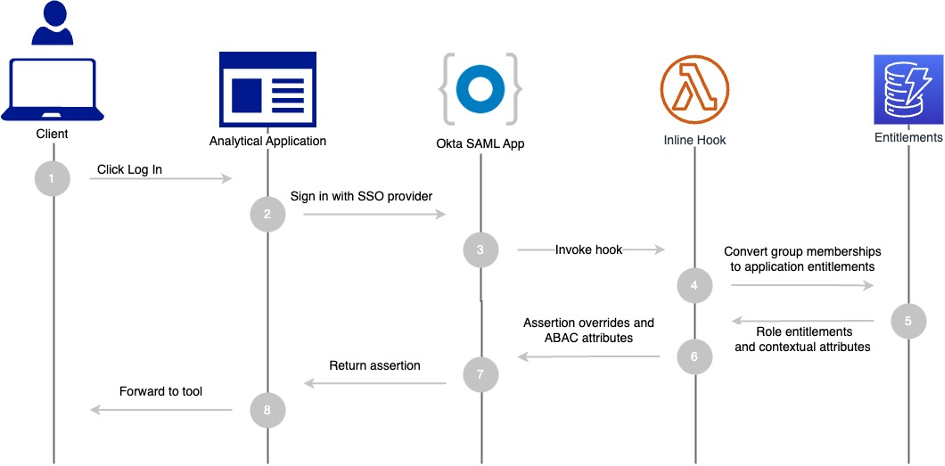
Rerun ProducerApp-1 in synchronous mode with the same command that you used earlier. The following screenshot illustrates that when ProducerApp-1 reaches its quota on any of the brokers, the produce-throttle-time-avg and produce-throttle-time-max client metrics value will be above 0.0. A value above 0.0 indicates that ProducerApp-1 is throttled. Allow ProducerApp-1 to run for a few seconds and then stop it by using Ctrl+C.

You can also test the effect of the produce quota by rerunning ProducerApp-1 again in asynchronous mode (--producer-type async). Similar to a synchronous run, the following screenshot illustrates that when ProducerApp-1 reaches its quota on any of the brokers, the produce-throttle-time-avg and produce-throttle-time-max client metrics value will be above 0.0. A value above 0.0 indicates that ProducerApp-1 is throttled. Allow asynchronous ProducerApp-1 to run for a while.

You will eventually see a TimeoutException stating org.apache.kafka.common.errors.TimeoutException: Expiring xxxxx record(s) for Topic-B-2:xxxxxxx ms has passed since batch creation

When using an asynchronous producer and sending messages at a rate greater than the broker can accept due to the quota, the messages will be queued in the client application memory first. The client will eventually run out of buffer space if the rate of sending messages continues to exceed the rate of accepting messages, causing the next Producer.send() call to be blocked. Producer.send() will eventually throw a TimeoutException if the timeout delay is not sufficient to allow the broker to catch up to the producer application. Stop ProducerApp-1 by using Ctrl+C.
Rerun ConsumerApp-1
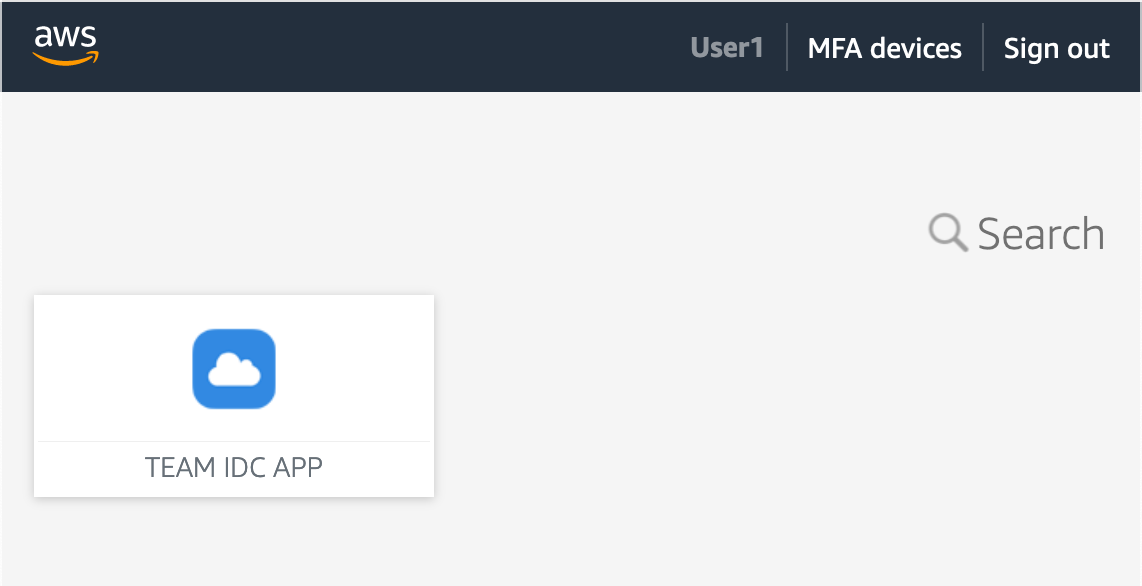
Rerun ConsumerApp-1 with the same command that you used earlier. The following screenshot illustrates that when ConsumerApp-1 reaches its quota, the fetch-throttle-time-avg and fetch-throttle-time-max client metrics value will be above 0.0. A value above 0.0 indicates that ConsumerApp-1 is throttled.

Allow ConsumerApp-1 to run for a few seconds and then stop it by using Ctrl+C.
Rerun ConsumerApp-2
Rerun ConsumerApp-2 with the same command that you used earlier. Similarly, when ConsumerApp-2 reaches its quota, the fetch-throttle-time-avg and fetch-throttle-time-max client metrics value will be above 0.0. A value above 0.0 indicates that ConsumerApp-2 is throttled. Allow ConsumerApp-2 to run for a few seconds and then stop it by pressing Ctrl+C.
Client quota metrics in Amazon CloudWatch
In Part 1, we explained that client metrics are metrics exposed by clients connecting to Kafka clusters. Let’s examine the client metrics in CloudWatch.
- On the CloudWatch console, choose All metrics.
- Under Custom Namespaces, choose the namespace you provided while running the client applications.
- Choose the dimension name and select
produce-throttle-time-max, produce-throttle-time-avg, fetch-throttle-time-max, and fetch-throttle-time-avg metrics for all the applications.
These metrics indicate throttling behavior for ProducerApp-1, ConsumerApp-1, and ConsumerApp-2 applications tested with the quota configurations in the previous section. The following screenshots indicate the throttling of ProducerApp-1, ConsumerApp-1, and ConsumerApp-2 based on network bandwidth quotas. ProducerApp-1, ConsumerApp-1, and ConsumerApp-2 applications feed their respective client metrics to CloudWatch. You can find the source code on GitHub for your reference.


Secure client ID and role session name
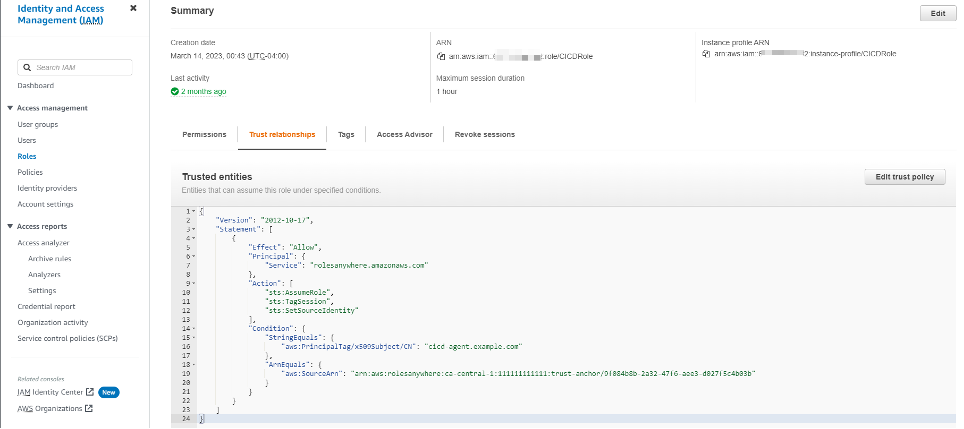
We discussed how to configure Kafka quotas using an application’s client ID and authenticated user principal. When a client application assumes an IAM role to access Kafka topics on a MSK cluster with IAM authentication enabled, its authenticated user principal is represented in the following format (for more information, refer to IAM identifiers):
arn:aws:sts::111111111111:assumed-role/Topic-B-Write-Role/producerapp-1-role-session
It contains the role session name (in this case, producerapp-1-role-session) used in the client application while assuming an IAM role through the AWS STS SDK. The client application source code is available for your reference. The client ID is a logical name string (for example, producerapp-1-client-id) that is configured in the application code by the application team. Therefore, an application can impersonate another application if it obtains the client ID and role session name of the other application, and if it has permission to assume the same IAM role.
As shown in the architecture diagram, ConsumerApp-1 and ConsumerApp-2 are two separate client applications with their respective quota allocations. Because both have permission to assume the same IAM role (Topic-B-Read-Role) in the demo account, they are allowed to consume messages from Topic-B. Thus, MSK cluster brokers distinguish them based on their client IDs and users (which contain their respective role session name values). If ConsumerApp-2 somehow obtains the ConsumerApp-1 role session name and client ID, it can impersonate ConsumerApp-1 by specifying the ConsumerApp-1 role session name and client ID in the application code.
Let’s assume ConsumerApp-1 uses consumerapp-1-client-id and consumerapp-1-role-session as its client ID and role session name, respectively. Therefore, ConsumerApp-1's authenticated user principal will appear as follows when it assumes the Topic-B-Read-Role IAM role:
arn:aws:sts::<AWS Account Id>:assumed-role/Topic-B-Read-Role/consumerapp-1-role-session
Similarly, ConsumerApp-2 uses consumerapp-2-client-id and consumerapp-2-role-session as its client ID and role session name, respectively. Therefore, ConsumerApp-2's authenticated user principal will appear as follows when it assumes the Topic-B-Read-Role IAM role:
arn:aws:sts::<AWS Account Id>:assumed-role/Topic-B-Read-Role/consumerapp-2-role-session
If ConsumerApp-2 obtains ConsumerApp-1's client ID and role session name and specifies them in its application code, MSK cluster brokers will treat it as ConsumerApp-1 and view its client ID as consumerapp-1-client-id, and the authenticated user principal as follows:
arn:aws:sts::<AWS Account Id>:assumed-role/Topic-B-Read-Role/consumerapp-1-role-session
This allows ConsumerApp-2 to consume data from the MSK cluster at a maximum rate of 5120 bytes per second rather than 1024 bytes per second as per its original quota allocation. Consequently, ConsumerApp-1's throughput will be negatively impacted if ConsumerApp-2 runs concurrently.
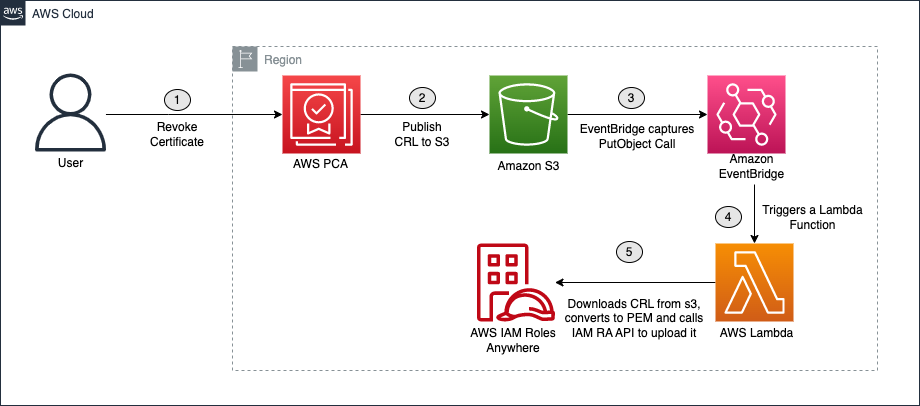
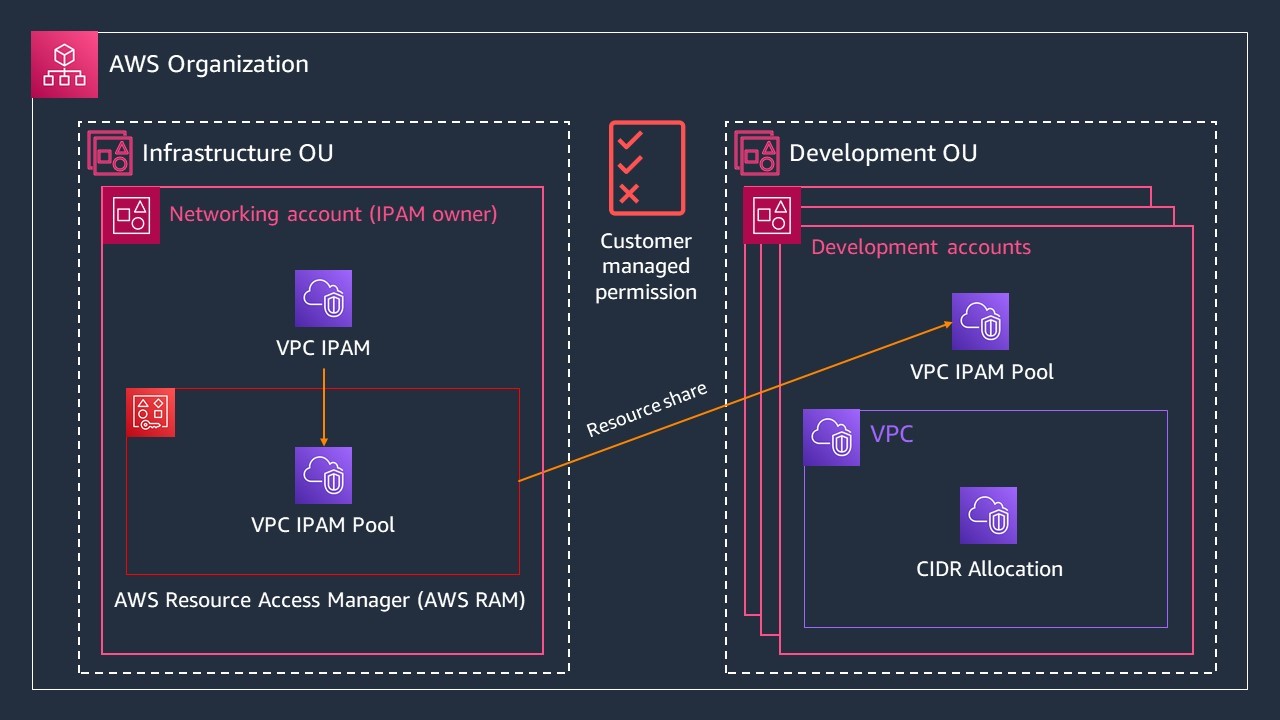
Enhanced architecture
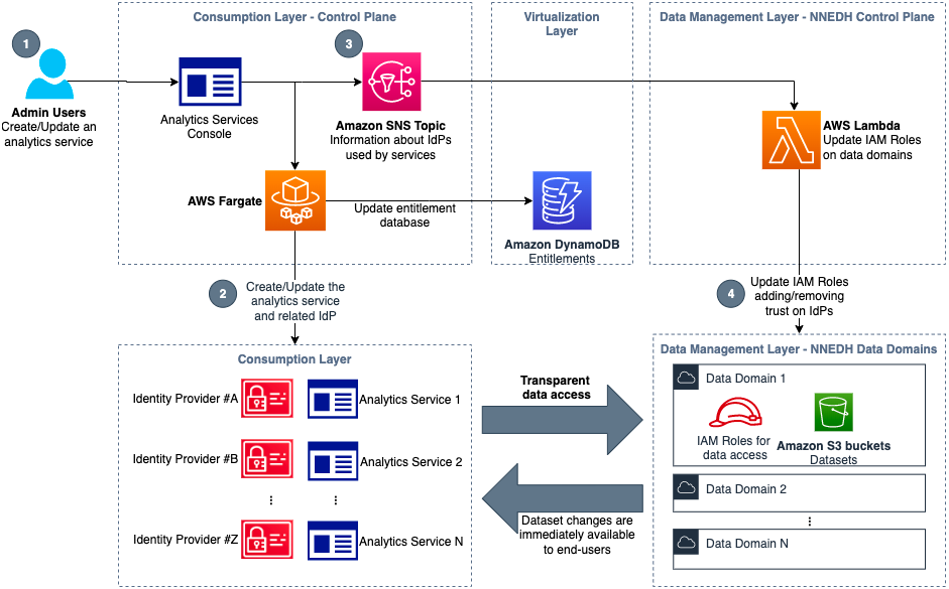
You can introduce AWS Secrets Manager and AWS Key Management Service (AWS KMS) in the architecture to secure applications’ client IDs and role session names. To provide stronger governance, the applications’ client ID and role session name must be stored as encrypted secrets in the Secrets Manager. The IAM resource policies associated with encrypted secrets and a KMS customer managed key (CMK) will allow applications to access and decrypt only their respective client ID and role session name. In this way, applications will not be able to access each other’s client ID and role session name and impersonate one another. The following image shows the enhanced architecture.

The updated flow has the following stages:
- P1 –
ProducerApp-1 retrieves its client-id and role-session-name secrets from Secrets Manager
- P2 –
ProducerApp-1 configures the secret client-id as CLIENT_ID_CONFIG in the application code, and assumes Topic-B-Write-Role (via its ProducerApp-1-Role IAM role) by passing the secret role-session-name to the AWS STS SDK assumeRole function call
- P3 – With the
Topic-B-Write-Role IAM role assumed, ProducerApp-1 begins sending messages to Topic-B
- C1 –
ConsumerApp-1 and ConsumerApp-2 retrieve their respective client-id and role-session-name secrets from Secrets Manager
- C2 –
ConsumerApp-1 and ConsumerApp-2 configure their respective secret client-id as CLIENT_ID_CONFIG in their application code, and assume Topic-B-Write-Role (via ConsumerApp-1-Role and ConsumerApp-2-Role IAM roles, respectively) by passing their secret role-session-name in the AWS STS SDK assumeRole function call
- C3 – With the
Topic-B-Read-Role IAM role assumed, ConsumerApp-1 and ConsumerApp-2 start consuming messages from Topic-B
Refer to the documentation for AWS Secrets Manager and AWS KMS to get a better understanding of how they fit into the architecture.
Clean up resources
Navigate to the CloudFormation console and delete the MSKStack stack. All resources created during this post will be deleted.
Conclusion
In this post, we covered detailed steps to configure Amazon MSK quotas and demonstrated their effect through sample client applications. In addition, we discussed how you can use client metrics to determine if a client application is throttled. We also highlighted a potential issue with plaintext client IDs and role session names. We recommend implementing Kafka quotas with Amazon MSK using Secrets Manager and AWS KMS as per the revised architecture diagram to ensure a zero-trust architecture.
If you have feedback or questions about this post, including the revised architecture, we’d be happy to hear from you. We hope you enjoyed reading this post.
About the Author
 Vikas Bajaj is a Senior Manager, Solutions Architects, Financial Services at Amazon Web Services. With over two decades of experience in financial services and working with digital-native businesses, he advises customers on product design, technology roadmaps, and application architectures.

 Ali Alemi is a Streaming Specialist Solutions Architect at AWS. Ali advises AWS customers with architectural best practices and helps them design real-time analytics data systems that are reliable, secure, efficient, and cost-effective. He works backward from customer’s use cases and designs data solutions to solve their business problems. Prior to joining AWS, Ali supported several public sector customers and AWS consulting partners in their application modernization journey and migration to the cloud.
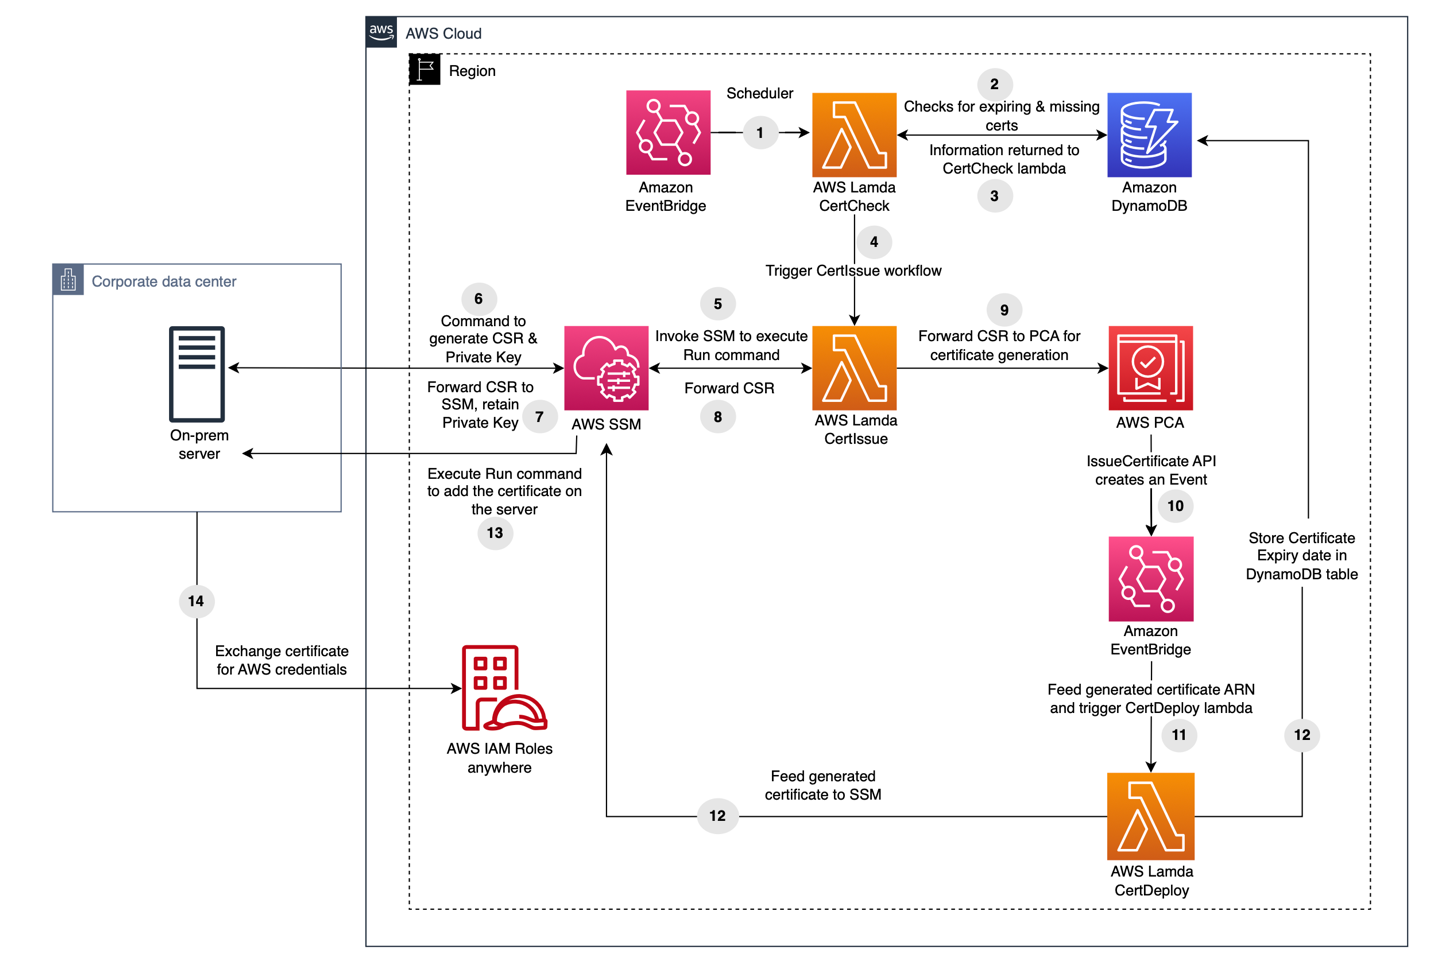


 Philipp Klose is a Global Solutions Architect at AWS based in Munich. He works with enterprise FSI customers and helps them solve business problems by architecting serverless platforms. In this free time, Philipp spends time with his family and enjoys every geek hobby possible.
 Daniel Wessendorf is a Global Solutions Architect at AWS based in Munich. He works with enterprise FSI customers and is primarily specialized in machine learning and data architectures. In his free time, he enjoys swimming, hiking, skiing, and spending quality time with his family.
 Marvin Gersho is a Senior Solutions Architect at AWS based in New York City. He works with a wide range of startup customers. He previously worked for many years in engineering leadership and hands-on application development, and now focuses on helping customers architect secure and scalable workloads on AWS with a minimum of operational overhead. In his free time, Marvin enjoys cycling and strategy board games.
 Nathan Lichtenstein is a Senior Solutions Architect at AWS based in New York City. Primarily working with startups, he ensures his customers build smart on AWS, delivering creative solutions to their complex technical challenges. Nathan has worked in cloud and network architecture in the media, financial services, and retail spaces. Outside of work, he can often be found at a Broadway theater.


 Vikas Bajaj is a Senior Manager, Solutions Architects, Financial Services at Amazon Web Services. Having worked with financial services organizations and digital native customers, he advises financial services customers in Australia on technology decisions, architectures, and product roadmaps.


 Vikas Bajaj is a Senior Manager, Solutions Architects, Financial Services at Amazon Web Services. With over two decades of experience in financial services and working with digital-native businesses, he advises customers on product design, technology roadmaps, and application architectures.


 Ayah Chamseddin is a Sr. Engagement Manager at AWS. She has a deep understanding of cloud technologies and has successfully overseen and lead strategic projects, partnering with clients to define business objectives, develop implementation strategies, and drive the successful delivery of solutions.
 Vamsi Bhadriraju is a Data Architect at AWS. He works closely with enterprise customers to build data lakes and analytical applications on the AWS Cloud.
 Srikanth Baheti is a Specialized World Wide Principal Solutions Architect for Amazon QuickSight. He started his career as a consultant and worked for multiple private and government organizations. Later he worked for PerkinElmer Health and Sciences & eResearch Technology Inc, where he was responsible for designing and developing high traffic web applications, highly scalable and maintainable data pipelines for reporting platforms using AWS services and Serverless computing.
 Raji Sivasubramaniam is a Sr. Solutions Architect at AWS, focusing on Analytics. Raji is specialized in architecting end-to-end Enterprise Data Management, Business Intelligence and Analytics solutions for Fortune 500 and Fortune 100 companies across the globe. She has in-depth experience in integrated healthcare data and analytics with wide variety of healthcare datasets including managed market, physician targeting and patient analytics.


 Jonatan Selsing is former research scientist with a PhD in astrophysics that has turned to the cloud. He is currently the Lead Cloud Engineer at Novo Nordisk, where he enables data and analytics workloads at scale. With an emphasis on reducing the total cost of ownership of cloud-based workloads, while giving full benefit of the advantages of cloud, he designs, builds, and maintains solutions that enable research for future medicines.
 Hassen Riahi is a Sr. Data Architect at AWS Professional Services. He holds a PhD in Mathematics & Computer Science on large-scale data management. He works with AWS customers on building data-driven solutions.
 Alessandro Fior is a Sr. Data Architect at AWS Professional Services. He is passionate about designing and building modern and scalable data platforms that accelerate companies to extract value from their data.