Tag Archives: AWS Systems Manager

How to monitor Windows and Linux servers and get internal performance metrics

Post Syndicated from Emma White original https://aws.amazon.com/blogs/compute/how-to-monitor-windows-and-linux-servers-and-get-internal-performance-metrics/

This post was written by Dean Suzuki, Senior Solutions Architect.

Customers who run Windows or Linux instances on AWS frequently ask, “How do I know if my disks are almost full?” or “How do I know if my application is using all the available memory and is paging to disk?” This blog helps answer these questions by walking you through how to set up monitoring to capture these internal performance metrics.

Solution overview

If you open the Amazon EC2 console, select a running Amazon EC2 instance, and select the Monitoring tab  you can see Amazon CloudWatch metrics for that instance. Amazon CloudWatch is an AWS monitoring service. The Monitoring tab (shown in the following image) shows the metrics that can be measured external to the instance (for example, CPU utilization, network bytes in/out). However, to understand what percentage of the disk is being used or what percentage of the memory is being used, these metrics require an internal operating system view of the instance. AWS places an extra safeguard on gathering data inside a customer’s instance so this capability is not enabled by default.

EC2 console showing Monitoring tab

To capture the server’s internal performance metrics, a CloudWatch agent must be installed on the instance. For Windows, the CloudWatch agent can capture any of the Windows performance monitor counters. For Linux, the CloudWatch agent can capture system-level metrics. For more details, please see Metrics Collected by the CloudWatch Agent. The agent can also capture logs from the server. The agent then sends this information to Amazon CloudWatch, where rules can be created to alert on certain conditions (for example, low free disk space) and automated responses can be set up (for example, perform backup to clear transaction logs). Also, dashboards can be created to view the health of your Windows servers.

There are four steps to implement internal monitoring:

  1. Install the CloudWatch agent onto your servers. AWS provides a service called AWS Systems Manager Run Command, which enables you to do this agent installation across all your servers.
  2. Run the CloudWatch agent configuration wizard, which captures what you want to monitor. These items could be performance counters and logs on the server. This configuration is then stored in AWS System Manager Parameter Store
  3. Configure CloudWatch agents to use agent configuration stored in Parameter Store using the Run Command.
  4. Validate that the CloudWatch agents are sending their monitoring data to CloudWatch.

The following image shows the flow of these four steps.

Process to install and configure the CloudWatch agent

In this blog, I walk through these steps so that you can follow along. Note that you are responsible for the cost of running the environment outlined in this blog. So, once you are finished with the steps in the blog, I recommend deleting the resources if you no longer need them. For the cost of running these servers, see Amazon EC2 On-Demand Pricing. For CloudWatch pricing, see Amazon CloudWatch pricing.

If you want a video overview of this process, please see this Monitoring Amazon EC2 Windows Instances using Unified CloudWatch Agent video.

Deploy the CloudWatch agent

The first step is to deploy the Amazon CloudWatch agent. There are multiple ways to deploy the CloudWatch agent (see this documentation on Installing the CloudWatch Agent). In this blog, I walk through how to use the AWS Systems Manager Run Command to deploy the agent. AWS Systems Manager uses the Systems Manager agent, which is installed by default on each AWS instance. This AWS Systems Manager agent must be given the appropriate permissions to connect to AWS Systems Manager, and to write the configuration data to the AWS Systems Manager Parameter Store. These access rights are controlled through the use of IAM roles.

Create two IAM roles

IAM roles are identity objects that you attach IAM policies. IAM policies define what access is allowed to AWS services. You can have users, services, or applications assume the IAM roles and get the assigned rights defined in the permissions policies.

To use System Manager, you typically create two IAM roles. The first role has permissions to write the CloudWatch agent configuration information to System Manager Parameter Store. This role is called CloudWatchAgentAdminRole.

The second role only has permissions to read the CloudWatch agent configuration from the System Manager Parameter Store. This role is called CloudWatchAgentServerRole.

For more details on creating these roles, please see the documentation on Create IAM Roles and Users for Use with the CloudWatch Agent.

Attach the IAM roles to the EC2 instances

Once you create the roles, you attach them to your Amazon EC2 instances. By attaching the IAM roles to the EC2 instances, you provide the processes running on the EC2 instance the permissions defined in the IAM role. In this blog, you create two Amazon EC2 instances. Attach the CloudWatchAgentAdminRole to the first instance that is used to create the CloudWatch agent configuration. Attach CloudWatchAgentServerRole to the second instance and any other instances that you want to monitor. For details on how to attach or assign roles to EC2 instances, please see the documentation on How do I assign an existing IAM role to an EC2 instance?.

Install the CloudWatch agent

Now that you have setup the permissions, you can install the CloudWatch agent onto the servers that you want to monitor. For details on installing the CloudWatch agent using Systems Manager, please see the documentation on Download and Configure the CloudWatch Agent.

Create the CloudWatch agent configuration

Now that you installed the CloudWatch agent on your server, run the CloudAgent configuration wizard to create the agent configuration. For instructions on how to run the CloudWatch Agent configuration wizard, please see this documentation on Create the CloudWatch Agent Configuration File with the Wizard. To establish a command shell on the server, you can use AWS Systems Manager Session Manager to establish a session to the server and then run the CloudWatch agent configuration wizard. If you want to monitor both Linux and Windows servers, you must run the CloudWatch agent configuration on a Linux instance and on a Windows instance to create a configuration file per OS type. The configuration is unique to the OS type.

To run the Agent configuration wizard on Linux instances, run the following command:

sudo /opt/aws/amazon-cloudwatch-agent/bin/amazon-cloudwatch-agent-config-wizard

To run the Agent configuration wizard on Windows instances, run the following commands:

cd "C:\Program Files\Amazon\AmazonCloudWatchAgent"

amazon-cloudwatch-agent-config-wizard.exe

Note for Linux instances: do not select to collect the collectd metrics in the agent configuration wizard unless you have collectd installed on your Linux servers. Otherwise, you may encounter an error.

Review the Agent configuration

The CloudWatch agent configuration generated from the wizard is stored in Systems Manager Parameter Store. You can review and modify this configuration if you need to capture extra metrics. To review the agent configuration, perform the following steps:

  1. Go to the console for the System Manager service.
  2. Click Parameter store on the left hand navigation.
  3. You should see the parameter that was created by the CloudWatch agent configuration program. For Linux servers, the configuration is stored in: AmazonCloudWatch-linux and for Windows servers, the configuration is stored in:  AmazonCloudWatch-windows.

System Manager Parameter Store: Parameters created by CloudWatch agent configuration wizard

  1. Click on the parameter’s hyperlink (for example, AmazonCloudWatch-linux) to see all the configuration parameters that you specified in the configuration program.

In the following steps, I walk through an example of modifying the Windows configuration parameter (AmazonCloudWatch-windows) to add an additional metric (“Available Mbytes”) to monitor.

  1. Click the AmazonCloudWatch-windows
  2. In the parameter overview, scroll down to the “metrics” section and under “metrics_collected”, you can see the Windows performance monitor counters that will be gathered by the CloudWatch agent. If you want to add an additional perfmon counter, then you can edit and add the counter here.
  3. Press Edit at the top right of the AmazonCloudWatch-windows Parameter Store page.
  4. Scroll down in the Value section and look for “Memory.”
  5. After the “% Committed Bytes In Use”, put a comma “,” and then press Enter to add a blank line. Then, put on that line “Available Mbytes” The following screenshot demonstrates what this configuration should look like.

AmazonCloudWatch-windows parameter contents and how to add a new metric to monitor

  1. Press Save Changes.

To modify the Linux configuration parameter (AmazonCloudWatch-linux), you perform similar steps except you click on the AmazonCloudWatch-linux parameter. Here is additional documentation on creating the CloudWatch agent configuration and modifying the configuration file.

Start the CloudWatch agent and use the configuration

In this step, start the CloudWatch agent and instruct it to use your agent configuration stored in System Manager Parameter Store.

  1. Open another tab in your web browser and go to System Manager console.
  2. Specify Run Command in the left hand navigation of the System Manager console.
  3. Press Run Command
  4. In the search bar,
    • Select Document name prefix
    • Select Equal
    • Specify AmazonCloudWatch (Note the field is case sensitive)
    • Press enter

System Manager Run Command's command document entry field

  1. Select AmazonCloudWatch-ManageAgent. This is the command that configures the CloudWatch agent.
  2. In the command parameters section,
    • For Action, select Configure
    • For Mode, select ec2
    • For Optional Configuration Source, select ssm
    • For optional configuration location, specify the Parameter Store name. For Windows instances, you would specify AmazonCloudWatch-windows for Windows instances or AmazonCloudWatch-linux for Linux instances. Note the field is case sensitive. This tells the command to read the Parameter Store for the parameter specified here.
    • For optional restart, leave yes
  3. For Targets, choose your target servers that you wish to monitor.
  4. Scroll down and press Run. The Run Command may take a couple minutes to complete. Press the refresh button. The Run Command configures the CloudWatch agent by reading the Parameter Store for the configuration and configure the agent using those settings.

For more details on installing the CloudWatch agent using your agent configuration, please see this Installing the CloudWatch Agent on EC2 Instances Using Your Agent Configuration.

Review the data collected by the CloudWatch agents

In this step, I walk through how to review the data collected by the CloudWatch agents.

  1. In the AWS Management console, go to CloudWatch.
  2. Click Metrics on the left-hand navigation.
  3. You should see a custom namespace for CWAgent. Click on the CWAgent Please note that this might take a couple minutes to appear. Refresh the page periodically until it appears.
  4. Then click the ImageId, Instanceid hyperlinks to see the counters under that section.

CloudWatch Metrics: Showing counters under CWAgent

  1. Review the metrics captured by the CloudWatch agent. Notice the metrics that are only observable from inside the instance (for example, LogicalDisk % Free Space). These types of metrics would not be observable without installing the CloudWatch agent on the instance. From these metrics, you could create a CloudWatch Alarm to alert you if they go beyond a certain threshold. You can also add them to a CloudWatch Dashboard to review. To learn more about the metrics collected by the CloudWatch agent, see the documentation Metrics Collected by the CloudWatch Agent.

Conclusion

In this blog, you learned how to deploy and configure the CloudWatch agent to capture the metrics on either Linux or Windows instances. If you are done with this blog, we recommend deleting the System Manager Parameter Store entry, the CloudWatch data and  then the EC2 instances to avoid further charges. If you would like a video tutorial of this process, please see this Monitoring Amazon EC2 Windows Instances using Unified CloudWatch Agent video.


Securing access to EMR clusters using AWS Systems Manager

Post Syndicated from Sai Sriparasa original https://aws.amazon.com/blogs/big-data/securing-access-to-emr-clusters-using-aws-systems-manager/

Organizations need to secure infrastructure when enabling access to engineers to build applications. Opening SSH inbound ports on instances to enable engineer access introduces the risk of a malicious entity running unauthorized commands. Using a Bastion host or jump server is a common approach used to allow engineer access to Amazon EMR cluster instances by enabling SSH inbound ports. In this post, we present a more secure way to access your EMR cluster launched in a private subnet that eliminates the need to open inbound ports or use a Bastion host.

We strive to answer the following three questions in this post:

  1. Why use AWS Systems Manager Session Manager with Amazon EMR?
  2. Who can use Session Manager?
  3. How can Session Manager be configured on Amazon EMR?

After answering these questions, we will walk you through configuring Amazon EMR with Session Manager and creating an AWS Identity and Access Management (IAM) policy to enable Session Manager capabilities on Amazon EMR. We also walk you through the steps required to configure secure tunneling to access Hadoop application web interfaces such as YARN Resource Manager and, Spark Job Server.

Creating an IAM role

AWS Systems Manager provides a unified user interface so you can view and manage your Amazon Elastic Compute Cloud (Amazon EC2) instances. Session Manager provides secure and auditable instance management. Systems Manager integration with IAM provides centralized access control to your EMR cluster. By default, Systems Manager doesn’t have permissions to perform actions on cluster instances. You must grant access by attaching an IAM role on the instance. Before you get started, create an IAM service role for cluster EC2 instances with the least privilege access policy.

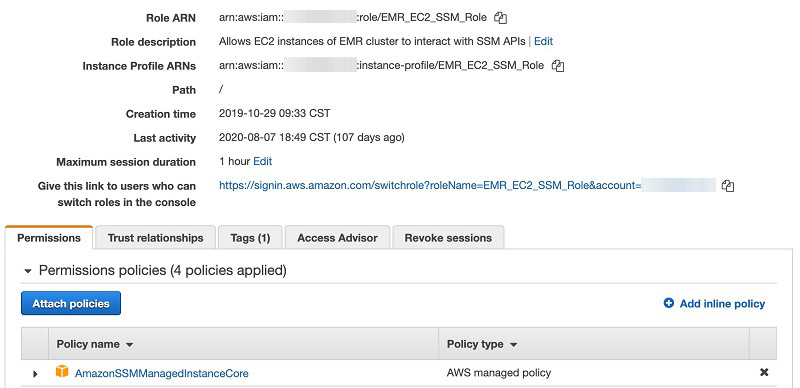
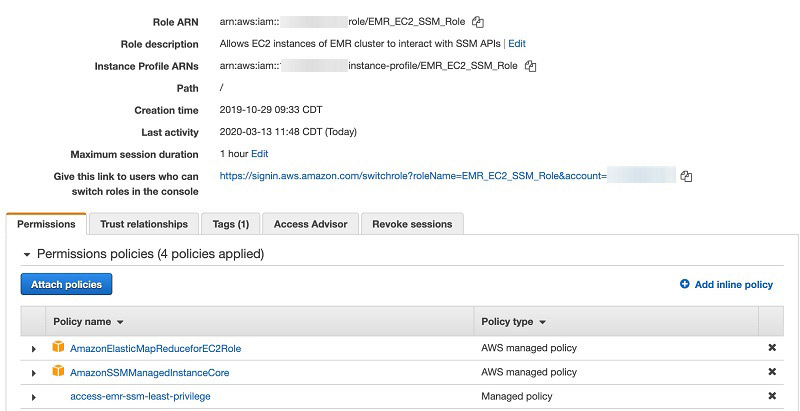
  1. Create an IAM service role (Amazon EMR role for Amazon EC2) for cluster EC2 instances and attach the AWS managed Systems Manager core instance (AmazonSSMManagedInstanceCore) policy.

  1. Create an IAM policy with least privilege to allow the principal to initiate a Session Manager session on Amazon EMR cluster instances:
    {
    "Version": "2012-10-17",
        	"Statement": [
    		{
                	"Effect": "Allow",
               "Action": [
                         "ssm:DescribeInstanceProperties",
                         "ssm:DescribeSessions",
        	             "ec2:describeInstances",
         	             "ssm:GetConnectionStatus"
                	],
               "Resource": "*"
            	},
            	{
                	"Effect": "Allow",
                	"Action": [
                    		"ssm:StartSession"
                	],
                	"Resource": ["arn:aws:ec2:${Region}:${Account-Id}:instance/*"],
                    "Condition": {
                    		"StringEquals": { "ssm:resourceTag/ClusterType": [ "QACluster" ] }
                }
            }
        ]
    }


  1. Attach the least privilege policy to the IAM principal (role or user).

How Amazon EMR works with AWS Systems Manager Agent

You can install and configure AWS Systems Manager Agent (SSM Agent) on Amazon EMR cluster node(s) using bootstrap actions. SSM Agent makes it possible for Session Manager to update, manage and configure these resources. Session Manager is available at no additional cost to manage Amazon EC2 instances, for cost on additional features refer Systems Manager pricing page. The agent processes requests from the Session Manager service in the AWS Cloud, and then runs them as specified in the user request. You can achieve dynamic port forwarding by installing the Systems Manager plug-in on a local computer. IAM policies provide centralized access control on the EMR cluster.

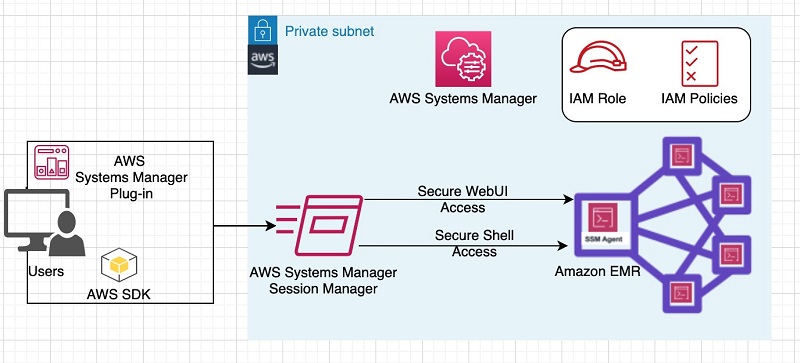
The following diagram illustrates a high-level integration of AWS Systems Manager interaction with an EMR cluster.

The following diagram illustrates a high-level integration of AWS Systems Manager interaction with an EMR cluster.

Configuring SSM Agent on an EMR Cluster:

To configure SSM Agent on your cluster, complete the following steps:

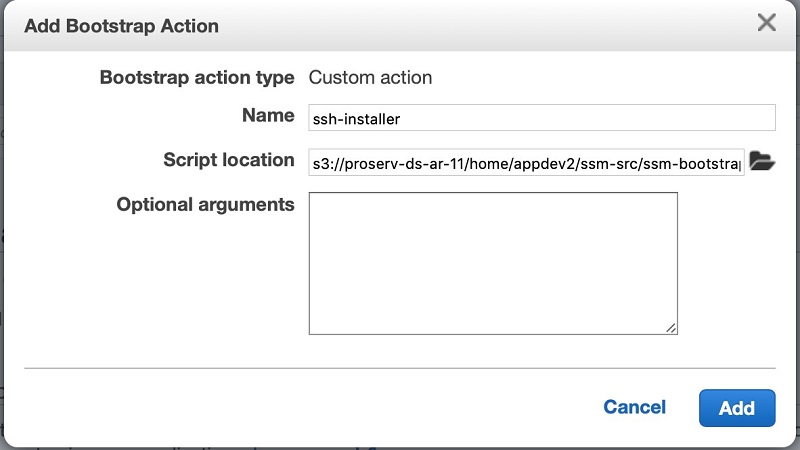
  1. While launching the EMR cluster, in the Bootstrap Actions section, choose add bootstrap action.
  2. Choose “Custom action”.
  3. Add a bootstrap action to run the following script from Amazon Simple Storage Service (Amazon S3) to install and configure SSM Agent on Amazon EMR cluster instances.

SSM Agent expects localhost entry in the hosts file to allow traffic redirection from a local computer to the EMR cluster instance when dynamic port forwarding is used.

SSM Agent expects localhost entry in the hosts file to allow traffic redirection from a local computer to the EMR cluster instance when dynamic port forwarding is used.

#!/bin/bash
## Name: SSM Agent Installer Script
## Description: Installs SSM Agent on EMR cluster EC2 instances and update hosts file
##
sudo yum install -y https://s3.amazonaws.com/ec2-downloads-windows/SSMAgent/latest/linux_amd64/amazon-ssm-agent.rpm
sudo status amazon-ssm-agent >>/tmp/ssm-status.log
## Update hosts file
echo "\n ########### localhost mapping check ########### \n" > /tmp/localhost.log
lhost=`sudo cat /etc/hosts | grep localhost | grep '127.0.0.1' | grep -v '^#'`
v_ipaddr=`hostname --ip-address`
lhostmapping=`sudo cat /etc/hosts | grep $v_ipaddr | grep -v '^#'`
if [ -z "${lhostmapping}" ];
then
echo "\n ########### IP address to localhost mapping NOT defined in hosts files. add now ########### \n " >> /tmp/localhost.log
sudo echo "${v_ipaddr} localhost" >>/etc/hosts
else
echo "\n IP address to localhost mapping already defined in hosts file \n" >> /tmp/localhost.log
fi
echo "\n ########### IP Address to localhost mapping check complete and below is the content ########### " >> /tmp/localhost.log
sudo cat /etc/hosts >> /tmp/localhost.log

echo "\n ########### Exit script ########### " >> /tmp/localhost.log
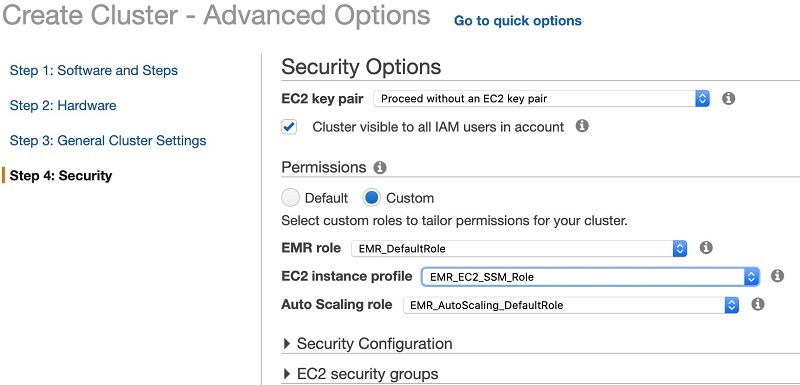
  1. In the Security Options section, under Permissions, select Custom.
  2. For EMR role, choose IAM role you created.

For EMR role, choose IAM role you created.

  1. After the cluster successfully launches, on the Session Manager console, choose Managed Instances.
  2. Select your cluster instance
  3. On the Actions menu, choose Start Session

On the Actions menu, choose Start Session.

Dynamic port forwarding to access Hadoop applications web UIs

To gain access to Hadoop applications web UIs such as YARN Resource Manager, Spark Job Server, and more on the Amazon EMR primary node, you create a secure tunnel between your computer and the Amazon EMR primary node using Session Manager. By doing so, you avoid needing to create and manage a SOCKS proxy and other add-ons such as FoxyProxy etc.

Before configuring port forwarding on your laptop, you must install the System Manager CLI extension (version 1.1.26.0 or more recent).

When the prerequisites are met, you use the StartPortForwardingSession feature to create secure tunneling onto EMR cluster instances.

aws ssm start-session --target "Your Instance ID" --document-name AWS-StartPortForwardingSession --parameters "portNumber"=["8080"],"localPortNumber"=["8158"]

The following code demonstrates port forwarding from your laptop local port [8158] to a remote port [8080] on an EMR instance to access the Hadoop Resource Manager web UI:

aws ssm start-session --target i-05a3f37cfc08ed176 --document-name AWS-StartPortForwardingSession --parameters '{"portNumber":["8080"], "localPortNumber":["8158"]}'

Restricting IAM principal access based on Instance Tags

In a multi-tenant Amazon EMR cluster environment, you can restrict access to Amazon EMR cluster instances based on specific Amazon EC2 tags. In the following example code, the IAM principal (IAM user or role) is allowed to start a session on any instance (Resource: arn:aws:ec2:*:*:instance/*) with the condition that the instance is a QACluster (ssm:resourceTag/ClusterType: QACluster).

{
    "Version": "2012-10-17",
    "Statement": [
    		{
            	"Effect": "Allow",
            	"Action": [
                      "ssm:DescribeInstanceProperties",
 	     	          "ssm:DescribeSessions",
                       "ec2:describeInstances",
                       "ssm:GetConnectionStatus"
            	],
            	"Resource": "*"
        	},
        	{
            	"Effect": "Allow",
            	"Action": [ "ssm:StartSession" ],
            	"Resource": [ "arn:aws:ec2:${Region}:${Account-Id}:instance/*" ],
            	"Condition": {
                		"StringEquals": { "aws:username": "${aws:username}"
                },
                		"StringLike": {
                    		"ssm:resourceTag/ClusterType": [ "QACluster" ]
                }
            }
        }
    ]

}


If the IAM principal initiates a session to an instance that isn’t tagged or that has any tag other than ClusterType: QACluster, the execution results show is not authorized to perform ssm:StartSession.

Restricting access to root-level commands on instance

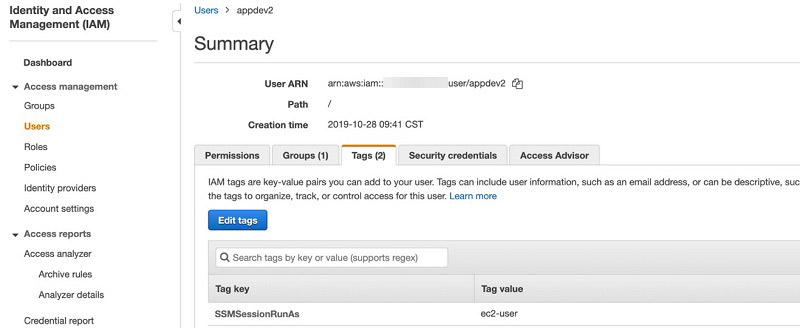
You can change the default user login behavior to restrict elevated permissions (root login) on a given user’s session. By default, sessions are launched using the credentials of a system-generated ssm-user. You can instead launch sessions using credentials of an operating system account by tagging an IAM user or role with the tag key SSMSessionRunAs or specify an operating system user name. Updates to Session Manager preferences enables this support.

The following screenshots show a configuration for the IAM user appdev2, who is always allowed to start a session with ec2-user instead of the default ssm-user.

The following screenshots show a configuration for the IAM user appdev2, who is always allowed to start a session with ec2-user instead of the default ssm-user

Conclusion

Amazon EMR with Session Manager can greatly improve your confidence in security and audit posture by centralizing access control and mitigating risk of managing access keys and inbound ports. It also reduces the overall cost, because as you get free from intermediate Bastion hosts.


About the Authors

Sai Sriparasa is a Sr. Big Data & Security Consultant with AWS Professional Services. He works with our customers to provide strategic and tactical big data solutions with an emphasis on automation, operations, governance & security on AWS. In his spare time, he follows sports and current affairs.


Ravi Kadiri is a security data architect at AWS, focused on helping customers build secure data lake solutions using native AWS security services. He enjoys using his experience as a Big Data architect to provide guidance and technical expertise on Big Data & Analytics space. His interests include staying fit, traveling and spend time with friends & family.
New – AWS Systems Manager Consolidates Application Management

Post Syndicated from Steve Roberts original https://aws.amazon.com/blogs/aws/new-aws-systems-manager-consolidates-application-management/

A desire for consolidated, and simplified operational oversight isn’t limited to just cloud infrastructure. Increasingly, customers ask us for a “single pane of glass” approach for also monitoring and managing their application portfolios.

These customers tell us that detection and investigation of application issues takes additional time and effort, due to the typical use of multiple consoles, tools, and sources of information such as resource usage metrics, logs, and more, to enable their DevOps engineers to obtain context about the application issue under investigation. Here, an “application” means not just the application code but also the logical group of resources that act as a unit to host the application, along with ownership boundaries for operators, and environments such as development, staging, and production.

Today, I’m pleased to announce a new feature of AWS Systems Manager, called Application Manager. Application Manager aggregates operational information from multiple AWS services and Systems Manager capabilities into a single console, making it easier to view operational data for your applications.

To make it even more convenient, the service can automatically discover your applications. Today, auto-discovery is available for applications running in AWS CloudFormation stacks and Amazon Elastic Kubernetes Service (EKS) clusters, or launched using AWS Launch Wizard. Applications can also be discovered from Resource Groups.

A particular benefit of automated discovery is that application components and resources are automatically kept up-to-date on an ongoing basis, but you can also always revise applications as needed by adding or deleting components manually.

With applications discovered and consolidated into a single console, you can more easily diagnose operational issues and resolve them with minimal time and effort. Automated runbooks targeting an application component or resource can be run to help remediate operational issues. For any given application, you can select a resource and explore relevant details without needing to leave the console.

For example, the application can surface Amazon CloudWatch logs, operational metrics, AWS CloudTrail logs, and configuration changes, removing the need to engage with multiple tools or consoles. This means your on-call engineers can understand issues more quickly and reduce the time needed to resolve them.

Exploring an Application with Application Manager
I can access Application Manager from the Systems Manager home page. Once open, I get an overview of my discovered applications and can see immediately that there are some alarms, without needing to switch context to the Amazon CloudWatch console, and some operations items (“OpsItems”) that I might need to pay attention to. I can also switch to the Applications tab to view the collections of applications, or I can click the buttons in the Applications panel for the collection I’m interested in.

Screenshot of the <span title="">Application Manager</span> overview page

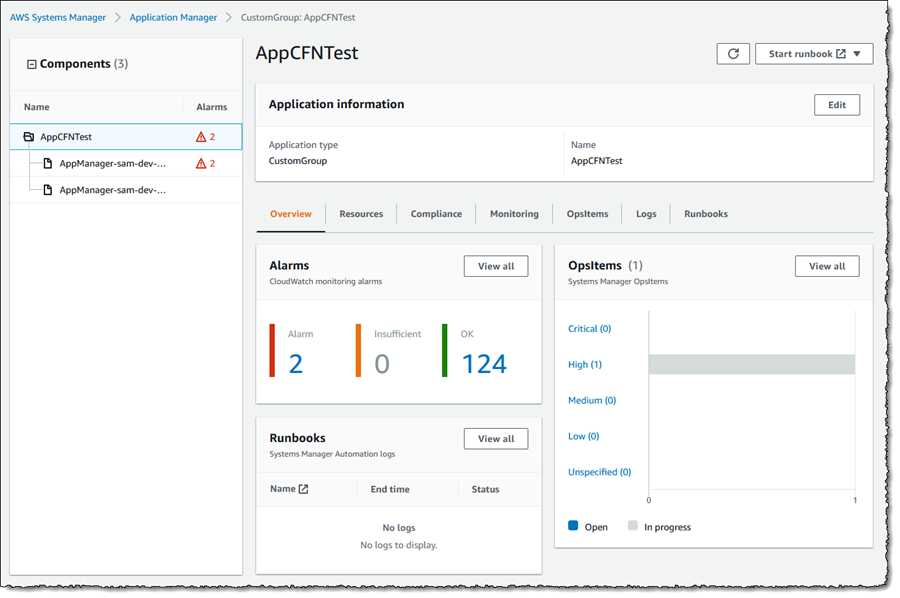
In the screenshot below, I’ve navigated to a sample application and again, have indicators showing that alarms have raised. The various tabs enable me to drill into more detail to view resources used by the application, config resource and rules compliance, monitoring alarms, logs, and automation runbooks associated with the application.

Screenshot of application components and overview

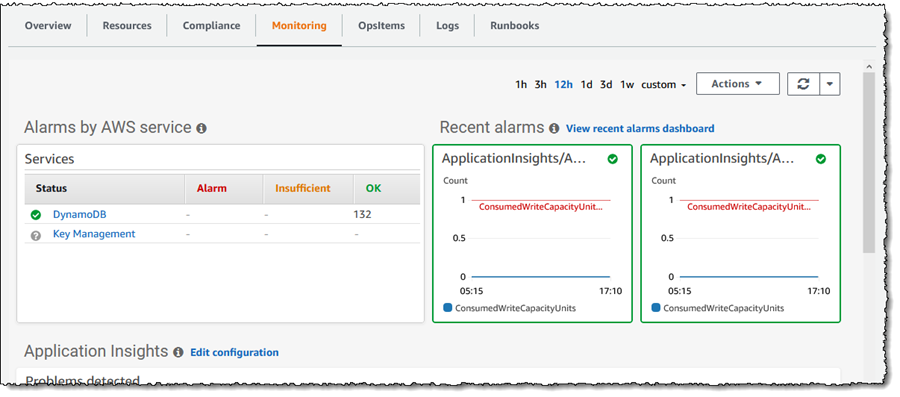
Clicking on the Alarm indicator takes me into the Monitoring tab, and it shows that the ConsumedWriteCapacityUnits alarm has been raised. I can change the timescale to zero in on when the event occurred, or I can use the View recent alarms dashboard link to jump into the Amazon CloudWatch Alarms console to view more detail.

Screenshot of alarms on the <span title="">Application Manager</span> Monitoring tab

The Logs tab shows me a consolidated list of log groups for the application, and clicking a log group name takes me directly to the CloudWatch Logs where I can inspect the log streams, and take advantage of Log Insights to dive deeper by querying the log data.

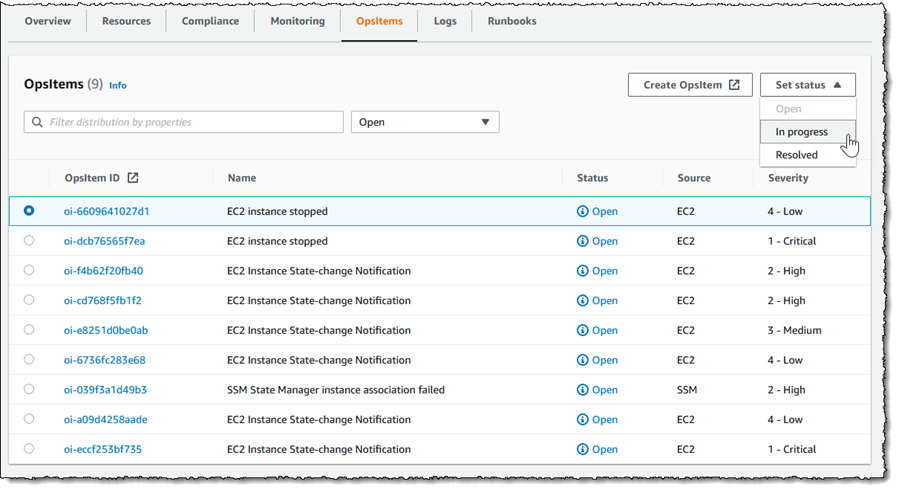
OpsItems shows me operational issues associated with the resources of my application, and enables me to indicate the current status of the issue (open, in progress, resolved). Below, I am marking investigation of a stopped EC2 instance as in progress.

Screenshot of <span title="">Application Manager</span> OpsItems tab

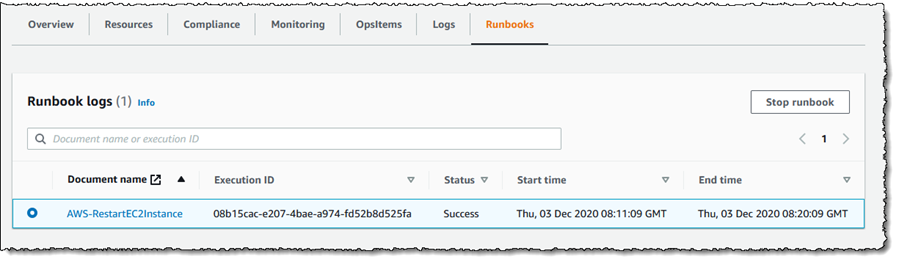
Finally, Runbooks shows me automation documents associated with the application and their execution status. Below, it’s showing that I ran the AWS-RestartEC2Instance automation document to restart the EC2 instance that was stopped, and I would now resolve the issue logged in the OpsItems tab.

Screenshot of <span title="">Application Manager</span>'s Runbooks tab

Consolidating this information into a single console gives engineers a single starting location to monitor and investigate issues arising with their applications, and automatic discovery of applications and resources makes getting started simple. AWS Systems Manager Application Manager is available today, at no extra charge, in all public AWS Regions where Systems Manager is available.

Learn more about Application Manager and get started at AWS Systems Manager.

— Steve

New – AWS Systems Manager Fleet Manager

Post Syndicated from Steve Roberts original https://aws.amazon.com/blogs/aws/new-aws-systems-manager-fleet-manager/

Organizations, and their systems administrators, routinely face challenges in managing increasingly diverse portfolios of IT infrastructure across cloud and on-premises environments. Different tools, consoles, services, operating systems, procedures, and vendors all contribute to complicate relatively common, and related, management tasks. As workloads are modernized to adopt Linux and open-source software, those same systems administrators, who may be more familiar with GUI-based management tools from a Windows background, have to continually adapt and quickly learn new tools, approaches, and skill sets.

AWS Systems Manager is an operational hub enabling you to manage resources on AWS and on-premises. Available today, Fleet Manager is a new console based experience in Systems Manager that enables systems administrators to view and administer their fleets of managed instances from a single location, in an operating-system-agnostic manner, without needing to resort to remote connections with SSH or RDP. As described in the documentation, managed instances includes those running Windows, Linux, and macOS operating systems, in both the AWS Cloud and on-premises. Fleet Manager gives you an aggregated view of your compute instances regardless of where they exist.

All that’s needed, whether for cloud or on-premises servers, is the Systems Manager agent installed on each server to be managed, some AWS Identity and Access Management (IAM) permissions, and AWS Key Management Service (KMS) enabled for Systems Manager‘s Session Manager. This makes it an easy and cost-effective approach for remote management of servers running in multiple environments without needing to pay the licensing cost of expensive management tools you may be using today. As noted earlier, it also works with instances running macOS. With the agent software and permissions set up, Fleet Manager enables you to explore and manage your servers from a single console environment. For example, you can navigate file systems, work with the registry on Windows servers, manage users, and troubleshoot logs (including viewing Windows event logs) and monitor common performance counters without needing the Amazon CloudWatch agent to be installed.

Exploring an Instance With Fleet Manager
To get started exploring my instances using Fleet Manager, I first head to the Systems Manager console. There, I select the new Fleet Manager entry on the navigation toolbar. I can also select the Managed Instances option – Fleet Manager replaces Managed Instances going forward, but the original navigation toolbar entry will be kept for backwards compatibility for a short while. But, before we go on to explore my instances, I need to take you on a brief detour.

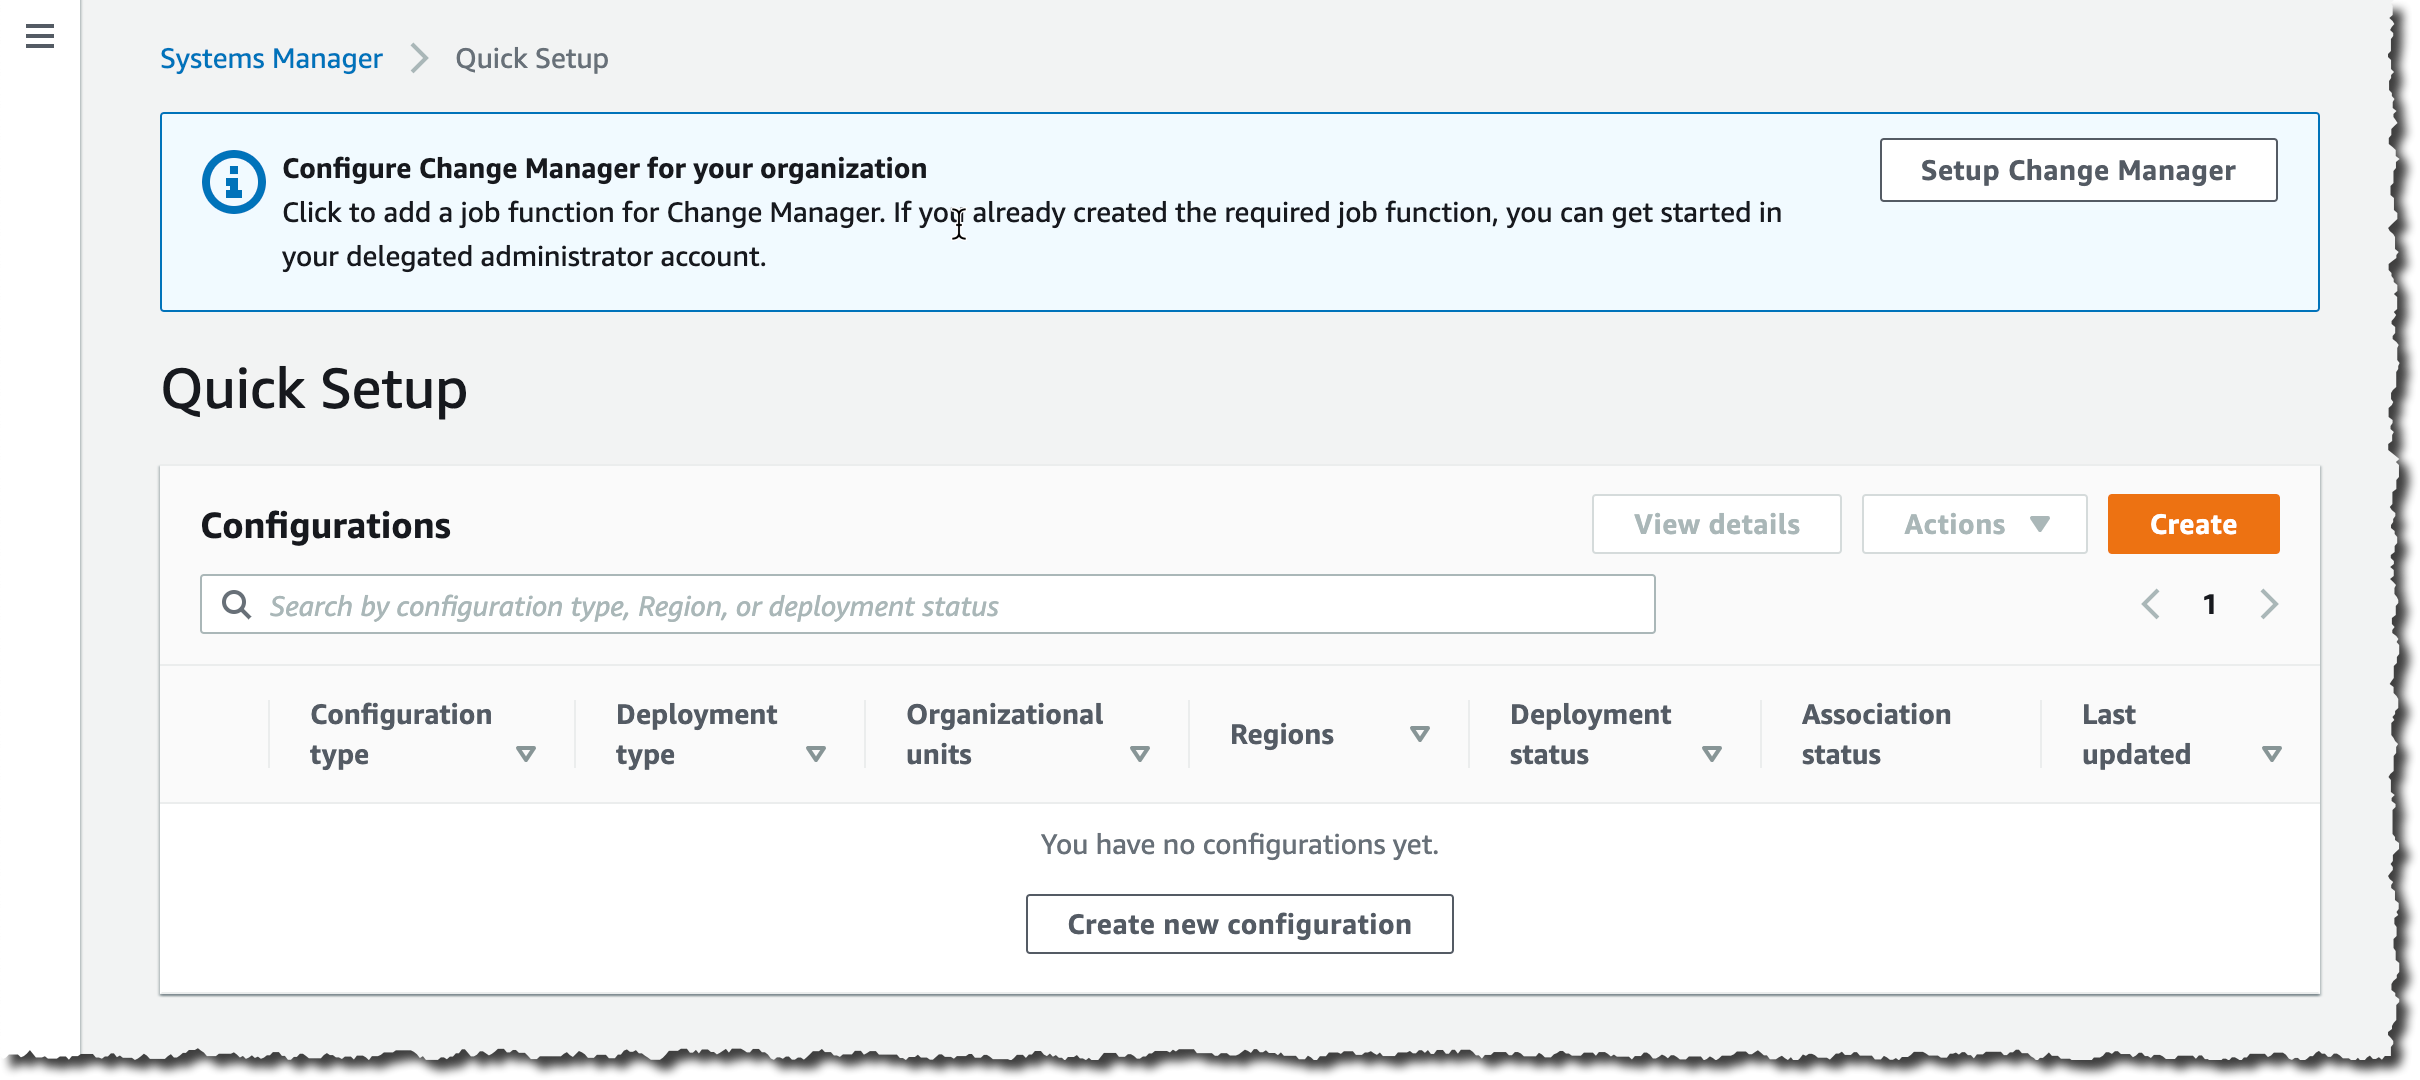
When you select Fleet Manager, as with some other views in Systems Manager, a check is performed to verify that a role, named AmazonSSMRoleForInstancesQuickSetup, exists in your account. If you’ve used other components of Systems Manager in the past, it’s quite possible that it does. The role is used to permit Systems Manager to access your instances on your behalf and if the role exists, then you’re directed to the requested view. If however the role doesn’t exist, you’ll first be taken to the Quick Setup view. This in itself will trigger creation of the role, but you might want to explore the capabilities of Quick Setup, which you can also access any time from the navigation toolbar.

Quick Setup is a feature of Systems Manager that you can use to set up specific configuration items, such as the Systems Manager and CloudWatch agents on your instances (and keep them up-to-date), and also IAM roles permitting access to your resources for Systems Manager components. For this post, all the instances I’m going to use already have the required agent set up, including the role permissions, so I’m not going to discuss this view further but I encourage you to check it out. I also want to remind you that to take full advantage of Fleet Manager‘s capabilities you first need to have KMS encryption enabled for your instances and secondly, the role attached to your Amazon Elastic Compute Cloud (EC2) instances must have the kms:Decrypt role permission included, referencing the key you selected when you enabled KMS encryption. You can enable encryption, and select the KMS key, using the Preferences section of the Session Manager console, and of course you can set up the role permission in the IAM console.

That’s it for the diversion; if you have the role already, as I do, you’ll now be at the Managed instances list view. If you’re at Quick Setup instead, simply click the Fleet Manager navigation button once more.

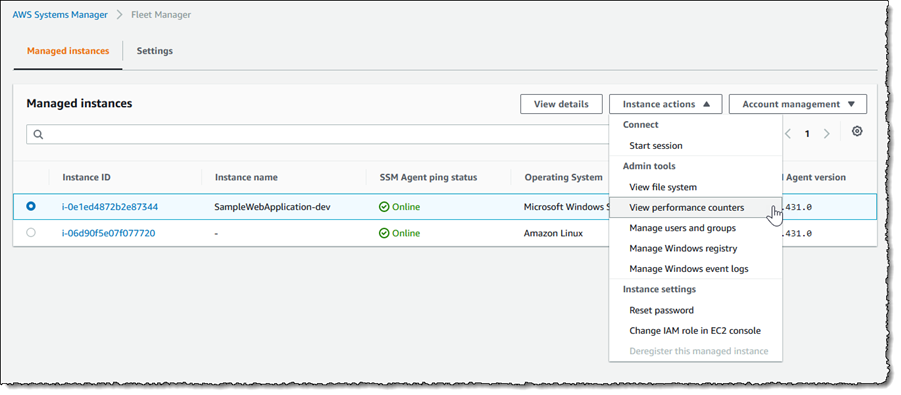
The Managed instances view shows me all of my instances, in the cloud or on-premises, that I can access. Selecting an instance, in this case an EC2 Windows instance launched using AWS Elastic Beanstalk, and clicking Instance actions presents me with a menu of options. The options (less those specific to Windows) are available for my Amazon Linux instance too, and for instances running macOS I can use the View file system option.

Screenshot of <span title="">Fleet Manager</span>'s Managed instances view

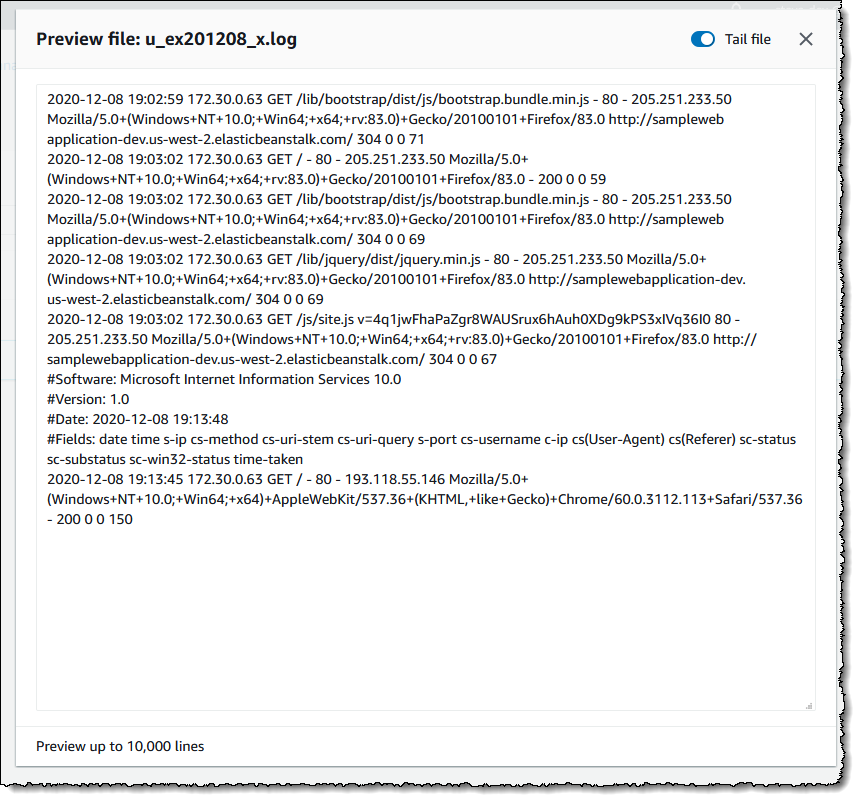
The File system view displays a read-only view onto the file system of the selected instance. This can be particularly useful for viewing text-based log files, for example, where I can preview up to 10,000 lines of a log file and even tail it to view changes as the log updates. I used this to open and tail an IIS web server log on my Windows Server instance. Having selected the instance, I next select View file system from the Instance actions dropdown (or I can click the Instance ID to open a view onto that instance and select File system from the menu displayed on the instance view).

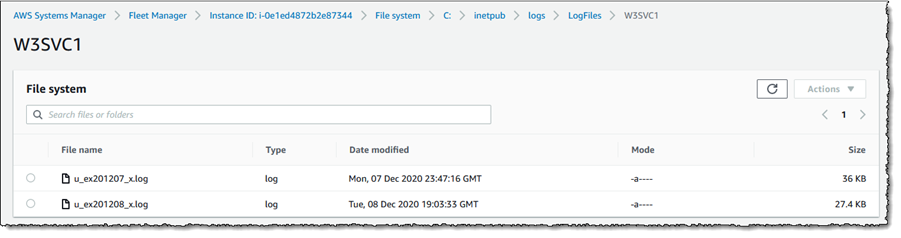
Having opened the file system view for my instance, I navigate to the folder on the instance containing the IIS web server logs.

Screenshot of <span title="">Fleet Manager</span>'s File system view

Selecting a log file, I then click Actions and select Tail file. This opens a view onto the log file contents, which updates automatically as new content is written.

Screenshot of tailing a log file in <span title="">Fleet Manager</span>

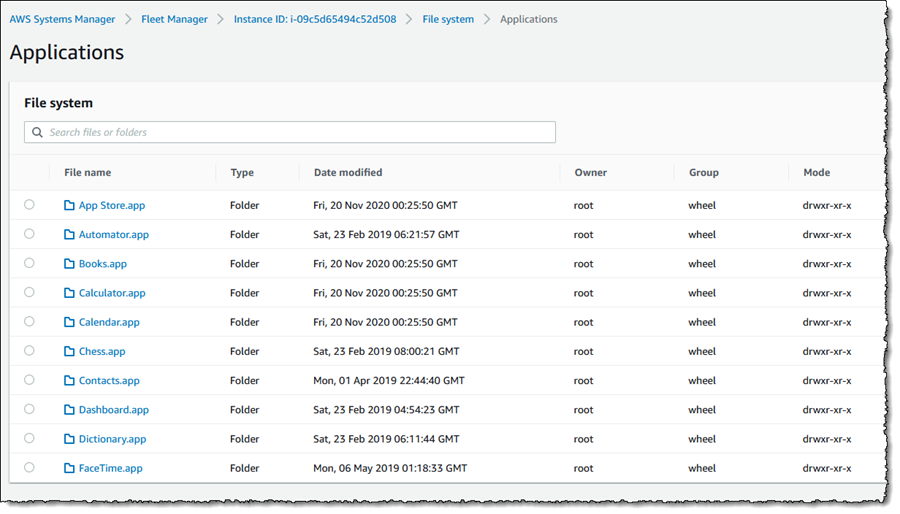
As I mentioned, the File system view is also accessible for macOS-based instances. For example, here is a screenshot of viewing the Applications folder on an EC2 macOS instance.

Screenshot of macOS file system view in <span title="">Fleet Manager</span>

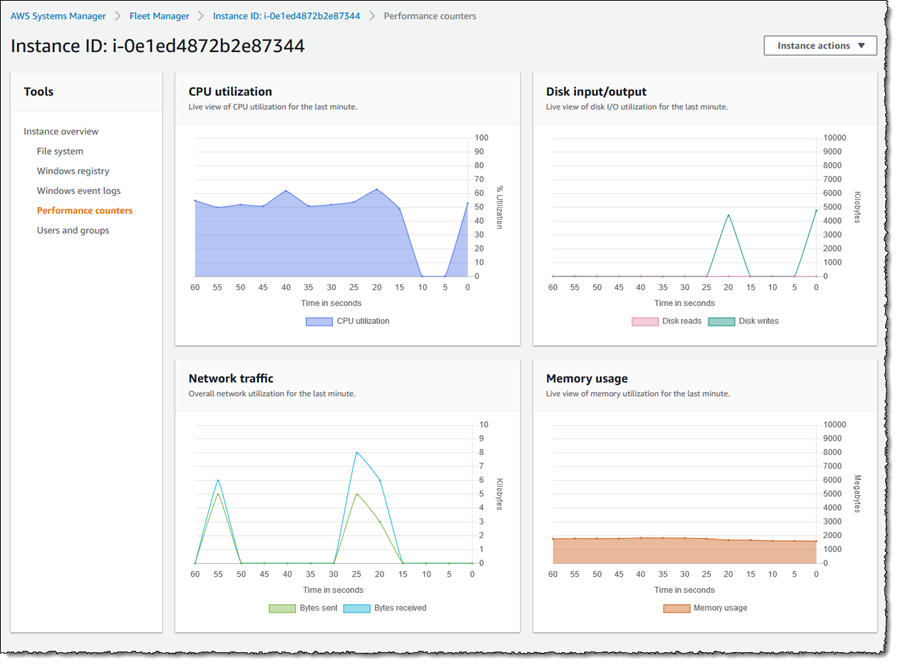
Next, let’s examine the Performance counters view, which is available for both Windows and Linux instances. This view displays CPU, memory, network traffic, and disk I/O and will be familiar to Windows users from Task Manager. The metrics shown reflect the guest OS metrics, whereas EC2 instance metrics you may be used to relate to the hypervisor. On this particular instance I’ve deployed an ASP.NET Core 5 application, which generates a varying length collection of Fibonacci numbers on page refresh. Below is a snapshot of the counters, after I’ve put the instance under a small amount of load. The view updates automatically every 5 seconds.

Screenshot of <span title="">Fleet Manager</span>'s Performance Counters view

There are more views available than I have space for in this post. Using the Windows Registry view, I can view and edit the registry on the selected Windows instance. Windows event logs gives me access to the Application and Service logs, and common Windows logs such as System, Setup, Security, etc. With Users and groups I can manage users or groups, including assignment of users to groups (again for both Windows and Linux instances). For all views, Fleet Manager enables me to use a single and convenient console.

Getting Started
AWS Systems Manager Fleet Manager is available today for use with managed instances running Windows, Linux, and macOS. Information on pricing, for this and other Systems Manager features, can be found at this page.

Learn more, and get started with Fleet Manager today, at AWS Systems Manager.

— Steve

Introducing AWS Systems Manager Change Manager

Post Syndicated from Sébastien Stormacq original https://aws.amazon.com/blogs/aws/introducing-systems-manager-change-manager/

Because you are constantly listening to the feedback from your customer, you are iterating, innovating, and improving your applications and infrastructures. You continually modify your IT systems in the cloud. And let’s face it, changing something in a working system risks breaking things or introducing side effects that are sometimes unpredictable; it doesn’t matter how many tests you do. On the other hand, not making changes is stasis, followed by irrelevance, followed by death.

This is why organizations of all sizes and types have embraced a culture of controlling changes. Some organizations adopt change management processes such as the ones defined in ITIL v4. Some have adopted DevOps’ Continuous Deployment, or other methods. In any case, to support your change management processes, it is important to have tools.

Today, we are launching AWS Systems Manager Change Manager, a new change management capability for AWS Systems Manager. It simplifies the way ops engineers track, approve, and implement operational changes to their application configurations and infrastructures.

Using Change Manager has two primary advantages. First, it can improve the safety of changes made to application configurations and infrastructures, reducing the risk of service disruptions. It makes operational changes safer by tracking that only approved changes are being implemented. Secondly, it is tightly integrated with other AWS services, such as AWS Organizations and AWS Single Sign-On, or the integration with the Systems Manager change calendar and Amazon CloudWatch alarms.

Change Manager provides accountability with a consistent way to report and audit changes made across your organization, their intent, and who approved and implemented them.

Change Manager works across AWS Regions and multiple AWS accounts. It works closely with Organizations and AWS SSO to manage changes from a central point and to deploy them in a controlled way across your global infrastructure.

Terminology
You can use AWS Systems Manager Change Manager on a single AWS account, but most of the time, you will use it in a multi-account configuration.

The way you manage changes across multiple AWS accounts depends on how these accounts are linked together. Change Manager uses the relationships between your accounts defined in AWS Organizations. When using Change Manager, there are three types of accounts:

  • The management account – also known as the “main account” or “root account.” The management account is the root account in an AWS Organizations hierarchy. It is the management account by virtue of this fact.
  • The delegated administrator account – A delegated administrator account is an account that has been granted permission to manage other accounts in Organizations. In the Change Manager context, this is the account from which change requests will be initiated. You will typically log in to this account to manage templates and change requests. Using a delegated administrators account allows you to limit connections made to the root account. It also allows you to enforce a least privileges policy by using a specific subset of permissions required by the changes.
  • The member accounts – Member accounts are accounts that are not the management account or a delegated administrator account, but are still included in Organizations. In my mental model for Change Manager, these would be the accounts that hold the resources where changes are deployed. A delegated administrator account would initiate a change request that would impact resources in a member account. System administrators are discouraged from logging directly into these accounts.

Let’s see how you can use AWS Systems Manager Change Manager by taking a short walk-through demo.

One-Time Configuration
In this scenario, I show you how to use Change Manager with multiple AWS accounts linked together with Organizations. If you are not interested in the one-time configuration, jump to the Create a Change Request section below.

There are four one-time configuration actions to take before using Change Manager: one action in the root account and three in the delegated administrator account. In the root account, I use Quick Setup to define my delegated administrator account and initially configure permissions on the accounts. In the delegated administrator account, you define your source of user identities, you define what users have permissions to approve change templates, and you define a change request template.

First, I ensure I have an Organization in place and my AWS accounts are organized in Organizational Units (OU). For the purpose of this simple example, I have three accounts: the root account, the delegated administrator account in the management OU and a member account in the managed OU. When ready, I use Quick Setup on the root account to configure my accounts. There are multiple paths leading to Quick Setup; for this demo, I use the blue banner on top of the Quick Setup console, and I click Setup Change Manager.

Change Manager Quick Setup


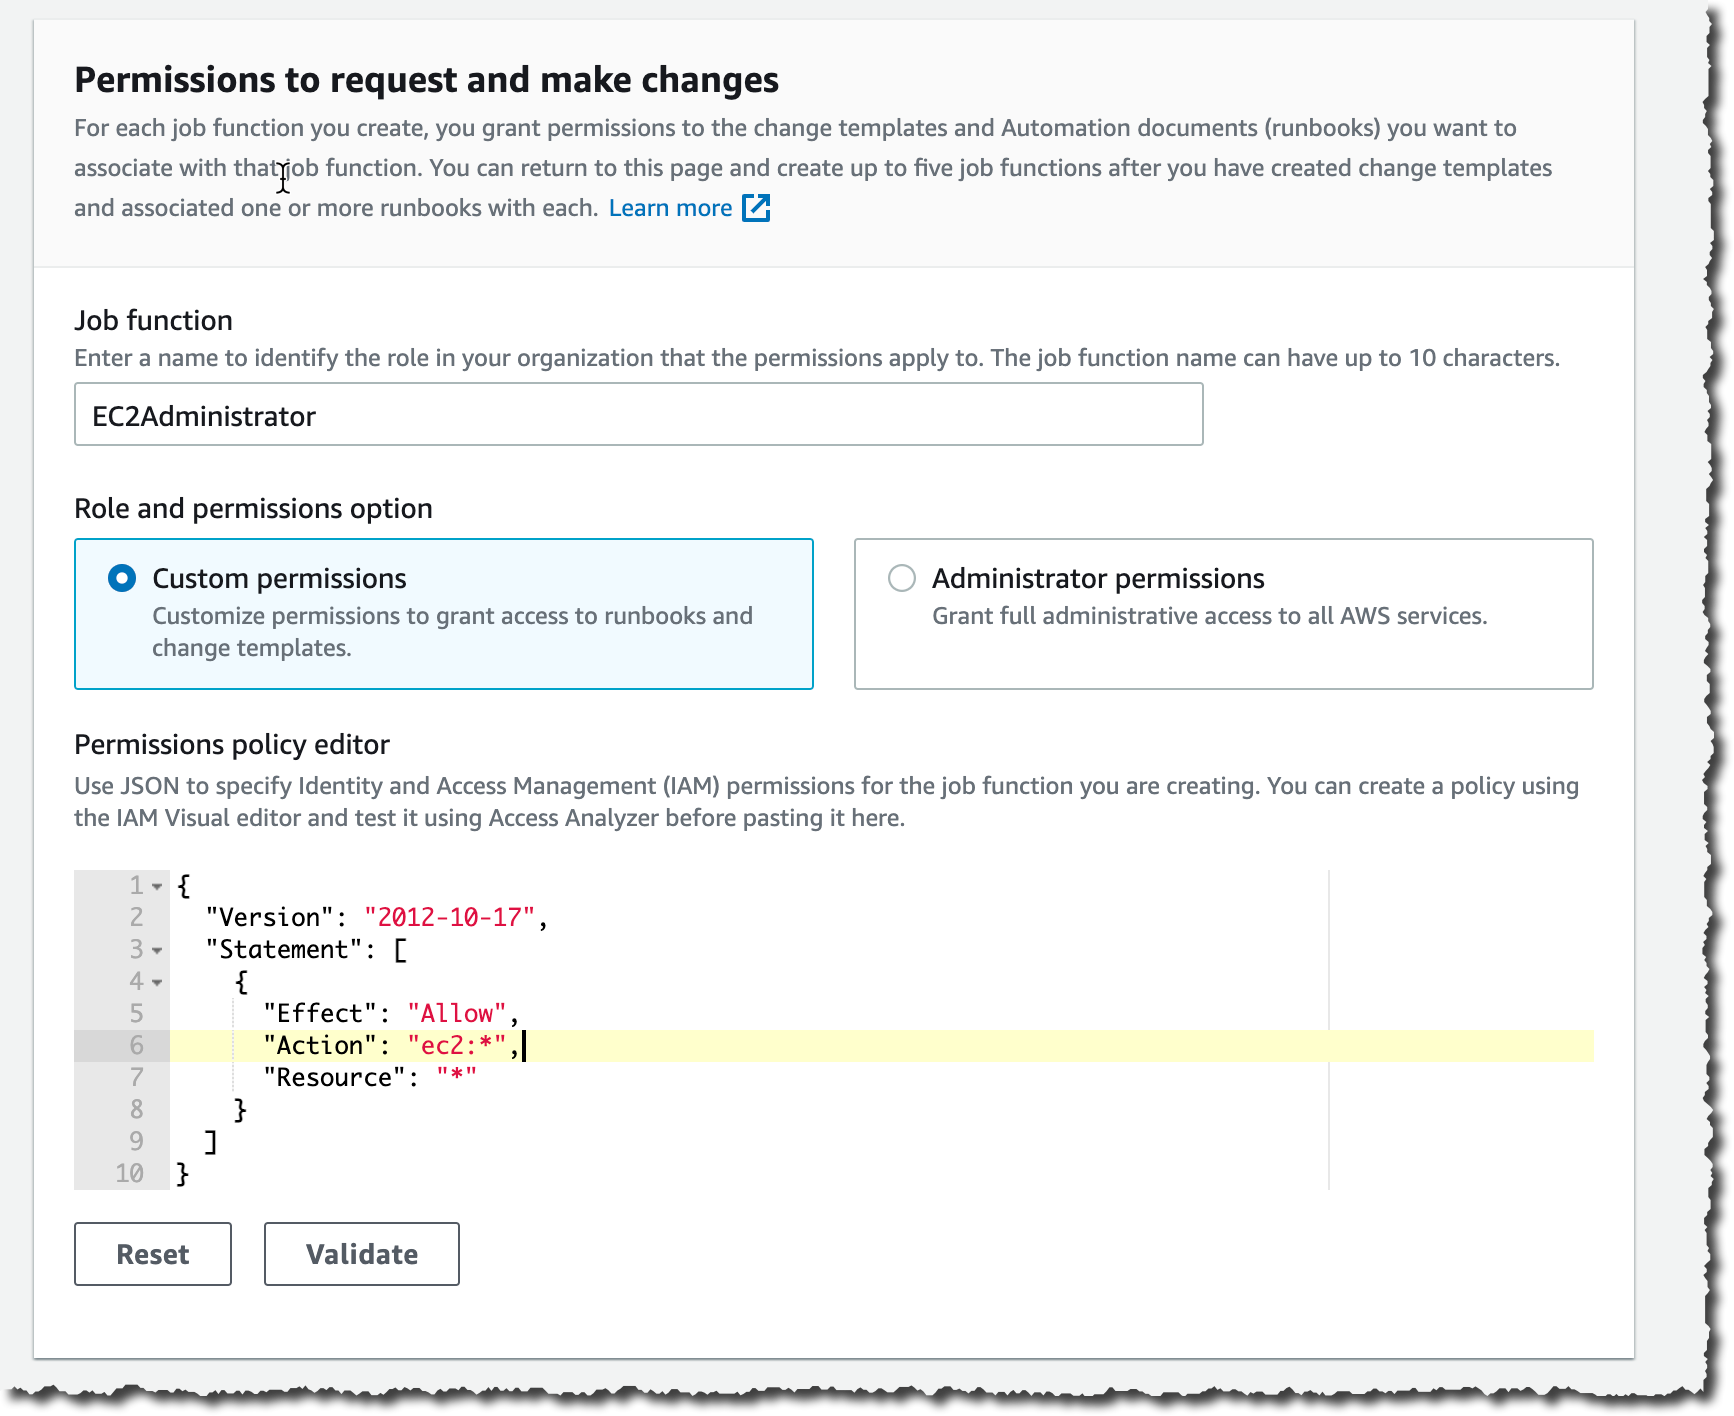
On the Quick Setup page, I enter the ID of the delegated administrator account if I haven’t defined it already. Then I choose the permissions boundaries I grant to the delegated administrator account to perform changes on my behalf. This is the maximum permissions Change Manager receives to make changes. I will further restrict this permission set when I create change requests in a few minutes. In this example, I grant Change Manager permissions to call any ec2 API. This effectively authorizes Change Manager to only run changes related to EC2 instances.

Change Manager Quick Setup

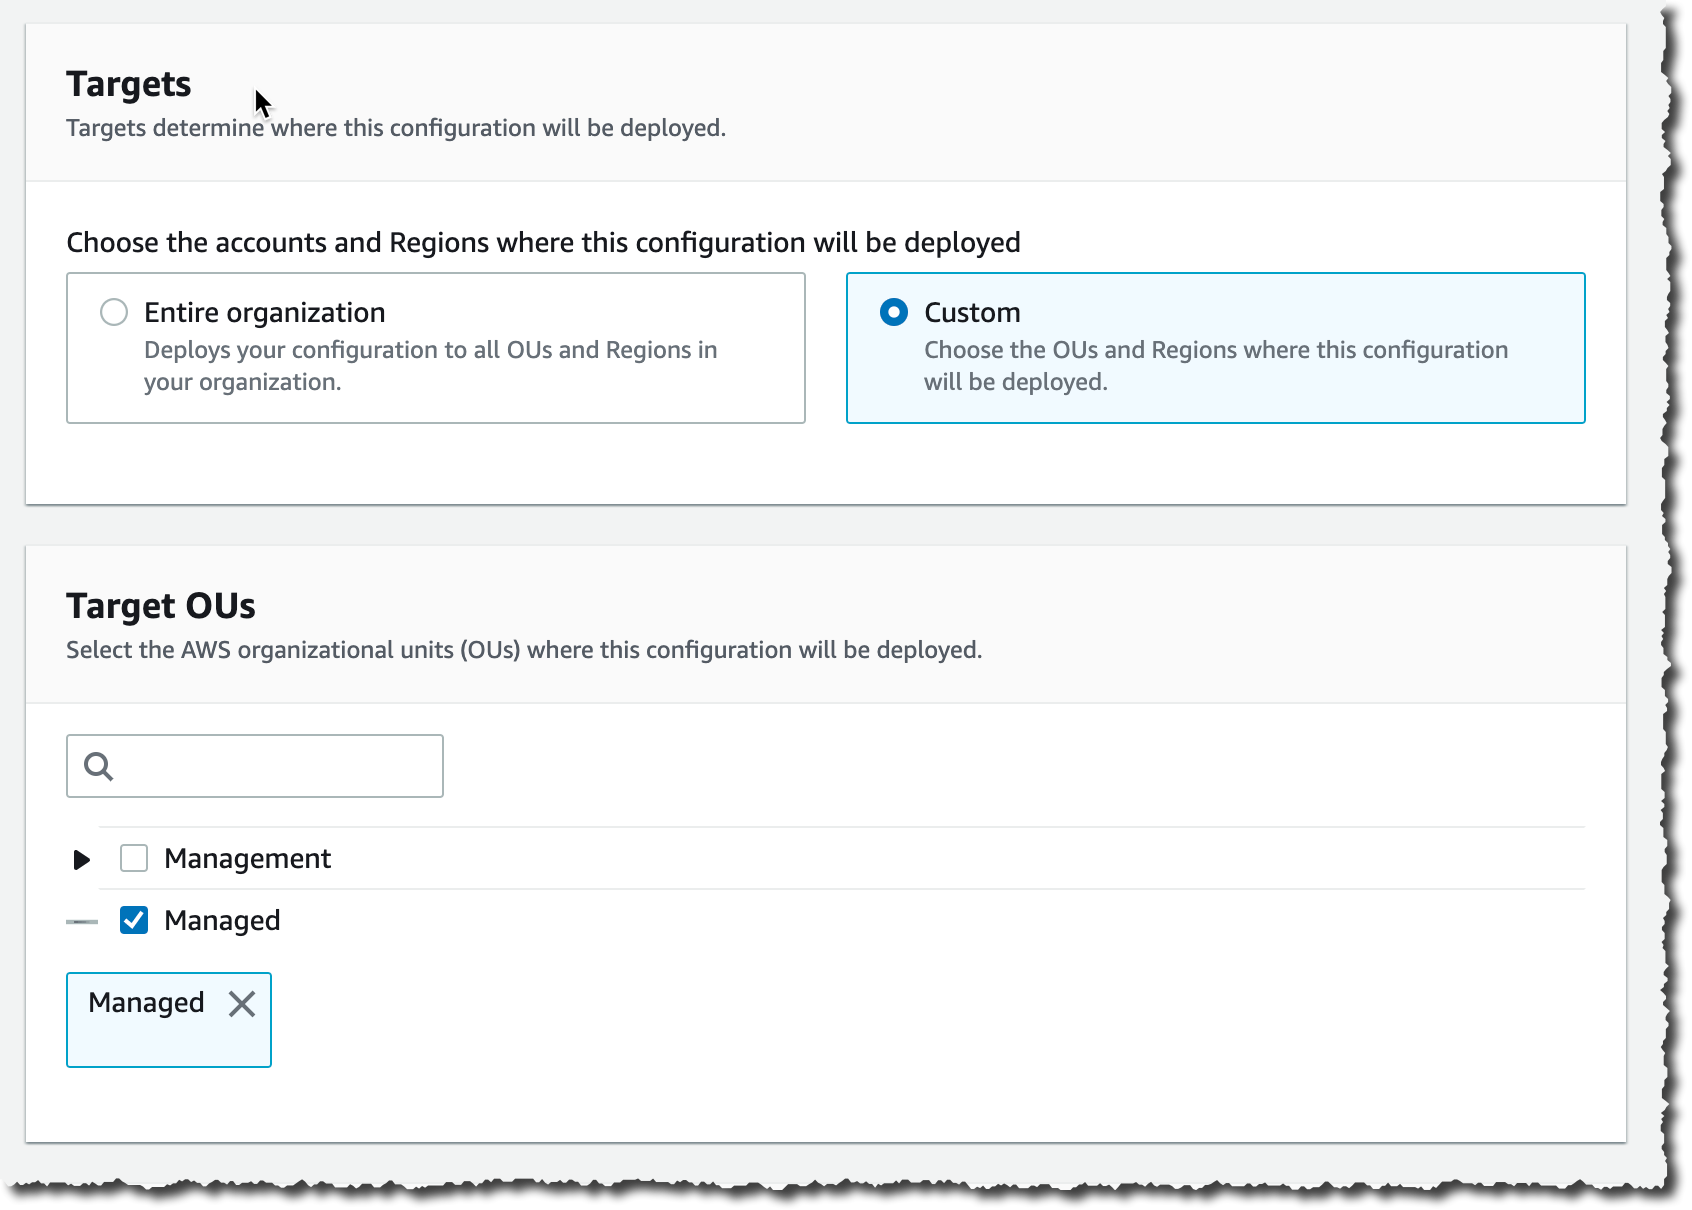
Lower on the screen, I choose the set of accounts that are targets for my changes. I choose between Entire organization or Custom to select one or multiple OUs.

Change Manager Quick Setup 2

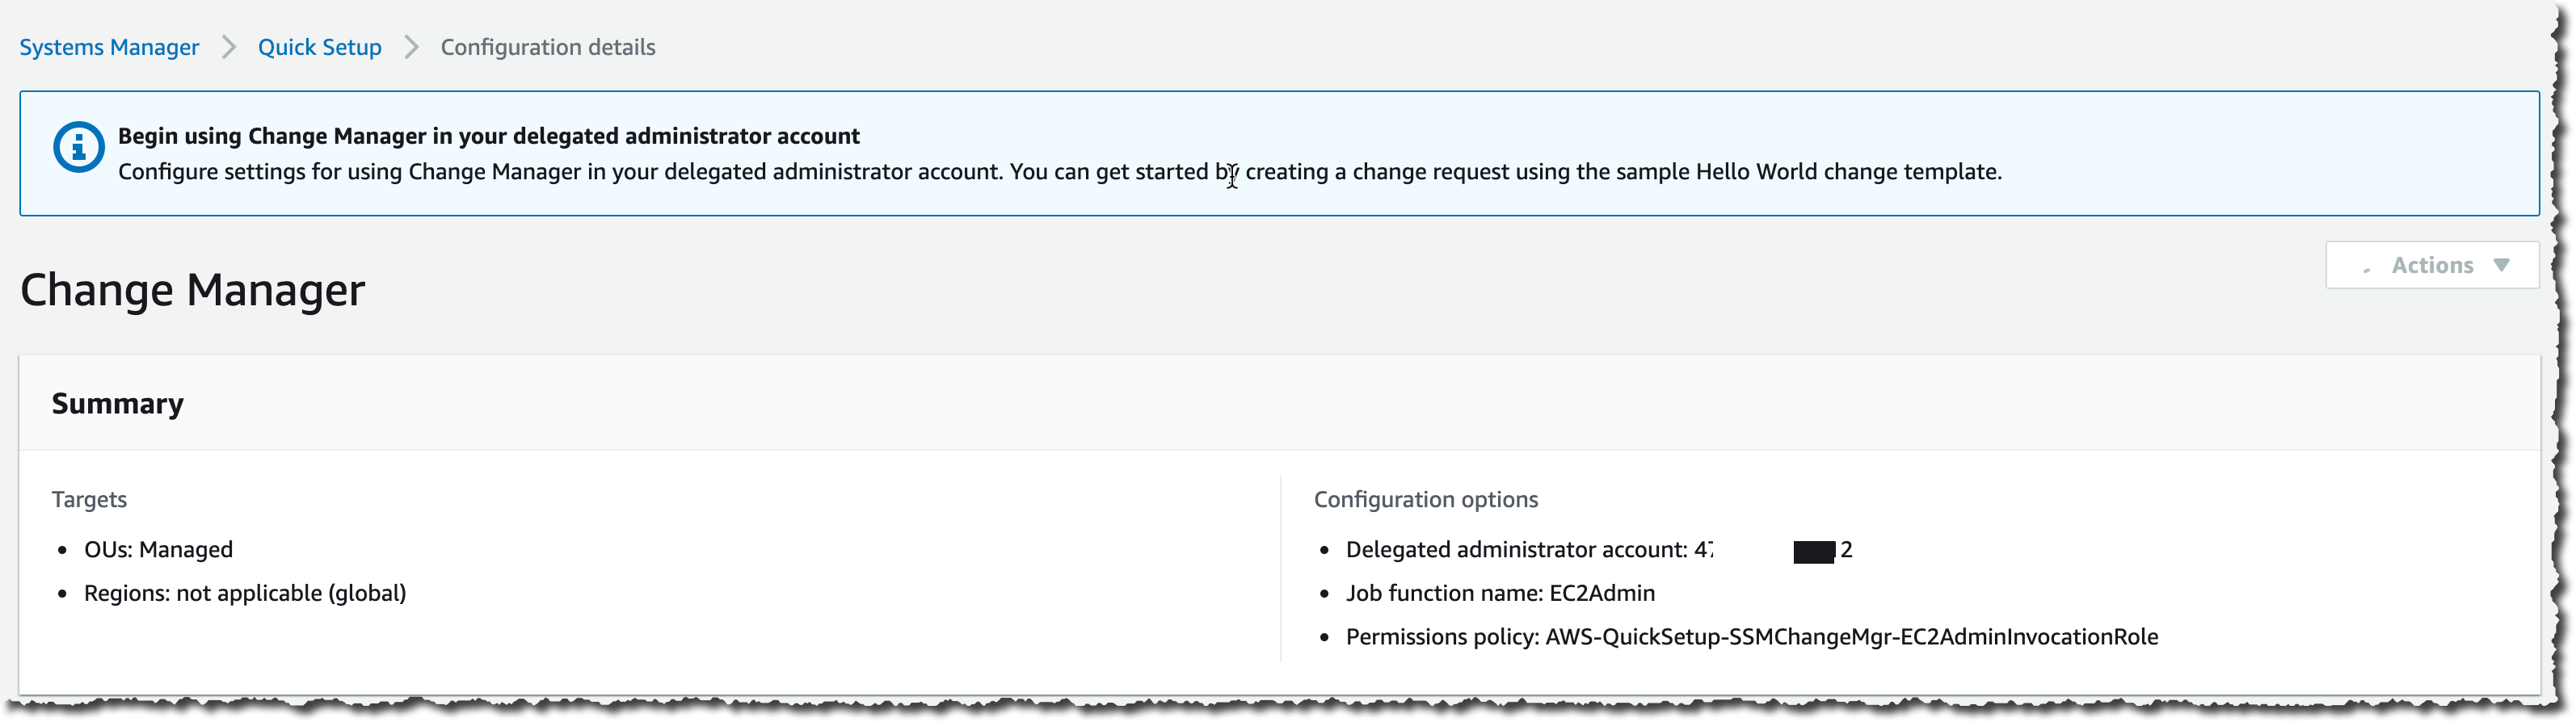
After a while, Quick Setup finishes configuring my AWS accounts permission and I can move to the second part of the one-time setup.

Change Manager Quick Setup 3

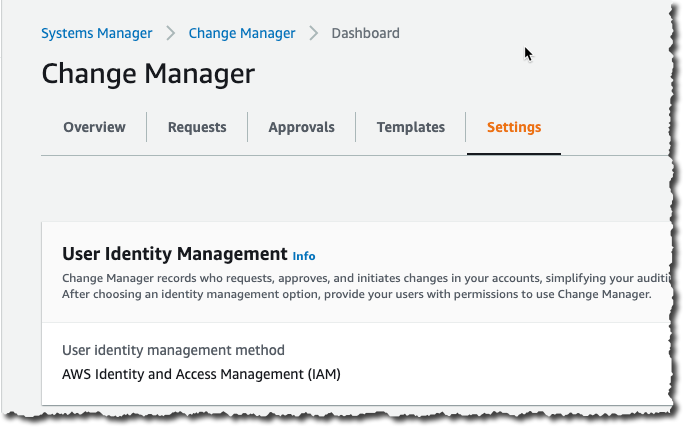
Second, I switch to my delegated administrator account. Change Manager asks me how I manage users in my organization: with AWS Identity and Access Management (IAM) or AWS Single Sign-On? This defines where Change Manager pulls user identities when I choose approvers. This is a one-time configuration option. This can be changed at any time in the Change Manager Settings page.

Change Manager Settings

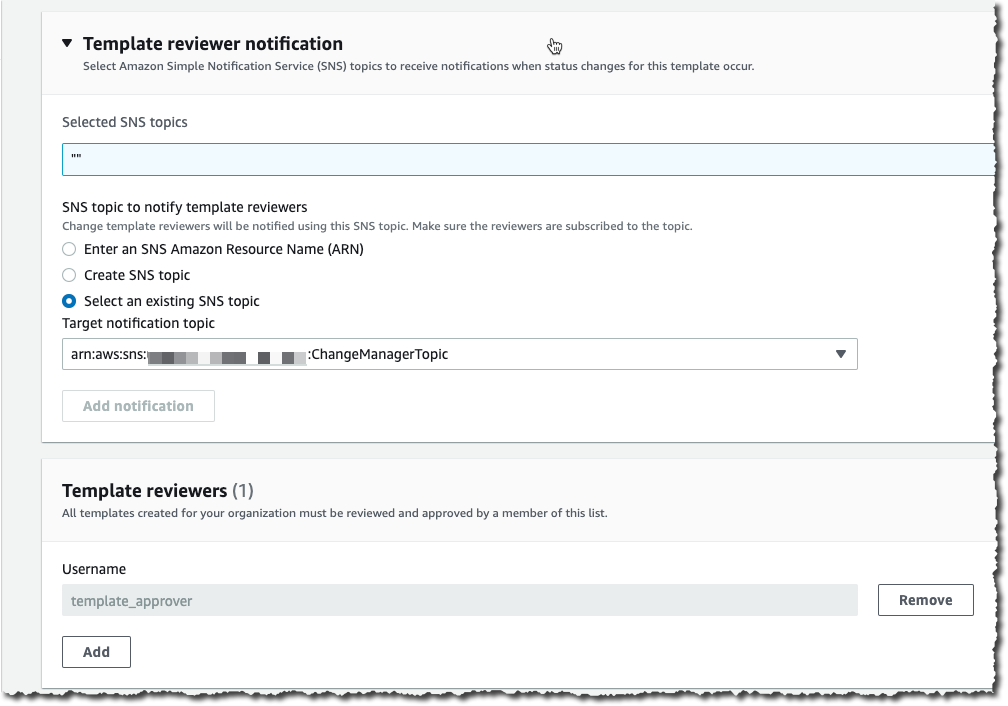
Third, on the same page, I define an Amazon Simple Notification Service (SNS) topic to receive notifications about template reviews. This channel is notified any time a template is created or modified, to let template approvers review and approve templates. I also define the IAM (or SSO) user with permission to approve change templates (more about these in one minute).

Change Manager Template Reviewers

Optionally, you can use the existing AWS Systems Manager Change Calendar to define the periods where changes are not authorized, such as marketing events or holiday sales.

Finally, I define a change template. Every change request is created from a template. Templates define common parameters for all change requests based on them, such as the change request approvers, the actions to perform, or the SNS topic to send notifications of progress. You can enforce the review and approval of templates before they can be used. It makes sense to create multiple templates to handle different type of changes. For example, you can create one template for standard changes, and one for emergency changes that overrides the change calendar. Or you can create different templates for different types of automation run books (documents).

To help you to get started, we created a template for you: the “Hello World” template. You can use it as a starting point to create a change request and test out your approval flow.

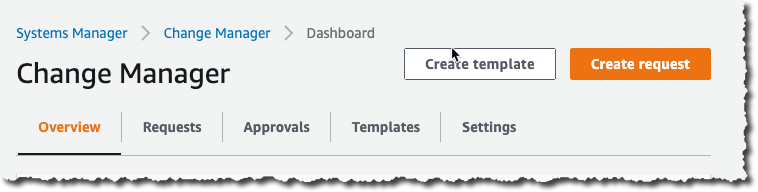
At any time, I can create my own template. Let’s imagine my system administrator team is frequently restarting EC2 instances. I create a template allowing them to create change requests to restart one or multiple instances. Using the delegated administrator account, I navigate to the Change Manager management console and click Create template.

Change Manager Create Template

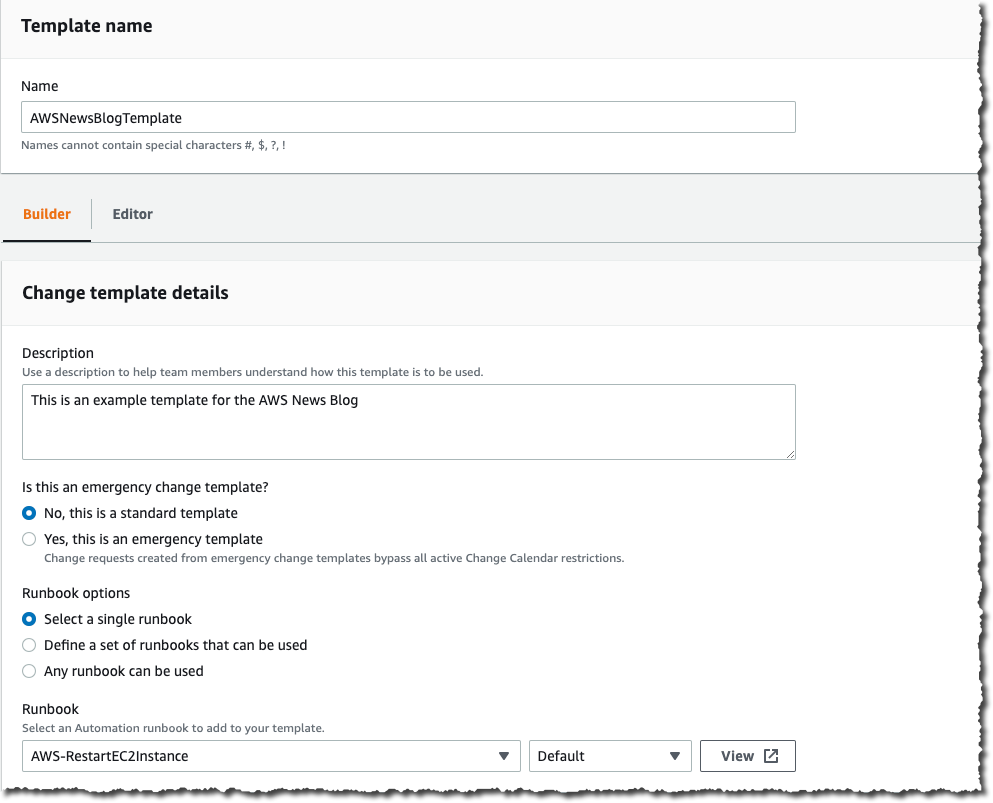
In a nutshell, a template defines the list of authorized actions, where to send notifications and who can approve the change request. Actions are an AWS Systems Manager runbook. Emergency change templates allow change requests to bypass the change calendar I wrote about earlier. Under Runbook Options, I choose one or multiple runbooks allowed to run. For this example, I choose the AWS EC2RestartInstance runbook.

I use the console to create the template, but templates are defined internally as YAML. I can edit the YAML using the Editor tab, or when I am using the AWS Command Line Interface (CLI) or API. This means I can version control them just like the rest of my infrastructure (as code).Change Manager Create Template part 1

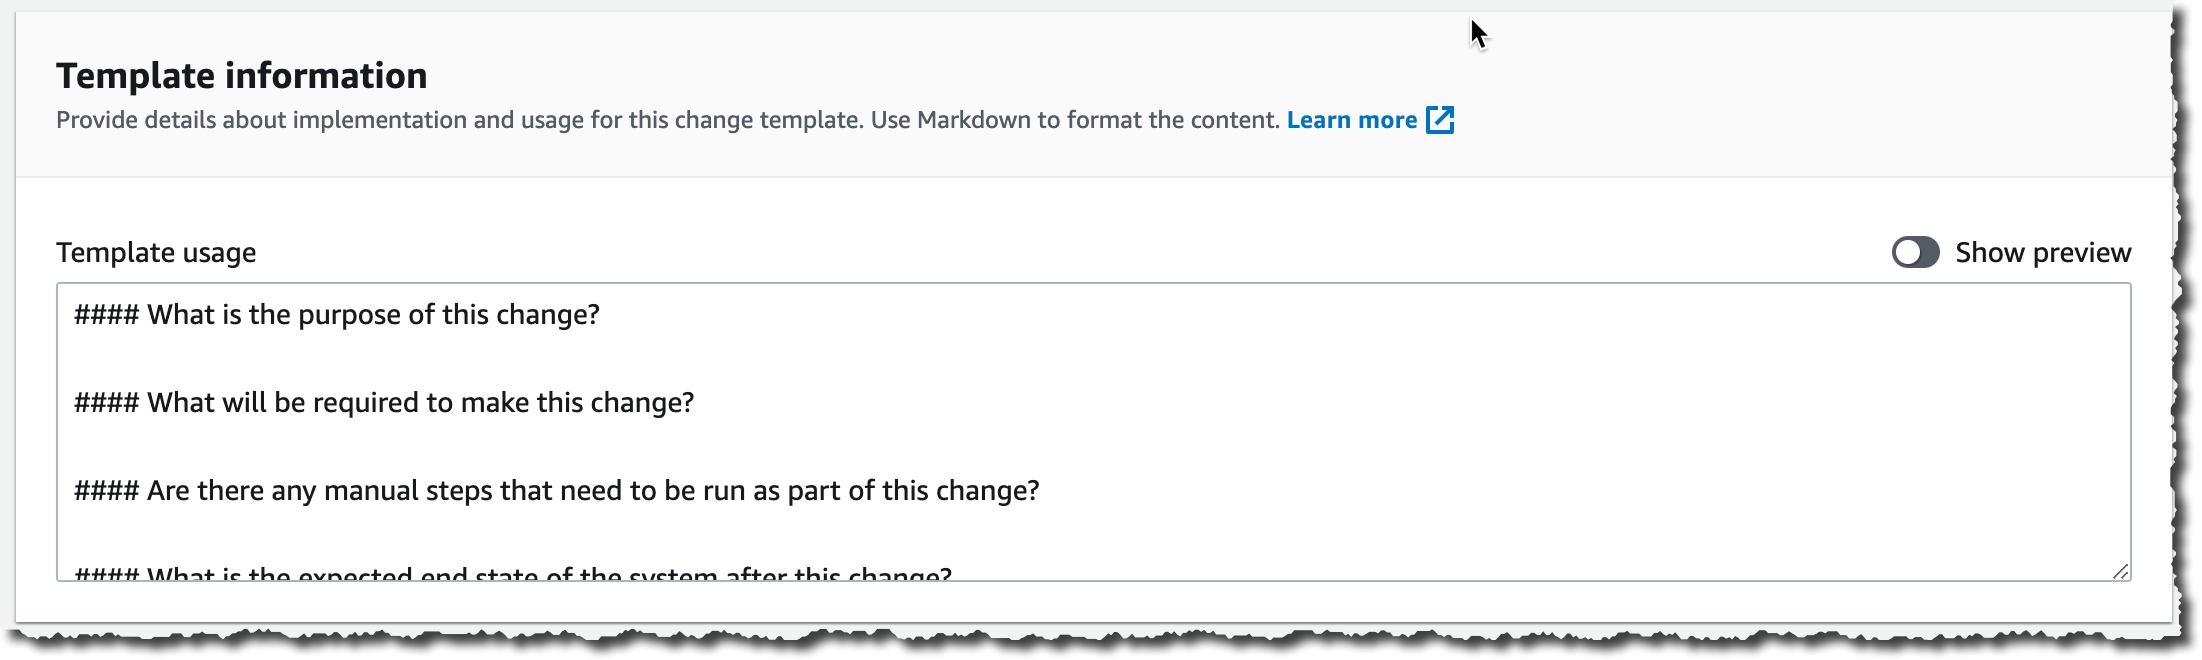
Just below, I document my template using text formatted as markdown format. I use this section to document the defining characteristics of the template and provide any necessary instructions, such as back-out procedures, to the requestor.

Change Manager Template Documentation

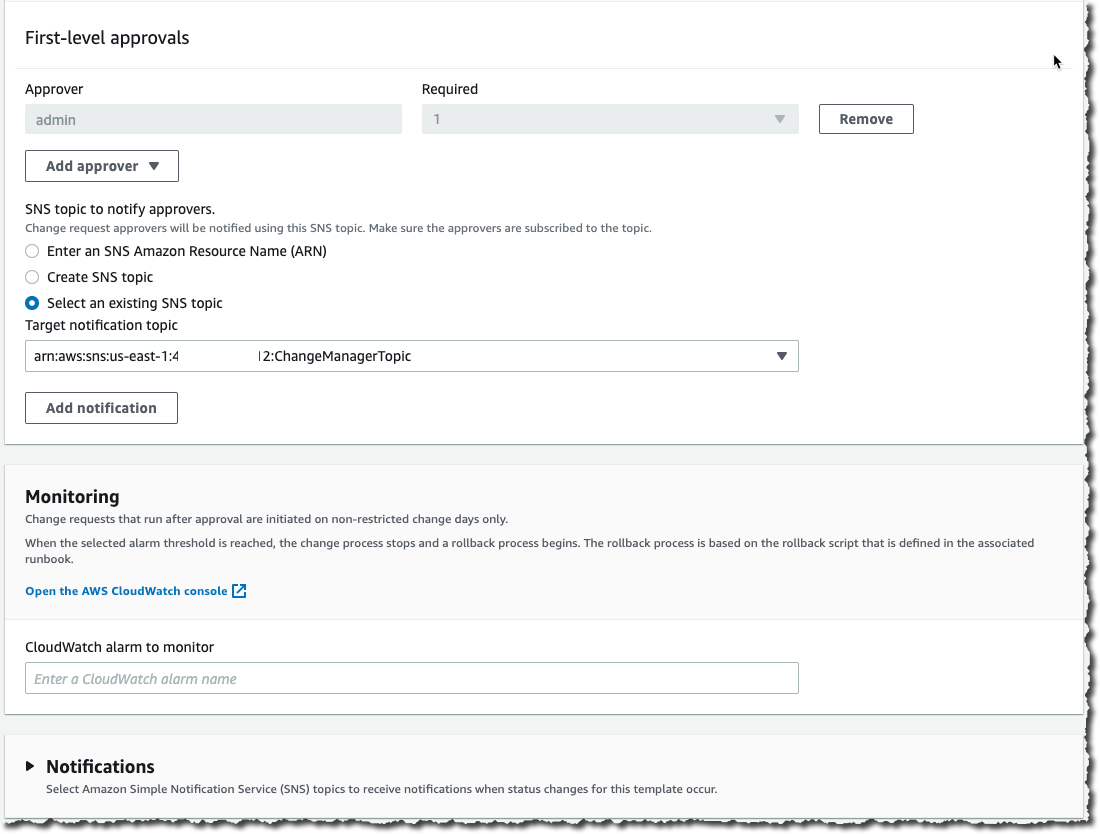
I scroll down that page and click Add Approver to define approvers. Approvers can be individual users or groups. The list of approvers are defined either at the template level or in the change request itself. I also choose to create an SNS topic to inform approvers when any requests are created that require their approval.

In the Monitoring section I select the alarm that, when active, stops any change based on this template, and initiate a rollback.

In the Notifications section, I select or create another SNS topic so I’m notified when status changes for this template occur.

Change Manager Create Template part 2

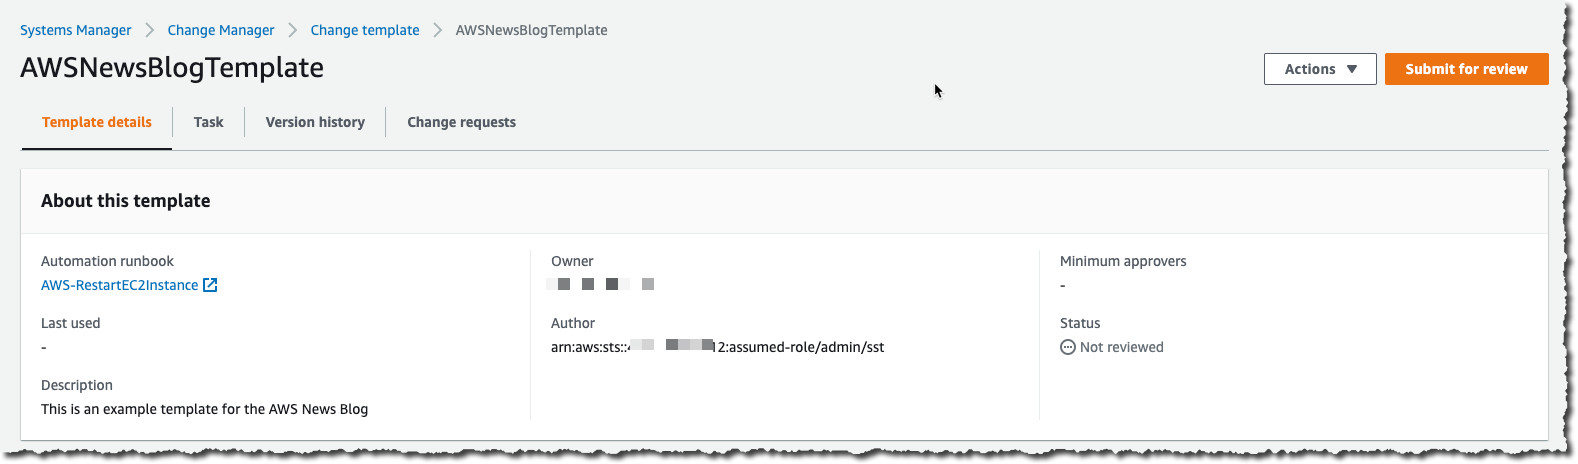
Once I am done, I save the template and submit it for review.

Change Manager Submit Template for Review

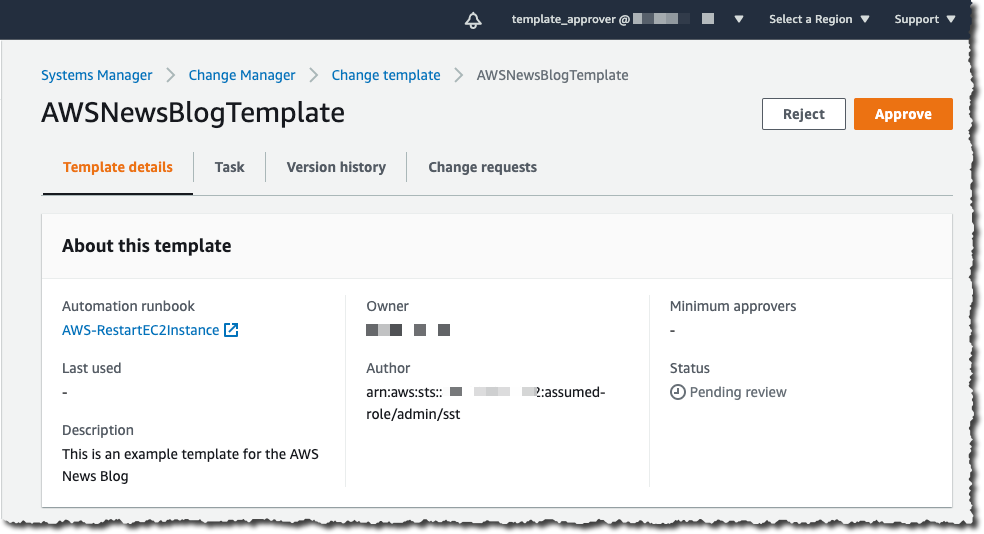
Templates have to be reviewed and approved before they can be used. To approve the template, I connect the console as the template_approver user I defined earlier. As template_approver user, I see pending approvals on the Overview tab. Or, I navigate to the Templates tab, select the template I want to review. When I am done reviewing it, I click Approve.

Change Manager Approve Template

Voila, now we’re ready to create change requests based on this template. Remember that all the preceding steps are one-time configurations and can be amended at any time. When existing templates are modified, the changes go through a review and approval process again.

Create a Change Request
To create a change request on any account linked to the Organization, I open a AWS Systems Manager Change Manager console from the delegated administrator account and click Create request.

Change Manager Create Request

I choose the template I want to use and click Next.

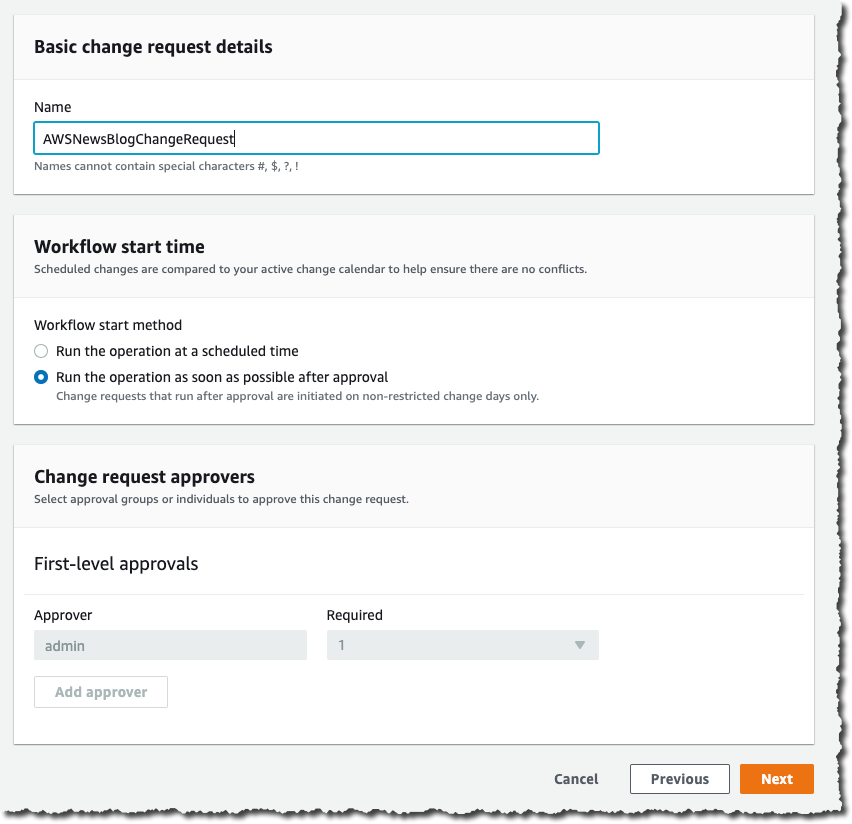
Change Manager Select Template I enter a name for this change request. The change is initiated immediately after all approvals are granted, or I specify an optional scheduled time. When the template allows me, I choose the approver for this change. In this example, the approver is defined by the template and cannot be changed. I click Next.

Change Manager Create CR part 1

On the next screen, there are multiple important configuration options, relating to the actual execution of the change:

  • Target location – lets me define on which target AWS accounts and AWS Region I want to run this change.
  • Deployment target – lets me define which resources are the target of this change. One EC2 instance? Or multiple ones identified by their tags, their resources groups, a list of instance IDs, or all EC2 instances.
  • Runbook parameters – lets me define the parameters I want to pass to my runbook, if any.
  • Execution role – lets me define the set of permissions I grant the System Manager to deploy with this change. The permission set must have service changemanagement.ssm.amazonaws.com as principal for the trust policy. Selecting a role allows me to grant the Change Manager runtime a different permission set than the one I have.

Here is an example allowing Change Manager to stop an EC2 instance (you can scope it down to a specific AWS account, specific Region, or specific instances):

{
    "Version": "2012-10-17",
    "Statement": [
        {
            "Effect": "Allow",
            "Action": [
                "ec2:StartInstances",
                "ec2:StopInstances"
            ],
            "Resource": "*",
        },
        {
            "Effect": "Allow",
            "Action": "ec2:DescribeInstances",
            "Resource": "*"
        }
    ]
}

And the associated trust policy:

{
  "Version": "2012-10-17",
  "Statement": [
    {
      "Effect": "Allow",
      "Principal": {
        "Service": "changemanagement.ssm.aws.internal"
      },
      "Action": "sts:AssumeRole"
    }
  ]
}

When I am ready, I click Next. On the last page, I review my data entry and click Submit for approval.

At this stage, the approver receives a notification, based on the SNS topic configured in the template. To continue this demo, I sign out of the console and sign in again as the cr_approver user, which I created, with permission to view and approve change requests.

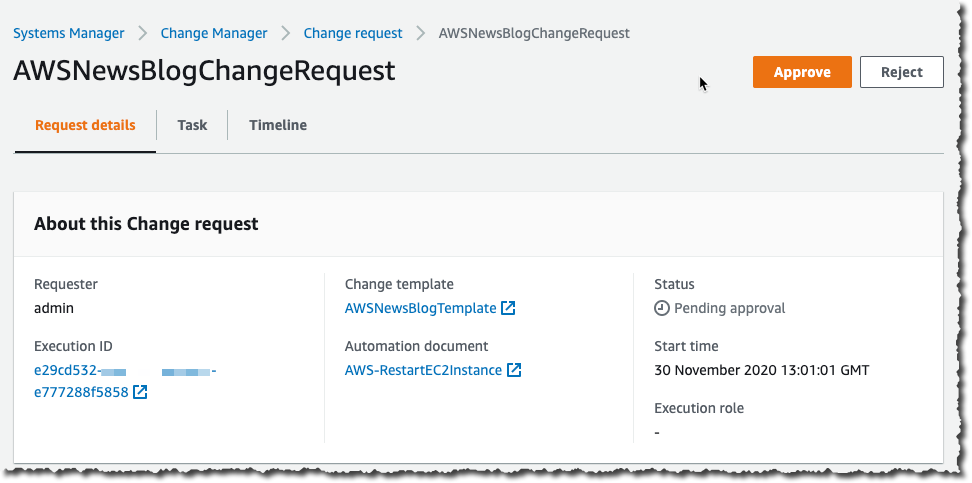
As the cr_approver user, I navigate to the console, review the change request, and click Approve.

Change Manager Review Change Request

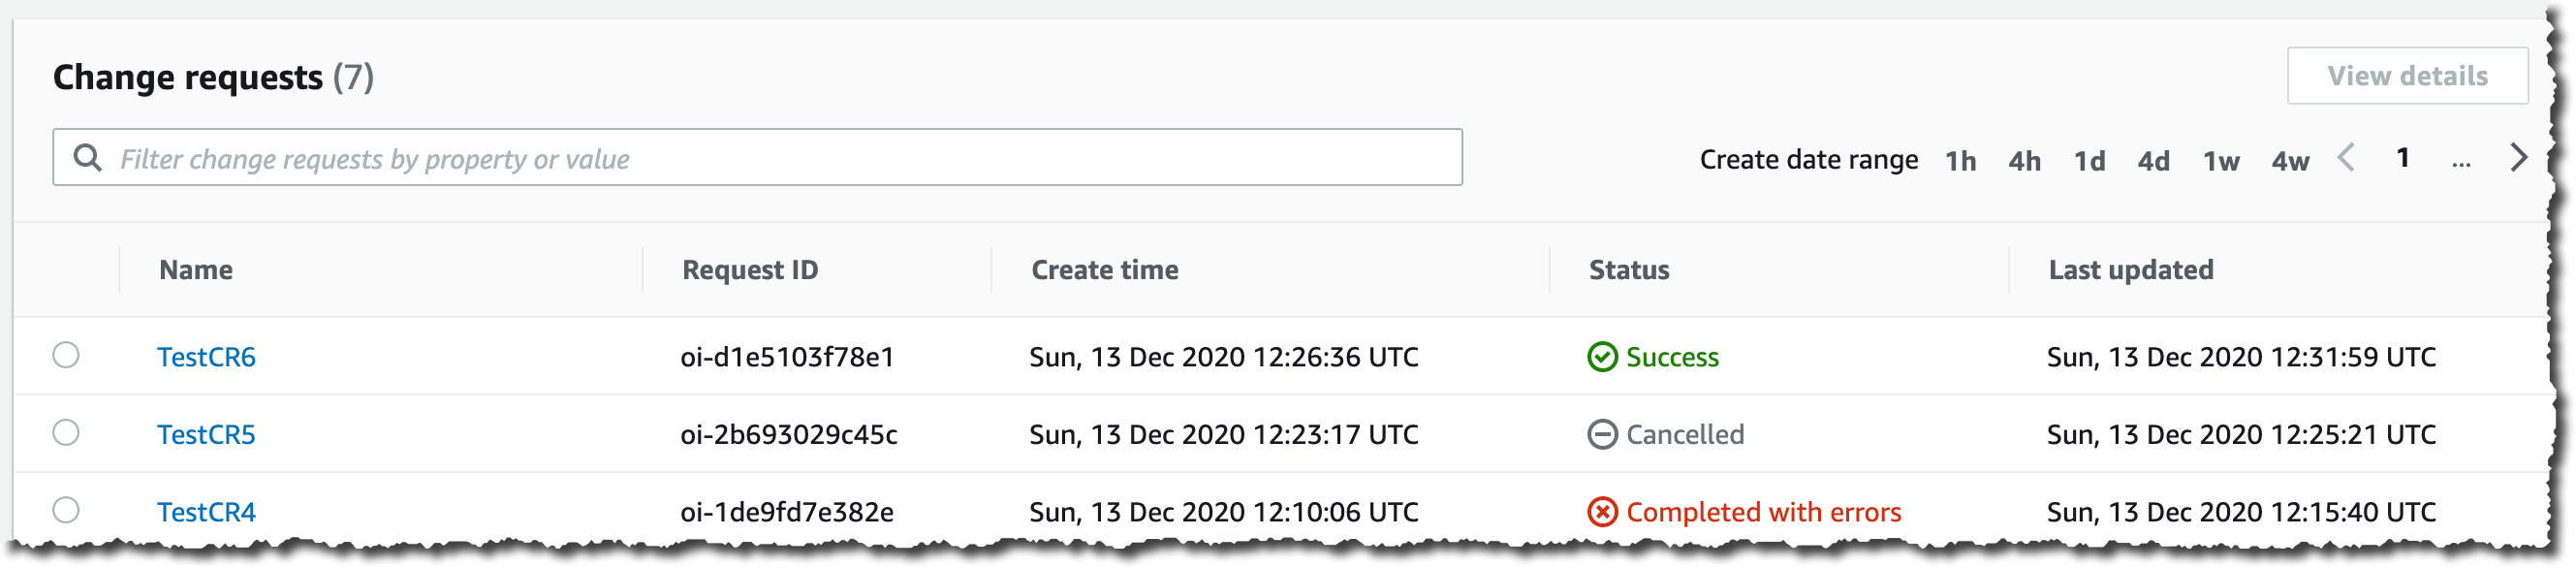
The change request status switches to scheduled, and eventually turns green to Success. At any time, I can click the change request to get the status, and to collect errors, if any.

Change Manager Dashboard with Succeeded Request

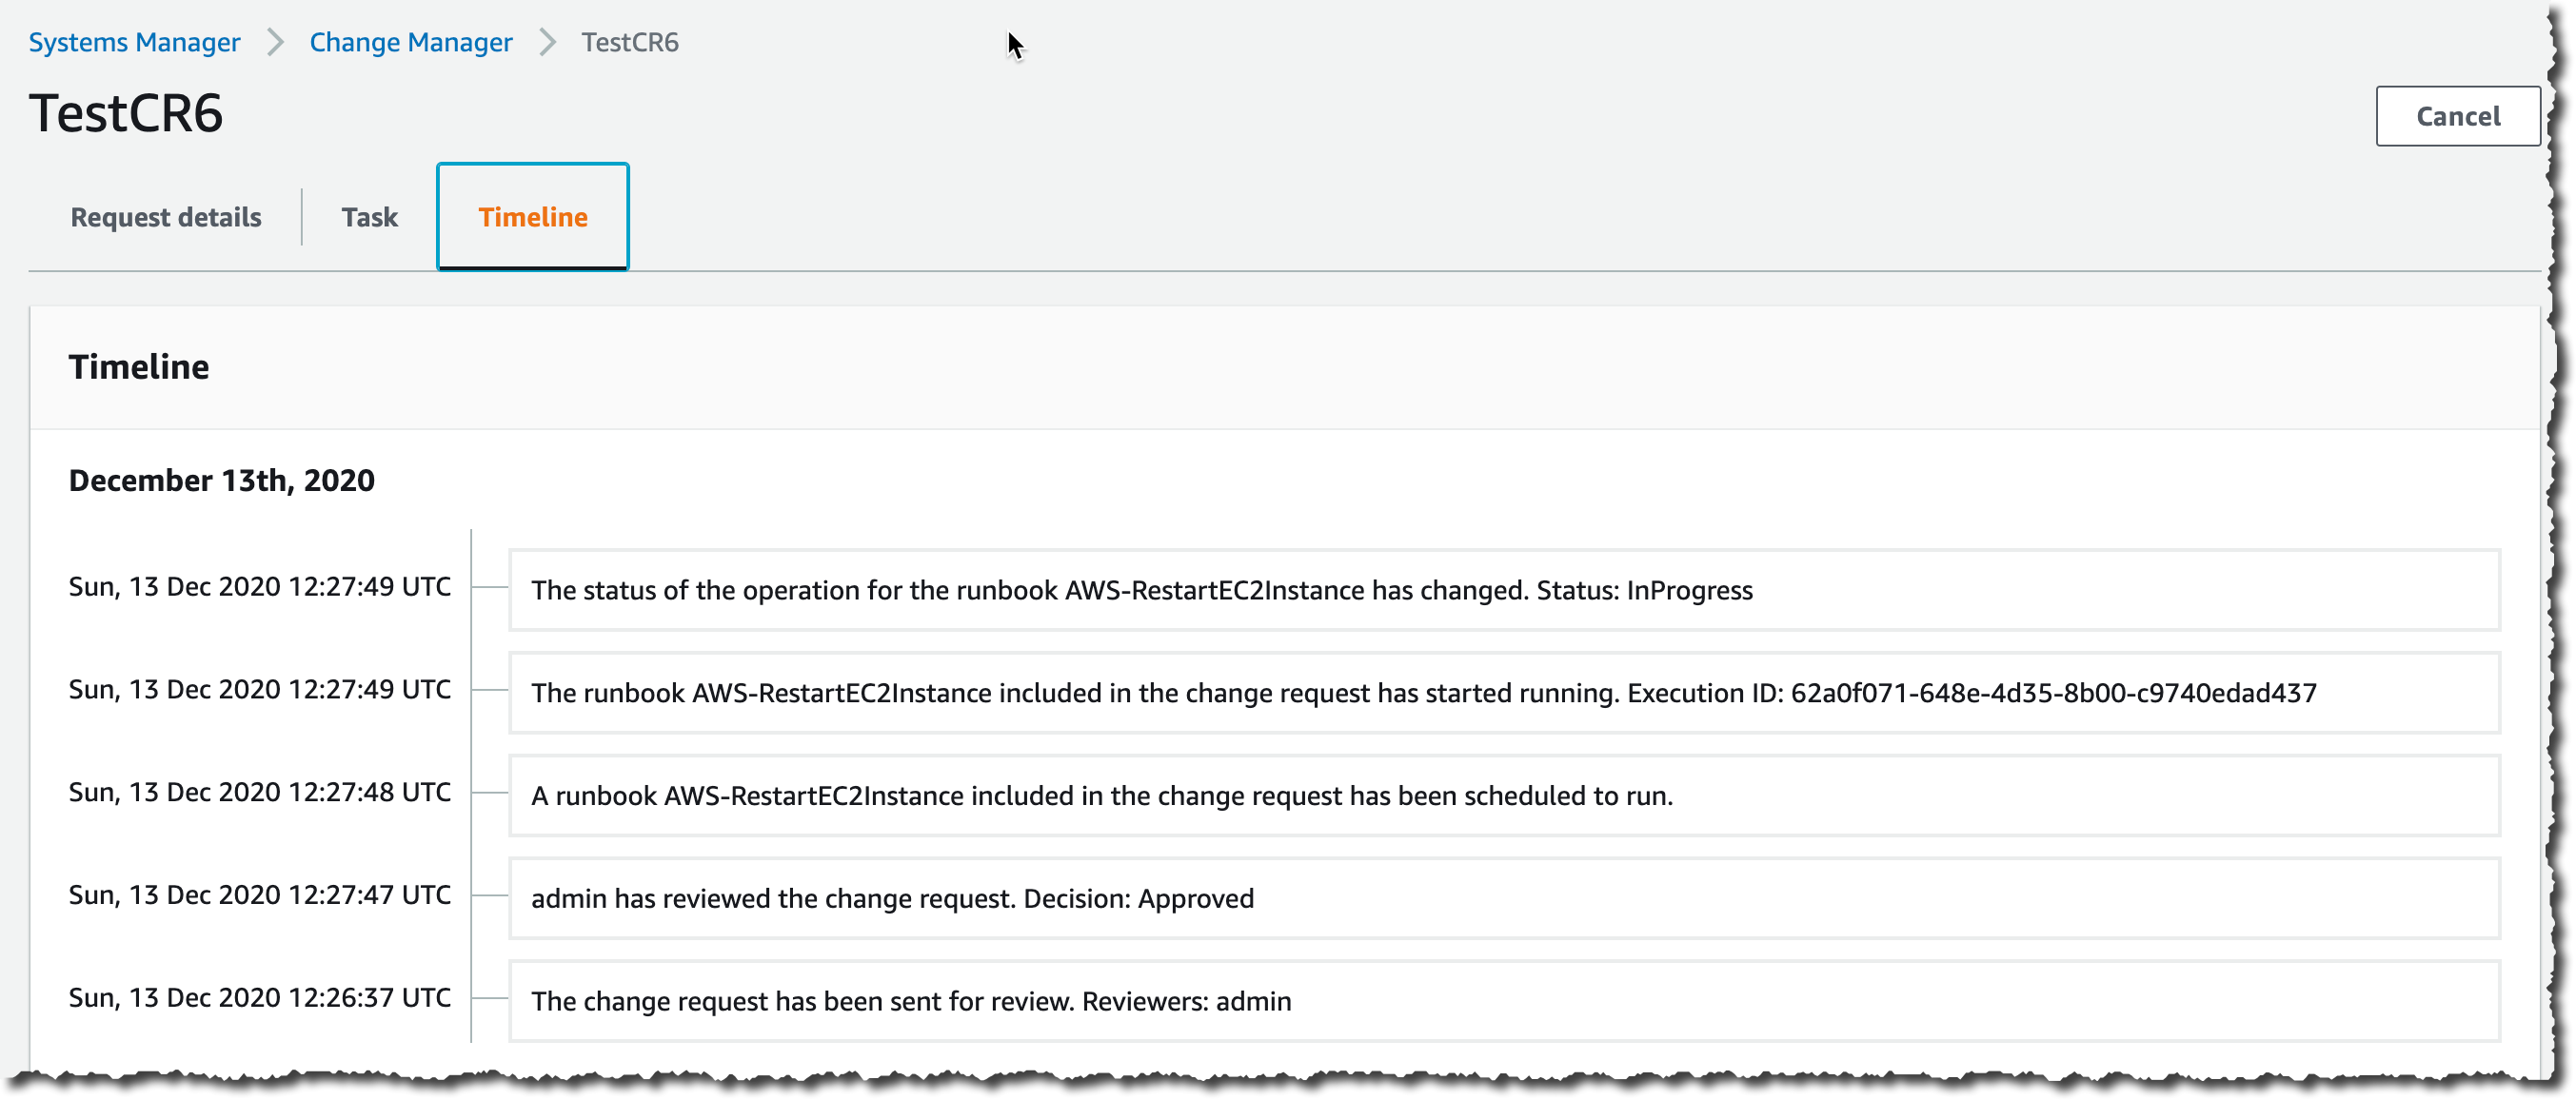
I click on the change request to see the details. In particular, the Timeline tab shows the history of this CR.

Change Management CR Timeline

Availability and Pricing
AWS Systems Manager Change Manager is available today in all commercial AWS Regions, except mainland China. The pricing is based on two dimensions: the number of change requests you submit and the total number of API calls made. The number of change requests you submit will be the main cost factor. We will charge $0.29 per change request. Check the pricing page for more details.

You can evaluate Change Manager for free for 30 days, starting on your first change request.

As usual, let us know what you think and let’s get started today

— seb

Tracking the latest server images in Amazon EC2 Image Builder pipelines

Post Syndicated from Eric Johnson original https://aws.amazon.com/blogs/compute/tracking-the-latest-server-images-in-amazon-ec2-image-builder-pipelines/

This post courtesy of Anoop Rachamadugu, Cloud Architect at AWS

The Amazon EC2 Image Builder service helps users to build and maintain server images. The images created by EC2 Image Builder can be used with Amazon Elastic Compute Cloud (EC2) and on-premises. Image Builder reduces the effort of keeping images up-to-date and secure by providing a graphical interface, built-in automation, and AWS-provided security settings. Customers have told us that they manage multiple server images and are looking for ways to track the latest server images created by the pipelines.

In this blog post, I walk through a solution that uses AWS Lambda and AWS Systems Manager (SSM) Parameter Store. It tracks and updates the latest Amazon Machine Image (AMI) IDs every time an Image Builder pipeline is run. With Lambda, you pay only for what you use. You are charged based on the number of requests for your functions and the time it takes for your code to run. In this case, the Lambda function is invoked upon the completion of the image builder pipeline. Standard SSM parameters are available at no additional charge.

Users can reference the SSM parameters in automation scripts and AWS CloudFormation templates providing access to the latest AMI ID for your EC2 infrastructure. Consider the use case of updating Amazon Machine Image (AMI) IDs for the EC2 instances in your CloudFormation templates. Normally, you might map AMI IDs to specific instance types and Regions. Then to update these, you would manually change them in each of your templates. With the SSM parameter integration, your code remains untouched and a CloudFormation stack update operation automatically fetches the latest Parameter Store value.

Overview

This solution uses a Lambda function written in Python that subscribes to an Amazon Simple Notification Service (SNS) topic. The Lambda function and the SNS topic are deployed using AWS SAM CLI. Once deployed, the SNS topic must be configured in an existing Image Builder pipeline. This results in the Lambda function being invoked at the completion of the Image Builder pipeline.

When a Lambda function subscribes to an SNS topic, it is invoked with the payload of the published messages. The Lambda function receives the message payload as an input parameter. The Lambda function first checks the message payload to see if the image status is available. If the image state is available, it retrieves the AMI ID from the message payload and updates the SSM parameter.

EC2 Image builder architecture diagram

EC2 Image builder architecture diagram

Prerequisites

To get started with this solution, the following is required:

Deploying the solution

The solution consists of two files, which can be downloaded from the amazon-ec2-image-builder GitHub repository.

  1. The Python file image-builder-lambda-update-ssm.py contains the code for the Lambda function. It first checks the SNS message payload to determine if the image is available. If it’s available, it extracts the AMI ID from the SNS message payload and updates the SSM parameter specified.The ‘ssm_parameter_name’ variable specifies the SSM parameter path where the AMI ID should be stored and updated. The Lambda function finishes by adding tags to the SSM parameter.
  2. The template.yaml file is an AWS SAM template. It deploys the Lambda function, SNS topic, and IAM role required for the Lambda function. I use Python 3.7 as the runtime and assign a memory of 256 MB for the Lambda function. The IAM policy gives the Lambda function permissions to retrieve and update SSM parameters. Deploy this application using the AWS SAM CLI guided deploy:
    sam deploy --guided

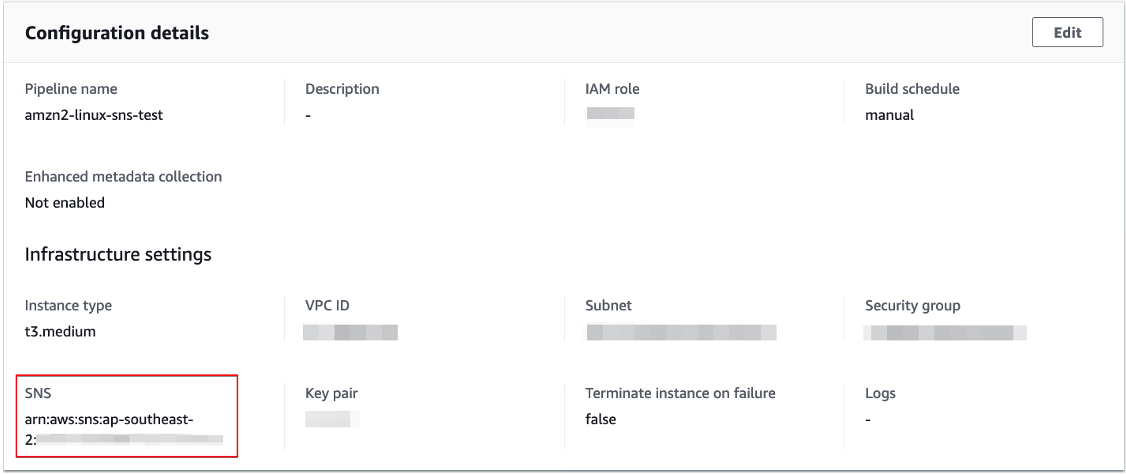
After deploying the application, note the ARN of the created SNS topic. Next, update the infrastructure settings of an existing Image Builder pipeline with this newly created SNS topic. This results in the Lambda function being invoked upon the completion of the image builder pipeline.

Configuration details

Configuration details

Verifying the solution

After the completion of the image builder pipeline, use the AWS CLI or check the AWS Management Console to verify the updated SSM parameter. To verify via AWS CLI, run the following commands to retrieve and list the tags attached to the SSM parameter:

aws ssm get-parameter --name ‘/ec2-imagebuilder/latest’
aws ssm list-tags-for-resource --resource-type "Parameter" --resource-id ‘/ec2-imagebuilder/latest’

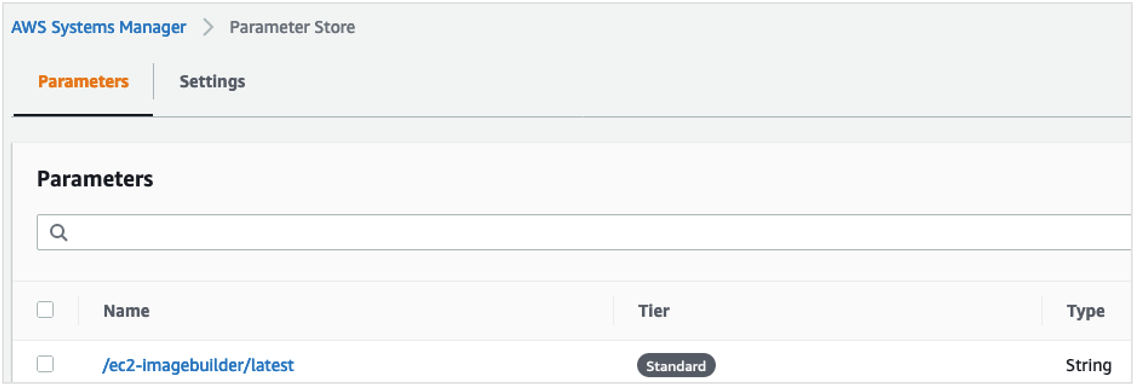
To verify via the AWS Management Console, navigate to the Parameter Store under AWS Systems Manager. Search for the parameter /ec2-imagebuilder/latest:

AWS Systems Manager: Parameter Store

AWS Systems Manager: Parameter Store

Select the Tags tab to view the tags attached to the SSM parameter:

Image builder tags list

Image builder tags list

Referencing the SSM Parameter in CloudFormation templates

Users can reference the SSM parameters in automation scripts and AWS CloudFormation templates providing access to the latest AMI ID for your EC2 infrastructure. This sample code shows how to reference the SSM parameter in a CloudFormation template.

Parameters :
  LatestAmiId :
    Type : 'AWS::SSM::Parameter::Value<AWS::EC2::Image::Id>'
    Default: ‘/ec2-imagebuilder/latest’

Resources :
  Instance :
    Type : 'AWS::EC2::Instance'
    Properties :
      ImageId : !Ref LatestAmiId

Conclusion

In this blog post, I demonstrate a solution that allows users to track and update the latest AMI ID created by the Image Builder pipelines. The Lambda function retrieves the AMI ID of the image created by a pipeline and update an AWS Systems Manager parameter. This Lambda function is triggered via an SNS topic configured in an Image Builder pipeline.

The solution is deployed using AWS SAM CLI. I also note how users can reference Systems Manager parameters in AWS CloudFormation templates providing access to the latest AMI ID for your EC2 infrastructure.

The amazon-ec2-image-builder-samples GitHub repository provides a number of examples for getting started with EC2 Image Builder. Image Builder can make it easier for you to build virtual machine (VM) images.

A New Integration for CloudWatch Alarms and OpsCenter

Post Syndicated from Martin Beeby original https://aws.amazon.com/blogs/aws/a-new-integration-for-cloudwatch-alarms-and-opscenter/

Over a year ago, I wrote about the Launch of a feature in AWS Systems Manager called OpsCenter, which allows customers to aggregate issues, events, and alerts into one place and make it easier for operations engineers and IT professionals to investigate and remediate problems. Today, I get to tell you about a new integration […]

Building storage-first serverless applications with HTTP APIs service integrations

Post Syndicated from Eric Johnson original https://aws.amazon.com/blogs/compute/building-storage-first-applications-with-http-apis-service-integrations/

Over the last year, I have been talking about “storage first” serverless patterns. With these patterns, data is stored persistently before any business logic is applied. The advantage of this pattern is increased application resiliency. By persisting the data before processing, the original data is still available, if or when errors occur.

Common pattern for serverless API backend

Common pattern for serverless API backend

Using Amazon API Gateway as a proxy to an AWS Lambda function is a common pattern in serverless applications. The Lambda function handles the business logic and communicates with other AWS or third-party services to route, modify, or store the processed data. One option is to place the data in an Amazon Simple Queue Service (SQS) queue for processing downstream. In this pattern, the developer is responsible for handling errors and retry logic within the Lambda function code.

The storage first pattern flips this around. It uses native error handling with retry logic or dead-letter queues (DLQ) at the SQS layer before any code is run. By directly integrating API Gateway to SQS, developers can increase application reliability while reducing lines of code.

Storage first pattern for serverless API backend

Storage first pattern for serverless API backend

Previously, direct integrations require REST APIs with transformation templates written in Velocity Template Language (VTL). However, developers tell us they would like to integrate directly with services in a simpler way without using VTL. As a result, HTTP APIs now offers the ability to directly integrate with five AWS services without needing a transformation template or code layer.

The first five service integrations

This release of HTTP APIs direct integrations includes Amazon EventBridge, Amazon Kinesis Data Streams, Simple Queue Service (SQS), AWS System Manager’s AppConfig, and AWS Step Functions. With these new integrations, customers can create APIs and webhooks for their business logic hosted in these AWS services. They can also take advantage of HTTP APIs features like authorizers, throttling, and enhanced observability for securing and monitoring these applications.

Amazon EventBridge

HTTP APIs service integration with Amazon EventBridge

HTTP APIs service integration with Amazon EventBridge

The HTTP APIs direct integration for EventBridge uses the PutEvents API to enable client applications to place events on an EventBridge bus. Once the events are on the bus, EventBridge routes the event to specific targets based upon EventBridge filtering rules.

This integration is a storage first pattern because data is written to the bus before any routing or logic is applied. If the downstream target service has issues, then EventBridge implements a retry strategy with incremental back-off for up to 24 hours. Additionally, the integration helps developers reduce code by filtering events at the bus. It routes to downstream targets without the need for a Lambda function as a transport layer.

Use this direct integration when:

  • Different tasks are required based upon incoming event details
  • Only data ingestion is required
  • Payload size is less than 256 kb
  • Expected requests per second are less than the Region quotas.

Amazon Kinesis Data Streams

HTTP APIs service integration with Amazon Kinesis Data Streams

HTTP APIs service integration with Amazon Kinesis Data Streams

The HTTP APIs direct integration for Kinesis Data Streams offers the PutRecord integration action, enabling client applications to place events on a Kinesis data stream. Kinesis Data Streams are designed to handle up to 1,000 writes per second per shard, with payloads up to 1 mb in size. Developers can increase throughput by increasing the number of shards in the data stream. You can route the incoming data to targets like an Amazon S3 bucket as part of a data lake or a Kinesis data analytics application for real-time analytics.

This integration is a storage first option because data is stored on the stream for up to seven days until it is processed and routed elsewhere. When processing stream events with a Lambda function, errors are handled at the Lambda layer through a configurable error handling strategy.

Use this direct integration when:

  • Ingesting large amounts of data
  • Ingesting large payload sizes
  • Order is important
  • Routing the same data to multiple targets

Amazon SQS

HTTP APIs service integration with Amazon SQS

HTTP APIs service integration with Amazon SQS

The HTTP APIs direct integration for Amazon SQS offers the SendMessage, ReceiveMessage, DeleteMessage, and PurgeQueue integration actions. This integration differs from the EventBridge and Kinesis integrations in that data flows both ways. Events can be created, read, and deleted from the SQS queue via REST calls through the HTTP API endpoint. Additionally, a full purge of the queue can be managed using the PurgeQueue action.

This pattern is a storage first pattern because the data remains on the queue for four days by default (configurable to 14 days), unless it is processed and removed. When the Lambda service polls the queue, the messages that are returned are hidden in the queue for a set amount of time. Once the calling service has processed these messages, it uses the DeleteMessage API to remove the messages permanently.

When triggering a Lambda function with an SQS queue, the Lambda service manages this process internally. However, HTTP APIs direct integration with SQS enables developers to move this process to client applications without the need for a Lambda function as a transport layer.

Use this direct integration when:

  • Data must be received as well as sent to the service
  • Downstream services need reduced concurrency
  • The queue requires custom management
  • Order is important (FIFO queues)

AWS AppConfig

HTTP APIs service integration with AWS Systems Manager AppConfig

HTTP APIs service integration with AWS Systems Manager AppConfig

The HTTP APIs direct integration for AWS AppConfig offers the GetConfiguration integration action and allows applications to check for application configuration updates. By exposing the systems parameter API through an HTTP APIs endpoint, developers can automate configuration changes for their applications. While this integration is not considered a storage first integration, it does enable direct communication from external services to AppConfig without the need for a Lambda function as a transport layer.

Use this direct integration when:

  • Access to AWS AppConfig is required.
  • Managing application configurations.

AWS Step Functions

HTTP APIs service integration with AWS Step Functions

HTTP APIs service integration with AWS Step Functions

The HTTP APIs direct integration for Step Functions offers the StartExecution and StopExecution integration actions. These actions allow for programmatic control of a Step Functions state machine via an API. When starting a Step Functions workflow, JSON data is passed in the request and mapped to the state machine. Error messages are also mapped to the state machine when stopping the execution.

This pattern provides a storage first integration because Step Functions maintains a persistent state during the life of the orchestrated workflow. Step Functions also supports service integrations that allow the workflows to send and receive data without needing a Lambda function as a transport layer.

Use this direct integration when:

  • Orchestrating multiple actions.
  • Order of action is required.

Building HTTP APIs direct integrations

HTTP APIs service integrations can be built using the AWS CLI, AWS SAM, or through the API Gateway console. The console walks through contextual choices to help you understand what is required for each integration. Each of the integrations also includes an Advanced section to provide additional information for the integration.

Creating an HTTP APIs service integration

Creating an HTTP APIs service integration

Once you build an integration, you can export it as an OpenAPI template that can be used with infrastructure as code (IaC) tools like AWS SAM. The exported template can also include the API Gateway extensions that define the specific integration information.

Exporting the HTTP APIs configuration to OpenAPI

Exporting the HTTP APIs configuration to OpenAPI

OpenAPI template

An example of a direct integration from HTTP APIs to SQS is located in the Sessions With SAM repository. This example includes the following architecture:

AWS SAM template resource architecture

AWS SAM template resource architecture

The AWS SAM template creates the HTTP APIs, SQS queue, Lambda function, and both Identity and Access Management (IAM) roles required. This is all generated in 58 lines of code and looks like this:

AWSTemplateFormatVersion: '2010-09-09'
Transform: AWS::Serverless-2016-10-31
Description: HTTP API direct integrations

Resources:
  MyQueue:
    Type: AWS::SQS::Queue
    
  MyHttpApi:
    Type: AWS::Serverless::HttpApi
    Properties:
      DefinitionBody:
        'Fn::Transform':
          Name: 'AWS::Include'
          Parameters:
            Location: './api.yaml'
          
  MyHttpApiRole:
    Type: "AWS::IAM::Role"
    Properties:
      AssumeRolePolicyDocument:
        Version: "2012-10-17"
        Statement:
          - Effect: "Allow"
            Principal:
              Service: "apigateway.amazonaws.com"
            Action: 
              - "sts:AssumeRole"
      Policies:
        - PolicyName: ApiDirectWriteToSQS
          PolicyDocument:
            Version: '2012-10-17'
            Statement:
              Action:
              - sqs:SendMessage
              Effect: Allow
              Resource:
                - !GetAtt MyQueue.Arn
                
  MyTriggeredLambda:
    Type: AWS::Serverless::Function
    Properties:
      CodeUri: src/
      Handler: app.lambdaHandler
      Runtime: nodejs12.x
      Policies:
        - SQSPollerPolicy:
            QueueName: !GetAtt MyQueue.QueueName
      Events:
        SQSTrigger:
          Type: SQS
          Properties:
            Queue: !GetAtt MyQueue.Arn

Outputs:
  ApiEndpoint:
    Description: "HTTP API endpoint URL"
    Value: !Sub "https://${MyHttpApi}.execute-api.${AWS::Region}.amazonaws.com"

The OpenAPI template handles the route definitions for the HTTP API configuration and configures the service integration. The template looks like this:

openapi: "3.0.1"
info:
  title: "my-sqs-api"
paths:
  /:
    post:
      responses:
        default:
          description: "Default response for POST /"
      x-amazon-apigateway-integration:
        integrationSubtype: "SQS-SendMessage"
        credentials:
          Fn::GetAtt: [MyHttpApiRole, Arn]
        requestParameters:
          MessageBody: "$request.body.MessageBody"
          QueueUrl:
            Ref: MyQueue
        payloadFormatVersion: "1.0"
        type: "aws_proxy”
        connectionType: "INTERNET"
x-amazon-apigateway-importexport-version: "1.0"

Because the OpenAPI template is included in the AWS SAM template via a transform, the API Gateway integration can reference the roles and services created within the AWS SAM template.

Conclusion

This post covers the concept of storage first integration patterns and how the new HTTP APIs direct integrations can help. I cover the five current integrations and possible use cases for each. Additionally, I demonstrate how to use AWS SAM to build and manage the integrated applications using infrastructure as code.

Using the storage first pattern with direct integrations can help developers build serverless applications that are more durable with fewer lines of code. A Lambda function is no longer required to transport data from the API endpoint to the desired service. Instead, use Lambda function invocations for differentiating business logic.

To learn more join us for the HTTP API service integrations session of Sessions With SAM! 

#ServerlessForEveryone