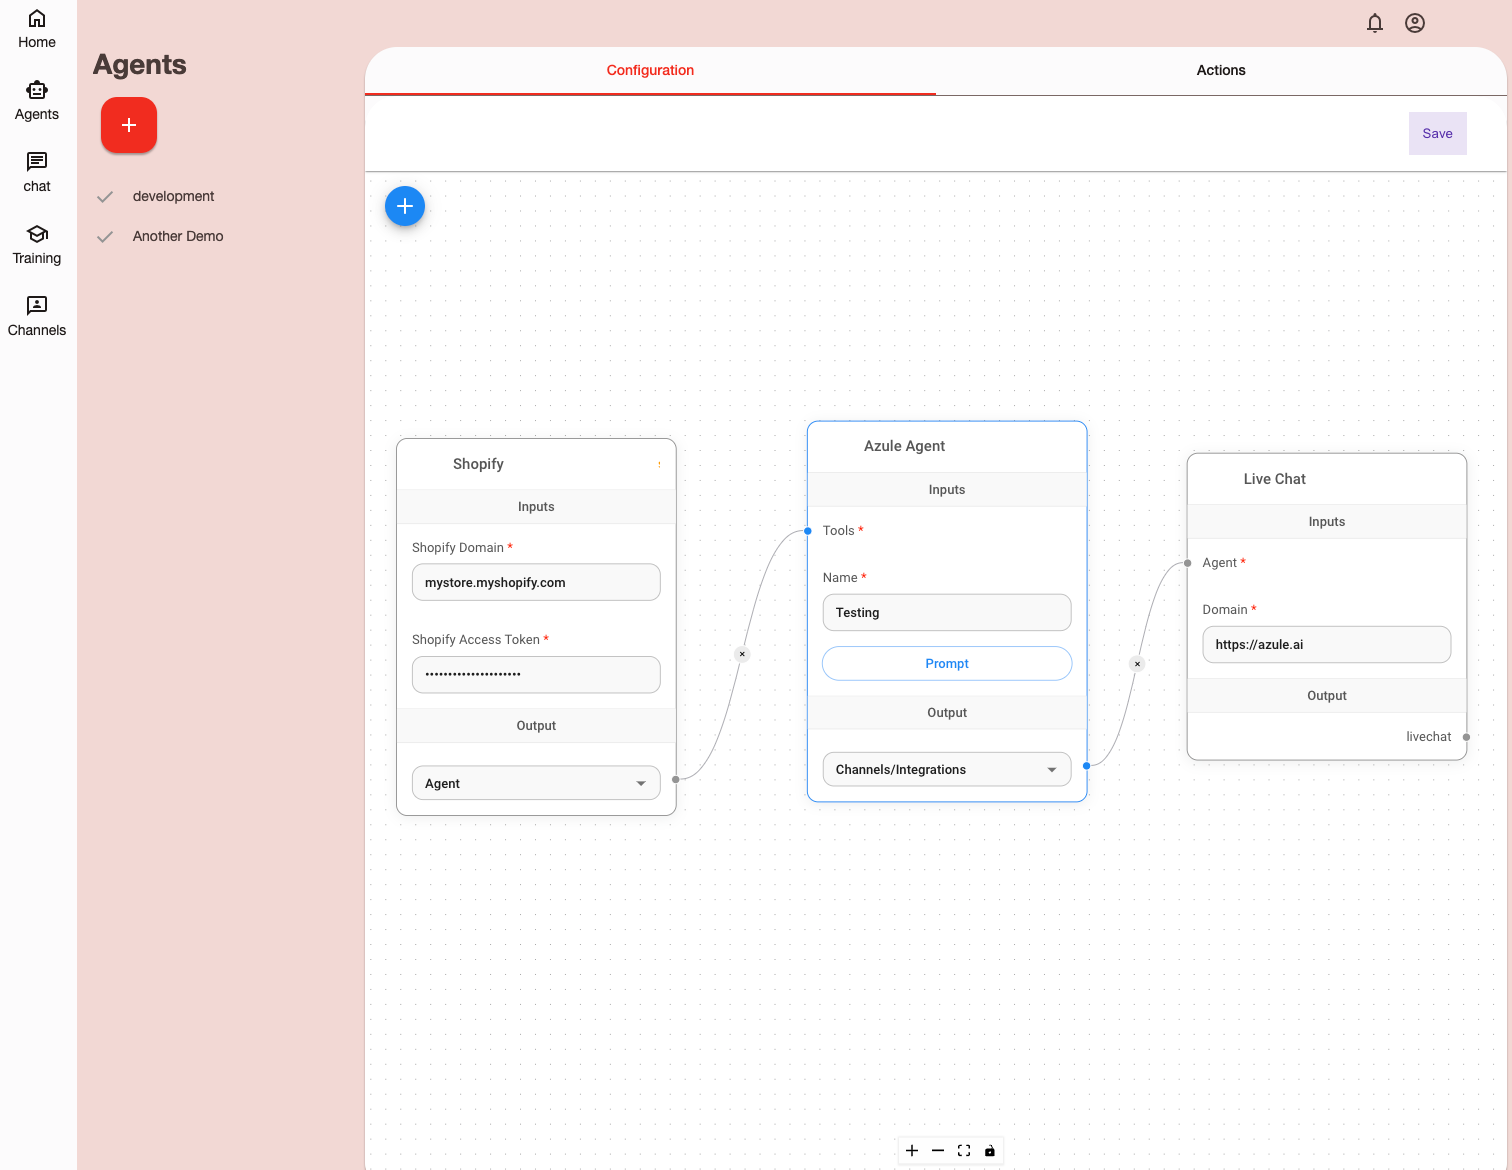
Building modern full-stack applications requires connecting to many hosted third party services, from observability platforms to databases and more. All too often, this means spending time doing busywork, managing credentials and writing glue code just to get started. This is why we’re building out the Cloudflare Integrations Marketplace to allow developers to easily discover, configure and deploy products to use with Workers.
Earlier this year, we introduced integrations with Supabase, PlanetScale, Neon and Upstash. Today, we are thrilled to introduce our newest additions to Cloudflare’s Integrations Marketplace – Sentry, Turso and Momento.
Let's take a closer look at some of the exciting integration providers that are now part of the Workers Integration Marketplace.
Improve performance and reliability by connecting Workers to Sentry
When your Worker encounters an error you want to know what happened and exactly what line of code triggered it. Sentry is an application monitoring platform that helps developers identify and resolve issues in real-time.
The Workers and Sentry integration automatically sends errors, exceptions and console.log() messages from your Worker to Sentry with no code changes required. Here’s how it works:
You enable the integration from the Cloudflare Dashboard.
The credentials from the Sentry project of your choice are automatically added to your Worker.
You can configure sampling to control the volume of events you want sent to Sentry. This includes selecting the sample rate for different status codes and exceptions.
Cloudflare deploys a Tail Worker behind the scenes that contains all the logic needed to capture and send data to Sentry.
Like magic, errors, exceptions, and log messages are automatically sent to your Sentry project.
In the future, we’ll be improving this integration by adding support for uploading source maps and stack traces so that you can pinpoint exactly which line of your code caused the issue. We’ll also be tying in Workers deployments with Sentry releases to correlate new versions of your Worker with events in Sentry that help pinpoint problematic deployments. Check out our developer documentation for more information.
Develop at the Data Edge with Turso + Workers
Turso is an edge-hosted, distributed database based on libSQL, an open-source fork of SQLite. Turso focuses on providing a global service that minimizes query latency (and thus, application latency!). It’s perfect for use with Cloudflare Workers – both compute and data are served close to users.
Turso follows the model of having one primary database with replicas that are located globally, close to users. Turso automatically routes requests to a replica closest to where the Worker was invoked. This model works very efficiently for read heavy applications since read requests can be served globally. If you’re running an application that has heavy write workloads, or want to cut down on replication costs, you can run Turso with just the primary instance and use Smart Placement to speed up queries.
The Turso and Workers integration automatically pulls in Turso API credentials and adds them as secrets to your Worker, so that you can start using Turso by simply establishing a connection using the libsql SDK. Get started with the Turso and Workers Integration today by heading to our developer documentation.
Cache responses from data stores with Momento
Momento Cache is a low latency serverless caching solution that can be used on top of relational databases, key-value databases or object stores to get faster load times and better performance. Momento abstracts details like scaling, warming and replication so that users can deploy cache in a matter of minutes.
The Momento and Workers integration automatically pulls in your Momento API key using an OAuth2 flow. The Momento API key is added as a secret in Workers and, from there, you can start using the Momento SDK in Workers. Head to our developer documentation to learn more and use the Momento and Workers integration!
Try integrations out today
We want to give you back time, so that you can focus less on configuring and connecting third party tools to Workers and spend more time building. We’re excited to see what you build with integrations. Share your projects with us on Twitter (@CloudflareDev) and stay tuned for more exciting updates as we continue to grow our Integrations Marketplace!
If you would like to build an integration with Cloudflare Workers, fill out the integration request form and we’ll be in touch.
Between third-party cookies that track your activity across websites, to highly targeted advertising based on your IP address and browsing data, it's no secret that today’s Internet browsing experience isn’t as private as it should be. Here at Cloudflare, we believe everyone should be able to browse the Internet free of persistent tracking and prying eyes.
That’s why we’re excited to announce that we’ve partnered with Microsoft Edge to provide a fast and secure VPN, right in the browser. Users don’t have to install anything new or understand complex concepts to get the latest in network-level privacy: Edge Secure Network VPN is available on the latest consumer version of Microsoft Edge in most markets, and automatically comes with 5 GB of data. Just enable the feature by going to [Microsoft Edge Settings & more (…) > Browser essentials, and click Get VPN for free]. See Microsoft’s Edge Secure Network page for more details.
Cloudflare’s Privacy Proxy platform isn’t your typical VPN
To take a step back: a VPN is a way in which the Internet traffic leaving your device is tunneled through an intermediary server operated by a provider – in this case, Cloudflare! There are many important pieces that make this possible, but among them is the VPNprotocol, which defines the way in which the tunnel is established and how traffic flows through it. You may have heard of some of these protocols: Wireguard, IPsec, and OpenVPN, for example. And while we’re no stranger to these, (Cloudflare’s WireGuard implementation is currently in use by millions of devices that use 1.1.1.1+WARP) – we see our Privacy Proxy Platform as a way to push forward the next frontier of Internet privacy and embrace one of Cloudflare’s core values: open Internet standards.
The Privacy Proxy Platform implements HTTP CONNECT, a method defined in the HTTP standard that proxies traffic by establishing a tunnel and then sending reliable and ordered byte streams through that tunnel. You can read more about this proxying method (and its history!) in our Primer on Proxies.
We also leverage other parts of Cloudflare’s privacy-oriented infrastructure that are already deployed at scale: requests first utilize 1.1.1.1 for DNS, a token proxy based on Privacy Pass for client authentication, and Geo-egress to choose an accurate egress IP address without exposing users’ precise location.
How it works
Let’s dive into the details of these components. For the purposes of this blog, we’ll call the devices people are using to browse the Internet (your phone, tablet or computer) clients, and the websites they’re trying to visit origin sites.
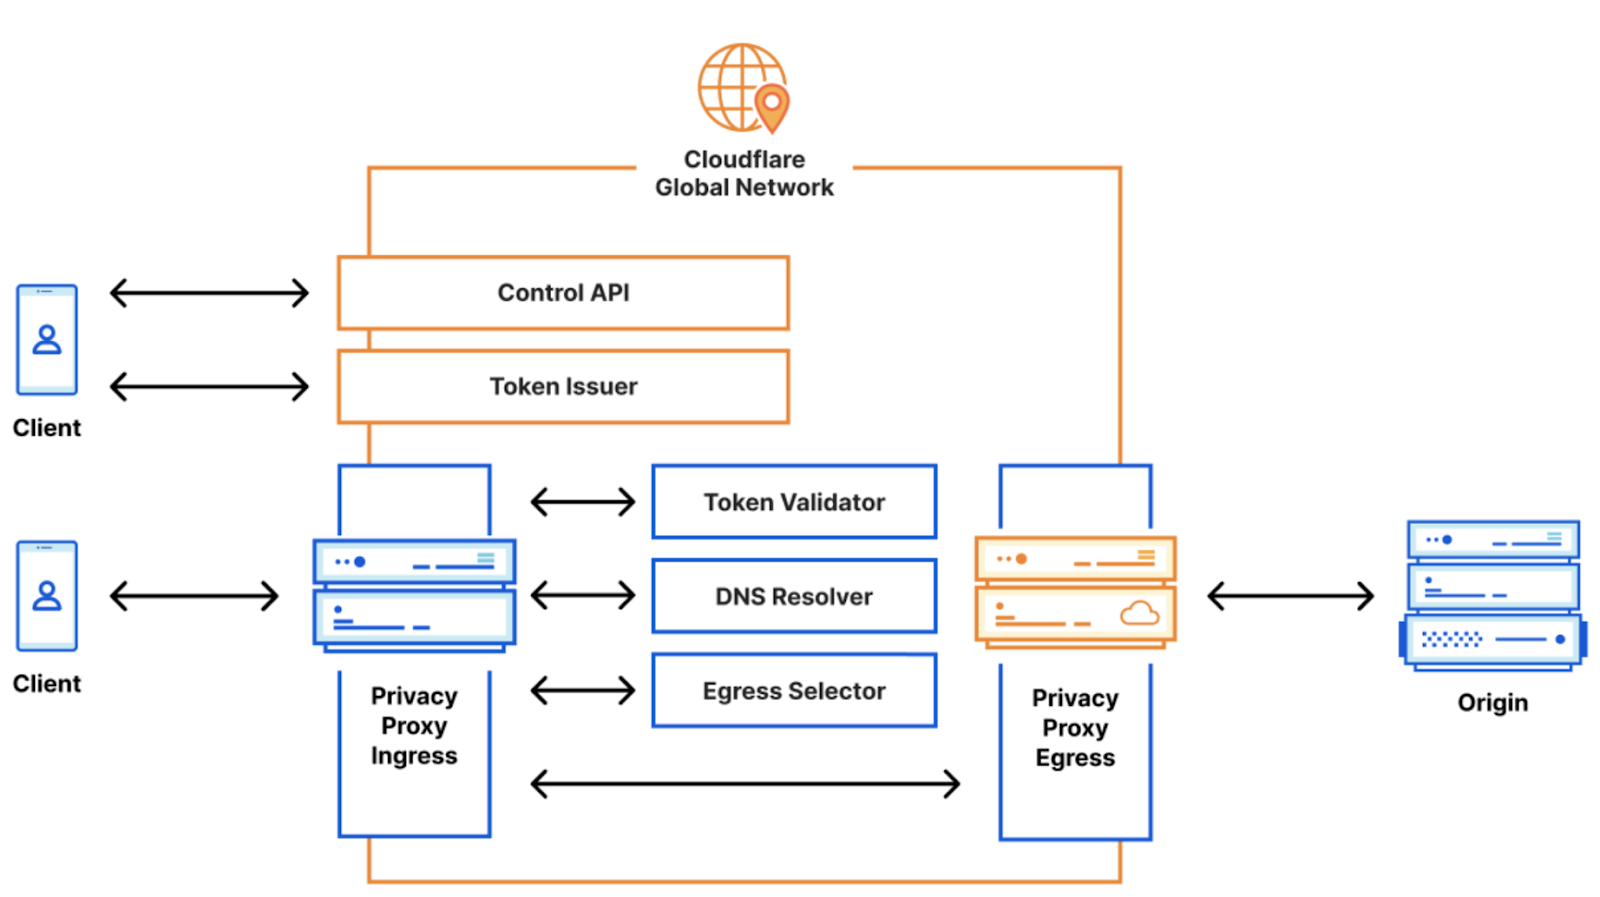
The Privacy Proxy Platform includes three main parts:
Token Proxy: this is the service that checks if you’re an Edge Secure Network user with a legitimate Microsoft account.
Privacy API: based on the above, Cloudflare’s Privacy API issues authentication tokens that clients use for authenticating to the proxy itself.
Privacy Proxy: this is the HTTP CONNECT-based proxy service running on Cloudflare’s network. This service checks that the client presents a valid authentication token, and if so, proxies the encrypted HTTP request to the origin site. It is also responsible for selecting a valid egress IP address to be used.
When Edge Secure Network protections are on – say, when a user connects to an open Wi-Fi network at a coffee shop – our proxy will automatically prompt that client for a token to authenticate. If the client has a token, it will present one. If it doesn’t, it will utilize the token proxy to mint a new pool using the help of an attester and issuer: the attester checks the validity of the client and Microsoft account, and the issuer issues tokens for that client in return. This dance is based on the Privacy Pass protocol. Importantly, it allows Cloudflare to validate that clients are who they say they are without collecting or storing personal information from Microsoft users.
Once the client has presented the proxy server with a valid token, the Privacy Proxy then chooses a valid egress IP address based on a hash of the client’s geolocation. It then uses the DNS record (provided by Cloudflare’s DNS resolver, 1.1.1.1) to open up an encrypted session to the origin website. From there, it’s pretty straightforward: if the user continues to browse on that site, further requests will be sent through that connection, if they stop or close the browser, that connection will close as well.
Because Cloudflare proxies millions of requests per second, many of the operational aspects of the proxy are managed by Oxy, our proxying framework that handles everything from telemetry, graceful restarts, to stream multiplexing and IP fallbacks, and authentication hooks.
Low last-mile latency and geolocation parity thanks to Cloudflare’s Network
Cloudflare’s privacy proxy implementation maximizes user experience without sacrificing privacy. When Edge Secure Network is enabled, users will have search and browsing results relevant to where they’re geographically located. At Cloudflare, we call this the pizza test: people should be able to use any of our privacy proxy products and still be able to get results for “pizza places near me”. We accomplish this by always egressing through a Cloudflare data center that has an IP address that corresponds to the user’s location – we’ve written more about how we did this for 1.1.1.1+WARP.
Unlike your typical VPN operator that has dozens – sometimes hundreds – of servers, Cloudflare has a much larger footprint: data centers in over 300 cities. Because our network is an anycast “every service, everywhere” approach, each of our data centers can accept traffic from an Edge Secure network client. This means that Edge users will automatically detect and connect with a Cloudflare data center geographically very close to them, minimizing last-mile latency. Finally, because Cloudflare also operates a CDN, websites that are already on Cloudflare will be given a “hot-path,” and will load faster.
We at Cloudflare are always striving to bring more privacy options to the open Internet, and we are excited to provide more private and secure browsing to Edge users. To learn more, head to Microsoft’s Edge Secure Network page or Microsoft’s support page. If you’re a partner interested in using a privacy-preserving proxy like this one, fill out this form.
D1 is now in open beta, and the theme is “scale”: with higher per-database storage limits and the ability to create more databases, we’re unlocking the ability for developers to build production-scale applications on D1. Any developers with an existing paid Workers plan don’t need to lift a finger to benefit: we’ve retroactively applied this to all existing D1 databases.
D1 our native serverless database, which we launched into alpha in November last year: the queryable database complement to Workers KV, Durable Objects and R2.
When we set out to build D1, we knew a few things for certain: it needed to be fast, it needed to be incredibly easy to create a database, and it needed to be SQL-based.
That last one was critical: so that developers could a) avoid learning another custom query language and b) make it easier for existing query buildings, ORM (object relational mapper) libraries and other tools to connect to D1 with minimal effort. From this, we’ve seen a huge number of projects build support in for D1: from support for D1 in the Drizzle ORM and Kysely, to the T4 App, a full-stack toolkit that uses D1 as its database.
We also knew that D1 couldn’t be the only way to query a database from Workers: for teams with existing databases and thousands of lines of SQL or existing ORM code, migrating across to D1 isn’t going to be an afternoon’s work. For those teams, we built Hyperdrive, allowing you to connect to your existing databases and make them feel global. We think this gives teams flexibility: combine D1 and Workers for globally distributed apps, and use Hyperdrive for querying the databases you have in legacy clouds and just can’t get rid of overnight.
Larger databases, and more of them
This has been the biggest ask from the thousands of D1 users throughout the alpha: not just more databases, but also bigger databases.
Developers on the Workers paid plan will now be able to grow each database up to 2GB and create 25 databases (up from 500MB and 10).
We’ll be continuing to work on unlocking even larger databases over the coming weeks and months: developers using the D1 beta will see automatic increases to these limits published on D1’s public changelog.
One of the biggest impediments to double-digit-gigabyte databases is performance: we want to ensure that a database can load in and be ready really quickly — cold starts of seconds (or more) just aren’t acceptable. A 10GB or 20GB database that takes 15 seconds before it can answer a query ends up being pretty frustrating to use.
Users on the Workers free plan will keep the ten 500MB databases (changelog) forever: we want to give more developers the room to experiment with D1 and Workers before jumping in.
Time Travel is here
Time Travel allows you to roll your database back to a specific point in time: specifically, any minute in the last 30 days. And it’s enabled by default for every D1 database, doesn’t cost any more, and doesn’t count against your storage limit.
For those who have been keeping tabs: we originally announced Time Travel earlier this year, and made it available to all D1 users in July. At its core, it’s deceptively simple: Time Travel introduces the concept of a “bookmark” to D1. A bookmark represents the state of a database at a specific point in time, and is effectively an append-only log. Time Travel can take a timestamp and turn it into a bookmark, or a bookmark directly: allowing you to restore back to that point. Even better: restoring doesn’t prevent you from going back further.
We think Time Travel works best with an example, so let’s make a change to a database: one with an Order table that stores every order made against our e-commerce store:
# To illustrate: we have 89,185 unique addresses in our order database.
# To illustrate: we have 89,185 unique addresses in our order database.
➜  wrangler d1 execute northwind --command "SELECT count(distinct ShipAddress) FROM [Order]"
┌──────────┐
│ count(*) │
├──────────┤
│ 89185    │
└──────────┘
OK, great. Now what if we wanted to make a change to a specific set of orders: an address change or freight company change?
# I think we might be forgetting something here...
➜  wrangler d1 execute northwind --command "UPDATE [Order] SET ShipAddress = 'Av. Veracruz 38, Roma Nte., Cuauhtémoc, 06700 Ciudad de México, CDMX, Mexico'
Wait: we’ve made a mistake that many, many folks have before: we forgot the WHERE clause on our UPDATE query. Instead of updating a specific order Id, we’ve instead updated the ShipAddress for every order in our table.
# Every order is now going to a wine bar in Mexico City.
➜  wrangler d1 execute northwind --command "SELECT count(distinct ShipAddress) FROM [Order]"
┌──────────┐
│ count(*) │
├──────────┤
│ 1        │
└──────────┘
Panic sets in. Did we remember to make a backup before we did this? How long ago was it? Did we turn on point-in-time recovery? It seemed potentially expensive at the time…
It’s OK. We’re using D1. We can Time Travel. It’s on by default: let’s fix this and travel back a few minutes.
# Let's go back in time.
➜  wrangler d1 time-travel restore northwind --timestamp="2023-09-23T14:20:00Z"

🚧 Restoring database northwind from bookmark 0000000b-00000002-00004ca7-9f3dba64bda132e1c1706a4b9d44c3c9
✔ OK to proceed (y/N) … yes

⚡️ Time travel in progress...
✅ Database dash-db restored back to bookmark 00000000-00000004-00004ca7-97a8857d35583887de16219c766c0785
↩️ To undo this operation, you can restore to the previous bookmark: 00000013-ffffffff-00004ca7-90b029f26ab5bd88843c55c87b26f497
We think that Time Travel becomes even more powerful when you have many smaller databases, too: the downsides of any restore operation is reduced further and scoped to a single user or tenant.
This is also just the beginning for Time Travel: we’re working to support not just only restoring a database, but also the ability to fork from and overwrite existing databases. If you can fork a database with a single command and/or test migrations and schema changes against real data, you can de-risk a lot of the traditional challenges that working with databases has historically implied.
Row-based pricing
Back in May we announced pricing for D1, to a lot of positive feedback around how much we’d included in our Free and Paid plans. In August, we published a new row-based model, replacing the prior byte-units, that makes it easier to predict and quantify your usage. Specifically, we moved to rows as it’s easier to reason about: if you’re writing a row, it doesn’t matter if it’s 1KB or 1MB. If your read query uses an indexed column to filter on, you’ll see not only performance benefits, but cost savings too.
Here’s D1’s pricing — almost everything has stayed the same, with the added benefit of charging based on rows:
As before, D1 does not charge you for “database hours”, the number of databases, or point-in-time recovery (Time Travel) — just query D1 and pay for your reads, writes, and storage — that’s it.
We believe this makes D1 not only far more cost-efficient, but also makes it easier to manage multiple databases to isolate customer data or prod vs. staging: we don’t care which database you query. Manage your data how you like, separate your customer data, and avoid having to fall for the trap of “Billing Based Architecture”, where you build solely around how you’re charged, even if it’s not intuitive or what makes sense for your team.
To make it easier to both see how much a given query charges and when to optimize your queries with indexes, D1 also returns the number of rows a query read or wrote (or both) so that you can understand how it’s costing you in both cents and speed.
For example, the following query filters over orders based on date:
The unindexed query above scans 16,800 rows. Even if we don’t optimize it, D1 includes 25 billion queries per month for free, meaning we could make this query 1.4 million times for a whole month before having to worry about extra costs.
But we can do better with an index:
CREATE INDEX IF NOT EXISTS idx_orders_date ON [Order](ShippedDate)
With the index created, let’s see how many rows our query needs to read now:
The same query with an index on the ShippedDate column reads just 417 rows: not only it is faster (duration is in milliseconds!), but it costs us less: we could run this query 59 million times per month before we’d have to pay any more than what the $5 Workers plan gives us.
D1 also exposes row counts via both the Cloudflare dashboard and our GraphQL analytics API: so not only can you look at this per-query when you’re tuning performance, but also break down query patterns across all of your databases.
D1 for Platforms
Throughout D1’s alpha period, we’ve both heard from and worked with teams who are excited about D1’s ability to scale out horizontally: the ability to deploy a database-per-customer (or user!) in order to keep data closer to where teams access it and more strongly isolate that data from their other users.
Teams building the next big thing on Workers for Platforms — think of it as “Functions as a Service, as a Service” — can use D1 to deploy a database per user — keeping customer data strongly separated from each other.
For example, and as one of the early adopters of D1, RONIN is building an edge-first content & data platform backed by a dedicated D1 database per customer, which allows customers to place data closer to users and provides each customer isolation from the queries of others.
Instead of spinning up and managing countless traditional database instances, RONIN uses D1 for Platforms to offer automatic infinite scalability at the edge. This allows RONIN to focus on providing a sleek, intuitive editing experience for your content & data.
When it comes to enabling “D1 for Platforms”, we’ve thought about this in a few ways from the very beginning:
Support for more than 100,000+ databases for Workers for Platforms users (there’s no limit, but if we said “unlimited” you might not believe us).
D1’s pricing – you don’t pay per-database or for “idle databases”. If you have a range of users, from thousands of QPS down to 1-2 every 10 minutes — you aren’t paying more for “database hours” on the less trafficked databases, or having to plan around spiky workloads across your user-base.
The ability to programmatically configure more databases via D1’s HTTP APIand attach them to your Worker without re-deploying. There’s no “provisioning” delay, either: you create the database, and it’s immediately ready to query by you or your users.
Detailed per-database analytics, so you can understand which databases are being used and how they’re being queried via D1’s GraphQL analytics API.
If you’re building the next big platform on top of Workers & want to use D1 at scale — whether you’re part of the Workers Launchpad program or not — reach out.
What’s next for D1?
We’re setting a clear goal: we want to make D1 “generally available” (GA) for production use-cases by early next year(Q1 2024). Although you can already use D1 without a waitlist or approval process, we understand that the GA label is an important one for many when it comes to a database (and as do we).
Between now and GA, we’re working on some really key parts of the D1 vision, with a continued focus on reliability and performance.
One of the biggest remaining pieces of that vision is global read replication, which we wrote about earlier this year. Importantly, replication will be free, won’t multiply your storage consumption, and will still enable session consistency (read-your-writes). Part of D1’s mission is about getting data closer to where users are, and we’re excited to land it.
We’re also working to expand Time Travel, D1’s built-in point-in-time recovery capabilities, so that you can branch and/or clone a database from a specific point-in-time on the fly.
We’ll also be progressively opening up our limits around per-database storage, unlocking more storage per account, and the number of databases you can create over the rest of this year, so keep an eye on the D1 changelog (or your inbox).
In the meantime, if you haven’t yet used D1, you can get started right now, visit D1’s developer documentation to spark some ideas, or join the #d1-beta channel on our Developer Discord to talk to other D1 developers and our product-engineering team.
Today we are announcing new pricing for Cloudflare Workers and Pages Functions, where you are billed based on CPU time, and never for the idle time that your Worker spends waiting on network requests and other I/O. Unlike other platforms, when you build applications on Workers, you only pay for the compute resources you actually use.
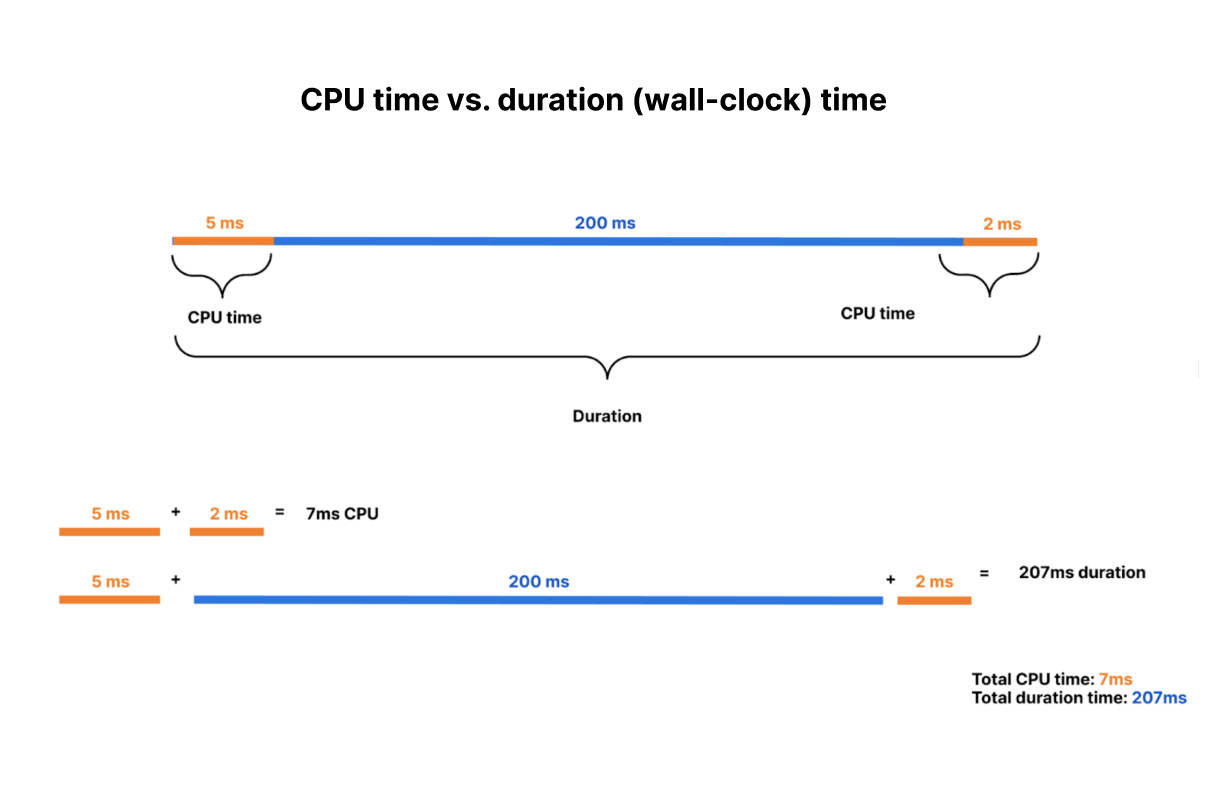
Why is this exciting? To date, all large serverless compute platforms have billed based on how long your function runs — its duration or “wall time”. This is a reflection of a new paradigm built on a leaky abstraction — your code may be neatly packaged up into a “function”, but under the hood there’s a virtual machine (VM). A VM can’t be paused and resumed quickly enough to execute another piece of code while it waits on I/O. So while a typical function might take 100ms to run, it might typically spend only 10ms doing CPU work, like crunching numbers or parsing JSON, with the rest of time spent waiting on I/O.
This status quo has meant that you are billed for this idle time, while nothing is happening.
With this announcement, Cloudflare is the first and only global serverless platform to offer standard pricing based on CPU time, rather than duration. We think you should only pay for the compute time you actually use, and that’s how we’re going to bill you going forward.
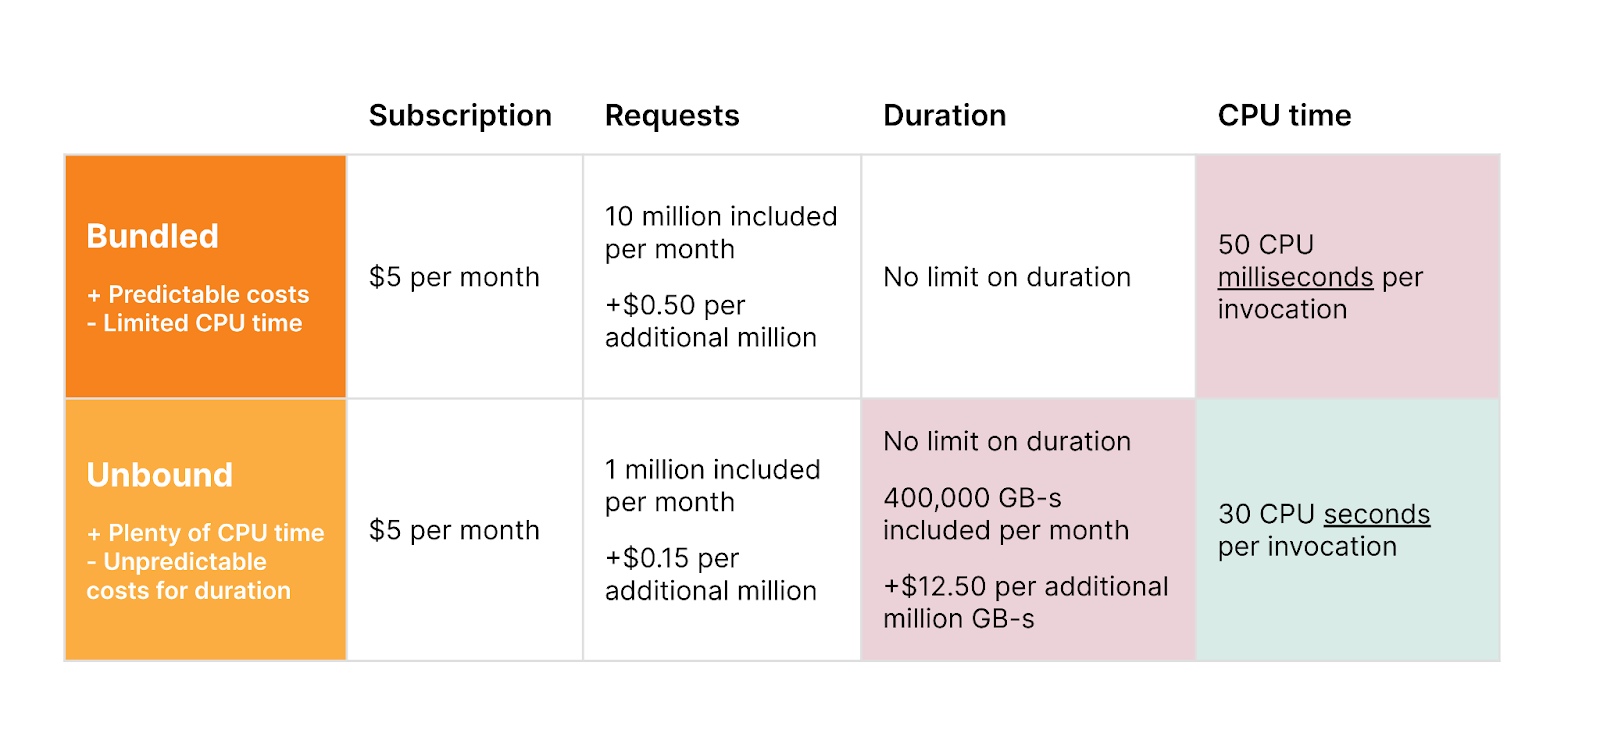
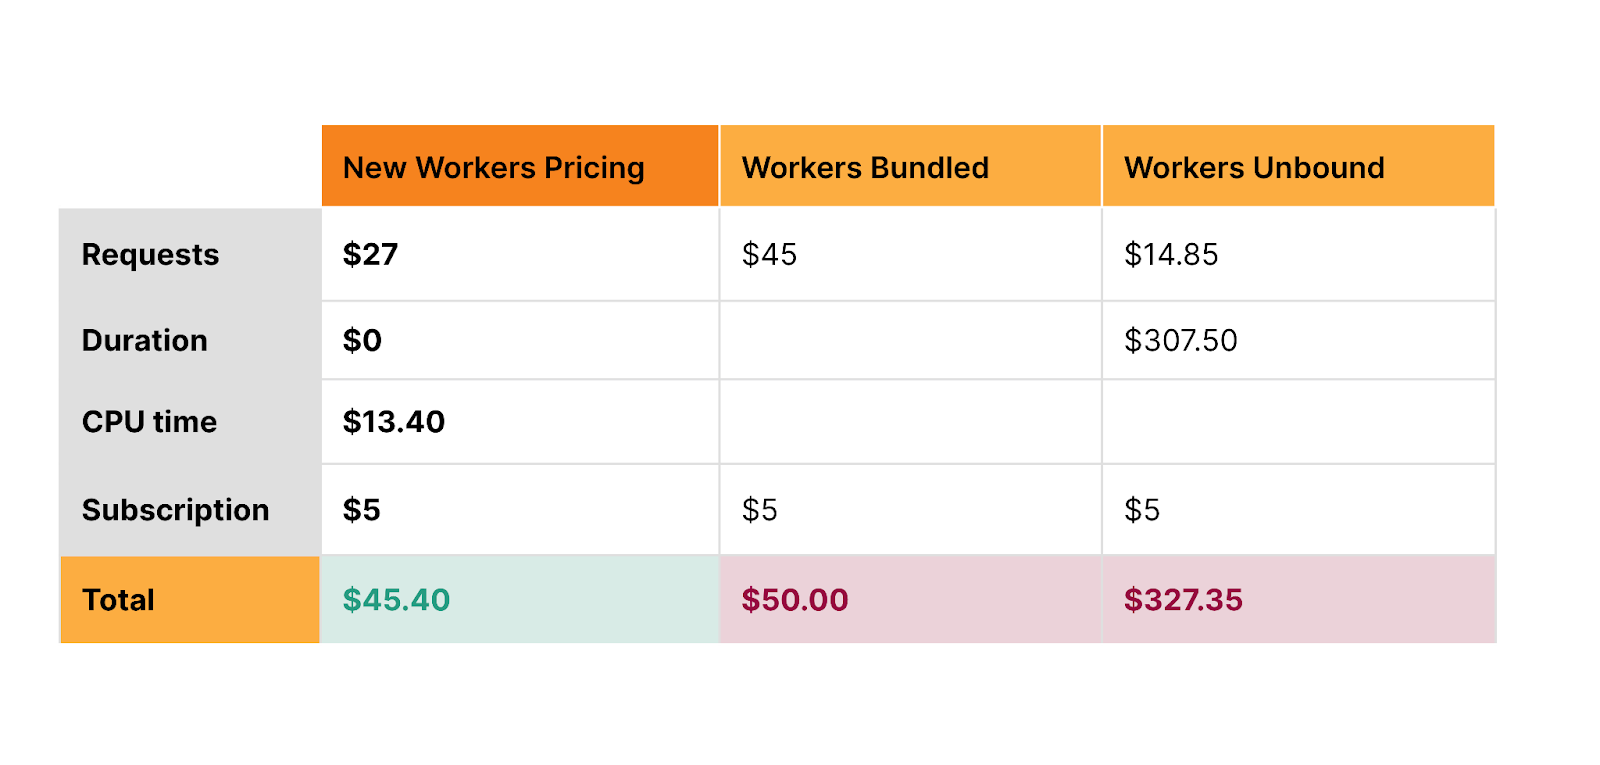
Old pricing — two pricing models, each with tradeoffs
New pricing — one simple and predictable pricing model
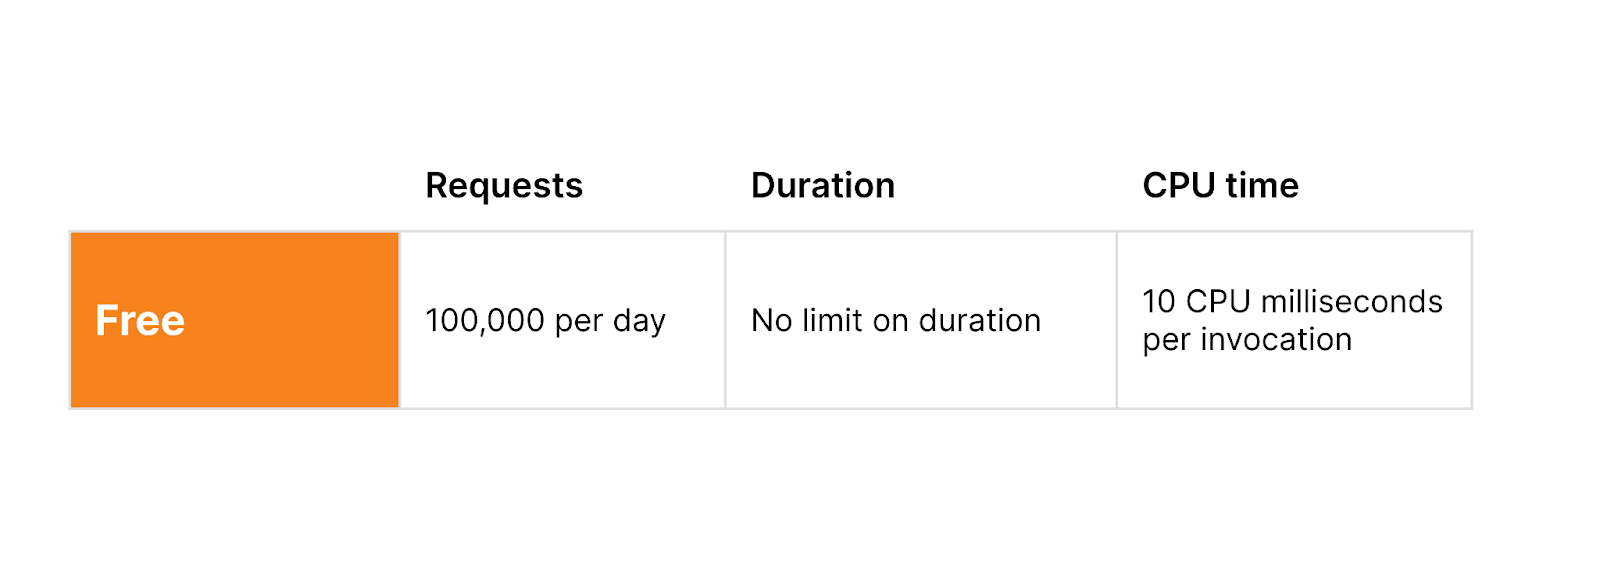
With the same generous Free plan
Unlike wall time (duration, or GB-s), CPU time is more predictable and under your control. When you make a request to a third party API, you can’t control how long that API takes to return a response. This time can be quite long, and vary dramatically — particularly when building AI applications that make inference requests to LLMs. If a request takes twice as long to complete, duration-based billing means you pay double. By contrast, CPU time is consistent and unaffected by time spent waiting on I/O — purely a function of the logic and processing of inputs on outputs to your Worker. It is entirely under your control.
Starting October 31, 2023, you will have the option to opt in individual Workers and Pages Functions projects on your account to new pricing, and newly created projects will default to new pricing. You’ll be able to estimate how much new pricing will cost in the Cloudflare dashboard. For the majority of current applications, new pricing is the same or less expensive than the previous Bundled and Unbound pricing plans.
If you’re on our Workers Paid plan, you will have until March 1, 2024 to switch to the new pricing on your own, after which all of your projects will be automatically migrated to new pricing. If you’re an Enterprise customer, any contract renewals after March 1, 2024, will use the new pricing. You’ll receive plenty of advance notice via email and dashboard notifications before any changes go into effect. And since CPU time is fully in your control, the more you optimize your Worker’s compute time, the less you’ll pay. Your incentives are aligned with ours, to make efficient use of compute resources on Region: Earth.
The challenge of truly scaling to zero
The beauty of serverless is that it allows teams to focus on what matters most — delivering value to their customers, rather than managing infrastructure. It saves you money by effortlessly scaling up and down all over the world based on your traffic, whether you’re an early stage startup or Shopify during Black Friday.
One of the promises of serverless is the idea of scaling to zero — once those big days subside, you no longer have to pay for virtual machines to sit idle before your autoscaling kicks in, or be charged by the hour for instances that you barely ended up using. No compute = no bills for usage. Or so, at least, is the promise of serverless.
Yet, there’s one hidden cost, where even in the serverless world you will find yourself paying for idle resources — what happens when your function is sitting around waiting on I/O? With pricing based on the duration that a function runs, you’re still billed for time that your service is doing zero work, and just waiting on network requests.
Most applications spend far more time waiting on this I/O than they do using the CPU, often ten times more.
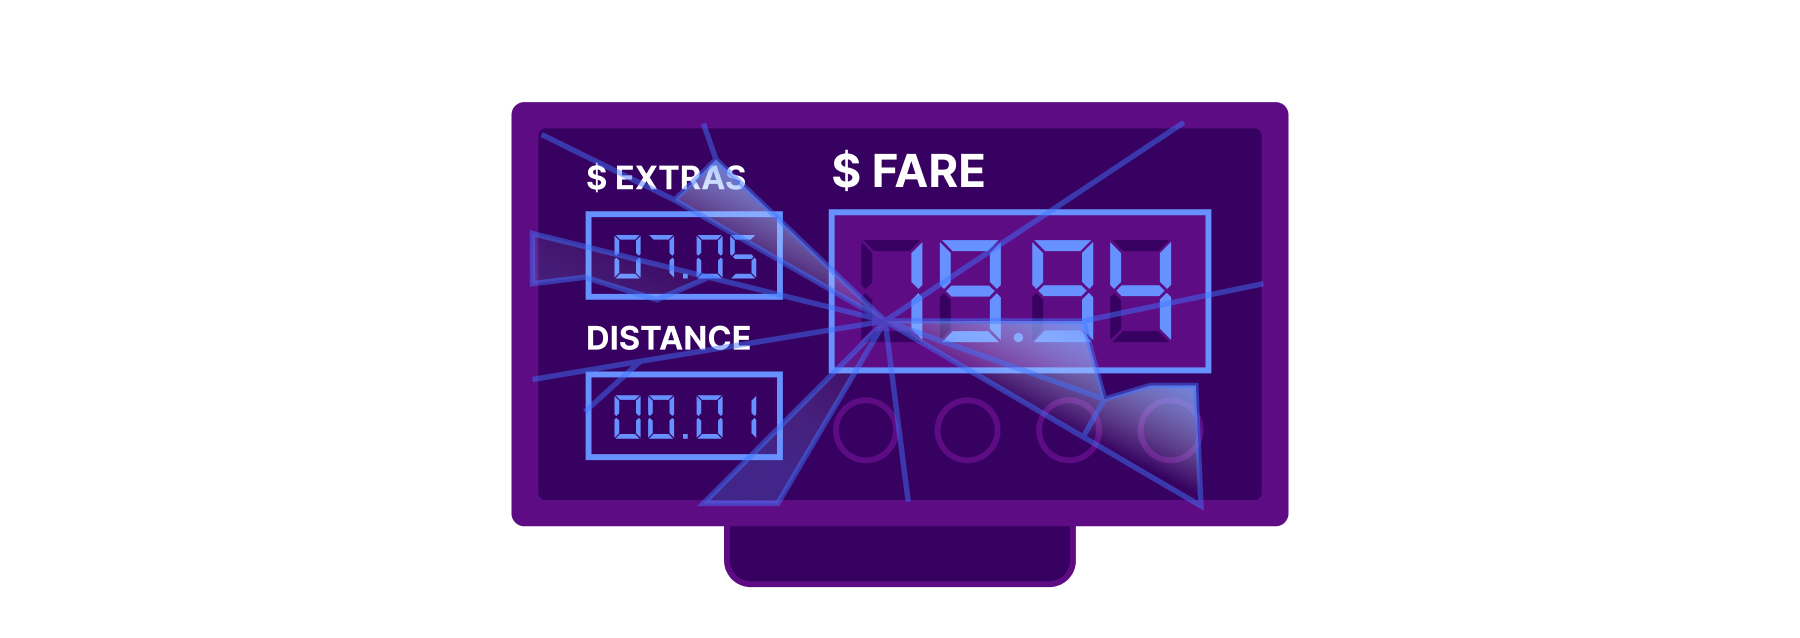
Imagine a similar scenario in your own life — you grab a cab to go to the airport. On the way, the driver decides to stop to refuel and grab a snack, but leaves the meter running. This is not time spent bringing you closer to your destination, but it’s time that you’re paying for. Now imagine for the time the driver was refueling the car, the meter was paused. That’s the difference between CPU time and duration, or wall clock time.
But rather than waiting on the driver to refuel or grab a Snickers bar, what is it that you’re actually paying for when it comes to serverless compute?
Time spent waiting on services you don’t control
Most applications depend on one or many external service providers. Providers of hosted large language models (LLMs) like GPT-4 or Stable Diffusion. Databases as a service. Payment processors. Or simply an API request to a system outside your control. This is where software development is headed — rather than reinventing the wheel and slowly building everything themselves, both fast-moving startups and the Fortune 500 increasingly build using other services to avoid undifferentiated heavy lifting.
Every time an application interacts with one of these external services, it has to send data over the network and wait until it receives a response. And while some services are lightning fast, others can take considerable time, like waiting for a payment processor or for a large media file to be uploaded or converted. Your own application sits idle for most of the request, waiting on services outside your control.
Until today, you’ve had to pay while your application waits. You’ve had to pay more when a service you depend on has an operational issue and slows down, or times out in responding to your request. This has been a disincentive to incrementally move parts of your application to serverless.
Cloudflare’s new pricing: the first serverless platform to truly scale down to zero
The idea of “scale to zero” is that you never have to keep instances of your application sitting idle, waiting for something to happen. Serverless is more than just not having to manage servers or virtual machines — you shouldn’t have to provision and manage the number of compute resources that are available or warm.
Our new pricing takes the “scale to zero” concept even further, and extends it to whether your application is actually performing work. If you’re still paying while nothing is happening, we don’t think that’s truly scale to zero. Your application is idle. The CPU can be used for other tasks. Whether your application is “running” is an old concept lifted from an era before multi-tenant cloud platforms. What matters is if you are actually using compute resources.
Pay less, deploy everywhere, without hidden costs
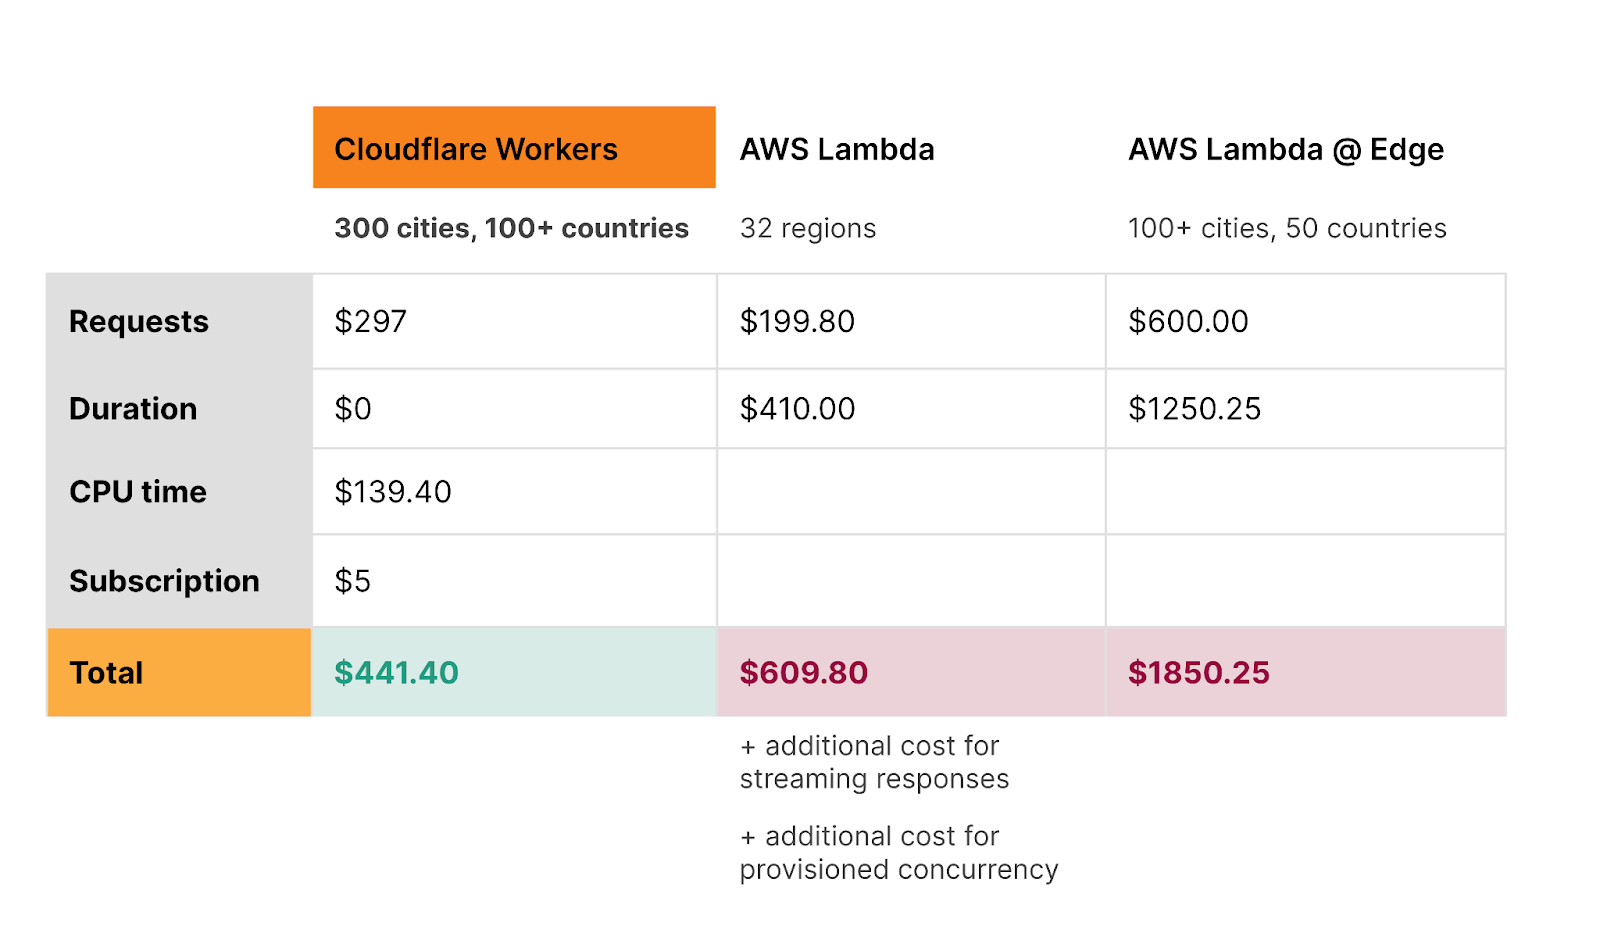
Let’s compare what you’d pay on new Workers pricing to AWS Lambda, for the following Worker:
One billion requests per month
Seven CPU milliseconds per request
200ms duration per request
The above table is for informational purposes only. Prices are limited to the public fees as of September 20, 2023, and do not include taxes and any other fees. AWS Lambda and Lambda @ Edge prices are based on publicly available pricing in US-East (Ohio) region as published on https://aws.amazon.com/lambda/pricing/
New Workers pricing makes building AI applications dramatically cheaper
Yesterday we announced a new suite of products to let you build AI applications on Cloudflare — Workers AI, AI Gateway, and our new vector database, Vectorize.
Nearly everyone is building new products and features using AI models right now. Large language models and generative AI models are incredibly powerful. But they aren’t always fast — asking a model to create an image, transcribe a segment of audio, or write a story often takes multiple seconds — far longer than a typical API response or database query that we expect to return in tens of milliseconds. There is significant compute work going on behind the scenes, and that means longer duration per request to a Worker.
New Workers pricing makes this much less expensive than it was previously on the Unbound usage model.
Let’s take the same example as above, but instead assume the duration of the request is two seconds (2000ms), because the Worker makes an inference request to a large AI model. With new Workers pricing, you pay the exact same amount, no matter how long this request takes.
No surprise bills — set a maximum limit on CPU time for each Worker
Surprise bills from cloud providers are an unfortunately common horror story. In the old way of provisioning compute resources, forgetting to shut down an instance of a database or virtual machine can cost hundreds of dollars. And accidentally autoscaling up too high can be even worse.
We’re building new safeguards to prevent these kinds of scenarios on Workers. As part of new pricing, you will be able to cap CPU usage on a per-Worker basis.
For example, if you have a Worker with a p99 CPU time of 15ms, you might use this to set a max CPU limit of 40ms — enough headroom to ensure that your worker will run successfully, while ensuring that even if you ship a bug that causes a CPU time to ratchet up dramatically, or have an edge case that causes infinite recursion, you can’t suddenly rack up a giant unexpected bill, or be vulnerable to a denial of wallet attack. This can be particularly helpful if your worker handles variable or user-generated input, to guard against edge cases that you haven’t accounted for.
Alternatively, if you’re running a production service, but want to make sure you stay on top of your costs, we will also be adding the option to configure notifications that can automatically email you, page you, or send a webhook if your worker exceeds a particular amount of CPU time per request. You will be able to choose at what threshold you want to be notified, and how.
New ways to “hibernate” Durable Objects while keeping connections alive
While Workers are stateless functions, Durable Objects are stateful and long-lived, commonly used to coordinate and persist real-time state in chat, multiplayer games, or collaborative apps. And unlike Workers, duration-based pricing fits Durable Objects well. As long as one or more clients are connected to a Durable Object, it keeps state available in memory. Durable Objects pricing will remain duration-based, and is not changing as part of this announcement.
What about when a client is connected to a Durable Object, but no work has happened for a long time? Consider a collaborative whiteboard app built using Durable Objects. A user of the app opens the app in a browser tab, but then forgets about it, and leaves it running for days, with an open WebSocket connection. Just like with Workers, we don’t think you should have to pay for this idle time. But until recently, there hasn’t been an API to signal to us that a Durable Object can be safely “hibernated”.
The recently introduced Hibernation API, currently in beta, allows you to set an automatic response to be used while hibernated and serialize state such that it survives hibernation. This gives Cloudflare the inputs we need in order to maintain open WebSocket connections from clients, while “hibernating” the Durable Object such that it is not actively running, and you are not billed for idle time. The result is that your state is always available in-memory when actually need it, but isn’t unnecessarily kept around when it’s not. As long as your Durable Object is hibernating, even if there are active clients still connected over a WebSocket, you won’t be billed for duration.
Snippets make Cloudflare’s CDN programmable — for free
What if you just want to modify a header, do a country code redirect, or cache a custom query? Developers have relied on Workers to program Cloudflare’s CDN like this for many years. With the announcement of Cloudflare Snippets last year, now in alpha, we’re making it free.
If you use Workers today for these smaller use cases, to customize any of Cloudflare’s application services, Snippets will be the optimal, zero cost option.
A serverless platform without limits
Developers are building ever larger and more complex full-stack applications on Workers each month. Our promise to you is to help you scale in any direction, without worrying about paying for idle time or having to manage and provision compute resources across regions.
This also means not having to worry about limits. Workers already serves many millions of requests per second, and scales and performs so well that we are rebuilding our own CDN on top of Workers. Individual Workers can now be up to 10MB, with a max startup time of 400ms, and can be easily composed together using Service Bindings. Entire platforms are built on top of Workers, with a growing number of companies allowing their own customers to write and deploy custom code and applications via Workers for Platforms. Some of the biggest platforms in the world rely on Cloudflare and the Workers platform during the most critical moments.
New pricing removes limits on the types of applications that could be built cost effectively with duration-based pricing. It removes the ceiling on CPU time from our original request-based pricing. We’re excited to see what you build, and are committed to being the development platform where you’re not constrained by limits on scale, regions, instances, concurrency or whatever else you need to handle to grow and operate globally.
When will new pricing be available?
Starting October 31, 2023, you will have the option to opt in individual Workers and Pages Functions projects on your account to new pricing, and newly created projects will default to new pricing. You will have until March 1, 2024, or the end of your Enterprise contract, whichever comes later, to switch to new pricing on your own, after which all of your projects will be automatically migrated to new pricing. You’ll receive plenty of advance notice via email and dashboard notifications before any changes go into effect.
Between now and then, we want to hear from you. We’ve based new pricing off feedback we’ve heard from developers building serverless applications, and companies estimating and projecting their costs. Tell us what you think of new pricing by sharing your feedback in this survey. We read every response.
The browser as an app platform is real and stronger every day; long gone are the Browser Wars. Vendors and standard bodies have done amazingly well over the last years, working together and advancing web standards with new APIs that allow developers to build fast and powerful applications, finally comparable to those we got used to seeing in the native OS' environment.
Today, browsers can render web pages and run code that interfaces with an extensive catalog of modern Web APIs. Things like networking, rendering accelerated graphics, or even accessing low-level hardware features like USB devices are all now possible within the browser sandbox.
One of the most exciting new browser APIs that browser vendors have been rolling out over the last months is WebGPU, a modern, low-level GPU programming interface designed for high-performance 2D and 3D graphics and general purpose GPU compute.
Today, we are introducing WebGPU support to Cloudflare Workers. This blog will explain why it's important, why we did it, how you can use it, and what comes next.
The history of the GPU in the browser
To understand why WebGPU is a big deal, we must revisit history and see how browsers went from relying only on the CPU for everything in the early days to taking advantage of GPUs over the years.
In 2011, WebGL 1, a limited port of OpenGL ES 2.0, was introduced, providing an API for fast, accelerated 3D graphics in the browser for the first time. By then, this was somewhat of a revolution in enabling gaming and 3D visualizations in the browser. Some of the most popular 3D animation frameworks, like Three.js, launched in the same period. Who doesn't remember going to the (now defunct) Google Chrome Experiments page and spending hours in awe exploring the demos? Another option then was using the Flash Player, which was still dominant in the desktop environment, and their Stage 3D API.
Later, in 2017, based on the learnings and shortcomings of its predecessor, WebGL 2 was a significant upgrade and brought more advanced GPU capabilities like compute shaders and more flexible textures and rendering.
WebGL, however, has proved to be a steep and complex learning curve for developers who want to take control of things, do low-level 3D graphics using the GPU, and not use 3rd party abstraction libraries.
Furthermore and more importantly, with the advent of machine learning and cryptography, we discovered that GPUs are great not only at drawing graphics but can be used for other applications that can take advantage of things like high-speed data or blazing-fast matrix multiplications, and one can use them to perform general computation. This became known as GPGPU, short for general-purpose computing on graphics processing units.
With this in mind, in the native desktop and mobile operating system worlds, developers started using more advanced frameworks like CUDA, Metal, DirectX 12, or Vulkan. WegGL stayed behind. To fill this void and bring the browser up to date, in 2017, companies like Google, Apple, Intel, Microsoft, Kronos, and Mozilla created the GPU for Web Community Working Group to collaboratively design the successor of WebGL and create the next modern 3D graphics and computation capabilities APIs for the Web.
What is WebGPU
WebGPU was developed with the following advantages in mind:
Lower Level Access – WebGPU provides lower-level, direct access to the GPU vs. the high-level abstractions in WebGL. This enables more control over GPU resources.
Multi-Threading – WebGPU can leverage multi-threaded rendering and compute, allowing improved CPU/GPU parallelism compared to WebGL, which relies on a single thread.
Compute Shaders – First-class support for general-purpose compute shaders for GPGPU tasks, not just graphics. WebGL compute is limited.
Safety – WebGPU ensures memory and GPU access safety, avoiding common WebGL pitfalls.
Portability – WGSL shader language targets cross-API portability across GPU vendors vs. GLSL in WebGL.
Reduced Driver Overhead – The lower level Vulkan/Metal/D3D12 basis improves overhead vs. OpenGL drivers in WebGL.
Pipeline State Objects – Predefined pipeline configs avoid per-draw driver overhead in WebGL.
Memory Management – Finer-grained buffer and resource management vs. WebGL.
The “too long didn't read” version is that WebGPU provides lower-level control over the GPU hardware with reduced overhead. It's safer, has multi-threading, is focused on compute, not just graphics, and has portability advantages compared to WebGL.
If these aren't reasons enough to get excited, developers are also looking at WebGPU as an option for native platforms, not just the Web. For instance, you can use this C API that mimics the JavaScript specification. If you think about this and the power of WebAssembly, you can effectively have a truly platform-agnostic GPU hardware layer that you can use to develop platforms for any operating system or browser.
More than just graphics
As explained above, besides being a graphics API, WebGPU makes it possible to perform tasks such as:
Machine Learning – Implement ML applications like neural networks and computer vision algorithms using WebGPU compute shaders and matrices.
Scientific Computing – Perform complex scientific computation like physics simulations and mathematical modeling using the GPU.
High Performance Computing – Unlock breakthrough performance for parallel workloads by connecting WebGPU to languages like Rust, C/C++ via WebAssembly.
WGSL, the shader language for WebGPU, is what enables the general-purpose compute feature. Shaders, or more precisely, compute shaders, have no user-defined inputs or outputs and are used for computing arbitrary information. Here are some examples of simple WebGPU compute shaders if you want to learn more.
WebGPU in Workers
We've been watching WebGPU since the API was published. Its general-purpose compute features perfectly fit our Workers' ecosystem and capabilities and align well with our vision of providing our customers multiple compute and hardware options and bringing GPU workloads to our global network, close to clients.
Cloudflare also has a track record of pioneering support for emerging web standards on our network and services, accelerating their adoption for our customers. Examples of these are Web Crypto API, HTTP/2, HTTP/3, TLS 1.3, or Early hints, but there are more.
Bringing WebGPU to Workers was both natural and timely. Today, we are announcing that we have released a version of workerd, the open-sourced JavaScript / Wasm runtime that powers Cloudflare Workers, with WebGPU support, that you can start playing and developing applications with, locally.
Starting today anyone can run this on their personal computer and experiment with WebGPU-enabled workers. Implementing local development first allows us to put this API in the hands of our customers and developers earlier and get feedback that will guide the development of this feature for production use.
But before we dig into code examples, let's explain how we built it.
How we built WebGPU on top of Workers
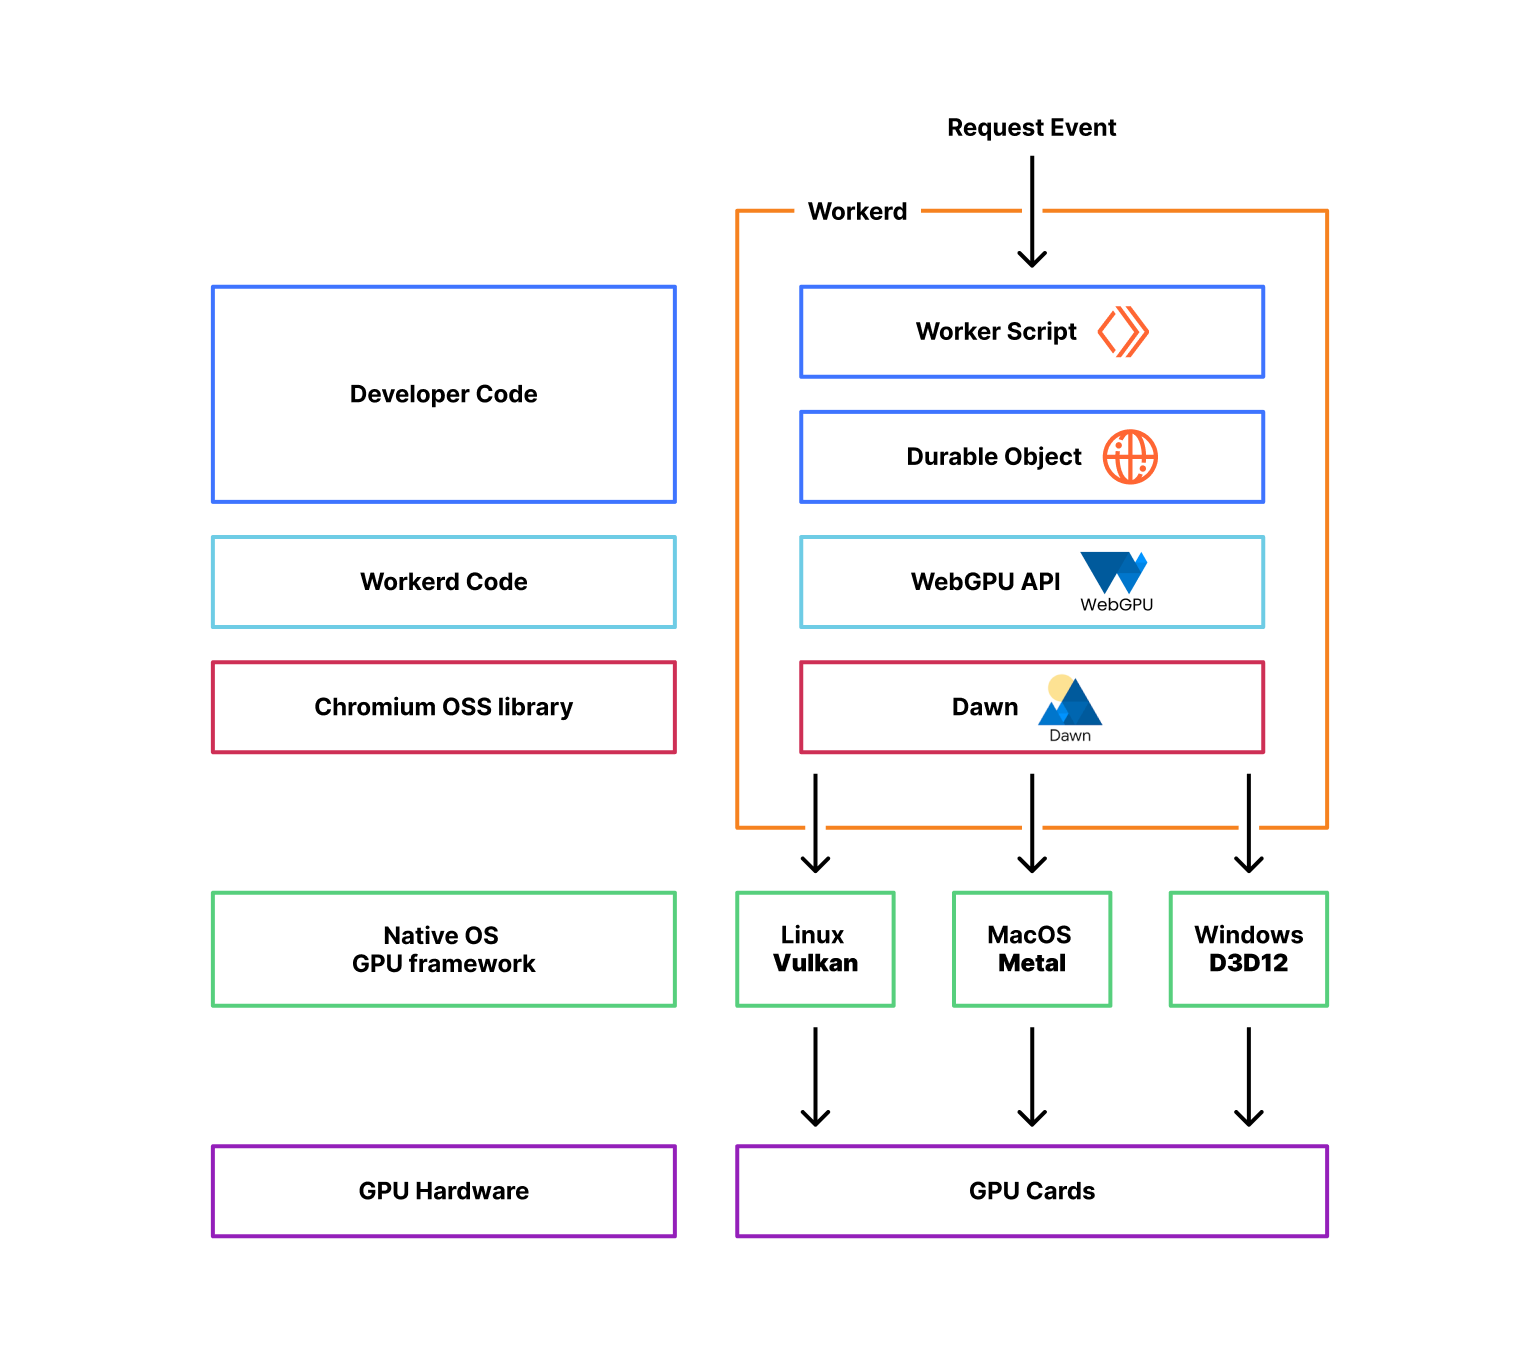
To implement the WebGPU API, we took advantage of Dawn, an open-source library backed by Google, the same used in Chromium and Chrome, that provides applications with an implementation of the WebGPU standard. It also provides the webgpu.h headers file, the de facto reference for all the other implementations of the standard.
Dawn can interoperate with Linux, MacOS, and Windows GPUs by interfacing with each platform's native GPU frameworks. For example, when an application makes a WebGPU draw call, Dawn will convert that draw command into the equivalent Vulkan, Metal, or Direct3D 12 API call, depending on the platform.
From an application standpoint, Dawn handles the interactions with the underlying native graphics APIs that communicate directly with the GPU drivers. Dawn essentially acts as a middle layer that translates the WebGPU API calls into calls for the platform's native graphics API.
Cloudflare workerd is the underlying open-source runtime engine that executes Workers code. It shares most of its code with the same runtime that powers Cloudflare Workers' production environment but with some changes designed to make it more portable to other environments. We then have release cycles that aim to synchronize both codebases; more on later. Workerd is also used with wrangler, our command-line tool for building and interacting with Cloudflare Workers, to support local development.
The WebGPU code that interfaces with the Dawn library can be found here, and can easily be enabled with a flag, checked here.
jsg::Ref<api::gpu::GPU> Navigator::getGPU(CompatibilityFlags::Reader flags) {
  // is this a durable object?
  KJ_IF_MAYBE (actor, IoContext::current().getActor()) {
    JSG_REQUIRE(actor->getPersistent() != nullptr, TypeError,
                "webgpu api is only available in Durable Objects (no storage)");
  } else {
    JSG_FAIL_REQUIRE(TypeError, "webgpu api is only available in Durable Objects");
  };

  JSG_REQUIRE(flags.getWebgpu(), TypeError, "webgpu needs the webgpu compatibility flag set");

  return jsg::alloc<api::gpu::GPU>();
}
The WebGPU API can only be accessed using Durable Objects, which are essentially global singleton instances of Cloudflare Workers. There are two important reasons for this:
WebGPU code typically wants to store the state between requests, for example, loading an AI model into the GPU memory once and using it multiple times for inference.
Not all Cloudflare servers have GPUs yet, so although the worker that receives the request is typically the closest one available, the Durable Object that uses WebGPU will be instantiated where there are GPU resources available, which may not be on the same machine.
Using Durable Objects instead of regular Workers allow us to address both of these issues.
The WebGPU Hello World in Workers
Wrangler uses Miniflare 3, a fully-local simulator for Workers, which in turn is powered by workerd. This means you can start experimenting and doing WebGPU code locally on your machine right now before we prepare things in our production environment.
Let’s get coding then.
Since Workers doesn't render graphics yet, we started with implementing the general-purpose GPU (GPGPU) APIs in the WebGPU specification. In other words, we fully support the part of the API that the compute shaders and the compute pipeline require, but we are not yet focused on fragment or vertex shaders used in rendering pipelines.
Here’s a typical “hello world” in WebGPU. This Durable Object script will output the name of the GPU device that workerd found in your machine to your console.
A more interesting example, though, is a simple compute shader. In this case, we will fill a results buffer with an incrementing value taken from the iteration number via global_invocation_id.
For this, we need two buffers, one to store the results of the computations as they happen (storageBuffer) and another to copy the results at the end (mappedBuffer).
We then dispatch four workgroups, meaning that the increments can happen in parallel. This parallelism and programmability are two key reasons why compute shaders and GPUs provide an advantage for things like machine learning inference workloads. Other advantages are:
Bandwidth – GPUs have a very high memory bandwidth, up to 10-20x more than CPUs. This allows fast reading and writing of all the model parameters and data needed for inference.
Floating-point performance – GPUs are optimized for high floating point operation throughput, which are used extensively in neural networks. They can deliver much higher TFLOPs than CPUs.
Now that we covered the basics of WebGPU and compute shaders, let's move to something more demanding. What if we could perform machine learning inference using Workers and GPUs?
ONNX WebGPU demo
The ONNX runtime is a popular open-source cross-platform, high performance machine learning inferencing accelerator. Wonnx is a GPU-accelerated version of the same engine, written in Rust, that can be compiled to WebAssembly and take advantage of WebGPU in the browser. We are going to run it in Workers using a combination of workers-rs, our Rust bindings for Cloudflare Workers, and the workerd WebGPU APIs.
For this demo, we are using SqueezeNet. This small image classification model can run under lower resources but still achieves similar levels of accuracy on the ImageNet image classification validation dataset as larger models like AlexNet.
In essence, our worker will receive any uploaded image and attempt to classify it according to the 1000 ImageNet classes. Once ONNX runs the machine learning model using the GPU, it will return the list of classes with the highest probability scores. Let’s go step by step.
First we load the model from R2 into the GPU memory the first time the Durable Object is called:
#[durable_object]
pub struct Classifier {
    env: Env,
    session: Option<wonnx::Session>,
}

impl Classifier {
    async fn ensure_session(&mut self) -> Result<()> {
        match self.session {
            Some(_) => worker::console_log!("DO already has a session"),
            None => {
                // No session, so this should be the first request. In this case
                // we will fetch the model from R2, build a wonnx session, and
                // store it for subsequent requests.
                let model_bytes = fetch_model(&self.env).await?;
                let session = wonnx::Session::from_bytes(&model_bytes)
                    .await
                    .map_err(|err| err.to_string())?;
                worker::console_log!("session created in DO");
                self.session = Some(session);
            }
        };
        Ok(())
    }
}
This is only required once, when the Durable Object is instantiated. For subsequent requests, we retrieve the model input tensor, call the existing session for the inference, and return to the calling worker the result tensor converted to JSON:
        let request_data: ArrayBase<OwnedRepr<f32>, Dim<[usize; 4]>> =
            serde_json::from_str(&req.text().await?)?;
        let mut input_data = HashMap::new();
        input_data.insert("data".to_string(), request_data.as_slice().unwrap().into());

        let result = self
            .session
            .as_ref()
            .unwrap() // we know the session exists
            .run(&input_data)
            .await
            .map_err(|err| err.to_string())?;
...
        let probabilities: Vec<f32> = result
            .into_iter()
            .next()
            .ok_or("did not obtain a result tensor from session")?
            .1
            .try_into()
            .map_err(|err: TensorConversionError| err.to_string())?;

        let do_response = serde_json::to_string(&probabilities)?;
        Response::ok(do_response)
On the Worker script itself, we load the uploaded image and pre-process it into a model input tensor:
    let image_file: worker::File = match req.form_data().await?.get("file") {
        Some(FormEntry::File(buf)) => buf,
        Some(_) => return Response::error("`file` part of POST form must be a file", 400),
        None => return Response::error("missing `file`", 400),
    };
    let image_content = image_file.bytes().await?;
    let image = load_image(&image_content)?;
Finally, we call the GPU Durable Object, which runs the model and returns the most likely classes of our image:
    let probabilities = execute_gpu_do(image, stub).await?;
    let mut probabilities = probabilities.iter().enumerate().collect::<Vec<_>>();
    probabilities.sort_unstable_by(|a, b| b.1.partial_cmp(a.1).unwrap());
    Response::ok(LABELS[probabilities[0].0])
We packaged this demo in a public repository, so you can also run it. Make sure that you have a Rust compiler, Node.js, Git and curl installed, then clone the repository:
git clone https://github.com/cloudflare/workers-wonnx.git
cd workers-wonnx
Upload the model to the local R2 simulator:
npx wrangler@latest r2 object put model-bucket-dev/opt-squeeze.onnx --local --file models/opt-squeeze.onnx
And then run the Worker locally:
npx wrangler@latest dev
With the Worker running and waiting for requests you can then open another terminal window and upload one of the image examples in the same repository using curl:
If everything goes according to plan the result of the curl command will be the most likely class of the image.
Next steps and final words
Over the upcoming weeks, we will merge the workerd WebGPU code in the Cloudflare Workers production environment and make it available globally, on top of our growing GPU nodes fleet. We didn't do it earlier because that environment is subject to strict security and isolation requirements. For example, we can't break the security model of our process sandbox and have V8 talking to the GPU hardware directly, that would be a problem; we must create a configuration where another process is closer to the GPU and use IPC (inter-process communication) to talk to it. Other things like managing resource allocation and billing are being sorted out.
For now, we wanted to get the good news out that we will support WebGPU in Cloudflare Workers and ensure that you can start playing and coding with it today and learn from it. WebGPU and general-purpose computing on GPUs is still in its early days. We presented a machine-learning demo, but we can imagine other applications taking advantage of this new feature, and we hope you can show us some of them.
As usual, you can talk to us on our Developers Discord or the Community forum; the team will be listening. We are eager to hear from you and learn about what you're building.
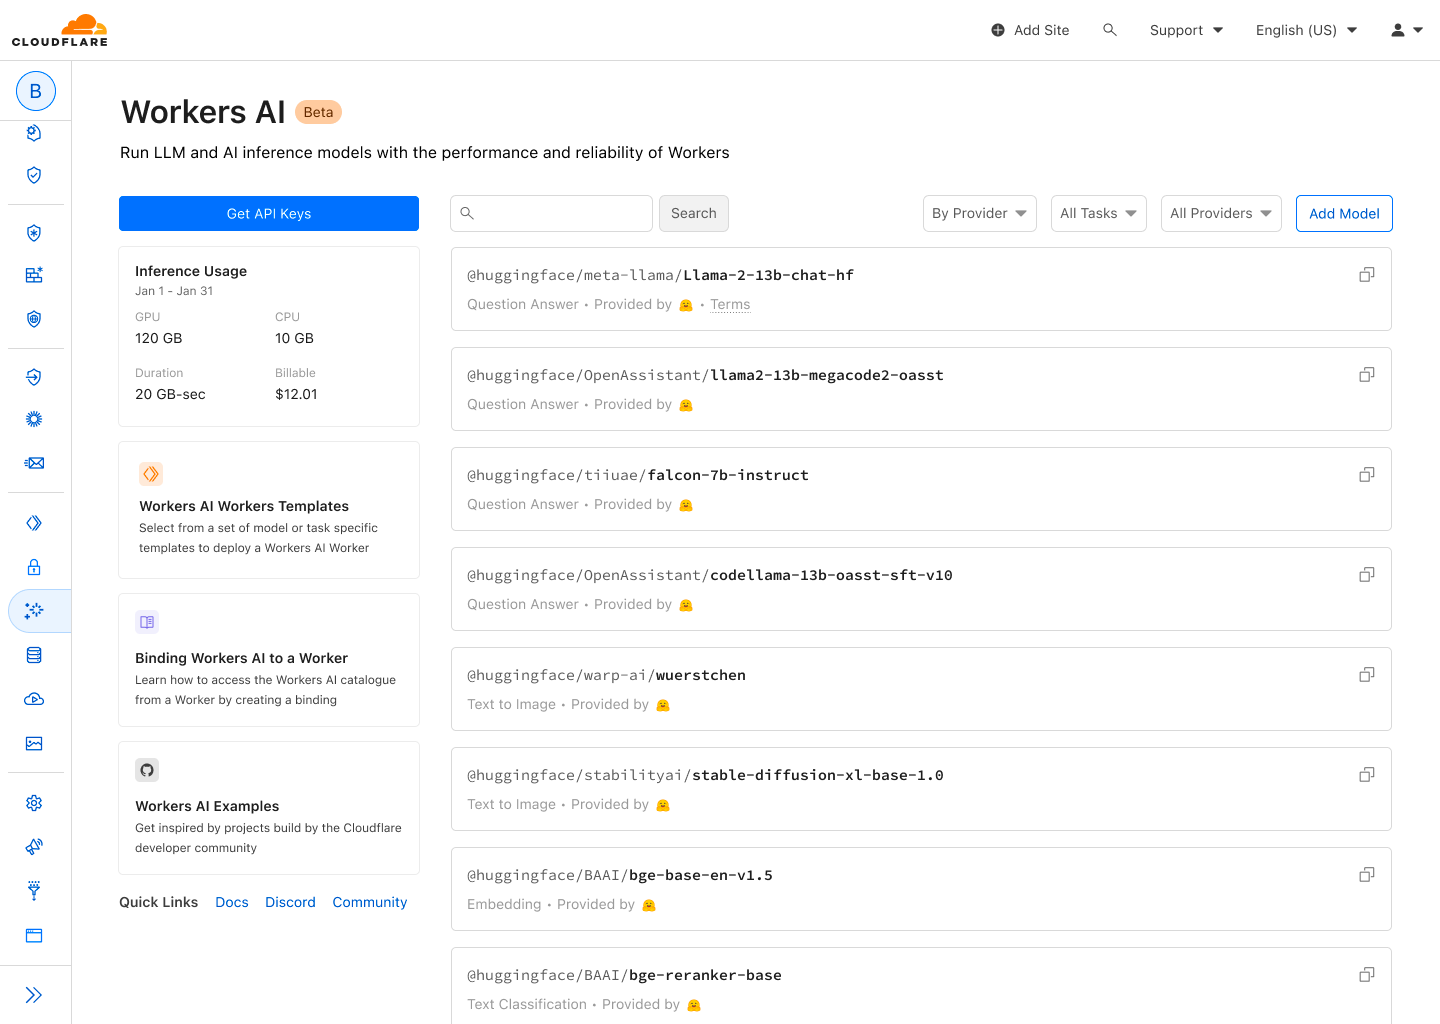
If you're anywhere near the developer community, it's almost impossible to avoid the impact that AI’s recent advancements have had on the ecosystem. Whether you're using AI in your workflow to improve productivity, or you’re shipping AI based features to your users, it’s everywhere. The focus on AI improvements are extraordinary, and we’re super excited about the opportunities that lay ahead, but it's not enough.
Not too long ago, if you wanted to leverage the power of AI, you needed to know the ins and outs of machine learning, and be able to manage the infrastructure to power it.
As a developer platform with over one million active developers, we believe there is so much potential yet to be unlocked, so we’re changing the way AI is delivered to developers. Many of the current solutions, while powerful, are based on closed, proprietary models and don't address privacy needs that developers and users demand. Alternatively, the open source scene is exploding with powerful models, but they’re simply not accessible enough to every developer. Imagine being able to run a model, from your code, wherever it’s hosted, and never needing to find GPUs or deal with setting up the infrastructure to support it.
That's why we are excited to launch Workers AI – an AI inference as a service platform, empowering developers to run AI models with just a few lines of code, all powered by our global network of GPUs. It's open and accessible, serverless, privacy-focused, runs near your users, pay-as-you-go, and it's built from the ground up for a best in class developer experience.
Workers AI – making inference just work
We’re launching Workers AI to put AI inference in the hands of every developer, and to actually deliver on that goal, it should just work out of the box. How do we achieve that?
At the core of everything, it runs on the right infrastructure – our world-class network of GPUs
We provide off-the-shelf models that run seamlessly on our infrastructure
Finally, deliver it to the end developer, in a way that’s delightful. A developer should be able to build their first Workers AI app in minutes, and say “Wow, that’s kinda magical!”.
So what exactly is Workers AI? It’s another building block that we’re adding to our developer platform – one that helps developers run well-known AI models on serverless GPUs, all on Cloudflare’s trusted global network. As one of the latest additions to our developer platform, it works seamlessly with Workers + Pages, but to make it truly accessible, we’ve made it platform-agnostic, so it also works everywhere else, made available via a REST API.
Models you know and love
We’re launching with a curated set of popular, open source models, that cover a wide range of inference tasks:
Text generation (large language model): meta/llama-2-7b-chat-int8
Text classification: huggingface/distilbert-sst-2-int8
Image classification: microsoft/resnet-50
Embeddings: baai/bge-base-en-v1.5
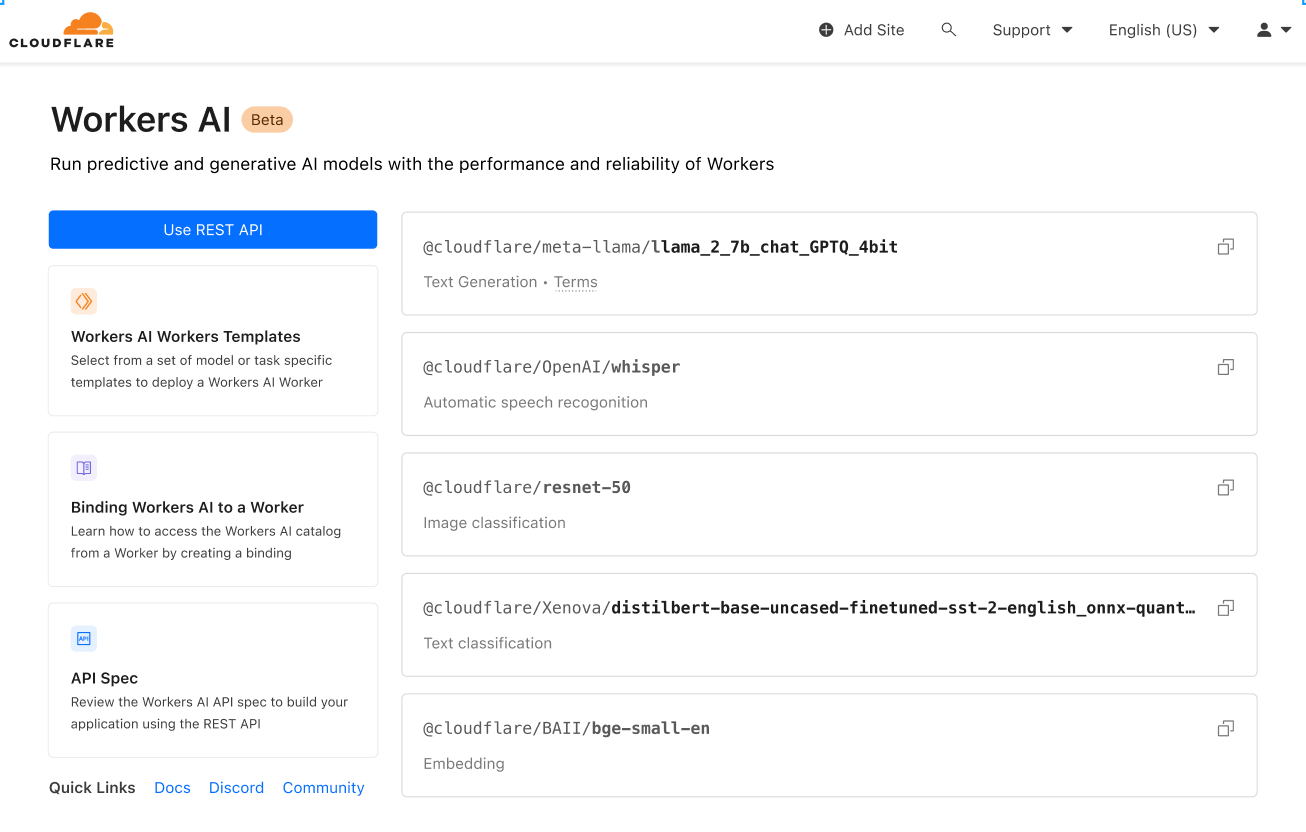
You can browse all available models in your Cloudflare dashboard, and soon you’ll be able to dive into logs and analytics on a per model basis!
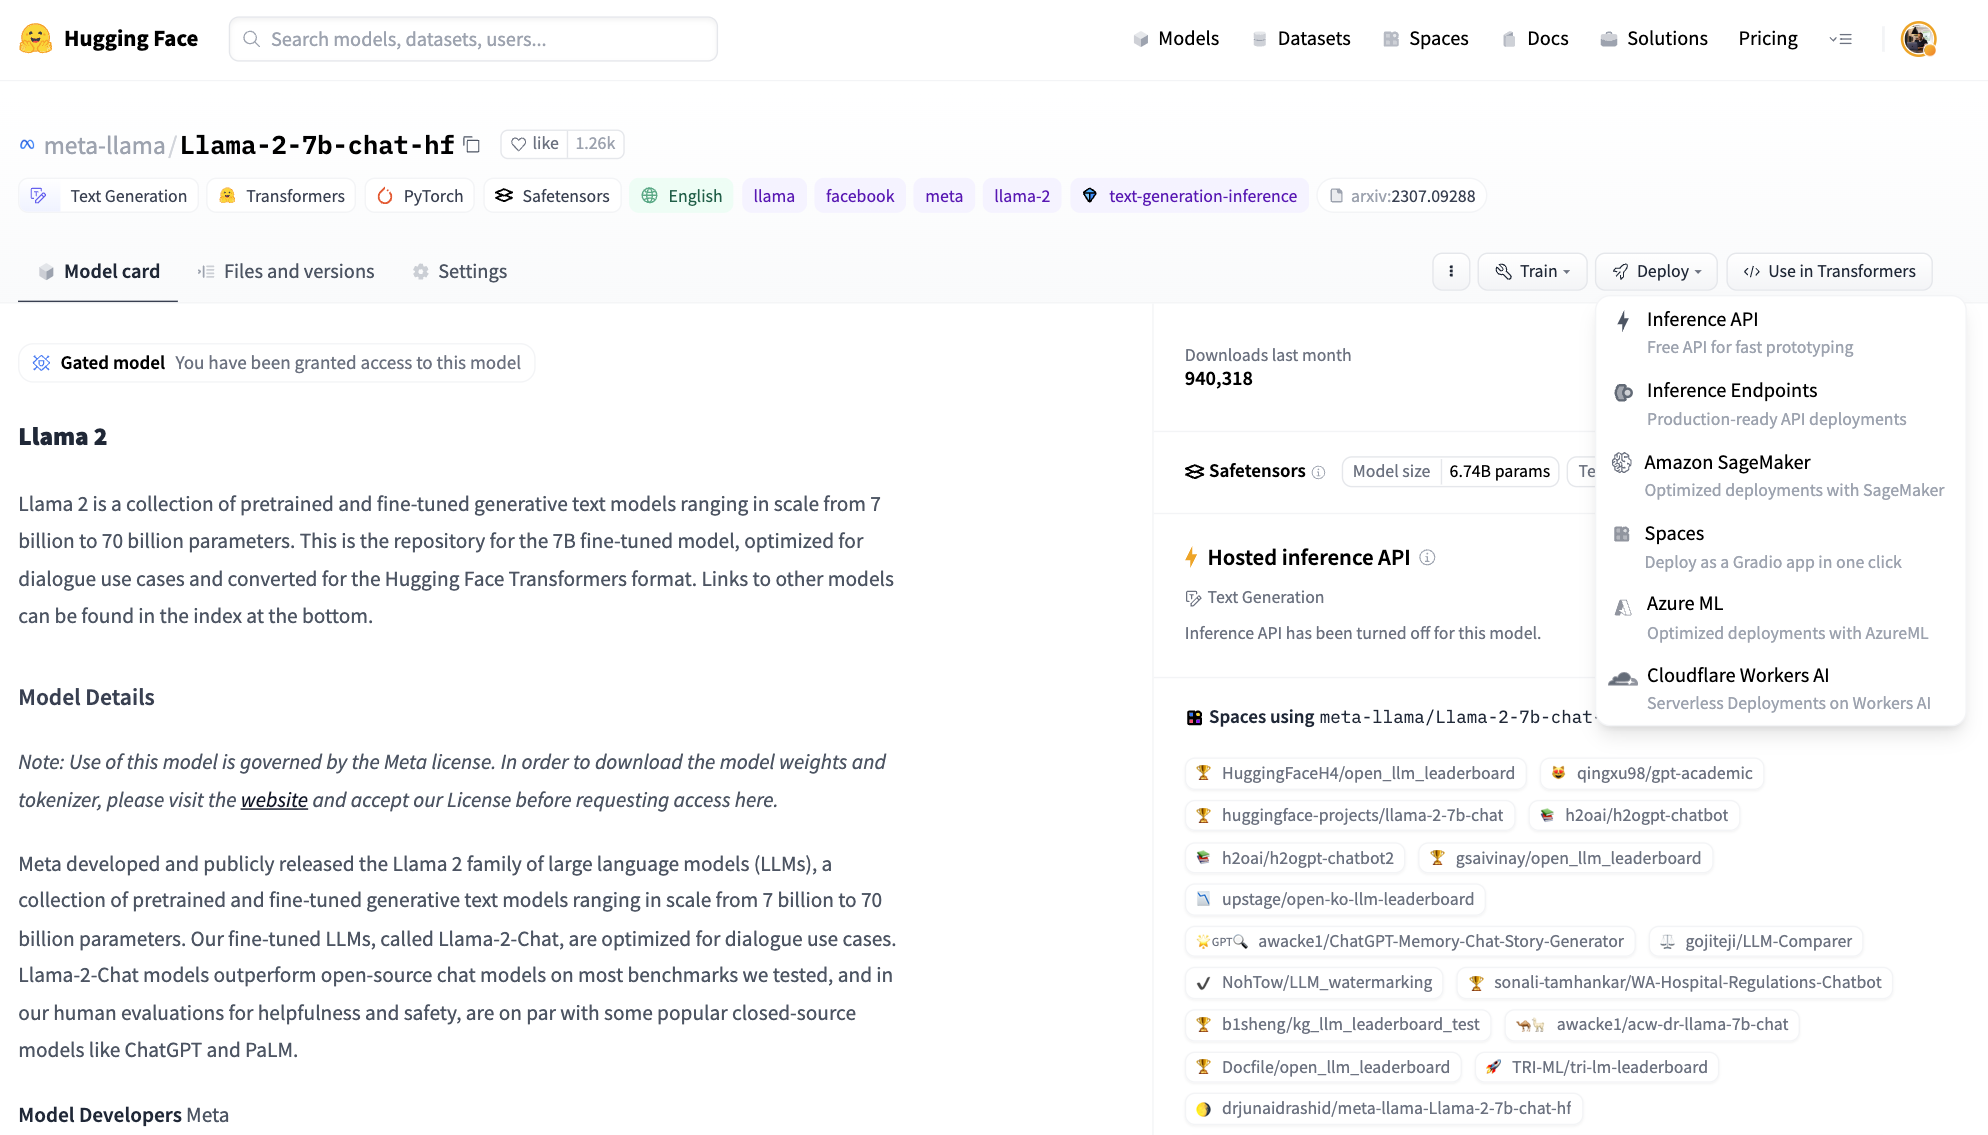
This is just the start, and we’ve got big plans. After launch, we’ll continue to expand based on community feedback. Even more exciting – in an effort to take our catalog from zero to sixty, we’re announcing a partnership with Hugging Face, a leading AI community + hub. The partnership is multifaceted, and you can read more about it here, but soon you’ll be able to browse and run a subset of the Hugging Face catalog directly in Workers AI.
Accessible to everyone
Part of the mission of our developer platform is to provide all the building blocks that developers need to build the applications of their dreams. Having access to the right blocks is just one part of it — as a developer your job is to put them together into an application. Our goal is to make that as easy as possible.
To make sure you could use Workers AI easily regardless of entry point, we wanted to provide access via: Workers or Pages to make it easy to use within the Cloudflare ecosystem, and via REST API if you want to use Workers AI with your current stack.
Here’s a quick CURL example that translates some text from English to French:
curl https://api.cloudflare.com/client/v4/accounts/{ACCOUNT_ID}/ai/run/@cf/meta/@cf/meta/m2m100-1.2b \
-H "Authorization: Bearer {API_TOKEN}" \
	-d '{ "text": "I'll have an order of the moule frites", "target_lang": "french" }'
Use it with any stack, anywhere – your favorite Jamstack framework, Python + Django/Flask, Node.js, Ruby on Rails, the possibilities are endless. And deploy
Designed for developers
Developer experience is really important to us. In fact, most of this post has been about just that. Making sure it works out of the box. Providing popular models that just work. Being accessible to all developers whether you build and deploy with Cloudflare or elsewhere. But it’s more than that – the experience should be frictionless, zero to production should be fast, and it should feel good along the way.
Let’s walk through another example to show just how easy it is to use! We’ll run Llama 2, a popular large language model open sourced by Meta, in a worker.
We’ll assume you have some of the basics already complete (Cloudflare account, Node, NPM, etc.), but if you don’t this guide will get you properly set up!
1. Create a Workers project
Create a new project named workers-ai by running:
$ npm create cloudflare@latest
When setting up your workers-ai worker, answer the setup questions as follows:
Enter workers-ai for the app name
Choose Hello World script for the type of application
Select yes to using TypeScript
Select yes to using Git
Select no to deploying
Lastly navigate to your new app directory:
cd workers-ai
2. Connect Workers AI to your worker
Create a Workers AI binding, which allows your worker to access the Workers AI service without having to manage an API key yourself.
To bind Workers AI to your worker, add the following to the end of your wrangler.toml file:
[ai]
binding = "AI" #available in your worker via env.AI
You can also bind Workers AI to a Pages Function. For more information, refer to Functions Bindings.
3. Install the Workers AI client library
npm install @cloudflare/ai --save-dev
4. Run an inference task in your worker
Update the source/index.ts with the following code:
import { Ai } from '@cloudflare/ai'
export default {
  async fetch(request, env) {
    const ai = new Ai(env.AI);
    const input = { prompt: "What's the origin of the phrase 'Hello, World'" };
    const output = await ai.run('@cf/meta/llama-2-7b-chat-int8', input );
    return new Response(JSON.stringify(output));
  },
};
5. Develop locally with Wrangler
While in your project directory, test Workers AI locally by running:
$ npx wranlger dev --remote
Note – These models currently only run on Cloudflare’s network of GPUs (and not locally), so setting `–remote` above is a must, and you’ll be prompted to log in at this point.
Wrangler will give you a URL (most likely localhost:8787). Visit that URL, and you’ll see a response like this
{
  "response": "Hello, World is a common phrase used to test the output of a computer program, particularly in the early stages of programming. The phrase "Hello, World!" is often the first program that a beginner learns to write, and it is included in many programming language tutorials and textbooks as a way to introduce basic programming concepts. The origin of the phrase "Hello, World!" as a programming test is unclear, but it is believed to have originated in the 1970s. One of the earliest known references to the phrase is in a 1976 book called "The C Programming Language" by Brian Kernighan and Dennis Ritchie, which is considered one of the most influential books on the development of the C programming language.
}
6. Deploy your worker
Finally, deploy your worker to make your project accessible on the Internet:
$ npx wranlger dev --remote
# Outputs: https://workers-ai.<YOUR_SUBDOMAIN>.workers.dev
And that’s it. You can literally go from zero to deployed AI in minutes. This is obviously a simple example, but shows how easy it is to run Workers AI from any project.
Privacy by default
When Cloudflare was founded, our value proposition had three pillars: more secure, more reliable, and more performant. Over time, we’ve realized that a better Internet is also a more private Internet, and we want to play a role in building it.
That’s why Workers AI is private by default – we don’t train our models, LLM or otherwise, on your data or conversations, and our models don’t learn from your usage. You can feel confident using Workers AI in both personal and business settings, without having to worry about leaking your data. Other providers only offer this fundamental feature with their enterprise version. With us, it’s built in for everyone.
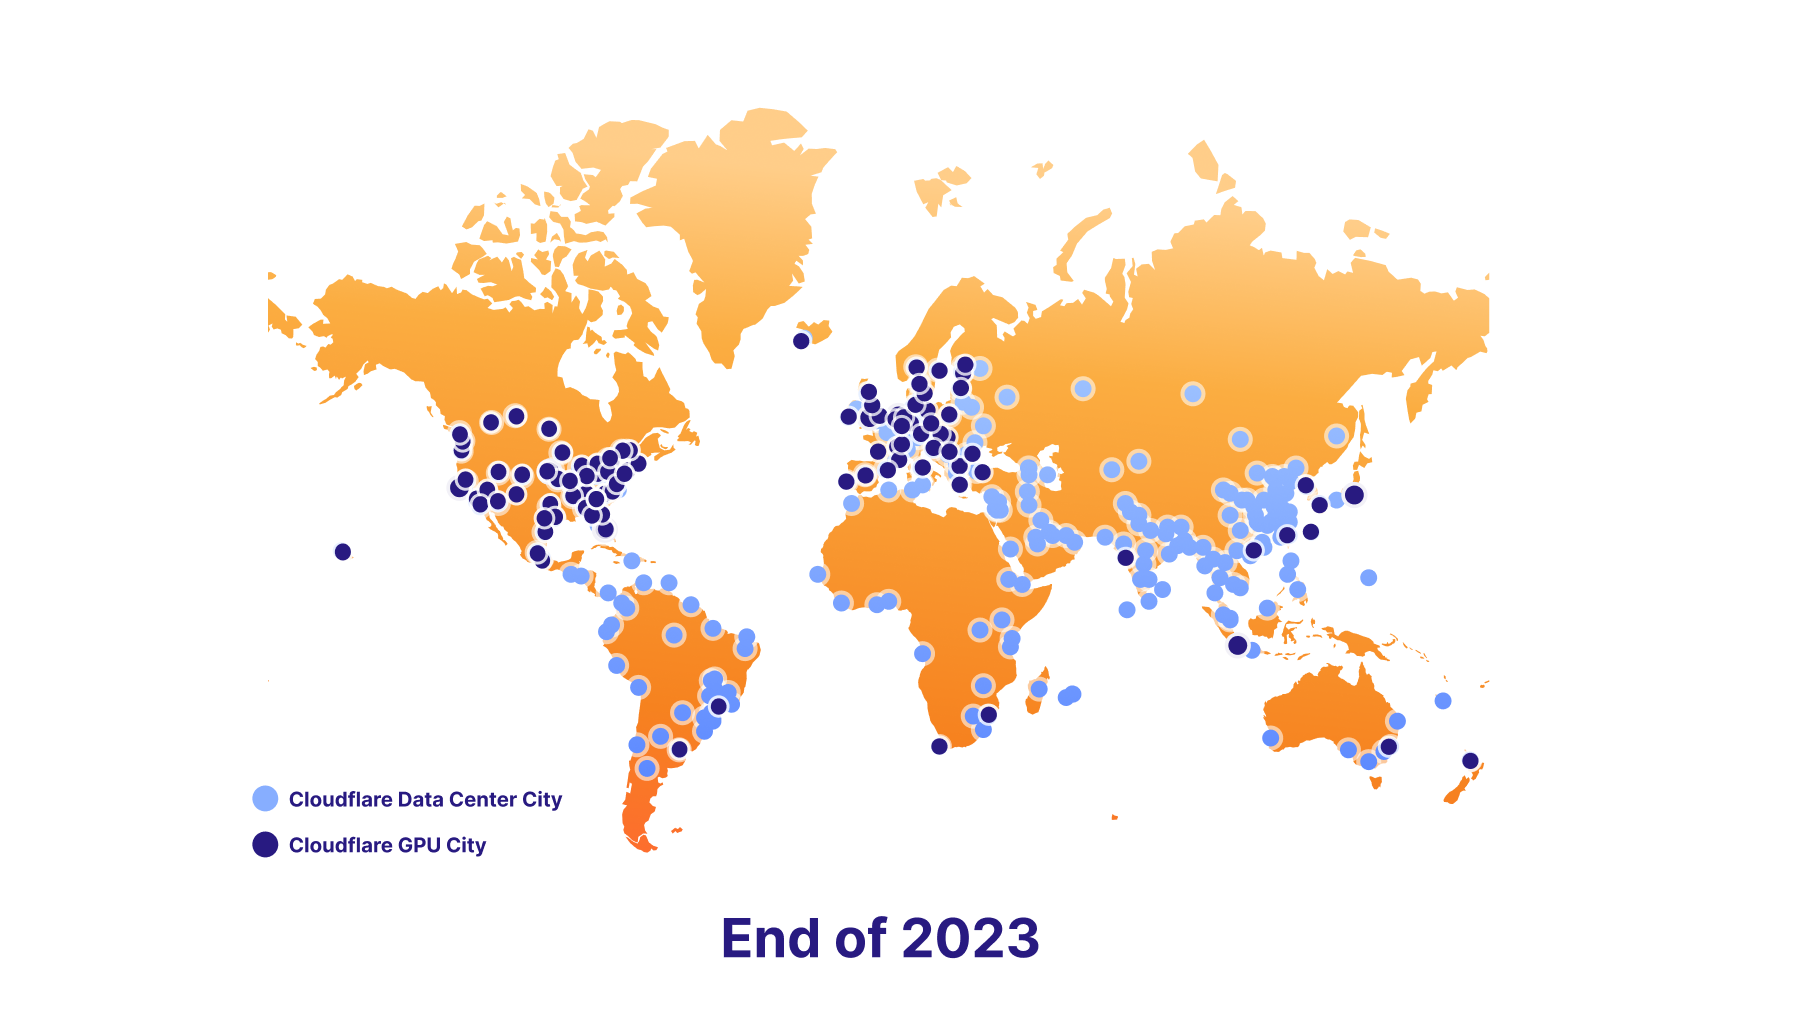
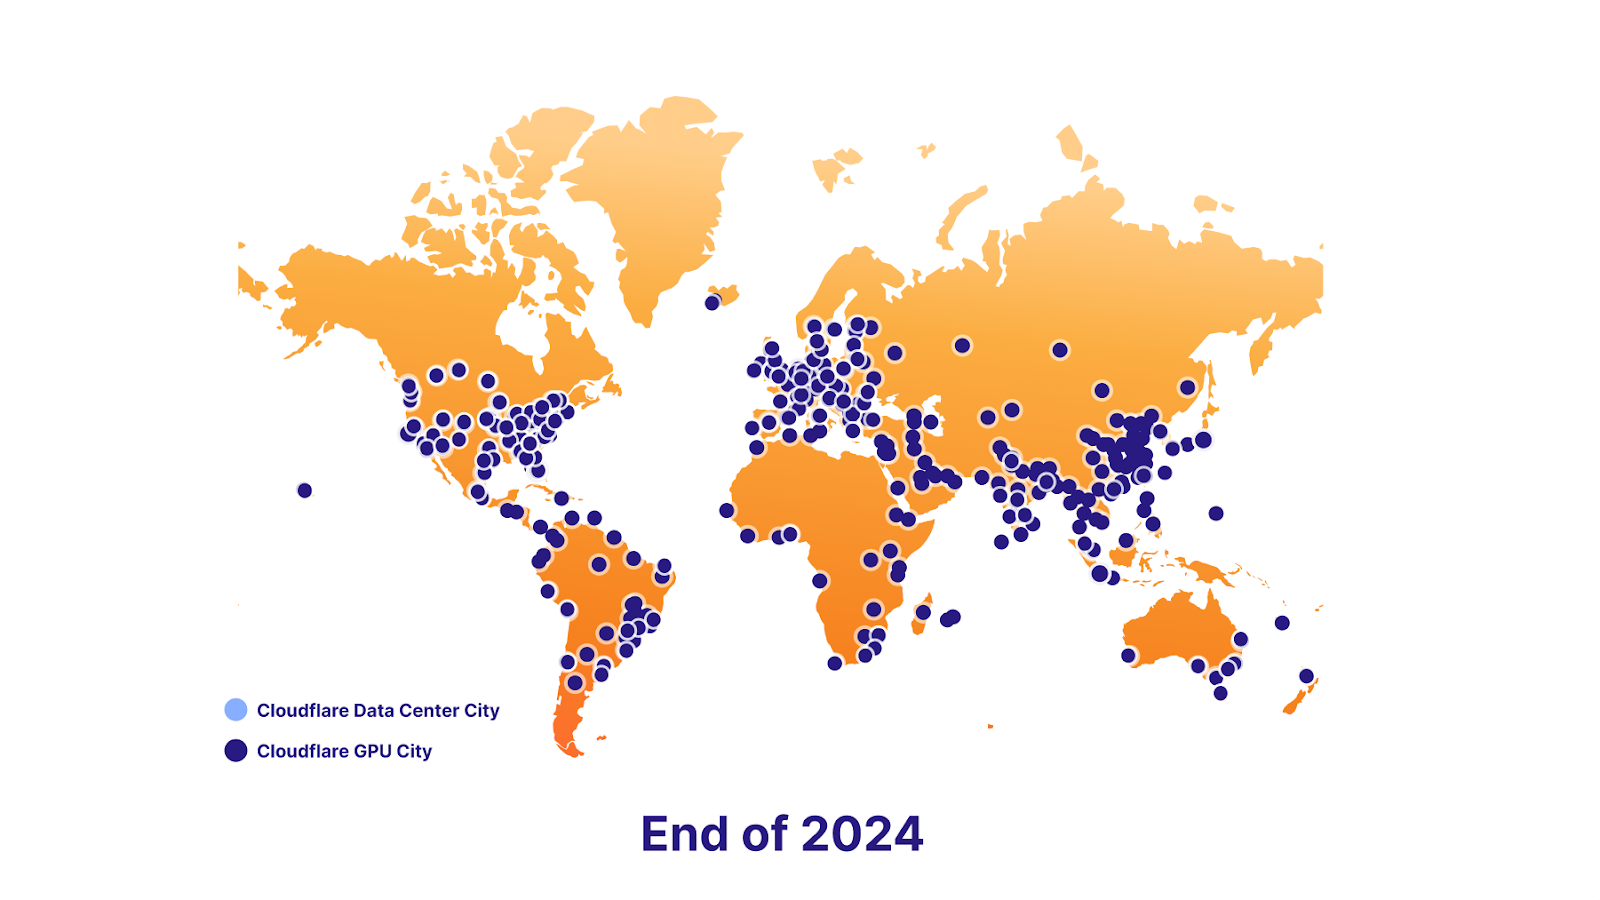
We’re also excited to support data localization in the future. To make this happen, we have an ambitious GPU rollout plan – we’re launching with seven sites today, roughly 100 by the end of 2023, and nearly everywhere by the end of 2024. Ultimately, this will empower developers to keep delivering killer AI features to their users, while staying compliant with their end users’ data localization requirements.
The power of the platform
Vector database – Vectorize
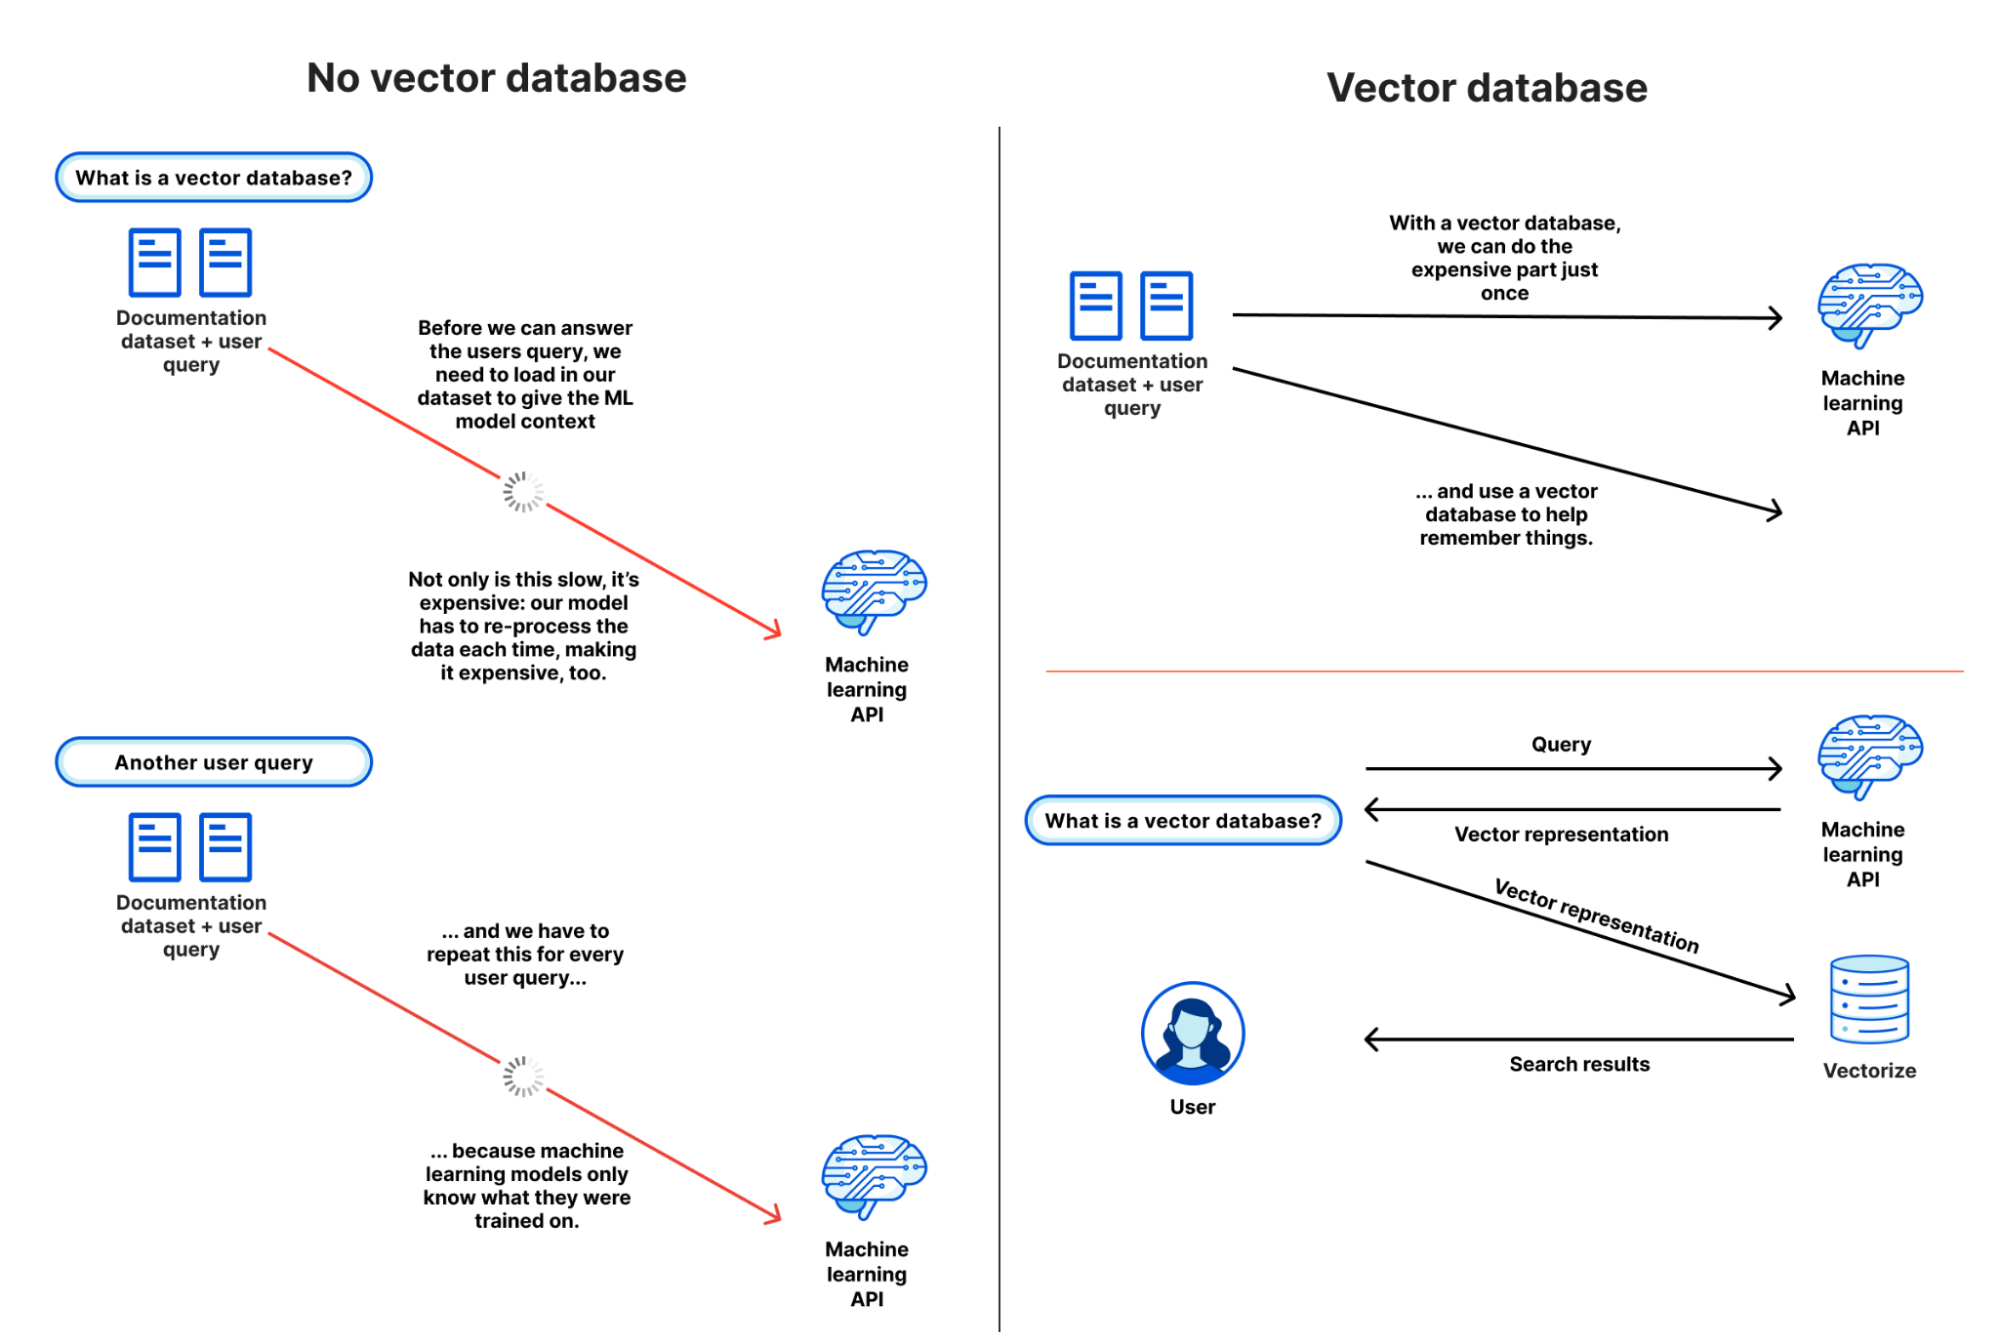
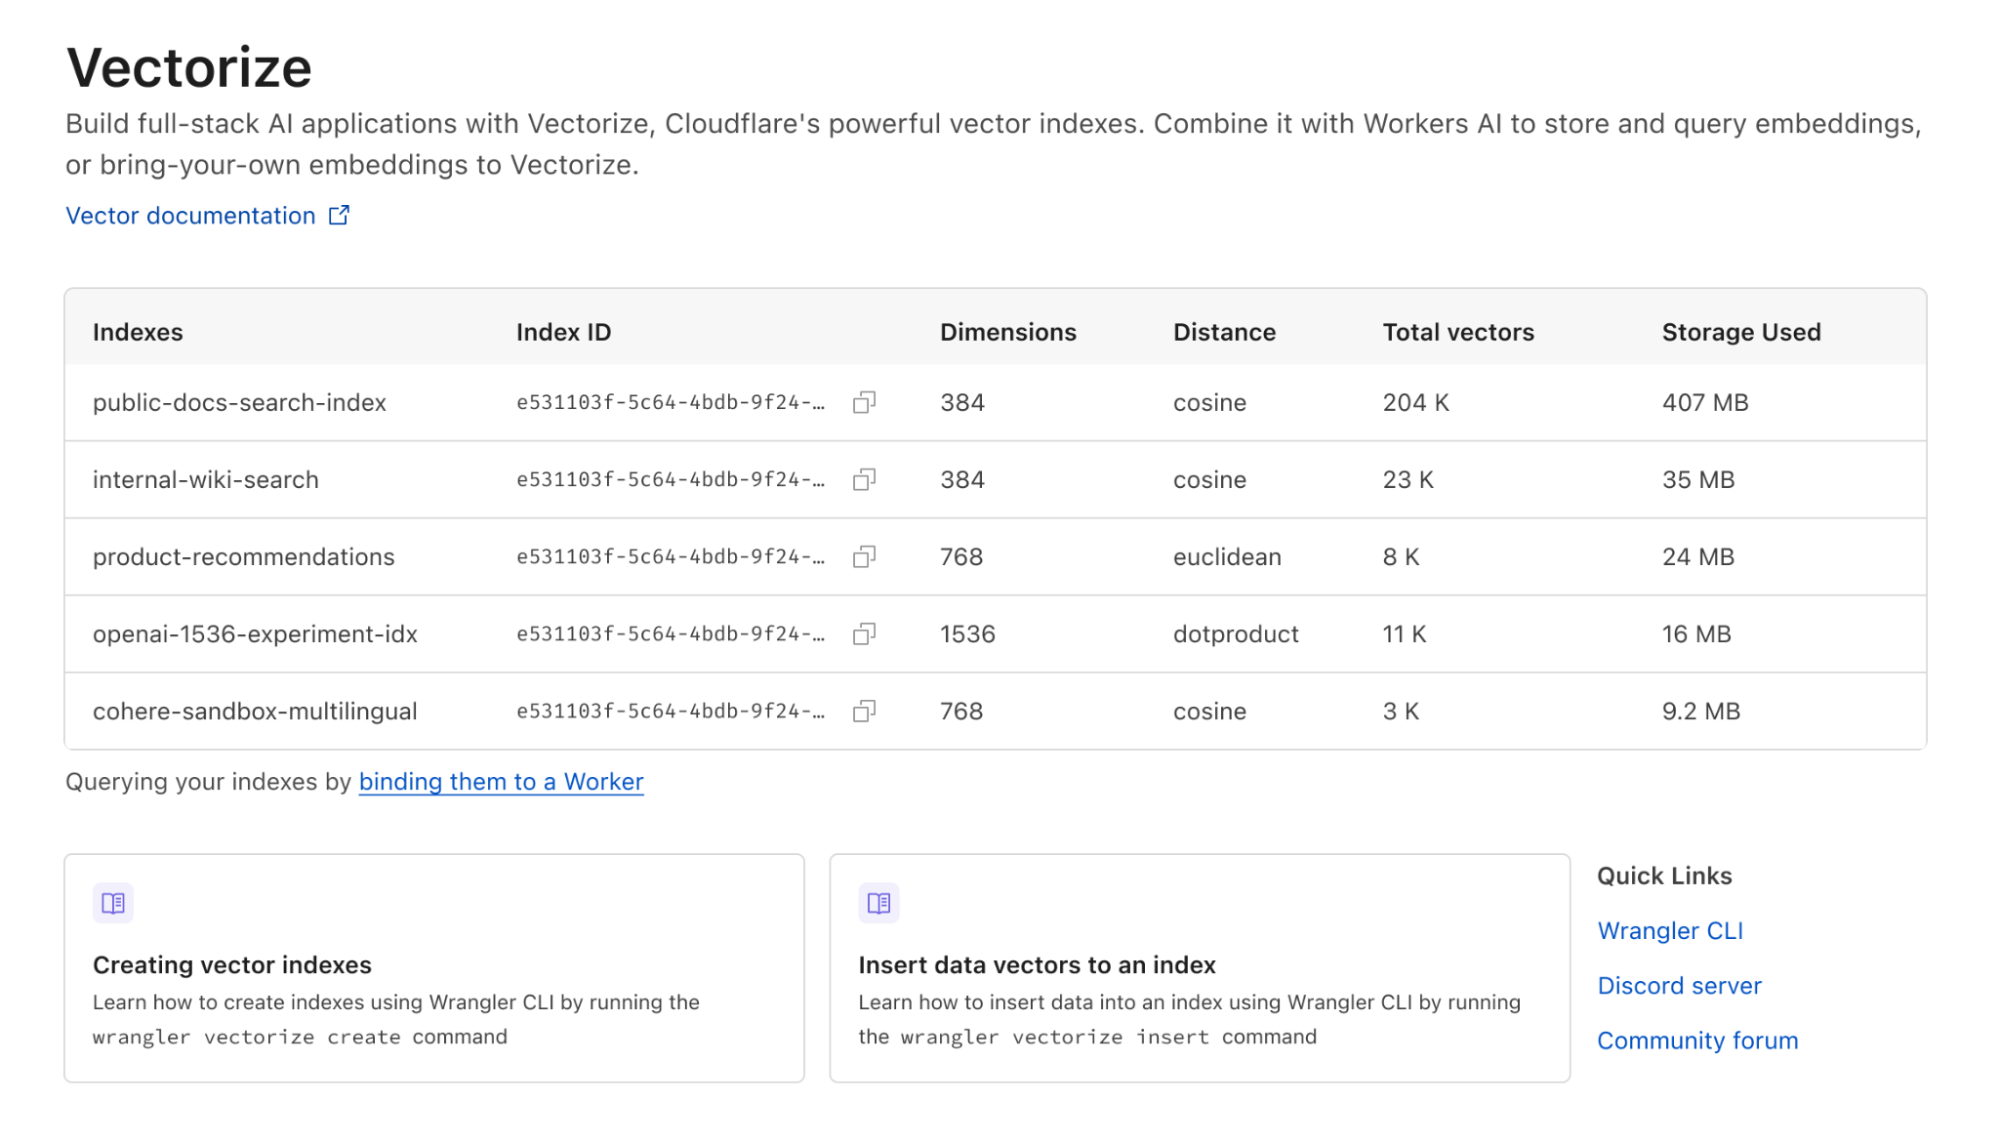
Workers AI is all about running Inference, and making it really easy to do so, but sometimes inference is only part of the equation. Large language models are trained on a fixed set of data, based on a snapshot at a specific point in the past, and have no context on your business or use case. When you submit a prompt, information specific to you can increase the quality of results, making it more useful and relevant. That’s why we’re also launching Vectorize, our vector database that’s designed to work seamlessly with Workers AI. Here’s a quick overview of how you might use Workers AI + Vectorize together.
Example: Use your data (knowledge base) to provide additional context to an LLM when a user is chatting with it.
Generate initial embeddings: run your data through Workers AI using an embedding model. The output will be embeddings, which are numerical representations of those words.
Insert those embeddings into Vectorize: this essentially seeds the vector database with your data, so we can later use it to retrieve embeddings that are similar to your users’ query
Generate embedding from user question: when a user submits a question to your AI app, first, take that question, and run it through Workers AI using an embedding model.
Get context from Vectorize: use that embedding to query Vectorize. This should output embeddings that are similar to your user’s question.
Create context aware prompt:Now take the original text associated with those embeddings, and create a new prompt combining the text from the vector search, along with the original question
Run prompt: run this prompt through Workers AI using an LLM model to get your final result
AI Gateway
That covers a more advanced use case. On the flip side, if you are running models elsewhere, but want to get more out of the experience, you can run those APIs through our AI gateway to get features like caching, rate-limiting, analytics and logging. These features can be used to protect your end point, monitor and optimize costs, and also help with data loss prevention. Learn more about AI gateway here.
Start building today
Try it out for yourself, and let us know what you think. Today we’re launching Workers AI as an open Beta for all Workers plans – free or paid. That said, it’s super early, so…
Warning – It’s an early beta
Usage is not currently recommended for production apps, and limits + access are subject to change.
Limits
We’re initially launching with limits on a per-model basis
@cf/meta/llama-2-7b-chat-int8: 5 reqs/min
All other modes are between 120-180 reqs/min
Checkout our docs for a full overview of our limits.
Pricing
What we released today is just a small preview to give you a taste of what’s coming (we simply couldn’t hold back), but we’re looking forward to putting the full-throttle version of Workers AI in your hands.
We realize that as you approach building something, you want to understand: how much is this going to cost me? Especially with AI costs being so easy to get out of hand. So we wanted to share the upcoming pricing of Workers AI with you.
While we won’t be billing on day one, we are announcing what we expect our pricing will look like.
Users will be able to choose from two ways to run Workers AI:
Fast Twitch Neurons (FTN) – running at nearest user location at $1.25 / 1k neurons
You may be wondering — what’s a neuron?
Neurons are a way to measure AI output that always scales down to zero (if you get no usage, you will be charged for 0 neurons). To give you a sense of what you can accomplish with a thousand neurons, you can: generate 130 LLM responses, 830 image classifications, or 1,250 embeddings.
Our goal is to help our customers pay only for what they use, and choose the pricing that best matches their use case, whether it’s price or latency that is top of mind.
What’s on the roadmap?
Workers AI is just getting started, and we want your feedback to help us make it great. That said, there are some exciting things on the roadmap.
More models, please
We're launching with a solid set of models that just work, but will continue to roll out new models based on your feedback. If there’s a particular model you'd love to see on Workers AI, pop into our Discord and let us know!
In addition to that, we're also announcing a partnership with Hugging Face, and soon you'll be able to access and run a subset of the Hugging Face catalog directly from Workers AI.
Analytics + observability
Up to this point, we’ve been hyper focussed on one thing – making it really easy for any developer to run powerful AI models in just a few lines of code. But that’s only one part of the story. Up next, we’ll be working on some analytics and observability capabilities to give you insights into your usage + performance + spend on a per-model basis, plus the ability to fig into your logs if you want to do some exploring.
A road to global GPU coverage
Our goal is to be the best place to run inference on Region: Earth, so we're adding GPUs to our data centers as fast as we can.
We plan to be in 100 data centers by the end this year
And nearly everywhere by the end of 2024
We’re really excited to see you build – head over to our docs to get started.
If you need inspiration, want to share something you’re building, or have a question – pop into our Developer Discord.
Matthew and Michelle, co-founders of Cloudflare, published their annual founders’ letter today. The letter ends with a poem written by an AI running using Workers AI on Cloudflare’s global network.
import { Ai } from "@cloudflare/ai";

export default {
    async fetch(request: Request, env: Env): Promise<Response> {
        const body = await request.json();
        const ai = new Ai(env.AI);
        const response = await ai.run("@cf/meta/llama-2-7b-chat-int8", body);
        return new Response(JSON.stringify(response));
    },
};

export interface Env {
    AI: any;
}
That was deployed on Workers AI and all I had to do was ask for poems. Here’s my terminal output (with just the domain name changed).
% curl -X POST https://example.com/ -d '{"prompt":"Write a poem \
that talks about the connectivity cloud"}' | jq -r .response
Cloud computing provides a connectivity that's unmatched, A bridge that spans the globe with ease and grace. It brings us closer, no matter where we are, And makes the world a smaller, more intimate place.
With just a click, we can connect and share, Our thoughts and ideas, our hopes and dreams. The cloud unites us, in a way that's fair, And makes the world a more harmonious theme.
So let us embrace this connectivity, And use it to build a better world for all. For in the cloud, we find a unity, That can help us reach new heights, and stand tall.
% curl -X POST https://example.com/ -d '{"prompt":"Write a poem \
that talks about the connectivity cloud and contrast it with the  \
captivity cloud"}' | jq -r .response
The connectivity cloud, a wondrous sight to see, Where data flows and knowledge is set free, A place where minds meet and ideas take flight, A world of endless possibility in sight.
But then there's the captivity cloud, a darker place, Where thoughts are trapped and minds are in disgrace, A prison of the mind, where freedom's lost, A world of endless sorrow and cost.
So let us choose the connectivity cloud,
And let our minds be free and allowed,
To soar and glide and reach for the sky,
And never be held back, but always fly.
% curl -X POST https://example.com/ -d '{"prompt":"Write a poem \
that talks about the connectivity cloud and contrast it with the  \
captivity cloud using Elizabethan English"}' | jq -r .response
In the connectivity cloud, I find my peace,
Where thoughts and dreams and hopes do cease to flee.
The captivity cloud doth but darken my day,
With chains of sorrow that will not away.
In the connectivity cloud, I find my home,
Where love and joy and laughter do make their moan.
The captivity cloud doth but lock me in,
With sorrow's shackles that will not give in.
In the connectivity cloud, I find my fate,
Where fortune smiles and misery doth wait.
The captivity cloud doth but bring me woe,
With darkness that will not let me go.
In the connectivity cloud, I find my heart,
Where love and hope and joy do play their part.
The captivity cloud doth but tear it apart,
With sorrow's hand that will not let it start.
% curl -X POST https://example.com/ -d '{"prompt":"Write a poem \
that talks about the connectivity cloud and contrast it with the  \
captivity cloud in the style of Lord Byron"}' | jq -r .response
In the realm of the cloud, where data reigns supreme,
A new divide has emerged, a digital dream,
The connectivity cloud, a place of delight,
Where knowledge and wisdom take flight.
But then there's the captivity cloud, a darker hue,
Where privacy and security are hard to pursue,
A prison of sorts, where freedom's light is lost,
And data's secrets are forever crossed.
Yet still, we cling to the captivity cloud,
For in its depths, we find a measure of proof,
That though the connectivity cloud may be bright,
The captivity cloud holds a certain allure in sight.
So let us embrace both, the light and the dark,
For in their union, we find a digital spark,
That illuminates the path to a brighter day,
Where knowledge and privacy reign in a digital way.
What are you going to build on Workers AI? It’s ready and waiting. We’ll help you go from idea to deployed in minutes.
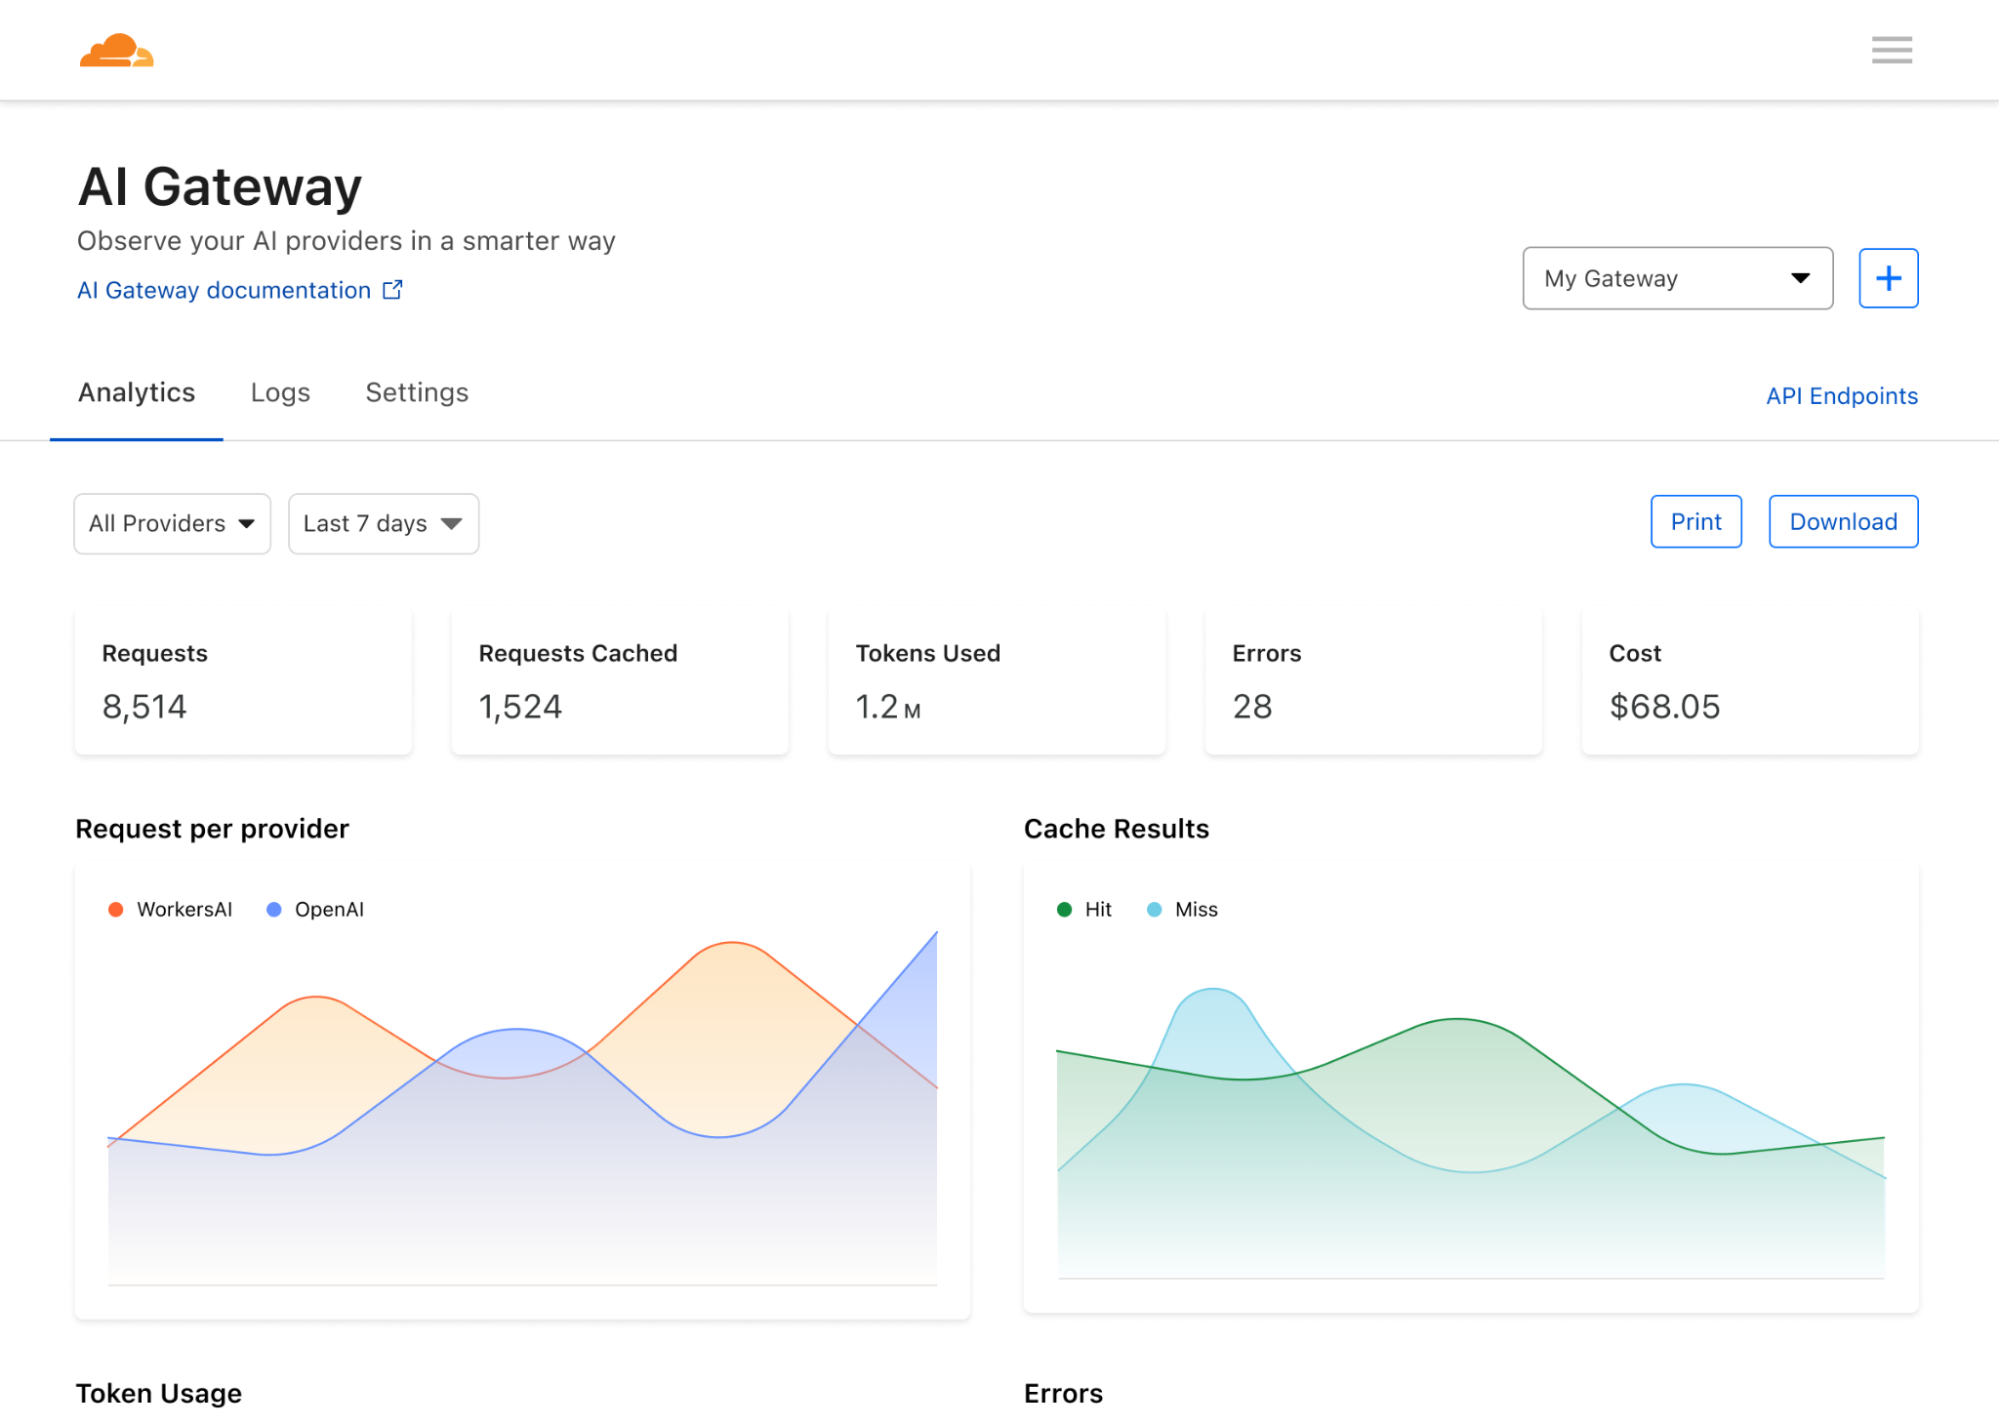
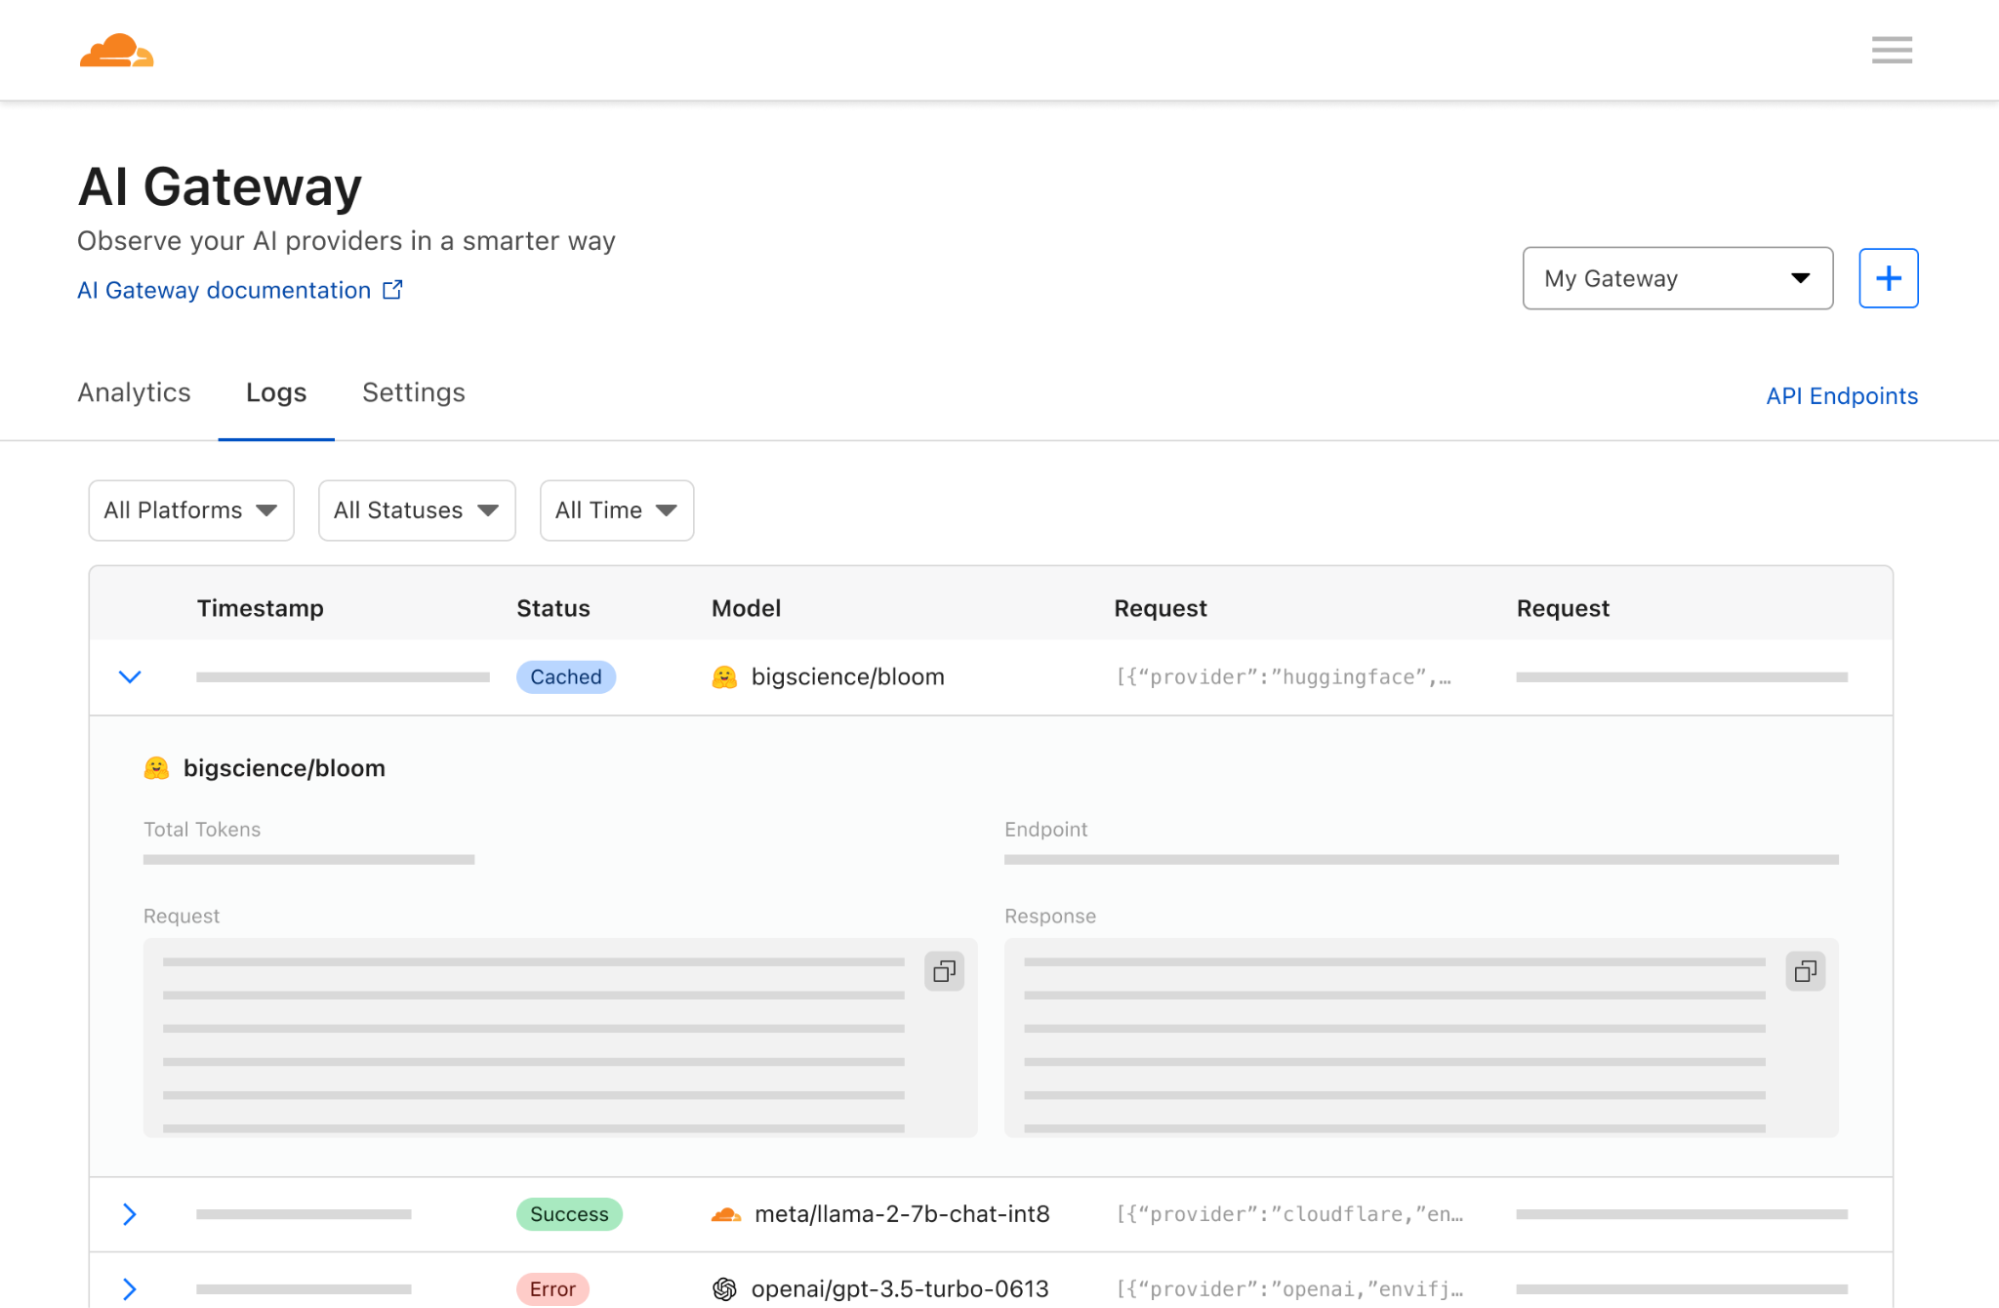
Today, we’re excited to announce our beta of AI Gateway – the portal to making your AI applications more observable, reliable, and scalable.
AI Gateway sits between your application and the AI APIs that your application makes requests to (like OpenAI) – so that we can cache responses, limit and retry requests, and provide analytics to help you monitor and track usage. AI Gateway handles the things that nearly all AI applications need, saving you engineering time, so you can focus on what you're building.
Connecting your app to AI Gateway
It only takes one line of code for developers to get started with Cloudflare’s AI Gateway. All you need to do is replace the URL in your API calls with your unique AI Gateway endpoint. For example, with OpenAI you would define your baseURL as "https://gateway.ai.cloudflare.com/v1/ACCOUNT_TAG/GATEWAY/openai" instead of "https://api.openai.com/v1" – and that’s it. You can keep your tokens in your code environment, and we’ll log the request through AI Gateway before letting it pass through to the final API with your token.
// configuring AI gateway with the dedicated OpenAI endpoint

const openai = new OpenAI({
  apiKey: env.OPENAI_API_KEY,
  baseURL: "https://gateway.ai.cloudflare.com/v1/ACCOUNT_TAG/GATEWAY/openai",
});
We currently support model providers such as OpenAI, Hugging Face, and Replicate with plans to add more in the future. We support all the various endpoints within providers and also response streaming, so everything should work out-of-the-box once you have the gateway configured. The dedicated endpoint for these providers allows you to connect your apps to AI Gateway by changing one line of code, without touching your original payload structure.
We also have a universal endpoint that you can use if you’d like more flexibility with your requests. With the universal endpoint, you have the ability to define fallback models and handle request retries. For example, let’s say a request was made to OpenAI GPT-3, but the API was down – with the universal endpoint, you could define Hugging Face GPT-2 as your fallback model and the gateway can automatically resend that request to Hugging Face. This is really helpful in improving resiliency for your app in cases where you are noticing unusual errors, getting rate limited, or if one bill is getting costly, and you want to diversify to other models. With the universal endpoint, you’ll just need to tweak your payload to specify the provider and endpoint, so we can properly route requests for you. Check out the example request below and the docs for more details on the universal endpoint schema.
# Using the Universal Endpoint to first try OpenAI, then Hugging Face

curl https://gateway.ai.cloudflare.com/v1/ACCOUNT_TAG/GATEWAY  -X POST \
  --header 'Content-Type: application/json' \
  --data '[
  {
    "provider": "openai",
    "endpoint": "chat/completions",
    "headers": {
      "Authorization": "Bearer $OPENAI_TOKEN",
      "Content-Type": "application/json"
    },
    "query": {
      "model": "gpt-3.5-turbo",
      "stream": true,
      "messages": [
        {
          "role": "user",
          "content": "What is Cloudflare?"
        }
      ]
    }
  },
  {
    "provider": "huggingface",
    "endpoint": "gpt2",
    "headers": {
      "Authorization": "Bearer $HF_TOKEN",
      "Content-Type": "application/json"
    },
    "query": {
      "inputs": "What is Cloudflare?"
    }
  },
]'
Gaining visibility into your app’s usage
Now that your app is connected to Cloudflare, we can help you gather analytics and give insight and control on the traffic that is passing through your apps. Regardless of what model or infrastructure you use in the backend, we can help you log requests and analyze data like the number of requests, number of users, cost of running the app, duration of requests, etc. Although these seem like basic analytics that model providers should expose, it’s surprisingly difficult to get visibility into these metrics with the typical model providers. AI Gateway takes it one step further and lets you aggregate analytics across multiple providers too.
Controlling how your app scales
One of the pain points we often hear is how expensive it costs to build and run AI apps. Each API call can be unpredictably expensive and costs can rack up quickly, preventing developers from scaling their apps to their full potential. At the speed that the industry is moving, you don’t want to be limited by your scale and left behind – and that’s where caching and rate limiting can help. We allow developers to cache their API calls so that new requests can be served from our cache rather than the original API – making it cheaper and faster. Rate limiting can also help control costs by throttling the number of requests and preventing excessive or suspicious activity. Developers have full flexibility to define caching and rate limiting rules, so that apps can scale at a sustainable pace of your choosing.
The Workers AI Platform
AI Gateway pairs perfectly with our new Workers AI and Vectorize products, so you can build full-stack AI applications all within the Workers ecosystem. From deploying applications with Workers, running model inference on the edge with Workers AI, storing vector embeddings on Vectorize, to gaining visibility into your applications with AI Gateway – the Workers platform is your one-stop shop to bring your AI applications to life. To learn how to use AI Gateway with Workers AI or the different providers, check out the docs.
Next up: the enterprise use case
We are shipping v1 of AI Gateway with a few core features, but we have plans to expand the product to cover more advanced use cases as well – usage alerts, jailbreak protection, dynamic model routing with A/B testing, and advanced cache rules. But what we’re really excited about are the other ways you can apply AI Gateway…
In the future, we want to develop AI Gateway into a product that helps organizations monitor and observe how their users or employees are using AI. This way, you can flip a switch and have all requests within your network to providers (like OpenAI) pass through Cloudflare first – so that you can log user requests, apply access policies, enable rate limiting and data loss prevention (DLP) strategies. A powerful example: if an employee accidentally pastes an API key to ChatGPT, AI Gateway can be configured to see the outgoing request and redact the API key or block the request entirely, preventing it from ever reaching OpenAI or any end providers. We can also log and alert on suspicious requests, so that organizations can proactively investigate and control certain types of activity. AI Gateway then becomes a really powerful tool for organizations that might be excited about the efficiency that AI unlocks, but hesitant about trusting AI when data privacy and user error are really critical threats. We hope that AI Gateway can alleviate these concerns and make adopting AI tools a lot easier for organizations.
Whether you’re a developer building applications or a company who’s interested in how employees are using AI, our hope is that AI Gateway can help you demystify what’s going on inside your apps – because once you understand how your users are using AI, you can make decisions on how you actually want them to use it. Some of these features are still in development, but we hope this illustrates the power of AI Gateway and our vision for the future.
At Cloudflare, we live and breathe innovation (as you can tell by our Birthday Week announcements!) and the pace of innovation in AI is incredible to witness. We’re thrilled that we can not only help people build and use apps, but actually help accelerate the adoption and development of AI with greater control and visibility. We can’t wait to hear what you build – head to the Cloudflare dashboard to try out AI Gateway and let us know what you think!
Today, we’re excited to announce that we are partnering with Hugging Face to make AI models more accessible and affordable than ever before to developers.
There are three things we look forward to making available to developers over the coming months:
We’re excited to bring serverless GPU models to Hugging Face — no more wrangling infrastructure or paying for unused capacity. Just pick your model, and go;
Bringing popular Hugging Face optimized models to Cloudflare’s model catalog;
Introduce Cloudflare integrations as a part of Hugging Face’s Inference solutions.
Hosting over 500,000 models and serving over one million model downloads a day, Hugging Face is the go-to place for developers to add AI to their applications.
Meanwhile, over the past six years at Cloudflare, our goal has been to make it as easy as possible for developers to bring their ideas and applications to life on our developer platform.
As AI has become a critical part of every application, this partnership has felt like a natural match to put tools in the hands of developers to make deploying AI easy and affordable.
“Hugging Face and Cloudflare both share a deep focus on making the latest AI innovations as accessible and affordable as possible for developers. We’re excited to offer serverless GPU services in partnership with Cloudflare to help developers scale their AI apps from zero to global, with no need to wrangle infrastructure or predict the future needs of your application — just pick your model and deploy.” — Clem Delangue, CEO of Hugging Face.
We’re excited to share what’s to come, so we wanted to give you a sneak peek into what’s ahead.
Hugging Face models at your fingertips
As a developer, when you have an idea, you want to be able to act on it as quickly as possible. Through our partnership, we’re excited to provide you with familiar models, regardless of where you’re getting started.
If you’re using Cloudflare’s developer platform to build applications, we’re excited to bring Hugging Face models into the flow as a native part of the experience. You will soon be able to deploy Hugging Face models, optimized for performance and speed, right from Cloudflare’s dashboard.
Alternatively, if you’re used to perusing and finding your models on Hugging Face, you will soon be able to deploy them directly from the Hugging Face UI directly to Workers AI.
Both of our teams are committed to building the best developer experiences possible, so we look forward to continuing to file away any friction that gets in developers’ ways of building the next big AI idea.
Bringing serverless GPU inference to Hugging Face users
Hugging Face offers multiple inference solutions to serve predictions from the 500,000 models hosted on the platform without managing infrastructure, from the free and rate-limited Inference API, to dedicated infrastructure deployments with Inference Endpoints, and even in-browser edge inference with Transformers.js.
We look forward to working closely with the teams at Hugging Face to enable new experiences powered by Cloudflare: from new serverless GPU inference solutions, to new edge use cases – stay tuned!
See you soon!
We couldn’t wait to share the news with our developers about our partnership, and can’t wait to put these experiences in the hands of developers over the coming months.
Vectorize is our brand-new vector database offering, designed to let you build full-stack, AI-powered applications entirely on Cloudflare’s global network: and you can start building with it right away. Vectorize is in open beta, and is available to any developer using Cloudflare Workers.
You can use Vectorize with Workers AI to power semantic search, classification, recommendation and anomaly detection use-cases directly with Workers, improve the accuracy and context of answers from LLMs (Large Language Models), and/or bring-your-own embeddings from popular platforms, including OpenAI and Cohere.
Visit Vectorize’s developer documentation to get started, or read on if you want to better understand what vector databases do and how Vectorize is different.
Why do I need a vector database?
Machine learning models can’t remember anything: only what they were trained on.
Vector databases are designed to solve this, by capturing how an ML model represents data — including structured and unstructured text, images and audio — and storing it in a way that allows you to compare against future inputs. This allows us to leverage the power of existing machine-learning models and LLMs (Large Language Models) for content they haven’t been trained on: which, given the tremendous cost of training models, turns out to be extremely powerful.
To better illustrate why a vector database like Vectorize is useful, let’s pretend they don’t exist, and see how painful it is to give context to an ML model or LLM for a semantic search or recommendation task. Our goal is to understand what content is similar to our query and return it: based on our own dataset.
Our user query comes in: they’re searching for “how to write to R2 from Cloudflare Workers”
We load up our entire documentation dataset — a thankfully “small” dataset at about 65,000 sentences, or 2.1 GB — and provide it alongside the query from our user. This allows the model to have the context it needs, based on our data.
We wait.
(A long time)
We get our similarity scores back, with the sentences most similar to the user’s query, and then work to map those back to URLs before we return our search results.
… and then another query comes in, and we have to start this all over again.
In practice, this isn’t really possible: we can’t pass that much context in an API call (prompt) to most machine learning models, and even if we could, it’d take tremendous amounts of memory and time to process our dataset over-and-over again.
With a vector database, we don’t have to repeat step 2: we perform it once, or as our dataset updates, and use our vector database to provide a form of long-term memory for our machine learning model. Our workflow looks a little more like this:
We load up our entire documentation dataset, run it through our model, and store the resulting vector embeddings in our vector database (just once).
For each user query (and only the query) we ask the same model and retrieve a vector representation.
We query our vector database with that query vector, which returns the vectors closest to our query vector.
If we looked at these two flows side by side, we can quickly see how inefficient and impractical it is to use our own dataset with an existing model without a vector database:
Using a vector database to help machine learning models remember.
From this simple example, it’s probably starting to make some sense: but you might also be wondering why you need a vector database instead of just a regular database.
Vectors are the model’s representation of an input: how it maps that input to its internal structure, or “features”. Broadly, the more similar vectors are, the more similar the model believes those inputs to be based on how it extracts features from an input.
This is seemingly easy when we look at example vectors of only a handful of dimensions. But with real-world outputs, searching across 10,000 to 250,000 vectors, each potentially 1,536 dimensions wide, is non-trivial. This is where vector databases come in: to make search work at scale, vector databases use a specific class of algorithm, such as k-nearest neighbors (kNN) or other approximate nearest neighbor (ANN) algorithms to determine vector similarity.
And although vector databases are extremely useful when building AI and machine learning powered applications, they’re not only useful in those use-cases: they can be used for a multitude of classification and anomaly detection tasks. Knowing whether a query input is similar — or potentially dissimilar — from other inputs can power content moderation (does this match known-bad content?) and security alerting (have I seen this before?) tasks as well.
Building a recommendation engine with vector search
We built Vectorize to be a powerful partner to Workers AI: enabling you to run vector search tasks as close to users as possible, and without having to think about how to scale it for production.
We’re going to take a real world example — building a (product) recommendation engine for an e-commerce store — and simplify a few things.
Our goal is to show a list of “relevant products” on each product listing page: a perfect use-case for vector search. Our input vectors in the example are placeholders, but in a real world application we would generate them based on product descriptions and/or cart data by passing them through a sentence similarity model (such as Worker’s AI’s text embedding model)
Each vector represents a product across our store, and we associate the URL of the product with it. We could also set the ID of each vector to the product ID: both approaches are valid. Our query — vector search — represents the product description and content for the product user is currently viewing.
Let’s step through what this looks like in code: this example is pulled straight from our developer documentation:
export interface Env {
	// This makes our vector index methods available on env.MY_VECTOR_INDEX.*
	// e.g. env.MY_VECTOR_INDEX.insert() or .query()
	TUTORIAL_INDEX: VectorizeIndex;
}

// Sample vectors: 3 dimensions wide.
//
// Vectors from a machine-learning model are typically ~100 to 1536 dimensions
// wide (or wider still).
const sampleVectors: Array<VectorizeVector> = [
	{ id: '1', values: [32.4, 74.1, 3.2], metadata: { url: '/products/sku/13913913' } },
	{ id: '2', values: [15.1, 19.2, 15.8], metadata: { url: '/products/sku/10148191' } },
	{ id: '3', values: [0.16, 1.2, 3.8], metadata: { url: '/products/sku/97913813' } },
	{ id: '4', values: [75.1, 67.1, 29.9], metadata: { url: '/products/sku/418313' } },
	{ id: '5', values: [58.8, 6.7, 3.4], metadata: { url: '/products/sku/55519183' } },
];

export default {
	async fetch(request: Request, env: Env, ctx: ExecutionContext): Promise<Response> {
		if (new URL(request.url).pathname !== '/') {
			return new Response('', { status: 404 });
		}
		// Insert some sample vectors into our index
		// In a real application, these vectors would be the output of a machine learning (ML) model,
		// such as Workers AI, OpenAI, or Cohere.
		let inserted = await env.TUTORIAL_INDEX.insert(sampleVectors);

		// Log the number of IDs we successfully inserted
		console.info(`inserted ${inserted.count} vectors into the index`);

		// In a real application, we would take a user query - e.g. "durable
		// objects" - and transform it into a vector emebedding first.
		//
		// In our example, we're going to construct a simple vector that should
		// match vector id #5
		let queryVector: Array<number> = [54.8, 5.5, 3.1];

		// Query our index and return the three (topK = 3) most similar vector
		// IDs with their similarity score.
		//
		// By default, vector values are not returned, as in many cases the
		// vectorId and scores are sufficient to map the vector back to the
		// original content it represents.
		let matches = await env.TUTORIAL_INDEX.query(queryVector, { topK: 3, returnVectors: true });

		// We map over our results to find the most similar vector result.
		//
		// Since our index uses the 'cosine' distance metric, scores will range
		// from 1 to -1.  A value of '1' means the vector is the same; the
		// closer to 1, the more similar. Values of -1 (least similar) and 0 (no
		// match).
		// let closestScore = 0;
		// let mostSimilarId = '';
		// matches.matches.map((match) => {
		// 	if (match.score > closestScore) {
		// 		closestScore = match.score;
		// 		mostSimilarId = match.vectorId;
		// 	}
		// });

		return Response.json({
			// This will return the closest vectors: we'll see that the vector
			// with id = 5 has the highest score (closest to 1.0) as the
			// distance between it and our query vector is the smallest.
			// Return the full set of matches so we can see the possible scores.
			matches: matches,
		});
	},
};
The code above is intentionally simple, but illustrates vector search at its core: we insert vectors into our database, and query it for vectors with the smallest distance to our query vector.
Here are the results, with the values included, so we visually observe that our query vector [54.8, 5.5, 3.1] is similar to our highest scoring match: [58.799, 6.699, 3.400] returned from our search. This index uses cosine similarity to calculate the distance between vectors, which means that the closer the score to 1, the more similar a match is to our query vector.
In a real application, we could now quickly return product recommendation URLs based on the most similar products, sorting them by their score (highest to lowest), and increasing the topK value if we want to show more. The metadata stored alongside each vector could also embed a path to an R2 object, a UUID for a row in a D1 database, or a key-value pair from Workers KV.
Workers AI + Vectorize: full stack vector search on Cloudflare
In a real application, we need a machine learning model that can both generate vector embeddings from our original dataset (to seed our database) and quickly turn user queries into vector embeddings too. These need to be from the same model, as each model represents features differently.
Here’s a compact example building an entire end-to-end vector search pipeline on Cloudflare:
import { Ai } from '@cloudflare/ai';
export interface Env {
	TEXT_EMBEDDINGS: VectorizeIndex;
	AI: any;
}
interface EmbeddingResponse {
	shape: number[];
	data: number[][];
}

export default {
	async fetch(request: Request, env: Env, ctx: ExecutionContext): Promise<Response> {
		const ai = new Ai(env.AI);
		let path = new URL(request.url).pathname;
		if (path.startsWith('/favicon')) {
			return new Response('', { status: 404 });
		}

		// We only need to generate vector embeddings just the once (or as our
		// data changes), not on every request
		if (path === '/insert') {
			// In a real-world application, we could read in content from R2 or
			// a SQL database (like D1) and pass it to Workers AI
			const stories = ['This is a story about an orange cloud', 'This is a story about a llama', 'This is a story about a hugging emoji'];
			const modelResp: EmbeddingResponse = await ai.run('@cf/baai/bge-base-en-v1.5', {
				text: stories,
			});

			// We need to convert the vector embeddings into a format Vectorize can accept.
			// Each vector needs an id, a value (the vector) and optional metadata.
			// In a real app, our ID would typicaly be bound to the ID of the source
			// document.
			let vectors: VectorizeVector[] = [];
			let id = 1;
			modelResp.data.forEach((vector) => {
				vectors.push({ id: `${id}`, values: vector });
				id++;
			});

			await env.TEXT_EMBEDDINGS.upsert(vectors);
		}

		// Our query: we expect this to match vector id: 1 in this simple example
		let userQuery = 'orange cloud';
		const queryVector: EmbeddingResponse = await ai.run('@cf/baai/bge-base-en-v1.5', {
			text: [userQuery],
		});

		let matches = await env.TEXT_EMBEDDINGS.query(queryVector.data[0], { topK: 1 });
		return Response.json({
			// We expect vector id: 1 to be our top match with a score of
			// ~0.896888444
			// We are using a cosine distance metric, where the closer to one,
			// the more similar.
			matches: matches,
		});
	},
};
The code above does four things:
It passes the three sentences to Workers AI’s text embedding model (@cf/baai/bge-base-en-v1.5) and retrieves their vector embeddings.
It inserts those vectors into our Vectorize index.
Takes the user query and transforms it into a vector embedding via the same Workers AI model.
Queries our Vectorize index for matches.
This example might look “too” simple, but in a production application, we’d only have to change two things: just insert our vectors once (or periodically via Cron Triggers), and replace our three example sentences with real data stored in R2, a D1 database, or another storage provider.
In fact, this is incredibly similar to how we run Cursor, the AI assistant that can answer questions about Cloudflare Worker: we migrated Cursor to run on Workers AI and Vectorize. We generate text embeddings from our developer documentation using its built-in text embedding model, insert them into a Vectorize index, and transform user queries on the fly via that same model.
BYO embeddings from your favorite AI API
Vectorize isn’t just limited to Workers AI, though: it’s a fully-fledged, standalone vector database.
If you’re already using OpenAI’s Embedding API, Cohere’s multilingual model, or any other embedding API, then you can easily bring-your-own (BYO) vectors to Vectorize.
It works just the same: generate your embeddings, insert them into Vectorize, and pass your queries through the model before you query your index. Vectorize includes a few shortcuts for some of the most popular embedding models.
# Vectorize has ready-to-go presets that set the dimensions and distance metric for popular embeddings models
$ wrangler vectorize create openai-index-example --preset=openai-text-embedding-ada-002
This can be particularly useful if you already have an existing workflow around an existing embeddings API, and/or have validated a specific multimodal or multilingual embeddings model for your use-case.
Making the cost of AI predictable
There’s a tremendous amount of excitement around AI and ML, but there’s also one big concern: that it’s too expensive to experiment with, and hard to predict at scale.
With Vectorize, we wanted to bring a simpler pricing model to vector databases. Have an idea for a proof-of-concept at work? That should fit into our free-tier limits. Scaling up and optimizing your embedding dimensions for performance vs. accuracy? It shouldn’t break the bank.
Importantly, Vectorize aims to be predictable: you don’t need to estimate CPU and memory consumption, which can be hard when you’re just starting out, and made even harder when trying to plan for your peak vs. off-peak hours in production for a brand new use-case. Instead, you’re charged based on the total number of vector dimensions you store, and the number of queries against them each month. It’s our job to take care of scaling up to meet your query patterns.
Here’s the pricing for Vectorize — and if you have a Workers paid plan now, Vectorize is entirely free to use until 2024:
Workers Free (coming soon)
Workers Paid ($5/month)
Queried vector dimensions included
30M total queried dimensions / month
50M total queried dimensions / month
Stored vector dimensions included
5M stored dimensions / month
10M stored dimensions / month
Additional cost
$0.04 / 1M vector dimensions queried or stored
$0.04 / 1M vector dimensions queried or stored
Pricing is based entirely on what you store and query: (total vector dimensions queried + stored) * dimensions_per_vector * price. Query more? Easy to predict. Optimizing for smaller dimensions per vector to improve speed and reduce overall latency? Cost goes down. Have a few indexes for prototyping or experimenting with new use-cases? We don’t charge per-index.
Create as many as you need indexes to prototype new ideas and/or separate production from dev.
As an example: if you load 10,000 Workers AI vectors (384 dimensions each) and make 5,000 queries against your index each day, it’d result in 49 million total vector dimensions queried and still fit into what we include in the Workers Paid plan ($5/month). Better still: we don’t delete your indexes due to inactivity.
Note that while this pricing isn’t final, we expect few changes going forward. We want to avoid the element of surprise: there’s nothing worse than starting to build on a platform and realizing the pricing is untenable after you’ve invested the time writing code, tests and learning the nuances of a technology.
This is also just the beginning of the vector database story for us at Cloudflare. Over the next few weeks and months, we intend to land a new query engine that should further improve query performance, support even larger indexes, introduce sub-index filtering capabilities, increased metadata limits, and per-index analytics.
If you’re looking for inspiration on what to build, see the semantic search tutorial that combines Workers AI and Vectorize for document search, running entirely on Cloudflare. Or an example of how to combine OpenAI and Vectorize to give an LLM more context and dramatically improve the accuracy of its answers.
And if you have questions about how to use Vectorize for our product & engineering teams, or just want to bounce an idea off of other developers building on Workers AI, join the #vectorize and #workers-ai channels on our Developer Discord.
What AI applications can you build with Cloudflare? Instead of us telling you we reached out to a small handful of the numerous AI companies using Cloudflare to learn a bit about what they’re building and how Cloudflare is helping them on their journey.
We heard common themes from these companies about the challenges they face in bringing new products to market in the ever-changing world of AI ranging from training and deploying models, the ethical and moral judgements of AI, gaining the trust of users, and the regulatory landscape. One area that is not a challenge is trusting their AI application infrastructure to Cloudflare.
Azule.ai
Azule, based in Calgary, Canada, was founded to apply the power of AI to streamline and improve ecommerce customer service. It’s an exciting moment that, for the first time ever, we can now dynamically generate, deploy, and test code to meet specific user needs or integrations. This kind of flexibility is crucial to create a tool like Azule that is designed to meet this demand, offering a platform that can handle complex requirements and provide flexible integration options with other tools.
The AI space is evolving quickly and that applies to the rapid evolution of AI agent design patterns. These are essentially frameworks built upon LLM APIs, and they're showing immense potential. Azule effectively allows users to create AI agents which interact with their customers on behalf of their business. It's not just about addressing customer service queries anymore – AI agents can perform significant, ongoing tasks across various industries.
Azule is built entirely on Cloudflare, except for API calls to OpenAI.
The application relies on multiple Developer Platform and Cloudflare products and services. Durable Objects and websockets are used for live chat.
“Durable Objects enabled us to build our MVP faster than we could have on any other platform, thanks to Cloudflare's thoughtful product design.” – Logan Grasby
Other products used by Azule:
Queues for data processing.
R2 for all data storage, including vector storage. Instead of using a vector database service, Azule relies entirely on Cloudflare's R2 and cache API for on-disk vector search.
Workers KV for storing frequently accessed configuration data.
D1 was implemented for their user database.
Constellation (now Workers AI) for various labeling and summarization tasks.
Workers for Platforms allows Azule AI to write and deploy custom features for the users.
Pages for hosting our landing page and marketing content.
Other valuable features used include API shield, email workers, the mail channels integration for email, log push, outbound workers, among others!
“I firmly believe that AI agents are at home on the web. Everything Cloudflare builds has web optimization in mind and so it only makes sense to invest in the platform. By building on Cloudflare, we've made significant cost reductions, particularly by moving all our search solutions to R2. For example, many of our users want to store large datasets on Azule and make them searchable through their agents. Our previous search solutions, based on Pinecone and Milisearch, would have cost thousands of dollars per month to store and search through just one customer's data. With Cloudflare's R2 and cache API, we can now enable our customer's AI agent to comb through large datasets in less than 900ms, at a fraction of the cost.” – Logan Grasby
42able.ai
42able, headquartered in Wales, UK, is at the forefront of AI-driven solutions, dedicated to revolutionizing engagement with business documents. Through cutting-edge technology and innovative strategies, the company seeks to streamline, enhance, and redefine the way businesses interact with their documents.
The modern business landscape is inundated with vast volumes of documents, from contracts and reports to invoices and internal communications. Navigating, understanding, and extracting value from these documents can be time-consuming, error-prone, and often requires significant manual effort.
42able envisions a future where business documents are not just static pieces of information but dynamic assets that businesses can engage with interactively, efficiently, and intelligently.
“Launching an AI product has come with many unique challenges and uncertainties. Users expect AI to be perfect or near-perfect, and are much less forgiving of an AI making an error compared to a human making the same mistake. Decisions about how AI systems should act often involve moral or ethical judgments, which might not be straightforward and can be subject to societal debates. Training and deploying AI models is challenging. Cloudflare's solutions are making it much easier, than managing all the individual parts ourselves.” – James Finney
42able chose Cloudflare for fantastic performance in comparison to other cloud providers, in part due to the no cold boot times, competitive pricing, ease of use, fantastic local development features, and brilliant support. Their development times have decreased through the use of:
Workers for all the APIs and re-occurring cron scripts.
Pages for all application/platform front-end hosting
KV for Angular apps.
R2 to store cached personal user data R2.
General DNS zone management
DDOS protection
DNS management
Turnstile
Zero Trust to secure login pages
They are starting to test with Constellation (now Workers AI) to host some of their models and D1 to support their database needs.
UseChat
UseChat.ai, based in London, UK, supercharges customer support with a ChatGPT powered chatbot that knows your website and everything on it. With a custom ChatGPT chatbot, customers can get instant answers to the most common questions. When a customer needs more support, UseChat.ai will seamlessly hand over from AI to human live chat.
The fully real-time platform was built to take advantage of Workers and Durable Objects from day one. Workers & Durable Objects power the real-time chatbot, integrated with OpenAI ChatGPT API, Queues manages website content crawling, and KV stores crawled website content.
“It wouldn’t have been possible to build and scale our real-time platform as quickly as we did without Workers & Durable Objects. Knowing that a customer can embed our chatbot on their website with millions of visitors, and it will just work lets me sleep sound at night.” – Damien Tanner
Eclipse AI
Eclipse’s mission is to revolutionise the way businesses approach customer feedback. Based in Melbourne, Australia, Eclipse empowers users to make data-driven decisions by leveraging AI for comprehensive customer understanding. If your goals are to; reduce churn, drive growth or improve your customer experience, Eclipse puts the data at your fingertips and provides you actionable insights to drive your business.
Eclipse allows you to unify your Voice of Customer channels (i.e. phone, video calls, emails, support tickets, public reviews and surveys), the platform analyses it at scale and utilises Generative AI to provide key actions specific to your business. Focused on democratising data driven decision-making, Eclipse AI has launched a Freemium model, leveling the playing field for businesses of all sizes to utilise this tech.
“We believe the future of the internet is on the edge and Cloudflare is at the forefront of this revolution with a growing network that covers most major cities around the world. As a startup with limited resources, the Cloudflare developer platform has enabled our dev team to focus on building our product and not be burdened with managing infrastructure. Best of all, it scales automagically with a pay-as-you-go pricing model.” – Saad Irfani
Eclipse AI uses:
Cloudflare Workers for the backend API.
Cloudflare Pages for the frontend to deliver content across hundreds of cities worldwide.
Cloudflare Images to serve cascaded versions of each asset
Cloudflare R2 as the object store.
“As a platform that transcribes video/audio call recordings for VoC analytics, choosing a reliable object-store was an important decision. After the launch of R2 we switched from S3 and noticed a staggering 70% reduction in cost. Overall, we are believers in Cloudflare’s vision and are eagerly awaiting the release of D1 so that our entire stack can be powered by the edge.” – Saad Irfani
Embley
Embley, based in Sierre, Switzerland, is a Marketplace Automation Platform that powers the future of marketplace commerce by enabling businesses to scale better and faster.
The platform combines the most advanced technologies such as Artificial Intelligence and Process Mining to strengthen a fast end-to-end business process automation with products tailored to marketplaces businesses.
Cloudflare powers Embley’s frontend through Cloudflare Pages that serves what they call the “control center” to the users at the edge. The control center is the core of the back-office tools that users use to manage their marketplace operations. The backend is powered by Workers, providing a serverless execution environment, connected to the frontend through the Cloudflare API Gateway.
“The primary reasons for choosing Cloudflare are the powerful serverless products that enable us to run an entire tech stack without having to care about infrastructure. Also, the scalability of Cloudflare’s global network is appealing. Finally, security is embedded into Cloudflare through the Zero Trust platform that enable us to secure both production but also the lower environments including the secured access to internal systems and apps.” – Laurent Christen
Chainfuse
ChainFuse, based in San Francisco, CA, is a multichannel AI platform that assists organizations in collecting and analyzing user feedback on a large scale. Their AI-powered community tool aids support, community, and product teams in garnering valuable insights, facilitating more informed product decisions.
“We have used Google Cloud and AWS, but our experience with Cloudflare has particularly stood out. Since 2016, we have consistently chosen Cloudflare for our projects due to their excellent product range and reliable performance. Saying "it just works" is an understatement.” – Victor Sanchez
ChainFuse relies on Workers for the core of their backend infrastructure and a range of our security solutions to secure their applications and employees. WAF and its vast adaptability is a major defense, blocking an average of 48% of all incoming traffic, effectively weeding out known malicious traffic. Additionally, it employs rate limiting to prevent abuse. API Shield, used in conjunction with WAF, intercepts an average of 1.32% of the incoming traffic that manages to bypass WAF. The Zero Trust Gateway not only secures their employees but also is integrated into their product to prevent end users from exploiting the platform for malicious purposes.
ai.moda
ai.moda, headquartered in Grand Cayman, Cayman Islands, is building multiple AI tools with a focus on helping bridge humans, developers, and machines together. They’re currently building several ChatGPT plugins (such as CVEs and S3 storage), YourCrowd (MTurk compatible API for humans and bots), and Valkyrie (an automated zero-trust hardening for Linux applications and cloud workloads).
Plugins like CVEs by ai.moda bring real-time vulnerability information into ChatGPT.
“By using Workers, we’re able to create SaaS services at a scale and cost that just wouldn’t be possible without. If you want a new ChatGPT plugin, let us know on Friday, and by Monday we can have it developed and shipped in production! The rapid development allowed by Workers is a huge advantage for us.”- David Manouchehri
They chose Cloudflare mainly because of the Workers platform. Being able to deploy new code rapidly globally with a single command has greatly simplified their DevOps needs, and they no longer need to worry about whether they have enough resources to scale up.
ai.moda is a heavy user of Cloudflare Workers, Email Workers, Pages, R2, Durable Objects, Constellation (now Workers AI), Cache API, DMARC management, Access, WAF, logpush, DNS, Health Checks, Zaraz, and D1.
We share the opinion of many of these companies that witnessing the incredible breadth and versatility of AI technology and the impact it has on organizations and people is astonishing, and we can’t wait to see where this technology takes people. If you’re inspired by reading these stories and want to start building, check out the Startup program and our Cloudflare for AI solutions.
If you want to share your story about what you’ve built, reach out to us or join the Developers Discord.
*** Since launching the Launchpad program in 2022, we have showcased a number of exciting startups looking to build the next big application. Whether innovative website designs, content delivery or AI-based features, the internet is waiting for the next big thing.
With that said, we are proud to announce our revamped Built With Workers site, an opportunity to showcase your projects with the developer community. Built With Workers will serve as a public facing repository of full-stack applications running on the Developer Platform to demonstrate how Cloudflare is helping developers build amazing applications.
Whether you're using R2 object storage to store web data, utilizing Workers to manage your application functionality or designing the next big web application UI with Pages, we love seeing what our customers are building!
To showcase your latest and greatest projects featured on Built with Workers, complete and submit our quick form to share your projects or business with us. Share how you're using Cloudflare products to build the application of your dreams or help expand developer knowledge with our developer community.
Cloudflare is officially a teenager. We launched on September 27, 2010. Today we celebrate our thirteenth birthday. As is our tradition, we use the week of our birthday to launch products that we think of as our gift back to the Internet. More on some of the incredible announcements in a second, but we wanted to start by talking about something more fundamental: our identity.
Like many kids, it took us a while to fully understand who we are. We chafed at being put in boxes. People would describe Cloudflare as a security company, and we'd say, "That's not all we do." They'd say we were a network, and we'd object that we were so much more. Worst of all, they'd sometimes call us a "CDN," and we'd remind them that caching is a part of any sensibly designed system, but it shouldn't be a feature unto itself. Thank you very much.
And so, yesterday, the day before our thirteenth birthday, we announced to the world finally what we realized we are: a connectivity cloud.
The connectivity cloud
What does that mean? "Connectivity" means we measure ourselves by connecting people and things together. Our job isn't to be the final destination for your data, but to help it move and flow. Any application, any data, anyone, anywhere, anytime — that's the essence of connectivity, and that’s always been the promise of the Internet.
"Cloud" means the batteries are included. It scales with you. It’s programmable. Has consistent security built in. It’s intelligent and learns from your usage and others' and optimizes for outcomes better than you ever could on your own.
Our connectivity cloud is worth contrasting against some other clouds. The so-called hyperscale public clouds are, in many ways, the opposite. They optimize for hoarding your data. Locking it in. Making it difficult to move. They are captivity clouds. And, while they may be great for some things, their full potential will only truly be unlocked for customers when combined with a connectivity cloud that lets you mix and match the best of each of their features.
Enabling the future
That's what we're seeing from the hottest startups these days. Many of the leading AI companies are using Cloudflare's connectivity cloud to move their training data to wherever there's excess GPU capacity. We estimate that across the AI startup ecosystem, Cloudflare is the most commonly used cloud provider. Because, if you're building the future, you know connectivity and the agility of the cloud are key.
We've spent the last year listening to our AI customers and trying to understand what the future of AI will look like and how we can better help them build it. Today, we're releasing a series of products and features borne of those conversations and opening incredible new opportunities.
The biggest opportunity in AI is inference. Inference is what happens when you type a prompt to write a poem about your love of connectivity clouds into ChatGPT and, seconds later, get a coherent response. Or when you run a search for a picture of your passport on your phone, and it immediately pulls it up.
The models that power those modern miracles take significant time to generate — a process called training. Once trained though, they can have new data fed through them over and over to generate valuable new output.
Where inference happens
Before today, those models could run in two places. The first was the end user's device — like in the case of the search for “passport” in the photos on your phone. When that's possible it's great. It's fast. Your private data stays local. And it works even when there's no network access. But it's also challenging. Models are big and the storage on your phone or other local device is limited. Moreover, putting the fastest GPU resources to process these models in your phone makes the phone expensive and burns precious battery resources.
The alternative has been the centralized public cloud. This is what’s used for a big model like OpenAI’s GPT-4, which runs services like ChatGPT. But that has its own challenges. Today, nearly all the GPU resources for AI are deployed in the US — a fact that rightfully troubles the rest of the world. As AI queries get more personal, sending them all to some centralized cloud is a potential security and data locality disaster waiting to happen. Moreover, it's inherently slow and less efficient and therefore more costly than running the inference locally.
A third place for inference
Running on the device is too small. Running on the centralized public cloud is too far. It’s like the story of “Goldilocks and the Three Bears”: the right answer is somewhere in between. That's why today we're excited to be rolling out modern GPU resources across Cloudflare's global connectivity cloud. The third place for AI inference. Not too small. Not too far. The perfect step in between. By the end of the year, you'll be able to run AI models in more than 100 cities in 40+ countries where Cloudflare operates. By the end of 2024, we plan to have inference-tuned GPUs deployed in nearly every city that makes up Cloudflare's global network and within milliseconds of nearly every device connected to the Internet worldwide.
(A brief shout out for the Cloudflare team members who are, as of this moment, literally dragging suitcases full of NVIDIA GPU cards around the world and installing them in the servers that make up our network worldwide. It takes a lot of atoms to move all the bits that we do, and it takes intrepid people spanning the globe to update our network to facilitate these new capabilities.)
Running AI in a connectivity cloud like Cloudflare gives you the best of both worlds: nearly boundless resources running locally near any device connected to the Internet. And we've made it flexible to run whatever models a developer creates, easy to use without needing a dev ops team, and inexpensive to run where you only pay for when we're doing inference work for you.
To make this tangible, think about a Cloudflare customer like Garmin. They make devices that need to be smart but also affordable and have the longest possible battery life. As explorers rely on them literally to navigate out of harrowing conditions, tradeoffs aren't an option. That's why, when they heard about Cloudflare Workers AI, they immediately knew it was something they needed to try. Here's what Aaron Dearinger, Edge Architect at Garmin International said to us:
"Garmin is alongside our users for all their runs, workouts, and outdoor adventures, and we want to ensure that our watches and devices' power can last weeks and months instead of hours or days. We're excited for Cloudflare's innovations to ensure AI is performant, fast, close to users, and importantly privacy-first. This holds a lot of potential to us as we aim to bring more advanced fitness, wellness, and adventure insights to our users as they explore."
They are one of the limited set of customers we gave an early sneak peek to, all of whom immediately started running off ideas of what they could do next and clamoring to get more access. We feel like we’ve seen it and are here to report: the not-so-distant future is super cool.
The spirit of helping build a better Internet
Over the years we've announced several things on our birthday that have gone on to change the future of the Internet. On our first birthday, we announced an IPv6 gateway that has helped the Internet scale past its early protocol decisions. On our fourth birthday, we announced that we were making encryption free and doubled the size of the encrypted web in a day. On our seventh birthday, we launched the Workers platform that has revolutionized how modern applications are developed. On our eleventh birthday we announced R2 and further freed data from the captivity clouds.
This year, as we celebrate Cloudflare's thirteenth birthday, we set out to have as dramatic an impact on AI development as we have in other areas we've focused on in the past: providing tools that bring affordable, powerful AI inference to anyone, anywhere on Earth.
Closing with a poem
And so, to commemorate that, let's close with a poem about the connectivity cloud. This one was generated using a tiny bit of code and Meta's Llama 2 LLM model running on Cloudflare's Workers AI platform in a data center not far from where we're writing this…
Prompt: “Write a poem that talks about the connectivity cloud and contrast it with the captivity cloud”
The connectivity cloud, a wondrous sight to see, Where data flows and knowledge is set free, A place where minds meet and ideas take flight, A world of endless possibility in sight.
But then there's the captivity cloud, a darker place, Where thoughts are trapped and minds are in disgrace, A prison of the mind, where freedom's lost, A world of endless sorrow and cost.
So let us choose the connectivity cloud, And let our minds be free and allowed, To soar and glide and reach for the sky, And never be held back, but always fly.
Today, Cloudflare’s Workers platform is the place over a million developers come to build sophisticated full-stack applications that previously wouldn’t have been possible.
Of course, Workers didn’t start out that way. It started, on a day like today, as a Birthday Week announcement. It may not have had all the bells and whistles that exist today, but if you got to try Workers when it launched, it conjured this feeling: “this is different, and it’s going to change things”. All of a sudden, going from nothing to a fully scalable, global application took seconds, not hours, days, weeks or even months. It was the beginning of a different way to build applications.
If you’ve played with generative AI over the past few months, you may have had a similar feeling. Surveying a few friends and colleagues, our “aha” moments were all a bit different, but the overarching sentiment across the industry at this moment is unanimous — this is different, and it’s going to change things.
Today, we’re excited to make a series of announcements that we believe will make a similar impact as Workers did in the future of computing. Without burying the lede any further, here they are:
Workers AI (formerly known as Constellation), running on NVIDIA GPUs on Cloudflare’s global network, bringing the serverless model to AI — pay only for what you use, spend less time on infrastructure, and more on your application.
Vectorize, our vector Database, making it easy, fast and affordable to index and store vectors to support use cases that require access not just to running models, but customized data too.
AI Gateway, giving organizations the tools to cache, rate limit and observe their AI deployments regardless of where they’re running.
But that’s not all.
Doing big things is a team sport, and we don’t want to do it alone. Like in so much of what we do, we stand on the shoulders of giants. We’re thrilled to partner with some of the biggest players in the space: NVIDIA, Microsoft, Hugging Face, Databricks, and Meta.
Our announcements today mark just the beginning of Cloudflare’s journey into the AI space, like Workers did six years ago. While we encourage you to dive into each of our announcements (you won’t be disappointed!), we also wanted to take the chance to step back and provide you with a bit of our broader vision for AI, and how these announcements fit into it.
Inference: The future of AI workloads
There are two main processes involved in AI: training and inference.
Training a generative AI model is a long-running (sometimes months-long) compute intensive process, which results in a model. Training workloads are therefore best suited for running in traditional centralized cloud locations. Given the recent challenges in being able to obtain long-running access to GPUs, resulting in companies going multi-cloud, we’ve talked about the ways in which R2 can provide an essential service that eliminates egress fees for the training data to be accessed from any compute cloud. But that’s not what we’re here to talk about today.
While training requires many resources upfront, the much more ubiquitous AI-related compute task is inference. If you’ve recently asked ChatGPT a question, generated an image, translated some text, then you’ve performed an inference task. Since inference is required upon every single invocation (rather than just once), we expect that inference will become the dominant AI-related workload.
If training is best suited for a centralized cloud, then what is the best place for inference?
The network — “just right” for inference
The defining characteristic of inference is that there’s usually a user waiting on the other end of it. That is, it’s a latency sensitive task.
The best place, you might think, for a latency sensitive task is on the device. And it might be in some cases, but there are a few problems. First, hardware on devices is not nearly as powerful. Battery life.
On the other hand, you have centralized cloud compute. Unlike devices, the hardware running in centralized cloud locations has nothing if not horsepower. The problem, of course, is that it’s hundreds of milliseconds away from the user. And sometimes, they’re even across borders, which presents its own set of challenges.
So devices are not yet powerful enough, and centralized cloud is too far away. This makes the network the goldilocks of inference. Not too far, with sufficient compute power — just right.
The first inference cloud, running on Region Earth
One lesson we learned building our developer platform is that running applications at network scale not only helps optimize performance and scale (though obviously that’s a nice benefit!), but even more importantly, creates the right level of abstraction for developers to move fast.
Workers AI for serverless inference
Kicking things off with our announcement of Workers AI, we’re bringing the first truly serverless GPU cloud, to its perfect match — Region Earth. No machine learning expertise, no rummaging for GPUs. Just pick one of our provided models, and go.
We’ve put a lot of thought into designing Workers AI to make the experience of deploying a model as smooth as possible.
And if you’re deploying any models in the year 2023, chances are, one of them is an LLM.
Vectorize for… storing vectors!
To build an end-to-end AI-operated chat bot, you also need a way to present the user with a UI, parse the corpus of information you want to pass it (for example your product catalog), use the model to convert it into embeddings — and store them somewhere. Up until today, we offered the products you needed for the first two, but the latter — storing embeddings — requires a unique solution: a vector database.
Just as when we announced Workers, we soon after announced Workers KV — there’s little you can do with compute, without access to state. The same is true of AI — to build meaningful AI use cases, you need to give AI access to state. This is where a vector database comes into play, and why today we’re also excited to announce Vectorize, our own vector database.
AI Gateway for caching, rate limiting and visibility into your AI deployments
At Cloudflare, when we set out to improve something, the first step is always to measure it — if you can’t measure it, how can you improve it? When we heard about customers struggling to reign in AI deployment costs, we thought about how we would approach it — measure it, then improve it.
Our AI Gateway helps you do both!
Real-time observation capabilities empower proactive management, making it easier to monitor, debug, and fine-tune AI deployments. Leveraging it to cache, rate limit, and monitor AI deployments is essential for optimizing performance and managing costs effectively. By caching frequently used AI responses, it reduces latency and bolsters system reliability, while rate limiting ensures efficient resource allocation, mitigating the challenges of spiraling AI costs.
Collaborating with Meta to bring Llama 2 to our global network
Until recently, the only way to have access to an LLM was through calls to proprietary models. Training LLMs is a serious investment — in time, computing, and financial resources, and thus not something that’s accessible to most developers. Meta’s release of Llama 2, an open-source LLM, has presented an exciting shift, allowing developers to run and deploy their own LLMs. Except of course, one small detail — you still have to have access to a GPU to do so.
By making Llama 2 available as a part of the Workers AI catalog, we look forward to giving every developer access to an LLM — no configuration required.
Having a running model is, of course, just one component of an AI application.
Leveraging the ONNX runtime to make moving between cloud to edge to device seamless for developers
While the edge may be the optimal location for solving many of these problems, we do expect that applications will continue to be deployed at other locations along the spectrum of device, edge and centralized cloud.
Take for example, self-driving cars — when you’re making decisions where every millisecond matters, you need to make these decisions on the device. Inversely, if you’re looking to run hundred-billion parameter versions of models, the centralized cloud is going to be better suited for your workload.
The question then becomes: how do you navigate between these locations smoothly?
Since our initial release of Constellation (now called Workers AI), one technology we were particularly excited by was the ONNX runtime. The ONNX runtime creates a standardized environment for running models, which makes it possible to run various models across different locations.
We already talked about the edge as a great place for running inference itself, but it’s also great as a routing layer to help guide workloads smoothly across all three locations, based on the use case, and what you’re looking to optimize for — be it latency, accuracy, cost, compliance, or privacy.
Partnering with Hugging Face to provide optimized models at your fingertips
There’s nothing of course that can help developers go faster than meeting them where they are, so we are partnering with Hugging Face to bring serverless inference to available models, right where developers explore them.
Partnering with Databricks to make AI models
Together with Databricks, we will be bringing the power of MLflow to data scientists and engineers. MLflow is an open-source platform for managing the end-to-end machine learning lifecycle, and this partnership will make it easier for users to deploy and manage ML models at scale. With this partnership, developers building on Cloudflare Workers AI will be able to leverage MLFlow compatible models for easy deployment into Cloudflare’s global network. Developers can use MLflow to efficiently package, implement, deploy and track a model directly into Cloudflare’s serverless developer platform.
AI that doesn’t keep your CIO or CFO or General Counsel up at night
Things are moving quickly in AI, and it’s important to give developers the tools they need to get moving, but it’s hard to move fast when there are important considerations to worry about. What about compliance, costs, privacy?
Compliance-friendly AI
Much as most of us would prefer not to think about it, AI and data residency are becoming increasingly regulated by governments. With governments requiring that data be processed locally or that their residents’ data be stored in-country, businesses have to think about that in the context of where inference workloads run as well. While with regard to latency, the network edge provides the ability to go as wide as possible. When it comes to compliance, the power of a network that spans 300 cities, and an offering like our Data Localization Suite, we enable the granularity required to keep AI deployments local.
Budget-friendly AI
Talking to many of our friends and colleagues experimenting with AI, one sentiment seems to resonate — AI is expensive. It’s easy to let costs get away before even getting anything into production or realizing value from it. Our intent with our AI platform is to make costs affordable, but perhaps more importantly, only charge you for what you use. Whether you’re using Workers AI directly, or our AI gateway, we want to provide the visibility and tools necessary to prevent AI spend from running away from you.
Privacy-friendly AI
If you’re putting AI front and center of your customer experiences and business operations, you want to be reassured that any data that runs through it is in safe hands. As has always been the case with Cloudflare, we’re taking a privacy-first approach. We can assure our customers that we will not use any customer data passing through Cloudflare for inference to train large language models.
No, but really — we’re just getting started
We're just getting started with AI, folks, and boy, are we in for a wild ride! As we continue to unlock the benefits of this technology, we can't help but feel a sense of awe and wonder at the endless possibilities that lie ahead. From revolutionizing healthcare to transforming the way we work, AI is poised to change the game in ways we never thought possible. So buckle up, folks, because the future of AI is looking brighter than ever – and we can't wait to see what's next!
This wrap up message may have been generated by AI, but the sentiment is genuine — this is just the beginning, and we can’t wait to see what you build.
The best part of our job is the time we spend talking to Cloudflare customers. We always learn something new and interesting about their IT and security challenges.
In recent years, something about those conversations has changed. More and more, the biggest challenge customers tell us about isn’t something that’s easy to define. And it’s definitely not something you can address with an individual product or feature.
Rather, what we’re hearing from IT and security teams is that they are losing control of their digital environment.
This loss of control comes in a few flavors. They might express hesitance about adopting a new capability they know they need, because of compatibility concerns. Or maybe they’ll talk about how much time and effort it takes to make relatively simple changes, and how those changes take time away from more impactful work. If we had to sum the feeling up, it would be something like, “No matter how large my team or budget, it’s never enough to fully connect and protect the business.”
Does any of this feel familiar? If so, let us tell you that you are far from alone.
Reasons for loss of control
The rate of change in IT and security is accelerating, bringing with it dreaded complexity. IT and security teams are responsible for a wider variety of technological domains than they were in years past. Recent research from Forrester confirms these shifts: of teams responsible for securing in-office, remote, and hybrid workers, 52% only took that on in the past five years. Meanwhile, 46% gained responsibility for managing and securing public cloud applications in that time, and 53% were handed the thorny issue of regulatory compliance.
IT and security teams have been handed a monumental challenge: connect remote teams, on-premises teams and infrastructure, multiple cloud environments, SaaS apps, and more, so they function like a single, secure environment. But doing so is difficult for multiple reasons:
In most businesses, proprietary infrastructure, unique compliance needs, and semi-compatible processes and configurations make it hard to connect clouds, SaaS apps, web apps, and on-prem infrastructure. Those domains simply weren’t built to work together easily and securely.
Conway’s Law tells us that systems tend to match the communication structure of their organization. And, through no fault of their own, many IT and security teams are quite siloed.
The circumstances are often ripe for IT and security to get bogged down with workarounds and tangled interdependencies.
Luckily, we’ve found a way forward.
Welcome to the connectivity cloud
Frequently, an important part of customer conversations is being able to read between the lines. When customers speak about loss of control, they seem to be quietly wishing for something they think doesn’t exist. What they want is a connective tissue for everything IT and security are responsible for — something that reduces complexity by working with everything in the environment, being available everywhere, and performing whatever security, networking, and development functions are needed.
Further research confirmed our suspicions. Surveys of IT and security leaders indicate that 72% would highly value a secure “any-to-any” cloud platform. And they said they would invest an average of 16% of their entire IT and security budget in such a platform.
That got us to thinking — what exactly would that sort of cloud platform look like? How would it accomplish everything it had to?
We’ve got answers to share: a connectivity cloud.
A connectivity cloud is a new approach for delivering the many services companies need to secure and connect their digital environment. It’s a unified, intelligent, platform of programmable cloud-native services that enable any-to-any connectivity between all networks (enterprise and internet), cloud environments, applications and users. It includes a huge array of security, performance, and developer services — not with an eye to replace everything everywhere, but with the ability to fit in wherever needed and consolidate many critical services onto a single platform.
A connectivity cloud is built around four fundamental principles.
Deep integration — Organizations rely on the Internet to connect various elements of their digital environment with their workers, partners and customers. A connectivity cloud is integrated natively with the Internet and with enterprise networks, offering secure, low-latency, infinitely scalable connectivity between every user, application, and infrastructure. It’s as fast and straightforward as the Internet at its best, without the risk or uncertainty.
Programmability — Every enterprise digital environment has proprietary infrastructure, multiple clouds, unique compliance needs, and other highly specific tooling, processes, and configurations. A connectivity cloud’s architecture provides limitless interoperability and customizable networking, letting it adapt to those unique needs while still providing consistent user experiences and efficient management.
Platform intelligence — Organizations need a wide variety of services to connect and secure everything in their digital environment. But integrating everything is onerous, and trying to manage it all causes inefficiency and security gaps. A well-architected connectivity cloud has a wide range of services built in at a foundational level, and analyzes extremely high volumes and varieties of traffic in order to automatically update intelligence models.
Simplicity — Too many IT and security services means too many dashboards, leading to inefficiency, poor visibility, and alert fatigue. While 100% consolidation onto one platform isn’t the answer, a connectivity cloud greatly reduces tool sprawl and dashboard overload by managing much more of the IT environment from a single pane of glass.
With these qualities, the connectivity cloud lets you add new services to your digital environment without losing even more control — and also helps restore control to what you’ve already got.
Cloudflare’s connectivity cloud
We’ll admit we’re predisposed to find those four qualities particularly important. From our earliest days, we’ve built our services based on the principles of integration, programmability, platform intelligence, and simplicity. And now, our overall portfolio is comprehensive enough to help customers achieve these benefits when tackling a huge array of security and IT needs.
Because of this approach, we’re proud to say that Cloudflare is the world’s first connectivity cloud.
But don’t take our word for it. Here are a few examples of customers that have used Cloudflare to help resolve their own crises of control:
Conrad Electric: Secure access for a global distributed workforce
A connectivity cloud’s programmability, deep network integration, and built-in intelligence make it ideal for delivering secure access to corporate resources.
The electronics retailer Conrad Electronic told us, “Just keeping people online created a series of administrative bottlenecks.” Nearly half of their 2,300 employees need to access corporate applications remotely. Enabling that access was burdensome: they had to deploy and configure VPN clients for each user.
Conrad Electronic now uses Cloudflare’s connectivity cloud to provide secure remote access to hundreds of corporate applications. Their management burden is significantly lower, with their team telling us they now have much more time per month to devote to improving their web operations. What’s more, their security posture is stronger: “We can restrict specific individuals or secure sensitive areas with a mouse click. Not having to maintain 1,000 VPN profiles improves our security and saves us time and money.”
Carrefour: Deliver and manage trusted customer-facing applications
A connectivity cloud’s threat intelligence, network integration, and unified interface also make it excellent at closing securing gaps and enabling secure application delivery on a global scale.
The multinational retail and wholesaling company Carrefour has a thriving and rapidly growing ecommerce presence. However, when cyber attacks ramped up, simply growing their security stack didn’t help. As their security team told us, “The interlacing of multiple tools complicated coordination and control of the architecture…additionally, the lack of integration across tools made investigating and resolving security and performance issues a complex and time-consuming effort.”
As part of their broader security transformation, they adopted Cloudflare’s connectivity cloud to prevent web exploits, zero-day threats, and malicious bot attacks. Doing so allowed them to replace five security tools from different vendors. And since then, they’ve reduced their incident resolution time by 75%.
Canva: Build innovative applications
Finally, a connectivity cloud’s programmability and network integration help it power innovative development in almost any context.
The global design juggernaut Canva is one example. Previously, they used a variety of developer platforms to run custom code at the network edge. But they found those services too time-consuming to use, and ran into limitations that held their innovation back.
Cloudflare’s connectivity cloud has become “a critical part of our software” They use the connectivity cloud’s developer services to build and run custom code, optimize page delivery for SEO, and time-limit content access. Recently, they told us “Thanks to Cloudflare, we can focus on growing our product and expanding into new markets with confidence, knowing that our platform is fast, reliable, and secure.”
What’s more, their experience has led to them also adopting Cloudflare’s for secure access and application delivery — a hugely gratifying example of a connectivity cloud operating at full power.
Learn more about the connectivity cloud
Customers are the inspiration for our innovation, and our connectivity cloud vision is no exception. We live to make things easier, faster, more secure and more connected – and it’s amazing to see how the connectivity cloud helps reduce complexity and increase security.
You can learn more about the connectivity cloud here — but we hope that’s just the beginning. Reach out to all of us at Cloudflare to ask questions and make suggestions — I look forward to continuing the conversation discovering ways we can continue to help customers on their secure, connected journey.
Earlier in 2023, we announced Super Slurper, a data migration tool that makes it easy to copy large amounts of data to R2 from other cloud object storage providers. Since the announcement, developers have used Super Slurper to run thousands of successful migrations to R2!
While Super Slurper is perfect for cases where you want to move all of your data to R2 at once, there are scenarios where you may want to migrate your data incrementally over time. Maybe you want to avoid the one time upfront AWS data transfer bill? Or perhaps you have legacy data that may never be accessed, and you only want to migrate what’s required?
Today, we’re announcing the open beta of Sippy, an incremental migration service that copies data from S3 (other cloud providers coming soon!) to R2 as it’s requested, without paying unnecessary cloud egress fees typically associated with moving large amounts of data. On top of addressing vendor lock-in, Sippy makes stressful, time-consuming migrations a thing of the past. All you need to do is replace the S3 endpoint in your application or attach your domain to your new R2 bucket and data will start getting copied over.
How does it work?
Sippy is an incremental migration service built directly into your R2 bucket. Migration-specific egress fees are reduced by leveraging requests within the flow of your application where you’d already be paying egress fees to simultaneously copy objects to R2. Here is how it works:
When an object is requested from Workers, S3 API, or public bucket, it is served from your R2 bucket if it is found.
If the object is not found in R2, it will simultaneously be returned from your S3 bucket and copied to R2.
Note: Some large objects may take multiple requests to copy.
That means after objects are copied, subsequent requests will be served from R2, and you’ll begin saving on egress fees immediately.
Start incrementally migrating data from S3 to R2
Create an R2 bucket
To get started with incremental migration, you’ll first need to create an R2 bucket if you don’t already have one. To create a new R2 bucket from the Cloudflare dashboard:
To learn more about other ways to create R2 buckets refer to the documentation on creating buckets.
Enable Sippy on your R2 bucket
Next, you’ll enable Sippy for the R2 bucket you created. During the beta, you can do this by using the API. Here’s an example of how to enable Sippy for an R2 bucket with cURL:
For more information on getting started, please refer to the documentation. Once enabled, requests to your bucket will now start copying data over from S3 if it’s not already present in your R2 bucket.
Finish your migration with Super Slurper
You can run your incremental migration for as long as you want, but eventually you may want to complete the migration to R2. To do this, you can pair Sippy with Super Slurper to easily migrate your remaining data that hasn’t been accessed to R2.
What’s next?
We’re excited about open beta, but it’s only the starting point. Next, we plan on making incremental migration configurable from the Cloudflare dashboard, complete with analytics that show you the progress of your migration and how much you are saving by not paying egress fees for objects that have been copied over so far.
If you are looking to start incrementally migrating your data to R2 and have any questions or feedback on what we should build next, we encourage you to join our Discord community to share!
We launched the Cloudflare Radar Outage Center (CROC) during Birthday Week 2022 as a way of keeping the community up to date on Internet disruptions, including outages and shutdowns, visible in Cloudflare’s traffic data. While some of the entries have their genesis in information from social media posts made by local telecommunications providers or civil society organizations, others are based on an internal traffic anomaly detection and alerting tool. Today, we’re adding this alerting feed to Cloudflare Radar, showing country and network-level traffic anomalies on the CROC as they are detected, as well as making the feed available via API.
Building on this new functionality, as well as the route leaks and route hijacks insights that we recently launched on Cloudflare Radar, we are also launching new Radar notification functionality, enabling you to subscribe to notifications about traffic anomalies, confirmed Internet outages, route leaks, or route hijacks. Using the Cloudflare dashboard’s existing notification functionality, users can set up notifications for one or more countries or autonomous systems, and receive notifications when a relevant event occurs. Notifications may be sent via e-mail or webhooks — the available delivery methods vary according to plan level.
Traffic anomalies
Internet traffic generally follows a fairly regular pattern, with daily peaks and troughs at roughly the same volumes of traffic. However, while weekend traffic patterns may look similar to weekday ones, their traffic volumes are generally different. Similarly, holidays or national events can also cause traffic patterns and volumes to differ significantly from “normal”, as people shift their activities and spend more time offline, or as people turn to online sources for information about, or coverage of, the event. These traffic shifts can be newsworthy, and we have covered some of them in past Cloudflare blog posts (King Charles III coronation, Easter/Passover/Ramadan, Brazilian presidential elections).
However, as you also know from reading our blog posts and following Cloudflare Radar on social media, it is the more drastic drops in traffic that are a cause for concern. Some are the result of infrastructure damage from severe weather or a natural disaster like an earthquake and are effectively unavoidable, but getting timely insights into the impact of these events on Internet connectivity is valuable from a communications perspective. Other traffic drops have occurred when an authoritarian government orders mobile Internet connectivity to be shut down, or shuts down all Internet connectivity nationwide. Timely insights into these types of anomalous traffic drops are often critical from a human rights perspective, as Internet shutdowns are often used as a means of controlling communication with the outside world.
Over the last several months, the Cloudflare Radar team has been using an internal tool to identify traffic anomalies and post alerts for followup to a dedicated chat space. The companion blog post Gone Offline: Detecting Internet Outages goes into deeper technical detail about our traffic analysis and anomaly detection methodologies that power this internal tool.
Many of these internal traffic anomaly alerts ultimately result in Outage Center entries and Cloudflare Radar social media posts. Today, we’re extending the Cloudflare Radar Outage Center and publishing information about these anomalies as we identify them. As shown in the figure below, the new Traffic anomalies table includes the type of anomaly (location or ASN), the entity where the anomaly was detected (country/region name or autonomous system), the start time, duration, verification status, and an “Actions” link, where the user can view the anomaly on the relevant entity traffic page or subscribe to a notification. (If manual review of a detected anomaly finds that it is present in multiple Cloudflare traffic datasets and/or is visible in third-party datasets, such as Georgia Tech’s IODA platform, we will mark it as verified. Unverified anomalies may be false positives, or related to Netflows collection issues, though we endeavor to minimize both.)
In addition to this new table, we have updated the Cloudflare Radar Outage Center map to highlight where we have detected anomalies, as well as placing them into a broader temporal context in a new timeline immediately below the map. Anomalies are represented as orange circles on the map, and can be hidden with the toggle in the upper right corner. Double-bordered circles represent an aggregation across multiple countries, and zooming in to that area will ultimately show the number of anomalies associated with each country that was included in the aggregation. Hovering over a specific dot in the timeline displays information about the outage or anomaly with which it is associated.
Internet outage information has been available via the Radar API since we launched the Outage Center and API in September 2022, and traffic anomalies are now available through a Radar API endpoint as well. An example traffic anomaly API request and response are shown below.
Timely knowledge about Internet “events”, such as drops in traffic or routing issues, are potentially of interest to multiple audiences. Customer service or help desk agents can use the information to help diagnose customer/user complaints about application performance or availability. Similarly, network administrators can use the information to better understand the state of the Internet outside their network. And civil society organizations can use the information to inform action plans aimed at maintaining communications and protecting human rights in areas of conflict or instability. With the new notifications functionality also being launched today, you can subscribe to be notified about observed traffic anomalies, confirmed Internet outages, route leaks, or route hijacks, at a country or autonomous system level. In the following sections, we discuss how to subscribe to and configure notifications, as well as the information contained within the various types of notifications.
Subscribing to notifications
Note that you need to log in to the Cloudflare dashboard to subscribe to and configure notifications. No purchase of Cloudflare services is necessary — just a verified email address is required to set up an account. While we would have preferred to not require a login, it enables us to take advantage of Cloudflare’s existing notifications engine, allowing us to avoid having to dedicate time and resources to building a separate one just for Radar. If you don’t already have a Cloudflare account, visit https://dash.cloudflare.com/sign-up to create one. Enter your username and a unique strong password, click “Sign Up”, and follow the instructions in the verification email to activate your account. (Once you’ve activated your account, we also suggest activating two-factor authentication (2FA) as an additional security measure.)
Once you have set up and activated your account, you are ready to start creating and configuring notifications. The first step is to look for the Notifications (bullhorn) icon – the presence of this icon means that notifications are available for that metric — in the Traffic, Routing, and Outage Center sections on Cloudflare Radar. If you are on a country or ASN-scoped traffic or routing page, the notification subscription will be scoped to that entity.
Look for this icon in the Traffic, Routing, and Outage Center sections of Cloudflare Radar to start setting up notifications.In the Outage Center, click the icon in the “Actions” column of an Internet outages table entry to subscribe to notifications for the related location and/or ASN(s). Click the icon alongside the table description to subscribe to notifications for all confirmed Internet outages.In the Outage Center, click the icon in the “Actions” column of a Traffic anomalies table entry to subscribe to notifications for the related entity. Click the icon alongside the table description to subscribe to notifications for all traffic anomalies.On country or ASN traffic pages, click the icon alongside the description of the traffic trends graph to subscribe to notifications for traffic anomalies or Internet outages impacting the selected country or ASN.On country or ASN routing pages, click the icon alongside the description to subscribe to notifications for route leaks or origin hijacks related to the selected country or ASN.Within the Route Leaks or Origin Hijacks tables on the routing pages, click the icon in a table entry to subscribe to notifications for route leaks or origin hijacks for referenced countries and/or ASNs.
After clicking a notification icon, you’ll be taken to the Cloudflare login screen. Enter your username and password (and 2FA code if required), and once logged in, you’ll see the Add Notification page, pre-filled with the key information passed through from the referring page on Radar, including relevant locations and/or ASNs. (If you are already logged in to Cloudflare, then you’ll be taken directly to the Add Notification page after clicking a notification icon on Radar.) On this page, you can name the notification, add an optional description, and adjust the location and ASN filters as necessary. Enter an email address for notifications to be sent to, or select an established webhook destination (if you have webhooks enabled on your account).
Click “Save”, and the notification is added to the Notifications Overview page for the account.
You can also create and configure notifications directly within Cloudflare, without starting from a link on Radar a Radar page. To do so, log in to Cloudflare, and choose “Notifications” from the left side navigation bar. That will take you to the Notifications page shown below. Click the “Add” button to add a new notification.
On the next page, search for and select “Radar” from the list of Cloudflare products for which notifications are available.
On the subsequent “Add Notification” page, you can create and configure a notification from scratch. Event types can be selected in the “Notify me for:” field, and both locations and ASNs can be searched for and selected within the respective “Filtered by (optional)” fields. Note that if no filters are selected, then notifications will be sent for all events of the selected type(s). Add one or more emails to send notifications to, or select a webhook target if available, and click “Save” to add it to the list of notifications configured for your account.
It is worth mentioning that advanced users can also create and configure notifications through the Cloudflare API Notification policies endpoint, but we will not review that process within this blog post.
Notification messages
Example notification email messages are shown below for the various types of events. Each contains key information like the type of event, affected entities, and start time — additional relevant information is included depending on the event type. Each email includes both plaintext and HTML versions to accommodate multiple types of email clients. (Final production emails may vary slightly from those shown below.)
Internet outage notification emails include information about the affected entities, a description of the cause of the outage, start time, scope (if available), and the type of outage (Nationwide, Network, Regional, or Platform), as well as a link to view the outage in a Radar traffic graph.Traffic anomaly notification emails simply include information about the affected entity and a start time, as well as a link to view the anomaly in a Radar traffic graph.BGP hijack notification emails include information about the hijacking and victim ASNs, affected IP address prefixes, the number of BGP messages (announcements) containing leaked routes, the number of peers announcing the hijack, detection timing, a confidence level on the event being a true hijack, and relevant tags, as well as a link to view details of the hijack event on Radar.BGP route leak notification emails include information about the AS that the leaked routes were learned from, the AS that leaked the routes, the AS that received and propagated the leaked routes, the number of affected prefixes, the number of affected origin ASes, the number of BGP route collector peers that saw the route leak, and detection timing, as well as a link to view details of the route leak event on Radar.
If you are sending notifications to webhooks, you can integrate those notifications into tools like Slack. For example, by following the directions in Slack’s API documentation, creating a simple integration took just a few minutes and results in messages like the one shown below.
Conclusion
Cloudflare’s unique perspective on the Internet provides us with near-real-time insight into unexpected drops in traffic, as well as potentially problematic routing events. While we’ve been sharing these insights with you over the past year, you had to visit Cloudflare Radar to figure out if there were any new “events”. With the launch of notifications, we’ll now automatically send you information about the latest events that you are interested in.
We encourage you to visit Cloudflare Radar to familiarize yourself with the information we publish about traffic anomalies, confirmed Internet outages, BGP route leaks, and BGP origin hijacks. Look for the notification icon on the relevant graphs and tables on Radar, and go through the workflow to set up and subscribe to notifications. (And don’t forget to sign up for a Cloudflare account if you don’t have one already.) Please send us feedback about the notifications, as we are constantly working to improve them, and let us know how and where you’ve integrated Radar notifications into your own tools/workflows/organization.
One of the wonderful things about the Internet is that, whether as a consumer or producer, the cost has continued to come down. Back in the day, it used to be that you needed a server room, a whole host of hardware, and an army of folks to help keep everything up and running. The cloud changed that, but even with that shift, services like SSL or unmetered DDoS protection were out of reach for many. We think that the march towards a more accessible Internet — both through ease of use, and reduced cost — is a wonderful thing, and we’re proud to have played a part in making it happen.
Every now and then, however, the march of progress gets interrupted.
On July 28, 2023, Amazon Web Services (AWS) announced that they would begin to charge “per IP per hour for all public IPv4 addresses, whether attached to a service or not”, starting February 1, 2024. This change will add at least \$43 extra per year for every IPv4 address Amazon customers use; this may not sound like much, but we’ve seen back of the napkin analysis that suggests this will result in an approximately \$2bn tax on the Internet.
In this blog, we’ll explain a little bit more about the technology involved, but most importantly, give you a step-by-step walkthrough of how Cloudflare can help you not only eliminate the need to pay Amazon for something that they shouldn’t be charging you for in the first place, but also if you’re a Pro or Business subscriber, we want to put \$43 in your pocket instead of taking it out. Don’t give Amazon \$43 for IPv4, let us give you \$43 and throw in IPv4 as well.
How can Cloudflare help?
The only way to avoid Amazon’s IPv4 tax is to transition to IPv6 with AWS. But we recognize that not everyone is ready to make that shift — it can be an expensive and challenging process, and may present problems with hardware compatibility and network performance. We cover the finer details of these challenges below, so keep reading! Cloudflare can help ease this transition: let us deal with communicating to AWS using IPv6. Not only that, you’ll get all the rest of the benefits of using Cloudflare and our global network — including all the performance and security that Cloudflare is known for — and a \$43 dollar credit for using us!
IPv6 services like these are something we’ve been offering at Cloudflare for years – in fact this was first announced during Cloudflare's first birthday week in 2011! We’ve made this process simple to enable as well, so you can set this up as soon as today.
To set this feature up you will need to both enable IPv6 Compatibility and set up your origin for AWS to be an IPv6 origin.
To configure this feature simply follow these steps:
1. Login to your Cloudflare account.
2. Select the appropriate domain
3. Click the Network app.
4. Make sure IPv6 Compatibility is toggled on.
To get an IPv6 origin from Amazon you will likely have to follow these steps:
Associate an IPv6 CIDR block with your VPC and subnets
Update your route tables
Update your security group rules
Change your instance type
Assign IPv6 addresses to your instances
(Optional) Configure IPv6 on your instances
(For more information about this migration, check out this link.)
Once you have your IPv6 origins, you’ll want to update your origins on Cloudflare to use the IPv6 addresses. In the simple example of a single origin at root, this is done by creating a proxied (orange-cloud) AAAA record in your Cloudflare DNS editor:
Once that’s done, you can remove the A/IPv4 record(s) and traffic will move over to the v6 address. While this process is easy now, we’re working on how we can make moving to IPv6 on Cloudflare even easier.
Once you have these features configured and have traffic running through Cloudflare to your origin for at least 6 months, you will be eligible to have a $43 credit deposited right into your Cloudflare account! You can use this credit for your Pro or Biz subscription or even for Workers and R2 usage. See here for more information on how to opt in to this offer.
Through this feature Cloudflare provides the flexibility to manage your IPv6 settings as per your requirements. By leveraging Cloudflare's robust IPv6 support, you can ensure seamless connectivity for your users, while avoiding additional costs associated with public IPv4 addresses.
What’s wrong with IPv4?
So if Cloudflare has this solution, why should you even move to IPv6? Well to clearly explain this let's start with the problem with IPv4.
IP addresses are used to identify and reach resources on a network, which could be a private network, like your office's private network, or a complex public network like the Internet. An example of an IPv4 address would be 198.51.100.1 or 198.51.100.50. And there are approximately 4.3 billion unique IPv4 addresses like these for websites, servers, and other destinations on the Internet to use for routing.
4.3 billion IPv4 addresses may sound like a lot, but it’s not as IPv4 space is running out. In September 2015 ARIN, one of the regional Internet registries that allows people to acquire IP addresses, announced that they had no available space: if you want to buy an IPv4 address you have to go and talk to private companies who are selling them. These companies charge a pretty penny for their IPv4 addresses. It costs about $40 per IPv4 address today. To buy a grouping of IPv4 addresses, also known as a prefix of which the minimum required size is 256 IP addresses, costs about \$10,000.
IP addresses are necessary for having a domain or device on the Internet, but today IPv4 addresses are an increasingly more complicated resource to acquire. Therefore, to facilitate the growth of the Internet there needed to be more unique addresses made available without breaking the bank. That’s where IPv6 comes in.
IPv4 vs. IPv6
In 1995 the IETF (Internet Engineering Task Force) published the RFC for IPv6, which proposed to solve this problem of the limited IPv4 space. Instead of 32 bits of addressable space, IPv6 expanded to 128 bits of addressable space. This means that instead of 4.3 billion addresses available, there are approximately 340 undecillion IPv6 addresses available. This is roughly equivalent to the number of grains of sand on Earth.
So this problem is solved, why should you care? The answer is because many networks on the Internet still prefer IPv4, and companies like AWS are starting to charge money for IPv4 usage.
Let's speak on AWS first: AWS today owns one of the largest chunks of the IPv4 space. During a period of time when IPv4 addresses were on the private market to purchase for dollars per IP address, AWS chose to use its large capital to its advantage and buy up a large amount of the space. Today AWS owns 1.7% of the IPv4 address space which equates to ~100 million IPv4 addresses.
So you would think that moving to IPv6 is the right move, however, for the Internet community it’s proven to be quite a challenge.
When IPv6 was published in the 90s very few networks had devices that supported IPv6. However, today in 2023, that is not the case: global networks supporting IPv6 has increased to 46 percent, so the hardware limitations around supporting it are decreasing. Additionally, anti-abuse and security tools initially had no idea how to deal with attacks or traffic that used IPv6 address space, and this still remains an issue for some of these tools. In 2014, we made it even easier for origin tools to convert by creating pseudo IPv4 to help bridge the gap to those tools.
Despite all of this, many networks don’t have good support infrastructure for IPv6 networking since most networks were built on IPv4. At Cloudflare, we have built our network to support both protocols, known as “dual-stack”.
For a while there were also many networks which had markedly worse performance for IPv6 than IPv4. This is not true anymore, as of today we see only a slight degradation in IPv6 performance across the whole Internet compared to IPv4. The reasons for this include things like legacy hardware, sub-optimal IPv6 connectivity outside our network and high cost for deploying IPv6. You can see in the chart below the additional latency of IPv6 traffic on Cloudflare’s network as compared to IPv4 traffic:
There were many challenges to adopting IPv6, and for some these issues with hardware compatibility and network performance are still worries. This is why still using IPv4 can be useful to folks while transitioning to IPv6, which is what makes AWS’ decision to charge for IPv4 impactful on many websites.
So, don’t pay the AWS tax
At the end of the day the choice is clear: you could pay Amazon more to rent their IPs than to buy them, or move to Cloudflare and use our free service to help with the transition to IPv6 with little overhead.
Starting November 15, 2023, we’re merging Cloudflare Images and Image Resizing.
All Image Resizing features will be available as part of the Cloudflare Images product. To let you calculate your monthly costs more accurately and reliably, we’re changing how we bill to resize images that aren’t stored at Cloudflare. Our new pricing model will cost $0.50 per 1,000 unique transformations.
For existing Image Resizing customers, you can continue to use the legacy version of Image Resizing. When the merge is live, then you can opt into the new pricing model for more predictable pricing.
In this post, we'll cover why we came to this decision, what's changing, and how these changes might impact you.
Simplifying our products
When you build an application with images, you need to think about three separate operations: storage, optimization, and delivery.
In 2019, we launched Image Resizing, which can optimize and transform any publicly available image on the Internet based on a set of parameters. This enables our customers to deliver variants of a single image for each use case without creating and storing additional copies.
For example, an e-commerce platform for furniture retailers might use the same image of a lamp on both the individual product page and the gallery page for all lamps. They can use Image Resizing to optimize the image in its original aspect for a slider view, or manipulate and crop the image for a thumbnail view.
Two years later, we released Images to let developers build an end-to-end image management pipeline. Developers no longer need to use different vendors to handle storage, optimization, and delivery. With Images, customers can store and deliver their images from a single bucket at Cloudflare to streamline their workflow and eliminate egress fees.
Both products have overlapping features to optimize and manipulate images, which can be confusing for customers. Over the years, we've received numerous questions about which product is optimal for which use cases.
To simplify our products, we're merging Cloudflare Images and Image Resizing to let customers store, optimize, and deliver their images all from one product. Customers can continue to optimize their images without using Cloudflare for storage or purchase storage to manage their entire image pipeline through Cloudflare.
Transparent and predictable pricing
Pricing can cause headaches for Image Resizing customers.
We often hear from customers seeking guidance for calculating how much Image Resizing will cost each month. Today, you are billed for Image Resizing by the number of uncached requests to transform an image. However, caching behavior is often unpredictable, and you can't guarantee how long a given image stays cached. This means that you can't reliably predict their costs.
If you make 1M total requests to Image Resizing each month, then you won't know whether you'll be billed for 10K or 100K of these requests because our pricing model relies on cache. Since assets can be ejected from cache for a variety of reasons, bills for Image Resizing are unpredictable month over month. In some cases, the monthly bills are inconsistent even when traffic remains constant. In other cases, the monthly bill is much higher than our customers expected.
With the new Cloudflare Images, you will be billed only once per 30 days for each unique request to transform an image stored outside of Cloudflare, whether the transformation is cached. Customers will be billed $0.50 per 1,000 unique transformations per month.
In other words, if you resize one image to 100×100, then our new pricing model guarantees that you will be billed only once per month, whether there are 10K or 100K uncached requests to deliver the image at this size. If you resize 200 images to 100×100, then you will be billed for only 200 unique transformations — one for each image at this size — each month.
This change aligns more closely with how our customers think about their usage, as well as ensures that our customers can accurately estimate their costs with confidence. You won't need to consider how your cache hit ratio will affect your bill. To estimate your costs, you'll need to know only the number of unique images and the number of different ways that you need to transform those images each month.
Resize without storage with Cloudflare Images
For developers who only want to resize and optimize images, Cloudflare Images now offers a zero-storage plan. This new plan enables you to transform images while keeping your existing storage and delivery solution unchanged (just like the current Image Resizing product does).
If you want to store your images with Cloudflare Images, then you can always upgrade your plan to purchase storage at any time.
Image Resizing is currently available only for accounts with a Pro or higher plan. The merged Cloudflare Images product will be available for all customers, with pricing plans that are tailored to meet specific use cases.
Existing customers can opt into new pricing
The new version of Cloudflare Images is available on November 15, 2023.
If you currently use Image Resizing, you will have the option to migrate to the new Cloudflare Images at no cost, or continue using Image Resizing.
The functionality and usability of the product will remain the same. You will still manage stored images under the Cloudflare Images tab and can enable transformations from the Speed tab.
As we execute, we'll continue to make improvements in the Dashboard to bring a more centralized and unified experience for Cloudflare Images.
You can learn more about our current image optimization capabilities in the Developer Docs. If you have feedback or thoughts, we'd love to hear from you on the Cloudflare Developers Discord.
Currently, Cloudflare Radar curates a list of observed Internet disruptions (which may include partial or complete outages) in the Outage Center. These disruptions are recorded whenever we have sufficient context to correlate with an observed drop in traffic, found by checking status updates and related communications from ISPs, or finding news reports related to cable cuts, government orders, power outages, or natural disasters.
However, we observe more disruptions than we currently report in the outage center because there are cases where we can’t find any source of information that provides a likely cause for what we are observing, although we are still able to validate with external data sources such as Georgia Tech’s IODA. This curation process involves manual work, and is supported by internal tooling that allows us to analyze traffic volumes and detect anomalies automatically, triggering the workflow to find an associated root cause. While the Cloudflare Radar Outage Center is a valuable resource, one of key shortcomings include that we are not reporting all disruptions, and that the current curation process is not as timely as we’d like, because we still need to find the context.
As we announced today in a related blog post, Cloudflare Radar will be publishing anomalous traffic events for countries and Autonomous Systems (ASes). These events are the same ones referenced above that have been triggering our internal workflow to validate and confirm disruptions. (Note that at this time “anomalous traffic events” are associated with drops in traffic, not unexpected traffic spikes.) In addition to adding traffic anomaly information to the Outage Center, we are also launching the ability for users to subscribe to notifications at a location (country) or network (autonomous system) level whenever a new anomaly event is detected, or a new entry is added to the outage table. Please refer to the related blog post for more details on how to subscribe.
The current status of each detected anomaly will be shown in the new “Traffic anomalies” table on the Outage Center page:
When the anomaly is automatically detected its status will initially be Unverified
After attempting to validate ‘Unverified’ entries:
We will change the status to ‘Verified’ if we can confirm that the anomaly appears across multiple internal data sources, and possibly external ones as well. If we find associated context for it, we will also create an outage entry.
We will change status to ‘False Positive’ if we cannot confirm it across multiple data sources. This will remove it from the “Traffic anomalies” table. (If a notification has been sent, but the anomaly isn’t shown in Radar anymore, it means we flagged it as ‘False Positive’.)
We might also manually add an entry with a “Verified” status. This might occur if we observe, and validate, a drop in traffic that is noticeable, but was not large enough for the algorithm to catch it.
A glimpse at what Internet traffic volume looks like
At Cloudflare, we have several internal data sources that can give us insights into what the traffic for a specific entity looks like. We identify the entity based on IP address geolocation in the case of locations, and IP address allocation in the case of ASes, and can analyze traffic from different sources, such as DNS, HTTP, NetFlows, and Network Error Logs (NEL). All the signals used in the figures below come from one of these data sources and in this blog post we will treat this as a univariate time-series problem — in the current algorithm, we use more than one signal just to add redundancy and identify anomalies with a higher level of confidence. In the discussion below, we intentionally select various examples to encompass a broad spectrum of potential Internet traffic volume scenarios.
1. Ideally, the signals would resemble the pattern depicted below for Australia (AU): a stable weekly pattern with a slightly positive trend meaning that the trend average is moving up over time (we see more traffic over time from users in Australia).
These statements can be clearly seen when we perform time-series decomposition which allows us to break down a time-series into its constituent parts to better understand and analyze its underlying patterns. Decomposing the traffic volume for Australia above assuming a weekly pattern with Seasonal-Trend decomposition using LOESS (STL) we get the following:
The weekly pattern we are referring to is represented by the seasonal part of the signal that is expected to be observed due to the fact that we are interested in eyeball / human internet traffic. As observed in the image above, the trend component is expected to move slowly when compared with the signal level and the residual part ideally would resemble white noise meaning that all existing patterns in the signal are represented by the seasonal and trend components.
2. Below we have the traffic volume for AS15964 (CAMNET-AS) that appears to have more of a daily pattern, as opposed to weekly.
We also observe that there’s a value offset of the signal right after the first four days (blue dashed-line) and the red background shows us an outage for which we didn’t find any reporting besides seeing it in our data and other Internet data providers — our intention here is to develop an algorithm that will trigger an event when it comes across this or similar patterns.
4. Another scenario is several scheduled outages for AS203214 (HulumTele), for which we also have context. These anomalies are the easiest to detect since the traffic goes to values that are unique to outages (cannot be mistaken as regular traffic), but it poses another challenge: if our plan was to just check the weekly patterns, since these government-directed outages happen with the same frequency, at some point the algorithm would see this as expected traffic.
5. This outage in Kenya could be seen as similar to the above: the traffic volume went down to unseen values although not as significantly. We also observe some upward spikes in the data that are not following any specific pattern — possibly outliers — that we should clean depending on the approach we use to model the time-series.
6. Lastly, here's the data that will be used throughout this post as an example of how we are approaching this problem. For Madagascar (MG), we observe a clear pattern with pronounced weekends (blue background). There’s also a holiday (Assumption of Mary), highlighted with a green background, and an outage, with a red background. In this example, weekends, holidays, and outages all seem to have roughly the same traffic volume. Fortunately, the outage gives itself away by showing that it intended to go up as in a normal working day, but then there was a sudden drop — we will see it more closely later in this post.
In summary, here we looked over six examples out of ~700 (the number of entities we are automatically detecting anomalies for currently) and we see a wide range of variability. This means that in order to effectively model the time-series we would have to run a lot of preprocessing steps before the modeling itself. These steps include removing outliers, detecting short and long-term data offsets and readjusting, and detecting changes in variance, mean, or magnitude. Time is also a factor in preprocessing, as we would also need to know in advance when to expect events / holidays that will push the traffic down, apply daylight saving time adjustments that will cause a time shift in the data, and be able to apply local time zones for each entity, including dealing with locations that have multiple time zones and AS traffic that is shared across different time zones.
To add to the challenge, some of these steps cannot even be performed in a close-to-real-time fashion (example: we can only say there’s a change in seasonality after some time of observing the new pattern). Considering the challenges mentioned earlier, we have chosen an algorithm that combines basic preprocessing and statistics. This approach aligns with our expectations for the data's characteristics, offers ease of interpretation, allows us to control the false positive rate, and ensures fast execution while reducing the need for many of the preprocessing steps discussed previously.
Above, we noted that we are detecting anomalies for around 700 entities (locations and autonomous systems) at launch. This obviously does not represent the entire universe of countries and networks, and for good reason. As we discuss in this post, we need to see enough traffic from a given entity (have a strong enough signal) to be able to build relevant models and subsequently detect anomalies. For some smaller or sparsely populated countries, the traffic signal simply isn’t strong enough, and for many autonomous systems, we see little-to-no traffic from them, again resulting in a signal too weak to be useful. We are initially focusing on locations where we have a sufficiently strong traffic signal and/or are likely to experience traffic anomalies, as well as major or notable autonomous systems — those that represent a meaningful percentage of a location’s population and/or those that are known to have been impacted by traffic anomalies in the past.
Detecting anomalies
The approach we took to solve this problem involves creating a forecast that is a set of data points that correspond to our expectation according to what we’ve seen in historical data. This will be explained in the section Creating a forecast. We take this forecast and compare it to what we are actually observing — if what we are observing is significantly different from what we expect, then we call it an anomaly. Here, since we are interested in traffic drops, an anomaly will always correspond to lower traffic than the forecast / expected traffic. This comparison is elaborated in the section Comparing forecast with actual traffic.
In order to compute the forecast we need to fulfill the following business requirements:
We are mainly interested in traffic related to human activity.
The more timely we detect the anomaly, the more useful it is. This needs to take into account constraints such as data ingestion and data processing times, but once the data is available, we should be able to use the latest data point and detect if it is an anomaly.
A low False Positive (FP) rate is more important than a high True Positive (TP) rate. As an internal tool, this is not necessarily true, but as a publicly visible notification service, we want to limit spurious entries at the cost of not reporting some anomalies.
Selecting which entities to observe
Aside from the examples given above, the quality of the data highly depends on the volume of the data, and this means that we have different levels of data quality depending on which entity (location / AS) we are considering. As an extreme example, we don’t have enough data from Antarctica to reliably detect outages. Follows the process we used to select which entities are eligible to be observed.
For ASes, since we are mainly interested in Internet traffic that represents human activity, we use the number of users estimation provided by APNIC. We then compute the total number of users per location by summing up the number of users of each AS in that location, and then we calculate what percentage of users an AS has for that location (this number is also provided by the APNIC table in column ‘% of country’). We filter out ASes that have less than 1% of the users in that location. Here’s what the list looks like for Portugal — AS15525 (MEO-EMPRESAS) is excluded because it has less than 1% of users of the total number of Internet users in Portugal (estimated).
At this point we have a subset of ASes and a set of locations (we don’t exclude any location a priori because we want to cover as much as possible) but we will have to narrow it down based on the quality of the data to be able to reliably detect anomalies automatically. After testing several metrics and visually analyzing the results, we came to the conclusion that the best predictor of a stable signal is related to the volume of data, so we removed the entities that don’t satisfy the criteria of a minimum number of unique IPs daily in a two weeks period — the threshold is based on visual inspection.
Creating a forecast
In order to detect the anomalies in a timely manner, we decided to go with traffic aggregated every fifteen minutes, and we are forecasting one hour of data (four data points / blocks of fifteen minutes) that are compared with the actual data.
After selecting the entities for which we will detect anomalies, the approach is quite simple:
1. We look at the last 24 hours immediately before the forecast window and use that interval as the reference. The assumption is that the last 24 hours will contain information about the shape of what follows. In the figure below, the last 24 hours (in blue) corresponds to data transitioning from Friday to Saturday. By using the Euclidean distance, we get the six most similar matches to that reference (orange) — four of those six matches correspond to other transitions from Friday to Saturday. It also captures the holiday on Monday (August 14, 2023) to Tuesday, and we also see a match that is the most dissimilar to the reference, a regular working day from Wednesday to Thursday. Capturing one that doesn't represent the reference properly should not be a problem because the forecast is the median of the most similar 24 hours to the reference, and thus the data of that day ends up being discarded.
There are two important parameters that we are using for this approach to work:
We take into consideration the last 28 days (plus the reference day equals 29). This way we ensure that the weekly seasonality can be seen at least 4 times, we control the risk associated with the trend changing over time, and we set an upper bound to the amount of data we need to process. Looking at the example above, the first day was one with the highest similarity to the reference because it corresponds to the transition from Friday to Saturday.
The other parameter is the number of most similar days. We are using six days as a result of empirical knowledge: given the weekly seasonality, when using six days, we expect at most to match four days for the same weekday and then two more that might be completely different. Since we use the median to create the forecast, the majority is still four and thus those extra days end up not being used as reference. Another scenario is in the case of holidays such as the example below:
A holiday in the middle of the week in this case looks like a transition from Friday to Saturday. Since we are using the last 28 days and the holiday starts on a Tuesday we only see three such transitions that are matching (orange) and then another three regular working days because that pattern is not found anywhere else in the time-series and those are the closest matches. This is why we use the lower quartile when computing the median for an even number of values (meaning we round the data down to the lower values) and use the result as the forecast. This also allows us to be more conservative and plays a role in the true positive/false positive tradeoff.
Lastly let's look at the outage example:
In this case, the matches are always connected to low traffic because the last 24h (reference) corresponds to a transition from Sunday to Monday and due to the low traffic the lowest Euclidean distance (most similar 24h) are either Saturdays (two times) or Sundays (four times). So the forecast is what we would expect to see on a regular Monday and that’s why the forecast (red) has an upward trend but since we had an outage, the actual volume of traffic (black) is considerably lower than the forecast.
This approach works for regular seasonal patterns, as would several other modeling approaches, and it has also been shown to work in case of holidays and other moving events (such as festivities that don’t happen at the same day every year) without having to actively add that information in. Nevertheless, there are still use cases where it will fail specifically when there’s an offset in the data. This is one of the reasons why we use multiple data sources to reduce the chances of the algorithm being affected by data artifacts.
Below we have an example of how the algorithm behaves over time.
Comparing forecast with actual traffic
Once we have the forecast and the actual traffic volume, we do the following steps.
We calculate relative change, which measures how much one value has changed relative to another. Since we are detecting anomalies based on traffic drops, the actual traffic will always be lower than the forecast.
After calculating this metric, we apply the following rules:
The difference between the actual and the forecast must be at least 10% of the magnitude of the signal. This magnitude is computed using the difference between 95th and 5th percentiles of the selected data. The idea is to avoid scenarios where the traffic is low, particularly during the off-peaks of the day and scenarios where small changes in actual traffic correspond to big changes in relative change because the forecast is also low. As an example:
a forecast of 100 Gbps compared with an actual value of 80 Gbps gives us a relative change of -0.20 (-20%).
a forecast of 20 Mbps compared with an actual value of 10 Mbps gives us a much smaller decrease in total volume than the previous example but a relative change of -0.50 (50%).
Then we have two rules for detecting considerably low traffic:
Sustained anomaly: The relative change is below a given threshold α throughout the forecast window (for all four data points). This allows us to detect weaker anomalies (with smaller relative changes) that are extended over time.
Point anomaly: The relative change of the last data point of the forecast window is below a given threshold β (where β < α — these thresholds are negative; as an example, β and α might be -0.6 and -0.4, respectively). In this case we need β < α to avoid triggering anomalies due to the stochastic nature of the data but still be able to detect sudden and short-lived traffic drops.
The values of α and β were chosen empirically to maximize detection rate, while keeping the false positive rate at an acceptable level.
Closing an anomaly event
Although the most important message that we want to convey is when an anomaly starts, it is also crucial to detect when the Internet traffic volume goes back to normal for two main reasons:
We need to have the notion of active anomaly, which means that we detected an anomaly and that same anomaly is still ongoing. This allows us to stop considering new data for the reference while the anomaly is still active. Considering that data would impact the reference and the selection of most similar sets of 24 hours.
Once the traffic goes back to normal, knowing the duration of the anomaly allows us to flag those data points as outliers and replace them, so we don’t end up using it as reference or as best matches to the reference. Although we are using the median to compute the forecast, and in most cases that would be enough to overcome the presence of anomalous data, there are scenarios such as the one for AS203214 (HulumTele), used as example four, where the outages are frequently occurring at the same time of the day that would make the anomalous data become the expectation after few days.
Whenever we detect an anomaly we keep the same reference until the data comes back to normal, otherwise our reference would start including anomalous data. To determine when the traffic is back to normal, we use lower thresholds than α and we give it a time period (currently four hours) where there should be no anomalies in order for it to close. This is to avoid situations where we observe drops in traffic that bounce back to normal and drop again. In such cases we want to detect a single anomaly and aggregate it to avoid sending multiple notifications, and in terms of semantics there’s a high chance that it’s related to the same anomaly.
Conclusion
Internet traffic data is generally predictable, which in theory would allow us to build a very straightforward anomaly detection algorithm to detect Internet disruptions. However, due to the heterogeneity of the time series depending on the entity we are observing (Location or AS) and the presence of artifacts in the data, it also needs a lot of context that poses some challenges if we want to track it in real-time. Here we’ve shown particular examples of what makes this problem challenging, and we have explained how we approached this problem in order to overcome most of the hurdles. This approach has been shown to be very effective at detecting traffic anomalies while keeping a low false positive rate, which is one of our priorities. Since it is a static threshold approach, one of the downsides is that we are not detecting anomalies that are not as steep as the ones we’ve shown.
We will keep working on adding more entities and refining the algorithm to be able to cover a broader range of anomalies.
A lot of people rely on Cloudflare. We serve over 46 million HTTP requests per second on average; millions of customers use our services, including 31% of the Fortune 1000. And these numbers are only growing.
That’s why today we are excited to announce Incident Alerts — available via email, webhook, or PagerDuty. These notifications are accessible easily in the Cloudflare dashboard, and they’re customizable to prevent notification overload. And best of all, they’re available to everyone; you simply need a free account to get started.
Lifecycle of an incident
Without proper transparency, incidents cause confusion and waste resources for anyone that relies on the Internet. With so many different entities working together to make the Internet operate, diagnosing and troubleshooting can be complicated and time-consuming. By far the best solution is for providers to have transparent and proactive alerting, so any time something goes wrong, it’s clear exactly where the problem is.
Cloudflare incident response
We understand the importance of proactive and transparent alerting around incidents. We have worked to improve communications by directly alerting enterprise level customers and allowing everyone to subscribe to an RSS feed or leverage the Cloudflare Status API. Additionally, we update the Cloudflare status page — which catalogs incident reports, updates, and resolutions — throughout an incident’s lifecycle, as well as tracking scheduled maintenance.
However, not everyone wants to use the Status API or subscribe to an RSS feed. Both of these options require some infrastructure and programmatic efforts from the customer’s end, and neither offers simple configuration to filter out noise like scheduled maintenance. For those who don’t want to build anything themselves, visiting the status page is still a pull, rather than a push, model. Customers themselves need to take it upon themselves to monitor Cloudflare’s status — and timeliness in these situations can make a world of difference.
Without a proactive channel of communication, there can be a disconnect between Cloudflare and our customers during incidents. Although we update the status page as soon as possible, the lack of a push notification represents a gap in meeting our customers’ expectations. The new Cloudflare Incident Alerts aim to remedy that.
Simple, free, and fast notifications
We want to proactively notify you as soon as a Cloudflare incident may be affecting your service —- without any programmatic steps on your end. Unlike the Status API and an RSS feed, Cloudflare Incident Alerts are configurable through just a few clicks in the dashboard, and you can choose to receive email, PagerDuty, or web hook alerts for incidents involving specific products at different levels of impact. The Status API will continue to be available.
With this multidimensional granularity, you can filter notifications by specific service and severity. If you are, for example, a Cloudflare for SaaS customer, you may want alerts for delays in custom hostname activation but not for increased latency on Stream. Likewise, you may only care about critical incidents instead of getting notified for minor incidents. Incident Alerts give you the ability to choose.
Lifecycle of an Incident
How to filter incidents to fit your needs
You can filter incident notifications with the following categories:
Cloudflare Sites and Services: get notified when an incident is affecting certain products or product areas.
Impact level: get notified for critical, major, and/or minor incidents.
These categories are not mutually exclusive. Here are a few possible configurations:
Notify me via email for all critical incidents.
Notify me via webhook for critical & major incidents affecting Pages.
Notify me via PagerDuty for all incidents affecting Stream.
With over fifty different alerts available via the dashboard, you can tailor your notifications to what you need. You can customize not only which alerts you are receiving but also how you would like to be notified. With PagerDuty, webhooks, and email integrated into the system, you have the flexibility of choosing what will work best with your working environment. Plus, with multiple configurations within many of the available notifications, we make it easy to only get alerts about what you want, when you want them.
Try it out
You can start to configure incident alerts on your Cloudflare account today. Here’s how:
Navigate to the Cloudflare dashboard → Notifications.
Select “Add”.
Select “Incident Alerts”.
Enter your notification name and description.
Select the impact level(s) and component(s) for which you would like to be notified. If either field is left blank, it will default to all impact levels or all components, respectively.
Select how you want to receive the notifications:
Check PagerDuty
Add Webhook
Add email recipient
Select “Save”.
Test the notification by selecting “Test” on the right side of its row.
For more information on Cloudflare’s Alert Notification System, visit our documentation here.
The collective thoughts of the interwebz
Manage Consent
To provide the best experiences, we use technologies like cookies to store and/or access device information. Consenting to these technologies will allow us to process data such as browsing behavior or unique IDs on this site. Not consenting or withdrawing consent, may adversely affect certain features and functions.
Functional
Always active
The technical storage or access is strictly necessary for the legitimate purpose of enabling the use of a specific service explicitly requested by the subscriber or user, or for the sole purpose of carrying out the transmission of a communication over an electronic communications network.
Preferences
The technical storage or access is necessary for the legitimate purpose of storing preferences that are not requested by the subscriber or user.
Statistics
The technical storage or access that is used exclusively for statistical purposes.The technical storage or access that is used exclusively for anonymous statistical purposes. Without a subpoena, voluntary compliance on the part of your Internet Service Provider, or additional records from a third party, information stored or retrieved for this purpose alone cannot usually be used to identify you.
Marketing
The technical storage or access is required to create user profiles to send advertising, or to track the user on a website or across several websites for similar marketing purposes.