Post Syndicated from Eric Johnson original https://aws.amazon.com/blogs/compute/starting-up-faster-with-aws-lambda-snapstart/
This blog written by Tarun Rai Madan, Sr. Product Manager, AWS Lambda, and Mike Danilov, Sr. Principal Engineer, AWS Lambda.
AWS Lambda SnapStart is a new performance optimization developed by AWS that can significantly improve the startup time for applications. Announced at AWS re:Invent 2022, the first capability to feature SnapStart is Lambda SnapStart for Java. This feature delivers up to 10x faster function startup times for latency-sensitive Java applications at no extra cost, and with minimal or no code changes.
Overview
When applications start up, whether it’s an app on your phone, or a serverless Lambda function, they go through initialization. The initialization process can vary based on the application and the programming language, but even the smallest applications written in the most efficient programming languages require some kind of initialization before they can do anything useful. For a Lambda function, the initialization phase involves downloading the function’s code, starting the runtime and any external dependencies, and running the function’s initialization code. Ordinarily, for a Lambda function, this initialization happens every time your application scales up to create a new execution environment.
With SnapStart, the function’s initialization is done ahead of time when you publish a function version. Lambda takes a Firecracker microVM snapshot of the memory and disk state of the initialized execution environment, encrypts the snapshot, and caches it for low-latency access. When your application starts up and scales to handle traffic, Lambda resumes new execution environments from the cached snapshot instead of initializing them from scratch, improving startup performance.
The following diagram compares a cold start request lifecycle for a non-SnapStart function and a SnapStart function. The time it takes to initialize the function, which is the predominant contributor to high startup latency, is replaced by a faster resume phase with SnapStart.
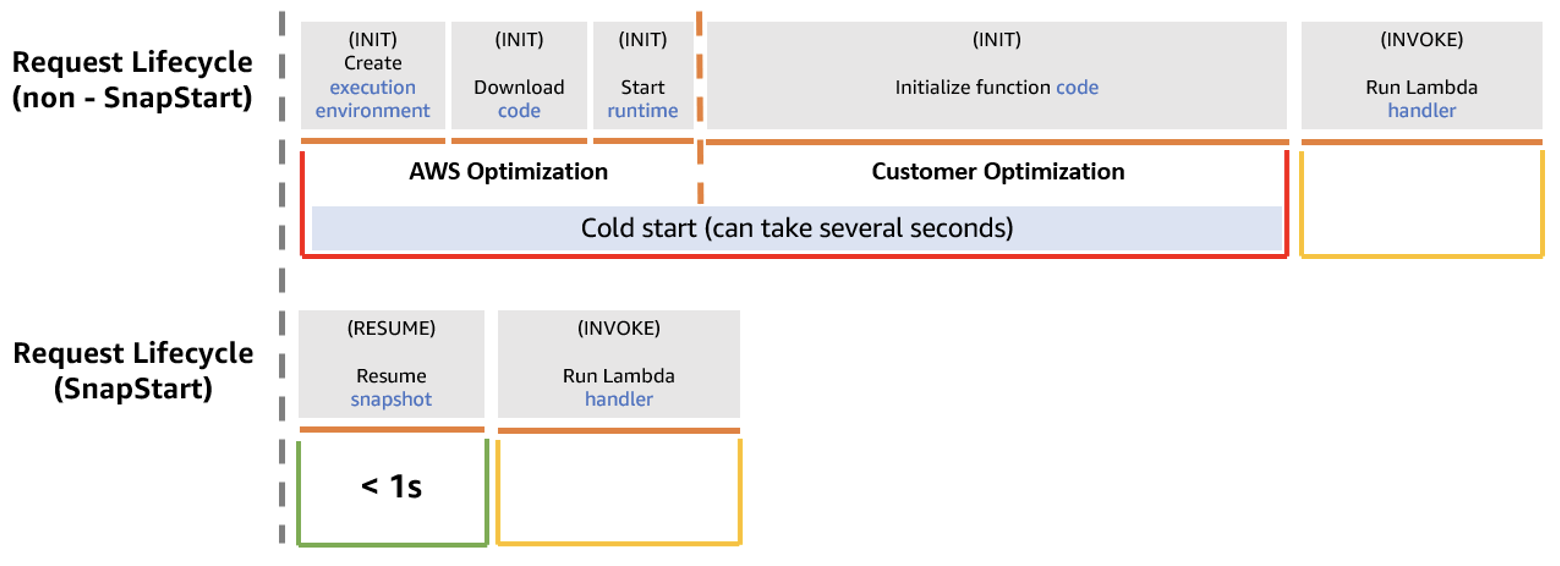
Diagram of a non-SnapStart function versus a SnapStart function
Request lifecycle for a non-SnapStart function versus a SnapStart function
Front loading the initialization phase can significantly improve the startup performance for latency-sensitive Lambda functions, such as synchronous microservices that are sensitive to initialization time. Because Java is a dynamic language with its own runtime and garbage collector, Lambda functions written in Java can be amongst the slowest to initialize. For applications that require frequent scaling, the delay introduced by initialization, commonly referred to as a cold start, can lead to a suboptimal experience for end users. Such applications can now start up faster with SnapStart.
AWS’ work in Firecracker makes it simple to use SnapStart. Because SnapStart uses micro Virtual Machine (microVM) snapshots to checkpoint and restore full applications, the approach is adaptable and general purpose. It can be used to speed up many kinds of application starts. While microVMs have long been used for strong secure isolation between applications and environments, the ability to front-load initialization with SnapStart means that microVMs can also augment performance savings at scale.
SnapStart and uniqueness
Lambda SnapStart speeds up applications by re-using a single initialized snapshot to resume multiple execution environments. As a result, unique content included in the snapshot during initialization is reused across execution environments, and so may no longer remain unique. A class of applications where uniqueness of state is a key consideration is cryptographic software, which assumes that the random numbers are truly random (both random and unpredictable). If content such as a random seed is saved in the snapshot during initialization, it is re-used when multiple execution environments resume and may produce predictable random sequences.
To maintain uniqueness, you must verify before using SnapStart that any unique content previously generated during the initialization now gets generated after that initialization. This includes unique IDs, unique secrets, and entropy used to generate pseudo-randomness.
Multiple execution environments resumed from a shared snapshot
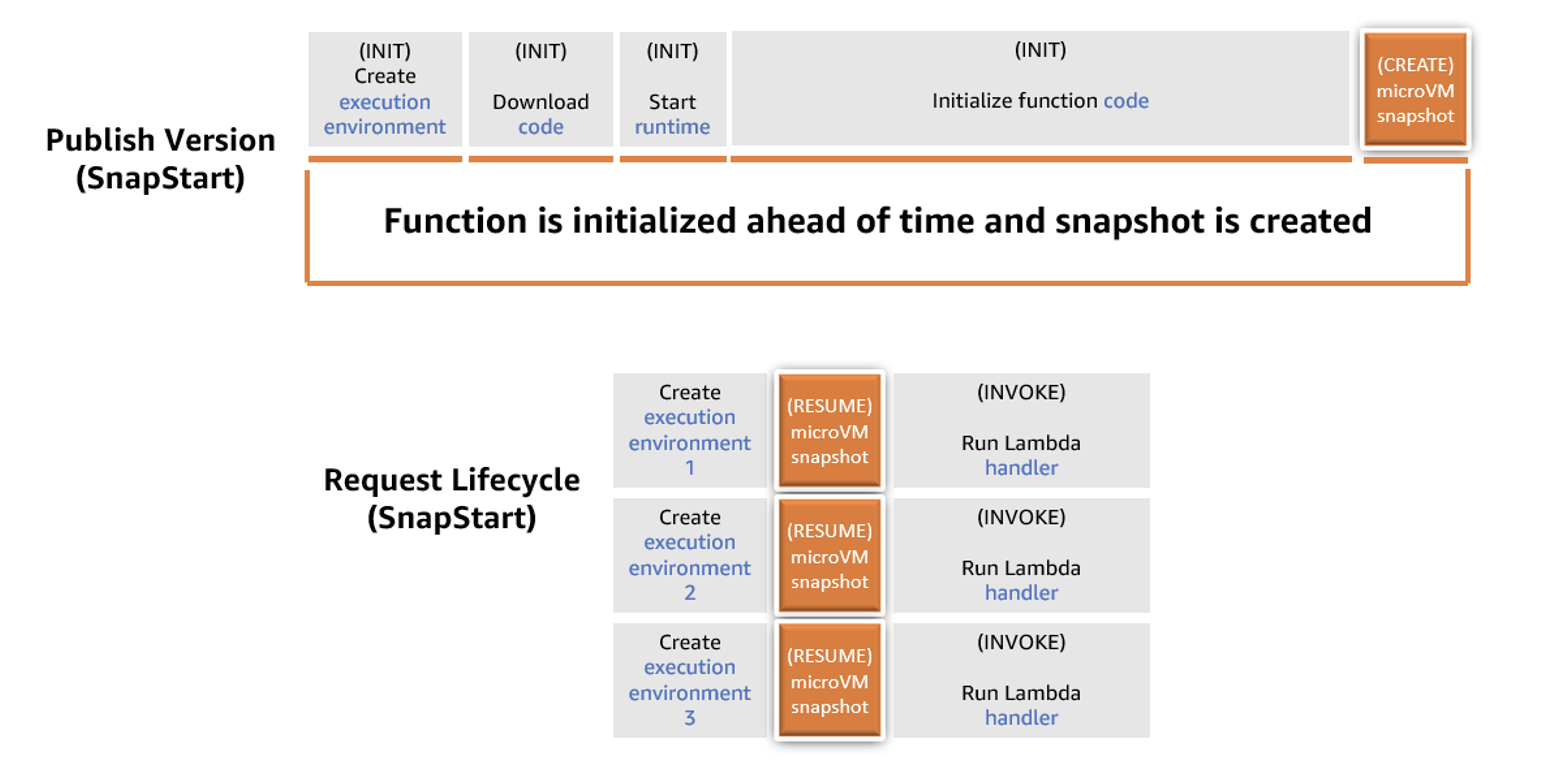
SnapStart life cycle
However, we have implemented a few things to make it easier for customers to maintain uniqueness.
First, it is not common or a best practice for applications to generate these unique items directly. Still, it’s worth confirming that your application handles uniqueness correctly. That’s usually a matter of checking for any unique IDs, keys, timestamps, or “homemade” entropy in the initializer methods for your function.
Lambda offers a SnapStart scanning tool that checks for certain categories of code that assume uniqueness, so customers can make changes as required. The SnapStart scanning tool is an open-source SpotBugs plugin that runs static analysis against a set of rules and reports “potential SnapStart bugs”. We are committed to engaging with the community to expand these set of rules against which the scanning tool checks the code.
As an example, the following Lambda function creates a unique log stream for each execution environment during initialization. This unique value is re-used across execution environments when they re-use a snapshot.
public class LambdaUsingUUID {

    private AWSLogsClient logs;
    private final UUID sandboxId;

    public LambdaUsingUUID() {
       sandboxId = UUID.randomUUID(); // <-- unique content created
       logs = new AWSLogsClient();
    }
    @Override
    public String handleRequest(Map<String,String> event, Context context) {
       CreateLogStreamRequest request = new CreateLogStreamRequest(
         "myLogGroup", sandboxId + ".log9.txt");
         logs.createLogStream(request);
         return "Hello world!";
    }
}
When you run the scanning tool on the previous code, the following message helps identify a potential implementation that assumes uniqueness. One way to address such cases is to move the generation of the unique ID inside your function’s handler method.
H C SNAP_START: Detected a potential SnapStart bug in Lambda function initialization code. At LambdaUsingUUID.java: [line 7]A best practice used by many applications is to rely on the system libraries and kernel for uniqueness. These have long-handled other cases where keys and IDs may be inadvertently duplicated, such as when forking or cloning processes. AWS has worked with upstream kernel maintainers and open source developers so that the existing protection mechanisms use the open standard VM Generation ID (vmgenid) that SnapStart supports. vmgenid is an emulated device, which exposes a 128-bit, cryptographically random integer value identifier to the kernel, and is statistically unique across all resumed microVMs.
Lambda’s included versions of Amazon Linux 2, OpenSSL (1.0.2), and java.security.SecureRandom all automatically re-initialize their randomness and secrets after a SnapStart. Software that always gets random numbers from the operating system (for example, from /dev/random or /dev/urandom) does not need any updates to maintain randomness. Because Lambda always reseeds /dev/random and /dev/urandom when restoring a snapshot, random numbers are not repeated even when multiple execution environments resume from the same snapshot.
Lambda’s request IDs are already unique for each invocation and are available using the getAwsRequestId() method of the Lambda request object. Most Lambda functions should require no modification to run with SnapStart enabled. It’s generally recommended that for SnapStart, you do not include unique state in the function’s initialization code, and use cryptographically secure random number generators (CSPRNGs) when needed.
Second, if you do want to create unique data directly in a Lambda function initialization phase, Lambda supports two new runtime hooks. Runtime hooks are available as part of the open-source Coordinated Restore at Checkpoint (CRaC) project. You can use the beforeCheckpoint hook to run code immediately before a snapshot is taken, and use the afterRestore hook to run code immediately after restoring a snapshot. This helps you delete any unique content before the snapshot is created, and restore any unique content after the snapshot is restored. For an example of how to use CRaC with a reference application, see the CRaC GitHub repository.
Conclusion
This blog describes how SnapStart optimizes startup performance under the hood, and outlines considerations around uniqueness. We also introduce the new interfaces that AWS Lambda provides (via scanning tool and runtime hooks) to customers to maintain uniqueness for their SnapStart functions.
SnapStart is made possible by several pieces of open-source work, including Firecracker, Linux, CraC, OpenSSL and more. AWS is grateful to the maintainers and developers who have made this possible. With this work, we’re excited to launch Lambda SnapStart for Java as what we hope is the first amongst many other capabilities to benefit from the performance savings and enhanced security that SnapStart microVMs provide.
For more serverless learning resources, visit Serverless Land.