Tag Archives: Developer Week

Making static sites dynamic with Cloudflare D1

Post Syndicated from Kristian Freeman original https://blog.cloudflare.com/making-static-sites-dynamic-with-cloudflare-d1/

Making static sites dynamic with Cloudflare D1

Introduction

Making static sites dynamic with Cloudflare D1

There are many ways to store data in your applications. For example, in Cloudflare Workers applications, we have Workers KV for key-value storage and Durable Objects for real-time, coordinated storage without compromising on consistency. Outside the Cloudflare ecosystem, you can also plug in other tools like NoSQL and graph databases.

But sometimes, you want SQL. Indexes allow us to retrieve data quickly. Joins enable us to describe complex relationships between different tables. SQL declaratively describes how our application’s data is validated, created, and performantly queried.

D1 was released today in open alpha, and to celebrate, I want to share my experience building apps with D1: specifically, how to get started, and why I’m excited about D1 joining the long list of tools you can use to build apps on Cloudflare.

Making static sites dynamic with Cloudflare D1

D1 is remarkable because it’s an instant value-add to applications without needing new tools or stepping out of the Cloudflare ecosystem. Using wrangler, we can do local development on our Workers applications, and with the addition of D1 in wrangler, we can now develop proper stateful applications locally as well. Then, when it’s time to deploy the application, wrangler allows us to both access and execute commands to your D1 database, as well as your API itself.

What we’re building

In this blog post, I’ll show you how to use D1 to add comments to a static blog site. To do this, we’ll construct a new D1 database and build a simple JSON API that allows the creation and retrieval of comments.

As I mentioned, separating D1 from the app itself – an API and database that remains separate from the static site – allows us to abstract the static and dynamic pieces of our website from each other. It also makes it easier to deploy our application: we will deploy the frontend to Cloudflare Pages, and the D1-powered API to Cloudflare Workers.

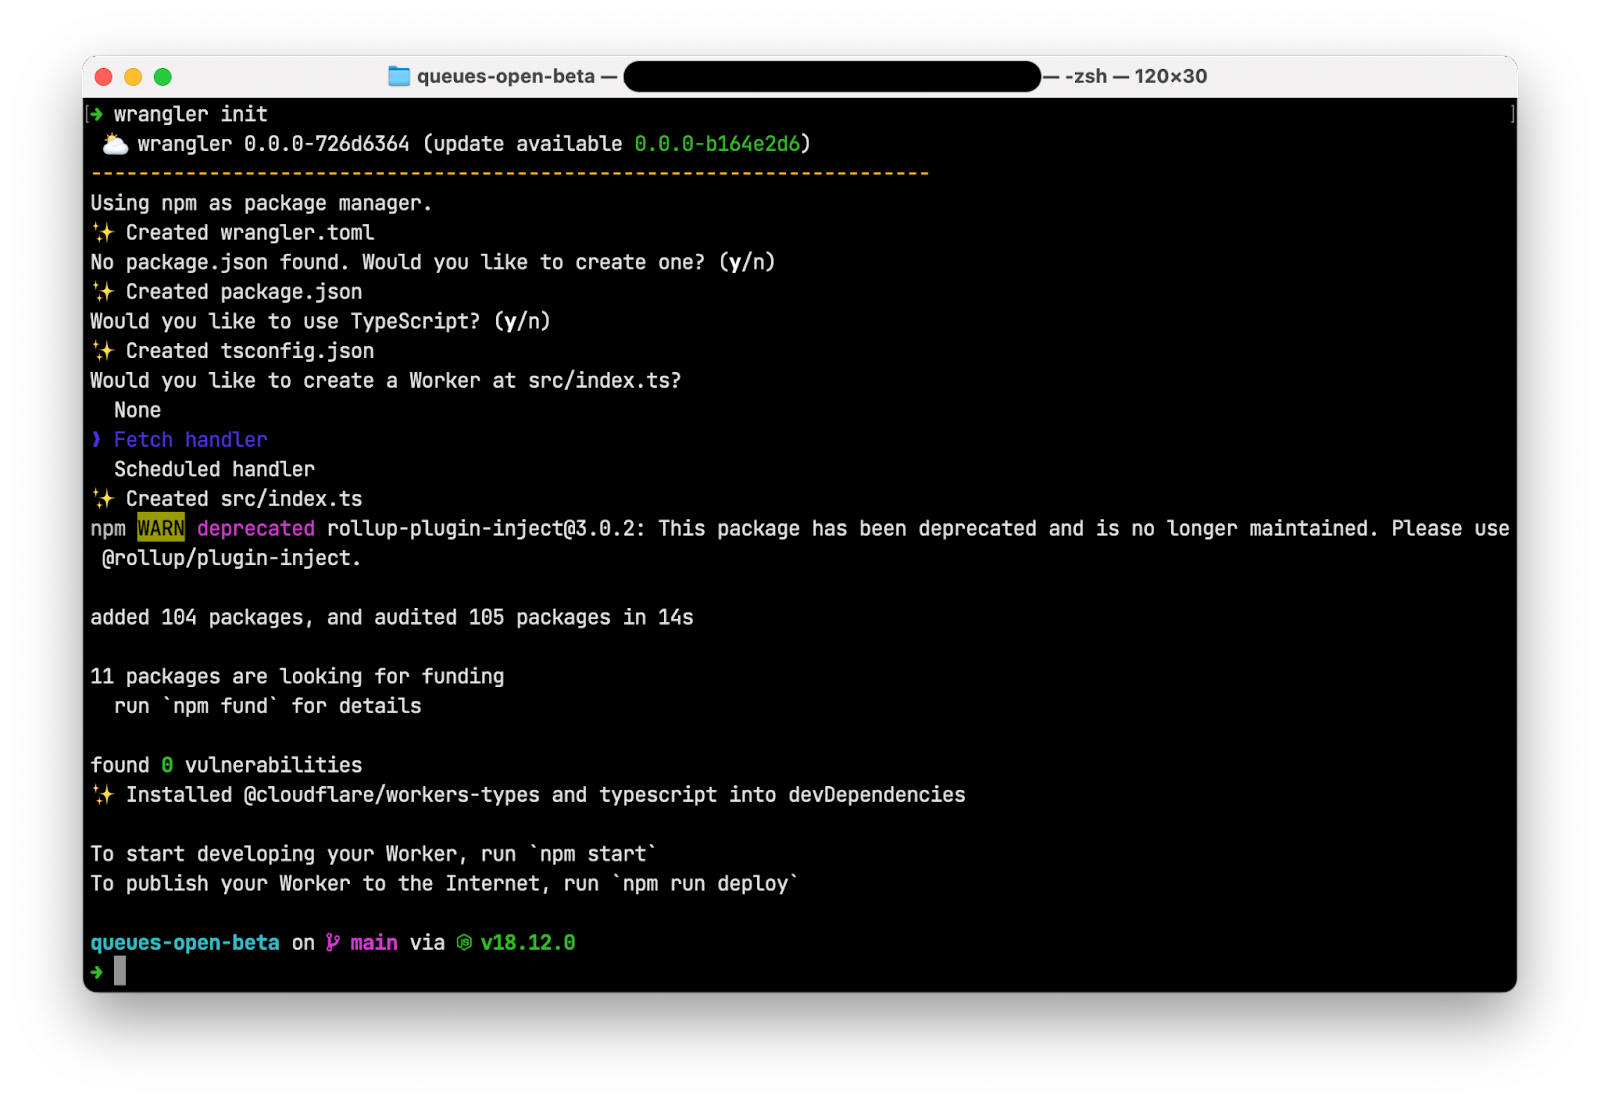
Building a new application

First, we’ll add a basic API in Workers. Create a new directory and in it a new wrangler project inside it:

$ mkdir d1-example && d1-example
$ wrangler init

In this example, we’ll use Hono, an Express.js-style framework, to rapidly build our API. To use Hono in this project, install it using NPM:

$ npm install hono

Then, in src/index.ts, we’ll initialize a new Hono app, and define a few endpoints – GET /API/posts/:slug/comments, and POST /get/api/:slug/comments.

import { Hono } from 'hono'
import { cors } from 'hono/cors'

const app = new Hono()

app.get('/api/posts/:slug/comments', async c => {
  // do something
})

app.post('/api/posts/:slug/comments', async c => {
  // do something
})

export default app

Now we’ll create a D1 database. In Wrangler 2, there is support for the wrangler d1 subcommand, which allows you to create and query your D1 databases directly from the command line. So, for example, we can create a new database with a single command:

$ wrangler d1 create d1-example

With our created database, we can take the database name ID and associate it with a binding inside of wrangler.toml, wrangler’s configuration file. Bindings allow us to access Cloudflare resources, like D1 databases, KV namespaces, and R2 buckets, using a simple variable name in our code. Below, we’ll create the binding DB and use it to represent our new database:

[[ d1_databases ]]
binding = "DB" # i.e. available in your Worker on env.DB
database_name = "d1-example"
database_id = "4e1c28a9-90e4-41da-8b4b-6cf36e5abb29"

Note that this directive, the [[d1_databases]] field, currently requires a beta version of wrangler. You can install this for your project using the command npm install -D wrangler/beta.

With the database configured in our wrangler.toml, we can start interacting with it from the command line and inside our Workers function.

First, you can issue direct SQL commands using wrangler d1 execute:

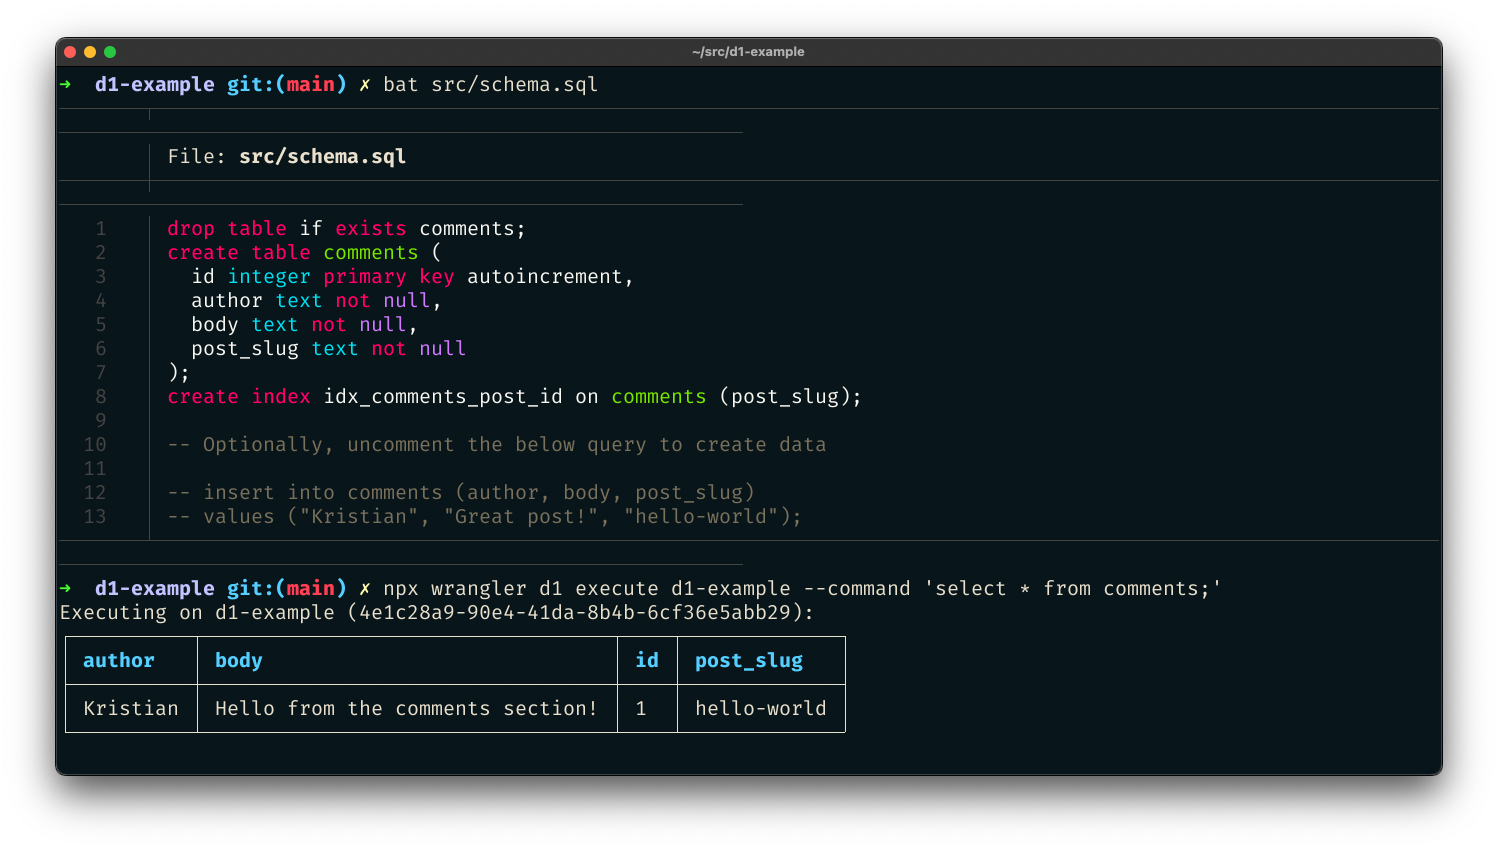
$ wrangler d1 execute d1-example --command "SELECT name FROM sqlite_schema WHERE type ='table'"
Executing on d1-example:
┌─────────────────┐
│ name │
├─────────────────┤
│ sqlite_sequence │
└─────────────────┘

You can also pass a SQL file – perfect for initial data seeding in a single command. Create src/schema.sql, which will create a new comments table for our project:

drop table if exists comments;
create table comments (
  id integer primary key autoincrement,
  author text not null,
  body text not null,
  post_slug text not null
);
create index idx_comments_post_id on comments (post_slug);

-- Optionally, uncomment the below query to create data

-- insert into comments (author, body, post_slug)
-- values ("Kristian", "Great post!", "hello-world");

With the file created, execute the schema file against the D1 database by passing it with the flag --file:

$ wrangler d1 execute d1-example --file src/schema.sql

We’ve created a SQL database with just a few commands and seeded it with initial data. Now we can add a route to our Workers function to retrieve data from that database. Based on our wrangler.toml config, the D1 database is now accessible via the DB binding. In our code, we can use the binding to prepare SQL statements and execute them, for instance, to retrieve comments:

app.get('/api/posts/:slug/comments', async c => {
  const { slug } = c.req.param()
  const { results } = await c.env.DB.prepare(`
    select * from comments where post_slug = ?
  `).bind(slug).all()
  return c.json(results)
})

In this function, we accept a slug URL query parameter and set up a new SQL statement where we select all comments with a matching post_slug value to our query parameter. We can then return it as a simple JSON response.

So far, we’ve built read-only access to our data. But “inserting” values to SQL is, of course, possible as well. So let’s define another function that allows POST-ing to an endpoint to create a new comment:

app.post('/API/posts/:slug/comments', async c => {
  const { slug } = c.req.param()
  const { author, body } = await c.req.json<Comment>()

  if (!author) return c.text("Missing author value for new comment")
  if (!body) return c.text("Missing body value for new comment")

  const { success } = await c.env.DB.prepare(`
    insert into comments (author, body, post_slug) values (?, ?, ?)
  `).bind(author, body, slug).run()

  if (success) {
    c.status(201)
    return c.text("Created")
  } else {
    c.status(500)
    return c.text("Something went wrong")
  }
})

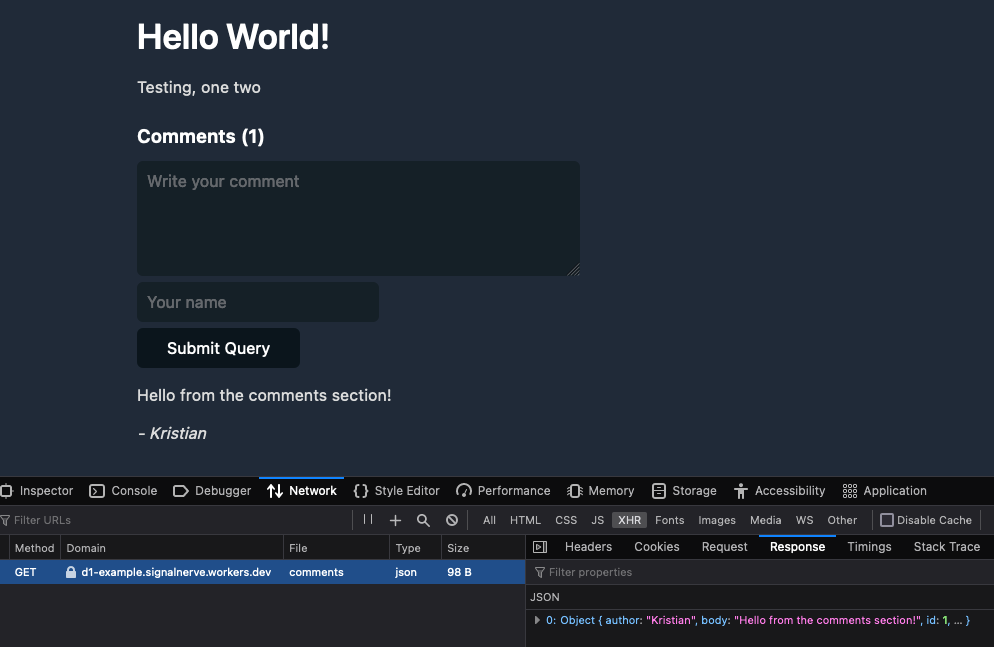
In this example, we built a comments API for powering a blog. To see the source for this D1-powered comments API, you can visit cloudflare/templates/worker-d1-api.

Making static sites dynamic with Cloudflare D1

Conclusion

One of the things most exciting about D1 is the opportunity to augment existing applications or websites with dynamic, relational data. As a former Ruby on Rails developer, one of the things I miss most about that framework in the world of JavaScript and serverless development tools is the ability to rapidly spin up full data-driven applications without needing to be an expert in managing database infrastructure. With D1 and its easy onramp to SQL-based data, we can build true data-driven applications without compromising on performance or developer experience.

This shift corresponds nicely with the advent of static sites in the last few years, using tools like Hugo or Gatsby. A blog built with a static site generator like Hugo is incredibly performant – it will build in seconds with small asset sizes.

But by trading a tool like WordPress for a static site generator, you lose the opportunity to add dynamic information to your site. Many developers have patched over this problem by adding more complexity to their build processes: fetching and retrieving data and generating pages using that data as part of the build.

This addition of complexity in the build process attempts to fix the lack of dynamism in applications, but it still isn’t genuinely dynamic. Instead of being able to retrieve and display new data as it’s created, the application rebuilds and redeploys whenever data changes so that it appears to be a live, dynamic representation of data. Your application can remain static, and the dynamic data will live geographically close to the users of your site, accessible via a queryable and expressive API.

Iteration isn’t just for code: here are our latest API docs

Post Syndicated from Claire Waters original https://blog.cloudflare.com/building-a-better-developer-experience-through-api-documentation/

Iteration isn't just for code: here are our latest API docs

Iteration isn't just for code: here are our latest API docs

We’re excited to share that the next iteration of Cloudflare’s API reference documentation is now available. The new docs standardize our API content and improve the overall developer experience for interacting with Cloudflare’s API.

Why does API documentation matter?

Everyone talks about how important APIs are, but not everyone acknowledges the critical role that API documentation plays in an API’s usability. Throwing docs together is easy. Getting them right is harder.

At Cloudflare, we try to meet our users where they are. For the majority of customers, that means providing clear, easy-to-use products in our dashboard. But developers don’t always want what our dashboard provides. Some developers prefer to use a CLI or Wrangler to have a higher level of control over what’s happening with their Cloudflare products. Others want more customization and deeper ties into their company’s internal applications. Some want all the above.

Iteration isn't just for code: here are our latest API docs

A developer’s job is to create, debug, and optimize code – whether that’s an application, interface, database, etc. – as efficiently as possible and ensure that code runs as efficiently as possible. APIs enable that efficiency through automation. Let’s say a developer wants to run a cache purge every time content is updated on their website. They could use Cloudflare’s dashboard to enable cache purge, but they might want it to happen automatically instead. Enter Cloudflare’s API.

In the same way that the Cloudflare dashboard is an interface for humans, an API is an interface for computers. For a computer to execute on instructions, there is no room for interpretation. The instructions, formatted as requests, have to follow a specific set of rules and include certain requirements. API documentation details what those rules and requirements are.

It’s a frustrating experience for developers when you’re in the details of a complex project and can’t troubleshoot an error because the docs aren’t comprehensive or don’t load. Unfortunately, that’s been the reality for developers using Cloudflare’s API. Figuring out how to use Cloudflare’s API was a “choose your own adventure” story for the Cloudflare users who made 126 million visits monthly to our API documentation. If the APIs you needed were fully documented, you encountered long page load times and a site that couldn’t render on mobile.

From a technical standpoint, we were using api.cloudflare.com for both the API documentation site and the Cloudflare API access point, which is awkward. We needed a more sustainable way for internal teams to create and document their APIs according to an accepted standard.

Building a better developer experience for our APIs

Like with all of our documentation projects at Cloudflare, we started by thinking about the user’s workflow – in this case, a developer’s workflow as they’re getting started with the Cloudflare API.

Providing docs on mobile
We know developers research products before diving into projects, usually exploring API documentation before writing any code. That means making docs available on mobile for working on the go. Check.

Improving the navigation
As a developer, at the point you’re looking at API docs, you generally have an idea of what you want to use the API for. Our goal with the new API docs is to make it as easy as possible for you to find the information you need. We recognize that endpoints are organized a bit haphazardly in the current API docs. To address that clunkiness, we’ve grouped endpoints by product or setting and alphabetized that list on the new site, making it easier to navigate and find what you’re looking for. And while this may seem like a small thing, you now can use a keyboard shortcut to search the page.

Iteration isn't just for code: here are our latest API docs

Clarifying authentication
Once developers start writing code, you first have to handle authentication to start using the API. Authentication information is now readily available for every endpoint, and we link to the full developer docs about authentication from the API overview page.

Adding examples
Good API docs have clear descriptions, but the best API docs share templates and examples to minimize a developer’s friction to deploying code. Every endpoint now includes an example and clearly indicates which parameters are required, removing yet another decision developers have to make when working with our API.

Iteration isn't just for code: here are our latest API docs

Gathering feedback and iterating
As we implemented all of these improvements, we kept some of our biggest users – our internal developers – informed along the way. We shared the test site early and often to get internal feedback, which caught bugs and helped us refine the site’s usability. The Discord and Community MVPs also volunteered to test the site, giving us valuable outside perspective on what we built. We incorporated all of that feedback to provide a vetted, deliberate UX at launch.

How we built this

Since this week is all about what you can build on our developer platform, we wanted to share the details about how this all works under the hood (hint: it’s mostly Workers).

We used a combination of open-source tools and Cloudflare products to revamp the API doc site. Previously the content on api.cloudflare.com was sourced from the JSON hyper-schema files that described our APIs, but over the years we repeatedly heard that published schemas would help you better integrate with Cloudflare. Several Cloudflare engineering teams started adopting the OpenAPI specification, and with a little research, planning, and testing, we pivoted from those JSON hyper-schemas to the OpenAPI framework. Check out the blog post about our Transition to OpenAPI for more details.

Because the OpenAPI specification defines how to describe APIs, our schema files now have consistency – not just among the various products, but also with an industry-accepted standard. Hundreds of documentation and code generation tools exist to pull from that standard, which means we have options that weren’t available for our homegrown JSON hyper-schemas.

Iteration isn't just for code: here are our latest API docs

We chose Stoplight Elements, an open-source React framework, for our site design because it has a clean layout and is easily customizable. While there are a number of both dynamic and static tools for parsing OpenAPI schemas and rendering documentation sites, we chose React because of its ubiquity, performance, and because it plays well with Cloudflare Pages, our deployment tool of choice. Within Stoplight you can generate code samples for a variety of  programming languages, like JavaScript, Java, and Python, as well as for tools like cURL, HTTPie, and wget.

We build and deploy the React application with Cloudflare Pages, and using Pages functions, we optimize the OpenAPI schema file for Stoplight’s UI and cache it on Cloudflare’s network, reducing the latency needed to request the schema. Whenever teams add new API endpoints or definitions to the schema, we just update the schema file in GitHub. Because our API documentation loads the schema dynamically, this means we don’t have to wait for Cloudflare Pages to deploy a new version of the documentation site. The automation helps us ensure that everything we expose in the API is documented without manual interaction. Deploying with Pages gives us yet another opportunity to test our own products out on ourselves, helping us find areas for improvement that we turn around and pass along to you.

Looking ahead

Moving our schemas to the OpenAPI specification allows us to use ready-to-go tools like Stoplight, but we’re just getting started. Soon we’ll be adding search functionality, letting you access all relevant information across developer, API, and support docs. The mobile experience will evolve, providing an even cleaner way to read API content when you’re on your phone. We’ll also add a “try it out” functionality to test out your requests right in the browser before writing your own code.

Over time, we want an even tighter integration between the API reference documentation, our how-to content in developer docs, and the Cloudflare dashboard. The standardized structure we get with the OpenAPI spec sets us up to reuse the schema files across our client libraries, Terraform, API gateway, and Trakal. The consistency across API descriptions makes it easier for us to do things like localize API content, customize out-of-the-box documentation generation tools, and continue innovating like we always do.

Iteration isn't just for code: here are our latest API docs

We want to hear from you!

As you’re using the new API doc site, send us your feedback and let us know if there are any feature improvements you’d like to see in the future. We want the site to be as useful as possible for your day-to-day interactions with Cloudflare’s API. We hope the improvements to our API doc experience will help you seamlessly use our API and efficiently deploy and maintain your Cloudflare products.

Thanks for your patience and perspective as we iterate on the API docs!

The Cloudflare API now uses OpenAPI schemas

Post Syndicated from Garrett Galow original https://blog.cloudflare.com/open-api-transition/

The Cloudflare API now uses OpenAPI schemas

The Cloudflare API now uses OpenAPI schemas

Today, we are announcing the general availability of OpenAPI Schemas for the Cloudflare API. These are published via GitHub and will be updated regularly as Cloudflare adds and updates APIs. OpenAPI is the widely adopted standard for defining APIs in a machine-readable format. OpenAPI Schemas allow for the ability to plug our API into a wide breadth of tooling to accelerate development for ourselves and customers. Internally, it will make it easier for us to maintain and update our APIs. Before getting into those benefits, let’s start with the basics.

What is OpenAPI?

Much of the Internet is built upon APIs (Application Programming Interfaces) or provides them as services to clients all around the world. This allows computers to talk to each other in a standardized fashion. OpenAPI is a widely adopted standard for how to define APIs. This allows other machines to reliably parse those definitions and use them in interesting ways. Cloudflare’s own API Shield product uses OpenAPI schemas to provide schema validation to ensure only well-formed API requests are sent to your origin.

Cloudflare itself has an API that customers can use to interface with our security and performance products from other places on the Internet. How do we define our own APIs? In the past we used a standard called JSON Hyper-Schema. That had served us well, but as time went on we wanted to adopt more tooling that could both benefit ourselves internally and make our customer’s lives easier. The OpenAPI community has flourished over the past few years providing many capabilities as we will discuss that were unavailable while we used JSON Hyper-Schema. As of today we now use OpenAPI.

You can learn more about OpenAPI itself here. Having an open, well-understood standard for defining our APIs allows for shared tooling and infrastructure to be used that can read these standard definitions. Let’s take a look at a few examples.

Uses of Cloudflare’s OpenAPI schemas

Most customers won’t need to use the schemas themselves to see value. The first system leveraging OpenAPI schemas is our new API Docs that were announced today. Because we now have OpenAPI schemas, we leverage the open source tool Stoplight Elements to aid in generating this new doc site. This allowed us to retire our previously custom-built site that was hard to maintain. Additionally, many engineers at Cloudflare are familiar with OpenAPI, so we gain teams can write new schemas more quickly and are less likely to make mistakes by using a standard that teams understand when defining new APIs.

There are ways to leverage the schemas directly, however. The OpenAPI community has a huge number of tools that only require a set of schemas to be able to use. Two such examples are mocking APIs and library generation.

Mocking Cloudflare’s API

Say you have code that calls Cloudflare’s API and you want to be able to easily run unit tests locally or integration tests in your CI/CD pipeline. While you could just call Cloudflare’s API in each run, you may not want to for a few reasons. First, you may want to run tests frequently enough that managing the creation and tear down of resources becomes a pain. Also, in many of these tests you aren’t trying to validate logic in Cloudflare necessarily, but your own system’s behavior. In this case, mocking Cloudflare’s API would be ideal since you can gain confidence that you aren’t violating Cloudflare’s API contract, but without needing to worry about specifics of managing real resources. Additionally, mocking allows you to simulate different scenarios, like being rate limited or receiving 500 errors. This allows you to test your code for typically rare circumstances that can end up having a serious impact.

As an example, Spotlight Prism could be used to mock Cloudflare’s API for testing purposes. With a local copy of Cloudflare’s API Schemas you can run the following command to spin up a local mock server:

$ docker run --init --rm \
  -v /home/user/git/api-schemas/openapi.yaml:/tmp/openapi.yaml \
  -p 4010:4010 stoplight/prism:4 \
  mock -h 0.0.0.0 /tmp/openapi.yaml

Then you can send requests to the mock server in order to validate that your use of Cloudflare’s API doesn’t violate the API contract locally:

$ curl -sX PUT localhost:4010/zones/f00/activation_check \
  -Hx-auth-email:[email protected] -Hx-auth-key:foobarbaz | jq
{
  "success": true,
  "errors": [],
  "messages": [],
  "result": {
    "id": "023e105f4ecef8ad9ca31a8372d0c353"
  }
}

This means faster development and shorter test runs while still catching API contract issues early before they get merged or deployed.

Library generation

Cloudflare has libraries in many programming languages like Terraform and Go, but we don’t support every possible programming language. Fortunately, using a tool like openapi generator, you can feed in Cloudflare’s API schemas and generate a library in a wide range of languages to then use in your code to talk to Cloudflare’s API. For example, you could generate a Java library using the following commands:

git clone https://github.com/openapitools/openapi-generator
cd openapi-generator
mvn clean package
java -jar modules/openapi-generator-cli/target/openapi-generator-cli.jar generate \
   -i https://raw.githubusercontent.com/cloudflare/api-schemas/main/openapi.yaml \
   -g java \
   -o /var/tmp/java_api_client

And then start using that client in your Java code to talk to Cloudflare’s API.

How Cloudflare transitioned to OpenAPI

As mentioned earlier, we previously used JSON Hyper-Schema to define our APIs. We have roughly 600 endpoints that were already defined in the schemas. Here is a snippet of what one endpoint looks like in JSON Hyper-Schema:

{
      "title": "List Zones",
      "description": "List, search, sort, and filter your zones.",
      "rel": "collection",
      "href": "zones",
      "method": "GET",
      "schema": {
        "$ref": "definitions/zone.json#/definitions/collection_query"
      },
      "targetSchema": {
        "$ref": "#/definitions/response_collection"
      },
      "cfOwnership": "www",
      "cfPlanAvailability": {
        "free": true,
        "pro": true,
        "business": true,
        "enterprise": true
      },
      "cfPermissionsRequired": {
        "enum": [
          "#zone:read"
        ]
      }
    }

Let’s look at the same endpoint in OpenAPI:

/zones:
    get:
      description: List, search, sort, and filter your zones.
      operationId: zone-list-zones
      responses:
        4xx:
          content:
            application/json:
              schema:
                allOf:
                - $ref: '#/components/schemas/components-schemas-response_collection'
                - $ref: '#/components/schemas/api-response-common-failure'
          description: List Zones response failure
        "200":
          content:
            application/json:
              schema:
                $ref: '#/components/schemas/components-schemas-response_collection'
          description: List Zones response
      security:
      - api_email: []
        api_key: []
      summary: List Zones
      tags:
      - Zone
      x-cfPermissionsRequired:
        enum:
        - '#zone:read'
      x-cfPlanAvailability:
        business: true
        enterprise: true
        free: true
        pro: true

You can see that the two look fairly similar and for the most part the same information is contained in each including method type, a description, and request and response definitions (although those are linked in $refs). The value of migrating from one to the other isn’t the change in how we define the schemas themselves, but in what we can do with these schemas. Numerous tools can parse the latter, the OpenAPI, while much fewer can parse the former, the JSON Hyper-Schema.

If this one API was all that made up the Cloudflare API, it would be easy to just convert the JSON Hyper-Schema into the OpenAPI Schema by hand and call it a day. Doing this 600 times, however, was going to be a huge undertaking. When considering that teams are constantly adding new endpoints, it would be impossible to keep up. It was also the case that our existing API docs used the existing JSON Hyper-Schema, so that meant that we would need to keep both schemas up to date during any transition period. There had to be a better way.

Auto conversion

Given both JSON Hyper-Schema and OpenAPI are standards, it reasons that it should be possible to take a file in one format and convert to the other, right? Luckily the answer is yes! We built a tool that took all existing JSON Hyper-Schema and output fully compliant OpenAPI schemas. This of course didn’t happen overnight, but because of existing OpenAPI tooling, we could iteratively improve the auto convertor and run OpenAPI validation tooling over the output schemas to see what issues the conversion tool still had.

After many iterations and improvements to the conversion tool, we finally had fully compliant OpenAPI Spec schemas being auto-generated from our existing JSON Hyper-Schema. While we were building this tool, teams kept adding and updating the existing schemas and our Product Content team was also updating text in the schemas to make our API docs easier to use. The benefit of this process is we didn’t have to slow any of that work down since anything that changed in the old schemas was automatically reflected in the new schemas!

Once the tool was ready, the remaining step was to decide when and how we would stop making updates to the JSON Hyper-Schemas and move all teams to the OpenAPI Schemas. The (now old) API docs were the biggest concern, given they only understood JSON Hyper-Schema. Thanks to the help of our Developer Experience and Product Content teams, we were able to launch the new API docs today and can officially cut over to OpenAPI today as well!

What’s next?

Now that we have fully moved over to OpenAPI, more opportunities become available. Internally, we will be investigating what tooling we can adopt in order to help reduce the effort of individual teams and speed up API development. One idea we are exploring is automatically creating openAPI schemas from code notations. Externally, we now have the foundational tools necessary to begin exploring how to auto generate and support more programming language libraries for customers to use. We are also excited to see what you may do with the schemas yourself, so if you do something cool or have ideas, don’t hesitate to share them with us!

Xata Workers: client-side database access without client-side secrets

Post Syndicated from Alexis Rico (Guest Blogger) original https://blog.cloudflare.com/xata-customer-story/

Xata Workers: client-side database access without client-side secrets

Xata Workers: client-side database access without client-side secrets

We’re excited to have Xata building their serverless functions product – Xata Workers – on top of Workers for Platforms. Xata Workers act as middleware to simplify database access and allow their developers to deploy functions that sit in front of their databases. Workers for Platforms opens up a whole suite of use cases for Xata developers all while providing the security, scalability and performance of Cloudflare Workers.

Now, handing it over to Alexis, a Senior Software Engineer at Xata to tell us more.

Introduction

In the last few years, there’s been a rise of Jamstack, and new ways of thinking about the cloud that some people call serverless or edge computing. Instead of maintaining dedicated servers to run a single service, these architectures split applications in smaller services or functions.

By simplifying the state and context of our applications, we can benefit from external providers deploying these functions in dozens of servers across the globe. This architecture benefits the developer and user experience alike. Developers don’t have to manage servers, and users don’t have to experience latency. Your application simply scales, even if you receive hundreds of thousands of unexpected visitors.

When it comes to databases though, we still struggle with the complexity of orchestrating replication, failover and high availability. Traditional databases are difficult to scale horizontally and usually require a lot of infrastructure maintenance or learning complex database optimization concepts.

At Xata we are building a modern data platform designed for scalable applications. It allows you to focus on your application logic, instead of having to worry about how the data is stored.

Making databases accessible to everyone

We started Xata with the mission of helping developers build their applications and forget about maintaining the underlying infrastructure.

With that mission in mind, we asked ourselves: how can we make databases accessible to everyone? How can we provide a delightful experience for a frontend engineer or designer using a database?

To begin with, we built an appealing web dashboard, that any developer — no matter their experience — can be comfortable using to work with their data.

Whether they’re defining or refining their schema, viewing or adding records, fine-tuning search results with query boosters, or getting code snippets to speed up development with our SDK. We believe that only the best user experience can provide the best development experience.

We identified a major challenge amongst our user base early on. Many front-end developers want to access their database from client-side code.

Allowing access to a database from client-side code comes with several security risks if not done properly. For example, someone could inspect the code, find the credentials, and if they weren’t scoped to a single operation, potentially query or modify other parts of the database. Unfortunately, this is a common reason for data leaks and security breaches.

It was a hard problem to solve, and after plenty of brainstorming, we agreed on two potential ways forward: implementing row-level access rules or writing API routes that talked to the database from server code.

Row-level access rules are a good way to solve this, but they would have required us to define our own opinionated language. For our users, it would have been hard to migrate away when they outgrow this solution. Instead, we preferred to focus on making serverless functions easier for our users.

Typically, serverless functions require you to either choose a full stack framework or manually write, compile, deploy and use them. This generally adds a lot of cognitive overhead even to choose the right solution. We wanted to simplify accessing the database from the frontend without sacrificing flexibility for developers. This is why we decided to build Xata Workers.

Xata Workers

A Xata Worker is a function that a developer can write in JavaScript or TypeScript as client-side code. Rather than being executed client-side, it will actually be executed on Cloudflare’s global network.

You can think of a Xata Worker as a getServerSideProps function in Next.js or a loader function in Remix. You write your server logic in a function and our tooling takes care of deploying and running it server-side for you (yes, it’s that easy).

The main difference with other alternatives is that Xata Workers are, by design, agnostic to a framework or hosting provider. You can use them to build any kind of application or website, and even upload it as static HTML in a service like GitHub Pages or S3. You don’t need a full stack web framework to use Xata Workers.

With our command line tool, we handle the build and deployment process. When the function is invoked, the Xata Worker actually makes a request to a serverless function over the network.

import { useQuery } from '@tanstack/react-query';
import { xataWorker } from '~/xata';

const listProducts = xataWorker('listProducts', async ({ xata }) => {
  return await xata.db.products.sort('popularity', 'desc').getMany();
});

export const Home = () => {
  const { data = [] } = useQuery(['products'], listProducts);

  return (
    <Grid>
      {data.map((product) => (
        <ProductCard key={product.id} product={product} />
      ))}
    </Grid>
  );
};

In the code snippet above, you can see a React component that connects to an e-commerce database with products on sale. Inside the UI component, with a popular client-side data fetching library, data is retrieved from the serverless function and for each product it renders another component in a grid.

As you can see a Xata Worker is a function that wraps any user-defined code and receives an instance of our SDK as a parameter. This instance has access to the database and, given that the code doesn’t run on the browser anymore, your secrets are not exposed for malicious usage.

When using a Xata Worker in TypeScript, our command line tool also generates custom types based on your schema. These types offer type-safety for your queries or mutations, and improve your developer experience by adding extra intellisense to your IDE.

Xata Workers: client-side database access without client-side secrets

A Xata Worker, like any other function, can receive additional parameters that pass application state, context or user tokens. The code you write in the function can either return an object that will be serialized over the network with a superset of JSON to support dates and other non-primitive data types, or a full response with a custom status code and headers.

Developers can write all their logic, including their own authentication and authorization. Unlike complex row level access control rules, you can easily express your logic without constraints and even unit test it with the rest of your code.

How we use Cloudflare

We are happy to join the Supercloud movement, Cloudflare has an excellent track record, and we are using Cloudflare Workers for Platforms to host our serverless functions. By using the Workers isolated execution contexts we reduce security risks of running untrusted code on our own while being close to our users, resulting in super low latency.

All of it, without having to deploy extra infrastructure to handle our user’s application load or ask them to configure how the serverless functions should be deployed. It really feels like magic! Now, let’s dive into the internals of how we use Cloudflare to run our Xata Workers.

For every workspace in Xata we create a Worker Namespace, a Workers for Platform concept to organize Workers and restrict the routing between them. We used Namespaces to group and encapsulate the different functions coming from all the databases built by a client or team.

When a user deploys a Xata Worker, we create a new Worker Script, and we upload the compiled code to its Namespace. Each script has a unique name with a compilation identifier so that the user can have multiple versions of the same function running at the same time.

During the compilation, we inject the database connection details and the database name. This way, the function can connect to the database without leaking secrets and restricting the scope of access to the database, all of it transparently for the developer.

When the client-side application runs a Xata Worker, it calls a Dispatcher function that processes the request and calls the correct Worker Script. The dispatcher function is also responsible for configuring the CORS headers and the log drain that can be used by the developer to debug their functions.

Xata Workers: client-side database access without client-side secrets

By using Cloudflare, we are also able to benefit from other products in the Workers ecosystem. For example, we can provide an easy way to cache the results of a query in Cloudflare’s global network. That way, we can serve the results for read-only queries directly from locations closer to the end users, without having to call the database again and again for every Worker invocation. For the developer, it’s only a matter of adding a “cache” parameter to their query with the number of milliseconds they want to cache the results in a KV Namespace.

import { xataWorker } from '~/xata';

const listProducts = xataWorker('listProducts', async ({ xata }) => {
  return await xata.db.products.sort('popularity', 'desc').getMany({
    cache: 15 * 60 * 1000 // TTL
  });
});

In development mode, we provide a command to run the functions locally and test them before deploying them to production. This enables rapid development workflows with real-time filesystem change monitoring and hot reloading of the workers code. Internally, we use the latest version of miniflare to emulate the Cloudflare Workers runtime, mimicking the real production environment.

Conclusion

Xata is now out of beta and available for everyone. We offer a generous free tier that allows you to build and deploy your applications and only pay to scale them when you actually need it.

You can sign up for free, create a database in seconds and enjoy features such as branching with zero downtime migrations, search and analytics, transactions, and many others. Check out our website to learn more!

Xata Workers are currently in private beta. If you are interested in trying them out, you can sign up for the waitlist and talk us through your use case. We are looking for developers that are willing to provide feedback and shape this new feature for our serverless data platform.

We are very proud of our collaboration with Cloudflare for this new feature. Processing data closer to where it’s being requested is the future of computing and we are excited to be part of this movement. We look forward to seeing what you build with Xata Workers.

Automate an isolated browser instance with just a few lines of code

Post Syndicated from Tanushree Sharma original https://blog.cloudflare.com/introducing-workers-browser-rendering-api/

Automate an isolated browser instance with just a few lines of code

Automate an isolated browser instance with just a few lines of code

If you’ve ever created a website that shows any kind of analytics, you’ve probably also thought about adding a “Save Image” or “Save as PDF” button to store and share results. This isn’t as easy as it seems (I can attest to this firsthand) and it’s not long before you go down a rabbit hole of trying 10 different libraries, hoping one will work.

This is why we’re excited to announce a private beta of the Workers Browser Rendering API, improving the browser automation experience for developers. With browser automation, you can programmatically do anything that a user can do when interacting with a browser.

The Workers Browser Rendering API, or just Rendering API for short, is our out-of-the-box solution for simplifying developer workflows, including capturing images or screenshots, by running browser automation in Workers.

Browser automation, everywhere

As with many of the best Cloudflare products, Rendering API was born out of an internal need. Many of our teams were setting up or wanted to set up their own tools to perform what sounds like an incredibly simple task: taking automated screenshots.

When gathering use cases, we realized that much of what our internal teams wanted would also be useful for our customers. Some notable ones are:

  • Taking screenshots for social sharing thumbnails or preview images
  • Emailed daily screenshots of dashboards (requested specifically by our SVP of Engineering)
  • Reporting bugs on websites and sending them directly to frontend teams

Not to mention use cases for other browser automation functions like:

Testing UI/UX Flows
End-to-end (E2E) testing is used to minimic user behaviour and can identify bugs that unit tests or integration tests have missed. And let’s be honest – no developer wants to manually check the user flow each time they make changes to their application. E2E tests can be especially useful to verify logic on your customer’s critical path like account creation, authentication or checkout.

Performance Tests
Application performance metrics, such as page load time, directly impact your user’s experience and your SEO rankings. To avoid performance regressions, you want to test impact on latency in conditions that are as close as possible to your production environment before you merge. By automating performance testing you can measure if your proposed changes will result in a degraded experience for your uses and make improvements accordingly.  

Unlocking a new building block

One of the most common browser automation frameworks is Puppeteer. It’s common to run Puppeteer in a containerization tool like Docker or in a serverless environment. Taking automated screenshots should be as easy as writing some code, hitting deploy and having it run when a particular event is triggered or on a regular schedule.

It should be, but it’s not.

Even on a serverless solution like AWS Lambda, running Puppeteer means packaging it, making sure dependencies are covered, uploading packages to S3 and deploying using Layers. Whether using Docker or something like Lambda, it’s clear that this is not easy to set up.

One of the pillars of Cloudflare’s development platform is to provide our developers with tools that are incredibly simple, yet powerful to build on. Rendering API is our out-of-the-box solution for running Puppeteer in Workers.

Screenshotting made simple

To start, the Rendering API will have support for navigating to a webpage and taking a screenshot, with more functions to follow. To use it, all you need to do is add our new browser binding to your project’s wrangler.toml file

wrangler.toml

bindings = [
 { name = "my_browser” type = "browser" }
]

From there, taking a screenshot and saving it to R2 is as simple as:

script.ts

import puppeteer from '@cloudflare/puppeteer'

export default {
    async fetch(request: Request, env: Env): Promise<Response> {
        const browser = await puppeteer.launch({
            browserBinding: env.MY_BROWSER
        })
        const page = await browser.newPage()

        await page.goto("https://example.com/")
        const img = await page.screenshot() as Buffer
        await browser.close()

        //upload to R2
        try {
            await env.MY_BUCKET.put("screenshot.jpg", img);
            return new Response(`Success!`);
        } catch (e) {
            return new Response('', { status: 400 })
        }
    }
}

Down the line, we have plans to add full Puppeteer support, including functions like page.type, page.click, page.evaluate!

What’s happening under the hood?

Remote browser isolation technology is an integral part of our Zero Trust product offering. Remote browser isolation lets users interact with a web browser that instead of running on the client’s device, runs in a remote environment. The Rendering API repurposes this under the hood!

Automate an isolated browser instance with just a few lines of code

We’ve wrapped the Puppeteer library so that it can be run directly from your own Worker. You can think of your Worker as the client. Each of Cloudflare’s data centers has a pool of warm browsers ready to go and when a Worker requests a browser, the browser is instantly returned and is connected to via a WebSocket. Once the WebSocket connection is established, our internal browser API Worker handles all communication to the browser session via the Chrome Devtools Protocol.

To ensure the security of your Worker, individual remote browsers are run as disposable instances – one instance per request, and never shared. They are secured using gVisor to protect against kernel level exploits. On top of that, the browser is running sandboxed processes with the lowest privilege level using a Linux seccomp profile.

The Rendering API should be used when you’re building and testing your applications.  To prevent abuse, Cloudflare Bot Management has baked in signals to indicate that a request is coming from a Worker running Puppeteer. As a Cloudflare Bot Management customer, this will automatically be added to your blocklist, with the option to explicitly opt in and allow it.

How can you get started?

We’re introducing the Workers Browser Rendering API in closed beta. If you’re interested, please tell us a bit about your use case and join the waitlist. We would love to hear what else you want to build using the Workers Browser Rendering API, let us know in the Workers channel on the Cloudflare Developers Discord!

Get started with Cloudflare Workers with ready-made templates

Post Syndicated from Gift Egwuenu original https://blog.cloudflare.com/cloudflare-workers-templates/

Get started with Cloudflare Workers with ready-made templates

Get started with Cloudflare Workers with ready-made templates

One of the things we prioritize at Cloudflare is enabling developers to build their applications on our developer platform with ease. We’re excited to share a collection of ready-made templates that’ll help you start building your next application on Workers. We want developers to get started as quickly as possible, so that they can focus on building and innovating and avoid spending so much time configuring and setting up their projects.

Introducing Cloudflare Workers Templates

Cloudflare Workers enables you to build applications with exceptional performance, reliability, and scale. We are excited to share a collection of templates that helps you get started quickly and give you an idea of what is possible to build on our developer platform.

We have made available a set of starter templates highlighting different use cases of Workers. We understand that you have different ideas you will love to build on top of Workers and you may have questions or wonder if it is possible. These sets of templates go beyond the convention ‘Hello, World’ starter. They’ll help shape your idea of what kind of applications you can build with Workers as well as other products in the Cloudflare Developer Ecosystem.

We are excited to introduce a new collection of starter templates workers.new/templates. This shortcut will serve you a collection of templates that you can immediately start using to build your next application.

Get started with Cloudflare Workers with ready-made templates
Cloudflare Workers Template Collection

How to use Cloudflare Workers templates

We created this collection of templates to support you in getting started with Workers. Some examples listed showcase a use-case with a combination of multiple Cloudflare developer platform products to build applications similar to ones you might use every day. We know that Workers are being used today for different use-cases, we want to showcase some of them to you.

We have templates for building an image sharing website with Pages Functions, direct creator upload to Cloudflare Stream, Durable Object-powered request scheduler and many more.

One example to highlight is a template that lets you accept payment for video content. It is powered by Pages Functions, Cloudflare Stream and Stripe Checkout.  This app shows how you can use Cloudflare Workers with external payment and authentication systems to create a logged-in experience, without ever having to manage a database or persist any state yourself.

Once a user has paid, Stripe Checkout redirects to a URL that verifies a token from Stripe, and generates a signed URL using Cloudflare Stream to view the video. This signed URL is only valid for a specified amount of time, and access can be restricted by country or IP address.

To use the template, you need to either click the deploy with Workers button or open the template with Stackblitz.

Get started with Cloudflare Workers with ready-made templates

The Deploy with Workers button will redirect you to a page where you can authorize GitHub to deploy a fork of the repository using GitHub actions while opening with StackBlitz creates a new fork of the template for you to start working with.

Get started with Cloudflare Workers with ready-made templates
Deploy to Workers Demo

These templates also comes bundled with additional features I would like to share with you:

Integrated Deploy with Workers Button

We added a deploy button to all templates listed in the templates repository and the collection website, so you can quickly get up to speed with your code. The deploy with Workers button lets you deploy your code in under five minutes, it uses a GitHub action powered with Cloudflare Workers to do this.

Get started with Cloudflare Workers with ready-made templates
GitHub Repository with Deploy to Workers Button

Support for Test Driven Development

As developers, we need to write tests for our code to ensure we’re shipping quality production grade software and also ensure that our code is bug-free. We support writing tests in Workers using the Wrangler unstable_dev API to write integration and end-to-end tests. We want to enable not just the developer experience but also nudge developers to follow best practices and prioritize TDD in development. We configured a number of templates to support integration tests against a local server, this will serve as a template to help you set up tests in your projects.

Here’s an example using Wrangler’s unstable_dev API and Vitest test framework to test the code written in an example ‘Hello worker’ starter template:

import { unstable_dev } from 'wrangler';
import { describe, expect, it, beforeAll, afterAll } from 'vitest';

describe('Worker', () => {
 let worker;

 beforeAll(async () => {
   worker = await unstable_dev('index.js', {}, { disableExperimentalWarning: true });
 });

 afterAll(async () => {
   await worker.stop();
 });

 it('should return Hello worker!', async () => {
   const resp = await worker.fetch();
   if (resp) {
     const text = await resp.text();
     expect(text).toMatchInlineSnapshot(`"Hello worker!"`);
   }
 });
});

Online IDE Integration with StackBlitz

We announced StackBlitz’s partnership with Cloudflare Workers during Platform Week early this year. We believe a developer’s experience should be of utmost priority because we want them to build with ease on our developer platform.

StackBlitz is an online development platform for building web applications. It is powered by WebContainers, the first WebAssembly-based operating system which boots Node.js environments in milliseconds, securely within your browser tab.

We made it even easier to get started with Workers with an integrated Open with StackBlitz button for each starter template, making it easier to create a fork of a template and the great thing is you only need a web browser to build your application.

Everything we’ve highlighted in this post, all leads to one thing – How can we create a better experience for developers getting started with Workers. We introduce these ready-made templates to make you more efficient, bring you a wholesome developer experience and help improve your time to deployment. We want you to spend less time getting started with building on the Workers developer platform, so what are you waiting for?

Next Steps

You can start building your own Worker today using the available templates provided in the templates collection to help you get started. If you would like to contribute your own templates to the collection, be sure to send in a pull request we’re more than happy to review and add to the growing collection. Share what you have built with us in the #builtwith channel on our Discord community. Make sure to follow us on Twitter or join our Discord Developers Community server.

Store and process your Cloudflare Logs… with Cloudflare

Post Syndicated from Jon Levine original https://blog.cloudflare.com/announcing-logs-engine/

Store and process your Cloudflare Logs... with Cloudflare

Store and process your Cloudflare Logs... with Cloudflare

Millions of customers trust Cloudflare to accelerate their website, protect their network, or as a platform to build their own applications. But, once you’re running in production, how do you know what’s going on with your application? You need logs from Cloudflare – a record of what happened on our network when your customers interacted with your product that uses Cloudflare.

Cloudflare Logs are an indispensable tool for debugging applications, identifying security vulnerabilities, or just understanding how users are interacting with your product. However, our customers generate petabytes of logs, and store them for months or years at a time. Log data is tantalizing: all those answers, just waiting to be revealed with the right query! But until now, it’s been too hard for customers to actually store, search, and understand their logs without expensive and cumbersome third party tools.

Today we’re announcing Cloudflare Logs Engine: a new product to enable any kind of investigation with Cloudflare Logs — all within Cloudflare.

Starting today, Cloudflare customers who push their logs to R2 can retrieve them by time range and unique identifier. Over the coming months we want to enable customers to:

  • Store logs for any Cloudflare dataset, for as long as you want, with a few clicks
  • Access logs no matter what plan you use, without relying on third party tools
  • Write queries that include multiple datasets
  • Quickly identify the logs you need and take action based on what you find

Why Cloudflare Logs?

When it comes to visibility into your traffic, most customers start with analytics. Cloudflare dashboard is full of analytics about all of our products, which give a high-level overview of what’s happening: for example, number of requests served, the ratio of cache hits, or the amount of CPU time used.

But sometimes, more detail is needed. Developers especially need to be able to read individual log lines to debug applications. For example, suppose you notice a problem where your application throws an error in an unexpected way – you need to know the cause of that error and see every request with that pattern.

Cloudflare offers tools like Instant Logs and wrangler tail which excel at real-time debugging. These are incredibly helpful if you’re making changes on the fly, or if the problem occurs frequently enough that it will appear during your debugging session.

In other cases, you need to find that needle in a haystack — the one rare event that causes everything to go wrong. Or you might have identified a security issue and want to make sure you’ve identified every time that issue could have been exploited in your application’s history.

When this happens, you need logs. In particular, you need forensics: the ability to search the entire history of your logs.

A brief overview of log analysis

Before we take a look at Logs Engine itself, I want to briefly talk about alternatives – how have our customers been dealing with their logs so far?

Cloudflare has long offered Logpull and Logpush. Logpull enables enterprise customers to store their HTTP logs on Cloudflare for up to seven days, and retrieve them by either time or RayID. Logpush can send your Cloudflare logs just about anywhere on the Internet, quickly and reliably. While Logpush provides more flexibility, it’s been up to customers to actually store and analyze those logs.

Cloudflare has a number of partnerships with SIEMs and data warehouses/data lakes. Many of these tools even have pre-built Cloudflare dashboards for easy visibility. And third party tools have a big advantage in that you can store and search across many log sources, not just Cloudflare.

That said, we’ve heard from customers that they have some challenges with these solutions.

First, third party log tooling can be expensive! Most tools require that you pay not just for storage, but for indexing all of that data when it’s ingested. While that enables powerful search functionality later on, Cloudflare (by its nature) is often one of the largest emitters of logs that a developer will have. If you were to store and index every log line we generate, it can cost more money to analyze the logs than to deliver the actual service.

Second, these tools can be hard to use. Logs are often used to track down an issue that customers discover via analytics in the Cloudflare dashboard. After finding what you need in logs, it can be hard to get back to the right part of the Cloudflare dashboard to make the appropriate configuration changes.

Finally, Logpush was previously limited to Enterprise plans. Soon, we will start offering these services to customers at any scale, regardless of plan type or how they choose to pay.

Why Logs Engine?

With Logs Engine, we wanted to solve these problems. We wanted to build something affordable, easy to use, and accessible to any Cloudflare customer. And we wanted it to work for any Cloudflare logs dataset, for any span of time.

Our first insight was that to make logs affordable, we need to separate storage and compute. The cost of Storage is actually quite low! Thanks to R2, there’s no reason many of our customers can’t store all of their logs for long periods of time. At the same time, we want to separate out the analysis of logs so that customers only pay for the compute of logs they analyze – not every line ingested. While we’re still developing our query pricing, our aim is to be predictable, transparent and upfront. You should never be surprised by the cost of a query (or land a huge bill by accident).

It’s great to separate storage and compute. But, if you need to scan all of your logs anyway to answer the first question you have, you haven’t gained any benefits to this separation. In order to realize cost savings, it’s critical to narrow down your search before executing a query. That’s where our next big idea came in: a tight integration with analytics.

Most of the time, when analyzing logs, you don’t know what you’re looking for. For example, if you’re trying to find the cause of a specific origin status code, you may need to spend some time understanding which origins are impacted, which clients are sending them, and the time range in which these errors happened. Thanks to our ABR analytics, we can provide a good summary of the data very quickly – but not the exact details of what happened. By integrating with analytics, we can help customers narrow down their queries, then switch to Logs Engine once you know exactly what you’re looking for.

Finally, we wanted to make logs accessible to anyone. That means all plan types – not just Enterprise.

Additionally, we want to make it easy to both set up log storage and analysis, and also to take action on logs once you find problems. With Logs Engine, it will be possible to search logs right from the dashboard, and to immediately create rules based on the patterns you find there.

What’s available today and our roadmap

Today, Enterprise customers can store logs in R2 and retrieve them via time range. Currently in beta, we also allow customers to retrieve logs by RayID (see our companion blog post) — to join the beta, please email [email protected].

Coming soon, we will enable customers on all plan types — not just Enterprise — to ingest logs into Logs Engine. Details on pricing will follow soon.

We also plan to build more powerful querying capability, beyond time range and RayID lookup. For example, we plan to support arbitrary filtering on any column, plus more expressive queries that can look across datasets or aggregate data.

But why stop at logs? This foundation lays the groundwork to support other types of data sources and queries one day. We are just getting started. Over the long term, we’re also exploring the ability to ingest data sources outside of Cloudflare and query them. Paired with Analytics Engine this is a formidable way to explore any data set in a cost-effective way!

Indexing millions of HTTP requests using Durable Objects

Post Syndicated from Cole MacKenzie original https://blog.cloudflare.com/r2-rayid-retrieval/

Indexing millions of HTTP requests using Durable Objects

Indexing millions of HTTP requests using Durable Objects

Our customers rely on their Cloudflare logs to troubleshoot problems and debug issues. One of the biggest challenges with logs is the cost of managing them, so earlier this year, we launched the ability to store and retrieve Cloudflare logs using R2.

In this post, I’ll explain how we built the R2 Log Retrieval API using Cloudflare Workers with a focus on Durable Objects and the Streams API. Using these, allows a customer to index and query millions of their Cloudflare logs stored in batches on R2.

Before we dive into the internals you might be wondering why one doesn’t just use a traditional database to index these logs? After all, databases are a well proven technology. Well, the reason is that individual developers or companies, both large and small, often don’t have the resources necessary to maintain such a database and the surrounding infrastructure to create this kind of setup.

Our approach instead relies on Durable Objects to maintain indexes of the data stored in R2, removing the complexity of managing and maintaining your own database. It was also super easy to add Durable Objects to our existing Workers code with just a few lines of config and some code. And R2 is very economical.

Indexing

Indexing data is often used to reduce the lookup time for a query by first pre-processing the data and computing an index – usually a file (or set of files) that have a known structure which can be used to perform lookups on the underlying data. This approach makes lookups quick as indexes typically contain the answer for a given query, or at the very least, tells you how to find it. For this project we are going to index records by the unique identifier called a RayID which our customers use to identify an HTTP request in their logs, but this solution can be modified to index any many other types of data.

When indexing RayIDs for logs stored in R2, we choose an index structure that is fairly straightforward and is commonly known as a forward-index. This type of index consists of a key-value mapping between a document’s name and a list of words contained in that document. The terms “document” and “words” are meant to be generic, and you get to define what a document and a word is.

In our case, a document is a batch of logs stored in R2 and the words are RayIDs contained within that document. For example, our index currently looks like this:

Indexing millions of HTTP requests using Durable Objects

Building an index using Durable Objects and the Streams API

In order to maintain the state of our index, we chose to use Durable Objects. Each Durable Object has its own transactional key-value storage. Therefore, to store our index, we assign each key to be the document (batch) name and the value being a JSON-array of RayIDs within that document. When extracting the RayIDs for a given batch, updating the index becomes as simple as storage.put(batchName, rayIds). Likewise, getting all the RayIDs for a document is just a call to storage.get(batchName).

When performing indexing, since the batches are stored using compression and often with a 30-100x compression ratio, reading an entire batch into memory can lead to out-of-memory (OOM) errors in our Worker. To get around this, we use the Streams API to avoid the OOM errors by processing the data in smaller chunks. There are two types of streams available: byte-oriented and value-oriented. Byte-oriented streams operate at the byte-level for things such as compressing and decompressing data, while the value-orientated streams work on first class values in JavaScript. Numbers, strings, undefined, null, objects, you name it. If it’s a valid JavaScript value, you can process it using a value-oriented stream. The Streams API also allows us to define our own JavaScript transformations for both byte- and value-oriented streams.

So, when our API receives a request to index a batch, our Worker streams the contents from R2 into a pipeline of TransformationStreams to decompress the data, decode the bytes into strings, split the data into records based on the newlines, and finally collect all the RayIDs. Once we’ve collected all the RayIDs, the data is then persisted in the index by making calls to the Durable Object, which in turn calls the aforementioned storage.put method to persist the data to the index. To illustrate what I mean, I include some code detailing the steps described above.

async function index(r2, bucket, key, storage) {
  const obj = await getObject(r2, bucket, key);

  const rawStream = obj.Body as ReadableStream;
  const index: Record<string, string[]> = {};

  const rayIdIndexingStream = new TransformStream({
    transform(chunk: string) {
      for (const match of chunk.matchAll(RAYID_FIELD_REGEX)) {
        const { rayid } = match.groups!;
        if (key in index) {
          index[key].push(rayid);
        } else {
          index[key] = [rayid];
        }
      }
    }
  });

  await collectStream(rawStream.pipeThrough(new DecompressionStream('gzip')).pipeThrough(textDecoderStream()).pipeThrough(readlineStream()).pipeThrough(rayIdIndexingStream));
  storage.put(index);
}

Searching for a RayID

Once a batch has been indexed, and the index is persisted to our Durable Object, we can then query it using a combination of the RayID and a batch name to check the presence of a RayID in that given batch. Assuming that a zone is producing a batch of logs at the rate of one batch per second this means that over 86,400 batches would be produced in a day! Over the course of a week, there would be far too many keys in our index for us to be able to iterate through them all in a timely manner. This is where the encoding of a RayID and the naming of each batch comes into play.

A RayID is currently, and I emphasize currently because this can change and has over time, a 16-byte hex encoded value where the first 36-bits encode a timestamp, and it looks something like: 764660d8ec5c2ab1. Note that the format of the RayID is likely to evolve in the near future, but for now we can use it to optimize retrieval.

Each batch produced by Logpush also happens to encode the time the batch was started and completed. Last but not least, upon analysis of our logging pipeline we found that 95% of RayIDs can be found in a batch produced within five minutes of the request completing. (Note that the encoded time sets a lower bound of the batch time we need to search).

Indexing millions of HTTP requests using Durable Objects
Encoding of a RayID
Indexing millions of HTTP requests using Durable Objects
Encoding of a batch name

For example: say we have a request that was made on November 3 at 16:00:00 UTC. We only need to check the batches under the prefix 20221103 and those batches that contain the time range of 16:00:00 to 16:05:00 UTC.

Indexing millions of HTTP requests using Durable Objects

By reducing the number of batches to just a small handful of possibilities for a given RayID, we can simply ask our index if any of those batches contains the RayID by iterating through all the batch names (keys).

async function lookup(r2, bucket, prefix, start, end, rayid, storage) {
  const keys = await listObjects(r2, bucket, prefix, start, end);
  for (const key of keys) {
    const haystack: string[] | undefined = await storage.get(key);
    if (haystack && haystack.includes(rayid)) {
      return key
    }
  }
  return undefined
}

If the RayID is found in a batch, we then stream the corresponding batch back from R2 using another TransformationStream pipeline to filter out any non-matching records from the final response. If no result was found, we return an error message saying we were unable to find the RayID.

Summary

To recap, we showed how we can use Durable Objects and their underlying storage to create and manage forward-indexes for performing efficient lookup on the RayID for potentially millions of records. All without needing to manage your own database or logging infrastructure or doing a full-scan of the data.

While this is just one possible use case for Durable Objects, we are just getting started. If you haven’t read it before, checkout How we built Instant Logs to see another application of Durable Objects to stream millions of logs in real-time to your Cloudflare Dashboard!

What’s next

We currently offer RayID lookups for the HTTP Requests, Firewall Events, and soon support for Workers Trace Events. This is just the beginning for our Log Retrieval API, and we are already looking to add the ability to index and query on more types of fields such as status codes and host names. We also plan to integrate this into the dashboard so that developers can quickly retrieve the logs they need without needing to craft the necessary API calls by hand.

Last but not least, we want to make our retrieval functionality even more powerful and are looking at adding more complex types of filters and queries that you can run against your logs.

As always, stay tuned to the blog for more updates to our developer documentation for instructions on how to get started with log retrieval. If you’re interested in joining the beta, please email [email protected].

Reduce origin load, save on cloud egress fees, and maximize cache hits with Cache Reserve

Post Syndicated from Alex Krivit original https://blog.cloudflare.com/cache-reserve-open-beta/

Reduce origin load, save on cloud egress fees, and maximize cache hits with Cache Reserve

Reduce origin load, save on cloud egress fees, and maximize cache hits with Cache Reserve

Earlier this year, we introduced Cache Reserve. Cache Reserve helps users serve content from Cloudflare’s cache for longer by using R2’s persistent data storage. Serving content from Cloudflare’s cache benefits website operators by reducing their bills for egress fees from origins, while also benefiting website visitors by having content load faster.

Cache Reserve has been in closed beta for a few months while we’ve collected feedback from our initial users and continued to develop the product. After several rounds of iterating on this feedback, today we’re extremely excited to announce that Cache Reserve is graduating to open beta – users will now be able to test it and integrate it into their content delivery strategy without any additional waiting.

If you want to see the benefits of Cache Reserve for yourself and give us some feedback– you can go to the Cloudflare dashboard, navigate to the Caching section and enable Cache Reserve by pushing one button.

How does Cache Reserve fit into the larger picture?

Content served from Cloudflare’s cache begins its journey at an origin server, where the content is hosted. When a request reaches the origin, the origin compiles the content needed for the response and sends it back to the visitor.

The distance between the visitor and the origin can affect the performance of the asset as it may travel a long distance for the response. This is also where the user is charged a fee to move the content from where it’s stored on the origin to the visitor requesting the content. These fees, known as “bandwidth” or “egress” fees, are familiar monthly line items on the invoices for users that host their content on cloud providers.

Reduce origin load, save on cloud egress fees, and maximize cache hits with Cache Reserve

Cloudflare’s CDN sits between the origin and visitor and evaluates the origin’s response to see if it can be cached. If it can be added to Cloudflare’s cache, then the next time a request comes in for that content, Cloudflare can respond with the cached asset, which means there’s no need to send the request to the origin– reducing egress fees for our customers. We also cache content in data centers close to the visitor to improve the performance and cut down on the transit time for a response.

To help assets remain cached for longer, a few years ago we introduced Tiered Cache which organizes all of our 250+ global data centers into a hierarchy of lower-tiers (generally closer to visitors) and upper-tiers (generally closer to origins). When a request for content cannot be served from a lower-tier’s cache, the upper-tier is checked before going to the origin for a fresh copy of the content. Organizing our data centers into tiers helps us cache content in the right places for longer by putting multiple caches between the visitor’s request and the origin.

Why do cache misses occur?
Misses occur when Cloudflare cannot serve the content from cache and must go back to the origin to retrieve a fresh copy. This can happen when a customer sets the cache-control time to signify when the content is out of date (stale) and needs to be revalidated. The other element at play – how long the network wants content to remain cached – is a bit more complicated and can fluctuate depending on eviction criteria.

CDNs must consider whether they need to evict content early to optimize storage of other assets when cache space is full. At Cloudflare, we prioritize eviction based on how recently a piece of cached content was requested by using an algorithm called “least recently used” or LRU. This means that even if cache-control signifies that a piece of content should be cached for many days, we may still need to evict it earlier (if it is least-requested in that cache) to cache more popular content.

This works well for most customers and website visitors, but is often a point of confusion for people wondering why content is unexpectedly displaying a miss. If eviction did not happen then content would need to be cached in data centers that were further away from visitors requesting that data, harming the performance of the asset and injecting inefficiencies into how Cloudflare’s network operates.

Some customers, however, have large libraries of content that may not be requested for long periods of time. Using the traditional cache, these assets would likely be evicted and, if requested again, served from the origin. Keeping assets in cache requires that they remain popular on the Internet which is hard given what’s popular or current is constantly changing. Evicting content that becomes cold means additional origin egress for the customer if that content needs to be pulled repeatedly from the origin.

Reduce origin load, save on cloud egress fees, and maximize cache hits with Cache Reserve

Enter Cache Reserve
This is where Cache Reserve shines. Cache Reserve serves as the ultimate upper-tier data center for content that might otherwise be evicted from cache. Once admitted to Cache Reserve, content can be stored for a much longer period of time– 30 days by default. If another request comes in during that period, it can be extended for another 30 days (and so on) or until cache-control signifies that we should no longer serve that content from cache. Cache Reserve serves as a safety net to backstop all cacheable content, so customers don’t have to worry about unwanted cache eviction and origin egress fees.

How does Cache Reserve save egress?

The promise of Cache Reserve is that hit ratios will increase and egress fees from origins will decrease for long tail content that is rarely requested and may be evicted from cache.

However, there are additional egress savings built into the product. For example, objects are written to Cache Reserve on misses. This means that when fetching the content from the origin on a cache miss, we both use that to respond to a request while also writing the asset to Cache Reserve, so customers won’t experience egress from serving that asset for a long time.

Cache Reserve is designed to be used with tiered cache enabled for maximum origin shielding. When there is a cache miss in both the lower and upper tiers, Cache Reserve is checked and if there is a hit, the response will be cached in both the lower and upper tier on its way back to the visitor without the origin needing to see the request or serve any additional data.

Cache Reserve accomplishes these origin egress savings for a low price, based on R2 costs. For more information on Cache Reserve prices and operations, please see the documentation here.

Scaling Cache Reserve on Cloudflare’s developer platform

When we first announced Cache Reserve, the response was overwhelming. Over 20,000 users wanted access to the beta, and we quickly made several interesting discoveries about how people wanted to use Cache Reserve.

The first big challenge we found was that users hated egress fees as much as we do and wanted to make sure that as much content as possible was in Cache Reserve. During the closed beta we saw usage above 8,000 PUT operations per second sustained, and objects served at a rate of over 3,000 GETs per second. We were also caching around 600Tb for some of our large customers. We knew that we wanted to open the product up to anyone that wanted to use it and in order to scale to meet this demand, we needed to make several changes quickly. So we turned to Cloudflare’s developer platform.

Cache Reserve stores data on R2 using its S3-compatible API. Under the hood, R2 handles all the complexity of an object storage system using our performant and scalable developer primitives: Workers and Durable Objects. We decided to use developer platform tools because it would allow us to implement different scaling strategies quickly. The advantage of building on the Cloudflare developer platform is that Cache Reserve was easily able to experiment to see how we could best distribute the high load we were seeing, all while shielding the complexity of how Cache Reserve works from users.  

With the single press of a button, Cache Reserve performs these functions:

  • On a cache miss, Pingora (our new L7 proxy) reaches out to the origin for the content and writes the response to R2. This happens while the content continues its trip back to the visitor (thereby avoiding needless latency).
  • Inside R2, a Worker writes the content to R2’s persistent data storage while also keeping track of the important metadata that Pingora sends about the object (like origin headers, freshness values, and retention information) using Durable Objects storage.
  • When the content is next requested, Pingora looks up where the data is stored in R2 by computing the cache key. The cache key’s hash determines both the object name in R2 and which bucket it was written to, as each zone’s assets are sharded across multiple buckets to distribute load.
  • Once found, Pingora attaches the relevant metadata and sends the content from R2 to the nearest upper-tier to be cached, then to the lower-tier and finally back to the visitor.
Reduce origin load, save on cloud egress fees, and maximize cache hits with Cache Reserve

This is magic! None of the above needs to be managed by the user. By bringing together R2, Workers, Durable Objects, Pingora, and Tiered Cache we were able to quickly build and make changes to Cache Reserve to scale as needed…

What’s next for Cache Reserve

In addition to the work we’ve done to scale Cache Reserve, opening the product up also opens the door to more features and integrations across Cloudflare. We plan on putting additional analytics and metrics in the hands of Cache Reserve users, so they know precisely what’s in Cache Reserve and how much egress it’s saving them. We also plan on building out more complex integrations with R2 so if customers want to begin managing their storage, they are able to easily make that transition. Finally, we’re going to be looking into providing more options for customers to control precisely what is eligible for Cache Reserve. These features represent just the beginning for how customers will control and customize their cache on Cloudflare.

What’s some of the feedback been so far?

As a long time Cloudflare customer, we were eager to deploy Cache Reserve to provide cost savings and improved performance for our end users. Ensuring our application always performs optimally for our global partners and delivery riders is a primary focus of Delivery Hero. With Cache Reserve our cache hit ratio improved by 5% enabling us to scale back our infrastructure and simplify what is needed to operate our global site and provide additional cost savings.
Wai Hang Tang, Director of Engineering at Delivery Hero

Anthology uses Cloudflare’s global cache to drastically improve the performance of content for our end users at schools and universities. By pushing a single button to enable Cache Reserve, we were able to provide a great experience for teachers and students and reduce two-thirds of our daily egress traffic.
Paul Pearcy, Senior Staff Engineer at Anthology

At Enjoei we’re always looking for ways to help make our end-user sites faster and more efficient. By using Cloudflare Cache Reserve, we were able to drastically improve our cache hit ratio by more than 10% which reduced our origin egress costs. Cache Reserve also improved the performance for many of our merchants’ sites in South America, which improved their SEO and discoverability across the Internet (Google, Criteo, Facebook, Tiktok)– and it took no time to set it up.
Elomar Correia, Head of DevOps SRE | Enterprise Solutions Architect at Enjoei

In the live events industry, the size and demand for our cacheable content can be extremely volatile, which causes unpredictable swings in our egress fees. Additionally, keeping data as close to our users as possible is critical for customer experience in the high traffic and low bandwidth scenarios our products are used in, such as conventions and music festivals. Cache Reserve helps us mitigate both of these problems with minimal impact on our engineering teams, giving us more predictable costs and lower latency than existing solutions.
Jarrett Hawrylak, VP of Engineering | Enterprise Ticketing at Patron Technology

How can I use it today?

As of today, Cache Reserve is in open beta, meaning that it’s available to anyone who wants to use it.

To use the Cache Reserve:

  • Simply go to the Caching tile in the dashboard.
  • Navigate to the Cache Reserve page and push the enable data sync button (or purchase button).

Enterprise Customers can work with their Cloudflare Account team to access Cache Reserve.

Customers can ensure Cache Reserve is working by looking at the baseline metrics regarding how much data is cached and how many operations we’ve seen in the Cache Reserve section of the dashboard. Specific requests served by Cache Reserve are available by using Logpush v2 and finding HTTP requests with the field “CacheReserveUsed.”

We will continue to make sure that we are quickly triaging the feedback you give us and making improvements to help ensure Cache Reserve is easy to use, massively beneficial, and your choice for reducing egress fees for cached content.

Reduce origin load, save on cloud egress fees, and maximize cache hits with Cache Reserve

Try it out

We’ve been so excited to get Cache Reserve in more people’s hands. There will be more exciting developments to Cache Reserve as we continue to invest in giving you all the tools you need to build your perfect cache.

Try Cache Reserve today and let us know what you think.

Migrate from S3 easily with the R2 Super Slurper

Post Syndicated from Aly Cabral original https://blog.cloudflare.com/cloudflare-r2-super-slurper/

Migrate from S3 easily with the R2 Super Slurper

Migrate from S3 easily with the R2 Super Slurper

R2 is an S3-compatible, globally distributed object storage, allowing developers to store large amounts of unstructured data without the costly egress bandwidth fees you commonly find with other providers.

To enjoy this egress freedom, you’ll have to start planning to send all that data you have somewhere else into R2. You might want to do it all at once, moving as much data as quickly as possible while ensuring data consistency. Or do you prefer moving the data to R2 slowly and gradually shifting your reads from your old provider to R2? And only then decide whether to cut off your old storage or keep it as a backup for new objects in R2?

There are multiple options for architecture and implementations for this movement, but taking terabytes of data from one cloud storage provider to another is always problematic, always involves planning, and likely requires staffing.

And that was hard. But not anymore.

Today we’re announcing the R2 Super Slurper, the feature that will enable you to move all your data to R2 in one giant slurp or sip by sip — all in a friendly, intuitive UI and API.

Migrate from S3 easily with the R2 Super Slurper

The first step: R2 Super Slurper Private Beta

One giant slurp

The very first iteration of the R2 Super Slurper allows you to target an S3 bucket and import the objects you have stored there into your R2 bucket. It’s a simple, one-time import that covers the most common scenarios. Point to your existing S3 source, grant the R2 Super Slurper permissions to read the objects you want to migrate, and an asynchronous job will take care of the rest.

Migrate from S3 easily with the R2 Super Slurper

You’ll also be able to save the definitions and credentials to access your source bucket, so you can migrate different folders from within the bucket, in new operations, without having to define URLs and credentials all over again. This operation alone will save you from scripting your way through buckets with many paths you’d like to validate for consistency.  During the beta stages — with your feedback — we will evolve the R2 Super Slurper to the point where anyone can achieve an entirely consistent, super slurp, all with the click of just a few buttons.

Automatic sip by sip migration

Other future development includes automatic sip by sip migration, which provides a way to incrementally copy objects to R2 as they get requested from an end-user. It allows you to start serving objects from R2 as they migrate, saving you money immediately.

Migrate from S3 easily with the R2 Super Slurper

The flow of the requests and object migration will look like this:

  • Check for Object — A request arrives at Cloudflare (1), and we check the R2 bucket for the requested object (2). If the object exists, R2 serves it (3).
  • Copy the Object — If the object does not exist in R2, a request for the object flows to the origin bucket (2a). Once there’s an answer with an object, we serve it and copy it into R2 (2b).
  • Serve the Object — R2 serves all future requests for the object (3).

With this capability you can copy your objects, previously scattered through one or even multiple buckets from other vendors, while ensuring that everything requested from the end-user side gets served from R2. And because you will only need to use the R2 Super Slurper to sip the object from elsewhere on the first request, you will start saving on those egress fees for any subsequent ones.

We are currently targeting S3-compatible buckets for now, but you can expect other sources to become available during 2023.

Join the waitlist for the R2 Super Slurper private beta

To access the R2 Super Slurper, you must be an R2 user first and sign up for the R2 Super Slurper waitlist here.

We will collaborate closely with many early users in the private beta stage to refine and test the service . Soon, we’ll announce an open beta where users can sign up for the service.

Make sure to join our Discord server and get in touch with a fantastic community of users and Cloudflare staff for all R2-related topics!

Easy Postgres integration on Cloudflare Workers with Neon.tech

Post Syndicated from Erwin van der Koogh original https://blog.cloudflare.com/neon-postgres-database-from-workers/

Easy Postgres integration on Cloudflare Workers with Neon.tech

Easy Postgres integration on Cloudflare Workers with Neon.tech

It’s no wonder that Postgres is one of the world’s favorite databases. It’s easy to learn, a pleasure to use, and can scale all the way up from your first database in an early-stage startup to the system of record for giant organizations. Postgres has been an integral part of Cloudflare’s journey, so we know this fact well. But when it comes to connecting to Postgres from environments like Cloudflare Workers, there are unfortunately a bunch of challenges, as we mentioned in our Relational Database Connector post.

Neon.tech not only solves these problems; it also has other cool features such as branching databases — being able to branch your database in exactly the same way you branch your code: instant, cheap and completely isolated.

How to use it

It’s easy to get started. Neon’s client library @neondatabase/serverless is a drop-in replacement for node-postgres, the npm pg package with which you may already be familiar. After going through the getting started process to set up your Neon database, you can easily create a Worker to ask Postgres for the current time like so:

  1. Create a new Worker — Run npx wrangler init neon-cf-demo and accept all the defaults. Enter the new folder with cd neon-cf-demo.
  2. Install the Neon package — Run npm install @neondatabase/serverless.
  3. Provide connection details — For deployment, run npx wrangler secret put DATABASE_URL and paste in your connection string when prompted (you’ll find this in your Neon dashboard: something like postgres://user:[email protected]/main). For development, create a new file .dev.vars with the contents DATABASE_URL= plus the same connection string.
  4. Write the code — Lastly, replace src/index.ts with the following code:

import { Client } from '@neondatabase/serverless';
interface Env { DATABASE_URL: string; }

export default {
  async fetch(request: Request, env: Env, ctx: ExecutionContext) {
    const client = new Client(env.DATABASE_URL);
    await client.connect();
    const { rows: [{ now }] } = await client.query('select now();');
    ctx.waitUntil(client.end());  // this doesn’t hold up the response
    return new Response(now);
  }
}

To try this locally, type npm start. To deploy it around the globe, type npx wrangler publish.

You can also check out the source for a slightly more complete demo app. This shows your nearest UNESCO World Heritage sites using IP geolocation in Cloudflare Workers and nearest-neighbor sorting in PostGIS.

Easy Postgres integration on Cloudflare Workers with Neon.tech

How does this work? In this case, we take the coordinates supplied to our Worker in request.cf.longitude and request.cf.latitude. We then feed these coordinates to a SQL query that uses the PostGIS distance operator <-> to order our results:

const { longitude, latitude } = request.cf
const { rows } = await client.query(`
  select 
    id_no, name_en, category,
    st_makepoint($1, $2) <-> location as distance
  from whc_sites_2021
  order by distance limit 10`,
  [longitude, latitude]
);

Since we created a spatial index on the location column, the query is blazing fast. The result (rows) looks like this:

[{
  "id_no": 308,
  "name_en": "Yosemite National Park",
  "category": "Natural",
  "distance": 252970.14782223428
},
{
  "id_no": 134,
  "name_en": "Redwood National and State Parks",
  "category": "Natural",
  "distance": 416334.3926827573
},
/* … */
]

For even lower latencies, we could cache these results at a slightly coarser geographical resolution — rounding, say, to one sixtieth of a degree (one arc minute) of longitude and latitude, which is a little under a mile.

Sign up to Neon using the invite code serverless and try the @neondatabase/serverless driver with Cloudflare Workers.

Why we did it

Cloudflare Workers has enormous potential to improve back-end development and deployment. It’s cost-effective, admin-free, and radically scalable.

The use of V8 isolates means Workers are now fast and lightweight enough for nearly any use case. But it has a key drawback: Cloudflare Workers don’t yet support raw TCP communication, which has made database connections a challenge.

Even when Workers eventually support raw TCP communication, we will not have fully solved our problem, because database connections are expensive to set up and also have quite a bit of memory overhead.

This is what the solution looks like:

Easy Postgres integration on Cloudflare Workers with Neon.tech

It consists of three parts:

  1. Connection pooling built into the platform — Given Neon’s serverless compute model, splitting storage and compute operations, it is not recommended to rely on a one-to-one mapping between external clients and Postgres connections. Instead, you can turn on connection pooling simply by flicking a switch (it’s in the Settings area of your Neon dashboard).
  2. WebSocket proxy — We deploy our own WebSocket-to-TCP proxy, written in Go. The proxy simply accepts WebSocket connections from Cloudflare Worker clients, relays message payloads to a requested (Neon-only) host over plain TCP, and relays back the responses.
  3. Client library — Our driver library is based on node-postgres but provides the necessary shims for Node.js features that aren’t present in Cloudflare Workers. Crucially, we replace Node’s net.Socket and tls.connect with code that redirects network reads and writes via the WebSocket connection. To support end-to-end TLS encryption between Workers and the database, we compile WolfSSL to WebAssembly with emscripten. Then we use esbuild to bundle it all together into an easy-to-use npm package.

The @neondatabase/serverless package is currently in public beta. We have plans to improve, extend, and explain it further in the near future on the Neon blog. In line with our commitment to open source, you can configure our serverless driver and/or run our WebSocket proxy to provide access to Postgres databases hosted anywhere — just see the respective repos for details.

So try Neon using invite code serverless, sign up and connect to it with Cloudflare Workers, and you’ll have a fully flexible back-end service running in next to no time.

Welcome to the Supercloud (and Developer Week 2022)

Post Syndicated from John Graham-Cumming original https://blog.cloudflare.com/welcome-to-the-supercloud-and-developer-week-2022/

Welcome to the Supercloud (and Developer Week 2022)

Welcome to the Supercloud (and Developer Week 2022)

In Cloudflare’s S-1 document there’s a section that begins: “The Internet was not built for what it has become”.

That sentence expresses the idea that the Internet, which started as an experiment, has blossomed into something we all need to rely upon for our daily lives and work. And that more is needed than just the Internet as was designed; it needed security and performance and privacy.

Something similar can be said about the cloud: the cloud was not designed for what it must become.

The introduction of services like Amazon EC2 was undoubtedly a huge improvement on the old way of buying and installing racks and racks of servers and storage systems, and then maintaining them.

But by its nature the cloud was a virtualization of the older real world infrastructure and not a radical rethink of what computing should look like to meet the demands of Internet-scale businesses. It’s as if steam locomotives were replaced with efficient electric engines but still required a chimney on top and stopped to take on water every two hundred miles.

Welcome to the Supercloud (and Developer Week 2022)

The cloud replaced the rituals of buying servers and installing operating systems with new and now familiar rituals of choosing regions, and provisioning virtual machines, and keeping code artificially warm.

But along the way glimpses of light are seen through the cloud in the form of lambdas, or edges, or functions, or serverless. All are trying to give a name to a model of cloud computing that promises to make developers highly productive at scaling from one to Internet-scale. It’s a model that rather than virtualizing machines or disks or wrapping things in containers says: “write code, we’ll run it, don’t sweat the details like scaling or location”.

We’re calling that the Supercloud.

The foundations of the Supercloud are compute and data services that make running any size application efficient and infinitely scalable without the baggage of the cloud as it exists today.

The foundations of the Supercloud

Some years ago a movement called NoSQL developed new ways of storing and processing data that didn’t rely on databases. Key-value stores and document stores flourished because rather than thinking about data at the granularity of databases or tables or even rows, they made a direct connection between code and data at a simple level.

You can think of NoSQL as a drive towards granularity. And it worked. NoSQL stores, KVs, object stores (like R2) abound. The rise of MapReduce for processing data is also about granularity; by breaking data processing into easily scaled pieces (the map and the reduce) it was possible to handle huge amounts of data efficiently and scale up and down as needed.

The same thing is happening for cloud code. Just as programmers didn’t always want to think in database-sized chunks, they shouldn’t have to think about VM- or container-sized chunks. It’s inefficient and has nothing to do with the actual job of writing code to create a service. It’s unnecessary work that distracts from the real value of programming something into existence.

In distributed programming theory, granularity has been around for a long time. The CSP model is of tiny processes performing tasks and passing data (it helped inspire the Go language); the Actor model has messages passed between multitudes of actors changing internal state; even the lambda calculus is about discrete functions acting on data.

Object-oriented programming has developers reasoning about objects (not virtual machines or disks). And in CORBA, and similar systems, there’s the concept of an object request broker allowing objects to run and by accessed remotely in a distributed system without knowing details of where or how the object executes.

The theory of computing points away from dedicated machines (virtual or real) and to code and data that run on the Supercloud handling the details of code execution and data locality automatically and efficiently.

So whether you write your code by breaking it up into functions or ship large pieces of functionality or entire programs, the foundations of the Supercloud means that your code benefits from its efficiency. And more.

The Supercloud advantage

The Supercloud makes scaling easy because no one has to think about how many VMs to provision, no one has to keep hot standby VMs in case there’s a flood of visitors. Just as MapReduce (which traces its heritage to the lambda calculus) scales up and down, so should general purpose computing.

And it’s not just about scaling. In the Supercloud both code and data are mobile and move around the network. Attach data to the code (such as with Durable Objects; hello Actor model) and you have a foundation for applications that can scale to any size and move close to users as needed to provide the best performance.

Alternatively, if your data is immovable, we move your code closer to it, no matter how many times you need to access it.

Not only that but working at this level of flexibility means that code enforcing a data privacy or data residence law about where data can be processed or stored can operate at the level of individual users or objects. The same code can behave differently and even be executed in a completely different country based on where its associated data is stored.

A Supercloud has two interesting effects on the cost of running a program. Firstly, it makes it more economical because you only run what you need. There’s never any need for committed VMs waiting for work, or idle machines you’re paying for just in case. Code either runs or it doesn’t. It scales up and down as needed. You only pay for precisely what you need.

Secondly, it creates a more efficient compute platform which is better for everyone. It forces the compute platform (e.g. us) to be as efficient as possible. We have to be able to start code quickly for performance and scale up reasons. We need to efficiently use CPUs because no customer is paying us to keep idle CPUs around. And it’s better for the environment because cloud machines run at very high levels of utilization. This level of efficiency is what allows our platform to scale to the 10 million requests that Cloudflare Workers processed in the time it took you to read the last word of this sentence.

And this compute platform scales well beyond a machine, or a data center, or a country. With the right software (which we’ve built) it scales to the size of the Internet. Software allocates resources automatically across the globe, moving connections, data and processing around for high efficiency and optimal end user experience.

Efficient compute and storage, a global network that’s everywhere everyone is, bound together by software that turns the globe into a single cloud. The Supercloud.

Welcome to the Supercloud (and Developer Week 2022)

Welcome to the Supercloud

The Supercloud is performant, scalable, available, private, and cost-efficient. Choosing a region for your application, or provisioning virtual machines, or working out how to auto-scale containers, or worrying about cold starts seems ridiculous, hard, anachronistic, a waste of time, rigid and expensive.

Happily, Cloudflare’s been building the alternative to that traditional cloud into our network and our developer platform for years. The Supercloud. The term may be new, but that doesn’t mean that it’s not real. Today, we have over a million developers building on the Supercloud.

Each of those developers wants to get code running on one machine and perfect it. It’s so much easier to work that way. We just happen to have one machine that scales to the size of the Internet: a global, distributed supercomputer. It’s the Supercloud and we build our own products on it, and you can join those one million developers and build on it too.

We’ve been building the Supercloud for 12 years, and five years ago opened it up to developers through Cloudflare Workers. Cloudflare Workers was built for scale and performance since day one, by running on our global network.

And with that, welcome to the Supercloud and welcome to Cloudflare Developer Week 2022.

As is it the case with all of our Innovation Weeks, we’re excited to kick off another week of announcements, enabling more and more use cases to be built on the Supercloud. In fact, it’s building on the Workers developer platform that gives us the super powers to continue delivering new building blocks for our users. This week, we’re going not to just tell you about all the new tools you can play with, but also how we built many of them, how you can use them, and what our customers are building with them in production today.

Watch on Cloudflare TV

You can watch the complete segment of our weekly show This Week in Net here — or hear it in the audio/podcast format.

The road to a more standards-compliant Workers API

Post Syndicated from James M Snell original https://blog.cloudflare.com/standards-compliant-workers-api/

The road to a more standards-compliant Workers API

The road to a more standards-compliant Workers API

Earlier this year, we announced our participation in a new W3C Community Group for the advancement of Web-interoperable API standards. Since then, this new WinterCG has been hard at work identifying the common API standards around which all JavaScript runtimes can build. Today I just want to give a peek at some work the WinterCG has been doing; and show off some of the improvements we have been making in the Workers runtime to increase alignment with Web Platform standards around event handling, task cancellation using AbortController, text encoding and decoding, URL parsing and pattern matching, and streams support.

The WinterCG Minimum Common Web Platform API

Right at the start of the WinterCG activity, the group took some time to evaluate and compare the various non-browser JavaScript runtimes such as Node.js, Deno, Bun, and Workers with the purpose of identifying the Web Platform APIs they all had in common. Following a very simple criteria, we looked at the standard APIs that were already implemented and supported by at least two of these runtimes and compiled those into a list that the WinterCG calls the “Minimum Common Web Platform API“. This list will serve as the basis for what the community group defines as the minimum set of Web Platform APIs that should be implemented consistently across runtimes that claim to be “Web-interoperable”.

The current list is straightforward:

AbortController ReadableStreamDefaultController
AbortSignal ReadableStreamDefaultReader
ByteLengthQueuingStrategy SubtleCrypto
CompressionStream TextDecoder
CountQueuingStrategy TextDecoderStream
Crypto TextEncoder
CryptoKey TextEncoderStream
DecompressionStream TransformStream
DOMException TransformStreamDefaultController
Event URL
EventTarget URLPattern
ReadableByteStreamController URLSearchParams
ReadableStream WritableStream
ReadableStreamBYOBReader WritableStreamDefaultController
ReadableStreamBYOBRequest  

In addition to these, the WinterCG also expects Web-interoperable runtimes to have implementations of the atob(), btoa(), queueMicrotask(), structuredClone(), setTimeout(), clearTimeout(), setInterval(), clearInterval(), console, and crypto.subtle APIs available on the global scope.

Today, we are happy to say that the Workers runtime has compliant or nearly compliant implementations of every one of these WinterCG Minimum Common Web Platform APIs. Some of these APIs intentionally diverge from the standards either due to backwards compatibility concerns, Workers-specific features, or performance optimizations. Other APIs diverge still because we are still in the process of updating them to align with the specifications.

Improving standards compliance in the Workers runtime

The Workers runtime has, from the beginning, had the mission to align its developer experience with JavaScript and Web Platform standards as much as possible. Over the past year we have worked hard to continue advancing that mission forward both by improving the standards-compliance of existing APIs such as Event, EventTarget, URL, and streams; and the introduction of new Web Platform APIs such as URLPattern, encoding streams, and compression streams.

Event and EventTarget

The Workers runtime has provided an implementation of the Event and EventTarget Web Platform APIs from the very beginning. These were, however, only limited implementations of what the WHATWG DOM specification defines. Specifically, Workers had only implemented the bare minimum of the Event API that it itself needed to operate.

Today, the Event and EventTarget implementations in Workers provide a more complete implementation.

Let’s look at the official definition of Event as defined by the WHATWG DOM standard:

[Exposed=*]
interface Event {
  constructor(DOMString type, optional EventInit eventInitDict = {});
 
  readonly attribute DOMString type;
  readonly attribute EventTarget? target;
  readonly attribute EventTarget? srcElement; // legacy
  readonly attribute EventTarget? currentTarget;
  sequence<EventTarget> composedPath();
 
  const unsigned short NONE = 0;
  const unsigned short CAPTURING_PHASE = 1;
  const unsigned short AT_TARGET = 2;
  const unsigned short BUBBLING_PHASE = 3;
  readonly attribute unsigned short eventPhase;
 
  undefined stopPropagation();
           attribute boolean cancelBubble; // legacy alias of .stopPropagation()
  undefined stopImmediatePropagation();
 
  readonly attribute boolean bubbles;
  readonly attribute boolean cancelable;
           attribute boolean returnValue;  // legacy
  undefined preventDefault();
  readonly attribute boolean defaultPrevented;
  readonly attribute boolean composed;
 
  [LegacyUnforgeable] readonly attribute boolean isTrusted;
  readonly attribute DOMHighResTimeStamp timeStamp;
 
  undefined initEvent(DOMString type, optional boolean bubbles = false, optional boolean cancelable = false); // legacy
};
 
dictionary EventInit {
  boolean bubbles = false;
  boolean cancelable = false;
  boolean composed = false;
};

Web Platform API specifications are always written in terms of a definition language called Web IDL. Every attribute defined in the interface is a property that is exposed on the object. Event objects, then, are supposed to have properties like type, target, srcElement, currentTarget, bubbles, cancelable, returnValue, defaultPrevented, composed, isTrusted, and timeStamp. They are also expected to have methods such as composedPath(), stopPropagation(), and stopImmediatePropagation(). Because most of these were not immediately needed by Workers, most were not provided originally.

Today, all standard, non-legacy properties and methods defined by the specification are available for use:

 const event = new Event('foo', {
    bubbles: false,
    cancelable: true,
    composed: true,
  });
 
  console.log(event.bubbles);
  console.log(event.cancelable);
  console.log(event.composed);
  
  addEventListener('foo', (event) => {
    console.log(event.eventPhase);  // 2 AT_TARGET
    console.log(event.currentTarget);
    console.log(event.composedPath());
  });
 
  dispatchEvent(event);

While we were at it, we also fixed a long standing bug in the implementation of Event that prevented user code from properly subclassing the Event object to create their own custom event types. This change is protected by a compatibility flag that is now enabled by default for all Workers using a compatibility date on or past 2022-01-31.

  class MyEvent extends Event {
    constructor() {
      super('my-event')
    }
 
    get type() { return super.type.toUpperCase() }
  }
 
  const myEvent = new MyEvent();
  // Previously, this would print "my-event" instead of "MY-EVENT" as expected.
  console.log(myEvent.type);

The EventTarget implementation has also been updated to support once handlers (event handlers that are triggered at-most once then automatically unregistered), cancelable handlers (using AbortSignal), and event listener objects, all in line with the standard.

Using a one-time event handler

  addEventListener('foo', (event) => {
    console.log('printed only once');
  }, {
    once: true
  });
 
  dispatchEvent(new Event('foo'));
  dispatchEvent(new Event('foo'));

Once handlers are key for preventing memory leaks in your applications when you know that a particular event is only ever going to be emitted once, or whenever you only care about handling it once. The stored reference to the function or object that is handling the event is removed immediately upon the first invocation, allowing the memory to be garbage collected.

Using a cancelable event handler

  const ac = new AbortController();
 
  addEventListener('foo', (event) => {
    console.log('not printed at all');
  }, {
    signal: ac.signal
  });
 
  ac.abort();
 
  dispatchEvent(new Event('foo'));

Using an event listener object

While passing a function to addEventListener() is the most common case, the standard actually allows an event listener to be an object with a handleEvent() method as well.

  const listener = {
    handleEvent(event) {
      console.log(event.type);
    }
  };
 
  addEventListener('foo', listener);
  addEventListener('bar', listener);
 
  dispatchEvent(new Event('foo'));
  dispatchEvent(new Event('bar'));

AbortController and AbortSignal

As illustrated in the cancelable event example above, we have also introduced an implementation of the AbortController and AbortSignal APIs into Workers. These provide a standard, and interoperable way of signaling cancellation of several kinds of tasks.

The AbortController/AbortSignal pattern is straightforward: An AbortSignal is just a type of EventTarget that will emit a single “abort” event when it is triggered:

  const ac = new AbortController();
 
  ac.signal.addEventListener('abort', (event) => {
    console.log(event.reason);  // 'just because'
  }, { once: true });
 
  ac.abort('just because');

The AbortController is used to actually trigger the abort event, optionally with a reason argument that is passed on to the event. The reason is typically an Error object but can be any JavaScript value.

The AbortSignal can only be triggered once, so the “abort” event should only ever be emitted once.

It is also possible to create AbortSignals that timeout after a specified period of time:

const signal = AbortSignal.timeout(10);

Or an AbortSignal that is pre-emptively triggered immediately on creation (these will never actually emit the “abort” event):

const signal = AbortSignal.abort('for reasons');

Currently, within Workers, AbortSignal and AbortController has been integrated with the EventTarget, fetch(), and streams APIs in alignment with the relevant standard specifications for each.

Using AbortSignal to cancel a fetch()

  const ac = new AbortController();
 
  const res = fetch('https://example.org', {
    signal: ac.signal
  });
 
  ac.abort(new Error('canceled'))
 
  try {
    await res;
  } catch (err) {
    console.log(err);
  }

TextEncoderStream and TextDecoderStream

The Workers runtime has long provided basic implementations of the TextEncoder and TextDecoder APIs. Initially, these were limited to only supporting encoding and decoding of UTF-8 text. The standard definition of TextDecoder, however, defines a much broader range of text encodings that are now fully supported by the Workers implementation. Per the standard, TextEncoder currently only supports UTF-8.

  const win1251decoder = new TextDecoder("windows-1251");
  const bytes = new Uint8Array([
    207, 240, 232, 226, 229, 242, 44, 32, 236, 232, 240, 33,
  ]);
  console.log(win1251decoder.decode(bytes)); // Привет, мир!

In addition to supporting the full range of encodings defined by the standard, Workers also now provides implementations of the TextEncoderStream and TextDecoderStream, which provide TransformStream implementations that apply encoding and decoding to streaming data:

  const { writable, readable } = new TextDecoderStream("windows-1251");
 
  const writer = writable.getWriter();
  writer.write(new Uint8Array([
    207, 240, 232, 226, 229, 242, 44, 32, 236, 232, 240, 33,
  ]));
 
  const reader = readable.getReader();
  const res = await reader.read();
  console.log(res.value); // Привет, мир!

Using the encoding streams requires the use of the transformstream_enable_standard_constructor compatibility flag.

CompressionStream and DecompressionStream

Streaming compression and decompression is also now supported in the runtime using the standard CompressionStream and DecompressionStream APIs.

const ds = new DecompressionStream('gzip');
const decompressedStream = blob.stream().pipeThrough(ds);

const cs = new CompressionStream('gzip');
const compressedStream = blob.stream().pipeThrough(cs);

These are TransformStream implementations that fully conform to the standard definitions. Use of the compression streams does not require a compatibility flag to enable.

URL and URLPattern

Similar to Event, there has been an implementation of the Web Platform standard URL API available within Workers from nearly the beginning. But also like Event, the implementation was not entirely compatible with the standard.

The incompatibilities were subtle, for instance, in the original implementation, the URL string “https://a//b//c//” would be parsed incorrectly as “https://a/b/c” (note that the extra empty path segments are removed) whereas the standard parsing algorithm would produce “https://a//b//c/” as a result. Such inconsistent results were causing interoperability issues with JavaScript written to run across multiple JavaScript runtimes and needed to be fixed.

A new implementation of the URL parsing algorithm has been provided, and as of October 31, 2022 it has been enabled by default for all newly deployed Workers. Older Workers can begin using the new implementation by updating their compatibility dates to 2022-10-31 or by enabling the url_standard compatibility flag.

Along with the updated URL implementation, Workers now provides an implementation of the standard URLPattern API.

URLPattern provides a regular-expression-like syntax for matching a URL string against a pattern. For instance, consider this example taken from the MDN documentation for URLPattern:

  // Matching a pathname
  let pattern1 = new URLPattern('https://example.com/books/:id')
  // same as
  let pattern2 = new URLPattern(
    '/books/:id',
    'https://example.com',
  );
  // or
  let pattern3 = new URLPattern({
    protocol: 'https',
    hostname: 'example.com',
    pathname: '/books/:id',
  });
  // or
  let pattern4 = new URLPattern({
    pathname: '/books/:id',
    baseURL: 'https://example.com',
  });

ReadableStream, WritableStream, and TransformStream

Last, but absolutely not least, our most significant effort over the past year has been providing new standards compliant implementations of the ReadableStream, WritableStream, and TransformStream APIs.

The Workers runtime has always provided an implementation of these objects but they were never fully conformant to the standard. User code was not capable of creating custom ReadableStream and WritableStream instances, and TransformStreams were limited to simple identity pass-throughs of bytes. The implementations have been updated now to near complete compliance with the standard (near complete because we still have a few edge cases and features we are working on).

The new streams implementation will be enabled by default in all new Workers as of November 30, 2022, or can be enabled earlier using the streams_enable_constructors and transformstream_enable_standard_constructor compatibility flags.

Creating a custom ReadableStream

async function handleRequest(request) {
  const enc = new TextEncoder();

  const rs = new ReadableStream({
    pull(controller) {
      controller.enqueue(enc.encode('hello world'));
      controller.close();
    }
  });

  return new Response(rs);
}

The new implementation supports both “regular” and “bytes” ReadableStream types, supports BYOB readers, and includes performance optimizations for both tee() and pipeThrough().

Creating a custom WritableStream

  const ws = new WritableStream({
    write(chunk) {
      console.log(chunk);  // "hello world"
    }
  });
 
  const writer = ws.getWriter();
  writer.write("hello world");

WritableStreams are fairly simple objects that can accept any JavaScript value written to them.

Creating a custom TransformStream

  const { readable, writable } = new TransformStream({
    transform(chunk, controller) {
      controller.enqueue(chunk.toUpperCase());
    }
  });
 
  const writer = writable.getWriter();
  const reader = readable.getReader();
 
  writer.write("hello world");
 
  const res = await reader.read();
  console.log(res.value);  // "HELLO WORLD"

It has always been possible in Workers to call new TransformStream() (with no arguments) to create a limited version of a TransformStream that only accepts bytes and only acts as a pass-through, passing the bytes written to the writer on to the reader without any modification.

That original implementation is now available within Workers using the IdentityTransformStream class.

  const { readable, writable } = new IdentityTransformStream();
 
  const writer = writable.getWriter();
  const reader = readable.getReader();
 
  const enc = new TextEncoder();
  const dec = new TextDecoder();
 
  writer.write(enc.encode("hello world"));
 
  const res = await reader.read();
  console.log(dec.decode(res.value));  // "hello world"

If your code is using new TransformStream() today as this kind of pass-through, the new implementation will continue to work except for one very important difference: the old, non-standard implementation of new TransformStream() supported BYOB reads on the readable side (i.e. readable.getReader({ mode: 'byob' })). The new implementation (enabled via a compatibility flag and becoming the default on November 30 ) does not support BYOB reads as required by the stream standard.

What’s next

It is clear that we have made a lot of progress in improving the standards compliance of the Workers runtime over the past year, but there is far more to do. Next we will be turning our attention to the implementation of the fetch() and WebSockets APIs, as well as actively seeking closer alignment with other runtimes through collaboration in the Web-interoperable Runtimes Community Group.

If you are interested in helping drive the implementation of Web Platform APIs forward, and advancing interoperability between JavaScript runtime environments, the Workers Runtime team at Cloudflare is hiring! Reach out, or see our open positions here.

Build applications of any size on Cloudflare with the Queues open beta

Post Syndicated from Rob Sutter original https://blog.cloudflare.com/cloudflare-queues-open-beta/

Build applications of any size on Cloudflare with the Queues open beta

Build applications of any size on Cloudflare with the Queues open beta

Message queues are a fundamental building block of cloud applications—and today the Cloudflare Queues open beta brings queues to every developer building for Region: Earth. Cloudflare Queues follows Cloudflare Workers and Cloudflare R2 in a long line of innovative services built for the Workers Developer Platform, enabling developers to build more complex applications without configuring networks, choosing regions, or estimating capacity. Best of all, like many other Cloudflare services, there are no egregious egress charges!

Build applications of any size on Cloudflare with the Queues open beta

If you’ve ever purchased something online and seen a message like “you will receive confirmation of your order shortly,” you’ve interacted with a queue. When you completed your order, your shopping cart and information were stored and the order was placed into a queue. At some later point, the order fulfillment service picks and packs your items and hands it off to the shipping service—again, via a queue. Your order may sit for only a minute, or much longer if an item is out of stock or a warehouse is busy, and queues enable all of this functionality.

Message queues are great at decoupling components of applications, like the checkout and order fulfillment services for an ecommerce site. Decoupled services are easier to reason about, deploy, and implement, allowing you to ship features that delight your customers without worrying about synchronizing complex deployments.

Queues also allow you to batch and buffer calls to downstream services and APIs. This post shows you how to enroll in the open beta, walks you through a practical example of using Queues to build a log sink, and tells you how we built Queues using other Cloudflare services. You’ll also learn a bit about the roadmap for the open beta.

Getting started

Enrolling in the open beta

Open the Cloudflare dashboard and navigate to the Workers section. Select Queues from the Workers navigation menu and choose Enable Queues Beta.

Review your order and choose Proceed to Payment Details.

Note: If you are not already subscribed to a Workers Paid Plan, one will be added to your order automatically.

Enter your payment details and choose Complete Purchase. That’s it – you’re enrolled in the open beta! Choose Return to Queues on the confirmation page to return to the Cloudflare Queues home page.

Creating your first queue

After enabling the open beta, open the Queues home page and choose Create Queue. Name your queue `my-first-queue` and choose Create queue. That’s all there is to it!

The dash displays a confirmation message along with a list of all the queues in your account.

Build applications of any size on Cloudflare with the Queues open beta

Note: As of the writing of this blog post each account is limited to ten queues. We intend to raise this limit as we build towards general availability.

Managing your queues with Wrangler

You can also manage your queues from the command line using Wrangler, the CLI for Cloudflare Workers. In this section, you build a simple but complete application implementing a log aggregator or sink to learn how to integrate Workers, Queues, and R2.

Setting up resources
To create this application, you need access to a Cloudflare Workers account with a subscription plan, access to the Queues open beta, and an R2 plan.

Install and authenticate Wrangler then run wrangler queues create log-sink from the command line to create a queue for your application.

Run wrangler queues list and note that Wrangler displays your new queue.

Note: The following screenshots use the jq utility to format the JSON output of wrangler commands. You do not need to install jq to complete this application.

Build applications of any size on Cloudflare with the Queues open beta

Finally, run wrangler r2 bucket create log-sink to create an R2 bucket to store your aggregated logs. After the bucket is created, run wrangler r2 bucket list to see your new bucket.

Build applications of any size on Cloudflare with the Queues open beta

Creating your Worker
Next, create a Workers application with two handlers: a fetch() handler to receive individual incoming log lines and a queue() handler to aggregate a batch of logs and write the batch to R2.

In an empty directory, run wrangler init to create a new Cloudflare Workers application. When prompted:

  • Choose “y” to create a new package.json
  • Choose “y” to use TypeScript
  • Choose “Fetch handler” to create a new Worker at src/index.ts
Build applications of any size on Cloudflare with the Queues open beta

Open wrangler.toml and replace the contents with the following:

wrangler.toml

name = "queues-open-beta"
main = "src/index.ts"
compatibility_date = "2022-11-03"
 
 
[[queues.producers]]
 queue = "log-sink"
 binding = "BUFFER"
 
[[queues.consumers]]
 queue = "log-sink"
 max_batch_size = 100
 max_batch_timeout = 30
 
[[r2_buckets]]
 bucket_name = "log-sink"
 binding = "LOG_BUCKET"

The [[queues.producers]] section creates a producer binding for the Worker at src/index.ts called BUFFER that refers to the log-sink queue. This Worker can place messages onto the log-sink queue by calling await env.BUFFER.send(log);

The [[queues.consumers]] section creates a consumer binding for the log-sink queue for your Worker. Once the log-sink queue has a batch ready to be processed (or consumed), the Workers runtime will look for the queue() event handler in src/index.ts and invoke it, passing the batch as an argument. The queue() function signature looks as follows:

async queue(batch: MessageBatch<Error>, env: Environment): Promise<void> {

The final binding in your wrangler.toml creates a binding for the log-sink R2 bucket that makes the bucket available to your Worker via env.LOG_BUCKET.

src/index.ts

Open src/index.ts and replace the contents with the following code:

export interface Env {
 BUFFER: Queue;
 LOG_BUCKET: R2Bucket;
}
 
export default {
 async fetch(request: Request, env: Environment): Promise<Response> {
   let log = await request.json();
   await env.BUFFER.send(log);
   return new Response("Success!");
 },
 async queue(batch: MessageBatch<Error>, env: Environment): Promise<void> {
   const logBatch = await JSON.stringify(batch.messages);
   await env.LOG_BUCKET.put(`logs/${Date.now()}.log.json`, logBatch);
 },
};

The export interface Env section exposes the two bindings you defined in wrangler.toml: a queue named BUFFER and an R2 bucket named LOG_BUCKET.

The fetch() handler transforms the request body into JSON, adds the body to the BUFFER queue, then returns an HTTP 200 response with the message Success!

The `queue()` handler receives a batch of messages that each contain log entries, iterates through concatenating each log into a string buffer, then writes that buffer to the LOG_BUCKET R2 bucket using the current timestamp as the filename.

Publishing and running your application
To publish your log sink application, run wrangler publish. Wrangler packages your application and its dependencies and deploys it to Cloudflare’s global network.

Build applications of any size on Cloudflare with the Queues open beta

Note that the output of wrangler publish includes the BUFFER queue binding, indicating that this Worker is a producer and can place messages onto the queue. The final line of output also indicates that this Worker is a consumer for the log-sink queue and can read and remove messages from the queue.

Use your favorite API client, like curl, httpie, or Postman, to send JSON log entries to the published URL for your Worker via HTTP POST requests. Navigate to your log-sink R2 bucket in the Cloudflare dashboard and note that the logs prefix is now populated with aggregated logs from your request.

Build applications of any size on Cloudflare with the Queues open beta

Download and open one of the logfiles to view the JSON array inside. That’s it – with fewer than 45 lines of code and config, you’ve built a log aggregator to ingest and store data in R2!

Build applications of any size on Cloudflare with the Queues open beta

Buffering R2 writes with Queues in the real world

In the previous example, you create a simple Workers application that buffers data into batches before writing the batches to R2. This reduces the number of calls to the downstream service, reducing load on the service and saving you money.

UUID.rocks, the fastest UUIDv4-as-a-service, wanted to confirm whether their API truly generates unique IDs on every request. With 80,000 requests per day, it wasn’t trivial to find out. They decided to write every generated UUID to R2 to compare IDs across the entire population. However, writing directly to R2 at the rate UUIDs are generated is inefficient and expensive.

To reduce writes and costs, UUID.rocks introduced Cloudflare Queues into their UUID generation workflow. Each time a UUID is requested, a Worker places the value of the UUID into a queue. Once enough messages have been received, the buffered batch of JSON objects is written to R2. This avoids invoking an R2 write on every API call, saving costs and making the data easier to process later.

The uuid-queue application consists of a single Worker with three event handlers:

  1. A fetch handler that receives a JSON object representing the generated UUID and writes it to a Cloudflare Queue.
  2. A queue handler that writes batches of JSON objects to R2 in CSV format.
  3. A scheduled handler that combines batches from the previous hour into a single file for future processing.

To view the source or deploy this application into your own account, visit the repository on GitHub.

How we built Cloudflare Queues

Like many of the Cloudflare services you use and love, we built Queues by composing other Cloudflare services like Workers and Durable Objects. This enabled us to rapidly solve two difficult challenges: securely invoking your Worker from our own service and maintaining a strongly consistent state at scale. Several recent Cloudflare innovations helped us overcome these challenges.

Securely invoking your Worker

In the Before Times (early 2022), invoking one Worker from another Worker meant a fresh HTTP call from inside your script. This was a brittle experience, requiring you to know your downstream endpoint at deployment time. Nested invocations ran as HTTP calls, passing all the way through the Cloudflare network a second time and adding latency to your request. It also meant security was on you – if you wanted to control how that second Worker was invoked, you had to create and implement your own authentication and authorization scheme.

Worker to Worker requests
During Platform Week in May 2022, Service Worker Bindings entered general availability. With Service Worker Bindings, your Worker code has a binding to another Worker in your account that you invoke directly, avoiding the network penalty of a nested HTTP call. This removes the performance and security barriers discussed previously, but it still requires that you hard-code your nested Worker at compile time. You can think of this setup as “static dispatch,” where your Worker has a static reference to another Worker where it can dispatch events.

Dynamic dispatch
As Service Worker Bindings entered general availability, we also launched a closed beta of Workers for Platforms, our tool suite to help make any product programmable. With Workers for Platforms, software as a service (SaaS) and platform providers can allow users to upload their own scripts and run them safely via Cloudflare Workers. User scripts are not known at compile time, but are dynamically dispatched at runtime.

Workers for Platforms entered general availability during GA week in September 2022, and is available for all customers to build with today.

With dynamic dispatch generally available, we now have the ability to discover and invoke Workers at runtime without the performance penalty of HTTP traffic over the network. We use dynamic dispatch to invoke your queue’s consumer Worker whenever a message or batch of messages is ready to be processed.

Consistent stateful data with Durable Objects

Another challenge we faced was storing messages durably without sacrificing performance. We took the design goal of ensuring that all messages were persisted to disk in multiple locations before we confirmed receipt of the message to the user. Again, we turned to an existing Cloudflare product—Durable Objects—which entered general availability nearly one year ago today.

Durable Objects are named instances of JavaScript classes that are guaranteed to be unique across Cloudflare’s entire network. Durable Objects process messages in-order and on a single-thread, allowing for coordination across messages and provide a strongly consistent storage API for key-value pairs. Offloading the hard problem of storing data durably in a distributed environment to Distributed Objects allowed us to reduce the time to build Queues and prepare it for open beta.

Open beta roadmap

Our open beta process empowers you to influence feature prioritization and delivery. We’ve set ambitious goals for ourselves on the path to general availability, most notably supporting unlimited throughput while maintaining 100% durability. We also have many other great features planned, like first-in first-out (FIFO) message processing and API compatibility layers to ease migrations, but we need your feedback to build what you need most, first.

Conclusion

Cloudflare Queues is a global message queue for the Workers developer. Building with Queues makes your applications more performant, resilient, and cost-effective—but we’re not done yet. Join the Open Beta today and share your feedback to help shape the Queues roadmap as we deliver application integration services for the next generation cloud.

Cloudflare Workers scale too well and broke our infrastructure, so we are rebuilding it on Workers

Post Syndicated from Jonathan Norris (Guest Blogger) original https://blog.cloudflare.com/devcycle-customer-story/

Cloudflare Workers scale too well and broke our infrastructure, so we are rebuilding it on Workers

Cloudflare Workers scale too well and broke our infrastructure, so we are rebuilding it on Workers

While scaling our new Feature Flagging product DevCycle, we’ve encountered an interesting challenge: our Cloudflare Workers-based infrastructure can handle way more instantaneous load than our traditional AWS infrastructure. This led us to rethink how we design our infrastructure to always use Cloudflare Workers for everything.

The origin of DevCycle

For almost 10 years, Taplytics has been a leading provider of no-code A/B testing and feature flagging solutions for product and marketing teams across a wide range of use cases for some of the largest consumer-facing companies in the world. So when we applied ourselves to build a new engineering-focused feature management product, DevCycle, we built upon our experience using Workers which have served over 140 billion requests for Taplytics customers.

The inspiration behind DevCycle is to build a focused feature management tool for engineering teams, empowering them to build their software more efficiently and deploy it faster. Helping engineering teams reach their goals, whether it be continuous deployment, lower change failure rate, or a faster recovery time. DevCycle is the culmination of our vision of how teams should use Feature Management to build high-quality software faster. We’ve used DevCycle to build DevCycle, enabling us to implement continuous deployment successfully.

DevCycle architecture

One of the first things we asked ourselves when ideating DevCycle was how we could get out of the business of managing 1000’s of vCPUs worth of AWS instances and move our core business logic closer to our end-user devices. Based on our experience with Cloudflare Workers at Taplytics we knew we wanted it to be a core part of our future infrastructure for DevCycle.

By using the global computing power of Workers and moving as much logic to the SDKs as possible with our local bucketing server-side SDKs, we were able to massively reduce or eliminate the latency of fetching feature flag configurations for our users. In addition, we used a shared WASM library across our Workers and local bucketing SDKs to dramatically reduce the amount of code we need to maintain per SDK, and increase the consistency of our platform. This architecture has also fundamentally changed our business’s cost structure to easily serve any customer of any scale.

The core architecture of DevCycle revolves around publishing and consuming JSON configuration files per project environment. The publishing side is managed in our AWS services, while Cloudflare manages the consumption of these config files at scale. This split in responsibilities allows for all high-scale requests to be managed by Cloudflare, while keeping our AWS services simple and low-scale.

Cloudflare Workers scale too well and broke our infrastructure, so we are rebuilding it on Workers

“Workers are breaking our events pipeline”

One of the primary challenges as a feature management platform is that we don’t have direct control over the load from our customers’ applications using our SDKs; our systems need the ability to scale instantly to match their load. For example, we have a couple of large customers whose mobile traffic is primarily driven by push notifications, which causes massive instantaneous spikes in traffic to our APIs in the range of 10x increases in load. As you can imagine, any traditional auto-scaled API service and the load balancer cannot manage that type of increase in load. Thus, our choices are to dramatically increase the minimum size of our cluster and load balancer to handle these unknown load spikes, accept that some requests will be rate-limited, or move to an architecture that can handle this load.

Cloudflare Workers scale too well and broke our infrastructure, so we are rebuilding it on Workers

Given that all our SDK API requests are already served with Workers, they have no problem scaling instantly to 10x+ their base load. Sadly we can’t say the same about the traditional parts of our infrastructure.

For each feature flag configuration request to a Worker, a corresponding events request is sent to our AWS events infrastructure. The events are received by our events API container in Kubernetes, where they are then published to Kafka and eventually ingested by Snowflake. While Cloudflare Workers have no problem handling instantaneous spikes in feature flag requests, the events system can’t keep up. Our cluster and events API containers need to be scaled up faster to prevent the existing instances from being overwhelmed. Even the load balancer has issues accepting the sudden increase. Cloudflare Workers just work too well in comparison to EC2 instances + EKS.

To solve this issue we are moving towards a new events Cloudflare Worker which will be able to handle the instantaneous events load from these requests and make use of the Kinesis Data Firehose to write events to our existing S3 bucket which is ingested by Snowflake. In the future, we look forward to testing out Cloudflare Queues writing to R2 once a Snowflake connector has been created. This architecture should allow us to ingest events at almost any scale and withstand instantaneous traffic spikes with a predictable and efficient cost structure.

Cloudflare Workers scale too well and broke our infrastructure, so we are rebuilding it on Workers

Building without a database next to your code

Workers provide many benefits, including fast response times, infinite scalability, serverless architecture, and excellent up-time performance. However, if you want to see all these benefits, you need to architect your Workers to assume that you don’t have direct access to a centralized SQL / NoSQL database (or D1) like you would with a traditional API service. For example, suppose you build your workers to require reaching out to a database to fetch and update user data every time a request is made to your Workers. In that case, your request latency will be tied to the geographic distance between your Worker and the database plus the latency of the database. In addition, your Workers will be able to scale significantly beyond the number of database connections you can support, and your uptime will be tied to the uptime of your external database. Therefore, when architecting your systems to use Workers, we advise relying primarily on data sent as part of the API request and cacheable data on Cloudflare’s global network.

Cloudflare provides multiple products and services to help with data on their global network:

  • KV: “global, low-latency, key-value data store.”
  • However, the lowest latency way of retrieving data from within a Worker is limited by a minimum 60-second TTL. So you’ll need to be ok with cached data that is 60 seconds stale.
  • Durable Objects: “provide low-latency coordination and consistent storage for the Workers platform through two features: global uniqueness and a transactional storage API.”
  • Ability to store user-level information closer to the end user.
  • Unfamiliar worker interface for accessing data for developers with SQL / NoSQL experience.
  • R2: “store large amounts of unstructured data.”
  • Ability to store arbitrarily large amounts of unstructured data using familiar S3 APIs.
  • Cloudflare’s cache can be used to provide low-latency access within workers.
  • D1: “serverless SQLite database”

Each of these tools that Cloudflare provides has made building APIs far more accessible than when Workers launched initially; however, each service has aspects which need to be accounted for when architecting your systems. Being an open platform, you can also access any publically available database you want from a Worker. For example, we are making use of Macrometa for our EdgeDB product built into our Workers to help customers access their user data.

The predictable cost structure of Workers

One of the greatest advantages of moving most of our workloads towards Cloudflare Workers is the predictable cost structure that can scale 1:1 with our request loads and can be easily mapped to usage-based billing for our customers. In addition, we no longer have to run excess EC2 instances to handle random spikes in load, just in case they happen.

Too many SaaS services have opaque billing based on max usage or other metrics that don’t relate directly to their costs. Moving from our legacy AWS architecture with high fixed costs like databases and caching layers to Workers has resulted in our infrastructure spending is directly tied to using our APIs and SDKs. For DevCycle, this architecture has been over ~5x more cost-efficient to operate.

The future of DevCycle and Cloudflare

With DevCycle we will continue to invest in leveraging serverless computing and moving our core business logic as close to our users as possible, either on Cloudflare’s global network or locally within our SDKs. We’re excited to integrate even more deeply with the Cloudflare developer platform as new services evolve. We already see future use cases for R2, Queues and Durable Objects and look forward to what’s coming next from Cloudflare.

Cloudflare Innovation Weeks 2021

Post Syndicated from Reagan Russell original https://blog.cloudflare.com/2021-innovations-weeks/

Cloudflare Innovation Weeks 2021

Cloudflare Innovation Weeks 2021

One of the things that makes Cloudflare unique is our Innovation Weeks. Rather than having one large conference annually, we have multiple Innovation Weeks throughout the year to highlight new product announcements, beta products opening up to general availability, and share how our customers are using Cloudflare to help build a better Internet.

Internally, these weeks generate a lot of energy and excitement as well, as they provide an opportunity for teams from across Cloudflare to work together on product delivery and celebrate company-wide successes. In 2021, we had seven Cloudflare Innovation Weeks. As we start planning our 2022 Innovation Weeks, we are reflecting back on the highlights from each of these weeks.

Cloudflare Innovation Weeks 2021

Security Week March 21-26, 2021

Patrick Donahue

Security Week kicked off Cloudflare’s 2021 Innovation Weeks with a series of foundational security announcements. The Internet wasn’t built with security in mind, but the products and partnerships announced this week continued Cloudflare’s core mission of helping build a better Internet—one that companies of all sizes can plug into and be protected by default from the types of attacks that have historically resulted in loss of data, computing resources, and customer confidence.

At the start of the week, we took on the task of replacing MPLS, the core network technology that many organizations use to connect their offices and data centers, with a more secure and cost-effective alternative. Next, we tackled the biggest risk to everyday users of the web by opening our remote browser isolation technology to teams of all sizes and protecting against malicious code injection. Following those announcements, we inverted the slow, network chokepoint model of data loss prevention by building zero trust controls over data directly into every aspect of the Cloudflare One suite. And to round out the week, we democratized access to bot-fighting technology previously only available to the largest enterprises while also  deepening our solutions for novel threats facing APIs.

View all Security Week 2021 Blog Posts
View all Security Week 2021 Cloudflare TV Series

Cloudflare Innovation Weeks 2021

Developer Week April 11-17, 2021

Alyson Cabral

With Developer Week, we had one focus – to make developers’ lives easier. Our announcements included Cloudflare Pages being made generally available, Introducing Web Socket Support in Workers, Workers Unbound, Free Tunnels, Partnering with Nvidia to bring AI to the Edge and many more announcements throughout the week. In addition to the announcements, we also launched our first ever Developer Challenge series. Each day, a new challenge was announced to encourage developers from across the globe to level up their skills by trying new features and approaches. Solutions were revealed the following day, with the bonus round solution wrapping up the week. To keep up to date on the next round of challenges, join our Cloudflare Developer community.

View all Developer Week 2021 Blog Posts
View all Developer Week 2021 Cloudflare TV Series

Cloudflare Innovation Weeks 2021

Impact Week July 26-31, 2021

Patrick Day

During our first Impact Week, we reflected on how we are achieving Cloudflare’s mission–helping build a better Internet– and why we continue to prioritize projects that give back to the Internet. Impact Week highlighted some of the things we are doing as a company around environmental, social and governance initiatives. We launched Project Pangea, a free program to provide secure, reliable access to the Internet for community networks that support under-served communities. We also shared how we are committed to helping build a green Internet through efficiency, renewable energy, and providing developers a choice to run their workloads in the most energy efficient data centers. In addition, we published our first human rights policy in order to better serve our mission and core values.

View all Impact Week 2021 Blog Posts
View all Impact Week 2021 Cloudflare TV Series

Cloudflare Innovation Weeks 2021

Speed Week Sept 12-17, 2021

Marc Lamik

Helping make the Internet faster is one of Cloudflare’s core priorities. During Speed Week we shared how fast Cloudflare’s Network is as well as the amazing performance of Workers and Pages’ lightning fast speed. We expanded the size of Cloudflare’s network, so it’s closer to more people than ever.

We launched two amazing performance features with Signed Exchanges reducing load times and increasing SEO rankings with one click as well as Early Hints which can reduce loading times by 30%.

As part of  Speed week, we also announced Cloudflare Images which stores, resizes, optimizes and serves images so that all of our customers can build a scalable, affordable image pipeline.

View all Speed Week 2021 Blog Posts
View all Speed Week 2021 Cloudflare TV Series

Cloudflare Innovation Weeks 2021

Cloudflare Birthday Week Sept 26-Oct 1, 2021

Dane Knecht and Jennifer Taylor

This is the week in which we celebrate Cloudflare’s birthday. We launched the company 11 years ago: September 27, 2010. It has been our tradition, since our first birthday, to use this week to launch innovative products that we think of as our gift back to the Internet. In 2021, we announced Cloudflare R2, our object-based storage with no egress fees, tackled solutions to Email Spoofing and Phishing, shared how we are expanding our network into office buildings as well as many more product announcements and Cloudflare TV executive fireside chats and product discussions.

View all Birthday Week Blog Posts
View all Birthday Week Cloudflare TV Series

Cloudflare Innovation Weeks 2021

Full Stack Week Nov 14-19, 2021

Rita Kozlov

During Full Stack Week, we brought the vision of the Network is the Computer to life — allowing developers to build their entire application on our network, soup to nuts. Over the course of the week, we made a series of announcements, each providing another critical piece of the puzzle, necessary to build a full stack application.

We started with the foundation — data, announcing the general availability of Durable Objects, and ability to connect to databases, alongside partnerships with MongoDB and Prisma. Cloudflare Pages, our Jamstack platform also took a step deeper down the stack by introducing support for seamless deployment of functions. We want development on our platform to be an enjoyable experience, so we announced the new version of wrangler, our CLI, and Services, a better way for teams to build applications. And while we want developers to have fun, we also want them to be able to monetize their efforts, which they now can do using the Stripe SDK on Workers.

View all Full Stack Week 2021 Blog Posts
View all Full Stack Week Cloudflare TV Series

Cloudflare Innovation Weeks 2021

CIO Week Dec 5-10, 2021

Annika Garbers

To wrap up the year, we demonstrated how Cloudflare One, our Zero Trust Network-as-a-Service, is helping Chief Information Officers transform their corporate networks. We launched new capabilities in Cloudflare One to help customers replace their hardware firewalls and a chance to win a trip to Oahu in the process, a Log Storage platform built on Cloudflare R2, a new premium DNS offering, and Cloudflare Security Center, which helps customers map their attack surface and mitigate potential security risks with just a few clicks. We also announced our acquisition of Zaraz to boost website speed and security without sacrificing privacy, as well as new partnerships with Microsoft and leading cyber insurance providers, among many other exciting announcements throughout the week.

View all CIO Week 2021 Blog Posts
View all CIO Week 2021 Cloudflare TV Series