When OpenAI launched ChatGPT plugins in alpha we knew that it opened the door for new possibilities for both Cloudflare users and developers building on Cloudflare. After the launch, our team quickly went to work seeing what we could build, and today we’re very excited to share with you two new Cloudflare ChatGPT plugins – the Cloudflare Radar plugin and the Cloudflare Docs plugin.
The Cloudflare Radar plugin allows you to talk to ChatGPT about real-time Internet patterns powered by Cloudflare Radar.
The Cloudflare Docs plugin allows developers to use ChatGPT to help them write and build Cloudflare applications with the most up-to-date information from our documentation. It also serves as an open source example of how to build a ChatGPT plugin with Cloudflare Workers.
Let’s do a deeper dive into how each of these plugins work and how we built them.
Cloudflare Radar ChatGPT plugin
When ChatGPT introduced plugins, one of their use cases was retrieving real-time data from third-party applications and their APIs and letting users ask relevant questions using natural language.
Cloudflare Radar has lots of data about how people use the Internet, a well-documented public API, an OpenAPI specification, and it’s entirely built on top of Workers, which gives us lots of flexibility for improvements and extensibility. We had all the building blocks to create a ChatGPT plugin quickly. So, that's what we did.
We added an OpenAI manifest endpoint which describes what the plugin does, some branding assets, and an enriched OpenAPI schema to tell ChatGPT how to use our data APIs. The longest part of our work was fine-tuning the schema with good descriptions (written in natural language, obviously) and examples of how to query our endpoints.
Amusingly, the descriptions ended up much improved by the need to explain the API endpoints to ChatGPT. An interesting side effect is that this benefits us humans also.
{
    "/api/v1/http/summary/ip_version": {
        "get": {
            "operationId": "get_SummaryIPVersion",
            "parameters": [
                {
                    "description": "Date range from today minus the number of days or weeks specified in this parameter, if not provided always send 14d in this parameter.",
                    "required": true,
                    "schema": {
                        "type": "string",
                        "example": "14d",
                        "enum": ["14d","1d","2d","7d","28d","12w","24w","52w"]
                    },
                    "name": "dateRange",
                    "in": "query"
                }
            ]
        }
    }
Luckily, itty-router-openapi, an easy and compact OpenAPI 3 schema generator and validator for Cloudflare Workers that we built and open-sourced when we launched Radar 2.0, made it really easy for us to add the missing parts.
import { OpenAPIRouter } from '@cloudflare/itty-router-openapi'

const router = OpenAPIRouter({
  aiPlugin: {
    name_for_human: 'Cloudflare Radar API',
    name_for_model: 'cloudflare_radar',
    description_for_human: "Get data insights from Cloudflare's point of view.",
    description_for_model:
      "Plugin for retrieving the data based on Cloudflare Radar's data. Use it whenever a user asks something that might be related to Internet usage, eg. outages, Internet traffic, or Cloudflare Radar's data in particular.",
    contact_email: '[email protected]',
    legal_info_url: 'https://www.cloudflare.com/website-terms/',
    logo_url: 'https://cdn-icons-png.flaticon.com/512/5969/5969044.png',
  },
})
We incorporated our changes into itty-router-openapi, and now it supports the OpenAI manifest and route, and a few other options that make it possible for anyone to build their own ChatGPT plugin on top of Workers too.
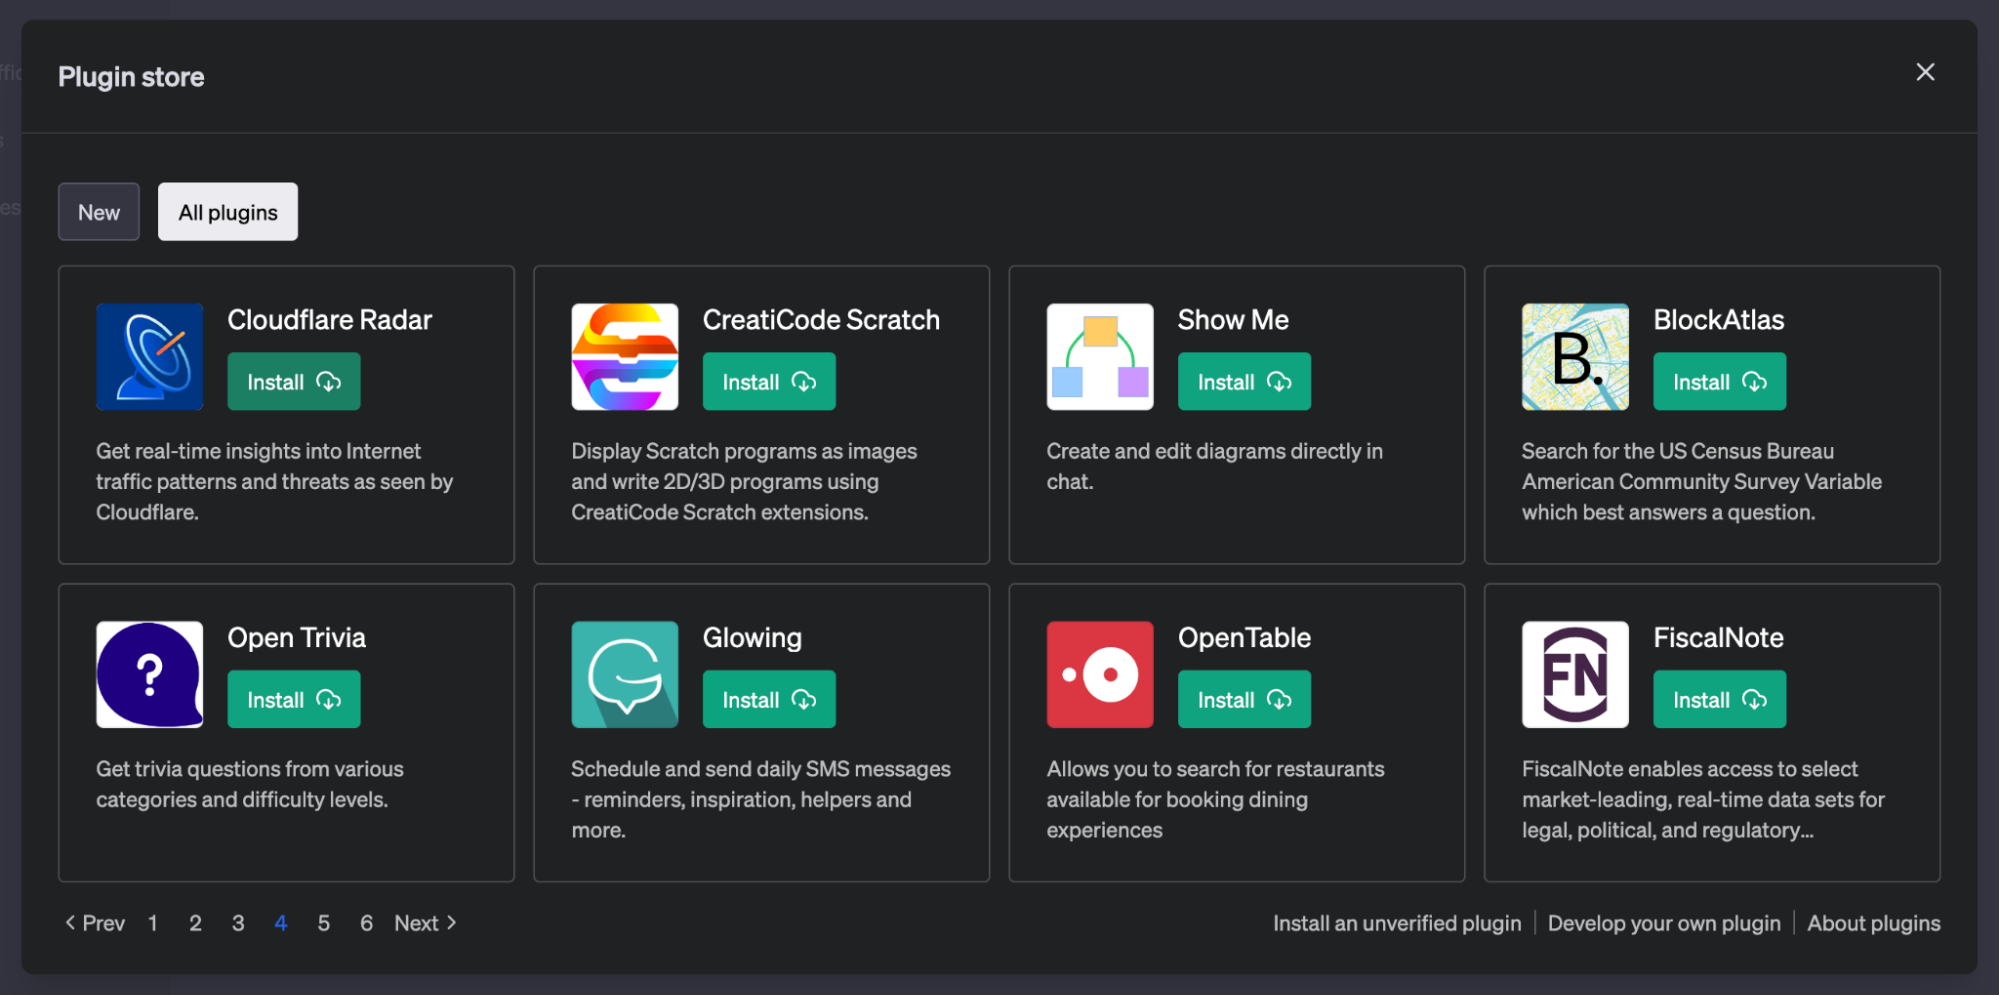
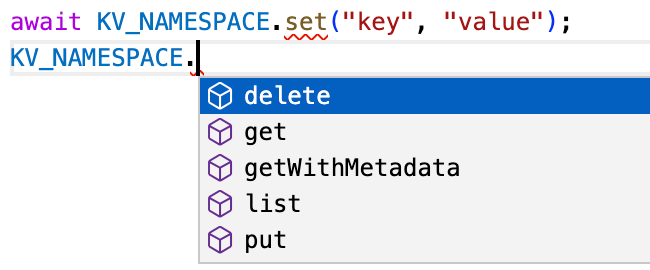
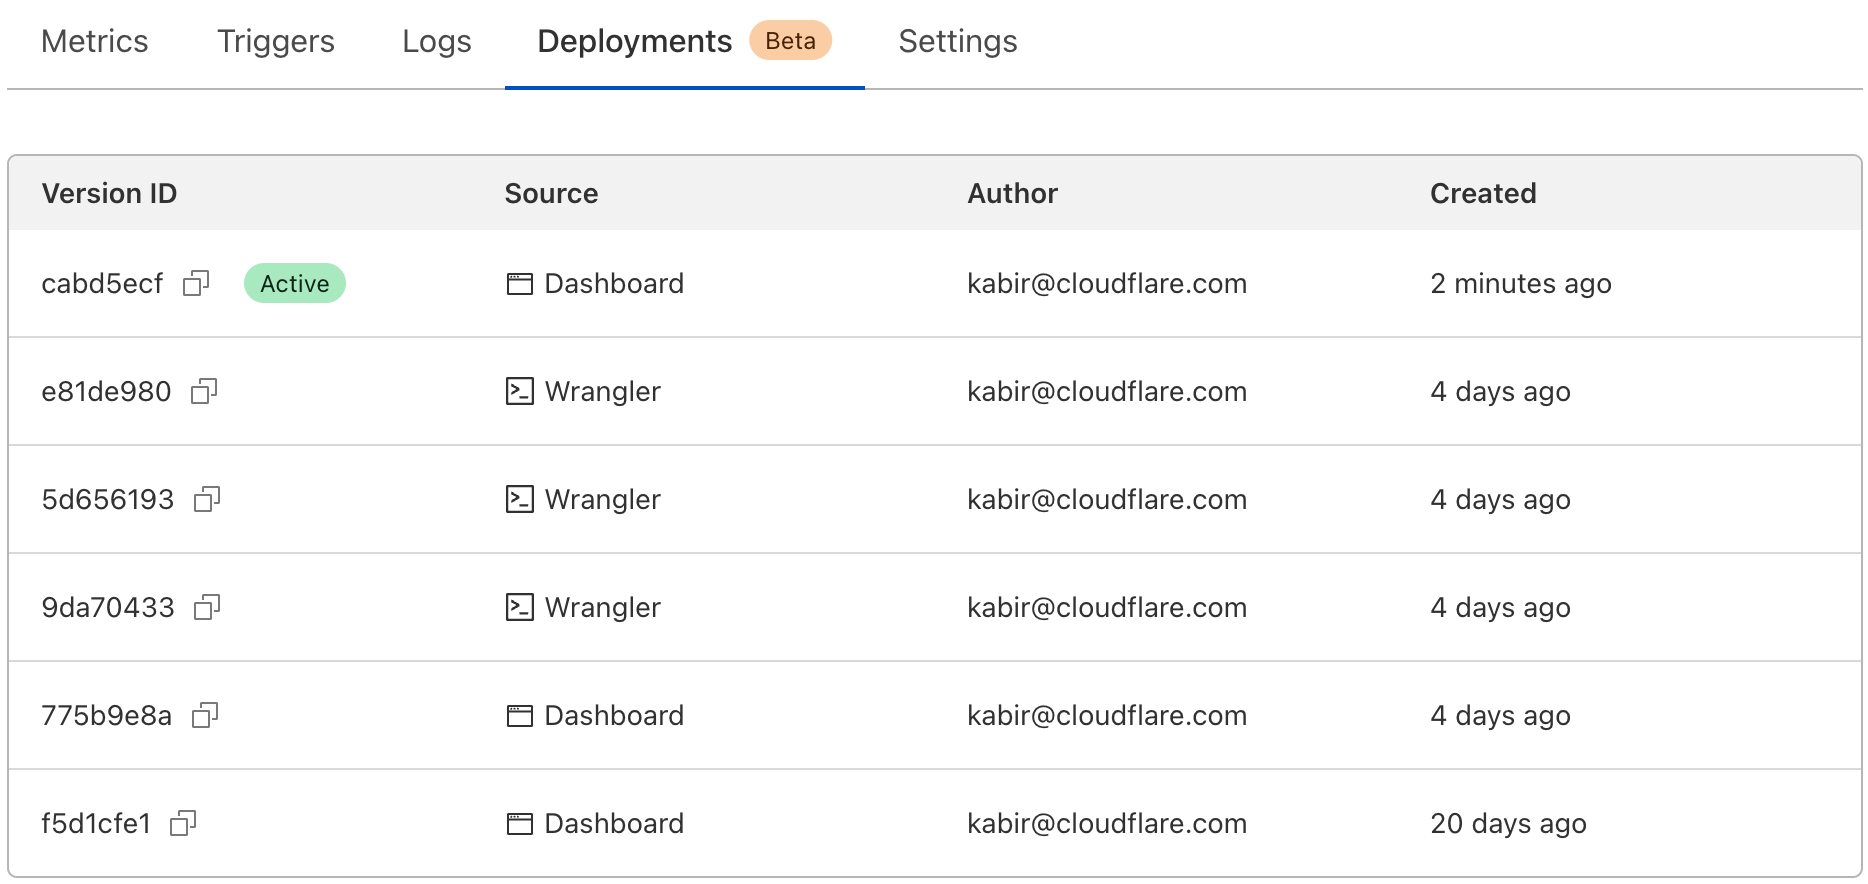
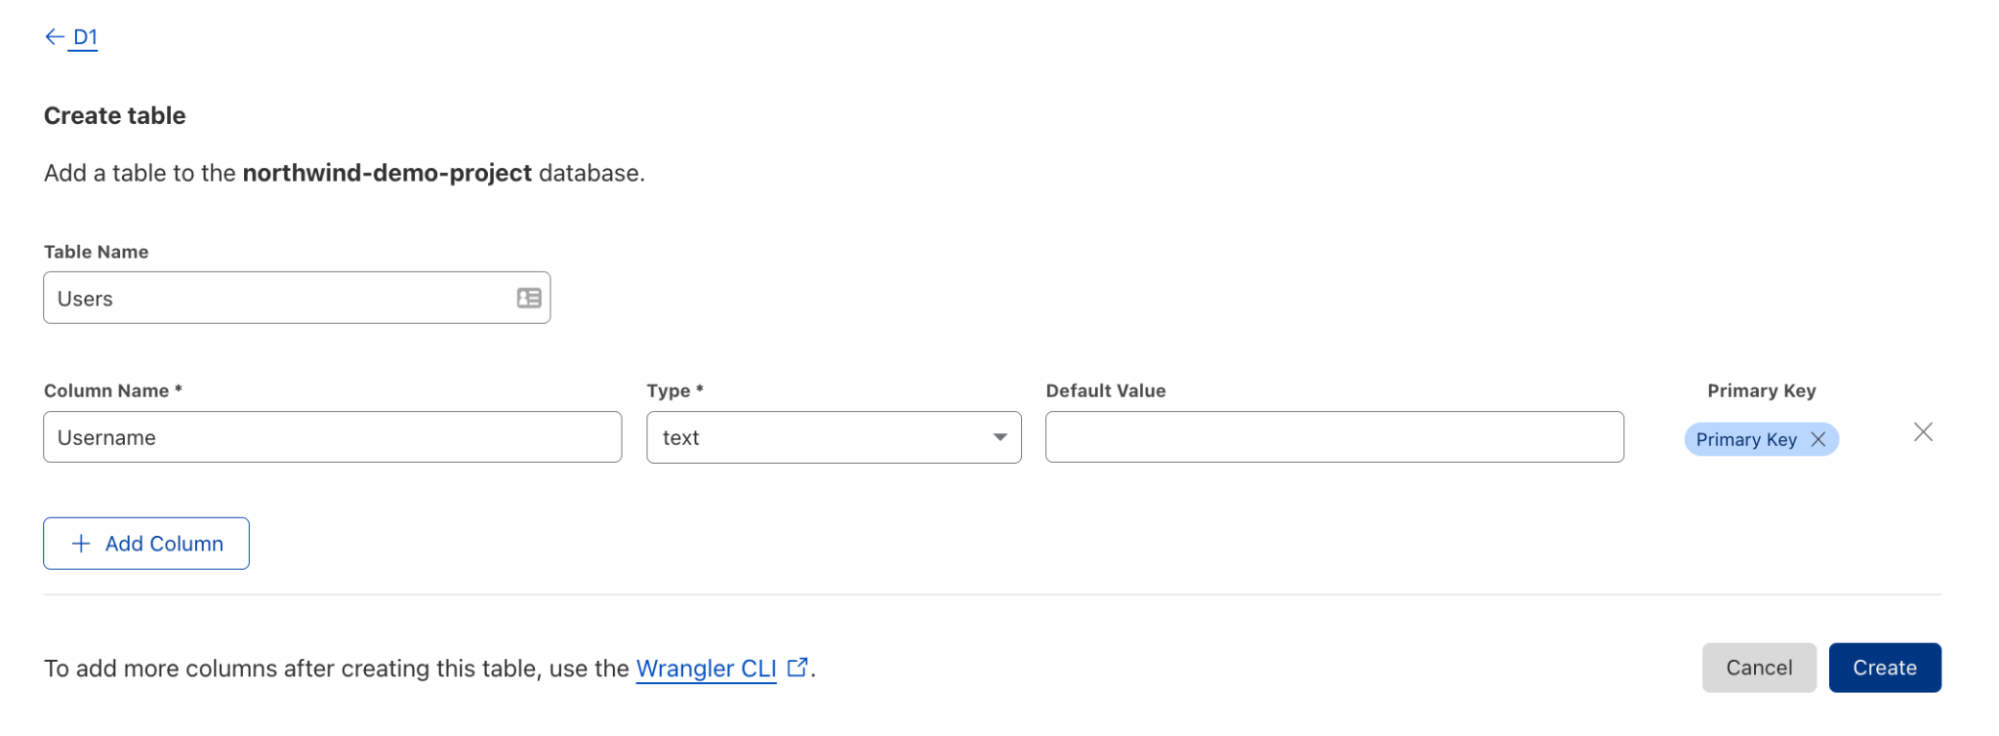
The Cloudflare Radar ChatGPT is available to non-free ChatGPT users or anyone on OpenAI’s plugin's waitlist. To use it, simply open ChatGPT, go to the Plugin store and install Cloudflare Radar.
Once installed, you can talk to it and ask questions about our data using natural language.
When you add plugins to your account, ChatGPT will prioritize using their data based on what the language model understands from the human-readable descriptions found in the manifest and Open API schema. If ChatGPT doesn't think your prompt can benefit from what the plugin provides, then it falls back to its standard capabilities.
Another interesting thing about plugins is that they extend ChatGPT's limited knowledge of the world and events after 2021 and can provide fresh insights based on recent data.
Here are a few examples to get you started:
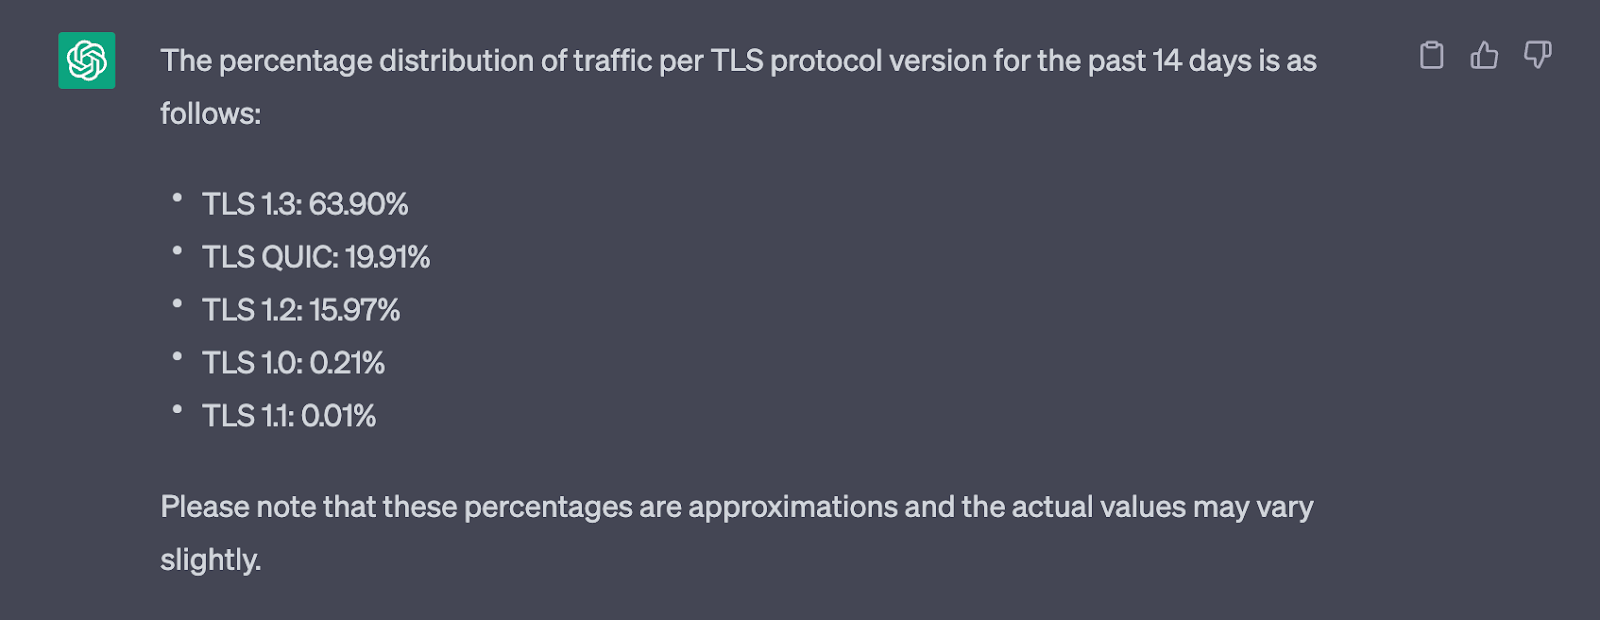
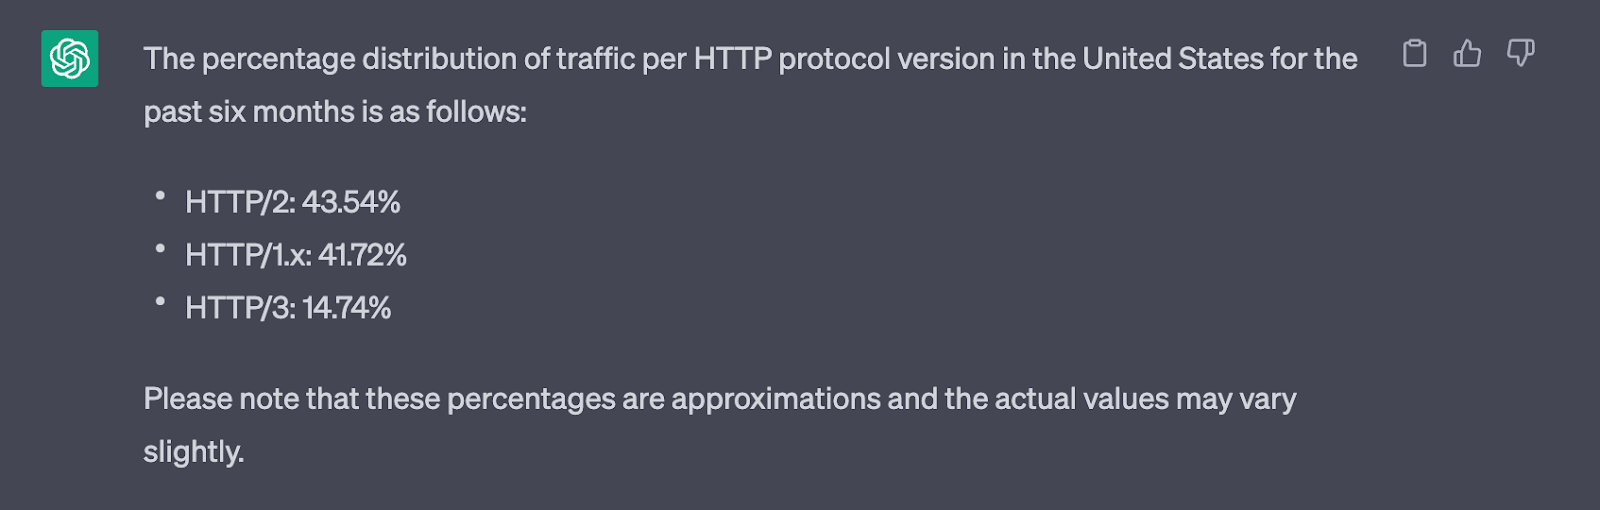
"What is the percentage distribution of traffic per TLS protocol version?"
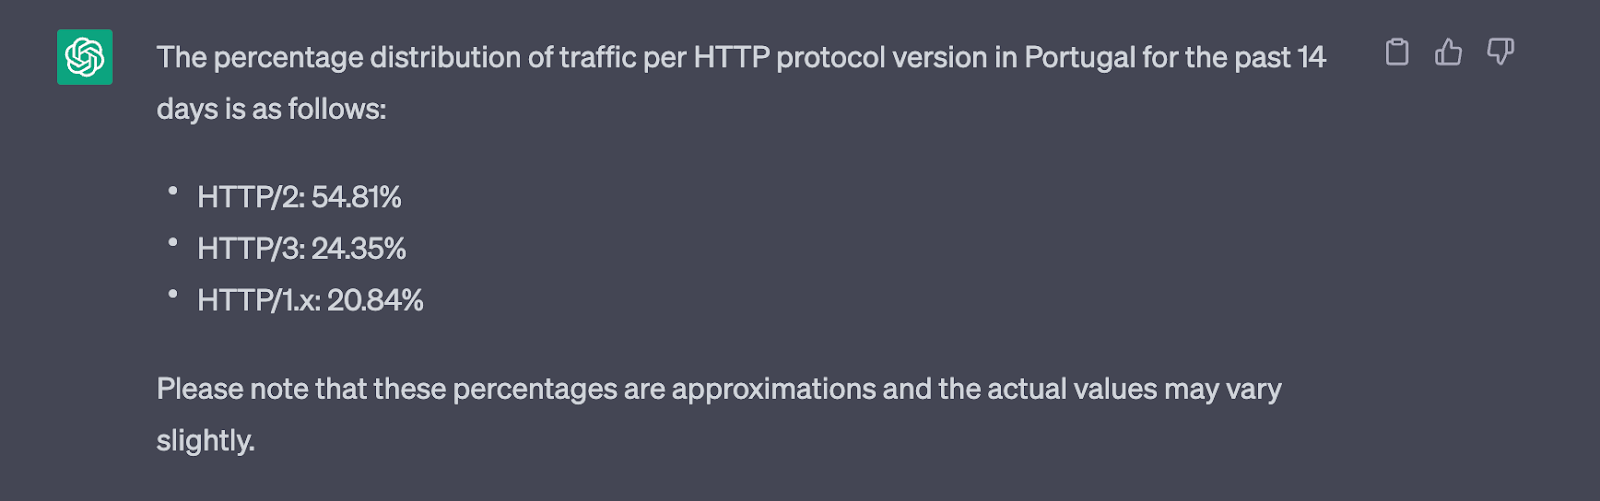
"What's the HTTP protocol version distribution in Portugal?"
Now that ChatGPT has context, you can add some variants, like switching the country and the date range.
“How about the US in the last six months?”
You can also combine multiple topics (ChatGPT will make multiple API calls behind the scenes and combine the results in the best possible way).
“How do HTTP protocol versions compare with TLS protocol versions?”
Out of ideas? Ask it “What can I ask the Radar plugin?”, or “Give me a random insight”.
Be creative, too; it understands a lot about our data, and we keep improving it. You can also add date or country filters using natural language in your prompts.
Cloudflare Docs ChatGPT plugin
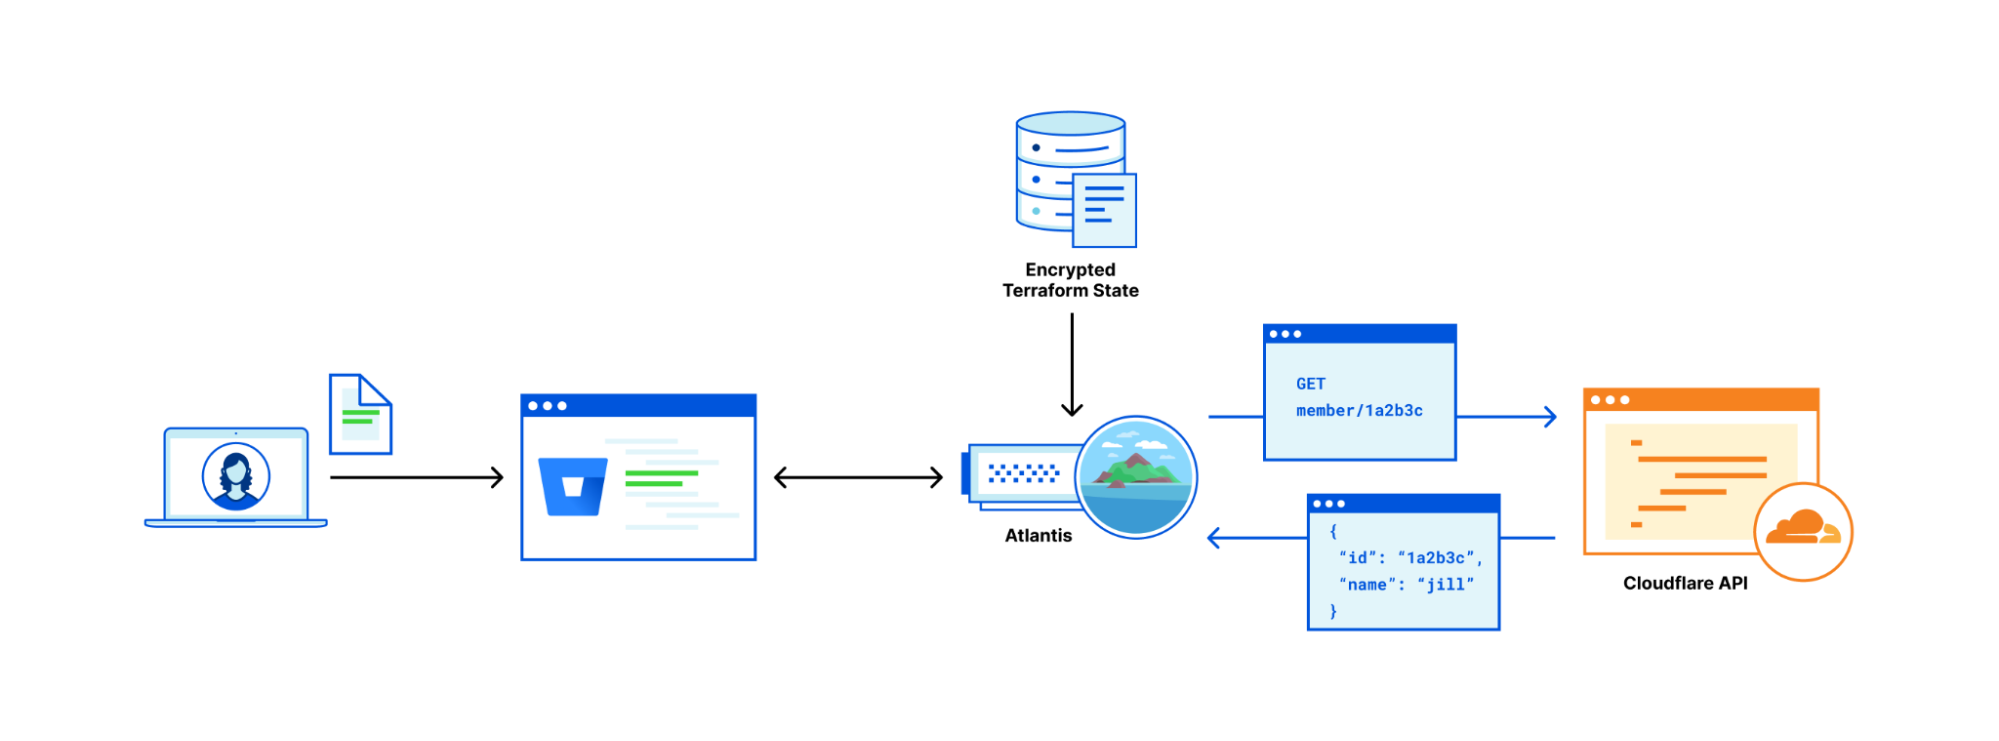
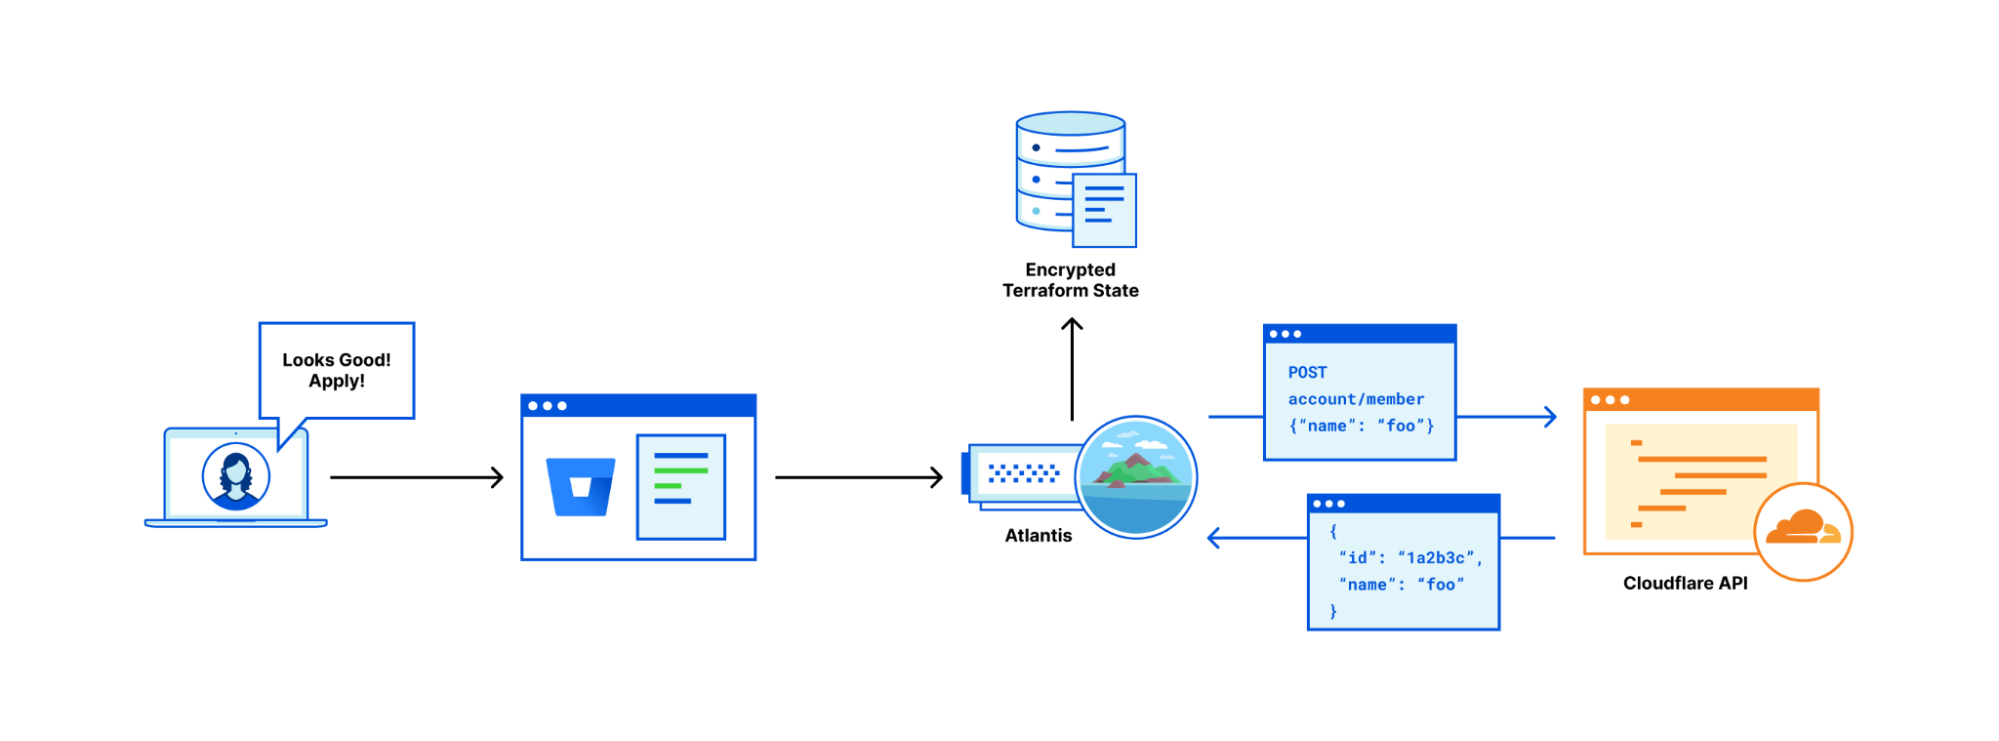
The Cloudflare Docs plugin is a ChatGPT Retrieval Plugin that lets you access the most up-to-date knowledge from our developer documentation using ChatGPT. This means if you’re using ChatGPT to assist you with building on Cloudflare that the answers you’re getting or code that’s being generated will be informed by current best practices and information located within our docs. You can set up and run the Cloudflare Docs ChatGPT Plugin by following the read me in the example repo.
The plugin was built entirely on Workers and uses KV as a vector store. It can also keep its index up-to-date using Cron Triggers, Queues and Durable Objects.
The plugin is a Worker that responds to POST requests from ChatGPT to a /query endpoint. When a query comes in, the Worker converts the query text into an embedding vector via the OpenAI embeddings API and uses this to find, and return, the most relevant document snippets from Cloudflare’s developer documentation.
The way this is achieved is by first converting every document in Cloudflare’s developer documentation on GitHub into embedding vectors (again using OpenAI’s API) and storing them in KV. This storage format allows you to find semantically similar content by doing a similarity search (we use cosine similarity), where two pieces of text that are similar in meaning will result in the two embedding vectors having a high similarity score. Cloudflare’s entire developer documentation compresses to under 5MB when converted to embedding vectors, so fetching these from KV is very quick. We’ve also explored building larger vector stores on Workers, as can be seen in this demo of 1 million vectors stored on Durable Object storage. We’ll be releasing more open source libraries to support these vector store use cases in the near future.
So ChatGPT will query the plugin when it believes the user’s question is related to Cloudflare’s developer tools, and the plugin will return a list of up-to-date information snippets directly from our documentation. ChatGPT can then decide how to use these snippets to best answer the user’s question.
The plugin also includes a “Scheduler” Worker that can periodically refresh the documentation embedding vectors, so that the information is always up-to-date. This is advantageous because ChatGPT’s own knowledge has a cutoff of September 2021 – so it’s not aware of changes in documentation, or new Cloudflare products.
The Scheduler Worker is triggered by a Cron Trigger, on a schedule you can set (eg, hourly), where it will check which content has changed since it last ran via GitHub’s API. It then sends these document paths in messages to a Queue to be processed. Workers will batch process these messages – for each message, the content is fetched from GitHub, and then turned into embedding vectors via OpenAI’s API. A Durable Object is used to coordinate all the Queue processing so that when all the batches have finished processing, the resulting embedding vectors can be combined and stored in KV, ready for querying by the plugin.
This is a great example of how Workers can be used not only for front-facing HTTP APIs, but also for scheduled batch-processing use cases.
Let us know what you think
We are in a time when technology is constantly changing and evolving, so as you experiment with these new plugins please let us know what you think. What do you like? What could be better? Since ChatGPT plugins are in alpha, changes to the plugins user interface or performance (i.e. latency) may occur. If you build your own plugin, we’d love to see it and if it’s open source you can submit a pull request on our example repo. You can always find us hanging out in our developer discord.
The 1947 paper titled “Preparation of Problems for EDVAC-Type Machines” talks about the idea and usefulness of a “subroutine”. At the time there were only a tiny number of computers worldwide and subroutines were a novel idea, and it was clear that these subroutines were going to make programmers more productive: “Many operations which are thus excluded from the built-in set are still of sufficiently frequent occurrence to make undesirable the repetition of their coding in detail.”
Looking back it seems amazing that subroutines had to be invented, but at the time programmers wrote literally everything they needed to complete a task. That made programming slow, error-prone and restricted who could be a programmer to a relatively small group of people.
Luckily, things changed.
You can look at the history of computer programming as improvements in programmer productivity and widening the scope of who is a programmer. Think of syntax highlighting, high-level languages, IDEs, libraries and frameworks, APIs, Visual Basic, code completion, refactoring tools, spreadsheets, and so on.
And here we are with things changing again.
The new programmers
The recent arrival of LLMs capable of assisting programmers in writing, debugging and modifying code is yet another step. It’s a step at both making programmers more productive and helping more people be programmers.
As programmers a lot of what we do is arcane.
Sure, we have helped create the modern world, but we spend a lot of time on things that actually exclude many from being programmers. Think of how many times you’ve messed up syntax, misinterpreted the result of calling a function, or made an off-by-one error in a loop.
And we’re expected to operate at a concrete and abstract level simultaneously. We hold the architecture and state of a system in our heads, imagining the program as data flows through it, and worry about a missing semicolon.
This is, frankly, weird.
That weirdness is partly why the children’s programming language Scratch eliminates much of the arcana. It’s designed to stop the user making small mistakes that add up to not making progress on a program. Its on-screen shapes are designed to show how a program flows and loops. What if AI eliminates much of our odd work and lets people concentrate on the thing they are creating?
I think that would be wonderful and would open the world of programming to many, many more people. But we’re not there yet. We’re at the point where AIs are hugely helpful assistants in the traditional art of programming. And this week Cloudflare will introduce its own AI assistants to make programmers using Cloudflare Workers much more productive. And these assistants are going to help more people use the Cloudflare Developer Platform.
The new platforms
A developer platform without AI isn’t going to be much use. It’ll be a bit like a developer platform that can’t do floating point arithmetic, or handle a list of data. We’re going to see every developer platform have AI capability built in because these capabilities will allow developers to make richer experiences for users.
If you’ve used a phone’s picture library recently you’ve probably discovered that you can search by what’s in an image. Type ‘cat’ and you can see all the cat pictures you’ve taken. Image classification like this is an example of the sort of functionality that a developer platform should provide so that a programmer can build a productive and exciting experience for their users.
That’s why this week we’ll be announcing AI features built directly into the Cloudflare Workers platform so that developers have a rich toolset at their disposal. And they’ll be able to train and upload their own models to run on our global network.
AI systems, by their nature, require a lot of data both for training and for executing models. Think giga- to petabytes. And a lot of that data needs to move around. Unlike a database where data might largely be stored and accessed infrequently, AI systems are alive with moving data.
To accommodate that, platforms need to stop treating data as something to lock in developers with. Data needs to be free to move from system to system, from platform to platform, without transfer fees, egress or other nonsense. If we want a world of AI, we need a world of data fluidity. We’ll look this week at how Cloudflare (including our R2) enables that.
I like to think (it has to be!)
As I look back at 40 years of my programming life, I haven’t been this excited about a new technology… ever. That’s because AI is going to be a pervasive change to how programs get written, who writes programs and how all of us interact with software.
In a talk, Andrew Ng called AI “The New Electricity”. Does that seem exaggerated? I don’t think so. Electricity utterly altered work and life for everyone and has become so much part of life that when electricity supplies fail it’s a shock.
AI is going to have a similarly profound effect on the way we live and work, and will be equally pervasive. And AI is already here, not just in the form of ChatGPT and Google Bard, but through machine translation, agents like Siri and Alexa, and a myriad of unseen systems that do something humans can’t do: keep up with the speed of the Internet helping to protect it and us.
And, I predict, AI is going to help people be smarter. That effect has already been seen with the ancient game Go. In 2016, one of the world’s strongest Go players, Lee Sedol, was beaten by AlphaGo and later retired. But something interesting has happened: Go players playing against AI are getting stronger. Humans are learning new strategies and improving.
I think AI has the potential to do that for all of us. And for programmers I think it’ll make us more productive and make more people programmers.
Which makes me wonder what a 2047 paper entitled “Preparation of Programs for NEURAL-Type Machines” will introduce. What new exciting way of programming is there for us to discover in the next few years? What cybernetic ecology will be created that makes the flow of ideas from the brain to silicon so much quicker?
It is an incredibly exciting time to be a developer.
The frameworks, libraries and developer tools we depend on keep leveling up in ways that allow us to build more efficiently. On top of that, we’re using AI-powered tools like ChatGPT and GitHub Copilot to ship code quicker than many of us ever could have imagined. This all means we’re spending less time on boilerplate code and setup, and more time writing the code that makes our applications unique.
It’s not only a time when we’re equipped with the tools to be successful in new ways, but we're also finding inspiration in what’s happening around us. It feels like every day there’s an advancement with AI that changes the boundaries of what we can build. Across meetups, conferences, chat rooms, and every other place we gather as developers, we’re pushing each other to expand our ideas of what is possible.
With so much excitement permeating through the global developer community, we couldn’t imagine a better time to be kicking off Developer Week here at Cloudflare.
A focus on developer experience
A big part of any Innovation Week at Cloudflare is bringing you all new products to play with. And this year will be no different, there will be plenty of new products coming your way over the next seven days, and we can’t wait for you to get your hands on them. But we know that for developers it can sometimes be more exciting to see a tool you already use upgrade its developer experience than to get something new. That’s why as we’ve planned for this Developer Week we have been particularly focused on how we can make our developer experience more seamless by addressing many of your most requested features & fixes.
Part of making our developer experience more seamless is ensuring you all can bring the technologies you already know and love to Cloudflare. We’ve especially heard this from you all when it comes to deploying JAMstack applications on Cloudflare. Without spoiling too much, if you’re using a frontend framework and building JAMstack applications we’re excited about what we’re shipping for you this week.
A platform born in the Age of AI
We want developers to be able to build anything they’re excited about on Cloudflare. And one thing a lot of us are excited about right now are AI applications. AI is something that’s been part of Cloudflare’s foundation since the beginning. We are a company that was born in the age of AI. A core part of how we work towards our mission to help build a better Internet is by using machine learning to help protect your applications.
Through this week, we want to empower you with the tools and wisdom we’ve gathered around AI and machine learning. As well as showing you how to use Cloudflare with some of your new favorite AI developer tools. We’ll be shipping sample code, tutorials, tips and best practices. And that wisdom won’t only be coming from us, we’ll be sharing the stories of customers who have built on us and give you all an opportunity to learn from the companies that inspire us.
Why I joined Cloudflare
This is special Developer Week for me because it’s my first Developer Week at Cloudflare. I joined a little over a month ago to lead our Developer Relations & Community team.
When I found out I was joining Cloudflare I called up one of my closest friends, and mentors, to share the news. He immediately said “What are you going to do? Developers are all already using Cloudflare. No matter how big or small of a project I build, I always use Cloudflare. It’s the last thing I set up before I deploy.” He couldn’t have set the stage better for me to share why I’m excited to join and a theme you’ll see throughout this week.
For many developers, you know us for our CDN, and we are one of the last pieces of infrastructure you set up for your project. Since we launched Cloudflare Workers in 2017, we’ve been shipping tools intended to help empower you not only at the end of your journey, but from the moment you start building a new project. Myself, and my team, are here to help you discover and be successful with all of our developers tools. We’ll be here from the moment you start building, when you go into production and all the way through when you’re scaling your application to millions of users around the world.
Whether you are one of the over one million developers already building on Cloudflare or you’re starting to use us for the first time during this Developer Week, I can’t wait to meet you.
Welcome to Developer Week 2023
We’re excited to kick off another Developer Week. Through this week we’ll tell you about the new tools we’re shipping and share how many of them were built. We’ll show you how you can use them, and share stories from customers who are using our developer platform today. We hope you’ll be part of the conversation, whether that’s on discord, Cloudflare TV, community.cloudflare.com, or social media.
Developer Week 2022 has come to a close. Over the last week we’ve shared with you 31 posts on what you can build on Cloudflare and our vision and roadmap on where we’re headed. We shared product announcements, customer and partner stories, and provided technical deep dives. In case you missed any of the posts here’s a handy recap.
Our vision of the cloud — a model of cloud computing that promises to make developers highly productive at scaling from one to Internet-scale in the most flexible, efficient, and economical way.
We’ve revamped our API reference documentation to standardize our API content and improve the overall developer experience when using the Cloudflare APIs.
The Segment Edge SDK, built on Workers, helps applications collect and track events from the client, and get access to realtime user state to personalize experiences.
Next
And that’s it for Developer Week 2022. But you can keep the conversation going by joining our Discord Community.
Workers Analytics Engine is a new tool, announced earlier this year, that enables developers and product teams to build time series analytics about anything, with high dimensionality, high cardinality, and effortless scaling. We built Analytics Engine for teams to gain insights into their code running in Workers, provide analytics to end customers, or even build usage based billing.
In this blog post we’re going to tell you about how we use Analytics Engine to build Analytics Engine. We’ve instrumented our own Analytics Engine SQL API using Analytics Engine itself and use this data to find bugs and prioritize new product features. We hope this serves as inspiration for other teams who are looking for ways to instrument their own products and gather feedback.
Why do we need Analytics Engine?
Analytics Engine enables you to generate events (or “data points”) from Workers with just a few lines of code. Using the GraphQL or SQL API, you can query these events and create useful insights about the business or technology stack. For more about how to get started using Analytics Engine, check out our developer docs.
Since we released the Analytics Engine open beta in September, we’ve been adding new features at a rapid clip based on feedback from developers. However, we’ve had two big gaps in our visibility into the product.
First, our engineering team needs to answer classic observability questions, such as: how many requests are we getting, how many of those requests result in errors, what are the nature of these errors, etc. They need to be able to view both aggregated data (like average error rate, or p99 response time) and drill into individual events.
Second, because this is a newly launched product, we are looking for product insights. By instrumenting the SQL API, we can understand the queries our customers write, and the errors they see, which helps us prioritize missing features.
We realized that Analytics Engine would be an amazing tool for both answering our technical observability questions, and also gathering product insight. That’s because we can log an event for every query to our SQL API, and then query for both aggregated performance issues as well as individual errors and queries that our customers run.
In the next section, we’re going to walk you through how we use Analytics Engine to monitor that API.
Adding instrumentation to our SQL API
The Analytics Engine SQL API lets you query events data in the same way you would an ordinary database. For decades, SQL has been the most common language for querying data. We wanted to provide an interface that allows you to immediately start asking questions about your data without having to learn a new query language.
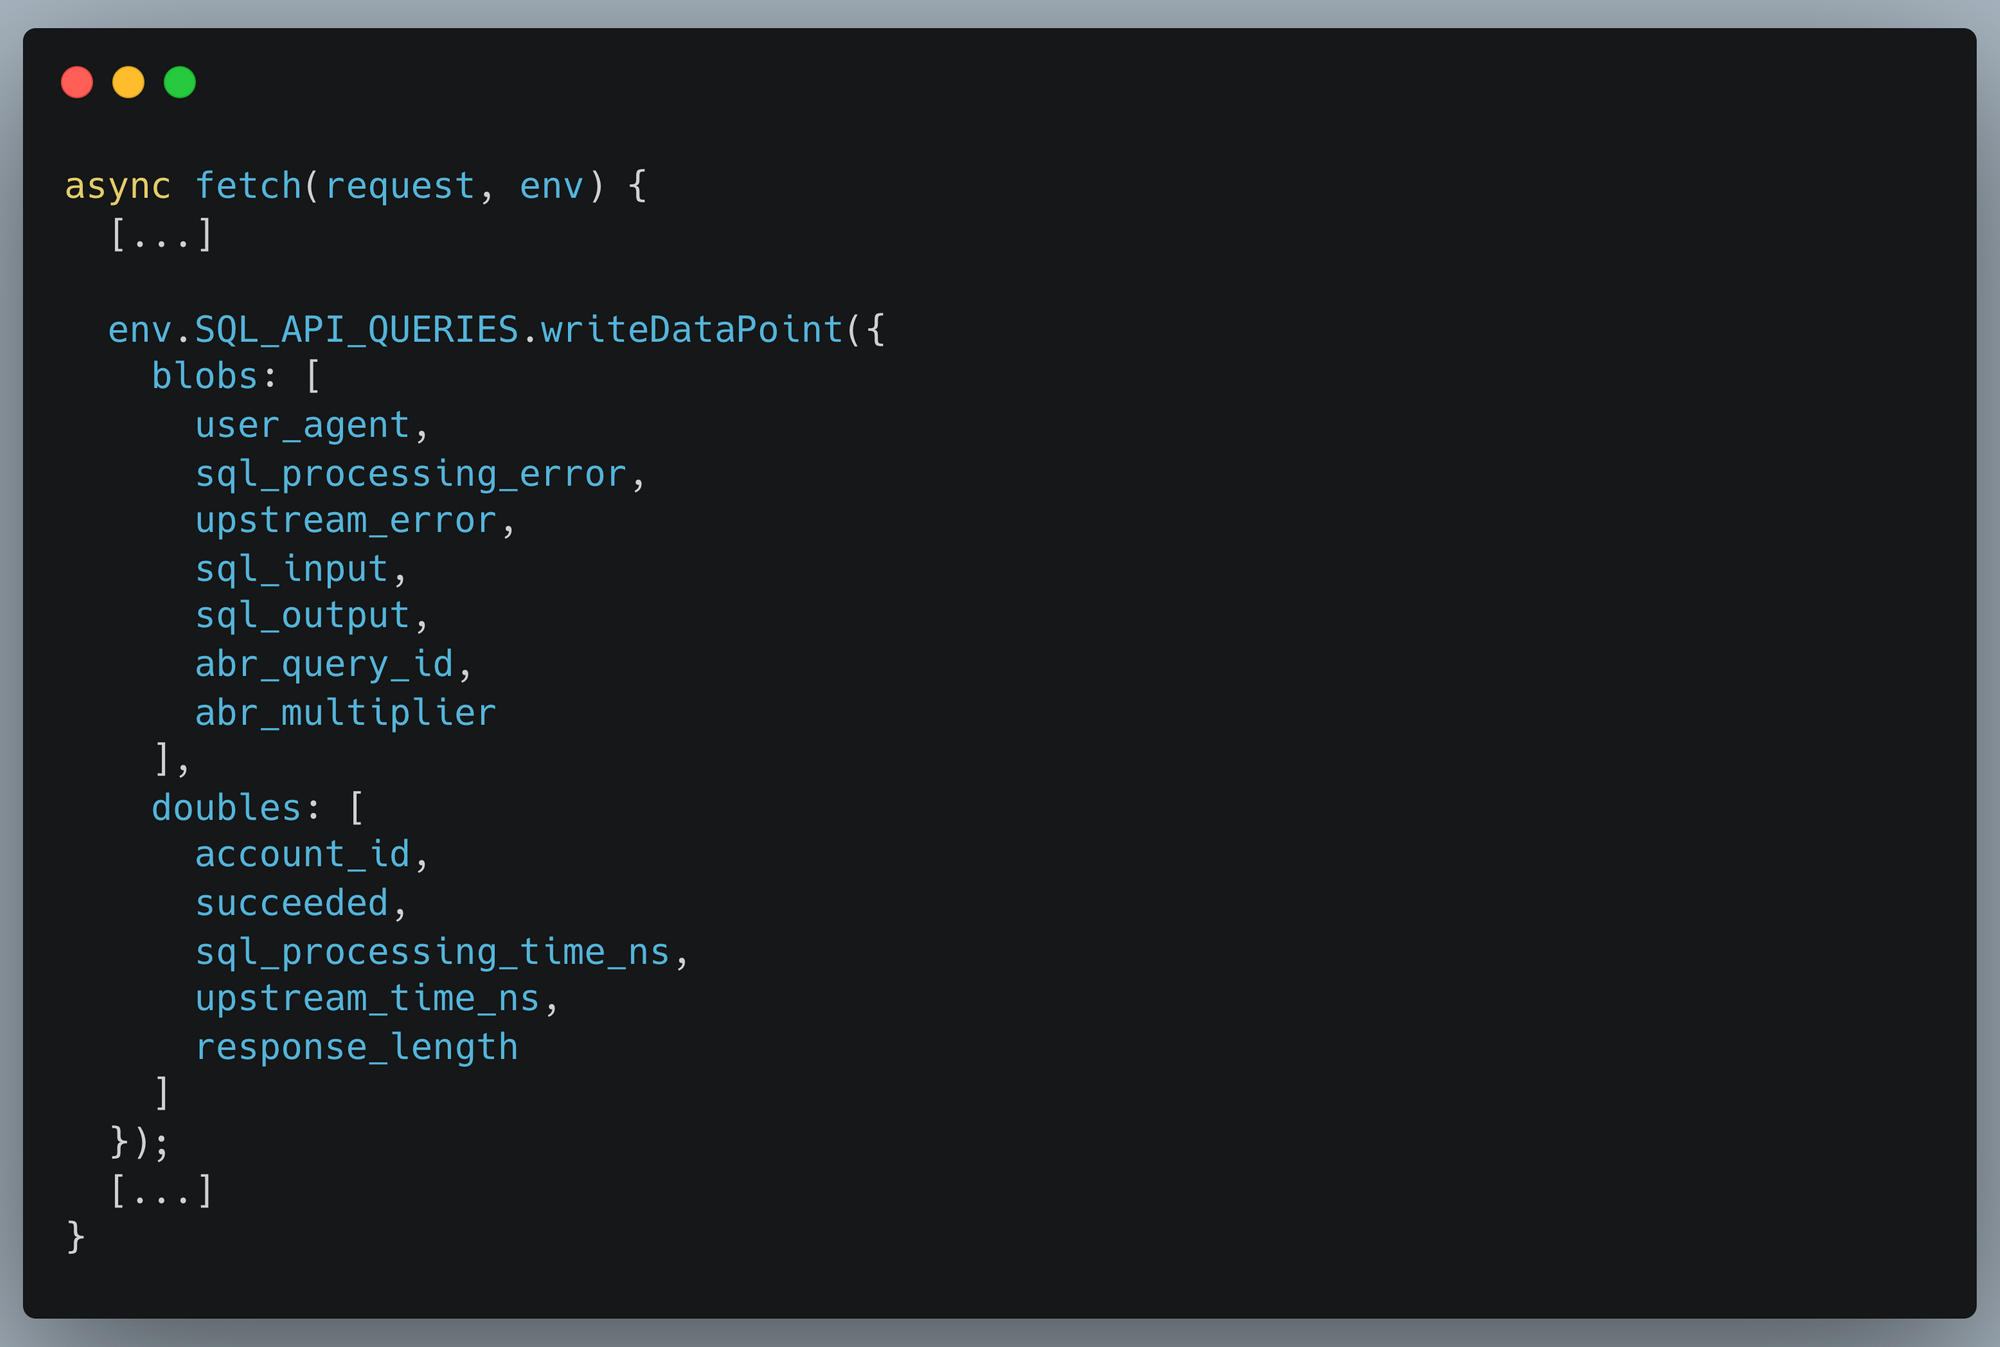
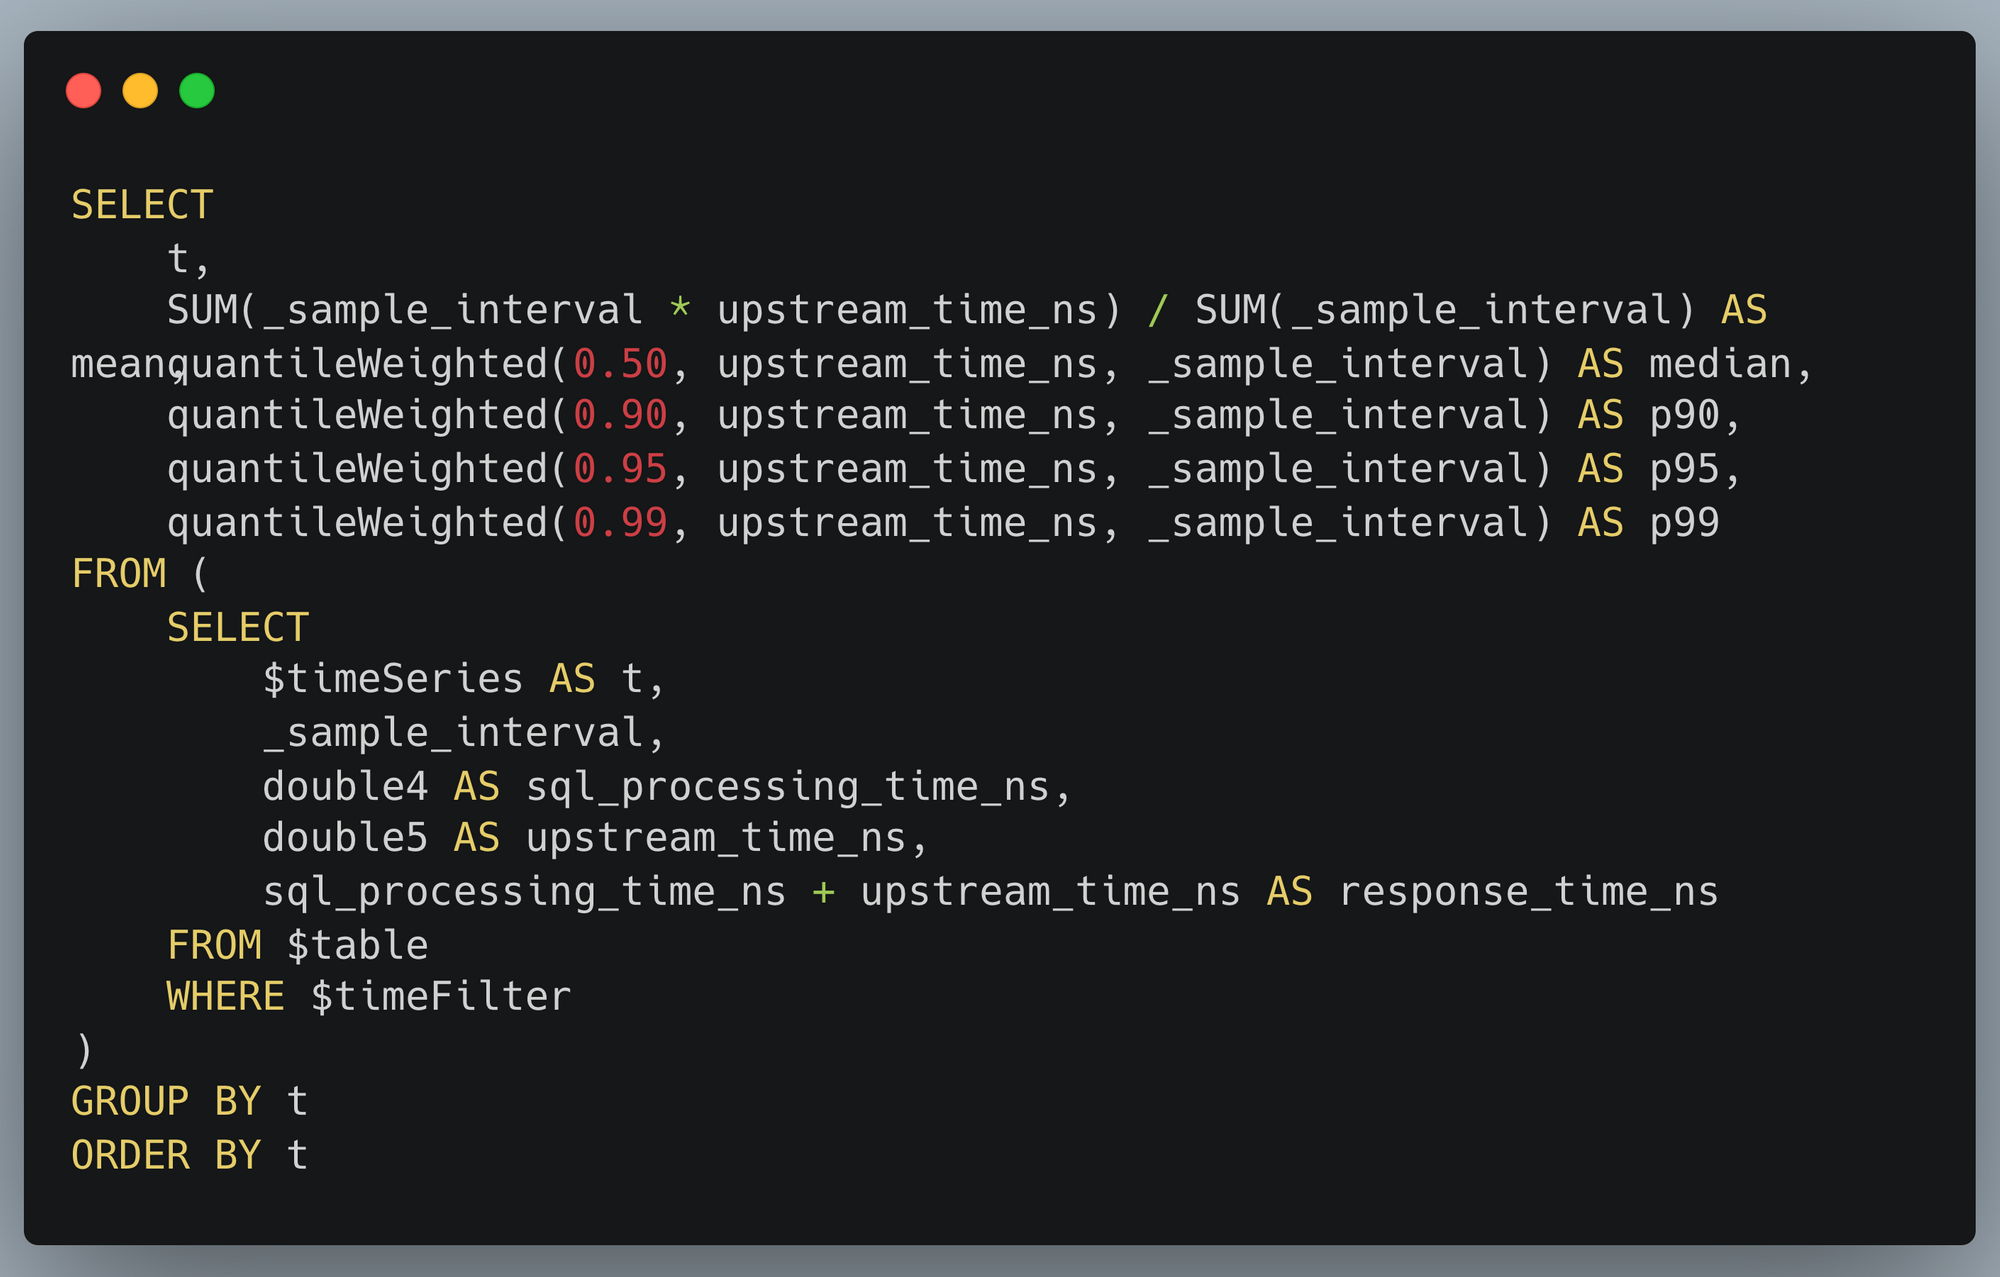
Our SQL API parses user SQL queries, transforms and validates them, and then executes them against backend database servers. We then write information about the query back into Analytics Engine so that we can run our own analytics. Writing data into Analytics Engine from a Cloudflare Worker is very simple and explained in our documentation. We instrument our SQL API in the same way our users do, and this code excerpt shows the data we write into Analytics Engine:
With that data now being stored in Analytics Engine, we can then pull out insights about every field we’re reporting.
Querying for insights
Having our analytics in an SQL database gives you the freedom to write any query you might want. Compared to using something like metrics which are often predefined and purpose specific, you can define any custom dataset desired, and interrogate your data to ask new questions with ease.
We need to support datasets comprising trillions of data points. In order to accomplish this, we have implemented a sampling method called Adaptive Bit Rate (ABR). With ABR, if you have large amounts of data, your queries may be returned sampled events in order to respond in reasonable time. If you have more typical amounts of data, Analytics Engine will query all your data. This allows you to run any query you like and still get responses in a short length of time. Right now, you have to account for sampling in how you make your queries, but we are exploring making it automatic.
Any data visualization tool can be used to visualize your analytics. At Cloudflare, we heavily use Grafana (and you can too!). This is particularly useful for observability use cases.
Observing query response times
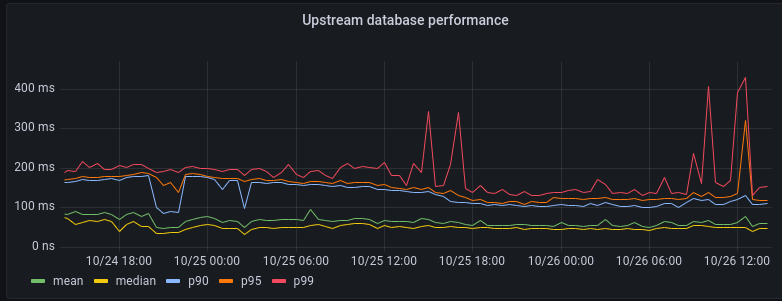
One query we pay attention to gives us information about the performance of our backend database clusters:
As you can see, the 99% percentile (corresponding to the 1% most complex queries to execute) sometimes spikes up to about 300ms. But on average our backend responds to queries within 100ms.
This visualization is itself generated from an SQL query:
Customer insights from high-cardinality data
Another use of Analytics Engine is to draw insights out of customer behavior. Our SQL API is particularly well-suited for this, as you can take full advantage of the power of SQL. Thanks to our ABR technology, even expensive queries can be carried out against huge datasets.
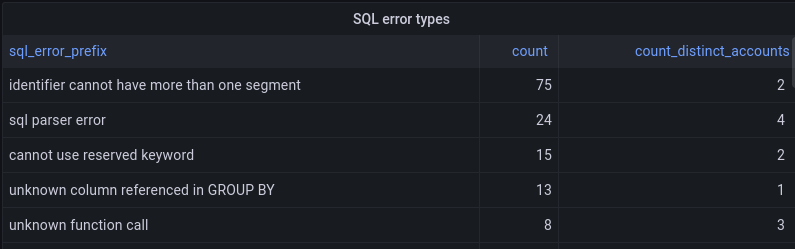
We use this ability to help prioritize improvements to Analytics Engine. Our SQL API supports a fairly standard dialect of SQL but isn’t feature-complete yet. If a user tries to do something unsupported in an SQL query, they get back a structured error message. Those error messages are reported into Analytics Engine. We’re able to aggregate the kinds of errors that our customers encounter, which helps inform which features to prioritize next.
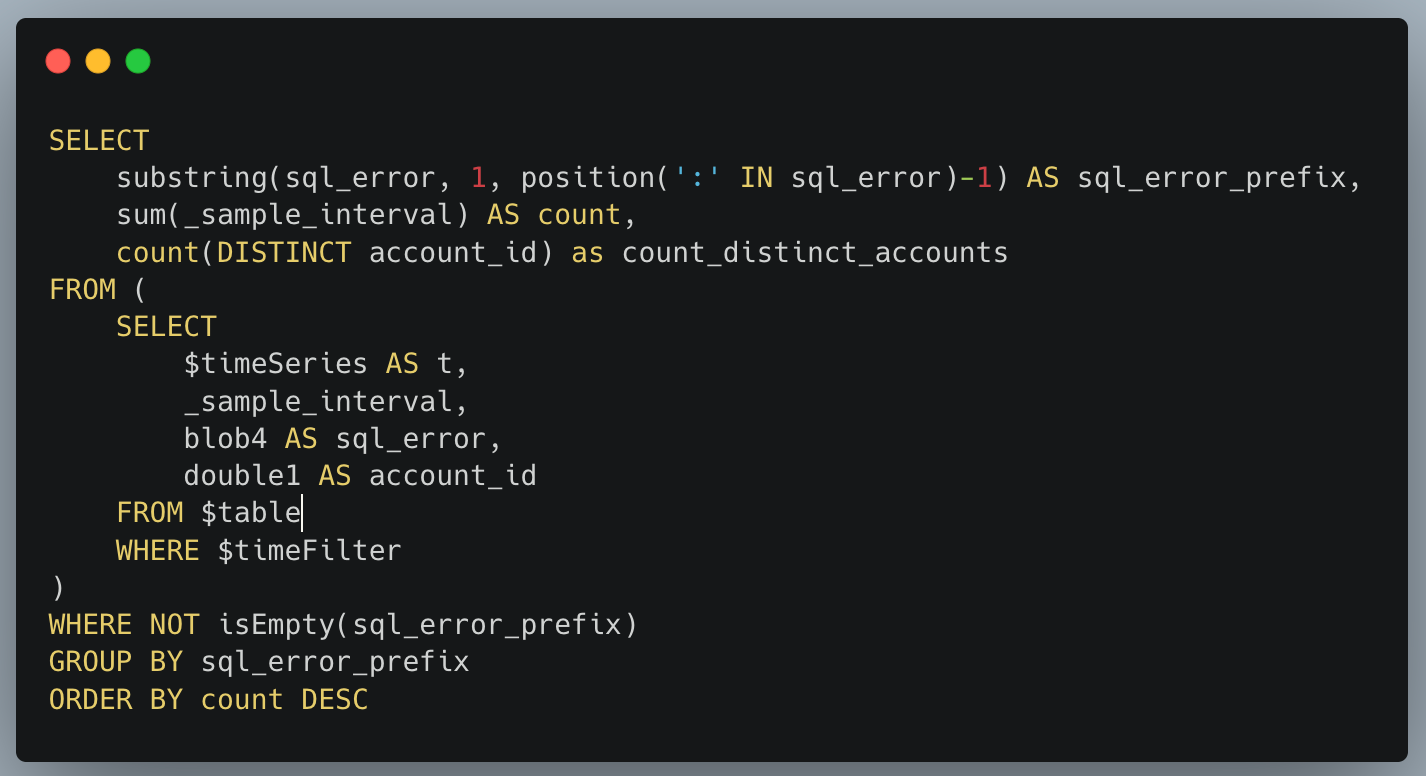
The SQL API returns errors in the format of type of error: more details, and so we can take the first portion before the colon to give us the type of error. We group by that, and get a count of how many times that error happened and how many users it affected:
To perform the above query using an ordinary metrics system, we would need to represent each error type with a different metric. Reporting that many metrics from each microservice creates scalability challenges. That problem doesn’t happen with Analytics Engine, because it’s designed to handle high-cardinality data.
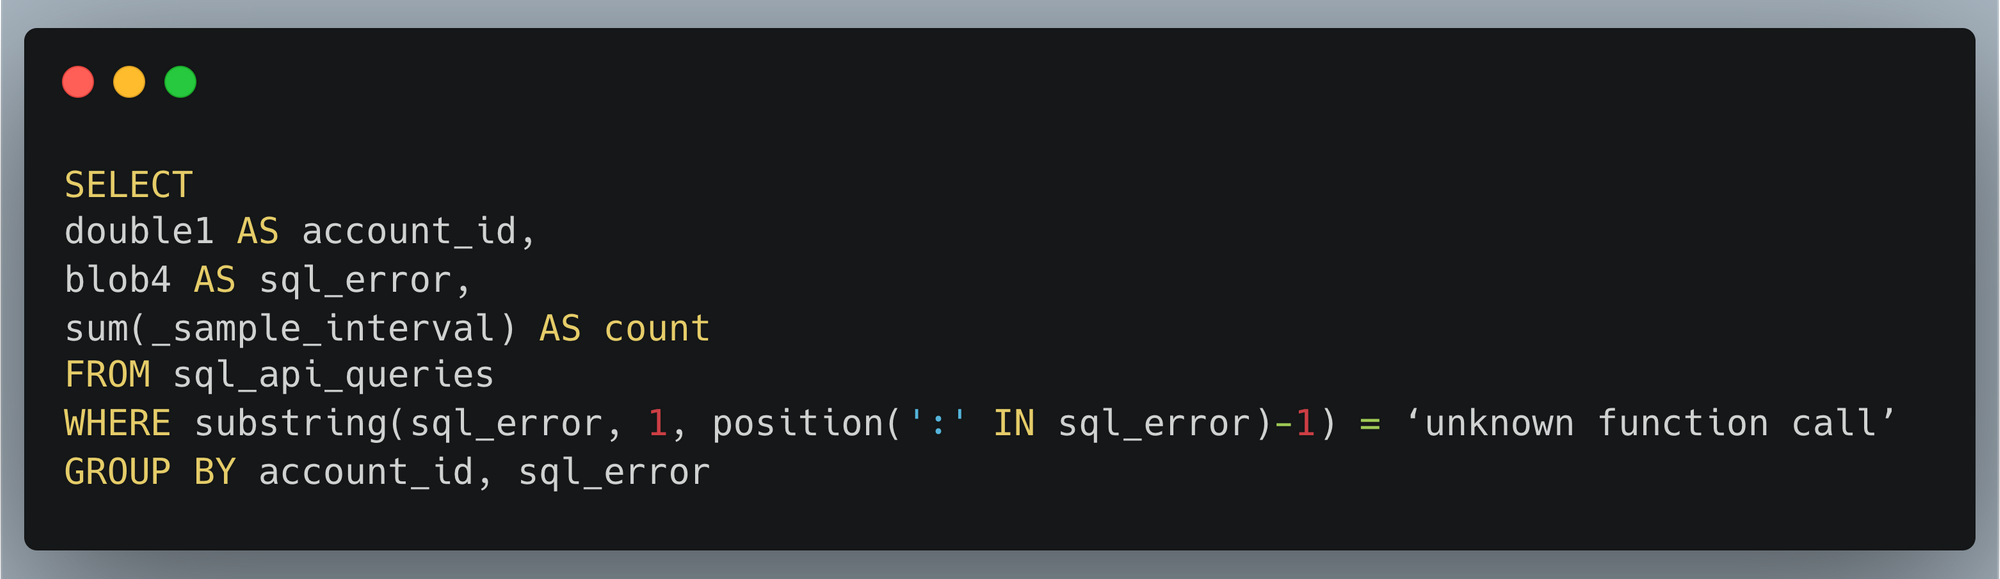
Another big advantage of a high-cardinality store like Analytics Engine is that you can dig into specifics. If there’s a large spike in SQL errors, we may want to find which customers are having a problem in order to help them or identify what function they want to use. That’s easy to do with another SQL query:
Inside Cloudflare, we have historically relied on querying our backend database servers for this type of information. Analytics Engine’s SQL API now enables us to open up our technology to our customers, so they can easily gather insights about their services at any scale!
Conclusion and what’s next
The insights we gathered about usage of the SQL API are a super helpful input to our product prioritization decisions. We already added support for substring and position functions which were used in the visualizations above.
Looking at the top SQL errors, we see numerous errors related to selecting columns. These errors are mostly coming from some usability issues related to the Grafana plugin. Adding support for the DESCRIBE function should alleviate this because without this, the Grafana plugin doesn’t understand the table structure. This, as well as other improvements to our Grafana plugin, is on our roadmap.
We also can see that users are trying to query time ranges for older data that no longer exists. This suggests that our customers would appreciate having extended data retention. We’ve recently extended our retention from 31 to 92 days, and we will keep an eye on this to see if we should offer further extension.
We saw lots of errors related to common mistakes or misunderstandings of proper SQL syntax. This indicates that we could provide better examples or error explanations in our documentation to assist users with troubleshooting their queries.
Stay tuned into our developer docs to be informed as we continue to iterate and add more features!
You can start using Workers Analytics Engine Now! Analytics Engine is now in open beta with free 90-day retention. Start using it today or join our Discord community to talk with the team.
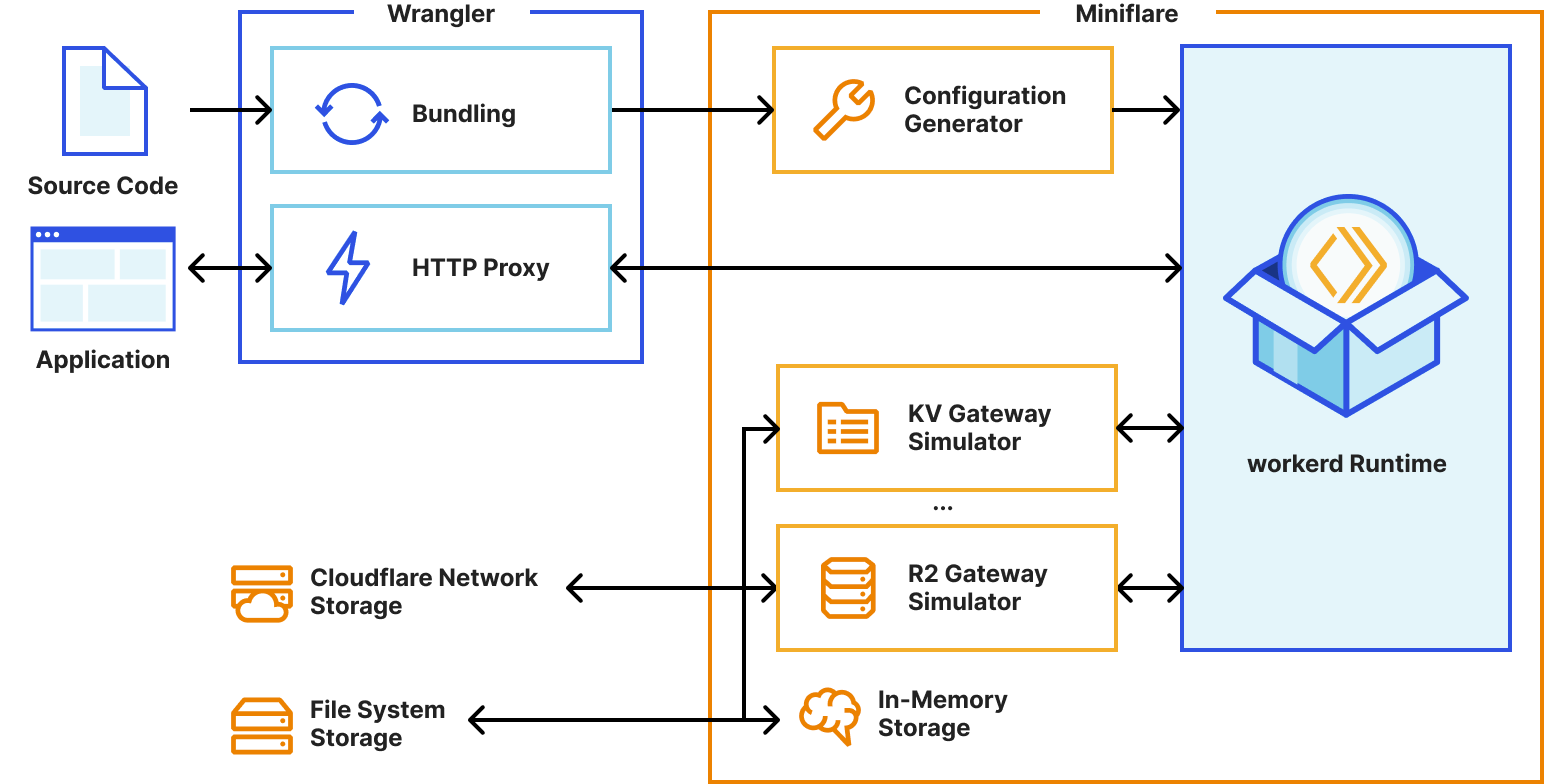
Local development gives you a fully-controllable and easy-to-debug testing environment. At the start of this year, we brought this experience to Workers developers by launching Miniflare 2.0: a local Cloudflare Workers simulator. Miniflare 2 came with features like step-through debugging support, detailed console.logs, pretty source-mapped error pages, live reload and a highly-configurable unit testing environment. Not only that, but we also incorporated Miniflare into Wrangler, our Workers CLI, to enable wrangler dev’s —local mode.
Today, we’re taking local development to the next level! In addition to introducing new support for migrating existing projects to your local development environment, we’re making it easier to work with your remote data—locally! Most importantly, we’re releasing a much more accurate Miniflare 3, powered by the recently open-sourced workerd runtime—the same runtime used by Cloudflare Workers!
Enabling local development with workerd
One of the superpowers of having a local development environment is that you can test changes without affecting users in production. A great local environment offers a level of fidelity on par with production.
The way we originally approached local development was with Miniflare 2, which reimplemented Workers runtime APIs in JavaScript. Unfortunately, there were subtle behavior mismatches between these re-implementations and the real Workers runtime. These types of issues are really difficult for developers to debug, as they don’t appear locally, and step-through debugging of deployed Workers isn’t possible yet. For example, the following Worker returns responses successfully in Miniflare 2, so we might assume it’s safe to publish:
let cachedResponsePromise;
export default {
  async fetch(request, env, ctx) {
    // Let's imagine this fetch takes a few seconds. To speed up our worker, we
    // decide to only fetch on the first request, and reuse the result later.
    // This works fine in Miniflare 2, so we must be good right?
    cachedResponsePromise ??= fetch("https://example.com");
    return (await cachedResponsePromise).clone();
  },
};
However, as soon as we send multiple requests to our deployed Worker, it fails with Error: Cannot perform I/O on behalf of a different request. The problem here is that response bodies created in one request’s handler cannot be accessed from a different request’s handler. This limitation allows Cloudflare to improve overall Worker performance, but it was almost impossible for Miniflare 2 to detect these types of issues locally. In this particular case, the best solution is to cache using fetch itself.
Additionally, because the Workers runtime uses a very recent version of V8, it supports some JavaScript features that aren’t available in all versions of Node.js. This meant a few features implemented in Workers, like Array#findLast, weren’t always available in Miniflare 2.
With the Workers runtime now open-sourced, Miniflare 3 can leverage the same implementations that are deployed on Cloudflare’s network, giving bug-for-bug compatibility and practically eliminating behavior mismatches. 🎉
Miniflare 3’s new simplified architecture using worked
This radically simplifies our implementation too. We were able to remove over 50,000 lines of code from Miniflare 2. Of course, we still kept all the Miniflare special-sauce that makes development fun like live reload and detailed logging. 🙂
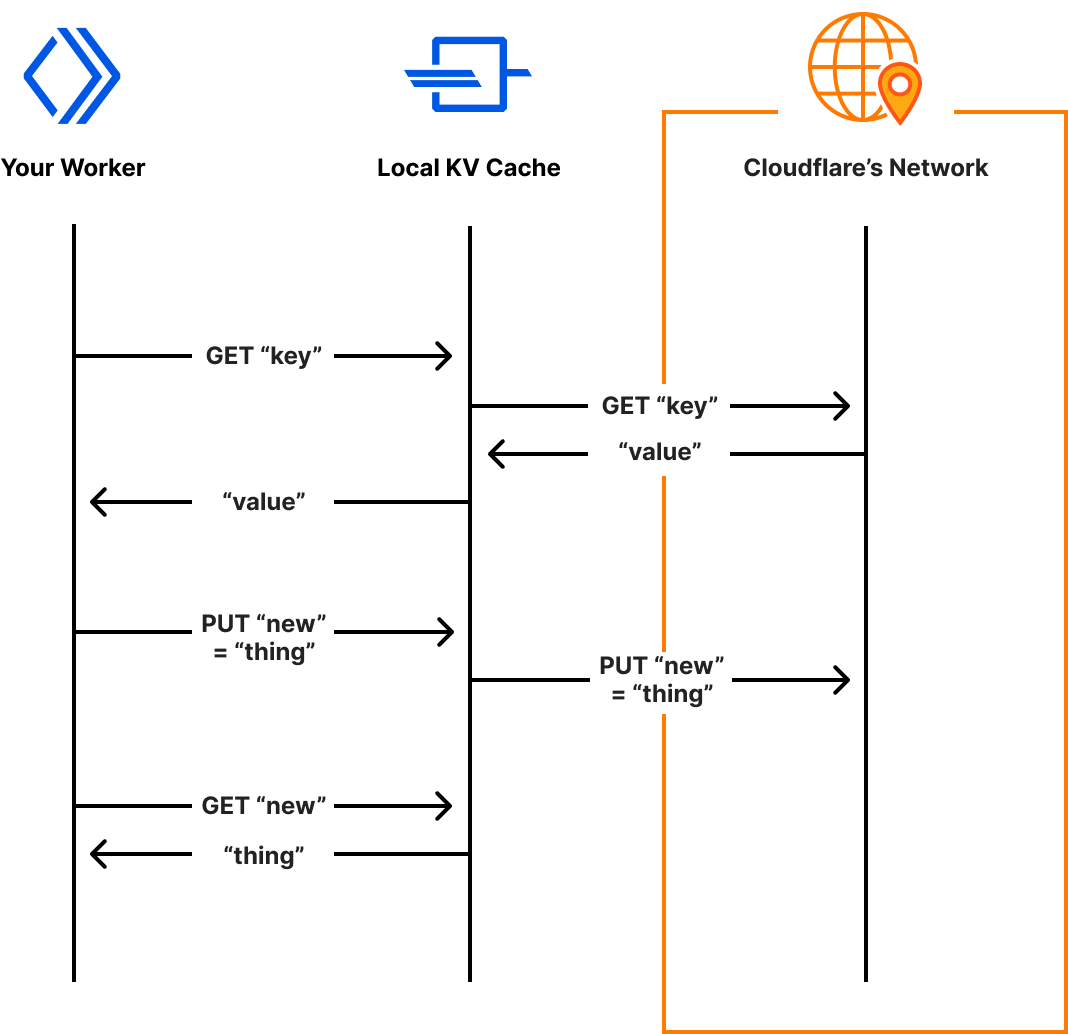
Local development with real data
We know that many developers choose to test their Workers remotely on the Cloudflare network as it gives them the ability to test against real data. Testing against fake data in staging and local environments is sometimes difficult, as it never quite matches the real thing.
With Miniflare 3, we’re blurring the lines between local and remote development, by bringing real data to your machine as an experimental opt-in feature. If enabled, Miniflare will read and write data to namespaces on the Cloudflare network, as your Worker would when deployed. This is only supported with Workers KV for now, but we’re exploring similar solutions for R2 and D1.
Miniflare’s system for accessing real KV data, reads and writes are cached locally for future accesses
A new default for Wrangler
With Miniflare 3 now effectively as accurate as the real Workers environment, and the ability to access real data locally, we’re revisiting the decision to make remote development the initial Wrangler experience. In a future update, wrangler dev --local will become the default. --local will no longer be required. Benchmarking suggests this will bring an approximate 10x reduction to startup and a massive 60x reduction to script reload times! Over the next few weeks, we’ll be focusing on further optimizing Wrangler’s performance to bring you the fastest Workers development experience yet!
wrangler init --from-dash
We want all developers to be able to take advantage of the improved local experience, so we’re making it easy to start a local Wrangler project from an existing Worker that’s been developed in the Cloudflare dashboard. With Node.js installed, run npx wrangler init –from-dash <your_worker_name> in your terminal to set up a new project with all your existing code and bindings such as KV namespaces configured. You can now seamlessly continue development of your application locally, taking advantage of all the developer experience improvements Wrangler and Miniflare provide. When you’re ready to deploy your worker, run npx wrangler publish.
Looking to the future
Over the next few months, the Workers team is planning to further improve the local development experience with a specific focus on automated testing. Already, we’ve released a preliminary API for programmatic end-to-end tests with wrangler dev, but we’re also investigating ways of bringing Miniflare 2’s Jest/Vitest environments to workerd. We’re also considering creating extensions for popular IDEs to make developing workers even easier. 👀
Miniflare 3.0 is now included in Wrangler! Try it out by running npx wrangler@latest dev --experimental-local. Let us know what you think in the #wrangler channel on the Cloudflare Developers Discord, and please open a GitHub issue if you hit any unexpected behavior.
TypeScript makes it easy for developers to write code that doesn’t crash, by catching type errors before your program runs. We want developers to take advantage of this tooling, which is why one year ago, we built a system to automatically generate TypeScript types for the Cloudflare Workers runtime. This enabled developers to see code completions in their IDEs for Workers APIs, and to type check code before deploying. Each week, a new version of the types would be published, reflecting the most recent changes.
Over the past year, we’ve received lots of feedback from customers and internal teams on how we could improve our types. With the switch to the Bazel build system in preparation for open-sourcing the runtime, we saw an opportunity to rebuild our types to be more accurate, easier to use, and simpler to generate. Today, we’re excited to announce the next major release of @cloudflare/workers-types with a bunch of new features, and the open-sourcing of the fully-rewritten automatic generation scripts.
How to use TypeScript with Workers
Setting up TypeScript in Workers is easy! If you’re just getting started with Workers, install Node.js, then run npx wrangler init in your terminal to generate a new project. If you have an existing Workers project and want to take advantage of our improved typings, install the latest versions of TypeScript and @cloudflare/workers-types with npm install --save-dev typescript @cloudflare/workers-types@latest, then create a tsconfig.json file with the following contents:
Your editor will now highlight issues and give you code completions as you type, leading to a less error-prone and more enjoyable developer experience.
Editor highlighting incorrect use of set instead of put, and providing code completions
Improved interoperability with standard types
Cloudflare Workers implement many of the same runtime APIs as browsers, and we’re working to improve our standards compliance even more with the WinterCG. However, there will always be fundamental differences between what browsers and Workers can do. For example, browsers can play audio files, whereas Workers have direct access to Cloudflare’s network for storing globally-distributed data. This mismatch means that the runtime APIs and types provided by each platform are different, which in turn makes it difficult to use Workers types with frameworks, like Remix, that run the same files on the Cloudflare network and in the browser. These files need to be type-checked against lib.dom.d.ts, which is incompatible with our types.
To solve this problem, we now generate a separate version of our types that can be selectively imported, without having to include @cloudflare/workers-types in your tsconfig.json’s types field. Here’s an example of what this looks like:
import type { KVNamespace } from "@cloudflare/workers-types";

declare const USERS_NAMESPACE: KVNamespace;
In addition, we automatically generate a diff of our types against TypeScript’s lib.webworker.d.ts. Going forward, we’ll use this to identify areas where we can further improve our spec-compliance.
Improved compatibility with compatibility dates
Cloudflare maintains strong backwards compatibility promises for all the APIs we provide. We use compatibility flags and dates to make breaking changes in a backwards-compatible way. Sometimes these compatibility flags change the types. For example, the global_navigator flag adds a new navigator global, and the url_standard flag changes the URLSearchParams constructor signature.
We now allow you to select the version of the types that matches your compatibility date, so you can be sure you’re not using features that won’t be supported at runtime.
In addition to compatibility dates, your Worker environment configuration also impacts the runtime and type API surface. If you have bindings such as KV namespaces or R2 buckets configured in your wrangler.toml, these need to be reflected in TypeScript types. Similarly, custom text, data and WebAssembly module rules need to be declared so TypeScript knows the types of exports. Previously, it was up to you to create a separate ambient TypeScript file containing these declarations.
To keep wrangler.toml as the single source of truth, you can now run npx wrangler types to generate this file automatically.
For example, the following wrangler.toml…
kv_namespaces = [{ binding = "MY_NAMESPACE", id = "..." }]
rules = [{ type = "Text", globs = ["**/*.txt"] }]
Code completions provide a great way for developers new to the Workers platform to explore the API surface. We now include the documentation for standard APIs from TypeScript’s official types in our types. We’re also starting the process of bringing docs for Cloudflare specific APIs into them too.
For developers already using the Workers platform, it can be difficult to see how types are changing with each release of @cloudflare/workers-types. To avoid type errors and highlight new features, we now generate a detailed changelog with each release that splits out new, changed and removed definitions.
How does type generation work under the hood?
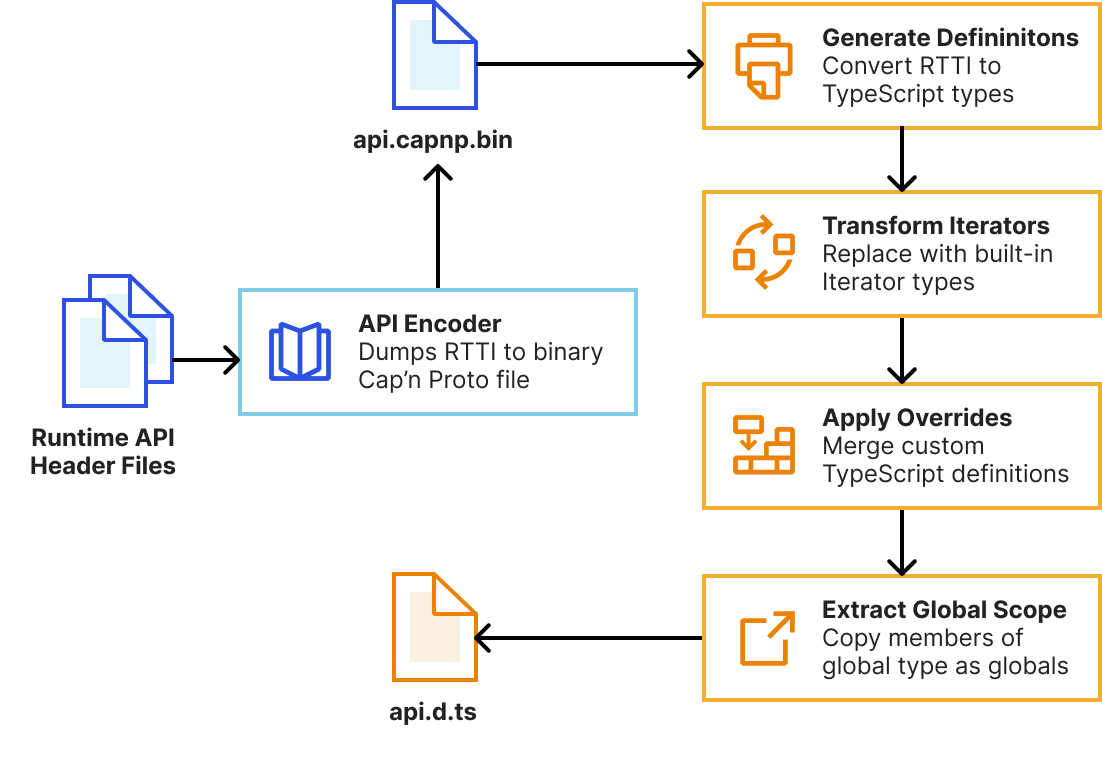
As mentioned earlier, we’ve completely rebuilt the automatic type generation scripts to be more reliable, extensible and maintainable. This means developers will get improved types as soon as new versions of the runtime are published. Our system now uses workerd’s new runtime-type-information (RTTI) system to query types of Workers runtime APIs, rather than attempting to extract this information from parsed C++ ASTs.
// Encode the KV namespace type without any compatibility flags enabled
CompatibilityFlags::Reader flags = {};
auto builder = rtti::Builder(flags);
auto type = builder.structure<KvNamespace>();
capnp::TextCodec codec;
auto encoded = codec.encode(type);
KJ_DBG(encoded); // (name = "KvNamespace", members = [ ... ], ...)
We then pass this RTTI to a TypeScript program that uses the TypeScript Compiler API to generate declarations and perform AST transformations to tidy them up. This is built into workerd’s Bazel build system, meaning generating types is now a single bazel build //types:types command. We leverage Bazel’s cache to rebuild as little as possible during generation.
Whilst the auto-generated types correctly describe the JavaScript interface of Workers runtime APIs, TypeScript provides additional features we can use to provide higher-fidelity types and improve developer ergonomics. Our system allows us to handwrite partial TypeScript “overrides” that get merged with the auto-generated types. This enables us to…
Add type parameters (generics) to types such as ReadableStream and avoid any typed values.
Specify the correspondence between input and output types with method overloads. For example, KVNamespace#get() should return a string when the type argument is text, but ArrayBuffer when it’s arrayBuffer.
Rename types to match TypeScript standards and reduce verbosity.
Fully-replace a type for more accurate declarations. For example, we replace WebSocketPair with a const declaration for better types with Object.values().
Provide types for values that are internally untyped such as the Request#cf object.
Hide internal types that aren’t usable in your workers.
Previously, these overrides were defined in separate TypeScript files to the C++ declarations they were overriding. This meant they often fell out-of-sync with the original declarations. In the new system, overrides are defined alongside the originals with C++ macros, meaning they can be reviewed alongside runtime implementation changes. See the README for workerd’s JavaScript glue code for many more details and examples.
Try typing with workers-types today!
We encourage you to upgrade to the latest version of @cloudflare/workers-types with npm install --save-dev @cloudflare/workers-types@latest, and try out the new wrangler types command. We’ll be publishing a new version of the types with each workerd release. Let us know what you think on the Cloudflare Developers Discord, and please open a GitHub issue if you find any types that could be improved.
The Cloudflare team was so excited to hear how Twilio Segment solved problems they encountered with tracking first-party data and personalization using Cloudflare Workers. We are happy to have guest bloggers Pooya Jaferian and Tasha Alfano from Twilio Segment to share their story.
Introduction
Twilio Segment is a customer data platform that collects, transforms, and activates first-party customer data. Segment helps developers collect user interactions within an application, form a unified customer record, and sync it to hundreds of different marketing, product, analytics, and data warehouse integrations.
There are two “unsolved” problem with app instrumentation today:
Problem #1: Many important events that you want to track happen on the “wild-west” of the client, but collecting those events via the client can lead to low data quality, as events are dropped due to user configurations, browser limitations, and network connectivity issues.
Problem #2: Applications need access to real-time (<50ms) user state to personalize the application experience based on advanced computations and segmentation logic that must be executed on the cloud.
The Segment Edge SDK – built on Cloudflare Workers – solves for both. With Segment Edge SDK, developers can collect high-quality first-party data. Developers can also use Segment Edge SDK to access real-time user profiles and state, to deliver personalized app experiences without managing a ton of infrastructure.
This post goes deep on how and why we built the Segment Edge SDK. We chose the Cloudflare Workers platform as the runtime for our SDK for a few reasons. First, we needed a scalable platform to collect billions of events per day. Workers running with no cold-start made them the right choice. Second, our SDK needed a fast storage solution, and Workers KV fitted our needs perfectly. Third, we wanted our SDK to be easy to use and deploy, and Workers’ ease and speed of deployment was a great fit.
It is important to note that the Segment Edge SDK is in early development stages, and any features mentioned are subject to change.
Serving a JavaScript library 700M+ times per day
analytics.js is our core JavaScript UI SDK that allows web developers to send data to any tool without having to learn, test, or use a new API every time.
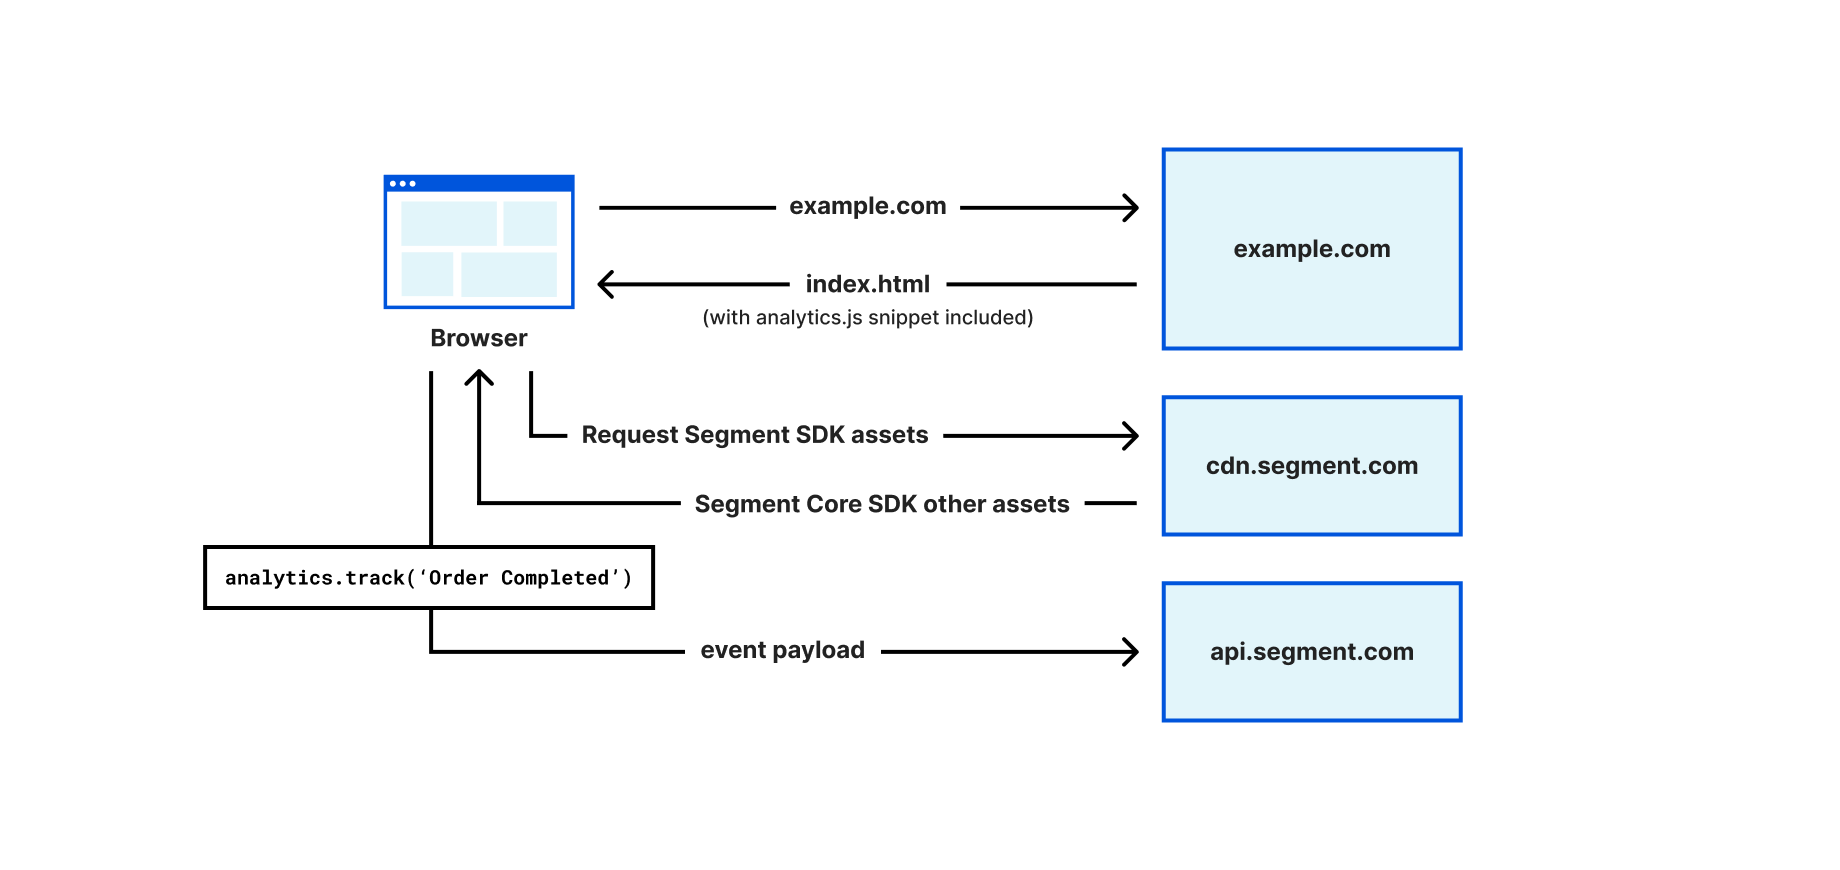
Figure 1 illustrates how Segment can be used to collect data on a web application. Developers add Segment’s web SDK, analytics.js, to their websites by including a JavaScript snippet to the HEAD of their web pages. The snippet can immediately collect and buffer events while it also loads the full library asynchronously from the Segment CDN. Developers can then use analytics.js to identify the visitors, e.g., analytics.identify('john'), and track user behavior, e.g., analytics.track('OrderCompleted'). Calling the `analytics.js methods such as identify or track will send data to Segment’s API (api.segment.io). Segment’s platform can then deliver the events to different tools, as well as create a profile for the user (e.g., build a profile for user “John”, associate “Order Completed”, as well as add all future activities of john to the profile).
Analytics.js also stores state in the browser as first-party cookies (e.g., storing an ajs_user_id cookie with the value of john, with cookie scoped at the example.com domain) so that when the user visits the website again, the user identifier stored in the cookie can be used to recognize the user.
Figure 1- How analytics.js loads on a website and tracks events
While analytics.js only tracks first-party data (i.e., the data is collected and used by the website that the user is visiting), certain browser controls incorrectly identify analytics.js as a third-party tracker, because the SDK is loaded from a third-party domain (cdn.segment.com) and the data is going to a third-party domain (api.segment.com). Furthermore, despite using first-party cookies to store user identity, some browsers such as Safari have limited the TTL for non-HTTPOnly cookies to 7-days, making it challenging to maintain state for long periods of time.
To overcome these limitations, we have built a Segment Edge SDK (currently in early development) that can automatically add Segment’s library to a web application, eliminate the use of third-party domains, and maintain user identity using HTTPOnly cookies. In the process of solving the first-party data problem, we realized that the Edge SDK is best positioned to act as a personalization library, given it has access to the user identity on every request (in the form of cookies), and it can resolve such identity to a full-user profile stored in Segment. The user profile information can be used to deliver personalized content to users directly from the Cloudflare Workers platform.
The remaining portions of this post will cover how we solved the above problems. We first explain how the Edge SDK helps with first-party collection. Then we cover how the Segment profiles database becomes available on the Cloudflare Workers platform, and how to use such data to drive personalization.
Segment Edge SDK and first-party data collection
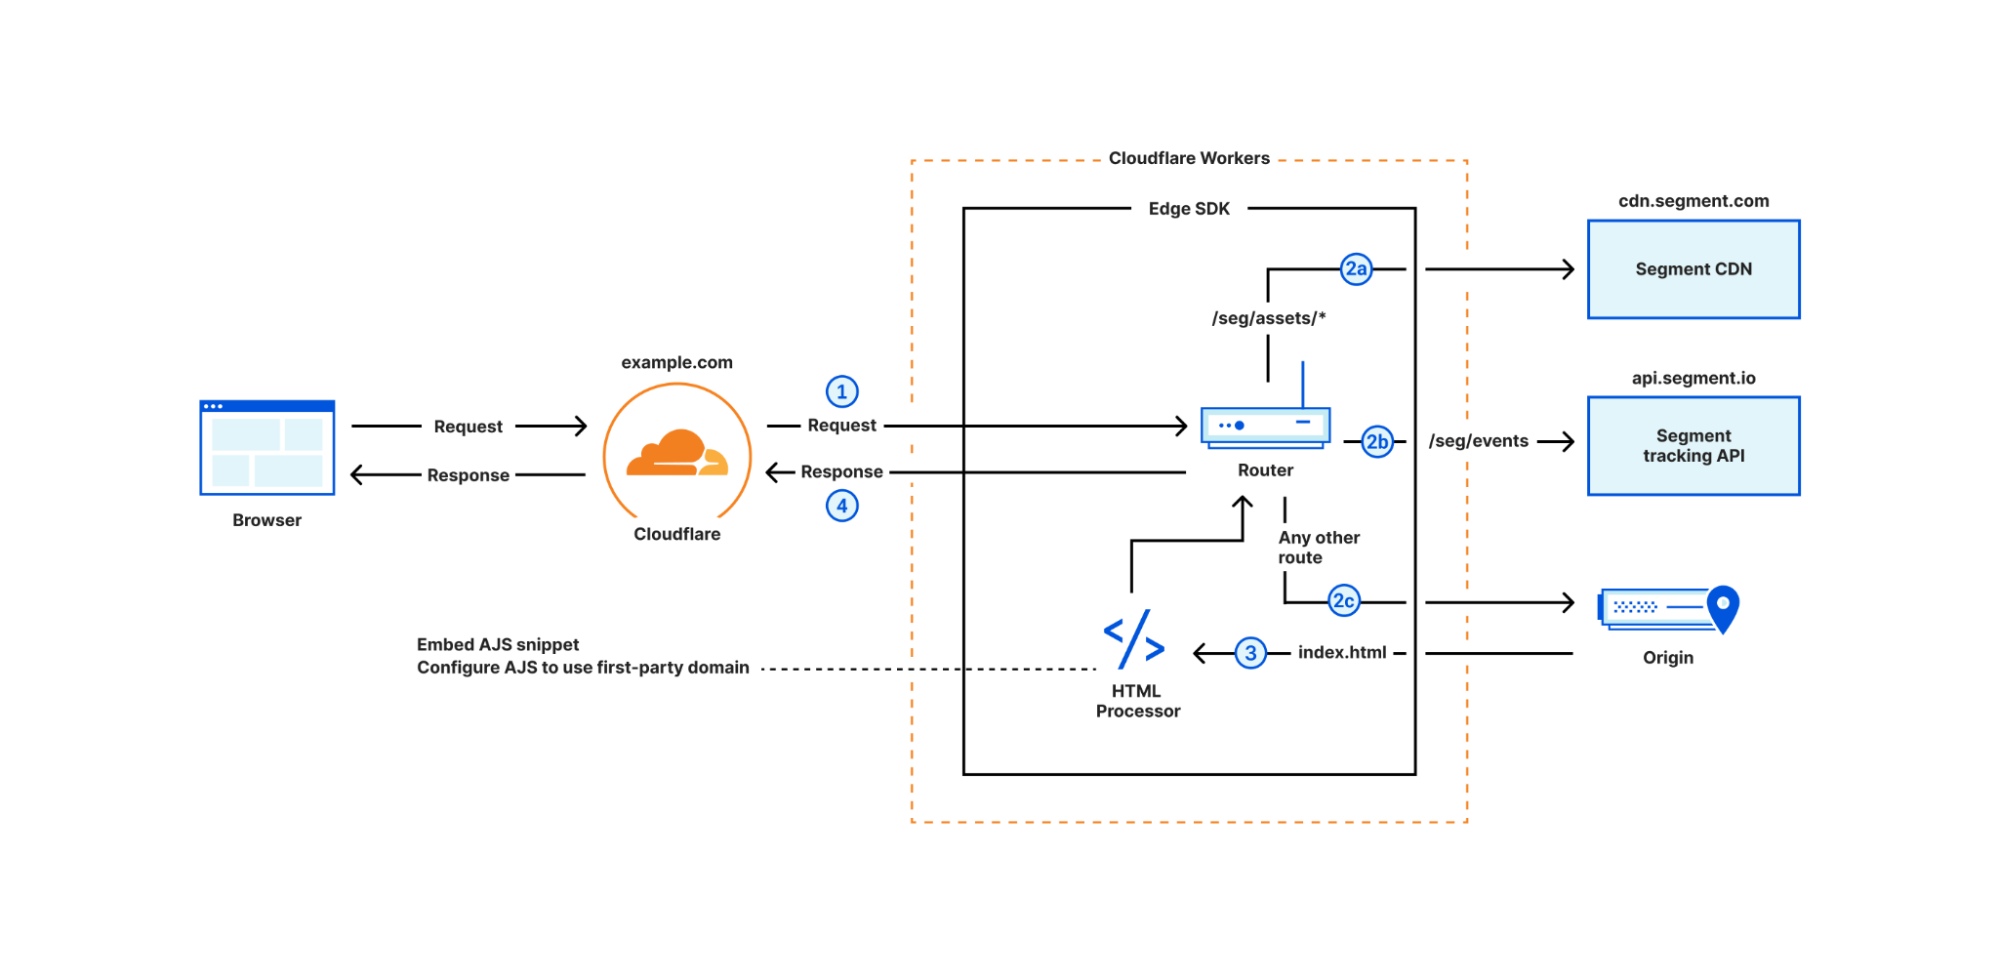
Developers can set up the Edge SDK by creating a Cloudflare Worker sitting in front of their web application (via Routes) and importing the Edge SDK via npm. The Edge SDK will handle requests and automatically injects analytics.js snippets into every webpage. It also configures first-party endpoints to download the SDK assets and send tracking data. The Edge SDK also captures user identity by looking at the Segment events and instructs the browser to store such identity as HTTPOnly cookies.
How the Edge SDK works under the hood to enable first-party data collection
The Edge SDK’s internal router checks the inbound request URL against predefined patterns. If the URL matches a route, the router runs the route’s chain of handlers to process the request, fetch the origin, or modify the response.
Figure 2 demonstrates the routing of incoming requests. The Worker calls segment.handleEvent method with the request object (step 1), then the router matches the request.url and request.method against a set of predefined routes:
GET requests with /seg/assets/* path are proxied to Segment CDN (step 2a)
POST requests with /seg/events/* path are proxied to Segment tracking API (step 2b)
Other requests are proxied to the origin (step 2c) and the HTML responses are enriched with the analytics.js snippet (step 3)
Regardless of the route, the router eventually returns a response to the browser (step 4) containing data from the origin, the response from Segment tracking API, or analytics.js assets. When Edge SDK detects the user identity in an incoming request (more on that later), it sets an HTTPOnly cookie in the response headers to persist the user identity in the browser.
Figure 2- Edge SDK router flow
In the subsequent three sections, we explain how we inject analytics.js, proxy Segment endpoints, and set server-side cookies.
Injecting Segment SDK on requests to origin
For all the incoming requests routed to the origin, the Edge SDK fetches the HTML page and then adds the analytics.js snippet to the <HEAD> tag, embeds the write key, and configures the snippet to download the subsequent javascript bundles from the first-party domain ([first-party host]/seg/assets/*) and sends data to the first-party domain as well ([first-party host]/seg/events/*). This is accomplished using the HTMLRewriter API.
import snippet from "@segment/snippet"; // Existing Segment package that generates snippet

class ElementHandler {
   constructor(host: string, writeKey: string)

   element(element: Element) {
     // generate Segment snippet and configure it with first-party host info
     const snip = snippet.min({
         host: `${this.host}/seg`,
         apiKey: this.writeKey,
       })
     element.append(`<script>${snip}</script>`, { html: true });
   }
 }

export const enrichWithAJS: HandlerFunction = async (
   request,
   response,
   context
 ) => {
   const {
     settings: { writeKey },
   } = context;
   const host = request.headers.get("host") || "";
    return [
     request,
     new HTMLRewriter().on("head",
         new ElementHandler(host, writeKey))
       .transform(response),
     context,
   ];
 };
Proxy SDK bundles and Segment API
The Edge SDK proxies the Segment CDN and API under the first-party domain. For example, when the browser loads a page with the injected analytics.js snippet, the snippet loads the full analytics.js bundle from https://example.com/seg/assets/sdk.js, and the Edge SDK will proxy that request to the Segment CDN:
Similarly, analytics.js collects events and sends them via a POST request to https://example.com/seg/events/[method] and the Edge SDK will proxy such requests to the Segment tracking API:
The Edge SDK also re-writes existing client-side analytics.js cookies as HTTPOnly cookies. When Edge SDK intercepts an identify event e.g., analytics.identify('john'), it extracts the user identity (“john”) and then sets a server-side cookie when sending a response back to the user. Therefore, any subsequent request to the Edge SDK can be associated with “john” using request cookies.
Intercepting the ajs_user_id on the Workers, and using the cookie identifier to associate each request to a user, is quite powerful, and it opens the door for delivering personalized content to users. The next section covers how Edge SDK can drive personalization.
Personalization on the Supercloud
The Edge SDK offers a registerVariation method that can customize how a request to a given route should be fetched from the origin. For example, let’s assume we have three versions of a landing page in the origin: /red, /green, and / (default), and we want to deliver one of the three versions based on the visitor traits. We can use Edge SDK as follows:
   const segment = new Segment(env.SEGMENT_WRITE_KEY);
   segment.registerVariation("/", (profile) => {
     if (profile.red_group) {
       return "/red"
     } else if (profile.green_group)
       return "/green"
     }
   });

   const resp = await segment.handleEvent(request, env);

   return resp
The registerVariation accepts two inputs: the path that displays the personalized content, and a decision function that should return the origin address for the personalized content. The decision function receives a profile object visitor in Segment. In the example, when users visit example.com/(root path), personalized content is delivered by checking if the visitor has a red_group or green_group trait and subsequently requesting the content from either /red or /green path at the origin.
We already explained that Edge SDK knows the identity of the user via ajs_user_id cookie, but we haven’t covered how the Edge SDK has access to the full profile object. The next section explains how the full profile becomes available on the Cloudflare Workers platform.
How does personalization work under the hood?
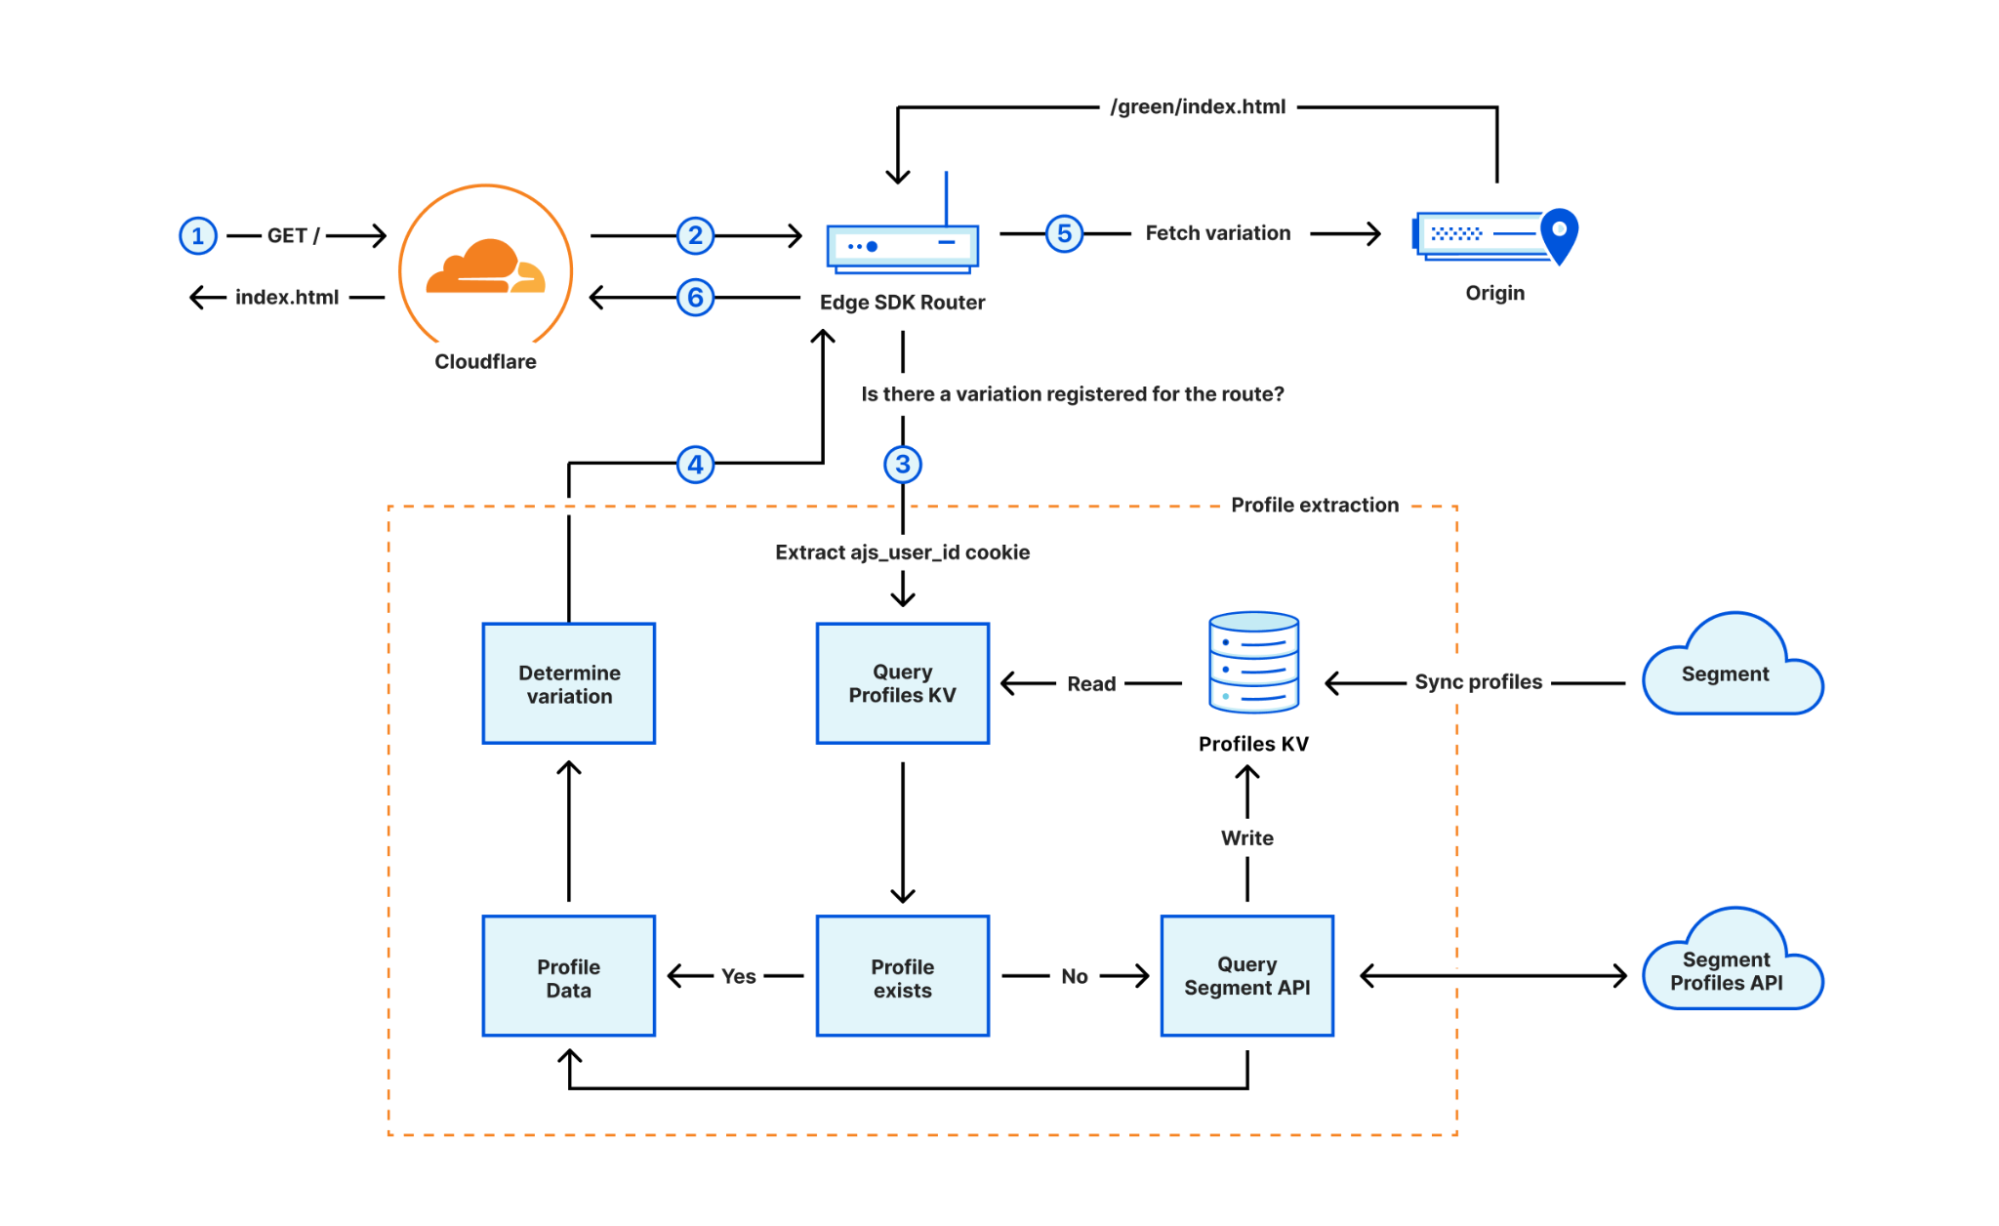
The Personalization feature of the Edge SDK requires storage of profiles on the Cloudflare Workers platform. A Cloudflare KV should be created for the Worker running the Edge SDK and passed to the Edge SDK during initialization. Edge SDK will store profiles in KV, where keys are the ajs_user_id, and values are the serialized profile object. To move Profiles data from Segment to the KV, the SDK uses two methods:
Profiles data push from Segment to the Cloudflare Workers platform: The Segment product can sync user profiles database with different tools, including pushing the data to a webhook. The Edge SDK automatically exposes a webhook endpoint under the first-party domain (e.g., example.com/seg/profiles-webhook) that Segment can call periodically to sync user profiles. The webhook handler receives incoming sync calls from Segment, and writes profiles to the KV.
Pulling data from Segment by the Edge SDK: If the Edge SDK queries the KV for a user id, and doesn’t find the profile (i.e., data hasn’t synced yet), it requests the user profile from the Segment API, and stores it in the KV.
Figure 3 demonstrates how the personalization flow works. In step 1, the user requests content for the root path ( / ), and the Worker sends the request to the Edge SDK (step 2). The Edge SDK router determines that a variation is registered on the route, therefore, extracts the ajs_user_id from the request cookies, and goes through the full profile extraction (step 3). The SDK first checks the KV for a record with the key of ajs_user_id value and if not found, queries Segment API to fetch the profile, and stores the profile in the KV. Eventually, the profile is extracted and passed into the decision function to decide which path should be served to the user (step 4). The router eventually fetches the variation from the origin (step 5) and returns the response under the / path to the browser (step 6).
Figure 3- Personalization flow
Summary
In this post we covered how the Cloudflare Workers platform can help with tracking first-party data and personalization. We also explained how we built a Segment Edge SDK to enable Segment customers to get those benefits out of the box, without having to create their own DIY solution. The Segment Edge SDK is currently in early development, and we are planning to launch a private pilot and open-source it in the near future.
When writing code, you can only move as fast as you can debug.
Our goal at Cloudflare is to give our developers the tools to deploy applications faster than ever before. This means giving you tools to do everything from initializing your Workers project to having visibility into your application successfully serving production traffic.
Last year we introduced wrangler tail, letting you access a live stream of Workers logs to help pinpoint errors to debug your applications. Workers Trace Events Logpush (or just Workers Logpush for short) extends this functionality – you can use it to send Workers logs to an object storage destination or analytics platform of your choice.
Workers Logpush is now available to everyone on the Workers Paid plan! Read on to learn how to get started and about pricing information.
Move fast and don’t break things
With the rise of platforms like Cloudflare Workers over containers and VMs, it now takes just minutes to deploy applications. But, when building an application, any tech stack that you choose comes with its own set of trade-offs.
As a developer, choosing Workers means you don’t need to worry about any of the underlying architecture. You just write code, and it works (hopefully!). A common criticism of this style of platform is that observability becomes more difficult.
We want to change that.
Over the years, we’ve made improvements to the testing and debugging tools that we offer — wrangler dev, Miniflare and most recently our open sourced runtime workerd. These improvements have made debugging locally and running unit tests much easier. However, there will always be edge cases or bugs that are only replicated in production environments.
If something does break…enter Workers Logpush
Wrangler tail lets you view logs in real time, but we’ve heard from developers that you would also like to set up monitoring for your services and have a historical record to look back on. Workers Logpush includes metadata about requests, console.log() messages and any uncaught exceptions. To give you an idea of what it looks like, below is a sample log line:
Logpush has support for the most popular observability tools. Send logs to Datadog, New Relic or even R2 for storage and ad hoc querying.
Pricing
Workers Logpush is available to both customers on our Workers Paid and Enterprise plans. We wanted this to be very affordable for our developers. Workers Logpush is priced at $0.05 per million requests, and we only charge you for requests that result in logs delivered to an end destination after any filtering or sampling is applied. It also has an included usage of 10M requests each month.
Configuration
Logpush is incredibly simple to set up.
1. Create a Logpush job. The following example sends Workers logs to R2.
In Logpush, you can also configure filters and a sampling rate to have more control of the volume of data that is sent to your configured destination. For example if you only want to receive logs for resulted in an exception, you could add the following under logpull_options:
You can do this by adding a new property, logpush = true, to your wrangler.toml file. This can be added either in the top level configuration or under an environment. Any new scripts with this property will automatically get picked up by the Logpush job.
Get started today!
Both customers on our Workers Paid Plan and Enterprise plan can get started with Workers Logpush now! The full guide on how to get started is here.
Cloudflare is building the fastest network in the world. But we don’t want you to just take our word for it. To demonstrate it, we are continuously testing ourselves versus everyone else to make sure we’re the fastest. Since it’s Developer Week, we wanted to provide an update on how our Workers products perform against the competition, as well as our overall network performance.
Earlier this year, we compared ourselves to Fastly’s Compute@Edge and overall we were faster. This time, not only did we repeat the tests, but we also added AWS Lambda@Edge to help show how we stack up against more and more competitors. The summary: we offer the fastest developer platform on the market. Let’s talk about how we build our network to help make you faster, and then we’ll get into how that translates to our developer platform.
Latest update on network performance
We have two updates on data: a general network performance update, and then data on how Workers compares with Compute@Edge and Lambda@Edge.
To quantify global network performance, we have to get enough data from around the world, across all manner of different networks, comparing ourselves with other providers. We used Real User Measurements (RUM) to fetch a 100kB file from different providers. Users around the world report the performance of different providers. The more users who report the data, the higher fidelity the signal is. The goal is to provide an accurate picture of where different providers are faster, and more importantly, where Cloudflare can improve. You can read more about the methodology in the original Speed Week blog post here.
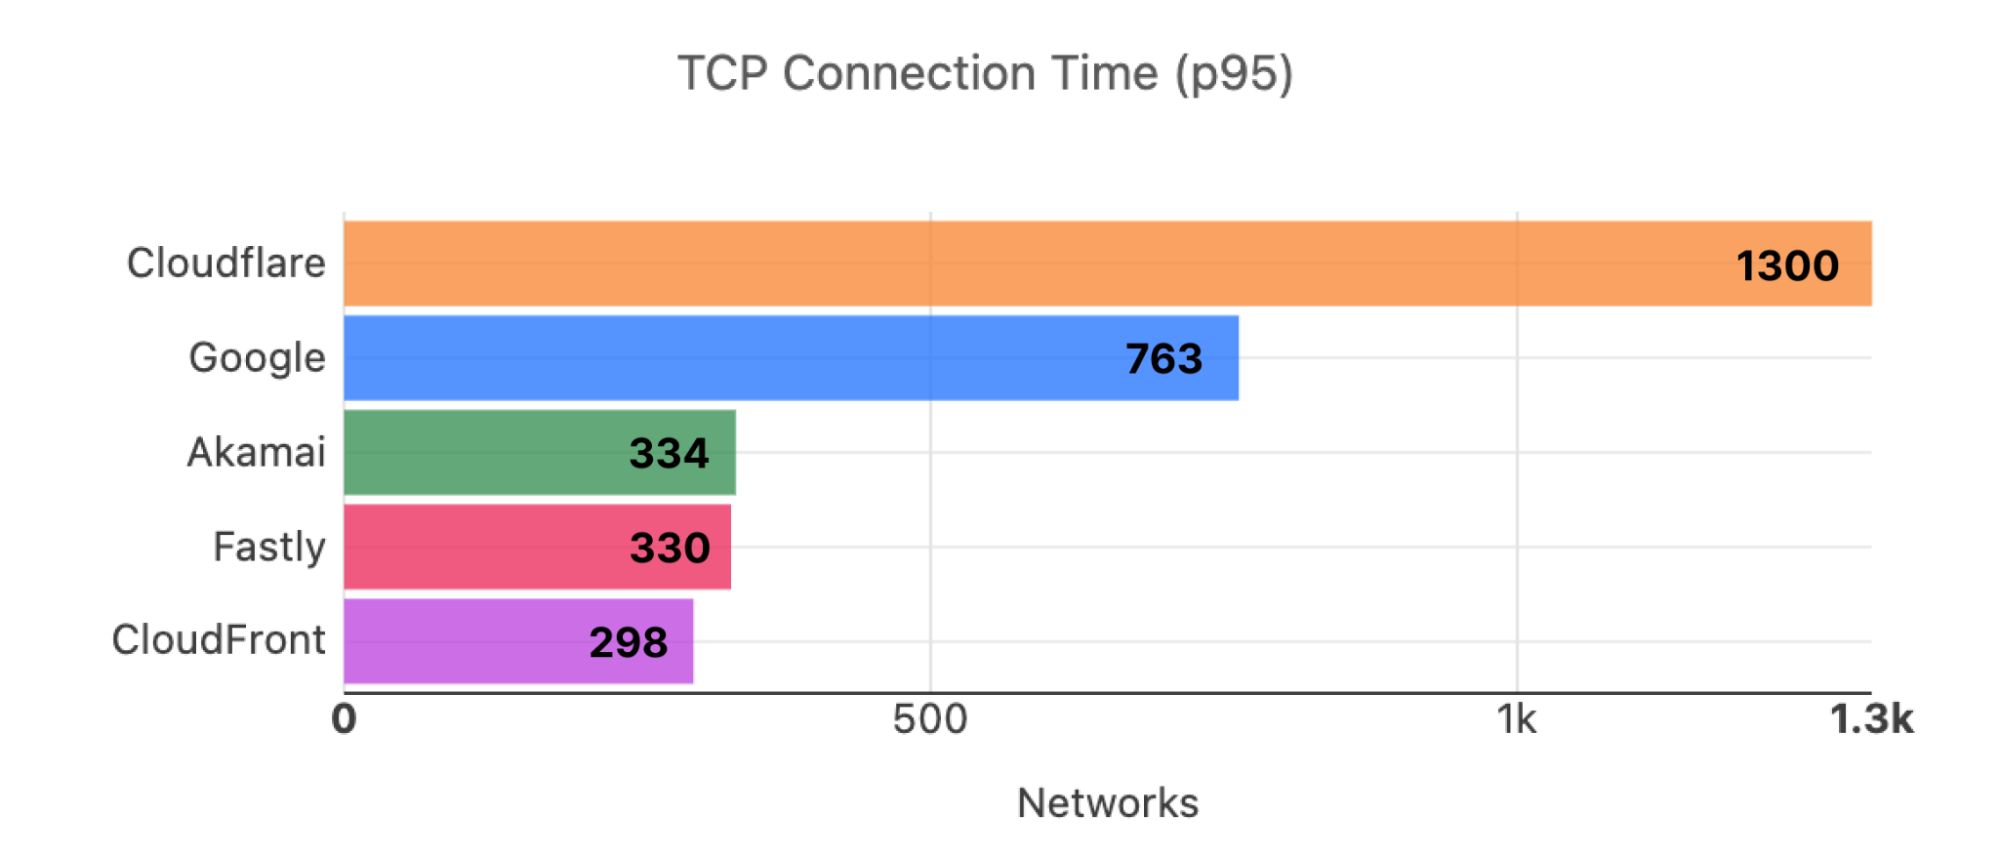
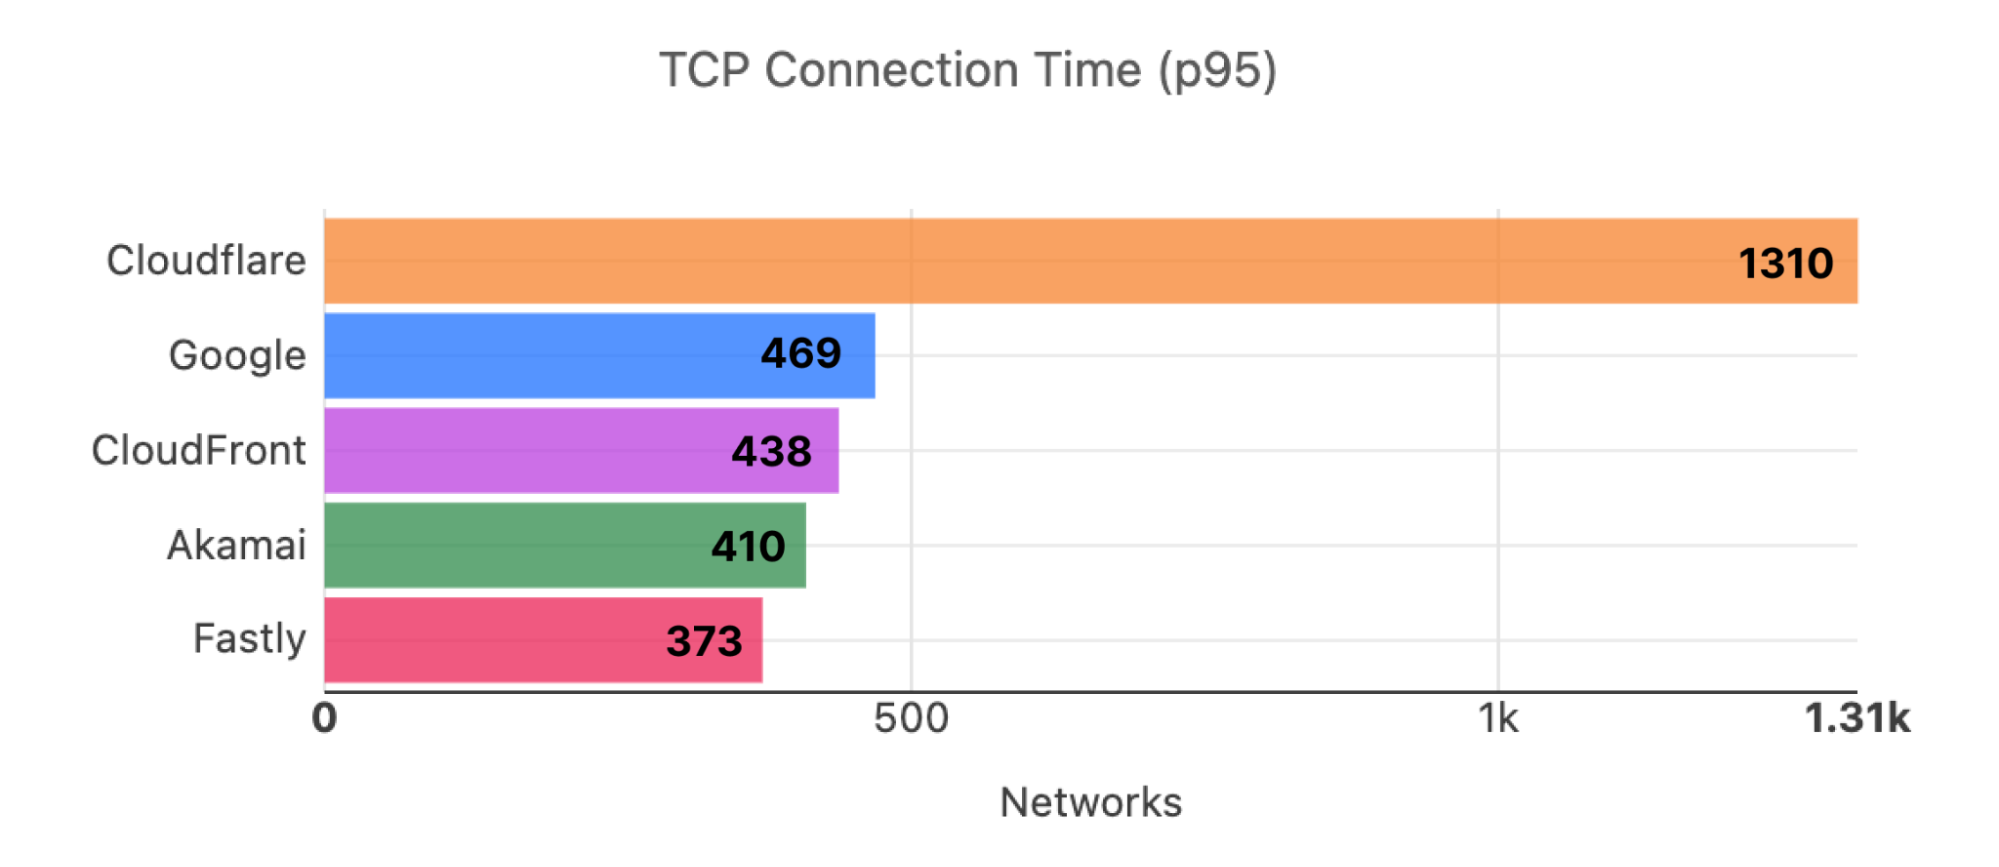
During Cloudflare One Week (June 2022), we shared that we were faster in more of the most reported networks than our competitors. Out of the top 3,000 networks in the world (by number of IPv4 addresses advertised), here’s a breakdown of the number of networks where each provider is number one in p95 TCP Connection Time, which represents the time it takes for a user on a given network to connect to the provider. This data is from Cloudflare One Week (June 2022):
Here is what the distribution looks like for the top 3,000 networks for Developer Week (November 2022):
In addition to being the fastest across popular networks, Cloudflare is also committed to being the fastest provider in every country.
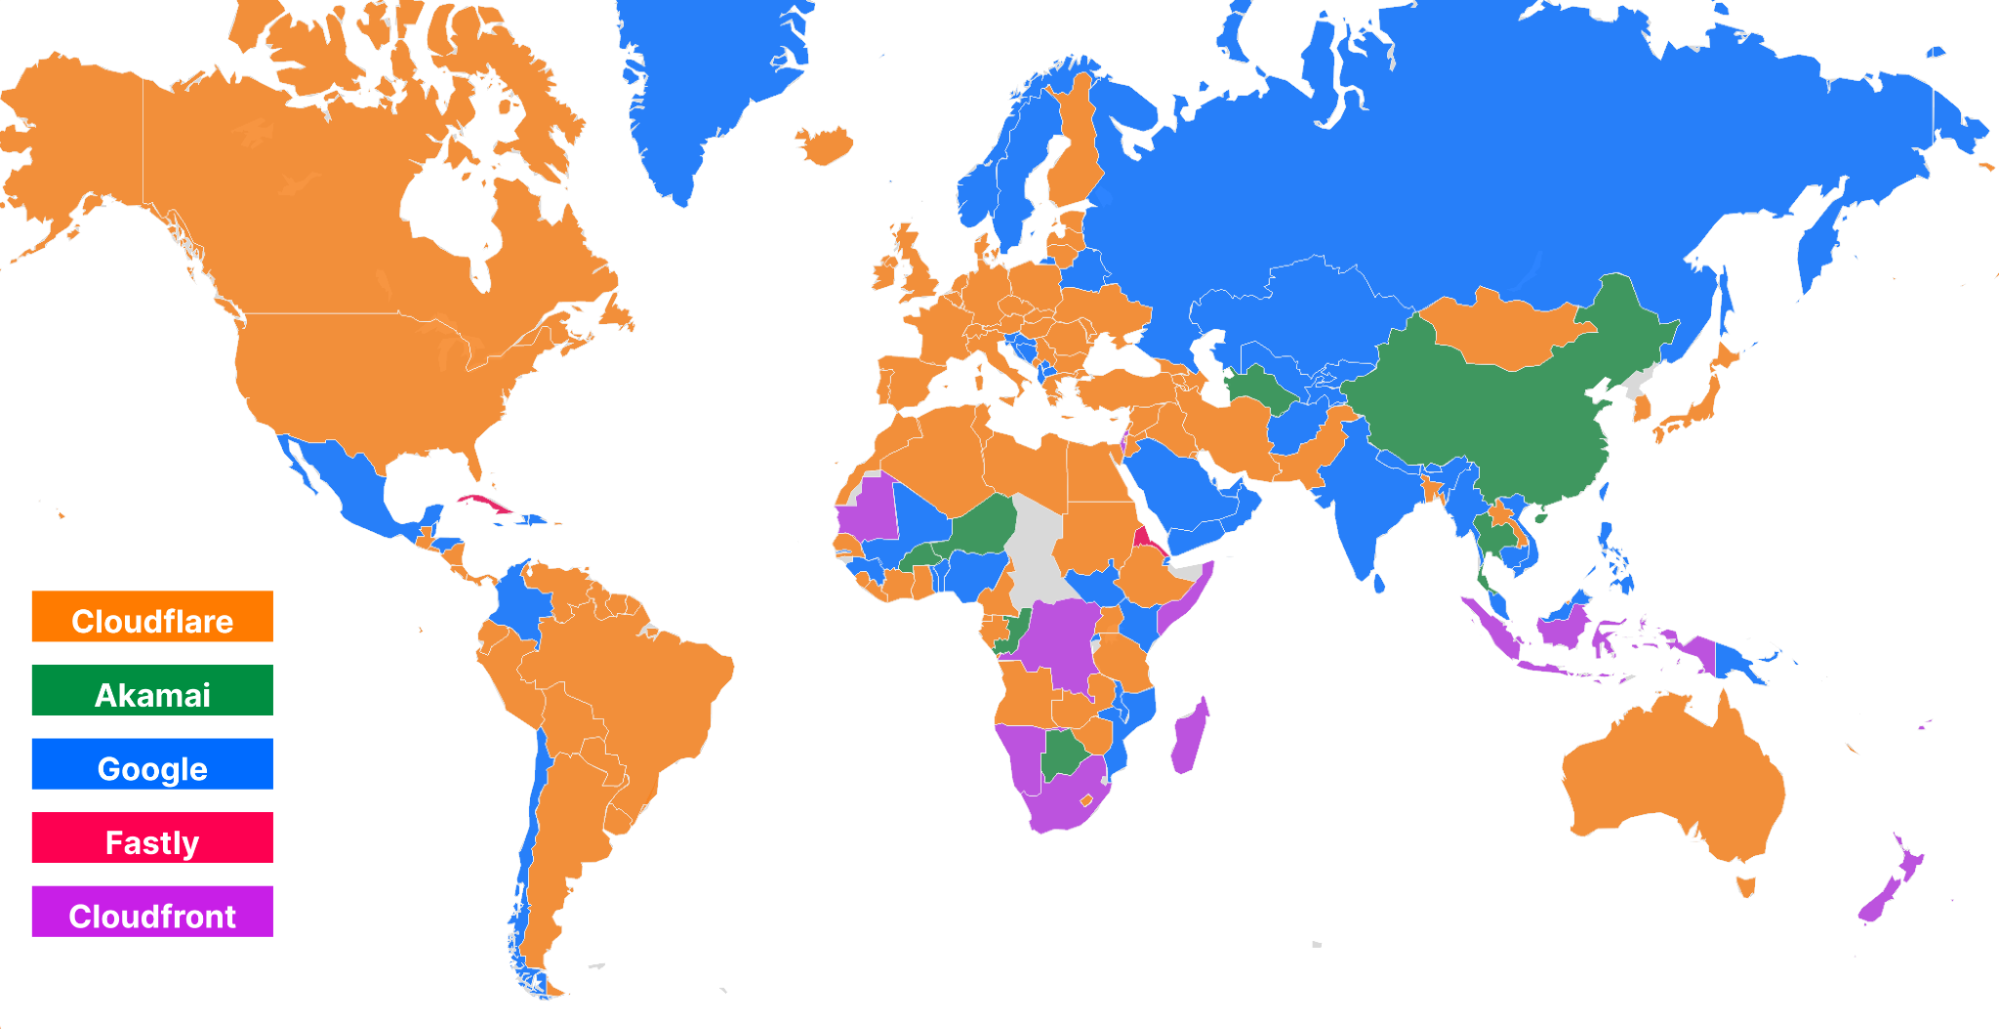
Using data on the top 3,000 networks from Cloudflare One Week (June 2022), here’s what the world map looks like (Cloudflare is in orange):
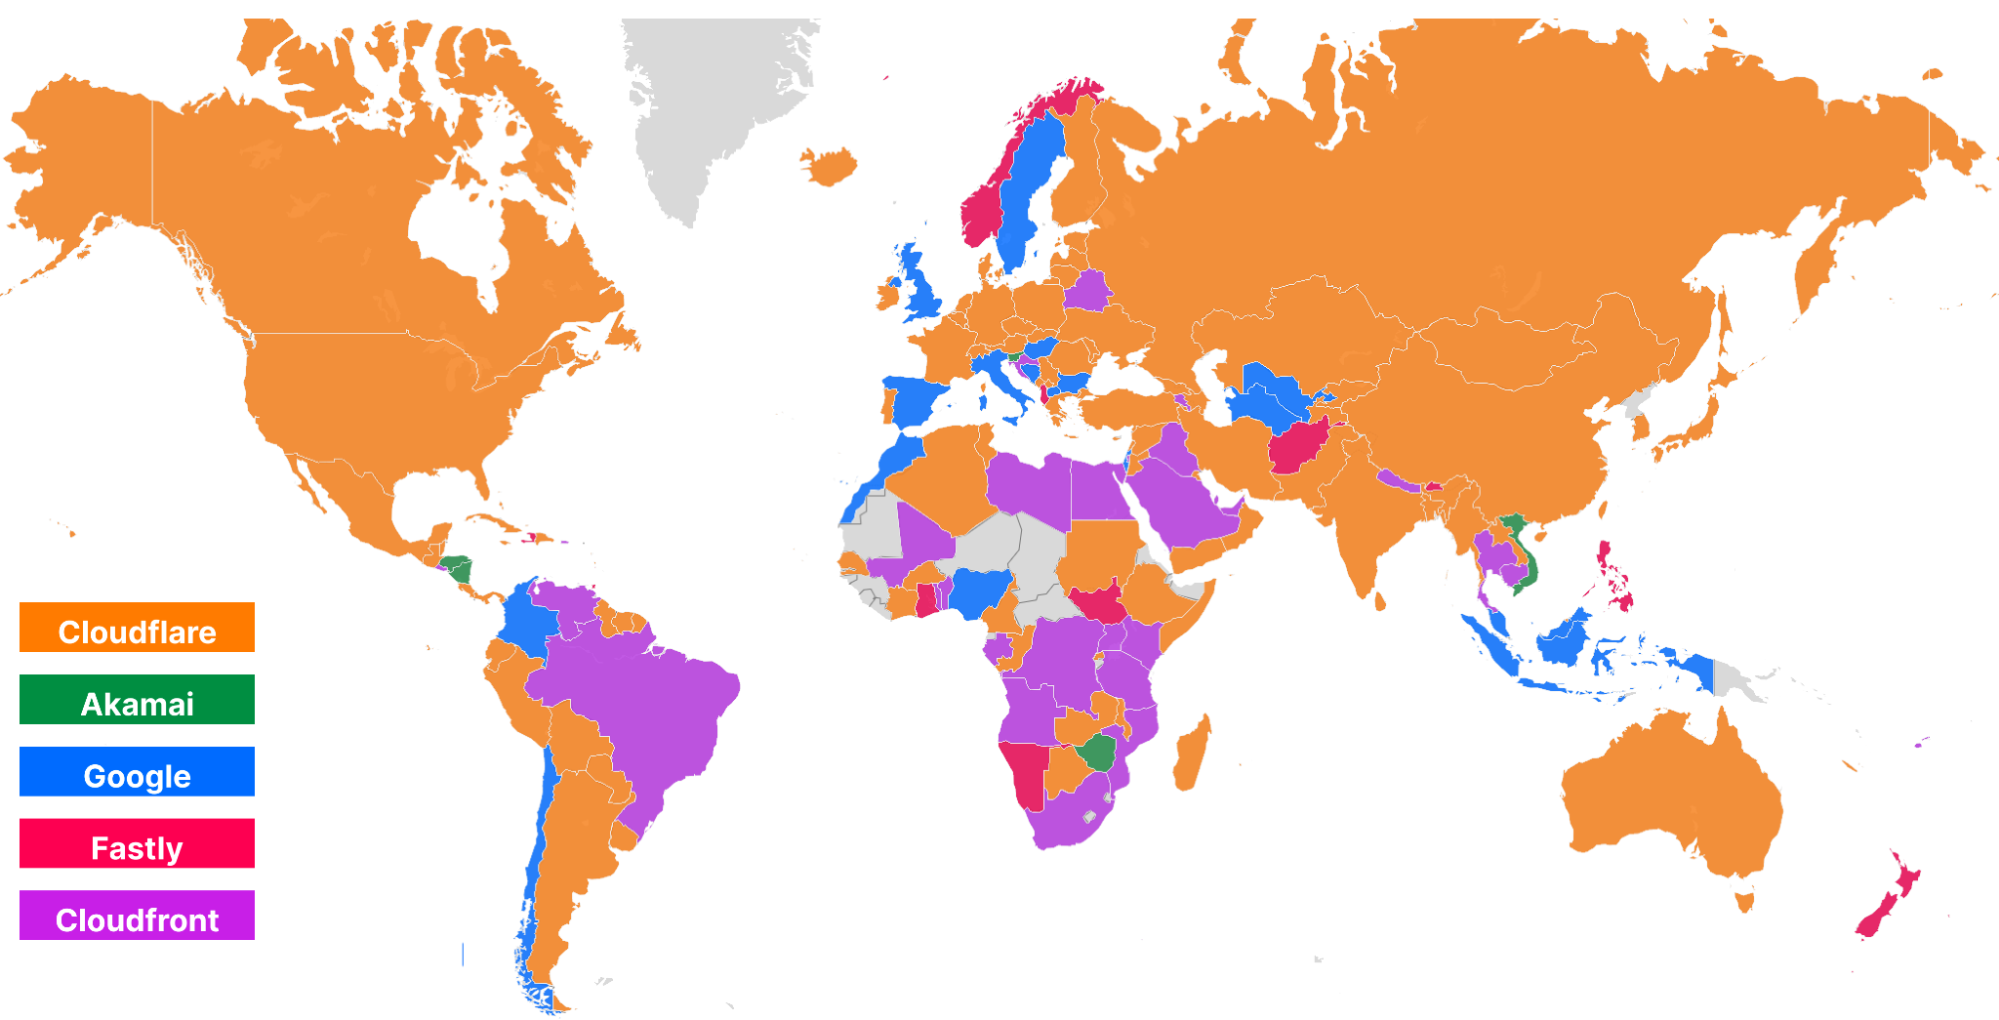
And here’s what the world looks like while looking at the top 3,000 networks for Developer Week (November 2022):
Cloudflare became #1 in more countries in Europe and Asia, specifically Russia, Ukraine, Kazakhstan, India, and China, further delivering on our mission to be the fastest network in the world. So let’s talk about how that network helps power the Supercloud to be the fastest developer platform around.
How we’re comparing developer platforms
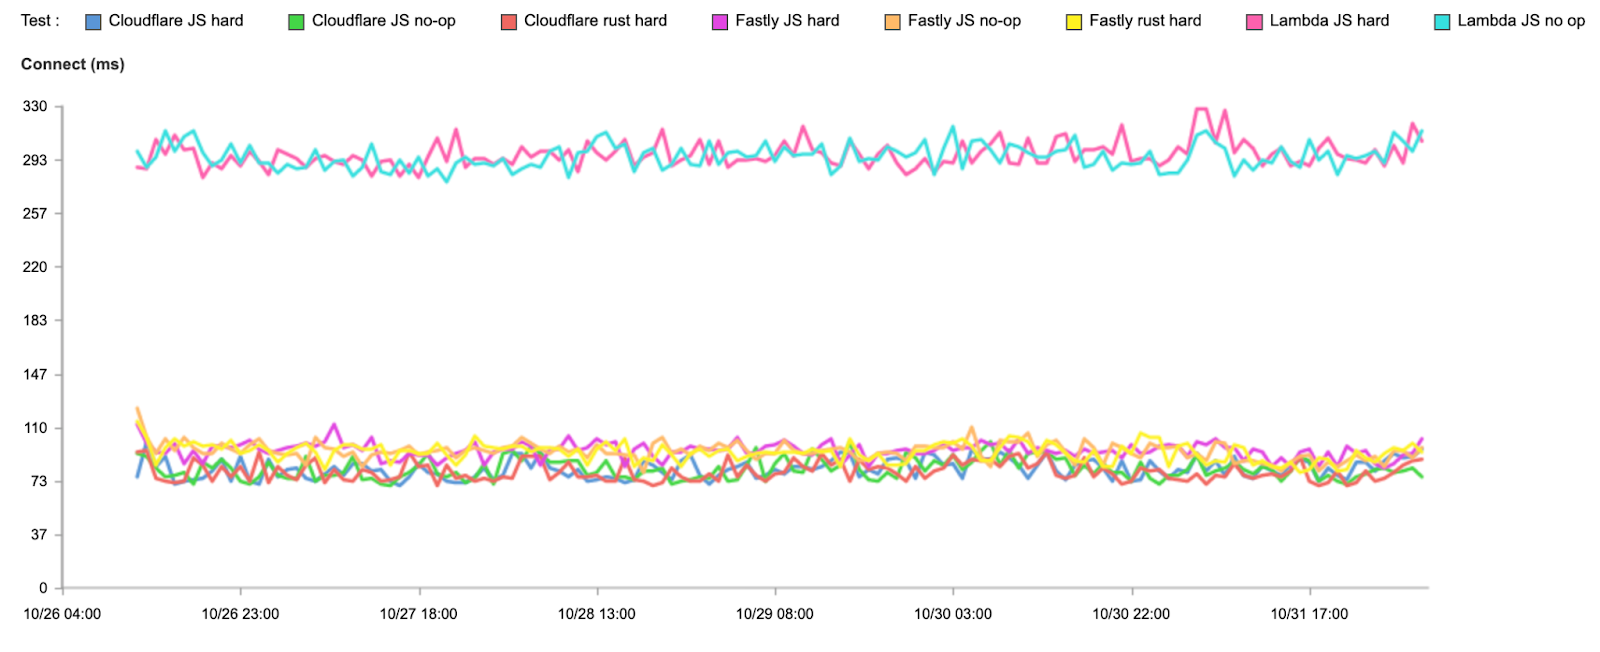
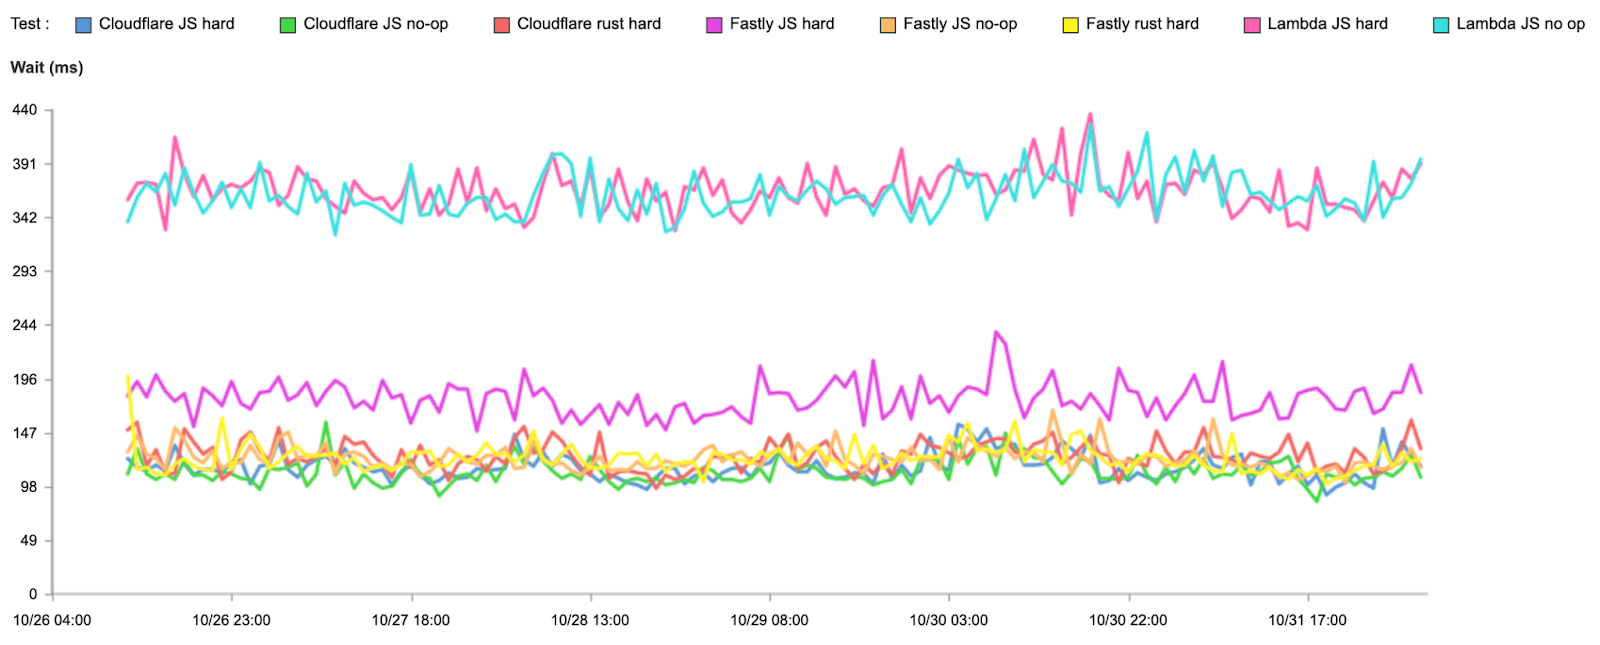
It’s been six months since we published our initial tests, but here’s a quick refresher. We make comparisons by measuring time to connect to the network, time spent completing requests, and overall time to respond. We call these numbers connect, wait, and response. We’ve chosen these numbers because they are critical components of a request that need to be as fast as possible in order for users to see a good experience. We can reduce the connect times by peering as close as possible to the users. We can reduce the wait times by optimizing code execution to be as fast as possible. If we optimize those two processes, we’ve optimized the response, which represents the end-to-end latency of a request.
Test methodology
To measure connect, wait, and response, we perform three tests against each provider: a simple no-op JavaScript function, a complex JavaScript function, and a complex Rust function. We don’t do a simple Rust function because we expect it to take almost no time at all, and we already have a baseline for end-to-end functionality in the no-op JavaScript function since many providers will often compile both down to WebAssembly.
Here are the functions for each of them:
JavaScript no-op:
async function getErrorResponse(event, message, status) {
  return new Response(message, {status: status, headers: {'Content-Type': 'text/plain'}});
}
JavaScript hard function:
function testHardBusyLoop() {
  let value = 0;
  let offset = Date.now();

  for (let n = 0; n < 15000; n++) {
    value += Math.floor(Math.abs(Math.sin(offset + n)) * 10);
  }

  return value;
}
Rust hard function:
fn test_hard_busy_loop() -> i32 {
  let mut value = 0;
  let offset = Date::now().as_millis();

  for n in 0..15000 {
    value += (((offset + n) as f64).sin().abs() * 10.0) as i32;
  }

  value
}
We’re trying to test how good each platform is at optimizing compute in addition to evaluating how close each platform is to end-users. However, for this test, we did not run a Rust test on Lambda@Edge because it did not natively support our Rust function without uploading a WASM binary that you compile yourself. Since Lambda@Edge does not have a true first-class developer platform and tooling to run Rust, we decided to exclude the Rust scenarios for Lambda@Edge. So when we compare numbers for Lambda@Edge, it will only be for the JavaScript simple and JavaScript hard tests.
Measuring Workers performance from real users
To collect data, we use two different methods: one from a third party service called Catchpoint, and a second from our own network performance benchmarking tests. First, we used Catchpoint to gather a set of data from synthetic probes. Catchpoint is an industry standard “synthetic” testing tool, and measurements collected from real users distributed around the world. Catchpoint is a monitoring platform that has around 2,000 total endpoints distributed around the world that can be configured to fetch specific resources and time for each test. Catchpoint is useful for network providers like us as it provides a consistent, repeatable way to measure end-to-end performance of a workload, and delivers a best-effort approximation for what a user sees.
Catchpoint has backbone nodes that are embedded in ISPs around the world. That means that these nodes are plugged into ISP routers just like you are, and the traffic goes through the ISP network to each endpoint they are monitoring. These can approximate a real user, but they will never truly replicate a real user. For example, the bandwidth for these nodes is 100% dedicated for platform monitoring, as opposed to your home Internet connection, where your Internet experience will be a mixed bag of different use cases, some of which won’t talk to Workers applications at all.
For this new test, we chose 300 backbone nodes that are embedded in last mile ISPs around the world. We filtered out nodes in cloud providers, or in metro areas with multiple transit options, trying to remove duplicate paths as much as possible.
We cross-checked these tests with our own data set, which is collected from users connecting to free websites when they are served 1xxx error pages, just like how we collect data for global network performance. When a user sees this error page, that page that will execute these tests as a part of rendering and upload performance metrics on these calls to Cloudflare.
We also changed our test methodology to use paid accounts for Fastly, Cloudflare, and AWS.
Workers vs Compute@Edge vs Lambda@Edge
This time, let’s start off with the response times to show how we’re doing end-to-end:
Test
95th percentile response (ms)
Cloudflare JavaScript no-op
479
Fastly JavaScript no-op
634
AWS JavaScript no-op
1,400
Cloudflare JavaScript hard
471
Fastly JavaScript hard
683
AWS JavaScript hard
1,411
Cloudflare Rust hard
472
Fastly Rust hard
638
We’re fastest in all cases. Now let’s look at connect times, which show us how fast users connect to the compute platform before doing any actual compute:
Test
95th percentile connect (ms)
Cloudflare JavaScript no-op
82
Fastly JavaScript no-op
94
AWS JavaScript no-op
295
Cloudflare JavaScript hard
82
Fastly JavaScript hard
94
AWS JavaScript hard
297
Cloudflare Rust hard
79
Fastly Rust hard
94
Note that we don’t expect these times to differ based on the code being run, but we extract them from the same set of tests, so we’ve broken them out here.
But what about wait times? Remember, wait times represent time spent computing the request, so who has optimized their platform best? Again, it’s Cloudflare, although Fastly still has a slight edge on the hard Rust test (which we plan to beat by further optimization):
Test
95th percentile wait (ms)
Cloudflare JavaScript no-op
110
Fastly JavaScript no-op
122
AWS JavaScript no-op
362
Cloudflare JavaScript hard
115
Fastly JavaScript hard
178
AWS JavaScript hard
367
Cloudflare Rust hard
125
Fastly Rust hard
122
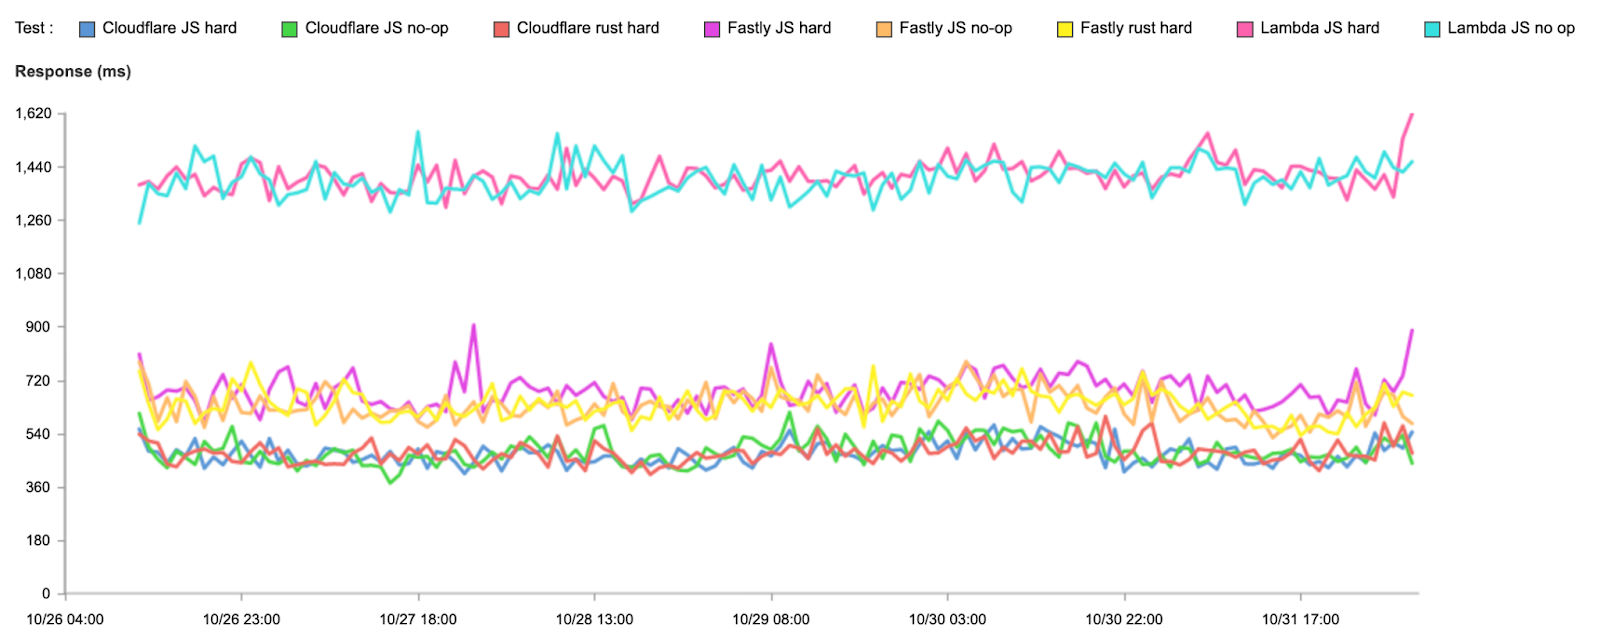
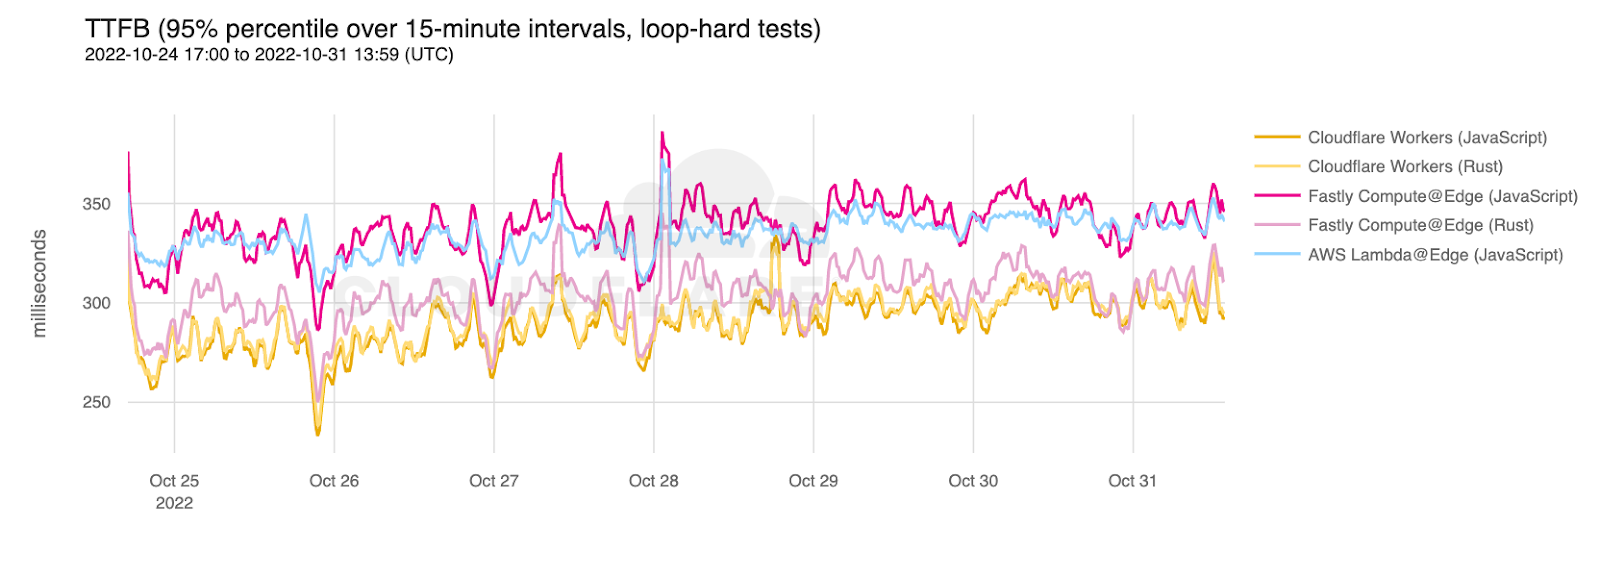
To verify these results, we compared the Catchpoint results to our own data set. Here is the p95 TTFB for the JavaScript and Rust hard loops for Fastly, AWS, and Cloudflare from our data:
Cloudflare is faster on JavaScript and Rust calls. These numbers also back up the slight compute advantage for Fastly on Rust calls.
The big takeaway from this is that in addition to Cloudflare being faster for the time spent processing requests in nearly every test, Cloudflare’s network and performance optimizations as a whole set us apart and make our Workers platform even faster for everything. And, of course, we plan to keep it that way.
Your application, but faster
Latency is an important component of the user experience, and for developers, being able to ensure their users can do things as fast as possible is critical for the success of an application. Whether you’re building applications in Workers, D1, and R2, hosting your documentation in Pages, or even leveraging Workers as part of your SaaS platform, having your code run in the SuperCloud that is our global network will ensure that your users see the best experience they possibly can.
Our network is hyper-optimized to make your code as fast as possible. By using Cloudflare’s network to run your applications, you can focus on making the best possible application possible and rest easy knowing that Cloudflare is providing you the best user experience possible. This is because Cloudflare’s developer platform is built on top of the world’s fastest network. So go out and build your dreams, and know that we’ll make your dreams as fast as they can possibly be.
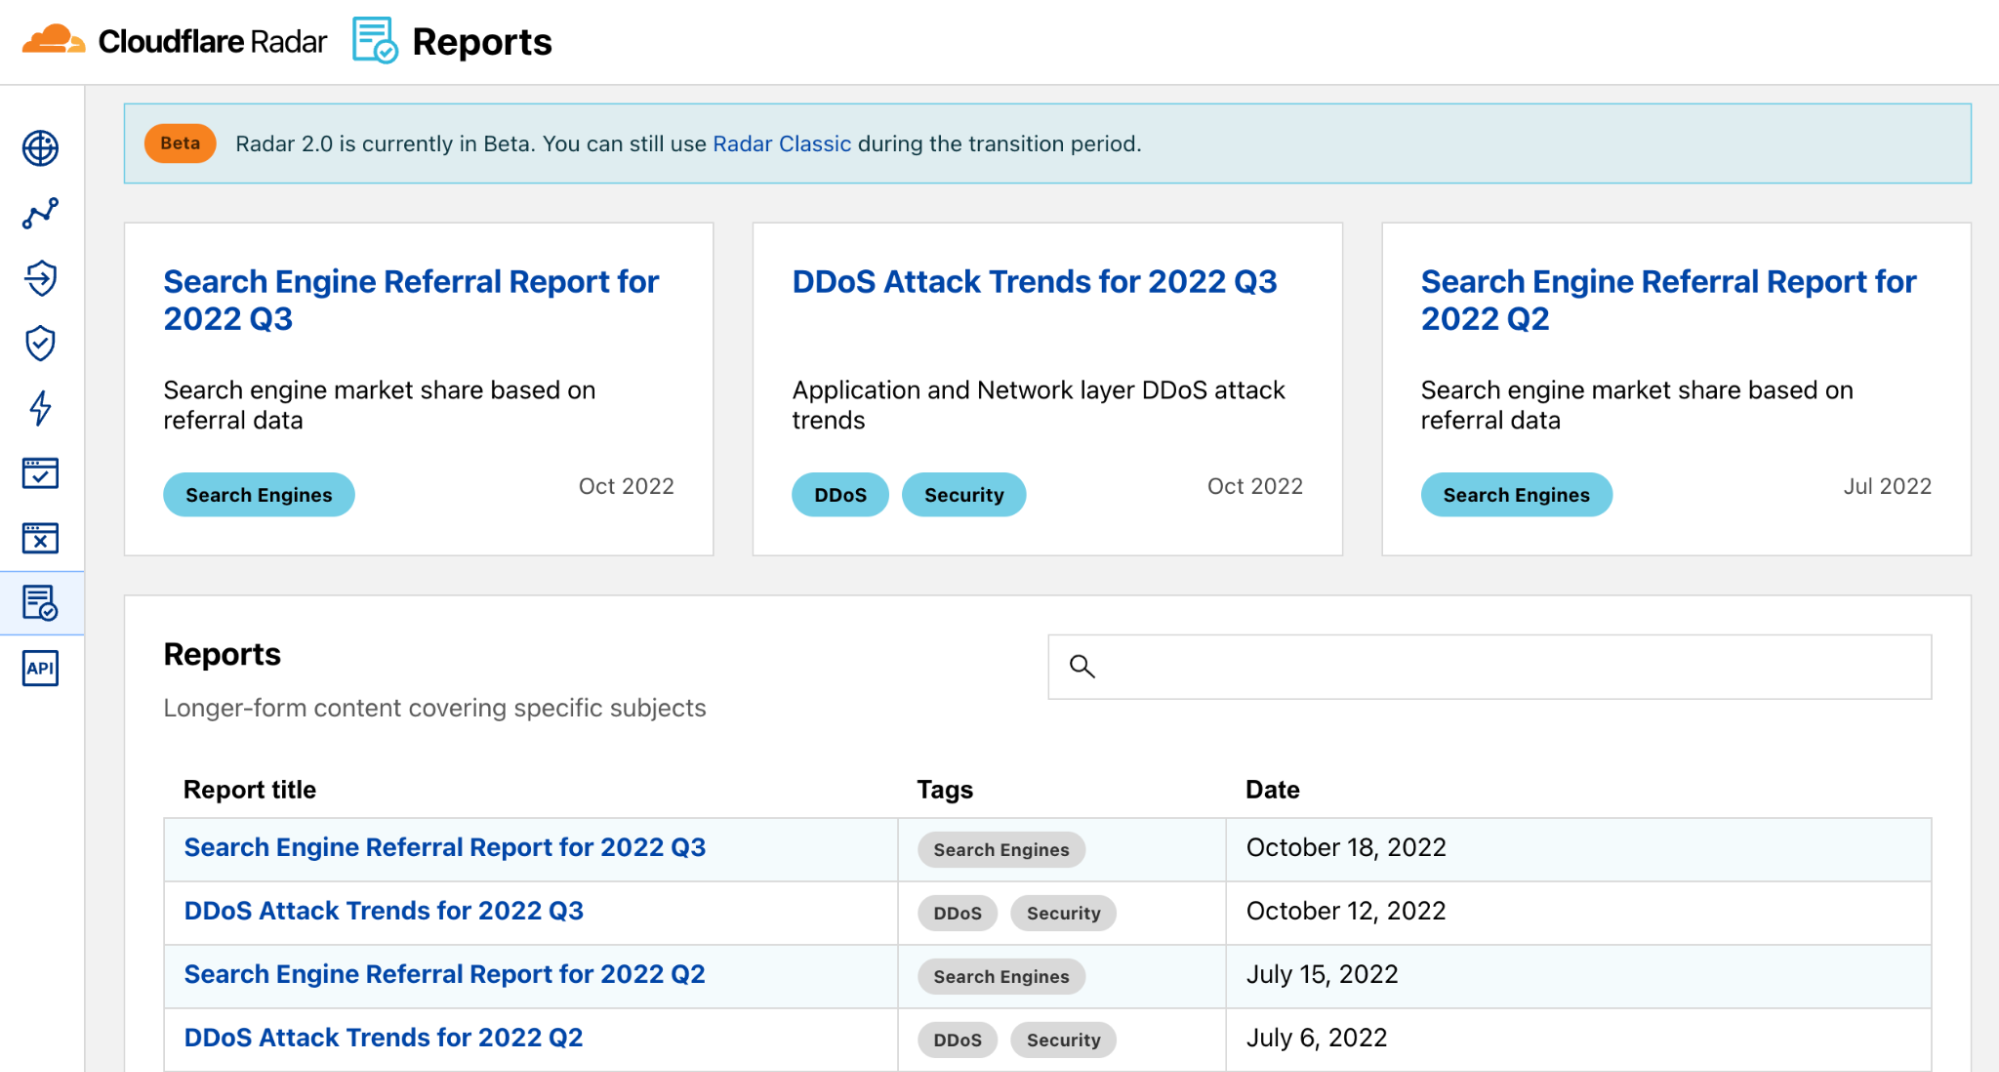
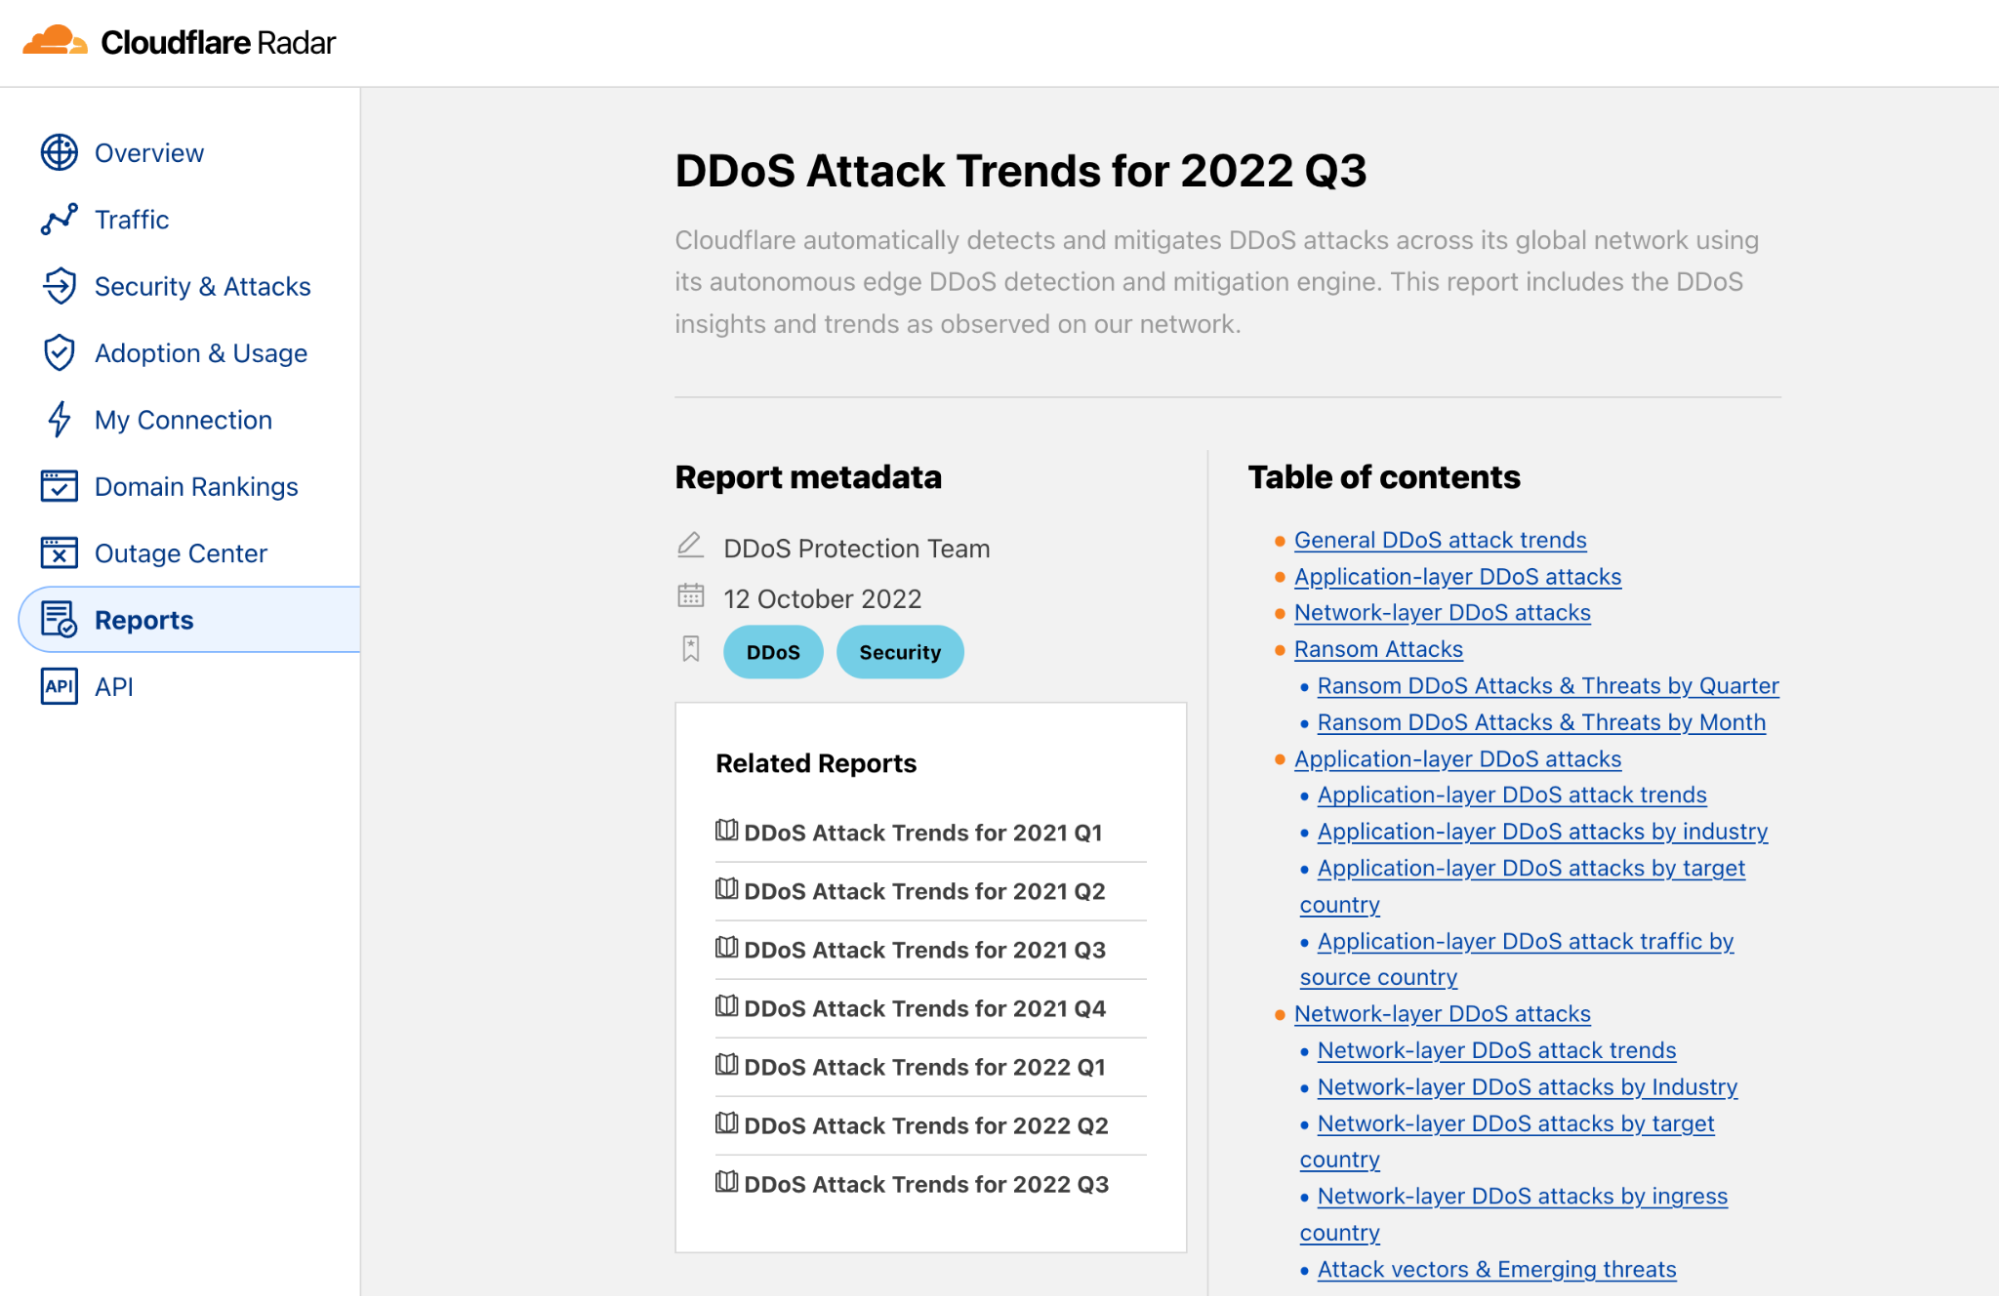
Radar 2.0 was built on the learnings of Radar 1.0 and was launched last month during Cloudflare’s Birthday Week as a complete product revamp. We wanted to make it easier for our users to find insights and navigate our data, and overall provide a better and faster user experience.
We’re building a Supercloud. Cloudflare’s products now include hundreds of features in networking, security, access controls, computing, storage, and more.
This blog will explain how we built the new Radar from an engineering perspective. We wanted to do this to demonstrate that anyone could build a somewhat complex website that involves demanding requirements and multiple architectural layers, do it on top of our stack, and how easy it can be.
Hopefully, this will inspire other developers to switch from traditional software architectures and build their applications using modern, more efficient technologies.
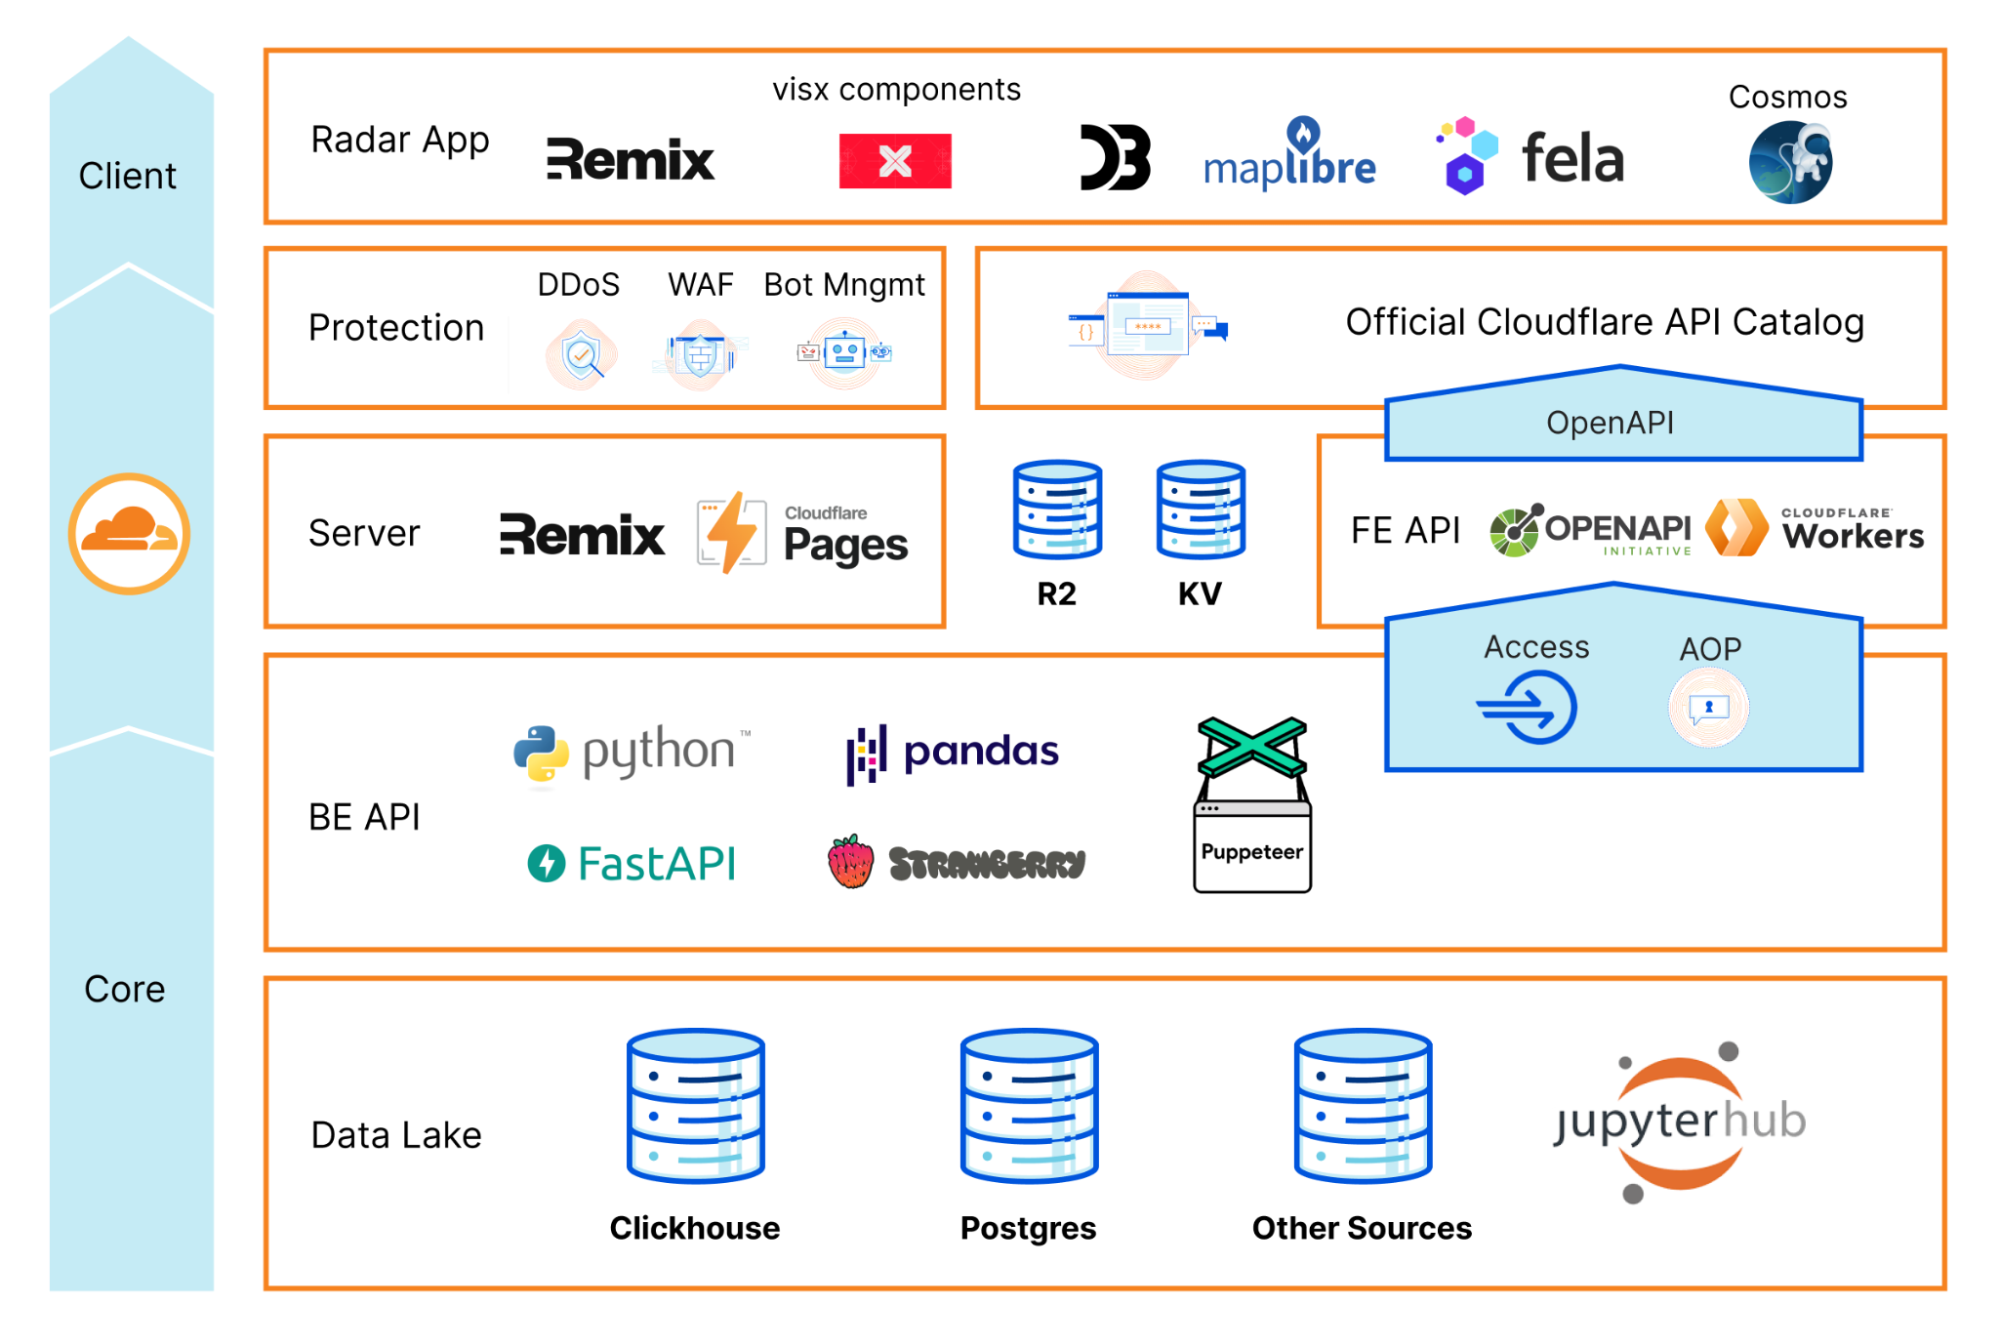
High level architecture
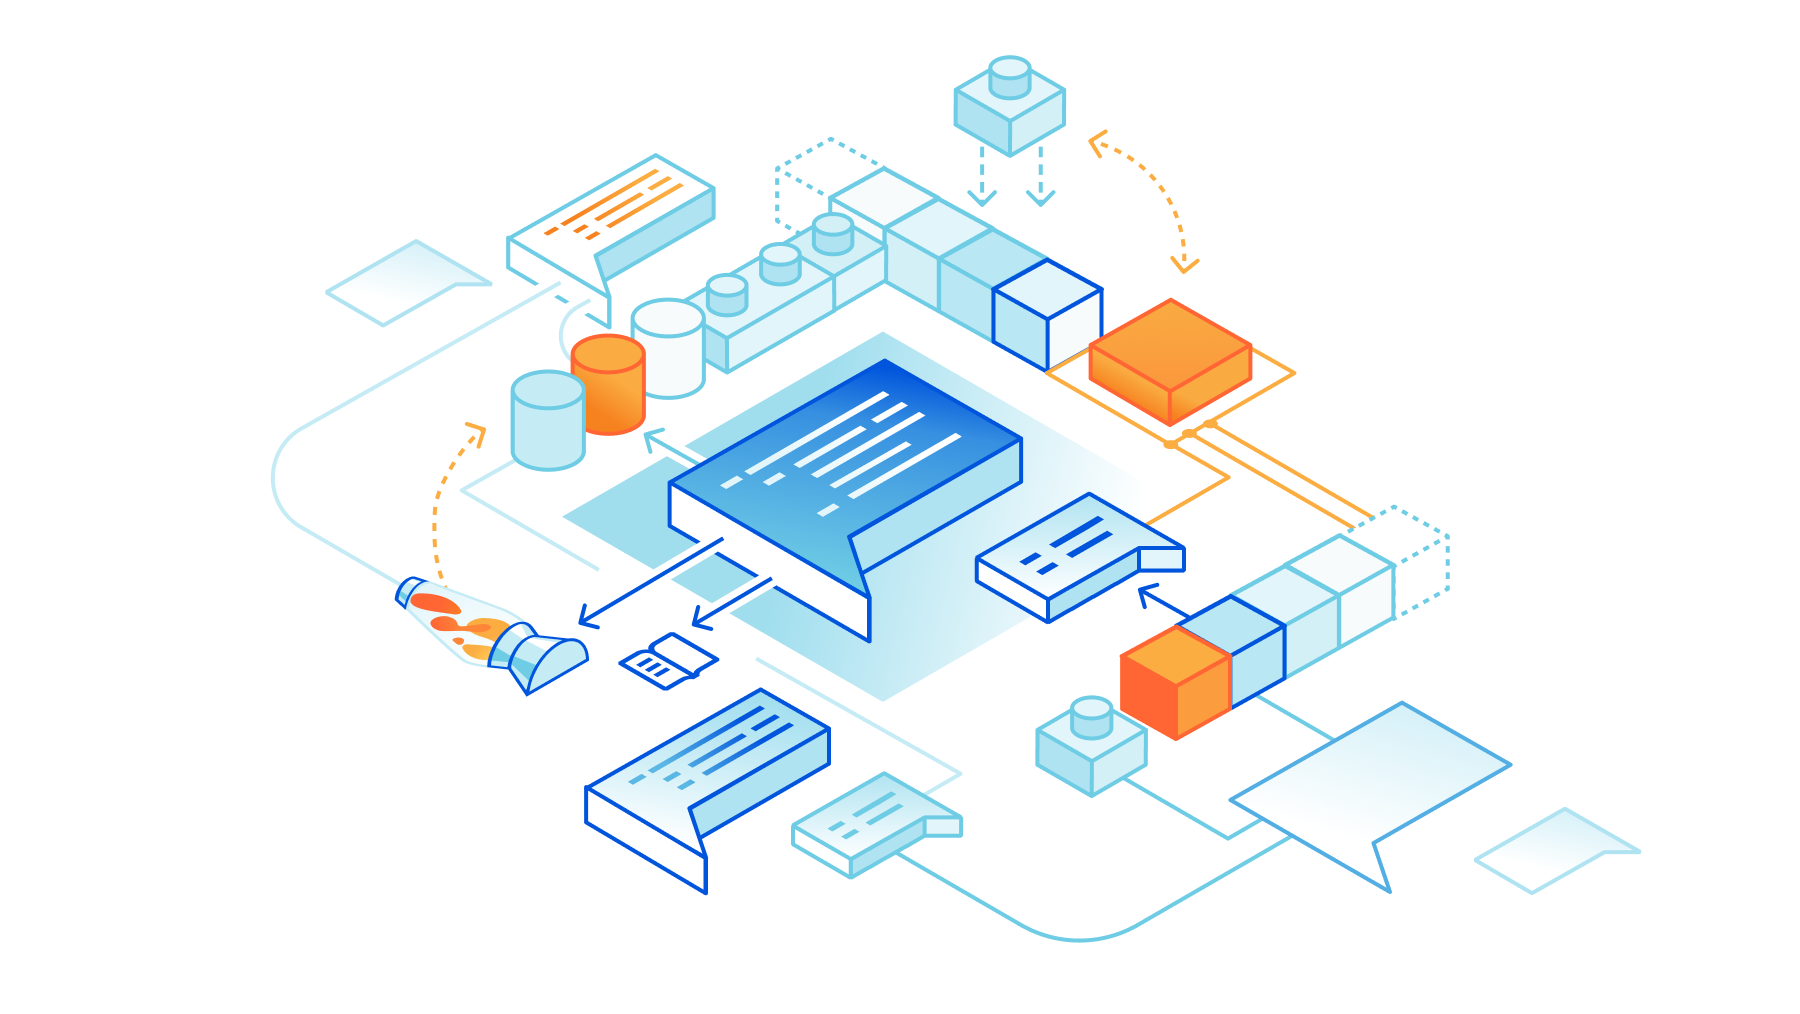
The following diagram is a birds-eye view of the Radar 2.0 architecture. As you can see, it’s divided into three main layers:
The Core layer is where we keep our data lake, data exploration tools, and backend API.
The Cloudflare network layer is where we host and run Radar and serve the public APIs.
The Client layer is essentially everything else that runs in your browser. We call it the Radar Web app.
As you can see, there are Cloudflare products everywhere. They provide the foundational resources to host and securely run our code at scale, but also other building blocks necessary to run the application end to end.
By having these features readily available and tightly integrated into our ecosystem and tools, at the distance of a click and a few lines of code, engineering teams don’t have to reinvent the wheel constantly and can use their time on what is essential: their app logic.
Let’s dig in.
Cloudflare Pages
Radar 2.0 is deployed using Cloudflare Pages, our developer-focused website hosting platform. In the early days, you could only host static assets on Pages, which was helpful for many use cases, including integrating with static site generators like Hugo, Jekyll, or Gatsby. Still, it wouldn’t solve situations where your application needs some sort of server-side computing or advanced logic using a single deployment.
Luckily Pages recently added support to run custom Workers scripts. With Functions, you can now run server-side code and enable any kind of dynamic functionality you’d typically implement using a separate Worker.
Cloudflare Pages Functions also allow you to use Durable Objects, KV, R2, or D1, just like a regular Worker would. We provide excellent documentation on how to do this and more in our Developer Documentation. Furthermore, the team wrote a blog on how to build a full-stack application that describes all the steps in detail.
Radar 2.0 needs server-side functions for two reasons:
To render Radar and run the server side of Remix.
To implement and serve our frontend API.
Remix and Server-side Rendering
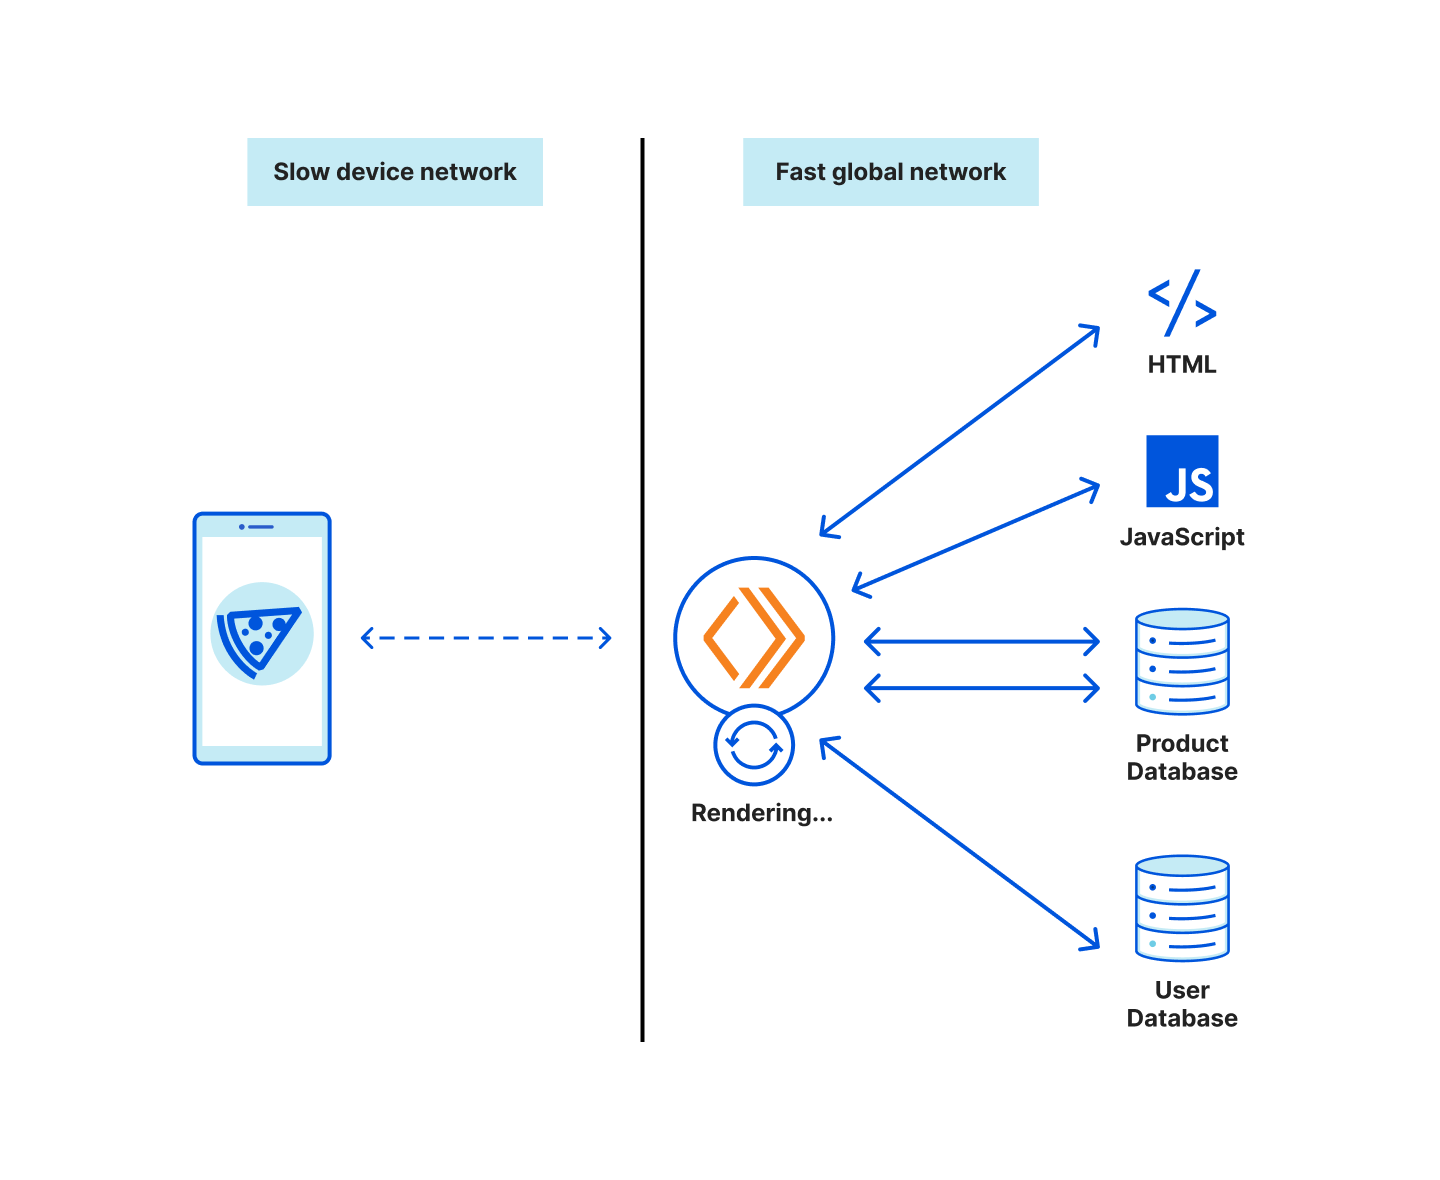
We use Remix with Cloudflare Pages on Radar 2.0.
Remix follows a server/client model and works under the premise that you can’t control the user’s network, so web apps must reduce the amount of Javascript, CSS, and JSON they send through the wire. To do this, they move some of the logic to the server.
In this case, the client browser will get pre-rendered DOM components and the result of pre-fetched API calls with just the right amount of JSON, Javascript, and CSS code, rightfully adjusted to the UI needs. Here’s the technical explanation with more detail.
Typically, Remix would need a Node.js server to do all of this, but guess what: It can also run on Cloudflare Workers and Pages.
Here’s the code to get the Remix server running on Workers, using Cloudflare Pages:
import { createPagesFunctionHandler } from "@remix-run/cloudflare-pages";
import * as build from "@remix-run/dev/server-build";

const handleRequest = createPagesFunctionHandler({
  build: {
    ...build,
    publicPath: "/build/",
    assetsBuildDirectory: "public/build",
  },
  mode: process.env.NODE_ENV,
  getLoadContext: (context) => ({
    ...context.env,
    CF: (context.request as any).cf as IncomingRequestCfProperties | undefined,
  }),
});

const handler: ExportedHandler<Env> = {
  fetch: async (req, env, ctx) => {
    const r = new Request(req);
    return handleRequest({
      env,
      params: {},
      request: r,
      waitUntil: ctx.waitUntil,
      next: () => {
        throw new Error("next() called in Worker");
      },
      functionPath: "",
      data: undefined,
    });
  },
};
In Remix, routes handle changes when a user interacts with the app and changes it (clicking on a menu option, for example). A Remix route can have a loader, an action and a default export. The loader handles API calls for fetching data (GET method). The action handles submissions to the server (POST, PUT, PATCH, DELETE methods) and returns the response. The default export handles the UI code in React that’s returned for that route. A route without a default export returns only data.
Because Remix runs both on the server and the client, it can get smart and know what can be pre-fetched and computed server-side and what must go through the network connection, optimizing everything for performance and responsiveness.
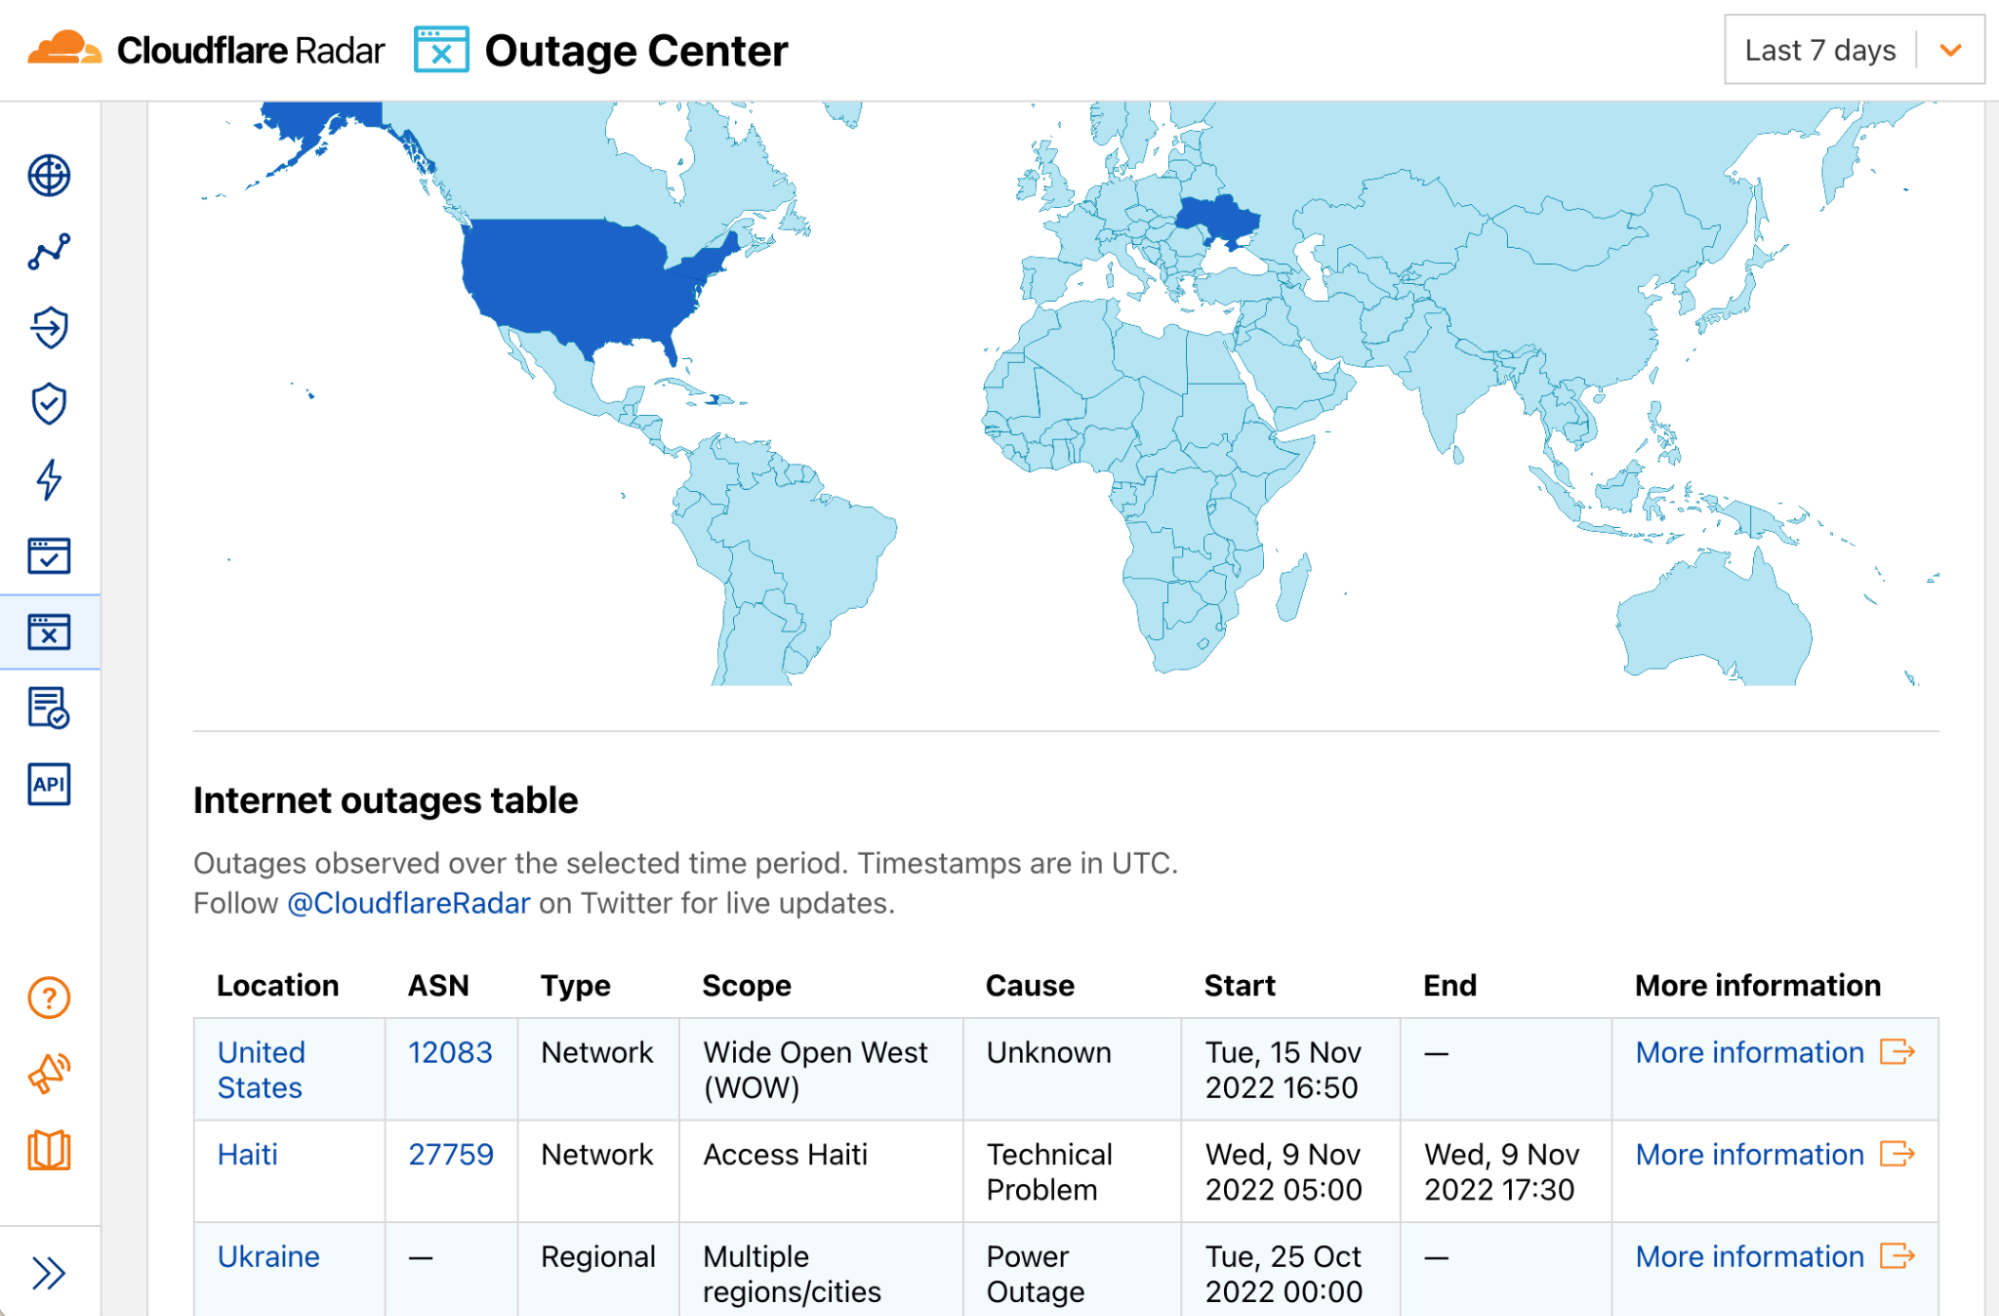
Here’s an example of a Radar route, simplified for readability, for the Outage Center page.
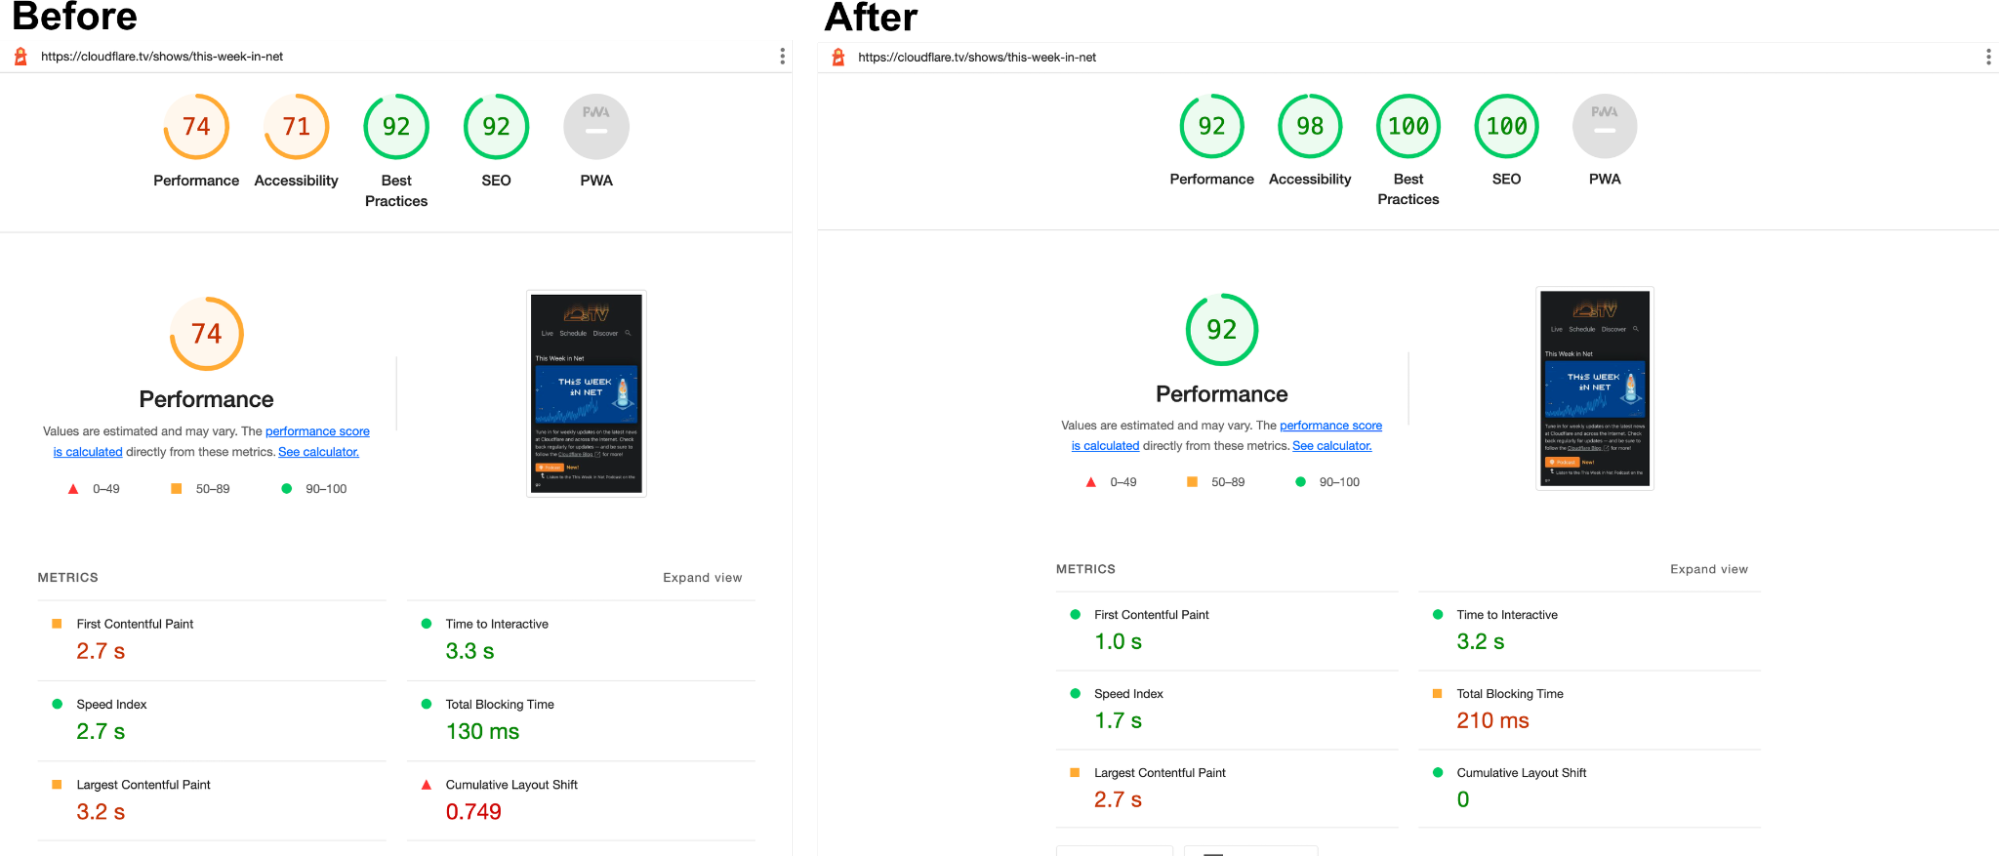
Another project porting their app to Remix is Cloudflare TV. This is how their metrics looked before and after the changes.
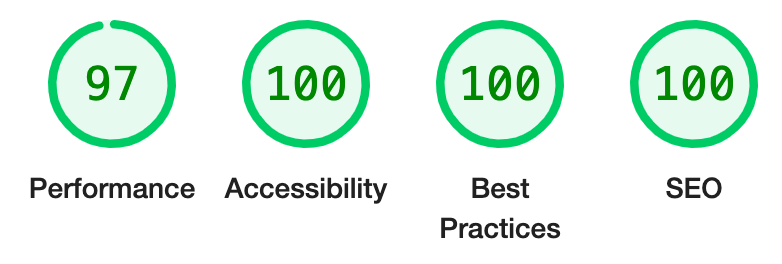
Radar’s Desktop Lighthouse score is now nearly 100% on Performance, Accessibility, Best Practices, and SEO.
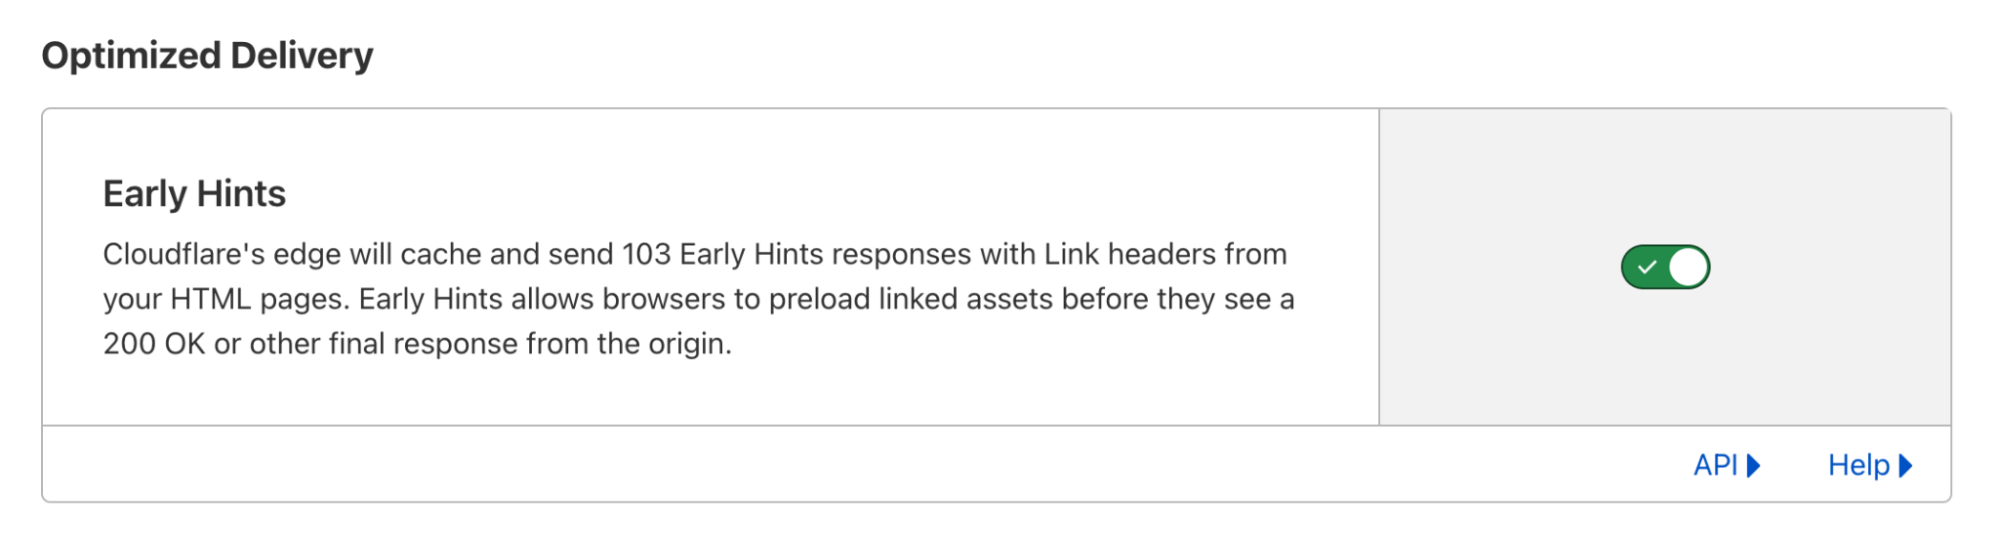
Another Cloudflare product that we use extensively on Radar 2.0 is Speed. In particular, we want to mention the Early Hints feature. Early Hints is a new web standard that defines a new HTTP 103 header the server can use to inform the browser which assets will likely be needed to render the web page while it’s still being requested, resulting in dramatic load times improvements.
Radar has two APIs. The backend which has direct access to our data sources, and the frontend, which is available on the Internet.
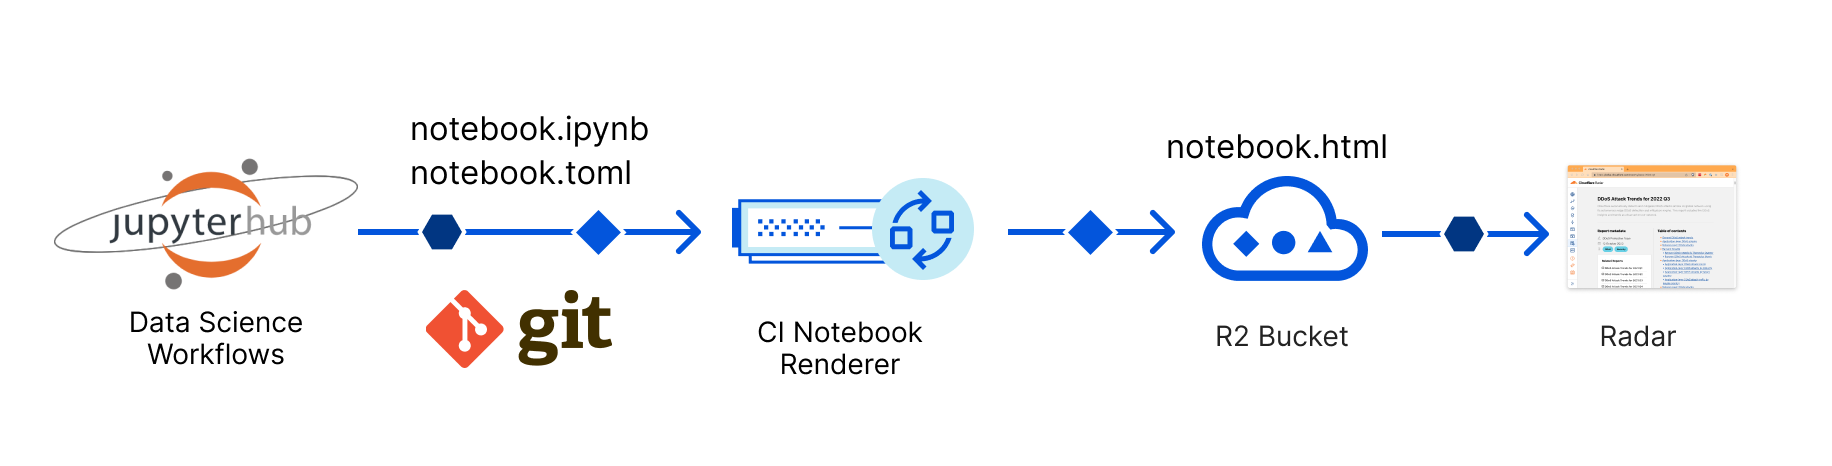
Backend API
The backend API was written using Python, Pandas and FastAPI and is protected by Cloudflare Access, JWT tokens and an authenticated origin pull (AOP) configuration. Using Python allows anyone on the team, engineers or data scientists, to collaborate easily and contribute to improving and expanding the API, which is great. Our data science team uses JupyterHub and Jupyter Notebooks as part of their data exploration workflows, which makes prototyping and reusing code, algorithms and models particularly easy and fast.
It then talks to the upstream frontend API via a Strawberry based GraphQL server. Using GraphQL makes it easy to create complex queries, giving internal users and analysts the flexibility they need when building reports from our vast collection of data.
Frontend API
We built Radar’s frontend API on top of Cloudflare Workers. This worker has two main functions:
It fetches data from the backend API using GraphQL, and then transforms it.
It provides a public REST API that anyone can use, including Radar.
Using a worker in front of our core API allows us to easily add and separate microservices, and also adds notable features like:
Cloudflare’s Cache API allows finer control over what to cache and for how long and supports POST requests and customizable cache control headers, which we use.
Stale responses using R2. When the backend API cannot serve a request for some reason, and there’s a stale response cached, it’ll be served directly from R2, giving end users a better experience.
CSV and JSON output formats. The CSV format is convenient and makes it easier for data scientists, analysts, and others to use the API and consume our API data directly from other tools.
Open sourcing our OpenAPI 3 schema generator and validator
One last feature on the frontend API is OpenAPI 3 support. We automatically generate an OpenAPI schema and validate user input with it. This is done through a custom library that we built on top of itty-router, which we also use. Today we’re open sourcing this work.
itty-router-openapi provides an easy and compact OpenAPI 3 schema generator and validator for Cloudflare Workers. Check our GitHub repository for more information and details on how to use it.
Developer’s Documentation
Today we’re also launching our developer’s documentation pages for the Radar API where you can find more information about our data license, basic concepts, how to get started and the available API methods. Cloudflare Radar’s API is free, allowing academics, data sleuths and other web enthusiasts to investigate Internet usage across the globe, based on data from our global network.
To facilitate using our API, we also put together a Colab Notebook template that you can play with, copy and expand to your use case.
The Radar App
The Radar App is the code that runs in your browser. We’ve talked about Remix, but what else do we use?
Radar relies on a lot of data visualizations. Things like charts and maps are essential to us. We decided to build our reusable library of visualization components on top of two other frameworks: visx, a “collection of expressive, low-level visualization primitives for React,” D3, a powerful JavaScript library for manipulating the DOM based on data, and MapLibre, an open-source map visualization stack.
Here’s one of our visualization components in action. We call it the “PewPew map”.
And here’s the Remix React code for it, whenever we need to use it in a page:
Another change we made to Radar was switching our images and graphical assets to Scalable Vector Graphics. SVGs are great because they’re essentially a declarative graphics language. They’re XML text files with vectorial information. And so, they can be easily manipulated, transformed, stored, or indexed, and of course, they can be rendered at any size, producing beautiful, crisp results on any device and resolution.
SVGs are also extremely small and efficient in size compared to bitmap formats and support internationalization, making them easier to translate to other languages (localization), thus providing better accessibility.
Here’s an example of a Radar Bubble Chart, inspected, where you can see the SVG code and the <text/> strings embedded.
Cosmos
React Cosmos is a “sandbox for developing and testing UI components in isolation.” We wanted to use Cosmos with Radar 2.0 because it’s the perfect project for it:
It has a lot of visual components; some are complex and have many configuration options and features.
The components are highly reusable across multiple pages in different contexts with different data.
We have a multidisciplinary team; everyone can send a pull request and add or change code in the frontend.
Cosmos acts as a component library where you can see our palette of ready-to-use visualizations and widgets, from simple buttons to complex charts, and you play with their options in real-time and see what happens. Anyone can do it, not only designers or engineers but also other project stakeholders. This effectively improves team communications and makes contributing and iterating quickly.
Here’s a screenshot of our Cosmos in action:
Continuous integration and development
Continuous integration is important for any team doing modern software. Cloudflare Pages provides multiple options to work with CI tools using direct uploads, out of the box. The team has put up documentation and examples on how to do that with GitHub Actions, CircleCI, and Travis, but you can use others.
In our case, we use BitBucket and TeamCity internally to build and deploy our releases. Our workflow automatically builds, tests, and deploys Radar 2.0 within minutes on an approved PR and follow-up merge.
Furthermore, we have multiple environments to stage and test our releases before they go live to production. Our CI/CD setup makes it easy to switch from one environment to the other or quickly roll back any undesired deployment.
Radar 1.0 wasn’t particularly fast doing CI/CD, we confess. We had a few episodes when a quick fix could take some good 30 minutes from committing the code to deployment, and we felt frustrated about it.
So we invested a lot in ensuring that the new CI would be fast, efficient, and furious.
One cool thing we ended up doing was fast preview links on any commit pushed to the code repository. Using a combination of intelligent caching during builds and doing asynchronous tests when the commit is outside the normal release branches, we were able to shorten the deployment time to seconds.
This is the notification we get in our chat when anyone pushes code to any branch:
Anyone can follow a thread for a specific branch in the chat and get notified on new changes when they happen.
Blazing-fast builds, preview links and notifications are game-changers. An engineer can go from an idea or a quick fix to showing the result on a link to a product manager or another team member. Anyone can quickly click the link to see the changes on a fully working end-to-end version of Radar.
Accessibility and localization
Cloudflare is committed to web accessibility. Recently we announced how we upgraded Cloudflare’s Dashboard to adhere to industry accessibility standards, but this premise is valid for all our properties. The same is true for localization. In 2020, we internationalized our Dashboard and added support for new languages and locales.
Accessibility and localization go hand in hand and are both important, but they are also different. The Web Content Accessibility Guidelines define many best practices around accessibility, including using color and contrast, tags, SVGs, shortcuts, gestures, and many others. The A11Y project page is an excellent resource for learning more.
Localization, though, also known as L10n, is more of a technical requirement when you start a new project. It’s about making sure you choose the right set of libraries and frameworks that will make it easier to add new translations without engineering dependencies or code rewrites.
We wanted Radar to perform well on both fronts. Our design system takes Cloudflare’s design and brand guidelines seriously and adds as many A11Y good practices as possible, and the app is fully aware of localization strings across its pages and UI components.
Adding a new language is as easy as translating a single JSON file. Here’s a snippet of the en-US.json file with the default American English strings:
{
  "abbr.asn": "Autonomous System Number",
  "actions.chart.download.csv": "Download chart data in CSV",
  "actions.chart.download.png": "Download chart in PNG Format",
  "actions.chart.download.svg": "Download chart in SVG Format",
  "actions.chart.download": "Download chart",
  "actions.chart.maximize": "Maximize chart",
  "actions.chart.minimize": "Minimize chart",
  "actions.chart.share": "Share chart",
  "actions.download.csv": "Download CSV",
  "actions.download.png": "Download PNG",
  "actions.download.svg": "Download SVG",
  "actions.share": "Share",
  "alert.beta.link": "Radar Classic",
  "alert.beta.message": "Radar 2.0 is currently in Beta. You can still use {link} during the transition period.",
  "card.about.cloudflare.p1": "Cloudflare, Inc. ({website} / {twitter}) is on a mission to help build a better Internet. Cloudflare's suite of products protects and accelerates any Internet application online without adding hardware, installing software, or changing a line of code. Internet properties powered by Cloudflare have all web traffic routed through its intelligent global network, which gets smarter with every request. As a result, they see significant improvement in performance and a decrease in spam and other attacks. Cloudflare was named to Entrepreneur Magazine's Top Company Cultures 2018 list and ranked among the World's Most Innovative Companies by Fast Company in 2019.",
  "card.about.cloudflare.p2": "Headquartered in San Francisco, CA, Cloudflare has offices in Austin, TX, Champaign, IL, New York, NY, San Jose, CA, Seattle, WA, Washington, D.C., Toronto, Dubai, Lisbon, London, Munich, Paris, Beijing, Singapore, Sydney, and Tokyo.",
  "card.about.cloudflare.title": "About Cloudflare",
...
You can expect us to release Radar in other languages soon.
Radar Reports and Jupyter notebooks
Radar Reports are documents that use data exploration and storytelling to analyze a particular theme in-depth. Some reports tend to get updates from time to time. Examples of Radar Reports are our quarterly DDoS Attack Trends, or the IPv6 adoption.
The source of these Reports is Jupyter Notebooks. Our Data Science team works on some use-case or themes with other stakeholders using our internal Jupyter Hub tool. After all the iteration and exploration are done, and the work is signed off, a notebook is produced.
A Jupyter Notebook is a JSON document containing text, source code, rich media such as images or charts, and other metadata. It is the de facto standard for presenting data science projects, and every data scientist uses it.
With Radar 1.0, converting a Jupyter Notebook to a Radar page was a lengthy and manual process implicating many engineering and design resources and causing much frustration to everyone involved. Even updating an already-published notebook would frequently cause trouble for us.
Radar 2.0 changed all of this. We now have a fully automated process that takes a Jupyter Notebook and, as long as it’s designed using a list of simple rules and internal guidelines, converts it automatically, hosts the resulting HTML and assets in an R2 bucket, and publishes it on the Reports page.
The conversion to HTML takes into account our design system and UI components, and the result is a beautiful document, usually long-form, perfectly matching Radar’s look and feel.
We will eventually open-source this tool so that anyone can use it.
More Cloudflare, less to worry about
We gave examples of using Cloudflare’s products and features to build your next-gen app without worrying too much about things that aren’t core to your business or logic. A few are missing, though.
Once the app is up and running, you must protect it from bad traffic and malicious actors. Cloudflare offers you DDoS, WAF, and Bot Management protection out of the box at a click’s distance.
For example, here are some of our security rules. This is traffic we don’t have to worry about in our app because Cloudflare detects it and acts on it according to our rules.
Another thing we don’t need to worry about is redirects from the old site to the new one. Cloudflare has a feature called Bulk Redirects, where you can easily create redirect lists directly on the dashboard.
It’s also important to mention that every time we talk about what you can do using our Dashboard, we’re, in fact, also saying you can do precisely the same using Cloudflare’s APIs. Our Dashboard is built entirely on top of them. And if you’re the infrastructure as code kind of person, we have you covered, too; you can use the Cloudflare Terraform provider.
Deploying and managing Workers, R2 buckets, or Pages sites is obviously scriptable too. Wrangler is the command-line tool to do this and more, and it goes the extra mile to allow you to run your full app locally, emulating our stack, on your computer, before deploying.
Final words
We hope you enjoyed this Radar team write-up and were inspired to build your next app on top of our Supercloud. We will continue improving and innovating on Radar 2.0 with new features, share our findings and open-sourcing our tools with you.
In the meantime, we opened a Radar room on our Developers Discord Server. Feel free to join it and ask us questions; the team is eager to receive feedback and discuss web technology with you.
You can also follow us on Twitter for more Radar updates.
Today, we’re excited to reveal the first cohort of Launchpad Startups as well as 14 additional VC partners, bringing the Launchpad to $2 billion in potential funding from 40 VC firms in total.
Who are our new VC partners?
We are excited to welcome 14 additional firms to the Workers Launchpad, which you can find included in the image below. They have worked with hundreds of companies that have grown to become leaders in their areas including Asana, Canva, Figma, Netlify, Vercel, Area 1 Security (which Cloudflare acquired in 2022), and many others. Notably, they also represent a diverse group of investors who support startups across North and South America, Europe, and Asia.
Many of these investors have seen the competitive advantages of building on Workers through their own portfolio companies firsthand and are looking forward to providing the capital and resources you need to build and scale your business.
Announcing the Fall 2022 cohort of Launchpad Startups!
We received hundreds of applications for the Fall cohort from startups representing more than 30 countries. We were blown away by the breadth of businesses that folks were building – some are creating tools to simplify developer workflows, while others are helping ecommerce businesses better reach and serve customers around the world. The common thread amongst all the Launchpad companies, however, is their usage of Cloudflare’s developer platform to build more secure, reliable, and feature-rich products faster than they otherwise could.
Introducing the Fall 2022 cohort
Our inaugural cohort of Launchpad startups features 25 diverse businesses. Here’s what they’re building, in their own words:
Nope! We will select Launchpad Startups on a quarterly basis, so if you are building on Workers, interested in pitching VCs, and want to join our next cohort of Workers Founder, apply here! If you’re new to Workers and looking to begin building, check out our Startup Plan for a year of free Cloudflare services, Built with Workers, and join our Cloudflare Developer Discord community.
Cloudflare is not providing any funding or making any funding decisions, and there is no guarantee that any particular company will receive funding through the program. All funding decisions will be made by the venture capital firms that participate in the program. Cloudflare is not a registered broker-dealer, investment adviser, or other similar intermediary.
Before we launched Pages back in April 2021, we knew it would be the start of something magical – an experience that felt “just right”. We envisioned an experience so simple yet so smooth that any developercould ship a website in seconds and add more to it by using the rest of our Cloudflare ecosystem.
A few months later, when we announced that Pages was a full stack platform in November 2021, that vision became a reality. Creating a development platform for just static sites was not the end of our Pages story, and with Cloudflare Workers already a part of our ecosystem, we knew we were sitting on untapped potential. With the introduction of Pages Functions, we empowered developers to take any static site and easily add in dynamic content with the power of Cloudflare Workers.
In the last year since Functions has been in open beta, we dove into an exploration on what kinds of full stack capabilities developers are looking for on their projects – and set out to fine tune the Functions experience into what it is today.
We’re thrilled to announce that Pages Functions is now generally available!
Functions recap
Though called “Functions” in the context of Pages, these functions running on our Cloudflare network are Cloudflare Workers in “disguise”. Pages harnesses the power and scalability of Workers and specializes them to align with the Pages experience our users know and love.
With Functions you can dream up the possibilities of dynamic functionality to add to your site – integrate with storage solutions, connect to third party services, use server side rendering with your favorite full stack frameworks and more. As Pages Functions opens its doors to production traffic, let’s explore some of the exciting features we’ve improved and added on this release.
The experience
Deploy with Git
Love to code? We’ll handle the infrastructure, and leave you to it.
Simply write a JavaScript/Typescript Function and drop it into a functions directory by committing your code to your Git provider. Our lightning fast CI system will build your code and deploy it alongside your static assets.
Directly upload your Functions
Prefer to handle the build yourself? Have a special git provider not yet supported on Pages? No problem! After dropping your Function in your functions folder, you can build with your preferred CI tooling and then upload your project to Pages to be deployed.
Debug your Functions
While in beta, we learned that you and your teams value visibility above all. As on Cloudflare Workers, we’ve built a simple way for you to watch your functions as it processes requests – the faster you can understand an issue the faster you can react.
You can now easily view logs for your Functions by “tailing” your logs. For basic information like outcome and request IP, you can navigate to the Pages dashboard to obtain relevant logs.
For more specific filters, you can use
wrangler pages deployment tail
to receive a live feed of console and exception logs for each request your Function receives.
Get real time Functions metrics
In the dashboard, Pages aggregates data for your Functions in the form of request successes/error metrics and invocation status. You can refer to your metrics dashboard not only to better understand your usage on a per-project basis but also to get a pulse check on the health of your Functions by catching success/error volumes.
Quickly integrate with the Cloudflare ecosystem
Storage bindings
Want to go truly full stack? We know finding a storage solution that fits your needs and fits your ecosystem is not an easy task – but it doesn’t have to be!
With Functions, you can take advantage of our broad range of storage products including Workers KV, Durable Objects, R2, D1 and – very soon – Queues and Workers Analytics Engine! Simply create your namespace, bucket or database and add your binding in the Pages dashboard to get your full stack site up and running in just a few clicks.
From dropping in a quick comment system to rolling your own authentication to creating database-backed eCommerce sites, integrating with existing products in our developer platform unlocks an exponential set of use cases for your site.
Secret bindings
In addition to adding environment variables that are available to your project at both build-time and runtime, you can now also add “secrets” to your project. These are encrypted environment variables which cannot be viewed by any dashboard interfaces, and are a great home for sensitive data like API tokens or passwords.
Integrate with 3rd party services
Our goal with Pages is always to meet you where you are when it comes to the tools you love to use. During this beta period we also noticed some consistent patterns in how you were employing Functions to integrate with common third party services. Pages Plugins – our ready-made snippets of code – offers a plug and play experience for you to build the ecosystem of your choice around your application.
In essence, a Pages Plugin is a reusable – and customizable – chunk of runtime code that can be incorporated anywhere within your Pages application. It’s a “composable” Pages Function, granting Plugins the full power of Functions (i.e. Workers), including the ability to set up middleware, parameterized routes, and static assets.
With Pages Plugins you can integrate with a plethora of 3rd party applications – including officially supported Sentry, Honeycomb, Stytch, MailChannels and more.
Use your favorite full stack frameworks
In the spirit of meeting developers where they are at, this sentiment also comes in the form of Javascript frameworks. As a big supporter of not only widely adopted frameworks but up and coming frameworks, our team works with a plethora of framework authors to create opportunities for you to play with their new tech and deploy on Pages right out of the box.
Now compatible with Next.js 13 and more!
Recently, we announced our support for Next.js applications which opt in to the Edge Runtime. Today we’re excited to announce we are now compatible with Next.js 13. Next.js 13 brings some most-requested modern paradigms to the Next.js framework, including nested routing, React 18’s Server Components and streaming.
Have a different preference of framework? No problem.
While Pages Functions are powered by Workers, we understand that at face-value they are not exactly the same. Nevertheless, for existing users who are perhaps using Workers and are keen on trying Cloudflare Pages, we’ve got a direct path to get you started quickly.
If you already have a single Worker and want an easy way to go full stack on Pages, you can use Pages Function’s “advanced mode”. Generate an ES module Worker called _worker.js in the output directory of your project and deploy! This can be especially helpful if you’re a framework author or perhaps have a more complex use case that does not fit into our file-based router.
Scaling without limits
So today, as we announce Functions as generally available we are thrilled to allow your traffic to scale. During the Open Beta period, we imposed a daily limit of 100,000 free requests per day as a way to let you try out the feature. While 100,000 requests per day remains the free limit today, you can now pay to truly go unlimited.
Since Functions are just “special” Workers, with this announcement you will begin to see your Functions usage reflected on your bill under the Workers Paid subscription or via your Workers Enterprise contract. Like Workers, when on a paid plan, you have the option to choose between our two usage models – Bundled and Unbound – and will be billed accordingly.
Keeping Pages on brand as Cloudflare’s “gift to the Internet”, you will get unlimited free static asset requests and will be billed primarily on dynamic requests. You can read more about how billing with Functions works in our documentation.
Bring micro-frontend benefits to legacy Web applications
Recently, we wrote about a new fragment architecture for building Web applications that is fast, cost-effective, and scales to the largest projects, while enabling a fast iteration cycle. The approach uses multiple collaborating Cloudflare Workers to render and stream micro-frontends into an application that is interactive faster than traditional client-side approaches, leading to better user experience and SEO scores.
This approach is great if you are starting a new project or have the capacity to rewrite your current application from scratch. But in reality most projects are too large to be rebuilt from scratch and can adopt architectural changes only in an incremental way.
In this post we propose a way to replace only selected parts of a legacy client-side rendered application with server-side rendered fragments. The result is an application where the most important views are interactive sooner, can be developed independently, and receive all the benefits of the micro-frontend approach, while avoiding large rewrites of the legacy codebase. This approach is framework-agnostic; in this post we demonstrate fragments built with React, Qwik, and SolidJS.
The pain of large frontend applications
Many large frontend applications developed today fail to deliver good user experience. This is often caused by architectures that require large amounts of JavaScript to be downloaded, parsed and executed before users can interact with the application. Despite efforts to defer non-critical JavaScript code via lazy loading, and the use of server-side rendering, these large applications still take too long to become interactive and respond to the user’s inputs.
Furthermore, large monolithic applications can be complex to build and deploy. Multiple teams may be collaborating on a single codebase and the effort to coordinate testing and deployment of the project makes it hard to develop, deploy and iterate on individual features.
As outlined in our previous post, micro-frontends powered by Cloudflare Workers can solve these problems but converting an application monolith to a micro-frontend architecture can be difficult and expensive. It can take months, or even years, of engineering time before any benefits are perceived by users or developers.
What we need is an approach where a project can incrementally adopt micro-frontends into the most impactful parts of the application incrementally, without needing to rewrite the whole application in one go.
Fragments to the rescue
The goal of a fragment based architecture is to significantly decrease loading and interaction latency for large web applications (as measured via Core Web Vitals) by breaking the application into micro-frontends that can be quickly rendered (and cached) in Cloudflare Workers. The challenge is how to integrate a micro-frontend fragment into a legacy client-side rendered application with minimal cost to the original project.
The technique we propose allows us to convert the most valuable parts of a legacy application’s UI, in isolation from the rest of the application.
It turns out that, in many applications, the most valuable parts of the UI are often nested within an application “shell” that provides header, footer, and navigational elements. Examples of these include a login form, product details panel in an e-commerce application, the inbox in an email client, etc.
Let’s take a login form as an example. If it takes our application several seconds to display the login form, the users will dread logging in, and we might lose them. We can however convert the login form into a server-side rendered fragment, which is displayed and interactive immediately, while the rest of the legacy application boots up in the background. Since the fragment is interactive early, the user can even submit their credentials before the legacy application has started and rendered the rest of the page.
Animation showing the login form being available before the main application
This approach enables engineering teams to deliver valuable improvements to users in just a fraction of the time and engineering cost compared to traditional approaches, which either sacrifice user experience improvements, or require a lengthy and high-risk rewrite of the entire application. It allows teams with monolithic single-page applications to adopt a micro-frontend architecture incrementally, target the improvements to the most valuable parts of the application, and therefore front-load the return on investment.
An interesting challenge in extracting parts of the UI into server-side rendered fragments is that, once displayed in the browser, we want the legacy application and the fragments to feel like a single application. The fragments should be neatly embedded within the legacy application shell, keeping the application accessible by correctly forming the DOM hierarchy, but we also want the server-side rendered fragments to be displayed and become interactive as quickly as possible — even before the legacy client-side rendered application shell comes into existence. How can we embed UI fragments into an application shell that doesn’t exist yet? We resolved this problem via a technique we devised, which we call “fragment piercing”.
Fragment piercing
Fragment piercing combines HTML/DOM produced by server-side rendered micro-frontend fragments with HTML/DOM produced by a legacy client-side rendered application.
The micro-frontend fragments are rendered directly into the top level of the HTML response, and are designed to become immediately interactive. In the background, the legacy application is client-side rendered as a sibling of these fragments. When it is ready, the fragments are “pierced” into the legacy application – the DOM of each fragment is moved to its appropriate place within the DOM of the legacy application – without causing any visual side effects, or loss of client-side state, such as focus, form data, or text selection. Once “pierced”, a fragment can begin to communicate with the legacy application, effectively becoming an integrated part of it.
Here, you can see a “login” fragment and the empty legacy application “root” element at the top level of the DOM, before piercing.
To keep the fragment from moving and causing a visible layout shift during this transition, we apply CSS styles that position the fragment in the same way before and after piercing.
At any time an application can be displaying any number of pierced fragments, or none at all. This technique is not limited only to the initial load of the legacy application. Fragments can also be added to and removed from an application, at any time. This allows fragments to be rendered in response to user interactions and client-side routing.
With fragment piercing, you can start to incrementally adopt micro-frontends, one fragment at a time. You decide on the granularity of fragments, and which parts of the application to turn into fragments. The fragments don’t all have to use the same Web framework, which can be useful when switching stacks, or during a post-acquisition integration of multiple applications.
The “Productivity Suite” demo
As a demonstration of fragment piercing and incremental adoption we have developed a “productivity suite” demo application that allows users to manage to-do lists, read hacker news, etc. We implemented the shell of this application as a client-side rendered React application — a common tech choice in corporate applications. This is our “legacy application”. There are three routes in the application that have been updated to use micro-frontend fragments:
/login – a simple dummy login form with client-side validation, displayed when users are not authenticated (implemented in Qwik).
/todos – manages one or more todo lists, implemented as two collaborating fragments:
Todo list selector – a component for selecting/creating/deleting Todo lists (implemented in Qwik).
Todo list editor – a clone of the TodoMVC app (implemented in React).
To try it out, you first need to log in – simply use any username you like (no password needed). The user’s data is saved in a cookie, so you can log out and back in using the same username. After you’ve logged in, navigate through the various pages using the navigation bar at the top of the application. In particular, take a look at the “Todo Lists” and “News” pages to see the piercing in action.
At any point, try reloading the page to see that fragments are rendered instantly while the legacy application loads slowly in the background. Try interacting with the fragments even before the legacy application has appeared!
At the very top of the page there are controls to let you see the impact of fragment piercing in action.
Use the “Legacy app bootstrap delay” slider to set the simulated delay before the legacy application starts.
Toggle “Piercing Enabled” to see what the user experience would be if the app did not use fragments.
Toggle “Show Seams” to see where each fragment is on the current page.
How it works
The application is composed of a number of building blocks.
An overview of the collaborating Workers and legacy application host
The Legacy application host in our demoserves the files that define the client-side React application (HTML, JavaScript and stylesheets). Applications built with other tech stacks would work just as well. The Fragment Workers hostthe micro-frontend fragments, as described in our previous fragment architecture post. And the Gateway Worker handles requests from the browser, selecting, fetching and combining response streams from the legacy application and micro-frontend fragments.
Once these pieces are all deployed, they work together to handle each request from the browser. Let’s look at what happens when you go to the `/login` route.
The flow of requests when viewing the login page
The user navigates to the application and the browser makes a request to the Gateway Worker to get the initial HTML. The Gateway Worker identifies that the browser is requesting the login page. It then makes two parallel sub-requests – one to fetch the index.html of the legacy application, and another to request the server-side rendered login fragment. It then combines these two responses into a single response stream containing the HTML that is delivered to the browser.
The browser displays the HTML response containing the empty root element for the legacy application, and the server-side rendered login fragment, which is immediately interactive for the user.
The browser then requests the legacy application’s JavaScript. This request is proxied by the Gateway Worker to the Legacy application host. Similarly, any other assets for the legacy application or fragments get routed through the Gateway Worker to the legacy application host or appropriate Fragment Worker.
Once the legacy application’s JavaScript has been downloaded and executed, rendering the shell of the application in the process, the fragment piercing kicks in, moving the fragment into the appropriate place in the legacy application, while preserving all of its UI state.
While focussed on the login fragment to explain fragment piercing, the same ideas apply to the other fragments implemented in the /todos and /news routes.
The piercing library
Despite being implemented using different Web frameworks, all the fragments are integrated into the legacy application in the same way using helpers from a “Piercing Library”. This library isa collection of server-side and client-side utilities that we developed, for the demo, to handle integrating the legacy application with micro-frontend fragments. The main features of the library are the PiercingGateway class, fragment host and fragment outlet custom elements, and the MessageBus class.
PiercingGateway
The PiercingGateway class can be used to instantiate a Gateway Worker that handles all requests for our application’s HTML, JavaScript and other assets. The `PiercingGateway` routes requests through to the appropriate Fragment Workers or to the host of the Legacy Application. It also combines the HTML response streams from these fragments with the response from the legacy application into a single HTML stream that is returned to the browser.
Implementing a Gateway Worker is straightforward using the Piercing Library. Create a new gateway instance of PiercingGateway, passing it the URL to the legacy application host and a function to determine whether piercing is enabled for the given request. Export the gateway as the default export from the Worker script so that the Workers runtime can wire up its fetch() handler.
const gateway = new PiercingGateway<Env>({
  // Configure the origin URL for the legacy application.
  getLegacyAppBaseUrl: (env) => env.APP_BASE_URL,
  shouldPiercingBeEnabled: (request) => ...,
});
...

export default gateway;
Fragments can be registered by calling the registerFragment() method so that the gateway can automatically route requests for a fragment’s HTML and assets to its Fragment Worker. For example, registering the login fragment would look like:
Routing requests and combining HTML responses in the Gateway Worker is only half of what makes piercing possible. The other half needs to happen in the browser where the fragments need to be pierced into the legacy application using the technique we described earlier.
The Gateway Worker wraps the HTML for each fragment in a fragment host. In the browser, the fragment host manages the life-time of the fragment and is used when moving the fragment’s DOM into position in the legacy application.
In the legacy application, the developer marks where a fragment should appear when it is pierced by adding a fragment outlet. Our demo application’s Login route looks as follows:
When a fragment outlet is added to the DOM, it searches the current document for its associated fragment host. If found, the fragment host and its contents are moved inside the outlet. If the fragment host is not found, the outlet will make a request to the gateway worker to fetch the fragment HTML, which is then streamed directly into the fragment outlet, using the writable-dom library (a small but powerful library developed by the MarkoJS team).
This fallback mechanism enables client-side navigation to routes that contain new fragments. This way fragments can be rendered in the browser via both initial (hard) navigation and client-side (soft) navigation.
Message bus
Unless the fragments in our application are completely presentational or self-contained, they also need to communicate with the legacy application and other fragments. The MessageBus is a simple asynchronous, isomorphic, and framework-agnostic communication bus that the legacy application and each of the fragments can access.
In our demo application the login fragment needs to inform the legacy application when the user has authenticated. This message dispatch is implemented in the Qwik LoginForm component as follows:
We settled on this message bus implementation because we needed a solution that was framework-agnostic, and worked well on both the server as well as client.
Give it a go!
With fragments, fragment piercing, and Cloudflare Workers, you can improve performance as well as the development cycle of legacy client-side rendered applications. These changes can be adopted incrementally, and you can even do so while implementing fragments with a Web framework for your choice.
Feel free to clone the repository. It is easy to run locally and even deploy your own version (for free) to Cloudflare. We tried to make the code as reusable as possible. Most of the core logic is in the piercing library that you could try in your own projects. We’d be thrilled to receive feedback, suggestions, or hear about applications you’d like to use it for. Join our GitHub discussion or also reach us on our discord channel.
We believe that combining Cloudflare Workers with the latest ideas from frameworks will drive the next big steps forward in improved experiences for both users and developers in Web applications. Expect to see more demos, blog posts and collaborations as we continue to push the boundaries of what the Web can offer. And if you’d also like to be directly part of this journey, we are also happy to share that we are hiring!
Cloudflare is used by a highly diverse customer base. We offer simple-to-use products for everything from setting HTTP headers to rewriting the URI path and performing URL redirects. Sometimes customers need more than the out-of-the-box functionality, not just adding an HTTP header – but performing some advanced calculation to create the output. Today they would need to create a feature request and wait for it to be shipped, write a Cloudflare Worker, or keep this modification ‘on origin’ – on their own infrastructure.
To simplify this, we are delighted to announce Cloudflare Snippets. Snippets are a new way to perform traffic modifications that users either cannot do via our productised offerings, or want to do programmatically. The best part? The vast majority of customers will pay nothing extra for using Snippets.
Users now have a choice. Perform the action via a rule. Or, if more functionality is needed, write a Snippet. Neither will mean waiting. Neither will incur additional cost (although a high fair usage cap will apply). Snippets unblocks users to do what they want, when they want. All on Cloudflare.
Snippets will support the import of code written in various languages, such as JavaScript (modern), VCL (legacy) and Apache .htaccess files (legacy). This allows customers to migrate legacy operational code onto our platform – whilst also consolidating their JavaScript operations.
Please use the sign-up form to join the waitlist for Snippets if you are interested in testing. We hope to begin admitting users into the closed beta early 2023.
Why build Snippets?
Over the past 18 months we have released a number of new rules products such as Transform Rules,Cache Rules, Origin Rules, Config Rules and Redirect Rules. These new products give more control to customers on how we process their traffic as it flows through our global network. The feedback on these products so far has been overwhelmingly positive. However, our customers still occasionally need the ability to do more than the out-of-the-box functionality allows.
There are always some use cases where a product doesn’t provide the functionality that a customer needs for their specific situation. For example, whilst thousands of our customers are now using Transform Rules to solve their HTTP header modification use cases, there remains a small number of use cases that are not possible, such as setting dynamic expiry times with cookies or hashing tokens with a key.
This is where Cloudflare Snippets help. Customers will no longer need to use the full Cloudflare Workers platform to implement these relatively simple use cases. Nor will they need to wait for us to build their feature requests. Instead, they will be able to run a Snippet of JavaScript.
Migrating legacy code to Snippets
Varnish Control Language (VCL) is only used within the context of Varnish. Launched around 16 years ago, it has historically been used to configure traffic and routing for Content Delivery Networks as it was extensible to a wide range of use cases.
There are still a good number of businesses out there using VCL to perform routing and traffic modification actions. Whilst other providers are deprecating support for VCL, we want to make sure those of you comfortable using it are still supported.
Snippets won’t run pure VCL. Instead, we will convert VCL into easy to maintain rules or Snippets. To achieve this we’re building a simple-to-use, self-serve VCL converter that analyzes uploaded VCL code and auto-generates suggested Snippets, and if we can find a match, also generates suggested rules for products such as Transform Rules or Cache Rules.
This topic was initially handled via Project Turpentine, a suite of tools used by Cloudflare employees to parse a customer’s VCL into a suggested JavaScript configuration. This JavaScript could then be loaded into a Worker, or series of Workers.
Snippets takes the idea and principles of Turpentine further. Much further. By building a parser directly in the dashboard it puts the power directly into the hands of users and gives them a choice. You can tell us to migrate everything we can into Rules with the remaining code migrated into Snippets, or, you can choose to tell us to migrate everything into discrete Snippets. It’s your call.
We’ll give Apache htaccess and NGINX configuration files the same treatment. The goal being users simply upload the files from their websites Apache or NGINX configuration, and we generate suggested Snippets and/or rules.
The days of having to use legacy code for operational tasks are coming to an end. Snippets allow users to migrate these workloads to Cloudflare, and let them focus on the bigger problems of the business vs maintaining legacy systems.
The difference between Snippets and Workers
Most readers will already be familiar with Cloudflare Workers, our powerful developer platform which allows businesses to run and build entire products and solutions on Cloudflare’s global network. Snippets is also built on this platform, but has a few key differences.
The first major difference is that a Snippet will run as part of the Ruleset Engine as dedicated new phases, similar to Transform Rules and Cache Rules. Customers will be able to select and execute a Snippet based on any ruleset engine filter. This allows customers to run a Snippet against every request, or filter for specific HTTP traffic based on the fields we offer, such as traffic with a certain bot score, originating from a specific country, or with a specific cookie. Snippets will be additive, meaning users can have one Snippet to add an HTTP header, and another to rewrite the URL, and both will execute if they match:
Another major difference – Cloudflare Snippets are available for all plan levels, at no additional cost. 99% of users won’t pay a single cent, ever, to use this solution. This allows customers to migrate their simple workloads from legacy solutions like VCL to the Cloudflare platform, and actively reduce their monthly spend.
Free Plans
Pro Plans
Business Plans
Enterprise Plans
Snippets available
5 Snippets per zone.
20 Snippets per zone.
50 Snippets per zone.
200 Snippets per zone* (Customers can speak with their Customer Success team to have this increased).
Cloudflare Snippets are lightweight when compared with Workers, offering 5ms maximum execution time, 2MB maximum memory and 32KB total package size. This comparably small footprint allows us to offer this to 99% of users at no additional cost, whilst also being sufficient for the identified use cases like HTTP header modification, URL rewriting and traffic routing – all of which don’t need the vast resources offered by Cloudflare Workers.
Cloudflare Snippets
Cloudflare Workers Unbound (For comparison)
Runtime support
JavaScript
JavaScript and WASM
Execution location
Global – All Cloudflare locations
Global – All Cloudflare locations
Triggers supported
Ruleset Engine Filters
HTTP Request HTTP Response Cron Triggers
Maximum execution time
5ms
30 Seconds HTTP 15 Minutes (Cron Trigger)
Maximum memory
2MB
128MB
Total package size
32KB
5MB
Environment variables
8/Snippet
64/Worker
Environment variable size
1KB
5KB
Subrequests
1/request
1000/request
Terraform Support
✅
✅
Wrangler Support
✅
Cron Triggers
✅
Key Value Store
✅
Durable Objects
✅
R2 Integration
✅
What will you be able to build with Cloudflare Snippets?
Snippets will allow customers to migrate their existing workloads to Cloudflare. They will also open up a number of new possible use cases for customers. We have highlighted three common examples below, however there are many more to choose from.
Example 1: Sending suspect bots to a honeypot
When creating Snippets customers will be able to access Cloudflare features available in the Workers runtime, such as the bot score field. This enables customers to forward an HTTP request to a honeypot or use the RegExp Javascript function to change the URL construct being sent back to the end user when traffic is assigned a bot score below a certain threshold, e.g. 29 and lower.
Another common use case we foresee Snippets addressing is cookie modification. Usage can range from simply setting an expiry in five minutes by using getTime and setTime JavaScript functions to setting a dynamic cookie based on user request attributes for A/B testing purposes.
…
{
let res = await fetch(request);
res = new Response(res.body, res);
// 24h * 60m * 60s * 1000ms = 86400000ms
const expiry = new Date(Date.now() + 7 * 86400000).toUTCString();
const group = request.headers.get("userGroup") == "premium" ? "A" : "B";
res.headers.append(
      "Set-Cookie",
`testGroup=${group}; Expires=${expiry}; path=/`
    );
…
Example 3: URI query management
Customers can also deploy Cloudflare Snippets to do complex operations such as splicing the URI query value to selectively remove or inject additional parameters. Query string manipulation is typically done using Transform Rules. However, with Transform Rules the set/ action is effectively a replace action. This action when applied to the URI query string will remove the entire value if there is one and set it to what the user specifies, thus overwriting it. This is a problem for customers who wish to selectively inject specific query parameters for matching traffic. For example, setting an additional query, e.g. ?utm_campaign=facebook when common social media platforms are detected in the user agent. With Snippets, customers will be able to do this selective removal and insertion using a simple piece of JavaScript, e.g.
…
if (userAgent.includes("Facebook")) {
      const url = new URL(request.url);
      const params = new URLSearchParams(url.search);
      params.set("utm_campaign", "facebook");
      url.search = params.toString();
      const transformedRequest = new Request(url, request)
…
}
We are excited to see what other use cases Cloudflare Snippets unlock for our customers.
Will you stop adding actions to rulesets?
The simple answer is no! We will continue to build out our no-code actions within the ruleset engine, developing new products to solve customer needs.
It may sound obvious – but a core component to feature improvement is talking to customers. Talking to Snippet users will help us understand what real life use cases Snippets help solve and highlight feature gaps we have in our product suite. We can then review if it makes sense to productise that use case, or leave it requiring Snippets.
We also understand that not everyone is a software developer. We are therefore exploring how we can make Snippets accessible to all by creating selectable templates available in a library that can be copied and modified by customers, with minimum coding knowledge required. With Snippets, powerful won’t mean difficult.
Accessing Cloudflare Snippets
Snippets are currently under development — you can sign up here to join the waitlist for access.
We hope to begin admitting users into the closed beta in early 2023, with an open beta to follow.
Today we’re happy to introduce Deployments for Workers. Deployments allow developers to keep track of changes to their Worker; not just the code, but the configuration and bindings as well. With deployments, developers now have access to a powerful audit log of changes to their production applications.
And tracking changes is just the beginning! Deployments provide a strong foundation to add: automated deployments, rollbacks, and integration with version control.
Today we’ll dive into the details of deployments, how you can use them, and what we’re thinking about next.
Deployments
Deployments are a powerful new way to track changes to your Workers. With them, you can track who’s making changes to your Workers, where those changes are coming from, and when those changes are being made.
Cloudflare reports on deployments made from wrangler, API, dashboard, or Terraform anytime you make changes to your Worker’s code, edit resource bindings and environment variables, or modify configuration like name or usage model.
We expose the source of your deployments, so you can track where changes are coming from. For example, if you have a CI job that’s responsible for changes, and you see a user made a change through the Cloudflare dashboard, it’s easy to flag that and dig into whether the deployment was a mistake.
Interacting with deployments
Cloudflare tracks the authors, sources, and timestamps of deployments. If you have a set of users responsible for deployment, or an API Token that’s associated with your CI tool, it’s easy to see which made recent deployments. Each deployment also includes a timestamp, so you can track when those changes were made.
You can access all this deployment information in your Cloudflare dashboard, under your Worker’s Deployments tab. We also report on the active version right at the front of your Worker’s detail page. Wrangler will also report on deployment information. wrangler publish now reports the latest deployed version, and a new `wrangler deployments` command can be used to view a deployment history.
We’re excited to share deployments with our customers, available today in an open beta. As we mentioned up front, we’re just getting started with deployments. We’re also excited for more on-platform tooling like rollbacks, deploy status, deployment rules, and a view-only mode to historical deployments. Beyond that, we want to ensure deployments can be automated from commits to your repository, which means working on version control integrations to services like GitHub, Bitbucket, and Gitlab. We’d love to hear more about how you’re currently using Workers and how we can improve developer experience. If you’re interested, let’s chat.
If you’d like to join the conversation, head over to Cloudflare’s Developer Discord and give us a shout! We love hearing from our customers, and we’re excited to see what you build with Cloudflare.
Configuration management is far from a solved problem. As organizations scale beyond a handful of administrators, having a secure, auditable, and self-service way of updating system settings becomes invaluable. Managing a Cloudflare account is no different. With dozens of products and hundreds of API endpoints, keeping track of current configuration and making bulk updates across multiple zones can be a challenge. While the Cloudflare Dashboard is great for analytics and feature exploration, any changes that could potentially impact users really should get a code review before being applied!
This is where Cloudflare’s Terraform provider can come in handy. Built as a layer on top of the cloudflare-go library, the provider allows users to interface with the Cloudflare API using stateful Terraform resource declarations. Not only do we actively support this provider for customers, we make extensive use of it internally! In this post, we hope to provide some best practices we’ve learned about managing complex Cloudflare configurations in Terraform.
Why Terraform
Unsurprisingly, we find Cloudflare’s products to be pretty useful for securing and enhancing the performance of services we deploy internally. We use DNS, WAF, Zero Trust, Email Security, Workers, and all manner of experimental new features throughout the company. This dog-fooding allows us to battle-harden the services we provide to users and feed our desired features back to the product teams all while running the backend of Cloudflare. But, as Cloudflare grew, so did the complexity and importance of our configuration.
When we were a much smaller company, we only had a handful of accounts with designated administrators making changes on behalf of their colleagues. However, over time this handful of accounts grew into hundreds with each managed by separate teams. Independent accounts are useful in that they allow service-owners to make modifications that can’t impact others, but it comes with overhead.
We faced the challenge of ensuring consistent security policies, up-to-date account memberships, and change visibility. While our accounts were still administered by kind human stewards, we had numerous instances of account members not being removed after they transferred to a different team. While this never became a security incident, it demonstrated the shortcomings of manually provisioning account memberships. In the case of a production service migration, the administrator executing the change would often hop on a video call and ask for others to triple-check an IP address, ruleset, or access policy update. It was an era of looking through the audit logs to see what broke a service.
We wanted to make it easier for developers and users to make the changes they wanted without having to reach out to an administrator. Defining our configuration in code using Terraform has allowed us to keep tabs on the complexity of configuration while improving visibility and change management practices. By dogfooding the Cloudflare Terraform provider, we’ve been able to ensure:
Modifications to accounts are peer reviewed by the team that owns an account.
Each change is tied to a user, commit, and a ticket explaining the rationale for the change.
API Tokens are tied to service accounts rather than individual human users, meaning they survive team changes and offboarding.
Account configuration can be audited by anyone at the company for current state, accuracy, and security without needing to add everyone as a member of every account.
Large changes, such as enforcing hard keys can be done rapidly– even in a single pull request.
Configuration can be easily copied and reused across accounts to promote best practices and speed up development.
We can use and iterate on our awesome provider and provide a better experience to other users (shoutout in particular to Jacob!).
Terraform in CI/CD
Terraform has a fairly mature open source ecosystem, built from years of running-in-production experience. Thus, there are a number of ways to make interacting with the system feel as comfortable to developers as git. One of these tools is Atlantis.
Atlantis acts as continuous integration/continuous delivery (CI/CD) for Terraform; fitting neatly into version control workflows, and giving visibility into the changes being deployed in each code change. We use Atlantis to display Terraform plans (effectively a diff in configuration) within pull requests and apply the changes after the pull request has been approved. Having all the output from the terraform provider in the comments of a pull request means there’s no need to fiddle with the state locally or worry about where a state lock is coming from. Using Terraform CI/CD like this makes configuration management approachable to developers and non-technical folks alike.
In this example pull request, I’m adding a user to the cloudflare-cool-account (see the code in the next section). Once the PR is opened, Bitbucket posts a webhook to Atlantis, telling it to run a `terraform plan` using this branch. The resulting comment is placed in the pull request. Notice that this pull request can’t be applied or merged yet as it doesn’t have an approval! Once the pull request is approved, I would comment “atlantis apply”, wait for Atlantis to post a comment containing the output of the command, and merge the pull request if that output looks correct.
Our Terraforming Cloudflare architecture consists of a monorepo with one directory (and tfstate) for each internally-owned Cloudflare account. This keeps all of our Cloudflare configuration centralized for easier oversight while remaining neatly organized.
It will be possible in a future (as of this writing) release to manage multiple Cloudflare accounts in the same tfstate, but we’ve found that accounts in our use generally map fairly neatly onto teams. Teams can be configured as CODEOWNERS for a given directory and be tagged on any pull requests to that account. With teams owning separate accounts and each account having a separate tfstate, it’s rare for pull requests to get stuck waiting for a lock on the tfstate. Team-account-sized states remain relatively small, meaning that they also build quickly. Later on, we’ll share some of the other optimizations we’ve made to keep the repo user-friendly.
Each of our terraform states, given that they include secrets (including the API key!), is stored encrypted in an internal datastore. When a pull request is opened, Atlantis reaches out to a piece of middleware (that we may open source once it’s cleaned up a bit) that retrieves and decrypts the state for processing. Once the pull request is applied, the state is encrypted and put away again.
We execute a daily Terraform apply across all tfstates to capture any unintended config drift and rotate certificates when they approach expiration. This prevents unrelated changes from popping up in pull request diffs and causing confusion. While we could run more frequent state applies to ensure Terraform remains firmly up to date, once-a-day rectification strikes a balance between code enforcement and avoiding state locks while users are running Terraform plans in pull requests.
One of the problems that we encountered during our transition to Terraform is that folks were in the habit of making updates to configuration in the Dashboard and were still able to edit settings there. Thus, we didn’t always have a single source of truth for our configuration in code. It also meant the change would get mysteriously (to them) reverted the next day! So that’s why I’m excited to share a new Zero Trust Dashboard toggle that we’ve been turning on for our accounts internally: API/Terraform read-only mode.
Easily one of my favorite new features
With this button, we’re able to politely prevent manual changes to your Cloudflare account’s Zero Trust configuration without removing permissions from the set of users who can fix settings manually in a break-glass emergency scenario. Check out how you can enable this setting in your Zero Trust organization.
Slick Snippets and Terraforming Recommendations
As our Terraform repository has matured, we’ve refined how we define Cloudflare resources in code. By finding a sweet spot between code reuse and readability, we’ve been able to minimize operational overhead and generally let users get their work done. Here’s a couple of useful snippets that have been particularly valuable to us.
Account Membership
This allows for defining a fairly straightforward mapping of user emails to account privileges without code duplication or complex modules. We pull the list of human-friendly names of account roles from the API to show user permission assignments at a glance. Note: status is a new argument that allows for accounts to be added without sending an email to the user; perfect for when an organization is using SSO. (Thanks patrobinson for the feature request and mblackman for the PR!)
The GitHub issue and provider change that enabled automatic Access service token refreshes actually came from a need inside Cloudflare. Here’s how we ended up implementing it. We begin by defining a set of services that need to connect to our hostnames that are protected by Access. Each of these tokens are created and stored in a secret key value store. Next, we reference those access tokens by ID in the target Access policies. Once this has run, the service owner or the service itself can retrieve the credentials from the data store. (Note: we’re using Vault here, but any storage provider could be used in its place).
mTLS (Authenticated Origin Pulls) certificate creation and rotation
To further defense-in-depth objectives, we’ve been rolling out mTLS throughout our internal systems. One of the places where we can take advantage of our Terraform provider is in defining AOP (Authenticated Origin Pulls) certificates to lock down the Cloudflare-edge-to-origin connection. Anyone who has managed certificates of any kind can speak to the headaches they can cause. Having certificate configurations in Terraform takes out the manual work of rotation and expiration.
In this example we’re defining hostname-level AOP as opposed to zone-level AOP. We start by cutting a certificate for each hostname. Once again we’re using Vault for certificate creation, but other backends could be used just as well. This certificate is created with a (not-shown) 30 day expiration, but set to renew automatically. This means once the time-to-expiration is equal to min_seconds_remaining, the resource will be automatically tainted and replaced on the next Terraform run. We like to give this automation plenty of room before expiration to take into account holiday seasons and avoid sending alerts to humans when the alerts hit seven days to expiration. For the rest of this snippet, the certificate is uploaded to Cloudflare and the ID from that upload is then placed in the AOP configuration for the given hostname. The create_before_destroy meta-argument ensures that the replacement certificate is uploaded successfully before we remove the certificate that’s currently in place.
The comfortable automation that we’ve achieved thus far did not come without some hair-pulling. Below are a few of the learnings that have allowed us to maintain the repository as a side project run by two engineers (shoutout David).
Store your state somewhere safe
It feels worth repeating that the tfstate contains secrets including any API keys you’re using with providers and the default location of the tfstate is in the current working directory. It’s very easy to accidentally commit this to source control. By defining a backend, the state can be stored with a cloud storage provider, in a secure location on a filesystem, in a database, or even Cloudflare Workers! Wherever the state is stored, make sure it is encrypted.
Choose simplicity, avoid modules
Modules are intended to reduce code repetition for well-defined chunks of systems such as “I want three clusters of whizz-bangs in locations A, C, and F.” If cloud-computing was like Factorio, this would be amazing. However, financial, technical, and physical constraints mean subtle differences in systems develop over time such as “I want fewer whizz-bangs in C and the whizz-bangs in F should get a different network topology.” In Terraform, implementation logic of these requirements is moved to the module code. HCL is absolutely not the place to write decipherable conditionals. While module versioning prevents having to make every change backwards-compatible, keeping module usage up-to-date becomes another chore for repository maintainers.
An understandable code base is a user-friendly codebase. It’s rare that a deeply cryptic error will return from a misconfigured resource definition. Conversely, modules, especially custom ones, can lead users on a head-scratching adventure. This kind of system can’t scale with confused users.
A few well-designed for_each loops (we’re obviously fans) can achieve similar objectives as modules without the complexity. It’s fine to use plain old resources too! Especially when there are more than a handful of varying arguments, it’s more valuable for the configuration to be clear than to be eloquent. For example: an account_member resource makes sense to be in a for_loop, but a page_rule probably doesn’t.
Keep tfstates small
Maintaining quick pull-request-to-plan turnaround keeps Terraform from feeling like a burden on users’ time. Furthermore, if a plan is taking 30 minutes to run, a rollback in the case of an issue would also take 30 minutes! This post describes our single-account-to-tfstate model.
However, after noticing slow-downs coming from the large number of AOP certificate configurations in a big zone, we moved that code to a separate tfstate. We were able to make this change because AOP configuration is fairly self-contained. To ensure there would be no fighting between the states, we kept the API token permissions for each tfstate mutually exclusive of each other. Our Atlantis Terraform plans typically finish under five minutes. If it feels impossible to keep the size of a tfstate down to a reasonable amount of time, it may be worth considering a different tool for that bit of configuration management.
Know when to use a Different tool
Terraform isn’t a panacea. We generally don’t use Terraform to manage DNS records, for example. We use OctoDNS which integrates more neatly into our infrastructure automation. DNS records can quickly add up to long state-rendering times and are often dynamically generated from systems that Terraform doesn’t know about. To avoid conflicts, there should only ever be one system publishing changes to DNS records.
We also haven’t figured out a maintainable way of managing Workers scripts in Terraform. When a .js script in the Terraform directory changes, Terraform isn’t aware of it. This means a change needs to occur somewhere else in a .tf file before the plan diff is generated. It likely isn’t an unsolvable issue, but doesn’t seem particularly worth cramming into Terraform when there are better options for Worker management like Wrangler.
Looking forward
We’re continuing to invest in the Cloudflare Terraforming experience both for our own use and for the benefit of our users. With the provider, we hope to offer a comfortable and scalable method of interacting with Cloudflare products. Hopefully this post has presented some useful suggestions to anyone interested in adopting Cloudflare-configuration-as-code. Don’t hesitate to reach out on the GitHub project for troubleshooting, bug reports, or feature requests. For more in depth documentation on using Terraform to manage your Cloudflare account, read on here. And if you don’t have a Cloudflare account already, click here to get started.
Pages Functions are now out of beta and generally available, bringing dynamic computation within 50ms of 95% of users globally. Built on top of Cloudflare Workers, Pages projects are easy to deploy and instantly benefit from this low latency, with over 275 data centers across the globe.
With Page Functions comes the ability to add dynamic server-side rendering to your applications. Pages makes it easy to deploy applications built using all the major meta-frameworks such as Astro, Next.js, Qwik, Remix, Solid, and Svelte. There is no better time to start deploying your server-side rendered full-stack applications to Cloudflare Pages.
Go server-side with Pages Functions
When Pages launched in December 2020, it was focused on being a high-performance host for static assets. Pages was a perfect choice for anyone building websites which could be generated ahead of time with static site generation. Jamstack was all the rage, and Cloudflare’s network was an excellent choice for its ability to serve static files to visitors from around the globe.
Once deployed the files would be effortlessly hosted and served at incredible speeds across the world to your users. These statically generated applications can run client-side code in the browser to customize the appearance and behavior of the page, but this approach often struggles with slow time-to-interactive (TTI), which results in a poor user experience, and SEO rankings.
Once loaded, client-side rendered applications are great at building highly interactive applications, but in order for such applications to load and become interactive, they usually need to make several network requests to fetch all the code and data it needs to create the UI. If your client devices have a slow or unreliable network connection, each request will become a hurdle that decreases the quality of the user experience.
Slow connected device making lots of requests
If you want users to start interacting with your web applications faster, you must make data requests when rendering the HTML. While static generation can avoid these runtime requests by making them at build time, it is not able to provide dynamic customized content. To give users both a customized and fast experience you can server-side render the HTML.
By using server-side rendering, you can optimize access to resources making use of Cloudflare’s high-bandwidth connectivity and the ability to cache data nearby, minimizing the time spent on the device waiting for data.
Furthermore, by running the server-side rendering in a Pages Function you get the benefit that both the client (browser) and server (Cloudflare Worker) are both executing similar JavaScript runtimes. This means that you can write isomorphic code that works on both the frontend and backend, avoiding duplication of business and data access logic. Many of the modern full-stack frameworks even provide for code to begin execution on the server and then continue running on the client.
Fast connected Worker making lots of requests
Use a full-stack framework
Writing your own library to do server-side rendering is no simple task. But luckily many frontend frameworks support server-side rendering, and Cloudflare Pages offers the perfect deployment platform for them. Each framework has its own take on server-side rendering, but most can be integrated effortlessly with Pages Functions. In fact, many frameworks come with starter kits and libraries that make deploying to Pages trivial.
The full-stack framework that uses the Qwik frontend framework is called QwikCity. You can read the full quick-start documentation for running Qwik on Pages here.
Create a new project by running the following command in your terminal:
npm create qwik@latest
You will be prompted to select a name – choose qwik-app – and a starter project – choose “Basic App (QwikCity)”. Now add the Cloudflare Pages adaptor by running the following in your terminal:
cd qwik-app
npm run qwik add cloudflare-pages
By installing the cloudflare-pages adapter, your project will have a Cloudflare Pages functions/[[path]].ts file. The [[path]] filename indicates that this file will handle requests to all incoming URLs, rendering the response in Pages Functions. Now, build and test the application using the wrangler pages dev tool:
npm run build
npx wrangler pages dev ./dist
The client and server-side code will be compiled and then Wrangler will start up a dev session. Press b to open a browser and see the server-side rendered site.
Astro
Astro is a full-stack framework that can run a range of different frontend frameworks. It added support for server-side rendering earlier this year. You can read the full quick-start documentation for running Astro on Pages here.
Create a new project by running the following command in your terminal:
npm create astro@latest
You will be prompted to select a path to the project, a starter template, and additional setup configuration – accept the defaults. Now add the Cloudflare Pages adaptor by running the following in your terminal:
cd <path/to/project>
npx astro add cloudflare
You will be prompted whether you wish to install – select continue when asked. This will update the astro.build/config file with the plugin. Update the configuration to set the cloudflare plugin to directory mode:
By installing this adaptor in directory mode, Astro will compile the server-side part of the application into a Pages Function at functions/[[path]].js. Now build and test the application using the wrangler pages dev tool:
npm run build
npx wrangler pages dev ./dist
The client and server-side code will be compiled and then Wrangler will start up a dev session. Press b to open a browser and see the server-side rendered site. Check out Astro’s docs to read more about configuring your Astro project when deploying it to Cloudflare Pages.
SolidStart
The full-stack framework that uses the SolidJS frontend framework is called SolidStart. Support for running SolidStart on Cloudflare Pages is provided by the start-cloudflare-pages Vite adapter.
Create a new SolidStart project by running the following command in your terminal:
mkdir my-app
cd my-app
npm init solid
You will be prompted to choose a template – choose “todomvc”. You are then prompted whether to add Server Side Rendering and TypeScript – choose “yes” for both. Now install the solid-start-cloudflare-pages adaptor.
Update the vite.config.ts file to use this adaptor.
import solid from "solid-start/vite";
import { defineConfig } from "vite";
import cloudflare from "solid-start-cloudflare-pages";

export default defineConfig({
  plugins: [solid({ adapter: cloudflare({}) })],
});
By including this adapter, Solid will compile the server-side part of the application into a Pages Function at functions/[[path]].js and the client-side part into dist/public. Now build and test the application using the wrangler pages dev tool:
npm run build
npx wrangler pages dev ./dist/public
The client and server-side code will be compiled and then Wrangler will start up a dev session. Press b to open a browser and see the server-side rendered site.
Nuxt.js
The full-stack framework that uses the Vue.js frontend framework is called Nuxt.js. Nuxt.js supports deploying to Cloudflare Pages natively via a Nitro preset.
Create a new Nuxt project using nuxi (a Nuxt.js specific version of Nitro), giving it the title nuxt-app in your terminal:
npx nuxi init nuxt-app
cd nuxt-app
npm install
By specifying an environment variable Nuxt.js can generate output for Cloudflare Pages Functions. Build and test the application using nuxi and wrangler:
NITRO_PRESET=cloudflare-pages npx nuxi build
npx wrangler pages dev .output/public
The client and server-side code will be compiled and then Wrangler will start up a dev session. Press b to open a browser and see the server-side rendered site.
Get rendering!
Now that Pages Functions are generally available, and the major full-stack frameworks provide straightforward integrations with Pages, there is no better time to add server-side rendering to your application and deploy to Cloudflare Pages.
In May 2022, we announced our quest to simplify databases – building them, maintaining them, integrating them. Our goal is to empower you with the tools to run a database that is powerful, scalable, with world-beating performance without any hassle. And we first set our sights on reimagining the database development experience for every type of user – not just database experts.
Over the past couple of months, we’ve been working to create just that, while learning some very important lessons along the way. As it turns out, building a global relational database product on top of Workers pushes the boundaries of the developer platform to their absolute limit, and often beyond them, but in a way that’s absolutely thrilling to us at Cloudflare. It means that while our progress might seem slow from outside, every improvement, bug fix or stress test helps lay down a path for all of our customers to build the world’s most ambitious serverless application.
However, as we continue down the road to making D1 production ready, it wouldn’t be “the Cloudflare way” unless we stopped for feedback first – even though it’s not quite finished yet. In the spirit of Developer Week, there is no better time to introduce the D1 open alpha!
An “open alpha” is a new concept for us. You’ll likely hear the term “open beta” on various announcements at Cloudflare, and while it makes sense for many products here, it wasn’t quite right for D1. There are still some crucial pieces that are still in active development and testing, so before we release the fully-formed D1 as a public beta for you to start building real-world apps with, we want to make sure everybody can start to get a feel for the product on their hobby apps or side-projects.
What’s included in the alpha?
While a lot is still changing behind the scenes with D1, we’ve put a lot of thought into how you, as a developer, interact with it – even if you’re new to databases.
Using the D1 dashboard
In a few clicks you can get your D1 database up and running right from within your dashboard. In our D1 interface, you can create, maintain and view your database as you please. Changes made in the UI are instantly available to your Worker – no redeploy required!
Use Wrangler
If you’re looking to get your hands a little dirty, you can also work with your database using our Wrangler CLI. Create your database and begin adding your data manually or bootstrap your database with one of two ways:
Migrations are a way to version your database changes. With D1, you can create a migration and then apply it to your database.
To create the migration, execute:
wrangler d1 migrations create <my-database-name> <short description of migration>
This will create an SQL file in a migrations folder where you can then go ahead and add your queries. Then apply the migrations to your database by executing:
wrangler d1 migrations apply <my-database-name>
Access D1 from within your Worker
You can attach your D1 to a Worker by adding the D1 binding to your wrangler.toml configuration file. Then interact with D1 by executing queries inside your Worker like so:
export default {
 async fetch(request, env) {
   const { pathname } = new URL(request.url);

   if (pathname === "/api/beverages") {
     const { results } = await env.DB.prepare(
       "SELECT * FROM Customers WHERE CompanyName = ?"
     )
       .bind("Bs Beverages")
       .all();
     return Response.json(results);
   }

   return new Response("Call /api/beverages to see Bs Beverages customers");
 },
};
Or access D1 from within your Pages Function
In this Alpha launch, D1 also supports integration with Cloudflare Pages! You can add a D1 binding inside the Pages dashboard, and write your queries inside a Pages Function to build a full-stack application! Check out the full documentation to get started with Pages and D1.
Community built tooling
During our private alpha period, the excitement behind D1 led to some valuable contributions to the D1 ecosystem and developer experience by members of the community. Here are some of our favorite projects to date:
d1-orm
An Object Relational Mapping (ORM) is a way for you to query and manipulate data by using JavaScript. Created by a Cloudflare Discord Community Champion, the d1-orm seeks to provide a strictly typed experience while using D1:
const users = new Model(
    // table name, primary keys, indexes etc
    tableDefinition,
    // column types, default values, nullable etc
    columnDefinitions
)

// TS helper for typed queries
type User = Infer<type of users>;

// ORM-style query builder
const user = await users.First({
    where: {
        id: 1,
    },
});
This is a zero-dependency query builder that provides a simple standardized interface while keeping the benefits and speed of using raw queries over a traditional ORM. While not intended to provide ORM-like functionality, workers-qb makes it easier to interact with the database from code for direct SQL access:
Instead of running the wrangler d1 execute command in your terminal every time you want to interact with your database, you can interact with D1 from within the d1-console. Created by a Discord Community Champion, this gives the benefit of executing multi-line queries, obtaining command history, and viewing a cleanly formatted table output.
While this is a community project today, we plan to natively support a “D1 Console” in the future. For now, get started by checking out the d1-console package here.
Kysely is a type-safe and autocompletion-friendly typescript SQL query builder. With this adapter you can interact with D1 with the familiar Kysely interface:
// Create Kysely instance with kysely-d1
const db = new Kysely<Database>({
  dialect: new D1Dialect({ database: env.DB })
});

// Read row from D1 table
const result = await db
  .selectFrom('kv')
  .selectAll()
  .where('key', '=', key)
  .executeTakeFirst();
The biggest pieces that have been disabled for this alpha release are replication and JavaScript transaction support. While we’ll be rolling out these changes gradually, we want to call out some limitations that exist today that we’re actively working on testing:
Database location: Each D1 database only runs a single instance. It’s created close to where you, as the developer, create the database, and does not currently move regions based on access patterns. Workers running elsewhere in the world will see higher latency as a result.
Concurrency limitations: Under high load, read and write queries may be queued rather than triggering new replicas to be created. As a result, the performance & throughput characteristics of the open alpha won’t be representative of the final product.
Availability limitations: Backups will block access to the DB while they’re running. In most cases this should only be a second or two, and any requests that arrive during the backup will be queued.
You can also check out a more detailed, up-to-date list on D1 alpha Limitations.
Request for feedback
While we can make all sorts of guesses and bets on the kind of databases you want to use D1 for, we are not the users – you are! We want developers from all backgrounds to preview the D1 tech at its early stages, and let us know where we need to improve to make it suitable for your production apps.
For general feedback about your experience and to interact with other folks in the alpha, join our #d1-open-alpha channel in the Cloudflare Developers Discord. We plan to make any important announcements and changes in this channel as well as on our monthly community calls.
To file more specific feature requests (no matter how wacky) and report any bugs, create a thread in the Cloudflare Community forum under the D1 category. We will be maintaining this forum as a way to plan for the months ahead!
Get started
Want to get started right away? Check out our D1 documentation to get started today. Build our classic Northwind Traders demo to explore the D1 experience and deploy your first D1 database!
We’re excited to announce that Workers will soon be able to send outbound requests through a mutually authenticated channel via mutual TLS authentication!
When making outbound requests from a Worker, TLS is always used on the server side, so that the client can validate that the information is being sent to the right destination. But in the same way, the server may want to authenticate the client to ensure that the request is coming from an authorized client. This two-way street of authentication is called Mutual TLS. In this blog, we’re going to talk through the importance of mutual TLS authentication, what it means to use mutual TLS within Workers, and how in a few months you’ll be able to use it to send information through an authenticated channel — adding a layer of security to your application!
mTLS between Cloudflare and an Origin
Mutual TLS authentication works by having a server validate the client certificate against a CA. If the validation passes then the server knows that it’s the right client and will let the request go through. If the validation fails or if a client certificate is not presented then the server can choose to drop the request.
Today, customers use mTLS to secure connections between Cloudflare and an origin — this is done through a product called Authenticated Origin Pull. Once a customer enables it, Cloudflare starts serving a client certificate on all outgoing requests. This is either a Cloudflare managed client certificate or it can be one uploaded by the customer. When enabled, Cloudflare will present this certificate when connecting to an origin. The origin should then check the client certificate to see if it’s the one that it expects to see. If it is then the request will go through. If it’s the wrong client certificate or is not included then the origin can choose to drop the request.
Doing this brings a big security boost because it allows the origin to only accept traffic from Cloudflare and drop any unexpected external traffic.
Digging up problems with dogfooding
Today, many Cloudflare services are built on Cloudflare Workers — it’s the secret sauce we use to continuously ship fast, reliable products to our customers. Internally, we might have one Cloudflare account that runs multiple services, with each service deployed on an individual Worker.
Whenever one service needs to talk to another, the fetch() function is used to request or send information. This can be object data that we send to upstream providers, it can be a read or write to a database, or service to service communication. In most regards, the information that’s going to the origin is sensitive and requires a layer of authentication. Without proper authentication, any client would be able to access the data, removing a layer of security.
Implementing service to service authentication
Today, there are a few ways that you can set up service to service authentication, if you’re building on Workers.
One way to set up service authentication is to use Authenticated Origin Pull. Authenticated Origin Pull allows customers to implement mutual TLS between Cloudflare and an origin by attaching a client certificate and private key to a domain or hostname, so that all outbound requests include a client certificate. The origin can then check this certificate to see whether the request came from Cloudflare. If there’s a valid certificate, then the origin can let the request through and if there’s an invalid certificate or no certificate then the origin can choose to drop the request. However, Authenticated Origin Pull has its limitations and isn’t ideal for some use-cases.
The first limitation is that an Authenticated Origin Pull certificate is tied to a publicly hosted hostname or domain. Some services that are built on Workers don’t necessarily need to be exposed to the public Internet. Therefore, tying it to a domain doesn’t really make sense.
The next limitation is that if you have multiple Workers services that are each writing to the same database, you may want to be able to distinguish them. What if at some point, you need to take the “write” power away from the Worker? Or, what if only Workers A and B are allowed to make writes but Worker C should only make “read” requests?
Today, if you use Authenticated Origin Pulls with Cloudflare’s client certificate then all requests will be accepted as valid. This is because for all outbound requests, we attach the same client certificate. So even though you’re restricting your traffic to “Cloudflare-Only”, there’s no Worker-level granularity.
Now, there’s another solution that you can use. You can make use of Access and set up Token Authentication by using a pre-shared key and configuring your Worker to allow or deny access based on the pre-shared key, presented in the header. While this does allow you to lock down authentication on a per-Worker or per-service basis, the feedback that we’ve gotten from our internal teams who have implemented this is that it’s 1) cumbersome to manage and 2) requires the two service to speak over HTTP, and 3) doesn’t expose the client’s identity. And so, with these limitations in mind, we’re excited to bring mutual TLS authentication to Workers — an easy, scalable way to manage authentication and identity for anyone building on Workers.
Coming soon: Mutual TLS for Workers
We’re excited to announce that in the next few months, we’re going to be bringing mutual TLS support to Workers. Customers will be able to upload client certificates to Cloudflare and attach them in the fetch() requests within a Worker. That way, you can have per-Worker or even per-request level of granularity when it comes to authentication and identification.
When sending out the subrequest, Cloudflare will present the client certificate and the receiving server will be able to check:
1) Is this client presenting a valid certificate? 2) Within Cloudflare, what service or Worker is this request coming from?
This is one of our most highly requested features, both from customers and from internal teams, and we’re excited to launch it and make it a no-brainer for any developer to use Cloudflare as their platform for anything they want to build!
The collective thoughts of the interwebz
Manage Consent
To provide the best experiences, we use technologies like cookies to store and/or access device information. Consenting to these technologies will allow us to process data such as browsing behavior or unique IDs on this site. Not consenting or withdrawing consent, may adversely affect certain features and functions.
Functional
Always active
The technical storage or access is strictly necessary for the legitimate purpose of enabling the use of a specific service explicitly requested by the subscriber or user, or for the sole purpose of carrying out the transmission of a communication over an electronic communications network.
Preferences
The technical storage or access is necessary for the legitimate purpose of storing preferences that are not requested by the subscriber or user.
Statistics
The technical storage or access that is used exclusively for statistical purposes.The technical storage or access that is used exclusively for anonymous statistical purposes. Without a subpoena, voluntary compliance on the part of your Internet Service Provider, or additional records from a third party, information stored or retrieved for this purpose alone cannot usually be used to identify you.
Marketing
The technical storage or access is required to create user profiles to send advertising, or to track the user on a website or across several websites for similar marketing purposes.