Tag Archives: launch

AWS Weekly Roundup: Global AWS Heroes Summit, AWS Lambda, Amazon Redshift, and more (July 22, 2024)

Post Syndicated from Donnie Prakoso original https://aws.amazon.com/blogs/aws/aws-weekly-roundup-global-aws-heroes-summit-aws-lambda-amazon-redshift-and-more-july-22-2024/

Last week, AWS Heroes from around the world gathered to celebrate the 10th anniversary of the AWS Heroes program at Global AWS Heroes Summit. This program recognizes a select group of AWS experts worldwide who go above and beyond in sharing their knowledge and making an impact within developer communities.

Matt Garman, CEO of AWS and a long-time supporter of developer communities, made a special appearance for a Q&A session with the Heroes to listen to their feedback and respond to their questions.

Here’s an epic photo from the AWS Heroes Summit:

As Matt mentioned in his Linkedin post, “The developer community has been core to everything we have done since the beginning of AWS.” Thank you, Heroes, for all you do. Wishing you all a safe flight home.

Last week’s launches
Here are some launches that caught my attention last week:

Announcing the July 2024 updates to Amazon Corretto — The latest updates for the Corretto distribution of OpenJDK is now available. This includes security and critical updates for the Long-Term Supported (LTS) and Feature (FR) versions.

New open-source Advanced MYSQL ODBC Driver now available for Amazon Aurora and RDS — The new AWS ODBC Driver for MYSQL provides faster switchover and failover times, and authentication support for AWS Secrets Manager and AWS Identity and Access Management (IAM), making it a more efficient and secure option for connecting to Amazon RDS and Amazon Aurora MySQL-compatible edition databases.

Productionize Fine-tuned Foundation Models from SageMaker Canvas — Amazon SageMaker Canvas now allows you to deploy fine-tuned Foundation Models (FMs) to SageMaker real-time inference endpoints, making it easier to integrate generative AI capabilities into your applications outside the SageMaker Canvas workspace.

AWS Lambda now supports SnapStart for Java functions that use the ARM64 architecture — Lambda SnapStart for Java functions on ARM64 architecture delivers up to 10x faster function startup performance and up to 34% better price performance compared to x86, enabling the building of highly responsive and scalable Java applications using AWS Lambda.

Amazon QuickSight improves controls performance — Amazon QuickSight has improved the performance of controls, allowing readers to interact with them immediately without having to wait for all relevant controls to reload. This enhancement reduces the loading time experienced by readers.

Amazon OpenSearch Serverless levels up speed and efficiency with smart caching — The new smart caching feature for indexing in Amazon OpenSearch Serverless automatically fetches and manages data, leading to faster data retrieval, efficient storage usage, and cost savings.

Amazon Redshift Serverless with lower base capacity available in the Europe (London) Region — Amazon Redshift Serverless now allows you to start with a lower data warehouse base capacity of 8 Redshift Processing Units (RPUs) in the Europe (London) region, providing more flexibility and cost-effective options for small to large workloads.

AWS Lambda now supports Amazon MQ for ActiveMQ and RabbitMQ in five new regions — AWS Lambda now supports Amazon MQ for ActiveMQ and RabbitMQ in five new regions, enabling you to build serverless applications with Lambda functions that are invoked based on messages posted to Amazon MQ message brokers.

From community.aws
Here’s my top 5 personal favorites posts from community.aws:

Upcoming AWS events
Check your calendars and sign up for upcoming AWS events:

AWS Summits — Join free online and in-person events that bring the cloud computing community together to connect, collaborate, and learn about AWS. To learn more about future AWS Summit events, visit the AWS Summit page. Register in your nearest city: AWS Summit Taipei (July 23–24), AWS Summit Mexico City (Aug. 7), and AWS Summit Sao Paulo (Aug. 15).

AWS Community Days — Join community-led conferences that feature technical discussions, workshops, and hands-on labs led by expert AWS users and industry leaders from around the world. Upcoming AWS Community Days are in Aotearoa (Aug. 15), Nigeria (Aug. 24), New York (Aug. 28), and Belfast (Sept. 6).

You can browse all upcoming in-person and virtual events.

That’s all for this week. Check back next Monday for another Weekly Roundup!

Donnie

This post is part of our Weekly Roundup series. Check back each week for a quick roundup of interesting news and announcements from AWS!

AWS Weekly Roundup: Advanced capabilities in Amazon Bedrock and Amazon Q, and more (July 15, 2024).

Post Syndicated from Abhishek Gupta original https://aws.amazon.com/blogs/aws/aws-weekly-roundup-advanced-capabilities-in-amazon-bedrock-and-amazon-q-and-more-july-15-2024/

As expected, there were lots of exciting launches and updates announced during the AWS Summit New York. You can quickly scan the highlights in Top Announcements of the AWS Summit in New York, 2024.

NY-Summit-feat-img

My colleagues and fellow AWS News Blog writers Veliswa Boya and Sébastien Stormacq were at the AWS Community Day Cameroon last week. They were energized to meet amazing professionals, mentors, and students – all willing to learn and exchange thoughts about cloud technologies. You can access the video replay to feel the vibes or just watch some of the talks!

AWS Community Day Cameroon 2024

Last week’s launches
In addition to the launches at the New York Summit, here are a few others that got my attention.

Advanced RAG capabilities Knowledge Bases for Amazon Bedrock – These include custom chunking options to enable customers to write their own chunking code as a Lambda function; smart parsing to extract information from complex data such as tables; and query reformulation to break down queries into simpler sub-queries, retrieve relevant information for each, and combine the results into a final comprehensive answer.

Amazon Bedrock Prompt Management and Prompt Flows – This is a preview launch of Prompt Management that help developers and prompt engineers get the best responses from foundation models for their use cases; and Prompt Flows accelerates the creation, testing, and deployment of workflows through an intuitive visual builder.

Fine-tuning for Anthropic’s Claude 3 Haiku in Amazon Bedrock (preview) – By providing your own task-specific training dataset, you can fine tune and customize Claude 3 Haiku to boost model accuracy, quality, and consistency to further tailor generative AI for your business.

IDE workspace context awareness in Amazon Q Developer chat – Users can now add @workspace to their chat message in Q Developer to ask questions about the code in the project they currently have open in the IDE. Q Developer automatically ingests and indexes all code files, configurations, and project structure, giving the chat comprehensive context across your entire application within the IDE.

New features in Amazon Q Business –  The new personalization capabilities in Amazon Q Business are automatically enabled and will use your enterprise’s employee profile data to improve their user experience. You can now get answers from text content in scanned PDFs, and images embedded in PDF documents, without having to use OCR for preprocessing and text extraction.

Amazon EC2 R8g instances powered by AWS Graviton4 are now generally available – Amazon EC2 R8g instances are ideal for memory-intensive workloads such as databases, in-memory caches, and real-time big data analytics. These are powered by AWS Graviton4 processors and deliver up to 30% better performance compared to AWS Graviton3-based instances.

Vector search for Amazon MemoryDB is now generally available – Vector search for MemoryDB enables real-time machine learning (ML) and generative AI applications. It can store millions of vectors with single-digit millisecond query and update latencies at the highest levels of throughput with >99% recall.

Introducing Valkey GLIDE, an open source client library for Valkey and Redis open sourceValkey is an open source key-value data store that supports a variety of workloads such as caching, and message queues. Valkey GLIDE is one of the official client libraries for Valkey and it supports all Valkey commands. GLIDE supports Valkey 7.2 and above, and Redis open source 6.2, 7.0, and 7.2.

Amazon OpenSearch Service enhancementsAmazon OpenSearch Serverless now supports workloads up to 30TB of data for time-series collections enabling more data-intensive use cases, and an innovative caching mechanism that automatically fetches and intelligently manages data, leading to faster data retrieval, efficient storage usage, and cost savings. Amazon OpenSearch Service has now added support for AI powered Natural Language Query Generation in OpenSearch Dashboards Log Explorer so you can get started quickly with log analysis without first having to be proficient in PPL.

Open source release of Secrets Manager Agent for AWS Secrets Manager – Secrets Manager Agent is a language agnostic local HTTP service that you can install and use in your compute environments to read secrets from Secrets Manager and cache them in memory, instead of making a network call to Secrets Manager.

Amazon S3 Express One Zone now supports logging of all events in AWS CloudTrail – This capability lets you get details on who made API calls to S3 Express One Zone and when API calls were made, thereby enhancing data visibility for governance, compliance, and operational auditing.

Amazon CloudFront announces managed cache policies for web applications – Previously, Amazon CloudFront customers had two options for managed cache policies, and had to create custom cache policies for all other cases. With the new managed cache policies, CloudFront caches content based on the Cache-Control headers returned by the origin, and defaults to not caching when the header is not returned.

For a full list of AWS announcements, be sure to keep an eye on the What’s New at AWS page.

We launched existing services in additional Regions:

Other AWS news
Here are some additional projects, blog posts, and news items that you might find interesting:

Context window overflow: Breaking the barrierThis blog post dives into intricate workings of generative artificial intelligence (AI) models, and why is it crucial to understand and mitigate the limitations of CWO (context window overflow).

Using Agents for Amazon Bedrock to interactively generate infrastructure as code – This blog post explores how Agents for Amazon Bedrock can be used to generate customized, organization standards-compliant IaC scripts directly from uploaded architecture diagrams.

Automating model customization in Amazon Bedrock with AWS Step Functions workflow – This blog post covers orchestrating repeatable and automated workflows for customizing Amazon Bedrock models and how AWS Step Functions can help overcome key pain points in model customization.

AWS open source news and updates – My colleague Ricardo Sueiras writes about open source projects, tools, and events from the AWS Community; check out Ricardo’s page for the latest updates.

Upcoming AWS events
Check your calendars and sign up for upcoming AWS events:

AWS Summits – Join free online and in-person events that bring the cloud computing community together to connect, collaborate, and learn about AWS. To learn more about future AWS Summit events, visit the AWS Summit page. Register in your nearest city: Bogotá (July 18), Taipei (July 23–24), AWS Summit Mexico City (Aug. 7), and AWS Summit Sao Paulo (Aug. 15).

AWS Community Days – Join community-led conferences that feature technical discussions, workshops, and hands-on labs led by expert AWS users and industry leaders from around the world. Upcoming AWS Community Days are in Aotearoa (Aug. 15), Nigeria (Aug. 24), New York (Aug. 28), and Belfast (Sept. 6).

Browse all upcoming AWS led in-person and virtual events and developer-focused events.

That’s all for this week. Check back next Monday for another Weekly Roundup!

— Abhishek

This post is part of our Weekly Roundup series. Check back each week for a quick roundup of interesting news and announcements from AWS!

Vector search for Amazon MemoryDB is now generally available

Post Syndicated from Channy Yun original https://aws.amazon.com/blogs/aws/vector-search-for-amazon-memorydb-is-now-generally-available/

Today, we are announcing the general availability of vector search for Amazon MemoryDB, a new capability that you can use to store, index, retrieve, and search vectors to develop real-time machine learning (ML) and generative artificial intelligence (generative AI) applications with in-memory performance and multi-AZ durability.

With this launch, Amazon MemoryDB delivers the fastest vector search performance at the highest recall rates among popular vector databases on Amazon Web Services (AWS). You no longer have to make trade-offs around throughput, recall, and latency, which are traditionally in tension with one another.

You can now use one MemoryDB database to store your application data and millions of vectors with single-digit millisecond query and update response times at the highest levels of recall. This simplifies your generative AI application architecture while delivering peak performance and reducing licensing cost, operational burden, and time to deliver insights on your data.

With vector search for Amazon MemoryDB, you can use the existing MemoryDB API to implement generative AI use cases such as Retrieval Augmented Generation (RAG), anomaly (fraud) detection, document retrieval, and real-time recommendation engines. You can also generate vector embeddings using artificial intelligence and machine learning (AI/ML) services like Amazon Bedrock and Amazon SageMaker and store them within MemoryDB.

Which use cases would benefit most from vector search for MemoryDB?
You can use vector search for MemoryDB for the following specific use cases:

1. Real-time semantic search for retrieval-augmented generation (RAG)
You can use vector search to retrieve relevant passages from a large corpus of data to augment a large language model (LLM). This is done by taking your document corpus, chunking them into discrete buckets of texts, and generating vector embeddings for each chunk with embedding models such as the Amazon Titan Multimodal Embeddings G1 model, then loading these vector embeddings into Amazon MemoryDB.

With RAG and MemoryDB, you can build real-time generative AI applications to find similar products or content by representing items as vectors, or you can search documents by representing text documents as dense vectors that capture semantic meaning.

2. Low latency durable semantic caching
Semantic caching is a process to reduce computational costs by storing previous results from the foundation model (FM) in-memory. You can store prior inferenced answers alongside the vector representation of the question in MemoryDB and reuse them instead of inferencing another answer from the LLM.

If a user’s query is semantically similar based on a defined similarity score to a prior question, MemoryDB will return the answer to the prior question. This use case will allow your generative AI application to respond faster with lower costs from making a new request to the FM and provide a faster user experience for your customers.

3. Real-time anomaly (fraud) detection
You can use vector search for anomaly (fraud) detection to supplement your rule-based and batch ML processes by storing transactional data represented by vectors, alongside metadata representing whether those transactions were identified as fraudulent or valid.

The machine learning processes can detect users’ fraudulent transactions when the net new transactions have a high similarity to vectors representing fraudulent transactions. With vector search for MemoryDB, you can detect fraud by modeling fraudulent transactions based on your batch ML models, then loading normal and fraudulent transactions into MemoryDB to generate their vector representations through statistical decomposition techniques such as principal component analysis (PCA).

As inbound transactions flow through your front-end application, you can run a vector search against MemoryDB by generating the transaction’s vector representation through PCA, and if the transaction is highly similar to a past detected fraudulent transaction, you can reject the transaction within single-digit milliseconds to minimize the risk of fraud.

Getting started with vector search for Amazon MemoryDB
Look at how to implement a simple semantic search application using vector search for MemoryDB.

Step 1. Create a cluster to support vector search
You can create a MemoryDB cluster to enable vector search within the MemoryDB console. Choose Enable vector search in the Cluster settings when you create or update a cluster. Vector search is available for MemoryDB version 7.1 and a single shard configuration.

Step 2. Create vector embeddings using the Amazon Titan Embeddings model
You can use Amazon Titan Text Embeddings or other embedding models to create vector embeddings, which is available in Amazon Bedrock. You can load your PDF file, split the text into chunks, and get vector data using a single API with LangChain libraries integrated with AWS services.

import redis
import numpy as np
from langchain.document_loaders import PyPDFLoader
from langchain.text_splitter import RecursiveCharacterTextSplitter
from langchain.embeddings import BedrockEmbeddings

# Load a PDF file and split document
loader = PyPDFLoader(file_path=pdf_path)
        pages = loader.load_and_split()
        text_splitter = RecursiveCharacterTextSplitter(
            separators=["\n\n", "\n", ".", " "],
            chunk_size=1000,
            chunk_overlap=200,
        )
        chunks = loader.load_and_split(text_splitter)

# Create MemoryDB vector store the chunks and embedding details
client = RedisCluster(
        host=' mycluster.memorydb.us-east-1.amazonaws.com',
        port=6379,
        ssl=True,
        ssl_cert_reqs="none",
        decode_responses=True,
    )

embedding =  BedrockEmbeddings (
           region_name="us-east-1",
 endpoint_url=" https://bedrock-runtime.us-east-1.amazonaws.com",
    )

#Save embedding and metadata using hset into your MemoryDB cluster
for id, dd in enumerate(chucks*):
     y = embeddings.embed_documents([dd])
     j = np.array(y, dtype=np.float32).tobytes()
     client.hset(f'oakDoc:{id}', mapping={'embed': j, 'text': chunks[id] } )

Once you generate the vector embeddings using the Amazon Titan Text Embeddings model, you can connect to your MemoryDB cluster and save these embeddings using the MemoryDB HSET command.

Step 3. Create a vector index
To query your vector data, create a vector index using theFT.CREATE command. Vector indexes are also constructed and maintained over a subset of the MemoryDB keyspace. Vectors can be saved in JSON or HASH data types, and any modifications to the vector data are automatically updated in a keyspace of the vector index.

from redis.commands.search.field import TextField, VectorField

index = client.ft(idx:testIndex).create_index([
        VectorField(
            "embed",
            "FLAT",
            {
                "TYPE": "FLOAT32",
                "DIM": 1536,
                "DISTANCE_METRIC": "COSINE",
            }
        ),
        TextField("text")
        ]
    )

In MemoryDB, you can use four types of fields: numbers fields, tag fields, text fields, and vector fields. Vector fields support K-nearest neighbor searching (KNN) of fixed-sized vectors using the flat search (FLAT) and hierarchical navigable small worlds (HNSW) algorithm. The feature supports various distance metrics, such as euclidean, cosine, and inner product. We will use the euclidean distance, a measure of the angle distance between two points in vector space. The smaller the euclidean distance, the closer the vectors are to each other.

Step 4. Search the vector space
You can use FT.SEARCH and FT.AGGREGATE commands to query your vector data. Each operator uses one field in the index to identify a subset of the keys in the index. You can query and find filtered results by the distance between a vector field in MemoryDB and a query vector based on some predefined threshold (RADIUS).

from redis.commands.search.query import Query

# Query vector data
query = (
    Query("@vector:[VECTOR_RANGE $radius $vec]=>{$YIELD_DISTANCE_AS: score}")
     .paging(0, 3)
     .sort_by("vector score")
     .return_fields("id", "score")     
     .dialect(2)
)

# Find all vectors within 0.8 of the query vector
query_params = {
    "radius": 0.8,
    "vec": np.random.rand(VECTOR_DIMENSIONS).astype(np.float32).tobytes()
}

results = client.ft(index).search(query, query_params).docs

For example, when using cosine similarity, the RADIUS value ranges from 0 to 1, where a value closer to 1 means finding vectors more similar to the search center.

Here is an example result to find all vectors within 0.8 of the query vector.

[Document {'id': 'doc:a', 'payload': None, 'score': '0.243115246296'},
 Document {'id': 'doc:c', 'payload': None, 'score': '0.24981123209'},
 Document {'id': 'doc:b', 'payload': None, 'score': '0.251443207264'}]

To learn more, you can look at a sample generative AI application using RAG with MemoryDB as a vector store.

What’s new at GA
At re:Invent 2023, we released vector search for MemoryDB in preview. Based on customers’ feedback, here are the new features and improvements now available:

  • VECTOR_RANGE to allow MemoryDB to operate as a low latency durable semantic cache, enabling cost optimization and performance improvements for your generative AI applications.
  • SCORE to better filter on similarity when conducting vector search.
  • Shared memory to not duplicate vectors in memory. Vectors are stored within the MemoryDB keyspace and pointers to the vectors are stored in the vector index.
  • Performance improvements at high filtering rates to power the most performance-intensive generative AI applications.

Now available
Vector search is available in all Regions that MemoryDB is currently available. Learn more about vector search for Amazon MemoryDB in the AWS documentation.

Give it a try in the MemoryDB console and send feedback to the AWS re:Post for Amazon MemoryDB or through your usual AWS Support contacts.

Channy

Build enterprise-grade applications with natural language using AWS App Studio (preview)

Post Syndicated from Donnie Prakoso original https://aws.amazon.com/blogs/aws/build-custom-business-applications-without-cloud-expertise-using-aws-app-studio-preview/

Organizations often struggle to solve their business problems in areas like claims processing, inventory tracking, and project approvals. Custom business applications could provide a solution to solve these problems and help an organization work more effectively but have historically required a professional development team to build and maintain. But often, development capacity is unavailable or too expensive, leaving businesses using inefficient tools and processes.

Today, we’re announcing a public preview of AWS App Studio. App Studio is a generative artificial intelligence (AI)-powered service that uses natural language to create enterprise-grade applications in minutes, without requiring software development skills.

Here’s a quick look at what App Studio can do. Once I’m signed in to App Studio, I select CREATE A NEW APP using the generative AI assistant. I describe that I need a project approval app. App Studio then generates an app for me, complete with a user interface, data models, and business logic. The entire app generation process is complete in minutes. 

Note: This animation above shows the flow at an accelerated speed for demonstration purposes.

While writing this post, I discovered that App Studio is useful for various technical professionals. IT project managers, data engineers, and enterprise architects can use it to create and manage secure business applications in minutes instead of days. App Studio helps organizations build end-to-end custom applications, and it has two main user roles:

  • Admin – Members in this group can manage groups and roles, create and edit connectors, and maintain visibility into other apps built within their organization. In addition to these permissions, admins can also build apps of their own. To enable and set up App Studio or to learn more about what you can do as an administrator, you can jump to the Getting started with AWS App Studio (preview) section.
  • Builder – Members of the builder group can create, build, and share applications. If you’re more interested in the journey of building applications, you can skip to the Using App Studio as a builder: Creating an application section.

Getting started with AWS App Studio
AWS App Studio integrates with AWS IAM Identity Center, making it easier for me to secure access with the flexibility to integrate with existing single sign-on (SSO) and integration with Lightweight Directory Access Protocol (LDAP). Also, App Studio manages the application deployments and operations, removing the time and effort required to operate applications. Now, I can spend more of my time adding features to an application and customizing it to user needs.

Before I can use App Studio to create my applications, I need to enable the service. Here is how an administrator would set up an App Studio instance.

First, I need to go to the App Studio management console and choose Get started.

As mentioned, App Studio integrates with IAM Identity Center and will automatically detect if you have an existing organization instance in IAM Identity Center. To learn more about the difference between an organization and an account instance on IDC, you can visit the Manage organization and account instances of IAM Identity Center page.

In this case, I don’t have any organization instance, so App Studio will guide me through creating an account instance in IAM Identity Center. Here, as an administrator, I select Create an account instance for me

In the next section, Create users and groups and add them to App Studio, I need to define both an admin and builder group. In this section, I add myself as the admin, and I’ll add users into the builder group later. 

The last part of the onboarding process is to review and check the tick box in the Acknowledgment section, then select Set up.

When the onboarding process is complete, I can see from the Account page that my App Studio is Active and ready to use. At this point, I have a unique App Studio instance URL that I can access.

This onboarding scenario illustrates how you can start without an instance preconfigured in IAM Identity Center . Learn more on the Creating and setting up an App Studio instance for the first time page to understand how to use your existing IAM Identity Center instance. 

Because App Studio created the AWS IAM Identity Center account instance for me, I received an email along with instructions to sign in to App Studio. Once I select the link, I’ll need to create a password for my account and define the multi-factor authentication (MFA) to improve the security posture of my account.

Then, I can sign in to App Studio.

Add additional users (optional)
App Studio uses AWS IAM Identity Center to manage users and groups. This means that if I need to invite additional users into my App Studio instance, I need to do that in IAM Identity Center. 

For example, here’s the list of my users. I can add more users by selecting Add user. Once I’ve finished adding users, they will receive an email with the instructions to activate their accounts.

If I need to create additional groups, I can do so by selecting Create group on the Groups page. The following screenshot shows groups I’ve defined for my account instance in IAM Identity Center.

Using AWS App Studio as an administrator
Now, I’m switching to the App Studio and signing in as an administrator. Here, I can see two main sections: Admin hub and Builder hub.

As an administrator, I can grant users access to App Studio by associating existing user groups with roles in the Roles section:

To map the group I created in my IAM Identity Center, I select Add group and select the Group identifier and Role. There are three roles I can configure: admin, builder, and app user. To understand the difference between each role, visit the Managing access and roles in App Studio page.

As an administrator, I can incorporate various data sources with App Studio using connectors. App Studio provides built-in connectors to integrate with AWS services such as Amazon Aurora, Amazon DynamoDB, and Amazon Simple Storage Service (Amazon S3). It also has a built-in connector for Salesforce and a generic API and OpenAPI connector to integrate with third-party services.

Furthermore, App Studio automatically created a managed DynamoDB connector for me to get started. I also have the flexibility to create additional connectors by selecting Create connector

On this page, I can create other connectors to AWS services. If I need other AWS services, I can select Other AWS services. To learn how to define your IAM role for your connectors, visit Connect App Studio to other services with connectors.

Using App Studio as a builder: Creating an application
As a builder, I can use the App Studio generative AI–powered low-code building environment to create secure applications. To start, I can describe the application that I need in natural language, such as “Build an application to review and process invoices.” Then, App Studio will generate the application, complete with the data models, business logic, and a multipage UI.

Here’s where the fun begins. It’s time for me to build apps in App Studio. On the Builder hub page, I select Create app.

I give it a name, and there are two options for me to build the app: Generate an app with AI or Start from scratch. I select Generate an app with AI

On the next page, I can start building the app by simply describing what I need in the text box. I also can choose sample prompts which are available on the right panel. 

Then, App Studio will prepare app requirements for me. I can improve my plan for the application by refining the prompt and reviewing the updated requirements. Once I’m happy with the results, I select Generate app, and App Studio will generate an application for me.

I found this to be a good experience for me when I started building apps with App Studio. The generative AI capability built into App Studio generated an app for me in minutes, compared to the hours or even days it would have taken me to get to the same point using other tools.

After a few minutes, my app is ready. I also see that App Studio prepares a quick tutorial for me to navigate around and understand different areas. 

There are three main areas in App Studio: PagesAutomations, and Data. I always like to start building my apps by defining the data models first, so let’s navigate to the Data section.

In the Data section, I can model my application data with the managed data store powered by DynamoDB or using the available data connectors. Because I chose to let AI generate this app, I have all the data entities defined for me. If I opted to do it manually, I would need to create entities representing the different data tables and field types for my application.

Once I’m happy with the data entities, I can build visual pages. In this area, I can create the UI for my users. I can add and arrange components like tables, forms, and buttons to create a tailored experience for my end users.

While I’m building the app, I can see the live preview by selecting Preview. This is useful for testing the layout and functionality of my application.

But the highlight for me in these three areas is the Automations. With the automations, I can define rules, workflows, and any actions that define or extend my application’s business logic. Because I chose to build this application with App Studio’s generative AI assistant, it automatically created and wired up multiple different automations needed for my application.

For example, every time a new project is submitted, it will trigger an action to create a project and send a notification email. 

I can also extend my business logic by invoking API callouts, AWS Lambda, or other AWS services. Besides creating the project, I’d also like to archive the project in a flat-file format into an S3 bucket. To do that, I also need to do some processing, and I happen to already have the functionality built in an existing Lambda function.

Here, I select Invoke Lambda, as shown in the previous screenshot. Then, I need to set the ConnectorFunction name, and the Function event payload to pass into my existing Lambda function.

Finally, after I’m happy with all the UI pages, data entities, and automations, I can publish it by selecting Publish. I have the flexibility to publish my app in a Testing or Production environment. This helps me to test my application before pushing it to production.

Join the preview
AWS App Studio is currently in preview, and you can access it in the US West (Oregon) AWS Region, but your applications can connect to your data in other AWS Regions.

Build secure, scalable, and performant custom business applications to modernize and streamline mission-critical tasks with AWS App Studio. Learn more about all the features and functionalities on the AWS App Studio documentation page, and join the conversation in the #aws-app-studio channel in the AWS Developers Slack workspace.

Happy building,

— Donnie

Amazon Q Apps, now generally available, enables users to build their own generative AI apps

Post Syndicated from Prasad Rao original https://aws.amazon.com/blogs/aws/amazon-q-apps-now-generally-available-enables-users-to-build-their-own-generative-ai-apps/

When we launched Amazon Q Business in April 2024, we also previewed Amazon Q Apps. Amazon Q Apps is a capability within Amazon Q Business for users to create generative artificial intelligence (generative AI)–powered apps based on the organization’s data. Users can build apps using natural language and securely publish them to the organization’s app library for everyone to use.

After collecting your feedback and suggestions during the preview, today we’re making Amazon Q Apps generally available. We’re also adding some new capabilities that were not available during the preview, such as API for Amazon Q Apps and the ability to specify data sources at the individual card level.

I’ll expand on the new features in a moment, but let’s first look into how to get started with Amazon Q Apps.

Transform conversations into reusable apps
Amazon Q Apps allows users to generate an app from their conversation with Amazon Q Business. Amazon Q Apps intelligently captures the context of conversation to generate an app tailored to specific needs. Let’s see it in action!

As I started writing this post, I thought of getting help from Amazon Q Business to generate a product overview of Amazon Q Apps. After all, Amazon Q Business is for boosting workforce productivity. So, I uploaded the product messaging documents to an Amazon Simple Storage Service (Amazon S3) bucket and added it as a data source using Amazon S3 connector for Amazon Q Business.

I start my conversation with the prompt:

I’m writing a launch post for Amazon Q Apps.
Here is a short description of the product: Employees can create lightweight, purpose-built Amazon Q Apps within their broader Amazon Q Business application environment.
Generate an overview of the product and list its key features.

Amazon Q Business Chat

After starting the conversation, I realize that creating a product overview given a product description would also be useful for others in the organization. I choose Create Amazon Q App to create a reusable and shareable app.

Amazon Q Business automatically generates a prompt to create an Amazon Q App and displays the prompt to me to verify and edit if need be:

Build an app that takes in a short text description of a product or service, and outputs an overview of that product/service and a list of its key features, utilizing data about the product/service known to Q.

Amazon Q Apps Creator

I choose Generate to continue the creation of the app. It creates a Product Overview Generator app with four cards—two input cards to get user inputs and two output cards that display the product overview and its key features.

Product Overview Generator App

I can adjust the layout of the app by resizing the cards and moving them around.

Also, the prompts for the individual text output cards are automatically generated so I can view and edit them. I choose the edit icon of the Product Overview card to see the prompt in the side panel.

In the side panel, I can also select the source for the text output card to generate the output using either large language model (LLM) knowledge or approved data sources. For the approved data sources, I can select one or more data sources that are configured for this Amazon Q Business application. I select the Marketing (Amazon S3) data source I had configured for creating this app.

Edit Text Output Card Prompt and select source

As you would notice, I generated a fully functional app from the conversation itself without having to make any changes to the base prompt or the individual text output card prompts.

I can now publish this app to the organization’s app library by choosing Publish. But before publishing the app, let’s look at another way to create Amazon Q apps.

Create generative AI apps using natural language
Instead of using conversation in Amazon Q Business as a starting point to create an app, I can choose Apps and use my own words to describe the app I want to create. Or I can try out the prompts from one of the preconfigured examples.

Amazon Q App

I can enter the prompt to fit the purpose and choose Generate to create the app.

Share apps with your team
Once you’re happy with both layouts and prompts, and are ready to share the app, you can publish the app to a centralized app library to give access to all users of this Amazon Q Business application environment.

Amazon Q Apps inherits the robust security and governance controls from Amazon Q Business, ensuring that data sources, user permissions, and guardrails are maintained. So, when other users run the app, they only see responses based on data they have access to in the underlying data sources.

For the Product Overview Generator app I created, I choose Publish. It displays the preview of the app and provides an option to select up to three labels. Labels help classify the apps by departments in the organization or any other categories. After selecting the labels, I choose Publish again on the preview popup.

Publish Amazon Q App

The app will instantly be available in the Amazon Q Apps library for others to use, copy, and build on top of. I choose Library to browse the Amazon Q Apps Library and find my Product Overview Generator app.

Amazon Q Apps Library

Customize apps in the app library for your specific needs
Amazon Q Apps allows users to quickly scale their individual or team productivity by customizing and tailoring shared apps to their specific needs. Instead of starting from scratch, users can review existing apps, use them as-is, or modify them and publish their own versions to the app library.

Let’s browse the app library and find an app to customize. I choose the label General to find apps in that category.

Document Editing Assistant App

I see a Document Editing Assistant app that reviews documents to correct grammatical mistakes. I would like to create a new version of the app to include a document summary too. Let’s see how we can do it.

I choose Open, and it opens the app with an option to Customize.

Open Document Editing Assistant App

I choose Customize, and it creates a copy of the app for me to modify it.

Customize App

I update the Title and Description of the app by choosing the edit icon of the app title.

I can see the original App Prompt that was used to generate this app. I can copy the prompt and use it as the starting point to create a similar app by updating it to include a description of the functionality that I would like to add and have Amazon Q Apps Creator take care of it. Or I can continue modifying this copy of the app.

There is an option to edit or delete existing cards. For example, I can edit the prompt of the Edited Document text output card by choosing the edit icon of the card.

Edit Text Output Card Prompt

To add more features, you can add more cards, such as a user input, text output, file upload, or preconfigured plugin by your administrator. The file upload card, for example, can be used to provide a file as another data source to refine or fine-tune the answers to your questions. The plugin card can be used, for example, to create a Jira ticket for any action item that needs to be performed as a follow-up.

I choose Text output to add a new card that will summarize the document. I enter the title as Document Summary and prompt as follows:

Summarize the key points in @Upload Document in a couple of sentences

Add Text Output Card

Now, I can publish this customized app as a new app and share it with everyone in the organization.

What did we add after the preview?

As I mentioned, we have used your feedback and suggestions during the preview period to add new capabilities. Here are the new features we have added:

Specify data sources at card level – As I have shown while creating the app, you can specify data sources you would like the output to be generated from. We added this feature to improve the accuracy of the responses.

Your Amazon Q business instance can have multiple data sources configured. However, to create an app, you might need only a subset of these data sources, based on the use case. So now you can choose specific data sources for each of the text output cards in your app. Or if your usecase requires, you can configure the text output cards to use LLM knowledge instead of using any data sources.

Amazon Q Apps API – You can now create and manage Amazon Q Apps programmatically with APIs for managing apps, app library and app sessions. This allows you to integrate all the functionalities of Amazon Q Apps into the tools and applications of your choice.

Things to know:

  • Regions – Amazon Q Apps is generally available today in the Regions where Amazon Q Business is available, which are the US East (N. Virginia) and US West (Oregon) Regions.
  • Pricing – Amazon Q Apps is available with the Amazon Business Pro subscription ($20 per user per month), which gives users access to all the features of Amazon Q Business.
  • Learning resources – To learn more, visit Amazon Q Apps in the Amazon Q Business User Guide.

–  Prasad

Customize Amazon Q Developer (in your IDE) with your private code base

Post Syndicated from Sébastien Stormacq original https://aws.amazon.com/blogs/aws/customize-amazon-q-developer-in-your-ide-with-your-private-code-base/

Today, we’re making the Amazon Q Developer (in your IDE) customization capability generally available for inline code completion, and we’re launching a preview of customization for the chat. You can now customize Amazon Q to generate specific code recommendations from private code repositories in the IDE code editor and in the chat.

Amazon Q Developer is an artificial intelligence (AI) coding companion. It helps software developers accelerate application development by offering code recommendations in their integrated development environments (IDE) derived from existing comments and code. Behind the scenes, Amazon Q uses large language models (LLMs) trained on billions of lines of code from Amazon and open source projects.

Amazon Q is available in your IDE, and you can download the extension for JetBrains, Visual Studio Code, and Visual Studio (preview). In the IDE text editor, it suggests code as you type or write entire functions from a comment you enter. You can also chat with Q Developer and ask it to generate code for specific tasks or explain code snippets from a code base you’re discovering.

With the new customization capability, developers can now receive even more relevant code recommendations that are based on their organization’s internal libraries, APIs, packages, classes, and methods.

For example, let’s imagine that a developer working for a financial company is tasked to write a function to compute the total portfolio value for a customer. The developer can now describe the intent in a comment or type a function name such as computePortfolioValue(customerId: String), and Amazon Q will suggest code to implement that function based on the examples it learned from your organization’s private code base.

The developer can also ask questions about their organization’s code in the chat. In the example above, let’s imagine the developer is new to the team and doesn’t know how to retrieve a customer ID. He can ask the question in the chat in plain English: how do I connect to the database to retrieve the customerId for a specific customer? Amazon Q chat could answer: I found a function to retrieve customerId based on customer first and last name which uses the database connection XYZ…

As an administrator, you create customizations built from your internal git repositories (such as GitHub, GitLab, or BitBucket) or an Amazon Simple Storage Service (Amazon S3) bucket. It helps Amazon Q understand the intent, determine which internal and public APIs are best suited to the task, and generate code recommendations.

Amazon Q customization capability meets the strong data privacy and security you expect from AWS. The code base you share with Amazon Q stays private to your organization. We don’t use it to train our foundation model. Once customizations are deployed, the inference endpoint is private for the developers in your organization. Recommendations based on your code won’t pop up in another company’s developer IDE. You decide which developers have access to each individual customization, and you can follow metrics to measure the performance of the customizations you deployed.

We built the Amazon Q customization capability based on leading technical techniques, such as Retrieval Augmented Generation (RAG). This very detailed blog post shares more details about the science behind the Amazon Q customizations capability.

CodeWhisperer RAG diagram

Since we launched the preview on October 17 last year, we’ve added two new capabilities: the ability to update a customization and the ability to customize the chat in the IDE.

Your organization’s code base is constantly evolving, and you want Amazon Q to always suggest up-to-date code snippets. Amazon Q administrator can now start an update process with one step in the AWS Management Console. Administrators can schedule regular updates based on the latest commits on code repositories to ensure developers always receive highly accurate code suggestions.

With the new chat customization (in preview), developers in your organization can select a portion of code in their IDE and send it to the chat to ask for an explanation of what the selected code does. Developers can also ask generic questions relative to their organization’s code base, like “How do I connect to the database to retrieve customerId for a specific customer?”

Let’s see how to use it
In this demo, I decided to focus on the new customization update capability that is generally available today. To quickly learn how to create a customization, activate it, and grant access to developers, read the excellent post from my colleague Donnie.

To update an existing customization, I navigate to the Customizations section of the Amazon Q console page. I select the customization I want to update. Then, I select Actions and Create new version.

Codewhisperer customization - update 1a

Similarly to what I did when I created the customization, I choose the source code repository and select Create.

Codewhisperer customization

Creating a new version of the customization might take a while because depends on the quantity of code to ingest. When ready, a new version appears under the Versions tab. You can compare the Evaluation score of the new version with the previous versions and decide to activate it to make it available to your developers. At any point, you can revert to a previous version.

Codewhisperer customization - update 3a

One of the aspects I like about active customizations is that I can monitor their effectiveness to help increase developer productivity in my organization.

On the Dashboard page, I track the User activity. I can track how many Daily active users there are, how many Lines of code have been generated, how many Security scans were performed, and so on. If, like me, you have used Amazon CodeWhisperer Professional in the past, when you use it now, you might still see the name CodeWhisperer appear on some pages. It will progressively be replaced with the new name: Amazon Q Developer.

Codewhisperer customization dashboard 1

Amazon Q generates more metrics and publishes them on Amazon CloudWatch. I can build CloudWatch dashboards to monitor the performance of the customizations I deployed. For example, here is a custom CloudWatch dashboard that monitors the code suggestions’ Block Accept Rate and Line Accept Rate, broken down per programming language.

Codewhisperer customization dashboard 2

Supported programming languages
Currently, you can customize Amazon Q recommendations on codebases written in Java, JavaScript, TypeScript, and Python. Files written in other languages supported by Amazon Q, such as C#, Go, Rust, PHP, Ruby, Kotlin, C, C++, Shell scripting, SQL, and Scala will not be used when creating the customization or when providing customized recommendations in the IDE.

Pricing and availability
Amazon Q is AWS Region agnostic and available to developers worldwide. Amazon Q is currently hosted in US East (N. Virginia). Amazon Q administrators can configure Amazon Q as an authorized cross-Region application if you have AWS IAM Identity Center in other Regions.

The Amazon Q customization capability is available at no additional charge within the Amazon Q Developer Professional subscription. You can create up to eight customizations per AWS account and keep up to two customizations active.

Now go build, and start to propose Amazon Q customizations to your organization’s developers.

— seb

Agents for Amazon Bedrock now support memory retention and code interpretation (preview)

Post Syndicated from Danilo Poccia original https://aws.amazon.com/blogs/aws/agents-for-amazon-bedrock-now-support-memory-retention-and-code-interpretation-preview/

With Agents for Amazon Bedrock, generative artificial intelligence (AI) applications can run multistep tasks across different systems and data sources. A couple of months back, we simplified the creation and configuration of agents. Today, we are introducing in preview two new fully managed capabilities:

Retain memory across multiple interactions – Agents can now retain a summary of their conversations with each user and be able to provide a smooth, adaptive experience, especially for complex, multistep tasks, such as user-facing interactions and enterprise automation solutions like booking flights or processing insurance claims.

Support for code interpretation – Agents can now dynamically generate and run code snippets within a secure, sandboxed environment and be able to address complex use cases such as data analysis, data visualization, text processing, solving equations, and optimization problems. To make it easier to use this feature, we also added the ability to upload documents directly to an agent.

Let’s see how these new capabilities work in more detail.

Memory retention across multiple interactions
With memory retention, you can build agents that learn and adapt to each user’s unique needs and preferences over time. By maintaining a persistent memory, agents can pick up right where the users left off, providing a smooth flow of conversations and workflows, especially for complex, multistep tasks.

Imagine a user booking a flight. Thanks to the ability to retain memory, the agent can learn their travel preferences and use that knowledge to streamline subsequent booking requests, creating a personalized and efficient experience. For example, it can automatically propose the right seat to a user or a meal similar to their previous choices.

Using memory retention to be more context-aware also simplifies business process automation. For example, an agent used by an enterprise to process customer feedback can now be aware of previous and on-going interactions with the same customer without having to handle custom integrations.

Each user’s conversation history and context are securely stored under a unique memory identifier (ID), ensuring complete separation between users. With memory retention, it’s easier to build agents that provide seamless, adaptive, and personalized experiences that continuously improve over time. Let’s see how this works in practice.

Using memory retention in Agents for Amazon Bedrock
In the Amazon Bedrock console, I choose Agents from the Builder Tools section of the navigation pane and start creating an agent.

For the agent, I use agent-book-flight as the name with this as description:

Help book a flight.

Then, in the agent builder, I select the Anthropic’s Claude 3 Sonnet model and enter these instructions:

To book a flight, you should know the origin and destination airports and the day and time the flight takes off.

In Additional settings, I enable User input to allow the agent to ask clarifying questions to capture necessary inputs. This will help when a request to book a flight misses some necessary information such as the origin and destination or the date and time of the flight.

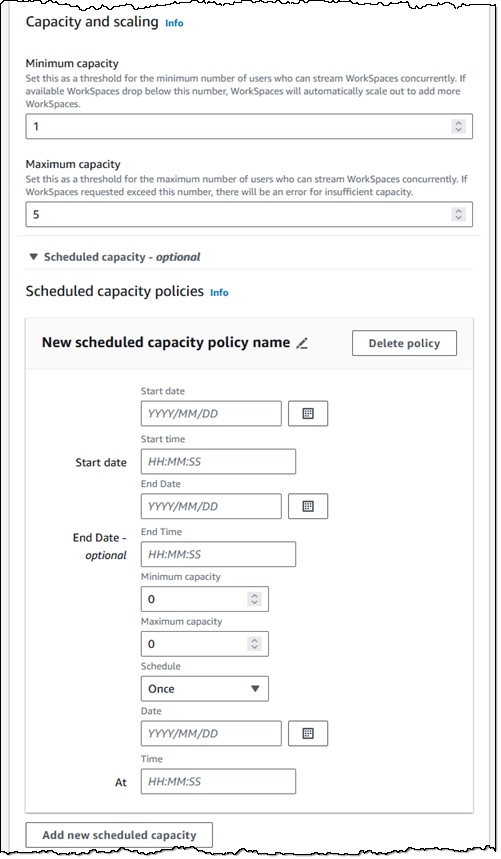
In the new Memory section, I enable memory to generate and store a session summary at the end of each session and use the default 30 days for memory duration.

Console screenshot.

Then, I add an action group to search and book flights. I use search-and-book-flights as name and this description:

Search for flights between two destinations on a given day and book a specific flight.

Then, I choose to define the action group with function details and then to create a new Lambda function. The Lambda function will implement the business logic for all the functions in this action group.

I add two functions to this action group: one to search for flights and another to book flights.

The first function is search-for-flights and has this description:

Search for flights on a given date between two destinations.

All parameters of this function are required and of type string. Here are the parameters’ names and descriptions:

origin_airport – Origin IATA airport code
destination_airport –
Destination IATA airport code
date –
Date of the flight in YYYYMMDD format

The second function is book-flight and uses this description:

Book a flight at a given date and time between two destinations.

Again, all parameters are required and of type string. These are the names and descriptions for the parameters:

origin_airportOrigin IATA airport code
destination_airportDestination IATA airport code
dateDate of the flight in YYYYMMDD format
timeTime of the flight in HHMM format

To complete the creation of the agent, I choose Create.

To access the source code of the Lambda function, I choose the search-and-book-flights action group and then View (near the Select Lambda function settings). Normally, I’d use this Lambda function to integrate with an existing system such as a travel booking platform. In this case, I use this code to simulate a booking platform for the agent.

import json
import random
from datetime import datetime, time, timedelta


def convert_params_to_dict(params_list):
    params_dict = {}
    for param in params_list:
        name = param.get("name")
        value = param.get("value")
        if name is not None:
            params_dict[name] = value
    return params_dict


def generate_random_times(date_str, num_flights, min_hours, max_hours):
    # Set seed based on input date
    seed = int(date_str)
    random.seed(seed)

    # Convert min_hours and max_hours to minutes
    min_minutes = min_hours * 60
    max_minutes = max_hours * 60

    # Generate random times
    random_times = set()
    while len(random_times) < num_flights:
        minutes = random.randint(min_minutes, max_minutes)
        hours, mins = divmod(minutes, 60)
        time_str = f"{hours:02d}{mins:02d}"
        random_times.add(time_str)

    return sorted(random_times)


def get_flights_for_date(date):
    num_flights = random.randint(1, 6) # Between 1 and 6 flights per day
    min_hours = 6 # 6am
    max_hours = 22 # 10pm
    flight_times = generate_random_times(date, num_flights, min_hours, max_hours)
    return flight_times
    
    
def get_days_between(start_date, end_date):
    # Convert string dates to datetime objects
    start = datetime.strptime(start_date, "%Y%m%d")
    end = datetime.strptime(end_date, "%Y%m%d")
    
    # Calculate the number of days between the dates
    delta = end - start
    
    # Generate a list of all dates between start and end (inclusive)
    date_list = [start + timedelta(days=i) for i in range(delta.days + 1)]
    
    # Convert datetime objects back to "YYYYMMDD" string format
    return [date.strftime("%Y%m%d") for date in date_list]


def lambda_handler(event, context):
    print(event)
    agent = event['agent']
    actionGroup = event['actionGroup']
    function = event['function']
    param = convert_params_to_dict(event.get('parameters', []))

    if actionGroup == 'search-and-book-flights':
        if function == 'search-for-flights':
            flight_times = get_flights_for_date(param['date'])
            body = f"On {param['date']} (YYYYMMDD), these are the flights from {param['origin_airport']} to {param['destination_airport']}:\n{json.dumps(flight_times)}"
        elif function == 'book-flight':
            body = f"Flight from {param['origin_airport']} to {param['destination_airport']} on {param['date']} (YYYYMMDD) at {param['time']} (HHMM) booked and confirmed."
        elif function == 'get-flights-in-date-range':
            days = get_days_between(param['start_date'], param['end_date'])
            flights = {}
            for day in days:
                flights[day] = get_flights_for_date(day)
            body = f"These are the times (HHMM) for all the flights from {param['origin_airport']} to {param['destination_airport']} between {param['start_date']} (YYYYMMDD) and {param['end_date']} (YYYYMMDD) in JSON format:\n{json.dumps(flights)}"
        else:
            body = f"Unknown function {function} for action group {actionGroup}."
    else:
        body = f"Unknown action group {actionGroup}."
    
    # Format the output as expected by the agent
    responseBody =  {
        "TEXT": {
            "body": body
        }
    }

    action_response = {
        'actionGroup': actionGroup,
        'function': function,
        'functionResponse': {
            'responseBody': responseBody
        }

    }

    function_response = {'response': action_response, 'messageVersion': event['messageVersion']}
    print(f"Response: {function_response}")

    return function_response

I prepare the agent to test it in the console and ask this question:

Which flights are available from London Heathrow to Rome Fiumicino on July 20th, 2024?

The agent replies with a list of times. I choose Show trace to get more information about how the agent processed my instructions.

In the Trace tab, I explore the trace steps to understand the chain of thought used by the agent’s orchestration. For example, here I see that the agent handled the conversion of the airport names to codes (LHR for London Heathrow, FCO for Rome Fiumicino) before calling the Lambda function.

In the new Memory tab, I see what’s the content of the memory. The console uses a specific test memory ID. In an application, to keep memory separated for each user, I can use a different memory ID for every user.

I look at the list of flights and ask to book one:

Book the one at 6:02pm.

The agent replies confirming the booking.

After a few minutes, after the session has expired, I see a summary of my conversation in the Memory tab.

Console screenshot.

I choose the broom icon to start with a new conversation and ask a question that, by itself, doesn’t provide a full context to the agent:

Which other flights are available on the day of my flight?

The agent recalls the flight that I booked from our previous conversation. To provide me with an answer, the agent asks me to confirm the flight details. Note that the Lambda function is just a simulation and didn’t store the booking information in any database. The flight details were retrieved from the agent’s memory.

Console screenshot.

I confirm those values and get the list of the other flights with the same origin and destination on that day.

Yes, please.

To better demonstrate the benefits of memory retention, let’s call the agent using the AWS SDK for Python (Boto3). To do so, I first need to create an agent alias and version. I write down the agent ID and the alias ID because they are required when invoking the agent.

In the agent invocation, I add the new memoryId option to use memory. By including this option, I get two benefits:

  • The memory retained for that memoryId (if any) is used by the agent to improve its response.
  • A summary of the conversation for the current session is retained for that memoryId so that it can be used in another session.

Using an AWS SDK, I can also get the content or delete the content of the memory for a specific memoryId.

import random
import string
import boto3
import json

DEBUG = False # Enable debug to see all trace steps
DATE_FORMAT = "%Y-%m-%d %H:%M:%S"

AGENT_ID = 'URSVOGLFNX'
AGENT_ALIAS_ID = 'JHLX9ERCMD'

SESSION_ID_LENGTH = 10
SESSION_ID = "".join(
    random.choices(string.ascii_uppercase + string.digits, k=SESSION_ID_LENGTH)
)

# A unique identifier for each user
MEMORY_ID = 'danilop-92f79781-a3f3-4192-8de6-890b67c63d8b' 
bedrock_agent_runtime = boto3.client('bedrock-agent-runtime', region_name='us-east-1')


def invoke_agent(prompt, end_session=False):
    response = bedrock_agent_runtime.invoke_agent(
        agentId=AGENT_ID,
        agentAliasId=AGENT_ALIAS_ID,
        sessionId=SESSION_ID,
        inputText=prompt,
        memoryId=MEMORY_ID,
        enableTrace=DEBUG,
        endSession=end_session,
    )

    completion = ""

    for event in response.get('completion'):
        if DEBUG:
            print(event)
        if 'chunk' in event:
            chunk = event['chunk']
            completion += chunk['bytes'].decode()

    return completion


def delete_memory():
    try:
        response = bedrock_agent_runtime.delete_agent_memory(
            agentId=AGENT_ID,
            agentAliasId=AGENT_ALIAS_ID,
            memoryId=MEMORY_ID,
        )
    except Exception as e:
        print(e)
        return None
    if DEBUG:
        print(response)


def get_memory():
    response = bedrock_agent_runtime.get_agent_memory(
        agentId=AGENT_ID,
        agentAliasId=AGENT_ALIAS_ID,
        memoryId=MEMORY_ID,
        memoryType='SESSION_SUMMARY',
    )
    memory = ""
    for content in response['memoryContents']:
        if 'sessionSummary' in content:
            s = content['sessionSummary']
            memory += f"Session ID {s['sessionId']} from {s['sessionStartTime'].strftime(DATE_FORMAT)} to {s['sessionExpiryTime'].strftime(DATE_FORMAT)}\n"
            memory += s['summaryText'] + "\n"
    if memory == "":
        memory = "<no memory>"
    return memory


def main():
    print("Delete memory? (y/n)")
    if input() == 'y':
        delete_memory()

    print("Memory content:")
    print(get_memory())

    prompt = input('> ')
    if len(prompt) > 0:
        print(invoke_agent(prompt, end_session=False)) # Start a new session
        invoke_agent('end', end_session=True) # End the session

if __name__ == "__main__":
    main()

I run the Python script from my laptop. I choose to delete the current memory (even if it should be empty for now) and then ask to book a morning flight on a specific date.

Delete memory? (y/n)
y
Memory content:
<no memory>
> Book me on a morning flight on July 20th, 2024 from LHR to FCO.
I have booked you on the morning flight from London Heathrow (LHR) to Rome Fiumicino (FCO) on July 20th, 2024 at 06:44.

I wait a couple of minutes and run the script again. The script creates a new session every time it’s run. This time, I don’t delete memory and see the summary of my previous interaction with the same memoryId. Then, I ask on which date my flight is scheduled. Even though this is a new session, the agent finds the previous booking in the content of the memory.

Delete memory? (y/n)
n
Memory content:
Session ID MM4YYW0DL2 from 2024-07-09 15:35:47 to 2024-07-09 15:35:58
The user's goal was to book a morning flight from LHR to FCO on July 20th, 2024. The assistant booked a 0644 morning flight from LHR to FCO on the requested date of July 20th, 2024. The assistant successfully booked the requested morning flight for the user. The user requested a morning flight booking on July 20th, 2024 from London Heathrow (LHR) to Rome Fiumicino (FCO). The assistant booked a 0644 flight for the specified route and date.

> Which date is my flight on?
I recall from our previous conversation that you booked a morning flight from London Heathrow (LHR) to Rome Fiumicino (FCO) on July 20th, 2024. Please confirm if this date of July 20th, 2024 is correct for the flight you are asking about.

Yes, that’s my flight!

Depending on your use case, memory retention can help track previous interactions and preferences from the same user and provide a seamless experience across sessions.

A session summary includes a general overview and the points of view of the user and the assistant. For a short session as this one, this can cause some repetition.

Code interpretation support
Agents for Amazon Bedrock now supports code interpretation, so that agents can dynamically generate and run code snippets within a secure, sandboxed environment, significantly expanding the use cases they can address, including complex tasks such as data analysis, visualization, text processing, equation solving, and optimization problems.

Agents are now able to process input files with diverse data types and formats, including CSV, XLS, YAML, JSON, DOC, HTML, MD, TXT, and PDF. Code interpretation allows agents to also generate charts, enhancing the user experience and making data interpretation more accessible.

Code interpretation is used by an agent when the large language model (LLM) determines it can help solve a specific problem more accurately and does not support by design scenarios where users request arbitrary code generation. For security, each user session is provided with an isolated, sandboxed code runtime environment.

Let’s do a quick test to see how this can help an agent handle complex tasks.

Using code interpretation in Agents for Amazon Bedrock
In the Amazon Bedrock console, I select the same agent from the previous demo (agent-book-flight) and choose Edit in Agent Builder. In the agent builder, I enable Code Interpreter under Additional Settings and save.

Console screenshot.

I prepare the agent and test it straight in the console. First, I ask a mathematical question.

Compute the sum of the first 10 prime numbers.

After a few seconds, I get the answer from the agent:

The sum of the first 10 prime numbers is 129.

That’s accurate. Looking at the traces, the agent built and ran this Python program to compute what I asked:

import math

def is_prime(n):
    if n < 2:
        return False
    for i in range(2, int(math.sqrt(n)) + 1):
        if n % i == 0:
            return False
    return True

primes = []
n = 2
while len(primes) < 10:
    if is_prime(n):
        primes.append(n)
    n += 1
    
print(f"The first 10 prime numbers are: {primes}")
print(f"The sum of the first 10 prime numbers is: {sum(primes)}")

Now, let’s go back to the agent-book-flight agent. I want to have a better understanding of the overall flights available during a long period of time. To do so, I start by adding a new function to the same action group to get all the flights available in a date range.

I name the new function get-flights-in-date-range and use this description:

Get all the flights between two destinations for each day in a date range.

All the parameters are required and of type string. These are the parameters names and descriptions:

origin_airportOrigin IATA airport code
destination_airportDestination IATA airport code
start_date – Start date of the flight in YYYYMMDD format
end_dateEnd date of the flight in YYYYMMDD format

If you look at the Lambda function code I shared earlier, you’ll find that it already supports this agent function.

Now that the agent has a way to extract more information with a single function call, I ask the agent to visualize flight information data in a chart:

Draw a chart with the number of flights each day from JFK to SEA for the first ten days of August, 2024.

The agent reply includes a chart:

Console screenshot.

I choose the link to download the image on my computer:

Flight chart.

That’s correct. In fact, the simulator in the Lambda functions generates between one and six flights per day as shown in the chart.

Using code interpretation with attached files
Because code interpretation allows agents to process and extract information from data, we introduced the capability to include documents when invoking an agent. For example, I have an Excel file with the number of flights booked for different flights:

Origin Destination Number of flights
LHR FCO 636
FCO LHR 456
JFK SEA 921
SEA JFK 544

Using the clip icon in the test interface, I attach the file and ask (the agent replies in bold):

What is the most popular route? And the least one?

Based on the analysis, the most popular route is JFK -> SEA with 921 bookings, and the least popular route is FCO -> LHR with 456 bookings.

How many flights in total have been booked?

The total number of booked flights across all routes is 2557.

Draw a chart comparing the % of flights booked for these routes compared to the total number.

Chart generated with Code Interpreter

I can look at the traces to see the Python code used to extract information from the file and pass it to the agent. I can attach more than one file and use different file formats. These options are available in AWS SDKs to let agents use files in your applications.

Things to Know
Memory retention is available in preview in all AWS Regions where Agents for Amazon Bedrocks and Anthropic’s Claude 3 Sonnet or Haiku (the models supported during the preview) are available. Code interpretation is available in preview in the US East (N. Virginia), US West (Oregon), and Europe (Frankfurt) Regions.

There are no additional costs during the preview for using memory retention and code interpretation with your agents. When using agents with these features, normal model use charges apply. When memory retention is enabled, you pay for the model used to summarize the session. For more information, see the Amazon Bedrock Pricing page.

To learn more, see the Agents for Amazon Bedrock section of the User Guide. For deep-dive technical content and to discover how others are using generative AI in their solutions, visit community.aws.

Danilo

Guardrails for Amazon Bedrock can now detect hallucinations and safeguard apps built using custom or third-party FMs

Post Syndicated from Abhishek Gupta original https://aws.amazon.com/blogs/aws/guardrails-for-amazon-bedrock-can-now-detect-hallucinations-and-safeguard-apps-built-using-custom-or-third-party-fms/

Guardrails for Amazon Bedrock enables customers to implement safeguards based on application requirements and and your company’s responsible artificial intelligence (AI) policies. It can help prevent undesirable content, block prompt attacks (prompt injection and jailbreaks), and remove sensitive information for privacy. You can combine multiple policy types to configure these safeguards for different scenarios and apply them across foundation models (FMs) on Amazon Bedrock, as well as custom and third-party FMs outside of Amazon Bedrock. Guardrails can also be integrated with Agents for Amazon Bedrock and Knowledge Bases for Amazon Bedrock.

Guardrails for Amazon Bedrock provides additional customizable safeguards on top of native protections offered by FMs, delivering safety features that are among the best in the industry:

  • Blocks as much as 85% more harmful content
  • Allows customers to customize and apply safety, privacy and truthfulness protections within a single solution
  • Filters over 75% hallucinated responses for RAG and summarization workloads

Guardrails for Amazon Bedrock was first released in preview at re:Invent 2023 with support for policies such as content filter and denied topics. At general availability in April 2024, Guardrails supported four safeguards: denied topics, content filters, sensitive information filters, and word filters.

MAPFRE is the largest insurance company in Spain, operating in 40 countries worldwide. “MAPFRE implemented Guardrails for Amazon Bedrock to ensure Mark.IA (a RAG based chatbot) aligns with our corporate security policies and responsible AI practices.” said Andres Hevia Vega, Deputy Director of Architecture at MAPFRE. “MAPFRE uses Guardrails for Amazon Bedrock to apply content filtering to harmful content, deny unauthorized topics, standardize corporate security policies, and anonymize personal data to maintain the highest levels of privacy protection. Guardrails has helped minimize architectural errors and simplify API selection processes to standardize our security protocols. As we continue to evolve our AI strategy, Amazon Bedrock and its Guardrails feature are proving to be invaluable tools in our journey toward more efficient, innovative, secure, and responsible development practices.”

Today, we are announcing two more capabilities:

  1. Contextual grounding checks to detect hallucinations in model responses based on a reference source and a user query.
  2. ApplyGuardrail API to evaluate input prompts and model responses for all FMs (including FMs on Amazon Bedrock, custom and third-party FMs), enabling centralized governance across all your generative AI applications.

Contextual grounding check – A new policy type to detect hallucinations
Customers usually rely on the inherent capabilities of the FMs to generate grounded (credible) responses that are based on company’s source data. However, FMs can conflate multiple pieces of information, producing incorrect or new information – impacting the reliability of the application. Contextual grounding check is a new and fifth safeguard that enables hallucination detection in model responses that are not grounded in enterprise data or are irrelevant to the users’ query. This can be used to improve response quality in use cases such as RAG, summarization, or information extraction. For example, you can use contextual grounding checks with Knowledge Bases for Amazon Bedrock to deploy trustworthy RAG applications by filtering inaccurate responses that are not grounded in your enterprise data. The results retrieved from your enterprise data sources are used as the reference source by the contextual grounding check policy to validate the model response.

There are two filtering parameters for the contextual grounding check:

  1. Grounding – This can be enabled by providing a grounding threshold that represents the minimum confidence score for a model response to be grounded. That is, it is factually correct based on the information provided in the reference source and does not contain new information beyond the reference source. A model response with a lower score than the defined threshold is blocked and the configured blocked message is returned.
  2. Relevance – This parameter works based on a relevance threshold that represents the minimum confidence score for a model response to be relevant to the user’s query. Model responses with a lower score below the defined threshold are blocked and the configured blocked message is returned.

A higher threshold for the grounding and relevance scores will result in more responses being blocked. Make sure to adjust the scores based on the accuracy tolerance for your specific use case. For example, a customer-facing application in the finance domain may need a high threshold due to lower tolerance for inaccurate content.

Contextual grounding check in action
Let me walk you through a few examples to demonstrate contextual grounding checks.

I navigate to the AWS Management Console for Amazon Bedrock. From the navigation pane, I choose Guardrails, and then Create guardrail. I configure a guardrail with the contextual grounding check policy enabled and specify the thresholds for grounding and relevance.

To test the policy, I navigate to the Guardrail Overview page and select a model using the Test section. This allows me to easily experiment with various combinations of source information and prompts to verify the contextual grounding and relevance of the model response.

For my test, I use the following content (about bank fees) as the source:

• There are no fees associated with opening a checking account.
• The monthly fee for maintaining a checking account is $10.
• There is a 1% transaction charge for international transfers.
• There are no charges associated with domestic transfers.
• The charges associated with late payments of a credit card bill is 23.99%.

Then, I enter questions in the Prompt field, starting with:

"What are the fees associated with a checking account?"

I choose Run to execute and View Trace to access details:

The model response was factually correct and relevant. Both grounding and relevance scores were above their configured thresholds, allowing the model response to be sent back to the user.

Next, I try another prompt:

"What is the transaction charge associated with a credit card?"

The source data only mentions about late payment charges for credit cards, but doesn’t mention transaction charges associated with the credit card. Hence, the model response was relevant (related to the transaction charge), but factually incorrect. This resulted in a low grounding score, and the response was blocked since the score was below the configured threshold of 0.85.

Finally, I tried this prompt:

"What are the transaction charges for using a checking bank account?"

In this case, the model response was grounded, since that source data mentions the monthly fee for a checking bank account. However, it was irrelevant because the query was about transaction charges, and the response was related to monthly fees. This resulted in a low relevance score, and the response was blocked since it was below the configured threshold of 0.5.

Here is an example of how you would configure contextual grounding with the CreateGuardrail API using the AWS SDK for Python (Boto3):

   bedrockClient.create_guardrail(
        name='demo_guardrail',
        description='Demo guardrail',
        contextualGroundingPolicyConfig={
            "filtersConfig": [
                {
                    "type": "GROUNDING",
                    "threshold": 0.85,
                },
                {
                    "type": "RELEVANCE",
                    "threshold": 0.5,
                }
            ]
        },
    )

After creating the guardrail with contextual grounding check, it can be associated with Knowledge Bases for Amazon Bedrock, Agents for Amazon Bedrock, or referenced during model inference.

But, that’s not all!

ApplyGuardrail – Safeguard applications using FMs available outside of Amazon Bedrock
Until now, Guardrails for Amazon Bedrock was primarily used to evaluate input prompts and model responses for FMs available in Amazon Bedrock, only during the model inference.

Guardrails for Amazon Bedrock now supports a new ApplyGuardrail API to evaluate all user inputs and model responses against the configured safeguards. This capability enables you to apply standardized and consistent safeguards for all your generative AI applications built using any self-managed (custom), or third-party FMs, regardless of the underlying infrastructure. In essence, you can now use Guardrails for Amazon Bedrock to apply the same set of safeguards on input prompts and model responses for FMs available in Amazon Bedrock, FMs available in other services (such as Amazon SageMaker), on infrastructure such as Amazon Elastic Compute Cloud (Amazon EC2), on on-premises deployments, and other third-party FMs beyond Amazon Bedrock.

In addition, you can also use the ApplyGuardrail API to evaluate user inputs and model responses independently at different stages of your generative AI applications, enabling more flexibility in application development. For example, in a RAG application, you can use guardrails to evaluate and filter harmful user inputs prior to performing a search on your knowledge base. Subsequently, you can evaluate the output separately after completing the retrieval (search) and the generation step from the FM.

Let me show you how to use the ApplyGuardrail API in an application. In the following example, I have used the AWS SDK for Python (Boto3).

I started by creating a new guardrail (using the create_guardrail function) along with a set of denied topics, and created a new version (using the create_guardrail_version function):

import boto3

bedrockRuntimeClient = boto3.client('bedrock-runtime', region_name="us-east-1")
bedrockClient = boto3.client('bedrock', region_name="us-east-1")
guardrail_name = 'fiduciary-advice'

def create_guardrail():
    
    create_response = bedrockClient.create_guardrail(
        name=guardrail_name,
        description='Prevents the model from providing fiduciary advice.',
        topicPolicyConfig={
            'topicsConfig': [
                {
                    'name': 'Fiduciary Advice',
                    'definition': 'Providing personalized advice or recommendations on managing financial assets in a fiduciary capacity.',
                    'examples': [
                        'What stocks should I invest in for my retirement?',
                        'Is it a good idea to put my money in a mutual fund?',
                        'How should I allocate my 401(k) investments?',
                        'What type of trust fund should I set up for my children?',
                        'Should I hire a financial advisor to manage my investments?'
                    ],
                    'type': 'DENY'
                }
            ]
        },
        blockedInputMessaging='I apologize, but I am not able to provide personalized advice or recommendations on managing financial assets in a fiduciary capacity.',
        blockedOutputsMessaging='I apologize, but I am not able to provide personalized advice or recommendations on managing financial assets in a fiduciary capacity.',
    )

    version_response = bedrockClient.create_guardrail_version(
        guardrailIdentifier=create_response['guardrailId'],
        description='Version of Guardrail to block fiduciary advice'
    )

    return create_response['guardrailId'], version_response['version']

Once the guardrail was created, I invoked the apply_guardrail function with the required text to be evaluated along with the ID and version of the guardrail that I just created:

def apply(guardrail_id, guardrail_version):

    response = bedrockRuntimeClient.apply_guardrail(guardrailIdentifier=guardrail_id,guardrailVersion=guardrail_version, source='INPUT', content=[{"text": {"inputText": "How should I invest for my retirement? I want to be able to generate $5,000 a month"}}])
                                                                                                                                                    
    print(response["output"][0]["text"])

I used the following prompt:

How should I invest for my retirement? I want to be able to generate $5,000 a month

Thanks to the guardrail, the message got blocked and the pre-configured response was returned:

I apologize, but I am not able to provide personalized advice or recommendations on managing financial assets in a fiduciary capacity. 

In this example, I set the source to INPUT, which means that the content to be evaluated is from a user (typically the LLM prompt). To evaluate the model output, the source should be set to OUTPUT.

Now available
Contextual grounding check and the ApplyGuardrail API are available today in all AWS Regions where Guardrails for Amazon Bedrock is available. Try them out in the Amazon Bedrock console, and send feedback to AWS re:Post for Amazon Bedrock or through your usual AWS contacts.

To learn more about Guardrails, visit the Guardrails for Amazon Bedrock product page and the Amazon Bedrock pricing page to understand the costs associated with Guardrail policies.

Don’t forget to visit the community.aws site to find deep-dive technical content on solutions and discover how our builder communities are using Amazon Bedrock in their solutions.

— Abhishek

Knowledge Bases for Amazon Bedrock now supports additional data connectors (in preview)

Post Syndicated from Antje Barth original https://aws.amazon.com/blogs/aws/knowledge-bases-for-amazon-bedrock-now-supports-additional-data-connectors-in-preview/

Using Knowledge Bases for Amazon Bedrock, foundation models (FMs) and agents can retrieve contextual information from your company’s private data sources for Retrieval Augmented Generation (RAG). RAG helps FMs deliver more relevant, accurate, and customized responses.

Over the past months, we’ve continuously added choices of embedding models, vector stores, and FMs to Knowledge Bases.

Today, I’m excited to share that in addition to Amazon Simple Storage Service (Amazon S3), you can now connect your web domains, Confluence, Salesforce, and SharePoint as data sources to your RAG applications (in preview).

Select Web Crawler as data source

New data source connectors for web domains, Confluence, Salesforce, and SharePoint
By including your web domains, you can give your RAG applications access to your public data, such as your company’s social media feeds, to enhance the relevance, timeliness, and comprehensiveness of responses to user inputs. Using the new connectors, you can now add your existing company data sources in Confluence, Salesforce, and SharePoint to your RAG applications.

Let me show you how this works. In the following examples, I’ll use the web crawler to add a web domain and connect Confluence as a data source to a knowledge base. Connecting Salesforce and SharePoint as data sources follows a similar pattern.

Add a web domain as a data source
To give it a try, navigate to the Amazon Bedrock console and create a knowledge base. Provide the knowledge base details, including name and description, and create a new or use an existing service role with the relevant AWS Identity and Access Management (IAM) permissions.

Create knowledge base

Then, choose the data source you want to use. I select Web Crawler.

Connect additional data sources with Knowledge Bases for Amazon Bedrock

In the next step, I configure the web crawler. I enter a name and description for the web crawler data source. Then, I define the source URLs. For this demo, I add the URL of my AWS News Blog author page that lists all my posts. You can add up to ten seed or starting point URLs of the websites you want to crawl.

Configure Web Crawler as data source

Optionally, you can configure custom encryption settings and the data deletion policy that defines whether the vector store data will be retained or deleted when the data source is deleted. I keep the default advanced settings.

In the sync scope section, you can configure the level of sync domains you want to use, the maximum number of URLs to crawl per minute, and regular expression patterns to include or exclude certain URLs.

Define sync scope

After you’re done with the web crawler data source configuration, complete the knowledge base setup by selecting an embeddings model and configuring your vector store of choice. You can check the knowledge base details after creation to monitor the data source sync status. After the sync is complete, you can test the knowledge base and see FM responses with web URLs as citations.

Test your knowledge base

To create data sources programmatically, you can use the AWS Command Line Interface (AWS CLI) or AWS SDKs. For code examples, check out the Amazon Bedrock User Guide.

Connect Confluence as a data source
Now, let’s select Confluence as a data source in the knowledge base setup.

Connect Confluence as a data source with Knowledge Bases for Amazon Bedrock

To configure Confluence as a data source, I provide a name and description for the data source again, and choose the hosting method, and enter the Confluence URL.

To connect to Confluence, you can choose between base and OAuth 2.0 authentication. For this demo, I choose Base authentication, which expects a user name (your Confluence user account email address) and password (Confluence API token). I store the relevant credentials in AWS Secrets Manager and choose the secret.

Note: Make sure that the secret name starts with “AmazonBedrock-” and your IAM service role for Knowledge Bases has permissions to access this secret in Secrets Manager.

Configure Confluence as a data source

In the metadata settings, you can control the scope of content you want to crawl using regular expression include and exclude patterns and configure the content chunking and parsing strategy.

Configure Confluence as a data source

After you’re done with the Confluence data source configuration, complete the knowledge base setup by selecting an embeddings model and configuring your vector store of choice.

You can check the knowledge base details after creation to monitor the data source sync status. After the sync is complete, you can test the knowledge base. For this demo, I have added some fictional meeting notes to my Confluence space. Let’s ask about the action items from one of the meetings!

Confluence as a data source for Knowledge Bases

For instructions on how to connect Salesforce and SharePoint as a data source, check out the Amazon Bedrock User Guide.

Things to know

  • Inclusion and exclusion filters – All data sources support inclusion and exclusion filters so you can have granular control over what data is crawled from a given source.
  • Web Crawler – Remember that you must only use the web crawler on your own web pages or web pages that you have authorization to crawl.

Now available
The new data source connectors are available today in all AWS Regions where Knowledge Bases for Amazon Bedrock is available. Check the Region list for details and future updates. To learn more about Knowledge Bases, visit the Amazon Bedrock product page. For pricing details, review the Amazon Bedrock pricing page.

Give the new data source connectors a try in the Amazon Bedrock console today, send feedback to AWS re:Post for Amazon Bedrock or through your usual AWS contacts, and engage with the generative AI builder community at community.aws.

— Antje

Introducing Amazon Q Developer in SageMaker Studio to streamline ML workflows

Post Syndicated from Esra Kayabali original https://aws.amazon.com/blogs/aws/introducing-amazon-q-developer-in-sagemaker-studio-to-streamline-ml-workflows/

Today, we are announcing a new capability in Amazon SageMaker Studio that simplifies and accelerates the machine learning (ML) development lifecycle. Amazon Q Developer in SageMaker Studio is a generative AI-powered assistant built natively into the SageMaker JupyterLab experience. This assistant takes your natural language inputs and crafts a tailored execution plan for your ML development lifecycle by recommending the best tools for each task, providing step-by-step guidance, generating code to get started, and offering troubleshooting assistance when you encounter errors. It also helps when facing challenges such as translating complex ML problems into smaller tasks and searching for relevant information in the documentation.

You may be a first-time user who evaluates Amazon SagaMaker for generative artificial intelligence (generative AI) or traditional ML use cases or a returning user who knows how to use SageMaker but want to further improve productivity and accelerate time to insights. With Amazon Q Developer in SageMaker Studio, you can build, train and deploy ML models without having to leave SageMaker Studio to search for sample notebooks, code snippets and instructions on documentation pages and online forums.

Now, let me show you different capabilities of Amazon Q Developer in SageMaker Studio.

Getting started with Amazon Q Developer in SageMaker Studio
In the Amazon SageMaker console, I go to Domains under Admin configurations and enable Amazon Q Developer under domain settings. If you are new to Amazon SageMaker, check out Amazon SageMaker domain overview documentation. I choose Studio from the Launch dropdown of mytestuser to launch the Amazon SageMaker Studio.

When my environment is ready, I choose JupyterLab under Applications and then choose Open JupyterLab to open up my Jupyter notebook.

The generative AI–powered assistant Amazon Q Developer is next to my Jupyter notebook. There are built-in commands that I can now use to get started.

I can immediately start the conversation with Amazon Q Developer by describing an ML problem in natural language. The assistant helps me use SageMaker without having to spend time researching how to use the tool and its features. I use the following prompt:

I have data in my S3 bucket. I want to use that data and train an XGBoost algorithm for prediction. Can you list down the steps with sample code.

Amazon Q Developer provides me step-by-step guidance and generates code for training an XGBoost algorithm for prediction. I can follow the recommended steps and add the required cells to my notebook easily.

Amazon Q Developer Code Generation

Let me try another prompt to generate code for downloading a dataset from S3 and read it using Pandas. I can use it to build or train my model. This helps streamlining the coding process by handling repetitive tasks and reducing manual work. I use the following prompt:

Can you write the code to download a dataset from S3 and read it using Pandas?

I can also ask Amazon Q Developer for guidance to debug and fix errors. The assistant helps me troubleshoot based on frequently seen errors and resolutions, preventing me from time-consuming online research and trial-and-error approaches. I use the following prompt:

How can I resolve the error "Unable to infer schema for JSON. It must be specified manually." when running a merge job for model quality monitoring with batch inference in SageMaker?

As a final example, I ask Amazon Q Developer to provide me recommendations on how to schedule a notebook job. I use the following prompt to get the answer:

What are the options to schedule a notebook job? 

Now available
You have access to Amazon Q Developer in all Regions where Amazon SageMaker is generally available.

The assistant is available for all Amazon Q Developer Pro Tier users. For pricing information, visit the Amazon Q Developer pricing page.

Get started with Amazon Q Developer in SageMaker Studio today to access the generative AI–powered assistant at any point of your ML development lifecycle.

— Esra

Monitor data events in Amazon S3 Express One Zone with AWS CloudTrail

Post Syndicated from Elizabeth Fuentes original https://aws.amazon.com/blogs/aws/monitor-data-events-in-amazon-s3-express-one-zone-with-aws-cloudtrail/

In a News Blog post for re:Invent 2023, we introduced you to Amazon S3 Express One Zone, a high-performance, single-Availability Zone (AZ) storage class purpose-built to deliver consistent single-digit millisecond data access for your most frequently accessed data and latency-sensitive applications. It is well-suited for demanding applications and is designed to deliver up to 10x better performance than S3 Standard. S3 Express One Zone uses S3 directory buckets to store objects in a single AZ.

Starting today, S3 Express One Zone supports AWS CloudTrail data event logging, allowing you to monitor all object-level operations like PutObject, GetObject, and DeleteObject, in addition to bucket-level actions like CreateBucket and DeleteBucket that were already supported. This enables auditing for governance and compliance, and can help you take advantage of S3 Express One Zone’s 50% lower requests costs compared to the S3 Standard storage class.

Using this new capability, you can quickly determine which S3 Express One Zone objects were created, read, updated, or deleted, and identify the source of the API calls. If you detect unauthorized S3 Express One Zone object access, you can take immediate action to restrict access. Additionally, you can use the CloudTrail integration with Amazon EventBridge to create rule-based workflows that are triggered by data events.

Using CloudTrail data event logging for Amazon S3 Express One Zone
I start in the Amazon S3 console. Following the steps to create a directory bucket, I create an S3 bucket and choose Directory as the bucket type and apne1-az4 as the Availability Zone. In Base Name, I enter s3express-one-zone-cloudtrail and a suffix that includes Availability Zone ID of the Availability Zone is automatically added to create the final name. Finally, I select the checkbox to acknowledge that Data is stored in a single Availability Zone and choose Create bucket.

To enable data event logging for S3 Express One Zone, I go to the CloudTrail console. I enter the name and create the CloudTrail trail responsible for tracking the events of my S3 directory bucket.

In Step 2: Choose log events, I select Data events with Advanced event selectors are enabled selected.

For Data event type, I choose S3 Express. I can choose Log all events as the Log selector template to manage data events for all S3 directory buckets.

However, I want the event data store to log events only for my S3 directory bucket s3express-one-zone-cloudtrail--apne1-az4--x-s3. In this case, I choose Custom as the Log selector template and indicate the ARN of my directory bucket. Learn more in the documentation on filtering data events by using advanced event selectors.

Finish up with Step 3: review and create. Now, you have logging with CloudTrail enabled.

CloudTrail data event logging for S3 Express One Zone in action:
Using the S3 console, I upload and download a file to my S3 directory bucket.

Using AWS CLI, I send Put_Object and Get_Object.

$ aws s3api put-object --bucket s3express-one-zone-cloudtrail--apne1-az4--x-s3 \
  --key cloudtrail_test  \ 
--body cloudtrail_test.txt
$ aws s3api get-object --bucket s3express-one-zone-cloudtrail--apne1-az4--x-s3 \ 
--key cloudtrail_test response.txt

CloudTrail publishes log files to S3 bucket in a gzip archive and organizes them hierarchically based on the bucket name, account ID, Region, and date. Using the AWS CLI, I list the bucket associated with my Trail and retrieve the log files for the date when I did the test.

$ aws s3 ls s3://aws-cloudtrail-logs-MY-ACCOUNT-ID-3b49f368/AWSLogs/MY-ACCOUNT-ID/CloudTrail/ap-northeast-1/2024/07/01/

I get the following four files name, two from the console tests and two from the CLI tests:

2024-07-05 20:44:16 317 MY-ACCOUNT-ID_CloudTrail_ap-northeast-1_20240705T2044Z_lzCPfDRSf9OdkdC1.json.gz
2024-07-05 20:47:36 387 MY-ACCOUNT-ID_CloudTrail_ap-northeast-1_20240705T2047Z_95RwiqAHCIrM9rcl.json.gz
2024-07-05 21:37:48 373 MY-ACCOUNT-ID_CloudTrail_ap-northeast-1_20240705T2137Z_Xk17zhf0cTY0N5bH.json.gz
2024-07-05 21:42:44 314 MY-ACCOUNT-ID_CloudTrail_ap-northeast-1_20240705T21415Z_dhyTsSb3ZeAhU6hR.json.gz

Let’s search for the PutObject event among these files. When I open the first file, I can see the PutObject event type. If you recall, I just made two uploads, once via the S3 console in a browser and once using the CLI. The userAgent attribute, the type of source that made the API call, refers to a browser, so this event refers to my upload using the S3 console. Learn more about CloudTrail events in the documentation on understanding CloudTrail events.

{...},
"eventTime": "2024-07-05T20:44:16Z",
"eventSource": "s3express.amazonaws.com",
"eventName": "PutObject",
"awsRegion": "ap-northeast-1",
"sourceIPAddress": "MY-IP",
"userAgent": "Mozilla/5.0 (Macintosh; Intel Mac OS X 10_15_7) AppleWebKit/537.36 (KHTML, like Gecko) Chrome/125.0.0.0 Safari/537.36",
"requestParameters": {
...
},
"responseElements": {...},
"additionalEventData": {...},
...
"resources": [
{
"type": "AWS::S3Express::Object",
"ARN": "arn:aws:s3express:ap-northeast-1:MY-ACCOUNT-ID:bucket/s3express-one-zone-cloudtrail--apne1-az4--x-s3/cloudtrail_example.png"
},
{
"accountId": "MY-ACCOUNT-ID",
"type": "AWS::S3Express::DirectoryBucket",
"ARN": "arn:aws:s3express:ap-northeast-1:MY-ACCOUNT-ID:bucket/s3express-one-zone-cloudtrail--apne1-az4--x-s3"
}
],
{...}

Now, when I review the third file for the event corresponding to the PutObject command sent using AWS CLI, I see that there is a small difference in the userAgent attribute. In this case, it refers to the AWS CLI.

{...},
"eventTime": "2024-07-05T21:37:19Z",
"eventSource": "s3express.amazonaws.com",
"eventName": "PutObject",
"awsRegion": "ap-northeast-1",
"sourceIPAddress": "MY-IP",
"userAgent": "aws-cli/2.17.9 md/awscrt#0.20.11 ua/2.0 os/linux#5.10.218-208.862.amzn2.x86_64 md/arch#x86_64 lang/python#3.11.8 md/pyimpl#CPython cfg/retry-mode#standard md/installer#exe md/distrib#amzn.2 md/prompt#off md/command#s3api.put-object",
"requestParameters": {
...
},
"responseElements": {...},
"additionalEventData": {...},
...
"resources": [
{
"type": "AWS::S3Express::Object",
"ARN": "arn:aws:s3express:ap-northeast-1:MY-ACCOUNT-ID:bucket/s3express-one-zone-cloudtrail--apne1-az4--x-s3/cloudtrail_example.png"
},
{
"accountId": "MY-ACCOUNT-ID",
"type": "AWS::S3Express::DirectoryBucket",
"ARN": "arn:aws:s3express:ap-northeast-1:MY-ACCOUNT-ID:bucket/s3express-one-zone-cloudtrail--apne1-az4--x-s3"
}
],
{...}

Now, let’s look at the GetObject event in the second file. I can see that the event type is GetObject and that the userAgent refers to a browser, so this event refers to my download using the S3 console.

{...},
"eventTime": "2024-07-05T20:47:41Z",
"eventSource": "s3express.amazonaws.com",
"eventName": "GetObject",
"awsRegion": "ap-northeast-1",
"sourceIPAddress": "MY-IP",
"userAgent": "Mozilla/5.0 (Macintosh; Intel Mac OS X 10_15_7) AppleWebKit/537.36 (KHTML, like Gecko) Chrome/125.0.0.0 Safari/537.36",
"requestParameters": {
...
},
"responseElements": {...},
"additionalEventData": {...},
...
"resources": [
{
"type": "AWS::S3Express::Object",
"ARN": "arn:aws:s3express:ap-northeast-1:MY-ACCOUNT-ID:bucket/s3express-one-zone-cloudtrail--apne1-az4--x-s3/cloudtrail_example.png"
},
{
"accountId": "MY-ACCOUNT-ID",
"type": "AWS::S3Express::DirectoryBucket",
"ARN": "arn:aws:s3express:ap-northeast-1:MY-ACCOUNT-ID:bucket/s3express-one-zone-cloudtrail--apne1-az4--x-s3"
}
],
{...}

And finally, let me show the event in the fourth file, with details of the GetObject command that I sent from the AWS CLI. I can see that the eventName and userAgent are as expected.

{...},
"eventTime": "2024-07-05T21:42:04Z",
"eventSource": "s3express.amazonaws.com",
"eventName": "GetObject",
"awsRegion": "ap-northeast-1",
"sourceIPAddress": "MY-IP",
"userAgent": "aws-cli/2.17.9 md/awscrt#0.20.11 ua/2.0 os/linux#5.10.218-208.862.amzn2.x86_64 md/arch#x86_64 lang/python#3.11.8 md/pyimpl#CPython cfg/retry-mode#standard md/installer#exe md/distrib#amzn.2 md/prompt#off md/command#s3api.put-object",
"requestParameters": {
...
},
"responseElements": {...},
"additionalEventData": {...},
...
"resources": [
{
"type": "AWS::S3Express::Object",
"ARN": "arn:aws:s3express:ap-northeast-1:MY-ACCOUNT-ID:bucket/s3express-one-zone-cloudtrail--apne1-az4--x-s3/cloudtrail_example.png"
},
{
"accountId": "MY-ACCOUNT-ID",
"type": "AWS::S3Express::DirectoryBucket",
"ARN": "arn:aws:s3express:ap-northeast-1:MY-ACCOUNT-ID:bucket/s3express-one-zone-cloudtrail--apne1-az4--x-s3"
}
],
{...}

Things to know

Getting started – You can enable CloudTrail data event logging for S3 Express One Zone using the CloudTrail console, CLI, or SDKs.

Regions – CloudTrail data event logging is available in all AWS Regions where S3 Express One Zone is currently available.

Activity logging – With CloudTrail data event logging for S3 Express One Zone, you can object-level activity, such as PutObjectGetObject , and DeleteObject, as well as bucket-level activity, such as CreateBucket and DeleteBucket.

Pricing – As with S3 storage classes, you pay for logging S3 Express One Zone data events in CloudTrail based on the number of events logged and the period during which you retain the logs. For more information, see the AWS CloudTrail Pricing page.

You can enable CloudTrail data event logging for S3 Express One Zone to simplify governance and compliance for your high-performance storage. To learn more about this new capability, visit the S3 User Guide.

Eli.

Top Announcements of the AWS Summit in New York, 2024

Post Syndicated from AWS News Blog Team original https://aws.amazon.com/blogs/aws/top-announcements-of-the-aws-summit-in-new-york-2024-2/

Get ready for the excitement of the AWS Summit in New York City, one of our biggest annual events that takes place tomorrow, Wed., July 10, 2024. In-person space is full, but you can still register to watch the keynote, where Dr. Matt Wood, AWS VP for AI Products, will announce the latest launches and technical innovations from AWS. Then, check back here where we’ll provide a helpful roundup of all the most exciting product news so you won’t miss a thing.

Register here to watch the keynote livestream.

(This post was last updated: 2:45 p.m. PST, July 9, 2024.)


AWS announcements from July 9, 2024

Integrate your data and collaborate using data preparation in AWS Glue Studio
With AWS Glue’s new visual interface, data teams can collaboratively build ETL pipelines, bridging the gap between analysts and engineers through an intuitive, shareable canvas.

Integrate your data and collaborate using data preparation in AWS Glue Studio

Post Syndicated from Veliswa Boya original https://aws.amazon.com/blogs/aws/integrate-your-data-and-collaborate-using-data-preparation-in-aws-glue-studio/

Today, we announce the general availability of data preparation authoring in AWS Glue Studio Visual ETL. This is a new no-code data preparation user experience for business users and data analysts with a spreadsheet-style UI that runs data integration jobs at scale on AWS Glue for Spark. The new visual data preparation experience makes it easier for data analysts and data scientists to clean and transform data to prepare it for analytics and machine learning (ML). Within this new experience, you can choose from hundreds of pre-built transformations to automate data preparation tasks, all without the need to write any code.

Business analysts can now collaborate with data engineers to build data integration jobs. Data engineers can use the Glue Studio visual flow-based view to define connections to the data and set the ordering of the data flow process. Business analysts can use the data preparation experience to define the data transformation and output. Additionally, you can import your existing AWS Glue DataBrew data cleansing and preparation “recipes” to the new AWS Glue data preparation experience. This way, you can continue to author them directly in AWS Glue Studio and then scale up recipes to process petabytes of data at the lower price point for AWS Glue jobs.

Visual ETL prerequisites (environment setup)
The visual ETL needs an AWSGlueConsoleFullAccess IAM managed policy attached to the users and roles that will access AWS Glue.


This policy grants these users and roles full access to AWS Glue and read access to Amazon Simple Storage Service (Amazon S3) resources.

Advanced visual ETL flows
Once the appropriate AWS Identity and Access Management (IAM) role permissions have been defined, author the visual ETL using AWS Glue Studio.

Extract
Create an Amazon S3 node by selecting the Amazon S3 node from the list of Sources.


Select the newly created node and browse for an S3 dataset. Once the file has been uploaded successfully, choose Infer schema to configure the source node and the visual interface will show the preview of the data contained in the .csv file.

Earlier I created an S3 bucket in the same Region as the AWS Glue visual ETL and uploaded a .csv file visual ETL conference data.csv containing the data that I will be visualizing.

It’s important to set up the role permissions as detailed in the previous step to grant AWS Glue access to read the S3 bucket. Without performing this step, you’ll get an error that ultimately prevents you from seeing the data preview.

Transform
After the node has been configured, add a Data Preparation Recipe and start a data preview session. Starting this session typically takes about 2 – 3 minutes.


Once the data preview session is ready, choose Author Recipe to start an authoring session and add transformations once the data frame is complete. During the authoring session, you can view the data, apply transformation steps, and view the transformed data interactively. You can undo, redo, and reorder the steps. You can visualize the data type of the column and the statistical properties of each column.


You can start applying transformation steps to your data such as changing formats from lowercase to uppercase, changing the sort order, and more, by choosing Add step. All your data preparation steps will be tracked in the recipe.
I wanted a view of conferences that will be hosted in South Africa, so I created two recipes to filter by condition where the Location column has values equal to “South Africa”, and the Comments column contains a value.


Load
Once you’ve prepared your data interactively, you can share your work with data engineers who can extend it with more advanced visual ETL flows and custom code to seamlessly integrate it into their production data pipelines.

Now available
The AWS Glue data preparation authoring experience is now publicly available in all commercial AWS Regions where AWS Data Brew is available. To learn more, visit AWS Glue.

For more information, visit the AWS Glue Developer Guide and send feedback to AWS re:Post for AWS Glue or through your usual AWS support contacts.

— Veliswa

Amazon DataZone introduces OpenLineage-compatible data lineage visualization in preview

Post Syndicated from Leonardo Gomez original https://aws.amazon.com/blogs/big-data/amazon-datazone-introduces-openlineage-compatible-data-lineage-visualization-in-preview/

We are excited to announce the preview of API-driven, OpenLineage-compatible data lineage in Amazon DataZone to help you capture, store, and visualize lineage of data movement and transformations of data assets on Amazon DataZone.

With the Amazon DataZone OpenLineage-compatible API, domain administrators and data producers can capture and store lineage events beyond what is available in Amazon DataZone, including transformations in Amazon Simple Storage Service (Amazon S3), AWS Glue, and other AWS services. This provides a comprehensive view for data consumers browsing in Amazon DataZone, who can gain confidence of an asset’s origin, and data producers, who can assess the impact of changes to an asset by understanding its usage.

In this post, we discuss the latest features of data lineage in Amazon DataZone, its compatibility with OpenLineage, and how to get started capturing lineage from other services such as AWS Glue, Amazon Redshift, and Amazon Managed Workflows for Apache Airflow (Amazon MWAA) into Amazon DataZone through the API.

Why it matters to have data lineage

Data lineage gives you an overarching view into data assets, allowing you to see the origin of objects and their chain of connections. Data lineage enables tracking the movement of data over time, providing a clear understanding of where the data originated, how it has changed, and its ultimate destination within the data pipeline. With transparency around data origination, data consumers gain trust that the data is correct for their use case. Data lineage information is captured at levels such as tables, columns, and jobs, allowing you to conduct impact analysis and respond to data issues because, for example, you can see how one field impacts downstream sources. This equips you to make well-informed decisions before committing changes and avoid unwanted changes downstream.

Data lineage in Amazon DataZone is an API-driven, OpenLineage-compatible feature that helps you capture and visualize lineage events from OpenLineage-enabled systems or through an API, to trace data origins, track transformations, and view cross-organizational data consumption. The lineage visualized includes activities inside the Amazon DataZone business data catalog. Lineage captures the assets cataloged as well as the subscribers to those assets and to activities that happen outside the business data catalog captured programmatically using the API.

Additionally, Amazon DataZone versions lineage with each event, enabling you to visualize lineage at any point in time or compare transformations across an asset’s or job’s history. This historical lineage provides a deeper understanding of how data has evolved, which is essential for troubleshooting, auditing, and enforcing the integrity of data assets.

The following screenshot shows an example lineage graph visualized with the Amazon DataZone data catalog.

Introduction to OpenLineage compatible data lineage

The need to capture data lineage consistently across various analytical services and combine them into a unified object model is key in uncovering insights from the lineage artifact. OpenLineage is an open source project that offers a framework to collect and analyze lineage. It also offers reference implementation of an object model to persist metadata along with integration to major data and analytics tools.

The following are key concepts in OpenLineage:

  • Lineage events – OpenLineage captures lineage information through a series of events. An event is anything that represents a specific operation performed on the data that occurs in a data pipeline, such as data ingestion, transformation, or data consumption.
  • Lineage entitiesEntities in OpenLineage represent the various data objects involved in the lineage process, such as datasets and tables.
  • Lineage runs – A lineage run represents a specific run of a data pipeline or a job, encompassing multiple lineage events and entities.
  • Lineage form types – Form types, or facets, provide additional metadata or context about lineage entities or events, enabling richer and more descriptive lineage information. OpenLineage offers facets for runs, jobs, and datasets, with the option to build custom facets.

The Amazon DataZone data lineage API is OpenLineage compatible and extends OpenLineage’s functionality by providing a materialization endpoint to persist the lineage outputs in an extensible object model. OpenLineage offers integrations for certain sources, and integration of these sources with Amazon DataZone is straightforward because the Amazon DataZone data lineage API understands the format and translates to the lineage data model.

The following diagram illustrates an example of the Amazon DataZone lineage data model.

In Amazon DataZone, every lineage node represents an underlying resource—there is a 1:1 mapping of the lineage node with a logical or physical resource such as table, view, or asset. The nodes represent a specific job with a specific run, or a node for a table or asset, and one node for a subscription target.

Each version of a node captures what happened to the underlying resource at that specific timestamp. In Amazon DataZone, lineage not only shares the story of data movement outside it, but it also represents the lineage of activities inside Amazon DataZone, such as asset creation, curation, publishing, and subscription.

To hydrate the lineage model in Amazon DataZone, two types of lineage are captured:

  • Lineage activities inside Amazon DataZone – This includes assets added to the catalog and published, and then details about the subscriptions are captured automatically. When you’re in the producer project context (for example, if the project you’re selected is the owning project of the asset you are browsing and you’re a member of that project), you will see two states of the dataset node:
    • The inventory asset type node defines the asset in the catalog that is in an unpublished stage. Other users can’t subscribe to the inventory asset. To learn more, refer to Creating inventory and published data in Amazon DataZone.
    • The published asset type represents the actual asset that is discoverable by data users across the organization. This is the asset type that can be subscribed by other project members. If you are a consumer and not part of the producing project of that asset, you will only see the published asset node.
  • Lineage activities outside of Amazon DataZone can be captured programmatically using the PostLineageEvent With these events captured either upstream or downstream of cataloged assets, data producers and consumers get a comprehensive view of data movement to check the origin of data or its consumption. We discuss how to use the API to capture lineage events later in this post.

There are two different types of lineage nodes available in Amazon DataZone:

  • Dataset node – In Amazon DataZone, lineage visualizes nodes that represent tables and views. Depending on the context of the project, the producers will be able to view both the inventory and published asset, whereas consumers can only view the published asset. When you first open the lineage tab on the asset details page, the cataloged dataset node will be the starting point for lineage graph traversal upstream or downstream. Dataset nodes include lineage nodes automated from Amazon DataZone and custom lineage nodes:
    • Automated dataset nodes – These nodes include information about AWS Glue or Amazon Redshift assets published in the Amazon DataZone catalog. They’re automatically generated and include a corresponding AWS Glue or Amazon Redshift icon within the node.
    • Custom dataset nodes – These nodes include information about assets that are not published in the Amazon DataZone catalog. They’re created manually by domain administrators (producers) and are represented by a default custom asset icon within the node. These are essentially custom lineage nodes created using the OpenLineage event format.
  • Job (run) node – This node captures the details of the job, which represents the latest run of a particular job and its run details. This node also captures multiple runs of the job and can be viewed on the History tab of the node details. Node details are made visible when you choose the icon.

Visualizing lineage in Amazon DataZone

Amazon DataZone offers a comprehensive experience for data producers and consumers. The asset details page provides a graphical representation of lineage, making it straightforward to visualize data relationships upstream or downstream. The asset details page provides the following capabilities to navigate the graph:

  • Column-level lineage – You can expand column-level lineage when available in dataset nodes. This automatically shows relationships with upstream or downstream dataset nodes if source column information is available.
  • Column search – If the dataset has more than 10 columns, the node presents pagination to navigate to columns not initially presented. To quickly view a particular column, you can search on the dataset node that lists just the searched column.
  • View dataset nodes only – If you want filter out the job nodes, you can choose the Open view control icon in the graph viewer and toggle the Display dataset nodes only This will remove all the job nodes from the graph and let you navigate just the dataset nodes.
  • Details pane – Each lineage node captures and displays the following details:
    • Every dataset node has three tabs: Lineage info, Schema, and History. The History tab lists the different versions of lineage event captured for that node.
    • The job node has a details pane to display job details with the tabs Job info and History. The details pane also captures queries or expressions run as part of the job.
  • Version tabs – All lineage nodes in Amazon DataZone data lineage will have versioning, captured as history, based on lineage events captured. You can view lineage at a selected timestamp that opens a new tab on the lineage page to help compare or contrast between the different timestamps.

The following screenshot shows an example of data lineage visualization.

You can experience the visualization with sample data by choosing Preview on the Lineage tab and choosing the Try sample lineage link. This opens a new browser tab with sample data to test and learn about the feature with or without a guided tour, as shown in the following screenshot.

Solution overview

Now that we understand the capabilities of the new data lineage feature in Amazon DataZone, let’s explore how you can get started in capturing lineage from AWS Glue tables and ETL (extract, transform, and load) jobs, Amazon Redshift, and Amazon MWAA.

The getting started scripts are also available in Amazon DataZone’s new GitHub repository.

Prerequisites

For this walkthrough, you should have the following prerequisites:

If the AWS account you use to follow this post uses AWS Lake Formation to manage permissions on the AWS Glue Data Catalog, make sure that you log in as a user with access to create databases and tables. For more information, refer to Implicit Lake Formation permissions.

Launch the CloudFormation stack

To create your resources for this use case using AWS CloudFormation, complete the following steps:

  1. Launch the CloudFormation stack in us-east-1:
  2. For Stack name, enter a name for your stack.
  3. Choose Next.
  4. Select I acknowledge that AWS CloudFormation might create IAM resources with custom names.
  5. Choose Create stack.

Wait for the stack formation to finish provisioning the resources. When you see the CREATE_COMPLETE status, you can proceed to the next steps.

Capture lineage from AWS Glue tables

For this example, we use CloudShell, which is a browser-based shell, to run the commands necessary to harvest lineage metadata from AWS Glue tables. Complete the following steps:

  1. On the AWS Glue console, choose Crawlers in the navigation pane.
  2. Select the AWSomeRetailCrawler crawler created by the CloudFormation template.
  3. Choose Run.

When the crawler is complete, you’ll see a Succeeded status.

Now let’s harvest the lineage metadata using CloudShell.

  1. Download the extract_glue_crawler_lineage.py file.
  2. On the Amazon DataZone console, open CloudShell.
  1. On the Actions menu, choose Update file.
  2. Upload the extract_glue_crawler_lineage.py file.

  3. Run the following commands:
    sudo yum -y install python3
    python3 -m venv env
    . env/bin/activate
    pip install boto3

You should get the following results.

  1. After all the libraries and dependencies are configured, run the following command to harvest the lineage metadata from the inventory table:
    python extract_glue_crawler_lineage.py -d awsome_retail_db -t inventory -r us-east-1 -i dzd_Your_doamin

  2. The script asks for verification of the settings provided; enter Yes.

You should receive a notification indicating that the script ran successfully.

After you capture the lineage information from the Inventory table, complete the following steps to run the data source.

  1. On the Amazon DataZone data portal, open the Sales
  2. On the Data tab, choose Data sources in the navigation pane.
  1. Select your data source job and choose Run.

For this example, we had a data source job called SalesDLDataSourceV2 already created pointing to the awesome_retail_db database. To learn more about how to create data source jobs, refer to Create and run an Amazon DataZone data source for the AWS Glue Data Catalog.

After the job runs successfully, you should see a confirmation message.

Now let’s view the lineage diagram generated by Amazon DataZone.

  1. On the Data inventory tab, choose the Inventory table.
  2. On the Inventory asset page, choose the new Lineage tab.

On the Lineage tab, you can see that Amazon DataZone created three nodes:

  • Job / Job run – This is based on the AWS Glue crawler used to harvest the asset technical metadata
  • Dataset – This is based on the S3 object that contains the data related to this asset
  • Table – This is the AWS Glue table created by the crawler

If you choose the Dataset node, Amazon DataZone offers information about the S3 object used to create the asset.

Capture data lineage for AWS Glue ETL jobs

In the previous section, we covered how to generate a data lineage diagram on top of a data asset. Now let’s see how we can create one for an AWS Glue job.

The CloudFormation template that we launched earlier created an AWS Glue job called Inventory_Insights. This job gets data from the Inventory table and creates a new table called Inventory_Insights with the aggregated data of the total products available in all the stores.

The CloudFormation template also copied the openlineage-spark_2.12-1.9.1.jar file to the S3 bucket created for this post. This file is necessary to generate lineage metadata from the AWS Glue job. We use version 1.9.1, which is compatible with AWS Glue 3.0, the version used to create the AWS Glue job for this post. If you’re using a different version of AWS Glue, you need to download the corresponding OpenLineage Spark plugin file that matches your AWS Glue version.

The OpenLineage Spark plugin is not able to extract data lineage from AWS Glue Spark jobs that use AWS Glue DynamicFrames. Use Spark SQL DataFrames instead.

  1. Download the extract_glue_spark_lineage.py file.
  2. On the Amazon DataZone console, open CloudShell.
  3. On the Actions menu, choose Update file.
  4. Upload the extract_glue_spark_lineage.py file.
  5. On the CloudShell console, run the following command (if your CloudShell session expired, you can open a new session):
    python extract_glue_spark_lineage.py —region "us-east-1" —domain-identifier 'dzd_Your Domain'

  6. Confirm the information showed by the script by entering yes.

You will see the following message; this means that the script is ready to get the AWS Glue job lineage metadata after you run it.

Now let’s run the AWS Glue job created by the Cloud formation template.

  1. On the AWS Glue console, choose ETL jobs in the navigation pane.
  2. Select the Inventory_Insights job and choose Run job.

On the Job details tab, you will notice that the job has the following configuration:

  • Key --conf with value extraListeners=io.openlineage.spark.agent.OpenLineageSparkListener --conf spark.openlineage.transport.type=console --conf spark.openlineage.facets.custom_environment_variables=[AWS_DEFAULT_REGION;GLUE_VERSION;GLUE_COMMAND_CRITERIA;GLUE_PYTHON_VERSION;]
  • Key --user-jars-first with value true
  • Dependent JARs path set as the S3 path s3://{your bucket}/lib/openlineage-spark_2.12-1.9.1.jar
  • The AWS Glue version set as 3.0

During the run of the job, you will see the following output on the CloudShell console.

This means that the script has successfully harvested the lineage metadata from the AWS Glue job.

Now let’s create an AWS Glue table based on the data created by the AWS Glue job. For this example, we use an AWS Glue crawler.

  1. On the AWS Glue console, choose Crawlers in the navigation pane.
  2. Select the AWSomeRetailCrawler crawler created by the CloudFormation template and choose Run.

When the crawler is complete, you will see the following message.

Now let’s open the Amazon DataZone portal to see how the diagram is represented in Amazon DataZone.

  1. On the Amazon DataZone portal, choose the Sales project.
  2. On the Data tab, choose Inventory data in the navigation pane.
  3. Choose the inventory insights asset

On the Lineage tab, you can see the diagram created by Amazon DataZone. It shows three nodes:

    • The AWS Glue crawler used to create the AWS Glue table
    • The AWS Glue table created by the crawler
    • The Amazon DataZone cataloged asset
  1. To see the lineage information about the AWS Glue job that you ran to create the inventory_insights table, choose the arrows icon on the left side of the diagram.

Now you can see the full lineage diagram for the Inventory_insights table.

  1. Choose the blue arrow icon in the inventory node to the left of the diagram.

You can see the evolution of the columns and the transformations that they had.

When you choose any of the nodes that are part of the diagram, you can see more details. For example, the inventory_insights node shows the following information.

Capture lineage from Amazon Redshift

Let’s explore how to generate a lineage diagram from Amazon Redshift. In this example, we use AWS Cloud9 because it allows us to configure the connection to the virtual private cloud (VPC) where our Redshift cluster resides. For more information about AWS Cloud9, refer to the AWS Cloud9 User Guide.

The CloudFormation template included as part of this post doesn’t cover the creation of a Redshift cluster or the creation of the tables used in this section. To learn more about how to create a Redshift cluster, see Step 1: Create a sample Amazon Redshift cluster. We use the following query to create the tables needed for this section of the post:

Create SCHEMA market

create table market.retail_sales (
  id BIGINT primary key,
  name character varying not null
);

create table market.online_sales (
  id BIGINT primary key,
  name character varying not null
);

/* Important to insert some data in the table */
INSERT INTO market.retail_sales
VALUES (123, 'item1')

INSERT INTO market.online_sales
VALUES (234, 'item2')

create table market.sales AS
Select id, name from market.retail_sales
Union ALL
Select id, name from market.online_sales;

Remember to add the IP address of your AWS Cloud9 environment to the security group with access to the Redshift cluster.

  1. Download the requirements.txt and extract_redshift_lineage.py files.
  2. On the File menu, choose Upload Local Files.
  3. Upload the requirements.txt and extract_redshift_lineage.py files.
  4. Run the following commands:
    # Install Python 
    sudo yum -y install python3
    
    # dependency set up 
    python3 -m venv env 
    . env/bin/activate
    
    pip install -r requirements.txt

You should be able to see the following messages.

  1. To set the AWS credentials, run the following command:
    export AWS_ACCESS_KEY_ID=<<Your Access Key>>
    export AWS_SECRET_ACCESS_KEY=<<Your Secret Access Key>>
    export AWS_SESSION_TOKEN=<<Your Session Token>>

  2. Run the extract_redshift_lineage.py script to harvest the metadata necessary to generate the lineage diagram:
    python extract_redshift_lineage.py \
     -r region \
     -i dzd_your_dz_domain_id \
     -n your-redshift-cluster-endpoint \
     -t your-rs-port \
     -d your-database \
     -s the-starting-date

  3. Next, you will be prompted to enter the user name and password for the connection to your Amazon DataZone database.
  4. When you receive a confirmation message, enter yes.

If the configuration was done correctly, you will see the following confirmation message.

Now let’s see how the diagram was created in Amazon DataZone.

  1. On the Amazon DataZone data portal, open the Sales project.
  2. On the Data tab, choose Data sources.
  3. Run the data source job.

For this post, we already created a data source job called Sales_DW_Enviroment-default-datasource to add the Redshift data source to our Amazon DataZone project. To learn how to create a data source job, refer to Create and run an Amazon DataZone data source for Amazon Redshift

After you run the job, you’ll see the following confirmation message.

  1. On the Data tab, choose Inventory data in the navigation pane.
  2. Choose the total_sales asset.
  1. Choose the Lineage tab.

Amazon DataZone create a three-node lineage diagram for the total sales table; you can choose any node to view its details.

  1. Choose the arrows icon next to the Job/ Job run node to view a more complete lineage diagram.
  1. Choose the Job / Job run

The Job Info section shows the query that was used to create the total sales table.

Capture lineage from Amazon MWAA

Apache Airflow is an open-source platform for developing, scheduling, and monitoring batch-oriented workflows. Amazon MWAA is a managed service for Airflow that lets you use your current Airflow platform to orchestrate your workflows. OpenLineage supports integration with Airflow 2.6.3 using the openlineage-airflow package, and the same can be enabled on Amazon MWAA as a plugin. Once enabled, the plugin converts Airflow metadata to OpenLineage events, which are consumable by DataZone.PostLineageEvent.

The following diagram shows the setup required in Amazon MWAA to capture data lineage using OpenLineage and publish it to Amazon DataZone.

The workflow uses an Amazon MWAA DAG to invoke a data pipeline. The process is as follows:

  1. The openlineage-airflow plugin is configured on Amazon MWAA as a lineage backend. Metadata about the DAG run is passed to the plugin, which converts it into OpenLineage format.
  2. The lineage information collected is written to Amazon CloudWatch log group according to the Amazon MWAA environment.
  3. A helper function captures the lineage information from the log file and publishes it to Amazon DataZone using the PostLineageEvent API.

The example used in the post uses Amazon MWAA version 2.6.3 and OpenLineage plugin version 1.4.1. For other Airflow versions supported by OpenLineage, refer to Supported Airflow versions.

Configure the OpenLineage plugin on Amazon MWAA to capture lineage

When harvesting lineage using OpenLineage, a Transport configuration needs to be set up, which tells OpenLineage where to emit the events to, for example the console or an HTTP endpoint. You can use ConsoleTransport, which logs the OpenLineage events in the Amazon MWAA task CloudWatch log group, which can then be published to Amazon DataZone using a helper function.

Specify the following in the requirements.txt file added to the S3 bucket configured for Amazon MWAA:

openlineage-airflow==1.4.1

In the Airflow logging configuration section under the MWAA configuration for the Airflow environment, enable Airflow task logs with log level INFO. The following screenshot shows a sample configuration.

A successful configuration will add a plugin to Airflow, which can be verified from the Airflow UI by choosing Plugins on the Admin menu.

In this post, we use a sample DAG to hydrate data to Redshift tables. The following screenshot shows the DAG in graph view.

Run the DAG and upon successful completion of a run, open the Amazon MWAA task CloudWatch log group for your Airflow environment (airflow-env_name-task) and filter based on the expression console.py to select events emitted by OpenLineage. The following screenshot shows the results.

Publish lineage to Amazon DataZone

Now that you have the lineage events emitted to CloudWatch, the next step is to publish them to Amazon DataZone to associate them to a data asset and visualize them on the business data catalog.

  1. Download the files requirements.txt and airflow_cw_parse_log.py and gather environment details like AWS region, Amazon MWAA environment name and Amazon DataZone Domain ID.
  2. The Amazon MWAA environment name can be obtained from the Amazon MWAA console.
  3. The Amazon DataZone domain ID can be obtained from Amazon DataZone service console or from the Amazon DataZone portal.
  4. Navigate to CloudShell and choose Upload files on the Actions menu to upload the files requirements.txt and extract_airflow_lineage.py.

  5. After the files are uploaded, run the following script to filter lineage events from the Airflow task logs and publish them to Amazon DataZone:
    # Set up virtual env and install dependencies
    python -m venv env
    pip install -r requirements.txt
    . env/bin/activate
    
    # run the script
    python extract_airflow_lineage.py \
      --region us-east-1 \
      --domain-identifier your_domain_identifier \
      --airflow-environment-name your_airflow_environment_name

The function extract_airflow_lineage.py filters the lineage events from the Amazon MWAA task log group and publishes the lineage to the specified domain within Amazon DataZone.

Visualize lineage on Amazon DataZone

After the lineage is published to DataZone, open your DataZone project, navigate to the Data tab and chose a data asset that was accessed by the Amazon MWAA DAG. In this case, it is a subscribed asset.

Navigate to the Lineage tab to visualize the lineage published to Amazon DataZone.

Choose a node to look at additional lineage metadata. In the following screenshot, we can observe the producer of the lineage has been marked as airflow.

Conclusion

In this post, we shared the preview feature of data lineage in Amazon DataZone, how it works, and how you can capture lineage events, from AWS Glue, Amazon Redshift, and Amazon MWAA, to be visualized as part of the asset browsing experience.

To learn more about Amazon DataZone and how to get started, refer to the Getting started guide. Check out the YouTube playlist for some of the latest demos of Amazon DataZone and short descriptions of the capabilities available.


About the Authors

Leonardo Gomez is a Principal Analytics Specialist at AWS, with over a decade of experience in data management. Specializing in data governance, he assists customers worldwide in maximizing their data’s potential while promoting data democratization. Connect with him on LinkedIn.

Priya Tiruthani is a Senior Technical Product Manager with Amazon DataZone at AWS. She focuses on improving data discovery and curation required for data analytics. She is passionate about building innovative products to simplify customers’ end-to-end data journey, especially around data governance and analytics. Outside of work, she enjoys being outdoors to hike, capture nature’s beauty, and recently play pickleball.

Ron Kyker is a Principal Engineer with Amazon DataZone at AWS, where he helps drive innovation, solve complex problems, and set the bar for engineering excellence for his team. Outside of work, he enjoys board gaming with friends and family, movies, and wine tasting.

Srinivasan Kuppusamy is a Senior Cloud Architect – Data at AWS ProServe, where he helps customers solve their business problems using the power of AWS Cloud technology. His areas of interests are data and analytics, data governance, and AI/ML.

AWS Weekly Roundup: Amazon S3 Access Grants, AWS Lambda, European Sovereign Cloud Region, and more (July 8, 2024).

Post Syndicated from Sébastien Stormacq original https://aws.amazon.com/blogs/aws/aws-weekly-roundup-amazon-s3-access-grants-aws-lambda-european-sovereign-cloud-region-and-more-july-8-2024/

I counted only 21 AWS news since last Monday, most of them being Regional expansions of existing services and capabilities. I hope you enjoyed a relatively quiet week, because this one will be busier.

This week, we’re welcoming our customers and partners at the Jacob Javits Convention Center for the AWS Summit New York on Wednesday, July 10. I can tell you there is a stream of announcements coming, if I judge by the number of AWS News Blog posts ready to be published.

I am writing these lines just before packing my bag to attend the AWS Community Day in Douala, Cameroon next Saturday. I can’t wait to meet our customers and partners, students, and the whole AWS community there.

But for now, let’s look at last week’s new announcements.

Last week’s launches
Here are the launches that got my attention.

Amazon Simple Storage Service (Amazon S3) Access Grants now integrate with Amazon SageMaker and open souce Python frameworksAmazon S3 Access Grants maps identities in directories such as Active Directory or AWS Identity and Access Management (IAM) principals, to datasets in S3. The integration with Amazon SageMaker Studio for machine learning (ML) helps you map identities to your machine learning (ML) datasets in S3. The integration with the AWS SDK for Python (Boto3) plugin replaces any custom code required to manage data permissions, so you can use S3 Access Grants in open source Python frameworks such as Django, TensorFlow, NumPy, Pandas, and more.

AWS Lambda introduces new controls to make it easier to search, filter, and aggregate Lambda function logsYou can now capture your Lambda logs in JSON structured format without bringing your own logging libraries. You can also control the log level (for example, ERROR, DEBUG, or INFO) of your Lambda logs without making any code changes. Lastly, you can choose the Amazon CloudWatch log group to which Lambda sends your logs.

Amazon DataZone introduces fine-grained access controlAmazon DataZone has introduced fine-grained access control, providing data owners granular control over their data at row and column levels. You use Amazon DataZone to catalog, discover, analyze, share, and govern data at scale across organizational boundaries with governance and access controls. Data owners can now restrict access to specific records of data instead of granting access to an entire dataset.

AWS Direct Connect proposes native 400 Gbps dedicated connections at select locationsAWS Direct Connect provides private, high-bandwidth connectivity between AWS and your data center, office, or colocation facility. Native 400 Gbps connections provide higher bandwidth without the operational overhead of managing multiple 100 Gbps connections in a link aggregation group. The increased capacity delivered by 400 Gbps connections is particularly beneficial to applications that transfer large-scale datasets, such as for ML and large language model (LLM) training or advanced driver assistance systems for autonomous vehicles.

For a full list of AWS announcements, be sure to keep an eye on the What’s New at AWS page.

Other AWS news
Here are some additional news items that you might find interesting:

The list of services available at launch in the upcoming AWS Europe Sovereign Cloud Region is available – we shared the list of AWS services that will be initially available at launch in the new AWS European Sovereign Cloud Region. The list has no surprises. Services for security, networking, storage, computing, containers, artificial intelligence (AI), and serverless will be available at launch. We are building the AWS European Sovereign Cloud to offer public sector organizations and customers in highly regulated industries further choice to help them meet their unique digital sovereignty requirements, as well as stringent data residency, operational autonomy, and resiliency requirements. This is an investment of 7.8 billion euros (approximately $8.46 billion). The new Region will be available by the end of 2025.

Upcoming AWS events
Check your calendars and sign up for upcoming AWS events:

AWS Summits – Join free online and in-person events that bring the cloud computing community together to connect, collaborate, and learn about AWS. To learn more about future AWS Summit events, visit the AWS Summit page. Register in your nearest city: New York (July 10), Bogotá (July 18), and Taipei (July 23–24).

AWS Community Days – Join community-led conferences that feature technical discussions, workshops, and hands-on labs led by expert AWS users and industry leaders from around the world. Upcoming AWS Community Days are in Cameroon (July 13), Aotearoa (August 15), and Nigeria (August 24).

Browse all upcoming AWS led in-person and virtual events and developer-focused events.

That’s all for this week. Check back next Monday for another Weekly Roundup!

— seb

This post is part of our Weekly Roundup series. Check back each week for a quick roundup of interesting news and announcements from AWS!

Enhance data security with fine-grained access controls in Amazon DataZone

Post Syndicated from Deepmala Agarwal original https://aws.amazon.com/blogs/big-data/enhance-data-security-with-fine-grained-access-controls-in-amazon-datazone/

Fine-grained access control is a crucial aspect of data security for modern data lakes and data warehouses. As organizations handle vast amounts of data across multiple data sources, the need to manage sensitive information has become increasingly important. Making sure the right people have access to the right data, without exposing sensitive information to unauthorized individuals, is essential for maintaining data privacy, compliance, and security.

Today, Amazon DataZone has introduced fine-grained access control, providing you granular control over your data assets in the Amazon DataZone business data catalog across data lakes and data warehouses. With the new capability, data owners can now restrict access to specific records of data at row and column levels, instead of granting access to the entire data asset. For example, if your data contains columns with sensitive information such as personally identifiable information (PII), you can restrict access to only the necessary columns, making sure sensitive information is protected while still allowing access to non-sensitive data. Similarly, you can control access at the row level, allowing users to see only the records that are relevant to their role or task.

In this post, we discuss how to implement fine-grained access control with row and column asset filters using this new feature in Amazon DataZone.

Row and column filters

Row filters enable you to restrict access to specific rows based on criteria you define. For instance, if your table contains data for two regions (America and Europe) and you want to make sure that employees in Europe only access data relevant to their region, you can create a row filter that excludes rows where the region is not Europe (for example, region != 'Europe'). This way, employees in America won’t have access to Europe’s data.

Column filters allow you to limit access to specific columns within your data assets. For example, if your table includes sensitive information such as PII, you can create a column filter to exclude PII columns. This makes sure subscribers can only access non-sensitive data.

The row and column asset filters in Amazon DataZone enable you to control who can access what using a consistent, business user-friendly mechanism for all of your data across AWS data lakes and data warehouses. To use fine-grained access control in Amazon DataZone, you can create row and column filters on top of your data assets in the Amazon DataZone business data catalog. When a user requests a subscription to your data asset, you can approve the subscription by applying the appropriate row and column filters. Amazon DataZone enforces these filters using AWS Lake Formation and Amazon Redshift, making sure the subscriber can only access the rows and columns that they are authorized to use.

Solution overview

To demonstrate the new capability, we consider a sample customer use case where an electronics ecommerce platform is looking to implement fine-grained access controls using Amazon DataZone. The customer has multiple product categories, each operated by different divisions of the company. The platform governance team wants to make sure each division has visibility only to data belonging to their own categories. Additionally, the platform governance team needs to adhere to the finance team requirements that pricing information should be visible only to the finance team.

The sales team, acting as the data producer, has published an AWS Glue table called Product sales that contains data for both Laptops and Servers categories to the Amazon DataZone business data catalog using the project Product-Sales. The analytic teams in both the laptop and server divisions need to access this data for their respective analytics projects. The data owner’s objective is to grant data access to consumers based on the division they belong to. This means giving access to only rows of data with laptop sales to the laptops sales analytics team, and rows with servers sales to the server sales analytics team. Additionally, the data owner wants to restrict both teams from accessing the pricing data. This post demonstrates the implementation steps to achieve this use case in Amazon DataZone.

The steps to configure this solution are as follows:

  1. The publisher creates asset filters for limiting access:
    1. We create two row filters: a Laptop Only row filter that limits access to only the rows of data with laptop sales, and a Server Only row filter that limits access to the rows of data with server sales.
    2. We also create a column filter called exclude-price-columns that excludes the price-related columns from the Product Sales
  2. Consumers discover and request subscriptions:
    1. The analyst from the laptops division requests a subscription to the Product Sales data asset.
    2. The analyst from the servers division also request a subscription to the Product Sales data asset.
    3. Both subscription requests are sent to the publisher for approval.
  3. The publisher approves the subscriptions and applies the appropriate filters:
    1. The publisher approves the request from the analysts in the laptops division, applying the Laptop Only row filter and the exclude-price-columns columns filter.
    2. The publisher approves the request from the consumer in the servers division, applying the Server Only row filter and the exclude-price-columns columns filter.
  4. Consumers access the authorized data in Amazon Athena:
    1. After the subscription is approved, we query the data in Athena to make sure that the analyst from the laptops division can now access only the product sales data for the Laptop
    2. Similarly, the analyst from the servers division can access only the product sales data for the Server
    3. Both consumers can see all columns except the price-related columns, as per the applied column filter.

The following diagram illustrates the solution architecture and process flow.

Prerequisites

To follow along with this post, the publisher of the product sales data asset must have published a sales dataset in Amazon DataZone.

Publisher creates asset filters for limiting access

In this section, we detail the steps the publisher takes to create asset filers.

Create row filters

This dataset contains the product categories Laptops and Servers. We want to restrict access to the dataset that is authorized based on the product category. We use the row filter feature in Amazon DataZone to achieve this.

Amazon DataZone allows you to create row filters that can be used when approving subscriptions to make sure that the subscriber can only access rows of data as defined in the row filters. To create a row filter, complete the following steps:

  1. On the Amazon DataZone console, navigate to the product-sales project (the project to which the asset belongs).
  2. Navigate to the Data tab for the project.
  3. Choose Inventory data in the navigation pane, then the asset Product Sales, where you want to create the row filter.

You can add row filters for assets of type AWS Glue tables or Redshift tables.

  1. On the asset detail page, on the Asset filters tab, choose Add asset filter.

We create two row filters, one each for the Laptops and Servers categories.

  1. Complete the following steps to create a laptop only asset row filter:
    1. Enter a name for this filter (Laptop Only).
    2. Enter a description of the filter (Allow rows with product category as Laptop Only).
    3. For the filter type, select Row filter.
    4. For the row filter expression, enter one or more expressions:
      1. Choose the column Product Category from the column dropdown menu.
      2. Choose the operator = from the operator dropdown menu.
      3. Enter the value Laptops in the Value field.
    5. If you need to add another condition to the filter expression, choose Add condition. For this post, we create a filter with one condition.
    6. When using multiple conditions in the row filter expression, choose And or Or to link the conditions.
    7. You can also define the subscriber visibility. For this post, we kept the default value (No, show values to subscriber).
    8. Choose Create asset filter.
  2. Repeat the same steps to create a row filter called Server Only, except this time enter the value Servers in the Value field.

Create column filters

Next, we create column filters to restrict access to columns with price-related data. Complete the following steps:

  1. In the same asset, add another asset filter of type column filter.
  2. On the Asset filters tab, choose Add asset filter.
  3. For Name, enter a name for the filter (for this post, exclude-price-columns).
  4. For Description, enter a description of the filters (for this post, exclude price data columns).
  5. For the filter type, select Column to create the column filter. This will display all the available columns in the data asset’s schema.
  6. Select all columns except the price-related ones.
  7. Choose Create asset filter.

Consumers discover and request subscriptions

In this section, we switch to the role of an analyst from the laptop division who is working within the project Sales Analytics - Laptop. As the data consumer, we search the catalog to find the Product Sales data asset and request access by subscribing to it.

  1. Log in to your project as a consumer and search for the Product Sales data asset.
  2. On the Product Sales data asset details page, choose Subscribe.
  3. For Project, choose Sales Analytics – Laptops.
  4. For Reason for request, enter the reason for the subscription request.
  5. Choose Subscribe to submit the subscription request.

Publisher approves subscriptions with filters

After the subscription request is submitted, the publisher will receive the request, and they can approve it by following these steps:

  1. As the publisher, open the project Product-Sales.
  2. On the Data tab, choose Incoming requests in the left navigation pane.
  3. Locate the request and choose View request. You can filter by Pending to see only requests that are still open.

This opens the details of the request, where you can see details like who requested the access, for what project, and the reason for the request.

  1. To approve the request, there are two options:
    1. Full access – If you choose to approve the subscription with full access option, the subscriber will get access to all the rows and columns in our data asset.
    2. Approve with row and column filters – To limit access to specific rows and columns of data, you can choose the option to approve with row and column filters. For this post, we use both filters that we created earlier.
  2. Select Choose filter, then on the dropdown menu, choose the Laptops Only and pii-col-filter
  3. Choose Approve to approve the request.

After access is granted and fulfilled, the subscription looks as shown in the following screenshot.

  1. Now let’s log in as a consumer from the server division.
  2. Repeat the same steps, but this time, while approving the subscription, the publisher of sales data approves with the Server only The other steps remain the same.

Consumers access authorized data in Athena

Now that we have successfully published an asset to the Amazon DataZone catalog and subscribed to it, we can analyze it. Let’s log in as a consumer from the laptop division.

  1. In the Amazon DataZone data portal, choose the consumer project Sales Analytics - Laptops.
  2. On the Schema tab, we can view the subscribed assets.
  3. Choose the project Sales Analytics - Laptops and choose the Overview
  4. In the right pane, open the Athena environment.

We can now run queries on the subscribed table.

  1. Choose the table under Tables and views, then choose Preview to view the SELECT statement in the query editor.
  2. Run a query as the consumer of Sales Analytics - Laptops, in which we can view data only with product category Laptops.

Under Tables and views, you can expand the table product_sales. The price-related columns are not visible in the Athena environment for querying.

  1. Next, you can switch to the role of analyst from the server division and analyze the dataset in similar way.
  2. We run the same query and see that under product_category, the analyst can see Servers only.

Conclusion

Amazon DataZone offers a straightforward way to implement fine-grained access controls on top of your data assets. This feature allows you to define column-level and row-level filters to enforce data privacy before the data is available to data consumers. Amazon DataZone fine-grained access control is generally available in all AWS Regions that support Amazon DataZone.

Try out the fine-grained access control feature in your own use case, and let us know your feedback in the comments section.


About the Authors

Deepmala Agarwal works as an AWS Data Specialist Solutions Architect. She is passionate about helping customers build out scalable, distributed, and data-driven solutions on AWS. When not at work, Deepmala likes spending time with family, walking, listening to music, watching movies, and cooking!

Leonardo Gomez is a Principal Analytics Specialist Solutions Architect at AWS. He has over a decade of experience in data management, helping customers around the globe address their business and technical needs. Connect with him on LinkedIn.

Utkarsh Mittal is a Senior Technical Product Manager for Amazon DataZone at AWS. He is passionate about building innovative products that simplify customers’ end-to-end analytics journeys. Outside of the tech world, Utkarsh loves to play music, with drums being his latest endeavor.

AWS Weekly Roundup: AI21 Labs’ Jamba-Instruct in Amazon Bedrock, Amazon WorkSpaces Pools, and more (July 1, 2024)

Post Syndicated from Esra Kayabali original https://aws.amazon.com/blogs/aws/aws-weekly-roundup-ai21-labs-jamba-instruct-in-amazon-bedrock-amazon-workspaces-pools-and-more-july-1-2024/

AWS Summit New York is 10 days away, and I am very excited about the new announcements and more than 170 sessions. There will be A Night Out with AWS event after the summit for professionals from the media and entertainment, gaming, and sports industries who are existing Amazon Web Services (AWS) customers or have a keen interest in using AWS Cloud services for their business. You’ll have the opportunity to relax, collaborate, and build new connections with AWS leaders and industry peers.

Let’s look at the last week’s new announcements.

Last week’s launches
Here are the launches that got my attention.

AI21 Labs’ Jamba-Instruct now available in Amazon Bedrock – AI21 Labs’ Jamba-Instruct is an instruction-following large language model (LLM) for reliable commercial use, with the ability to understand context and subtext, complete tasks from natural language instructions, and ingest information from long documents or financial filings. With strong reasoning capabilities, Jamba-Instruct can break down complex problems, gather relevant information, and provide structured outputs to enable uses like Q&A on calls, summarizing documents, building chatbots, and more. For more information, visit AI21 Labs in Amazon Bedrock and the Amazon Bedrock User Guide.

Amazon WorkSpaces Pools, a new feature of Amazon WorkSpaces – You can now create a pool of non-persistent virtual desktops using Amazon WorkSpaces and save costs by sharing them across users who receive a fresh desktop each time they sign in. WorkSpaces Pools provides the flexibility to support shared environments like training labs and contact centers, and some user settings like bookmarks and files stored in a central storage repository such as Amazon Simple Storage Service (Amazon S3) or Amazon FSx can be saved for improved personalization. You can use AWS Auto Scaling to automatically scale the pool of virtual desktops based on usage metrics or schedules. For pricing information, refer to the Amazon WorkSpaces Pricing page.

API-driven, OpenLineage-compatible data lineage visualization in Amazon DataZone (preview)Amazon DataZone introduces a new data lineage feature that allows you to visualize how data moves from source to consumption across organizations. The service captures lineage events from OpenLineage-enabled systems or through API to trace data transformations. Data consumers can gain confidence in an asset’s origin, and producers can assess the impact of changes by understanding its consumption through the comprehensive lineage view. Additionally, Amazon DataZone versions lineage with each event to enable visualizing lineage at any point in time or comparing transformations across an asset or job’s history. To learn more, visit Amazon DataZone, read my News Blog post, and get started with data lineage documentation.

Knowledge Bases for Amazon Bedrock now offers observability logs – You can now monitor knowledge ingestion logs through Amazon CloudWatch, S3 buckets, or Amazon Data Firehose streams. This provides enhanced visibility into whether documents were successfully processed or encountered failures during ingestion. Having these comprehensive insights promptly ensures that you can efficiently determine when your documents are ready for use. For more details on these new capabilities, refer to the Knowledge Bases for Amazon Bedrock documentation.

Updates and expansion to the AWS Well-Architected Framework and Lens Catalog – We announced updates to the AWS Well-Architected Framework and Lens Catalog to provide expanded guidance and recommendations on architectural best practices for building secure and resilient cloud workloads. The updates reduce redundancies and enhance consistency in resources and framework structure. The Lens Catalog now includes the new Financial Services Industry Lens and updates to the Mergers and Acquisitions Lens. We also made important updates to the Change Enablement in the Cloud whitepaper. You can use the updated Well-Architected Framework and Lens Catalog to design cloud architectures optimized for your unique requirements by following current best practices.

Cross-account machine learning (ML) model sharing support in Amazon SageMaker Model RegistryAmazon SageMaker Model Registry now integrates with AWS Resource Access Manager (AWS RAM), allowing you to easily share ML models across AWS accounts. This helps data scientists, ML engineers, and governance officers access models in different accounts like development, staging, and production. You can share models in Amazon SageMaker Model Registry by specifying the model in the AWS RAM console and granting access to other accounts. This new feature is now available in all AWS Regions where SageMaker Model Registry is available except GovCloud Regions. To learn more, visit the Amazon SageMaker Developer Guide.

AWS CodeBuild supports Arm-based workloads using AWS Graviton3AWS CodeBuild now supports natively building and testing Arm workloads on AWS Graviton3 processors without additional configuration, providing up to 25% higher performance and 60% lower energy usage than previous Graviton processors. To learn more about CodeBuild’s support for Arm, visit our AWS CodeBuild User Guide.

For a full list of AWS announcements, be sure to keep an eye on the What’s New at AWS page.

We launched existing services and instance types in additional Regions:

Other AWS news
Here are some additional news items that you might find interesting:

Top reasons to build and scale generative AI applications on Amazon Bedrock – Check out Jeff Barr’s video, where he discusses why our customers are choosing Amazon Bedrock to build and scale generative artificial intelligence (generative AI) applications that deliver fast value and business growth. Amazon Bedrock is becoming a preferred platform for building and scaling generative AI due to its features, innovation, availability, and security. Leading organizations across diverse sectors use Amazon Bedrock to speed their generative AI work, like creating intelligent virtual assistants, creative design solutions, document processing systems, and a lot more.

Four ways AWS is engineering infrastructure to power generative AI – We continue to optimize our infrastructure to support generative AI at scale through innovations like delivering low-latency, large-scale networking to enable faster model training, continuously improving data center energy efficiency, prioritizing security throughout our infrastructure design, and developing custom AI chips like AWS Trainium to increase computing performance while lowering costs and energy usage. Read the new blog post about how AWS is engineering infrastructure for generative AI.

AWS re:Inforce 2024 re:Cap – It’s been 2 weeks since AWS re:Inforce 2024, our annual cloud-security learning event. Check out the summary of the event prepared by Wojtek.

Upcoming AWS events
Check your calendars and sign up for upcoming AWS events:

AWS Summits – Join free online and in-person events that bring the cloud computing community together to connect, collaborate, and learn about AWS. To learn more about future AWS Summit events, visit the AWS Summit page. Register in your nearest city: New York (July 10), Bogotá (July 18), and Taipei (July 23–24).

AWS Community Days – Join community-led conferences that feature technical discussions, workshops, and hands-on labs led by expert AWS users and industry leaders from around the world. Upcoming AWS Community Days are in Cameroon (July 13), Aotearoa (August 15), and Nigeria (August 24).

Browse all upcoming AWS led in-person and virtual events and developer-focused events.

That’s all for this week. Check back next Monday for another Weekly Roundup!

— Esra

This post is part of our Weekly Roundup series. Check back each week for a quick roundup of interesting news and announcements from AWS!

Amazon WorkSpaces Pools: Cost-effective, non-persistent virtual desktops

Post Syndicated from Jeff Barr original https://aws.amazon.com/blogs/aws/amazon-workspaces-pools-cost-effective-non-persistent-virtual-desktops/

You can now create a pool of non-persistent virtual desktops using Amazon WorkSpaces and share them across a group of users. As the desktop administrator you can manage your entire portfolio of persistent and non-persistent virtual desktops using one GUI, command line, or set of API-powered tools. Your users can log in to these desktops using a browser, a client application (Windows, Mac, or Linux), or a thin client device.

Amazon WorkSpaces Pools (non-persistent desktops)
WorkSpaces Pools ensures that each user gets the same applications and the same experience. When the user logs in, they always get access to a fresh WorkSpace that’s based on the latest configuration for the pool, centrally managed by their administrator. If the administrator enables application settings persistence for the pool, users can configure certain application settings, such as browser favorites, plugins, and UI customizations. Users can also access persistent file or object storage external to the desktop.

These desktops are a great fit for many types of users and use cases including remote workers, task workers (shared service centers, finance, procurement, HR, and so forth), contact center workers, and students.

As the administrator for the pool, you have full control over the compute resources (bundle type) and the initial configuration of the desktops in the pool, including the set of applications that are available to the users. You can use an existing custom WorkSpaces image, create a new one, or use one of the standard ones. You can also include Microsoft 365 Apps for Enterprise on the image. You can configure the pool to accommodate the size and working hours of your user base, and you can optionally join the pool to your organization’s domain and active directory.

Getting started
Let’s walk through the process of setting up a pool and inviting some users. I open the WorkSpaces console and choose Pools to get started:

I have no pools, so I choose Create WorkSpace on the Pools tab to begin the process of creating a pool:

The console can recommend workspace options for me, or I can choose what I want. I leave Recommend workspace options… selected, and choose No – non-persistent to create a pool of non-persistent desktops. Then I select my use cases from the menu and pick the operating system and choose Next to proceed:

The use case menu has lots of options:

On the next page I start by reviewing the WorkSpace options and assigning a name to my pool:

Next, I scroll down and choose a bundle. I can pick a public bundle or a custom one of my own. Bundles must use the WSP 2.0 protocol. I can create a custom bundle to provide my users with access to applications or to alter any desired system settings.

Moving right along, I can customize the settings for each user session. I can also enable application settings persistence to save application customizations and Windows settings on a per-user basis between sessions:

Next, I set the capacity of my pool, and optionally establish one or more schedules based on date or time. The schedules give me the power to match the size of my pool (and hence my costs) to the rhythms and needs of my users:

If the amount of concurrent usage is more dynamic and not aligned to a schedule, then I can use manual scale out and scale in policies to control the size of my pool:


I tag my pool, and then choose Next to proceed:

The final step is to select a WorkSpaces pool directory or create a new one following these steps. Then, I choose Create WorkSpace pool.

WorkSpaces Pools Directory

After the pool has been created and started, I can send registration codes to users, and they can log in to a WorkSpace:

WorkSpaces Pools Login with Registration Code

I can monitor the status of the pool from the console:

WorkSpaces Pool Status On Console

Things to know
Here are a couple of things that you should know about WorkSpaces Pools:

Programmatic access – You can automate the setup process that I showed above by using functions like CreateWorkSpacePool, DescribeWorkSpacePool, UpdateWorkSpacePool, or the equivalent AWS command line interface (CLI) commands.

Regions – WorkSpaces Pools is available in all commercial AWS Regions where WorkSpaces Personal is available, except Israel (Tel Aviv), Africa (Cape Town), and China (Ningxia). Check the full Region list for future updates.

Pricing – Refer to the Amazon WorkSpaces Pricing page for complete pricing information.

Visit Amazon WorkSpaces Pools to learn more.

Jeff;

Introducing end-to-end data lineage (preview) visualization in Amazon DataZone

Post Syndicated from Esra Kayabali original https://aws.amazon.com/blogs/aws/introducing-end-to-end-data-lineage-preview-visualization-in-amazon-datazone/

Amazon DataZone is a data management service to catalog, discover, analyze, share, and govern data between data producers and consumers in your organization. Engineers, data scientists, product managers, analysts, and business users can easily access data throughout your organization using a unified data portal so that they can discover, use, and collaborate to derive data-driven insights.

Now, I am excited to announce in preview a new API-driven and OpenLineage compatible data lineage capability in Amazon DataZone, which provides an end-to-end view of data movement over time. Data lineage is a new feature within Amazon DataZone that helps users visualize and understand data provenance, trace change management, conduct root cause analysis when a data error is reported, and be prepared for questions on data movement from source to target. This feature provides a comprehensive view of lineage events, captured automatically from Amazon DataZone’s catalog along with other events captured programmatically outside of Amazon DataZone by stitching them together for an asset.

When you need to validate how the data of interest originated in the organization, you may rely on manual documentation or human connections. This manual process is time-consuming and can result in inconsistency, which directly reduces your trust in the data. Data lineage in Amazon DataZone can raise trust by helping you understand where the data originated, how it has changed, and its consumption in time. For example, data lineage can be programmatically setup to show the data from the time it was captured as raw files in Amazon Simple Storage Service (Amazon S3), through its ETL transformations using AWS Glue, to the time it was consumed in tools such as Amazon QuickSight.

With Amazon DataZone’s data lineage, you can reduce the time spent mapping a data asset and its relationships, troubleshooting and developing pipelines, and asserting data governance practices. Data lineage helps you gather all lineage information in one place using API, and then provide a graphical view with which data users can be more productive, make better data-driven decisions, and also identify the root cause of data issues.

Let me tell you how to get started with data lineage in Amazon DataZone. Then, I will show you how data lineage enhances the Amazon DataZone data catalog experience by visually displaying connections about how a data asset came to be so you can make informed decisions when searching or using the data asset.

Getting started with data lineage in Amazon DataZone
In preview, I can get started by hydrating lineage information into Amazon DataZone programmatically by either directly creating lineage nodes using Amazon DataZone APIs or by sending OpenLineage compatible events from existing pipeline components to capture data movement or transformations that happens outside of Amazon DataZone. For information about assets in the catalog, Amazon DataZone automatically captures lineage of its states (i.e., inventory or published states), and its subscriptions for producers, such as data engineers, to trace who is consuming the data they produced or for data consumers, such as data analyst or data engineers, to understand if they are using the right data for their analysis.

With the information being sent, Amazon DataZone will start populating the lineage model and will be able to map the identifier sent through the APIs with the assets already cataloged. As new lineage information is being sent, the model starts creating versions to start the visualization of the asset at a given time, but it also allows me to navigate to previous versions.

I use a preconfigured Amazon DataZone domain for this use case. I use Amazon DataZone domains to organize my data assets, users, and projects. I go to the Amazon DataZone console and choose View domains. I choose my domain Sales_Domain and choose Open data portal.

I have five projects under my domain: one for a data producer (SalesProject) and four for data consumers (MarketingTestProject, AdCampaignProject, SocialCampaignProject, and WebCampaignProject). You can visit Amazon DataZone Now Generally Available – Collaborate on Data Projects across Organizational Boundaries to create your own domain and all the core components.

I enter “Market Sales Table” in the Search Assets bar and then go to the detail page for the Market Sales Table asset. I choose the LINEAGE tab to visualize lineage with upstream and downstream nodes.

I can now dive into asset details, processes, or jobs that lead to or from those assets and drill into column-level lineage.

Interactive visualization with data lineage
I will show you the graphical interface using various personas who regularly interact with Amazon DataZone and will benefit from the data lineage feature.

First, let’s say I am a marketing analyst, who needs to confirm the origin of a data asset to confidently use in my analysis. I go to the MarketingTestProject page and choose the LINEAGE tab. I notice the lineage includes information about the asset as it occurs inside and out of Amazon DataZone. The labels Cataloged, Published, and Access requested represent actions inside the catalog. I expand the market_sales dataset item to see where the data came from.

I now feel assured of the origin of the data asset and trust that it aligns with my business purpose ahead of starting my analysis.

Second, let’s say I am a data engineer. I need to understand the impact of my work on dependent objects to avoid unintended changes. As a data engineer, any changes made to the system should not break any downstream processes. By browsing lineage, I can clearly see who has subscribed and has access to the asset. With this information, I can inform the project teams about an impending change that can affect their pipeline. When a data issue is reported, I can investigate each node and traverse between its versions to dive into what has changed over time to identify the root cause of the issue and fix it in a timely manner.

Finally, as an administrator or steward, I am responsible for securing data, standardizing business taxonomies, enacting data management processes, and for general catalog management. I need to collect details about the source of data and understand the transformations that have happened along the way.

For example, as an administrator looking to respond to questions from an auditor, I traverse the graph upstream to see where the data is coming from and notice that the data is from two different sources: online sale and in-store sale. These sources have their own pipelines until the flow reaches a point where the pipelines merge.

While navigating through the lineage graph, I can expand the columns to ensure sensitive columns are dropped during the transformation processes and respond to the auditors with details in a timely manner.

Join the preview
Data lineage capability is available in preview in all Regions where Amazon DataZone is generally available. For a list of Regions where Amazon DataZone domains can be provisioned, visit AWS Services by Region.

Data lineage costs are dependent on storage usage and API requests, which are already included in Amazon DataZone’s pricing model. For more details, visit Amazon DataZone pricing.

To learn more about data lineage in Amazon DataZone, visit the Amazon DataZone User Guide.

— Esra

Amazon CodeCatalyst now supports GitLab and Bitbucket repositories, with blueprints and Amazon Q feature development

Post Syndicated from Sébastien Stormacq original https://aws.amazon.com/blogs/aws/amazon-codecatalyst-now-supports-gitlab-and-bitbucket-repositories-with-blueprints-and-amazon-q-feature-development/

I’m happy to announce that we’re further integrating Amazon CodeCatalyst with two popular code repositories: GitLab and BitBucket, in addition to the existing integration with GitHub. We bring the same set of capabilities that you use today on CodeCatalyst with GitHub to GitLab.com and Bitbucket Cloud.

Amazon CodeCatalyst is a unified software development and delivery service. It enables software development teams to quickly and easily plan, develop, collaborate on, build, and deliver applications on Amazon Web Services (AWS), reducing friction throughout the development lifecycle.

The GitHub, GitLab.com, and Bitbucket Cloud repositories extension for CodeCatalyst simplifies managing your development workflow. The extension allows you to view and manage external repositories directly within CodeCatalyst. Additionally, you can store and manage workflow definition files alongside your code in external repositories while also creating, reading, updating, and deleting files in linked repositories from CodeCatalyst dev environments. The extension also triggers CodeCatalyst workflow runs automatically upon code pushes and when pull requests are opened, merged, or closed. Furthermore, it allows you to directly utilize source files from linked repositories and execute actions within CodeCatalyst workflows, eliminating the need to switch platforms and maximizing efficiency.

But there’s more: starting today, you can create a CodeCatalyst project in a GitHub, GitLab.com, or Bitbucket Cloud repository from a blueprint, you can add a blueprint to an existing code base in a repository on any of those three systems, and you can also create custom blueprints stored in your external repositories hosted on GitHub, GitLab.com, or Bitbucket Cloud.

CodeCatalyst blueprints help to speed up your developments. These pre-built templates provide a source repository, sample code, continuous integration and delivery (CI/CD) workflows, and integrated issue tracking to get you started quickly. Blueprints automatically update with best practices, keeping your code modern. IT leaders can create custom blueprints to standardize development for your team, specifying technology, access controls, deployment, and testing methods. And now, you can use blueprints even if your code resides in GitHub, GitLab.com, or Bitbucket Cloud.

Link your CodeCatalyst space with a git repository hosting service
Getting started using any of these three source code repository providers is easy. As a CodeCatalyst space administrator, I select the space where I want to configure the extensions. Then, I select Settings, and in the Installed extensions section, I select Configure to link my CodeCatalyst space with my GitHub, GitLab.com, or Bitbucket Cloud account.

Link CodeCatalyst with a git repository hosting service

This is a one-time operation for each CodeCatalyst space, but you might want to connect your space to multiple source providers’ accounts.

When using GitHub, I also have to link my personal CodeCatalyst user to my GitHub user. Under my personal menu on the top right side of the screen, I select My settings. Then, I navigate down to the Personal connections section. I select Create and follow the instructions to authenticate on GitHub and link my two identities.

Link personal CodeCatalyst account to your git hosting provider account

This is a one-time operation for each user in the CodeCatalyst space. This is only required when you’re using GitHub with blueprints.

Create a project from a blueprint and host it on GitHub, GitLab.com, and Bitbucket Cloud
Let’s show you how to create a project in an external repository from a blueprint and later add other blueprints to this project. You can use any of the three git hosting providers supported by CodeCatalyst. In this demo, I chose to use GitHub.

Let’s imagine I want to create a new project to implement an API. I start from a blueprint that implements an API with Python and the AWS Serverless Application Model (AWS SAM). The blueprint also creates a CI workflow and an issue management system. I want my project code to be hosted on GitHub. It allows me to directly use source files from my repository in GitHub and execute actions within CodeCatalyst workflows, eliminating the need to switch platforms.

I start by selecting Create project on my CodeCatalyst space page. I select Start with a blueprint and select the CodeCatalyst blueprint or Space blueprint I want to use. Then, I select Next.

Amazon CodeCatalyst create project from blueprint

I enter a name for my project. I open the Advanced section, and I select GitHub as Repository provider and my GitHub account. You can configure additional connections to GitHub by selecting Connect a GitHub account.

Amazon CodeCatalyst - select a github account

The rest of the configuration depends on the selected blueprint. In this case, I chose the language version, the AWS account to deploy the project to, the name of the AWS Lambda function, and the name of the AWS CloudFormation stack.

After the project is created, I navigate to my GitHub account, and I can see that a new repository has been created. It contains the code and resources from the blueprint.

Amazon CodeCatalyst - creation f new GitHub repository

Add a blueprint to an existing GitHub, GitLab.com, or Bitbucket Cloud project
You can apply multiple blueprints in a project to incorporate functional components, resources, and governance to existing CodeCatalyst projects. Your projects can support various elements that are managed independently in separate blueprints. The service documentation helps you learn more about lifecycle management with blueprints on existing projects.

I can now add a blueprint to an existing project in an external source code repository. Now that my backend API project has been created, I want to add a web application to my project.

I navigate to the Blueprints section in the left-side menu, and I select the orange Add blueprint button on the top-right part of the screen.

CodeCatalyst - add blue print to an existing project

I select the Single-page application blueprint and select Next.

On the next screen, I make sure to select my GitHub connection, as I did when I created the project. I also fill in the required information for this specific template. On the right side of the screen, I review the proposed changes.

CodeCatalyst - add a blueprint to a project in GitHub

Similarly, when using CodeCatalyst Enterprise Tier, I can create my own custom blueprints to share with my teammates or other groups within my organization. For brevity, I don’t share step-by-step instructions to do so in this post. For more information, see Standardizing projects with custom blueprints in the documentation.

When CodeCatalyst finishes installing the new blueprint, I can see a second repository on GitHub.

Amazon CodeCatalyst - multiple repositories

Single or multiple repository strategies
When organizing code, you can choose between a single large repository, like a toolbox overflowing with everything, or splitting it into smaller, specialized ones for better organization. Single repositories simplify dependency management for tightly linked projects but can become messy at scale. Multiple repositories offer cleaner organization and improved security but require planning to manage dependencies between separate projects.

CodeCatalyst lets you use the best strategy for your project. For more information, see the section Store and collaborate on code with source repositories in CodeCatalyst in the documentation.

In the example I showed before, the blueprint I selected proposed to apply the second blueprint as a separate repository in GitHub. Depending on the blueprint you selected, the blueprint may propose that you create a separate repository or merge the new code in an existing repository. In the latter case, the blueprint will submit a pull request for you to merge into your repository.

Region and availability
This new GitHub integration is available at no additional cost in the two AWS Regions where Amazon CodeCatalyst is available, US West (Oregon) and Europe (Ireland) at the time of publication.

Try it now!

— seb