Tag Archives: news

Announcing Amazon EC2 Capacity Blocks for ML to reserve GPU capacity for your machine learning workloads

Post Syndicated from Channy Yun original https://aws.amazon.com/blogs/aws/announcing-amazon-ec2-capacity-blocks-for-ml-to-reserve-gpu-capacity-for-your-machine-learning-workloads/

Recent advancements in machine learning (ML) have unlocked opportunities for customers across organizations of all sizes and industries to reinvent new products and transform their businesses. However, the growth in demand for GPU capacity to train, fine-tune, experiment, and inference these ML models has outpaced industry-wide supply, making GPUs a scarce resource. Access to GPU capacity is an obstacle for customers whose capacity needs fluctuate depending on the research and development phase they’re in.

Today, we are announcing Amazon Elastic Compute Cloud (Amazon EC2) Capacity Blocks for ML, a new Amazon EC2 usage model that further democratizes ML by making it easy to access GPU instances to train and deploy ML and generative AI models. With EC2 Capacity Blocks, you can reserve hundreds of GPUs collocated in EC2 UltraClusters designed for high-performance ML workloads, using Elastic Fabric Adapter (EFA) networking in a peta-bit scale non-blocking network, to deliver the best network performance available in Amazon EC2.

This is an innovative new way to schedule GPU instances where you can reserve the number of instances you need for a future date for just the amount of time you require. EC2 Capacity Blocks are currently available for Amazon EC2 P5 instances powered by NVIDIA H100 Tensor Core GPUs in the AWS US East (Ohio) Region. With EC2 Capacity Blocks, you can reserve GPU instances in just a few clicks and plan your ML development with confidence. EC2 Capacity Blocks make it easy for anyone to predictably access EC2 P5 instances that offer the highest performance in EC2 for ML training.

EC2 Capacity Block reservations work similarly to hotel room reservations. With a hotel reservation, you specify the date and duration you want your room for and the size of beds you’d like─a queen bed or king bed, for example. Likewise, with EC2 Capacity Block reservations, you select the date and duration you require GPU instances and the size of the reservation (the number of instances). On your reservation start date, you’ll be able to access your reserved EC2 Capacity Block and launch your P5 instances. At the end of the EC2 Capacity Block duration, any instances still running will be terminated.

You can use EC2 Capacity Blocks when you need capacity assurance to train or fine-tune ML models, run experiments, or plan for future surges in demand for ML applications. Alternatively, you can continue using On-Demand Capacity Reservations for all other workload types that require compute capacity assurance, such as business-critical applications, regulatory requirements, or disaster recovery.

Getting started with Amazon EC2 Capacity Blocks for ML
To reserve your Capacity Blocks, choose Capacity Reservations on the Amazon EC2 console in the US East (Ohio) Region. You can see two capacity reservation options. Select Purchase Capacity Blocks for ML and then Get started to start looking for an EC2 Capacity Block.

Choose your total capacity and specify how long you need the EC2 Capacity Block. You can reserve an EC2 Capacity Block in the following sizes: 1, 2, 4, 8, 16, 32, or 64 p5.48xlarge instances. The total number of days that you can reserve EC2 Capacity Blocks is 1– 14 days in 1-day increments. EC2 Capacity Blocks can be purchased up to 8 weeks in advance.

EC2 Capacity Block prices are dynamic and depend on total available supply and demand at the time you purchase the EC2 Capacity Block. You can adjust the size, duration, or date range in your specifications to search for other EC2 Capacity Block options. When you select Find Capacity Blocks, AWS returns the lowest-priced offering available that meets your specifications in the date range you have specified. At this point, you will be shown the price for the EC2 Capacity Block.

After reviewing EC2 Capacity Blocks details, tags, and total price information, choose Purchase. The total price of an EC2 Capacity Block is charged up front, and the price does not change after purchase. The payment will be billed to your account within 12 hours after you purchase the EC2 Capacity Blocks.

All EC2 Capacity Blocks reservations start at 11:30 AM Coordinated Universal Time (UTC). EC2 Capacity Blocks can’t be modified or canceled after purchase.

You can also use AWS Command Line Interface (AWS CLI) and AWS SDKs to purchase EC2 Capacity Blocks. Use the describe-capacity-block-offerings API to provide your cluster requirements and discover an available EC2 Capacity Block for purchase.

$ aws ec2 describe-capacity-block-offerings \
          --instance-type p5.48xlarge \
          --instance-count 4 \
          --start-date-range 2023-10-30T00:00:00Z \
          --end-date-range 2023-11-01T00:00:00Z \
          –-capacity-duration 48

After you find an available EC2 Capacity Block with the CapacityBlockOfferingId and capacity information from the preceding command, you can use purchase-capacity-block-reservation API to purchase it.

$ aws ec2 purchase-capacity-block-reservation \
          --capacity-block-offering-id cbr-0123456789abcdefg \
          –-instance-platform Linux/UNIX

For more information about new EC2 Capacity Blocks APIs, see the Amazon EC2 API documentation.

Your EC2 Capacity Block has now been scheduled successfully. On the scheduled start date, your EC2 Capacity Block will become active. To use an active EC2 Capacity Block on your starting date, choose the capacity reservation ID for your EC2 Capacity Block. You can see a breakdown of the reserved instance capacity, which shows how the capacity is currently being utilized in the Capacity details section.

To launch instances into your active EC2 Capacity Block, choose Launch instances and follow the normal process of launching EC2 instances and running your ML workloads.

In the Advanced details section, choose Capacity Blocks as the purchase option and select the capacity reservation ID of the EC2 Capacity Block you’re trying to target.

As your EC2 Capacity Block end time approaches, Amazon EC2 will emit an event through Amazon EventBridge, letting you know your reservation is ending soon so you can checkpoint your workload. Any instances running in the EC2 Capacity Block go into a shutting-down state 30 minutes before your reservation ends. The amount you were charged for your EC2 Capacity Block does not include this time period. When your EC2 Capacity Block expires, any instances still running will be terminated.

Now available
Amazon EC2 Capacity Blocks are now available for p5.48xlarge instances in the AWS US East (Ohio) Region. You can view the price of an EC2 Capacity Block before you reserve it, and the total price of an EC2 Capacity Block is charged up-front at the time of purchase. For more information, see the EC2 Capacity Blocks pricing page.

To learn more, see the EC2 Capacity Blocks documentation and send feedback to AWS re:Post for EC2 or through your usual AWS Support contacts.

Channy

AWS Weekly Roundup – re:Post Selections, SNS and SQS FIFO improvements, multi-VPC ENI attachments, and more – October 30, 2023

Post Syndicated from Danilo Poccia original https://aws.amazon.com/blogs/aws/aws-weekly-roundup-repost-selections-sns-and-sqs-fifo-improvements-multi-vpc-eni-attachments-and-more-october-30-2023/

It’s less than a month to AWS re:Invent, but interesting news doesn’t slow down in the meantime. This week is my turn to help keep you up to date!

Last week’s launches
Here are some of the launches that caught my attention last week:

AWS re:Post – With re:Post, you have access to a community of experts that helps you become even more successful on AWS. With Selections, community members can organize knowledge in an aggregated view to create learning paths or curated content sets.

Amazon SNS – First-in-First-out (FIFO) topics now support the option to store and replay messages without needing to provision a separate archival resource. This improves the durability of your event-driven applications and can help you recover from downstream failure scenarios. Find out more in this AWS Comput Blog post – Archiving and replaying messages with Amazon SNS FIFO. Also, you can now use custom data identifiers to protect not only common sensitive data (such as names, addresses, and credit card numbers) but also domain-specific sensitive data, such as your company’s employee IDs. You can find additional info on this feature in this AWS Security blog post – Mask and redact sensitive data published to Amazon SNS using managed and custom data identifiers.

Amazon SQS – With the increased throughput quota for FIFO high throughput mode, you can process up to 18,000 transactions per second, per API action. Note the throughput quota depends on the AWS Region.

Amazon OpenSearch Service – OpenSearch Serverless now supports automated time-based data deletion with new index lifecycle policies. To determine the best strategy to deliver accurate and low latency vector search queries, OpenSearch can now intelligently evaluate optimal filtering strategies, like pre-filtering with approximate nearest neighbor (ANN) or filtering with exact k-nearest neighbor (k-NN). Also, OpenSearch Service now supports Internet Protocol Version 6 (IPv6).

Amazon EC2 – With multi-VPC ENI attachments, you can launch an instance with a primary elastic network interface (ENI) in one virtual private cloud (VPC) and attach a secondary ENI from another VPC. This helps maintain network-level segregation, but still allows specific workloads (like centralized appliances and databases) to communicate between them.

AWS CodePipeline – With parameterized pipelines, you can dynamically pass input parameters to a pipeline execution. You can now start a pipeline execution when a specific git tag is applied to a commit in the source repository.

Amazon MemoryDB – Now supports Graviton3-based R7g nodes that deliver up to 28 percent increased throughput compared to R6g. These nodes also deliver higher networking bandwidth.

Other AWS news
Here are a few posts from some of the other AWS and cloud blogs that I follow:

Networking & Content Delivery Blog – Some of the technical management and hardware decisions we make when building AWS network infrastructure: A Continuous Improvement Model for Interconnects within AWS Data Centers

Interconnect monitoring service infrastructure diagram

DevOps Blog – To help enterprise customers understand how many of developers use CodeWhisperer, how often they use it, and how often they accept suggestions: Introducing Amazon CodeWhisperer Dashboard and CloudWatch Metrics

Front-End Web & Mobile Blog – How to restrict access to your GraphQL APIs to consumers within a private network: Architecture Patterns for AWS AppSync Private APIs

Architecture Blog – Another post in this super interesting series: Let’s Architect! Designing systems for stream data processing

A serverless streaming data pipeline using Amazon Kinesis and AWS Glue

From Community.AWS: Load Testing WordPress Amazon Lightsail Instances and Future-proof Your .NET Apps With Foundation Model Choice and Amazon Bedrock.

Don’t miss the latest AWS open source newsletter by my colleague Ricardo.

Upcoming AWS events
Check your calendars and sign up for these AWS events

AWS Community Days – Join a community-led conference run by AWS user group leaders in your region: Jaipur (November 4), Vadodara (November 4), Brasil (November 4), Central Asia (Kazakhstan, Uzbekistan, Kyrgyzstan, and Mongolia on November 17-18), and Guatemala (November 18).

AWS re:Invent (November 27 – December 1) – Join us to hear the latest from AWS, learn from experts, and connect with the global cloud community. Browse the session catalog and attendee guides and check out the highlights for generative AI.

Here you can browse all upcoming AWS-led in-person and virtual events and developer-focused events.

And that’s all from me for this week. On to the next one!

Danilo

This post is part of our Weekly Roundup series. Check back each week for a quick roundup of interesting news and announcements from AWS!

In the Works – AWS European Sovereign Cloud

Post Syndicated from Jeff Barr original https://aws.amazon.com/blogs/aws/in-the-works-aws-european-sovereign-cloud/

The AWS European Sovereign Cloud will allow government agencies, regulated industries, and the independent software vendors (ISVs) that support them to store sensitive data and run critical workloads on AWS infrastructure that is operated and supported by AWS employees located in and residents of the European Union (EU). The first Region will be located in Germany.

Background
Late last year we announced the AWS Digital Sovereignty Pledge and made a commitment to offer you (and all AWS customers) the most advanced set of sovereignty controls and features available in the cloud. Since that announcement we have taken several important steps forward in fulfillment of that pledge:

May 2023 – We announced that AWS Nitro System had been validated by an independent third-party to confirm that it contains no mechanism that allows anyone at AWS to access your data on AWS hosts. At the same time we announced that the AWS Key Management Service (KMS) External Key Store allows you to store keys outside of AWS and use them to encrypt data stored in AWS.

August 2023 – We announced AWS Dedicated Local Zones, infrastructure that is fully managed by AWS and built for exclusive use by a customer or community, and placed in a customer-specified location or data center.

AWS European Sovereign Cloud
The upcoming AWS European Sovereign Cloud will be separate from, and independent of, the eight existing AWS Regions already open in Frankfurt, Ireland, London, Milan, Paris, Stockholm, Spain, and Zurich. It will give you additional options for deployment, while providing AWS services, APIs, and tools that you are already familiar with. The design will help you meet your data residency, operational autonomy, and resiliency needs.

In order to maintain separation between this cloud and the existing AWS Global Cloud you will need to create a fresh AWS account. The metadata you create such as data labels, categories, permissions, and configurations will be stored within the EU. This does not apply to AWS account information such as spend and billing data, which will be aggregated and used to ensure that you get favorable pricing within any applicable volume usage tiers.

As I mentioned earlier, this cloud will be operated and supported by AWS employees located in and residents of the EU, with support available 24/7/365.

The AWS European Sovereign Cloud will be operationally independent of the other regions, with separate in-Region billing and usage metering systems.

Initial Region
The initial region will be located in Germany. It will launch with multiple Availability Zones, each in separate and distinct geographic locations, with enough distance between them to significantly reduce the risk of a single event impacting your business continuity. We will have additional details on the list of available services, instance types, and so forth as we get closer to the launch.

Over time, this and other regions in this cloud will also function as parent regions for AWS Outposts and Dedicated Local Zones. These options give you even more flexibility with regard to isolation and in-country data residency. If you would like to express your interest in Dedicated Local Zones in your country, please contact your AWS account manager.

Get Ready
You can start to build applications today in any of the existing regions and move them to the AWS European Sovereign Cloud when the region launches. You can also initiate conversations with your local regulatory authorities in order to better understand any issues that are specific to your particular location.

Jeff;

Rotate Your SSL/TLS Certificates Now – Amazon RDS and Amazon Aurora Expire in 2024

Post Syndicated from Channy Yun original https://aws.amazon.com/blogs/aws/rotate-your-ssl-tls-certificates-now-amazon-rds-and-amazon-aurora-expire-in-2024/

Don’t be surprised if you have seen the Certificate Update in the Amazon Relational Database Service (Amazon RDS) console.

If you use or plan to use Secure Sockets Layer (SSL) or Transport Layer Security (TLS) with certificate verification to connect to your database instances of Amazon RDS for MySQL, MariaDB, SQL Server, Oracle, PostgreSQL, and Amazon Aurora, it means you should rotate new certificate authority (CA) certificates in both your DB instances and application before the root certificate expires.

Most SSL/TLS certificates (rds-ca-2019) for your DB instances will expire in 2024 after the certificate update in 2020. In December 2022, we released new CA certificates that are valid for 40 years (rds-ca-rsa2048-g1) and 100 years (rds-ca-rsa4096-g1 and rds-ca-ecc384-g1). So, if you rotate your CA certificates, you don’t need to do It again for a long time.

Here is a list of affected Regions and their expiration dates of rds-ca-2019:

Expiration Date Regions
May 8, 2024 Middle East (Bahrain)
August 22, 2024 US East (Ohio), US East (N. Virginia), US West (N. California), US West (Oregon), Asia Pacific (Mumbai), Asia Pacific (Osaka), Asia Pacific (Seoul), Asia Pacific (Singapore), Asia Pacific (Sydney), Asia Pacific (Tokyo), Canada (Central), Europe (Frankfurt), Europe (Ireland), Europe (London), Europe (Milan), Europe (Paris), Europe (Stockholm), and South America (São Paulo)
September 9, 2024 China (Beijing), China (Ningxia)
October 26, 2024 Africa (Cape Town)
October 28, 2024 Europe (Milan)
Not affected until 2061 Asia Pacific (Hong Kong), Asia Pacific (Hyderabad), Asia Pacific (Jakarta), Asia Pacific (Melbourne), Europe (Spain), Europe (Zurich), Israel (Tel Aviv), Middle East (UAE), AWS GovCloud (US-East), and AWS GovCloud (US-West)

The following steps demonstrate how to rotate your certificates to maintain connectivity from your application to your database instances.

Step 1 – Identify your impacted Amazon RDS resources
As I said, you can identify the total number of affected DB instances in the Certificate update page of the Amazon RDS console and see all of your affected DB instances. Note: This page only shows the DB instances for the current Region. If you have DB instances in more than one Region, check the certificate update page in each Region to see all DB instances with old SSL/TLS certificates.

You can also use AWS Command Line Interface (AWS CLI) to call describe-db-instances to find instances that use the expiring CA. The query will show a list of RDS instances in your account and us-east-1 Region.

$ aws rds describe-db-instances --region us-east-1 | 
      jq -r '.DBInstances[] | 
      select ((.CACertificateIdentifier != "rds-ca-rsa2048-g1") and 
              (.CACertificateIdentifier != "rds-ca-rsa4096-g1") and 
              (.CACertificateIdentifier != "rds-ca-ecc384-g1")) | 
               "DBInstanceIdentifier: 
              (.DBInstanceIdentifier), CACertificateIdentifier: 
              (.CACertificateIdentifier)"'

Step 2 – Updating your database clients and applications
Before applying the new certificate on your DB instances, you should update the trust store of any clients and applications that use SSL/TLS and the server certificate to connect.  There’s currently no easy method from your DB instances themselves to determine if your applications require certificate verification as a prerequisite to connect. The only option here is to inspect your applications’ source code or configuration files.

Although the DB engine-specific documentation outlines what to look for in most common database connectivity interfaces, we strongly recommend you work with your application developers to determine whether certificate verification is used and the correct way to update the client applications’ SSL/TLS certificates for your specific applications.

To update certificates for your application, you can use the new certificate bundle that contains certificates for both the old and new CA so you can upgrade your application safely and maintain connectivity during the transition period.

For information about checking for SSL/TLS connections and updating applications for each DB engine, see the following topics:

Step 3 – Test CA rotation on a non-production RDS instance
If you have updated new certificates in all your trust stores, you should test with a RDS instance in non-production. Do this set up in a development environment with the same database engine and version as your production environment. This test environment should also be deployed with the same code and configurations as production.

To rotate a new certificate in your test database instance, choose Modify for the DB instance that you want to modify in the Amazon RDS console.

In the Connectivity section, choose rds-ca-rsa2048-g1.

Choose Continue to check the summary of modifications. If you want to apply the changes immediately, choose Apply immediately.

To use the AWS CLI to change the CA from rds-ca-2019 to rds-ca-rsa2048-g1 for a DB instance, call the modify-db-instance command and specify the DB instance identifier with the --ca-certificate-identifier option.

$ aws rds modify-db-instance \
          --db-instance-identifier <mydbinstance> \
          --ca-certificate-identifier rds-ca-rsa2048-g1 \
          --apply-immediately

This is the same way to rotate new certificates manually in the production database instances. Make sure your application reconnects without any issues using SSL/TLS after the rotation using the trust store or CA certificate bundle you referenced.

When you create a new DB instance, the default CA is still rds-ca-2019 until January 25, 2024, when it will be changed to rds-ca-rsa2048-g1. For setting the new CA to create a new DB instance, you can set up a CA override to ensure all new instance launches use the CA of your choice.

$ aws rds modify-certificates \
          --certificate-identifier rds-ca-rsa2048-g1 \
          --region <region name>

You should do this in all the Regions where you have RDS DB instances.

Step 4 – Safely update your production RDS instances
After you’ve completed testing in non production environment, you can start the rotation of your RDS databases CA certificates in your production environment. You can rotate your DB instance manually as shown in Step 3. It’s worth noting that many of the modern engines do not require a restart, but it’s still a good idea to schedule it in your maintenance window.

In the Certificate update page of Step 1, choose the DB instance you want to rotate. By choosing Schedule, you can schedule the certificate rotation for your next maintenance window. By choosing Apply now, you can apply the rotation immediately.

If you choose Schedule, you’re prompted to confirm the certificate rotation. This prompt also states the scheduled window for your update.

After your certificate is updated (either immediately or during the maintenance window), you should ensure that the database and the application continue to work as expected.

Most of modern DB engines do not require restarting your database to update the certificate. If you don’t want to restart the database just for CA update, you can use the --no-certificate-rotation-restart flag in the modify-db-instance command.

$ aws rds modify-db-instance \
          --db-instance-identifier <mydbinstance> \
          --ca-certificate-identifier rds-ca-rsa2048-g1 \
          --no-certificate-rotation-restart

To check if your engine requires a restart you can check the SupportsCertificateRotationWithoutRestart field in the output of the describe-db-engine-versions command. You can use this command to see which engines support rotations without restart:

$ aws rds describe-db-engine-versions \
          --engine <engine> --include-all --region <region> | 
          jq -r '.DBEngineVersions[] | 
          "EngineName: (.Engine), 
           EngineVersion: (.EngineVersion), 
           SupportsCertificateRotationWithoutRestart: (.SupportsCertificateRotationWithoutRestart), 
           SupportedCAs: ([.SupportedCACertificateIdentifiers | 
          join(", ")])"'

Even if you don’t use SSL/TLS for the database instances, I recommend to rotate your CA. You may need to use SSL/TLS in the future, and some database connectors like the JDBC and ODBC connectors check for a valid cert before connecting and using an expired CA can prevent you from doing that.

To learn about updating your certificate by modifying your DB instance manually, automatic server certificate rotation, and finding a sample script for importing certificates into your trust store, see the Amazon RDS User Guide or the Amazon Aurora User Guide.

Things to Know
Here are a couple of important things to know:

  • Amazon RDS Proxy and Amazon Aurora Serverless use certificates from the AWS Certificate Manager (ACM). If you’re using Amazon RDS Proxy when you rotate your SSL/TLS certificate, you don’t need to update applications that use Amazon RDS Proxy connections. If you’re using Aurora Serverless, rotating your SSL/TLS certificate isn’t required.
  • Now through January 25, 2024 – new RDS DB instances will have the rds-ca-2919 certificate by default, unless you specify a different CA via the ca-certificate-identifier option on the create-db-instance API; or you specify a default CA override for your account like mentioned in the above section. Starting January 26, 2024 – any new database instances will default to using the rds-ca-rsa2048-g1 certificate. If you wish for new instances to use a different certificate, you can specify which certificate to use with the AWS console or the AWS CLI. For more information, see the create-db-instance API documentation.
  • Except for Amazon RDS for SQL Server, most modern RDS and Aurora engines support certificate rotation without a database restart in the latest versions. Call describe-db-engine-versions and check for the response field SupportsCertificateRotationWithoutRestart. If this field is set to true, then your instance will not require a database restart for CA update. If set to false, a restart will be required. For more information, see Setting the CA for your database in the AWS documentation.
  • Your rotated CA signs the DB server certificate, which is installed on each DB instance. The DB server certificate identifies the DB instance as a trusted server. The validity of DB server certificate depends on the DB engine and version either 1 year or 3 year. If your CA supports automatic server certificate rotation, RDS automatically handles the rotation of the DB server certificate too. For more information about DB server certificate rotation, see Automatic server certificate rotation in the AWS documentation.
  • You can choose to use the 40-year validity certificate (rds-ca-rsa2048-g1) or the 100-year certificates. The expiring CA used by your RDS instance uses the RSA2048 key algorithm and SHA256 signing algorithm. The rds-ca-rsa2048-g1 uses the exact same configuration and therefore is best suited for compatibility. The 100-year certificates (rds-ca-rsa4096-g1 andrds-ca-ecc384-g1) use more secure encryption schemes than rds-ca-rsa2048-g1. If you want to use them, you should test well in pre-production environments to double-check that your database client and server support the necessary encryption schemes in your Region.

Just Do It Now!
Even if you have one year left until your certificate expires, you should start planning with your team. Updating SSL/TLS certificate may require restart your DB instance before the expiration date. We strongly recommend that you schedule your applications to be updated before the expiry date and run tests on a staging or pre-production database environment before completing these steps in a production environments. To learn more about updating SSL/TLS certificates, see Amazon RDS User Guide and Amazon Aurora User Guide.

If you don’t use SSL/TLS connections, please note that database security best practices are to use SSL/TLS connectivity and to request certificate verification as part of the connection authentication process. To learn more about using SSL/TLS to encrypt a connection to your DB instance, see Amazon RDS User Guide and Amazon Aurora User Guide.

If you have questions or issues, contact your usual AWS Support by your Support plan.

Channy

Introducing Amazon MSK Replicator – Fully Managed Replication across MSK Clusters in Same or Different AWS Regions

Post Syndicated from Danilo Poccia original https://aws.amazon.com/blogs/aws/introducing-amazon-msk-replicator-fully-managed-replication-across-msk-clusters-in-same-or-different-aws-regions/

Amazon Managed Streaming for Apache Kafka (Amazon MSK) provides a fully managed and highly available Apache Kafka service simplifying the way you process streaming data. When using Apache Kafka, a common architectural pattern is to replicate data from one cluster to another.

Cross-cluster replication is often used to implement business continuity and disaster recovery plans and increase application resilience across AWS Regions. Another use case, when building multi-Region applications, is to have copies of streaming data in multiple geographies stored closer to end consumers for lower latency access. You might also need to aggregate data from multiple clusters into one centralized cluster for analytics.

To address these needs, you would have to write custom code or install and manage open-source tools like MirrorMaker 2.0, available as part of Apache Kafka starting with version 2.4. However, these tools can be complex and time-consuming to set up for reliable replication, and require continuous monitoring and scaling.

Today, we’re introducing MSK Replicator, a new capability of Amazon MSK that makes it easier to reliably set up cross-Region and same-Region replication between MSK clusters, scaling automatically to handle your workload. You can use MSK Replicator with both provisioned and serverless MSK cluster types, including those using tiered storage.

With MSK Replicator, you can setup both active-passive and active-active cluster topologies to increase the resiliency of your Kafka application across Regions:

  • In an active-active setup, both MSK clusters are actively serving reads and writes.
  • In an active-passive setup, only one MSK cluster at a time is actively serving streaming data while the other cluster is on standby.

Let’s see how that works in practice.

Creating an MSK Replicator across AWS Regions
I have two MSK clusters deployed in different Regions. MSK Replicator requires that the clusters have IAM authentication enabled. I can continue to use other authentication methods such as mTLS or SASL for my other clients. The source cluster also needs to enable multi-VPC private connectivity.

MSK Replicator cross-Region architecture diagram.

From a network perspective, the security groups of the clusters allow traffic between the cluster and the security group used by the Replicator. For example, I can add self-referencing inbound and outbound rules that allow traffic from and to the same security group. For simplicity, I use the default VPC and its default security group for both clusters.

Before creating a replicator, I update the cluster policy of the source cluster to allow the MSK service (including replicators) to find and reach the cluster. In the Amazon MSK console, I select the source Region. I choose Clusters from the navigation pane and then the source cluster. First, I copy the source cluster ARN at the top. Then, in the Properties tab, I choose Edit cluster policy in the Security settings. There, I use the following JSON policy (replacing the source cluster ARN) and save the changes:

{
    "Version": "2012-10-17",
    "Statement": [
        {
            "Effect": "Allow",
            "Principal": {
                "Service": "kafka.amazonaws.com"
            },
            "Action": [
                "kafka:CreateVpcConnection",
                "kafka:GetBootstrapBrokers",
                "kafka:DescribeClusterV2"
            ],
            "Resource": "<SOURCE_CLUSTER_ARN>"
        }
    ]
}

I select the target Region in the console. I choose Replicators from the navigation pane and then Create replicator. Here, I enter a name and a description for the replicator.

Console screenshot.

In the Source cluster section, I select the Region of the source MSK cluster. Then, I choose Browse to select the source MSK cluster from the list. Note that Replicators can be created only for clusters that have a cluster policy set.

Console screenshot.

I leave Subnets and Security groups as their default values to use my default VPC and its default security group. This network configuration may be used to place elastic network interfaces (EINs) to facilitate communication with your cluster.

The Access control method for the source cluster is set to IAM role-based authentication. Optionally, I can turn on multiple authentication methods at the same time to continue to use clients that need other authentication methods like mTLS or SASL while the Replicator uses IAM. For cross-Region replication, the source cluster cannot have unauthenticated access enabled, because we use multi-VPC to access their source cluster.

Console screenshot.

In the Target cluster section, the Cluster region is set to the Region where I’m using the console. I choose Browse to select the target MSK cluster from the list.

Console screenshot.

Similar to what I did for the source cluster, I leave Subnets and Security groups as their default values. This network configuration is used to place the ENIs required to communicate with the target cluster. The Access control method for the target cluster is also set to IAM role-based authentication.

Console screenshot.

In the Replicator settings section, I use the default Topic replication configuration, so that all topics are replicated. Optionally, I can specify a comma-separated list of regular expressions that indicate the names of the topics to replicate or to exclude from replication. In the Additional settings, I can choose to copy topics configurations, access control lists (ACLs), and to detect and copy new topics.

Console screenshot.

Consumer group replication allows me to specify if consumer group offsets should be replicated so that, after a switchover, consuming applications can resume processing near where they left off in the primary cluster. I can specify a comma-separated list of regular expressions that indicate the names of the consumer groups to replicate or to exclude from replication. I can also choose to detect and copy new consumer groups. I use the default settings that replicate all consumer groups.

Console screenshot.

In Compression, I select None from the list of available compression types for the data that is being replicated.

Console screenshot.

The Amazon MSK console can automatically create a service execution role with the necessary permissions required for the Replicator to work. The role is used by the MSK service to connect to the source and target clusters, to read from the source cluster, and to write to the target cluster. However, I can choose to create and provide my own role as well. In Access permissions, I choose Create or update IAM role.

Console screenshot.

Finally, I add tags to the replicator. I can use tags to search and filter my resources or to track my costs. In the Replicator tags section, I enter Environment as the key and AWS News Blog as the value. Then, I choose Create.

Console screenshot.

After a few minutes, the replicator is running. Let’s put it into use!

Testing an MSK Replicator across AWS Regions
To connect to the source and target clusters, I already set up two Amazon Elastic Compute Cloud (Amazon EC2) instances in the two Regions. I followed the instructions in the MSK documentation to install the Apache Kafka client tools. Because I am using IAM authentication, the two instances have an IAM role attached that allows them to connect, send, and receive data from the clusters. To simplify networking, I used the default security group for the EC2 instances and the MSK clusters.

First, I create a new topic in the source cluster and send a few messages. I use Amazon EC2 Instance Connect to log into the EC2 instance in the source Region. I change the directory to the path where the Kafka client executables have been installed (the path depends on the version you use):

cd /home/ec2-user/kafka_2.12-2.8.1/bin

To connect to the source cluster, I need to know its bootstrap servers. Using the MSK console in the source Region, I choose Clusters from the navigation page and then the source cluster from the list. In the Cluster summary section, I choose View client information. There, I copy the list of Bootstrap servers. Because the EC2 instance is in the same VPC as the cluster, I copy the list in the Private endpoint (single-VPC) column.

Console screenshot.

Back to the EC2 instance, I put the list of bootstrap servers in the SOURCE_BOOTSTRAP_SERVERS environment variable.

export SOURCE_BOOTSTRAP_SERVERS=b-2.uscluster.esijym.c9.kafka.us-east-1.amazonaws.com:9098,b-3.uscluster.esijym.c9.kafka.us-east-1.amazonaws.com:9098,b-1.uscluster.esijym.c9.kafka.us-east-1.amazonaws.com:9098

Now, I create a topic on the source cluster.

./kafka-topics.sh --bootstrap-server $SOURCE_BOOTSTRAP_SERVERS --command-config client.properties --create --topic my-topic --partitions 6

Using the new topic, I send a few messages to the source cluster.

./kafka-console-producer.sh --broker-list $SOURCE_BOOTSTRAP_SERVERS --producer.config client.properties --topic my-topic
>Hello from the US
>These are my messages

Let’s see what happens in the target cluster. I connect to the EC2 instance in the target Region. Similar to what I did for the other instance, I get the list of bootstrap servers for the target cluster and put it into the TARGET_BOOTSTRAP_SERVERS environment variable.

On the target cluster, the source cluster alias is added as a prefix to the replicated topic names. To find the source cluster alias, I choose Replicators in the MSK console navigation pane. There, I choose the replicator I just created. In the Properties tab, I look up the Cluster alias in the Source cluster section.

Console screenshot.

I confirm the name of the replicated topic by looking at the list of topics in the target cluster (it’s the last one in the output list):

./kafka-topics.sh --list --bootstrap-server $TARGET_BOOTSTRAP_SERVERS --command-config client.properties
. . .
us-cluster-c78ec6d63588.my-topic

Now that I know the name of the replicated topic on the target cluster, I start a consumer to receive the messages originally sent to the source cluster:

./kafka-console-consumer.sh --bootstrap-server $TARGET_BOOTSTRAP_SERVERS --consumer.config client.properties --topic us-cluster-c78ec6d63588.my-topic --from-beginning
Hello from the US
These are my messages

Note that I can use a wildcard in the topic subscription (for example, .*my-topic) to automatically handle the prefix and have the same configuration in the source and target clusters.

As expected, all the messages I sent to the source cluster have been replicated and received by the consumer connected to the target cluster.

I can monitor the MSK Replicator latency, throughput, errors, and lag metrics using the Monitoring tab. Because this works through Amazon CloudWatch, I can easily create my own alarms and include these metrics in my dashboards.

To update the configuration to an active-active setup, I follow similar steps to create a replicator in the other Region and replicate streaming data between the clusters in the other direction. For details on how to manage failover and failback, see the MSK Replicator documentation.

Availability and Pricing
MSK Replicator is available today in: US East (Ohio), US East (N. Virginia), US West (Oregon), Asia Pacific (Singapore), Asia Pacific (Sydney), Europe (Frankfurt), and Europe (Ireland).

With MSK Replicator, you pay per GB of data replicated and an hourly rate for each Replicator. You also pay Amazon MSK’s usual charges for your source and target MSK clusters and standard AWS charges for cross-Region data transfer. For more information, see MSK pricing.

Using MSK replicators, you can quickly implement cross-Region and same-Region replication to improve the resiliency of your architecture and store data close to your partners and end users. You can also use this new capability to get better insights by replicating streaming data to a single, centralized cluster where it is easier to run your analytics.

Simplify your data streaming architectures using Amazon MSK Replicator.

Danilo

New Customization Capability in Amazon CodeWhisperer Generates Even Better Suggestions (Preview)

Post Syndicated from Donnie Prakoso original https://aws.amazon.com/blogs/aws/new-customization-capability-in-amazon-codewhisperer-generates-even-better-suggestions-preview/

An AI coding companion, such as Amazon CodeWhisperer, aims to improve developers’ productivity by helping them write code quickly and securely. However, in particular cases, developers need to have code recommendations based on their internal libraries and APIs they extensively use every day.

As most of the existing AI coding companion tools are trained only on open-source codes, they lack the capability to customize the code recommendations using private code repositories. This limitation presents a variety of challenges for developers. Developers have a difficulty learning how to use internal libraries correctly and avoid security problems. For large codebases, it requires hours of reading documentation to understand what code needs to be written to complete the task.

Now in Preview —  Amazon CodeWhisperer Customization Capability
Today, I’m excited to announce Amazon CodeWhisperer customization capability (in preview) that enables organizations to customize CodeWhisperer to generate specific code recommendations from private code repositories. With this feature, developers who are part of Amazon CodeWhisperer Professional tier can now receive real-time code recommendations that include their internal libraries, APIs, packages, classes, and methods.

Let’s say that you’re a developer working for a hypothetical food delivery company called AnyCompany. You’re given a task to process a list of unassigned food deliveries around the driver’s current location. Previously, with CodeWhisperer, it would not know the correct internal APIs to process unassigned food deliveries or getting driver’s current location as this isn’t publicly available information. 

Now, with customization capability, you can ask CodeWhisperer to provide recommendations that include specific code related to the company’s internal services. The following screenshot shows how CodeWhisperer generates codes based on the internal codebase just by writing a set of comments.

With the customization capability of utilizing your internal codebase, CodeWhisperer now understands the intent, determines which internal and public APIs are best suited to the task, and generates code recommendations.

How It Works
The explanation above described how you can use CodeWhisperer customization capability as a developer. Now, let me share how it works and how you can get started. 

To create a customization, you need to complete the following steps as a CodeWhisperer administrator. 

  1. Administer your end users as CodeWhisperer administrator.
  2. Connect to existing repositories. You can connect one or more code repositories in your GitHub, GitLab, or BitBucket account using AWS CodeStar Connections or manually upload all of your codes into an Amazon Simple Storage Service (Amazon S3) bucket.
  3. Create a customization. CodeWhisperer will customize its model based on your codebase.
  4. Activate the customization for your team members. Once the customization is created, you can review and manually activate the customization to make it available automatically in your team members’ IDEs.

This capability provides two main advantages: providing real-time customized code recommendations that are specific to organizations and ensuring the protection of valuable intellectual property. Organizations can now promote the use of code that meets their quality and security standards based on their codes in existing repositories.

Furthermore, CodeWhisperer helps to ensure the security of your codes by providing the option to encrypt your customization data using customer managed keys in AWS Key Management Service (AWS KMS). This customization data will be deleted once the customization job finishes. 

Let’s Get Started
Let me show you how you can use the Amazon CodeWhisperer customization capability.

To get started, I need to create a customization. I need to have administrator access to navigate to the Create customization page on the Amazon CodeWhisperer dashboard.

On the Create customization page, I can connect the desired private code repositories I want CodeWhisperer to train. Currently, CodeWhisperer customization capability supports connection to GitHub, GitLab, and Bitbucket via AWS CodeStar Connections. If I have codes that are not in any code repositories, I can also manually upload my codes into an S3 bucket and define the Amazon S3 URI.

The following screenshot shows that I have existing connections with my code repositories using AWS CodeStar Connections. I can also create a new connection by selecting Create new connection.

Then, I can select Create Customization so CodeWhisperer can start training the model based on the codes available in the connection. The duration to complete this process depends on the size of the code repositories.

When the customization is ready, CodeWhisperer will not activate it automatically. This gives me the flexibility to activate the customizations just when I need them. But before I demonstrate that, I’d like to explain the evaluation score.

In short, the evaluation score helps me to measure the customization’s accuracy in predicting and providing code recommendations based on the codes in my code repositories. It provides a score in one of three categories: 1) Very Good, with a score ranging from 7–10; 2) Fair, with a score ranging from 4–7; and 3) Poor, with a score ranging from 0–4. It’s recommended to activate the customization if the evaluation score is 6 or higher. If the evaluation score is less than desired, I need to make sure that I’m providing enough codes for customization and provide a new code dataset that extensively contains references to internal APIs.

Here, I can see the Evaluation score for my customization is 8, and I’m happy with this result. Then, I can select Activate to start using this customization.

Once I have activated the customizations, I can define the access to selected customizations by selecting Add users. Now, I can give access to the customizations for selected team members who have been added as users for Amazon CodeWhisperer Professional tier. To do that, I can follow the guide from the Administering end users page. 

Then, once my team members sign in via AWS Toolkit in their IDEs, they will see the available customizations and can start using them. 

With Amazon CodeWhisperer, I can create multiple customizations by providing different code repositories. This feature is useful if I want to build customizations for code recommendations for certain teams. 

As administrator, I can also monitor the performance of each of the customizations by navigating to the CodeWhisperer dashboard page. This page summarizes useful data such as user activity, how many lines of code were suggested by CodeWhisperer and accepted by my team members, and how many security scans have successfully been run from IDEs. 

Amazon CodeWhisperer customization capability also follows the supported IDEs as part of AWS Toolkit by Amazon CodeWhisperer, such as Visual Studio Code, IntelliJ JetBrains, Visual Studio, and AWS Cloud9. This feature also provides support for most popular programming languages, including Python, Java, JavaScript, TypeScript, and C#.

Join the Public Preview
By securely leveraging customer’s internal codebase, Amazon CodeWhisperer unlocks the full potential of generative AI-powered coding that is customized to your unique requirements.

Join the public preview now and learn more on how to get started on the Amazon CodeWhisperer Customization page.

Happy coding!
Donnie

New – Seventh Generation Memory-optimized Amazon EC2 Instances (R7i)

Post Syndicated from Irshad Buchh original https://aws.amazon.com/blogs/aws/new-seventh-generation-memory-optimized-amazon-ec2-instances-r7i/

Earlier, we introduced a duo of Amazon Elastic Compute Cloud (Amazon EC2) instances to our lineup: the general-purpose Amazon EC2 M7i instances and the compute-optimized Amazon EC2 C7i instances.

Today, I’m happy to share that we’re expanding these seventh-generation x86-based offerings to include memory-optimized Amazon EC2 R7i instances. These instances are powered by custom 4th Generation Intel Xeon Scalable Processors (Sapphire Rapids) exclusive to AWS and will offer the highest compute performance among the comparable fourth-generation Intel processors in the cloud. The R7i instances are available in eleven sizes including two bare metal sizes (coming soon), and offer 15 percent improvement in price-performance compared to Amazon EC2 R6i instances.

Amazon EC2 R7i instances are SAP Certified and are an ideal fit for memory-intensive workloads such as high-performance databases (SQL and NoSQL databases), distributed web scale in-memory caches (Memcached and Redis), in-memory databases (SAP HANA), real-time big data analytics (Apache Hadoop and Spark clusters) and other enterprise applications. Amazon EC2 R7i offers larger instance sizes (48xlarge) with up to 192 vCPUs and 1,536 GiB of memory, including both virtual and bare metal instances, enabling you to consolidate your workloads and scale-up applications.

You can attach up to 128 EBS volumes to each R7i instance; by way of comparison, the R6i instances allow you to attach up to 28 volumes.

Here are the specs for the R7i instances:

Instance Name vCPUs
Memory (GiB)
Network Bandwidth
EBS Bandwidth
r7i.large 2 16 GiB Up to 12.5 Gbps Up to 10 Gbps
r7i.xlarge 4 32 GiB Up to 12.5 Gbps Up to 10 Gbps
r7i.2xlarge 8 64 GiB Up to 12.5 Gbps Up to 10 Gbps
r7i.4xlarge 16 128 GiB Up to 12.5 Gbps Up to 10 Gbps
r7i.8xlarge 32 256 GiB 12.5 Gbps 10 Gbps
r7i.12xlarge 48 384 GiB 18.75 Gbps 15 Gbps
r7i.16xlarge 64 512 GiB 25 Gbps 20 Gbps
r7i.24xlarge 96 768 GiB 37.5 Gbps 30 Gbps
r7i.48xlarge 192 1,536 GiB 50 Gbps 40 Gbps

We’re also getting ready to launch two sizes of bare metal R7i instances soon:

Instance Name vCPUs
Memory (GiB)
Network Bandwidth
EBS Bandwidth
r7i.metal-24xl 96 768 GiB Up to 37.5 Gbps Up to 30 Gbps
r7i.metal-48xl 192 1,536 GiB Up to 50.0 Gbps Up to 40 Gbps

Built-in Accelerators
The Sapphire Rapids processors include four built-in accelerators, each providing hardware acceleration for a specific workload:

  • Advanced Matrix Extensions (AMX) – The AMX extensions are designed to accelerate machine learning and other compute-intensive workloads that involve matrix operations. It improves the efficiency of these operations by providing specialized hardware instructions and registers tailored for matrix computations. Matrix operations, such as multiplication and convolution, are fundamental building blocks in various computational tasks, especially in machine learning algorithms.
  • Intel Data Streaming Accelerator (DSA) – DSA enhances data processing and analytics capabilities for a wide range of applications and enables developers to harness the full potential of their data-driven workloads. With DSA, you gain access to optimized hardware acceleration that delivers exceptional performance for data-intensive tasks.
  • Intel In-Memory Analytics Accelerator (IAA) – This accelerator runs database and analytic workloads faster, with the potential for greater power efficiency. In-memory compression, decompression, encryption at very high throughput, and a suite of analytics primitives support in-memory databases, open-source databases, and data stores like RocksDB and ClickHouse.
  • Intel QuickAssist Technology (QAT) – This accelerator offloads encryption, decryption, and compression, freeing up processor cores and reducing power consumption. It also supports merged compression and encryption in a single data flow. To learn more start at the Intel QuickAssist Technology (Intel QAT) Overview.

Advanced Matrix Extensions are available on all sizes of R7i instances. The Intel QAT, Intel IAA, and Intel DSA accelerators will be available on the r7i.metal-24xl and r7i.metal-48xl instances.

Now Available
The new instances are available in the US East (Ohio, N. Virginia), US West (Oregon), Europe (Spain), Europe (Stockholm), and Europe (Ireland) AWS Regions.

Purchasing Options
R7i instances are available in On-Demand, Reserved, Savings Plan, and Spot Instance form. R7i instances are also available in Dedicated Host and Dedicated Instance form.

— Irshad

AWS Weekly Roundup – EBS Status Check, Textract Custom Queries, Amazon Linux 2, and more – October 16, 2023

Post Syndicated from Jeff Barr original https://aws.amazon.com/blogs/aws/aws-weekly-roundup-ebs-status-check-textract-custom-queries-amazon-linux-2-and-more-october-16-2023/

With just 41 days until AWS re:Invent 2023 opens, I’m doing my best to stay heads-down and focused on working with the entire AWS News Blog team to create plenty of awesome new posts for your reading pleasure! I’ll take a short break this morning to share some of the most exciting launches and other news from last week. Here we go!

Last Week’s Launches
Here are some of the launches that captured my attention:

Amazon EBS – The new Attached EBS Status Check CloudWatch metric lets you monitor the status of all of the Amazon Elastic Block Store (Amazon EBS) volumes attached to a particular Amazon Elastic Compute Cloud (Amazon EC2) instance, verifying that the volumes are reachable and able to complete I/O operations.

AWS Systems Manager – You can now enable AWS Systems Manager by default for all EC2 instances within an Organization. This lets you confirm that core Systems Manager capabilities are present on all new and existing instances.

Amazon EC2 – You can now set unused or obsolete AMIs to a disabled state. This makes the AMI private if it was previously shared, hides it from DescribeImages by default, and prevents new instances from being launched from it.

Amazon Textract – You can now use Custom Queries to adapt Textract’s Queries feature to improve extraction accuracy for business-specific documents. You upload sample documents, label the data, and generate an adapter, which you then use in calls to the AnalyzeDocument function.

Amazon OpenSearch Service – You can now create Search Pipelines for easier processing of queries and results. Each search pipeline can contain multiple processing steps: query rewriters, natural language processors, result rerankers, and filters; several standard processors are also included.

Amazon Linux 2 – The latest quarterly release (AL2023.2) of Amazon Linux 2 includes a core set of Ansible features as well as a curated set of community collections. It also includes Amazon Corretto 21, and many other new features and capabilities.

Amazon Rekognition – You can now train custom adapters to reduce the number of false positives and false negative flagged by Amazon Rekognition, giving you the power to tailor the deep learning model to improve performance for your specific use case.

Amazon RDSAmazon Relational Database Service (RDS) now supports PostgreSQL, MySQL, and MariaDB databases on M6in, M6idn, R6in, and R6idn database instances.

X in Y – We launched existing services and instance types in additional regions:

Other AWS News
Here are some other blog posts and news items that you might like:

On the Community.AWS Blog, Seth Eliot listed Twelve Resilience Sessions at AWS re:Invent You Won’t Want to Miss, Brooke Jamieson explained How to Learn Generative AI from Scratch, and Daniel Wirjo shared some Patterns for Building Generative AI Applications on Amazon Bedrock.

On the AWS Insights blog, fellow news blogger Irshad Buchh explained why Two billion downloads of Terraform AWS Provider shows value of IaC for infrastructure management.

The AWS IoT Blog explained How to build a scalable, multi-tenant IoT SaaS platform on AWS using a multi-account strategy.

The Amazon SES Blog showed you how to Automate marketing campaigns with real-time customer data using Amazon Pinpoint.

The AWS Big Data Blog showed you how to Orchestrate Amazon EMR Serverless jobs with AWS Step functions.

The AWS Compute Blog talked about Filtering events in Amazon EventBridge with wildcard pattern matching.

The AWS Storage Blog talked about Retaining Amazon EC2 AMI snapshots for compliance using Amazon EBS Snapshots Archive.

The AWS Architecture Blog talked about how Internet Travel Service ITS adopts microservices architecture for improved air travel search engine.

Some other great sources of AWS news include:

Upcoming AWS Events
Check your calendars and sign up for these AWS events:

AWS Community Days – Join a community-led conference run by AWS user group leaders in your region: Italy (October 18), UAE (October 21), Jaipur (November 4), Vadodara (November 4), and Brasil (November 4).

AWS InnovateAWS Innovate: Every Application Edition – Join our free online conference to explore cutting-edge ways to enhance security and reliability, optimize performance on a budget, speed up application development, and revolutionize your applications with generative AI. Register for AWS Innovate Online Americas and EMEA on October 19 and AWS Innovate Online Asia Pacific & Japan on October 26.

AWS re:Invent 2023AWS re:Invent (November 27 – December 1) – Join us to hear the latest from AWS, learn from experts, and connect with the global cloud community. Browse the session catalog and attendee guides and check out the re:Invent highlights for generative AI.

You can browse all upcoming in-person and virtual events.

And that’s a wrap. Check back next Monday for another Weekly Roundup!

Jeff;

This post is part of our Weekly Roundup series. Check back each week for a quick roundup of interesting news and announcements from AWS!

AWS Weekly Roundup: AWS Control Tower, Amazon Bedrock, Amazon OpenSearch Service, and More (October 9, 2023)

Post Syndicated from Antje Barth original https://aws.amazon.com/blogs/aws/aws-weekly-roundup-aws-control-tower-amazon-bedrock-amazon-opensearch-service-and-more-october-9-2023/

Pumpkins

As the Northern Hemisphere enjoys early fall and pumpkins take over the local farmers markets and coffee flavors here in the United States, we’re also just 50 days away from re:Invent 2023! But before we officially enter pre:Invent sea­­son, let’s have a look at some of last week’s exciting news and announcements.

Last Week’s Launches
Here are some launches that got my attention:

AWS Control Tower – AWS Control Tower released 22 proactive controls and 10 AWS Security Hub detective controls to help you meet regulatory requirements and meet control objectives such as encrypting data in transit, encrypting data at rest, or using strong authentication. For more details and a list of controls, check out the AWS Control Tower user guide.

Amazon Bedrock – Just a week after Amazon Bedrock became available in AWS Regions US East (N. Virginia) and US West (Oregon), Amazon Bedrock is now also available in the Asia Pacific (Tokyo) AWS Region. To get started building and scaling generative AI applications with foundation models, check out the Amazon Bedrock documentation, explore the generative AI space at community.aws, and get hands-on with the Amazon Bedrock workshop.

Amazon OpenSearch Service – You can now run OpenSearch version 2.9 in Amazon OpenSearch Service with improvements to search, observability, security analytics, and machine learning (ML) capabilities. OpenSearch Service has expanded its geospatial aggregations support in version 2.9 to gather insights on high-level overview of trends and patterns and establish correlations within the data. OpenSearch Service 2.9 now also comes with OpenSearch Service Integrations to take advantage of new schema standards such as OpenTelemetry and supports managing and overlaying alerts and anomalies onto dashboard visualization line charts.

Amazon SageMakerSageMaker Feature Store now supports a fully managed, in-memory online store to help you retrieve features for model serving in real time for high throughput ML applications. The new online store is powered by ElastiCache for Redis, an in-memory data store built on open-source Redis. The SageMaker developer guide has all the details.

Also, SageMaker Model Registry added support for private model repositories. You can now register models that are stored in private Docker repositories and track all your models across multiple private AWS and non-AWS model repositories in one central service, simplifying ML operations (MLOps) and ML governance at scale. The SageMaker Developer Guide shows you how to get started.

Amazon SageMaker CanvasSageMaker Canvas expanded its support for ready-to-use models to include foundation models (FMs). You can now access FMs such as Claude 2, Amazon Titan, and Jurassic-2 (powered by Amazon Bedrock) as well as publicly available models such as Falcon and MPT (powered by SageMaker JumpStart) through a no-code chat interface. Check out the SageMaker Developer Guide for more details.

For a full list of AWS announcements, be sure to keep an eye on the What’s New at AWS page.

Other AWS News
Here are some additional blog posts and news items that you might find interesting:

Behind the scenes on AWS contributions to open-source databases – This post shares some of the more substantial open-source contributions AWS has made in the past two years to upstream databases, introduces some key contributors, and shares how AWS approaches upstream work in our database services.

Fast and cost-effective Llama 2 fine-tuning with AWS Trainium – This post shows you how to fine-tune the Llama 2 model from Meta on AWS Trainium, a purpose-built accelerator for LLM training, to reduce training times and costs.

Code Llama code generation models from Meta are now available via Amazon SageMaker JumpStart – You can now deploy Code Llama FMs, developed by Meta, with one click in SageMaker JumpStart. This post walks you through the details.

Upcoming AWS Events
Check your calendars and sign up for these AWS events:

Build On AWS - Generative AIBuild On Generative AI – Season 2 of this weekly Twitch show about all things generative AI is in full swing! Every Monday, 9:00 US PT, my colleagues Emily and Darko look at new technical and scientific patterns on AWS, invite guest speakers to demo their work, and show us how they built something new to improve the state of generative AI. In today’s episode, Emily and Darko discussed how to translate unstructured documents into structured data. Check out show notes and the full list of episodes on community.aws.

AWS Community Days – Join a community-led conference run by AWS user group leaders in your region: DMV (DC, Maryland, Virginia) (October 13), Italy (October 18), UAE (October 21), Jaipur (November 4), Vadodara (November 4), and Brasil (November 4).

AWS InnovateAWS Innovate: Every Application Edition – Join our free online conference to explore cutting-edge ways to enhance security and reliability, optimize performance on a budget, speed up application development, and revolutionize your applications with generative AI. Register for AWS Innovate Online Americas and EMEA on October 19 and AWS Innovate Online Asia Pacific & Japan on October 26.

AWS re:Invent 2023AWS re:Invent (November 27 – December 1) – Join us to hear the latest from AWS, learn from experts, and connect with the global cloud community. Browse the session catalog and attendee guides and check out the re:Invent highlights for generative AI.

You can browse all upcoming in-person and virtual events.

That’s all for this week. Check back next Monday for another Weekly Roundup!

— Antje

This post is part of our Weekly Roundup series. Check back each week for a quick roundup of interesting news and announcements from AWS!

AWS ExecLeaders Data and Generative AI Day: Fueling Business Growth with Data and Generative AI

Post Syndicated from Irshad Buchh original https://aws.amazon.com/blogs/aws/aws-execleaders-data-and-generative-ai-day-fueling-business-growth-with-data-and-generative-ai/

Join us on Thursday, October 5, 2023, for a free-to-attend online event, Data and Generative AI Day. AWS will stream the event simultaneously across multiple platforms, including LinkedIn Live and YouTube.

In the realm of generative AI, the power and potential hidden within your organization’s data are more expansive than ever before. Generative AI has the capability to reshape customer interactions, elevate employee productivity, stimulate creative ideation, and drive groundbreaking innovation. However, as a forward-thinking leader, what steps are required to fully harness this data-driven potential and translate it into tangible outcomes?

During this half-day event, AWS experts, partners, customers, and leading startups will provide you insights into their efforts to propel innovation using data and generative AI within the ever-evolving landscape of today. You shall find practical guidance from industry leaders on how to navigate the diverse spectrum of opportunities and challenges presented by this transformative technology, all while gaining a glimpse into what the future holds in store.

Here are some of the highlights you can expect from this event.

Swami Sivasubramanian, VP, Database, Analytics, and ML at AWS, will kick off the event with a keynote session where he will share the blueprint to democratize data and AI for business leaders. Swami will share how leaders can usher in the right mindset, strategy, and tools to translate the promise of generative AI into real business value.

Tom Godden, Director of Enterprise Strategy at AWS, will explore practical strategies for leveraging generative AI to drive business outcomes. He will share the frameworks for identifying opportunities to pilot generative AI across your organization and provide business leaders with a timely understanding of how to employ these powerful emerging capabilities.

Gopinath Sankaran, Vice President, Strategic Cloud Ecosystems at Informatica, will share insights on the impact of generative AI on data management and explore how Informatica’s AI-powered Intelligent Data Management Cloud and AWS AI and Analytics services can power a new wave of insights and experiences.

Diego Saenz, Managing Director of Data & AI at Deloitte, and Jojy Matthew, Principal, Global Financial Services Industry (GFSI) Data, Analytics, & AI at Deloitte, will share what a well-crafted data strategy means to generative AI success. Diego will share practical advice on assessing if your data estate is ready for leveraging generative AI and driving business outcomes.

You will hear from AWS leaders and AWS customers FOX, Salesforce, and Booking.com, as they share their data and generative AI journeys and explain how you can leverage this transformational technology to re-imagine your customer and employee experiences.

Data & Generative AI Day

You can add an event reminder to your calendar by registering on the event page.

See you there.

— Irshad

New – Amazon EC2 C7a Instances Powered By 4th Gen AMD EPYC Processors for Compute Optimized Workloads

Post Syndicated from Channy Yun original https://aws.amazon.com/blogs/aws/new-amazon-ec2-c7a-instances-powered-by-4th-gen-amd-epyc-processors-for-compute-optimized-workloads/

We launched the compute optimized Amazon EC2 C6a instances in February 2022 powered by 3rd Gen AMD EPYC (Milan) processors, running at frequencies up to 3.6 GHz.

Today, we’re announcing the general availability of new, compute optimized Amazon EC2 C7a instances, powered by the 4th Gen AMD EPYC (Genoa) processors with a maximum frequency of 3.7 GHz, which offer up to 50 percent higher performance compared to C6a instances. You can use this increased performance to process data faster, consolidate workloads, and lower the cost of ownership.

C7a instances offer up to 50 percent higher performance compared to C6a instances. These instances are ideal for running compute-intensive workloads such as high-performance web servers, batch processing, ad serving, machine learning, multiplayer gaming, video encoding, high performance computing (HPC) such as scientific modeling, and machine learning.

C7a instances support AVX-512, Vector Neural Network Instructions (VNNI), and brain floating point (bfloat16). These instances feature Double Data Rate 5 (DDR5) memory, which enables high-speed access to data in-memory, and deliver 2.25 times more memory bandwidth compared to the previous generation instances for lower latency.

C7a instances feature sizes of up to 192 vCPUs with 384 GiB RAM, which you have a new medium instance size, which enables you to right-size your workloads more accurately, offering 1 vCPU, 2 GiB. Here are the detailed specs:

Name vCPUs Memory (GiB) Network Bandwidth (Gbps) EBS Bandwidth (Gbps)
c7a.medium 1 2 Up to 12.5 Up to 10
c7a.large 2 4 Up to 12.5 Up to 10
c7a.xlarge 4 8 Up to 12.5 Up to 10
c7a.2xlarge 8 16 Up to 12.5 Up to 10
c7a.4xlarge 16 32 Up to 12.5 Up to 10
c7a.8xlarge 32 64 12.5 10
c7a.12xlarge 48 96 18.75 15
c7a.16xlarge 64 128 25 20
c7a.24xlarge 96 192 37.5 30
c7a.32xlarge 128 256 50 40
c7a.48xlarge 192 384 50 40
c7a.metal-48xl 192 384 50 40

C7a instances have up to 50 Gbps enhanced networking and 40 Gbps EBS bandwidth, and you can attach up to 128 EBS volumes to an instance, compared to up to 28 EBS volume attachments with the previous generation instances.

C7a instances support always-on memory encryption with AMD secure memory encryption (SME) and new AVX-512 instructions for accelerating encryption and decryption algorithms, convolutional neural network (CNN) based algorithms, financial analytics, and video encoding workloads. C7a instances also support AES-256 compared to AES-128 in C6a instances for enhanced security.

These instances are built on the AWS Nitro System and support Elastic Fabric Adapter (EFA) for workloads that benefit from lower network latency and highly scalable inter-node communication, such as high-performance computing and video processing.

Now Available
Amazon EC2 C7a instances are now available in the following AWS Regions: US East (Ohio), US East (N. Virginia), US West (Oregon), and EU (Ireland). As usual with Amazon EC2, you only pay for what you use. For more information, see the Amazon EC2 pricing page.

To learn more, visit the EC2 C7a instances page and AWS/AMD partner page. You can send feedback to [email protected], AWS re:Post for EC2, or through your usual AWS Support contacts.

Channy

Amazon DataZone Now Generally Available – Collaborate on Data Projects across Organizational Boundaries

Post Syndicated from Channy Yun original https://aws.amazon.com/blogs/aws/amazon-datazone-now-generally-available-collaborate-on-data-projects-across-organizational-boundaries/

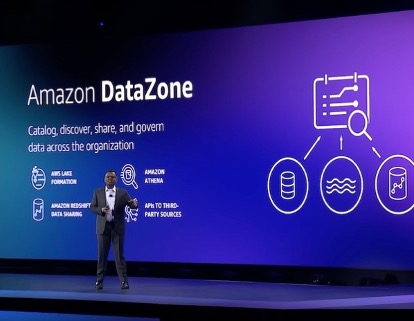
Today, we’re announcing the general availability of Amazon DataZone, a new data management service to catalog, discover, analyze, share, and govern data between data producers and consumers in your organization.

At AWS re:Invent 2022, we preannounced Amazon DataZone, and in March 2023, we previewed it publicly.

During the keynote of the last re:Invent, Swami Sivasubramanian, vice president of Databases, Analytics, and Machine Learning at AWS said “I have had the benefit of being an early customer of DataZone to run the AWS weekly business review meeting where we assemble data from our sales pipeline and revenue projections to inform our business strategy.”

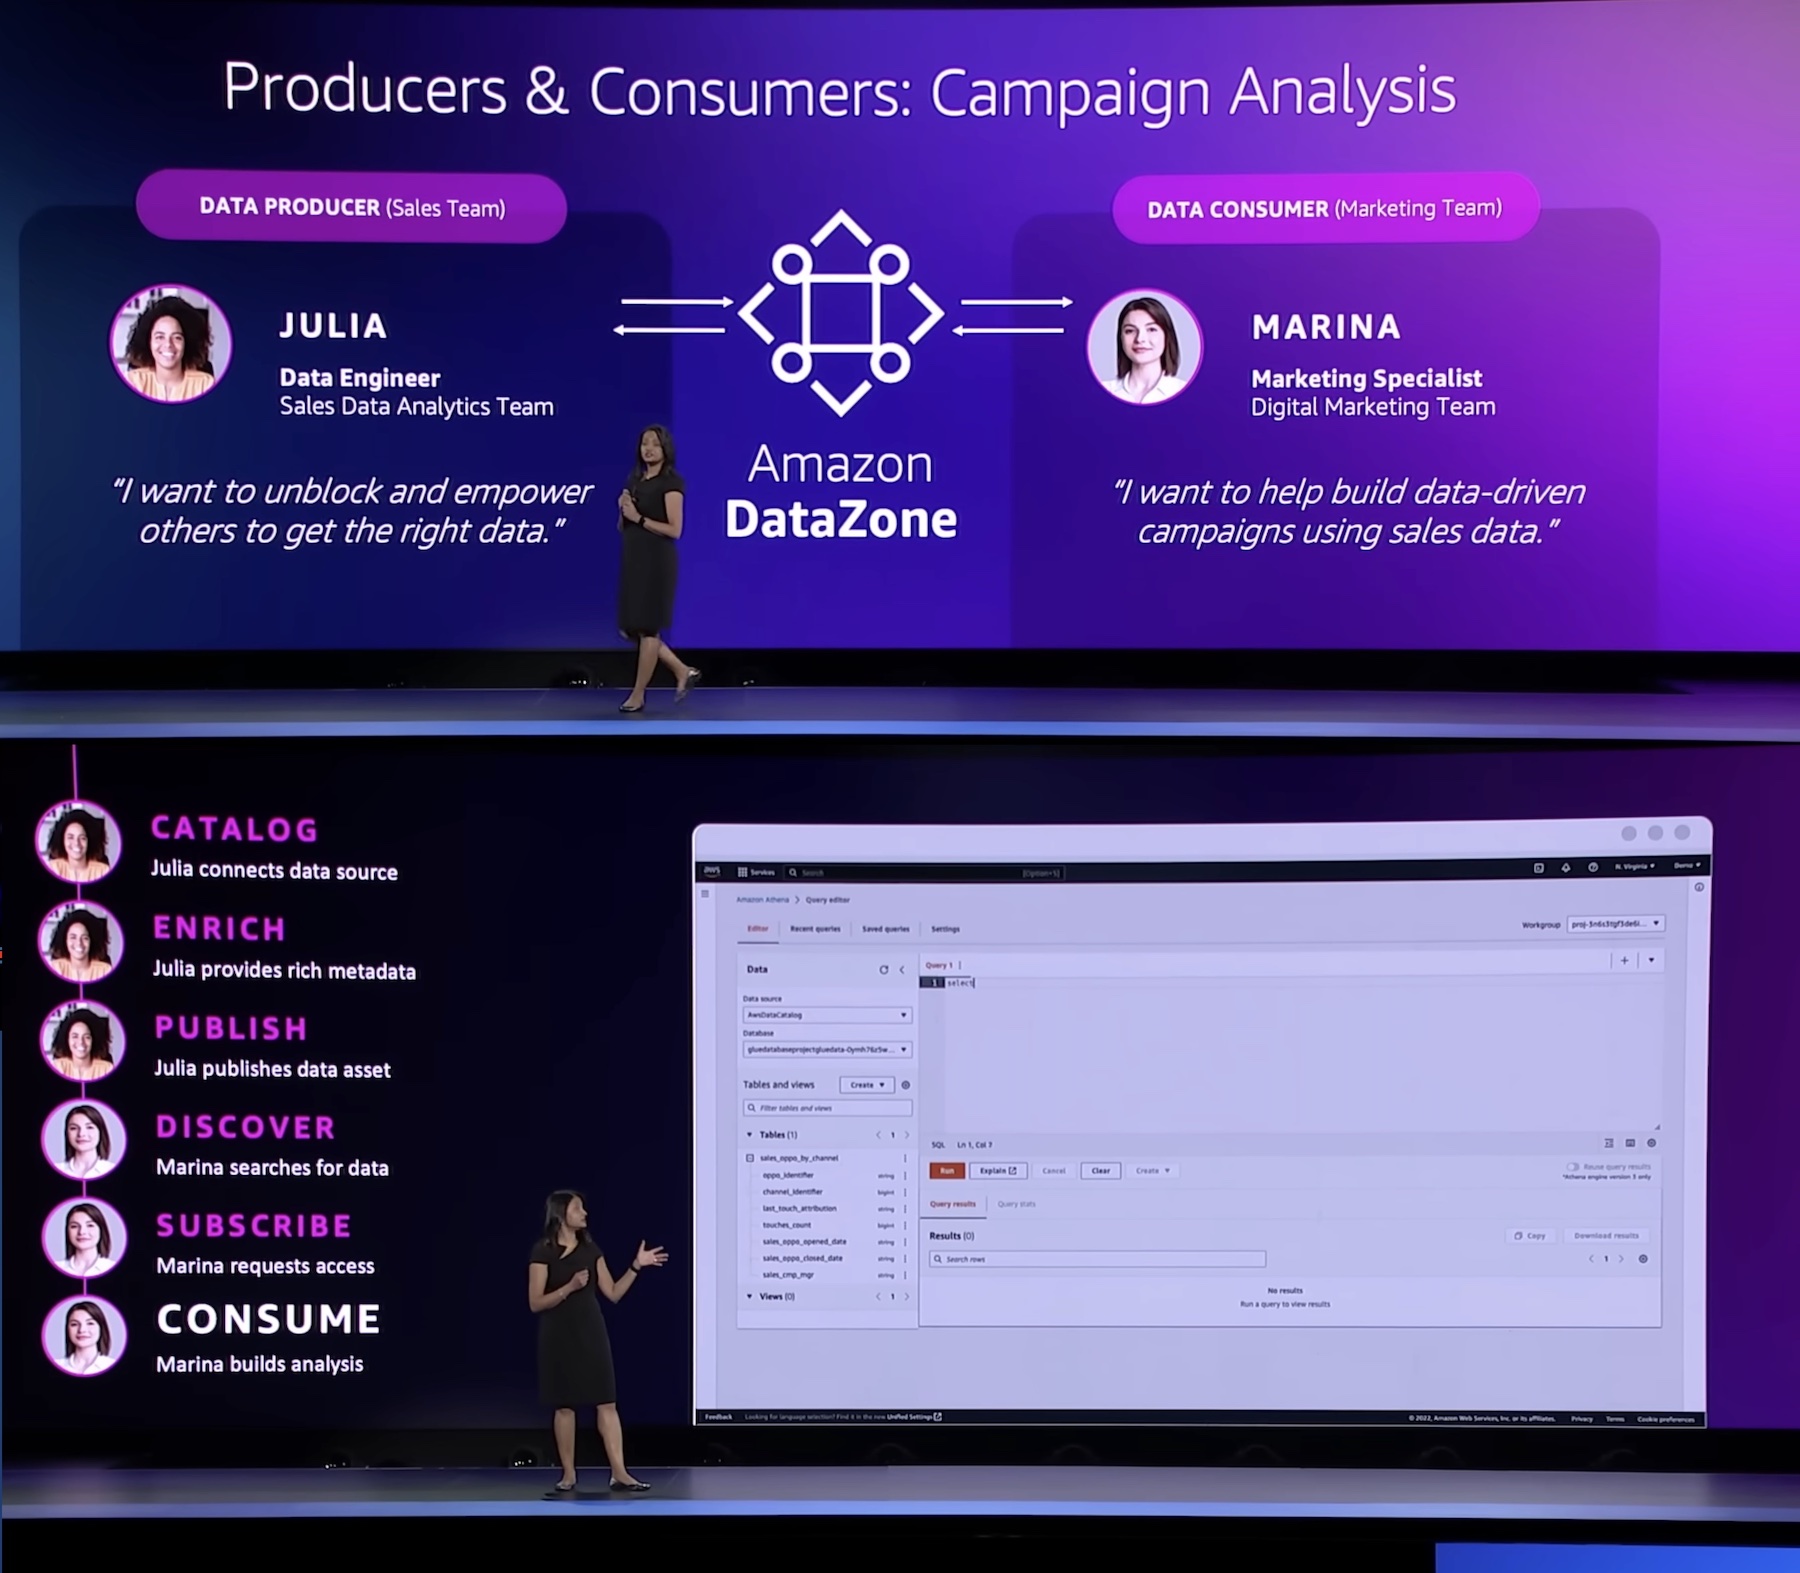
During the keynote, a demo led by Shikha Verma, head of product for Amazon DataZone, demonstrated how organizations can use the product to create more effective advertising campaigns and get the most out of their data.

“Every enterprise is made up of multiple teams that own and use data across a variety of data stores. Data people have to pull this data together but do not have an easy way to access or even have visibility to this data. DataZone provides a unified environment where everyone in an organization—from data producers to consumers, can go to access and share data in a governed manner.”

With Amazon DataZone, data producers populate the business data catalog with structured data assets from AWS Glue Data Catalog and Amazon Redshift tables. Data consumers search and subscribe to data assets in the data catalog and share with other business use case collaborators. Consumers can analyze their subscribed data assets with tools—such as Amazon Redshift or Amazon Athena query editors—that are directly accessed from the Amazon DataZone portal. The integrated publishing-and-subscription workflow provides access-auditing capabilities across projects.

Introducing Amazon DataZone
For those of you who aren’t yet familiar with Amazon DataZone, let me introduce you to its key concept and capabilities.

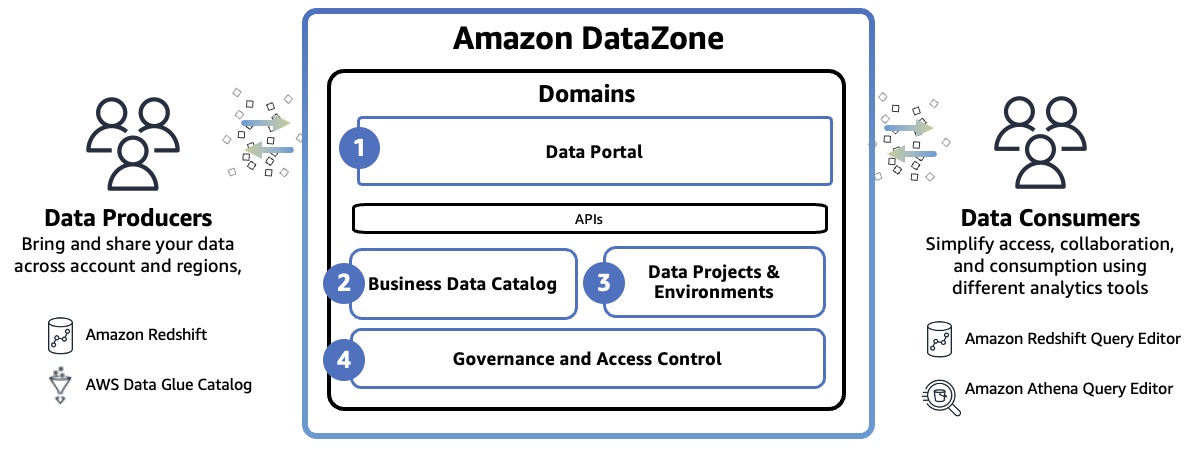
Amazon DataZone Domain represents the distinct boundary of a line of business (LOB) or a business area within an organization that can manage it’s own data, including it’s own data assets and its own definition of data or business terminology, and may have it’s own governing standards. The domain includes all core components such as the data portal, business data catalog, projects and environments, and built-in workflows.

  1. Data portal (outside the AWS Management Console) – This is a web application where different users can go to catalog, discover, govern, share, and analyze data in a self-service fashion. The data portal authenticates users with AWS Identity and Access Manager (IAM) credentials or existing credentials from your identity provider through the AWS IAM Identity Center.
  2. Business data catalog – In your catalog, you can define the taxonomy or the business glossary. You can use this component to catalog data across your organization with business context and thus enable everyone in your organization to find and understand data quickly.
  3. Data projects & environments – You can use projects to simplify access to the AWS analytics by creating business use case–based groupings of people, data assets, and analytics tools. Amazon DataZone projects provide a space where project members can collaborate, exchange data, and share data assets. Within projects, you can create environments that provide the necessary infrastructure to project members such as analytics tools and storage so that project members can easily produce new data or consume data they have access to.
  4. Governance and access control – You can use built-in workflows that allow users across the organization to request access to data in the catalog and owners of the data to review and approve those subscription requests. Once a subscription request is approved, Amazon DataZone can automatically grant access by managing permission at underlying data stores such as AWS Lake Formation and Amazon Redshift.

To learn more, see Amazon DataZone Terminology and Concepts.

Getting Started with Amazon DataZone
To get started, consider a scenario where a product marketing team wants to run campaigns to drive product adoption. To do this, they need to analyze product sales data owned by a sales team. In this walkthrough, the sales team, which acts as the data producer, publishes sales data in Amazon DataZone. Then the marketing team, which acts as the data consumer, subscribes to sales data and analyzes it in order to build a campaign strategy.

To understand how the DataZone works, let’s walk through a condensed version of the Getting started guide for Amazon DataZone.

1. Create a Domain
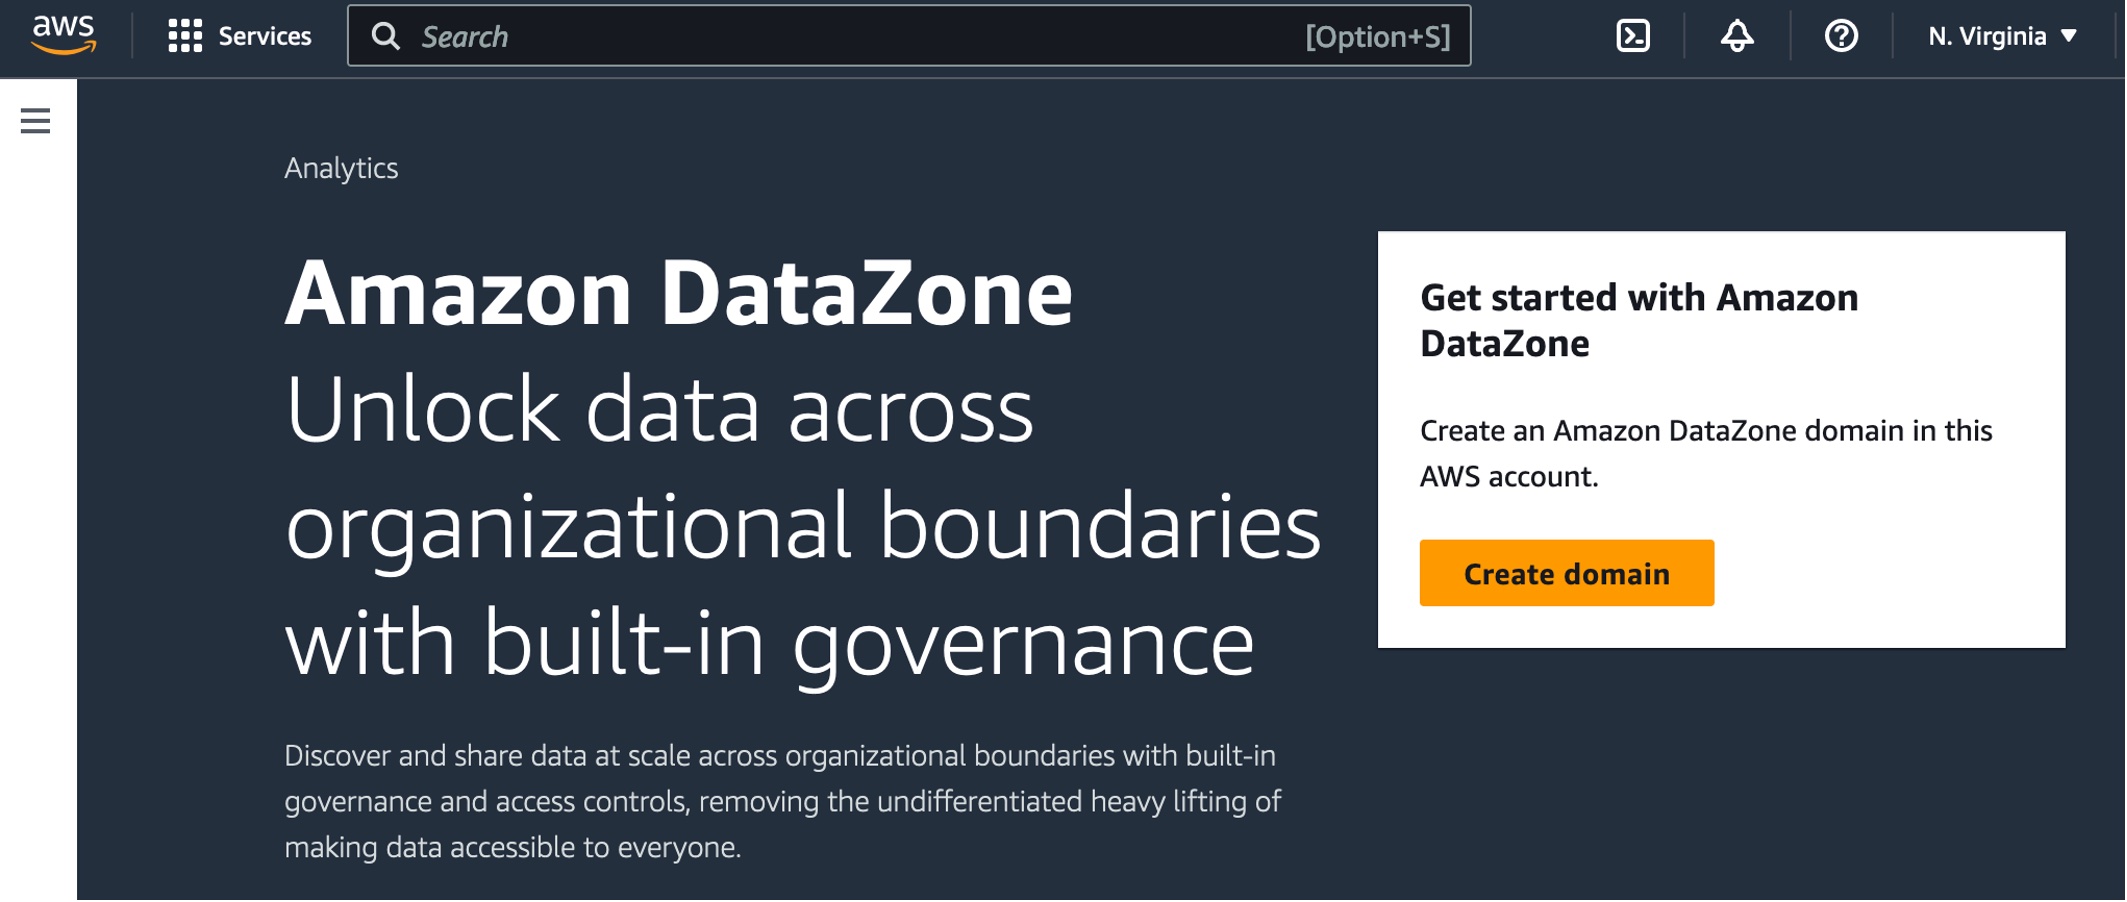
When you first start using DataZone, you start by creating a domain and all core components such as business data catalog, projects, and environments in the data portal, then exist within that domain. Go to the Amazon DataZone console and choose Create domain.

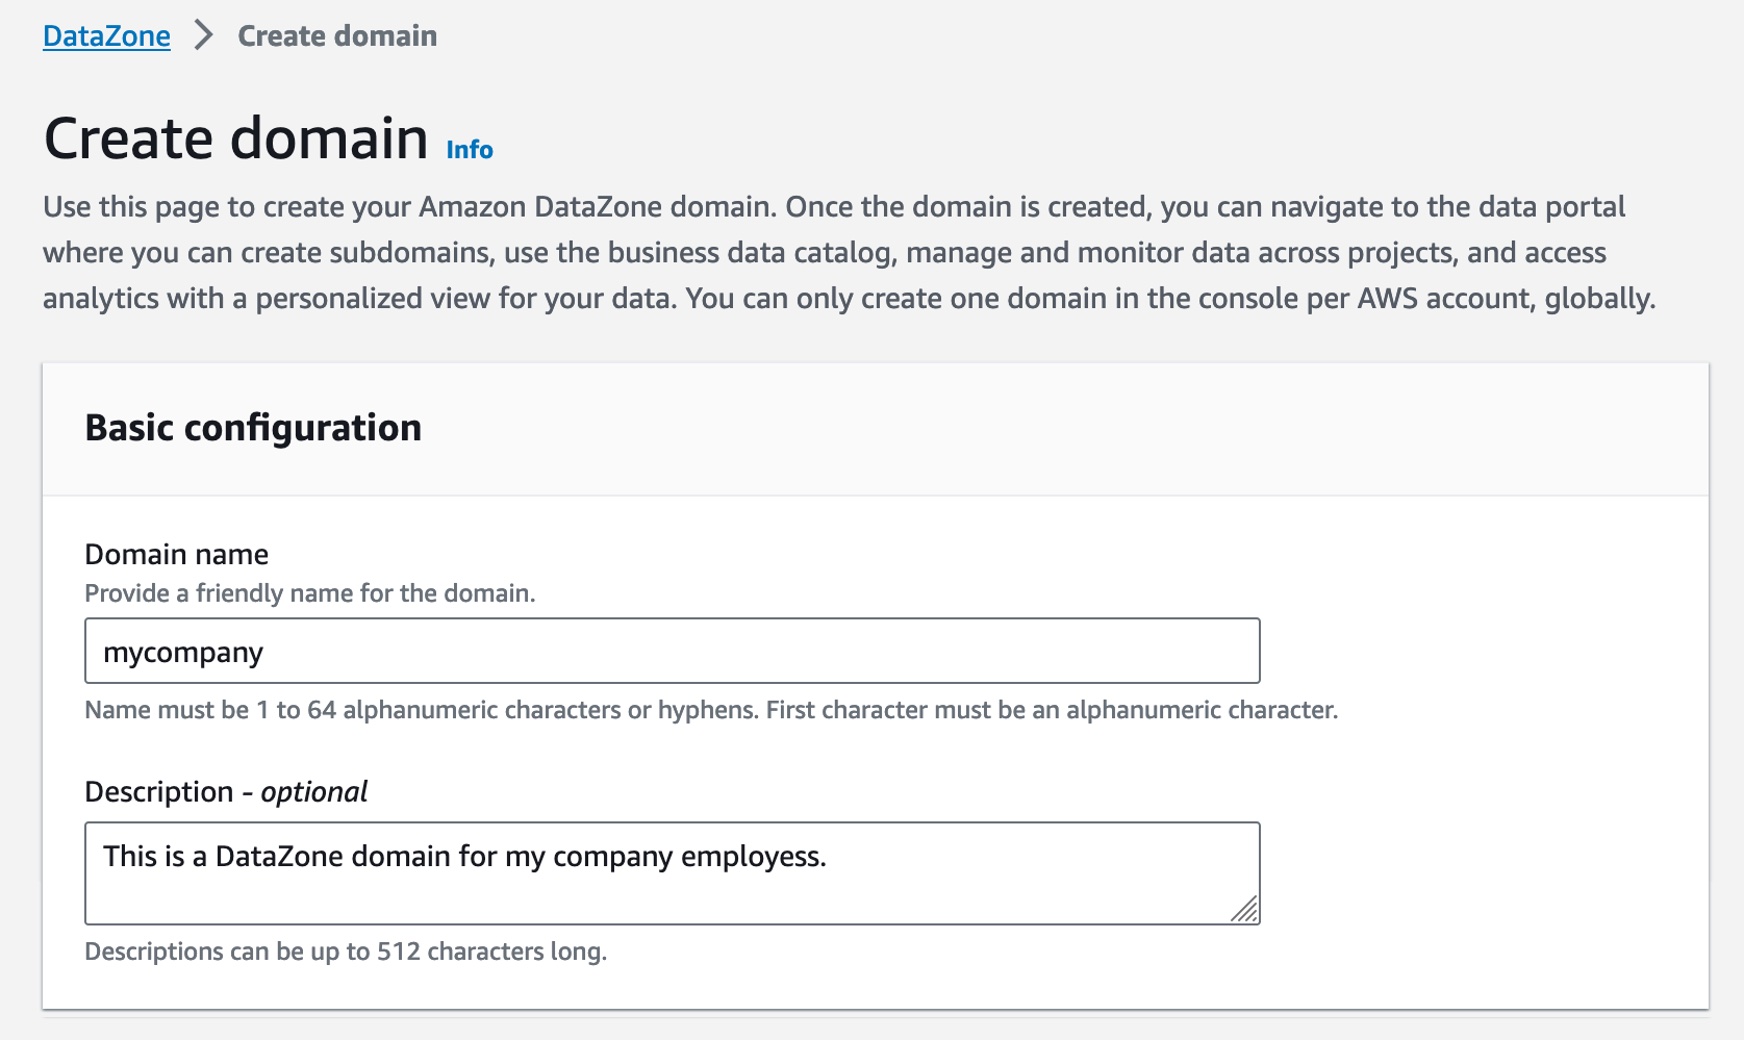
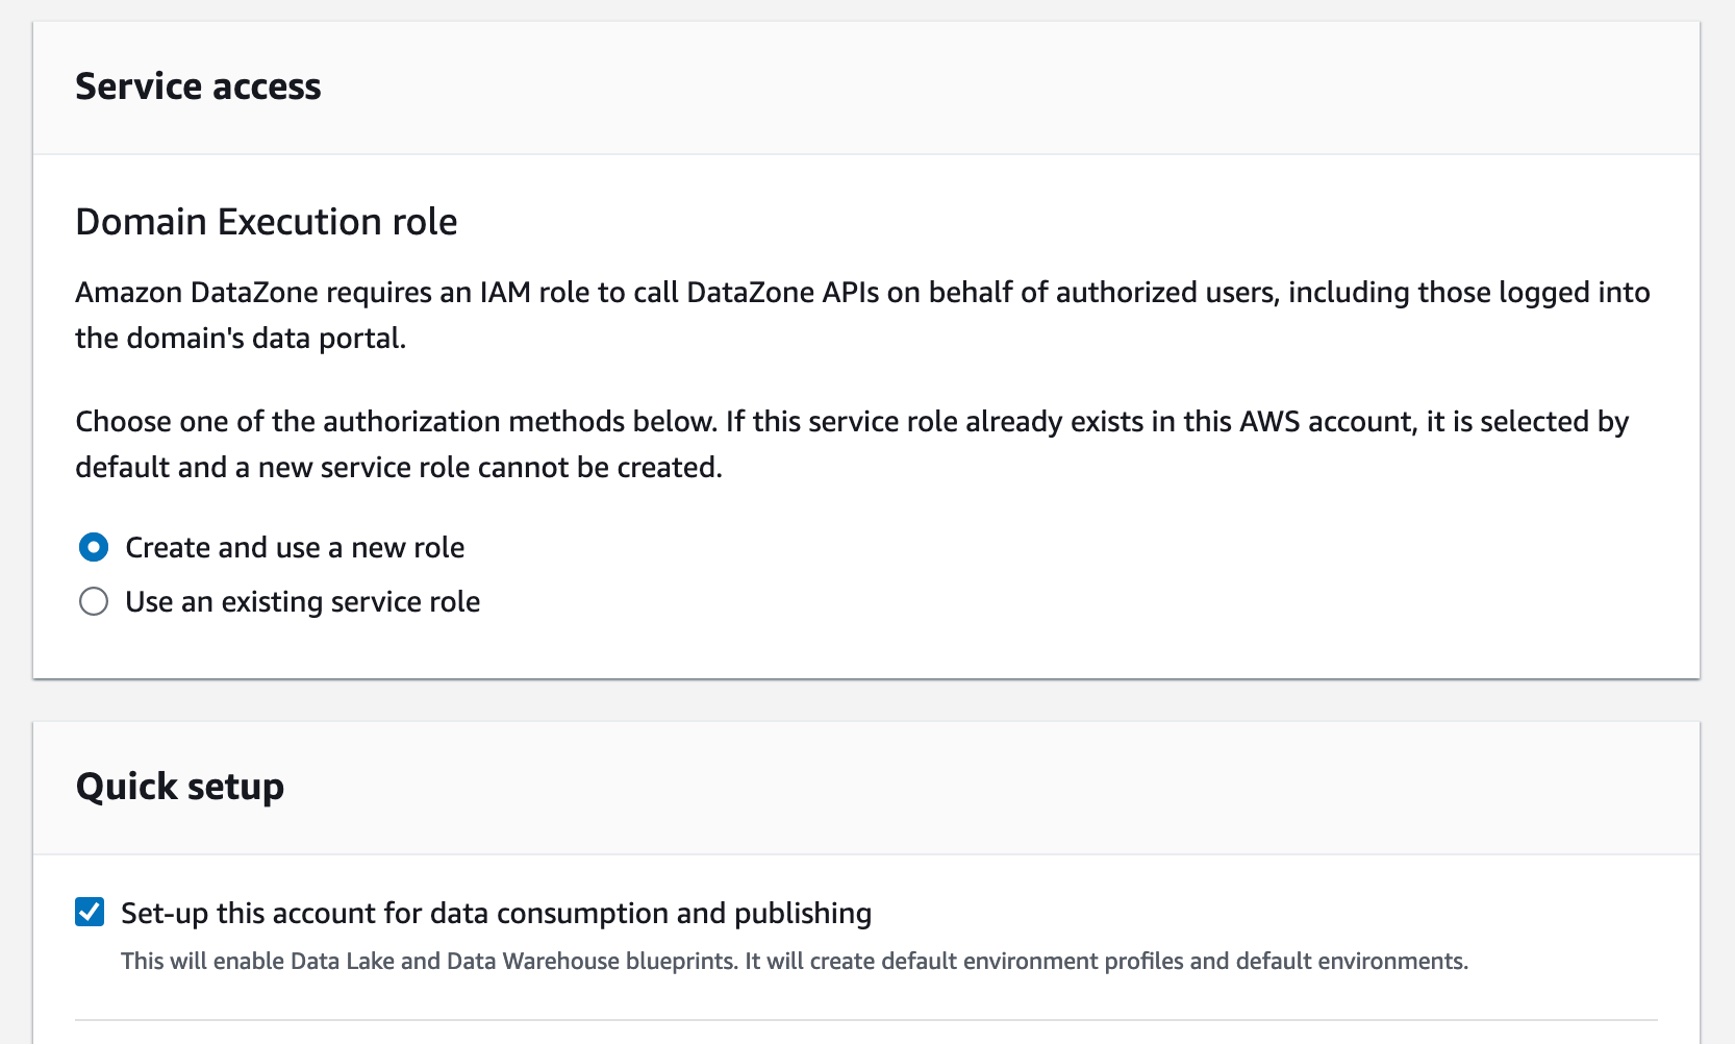
Enter Domain name and a descrption and leave all other values as default.

For example, in the Service access section, if you choose Create and use a new role by default, Amazon DataZone will automatically create a new role with necessary permissions that authorize DataZone to make API calls on behalf of users within the domain. Check the Quick setup option where DataZone can take care of all the setup steps.

Finally, choose Create domain. Amazon DataZone creates the necessary IAM roles and enables this domain to use resources within your account such as AWS Glue Data Catalog, Amazon Redshift, and Amazon Athena. Domain creation can take several minutes to complete. Wait for the domain to have a status of Available.

2. Create a Project and Environment in the Data Portal
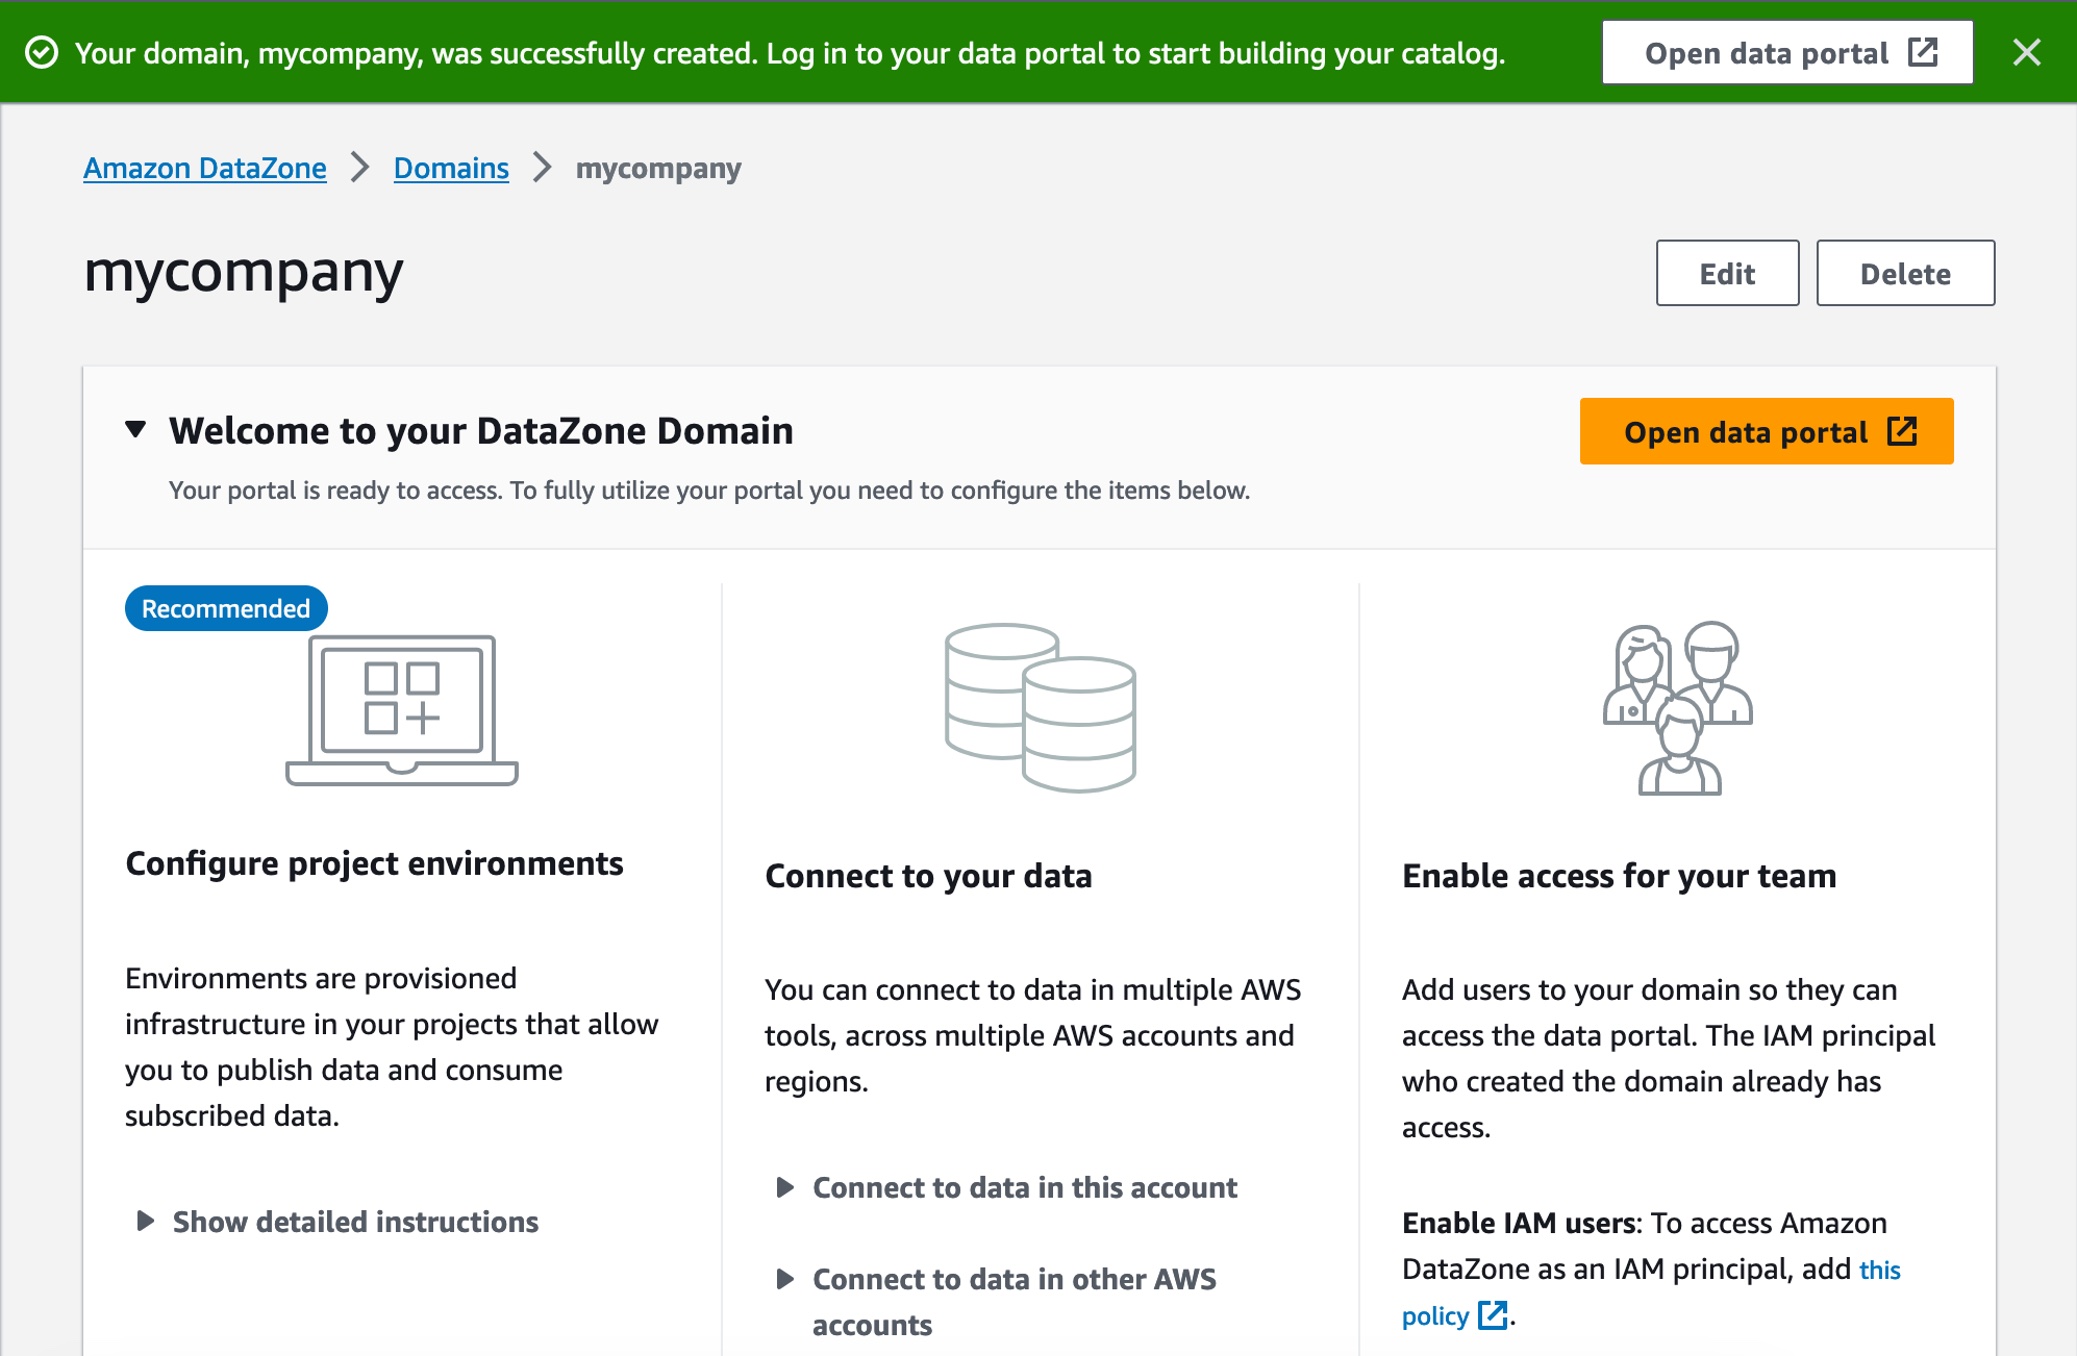
After the domain is successfully created, select it, and on the domain’s summary page, note the data portal URL for the root domain. You can use this URL to access your Amazon DataZone data portal. Choose Open data portal.

To create a new data project as the sales team to publish sales data, choose Create Project.

In the dialogbox, enter “Sales producer project” as the Name, then enter a Description for this project and choose Create.

Once you have the project, you need to create a environment to work with data and analytics tools such as Amazon Athena or Amazon Redshift in this project. Choose Create environment in the overview page or after clicking the Environment tab.

Enter “publish-environment” as the Name, then enter a Description for this environment and choose Environment profile. An environment profile is a pre-defined template that includes technical details required to create an environment such as which AWS account, Region, VPC details, and resources and tools are added to the project.

You can select a couple of default environment profiles. Choosing DataLakeProfile enables you to publish data from your Amazon S3 and AWS Glue based data lakes. It also simplifies querying the AWS Glue tables that you have access to using Amazon Athena.

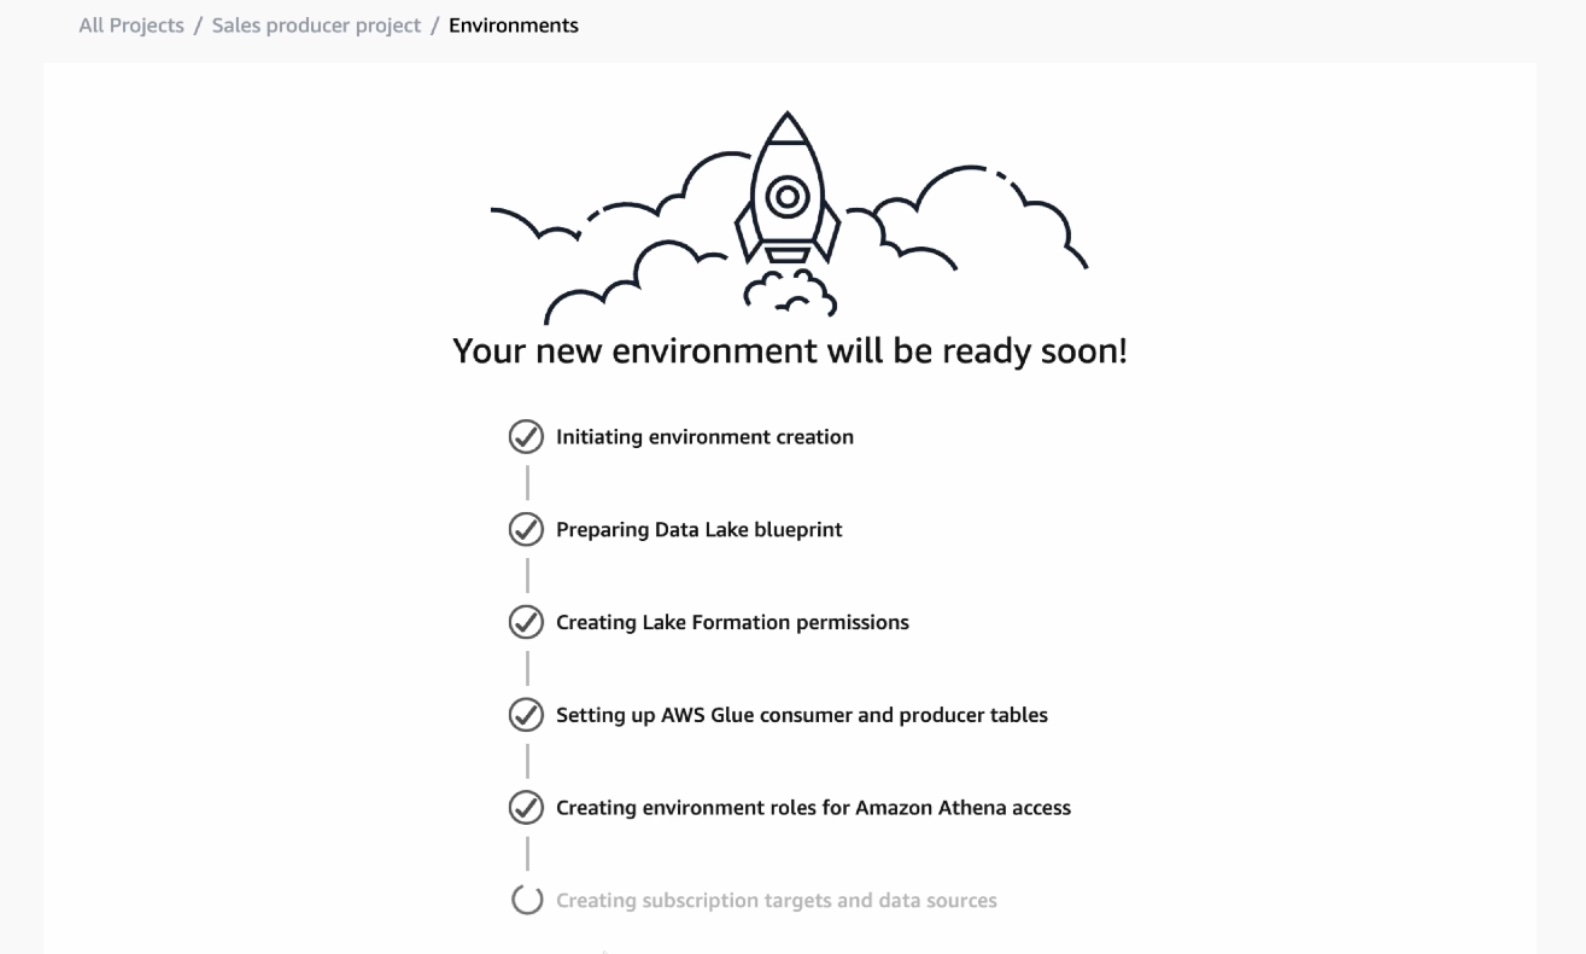
Next, ignore all the optional parameters and choose Create environment. It takes about a minute for the environment to create certain resources in your AWS account such as IAM roles, an Amazon S3 suffix, AWS Glue databases, and an Athena workgroup, which makes it easier for members of a project to produce and consume data in the data lake.

3. Publish Data in the Data Portal
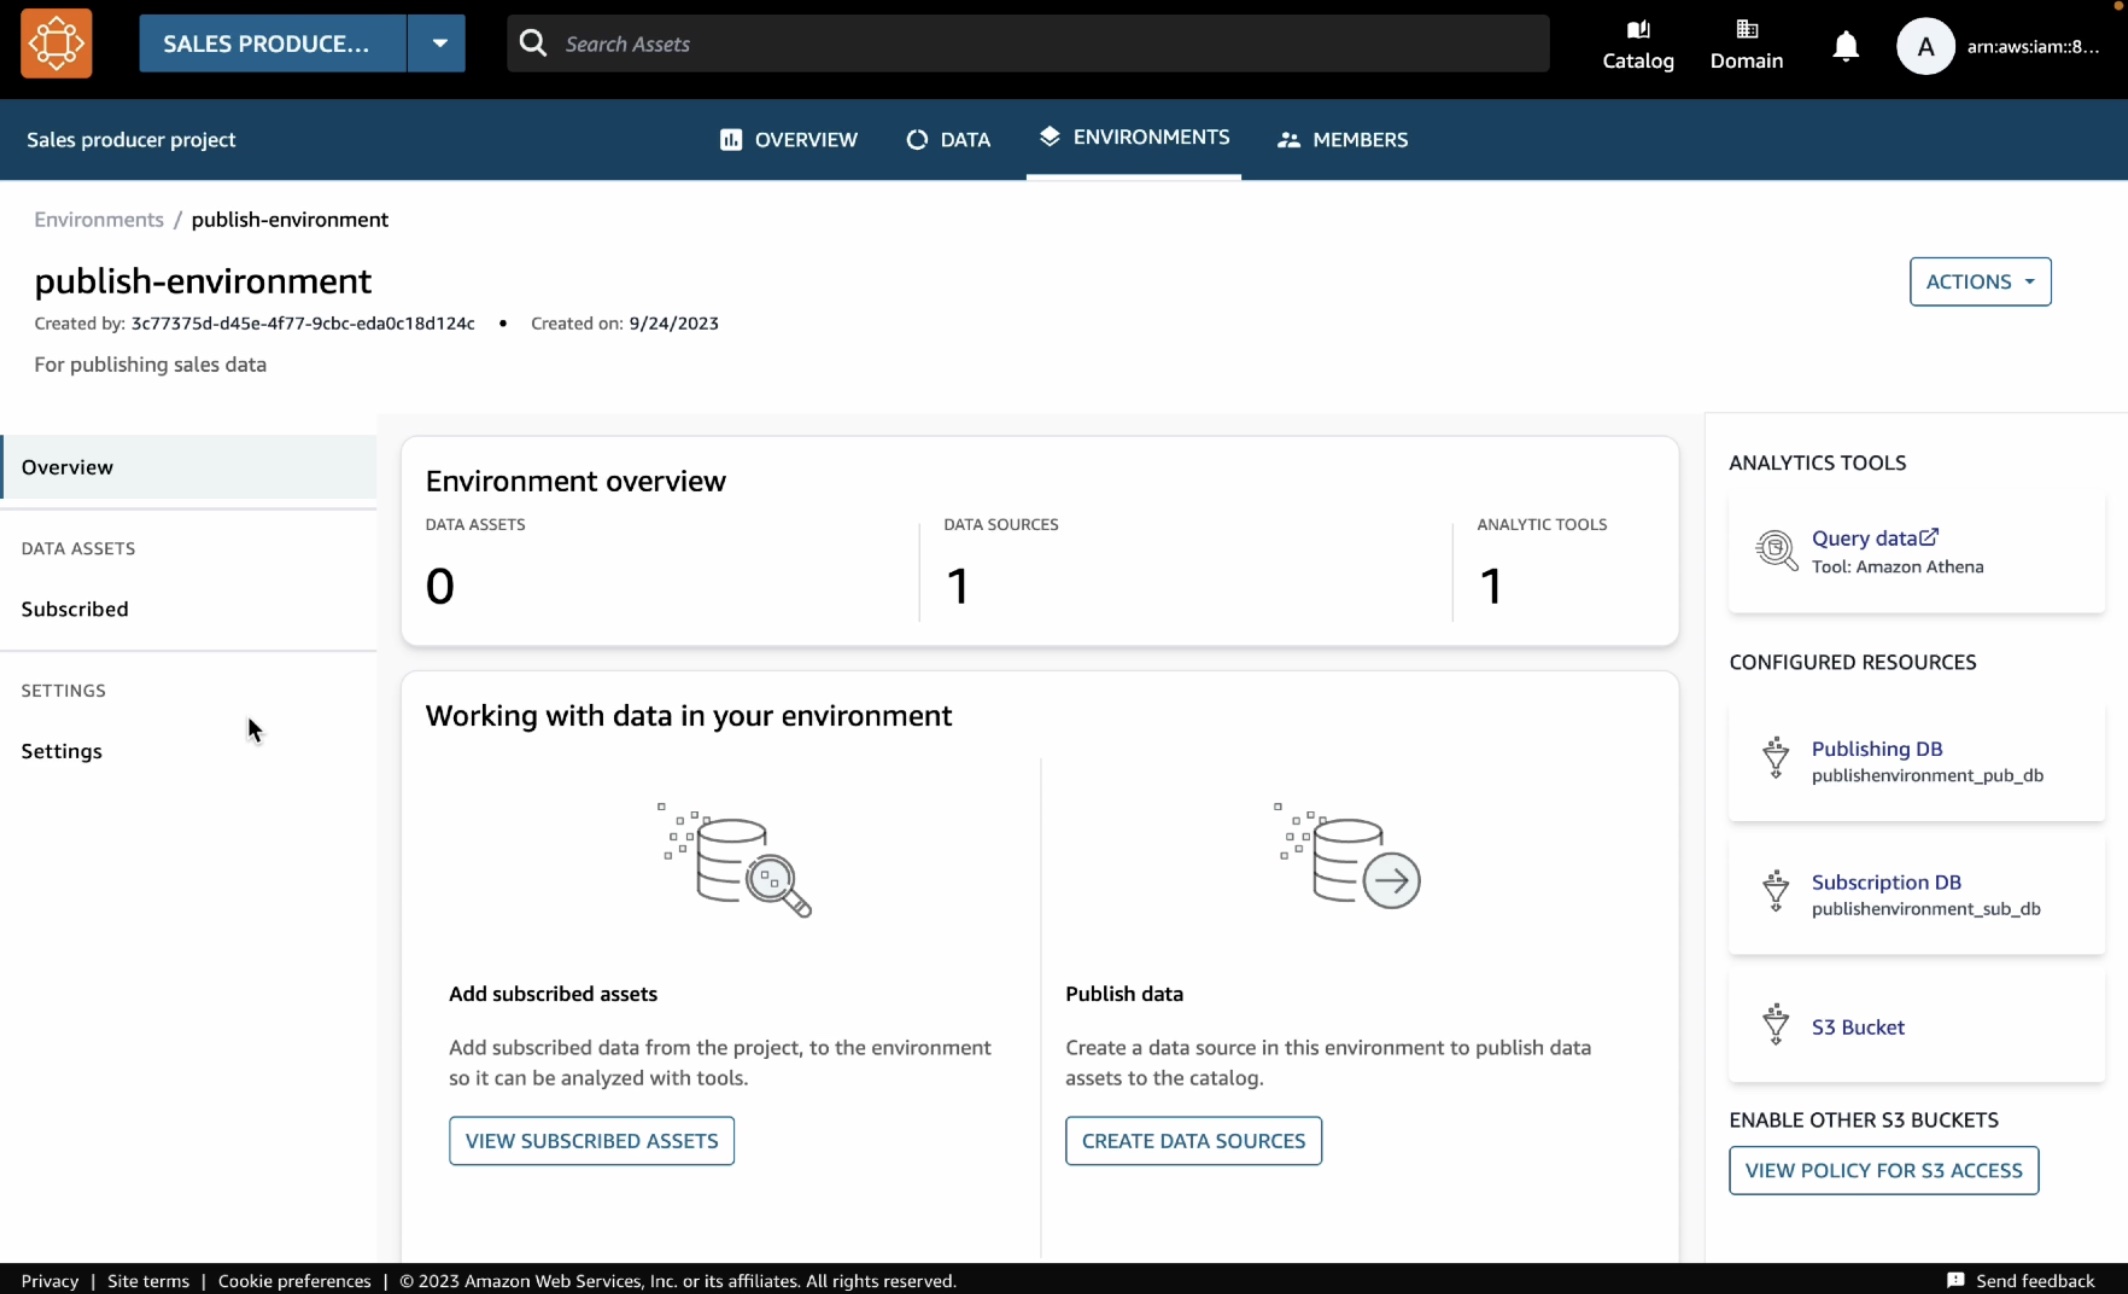
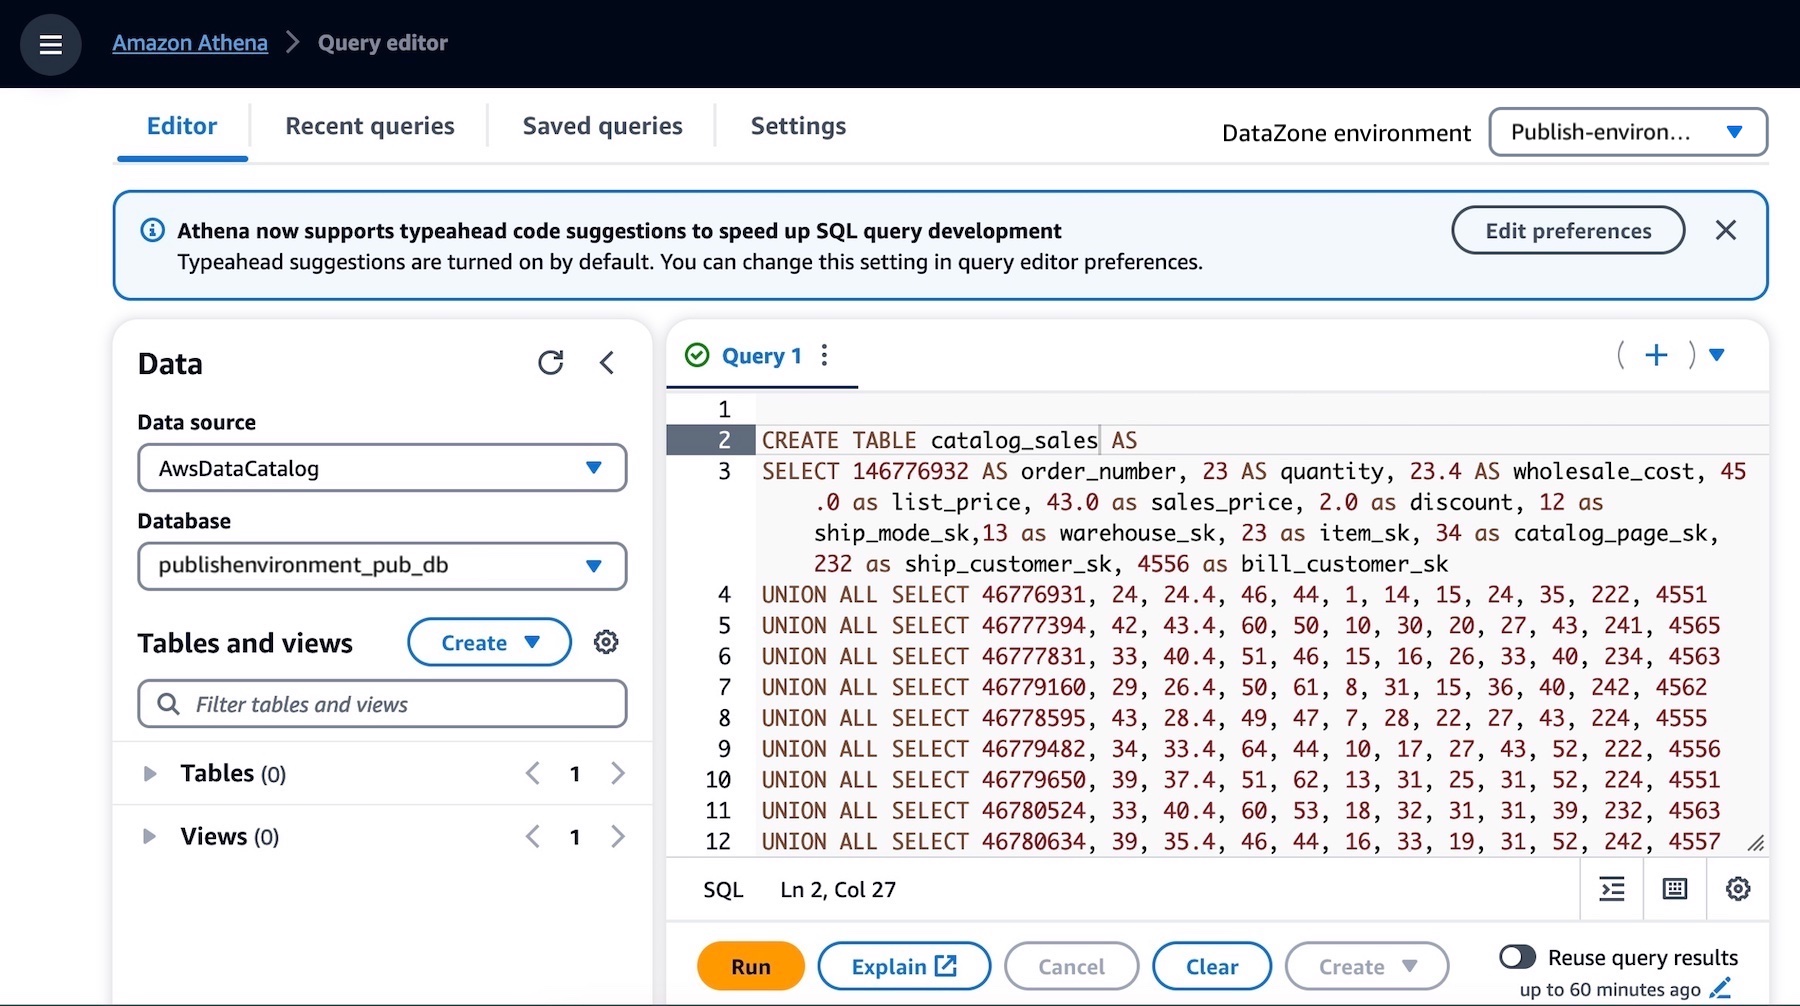
You have the environment to publish your data in your AWS Glue table. To create this table in Amazon Athena, choose Query data with the Athena link on the right-hand side of the Environments page.

This opens the Athena query editor in a new tab. Select publishenvironment_pub_db from the database dropdown and then paste the following query into the query editor. This will create a table called catalog_sales in the environment’s AWS Glue database.

CREATE TABLE catalog_sales AS 
SELECT 146776932 AS order_number, 23 AS quantity, 23.4 AS wholesale_cost, 45.0 as list_price, 43.0 as sales_price, 2.0 as discount, 12 as ship_mode_sk,13 as warehouse_sk, 23 as item_sk, 34 as catalog_page_sk, 232 as ship_customer_sk, 4556 as bill_customer_sk
UNION ALL SELECT 46776931, 24, 24.4, 46, 44, 1, 14, 15, 24, 35, 222, 4551
UNION ALL SELECT 46777394, 42, 43.4, 60, 50, 10, 30, 20, 27, 43, 241, 4565
UNION ALL SELECT 46777831, 33, 40.4, 51, 46, 15, 16, 26, 33, 40, 234, 4563
UNION ALL SELECT 46779160, 29, 26.4, 50, 61, 8, 31, 15, 36, 40, 242, 4562
UNION ALL SELECT 46778595, 43, 28.4, 49, 47, 7, 28, 22, 27, 43, 224, 4555
UNION ALL SELECT 46779482, 34, 33.4, 64, 44, 10, 17, 27, 43, 52, 222, 4556
UNION ALL SELECT 46779650, 39, 37.4, 51, 62, 13, 31, 25, 31, 52, 224, 4551
UNION ALL SELECT 46780524, 33, 40.4, 60, 53, 18, 32, 31, 31, 39, 232, 4563
UNION ALL SELECT 46780634, 39, 35.4, 46, 44, 16, 33, 19, 31, 52, 242, 4557
UNION ALL SELECT 46781887, 24, 30.4, 54, 62, 13, 18, 29, 24, 52, 223, 4561

You can see the two databases in the dropdown menu. The publishenvironment_pub_db is to provide you with a space to produce new data and choose to publish it to the DataZone catalog. The other one, publishenvironment_sub_db is for project members when they subscribe to or access to data in the catalog within that project.

Make sure that the catalog_sales table is successfully created. Now you have a data asset that can be published into the Amazon DataZone catalog.

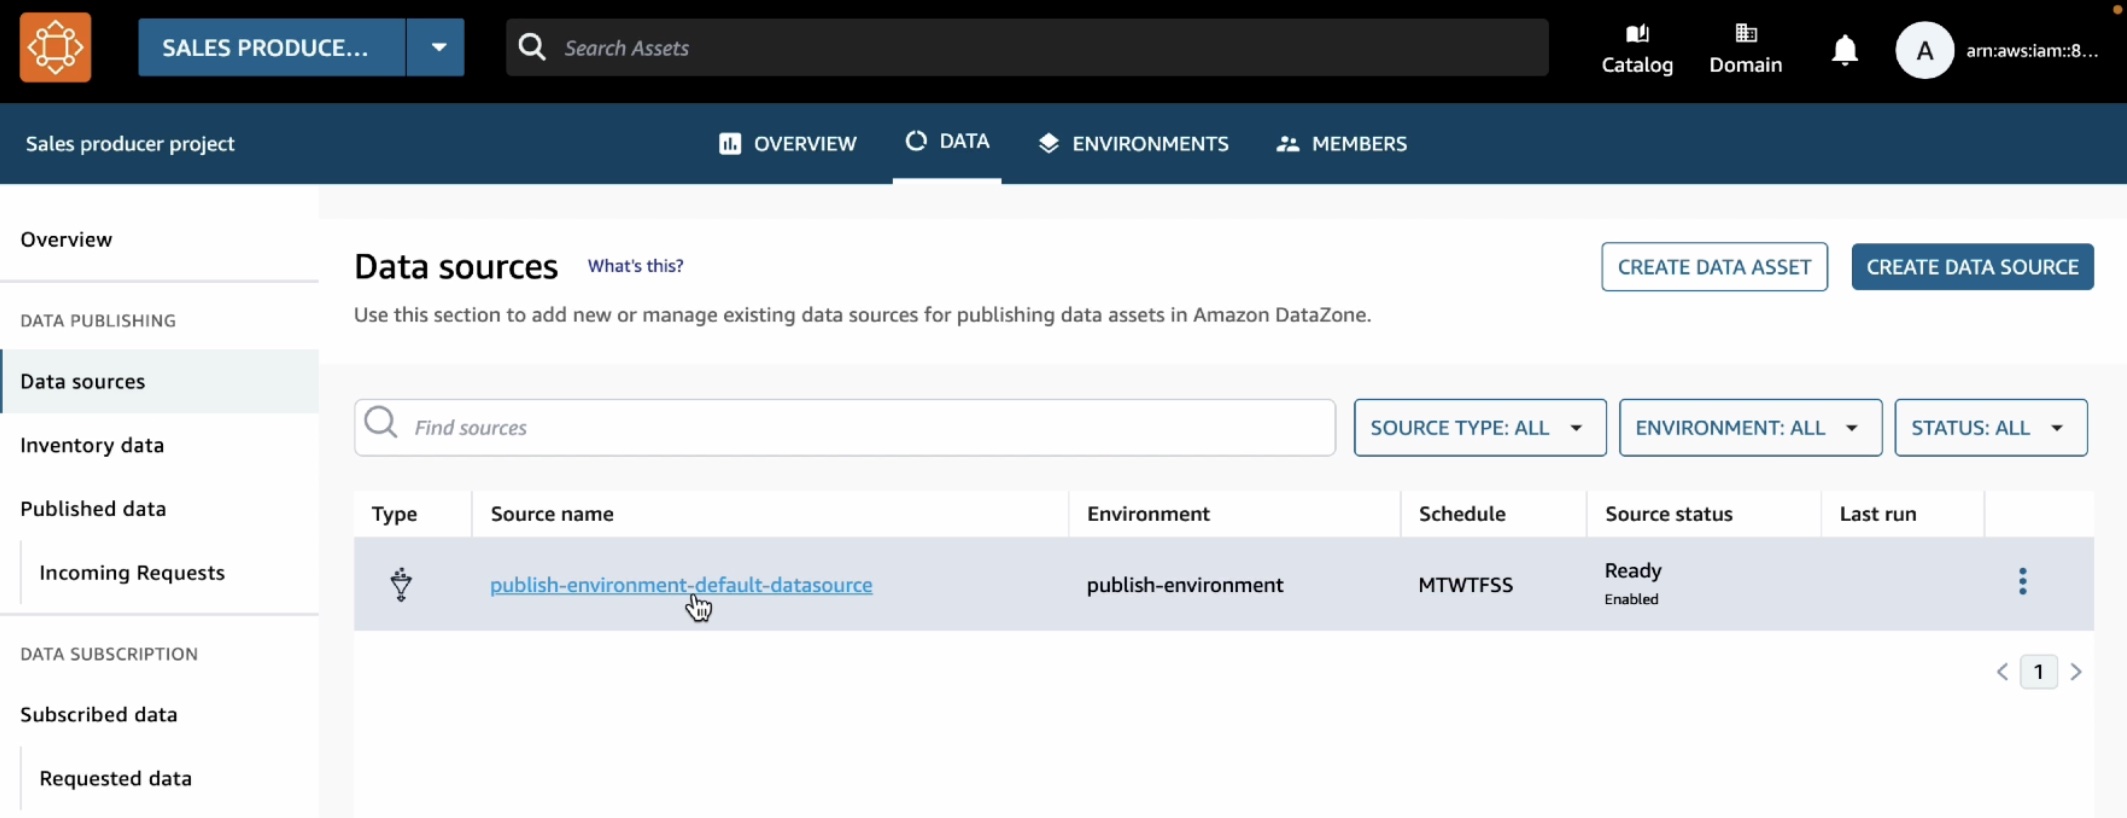
As the data producer, you can now go back to the data portal and publish this table into the DataZone catalog. Choose the Data tab in the top menu and Data sources in the left navigation pane.

You can see a default data source automatically created in your environment. When you open this data source, you will see your environments’ publishing database where we just created the catalog_sales table.

This data source will bring in all the tables it finds in the publishing database into the DataZone. By default, automated metadata generation is enabled, which means that any asset that the data source bring into the DataZone will automatically generate the business names of the table and columns for that asset. Choose Run in this data source.

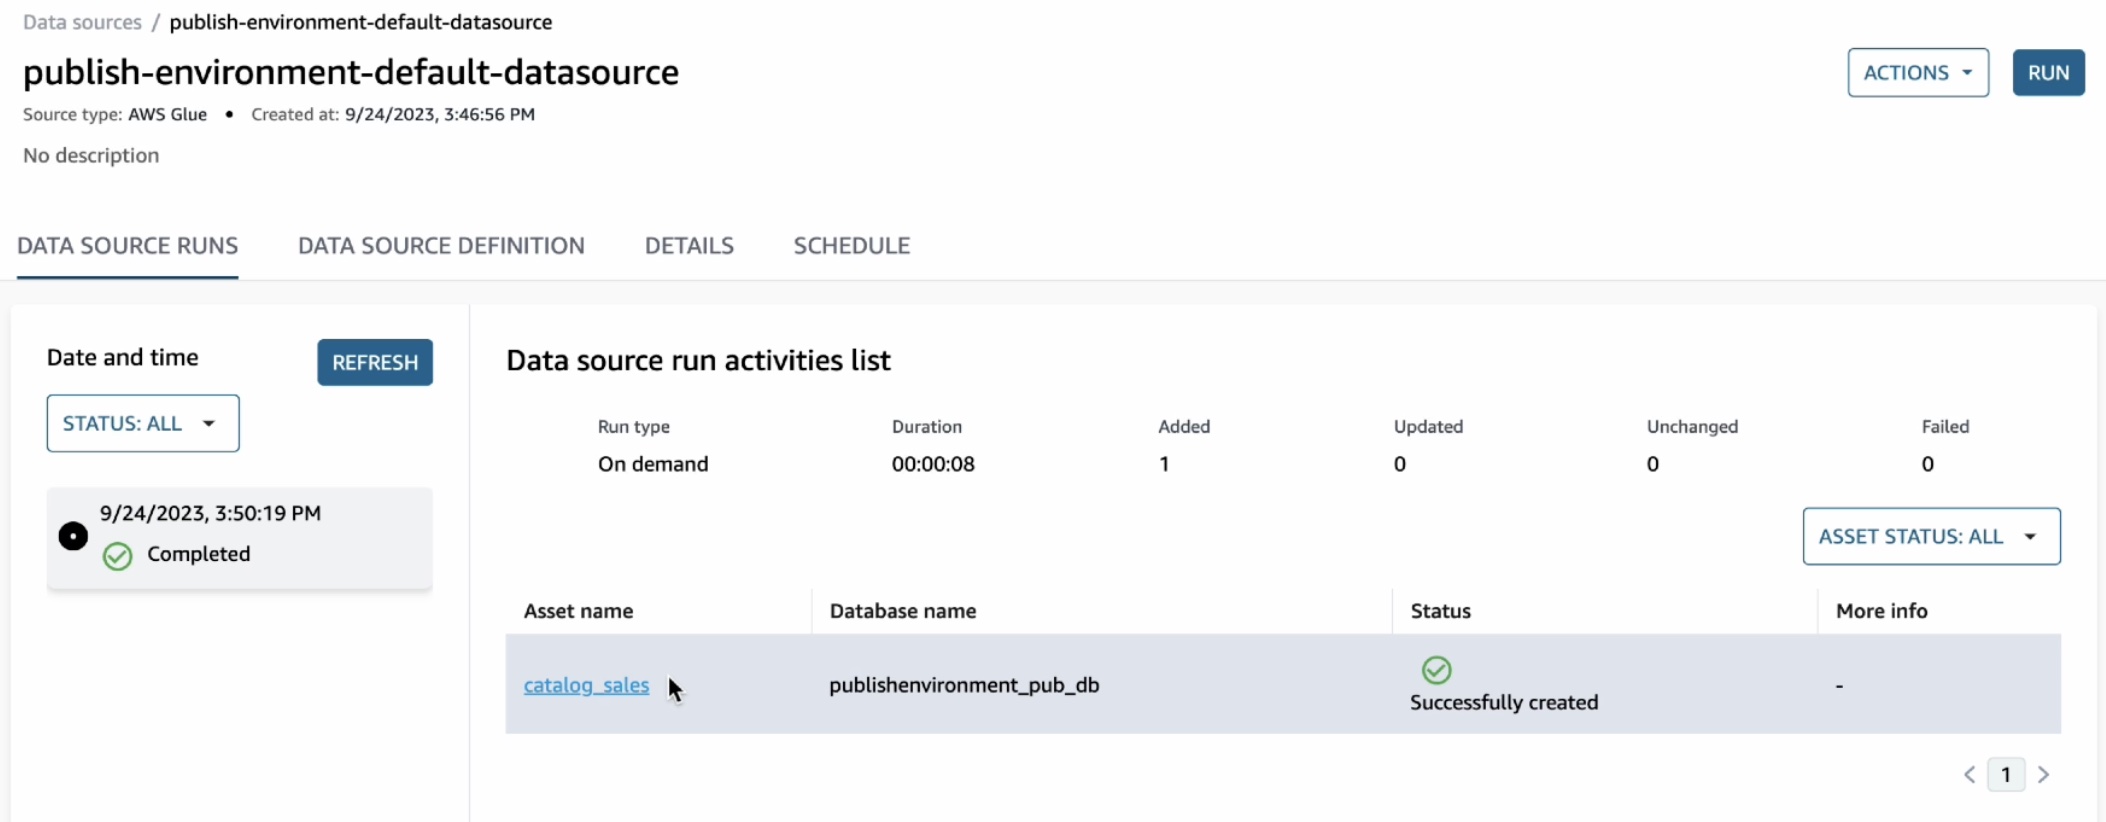
Once the data source has finished running, you can see the catalog sales table in the Data Source Runs.

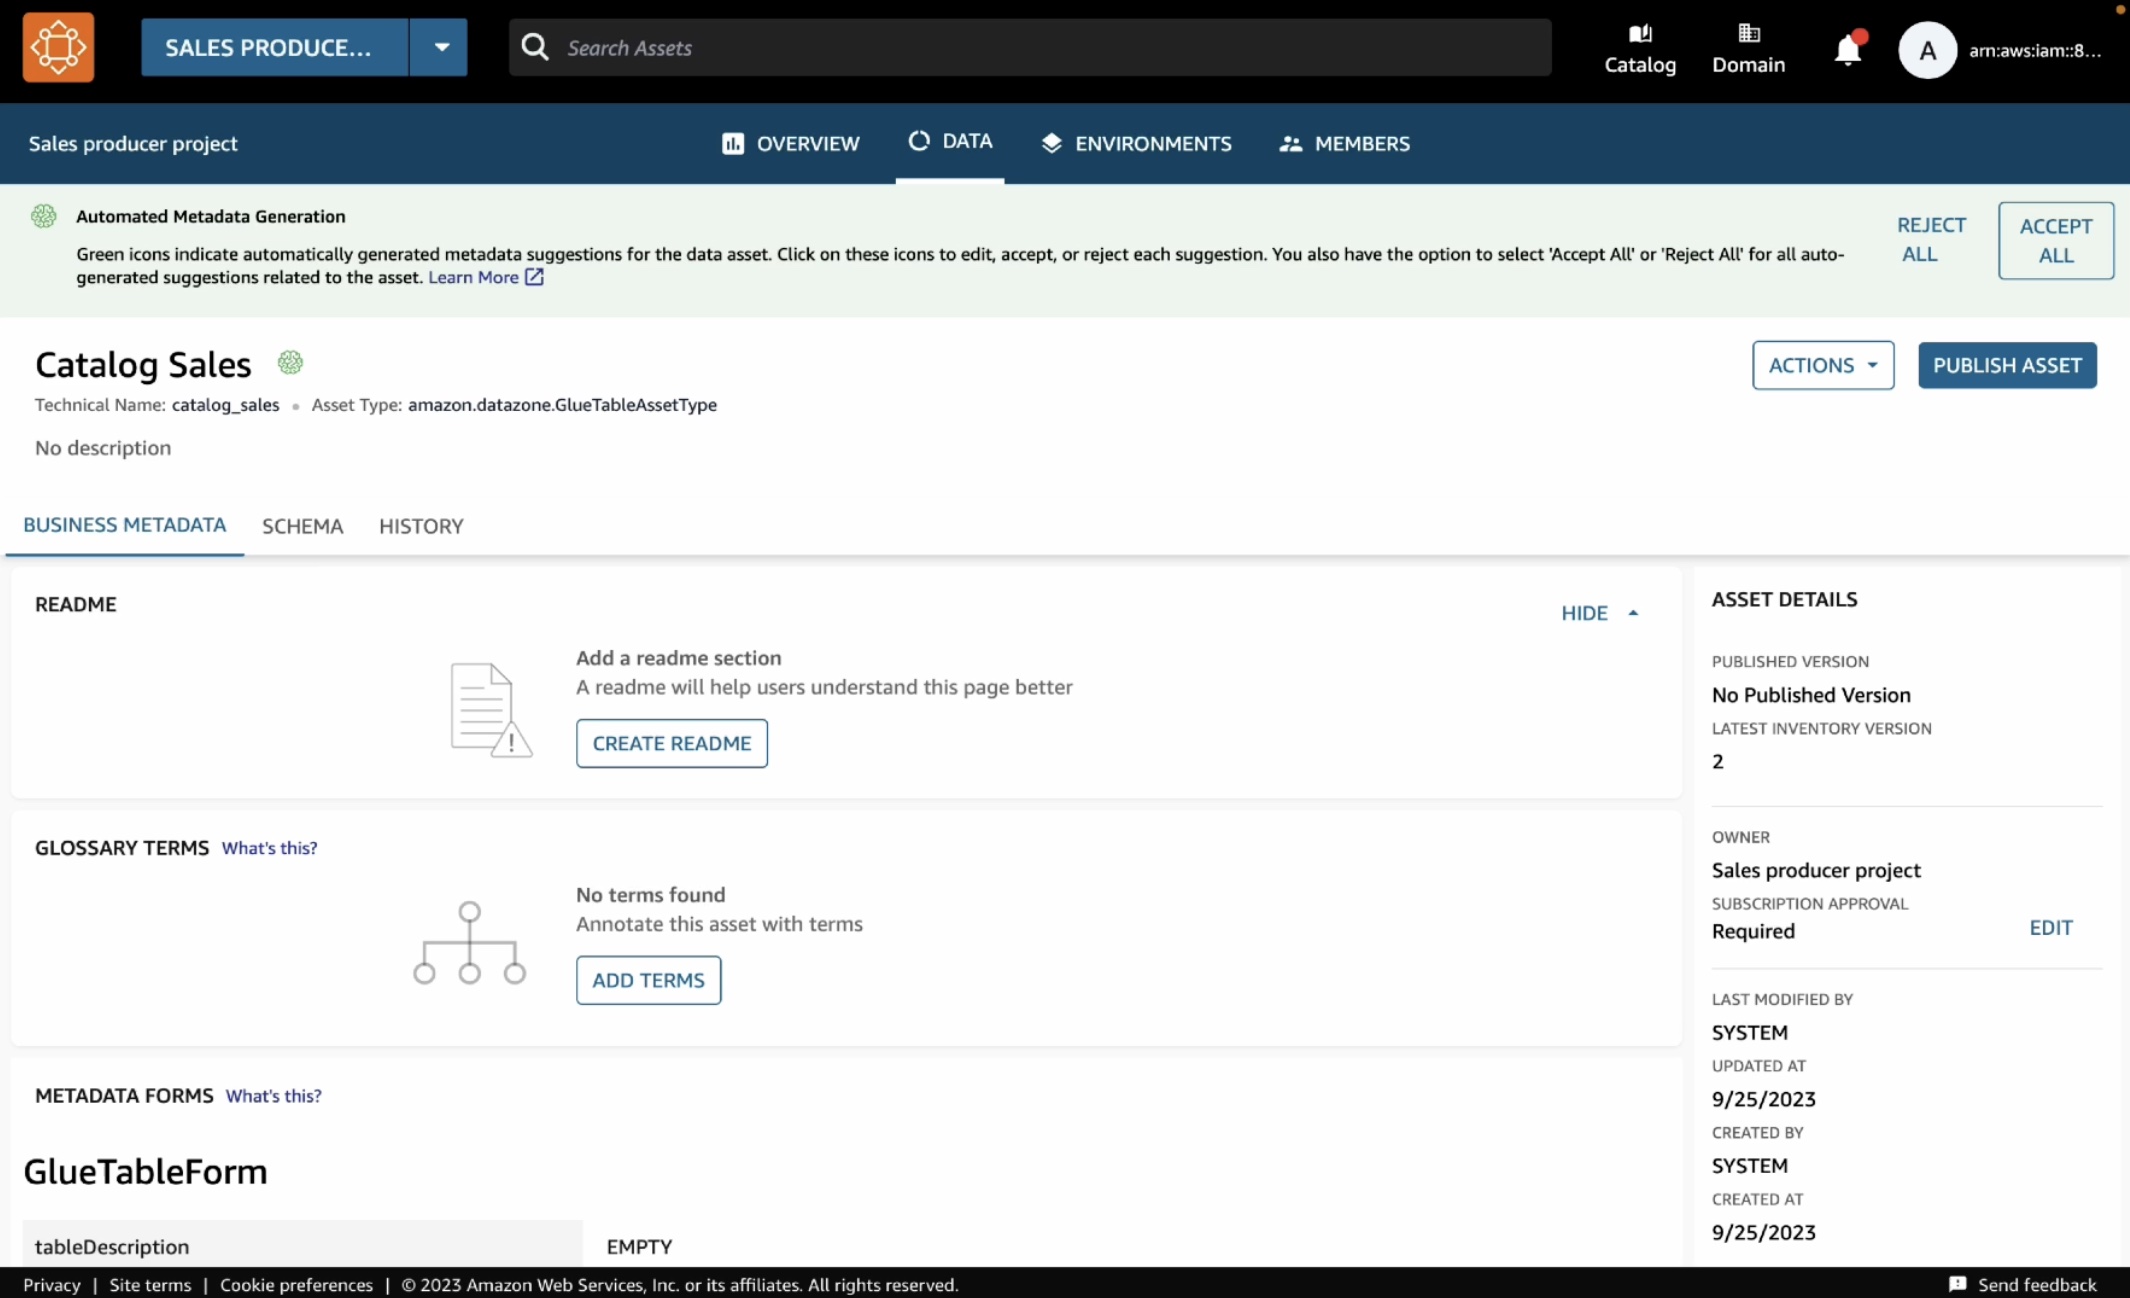
You can open this asset and see that the publishing job could automatically extract the technical metadata including the schema of the table and several other technical details such as AWS account, Region, and physical location of the data.

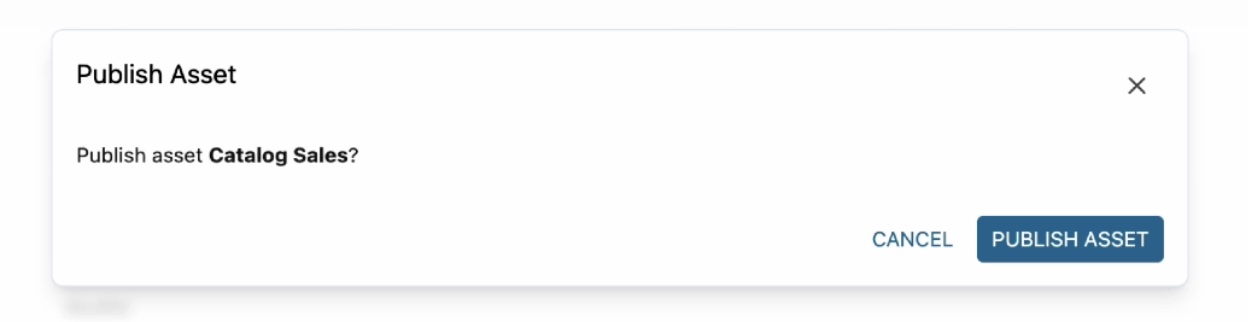
If they look correct, you can simply accept these recommendations either by clicking the brain icon in each recommended item or the Accept all button for all recommendations. When you are ready to publish, choose Publish asset and reconfirm in the dialog box.

4. Subscribe Data as a Data Consumer
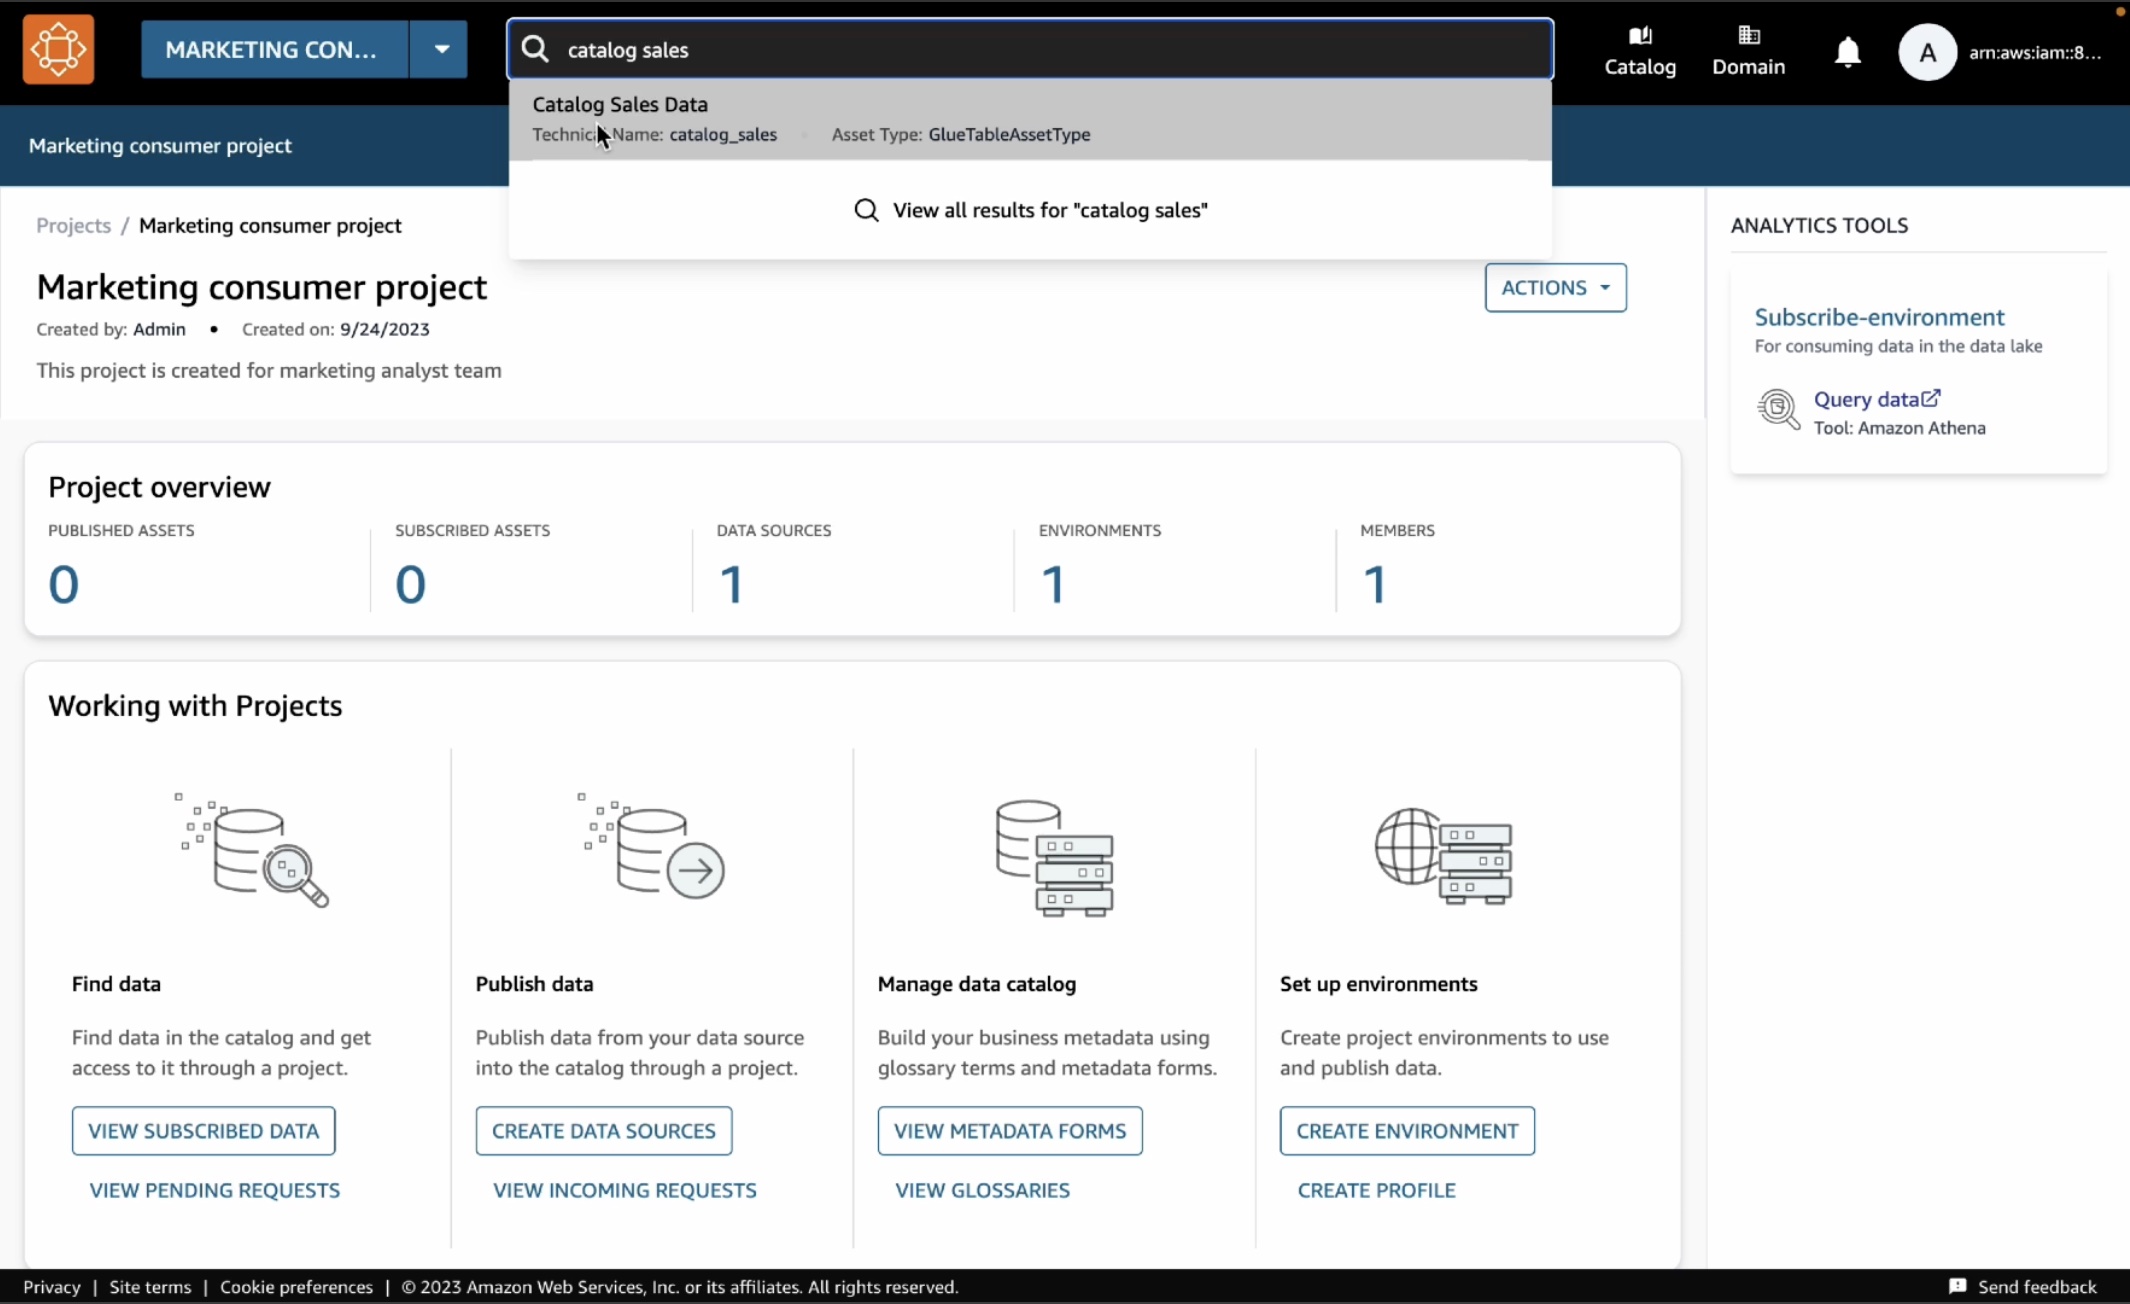
Now let’s switch the role to a marketing team and see how you can subscribe to or request access this table. Repeat to create a new project called “Marketing consumer project” and a new environment called “subscriber-environment” as the data consumer using the same steps as before.

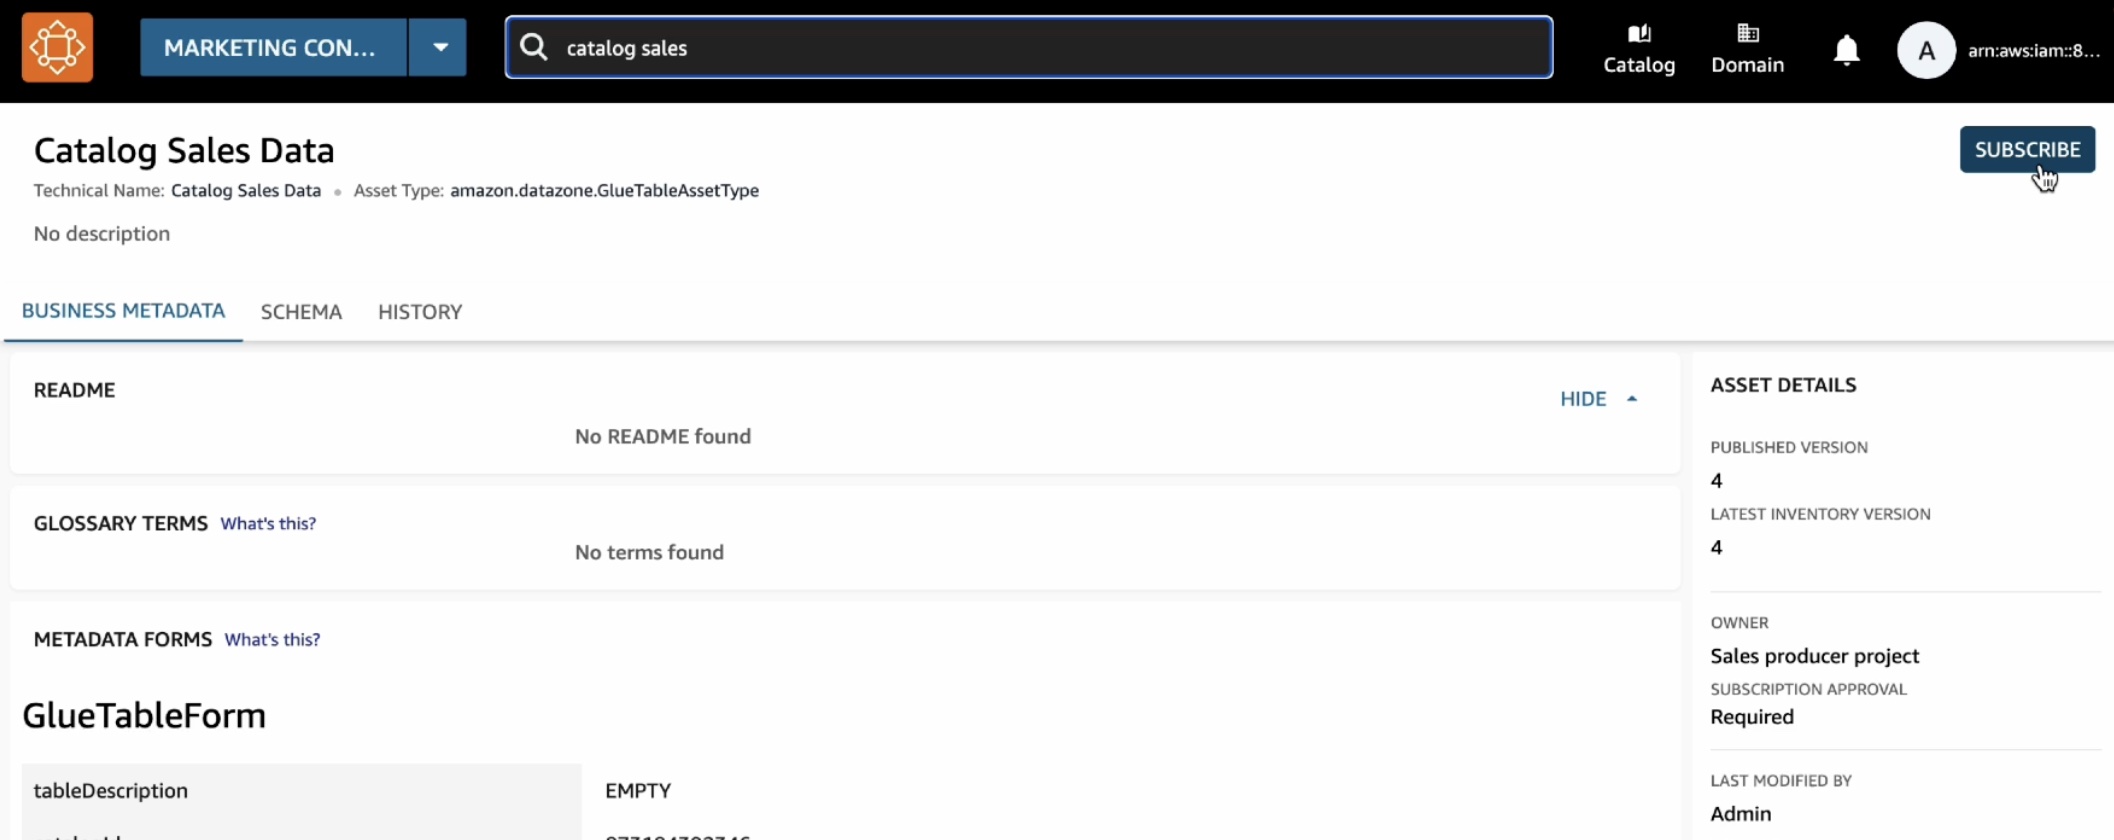
In the new created project, when you type “catalog sales” in the search bar, you can see the published table in the search results. Choose the Catalog Sales Data.

In the catalog, choose Subscribe.

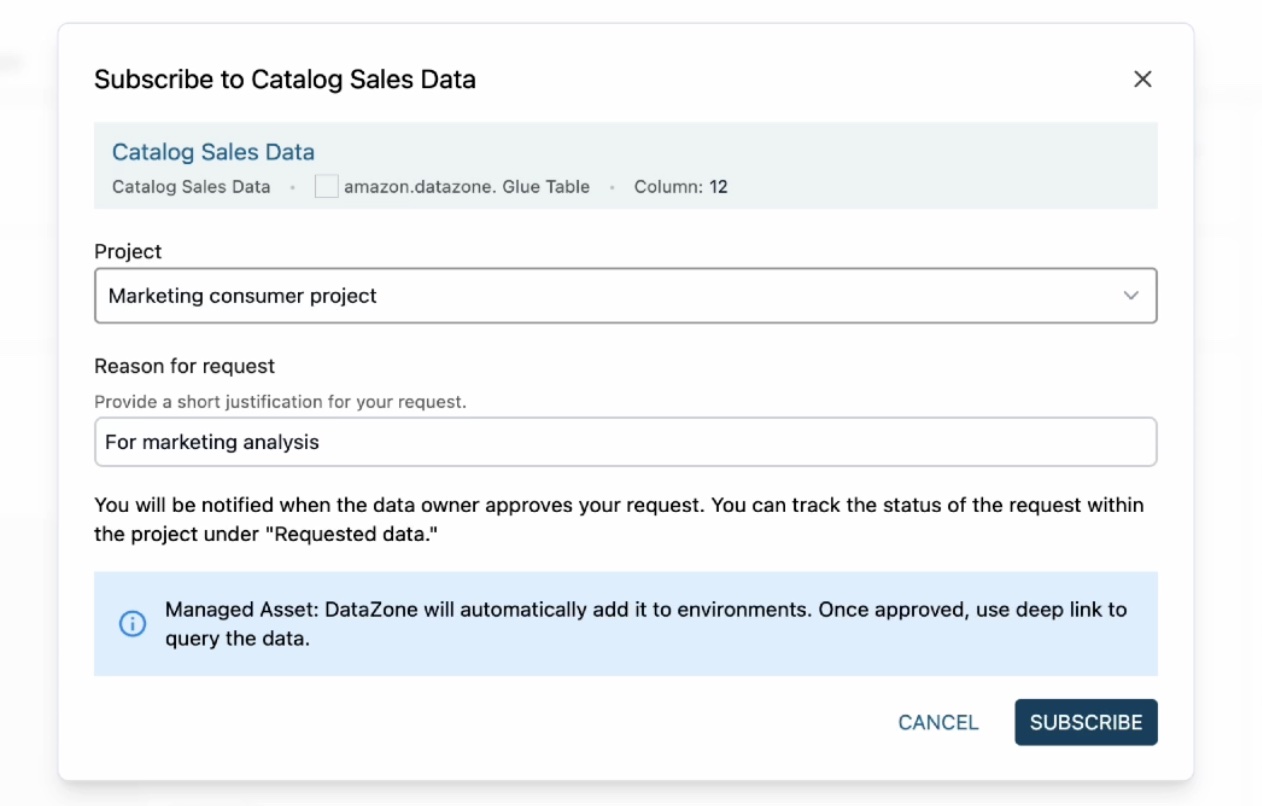
In the Subscribe to Catalog Sales Data window, select your marketing consumer project, provide a reason for the subscription request, and then choose Subscribe.

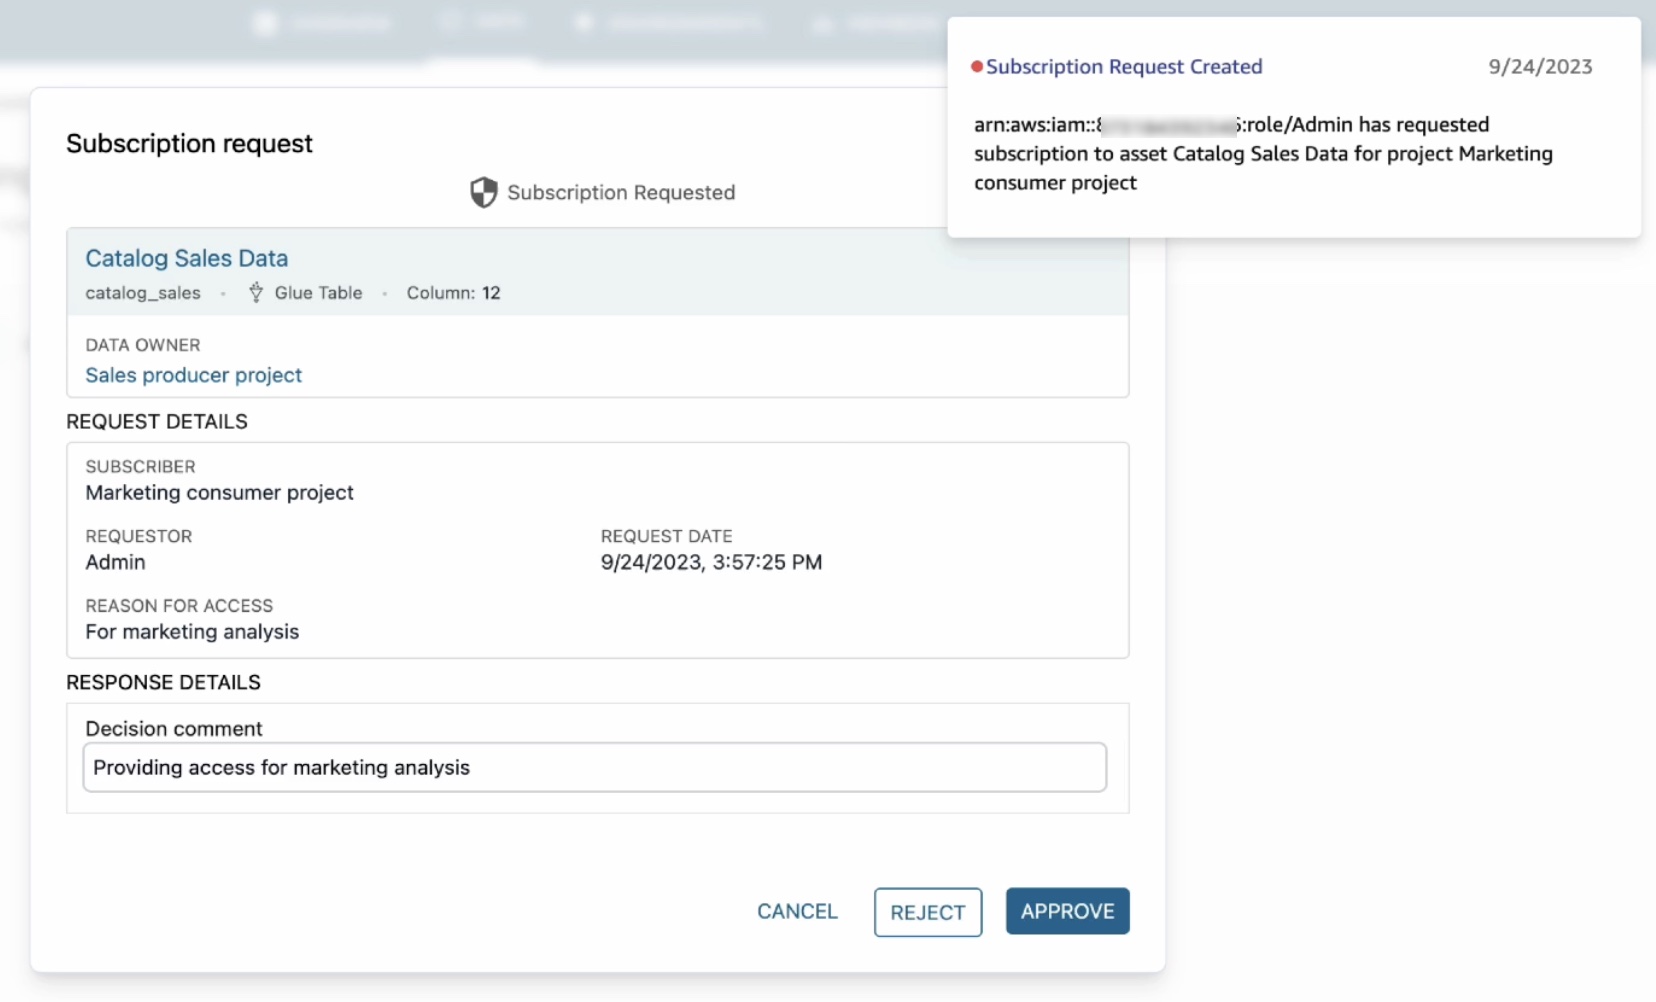
When you get a subscription request as a data producer, it will notify you through a task in the sales producer project. Since you are acting as both subscriber and publisher here, you will see a notification.

When you click on this notification, it will open the subscription request including which project has requested access, who the requestor is, and why they need access. Choose Approve and provide a reason for approval.

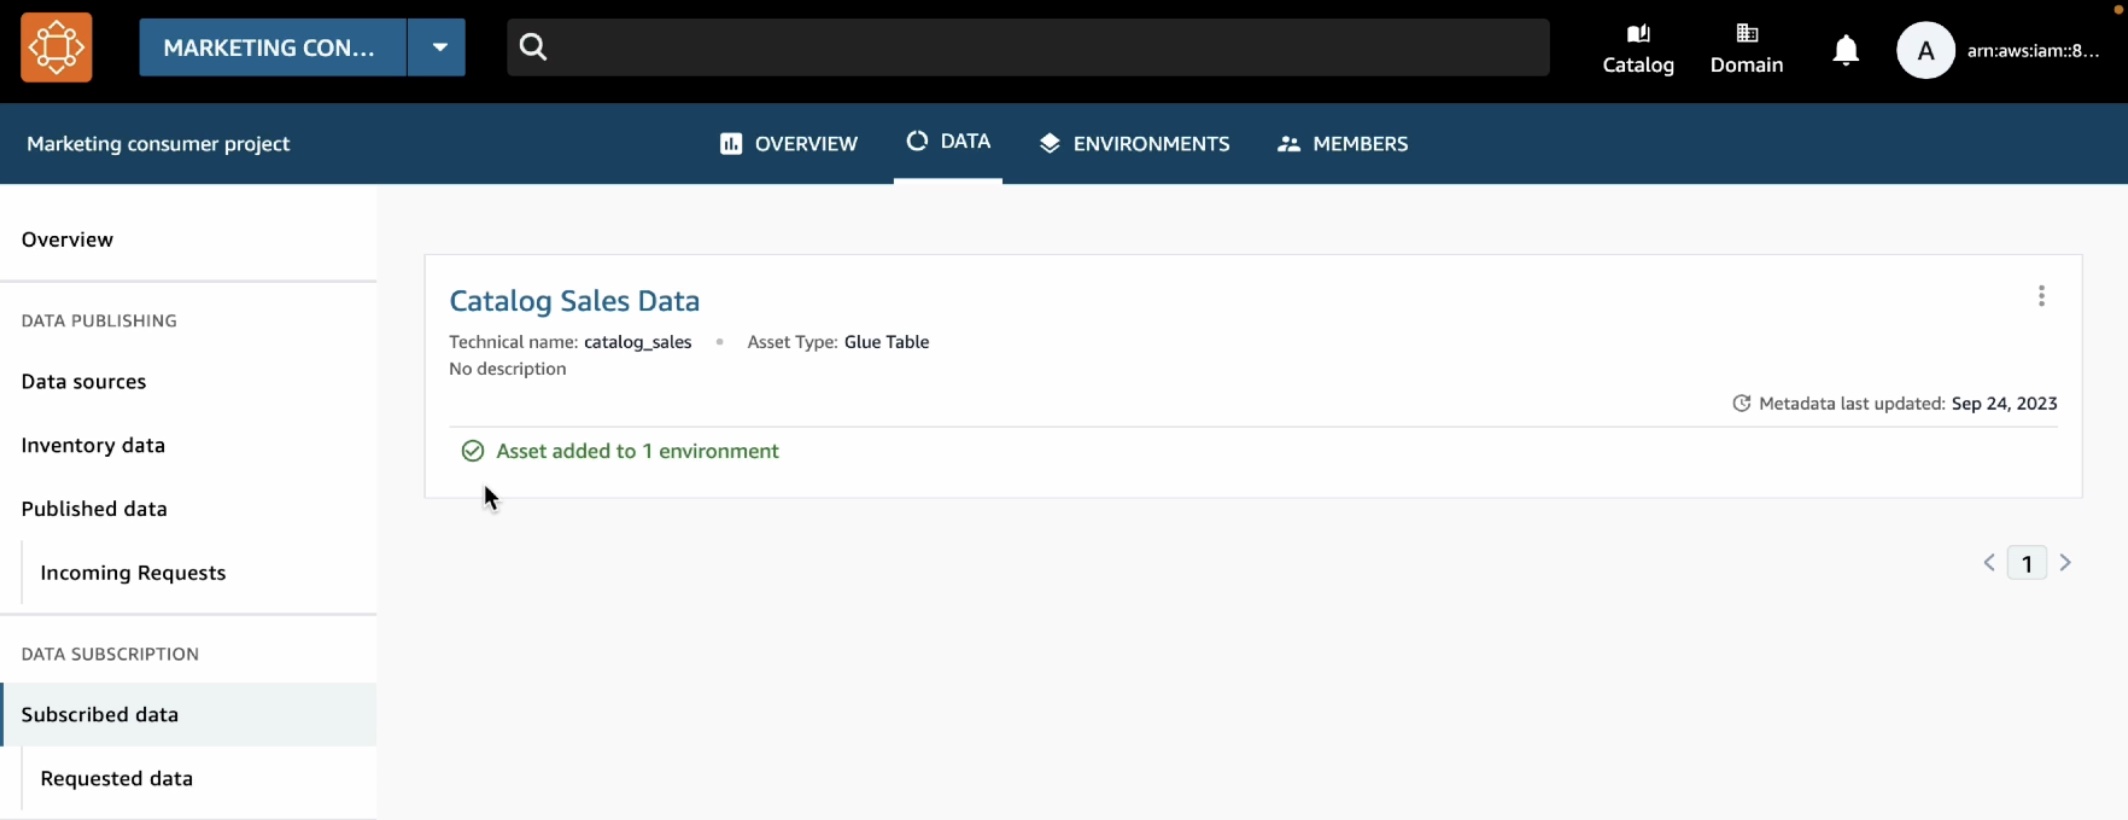
Now that subscription has been approved, you can see catalog sales data in your marketing consumer project. To confirm this, choose the Data tab in the top menu and Data sources in the left navigation pane.


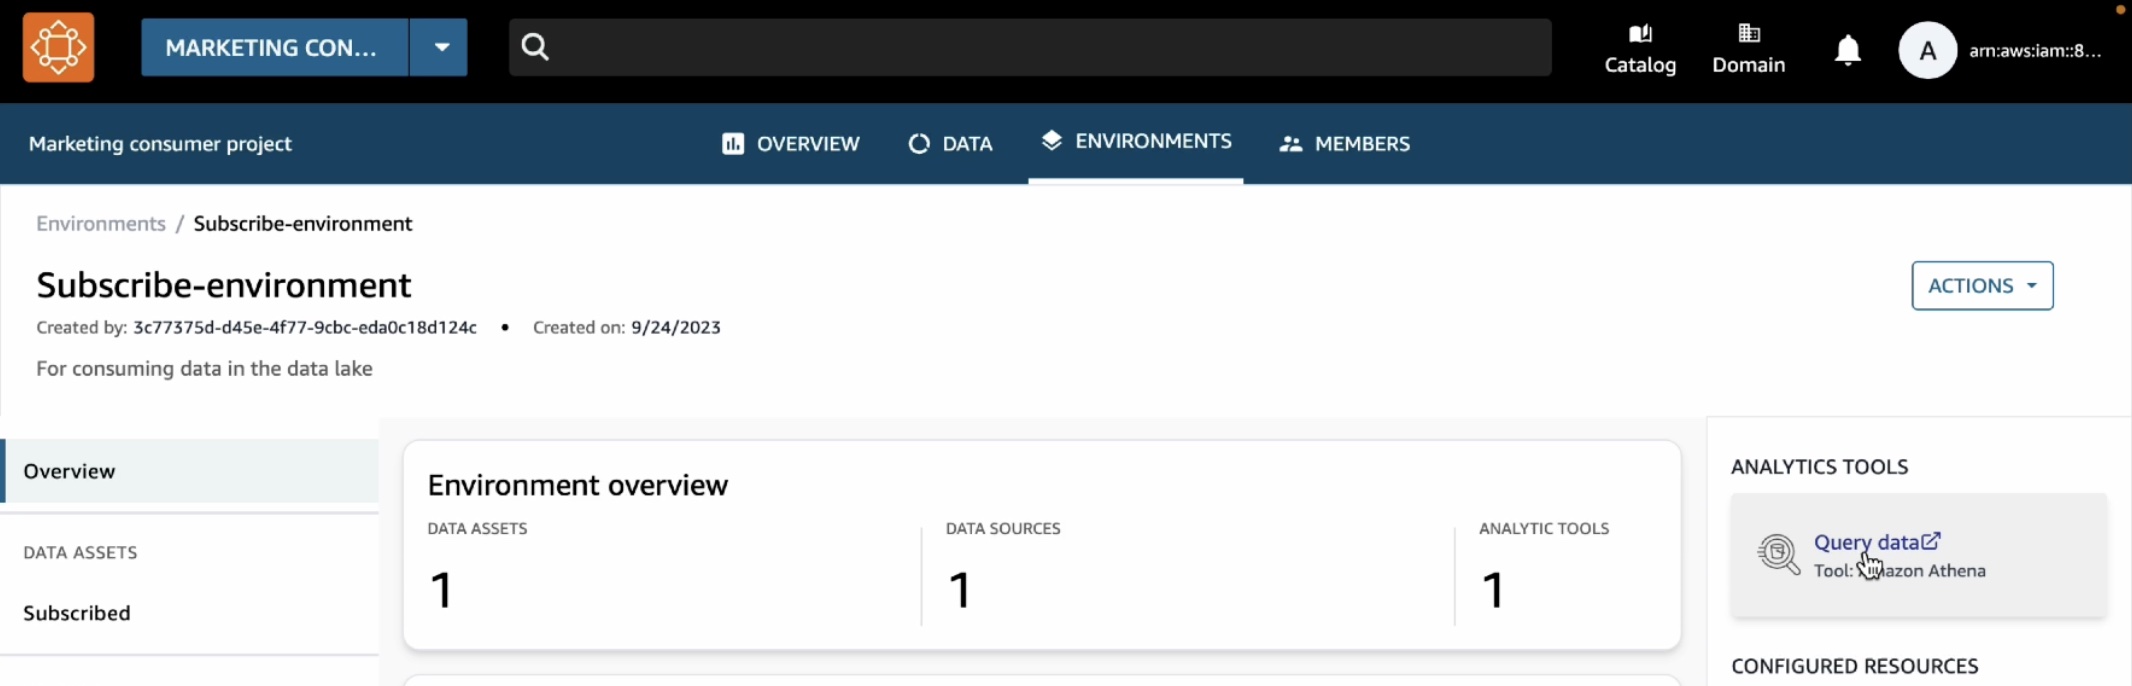
To analyze your subscribe data, choose the Environments tab in the top menu and Subscribe-environment you created in the marketing consumer project. It shows a new Query Data link in the right pane.

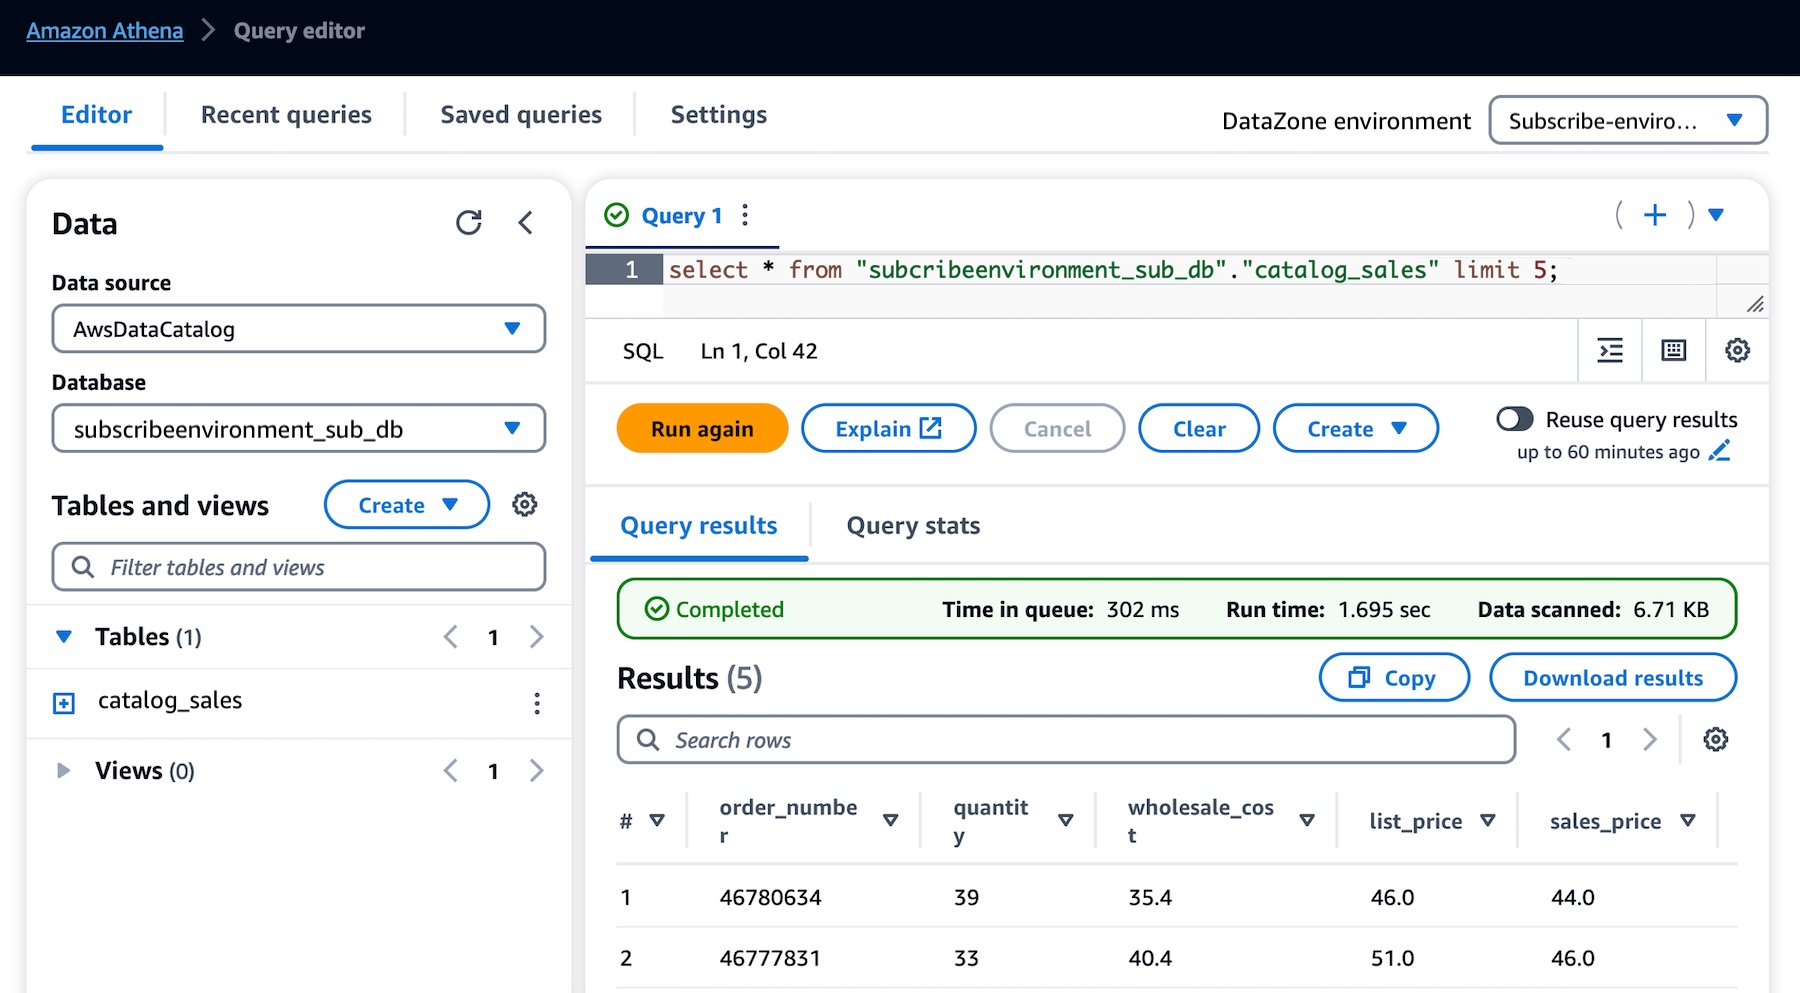
We can see that the catalog sales table is showing up under subscription database.
To make sure that we have access to this table, we can preview it and we can see that the query executes successfully.

This opens the Athena query editor in a new tab. Select subscribeenvironment_sub_db from the database dropdown, and then enter your query into the query editor.

You can now run any queries on the sales data table that you have subscribed to as a consumer (marketing team) and that was published into the business data catalog by a producer (sales team).

For more detailed demos such as publishing AWS Glue tables and Amazon Redshift tables and view, see the YouTube playlist.

What’s New at GA?
During the preview, we had lots of interest and great feedback from customers. I want to quickly review the features and introduce some improvements:

Enterprise-Ready Business Catalog – To add business context and make data discoverable by everyone in the organization, you can customize the catalog with automated metadata generation which uses machine learning to automatically generate business names of data assets and columns within those assets. We also improved metadata curation functionality. At GA, you can attach multiple business glossary terms to assets and glossary terms to individual columns in the asset.

Self-Service for Data Users – To provide data autonomy for users to publish and consume data, you can customize and bring any type of asset to the catalog using APIs. Data publishers can automate metadata discovery through ingestion jobs or manually publish files from Amazon Simple Storage Service (Amazon S3). Data consumers can use faceted search to quickly find and understand the data. Users can be notified of updates in the system or actions to be taken. These events are emitted to the customer’s event bus using Amazon EventBridge to customize actions.

Simplified Access to analysis – At GA, projects will serve as business use case-based logical containers. You can create a project and collaborate on specific business use case-based groupings of people, data, and analytics tools. Within the project, you can create an environment that provides the necessary infrastructure to project members such as analytics tools and storage so that project members can easily produce new data or consume data they have access to. This allows users to add multiple capabilities and analytics tools to the same project depending on their needs.

Governed Data Sharing – Data producers own and manage access to data with a subscription approval workflow that allows consumers to request access and data owners to approve. You can now set up subscription terms to be attached to assets when published and automate subscription grant fulfillment for AWS managed data lakes and Amazon Redshift with customizations using EventBridge events for other sources.

Now Available
Amazon DataZone is now generally available in eleven AWS Regions: US East (Ohio), US East (N. Virginia), US West (Oregon), Asia Pacific (Singapore), Asia Pacific (Sydney), Asia Pacific (Tokyo), Canada (Central), Europe (Frankfurt), Europe (Ireland), Europe (Stockholm), and South America (São Paulo).

You can use the free trial of Amazon DataZone, which includes 50 users at no additional cost for the first 3 calendar months of usage. The free trial starts when you first create an Amazon DataZone domain in an AWS account. If you exceed the number of monthly users during your trial, you will be charged at the standard pricing.

To learn more, visit the product page and user guide. You can send feedback to AWS re:Post for Amazon DataZone or through your usual AWS Support contacts.

Channy

Intel Altera Experiment Ending as PSG Goes Standalone En Route to IPO

Post Syndicated from Patrick Kennedy original https://www.servethehome.com/intel-altera-experiment-ending-as-psg-goes-standalone-en-route-to-ipo/

Intel’s Altera experiment is ending as Intel PSG is transitioning to a standalone business on its way to an upcoming IPO

The post Intel Altera Experiment Ending as PSG Goes Standalone En Route to IPO appeared first on ServeTheHome.

AWS Weekly Roundup – Amazon Bedrock Is Now Generally Available, Attend AWS Innovate Online, and More – Oct 2, 2023

Post Syndicated from Veliswa Boya original https://aws.amazon.com/blogs/aws/aws-weekly-roundup-amazon-bedrock-is-now-generally-available-attend-aws-innovate-online-and-more-oct-2-2023/

Last week I attended the AWS Summit Johannesburg. This was the first summit to be hosted in my own country and my own city since 2019 so it was very special to have the opportunity to attend. It was great to get to meet with so many of our customers and hear how they are building on AWS.

Now on to the AWS updates. I’ve compiled a few announcements and upcoming events you need to know about. Let’s get started!

Last Week’s Launches
Amazon Bedrock Is Now Generally Available – Amazon Bedrock was announced in preview in April of this year as part of a set of new tools for building with generative AI on AWS. Last week’s announcement of this service being generally available was received with a lot of excitement and customers have already been sharing what they are building with Amazon Bedrock. I quite enjoyed this lighthearted post from AWS Serverless Hero Jones Zachariah Noel about the “Bengaluru with traffic-filled roads” image he produced using Stability AI’s Stable Diffusion XL image generation model on Amazon Bedrock.

Amazon MSK Introduces Managed Data Delivery from Apache Kafka to Your Data Lake – Amazon MSK was released in 2019 to help our customers reduce the work needed to set up, scale, and manage Apache Kafka in production. Now you can continuously load data from an Apache Kafka cluster to Amazon Simple Storage Service (Amazon S3).

Other AWS News
A few more news items and blog posts you might have missed:

The Community.AWS Blog is where builders share and learn with the community of cloud enthusiasts. Contributors to this blog include AWS employees, AWS Heroes, AWS Community Builders, and other members of the AWS Community. Last week, AWS Hero Johannes Koch published this awesome post on how to build a simple website using Flutter that interacts with a serverless backend powered by AppSync-merged APIs.

For a full list of AWS announcements, be sure to keep an eye on the What’s New at AWS page.

Upcoming AWS Events
We have the following upcoming events:

AWS Cloud Days (October 10, 24) – Connect and collaborate with other like-minded folks while learning about AWS at the AWS Cloud Day in Athens and Prague.

AWS Innovate Online (October 19)Register for AWS Innovate Online to learn how you can build, run, and scale next-generation applications on the most extensive cloud platform. There will be 80+ sessions delivered in five languages and you’ll receive a certificate of attendance to showcase all you’ve learned.

We’re focused on improving our content to provide a better customer experience, and we need your feedback to do so. Take this quick survey to share insights on your experience with the AWS Blog. Note that this survey is hosted by an external company, so the link doesn’t lead to our website. AWS handles your information as described in the AWS Privacy Notice.

Veliswa