Post Syndicated from Danilo Poccia original https://aws.amazon.com/blogs/aws/new-attribute-based-instance-type-selection-for-ec2-auto-scaling-and-ec2-fleet/
The first AWS service I used, more than ten years ago, was Amazon Elastic Compute Cloud (Amazon EC2). Over time, EC2 has added a wide selection of instance types optimized to fit different use cases, with a varying combination of CPU/GPU, memory, storage, and networking capacity to give you the flexibility to choose the appropriate mix of resources for your applications.
One of the key advantages of the cloud is elasticity. With EC2 Fleet, you can synchronously request capacity across multiple instance types and purchase options, launching your instances across multiple Availability Zones, using the On-Demand, Reserved, and Spot Instances together. With EC2 Auto Scaling, you can automatically add or remove EC2 instances according to conditions you define and add advanced instance management capabilities such as warm pools, instance refresh, and health checks. With these tools, you need to manually update your configurations to benefit from the newest EC2 instances. Also, when you use EC2 Spot Instances to optimize your costs, it is important that you select multiple instance types to access the highest amount of Spot capacity. Until now, there was no easy way to build and maintain instance type configurations in a flexible way.
Today, I am happy to share that we are introducing attribute-based instance type selection (ABS), a new feature that lets you express your instance requirements as a set of attributes, such as vCPU, memory, and storage. Your requirements are translated by ABS to all matching instance types, simplifying the creation and maintenance of instance type configurations. This also allows you to automatically use newer generation instance types when they are released and access a broader range of capacity via EC2 Spot Instances. EC2 Fleet and EC2 Auto Scaling select and launch instances that fit the specified attributes, removing the need to manually pick instance types.
ABS is ideal for flexible workloads and frameworks, such as when running containers or web fleets, processing big data, and implementing continuous integration and deployment (CI/CD) tooling. When using Spot Instances, instead of picking and entering tens of instance types and sizes, you can now just use a simple attribute config to cover all of them and include new ones as they come out.
How Attribute-Based Instance Type Selection Works
With ABS, you replace the list of instance types with your instance requirements. You can specify instance requirements inside a launch template or in the EC2 Fleet or EC2 Auto Scaling requests as a launch template override.
ABS works in two steps:
- First, ABS determines a list of instance types based on specified attributes, AWS Region, Availability Zone, and price.
- Then, EC2 Auto Scaling or EC2 Fleet applies the selected allocation strategy to that list.
For Spot Instances, ABS supports the capacity-optimized and the lowest-price allocation strategies.
For On-Demand Instances, ABS supports the lowest-price allocation strategy. EC2 Auto Scaling or EC2 Fleet will resolve ABS attributes to a list of instance types and will launch the lowest priced instance first to fulfill the On-Demand portion of the capacity request, moving to the next lowest priced instance if needed.
By default ABS enables price protection to keep your spending under control. Price protection makes ABS avoid provisioning overly expensive instance types even if they happen to fit the attributes you selected and keeps the prices of provisioned instances within certain boundaries. With price protection enabled, ABS doesn’t select instance types whose price is above price protection thresholds. There are two separate thresholds for Spot and On-Demand instances that you can optionally customize.
Let’s see how ABS works in practice with a couple of examples.
Using Attribute-Based Instance Type Selection with EC2 Auto Scaling
I use the AWS Command Line Interface (CLI) with the --generate-cli-skeleton parameter to generate a file in YAML format with all the parameters accepted by the CreateAutoScalingGroup API.
aws autoscaling create-auto-scaling-group \
    --generate-cli-skeleton yaml-input > create-asg.yaml
In the YAML file, there is a new InstanceRequirements section that can be used to override the configuration of the launch template. These are all the attributes I can choose from with some sample values:
InstanceRequirements:
  VCpuCount:  # [REQUIRED]
    Min: 0
    Max: 0
  MemoryMiB: # [REQUIRED]
    Min: 0
    Max: 0
  CpuManufacturers:
  - amd
  MemoryGiBPerVCpu:
    Min: 0.0
    Max: 0.0
  ExcludedInstanceTypes:
  - ''
  InstanceGenerations:
  - previous
  SpotMaxPricePercentageOverLowestPrice: 0
  OnDemandMaxPricePercentageOverLowestPrice: 0
  BareMetal: required  #  Valid values are: included, excluded, required.
  BurstablePerformance: excluded #  Valid values are: included, excluded, required.
  RequireHibernateSupport: true
  NetworkInterfaceCount:
    Min: 0
    Max: 0
  LocalStorage: required  #  Valid values are: included, excluded, required.
  LocalStorageTypes:
  - ssd
  TotalLocalStorageGB:
    Min: 0.0
    Max: 0.0
  BaselineEbsBandwidthMbps:
    Min: 0
    Max: 0
  AcceleratorTypes:
  - inference
  AcceleratorCount:
    Min: 0
    Max: 0
  AcceleratorManufacturers:
  - amazon-web-services
  AcceleratorNames:
  - a100
  AcceleratorTotalMemoryMiB:
    Min: 0
    Max: 0
Instead of providing a list of overrides, each having an InstanceType attribute with a single instance type selected, I can now select the instance types based on my requirements. I can specify the minimum and maximum amount of vCPUs, and the range of memory. Optionally, I can ask for a minimum amount of memory per vCPUs.
There are many more attributes that I can select from. For example, I can include, exclude, or require the use of bare metal or burstable instances. I can add networking or storage requirements. If necessary, I can ask for GPU or FPGA accelerators, and so on.
In my case, I ask for instances with two to four vCPUs and at least 2048 MiB of memory. Previously, it would have taken about 40 overrides, one for each instance type that meets these requirements, but with ABS, I just have to specify three parameters in the InstanceRequirements section. This is the full configuration file I am going to use to create the Auto Scaling group:
AutoScalingGroupName: 'my-asg' # [REQUIRED]
MixedInstancesPolicy:
  LaunchTemplate:
    LaunchTemplateSpecification:
      LaunchTemplateId: 'lt-0537239d9aef10a77'
    Overrides:
    - InstanceRequirements:
        VCpuCount: # [REQUIRED]
          Min: 2
          Max: 4
        MemoryMiB: # [REQUIRED]
          Min: 2048
  InstancesDistribution:
    OnDemandPercentageAboveBaseCapacity: 50
    SpotAllocationStrategy: 'capacity-optimized'
MinSize: 0 # [REQUIRED]
MaxSize: 100 # [REQUIRED]
DesiredCapacity: 4
VPCZoneIdentifier: 'subnet-e76a128a,subnet-e66a128b,subnet-e16a128c'
I create the Auto Scaling group passing the configuration file with the --cli-input-yaml parameter:
aws autoscaling create-auto-scaling-group \
    --cli-input-yaml file://my-create-asg.yaml
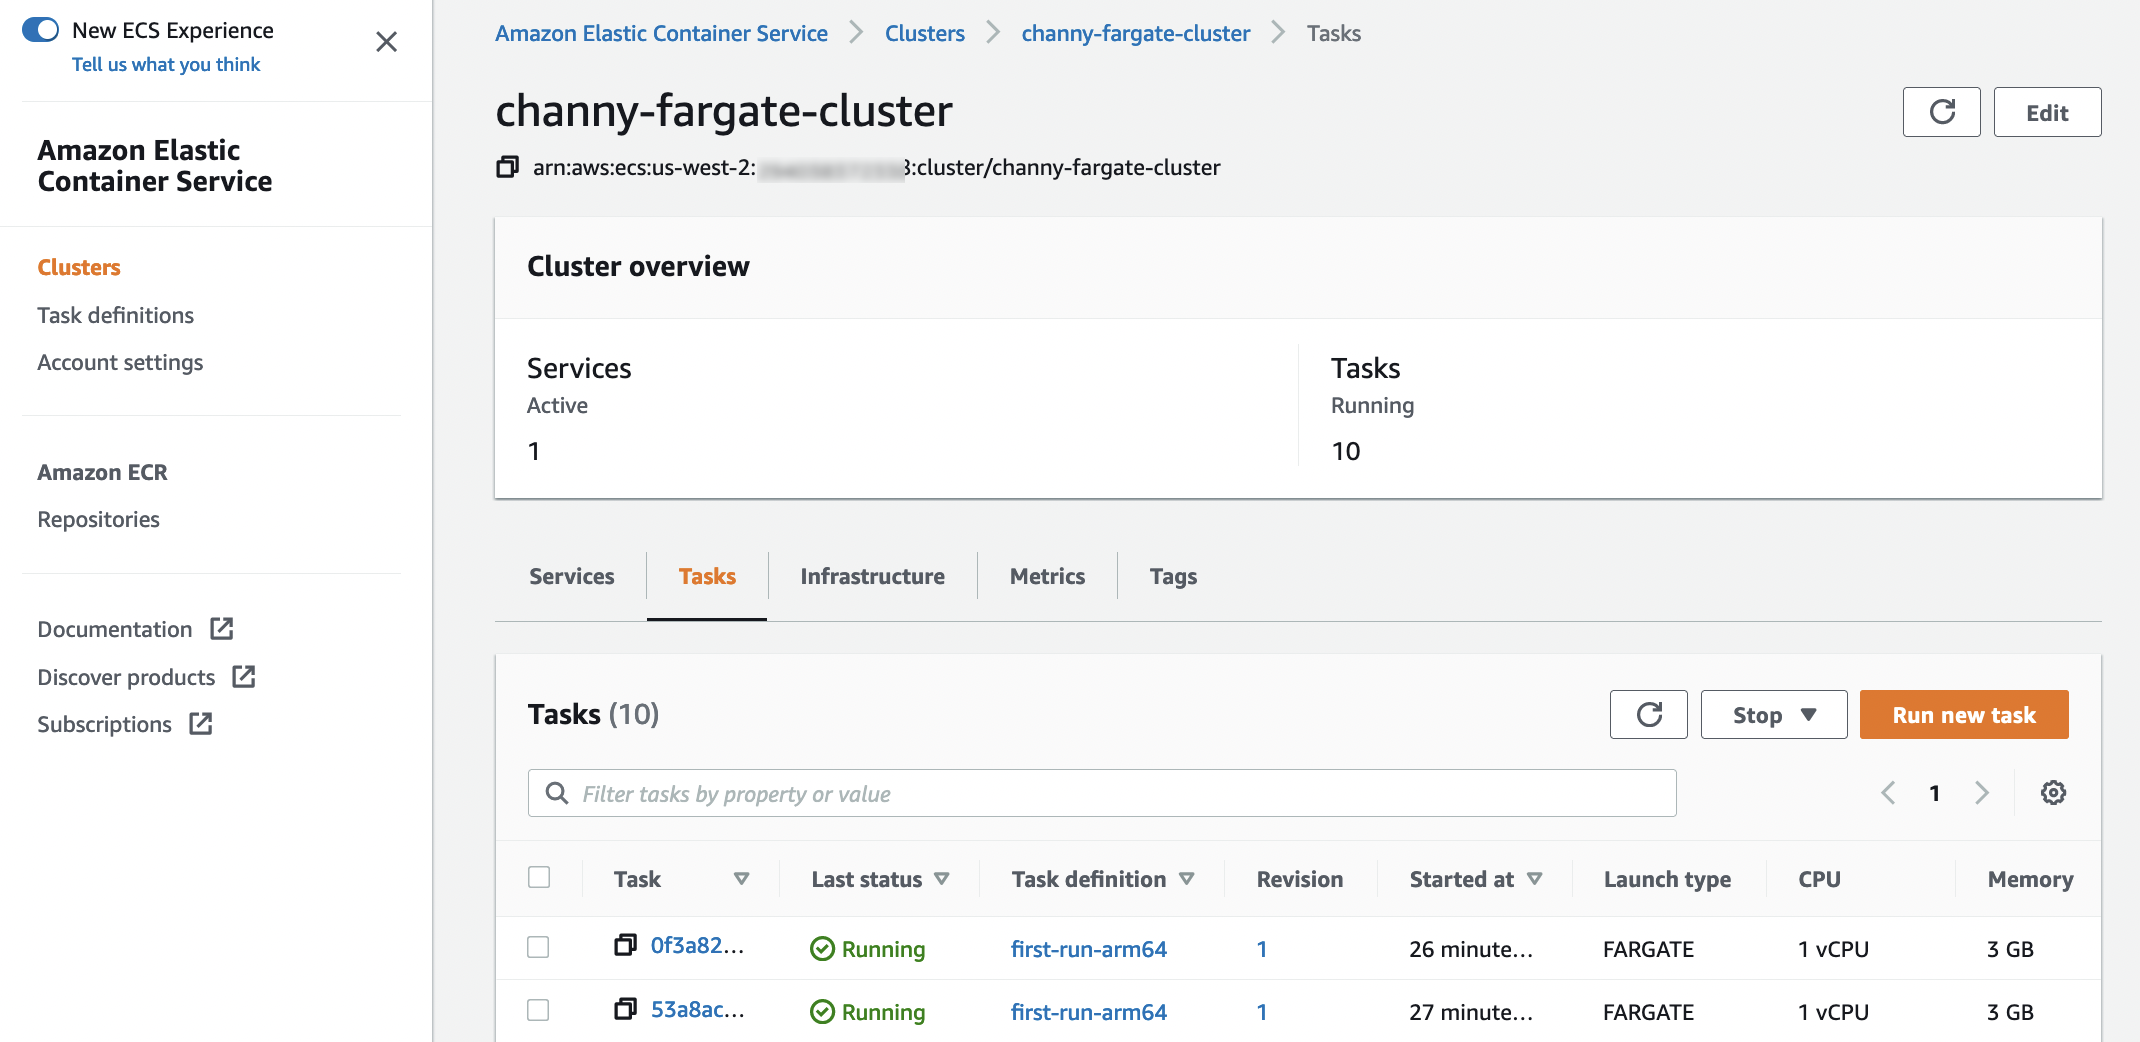
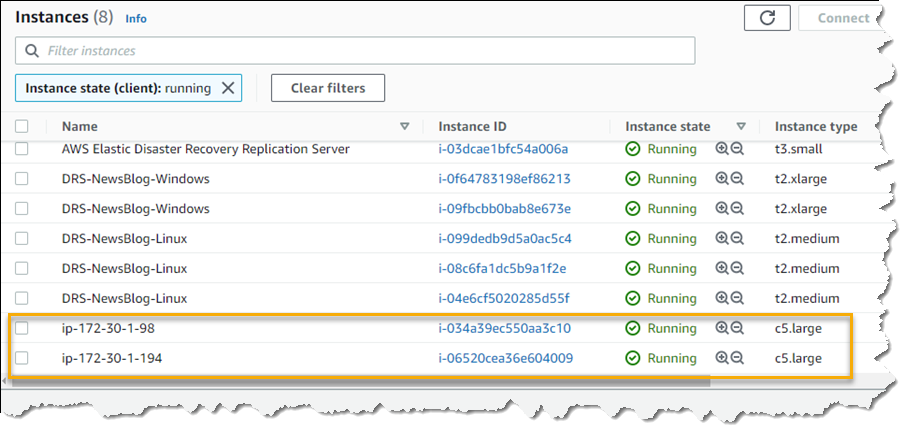
After a few minutes, four EC2 instances (corresponding to my DesiredCapacity) are running in the EC2 console. In the list, I find both C3 and C5a instances, spanning both time and CPU manufacturer.

Of those instances, 50 percent is On-Demand (based on the OnDemandPercentageAboveBaseCapacity option in the InstancesDistribution section). In the Spot Request tab of the EC2 console, I see the two requests:

As expected, all instance types follow my requirements and have size large. However, I quickly realize my application needs more compute capacity in each instance. I update the Auto Scaling group with the new requirements, asking for more vCPUs (between four and six):
aws autoscaling update-auto-scaling-group \
    --auto-scaling-group-name my-asg \
    --mixed-instances-policy '{
        "LaunchTemplate": {
            "Overrides": [
                {
                    "InstanceRequirements": {
                    "VCpuCount":{"Min": 4, "Max": 6},
                    "MemoryMiB":{"Min": 2048} }
                } ]
        } }'
Then, I start the instance refresh of the Auto Scaling group:
aws autoscaling start-instance-refresh \
    --auto-scaling-group-name my-asg
EC2 Auto Scaling performs a rolling replacement of the instances based on the new requirements. After a few minutes, all instances have been replaced by new ones with size xlarge, and I have a mix of C5, C5a, and M3 instances running. All previous instances have been terminated.

Similar to before, two of the new instances are launched using Spot requests. The previous Spot requests have been closed.

How to Preview Matching Instances without Launching Them
To better understand how the new ABS works, I use the new EC2 GetInstanceTypesFromInstanceRequirements API. This API returns the list of instance types matching my requirements.
First, I create the YAML parameter file:
aws ec2 get-instance-types-from-instance-requirements --generate-cli-skeleton yaml-input > requirements.yaml
I edit the file with the same requirements I used to update the Auto Scaling group. This time, I also ask to use current generation instances:
ArchitectureTypes:  # [REQUIRED]
- x86_64
VirtualizationTypes: # [REQUIRED]
- hvm
InstanceRequirements: # [REQUIRED]
  VCpuCount:
    Min: 4
    Max: 6
  MemoryMiB:
    Min: 2048
  InstanceGenerations:
    - current
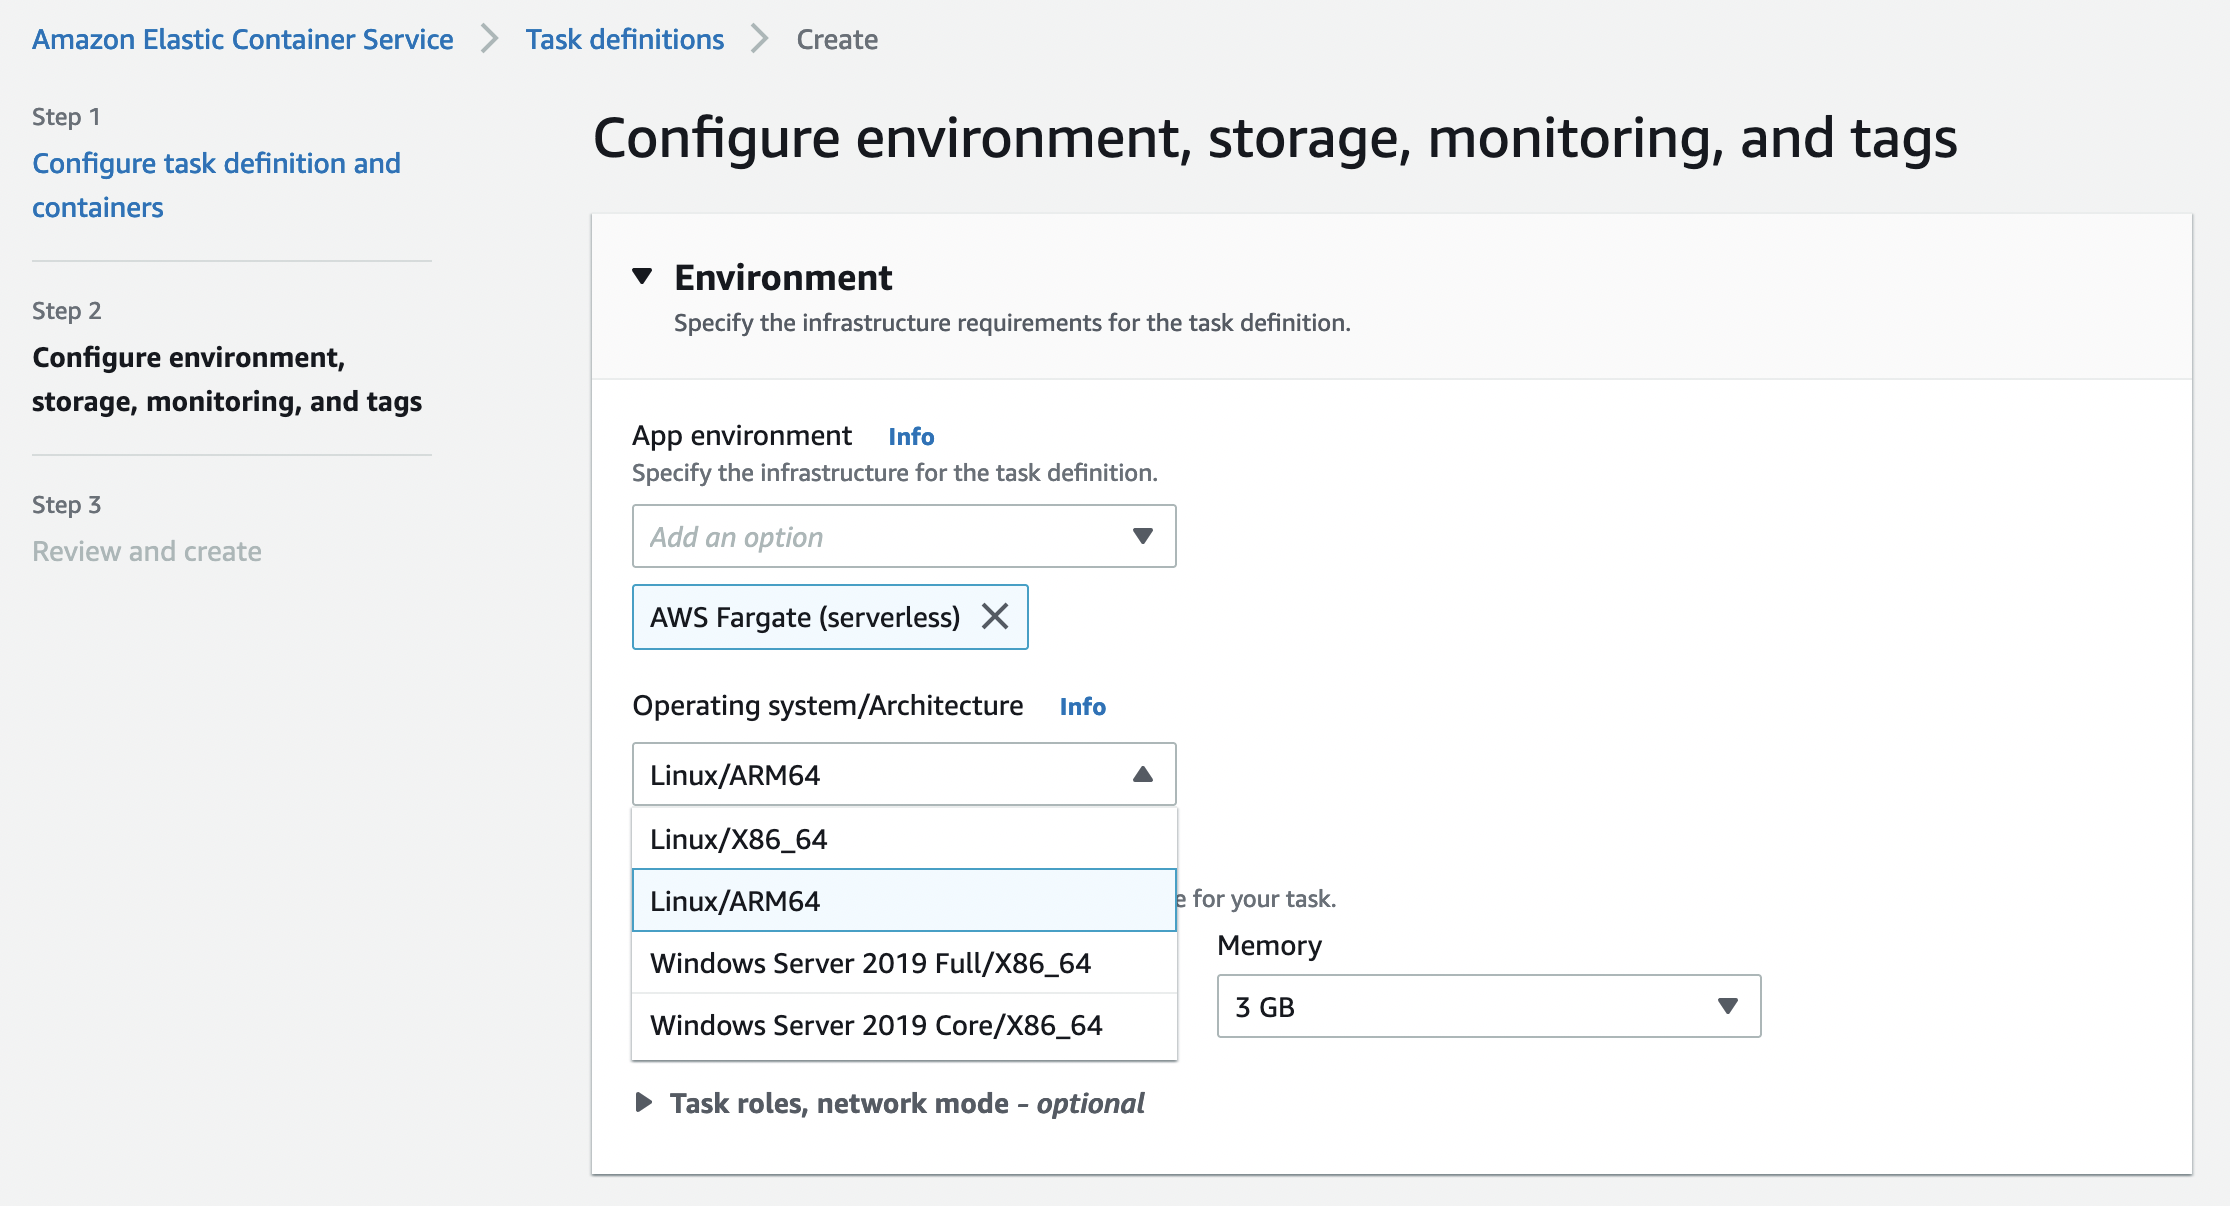
Note that here I had to specify the type of architecture (x86_64) and virtualization (hvm). When creating the Auto Scaling group, this information was provided by the Amazon Machine Images (AMI) used by the launch template.
Now, let’s preview all the instance types selected by these requirements:
aws ec2 get-instance-types-from-instance-requirements \
    --cli-input-yaml file://requirements.yaml \
    --output table

------------------------------------------
|GetInstanceTypesFromInstanceRequirements|
+----------------------------------------+
||             InstanceTypes            ||
|+--------------------------------------+|
||             InstanceType             ||
|+--------------------------------------+|
||  c4.xlarge                           ||
||  c5.xlarge                           ||
||  c5a.xlarge                          ||
||  c5ad.xlarge                         ||
||  c5d.xlarge                          ||
||  c5n.xlarge                          ||
||  d2.xlarge                           ||
||  d3.xlarge                           ||
||  d3en.xlarge                         ||
||  g3s.xlarge                          ||
||  g4ad.xlarge                         ||
||  g4dn.xlarge                         ||
||  i3.xlarge                           ||
||  i3en.xlarge                         ||
||  inf1.xlarge                         ||
||  m4.xlarge                           ||
||  m5.xlarge                           ||
||  m5a.xlarge                          ||
||  m5ad.xlarge                         ||
||  m5d.xlarge                          ||
||  m5dn.xlarge                         ||
||  m5n.xlarge                          ||
||  m5zn.xlarge                         ||
||  m6i.xlarge                          ||
||  p2.xlarge                           ||
||  r4.xlarge                           ||
||  r5.xlarge                           ||
||  r5a.xlarge                          ||
||  r5ad.xlarge                         ||
||  r5b.xlarge                          ||
||  r5d.xlarge                          ||
||  r5dn.xlarge                         ||
||  r5n.xlarge                          ||
||  x1e.xlarge                          ||
||  z1d.xlarge                          ||
|+--------------------------------------+|
Using this new EC2 API, I can quickly test different requirements and see how they map to instance types. When new instance types are released, they are automatically added to the list if they match my requirements.
Availability and Pricing
You can use attribute-based instance type selection (ABS) with EC2 Auto Scaling and EC2 Fleet today in all public and GovCloud AWS Regions, with the exception of those based in China where we need more time. You can configure ABS using the AWS Command Line Interface (CLI), AWS SDKs, AWS Management Console, and AWS CloudFormation. There is no additional charge for using ABS; you only pay the standard EC2 pricing for the provisioned instances. For more information on price protection, see the EC2 Auto Scaling documentation.
This new feature makes it easy to use flexible instance type configurations instead of long lists of instance types. In this way, you can automatically use newer generation instance types when they are released in the Region. Also, you can easily access more capacity with your Spot requests.
Simplify your EC2 instance type configurations with attribute-based instance type selection.
— Danilo


 Scaling is a really interesting problem, with challenges around performance, storage, availability, cost, and effectiveness. In addition to handling hundreds of millions of ad requests per second (trillions of ads per day) within a latency budget of 120 ms, the ad server must be able to:
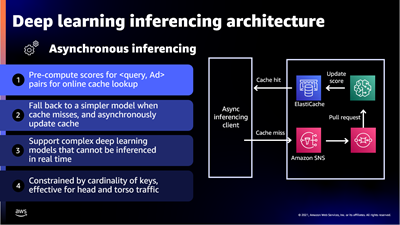 The presentation wraps up by discussing some of the ways that they were able to apply machine learning at scale. For example, to select the right ad for each request, Amazon Ads uses deep learning models to predict relevant ads to show shoppers, predict whether a shopper will click or purchase, and allocate and price an ad. In order to do this, they needed to be able to score thousands of ads per request within a 20 ms window at over 100K transactions per second, all across hundreds of models that each required different hardware and software optimizations.

 The
The