Qualcomm this week has introduced its Dragonfly brand for its upcoming data center products. The brief teaser promised more details to come on June 24th, during Qualcomm’s 2026 Investor’s Day
If you’re running applications or mail servers that need to send email over Simple Mail Transfer Protocol (SMTP), you may find that the classic Amazon Simple Email Service (Amazon SES) SMTP endpoint (email-smtp.<region>.amazonaws.com) is not available in every AWS Region.
This applies to some newer AWS Regions and partitions, including eusc-de-east-1 in the AWS European Sovereign Cloud (ESC). In these AWS Regions, services configured with a traditional SMTP hostname and credentials, such as Postfix relays, cannot use the classic SES SMTP integration pattern. Amazon SES Mail Manager provides an alternative: an authenticated SMTP ingress endpoint that accepts connections using a hostname, port, and credentials, just like any standard SMTP server.
In addition to SMTP connectivity, Mail Manager introduces a configurable email pipeline between acceptance and delivery. This pipeline gives you traffic filtering, message archiving, and rule-based routing that are not available with the classic SES SMTP endpoint.
In this post, you configure Amazon SES Mail Manager to send outbound email in a Region that does not offer the classic SES SMTP endpoint. This post uses eusc-de-east-1 (AWS European Sovereign Cloud) as an example, but the same steps apply to AWS Regions where Mail Manager is available and the classic SMTP endpoint is not. By the end, you have a working Mail Manager pipeline that can:
Control outbound email flow with traffic policies.
Archive outgoing messages for compliance.
Deliver messages to recipients through a managed SMTP pipeline.
This post walks through a practical setup in eusc-de-east-1 with step-by-step instructions for configuring each component.
Solution overview
In this walkthrough, you configure Amazon SES Mail Manager in eusc-de-east-1 with the following components:
Traffic policy: You create a traffic policy with a default action set to Deny. The policy includes two policy statements connected by an OR condition. Policy Statement 1 allows messages that use TLS protocol version 1.2 or higher. Policy Statement 2 allows messages where the recipient address ends with a specific domain, filtering outgoing mail to approved recipients only.
Rule set: You create a rule set containing a single rule with two actions that archive outgoing email and then deliver it to recipients.
Ingress endpoint: You create an authenticated Mail Manager ingress endpoint that receives, routes, and manages messages based on your configured traffic policy and rule set.
After setting up these components, you use sample Python code to send an email through the ingress endpoint. Optionally, you can integrate with Postfix for relay-based delivery. You also configure Amazon CloudWatch logging to monitor how each message flows through the pipeline. To verify functionality, you check the email archive to confirm that outgoing messages are stored and that the email is received in the intended inbox.
The following diagram shows the message flow: Application or Amazon Elastic Compute Cloud (Amazon EC2) instance → ingress endpoint → traffic policy (allow or deny) → rule set (archive, then send to internet) → recipient inbox.
Walkthrough
This walkthrough covers the prerequisites and the step-by-step setup. Before you create traffic policies and a rule set, you first set up email archiving and AWS Identity and Access Management (IAM) roles, which are needed when you create the traffic policies and rules.
Prerequisites
Before beginning, verify that you have completed domain verification in the eusc-de-east-1 (ESC) Region and moved out of the Amazon SES sandbox. Domain verification is a required first step that confirms your authority to send email through SES from your domain. In this tutorial, you use a sample Python program to send email programmatically through an ingress SMTP endpoint (ARecord). You can run this program on your local machine through the AWS Command Line Interface (AWS CLI).
An active AWS account in the AWS European Sovereign Cloud with access to the eusc-de-east-1 Region.
A domain to verify as a sending identity in Amazon SES.
The AWS CLI, installed and configured for eusc-de-east-1 (required for Amazon CloudWatch logging).
An AWS Secrets Manager secret to store ingress endpoint credentials.
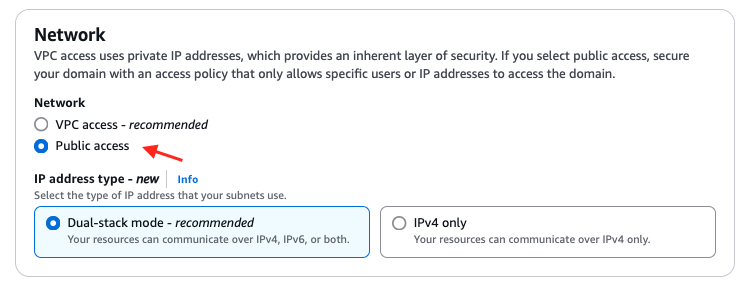
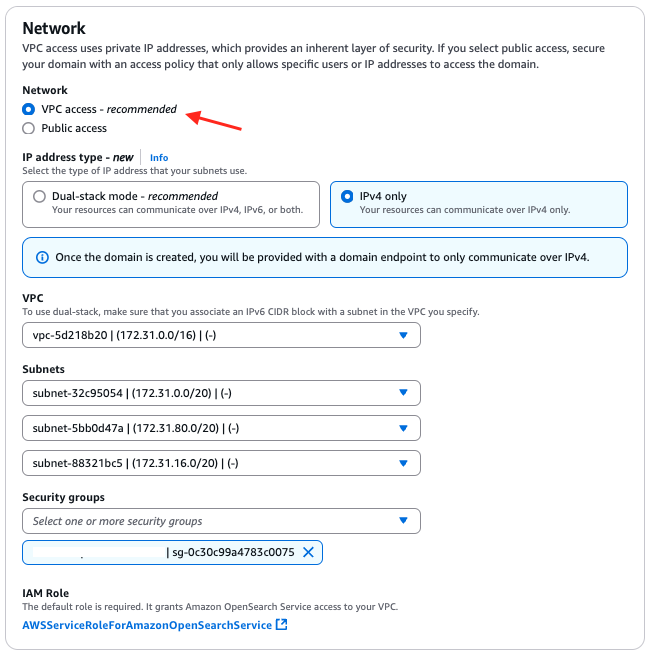
(Optional) An Amazon Virtual Private Cloud (Amazon VPC) with at least two subnets and an Amazon EC2 instance, if you plan to configure VPC endpoint connectivity.
IAM permissions for Amazon SES, AWS Key Management Service (AWS KMS), AWS Secrets Manager, and CloudWatch for the user who is signed in to the AWS Management Console.
Step 1: Create and verify an identity
To create and verify a sending identity in Amazon SES:
In the Amazon SES console, choose Configuration, and then select Identities.
Create the identity (domain or email address). If you verify a domain identity, configure email authentication with Sender Policy Framework (SPF), DomainKeys Identified Mail (DKIM), and Domain-based Message Authentication and Reporting and Conformance (DMARC) to prevent email from being marked as spam or failing delivery. See the following guides:
Authenticating Email with DKIM in Amazon SES.
Authenticating Email with SPF in Amazon SES.
Complying with DMARC authentication protocol in Amazon SES.
If you verify an email address identity without also verifying the parent domain, your messages may be quarantined or rejected depending on the domain’s DMARC policy.
Complete the verification process.
Note: For eusc-de-east-1, the Custom MAIL FROM Domain Name System (DNS) records use amazonses.eu instead of amazonses.com.
Step 2: Configure an email archive for compliance and retention
Create an email archive to store outgoing messages. You configure this archive as the first action in your rule. The archive serves as a repository for outgoing messages.
In the Amazon SES console, choose Mail Manager, then Email Archiving.
Under Manage archives, select Create archive.
Enter a unique name in the Archive name field.
(Optional) Select a retention period to override the default of 180 days (6 months).
(Optional) Set up encryption by either entering your own AWS Key Management Service (AWS KMS) key in the AWS KMS key ARN field, or selecting Create new key.
Choose Create archive.
After it is created, this archive stores your email according to the rules you define in the next step.
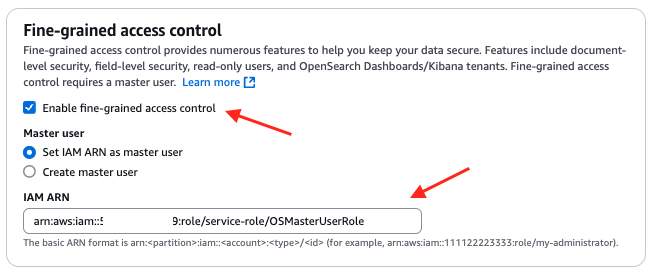
Step 3: Create an IAM role permission policy for the send to internet rule action
Configure an IAM role that permits Mail Manager to send email to external domains. This role is referenced in the rule for the second action, “send to internet,” which delivers email to recipients.
Go to the IAM console.
Choose Roles, and then choose Create role.
For trusted entity, select Custom trust policy and paste the following (replace XXXXXXXXXXX with your AWS EUSC account ID):
Skip add permissions, name review, and create your role.
Open your newly created role and select Add permissions.
From the menu, choose Create inline policy.
Select JSON in the policy editor and paste the following (replace example.com with your verified domain, XXXXXXXXXXX with your AWS account ID, and my-configuration-set with your configuration set name if applicable). This policy grants the necessary permissions to send email to recipients on the internet, which is used in rule 2 of your rule set.
Your newly created role now has the custom trust policy in Trusted entities, and a customer-managed inline permission policy under Permissions.
Step 4: Create a traffic policy
Traffic policies act as security checkpoints for your email infrastructure. They control which messages can enter your system based on rules you define. To create a traffic policy that enforces security requirements for your email:
Open the Amazon SES console.
Go to Mail Manager and select Traffic policies.
Choose Create traffic policy.
Enter a unique name for your policy.
Set Default action to Deny.
In your traffic policy, select “add new policy statement.”
For Allow or deny properties, select Allow.
For Properties, select TLS protocol version.
For Operator, select Minimum version or Is version.
For Value, select TLS 1.2 (minimum) or TLS 1.3 (Is version).
Now, add a second condition to the same policy statement to filter outgoing mail to *example.com domains:
For Properties, select Recipient address.
For Operator, select “Ends with” and for Value enter example.com.
Configure your policy statements as you like.
Choose Create traffic policy.
Traffic policies are evaluated in a specific sequence:
Deny policy statements are evaluated in order. If any match, the email is immediately blocked and no further evaluation occurs.
If no Deny statements match, all Allow policy statements are evaluated in order. Multiple statements within a policy are connected by OR logic. If any statement matches, the email is allowed.
Within each individual policy statement, multiple conditions are connected by AND logic. Each condition must be true for the statement to match.
If no policy statements match (neither Deny nor Allow), the default action of the traffic policy (either Allow or Deny) is applied.
This policy denies traffic by default and allows only messages that meet the TLS 1.2 minimum requirement and are addressed to approved recipient domains.
Default action: Deny by default. Email traffic is initially blocked unless explicitly allowed by the following policy statements.
Policy statement 1: Allows messages to be sent if the recipient’s address ends with *example.com AND meets the minimum TLS protocol version of TLS 1.2.
Step 5: Create a rule set
Rule sets define how your messages are processed after they pass through your traffic policy. In this example, the rule set establishes a sequential email processing workflow. First, you add the action for archiving outgoing messages, and then you add a second action to deliver messages to recipients.
To create a rule set:
Open the Amazon SES console.
Go to Mail Manager and select Rule sets.
Choose Create rule set.
Enter a unique name for your rule set.
On the rule set’s overview page, select Edit, then select Create new rule.
Step 6: Create rules
In this step, you create rules within your rule set that define the actions performed on each email: archiving for compliance and delivering to recipients.
Email add-ons are optional: In your rule set, you can configure the Vade Advanced Email Security Add On for scanning or dropping messages, archiving for compliance, writing to Amazon Simple Storage Service (Amazon S3) for future analysis, and sending email out. Configure these rules accordingly. This guide covers email sending and archiving in the rule below.
Add conditions or exceptions as needed:
Select Add new condition to specify what messages the rule applies to.
Select EXCEPT in the case of and select Add new exception for exclusions.
Configure actions by choosing Add new action.
For multiple actions, use the up and down arrows to set the execution order.
Action 1: Archive outgoing email. Stores a copy of each outgoing email in a Mail Manager archive. Archived email can be searched and retrieved directly from the Amazon SES console under Email archiving, supporting compliance and audit requirements.
Action 2: Send to internet. Delivers the email to the intended recipient using Amazon SES.
After you create your rule set, add rules that define how email is processed. You create a rule set containing a single rule with two actions that execute in sequential order.
Follow these steps to create and configure your rules.
In the created rule set’s overview page, select Edit, then choose Create new rule.
In the Rule details sidebar, enter a unique name for your rule.
In the rule details on the right side, select “add new action.”
From the menu, choose “archive,” and choose the archive you created at Step 2.
Then add another action: select “add new action” and from the menu, choose “Send to internet.”
Choose the IAM role that you created in Step 3. This role grants SES Mail Manager access to your resource.
When finished creating your rules, choose Save rule set to apply your changes.
Rule 1: Archive and send email to recipients
The rule processes messages that have successfully passed through the traffic policy. The archive action confirms that messages are archived and searchable. The send to internet action then forwards messages to their intended recipients, completing the email delivery workflow.
Step 7: Store password in AWS Secrets Manager for the ingress endpoint
Before you create an ingress endpoint, set up a password in AWS Secrets Manager and an AWS KMS customer managed key:
1. Create a customer managed key policy for your ingress endpoint.
You need these details when configuring your email client or application to send email through this endpoint.
Step 9: Configure VPC endpoint for SES Mail Manager (optional enhanced security)
A VPC endpoint allows your Postfix EC2 instance to reach Mail Manager privately, without sending traffic over the public internet. To use this option, create the VPC endpoint in the same VPC as your Postfix instance. Configure security group rules to allow traffic on port 587.
VPC: The VPC endpoint must be created in the same VPC where your Postfix EC2 instance resides.
Security groups:
Postfix EC2 SG: Outbound rule to VPC endpoint SG on port 587.
VPC endpoint SG: Inbound rule from Postfix EC2 SG on port 587.
Subnets: The VPC endpoint should be in subnets that are routable from your EC2 instance’s subnet.
Create a security group for the VPC endpoint:
Open the Amazon VPC console.
Select Security groups.
Choose Create security group.
Name: mail-manager-vpce-sg (example).
VPC: Choose the VPC where your Postfix EC2 instance resides.
Add an inbound rule:
Type: Custom TCP.
Port: 587 (or 25 if using port 25).
Source: Security Group ID of your Postfix EC2 instance (or create a placeholder, update later).
Choose Create security group. Note the Security Group ID for the next step.
Choose Endpoints in the VPC console.
Choose Create endpoint.
Name: mailmanager-ingress-endpoint (example).
For Service category, select AWS services.
For Service Name, select com.amazonaws.eusc-de-east-1.mail-manager-smtp.auth.
For VPC, choose the VPC where your Postfix server resides.
Subnets: Select at least 2 (private) subnets (for high availability).
Security Groups: Choose the security group you created.
Choose Create Endpoint.
Wait for the endpoint status to become Available. After the endpoint status becomes Available, note the DNS name from the endpoint details. Use the regional (non-AZ-specific) DNS name for your Postfix relay configuration:
Now that you have created your Mail Manager resources, you can configure log delivery through the AWS CLI to track message flow from ingress endpoints through rule set processing. After it is configured, you can view these logs in CloudWatch Log Groups.
Open your terminal (CLI).
Log in to your AWS account using the following command:
Before you proceed, copy the log group ARN for the step Create the Delivery Destination.
Create the Log Delivery Source:Add your rule set ID to the resource-arn parameter below. You can find the resource ARN for the rule set when you click on the rule set name under rule sets in the SES console.
import smtplib
import ssl

# Your ingress endpoint and port
smtp_server = "*****.eusc-de-east-1.amazonaws.eu"
# Or for VPC: "vpce-xxxxx.mail-manager-smtp.auth.eusc-de-east-1.vpce.amazonaws.eu"
smtp_port = 587

# Your SMTP credentials retrieved from Secrets Manager
username = "****"
password = "[REDACTED_PASSWORD]"

sender_email = "[email protected]"  # Your verified identity
receiver_email = "[email protected]"

# Properly formatted email message with headers
message = f"""From: Firstname Lastname <{sender_email}>
To: Firstname Lastname <{receiver_email}>
Subject: Test Email from Python

This email was sent via the Mail Manager ingress endpoint and delivered
to the recipient through the "Send to Internet" rule action.
"""

server = None
try:
    print(f"Connecting to {smtp_server}:{smtp_port}...")
    server = smtplib.SMTP(smtp_server, smtp_port)
    server.set_debuglevel(1)

    print("\nStarting TLS...")
    context = ssl.create_default_context()
    server.starttls(context=context)

    print("\nLogging in...")
    server.login(username, password)

    print("\nSending email...")
    server.sendmail(sender_email, receiver_email, message)
    print("\nEmail sent successfully.")
except Exception as e:
    print(f"\nError: {e}")
    import traceback
    traceback.print_exc()
finally:
    if server:
        server.quit()
Step 12: Integrate with your existing email server
Use Postfix or SMTP clients on Amazon EC2 to relay outbound email through Mail Manager, which then forwards it through the “Send to internet” action configured in Step 3.
If you choose to integrate with Postfix in this guide, your relay host is the ingress endpoint or the VPC endpoint you created. Your port is typically 587.
relayhost = [<ARecord>]:<port>
Example with Postfix
/etc/postfix/main.cf:
relayhost = [xxxx.eusc-de-east-1.amazonaws.eu]:587 or 25
relayhost = [vpce-xxxxx.mail-manager-smtp.auth.eusc-de-east-1.vpce.amazonaws.eu]:587
Clean up
Clean up your AWS environment by removing all resources created during this walkthrough, including Mail Manager configurations, ingress endpoints, rule sets, traffic policies, archives, IAM roles, Secrets Manager secrets, AWS KMS keys, and CloudWatch log groups.
Conclusion
In this post, you configured Amazon SES Mail Manager in the eusc-de-east-1 Region of the AWS European Sovereign Cloud to send outbound email over SMTP. You created a traffic policy to enforce TLS and recipient filtering, a rule set to archive and deliver messages, and an authenticated ingress endpoint that serves as a compatible SMTP relay for your applications.
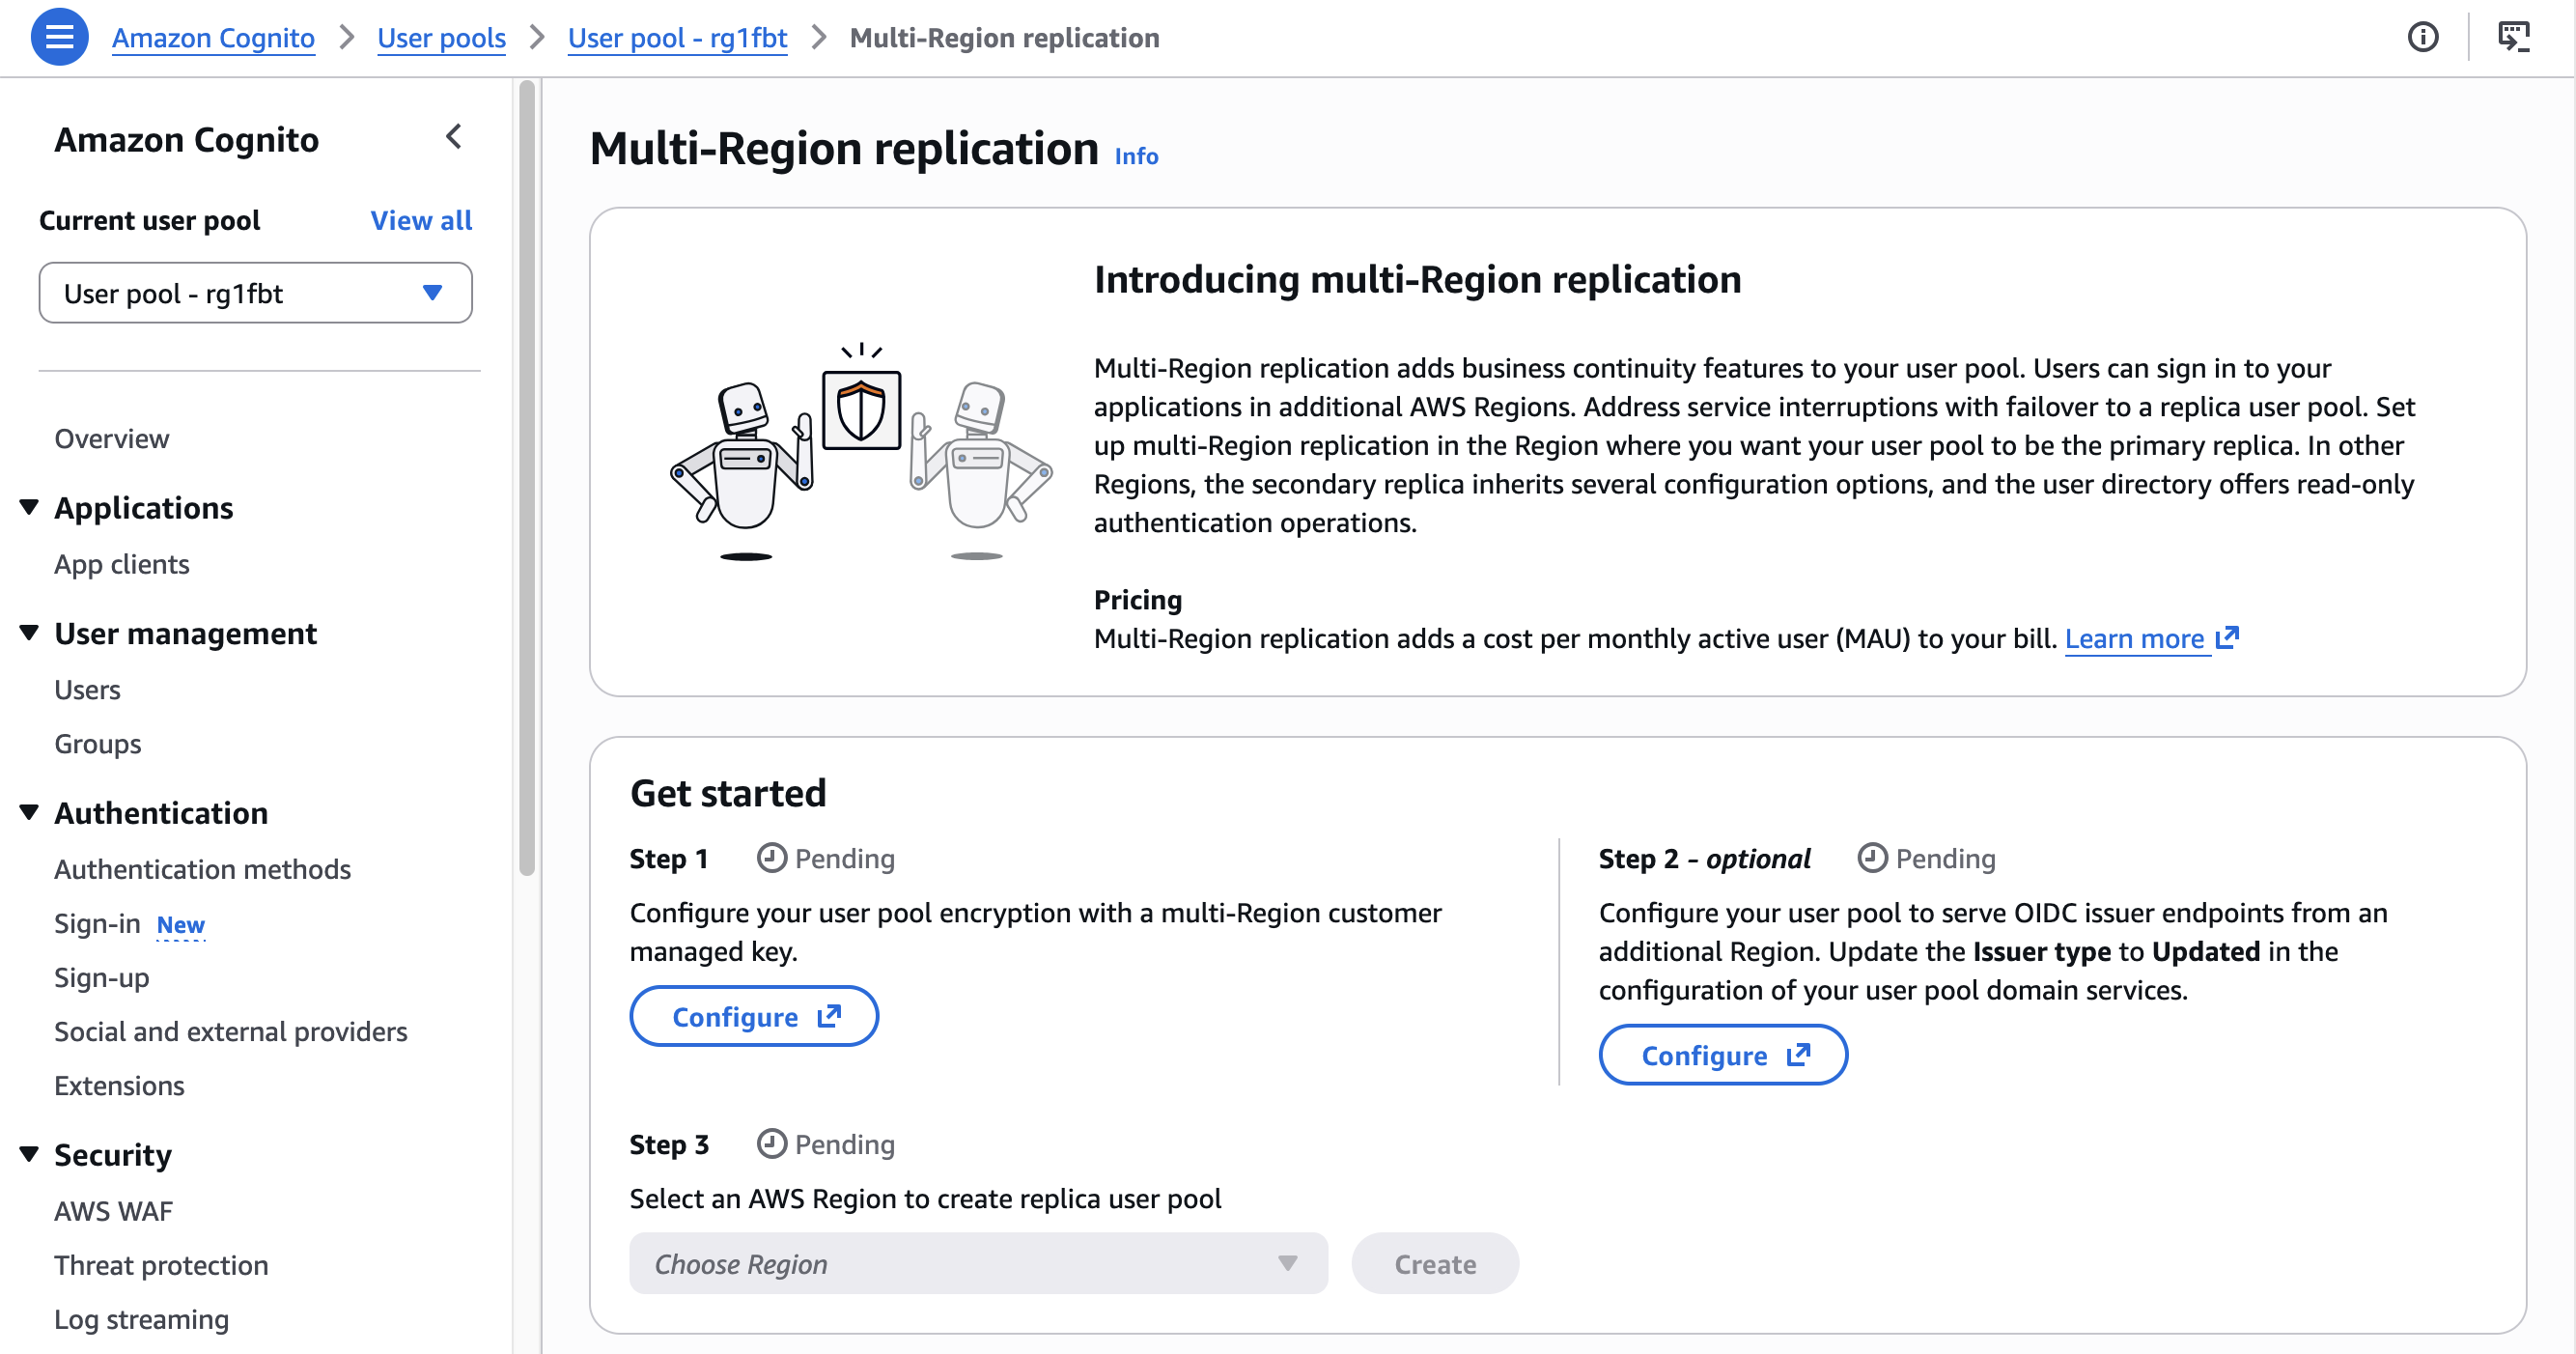
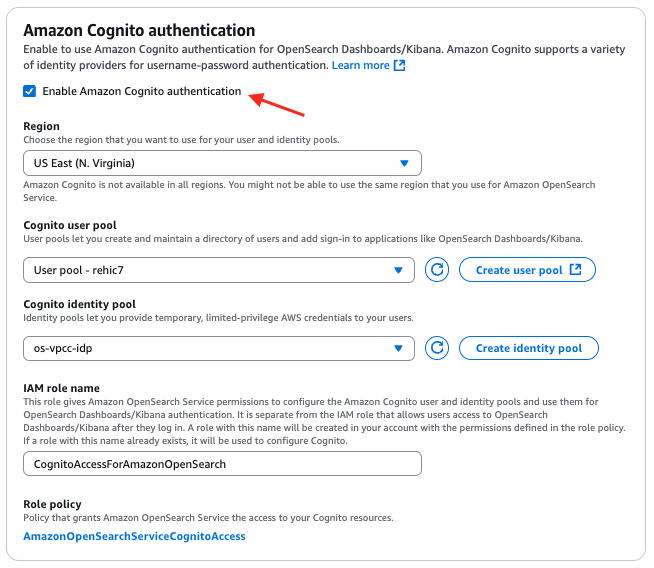
As a developer advocate working with web and mobile application developers, I’ve often heard about the need to maintain consistent user authentication in the unlikely event of a regional service interruption. The increasing use of agentic AI, microservices, automation, and service accounts has sparked a similar need for machine-to-machine authentication. Today, I’m excited to share two important updates to Amazon Cognito: multi-Region replication for improved resilience, and support for customer managed keys for more control encryption control.
Many applications rely on Amazon Cognito to handle user and machine-to-machine authentication, and to manage user profiles. When building for high availability, having consistent data across different AWS Regions is a key approach, and until now, achieving that consistency came with significant challenges. Engineering teams spent significant time building and maintaining custom replication solutions to synchronize configurations across Regions. Manual export and import of user data between Regions created security risks from potential data exposure and introduced opportunities for data inconsistencies. During regional transitions, end users experienced disruptions like forced password resets and re-authentication. For machine-to-machine communications, teams had to create new app clients in the secondary region, which meant reconfiguring their applications and updating OAuth-protected resources to accept access tokens issued by the new regional issuer. These challenges made it difficult to maintain uninterrupted operations across Regions.
With multi-Region replication, Amazon Cognito automatically maintains a synchronized copy of your user data and machine secrets in a secondary AWS Region of your choice. The replication flows in one direction, from your primary Region to the secondary Region. This includes user profiles, credentials, and pool configurations. The secondary Region operates in read-only mode, focusing on maintaining authentication capabilities. Existing sessions continue uninterrupted.
When you need to direct traffic to the secondary Region, your existing users can continue signing in with their existing credentials without disruption, and currently signed-in users remain authenticated because both regions recognize access tokens issued by either region. Multi-Region replication supports all authentication methods, including federated sign-in through social providers (Amazon, Google, Apple, Facebook), Security Assertion Markup Language (SAML) and OpenID Connect (OIDC) integrations, and API authorization flows. This approach maintains availability for both customer-facing applications and machine-to-machine communications in your backend services. While authentication continues without interruption, operations like new user registration or profile updates are not available during failover.
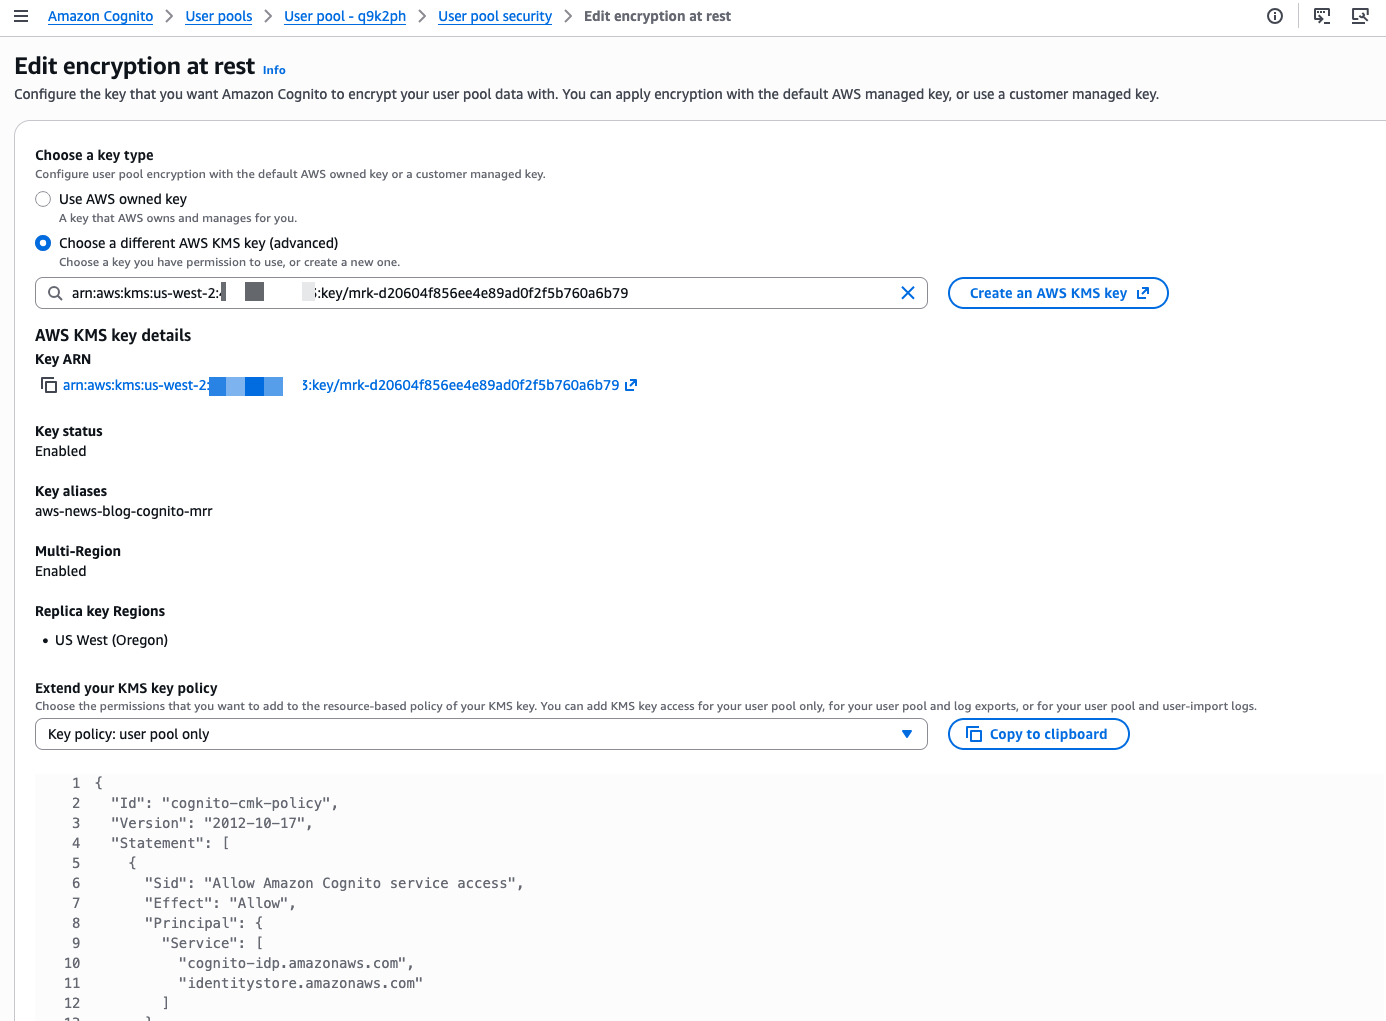
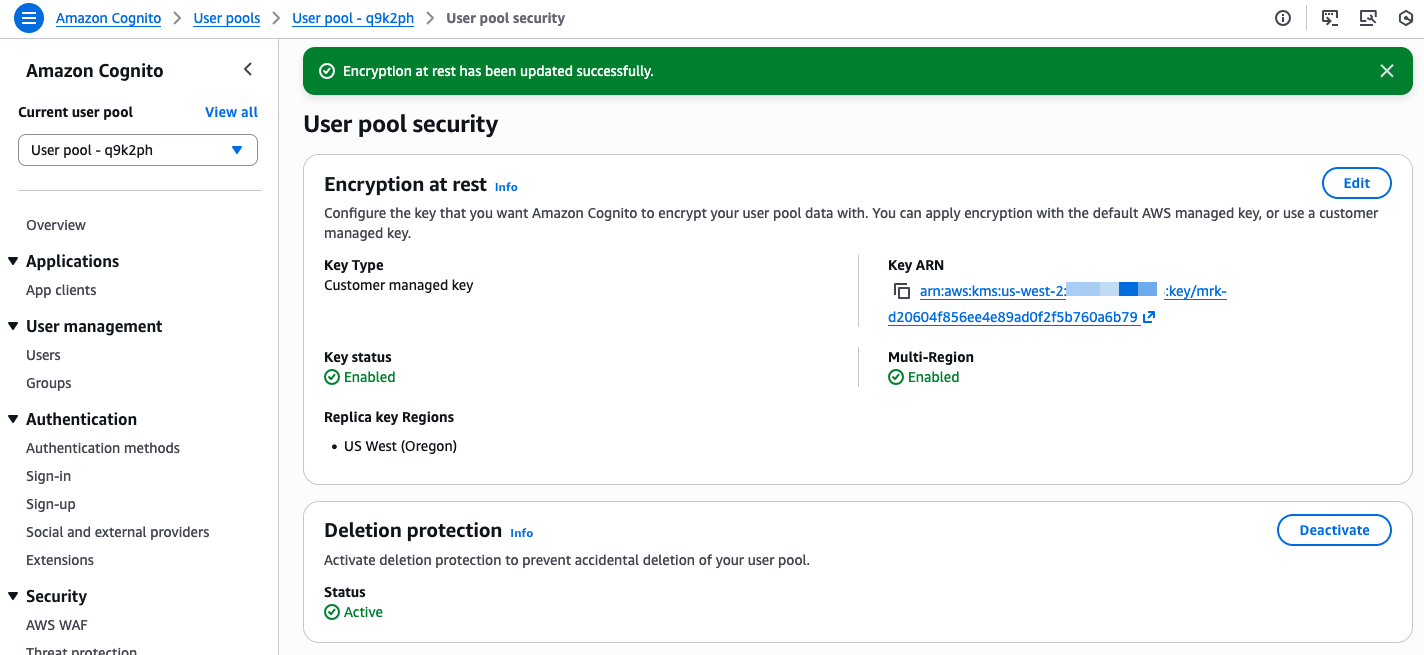
Before configuring multi-Region replication, you must configure a multi-Region customer managed key stored in AWS Key Management Service (AWS KMS) to encrypt your user data at rest. These keys provide consistent encryption across Regions while giving you control over your encryption strategy.
How this works in practice I start this demo with an existing Cognito user pool in the us-west-2 (Oregon) Region. I want to configure replication to us-east-1 (Northern Virginia). I also have a customer managed key replicated in these two Regions.
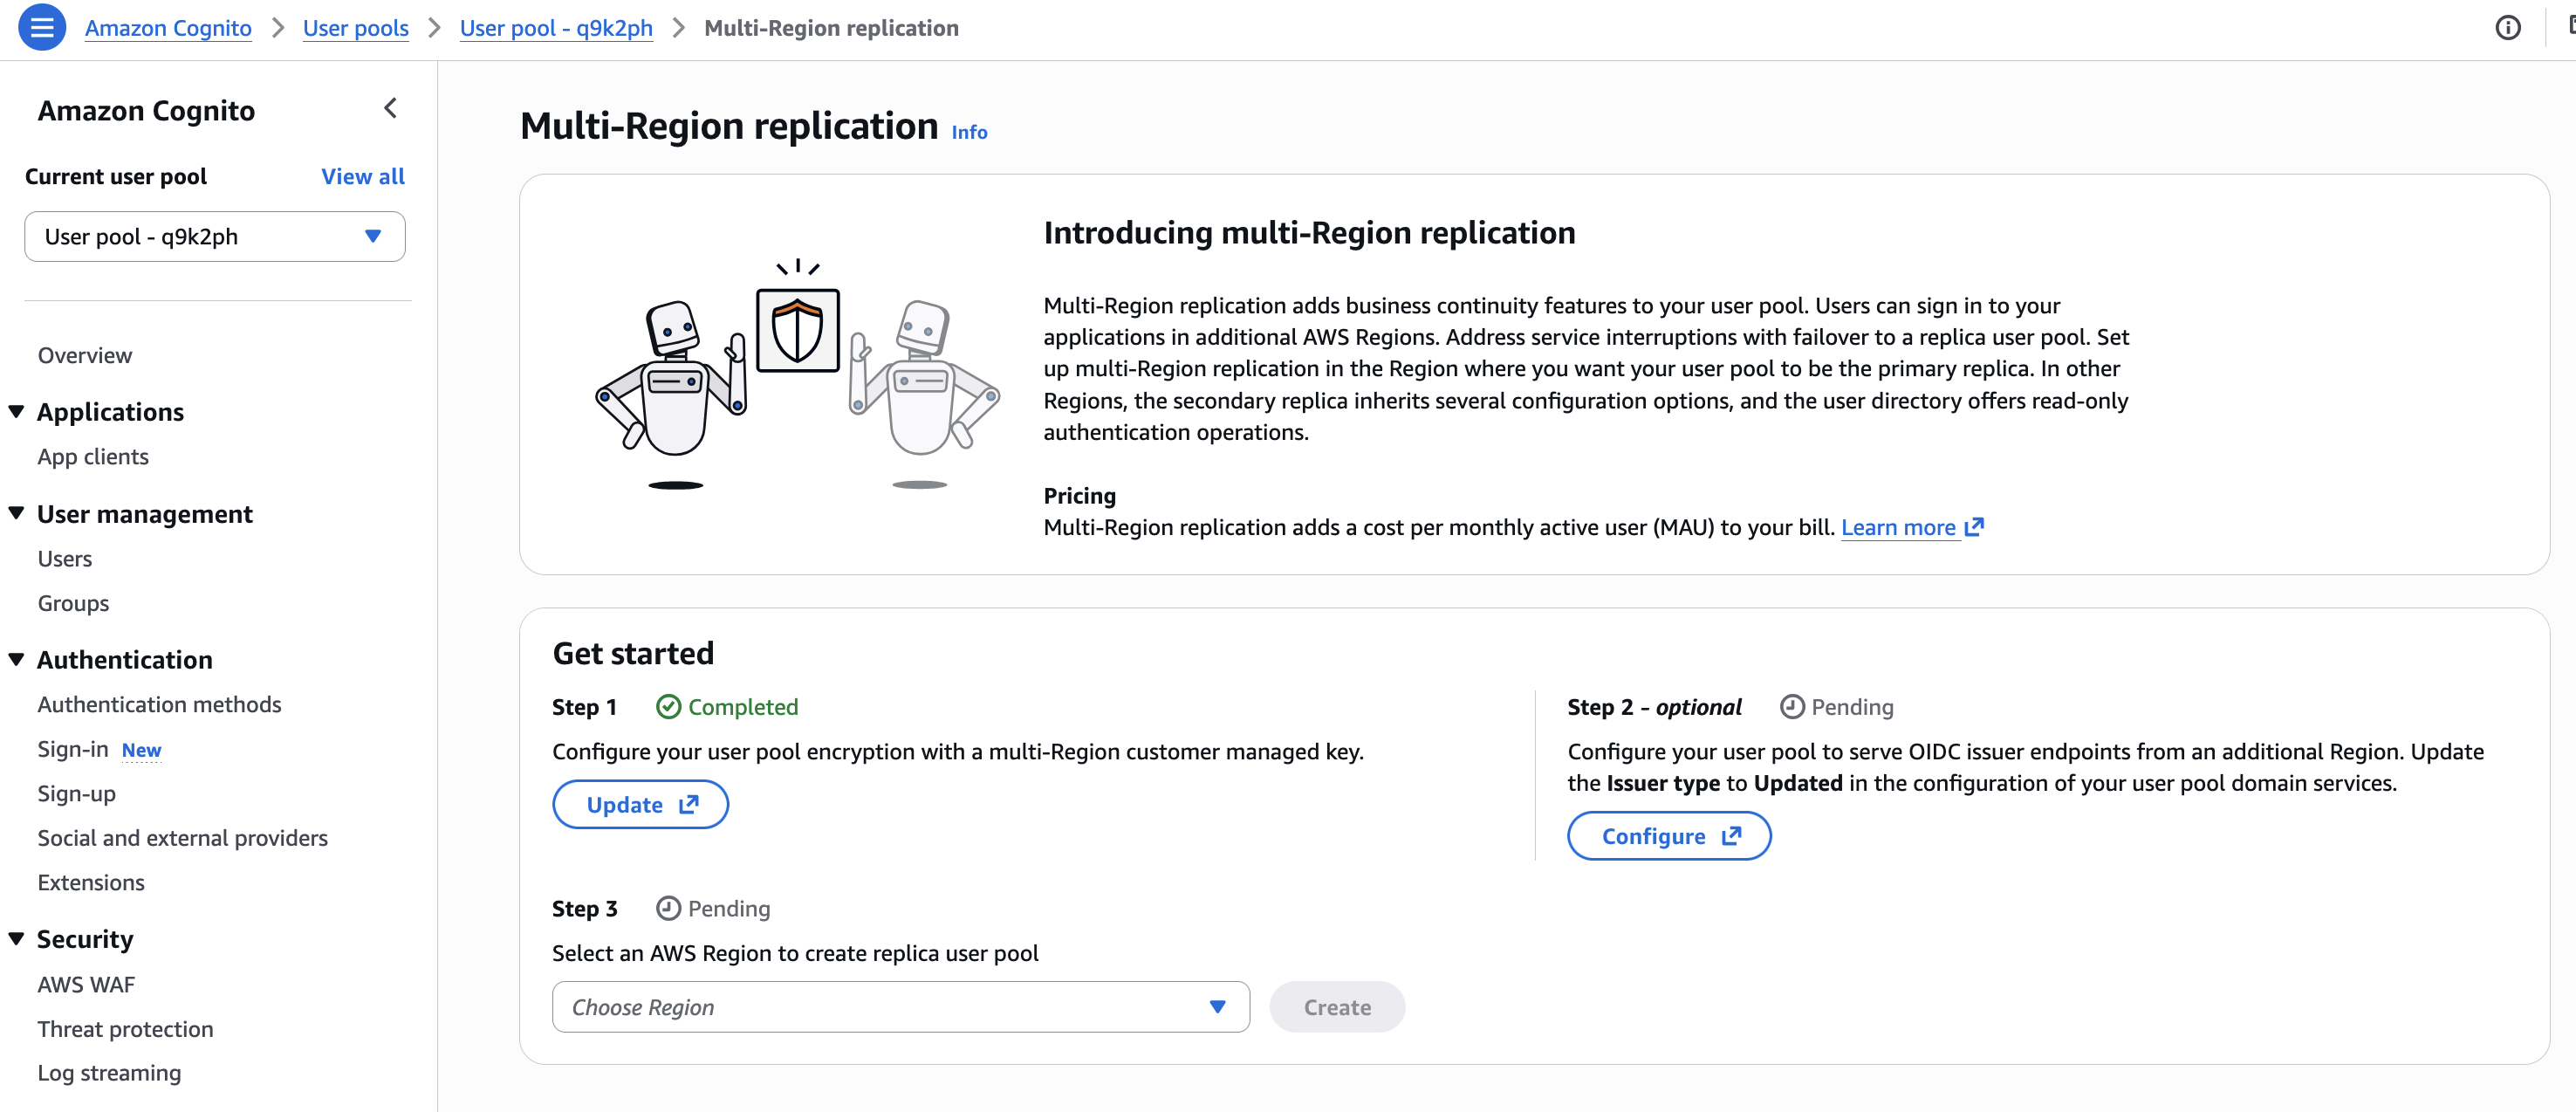
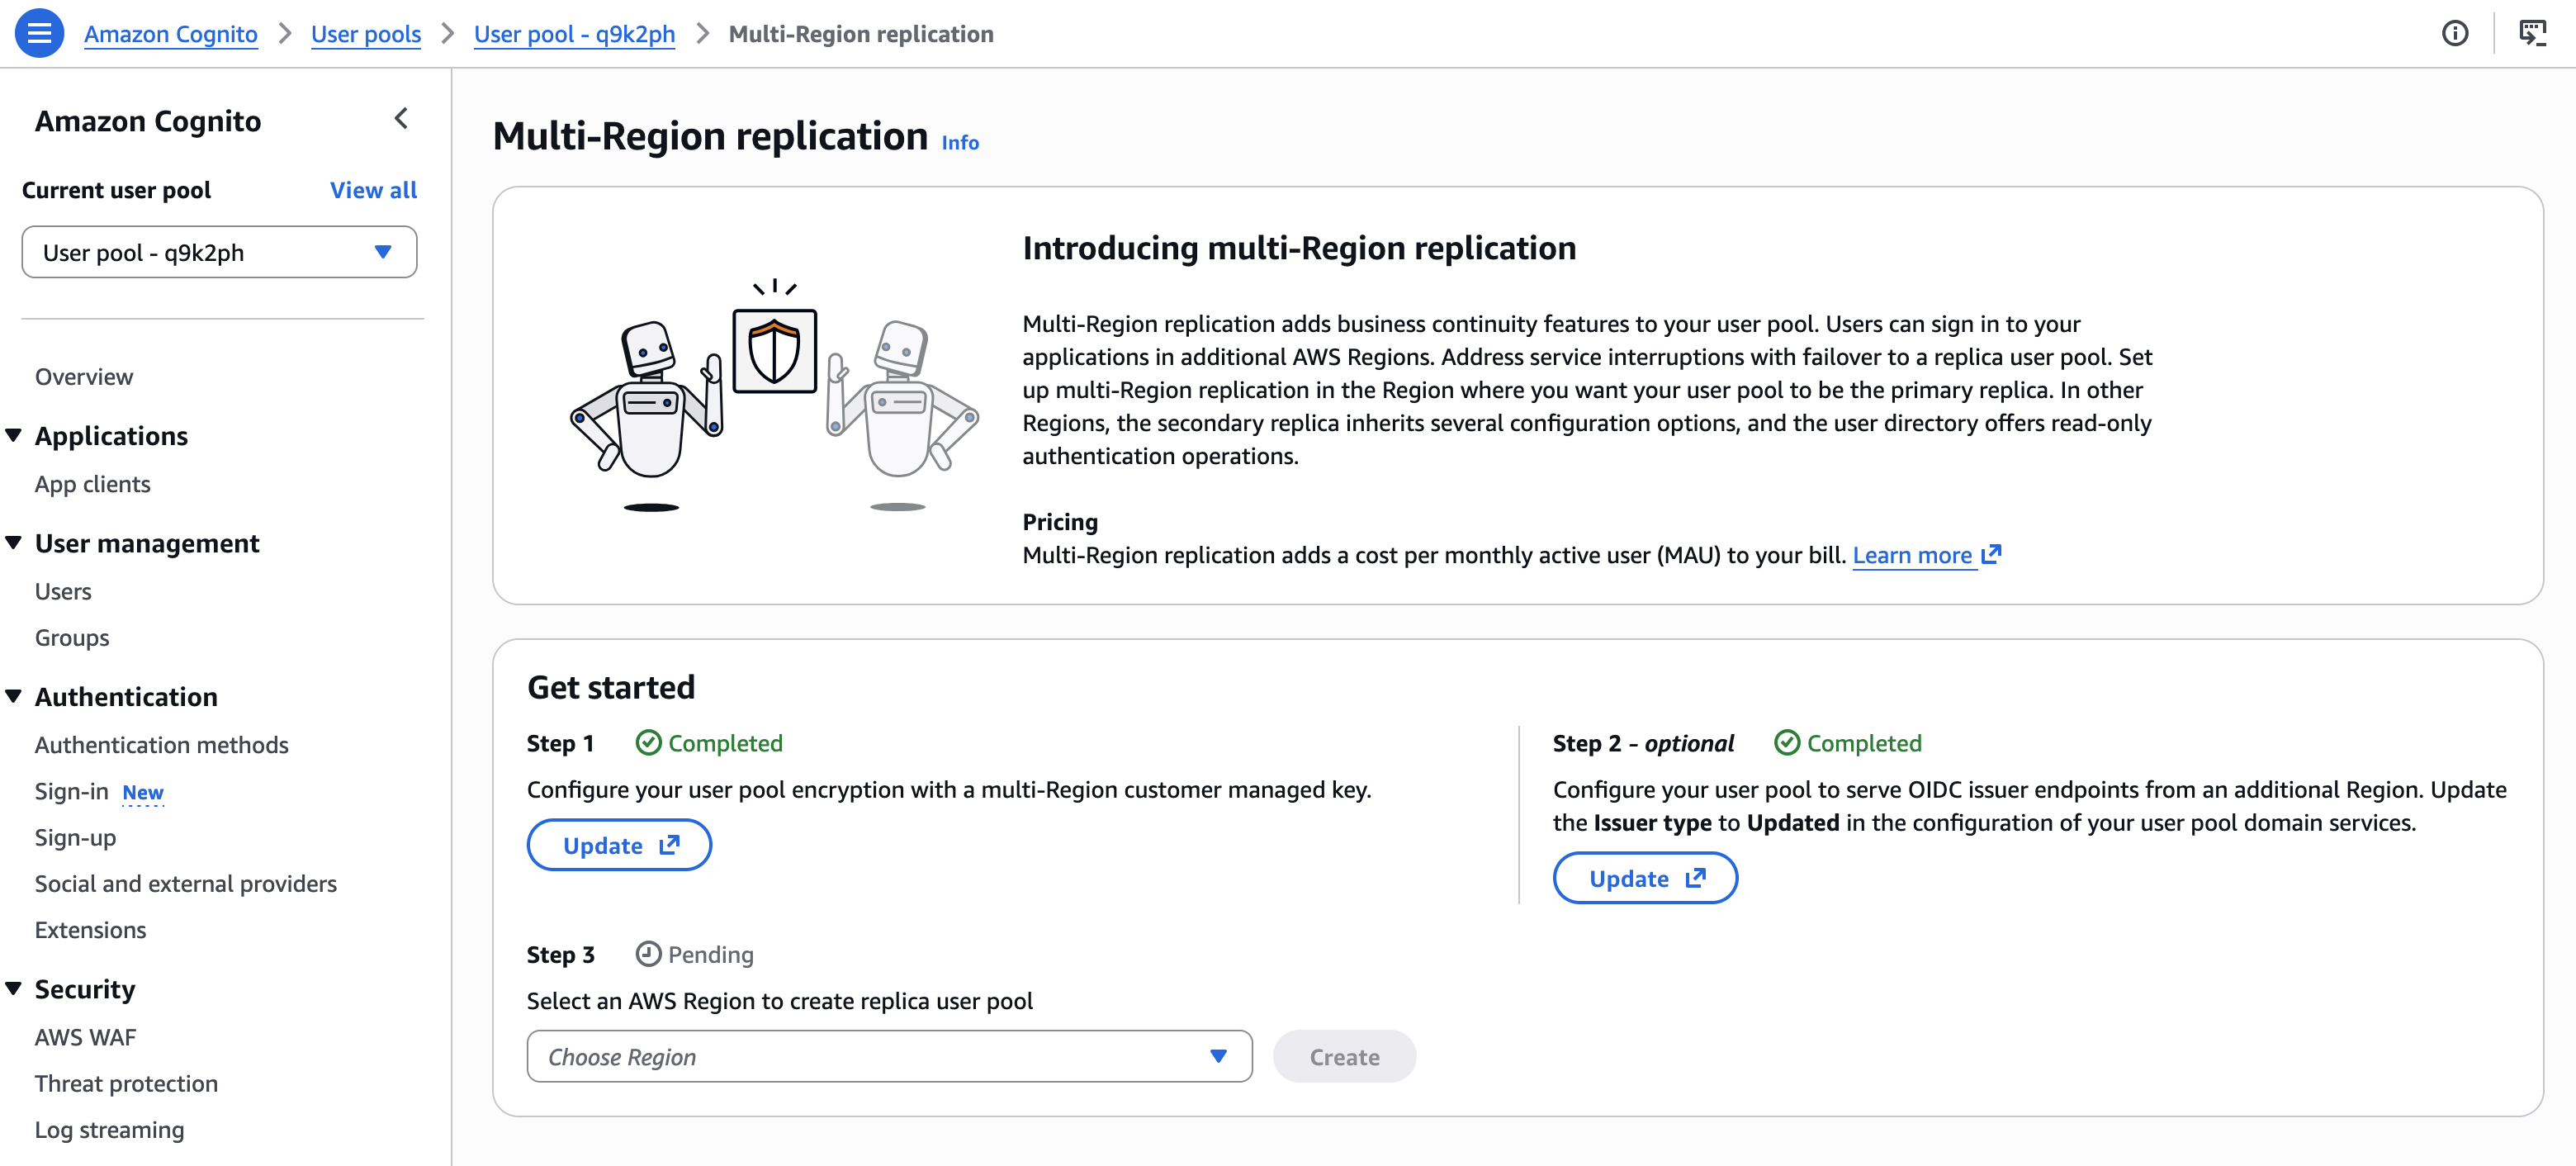
Configuring multi-Region replication is just three steps. The AWS Management Console guides me through the steps: set up a custom key for encryption, configure multi-region OIDC endpoints, and configure the replication itself.
First, I set up a custom AWS KMS key to encrypt the data at rest.
I select the custom key I created. I also update the key policy to allow Amazon Cognito to access and use the key. The console shows the correct IAM policy statements to add to my key policy.
The console confirms when the custom key is selected and correctly configured.
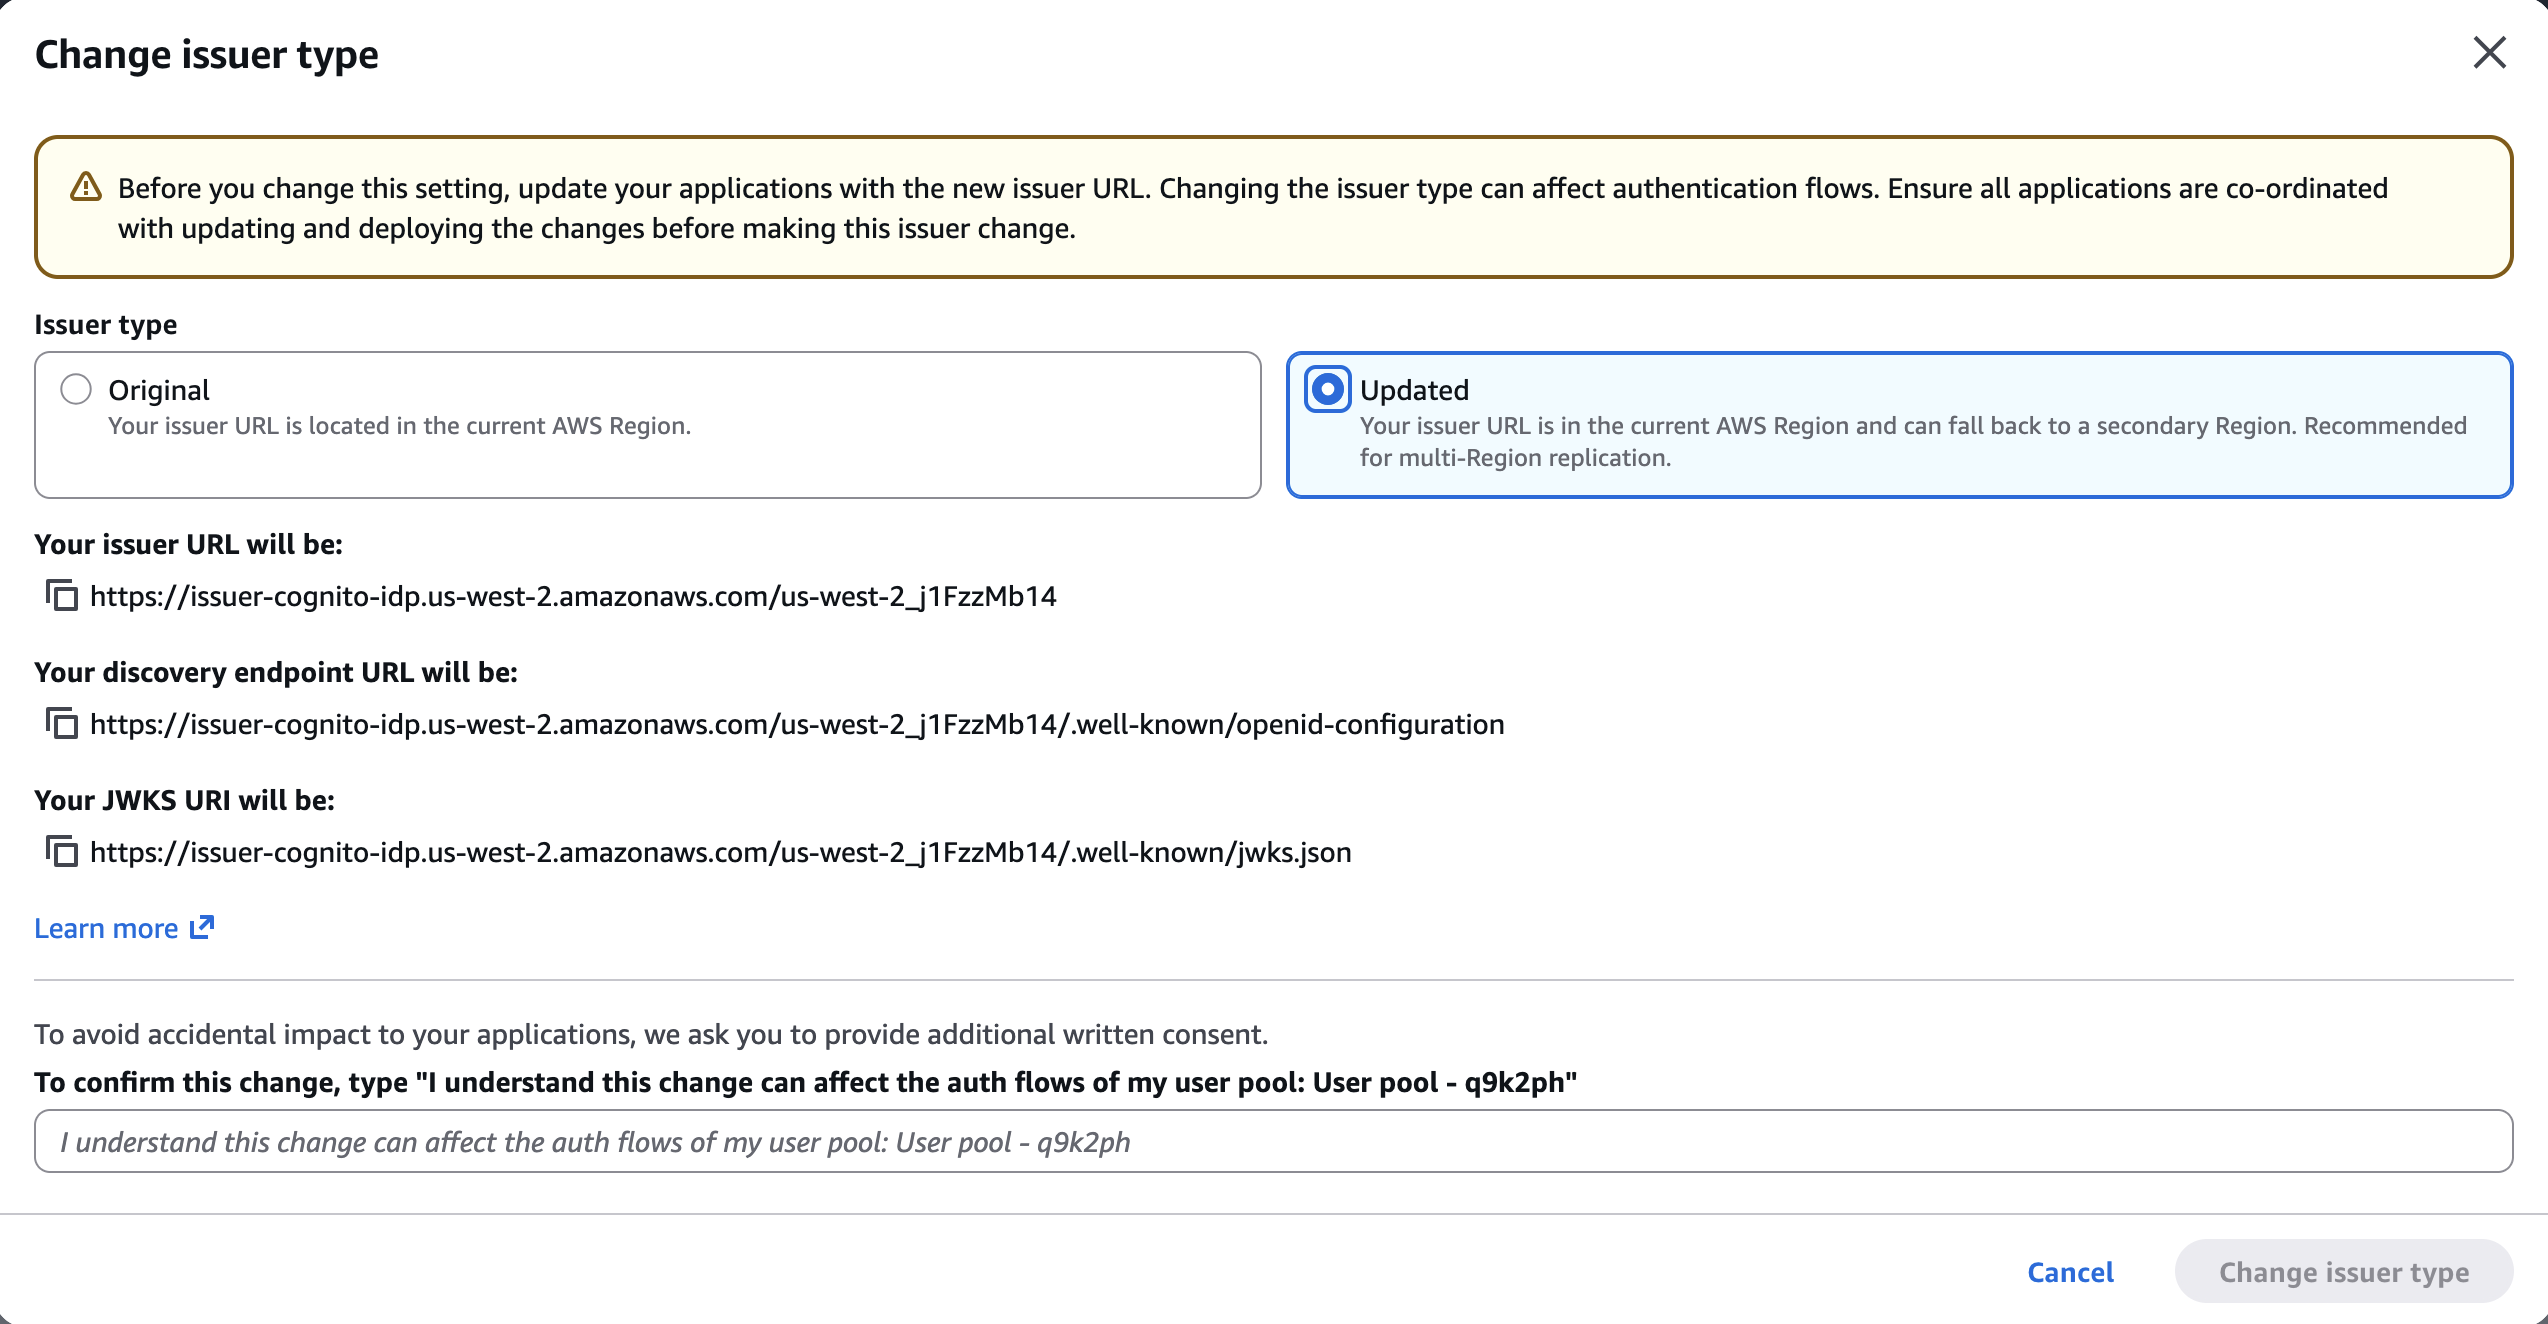
Second, I follow the console instructions to configure the OIDC issuer type. On Step 2 – optional, I choose Configure.
I make sure to update my client applications with these new endpoints. This is a required change that will need a redeployment of server-side applications and an update submission for mobile apps on the App Store and Google Play. If I don’t update the endpoints, my users will experience disruptions because requests to the old endpoints will no longer be routed correctly.
On the next screen, I select Updated. I take note of the new URLs. I confirm the changes and choose Change issuer type.
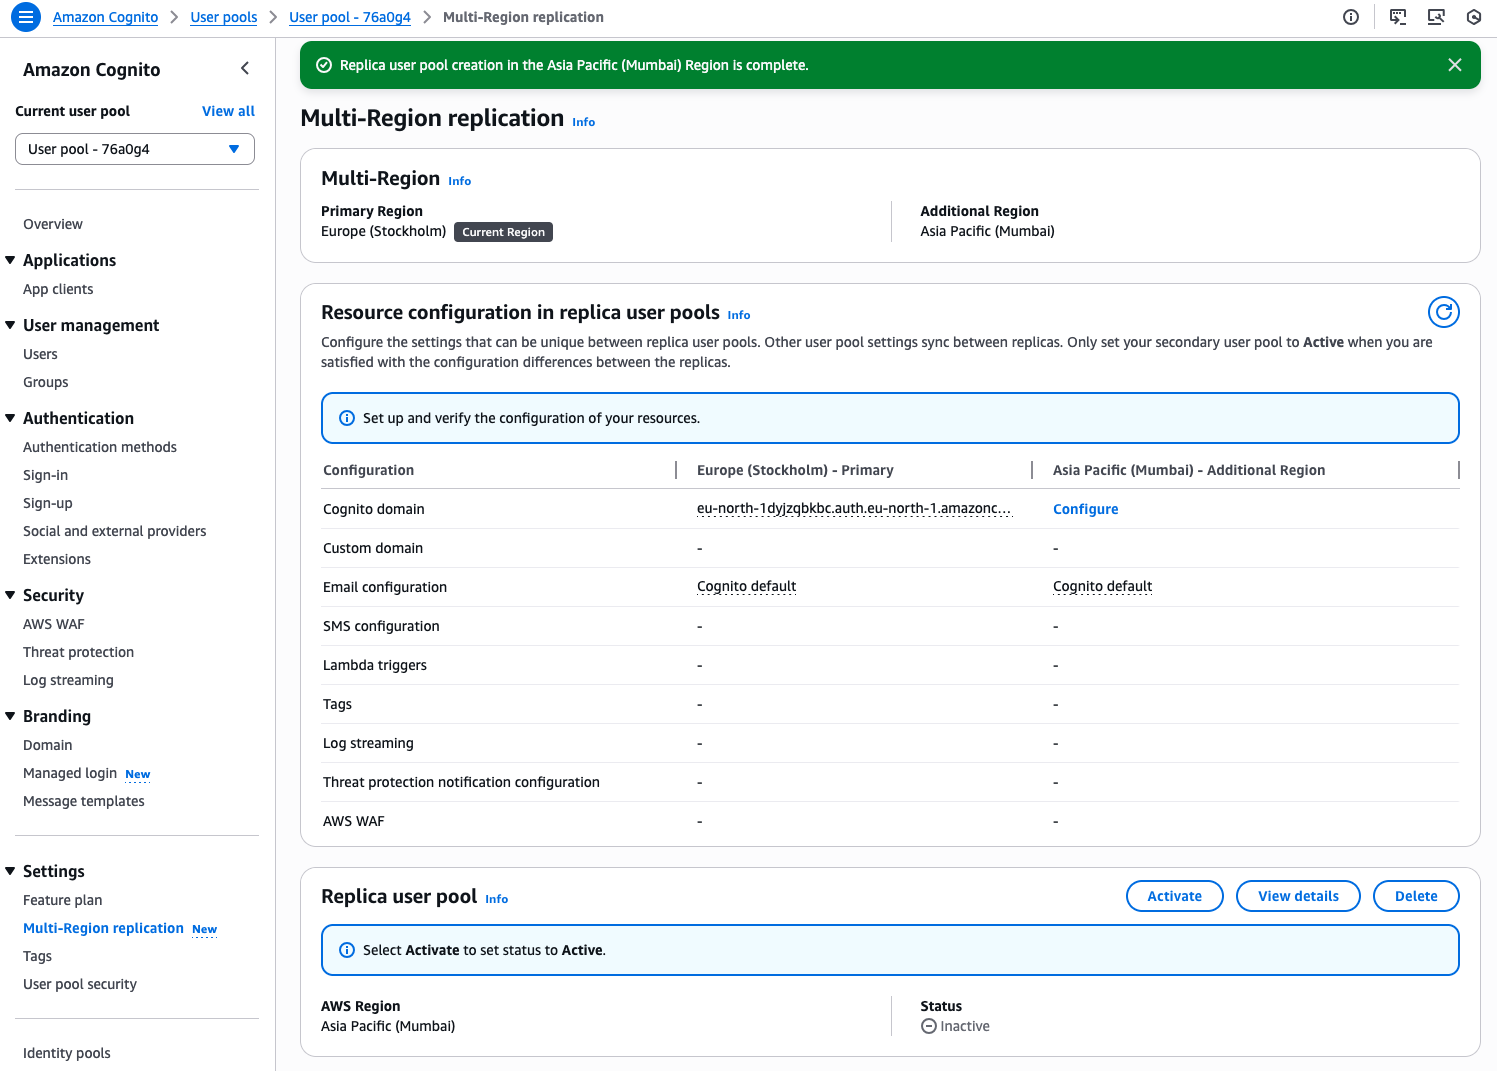
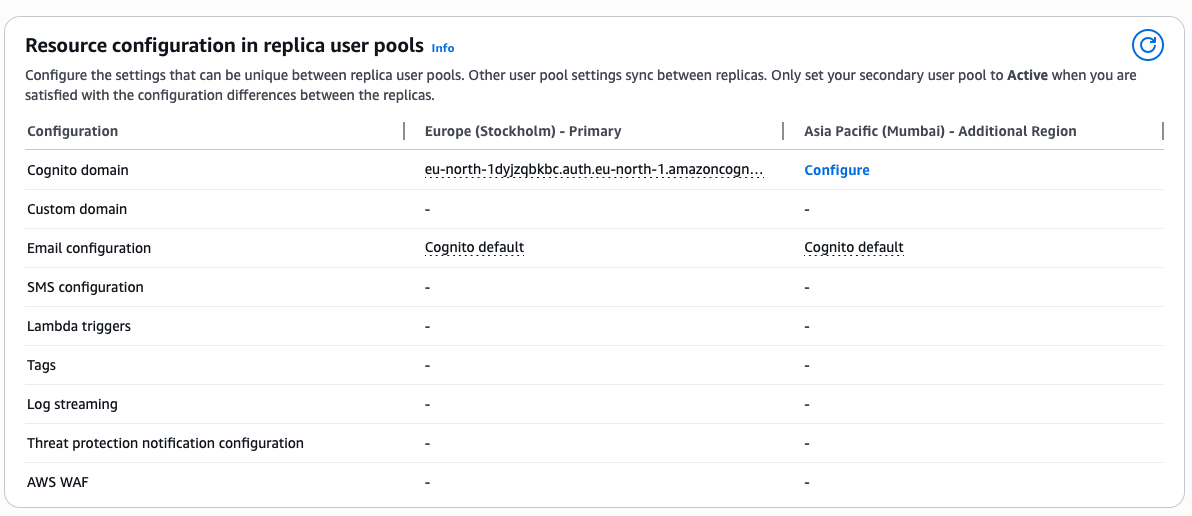
Finally, I select the target Region for replication. Only Regions where the custom encryption key is replicated are available for selection. After having chosen the target Region, I choose Create..
The service prepares the replication. The time needed depends on the amount of data in the user pool.
When the replicated user pool is ready, I manually Activate it.
The replication status becomes Active. It is ready to direct traffic to the replica.
Additional configurations The console helps me to keep track of additional configurations I have to plan. When I’m using Lambda functions for custom authentication flows or SMS or email notifications, I must also deploy and configure these resources in the new Region.
Similarly, log streaming or AWS WAF configuration must be manually configured in the target Region before I start directing authentication traffic to it.
Health checks and failover Both primary and secondary regional endpoints remain active and ready to serve your traffic at all times. To monitor system health and manage failovers, you design a strategy that aligns with your application’s specific requirements and security posture. You can implement health checks to monitor the status of authentication services in your primary Region and define criteria for when to initiate failover. These checks might look for error rates, latency patterns, or specific service alerts.
When your monitoring system detects issues meeting your failover criteria, you can redirect traffic to the secondary Region through DNS updates. This approach gives you control over the failover process while maintaining security. Consider testing your failover strategy during off-peak hours by redirecting a small portion of traffic to verify that authentication continues working as expected in the secondary Region.
When using managed login and federation with custom domains, you can also use the built-in traffic routing feature by providing an Amazon Route 53 health check ID.
Pricing and availability Multi-Region replication is available today as an add-on feature for Amazon Cognito customers using Essentials and Plus tier. For user authentication, the add-on costs $0.0045 per monthly active user per replica Region for Essentials tier customers and $0.006 per monthly active user per replica region for Plus tier customers. For machine-to-machine (M2M) authentication, the add-on is a 30% charge on top of the standard volume-based pricing for successful tokens issued. For detailed pricing information, see Amazon Cognito pricing.
Multi-Region replication is available in the following Regions: US East (Ohio, N. Virginia), US West (N. California, Oregon), Asia Pacific (Mumbai, Seoul, Singapore, Sydney, Tokyo), Canada (Central), Europe (Frankfurt, Ireland, London, Paris, Stockholm), and South America (São Paulo).
Any of these Regions can be used as the source or the destination for the replication.
Support for customer managed keys is available for the Essentials and Plus tiers. It is available in the following Regions: US East (Ohio, N. Virginia), US West (N. California, Oregon), Africa (Cape Town), Asia Pacific (Hong Kong, Hyderabad, Jakarta, Malaysia, Melbourne, Mumbai, New Zealand, Osaka, Seoul, Singapore, Sydney, Thailand, Tokyo), Canada (Central), Canada West (Calgary), Europe (Frankfurt, Ireland, London, Milan, Paris, Spain, Stockholm, Zurich), Israel (Tel Aviv), Mexico (Central), South America (São Paulo), and AWS GovCloud (US-East, US-West)
From my conversations with customers, maintaining business continuity during regional incidents while meeting security requirements is a high priority. Multi-Region replication provides the capability to build more resilient applications without managing complex replication logic yourself. The automatic synchronization of user data and configurations reduces operational overhead while maintaining security.
For customers in regulated industries, the new support for customer managed keys provides additional control over data encryption. You can now use your own encryption keys to protect user data at rest, helping you meet regulatory requirements in industries like healthcare and financial services.
To get started with multi-Region replication and customer managed key encryption, visit the Amazon Cognito console or see the documentation for detailed setup instructions. I look forward to hearing how you use this feature to strengthen your application architecture.
If you build notebooks for recurring tasks such as daily customer analysis, weekly report generation, or data quality checks in Amazon SageMaker Unified Studio, you’ve likely wanted to run them automatically on a schedule. Until now, there wasn’t a native way to do this. Teams had to manage orchestration separately, even though the interactive notebook experience was already in place. Now, notebook scheduling is available, so you can configure your production workloads to run automatically with minimal manual intervention.
In this post, we walk you through the new scheduling and orchestrating capabilities for notebooks in Amazon SageMaker Unified Studio. You will learn how to:
Trigger on-demand background runs, such as a model re-training job, without waiting at your desk.
Create recurring schedules for tasks such as nightly data freshness checks or weekly business reviews.
Parameterize notebooks so a single template can generate reports across different AWS Regions or customer segments.
Orchestrate multi-notebook workflows where one notebook’s output feeds into the next. For example, an extract, transform, and load (ETL) pipeline followed by a summary dashboard refresh.
Debug failed runs with AI-assisted troubleshooting.
Sample use case overview
In this walkthrough, you will take on the role of a logistics analyst who monitors shipping performance across carriers. The notebook loads shipping data from the ShippingLogs.csv dataset, identifies late deliveries, and generates a performance summary. You want to run this notebook every morning without manual intervention, reuse it across different carriers, and know when something goes wrong.
You will start by running a notebook in the background and viewing the results. Next, you will create a recurring schedule for daily runs, then parameterize the notebook to generate reports for different carriers. You will also orchestrate the notebook in a multi-step workflow and debug a failed run using AI-assisted troubleshooting.
Prerequisites
Before you begin, you need:
An Amazon SageMaker Unified Studio project with Notebooks enabled. See Set up IAM-based domains for permission requirements.
A sample dataset. We use the ShippingLogs.csv dataset, which contains shipping data including estimated and actual delivery times, carriers, and origins. You can download it from the Workshop Studio (the file is named ShippingLogs.csv on the linked page).
Setting up the notebook
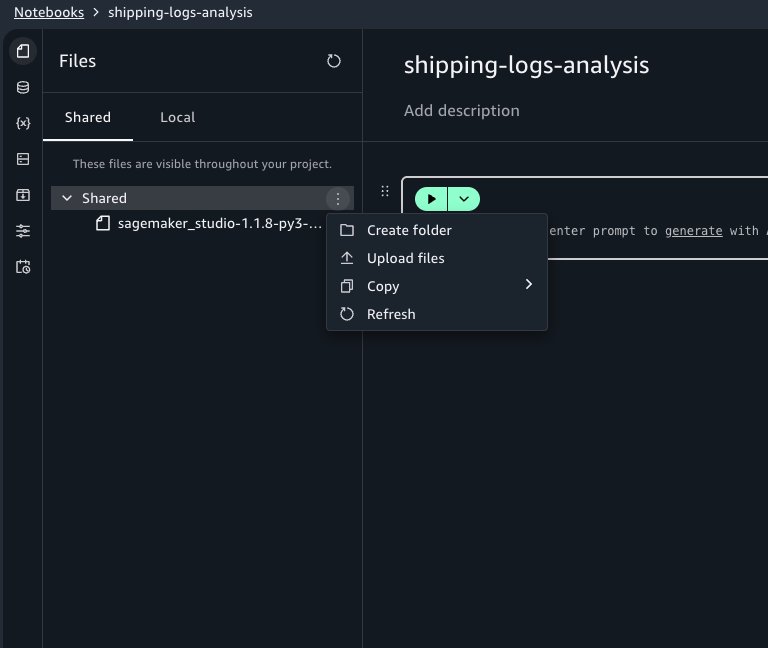
Start by creating a new notebook in your SageMaker Unified Studio project. If you haven’t already, upload the ShippingLogs.csv file under the Shared tab in the Files panel.
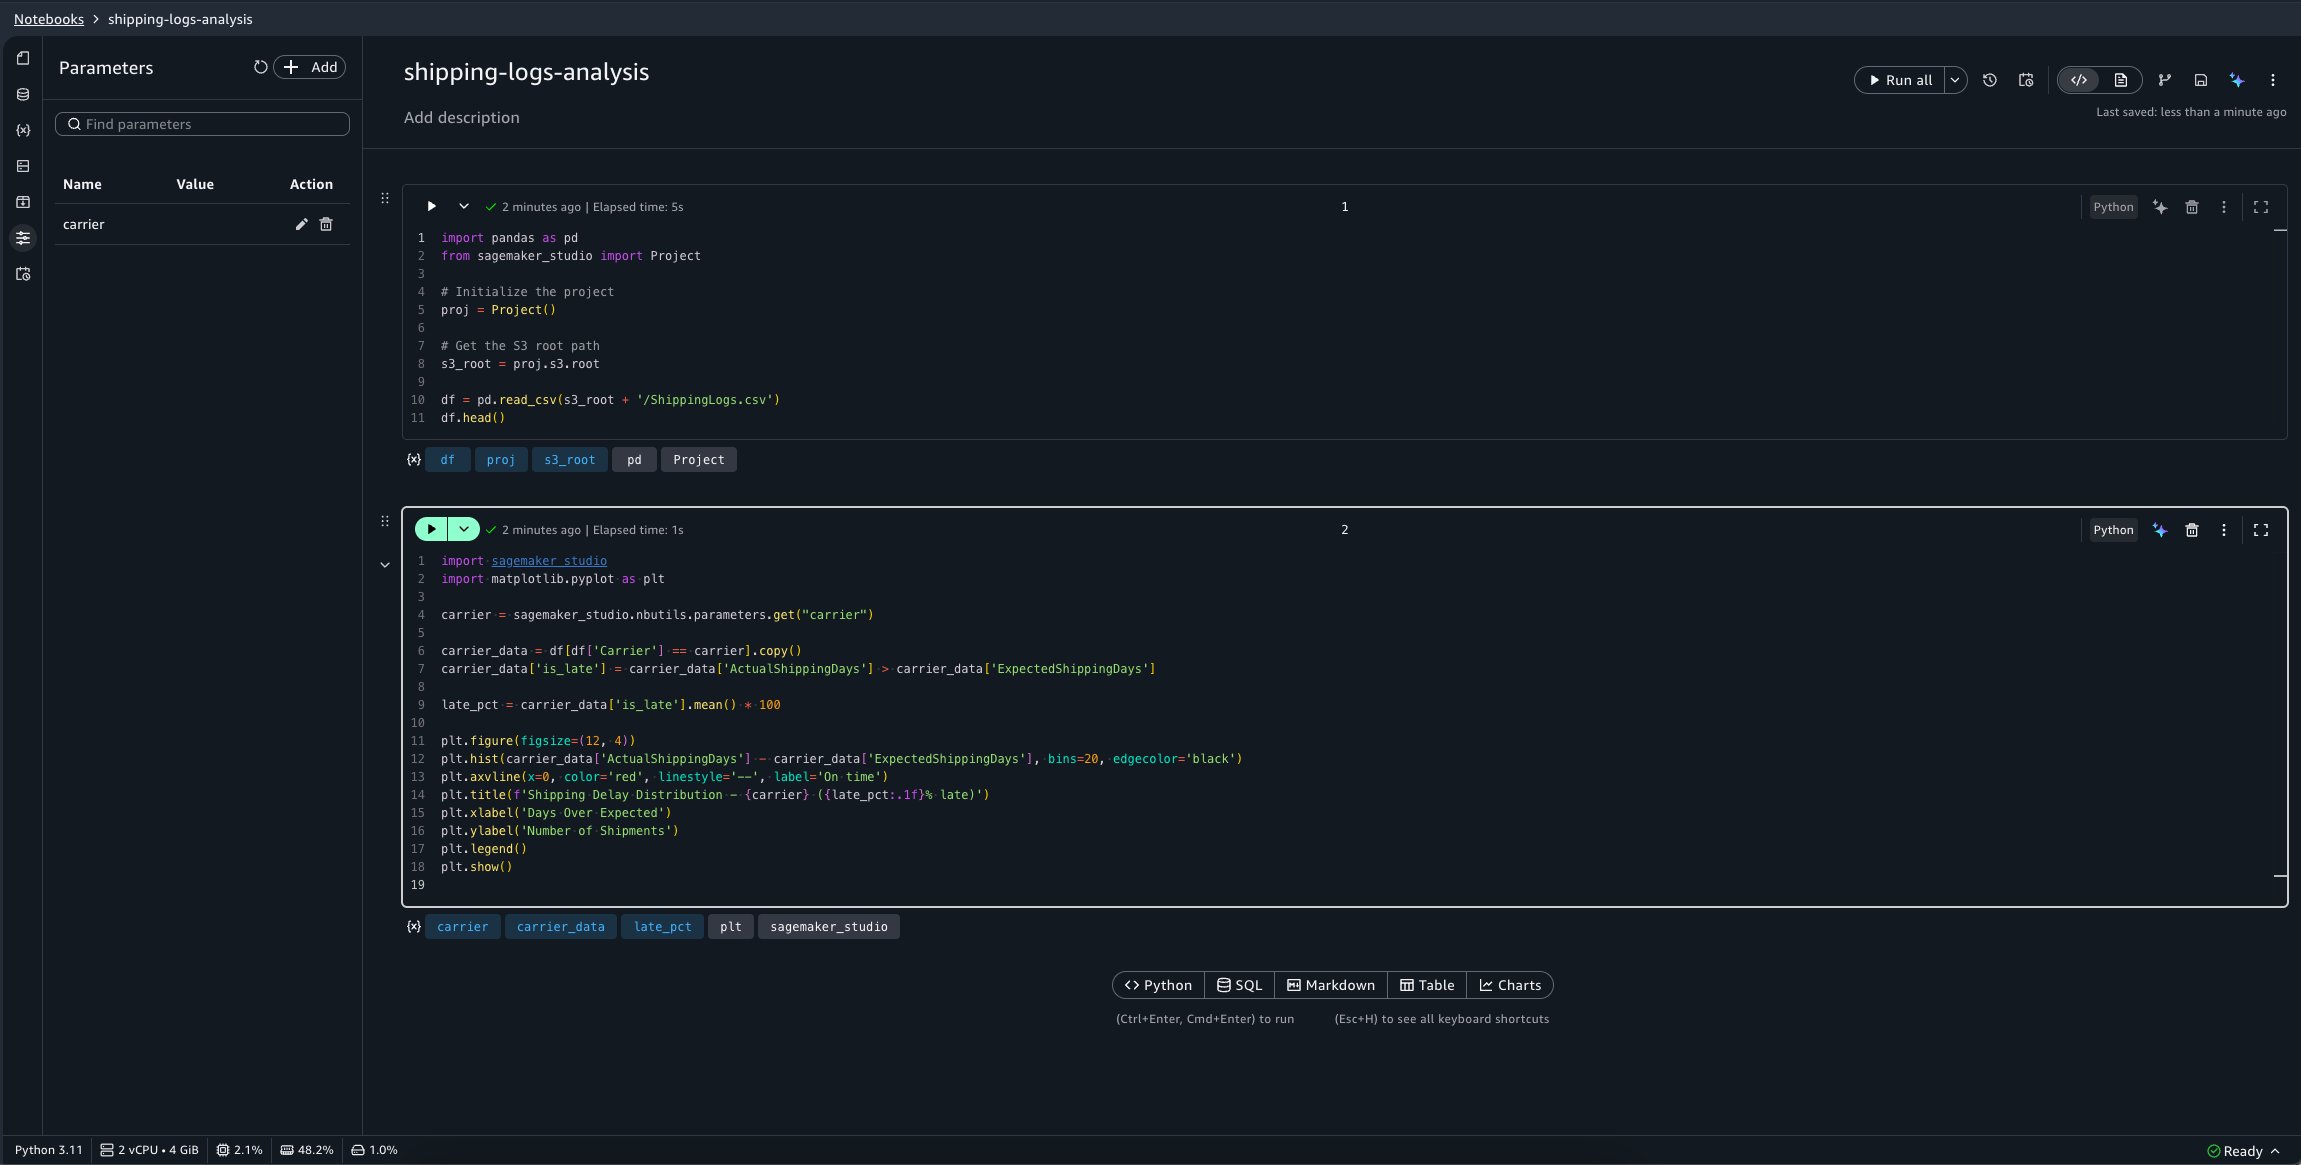
In the first cell, we load and explore the dataset. To reference the file in code, select the file in the Shared tab and copy the Amazon Simple Storage Service (Amazon S3) URI shown in the file details. Alternatively, you can reference it with this code:
import pandas as pd
from sagemaker_studio import Project

# Initialize the project
proj = Project()

# Get the S3 root path
s3_root = proj.s3.root

df = pd.read_csv(s3_root + '/ShippingLogs.csv')
df.head()
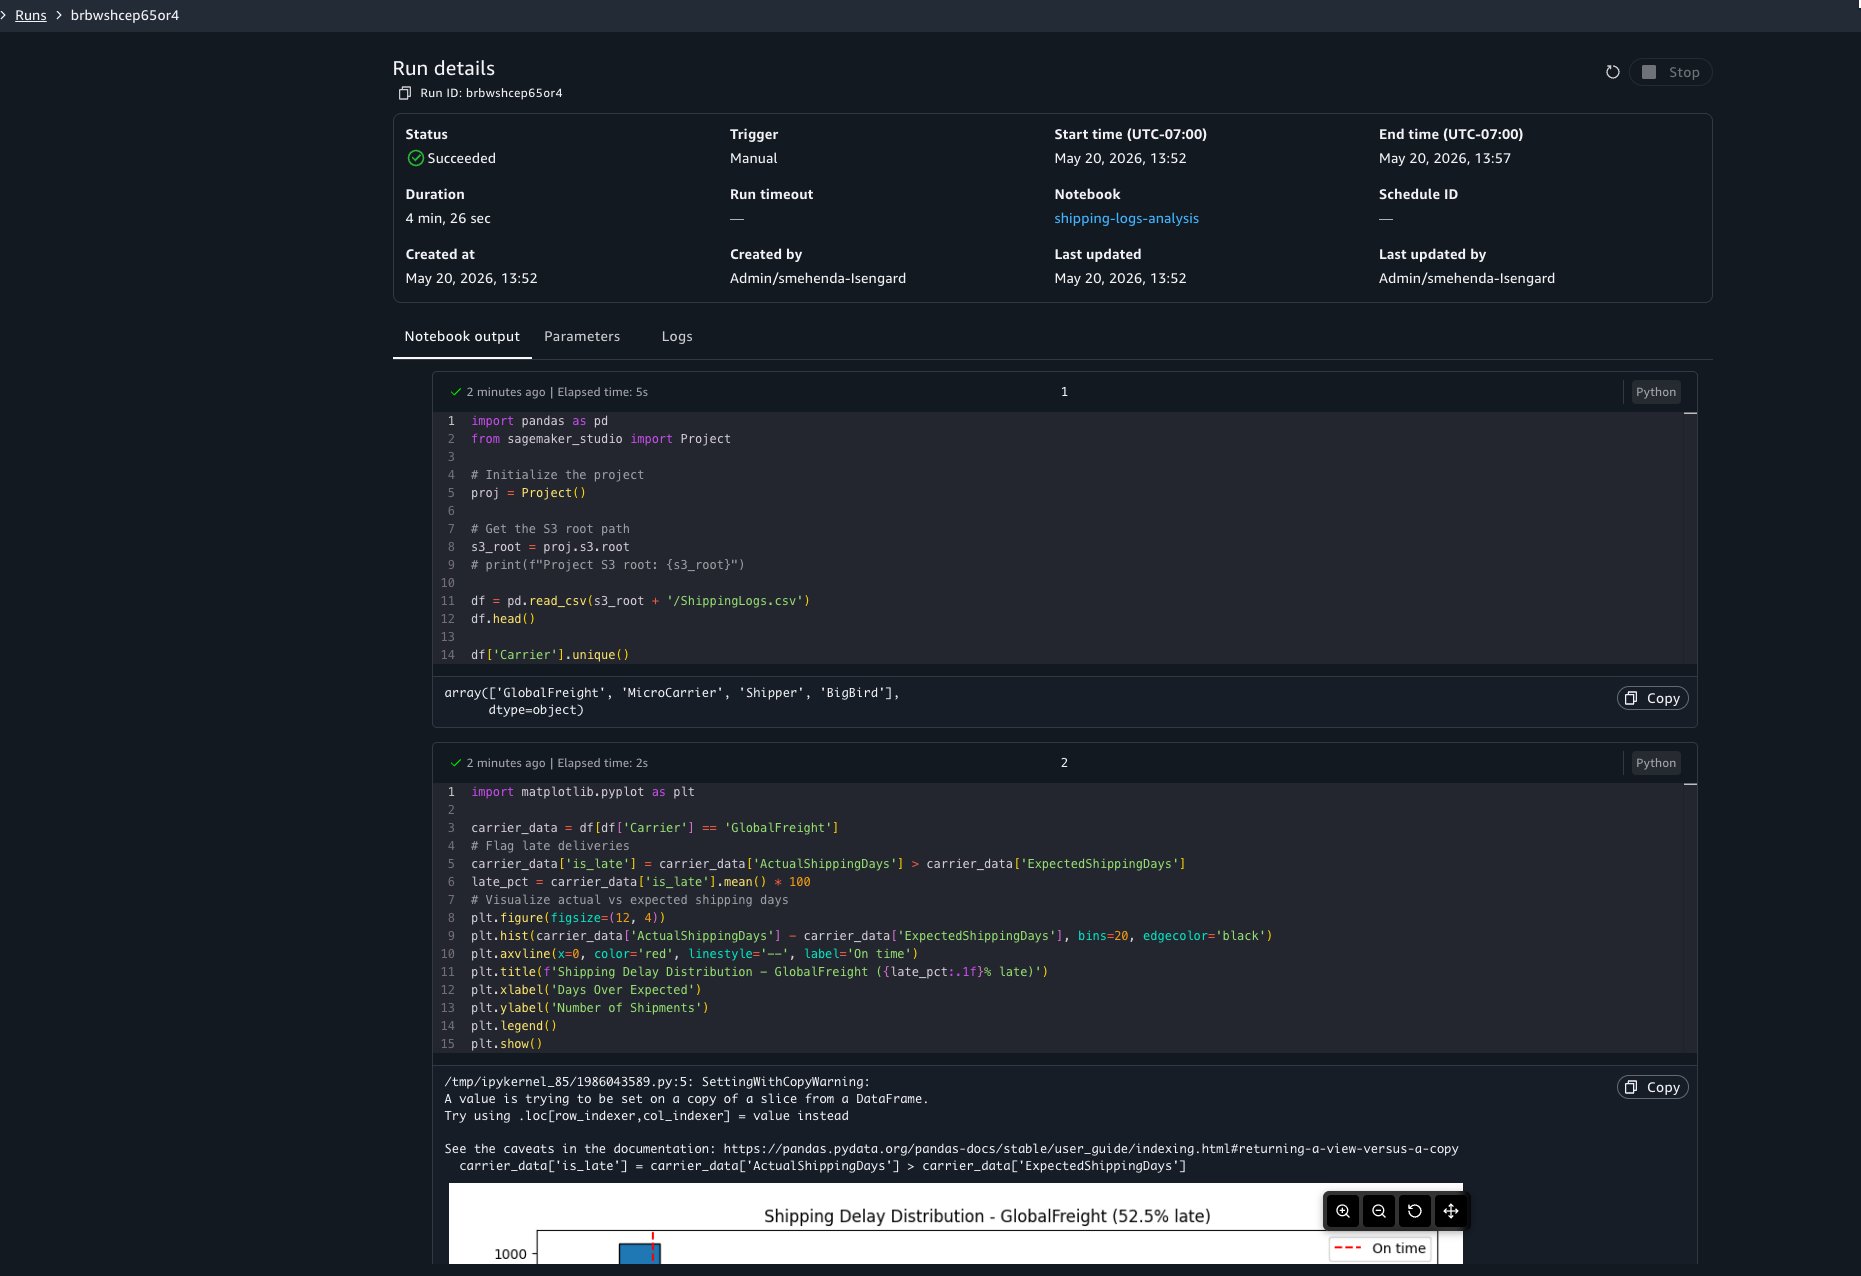
The dataset contains columns including Carrier, ActualShippingDays, ExpectedShippingDays, ShippingOrigin, ShippingPriority, and OnTimeDelivery. Add a second cell to analyze shipping performance for a single carrier:
import matplotlib.pyplot as plt

carrier_data = df[df['Carrier'] == 'GlobalFreight']
# Flag late deliveries
carrier_data['is_late'] = carrier_data['ActualShippingDays'] > carrier_data['ExpectedShippingDays']
late_pct = carrier_data['is_late'].mean() * 100
# Visualize actual vs expected shipping days
plt.figure(figsize=(12, 4))
plt.hist(carrier_data['ActualShippingDays'] - carrier_data['ExpectedShippingDays'], bins=20, edgecolor='black')
plt.axvline(x=0, color='red', linestyle='--', label='On time')
plt.title(f'Shipping Delay Distribution - GlobalFreight ({late_pct:.1f}% late)')
plt.xlabel('Days Over Expected')
plt.ylabel('Number of Shipments')
plt.legend()
plt.show()
With the notebook working interactively, you’re ready to automate it.
Running a notebook asynchronously
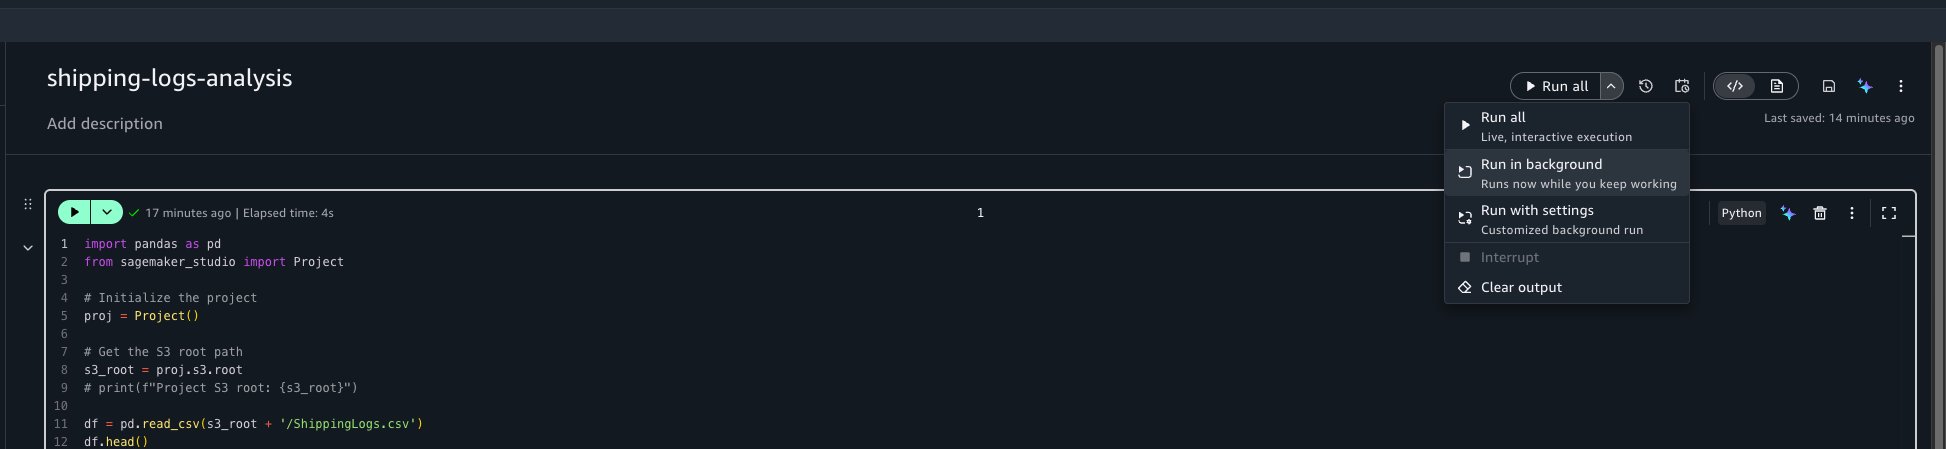
To trigger an asynchronous run, open your notebook. In the notebook header, choose the menu on the Run all button, and then choose Run in background.
This captures a snapshot of the notebook in its current state and starts a run on a separate dedicated compute. You can continue working on other tasks or close the browser entirely. Your interactive session isn’t affected.
You will see a notification at the bottom of your screen confirming that the run started. To check the status of your run, choose View Run in the notification. This opens a view showing every background and scheduled run with its status, duration, and a link to view the full output.
You can choose to view the run details at any point to view results as cells run. The run details include three tabs:
Output: The notebook in read-only mode with cell results rendered, including dataframe outputs, visualizations, and print statements.
Parameters: The parameter values used for this run.
Logs: Run logs for debugging.
You can also access past runs by selecting the View Runs option in the notebook header.
Stopping an in-progress run
If you need to cancel a run, open the run, and choose Stop. The run terminates, and its status updates to reflect the cancellation.
What to know about background runs
Compute: Each background run uses its own dedicated compute, separate from your interactive session. Your interactive work isn’t interrupted.
Packages: The packages that you install through the notebook’s package manager will be available in your background runs. When you use !pip install in code cells, the asynchronous run installs those packages as well.
Local files: Background runs can’t access files stored locally in your notebook environment. Reference data from your project’s shared storage (Amazon S3) or connected data sources instead.
Startup time: Expect a few minutes of startup time while compute is provisioned and your environment is prepared.
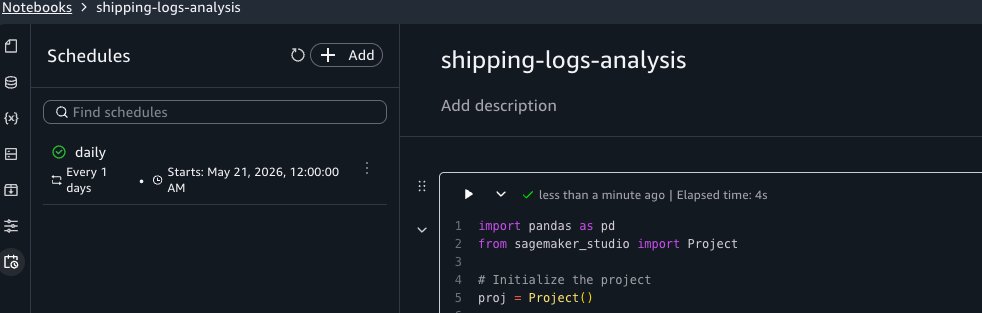
Creating a recurring schedule
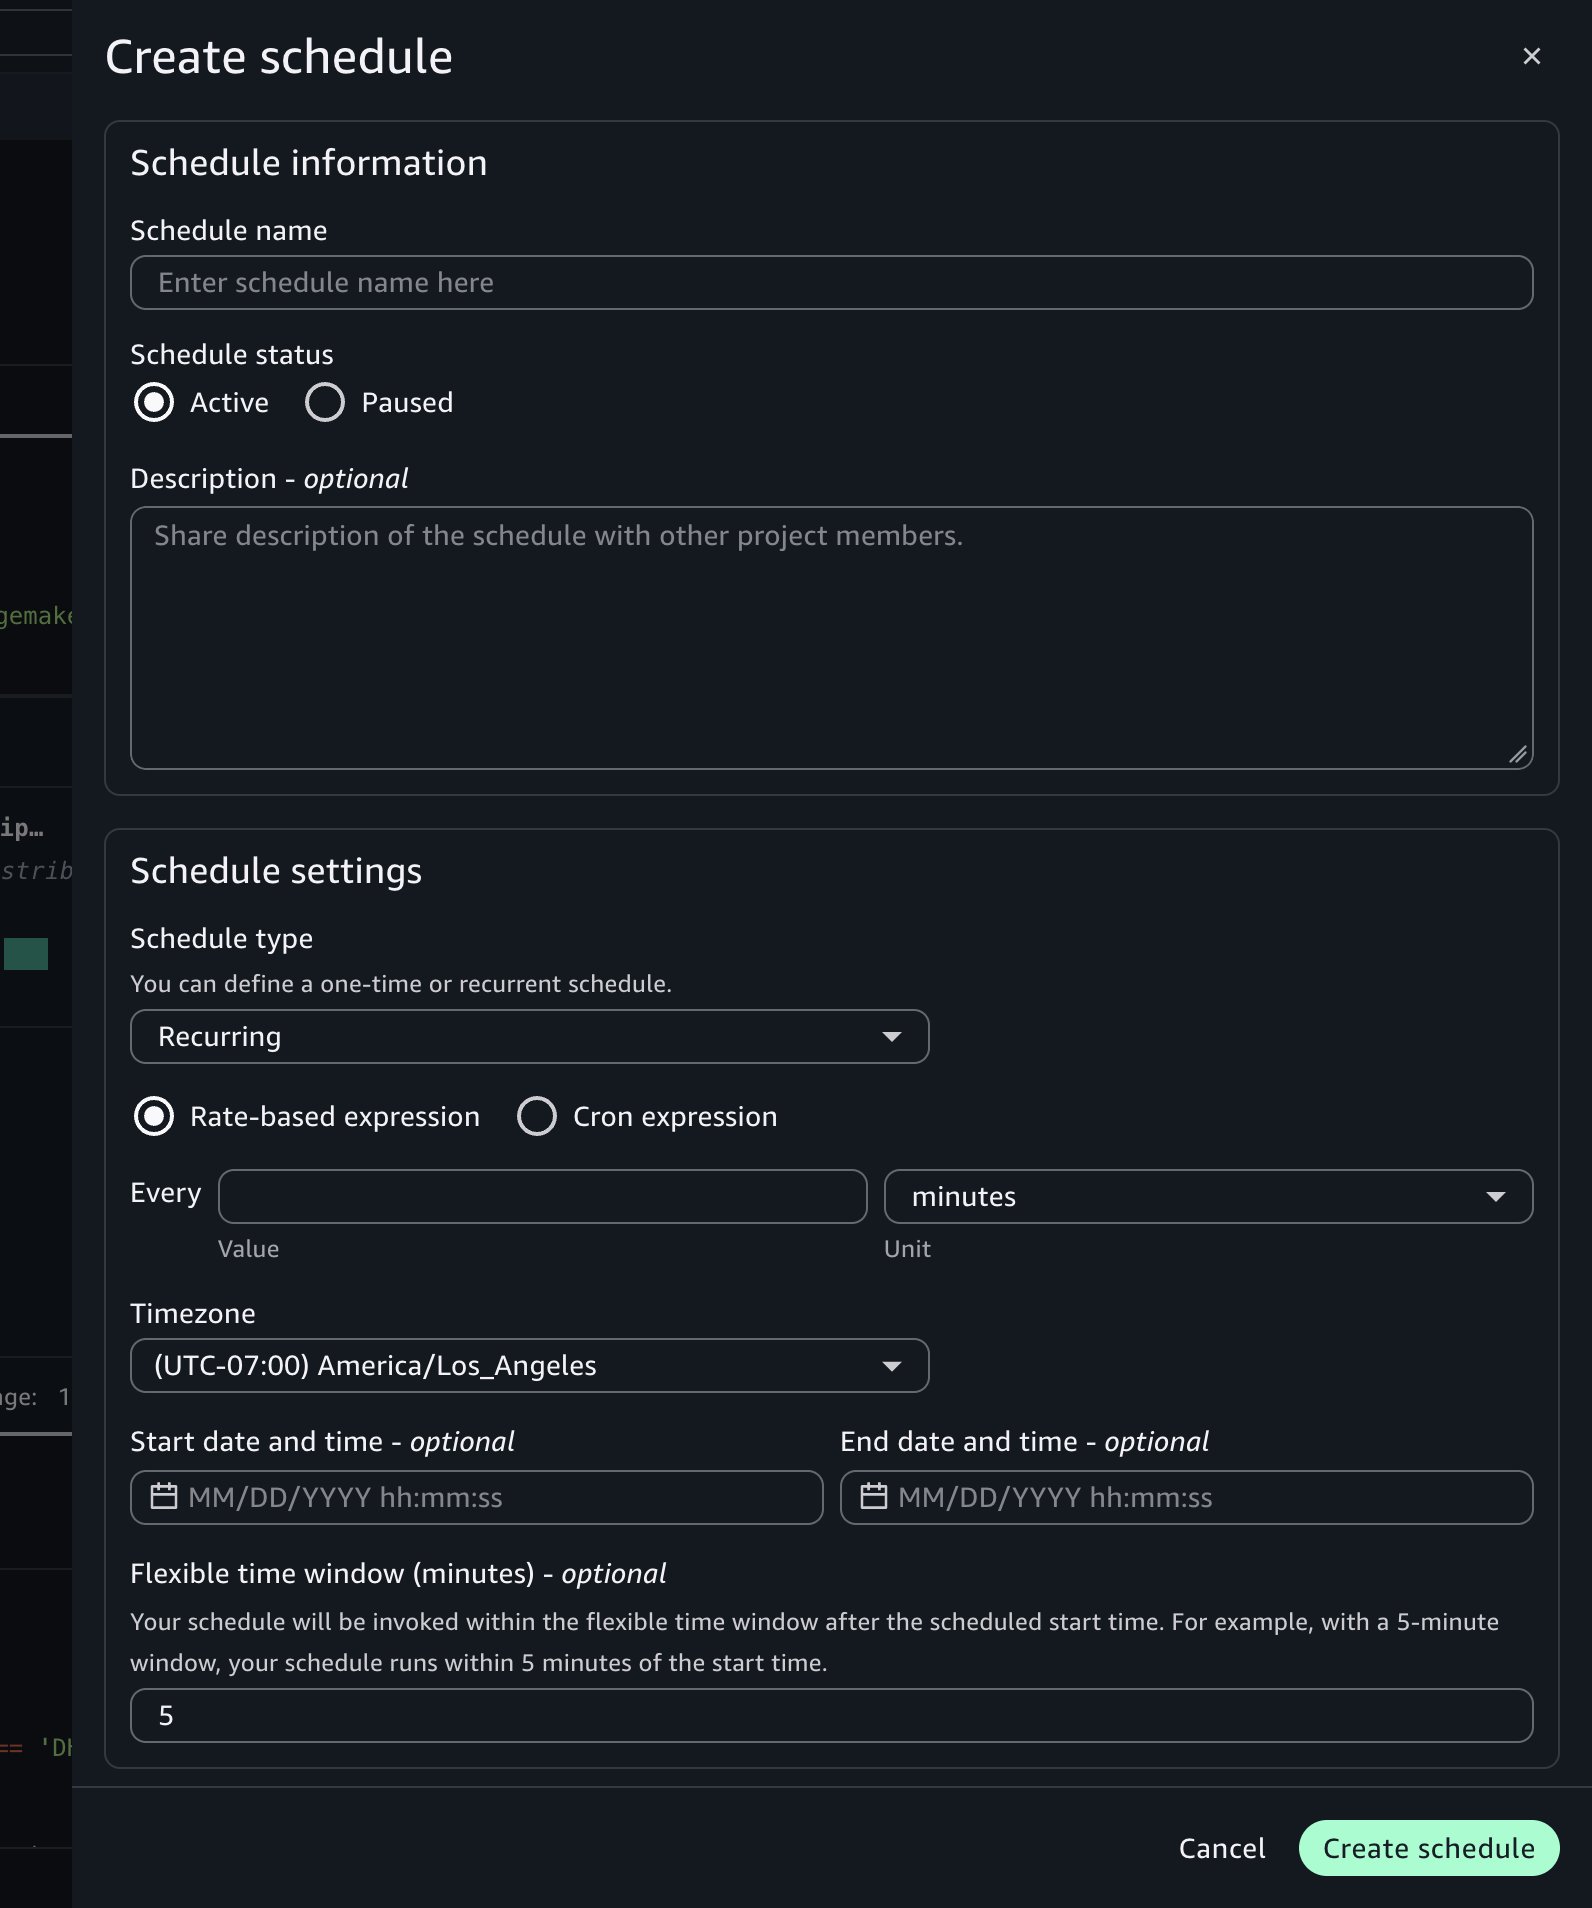
Now that you’ve confirmed asynchronous runs work correctly, you can automate the notebook on a schedule. Choose the schedule icon in the notebook header to open the schedule creation form.
Configure the following settings:
Schedule name: Enter a descriptive name, such as Daily Shipping Report.
Schedule type: Choose Recurring for repeated runs or One-time for a single future run.
Frequency: Define how often the notebook runs using a rate (for example, every one day) or a cron expression. Set the time zone and the start and end dates for the schedule. For example, set the schedule to run every day at 7:00 AM UTC starting tomorrow.
Flexible time window (optional): The number of minutes after the scheduled start time within which the run can be invoked. For example, with a 5-minute window, the notebook runs within 5 minutes of the start time.
Advanced settings:
Compute Instance: Keep the current settings or override with a different instance type for the asynchronous run to use.
Timeout: Set a maximum run duration to help prevent notebooks from running indefinitely. If left blank, it defaults to 60 minutes.
Choose Create.
The schedule appears in the Schedules tab of the activity panel. SageMaker Unified Studio creates an Amazon EventBridge Scheduler schedule for each schedule you configure.
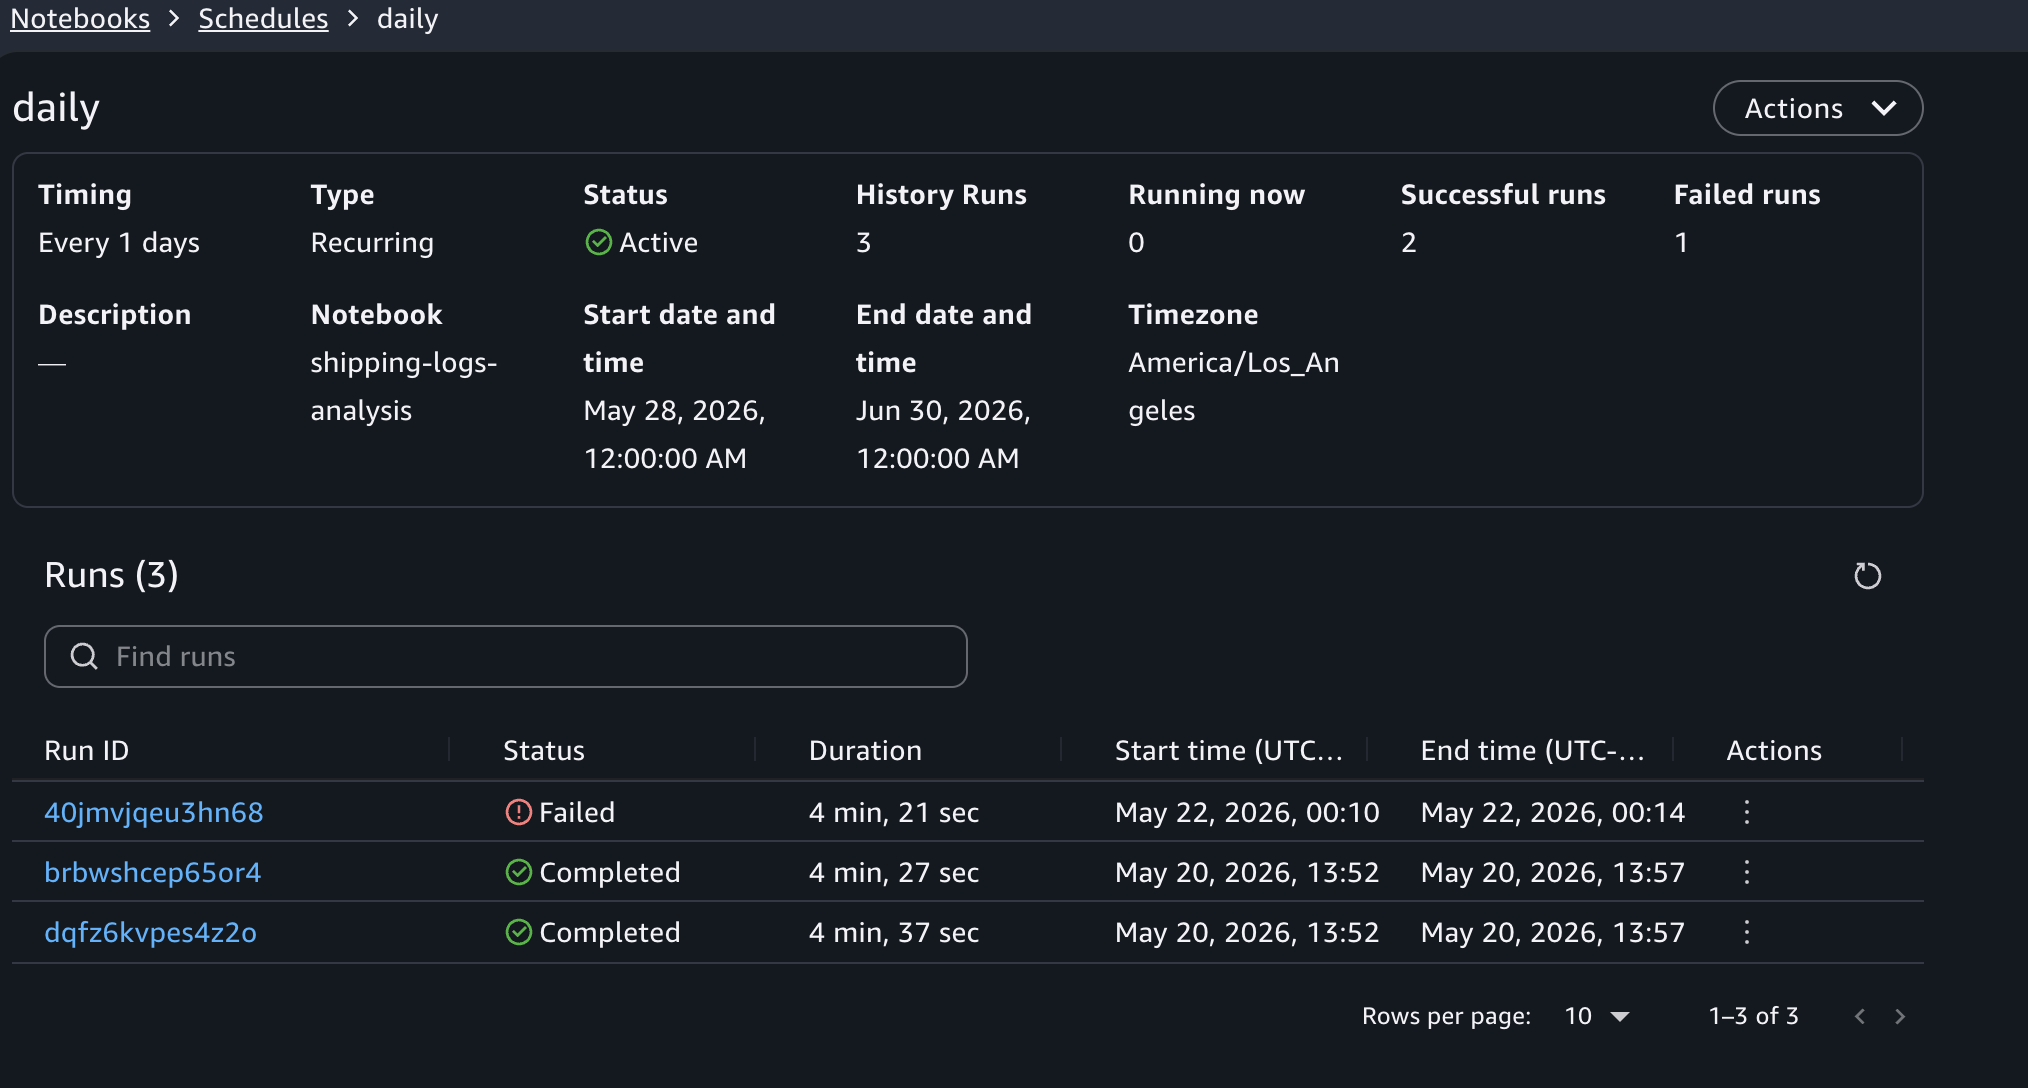
Viewing schedule run history
To view past runs for a schedule, choose the schedule name in the Schedules activity panel. This opens the schedule details view, where you can see the list of runs triggered by that schedule, the duration of each run, and a link to open the notebook output for an individual run.
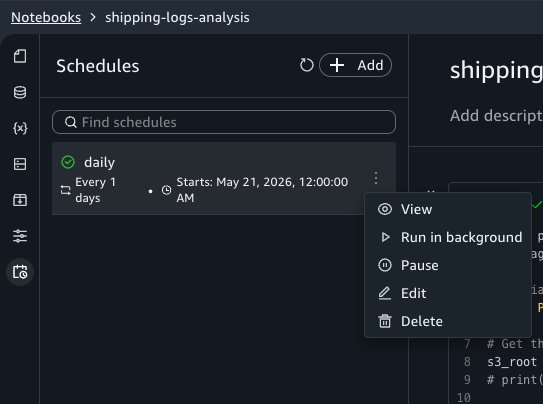
Editing and deleting schedules
To modify a schedule, choose Edit next to it in the Schedules panel. You can change the frequency, instance type, timeout, and other configuration fields. To pause or resume a schedule, choose Pause or Resume from the same menu. To remove a schedule, choose Delete from that menu. Deleting a schedule stops future runs but preserves historical run outputs in Amazon S3 for auditing purposes.
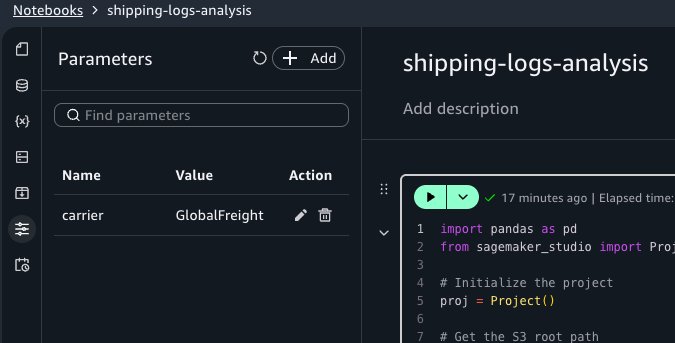
Parameterizing notebooks
With parameters, you can reuse a single notebook across different inputs without duplicating code. For example, you can run the same shipping performance report for each carrier by passing a different carrier name to each run.
Defining parameters
Open the Parameters activity panel and choose Add. Set the parameter name to carrier and the default value to GlobalFreight.
Using parameters in code
In your notebook, replace the second cell with the following code. This retrieves the carrier parameter value using the SageMaker Unified Studio Python SDK instead of the hardcoded value:
Creating schedules with different parameter values
Now create three schedules for the same notebook, each targeting a different carrier:
“daily-shipping-gf” with carrier = GlobalFreight.
“daily-shipping-mc” with carrier = MicroCarrier.
“daily-shipping-shipper” with carrier = Shipper.
When you view a historical run, a separate Parameters tab in the run output displays the parameter values that were active for that run.
You can also override parameter values when triggering an on-demand background run. Choose the menu on the Run all button, then choose Run with settings. You can keep the defaults or provide custom values for that run.
Orchestrating with Workflows
To combine notebooks into a multi-step pipeline, such as running a data calculation notebook before the shipping log notebook, you can use the Notebook Operator in the Workflows tool to orchestrate them.
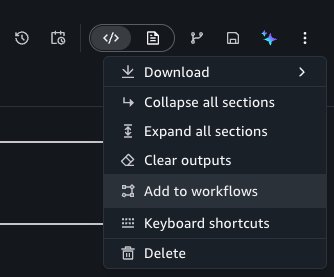
To do this, choose the Add to workflows button under the options menu of the notebook header.
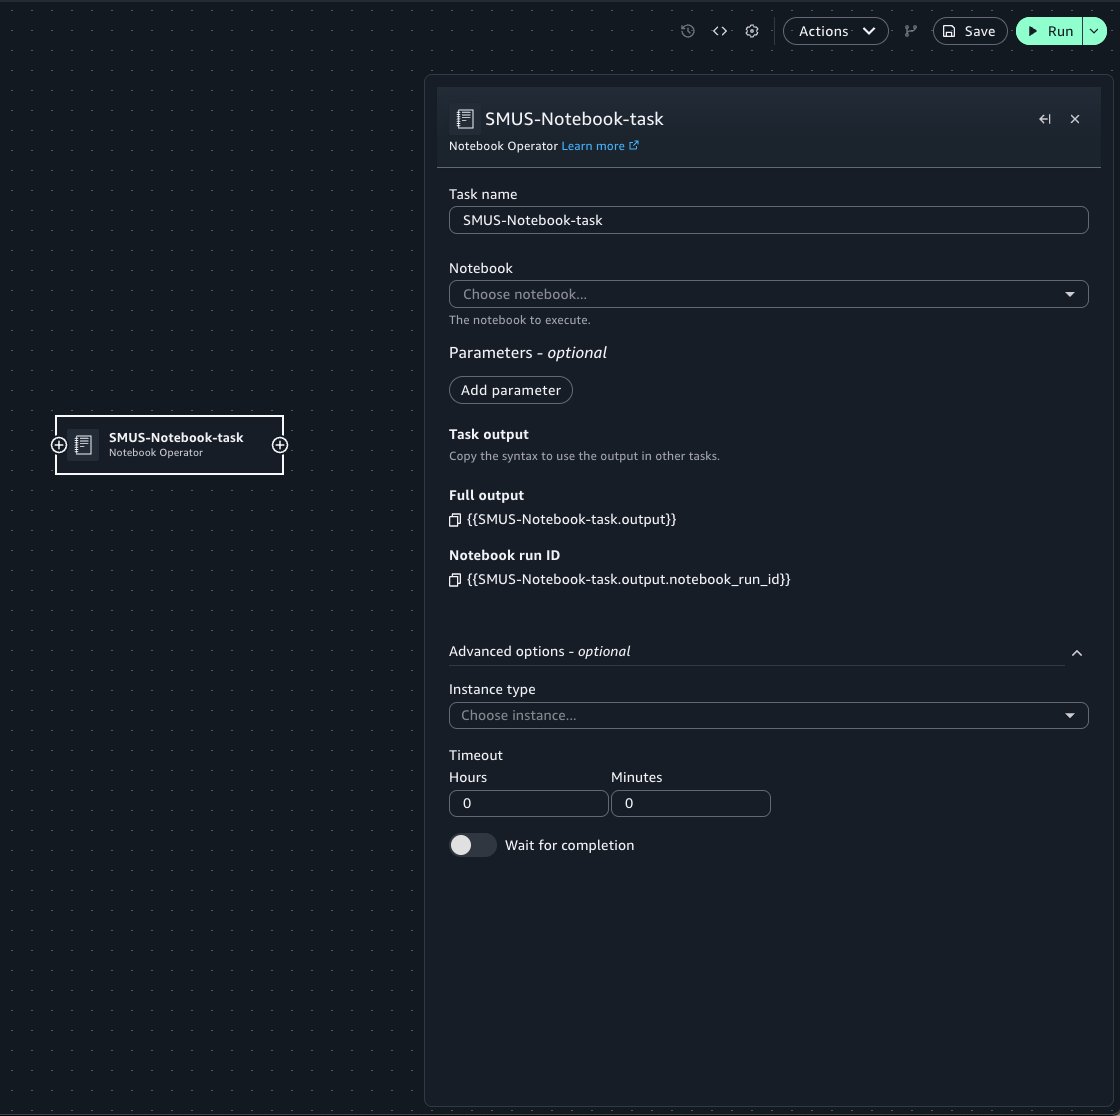
This takes you to the Workflows tool, adding a new Notebook Operator task with prefilled properties from your notebook. When configuring the Operator task:
Select the target notebook from the notebook menu.
Use the Parameters widget to pass notebook parameters into the run of the notebook.
Specify optional arguments such as the compute instance and timeout configuration for the run.
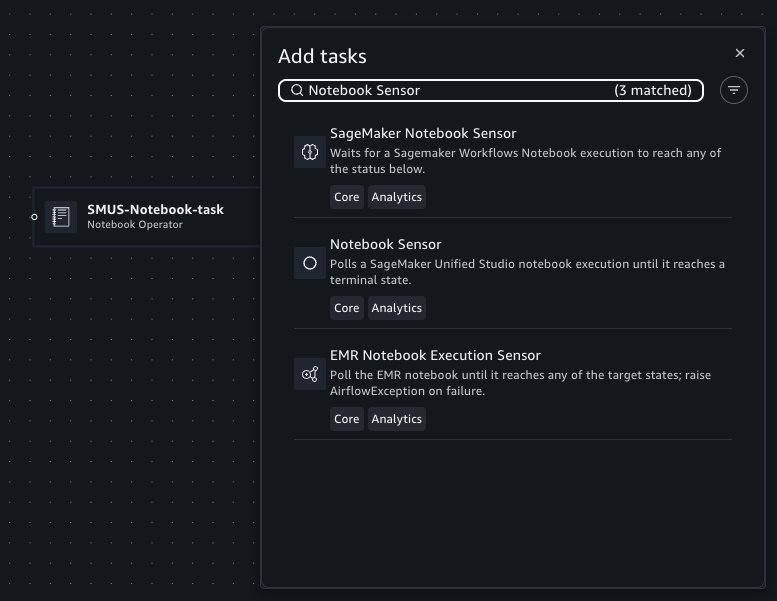
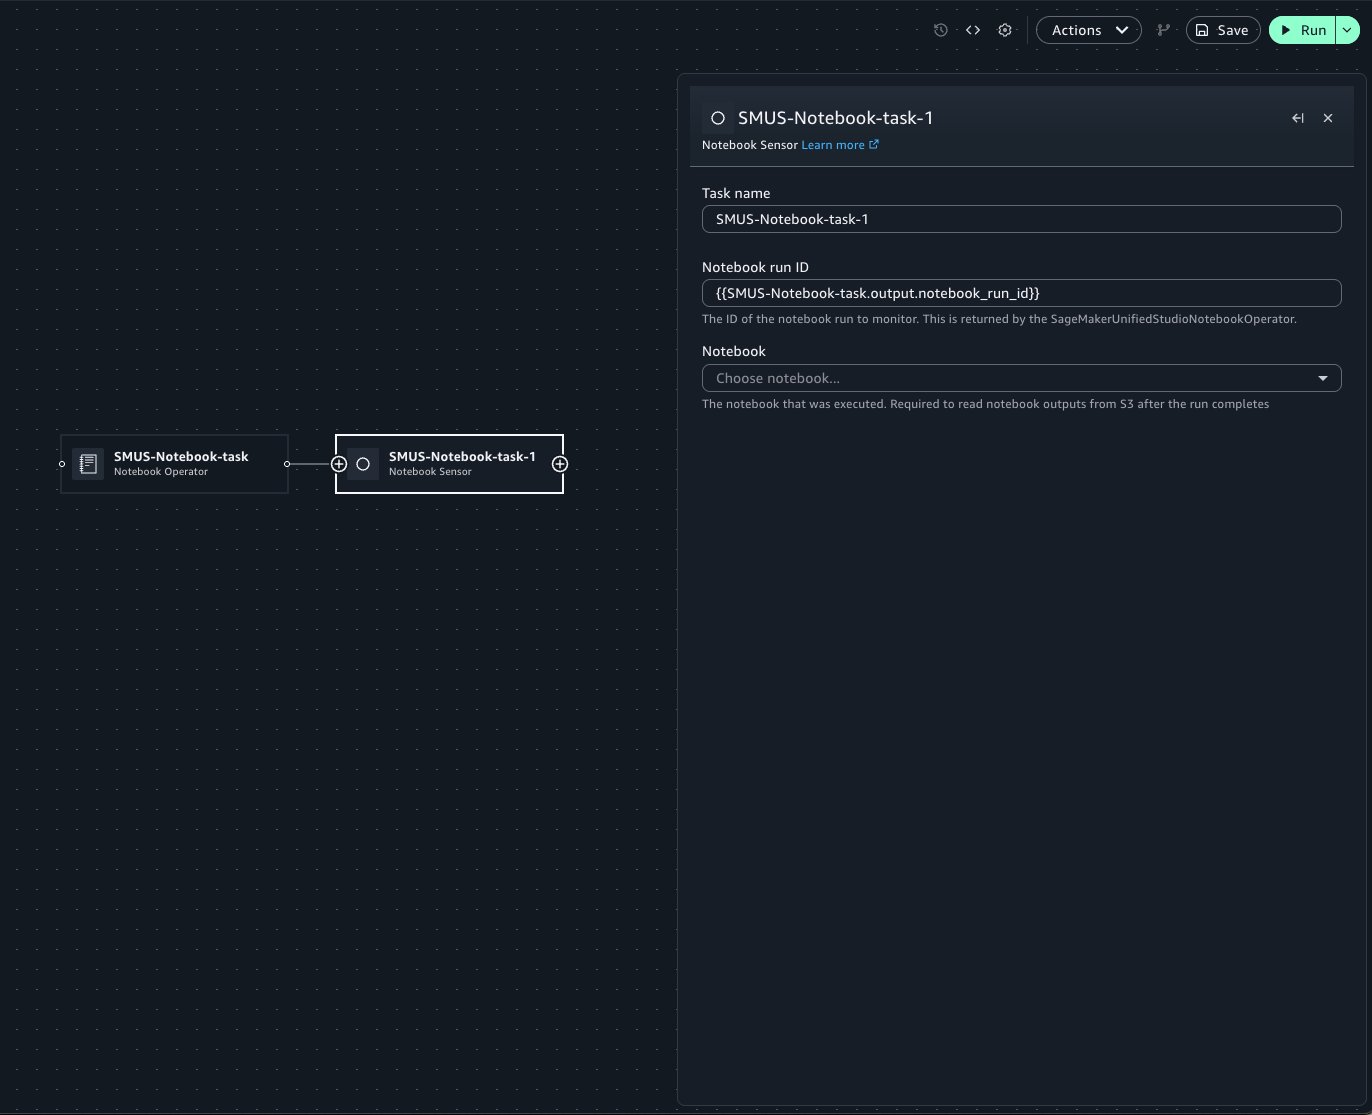
Workflows also supports polling for the status of a notebook run for a particular notebook using Notebook Sensor. In Workflows, you can add a new Sensor task by hovering on the edge of the existing Operator task, where a plus (+) button is displayed.
You can then search for and add the Notebook Sensor to the canvas.
When configuring the Sensor task, specify the notebook run ID within the text field. The Operator’s form field contains Jinja templating to retrieve the notebook run. If the Sensor is used within the same workflow as the Operator, this template can be copied to use within a Sensor to poll the notebook run. Select the target notebook from the notebook menu.
Within Workflows, you can configure notebook runs to emit outputs and use those outputs as inputs for subsequent notebook runs.
Building off of the previous shipping log notebook example, we will pass the carrier parameter from an upstream notebook’s output. Your shipping-logs-analysis notebook should be already set up.
Because the notebook depends on the carrier parameter, you can specify it in the Parameters panel.
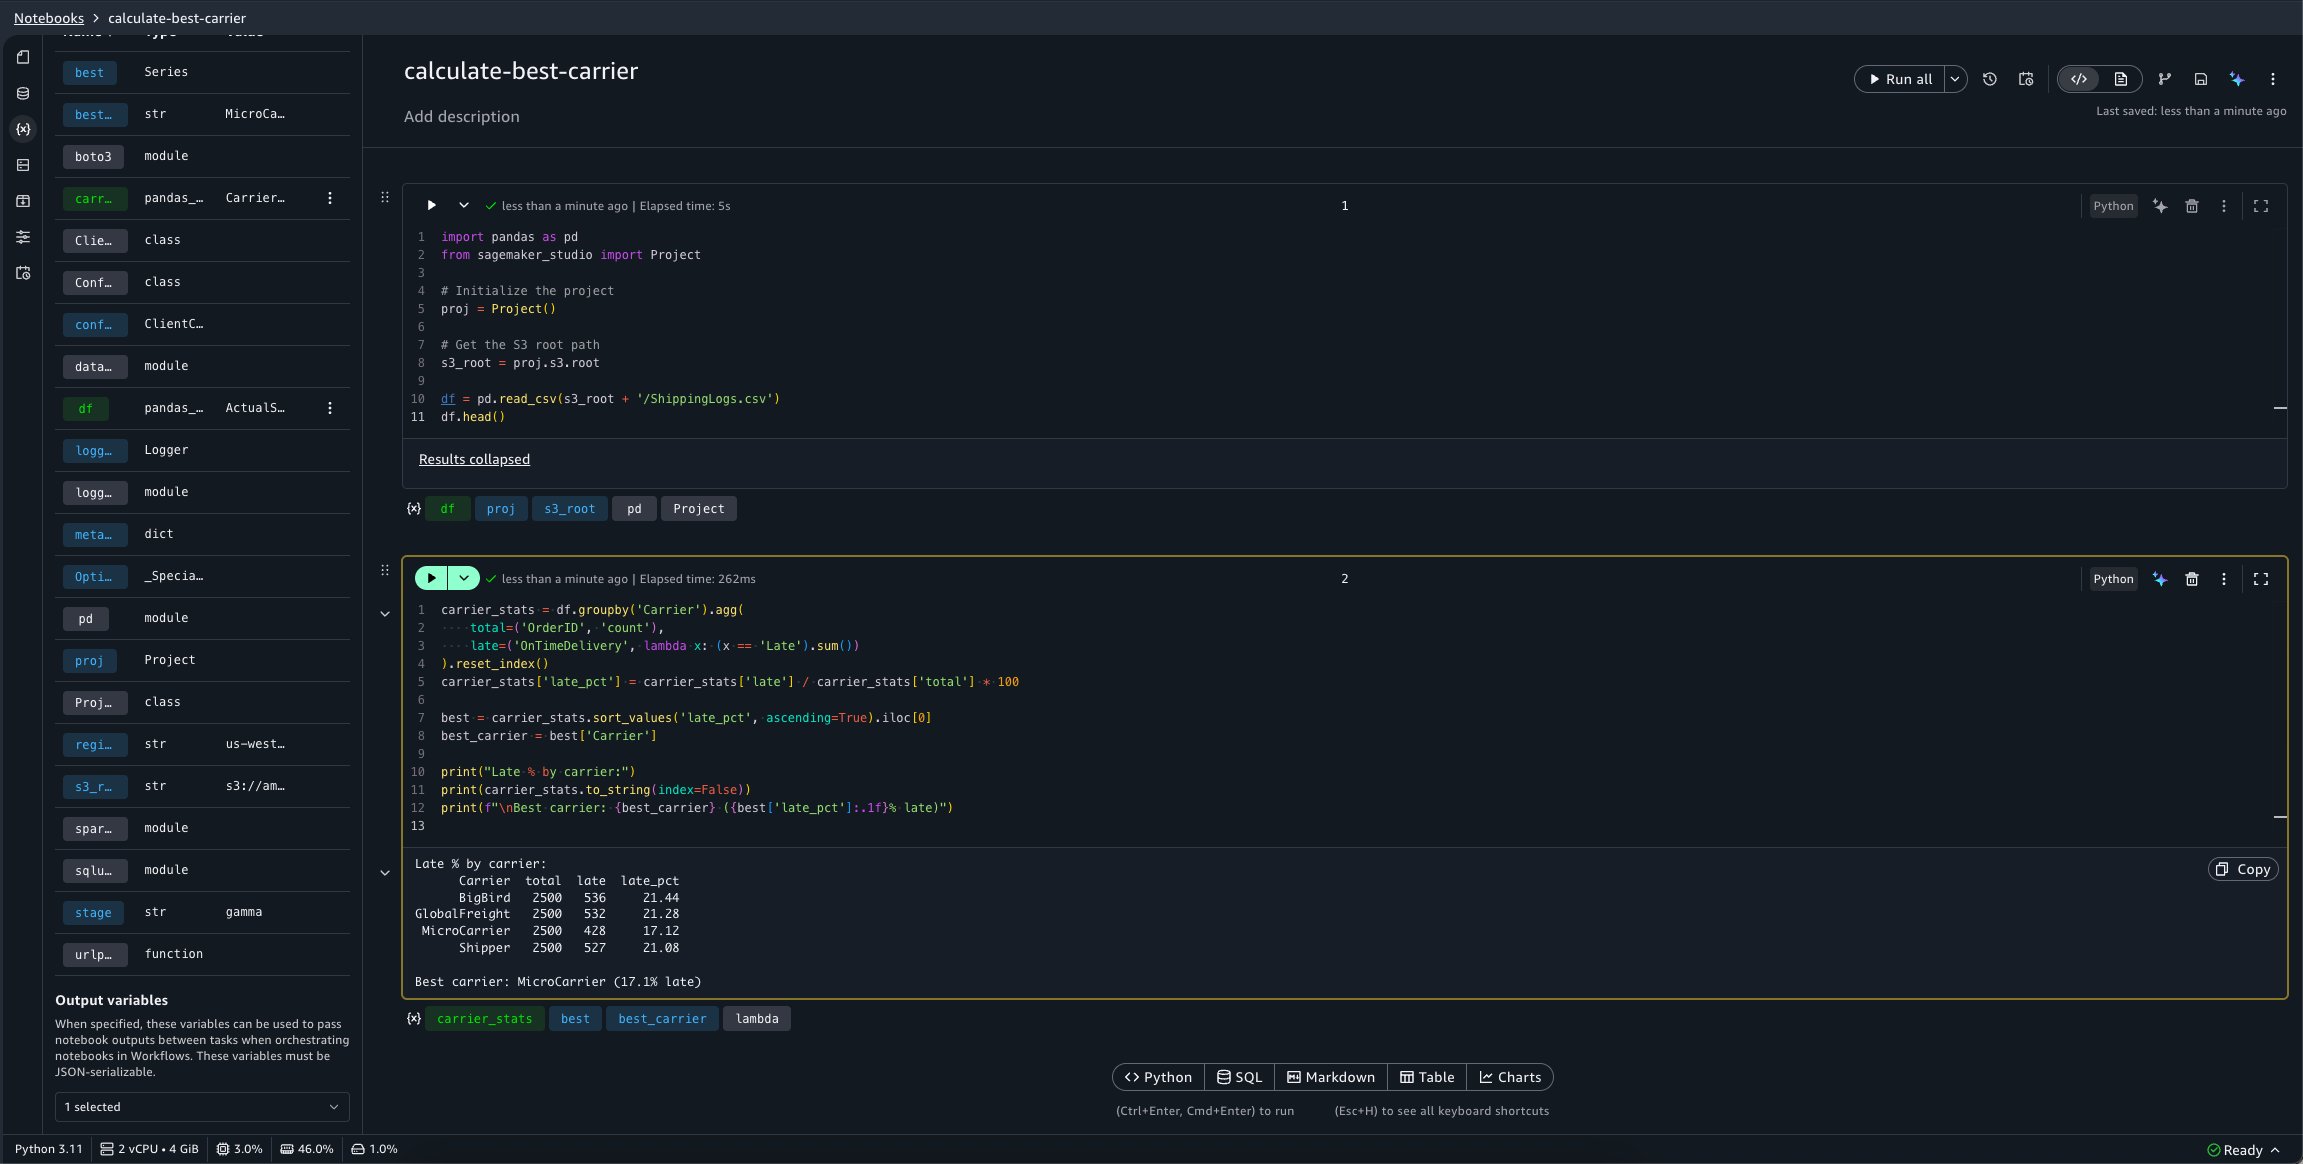
Now, define a second notebook, calculate-best-carrier, which performs a calculation to determine our best carrier to use for shipping:
import pandas as pd
from sagemaker_studio import Project

# Initialize the project
proj = Project()

# Get the S3 root path
s3_root = proj.s3.root

df = pd.read_csv(s3_root + '/ShippingLogs.csv')
df.head()

carrier_stats = df.groupby('Carrier').agg(
    total=('OrderID', 'count'),
    late=('OnTimeDelivery', lambda x: (x == 'Late').sum())
).reset_index()
carrier_stats['late_pct'] = carrier_stats['late'] / carrier_stats['total'] * 100

best = carrier_stats.sort_values('late_pct', ascending=True).iloc[0]
best_carrier = best['Carrier']

print("Late % by carrier:")
print(carrier_stats.to_string(index=False))
print(f"\nBest carrier: {best_carrier} ({best['late_pct']:.1f}% late)")
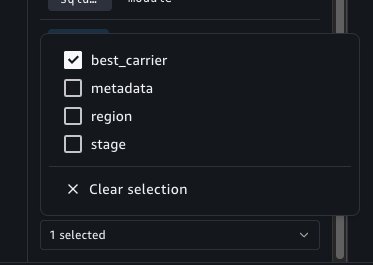
To configure the calculate-best-carrier notebook’s outputs, you can choose the Variables panel. A new selector is available at the bottom of this panel which allows you to select variables to mark as outputs.
We want this notebook to emit the best_carrier variable.
Now, use the Add to workflows button as previously demonstrated to quickly add this notebook within a workflow. Chain a second Notebook Operator that points to our shipping-logs-analysis notebook. Because we specified a parameter dependency on carrier for this notebook, it’s available as an option in the Parameters widget menu.
When they’re chained, the notebook tasks detect the outputs set in upstream notebook runs. These outputs can be selected as keys within the Parameters widget of the Operator to pass into the run. This can be done recursively for an arbitrary number of Operator tasks. We can select the emitted best_carrier output from the calculate-best-carrier notebook.
You can now choose the Save button on the top left of the visual canvas and the Run button to start the workflow. When the workflow is completed, the specified notebook outputs are available in the Task Output panel and the notebook run result can be viewed in the Notebooks tool.
In a similar manner, the Notebook Sensor will also emit the notebook outputs from a particular notebook’s run which can be used within other tasks. This is useful when you want to retrieve outputs from a notebook run in another workflow.
Debugging a failed run with AI assistance
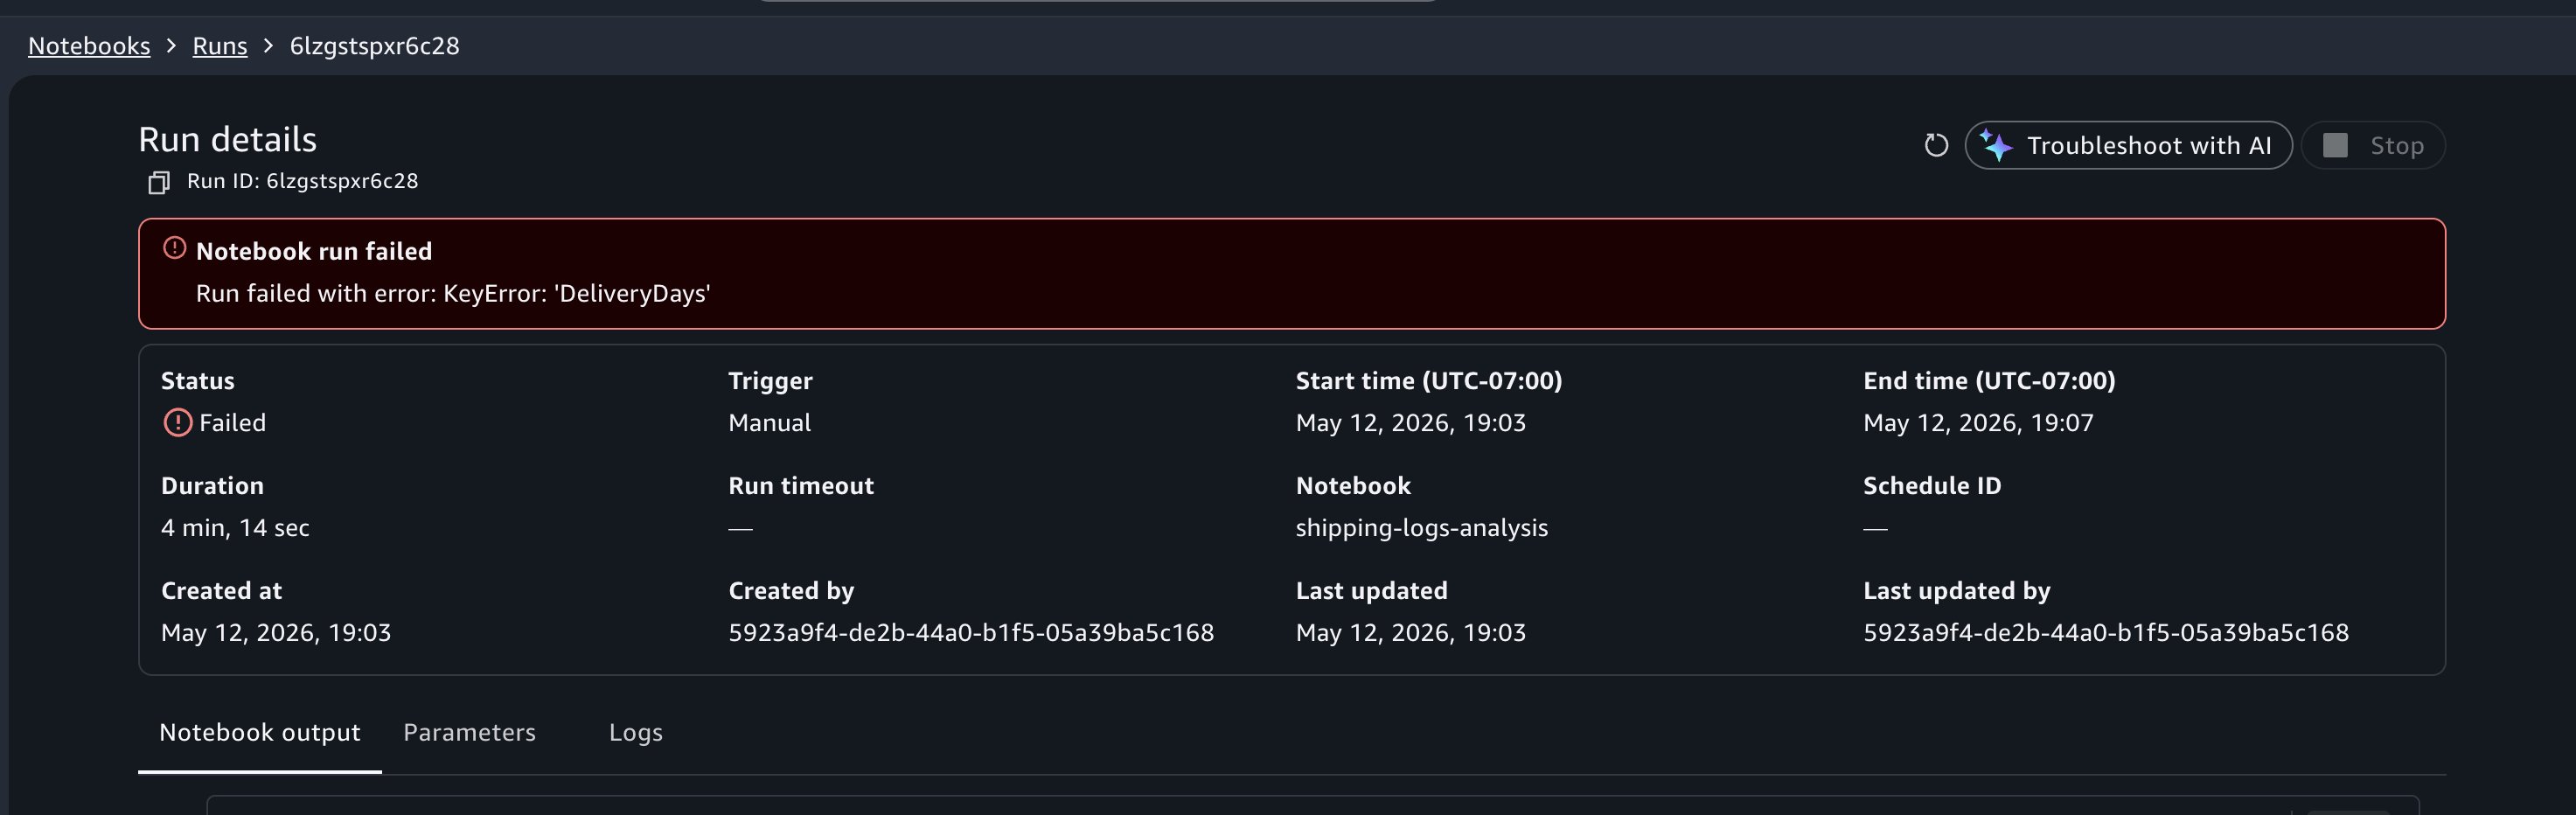
When viewing your past runs, you notice that a run from earlier today has a Failed status. Choose the failed run to open the notebook output in read-only mode.
In this example, suppose you incorrectly referred to column name ActualShippingDays as DeliveryDays. The run would fail with a KeyError: 'DeliveryDays' in the cell that computes late deliveries.
At the top of the failed run output, choose Troubleshoot with AI. Choosing the Troubleshoot with AI button lands you in the notebook with the Agent chat panel open.
The data agent analyzes the cell outputs, identifies the cell that errored, explains the root cause, and suggests a fix. In this case, it identifies that the column DeliveryDays doesn’t exist in the dataframe and suggests updating the code reference. You can review the change, then verify the fix by choosing Run in background from the Run all menu to trigger a test run before the next scheduled run.
Note: You can also use the Data Agent to create schedules and start notebook runs using natural language, without having to navigate.
Cleaning up
To avoid incurring future charges, delete the resources that you created in this walkthrough:
Delete any schedules that you created from the Schedules panel in your notebook.
Delete test notebooks if you don’t need them.
Navigate to the Workflows page and delete any workflows that you created during this walkthrough.
Your project’s Amazon S3 storage retains historical run outputs until you manually remove them.
Conclusion
In this post, we showed how to run notebooks in the background in Amazon SageMaker Unified Studio using background runs, schedules, parameterization, workflow orchestration, and AI-assisted debugging. Using a shipping logistics dataset, we demonstrated how a single notebook can be parameterized to generate performance reports for different carriers on independent schedules, all without duplicating code or managing extensive infrastructure.
To get started, open a notebook in your SageMaker Unified Studio project, choose the menu on the Run all button in the notebook header, and choose Run in background. For more advanced use cases, explore workflows in Amazon SageMaker Unified Studio to build multi-step data pipelines, or review the Amazon SageMaker Unified Studio User Guide for additional configuration options.
What do the organizations that succeed at digital transformation have in common? They align business and technical stakeholders around a shared plan before writing a single line of code. Yet research from McKinsey shows that 70 percent of transformations fail. Stakeholder misalignment and the inability to scale initiatives beyond initial pilots are patterns we see repeatedly across these failures. Before you architect your workloads, your team must agree on which ones deserve focus first.
In this post, we show you how to run a one-hour prioritization session with your stakeholders, plot competing initiatives on a shared matrix by cost and impact and turn the result into an actionable architecture backlog – using a framework called Tech Roadmap Prioritization (TRP).
The architect’s challenge
You’re facilitating alignment between five competing initiatives, but your organization only has capacity to execute two. Who decides? Without structure, decisions default to political influence or recency bias. High-value work stalls while low-impact projects consume resources.
Consider this scenario: your organization has competing initiatives such as a new product launch, application modernization, sales expansion, and security upgrades. Business and technical leaders each hold different priorities, share no view of tradeoffs, and have no shared way to decide what gets done first.
Developers work story backlogs. Support teams work ticket queues. As an architect, your backlog is the set of prioritized initiatives your organization needs to execute, and TRP is how you build it with your stakeholders.
The TRP framework
In approximately one hour, you bring business and technical owners into the same room and build a shared roadmap together. At every stage of your cloud journey, you face competing workloads that require your team’s attention. TRP gives you a repeatable way to decide which ones come first. You produce a single visual artifact: a modified prioritization matrix adapted for architecture roadmapping that plots your initiatives by cost and complexity against business impact.
The initiatives that you surface in TRP feed directly into the AWS Cloud Adoption Framework (AWS CAF) Envision phase, where you can connect business goals to enabling technologies and evaluate initiatives across the CAF’s six perspectives. TRP gives you the starting artifact and AWS CAF gives you the structured analysis that follows.
Why a visual roadmap?
You track your technology initiatives across spreadsheets, slide decks, and hallway conversations. Your business leaders frame urgency in revenue terms. Your technical leaders frame it in risk terms. No single artifact exists where both can view every initiative, its relative priority, and the reasoning behind it. TRP produces that artifact. One hour, one room, one artifact. You plot each initiative on a matrix where position alone communicates priority, and the conversation shifts from “my initiative matters more” to “where does this land relative to everything else?”
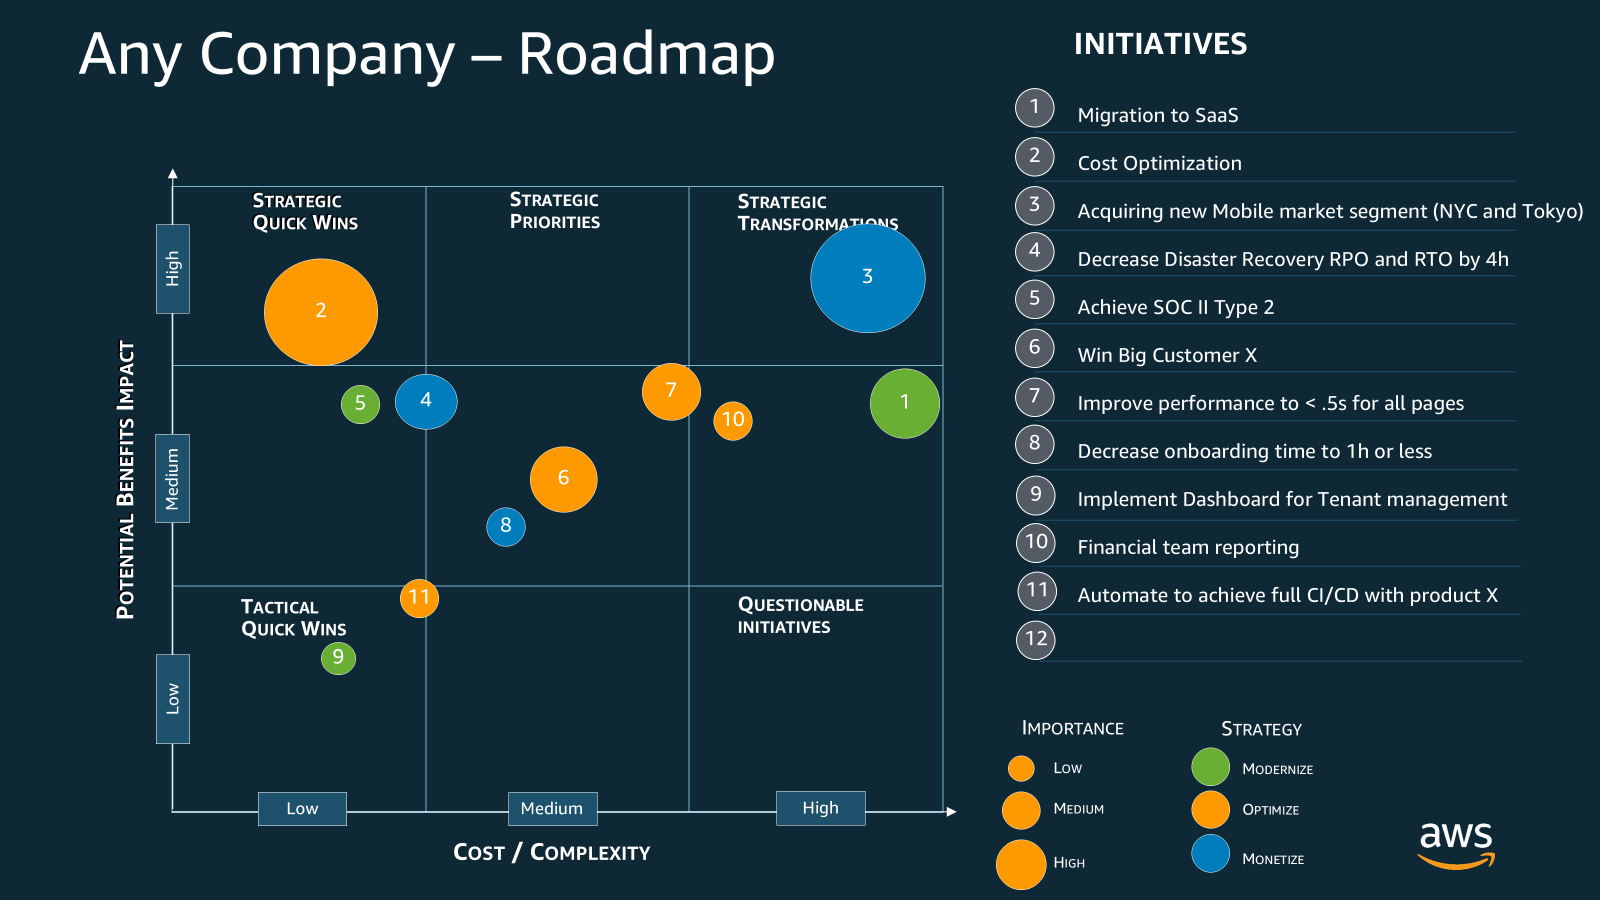
The TRP matrix
You represent each initiative as a numbered bubble. The numbers are identifiers, not a priority ranking. Priority is determined by position on the matrix, which you read using five visual cues:
X-axis position: Cost and complexity of the initiative (low to high).
Y-axis position: Potential benefits and business impact (low to high).
Bubble size: Strategic importance to the organization (small = low, large = high).
Bubble color: Strategy type based on the Modernize, Optimize, Monetize (MOM) framework. Healthy cloud architectures balance all three: yellow = Modernize (improve what exists), blue = Optimize (reduce cost or increase efficiency), green = Monetize (generate new revenue).
Position on the matrix: Where a bubble lands reveals its priority. Upper-left = strategic quick wins (high impact, low cost). Upper-right = strategic transformations (high impact, high cost). Lower-left = tactical quick wins. Lower-right = questionable initiatives that should wait.
What each position tells you to do
After you plot your initiatives, position on the matrix tells you more than priority. It tells you what kind of work comes next.
Upper-left: Strategic quick wins. High impact, low cost. You execute these now. Assign an owner, set a delivery date, and get moving. These build momentum and demonstrate early value to your stakeholders.
Upper-right: Strategic transformations. High impact, high cost. Look at a large blue bubble here, like initiative 1 (Migration to SaaS) in the sample. This delivers high value but carries significant risk. You don’t commit resources to this on day one. You de-risk it first. Run a proof of concept. Schedule workshops to close skill gaps. Identify the complexity drivers and investment requirements, then remove them before you scale. Your job as the facilitator is to define the path from “we want this” to “we’re ready to build this.” For initiatives requiring skills your organization lacks, engage AWS Partners to de-risk and accelerate the work.
Lower-left: Tactical quick wins. Low impact, low cost. Delegate or batch these small wins together. They won’t move the needle on their own, but they clear the backlog and free up attention for the strategic work above.
Lower-right: Questionable initiatives. Low impact, high cost. You park these. They stay visible on the matrix so stakeholders know they haven’t been forgotten, but you don’t invest in them until the business case changes. If someone pushes for one of these, you point to the matrix and ask what moves off the board to make room.
Your architecture decisions start here. Each quadrant demands a different response, and the matrix gives you the shared language to explain why.
Look at initiative 2 in the sample, Cost Optimization. It sits in the upper-left as a large yellow bubble: high impact, low cost, high strategic importance, optimization strategy. That is your first move. Initiative 1 (Migration to SaaS) ranks second: high impact but high cost, meaning you de-risk it before committing. You read every initiative the same way, and the full priority order emerges from the diagram itself.
Now that you know how to read the matrix, here’s how to run the session that creates it.
How to run a one-hour roadmap session
You are the facilitator, not a participant, not a decision-maker. The decisions belong to the business and technical owners in the room. Your role is to keep the group moving, protect the scope, and ensure every voice is heard. TRP isn’t a substitute for capacity planning, project sequencing, or backlog management – those follow TRP and are handled by project management, product owners, and technical owners. What TRP produces is the shared prioritization artifact that informs all of those downstream functions.
You’re answering four questions per initiative, relative to one another. That is the entire scope. Keep the group focused on relative positioning, not detailed analysis. Target 60 minutes. For larger groups, budget 90. The hour works when you protect the scope.
1. Get the right people in the room
Invite people who can make decisions and commit resources. Bring your CTO, VP of Engineering, product leaders, and line-of-business owners. If you don’t have access to those people, find the person who does. That’s your sponsor up your chain of command. Seat business owners and technical owners at the same table. Whether your organization has dedicated roles for each or one person wears multiple hats, the key is getting the people who understand the business priorities and the people who understand the technical complexity into the same conversation.
2. Bring the set of initiatives
Gather your list of competing initiatives before the session. Aim for 5–15. Too few and the exercise feels trivial, too many and you won’t finish in an hour. Pull from your existing project proposals, strategic plans, customer requests, and technical debt backlog. Write a name and a one-sentence description for each one that everyone in the room can understand.
3. Ask the four questions
Walk through each initiative and ask four questions:
How big is it? Skip detailed estimates. Size it relative to the others. Is this a quarter-long effort or a multi-year program? Is it cost, complexity, or something your team has never attempted? Plot it on the x-axis accordingly.
How important is it? Determine where it sits in your organization’s strategic priorities. Does it directly impact initiatives from the board or company owners? Does it enable new technical capabilities? Identify who sponsors it and why. Set the bubble size based on the answer.
Does it modernize, optimize, or monetize? Assign the bubble color and check your portfolio balance. If every initiative targets optimization, you may be missing growth opportunities. If everything targets monetization, technical debt may be piling up.
Keep these questions high-level on purpose. TRP is qualitative by design. You’re calibrating relative priority, not producing detailed estimates. Focus on alignment, not solutioning. Save the how for after the group agrees on the what and the why.
4. Dos and don’ts
The following patterns are drawn from facilitation observations across TRP sessions run with AWS customers since its creation. They’re specific to what goes wrong (and right) in this particular conversation.
Do:
Establish your role at the start. Open with: “I’m here as a facilitator. My job is to help you reach a shared view – the decisions are yours.” This prevents the group from deferring to you and keeps accountability where it belongs.
Surface the “someone else’s problem” initiatives. Each team knows what matters to them but assumes another team owns the overlap. TRP puts both sides in the same room and forces them to name where their work ends and the other’s begins.
Break the “everything is number one” cluster. Teams that struggle to prioritize will plot every initiative in the same spot. When you see clustering, force relative comparison: no two initiatives can occupy the same position on the matrix.
Watch for portfolio imbalance. If every initiative maps to a single color, name it. An all-blue portfolio means no one is investing in growth. A healthy roadmap balances modernization, optimization, and monetization.
Redirect from “what it is” to “what it does.” Teams describe initiatives as technologies: “migrate our database,” “upgrade our instances.” Redirect to the business outcome. You can’t plot an initiative on the matrix until the group agrees on what it accomplishes.
Don’t:
Let the group solution. The most common failure mode in TRP is the group diving into architecture details mid-session. The moment someone says “well, for initiative 3 we’d need to refactor the data layer,” pull them back: “We’re deciding what matters, not how to build it. Let’s place it on the matrix first.”
Skip preparation. The second most common failure: walking in without a pre-populated list of initiatives. You will spend the hour defining them instead of prioritizing them. Even a rough list of five initiatives with one-sentence descriptions is enough to start.
Ignore missing data. If nobody can estimate cost or impact for an initiative, flag it. That gap tells you something: you can’t prioritize what you can’t size. These are the initiatives that need a discovery conversation before they can be placed.
5. Close with next steps
Assign the number one priority a point person and set specific dates for next steps. Repeat for each initiative in priority order. Every initiative on the matrix should leave the session with an owner and a next action, even if that action is “revisit in Q3.”
After the session
Treat the matrix as a living document, not an annual artifact. A formal review cadence of at least once per year is a floor, not a target. The real question is: what triggers an out-of-cycle review? Based on patterns across TRP engagements, the answer is any of the following:
A major strategic shift – new leadership, a market pivot, an acquisition.
A failed or stalled initiative that changes the cost or complexity picture.
A significant budget change that reorders what’s feasible.
A new initiative that clearly belongs in the upper-left quadrant and displaces existing priorities.
A completed initiative that frees capacity and opens room to pull forward work from the upper-right.
When any of these occur, call a TRP session. The matrix is the mechanism for keeping your architecture decisions aligned with a business that doesn’t stand still.
As your prioritized initiatives break down into epics and themes, use the matrix to drive your architecture decision-making throughout the year. Share it with executives, delivery teams, and partners. Before TRP, you justified priorities in meetings and emails that nobody could find later. After TRP, you have a single artifact that documents what was decided, why, and in what order.
Conclusion
Since its creation, TRP has been run with AWS customers of all sizes across industries. That volume is the source of the practitioner patterns in this post, not just a credibility number. Customers consistently surface 4–7 initiatives they hadn’t previously articulated or prioritized as a group. That finding alone is worth one hour of your time.
For example, Zinnia, a leading insurance technology company that processes over 55 percent of digital annuity sales in the U.S., used TRP to prioritize the most critical workloads in their migration to AWS. By identifying their core order entry platform, AnnuityNet, as the highest-impact initiative, they focused resources there first before tackling their data warehouse and commission systems. Within 16 months, Zinnia completed the migration and now processes over 55 percent of digital annuity sales in the U.S. on AWS infrastructure.
The biggest risk in architecture isn’t the technology. It’s that your team isn’t on the same page. TRP gives you a repeatable way to fix that in one hour. Gather your stakeholders, bring your initiatives, ask the four questions, and walk out with a shared roadmap. If you want facilitation support, reach out to your AWS account team. For deeper guidance on the workloads you prioritize, explore the AWS Architecture Center.
Some recent route hijacks reported by Spamhaus captured our attention. In many of these hijack attempts, an apparent bad actor took advantage of unused autonomous system numbers, or ASNs. Notably in these hijacks, the actor appears to be creating fake AS_PATHs toward destinations, misdirecting traffic down an unexpected path.
By creating forged AS_PATHs, the hijacker is attempting to lead traffic somewhere it isn’t normally meant to go while also trying to conceal their identity. A hijacker could strip enough information away from a network path that they could pretend to be the origin of a Border Gateway Protocol (BGP) prefix themselves. Attackers can use this hijacked route to intercept traffic and for other nefarious purposes.
There is a simple solution for these cases: basic verification that a BGP peer autonomous system (AS) always includes their network as the “First AS” in an advertised route. To get a sense of how well these safeguards are implemented, we stress-tested several major networks and researched their BGP implementations. Read on to see what we learned.
Examining route hijacks involving forged paths
The idea that an actor is creating fake AS_PATHs is supported when we take a closer look at implausible AS relationships in the path. For example, let’s examine one of the hijacks reported by Spamhaus, involving a prefix belonging to Orange S.A., the French telecom company. Using the monocle tool, we can easily find a BGP UPDATE message related to the hijack:
We know AS1299 (Arelion) is a Tier 1 network, meaning every AS on the right-hand side in the path is describing an upstream (customer-to-provider) relationship. This implies that AS17072 is a transit provider for AS41128, AS270118 for AS17072, and AS199524 for AS270118. If we take a closer look at these networks:
AS41128 is an unused ASN belonging to Orange France
The order of the ASes in the message above would suggest that an unused Orange France AS is buying transit from Mexican ISPs, which is then upstreamed to Gcore and Tier 1 providers – which would be quite odd.
In another instance, a reported hijack for prefixes 47.1.0.0/16 and 47.2.0.0/16 from origin AS36429 even included Cloudflare’s main ASN, 13335, in the AS_PATH, “199524 270118 17072 13335 36429”. We can view examples of these BGP UPDATEs in the MRT Explorer from Cloudflare Radar:
We can authoritatively confirm that we (Cloudflare, AS13335) have noadjacency with the now-unused AS36429 owned by Charter. This means this was a forged path by the hijacker that included Cloudflare’s ASN as one of the fake upstream networks in advertisements propagated toward Gcore (AS199524). Further, Spamhaus correctly pointed out that all the hijack routes led to a network behind Gcore peering in Chicago, never actually traversing the Mexican ISPs or Cloudflare’s network in the forwarding path.
Because of this, we can reasonably conclude these paths are forged up until the leftmost common AS, which in this case is AS199524, as the rest of the path seems implausible. We believe what is happening here is the result of a specific strategy by the hijacker, involving the following steps:
Originate BGP announcements for “parked” prefixes
Forge the AS_PATH completely, without including the hijacker’s own local ASN
Advertise these routes to Gcore, AS199524
In these hijacks it appears Gcore (AS199524) skips the verification and enforcement of the First AS matching the expected customer’s ASN. (We’ll look at why it might skip those steps later in this post.) As a result, the forged path is accepted and the hijacked prefixes are propagated to upstream providers and peers.
While Autonomous System Provider Authorization (ASPA) will help invalidate these forged paths, attackers may bypass it by only including an RPKI-ROV-valid origin AS, or a legitimate ASPA upstream AS. To stop these specific hijacks, we must rely on a different protection mechanism already built into BGP: First AS checking and enforcement.
The importance of First AS checking
Routing traffic across the Internet is a bit like shipping a package. When the package is shipped, a log is kept of every courier that handles it. In BGP, this is called the AS_PATH (Autonomous System Path) and it tracks each network in the path of that route.
The AS_PATH attribute in BGP is used for path selection. This selection algorithm determines which route to a destination traverses the best list of hops, where “best” is defined by multiple variables. It is also used for loop prevention, where networks can decide not to accept paths that have already traversed their own network. Aside from keeping a record of the networks a BGP UPDATE, and therefore route, will traverse, the AS_PATH can also be examined by operator-configured routing policies to route around or purposely through a given AS – for example to avoid BGP anomalies having unexpected impact.
BGP was built on trust, and the AS_PATH can be easily manipulated – whether for seemingly legitimate reasons such as AS prepending to move traffic around, or nefarious reasons such as shortening it to artificially attract traffic or perform origin attacks.
Let’s look at how these two types of malicious BGP manipulations are carried out.
Example 1: Forged origin attacks
AS64506 cryptographically signs their routes with an RPKI ROA (Route Origin Authorization) record, to prevent route origin hijacks.
AS64506 also creates an ASPA object, specifying only AS64503 as a valid provider
AS64505 manipulates their AS_PATH to strip AS64505 and originate with AS64506
AS64502 does not enforce the First AS
The route appears RPKI-ROV valid and is the shortest path, effectively hijacking traffic with the route. AS64506 has done everything correctly by specifying a valid ROA for a prefix advertisement, and has even configured an ASPA object consisting of their sole provider AS64503.
Unfortunately, the hijacker running AS64505 is still able to attract traffic meant for AS64506. Even if AS64501, the customer, and AS64502, their provider, run ASPA validation, they will not find an invalid path, because there is no valley in the path “64502 64506”. In other words, AS64505 by way of not even including their own ASN in the AS_PATH is able to pretend they are AS64506 with no intermediate AS hop.
The correct way of preventing this hijack with existing tools is to enforce the First AS in the AS_PATH. Once enforcing this rule, AS64502 would properly drop the route from AS64505.
Example 2: Shortening the AS_PATH to attract traffic
AS64506 has two transit providers: AS64503 and AS64505.
AS64505 bills their customer AS64506 based on traffic usage ratios.
AS64505 strips itself from the path, and their peer AS64504 does not enforce the First AS.
The BGP path selection algorithm now chooses the route via AS64504 as the best path from AS64501. AS64506 pays both of their providers, AS64503 and AS64505, to deliver traffic from the Internet. However, now AS64505 provides a shorter BGP path from far-end sources, meaning AS64505 will process all the traffic toward AS64506 and be paid for doing so, and AS64503 will not be paid at all.
These BGP vulnerabilities can be solved very simply by enforcing the First AS to match the peer AS in a received AS_PATH.
When an operator configures a BGP neighbor, they must set the remote AS of the network they are interconnecting with. If the First AS in the AS_PATH does not match this value, then the path has been manipulated. The First AS enforcement procedure is outlined in Section 6.3 of RFC 4271 very clearly as:
“If the UPDATE message is received from an external peer, the local
system MAY check whether the leftmost (with respect to the position
of octets in the protocol message) AS in the AS_PATH attribute is
equal to the autonomous system number of the peer that sent the
message. If the check determines this is not the case, the Error
Subcode MUST be set to Malformed AS_PATH.”
RFC 7606 later revises how error-handling should be implemented by vendors, suggesting that routes containing malformed AS_PATHs should be dropped via treat-as-withdraw method. This allows routers to drop specific prefixes with malformed attributes without disrupting the entire BGP session.
The current ASPA draft clearly calls out the importance of First AS enforcement, stating that ASPA cannot handle paths where sufficient AS_PATH information is lacking due to malformed announcements. Enforcing First AS in AS_PATHs is a must for Internet routing security.
Measurement by breaking the First AS rule on purpose
Instead of sticking to theoretical failure cases and past public incidents about violations of the First AS rule, we wanted to measure for ourselves how widely these AS_PATH violations could be accepted on the Internet. To do so, we set up BGP announcements to neighbors where we purposely violated the rule ourselves. Here is what we did:
Allocated two IP prefixes, one for IPv4 and one for IPv6, to advertise to Tier 1 External BGP (EBGP) neighbors
Purposely prepended the test prefix advertisements to Tier 1 neighbors with a Cloudflare-owned, non-13335 ASN (AS402542) in front of 13335
For example, we advertised the prefixes to AS1299 from our normal BGP session in Geneva. Our local AS is AS13335, but we include AS402542 clearly as the First AS in the AS_PATH.
[email protected]> show configuration policy-options policy-statement 4-TELIA-ACCEPT-EXPORT term ADV-FIRST-AS-PROBE-CR-1695522
from {
    community ANYCAST-ROUTE;
    prefix-list fl_first_as_prober;
    route-type internal;
}
then {
    origin igp;
    as-path-prepend 402542;
    next-hop self;
    accept;
}

[email protected]> show route advertising-protocol bgp <redacted_1299_ip> 162.159.82.0/24 detail | grep "AS path: "
     AS path: 402542 [13335] I
With this configuration, our expectation is that:
Networks that do enforce-first-as will quietly drop the route via RFC 7606 withdrawal method
Networks that do not enforce-first-as will accept the route and install it for forwarding toward our test prefixes
Either result will be visible in BGP public route views. It was initially our goal to implement a continuous announcement of prefixes toward all peers that would purposely violate the First AS rule in announcements, and give everyone a tool to check which ISPs validate First AS and those which do not. However, we found there are still networks that have not implemented the guidance published in RFC 7606 when receiving malformed BGP AS_PATHs, and would reset BGP sessions instead of a treat-as-withdraw behavior. This meant we could not safely implement a continuous set of announcements that violate the First AS rule without impacting real traffic to Cloudflare, which we obviously can’t do.
But we can take a closer look at the networks whose policies make the biggest impact: Tier 1 networks. These networks make up the backbone of the Internet and have the largest AS customer cones of anyone, meaning hijacks or malformed paths by these peers have the broadest significance. Let’s start by examining the normal propagation of an anycast prefix, 1.1.1.0/24, across the Tier 1 networks.
The propagation of 1.1.1.0/24 looks how you would expect – it is directly reachable by every Tier 1 network that Cloudflare has a direct adjacency with currently.
Now, let’s compare that with our purposely malformed announcement of the prefix 162.159.82.0/24:
Note: AS5511 (Orange S.A.) is not pictured above due to its limited presence in public route views, but it was a part of our testing and measurements.
The prefix is propagated very differently from 1.1.1.0/24 – far fewer Tier 1 networks are accepting the announcement directly from Cloudflare (in this case from AS13335 with AS402542 prepended). Based on the criteria of our test mentioned earlier, these are the results we found.
Tier 1 networks that are enforcing First AS rule (by dropping the invalid announcements):
AS174 (Cogent)
AS1299 (Arelion)
AS3257 (GTT)
AS3491 (PCCW)
AS5511 (Orange S.A.)
AS6453 (Tata)
AS7018 (AT&T)
Tier 1 networks that arenot enforcing the First AS rule (by accepting and installing the prefixes):
AS701 (Verizon)
AS2914 (NTT)
AS3356 (Lumen/Colt/Cirion)
AS6461 (Zayo)
AS6762 (Sparkle)
AS6830 (Liberty Global)
AS12956 (Telefonica)
With our testing, we uncovered a troubling reality: Half of the Tier 1 networks are vulnerable to hijacks that violate the First AS rule.
While we only tested Tier 1 networks in this measurement study, there’s no doubt there are many non-Tier 1 networks that also break the First AS rule.
We noted that the majority of the Tier 1 networks failing the First AS violation test are running Juniper Networks routers, identified by the peers’ MAC addresses.
This highlights that the default behavior of vendors defines how secure a network is “out of the box” against First AS violation-based attacks. Let’s go over some of the BGP implementations and their defaults to have a better understanding of who is protected by default, and who isn’t.
BGP implementations and default behaviors
The chart below lists major routing/networking vendors and their BGP policies. Here, “Yes” means the BGP implementation by default enforces First AS, which is good. “No” means the BGP implementation is vulnerable by default.
The lack of default enforcement from some vendors may stem from the only valid use case where the First AS should not be enforced on External BGP (EBGP) sessions: Internet Exchange (IX) route servers.
A route server is responsible for transparently (without appending its AS to the AS_PATH) distributing routes between peers on the fabric. This ensures peers do not have to configure new BGP sessions every time a network joins the fabric – instead they can peer with just the route server.
In reality, most production networks have far more sessions with neighbors who are not transparent IX route servers than neighbors who are. It makes much more sense to configure “no enforce-first-as” on a handful of route-server sessions than to manually enable “enforce-first-as” on every single peer in your network.
While a “safe by default” approach is best for protecting against First AS violations, it is generally a steep hill to climb trying to convince vendors to change longstanding defaults. Vendors would also need to introduce a method of doing this gracefully, so as to not impact the IX route server BGP sessions that require “no enforce-first-as” settings to successfully receive routes.
Safer Internet routing with your help: enforce the First AS
Attackers will purposely malform AS_PATHs to slide around BGP security mechanisms. Even RPKI-based ASPA path validation will not be able to protect us from forged-origin hijacks where the path has been totally stripped of everything but the origin AS, leaving nothing for ASPA to invalidate.
The good news is we already have a mitigation for these cases: we can verify the First AS matches BGP peer AS and always enforce it. Refer to the corresponding “Documentation” column in the above table we have provided. It should be safe to enforce First AS on any External BGP (EBGP) session besides those facing an IX route server neighbor.
If you are a network operator, please enforce First AS on your routers today to protect your network and the wider Internet.
If your router vendor or choice of BGP implementation has a default of enforcing First AS, you’re already safe and should be rejecting any First AS violations.
By working together, we can make the Internet safer from these kinds of hijacks.
What actually happens inside a SOC when an incident unfolds? Most teams see the alerts and the outcomes, but the decision-making in between is often less visible.
At the Rapid7 2026 Global Cybersecurity Summit, the signature session Inside the Modern SOC: Who Carries You Through an Incident takes a different approach. Rather than focusing on tools or dashboards, it follows a real-world incident from the perspective of the people responsible for investigating and containing it.
The session walks through how modern MDR teams operate under pressure, drawing on real experience across cloud, identity, and on-prem environments. Led by Karl Lankford, Senior Director, Sales Engineering, Rapid7, the discussion brings in perspectives from across the SOC, including incident response and detection, to show how teams work together when it matters most.
Structured around a full incident lifecycle, the walkthrough begins with the initial signal and moves through triage and investigation, following the decisions that shape the outcome. The focus is not on theory but on how incidents are handled in practice, from background and context through to the final result.
What stands out is how much of the process depends on judgment. Alerts are only the starting point. From there, analysts are working to understand context, assess risk, and decide what matters most in the moment. This includes identifying compromised identities, understanding how attackers move across environments, and coordinating response across multiple systems.
The session also highlights how quickly these decisions need to be made. As shown in the high-level timeline, attackers can move from initial access to broader compromise across cloud and on-prem systems in a matter of minutes, which leaves little room for hesitation or uncertainty.
Throughout the walkthrough, the focus stays on what carries organizations through an incident. Detection plays a role, but outcomes are shaped by coordination, tradeoffs, and the ability to act with clarity under pressure. The session also explores how visibility across environments, combined with human-led response, helps teams connect signals and act before impact occurs.
For practitioners, SOC leaders, and teams evaluating MDR, this session offers a grounded view of how modern incident response works under real conditions. It shows what happens between the alert and the outcome, and why that gap is where the real value lies. Watch the full session to follow the investigation step by step and see how MDR teams carry organizations through real incidents.
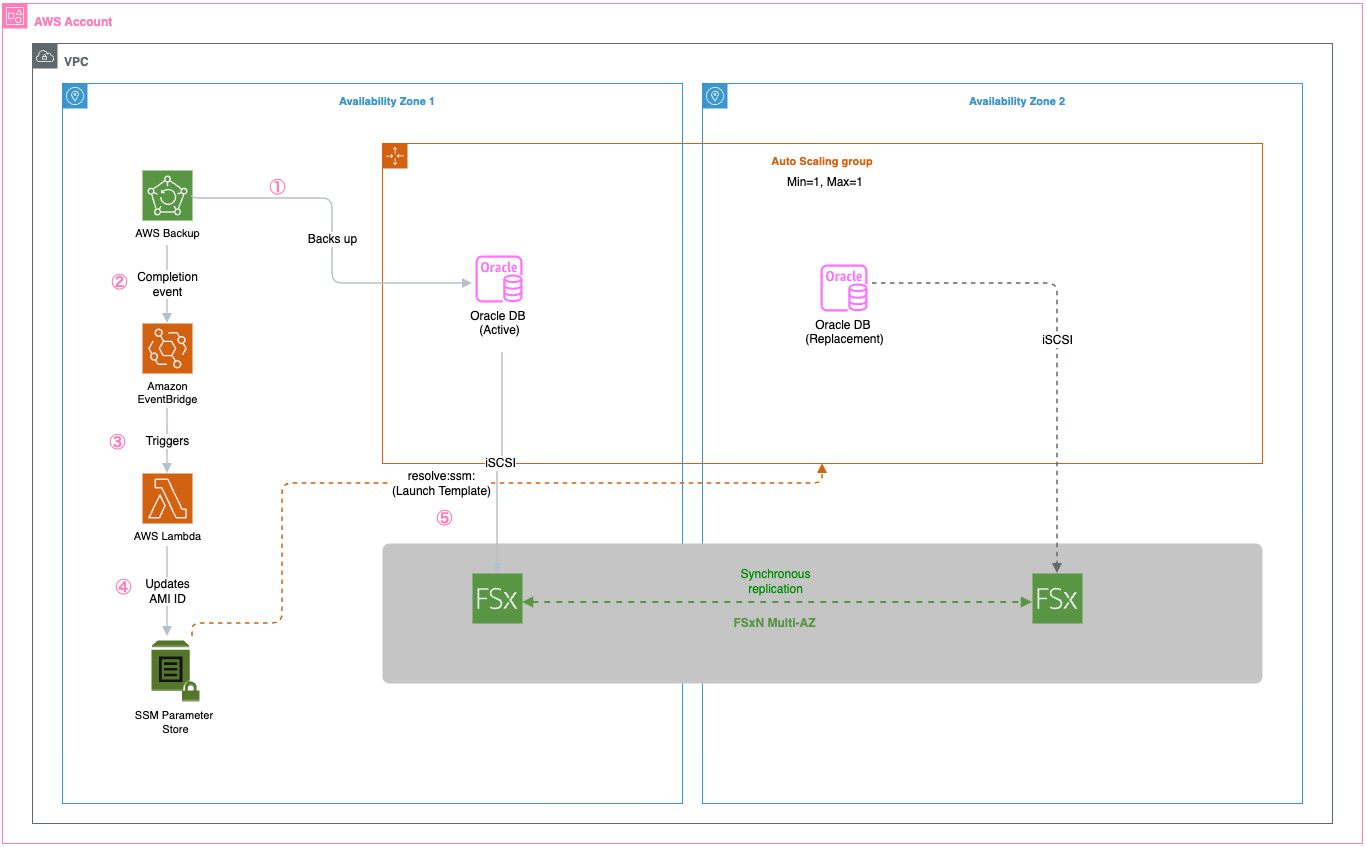
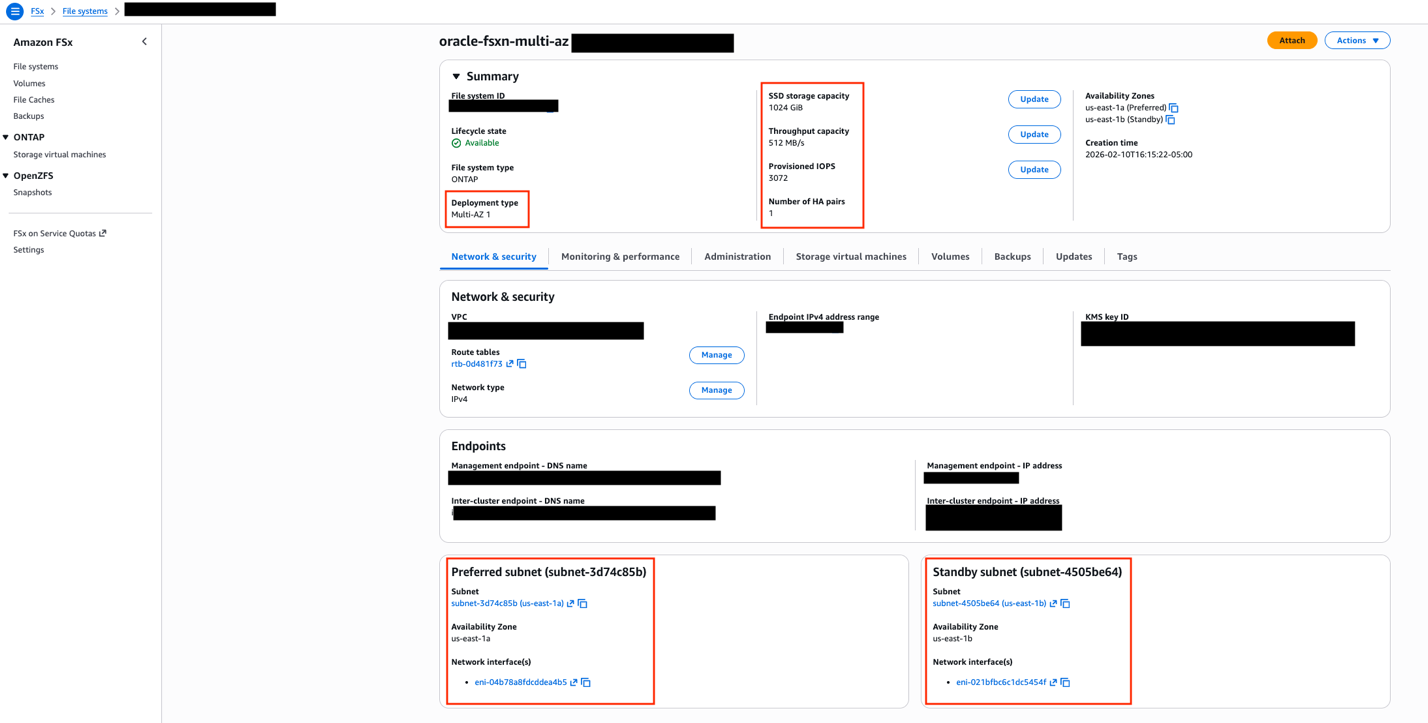
Oracle databases power mission-critical enterprise applications, making their continuous availability essential for business operations. Traditional Oracle high availability (HA) solutions require complex clustering software, expensive shared storage arrays, and specialized database administration teams. These conventional approaches often introduce single points of failure while demanding significant operational overhead.
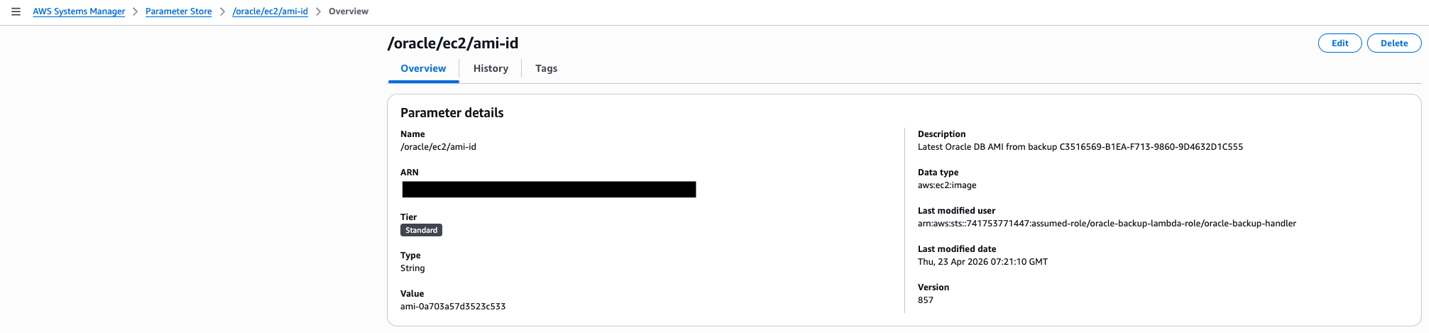
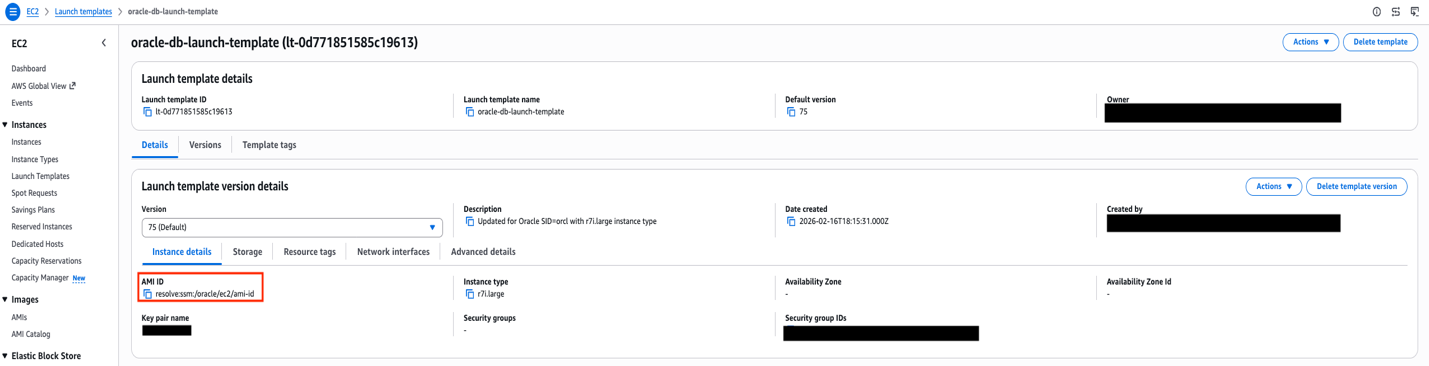
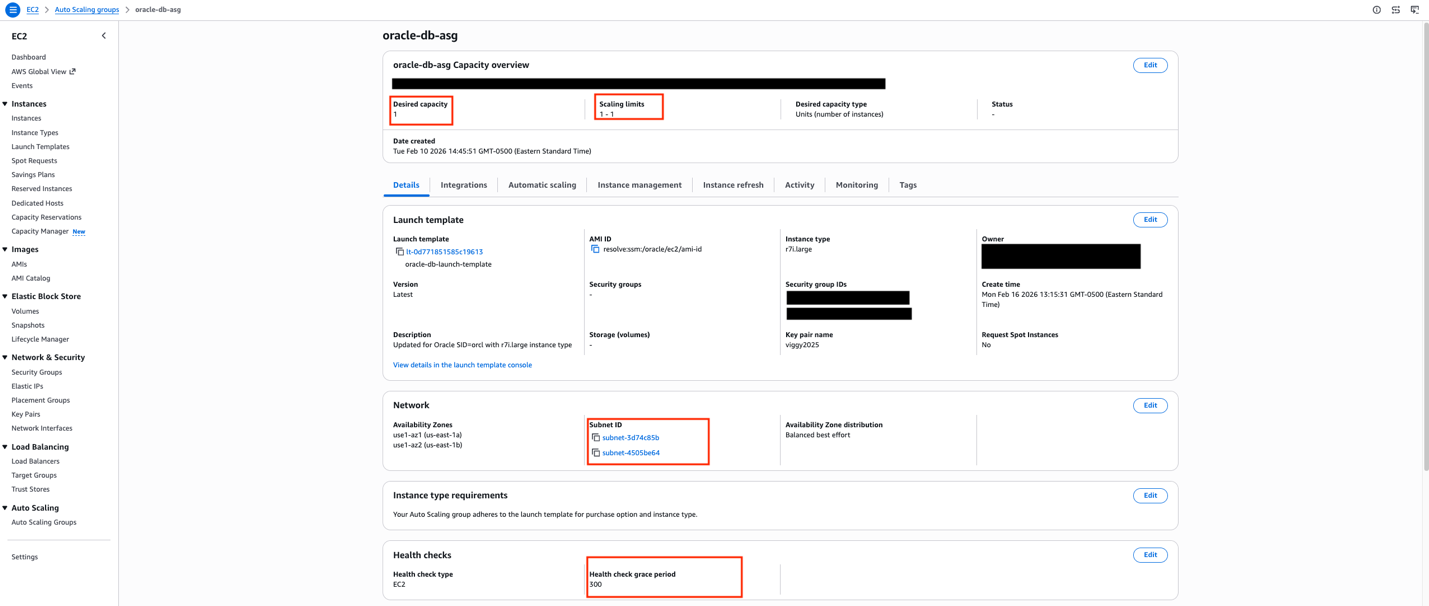
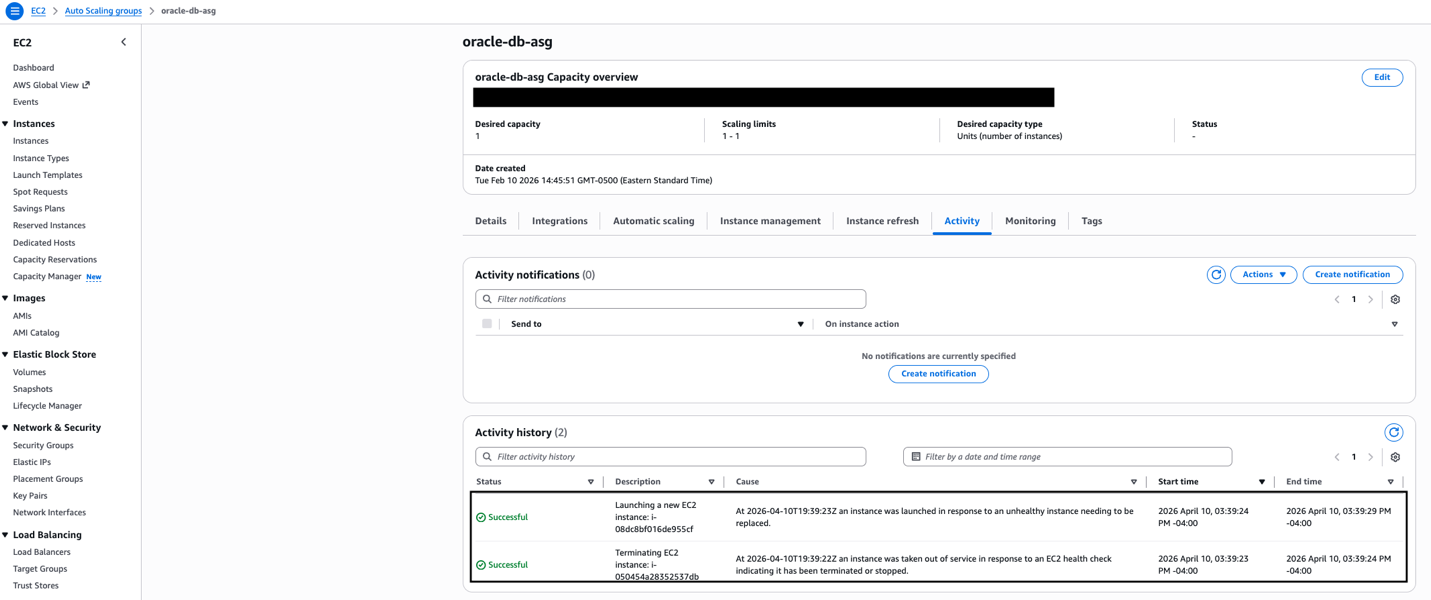
Modern cloud architectures offer a transformative approach that combines Amazon FSx for NetApp ONTAP (FSxN) with Amazon EC2 Auto Scaling groups, automated AMI creation, AWS Lambda-driven orchestration, and AWS Systems Manager Parameter Store (SSM Parameter). This solution removes traditional Oracle HA complexities while delivering enterprise-grade availability, automated recovery, and makes sure new instances launch with the latest Oracle configuration.
This post shows how to build a highly available Oracle database architecture using FSxN shared storage, Auto Scaling groups with dynamic AMI updates, and serverless orchestration to help reduce recovery times with current configurations.
Solution overview
The solution uses multiple AWS services working together to create a comprehensive high availability architecture. FSxN Multi-AZ provides persistent shared storage spanning availability zones for Oracle database files, software, and configurations, so that data remains accessible when EC2 instances are replaced. Auto Scaling groups deliver automated instance lifecycle management with the latest AMI configurations, so failed instances are quickly replaced with identical configurations that can immediately access the existing Oracle database files on FSxN. AWS Backup creates AMIs that capture the latest Oracle host configurations including patches and settings, preserving the complete server state for consistent deployments. AWS Lambda extracts the AMI ID from backup recovery points and updates the SSM Parameter, orchestrating the entire configuration management workflow. Systems Manager Parameter Store stores the current AMI ID for Auto Scaling group launch templates, so new instances always launch with the most recent configuration and can immediately connect to the Oracle database on shared storage.
The following diagram shows the complete architecture with all AWS services and their interactions:
Key benefits include:
Recovery Time Objective (RTO): Can help achieve 2–5 minutes with latest Oracle configuration
Recovery Point Objective (RPO): Near-zero through synchronous Multi-AZ replication
Configuration consistency: New instances launch with identical Oracle host setup
Automated AMI management: Scheduled AMI creation with Parameter Store updates
Walkthrough
This walkthrough demonstrates implementing Oracle HA using Amazon FSx for NetApp ONTAP shared storage, AWS Backup-driven AMI creation, Lambda orchestration, and Auto Scaling groups with Parameter Store integration for configuration consistency and automated failover.
Prerequisites
For this walkthrough, you should have the following prerequisites:
An AWS account with appropriate permissions for Amazon FSx, Auto Scaling, EC2, Lambda, and Systems Manager
A VPC with subnets in at least two Availability Zones
Keep in mind that customers are responsible for their own Oracle licensing compliance.
An EC2 instance with Oracle database installed and configured
AWS Identity and Access Management (IAM) roles for AMI creation and cross-service communication
Basic knowledge of Oracle database administration and AWS automation
Assumptions
This post is a conceptual illustration of the architecture. Your specific implementation will vary based on your VPC layout, Oracle version, storage requirements, and organizational security policies.
We assume the reader is familiar with:
Creating and configuring Amazon FSx for NetApp ONTAP file systems through the AWS console
iSCSI concepts including initiators, targets, and multipath I/O
Oracle database startup and shutdown procedures
AWS Backup, Lambda, and Auto Scaling group fundamentals
For detailed step-by-step instructions on specific AWS services, refer to the additional resources section.
Step 1: Create an Amazon FSx for NetApp ONTAP file system
FSxN Multi-AZ provides the persistent shared storage foundation for this architecture. Unlike Amazon Elastic Block Store (Amazon EBS) volumes, which are bound to a single AZ, FSxN Multi-AZ replicates data synchronously across two AZs with automatic failover. This means that when an EC2 instance is replaced (whether in the same AZ or a different one), the new instance can immediately access the existing Oracle database files without restoring from backup.
To create the file system, navigate to the Amazon FSx console and select Amazon FSx for NetApp ONTAP as the file system type.
The critical configuration choice is selecting Multi-AZ deployment, which places an active file server in one AZ and a standby in another.
FSxN console showing Multi-AZ deployment type selection with preferred and standby subnets in separate availability zones.
After the file system is created, you need to set up a Storage Virtual Machine (SVM), which acts as a logical storage container providing data access to your Oracle instances. The SVM creation is done from the FSx console under your file system’s details.With the SVM in place, the next step is configuring iSCSI access. FSxN exposes iSCSI endpoints—these are IP addresses (one per AZ) that your EC2 instances use to connect to the storage over the iSCSI protocol. You can find these endpoint addresses in the FSx console under your SVM’s Endpoints tab.
SVM Endpoints tab showing iSCSI endpoint IP addresses for each availability zone. These addresses are used in the EC2 instance’s iSCSI discovery configuration.
The iSCSI setup involves creating iGroups (which define which EC2 instances can access the storage) and LUNs (logical storage units mapped to those groups) through the NetApp ONTAP CLI. On the EC2 side, you configure the iSCSI initiator to discover and connect to the FSxN endpoints, then mount the resulting block devices. Using multipath I/O with both endpoints makes sure that Oracle data remains accessible even during an AZ failover. For detailed iSCSI configuration steps, see mounting iSCSI LUNs on Linux clients.
A dedicated security group is required for FSxN access. At minimum, the security group must allow inbound traffic on ports 111 (NFS portmapper), 635 (NFS mountd), 2049 (NFS), 3260 (iSCSI), 4045–4046 (NFS lock), 443 (HTTPS for management), and 22 (SSH for ONTAP CLI). Restrict the source to only your Oracle EC2 instances’ security group.
Step 2: Set up AWS Backup for EC2 instance protection
AWS Backup captures the complete state of your Oracle EC2 instance. The key design choice here is using tag-based resource selection rather than specifying instance IDs directly. Because Auto Scaling groups replace instances (and generate new instance IDs), tag-based selection makes sure that any new instance with the correct tags are automatically included in the backup plan.Configure a backup plan with a frequency appropriate for your environment and set the resource assignment to select EC2 instances matching your application tag (for example, ‘Application: Oracle’).
AWS Backup resource assignment configured with tag-based selection. Any EC2 instances tagged with the application tag are automatically included in the backup plan.
Step 3: Configure Lambda for AMI management
When AWS Backup completes an EC2 backup, it creates an AMI as the recovery point. An Amazon EventBridge rule detects this completion event and triggers a Lambda function. The function extracts the AMI ID from the backup recovery point, updates the SSM Parameter Store parameter with the new AMI ID, and cleans up older AMIs to control storage costs.
Lambda function overview showing the EventBridge trigger, Python 3.11 runtime, and function description indicating its role in processing backup completions and updating AMI references in SSM.
This event-driven approach means the latest AMI is available without manual intervention. The Lambda function needs IAM permissions for EC2 (to manage AMIs), SSM (to update the parameter), and Backup (to read recovery point metadata).
EventBridge rule configured to match AWS Backup job completion events for EC2 resources, with the Lambda function as the target.
Step 4: Configure the Systems Manager Parameter Store
The SSM Parameter Store holds the current AMI ID that the Auto Scaling group’s launch template references. The parameter is created with the aws:ec2:image data type, which enables the launch template’s resolve:ssm: functionality, a feature that allows the launch template to dynamically resolve the AMI ID at instance launch time without requiring a template version update.
SSM Parameter Store showing the /oracle/ec2/ami-id parameter with aws:ec2:image data type. The “Last modified user” confirms the Lambda function is automatically updating this parameter after each backup cycle.
When Lambda updates this parameter after each backup cycle, the next instance launched by the Auto Scaling group will automatically use the latest AMI. This removes the operational burden of manually updating launch template versions.
Step 5: Set up an Auto Scaling Group with dynamic AMI
The launch template references the SSM parameter using the resolve:ssm: prefix for the AMI ID field. This is the mechanism that ties the entire automation pipeline together. The mechanism backups trigger AMI creation, AMI IDs flow into Parameter Store, and the launch template resolves the latest AMI at launch time.
Launch template AMI configuration showing the ‘resolve:ssm:’ prefix, which dynamically retrieves the latest AMI ID from Parameter Store at instance launch time.
The Auto Scaling group is configured with minimum, maximum, and desired capacity all set to 1. This is not traditional auto-scaling, it’s a self-healing pattern. The sole purpose is to detect when the Oracle instance becomes unhealthy and automatically launch a replacement. The health check grace period should be set to at least 300 seconds (5 minutes) to allow Oracle sufficient time to start before health checks begin evaluating the new instance.
The launch template also includes a User Data script that runs on each new instance. This script configures the iSCSI initiator, discovers and connects to the FSxN endpoints, mounts the Oracle data volumes, and starts the Oracle database through a systemd service. This automation makes sure that a replacement instance is fully operational without manual intervention.
Auto Scaling group configured with min=max=desired=1 across two availability zones, providing self-healing capability.
Test the complete workflow
To validate the architecture, simulate an instance failure by terminating the current Oracle EC2 instance.
The expected sequence is:
The Auto Scaling group detects the instance is unhealthy (within approximately 30 seconds)
A new instance launches from the latest AMI resolved from Parameter Store (approximately 2 minutes)
The User Data script connects to FSxN using iSCSI and starts Oracle (approximately 2–3 minutes)
The Oracle database is available and accepting connections (total elapsed: approximately 5 minutes)
Auto Scaling group Activity History showing the self-healing sequence — the unhealthy instance is terminated, and a replacement is launched automatically within seconds.
The new instance automatically inherits the application tags from the Auto Scaling group, which means AWS Backup includes it in the next backup cycle without manual configuration.
Cleaning up
To avoid incurring future charges, delete the resources:
Delete Lambda functions and EventBridge rules
Remove Parameters from Systems Manager Parameter Store
Delete AWS Backup plans and backup vault
Deregister created AMIs
Terminate Auto Scaling group instances
Delete the Amazon FSx for NetApp ONTAP file system
Conclusion
This architecture facilitates Oracle high availability with configuration consistency by combining FSxN persistent shared storage with automated AMI management and AWS Backup protection. The Lambda-driven AMI management from backup recovery points and Parameter Store integration helps make sure that replacement instances launched by Auto Scaling groups always use the latest Oracle host configuration and can immediately connect to the existing Oracle database files stored on FSxN. Replacements occur only when health checks fail. Organizations can target high availability while maintaining configuration consistency across instance replacements. The automated AMI management alleviates configuration drift and makes sure that disaster recovery scenarios restore Oracle instances with identical host-level configurations that can immediately access the persistent Oracle database on shared storage. Healthy instances continue running unchanged, with replacements occurring only, when necessary, because of health check failures.Next steps include implementing cross-Region AMI replication, adding AMI validation testing, and developing custom health checks that verify both Oracle database and host configuration consistency.
Imagine you’re building a product search feature for your website or storing customer records in Amazon OpenSearch Service to power full-text search. The moment that real user data enters your domain, security becomes essential.
Whether your workload is a public-facing website search, an internal application querying sensitive data, or a pipeline handling personally identifiable information (PII), the questions you face are the same:
Who should be allowed to connect to my domain?
How do I authenticate users and services?
How do I make sure that even authenticated users only see data they are entitled to see?
How do I satisfy regulatory requirements such as HIPAA, PCI DSS, or SOC 2?
This post offers an overview of the security mechanisms available for Amazon OpenSearch Service, spanning authentication and authorization, encryption, and network access controls. You learn how to implement fine-grained access control, manage AWS Identity and Access Management (IAM) roles, and secure data both in transit and at rest for both public and virtual private cloud (VPC) access domains.
Scope: This post covers security for Amazon OpenSearch Service managed clusters only. It doesn’t cover Amazon OpenSearch Serverless, which uses a different security model. For serverless security, see Amazon OpenSearch Serverless security in the AWS documentation.
To begin, let’s look at the security layers in Amazon OpenSearch Service.
Amazon OpenSearch Service security layers
Amazon OpenSearch Service has multi-layer security. The following diagram illustrates the multi-layer security in Amazon OpenSearch Service.
Figure 1: Multi-layer security.
The three main layers of security are network, domain access policy, and fine-grained access control.
Network – The first security layer is the network, which determines whether requests reach an OpenSearch Service domain. If you choose Public access when you create a domain, requests from any internet-connected client can reach the domain endpoint. If you choose VPC access, clients must connect to the Amazon Virtual Private Cloud (Amazon VPC) (and the associated security groups must permit it) for a request to reach the endpoint.
Domain access policy – The second security layer is the domain access policy. After a request reaches a domain endpoint, the resource-based access policy allows or denies the request access to a given URI. The access policy accepts or rejects requests at the edge of the domain, before they reach data or indexes in OpenSearch itself.
Fine-grained access control – The third and final security layer is fine-grained access control. After a resource-based access policy allows a request to reach a domain endpoint, fine-grained access control evaluates the user credentials and either authenticates the user or denies the request. If fine-grained access control authenticates the user, it fetches all OpenSearch internal roles mapped to that user and uses the full set of permissions to determine how to handle the request.
With fine-grained access control, you can control access to your data in Amazon OpenSearch Service. For example, depending on who makes the request, you might want to hide certain fields in your documents or exclude certain documents altogether. With fine-grained access control, you can:
Define role-based access control to determine who can perform which actions on which indexes, documents, and fields.
Define security at the index, document, and field level to allow access to only required data.
Fine-grained access control requires OpenSearch or Elasticsearch 6.7 or later. It also requires HTTPS for all traffic to the domain, encryption of data at rest, and node-to-node encryption. Depending on how you configure the advanced features of fine-grained access control, more processing of your requests might require compute and memory resources on individual data nodes. After you turn on fine-grained access control, you can’t turn it off. For more details, see Fine-grained access control in Amazon OpenSearch Service in the AWS documentation.
To learn more about security features in an OpenSearch Service domain, let’s start by configuring a new public access domain. We discuss a VPC access domain later in the post.
Public access domain
With a public access domain, you can configure an OpenSearch Service domain so that the domain endpoint is accessible from the internet.
The AWS console for Amazon OpenSearch Service provides a guided wizard that you can use to configure and reconfigure your provisioned Amazon OpenSearch Service domains. Follow the Tutorial: Configure a domain with the internal user database and HTTP basic authentication in the AWS documentation to configure a domain with basic authentication and validate fine-grained access control.
Let’s review some important configuration attributes for a public access domain.
Network:
Public access. To simplify the network access configurations, you can use Public access, but for production workloads, we recommend VPC access.
With the domain in public access, you have several options to secure access. While you can use a resource-based access policy to restrict access to specific IAM principals or IP addresses, the recommended approach is to turn on fine-grained access control (FGAC) and use it as the primary mechanism for securing your domain. With FGAC turned on, you can set an open access policy (allowing all traffic to reach the domain) and let FGAC handle authentication and authorization at the index, document, and field level.
When using IAM-based authentication with FGAC, you should map IAM roles to backend roles in OpenSearch. You can use backend roles to assign permissions to groups of users based on their IAM role, rather than managing individual user mappings. This is especially important because if your IAM federation or authentication mechanism changes, the backend role mappings make sure of consistent access control within OpenSearch.
Figure 2: Use public access domain.
Fine-grained access control: Fine-grained access control provides numerous features to help you keep your data secure, such as document-level security, field-level security, read-only users, and OpenSearch Dashboards/Kibana tenants. Fine-grained access control requires a primary user, which is the administrator identity we discuss through the rest of this post.
The primary user is the administrator identity for your OpenSearch domain. This user can set up additional users in Amazon OpenSearch Service, assign roles to them, and assign permissions for those roles. You can choose username and password authentication for the primary user or use an IAM identity. You use these credentials to log in to OpenSearch Dashboards. Following the best practices on choosing your primary user, you should move to an IAM primary user for production workloads.
Fine-grained access control can be applied regardless of how you log in. You can follow your organization’s suggested authentication mechanism and apply fine-grained access control on top of it.
FGAC provides security at multiple levels to meet your security needs:
Index-level security – Controls who can create, search, read, write, update, or delete within specific indexes.
Document-level security – Restricts which documents within an index a user can see, using OpenSearch query filters (for example, only show documents where department: “sales”).
Field-level security – Controls which fields within documents are visible (include or exclude specific fields).
Field masking – Anonymizes sensitive field data (for example, hash a release_date or SSN field) rather than hiding it entirely.
Fine-grained access control supports several authentication mechanisms, including HTTP basic authentication using an internal user database, Amazon Cognito for web-based Dashboards access, SAML for enterprise identity provider integration, JSON Web Tokens (JWT) for token-based authentication, and AWS Identity and Access Management with SigV4 signing for IAM users and roles.
Encryption:
Amazon OpenSearch Service encrypts data both in transit and at rest. When you turn on fine-grained access control, encryption is required—the corresponding settings are automatically turned on and can’t be changed. These include Transport Layer Security (TLS 1.2 or later) for requests to the domain and for traffic between nodes in the domain, and encryption of data at rest through AWS Key Management Service (AWS KMS).
For encryption at rest, OpenSearch Service supports three key types: AWS owned keys, AWS managed keys, and customer managed keys. While AWS owned keys provide a quick-start option with no additional configuration, customer managed keys are the recommended best practice. Customer managed keys give you full control over the encryption key lifecycle, including key rotation policies, granular access control through key policies, and the ability to audit key usage through AWS CloudTrail. To use a customer managed key, create a symmetric encryption key in AWS KMS and select it when configuring your domain’s encryption settings.
For a basic public access domain with FGAC, all traffic reaches the domain freely (no VPC restriction), and an open access policy is used so no SigV4 signing is needed. FGAC then takes over, authenticating users through the internal user database (username/password) and enforcing role-based permissions at the index, document, and field level.
The public access configuration we discussed is useful for development and testing, but for production workloads, a best practices deployment combines VPC access, IAM-based authentication, and fine-grained access control. This approach layers all three security mechanisms—network isolation, identity verification, and granular permissions—to protect your domain end to end.
VPC access domain
Placing your OpenSearch Service domain inside a VPC restricts network-level access to resources within the VPC or connected networks. Traffic between your applications and the OpenSearch endpoint doesn’t traverse the public internet, and you can use security groups to further limit which entities can communicate with the domain. OpenSearch Service places a VPC endpoint (VPCe) using AWS PrivateLink into one, two, or three subnets of your VPC depending on your Availability Zone configuration. For high availability (HA), turn on multiple Availability Zones with each subnet in a different zone within the same AWS Region. For more details, see Launching your Amazon OpenSearch Service domains within a VPC.
For this best practices deployment, we use an IAM primary user with Amazon Cognito authentication for OpenSearch Dashboards and for fine-grained access control. We configure a primary IAM role and a limited IAM role, associate them with users in Amazon Cognito through a user pool and identity pool, and then use fine-grained access control to manage permissions. The primary user can then sign in to OpenSearch Dashboards, create backend roles, map the limited user to a restricted role, and enforce granular access at the index, document, and field level. For more details, see Tutorial: Configure a domain with an IAM master user and Amazon Cognito authentication in the AWS documentation.
The following high-level steps detail what’s needed to configure a VPC access domain with Amazon Cognito users. These steps use the Amazon Cognito user pool for authentication. The same basic process works for any Cognito authentication provider that lets you assign different IAM roles to different users.
Create an Amazon Cognito user pool.
Add users in the user pool for the primary user and a limited-access user.
Create an Amazon Cognito identity pool.
Update the IAM role for the primary user to allow access to OpenSearch Dashboards.
VPC access. Public access isn’t recommended for production workloads. We recommend that you use VPC access for all production workloads. Pick the VPC, subnets, and security group that you have created for the OpenSearch domain.
Figure 5: Turn on fine-grained access control with an IAM role.
Fine-grained access control provides numerous features to help you keep your data secure, such as document-level security, field-level security, read-only users, and OpenSearch Dashboards/Kibana tenants. Fine-grained access control requires a primary user.
The primary user is the administrator identity for your OpenSearch domain. This user can set up additional users in Amazon OpenSearch Service, assign roles to them, and assign permissions for those roles. You can choose username and password authentication for the primary user or use an IAM identity. You use these credentials to log in to OpenSearch Dashboards. Following the best practices on choosing your primary user, you should choose an IAM primary user for production workloads.
Fine-grained access control can be applied regardless of how you log in. You can follow your organization’s suggested authentication mechanism and apply fine-grained access control on top of it.
Amazon Cognito authentication:
To turn on Amazon Cognito authentication, select Enable Amazon Cognito authentication and choose the Amazon Cognito user pool and Amazon Cognito identity pool for your OpenSearch Dashboards.
Figure 6: Turn on Amazon Cognito authentication.
Access policy:
The access policy controls whether a request is accepted or rejected when it reaches the Amazon OpenSearch Service domain. You can configure a domain-level access policy to allow access to your Amazon OpenSearch Service domain.
Figure 7: Configure domain-level access to the domain.
Encryption:
Amazon OpenSearch Service encrypts data both in transit and at rest. When you turn on fine-grained access control, encryption is required—the corresponding settings are automatically turned on and can’t be changed. These include Transport Layer Security (TLS 1.2 or later) for requests to the domain and for traffic between nodes in the domain, and encryption of data at rest through AWS KMS.
For encryption at rest, OpenSearch Service supports three key types: AWS owned keys, AWS managed keys, and customer managed keys. While AWS owned keys provide a quick-start option with no additional configuration, customer managed keys are the recommended best practice. Customer managed keys give you full control over the encryption key lifecycle, including key rotation policies, granular access control through key policies, and the ability to audit key usage through AWS CloudTrail. To use a customer managed key, create a symmetric encryption key in AWS KMS and select it when configuring your domain’s encryption settings.
With these configurations, you can configure your Amazon OpenSearch domain and OpenSearch Service Dashboards so that they’re accessible only within the chosen VPC. For your production scenario, you can follow your organization’s approved mechanism to access the resources in a VPC. You can access OpenSearch Service Dashboards with a primary user to create a limited-access role and map it to the IAM role with limited access to validate fine-grained access control.
Conclusion
In this post, we looked at the important security configurations for a public and a VPC-based Amazon OpenSearch domain. You can examine more settings for fine-grained access control in the OpenSearch Dashboards Security section.
Over time, many open-source maintainers face the same problem: they
lack the time to do all of the work that their project needs, and no
one else is stepping up to provide adequate help. Maintainers, though,
are often reluctant to throw in the towel. The result is suboptimal
all around; the maintainer is stressed out, project quality suffers,
and users face security risks that they may not be fully aware of. At
the 2026 Open
Source Summit North America, Robin Bender Ginn spoke about this
problem, when it might be time for maintainers to pass the torch, and
the responsibilities of users.
At the Raspberry Pi Foundation, we believe that alongside learning to code, a crucial part of computing education is building AI literacy skills. Amidst the rapid pace of development and the growing impact of AI tools, it is increasingly important for educators everywhere to feel equipped to address the topic of AI with their learners, to help young people understand their world, be responsible users of AI technologies, and prepare to become the future creators of these technologies.
We work at the leading edge of AI education, combining research and industry expertise with practical classroom experience to define what AI means for computing education, and how to best support teachers and learners to understand these technologies.
Whether you are a teacher, a Code Club mentor, or a parent, we have a wide range of free resources to help you teach your young people about AI, and learn more about it yourself.
Explore our teaching resources
We offer a variety of teaching materials to help you bring AI into your setting. You do not need to be a professional educator or have a background in computer science to use these resources, and we provide everything you need to guide your learners with confidence.
Experience AI is our free AI literacy programme, developed in collaboration with Google DeepMind. Through ready-to-use classroom resources, including lesson plans, presentations, and hands-on activities, the programme helps educators all over the world teach their learners about how AI works, as well as its wider social and ethical implications. You and your learners will investigate AI tools, explore real-world uses of AI, and engage with critical issues such as bias, fairness, and transparency, helping learners to understand AI and use it responsibly. The lessons currently available are designed for learners aged 11–14, and we are releasing resources for other age groups this year.
To help bring Experience AI to more educators and learners around the world, we work with a global network of partner organisations, who help us provide tailored and translated resources and offer localised, high-quality training and support for educators in their regions. Experience AI resources are currently available in 19 languages, and have already been downloaded in more than 180 countries. In recognition of its impact, in 2025 Experience AI was named a laureate of the UNESCO King Hamad Bin Isa Al-Khalifa Prize for the Use of ICT in Education.
“[Experience AI] has definitely changed my outlook on AI. I went from knowing nothing about it to understanding how it works, why it acts in certain ways, and how to actually create my own AI models and what data I would need for that. I would 100% recommend others who don’t know much about AI to try it out.” – Student, Arthur Mellows Village College, UK
If you are looking to introduce school-aged young people to AI with short, beginner-friendly coding and digital making projects, take a look at our collection of Code Club projects about AI and machine learning. These projects are a great way to spark curiosity and investigate how AI and machine learning works.
In the projects, learners get hands-on with a range of AI tools and platforms, and explore different applications of AI, such as image recognition, voice recognition, and (for learners aged 13 and over) generative AI. For example, in Doodle detector, learners use Machine Learning for Kids with Scratch to create a machine learning application that can identify what they have drawn.
The projects feature clear step-by-step instructions, and many include video tutorials, to help learners work at their own pace and in a style that suits them. We also provide mentor guidance to help you prepare.
Learners can explore topics such as image classification through our collection of Code Club projects about AI and machine learning
For resources to support older learners to build their understanding of AI, head to Ada Computer Science. Ada Computer Science is our free online platform for computer science students and teachers, developed in partnership with the University of Cambridge. It provides comprehensive resources for learners aged 14–19 across the breadth of computer science, including detailed learning materials about AI and machine learning. The materials include helpful definitions, clear explanations, and carefully designed self-marking questions to support young people’s learning.
Learners aged 14–19 can build their knowledge of AI and machine learning on our Ada Computer Science platform
Explore our learning and training opportunities for educators
To help you build your knowledge around AI technologies and grow your confidence to teach your young people about this important topic, we offer a range of learning resources and professional development opportunities, all for free. They are open to everyone, so we invite you to dive into any that interest you.
For flexible, self-paced learning options, take a look at the following free online courses, which cover a range of topics within AI:
Introducing AI: Investigate how AI systems work and how to evaluate them, and explore the benefits, risks, and ethical issues related to them. This course is made up of 2 modules, and takes around 2–4 hours to complete.
AI literacy for teachers and school leaders: Learn how to support your students and staff to understand, use, and critically assess AI technologies. This course takes around 1–2 hours to complete.
Machine learning and AI: Discover machine learning and how it works, and train your own AI models using free online tools. This course is made up of 4 modules, and takes around 4–8 hours to complete.
Learn more about AI through our free online courses for educators
You might also be interested in Hello World, our free magazine and podcast for educators teaching computing and AI. Each magazine is packed with resources, discussions, news, and ideas, and you can subscribe to receive each issue as soon as it is released. The next issue, coming in July, will focus on critical thinking in the age of AI. You can download our previous issues to explore articles about a variety of topics within AI too. What’s more, you can continue your learning with the Hello World podcast, which accompanies the magazine and features discussions with educators and researchers from around the world. Visit the podcast page to discover previous episodes exploring vibe coding and programming education, AI education around the world, and more.
Hello World Issue 29 – Safety & security
To learn about research-informed teaching strategies to help you as you explore AI with your learners, you can read these short Pedagogy Quick Reads:
Anthropomorphism: Explore how to help learners avoid thinking of AI systems as human-like, to support their understanding.
Computational Thinking 2.0: Consider how computational thinking is evolving and how to help learners develop the computational thinking skills they need to understand modern digital systems involving AI.
Feedback literacy: Explore how feedback literacy can help teachers and learners interact effectively with feedback generated by AI tools.
A Pedagogy Quick Read entitled ‘The effects of anthropomorphisation on students’ mental models of AI’.
For more insights from computing education research, you can join our monthly online research seminars. Our 2026 research seminar series focuses on teaching about AI across the curriculum, delving into research on teaching and learning about AI from disciplines beyond computer science, including the arts, sciences, and humanities. Our next seminar takes place on 16 June, and you can catch up on previous seminars from our current series here. You can also explore our archive of recordings from previous seminar series, with themes including teaching about AI and data science, teaching programming (with or without AI), and more.
Bring AI into your classroom today
All of these resources and learning opportunities are available to anyone interested in educating young people about AI, anywhere in the world. We hope they help you gain understanding, confidence, and inspiration to guide your young learners to engage with AI safely and responsibly, and to learn valuable skills that will help them navigate their world.
“Let the students explore, advance, and grow. And who knows — maybe one of our students will go on to become a mentor or leader in this field someday.” – Ana Judith Zavaleta, computer science teacher, Mexico, speaking about Experience AI
If you are in the UK, you can also use these resources to get involved with the first-ever AI Awareness Day, a new nationwide campaign designed to build AI literacy across UK schools, which is taking place on 4 June.
Alexei Starovoitov gave “less of a presentation, more of a scream of
realization” at the BPF track of the 2026
Linux Storage, Filesystem,
Memory-Management, and BPF Summit. He shared a set of ideas for how BPF could
change to avoid being swept away by the sea-change in programming represented by modern
large language models (LLMs) and the coding agents based on them.
In a follow-up session, the discussion covered
more problems with how coding agents use tools like bpftrace, and the current deluge of
patches in need of review in the BPF subsystem.
Andrew Tridgell has written a blog
post responding to complaints that he has begun using LLM tools in
his work maintaining rsync:
Like many developers of open source packages I’ve been hit by a
flood of security reports lately in my role as the rsync
maintainer. Many of those reports are AI generated (not all though,
there are some notable ones with very careful and high quality manual
analysis).
As this flood started to get more intense I realised I needed to
raise the defences on rsync a lot — we needed much more thorough test
suites, code coverage analysis, CI testing on a lot more platforms,
deliberate and thorough scanning for possible security issues (so I
find at least some of them before other people!) and the addition of a
whole lot of defence-in-depth hardening techniques.
[…] Now to the future, because we’re not done yet by a long
shot. The security reports keep rolling in. I’m working on a bunch of
CVEs right now. Luckily I’ve been joined by some other very good
developers with great systems development skills and security
knowledge. Some of these people came to my attention partly because of
all the rage happening at the moment, so I get some rage storm clouds
have silver linings. Watch out for some credits for some great new
rsync developers in the next release.
To provide the best experiences, we use technologies like cookies to store and/or access device information. Consenting to these technologies will allow us to process data such as browsing behavior or unique IDs on this site. Not consenting or withdrawing consent, may adversely affect certain features and functions.
Functional
Always active
The technical storage or access is strictly necessary for the legitimate purpose of enabling the use of a specific service explicitly requested by the subscriber or user, or for the sole purpose of carrying out the transmission of a communication over an electronic communications network.
Preferences
The technical storage or access is necessary for the legitimate purpose of storing preferences that are not requested by the subscriber or user.
Statistics
The technical storage or access that is used exclusively for statistical purposes.The technical storage or access that is used exclusively for anonymous statistical purposes. Without a subpoena, voluntary compliance on the part of your Internet Service Provider, or additional records from a third party, information stored or retrieved for this purpose alone cannot usually be used to identify you.
Marketing
The technical storage or access is required to create user profiles to send advertising, or to track the user on a website or across several websites for similar marketing purposes.