Post Syndicated from The History Guy: History Deserves to Be Remembered original https://www.youtube.com/watch?v=mUsOqjuXT0E
Comic for 2023.10.18 – Swears
Post Syndicated from Explosm.net original https://explosm.net/comics/swears
New Cyanide and Happiness Comic
Analysis of Intellexa’s Predator Spyware
Post Syndicated from Bruce Schneier original https://www.schneier.com/blog/archives/2023/10/analysis-of-intellexas-predator-spyware.html
Amnesty International has published a comprehensive analysis of the Predator government spyware products.
These technologies used to be the exclusive purview of organizations like the NSA. Now they’re available to every country on the planet—democratic, nondemocratic, authoritarian, whatever—for a price. This is the legacy of not securing the Internet when we could have.
Сляпото петно за фашизма вляво
Post Syndicated from Светла Енчева original https://www.toest.bg/slyapoto-petno-za-fashizma-vlyavo/

През изминалите седмици България е в обичайната си за последните години ситуация – в предизборна кампания. И по стар обичай либералнодемократичните избиратели (неточно слагани под общия знаменател „десни“) се карат и люспят, дерейки ризи. Едни не могат да преглътнат родата на кандидата за кмет на София Васил Терзиев. Други (и част от първите) – наличието на кандидат за общински съветник в листата на „Продължаваме промяната“, „Демократична България“ и „Спаси София“, който преди е бил от ВМРО. А за известния с хомофобските си възгледи бургаски кандидат-кмет Константин Бачийски ДБ така и не постигнаха съгласие с ПП, затова издигнаха собствена кандидатура – на Димитър Найденов.
Обвинения във фашизъм отляво
Въпреки хетерогенността на либералнодемократичните избиратели, въпреки несъгласията и конфликтите помежду им, те биват обвинявани във „фашизъм“ от млади активисти, идентифициращи се като леви. Но не „леви“ като председателката на БСП Корнелия Нинова. Става въпрос за хора с далеч по-демократични убеждения от нея. Те са за равни права на ЛГБТИ+ хората, жените, дискриминираните малцинства, бежанците и са против национализма и расизма. От тези позиции обвиняват не само „десните“, а и „либералите“ и „центристите“, че всъщност не са против „фашистите“ и никога не им се противопоставят.
С тези активисти е практически безпредметно да се спори, защото все се изплъзват. Когато им се посочат античовешките практики през тоталитарния период в България преди 1989 г., например т.нар. Възродителен процес или съдебните дела срещу хомосексуални хора, те казват, че онзи режим всъщност не е бил ляв. В същото време се възмущават от критиките срещу тоталитарния период, определяйки ги като „пещерен антикомунизъм“ и изтъквайки аргументи от типа на този, че по време на социализма жените са получили право на глас наравно с мъжете.
Отскоро, за да изразят възмущението си, левите активисти използват определението „антикоми“. Втората част на думата идва не от названието на областта Коми в Северозападна Русия, а е умалително за „комунизъм“, дошло през английския език. За тези активисти „Времеубежище“ на Георги Господинов например е „антикоми“ роман.
Предизборната коалиция на БСП и „Атака“, за която не се говори
Младите леви активисти са за Истанбулската конвенция и не одобряват антиджендър патоса на председателката на БСП Корнелия Нинова. Но за разлика от либералните избиратели, не си дерат ризите по време на предизборна кампания, критикувайки Столетницата, а вместо това продължават да обвиняват десните, либералите и центристите във фашизъм. За тях не изглежда да е особен проблем, че зад Ваня Григорова, кандидатката на БСП за кмет на София и оглавяваща листата за Общинския съвет, стои и партията на Волен Сидеров „Атака“.
В сравнение с фашистките послания на „Атака“ и лидера ѝ Волен Сидеров, ВМРО и дори „Възраждане“ направо бледнеят. Самото име на партията идва от вестник „Атака“ – орган на основаната през 1932 г. Националсоциалистическа българска работническа партия. Волен Сидеров е автор на две книги с откровено неонацистки и антисемитски характер – „Бумерангът на злото“ (2002 г.) и „Властта на Мамона“ (2004 г.). България е осъдена от Европейския съд по правата на човека в Страсбург (ЕСПЧ), защото е отказала да види антисемитизма в първата книга.
По останалите теми Сидеров е също толкова дискриминационно настроен, колкото и „фюрерите“ на останалите партии с неонацистки уклон в България. Като кандидат за кмет на София през 2019 г. той обещаваше да забрани „София прайд“. Незабелязването на антиромските му позиции е докарало на България друга присъда от ЕСПЧ. През 2011 г. протест на „Атака“ срещу новините на турски език ескалира до подпалването на софийската джамия „Баня Башъ“ по време на петъчната молитва. Впрочем и заради това България е осъдена от ЕСПЧ.
Генезис на фашистките елементи в БСП
Топлите връзки на БСП с неонацистки (или както левите активисти казват, фашистки) политици и практики съвсем не започват с управлението на Корнелия Нинова, която понякога е обвинявана, че всъщност не е лява, заради връзката между възхода на кариерата ѝ и правителството на Иван Костов. Нинова обаче е начело на БСП от 2016 г., а Сидеров беше „златният пръст“ на подкрепяното от партията правителство на Пламен Орешарски още през 2013 г.
Връзката между БСП и фашизма всъщност е далеч по-дълбока и исторически вкоренена. Тя произтича от самите характеристики на тоталитарната система начело с БКП, от която БСП така и не се е еманципирала. Характеристики, довели до античовешки практики и национализъм, принципно не толкова различни от режима на Хитлер. В България кулминацията на този процес е етническото прочистване на няколкостотин хиляди турци през 80-те години на ХХ век.
Самоидентификацията на социализма като антифашизъм пречи на режима да забележи фашистките/нацистките елементи в самия себе си. Това води не само до безкритичност, типична за диктатурите, а и до дълбоко неразбиране в постсоциалистическите страни на измеренията на режима на Хитлер. Неслучайно крайнодясната германска партия „Алтернатива за Германия“ намира по-широк прием във федералните провинции на бившата ГДР.
Социалистическият антисемитизъм
В страните от бившия Източен блок липсва културата на неприемане на антисемитизма, която е методично възпитавана на Запад след края на Втората световна война. Социалистическото образование представя фашизма по-скоро като радикална форма на капитализма (поради което и избягва термина „националсоциализъм“). За убитите евреи се учи, но на фона на всички числа и жертви за назубряне няколко милиона повече нямат особен смисъл.
В учебниците по история обаче не се учи за антисемитизма в СССР. И тук не става дума за критичното отношение на социалистическия режим към Държавата Израел и слагането на знак за равенство между ционизъм и милитаризъм. През 1952 г. по нареждане на Сталин са екзекутирани 24-ма интелектуалци евреи, което остава в еврейската история като „Нощта на убитите поети“. На следващата година същото се случва с лекари, обвинени в държавна измяна.
И един съветски виц от 80-те
Един евреин отишъл на сбирка на националистическата организация „Память“ („Памет“), понеже чул, че членовете на организацията не харесват сънародниците му, и решил да ги попита защо. Когато разбрали какъв е, те го спукали от бой още преди да си е задал въпроса.
– Но защо? Защо ме биете? – успял да попита накрая той, плюейки кръв.
– Защото вие, евреите, разпънахте Христос! – бил отговорът.
Освен любопитен, евреинът бил и упорит. Решил, че щом вече са го набили, ще може спокойно да си поговори с тях и да ги убеди, че евреите не са лоши хора. Затова пак отишъл. Нахвърлили му се още щом го видели на вратата.
– Вече ме бихте заради Христос. Сега за какво? – попитал той, когато успял да си поеме въздух.
– Ами децата в Палестина?
Във вицовете обикновено има и трети път, така е и в този. Както можете да предположите, евреинът отново отишъл на сбирка на „Память“, отново ял бой и си задал въпроса. Този път отговорът бил:
– Защото вие, евреите, потопихте „Титаник“!
– Разбирам за Христос, разбирам за Палестина, но какво общо имат евреите с „Титаник“? – попитал недоумяващият евреин.
– А името Айсберг да ви говори нещо?
Вицът си е виц, но организацията „Память“ е истинска. Тя възниква в СССР през 1980 г. и въпреки антисемитските и монархистките си елементи така и не е забранена, а членовете ѝ разполагат с доста голяма за онези години свобода на изразяване. Смята се, че е създадена със съдействието на КГБ. Организацията продължава съществуването си чак до 2021 г. Освен антисемитизъм проповядва и православен фундаментализъм и логично е на страната на Русия при окупацията на Крим и Донбас.
„Невидимият“ либерален активизъм
След тази историческа ретроспекция да се върнем там, откъдето започнахме. Твърдящите как либералите и центристите не се противопоставят на фашистите, не забелязват както фашизма вляво, така и противопоставянето му от страна на личности и организации с либерална насоченост.
А либерални хора може да се видят на протестите срещу „Луковмарш“. Правозащитни и други неправителствени организации, както и техните лидери са постоянна мишена от страна на неонацистки групи. Под особен натиск бяха по време на кампаниите срещу Истанбулската конвенция, Стратегията за детето и Закона за социалните услуги.
През 2016 г., в разгара на т.нар. бежанска криза, председателят на Българския хелзинкски комитет Красимир Кънев беше бит в центъра на София. В края на 2014 г. 10 от 11-те членове на сдружението „Маргиналия“ бяха дадени на съд заради отворено писмо, в което Дянко Марков, обявил във Великото народно събрание евреите за „враждебно население“, е наречен „антисемит“. Делото беше прекратено поради липса на престъпление, но после беше съдена лично главната редакторка на „Маргиналия“ Юлиана Методиева. В края на 2018 г. съдът окончателно я оправда.
Новото ляво – без политическо представителство, но с наследство
„Нови леви“ в България има поне от 15-ина години. Млади хора, повечето с възможност да учат на Запад, където са попили западняшкото университетско левичарство и са го приложили върху българския постсоциалистически контекст. През всички тези години те страдаха за липсата на истинска лява политическа алтернатива в България. Но така и не създадоха свое политическо представителство. Вместо това заставаха я зад кандидатката на БСП за евродепутат Достена Лаверн, я зад Ваня Григорова, когато се кандидатира за независим евродепутат през 2019 г., я зад Мая Манолова и Татяна Дончева.
Вместо политическо представителство, чиято липса оплакват, „новите леви“, които вече не са толкова нови, създадоха нещо друго. Те успяха да произведат поколение от още по-нови леви, които нямат съзнателни спомени от социализма (повечето са родени след края му). За сметка на това обаче са индоктринирани в прости идеологически схеми, които изповядват с религиозен плам. За тях по дефиниция всичко либерално е неолиберално, което е капитализъм, който пък е фашизъм. И патриархат.
Важността на нюансите
Непрекъснатото взаимно ръфане не се отразява добре в електорален план на и без това рехавия либерален слой. Представителите му се карат не само за кандидатите и листите за местните избори, а в последно време и за войната в Израел. Комай няма тема, по която да имат едно „официално“ мнение, а все се съмняват и търсят нюансите, докато левите ги етикетират като фашисти, а консервативнодесните – като комунисти.
Ала макар от електорална гледна точка това поведение да е контрапродуктивно, то поне е знак за демократичност. Различни позиции може да се отстояват единствено в ситуация на свобода. Затова всеки тоталитаризъм започва от дисциплинирането на мисълта. В наши дни по-важна от опозицията между ляво и дясно е тази между либерално/демократично и авторитарно/недемократично.
Ето защо е крайно време разговорът какво е ляво и какво е дясно, да напусне учебникарските клишета и да се видят сложните преплитания между тях, които клишетата скриват. Но за да се забелязват нюансите, е необходимо да има базисно равнище на самокритичност.
How To Align Your Ultra Short Throw (UST) Projector WITHOUT Keystone
Post Syndicated from The Hook Up original https://www.youtube.com/watch?v=uqRn1sfan58
Professional Oaths
Post Syndicated from xkcd.com original https://xkcd.com/2843/

CVE-2023-20198: Active Exploitation of Cisco IOS XE Zero-Day Vulnerability
Post Syndicated from Caitlin Condon original https://blog.rapid7.com/2023/10/17/etr-cve-2023-20198-active-exploitation-of-cisco-ios-xe-zero-day-vulnerability/

On Monday, October 16, Cisco’s Talos group published a blog on an active threat campaign exploiting CVE-2023-20198, a “previously unknown” zero-day vulnerability in the web UI component of Cisco IOS XE software. IOS XE is an operating system that runs on a wide range of Cisco networking devices, including routers, switches, wireless controllers, access points, and more. Successful exploitation of CVE-2023-20198 allows a remote, unauthenticated attacker to create an account on an affected device and use that account to obtain full administrator privileges, effectively enabling a complete takeover of the system.
There is no patch for CVE-2023-20198 as of October 17, 2023. As Cisco Talos noted in their blog, it is being actively exploited in the wild. There appear to be a significant number of devices running IOS XE on the public internet as of October 17. Estimates of internet-exposed devices running IOS XE vary, but the attack surface area does appear to be relatively large; one estimate puts the exposed device population at 140K+.
In the activity Cisco observed, attackers created (malicious) local user accounts from suspicious IP addresses. Additional activity has included deployment of an implant that allows the attacker to execute arbitrary commands at the system level or IOS level. Cisco has an extensive description of the malicious behavior they’ve observed here.
Affected products
Cisco’s public advisory on CVE-2023-20198 merely says that Cisco IOS XE software is vulnerable if the web UI feature is enabled (the UI is enabled through the ip http server or ip http secure-server commands). Cisco does not offer a list of products that definitively run IOS XE, but their product page for IOS XE lists some, including the Catalyst, ASR, and NCS families.
According to the advisory, customers can determine whether the HTTP Server feature is enabled for a system, by logging into the system and using the show running-config | include ip http server|secure|active command in the CLI to check for the presence of the ip http server command or the ip http secure-server command in the global configuration. The presence of either command or both commands in the system configuration indicates that the web UI feature is enabled (and that the system is therefore vulnerable).
Cisco’s advisory also specifies that if the ip http server command is present and the configuration also contains ip http active-session-modules none, the vulnerability is not exploitable over HTTP. If the ip http secure-server command is present and the configuration also contains ip http secure-active-session-modules none, the vulnerability is not exploitable over HTTPS.
Mitigation guidance
In lieu of a patch, organizations should disable the web UI (HTTP Server) component on internet-facing systems on an emergency basis. To disable the HTTP Server feature, use the no ip http server or no ip http secure-server command in global configuration mode. Per Cisco’s advisory, if both the HTTP server and HTTPS server are in use, both commands are required to disable the HTTP Server feature. Organizations should also avoid exposing the web UI and management services to the internet or to untrusted networks.
Disabling the web UI component of IOS XE systems and limiting internet exposure reduces risk from known attack vectors, but notably does not mitigate risk from implants that may have already been successfully deployed on vulnerable systems. Rapid7 recommends invoking incident response procedures where possible to prioritize hunting for indicators of compromise Cisco has shared, listed below.
Cisco-observed attacker behavior
The Cisco Talos blog on CVE-2023-21098 has a full analysis of the implant they’ve observed being deployed as part of this threat campaign. We strongly recommend reading the analysis in its entirety. The implant is saved under the file path /usr/binos/conf/nginx-conf/cisco_service.conf that contains two variable strings made up of hexadecimal characters. While the implant is not persistent (a device reboot will remove it), the attacker-created local user accounts are.
Cisco observed the threat actor exploiting CVE-2021-1435, which was patched in 2021, to install the implant after gaining access to a device vulnerable to CVE-2023-20198. Talos also notes that they have seen devices fully patched against CVE-2021-1435 getting the implant successfully installed “through an as of yet undetermined mechanism.”
Indicators of compromise
The Cisco Talos blog on CVE-2023-20198 directs organizations to look for unexplained or newly created users on devices running IOS XE. One way of identifying whether the implant observed by Talos is present is to run the following command against the device, where the "DEVICEIP” portion is a placeholder for the IP address of the device to check:
curl -k -X POST "https[:]//DEVICEIP/webui/logoutconfirm.html?logon_hash=1"
The command above will execute a request to the device’s Web UI to see if the implant is present. If the request returns a hexadecimal string, the implant is present (note that the web server must have been restarted by the attacker after the implant was deployed for the implant to have become active). Per Cisco’s blog, the above check should use the HTTP scheme if the device is only configured for an insecure web interface.
Additional Cisco IOCs
- 5.149.249[.]74
- 154.53.56[.]231
Usernames:
- cisco_tac_admin
- cisco_support
Cisco Talos also advises performing the following checks to determine whether a device may have been compromised:
Check the system logs for the presence of any of the following log messages where “user” could be cisco_tac_admin, cisco_support or any configured, local user that is unknown to the network administrator:
-
%SYS-5-CONFIG_P: Configured programmatically by process SEP_webui_wsma_http from console as user on line -
%SEC_LOGIN-5-WEBLOGIN_SUCCESS: Login Success [user: user] [Source: source_IP_address] at 03:42:13 UTC Wed Oct 11 2023
Note: The %SYS-5-CONFIG_P message will be present for each instance that a user has accessed the web UI. The indicator to look for is new or unknown usernames present in the message.
Organizations should also check the system logs for the following message where filename is an unknown filename that does not correlate with an expected file installation action:
%WEBUI-6-INSTALL_OPERATION_INFO: User: username, Install Operation: ADD filename
Rapid7 customers
InsightVM and Nexpose customers can assess their exposure to CVE-2023-20198 with an authenticated vulnerability check that looks for Cisco IOS XE devices with the web UI enabled. The check is available in today’s (October 17) content release.
Rapid7 Managed Detection and Response (MDR) customers have existing detection coverage through Rapid7’s expansive library of detection rules. The following detection rules are deployed and alerting on activity related to this vulnerability via the IP addresses provided by Cisco:
- Network Flow – CURRENT_EVENTS Related IP Observed
- Suspicious Connection – CURRENT_EVENTS Related IP Observed
Training machine learning models on premises for data residency with AWS Outposts rack
Post Syndicated from Macey Neff original https://aws.amazon.com/blogs/compute/training-machine-learning-models-on-premises-for-data-residency-with-aws-outposts-rack/
This post is written by Sumit Menaria, Senior Hybrid Solutions Architect, and Boris Alexandrov, Senior Product Manager-Tech.
In this post, you will learn how to train machine learning (ML) models on premises using AWS Outposts rack and datasets stored locally in Amazon S3 on Outposts. With the rise in data sovereignty and privacy regulations, organizations are seeking flexible solutions that balance compliance with the agility of cloud services. Healthcare and financial sectors, for instance, harness machine learning for enhanced patient care and transaction safety, all while upholding strict confidentiality. Outposts rack provide a seamless hybrid solution by extending AWS capabilities to any on-premises or edge location, providing you the flexibility to store and process data wherever you choose. Data sovereignty regulations are highly nuanced and vary by country. This blog post addresses data sovereignty scenarios where training datasets need to be stored and processed in a geographic location without an AWS Region.
Amazon S3 on Outposts
As you prepare datasets for ML model training, a key component to consider is the storage and retrieval of your data, especially when adhering to data residency and regulatory requirements.
You can store training datasets as object data in local buckets with Amazon S3 on Outposts. In order to access S3 on Outposts buckets for data operations, you need to create access points and route the requests via an S3 on Outposts endpoint associated with your VPC. These endpoints are accessible both from within the VPC as well as on premises via the local gateway.

Solution overview
Using this sample architecture, you are going to train a YOLOv5 model on a subset of categories of the Common Objects in Context (COCO) dataset. The COCO dataset is a popular choice for object detection tasks offering a wide variety of image categories with rich annotations. It is also available under the AWS Open Data Sponsorship Program via fast.ai datasets.

This example is based on an architecture using an Amazon Elastic Compute Cloud (Amazon EC2) g4dn.8xlarge instance for model training on the Outposts rack. Depending on your Outposts rack compute configuration, you can use different instance sizes or types and make adjustments to training parameters, such as learning rate, augmentation, or model architecture accordingly. You will be using the AWS Deep Learning AMI to launch your EC2 instance, which comes with frameworks, dependencies, and tools to accelerate deep learning in the cloud.
For the training dataset storage, you are going to use an S3 on Outposts bucket and connect to it from your on-premises location via the Outposts local gateway. The local gateway routing mode can be direct VPC routing or Customer-owned IP (CoIP) depending on your workload’s requirements. Your local gateway routing mode will determine the S3 on Outposts endpoint configuration that you need to use.
1. Download and populate training dataset
You can download the training dataset to your local client machine using the following AWS CLI command:
aws s3 sync s3://fast-ai-coco/ .After downloading, unzip annotations_trainval2017.zip, val2017.zip and train2017.zip files.
$ unzip annotations_trainval2017.zip
$ unzip val2017.zip
$ unzip train2017.zip
In the annotations folder, the files which you need to use are instances_train2017.json and instances_val2017.json, which contain the annotations corresponding to the images in the training and validation folders.
2. Filtering and preparing training dataset
You are going to use the training, validation, and annotation files from the COCO dataset. The dataset contains over 100K images across 80 categories, but to keep the training simple, you can focus on 10 specific categories of popular food items in supermarket shelves: banana, apple, sandwich, orange, broccoli, carrot, hot dog, pizza, donut, and cake. (Because who doesn’t like a bite after a model training.) Applications for training such models could be self-stock monitoring, automatic checkouts, or product placement optimization using computer vision in retail stores. Since YOLOv5 uses a specific annotations (labels) format, you need to convert the COCO dataset annotation to the target annotation.
3. Load training dataset to S3 on Outposts bucket
In order to load the training data on S3 on Outposts you need to first create a new bucket using the AWS Console or CLI, as well as an access point and endpoint for the VPC. You can use a bucket style access point alias to load the data, using the following CLI command:
$ cd /your/local/target/upload/path/
$ aws s3 sync . s3://trainingdata-o0a2b3c4d5e6d7f8g9h10f--op-s3
Replace the alias in the above CLI command with corresponding bucket alias name for your environment. The s3 sync command syncs the folders in the same structure containing the images and labels for the training and validation data, which you will be using later for loading it to the EC2 instance for model training.
4. Launch the EC2 instance
You can launch the EC2 instance with the Deep Learning AMI based on this getting started tutorial. For this exercise, the Deep Learning AMI GPU PyTorch 2.0.1 (Ubuntu 20.04) has been used.
5. Download YOLOv5 and install dependencies
Once you ssh into the EC2 instance, activate the pre-configured PyTorch environment and clone the YOLOv5 repository.
$ ssh -i /path/key-pair-name.pem ubuntu@instance-ip-address
$ conda activate pytorch
$ git clone https://github.com/ultralytics/yolov5.git
$ cd yolov5
Then, and install its necessary dependencies.
$ pip install -U -r requirements.txtTo ensure the compatibility between various packages, you may need to modify existing packages on your instance running the AWS Deep Learning AMI.
6. Load the training dataset from S3 on Outposts to the EC2 instance
For copying the training dataset to the EC2 instance, use the s3 sync CLI command and point it to your local workspace.
aws s3 sync s3://trainingdata-o0a2b3c4d5e6d7f8g9h10f--op-s3 .7. Prepare the configuration files
Create the data configuration files to reflect your dataset’s structure, categories, and other parameters.
data.yml
train: /your/ec2/path/to/data/images/train
val: /your/ec2/path/to/data/images/val
nc: 10 # Number of classes in your dataset
names: ['banana', 'apple', 'sandwich', 'orange', 'broccoli', 'carrot', 'hot dog', 'pizza', 'donut', 'cake']
Create the model training parameter file using the sample configuration file from the YOLOv5 repository. You will need to update the number of classes to 10, but you can also change other parameters as you fine tune the model for performance.
parameters.yml:
# Parameters
nc: 10 # number of classes in your dataset
depth_multiple: 0.33 # model depth multiple
width_multiple: 0.50 # layer channel multiple
anchors:
- [10,13, 16,30, 33,23] # P3/8
- [30,61, 62,45, 59,119] # P4/16
- [116,90, 156,198, 373,326] # P5/32

# Backbone
backbone:
[[-1, 1, Conv, [64, 6, 2, 2]], # 0-P1/2
[-1, 1, Conv, [128, 3, 2]], # 1-P2/4
[-1, 3, C3, [128]],
[-1, 1, Conv, [256, 3, 2]], # 3-P3/8
[-1, 6, C3, [256]],
[-1, 1, Conv, [512, 3, 2]], # 5-P4/16
[-1, 9, C3, [512]],
[-1, 1, Conv, [1024, 3, 2]], # 7-P5/32
[-1, 3, C3, [1024]],
[-1, 1, SPPF, [1024, 5]], # 9
]

# Head
head:
[[-1, 1, Conv, [512, 1, 1]],
[-1, 1, nn.Upsample, [None, 2, 'nearest']],
[[-1, 6], 1, Concat, [1]], # cat backbone P4
[-1, 3, C3, [512, False]], # 13

[-1, 1, Conv, [256, 1, 1]],
[-1, 1, nn.Upsample, [None, 2, 'nearest']],
[[-1, 4], 1, Concat, [1]], # cat backbone P3
[-1, 3, C3, [256, False]], # 17 (P3/8-small)

[-1, 1, Conv, [256, 3, 2]],
[[-1, 14], 1, Concat, [1]], # cat head P4
[-1, 3, C3, [512, False]], # 20 (P4/16-medium)

[-1, 1, Conv, [512, 3, 2]],
[[-1, 10], 1, Concat, [1]], # cat head P5
[-1, 3, C3, [1024, False]], # 23 (P5/32-large)

[[17, 20, 23], 1, Detect, [nc, anchors]], # Detect(P3, P4, P5)
At this stage, the directory structure should look like below:
![Directory tree showing training dataset and model configuration structure]](https://d2908q01vomqb2.cloudfront.net/1b6453892473a467d07372d45eb05abc2031647a/2023/10/17/figure-3.jpg)
8. Train the model
You can run the following command to train the model. The batch-size and epochs can vary depending on your vCPU and GPU configuration and you can further modify these values or add weights as you try with additional rounds of training.
$ python3 train.py —img-size 640 —batch-size 32 —epochs 50 —data /your/path/to/configuation_files/dataconfig.yaml —cfg /your/path/to/configuation_files/parameters.yamlYou can monitor the model performance as it iterates through each epoch
Starting training for 50 epochs...

Epoch GPU_mem box_loss obj_loss cls_loss Instances Size
0/49 6.7G 0.08403 0.05 0.04359 129 640: 100%|██████████| 455/455 [06:14<00:00,
Class Images Instances P R mAP50 mAP50-95: 100%|██████████| 9/9 [00:05<0
all 575 2114 0.216 0.155 0.0995 0.0338

Epoch GPU_mem box_loss obj_loss cls_loss Instances Size
1/49 8.95G 0.07131 0.05091 0.02365 179 640: 100%|██████████| 455/455 [06:00<00:00,
Class Images Instances P R mAP50 mAP50-95: 100%|██████████| 9/9 [00:04<00:00, 1.97it/s]
all 575 2114 0.242 0.144 0.11 0.04

Epoch GPU_mem box_loss obj_loss cls_loss Instances Size
2/49 8.96G 0.07068 0.05331 0.02712 154 640: 100%|██████████| 455/455 [06:01<00:00, 1.26it/s]
Class Images Instances P R mAP50 mAP50-95: 100%|██████████| 9/9 [00:04<00:00, 2.23it/s]
all 575 2114 0.185 0.124 0.0732 0.0273
Once the model training finishes, you can see the validation results against the batch of validation dataset and evaluate the model’s performance using standard metrics.
Validating runs/train/exp/weights/best.pt...
Fusing layers...
YOLOv5 summary: 157 layers, 7037095 parameters, 0 gradients, 15.8 GFLOPs
                 Class     Images  Instances          P          R      mAP50   mAP50-95: 100%|██████████| 9/9 [00:06<00:00,  1.48it/s]
                   all        575       2114      0.282      0.222       0.16     0.0653
                banana        575        280      0.189      0.143     0.0759      0.024
                 apple        575        186      0.206      0.085     0.0418     0.0151
              sandwich        575        146      0.368      0.404      0.343      0.146
                orange        575        188      0.265      0.149     0.0863     0.0362
              broccoli        575        226      0.239      0.226      0.138     0.0417
                carrot        575        310      0.182      0.203     0.0971     0.0267
               hot dog        575        108      0.242      0.111     0.0929     0.0311
                 pizza        575        208      0.405      0.418      0.333       0.15
                 donut        575        228      0.352      0.241       0.19     0.0973
                  cake        575        234      0.369      0.235      0.203     0.0853
Results saved to runs/train/exp
Use the model for inference
In order to test the model performance, you can test it by passing a new image which is from a shelf in a supermarket with some of the objects that you trained the model on.

(pytorch) ubuntu@ip-172-31-48-165:~/workspace/source/yolov5$ python3 detect.py --weights /home/ubuntu/workspace/source/yolov5/runs/train/exp/weights/best.pt —source /home/ubuntu/workspace/inference/Inference-image.jpg
<<omitted output>>
Fusing layers...
YOLOv5 summary: 157 layers, 7037095 parameters, 0 gradients, 15.8 GFLOPs
image 1/1 /home/ubuntu/workspace/inference/Inference-image.jpg: 640x640 4 apples, 6 oranges, 1 cake, 5.3ms
Speed: 0.6ms pre-process, 5.3ms inference, 1.1ms NMS per image at shape (1, 3, 640, 640)
Results saved to runs/detect/exp7
The response from the preceding model inference indicates that it predicted 4 apples, 6 oranges, and 1 cake in the image. The prediction may differ based on the image type used, and while a single sample image can give you a sense of the model’s performance, it will not provide a comprehensive understanding. For a more complete evaluation, it’s always recommended to test the model on a larger and more diverse set of validation images. Additional training and tuning of your parameters or datasets may be required to achieve better prediction.
Clean Up
You can terminate the following resources used in this tutorial after you have successfully trained and tested the model:
- Terminate the EC2 instance used for the model training;
- Delete the S3 on Outposts resources if you no longer need the training dataset.
Conclusion
The seamless integration of compute on AWS Outposts with S3 on Outposts, coupled with on-premises ML model training capabilities, offers organizations a robust solution to tackle data residency requirements. By setting up this environment, you can ensure that your datasets remain within desired geographies while still utilizing advanced machine learning models and cloud infrastructure. In addition to this, it remains essential to diligently review and fine-tune your implementation strategies and guard rails in place to ensure your data remains within the boundaries of your regulatory requirements. You can read more about architecting for data residency in this blog post.
Reference
- COCO – Common Objects in Context – fast.ai datasets was accessed on 20-08-2023 from https://registry.opendata.aws/fast-ai-coco.
Accelerate your data warehouse migration to Amazon Redshift – Part 7
Post Syndicated from Mykhailo Kondak original https://aws.amazon.com/blogs/big-data/accelerate-your-data-warehouse-migration-to-amazon-redshift-part-7/
Tens of thousands of customers use Amazon Redshift to gain business insights from their data. With Amazon Redshift, you can use standard SQL to query data across your data warehouse, operational data stores, and data lake. You can also integrate other AWS services such as Amazon EMR, Amazon Athena, Amazon SageMaker, AWS Glue, AWS Lake Formation, and Amazon Kinesis to use all the analytic capabilities in AWS.
Migrating a data warehouse can be complex. You have to migrate terabytes or petabytes of data from your legacy system while not disrupting your production workload. You also need to ensure that the new target data warehouse is consistent with upstream data changes so that business reporting can continue uninterrupted when you cut over to the new platform.
Previously, there were two main strategies to maintain data consistency after the initial bulk load during a migration to Amazon Redshift. You could identify the changed rows, perhaps using a filter on update timestamps, or you could modify your extract, transform, and load (ETL) process to write to both the source and target databases. Both of these options require manual effort to implement and increase the cost and risk of the migration project.
AWS Schema Conversion Tool (AWS SCT) could help you with initial bulk load from Azure Synapse Analytics, BigQuery, Greenplum Database, IBM Netezza, Microsoft SQL Server, Oracle, Snowflake, Teradata and Vertica. Now, we’re happy to share that AWS SCT has automated maintaining data consistency for you. If you’re migrating from an IBM Netezza data warehouse to Amazon Redshift, the AWS SCT data extractors will automatically capture changes from the source and apply them on the target. You configure a change data capture (CDC) migration task in AWS SCT, and it will extract the relevant data changes from IBM Netezza and apply them in a transactionally consistent order on Amazon Redshift. You need to configure the needed resources on IBM Netezza and start the data migration—the source database remains fully operational during the migration and replication.
In this post, we describe at a high-level how CDC tasks work in AWS SCT. Then we deep dive into an example of how to configure, start, and manage a CDC migration task. We look briefly at performance and how you can tune a CDC migration, and then conclude with some information about how you can get started on your own migration.
Accelerate your data warehouse migration to Amazon Redshift:
|
Solution overview
The following diagram shows the data migration and replication workflow with AWS SCT.

In the first step, your AWS SCT data extraction agent completes the full load of your source data to Amazon Redshift. Then the AWS SCT data extraction agent uses a history database in Netezza. The history database captures information about user activity such as queries, query plans, table access, column access, session creation, and failed authentication requests. The data extraction agent extracts information about transactions that you run in your source Netezza database and replicates them to your target Redshift database.
You can start ongoing replication automatically after you complete the full load. Alternatively, you can start CDC at a later time or on a schedule. For more information, refer to Configuring ongoing data replication.
At a high level, the ongoing replication flow is as follows.
At the start of the replication, the data extraction agent captures the last transaction identifier in the history table. The data extraction agent stores this value in the max_createxid variable. To capture the transaction ID, the agent runs the following query:
If this transaction ID value is different from the CDC start point, then the agent identifies the delta to replicate. This delta includes all transactions for the selected tables that happened after full load or after the previous replication. The data extraction agent selects the updated data from your source table.
From this updated data, AWS SCT creates two temporary tables. The first table includes all rows that you deleted from your source database and the old data of the rows that you updated. The second table includes all rows that you inserted and the new data of the rows that you updated. AWS SCT then uses these tables in JOIN clauses to replicate the changes to your target Redshift database.
Next, AWS SCT copies these tables to your Amazon Simple Storage Service (Amazon S3) bucket and uses this data to update your target Redshift cluster.
After updating your target database, AWS SCT deletes these temporary tables. Next, your data extraction agent sets the value of the CDC start point equal to the captured transaction ID (max_createxid). During the next data replication run, your agent will determine the delta to replicate using this updated CDC start point.
All changes that happen to your source database during the replication run will be captured in the next replication run. Make sure that you repeat the replication steps until the delta is equal to zero for each table that you included in the migration scope. At this point, you can cut over to your new databases.
Configure your source database
In your source Netezza database, create a history database and configure the history logging. Next, grant read permissions for all tables in the history database to the user that you use in the AWS SCT project. This user has the minimal permissions that are required to convert your source database schemas to Amazon Redshift.
Configure AWS SCT
Before you start data migration and replication with AWS SCT, make sure that you download the Netezza and Amazon Redshift drivers. Take note of the path to the folder where you saved these files. You will specify this path in the AWS SCT and data extraction agent settings.
To make sure the data extraction agents work properly, install the latest version of Amazon Corretto 11.
To configure AWS SCT, complete the following steps:
- After you create an AWS SCT project, connect to your source and target databases and set up the mapping rules. A mapping rule describes a source-target pair that defines the migration target for your source database schema.
- Convert your database schemas and apply them to Amazon Redshift if you haven’t done this yet. Make sure that the target tables exist in your Redshift database before you start data migration.
- Now, install the data extraction agent. The AWS SCT installer includes the installation files for data extraction agents in the agents folder. Configure your data extraction agents by adding the listening port number and the path to the source and target database drivers. For the listening port, you can proceed with the default value. For database drivers, enter the path that you noted before.
The following diagram shows how the AWS SCT data extraction agents work.

After you install the data extraction agent, register it in AWS SCT.
- Open the data migration view in AWS SCT and choose Register.
- Enter the name of your agent, the host name, and the port that you configured in the previous step. For the host name, you can use the localhost 0.0.0.0 if you run the agent on the same machine where you installed the data extraction agent.
Create and run a CDC task
Now you can create and manage your data migration and replication tasks. To do so, complete the following steps:
- Select the tables in your source database to migrate, open the context (right-click) menu, and choose Create local task.
- Choose your data migration mode (for this post, choose Extract, upload and copy to replicate data changes from your source database):
- Extract only – Extract your data and save it to your local working folders.
- Extract and upload – Extract your data and upload it to Amazon S3.
- Extract, upload and copy – Extract your data, upload it to Amazon S3, and copy it into your Redshift data warehouse.
- Choose your encryption type. Make sure that you configure encryption for safe and secure data migrations.
- Select Enable CDC.

- After this, you can switch to the CDC settings tab.
- For CDC mode, you can choose from the following options:
- Migrate existing data and replicate ongoing changes – Migrate all existing source data and then start the replication. This is the default option.
- Replicate data changes only – Start data replication immediately.
Sometimes you don’t need to migrate all existing source data. For example, if you have already migrated your data, you can start the data replication by choosing Replicate data changes only.
- If you choose Replicate data changes only, you can also set the Last CDC point to configure the replication to start from this point. If it is not set, AWS SCT data extraction agents replicate all changes that occur after your replication task is started.
If your replication task failed, you can restart the replication from the point of failure. You can find the identifier of the last migrated CDC point on the CDC processing details tab in AWS SCT, set Last CDC point and start the task again. This will allow AWS SCT data extraction agents to replicate all changes in your source tables to your target database without gaps.
- You can also configure when you want to schedule the CDC runs to begin.
If you select Immediately, the first replication run immediately after your agent completes the full load. Alternatively, you can specify the time and date when you want to start the replication.
- Also, you can schedule when to run the replication again. You can enter the number of days, hours, or minutes when to repeat the replication runs. Set these values depending on the intensity of data changes in your source database.
- Finally, you can set the end date when AWS SCT will stop running the replication.

- On the Amazon S3 settings tab, you can connect your AWS SCT data extraction agent with your Amazon S3 bucket.
You don’t need to do this step if you have configured the AWS service profile in the global application settings.
- After you have configured all settings, choose Create to create a CDC task.

- Start this task in the AWS SCT user interface.
The following screenshots show examples of the AWS SCT user interface once you started tasks.

You can run multiple CDC tasks in parallel at the same time. For example, you can include different sets of source tables in each task to replicate the changes to different target Redshift clusters. AWS SCT handles these replication tasks and distributes resources correctly to minimize the replication time.
Data replication limitations
There are a few limitations in AWS SCT data replication:
- Changes in your source database don’t trigger the replication run because AWS SCT isn’t able to automate these runs (as of this writing). You can instead run the data replication tasks on a predefined schedule.
- AWS SCT doesn’t replicate TRUNCATE and DDL statements. If you change the structure of your source table or truncate it, then you must run the same statements in your target database. You should make these changes manually because AWS SCT isn’t aware of structure updates.
End-to-end example
Now that you know how to create a local replication task in AWS SCT, we deep dive and show how AWS SCT performs the extract and load processes.
- First, we run the following code to check that we correctly configured our source Netezza database. To use this code example, change the name of your history database.
If you configured your database correctly, then the output of this command includes a value that is different from zero. In our case, the result is as follows:
- Now we create a table on Netezza to use in the example. The table has three columns and a primary key.
- The SELECT statement returns an empty table:
- Before we start the replication, we run the following query on Netezza to get the latest transaction identifier in the history table:
For our test table, the script prints the last transaction identifier, which is 2691798:
- To make sure that our table doesn’t include new transactions, AWS SCT runs the following script. If you want to run this script manually, replace
2691798with the last transaction identifier in your history table.
As expected, the script doesn’t return any values.
CREATEXID and DELETEXID are hidden system columns that exist in every Netezza table. CREATEXID identifies the transaction ID that created the row, and DELETEXID identifies the transaction ID that deleted the row. AWS SCT uses them to find changes in the source data.
Now we’re ready to start the replication.
- We assume you’ve used AWS SCT to convert the example table and build it on the target Amazon Redshift. AWS SCT runs the following statement on Amazon Redshift:
- AWS SCT also creates a staging table that holds replication changes until they can be applied on the actual target table:
- AWS SCT runs the following query to capture all changes that happened after the last transaction identifier:
This script returns an empty table:
- Now, we change data on Netezza and see how it gets replicated to Amazon Redshift:
The preceding script returns the following result:
- AWS SCT checks for data changes starting from the last transaction ID using the following query:
The script returns a result that is different from zero:
Because the new transaction ID is greater than the last transaction ID, the history table contains new data to be replicated.
- AWS SCT runs the following query to extract the changes. The application detects all rows that were inserted, deleted, or updated within the scope of transactions with IDs in range from 2691798 + 1 to 2691824.
The extracted data is as follows:
- Next, AWS SCT compresses the data and uploads it to Amazon S3. Then AWS SCT runs the following command to copy the data into the staging table on Amazon Redshift:
- From the staging table, AWS SCT applies the changes to the actual target table. For this iteration, we insert new rows into the Redshift table:
- Let’s run another script that not only inserts, but also deletes and updates data in the source table:
The Netezza table contains the following rows:
- AWS SCT detects the changes as before using the new transaction ID:
The extracted changes appear as follows:
Notice that we inserted a new row with ID 7 and then deleted this row. Therefore, we can ignore the row with ID 7 in our delta.
Also, we made several updates of the row with ID 4. In our delta, we include the original and the most recent versions of the row. We ignore all intermediate versions in our delta.
We updated the row with ID 5 and then deleted this row. We don’t include the updated row in our delta.
This way, AWS SCT optimizes the migrated data, reducing the migration time and the network traffic.
- Now, as before, AWS SCT compresses, uploads to Amazon S3, and copies the data into the staging Redshift table:
- Then, AWS SCT applies the changes to the target table. AWS SCT removes the deleted rows, removes the old version of updated rows, and then inserts new rows and the most recent version of any updated rows:
- You can compare the data on the source and target to verify that AWS SCT captured all changes correctly:
The data on Amazon Redshift matches exactly:
In the previous examples, we showed how to run full load and CDC tasks. You can also create a CDC migration task without the full load. The process is the same—you provide AWS SCT with the transaction ID to start the replication from.
The CDC process does not have a significant impact on the source side. AWS SCT runs only SELECT statements there, using the transaction ID as boundaries for the WHERE clause. The performance impact of these statements is always smaller than the impact of DML statements generated by customer’s applications. For machines where AWS SCT data extraction agents are running, the CDC-related workload is always smaller than the full load workload because the volume of transferred data is smaller.
On the target side, for Amazon Redshift, the CDC process can generate considerable additional workload. The reason is that this process issues INSERT and DELETE statements and these can result in overhead for MPP systems, which Amazon Redshift is. Refer to Top 10 performance tuning techniques for Amazon Redshift to find best practices and tips on how to boost performance of your Redshift cluster.
Conclusion
In this post, we showed how to configure ongoing data replication for Netezza database migration to Amazon Redshift. You can use the described approach to automate data migration and replication from your IBM Netezza database to Amazon Redshift. Or, if you’re considering a migration of your existing Netezza workloads to Amazon Redshift, you can use AWS SCT to automatically convert your database schemas and migrate data. Download the latest version of AWS SCT and give it a try!
We’re happy to share these updates to help you in your data warehouse migration projects. In the meantime, you can learn more about Amazon Redshift and AWS SCT. Happy migrating!
About the Authors
 Mykhailo Kondak is a Database Engineer in the AWS Database Migration Service team at AWS. He uses his experience with different database technologies to help Amazon customers to move their on-premises data warehouses and big data workloads to the AWS Cloud. In his spare time, he plays soccer.
 Illia Kravtsov is a Database Engineer on the AWS Database Migration Service team. He has over 10 years of experience in data warehouse development with Teradata and other massively parallel processing (MPP) databases.
 Michael Soo is a Principal Database Engineer in the AWS Database Migration Service. He builds products and services that help customers migrate their database workloads to the AWS Cloud.
New Customization Capability in Amazon CodeWhisperer Generates Even Better Suggestions (Preview)
Post Syndicated from Donnie Prakoso original https://aws.amazon.com/blogs/aws/new-customization-capability-in-amazon-codewhisperer-generates-even-better-suggestions-preview/
An AI coding companion, such as Amazon CodeWhisperer, aims to improve developers’ productivity by helping them write code quickly and securely. However, in particular cases, developers need to have code recommendations based on their internal libraries and APIs they extensively use every day.
As most of the existing AI coding companion tools are trained only on open-source codes, they lack the capability to customize the code recommendations using private code repositories. This limitation presents a variety of challenges for developers. Developers have a difficulty learning how to use internal libraries correctly and avoid security problems. For large codebases, it requires hours of reading documentation to understand what code needs to be written to complete the task.
Now in Preview — Amazon CodeWhisperer Customization Capability
Today, I’m excited to announce Amazon CodeWhisperer customization capability (in preview) that enables organizations to customize CodeWhisperer to generate specific code recommendations from private code repositories. With this feature, developers who are part of Amazon CodeWhisperer Professional tier can now receive real-time code recommendations that include their internal libraries, APIs, packages, classes, and methods.
Let’s say that you’re a developer working for a hypothetical food delivery company called AnyCompany. You’re given a task to process a list of unassigned food deliveries around the driver’s current location. Previously, with CodeWhisperer, it would not know the correct internal APIs to process unassigned food deliveries or getting driver’s current location as this isn’t publicly available information.
Now, with customization capability, you can ask CodeWhisperer to provide recommendations that include specific code related to the company’s internal services. The following screenshot shows how CodeWhisperer generates codes based on the internal codebase just by writing a set of comments.
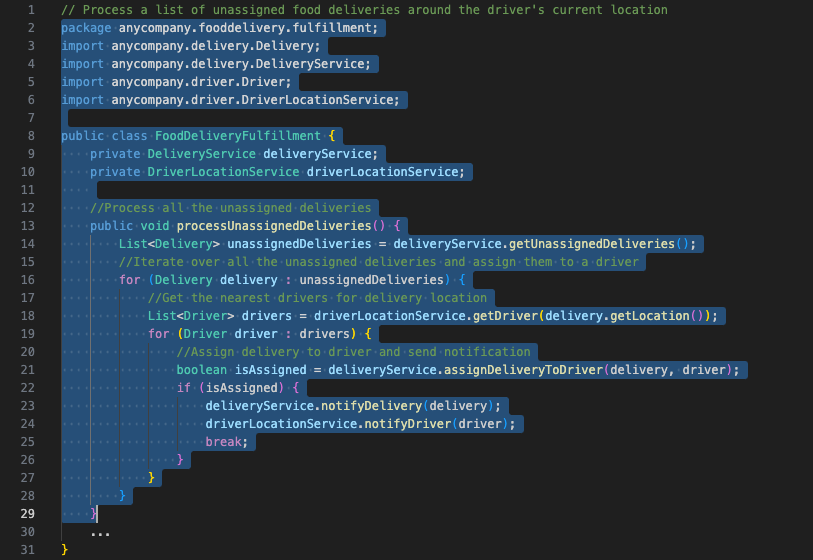
With the customization capability of utilizing your internal codebase, CodeWhisperer now understands the intent, determines which internal and public APIs are best suited to the task, and generates code recommendations.
How It Works
The explanation above described how you can use CodeWhisperer customization capability as a developer. Now, let me share how it works and how you can get started.

To create a customization, you need to complete the following steps as a CodeWhisperer administrator.
- Administer your end users as CodeWhisperer administrator.
- Connect to existing repositories. You can connect one or more code repositories in your GitHub, GitLab, or BitBucket account using AWS CodeStar Connections or manually upload all of your codes into an Amazon Simple Storage Service (Amazon S3) bucket.
- Create a customization. CodeWhisperer will customize its model based on your codebase.
- Activate the customization for your team members. Once the customization is created, you can review and manually activate the customization to make it available automatically in your team members’ IDEs.
This capability provides two main advantages: providing real-time customized code recommendations that are specific to organizations and ensuring the protection of valuable intellectual property. Organizations can now promote the use of code that meets their quality and security standards based on their codes in existing repositories.
Furthermore, CodeWhisperer helps to ensure the security of your codes by providing the option to encrypt your customization data using customer managed keys in AWS Key Management Service (AWS KMS). This customization data will be deleted once the customization job finishes.
Let’s Get Started
Let me show you how you can use the Amazon CodeWhisperer customization capability.
To get started, I need to create a customization. I need to have administrator access to navigate to the Create customization page on the Amazon CodeWhisperer dashboard.

On the Create customization page, I can connect the desired private code repositories I want CodeWhisperer to train. Currently, CodeWhisperer customization capability supports connection to GitHub, GitLab, and Bitbucket via AWS CodeStar Connections. If I have codes that are not in any code repositories, I can also manually upload my codes into an S3 bucket and define the Amazon S3 URI.
The following screenshot shows that I have existing connections with my code repositories using AWS CodeStar Connections. I can also create a new connection by selecting Create new connection.

Then, I can select Create Customization so CodeWhisperer can start training the model based on the codes available in the connection. The duration to complete this process depends on the size of the code repositories.

When the customization is ready, CodeWhisperer will not activate it automatically. This gives me the flexibility to activate the customizations just when I need them. But before I demonstrate that, I’d like to explain the evaluation score.
In short, the evaluation score helps me to measure the customization’s accuracy in predicting and providing code recommendations based on the codes in my code repositories. It provides a score in one of three categories: 1) Very Good, with a score ranging from 7–10; 2) Fair, with a score ranging from 4–7; and 3) Poor, with a score ranging from 0–4. It’s recommended to activate the customization if the evaluation score is 6 or higher. If the evaluation score is less than desired, I need to make sure that I’m providing enough codes for customization and provide a new code dataset that extensively contains references to internal APIs.
Here, I can see the Evaluation score for my customization is 8, and I’m happy with this result. Then, I can select Activate to start using this customization.

Once I have activated the customizations, I can define the access to selected customizations by selecting Add users. Now, I can give access to the customizations for selected team members who have been added as users for Amazon CodeWhisperer Professional tier. To do that, I can follow the guide from the Administering end users page.

Then, once my team members sign in via AWS Toolkit in their IDEs, they will see the available customizations and can start using them.

With Amazon CodeWhisperer, I can create multiple customizations by providing different code repositories. This feature is useful if I want to build customizations for code recommendations for certain teams.

As administrator, I can also monitor the performance of each of the customizations by navigating to the CodeWhisperer dashboard page. This page summarizes useful data such as user activity, how many lines of code were suggested by CodeWhisperer and accepted by my team members, and how many security scans have successfully been run from IDEs.

Amazon CodeWhisperer customization capability also follows the supported IDEs as part of AWS Toolkit by Amazon CodeWhisperer, such as Visual Studio Code, IntelliJ JetBrains, Visual Studio, and AWS Cloud9. This feature also provides support for most popular programming languages, including Python, Java, JavaScript, TypeScript, and C#.
Join the Public Preview
By securely leveraging customer’s internal codebase, Amazon CodeWhisperer unlocks the full potential of generative AI-powered coding that is customized to your unique requirements.
Join the public preview now and learn more on how to get started on the Amazon CodeWhisperer Customization page.
Happy coding!
— Donnie
NAS Performance Guide: How To Optimize Your NAS
Post Syndicated from Vinodh Subramanian original https://www.backblaze.com/blog/nas-performance-guide-how-to-optimize-your-nas/

Upgrading to a network attached storage (NAS) device puts your data in the digital fast lane. If you’re using one, it’s likely because you want to keep your data close to you, ensuring quick access whenever it’s needed. NAS devices, acting as centralized storage systems connected to local networks, offer a convenient way to access data in just a few clicks.
However, as the volume of data on the NAS increases, its performance can tank. You need to know how to keep your NAS operating at its best, especially with growing data demand.
In this blog, you’ll learn about various factors that can affect NAS performance, as well as practical steps you can take to address these issues, ensuring optimal speed, reliability, and longevity for your NAS device.
Why NAS Performance Matters
NAS devices can function as extended hard disks, virtual file cabinets, or centralized local storage solutions, depending on individual needs.
While NAS offers a convenient way to store data locally, storing the data alone isn’t enough. How quickly and reliably you can access your data can make all the difference if you want an efficient workflow. For example, imagine working on a critical project with your team and facing slow file transfers, or streaming a video on a Zoom call only for it to stutter or buffer continuously.
All these can be a direct result of NAS performance issues, and an increase in stored data can directly undermine the device’s performance. Therefore, ensuring optimal performance isn’t just a technical concern, it’s also a concern that directly affects user experience, productivity, and collaboration.
So, let’s talk about what could potentially cause performance issues and how to enhance your NAS.
Common NAS Performance Issues
NAS performance can be influenced by a variety of factors. Here are some of the most common factors that can impact the performance of a NAS device.
Hardware Limitations:
- Insufficient RAM: Especially in tasks like media streaming or handling large files, having inadequate memory can slow down operations.
- Slow CPU: An underpowered processor can become a bottleneck when multiple users access the NAS at once or during collaboration with team members.
- Drive Speed and Type: Hard disk drives (HDDs) are generally slower compared to solid state drives (SSDs), and your NAS can have either type. If your NAS mainly serves as a hub for storing and sharing files, a conventional HDD should meet your requirements. However, for those seeking enhanced speed and performance, SSDs deliver the performance you need.
- Outdated Hardware: Older NAS models might not be equipped to handle modern data demands or the latest software.
Software Limitations:
- Outdated Firmware/Software: Not updating to the latest firmware or software can lead to performance issues, or to missing out on optimization and security features.
- Misconfigured Settings: Incorrect settings can impact performance. This includes improper RAID configuration or network settings.
- Background Processes: Certain background tasks, like indexing or backups, can also slow down the system when running.
Network Challenges:
- Bandwidth Limitations: A slow network connection, especially on a Wi-Fi network can limit data transfer rates.
- Network Traffic: High traffic on the network can cause congestion, reducing the speed at which data can be accessed or transferred.

Disk Health and Configuration:
- Disk Failures: A failing disk in the NAS can slow down performance and also poses data loss risk.
- Suboptimal RAID Configuration: Some RAID configurations prioritize redundancy more than performance, which can affect the data storage and access speeds.
External Factors:
- Simultaneous User Access: If multiple users are accessing, reading, or writing to the NAS simultaneously, it can strain the system, especially if the hardware isn’t optimized to such traffic from multiple users.
- Inadequate Power Supply: Fluctuating or inadequate power can cause the NAS to malfunction or reduce its performance.
- Operating Temperature: Additionally, if the NAS is in a hot environment, it might overheat and impact the performance of the device.
Practical Solutions for Optimizing NAS Performance
Understanding the common performance issues with NAS devices is the first critical step. However, simply identifying these issues alone isn’t enough. It’s vital to understand practical ways to optimize your existing NAS setup so you can enhance its speed, efficiency, and reliability. Let’s explore how to optimize your NAS.
Performance Enhancement 1: Upgrading Hardware
There are a few different things you can do on a hardware level to enhance NAS performance. First, adding more RAM can significantly improve performance, especially if multiple tasks or users are accessing the NAS simultaneously.
You can also consider switching to SSDs. While they can be more expensive, SSDs offer faster read/write speeds than traditional HDDs, and they store data in flash memory, which means that they retain information even without power.
Finally, you could upgrade the CPU. For NAS devices that support it, a more powerful CPU can better handle multiple simultaneous requests and complex tasks.
Performance Enhancement 2: Optimizing Software Configuration
Remember to always keep your NAS operating system and software up-to-date to benefit from the latest performance optimizations and security patches. Schedule tasks like indexing, backups or antivirus scans during off-peak hours to ensure they don’t impact user access during high-traffic times. You also need to make sure you’re using the right RAID configuration for your needs. RAID 5 or RAID 6, for example, can offer a good balance between redundancy and performance.

Performance Enhancement 3: Network Enhancements
Consider moving to faster network protocols, like 10Gb ethernet, or ensuring that your router and switches can handle high traffic. Wherever possible, use wired connections instead of Wi-Fi to connect to the NAS for more stable and faster data access and transfer. And, regularly review and adjust network settings for optimal performance. If you can, it also helps to limit simultaneous access. If possible, manage peak loads by setting up access priorities.
Performance Enhancement 4: Regular Maintenance
Use your NAS device’s built-in tools or third-party software to monitor the health of your disks and replace any that show signs of failure. And, keep the physical environment around your NAS device clean, cool, and well ventilated to prevent overheating.
Leveraging the Cloud for NAS Optimization
After taking the necessary steps to optimize your NAS for improved performance and reliability, it’s worth considering leveraging the cloud to further enhance the performance. While NAS offers convenient local storage, it can sometimes fall short when it comes to scalability, accessibility from different locations, and seamless collaboration. Here’s where cloud storage comes into play.
At its core, cloud storage is a service model in which data is maintained, managed, and backed up remotely, and made available to users over the internet. Instead of relying solely on local storage solutions such as NAS or a server, you utilize the vast infrastructure of data centers across the globe to store your data not just in one physical location, but across multiple secure and redundant environments.
As an off-site storage solution for NAS, the cloud not only completes your 3-2-1 backup plan, but can also amplify its performance. Let’s take a look at how integrating cloud storage can help optimize your NAS.
- Off-Loading and Archiving: One of the most straightforward approaches is to move infrequently accessed or archival data from the NAS to the cloud. This frees up space on the NAS, ensuring it runs smoothly, while optimizing the NAS by only keeping data that’s frequently accessed or essential.
- Caching: Some advanced NAS systems can cache frequently accessed data in the cloud. This means that the most commonly used data can be quickly retrieved, enhancing user experience and reducing the load on the NAS device.
- Redundancy and Disaster Recovery: Instead of duplicating data on multiple NAS devices for redundancy, which can be costly and still vulnerable to local disasters, the data can be backed up to the cloud. In case of NAS failure or catastrophic event, the data can be quickly restored from the cloud, ensuring minimal downtime.
- Remote Access and Collaboration: While NAS devices can offer remote access, integrating them with cloud storage can streamline this process, often offering a more user-friendly interface and better speeds. This is especially useful for collaborative environments where multiple users work together on files and projects.
- Scaling Without Hardware Constraints: As your data volume grows, expanding a NAS can involve purchasing additional drives or even new devices. With cloud integration, you can expand your storage capacity without these immediate hardware investments, eliminating or delaying the need for physical upgrades and extending the lifespan of your NAS.
In essence, integrating cloud storage solutions with your NAS can create a comprehensive system that addresses the shortcomings of NAS devices, helping you create a hybrid setup that offers the best of both worlds: the speed and accessibility of local storage, and the flexibility and scalability of the cloud.
Getting the Best From Your NAS
At its core, NAS offers an unparalleled convenience of localized storage. However, it’s not without challenges, especially when performance issues come into play. Addressing these challenges requires a blend of hardware optimization, software updates, and smart data management settings.
But, it doesn’t have to stop at your local network. Cloud storage can be leveraged effectively to optimize your NAS. It doesn’t just act as a safety net by storing your NAS data off-site, it also makes collaboration easier with dispersed teams and further optimizes NAS performance.
Now, it’s time to hear from you. Have you encountered any NAS performance issues? What measures have you taken to optimize your NAS? Share your experiences and insights in the comments below.
The post NAS Performance Guide: How To Optimize Your NAS appeared first on Backblaze Blog | Cloud Storage & Cloud Backup.
Henry Winkler | Being Henry: The Fonz…and Beyond | Talks at Google
Post Syndicated from Talks at Google original https://www.youtube.com/watch?v=h1zPZNKG8Qk
Cloud Webinar Series Part 1: Commanding Cloud Strategies
Post Syndicated from Owen Holland original https://blog.rapid7.com/2023/10/17/cloud-webinar-series-part-1-commanding-cloud-strategies/

Over the past decade, cloud computing has evolved into a cornerstone of modern business operations. Its flexibility, scalability, and efficiency have reshaped industries and brought unprecedented opportunities.
However, this transformation has come with challenges—most notably those associated with cloud security. Our new cloud security webinar series will explore the dynamic landscape of cloud security, unveiling key trends, pinpointing critical challenges, and providing actionable insights tailored to security professionals.
In Commanding Cloud Strategies, the first webinar of the series, Rapid7’s Chief Security Officer Jaya Baloo and other experts will share their thoughts on the cloud challenges that security leaders face and offer insights on how to overcome them.
Please register for the first episode of our Cloud Security Series here to find out what our security experts think are the top strategies to overcome these challenges and considerations.
Armed with the knowledge and insights provided in part-one, security professionals will be better equipped to safeguard their cloud environments and data assets in the modern digital landscape.
To learn more, check out the webinar abstract below.
Commanding Cloud Strategies Webinar Abstract
In the ever-evolving world of cloud security, staying ahead of the curve is paramount. Over the past ten years, several trends have emerged, shaping how organizations safeguard their digital assets.
The shift towards a shared responsibility model, greater emphasis on automation and orchestration, and a growing focus on identity and access management (IAM) are among the defining trends.
Cloud Security Challenges
- Data Privacy and Compliance: Ensuring data protection and regulatory compliance within cloud environments is a persistent challenge. As data becomes more mobile and diverse, maintaining compliance becomes increasingly complex.
- Evolving Threat Landscape: The threat landscape is in constant flux, with cyberattacks targeting cloud infrastructure and applications growing in sophistication. Security professionals must adapt to this ever-changing landscape to keep their organizations safe.
Considerations in Cloud Security
- Scalable Security Architecture: Large enterprises must design security architectures that are both scalable and flexible to adapt to evolving cloud infrastructure and workload needs. The ability to scale security measures efficiently is crucial.
- Identity and Access Management (IAM): Given the intricate web of user roles and permissions in large organizations, effective IAM is essential. Organizations should prioritize IAM solutions that streamline access while maintaining security.
Understanding Risk
Understanding cybersecurity risk is at the heart of cloud security. Effective risk assessment and mitigation involve evaluating internal and external tactics that could compromise an organization’s digital assets and information security. Our security experts will delve into this critical domain’s core challenges and considerations in the session.
Challenges in Understanding Risk
- Complexity of Cloud Ecosystems: Successful organizations often operate intricate cloud ecosystems with numerous interconnected services and platforms. Navigating this complexity while assessing risk can be daunting.
- Lack of Skilled Cybersecurity Personnel: The need for more skilled cybersecurity professionals capable of analyzing and managing cloud security risks is a widespread challenge. Organizations must find and retain the right talent to stay secure.
Considerations for Understanding Risk
- Risk Assessment and Prioritization: Organizations should prioritize the identification and assessment of cloud security risks based on their potential impact and likelihood. Effective risk assessment tools and threat modelling can help in this regard.
- Continuous Monitoring and Response: Establishing a robust, real-time monitoring system is essential. It allows organizations to continuously assess cloud environments for security incidents and respond promptly to emerging threats. Integrating Security Information and Event Management (SIEM) and DevSecOps practices can enhance this capability.
Threat Intelligence
In cloud security, threat intelligence is pivotal in staying one step ahead of potential threats and vulnerabilities. Effective threat intelligence involves collecting, analyzing, and disseminating timely information to protect cloud environments and data assets proactively.
Challenges in Threat Intelligence
- Data Overload and False Positives: Organizations generate vast amounts of security data, including threat intelligence feeds. Managing this data can lead to data overload and false positives, causing alert fatigue.
- Integration and Compatibility: Integrating threat intelligence feeds into existing security infrastructure can be complex, as different sources may use varying formats and standards.
Considerations in Threat Intelligence
- Customization and Contextualization: To make threat intelligence actionable, organizations should customize it to their specific cloud environments, industry, and business context. Tailored alerting rules and threat-hunting workflows can enhance effectiveness.
- Sharing and Collaboration: Collaborating with industry peers, Information Sharing and Analysis Centers (ISACs), and government agencies for threat intelligence sharing can provide valuable insights into emerging threats specific to the industry.
Security Capabilities
Cloud security capabilities encompass the ability to comprehend evolving risks, establish benchmark standards, and take immediate, informed actions to safeguard cloud environments and data assets effectively. The final topic in the webinar will explore the core challenges and considerations in building robust security capabilities.
Challenges in Security Capabilities
- Resource Allocation and Prioritization: Allocating resources effectively across vast cloud environments can be challenging, leading to difficulties prioritizing security efforts and ensuring critical areas receive the necessary attention and investment.
- Complexity of Hybrid and Multi-Cloud Environments: Managing security capabilities becomes particularly challenging when organizations operate in hybrid or multi-cloud environments. Ensuring consistent security practices and policies across different platforms and providers requires specialized expertise.
Considerations in Security Capabilities
- Integrated Security Ecosystem: Organizations should strive to create an integrated security ecosystem that combines various security tools, technologies, and processes to provide a comprehensive view of their cloud environment.
- Scalability and Elasticity: Cloud security capabilities should be designed to scale and adapt to the organization’s evolving cloud infrastructure and workloads. This includes automated resource scaling and continuous security testing.
Разпитите Барселонагейт: Бойко Методиев Борисов
Post Syndicated from Екип на Биволъ original https://bivol.bg/barcelonagate-razpit-borisov.html
вторник 17 октомври 2023

Биволъ разполага с факсимилета от разпитите на свидетели и обекти на досъдебното производство с номер 16617/2022 г. на Софийска градска прокуратура. Документите по това производство бяха внесени в Народното събрание…
[$] Improving C-library scalability with restartable sequences
Post Syndicated from corbet original https://lwn.net/Articles/946870/
The Linux kernel has supported restartable
sequences (sometimes referred to as “RSEQ”) since 2018, but it remains
a bit of a niche feature, mostly useful to performance-oriented developers
who do not mind writing assembly code. According to Mathieu Desnoyers, the
behind the kernel’s implementation of restartable sequences, this feature
can be applicable to a much wider range of performance-sensitive code with
proper library support. He came to the 2023 GNU Tools Cauldron to
present the case for use of restartable sequences within the GNU C Library
(glibc).
New 30.72TB Kioxia LD2-L NVMe SSD Announced at OCP Summit 2023
Post Syndicated from Cliff Robinson original https://www.servethehome.com/new-30-72tb-kioxia-ld2-l-nvme-ssd-announced-at-ocp-summit-2023/
At OCP Summit 2023, the new 30.72TB Kioxia LD2-L NVMe SSD is being announced making for another very different 32TB class drive from Kioxia
The post New 30.72TB Kioxia LD2-L NVMe SSD Announced at OCP Summit 2023 appeared first on ServeTheHome.
Security updates for Tuesday
Post Syndicated from corbet original https://lwn.net/Articles/948010/
Security updates have been issued by Debian (axis, nghttp2, node-babel7, and tomcat9), Fedora (curl and ghostscript), Oracle (bind, kernel-container, mariadb:10.5, and python3.11), Red Hat (.NET 7.0, go-toolset, golang, and go-toolset:rhel8), SUSE (kernel, libcue, libxml2, python-Django, and python-gevent), and Ubuntu (curl, ghostscript, iperf3, libcue, python2.7, quagga, and samba).
Announcing the AWS Well-Architected Framework DevOps Guidance
Post Syndicated from Michael Rhyndress original https://aws.amazon.com/blogs/devops/announcing-the-aws-well-architected-framework-devops-guidance/
Today, Amazon Web Services (AWS) announced the launch of the AWS Well-Architected Framework DevOps Guidance. The AWS DevOps Guidance introduces the AWS DevOps Sagas—a collection of modern capabilities that together form a comprehensive approach to designing, developing, securing, and efficiently operating software at cloud scale. Taking the learnings from Amazon’s own transformation journey and our experience managing global cloud services, the AWS DevOps Guidance was built to equip organizations of all sizes with best practice culture, processes, and technical capabilities that help to deliver business value and applications more securely and at a higher velocity.
A Glimpse into Amazon’s DevOps Transformation
In the early 2000s, Amazon went through its own DevOps transformation which led to an online bookstore forming the AWS cloud computing division. Today, AWS provides a wide range of products and services for global customers that are powered by that same innovative DevOps approach. Due to the positive effects of this transformation, AWS recognizes the significance of DevOps and has been at the forefront of its adoption and implementation.
Amazon’s own journey, along with the collective experience gained from assisting customers as they modernize and migrate to the cloud, provided insight into the capabilities which we believe make DevOps adoption successful. With these learnings, we created the DevOps Sagas to help our customers sustainably adopt and practice DevOps through the implementation of an interconnected set of capabilities. Each DevOps Saga includes prescriptive guidance for capabilities that provide indicators of success, metrics to measure, and common anti-patterns to avoid.
Introducing The DevOps Sagas
The DevOps Sagas are core domains within the software delivery process that collectively form AWS DevOps best practices. Together, they encompass a collection of modern capabilities representing a comprehensive approach to designing, developing, securing, and efficiently operating software at cloud scale. You can use the DevOps Sagas as a common definition of what DevOps means to your organization by aligning on a shared understanding within your organization and to consistently measure DevOps adoption over time. The 5 DevOps Sagas are:
- Organizational Adoption Saga: Inspires the formation of a customer-centric, adaptive culture focused on optimizing people-driven processes, personal and professional development, and improving developer experience to set the foundation for successful DevOps adoption.
- Development Lifecycle Saga: Aims to enhance the organization’s capacity to develop, review, and deploy workloads swiftly and securely. It leverages feedback loops, consistent deployment methods, and an ‘everything-as-code’ approach to attain efficiency in deployment.
- Quality Assurance Saga: Advocates for a proactive, test-first methodology integrated into the development process to ensure that applications are well-architected by design, secure, cost-efficient, sustainable, and delivered with increased agility through automation.
- Automated Governance Saga: Facilitates directive, detective, preventive, and responsive measures at all stages of the development process. It emphasizes risk management, business process adherence, and application and infrastructure compliance at scale through automated processes, policies, and guardrails.
- Observability Saga: Presents an approach to incorporating observability within environment and workloads, allowing teams to detect and address issues, improve performance, reduce costs, and ensure alignment with business objectives and customer needs.

Who should use the AWS DevOps Guidance?
We recognize that every organization is unique and that there is no one-size-fits-all approach to practicing DevOps. The recommendations and examples provided can be tailored to suit your organization’s environment, quality, and security needs. The AWS DevOps Guidance is designed for a wide range of professionals and organizations, including startups exploring DevOps for the first time, established enterprises refining their processes, public sector companies, cloud-native businesses, and customers migrating to the AWS Cloud. Whether you are steering strategic direction as a Chief Technology Officer (CTO) or Chief Information Security Officer (CISO), a developer or architect actively engaged in designing and deploying workloads, or in a compliance role overseeing quality assurance, auditing, or governance, this guidance is tailored to help you.
Next Steps
With the release of the AWS DevOps Guidance, we encourage you, our customers, to download and read the document, as well as implement and test your workloads in accordance with the recommendations within. Use the AWS DevOps Guidance in tandem with the AWS Well-Architected Framework to conduct an assessment of your organization and individual workload’s adherence to DevOps best practices to pinpoint areas of strength and opportunities for improvement. Collaborate with your teams – from developers to operations and decision-makers – to share insights from your assessment. Use the insights gained from the AWS DevOps Guidance to prioritize areas of improvement and iteratively improve your DevOps capabilities.
Find the AWS DevOps Guidance on the AWS Well-Architected website or contact your AWS account team for more information. As with the AWS Well-Architected Framework and other industry and technology guidance, we recommend leveraging the AWS DevOps Guidance early and often – as you approach architectural and service design decisions, and whenever you carry out Well-Architected reviews. As you use the AWS DevOps Guidance, we would appreciate your comments and feedback to help us improve as best practices and technology evolve. We will continually refresh the content as we identify new best practices, metrics, and common scenarios.
Security Vulnerability of Switzerland’s E-Voting System
Post Syndicated from Bruce Schneier original https://www.schneier.com/blog/archives/2023/10/security-vulnerability-of-switzerlands-e-voting-system.html
Online voting is insecure, period. This doesn’t stop organizations and governments from using it. (And for low-stakes elections, it’s probably fine.) Switzerland—not low stakes—uses online voting for national elections. Andrew Appel explains why it’s a bad idea:
Last year, I published a 5-part series about Switzerland’s e-voting system. Like any internet voting system, it has inherent security vulnerabilities: if there are malicious insiders, they can corrupt the vote count; and if thousands of voters’ computers are hacked by malware, the malware can change votes as they are transmitted. Switzerland “solves” the problem of malicious insiders in their printing office by officially declaring that they won’t consider that threat model in their cybersecurity assessment.
But it also has an interesting new vulnerability:
The Swiss Post e-voting system aims to protect your vote against vote manipulation and interference. The goal is to achieve this even if your own computer is infected by undetected malware that manipulates a user vote. This protection is implemented by special return codes (Prüfcode), printed on the sheet of paper you receive by physical mail. Your computer doesn’t know these codes, so even if it’s infected by malware, it can’t successfully cheat you as long as, you follow the protocol.
Unfortunately, the protocol isn’t explained to you on the piece of paper you get by mail. It’s only explained to you online, when you visit the e-voting website. And of course, that’s part of the problem! If your computer is infected by malware, then it can already present to you a bogus website that instructs you to follow a different protocol, one that is cheatable. To demonstrate this, I built a proof-of-concept demonstration.
Appel again:
Kuster’s fake protocol is not exactly what I imagined; it’s better. He explains it all in his blog post. Basically, in his malware-manipulated website, instead of displaying the verification codes for the voter to compare with what’s on the paper, the website asks the voter to enter the verification codes into a web form. Since the website doesn’t know what’s on the paper, that web-form entry is just for show. Of course, Kuster did not employ a botnet virus to distribute his malware to real voters! He keeps it contained on his own system and demonstrates it in a video.
Again, the solution is paper. (Here I am saying that in 2004.) And, no, blockchain does not help—it makes security worse.
Serverless ICYMI Q3 2023
Post Syndicated from Benjamin Smith original https://aws.amazon.com/blogs/compute/serverless-icymi-q3-2023/
Welcome to the 23rd edition of the AWS Serverless ICYMI (in case you missed it) quarterly recap. Every quarter, we share all the most recent product launches, feature enhancements, blog posts, webinars, live streams, and other interesting things that you might have missed!
In case you missed our last ICYMI, check out what happened last quarter here.

AWS announces the general availability of Amazon Bedrock

Amazon Web Services (AWS) unveils five generative artificial intelligence (AI) innovations to democratize generative AI applications. Amazon Bedrock, now generally available, enables experimentation with top foundation models (FMs) and allows customization with proprietary data.
It supports creating managed agents for complex tasks without code and ensures security and privacy. Amazon Titan Embeddings, another FM, is generally available for various language-related use cases. Meta’s Llama 2, coming soon, enhances dialogue scenarios.
The upcoming Amazon CodeWhisperer customization capability enables secure customization using private code bases. Generative BI authoring capabilities in Amazon QuickSight simplify visualization creation for business analysts.
AWS Lambda
AWS Lambda now detects and stops recursive loops in Lambda functions. AWS Lambda now detects and halts functions caught in recursive or infinite loops, guarding against unexpected costs. Lambda identifies recursive behavior, discontinuing requests after 16 invocations. The feature addresses pitfalls stemming from misconfiguration or coding bugs, introducing detailed error messaging, and allowing users to set maximum limits on retry intervals. Notifications about recursive occurrences are relayed through the AWS Health Dashboard, emails, and CloudWatch Alarms for streamlined troubleshooting. Lambda uses AWS X-Ray trace headers for invocation tracking, requiring supported AWS SDK versions.
AWS simplifies writing .NET 6 Lambda functions. The Lambda Annotations Framework for .NET. A new programming model makes the experience of writing Lambda functions in C# feel more natural for .NET developers by using C# source generator technology. This streamlines the development workflow for .NET developers, making it easier to create serverless applications using the latest version of the .NET framework.
AWS Lambda and Amazon EventBridge Pipes now support enhanced filtering. Additional filtering capabilities include the ability to match against characters at the end of a value (suffix filtering), ignore case sensitivity (equals-ignore-case), and have a single rule match if any conditions across multiple separate fields are true (OR matching).
AWS Lambda Functions powered by AWS Graviton2 are now available in 6 additional Regions. Graviton2 processors are known for their performance benefits, and this expansion provides users with more choices for running serverless workloads.
AWS Lambda adds support for Python 3.11 allowing developers to take advantage of the latest features and improvements in the Python programming language for their serverless functions.
AWS Step Functions
AWS Step Functions enhances Workflow Studio, focusing on an Advanced Starter Template and Code Mode for efficient AWS Step Functions workflow creation. Users benefit from streamlined design-to-code transitions, pasting Amazon States Language (ASL) definitions directly into Workflow Studio, speeding up adjustments. Enhanced workflow execution and configuration allow direct execution and setting adjustments within Workflow Studio, improving user experience.
AWS Step Functions launches enhanced error handling This update helps users to identify errors with precision and refine retry strategies. Step Functions now enables detailed error messages in Fail states and precise control over retry intervals. Use the new maximum limits and jitter functionality to ensure efficient and controlled retries, preventing service overload in recovery scenarios.
AWS Step Functions distributed map is now available in the AWS GovCloud (US) Regions. This release highlights the availability of the distributed map feature in Step Functions specifically tailored for the AWS GovCloud (US) Regions. The distributed map feature is a powerful capability for orchestrating parallel and distributed processing in serverless workflows.
AWS SAM
AWS SAM CLI announces local testing and debugging support on Terraform projects.
Developers can now use AWS SAM CLI to locally test and debug AWS Lambda functions and Amazon API Gateway defined in their Terraform projects. AWS SAM CLI reads infrastructure resource information from the Terraform application, allowing users to start Lambda functions and API Gateway endpoints locally in a Docker container.
This update enables faster development cycles for Terraform users, who can use AWS SAM CLI commands like `AWS SAM local start-api`, `sam local start-lambda`, and `sam local invoke`, along with `sam local generate` for generating mock test events.
Amazon EventBridge
Amazon EventBridge Scheduler adds schedule deletion after completion. This feature offers enhanced functionality by supporting the automatic deletion of schedules upon completion of their last invocation. It is applicable to various scheduling types, including one-time, cron, and rate schedules with an end date. Amazon EventBridge Scheduler, a centralized and highly scalable service, enables the creation, execution, and management of schedules.
With the ability to schedule millions of tasks invoking over 270 AWS services and 6,000 API operations. This update streamlines the process of managing completed schedules. The automatic deletion feature reduces the need for manual intervention or custom code, saving time and simplifying scalability for users leveraging EventBridge Scheduler.
Amazon EventBridge Pipes now available in three additional Regions. This update extends the availability of Amazon EventBridge Pipes, a powerful event-routing service, to three additional Regions.
Amazon EventBridge API Destinations is now available in additional Regions. Providing users with more options for building scalable and decoupled applications.
Amazon EventBridge Schema Registry and Schema Discovery now in additional Regions. This expansion allows you to discover and store event structure – or schema – in a shared, central location. You can download code bindings for those schemas for Java, Python, TypeScript, and Golang so it’s easier to use events as objects in your code.
Amazon SNS
To enhance message privacy and security, Amazon Simple Notification Service (SNS) implemented Message Data Protection, allowing users to de-identify outbound messages via redaction or masking. Amazon SNS FIFO topics now support message delivery to Amazon SQS Standard queues. This provides users with increased flexibility in managing message delivery and ordering.
Expanding its monitoring capabilities, Amazon SNS introduced Additional Usage Metrics in Amazon CloudWatch. This enhancement allows users to gain more comprehensive insights into the performance and utilization of their SNS resources. SNS extended its global SMS sending capabilities to Israel (Tel Aviv), providing users in that Region with additional options for SMS notifications. SNS also expanded its reach by supporting Mobile Push Notifications in twelve new AWS Regions. This expansion aligns with the growing demand for mobile notification capabilities, offering a broader coverage for users across diverse Regions.
Amazon SQS
Amazon Simple Queue Service (SQS) introduced a number of updates. Attribute-Based Access Control (ABAC) was implemented for scalable access permissions, while message data protection can now de-identify outbound messages via redaction or masking. SQS FIFO topics now support message delivery to Amazon SQS Standard queues, providing enhanced flexibility. Addressing throughput demands, SQS increased the quota for FIFO High Throughput mode. JSON protocol support was previewed, offering improved message format flexibility. These updates underscore SQS’s commitment to advanced security and flexibility.
Amazon API Gateway
Amazon API Gateway undergoes a console refresh, aligning with Cloudscape Design System guidelines. Notable enhancements include improved usability, sortable tables, enhanced API key management, and direct API deployment from the Resource view. The update introduces dark mode, accessibility improvements, and visual alignment with HTTP APIs and AWS Services.
GOTO EDA day Nashville 2023

Join GOTO EDA Day in Nashville on October 26 for insights on event-driven architectures. Learn from industry leaders at Music City Center with talks, panels, and Hands-On Labs. Limited tickets available.
Serverless blog posts
July 2023
July 5- Implementing AWS Lambda error handling patterns
July 6 – Implementing AWS Lambda error handling patterns
July 7 – Understanding AWS Lambda’s invoke throttling limits
July 10 – Detecting and stopping recursive loops in AWS Lambda functions
July 11 – Implementing patterns that exit early out of a parallel state in AWS Step Functions
July 26 – Migrating AWS Lambda functions from the Go1.x runtime to the custom runtime on Amazon Linux 2
July 27 – Python 3.11 runtime now available in AWS Lambda
August 2023
August 2 – Automatically delete schedules upon completion with Amazon EventBridge Scheduler
August 7 – Using response streaming with AWS Lambda Web Adapter to optimize performance
August 15 – Integrating IBM MQ with Amazon SQS and Amazon SNS using Apache Camel
August 15 – Implementing the transactional outbox pattern with Amazon EventBridge Pipes
August 23 – Protecting an AWS Lambda function URL with Amazon CloudFront and Lambda@Edge
August 29 – Enhancing file sharing using Amazon S3 and AWS Step Functions
August 31 – Enhancing Workflow Studio with new features for streamlined authoring
September 2023
September 5 – AWS SAM support for HashiCorp Terraform now generally available
September 14 – Building a secure webhook forwarder using an AWS Lambda extension and Tailscale
September 18 – Building resilient serverless applications using chaos engineering
September 19 – Implementing idempotent AWS Lambda functions with Powertools for AWS Lambda (TypeScript)
September 19 – Centralizing management of AWS Lambda layers across multiple AWS Accounts
September 26 – Architecting for scale with Amazon API Gateway private integrations
September 26 – Visually design your application with AWS Application Composer
Videos
Serverless Office Hours – Tues 10AM PT

July 2023
July 4 – Benchmarking Lambda cold starts
July 11 – Lambda testing: AWS SAM remote invoke
July 18 – Using DynamoDB global tables
July 25 – Serverless observability with SLIC-watch
August 2023
August 1 – Step Functions versions and aliases
August 8 – Deploying Lambda with EKS and Crossplane / Managing Lambda with Kubernetes
August 15 – Serverless caching with Momento
September 2023
September 5 – Run any web app on Lambda
September 12 – Building an API platform on AWS
September 19 – Idempotency: exactly once processing
September 26 – AWS Amplify Studio + GraphQL
FooBar Serverless YouTube channel

July 2023
July 27 – Generative AI and Serverless to create a new story everyday
August 2023
August 3 – Getting started with Data Streaming
August 10 – Amazon Kinesis Data Streams – Shards? Provisioned? On-demand? What does all this mean?
August 17 – Put and consume events with AWS Lambda, Amazon Kinesis Data Stream and Event Source Mapping
August 24 – Create powerful data pipelines with Amazon Kinesis and EventBridge Pipes
August 31 – New Step Functions versions and alias!
September 2023
September 7 – Amazon Kinesis Data Firehose – What is this service for?
September 14 – Kinesis Data Firehose with AWS CDK – Lambda transformations
September 21 – Advanced Event Source Mapping configuration | AWS Lambda and Amazon Kinesis Data Streams
September 28 – Data Streaming Patterns
Still looking for more?
The Serverless landing page has more information. The Lambda resources page contains case studies, webinars, whitepapers, customer stories, reference architectures, and even more Getting Started tutorials.
You can also follow the Serverless Developer Advocacy team on Twitter to see the latest news, follow conversations, and interact with the team.
- Eric Johnson: @edjgeek
- James Beswick: @jbesw
- Ben Smith: @benjamin_l_s
- Julian Wood: @julian_wood
- Marcia Villalba: @mavi888uy
- David Boyne: @boyney123