Security updates for Thursday

Post Syndicated from original https://lwn.net/Articles/885177/

Security updates have been issued by Debian (drupal7), Fedora (kernel, lua, vim, and xrdp), openSUSE (firejail, json-c, kafka, webkit2gtk3, and xorg-x11-server), Oracle (bind, firefox, ruby:2.5, ruby:2.6, and thunderbird), Red Hat (ruby:2.5 and ruby:2.6), SUSE (apache2, glibc, json-c, libvirt, webkit2gtk3, xen, and xorg-x11-server), and Ubuntu (linux-raspi, linux-raspi-5.4).

Cloud Security and Compliance: The Ultimate Frenemies of Financial Services

Post Syndicated from Ben Austin original https://blog.rapid7.com/2022/02/17/cloud-security-and-compliance-the-ultimate-frenemies-of-financial-services/

Cloud Security and Compliance: The Ultimate Frenemies of Financial Services

Meeting compliance standards as a financial services (finserv) company can be incredibly time-consuming and expensive. Finserv has some of the highest regulatory bars to clear out of any industry — with the exception, perhaps, of healthcare.

That said, these regulations exist for good reason. Even beyond being requirements to operate, meeting compliance standards helps financial services companies gain customer trust, avoid reputational damage, and protect themselves from unnecessary or unprofitable risk.

But as I’m sure just about everyone reading this will agree, meeting regulatory compliance standards does not necessarily mean your organization is fully secure. Often, it’s difficult for government agencies and legislators to keep up with the pace of changing technologies, so regulations tend to lag behind the state of tech. This is often particularly true with emerging technologies, such as hybrid and multi-cloud environments.

On top of all of that, the cost of not having a well-rounded security portfolio is particularly massive here — the average cost of a data breach in financial services is second highest of all industries (only healthcare is more expensive).

Needless to say, financial services organizations have a complex relationship with compliance, particularly as it relates to business-driven cloud migration and innovation.

Here are four ways finserv companies can embrace the love-hate relationship with cloud security and compliance while effectively navigating the need to maintain pace with today’s rapid rate of change.

1. Implement continuous monitoring

Change seems to be the only constant when it comes to multi-cloud environments. And there’s virtually no limit to where these changes can occur — all clouds and regions are fair game. In addition, new compliance regulations are continuously taking shape as cloud security best practices continue to progress. Lawmakers around the globe are tasked with implementing these new and updated rules to protect data in every industry to effectively address the rapidly changing vulnerabilities.

A key component to remain compliant with these rules and regulations is knowing who is responsible for making changes and maintaining compliance. To do this, you’ll need visibility to distinguish between normal changes to infrastructure, applications, or access made by your development team and the changes that occur at the hands of a threat actor.

But the reality is that many data points can make distinguishing threats difficult for security professionals. After all, financial services organizations are an irresistible target for those with malicious intent because there’s a direct line to the dollar value.

Clearly, information security statutes provide necessary oversight. Since assessing data in real time is essential for success in this industry, continuous monitoring can help you stay compliant at every stage of development. This can also be useful during an audit to show your organization has taken a proactive approach to compliance.

2. Automate security processes

Many regulations require organizations to act fast in the wake of a security breach. The European Union (EU)’s General Data Protection Regulation (GDPR), which is setting the standard for privacy and security laws globally, requires supervisory authorities (and at times individuals) to be notified within 72 hours of becoming aware of a data breach. And these correspondences must provide extensive information about the breach, such as how many individuals were impacted, the consequences of the breach, and perhaps most importantly, what the next steps are for containment and mitigation.

While not every jurisdiction has laws that are as strict as the EU’s GDPR, many countries are using GDPR as a baseline for their own guidance in how they hold organizations responsible and accountable for protecting consumer information. Industry regulations and cloud governance frameworks, such as PCI DSS, SOC 2, ISO 27001, and Gramm-Leach-Bliley Act, are just a few of the many standards with which finserv organizations need to ensure compliance. Organizations that do business globally not only need to be aware of these guidelines but also how they impact the way they do business. For example, if a consumer lives in a country protected by GDPR, their data is protected by GDPR guidelines. This is necessary even if the organization doesn’t operate directly in that country.

The best-case scenario is to catch misconfigurations before they go live and cause a breach, so you can safeguard customer data and avoid going through the lengthy disclosure process and the ensuing loss of customer trust. That’s exactly what automation helps you do.

Relying on manual efforts from your team to ensure that owners of noncompliant resources are notified and remediation takes place can be a time-consuming and involved process. Plus, it’s too easy for potential threats to fall between the cracks. By automating continuous auditing of resources, misconfiguration notification, and remediation, organizations can address noncompliance before issues escalate.

3. Improve organizational culture by sharing context

Large teams that leverage multiple platforms can commonly experience information breakdowns. After all, not everyone can understand security jargon. When misunderstandings occur, it can often lead to an unintentional lapse in compliance among employees. Implementing a simplified reporting structure can help security professionals communicate more effectively with resource owners and other immediate stakeholders. Isolated data points from multiple threat alarms can make it confusing and time-consuming for cloud resource owners to understand what happened and what to do next.

Finding a platform that empowers product and engineering teams to take responsibility for their own security, while also providing thorough context about the violation and the necessary remediation steps is essential. This can help set a standard by challenging teams to measure security compliance daily, while minimizing a lot of the friction and guesswork that comes from shifting security earlier in the development lifecycle.

Not only does this help with compliance legalities, but showing these ongoing, team-wide security compliance checks can also satisfy squeamish boards. Gartner predicts that security concerns will continue to be a top priority for board members in the wake of sensational security breaches that are occurring with startling regularity. Ransomware, for example, has gone mainstream, and boards have taken notice. Cybersecurity is seen as a potentially major vulnerability, which means the expectations placed on CISOs are mounting.

Though a lot of focus goes into updating frameworks and systems, corporate culture is the third piece of a powerful security strategy. It must not be overlooked.

4. Gain greater visibility

Robust, multi-cloud environments can make visibility challenging. Enterprises need to govern their clouds using Identity and Access Management (IAM) and adopt a least-privileged access security model across cloud and container environments. But that’s not enough. They also need a strategy that enables them to see vulnerabilities across multiple environments and devices. This is especially important as more insiders gain access to the cloud who also have the ability to make changes and add assets — and do all of this at a startling pace.

This visibility is a significant part of remaining compliant because rapid changes can have unintended results that can be missed without an overarching view of the cloud environment. What might look like harmless or anonymized data could still cause privacy and compliance concerns. For example, knowing simply gender, zip code, and birth date is enough information to identify 87% of Americans. To protect consumers, legislation such as the California Consumer Privacy Act (CCPA) stipulates that toxic data combinations, or data that can be viewed as a whole to reveal personal identities, must be avoided.

In order to remain compliant, organizations must have a system in place to spot toxic data combinations that could run afoul of regulators. This is especially important as data-sharing agreements become more commonplace.

Next steps: Embracing the complex relationship

Finserv organizations must embrace the complex relationship with cloud security and compliance. It is, realistically, the only way to survive and thrive in a world where the cloud is the go-to method of innovation.

Taking steps for improvement in each of the four areas outlined above can feel overwhelming, so we suggest getting started by focusing on these three key actions:

  • Innovate quickly. Innovation is crucial in today’s finserv landscape. Organizations in financial services are competing for attention, which requires continuous digital transformation. The cloud allows these innovations to happen fast, but CISOs must ensure a secure environment for advancements to effectively take place. Is your organization striking the right balance between innovation and safety?
  • Automate aggressively. There are too many data points in today’s multi-cloud environments for security teams to track successfully without automation. Ongoing hygiene practices and internal audits are made possible using automation best practices. Do you have the right controls in place to launch an automation strategy that supports — and enhances — your security processes?
  • Transform culture. Never forget that people are at the center of your security and compliance strategy. Improving communication, education and consistency across teams can upgrade your organization’s compliance strategy. And remember: Your compliance strategy will be under increased scrutiny from executives and boards in the coming years. Does your team understand the “why” behind the security best practices you’re asking them to support?

Let’s navigate the future of cloud security for finserv together. Learn more here.

Additional reading:

Linking AI education to meaningful projects

Post Syndicated from Sue Sentance original https://www.raspberrypi.org/blog/ai-education-meaningful-projects-tara-chklovski/

Our seminars in this series on AI and data science education, co-hosted with The Alan Turing Institute, have been covering a range of different topics and perspectives. This month was no exception. We were delighted to be able to host Tara Chklovski, CEO of Technovation, whose presentation was called ‘Teaching youth to use AI to tackle the Sustainable Development Goals’.

Tara Chklovski.
Tara Chklovski

The Technovation Challenge

Tara started Technovation, formerly called Iridescent, in 2007 with a family science programme in one school in Los Angeles. The nonprofit has grown hugely, and Technovation now runs computing education activities across the world. We heard from Tara that over 350,000 girls from more than 100 countries take part in their programmes, and that the nonprofit focuses particularly on empowering girls to become tech entrepreneurs. The girls, with support from industry volunteers, parents, and the Technovation curriculum, work in teams to solve real-world problems through an annual event called the Technovation Challenge. Working at scale with young people has given the Technovation team the opportunity to investigate the impact of their programmes as well as more generally learn what works in computing education. 

Tara Chklovski describes the Technovation Challenge in an online seminar.
Click to enlarge

Tara’s talk was extremely engaging (you’ll find the recording below), with videos of young people who had participated in recent years. Technovation works with volunteers and organisations to reach young people in communities where opportunities may be lacking, focussing on low- and middle-income countries. Tara spoke about the 900 million teenage girls in the world, a  substantial number of whom live in countries where there is considerable inequality. 

To illustrate the impact of the programme, Tara gave a number of examples of projects that students had developed, including:

  • An air quality sensor linked to messaging about climate change
  • A support circle for girls living in domestic violence situation
  • A project helping mothers communicate with their daughters
  • Support for water collection in Kenya

Early on, the Technovation Challenge had involved the creation of mobile apps, but in recent years, the projects have focused on using AI technologies to solve problems. An key message that Tara wanted to get across was that the focus on real-world problems and teamwork was as important, if not more, than the technical skills the young people were developing.

Technovation has designed an online curriculum to support teams, who may have no prior computing experience, to learn how to design an AI project. Students work through units on topics such as data analysis and building datasets. As well as the technical activities, young people also work through activities on problem-solving approaches, design, and system thinking to help them tackle a real-world problem that is relevant to them. The curriculum supports teams to identify problems in their community and find a path to prototype and share an invention to tackle that problem.

Tara Chklovski describes the Technovation Challenge in an online seminar.
Click to enlarge

While working through the curriculum, teams develop AI models to address the problem that they have chosen. They then submit them to a global competition for beginners, juniors, and seniors. Many of the girls enjoy the Technovation Challenge so much that they come back year on year to further develop their team skills. 

AI Families: Children and parents using AI to solve problems

Technovation runs another programme, AI Families, that focuses on families working together to learn AI concepts and skills and use them to develop projects together. Families worked together with the help of educators to identify meaningful problems in their communities, and developed AI prototypes to address them.

A list of lessons in the AI Families programme from Technovation.

There were 20,000 participants from under-resourced communities in 17 countries through 2018 and 2019. 70% of them were women (mothers and grandmothers) who wanted their children to participate; in this way the programme encouraged parents to be role models for their daughters, as well as enabling families to understand that AI is a tool that could be used to think about what problems in their community can be solved with the help of AI skills and principles. Tara was keen to emphasise that, given the importance of AI in the world, the more people know about it, the more impact they can make on their local communities.

Tara shared links to the curriculum to demonstrate what families in this programme would learn week by week. The AI modules use tools such as Machine Learning for Kids.

The results of the AI Families project as investigated over 2018 and 2019 are reported in this paper.  The findings of the programme included:

  • Learning needs to focus on more than just content; interviews showed that the learners needed to see the application to real-world applications
  • Engaging parents and other family members can support retention and a sense of community, and support a culture of lifelong learning
  • It takes around 3 to 5 years to iteratively develop fun, engaging, effective curriculum, training, and scalable programme delivery methods. This level of patience and commitment is needed from all community and industry partners and funders.

The research describes how the programme worked pre-pandemic. Tara highlighted that although the pandemic has prevented so much face-to-face team work, it has allowed some young people to access education online that they would not have otherwise had access to.

Many perspectives on AI education

Our goal is to listen to a variety of perspectives through this seminar series, and I felt that Tara really offered something fresh and engaging to our seminar audience, many of them (many of you!) regular attendees who we’ve got to know since we’ve been running the seminars. The seminar combined real-life stories with videos, as well as links to the curriculum used by Technovation to support learners of AI. The ‘question and answer’ session after the seminar focused on ways in which people could engage with the programme. On Twitter, one of the seminar participants declared this seminar “my favourite thus far in the series”.  It was indeed very inspirational.

As we near the end of this series, we can start to reflect on what we’ve been learning from all the various speakers, and I intend to do this more formally in a month or two as we prepare Volume 3 of our seminar proceedings. While Tara’s emphasis is on motivating children to want to learn the latest technologies because they can see what they can achieve with them, some of our other speakers have considered the actual concepts we should be teaching, whether we have to change our approach to teaching computer science if we include AI, and how we should engage young learners in the ethics of AI.

Join us for our next seminar

I’m really looking forward to our final seminar in the series, with Stefania Druga, on Tuesday 1 March at 17:00–18:30 GMT. Stefania, PhD candidate at the University of Washington Information School, will also focus on families. In her talk ‘Democratising AI education with and for families’, she will consider the ways that children engage with smart, AI-enabled devices that they are becoming part of their everyday lives. It’s a perfect way to finish this series, and we hope you’ll join us.

Thanks to our seminars series, we are developing a list of AI education resources that seminar speakers and attendees share with us, plus the free resources we are developing at the Foundation. Please do take a look.

You can find all blog posts relating to our previous seminars on this page.

The post Linking AI education to meaningful projects appeared first on Raspberry Pi.

„Луковмарш“ като политическа дъвка

Post Syndicated from Светла Енчева original https://toest.bg/lukovmarsh-kato-politicheska-duvka/

От 2005 г. насам „Луковмарш“ е като котката на Шрьодингер – хем не се провежда, хем се провежда. Провежда се според участниците в събитието и очевидците. Не се провежда според Столичната община и според онези медии, които възприемат институционалните прессъобщения като по-достоверна информация от онова, което виждат с очите си. Този път абсурдът стигна до впечатляващи измерения – кметицата на София забрани неонацисткото шествие, след като вече беше започнало. В резултат то се раздели на три, така че се проведе троен „Луковмарш“.

Това шизоидно дежавю е ефект на съвместното управление на ГЕРБ и подкрепящата „Луковмарш“ ВМРО – първоначално на ниво Столична община, а от 2017 г. партията на „воеводите“ беше част и от третото правителство на Бойко Борисов. Година след година ГЕРБ и организаторите на „Луковмарш“ разиграваха сценка, напомняща филма на Чарли Чаплин „Хлапето“.

Управляващата партия използваше шествието, за да отправя гръмки декларации против неонацизма и антисемитизма по начин, който да се чуе от международните партньори. Столичната община все забраняваше марша и забраната все падаше в съда – било поради формулировката на забраната, било поради липса на усилия от страна на прокуратурата да се осигурят достатъчно доказателства и поради избирателно интерпретиране на наличните факти от страна на съда. В последния момент преди провеждането на марша Йорданка Фандъкова пак го забраняваше. Накрая то се провеждаше под формата на шествие до къщата на Христо Луков, в краен случай – на статичен митинг.

Тази година изненадващо темата за „Луковмарш“ влезе и в парламента.

Инициативата дойде от „Продължаваме промяната“, чиято депутатка Татяна Султанова прочете от трибуната декларация от името на парламентарната група. В нея шествието се определя като неонацистко, профашистко и застрашаващо социалния мир и се казва:

Демократичното настояще и бъдеще на България изключва подобни прояви на ксенофобия и език на омразата. Провокациите към насилие, пропагандирането на расизъм, антисемитизъм, хомофобия, сексизъм нямат място в българското общество.

Последното изречение заслужава специално внимание. Съзнателно или не, с него се разбива едно табу – хомофобията експлицитно се споменава в Народното събрание, и то от политическата сила, спечелила изборите.

По темата взе отношение и БСП в лицето на Александър Симов,

чиято реторика припомни прашасалите клишета, с които социалистическият режим говореше за фашизма. В този дух Симов се позова на стихотворението „Балада за комуниста“ на Веселин Андреев. Андреев е един от официозните социалистически поети, съдия в т.нар. Народен съд и депутат до падането на режима, а в последните години на този период – и член на Централния комитет на БКП. (След промените през 1989 г. е в сериозен конфликт с бившия диктатор Тодор Живков и БКП, впоследствие БСП, и се самоубива през 1991 г.).

Соцпатосът на Симов удобно не забелязва връзката на собствената му партия с неонацистки политически субекти като „Атака“, а в някои отношения – и „Възраждане“. Ала докато реториката на БСП е предвидима,

изказването на Станислав Атанасов от името на парламентарната група на ДПС предизвиква почуда:

„ДПС от 30 години осъжда „Луковмарш“. От 30 години, г-н Симов, ние сме сами. Сами сме и на контрапротеста на „Луковмарш“, за съжаление. […] Сега имате възможността, защото МВР има абсолютно всички ресурси да спре „Луковмарш“.“

„Луковмарш“ се провежда от 2003 г. Излиза, че от 30 години ДПС са против събитие, което се провежда… от 19. Също толкова фактологически „вярно“ е и твърдението, че от партията на Делян Пеевски са сам-самички на контрапротеста срещу марша. Тук ще си позволя да споделя личен опит в качеството си на участвала в няколко от шествията срещу „Луковмарш“. В тях се включват представители на разнообразни до несъвместимост групи – либерали, правозащитници, феминисти, ЛГБТИ и ромски активисти, анархисти, анархокомунисти, комунисти, социалисти, живковисти, агенти на ДС и сталинисти (извинявам се, ако пропускам някоя група). Хора от ДПС на контрапротеста обаче не съм виждала, поне не разпознаваеми лица. И да е имало такива, са били малцинство сред останалите.

От парламентарната група на ГЕРБ разпространиха до медиите декларация в навечерието на шествието.

Професорът по културология Ивайло Дичев иронично коментира, че след 70 години историците ще се кълнат, че в България е нямало „Луковмарш“. Ала ако питате ГЕРБ, в предишните години „Луковмарш“ е нямало, и то изключително поради техните усилия. И ако ще се проведе пак, то ще е поради лошата нова власт (оригиналният правопис на този и следващите цитати е запазен):

Верни на европейската си демократична същност, ние от ГЕРБ, с усилията лично на министър-председателя Бойко Борисов, и в партньорство с всички български институции, сред които МВнР, националния координатор за борба с антисемитизма, МВР, ДАНС, прокуратурата и Столична община, две години подред успявахме да предотвратим провеждането на позорното шествие „Луковмарш“. За първи път в 17-годишната си история това срамно събитие бе осуетено и две поредни години то не мърси булевардите на столицата. […]

Очевидната липса на чувствителност в управляващата коалиция по темата борба с езика на омразата, поражда риска от реабилитиране на „Луковмарш“, чието факелно шествие застрашава международния имидж и репутация на България като страна, доскоро ефективно прилагаща мерки за борба с антисемитизма, ксенофобията, расизма и нетолерантността.

От тези думи нестрадащите от политическа амнезия остават с впечатлението, че бившите управляващи живеят в паралелна вселена. Като се има предвид, че и тази година, както и предишните, неонацисткото шествие се проведе толкова, колкото и не се проведе, къде от ГЕРБ ще сложат акцента този път? Ако надделее обстоятелството, че кметицата на София е от тяхната партия, а прокуратурата е на тяхна страна, „Луковмарш“ не се е провел. Но ако сложат акцента върху новата власт и промените в ръководството на МВР и ДАНС, той ще да се е провел.

Две от трите партии в „Демократична България“ също излязоха с декларации.

„Смятаме, че в 21-ви век е недопустимо да се провежда и разпространява, даже и като спомен, идеологията на Съюза на българските национални легиони или пък да се веят неофашистки символи, да се проповядва омраза срещу хора от различен етнически или расов произход и срещу хора с различни политически възгледи“, се казва в декларация на „Зелено движение“.

От „Да, България“ предлагат формулировка, с която да осъдят „Луковмарш“, като в същото време да подчертаят и антикомунистическата си ценностна ориентация:

Ограничаването на тази проява не представлява нарушаване на права, а e защита на висши ценности и принципи като достойнството и свободата на личността, равенството на всички пред правото, недискриминацията на основа различни признаци като раса, етнос и религия. […]

Заедно с всички честни демократи ние от „Да, България“ казваме: националсоциализмът и комунизмът не са мнение, а престъпление.

От управляващата коалиция за „Луковмарш“ не взеха отношение само от „Има такъв народ“ и ДСБ, а от опозицията – „Възраждане“. След като в по-голямата си част и управляващи, и опозиция осъждат провеждането на неонацисткото шествие,

истинският въпрос е какво следва от това.

Защото ако година след година властта излиза с голи декларации, а Столичната община повтаря едни и същи неуспешни опити да забрани неонацисткото шествие, цялата работа е просто демонстрация на заучена безпомощност. Ако има политическа воля да се сложи край на неонацисткото шествие, това едва ли ще е невъзможно и с инструментите на сегашното несъвършено законодателство. Ако част от проблема е в Наказателния кодекс, депутатите са тези, които могат да го променят.

По-важно от законовите промени обаче е по темите за недемократичните идеологии и престъпленията от омраза да се говори системно. Не само два-три пъти в годината по повод на определени събития, за които в обществото ни няма консенсус. Носителите на политическата власт имат възможност да поставят теми на вниманието на публиката и да предлагат посоки на обществения разговор. С жестове като промяната на тона към Северна Македония и споменаването на хомофобията от парламентарната трибуна от „Продължаваме промяната“ правят наченки в тази посока. Те обаче трябва да се превърнат в систематично усилие, за да не се събудим след още 19 години с поредните декларации срещу „Луковмарш“.

Заглавна снимка: Стопкадър от рекламен клип на „Луковмарш“

Източник

[$] Uniting the Linux random-number devices

Post Syndicated from original https://lwn.net/Articles/884875/

Blocking in the kernel’s random-number generator (RNG)—causing a process to
wait for “enough”
entropy to generate strong random numbers—has always been controversial. It has also led to
various kinds of problems over the years, from timeouts and delays caused
by misuse in user-space
programs to deadlocks and other problems in the boot
process. That behavior has undergone a number of changes over the last few
years and it looks possible that the last vestige of the difference between
merely “good” and “cryptographic-strength” random numbers may go away in some
upcoming kernel version.

AWS User Guide to Financial Services Regulations and Guidelines in Switzerland and FINMA workbooks publications

Post Syndicated from Margo Cronin original https://aws.amazon.com/blogs/security/aws-user-guide-to-financial-services-regulations-and-guidelines-in-switzerland-and-finma/

AWS is pleased to announce the publication of the AWS User Guide to Financial Services Regulations and Guidelines in Switzerland whitepaper and workbooks.

This guide refers to certain rules applicable to financial institutions in Switzerland, including banks, insurance companies, stock exchanges, securities dealers, portfolio managers, trustees and other financial entities which are overseen (directly or indirectly) by the Swiss Financial Market Supervisory Authority (FINMA).

Amongst other topics, this guide covers requirements created by the following regulations and publications of interest to Swiss financial institutions:

  • Federal Laws – including Article 47 of the Swiss Banking Act (BA). Banks and Savings Banks are overseen by FINMA and governed by the BA (Bundesgesetz über die Banken und Sparkassen, Bankengesetz, BankG). Article 47 BA holds relevance in the context of outsourcing.
  • Response on Cloud Guidelines for Swiss Financial institutions produced by the Swiss Banking Union, Schweizerische Bankiervereinigung SBVg.
  • Controls outlined by FINMA, Switzerland’s independent regulator of financial markets, that may be applicable to Swiss banks and insurers in the context of outsourcing arrangements to the cloud.

In combination with the AWS User Guide to Financial Services Regulations and Guidelines in Switzerland whitepaper, customers can use the detailed AWS FINMA workbooks and ISAE 3000 report available from AWS Artifact.

The five core FINMA circulars are intended to assist Swiss-regulated financial institutions in understanding approaches to due diligence, third-party management, and key technical and organizational controls that should be implemented in cloud outsourcing arrangements, particularly for material workloads. The AWS FINMA workbooks and ISAE 3000 report scope covers, in detail, requirements of the following FINMA circulars:

  • 2018/03 Outsourcing – banks and insurers (04.11.2020)
  • 2008/21 Operational Risks – Banks – Principle 4 Technology Infrastructure (31.10.2019)
  • 2008/21 Operational Risks – Banks – Appendix 3 Handling of electronic Client Identifying Data (31.10.2019)
  • 2013/03 Auditing – Information Technology (04.11.2020)
  • 2008/10 Self-regulation as a minimum standard – Minimum Business Continuity Management (BCM) minimum standards proposed by the Swiss Insurance Association (01.06.2015) and Swiss Bankers Association (29.08.2013)

Customers can use the detailed FINMA workbooks, which include detailed control mappings for each FINMA control, covering both the AWS control activities and the Customer User Entity Controls. Where applicable, under the AWS Shared Responsibility Model, these workbooks provide industry standard practices, incorporating AWS Well-Architected, to assist Swiss customers in their own preparation for FINMA circular alignment.

This whitepaper follows the issuance of the second Swiss Financial Market Supervisory Authority (FINMA) ISAE 3000 Type 2 attestation report. The latest report covers the period from October 1, 2020 to September 30, 2021, with a total of 141 AWS services and 23 global AWS Regions included in the scope. Customers can download the report from AWS Artifact. A full list of certified services and Regions is presented within the published FINMA report.

As always, AWS is committed to bringing new services into the scope of our FINMA program in the future based on customers’ architectural and regulatory needs. Please reach out to your AWS account team if you have any questions or feedback. If you have questions about this post, contact AWS Support.

Want more AWS Security news? Follow us on Twitter.

Author

Margo Cronin

Margo is a Principal Security Specialist at Amazon Web Services based in Zurich, Switzerland. She spends her days working with customers, from startups to the largest of enterprises, helping them build new capabilities and accelerating their cloud journey. She has a strong focus on security, helping customers improve their security, risk, and compliance in the cloud.

Detect anomalies on one million unique entities with Amazon OpenSearch Service

Post Syndicated from Kaituo Li original https://aws.amazon.com/blogs/big-data/detect-anomalies-on-one-million-unique-entities-with-amazon-opensearch-service/

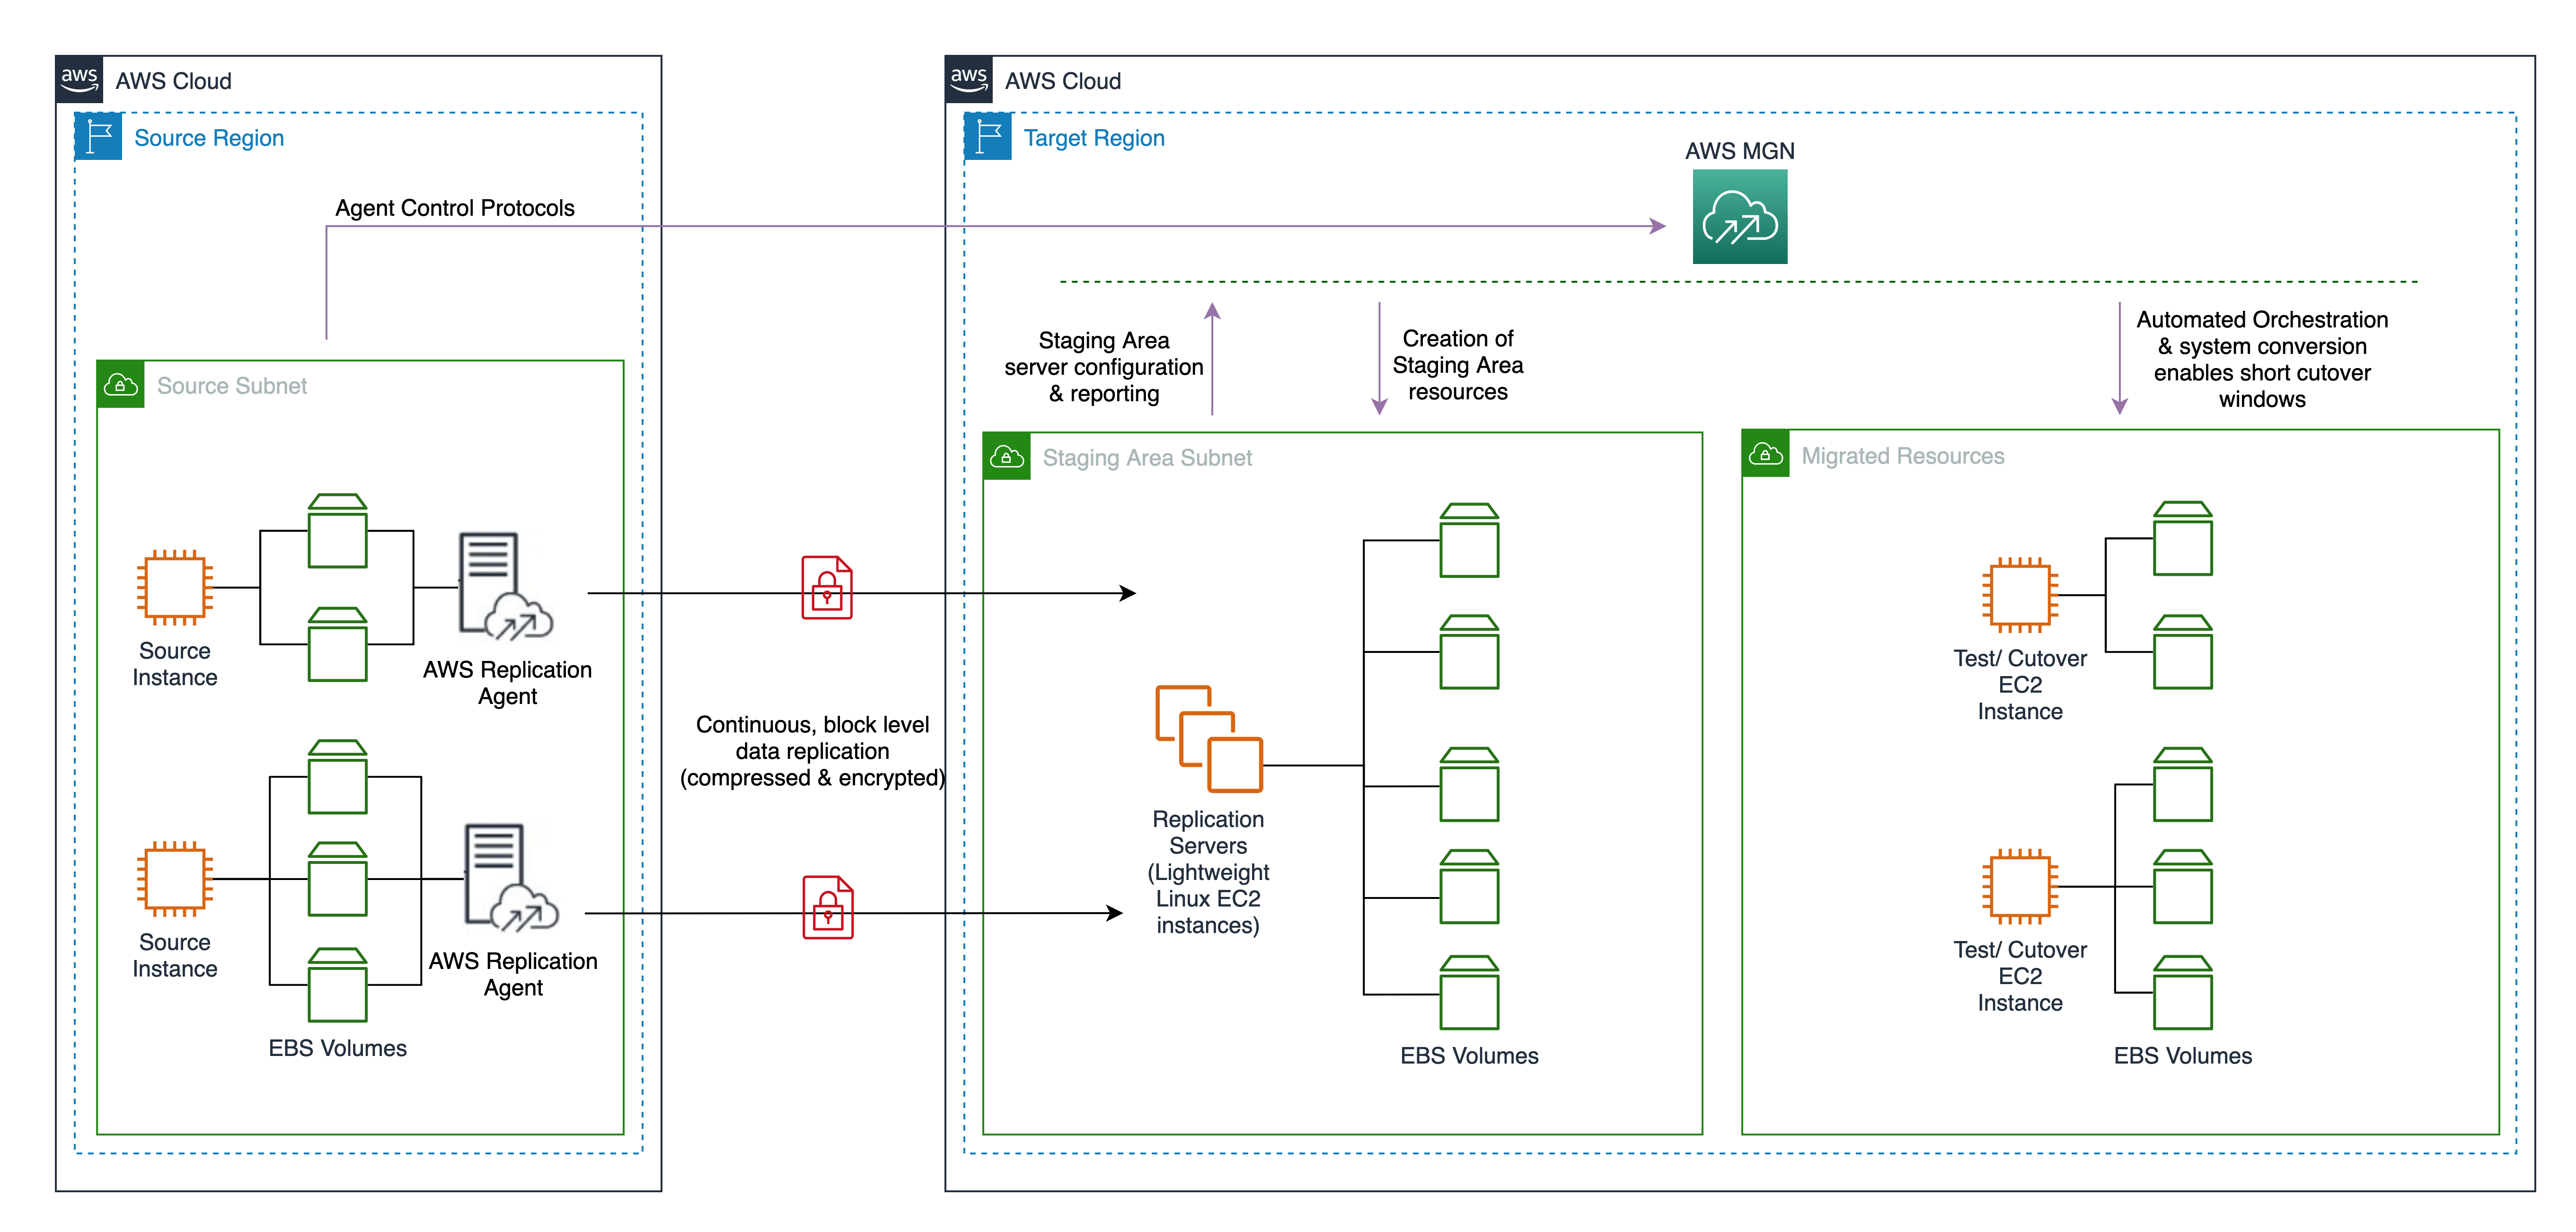
Amazon OpenSearch Service (successor to Amazon Elasticsearch Service) supports a highly performant, integrated anomaly detection engine that enables the real-time identification of anomalies in streaming data. Last year, we released high-cardinality anomaly detection (HCAD) to detect individual entities’ anomalies. With the 1.1 release, we have allowed you to monitor a million entities with steady, predictable performance. HCAD is easiest when described in contrast to the non-HCAD single-stream solution. In a single-stream detector, we detect anomalies for an aggregate entity. For example, we can use a single-stream detector to sift through aggregated traffic across all IP addresses so that users can be notified when unusual spikes occur. However, we often need to identify anomalies in entities, such as individual hosts and IP addresses. Each entity may work on a different baseline, which means its time series’ distribution (measured in parameters such as magnitude, trend, and seasonality, to name a few) are different. The different baselines make it inaccurate to detect anomalies using a single monolithic model. HCAD distinguishes itself from single-stream detectors by customizing anomaly detection models to entities.

Example use cases of HCAD include the following:

  • Internet of things – Continuously tracking the temperature of fridges and warning users of temperatures at which food or medicine longevity is at risk, so users can take measures to avoid them. Each entity has specific categorical fields that describe it, and you can think of the categorical fields as characteristics for those entities. A fridge’s serial number is the categorical field that uniquely identifies the fridges. Using a single model generates a lot of false alarms because ambient temperatures can be different. A temperature of 5° C is normal during winter in Seattle, US, but such a temperature in a tropical place during winter is likely anomalous. Also, users may open the door to a fridge several times, triggering a spike in the temperature. The duration and frequency of spikes can vary according to user behavior. HCAD can group temperature data into geographies and users to detect varying local temperatures and user behavior.
  • Security – An intrusion detection system identifying an increase in failed login attempts in authentication logs. The user name and host IP are the categorical fields used to determine the user accessing from the host. Hackers might guess user passwords by brute force, and not all users on the same host IP may be targeted. The number of failed login counts varies on a host for a particular user at a specific time of day. HCAD creates a representative baseline per user on each host and adapts to changes in the baseline.
  • IT operations – Monitoring access traffic by shard in a distributed service. The shard ID is the categorical field, and the entity is the shard. A modern distributed system usually consists of shards linked together. When a shard experiences an outage, the traffic increases significantly for dependent shards due to retry storms. It’s hard to discover the increase because only a limited number of shards are affected. For example, traffic on the related shards might be as much as 64 times that of normal levels, whereas average traffic across all shards might just grow by a small constant factor (less than 2).

Making HCAD real time and performant while achieving completeness and scalability is a formidable challenge:

  • Completeness – Model all or as many entities as possible.
  • ScalabilityHorizontal and vertical scaling without changing model fidelity. That is, when scaling the machine up or out, an anomaly detector can add models monotonically. HCAD uses the same model and gives the same answer for an entity’s time series as in single-stream detection.
  • Performance – Low impact to system resource usage and high overall throughput.

The first release of HCAD in Amazon OpenSearch Service traded completeness and scalability for performance: the anomaly detector limited the number of entities to 1,000. You can change the setting plugins.anomaly_detection.max_entities_per_query to increase the number of monitored entities per interval. However, such a change incurs a non-negligible cost, which opens the door to cluster instability. Each entity uses memory to host models, disk I/O to read and write model checkpoints and anomaly results, CPU cycles for metadata maintenance and model training and inference, and garbage collection for deleted models and metadata. The more entities, the more resource usage. Furthermore, HCAD could suffer a combinatorial explosion of entities when supporting multiple categorical fields (a feature released in Amazon OpenSearch Service 1.1). Imagine a detector with only one categorical field geolocation. Geolocation has 1,000 possible values. Adding another categorical field product with 1,000 allowed values gives the detector 1 million entities.

For the next version of HCAD, we devoted much effort to improving completeness and scalability. Our approach captures sizing a cluster right and combines in-memory model hosting and on-disk model loading. Performance metrics show HCAD doesn’t saturate the cluster with substantial cost and still leaves plenty of room for other tasks. As a result, HCAD can analyze one million entities in 10 minutes and flags anomalies in different patterns. In this post, we will explore how HCAD can analyze one million entities and the technical implementations behind the improvements.

How to size domains

Model management is a trade-off: disk-based solutions that reload-use-stop-store models on every interval offer savings in memory but suffer high overhead and are hard to scale. Memory-based solutions offer lower overhead and higher throughput but typically increase memory requirements. We exploit the trade-off by implementing an adaptive mechanism that hosts models in memory as much as allowed (capped via the cluster setting plugins.anomaly_detection.model_max_size_percent), as required by best performance. When models don’t fit in memory, we process extra model requests by loading models from disks.

The use of memory whenever possible is responsible for the HCAD scalability. Therefore, it is crucial to sizing a cluster right to offer enough memory for HCAD. The main factors to consider when sizing a cluster are:

  • Sum of all detectors’ total entity count – A detector’s total entity count is the cardinality of the categorical fields. If there are multiple categorical fields, the number counts all unique combinations of values of these fields present in data. You can decide the cardinality via cardinality aggregation in Amazon OpenSearch Service. If the detector is a single-stream detector, the number of entities is one because there is no defined categorical field.
  • Heap size – Amazon OpenSearch Service sets aside 50% of RAM for heap. To determine the heap size of an instance type, refer to Amazon OpenSearch Service pricing. For example, an r5.2xlarge host has 64 GB RAM. Therefore, the host’s heap size is 32 GB.
  • Anomaly detection (AD) maximum memory percentage – AD can use up to 10% of the heap by default. You can customize the percentage via the cluster setting plugins.anomaly_detection.model_max_size_percent. The following update allows AD to use half of the heap via the aforementioned setting:
PUT /_cluster/settings
{
	"persistent": {
		"plugins.anomaly_detection.model_max_size_percent": "0.5"
	}
}
  • Entity in-memory model size – An entity’s in-memory model size varies according to shingle size, the number of features, and Amazon OpenSearch Service version as we’re constantly improving. All entity models of the same detector configuration in the same software version have the same size. A safe way to obtain the size is to run a profile API on the same detector configuration on an experimental cluster before creating a production cluster. In the following case, each entity model of detector fkzfBX0BHok1ZbMqLMdu is of size 470,491 bytes:

Enter the following profile request:

GET /_plugins/_anomaly_detection/detectors/fkzfBX0BHok1ZbMqLMdu/_profile/models

We get the following response:

{
	...{
		"model_id": "fkzfBX0BHok1ZbMqLMdu_entity_GOIubzeHCXV-k6y_AA4K3Q",
		"entity": [{
				"name": "host",
				"value": "host141"
			},
			{
				"name": "process",
				"value": "process54"
			}
		],
		"model_size_in_bytes": 470491,
		"node_id": "OcxBDJKYRYKwCLDtWUKItQ"
	}
	...
}
  • Storage requirement for result indexes – Real-time detectors store detection results as much as possible when the indexing pressure isn’t high, including both anomalous and non-anomalous results. When the indexing pressure is high, we save anomalous and a random subset of non-anomalous results. OpenSearch Dashboard employs non-anomalous results as the context of abnormal results and plots the results as a function of time. Additionally, AD stores the history of all generated results for a configurable number of days after generating results. This result retention period is 30 days by default, and adjustable via the cluster setting plugins.anomaly_detection.ad_result_history_retention_period. We need to ensure enough disk space is available to store the results by multiplying the amount of data generated per day by the retention period. For example, consider a detector that generates 1 million result documents for a 10-minute interval detector with 1 million entities per interval. One document’s size is about 1 KB. That’s roughly 144 GB per day, 4,320 GB after a 30-day retention period. The total disk requirement should also be multiplied by the number of shard copies. Currently, AD chooses one primary shard per node (up to 10) and one replica when called for the first time. Because the number of replicas is 1, every shard has two copies, and the total disk requirement is closer to 8,640 GB for the million entities in our example.
  • Anomaly detection overhead – AD incurs memory overhead for historical analyses and internal operations. We recommend reserving 20% more memory for the overhead to keep running models uninterrupted.

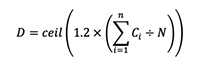
In order to derive the required number of data nodes D, we must first derive an expression for the number of entity models N that a node can host in memory. We define Si to be the entity model size of detector i. If we use an instance type with heap size H where the maximum AD memory percentage is PN is equal to AD memory allowance divided by the maximum entity model size among all detectors:

We consider the required number of data nodes D as a function of N. Let’s denote by Ci the total entity counts of detector i. Given n detectors, it follows that:

The fact that AD needs an extra 20% memory overhead is expressed by multiplying 1.2 in the formula. The ceil function represents the smallest integer greater than or equal to the argument.

For example, an r5.2xlarge Amazon Elastic Compute Cloud (Amazon EC2) instance has 64 GB RAM, so the heap size is 32 GB. We configure AD to use at most half of the allowed heap size. We have two HCAD detectors, whose model sizes are 471 KB and 403 KB, respectively. To host 500,000 entities for each detector, we need a 36-data-node cluster according to the following calculation:


We also need to ensure there is enough disk space. In the end, we used a 39-node r5.2xlarge cluster (3 primary and 36 data nodes) with 4 TB Amazon Elastic Block Store (EBS) storage on each node.

What if a detector’s entity count is unknown?

Sometimes, it’s hard to know a detector’s entity count. We can check historical data and estimate the cardinality. But it’s impossible to predict the future accurately. A general guideline is to allocate buffer memory during planning. Appropriately used, buffer memory provides room for small changes. If the changes are significant, you can adjust the number of data nodes because HCAD can scale in and out horizontally.

What if the number of active entities is changing?

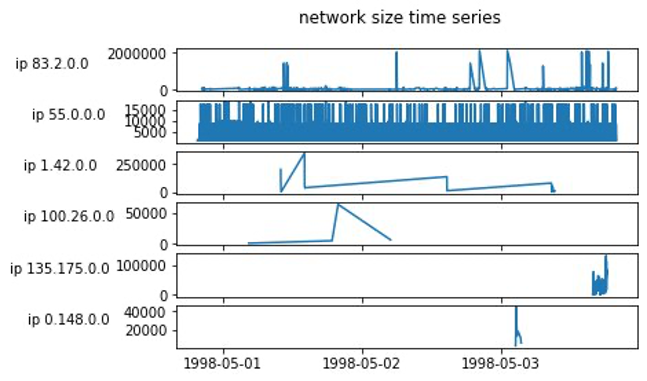
The total number of entities created can be higher than the number of active entities, as evident from the following two figures. The total number of entities in the HTTP logs dataset is 2 million within 2 months, but each entity only appears seven times on average. The number of active entities within a time-boxed interval is much less than 2 million. The following figure presents an example time series of network size of IP addresses from the HTTP logs dataset.

http log data distribution

The KPI dataset also shows similar behavior, where entities often appear in a short amount of time during bursts of entity activities.

kpi data distribution

AD requires large sample sizes to create a comprehensive picture of the data patterns, making it suitable for dense time series that can be uniformly sampled. AD can still train models and produce predictions if the preceding bursty behavior can last a while and provide at least 400 points. However, training becomes more difficult, and prediction accuracy is lower as data gets more sparse.

It’s wasteful to preallocate memory according to the total number of entities in this case. Instead of the total number of entities, we need to consider the maximal active entities within an interval. You can get an approximate number by using a date_histogram and cardinality aggregation pipeline, and sorting during a representative period. You can run the following query if you’re indexing host-cloudwatch and want to find out the maximal number of active hosts within a 10-minute interval throughout 10 days:

GET /host-cloudwatch/_search?size=0
{
	"query": {
		"range": {
			"@timestamp": {
				"gte": "2021-11-17T22:21:48",
				"lte": "2021-11-27T22:22:48"
			}
		}
	},
	"aggs": {
		"by_10m": {
			"date_histogram": {
				"field": "@timestamp",
				"fixed_interval": "10m"
			},
			"aggs": {
				"dimension": {
					"cardinality": {
						"field": "host"
					}
				},
				"multi_buckets_sort": {
					"bucket_sort": {
						"sort": [{
							"dimension": {
								"order": "desc"
							}
						}],
						"size": 1
					}
				}
			}
		}
	}
}

The query result shows that at most about 1,000 hosts are active during a ten-minute interval:

{
	...
	"aggregations": {
		"by_10m": {
			"buckets": [{
				"key_as_string": "2021-11-17T22:30:00.000Z",
				"key": 1637188200000,
				"doc_count": 1000000,
				"dimension": {
					"value": 1000
				}
			}]
		}
	}
	...
}

HCAD has a cache to store models and maintain a timestamp of last access for each model. For each model, an hourly job checks the time of inactivity and invalidates the model if the time of inactivity is longer than 1 hour. Depending on the timing of the hourly check and the cache capacity, the elapsed time a model is cached varies. If the cache capacity isn’t large enough to hold all non-expired models, we have an adapted least frequently used (LFU) cache policy to evict models (more on this in a later section), and the cache time of those invalidated models is less than 1 hour. If the last access time of a model is reset immediately after the hourly check, when the next hourly check happens, the model doesn’t expire. The model can take another hour to expire when the next hourly check comes. So the max cache time is 2 hours.

The upper bound of active entities that detector i can observe is:


This equation has the following parameters:

  • Ai is the maximum number of active entities per interval of detector i. We get the number from the preceding query.
  • 120 is the number of minutes in 2 hours. ∆Ti denotes detector i’s interval in minutes. The ceil function represents the smallest integer greater than or equal the argument. ceil(120÷∆Ti) refers to the max number of intervals a model is cached.

Accordingly, we should account for Bi in the sizing formula:

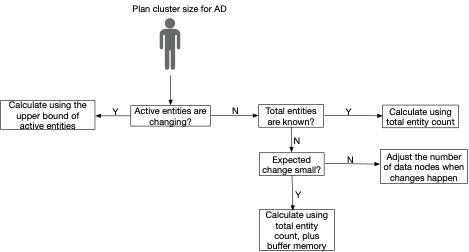
Sizing calculation flow chart

With the definitions of calculating the number of data nodes in place, we can use the following flow chart to make decisions under different scenarios.

sizing flowchart

What if the cluster is underscaled?

If the cluster is underscaled, AD prioritizes more frequent and recent entities. AD makes its best effort to accommodate extra entities by loading their models on demand from disk without hosting them in the in-memory cache. Loading the models on demand means reloading-using-stopping-storing models at every interval, whose overheads are quite high. The overheads mostly have to do with network or disk I/O, rather than with the cost of model inferencing. Therefore, we did it in a steady, controlled manner. If the system resource usage isn’t heavy and there is enough time, HCAD may finish processing the extra entities. Otherwise, HCAD doesn’t necessarily find all the anomalies it could otherwise find.

Example: Analysis of 1 million entities

In the following example, you will learn how to set up a detector to analyze one million entities.

Ingest data

We generated 10 billion documents for 1 million entities in our evaluation of scalability and completeness improvement. Each entity has a cosine wave time series with randomly injected anomalies. With help from the tips in this post, we created the index host-cloudwatch and ingested the documents into the cluster. host-cloudwatch records elapsed CPU and JVM garbage collection (GC) time by a process within a host. Index mapping is as follows:

{
	...
	"mappings": {
		"properties": {
			"@timestamp": {
				"type": "date"
			},
			"cpuTime": {
				"type": "double"
			},
			"jvmGcTime": {
				"type": "double"
			},
			"host": {
				"type": "keyword"
			},
			"process": {
				"type": "keyword"
			}
		}
	}
	...
}

Create a detector

Consider the following factors before you create a detector:

  • Indexes to monitor – You can use a group of index names, aliases, or patterns. Here we use the host-cloudwatch index created in the last step.
  • Timestamp field – A detector monitors time series data. Each document in the provided index must be associated with a timestamp. In our example, we use the @timetamp field.
  • Filter – A filter selects data you want to analyze based on some condition. One example filter selects requests with status code 400 afterwards from HTTP request logs. The 4xx and 5xx classes of HTTP status code indicate that a request is returned with an error. Then you can create an anomaly detector for the number of error requests. In our running example, we analyze all of the data, and thus no filter is used.
  • Category field – Every entity has specific characteristics that describe it. Category fields provide categories of those characteristics. An entity can have up to two category fields as of Amazon OpenSearch Service 1.1. Here we monitor a specific process of a particular host by specifying the process and host field.
  • Detector interval – The detector interval is typically application-defined. We aggregate data within an interval and run models on the aggregated data. As mentioned earlier, AD is suitable for dense time series that can be uniformly sampled. You should at least make sure most intervals have data. Also, different detector intervals require different trade-offs between delay and accuracy. Long intervals smooth out long-term and short-term workload fluctuations and, therefore, may be less prone to noise, resulting in a high delay in detection. Short intervals lead to quicker detection but may find anticipated workload fluctuations instead of anomalies. You can plot your time series with various intervals and observe which interval keeps relevant anomalies while reducing noise. For this example, we use the default 10-minute interval.
  • Feature – A feature is an aggregated value extracted from the monitored data. It gets sent to models to measure the degrees of abnormality. Forming a feature can be as simple as picking a field to monitor and the aggregation function that summarizes the field data as metrics. We provide a suite of functions such as min and average. You can also use a runtime field via scripting. We’re interested in the garbage collection time field aggregated via the average function in this example.
  • Window delay – Ingestion delay. If the value isn’t configured correctly, a detector might analyze data before the late data arrives at the cluster. Because we ingested all the data in advance, the window delay is 0 in this case.

Our detector’s configuration aggregates average garbage collection processing time every 10 minutes and analyzes the average at the granularity of processes on different hosts. The API request to create such a detector is as follows. You can also use our streamlined UI to create and start a detector.

POST _plugins/_anomaly_detection/detectors
{
	"name": "detect_gc_time",
	"description": "detect gc processing time anomaly",
	"time_field": "@timestamp",
	"indices": [
		"host-cloudwatch"
	],
	"category_field": ["host", "process"],
	"feature_attributes": [{
		"feature_name": "jvmGcTime average",
		"feature_enabled": true,
		"importance": 1,
		"aggregation_query": {
			"gc_time_average": {
				"avg": {
					"field": "jvmGcTime"
				}
			}
		}
	}],
	"detection_interval": {
		"period": {
			"interval": 10,
			"unit": "MINUTES"
		}
	},
	"schema_version": 2
}

After the initial training is complete, all models of the 1 million entities are up in the memory, and 1 million results are generated every detector interval after a few hours. To verify the number of active models in the cache, you can run the profile API:

GET /_plugins/_anomaly_detection/detectors/fkzfBX0BHok1ZbMqLMdu/_profile/models

We get the following response:

{
	...
	"model_count": 1000000
}

You can observe how many results are generated every detector interval (in our case 10 minutes) by invoking the result search API:

GET /_plugins/_anomaly_detection/detectors/results/_search
{
	"query": {
		"range": {
			"execution_start_time": {
				"gte": 1636501467000,
				"lte": 1636502067000
			}
		}
	},
	"track_total_hits": true
}

We get the following response:

{
	...
	"hits": {
		"total": {
			"value": 1000000,
			"relation": "eq"
		},
		...
	}
	...
}

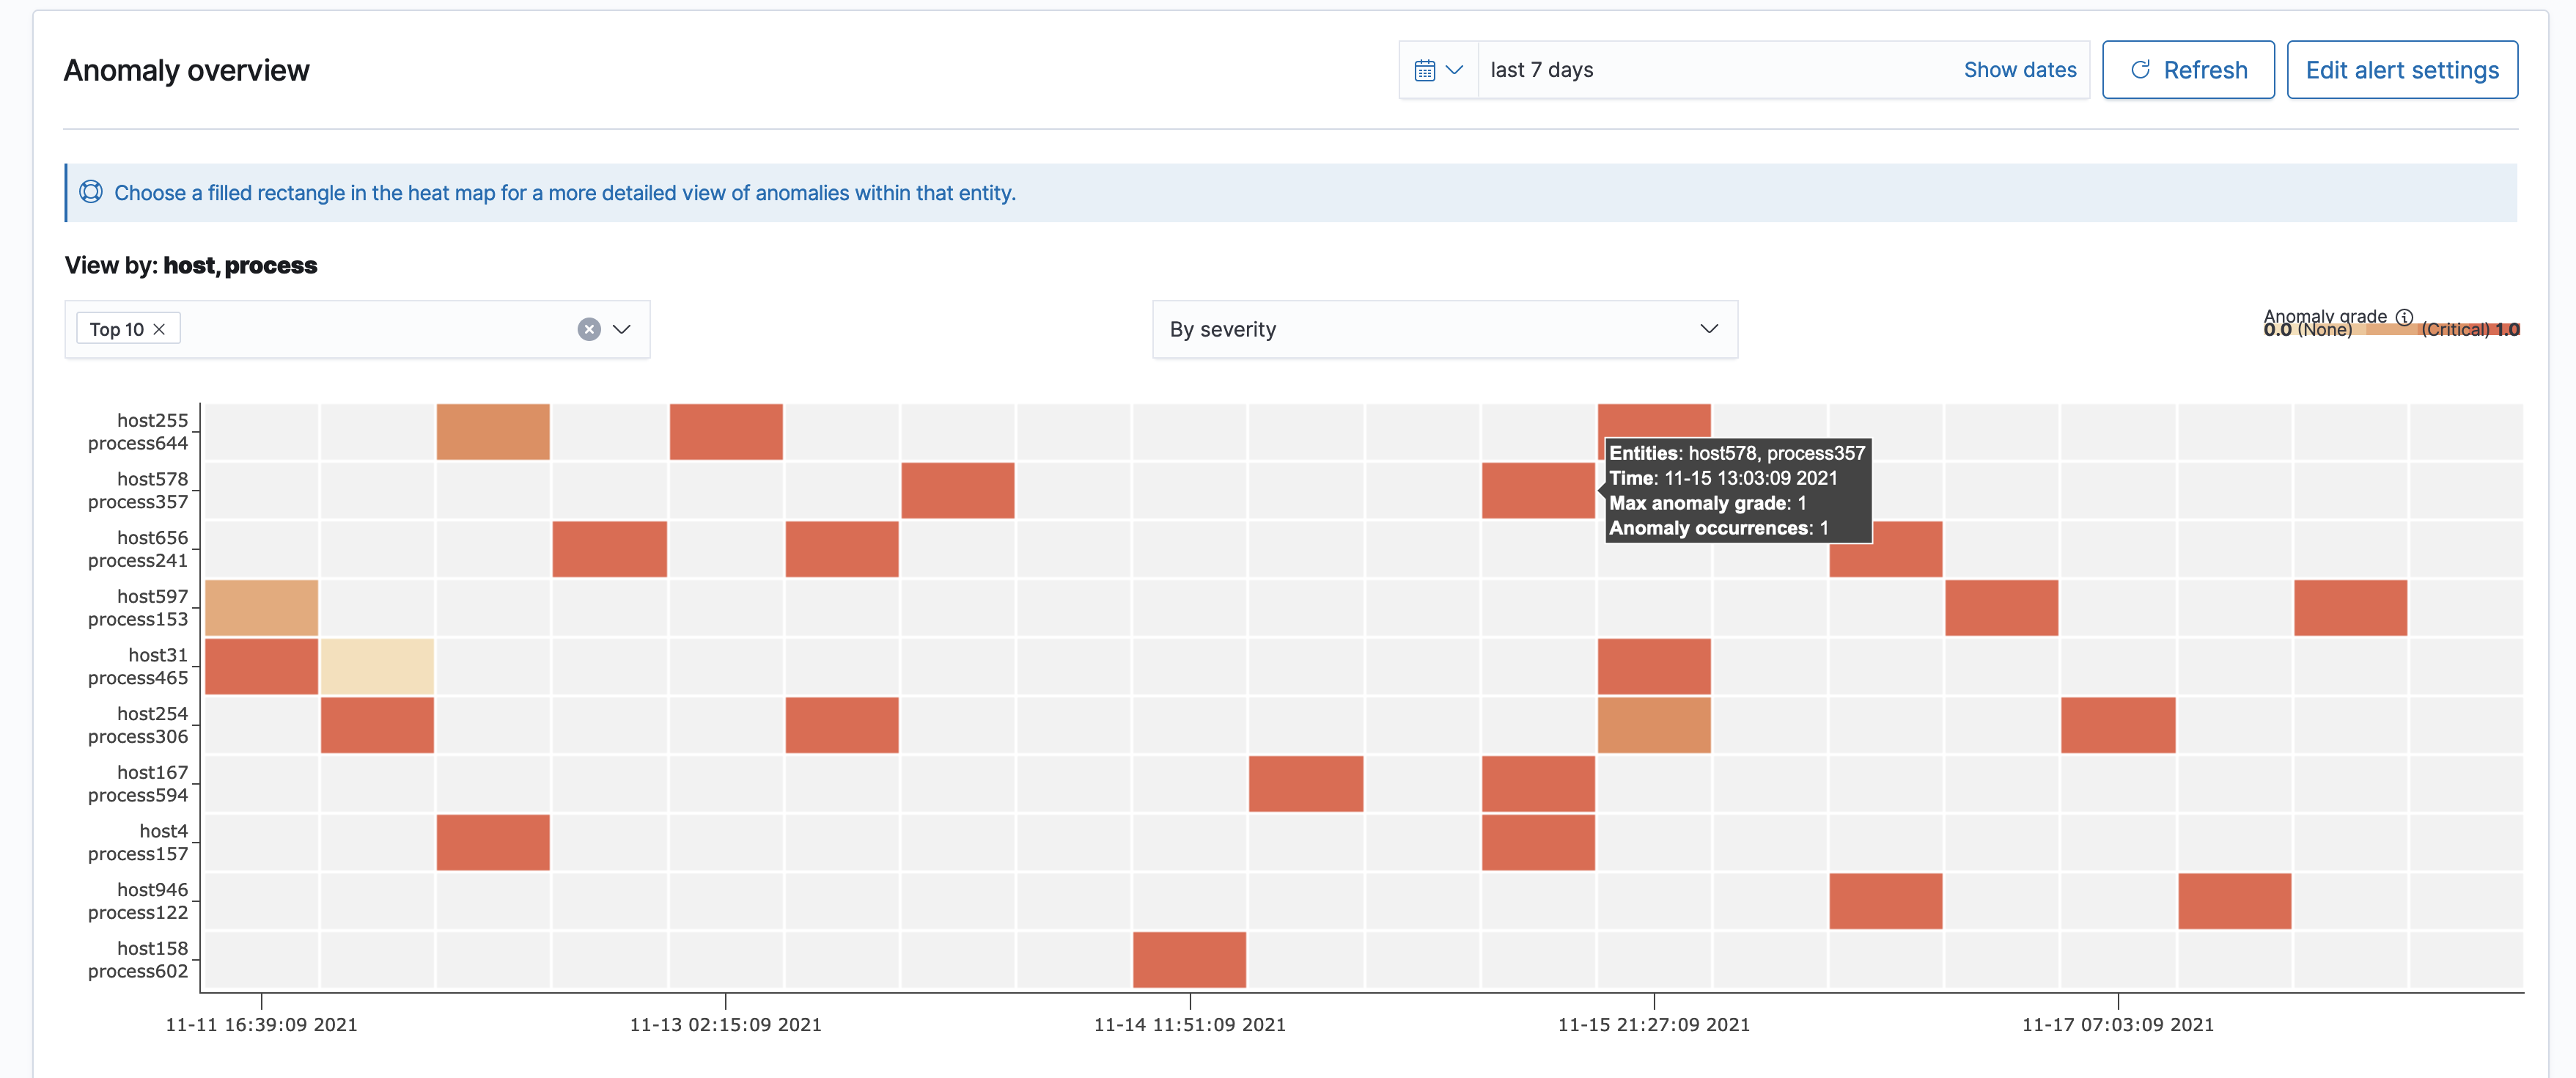
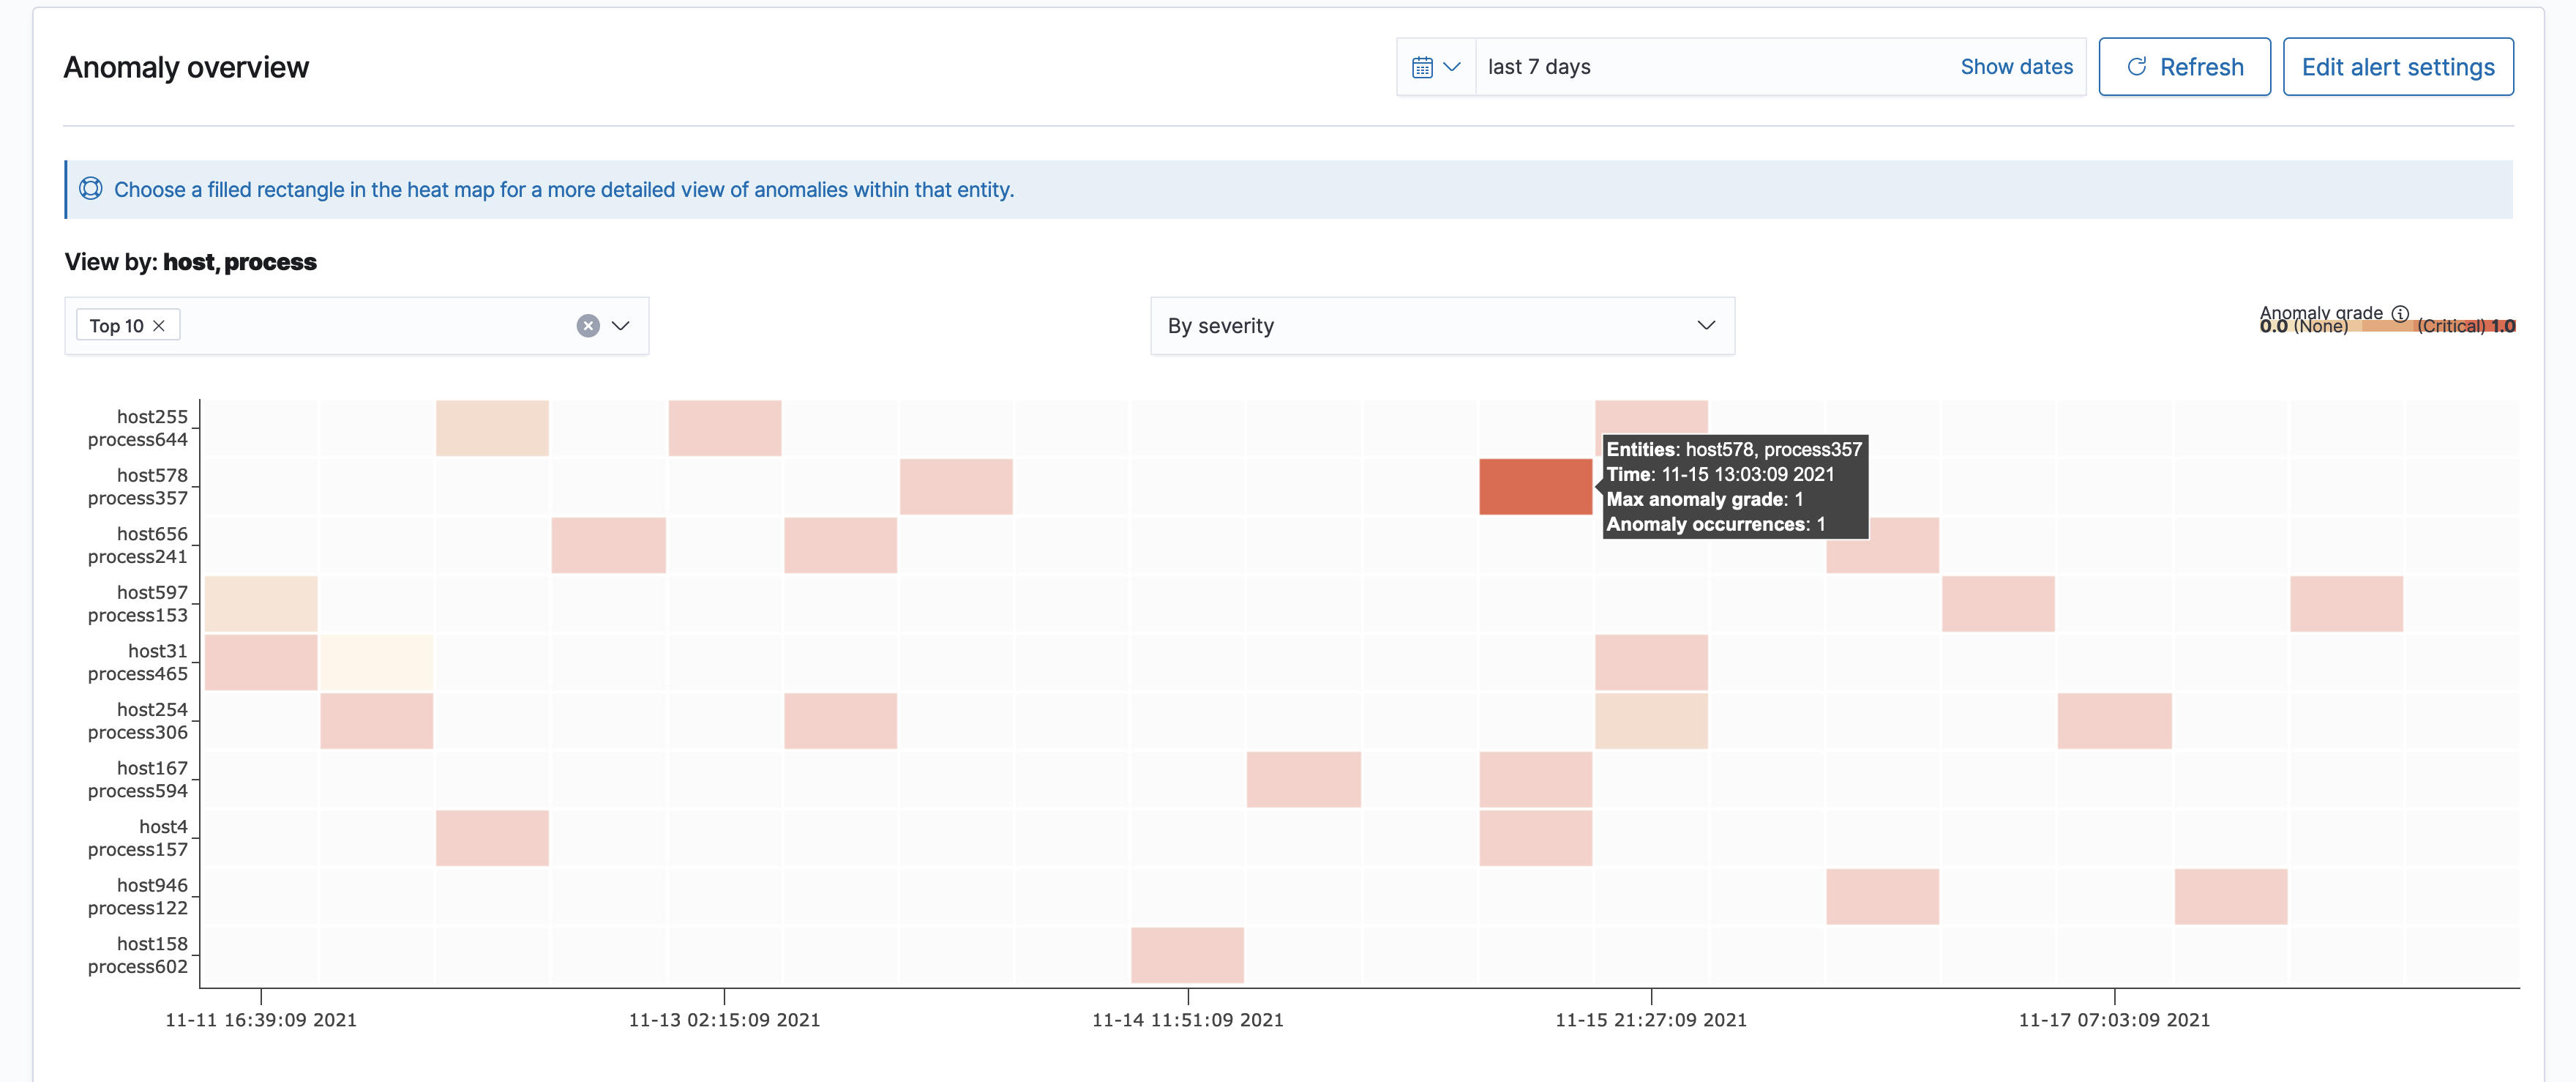
The OpenSearch Dashboard gives an exposition of the top entities producing the most severe or most number of anomalies.

anomaly overview

You can choose a colored cell to review the details of anomalies occurring within that given period.

press anomaly

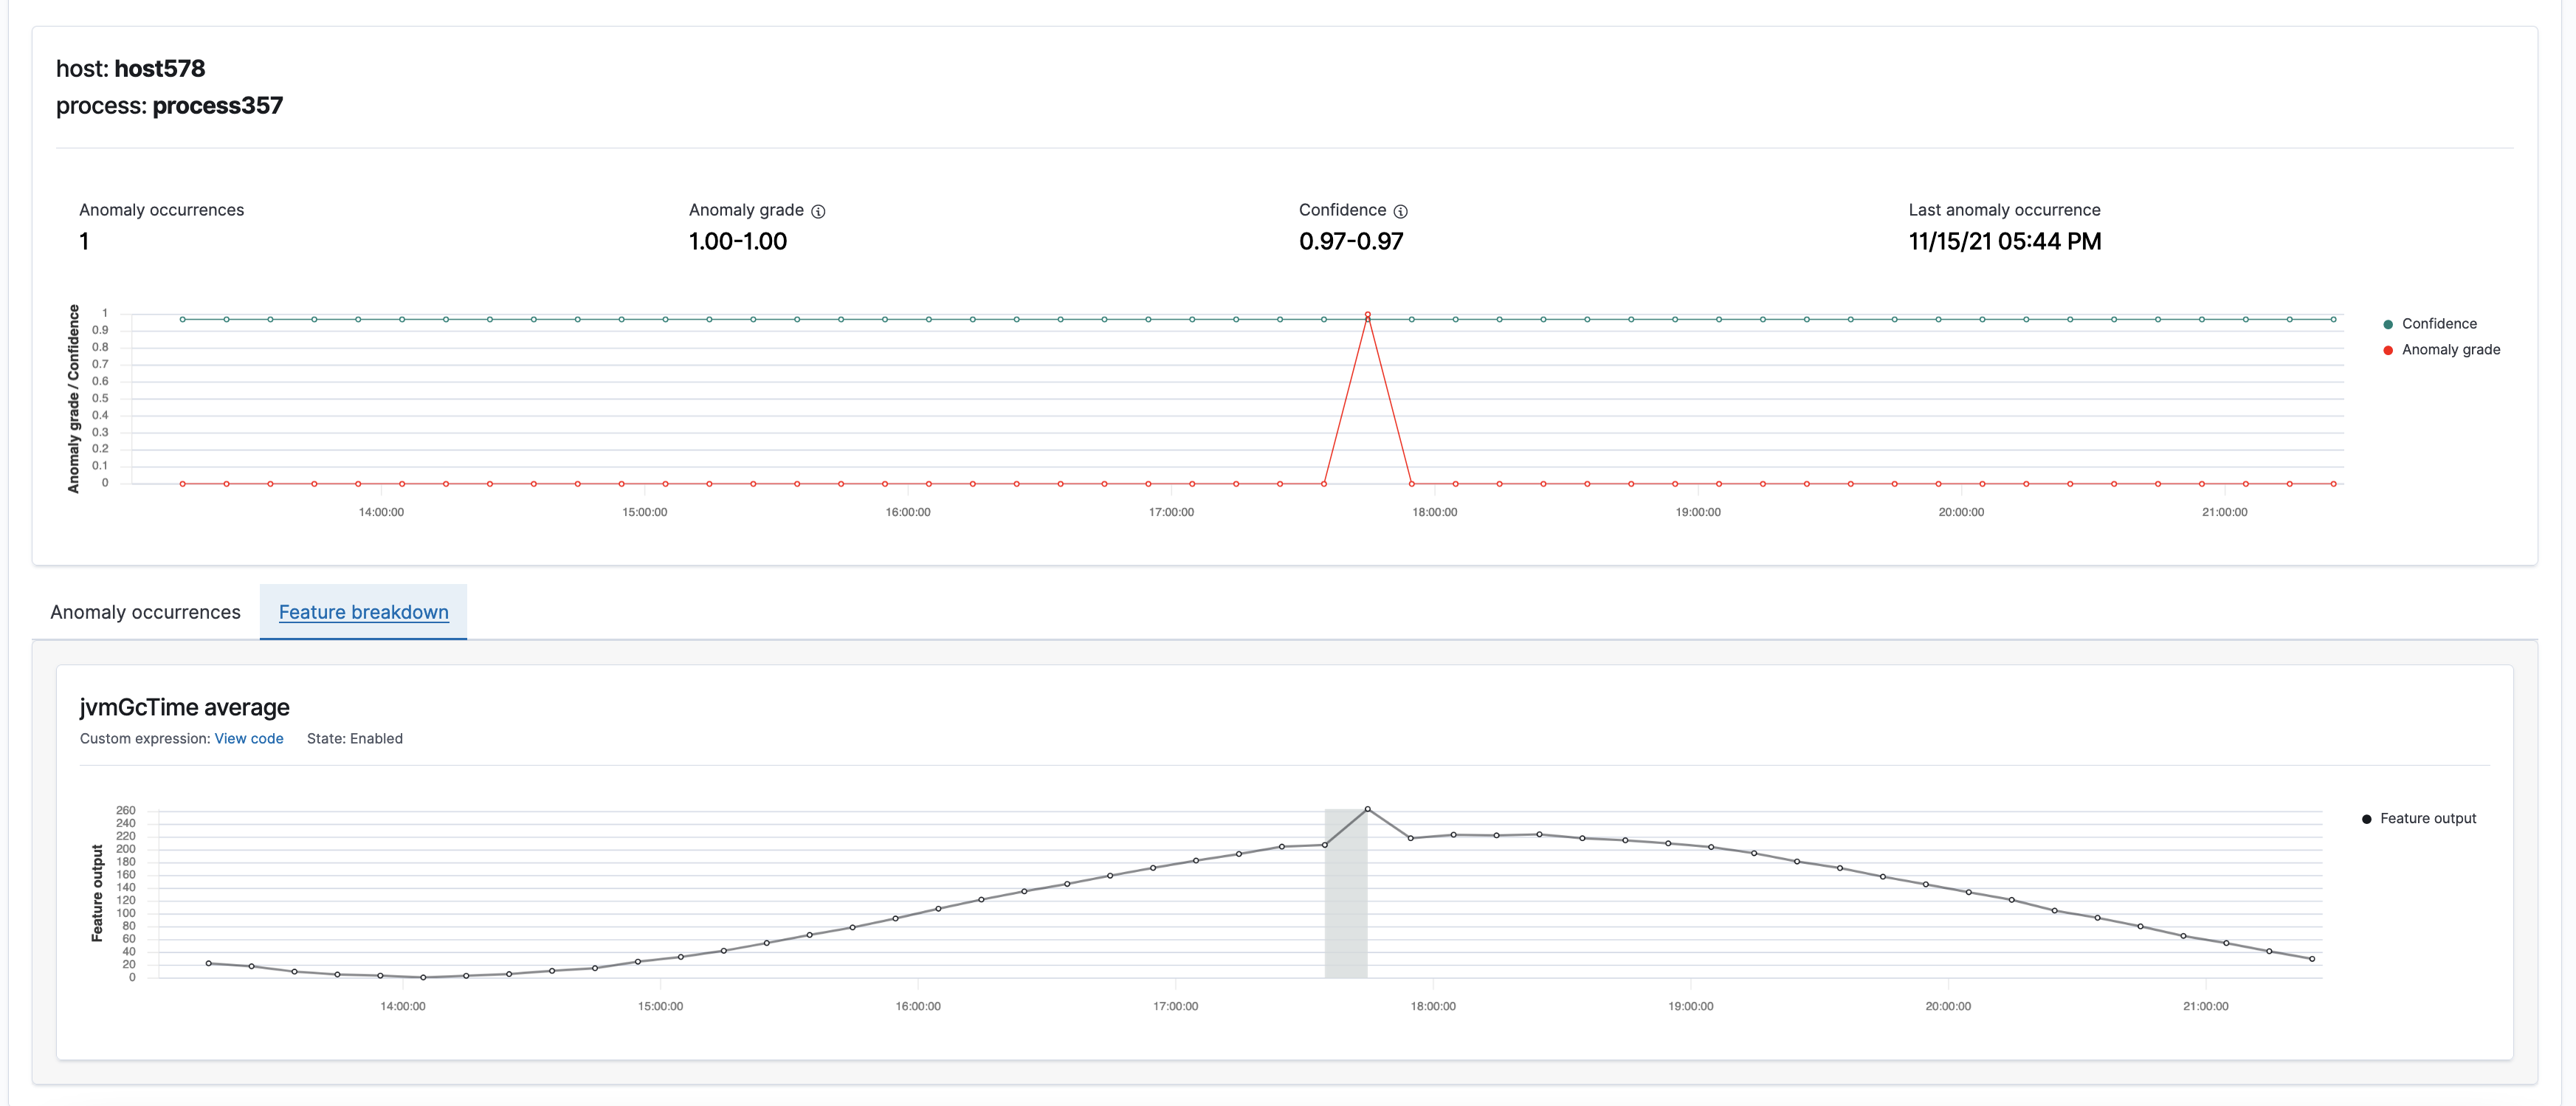
You can view anomaly grade, confidence, and the corresponding features in a shaded area.
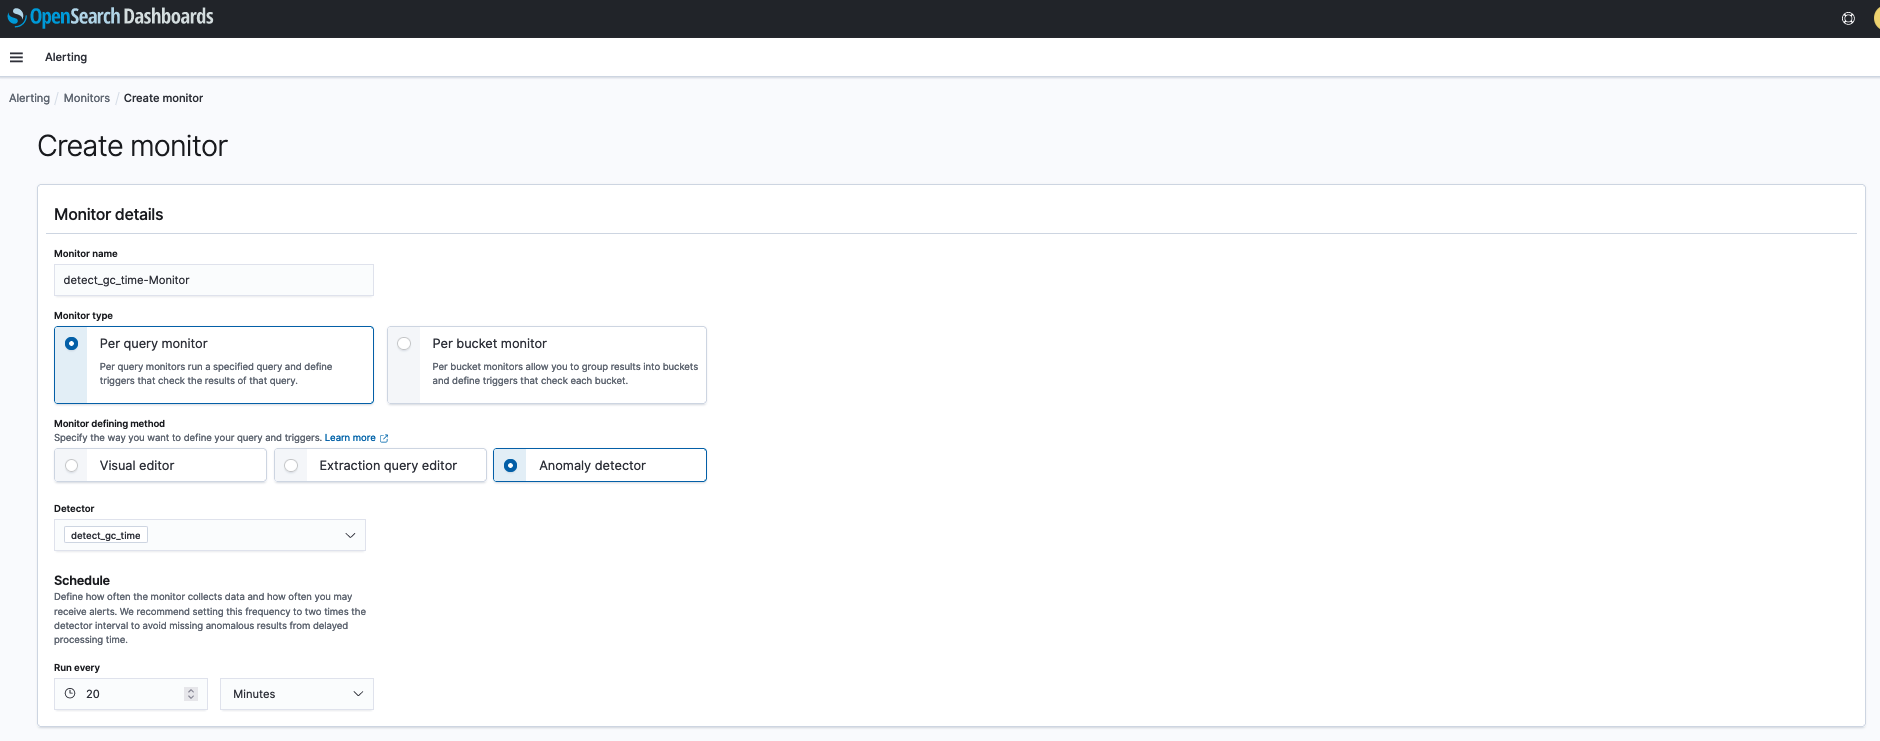
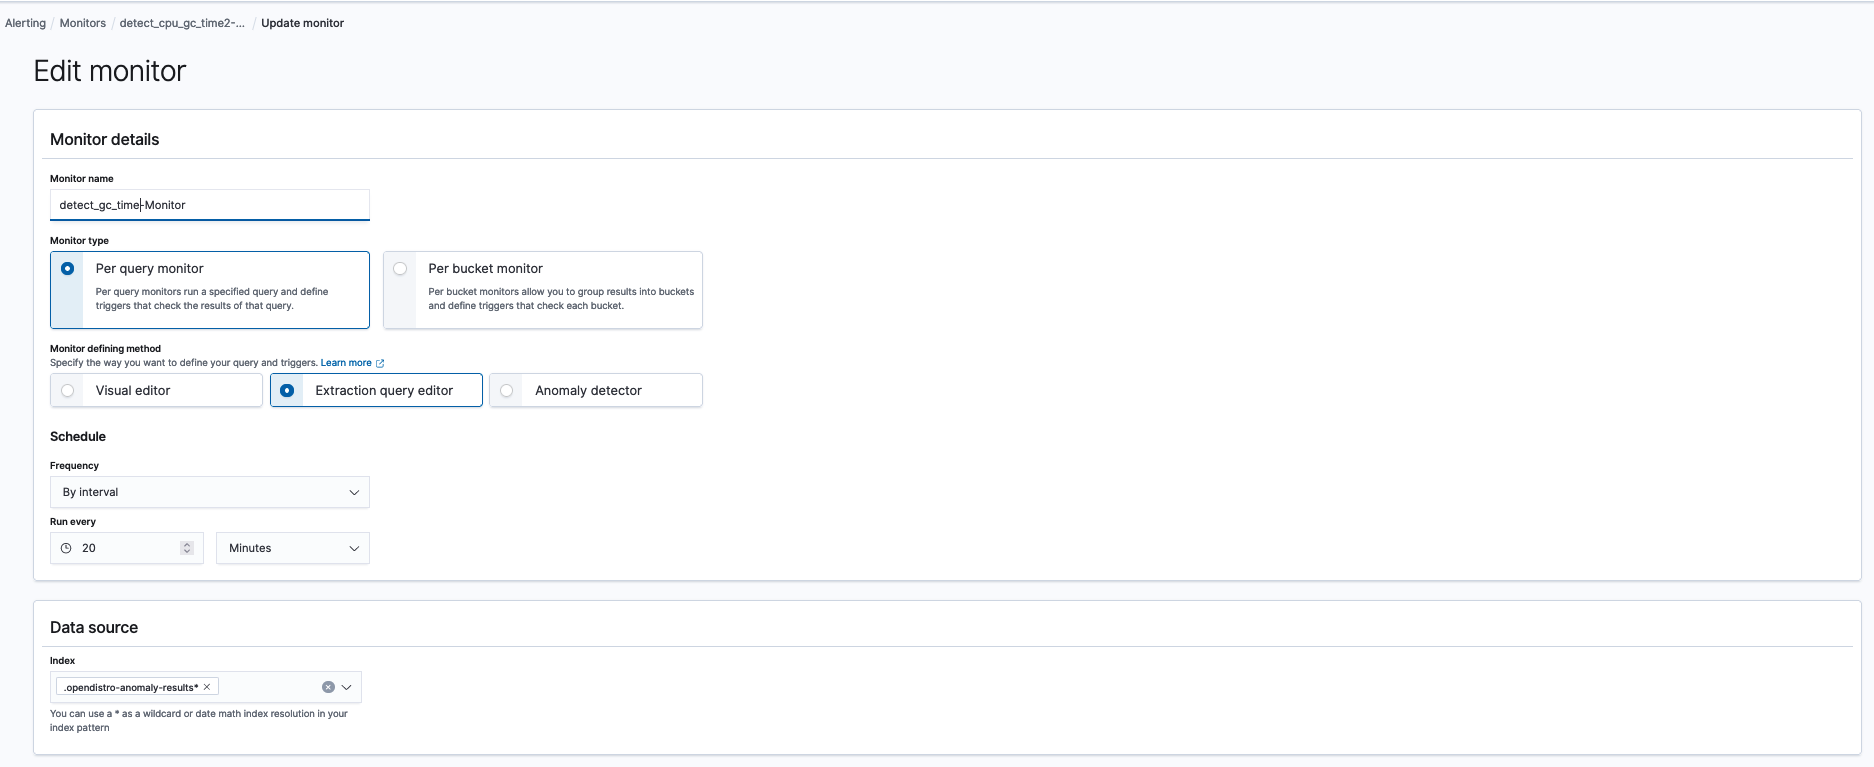
feature graph

Create a monitor

You can create an alerting monitor to notify you of anomalies based on the defined anomaly detector, as shown in the following screenshot.

create monitor

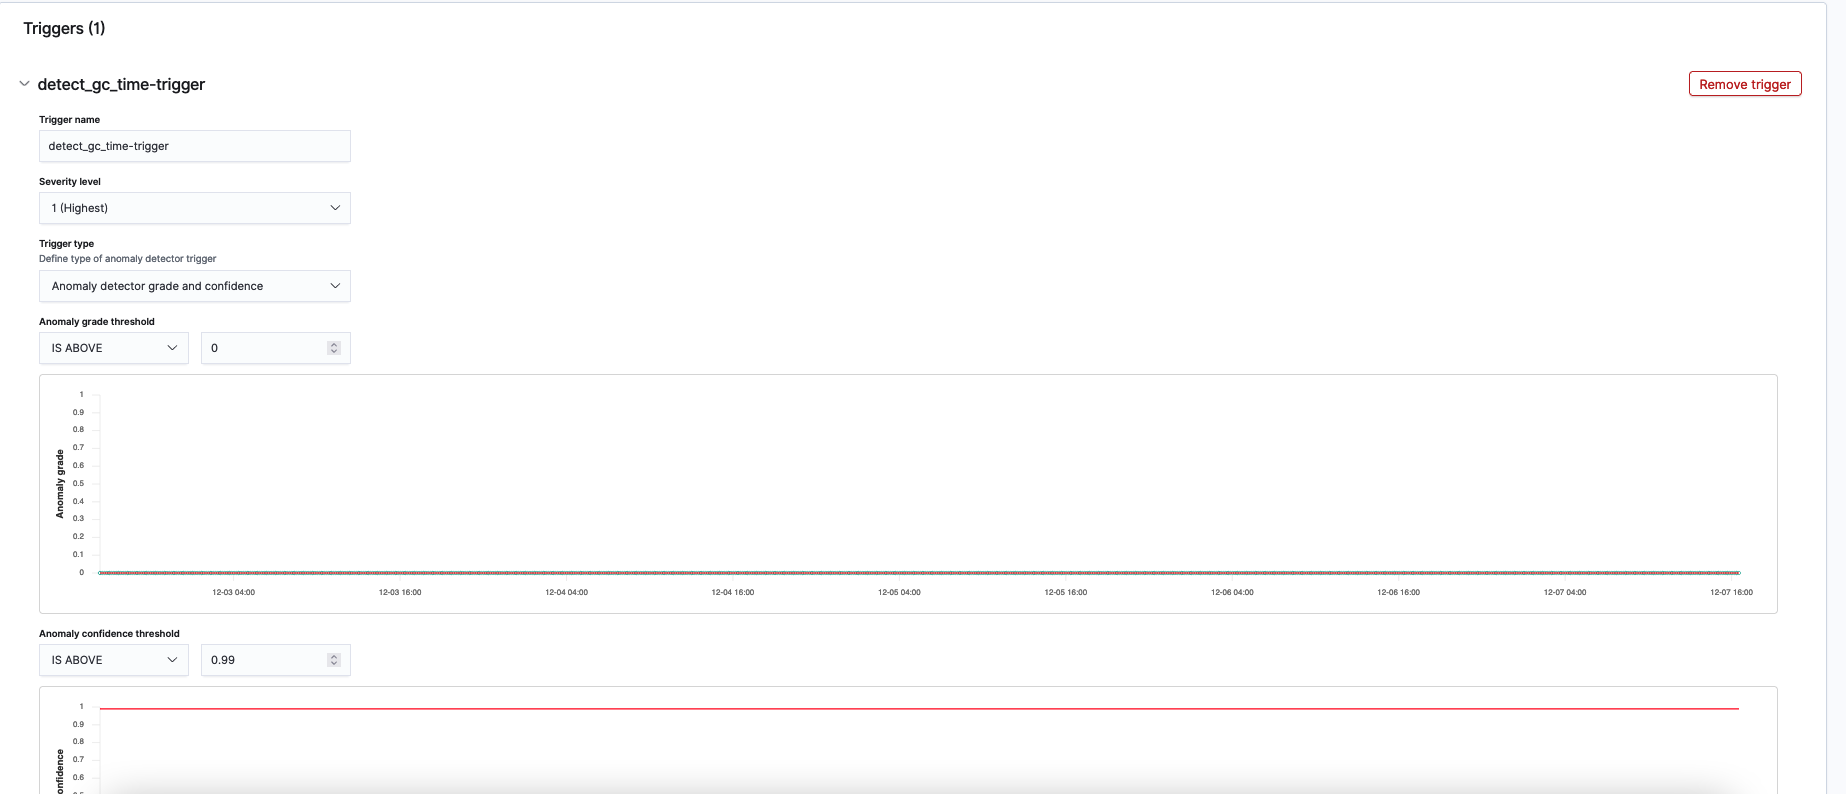
We use anomaly grade and confidence to define a trigger. Both anomaly grade and confidence are values between 0 and 1.

Anomaly grade represents the severity of an anomaly. The closer the grade is to 1, the higher the severity. 0 grade means the corresponding prediction isn’t an anomaly.

Confidence measures whether an entity’s model has observed enough data such that the model contains enough unique, real-world data points. If a confidence value from one model is larger than the confidence of a different model, then the anomaly from the first model has observed more data.

Because we want to receive high fidelity alerts, we configured the grade threshold to be 0 and the confidence threshold to be 0.99.

edit trigger

The final step of creating a monitor is to add an action on what to include in the notification. Our example detector finds anomalies at a particular process in a host. The notification message should contain the entity identity. In this example, we use ctx.results.0.hits.hits.0._source.entity to grab the entity identity.

edit action

A monitor based on a detector extracts the maximum grade anomaly and triggers an alert based on the configured grade and confidence threshold. The following is an example alert message:

Attention

Monitor detect_cpu_gc_time2-Monitor just entered alert status. Please investigate the issue.
- Trigger: detect_cpu_gc_time2-trigger
- Severity: 1
- Period start: 2021-12-08T01:01:15.919Z
- Period end: 2021-12-08T01:21:15.919Z
- Entity: {0={name=host, value=host107}, 1={name=process, value=process622}}

You can customize the extraction query and trigger condition by changing the monitor defining method to Extraction query monitor and modifying the corresponding query and condition. Here is the explanation of all anomaly result index fields you can query.

edit monitor

Evaluation

In this section, we evaluate HCAD’s precision, recall, and overall performance.

Precision and recall

We evaluated precision and recall over the cosine wave data, as mentioned earlier. Such evaluations aren’t easy in the context of real-time processing because only one point is available per entity during each detector interval (10 minutes in the example). Processing all the points takes a long time. Instead, we simulated real-time processing by fast-forwarding the processing in a script. The results are an average of 100 runs. The standard deviation is around 0.12.

The overall average precision, including the effects of cold start using linear interpolation, for the synthetic data is 0.57. The recall is 0.61. We note that no transformations were applied; it’s possible and likely that transformations improve these numbers. The precision is 0.09, and recall is 0.34 for the first 300 points due to interpolated cold start data for training. The numbers pick up as the model observes more real data. After another 5,000 real data points, the precision and recall improve to 0.57 and 0.63, respectively. We reiterate that the exact numbers vary based on the data characteristics—a different benchmark or detection configuration would have other numbers. Further, if there is no missing data, the fidelity of the HCAD model would be the same as that of a single-stream detector.

Performance

We ran HCAD on an idle cluster without ingestion or search traffic. Metrics such as JVM memory pressure and CPU of each node are well within the safe zone, as shown in the following screenshot. JVM memory pressure varies between 23–39%. CPU is mostly around 1%, with hourly spikes up to 65%. An internal hourly maintenance job can account for the spike due to saving hundreds of thousands of model checkpoints, clearing unused models, and performing bookkeeping for internal states. However, this can be a future improvement.

jvm memory pressure

cpu

Implementation

We next discuss the specifics of the technical work that is germane to HCAD’s completeness and scalability.

RCF 2.0

In Amazon OpenSearch Service 1.1, we integrated with Random Cut Forest library (RCF) 2.0. RCF is based on partitioning data into different bounding boxes. The previous RCF version maintains bounding boxes in memory. However, a real-time detector only uses the bounding boxes when processing a new data point and leaves them dormant most of the time. RCF 2.0 allows for recreating those bounding boxes when required so that bounding boxes are present in memory when processing the corresponding input. The on-demand recreation has led to nine times memory overhead reduction and therefore can support hosting nine times as many models in a node. In addition, RCF 2.0 revamps the serialization module. The new module serializes and deserializes a model 26 times faster using 20 times smaller disk space.

Pagination

Regarding feature aggregation, we switched from getting top hits using terms aggregation to pagination via composite aggregation. We evaluated multiple pagination implementations using a generated dataset with 1 million entities. Each entity has two documents. The experiment configurations can vary according to the number of data nodes, primary shards, and categorical fields. We believe composite queries are the right choice because even though they may not be the fastest in all cases, they’re the most stable on average (40 seconds).

Amortize expensive operations

HCAD can face thundering herd traffic, in which many entities make requests like reading checkpoints from disks at approximately the same time. Therefore, we create various queues to buffer pent-up requests. These queues amortize expensive costs by performing a small and bounded amount of work steadily. Therefore, HCAD can offer predictable performance and availability at scale.

In-memory cache

HCAD appeals to caching to process entities whose memory requirement is larger than the configured memory size. At first, we tried a least recently used cache but experienced thrashing when running the HTTP logs workload: with 100 1-minute interval detectors and millions of entities for each detector, we saw few cache hits (many hundreds) within 7 hours. We were wasting CPU cycles swapping models in and out of memory all the time. As a general rule, a hit-to-miss ratio worse than 3:1 is not worth considering caching for quick model accesses.

Instead, we turned to a modified LFU caching, augmented to include heavy hitters’ approximation. A decayed count is maintained for each model in the cache. The decayed count for a model in the cache is incremented when the model is accessed. The model with the smallest decayed count is the least frequently used model. When the cache reaches its capacity, it invalidates and removes the least frequently used model if the new entity’s frequency is no smaller than the least frequently used entity. This connection between heavy hitter approximation and traditional LFU allows us to make the more frequent and recent models sticky in memory and phase out models with lesser cache hit probabilities.

Fault tolerance

Unrecoverable memory state is limited, and enough information of models is stored on disk for crash resilience. Models are recovered on a different host after a crash is detected.

High performance

HCAD builds on asynchronous I/O: all I/O requests such as network calls or disk accesses are non-blocking. In addition, model distribution is balanced across the cluster using a consistent hash ring.

Summary

We enhanced HCAD to improve its scalability and completeness without altering the fidelity of the computation. As a result of these improvements, I showed you how to size an OpenSearch domain and use HCAD to monitor 1 million entities in 10 minutes. To learn more about HCAD, see anomaly detection documentation.

If you have feedback about this post, submit comments in the comments section below. If you have questions about this post, start a new thread on the Machine Learning forum.


About the Author

bio

Kaituo Li is an engineer in Amazon OpenSearch Service. He has worked on distributed systems, applied machine learning, monitoring, and database storage in Amazon. Before Amazon, Kaituo was a PhD student in Computer Science at University of Massachusetts, Amherst. He likes reading and sports.

Top 2021 AWS Security service launches security professionals should review – Part 1

Post Syndicated from Ryan Holland original https://aws.amazon.com/blogs/security/top-2021-aws-security-service-launches-part-1/

Given the speed of Amazon Web Services (AWS) innovation, it can sometimes be challenging to keep up with AWS Security service and feature launches. To help you stay current, here’s an overview of some of the most important 2021 AWS Security launches that security professionals should be aware of. This is the first of two related posts; Part 2 will highlight some of the important 2021 launches that security professionals should be aware of across all AWS services.

Amazon GuardDuty

In 2021, the threat detection service Amazon GuardDuty expanded the internal AWS security intelligence it consumes to use more of the intel that AWS internal threat detection teams collect, including additional nation-state threat intelligence. Sharing more of the important intel that internal AWS teams collect lets you quickly improve your protection. GuardDuty also launched domain reputation modeling. These machine learning models take all the domain requests from across all of AWS, and feed them into a model that allows AWS to categorize previously unseen domains as highly likely to be malicious or benign based on their behavioral characteristics. In practice, AWS is seeing that these models often deliver high-fidelity threat detections, identifying malicious domains 7–14 days before they are identified and available on commercial threat feeds.

AWS also launched second generation anomaly detection for GuardDuty. Shortly after the original GuardDuty launch in 2017, AWS added additional anomaly detection for user behavior analytics and monitoring for unusual activity of AWS Identity and Access Management (IAM) users. After receiving customer feedback that the original feature was a little too noisy, and that it was difficult to understand why some findings were generated, the GuardDuty analytics team rebuilt this functionality on an entirely new machine learning model, considerably reducing the number of detections and generating a more accurate positive-detection rate. The new model also added additional context that security professionals (such as analysts) can use to understand why the model shows findings as suspicious or unusual.

Since its introduction, GuardDuty has detected when AWS EC2 Role credentials are used to call AWS APIs from IP addresses outside of AWS. Beginning in early 2022, GuardDuty now supports detection when credentials are used from other AWS accounts, inside the AWS network. This is a complex problem for customers to solve on their own, which is why the GuardDuty team added this enhancement. The solution considers that there are legitimate reasons why a source IP address that is communicating with AWS services APIs might be different than the Amazon Elastic Compute Cloud (Amazon EC2) instance IP address, or a NAT gateway associated with the instance’s VPC. The enhancement also considers complex network topologies that route traffic to one or multiple VPCs—for example, AWS Transit Gateway or AWS Direct Connect.

Our customers are increasingly running container workloads in production; helping to raise the security posture of these workloads became an AWS development priority in 2021. GuardDuty for EKS Protection is one recent feature that has resulted from this investment. This new GuardDuty feature monitors Amazon Elastic Kubernetes Service (Amazon EKS) cluster control plane activity by analyzing Kubernetes audit logs. GuardDuty is integrated with Amazon EKS, giving it direct access to the Kubernetes audit logs without requiring you to turn on or store these logs. Once a threat is detected, GuardDuty generates a security finding that includes container details such as pod ID, container image ID, and associated tags. See below for details on how the new Amazon Inspector is also helping to protect containers.

Amazon Inspector

At AWS re:Invent 2021, we launched the new Amazon Inspector, a vulnerability management service that continually scans AWS workloads for software vulnerabilities and unintended network exposure. The original Amazon Inspector was completely re-architected in this release to automate vulnerability management and to deliver near real-time findings to minimize the time needed to discover new vulnerabilities. This new Amazon Inspector has simple one-click enablement and multi-account support using AWS Organizations, similar to our other AWS Security services. This launch also introduces a more accurate vulnerability risk score, called the Inspector score. The Inspector score is a highly contextualized risk score that is generated for each finding by correlating Common Vulnerability and Exposures (CVE) metadata with environmental factors for resources such as network accessibility. This makes it easier for you to identify and prioritize your most critical vulnerabilities for immediate remediation. One of the most important new capabilities is that Amazon Inspector automatically discovers running EC2 instances and container images residing in Amazon Elastic Container Registry (Amazon ECR), at any scale, and immediately starts assessing them for known vulnerabilities. Now you can consolidate your vulnerability management solutions for both Amazon EC2 and Amazon ECR into one fully managed service.

AWS Security Hub

In addition to a significant number of smaller enhancements throughout 2021, in October AWS Security Hub, an AWS cloud security posture management service, addressed a top customer enhancement request by adding support for cross-Region finding aggregation. You can now view all your findings from all accounts and all selected Regions in a single console view, and act on them from an Amazon EventBridge feed in a single account and Region. Looking back at 2021, Security Hub added 72 additional best practice checks, four new AWS service integrations, and 13 new external partner integrations. A few of these integrations are Atlassian Jira Service Management, Forcepoint Cloud Security Gateway (CSG), and Amazon Macie. Security Hub also achieved FedRAMP High authorization to enable security posture management for high-impact workloads.

Amazon Macie

Based on customer feedback, data discovery tool Amazon Macie launched a number of enhancements in 2021. One new feature, which made it easier to manage Amazon Simple Storage Service (Amazon S3) buckets for sensitive data, was criteria-based bucket selection. This Macie feature allows you to define runtime criteria to determine which S3 buckets should be included in a sensitive data-discovery job. When a job runs, Macie identifies the S3 buckets that match your criteria, and automatically adds or removes them from the job’s scope. Before this feature, once a job was configured, it was immutable. Now, for example, you can create a policy where if a bucket becomes public in the future, it’s automatically added to the scan, and similarly, if a bucket is no longer public, it will no longer be included in the daily scan.

Originally Macie included all managed data identifiers available for all scans. However, customers wanted more surgical search criteria. For example, they didn’t want to be informed if there were exposed data types in a particular environment. In September 2021, Macie launched the ability to enable/disable managed data identifiers. This allows you to customize the data types you deem sensitive and would like Macie to alert on, in accordance with your organization’s data governance and privacy needs.

Amazon Detective

Amazon Detective is a service to analyze and visualize security findings and related data to rapidly get to the root cause of potential security issues. In January 2021, Amazon Detective added a convenient, time-saving integration that allows you to start security incident investigation workflows directly from the GuardDuty console. This new hyperlink pivot in the GuardDuty console takes findings directly from the GuardDuty console into the Detective console. Another time-saving capability added was the IP address drill down functionality. This new capability can be useful to security forensic teams performing incident investigations, because it helps quickly determine the communications that took place from an EC2 instance under investigation before, during, and after an event.

In December 2021, Detective added support for AWS Organizations to simplify management for security operations and investigations across all existing and future accounts in an organization. This launch allows new and existing Detective customers to onboard and centrally manage the Detective graph database for up to 1,200 AWS accounts.

AWS Key Management Service

In June 2021, AWS Key Management Service (AWS KMS) introduced multi-Region keys, a capability that lets you replicate keys from one AWS Region into another. With multi-Region keys, you can more easily move encrypted data between Regions without having to decrypt and re-encrypt with different keys for each Region. Multi-Region keys are supported for client-side encryption using direct AWS KMS API calls, or in a simplified manner with the AWS Encryption SDK and Amazon DynamoDB Encryption Client.

AWS Secrets Manager

Last year was a busy year for AWS Secrets Manager, with four feature launches to make it easier to manage secrets at scale, not just for client applications, but also for platforms. In March 2021, Secrets Manager launched multi-Region secrets to automatically replicate secrets for multi-Region workloads. Also in March, Secrets Manager added three new rules to AWS Config, to help administrators verify that secrets in Secrets Manager are configured according to organizational requirements. Then in April 2021, Secrets Manager added a CSI driver plug-in, to make it easy to consume secrets from Amazon EKS by using Kubernetes’s standard Secrets Store interface. In November, Secrets Manager introduced a higher secret limit of 500,000 per account to simplify secrets management for independent software vendors (ISVs) that rely on unique secrets for a large number of end customers. Although launched in January 2022, it’s also worth mentioning Secrets Manager’s release of rotation windows to align automatic rotation of secrets with application maintenance windows.

Amazon CodeGuru and Secrets Manager

In November 2021, AWS announced a new secrets detector feature in Amazon CodeGuru that searches your codebase for hardcoded secrets. Amazon CodeGuru is a developer tool powered by machine learning that provides intelligent recommendations to detect security vulnerabilities, improve code quality, and identify an application’s most expensive lines of code.

This new feature can pinpoint locations in your code with usernames and passwords; database connection strings, tokens, and API keys from AWS; and other service providers. When a secret is found in your code, CodeGuru Reviewer provides an actionable recommendation that links to AWS Secrets Manager, where developers can secure the secret with a point-and-click experience.

Looking ahead for 2022

AWS will continue to deliver experiences in 2022 that meet administrators where they govern, developers where they code, and applications where they run. A lot of customers are moving to container and serverless workloads; you can expect to see more work on this in 2022. You can also expect to see more work around integrations, like CodeGuru Secrets Detector identifying plaintext secrets in code (as noted previously).

To stay up-to-date in the year ahead on the latest product and feature launches and security use cases, be sure to read the Security service launch announcements. Additionally, stay tuned to the AWS Security Blog for Part 2 of this blog series, which will provide an overview of some of the important 2021 launches that security professionals should be aware of across all AWS services.

If you’re looking for more opportunities to learn about AWS security services, check out AWS re:Inforce, the AWS conference focused on cloud security, identity, privacy, and compliance, which will take place June 28-29 in Houston, Texas.

If you have feedback about this post, submit comments in the Comments section below. If you have questions about this post, contact AWS Support.

Want more AWS Security news? Follow us on Twitter.

Author

Ryan Holland

Ryan is a Senior Manager with GuardDuty Security Response. His team is responsible for ensuring GuardDuty provides the best security value to customers, including threat intelligence, behavioral analytics, and finding quality.

Author

Marta Taggart

Marta is a Seattle-native and Senior Product Marketing Manager in AWS Security Product Marketing, where she focuses on data protection services. Outside of work you’ll find her trying to convince Jack, her rescue dog, not to chase squirrels and crows (with limited success).

[Security Nation] Amit Serper on Finding Leaks in Autodiscover

Post Syndicated from Rapid7 original https://blog.rapid7.com/2022/02/16/security-nation-amit-serper-on-finding-leaks-in-autodiscover/

[Security Nation] Amit Serper on Finding Leaks in Autodiscover

In this episode of Security Nation, Jen and Tod chat with Amit Serper, Director of Security Research at Akamai, on his work uncovering a flaw in the Autodiscover protocol within Microsoft Exchange that can leak domain credentials outside an organization. Amit details some of the techniques he and his team used during the discovery – and the five months of research that followed to validate and document their findings, including the social media aftermath of the disclosure.

Stick around for our Rapid Rundown, where Tod and Jen talk about the improvements in vulnerability disclosure time as revealed by the latest report from Google’s Project Zero.

Amit Serper

[Security Nation] Amit Serper on Finding Leaks in Autodiscover

Amit Serper is the Director of Security Research at Akamai Technologies’ Enterprise Security group. He specializes in low-level, vulnerability, and kernel research, malware analysis, and reverse engineering on Windows, Linux, and macOS. Amit’s career in security spans over 15 years, in which he worked at an Israeli government intelligence agency conducting cutting edge research and, later, at security startups Cybereason and Guardicore, where he led complex research projects and thwarted a few global attacks (such as NotPetya, BadRabbit, and Operation Softcell). Amit has been active in the security community for a few years now, speaking at conferences and releasing various research papers and blogs.

Show notes

Interview links

Rapid Rundown links

  • Read up on the vulnerability disclosure metrics from Google’s Project Zero.

Like the show? Want to keep Jen and Tod in the podcasting business? Feel free to rate and review with your favorite podcast purveyor, like Apple Podcasts.

Want More Inspiring Stories From the Security Community?

Subscribe to Security Nation Today

Multi-Region Migration using AWS Application Migration Service

Post Syndicated from Shreya Pathak original https://aws.amazon.com/blogs/architecture/multi-region-migration-using-aws-application-migration-service/

AWS customers are in various stages of their cloud journey. Frequently, enterprises begin that journey by rehosting (lift-and-shift migrating) their on-premises workloads into AWS, and running Amazon Elastic Compute Cloud (Amazon EC2) instances. You can rehost using AWS Application Migration Service (MGN), a cloud-native migration tool.

You may need to relocate instances and workloads to a Region that is closer in proximity to one of your offices or data centers. Or you may have a resilience requirement to balance your workloads across multiple Regions. This rehosting migration pattern with AWS MGN can also be used to migrate Amazon EC2-hosted workloads from one AWS Region to another.

In this blog post, we will show you how to configure AWS MGN for migrating your workloads from one AWS Region to another.

Overview of AWS MGN migration

AWS MGN, an AWS native service, minimizes time-intensive, error-prone, manual processes by automatically converting your source servers from physical, virtual, or cloud infrastructure to run natively on AWS. It reduces overall migration costs, such as investment in multiple migration solutions, specialized cloud development, or application-specific skills. With AWS MGN, you can migrate your applications from physical infrastructure, VMware vSphere, Microsoft Hyper-V, Amazon EC2, and Amazon Virtual Private Cloud (Amazon VPC) to AWS.

To migrate to AWS, install the AWS MGN Replication Agent on your source servers and define replication settings in the AWS MGN console, shown in Figure 1. Replication servers receive data from an agent running on source servers, and write this data to the Amazon Elastic Block Store (EBS) volumes. Your replicated data is compressed and encrypted in transit and at rest using EBS encryption.

AWS MGN keeps your source servers up to date on AWS using nearly continuous, block-level data replication. It uses your defined launch settings to launch instances when you conduct non-disruptive tests or perform a cutover. After confirming that your launched instances are operating properly on AWS, you can decommission your source servers.

Figure 1. MGN service architecture

Figure 1. MGN service architecture

Steps for migration with AWS MGN

This tutorial assumes that you already have your source AWS Region set up with Amazon EC2-hosted workloads running and a target AWS Region defined.

Migrating Amazon EC2 workload across AWS Regions include the following steps:

  1. Create the Replication Settings template. These settings are used to create and manage your staging area subnet with lightweight Amazon EC2 instances. These instances act as replication servers used to replicate data between your source servers and AWS.
  2. Install the AWS Replication Agent on your source instances to add them to the AWS MGN console.
  3. Configure the launch settings for each source server. These are a set of instructions that determine how a Test or Cutover instance will be launched for each source server on AWS.
  4. Initiate the test/cutover to the target Region.

Prerequisites

Following are the prerequisites:

Setting up AWS MGN for multi-Region migration

This section will guide you through AWS MGN configuration setup for multi-Region migration.

Log into your AWS account, select the target AWS Region, and complete the prerequisites. Then you are ready to configure AWS MGN:

1.      Choose Get started on the AWS MGN landing page.

2.      Create the Replication Settings template (see Figure 2):

  • Select Staging area subnet for Replication Server
  • Choose Replication Server instance type (By default, AWS MGN uses t3.small instance type)
  • Choose default or custom Amazon EBS encryption
  • Enable ‘Always use the Application Migration Service security group’
  • Add custom Replication resources tags
  • Select Create Template button
Figure 2. Replication Settings template creation

Figure 2. Replication Settings template creation

3.      Add source servers to AWS MGN:

  • Select Add Servers following Source Servers (AWS MGN > Source Servers)
  • Enter OS, Replication Preferences, IAM Access Key and Secret Access Key ID of the IAM user created following Prerequisites. This does not expose your Secret Access Key ID in any request
  • Copy the installation command and run on your source server for agent installation

After successful agent installation, the source server is listed on the Source Servers page. Data replication begins after completion of the Initial Sync steps.

4.      Monitor the Initial Sync status (shown in Figure 3):

  •  Source server name > Migration Dashboard > Data Replication Status
    (Refer to the Source Servers page documentation for more details)
  • After 100% initial data replication confirm:
    • Migration Lifecycle = Ready for testing
    • Next step = Launch test instance
Figure 3. Monitoring initial replication status

Figure 3. Monitoring initial replication status

5.      Configure Launch Settings for each server:

  • Source servers page > Select source server
  • Navigate to the Launch settings tab (see Figure 4.) For this tutorial we won’t adjust the General launch settings. We will modify the EC2 Launch Template instead
  • Click on EC2 Launch Template > About modifying EC2 Launch Templates > Modify
Figure 4. Modifying EC2 Launch Template

Figure 4. Modifying EC2 Launch Template

6.      Provide values for Launch Template:

  • AMI: Recents tab > Don’t include in launch template
  • Instance Type: Can be kept same as source server or changed as per expected workload
  • Key pair (login): Create new or use existing if already created in the Target AWS Region
  • Network Settings > Subnet: Subnet for launching Test instance
  • Advanced network configuration:
    • Security Groups: For access to the test and final cutover instances
    • Configure Storage: Size – Do not change or edit this field
    • Volume type: Select any volume type (io1 is default)
  • Review details and click Create Template Version under the Summary section on right side of the console

7.      Every time you modify the Launch template, a new version is created. Set the launch template that you want to use with MGN as the default (shown in Figure 5):

  • Navigate to Amazon EC2 dashboard > Launch Templates page
  • Select the Launch template ID
  • Open the Actions menu and choose Set default version and select the latest Launch template created
Figure 5. Setting up your Launch template as the default

Figure 5. Setting up your Launch template as the default

8.      Launch a test instance and perform a Test prior to Cutover to identify potential problems and solve them before the actual Cutover takes place:

  • Go to the Source Servers page (see Figure 6)
  • Select source server > Open Test and Cutover menu
  • Under Testing, choose Launch test instances
  • Launch test instances for X servers > Launch
  • Choose View job details on the ‘Launch Job Created’ dialog box to view the specific Job details for the test launch in the Launch History tab
Figure 6. Launching test instances

Figure 6. Launching test instances

9.      Validate launch of test instance (shown in Figure 7) by confirming:

  • Alerts column = Launched
  • Migration lifecycle column = Test in progress
  • Next step column = Complete testing and mark as ‘Ready for cutover’
Figure 7. Validating launch of test instances

Figure 7. Validating launch of test instances

10.  SSH/ RDP into Test instance (view from EC2 console) and validate connectivity. Perform acceptance tests for your application as required. Revert the test if you encounter any issues.

11.  Terminate Test instances after successful testing:

  • Go to Source servers page
  • Select source server > Open Test and Cutover menu
  • Under Testing, choose Mark as “Ready for cutover”
  • Mark X servers as “Ready for cutover” > Yes, terminate launched instances (recommended) > Continue

12.  Validate the status of termination job and cutover readiness:

  • Migration Lifecycle = Ready for cutover
  • Next step = Launch cutover instance

13.  Perform the final cutover at a set date and time:

  • Go to Source servers page (see Figure 8)
  • Select source server > Open Test and Cutover menu
  • Under Cutover, choose Launch cutover instances
  • Launch cutover instances for X > Launch
Figure 8. Performing final Cutover by launching Cutover instances

Figure 8. Performing final Cutover by launching Cutover instances

14.  Monitor the indicators to validate the success of the launch of your Cutover instance (shown in Figure 9):

  • Alerts column = Launched
  • Migration lifecycle column = Cutover in progress
  • Data replication status = Healthy
  • Next step column = Finalize cutover
Figure 9. Indicators for successful launch of Cutover instances

Figure 9. Indicators for successful launch of Cutover instances

15.  Test Cutover Instance:

  • Navigate to Amazon EC2 console > Instances (running)
  • Select Cutover instance
  • SSH/ RDP into your Cutover instance to confirm that it functions correctly
  • Validate connectivity and perform acceptance tests for your application
  • Revert Cutover if any issues

16.  Finalize the cutover after successful validation:

  • Navigate to AWS MGN console > Source servers page
  • Select source server > Open Test and Cutover menu
  • Under Cutover, choose Finalize Cutover
  • Finalize cutover for X servers > Finalize

17.  At this point, if your cutover is successful:

  • Migration lifecycle column = Cutover complete,
  • Data replication status column = Disconnected
  • Next step column = Mark as archived

The cutover is now complete and that the migration has been performed successfully. Data replication has also stopped and all replicated data will now be discarded.

Cleaning up

Archive your source servers that have launched Cutover instances to clean up your Source Servers page-

  • Navigate to Source Servers page (see Figure 10)
  • Select source server > Open Actions
  • Choose Mark as archived
  • Archive X server > Archive
Figure 10. Mark source servers as archived that are cutover

Figure 10. Mark source servers as archived that are cutover

Conclusion

In this post, we demonstrated how AWS MGN simplifies, expedites, and reduces the cost of migrating Amazon EC2-hosted workloads from one AWS Region to another. It integrates with AWS Migration Hub, enabling you to organize your servers into applications. You can track the progress of all your MGN at the server and app level, even as you move servers into multiple AWS Regions. Choose a Migration Hub Home Region for MGN to work with the Migration Hub.

Here are the AWS MGN supported AWS Regions. If your preferred AWS Region isn’t currently supported or you cannot install agents on your source servers, consider using CloudEndure Migration or AWS Server Migration Service respectively. CloudEndure Migration will be discontinued in all AWS Regions on December 30, 2022. Refer to CloudEndure Migration EOL for more information.

Note: Use of AWS MGN is free for 90 days but you will incur charges for any AWS infrastructure that is provisioned during migration and after cutover. For more information, refer to the pricing page.

Thanks for reading this blog post! If you have any comments or questions, feel free to put them in the comments section.

Export JSON data to Amazon S3 using Amazon Redshift UNLOAD

Post Syndicated from Dipankar Kushari original https://aws.amazon.com/blogs/big-data/export-json-data-to-amazon-s3-using-amazon-redshift-unload/

Amazon Redshift is a fast, scalable, secure, and fully managed cloud data warehouse that makes it simple and cost-effective to analyze all your data using standard SQL. Amazon Redshift offers up to three times better price performance than any other cloud data warehouse. Tens of thousands of customers use Amazon Redshift to process exabytes of data per day and power analytics workloads such as high-performance business intelligence (BI) reporting, dashboarding applications, data exploration, and real-time analytics.

As the amount of data generated by IoT devices, social media, and cloud applications continues to grow, organizations are looking to easily and cost-effectively analyze this data with minimal time-to-insight. A vast amount of this data is available in semi-structured format and needs additional extract, transform, and load (ETL) processes to make it accessible or to integrate it with structured data for analysis. Amazon Redshift powers the modern data architecture, which enables you to query data across your data warehouse, data lake, and operational databases to gain faster and deeper insights not possible otherwise. With a modern data architecture, you can store data in semi-structured format in your Amazon Simple Storage Service (Amazon S3) data lake and integrate it with structured data on Amazon Redshift. This allows you to make this data available to other analytics and machine learning applications rather than locking it in a silo.

In this post, we discuss the UNLOAD feature in Amazon Redshift and how to export data from an Amazon Redshift cluster to JSON files on an Amazon S3 data lake.

JSON support features in Amazon Redshift

Amazon Redshift features such as COPY, UNLOAD, and Amazon Redshift Spectrum enable you to move and query data between your data warehouse and data lake.

With the UNLOAD command, you can export a query result set in text, JSON, or Apache Parquet file format to Amazon S3. UNLOAD command is also recommended when you need to retrieve large result sets from your data warehouse. Since UNLOAD processes and exports data in parallel from Amazon Redshift’s compute nodes to Amazon S3, this reduces the network overhead and thus time in reading large number of rows. When using the JSON option with UNLOAD, Amazon Redshift unloads to a JSON file with each line containing a JSON object, representing a full record in the query result. In the JSON file, Amazon Redshift types are unloaded as the closest JSON representation. For example, Boolean values are unloaded as true or false, NULL values are unloaded as null, and timestamp values are unloaded as strings. If a default JSON representation doesn’t suit a particular use case, you can modify it by casting to the desired type in the SELECT query of the UNLOAD statement.

Additionally, to create a valid JSON object, the name of each column in the query result must be unique. If the column names in the query result aren’t unique, the JSON UNLOAD process fails. To avoid this, we recommend using proper column aliases so that each column in the query result remains unique while getting unloaded. We illustrate this behavior later in this post.

With the Amazon Redshift SUPER data type, you can store data in JSON format on local Amazon Redshift tables. This way, you can process the data without any network overhead and use Amazon Redshift schema properties to optimally save and query semi structured data locally. In addition to achieving low latency, you can also use the SUPER data type when your query requires strong consistency, predictable query performance, complex query support, and ease of use with evolving schemas and schemaless data. Amazon Redshift supports writing nested JSON when the query result contains SUPER columns.

Updating and maintaining data with constantly evolving schemas can be challenging and adds extra ETL steps to the analytics pipeline. The JSON file format provides support for schema definition, is lightweight, and is widely used as a data transfer mechanism by different services, tools, and technologies.

Amazon OpenSearch Service (successor to Amazon Elasticsearch Service) is a distributed, open-source search and analytics suite used for a broad set of use cases like real-time application monitoring, log analytics, and website search. It uses JSON as the supported file format for data ingestion. The ability to unload data natively in JSON format from Amazon Redshift into the Amazon S3 data lake reduces complexity and additional data processing steps if that data needs to be ingested into Amazon OpenSearch Service for further analysis.

This is one example of how seamless data movement can help you build an integrated data platform with a data lake on Amazon S3, data warehouse on Amazon Redshift and search and log analytics using Amazon OpenSearch Service and any other JSON-oriented downstream analytics solution. For more information about the Lake House approach, see Build a Lake House Architecture on AWS.

Examples of Amazon Redshift JSON UNLOAD

In this post, we show you the following different scenarios:

  • Example 1 – Unload customer data in JSON format into Amazon S3, partitioning output files into partition folders, following the Apache Hive convention, with customer birth month as the partition key. We make a few changes to the columns in the SELECT statement of the UNLOAD command:
    • Convert the c_preferred_cust_flag column from character to Boolean
    • Remove leading and trailing spaces from the c_first_name, c_last_name, and c_email_address columns using the Amazon Redshift built-in function btrim
  • Example 2 – Unload line item data (with SUPER column) in JSON format into Amazon S3 with data not partitioned
  • Example 3 – Unload line item data (With SUPER column) in JSON format into Amazon S3, partitioning output files into partition folders, following the Apache Hive convention, with customer key as the partition key

For the first example, we used the customer table and data from the TPCDS dataset. For examples involving table with SUPER column, we used the customer_orders_lineitem table and data from the following tutorial.

Example 1: Export customer data

For this example, we used the customer table and data from TPCDS dataset. We created the database schema and customer table, and copied data into it. See the following code:

-- Created a new database
create schema json_unload_demo; 

-- created and populated customer table in the new schema

create table json_unload_demo.customer
(
  c_customer_sk int4 not null ,                 
  c_customer_id char(16) not null ,             
  c_current_cdemo_sk int4 ,   
  c_current_hdemo_sk int4 ,   
  c_current_addr_sk int4 ,    
  c_first_shipto_date_sk int4 ,                 
  c_first_sales_date_sk int4 ,
  c_salutation char(10) ,     
  c_first_name char(20) ,     
  c_last_name char(30) ,      
  c_preferred_cust_flag char(1) ,               
  c_birth_day int4 ,          
  c_birth_month int4 ,        
  c_birth_year int4 ,         
  c_birth_country varchar(20) ,                 
  c_login char(13) ,          
  c_email_address char(50) ,  
  c_last_review_date_sk int4 ,
  primary key (c_customer_sk)
) distkey(c_customer_sk);

copy json_unload_demo.customer from 's3://redshift-downloads/TPC-DS/2.13/3TB/customer/' 
iam_role '<<AWS IAM role attached to your amazon redshift cluster>>' 
gzip delimiter '|' EMPTYASNULL;

You can create a default AWS Identity and Access Management (IAM) role for your Amazon Redshift cluster to copy from and unload to your Amazon S3 location. For more information, see Use the default IAM role in Amazon Redshift to simplify accessing other AWS services.

In this example, we unloaded customer data for all customers with birth year 1992 in JSON format into Amazon S3 without any partitions. We make the following changes to the UNLOAD statement:

  • Convert the c_preferred_cust_flag column from character to Boolean
  • Remove leading and trailing spaces from the c_first_name, c_last_name, and c_email_address columns using the btrim function
  • Set the maximum size of exported files in Amazon S3 to 64 MB

See the following code:

unload ('SELECT c_customer_sk,
    c_customer_id ,
    c_current_cdemo_sk ,
    c_current_hdemo_sk ,
    c_current_addr_sk ,
    c_first_shipto_date_sk ,
    c_first_sales_date_sk ,
    c_salutation ,
    btrim(c_first_name),
    btrim(c_last_name),
    c_birth_day ,
    c_birth_month ,
    c_birth_year ,
    c_birth_country ,
    c_last_review_date_sk,
    DECODE(c_preferred_cust_flag, ''Y'', TRUE, ''N'', FALSE)::boolean as c_preferred_cust_flag_bool,
    c_login, 
    btrim(c_email_address) 
    from customer where c_birth_year = 1992;')
to 's3://<<Your Amazon S3 Bucket>>/non-partitioned/non-super/customer/' 
FORMAT JSON 
partition by (c_birth_month)  include
iam_role '<<AWS IAM role attached to your amazon redshift cluster>>'
MAXFILESIZE 64 MB;

When we ran the UNLOAD command, we encountered an error because the columns that used the btrim function all attempted to be exported as btrim (which is the default behavior of Amazon Redshift when the same function is applied to multiple columns that are selected together). To avoid this error, we need to use a unique column alias for each column where the btrim function was used.

If we select the c_first_name, c_last_name, and c_email_address columns by applying the btrim function and c_preferred_cust_flag, we can convert them from character to Boolean.

We ran the following query in Amazon Redshift Query Editor v2:

SELECT btrim(c_first_name) ,
    btrim(c_last_name),
    btrim(c_email_address) , 
    DECODE(c_preferred_cust_flag, 'Y', TRUE, 'N', FALSE)::boolean c_preferred_cust_flag_bool  
    from customer where c_birth_year = 1992 limit 10; 

All three columns that used the btrim function are set as btrim in the output result instead of their respective column name.

An error occurred in UNLOAD because we didn’t use a column alias.

We added column aliases in the following code:

unload ('SELECT c_customer_sk,
    c_customer_id ,
    c_current_cdemo_sk ,
    c_current_hdemo_sk ,
    c_current_addr_sk ,
    c_first_shipto_date_sk ,
    c_first_sales_date_sk ,
    c_salutation ,
    btrim(c_first_name) as c_first_name,
    btrim(c_last_name) as c_last_name,
    c_birth_day ,
    c_birth_month ,
    c_birth_year ,
    c_birth_country ,
    c_last_review_date_sk,
    DECODE(c_preferred_cust_flag, ''Y'', TRUE, ''N'', FALSE)::boolean as c_preferred_cust_flag_bool,
    c_login, 
    btrim(c_email_address) as c_email_addr_trimmed 
    from customer where c_birth_year = 1992;')
to 's3://<<Your Amazon S3 Bucket>>/non-partitioned/non-super/customer/' 
FORMAT JSON 
partition by (c_birth_month)  include
iam_role '<<AWS IAM role attached to your amazon redshift cluster>>'
MAXFILESIZE 64 MB;

After we added column aliases, the UNLOAD command completed successfully and files were exported to the desired location in Amazon S3.

The following screenshot shows data is unloaded in JSON format partitioning output files into partition folders, following the Apache Hive convention, with customer birth month as the partition key into Amazon S3 from the Amazon Redshift customer table.

A query with Amazon S3 Select shows a snippet of data in the JSON file on Amazon S3 that was unloaded.

The column aliases c_first_name, c_last_name, and c_email_addr_trimmed were written into the JSON record as per the SELECT query. Boolean values were saved in c_preferred_cust_flag_bool as well.

Examples 2 and 3: Using the SUPER column

For the next two examples, we used the customer_orders_lineitem table and data. We created the customer_orders_lineitem table and copied data into it with the following code:

-- Created a new table with SUPER column

CREATE TABLE JSON_unload_demo.customer_orders_lineitem
(c_custkey bigint
,c_name varchar
,c_address varchar
,c_nationkey smallint
,c_phone varchar
,c_acctbal decimal(12,2)
,c_mktsegment varchar
,c_comment varchar
,c_orders super
);

-- Loaded data into the new table
COPY json_unload_demo.customer_orders_lineitem 
FROM 's3://redshift-downloads/semistructured/tpch-nested/data/json/customer_orders_lineitem'
IAM_ROLE '<<AWS IAM role attached to your amazon redshift cluster>>'
FORMAT JSON 'auto';

Next, we ran a few queries to explore the customer_orders_lineitem table’s data:

select * from json_unload_demo.customer_orders_lineitem;

select c_orders from json_unload_demo.customer_orders_lineitem;

SELECT attr as attribute_name, val as object_value FROM json_unload_demo.customer_orders_lineitem c, c.c_orders o, UNPIVOT o AS val AT attr;

Example 2: Without partitions

In this example, we unloaded all the rows of the customer_orders_lineitem table in JSON format into Amazon S3 without any partitions:

unload ('select * from json_unload_demo.customer_orders_lineitem;')
to 's3://<<Your Amazon S3 Bucket>>/non-partitioned/super/customer-order-lineitem/'
FORMAT JSON
iam_role '<<AWS IAM role attached to your amazon redshift cluster>>';

After we run the UNLOAD command, the data is available in the desired Amazon S3 location. The following screenshot shows data is unloaded in JSON format without any partitions into Amazon S3 from the Amazon Redshift customer_orders_lineitem table.

A query with Amazon S3 Select shows a snippet of data in the JSON file on Amazon S3 that was unloaded.

Example 3: With partitions

In this example, we unloaded all the rows of the customer_orders_lineitem table in JSON format partitioning output files into partition folders, following the Apache Hive convention, with customer key as the partition key into Amazon S3:

unload ('select * from json_unload_demo.customer_orders_lineitem;')
to 's3://<<Your Amazon S3 Bucket>>/partitioned/super/customer-order-lineitem-1/'
FORMAT JSON
partition by (c_custkey) include
iam_role '<<AWS IAM role attached to your amazon redshift cluster>>';

After we run the UNLOAD command, the data is available in the desired Amazon S3 location. The following screenshot shows data is unloaded in JSON format partitioning output files into partition folders, following the Apache Hive convention, with customer key as the partition key into Amazon S3 from the Amazon Redshift customer_orders_lineitem table.

A query with Amazon S3 Select shows a snippet of data in the JSON file on Amazon S3 that got unloaded.

Conclusion

In this post, we showed how you can use the Amazon Redshift UNLOAD command to unload the result of a query to one or more JSON files into your Amazon S3 location. We also showed how you can partition the data using your choice of partition key while you unload the data. You can use this feature to export data to JSON files into Amazon S3 from your Amazon Redshift cluster or your Amazon Redshift Serverless endpoint to make your data processing simpler and build an integrated data analytics platform.


About the Authors

Dipankar Kushari is a Senior Analytics Solutions Architect with AWS.

Sayali Jojan is a Senior Analytics Solutions Architect with AWS. She has 7 years of experience working with customers to design and build solutions on the AWS Cloud, with a focus on data and analytics.

Cody Cunningham is a Software Development Engineer with AWS, working on data ingestion for Amazon Redshift.

Военни сделки без санкция на парламента? На някого много му се иска

Post Syndicated from Емилия Милчева original https://toest.bg/voenni-sdelki-bez-sanktsiya-na-parlamenta/

Съгласни ли сте 2% от брутния вътрешен продукт на България да се изразходва за военни сделки без санкция на парламента? Това са над 2 млрд. лв., които ще се увеличават в следващите години, тъй като и БВП ще расте. За тази година проектобюджетът предвижда за отбрана да се изразходват 1,73% от БВП, тоест около 1,88 млрд. лв., от които близо 80% – за персонал.

Управляващата коалиция ще се опита да промени законите така, че въпросът да се уреди, тъй като настоящата законова уредба прекалено бави сключването на сделките, стана ясно след свикания тази седмица от президента Румен Радев Консултативен съвет за национална сигурност, поводът за който бе напрежението по оста Украйна–Русия–НАТО.

„Обсъжда се дали е възможно сделки за модернизация на армията за над 100 млн. лв. да могат да се сключват без санкцията на парламента“,

съобщи Десислава Атанасова (ГЕРБ) след заседанието на Консултативния съвет. Модернизацията на българските въоръжени сили бе основната тема в контекста на заплахата от военен конфликт в Украйна. Независимо как ще се развие този сблъсък, България поема курс към ускорено въоръжаване в името на повишаването на отбранителния си потенциал. Военните кръгове начело с президента използваха заплахата, за да се фокусират върху брадясалите проблеми на армията – остаряла техника, липса на кадри, но и на мотивация младежите да избират военната професия, забавени проекти за модернизация, в т.ч. прекратения за нова бойна машина за пехотата, и др.

Президентът съобщи, че на КСНС политическите сили са се съгласили още от 2023 г. България да отделя 2% от БВП за отбрана (както изисква НАТО) и правителството да разработи план за превъоръжаване до 2032 г. Освен това кабинетът ще предложи, а парламентът ще обсъди промени в нормативната уредба, които да позволят „ускоряване на процедурите, свързани с модернизацията на въоръжените сили и поддръжката на наличното въоръжение и техника; преодоляване на некомплекта от личен състав и издигане на престижа на военната професия“.

„Всички разбират, че при сегашното международно положение трябва да се подкрепят реформите в българската армия“, коментира след КСНС съпредседателят на „Демократична България“ Христо Иванов.

Реформи – да, но в случая става въпрос единствено за пари, и то много пари.

За реформи в приетите на КСНС седем предложения изобщо не става и дума. Например за структурата на въоръжените сили, от която логично следват и проектите за превъоръжаване и модернизация. Тази тема, макар и повдигната на преговорите за коалиционно споразумение, някак изпадна от полезрението. Така въоръжените сили ще останат обременени с тежка бюрокрация – и непостижима численост от 43 000 души.

Впечатлението, което този КСНС остави, е, че президентът има водещата роля в политиката по отбраната и сигурността – макар тя да е прерогатив на правителството, независимо че държавният глава е главнокомандващ. Впрочем одобрените на 15 февруари предложения са идентични с приетите по време на преговорите за коалиционно споразумение. И там бяха препотвърдени 2% от БВП за отбрана, а Асен Василев, настоящ вицепремиер и министър на финансите, заяви тогава, че България ще спази ангажимента си към НАТО за достигане на този дял до 2024 г., но ще се направят разчети как точно да стане. Сега тези темпове се забързват и се иска още догодина това да е факт.

Сделките в отбраната и в енергетиката си приличат – те не са обикновени покупко-продажби, а геополитика; реализират се за дълъг период от време (изборът на изтребители за българската армия отне над 15 години) и са предмет на големи интереси и засилен лобизъм. Последният пример за това е развалената от Австралия сделка за 12 френски подводници с дизелови двигатели за над 56 млрд. евро и геополитическата буря, която предизвика – отзоваване на посланици, напрежение между Франция, САЩ и Австралия. Особено след като Канбера влезе в нов тихоокеански съюз със САЩ и Великобритания с цел възпиране на Китай в региона и поръча атомни подводници с американски и британски технологии.

В парламентарните демокрации такива сделки се одобряват от парламента.

В САЩ Конгресът разрешава на кого да продават оръжие американски компании. Гръцкият парламент одобрява проектите за нова военна техника, последният от които е купуване на три нови френски фрегати за 3 млрд. евро. Така е и в Румъния, Словакия, Полша и др.

В Германия всяка програма за развитие и обществени поръчки за над 25 млн. евро трябва да бъде одобрена от парламентарната бюджетна комисия. Сред тези програми, получили зелена светлина през 2021 г., е например разработване на подводници тип 212 CD и бъдеща военноморска ударна ракета, придобиване на нови хеликоптери NH-90Sea Lion и Sea Tiger, P-8A Poseidon MPA, разузнавателни кораби, модернизация на системите за миноносци и др.

В България, с аргумента за лошото състояние на армията и външните заплахи, се иска парламентът да бъде отрязан при вземане на толкова важни решения, като отбранителния потенциал. За да вървят по-бързо сделките…

Според Конституцията част от компетенциите на Народното събрание са следните: „… решава въпросите за обявяване на война и за сключване на мир; разрешава изпращането и използването на български въоръжени сили извън страната, както и пребиваването на чужди войски на територията на страната или преминаването им през нея; обявява военно или друго извънредно положение върху цялата територия на страната или върху част от нея по предложение на президента или на Министерския съвет“.

Военните сделки не може и не трябва да остават извън пленарната зала не само защото България е парламентарна република, но и защото са компонент от голямата шахматна дъска. Подобни решения не би трябвало да се ограничават до правителството и президента или до двете институции заедно.

Какво следва, ако законът се промени и сделки за над 100 млн. лв. няма да се одобряват от Народното събрание?

Настоящият военен министър Стефан Янев, личен кадър на президента в правителството, ще взема решения заедно с един тесен кръг, в който несъмнено ще бъде и Румен Радев (неофициално, разбира се), не просто за милиони, а за милиарди. За същото, но в областта на пътното строителство, ГЕРБ и Бойко Борисов са под сериозни подозрения за корупция – заради раздадените милиарди чрез инхаус процедури.

Много контракти за преоборудване, ремонти и други, свързани с българската армия, се движеха съобразно интересите на конкретните управляващи и техните лобисти. Договорите за транспортни хеликоптери, транспортни самолети, фрегати втора ръка и др., сключени от правителството на Сакскобургготски и кабинета на тройната коалиция начело със Станишев, са „образци“ в това отношение.

На преговорите за коалиционно споразумение бе договорено до края на 2022 г. правителството да подготви нова програма за превъоръжаване с хоризонт от 10 години, която да бъде одобрена от Народното събрание. В интерес на данъкоплатците е да бъде комбинирана и със структура на въоръжените сили, за да е ясно каква армия е необходима на България – да е в състояние да осъществява „въоръжена защита на териториалната цялост и независимостта на държавата“ и да изпълнява съюзни ангажименти в рамките на НАТО. Няма съмнение, че настоящата армия не може да се справи с нито едно от двете.

Радикалното превъоръжаване и модернизация без модернизация на структурата и кадровото обезпечаване вършат работа единствено на оръжейните производители и лобистите за сделките. А парламентът не може и не бива да бъде отстраняван от тях.

Заглавна снимка: Стопкадър от видеоизлъчване на пресконференцията след КСНС / Facebook страницата на президента Румен Радев

Източник

The collective thoughts of the interwebz