Top 2022 AWS data protection service and cryptography tool launches

Post Syndicated from Marta Taggart original https://aws.amazon.com/blogs/security/top-2022-aws-data-protection-service-and-cryptography-tool-launches/

Given the pace of Amazon Web Services (AWS) innovation, it can be challenging to stay up to date on the latest AWS service and feature launches. AWS provides services and tools to help you protect your data, accounts, and workloads from unauthorized access. AWS data protection services provide encryption capabilities, key management, and sensitive data discovery. Last year, we saw growth and evolution in AWS data protection services as we continue to give customers features and controls to help meet their needs. Protecting data in the AWS Cloud is a top priority because we know you trust us to help protect your most critical and sensitive asset: your data. This post will highlight some of the key AWS data protection launches in the last year that security professionals should be aware of.

AWS Key Management Service
Create and control keys to encrypt or digitally sign your data

In April, AWS Key Management Service (AWS KMS) launched hash-based message authentication code (HMAC) APIs. This feature introduced the ability to create AWS KMS keys that can be used to generate and verify HMACs. HMACs are a powerful cryptographic building block that incorporate symmetric key material within a hash function to create a unique keyed message authentication code. HMACs provide a fast way to tokenize or sign data such as web API requests, credit card numbers, bank routing information, or personally identifiable information (PII). This technology is used to verify the integrity and authenticity of data and communications. HMACs are often a higher performing alternative to asymmetric cryptographic methods like RSA or elliptic curve cryptography (ECC) and should be used when both message senders and recipients can use AWS KMS.

At AWS re:Invent in November, AWS KMS introduced the External Key Store (XKS), a new feature for customers who want to protect their data with encryption keys that are stored in an external key management system under their control. This capability brings new flexibility for customers to encrypt or decrypt data with cryptographic keys, independent authorization, and audit in an external key management system outside of AWS. XKS can help you address your compliance needs where encryption keys for regulated workloads must be outside AWS and solely under your control. To provide customers with a broad range of external key manager options, AWS KMS developed the XKS specification with feedback from leading key management and hardware security module (HSM) manufacturers as well as service providers that can help customers deploy and integrate XKS into their AWS projects.

AWS Nitro System
A combination of dedicated hardware and a lightweight hypervisor enabling faster innovation and enhanced security

In November, we published The Security Design of the AWS Nitro System whitepaper. The AWS Nitro System is a combination of purpose-built server designs, data processors, system management components, and specialized firmware that serves as the underlying virtualization technology that powers all Amazon Elastic Compute Cloud (Amazon EC2) instances launched since early 2018. This new whitepaper provides you with a detailed design document that covers the inner workings of the AWS Nitro System and how it is used to help secure your most critical workloads. The whitepaper discusses the security properties of the Nitro System, provides a deeper look into how it is designed to eliminate the possibility of AWS operator access to a customer’s EC2 instances, and describes its passive communications design and its change management process. Finally, the paper surveys important aspects of the overall system design of Amazon EC2 that provide mitigations against potential side-channel vulnerabilities that can exist in generic compute environments.

AWS Secrets Manager
Centrally manage the lifecycle of secrets

In February, AWS Secrets Manager added the ability to schedule secret rotations within specific time windows. Previously, Secrets Manager supported automated rotation of secrets within the last 24 hours of a specified rotation interval. This new feature added the ability to limit a given secret rotation to specific hours on specific days of a rotation interval. This helps you avoid having to choose between the convenience of managed rotations and the operational safety of application maintenance windows. In November, Secrets Manager also added the capability to rotate secrets as often as every four hours, while providing the same managed rotation experience.

In May, Secrets Manager started publishing secrets usage metrics to Amazon CloudWatch. With this feature, you have a streamlined way to view how many secrets you are using in Secrets Manager over time. You can also set alarms for an unexpected increase or decrease in number of secrets.

At the end of December, Secrets Manager added support for managed credential rotation for service-linked secrets. This feature helps eliminate the need for you to manage rotation Lambda functions and enables you to set up rotation without additional configuration. Amazon Relational Database Service (Amazon RDS) has integrated with this feature to streamline how you manage your master user password for your RDS database instances. Using this feature can improve your database’s security by preventing the RDS master user password from being visible during the database creation workflow. Amazon RDS fully manages the master user password’s lifecycle and stores it in Secrets Manager whenever your RDS database instances are created, modified, or restored. To learn more about how to use this feature, see Improve security of Amazon RDS master database credentials using AWS Secrets Manager.

AWS Private Certificate Authority
Create private certificates to identify resources and protect data

In September, AWS Private Certificate Authority (AWS Private CA) launched as a standalone service. AWS Private CA was previously a feature of AWS Certificate Manager (ACM). One goal of this launch was to help customers differentiate between ACM and AWS Private CA. ACM and AWS Private CA have distinct roles in the process of creating and managing the digital certificates used to identify resources and secure network communications over the internet, in the cloud, and on private networks. This launch coincided with the launch of an updated console for AWS Private CA, which includes accessibility improvements to enhance screen reader support and additional tab key navigation for people with motor impairment.

In October, AWS Private CA introduced a short-lived certificate mode, a lower-cost mode of AWS Private CA that is designed for issuing short-lived certificates. With this new mode, public key infrastructure (PKI) administrators, builders, and developers can save money when issuing certificates where a validity period of 7 days or fewer is desired. To learn more about how to use this feature, see How to use AWS Private Certificate Authority short-lived certificate mode.

Additionally, AWS Private CA supported the launches of certificate-based authentication with Amazon AppStream 2.0 and Amazon WorkSpaces to remove the logon prompt for the Active Directory domain password. AppStream 2.0 and WorkSpaces certificate-based authentication integrates with AWS Private CA to automatically issue short-lived certificates when users sign in to their sessions. When you configure your private CA as a third-party root CA in Active Directory or as a subordinate to your Active Directory Certificate Services enterprise CA, AppStream 2.0 or WorkSpaces with AWS Private CA can enable rapid deployment of end-user certificates to seamlessly authenticate users. To learn more about how to use this feature, see How to use AWS Private Certificate Authority short-lived certificate mode.

AWS Certificate Manager
Provision and manage SSL/TLS certificates with AWS services and connected resources

In early November, ACM launched the ability to request and use Elliptic Curve Digital Signature Algorithm (ECDSA) P-256 and P-384 TLS certificates to help secure your network traffic. You can use ACM to request ECDSA certificates and associate the certificates with AWS services like Application Load Balancer or Amazon CloudFront. Previously, you could only request certificates with an RSA 2048 key algorithm from ACM. Now, AWS customers who need to use TLS certificates with at least 120-bit security strength can use these ECDSA certificates to help meet their compliance needs. The ECDSA certificates have a higher security strength—128 bits for P-256 certificates and 192 bits for P-384 certificates—when compared to 112-bit RSA 2048 certificates that you can also issue from ACM. The smaller file footprint of ECDSA certificates makes them ideal for use cases with limited processing capacity, such as small Internet of Things (IoT) devices.

Amazon Macie
Discover and protect your sensitive data at scale

Amazon Macie introduced two major features at AWS re:Invent. The first is a new capability that allows for one-click, temporary retrieval of up to 10 samples of sensitive data found in Amazon Simple Storage Service (Amazon S3). With this new capability, you can more readily view and understand which contents of an S3 object were identified as sensitive, so you can review, validate, and quickly take action as needed without having to review every object that a Macie job returned. Sensitive data samples captured with this new capability are encrypted by using customer-managed AWS KMS keys and are temporarily viewable within the Amazon Macie console after retrieval.

Additionally, Amazon Macie introduced automated sensitive data discovery, a new feature that provides continual, cost-efficient, organization-wide visibility into where sensitive data resides across your Amazon S3 estate. With this capability, Macie automatically samples and analyzes objects across your S3 buckets, inspecting them for sensitive data such as personally identifiable information (PII) and financial data; builds an interactive data map of where your sensitive data in S3 resides across accounts; and provides a sensitivity score for each bucket. Macie uses multiple automated techniques, including resource clustering by attributes such as bucket name, file types, and prefixes, to minimize the data scanning needed to uncover sensitive data in your S3 buckets. This helps you continuously identify and remediate data security risks without manual configuration and lowers the cost to monitor for and respond to data security risks.

Support for new open source encryption libraries

In February, we announced the availability of s2n-quic, an open source Rust implementation of the QUIC protocol, in our AWS encryption open source libraries. QUIC is a transport layer network protocol used by many web services to provide lower latencies than classic TCP. AWS has long supported open source encryption libraries for network protocols; in 2015 we introduced s2n-tls as a library for implementing TLS over HTTP. The name s2n is short for signal to noise and is a nod to the act of encryption—disguising meaningful signals, like your critical data, as seemingly random noise. Similar to s2n-tls, s2n-quic is designed to be small and fast, with simplicity as a priority. It is written in Rust, so it has some of the benefits of that programming language, such as performance, threads, and memory safety.

Cryptographic computing for AWS Clean Rooms (preview)

At re:Invent, we also announced AWS Clean Rooms, currently in preview, which includes a cryptographic computing feature that allows you to run a subset of queries on encrypted data. Clean rooms help customers and their partners to match, analyze, and collaborate on their combined datasets—without sharing or revealing underlying data. If you have data handling policies that require encryption of sensitive data, you can pre-encrypt your data by using a common collaboration-specific encryption key so that data is encrypted even when queries are run. With cryptographic computing, data that is used in collaborative computations remains encrypted at rest, in transit, and in use (while being processed).

If you’re looking for more opportunities to learn about AWS security services, read our AWS re:Invent 2022 Security recap post or watch the Security, Identity, and Compliance playlist.

Looking ahead in 2023

With AWS, you control your data by using powerful AWS services and tools to determine where your data is stored, how it is secured, and who has access to it. In 2023, we will further the AWS Digital Sovereignty Pledge, our commitment to offering AWS customers the most advanced set of sovereignty controls and features available in the cloud.

You can join us at our security learning conference, AWS re:Inforce 2023, in Anaheim, CA, June 13–14, for the latest advancements in AWS security, compliance, identity, and privacy solutions.

Stay updated on launches by subscribing to the AWS What’s New RSS feed and reading the AWS Security Blog.

 
If you have feedback about this post, submit comments in the Comments section below. If you have questions about this post, contact AWS Support.

Want more AWS Security news? Follow us on Twitter.
Author

Marta Taggart

Marta is a Seattle-native and Senior Product Marketing Manager in AWS Security Product Marketing, where she focuses on data protection services. Outside of work you’ll find her trying to convince Jack, her rescue dog, not to chase squirrels and crows (with limited success).

New: AWS Telco Network Builder – Deploy and Manage Telco Networks

Post Syndicated from Jeff Barr original https://aws.amazon.com/blogs/aws/new-aws-telco-network-builder-deploy-and-manage-telco-networks/

Over the course of more than one hundred years, the telecom industry has become standardized and regulated, and has developed methods, technologies, and an entire vocabulary (chock full of interesting acronyms) along the way. As an industry, they need to honor this tremendous legacy while also taking advantage of new technology, all in the name of delivering the best possible voice and data services to their customers.

Today I would like to tell you about AWS Telco Network Builder (TNB). This new service is designed to help Communications Service Providers (CSPs) deploy and manage public and private telco networks on AWS. It uses existing standards, practices, and data formats, and makes it easier for CSPs to take advantage of the power, scale, and flexibility of AWS.

Today, CSPs often deploy their code to virtual machines. However, as they look to the future they are looking for additional flexibility and are increasingly making use of containers. AWS TNB is intended to be a part of this transition, and makes use of Kubernetes and Amazon Elastic Kubernetes Service (EKS) for packaging and deployment.

Concepts and Vocabulary
Before we dive in to the service, let’s take a look some concepts and vocabulary that are unique to this industry, and are relevant to AWS TNB:

European Telecommunications Standards Institute (ETSI) – A European organization that defines specifications suitable for global use. AWS TNB supports multiple ETSI specifications including ETSI SOL001 through ETSI SOL005, and ETSI SOL007.

Communications Service Provider (CSP) – An organization that offers telecommunications services.

Topology and Orchestration Specification for Cloud Applications (TOSCA) – A standardized grammar that is used to describe service templates for telecommunications applications.

Network Function (NF) – A software component that performs a specific core or value-added function within a telco network.

Virtual Network Function Descriptor (VNFD) – A specification of the metadata needed to onboard and manage a Network Function.

Cloud Service Archive (CSAR) – A ZIP file that contains a VNFD, references to container images that hold Network Functions, and any additional files needed to support and manage the Network Function.

Network Service Descriptor (NSD) – A specification of the compute, storage, networking, and location requirements for a set of Network Functions along with the information needed to assemble them to form a telco network.

Network Core – The heart of a network. It uses control plane and data plane operations to manage authentication, authorization, data, and policies.

Service Orchestrator (SO) – An external, high-level network management tool.

Radio Access Network (RAN) – The components (base stations, antennas, and so forth) that provide wireless coverage over a specific geographic area.

Using AWS Telco Network Builder (TNB)
I don’t happen to be a CSP, but I will do my best to walk you through the getting-started experience anyway! The primary steps are:

  1. Creating a function package for each Network Function by uploading a CSAR.
  2. Creating a network package for the network by uploading a Network Service Descriptor (NSD).
  3. Creating a network by selecting and instantiating an NSD.

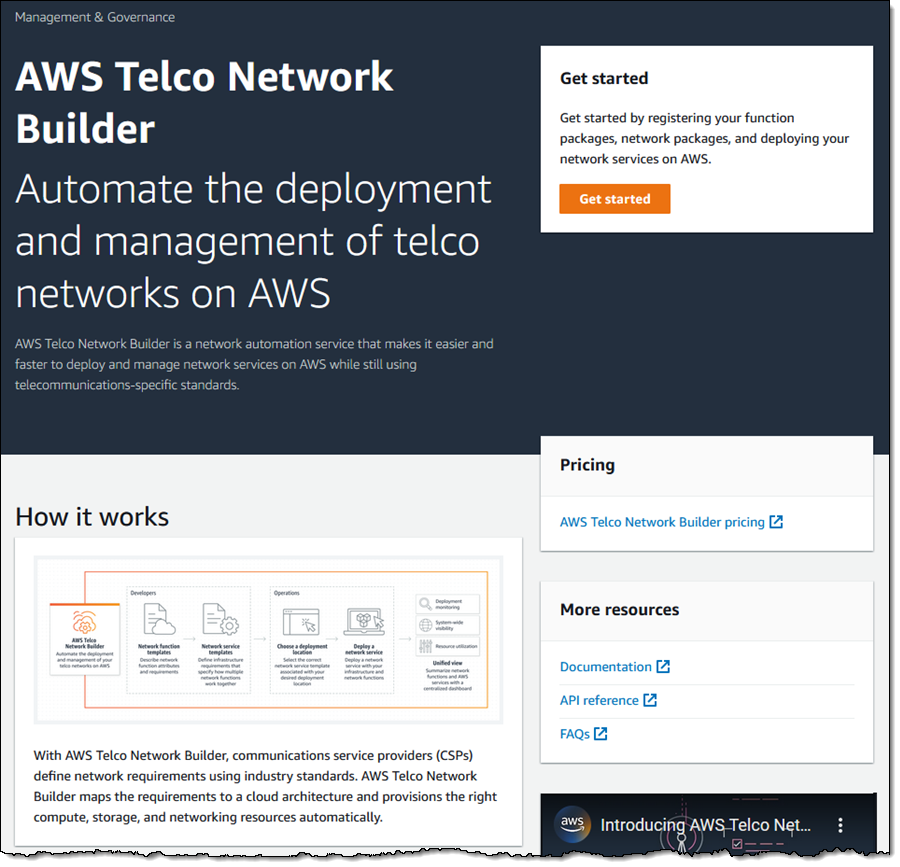
To begin, I open the AWS TNB Console and click Get started:

Initially, I have no networks, no function packages, and no network packages:

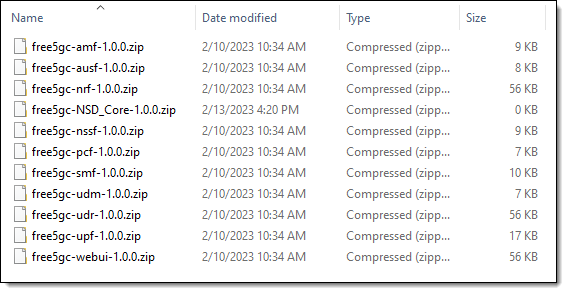
My colleagues supplied me with sample CSARs and an NSD for use in this blog post (the network functions are from Free 5G Core):

Each CSAR is a fairly simple ZIP file with a VNFD and other items inside. For example, the VNFD for the Free 5G Core Session Management Function (smf) looks like this:

tosca_definitions_version: tnb_simple_yaml_1_0

topology_template:

  node_templates:

    Free5gcSMF:
      type: tosca.nodes.AWS.VNF
      properties:
        descriptor_id: "4b2abab6-c82a-479d-ab87-4ccd516bf141"
        descriptor_version: "1.0.0"
        descriptor_name: "Free5gc SMF 1.0.0"
        provider: "Free5gc"
      requirements:
        helm: HelmImage

    HelmImage:
      type: tosca.nodes.AWS.Artifacts.Helm
      properties:
        implementation: "./free5gc-smf"

The final section (HelmImage) of the VNFD points to the Kubernetes Helm Chart that defines the implementation.

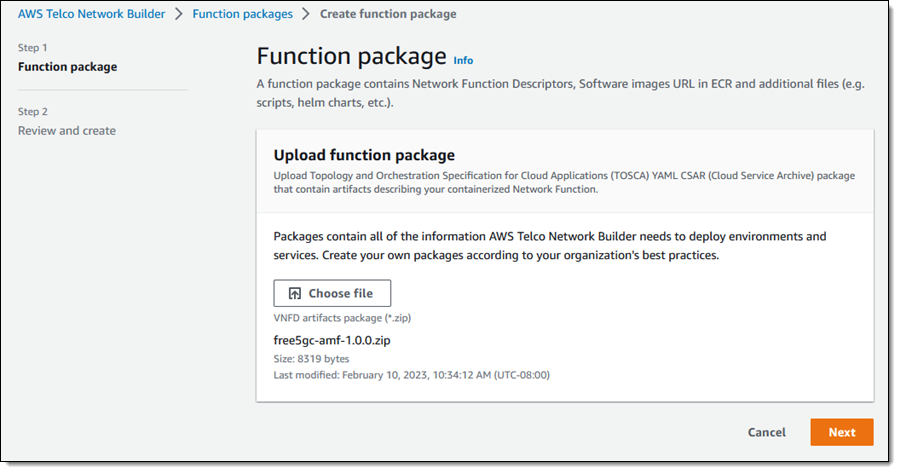
I click Function packages in the console, then click Create function package. Then I upload the first CSAR and click Next:

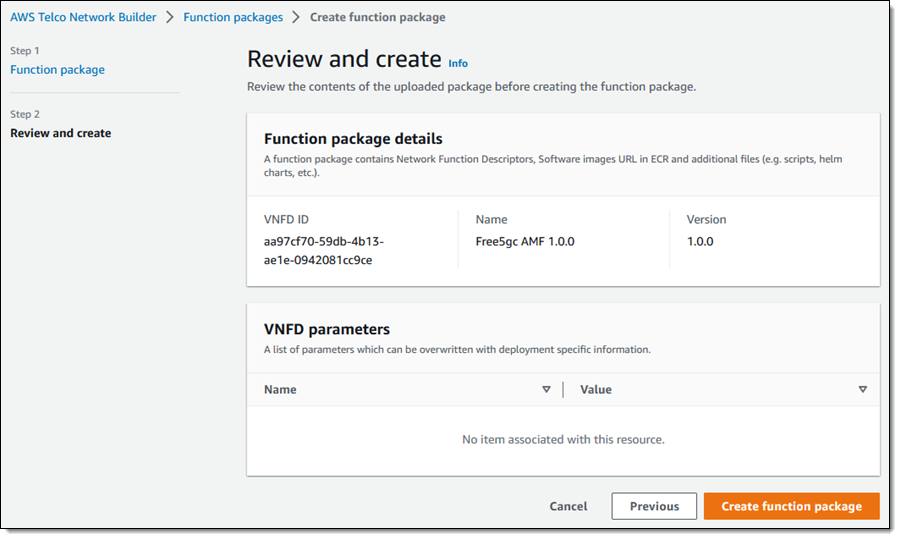
I review the details and click Create function package (each VNFD can include a set of parameters that have default values which can be overwritten with values that are specific to a particular deployment):

I repeat this process for the nine remaining CSARs, and all ten function packages are ready to use:

Now I am ready to create a Network Package. The Network Service Descriptor is also fairly simple, and I will show you several excerpts. First, the NSD establishes a mapping from descriptor_id to namespace for each Network Function so that the functions can be referenced by name:

vnfds:
  - descriptor_id: "aa97cf70-59db-4b13-ae1e-0942081cc9ce"
    namespace: "amf"
  - descriptor_id: "86bd1730-427f-480a-a718-8ae9dcf3f531"
    namespace: "ausf"
...

Then it defines the input variables, including default values (this reminds me of a AWS CloudFormation template):

  inputs:
    vpc_cidr_block:
      type: String
      description: "CIDR Block for Free5GCVPC"
      default: "10.100.0.0/16"

    eni_subnet_01_cidr_block:
      type: String
      description: "CIDR Block for Free5GCENISubnet01"
      default: "10.100.50.0/24"
...

Next, it uses the variables to create a mapping to the desired AWS resources (a VPC and a subnet in this case):

   Free5GCVPC:
      type: tosca.nodes.AWS.Networking.VPC
      properties:
        cidr_block: { get_input: vpc_cidr_block }
        dns_support: true

    Free5GCENISubnet01:
      type: tosca.nodes.AWS.Networking.Subnet
      properties:
        type: "PUBLIC"
        availability_zone: { get_input: subnet_01_az }
        cidr_block: { get_input: eni_subnet_01_cidr_block }
      requirements:
        route_table: Free5GCRouteTable
        vpc: Free5GCVPC

Then it defines an AWS Internet Gateway within the VPC:

    Free5GCIGW:
      type: tosca.nodes.AWS.Networking.InternetGateway
      capabilities:
        routing:
          properties:
            dest_cidr: { get_input: igw_dest_cidr }
      requirements:
        route_table: Free5GCRouteTable
        vpc: Free5GCVPC

Finally, it specifies deployment of the Network Functions to an EKS cluster; the functions are deployed in the specified order:

    Free5GCHelmDeploy:
      type: tosca.nodes.AWS.Deployment.VNFDeployment
      requirements:
        cluster: Free5GCEKS
        deployment: Free5GCNRFHelmDeploy
        vnfs:
          - amf.Free5gcAMF
          - ausf.Free5gcAUSF
          - nssf.Free5gcNSSF
          - pcf.Free5gcPCF
          - smf.Free5gcSMF
          - udm.Free5gcUDM
          - udr.Free5gcUDR
          - upf.Free5gcUPF
          - webui.Free5gcWEBUI
      interfaces:
        Hook:
          pre_create: Free5gcSimpleHook

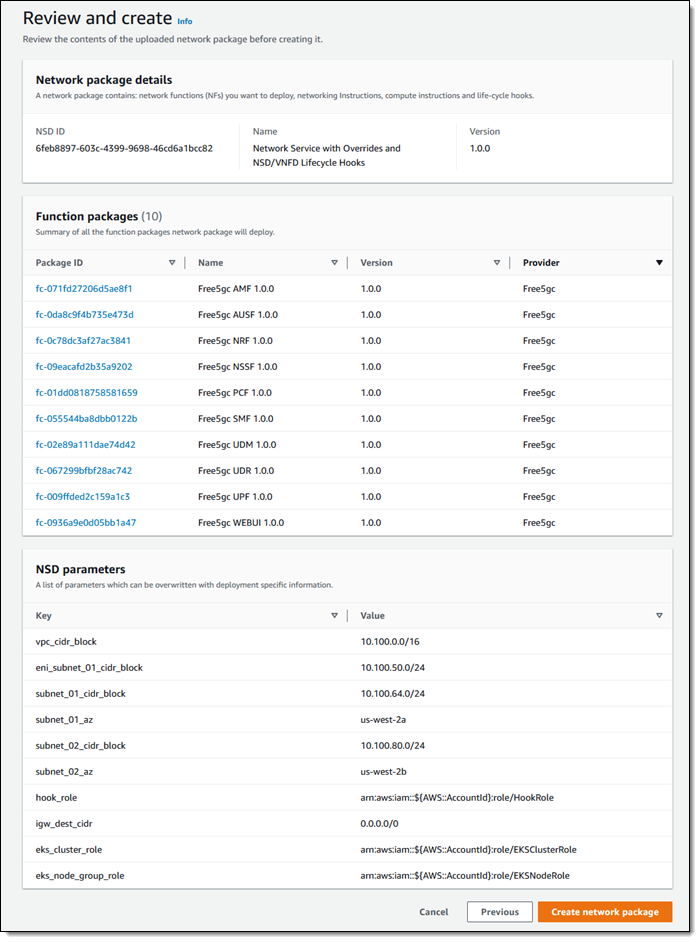
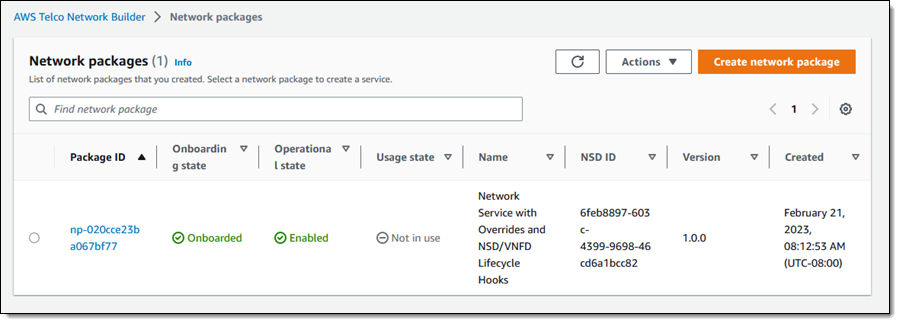
I click Create network package, select the NSD, and click Next to proceed. AWS TNB asks me to review the list of function packages and the NSD parameters. I do so, and click Create network package:

My network package is created and ready to use within seconds:

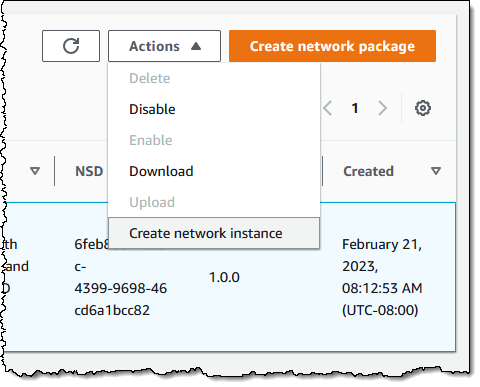
Now I am ready to create my network instance! I select the network package and choose Create network instance from the Actions menu:

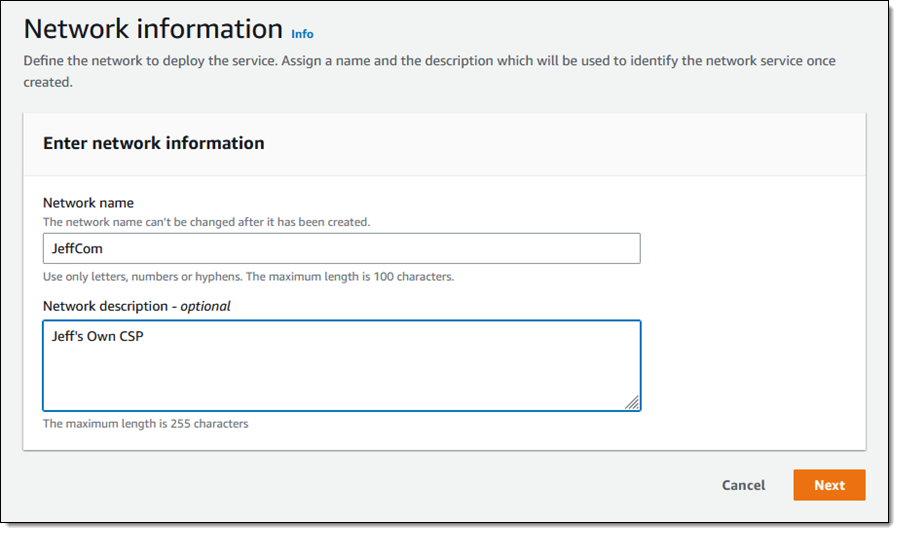
I give my network a name and a description, then click Next:

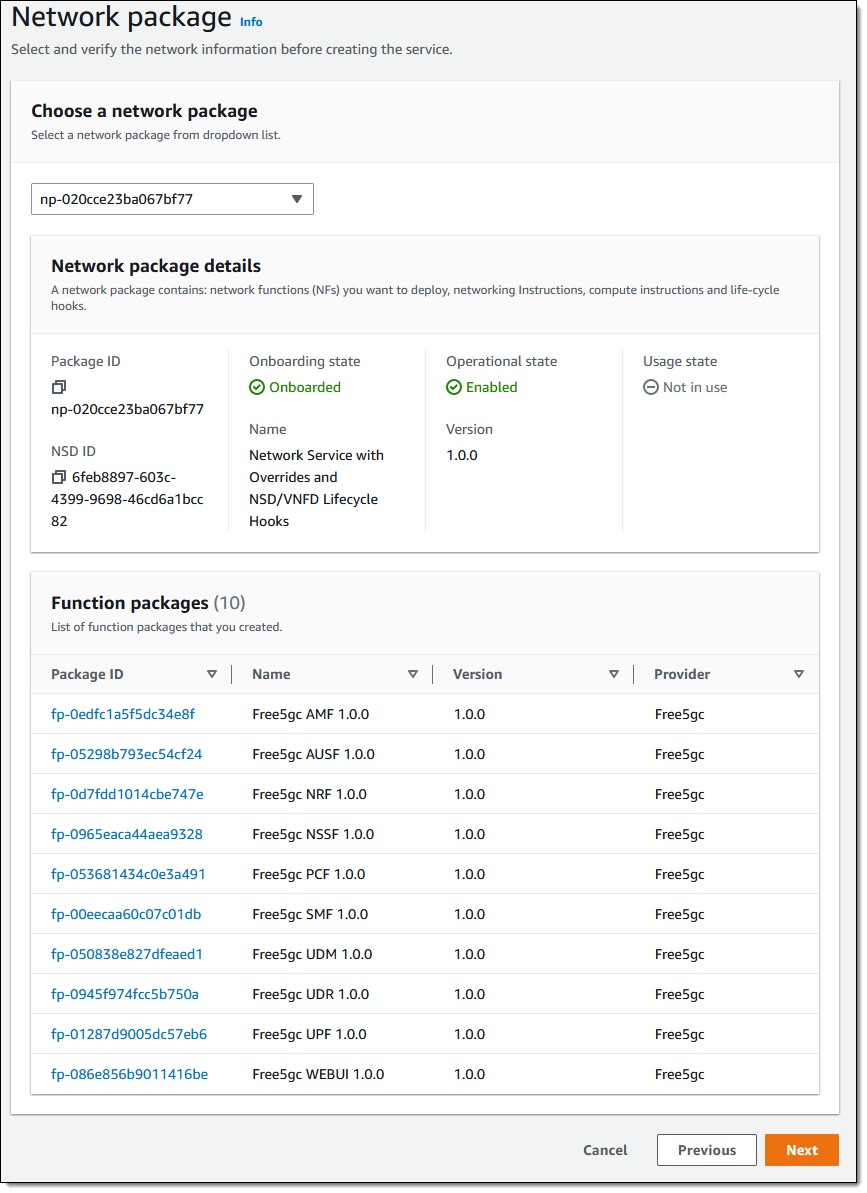
I make sure that I have selected the desired network package, review the list of functions packages that will be deployed, and click Next:

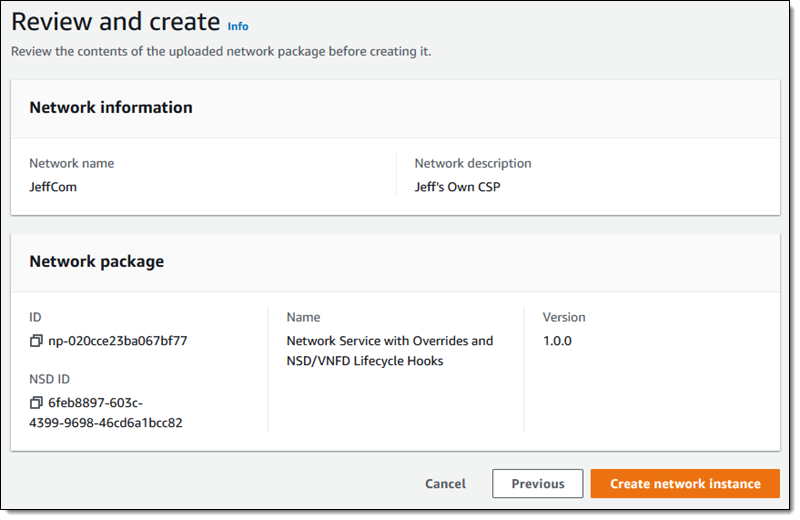
Then I do one final review, and click Create network instance:

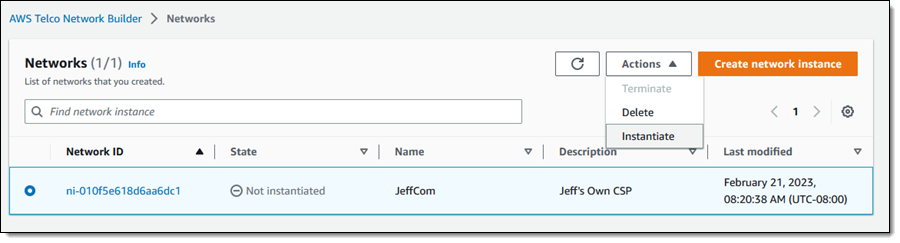
I select the new network instance and choose Instantiate from the Actions menu:

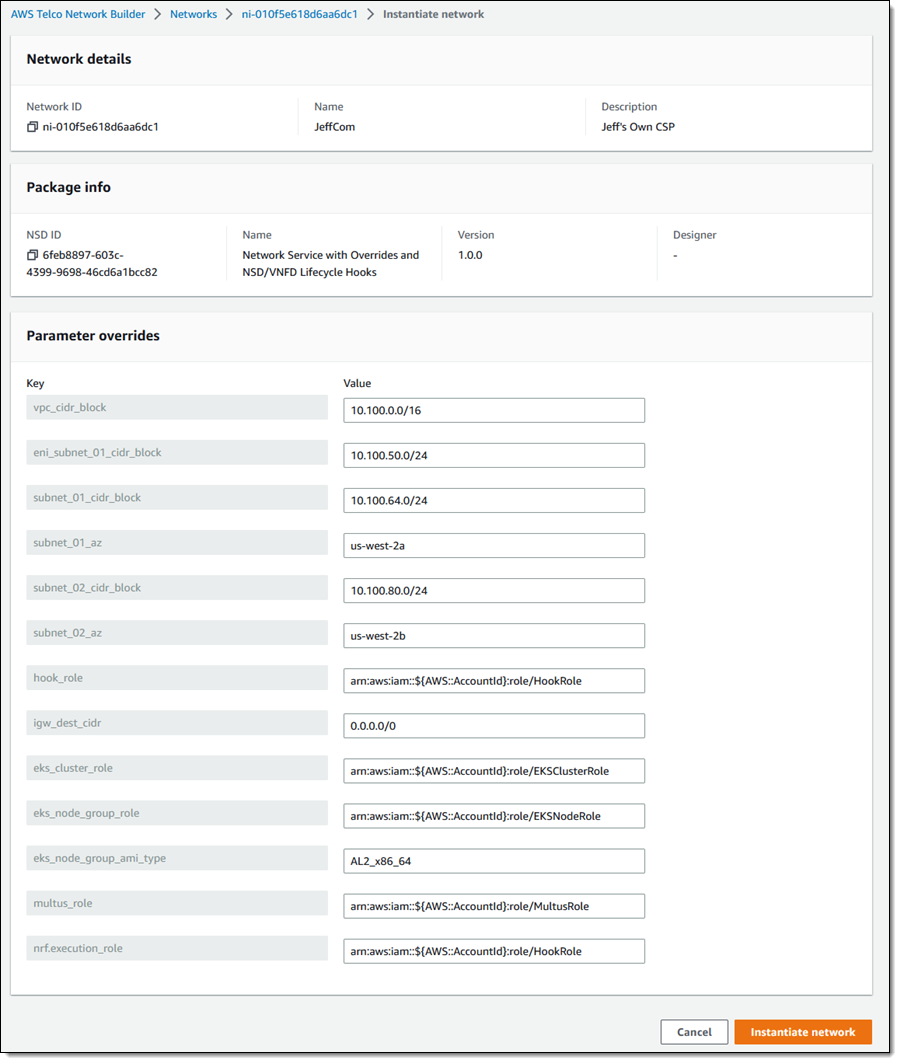
I review the parameters, and enter any desired overrides, then click Instantiate network:

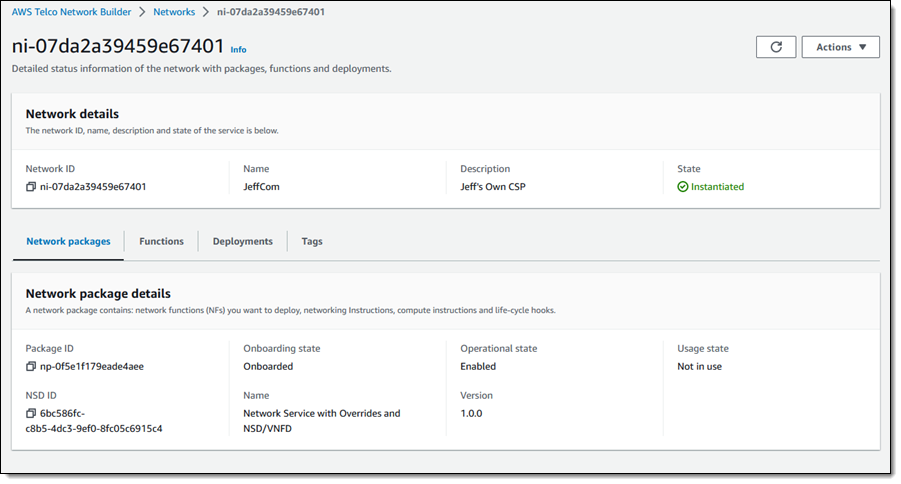
AWS Telco Network Builder (TNB) begins to instantiate my network (behind the scenes, the service creates a AWS CloudFormation template, uses the template to create a stack, and executes other tasks including Helm charts and custom scripts). When the instantiation step is complete, my network is ready to go. Instantiating a network creates a deployment, and the same network (perhaps with some parameters overridden) can be deployed more than once. I can see all of the deployments at a glance:

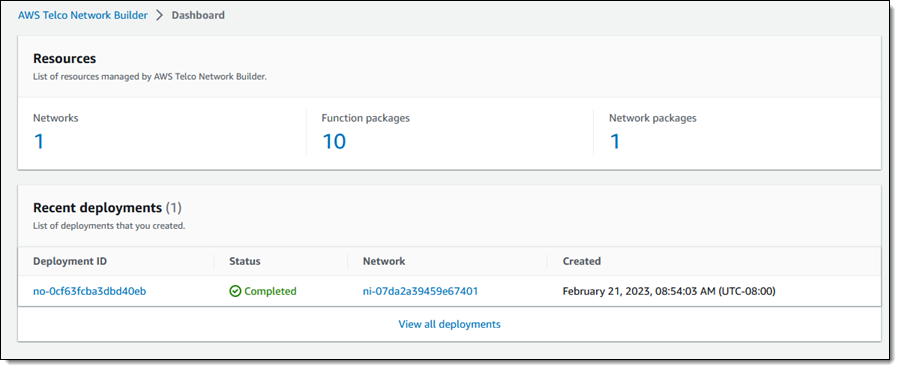
I can return to the dashboard to see my networks, function packages, network packages, and recent deployments:

Inside an AWS TNB Deployment
Let’s take a quick look inside my deployment. Here’s what AWS TNB set up for me:

Network – An Amazon Virtual Private Cloud (Amazon VPC) with three subnets, a route table, a route, and an Internet Gateway.

Compute – An Amazon Elastic Kubernetes Service (EKS) cluster.

CI/CD – An AWS CodeBuild project that is triggered every time a node is added to the cluster.

Things to Know
Here are a couple of things to know about AWS Telco Network Builder (TNB):

Access – In addition to the console access that I showed you above, you can access AWS TNB from the AWS Command Line Interface (AWS CLI) and the AWS SDKs.

Deployment Options – We are launching with the ability to create a network that spans multiple Availability Zones in a single AWS Region. Over time we expect to add additional deployment options such as Local Zones and Outposts.

Pricing – Pricing is based on the number of Network Functions that are managed by AWS TNB and on calls to the AWS TNB APIs, but the first 45,000 API requests per month in each AWS Region are not charged. There are also additional charges for the AWS resources that are created as part of the deployment. To learn more, read the TNB Pricing page.

Getting Started
To learn more and to get started, visit the AWS Telco Network Builder (TNB) home page.

— Jeff;

Using Porting Advisor for Graviton

Post Syndicated from Sheila Busser original https://aws.amazon.com/blogs/compute/using-porting-advisor-for-graviton/

This blog post is written by Ryan Doty Solutions Architect , AWS and Vishal Manan Sr. SSA, EC2 Graviton , AWS.

Introduction

AWS customers recognize that Graviton-based EC2 instances deliver price-performance benefits but many are concerned about the effort to port existing applications. Porting code from one architecture to another can result in a substantial investment in time and effort. AWS has worked continuously to improve the migration process for customers. We recently introduced the Porting Advisor for Graviton as a tool to further simplify the migration process. In this blog, we’ll walk you through how to use Porting Advisor for Graviton so that you can learn how to use it.

Porting Advisor for Graviton is an open-source, command-line tool that analyzes source code and generates a report highlighting missing or outdated libraries and code constructs that may require modification and provides a user with alternative recommendations. It helps customers and developers accelerate their transition to Graviton-based Amazon EC2 instances by reducing the iterative process of identifying and resolving source code and library dependencies. This blog post will provide you with a step-by-step implementation on how to use Porting Advisor for Graviton. At the end of the blog, you will be able to run Porting Advisor for Graviton on your source code tree, generating findings that will help simplify the effort required to port your application.

Porting Advisor for Graviton scans for potentially unsupported or non-portable arm64 code in source code trees. The tool only scans source code files for the programming languages C/C++, Fortran, Go 1.11+, Java 8+, Python 3+, and dependency files such as project/requirements.txt file(s). Most importantly the Porting Advisor doesn’t make any code modifications, API-level recommendations, or send data back to AWS.

You can utilize Porting Advisor for Graviton either as a Python script or compiled into a binary and run on x86-64 or arm64 systems. Therefore, it can be easily implemented as part of your build processes.

Expected Results

Porting Advisor for Graviton reports the following issues:

  1. Inline assembly with no corresponding arm64 inline assembly.
  2. Assembly source files with no corresponding arm64 assembly source files.
  3. Missing arm64 architecture detection in autoconf config.guess scripts.
  4. Linking against libraries that aren’t available on the arm64 architecture.
  5. Use  architecture specific intrinsics.
  6. Preprocessor errors that trigger when compiling on arm64.
  7. Usages of old Visual C++ runtime (Windows specific).

Compiler specific code guarded by compiler specific pre-defined macros is detected, but not reported by default. The following cross-compile specific issues are detected, but not reported by default:

  • Architecture detection that depends on the host rather than the target.
  • Use of build artifacts in the build process.

Skillsets needed for using the tool

Porting Advisor for Graviton is designed to be easy to use. Users though should be versed in the following skills in order to take advantage of the recommendations the tool provides:

  • An understanding of the build system – project requirements and dependencies, versioning, etc.
  • Basic scripting language skills around Python, PowerShell/Bash.
  • Understanding hardware (inline assembly for C/C++) or compiler specific (intrinsic for C/C++) constructs when applicable.
  • The ability to follow best practices in the AWS Graviton Technical Guide for code optimization.

How to use Porting Advisor for Graviton

Prerequisites

The tool requires a minimum version of Python 3.10 and Java (8+ to be installed). The installation of Java is also optional and only required if you want to scan JAR files for native method calls. You can run the tool on a Windows/Linux/MacOS machine, or in an EC2 instance. I will show case usage on Windows and Amazon Linux 2(AL2) running on an EC2 instance. It supports both arm64 and x86-64 processors.

You don’t need to be on an arm64-based processor to run the tool.

The tool doesn't need a lot of CPU Horsepower and even a system with few processors will do

You can run the tool as a Python script or an executable. The executable requires extra steps to build. However, it can be used on another machine without the need to install Python packages.

You must copy the complete “dist” folder for it to work, as there are libraries that are present in that folder along with the executable.

Porting Advisor for Graviton can be run as a binary or as a script. You must run the script to generate the binaries

./porting-advisor-linux-x86_64 ~/my/path/to/my/repo --output report.html 
./porting-advisor-linux-x86_64.exe ../test/CppCode/inline_assembly --output report.html

Running Porting Advisor for Graviton as an executable

The first step is to build the executable.

Building the executable

The first step is to set up the Python Environment. If you run into any errors building the binary, see the Troubleshooting section for more details.

Building the binary on Windows

Building Porting Advisor using Powershell

Building Porting Advisor binary

Building the binary on Linux/Mac

Using shell script to build on Linux or macOS

Porting Advisor binary saved in dist folder

Running the binary

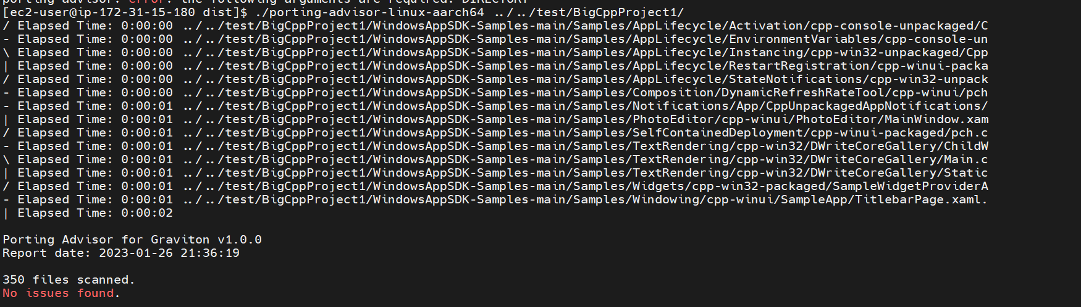
Here you can see how you can run the tool on Linux as a binary for a C++ project.

Porting advisor binary run on a C++ codebase with 350 files

The “dist” folder will have the executable.

Running Porting Advisor for Graviton as a script

Enable the Python environment for the following:

Linux/Mac:

$. python3 -m venv .venv
$. source .venv/bin/activate

PowerShell:

PS> python -m venv .venv
PS> .\.venv\Scripts\Activate.ps1

The following shows how the tool would work on Windows when run as a script:

Running Porting Advisor on Windows as a powershell script

Running the Porting Advisor for Graviton on Linux as a Script

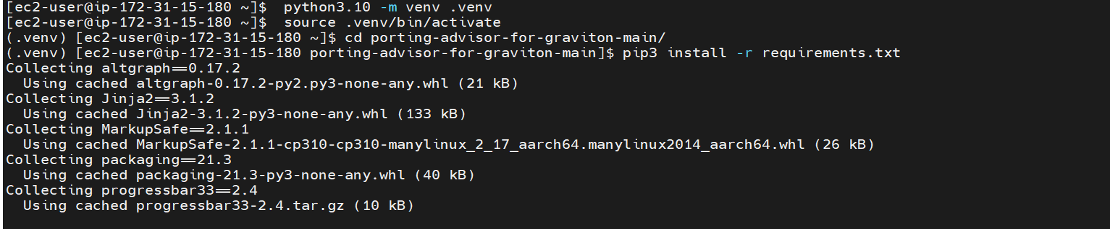
Setting up Python environment to run the Porting Advisor as a script

Running Porting Advisor on Linux as a script

Output of the Porting Advisor for Graviton

The Porting Advisor for Graviton requires the directory parameter to point to the folder where your source code lives. If there are multiple locations, then you can run the tool as part of the script.

If no output file is supplied only standard output will be produced. The following is the output of the tool in HTML format. The first line shows the total files scanned.

  1. If no issues are found, then you’ll see an output like the following:

Results of Porting Advisor run on C++ code with 2836 files with no issues found

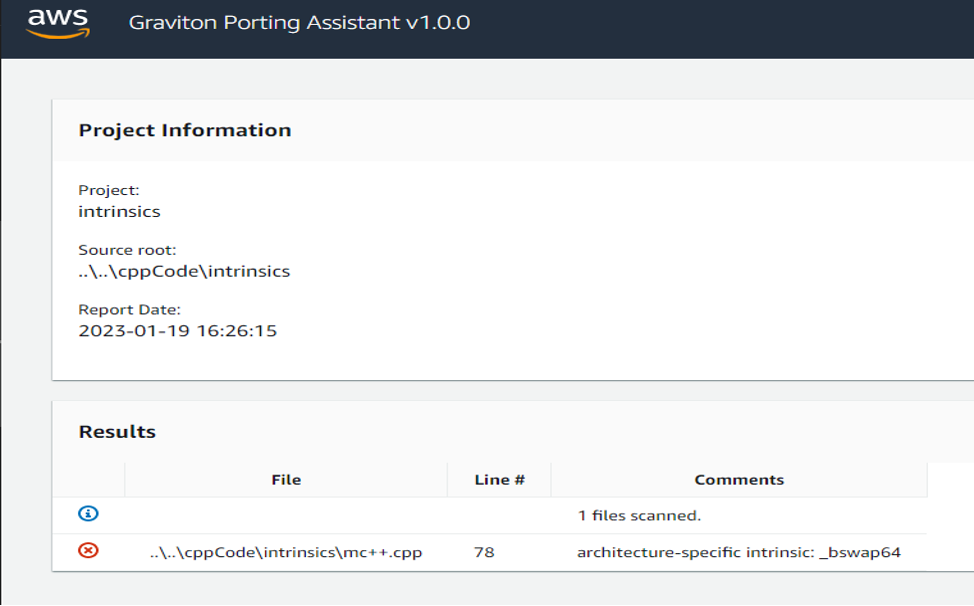
  1. With x86-64 specific intrinsics, such as _bswap64, you’ll see it flagged. arm64 specific intrinsics won’t be flagged. Therefore, if your code has arm64 specific intrinsics, then the porting advisor will only flag x86-64 to arm64 and not vice versa. The primary goal of the tool is determining the arm64 readiness of your code.

Porting Advisor reporting inline assembly files in C++ code

  1. The scanner typically looks for source code files only, but it can also look for assembly files with *.s extensions. An example of a file with the C++ code with inline assembly code is as follows:

Porting Advisor reporting use of intrinsics in C++ code

  1. The tool has pointed out errors such as a preprocessor error and architecture-specific intrinsic usage errors.

Porting Advisor results run on C++ code pointing out missing preprocessor macros for arm64 and x86-64 specific intrinsics

Next steps

If you don’t see any issues reported by the tool, then you are in good shape for doing the port. If no issues are reported it does not guarantee that it will work as port. Porting Advisor for Graviton is a tool used best as a helper. Regardless of the issues reported by the tool, we still highly suggest testing the application thoroughly.

As a good practice, we recommend that you use the latest version of your libraries.

Based on the issue, you can consider further actions. For Compiler intrinsic errors, we recommend studying Intel and arm64 intrinsics.

Once you’ve migrated your code and are using Gravition, you can start to look at taking steps to optimize your performance. If you’re interested in doing that please look at our Getting Started Guide.

If you run into any issues, then see our CONTRIBUTING file.

FAQs

  1. How fast is the tool? The tool is able to scan 4048 files in 1.18 seconds.

On an arm64 Based Instance:

Porting Advisor scans 4048 files in 1.18 seconds

  1. False Positives?

This tool scans all files in a source tree, regardless of whether they are included by the build system or not. Therefore, it may misreport issues in files that appear in the source tree but are excluded by the build system. Currently, the tool supports the following languages/dependencies: C/C++, Fortran, Go 1.11+, Java 8+, and Python 3+.

For example: You may have legacy code using Python version 2.7 that is in the source tree but isn’t being used. The tool will scan the code base and point out issues in that particular codebase even though you may not be using that piece of code.  To mitigate, either  remove that folder from the source code or ignore the error pointed by the tool.

  1. I see mention of Ruby and .Net in the Open source tool, but they don’t work on my tool.

Ruby and .Net haven’t been implemented yet, but please consider contributing to it and open an issue requesting support. If you need support then see our CONTRIBUTING file.

Troubleshooting

Errors that you may encounter while building the tool binary:

PyInstaller needs a shared version of libraries.

  1. Python 3.10+ not having shared libraries for use by the PyInstaller tool.

Building Porting Advisor binaries

Pyinstaller failed at building binary and suggesting building Python configure script with --enable-shared on Linux or --enable-framework on macOS

The fix for this is to build your version of Python(3.10+) with the right flags:

./configure --enable-optimizations --enable-shared

If the two flags don’t work together, try doing the build with each flag enabled sequentially.

pyinstaller tool needs python configure script with --enable-shared and enable-optimizations flag

  1. Incorrect Python version (version less than 3.10).If you aren’t on the correct version of Python:

You will get errors similar to the ones here:

Python version on host is 3.7.15 which is less than the recommended version

If you want to run the tool in an EC2 instance on Amazon Linux 2(AL2), then you could try upgrading/installing Python 3.10 as pointed out here.

If you run into any issues, then see our CONTRIBUTING file.

Trying to run Porting Advisor as script will result in Syntax errors on Python version less than 3.10

Conclusion

Porting Advisor for Graviton helps customers quantify the amount of work that is required to port an application. It accelerates your ability to transition to Graviton-based Amazon EC2 instances by reducing the iterative process of identifying and resolving source code and library dependencies.

Resources

To learn how to migrate your workloads to Graviton-based instances, see the AWS Graviton Technical Guide GitHub Repository and AWS Graviton Transition Guide. To get started with Graviton-based Amazon EC2 instances, see the AWS Management Console, AWS Command Line Interface (AWS CLI), and AWS SDKs.

Some other resources include:

How SafeGraph built a reliable, efficient, and user-friendly Apache Spark platform with Amazon EMR on Amazon EKS

Post Syndicated from Nan Zhu original https://aws.amazon.com/blogs/big-data/how-safegraph-built-a-reliable-efficient-and-user-friendly-spark-platform-with-amazon-emr-on-amazon-eks/

This is a guest post by Nan Zhu, Engineering Manager/Software Engineer, SafeGraph, and Dave Thibault, Sr. Solutions Architect – AWS

SafeGraph is a geospatial data company that curates over 41 million global points of interest (POIs) with detailed attributes, such as brand affiliation, advanced category tagging, and open hours, as well as how people interact with those places. We use Apache Spark as our main data processing engine and have over 1,000 Spark applications running over massive amounts of data every day. These Spark applications implement our business logic ranging from data transformation, machine learning (ML) model inference, to operational tasks.

SafeGraph found itself with a less-than-optimal Spark environment with their incumbent Spark vendor. Their costs were climbing. Their jobs would suffer frequent retries from Spot Instance termination. Developers spent too much time troubleshooting and changing job configurations and not enough time shipping business value code. SafeGraph needed to control costs, improve developer iteration speed, and improve job reliability. Ultimately, SafeGraph chose Amazon EMR on Amazon EKS to meet their needs and realized 50% savings relative to their previous Spark managed service vendor.

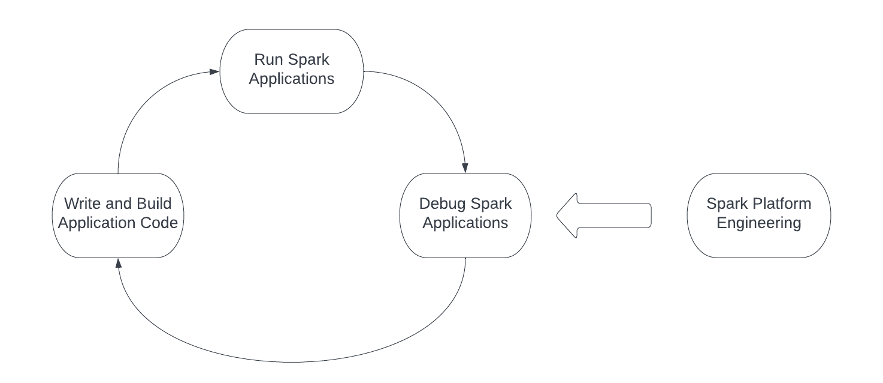
If building Spark applications for our product is like cutting a tree, having a sharp saw becomes crucial. The Spark platform is the saw. The following figure highlights the engineering workflow when working with Spark, and the Spark platform should support and optimize each action in the workflow. The engineers usually start with writing and building the Spark application code, then submit the application to the computing infrastructure, and finally close the loop by debugging the Spark applications. Additionally, platform and infrastructure teams need to continually operate and optimize the three steps in the engineering workflow.

Figure 1 engineering workflow of Spark applications

There are various challenges involved in each action when building a Spark platform:

  • Reliable dependency management – A complicated Spark application usually brings many dependencies. To run a Spark application, we need to identify all dependencies, resolve any conflicts, pack dependent libraries reliably, and ship them to the Spark cluster. Dependency management is one of the biggest challenges for engineers, especially when they work with PySpark applications.
  • Reliable computing infrastructure – The reliability of the computing infrastructure hosting Spark applications is the foundation of the whole Spark platform. Unstable resource provisioning will not only cause negative impact over engineering efficiency, but it will also increase infrastructure costs due to reruns of the Spark applications.
  • Convenient debugging tools for Spark applications – The debugging tooling plays a key role for engineers to iterate fast on Spark applications. Performant access to the Spark History Server (SHS) is a must for developer iteration speed. Conversely, poor SHS performance slows developers and increases the cost of goods sold for software companies.
  • Manageable Spark infrastructure – A successful Spark platform engineering involves multiple aspects, such as Spark distribution version management, computing resource SKU management and optimization, and more. It largely depends on whether the Spark service vendors provide the right foundation for platform teams to use. The wrong abstraction over distribution version and computing resources, for example, could significantly reduce the ROI of platform engineering.

At SafeGraph, we experienced all of the aforementioned challenges. To resolve them, we explored the marketplace and found that building a new Spark platform on top of EMR on EKS was the solution to our roadblocks. In this post, we share our journey of building our latest Spark platform and how EMR on EKS serves as a robust and efficient foundation for it.

Reliable Python dependency management

One of the biggest challenges for our users to write and build Spark application code is the struggle of managing dependencies reliably, especially for PySpark applications. Most of our ML-related Spark applications are built with PySpark. With our previous Spark service vendor, the only supported way to manage Python dependencies was via a wheel file. Despite its popularity, wheel-based dependency management is fragile. The following figure shows two types of reliability issues faced with wheel-based dependency management:

  • Unpinned direct dependency – If the .whl file doesn’t pinpoint the version of a certain direct dependency, Pandas in this example, it will always pull the latest version from upstream, which may potentially contain a breaking change and take down our Spark applications.
  • Unpinned transitive dependency – The second type of reliability issue is more out of our control. Even though we pinned the direct dependency version when building the .whl file, the direct dependency itself could miss pinpointing the transitive dependencies’ versions (MLFlow in this example). The direct dependency in this case always pulls the latest versions of these transitive dependencies that potentially contain breaking changes and may take down our pipelines.

Figure 2 fragile wheel based dependency management

The other issue we encountered was the unnecessary installation of all Python packages referred by the wheel files for every Spark application initialization. With our previous setup, we needed to run the installation script to install wheel files for every Spark application upon starting even if there is no dependency change. This installation prolongs the Spark application start time from 3–4 minutes to at least 7–8 minutes. The slowdown is frustrating especially when our engineers are actively iterating over changes.

Moving to EMR on EKS enables us to use pex (Python EXecutable) to manage Python dependencies. A .pex file packs all dependencies (including direct and transitive) of a PySpark application in an executable Python environment in the spirit of virtual environments.

The following figure shows the file structure after converting the wheel file illustrated earlier to a .pex file. Compared to the wheel-based workflow, we don’t have transitive dependency pulling or auto-latest version fetching anymore. All versions of dependencies are fixed as x.y.z, a.b.c, and so on when building the .pex file. Given a .pex file, all dependencies are fixed so that we don’t suffer from the slowness or fragility issues in a wheel-based dependency management anymore. The cost of building a .pex file is a one-off cost, too.

Figure 3 PEX file structure

Reliable and efficient resource provisioning

Resource provisioning is the process for the Spark platform to get computing resources for Spark applications, and is the foundation for the whole Spark platform. When building a Spark platform in the cloud, using Spot Instances for cost optimization makes resource provisioning even more challenging. Spot Instances are spare compute capacity available to you at a savings of up to 90% off compared to On-Demand prices. However, when the demand for certain instance types grows suddenly, Spot Instance termination can happen to prioritize meeting those demands. Because of these terminations, we saw several challenges in our earlier version of Spark platform:

  • Unreliable Spark applications – When the Spot Instance termination happened, the runtime of Spark applications got prolonged significantly due to the retried compute stages.
  • Compromised developer experience – The unstable supply of Spot Instances caused frustration among engineers and slowed our development iterations because of the unpredictable performance and low success rate of Spark applications.
  • Expensive infrastructure bill – Our cloud infrastructure bill increased significantly due to the retry of jobs. We had to buy more expensive Amazon Elastic Compute Cloud (Amazon EC2) instances with higher capacity and run in multiple Availability Zones to mitigate issues but in turn paid for the high cost of cross-Availability Zone traffic.

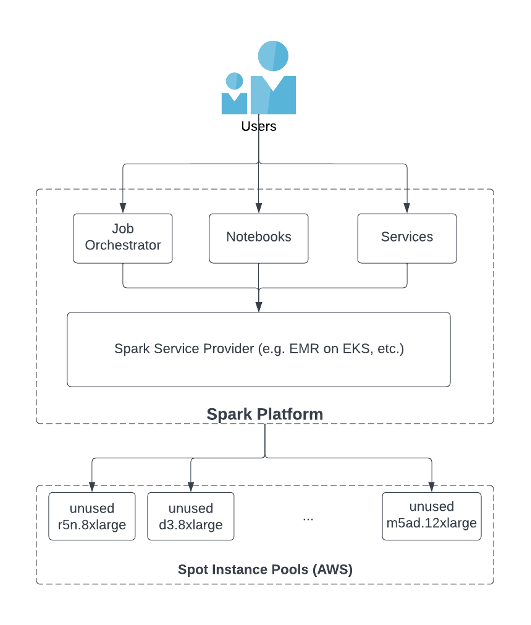
Spark Service Providers (SSPs) like EMR on EKS or other third-party software products serve as the intermediate between users and Spot Instance pools, and play a key role to ensure the sufficient supply of Spot Instances. As shown in the following figure, users launch Spark jobs with job orchestrators, notebooks, or services via SSPs. The SSP implements their internal functionality to access the unused instances in the Spot Instance pool in cloud services like AWS. One of the best practices of using Spot Instances is to diversify instance types (for more information, see Cost Optimization using EC2 Spot Instances). Specifically, there are two key features for a SSP to achieve instance diversification:

  • The SSP should be able to access all types of instances in the Spot Instance pool in AWS
  • The SSP should provide functionality for users to use as many instance types as possible when launching Spark applications

Figure 4 SSP provides the access to the unused instances in Cloud Service Provider

Our last SSP doesn’t provide the expected solution to these two points. They only support a limited set of Spot Instance types and by default, allow only a single Spot Instance type to be selected when launching Spark jobs. As a result, each Spark application only runs with a small capacity of Spot Instances and is vulnerable to Spot Instance terminations.

EMR on EKS uses Amazon Elastic Kubernetes Service (Amazon EKS) for accessing Spot Instances in AWS. Amazon EKS supports all available EC2 instance types, bringing a much higher capacity pool to us. We use the features of Amazon EKS managed node groups and node selectors and taints to assign each Spark application to a node group that is made of multiple instance types. After moving to EMR on EKS, we observed the following benefits:

  • Spot Instance termination was less frequent and our Spark applications’ runtime became shorter and stayed stable.
  • Engineers were able to iterate faster as they saw improvement in the predictability of application behaviors.
  • The infrastructure costs dropped significantly because we no longer needed costly workarounds and, simultaneously, we had a sophisticated selection of instances in each node group of Amazon EKS. We were able to save approximately 50% of computing costs without the workarounds like running in multiple Availability Zones and simultaneously provide the expected level of reliability.

Smooth debugging experience

An infrastructure that supports engineers conveniently debugging the Spark application is critical to close the loop of our engineering workflow. Apache Spark uses event logs to record the activities of a Spark application, such as task start and finish. These events are formatted in JSON and are used by SHS to rerender the UI of Spark applications. Engineers can access SHS to debug task failure reasons or performance issues.

The major challenge for engineers in SafeGraph was the scalability issue in SHS. As shown in the left part of the following figure, our previous SSP forced all engineers to share the same SHS instance. As a result, SHS was under intense resource pressure due to many engineers accessing at the same time for debugging their applications, or if a Spark application had a large event log to be rendered. Prior to moving to EMR on EKS, we frequently experienced either slowness of SHS or SHS crashed completely.

As shown in the following figure, for every request to view Spark history UI, EMR on EKS starts an independent SHS instance container in an AWS-managed environment. The benefit of this architecture is two-fold:

  • Different users and Spark applications won’t compete for SHS resources anymore. Therefore, we never experience slowness or crashes of SHS.
  • All SHS containers are managed by AWS; users don’t need pay additional financial or operational costs to enjoy the scalable architecture.

Figure 5 SHS provisioning architecture in previous SSP and EMR on EKS

Manageable Spark platform

As shown in the engineering workflow, building a Spark platform is not a one-off effort, and platform teams need to manage the Spark platform and keep optimizing each step in the engineer development workflow. The role of the SSP should provide the right facilities to ease operational burden as much as possible. Although there are many types of operational tasks, we focus on two of them in this post: computing resource SKU management and Spark distro version management.

Computing resource SKU management refers to the design and process for a Spark platform to allow users to choose different sizes of computing instances. Such a design and process would largely rely on the relevant functionality implemented from SSPs.

The following figure shows the SKU management with our previous SSP.

Figure 6 (a) Previous SSP: Users have to explicitly specify instance type and availability zone

The following figure shows SKU management with EMR on EKS.

Figure 6 (b) EMR on EKS helps abstracting out instance types from users and make it easy to manage computing SKU

With our previous SSP, job configuration only allowed explicitly specifying a single Spot Instance type, and if that type ran out of Spot capacity, the job switched to On-Demand or fell into reliability issues. This left platform engineers with the choice of changing the settings across the fleet of Spark jobs or risking unwanted surprises for their budget and cost of goods sold.

EMR on EKS makes it much easier for the platform team to manage computing SKUs. In SafeGraph, we embedded a Spark service client between users and EMR on EKS. The Spark service client exposes only different tiers of resources to users (such as small, medium, and large). Each tier is mapped to a certain node group configured in Amazon EKS. This design brings the following benefits:

  • In the case of prices and capacity changes, it’s easy for us to update configurations in node groups and keep it abstracted from users. Users don’t change anything, or even feel it, and continue to enjoy the stable resource provisioning while we keep costs and operational overhead as low as possible.
  • When choosing the right resources for the Spark application, end-users don’t need to do any guess work because it’s easy to choose with simplified configuration.

Improved Spark distro release management is the other benefit we gain from EMR on EKS. Prior to using EMR on EKS, we suffered from the non-transparent release of Spark distro in our SSP. Every 1–2 months, there is a new patched version of Spark distro released to users. These versions are all exposed to users via their UI. This resulted in engineers choosing various versions of distro, some of which hadn’t been tested with our internal tools. It significantly increased the breaking rate of our pipelines, internal systems, and the support burden of platform teams. We expect that the risk from releases of Spark distros should be minimum and transparent to users with an EMR on EKS architecture.

EMR on EKS follows the best practices with a stable base Docker image containing a fixed version of Spark distro. For any change of Spark distro, we have to explicitly rebuild and roll out the Docker image. With EMR on EKS, we can keep a new version of Spark distro hidden from users before testing it with our internal toolings and systems and make a formal release.

Conclusion

In this post, we shared our journey building a Spark platform on top of EMR on EKS. EMR on EKS as the SSP serves as a strong foundation of our Spark platform. With EMR on EKS, we were able to resolve challenges ranging from dependency management, resource provisioning, and debugging experience, and also significantly reduce our computing cost by 50% due to higher availability of Spot Instance types and sizes.

We hope this post could share some insights to the community when choosing the right SSP for your business. Learn more about EMR on EKS, including benefits, features, and how to get started.


About the Authors

Nan Zhu is the engineering lead of the platform team in SafeGraph. He leads the team to build a broad range of infrastructure and internal toolings to improve the reliability, efficiency and productivity of the SafeGraph engineering process, e.g. internal Spark ecosystem, metrics store and CI/CD for large mono repos, etc. He is also involved in multiple open source projects like Apache Spark, Apache Iceberg, Gluten, etc.

Dave Thibault is a Sr. Solutions Architect serving AWS’s independent software vendor (ISV) customers. He’s passionate about building with serverless technologies, machine learning, and accelerating his AWS customers’ business success. Prior to joining AWS, Dave spent 17 years in life sciences companies doing IT and informatics for research, development, and clinical manufacturing groups. He also enjoys snowboarding, plein air oil painting, and spending time with his family.

Lenovo ThinkStation P360 Ultra Review the Ultra Small Workstation

Post Syndicated from Patrick Kennedy original https://www.servethehome.com/lenovo-thinkstation-p360-ultra-review-the-ultra-small-workstation/

In our Lenovo ThinkStation P360 Ultra review, we see how Lenovo built a wildly expandable small box with high-end Intel and NVIDIA processors

The post Lenovo ThinkStation P360 Ultra Review the Ultra Small Workstation appeared first on ServeTheHome.

Security updates for Tuesday

Post Syndicated from original https://lwn.net/Articles/923942/

Security updates have been issued by CentOS (libksba, thunderbird, and tigervnc and xorg-x11-server), Debian (clamav, nss, python-django, and sox), Fedora (kernel and thunderbird), Mageia (curl, firefox, nodejs-qs, qtbase5, thunderbird, upx, and webkit2), Red Hat (httpd:2.4, kernel, kernel-rt, kpatch-patch, pcs, php:8.0, python-setuptools, Red Hat build of Cryostat, Red Hat Virtualization Host 4.4.z SP 1, samba, systemd, tar, and thunderbird), Scientific Linux (firefox and thunderbird), and SUSE (clamav, firefox, jhead, mozilla-nss, prometheus-ha_cluster_exporter, tar, and ucode-intel).

The Chief Zero Trust Officer: a new role for a new era of cybersecurity

Post Syndicated from John Engates original https://blog.cloudflare.com/chief-zero-trust-officer/

The Chief Zero Trust Officer: a new role for a new era of cybersecurity

Setting the stage for Zero Trust

The Chief Zero Trust Officer: a new role for a new era of cybersecurity

Over the last few years the topic of cyber security has moved from the IT department to the board room. The current climate of geopolitical and economic uncertainty has made the threat of cyber attacks all the more pressing, with businesses of all sizes and across all industries feeling the impact. From the potential for a crippling ransomware attack to a data breach that could compromise sensitive consumer information, the risks are real and potentially catastrophic. Organizations are recognizing the need for better resilience and preparation regarding cybersecurity. It is not enough to simply react to attacks as they happen; companies must proactively prepare for the inevitable in their approach to cybersecurity.

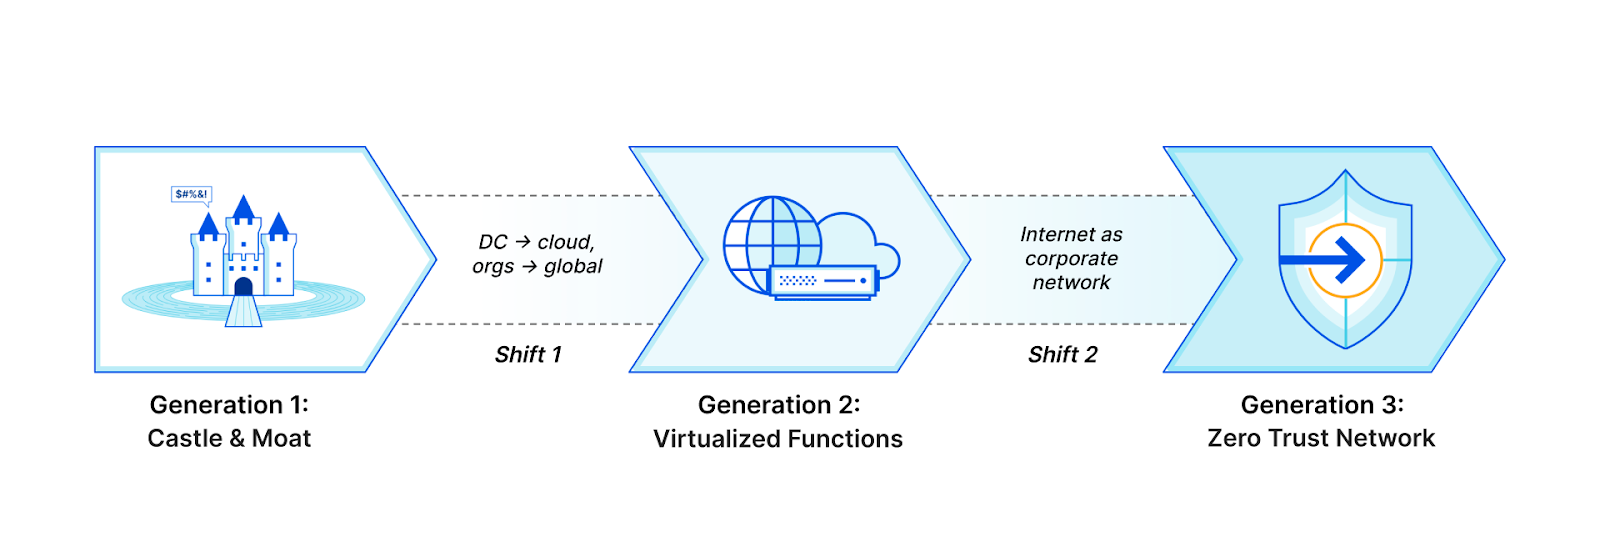
The security approach that has gained the most traction in recent years is the concept of Zero Trust. The basic principle behind Zero Trust is simple: don’t trust anything; verify everything. The impetus for a modern Zero Trust architecture is that traditional perimeter-based (castle-and-moat) security models are no longer sufficient in today’s digitally distributed landscape. Organizations must adopt a holistic approach to security based on verifying the identity and trustworthiness of all users, devices, and systems that access their networks and data.

The Chief Zero Trust Officer: a new role for a new era of cybersecurity

Zero Trust has been on the radar of business leaders and board members for some time now. However, Zero Trust is no longer just a concept being discussed; it’s now a mandate. With remote or hybrid work now the norm and cyber-attacks continuing to escalate, businesses realize they must take a fundamentally different approach to security. But as with any significant shift in strategy, implementation can be challenging, and efforts can sometimes stall. Although many firms have begun implementing Zero Trust methods and technologies, only some have fully implemented them throughout the organization. For many large companies, this is the current status of their Zero Trust initiatives – stuck in the implementation phase.

A new leadership role emerges

But what if there was a missing piece in the cybersecurity puzzle that could change everything? Enter the role of “Chief Zero Trust Officer” (CZTO) – a new position that we believe will become increasingly common in large organizations over the next year.

The idea of companies potentially creating the role of Chief Zero Trust Officer evolved from conversations last year between Cloudflare’s Field CTO team members and US federal government agencies. A similar job function was first noted in the White House memorandum directing federal agencies to “move toward Zero Trust cybersecurity principles” and requiring agencies “designate and identify a Zero Trust strategy implementation lead for their organization” within 30 days. In government, a role like this is often called a “czar,” but the title “chief” is more appropriate within a business.

Large organizations need strong leaders to efficiently get things done. Businesses assign the ultimate leadership responsibility to people with titles that begin with the word chief, such as Chief Executive Officer (CEO) or Chief Financial Officer (CFO). These positions exist to provide direction, set strategy, make critical decisions, and manage day-to-day operations and they are often accountable to the board for overall performance and success.

Why a C-level for Zero Trust, and why now?

An old saying goes, “when everyone is responsible, no one is responsible.” As we consider the challenges in implementing Zero Trust within an enterprise, it appears that a lack of clear leadership and accountability is a significant issue. The question remains, who *exactly* is responsible for driving the adoption and execution of Zero Trust within the organization?

Large enterprises need a single person responsible for driving the Zero Trust journey. This leader should be empowered with a clear mandate and have a singular focus: getting the enterprise to Zero Trust. This is where the idea of the Chief Zero Trust Officer was born. “Chief Zero Trust Officer” may seem like just a title, but it holds a lot of weight. It commands attention and can overcome many obstacles to Zero Trust.

Barriers to adoption

Implementing Zero Trust can be hindered by various technological challenges. Understanding and implementing the complex architecture of some vendors can take time, demand extensive training, or require a professional services engagement to acquire the necessary expertise. Identifying and verifying users and devices in a Zero Trust environment can also be a challenge. It requires an accurate inventory of the organization’s user base, groups they’re a part of, and their applications and devices.

On the organizational side, coordination between different teams is crucial for effectively implementing Zero Trust. Breaking down the silos between IT, cybersecurity, and networking groups, establishing clear communication channels, and regular meetings between team members can help achieve a cohesive security strategy. General resistance to change can also be a significant obstacle. Leaders should use techniques such as leading by example, transparent communication, and involving employees in the change process to mitigate it. Proactively addressing concerns, providing support, and creating employee training opportunities can also help ease the transition.

Responsibility and accountability – no matter what you call it

But why does an organization need a CZTO? Is another C-level role essential? Why not assign someone already managing security within the CISO organization? Of course, these are all valid questions. Think about it this way – companies should assign the title based on the level of strategic importance to the company. So, whether it’s Chief Zero Trust Officer, Head of Zero Trust, VP of Zero Trust, or something else, the title must command attention and come with the power to break down silos and cut through bureaucracy.

New C-level titles aren’t without precedent. In recent years, we’ve seen the emergence of titles such as Chief Digital Transformation Officer, Chief eXperience Officer, Chief Customer Officer, and Chief Data Scientist. The Chief Zero Trust Officer title is likely not even a permanent role. What’s crucial is that the person holding the role has the authority and vision to drive the Zero Trust initiative forward, with the support of company leadership and the board of directors.

Getting to Zero Trust in 2023

Getting to Zero Trust security is now a mandate for many companies, as the traditional perimeter-based security model is no longer enough to protect against today’s sophisticated threats. To navigate the technical and organizational challenges that come with Zero Trust implementation, the leadership of a CZTO is crucial. The CZTO will lead the Zero Trust initiative, align teams and break down barriers to achieve a smooth rollout. The role of CZTO in the C-suite emphasizes the importance of Zero Trust in the company. It ensures that the Zero Trust initiative is given the necessary attention and resources to succeed. Organizations that appoint a CZTO now will be the ones that come out on top in the future.

Cloudflare One for Zero Trust

Cloudflare One is Cloudflare’s Zero Trust platform that is easy to deploy and integrates seamlessly with existing tools and vendors. It is built on the principle of Zero Trust and provides organizations with a comprehensive security solution that works globally. Cloudflare One is delivered on Cloudflare’s global network, which means that it works seamlessly across multiple geographies, countries, network providers, and devices. With Cloudflare’s massive global presence, traffic is secured, routed, and filtered over an optimized backbone that uses real-time Internet intelligence to protect against the latest threats and route traffic around bad Internet weather and outages. Additionally, Cloudflare One integrates with best-of-breed identity management and endpoint device security solutions, creating a complete solution that encompasses the entire corporate network of today and tomorrow. If you’d like to know more, let us know here, and we’ll reach out.

Do you prefer to avoid talking to someone just yet? Nearly every feature in Cloudflare One is available at no cost for up to 50 users. Many of our largest enterprise customers start by exploring our Zero Trust products themselves on our free plan, and we invite you to do so by following the link here.

Working with another Zero Trust vendor?

Cloudflare’s security experts have built a vendor-neutral roadmap to provide a Zero Trust architecture and an example implementation timeline. The Zero Trust Roadmap https://zerotrustroadmap.org/ is an excellent resource for organizations that want to learn more about the benefits and best practices of implementing Zero Trust. And if you feel stuck on your current Zero Trust journey, have your chief Zero Trust officer give us a call at Cloudflare!

New zoom freezing feature for Geohash plugin

Post Syndicated from Grab Tech original https://engineering.grab.com/geohash-plugin

Introduction

Geohash is an encoding system with a unique identifier for each region on the planet. Therefore, all geohash units can be associated with an individual set of digits and letters.

Geohash is a plugin built by Grab that is available in the Java OpenStreetMap Editor (JOSM) tool, which comes in handy for those who work on precise areas based on geohash units.

Background

Up until recently, users of the Geohash JOSM plugin were unable to stop the displaying of new geohashes with every zoom-in or zoom-out. This meant that every time they changed the zoom, new geohashes would be displayed, and this became bothersome for many users when it was unneeded. The previous behaviour of the plugin when zooming in and out is depicted in the following short video:


This led to the implementation of the zoom freeze feature, which helps users toggle between Enable zoom freeze and Disable zoom freeze, based on their needs.

Solution

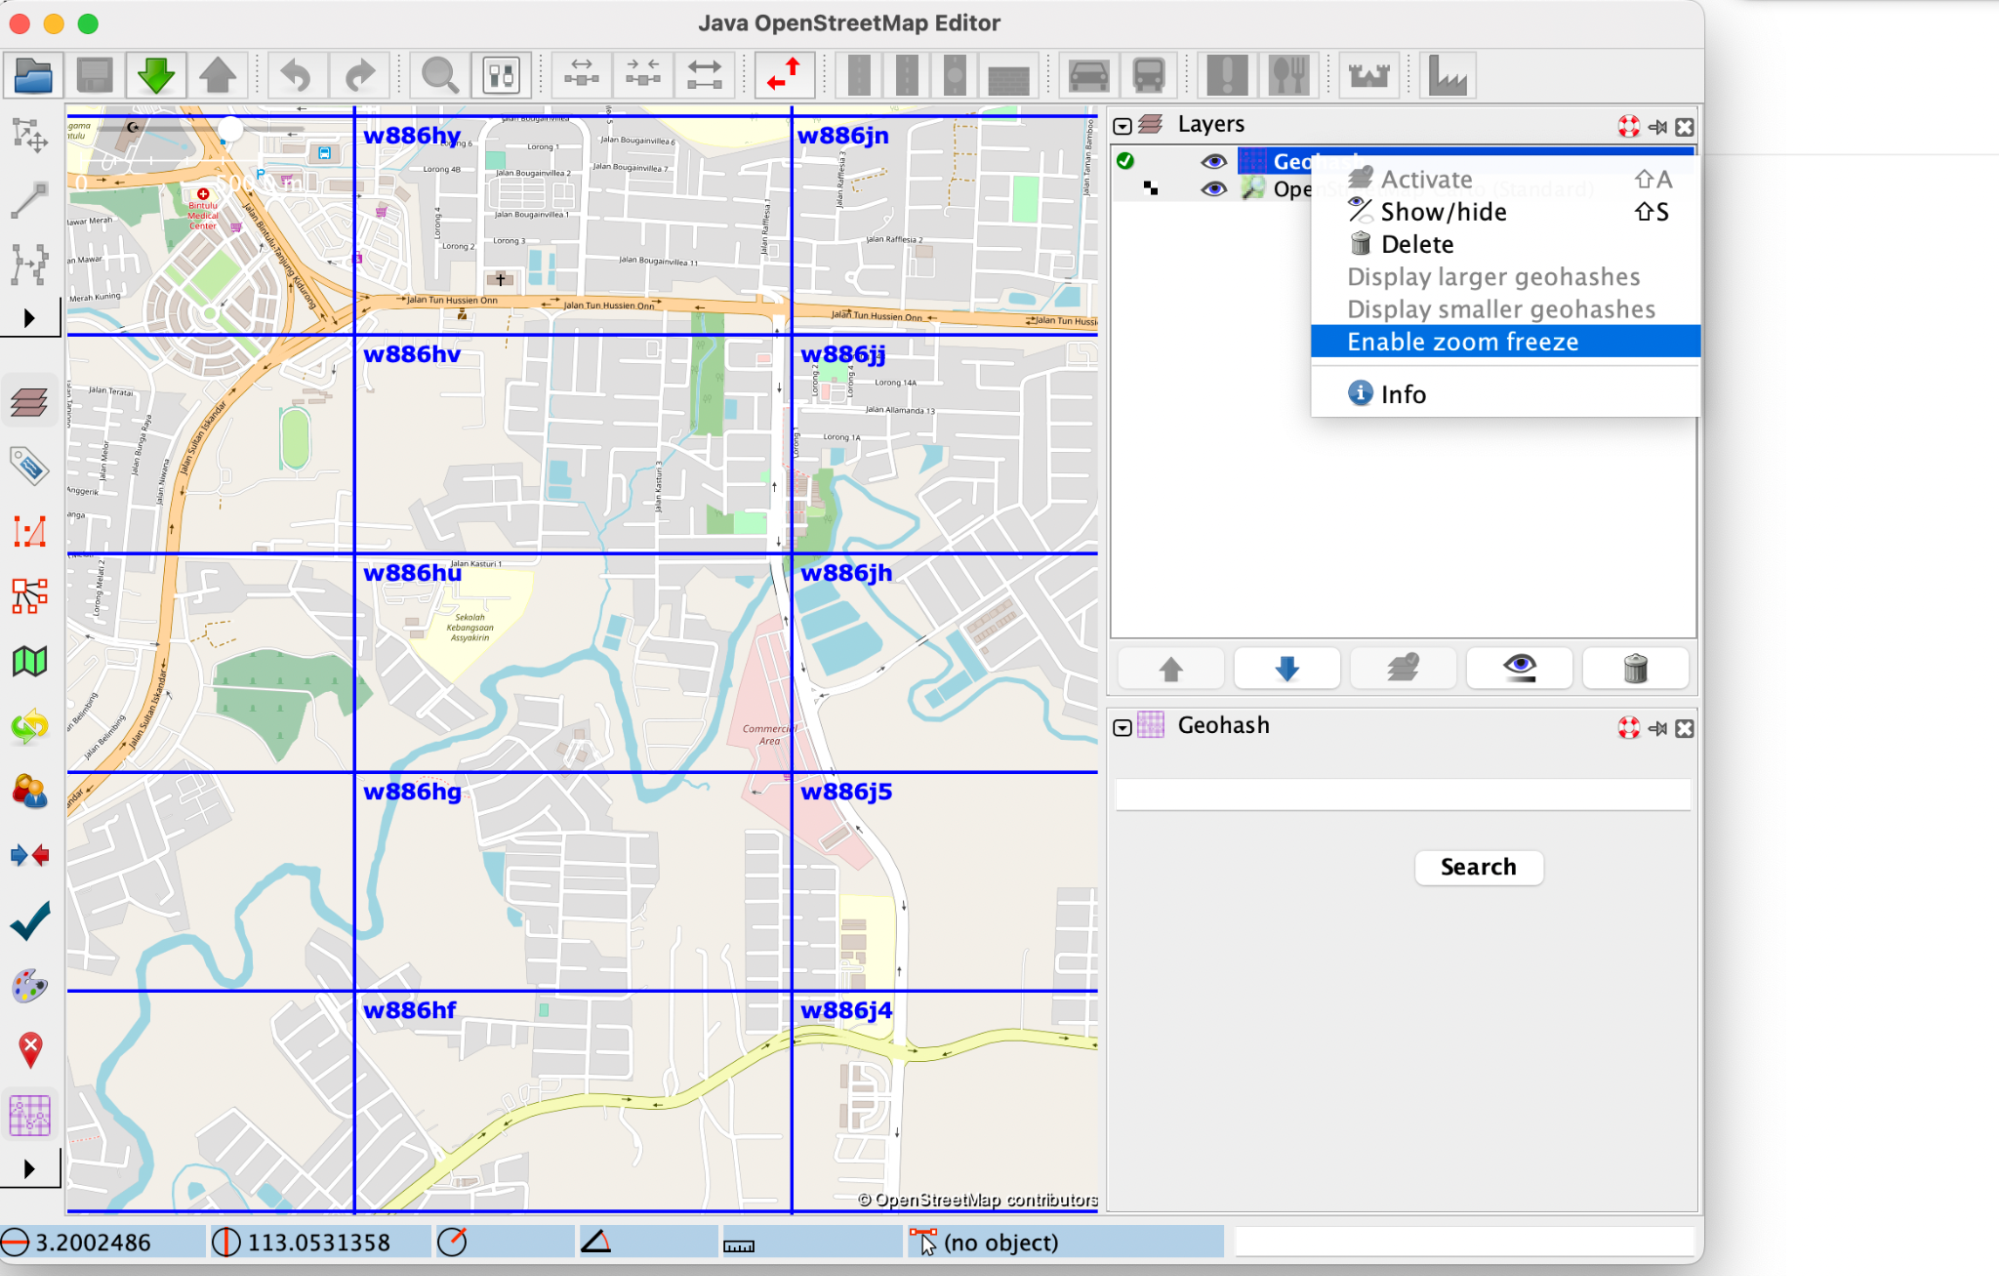
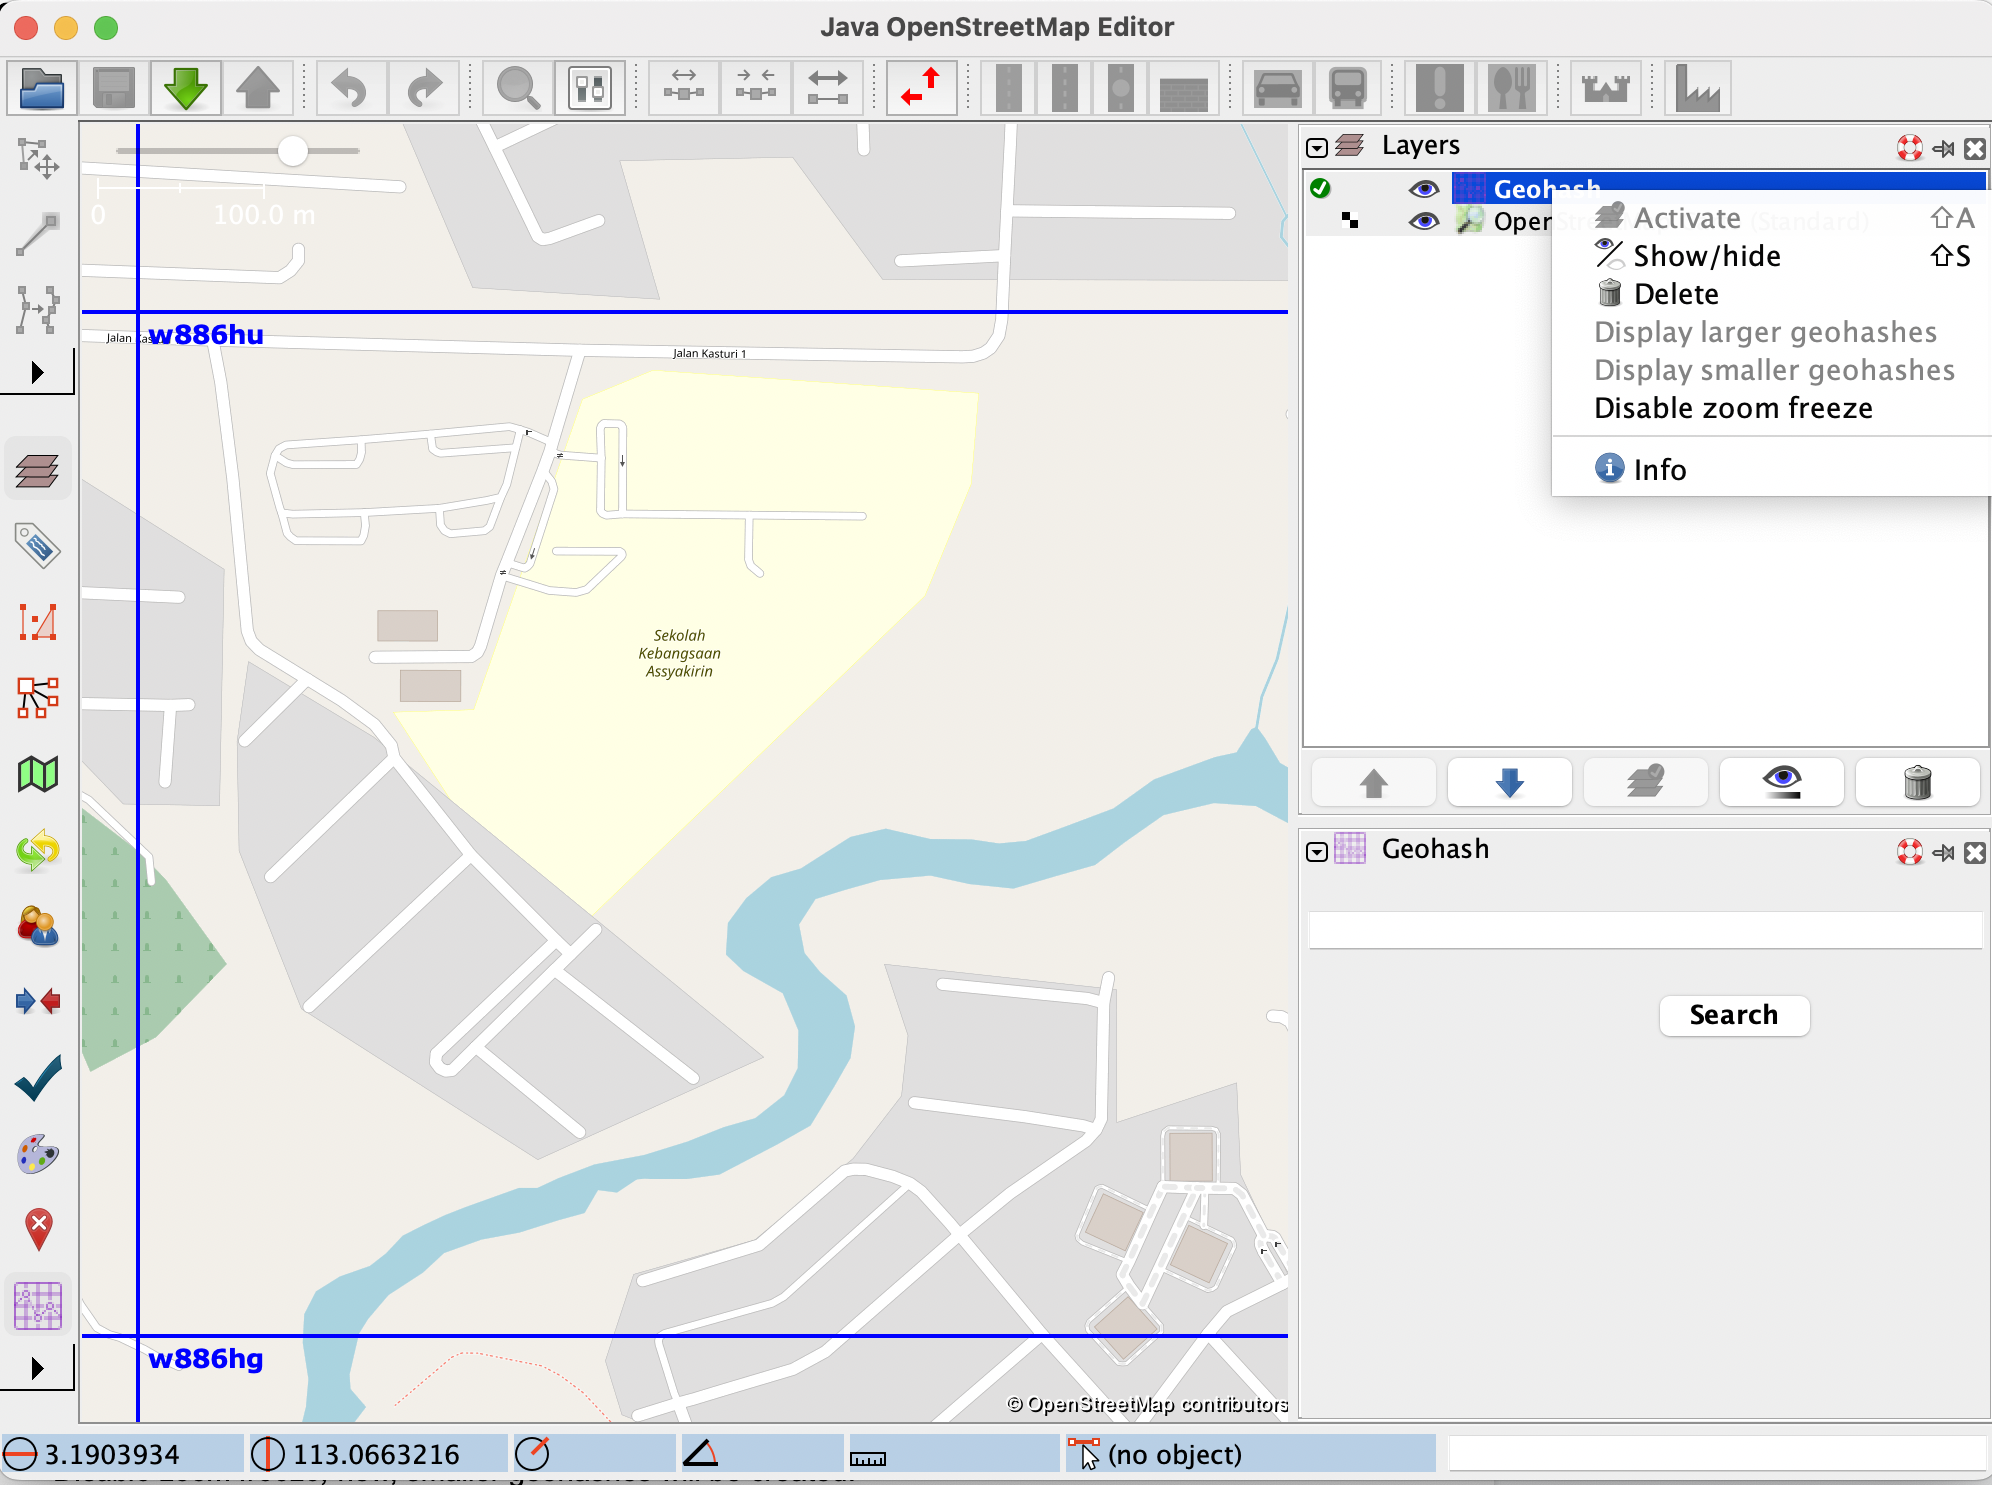
As you can see in the following image, a new label was created with the purpose of freezing or unfreezing the display of new geohashes with each zoom change:


By default, this label says “Enable zoom freeze”, and when zoom freezing is enabled, the label changes to “Disable zoom freeze”.

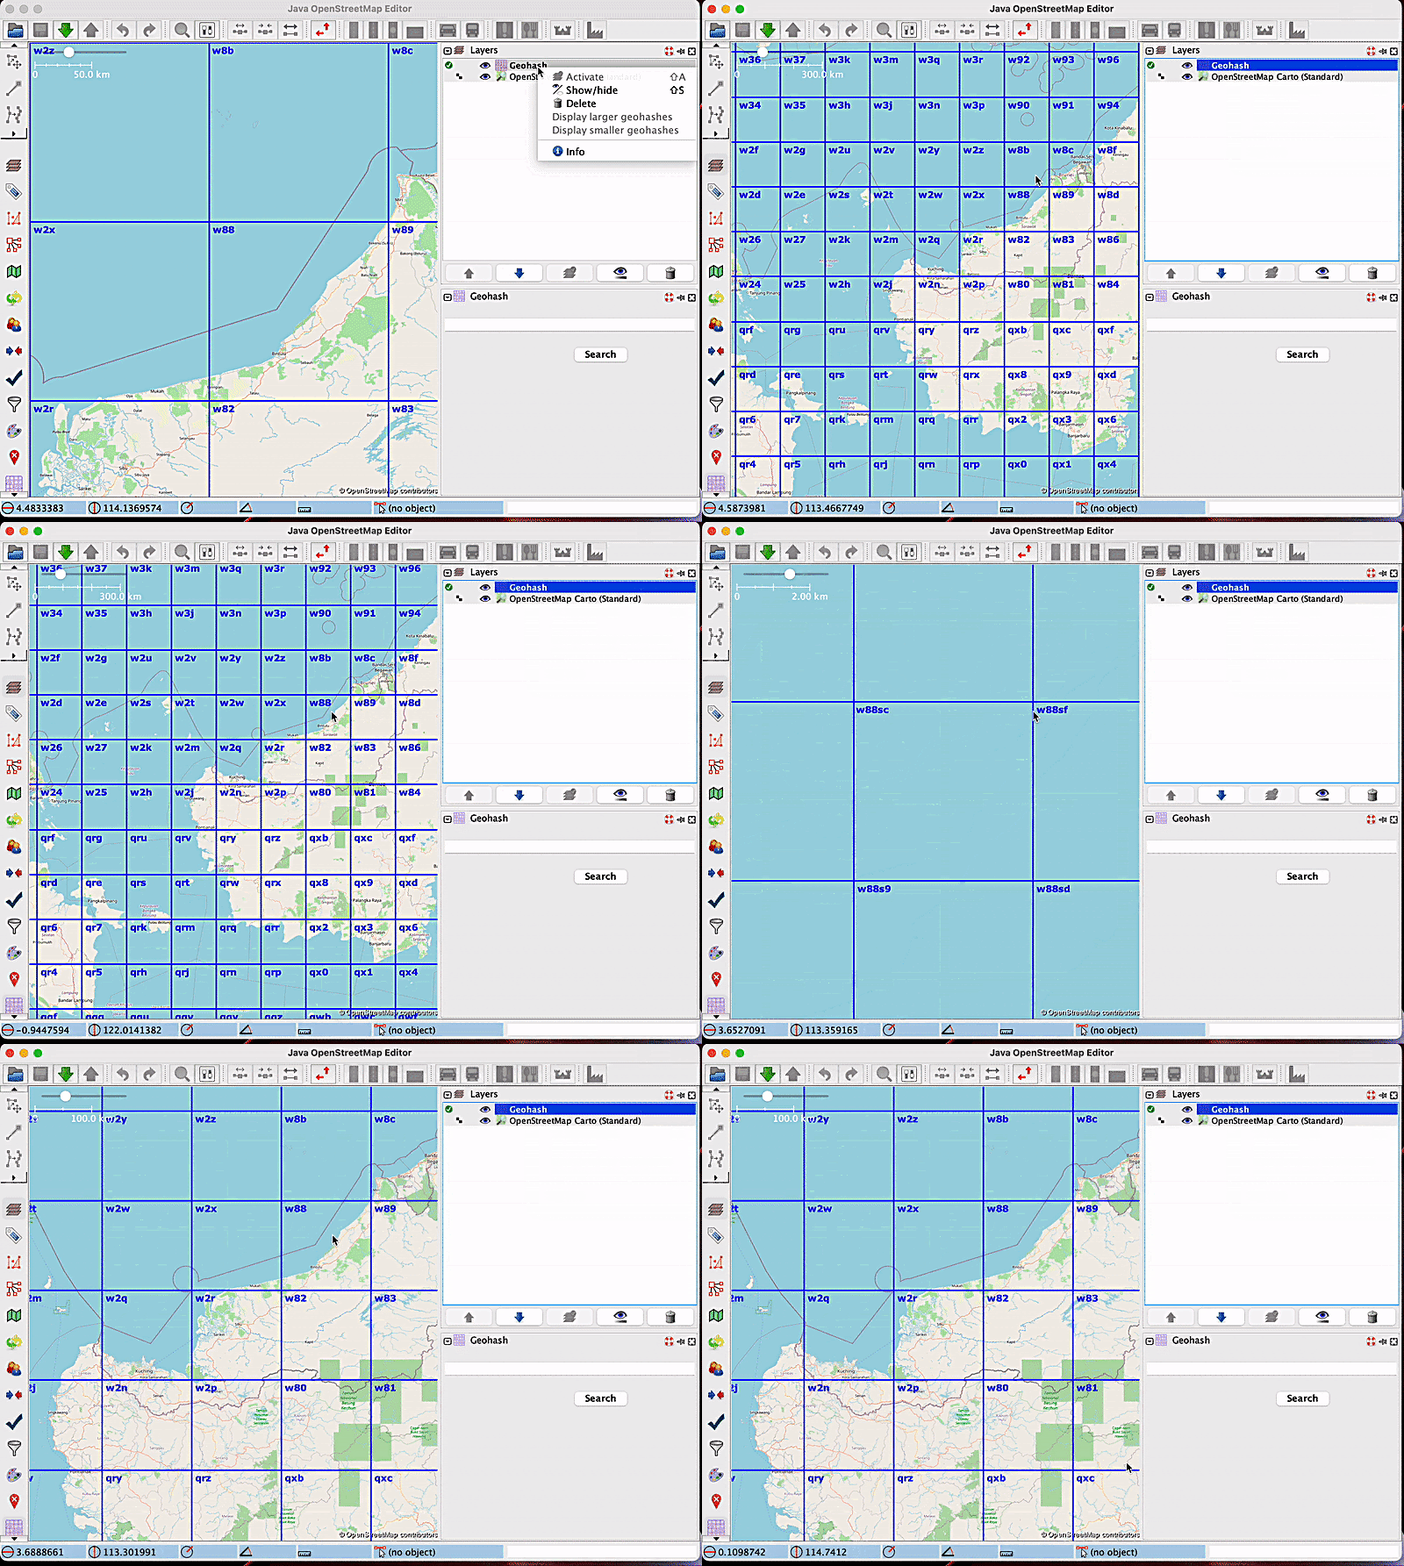
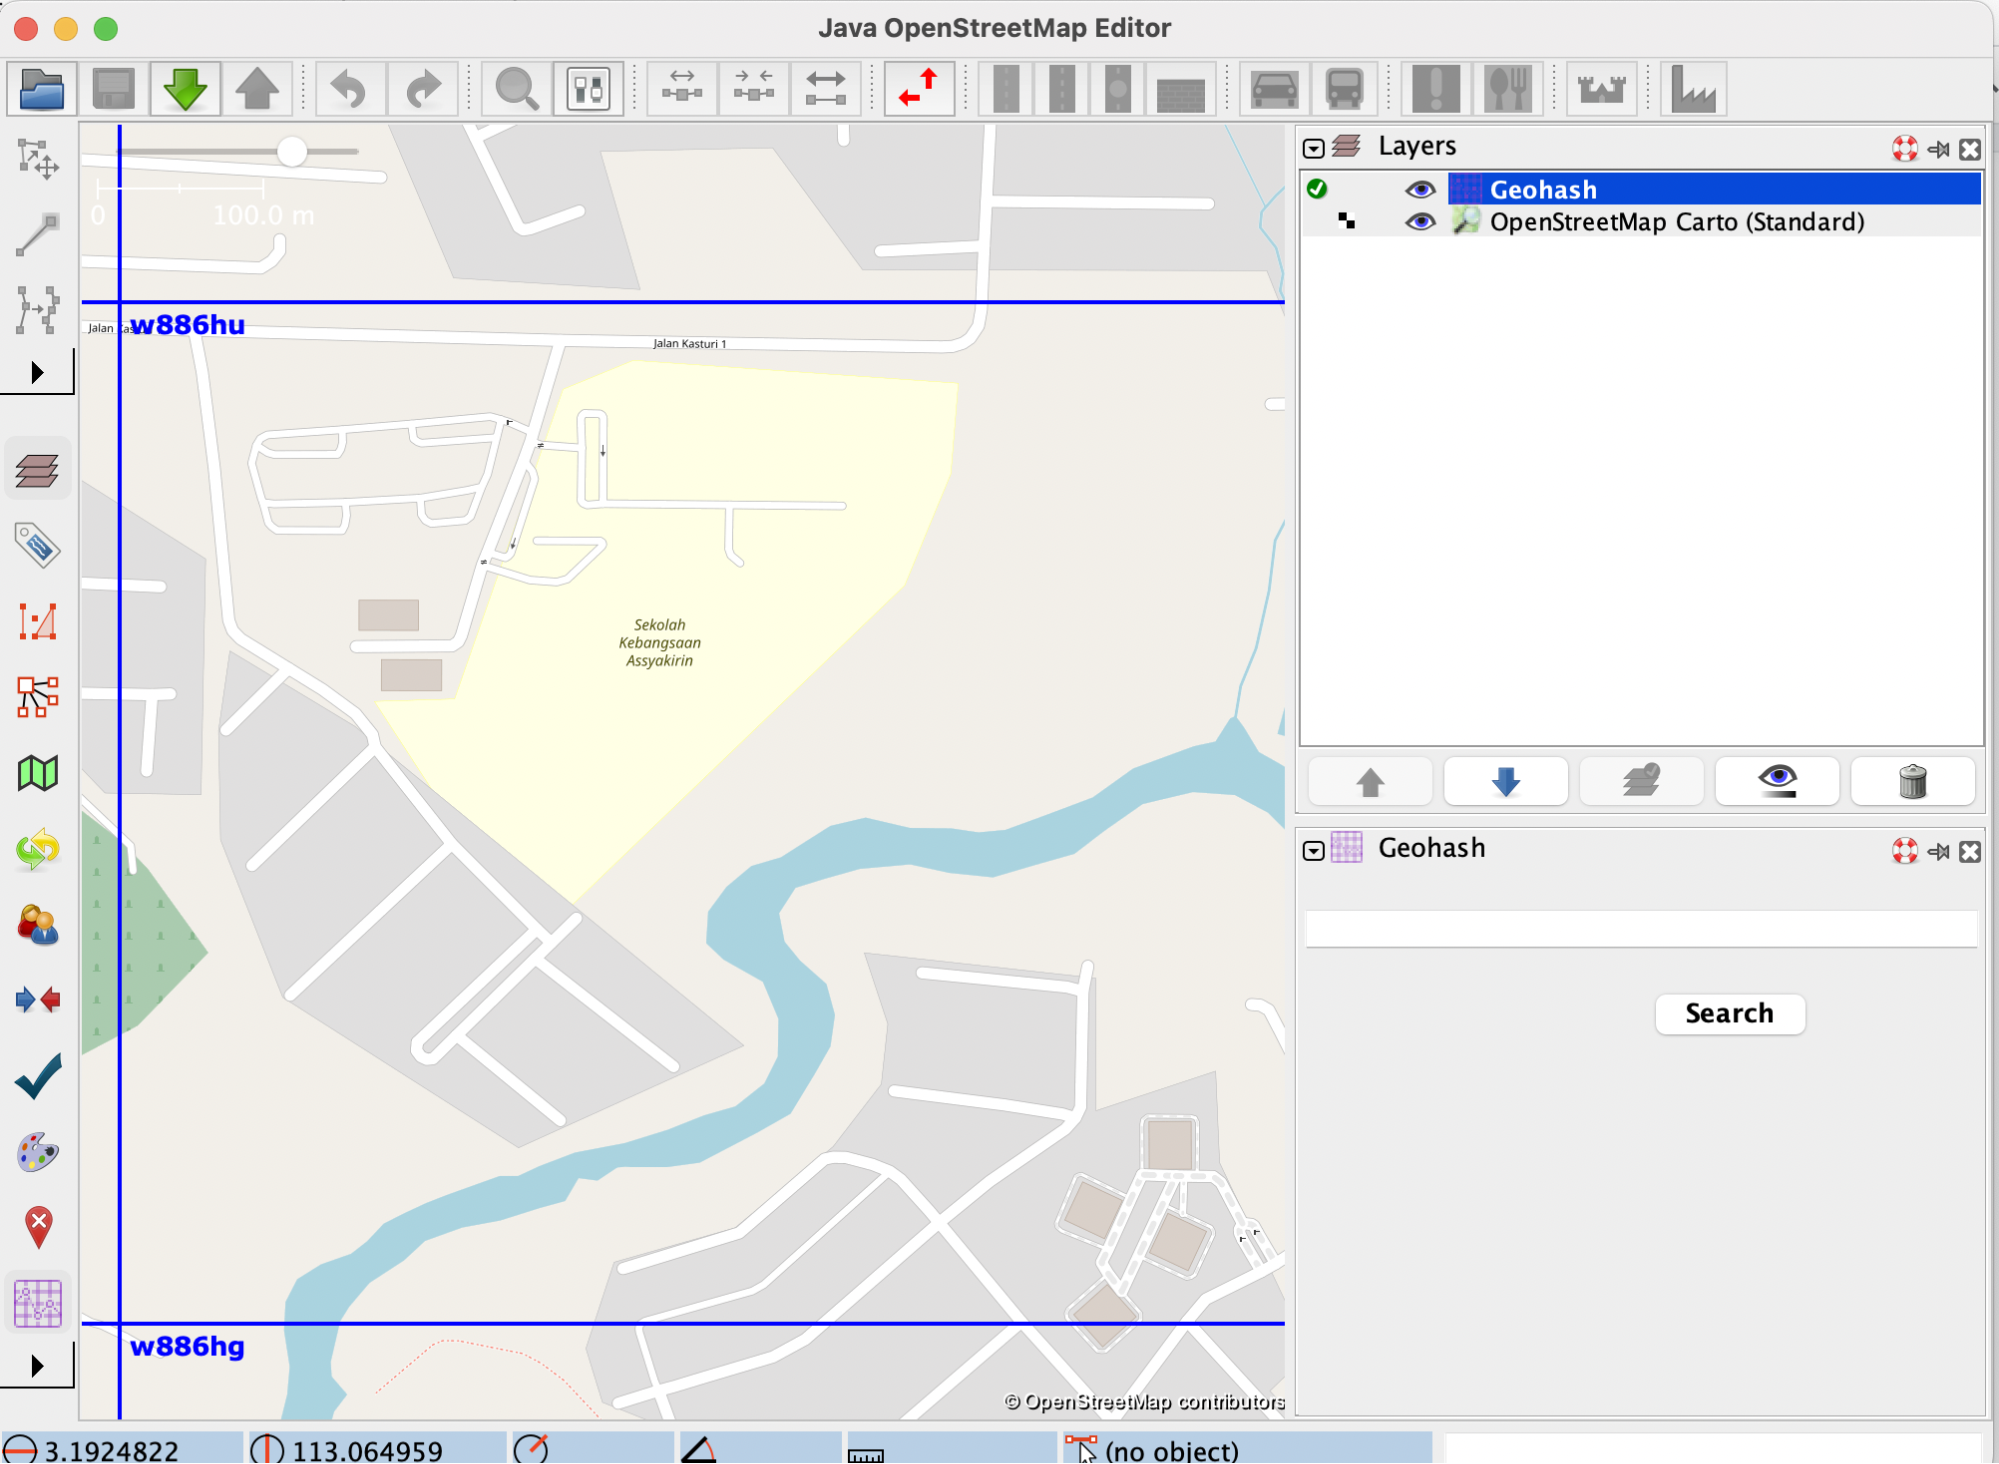
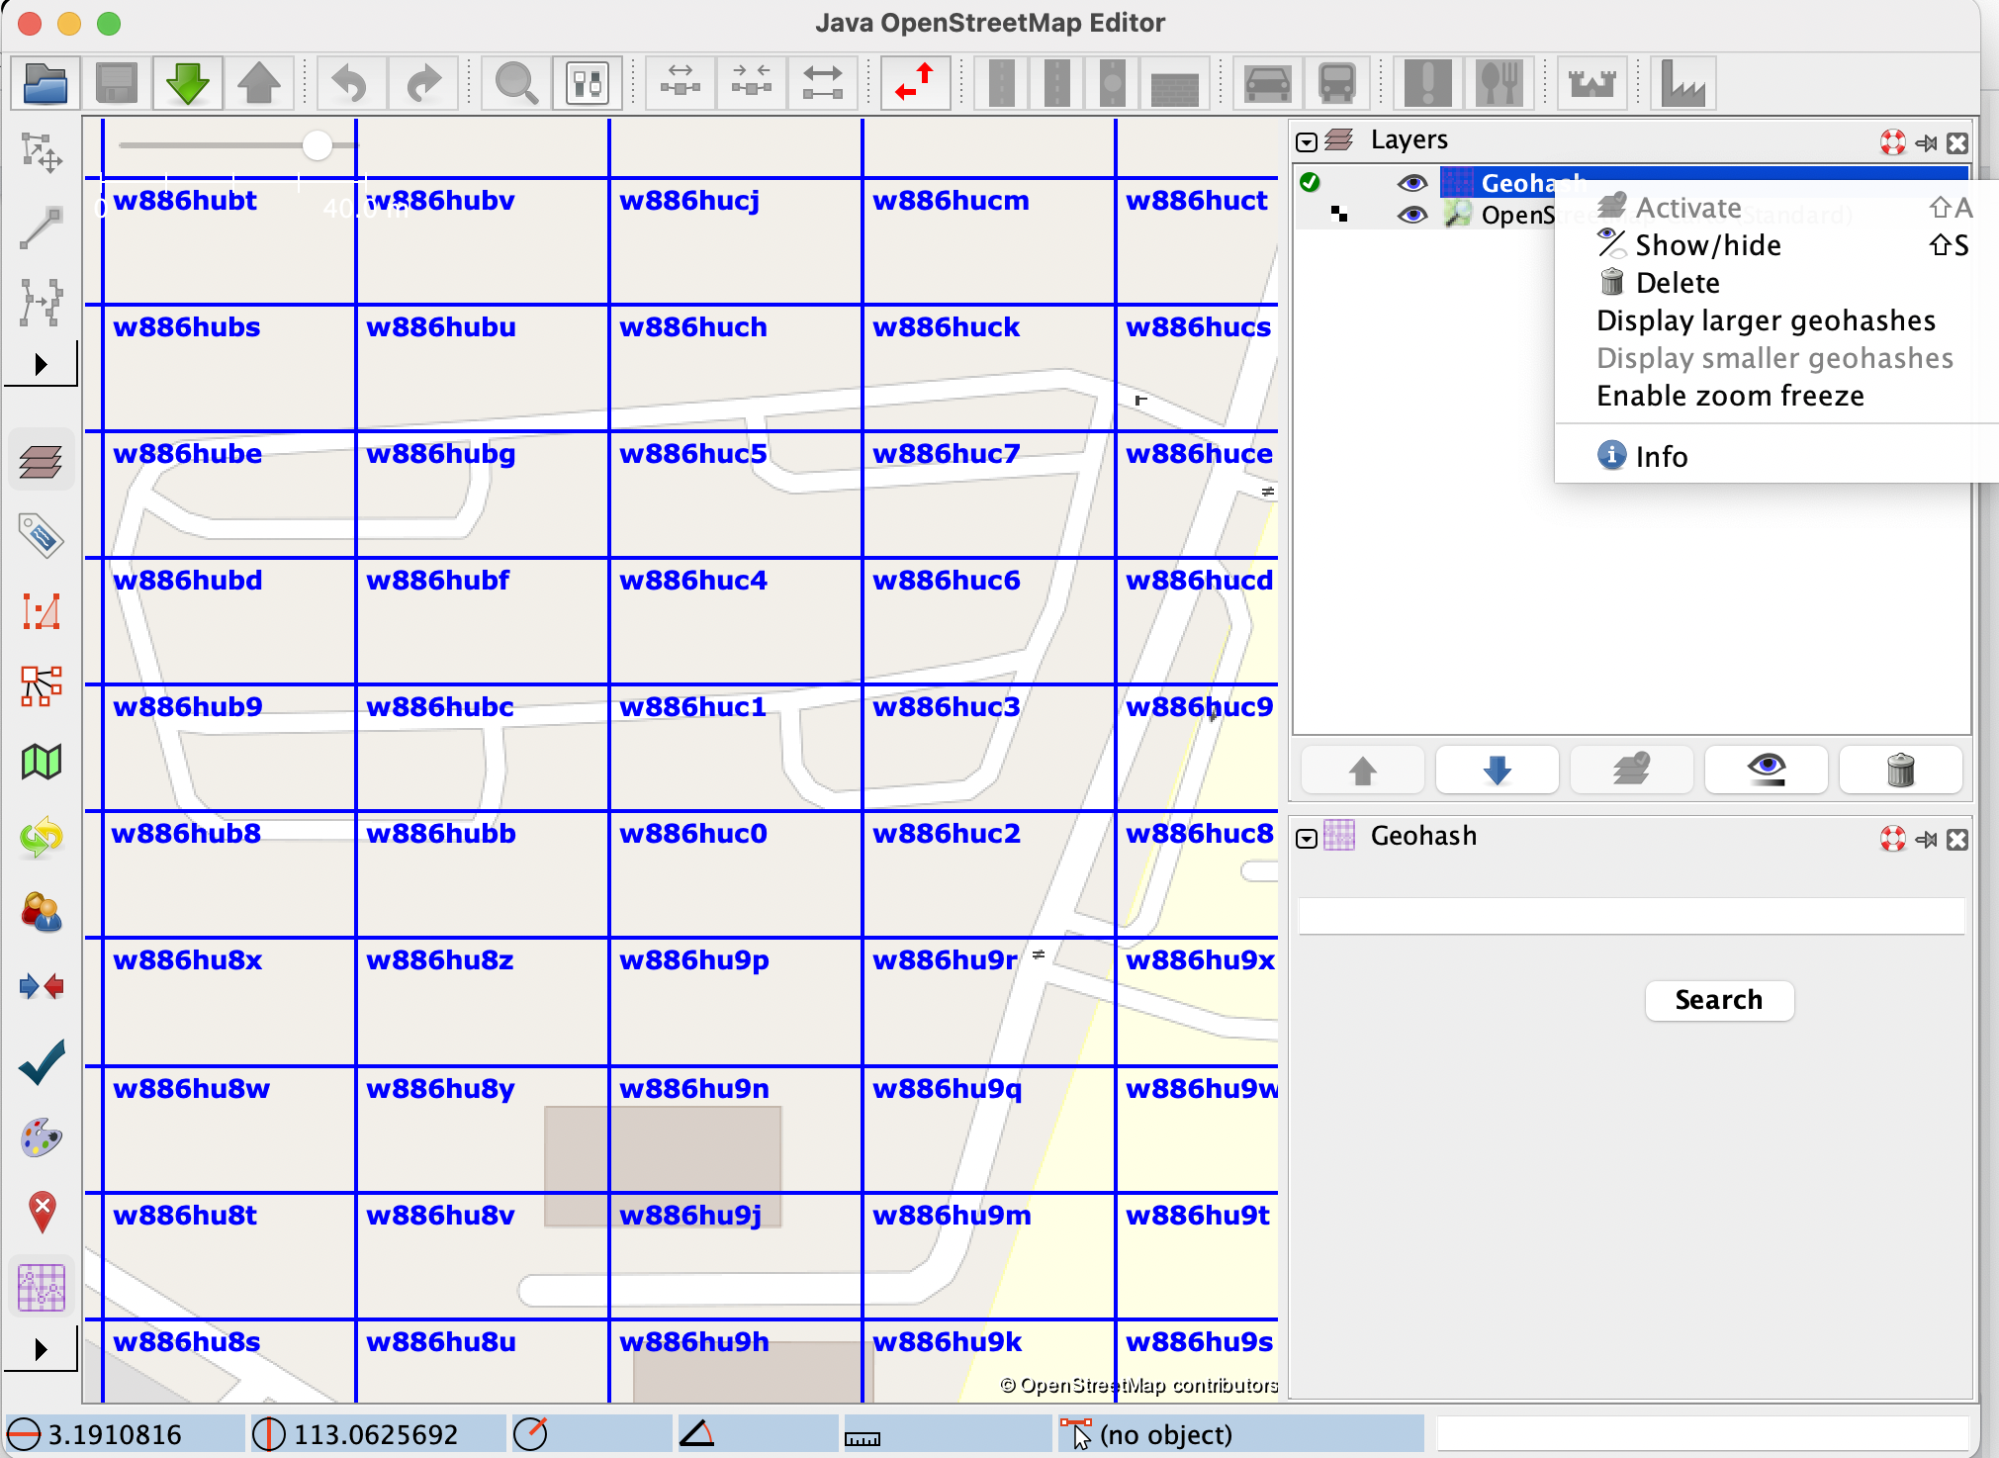
In order to see how zoom freezing works, let’s consider the following example: a user wants to zoom inside the geohash with the code w886hu, without triggering the display of smaller geohashes inside of it. For this purpose, the user will enable the zoom freezing feature by clicking on the label, and then they will proceed with the zoom. The map will look like this:


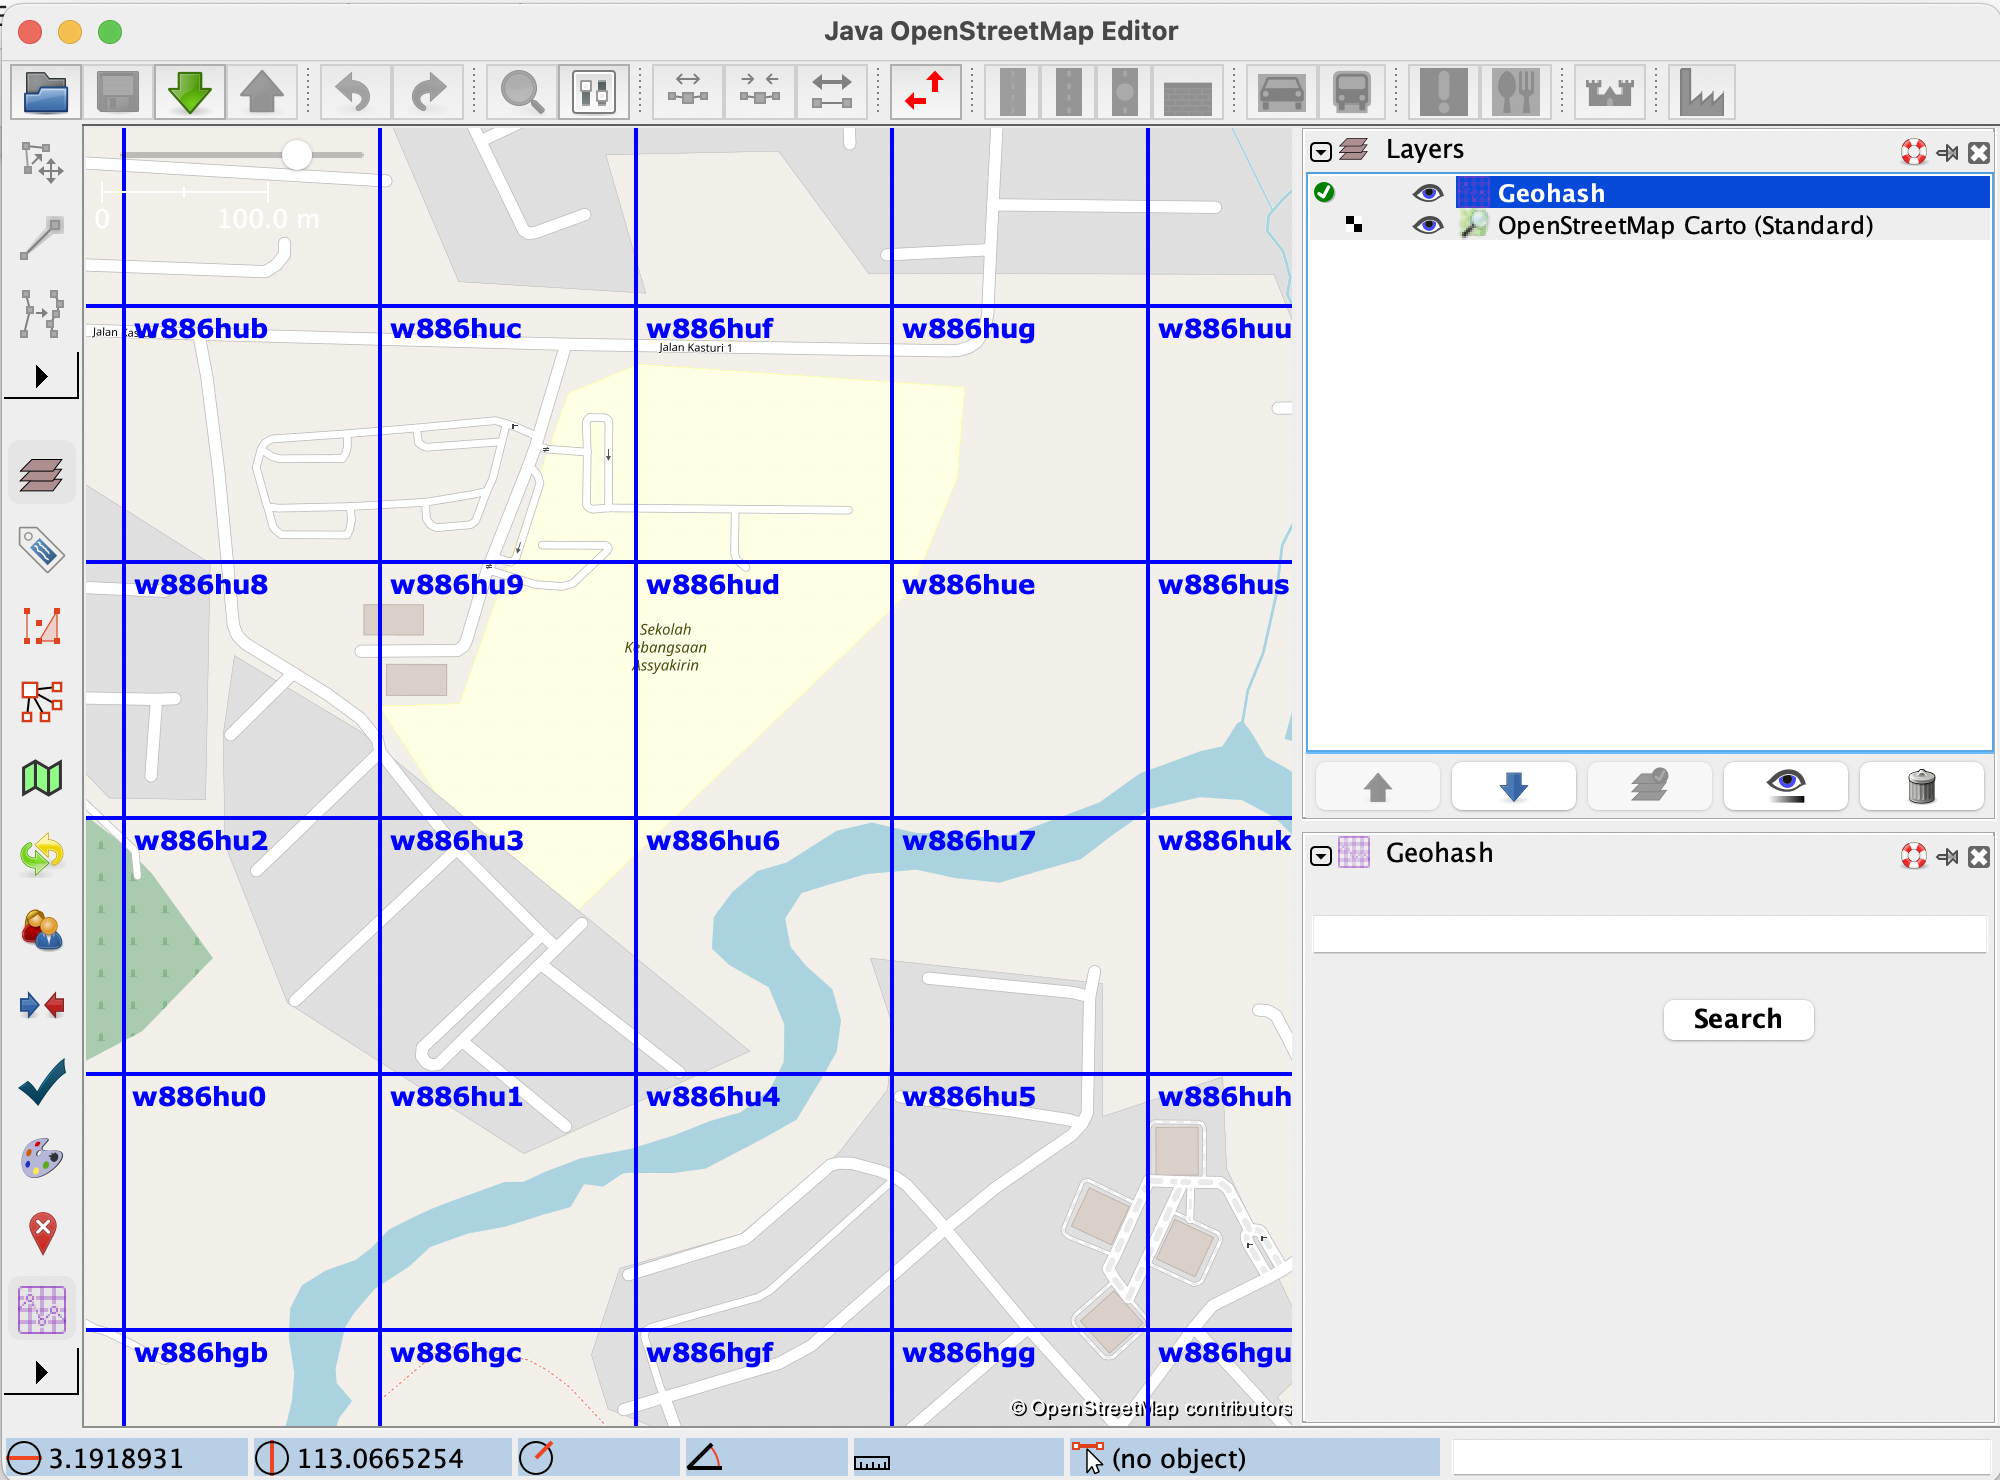
It is apparent from the image that no new geohashes were created. Now, let’s say the user has finished what they wanted to do, and wants to go back to the “normal” geohash visualisation mode, which means disabling the zoom freeze option. After clicking on the label that now says ‘Disable zoom freeze’, new, smaller geohashes will be displayed, according to the current zoom level:


The functionality is illustrated in the following short video:


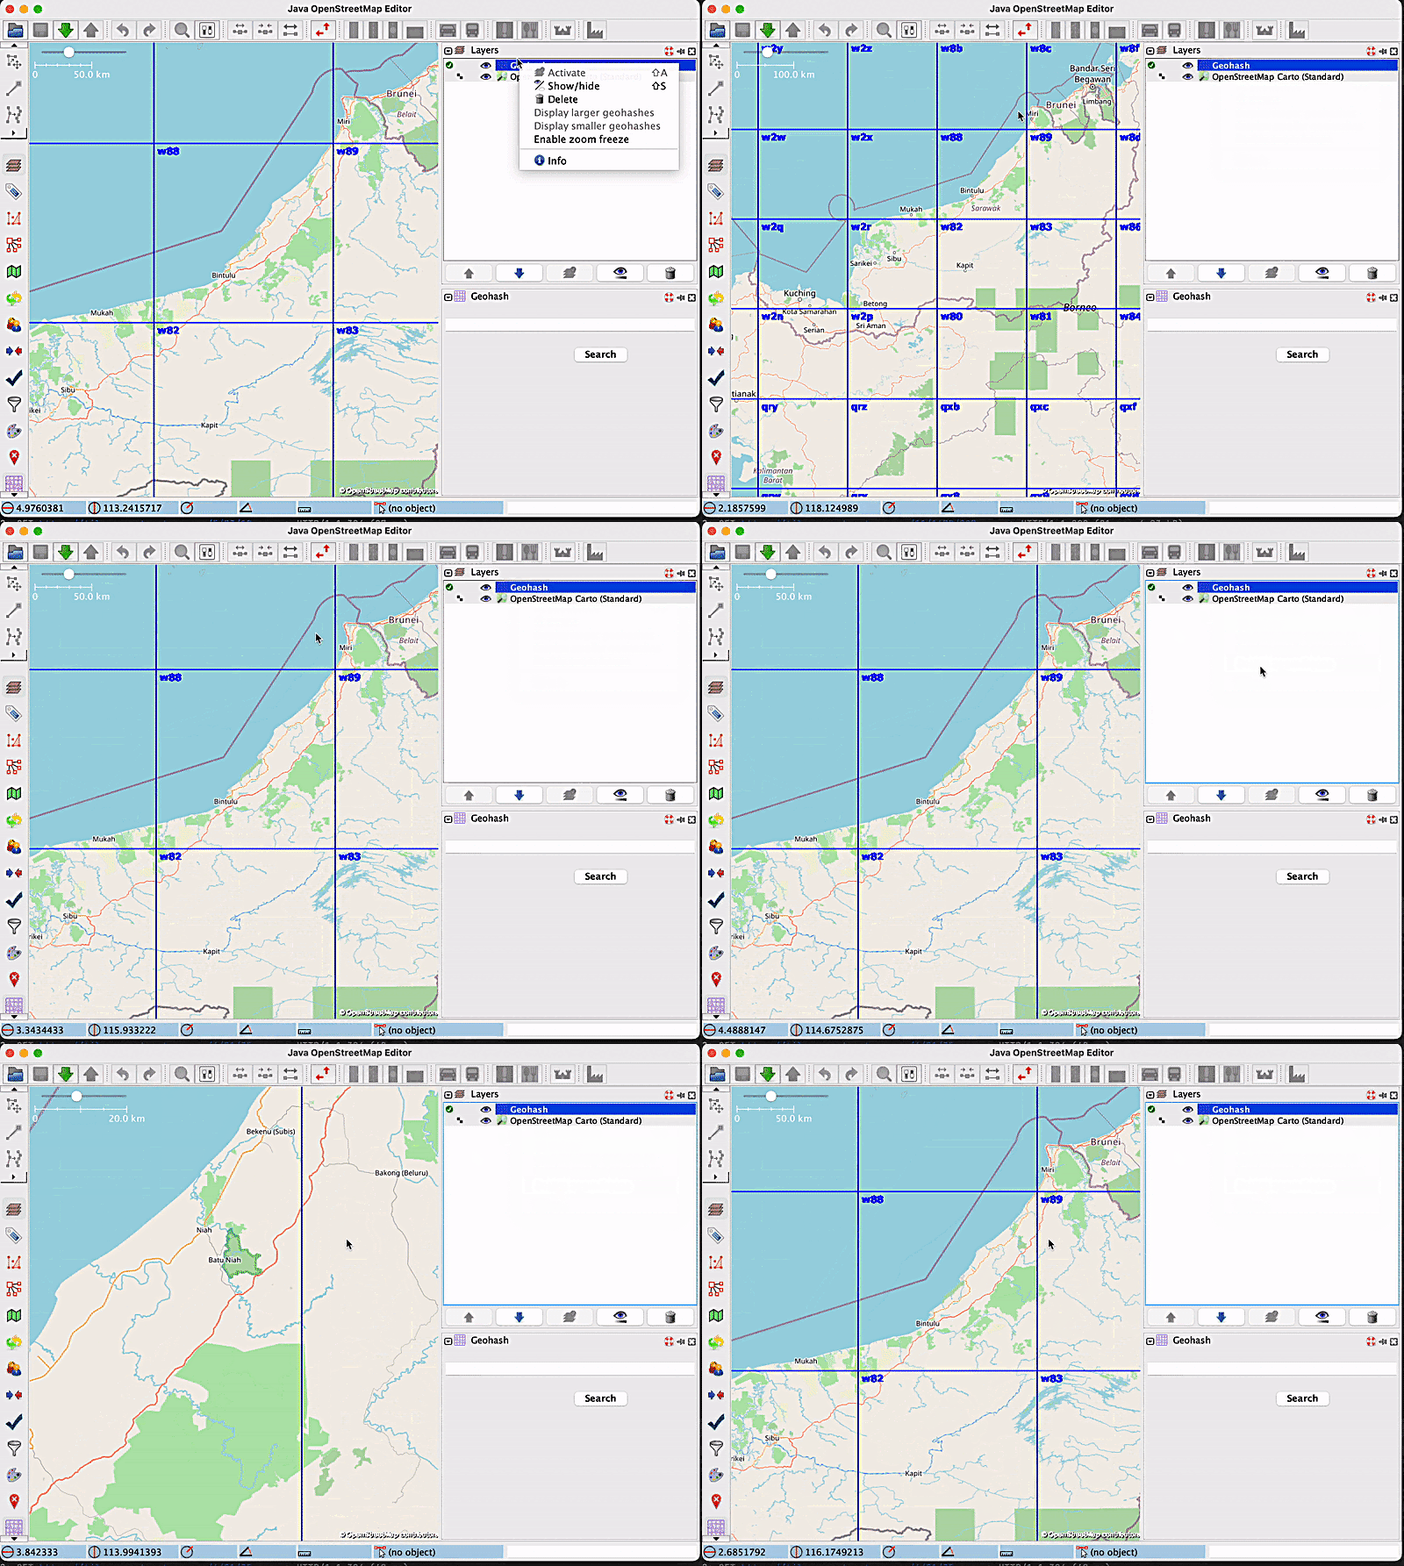
Another effect that enabling zoom freeze has is that it disables the ‘Display larger geohashes’ and ‘Display smaller geohashes’ options, since the geohashes are now fixed. The following images show how these options work before and after disabling zoom freeze:


To conclude, we believe that the release of this new feature will benefit users by making it more comfortable for them to zoom in and out of a map. By turning off the display of new geohashes when this is unwanted, map readability is improved, and this translates to a better user experience.

Impact/Limitations

In order to start using this new feature, users need to update the Geohash JOSM plugin.

What’s next?

Grab has come a long way in map-making, from using open source map-making software and developing its own suite of map-making tools to contributing to the open-source map community and building and launching GrabMaps. To find out more, read How KartaCam powers GrabMaps and KartaCam delivers comprehensive, cost-effective mapping data.

Join us

Grab is the leading superapp platform in Southeast Asia, providing everyday services that matter to consumers. More than just a ride-hailing and food delivery app, Grab offers a wide range of on-demand services in the region, including mobility, food, package and grocery delivery services, mobile payments, and financial services across 428 cities in eight countries.

Powered by technology and driven by heart, our mission is to drive Southeast Asia forward by creating economic empowerment for everyone. If this mission speaks to you, join our team today!

How to use AWS Private Certificate Authority short-lived certificate mode

Post Syndicated from Zachary Miller original https://aws.amazon.com/blogs/security/how-to-use-aws-private-certificate-authority-short-lived-certificate-mode/

AWS Private Certificate Authority (AWS Private CA) is a highly available, fully managed private certificate authority (CA) service that you can use to create CA hierarchies and issue private X.509 certificates. You can use these private certificates to establish endpoints for TLS encryption, cryptographically sign code, authenticate users, and more.

Based on customer feedback for prorated certificate pricing options, AWS Private CA now offers short-lived certificate mode, a lower cost mode of AWS Private CA that is designed to issue short-lived certificates. In this blog post, we will compare the original general-purpose and new short-lived CA modes and discuss use cases for each of them.

The general-purpose mode of AWS Private CA supports certificates of any validity period. The addition of short-lived CA mode is intended to facilitate use cases where you want certificates with a short validity period, defined as 7 days or less. Keep in mind this doesn’t mean that the root CA certificate must also be short lived. Although a typical root CA certificate is valid for 10 years, you can customize the certificate validity period for CAs in either mode when you install the CA certificate.

You select the CA mode when you create a certificate authority. The CA mode cannot be changed for an existing CA. Both modes (general-purpose and short-lived) have distinct pricing for the different use cases that they support.

The short-lived CA mode offers an accessible pricing model for customers who need to issue certificates with a short-term validity period. You can use these short-lived certificates for on-demand AWS workloads and align the validity of the certificate with the lifetime of the certificate holder. For example, if you’re using certificate-based authentication for a virtual workstation that is rebuilt each day, you can configure your certificates to expire after 24 hours.

In this blog post, we will compare the two CA modes, examine their pricing models, and discuss several potential use cases for short-lived certificates. We will also provide a walkthrough that shows you how to create a short-lived mode CA by using the AWS Command Line Interface (AWS CLI). To create a short-lived mode CA using the AWS Management Console, see Procedure for creating a CA (console).

Comparing general-purpose mode CAs to short-lived mode CAs

You might be wondering, “How is the short-lived CA mode different from the general-purpose CA mode? I can already create certificates with a short validity period by using AWS Private CA.” The key difference between these two CA modes is cost. Short-lived CA mode is priced to better serve use cases where you reissue private certificates frequently, such as for certificate-based authentication (CBA).

With CBA, users can authenticate once and then seamlessly access resources, including Amazon WorkSpaces and Amazon AppStream 2.0, without re-entering their credentials. This use case demonstrates the security value of short-lived certificates. A short validity period for the certificate reduces the impact of a compromised certificate because the certificate can only be used for authentication during a small window before it’s automatically invalidated. This method of authentication is useful for customers who are looking to adopt a Zero Trust security strategy.

Before the release of the short-lived CA mode, using AWS Private CA for CBA could be cost prohibitive for some customers. This is because CBA needs a new certificate for each user at regular intervals, which can require issuing a high volume of certificates. The best practice for CBA is to use short-lived CA mode, which can issue certificates at a lower cost that can be used to authenticate a user and then expire shortly afterward.

Let’s take a closer look at the pricing models for the two CA modes that are available when you use AWS Private CA.

Pricing model comparison

You can issue short-lived certificates from both the general-purpose and short-lived CA modes of AWS Private CA. However, the general-purpose mode CAs incur a monthly charge of $400 per CA. The cost of issuing certificates from a general-purpose mode CA is based on the number of certificates that you issue per month, per AWS Region.

The following table shows the pricing tiers for certificates issued by AWS Private CA by using a general-purpose mode CA.

Number of private certificates created each month (per Region) Price (per certificate)
1–1,000 $0.75 USD
1,001–10,000 $0.35 USD
10,001 and above $0.001 USD

The short-lived mode CA will only incur a monthly charge of $50 per CA. The cost of issuing certificates from a short-lived mode CA is the same regardless of the volume of certificates issued: $0.058 per certificate. This pricing structure is more cost effective than general-purpose mode if you need to frequently issue new, short-lived certificates for a use case like certificate-based authentication. Figure 1 compares costs between modes at different certificate volumes.

Figure 1: Cost comparison of AWS Private CA modes

Figure 1: Cost comparison of AWS Private CA modes

It’s important to note that if you already issue a high volume of certificates each month from AWS Private CA, the short-lived CA mode might not be more cost effective than the general-purpose mode. Consider a customer who has one CA and issues 80,000 certificates per month using the general-purpose CA mode: This will incur a total monthly cost of $4,370. A breakdown of the total cost per month in this scenario is as follows.

1 private CA x 400 USD per month = 400 USD per month for operation of AWS Private CA

Tiered price for 80,000 issued certificates:
1,000 issued certificates x 0.75 USD = 750 USD
9,000 issued certificates x 0.35 USD = 3,150 USD
70,000 issued certificates x 0.001 USD = 70 USD
Total tier cost: 750 USD + 3,150 USD + 70 USD = 3,970 USD per month for certificates issued
400 USD for instances + 3,970 USD for certificate issued = 4,370 USD
Total cost (monthly): 4,370 USD

Now imagine that same customer chose to use a short-lived mode CA to issue the same number of private certificates. Although the cost per month of the short-lived mode CA instance is lower, the price of issuing short-lived certificates would still be greater than the 70,000 certificates issued at a cost of $0.001 with the general-purpose mode CA. The total cost of issuing this many certificates from a single short-lived mode CA is $4,690. A breakdown of the total cost per month in this scenario is as follows.

1 private CA x 50 USD per month = 50 USD per month for operation of AWS Private CA (short-lived CA mode)

Price for 80,000 issued certificates (short-lived CA mode):
80,000 issued certificates x 0.058 USD = 4,640 USD
50 USD for instances + 4,640 USD for certificate issued = 4,690 USD
Total cost (monthly): 4,690 USD

At very high volumes of certificate issuance, the short-lived CA mode is not as cost effective as the general-purpose CA mode. It’s important to consider the volume of certificates that your organization will be issuing when you decide which CA mode to use. Figure 1 shows the cost difference at various volumes of certificate issuance. This difference will vary based on the number of certificates issued, as well as the number of CAs that your organization used.

You should also evaluate the various use cases that your organization has for using private certificates. For example, private certificates that are used to terminate TLS traffic typically have a validity of a year or more, meaning that the short-lived CA mode could not facilitate this use case. The short-lived CA mode can only issue certificates with a validity of 7 days or less.

However, you can create multiple private CAs and select the appropriate certificate authority mode for each CA based on your requirements. We recommend that you evaluate your use cases and estimate your certificate volume when you consider which CA mode to use.

In general, you should use the new short-lived CA mode for use cases where you require certificates with a short validity period (less than 7 days) and you are not planning to issue more than 75,000 certificates per month. You should use the general-purpose CA mode for scenarios where you need to issue certificates with a validity period of more than 7 days, or when you need short-lived certificates but will be issuing very high volumes of certificates each month (for example, over 75,000).

Use cases

The short-lived certificate feature was initially developed for certificate-based authentication with Amazon WorkSpaces and Amazon AppStream 2.0. For a step-by-step guide on how to configure certificate-based authentication for Amazon Workspaces, see How to configure certificate-based authentication for Amazon WorkSpaces. However, there are other ways to get value from the AWS Private CA short-lived CA mode, which we will describe in the following sections.

IAM Roles Anywhere

For customers who use AWS Identity and Access Management (IAM) Roles Anywhere, you might want to reduce the time period for which a certificate can be used to retrieve temporary credentials to assume an IAM role. If you frequently issue X.509 certificates to servers outside of AWS for use with IAM Roles Anywhere, and you want to use short-lived certificates, the pricing model for short-lived CA mode will be more cost effective in most cases (see Figure 1).

Short-lived credentials are useful for administrative personas that have broad permissions to AWS resources. For instance, you might use IAM Roles Anywhere to allow an entity outside AWS to assume an IAM role with the AdministratorAccess AWS managed policy attached. To help manage the risk of this access pattern, we want the certificate to expire relatively quickly, which reduces the time period during which a compromised certificate could potentially be used to authenticate to a highly privileged IAM role.

Furthermore, IAM Roles Anywhere requires that you manually upload a certificate revocation list (CRL), and does not support the CRL and Online Certificate Status Protocol (OCSP) mechanisms that are native to AWS Private CA. Using short-lived certificates is a way to reduce the impact of a potential credential compromise without needing to configure revocation for IAM Roles Anywhere. The need for certificate revocation is greatly reduced if the certificates are only valid for a single day and can’t be used to retrieve temporary credentials to assume an IAM role after the certificate expires.

Mutual TLS between workloads

Consider a highly sensitive workload running on Amazon Elastic Kubernetes Service (Amazon EKS). AWS Private CA supports an open-source plugin for cert-manager, a widely adopted solution for TLS certificate management in Kubernetes, that offers a more secure CA solution for Kubernetes containers. You can use cert-manager and AWS Private CA to issue certificates to identify cluster resources and encrypt data in transit with TLS.

If you use mutual TLS (mTLS) to protect network traffic between Kubernetes pods, you might want to align the validity period of the private certificates with the lifetime of the pods. For example, if you rebuild the worker nodes for your EKS cluster each day, you can issue certificates that expire after 24 hours and configure your application to request a new short-lived certificate before the current certificate expires.

This enables resource identification and mTLS between pods without requiring frequent revocation of certificates that were issued to resources that no longer exist. As stated previously, this method of issuing short-lived certificates is possible with the general-purpose CA mode—but using the new short-lived CA mode makes this use case more cost effective for customers who issue fewer than 75,000 certificates each month.

Create a short-lived mode CA by using the AWS CLI

In this section, we show you how to use the AWS CLI to create a new private certificate authority with the usage mode set to SHORT_LIVED_CERTIFICATE. If you don’t specify a usage mode, AWS Private CA creates a general-purpose mode CA by default. We won’t use a form of revocation, because the short-lived CA mode makes revocation less useful. The certificates expire quickly as part of normal operations. For more examples of how to create CAs with the AWS CLI, see Procedure for creating a CA (CLI). For instructions to create short-lived mode CAs with the AWS console, see Procedure for creating a CA (Console).

This walkthrough has the following prerequisites:

  1. A terminal with the .aws configuration directory set up with a valid default Region, endpoint, and credentials. For information about configuring your AWS CLI environment, see Configuration and credential file settings.
  2. An AWS Identity and Access Management (IAM) user or role that has permissions to create a certificate authority by using AWS Private CA.
  3. A certificate authority configuration file to supply when you create the CA. This file provides the subject details for the CA certificate, as well as the key and signing algorithm configuration.

    Note: We provide an example CA configuration file, but you will need to modify this example to meet your requirements.

To use the create-certificate-authority command with the AWS CLI

  1. We will use the following ca_config.txt file to create the certificate authority. You will need to modify this example to meet your requirements.
    {
       "KeyAlgorithm":"RSA_2048",
       "SigningAlgorithm":"SHA256WITHRSA",
       "Subject":{
          "Country":"US",
          "Organization":"Example Corp",
          "OrganizationalUnit":"Sales",
          "State":"WA",
          "Locality":"Seattle",
          "CommonName":"Example Root CA G1"
       }
    }

  2. Enter the following command to create a short-lived mode root CA by using the parameters supplied in the ca_config.txt file.

    Note: Make sure that ca_config.txt is located in your current directory, or specify the full path to the file.

    aws acm-pca create-certificate-authority \
    --certificate-authority-configuration file://ca_config.txt \
    --certificate-authority-type "ROOT" \
    --usage-mode SHORT_LIVED_CERTIFICATE \
    --tags Key=usageMode,Value=SHORT_LIVED_CERTIFICATE

  3. Use the describe-certificate-authority command to view the status of your new root CA. The status will show Pending_Certificate, until you install a self-signed root CA certificate. You will need to replace the certificate authority Amazon Resource Name (ARN) in the following command with your own CA ARN.

    sh-4.2$ aws acm-pca describe-certificate-authority --certificate-authority-arn arn:aws:acm-pca:region:account:certificate-authority/CA_ID

    The output of this command is as follows:

    {
        "CertificateAuthority": {
            "Arn": "arn:aws:acm-pca:region:account:certificate-authority/CA_ID",
            "OwnerAccount": "account",
            "CreatedAt": "2022-11-02T23:12:46.916000+00:00",
            "LastStateChangeAt": "2022-11-02T23:12:47.779000+00:00",
            "Type": "ROOT",
            "Status": "PENDING_CERTIFICATE",
            "CertificateAuthorityConfiguration": {
                "KeyAlgorithm": "RSA_2048",
                "SigningAlgorithm": "SHA256WITHRSA",
                "Subject": {
                    "Country": "US",
                    "Organization": "Example Corp",
                    "OrganizationalUnit": "Sales",
                    "State": "WA",
                    "CommonName": "Example Root CA G1",
                    "Locality": "Seattle"
                }
            },
            "RevocationConfiguration": {
                "CrlConfiguration": {
                    "Enabled": false
                },
                "OcspConfiguration": {
                    "Enabled": false
                }
            },
            "KeyStorageSecurityStandard": "FIPS_140_2_LEVEL_3_OR_HIGHER",
            "UsageMode": "SHORT_LIVED_CERTIFICATE"
        }
    }

  4. Generate a certificate signing request for your root CA certificate by running the following command. Make sure to replace the certificate authority ARN in the command with your own CA ARN.

    aws acm-pca get-certificate-authority-csr \
    --certificate-authority-arn arn:aws:acm-pca:region:account:certificate-authority/CA_ID \
    --output text > ca.csr

  5. Using the ca.csr file from the previous step as the argument for the --csr parameter, issue the root certificate with the following command. Make sure to replace the certificate authority ARN in the command with your own CA ARN.

    aws acm-pca issue-certificate \
    --certificate-authority-arn arn:aws:acm-pca:region:account:certificate-authority/CA_ID \
    --csr fileb://ca.csr \
    --signing-algorithm SHA256WITHRSA \
    --template-arn arn:aws:acm-pca:::template/RootCACertificate/V1 \
    --validity Value=10,Type=YEARS

  6. The response will include the CertificateArn for the issued root CA certificate. Next, use your CA ARN and the certificate ARN provided in the response to retrieve the certificate by using the get-certificate CLI command, as follows.

    aws acm-pca get-certificate \
    --certificate-authority-arn arn:aws:acm-pca:region:account:certificate-authority/CA_ID \
    --certificate-arn arn:aws:acm-pca:region:account:certificate-authority/CA_ID/certificate/CERTIFICATE_ID \
    --output text > cert.pem

  7. Notice that we created a new file, cert.pem, that contains the certificate we retrieved in the previous command. We will import this certificate to our short-lived mode root CA by running the following command. Make sure to replace the certificate authority ARN in the command with your own CA ARN.

    aws acm-pca import-certificate-authority-certificate \
    --certificate-authority-arn arn:aws:acm-pca:region:account:certificate-authority/CA_ID \
    --certificate fileb://cert.pem

  8. Check the status of your short-lived mode CA again by using the describe-certificate-authority command. Make sure to replace the certificate authority ARN in the following command with your own CA ARN.

    sh-4.2$ aws acm-pca describe-certificate-authority \
    > --certificate-authority-arn arn:aws:acm-pca:region:account:certificate-authority/CA_ID \
    > --output json

    The output of this command is as follows:

    {
        "CertificateAuthority": {
            "Arn": "arn:aws:acm-pca:region:account:certificate-authority/CA_ID",
            "OwnerAccount": "account",
            "CreatedAt": "2022-11-02T23:12:46.916000+00:00",
            "LastStateChangeAt": "2022-11-02T23:39:23.482000+00:00",
            "Type": "ROOT",
            "Serial": "serial",
            "Status": "ACTIVE",
            "NotBefore": "2022-11-02T22:34:50+00:00",
            "NotAfter": "2032-11-02T23:34:50+00:00",
            "CertificateAuthorityConfiguration": {
                "KeyAlgorithm": "RSA_2048",
                "SigningAlgorithm": "SHA256WITHRSA",
                "Subject": {
                    "Country": "US",
                    "Organization": "Example Corp",
                    "OrganizationalUnit": "Sales",
                    "State": "WA",
                    "CommonName": "Example Root CA G1",
                    "Locality": "Seattle"
                }
            },
            "RevocationConfiguration": {
                "CrlConfiguration": {
                    "Enabled": false
                },
                "OcspConfiguration": {
                    "Enabled": false
                }
            },
            "KeyStorageSecurityStandard": "FIPS_140_2_LEVEL_3_OR_HIGHER",
            "UsageMode": "SHORT_LIVED_CERTIFICATE"
        }
    }

  9. Great! As shown in the output from the preceding command, the new short-lived mode root CA has a status of ACTIVE, meaning it can now issue certificates. This certificate authority will be able to issue end-entity certificates that have a validity period of up to 7 days, as shown in the UsageMode: SHORT_LIVED_CERTIFICATE parameter.

Conclusion

In this post, we introduced the short-lived CA mode that is offered by AWS Private CA, explained how it differs from the general-purpose CA mode, and compared the pricing models for both CA modes. We also provided some recommendations for choosing the appropriate CA mode based on your certificate issuance volume and use cases. Finally, we showed you how to create a short-lived mode CA by using the AWS CLI.

Get started using AWS Private CA, and consult the AWS Private CA User Guide for more details on the short-lived CA mode.

If you have feedback about this post, submit comments in the Comments section below. If you have questions about this post, start a new thread on the AWS Certificate Manager re:Post or contact AWS Support.

Want more AWS Security news? Follow us on Twitter.
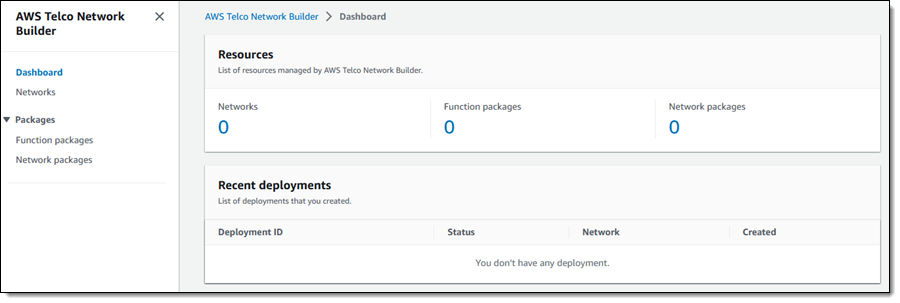
Zach Miller

Zach Miller

Zach is a Senior Security Specialist Solutions Architect at AWS. His background is in data protection and security architecture, focused on a variety of security domains, including cryptography, secrets management, and data classification. Today, he is focused on helping enterprise AWS customers adopt and operationalize AWS security services to increase security effectiveness and reduce risk.

Rushir Patel

Rushir Patel

Rushir is a Senior Security Specialist at AWS focused on data protection and cryptography services. His goal is to make complex topics simple for customers and help them adopt better security practices. Prior to AWS, he worked in security product management, engineering, and operations roles.

Trevor Freeman

Trevor Freeman

Trevor is an innovative and solutions-oriented Product Manager at Amazon Web Services, focusing on AWS Private CA. With over 20 years of experience in software and service development, he became an expert in Cloud Services, Security, Enterprise Software, and Databases. Being adept in product architecture and quality assurance, Trevor takes great pride in providing exceptional customer service.

AWS Week in Review – February 20, 2023

Post Syndicated from Channy Yun original https://aws.amazon.com/blogs/aws/aws-week-in-review-february-20-2023/

Since the devastating earthquake in Türkiye and Syria, Amazon has activated disaster relief services to quickly provide relief items to impacted areas. The company and Amazon customers have donated nearly 100,000 relief items so far, and donations continue to come in.

The AWS Disaster Preparedness and Response team is providing trained technical volunteers and solutions to Help.NGO, a United Nations standby partner assisting in the region.

We continue to support field requests for winter survival equipment, clothing, hygiene products, and other items. If you wish to donate, check out our blog post to find your local donation site and to learn more about how we’ve supported relief efforts so far. Thank you for your support!

Last Week’s Launches
As usual, let’s take a look at some launches from the last week that I want to remind you of:

New Amazon EC2 M7g and R7g instances – Since we launched C7g instances in May 2022, the General Purpose (M7g) and the Memory-Optimized (R7g) instances are generally available. Both types are powered by the latest generation AWS Graviton3 processors, and are designed to deliver up to 25 percent better performance than the equivalent sixth-generation (M6g and R6g) instances, making them the best performers in Amazon EC2.

Here is my infographic to highlight the principal performance and capacity improvements that we have made available with the new instances:

Enable AWS Systems Manager across all Amazon EC2 instances – All EC2 instances in your account become managed instances, with a single action using the Default Host Management Configuration (DHMC) Agent without changing existing instance profile roles. DHMC is ideal for all EC2 users, and offers a simple, scalable process to standardize the availability of System Manager tools for users who manage many instances. To learn more, see Default Host Management Configuration in the AWS documentation.

Programmatically manage opt-in AWS Regions – You can now view and manage enabled and disabled opt-in AWS Regions on your AWS accounts using AWS APIs. You can enable, disable, read, and list Region opt status by using the following AWS CLI commands in case of enabling Africa (Cape Town) Region:

$ aws account enable-region --region-name af-south-1
$ aws account get-region-opt-status --region-name af-south-1 
{ 
   "RegionName": "af-south-1", 
   "RegionOptStatus": "ENABLING" 
}

It will save you the time and effort of doing it through the AWS Management Console. To learn more, see Specifying which AWS Regions your account can use in the AWS documentation.

Pictured: A 3D rendering of the AWS Modular Data Center (MDC) unit.AWS Modular Data Center (AWS MDC) – AWS MDC is available as a self-contained modular data center unit: an environmentally controlled physical enclosure that can host racks of AWS Outposts or AWS Snow Family devices. AWS MDC lets defense customers run low-latency applications in infrastructure-limited environments for scenarios like large-scale military operations, crisis response, and security cooperation.

At this time, AWS MDC is now available in the AWS GovCloud Regions, and this service can only be purchased by the U.S. Department of Defense under the Joint Warfighting Cloud Capability (JWCC) contract. To learn more, read the AWS Public Sector Blog post.

A picture of a cute English bulldog on top of 3 AWS Snowball Edge device. Amazon EKS Anywhere on Snow – This is a new deployment option that helps you create and operate Kubernetes clusters on AWS Snowball Edge devices for provisioning and familiar operational visibility tooling of container applications deployed at the edge.

Amazon EKS Anywhere on Snow is ideal for customers who run their operations using secure and durable AWS Snow Family devices in unconditioned or mobile environments such as construction sites, ships, and rapidly deployed military forces. To learn more, read the AWS Container Blog post.

For a full list of AWS announcements, be sure to keep an eye on the What’s New at AWS page.

Other AWS News
Here are some other news items that you may find interesting in the last week:

Upcoming AWS Events
Check your calendars and sign up for these AWS-led events:

AWS at MWC 2023 – Join AWS at MWC23 in Barcelona, Spain, February 27 – March 2, and interact with upcoming innovative new service demonstrations, be inspired at one of our many sessions, or request a more personal meeting with us onsite.

AWS Innovate Data and AI/ML edition – AWS Innovate is a free online event to learn the latest from AWS experts and get step-by-step guidance on using AI/ML to drive fast, efficient, and measurable results. Register now for Asia Pacific & Japan (February 22, 2023), EMEA (March 9), and the Americas (March 14).

AWS Summits – AWS Global Summits are free events that bring the cloud computing community together to connect, collaborate, and learn about AWS. We kick off Paris and Sydney on April 4th and schedule most other Summits from April to June. Please stay tuned and watch for the dates and locations to be announced.

You can browse all upcoming AWS-led in-person, virtual events, and developer focused events such as Community Days.

That’s all for this week. Check back next Monday for another Week in Review!

— Channy

This post is part of our Week in Review series. Check back each week for a quick roundup of interesting news and announcements from AWS!

Detecting solar panel damage with Amazon Rekognition Custom Labels

Post Syndicated from Ramakant Joshi original https://aws.amazon.com/blogs/architecture/detecting-solar-panel-damage-with-amazon-rekognition-custom-labels/

Enterprises perform quality control to ensure products meet production standards and avoid potential brand reputation damage. As the cost of sensors decreases and connectivity increases, industries adopt real-time imagery analysis to detect quality issues.

At the same time, artificial intelligence (AI) advancements enable advanced automation, reduce overall cost and project time, and produce accurate defect detection results in manufacturing plants. As these technologies mature, AI-driven inspections are more common outside of the plant environment.

Overview of solution

This post describes our SOLVED (Solar Roving Eye Detector) project leveraging machine learning (ML) to identify damaged solar panels using Amazon Rekognition Custom Labels and alert operators to take corrective action.

As solar adoption increases, so does the need to detect panel damage. Applying AWS-managed AI services is a simpler, more cost-effective approach than human solar panel inspection or custom-built production applications.

Customers can capture and process videos from the field and build effective computer vision models without creating a dedicated data science team. This approach can be generalized for use cases across industries to detect defects in wind turbines, cell phone towers, automotive parts, and other field components.

Amazon Rekognition Custom Labels builds off of existing service capabilities already trained to identify the objects and scenes in millions of cross-category images. You upload a small set of training images—typically a few hundred or less—into our console. The solution automatically loads and inspects the training data, selects the right ML algorithms, trains a model, and provides model performance metrics. You can then integrate your custom model into your applications through the Amazon Rekognition Custom Labels API.

Walkthrough

This post introduces the SOLVED project featured at the re:Invent 2021 Builders Fair. It will:

  • Review the need for solar panel damage detection
  • Discuss a cloud-based approach to ingest, store, process, analyze, and detect damaged solar panels
  • Present a diagram streaming videos from a Raspberry Pi, storing them on Amazon Simple Storage Service (Amazon S3), processing them using an AWS video-on-demand solution, and inferring damage using Amazon Rekognition
  • Introduce a console to mimic an operation center for appropriate action
  • Demonstrate the integration of AWS IoT Core with a Philips Hue bulb for operator alerts

Prerequisites

Before getting started, review the following prerequisites for this solution:

The SOLVED project

The SOLVED project leverages ML to identify damaged solar panels using Amazon Rekognition Custom Labels. It involves four steps:

  1. Data ingestion: Live solar panel video ingested from moving rover into an Amazon S3 bucket
  2. Pre-processing: Captured video split into thumbnail images
  3. Processing and visualization: ML models making real-time inferences to identify defective panels with a dashboard to review images and prediction scores
  4. Alerting: Defective panels result in notification sent through MQTT messages to light a smart bulb

Figure 1 shows the SOLVED project system architecture.

The SOLVED project system architecture

Figure 1. The SOLVED project system architecture

Installation steps

Let’s review each of the steps in this use case.

Data ingestion

The data ingestion layer of the SOLVED project consists of a continuous video stream captured as a rover moves through a field of solar panels.

We used a Freenove 4WD Smart Car rover with Raspberry Pi. The mounted camera captures video as it moves through the field. We installed an Amazon Kinesis Video Streams Producer on the Pi and streamed the live video to a Kinesis Video Stream named reinventbuilder2021.

Figure 2 shows the Kinesis Video Stream setup window for reinventbuilder2021.

Kinesis Video Stream setup for reinventbuilder2021

Figure 2. Kinesis Video Stream setup for reinventbuilder2021

To start streaming, use the following steps.

  1. Create a new Kinesis Video Stream using this Amazon Kinesis Video Streams Developer Guide
  2. Make a note of the Amazon Resource Name (ARN)
  3. On the Pi, access the command prompt and use aws sts get-session-token for temporary credentials. The IAM user should have the permissions for Kinesis Video Streams PutMedia.
  4. Set the following environment variables:
    export AWS_DEFAULT_REGION="us-east-1"
    export AWS_ACCESS_KEY_ID="xxxxx"
    export AWS_SECRET_ACCESS_KEY="yyyyy"
    export AWS_SESSION_TOKEN=“zzzzz”
  5. Start the streamer using the following command:
    cd ~/amazon-kinesis-video-streams-producer-sdk-cpp/build
    ./kvs_gstreamer_sample reinventbuilder2021
  6. Validate the captured stream by viewing the Media playback on the console.

Figure 3 shows the video stream console, including the Media playback option.

Video stream console with Media playback option

Figure 3. Video stream console with Media playback option

There are two ways to clip video snippets, which we’ll do next.

You can use the Download clip button on the video stream console as shown in Figure 4.

Choose your video streaming clip duration

Figure 4. Choose your video streaming clip duration

Alternately, you can use a script from the following command line:

ONE_MIN_AGO=$(date -v -30S -u "+%FT%T+0000")
NOW=$(date -u "+%FT%T+0000")

FILE_NAME=reinventbuilder-solved-$RANDOM.mp4
echo $FILE_NAME
S3_PATH=s3://videoondemandsplitter-source-e6lyof9qjv1j/

aws kinesis-video-archived-media get-clip --endpoint-url $KVS_DATA_ENDPOINT \
--stream-name reinventbuilder2021 \
--clip-fragment-selector "FragmentSelectorType=SERVER_TIMESTAMP,TimestampRange={StartTimestamp=$ONE_MIN_AGO,EndTimestamp=$NOW}" \
$FILE_NAME

echo "Running get-clip for stream"

sleep 45

aws s3 cp $FILE_NAME $S3_PATH
echo "copying file $FILE_NAME TO $S3_PATH"

The clip is available in the Amazon S3 source folder created using AWS CloudFormation, as shown in Figure 5.

Access your clip in the Amazon S3 source folder

Figure 5. Access your clip in the Amazon S3 source folder

Pre-processing

To process the video, we leverage Video on Demand at AWS. This solution encodes video files with AWS Elemental MediaConvert. Out of the box, it:

1. Automatically transcodes videos uploaded to Amazon S3 into formats suitable for playback on a range of devices using MediaConvert
2. Customizes MediaConvert job settings by uploading a custom file and using different settings per input
3. Stores transcoded files in a destination Amazon S3 bucket and uses CloudFront to deliver them to end viewers
4. Provides outputs including input file metadata, job settings, and output details in addition to transcoded video. These outputs are stored in a separate JSON file, available for further processing

For our use case, we used the frame capture feature to create a set of thumbnails from the source videos. The thumbnails are stored in the Amazon S3 bucket with the video output.

To deploy this solution, use the CloudFormation stack.

Processing and visualization

Every trained ML model requires quality training data. We began with publicly available solar panel images that were categorized as “good” or “defective” and uploaded the images to an Amazon S3 bucket into corresponding folders.

Next, we configured Amazon Rekognition Custom Labels with the folders to indicate the labels to use in training and deploying the model. Using the rover images, we tested the model.

We used the rover to record videos of good and damaged solar panels over an extended period and label the outcome favorably. The video was then split into individual frames using MediaConvert, giving us a well-labeled dataset that we trained our model with using Amazon Rekognition Custom Labels.

We used the model endpoint to infer outcomes on solar panels with varying damage footprints across multiple locations. AWS Elemental Mediaconvert expedited the process of curating the training set, and creating the model and endpoint using Amazon Rekognition was straightforward.

As shown in Figure 6, we used a training set of 7,000 images with an even mix of good and damaged panels.

A training set of images

Figure 6. A training set of images

Examples of good panel images are depicted in Figure 7.

Good panel images

Figure 7. Good panel images

Examples of damaged panel images are depicted in Figure 8.

Damaged panel images

Figure 8. Damaged panel images

In this use case, 90 percent model accuracy was achieved.

To visualize the results, we leveraged AWS Amplify to provide an operator interface to identify the damaged panels.

Figure 9 shows screenshots from the operator dashboard with output from the Amazon Custom Labels Rekognition model for good and defective panels.

Operator dashboard in AWS Amplify

Figure 9. Operator dashboard in AWS Amplify

Alerting

Maintenance teams must be notified of defective panels to take corrective action. To create alerts, we configured AWS IoT Core to send MQTT messages to a Philips Hue smart bulb, with red bulbs indicating defective panels. To set up the Philips Hue API, use the How to develop for Hue guide.

For example, here’s the API to change color:

PUT https://192.xx.xx.xx/api/xxxxxxx/lights/1/state

{"on":true, "sat":254, "bri":254,"hue":20000} 

turns color to green

{"on":true, "sat":254, "bri":254,"hue":1000}

turns to red.

We set up a client on the Pi that listens on an AWS IoT Core MQTT topic and makes an API request to Philips Hue.

To connect a device to AWS IoT, complete these steps:

  1. Create an IoT thing, a device certificate, and an AWS IoT policy. An AWS IoT thing represents a physical device (in this case, Raspberry Pi) and contains static device metadata, as shown in Figure 10.
    AWS IoT Thing

    Figure 10. AWS IoT Thing

    2. Create a device certificate, required to connect to and authenticate with AWS IoT. An example is shown in Figure 11.

Device certificate

Figure 11. Device certificate

3. Associate an AWS IoT policy with each device certificate. They determine which AWS IoT resources the device can access. In this case, we allowed iot.*, giving the device access to all IoT resources, as shown in Figure 12.

IoT policy

Figure 12. IoT policy

Devices and other clients use an AWS IoT root CA certificate to authenticate the server they’re communicating with. For more on how devices authenticate with AWS IoT Core, see Server authentication in the AWS IoT Core Developer Guide. Copy the certificate chain to the Raspberry Pi.

For communication with the Philips Hue, we used the Qhue wrapper as shown in Figure 13.

Qhue wrapper

Figure 13. Qhue wrapper

The authors presented a demo of this solution at re:Invent 2021 Builder’s Fair.

Author demo at re:Invent 2021 Builder's Fair

Figure 14. Author demo at re:Invent 2021 Builder’s Fair

Clean up

If you used the CloudFormation stack, delete it to avoid unexpected future charges. Delete Amazon S3 buckets and terminate Amazon Rekognition jobs to stop accruing charges.

Conclusion

Amazon Rekognition helps customers collect images in the field and apply AI-based analysis to interpret the condition of assets within the images.

In this post, you learned how to configure the Kinesis Video Stream producer on a Raspberry Pi to upload captured videos to Amazon Kinesis Video streams. You also learned how to save video streams to Amazon S3 and leverage the Video on Demand at AWS solution.

Using AWS MediaConvert, we transcoded the videos and create a set of thumbnails from the source videos. We then used Amazon Rekognition Custom Labels to train and deploy models for solar panel damage detection. Finally, we configured AWS IoT core to send MQTT messages to a Philips Hue smart bulb for notifications.

In this post, we presented a serverless architecture on AWS to detect defective solar panels. The reference architecture diagram is adaptable to solve inspection and damage detection problems across other industries.

The collective thoughts of the interwebz