Post Syndicated from original https://lwn.net/Articles/874144/rss
Stable kernels 5.14.15, 5.10.76, 5.4.156, 4.19.214, 4.14.253, 4.9.288, and 4.4.290 have been released. They all contain
important fixes and users should upgrade.
Post Syndicated from original https://lwn.net/Articles/874152/rss
For those of you still using the X.org display server, version 21.1 is
out. It includes “fully mature” meson build support, Glamor
support in Xvfb, variable refresh rate support, touchpad gestures, and
more.
Post Syndicated from original https://lwn.net/Articles/874143/rss
Security updates have been issued by Debian (mosquitto and php7.0), Fedora (python-django-filter and qt), Mageia (fossil, opencryptoki, and qtbase5), openSUSE (apache2, busybox, dnsmasq, ffmpeg, pcre, and wireguard-tools), Red Hat (kpatch-patch), SUSE (apache2, busybox, dnsmasq, ffmpeg, java-11-openjdk, libvirt, open-lldp, pcre, python, qemu, util-linux, and wireguard-tools), and Ubuntu (apport and libslirp).
Post Syndicated from Eric Johnson original https://aws.amazon.com/blogs/compute/accelerating-serverless-development-with-aws-sam-accelerate/
Building a serverless application changes the way developers think about testing their code. Previously, developers would emulate the complete infrastructure locally and only commit code ready for testing. However, with serverless, local emulation can be more complex.
In this post, I show you how to bypass most local emulation by testing serverless applications in the cloud against production services using AWS SAM Accelerate. AWS SAM Accelerate aims to increase infrastructure accuracy for testing with sam sync, incremental builds, and aggregated feedback for developers. AWS SAM Accelerate brings the developer to the cloud and not the cloud to the developer.
The AWS SAM team has listened to developers wanting a better way to emulate the cloud on their local machine and we believe that testing against the cloud is the best path forward. With that in mind, I am happy to announce the beta release of AWS SAM Accelerate!
Previously, the latency of deploying after each change has caused developers to seek other options. AWS SAM Accelerate is a set of features to reduce that latency and enable developers to test their code quickly against production AWS services in the cloud.
To demonstrate the different options, this post uses an example application called “Blog”. To follow along, create your version of the application by downloading the demo project. Note, you need the latest version of AWS SAM and Python 3.9 installed. AWS SAM Accelerate works with other runtimes, but this example uses Python 3.9.
After installing the pre-requisites, set up the demo project with the following commands:
mkdir blog && cd blogsam initAWS SAM downloads the sample project into the current folder. With the blog application in place, you can now try out AWS SAM Accelerate.
The first feature of AWS SAM Accelerate is a new command called sam sync. This command synchronizes your project declared in an AWS SAM template to the AWS Cloud. However, sam sync differentiates between code and configuration.
AWS SAM defines code as the following:
Anything else is considered configuration. The following description of the sam sync options explains how sam sync differentiates between configuration synchronization and code synchronization. The resulting patterns are the fastest way to test code in the cloud with AWS SAM.
The sam sync command with no options deploys or updates all infrastructure and code like the sam deploy command. However, unlike sam deploy, sam sync bypasses the AWS CloudFormation changeset process. To see this, run:
sam sync --stack-name blog
AWS SAM sync with no options
First, sam sync builds the code using the sam build command and then the application is synchronized to the cloud.

Successful sync
The sam sync command can also synchronize code changes to the cloud without updating the infrastructure. This code synchronization uses the service APIs and bypasses CloudFormation, allowing AWS SAM to update the code in seconds instead of minutes.
To synchronize code, use the --code flag, which instructs AWS SAM to sync all the code resources in the stack:
sam sync --stack-name blog --code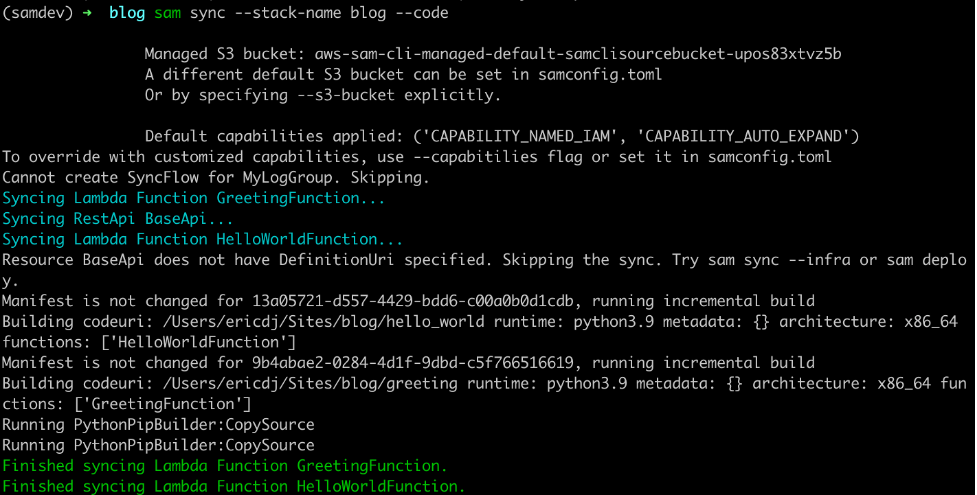
AWS SAM sync with the code flag
The sam sync command verifies each of the code types present and synchronizes the sources to the cloud. This example uses an API Gateway REST API and two Lambda functions. AWS SAM skips the REST API because there is no external OpenAPI file for this project. However, the Lambda functions and their dependencies are synchronized.
You can limit the synchronized resources by using the --resource flag with the --code flag:
sam sync --stack-name blog --code --resource AWS::Serverless::Function
SAM sync specific resource types
This command limits the synchronization to Lambda functions. Other available resources are AWS::Serverless::Api, AWS::Serverless::HttpApi, and AWS::Serverless::StateMachine.
You can target one specific resource with the --resource-id flag to get more granular:
sam sync --stack-name blog --code --resource-id HelloWorldFunction
SAM sync specific resource
This time sam sync ignores the GreetingFunction and only updates the HelloWorldFunction declared with the command’s --resource-id flag.
The sam sync --watch option tells AWS SAM to monitor for file changes and automatically synchronize when changes are detected. If the changes include configuration changes, AWS SAM performs a standard synchronization equivalent to the sam sync command. If the changes are code only, then AWS SAM synchronizes the code with the equivalent of the sam sync --code command.
The first time you run the sam sync command with the --watch flag, AWS SAM ensures that the latest code and infrastructure are in the cloud. It then monitors for file changes until you quit the command:
sam sync --stack-name blog --watch
Initial sync
To see a change, modify the code in the HelloWorldFunction (hello_world/app.py) by updating the response to the following:
return {
  "statusCode": 200,
  "body": json.dumps({
    "message": "hello world, how are you",
    # "location": ip.text.replace("\n", "")
  }),
}
Once you save the file, sam sync detects the change and syncs the code for the HelloWorldFunction to the cloud.

AWS SAM detects changes
During the initial sync, there is a logical resource name called AwsSamAutoDependencyLayerNestedStack. This feature helps to synchronize code more efficiently.
When working with Lambda functions, developers manage the code for the Lambda function and any dependencies required for the Lambda function. Before AWS SAM Accelerate, if a developer does not create a Lambda layer for dependencies, then the dependencies are re-uploaded with the function code on every update. However, with sam sync, the dependencies are automatically moved to a temporary layer to reduce latency.

Auto dependency layer in change set
During the first synchronization, sam sync creates a single nested stack that maintains a Lambda layer for each Lambda function in the stack.
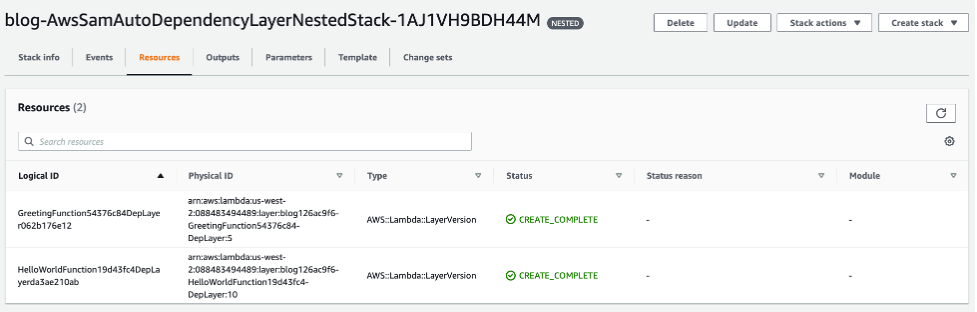
Auto dependency layer in console
These layers are only updated when the dependencies for one of the Lambda functions are updated. To demonstrate, change the requirements.txt (greeting/requirements.txt) file for the GreetingFunction to the following:
Requests
boto3
AWS SAM detects the change, and the GreetingFunction and its temporary layer are updated:

Auto dependency layer synchronized
The Lambda function changes because the Lambda layer version must be updated.
The second feature of AWS SAM Accelerate is an update to the SAM build command. This change separates the cache for dependencies from the cache for the code. The build command now evaluates these separately and only builds artifacts that have changed.
To try this out, build the project with the cached flag:
sam build --cached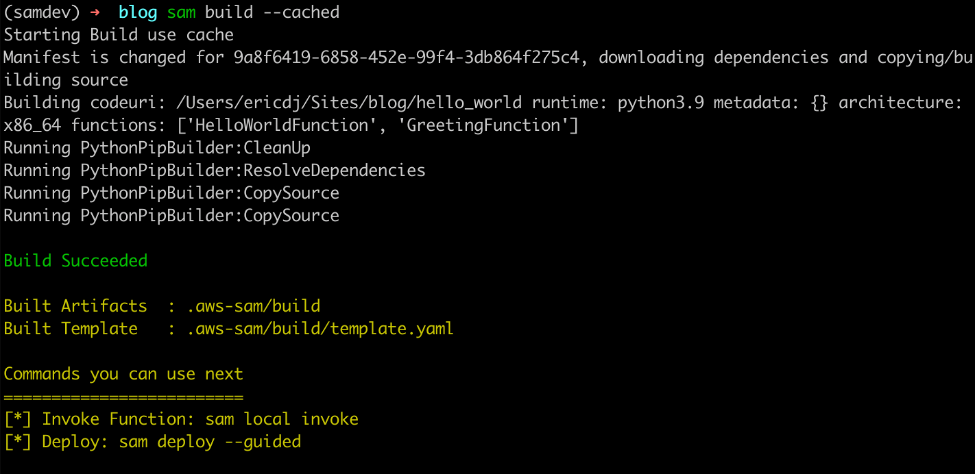
The first build establishes cache
The first build recognizes that there is no cache and downloads the dependencies and builds the code. However, when you rerun the command:

The second build uses existing cached artifacts
The sam build command verifies that the dependencies have not changed. There is no need to download them again so it builds only the application code.
Finally, update the requirements file for the HelloWorldFunction (hello_w0rld/requirements.txt) to:
Requests
boto3
Now rerun the build command:

AWS SAM build detects dependency changes
The sam build command detects a change in the dependency requirements and rebuilds the dependencies and the code.
The final part of AWS SAM Accelerate’s beta feature set is aggregating logs for developer feedback. This feature is an enhancement to the already existing sam logs command. In addition to pulling Amazon CloudWatch Logs or the Lambda function, it is now possible to retrieve logs for API Gateway and traces from AWS X-Ray.
To test this, start the sam logs:
sam logs --stack-name blog --include-traces --tailInvoke the HelloWorldApi endpoint returned in the outputs on syncing:
curl https://112233445566.execute-api.us-west-2.amazonaws.com/Prod/helloThe sam logs command returns logs for the AWS Lambda function, Amazon API Gateway REST execution logs, and AWS X-Ray traces.

AWS Lambda logs from Amazon CloudWatch

Amazon API Gateway execution logs from Amazon CloudWatch
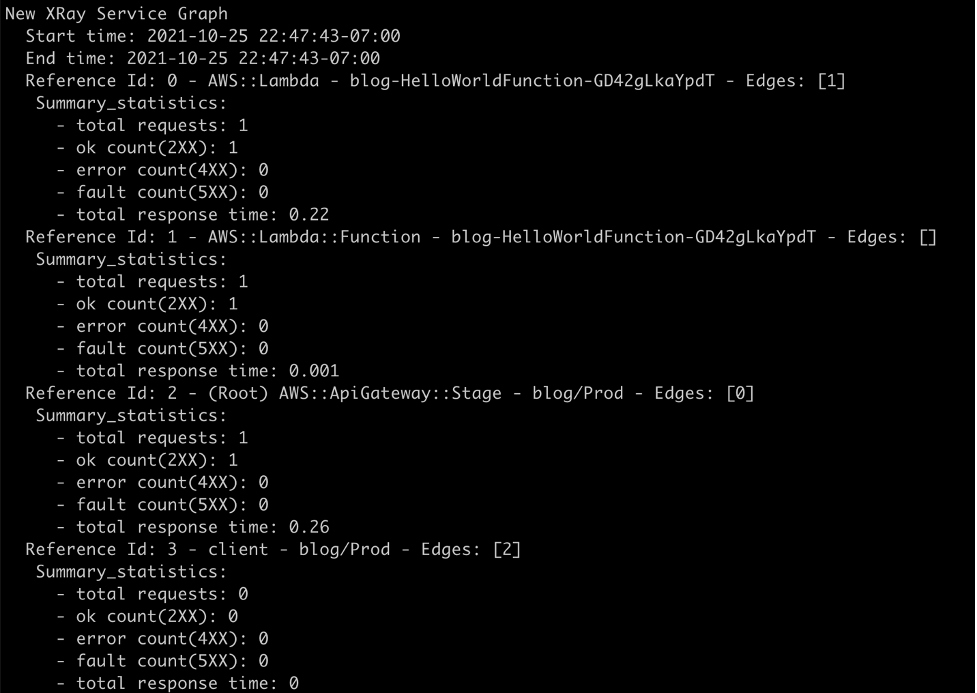
Traces from AWS X-Ray

Development diagram for AWS SAM Accelerate
With AWS SAM Accelerate, creating and testing an application is easier and faster. To get started:
sam initsam sync --stack-name <project name> --watchsam logs --stack-name <project name> --include-traces --tailAWS SAM Accelerate is in beta as of today. The team has worked hard to implement a solid minimum viable product (MVP) to get feedback from our community. However, there are a few caveats.
sam logs command only supports execution logs on REST APIs and access logs on HTTP APIs.When testing serverless applications, developers must get to the cloud as soon as possible. AWS SAM Accelerate helps developers escape from emulating the cloud locally and move to the fidelity of testing in the cloud.
In this post, I walk through the philosophy of why the AWS SAM team built AWS SAM Accelerate. I provide an example application and demonstrate the different features designed to remove barriers from testing in the cloud.
We invite the serverless community to help improve AWS SAM for building serverless applications. As with AWS SAM and the AWS SAM CLI (which includes AWS SAM Accelerate), this project is open source and you can contribute to the repository.
For more serverless content, visit Serverless Land.
Post Syndicated from Emma White original https://aws.amazon.com/blogs/compute/use-amazon-ec2-for-cost-efficient-cloud-gaming-with-pay-as-you-go-pricing/
This post is written by Markus Ziller, Solutions Architect
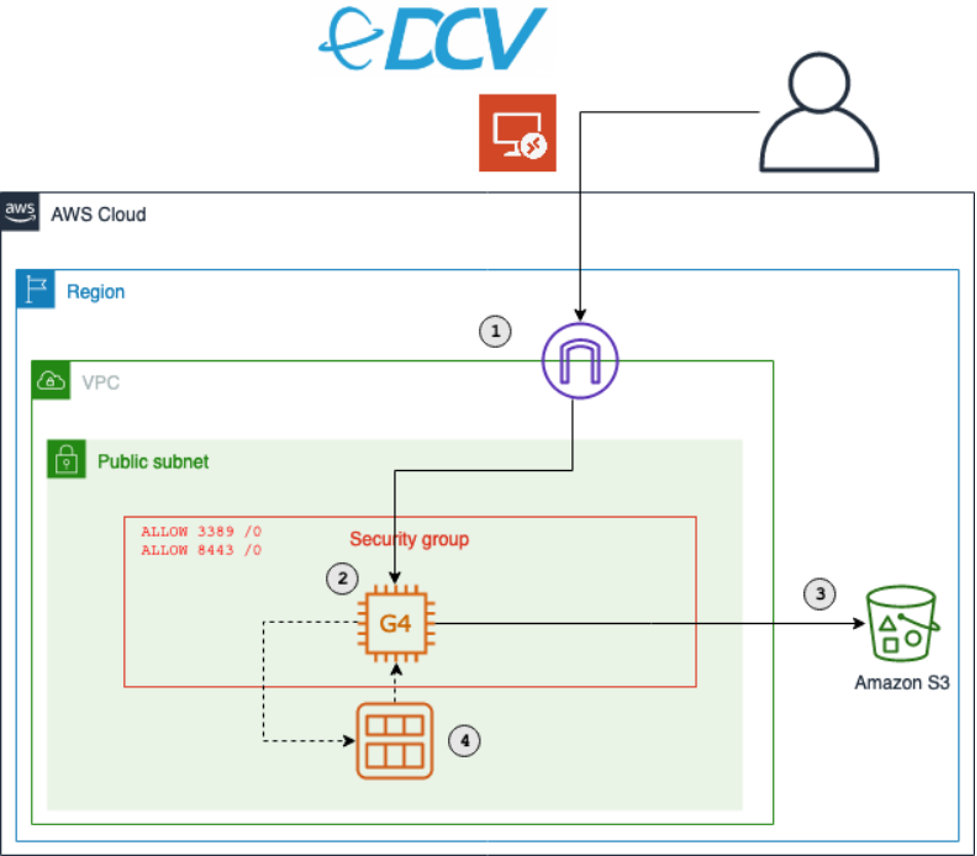
Since AWS launched in 2006, cloud computing disrupted traditional IT operations by providing a more cost-efficient, scalable, and secure alternative to owning hardware and data centers. Similarly, cloud gaming today enables gamers to play video games with pay-as-you go pricing. This removes the need of high upfront investments in gaming hardware. Cloud gaming platforms like Amazon Luna are an entryway, but customers are limited to the games available on the service. Furthermore, many customers also prefer to own their games, or they already have a sizable collection. For those use cases, vendor-neutral software like NICE DCV or Parsec are powerful solutions for streaming your games from anywhere.
This post shows a way to stream video games from the AWS Cloud to your local machine. I will demonstrate how you can provision a powerful gaming machine with pay-as-you-go pricing that allows you to play even the most demanding video games with zero upfront investment into gaming hardware.
The post comes with code examples on GitHub that let you follow along and replicate this post in your account.
In this example, I use the AWS Cloud Development Kit (AWS CDK), an open source software development framework, to model and provision cloud application resources. Using the CDK can reduce the complexity and amount of code needed to automate resource deployment.
The main services in this solution are Amazon Elastic Compute Cloud (Amazon EC2) and Amazon Elastic Block Store (Amazon EBS). The architecture is as follows:
The key components of this solution are described in the following list. During this post, I will explain each component in detail. Deploy this architecture with the sample CDK project that comes with this blog post.
The following sections walk through the steps required to set up your personal gaming AMI. You will only have to do this once.
For this walkthrough, you need:
You will also need an EC2 key pair for the initial instance setup. List your available key pairs with the following CLI command:
aws ec2 describe-key-pairs --query 'KeyPairs[*].KeyName' --output table
Alternatively, create a new key pair with the CLI. You will need the created .pem file later, so make sure to keep it.
KEY_NAME=Gaming
aws ec2 create-key-pair --key-name $KEY_NAME –query 'KeyMaterial' --output text > $KEY_NAME.pem
git clone [email protected]:aws-samples/cloud-gaming-on-ec2-instances*.ts files in cdk/bin/ and cdk/lib/gaming-on-g4-instances.ts you will find two CDK stacks: G4DNStack and G4ADStack. A CDK stack is a unit of deployment. All AWS resources defined within the scope of a stack, either directly or indirectly, are provisioned as a single unit.The architecture for both stacks is similar, and it only differs in the instance type that will be deployed.
G4DNStack and G4ADStack share parameters that determine the configuration of the EC2 instance, the VPC network and the preinstalled software. The stacks come with defaults for some parameters – I recommend keeping the default values.
For g4dn instances, one more parameter is required (see process of installing NVIDIA drivers):
Choose an instance type based on your performance and cost requirements, and then adapt the config accordingly. I recommend starting with the G4DNStack, as it comes at the lowest hourly instance cost. If you need more graphics performance, then choose the G4ADStack for up to 40% improvement in graphics performance.
After choosing an instance, follow the instructions in the README.md in order to deploy the stack.
The CDK will create a new Amazon VPC with a public subnet. It will also configure security groups to allow inbound traffic from the CIDR range and ports specific in the config. By default, this will allow inbound traffic from any IP address. I recommend restricting access to your current IP address by going to checkip.amazonaws.com and replacing 0.0.0.0/0 with <YOUR_IP>/32 for the allowInboundCidr config parameter.
Besides the security groups, the CDK also manages all required IAM permissions.
It creates the following resources in your VPC:
After the stack has been deployed, you will see the following output:

Click the first link, and download the remote desktop file in order to connect to your instance. Use the .pem file from the previous step to receive the instance password.
You will use the RDP to initially connect to your instance. RDP provides a user with a graphical interface to connect to another computer over a network connection. RDP clients are available for a large number of platforms. Use the public IP address provided by the CDK output, the username Administrator, and the password displayed by the EC2 dialogue.
Ensure that you note the password for later steps.
Most configuration process steps are automated by the CDK. However, a few actions (e.g., driver installation) cannot be properly automated. For those, the following manual steps are required once.
Navigate to $home\Desktop\InstallationFiles. If the folder contains an empty file named “OK”, then everything was downloaded correctly and you can proceed with the installation. If you connect while the setup process is still in progress, then wait until the OK file gets created before proceeding. This typically takes 2-3 minutes.
The next step differs slightly for g4ad and g4dn instances.
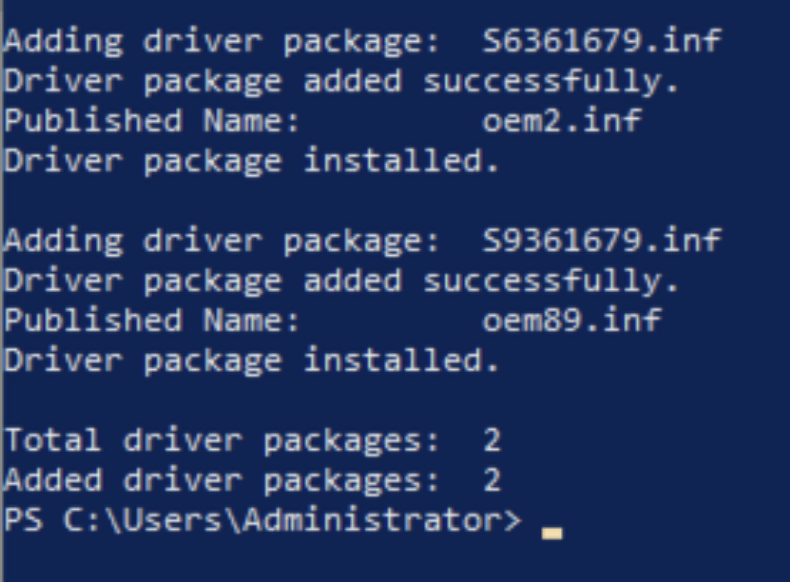
Follow the instructions in the EC2 documentation to install the AMD driver from the InstallationFiles folder. The installation may take a few minutes, and it will display the following output when successfully finished.
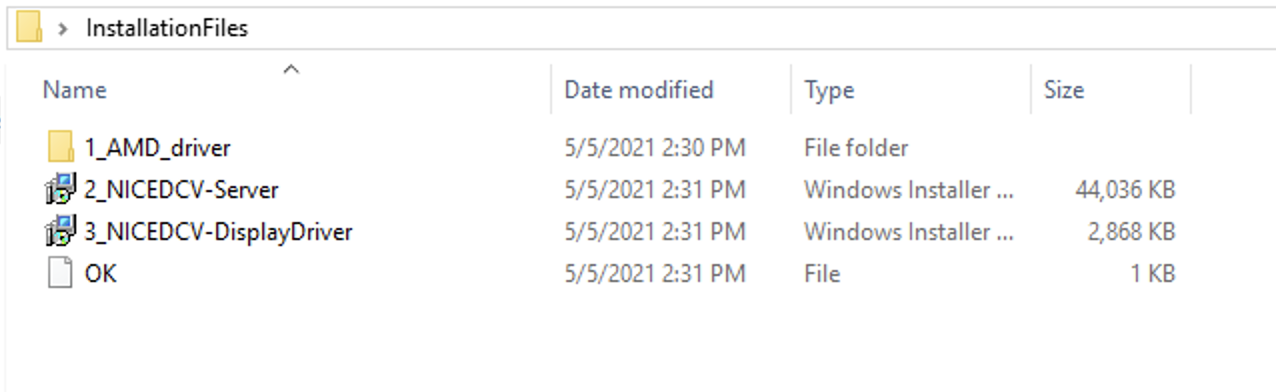
Next, install NICE DCV Server and Display driver by double-clicking the respective files. Finally, restart the instance by running the Restart-Computer PowerShell command.
Navigate to 1_NVIDIA_drivers, run the NVIDIA driver installer for Windows Server 2019 and follow the instructions.
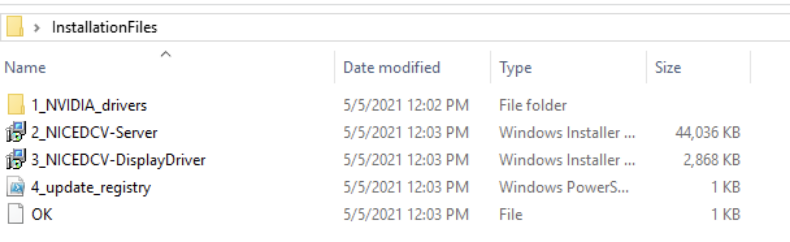
Next, double-click the respective files in the InstallationFiles folder in order to install NICE DCV Server and Display driver.
Finally, right-click on 4_update_registry.ps1, and select “Run with PowerShell” to activate the driver. In order to complete the setup, restart the instance.
After the instance restart, you can connect from your local machine to your EC2 instance with NICE DCV. The NICE DCV bandwidth-adaptive streaming protocol allows near real-time responsiveness for your applications without compromising the image accuracy. This is the recommended way to stream latency sensitive applications.
Download the NICE DCV viewer client and connect to your EC2 instance with the same credentials that you used for the RDP connection earlier. After testing the NICE DCV connection, I recommend disabling RDP by removing the corresponding rule in your security group.
You are now all set to install your games and tools on the EC2 instance. Make sure to install it on the C: drive, as you will create an AMI with the contents of C: later.
At this point, you have fully set up the EC2 instance for cloud gaming on AWS. You can now start and stop the instance when needed. The following CLI commands are all you need to remember:
aws ec2 start-instances --instance-ids <INSTANCE_ID>
aws ec2 stop-instances --instance-ids <INSTANCE_ID>
This will use the regular On-Demand instance capacity of EC2, and you will be billed hourly charges for the time that your instance is running. If your instance is stopped, you will only be charged for the EBS volume and the Elastic IP address if you chose to use one.
Make sure you have installed all of the applications you require on your EC2, and then create your personal gaming AMI by running the following AWS CLI command.
aws ec2 create-image --instance-id <YOUR_INSTANCE_ID> --name <THE_NAME_OF_YOUR_AMI>
Use the following command to get details about your AMI creation. When the status changes from pending to available, then your AMI is ready.
aws ec2 describe-images --owners self --query 'Images[*].[Name, ImageId, BlockDeviceMappings[0].Ebs.SnapshotId, State]' --output table
The CDK created an EC2 launch template when it deployed the stack. Run the following CLI command to spin up an EC2 instance from this template.
aws ec2 run-instances --image-id <YOUR_AMI_ID> --launch-template LaunchTemplateName=<LAUNCH_TEMPLATE_NAME> --query "Instances[*].[InstanceId, PublicIpAddress]" --output table
This command will start a new EC2 instance with the exact same configuration as your initial EC2, but with all your software already installed.
This post walked you through creating your personal cloud gaming stack. You are now all set to lean back and enjoy the benefits of per second billing while playing your favorite video games in the AWS cloud.
Visit the Amazon EC2 G4 instances service page to learn more about how AWS continues to push the boundaries of cost-effectiveness for graphic-intensive applications.
Post Syndicated from Rita Kozlov original https://blog.cloudflare.com/forrester-wave-edge-development-2021/

Forrester’s New Wave for Edge Development Platforms has just been announced. We’re thrilled that they have named Cloudflare a leader (you can download a complimentary copy of the report here).
Since the very beginning, Cloudflare has sought to help developers building on the web, and since the introduction of Workers in 2017, Cloudflare has enabled developers to deploy their applications to the edge itself.
According to the report by Forrester Vice President, Principal Analyst, Jeffrey Hammond, Cloudflare “offers strong compute, data services and web development capabilities. Alongside Workers, Workers KV adds edge data storage. Pages, Stream and Images provide higher level platform services for modern web workloads. Cloudflare has an intuitive developer experience, fast, global deployment of updated code, and minimal cold start times.”

Building on the web has come a long way. The idea that one might have to buy a physical machine in order to build a website seems incomprehensible now. The cloud has played a major role in making it easier for developers to get started. However, since the advent of the cloud, things have stalled — and innovation has become more incremental. That means that while developers don’t have to think about buying a server, they’re still tasked with thinking about where in the world it is, how to add concurrency to handle increasing traffic, and how to make them secure.
We wanted to abstract that all away. Our aim: to reimagine what things might look like if developers could truly just think about the application they wanted to build. Leaving the scaling, speed, and even compliance, to us.
Of course, reimagining things is always scary. There’s no guarantee that taking a new approach is going to work — it usually requires a leap of faith.
It’s been gratifying to see developers flock to our platform — and the applications they’ve been able to build, free of scalability and latency constraints, have been phenomenal.
It’s also gratifying to be named a Leader in Edge Development Platforms by Forrester — one of the preeminent analyst firms in the industry. We feel it really does provide industry recognition to the approach we bet on four years ago.
We received a differentiated rating in the following criteria:
While being able to build our platform atop Cloudflare’s network gave us an advantage in eliminating latency from the start, we knew that wasn’t enough to compel developers to think in a new way. Since the release of Workers, we have relentlessly focused on making the experience of building a new application as easy as possible at every step of the way: from onboarding, through day 2, and beyond.
This approach extends beyond tooling, and to how we think about additional services developers need in order to complete their applications. For example, in thinking about providing data solutions on the edge, we again wanted to make the distributed nature of the system just work, rather than making developers think about it, which is what led us to develop Durable Objects. With Durable Objects, Cloudflare can make intelligent decisions about where to store the data based on access patterns (or compliance — whichever is most important to the developer), rather than forcing the developer to think about regions.
As we expand our offering, it’s important to us that it continues to be intuitive and easy for developers to solve problems.
But, we’re not stopping here. As our cofounder Michelle likes to say, we’re just getting started. We recognize this is just the beginning of the journey to bring the full stack to the edge. We have some exciting announcements coming in the next couple of weeks — stay tuned!
Post Syndicated from Shelby Matthews original https://blog.rapid7.com/2021/10/27/automation-enables-innovation-in-the-cloud/

As public cloud adoption continues to grow year after year, we see more and more enterprises realizing the strategic advantage the cloud can provide to help deliver new and innovative products quicker, roll out new features with ease, and reach new customers. But along with those advantages comes a new level of complexity and risk that organizations need to account for.
Rapid7’s recently released 2021 Cloud Misconfigurations Report revealed that there were 121 publicly reported data exposure events last year that were the result of cloud misconfigurations.
One critical part of preventing these misconfigurations is the strategic, gradual adoption of automated notification and remediation workflows.
Automation in the cloud is the implementation of tools that take away the responsibility of security from the user and make it automated. These tools can catch and fix misconfigurations before you even realize they were ever there.
Some of the benefits these tools can bring include:
To deliver threat protection, InsightCloudSec integrates with native cloud service providers’ security platforms (e.g., Amazon GuardDuty) and other partners (e.g., Tenable) for best-in-class, intelligent threat detection that continuously monitors for malicious activity and unauthorized behavior. These services use machine learning, anomaly detection, and integrated threat intelligence to identify and prioritize potential threats. You’ll be able to detect cryptocurrency mining, credential compromise behavior, communication with known command-and-control servers, and API calls from known malicious IP addresses.
While automating every workflow possible isn’t the answer, one thing is clear: Enterprise-scale cloud environments have outstripped the human capacity to manage them manually.
Not only is automation essential for bringing security — it’s a way to cut down the time it would take to fix resources, as compared to a manual approach. Automation greatly reduces the risk of human error in the cloud and allows workflows to include automated security across the board.
InsightCloudSec comes with an automated program that we call our bots, which allow you to execute actions on resources based on your conditions. Your bot consists of three things: scope, filters, and actions. A single bot can be configured to apply a unified approach to remediation across all clouds, creating a consistent, scalable, and sustainable approach to cloud security.
Bots offer a unified approach to remediation across all your cloud environments. With InsightCloudSec, you can customize them just how you want it based on the full context of a misconfiguration. Automation with InsightCloudSec is the key to achieving security at the speed of scale.
Post Syndicated from The Atlantic original https://www.youtube.com/watch?v=iHu50CO2jqw
Post Syndicated from Bruce Schneier original https://www.schneier.com/blog/archives/2021/10/how-the-fbi-gets-location-information.html
Vice has a detailed article about how the FBI gets data from cell phone providers like AT&T, T-Mobile, and Verizon, based on a leaked (I think) 2019 139-page presentation.
Post Syndicated from Nevi Shah original https://blog.cloudflare.com/custom-headers-for-pages/


Until today, Cloudflare Workers has been a great solution to setting headers, but we wanted to create an even smoother developer experience. Today, we’re excited to announce that Pages now natively supports custom headers on your projects! Simply create a _headers file in the build directory of your project and within it, define the rules you want to apply.
/developer-docs/*
  X-Hiring: Looking for a job? We're hiring engineers
(https://www.cloudflare.com/careers/jobs)Being able to set custom headers is useful for a variety of reasons — let’s explore some of your most popular use cases.
When you create a Pages project, a pages.dev deployment is created for your project which enables you to get started immediately and easily preview changes as you iterate. However, we realize this poses an issue — publishing multiple copies of your website can harm your rankings in search engine results. One way to solve this is by disabling indexing on all pages.dev subdomains, but we see many using their pages.dev subdomain as their primary domain. With today’s announcement you can attach headers such as X-Robots-Tag to hint to Google and other search engines how you’d like your deployment to be indexed.
For example, to prevent your pages.dev deployment from being indexed, you can add the following to your _headers file:
https://:project.pages.dev/*
X-Robots-Tag: noindexCustomizing headers doesn’t just help with your site’s search result ranking — a number of browser security features can be configured with headers. A few headers that can enhance your site’s security are:
X-Frame-Options: You can prevent click-jacking by informing browsers not to embed your application inside another (e.g. with an <iframe>).X-Content-Type-Option: nosniff: To prevent browsers from interpreting a response as any other content-type than what is defined with the Content-Type header.Referrer-Policy: This allows you to customize how much information visitors give about where they’re coming from when they navigate away from your page.Permissions-Policy: Browser features can be disabled to varying degrees with this header (recently renamed from Feature-Policy).Content-Security-Policy: And if you need fine-grained control over the content in your application, this header allows you to configure a number of security settings, including similar controls to the X-Frame-Options header.You can configure these headers to protect an /app/* path, with the following in your _headers file:
/app/*
  X-Frame-Options: DENY
  X-Content-Type-Options: nosniff
  Referrer-Policy: no-referrer
  Permissions-Policy: document-domain=()
Content-Security-Policy: script-src 'self'; frame-ancestors 'none';Modern browsers implement a security protection called CORS or Cross-Origin Resource Sharing. This prevents one domain from being able to force a user’s action on another. Without CORS, a malicious site owner might be able to do things like make requests to unsuspecting visitors’ banks and initiate a transfer on their behalf. However, with CORS, requests are prevented from one origin to another to stop the malicious activity.
There are, however, some cases where it is safe to allow these cross-origin requests. So-called, “simple requests” (such as linking to an image hosted on a different domain) are permitted by the browser. Fetching these resources dynamically is often where the difficulty arises, and the browser is sometimes overzealous in its protection. Simple static assets on Pages are safe to serve to any domain, since the request takes no action and there is no visitor session. Because of this, a domain owner can attach CORS headers to specify exactly which requests can be allowed in the _headers file for fine-grained and explicit control.
For example, the use of the asterisk will enable any origin to request any asset from your Pages deployment:
/*
  Access-Control-Allow-Origin: *
To be more restrictive and limit requests to only be allowed from a ‘staging’ subdomain, we can do the following:
https://:project.pages.dev/*
  Access-Control-Allow-Origin: https://staging.:project.pages.dev
To support all these use cases for custom headers, we had to build a new engine to determine which rules to apply for each incoming request. Backed, of course, by Workers, this engine supports splats and placeholders, and allows you to include those matched values in your headers.
Although we don’t support all of its features, we’ve modeled this matching engine after the URLPattern specification which was recently shipped with Chrome 95. We plan to be able to fully implement this specification for custom headers once URLPattern lands in the Workers runtime, and there should hopefully be no breaking changes to migrate.
With this same engine, we’re bringing these features to your _redirects file as well. You can now configure your redirects with splats, placeholders and status codes as shown in the example below:
/blog/* https://blog.example.com/:splat 301
/products/:code/:name /products?name=:name&code=:code
/submit-form https://static-form.example.com/submit 307
Custom headers and redirects for Cloudflare Pages can be configured today. Check out our documentation to get started, and let us know how you’re using it in our Discord server. We’d love to hear about what this unlocks for your projects!
And finally, if a _headers file and enhanced support for _redirects just isn’t enough for you, we also have something big coming very soon which will give you the power to build even more powerful projects. Stay tuned!
Post Syndicated from The History Guy: History Deserves to Be Remembered original https://www.youtube.com/watch?v=HLyqJF_WhMg
Post Syndicated from Sue Sentance original https://www.raspberrypi.org/blog/brookings-report-global-computer-science-education-policy/
For the last two years, I’ve been one of the advisors to the Center for Universal Education at the Brookings Institution, a US-based think tank, on their project to survey formal computing education systems across the world. The resulting education policy report, Building skills for life: How to expand and improve computer science education around the world, pulls together the findings of their research. I’ll highlight key lessons policymakers and educators can benefit from, and what elements I think have been missed.

Work on this new Brookings report was motivated by the belief that if our goal is to create an equitable, global society, then we need computer science (CS) in school to be accessible around the world; countries need to educate their citizens about computer science, both to strengthen their economic situation and to tackle inequality between countries. The report states that “global development gaps will only be expected to widen if low-income countries’ investments in these domains falter while high-income countries continue to move ahead” (p. 12).

The report makes an important contribution to our understanding of computer science education policy, providing a global overview as well as in-depth case studies of education policies around the world. The case studies look at 11 countries and territories, including England, South Africa, British Columbia, Chile, Uruguay, and Thailand. The map below shows an overview of the Brookings researchers’ findings. It indicates whether computer science is a mandatory or elective subject, whether it is taught in primary or secondary schools, and whether it is taught as a discrete subject or across the curriculum.

It’s a patchy picture, demonstrating both countries’ level of capacity to deliver computer science education and the different approaches countries have taken. Analysis in the Brookings report shows a correlation between a country’s economic position and implementation of computer science in schools: no low-income countries have implemented it at all, while over 20% of high-income countries have mandatory computer science education at both primary and secondary level.
Given these disparities, there is a significant focus in the report on what IT infrastructure countries need in order to deliver computer science education. This infrastructure needs to be preceded by investment (funds to afford it) and policy (a clear statement of intent and an implementation plan). Many countries that the Brookings report describes as having no computer science education may still be struggling to put these in place.

The recently developed CAPE (capacity, access, participation, experience) framework offers another way of assessing disparities in education. To have capacity to make computer science part of formal education, a country needs to put in place the following elements:
My view is that countries that are at the beginning of this process need to focus on IT infrastructure, but also on the other elements of capacity. The Brookings report touches on these elements of capacity as well. Once these are in place in a country, the focus can shift to the next level: access for learners.
In their report, the Brookings researchers identify seven complementary policy actions that a country can take to facilitate implementation of computer science education:
The figure below compares the 11 case-study regions in terms of how many of the seven policy actions have been taken, what IT infrastructure is in place, and when the process of implementing CS education started.
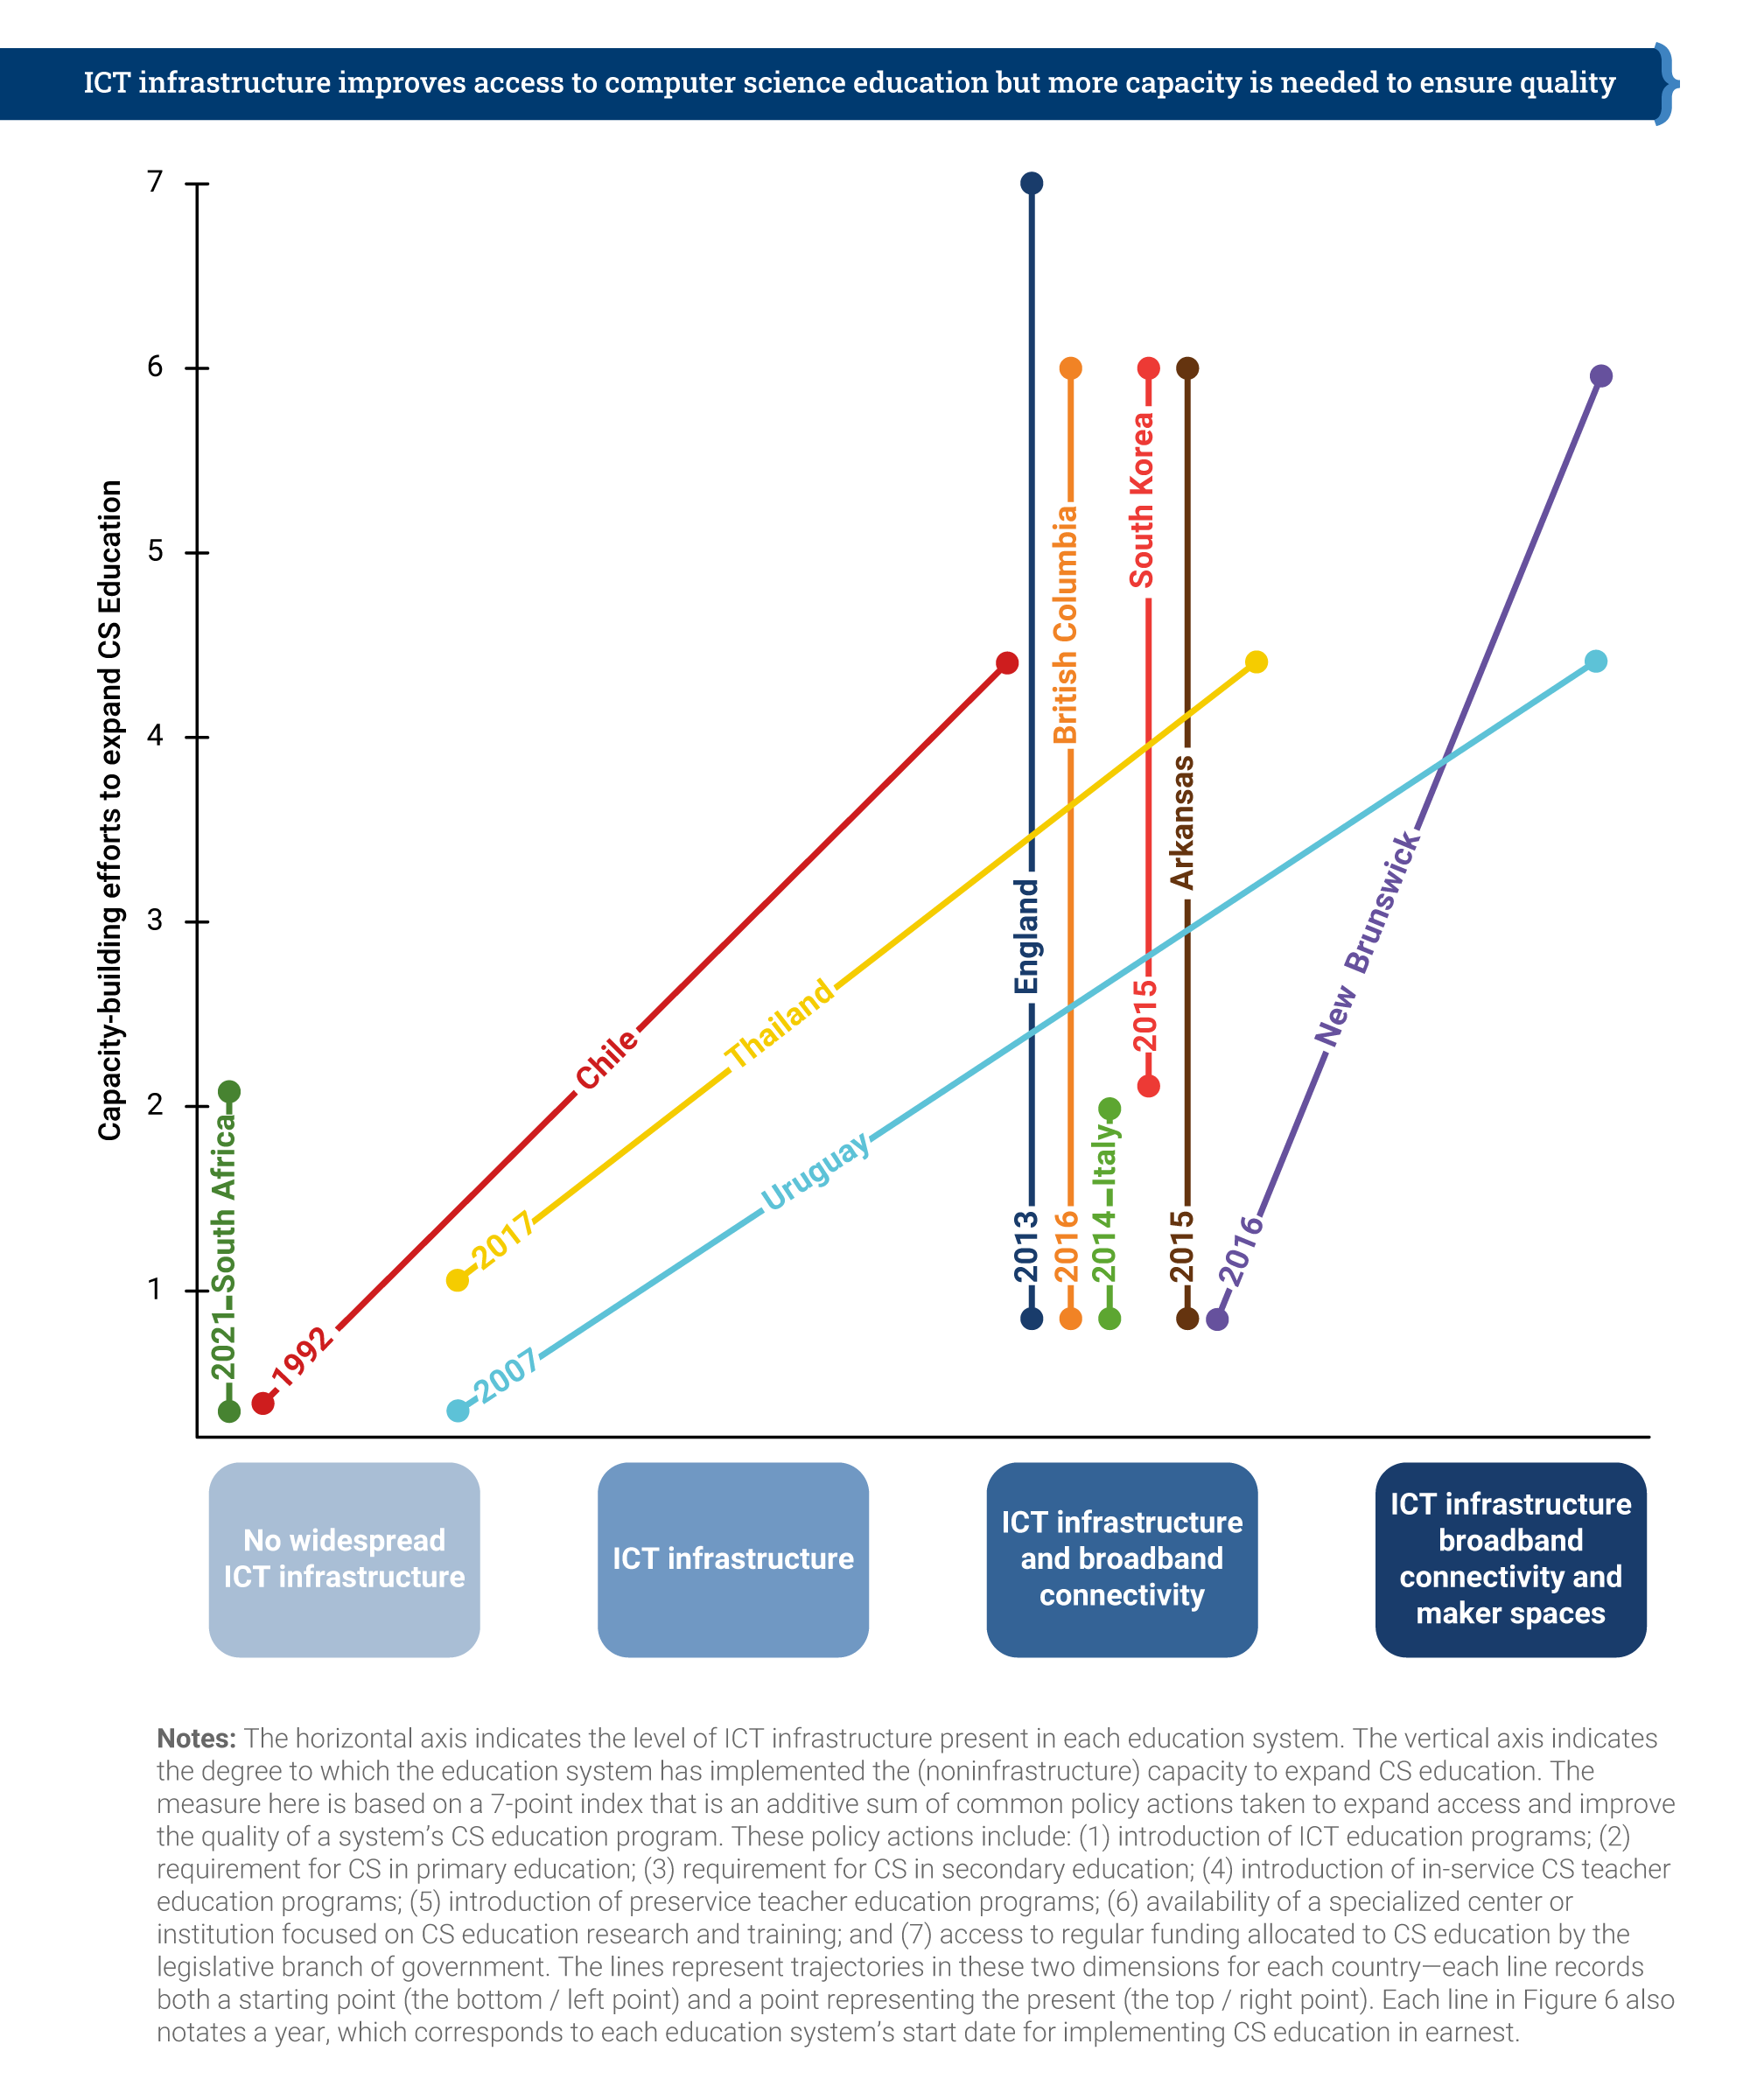
England is the only country that has taken all seven of the identified policy actions, having already had nation-wide IT infrastructure and broadband connectivity in place. Chile, Thailand, and Uruguay have made impressive progress, both on infrastructure development and on policy actions. However, it’s clear that making progress takes many years — Chile started in 1992, and Uruguay in 2007 — and requires a considerable amount of investment and government policy direction.
The first case study that Brookings produced for this report, back in 2019, related to England. Over the last 8 years in England, we have seen the development of computing education in the curriculum as a mandatory subject in primary and secondary schools. Initially, funding for teacher education was limited, but in 2018, the government provided £80 million of funding to us and a consortium of partners to establish the National Centre for Computing Education (NCCE). Thus, in-service teacher education in computing has been given more priority in England than probably anywhere else in the world.

Alongside teacher education, the funding also covered our development of classroom resources to cover the whole CS curriculum, and of Isaac Computer Science, our online platform for 14- to 18-year-olds learning computer science. We’re also working on a £2m government-funded research project looking at approaches to improving the gender balance in computing in English schools, which is due to report results next year.
The future of education policy in the UK as it relates to AI technologies is the topic of an upcoming panel discussion I’m inviting you to attend.

The Brookings report highlights the way in which the English government worked with non-profit organisations, including us here at the Raspberry Pi Foundation, to deliver on the seven policy actions. Partnerships and engagement with stakeholders appear to be key to effectively implementing computer science education within a country.
What can we learn from the Brookings report’s helicopter view of 11 case studies? How can we ensure that computer science education is going to be accessible for all children? The Brookings researchers draw our six lessons learned in their report, which I have taken the liberty of rewording and shortening here:
In the report, the sixth lesson is phrased as, “When taught in an interactive, hands-on way, CS education builds skills for life.” The Brookings researchers conclude that focusing on project-based learning and maker spaces is the way for schools to achieve this, which I don’t find convincing. The problem with project-based learning in maker spaces is one of scale: in my experience, this approach only works well in a non-formal, small-scale setting. The other reason is that maker spaces, while being very engaging, are also very expensive. Therefore, I don’t see them as a practicable aspect of a nationally rolled-out, mandatory, formal curriculum.
When we teach computer science, it is important that we encourage young people to ask questions about ethics, power, privilege, and social justice.
Sue Sentance
We have other ways to make computer science engaging to all learners, using a breadth of pedagogical approaches. In particular, we should focus on cultural relevance, an aspect of education the Brookings report does not centre. Culturally relevant pedagogy is a framework for teaching that emphasises the importance of incorporating and valuing all learners’ knowledge, heritage, and ways of learning, and promotes the development of learners’ critical consciousness of the world. When we teach computer science, it is important that we encourage young people to ask questions about ethics, power, privilege, and social justice.

The Brookings report states that we need to develop and use evidence on how to teach computer science, and I agree with this. But to properly support teachers and learners, we need to offer them a range of approaches to teaching computing, rather than just focusing on one, such as project-based learning, however valuable that approach may be in some settings. Through the NCCE, we have embedded twelve pedagogical principles in the Teach Computing Curriculum, which is being rolled out to six million learners in England’s schools. In time, through this initiative, we will gain firm evidence on what the most effective approaches are for teaching computer science to all students in primary and secondary schools.
I believe the Brookings Institution’s report has a huge contribution to make as countries around the world seek to introduce computer science in their classrooms. As we can conclude from the patchiness of the CS education world map, there is still much work to be done. I feel fortunate to be living in a country that has been able and motivated to prioritise computer science education, and I think that partnerships and working across stakeholder groups, particularly with schools and teachers, have played a large part in the progress we have made.
To my mind, the challenge now is to find ways in which countries can work together towards more equity in computer science education around the world. The findings in this report will help us make that happen.
PS We invite you to join us on 16 November for our online panel discussion on what the future of the UK’s education policy needs to look like to enable young people to navigate and shape AI technologies. Our speakers include UK Minister Chris Philp, our CEO Philip Colligan, and two young people currently in education. Tabitha Goldstaub, Chair of the UK government’s AI Council, will be chairing the discussion.
Sign up for your free ticket today and submit your questions to our panel!
The post Computer science education is a global challenge appeared first on Raspberry Pi.
Post Syndicated from Explosm.net original http://explosm.net/comics/6013/
New Cyanide and Happiness Comic
Post Syndicated from original https://xkcd.com/2534/

Post Syndicated from original https://lwn.net/Articles/873921/rss
Uniquely identifying users so that they can be tracked as they go about
their business on the internet is, sadly, a major goal for advertisers and
others today. Web browser cookies provide a fairly well-known avenue
for tracking users as they traverse various web sites, but mobile apps are
not browsers, so that mechanism is not available. As it turns out, though,
there are ways
to “fingerprint” Android devices—and likely those of other mobile
platforms—so that the device owners can be tracked as they hop
between their apps.
Post Syndicated from Marvin Fernandes original https://aws.amazon.com/blogs/architecture/simplifying-multi-account-ci-cd-deployments-using-aws-proton/
Many large enterprises, startups, and public sector entities maintain different deployment environments within multiple Amazon Web Services (AWS) accounts to securely develop, test, and deploy their applications. Maintaining separate AWS accounts for different deployment stages is a standard practice for organizations. It helps developers limit the blast radius in case of failure when deploying updates to an application, and provides for more resilient and distributed systems.
Typically, the team that owns and maintains these environments (the platform team) is segregated from the development team. A platform team performs critical activities. These can include setting infrastructure and governance standards, keeping patch levels up to date, and maintaining security and monitoring standards. Development teams are responsible for writing the code, performing appropriate testing, and pushing code to repositories to initiate deployments. The development teams are focused more on delivering their application and less on the infrastructure and networking that ties them together. The segregation of duties and use of multi-account environments are effective from a regulatory and development standpoint. But monitoring, maintaining, and enabling the safe release to these environments can be cumbersome and error prone.
In this blog, you will see how to simplify multi-account deployments in an environment that is segregated between platform and development teams. We will show how you can use one consistent and standardized continuous delivery pipeline with AWS Proton.
For platform teams, maintaining these large environments at different stages in the development lifecycle and within separate AWS accounts can be tedious. The platform teams must ensure that certain security and regulatory requirements (like networking or encryption standards) are implemented in each separate account and environment. When working in a multi-account structure, AWS Identity and Access Management (IAM) permissions and cross-account access management can be a challenge for many account administrators. Many organizations rely on specific monitoring metrics and tagging strategies to perform basic functions. The platform team is responsible for enforcing these processes and implementing these details repeatedly across multiple accounts. This is a pain point for many infrastructure administrators or platform teams.
Platform teams are also responsible for ensuring a safe and secure application deployment pipeline. To do this, they isolate deployment and production environments from one another limiting the blast radius in case of failure. Platform teams enforce the principle of least privilege on each account, and implement proper testing and monitoring standards across the deployment pipeline.
Instead of focusing on the application and code, many developers face challenges complying with these rigorous security and infrastructure standards. This results in limited access to resources for developers. Delays come with reliance on administrators to deploy application code into production. This can lead to lags in deployment of updated code.
The ownership for infrastructure lies with the platform teams. They set the standards for security, code deployment, monitoring, and even networking. AWS Proton is an infrastructure provisioning and deployment service for serverless and container-based applications. Using AWS Proton, the platform team can provide their developers with a highly customized and catered “platform as a service” experience. This allows developers to focus their energy on building the best application, rather than spending time on orchestration tools. Platform teams can similarly focus on building the best platform for that application.
With AWS Proton, developers use predefined templates. With only a few input parameters, infrastructure can be provisioned and code deployed in an effective pipeline. This way you can get your application running and updated more quickly, see Figure 1.

Figure 1. Platform and development team roles when using AWS Proton
AWS Proton allows you to deploy any serverless or container-based application across multiple accounts. You can define infrastructure standards and effective continuous delivery pipelines for your organization. Proton breaks down the infrastructure into environment and service (“infrastructure as code” templates).
In Figure 2, platform teams provide a service template of a secure environment to host a microservices application on Amazon Elastic Container Service (Amazon ECS) and AWS Fargate. The environment template contains infrastructure that is shared across services. This includes the networking configuration: Amazon Virtual Private Cloud (VPC), subnets, route tables, Internet Gateway, security groups, and ECS cluster definition for the Fargate service.
The service template provides details of the service. It includes the container task definitions, monitoring and logging definitions, and an effective continuous delivery pipeline. Using the environment and service template definitions, development teams can define the microservices that are running on Amazon ECS. They can deploy their code following the continuous integration and continuous delivery (CI/CD) pipeline.

Figure 2. Platform teams provision environment and service infrastructure as code templates in AWS Proton management account
For Figures 3 and 4, we used publicly available templates and created three separate AWS accounts: the AWS Proton management account, development account, and production environment accounts. Additional accounts may be added based on your use case and security requirements. As shown in Figure 3, the AWS Proton service account contains the environment, service, and pipeline templates. It also provides the connection to other accounts within the organization. The development and production accounts follow the structure of a development pipeline for a typical organization.
AWS Proton alleviates complicated cross-account policies by using a secure “environment account connection” feature. With environment account connections, platform administrators can give AWS Proton permissions to provision infrastructure in other accounts. They create an IAM role and specify a set of permissions in the target account. This enables Proton to assume the role from the management account to build resources in the target accounts.
AWS Key Management Service (KMS) policies can also be hard to manage in multi-account deployments. Proton reduces managing cross-account KMS permissions. In an AWS Proton management account, you can build a pipeline using a single artifact repository. You can also extend the pipeline to additional accounts from a single source of truth. This feature can be helpful when accounts are located in different Regions, due to regulatory requirements for example.

Figure 3. AWS Proton uses cross-account policies and provisions infrastructure in development and production accounts with environment connection feature
Once the environment and service templates are defined in the AWS Proton management account, the developer selects the templates. Proton then provisions the infrastructure, and the continuous delivery pipeline that will deploy the services to each separate account.
Developers commit code to a repository, and the pipeline is responsible for deploying to the different deployment stages. You don’t have to worry about any of the environment connection workflows. Proton allows platform teams to provide a single pipeline definition to deploy the code into multiple different accounts without any additional account level information. This standardizes the deployment process and implements effective testing and staging policies across the organization.
Platform teams can also inject manual approvals into the pipeline so they can control when a release is deployed. Developers can define tests that initiate after a deployment to ensure the validity of releases before moving to a production environment. This simplifies application code deployment in an AWS multi-account environment and allows updates to be deployed more quickly into production. The resulting deployed infrastructure is shown in Figure 4.

Figure 4. AWS Proton deploys service into multi-account environment through standardized continuous delivery pipeline
In this blog, we have outlined how using AWS Proton can simplify handling multi-account deployments using one consistent and standardized continuous delivery pipeline. AWS Proton addresses multiple challenges in the segregation of duties between developers and platform teams. By having one uniform resource for all these accounts and environments, developers can develop and deploy applications faster, while still complying with infrastructure and security standards.
For further reading:
Getting started with Proton
Identity and Access Management for AWS Proton
Proton administrative guide
Post Syndicated from Andrew Lee original https://aws.amazon.com/blogs/big-data/copy-large-datasets-from-google-cloud-storage-to-amazon-s3-using-amazon-emr/
Many organizations have data sitting in various data sources in a variety of formats. Even though data is a critical component of decision-making, for many organizations this data is spread across multiple public clouds. Organizations are looking for tools that make it easy and cost-effective to copy large datasets across cloud vendors. With Amazon EMR and the Hadoop file copy tools Apache DistCp and S3DistCp, we can migrate large datasets from Google Cloud Storage (GCS) to Amazon Simple Storage Service (Amazon S3).
Apache DistCp is an open-source tool for Hadoop clusters that you can use to perform data transfers and inter-cluster or intra-cluster file transfers. AWS provides an extension of that tool called S3DistCp, which is optimized to work with Amazon S3. Both these tools use Hadoop MapReduce to parallelize the copy of files and directories in a distributed manner. Data migration between GCS and Amazon S3 is possible by utilizing Hadoop’s native support for S3 object storage and using a Google-provided Hadoop connector for GCS. This post demonstrates how to configure an EMR cluster for DistCp and S3DistCP, goes over the settings and parameters for both tools, performs a copy of a test 9.4 TB dataset, and compares the performance of the copy.
The following are the prerequisites for configuring the EMR cluster:
s3://<S3 BUCKET>/copygcsjar.sh. The following is an example shell script:s3://<S3 BUCKET>/gcs-connector-hadoop3-latest.jar.s3://<S3 BUCKET>/gcs.json. The following is a sample key:gcsconfiguration.json to enable the GCS connector in Amazon EMR. Make sure the file is in the same directory as where you plan to run your AWS CLI commands. The following is an example configuration file:For our test dataset, we start with a basic cluster consisting of one primary node and four core nodes for a total of five c5n.xlarge instances. You should iterate on your copy workload by adding more core nodes and check on your copy job timings in order to determine the proper cluster sizing for your dataset.
Refer to Create bootstrap actions to install additional software for more details about this step.
Refer to Configure applications when you create a cluster for more details on how to supply this object when creating the cluster.
Putting it all together, the following code is an example of a command to launch and configure an EMR cluster that can perform migrations from GCS to Amazon S3:
aws emr create-cluster \ --name "My First EMR Cluster" \ --release-label emr-6.3.0 \ --applications Name=Hadoop \ --ec2-attributes KeyName=myEMRKeyPairName \ --instance-type c5n.xlarge \ --instance-count 5 \ --use-default-roles \ --bootstrap-actions Path="s3:///copygcsjar.sh" \ --configurations file://gcsconfiguration.json
You can run the S3DistCp or DistCp tool in several ways.
When the cluster is up and running, you can SSH to the primary node and run the command in a terminal window, as mentioned in this post.
You can also start the job as part of the cluster launch. After the job finishes, the cluster can either continue running or be stopped. You can do this by submitting a step directly via the AWS Management Console when creating a cluster. Provide the following details:
S3DistCp Stepcommand-runner.jars3-dist-cp --src=gs://<GCS BUCKET>/ --dest=s3://<S3 BUCKET>/We can always submit a new step to the existing cluster. The syntax here is slightly different than in previous examples. We separate arguments by commas. In the case of a complex pattern, we shield the whole step option with single quotation marks:
aws emr add-steps \
--cluster-id j-ABC123456789Z \
--steps 'Name=LoadData,Jar=command-runner.jar,ActionOnFailure=CONTINUE,Type=CUSTOM_JAR,Args=s3-dist-cp,--src=gs://<GCS BUCKET>/, --dest=s3://<S3 BUCKET>/'
In this section, we optimize the cluster copy throughput by adjusting the number of maps or reducers and other related settings.
We use the following memory settings:
-Dmapreduce.map.memory.mb=1536
-Dyarn.app.mapreduce.am.resource.mb=1536
Both parameters determine the size of the map containers that are used to parallelize the transfer. Setting this value in line with the cluster resources and the number of maps defined is key to ensuring efficient memory usage. You can calculate the number of launched containers by using the following formula:
We use the following dynamic strategy settings:
-Ddistcp.dynamic.max.chunks.tolerable=4000
-Ddistcp.dynamic.split.ratio=3 -strategy dynamic
We use the following map setting:
This determines the number of map containers to launch.
We use the following list status setting:
-numListstatusThreads 15
This determines the number of threads to perform the file listing of the source GCS bucket.
The following is a sample command when running with 96 core or task nodes in the EMR cluster:
hadoop distcp
-Dmapreduce.map.memory.mb=1536 \
-Dyarn.app.mapreduce.am.resource.mb=1536 \
-Ddistcp.dynamic.max.chunks.tolerable=4000 \
-Ddistcp.dynamic.split.ratio=3 \
-strategy dynamic \
-update \
-m 640 \
-numListstatusThreads 15 \
gs://<GCS BUCKET>/ s3://<S3 BUCKET>/
When running large copies from GCS using S3DistCP, make sure you have the parameter fs.gs.status.parallel.enable (also shown earlier in the sample Amazon EMR application configuration object) set in core-site.xml. This helps parallelize getFileStatus and listStatus methods to reduce latency associated with file listing. You can also adjust the number of reducers to maximize your cluster utilization. The following is a sample command when running with 24 core or task nodes in the EMR cluster:
To test the performance of DistCp with S3DistCp, we used a test dataset of 9.4 TB (157,000 files) stored in a multi-Region GCS bucket. Both the EMR cluster and S3 bucket were located in us-west-2. The number of core nodes that we used in our testing varied from 24–120.
The following are the results of the DistCp test:
| Nodes | Throughput | Transfer Time | Maps |
| 24 | 1.5GB/s | 100 mins | 168 |
| 48 | 2.9GB/s | 53 mins | 336 |
| 96 | 4.4GB/s | 35 mins | 640 |
| 120 | 5.4GB/s | 29 mins | 840 |
The following are the results of the S3DistCp test:
| Nodes | Throughput | Transfer Time | Reducers |
| 24 | 1.9GB/s | 82 mins | 48 |
| 48 | 3.4GB/s | 45 mins | 120 |
| 96 | 5.0GB/s | 31 mins | 240 |
| 120 | 5.8GB/s | 27 mins | 240 |
The results show that S3DistCP performed slightly better than DistCP for our test dataset. In terms of node count, we stopped at 120 nodes because we were satisfied with the performance of the copy. Increasing nodes might yield better performance if required for your dataset. You should iterate through your node counts to determine the proper number for your dataset.
Amazon EMR supports the capacity-optimized allocation strategy for EC2 Spot Instances for launching Spot Instances from the most available Spot Instance capacity pools by analyzing capacity metrics in real time. You can now specify up to 15 instance types in your EMR task instance fleet configuration. For more information, see Optimizing Amazon EMR for resilience and cost with capacity-optimized Spot Instances.
Make sure to delete the cluster when the copy job is complete unless the copy job was a step at the cluster launch and the cluster was set up to stop automatically after the completion of the copy job.
In this post, we showed how you can copy large datasets from GCS to Amazon S3 using an EMR cluster and two Hadoop file copy tools: DistCp and S3DistCp.
We also compared the performance of DistCp with S3DistCp with a test dataset stored in a multi-Region GCS bucket. As a follow-up to this post, we will run the same test on Graviton instances to compare the performance/cost of the latest x86 based instances vs. Graviton 2 instances.
You should conduct your own tests to evaluate both tools and find the best one for your specific dataset. Try copying a dataset using this solution and let us know your experience by submitting a comment or starting a new thread on one of our forums.
 Hammad Ausaf is a Sr Solutions Architect in the M&E space. He is a passionate builder and strives to provide the best solutions to AWS customers.
 Andrew Lee is a Solutions Architect on the Snap Account, and is based in Los Angeles, CA.
Post Syndicated from Jeff Barr original https://aws.amazon.com/blogs/aws/new-ec2-instances-powered-by-gaudi-accelerators-for-training-deep-learning-models/
There are more applications today for deep learning than ever before. Natural language processing, recommendation systems, image recognition, video recognition, and more can all benefit from high-quality, well-trained models.
The process of building such a model is iterative: construct an initial model, train it on the ground truth data, do some test inferences, refine the model and repeat. Deep learning models contain many layers (hence the name), each of which transforms outputs of the previous layer. The training process is math and processor intensive, and places demands on just about every part of the systems used for training including the GPU or other training accelerator, the network, and local or network storage. This sophistication and complexity increases training time and raises costs.
New DL1 Instances
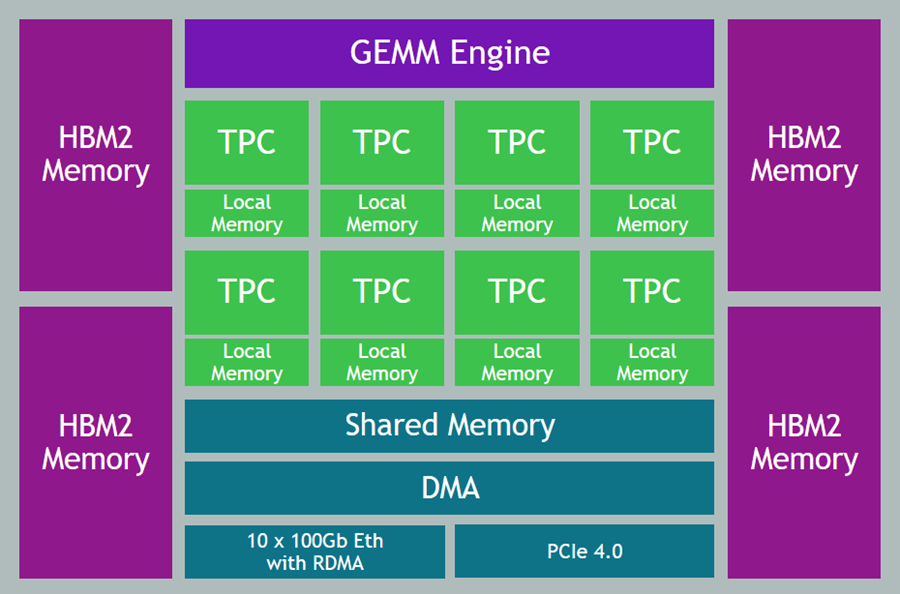
Today I would like to tell you about our new DL1 instances. Powered by Gaudi accelerators from Habana Labs, the dl1.24xlarge instances have the following specs:
Gaudi Accelerators – Each instance is equipped with eight Gaudi accelerators, with a total of 256 GB of High Bandwidth (HBM2) accelerator memory and high-speed, RDMA-powered communication between accelerators.
System Memory – 768 GB of system memory, enough to hold very large sets of training data in memory, as often requested by our customers.
Local Storage – 4 TB of local NVMe storage, configured as four 1 TB volumes.
Processor – Intel Cascade Lake processor with 96 vCPUs.
Network – 400 Gbps of network throughput.
As you can see, we have maxed out the specs in just about every dimension, with the goal of giving you a highly capable machine learning training platform with a low cost of entry and up to 40% better price-performance than current GPU-based EC2 instances.
Gaudi Inside
The Gaudi accelerators are custom-designed for machine learning training, and have a ton of cool & interesting features & attributes:
Data Types – Support for floating point (BF16 and FP32), signed integer (INT8, INT16, and INT32), and unsigned integer (UINT8, UINT16, and UINT32) data.
Generalized Matrix Multiplier Engine (GEMM) – Specialized hardware to accelerate matrix multiplication.
Tensor Processing Cores (TPCs) – Specialized VLIW SIMD (Very Long Instruction Word / Single Instruction Multiple Data) processing units designed for ML training. The TPCs are C-programmable, although most users will use higher-level tools and frameworks.
Getting Started with DL1 Instances
The Gaudi SynapseAI Software Suite for Training will help you to build new models and to migrate existing models from popular frameworks such as PyTorch and TensorFlow:
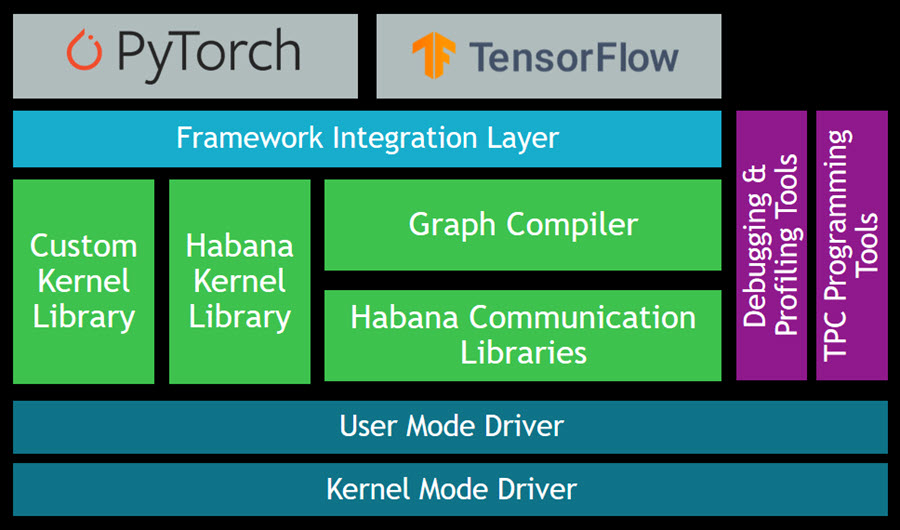
Here are some resources to get you started:
TensorFlow User Guide – Learn how to run your TensorFlow models on Gaudi.
PyTorch User Guide – Learn how to run your PyTorch models on Gaudi.
Gaudi Model Migration Guide – Learn how to port your PyTorch or TensorFlow to Gaudi.
HabanaAI Repo – This large, active repo contains setup instructions, reference models, academic papers, and much more.
You can use the TPC Programming Tools to write, simulate, and debug code that runs directly on the TPCs, and you can use the Habana Communication Library (HCL) to build applications that harness the power of multiple accelerators. The Habana Collective Communications Library (HCCL) runs atop HCL and gives you access to collective primitives for Reduce, Broadcast, Gather, and Scatter operations.
Now Available
DL1 instances are available today in the US East (N. Virginia) and US West (Oregon) Regions in On-Demand and Spot form. You can purchase Reserved Instances and Savings plans as well.
— Jeff;
Post Syndicated from Sébastien Stormacq original https://aws.amazon.com/blogs/aws/aws-local-zones-are-now-open-in-las-vegas-new-york-city-and-portland/
Today, we are opening three new AWS Local Zones in Las Vegas, New York City (located in New Jersey), and Portland metro areas. We are now at a total of 14 Local Zones in 13 cities since Jeff Barr announced the first Local Zone in Los Angeles in December 2019. These three new Local Zones join the ones in full operation in Boston, Chicago, Dallas, Denver, Houston, Kansas City, Los Angeles, Miami, Minneapolis, and Philadelphia.
Local Zones are one of the ways we bring select AWS services much closer to large populations and geographic areas where major industries come together. By having this proximity, you can deploy latency-sensitive workloads such as real-time gaming platforms, financial transaction processing, media and entertainment content creation, or ad services. Using Local Zones for migrations or hybrid strategies are two additional use cases allowing you to migrate your applications to a nearby AWS Local Zone while still meeting the low-latency requirements of hybrid deployments.
Local Zones support the deployment of workloads using Amazon Elastic Compute Cloud (Amazon EC2), Amazon Elastic Block Store (EBS), Amazon FSx for Windows File Server and Amazon FSx for Lustre, Elastic Load Balancing, Amazon Relational Database Service (RDS), and Amazon Virtual Private Cloud (VPC). Local Zones provide a high-bandwidth, secure connection between local workloads and those running in the parent AWS Region, while offering the full range of services found in a Region through the same APIs, console and tool sets. This page lists the exact AWS services and features available in each Local Zone.
Local Zones are easy to use and can be enabled in only three clicks! This article will help you learn how to provision infrastructure in a Local Zone, which is very similar to creating infrastructure in an Availability Zone. Once enabled, Local Zones appear as additional Availability Zones in your AWS Management Console or AWS Command Line Interface (CLI).
Local Zones in Action
Examples of workloads that our customers run in Local Zones include:
Dish Wireless is building the US-telecom’s first cloud-native 5G network. They are unleashing 5G connectivity with better speed, better security, and better latency. DISH is leveraging AWS Regions, AWS Local Zones, and AWS Outposts to extend AWS infrastructure and services to wherever they – or their customers – need it.
Integral Ad Science (IAS) is a global leader in digital media quality. Every millisecond counts when it comes to delivering actionable insights for its advertiser and publisher customers. Leveraging AWS Regions and AWS Local Zones, IAS ensures rapid response times in milliseconds when analyzing data and delivering insights.
Esports Engine (a Vindex company) is a turnkey esports solutions company working with gaming publishers, rights holders, brands, and teams to provide production, broadcast, tournament, and program design. Their graphic-intensive streaming content is live-fed from the locations where the games are recorded and then broadcast from the studios to viewers. AWS Local Zones replace their previous on-premises data centers to reduce the need for support for the physical data center buildings.
Proof Trading is a financial services company looking forward to taking advantage of AWS Local Zones to bring trading workloads closer to the major trading venues located in Chicago and New Jersey. Our industry blog has a detailed article that provides more context on trading-related workloads.
Ubitus is a cloud gaming technology leader. They deploy latency-sensitive game servers all over the world to be closer to gamers. An important part of having a great gaming experience is to have consistent low-latency game plays. AWS Local Zones are a game changer for them. Now, they can easily deploy and test clusters of game servers in many cities across the US, ensuring that more customers get a consistent experience regardless of where they are located.
What’s Next?
In 2019 when we launched our first Local Zone at AWS re:Invent 2019, we said we were just getting started. In addition to today’s announcement, we are working on opening three additional Local Zones in Atlanta, Phoenix, and Seattle by the end of the year, and we keep expanding. If you would like to express your interest in a particular location, please let us know by filling out the AWS Local Zones Interest form.
We are also listening to your feedback on additional services that we should add to Local Zones, such as more EC2 instance types to give you even more flexibility.
Build and deploy your workload on a Local Zone today.
Post Syndicated from Manash Deb original https://aws.amazon.com/blogs/big-data/automate-building-an-integrated-analytics-solution-with-aws-analytics-automation-toolkit/
Amazon Redshift is a fast, fully managed, widely popular cloud data warehouse that powers the modern data architecture enabling fast and deep insights or machine learning (ML) predictions using SQL across your data warehouse, data lake, and operational databases. A key differentiating factor of Amazon Redshift is its native integration with other AWS services, which makes it easy to build complete, comprehensive, and enterprise-level analytics applications.
As analytics solutions have moved away from the one-size-fits-all model to choosing the right tool for the right function, architectures have become more optimized and performant while simultaneously becoming more complex. You can use Amazon Redshift for a variety of use cases, along with other AWS services for ingesting, transforming, and visualizing the data.
Manually deploying these services is time-consuming. It also runs the risk of making human errors and deviating from best practices.
In this post, we discuss how to automate the process of building an integrated analytics solution by using a simple script.
The framework described in this post uses Infrastructure as Code (IaC) to solve the challenges with manual deployments, by using AWS Cloud Development Kit (CDK) to automate provisioning AWS analytics services. You can indicate the services and resources you want to incorporate in your infrastructure by editing a simple JSON configuration file.
The script then instantly auto-provisions all the required infrastructure components in a dynamic manner, while simultaneously integrating them according to AWS recommended best practices.
In this post, we go into further detail on the specific steps to build this solution.
Prior to deploying the AWS CDK stack, complete the following prerequisite steps:
AWSCloudShellFullAccessIAM Full AccessAWSCloudFormationFullAccessAmazonSSMFullAccessAmazonRedshiftFullAccessAmazonS3ReadOnlyAccessSecretsManagerReadWriteAmazonEC2FullAccessAmazonDMSRoleCustom with the following permissions:To launch the target infrastructures, download the user-config-template.json file from the GitHub repo.
To prep the config file, start by entering one of the following values for each key in the top section: CREATE, N/A, or an existing resource ID to indicate whether you want to have the component provisioned on your behalf, skipped, or integrated using an existing resource in your account.
For each of the services with the CREATE value, you then edit the appropriate section under it with the specific parameters to use for that service. When you’re done customizing the form, save it as user-config.json.
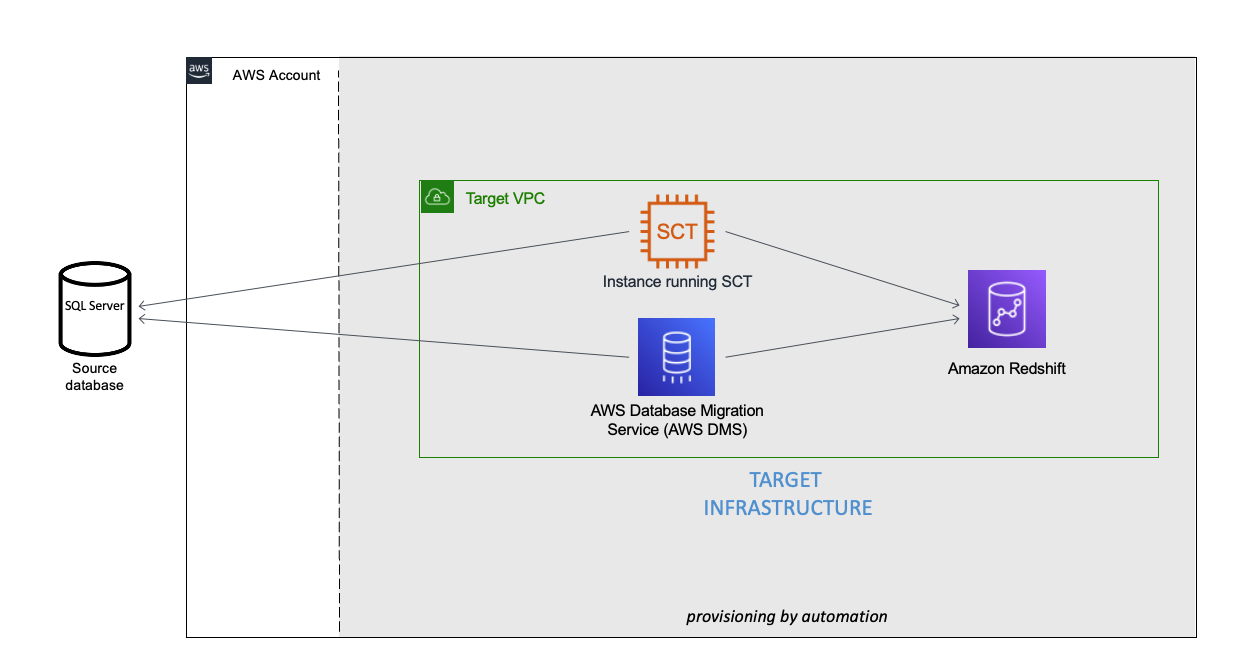
You can see an example of the completed config file under user-config-sample.json in the GitHub repo, which illustrates a config file for the following architecture by newly provisioning all the services, including Amazon Virtual Private Cloud (Amazon VPC), Amazon Redshift, an Amazon Elastic Compute Cloud (Amazon EC2) instance with AWS SCT, and AWS DMS instance connecting an external source SQL Server on Amazon EC2 to the Amazon Redshift cluster.
This project uses CloudShell, a browser-based shell service, to programatically initiate the deployment through the AWS Management Console. Prior to opening CloudShell, you need to configure an IAM user, as described in the prerequisites.
user-config.json.
After you run the script, you can monitor the deployment of resource stacks through the CloudShell terminal, or through the AWS CloudFormation console, as shown in the following screenshot.
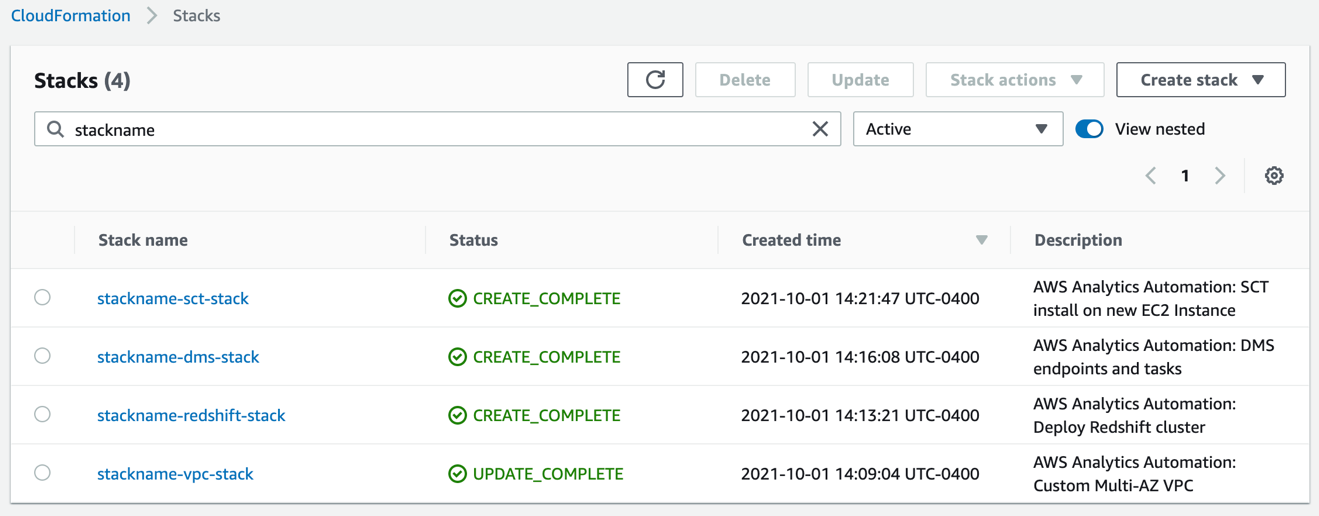
Each stack corresponds to the creation of a resource from the config file. You can see the newly created VPC, Amazon Redshift cluster, EC2 instance running AWS SCT, and AWS DMS instance. To test the success of the deployment, you can test the newly created AWS DMS endpoint connectivity to the source system and the target Amazon Redshift cluster. Select your endpoint and on the Actions menu, choose Test connection.
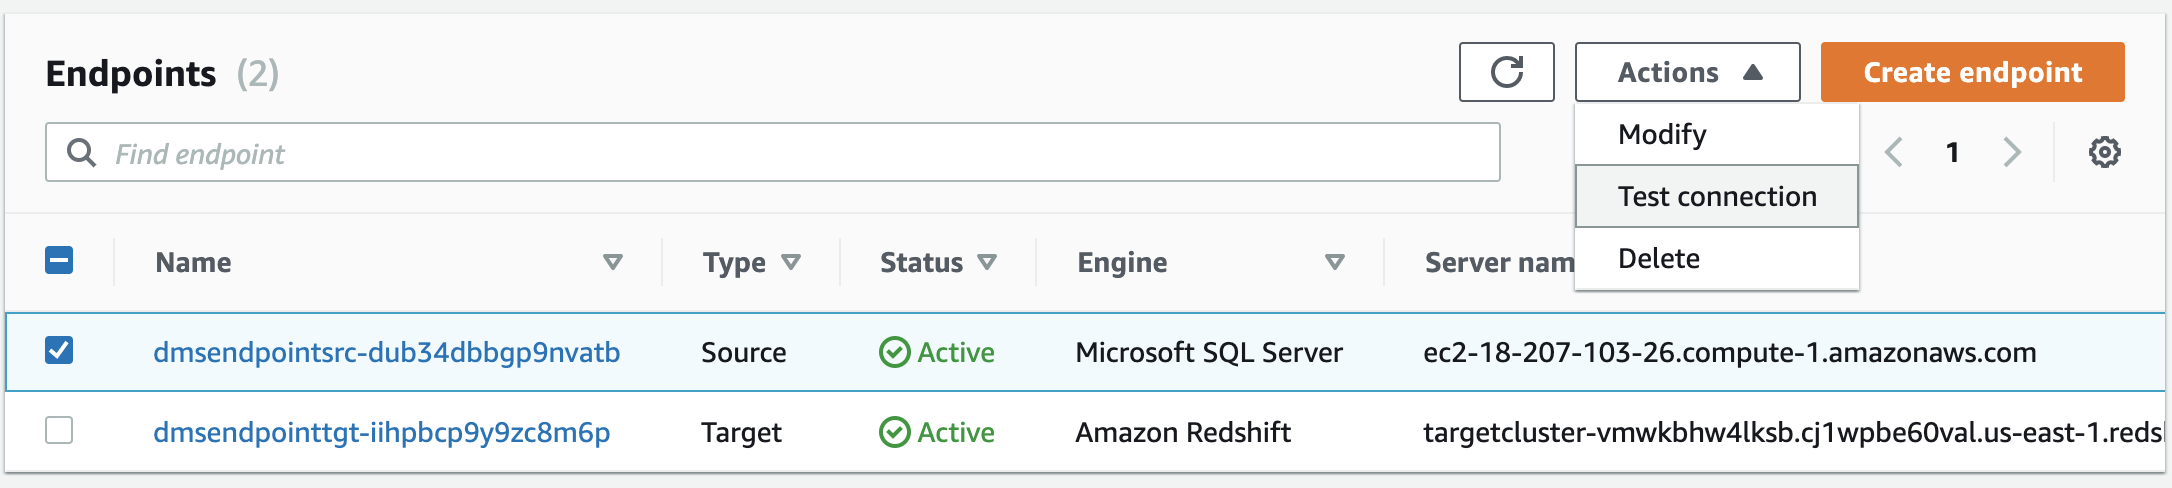
If both statuses say Success, the AWS DMS workflow is fully integrated.
If the stack launch stalls at any point, visit our GitHub repository for troubleshooting instructions.
In this post, we discussed how you can use the AWS Analytics Infrastructure Automation utility to quickly get started with Amazon Redshift and other AWS services. It helps you provision your entire solution on AWS instantly without any spending any time on challenges around integrating the services or scaling your solution.
 Manash Deb is a Software Development Engineer in the AWS Directory Service team. He has worked on building end-to-end applications in different database and technologies for over 15 years. He loves to learn new technologies and solving, automating, and simplifying customer problems on AWS.
 Samir Kakli is an Analytics Specialist Solutions Architect at AWS. He has worked with building and tuning databases and data warehouse solutions for over 20 years. His focus is architecting end-to-end analytics solutions designed to meet the specific needs for each customer.
 Julia Beck is a Specialist Solutions Architect at AWS. She supports customers building analytics proof of concept workloads. Outside of work, she enjoys traveling, cooking, and puzzles.