Вино или гной: Какво се яде и пие в отвъдното според исляма

Post Syndicated from Атанас Шиников original https://www.toest.bg/vino-ili-gnoy-kakvo-se-yade-i-pie-v-otvudnoto-spored-islyama/

Вино или гной: Какво се яде и пие в отвъдното според исляма

Първото тримесечие на календарната година почва с тежък хранителен товар за трите монотеистични религии и техните тукашни вариации. Ако превъртим часовника постепенно назад, най-пресен ще да ни е споменът от таман преминалото великденско преяждане и препиване. Агнета, дроб сарми, яйца, козунаци, вина, ракии, зелени салати след Великия пост – положението е сериозно, отговорно. 

Католическият Великден беше малко преди това – тази година приблизително съвпадаше с еврейския празник Песах (не го наричайте Пасха, защото за еврейската и християнската общност това са различни неща). Парче агнешко месо с кокал, горчиви зелени гарнитури от маруля или цикория, варени яйца, настъргани ябълки, ядки и подправки с вино, безквасен хляб маца, сладкиши, варени моркови и картофи, а накрая – много (наистина щедро разлято!) вино за пиене.

Преди това, застъпил част от нашите постни февруари и март, беше мюсюлманският пост за Рамадан, на който по тукашните земи му казват Рамазан – според турското произношение на арабското име на месеца. Там се пости през деня, ама за сметка на това през нощта се яде предостатъчно: баници, пилафи, баклави – каквото е дал Всевишният. „Хвала на Аллах – казваше един мой познат в Сирия навремето, – накрая на месеца на пост съм наддал с няколко килограма!“

Пък и то яденето си е за хвалба: започва с разговяване (ифтар), тоест прекъсване на поста надвечер с няколко фурми, и продължава с обилни хранения в тъмната част на денонощието. Сутринта преди съмване пак се сяда да се яде – за това хранене в арабския съществува терминът сахур. Та е някак показателно, че Главното мюфтийство в България съветва да не се преяжда по време на свещения месец.

Но нека сега да превъртим часовника напред. Много напред, чак отвъд времето на тукашния свят, за който в арабския език се употребява терминът дунйа – „по-близкото“, „по-ниското“, „настоящият живот“.

Направо ще превъртим не само часовника, но и религиозно-кулинарната игра. Ще нагазим в тема колкото странна за нас, толкова и привична за мюсюлманската теология. Как се яде и пие – не в тоя свят, ами в онзи. За него пък езикът на Пророка от Арабия разполага с термина ахира ‘онова, което иде после, по-сетне, оттатъшното’. А за оттатъшното мюсюлманското Писание, Предание и богословска традиция не пестят детайли. Защото отвъдното битие съвсем не е безплътно, безтелесно и призрачно лишено от сетивни усещания – къде наслади, къде мъчения. В крайна сметка най-популярното название на Рая е Джанна, тоест „Градина“, което и намеква, че животът в оня свят прилича на безкраен отвъден пикник (подобен на онзи, от който Адам и Ева (Хауа’) биват пропъдени).

За теб там има, да не си нито гладен, нито гол. И не ще изпиташ там нито жажда, нито слънчев пек.“ (20:118–119).

Но да не бъда голословен, нека оставим самия текст на Писанието да говори. Разгърнете Корана на сура 76, „Човекът“ (Ал-Инсан) например, и ще видите, че

храната и питието са част от насищащо, всеобхватно, направо холистично, както биха казали в бизнеса и медицината, преживяване на отвъдното.

Праведниците пият от чаши с „добавено питие“ от „Камфор“ (Кафур). Това обаче не е познатото ни вещество, а „извор, от който пият рабите на Аллах“, бликащ в изобилие. Сред наградите на праведниците за тяхното търпение е и „Градина“ (въпросната Джанна), където те са облечени с коприна, облегнати на престоли, без да виждат там ни зной, ни мраз, на сянка под сведени плодове. Обслужват ги със съдове от сребро и с чаши от сребърен кристал; отмерва им се с мярка и им се дава да пият от питие, смесено с „джинджифил“ (занджабил), от извор, наречен Салсабил. Заобикалят ги вечно млади юноши, подобни на разпръснати бисери; облечени са в зелени одежди от коприна и брокат, носят украшения – гривни от сребро – и пият от „чиста напитка“.

Небесните градини раждат колкото праведниците си пожелаят, и то леснодостъпна реколта („сведени плодовете ѝ ниско“, 76:14). Има и грозде сред „градини и лозя“, отредени в спасението за богобоязливите (78:31–32), плодове, фурми и нарове (55:68), че и „лотоси без бодли, и натежали бананови дървета“ (56:28–29). Ала този кулинарен списък не просто не се ограничава с конкретните плодове, изборът е неограничен – добавете и „птиче месо, каквото обичат“ (Коран 56:21), както и „в изобилие плодове и месо, каквито пожелаят“ (52:22). Като че ли млякото и медът стоят по средата между питиетата и храните (малко като нашенското виждане за бирата или бозата като „течна баничка“).

В Рая има и четири вида „реки от вода, която не застоява, и реки от мляко с вкус, който не се променя, и реки от вино, приятно за пиещите, и реки пречистен мед, и в който има за тях от всякакви плодове“ (47:15). Вода, мляко, мед – всичко това звучи приемливо. Водата е особено важна в множеството споменавания на извори. А ако искаме да намерим възможно инструментално обяснение за този факт, може да мислим за Пророка като литературно подобен на Пол Муад’Диб от „Дюн“ на Франк Хърбърт и пустинната планета Аракис. С други думи, в пясъците на древна Арабия водата представлява особена ценност, затова и в отвъдното е силно застъпена. „Градини, сред които реки текат“ е устойчива фигура в описанието на кораничния Рай. Добавете към тях и множеството споменавания на извори.

Но що дири тук виното? Та нали тук, при нас, е напълно възбранено (харам) заедно със свинското, хазарта и ред други неща?

Че и класическото наказание в свещения закон за консумацията му е бой с камшик. Някаква трансмутация, почти по алхимически, да не кажа транссубстанциация, за да не обидя приятелите католици, се е случила с ферментиралата напитка в отвъдното. Освен че тече в реки, то носи наслада, без да носи грях. На всичкото отгоре правоверните не ще ги боли глава, няма да се опияняват и няма да губят разум (37:47, 56:19).

Тук обаче словото на Аллах не говори директно за вино, макар коментаторската традиция изрично да уточнява, че именно то е темата на по-горните знамения. Интересен нюанс въвежда откровението чрез уточнението, че на правоверните „ще им се поднесе запечатано, пребистро питие“ с ухание на мускус, идващо от извора Тасним (83:25–28). Питието в случая е особен вид небесно вино, за което Коранът употребява необичайния термин рахик, за разлика от разпространения иначе хамр. Отделен, но свързан нюанс, е този за употребата на парфюми в отвъдното покрай одеждите и украшенията на праведните, техните ястия и питиета. 

Добре де, сега ще се отклоним още малко, за да ви вменя ход на мислите и ви изпреваря, като попитам:

А къде са девиците?

Онези, 72 на брой, с които мюсюлманският Рай е предимно известен в популярната култура – т.нар. хурии. Ето ги и тях, макар и неуточнено колко: „красавици с големи очи“ (Коран 44:54), „жени с целомъдрен поглед, недокоснати нито от човек преди тях, нито от джин“ (55:56), „хубавици, пазени в шатри“ (55:72), „хубавици с големи очи, подобни на скрити бисери“ (56:22–23), несъмнено отредени за богобоязливите в „градини и лозя, и с напъпили гърди девствени връстнички, и пълни стакани“ (Коран 78:32–34). Но колкото и да е изкушаващо, нека оставим тази отвъдна пикантерия за момент настрани – въпреки че не е съвсем почтено спрямо мюсюлманското Писание и Предание, доколкото хуриите често вървят с темата на настоящото ни разсъждение! – и да се върнем към храната и питието.

Да не си мислите, че храна в отвъдното има само за добрите. Има и за лошите, но служи за назидание и вечно мъчение.

Малко като израза на баща ми „Ще изядеш шамара!“. Ял съм го в тукашния свят – кога щедро, кога пестеливо. Само че шамарът в исляма има отвъдни кулинарни измерения и слиза в стомаха ти като адски огън, по-лош от люта чушка, сорт „Каролина Рийпър“, на прах. Апропо, водата в Ада не служи за утоляване на жаждата. Там тя е инструмент за вечно въздаяние, грешниците в Огъня вкусват „вряща вода и гной“ (38:57). Терминът за този вид вода не е обичайното арабско ма’ – онова, което тече в райските реки, а хамим – вряща течност, „която разкъсва червата“ (47:15).

Листата с напитките за грешниците се отличава с известно разнообразие – освен кипналата вода има и „гнойна вода“ (14:16), „кръв и гной“ (69:36). Това получават те, когато викат към обитателите на Рая и молят за водата или препитанието от Аллах (7:50), а като „викнат за помощ, ще им се помогне с вода като разтопен метал, която изпича лицата“ (18:29) и „кипящ извор да пият“ (88:5).

Но центърът на адското наказание е дървото Закум (аз-Заккум),

злокобната антитеза на дърветата в райската градина и на „дървото на вечността“ (20:120) от изначалната обител на Адам и Ева. На български баба ми казваше „зокум“ на олеандъра (Nerium oleander), от който гледахме няколко храста вкъщи – в тенекии от сирене. Но в кораничния контекст винаги съм си представял въпросното дърво като уродлив, мъчителен и древен аналог на Дървото на болката от „Хиперион“, друга моя любима фантастика на Дан Симънс. Споменато е пряко поне на три места в Корана, а на едно място се говори за „прокълнатото дърво“, сторено за изпитание (17:60). Заблудените, отричащите, казва самият Аллах, ще ядат от него, ще си пълнят от него стомасите и ще пият след това от врящата вода (56:52), защото е дърво, изникващо от дъното на Ада. Плодовете му са като главите на сатаните, от които ядат грешниците, и го примесват с питие от врящата вода (37:63–67). То е храната на всеки грешник, подобна на разтопен метал, кипящ в стомасите (44:44–46).

А това дотук е просто кратка разходка из Корана… Никак не е зле откъм бюлюк (от тур. изобилие), както казваше баба ми. В юдейския Танах, еврейската Библия, тоест онова, което християните наричат Стар завет, че и в християнския Нов завет липсват подобни плътни описания на отвъдното, нали?

А пък аз обичам да казвам, че има религиозни доктрини и традиции, породени от много по-оскъдни основания в дадено Писание. Кораничният текст от VII век колкото завещава на мюсюлманската общност (умма) отговори, толкова отваря пространство за множество въпроси, все важни. Ето, например аз, напълно пристрастно, веднага се запитвам: щом има плодове и меса, „каквито пожелаят“, може ли да си поръчам в отвъдния ресторант сочна свинска вратна пържола? Защото все пак, ако в оня свят има вино, от „което не боли глава“, защо любимото ми барбекю да попада под несправедливите удари на шариата и да остане харам? Или какво точно е птичето месо – знаем, че според някои предания от Пророка в Рая има зелени птици, в чиито гуши и вътрешности се помещават душите на мъчениците (ед.ч. шахид, мн.ч. шухада’) в междинното състояние (барзах) между смъртта на индивида и Съдния ден. Дали тези птици, които, след като вече не са нужни като преносители на душата на шахида, се използват за храната, спомената в Корана? Какви точно са реките на Рая, имат ли си имена, къде текат, защо се говори, че са „под градините“?

Или пък друга тема – не води ли цялото това обилно ядене и пиене до някаква отделителна дейност при обитателите на отвъдното? Следователно да очакваме ли нещо като небесни тоалетни? Ако отвъдното в добрата му част е парк, може ли да предположим, че подобно на Версай от XVII–XVIII век, неговите жители се крият по кьошетата на живия плет, за да откликнат на повика на природата – каквото и да означава „природа“ там? А ако надзърнем към дъното на Ада, как ли точно изглежда дървото Закум? Какви са тези плодове като глави на дяволи, големи ли са, малки ли са, черни ли са, бели ли са, много ли са, как са овесени, какво се случва с грешниците, когато посегнат към тях, та вътрешностите им биват прогорени от разтопен метал? Що за метал е това? Ами докато праведните се отдават на ядене, пиене и разкош в небесния пир, каква е ролята на „хуриите“? И в крайна сметка,

ако не ни харесва плътската конкретика на разказа, възможно ли е напълно да го алегоризираме и така да избегнем обвиненията в прекомерен чувствен буквализъм?

Та нали например виното в старата мюсюлманска мистична поезия на суфите се превръща в символ на опиянението от единението с Всевишния и Неговата любов. Защо да не може да направим същото с всичко останало? Само че преди да го направим според нашето собствено хрумване, е добре да знаем върху какво реално се гради отвъдната кулинария.

(Следва продължение.)


В рубриката „Ориент кафе“ Атанас Шиников поднася любопитни теми, свързани не толкова с горещата политика, колкото с историята и културата на Близкия изток. А той, древен и днешен, е по-близко до нас и съвремието ни, отколкото си представяме.
Карта на купения вот за избори 2026

Post Syndicated from Боян Юруков original https://yurukov.net/blog/2026/karta-voterfraud/

Когато има желание и ръководството на МВР сериозно се заеме с изборните измами, резултатите идват бързо. Всички бяхме учудени колко добре работи полицията, която „отгоре“ не им вързват ръцете, не се опъва чадър и не ги карат „да се прибират“. Всеки ден ставаме свидетели на поток от снимки на сериозни суми, схеми и фалшива валута, с която се осигуряват гласове на определени партии. Това не е нищо ново в изборния процес в България. Разликата е, че сега го виждаме в реално време.
Снощи ми дадоха идея, че толкова много съобщение за арести и разкрити схеми биха били по-лесно осмислени, ако се сложат на карта. Затова седнах на правих набързо такава. В тази карта се оптивам да събера информацията за тези случаи. Източникът на известните случаи в профилът на Георги Кандев във Facebook и страницата на МВР. Към всеки случай има линк към оригиналния му пост. На картата виждате случаи за поне 810 хил. евро между 18 март и 15 април 2026, т.е. около 80% от обявените от главния секретар на МВР заловени суми. Някои от разкритите случаи нямат упомената точна сума, затова не се вижда на картата. Някои от схемите нямат споменато местоположение или са организирани online, затова не са поместени тук.

Местоположението на случаите в тази карта е приблизително спрямо споменатите градове, села и общини. При всяко отваряне ще е малко различно за тази цел. Поместената информация се базира изцяло на публикациите на лица от МВР и обвиненията за купуване на гласове следва да се докажат в съда от разследващите и прокуратурата, ако последните благоволят да се заемат въобще с тези случаи вместо да опъват чадър. За разлика от МВР, те все още се управляват от незаконен главен прокурор, който се държи на поста именно с цел спокойствие за купения и контролиран вот и атаки срещу длъжностни лица опитващи се да му се противопоставят.

Може да видите картата на цял екран тук.

Този сайт не е обвързан МВР, Георги Кандев или който и да е държавен орган или официално лице. Създаден е без тяхно знание или разрешение на база публична информация и не претендира за изчерпателност или точност на детайлите отвъд това, което е публикувано към дадения момент. Ще го допълвам с още информация, когато стане налична.

Cloudflare Email Service: now in public beta. Ready for your agents

Post Syndicated from Thomas Gauvin original https://blog.cloudflare.com/email-for-agents/

Email is the most accessible interface in the world. It is ubiquitous. There’s no need for a custom chat application, no custom SDK for each channel. Everyone already has an email address, which means everyone can already interact with your application or agent. And your agent can interact with anyone.

If you are building an application, you already rely on email for signups, notifications, and invoices. Increasingly, it is not just your application logic that needs this channel. Your agents do, too. During our private beta, we talked to developers who are building exactly this: customer support agents, invoice processing pipelines, account verification flows, multi-agent workflows. All built on top of email. The pattern is clear: email is becoming a core interface for agents, and developers need infrastructure purpose-built for it.

Cloudflare Email Service is that piece. With Email Routing, you can receive email to your application or agent. With Email Sending, you can reply to emails or send outbounds to notify your users when your agents are done doing work. And with the rest of the developer platform, you can build a full email client and Agents SDK onEmail hook as native functionality. 

Today, as part of Agents Week, Cloudflare Email Service is entering public beta, allowing any application and any agent to send emails. We are also completing the toolkit for building email-native agents: 

  • Email Sending binding, available from your Workers and the Agents SDK 

  • A new Email MCP server

  • Wrangler CLI email commands

  • Skills for coding agents

  • An open-source agentic inbox reference app

Email Sending: now in public beta

Email Sending graduates from private beta to public beta today. You can now send transactional emails directly from Workers with a native Workers binding — no API keys, no secrets management.

export default {
  async fetch(request, env, ctx) {
    await env.EMAIL.send({
      to: "[email protected]",
      from: "[email protected]",
      subject: "Your order has shipped",
      text: "Your order #1234 has shipped and is on its way."
    });
    return new Response("Email sent");
  },
};

Or send from any platform, any language, using the REST API and our TypeScript, Python, and Go SDKs:

curl "https://api.cloudflare.com/client/v4/accounts/{account_id}/email-service/send" \
   --header "Authorization: Bearer <API_TOKEN>" \
   --header "Content-Type: application/json" \
   --data '{
     "to": "[email protected]",
     "from": "[email protected]",
     "subject": "Your order has shipped",
     "text": "Your order #1234 has shipped and is on its way."
   }'

Sending email that actually reaches inboxes usually means wrestling with SPF, DKIM, and DMARC records. When you add your domain to Email Service, we configure all of it automatically. Your emails are authenticated and delivered, not flagged as spam. And because Email Service is a global service built on Cloudflare’s network, your emails are delivered with low latency anywhere in the world.

Combined with Email Routing, which has been free and available for years, you now have complete bidirectional email within a single platform. Receive an email, process it in a Worker, and reply, all without leaving Cloudflare.

For the full deep dive on Email Sending, refer to our Birthday Week announcement. The rest of this post describes what Email Service unlocks for agents.

Agents SDK: your agent is email-native

The Agents SDK for building agents on Cloudflare already has a first-class onEmail hook for receiving and processing inbound email. But until now, your agent could only reply synchronously, or send emails to members of your Cloudflare account. 

With Email Sending, that constraint is gone. This is the difference between a chatbot and an agent.


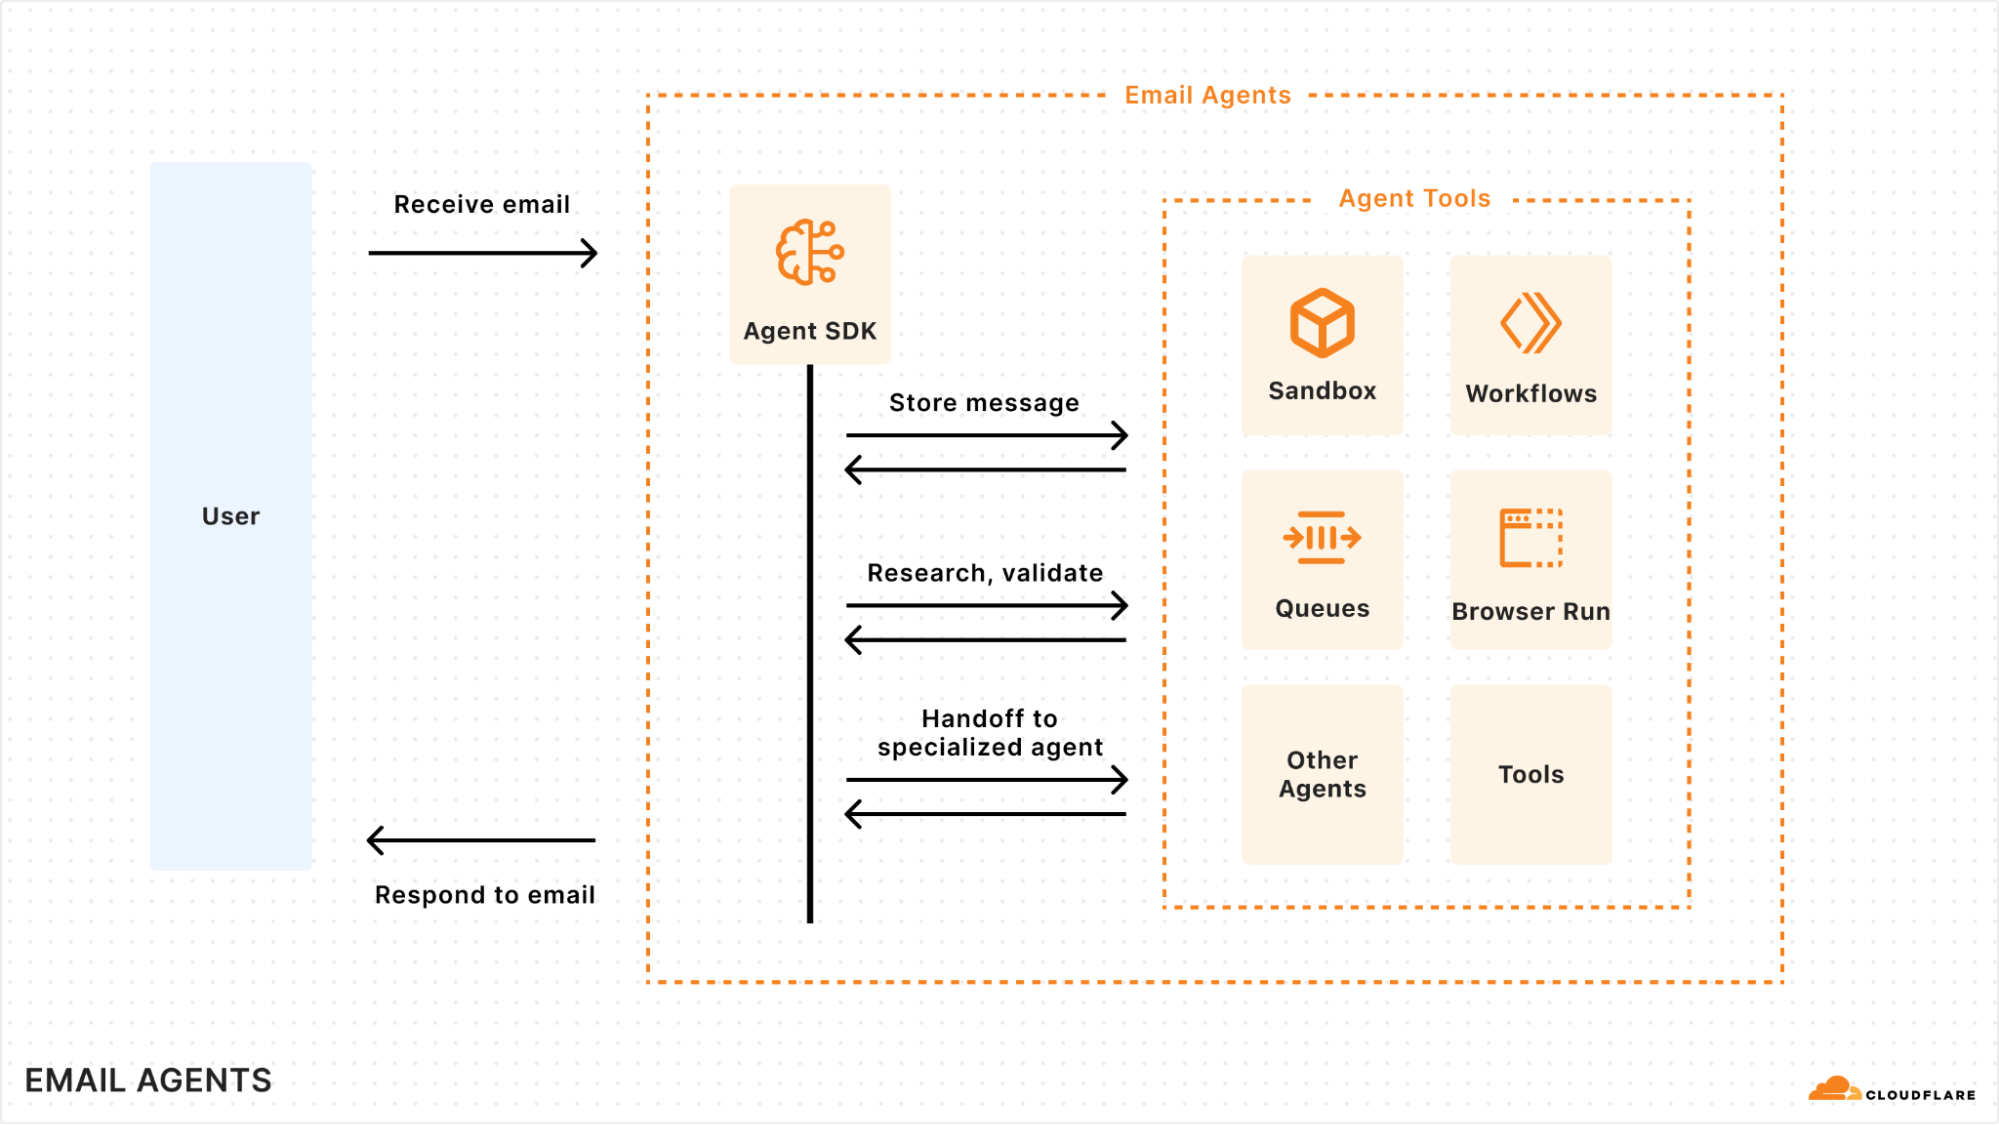
Email agents receive a message, orchestrate work across the platform, and respond asynchronously.

A chatbot responds in the moment or not at all. An agent thinks, acts, and communicates on its own timeline. With Email Sending, your agent can receive a message, spend an hour processing data, check three other systems, and then reply with a complete answer. It can schedule follow-ups. It can escalate when it detects an edge case. It can operate independently. In other words: it can actually do work, not just answer questions. 

Here’s what a support agent looks like with the full pipeline — receive, persist, and reply:

import { Agent, routeAgentEmail } from "agents";
import { createAddressBasedEmailResolver, type AgentEmail } from "agents/email";
import PostalMime from "postal-mime";

export class SupportAgent extends Agent {
  async onEmail(email: AgentEmail) {
    const raw = await email.getRaw();
    const parsed = await PostalMime.parse(raw);

   // Persist in agent state
    this.setState({
      ...this.state,
      ticket: { from: email.from, subject: parsed.subject, body: parsed.text, messageId: parsed.messageId },
    });

    // Kick off long running background agent task 
    // Or place a message on a Queue to be handled by another Worker

    // Reply here or in other Worker handler, like a Queue handler
    await this.sendEmail({
      binding: this.env.EMAIL,
      fromName: "Support Agent",
      from: "[email protected]",
      to: this.state.ticket.from,
      inReplyTo: this.state.ticket.messageId,
      subject: `Re: ${this.state.ticket.subject}`,
      text: `Thanks for reaching out. We received your message about "${this.state.ticket.subject}" and will follow up shortly.`
    });
  }
}

export default {
  async email(message, env) {
    await routeAgentEmail(message, env, {
      resolver: createAddressBasedEmailResolver("SupportAgent"),
    });
  },
} satisfies ExportedHandler<Env>;

If you’re new to the Agents SDK’s email capabilities, here’s what’s happening under the hood.

Each agent gets its own identity from a single domain. The address-based resolver routes [email protected] to a “support” agent instance, [email protected] to a “sales” instance, and so on. You don’t need to provision separate inboxes — the routing is built into the address. You can even use sub-addressing ([email protected]) to route to different agent namespaces and instances.

State persists across emails. Because agents are backed by Durable Objects, calling this.setState() means your agent remembers conversation history, contact information, and context across sessions. The inbox becomes the agent’s memory, without needing a separate database or vector store.

Secure reply routing is built in. When your agent sends an email and expects a reply, you can sign the routing headers with HMAC-SHA256 so that replies route back to the exact agent instance that sent the original message. This prevents attackers from forging headers to route emails to arbitrary agent instances — a security concern that most “email for agents” solutions haven’t addressed.

This is the complete email agent pipeline that teams are building from scratch elsewhere: receive email, parse it, classify it, persist state, kick off async workflows, reply or escalate — all within a single Agent class, deployed globally on Cloudflare’s network.

Email tooling for your agents: MCP server, Wrangler CLI, and skills

Email Service isn’t only for agents running on Cloudflare. Agents run everywhere, whether it’s coding agents like Claude Code, Cursor, or Copilot running locally or in remote environments, or production agents running in containers or external clouds. They all need to send email from those environments. We’re shipping three integrations that make Email Service accessible to any agent, regardless of where it runs.

Email is now available through the Cloudflare MCP server, the same Code Mode-powered server that gives agents access to the entire Cloudflare API. With this MCP server, your agent can discover and call the Email endpoints to send and configure emails. You can send an email with a simple prompt:

"Send me a notification email at [email protected] from my staging domain when the build completes"

For agents running on a computer or a sandbox with bash access, the Wrangler CLI solves the MCP context window problem that we discussed in the Code Mode blog post — tool definitions can consume tens of thousands of tokens before your agent even starts processing a single message. With Wrangler, your agent starts with near-zero context overhead and discovers capabilities on demand through `–help` commands. Here is how your agent can send an email via Wrangler:

wrangler email send \
  --to "[email protected]" \
  --from "[email protected]" \
  --subject "Build completed" \
  --text "The build passed. Deployed to staging."

Regardless of whether you give your agent the Cloudflare MCP or the Wrangler CLI, your agent will be able to now send emails on your behalf with just a prompt.

Skills

We are also publishing a Cloudflare Email Service skill. It gives your agents complete guidance: configuring the Workers binding, sending emails via the REST API or SDKs, handling inbound email with Email Routing configuration, building with Agents SDK, and managing email through Wrangler CLI or MCP. It also covers deliverability best practices and how to craft good transactional emails that land in inboxes rather than spam. Drop it into your project and your coding agent has everything needed to build production-ready email on Cloudflare.

Open-sourcing tools for email agents

During the private beta, we also experimented with email agents. It became clear that you often want to keep the human-in-the-loop element to review emails and see what the agent is doing.The best way to do that is to have a fully featured email client with agent automations built-in.

That’s why we built Agentic Inbox: a reference application with full conversation threading, email rendering, receiving and storing emails and their attachments, and automatically replying to emails. It includes a dedicated MCP server built-in, so external agents can draft emails for your review before sending from your agentic-inbox. 


We’re open-sourcing Agentic Inbox as a reference application for how to build a full email application using Email Routing for inbound, Email Sending for outbound, Workers AI for classification, R2 for attachments, and Agents SDK for stateful agent logic. You can deploy it today to get a full inbox, email client and agent for your emails, with the click of a button.

We want email agent tooling to be composable and reusable. Rather than every team rebuilding the same inbound-classify-reply pipeline, start with this reference application. Fork it, extend it, use it as a starting point for your own email agents that fit your workflows.

Try it out today

Email is where the world’s most important workflows live, but for agents, it has often been a difficult channel to reach. With Email Sending now in public beta, Cloudflare Email Service becomes a complete platform for bidirectional communication, making the inbox a first-class interface for your agents.

Whether you’re building a support agent that meets customers in their inbox or a background process that keeps your team updated in real time, your agents now have a seamless way to communicate on a global scale. The inbox is no longer a silo. Now it’s one more place for your agents to be helpful.


Watch on Cloudflare TV

Getting started with Apache Iceberg write support in Amazon Redshift – Part 2

Post Syndicated from Sanket Hase original https://aws.amazon.com/blogs/big-data/getting-started-with-apache-iceberg-write-support-in-amazon-redshift-part-2/

In Getting started with Apache Iceberg write support in Amazon Redshift – part 1, you learned how to create Apache Iceberg tables and write data directly from Amazon Redshift to your data lake. You set up external schemas, created tables in both Amazon Simple Storage Service (Amazon S3) and S3 Tables, and performed INSERT operations while maintaining ACID (Atomicity, Consistency, Isolation, Durability) compliance.

Amazon Redshift now supports DELETE, UPDATE, and MERGE operations for Apache Iceberg tables stored in Amazon S3 and Amazon S3 table buckets. With these operations, you can modify data at the row level, implement upsert patterns, and manage the data lifecycle while maintaining transactional consistency using familiar SQL syntax. You can run complex transformations in Amazon Redshift and write results to Apache Iceberg tables that other analytics engines like Amazon EMR or Amazon Athena can immediately query.

In this post, you work with customer and orders datasets that were created and used in the previously mentioned post to demonstrate these capabilities in a data synchronization scenario.

Solution overview

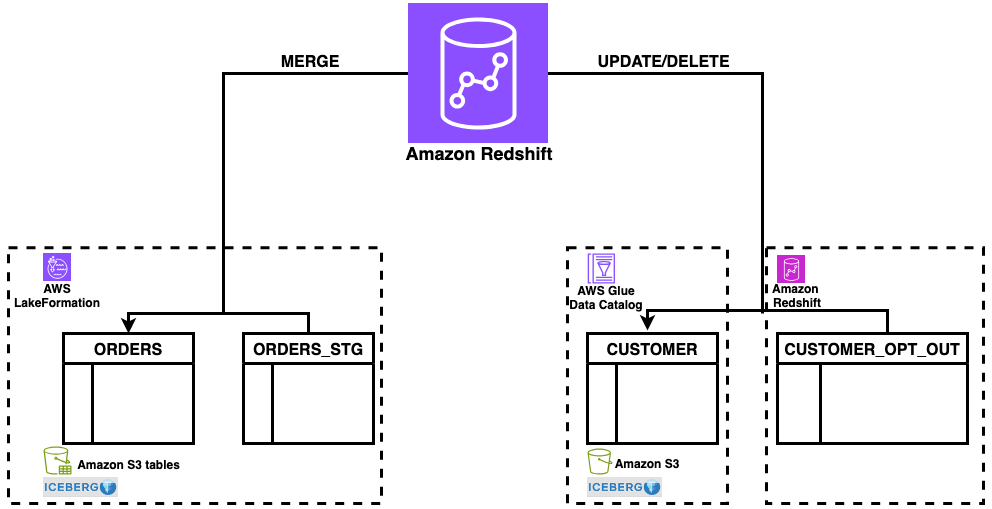
This solution demonstrates DELETE, UPDATE, and MERGE operations for Apache Iceberg tables in Amazon Redshift using a common data synchronization pattern: maintaining customer records and orders data across staging and production tables. The workflow includes three key operations:

  • DELETE – Remove customer records based on opt-out requests
  • UPDATE – Modify existing customer information
  • MERGE – Synchronize order data between staging and production tables using upsert patterns
Figure : solution overview

Figure 1: solution overview

The solution uses a staging table (orders_stg) stored in an S3 table bucket for incoming data and reference tables (customer_opt_out) in Amazon Redshift for managing data lifecycle operations. With this architecture, you can process changes efficiently while maintaining ACID compliance across both storage types.

Prerequisites

For this walkthrough, you should have completed the setup steps from Getting started with Apache Iceberg write support in Amazon Redshift – part 1, including:

  • Create an Amazon Redshift data warehouse (provisioned or Serverless)
  • Set up the required IAM role (RedshifticebergRole) with appropriate permissions
  • Create an Amazon S3 bucket and S3 Table bucket
  • Configure AWS Glue Data Catalog database and setting up access
  • Set up AWS Lake Formation permissions
  • Create the customer Apache Iceberg table in Amazon S3 standard buckets with sample customer data
  • Create the orders Apache Iceberg table in Amazon S3 Table buckets with sample order data
  • Amazon Redshift data warehouse on p200 version or higher

Data preparation

In this section, you set up the sample data needed to demonstrate MERGE, UPDATE, and DELETE operations. To prepare your data, complete the following steps:

  1. Log in to Amazon Redshift using Query Editor V2 with the Federated user option.
  2. Create the orders_stg and customer_opt_out tables with sample data:
CREATE TABLE "iceberg-write-blog@s3tablescatalog".iceberg_write_namespace.orders_stg
(
customer_id BIGINT,
order_id BIGINT,
Total_order_amt DECIMAL(10,2),
Total_order_tax_amt REAL,
tax_pct DOUBLE PRECISION,
order_date DATE,
order_created_at_tz TIMESTAMPTZ,
is_active_ind BOOLEAN
)
USING ICEBERG;
INSERT INTO "iceberg-write-blog@s3tablescatalog".iceberg_write_namespace.orders_stg
(order_date, order_id, customer_id, total_order_amt, total_order_tax_amt, tax_pct, order_created_at_tz, is_active_ind)
VALUES
('2024-11-11', 1016, 10, 167.45, 13.40, 0.08, '2024-11-11 06:55:00-06:00', true),
('2024-11-12', 1017, 15, 34.99, 2.80, 0.08, '2024-11-12 23:30:30-06:00', true),
('2024-11-09', 1014, 9, 500.60, 56.80, 0.09, '2024-11-09 16:20:55-06:00', true),
('2024-11-10', 1015, 5, 329.85, 33.51, 0.08, '2024-11-10 11:45:30-06:00', true);
select * from "iceberg-write-blog@s3tablescatalog".iceberg_write_namespace.orders_stg;
Figure 2: orders_stg result set

Figure 2: orders_stg result set

CREATE TABLE dev.public.customer_opt_out
(
customer_id bigint,
customer_name varchar,
opt_out_ind char(1),
cust_rec_upd_ind char(1)
);
INSERT INTO dev.public.customer_opt_out VALUES
(9, 'Customer9 Martinez', 'Y', 'N'),
(12, 'Customer12 Thomas', 'Y', 'N'),
(13, 'Customer13 Albon', 'N', 'Y'),
(14, 'Customer14 Oscar', 'N', 'Y');
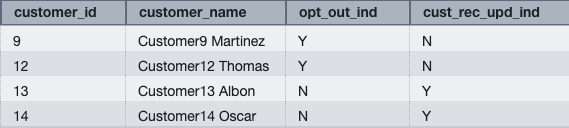
select * from dev.public.customer_opt_out;
Figure 3: customer_opt_out result set

Figure 3: customer_opt_out result set

You can now use the orders_stg and customer_opt_out tables to demonstrate data manipulation operations on the orders and customer tables created in the prerequisite section.

MERGE

MERGE conditionally inserts, updates, or deletes rows in a target table based on the results of a join with a source table. You can use MERGE to synchronize two tables by inserting, updating, or deleting rows in one table based on differences found in the other table.

To perform a MERGE operation:

  1. Verify that the current data in the orders table for order IDs 1014, 1015, 1016, and 1017.You loaded this sample data in Part 1:
select * from "iceberg-write-blog@s3tablescatalog".iceberg_write_namespace.orders
where order_id in (1014,1015,1016,1017);
Figure 4: orders data for existing orders for orders in orders_stg

Figure 4: orders data for existing orders for orders in orders_stg

The orders table contains existing rows for order IDs 1014 and 1015.

  1. Run the following MERGE operation using order_id as the key column to match rows between the orders and orders_stg tables:
MERGE INTO "iceberg-write-blog@s3tablescatalog".iceberg_write_namespace.orders
USING "iceberg-write-blog@s3tablescatalog".iceberg_write_namespace.orders_stg
ON orders.order_id = orders_stg.order_id
WHEN MATCHED THEN UPDATE 
SET
customer_id         = orders_stg.customer_id,
total_order_amt     = orders_stg.total_order_amt,
total_order_tax_amt = orders_stg.total_order_tax_amt,
tax_pct             = orders_stg.tax_pct,
order_date          = orders_stg.order_date,
order_created_at_tz = orders_stg.order_created_at_tz,
is_active_ind       = orders_stg.is_active_ind
WHEN NOT MATCHED THEN INSERT
VALUES 
(orders_stg.customer_id,orders_stg.order_id,orders_stg.total_order_amt,orders_stg.total_order_tax_amt,orders_stg.tax_pct,orders_stg.order_date,orders_stg.order_created_at_tz,orders_stg.is_active_ind);

The operation updates existing rows (1014 and 1015) and inserts new rows for order IDs that don’t exist in the orders table (1016 and 1017).

  1. Verify the updated data in the orders table:
select * from "iceberg-write-blog@s3tablescatalog".iceberg_write_namespace.orderswhere order_id in (1014,1015,1016,1017);
Figure 5: merged data on orders from orders_stg

Figure 5: merged data on orders from orders_stg

The MERGE operation performs the following changes:

  • Updates existing rows – Order IDs 1014 and 1015 have updated total_order_amt and total_order_tax_amt values from the orders_stg table
  • Inserts new rows – Order IDs 1016 and 1017 are inserted because they don’t exist in the orders table

This demonstrates the upsert pattern, where MERGE conditionally updates or inserts rows based on the matching key column.

UPDATE

UPDATE modifies existing rows in a table based on specified conditions or values from another table.

Update the customer Apache Iceberg table using data from the customer_opt_out Amazon Redshift native table. The UPDATE operation uses the cust_rec_upd_ind column as a filter, updating only rows where the value is ‘Y’.

To perform an UPDATE operation:

  1. Verify the current customer_name values for customer IDs 13 and 14 in customer_opt_out and customer (loaded this sample data in Part 1) tables:
select * from dev.public.customer_opt_out
where cust_rec_upd_ind = 'Y';
Figure 6: verify existing customer data for customers from customer_opt_out

Figure 6: verify existing customer data for customers from customer_opt_out

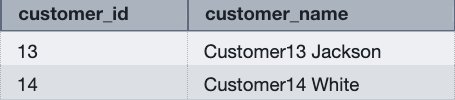
select customer_id,customer_name from dev.demo_iceberg.customer
where customer_id in(13,14);
Figure 7: verify existing customer name for customers from customer_opt_out

Figure 7: verify existing customer name for customers from customer_opt_out

  1. Run the following UPDATE operation to modify customer names based on the cust_rec_upd_ind from customer_opt_out:
UPDATE dev.demo_iceberg.customerSET customer_name = customer_opt_out.customer_name
FROM dev.public.customer_opt_out
WHERE customer_opt_out.cust_rec_upd_ind = 'Y'and customer.customer_id = customer_opt_out.customer_id;
  1. Verify the changes for customer IDs 13 and 14:
select customer_id,customer_name from dev.demo_iceberg.customer where customer_id in(13,14) order by 1;
Figure 8: updated customer names in customer table

Figure 8: updated customer names in customer table

The UPDATE operation modifies the customer_name values based on the join condition with the customer_opt_out table. Customer IDs 13 and 14 now have updated names (Customer13 Albon and Customer14 Oscar).

DELETE

DELETE removes rows from a table based on specified conditions. Without a WHERE clause, DELETE removes all the rows from table.

Delete rows from the customer Apache Iceberg table using data from the customer_opt_out Amazon Redshift native table. The DELETE operation uses the opt_out_ind column as a filter, removing only rows where the value is ‘Y’.

To perform a DELETE operation:

  1. Verify the opt-out indicator data in the customer_opt_out table:
select * from dev.public.customer_opt_out
where opt_out_ind = 'Y';
Figure 9: verify customer records for opt out

Figure 9: verify customer records for opt out

  1. Verify the current customer data for customer IDs 9 and 12:
select * from dev.demo_iceberg.customerwhere customer_id in(9,12);
Figure 0: verify existing customers data in customer table for opt out

Figure 10: verify existing customers data in customer table for opt out

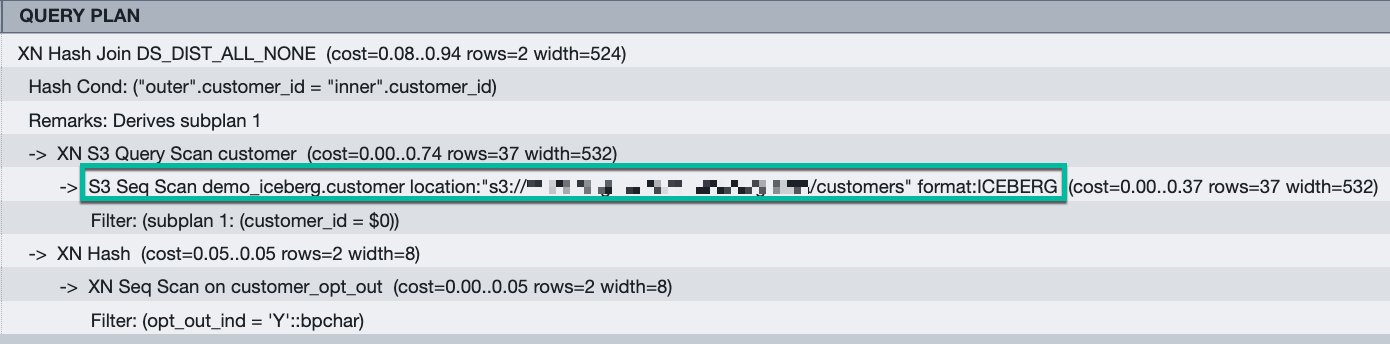
  1. Review the query execution plan:
EXPLAINDELETE FROM demo_iceberg.customerUSING public.customer_opt_out
WHERE customer.customer_id = customer_opt_out.customer_id
AND customer_opt_out.opt_out_ind = 'Y';
Figure 1: query plan for the DELETE queryThe execution plan shows Amazon S3 scans for Apache Iceberg format tables, indicating that Amazon Redshift removes rows directly from the Amazon S3 bucket.

Figure 11: query plan for the DELETE query. The execution plan shows Amazon S3 scans for Apache Iceberg format tables, indicating that Amazon Redshift removes rows directly from the Amazon S3 bucket.

  1. Run the following DELETE operation:
DELETE FROM demo_iceberg.customer
USING public.customer_opt_out
WHERE customer.customer_id = customer_opt_out.customer_id
AND customer_opt_out.opt_out_ind = 'Y';
  1. Verify that the rows were removed:
select * from dev.demo_iceberg.customer where customer_id in(9,12);
Figure 2: result set from customer table for opt out customer after delete

Figure 12: result set from customer table for opt out customer after delete

The query returns no rows, confirming that customer IDs 9 and 12 were successfully deleted from the customer table.

Best practices

After performing multiple UPDATE or DELETE operations, consider running table maintenance to optimize read performance:

  • For AWS Glue tables – Use AWS Glue table optimizers. For more information, see Table optimizers in the AWS Glue Developer Guide.
  • For S3 Tables – Use S3 Tables maintenance operations. For more information, see S3 Tables maintenance in the Amazon S3 User Guide.

Table maintenance merges and compacts deletion files generated by Merge-on-Read operations, improving query performance for subsequent reads.

Conclusion

You can use Amazon Redshift support for DELETE, UPDATE, and MERGE operations on Apache Iceberg tables to build data architectures that combine warehouse performance with data lake scalability. You can modify data at the row level while maintaining ACID compliance, giving you the same flexibility with Apache Iceberg tables as you have with native Amazon Redshift tables.

Get started:


About the authors

Sanket Hase

Sanket Hase

Sanket is an Engineering Manager with the Amazon Redshift team, leading query execution teams in the areas of data lake analytics, hardware-software co-design, and vectorized query execution.

Raghu Kuppala

Raghu Kuppala

Raghu is an Analytics Specialist Solutions Architect experienced working in the databases, data warehousing, and analytics space. Outside of work, he enjoys trying different cuisines and spending time with his family and friends.

Ritesh Sinha

Ritesh is an Analytics Specialist Solutions Architect based out of San Francisco. He has helped customers build scalable data warehousing and big data solutions for over 16 years. He loves to design and build efficient end-to-end solutions on AWS. In his spare time, he loves reading, walking, and doing yoga.

Sundeep Kumar

Sundeep Kumar

Sundeep is a Sr. Specialist Solutions Architect at Amazon Web Services (AWS), helping customers build data lake and analytics platforms and solutions. When not building and designing data lakes, Sundeep enjoys listening to music and playing guitar.

Get to insights faster using Notebooks in Amazon SageMaker Unified Studio

Post Syndicated from Praveen Kumar original https://aws.amazon.com/blogs/big-data/get-to-insights-faster-using-notebooks-in-amazon-sagemaker-unified-studio/

In this post, we demonstrate how Notebooks in Amazon SageMaker Unified Studio help you get to insights faster by simplifying infrastructure configuration. You’ll see how to analyze housing price data, create scalable data tables, run distributed profiling, and train machine learning (ML) models within a single notebook environment.

Data scientists and analysts often spend days configuring infrastructure and managing authentication across multiple data sources before they can begin analysis. When working with data across Amazon Simple Storage Service (Amazon S3), Amazon Redshift, Snowflake, and local files, teams face repeated authentication setup, manual compute scaling decisions, and tool-switching overhead that delays insights.

Notebooks in Amazon SageMaker Unified Studio provide instant access to 12+ data sources, compute scaling from local to distributed processing, and AI-powered code generation within a single browser-based environment. You’ll learn to use polyglot programming, multi-engine compute, and AI-assisted development to accelerate your path from question to insight.

What are Notebooks in Amazon SageMaker Unified Studio?

Notebooks in Amazon SageMaker Unified Studio provide an interactive environment for data analysis, exploration, engineering, and machine learning workflows. It delivers five integrated capabilities:

  • Polyglot programming: Write code in Python and SQL interchangeably within the same notebook environment
  • Unified data access: Connect instantly to data stored in Amazon S3, AWS Glue Data Catalog, Apache Iceberg tables, and third-party sources like Snowflake and BigQuery
  • Native visualization: Create charts directly from Python and SQL results for immersive data analytics
  • AI-powered development: Generate code through natural language prompts using SageMaker Data Agent, with an intelligent chat interface for data analytics, data science, and ML tasks
  • Flexible compute: Scale from basic instances to GPU-powered environments as your needs grow

Architecture

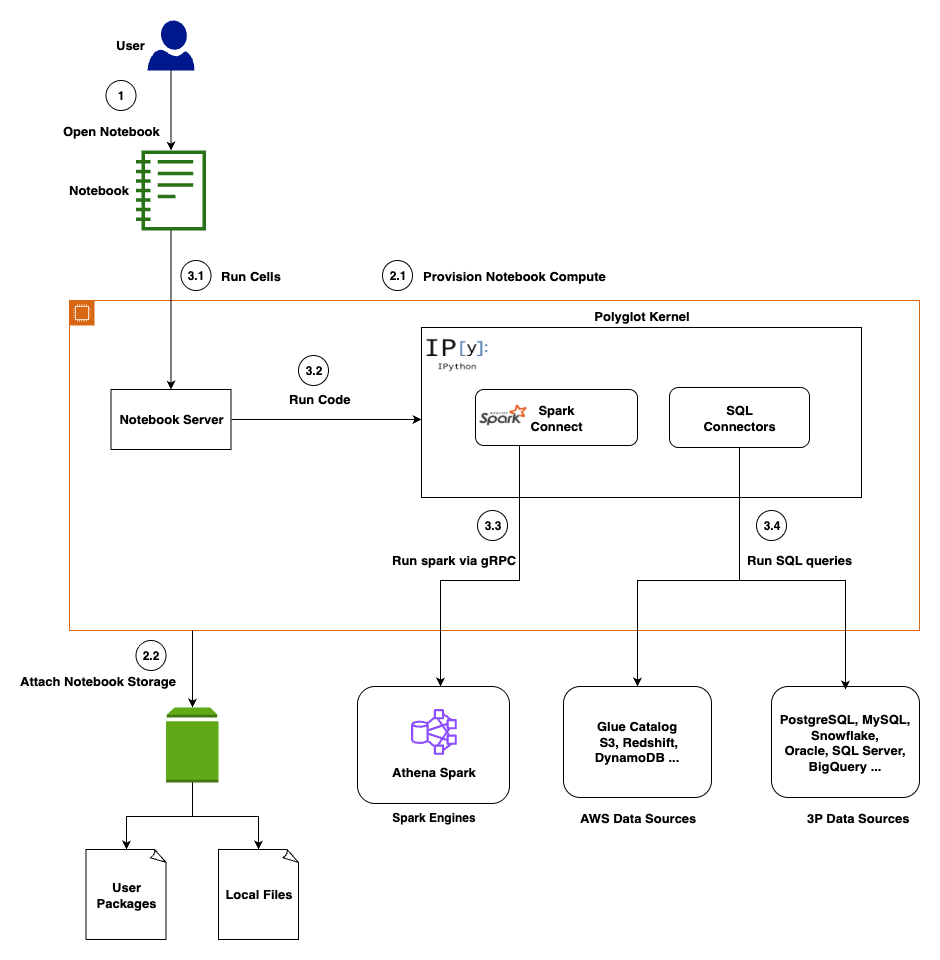
This section covers the architecture of Notebooks, which delivers enterprise-scale analytics with browser-based simplicity through a cloud-native architecture that integrates multiple compute engines, diverse data sources, and AI-powered assistance.

Presentation layer

You access the notebook interface through Amazon SageMaker Unified Studio, interacting with a familiar interface featuring code cells for execution, markdown cells for documentation, and visualization cells for charts and tables.

Compute layer

A dedicated notebook server manages your kernel lifecycle and session state. Key components include a Language Server for code completion, a Python 3.11 runtime with pre-loaded data science libraries, and a Polyglot Kernel that handles your Python, PySpark, and SQL execution within the same notebook. Persistent Amazon Elastic Block Store (Amazon EBS) storage backs each notebook you create.

Execution layer

Notebooks support multiple execution engines, automatically routing your code to the optimal processing engine. In-memory execution handles your smaller datasets and rapid prototyping. Apache Spark via Amazon Athena provides distributed processing for your large-scale analytics via Spark Connect. Native connectivity to Amazon Athena (Trino), Amazon Redshift, Snowflake, and BigQuery processes your SQL queries.

Data Integration

You get unified access to 12+ data sources including AWS-native (Amazon S3, AWS Glue, Amazon Athena, Amazon Redshift) and third-party (Snowflake, BigQuery, PostgreSQL, MySQL) data sources. For the latest supported data sources, see Connect to data sources .

AI layer

The SageMaker Data Agent operates in two modes to assist you: an Agent Panel for multi-step analytical workflows and Inline Assistance for focused, cell-level code generation. For a detailed overview, see Accelerate context-aware data analysis and ML workflows with Amazon SageMaker Data Agent .

Security is embedded throughout the architecture to protect your work. Data access respects your AWS Identity and Access Management (AWS IAM) permissions. The notebook and the agent can only access data sources you’re authorized to use. Communication between components uses encrypted channels, and your notebook storage is encrypted at rest. The AI agent includes built-in guardrails to help prevent destructive operations and logs interactions for your compliance and auditing purposes.

Prerequisites

Before you begin, you need:

  • An AWS account with appropriate permissions to create Amazon SageMaker Unified Studio resources. See Set up IAM-based domains for complete permission requirements.
  • Basic familiarity with Python programming and SQL queries
  • Understanding of data analysis concepts and ML workflows
  • Access to the sample housing dataset (provided in the walkthrough)

Getting started with Notebooks

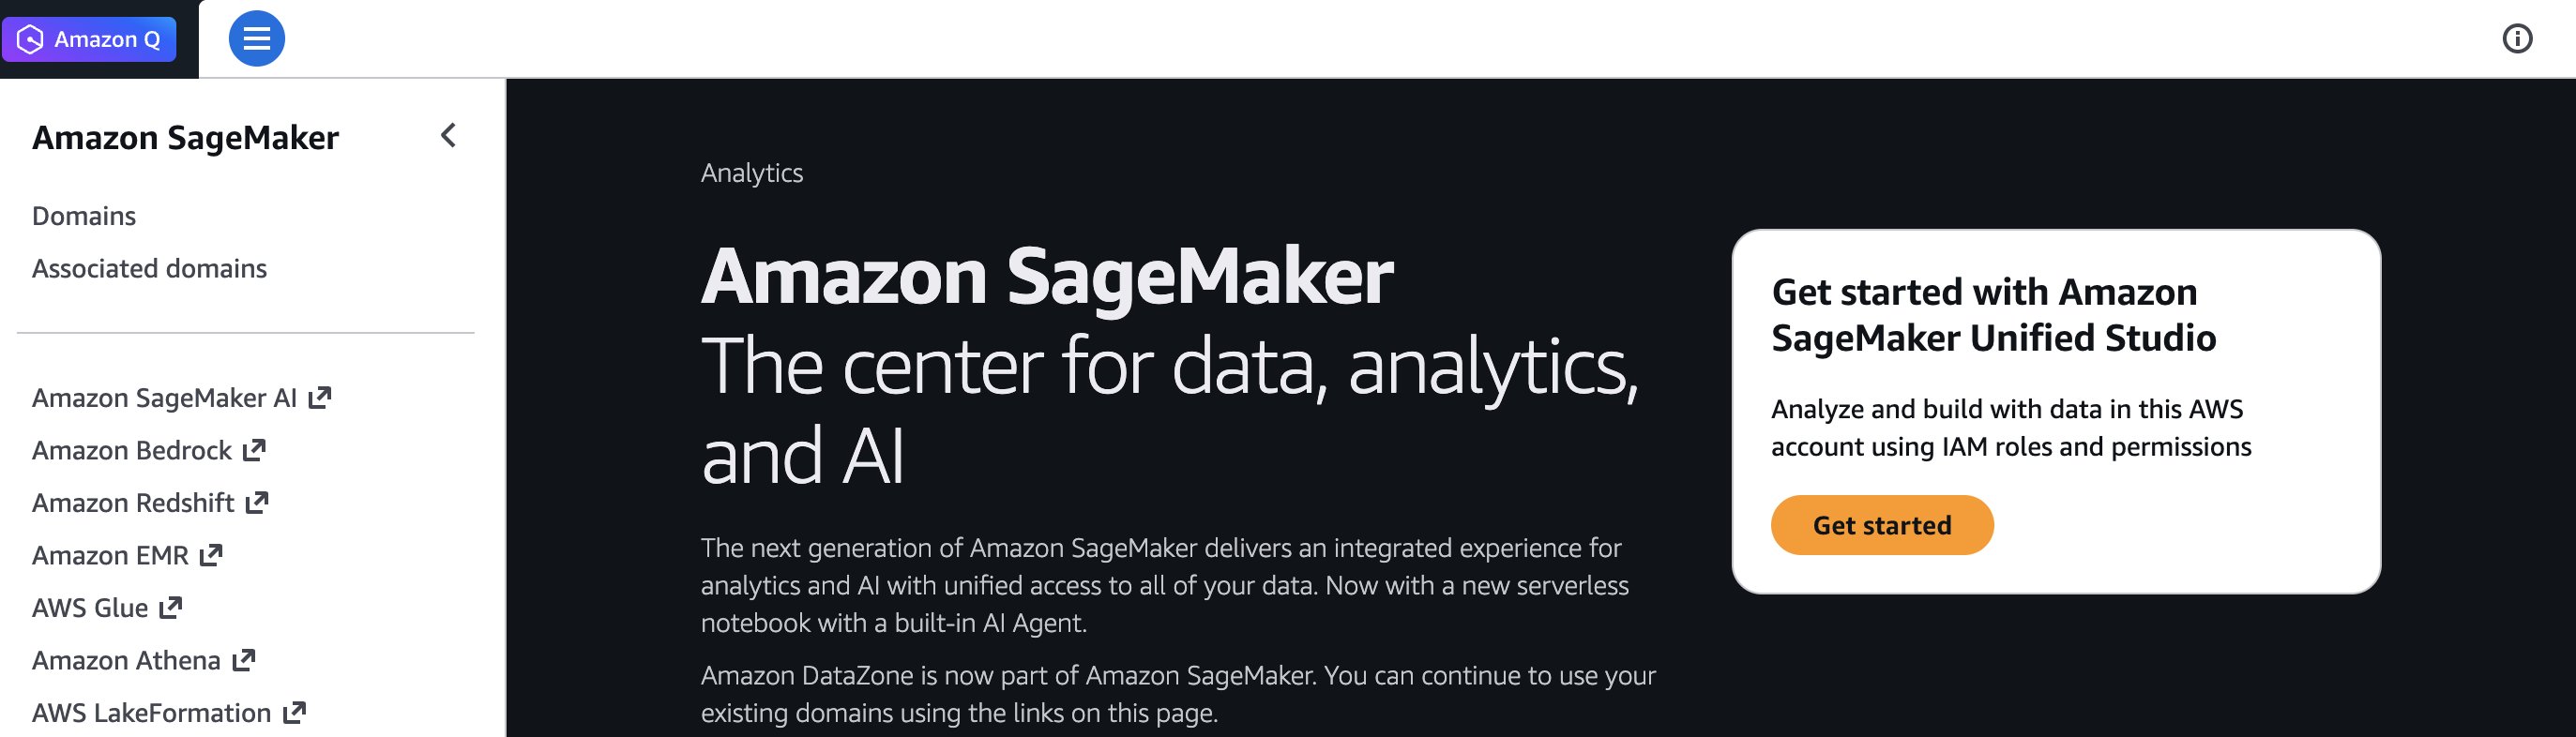
To get started, open the Amazon SageMaker console and choose Get started.

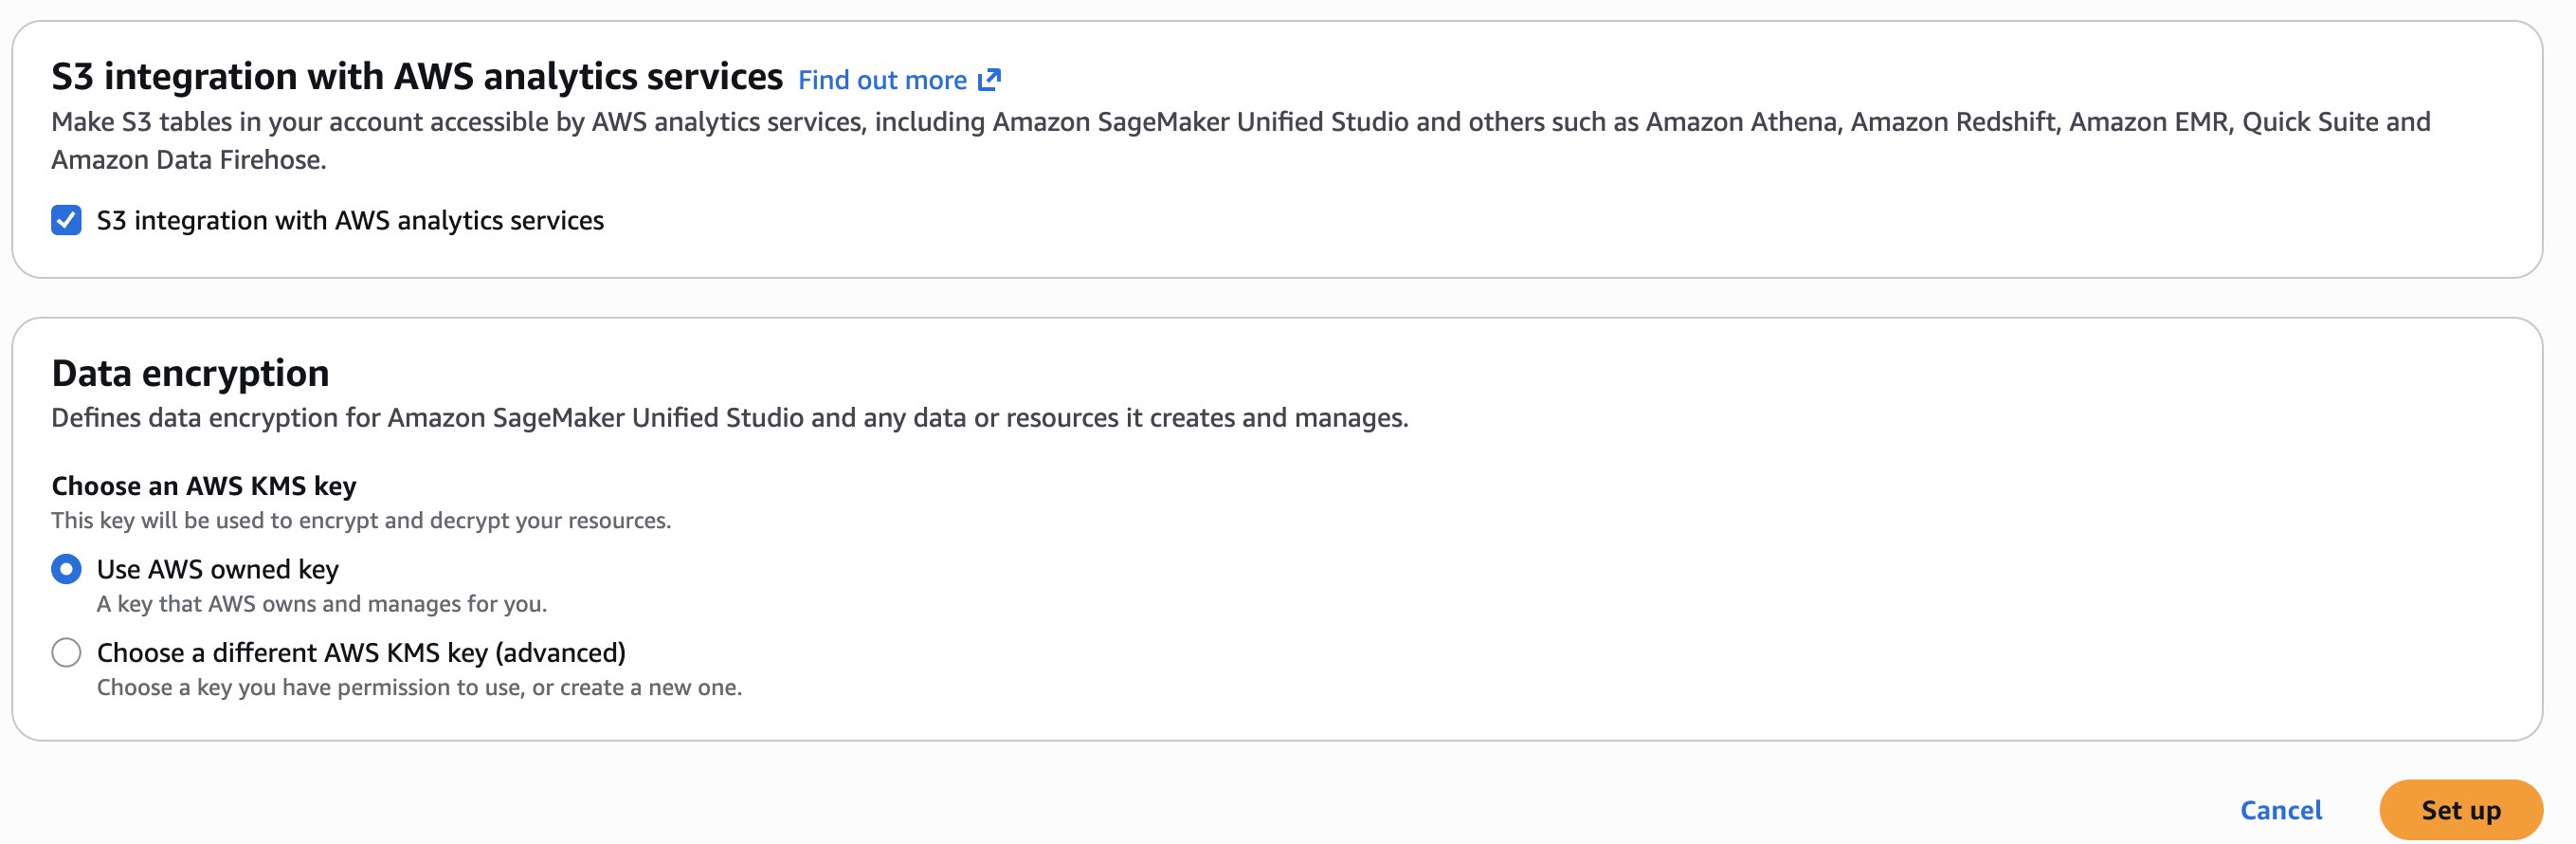
You will be prompted either to select an existing AWS Identity and Access Management (AWS IAM) role that has access to your data and compute, or to create a new role. For this walkthrough, choose Create a new role and leave the other options at their defaults.

Choose Set up. It takes a few minutes to complete your environment.

Use case

In this post, you’ll use a Notebook and the SageMaker Data Agent to perform the following:

  1. Working with dataset: Upload sample dataset housing.csv and explore with data explorer
  2. Polyglot programming: Query dataframes with SQL via DuckDB
  3. Multi-engine access via AWS Glue: Create an AWS Glue table to unlock Athena SQL/Spark engines for distributed processing
  4. Advanced analytics: Use Athena Spark for data profiling
  5. AI-assisted development: Generate profiling and ML code with Data Agent
  6. ML workflow: Train Random Forest model and evaluate results

First, let’s walk through the interface and explore its core capabilities.

Understanding the interface

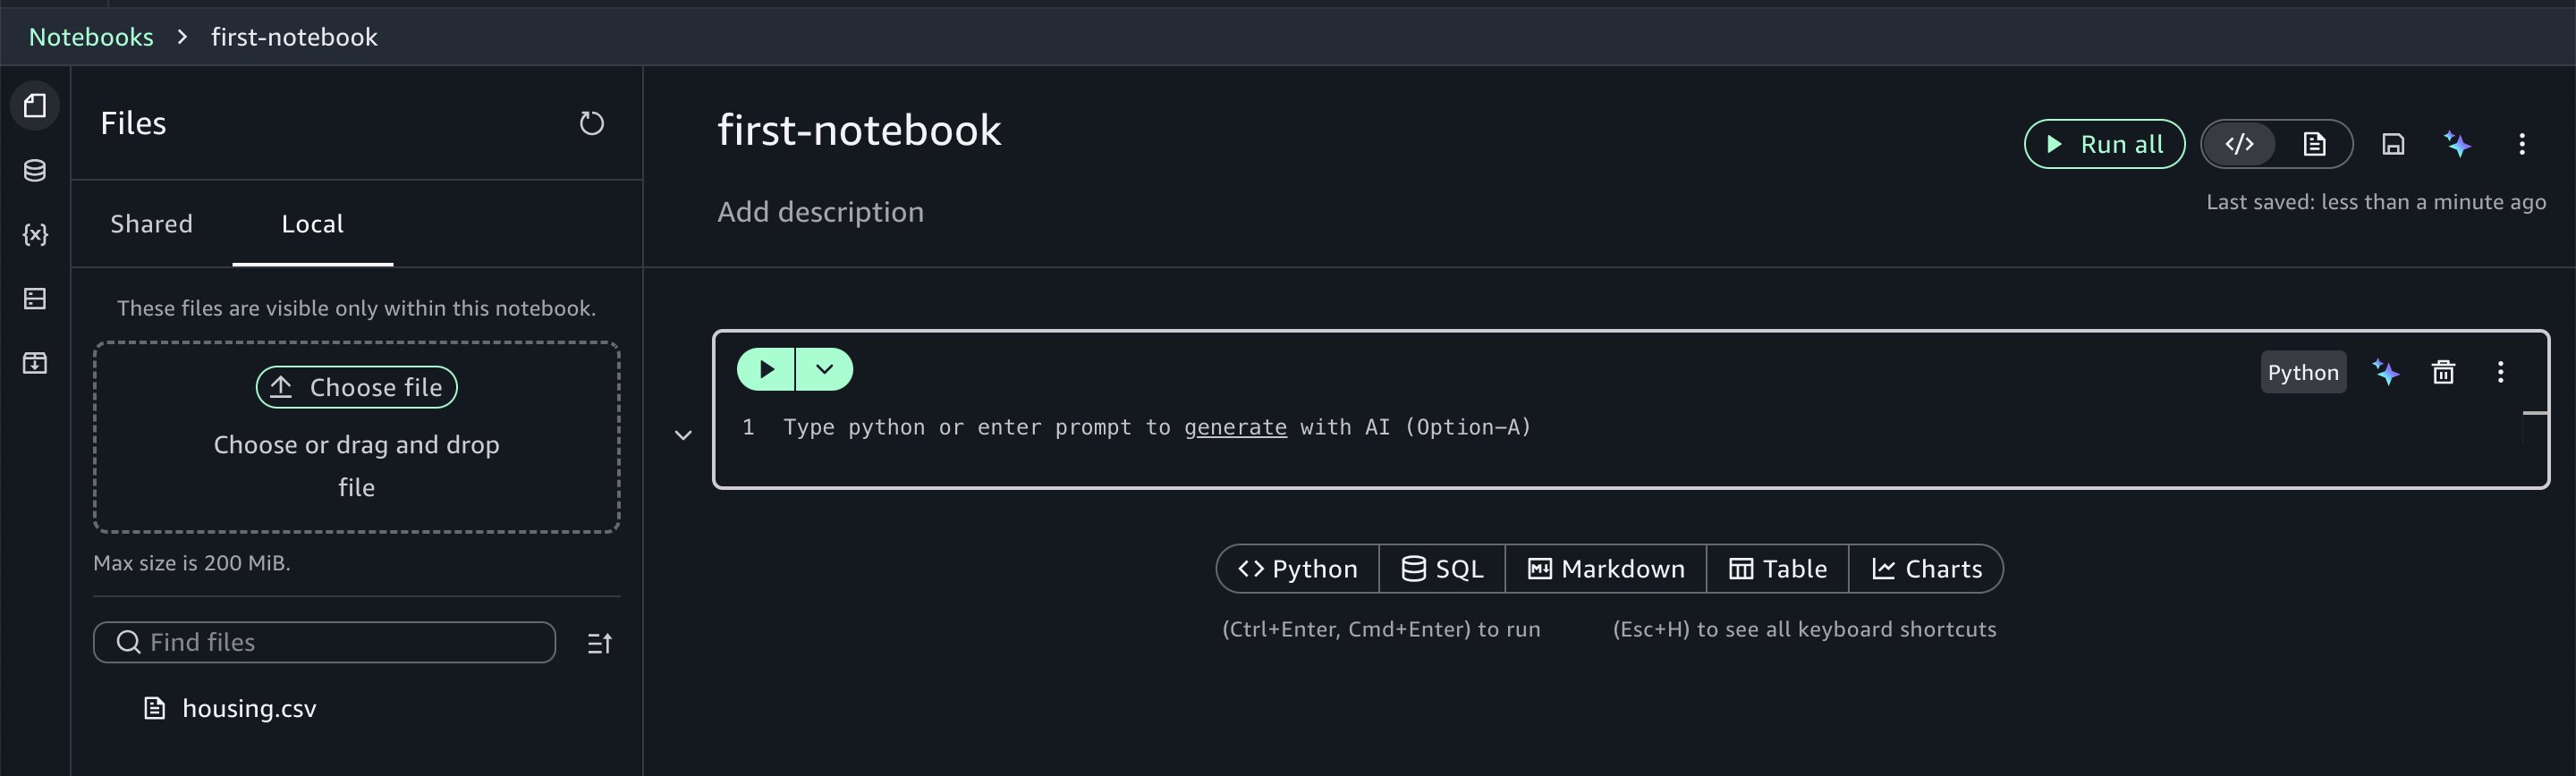
The Notebooks interface follows familiar notebook conventions with cells for code execution and markdown for documentation. Within the notebook, you’ll see your current programming environment (such as Python 3.11) and compute profile specifications. The interface allows you to:

  • Access your data by browsing files, exploring data catalogs, and managing third-party connections
  • Monitor variables created within your notebook context
  • Scale compute resources on demand by adjusting virtual CPUs and RAM based on your workload requirements, even scaling up to GPU instances
  • Manage packages by installing and configuring Python packages as needed

Working with the dataset

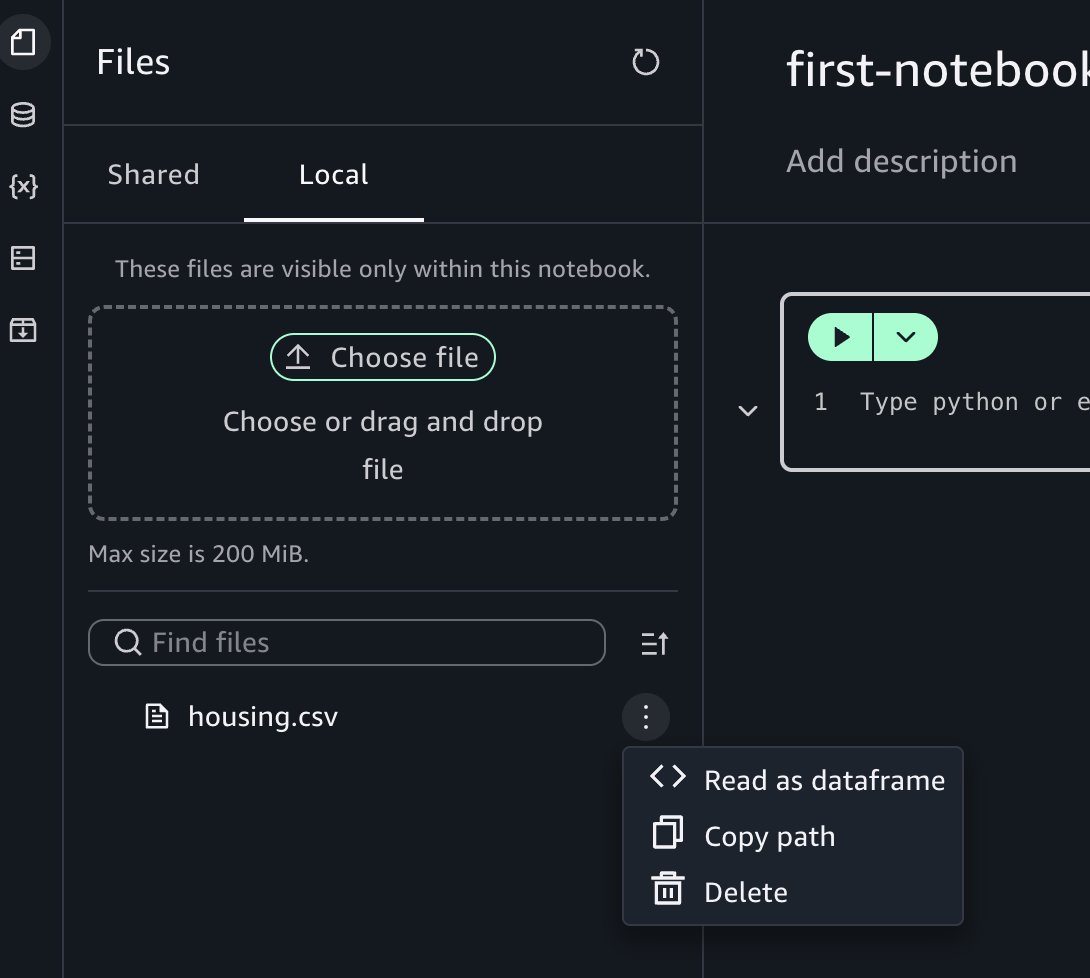
For this walkthrough, you’ll use the housing.csv sample dataset which you can download from this page. (the file is named canvas-sample-housing.csv on the linked page). Choose the Files icon in the left panel and choose the Local tab. Upload the CSV file to the notebook on the Local tab.

Notebooks provide you with instant access to your data assets. Using the data explorer, you can browse your AWS Glue Data Catalog, Amazon S3 table catalogs, Amazon S3 buckets, and configured third-party connections.

Choose the three-dot options menu.

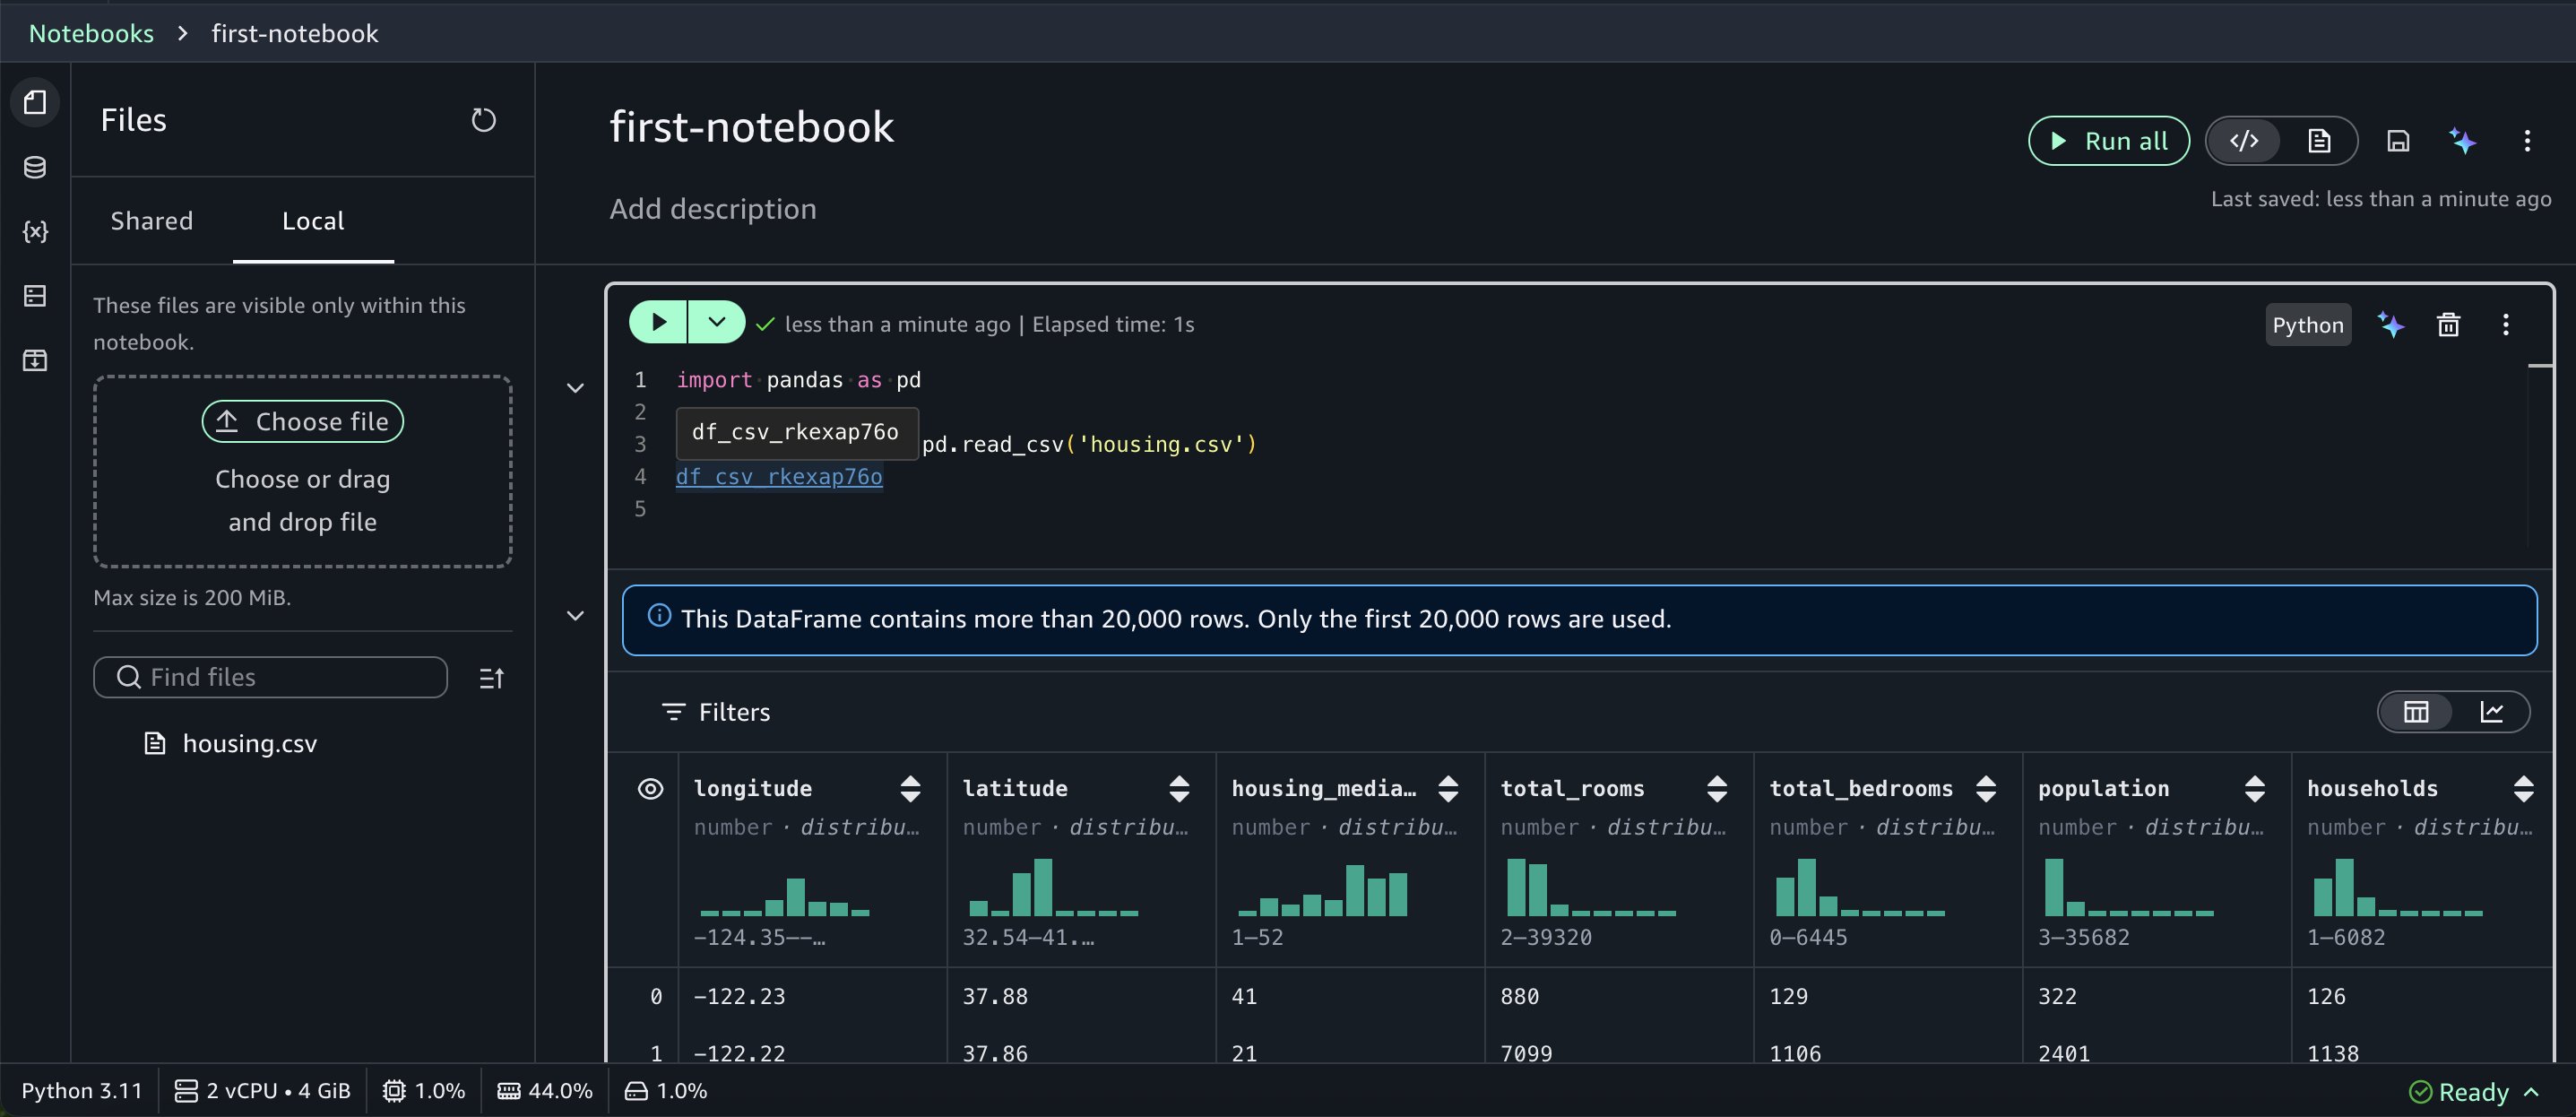
Choose Read as dataframe, then run the inserted cell in the notebook to view the results.

import pandas as pd
<<df_csv_xxxx>> = pd.read_csv('housing.csv')
<<df_csv_xxxx>>

When you return a dataframe, Notebooks render it in a rich table format with automatic data profiling.

Polyglot programming: Python and SQL together

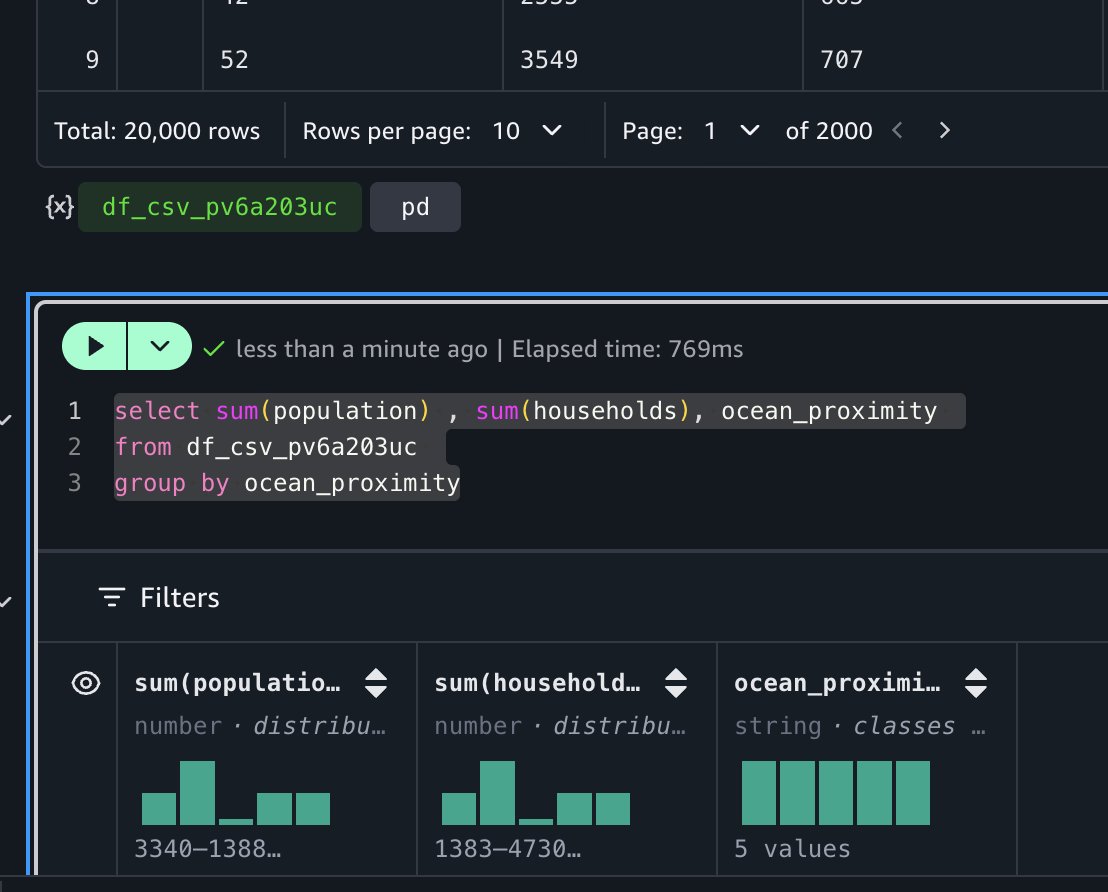
One of the most powerful features in Notebooks is the interoperability between Python and SQL. After you load data into a Python dataframe, you can immediately query it using SQL. For example, to calculate total population and household by ocean proximity, you can run:

select sum(population) ,sum(households),ocean_proximity 
from<<df_csv_xxxx>> 
group byocean_proximity

The notebook’s autocomplete functionality recognizes dataframes in your context, making SQL queries intuitive.

This SQL query runs on DuckDB (an in-memory SQL database engine), which requires no separate installation or server maintenance on your part. DuckDB’s lightweight design integrates into Python, Java, and other environments, making it ideal for your rapid interactive data analysis. For distributed processing needs, you can use engines such as Apache Spark or Trino after creating an AWS Glue table for this dataset.

Create an AWS Glue table for the dataset

After you create an AWS Glue table, you can query the dataset using various AWS Glue catalog-compatible engines, including Amazon Athena SQL (Trino) and Amazon Athena Spark. These engines deliver optimal price-performance for your specific workload requirements.

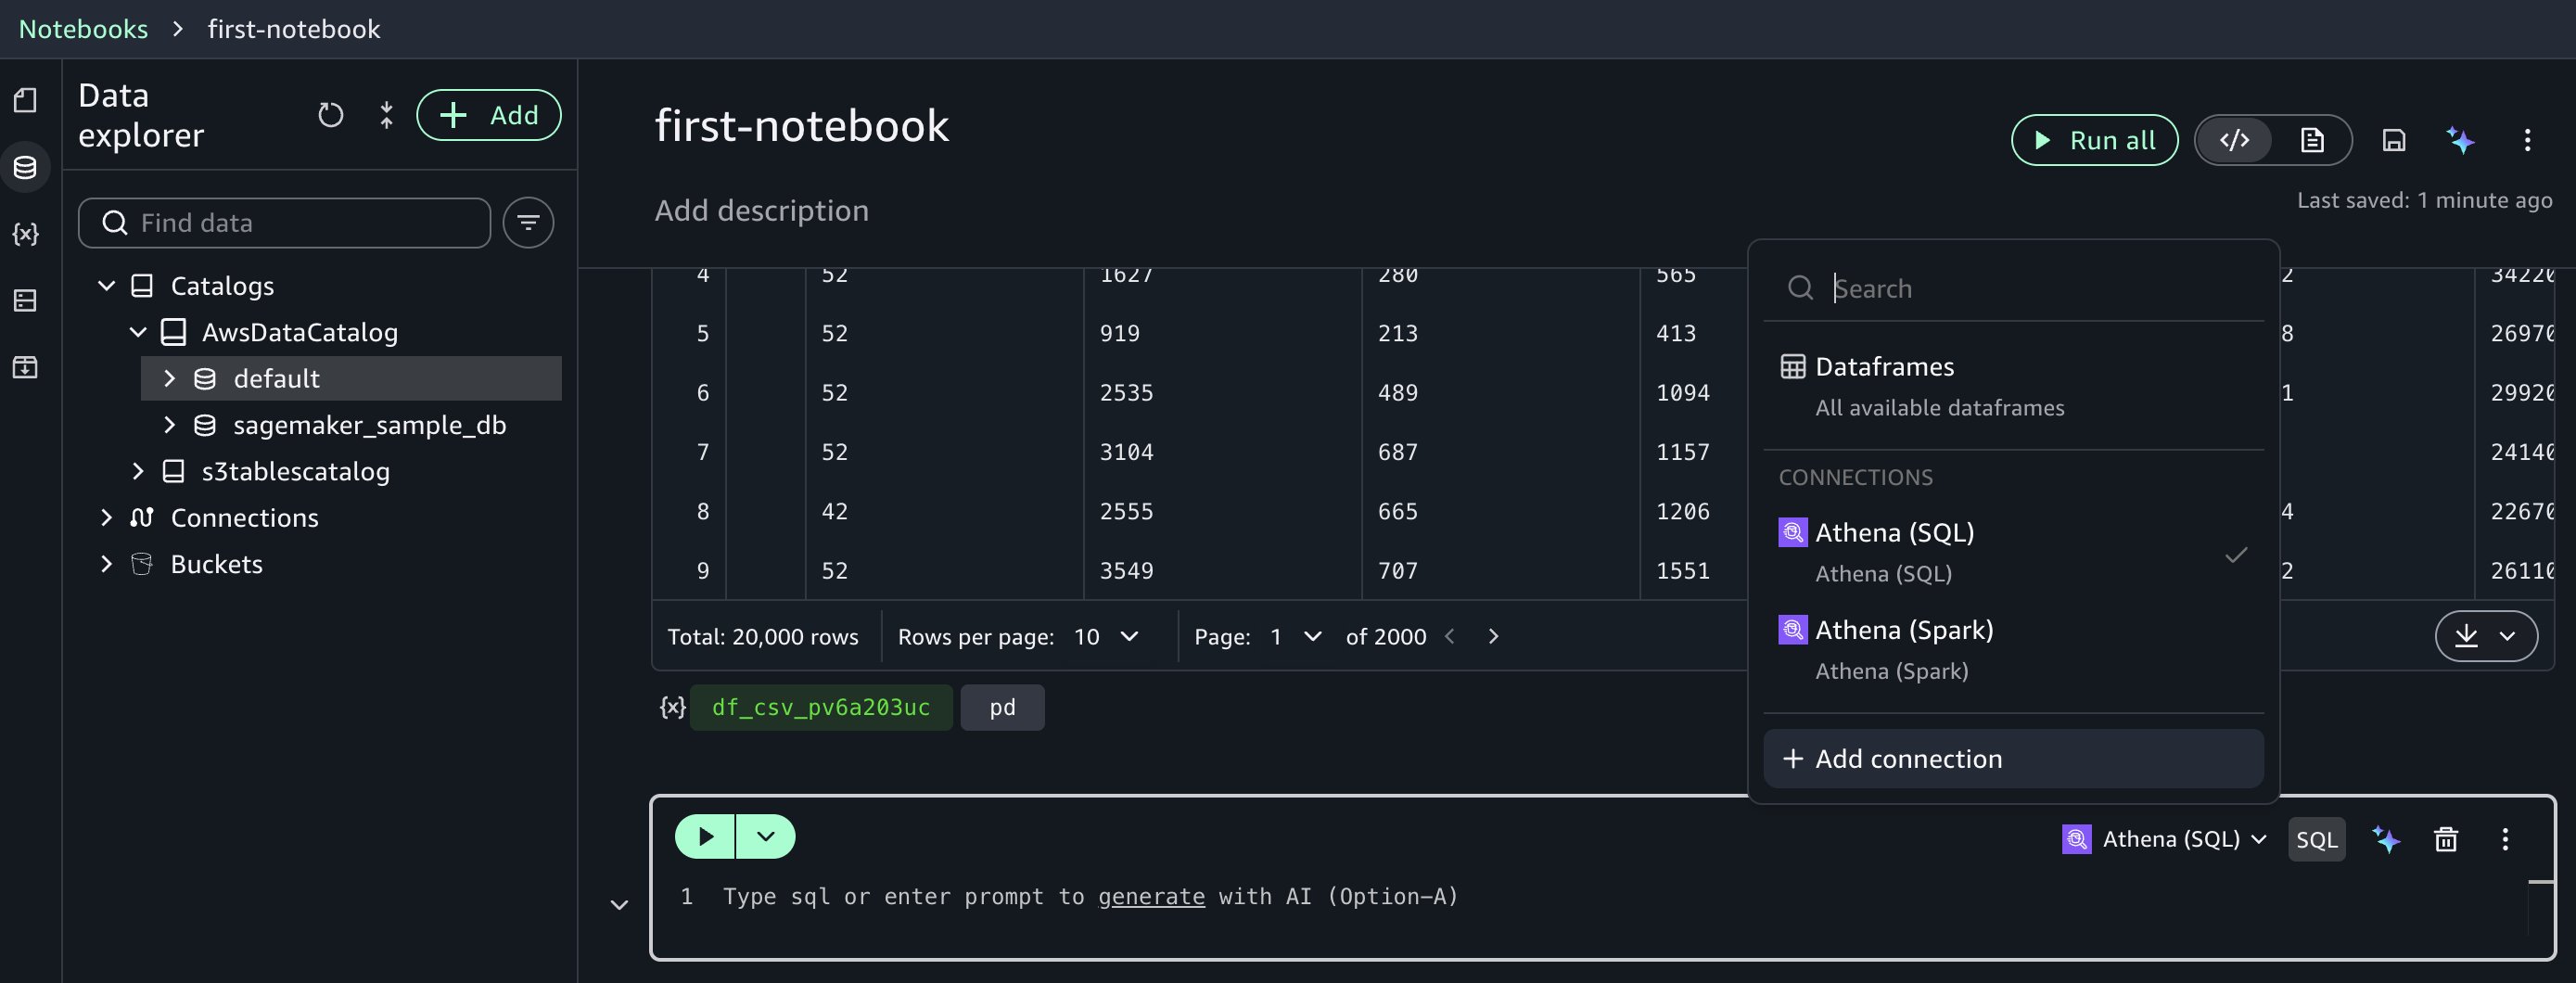
Start by creating an AWS Glue database. To do that, create a new cell in the notebook by choosing SQL and selecting Amazon Athena (SQL).

Run this SQL to create a database: create database demo;

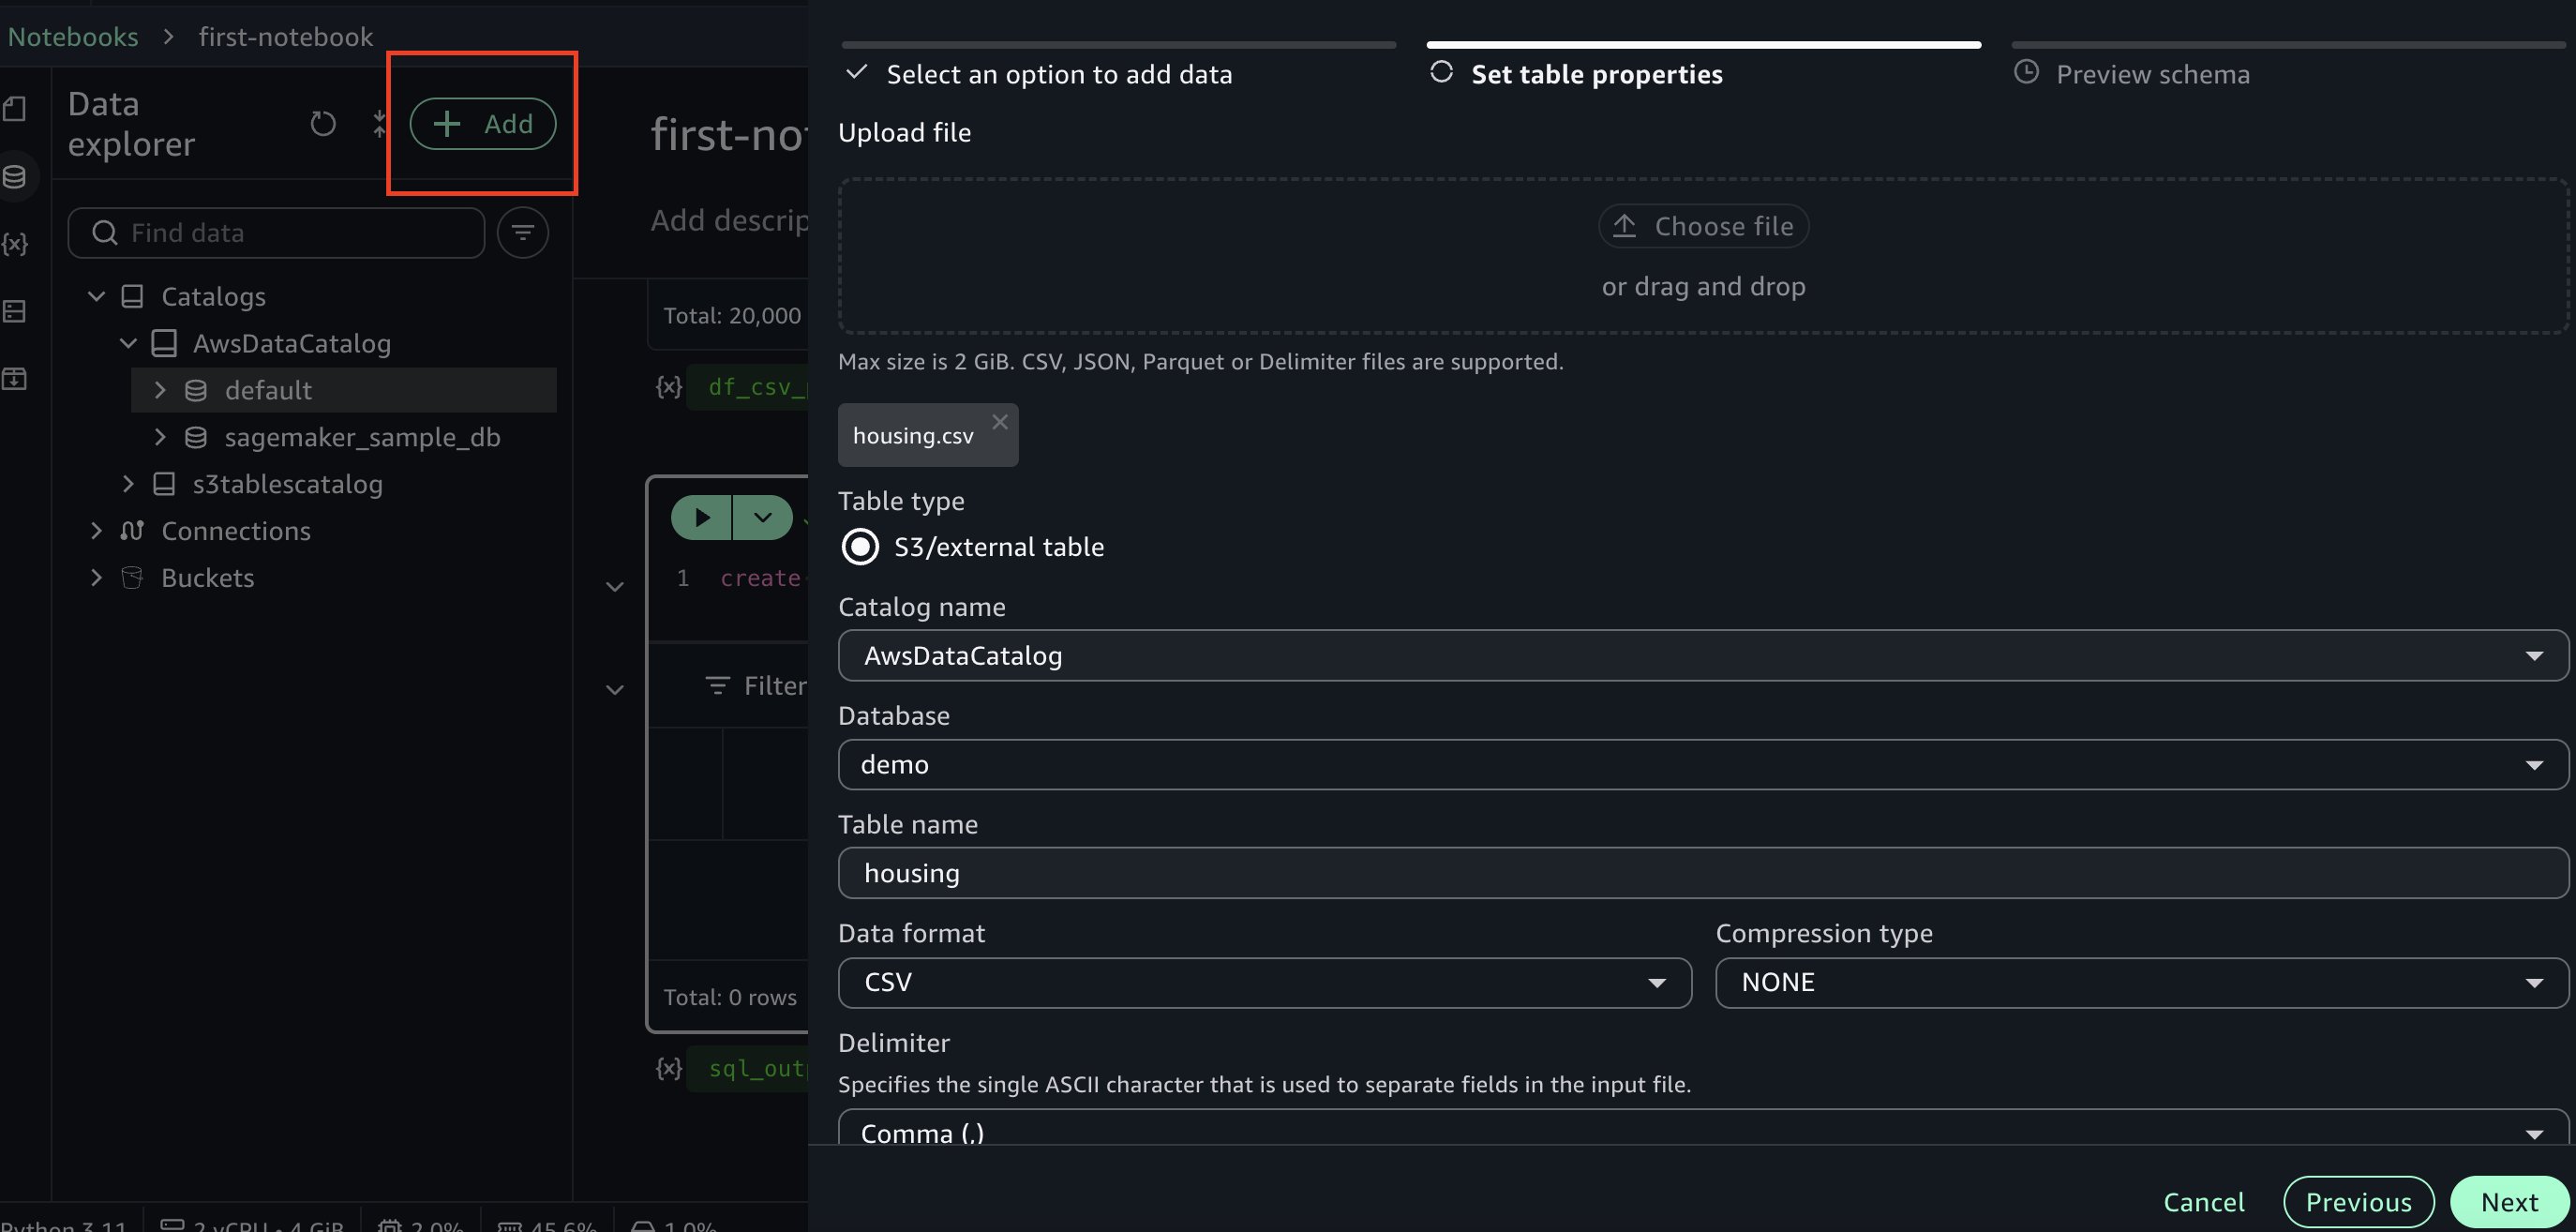
Next, go to data explorer and choose +Add on the top left, then choose Create table. Choose the database you created earlier and enter a name for the table. Upload the housing.csv dataset file used earlier. Continue by choosing Next in the side panel to create the table.

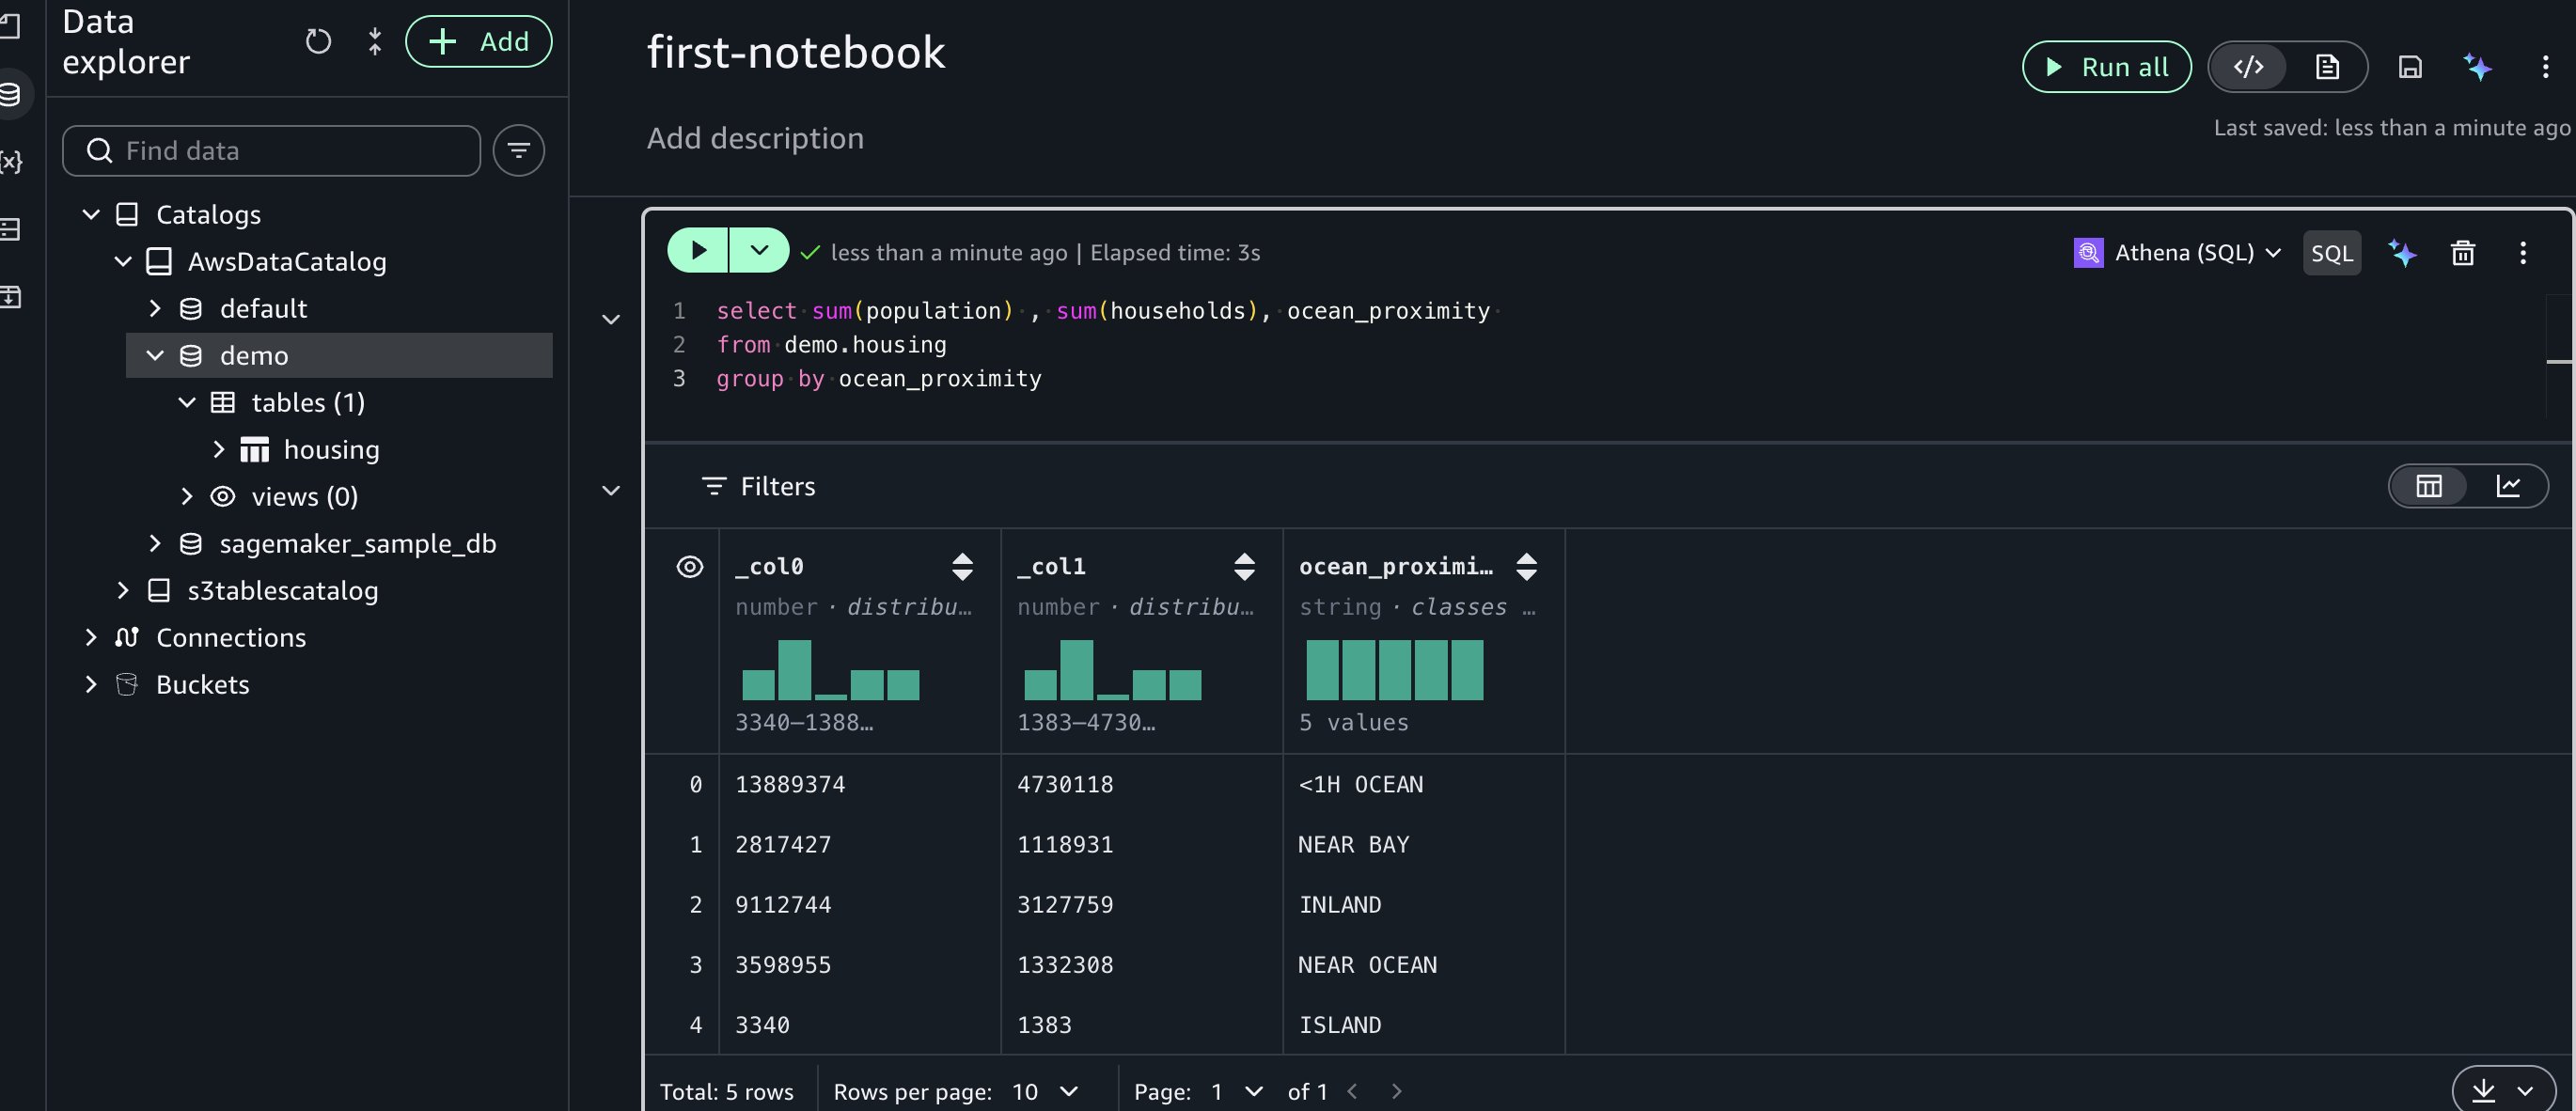
Next, let’s run a sample SQL query in a new cell using Amazon Athena SQL:

select sum(population) , sum(households), ocean_proximity 
fromdemo.housing
group by ocean_proximity

Advanced capabilities with Athena Spark

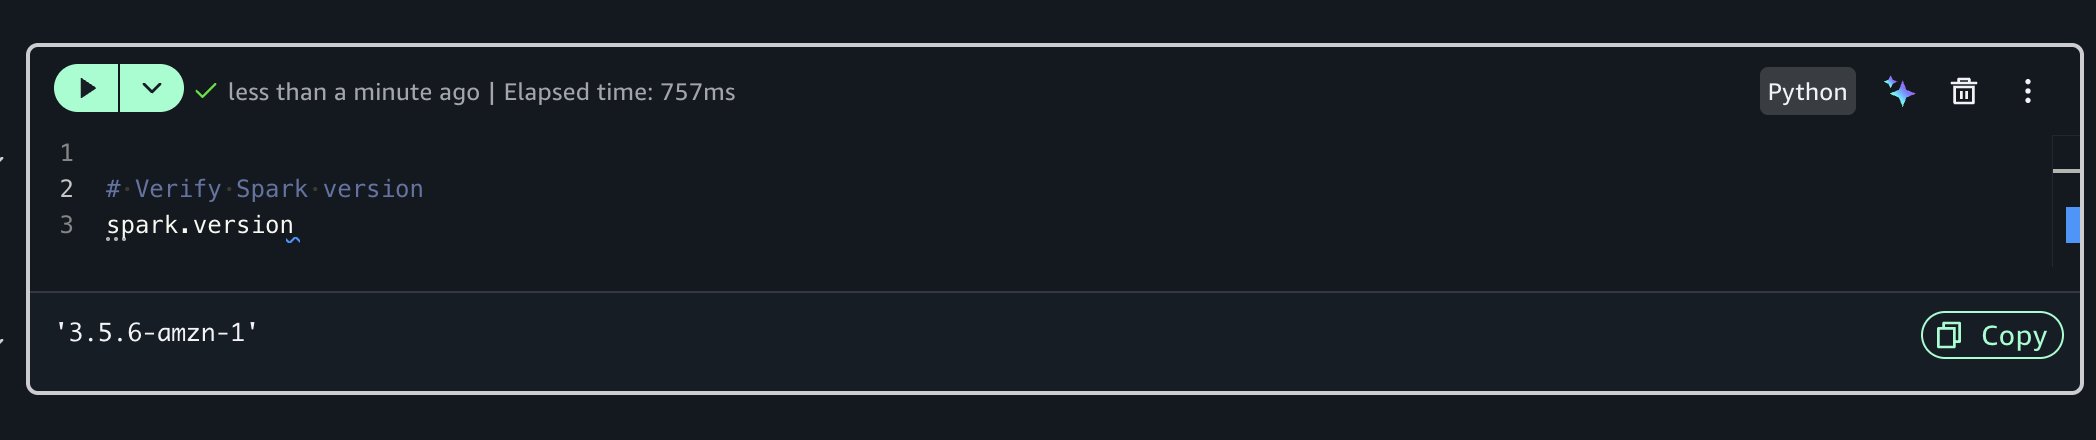
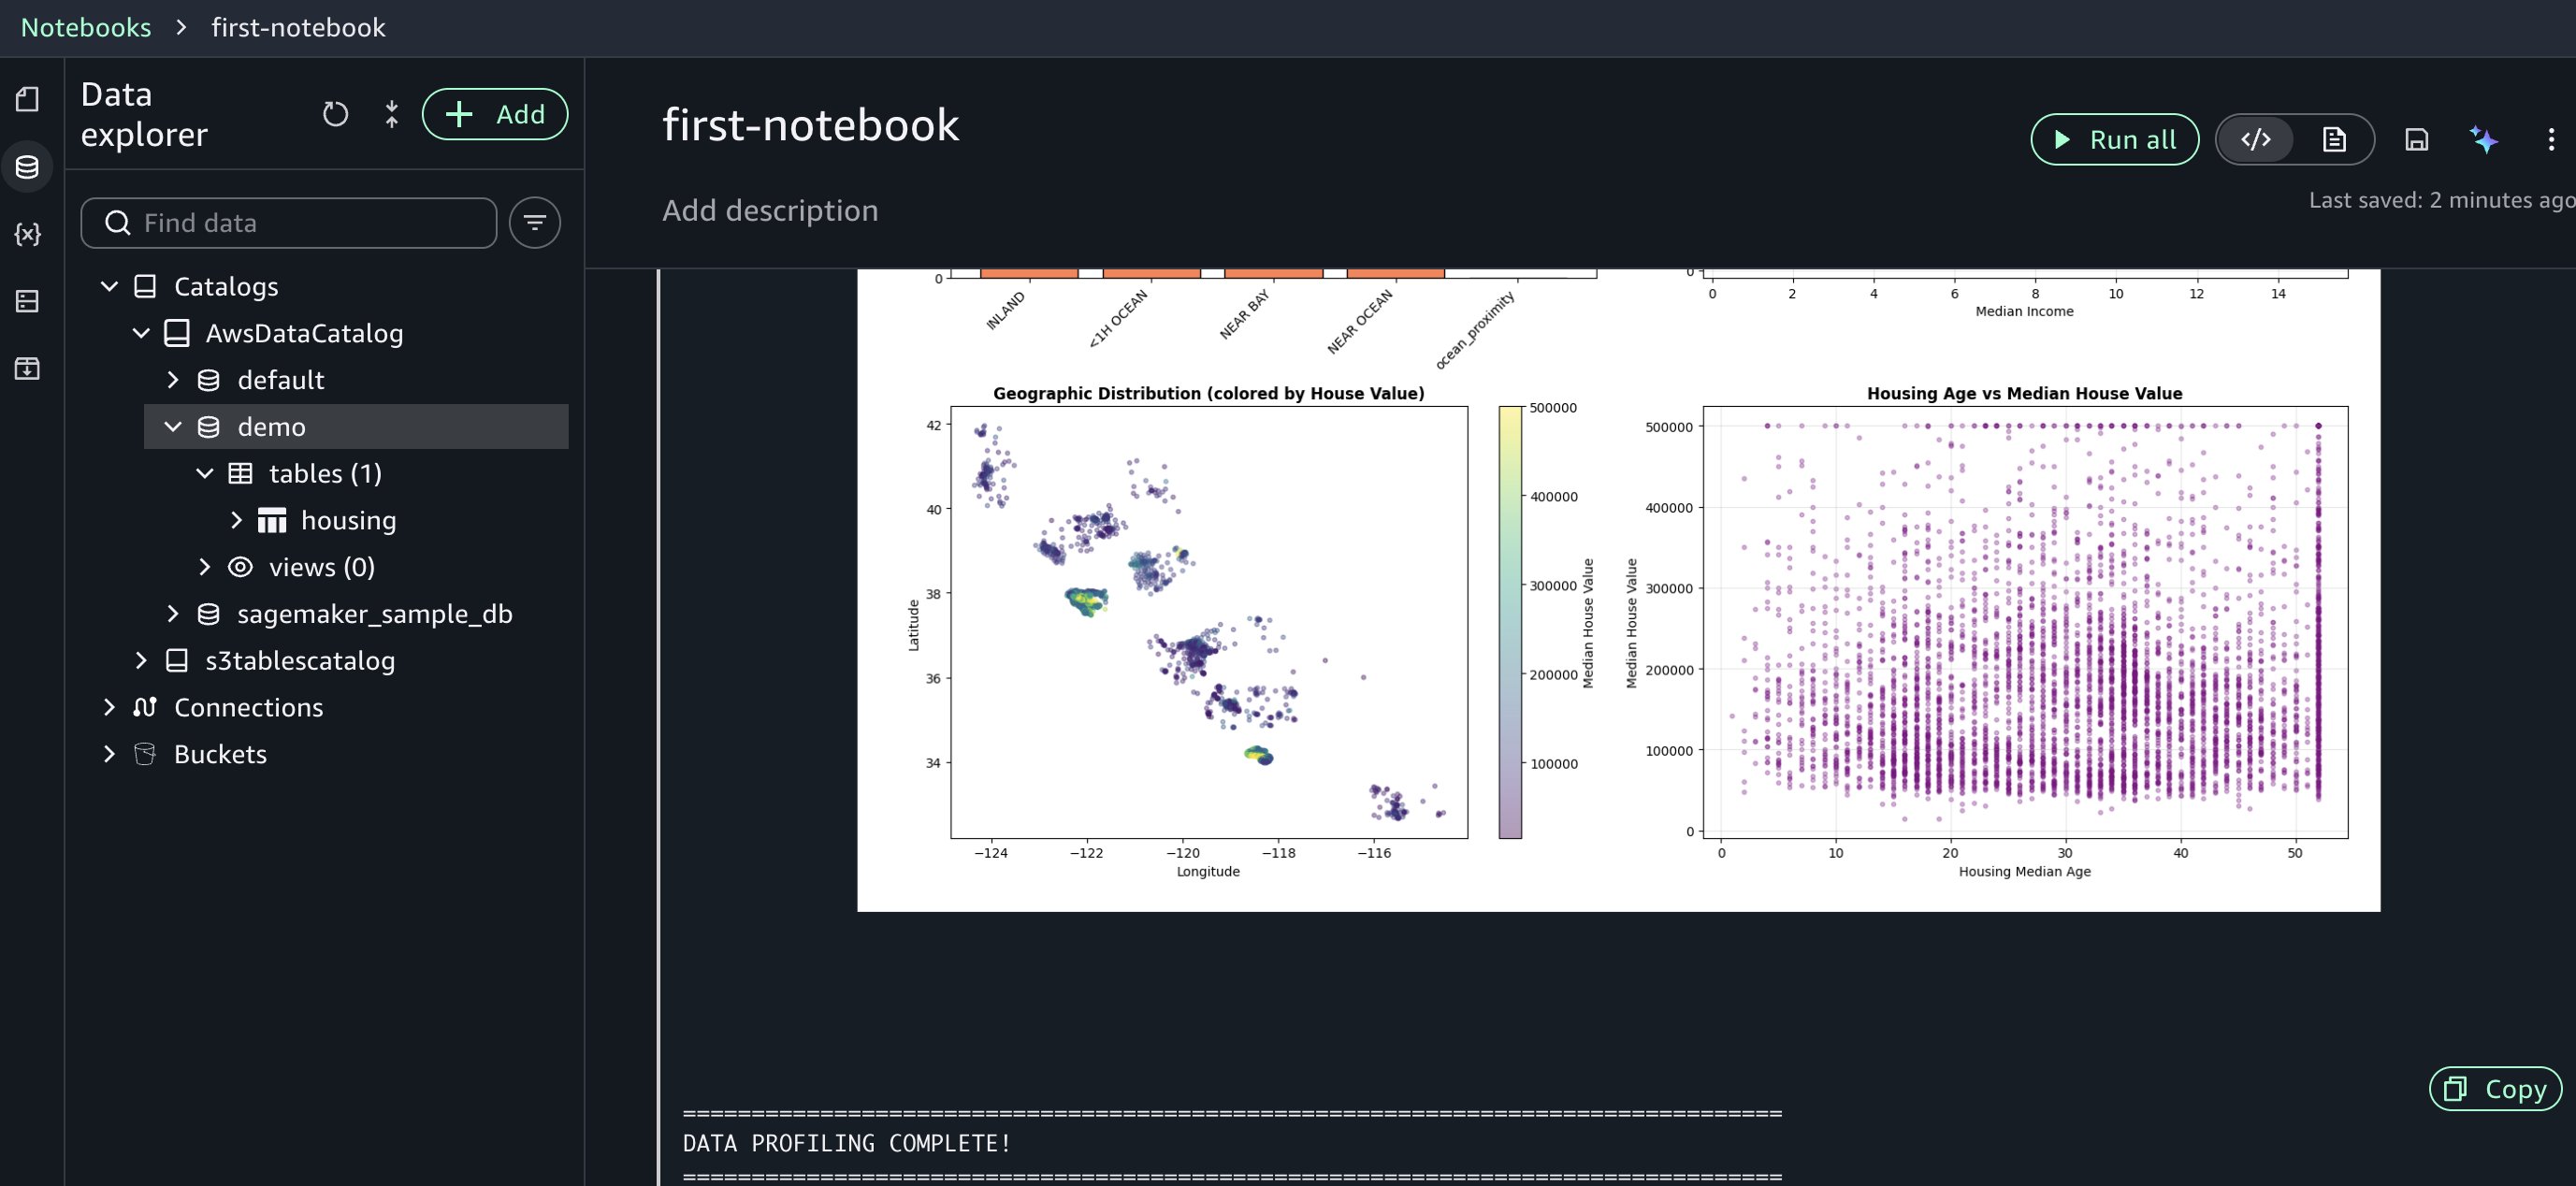
Before you can build an ML model to predict house prices, let’s analyze the dataset further and run data profiling for additional insights. For advanced exploration, you can use Amazon Athena Spark within your notebook.To do that, you’ll create a new Python cell which has a built-in Spark session. Run the following code to check the Spark version:

# Verify Spark version
spark.version

Using the SageMaker Data Agent for data profiling

Instead of writing boilerplate code manually, you can use the built-in generative AI capability.

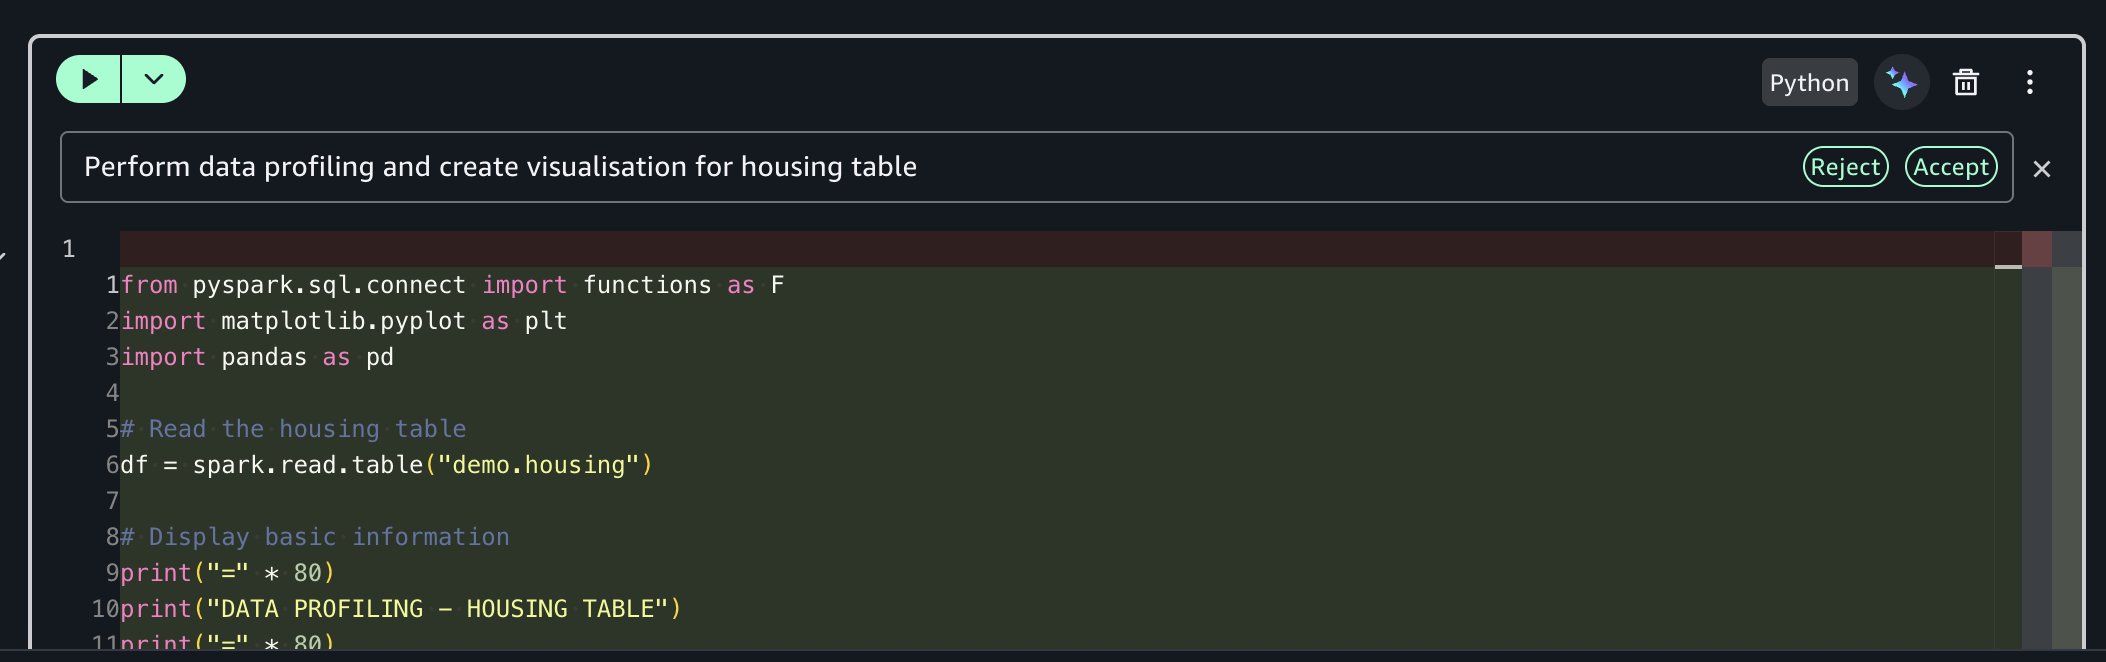
Prompt: “Perform data profiling and create visualization for housing table”

The AI assistant generates comprehensive profiling code for you, including basic statistics calculation, column-level profiling, data type analysis, and missing value detection.

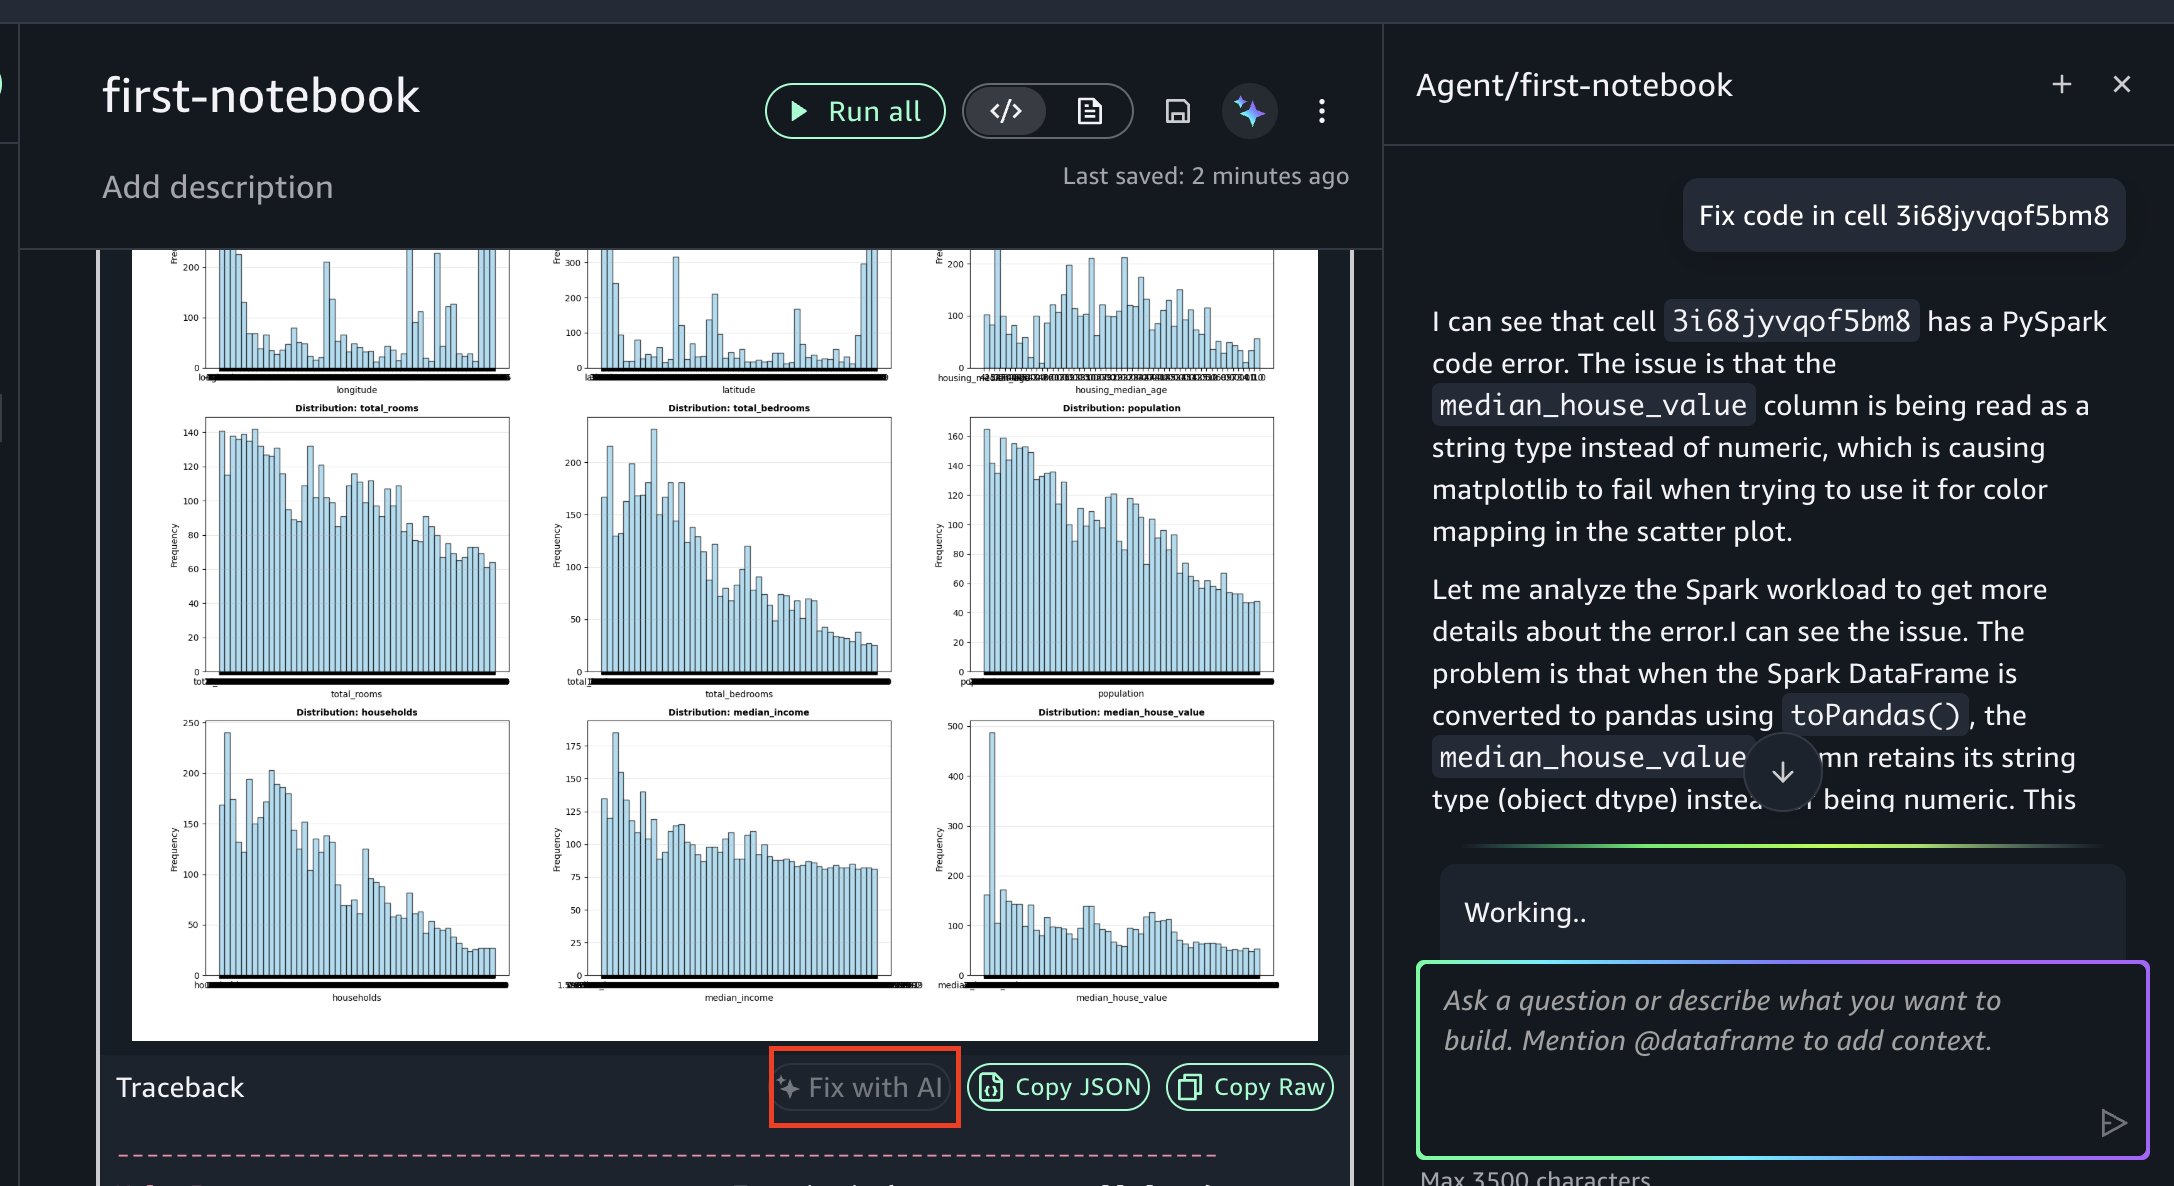
The agent accessed your AWS Glue Data Catalog, understood your housing table structure, and generated profiling code tailored to your specific columns and data types. This context awareness reduces the trial-and-error cycle you’d normally face when adapting generic code snippets to your environment. Review the generated code and run it. The fast response times help you iterate on your analysis efficiently.

If you encounter an error, you can resolve it using Fix with AI as shown in the following figure. When errors occur during execution, the “Fix with AI” feature analyzes the traceback, diagnoses the root cause, and generates corrected code, so you can keep your analysis moving forward.

Training ML models

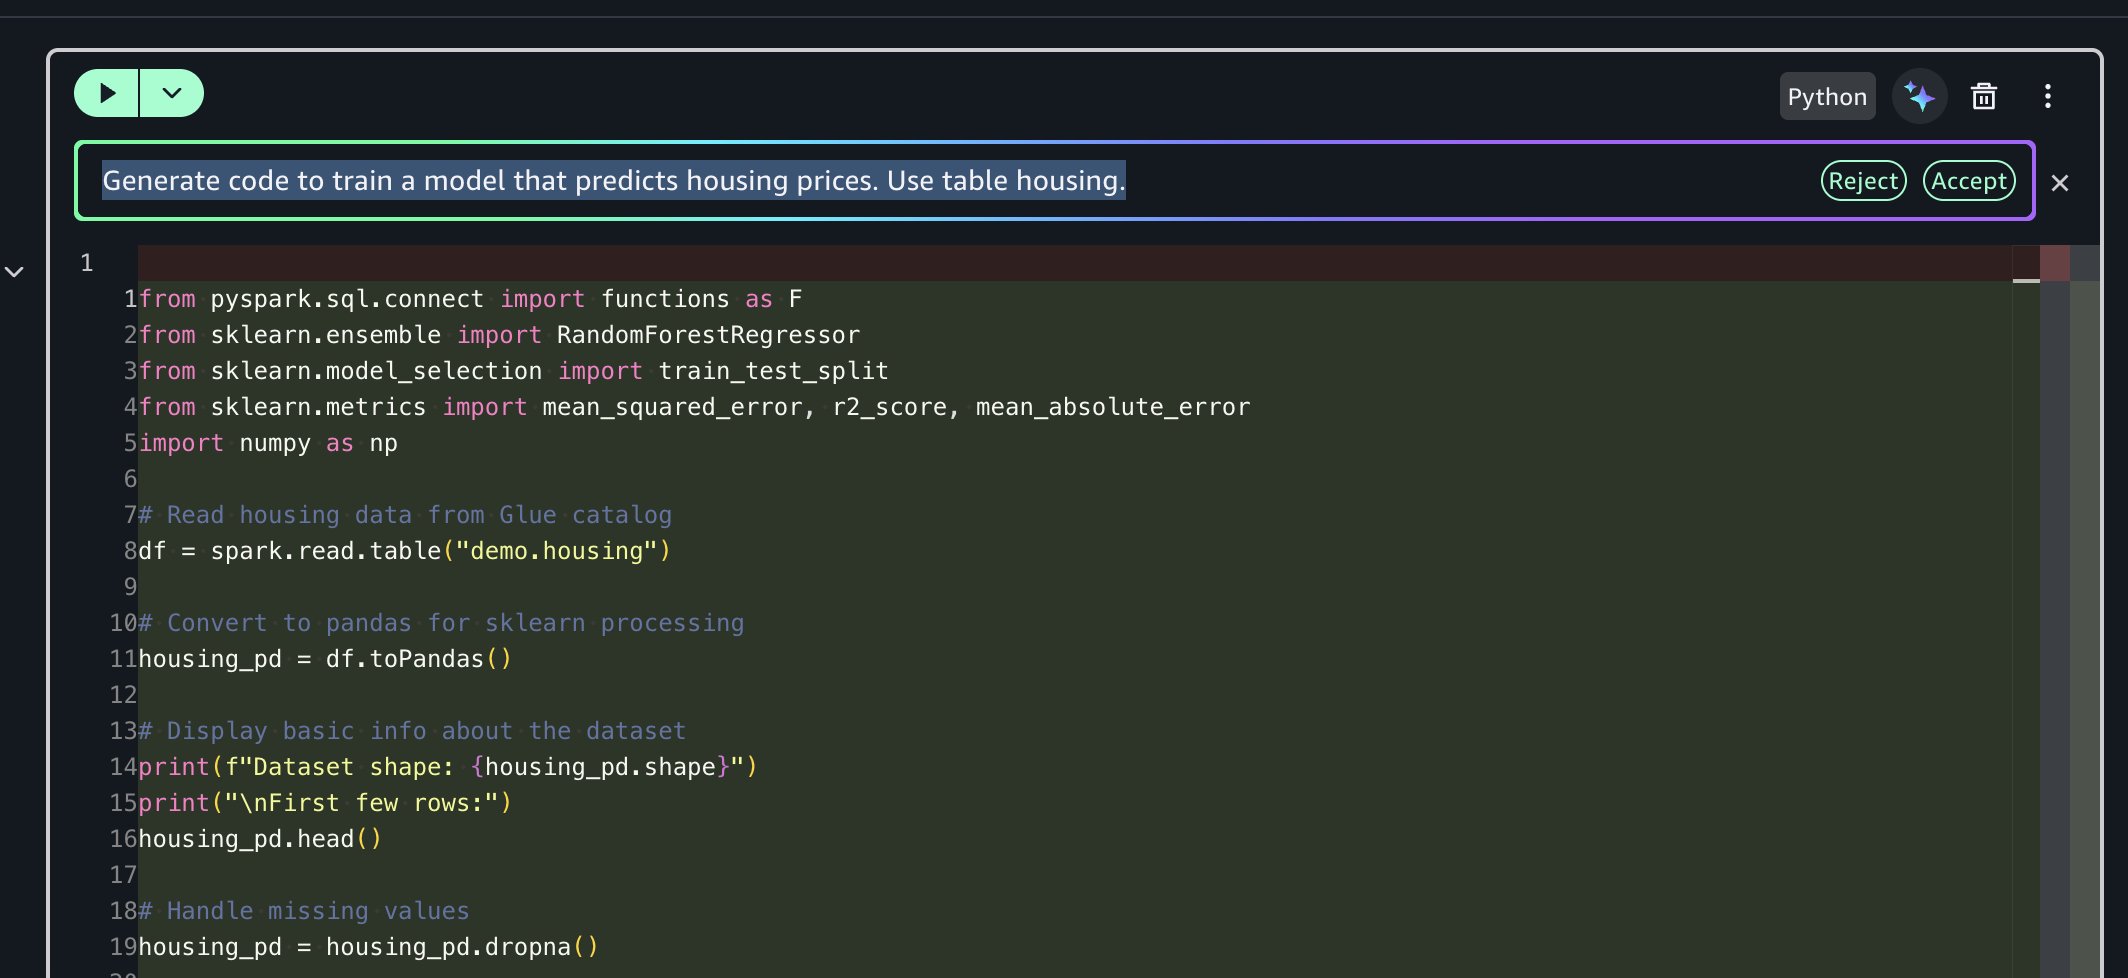
Next, you’ll use the data agent to generate code for training a model that predicts housing prices.

Prompt: “Generate code to train a model that predicts housing prices. Use table housing.”

The AI assistant generates end-to-end code for you that:

  1. Reads housing data from AWS Glue catalog using Amazon Athena Spark and converts to pandas
  2. Converts string columns to numeric, encodes using one-hot encoding and removes missing values
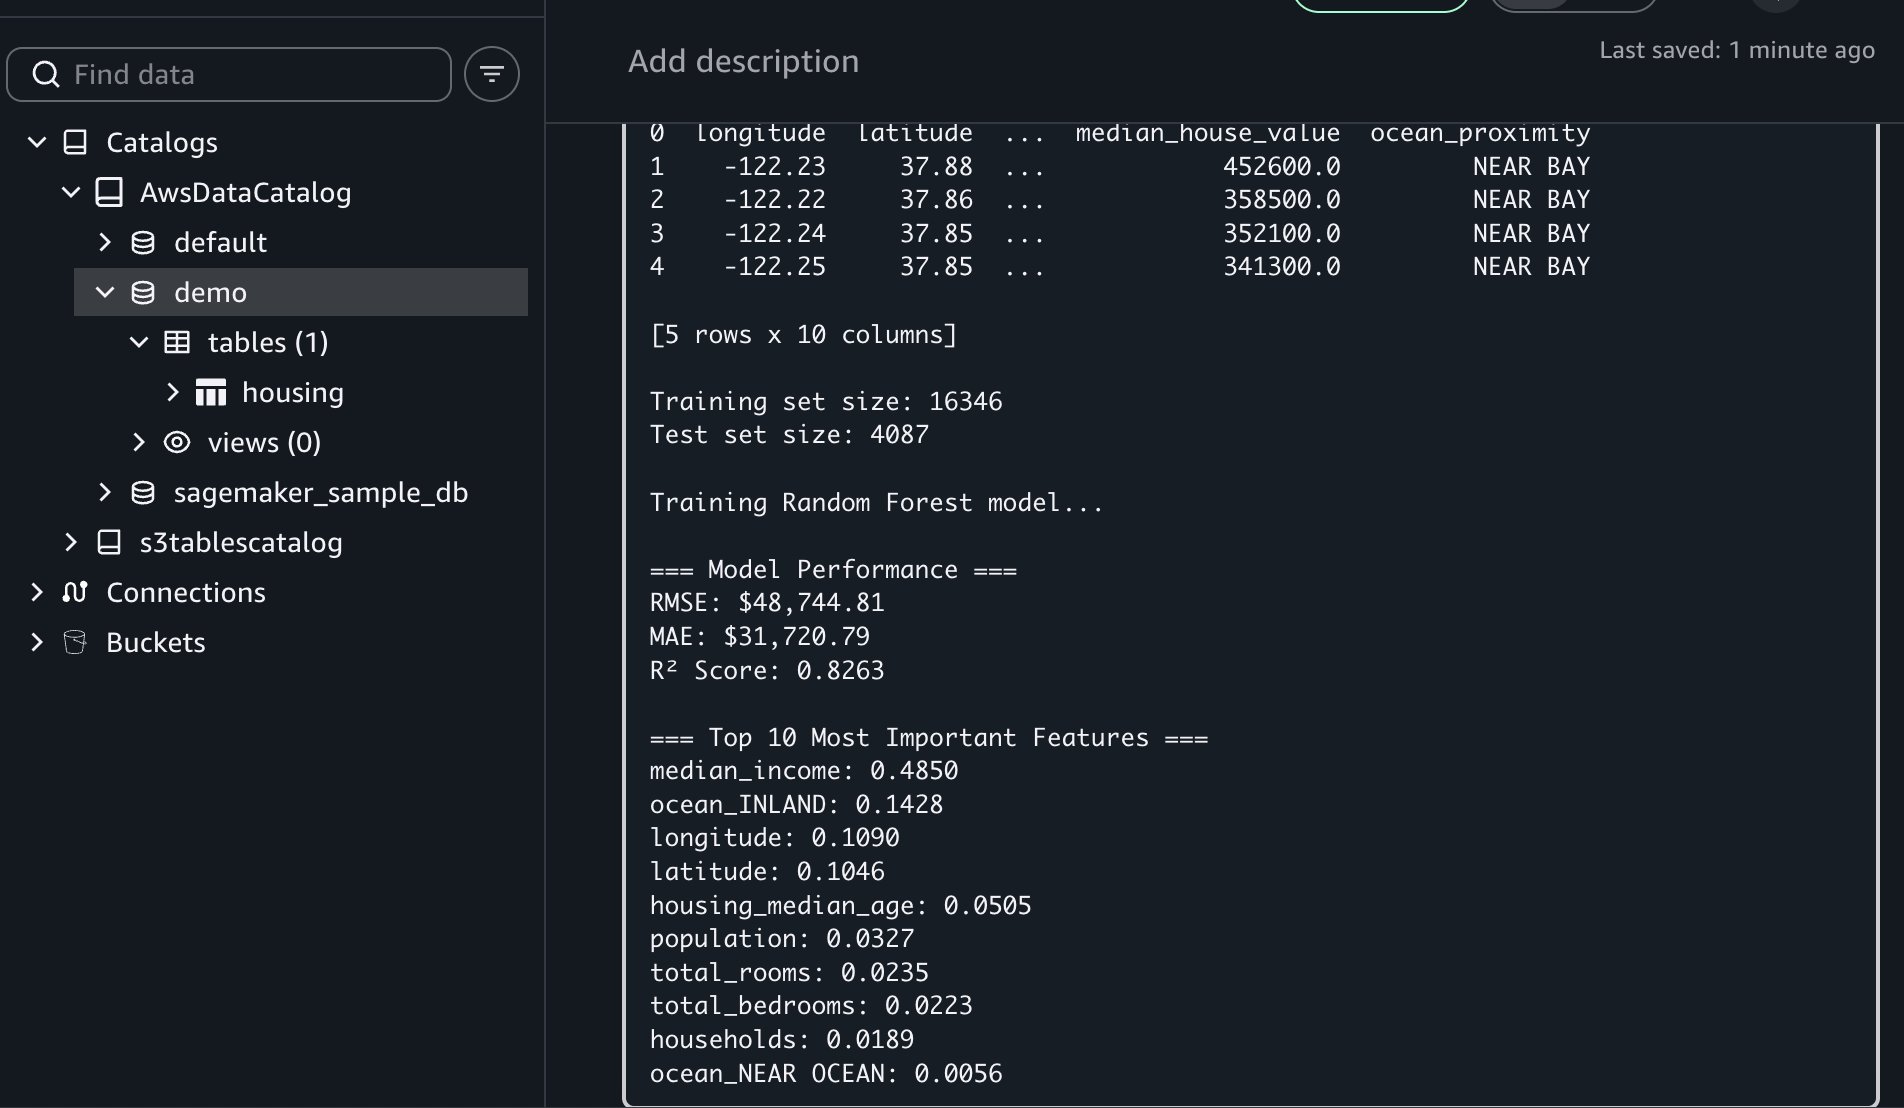
  3. Trains a Random Forest model to predict median house values
  4. Evaluates model performance (RMSE, MAE, R-square)
  5. Displays top 10 most important features for predictions

This multi-step orchestration saves you hours of development time by handling the entire workflow from data access to model evaluation.

If you encounter an error, you can resolve it using Fix with AI available in the results traceback section.

This workflow showcased Notebooks’ unified capabilities: you uploaded files locally, created AWS Glue tables for multi-engine access, used Amazon Athena Spark for distributed profiling, and used AI-assisted ML development to predict housing prices. All of this happened within a single notebook environment without switching tools.

Key benefits and best practices

Notebooks in Amazon SageMaker Unified Studio deliver several advantages:

  • Faster time to insights: With traditional environments, you might spend hours on configuration before analysis begins. Notebooks bypass this overhead, so you can start work immediately.
  • Improved collaboration: You can share notebooks with consistent environments, supporting reproducibility and reducing “works on my machine” issues.
  • Reduced complexity: You can access multiple data sources and compute engines from one interface rather than navigating separate tools for each data source or processing engine.
  • AI-accelerated development: Generate task-specific code and receive intelligent suggestions, reducing time spent on repetitive coding tasks.
  • Scalable performance: Handle datasets from megabytes to petabytes with appropriate compute resources. The system scales automatically as data volumes grow.

Best practices

  1. Start with appropriate compute profiles by beginning with smaller instances and scaling up as your needs grow.
  2. Use AI assistance with natural language prompts for your repetitive tasks and complex operations.
  3. Combine engines strategically by using Amazon Athena Spark for your large-scale processing, Amazon Redshift for data warehousing and other specialized engines for your specific workloads.
  4. Document your work using markdown cells to create living documentation alongside your code.
  5. Organize using multiple cells by breaking the complex workflows into logical steps for better readability and debugging.

Cleaning up

To avoid incurring future charges, delete the resources you created in this walkthrough:

  1. In the Amazon SageMaker Unified Studio console, navigate to the Notebook page
  2. Delete the notebook
  3. Delete the demo database and housing table from the AWS Glue Data Catalog
  4. Delete Amazon SageMaker Unified Studio domain created during this walkthrough
  5. If you created a new IAM role specifically for this walkthrough, delete it from the IAM console

Conclusion

In this post, we demonstrated how Notebooks in Amazon SageMaker Unified Studio help you work more efficiently and deliver insights more quickly. By combining familiar notebook interfaces with enterprise-scale compute, multi-engine support, and generative AI assistance, teams can streamline data and AI workflows.

The integration of Python and SQL, instant access to diverse data sources, and intelligent code generation capabilities make Notebooks a valuable tool for modern data teams. Teams can perform exploratory data analysis, build complex data pipelines, or train ML models with the flexibility and power needed within a single, intuitive environment.

Ready to get started? Create your first notebook in Amazon SageMaker Unified Studio and begin analyzing data within minutes.

Explore additional capabilities:

  • Time series analysis workflows with seasonal decomposition and forecasting
  • Natural language processing pipelines for text classification and sentiment analysis
  • Integration with Amazon SageMaker Model Registry for ML model versioning
  • Advanced Spark optimization techniques for petabyte-scale processing

Learn more:


About the authors

Praveen Kumar

Praveen Kumar is a Principal Analytics Solutions Architect at AWS with expertise in designing, building, and implementing modern data and analytics applications using cloud-based services. His areas of interest are serverless technology, data governance, and data-driven AI applications.

Majisha Namath Parambath

Majisha Namath Parambath is a Principal Engineer at Amazon SageMaker, bringing over a decade of experience at AWS to her role. She spearheads critical initiatives for Amazon SageMaker Unified Studio, the next-generation service that provides comprehensive data analytics and interactive machine learning capabilities with an emphasis on agentic systems. Her expertise encompasses system design, architecture, and cross-functional execution, with particular attention to security, performance, and reliability at enterprise scale. When she’s not engineering solutions, Majisha enjoys reading, cooking, and hitting the slopes for skiing.

Siddharth Gupta

Siddharth Gupta is heading Generative AI within SageMaker’s Unified Experiences. His focus is on driving agentic experiences, where AI systems act autonomously on behalf of users to accomplish complex tasks. Previously, he led edge machine learning solutions at AWS. His work focuses on improving how developers and data scientists interact with AI, creating more intuitive data integrations and better tools for building and deploying machine learning models. An alumnus of the University of Illinois at Urbana-Champaign, he brings extensive experience from his roles at Yahoo, Glassdoor, and Twitch. You can reach out to him on LinkedIn.

Избори 2026 – четири карти за секциите в България и чужбина

Post Syndicated from Боян Юруков original https://yurukov.net/blog/2026/iz2026-karti/

Тази година има няколко различни ресурса, с които може да се запознаете с местата за гласуване в страната и в чужбина. Някои – като картата на МВнР и Софийска община ги има от последните няколко вота през 2024-та. Други се публикуват за пръв път сега.

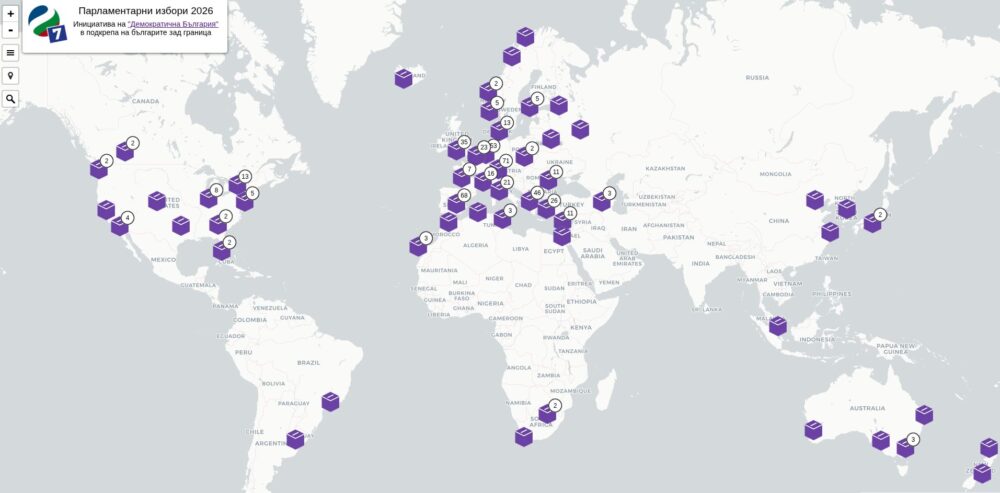
Glasuvam.org

Започвам с картата на секциите в чужбина, която поддържам от 13 години и 15 вота до сега. Всички предходни ще намерите на основната страница на проекта. Самата карта ще намерите тук. Повече за секциите ще прочетете в предходната ми статия заедно с още една карта показваща къде е машинният вот в чужбина. В по-ранна статия показах и разликата между отворените сега секции и предишни години.

Данните за картата събирам от заповедите на МВнР. Обикновено сам ги намирам и поставям на картата. В последните години седмица преди вота публикуват и таблица с адресите, а от предишния вот и карта. От там взимам по-точно местоположение и изменени адреси преди изборния ден. В последните три дни, например, има три секции със изменен адрес и още две, които бяха без адрес, но вече са със заповеди.

При публикуване на картата и при изменение на адресите уведомявам с индивидуални email-и всички абонирани за бюлетина на Glasuvam.org заедно със съвети за деня на гласуване. Преди и след това пускам също съобщения и новини, като например за процеса на заявления, промени в начина на гласуване и прочие. Към този момент има над 3100 абонирани за бюлетина. Анонимизираното разпределение от къде са се вижда на картата на заглавната страница на проекта.

В последните няколко години картата и проекта са с логото на Демократична България като част от усилията на Да, България в помощ на българите зад граница. На тези избори може да подкрепите кандидатите и програмата с номер 7 в бюлетината. Призовавам ви да разгледате профилите им, защото има не само прекрасни хора, кои и прекрасни истории, стратегии и опит зад тях. Както често казвам, сред тях ще намерите хората с план като контрапункт на хората със схема, за които съм писал премного до сега.

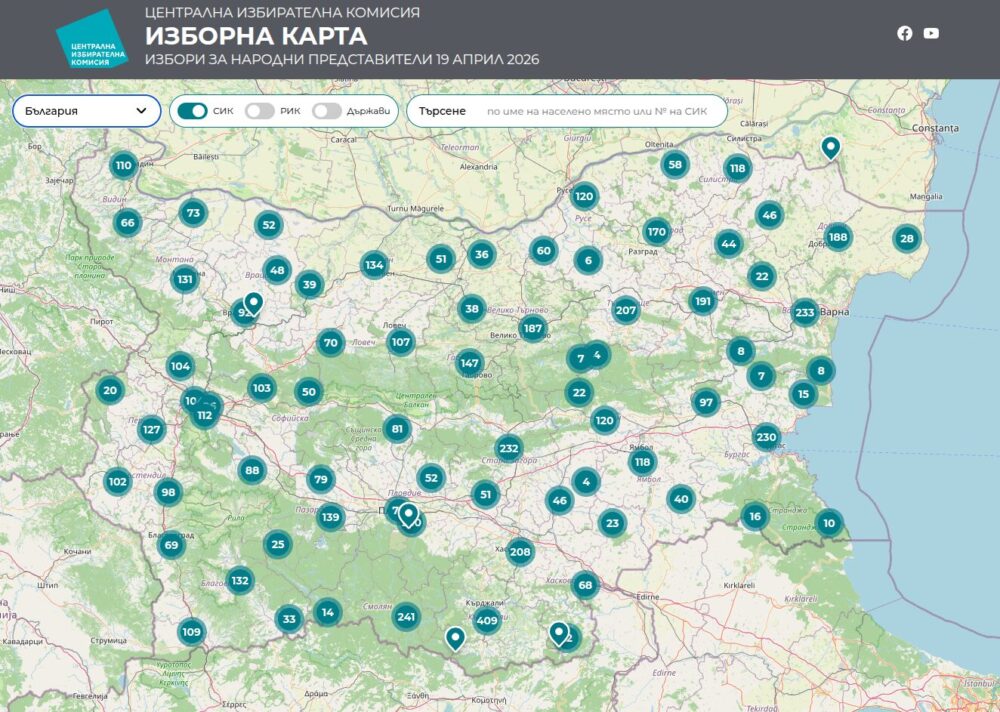
Новата карта на ЦИК

Буквално преди часове за пръв път ЦИК публикува карта на всички секции в страната и чужбина. Данните за чужбина съвпадат с тези от картата на МВнР, която ще спомена след малко. В България секциите имаха публикувани адреси до сега, но за пръв път ги виждам поставени на картата за цялата страна. Опитах се да го направя преди години, но се отказах след като поне една четвърт не успях да открия. Например „старото читалище“ в някое село, както често се случва.

Към този момент картата показва местата и секциите, както и броят гласоподаватели в тях. Разрових се в кода и данните, които зарежда страницата и има функционалност за показване на активност, резултати, PDF-и и видео. Към този момент са изключени, но предполагам, че в деня на изборите ще публикуват текущи данни, а след това може би резултати и излъчване на живо от преброяването. Надявам се да е така и за тази цел да е предвиден кода в страницата.

Картата ще намерите с банер на страницата на ЦИК или направо през този линк. С филтрите може да изберете секциите в чужбина или за цяла България или за определена област. Може също да покажете обобщена информация по РИК или държави.

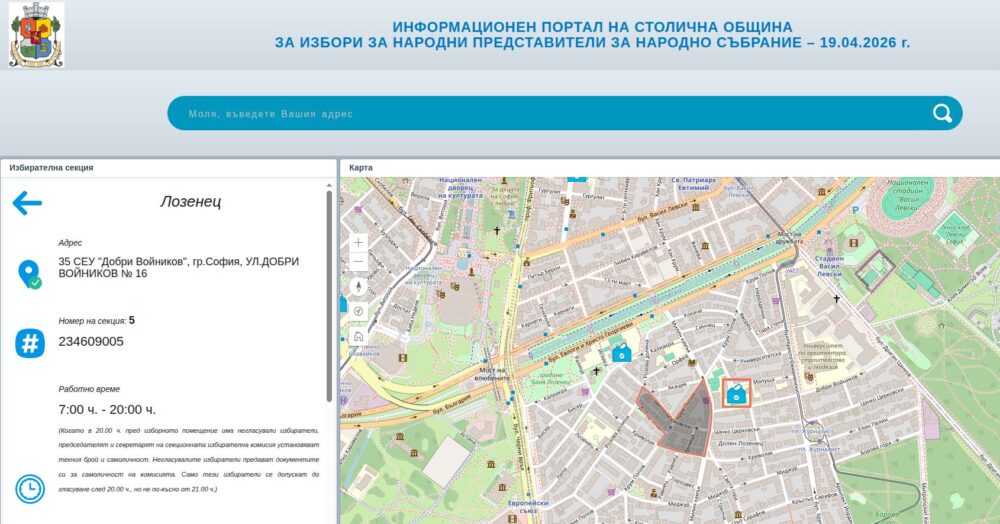
Картата на София

Столична община публикува портал вече няколко вота подред с цялата нужна информация за изборите. Там ще намерите гео портал и карта на всички секции. В допълнение на информацията, която ЦИК публикува днес, картата на Столична община показва и районът, в който гласуват в дадената секция, както и дали е достъпна за инвалиди. Тук виждате, например, една секция в Лозенец.

За съжаление, не мога да показа на картата в коя секция би следвало да гласува Пеевски, защото както BIRD писаха преди четири години, според ГРАО той няма право да бъде поместен в никой изборен списък. Защо не отговаря на условията да гласува, а се кандидатира и е бил депутат междувременно, ЦИК отказва да отговори или провери.

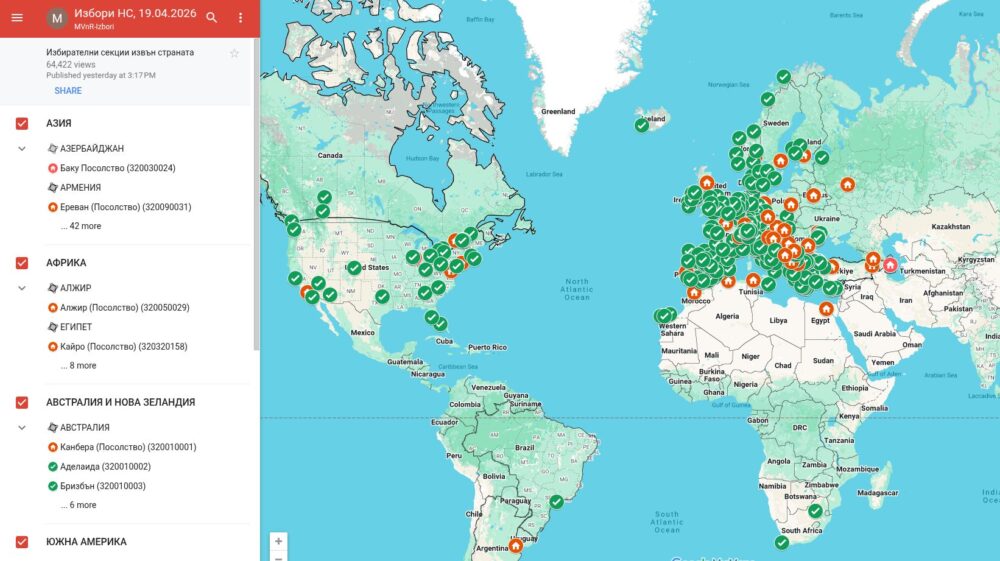
Картата на Външно

Министерство на Външните Работи публикува втори вот подред карта на секциите в чужбина. Заедно с това предоставя и таблица с адресите на секциите на български и английски. В предишни години тези адреси се събираха от общото усилие на доброволци и сверяваха със заповедите публикувани от МВнР. Последните са сканирани, отделни документи и беше много трудоемко да се извлече някаква информация.

Картата им е обикновена Google Maps карта, но с последните промени в приложението им позволява да я добавите като слой на картата, която много използват за навигация. Така за някои може да е по-удобно да намерят секциите. Не работи обаче с Apple Maps, но тогава се отваря като страница.

Бонус – карта на активните българи в чужбина

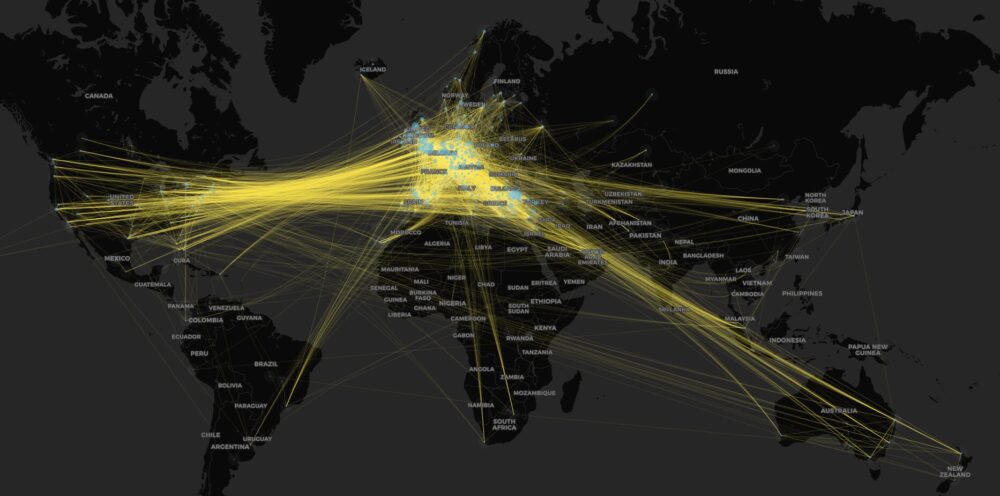
След всеки вот използвам анонимизираните данни, които платформата на Glasuvam.org събира, за да направя анализ за движението на българи в чужбина. Не пазя лична информация за хора, макар тя да е достъпна в изборните списъци, а само хешове на публичните записи от заявленията за гласуване. На тяхна база мога да направя оценка за това как някои българи са се местили по света приемайки, че заявлението им за гласуване отчита пребиваване. Разбира се, част от тях може да са само на почивка и да има съвпадение на имената.

Повече за методологията как изчиствам тези и други проблеми съм описал в статията за първата карта, която направих преди 10 години. За последно публикувах карта след изборите през 2021-та. Направих анализа и след изборите през 2024-та, но не я бях публикувал до сега. Може да я намерите на този линк. Препоръчвам първо да прочетете предходните статии с разясненията, за да я разберете.

Доколкото картата умишлено не предоставя възможност за проследяване на отделни хора, тя дава обща картинка за движението на миграцията ни. Например кои градове биват напускани от хора и в кои има прираст. Разбира се, това далеч не е представително и съм го описал подробно в миналото. Картата има за цел колкото да предостави обща картина, колкото и да има естетическа стойност, поне в моите очи.

Показва също какво е възможно да бъде постигнато с данните публикувани от избирателните списъци, особено тези в България, ако някой наистина се заеме. Призовавах доста години наред да се спре с публикуването им и да се премине към проверка през защитена услуга подобна на тази, която има при ГРАО. За съжаление, това не се случи.

FSF clarifies its stance on AGPLv3 additional terms

Post Syndicated from jzb original https://lwn.net/Articles/1067771/

OnlyOffice CEO Lev Bannov has recently
claimed
that the Euro-Office fork of the
OnlyOffice suite violates the GNU Affero General Public License
version 3 (AGPLv3). Krzysztof Siewicz of the Free Software
Foundation (FSF) has published
an article
on the FSF’s position on adding terms to the AGPLv3. In
short, Siewicz concludes that OnlyOffice has added restrictions to
the license that are not compatible with the AGPLv3, and those
restrictions can be removed by recipients of the code.

We urge OnlyOffice to clarify the situation by making it unambiguous
that OnlyOffice is licensed under the AGPLv3, and that users who
already received copies of the software are allowed to remove any
further restrictions. Additionally, if they intend to continue to use
the AGPLv3 for future releases, they should state clearly that the
program is licensed under the AGPLv3 and make sure they remove any
further restrictions from their program documentation and source
code. Confusing users by attaching further restrictions to any of the
FSF’s family of GNU General Public Licenses is not in line with free
software.

[$] Forking Vim to avoid LLM-generated code

Post Syndicated from daroc original https://lwn.net/Articles/1067007/

Many people dislike the proliferation of Large Language Models (LLMs) in recent
years, and so make an understandable attempt to avoid them.
That may not be possible in general, but there are two new forks of
Vim that seek to provide an editing
environment with no LLM-generated code. EVi focuses on being a modern Vim
without LLM-assisted contributions, while Vim Classic focuses on providing a long-term maintenance
version of Vim 8. While both are still in their early phases,
the projects look to be on track to provide stable alternatives — as long as
enough people are interested.

Security updates for Wednesday

Post Syndicated from jzb original https://lwn.net/Articles/1067718/

Security updates have been issued by AlmaLinux (capstone, cockpit, firefox, git-lfs, golang-github-openprinting-ipp-usb, kea, kernel, nghttp2, nodejs24, openexr, perl-XML-Parser, rsync, squid, and vim), Debian (imagemagick, systemd, and thunderbird), Slackware (libexif and xorg), SUSE (bind, clamav, firefox, freerdp2, giflib, go1.25, go1.26, helm, ignition, libpng16, libssh, oci-cli, rust1.92, strongswan, sudo, xorg-x11-server, and xwayland), and Ubuntu (rust-tar and rustc, rustc-1.76, rustc-1.77, rustc-1.78, rustc-1.79, rustc-1.80).

Introducing Agent Lee – a new interface to the Cloudflare stack

Post Syndicated from Kylie Czajkowski original https://blog.cloudflare.com/introducing-agent-lee/

While there have been small improvements along the way, the interface of technical products has not really changed since the dawn of the Internet. It still remains: clicking five pages deep, cross-referencing logs across tabs, and hunting for hidden toggles.

AI gives us the opportunity to rethink all that. Instead of complexity spread over a sprawling graphical user interface: what if you could describe in plain language what you wanted to achieve? 

This is the future — and we’re launching it today. We didn’t want to just put an agent in a dashboard. We wanted to create an entirely new way to interact with our entire platform. Any task, any surface, a single prompt.

Introducing Agent Lee.

Agent Lee is an in-dashboard AI assistant that understands your Cloudflare account. 

It can help you with troubleshooting, which, today, is a manual grind. If your Worker starts returning 503s at 02:00 UTC, finding the root cause: be it an R2 bucket, a misconfigured route, or a hidden rate limit, you’re opening half a dozen tabs and hoping you recognize the pattern. Most developers don’t have a teammate who knows the entire platform standing over their shoulder at 2 a.m. Agent Lee does. 

But it won’t just troubleshoot for you at 2 a.m. Agent Lee will also fix the problem for you on the spot.


Agent Lee has been running in an active beta during which it has served over 18,000 daily users, executing nearly a quarter of a million tool calls per day. While we are confident in its current capabilities and success in production, this is a system we are continuously developing. As it remains in beta, you may encounter unexpected limitations or edge cases as we refine its performance. We encourage you to use the feedback form below to help us make it better every day.

What Agent Lee can do

Agent Lee is built directly into the dashboard and understands the resources in your account. It knows your Workers, your zones, your DNS configuration, your error rates. The knowledge that today lives across six tabs and two browser windows will now live in one place, and you can talk to it.

With natural language, you can use it to:

  • Answer questions about your account: “Show me the top 5 error messages on my Worker.”

  • Debug an issue: “I can’t access my site with the www prefix.”

  • Apply a change: “Enable Access for my domain.”

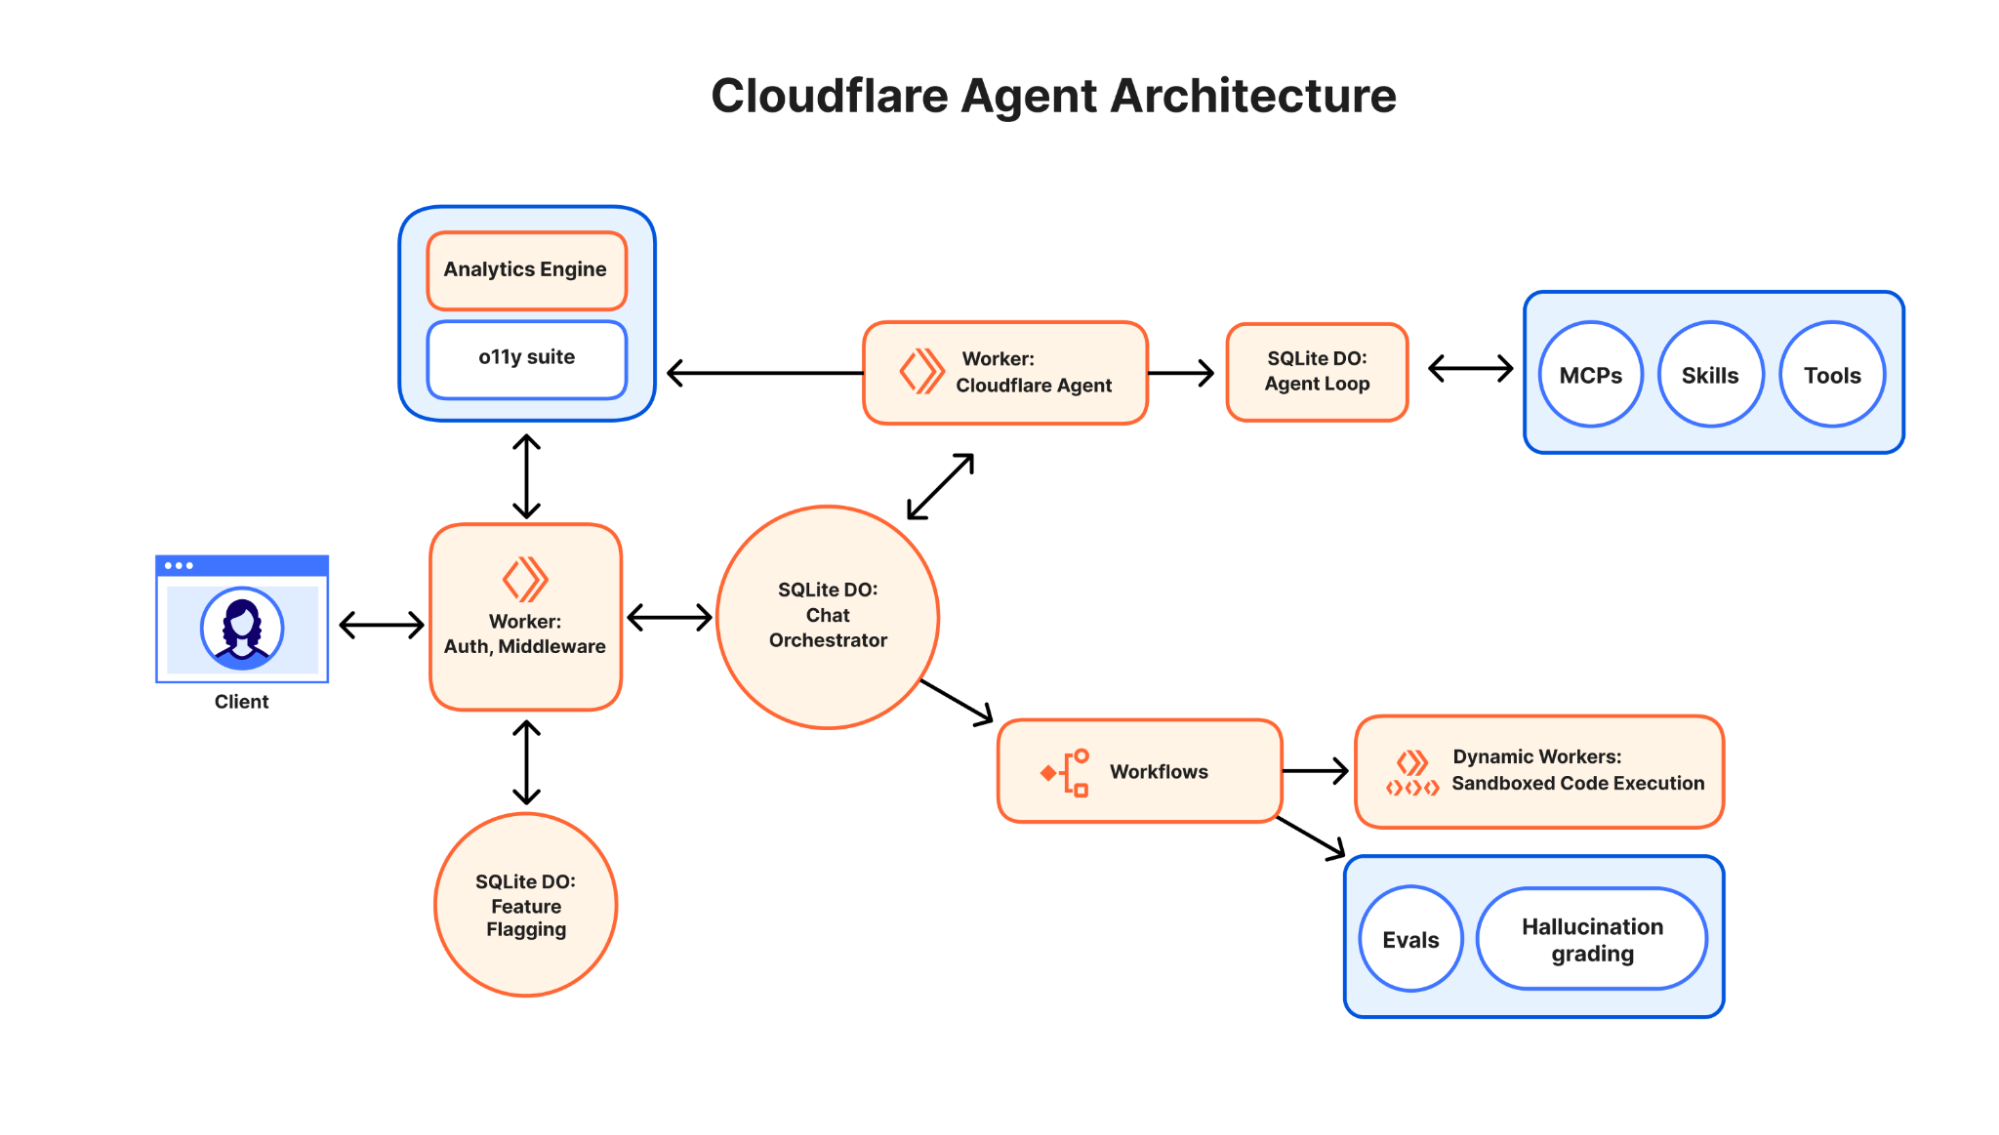
  • Deploy a resource: “Create a new R2 bucket for my photos and connect it to my Worker.”

Instead of switching between products, you describe what you want to do, and Agent Lee helps you get there with instructions and visualizations. It retrieves context, uses the right tools, and creates dynamic visualizations based on the types of questions you ask. Ask what your error rate looks like over the last 24 hours, and it renders a chart inline, pulling from your actual traffic, not sending you to a separate Analytics page.

Agent Lee isn’t answering FAQ questions — it’s doing real work, against real accounts, at scale. Today, Agent Lee serves ~18,000 daily users, executing ~250k tool calls per day across DNS, Workers, SSL/TLS, R2, Registrar, Cache, Cloudflare Tunnel, API Shield, and more. 

How we built it

Codemode

Rather than presenting MCP tool definitions directly to the model, Agent Lee uses Codemode to convert the tools into a TypeScript API and asks the model to write code that calls it instead.

This works better for a couple of reasons. LLMs have seen a huge amount of real-world TypeScript but very few tool call examples, so they’re more accurate when working in code. For multi-step tasks, the model can also chain calls together in a single script and return only the final result, ultimately skipping the round-trips.

The generated code is sent to an upstream Cloudflare MCP server for sandboxed execution, but it goes through a Durable Object that acts as a credentialed proxy. Before any call goes out, the DO classifies the generated code as read or write by inspecting the method and body. Read operations are proxied directly. Write operations are blocked until you explicitly approve them through the elicitation gate. API keys are never present in the generated code — they’re held inside the DO and injected server-side when the upstream call is made. The security boundary isn’t just a sandbox that gets thrown away; it’s a permission architecture that structurally prevents writes from happening without your approval.

The MCP permission system

Agent Lee connects to Cloudflare’s own MCP server, which exposes two tools: a search tool for querying API endpoints and an execute tool for writing code that performs API requests. This is the surface through which Agent Lee reads your account and, when you approve, writes to it.

Write operations go through an elicitation system that surfaces the approval step before any code executes. Agent Lee cannot skip this step. The permission model is the enforcement layer, and the confirmation prompt you see is not a UX courtesy. It’s the gate.


Built on the same stack you can use

Every primitive Agent Lee is built on is available to all our customers: Agents SDK, Workers AI, Durable Objects, and the same MCP infrastructure available to any Cloudflare developer. We didn’t build internal tools that aren’t available to you — instead we built it with the same Cloudflare lego blocks that you have access to.

Building Agent Lee on our own primitives wasn’t just a design principle. It was the fastest way to find out what works and what doesn’t. We built this in production, with real users, against real accounts. That means every limitation we hit is a limitation we can fix in the platform. Every pattern that works is one we can make easier for the next team that builds on top of it.

These are not opinions. They’re what quarter of a million tool calls across 18,000 users a day are telling us.


Generative UI

Interacting with a platform should feel like collaborating with an expert. Conversations should transcend simple text. With Agent Lee, as your dialogue evolves, the platform dynamically generates UI components alongside textual responses to provide a richer, more actionable experience.

For example, if you ask about website traffic trends for the month, you won’t just get a paragraph of numbers. Agent Lee will render an interactive line graph, allowing you to visualize peaks and troughs in activity at a glance.

To give you full creative control, every conversation is accompanied within an adaptive grid. Here you can click and drag across the grid to carve out space for new UI blocks, then simply describe what you want to see and let the agent handle the heavy lifting.

Today, we support a diverse library of visual blocks, including dynamic tables, interactive charts, architecture maps, and more. By blending the flexibility of natural language with the clarity of structured UI, Agent Lee transforms your chat history into a living dashboard.


Measuring quality and safety

An agent that can take action on your account needs to be reliable and secure. Elicitations allow agentic systems to actively solicit information, preferences, or approvals from users or other systems mid-execution. When Agent Lee needs to take non-read actions on a user’s behalf we use elicitations by requiring an explicit approval action in the user interface. These guardrails allow Agent Lee to truly be a partner alongside you in managing your resource safely.

In addition to safety, we continuously measure quality.

  • Evals to measure conversation success rate and information accuracy.

  • Feedback signals from user interactions (thumbs up / thumbs down).

  • Tool call execution success rate and hallucination scorers.

  • Per-product breakdown of conversation performance.

These systems help us improve Agent Lee over time while keeping users in control. 

Our vision ahead

Agent Lee in the dashboard is only the beginning.

The bigger vision is Agent Lee as the interface to the entire Cloudflare platform — from anywhere. The dashboard today, the CLI next, your phone when you’re on the go. The surface you use shouldn’t matter. You should be able to describe what you need and have it done, regardless of where you are.

From there, Agent Lee gets proactive. Rather than waiting to be asked, it watches what matters to you, your Workers, your traffic, your error thresholds and reaches out when something warrants attention. An agent that only responds is useful. One that notices things first is something different.

Underlying all of this is context. Agent Lee already knows your account configuration. Over time, it will know more, what you’ve asked before, what page you’re on, what you were debugging last week. That accumulated context is what makes a platform feel less like a tool and more like a collaborator.

We’re not there yet. Agent Lee today is the first step, running in production, doing real work at scale. The architecture is built to get to the rest.

Try it out

Agent Lee is available in beta for Free plan users. Log in to your Cloudflare dashboard and click Ask AI in the upper right corner to get started.


We’d love to know what you build and what you’d like to see in Agent Lee. Please share your feedback here.


Register domains wherever you build: Cloudflare Registrar API now in beta

Post Syndicated from Ankit Shah original https://blog.cloudflare.com/registrar-api-beta/

Today we’re launching the next chapter of Cloudflare Registrar: the Registrar API in beta.

The Registrar API makes it possible to search for domains, check availability, and register them programmatically. Now, buying a domain the moment an idea starts to feel real no longer has to pull you out of the agentic workflow.

A Registrar API has been one of the clearest asks from builders using Cloudflare. As more of the agentic workflow has moved into editors, terminals, and agent-driven tools, domain registration became the obvious gap to close.

When we launched Cloudflare Registrar seven years ago, the idea was simple. Domains should be offered at cost, with no markup and no games. Since then, Cloudflare Registrar has become one of the fastest growing registrars in the world as more people choose Cloudflare as the place to build their next project.

Prompting an agent inside an AI code editor to generate name ideas, search, check, and purchase a domain.

Built for agents and automation

The Registrar API is designed to work well anywhere software is already being built: inside editors, deployment pipelines, backend services, and agent-driven workflows.

The workflow is intentionally simple and machine-friendly. Search returns candidate names. Check returns real-time availability and pricing. Register takes a minimal request and returns a workflow-shaped response that can complete immediately or be polled if it takes longer. That makes it straightforward to use for traditional API clients and for AI agents acting on a user’s behalf.

In practice, all this means that an agent can help with the full flow: suggest names, confirm which one is actually registrable, surface the price for approval, and then complete the purchase without forcing the user out of the tool they are already using.

The Registrar API

At its core, this first release of the Registrar API does three things

  • Search for domains

  • Check availability

  • Register domains

For a curated set of popular TLDs to start, see the Registrar API docs. When supported, premium domains can also be registered, but they require explicit fee acknowledgement.

The Registrar API is part of the full Cloudflare API, which means agents already have access to it today through the Cloudflare MCP. It does not require a separate integration or a custom tool definition. An agent working in Cursor, Claude Code, or any MCP-compatible environment can discover and call Registrar endpoints using the same search() and execute() pattern that covers the entire Cloudflare API surface. The moment the API was part of our spec, it was ready for agents.

What it looks like in practice:

You’re building a new project in your favorite AI code editor. Halfway through scaffolding, you ask your agent: “Find me a good .dev domain for this project and register it.”

The agent searches for candidate names based on your project. It checks real-time availability for the one you pick and confirms the price. You say yes. It registers the domain, using your account’s default contact info and payment method automatically. By the time you’ve read the response, the domain is registered, and privacy is on.

Three API calls. A few seconds.

What it looks like in code:

Step 1: Search for domain names

Use the search endpoint to submit a domain query, with or without a domain extension.

async () => {
  return cloudflare.request({
    method: "GET",
    path: `/accounts/${accountId}/registrar/domain-search`,
    query: { q: "acme corp", limit: 3 },
  });
}
{
  "success": true,
  "errors": [],
  "messages": [],
  "result": {
    "domains": [
      {
        "name": "acmecorp.com",
        "registrable": true,
        "tier": "standard",
        "pricing": {
          "currency": "USD",
          "registration_cost": "8.57",
          "renewal_cost": "8.57"
        }
      },
      {
        "name": "acmecorp.dev",
        "registrable": true,
        "tier": "standard",
        "pricing": {
          "currency": "USD",
          "registration_cost": "10.11",
          "renewal_cost": "10.11"
        }
      },
      {
        "name": "acmecorp.app",
        "registrable": true,
        "tier": "standard",
        "pricing": {
          "currency": "USD",
          "registration_cost": "11.00",
          "renewal_cost": "11.00"
        }
      }
    ]
  }
}

Step 2: Check availability and pricing

Search results are fast but non-authoritative; they’re based on cached data, and availability can change in seconds for popular names. Check queries the registry directly. Call it immediately before registering, and use its price response as the source of truth.

async () => {
  return cloudflare.request({
    method: "POST",
    path: `/accounts/${accountId}/registrar/domain-check`,
    body: { domains: ["acmecorp.dev"] },
  });
}
{
  "success": true,
  "errors": [],
  "messages": [],
  "result": {
    "domains": [
      {
        "name": "acmecorp.dev",
        "registrable": true,
        "tier": "standard",
        "pricing": {
          "currency": "USD",
          "registration_cost": "10.11",
          "renewal_cost": "10.11"
        }
      }
    ]
  }
}

Step 3: Register the domain

The only required field is the domain name. WHOIS privacy protection is enabled by default at no extra charge. If your account has a default registrant contact, the API uses it automatically; otherwise you can provide contact details inline in the request. Your default payment method is used automatically.

async () => {
  return cloudflare.request({
    method: "POST",
    path: `/accounts/${accountId}/registrar/registrations`,
    body: { domain_name: "acmecorp.dev" },
  });
}
{
  "success": true,
  "errors": [],
  "messages": [],
  "result": {
    "domain_name": "acmecorp.dev",
    "state": "succeeded",
    "completed": true,
    "created_at": "2025-10-27T10:00:00Z",
    "updated_at": "2025-10-27T10:00:03Z",
    "context": {
      "registration": {
        "domain_name": "acmecorp.dev",
        "status": "active",
        "created_at": "2025-10-27T10:00:00Z",
        "expires_at": "2026-10-27T10:00:00Z",
        "auto_renew": true,
        "privacy_enabled": true,
        "locked": true
      }
    },
    "links": {
      "self": "/accounts/abc/registrar/registrations/acmecorp.dev/registration-status",
      "resource": "/accounts/abc/registrar/registrations/acmecorp.dev"
    }
  }
}

Registration typically completes synchronously within seconds. If it takes longer, the API returns a 202 Accepted with a workflow URL to poll. The response shape is the same either way, no special-casing needed. For premium domains, the Check response returns the exact registry-set price, and the Register request echoes that back as an explicit fee acknowledgement.

A note on agents and non-refundable purchases

When an agent registers a domain on your behalf, it charges your default payment method. Domain registrations are non-refundable once complete. A well-designed agent flow should confirm the domain name and price with the user before calling the registration endpoint. The Check step exists precisely to make that confirmation step explicit and unambiguous. The API gives you the tools to build it correctly; the responsibility to do so belongs in your agent’s logic.

By default, our API docs have explicit agent-facing instructions to seek permission from the user during the register API call. Still, it is the responsibility of the human to design an agent flow that will not buy domains without your approval.

Why Cloudflare can do this differently

What makes Cloudflare different from many developer platforms now adding domain workflows is that Cloudflare operates the registrar itself. That means the same platform where a project is built and deployed can also search for, register, and manage the domain — without adding markup on top.

At-cost pricing is at the core of Cloudflare’s registrar model. We charge exactly what the registry charges. That holds true whether you’re registering a domain through the dashboard, calling the API directly, or asking an agent to do it on your behalf.

Where the API goes next

This beta focuses on the first critical moment in the domain lifecycle: search, check, and registration. We are actively working on expanding the API to cover more of the core Registrar experience, so domains can be managed programmatically after they are purchased, not just at the moment they are created. This will include lifecycle elements like transfers, renewals, contact updates, and more.

The API is the first step toward a broader registrar-as-a-service offering. Development of that service is underway now, and we’re aiming to launch it later this year. As the API expands, platforms like website builders, hosting providers, AI products, and other multi-tenant applications will be able to make domain registration part of their own user experience. Users can search for a domain, buy it, and provision it without ever leaving the service or agent-driven workflow they are already building in.

Start building today

The Registrar API exists because builders asked for it. Now that it’s available as a beta, we’d love to see what you build, in the Cloudflare Community or on X, or on Discord.

To get started:

Please let us know if something is missing, if a workflow breaks down, or if you are building toward a larger platform use case. We’re working quickly to expand the functionality of the API to support domain renewals, transfers, and more.

We can’t wait to see what you build!

Special thanks to Lucy Dryaeva and Fred Pinto for their valuable contributions to delivering the Registrar API beta.

Project Think: building the next generation of AI agents on Cloudflare

Post Syndicated from Sunil Pai original https://blog.cloudflare.com/project-think/

Today, we’re introducing Project Think: the next generation of the Agents SDK. Project Think is a set of new primitives for building long-running agents (durable execution, sub-agents, sandboxed code execution, persistent sessions) and an opinionated base class that wires them all together. Use the primitives to build exactly what you need, or use the base class to get started fast.

Something happened earlier this year that changed how we think about AI. Tools like Pi, OpenClaw, Claude Code, and Codex proved a simple but powerful idea: give an LLM the ability to read files, write code, execute it, and remember what it learned, and you get something that looks less like a developer tool and more like a general-purpose assistant.

These coding agents aren’t just writing code anymore. People are using them to manage calendars, analyze datasets, negotiate purchases, file taxes, and automate entire business workflows. The pattern is always the same: the agent reads context, reasons about it, writes code to take action, observes the result, and iterates. Code is the universal medium of action.

Our team has been using these coding agents every day. And we kept running into the same walls:

  • They only run on your laptop or an expensive VPS: there’s no sharing, no collaboration, no handoff between devices.

  • They’re expensive when idle: a fixed monthly cost whether the agent is working or not. Scale that to a team, or a company, and it adds up fast.

  • They require management and manual setup: installing dependencies, managing updates, configuring identity and secrets.

And there’s a deeper structural issue. Traditional applications serve many users from one instance. As mentioned in our Welcome to Agents Week post, agents are one-to-one. Each agent is a unique instance, serving one user, running one task. A restaurant has a menu and a kitchen optimized to churn out dishes at volume. An agent is more like a personal chef: different ingredients, different techniques, different tools every time.

That fundamentally changes the scaling math. If a hundred million knowledge workers each use an agentic assistant at even modest concurrency, you need capacity for tens of millions of simultaneous sessions. At current per-container costs, that’s unsustainable. We need a different foundation.

That’s what we’ve been building.

Introducing Project Think

Project Think ships a set of new primitives for the Agents SDK:

  • Durable execution with fibers: crash recovery, checkpointing, automatic keepalive

  • Sub-agents: isolated child agents with their own SQLite and typed RPC

  • Persistent sessions: tree-structured messages, forking, compaction, full-text search

  • Sandboxed code execution: Dynamic Workers, codemode, runtime npm resolution

  • The execution ladder: workspace, isolate, npm, browser, sandbox

  • Self-authored extensions: agents that write their own tools at runtime

Each of these is usable directly with the Agent base class. Build exactly what you need with the primitives, or use the Think base class to get started fast. Let’s look at what each one does.

Long-running agents

Agents, as they exist today, are ephemeral. They run for a session, tied to a single process or device, and then they are gone. A coding agent that dies when your laptop sleeps, that’s a tool. An agent that persists — that can wake up on demand, continue work after interruptions, and carry forward the state without depending on your local runtime — that starts to look like infrastructure. And it changes the scaling model for agents completely.

The Agents SDK builds on Durable Objects to give every agent an identity, persistent state, and the ability to wake on message. This is the actor model: each agent is an addressable entity with its own SQLite database. It consumes zero compute when hibernated. When something happens (an HTTP request, a WebSocket message, a scheduled alarm, an inbound email) the platform wakes the agent, loads its state, and hands it the event. The agent does its work, then goes back to sleep.

VMs / Containers

Durable Objects

Idle cost

Full compute cost, always

Zero (hibernated)

Scaling

Provision and manage capacity

Automatic, per-agent

State

External database required

Built-in SQLite

Recovery

You build it (process managers, health checks)

Platform restarts, state survives

Identity / routing

You build it (load balancers, sticky sessions)

Built-in (name → agent)

10,000 agents, each active 1% of the time

10,000 always-on instances

~100 active at any moment

This changes the economics of running agents at scale. Instead of “one expensive agent per power user,” you can build “one agent per customer” or “one agent per task” or “one agent per email thread.” The marginal cost of spawning a new agent is effectively zero.

Surviving crashes: durable execution with fibers

An LLM call takes 30 seconds. A multi-turn agent loop can run for much longer. At any point during that window, the execution environment can vanish: a deploy, a platform restart, hitting resource limits. The upstream connection to the model provider is severed permanently, in-memory state is lost, and connected clients see the stream stop with no explanation.

runFiber() solves this. A fiber is a durable function invocation: registered in SQLite before execution begins, checkpointable at any point via stash(), and recoverable on restart via onFiberRecovered.

import { Agent } from "agents";

export class ResearchAgent extends Agent {
  async startResearch(topic: string) {
    void this.runFiber("research", async (ctx) => {
      const findings = [];

      for (let i = 0; i < 10; i++) {
        const result = await this.callLLM(`Research step ${i}: ${topic}`);
        findings.push(result);

        // Checkpoint: if evicted, we resume from here
        ctx.stash({ findings, step: i, topic });

        this.broadcast({ type: "progress", step: i });
      }

      return { findings };
    });
  }

  async onFiberRecovered(ctx) {
    if (ctx.name === "research" && ctx.snapshot) {
      const { topic } = ctx.snapshot;
      await this.startResearch(topic);
    }
  }
}

The SDK keeps the agent alive automatically during fiber execution, no special configuration needed. For work measured in minutes, keepAlive() / keepAliveWhile() prevents eviction during active work. For longer operations (CI pipelines, design reviews, video generation) the agent starts the work, persists the job ID, hibernates, and wakes on callback.

Delegating work: sub-agents via Facets

A single agent shouldn’t do everything itself. Sub-agents are child Durable Objects colocated with the parent via Facets, each with their own isolated SQLite and execution context:

import { Agent } from "agents";

export class ResearchAgent extends Agent {
  async search(query: string) { /* ... */ }
}

export class ReviewAgent extends Agent {
  async analyze(query: string) { /* ... */ }
}

export class Orchestrator extends Agent {
  async handleTask(task: string) {
    const researcher = await this.subAgent(ResearchAgent, "research");
    const reviewer = await this.subAgent(ReviewAgent, "review");

    const [research, review] = await Promise.all([
      researcher.search(task),
      reviewer.analyze(task)
    ]);

    return this.synthesize(research, review);
  }
}

Sub-agents are isolated at the storage level. Each one gets its own SQLite database, and there’s no implicit sharing of data between them. This is enforced by the runtime where sub-agent RPC latency is a function call. TypeScript catches misuse at compile time.

Conversations that persist: the Session API

Agents that run for days or weeks need more than the typical flat list of messages. The experimental Session API models this explicitly. Available on the Agent base class, conversations are stored as trees, where each message has a parent_id. This enables forking (explore an alternative without losing the original path), non-destructive compaction (summarize older messages rather than deleting them), and full-text search across conversation history via FTS5.

import { Agent } from "agents";
import { Session, SessionManager } from "agents/experimental/memory/session";

export class MyAgent extends Agent {
  sessions = SessionManager.create(this);

  async onStart() {
    const session = this.sessions.create("main");
    const history = session.getHistory();
    const forked = this.sessions.fork(session.id, messageId, "alternative-approach");
  }
}

Session is usable directly with Agent, and it’s the storage layer that the Think base class builds on.

From tool calls to code execution

Conventional tool-calling has an awkward shape. The model calls a tool, pulls the result back through the context window, calls another tool, pulls that back, and so on. As the tool surface grows, this gets both expensive and clumsy. A hundred files means a hundred round-trips through the model.

But models are better at writing code to use a system than they are at playing the tool-calling game. This is the insight behind @cloudflare/codemode: instead of sequential tool calls, the LLM writes a single program that handles the entire task.

// The LLM writes this. It runs in a sandboxed Dynamic Worker.
const files = await tools.find({ pattern: "**/*.ts" });
const results = [];
for (const file of files) {
  const content = await tools.read({ path: file });
  if (content.includes("TODO")) {
    results.push({ file, todos: content.match(/\/\/ TODO:.*/g) });
  }
}
return results;

Instead of 100 round-trips to the model, you just run a single program. This leads to fewer tokens used, faster execution, and better results. The Cloudflare API MCP server demonstrates this at scale. We expose only two tools (search() and execute()), which consume ~1,000 tokens, vs. ~1.17 million tokens for the naive tool-per-endpoint equivalent. This is a 99.9% reduction.

The missing primitive: safe sandboxes

Once you accept that models should write code on behalf of users, the question becomes: where does that code run? Not eventually, not after a product team turns it into a roadmap item. Right now, for this user, against this system, with tightly defined permissions.

Dynamic Workers are that sandbox. A fresh V8 isolate spun up at runtime, in milliseconds, with a few megabytes of memory. That’s roughly 100x faster and up to 100x more memory-efficient than a container. You can start a new one for every single request, run a snippet of code, and throw it away.

The critical design choice is the capability model. Instead of starting with a general-purpose machine and trying to constrain it, Dynamic Workers begin with almost no ambient authority (globalOutbound: null, no network access) and the developer grants capabilities explicitly, resource by resource, through bindings. We go from asking “how do we stop this thing from doing too much?” to “what exactly do we want this thing to be able to do?”

This is the right question for agent infrastructure.

The execution ladder

This capability model leads naturally to a spectrum of compute environments, an execution ladder that the agent escalates through as needed:


Tier 0 is the Workspace, a durable virtual filesystem backed by SQLite and R2. Read, write, edit, search, grep, diff. Powered by @cloudflare/shell.

Tier 1 is a Dynamic Worker: LLM-generated JavaScript running in a sandboxed isolate with no network access. Powered by @cloudflare/codemode.

Tier 2 adds npm. @cloudflare/worker-bundler fetches packages from the registry, bundles them with esbuild, and loads the result into the Dynamic Worker. The agent writes import { z } from "zod" and it just works.

Tier 3 is a headless browser via Cloudflare Browser Run. Navigate, click, extract, screenshot. Useful when the service doesn’t support agents yet via MCP or APIs.

Tier 4 is a Cloudflare Sandbox configured with your toolchains, repos, and dependencies: git clone, npm test, cargo build, synced bidirectionally with the Workspace.

The key design principle: the agent should be useful at Tier 0 alone, where each tier is additive. The user can add capabilities as they go.

Building blocks, not a framework

All of these primitives are available as standalone packages. Dynamic Workers, @cloudflare/codemode, @cloudflare/worker-bundler, and @cloudflare/shell (a durable filesystem with tools) are all usable directly with the Agent base class. You can combine them to give any agent a workspace, code execution, and runtime package resolution without adopting an opinionated framework.

The platform

Here’s the complete stack for building agents on Cloudflare:

Capability

What it does

Powered by

Per-agent isolation

Every agent is its own world

Durable Objects (DOs)

Zero cost when idle

$0 until the agent wakes up

DO Hibernation

Persistent state

Queryable, transactional storage

DO SQLite

Durable filesystem

Files that survive restarts

Workspace (SQLite + R2)

Sandboxed code execution

Run LLM-generated code safely

Dynamic Workers + @cloudflare/codemode

Runtime dependencies

import * from react just works

@cloudflare/worker-bundler

Web automation

Browse, navigate, fill forms

Browser Run

Full OS access

git, compilers, test runners

Sandboxes

Scheduled execution

Proactive, not just reactive

DO Alarms + Fibers

Real-time streaming

Token-by-token to any client

WebSockets

External tools

Connect to any tool server

MCP

Agent coordination

Typed RPC between agents

Sub-agents (Facets)

Model access

Connect to an LLM to power the agent

AI Gateway + Workers AI (or Bring Your Own Model)

Each of these is a building block. Together, they form something new: a platform where anyone can build, deploy, and run AI agents as capable as the ones running on your local machine today, but serverless, durable, and safe by construction.

The Think base class

Now that you’ve seen the primitives, here’s what happens when you wire them all together.

Think is an opinionated harness that handles the full chat lifecycle: agentic loop, message persistence, streaming, tool execution, stream resumption, and extensions. You focus on what makes your agent unique.

The minimal subclass looks like this:

import { Think } from "@cloudflare/think";
import { createWorkersAI } from "workers-ai-provider";

export class MyAgent extends Think<Env> {
  getModel() {
    return createWorkersAI({ binding: this.env.AI })(
      "@cf/moonshotai/kimi-k2.5"
    );
  }
}

That’s effectively all you need to have a working chat agent with streaming, persistence, abort/cancel, error handling, resumable streams, and a built-in workspace filesystem. Deploy with npx wrangler deploy.

Think makes decisions for you. When you need more control, you can override the ones you care about:

Override

Purpose

getModel()

Return the LanguageModel to use

getSystemPrompt()

System prompt

getTools()

AI SDK compatible ToolSet for the agentic loop

maxSteps

Max tool-call rounds per turn

configureSession()

Context blocks, compaction, search, skills

Under the hood, Think runs the complete agentic loop on every turn: it assembles the context (base instructions + tool descriptions + skills + memory + conversation history), calls streamText, executes tool calls (with output truncation to prevent context blowup), appends results, loops until the model is done or the step limit is reached. All messages are persisted after each turn.

Lifecycle hooks

Think gives you hooks at every stage of the chat turn, without requiring you to own the whole pipeline:

beforeTurn()
  → streamText()
    → beforeToolCall()
    → afterToolCall()
  → onStepFinish()
→ onChatResponse()

Switch to a lower cost model for follow-up turns, limit the tools it can use, and pass in client-side context on each turn. Also log every tool call to analytics and automatically trigger one more follow-up turn after the model completes, all without replacing onChatMessage.

Persistent memory and long conversations

Think builds on Session API as its storage layer, giving you tree-structured messages with branching built in.

On top of that, it adds persistent memory through context blocks. These are structured sections of the system prompt that the model can read and update over time, and they persist across hibernation.The model sees “MEMORY (Important facts, use set_context to update) [42%, 462/1100 tokens]” and can proactively remember things.

configureSession(session: Session) {
  return session
    .withContext("soul", {
      provider: { get: async () => "You are a helpful coding assistant." }
    })
    .withContext("memory", {
      description: "Important facts learned during conversation.",
      maxTokens: 2000
    })
    .withCachedPrompt();
}

Sessions are flexible. You can run multiple conversations per agent and fork them to try a different direction without losing the original. 

As context grows, Think handles limits with non-destructive compaction. Older messages are summarized instead of removed, while the full history remains stored in SQLite. 

Search is built in as well. Using FTS5, you can query conversation history within a session or across all the sessions. The agent is also able to search its own past using search_context tool.

The full execution ladder, wired in

Think integrates the entire execution ladder into a single getTools() return:

import { Think } from "@cloudflare/think";
import { createWorkspaceTools } from "@cloudflare/think/tools/workspace";
import { createExecuteTool } from "@cloudflare/think/tools/execute";
import { createBrowserTools } from "@cloudflare/think/tools/browser";
import { createSandboxTools } from "@cloudflare/think/tools/sandbox";
import { createExtensionTools } from "@cloudflare/think/tools/extensions";

export class MyAgent extends Think<Env> {
  extensionLoader = this.env.LOADER;

  getModel() {
    /* ... */
  }

  getTools() {
    return {
      execute: createExecuteTool({
        tools: createWorkspaceTools(this.workspace),
        loader: this.env.LOADER
      }),
      ...createBrowserTools(this.env.BROWSER),
      ...createSandboxTools(this.env.SANDBOX), // configured per-agent: toolchains, repos, snapshots
      ...createExtensionTools({ manager: this.extensionManager! }),
      ...this.extensionManager!.getTools()
    };
  }
}

Self-authored extensions

Think takes code execution one step further. An agent can write its own extensions: TypeScript programs that run in Dynamic Workers, declaring permissions for network access and workspace operations.

{
  "name": "github",
  "description": "GitHub integration: PRs, issues, repos",
  "tools": ["create_pr", "list_issues", "review_pr"],
  "permissions": {
    "network": ["api.github.com"],
    "workspace": "read-write"
  }
}

Think’s ExtensionManager bundles the extension (optionally with npm deps via @cloudflare/worker-bundler), loads it into a Dynamic Worker, and registers the new tools. The extension persists in DO storage and survives hibernation. The next time the user asks about pull requests, the agent has a github_create_pr tool that didn’t exist 30 seconds ago.

This is the kind of self-improvement loop that makes agents genuinely more useful over time. Not through fine-tuning or RLHF, but through code. The agent is able to write new capabilities for itself, all in sandboxed, auditable, and revocable TypeScript.

Sub-agent RPC

Think also works as a sub-agent, called via chat() over RPC from a parent, with streaming events via callback:

const researcher = await this.subAgent(ResearchSession, "research");
const result = await researcher.chat(`Research this: ${task}`, streamRelay);

Each child gets its own conversation tree, memory, tools, and model. The parent doesn’t need to know the details.

Getting started

Project Think is experimental. The API surface is stable but will continue to evolve in the coming days and weeks. We’re already using it internally to build our own background agent infrastructure, and we’re sharing it early so you can build alongside us.

npm install @cloudflare/think agents ai @cloudflare/shell zod workers-ai-provider
// src/server.ts
import { Think } from "@cloudflare/think";
import { createWorkersAI } from "workers-ai-provider";
import { routeAgentRequest } from "agents";

export class MyAgent extends Think<Env> {
  getModel() {
    return createWorkersAI({ binding: this.env.AI })(
      "@cf/moonshotai/kimi-k2.5"
    );
  }
}

export default {
  async fetch(request: Request, env: Env) {
    return (
      (await routeAgentRequest(request, env)) ||
      new Response("Not found", { status: 404 })
    );
  }
} satisfies ExportedHandler<Env>;
// src/client.tsx
import { useAgent } from "agents/react";
import { useAgentChat } from "@cloudflare/ai-chat/react";

function Chat() {
  const agent = useAgent({ agent: "MyAgent" });
  const { messages, sendMessage, status } = useAgentChat({ agent });
  // Render your chat UI
}

Think speaks the same WebSocket protocol as @cloudflare/ai-chat, so existing UI components work out of the box. If you’ve built on AIChatAgent, your client code doesn’t change.

The third wave

We see three waves of AI agents:

The first wave was chatbots. They were stateless, reactive, and fragile. Every conversation started from scratch with no memory, no tools, and no ability to act. This made them useful for answering questions, but limited them to only answering questions.

The second wave was coding agents. These are stateful, tool-using and far more capable tools like Pi, Claude Code, OpenClaw, and Codex. These agents can read codebases, write code, execute it, and iterate. These proved that an LLM with the right tools is a general-purpose machine, but they run on your laptop, for one user, with no durability guarantees.

Now we are entering the third wave: agents as infrastructure. Durable, distributed, structurally safe, and serverless. These are agents that run on the Internet, survive failures, cost nothing when idle, and enforce security through architecture rather than behavior. Agents that any developer can build and deploy for any number of users.

This is the direction we’re betting on.

The Agents SDK is already powering thousands of production agents. With Project Think and the the primitives it introduces, we’re adding the missing pieces to make those agents dramatically more capable: persistent workspaces, sandboxed code execution, durable long-running tasks, structural security, sub-agent coordination, and self-authored extensions.

It’s available today in preview. We’re building alongside you, and we’d genuinely love to see what you (and your coding agent) create with it.


Think is part of the Cloudflare Agents SDK, available as @cloudflare/think. The features described in this post are in preview. APIs may change as we incorporate feedback. Check the documentation and example to get started.


Browser Run: give your agents a browser

Post Syndicated from Kathy Liao original https://blog.cloudflare.com/browser-run-for-ai-agents/

AI agents need to interact with the web. To do that, they need a browser. They need to navigate sites, read pages, fill forms, extract data, and take screenshots. They need to observe whether things are working as expected, with a way for their humans to step in if needed. And they need to do all of this at scale.

Today, we’re renaming Browser Rendering to Browser Run, and shipping key features that make it the browser for AI agents. The name Browser Rendering never fully captured what the product does. Browser Run lets you run full browser sessions on Cloudflare’s global network, drive them with code or AI, record and replay sessions, crawl pages for content, debug in real time, and let humans intervene when your agent needs help. 

Here’s what’s new:

  • Live View: see what your agent sees and is doing, in real time. Know instantly if things are working, and when they’re not, see exactly why.

  • Human in the Loop: when your agent hits a snag like a login page or unexpected edge case, it can hand off to a human instead of failing. The human steps in, resolves, then hands back control.

  • Chrome DevTools Protocol (CDP) Endpoint: the Chrome DevTools Protocol is how agents control browsers. Browser Run now exposes it directly, so agents get maximum control over the browser and existing CDP scripts work on Cloudflare.

  • MCP Client Support: AI coding agents like Claude Desktop, Cursor, and OpenCode can now use Browser Run as their remote browser.

  • WebMCP Support: agents will outnumber humans using the web. WebMCP allows websites to declare what actions are available for agents to discover and call, making navigation more reliable.

  • Session Recordings: capture every browser session for debugging purposes. When something goes wrong, you have the full recording with DOM changes, user interactions, and page navigation.

  • Higher limits: run more tasks at once with 120 concurrent browsers, up from 30. 

An AI agent searching Amazon for an orange lava lamp, comparing options, and handing off to a human when sign-in is required to complete the purchase

Everything an agent needs

Let’s think about what agents need when browsing the web and how each feature fits in:

What an agent needs Browser Run (formerly Browser Rendering)
1) Browsers on-demand Chrome browser on Cloudflare’s global network
2) A way to control the browser Take actions like navigate, click, fill forms, screenshot, and more with Puppeteer, Playwright, CDP (new), MCP Client Support (new) and WebMCP (new)
3) Observability Live View (new), Session Recordings (new), and Dashboard redesign (new)
4) Human intervention Human in the Loop (new)
5) Scale 10 requests/second for Quick Actions, 120 concurrent browsers (4x increase)

1) Open a browser

First, an agent needs a browser. With Browser Run, agents can spin up a headless Chrome instance on Cloudflare’s global network, on demand. No infrastructure to manage, no Chrome versions to maintain. Browser sessions open near users for low latency, and scale up and down as needed. Pair Browser Run with the Agents SDK to build long-running agents that browse the web, remember everything, and act on their own. 

2) Take actions

Once your agent has a browser, it needs ways to control it. Browser Run supports multiple approaches: new low-level protocol access with the Chrome DevTools Protocol (CDP) and WebMCP, in addition to existing higher-level automation using Puppeteer and Playwright, and Quick Actions for simple tasks. Let’s look at the details.

Chrome DevTools Protocol (CDP) endpoint

The Chrome DevTools Protocol (CDP) is the low-level protocol that powers browser automation. Exposing CDP directly means the growing ecosystem of agent tools and existing CDP automation scripts can use Browser Run. When you open Chrome DevTools and inspect a page, CDP is what’s running underneath. Puppeteer, Playwright, and most agent frameworks are built on top of it.

Every way that you have been using Browser Run has actually been through CDP already. What’s new is that we’re now exposing CDP directly as an endpoint. This matters for agents because CDP gives agents the most control possible over the browser. Agent frameworks already speak CDP natively, and can now connect to Browser Run directly. CDP also unlocks browser actions that aren’t available through Puppeteer or Playwright, like JavaScript debugging. And because you’re working with raw CDP messages instead of going through higher-level libraries, you can pass messages directly to models for more token-efficient browser control.

If you already have CDP automation scripts running against self-hosted Chrome, they work on Browser Run with a one-line config change. Point your WebSocket URL at Browser Run and stop managing your own browser infrastructure.

// Before: connecting to self-hosted Chrome
const browser = await puppeteer.connect({
  browserWSEndpoint: 'ws://localhost:9222/devtools/browser'
});

// After: connecting to Browser Run
const browser = await puppeteer.connect({
  browserWSEndpoint: 'wss://api.cloudflare.com/client/v4/accounts/<ACCOUNT_ID>/browser-rendering/devtools/browser',
  headers: { 'Authorization': 'Bearer <API_TOKEN>' }
});

The CDP endpoint also makes Browser Run more accessible. You can now connect from any language, any environment, without needing to write a Cloudflare Worker. (If you’re already using Workers, nothing changes.)

Using Browser Run with MCP Clients

Now that Browser Run exposes the Chrome DevTools Protocol (CDP), MCP clients including Claude Desktop, Cursor, Codex, and OpenCode can use Browser Run as their remote browser. The chrome-devtools-mcp package from the Chrome DevTools team is an MCP server that gives your AI coding assistant access to the full power of Chrome DevTools for reliable automation, in-depth debugging, and performance analysis.

Here’s an example of how to configure Browser Run for Claude Desktop:

{
  "mcpServers": {
    "browser-rendering": {
      "command": "npx",
      "args": [
        "-y",
        "chrome-devtools-mcp@latest",
        "--wsEndpoint=wss://api.cloudflare.com/client/v4/accounts/<ACCOUNT_ID>/browser-rendering/devtools/browser?keep_alive=600000",
        "--wsHeaders={\"Authorization\":\"Bearer <API_TOKEN>\"}"
      ]
    }
  }
}

For other MCP clients, see documentation for using Browser Run with MCP clients.

WebMCP support

The Internet was built for humans, so navigating as an AI agent today is unreliable. We’re betting on a future where more agents use the web than humans. In that world, sites need to be agent-friendly.

That’s why we’re launching support for WebMCP, a new browser API from the Google Chrome team that landed in Chromium 146+. WebMCP lets websites expose tools directly to AI agents, declaring what actions are available for agents to discover and call on each page. This helps agents navigate the web more reliably. Instead of agents needing to figure out how to use a site, websites can expose their tools for agents to discover and call

Two APIs make this work:

  • navigator.modelContext allows websites to register their tools

  • navigator.modelContextTesting allows agents to discover and execute those tools

Today, an agent visiting a travel booking site has to figure out the UI by looking at it. With WebMCP, the site declares “here’s a search_flights tool that takes an origin, destination, and date.” The agent calls it directly, without having to loop through slow screenshot-analyze-click loops. This makes navigation more reliable regardless of potential changes to the UI.

Tools are discovered on the page rather than preloaded. This matters for the long tail of the web, where preloading an MCP server for every possible site is not feasible and would bloat the context window. 

Using WebMCP to book a hotel through the Chrome DevTools console, discovering available tools with listTools()

We have an experimental pool with browser instances running Chrome beta so you can test emerging browser features before they reach stable Chrome. We also just shipped Wrangler browser commands that let you manage browser sessions directly from the CLI, letting you create, manage, and view browser sessions directly from your terminal. To access WebMCP-enabled browsers, use the following Wrangler command to create a session in the experimental pool:

npm i -g wrangler@latest
wrangler browser create --lab --keepAlive 300  

Existing ways to use Browser Run

While CDP and WebMCP are new, you could already use Puppeteer, Playwright, or Stagehand for full browser automation through Browser Run. And for simple tasks like capturing screenshots, generating PDFs, and extracting markdown, there are the Quick Action endpoints. 

/crawl endpoint — crawl web content

We also recently shipped a /crawl endpoint that lets you crawl entire sites with a single API call. Give it a starting URL and pages are automatically discovered and scraped, then returned in your preferred format (HTML, Markdown, and structured JSON), with additional parameters to control crawl depth and scope, skip pages that haven’t changed, and specify certain paths to include or exclude. 

We intentionally built /crawl to be a well-behaved crawler. That means it respects site owner’s preferences out of the box, is a signed agent with a distinct bot ID that is cryptographically signed using Web Bot Auth, a non-customizable User-Agent, and follows robots.txt and AI Crawl Control. It does not bypass Cloudflare’s bot protections or CAPTCHAs. Site owners choose whether their content is accessible and /crawl respects it. 

# Initiate a crawl
curl -X POST 'https://api.cloudflare.com/client/v4/accounts/{account_id}/browser-rendering/crawl' \
  -H 'Authorization: Bearer <apiToken>' \
  -H 'Content-Type: application/json' \
  -d '{
    "url": "https://blog.cloudflare.com/"
  }'

3) Observe

Things don’t always go right the first try. We kept hearing from customers that when their automations failed, they had no idea why. That’s why we’ve added multiple ways to observe what’s happening, so you can see exactly what your agent sees, both live and after the fact. 

Live View

Live View lets you watch your agent’s browser session in real time. Whether you’re debugging an agent or running a long automation script, you see exactly what’s happening as it happens. This includes the page itself, as well as the DOM, console, and network requests. When something goes wrong — the expected button isn’t there, the page needs authentication, or a CAPTCHA appears — you can catch it immediately.

There are two ways to access Live View. From code, obtain the session_id of the browser you want to inspect and open the devtoolsFrontendURL from the response in Chrome. Or from the Cloudflare dashboard, open the new Live Sessions tab in the Browser Run section and click into any active session.

Live View of an AI agent booking a hotel, showing real-time browser activity

Session Recordings

Live View is great when you’re available, but you can’t watch every session. Session Recordings captures DOM changes, mouse and keyboard events, and page navigation as structured JSON so you can replay any session after it ends.

Enable Session Recordings by passing recording:true when launching a browser. After the session closes, you can access the recording in the Cloudflare dashboard from the Runs tab or retrieve recordings via API and replay them with the rrweb-player. Next, we’re adding the ability to inspect DOM state and console output at any point during the recording. 

Session recording replay of a browser automation browsing the Sentry Shop and adding a bomber jacket to the cart

Dashboard Redesign

Previously, the Browser Run dashboard only showed logs from browser sessions. Requests for screenshots, PDFs, markdown, and crawls were not visible. The redesigned dashboard changes that. The new Runs tab shows every request. You can filter by endpoint and view details including target URLs, status, and duration. 


The Browser Run dashboard Runs tab showing browser sessions and quick actions like PDF, Screenshot, and Crawl in a single view, with a crawl job expanded to show its progress

4) Intervene

Agents are good, but they’re not perfect. Sometimes they need their human to step in. Browser Run supports Human in the Loop workflows where a human can take control of a live browser session, handle what the automation cannot, then let the session continue. 

Human in the Loop

When automation hits a wall, you don’t have to restart. With Human in the Loop, you can step in and interact with the page directly to click, type, navigate, enter credentials, or submit forms. This unlocks workflows that agents cannot handle.

Today, you can step in by opening the Live View URL for any active session. Next, we’re adding a handoff flow where the agent can signal that it needs help, notify a human to step in, then hand control back to the agent once the issue is resolved.

An AI agent searching Amazon for an orange lava lamp, comparing options, and handing off to a human when sign-in is required to complete the purchase

5) Scale

Customers have asked us to raise limits so that they can do more, faster.

Higher limits

We’ve quadrupled the default concurrent browser limit from 30 to 120. Every session gives you instant access to a browser from a global pool of warm instances, so there’s no cold start waiting for a browser to spin up. In March, we also increased limits for Quick Actions to 10 requests per second. If you need higher limits, they’re available by request.

What’s next

  • Human in the Loop Handoff: today you can intervene in a browser session through Live View. Soon, the agent will be able to signal when it needs help, so you can build in notifications to alert a human to step in.

  • Session Recordings Inspection: you can already scrub through the timeline and replay any session. Soon, you’ll be able to inspect DOM state and console output as well.

  • Traces and Browser Logs: access debugging information without instrumenting your code. Console logs, network requests, timing data. If something broke, you’ll know where.

  • Screenshot, PDF, and markdown directly from Workers: the same simple tasks available through the REST API are coming to Workers Bindings. env.BROWSER.screenshot() just works, with no API tokens needed.

Get started

Browser Run is available today on both the Workers Free and Workers Paid plans. Everything we shipped today — Live View, Human in the Loop, Session Recordings, and higher concurrency limits — is ready to use. 

If you were already using Browser Rendering, everything works the same, just with a new name and more features.  

Check out the documentation to get started.


Rearchitecting the Workflows control plane for the agentic era

Post Syndicated from Luís Duarte original https://blog.cloudflare.com/workflows-v2/

When we originally built Workflows, our durable execution engine for multi-step applications, it was designed for a world in which workflows were triggered by human actions, like a user signing up or placing an order. For use cases like onboarding flows, workflows only had to support one instance per person — and people can only click so fast. 

Over time, what we’ve actually seen is a quantitative shift in the workload and access pattern: fewer human-triggered workflows, and more agent-triggered workflows, created at machine speed. 

As agents become persistent and autonomous infrastructure, operating on behalf of users for hours or days, they need a durable, asynchronous execution engine for the work they are doing. Workflows provides exactly that: every step is independently retryable, the workflow can pause for human-in-the-loop approval, and each instance survives failures without losing progress.  

Moreover, workflows themselves are being used to implement agent loops and serve as the durable harnesses that manage and keep agents alive. Our Agents SDK integration accelerated this, making it easy for agents to spawn workflow instances and get real-time progress back. A single agent session can now kick off dozens of workflows, and many agents running concurrently means thousands of instances created in seconds. With Project Think now available, we anticipate that velocity will only increase.

To help developers scale their agents and applications on Workflows, we are excited to announce that we now support:

  • 50,000 concurrent instances (number of workflow executions running in parallel), originally 4,500

  • 300 instances/second created per account, previously 100

  • 2 million queued instances (meaning instances that have been created or awoken and are waiting for a concurrency slot) per workflow, up from 1 million

We redesigned the Workflows control plane from usage data and first principles to support these increases. For V1 of the control plane, a single Durable Object (DO) could serve as the central registry and coordinator of an entire account. For V2, we built two new components to help horizontally scale the system and alleviate the bottlenecks that V1 introduced, before migrating all customers — with live traffic — seamlessly onto the new version.

V1: initial architecture of Workflows

As described in our public beta blog post, we built Workflows entirely on our own developer platform. Fundamentally, a workflow is a series of durable steps, each independently retryable, that can execute tasks, wait for external events, or sleep until a predetermined time. 

export class MyWorkflow extends WorkflowEntrypoint {

  async run(event, step) {
    const data = await step.do("fetch-data", async () => {
      return fetchFromAPI();
    });

    const approval = await step.waitForEvent("approval", {
      type: "approval",
      timeout: "24 hours",
    });

    await step.do("process-and-save", async () => {
      return store(transform(data));
    });
  }
}

To trigger each instance, execute its logic, and store its metadata, we leverage SQLite-backed Durable Objects, which are a simple but powerful primitive for coordination and storage within a distributed system. 

In the control plane, some Durable Objects — like the Engine, which executes the actual workflow instance, including its step, retry, and sleep logic — are spun up at a ratio of 1:1 per instance. On the other hand, the Account is an account-level Durable Object that manages all workflows and workflow instances for that account.


To learn more about the V1 control plane, refer to our Workflows announcement blog post.

After we launched Workflows into beta, we were thrilled to see customers quickly scaling their use of the product, but we also realized that having a single Durable Object to store all that account-level information introduced a bottleneck. Many customers needed to create and execute hundreds or even thousands of Workflow instances per minute, which could quickly overwhelm the Account in our original architecture. The original rate limits — 4,500 concurrency slots and 100 instance creations per 10 seconds — were a result of this limitation. 

On the V1 control plane, these limits were a hard cap. Any and all operations depending on Account, including create, update, and list, had to go through that single DO. Users with high concurrency workloads could have thousands of instances starting and ending at any given moment, building up to thousands of requests per second to Account. To solve for this, we rearchitected the workflow control plane such that it horizontally scales to higher concurrency and creation rate limits. 

V2: horizontal scale for higher throughput

For the new version, we rethought every single operation from the ground up with the goal of optimizing for high-volume workflows. Ultimately, Workflows should scale to support whatever developers need – whether that is thousands of instances created per second or millions of instances running at a time. We also wanted to ensure that V2 allowed for flexible limits, which we can toggle and continue increasing, rather than the hard cap which V1 limits imposed. After many design iterations, we settled on the following pillars for our new architecture: 

  • The source of truth for the existence of a given instance should be its Engine and nothing else. 

    • In the V1 control plane architecture, we lacked a check before queuing the instance as to whether its Engine actually existed. This allowed for a bad state where an instance may have been queued without its corresponding Engine having spun up. 

    • Instance lifecycle and liveness mechanisms must be horizontally scalable per-workflow and distributed throughout many regions.

  • The new Account singleton should only store the minimum necessary metadata and have an invariant maximum amount of concurrent requests.


There are two new, critical components in the V2 control plane which allowed us to improve the scalability of Workflows: SousChef and Gatekeeper. The first component, SousChef, is a “second in command” to the Account. Recall that previously, the Account managed the metadata and lifecycle for all of the instances across all of the workflows within a given account. SousChef was introduced to keep track of metadata and lifecycle on a subset of instances in a given workflow. Within an account, a distribution of SousChefs can then report back to Account in a more efficient and manageable way. (An added benefit of this design: not only did we already have per-account isolation, but we also inadvertently gained “per-workflow” isolation within the same account, since each SousChef only takes care of one specific workflow).

The second component, Gatekeeper, is a mechanism to distribute concurrency “slots” (derived from concurrency limits) across all SousChefs within the account. It acts as a leasing system. When an instance is created, it is randomly assigned to one of the SousChefs within that account. Then the SousChef makes a request to Account to trigger that instance. Either a slot is granted, or the instance is queued. Once the slot is granted, the SousChef triggers execution of the instance and assumes responsibility that the instance never gets stuck. 

Gatekeeper was needed to make sure that Engines never overloaded their Account (a pressing risk on V1) so every communication between SousChefs and their Account happens on a periodic cycle, once per second — each cycle will also batch all slot requests, ensuring that only one JSRPC call is made. This ensures the instance creation rate can never overload or influence the most important component, Account (as an aside: if the SousChef count is too high, we rate-limit calls or spread across different SousChefs throughout different time periods). Also, this periodic property allows us to preserve fairness on older instances and to ensure max-min fairness through the many SousChefs, allowing them all to progress. For example, if an instance wakes up, it should be prioritized for a slot over a newly created instance, but each SousChef ensures that its own instances do not get stuck.

This architecture is more distributed, and therefore, more scalable. Now, when an instance is created, the request path is:

  1. Check control plane version

  2. Check if a cached version of the workflow and version details is available in that location

    1. If not, check Account to get workflow name, unique ID, and version, and cache that information

  3. Store only necessary metadata (instance payload, creation date) onto its own Engine

So, how does Engine tell the control plane that it now exists? That happens in the background after instance metadata is set. As background operations on a Durable Object can fail, due to eviction or server failure, we also set an “alarm” on Engine in the creation hot-path. That way, if the background task does not finish, the alarm ensures that the instance will begin. 

A Durable Object alarm allows a Durable Object instance to be awakened at a fine-grained time in the future with an at-least-once execution model, with automatic retries built in. We extensively use this combination of background “tasks” and alarms to remove operations off the hot-path while still ensuring that everything will happen as planned. That’s how we keep critical operations like creating an instance fast without ever compromising on reliability. 

Other than unlocking scale, this version of the control plane means that: 

  • Instance listing performance is faster, and actually consistent with cursor pagination; 

  • Any operation on an instance does exactly one network hop (as it can go directly to its Engine, ensuring that eyeball request latency is as small as we can manage);

  • We can ensure that more instances are actually behaving correctly (by running on time) concurrently (and correct them if not, making sure that Engines are never late to continue execution).

V1 → V2 migration

Now that we had a new version of the Workflows control plane that can handle a higher volume of user load, we needed to do the “boring” part: migrating our customers and instances to the new system. At Cloudflare’s scale, this becomes a problem in and of itself, so the “boring” part becomes the biggest challenge. Well before its one-year mark, Workflows had already racked up millions of instances and thousands of customers. Also, some tech debt on V1’s control plane meant that a queued instance might not have its own Engine Durable Object created yet, complicating matters further.

Such a migration is tricky because customers might have instances running at any given moment; we needed a way to add the SousChef and Gatekeeper components into older accounts without causing any disruption or downtime.

We ultimately decided that we would migrate existing Accounts (which we’ll refer to as AccountOlds) to behave like SousChefs. By persisting the Account DOs, we maintained the instance metadata, and simply converted the DO into a SousChef “DO”: 

// You might be wondering what's this SousChef class? This is the SousChef DO class!
import { SousChef } from "@repo/souschef";

class AccountOld extends DurableObject {
  constructor(state: DurableObjectState, env: Env) {
    // We added the following snippet to the end of our AccountOld DO's
    // constructor. This ensures that if we want, we can use any primitive
    // that is available on SousChef DO
    if (this.currentVersion === ControlPlaneVersions.SOUS_CHEFS) {
      this.sousChef = new SousChef(this.ctx, this.env);
      await this.sousChef.setup()
    }
  }

  async updateInstance(params: UpdateInstanceParams) {
    if (this.currentVersion === ControlPlaneVersions.SOUS_CHEFS) {
      assert(this.sousChef !== undefined, 'SousChef must exist on v2');
      return this.sousChef.updateInstance(params);
    }

    // old logic remains the same
  }

  @RequiresVersion<AccountOld>(ControlPlaneVersions.V1)
  async getMetadata() {
    // this method can only be run if 
    // this.currentVersion === ControlPlaneVersions.V1
  }
}

We can instantiate the SousChef class within the AccountOld because the SQL tables that track instance metadata, on both SousChefs and AccountOld DOs, are the same on both. As such, we could just decide which version of the code to use. If this hadn’t been the case, we would have been forced to migrate the metadata of millions of instances, which would have made the migration more difficult and longer running for each account. So, how did the migration work?

First, we prepared AccountOld DOs to be switched to behave as SousChefs (which meant creating a release with a version of the snippet above). Then, we enabled control plane V2 per account, which triggered the next three steps roughly at the same time:

  • All new instance creation requests are now routed to the new SousChefs (SousChefs are created when they receive the first request), new instances never go to AccountOld again;

  • AccountOld DOs start migrating themselves to behave like SousChefs;

  • The new Account DO is spun up with the corresponding metadata.

After all accounts were migrated to the new control plane version, we were able to sunset AccountOld DOs as their instance retention periods expired. Once all instances on all accounts on AccountOlds were migrated, we could spin down those DOs permanently. The migration was completed with no downtime in a process that truly felt like changing a car’s wheels while driving.

Try it out

If you are new to Workflows, try our Get Started guide or build your first durable agent with Workflows.

If your use case requires higher limits than our new defaults — a concurrency limit of 50,000 slots and account-level creation rate limit of 300 instances per second, 100 per workflow — reach out via your account team or the Workers Limit Request Form. You can also reach out with feedback, feature requests, or just to share how you are using Workflows on our Discord server.

Add voice to your agent

Post Syndicated from Sunil Pai original https://blog.cloudflare.com/voice-agents/

For many of us, our first experiences with AI agents have been through typing into a chat box. And for those of us using agents day to day, we have likely gotten very good at writing detailed prompts or markdown files to guide them.

But some of the moments where agents would be most useful are not always text-first. You might be on a long commute, juggling a few open sessions, or just wanting to speak naturally to an agent, have it speak back, and continue the interaction.

Adding voice to an agent should not require moving that agent into a separate voice framework. Today, we are releasing an experimental voice pipeline for the Agents SDK.

With @cloudflare/voice, you can add real-time voice to the same Agent architecture you already use. Voice just becomes another way you can talk to the same Durable Object, with the same tools, persistence, and WebSocket connection model that the Agents SDK already provides. 

@cloudflare/voice is an experimental package for the Agents SDK that provides: 

  • withVoice(Agent) for full conversation voice agents

  • withVoiceInput(Agent) for speech-to-text-only use cases, like dictation or voice search 

  • useVoiceAgent and useVoiceInput hooks for React apps 

  • VoiceClient for framework-agnostic clients 

  • Built-in Workers AI providers, so that you can get started without external API keys: 

This means you can now build an agent that users can talk to in real time over a single WebSocket connection, while keeping the same Agent class, Durable Object instance, and the same SQLite-backed conversation history. 

Just as importantly, we want this to be bigger than one fixed default stack. The provider interfaces in @cloudflare/voice are intentionally small, and we want speech, telephony, and transport providers to build with us, so developers can mix and match the right components for their use case, instead of being locked into a single voice architecture.

Get started with voice

Here’s the minimal server-side pattern for a voice agent in the Agents SDK: 

import { Agent, routeAgentRequest } from "agents";
import {
  withVoice,
  WorkersAIFluxSTT,
  WorkersAITTS,
  type VoiceTurnContext
} from "@cloudflare/voice";

const VoiceAgent = withVoice(Agent);

export class MyAgent extends VoiceAgent<Env> {
  transcriber = new WorkersAIFluxSTT(this.env.AI);
  tts = new WorkersAITTS(this.env.AI);

  async onTurn(transcript: string, context: VoiceTurnContext) {
    return `You said: ${transcript}`;
  }
}

export default {
  async fetch(request: Request, env: Env) {
    return (
      (await routeAgentRequest(request, env)) ??
      new Response("Not found", { status: 404 })
    );
  }
} satisfies ExportedHandler<Env>;

That’s the whole server. You add a continuous transcriber, a text-to-speech provider, and implement onTurn().

On the client side, you can connect to it with a React hook: 

import { useVoiceAgent } from "@cloudflare/voice/react";

function App() {
  const {
    status,
    transcript,
    interimTranscript,
    startCall,
    endCall,
    toggleMute
  } = useVoiceAgent({ agent: "my-agent" });

  return (
    <div>
      <p>Status: {status}</p>
      {interimTranscript && <p><em>{interimTranscript}</em></p>}
      <ul>
        {transcript.map((msg, i) => (
          <li key={i}>
            <strong>{msg.role}:</strong> {msg.text}
          </li>
        ))}
      </ul>
      <button onClick={startCall}>Start Call</button>
      <button onClick={endCall}>End Call</button>
      <button onClick={toggleMute}>Mute / Unmute</button>
    </div>
  );
}

If you are not using React, you can use VoiceClient directly from @cloudflare/voice/client. 

How the voice pipeline works

With the Agents SDK, every agent is a Durable Object — a stateful, addressable server instance with its own SQLite database, WebSocket connections, and application logic. The voice pipeline extends this model instead of replacing it. 

At a high level, the flow looks like this:


Here’s how the pipeline breaks down, step by step:

  1. Audio transport: The browser captures microphone audio and streams 16 kHz mono PCM over the same WebSocket connection the agent already uses.

  2. STT session setup:  When the call starts, the agent creates a continuous transcriber session that lives for the duration of the call. 

  3. STT input: Audio streams continuously into that session.

  4. STT turn detection: The speech-to-text model itself decides when the user has finished an utterance and emits a stable transcript for that turn. 

  5. LLM/application logic: The voice pipeline passes that transcript to your onTurn() method.

  6. TTS output: Your response is synthesized to audio and sent back to the client. If onTurn() returns a stream, the pipeline sentence-chunks it and starts sending audio as sentences are ready. 

  7. Persistence: The user and agent messages are persisted in SQLite, so conversation history survives reconnections and deployments.  

Why voice should grow with the rest of your agent

Many voice frameworks focus on the voice loop itself: audio in, transcription, model response, audio out. Those are important primitives, but there’s a lot more to an agent than just voice. 

Real agents running in production will grow. They need state, scheduling, persistence, tools, workflows, telephony, and ways to keep all of that consistent across channels. As your agent grows in complexity, voice stops being a standalone feature and becomes part of a larger system. 

We wanted voice in the Agents SDK to start from that assumption. Instead of building voice as a separate stack, we built it on top of the same Durable Object-based agent platform, so you can pull in the rest of the primitives you need without re-architecting the application later.

Voice and text share the same state

A user might start by typing, switch to voice, and go back to text. With Agents SDK, these are all just different inputs to the same agent. The same conversation history lives in SQLite, and the same tools are available. This gives you both a cleaner mental model and a much simpler application architecture to reason about. 

Lower latency comes from…

a shorter network path 

Voice experiences feel good or bad very quickly. Once a user stops speaking, the system needs to transcribe, think, and start speaking back fast enough to feel conversational. 

A lot of voice latency is not pure model time. It’s the cost of bouncing audio and text between different services in different places. Audio needs to go to STT, transcripts go to an LLM, and responses go to a TTS model – and each handoff adds network overhead. 

With the Agents SDK voice pipeline, the agent runs on Cloudflare’s network, and the built-in providers use Workers AI bindings. That keeps the pipeline tighter and reduces the amount of infrastructure you have to stitch together yourself. 

built-in streaming

A voice agent interaction feels much more natural if it speaks the first sentence quickly (also called Time-to-First Audio). When onTurn() returns a stream, the pipeline chunks it into sentences and starts synthesis as sentences complete. That means the user can hear the beginning of the answer while the rest is still being generated. 

A more realistic backend 

Here is a fuller example that streams an LLM response and starts speaking it back, sentence by sentence:

import { Agent, routeAgentRequest } from "agents";
import {
  withVoice,
  WorkersAIFluxSTT,
  WorkersAITTS,
  type VoiceTurnContext
} from "@cloudflare/voice";
import { streamText } from "ai";
import { createWorkersAI } from "workers-ai-provider";

const VoiceAgent = withVoice(Agent);

export class MyAgent extends VoiceAgent<Env> {
  transcriber = new WorkersAIFluxSTT(this.env.AI);
  tts = new WorkersAITTS(this.env.AI);

  async onTurn(transcript: string, context: VoiceTurnContext) {
    const ai = createWorkersAI({ binding: this.env.AI });

    const result = streamText({
      model: ai("@cf/cloudflare/gpt-oss-20b"),
      system: "You are a helpful voice assistant. Be concise.",
      messages: [
        ...context.messages.map((m) => ({
          role: m.role as "user" | "assistant",
          content: m.content
        })),
        { role: "user" as const, content: transcript }
      ],
      abortSignal: context.signal
    });

    return result.textStream;
  }
}

export default {
  async fetch(request: Request, env: Env) {
    return (
      (await routeAgentRequest(request, env)) ??
      new Response("Not found", { status: 404 })
    );
  }
} satisfies ExportedHandler<Env>;

Context.messages gives you recent SQLite-backed conversation history, and context.signal lets the pipeline abort the LLM call if the user interrupts. 

Voice as an input: withVoiceInput

Not every speech interface needs to speak back. Sometimes you might want dictation, transcription, or voice search. For these use cases, you can use withVoiceInput

import { Agent, type Connection } from "agents";
import { withVoiceInput, WorkersAINova3STT } from "@cloudflare/voice";

const InputAgent = withVoiceInput(Agent);

export class DictationAgent extends InputAgent<Env> {
  transcriber = new WorkersAINova3STT(this.env.AI);

  onTranscript(text: string, _connection: Connection) {
    console.log("User said:", text);
  }
}

On the client, useVoiceInput gives you a lightweight interface centered on transcriptions: 

import { useVoiceInput } from "@cloudflare/voice/react";

const { transcript, interimTranscript, isListening, start, stop, clear } =
  useVoiceInput({ agent: "DictationAgent" });

This is useful when speech is an input method, and you don’t need a full conversational loop. 

Voice and text on the same connection

The same client can call sendText(“What’s the weather?”), which bypasses STT and sends the text directly to onTurn(). During an active call, the response can be spoken and shown as text. Outside a call, it can remain text-only. 

This gives you a genuinely multimodal agent, without splitting the implementation into different code paths. 

What else can you build? 

Because a voice agent is still an agent, all the normal Agents SDK capabilities still apply. 

Tools and scheduling

You can greet a caller when a session starts: 

import { Agent, type Connection } from "agents";
import { withVoice, WorkersAIFluxSTT, WorkersAITTS } from "@cloudflare/voice";

const VoiceAgent = withVoice(Agent);

export class MyAgent extends VoiceAgent<Env> {
  transcriber = new WorkersAIFluxSTT(this.env.AI);
  tts = new WorkersAITTS(this.env.AI);

  async onTurn(transcript: string) {
    return `You said: ${transcript}`;
  }

  async onCallStart(connection: Connection) {
    await this.speak(connection, "Hi! How can I help you today?");
  }
}

You can schedule spoken reminders and expose tools to your LLM just like any other agent: 

import { Agent } from "agents";
import {
  withVoice,
  WorkersAIFluxSTT,
  WorkersAITTS,
  type VoiceTurnContext
} from "@cloudflare/voice";
import { streamText, tool } from "ai";
import { createWorkersAI } from "workers-ai-provider";
import { z } from "zod";

const VoiceAgent = withVoice(Agent);

export class MyAgent extends VoiceAgent<Env> {
  transcriber = new WorkersAIFluxSTT(this.env.AI);
  tts = new WorkersAITTS(this.env.AI);

  async speakReminder(payload: { message: string }) {
    await this.speakAll(`Reminder: ${payload.message}`);
  }

  async onTurn(transcript: string, context: VoiceTurnContext) {
    const ai = createWorkersAI({ binding: this.env.AI });

    const result = streamText({
      model: ai("@cf/cloudflare/gpt-oss-20b"),
      messages: [
        ...context.messages.map((m) => ({
          role: m.role as "user" | "assistant",
          content: m.content
        })),
        { role: "user" as const, content: transcript }
      ],
      tools: {
        set_reminder: tool({
          description: "Set a spoken reminder after a delay",
          inputSchema: z.object({
            message: z.string(),
            delay_seconds: z.number()
          }),
          execute: async ({ message, delay_seconds }) => {
            await this.schedule(delay_seconds, "speakReminder", { message });
            return { confirmed: true };
          }
        })
      },
      abortSignal: context.signal
    });

    return result.textStream;
  }
}

Runtime model switching

The voice pipeline also lets you choose a transcription model dynamically per connection. 

For example, you might prefer Flux for conversational turn-taking and Nova 3 for higher-accuracy dictation. You can switch at runtime by overriding createTranscriber(): 

import { Agent, type Connection } from "agents";
import {
  withVoice,
  WorkersAIFluxSTT,
  WorkersAINova3STT,
  WorkersAITTS,
  type Transcriber
} from "@cloudflare/voice";

export class MyAgent extends VoiceAgent<Env> {
  tts = new WorkersAITTS(this.env.AI);

  createTranscriber(connection: Connection): Transcriber {
    const url = new URL(connection.url ?? "http://localhost");
    const model = url.searchParams.get("model");
    if (model === "nova-3") {
      return new WorkersAINova3STT(this.env.AI);
    }
    return new WorkersAIFluxSTT(this.env.AI);
  }
}

On the client, you can pass query parameters through the hook: 

const voiceAgent = useVoiceAgent({
  agent: "my-voice-agent",
  query: { model: "nova-3" }
});

Pipeline hooks

You can also intercept data between stages: 

  • afterTranscribe(transcript, connection)

  • beforeSynthesize(text, connection)

  • afterSynthesize(audio, text, connection)

These hooks are useful for content filtering, text normalization, language-specific transformations, or custom logging. 

Telephone and transport options

By default, the voice pipeline uses a single WebSocket connection as the simplest path for 1:1 voice agents. But that’s not the only option. 

Phone calls via Twilio

You can connect phone calls to the same agent using the Twilio adapter:

import { TwilioAdapter } from "@cloudflare/voice-twilio";

export default {
  async fetch(request: Request, env: Env) {
    if (new URL(request.url).pathname === "/twilio") {
      return TwilioAdapter.handleRequest(request, env, "MyAgent");
    }

    return (
      (await routeAgentRequest(request, env)) ??
      new Response("Not found", { status: 404 })
    );
  }
};

This lets the same agent handle web voice, text input, and phone calls. 

One caveat: the default Workers AI TTS provider returns MP3, while Twilio expects mulaw 8kHz audio. For production telephony, you may want to use a TTS provider that outputs PCM or mulaw directly. 

WebRTC

If you need a transport that is better suited to difficult network conditions or will include multiple participants, the voice package also includes SFU utilities and supports custom transports. The default model is WebSocket-native today, but we plan to develop more adapters to connect to our global SFU infrastructure. 

Build with us 

The voice pipeline is provider-agnostic by design. 

Under the hood, each stage is defined by a small interface: a transcriber opens a continuous session and accepts audio frames as they arrive, while a TTS provider takes text and returns audio. If a provider can stream audio output, the pipeline can use that too.

interface Transcriber {
  createSession(options?: TranscriberSessionOptions): TranscriberSession;
}

interface TranscriberSession {
  feed(chunk: ArrayBuffer): void;
  close(): void;
}

interface TTSProvider {
  synthesize(text: string, signal?: AbortSignal): Promise<ArrayBuffer | null>;
}

We didn’t want voice support in Agents SDK to only work with one fixed combination of models and transports. We wanted the default path to be simple, while still making it easy to plug in other providers as the ecosystem grows. 

The built-in providers use Workers AI, so you can get started without external API keys:

  • WorkersAIFluxSTT for conversational streaming STT

  • WorkersAINova3STT for dictation-style streaming STT

  • WorkersAITTS for text-to-speech

But the bigger goal is interoperability. If you maintain a speech or voice service, these interfaces are small enough to implement without needing to understand the rest of the SDK internals. If your STT provider accepts streaming audio and can detect utterance boundaries, it can satisfy the transcriber interface. If your TTS provider can stream audio output, even better. 

We would love to work on interoperability with:

  • STT providers like AssemblyAI, Rev.ai, Speechmatics, or any service with a real-time transcription API

  • TTS providers like PlayHT, LMNT, Cartesia, Coqui, Amazon Polly, or Google Cloud TTS

  • telephony adapters for platforms like Vonage, Telnyx, or Bandwidth

  • transport implementations for WebRTC data channels, SFU bridges, and other audio transport layers

We are also interested in collaborations that go beyond individual providers:

  • latency benchmarking across STT + LLM + TTS combinations

  • multilingual support and better documentation for non-English voice agents

  • accessibility work, especially around multimodal interfaces and speech impairments

If you are building voice infrastructure and want to see a first-class integration, open a PR or reach out.

Try it now

The voice pipeline is available today as an experimental package:

npm create cloudflare@latest -- --template cloudflare/agents-starter

Add @cloudflare/voice, give your agent a transcriber and a TTS provider, deploy it, and start talking to it. You can also read the API reference.

If you build something interesting, open an issue or PR on github.com/cloudflare/agents. Voice should not require a separate stack, and we think the best voice agents will be the ones built on the same durable application model as everything else.


The collective thoughts of the interwebz