Post Syndicated from The History Guy: History Deserves to Be Remembered original https://www.youtube.com/watch?v=3LfgWh0wKTQ
Слонът в стаята на българския правопис
Post Syndicated from original https://www.toest.bg/slonut-v-stayata-na-bulgharskiya-pravopis/

От десетилетия е там, но ние продължаваме публично да мълчим за него, продължаваме да игнорираме вероятно най-големия проблем в съвременния български правопис. И не, според мен това не са правилата за поставяне на пълен и кратък член, а за слято, полуслято и разделно писане.
Да разчленим проблема
Наистина ли е толкова сложно и трудно да се справим с тези правила? Ще се опитам да обясня в какво се състои проблемът, а отговорът на въпроса, мисля, няма да затрудни никого.
1. Правилата за слято, полуслято и разделно писане са много на брой – между 110 и 1201 .
За сравнение, следващият по обем раздел – за употреба на главни и малки букви – съдържа около 70 правила. Няма какво толкова да се коментира и анализира. И при най-добро желание редовият българин ще се обезсърчи само като се изправи пред такова количество разпоредби в един раздел.
2. Прилагането на правилата изисква време и способности за лингвистичен анализ.
Понеже летните жеги настъпиха със страшна сила още през юни, да се поразхладим с едно айскафе. Случаят е сравнително прост: имаме сложно съществително име, в което двете части са от чужд произход и първата пояснява втората. Тъй като айс не се употребява като самостоятелна дума в българския език, айскафе се пише слято. Ако си пием напитката в кафе-ресторанта обаче, ще трябва да прибегнем до полуслятото писане, защото тук смисловото отношение между двете части е равноправно: заведението е кафе(не) и ресторант.
В случай че бързаме, може да си вземем кофеиновата доза от уличен кафе автомат/кафеавтомат. При тази сложна дума първата част пояснява втората и смисловото отношение е както при айскафе, но понеже и двете части (кафе и автомат) се употребяват самостоятелно, сложната дума може да се пише и слято, и разделно. В практиката масово се предпочита разделното писане в този случай, който може да илюстрираме с примери като фитнес клуб, бизнес среща, рок група2.
При прилагането на някои правила е нужен по-обстоен анализ. Как например следва да пишем компютърно-томографски и ядрено-магнитен? И за двете прилагателни кодификаторът още не се е произнесъл, затова ще се наложи да се заровим в словообразуването и във… физиката. За да напишем правилно първата дума, е нужно само: 1) да знаем, че ако едно сложно прилагателно е образувано от съчетание на прилагателно и съществително име, то се пише слято; 2) да предположим, че има уред, наречен компютърен томограф; 3) да се уверим, че уредът съществува наистина. Е, вече уверено може да напишем компютърнотомографски.
Второто прилагателно обаче явно не може да се свърже с ядрен магнит или с някакво подобно словосъчетание. Затова зарязваме за неопределено време текста, по който работим, и започваме да проучваме физичното явление ядрено-магнитен резонанс, стоящо в основата на едноименното медицинско изследване. Разбираме, че става въпрос за атомни ядра на вещество, поставено в магнитно поле. След като ядро/ядрен не пояснява магнит/магнитен, нито пък обратното, е логично да приемем, че са в равноправни смислови отношения в прилагателното, и да напишем ядрено-магнитен. А колко ценно време загубихме?
3. Част от правилата за слято, полуслято и разделно писане не могат да се приложат обективно.
Най-ярка илюстрация е слятото/разделното писане на сложни прилагателни от типа световноизвестен/безследно изчезнал, които се срещат доста по-често, отколкото може да предположите. В първия пример съчетанието от наречие (световно) и прилагателно име (известен) образуват смислово единство, а във втория – не (тук втората част изчезнал е причастие, функциониращо като прилагателно име). В пощата на „Как се пише?“ вече са ми задавали десетки, ако не и стотици въпроси за правописа на такива прилагателни имена. И това е съвсем естествено, защото, когато слято написаната дума липсва в Официалния правописен речник (вече в БЕРОН), човек изпада в двоумение, а и в триумение как да я напише.
Лютеницата едросмляна ли е, или едро смляна? Обучението проектнобазирано ли е, или проектно базирано (досега съм получила 15 въпроса конкретно за това съчетание!)? Кучетата от породата „Басет“ средноголеми ли са, или средно големи? Едно е сигурно: полуслетият вариант се изключва и е добре това да се уточни, защото немалко питащи всъщност се колебаят между трите начина на писане.
Кой трябва да определи дали дадено съчетание от наречие и прилагателно име/причастие вече представлява смислово единство, тоест едно цялостно понятие, и съответно се е лексикализирало, станало е нова дума в езика? Нима тази задача се вменява на пишещия, който в общия случай не е филолог? Но дори и да е филолог, той не притежава компетентността на висококвалифицирания специалист лексикограф. Според мен конкретно тези правила са едно от най-големите недоразумения в българския правопис и издават определена кодификаторска немощ.
Да продължим със сложните наречия. Правилото в този вид, в който е формулирано, не е кой знае колко полезно:
Сложни наречия, образувани от предлог и наречие, се пишат слято.
За досега, отскоро, вдясно се съгласяваме, че се подчиняват на правилото, но как да се досетим, че до утре, от вчера, в повече са на друг правописен режим? Добре че подобни съчетания не са необозримо много и може да се запомнят от хората, които са паметливи и държат на правописа.
4. При правилата за слято, полуслято и разделно писане има непоследователност, противоречия, ненужни изключения.
Нали си спомняте, че съществителното име кафе автомат може да се пише и разделно, и слято (кафеавтомат), защото двете му части (от чужд произход) се употребяват самостоятелно? Би следвало това да важи например за кинопремиера и радиопрограма. Ами не, не важи, защото думи от този тип се пишат слято по традиция.
Понеже сме на вълна Европейско първенство по футбол, да отбележим и една актуална дума с традиционно слят правопис – голмайстор. Но пък голлиния не е в този списък и може да се пише и слято, и разделно. Изпуснахте ли вече логиката? Добре, ще ви върна в нейното лоно: голлинията е на същия режим като кафеавтомата. И тъкмо нещата да се прояснят и да си дойдат на мястото, макар и с цената на известно умствено напрежение, ще изтичаме до тъчлинията, която трябва да се пише само слято. Същото важи и за аутлинията. Не ме питайте защо. И тъч, и аут се употребяват като самостоятелни съществителни имена в българския език, следователно разделното писане трябва да е позволено.
Ако продължавате да четете, със сигурност сте хвърлени в тъч и ви предлагам там да си останете, за да понесете по-лесно още едно противоречие, което може и да сте установили, в случай че сте се замисляли по въпроса.
Няма логика – нито филологическа, нито обикновена човешка – вкъщи да се пише слято, а у дома – разделно.
И двете представляват съчетание на предлог и стара падежна форма на съществително име3. Когато се променя правописът на дадена дума, редно е да се държи сметка за цялата система. Щом си казал А (вече ще пишем вкъщи), трябва да кажеш и Б (вече ще пишем удома). Иначе дискредитираш въпросната система.
Какво да се прави?
Представих ви само част от проблемите, свързани със слятото, полуслятото и разделното писане, но и те са достатъчни, за извода, че в сегашния си вид правописните правила затрудняват значително не само средностатистическия българин, но и филолозите. Главната причина за тази зле функционираща система от правила според мен е в погрешната концепция, която е стъпила на смисловите отношения между частите, изграждащи сложните думи. Така смята и професор Боян Вълчев:
В частта за слятото, полуслятото и разделното писане […] последователно се говори за главна и подчинена основа, за равноправно и неравноправно отношение […]. Това означава, че когато човек пише, трябва да спре и да направи лингвистичен анализ на думата или думите и тогава да реши как да постъпи. Дори и аз в много от случаите не мога еднозначно да си обясня бързо коя е главната и коя – подчинената основа. Това е постановка, която по принцип е погрешна. Правописът трябва да има почти напълно автоматичен характер.
Ако наистина искаме правилата за слято, полуслято и разделно писане да са функционални, с козметични промени нищо няма да се постигне. Нужна е промяна на концепцията, която да се основава на структурата на думите, а не на смисловите отношения между частите им. Лошото е, че белята вече е направена – макар и лоши, правилата са познати и хората, които държат на правописа, са свикнали с тях. Затова кардинална промяна ще се посрещне, меко казано, с неодобрение. Зле е, но е познатото зле. Би ли имал смелост кодификаторът да предприеме такава промяна? Надявам се, че поне мисли върху нея.
1 Поради начина, по който са формулирани, и поради включването на някои правила в различни подраздели е трудно броят им да се прецизира.
2 Правилно е също да се пише фитнесклуб, бизнессреща, рокгрупа.
3 Дома е падежна, а не членувана форма на съществителното дом, както биха възразили някои, и доказателство е най-малкото това, че произнасяме [домà], а не [домъ̀].
Езикът може да е вкусен и извън блюдото – онзи, българският език, на който говорим от малки и на който около 24 май се кълнем в обич. А той в същността си е средство за общуване и за да ни служи добре, непрекъснато се променя. Да го погледнем в неговата динамика и да се опитаме да разберем какво става и защо, кои са движещите механизми и как те са свързани с обществените процеси. И тъй като задачата не е лека, ще го правим постепенно – на порции.
Security Analysis of the EU’s Digital Wallet
Post Syndicated from Bruce Schneier original https://www.schneier.com/blog/archives/2024/06/security-analysis-of-the-eus-digital-wallet.html
A group of cryptographers have analyzed the eiDAS 2.0 regulation (electronic identification and trust services) that defines the new EU Digital Identity Wallet.
UK Elections: Last Week Tonight with John Oliver (HBO)
Post Syndicated from LastWeekTonight original https://www.youtube.com/watch?v=tkAqwHiAR-g
Britain’s Conservatives Are About to Lose Big
Post Syndicated from The Atlantic original https://www.youtube.com/watch?v=j_jFQ0xG-RI
Comic for 2024.06.27 – Afraid Of Commitment
Post Syndicated from Explosm.net original https://explosm.net/comics/afraid-of-commitment
New Cyanide and Happiness Comic
Aaron Burr – Hamilton’s nemesis and America’s modern politician
Post Syndicated from The History Guy: History Deserves to Be Remembered original https://www.youtube.com/watch?v=IFuI0SU8jTI
[$] LWN.net Weekly Edition for June 27, 2024
Post Syndicated from corbet original https://lwn.net/Articles/979084/
The LWN.net Weekly Edition for June 27, 2024 is available.
Let’s Architect! Migrating to the cloud with AWS
Post Syndicated from Federica Ciuffo original https://aws.amazon.com/blogs/architecture/lets-architect-migrating-to-the-cloud-with-aws/
In today’s digital world, businesses are increasingly turning to the cloud for its scalability, agility, and cost-effectiveness. Migrating your data center to the cloud can be a daunting task, but with the right approach and tools, it can be a successful journey. This Let’s Architect! blog post will guide you through the process of migrating to the cloud with AWS, leveraging the proven AWS Cloud Adoption Framework (AWS CAF) and exploring valuable resources to help you navigate each step.
AWS Cloud Adoption Framework
The AWS Cloud Adoption Framework (CAF) provides a comprehensive approach to planning, designing, and deploying your cloud migration. This robust framework outlines a four-phase methodology that guides you through every stage of the process, from strategy and planning to ongoing management and optimization. Here’s a closer look at the four phases of the AWS CAF:
- Envision: Identify business transformation opportunities that align with your strategic goals and demonstrate how the cloud will accelerate your business outcomes.
- Align: Assess your organization’s cloud readiness by identifying capability gaps across six key perspectives (Business, People, Governance, Platform, Security, and Operations). Address these gaps by developing strategies, ensuring stakeholder alignment, and implementing relevant change management activities.
- Launch: Select impactful pilot initiatives and deploy them in production. These pilots should showcase the value proposition of the cloud and provide valuable insights for further refinement.
- Scale: Focus on expanding production pilots and business value to desired scale and ensuring that the business benefits associated with your cloud investments are realized and sustained.

Figure 1. The AWS CAF recommends four iterative and incremental cloud transformation phases
Large-scale migration and modernization
Migrating a large-scale data center to the cloud requires careful planning and execution. This video session focuses on valuable lessons learned from the thousands of enterprises who have migrated and modernized their on-premises workloads with AWS. Dive deep on technical lessons learned, mental models used, how to set up teams to modernize as they migrate, and how to engage with AWS Professional Services and AWS Partners for success. Finally, you will get insights on the latest AWS migration and modernization tools.

Figure 2. Migrating to AWS Cloud unlocked major benefits for Live Nation, including a 58% cost saving
Dive deep into different AWS DMS migration options
At the heart of any successful data migration lies a robust database migration strategy. AWS Database Migration Service (AWS DMS) empowers you with a comprehensive suite of tools to seamlessly move and replicate your data. This session explains the various options offered by AWS DMS, including logical replication, managed native methods for export, import, and replication, and bulk extract and load functionalities. Through these options, you’ll gain a thorough understanding of how to migrate and replicate your data, along with the distinct advantages of each approach. The session also explores performance considerations to ensure optimal migration efficiency. Finally, you will learn how modern capabilities like serverless technologies, auto scaling, and schema conversion can simplify migrations.

FIgure 3. AWS DMS Schema Conversion converts your existing database schemas and a majority of the database code objects to a format compatible with the target database
Application Migration with AWS
Migrating and modernizing your applications is a crucial aspect of your cloud adoption strategy. The Application Migration with AWS workshop series provides hands-on experience with planning and executing application migrations. You’ll learn practical techniques like database replatforming, application rehosting, and containerization to make your move to the cloud smooth and efficient.

Figure 4. As part of this lab, you will perform a database migration with AWS DMS
But the journey doesn’t end there. As your applications scale in the cloud, managing that growth becomes key. This is where infrastructure as code (IaC) comes in, and AWS CDK takes IaC a step further by allowing you to write infrastructure code in familiar programming languages you already know. This streamlines your migration by leveraging your existing coding knowledge. We recommend this AWS CDK workshop to get started with CDK for infrastructure automation.
See you next time!
Thanks for reading! With this post, we provided resources to help you navigate your cloud migration journey with confidence and success. In the next blog, we will talk about Well-Architected best practices!
To revisit any of our previous posts or explore the entire series, visit the Let’s Architect! page.
Automatically replacing polyfill.io links with Cloudflare’s mirror for a safer Internet
Post Syndicated from Matthew Prince original https://blog.cloudflare.com/automatically-replacing-polyfill-io-links-with-cloudflares-mirror-for-a-safer-internet

polyfill.io, a popular JavaScript library service, can no longer be trusted and should be removed from websites.
Multiple reports, corroborated with data seen by our own client-side security system, Page Shield, have shown that the polyfill service was being used, and could be used again, to inject malicious JavaScript code into users’ browsers. This is a real threat to the Internet at large given the popularity of this library.
We have, over the last 24 hours, released an automatic JavaScript URL rewriting service that will rewrite any link to polyfill.io found in a website proxied by Cloudflare to a link to our mirror under cdnjs. This will avoid breaking site functionality while mitigating the risk of a supply chain attack.
Any website on the free plan has this feature automatically activated now. Websites on any paid plan can turn on this feature with a single click.

You can find this new feature under Security ⇒ Settings on any zone using Cloudflare.
Contrary to what is stated on the polyfill.io website, Cloudflare has never recommended the polyfill.io service or authorized their use of Cloudflare’s name on their website. We have asked them to remove the false statement and they have, so far, ignored our requests. This is yet another warning sign that they cannot be trusted.
If you are not using Cloudflare today, we still highly recommend that you remove any use of polyfill.io and/or find an alternative solution. And, while the automatic replacement function will handle most cases, the best practice is to remove polyfill.io from your projects and replace it with a secure alternative mirror like Cloudflare’s even if you are a customer.
You can do this by searching your code repositories for instances of polyfill.io and replacing it with cdnjs.cloudflare.com/polyfill/ (Cloudflare’s mirror). This is a non-breaking change as the two URLs will serve the same polyfill content. All website owners, regardless of the website using Cloudflare, should do this now.
How we came to this decision
Back in February, the domain polyfill.io, which hosts a popular JavaScript library, was sold to a new owner: Funnull, a relatively unknown company. At the time, we were concerned that this created a supply chain risk. This led us to spin up our own mirror of the polyfill.io code hosted under cdnjs, a JavaScript library repository sponsored by Cloudflare.
The new owner was unknown in the industry and did not have a track record of trust to administer a project such as polyfill.io. The concern, highlighted even by the original author, was that if they were to abuse polyfill.io by injecting additional code to the library, it could cause far reaching security problems on the Internet affecting several hundreds of thousands websites. Or it could be used to perform a targeted supply-chain attack against specific websites.
Unfortunately, that worry came true on June 25, 2024 as the polyfill.io service was being used to inject nefarious code that, under certain circumstances, redirected users to other websites.
We have taken the exceptional step of using our ability to modify HTML on the fly to replace references to the polyfill.io CDN in our customers’ websites with links to our own, safe, mirror created back in February.
In the meantime, additional threat feed providers have also taken the decision to flag the domain as malicious. We have not outright blocked the domain through any of the mechanisms we have because we are concerned it could cause widespread web outages given how broadly polyfill.io is used with some estimates indicating usage on nearly 4% of all websites.
Corroborating data with Page Shield
The original report indicates that malicious code was injected that, under certain circumstances, would redirect users to betting sites. It was doing this by loading additional JavaScript that would perform the redirect, under a set of additional domains which can be considered Indicators of Compromise (IoCs):
https://www.googie-anaiytics.com/analytics.js
https://www.googie-anaiytics.com/html/checkcachehw.js
https://www.googie-anaiytics.com/gtags.js
https://www.googie-anaiytics.com/keywords/vn-keyword.json
https://www.googie-anaiytics.com/webs-1.0.1.js
https://www.googie-anaiytics.com/analytics.js
https://www.googie-anaiytics.com/webs-1.0.2.js
https://www.googie-anaiytics.com/ga.js
https://www.googie-anaiytics.com/web-1.0.1.js
https://www.googie-anaiytics.com/web.js
https://www.googie-anaiytics.com/collect.js
https://kuurza.com/redirect?from=bitget
(note the intentional misspelling of Google Analytics)
Page Shield, our client side security solution, is available on all paid plans. When turned on, it collects information about JavaScript files loaded by end user browsers accessing your website.
By looking at the database of detected JavaScript files, we immediately found matches with the IoCs provided above starting as far back as 2024-06-08 15:23:51 (first seen timestamp on Page Shield detected JavaScript file). This was a clear indication that malicious activity was active and associated with polyfill.io.
Replacing insecure JavaScript links to polyfill.io
To achieve performant HTML rewriting, we need to make blazing-fast HTML alterations as responses stream through Cloudflare’s network. This has been made possible by leveraging ROFL (Response Overseer for FL). ROFL powers various Cloudflare products that need to alter HTML as it streams, such as Cloudflare Fonts, Email Obfuscation and Rocket Loader
ROFL is developed entirely in Rust. The memory-safety features of Rust are indispensable for ensuring protection against memory leaks while processing a staggering volume of requests, measuring in the millions per second. Rust’s compiled nature allows us to finely optimize our code for specific hardware configurations, delivering performance gains compared to interpreted languages.
The performance of ROFL allows us to rewrite HTML on-the-fly and modify the polyfill.io links quickly, safely, and efficiently. This speed helps us reduce any additional latency added by processing the HTML file.
If the feature is turned on, for any HTTP response with an HTML Content-Type, we parse all JavaScript script tag source attributes. If any are found linking to polyfill.io, we rewrite the src attribute to link to our mirror instead. We map to the correct version of the polyfill service while the query string is left untouched.
The logic will not activate if a Content Security Policy (CSP) header is found in the response. This ensures we don’t replace the link while breaking the CSP policy and therefore potentially breaking the website.
Default on for free customers, optional for everyone else
Cloudflare proxies millions of websites, and a large portion of these sites are on our free plan. Free plan customers tend to have simpler applications while not having the resources to update and react quickly to security concerns. We therefore decided to turn on the feature by default for sites on our free plan, as the likelihood of causing issues is reduced while also helping keep safe a very large portion of applications using polyfill.io.
Paid plan customers, on the other hand, have more complex applications and react quicker to security notices. We are confident that most paid customers using polyfill.io and Cloudflare will appreciate the ability to virtually patch the issue with a single click, while controlling when to do so.
All customers can turn off the feature at any time.
This isn’t the first time we’ve decided a security problem was so widespread and serious that we’d enable protection for all customers regardless of whether they were a paying customer or not. Back in 2014, we enabled Shellshock protection for everyone. In 2021, when the log4j vulnerability was disclosed we rolled out protection for all customers.
Do not use polyfill.io
If you are using Cloudflare, you can remove polyfill.io with a single click on the Cloudflare dashboard by heading over to your zone ⇒ Security ⇒ Settings. If you are a free customer, the rewrite is automatically active. This feature, we hope, will help you quickly patch the issue.
Nonetheless, you should ultimately search your code repositories for instances of polyfill.io and replace them with an alternative provider, such as Cloudflare’s secure mirror under cdnjs (https://cdnjs.cloudflare.com/polyfill/). Website owners who are not using Cloudflare should also perform these steps.
The underlying bundle links you should use are:
For minified: https://cdnjs.cloudflare.com/polyfill/v3/polyfill.min.js
For unminified: https://cdnjs.cloudflare.com/polyfill/v3/polyfill.js
Doing this ensures your website is no longer relying on polyfill.io.
Amazon DataZone announces custom blueprints for AWS services
Post Syndicated from Anish Anturkar original https://aws.amazon.com/blogs/big-data/amazon-datazone-announces-custom-blueprints-for-aws-services/
Last week, we announced the general availability of custom AWS service blueprints, a new feature in Amazon DataZone allowing you to customize your Amazon DataZone project environments to use existing AWS Identity and Access Management (IAM) roles and AWS services to embed the service into your existing processes. In this post, we share how this new feature can help you in federating to your existing AWS resources using your own IAM role. We also delve into details on how to configure data sources and subscription targets for a project using a custom AWS service blueprint.
New feature: Custom AWS service blueprints
Previously, Amazon DataZone provided default blueprints that created AWS resources required for data lake, data warehouse, and machine learning use cases. However, you may have existing AWS resources such as Amazon Redshift databases, Amazon Simple Storage Service (Amazon S3) buckets, AWS Glue Data Catalog tables, AWS Glue ETL jobs, Amazon EMR clusters, and many more for your data lake, data warehouse, and other use cases. With Amazon DataZone default blueprints, you were limited to only using preconfigured AWS resources that Amazon DataZone created. Customers needed a way to integrate these existing AWS service resources with Amazon DataZone, using a customized IAM role so that Amazon DataZone users can get federated access to those AWS service resources and use the publication and subscription features of Amazon DataZone to share and govern them.
Now, with custom AWS service blueprints, you can use your existing resources using your preconfigured IAM role. Administrators can customize Amazon DataZone to use existing AWS resources, enabling Amazon DataZone portal users to have federated access to those AWS services to catalog, share, and subscribe to data, thereby establishing data governance across the platform.
Benefits of custom AWS service blueprints
Custom AWS service blueprints don’t provision any resources for you, unlike other blueprints. Instead, you can configure your IAM role (bring your own role) to integrate your existing AWS resources with Amazon DataZone. Additionally, you can configure action links, which provide federated access to any AWS resources like S3 buckets, AWS Glue ETL jobs, and so on, using your IAM role.
You can also configure custom AWS service blueprints to bring your own resources, namely AWS databases, as data sources and subscription targets to enhance governance across those assets. With this release, administrators can configure data sources and subscription targets on the Amazon DataZone console and not be restricted to do those actions in the data portal.
Custom blueprints and environments can only be set up by administrators to manage access to configured AWS resources. As custom environments are created in specific projects, the right to grant access to custom resources is delegated to the project owners who can manage project membership by adding or removing members. This restricts the ability of portal users to create custom environments without the right permissions in AWS Console for Amazon DataZone or access custom AWS resources configured in a project that they are not a member of.
Solution overview
To get started, administrators need to enable the custom AWS service blueprints feature on the Amazon DataZone console. Then administrators can customize configurations by defining which project and IAM role to use when federating to the AWS services that are set up as action links for end-users. After the customized set up is complete, when a data producer or consumer logs in to the Amazon DataZone portal and if they’re part of those customized projects, they can federate to any of the configured AWS services such as Amazon S3 to upload or download files or seamlessly go to existing AWS Glue ETL jobs using their own IAM roles and continue their work with data with the customized tool of choice. With this feature, you can how include Amazon DataZone in your existing data pipeline processes to catalog, share, and govern data.
The following diagram shows an administrator’s workflow to set up a custom blueprint.

In the following sections, we discuss common use cases for custom blueprints, and walk through the setup step by step. If you’re new to Amazon DataZone, refer to Getting started.
Use case 1: Bring your own role and resources
Customers manage data platforms that consist of AWS managed services such as AWS Lake Formation, Amazon S3 for data lakes, AWS Glue for ETL, and so on. With those processes already set up, you may want to bring your own roles and resources to Amazon DataZone to continue with an existing process without any disruption. In such cases, you may not want Amazon DataZone to create new resources because it disrupts existing processes in data pipelines and to also curtail AWS resource usage and costs.
In the current setup, you can create an Amazon DataZone domain associated with different accounts. There could be a dedicated account that acts like a producer to share data, and a few other consumer accounts to subscribe to published assets in the catalog. The consumer account has IAM permissions set up for the AWS Glue ETL job to use for the subscription environment of a project. By doing so, the role has access to the newly subscribed data as well as permissions from previous setups to access data from other AWS resources. After you configure the AWS Glue job IAM role in the environment using the custom AWS service blueprint, the authorized users of that role can use the subscribed assets in the AWS Glue ETL job and extend that data for downstream activities to store them in Amazon S3 and other databases to be queried and analyzed using the Amazon Athena SQL editor or Amazon QuickSight.
Use case 2: Amazon S3 multi-file downloads
Customers and users of the Amazon DataZone portal often need the ability to download files after searching and filtering through the catalog in an Amazon DataZone project. This requirement arises because the data and analytics associated with a particular use case can sometimes involve hundreds of files. Downloading these files individually would be a tedious and time-consuming process for Amazon DataZone users. To address this need, the Amazon DataZone portal can take advantage of the capabilities provided by custom AWS service blueprints. These custom blueprints allow you to configure action links to S3 bucket folders associated with specified Amazon DataZone projects.
You can build projects and subscribe to both unstructured and structured data assets within the Amazon DataZone portal. For structured datasets, you can use Amazon DataZone blueprint-based environments like data lakes (Athena) and data warehouses (Amazon Redshift). For unstructured data assets, you can use the custom blueprint-based Amazon S3 environment, which provides a familiar Amazon S3 browser interface with access to specific buckets and folders, using an IAM role owned and provided by the customer. This functionality streamlines the process of finding and accessing unstructured data and allows you to download multiple files at once, enabling you to build and enhance your analytics more efficiently.
Use case 3: Amazon S3 file uploads
In addition to the download functionality, users often need to retain and attach metadata to new versions of files. For example, when you download a file, you can perform data changes, enrichment, or analysis on the file, and then upload the updated version back to the Amazon DataZone portal. For uploading files, Amazon DataZone users can use the same custom blueprint-based Amazon S3 environment action links to upload files.
Use case 4: Extend existing environments to custom blueprint environments
You may have existing Amazon DataZone project environments created using default data lake and data warehouse blueprints. With other AWS services set up in the data platform, you may want to extend the configured project environments to include those additional services to provide a seamless experience for your data producers or consumers while switching between tools.
Now that you understand the capabilities of the new feature, let’s look at how administrators can set up a custom role and resources on the Amazon DataZone console.
Create a domain
First, you need an Amazon DataZone domain. If you already have one, you can skip to enabling your custom blueprints. Otherwise, refer to Create domains for instructions to set up a domain. Optionally, you can associate accounts if you want to set up Amazon DataZone across multiple accounts.
Associate accounts for cross-account scenarios
You can optionally associate accounts. For instructions, refer to Request association with other AWS accounts. Make sure to use the latest AWS Resource Access Manager (AWS RAM) DataZonePortalReadWrite policy when requesting account association. If your account is already associated, request access again with the new policy.

Accept the account association request
To accept the account associated request, refer to Accept an account association request from an Amazon DataZone domain and enable an environment blueprint. After you accept the account association, you should see the following screenshot.

Add associated account users in the Amazon DataZon domain account
With this launch, you can set up associated account owners to access the Amazon DataZone data portal from their account. To enable this, they need to be registered as users in the domain account. As a domain admin, you can create Amazon DataZone user profiles to allow Amazon DataZone access to users and roles from the associated account. Complete the following steps:
- On the Amazon DataZone console, navigate to your domain.
- On the User management tab, choose Add IAM Users from the Add dropdown menu.

- Enter the ARNs of your associated account IAM users or roles. For this post, we add
arn:aws:iam::123456789101:role/serviceBlueprintRoleandarn:aws:iam::123456789101:user/Jacob. - Choose Add users(s).


Back on the User management tab, you should see the new user state with Assigned status. This means that the domain owner has assigned associated account users to access Amazon DataZone. This status will change to Active when the identity starts using Amazon DataZone from the associated account.

As of writing this post, there is a maximum limit of adding six identities (users or roles) per associated account.
Enable the custom AWS service blueprint feature
You can enable custom AWS service blueprints in the domain account or the associated account, according to your requirements. Complete the following steps:
- On the Account associations tab, choose the associated domain.
- Choose the AWS service blueprint.
- Choose Enable.

Create an environment using the custom blueprint
If an associated account is being used to create this environment, use the same associated account IAM identity assigned by the domain owner in the previous step. Your identity needs to be explicitly assigned a user profile in order for you to create this environment. Complete the following steps:
- Choose the custom blueprint.
- In the Created environments section, choose Create environment.
- Select Create and use a new project or use an existing project if you already have one.
- For Environment role, choose a role. For this post, we curated a cross-account role called
AmazonDataZoneAdminand gave itAdministratorAccessThis is the bring your own role feature. You should curate your role according to your requirements. Here are some guidelines on how to set up custom role as we have used a more permissible policy for this blog:- You can use AWS Policy Generator to build a policy that fits your requirements and attach it to the custom IAM role you want to use.
- Make sure the role begins with
AmazonDataZone*to follow conventions. This is not mandatory, but recommended. If the IAM admin is using anAmazonDataZoneFullAccesspolicy, you need to follow this convention because there is a pass role check validation. - When you create the
CustomRole(AWSDataZone*) make sure it trustsamazonaws.comin its trust policy:

- For Region, choose an AWS Region.
- Choose Create environment.

Although you could use the same IAM role for multiple environments in a project, the recommendation is to not use a same IAM role for multiple environments across projects. Subscription grants are fulfilled at the project construct and therefore we don’t allow the same environment role to be used across different projects.
Configure custom action links
After you create the AWS service environment, you can configure any AWS Management Console links to your environment. Amazon DataZone will assume the custom role to help federate environment users to the configured action links. Complete the following steps:
- In your environment, choose Customize AWS links.
- Configure any S3 buckets, Athena workgroups, AWS Glue jobs, or other custom resources.
- Select Custom AWS links and enter any AWS service console custom resources. For this post, we link to the Amazon Relational Database Service (Amazon RDS) console.


You should now see the console links set up for your environment.

Access resources using a custom role through the Amazon DataZone portal from an associated account
Associate account users who have been added to Amazon DataZone can access the data portal from their associated account directly. Complete the following steps:
- In your environment, in the Summary section, choose the My Environment link.

You should see all your configured resources (role and action links) for your environment.

- Choose any action link to navigate to the appropriate console resources.
- Choose any action link for a custom resource (for this post, Amazon RDS).


You’re directed to the appropriate service console.

With this setup, you have now configured a custom AWS service blueprint to use your own role for the environment to use for data access as well. You have also set up action links for configured AWS resources to be shown to data producers and consumers in the Amazon DataZone data portal. With these links, you can federate to those services in a single click and take the project context along while working with the data.
Configure data sources and subscription targets
Additionally, administrators can now configure data sources and subscription targets on the Amazon DataZone console using custom AWS service blueprint environments. This needs to be configured to set up the database role ManagedAccessRole to the data source and subscription target, which you can’t do through the Amazon DataZone portal.
Configure data sources in the custom AWS service blueprint environment for publishing
Complete the following steps to configure your data source:
- On the Amazon DataZone console, navigate to the custom AWS service blueprint environment you just created.
- On the Data sources tab, choose Add
- Select AWS Glue or Amazon Redshift.
- For AWS Glue, complete the following steps:
- Enter your AWS Glue database. If you don’t already have an existing AWS Glue database setup, refer to Create a database.
- Enter the
manageAccessRolerole that is added as a Lake Formation admin. Make sure the role provided hasaws.internalin its trust policy. The role starts withAmazonDataZone*. - Choose Add.

- For Amazon Redshift, complete the following steps:
- Select Cluster or Serverless. If you don’t already have a Redshift cluster, refer to Create a sample Amazon Redshift cluster. If you don’t already have an Amazon Redshift Serverless workgroup, refer Amazon Redshift Serverless to create a sample database.
- Choose Create new AWS Secret or use a preexisting one.
- If you’re creating a new secret, enter a secret name, user name, and password.
- Choose the cluster or workgroup you want to connect to.
- Enter the database and schema names.
- Enter the role ARN for
manageAccessRole. - Choose Add.


Configure a subscription target in the AWS service environment for subscribing
Complete the following steps to add your subscription target
- On the Amazon DataZone console, navigate the custom AWS service blueprint environment you just created.
- On the Subscription targets tab, choose Add.
- Follow the same steps as you did to set up a data source.
- For Redshift subscription targets, you also need to add a database role that will be granted access to the given schema. You can enter a specific Redshift user role or, if you’re a Redshift admin, enter
sys:superuser. - Create a new tag on the environment role (BYOR) with
RedshiftDbRolesas key and the database name used for configuring the Redshift subscription target as value.
Extend existing data lake and data warehouse blueprints
Finally, if you want to extend existing data lake or data warehouse project environments to create to use existing AWS services in the platform, complete the following steps:
- Create a copy of the environment role of an existing Amazon DataZone project environment.
- Extend this role by adding additional required policies to allow this custom role to access additional resources.
- Create a custom AWS service environment in the same Amazon DataZone project using this new custom role.
- Configure the subscription target and data source using the database name of the existing Amazon DataZone environment (
<env_name>_pub_db,<env_name>_sub_db). - Use the same
managedAccessRolerole from the existing Amazon DataZone environment. - Request subscription to the required data assets or add subscribed assets from the project to this new AWS service environment.
Clean up
To clean up your resources, complete the following steps:
- If you used sample code for AWS Glue and Redshift databases, make sure to clean up all those resources to avoid incurring additional charges. Delete any S3 buckets you created as well.
- On the Amazon DataZone console, delete the projects used in this post. This will delete most project-related objects like data assets and environments.
- On the Lake Formation console, delete the Lake Formation admins registered by Amazon DataZone.
- On the Lake Formation console, delete any tables and databases created by Amazon DataZone.
Conclusion
In this post, we discussed how the custom AWS service blueprint simplifies the process to start using existing IAM roles and AWS services in Amazon DataZone for end-to-end governance of your data in AWS. This integration helps you circumvent the prescriptive default data lake and data warehouse blueprints.
To learn more about Amazon DataZone and how to get started, refer to the Getting started guide. Check out the YouTube playlist for some of the latest demos of Amazon DataZone and more information about the capabilities available.
About the Authors
 Anish Anturkar is a Software Engineer and Designer and part of Amazon DataZone with an expertise in distributed software solutions. He is passionate about building robust, scalable, and sustainable software solutions for his customers.
 Navneet Srivastava is a Principal Specialist and Analytics Strategy Leader, and develops strategic plans for building an end-to-end analytical strategy for large biopharma, healthcare, and life sciences organizations. Navneet is responsible for helping life sciences organizations and healthcare companies deploy data governance and analytical applications, electronic medical records, devices, and AI/ML-based applications, while educating customers about how to build secure, scalable, and cost-effective AWS solutions. His expertise spans across data analytics, data governance, AI, ML, big data, and healthcare-related technologies.
 Priya Tiruthani is a Senior Technical Product Manager with Amazon DataZone at AWS. She focuses on improving data discovery and curation required for data analytics. She is passionate about building innovative products to simplify customers’ end-to-end data journey, especially around data governance and analytics. Outside of work, she enjoys being outdoors to hike, capture nature’s beauty, and recently play pickleball.
 Subrat Das is a Senior Solutions Architect and part of the Global Healthcare and Life Sciences industry division at AWS. He is passionate about modernizing and architecting complex customer workloads. When he’s not working on technology solutions, he enjoys long hikes and traveling around the world.
Takeaways From The Take Command Summit: Unprecedented Threat Landscape
Post Syndicated from Emma Burdett original https://blog.rapid7.com/2024/06/26/takeaways-from-the-take-command-summit-unprecedented-threat-landscape/

The Rapid7 Take Command summit unveiled crucial findings from the 2024 Attack Intelligence Report, offering invaluable insights for cybersecurity professionals navigating today’s complex threat landscape.
Key takeaways from the 30 minute panel:
- Rise of Zero-Day Exploits: 53% of mass compromise events in 2023 and early 2024 began with zero-day exploits. This highlights the urgent need for improved patch management and proactive defense strategies.
- Network Edge Vulnerabilities: Over a third of the vulnerabilities leading to mass compromise events were in network edge technologies, such as firewalls and VPNs, emphasizing the importance of securing these critical points.
- Ransomware on the Rise: Rapid7 tracked over 5,600 ransomware incidents in 2023 and early 2024, with ransomware payouts exceeding $1 billion. The sheer volume underscores the importance of robust defenses and incident response plans.
Key Quote:
“Our research shows that more than 40% of incident responses in 2023 stemmed from remote remote access exploits without multifactor authentication. Basic security components are still crucial in making attacks harder.” – Caitlin Condon, Director Vulnerability Intelligence, Rapid7
The 2024 Attack Intelligence Report provides deep insights into the evolving threat landscape, highlighting the rise of zero-day exploits, the critical vulnerabilities in network edge technologies, and the rampant increase in ransomware incidents, you can view it here.
For a deeper dive into these findings, click through to watch the full video and stay ahead of attackers.
Intel CPU with Optical Compute Interconnect Chiplet Demoed with 4Tbps of Bandwidth and 100m Reach
Post Syndicated from Rohit Kumar original https://www.servethehome.com/intel-cpu-with-optical-compute-interconnect-chiplet-demoed-with-4tbps-of-bandwidth-and-100m-reach/
At 4Tbps, the Intel Optical Compute Interconnect chiplet is designed to co-package optical interconnects directly onto xPU packages
The post Intel CPU with Optical Compute Interconnect Chiplet Demoed with 4Tbps of Bandwidth and 100m Reach appeared first on ServeTheHome.
OpenSUSE Leap Micro 6.0 is now available
Post Syndicated from jzb original https://lwn.net/Articles/979748/
The openSUSE project has announced
Leap Micro version
6.0. Leap Micro is an image-based, lightweight Linux distribution
that is designed to run containerized and virtualized applications. It
is based on SUSE Linux
Enterprise (SLE) Micro. Changes in this release include the
support for full-disk encryption, the addition of Cockpit for
web-based system management, and an optional real-time kernel for
x86_64. Boot support for legacy BIOS on x86_64 is deprecated with 6.0, and will be removed in a later release. See the SLE
Micro release notes for more information.
Hutterer: GNOME tablet support papercut fixes
Post Syndicated from jzb original https://lwn.net/Articles/979745/
Peter Hutterer has written
a summary of “papercut fixes” for GNOME tablet support that are
planned to ship with GNOME 47.
If you’re an avid tablet user, you may have multiple stylus tools –
but it’s also likely that you have multiple tools of the same type
which makes differentiating them in the GUI hard. Which is why they’re
highlighted now – if you bring the tool into proximity, the matching
image is highlighted to make it easier to know which stylus you’re
about to configure. Oh, and in the process we added a new SVG for AES
styli too to make the picture look more like the actual physical
tool. The <blink> tag may no longer be cool but at least we can disco
our way through the stylus configuration now.
Optimizing Amazon Simple Queue Service (SQS) for speed and scale
Post Syndicated from Jeff Barr original https://aws.amazon.com/blogs/aws/optimizing-amazon-simple-queue-service-sqs-for-speed-and-scale/
 After several public betas, we launched Amazon Simple Queue Service (Amazon SQS) in 2006. Nearly two decades later, this fully managed service is still a fundamental building block for microservices, distributed systems, and serverless applications, processing over 100 million messages per second at peak times.
Because there’s always a better way, we continue to look for ways to improve performance, security, internal efficiency, and so forth. When we do find a potential way to do something better, we are careful to preserve existing behavior, and often run new and old systems in parallel to allow us to compare results.
Today I would like to tell you how we recently made improvements to Amazon SQS to reduce latency, increase fleet capacity, mitigate an approaching scalability cliff, and reduce power consumption.
Improving SQS
Like many AWS services, Amazon SQS is implemented using a collection of internal microservices. Let’s focus on two of them today:
Customer Front-End – The customer-facing front-end accepts, authenticates, and authorizes API calls such as CreateQueue and SendMessage. It then routes each request to the storage back-end.
Storage Back-End -This internal microservice is responsible for persisting messages sent to standard (non-FIFO) queues. Using a cell-based model, each cluster in the cell contains multiple hosts, each customer queue is assigned to one or more clusters, and each cluster is responsible for a multitude of queues:

Connections – Old and New
The original implementation used a connection per request between these two services. Each front-end had to connect to many hosts, which mandated the use of a connection pool, and also risked reaching an ultimate, hard-wired limit on the number of open connections. While it is often possible to simply throw hardware at problems like this and scale out, that’s not always the best way. It simply moves the moment of truth (the “scalability cliff”) into the future and does not make efficient use of resources.
After carefully considering several long-term solutions, the Amazon SQS team invented a new, proprietary binary framing protocol between the customer front-end and storage back-end. The protocol multiplexes multiple requests and responses across a single connection, using 128-bit IDs and checksumming to prevent crosstalk. Server-side encryption provides an additional layer of protection against unauthorized access to queue data.
It Works!
The new protocol was put into production earlier this year and has processed 744.9 trillion requests as I write this. The scalability cliff has been eliminated and we are already looking for ways to put this new protocol to work in other ways.
Performance-wise, the new protocol has reduced dataplane latency by 11% on average, and by 17.4% at the P90 mark. In addition to making SQS itself more performant, this change benefits services that build on SQS as well. For example, messages sent through Amazon Simple Notification Service (Amazon SNS) now spend 10% less time “inside” before being delivered. Finally, due to the protocol change, the existing fleet of SQS hosts (a mix of X86 and Graviton-powered instances) can now handle 17.8% more requests than before.
More to Come
I hope that you have enjoyed this little peek inside the implementation of Amazon SQS. Let me know in the comments, and I will see if I can find some more stories to share.
— Jeff;
[$] Finishing the conversion to the “new” mount API
Post Syndicated from jake original https://lwn.net/Articles/979166/
Eric Sandeen led a filesystem-track session at
the
2024 Linux Storage,
Filesystem, Memory Management, and BPF Summit on completing the
conversion of the existing kernel filesystems to use the mount API that was added for the 5.2 kernel in 2019. That API is
invariably called the “new” API, which it is when compared to the
venerable mount()
system call, but it has been available for five years or so at this point
without really pushing its predecessor aside. Sandeen wanted to discuss
the status of the conversion process and some other questions surrounding
the new API.
Types Team Update and Roadmap (Rust Blog)
Post Syndicated from corbet original https://lwn.net/Articles/979741/
The Rust Blog is carrying an
update on what the Rust Types Team has been up to and its near-future
plans.
There has been a
lot of work on the next-generation
trait solver. The initiative posted a
separate update at the end of last year. While we would have
liked to stabilize its
use in coherence a few months ago, this surfaced additional
small behavior regressions and hangs, causing delays. We are
working on fixing these issues and intend to merge the
stabilization PR soon. We are getting close to compiling the
standard library and the compiler with the new solver enabled
everywhere, after which will be able to run crater to figure out
the remaining issues.
Security updates for Wednesday
Post Syndicated from jzb original https://lwn.net/Articles/979740/
Security updates have been issued by AlmaLinux (git, python3.11, and python3.9), Debian (chromium, emacs, git, linux-5.10, and org-mode), Fedora (libopenmpt, nginx-mod-modsecurity, and thunderbird), Mageia (emacs, python-ansible-core, and python-authlib), Oracle (git, python3.11, and python3.9), Red Hat (kernel, kernel-rt, and samba), and Ubuntu (ansible, cups, google-guest-agent, google-osconfig-agent, libheif, openvpn, roundcube, and salt).
Cloudflare incident on June 20, 2024
Post Syndicated from Lloyd Wallis original https://blog.cloudflare.com/cloudflare-incident-on-june-20-2024

On Thursday, June 20, 2024, two independent events caused an increase in latency and error rates for Internet properties and Cloudflare services that lasted 114 minutes. During the 30-minute peak of the impact, we saw that 1.4 – 2.1% of HTTP requests to our CDN received a generic error page, and observed a 3x increase for the 99th percentile Time To First Byte (TTFB) latency.
These events occurred because:
- Automated network monitoring detected performance degradation, re-routing traffic suboptimally and causing backbone congestion between 17:33 and 17:50 UTC
- A new Distributed Denial-of-Service (DDoS) mitigation mechanism deployed between 14:14 and 17:06 UTC triggered a latent bug in our rate limiting system that allowed a specific form of HTTP request to cause a process handling it to enter an infinite loop between 17:47 and 19:27 UTC
Impact from these events were observed in many Cloudflare data centers around the world.
With respect to the backbone congestion event, we were already working on expanding backbone capacity in the affected data centers, and improving our network mitigations to use more information about the available capacity on alternative network paths when taking action. In the remainder of this blog post, we will go into more detail on the second and more impactful of these events.
As part of routine updates to our protection mechanisms, we created a new DDoS rule to prevent a specific type of abuse that we observed on our infrastructure. This DDoS rule worked as expected, however in a specific suspect traffic case it exposed a latent bug in our existing rate-limiting component. To be absolutely clear, we have no reason to believe this suspect traffic was intentionally exploiting this bug, and there is no evidence of a breach of any kind.
We are sorry for the impact and have already made changes to help prevent these problems from occurring again.
Background
Rate-limiting suspicious traffic
Depending on the profile of an HTTP request and the configuration of the requested Internet property, Cloudflare may protect our network and our customer’s origins by applying a limit to the number of requests a visitor can make within a certain time window. These rate limits can activate through customer configuration or in response to DDoS rules detecting suspicious activity.
Usually, these rate limits will be applied based on the IP address of the visitor. As many institutions and Internet Service Providers (ISPs) can have many devices and individual users behind a single IP address, rate limiting based on the IP address is a broad brush that can unintentionally block legitimate traffic.
Balancing traffic across our network
Cloudflare has several systems that together provide continuous real-time capacity monitoring and rebalancing to ensure we serve as much traffic as we can as quickly and efficiently as we can.
The first of these is Unimog, Cloudflare’s edge load balancer. Every packet that reaches our anycast network passes through Unimog, which delivers it to an appropriate server to process that packet. That server may be in a different location from where the packet originally arrived into our network, depending on the availability of compute capacity. Within each data center, Unimog aims to keep the CPU load uniform across all active servers.
For a global view of our network, we rely on Traffic Manager. Across all of our data center locations, it takes in a variety of signals, such as overall CPU utilization, HTTP request latency, and bandwidth utilization to instruct rebalancing decisions. It has built-in safety limits to prevent causing outsized traffic shifts, and also considers the expected resulting load in destination locations when making any decisions.
Incident timeline and impact
All timestamps are UTC on 2024-06-20.
- 14:14 DDoS rule gradual deployment starts
- 17:06 DDoS rule deployed globally
- 17:47 First HTTP request handling processe is poisoned
- 18:04 Incident declared automatically based on detected high CPU load
- 18:34 Service restart shown to recover on a server, full restart tested in one data center
- 18:44 CPU load normalized in data center after service restart
- 18:51 Continual global reloads of all servers with many stuck processes begin
- 19:05 Global eyeball HTTP error rate peaks at 2.1% service unavailable / 3.45% total
- 19:05 First Traffic Manager actions recovering service
- 19:11 Global eyeball HTTP error rate halved to 1% service unavailable / 1.96% total
- 19:27 Global eyeball HTTP error rate reduced to baseline levels
- 19:29 DDoS rule deployment identified as likely cause of process poisoning
- 19:34 DDoS rule is fully disabled
- 19:43 Engineers stop routine restarts of services on servers with many stuck processes
- 20:16 Incident response stood down
Below, we provide a view of the impact from some of Cloudflare’s internal metrics. The first graph illustrates the percentage of all eyeball (inbound from external devices) HTTP requests that were served an error response because the service suffering poisoning could not be reached. We saw an initial increase to 0.5% of requests, and then later a larger one reaching as much as 2.1% before recovery started due to our service reloads.
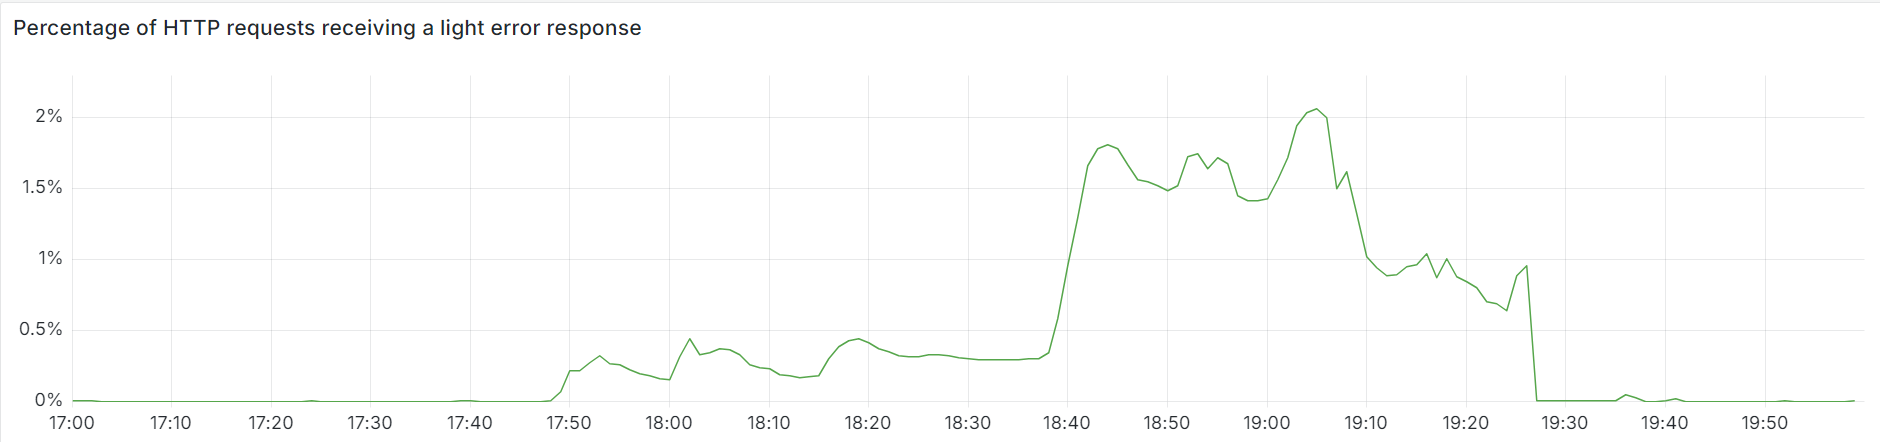
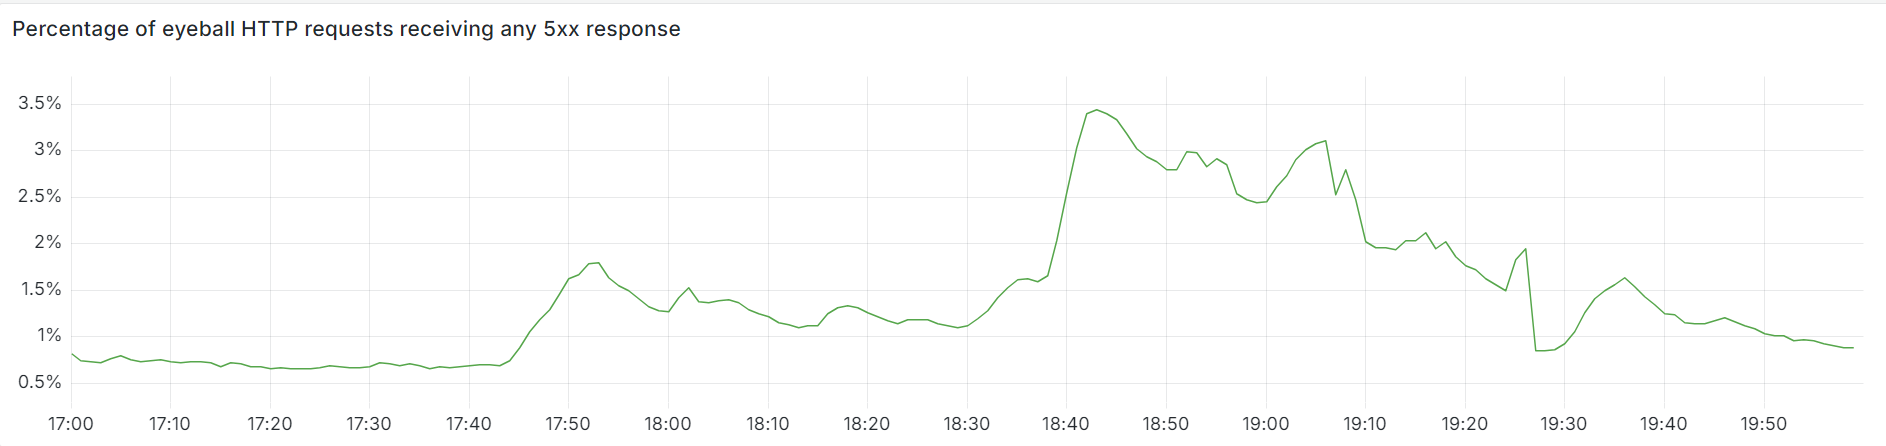
For a broader view of errors, we can see all 5xx responses our network returned to eyeballs during the same window, including those from origin servers. These peaked at 3.45%, and you can more clearly see the gradual recovery between 19:25 and 20:00 UTC as Traffic Manager finished its re-routing activities. The dip at 19:25 UTC aligns with the last large reload, with the error increase afterwards primarily consisting of upstream DNS timeouts and connection limits which are consistent with high and unbalanced load.
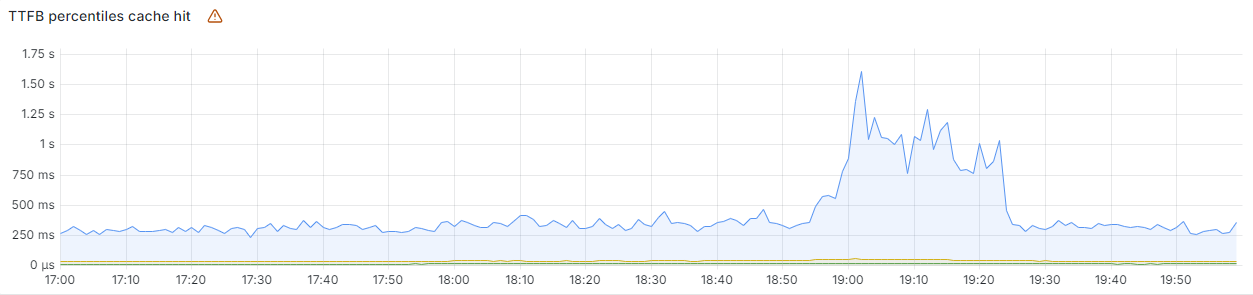
And here’s what our TTFB measurements looked like at the 50th, 90th and 99th percentiles, showing an almost 3x increase in latency at p99:
Technical description of the error and how it happened
Earlier on June 20, between 14:14 – 17:06 UTC, we gradually activated a new DDoS rule on our network. Cloudflare has recently been building a new way of mitigating HTTP DDoS attacks. This method is using a combination of rate-limits and cookies in order to allow legitimate clients that were falsely identified as being part of an attack to proceed anyway.
With this new method, an HTTP request that is considered suspicious runs through these key steps:
- Check for the presence of a valid cookie, otherwise block the request
- If a valid cookie is found, add a rate-limit rule based on the cookie value to be evaluated at a later point
- Once all the currently applied DDoS mitigation are run, apply rate-limit rules
We use this “asynchronous” workflow because it is more efficient to block a request without a rate-limit rule, so it gives a chance for other rule types to be applied.
So overall, the flow can be summarized with this pseudocode:
for (rule in active_mitigations) {
   // ... (ignore other rule types)
   if (rule.match_current_request()) {
       if (!has_valid_cookie()) {
           // no cookie: serve error page
           return serve_error_page();
       } else {
           // add a rate-limit rule to be evaluated later
           add_rate_limit_rule(rule);
       }
   }
}


evaluate_rate_limit_rules();
When evaluating rate-limit rules, we need to make a key for each client that is used to look up the correct counter and compare it with the target rate. Typically, this key is the client IP address, but other options are available, such as the value of a cookie as used here. We actually reused an existing portion of the rate-limit logic to achieve this. In pseudocode, it looks like:
function get_cookie_key() {
   // Validate that the cookie is valid before taking its value.
   // Here the cookie has been checked before already, but this code is
   // also used for "standalone" rate-limit rules.
   if (!has_valid_cookie_broken()) { // more on the "broken" part later
       return cookie_value;
   } else {
       return parent_key_generator();
   }
}
This simple key generation function had two issues that, combined with a specific form of client request, caused an infinite loop in the process handling the HTTP request:
- The rate-limit rules generated by the DDoS logic are using internal APIs in ways that haven’t been anticipated. This caused the
parent_key_generatorin the pseudocode above to point to theget_cookie_keyfunction itself, meaning that if that code path was taken, the function would call itself indefinitely - As these rate-limit rules are added only after validating the cookie, validating it a second time should give the same result. The problem is that the
has_valid_cookie_brokenfunction used here is actually different and both can disagree if the client sends multiple cookies where some are valid but not others
So, combining these two issues: the broken validation function tells get_cookie_key that the cookie is invalid, causing the else branch to be taken and calling the same function over and over.
A protection many programming languages have in place to help prevent loops like this is a run-time protection limit on how deep the stack of function calls can get. An attempt to call a function once already at this limit will result in a runtime error. When reading the logic above, an initial analysis might suggest we were reaching the limit in this case, and so requests eventually resulted in an error, with a stack containing those same function calls over and over.
However, this isn’t the case here. Some languages, including Lua, in which this logic is written, also implement an optimization called proper tail calls. A tail call is when the final action a function takes is to execute another function. Instead of adding that function as another layer in the stack, as we know for sure that we will not be returning execution context to the parent function afterwards, nor using any of its local variables, we can replace the top frame in the stack with this function call instead.
The end result is a loop in the request processing logic which never increases the size of the stack. Instead, it simply consumes 100% of available CPU resources, and never terminates. Once a process handling HTTP requests receives a single request on which the action should be applied and has a mixture of valid and invalid cookies, that process is poisoned and is never able to process any further requests.
Every Cloudflare server has dozens of such processes, so a single poisoned process does not have much of an impact. However, then some other things start happening:
- The increase in CPU utilization for the server causes Unimog to lower the amount of new traffic that server receives, moving traffic to other servers, so at a certain point, more new connections are directed away from servers with a subset of their processes poisoned to those with fewer or no poisoned processes, and therefore lower CPU utilization.
- The gradual increase in CPU utilization in the data center starts to cause Traffic Manager to redirect traffic to other data centers. As this movement does not fix the poisoned processes, CPU utilization remains high, and so Traffic Manager continues to redirect more and more traffic away.
- The redirected traffic in both cases includes the requests that are poisoning processes, causing the servers and data centers to which this redirected traffic was sent to start failing in the same way.
Within a few minutes, multiple data centers had many poisoned processes, and Traffic Manager had redirected as much traffic away from them as possible, but was restricted from doing more. This was partly due to its built-in automation safety limits, but also because it was becoming more difficult to find a data center with sufficient available capacity to use as a target.
The first case of a poisoned process was at 17:47 UTC, and by 18:09 UTC – five minutes after the incident was declared – Traffic Manager was re-routing a lot of traffic out of Europe:
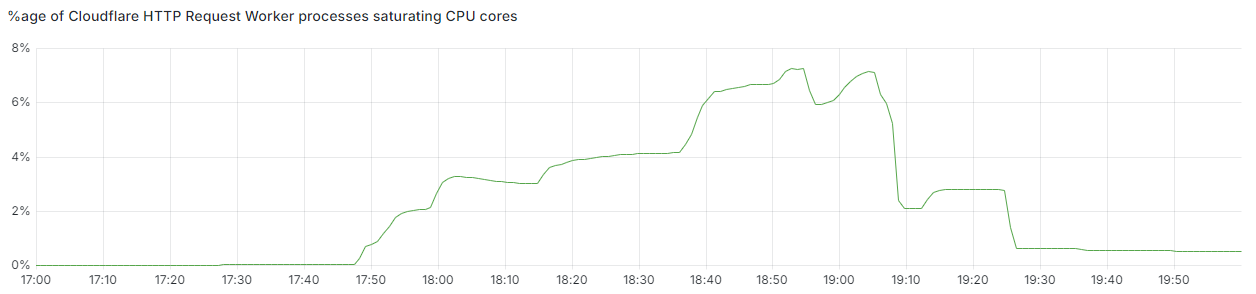
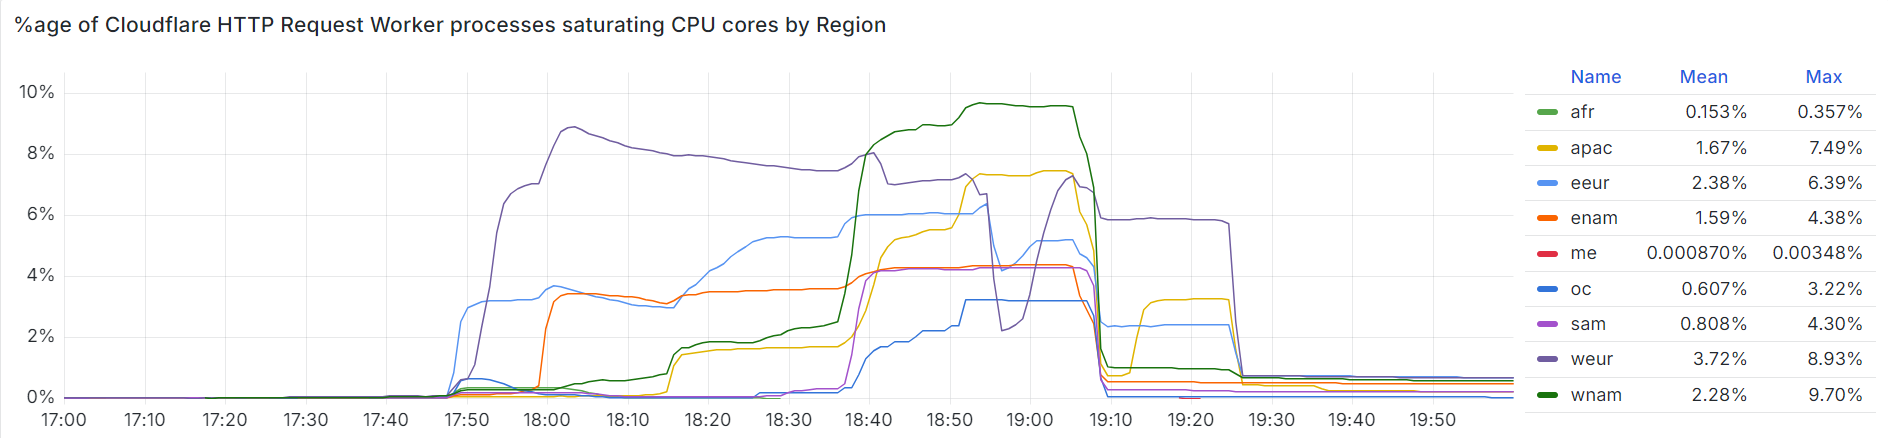
It’s obvious to see why, if we look at the percentage of the HTTP request service’s processes that were saturating their CPUs. 10% of our capacity in Western Europe was already gone, and 4% in Eastern Europe, during peak traffic time for those timezones:
Partially poisoned servers in many locations struggled with the request load, and the remaining processes could not keep up, resulting in Cloudflare returning minimal HTTP error responses.
Cloudflare engineers were automatically notified at 18:04 UTC, once our global CPU utilization reached a certain sustained level, and started to investigate. Many of our on-duty incident responders were already working on the open incident caused by backbone network congestion, and in the early minutes we looked into likely correlation with the network congestion events. It took some time for us to realize that locations where the CPU was highest is where traffic was the lowest, drawing the investigation away from a network event being the trigger. At this point, the focus moved to two main streams:
- Evaluating if restarting poisoned processes allowed them to recover, and if so, instigating mass-restarts of the service on affected servers
- Identifying the trigger of processes entering this CPU saturation state
It was 25 minutes after the initial incident was declared when we validated that restarts helped on one sample server. Five minutes after this, we started executing wider restarts – initially to entire data centers at once, and then as the identification method was refined, on servers with a large number of poisoned processes. Some engineers continued regular routine restarts of the affected service on impacted servers, whilst others moved to join the ongoing parallel effort to identify the trigger. At 19:36 UTC, the new DDoS rule was disabled globally, and the incident was declared resolved after executing one more round of mass restarts and monitoring.
At the same time, conditions presented by the incident triggered a latent bug in Traffic Manager. When triggered, the system would attempt to recover from the exception by initiating a graceful restart, halting its activity. The bug was first triggered at 18:17 UTC, then numerous times between 18:35 and 18:57 UTC. During two periods in this window (18:35-18:52 UTC and 18:56-19:05 UTC) the system did not issue any new traffic routing actions. This meant whilst we had recovered service in the most affected data centers, almost all traffic was still being re-routed away from them. Alerting notified on-call engineers of the issue at 18:34 UTC. By 19:05 UTC the Traffic team had written, tested, and deployed a fix. The first actions following restoration showed a positive impact on restoring service.
Remediation and follow-up steps
To resolve the immediate impact to our network from the request poisoning, Cloudflare instigated mass rolling restarts of the affected service until the change that triggered the condition was identified and rolled back. The change, which was the activation of a new type of DDoS rule, remains fully rolled back, and the rule will not be reactivated until we have fixed the broken cookie validation check and are fully confident this situation cannot recur.
We take these incidents very seriously, and recognize the magnitude of impact they had. We have identified several steps we can take to address these specific situations, and the risk of these sorts of problems from recurring in the future.
- Design: The rate limiting implementation in use for our DDoS module is a legacy component, and rate limiting rules customers configure for their Internet properties use a newer engine with more modern technologies and protections.
- Design: We are exploring options within and around the service which experienced process poisoning to limit the ability to loop forever through tail calls. Longer term, Cloudflare is entering the early implementation stages of replacing this service entirely. The design of this replacement service will allow us to apply limits on the non-interrupted and total execution time of a single request.
- Process: The activation of the new rule for the first time was staged in a handful of production data centers for validation, and then to all data centers a few hours later. We will continue to enhance our staging and rollout procedures to minimize the potential change-related blast radius.
Conclusion
Cloudflare experienced two back-to-back incidents that affected a significant set of customers using our CDN and network services. The first was network backbone congestion that our systems automatically remediated. We mitigated the second by regularly restarting the faulty service whilst we identified and deactivated the DDoS rule that was triggering the fault. We are sorry for any disruption this caused our customers and to end users trying to access services.
The conditions necessary to activate the latent bug in the faulty service are no longer possible in our production environment, and we are putting further fixes and detections in place as soon as possible.