Post Syndicated from David Belson original https://blog.cloudflare.com/q1-2024-internet-disruption-summary
This post is also available in 日本語, 한국어, Deutsch, Français, Español.

Cloudflare’s network spans more than 310 cities in over 120 countries, where we interconnect with over 13,000 network providers in order to provide a broad range of services to millions of customers. The breadth of both our network and our customer base provides us with a unique perspective on Internet resilience, enabling us to observe the impact of Internet disruptions. Thanks to recently released Cloudflare Radar functionality, this quarter we have started to explore the impact from a routing perspective, as well as a traffic perspective, at both a network and location level.
The first quarter of 2024 kicked off with quite a few Internet disruptions. Damage to both terrestrial and submarine cables caused problems in a number of locations, while military action related to ongoing geopolitical conflicts impacted connectivity in other areas. Governments in several African countries, as well as Pakistan, ordered Internet shutdowns, focusing heavily on mobile connectivity. Malicious actors known as Anonymous Sudan claimed responsibility for cyberattacks that disrupted Internet connectivity in Israel and Bahrain. Maintenance and power outages forced users offline, resulting in observed drops in traffic. And in a more unusual turn, RPKI, DNS, and DNSSEC issues were among the technical problems that disrupted connectivity for subscribers across multiple network providers.
As we have noted in the past, this post is intended as a summary overview of observed disruptions, and is not an exhaustive or complete list of issues that have occurred during the quarter.
Cable cuts
Moov Africa Tchad
Reported fiber optic cable damage that occurred in Cameroon on January 10 further disrupted connectivity for customers of AS327802 (Moov Africa Tchad / Millicom) a telecommunications provider in Chad. According to a (translated) Facebook post from Moov Africa Tchad, “On the afternoon of January 10, 2024, there was a breakdown of the internet due to a cut in the optical fiber coming from Cameroon through which Chad has access to the internet, the one coming from Sudan being unavailable for a while.” It is unclear whether the referenced cable cut occurred in Cameroon or Chad, and the mentioned Sudan cable issue may be the one covered in our Q4 2023 summary post. As a landlocked country, Chad is dependent on terrestrial Internet connections to/through neighboring countries, and the AfTerFibre cable map illustrates Chad’s reliance on limited cable paths through Cameroon and Sudan.
The graphs below show that Moov Africa Tchad traffic was disrupted for over 12 hours starting midday (UTC) on January 10, and the disruption was visible at a country level as well. The fiber cut also resulted in significant volatility from a routing perspective, as the volume of announced IPv4 address space shifted frequently at a network and country level during the disruption.
A second less severe disruption was also observed during the morning (UTC) of January 11. That disruption was reportedly due to an alleged cyberattack by Anonymous Sudan that targeted AS328594 (SudaChad Telecom), which is an upstream provider for Moov Africa Tchad.
Orange Burkina Faso
On February 15, a brief (~30 minute) but complete significant Internet disruption was observed at AS37577 (Orange Burkina Faso). According to the translation of a communiqué posted by the provider on social media, “The incident is due to a fiber cut, which causes a disruption of Internet services for certain customers.” Orange did not specify whether it was a more localized fiber cut, or damage to one of the terrestrial fibers that cross the country. The incident took the network completely offline, as the ASN’s amount of announced IPv4 address space dropped to zero for the duration.
MTN Nigeria
MTN Nigeria turned to social media on February 28 to let customers know that “You have been experiencing challenges connecting to the network due to a major service outage caused by multiple fibre cuts, affecting voice and data services.” A published report described the impact, noting “Millions of customers nationwide were impacted by the hours-long outage, especially in Lagos.” Connectivity was disrupted for approximately seven hours between 13:30 – 20:30 local time (12:30 – 19:30 UTC), and the provider posted a followup note just before midnight local time stating that service had been fully restored.
Digicel Haiti
A 16-hour Internet disruption on March 2/3 at AS27653 (Digicel Haiti) was due to a double fiber cut as a result of violence related to attempts to oust Prime Minister Ariel Henry. Starting around 22:00 local time on March 2 (03:00 on March 3), a complete outage was observed for approximately nine hours. Some recovery in traffic occurred for approximately two-and-a-half hours, followed by a three hour near-complete disruption. Digicel Haiti effectively disappeared from the Internet during the nine-hour outage, as no IPv4 or IPv6 address space was announced by the network during that time.
SKY (Philippines)
A brief traffic disruption observed on AS23944 (SKY) in the Philippines on March 18 was likely related to a fiber cut. In an advisory posted by SKY on social media, they stated that “SKY services in several areas in Marikina, Pasig and Quezon City are currently affected by a cut-fiber issue”, listing 45 affected areas. Traffic was most significantly impacted between 20:00 – 21:00 local time (12:00 – 13:00 UTC), although full recovery took several more hours. Only a minor impact to routing resulting from the fiber cut was observed.
Multiple African countries
On March 14, damage to multiple submarine cables off the west coast of Africa impacted Internet connectivity across multiple countries in West and Southern Africa. The damage was reportedly caused by underwater rock falls, and in addition to disrupting Internet connectivity, also caused availability issues for Microsoft Azure and Office 365 cloud services.
The Africa Coast to Europe (ACE), Submarine Atlantic 3/West Africa Submarine Cable (SAT-3/WASC), West Africa Cable System (WACS), and MainOne cables were all damaged, and impacted 13 African countries including Benin, Burkina Faso, Cameroon, Côte d’Ivoire, Gambia, Ghana, Guinea, Liberia, Namibia, Niger, Nigeria, South Africa, and Togo.
Comparatively brief disruptions were observed in Niger, Guinea, and Gambia, lasting from under an hour to approximately two hours.
However, the disruptions stretched out across multiple days in countries including Togo, Liberia, and Ghana, where it took several weeks for traffic to return to previously observed peak levels.
Operators in impacted countries attempted to maintain availability by shifting traffic to Google’s Equiano submarine cable, which reportedly experienced a 4x increase in traffic, and Morocco’s Maroc Telecom West Africa submarine cable. Service on the SAT-3 cable was fully restored as of April 6, with repairs on ACE completed on April 17, repairs to WACS and MainOne expected to be done by April 28.
Additional details and observations can be found in our blog post Undersea cable failures cause Internet disruptions for multiple African countries.
Red Sea
On February 24, three submarine cables that run through the Red Sea were damaged: the Seacom/Tata cable, the Asia Africa Europe-1 (AAE-1), and the Europe India Gateway (EIG). It is believed that the cables were cut by the anchor of the Rubymar, a cargo ship that was damaged by a ballistic missile on February 18. At the time of the disruption, Seacom confirmed the damage to their cable, while the owners of the other two cables did not publish similar confirmations.
While the cable cuts reportedly impacted countries in East Africa, including Tanzania, Kenya, Uganda, and Mozambique, no loss of traffic was observed across these countries in Cloudflare Radar.
Military action
Sudan
On February 2, Cloudflare observed a loss of traffic at AS15706 (Sudatel) and AS36972 (MTN Sudan), with a similar loss occurring on February 7 at AS36998 (Zain Sudan / SDN Mobitel). The disruption at MTN Sudan aligns with a social media post from the provider, in which they stated (translated) “We regret the interruption of all services due to circumstances beyond our control. While we apologize for the inconvenience caused by this interruption, we assure you of our endeavor to restore the service as soon as possible, and you will be notified of the return of the service.” On February 5, several days after their outage started, Zain Sudan published a social media post that stated (translated) “Zain Sudan has been constantly striving to maintain communication and Internet service to serve its valued subscribers, and we would like to point out that the current network outage is due to circumstances beyond its control, with our hopes that safety will prevail, and that service will be restored as soon as possible.” Sudatel did not share any information about the status of its network. On February 4, Digital Rights Lab – Sudan posted on social media that “Our sources confirmed that @RSFSudan forces tookover data centers of ISPs in Khartoum, #Sudan.” It is likely that the Internet outages observed across these providers are related to these takeovers, part of the military conflict that has been underway in the country since April 15, 2023.
The disruptions on these networks varied in length. At Sudatel, traffic started to return on February 11. At Zain Sudan, traffic began to return on March 3, corroborated by a social media post that stated (translated) “Zain network is gradually returning to work and allows its subscribers to communicate for free for a limited time. Zain promises to continue working to restore its network in the rest of the states.” Traffic had not yet returned on MTN Sudan by the end of the first quarter.
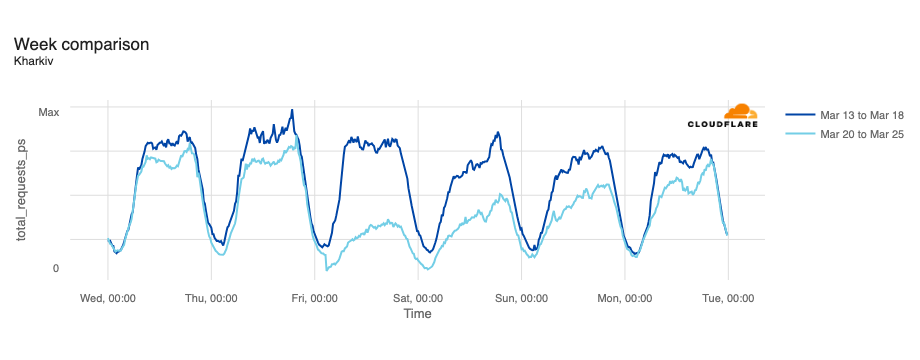
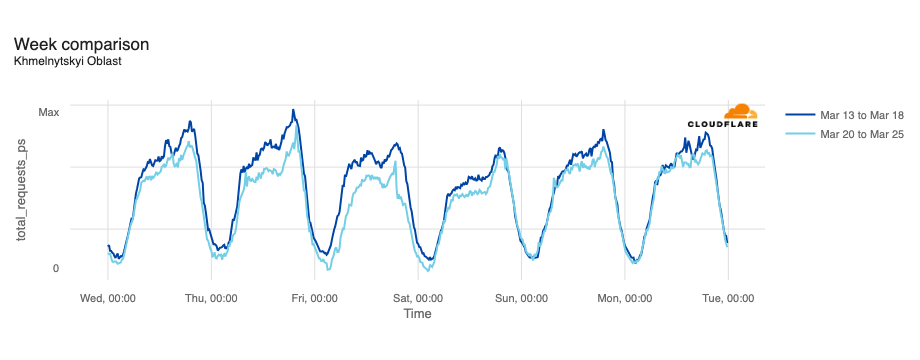
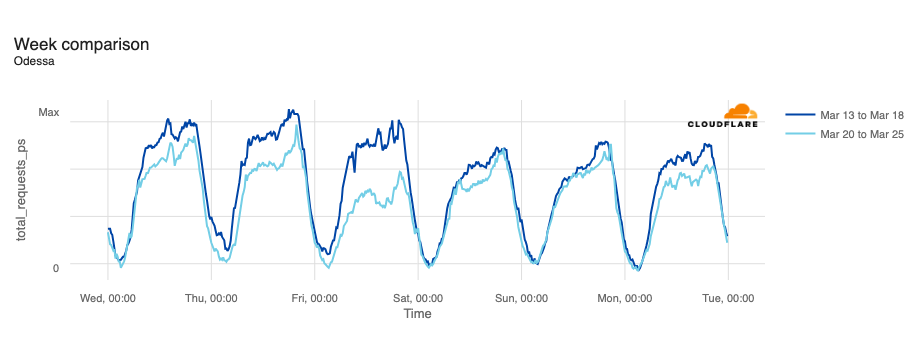
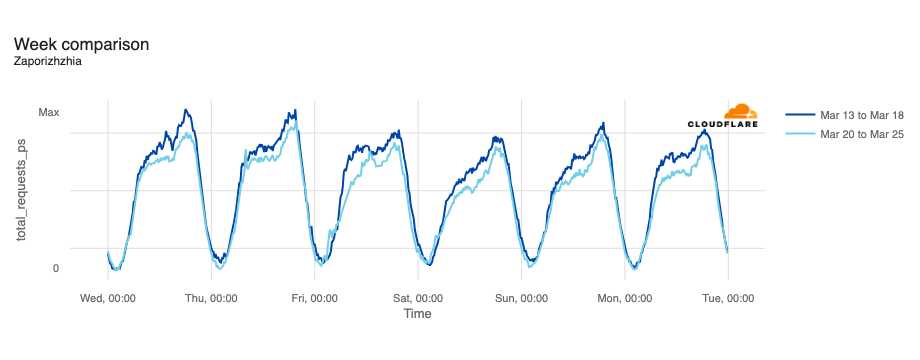
Ukraine
In February, the Ukraine/Russia war reached the two-year mark, and over that time, we have covered a number of Internet outages in Ukraine caused by conflict-related attacks. On February 22, Russian air strikes on critical infrastructure in Ukraine damaged energy facilities across the country, resulting in widespread power outages. These power outages caused Internet disruptions across multiple regions in Ukraine, including Kharkiv, Zaporizhzhia, Odessa, Dnipropetrovsk Oblast, and Khmelnytskyi Oblast. Traffic initially dropped around 05:00 local time (03:00 UTC), falling as much as 68% in Kharkiv. However, all regions saw lower traffic levels for several days as compared to the week before.

Gaza Strip
In our Q4 2023 Internet disruption summary blog post, we noted that throughout October, November, and December, Paltel (Palestine Telecommunications Company) had published several social media posts about disruptions to its landline, mobile, and Internet services. During the first quarter of 2024, similar outages were observed on January 12, January 22, and March 5. Paltel attributes these outages to the ongoing aggression related to the war with Israel.
The associated outages during the quarter varied in length, from just a few hours to over a week. Each outage is shown in the graphs below, which show Paltel traffic within four Palestinian governorates in the Gaza Strip region. While it appears that the Gaza governorate suffered a disruption to traffic as connectivity remained available, complete outages occurred in the Khan Yunis, Rafah, and Deir al-Balah governorates.
January 12-19
 |
 |
 |
 |
January 22-24
 |
 |
 |
 |
March 5
 |
 |
 |
 |
Cyberattacks
In addition to the previously discussed cyberattack that impacted connectivity for AS327802 (Moov Africa Tchad / Millicom) on January 11, several other observed Internet disruptions were caused by cyberattacks in the first quarter.
HotNet Internet Services (Israel)
Anonymous Sudan reportedly launched an attack against AS12849 (HotNet Internet Services), a major Israeli telecommunications provider. The attack was apparently brief, as it only disrupted traffic between 22:00 on February 20 and 00:00 on February 21 local time (20:00 to 22:00 UTC on February 20). Although brief, the attack succeeded in knocking the provider offline as the volume of IPv4 and IPv6 address space announced by HotNet fell to zero during the period the attack occurred.
Zain Bahrain
Anonymous Sudan also reportedly targeted AS31452 (Zain Bahrain) with a cyber attack. This attack appeared to be less severe than the one that targeted HotNet in Israel, but it also lasted significantly longer, with traffic disrupted between 20:45 on March 3 and 18:15 on March 4 local time (17:45 on March 3 to 15:15 on March 4 UTC). No impact to announced IP address space was observed. Zain Bahrain acknowledged the connectivity disruption in a social media post on March 4, noting (translated) “We would like to inform you that some customers may encounter difficulties in using some of our services. Our technical team works to avoid these difficulties as quickly as possible.”
Multiple networks in Ukraine
On March 13, an attack targeted a number of Ukrainian telecommunications providers, including AS16066 (Triangulum), AS34359 (Link Telecom Ukraine), AS197522 (Kalush Information Network), AS52074 (Mandarun), and AS29013 (LinkKremen). Triangulum appeared to be the most significantly impacted, experiencing a near complete loss of traffic between March 13 and March 20, as seen below. Triangulum posted a notice on its website, noting in part “On March 13, 2024, a hacker attack was carried out on a number of Ukrainian providers. At 10:28 a.m. on March 13, 2024, a large-scale technical failure occurred on our Company’s network, as a result of which it became impossible to provide electronic communication services. The Company’s employees, together with employees of the Cyber Police and the National Cyber Security Coordination Center, are taking comprehensive measures around the clock aimed at restoring the entire range of services as soon as possible. Services are being restored gradually. Full recovery may take several days.”
Other affected providers experienced comparatively shorter connectivity disruptions. The near complete outage at Mandarun lasted approximately a day, while the others saw outages lasting around seven hours, starting around 11:30 local time (09:30 UTC) on March 13, with connectivity returning to typical levels around 08:00 local time (06:00 UTC) on March 14.
Government directed
Comoros
Following protests against the re-election of President Azali Assoumani, authorities in Comoros reportedly shut down Internet connectivity on January 17. While some disruption was visible to traffic at a country level between 12:00 local time on January 17 (09:00 UTC) and 17:30 local time on January 19 (14:30 UTC), it was significantly more noticeable in the traffic from AS36939 (Comores Telecom), which saw several periods of near-complete outage across the two-day span. Although Comores Telecom announces a limited amount of IPv4 address space, it saw significant volatility on January 17 & 18, dropping to zero several times.
Sudatel Senegal/Expresso Telecom and Tigo/Free (Senegal)
On February 4, the Minister of Communication, Telecommunications, and Digital Affairs in Senegal ordered the suspension of mobile Internet connectivity starting at 22:00 local time (22:00 UTC). The suspension followed protests that erupted in the wake of the postponement of the presidential election. Traffic from AS37196 (Sudatel Senegal/Expresso Telecom) fell sharply at the time the suspension went into effect, recovering around 07:30 local time (07:30 UTC) on February 7. Traffic from AS37649 (Tigo/Free) fell at around 09:30 local time (09:30 UTC) on February 5, with the provider notifying subscribers of the suspension via social media. Traffic on Tigo/Free recovered around midnight local time (00:00 UTC) on February 7, and the provider again used social media to inform subscribers of service availability. No changes were observed to announced IP address space for either provider, indicating that the suspension of mobile Internet connectivity was not done at a routing level.
A little more than a week later, on February 13, the government in Senegal again ordered the suspension of mobile Internet connectivity in an effort to prevent “the spread of hateful and subversive messages online.” ahead of a march planned by activist groups which aimed to express dissent against the postponement of the presidential election. The mobile Internet shutdown was most visible on Tigo/Free, which saw a significant disruption between 10:15 and 19:45 local time (10:15 – 19:45 UTC).
Pakistan
According to a published report, The Pakistan Telecommunication Authority (PTA) said that Internet services would remain available as citizens went to the polls on February 8 to elect a new government. However, on that day, Pakistani authorities cut mobile Internet access across the country as the nation’s voters went to cast their ballots, with the authorities attributing the move “to maintain law and order” in the wake of the violence that occurred the previous day. The impact of the ordered shutdown was visible across multiple Internet providers in Pakistan, including AS59257 (Zong/CMPak), AS24499 (Telenor Pakistan), and AS45669 (Jazz/Mobilink), lasting from 07:00 until 20:00 (02:00 – 15:00 UTC), with traffic returning to expected levels approximately nine hours later. A post on the Internet Society’s Pulse blog estimated that the shutdown cost Pakistan nearly USD $18.5M in lost Gross Domestic Product.
Chad
Several Internet disruptions were observed in Chad between February 28 and March 7. The first one started at 10:45 local time on February 28 and lasted until 18:00 local time on March 1 (09:45 on February 28 – 17:00 on March 1). Shorter disruptions lasting just a few hours each were also observed on March 3, 4, and 7. The apparent shutdowns came in the wake of political violence in the country. Notable drops in announced IPv4 address space aggregated across networks in the country were observed coincident with the February 28, March 3, and March 4 shutdowns, although it isn’t clear why a similar drop did not occur on March 7.
Power outages
Tajikistan
According to a published report, a widespread multi-hour power outage occurred in Tajikistan on March 1, possibly related to increased electricity usage by electric heaters as temperatures across the country neared freezing. The outage began around 11:00 local time (06:00 UTC), and lasted for approximately three hours. The impact on Internet traffic from the country is visible in the graph below. Although power was restored around 14:00 local time (09:00 UTC), Internet traffic did not return to expected levels until around 05:00 local time the next day (midnight UTC on March 2).
Although power outages most often have the biggest impact on Internet traffic, as computers and home/office routers shut down, this outage also appeared to impact network infrastructure within the country, as the aggregate volume of announced IPv4 address space across the country dipped slightly when the power was out.
Tanzania
On March 4, the Tanzania Electricity Corporation (TANESCO) posted a notice on social media regarding an ongoing power outage. It stated (translated) “The Tanzania Electricity Corporation (TANESCO) has notified the public that there has been an error in the National Grid system, resulting in a lack of electricity service in some areas of the country including Zanzibar. Our experts are continuing their efforts to ensure that the electricity service returns to its normal state. The organization apologizes for any inconvenience caused.” The power outage disrupted Internet connectivity in Tanzania, causing an observed drop in traffic between 13:30 and 23:00 local time (10:30 – 20:00 UTC).
Technical problems
Orange España
Network routing is the process of selecting a path across one or more networks, and on the Internet, routing relies on the Border Gateway Protocol (BGP). Historically, the exchange of BGP routing information was based on trust between providers, but over time, security mechanisms such as Resource Public Key Infrastructure (RPKI) have been developed to prevent abuse of the system by bad actors. RPKI is a cryptographic method of signing records that associate a BGP route announcement with the correct originating AS number. ROA (Route Origin Authorization) records provide a means of verifying that an IP address block holder has authorized an AS (Autonomous System) to originate routes to that one or more prefixes within the address block. Cloudflare has published a number of blog posts over the years about the importance of, and our support for, RPKI. Properly implemented and configured, RPKI and ROAs help support routing security, effectively preventing behavior like BGP hijacking.
The RIPE NCC (“RIPE”) is one of five Regional Internet Registries (RIRs) that provides Internet resource allocation and registration, and coordination activities. RIPE’s region covers Europe, the Middle East, and Central Asia. On January 3, a malicious actor took advantage of lax account security on the part of RIPE and AS12479 (Orange España) and used credentials found on the public Internet to log into Orange España’s RIPE account. Once in control of the account, the attacker published multiple ROAs with “bogus” origins, rendering thousands of routes originated by AS12479 “RPKI-invalid”, which resulted in carriers that reject RPKI-invalid routes to stop carrying a large amount of Orange España’s IP space.
Because Cloudflare enforces RPKI validation, we also rejected the RPKI-invalid routes. We would have started trying to reach Orange España over our default route toward some of our transit providers, but because they also perform RPKI validation, traffic would have been dropped within those provider networks as well. Because of this, from Cloudflare’s perspective, this incident caused a drop in traffic from Orange España between 16:45 and 19:45 local time (14:45 – 17:45 UTC) as well as a notable drop in announced IPv4 address space from AS12479.
Orange España confirmed on social media that its RIPE account had been improperly accessed, and as a result of the incident, RIPE has made two-factor authentication (2FA) mandatory for logins. For additional insights into the incident, Doug Madory at Kentik and Ben Cartwright-Cox at bgp.tools have both published detailed analyses and timelines.
MaxNet (Ukraine)
On January 11, subscribers of AS34700 (MaxNet) in Ukraine experienced a nine-hour Internet outage. Initial traffic loss occurred around 16:00 local time (14:00 UTC), and recovered around 01:00 local time on January 12 (23:00 UTC on January 11). An initial social media post from the provider explained the reason for the outage, noting (translated) “Dear subscribers! Due to the flooding of one of the hub sites due to a utility malfunction, some areas of the city may be without services, partially or completely. We are doing our best to restore services, but it takes time. Further information regarding the opening times will be published as soon as the emergency works have been completed.” A subsequent post informed subscribers that Internet connectivity had been restored. The flooding apparently impacted core routing infrastructure as well, as the volume of IPv4 address space announced by MaxNet also fell to zero between 16:00 and 22:00 local time (14:00 – 20:00 UTC).
Plusnet (United Kingdom)
A traffic disruption observed on AS6871 (Plusnet) in the United Kingdom on January 15 was initially characterized as a “mass outage” by the provider in replies to customer complaints on social media. However, the underlying cause of the disruption turned out to be significantly less sensational – it was apparently linked to problems with their DNS servers. Because subscribers were unable to successfully resolve hostnames using Plusnet’s default DNS resolvers, this ultimately manifested itself as a drop in traffic from the network for approximately two hours, between 16:00 and 18:00 local time (and UTC). Users that had configured their systems to use a third-party DNS resolver, such as Cloudflare’s 1.1.1.1 service, did not experience a service disruption.
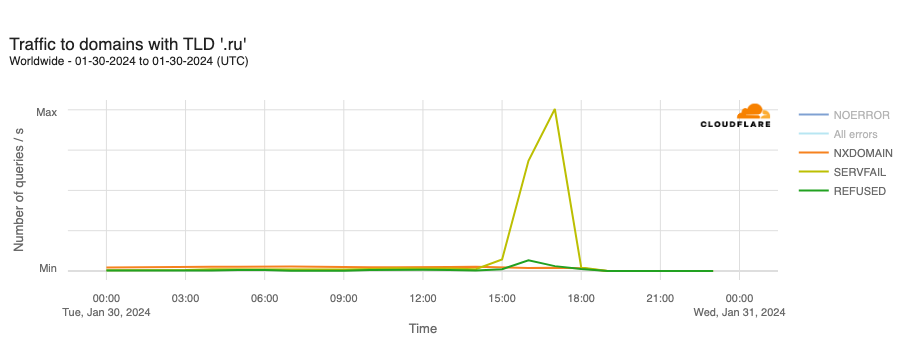
Russia
DNS issues also impacted users in Russia during January, though in a different way than Plusnet subscribers in the UK experienced. A reported DNSSEC failure on January 30 resulted in .ru domains becoming inaccessible for several hours. (DNSSEC creates a secure domain name system by adding cryptographic signatures to existing DNS records. By checking its associated signature, you can verify that a requested DNS record comes from its authoritative name server and wasn’t altered en-route, as opposed to a fake record injected in a man-in-the-middle attack.)
The DNSSEC validation failure resulted in SERVFAIL responses to DNS lookups against Cloudflare’s 1.1.1.1 resolver for hostnames in the .ru country code top level domain (ccTLD). At peak, 68.4% of requests received SERVFAIL responses. The Coordination Center for the .ru ccTLD confirmed that it was working on the “technical problem affecting the .ru zone associated with the global DNSSEC infrastructure” but didn’t provide any additional details around the root cause of the problem, such as a potential issue with a DNSSEC key rollover. The .ru ccTLD experienced a similar DNSSEC-related outage for several hours on August 16, 2019, as well.
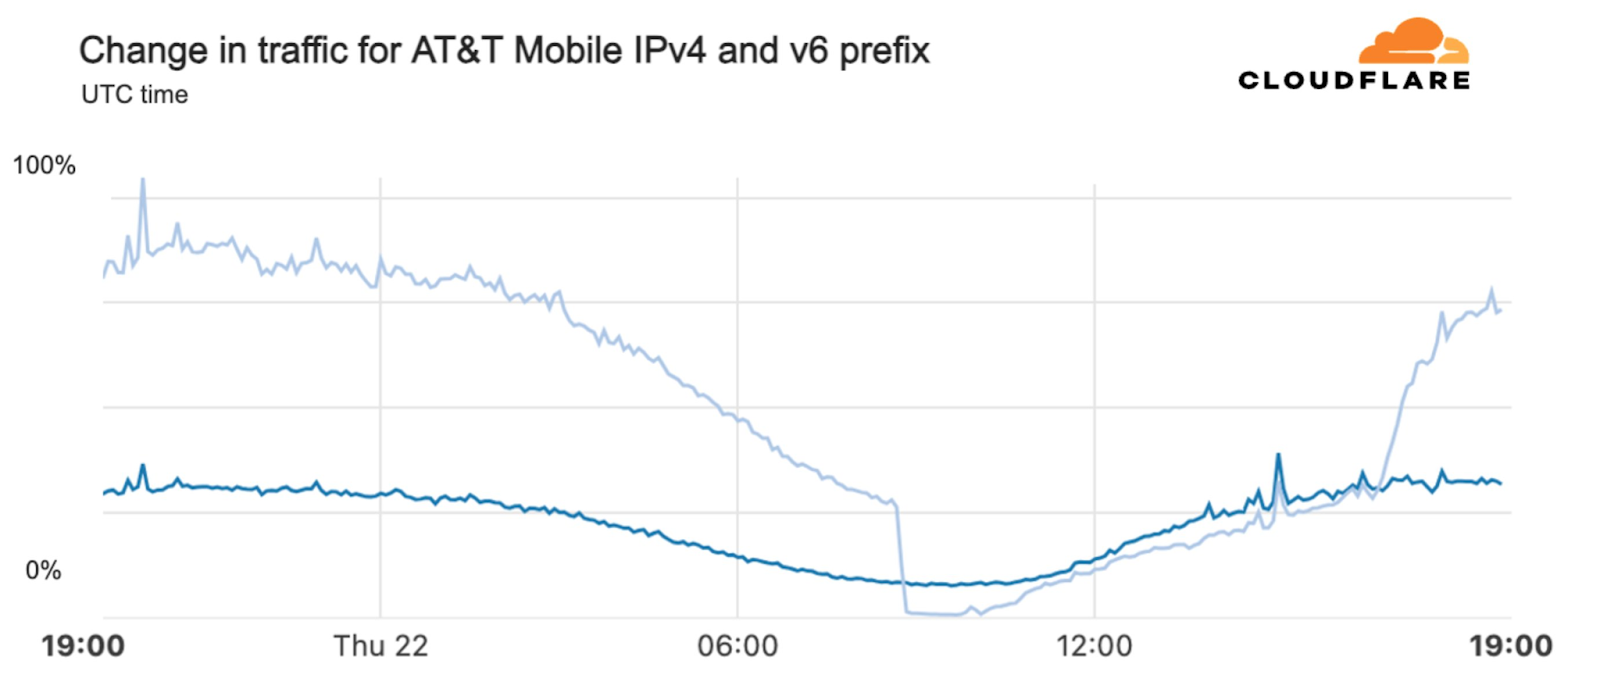
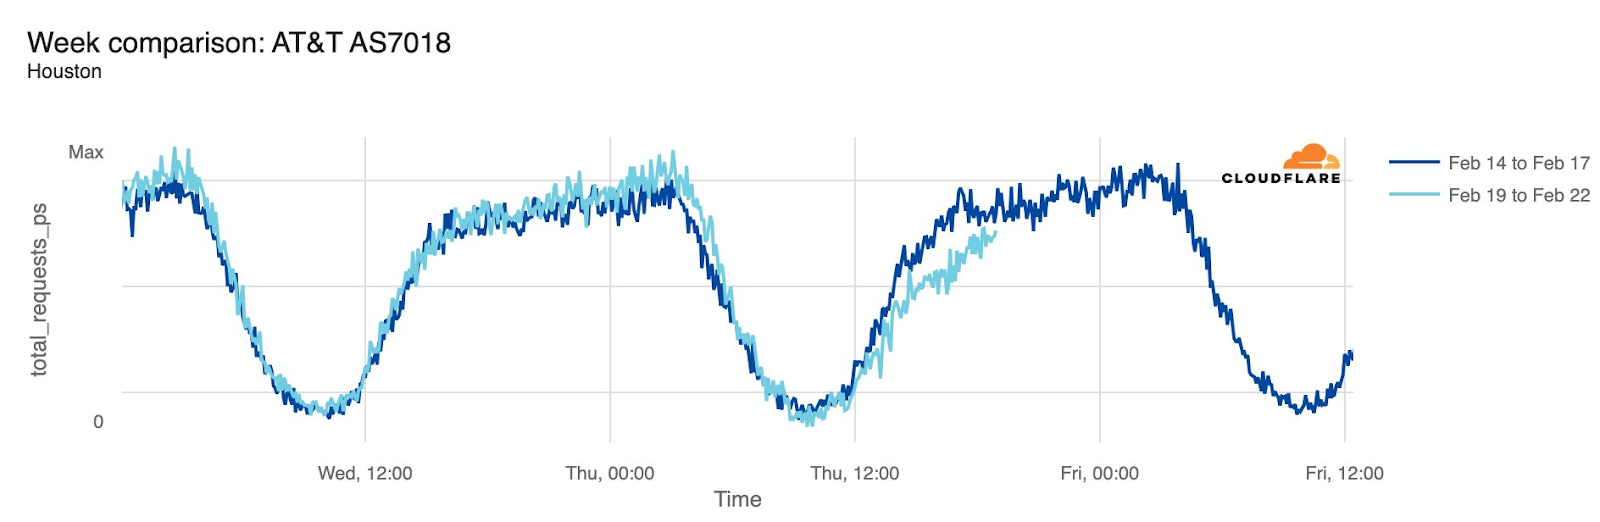
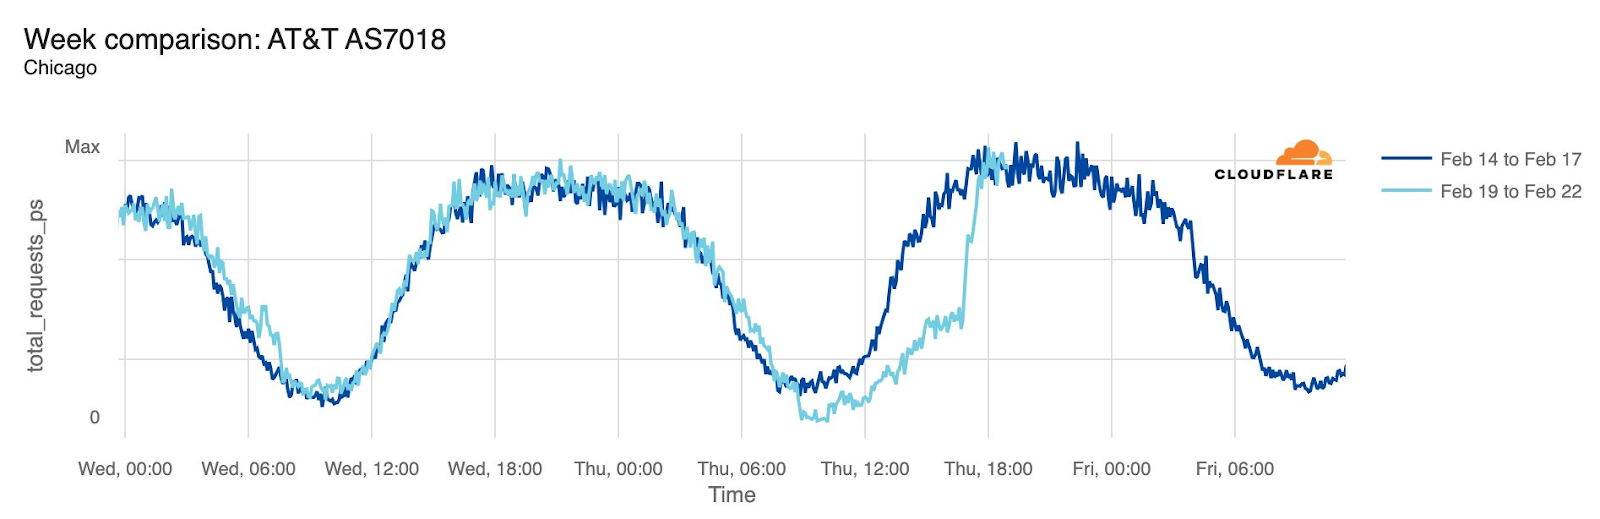
AT&T (United States)
Starting just before 04:00 Eastern / 03:00 Central (09:00 UTC) on February 22, AT&T subscribers in several cities across the United States experienced mobile service interruptions. Impacted cities included Atlanta, Houston, and Chicago, with connectivity disrupted for approximately eight hours. Cloudflare data showed that as the problem began, AT&T (AS7018) traffic dropped as much as 45% in Chicago and 18% in Dallas, as compared with the previous week.
According to a “network update” published by AT&T, “Based on our initial review, we believe that today’s outage was caused by the application and execution of an incorrect process used as we were expanding our network, not a cyber attack.”

Maintenance
Vodafone Egypt
Between 05:15 and 11:30 local time (03:15 – 09:30 UTC) on March 5, customers of AS36935 (Vodafone Egypt) experienced disruptions to their mobile Internet connectivity, with observed traffic from the network dropping as much as 70% below expected levels. A (translated) social media post from the provider noted in part “We apologize that some areas are currently affected by difficulties in operating the 4G service due to updates that took place this morning.” As a result of the 4G network outage, Vodafone was required to compensate affected customers, and was also fined by Egypt’s National Telecommunications Regulatory Authority (NTRA).
Ocean Wave Communication (Myanmar)
Just before noon local time (05:15 UTC) on March 12, a significant drop in traffic was observed on AS136442 (Ocean Wave), a consumer fiber and business Internet service provider in Myanmar. A (translated) social media post from the provider noted “Ocean Wave customers, please be informed that there will be no internet/ slow connection due to network maintenance.” The connectivity disruption lasted approximately seven hours, with traffic returning to typical levels just before 19:00 local time (12:15 UTC).
Conclusion
Two notable submarine cable damage events during the first quarter again highlighted the importance of protecting submarine cables, and the risks associated with them passing through/near geopolitically sensitive areas. Given the reliance on submarine cables for carrying Internet traffic, this will continue to be an issue for many years to come.
The Orange España incident also shed light on the importance of securing operationally important resources with multi-factor authentication, a topic that Cloudflare has written about in the past. Organizations like RIPE play a critically important behind-the-scenes role in functioning of the Internet, arguably obligating them to take all practical precautions when it comes to securing their systems in order to prevent malicious actors from taking actions that could broadly disrupt Internet connectivity.
The Cloudflare Radar team is constantly monitoring for Internet disruptions, sharing our observations on the Cloudflare Radar Outage Center, via social media, and in posts on blog.cloudflare.com. Follow us on social media at @CloudflareRadar (X), cloudflare.social/@radar (Mastodon), and radar.cloudflare.com (Bluesky), or contact us via email.
