Security updates for Tuesday

Post Syndicated from original https://lwn.net/Articles/903555/

Security updates have been issued by Debian (curl and jetty9), Fedora (dovecot), Gentoo (vault), Scientific Linux (java-1.8.0-openjdk, java-11-openjdk, and squid), SUSE (booth, dovecot22, dwarves and elfutils, firefox, gimp, java-11-openjdk, kernel, and oracleasm), and Ubuntu (linux, linux-hwe-5.15, linux-lowlatency, linux-lowlatency-hwe-5.15, net-snmp, and samba).

Surveillance of Your Car

Post Syndicated from Bruce Schneier original https://www.schneier.com/blog/archives/2022/08/surveillance-of-your-car.html

TheMarkup has an extensive analysis of connected vehicle data and the companies that are collecting it.

The Markup has identified 37 companies that are part of the rapidly growing connected vehicle data industry that seeks to monetize such data in an environment with few regulations governing its sale or use.

While many of these companies stress they are using aggregated or anonymized data, the unique nature of location and movement data increases the potential for violations of user privacy.

New – AWS Skill Builder Subscriptions

Post Syndicated from Sébastien Stormacq original https://aws.amazon.com/blogs/aws/new-aws-skill-builder-subscriptions/

Today, I am excited to announce AWS Skill Builder Individual and Team subscriptions. This is a new way for you to learn about cloud technologies and get practical experience with hands-on training.

Between 2013 and 2016, I spent three years delivering AWS Training classes to customers in Europe, North America, and Asia. At the time, the only classes we offered were in-person, instructor-led classes. Now, you have the choice between a variety of digital courses or in-person classes, lecture-style or hands-on. The foundations are available online for free, and the new subscriptions we are announcing today give you access to a range of exclusive content to advance your cloud skills and prepare for AWS Certification exams with self-paced, digital training. The subscriptions allow you to learn AWS services with hands-on activities.

At Amazon, we often say that it is still Day 1. The cloud market is still nascent. Gartner predicts global public cloud spending will grow from $396 billion to $482 billion this year, a rate of 22 percent this year alone. But this is just 10 percent of total global IT spending in 2022. I talk with customers every day. When I ask them the main obstacles to adopting the cloud, they all mention the lack of trained IT professionals. In fact, 76 percent of IT decision-makers report an IT skills gap, which is up from 31 percent in 2016, according to the Global Knowledge IT Skills and Salary Report, one of the largest studies of industry salaries, certifications, skills, and more.

To close the skills gap, we want to give learners hands-on experience with cloud technologies.

What Content Is Available When I Subscribe?
Starting today, AWS Skill Builder subscriptions give registered individuals and organizations access to exclusive learning materials built by builders for builders. In addition to our 500+ free courses, there are four new learning experiences available.

AWS Builder Labs are hands-on guided exercises to develop practical skills for common cloud scenarios. You receive a sandbox AWS account for the duration of the lab. There is no need for you to use your own AWS account and risk accruing unwanted charges. Next, we provide you with step-by-step instructions to go through a typical cloud scenario. It goes from simple tasks, such as configuring Amazon Simple Storage Service (Amazon S3) to host a static website, to more advanced scenarios, such as developing a serverless web application using Amazon DynamoDB. These are just two examples, and we have 100+ labs available for you to learn by doing it yourself.

AWS Jam gives you clues to guide you in solving real-world, open-ended problems. There are no step-by-step instructions, just hints. There are two types of AWS Jam: AWS Jam Journey and AWS Jam events. Jam events are exclusive to Team subscription. Once started, the Jam Journey is available for several months to give you time to complete all the challenges at your own pace and schedule. With Jam events, team administrators can create events where teams can come together at a certain date and time to solve challenges and compete with each other. AWS Jam events provide 140+ challenges across different domains.

Let’s take a practical example. When you select the security Jam, you are tasked with resolving a series of security-related challenges curated by AWS experts. Tasks might be to perform a security posture evaluation, restore a previous version of a static website, or encrypt an existing Amazon Relational Database Service (Amazon RDS) database with a customer-managed AWS Key Management Service (AWS KMS) key.

Here is the dashboard for the security AWS Jam Journey.

AWS Jam - Security

AWS Cloud Quest is a role-based game where your mission is to help citizens of a virtual city by learning and building cloud solutions for their challenges. You move around in the city, and you’re assigned tasks to complete. Each time you complete a task, you get rewards, which you can use to transform the city. For each task, the Solution Center guides you through four steps: learn the cloud concept to complete the task, practice the execution of the task with instructions, practice by yourself, and evaluate the result. Once again, the practice is done inside an AWS sandbox environment where you can safely test your new skill. To evaluate the result, the Solution Center asks you to enter validation data, such as the name of an S3 bucket or a URL. The system automatically verifies your setup and grants you points when the test succeeds. As of today, there are four roles available: Cloud Practitioner, Solutions Architect, Serverless Developer, and Machine Learning Specialist. We have plans to add more roles to this list over time. AWS Cloud Quest is a fun way to learn cloud skills!

We’ll see Cloud Quest in action in a minute.

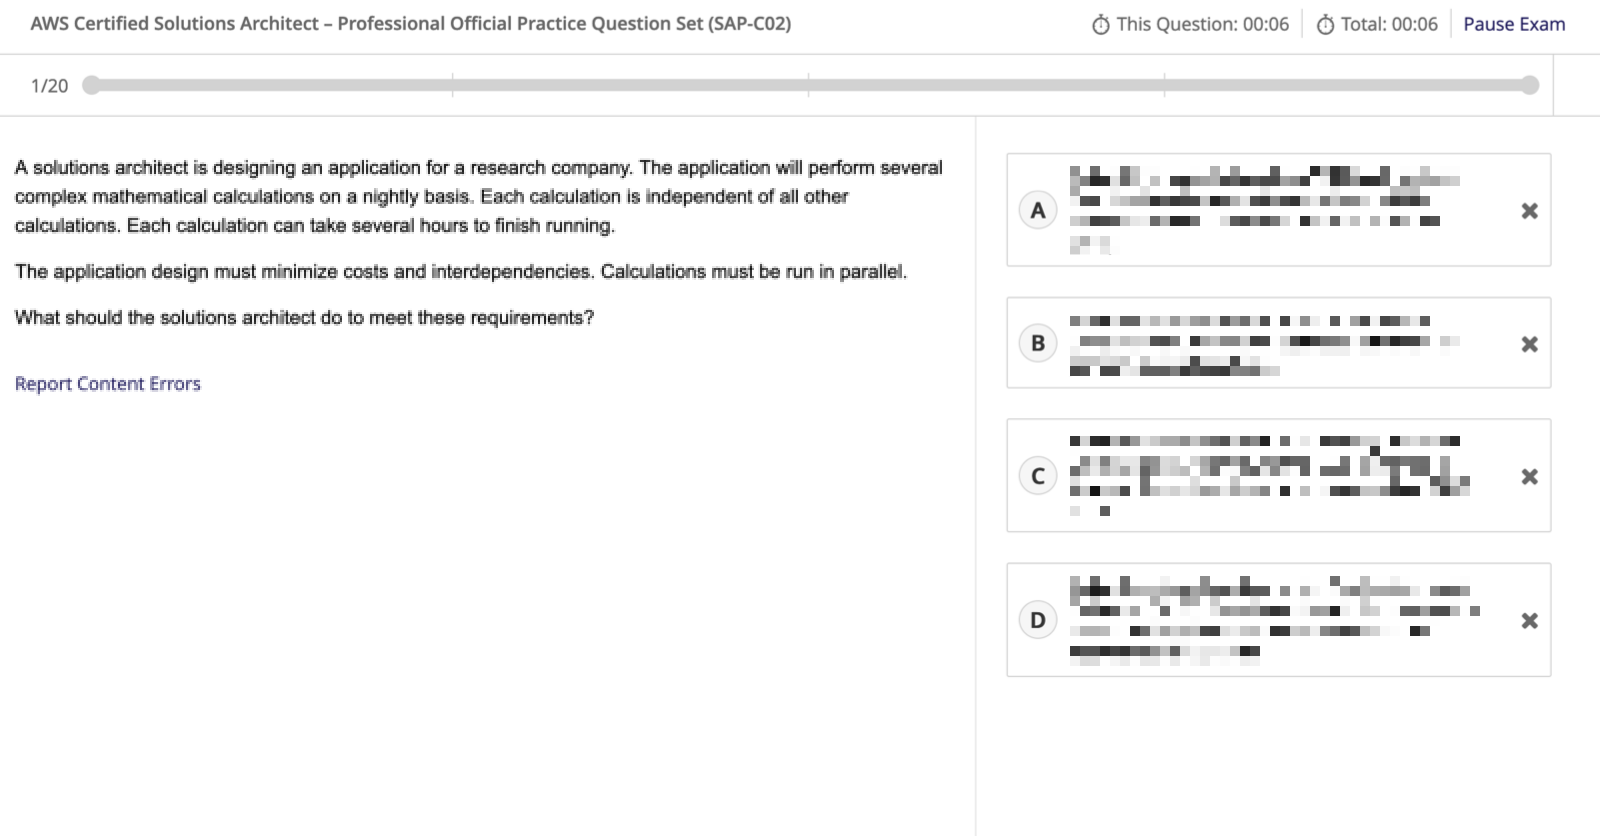
AWS Certification Official Practice Exams are, as the name implies, full-length practice exams to help you to evaluate your exam readiness. But wait! Aren’t there free Official Practice Question Sets already? Yes! But in addition to those free 20-question practice question sets, subscribed individuals or teams can now prepare for AWS Certification with new exam preparation courses that include practice materials and the full-length AWS Certification Official Practice Exams. We have designed the exam preparation courses to help you assess your exam preparedness. Each exam preparation course includes a review of technical content, practice questions, lab exercises, and access to the AWS Certification Official Practice Exams. And this is not just a pass/fail exercise. Official practice exams come with thorough feedback for each question and scaled scores simulating actual exam scores. The questions presented have the same style, depth, rigor, and scoring as our AWS Certification exams. Full-length practice exams and exam preparation courses are currently available for the AWS Certified Cloud Practitioner, AWS Certified Solutions Architect – Associate, and AWS Certified SysOps Administrator – Associate certifications, with more to come. Much of the other content available through the subscription, such as AWS Builder Labs and AWS Cloud Quest, can complement your exam preparation.

Here is a typical screen for an Official Practice Exam. I blurred the answers obviously.

SkilBuilder Practice Exam

Type of Subscriptions
Both Individual and Team subscriptions include these four new learning experiences. Team subscriptions are available to organizations that want to purchase seats for 50 or more people. Besides a tiered pricing model, depending on the number of seats, a Team subscription gives you administrator functionality and a single sign-on experience for employees. Team administrators may assign training to individuals to drive targeted skills in their team and track progress. Built-in reports show course enrollment, course progress, completion rates, and more.

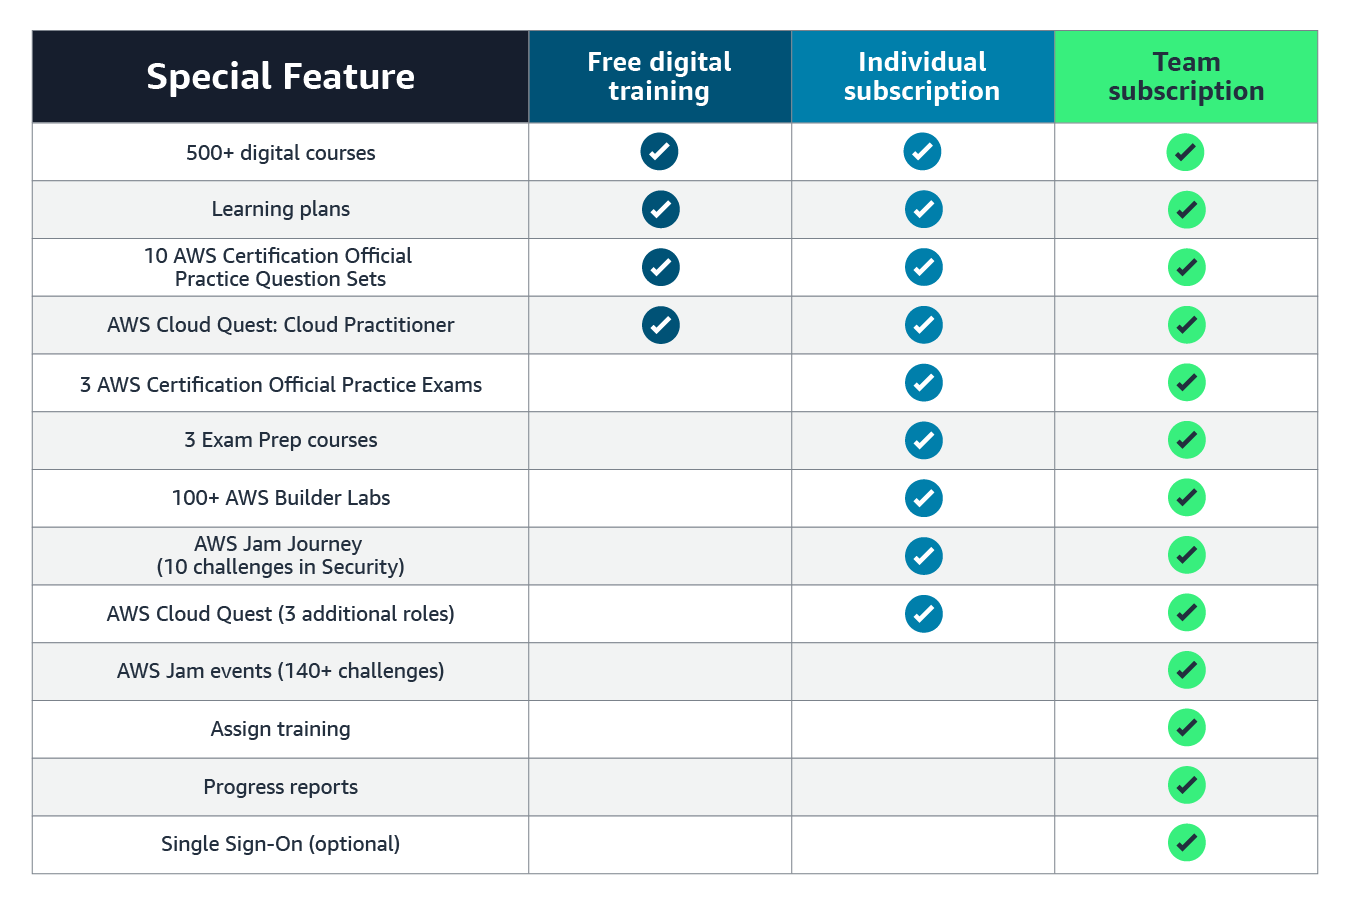
This table compares the free digital training, the Individual subscription, and the Team subscription.

SkillBuilder Subscription Comparison

Let’s See It in Action
Regular readers of this blog know we like to show you what we are talking about. Let’s see what AWS Cloud Quest looks like. First, I open AWS Skill Builder and subscribe as an individual.

AWS Skil Builder Subscription Plans

Then, I search for Cloud Quest and launch the experience.

AWS Cloud Quest

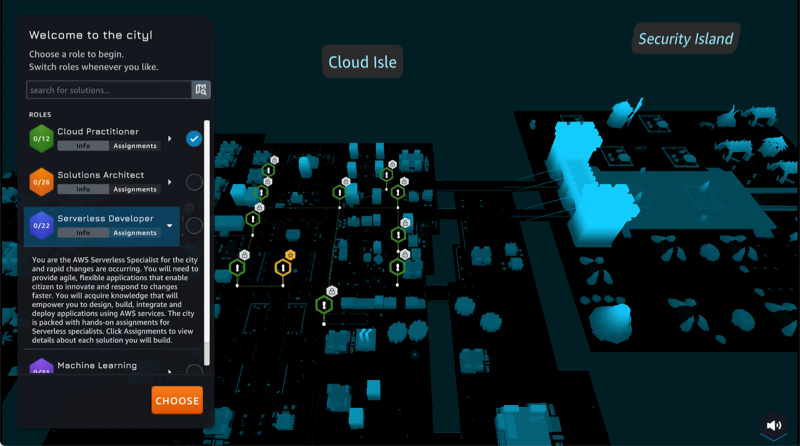
I select the role playing game I want to start. I have the choice between Cloud Practitioner, Solutions Architect, Serverless Developer, and Machine Learning Specialist.

Select a quest

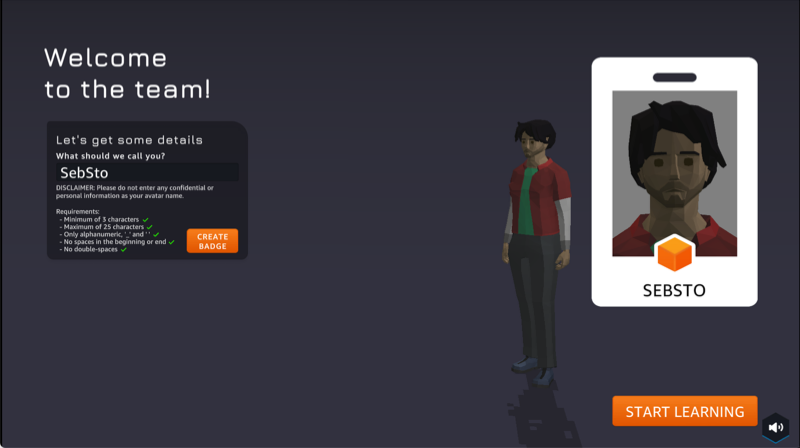
Just like in every role game, I may personalize my avatar before starting the game. Any resemblance with the actual me is pure coincidence 🤔.

Quest : personalize my avatar

And finally, I am ready to walk the city, help citizens, and complete my challenges.

quest : start my mission

How Much Does It Cost?
Inclusion is a core value at Amazon. We believe everybody must have a chance to learn and grow their professional career. We made the Individual subscription available in over 200 countries and territories and up to 12 languages: Chinese (Simplified), Chinese (Traditional), English, French (France), German, Indonesian, Italian, Japanese, Korean, Portuguese (Brazil), Spanish (Latin America), and Spanish (Spain). AWS Cloud Quest is in English.

The Individual subscription is offered monthly at the price of $29 per month or annually at the price of $299 per year (this is a 14 percent discount compared to the monthly price). The subscription fee is added to your monthly AWS bill, and there is no need to have a separate credit card or billing agreement. As usual with AWS, you can stop the subscription at any time.

The Team subscription is available for purchase in 17 countries (Australia, Brazil, Canada, Colombia, France, Germany, Ireland, India, Israel, Japan, Netherlands, New Zealand, Singapore, South Korea, Spain, United Kingdom, and the United States) and the same languages as the Individual subscription. These are available for teams over 50 persons. We offer an annual plan for $449 per year and per seat, with tiered pricing based on volume. Our pricing page has all the details.

I am excited to see a new generation of IT professionals acquiring AWS Cloud skills. I can’t wait to discover the new use cases, applications, or innovations you will bring to the world when armed with these new skills.

And now, get your AWS Skill Builder subscription and go learn.

— seb

Using e-textiles to deliver equitable computing lessons and broaden participation

Post Syndicated from Katharine Childs original https://www.raspberrypi.org/blog/using-e-textiles-to-deliver-equitable-computing-lessons-and-broaden-participation/

In our current series of research seminars, we are exploring how computing can be connected to other subjects using cross-disciplinary approaches. In July 2022, our speakers were Professor Yasmin Kafai from the University of Pennsylvania and Elaine Griggs, an award-winning teacher from Pembroke High School, Massachusetts, and we heard about their use of e-textiles to engage learners and broaden participation in computing. 

Professor Yasmin Kafai illustrated her research with a wonderful background made up of young people’s e-textile projects

Building new clubhouses

The spaces where young people learn about computing have sometimes been referred to as clubhouses to relate them to the places where sports or social clubs meet. A computing clubhouse can be a place where learners come together to take part in computing activities and gain a sense of community. However, as Yasmin pointed out, research has found that computing clubhouses have also often been dominated by electronics and robotics activities. This has led to clubhouses being perceived as exclusive spaces for only the young people who share those interests.

Yasmin’s work is motivated by the idea of building new clubhouses that include a wide range of computing interests, with a specific focus on spaces for e-textile activities, to show that diverse uses of computing are valued. 

At Coolest Projects, a group of people explore a coding project.
A group of young people share their projects at Coolest Projects

Yasmin’s research into learning through e-textiles has taken place in formal computing lessons in high schools in America, by developing and using a unit from the Exploring Computer Science curriculum called “Stitching the Loop”. In the seminar, we were fortunate to be joined by Elaine, a computer science and robotics teacher who has used the scheme of work in her classroom. Elaine’s learners have designed wearable electronic textile projects with microcontrollers, sensors, LEDs, and conductive thread. With these materials, learners have made items such as paper circuits, wristbands, and collaborative banners, as shown in the examples below. 

alt=""
 Items created by learners in the e-textile units of work

Teaching approaches for equity-oriented learning

The hands-on, project-based approach in the e-textile unit has many similarities with the principles underpinning the work we do at the Raspberry Pi Foundation. However, there were also two specific teaching approaches that were embedded in Elaine’s teaching in order to promote equitable learning in the computing classroom: 

  1. Prioritising time for learners to design their artefacts at the start of the activity.
  2. Reflecting on learning through the use of a digital portfolio.  

Making time for design

As teachers with a set of learning outcomes to deliver, we can often feel a certain pressure to structure lessons so that our learners spend the most time on activities that we feel will deliver those outcomes. I was very interested to hear how in these e-textile projects, there was a deliberate choice to foreground the aesthetics. When learners spent time designing their artefacts and could link it to their own interests, they had a sense of personal ownership over what they were making, which encouraged them to persevere and overcome any difficulties with sewing, code, or electronics. 

Title: Process of making your project.   Learner's reflection: One main challenge that I faced while making this project was setting up my circuit diagram. I had trouble setting up where all my lights were gonna be placed at, and I had trouble color coding where the negatives and positives would be at. I sketched about 6 different papers and the 6th page was the one that came out fine because all of the other ones had negative and positive crossings which was not gonna help the program work, so I was finally able to get my diagram correct.
Spending time on design helped this learner to persevere with problem-solving

My personal reflection was that creating a digital textiles project based on a set template could be considered the equivalent of teaching programming by copying code. Both approaches would increase the chances of a successful output, but wouldn’t necessarily increase learners’ understanding of computing concepts, nor encourage learners to perceive computing as a subject where everyone belongs. I was inspired by the insights shared at the seminar about how prioritising design time can lead to more diverse representations of making. 

Reflecting on learning using a digital portfolio

Elaine told us that learners were encouraged to create a digital portfolio which included photographs of the different stages of their project, examples of their code, and reflections on the problems that they had solved during the project. In the picture below, the learner has shared both the ‘wrong’ and ‘right’ versions of their code, along with an explanation of how they debugged the error. 

A student portfolio with the title 'Coding Challenge'. The wrong code is on the left-hand side and the right code is on the right. The student has included an explanation beneath the wrong code: This is the wrong code. The problem I had was that I was putting the semicolon outside of the bracket. But the revision I needed was putting the semicolon inside of the bracket. That problem was a hard one to see because it is a very minor problem and most people wouldn't have caught it.
A learner’s example of debugging code from their portfolio

Yasmin explained the equity-oriented theories underpinning the digital portfolio teaching approach. The learners’ reflections allowed deeper understanding of the computing and electronics concepts involved and helped to balance the personalised nature of their artefacts with the need to meet learning goals.

Yasmin also emphasised how important it was for learners to take part in a series of projects so that they encountered computing and electronics concepts more than once. In this way, reflective journalling can be seen as an equitable teaching approach because it helps to move learners on from their initial engagement into more complex projects. Thinking back to the clubhouse model, it is equally important for learners to be valued for their complex e-textile projects as it is for their complex robotics projects, and so portfolios of a series of e-textile projects show that a diverse range of learners can be successful in computing at the highest levels. 

Try e-textiles with your learners

alt=""
Science and nature models made with an RPF project

If you’re thinking about ways of introducing e-textile activities to your learners, there are some useful resources here: 

  • The Exploring Computer Science page contains all the information and resources relating to the “Stitching the Loop” electronic textiles unit. You can also find the video that Yasmin and Elaine shared during the seminar. 
  • For e-textiles in a non-formal learning space, the StitchFest webpage has lots of information about an e-textile hackathon that took place in 2014, designed to broaden participation and perceptions in computing. 
  • 3D LED science display with Scratch” is a project that combines using LEDs with science and nature to create a 3D installation. This project is from the Raspberry Pi Foundation’s “Physical computing with Scratch and the Raspberry Pi” projects pathway.

Looking forward to our next free seminar

We’re having a short break in the seminar series but will be back in September when we’ll be continuing to find out more about cross-disciplinary approaches to computing.

In our next seminar on Tuesday 6 September 2022 at 17:00–18:30 BST / 12:00–13:30 EST / 9:00–10:30 PST / 18:00–19:30 CEST, we’ll be hearing all about the links between computing and dance, with our speaker Genevieve Smith-Nunes (University of Cambridge). Genevieve will be speaking about data ethics for the computing classroom through biometrics, ballet, and augmented reality (AR) which promises to be a fascinating perspective on bringing computing to new audiences.

The post Using e-textiles to deliver equitable computing lessons and broaden participation appeared first on Raspberry Pi.

AWS Week in Review – August 1, 2022

Post Syndicated from Jeff Barr original https://aws.amazon.com/blogs/aws/aws-week-in-review-august-1-2022/

AWS re:Inforce returned to Boston last week, kicking off with a keynote from Amazon Chief Security Officer Steve Schmidt and AWS Chief Information Security officer C.J. Moses:

Be sure to take some time to watch this video and the other leadership sessions, and to use what you learn to take some proactive steps to improve your security posture.

Last Week’s Launches
Here are some launches that caught my eye last week:

AWS Wickr uses 256-bit end-to-end encryption to deliver secure messaging, voice, and video calling, including file sharing and screen sharing, across desktop and mobile devices. Each call, message, and file is encrypted with a new random key and can be decrypted only by the intended recipient. AWS Wickr supports logging to a secure, customer-controlled data store for compliance and auditing, and offers full administrative control over data: permissions, ephemeral messaging options, and security groups. You can now sign up for the preview.

AWS Marketplace Vendor Insights helps AWS Marketplace sellers to make security and compliance data available through AWS Marketplace in the form of a unified, web-based dashboard. Designed to support governance, risk, and compliance teams, the dashboard also provides evidence that is backed by AWS Config and AWS Audit Manager assessments, external audit reports, and self-assessments from software vendors. To learn more, read the What’s New post.

GuardDuty Malware Protection protects Amazon Elastic Block Store (EBS) volumes from malware. As Danilo describes in his blog post, a malware scan is initiated when Amazon GuardDuty detects that a workload running on an EC2 instance or in a container appears to be doing something suspicious. The new malware protection feature creates snapshots of the attached EBS volumes, restores them within a service account, and performs an in-depth scan for malware. The scanner supports many types of file systems and file formats and generates actionable security findings when malware is detected.

Amazon Neptune Global Database lets you build graph applications that run across multiple AWS Regions using a single graph database. You can deploy a primary Neptune cluster in one region and replicate its data to up to five secondary read-only database clusters, with up to 16 read replicas each. Clusters can recover in minutes in the result of an (unlikely) regional outage, with a Recovery Point Objective (RPO) of 1 second and a Recovery Time Objective (RTO) of 1 minute. To learn a lot more and see this new feature in action, read Introducing Amazon Neptune Global Database.

Amazon Detective now Supports Kubernetes Workloads, with the ability to scale to thousands of container deployments and millions of configuration changes per second. It ingests EKS audit logs to capture API activity from users, applications, and the EKS control plane, and correlates user activity with information gleaned from Amazon VPC flow logs. As Channy notes in his blog post, you can enable Amazon Detective and take advantage of a free 30 day trial of the EKS capabilities.

AWS SSO is Now AWS IAM Identity Center in order to better represent the full set of workforce and account management capabilities that are part of IAM. You can create user identities directly in IAM Identity Center, or you can connect your existing Active Directory or standards-based identify provider. To learn more, read this post from the AWS Security Blog.

AWS Config Conformance Packs now provide you with percentage-based scores that will help you track resource compliance within the scope of the resources addressed by the pack. Scores are computed based on the product of the number of resources and the number of rules, and are reported to Amazon CloudWatch so that you can track compliance trends over time. To learn more about how scores are computed, read the What’s New post.

Amazon Macie now lets you perform one-click temporary retrieval of sensitive data that Macie has discovered in an S3 bucket. You can retrieve up to ten examples at a time, and use these findings to accelerate your security investigations. All of the data that is retrieved and displayed in the Macie console is encrypted using customer-managed AWS Key Management Service (AWS KMS) keys. To learn more, read the What’s New post.

AWS Control Tower was updated multiple times last week. CloudTrail Organization Logging creates an org-wide trail in your management account to automatically log the actions of all member accounts in your organization. Control Tower now reduces redundant AWS Config items by limiting recording of global resources to home regions. To take advantage of this change you need to update to the latest landing zone version and then re-register each Organizational Unit, as detailed in the What’s New post. Lastly, Control Tower’s region deny guardrail now includes AWS API endpoints for AWS Chatbot, Amazon S3 Storage Lens, and Amazon S3 Multi Region Access Points. This allows you to limit access to AWS services and operations for accounts enrolled in your AWS Control Tower environment.

For a full list of AWS announcements, be sure to keep an eye on the What’s New at AWS page.

Other AWS News
Here are some other news items and customer stories that you may find interesting:

AWS Open Source News and Updates – My colleague Ricardo Sueiras writes a weekly open source newsletter and highlights new open source projects, tools, and demos from the AWS community. Read installment #122 here.

Growy Case Study – This Netherlands-based company is building fully-automated robot-based vertical farms that grow plants to order. Read the case study to learn how they use AWS IoT and other services to monitor and control light, temperature, CO2, and humidity to maximize yield and quality.

Journey of a Snap on Snapchat – This video shows you how a snapshot flows end-to-end from your camera to AWS, to your friends. With over 300 million daily active users, Snap takes advantage of Amazon Elastic Kubernetes Service (EKS), Amazon DynamoDB, Amazon Simple Storage Service (Amazon S3), Amazon CloudFront, and many other AWS services, storing over 400 terabytes of data in DynamoDB and managing over 900 EKS clusters.

Cutting Cardboard Waste – Bin packing is almost certainly a part of every computer science curriculum! In the linked article from the Amazon Science site, you can learn how an Amazon Principal Research Scientist developed PackOpt to figure out the optimal set of boxes to use for shipments from Amazon’s global network of fulfillment centers. This is an NP-hard problem and the article describes how they build a parallelized solution that explores a multitude of alternative solutions, all running on AWS.

Upcoming Events
Check your calendar and sign up for these online and in-person AWS events:

AWS SummitAWS Global Summits – AWS Global Summits are free events that bring the cloud computing community together to connect, collaborate, and learn about AWS. Registrations are open for the following AWS Summits in August:

Imagine Conference 2022IMAGINE 2022 – The IMAGINE 2022 conference will take place on August 3 at the Seattle Convention Center, Washington, USA. It’s a no-cost event that brings together education, state, and local leaders to learn about the latest innovations and best practices in the cloud. You can register here.

That’s all for this week. Check back next Monday for another Week in Review!

Jeff;

This post is part of our Week in Review series. Check back each week for a quick roundup of interesting news and announcements from AWS!

Data Mesh — A Data Movement and Processing Platform @ Netflix

Post Syndicated from Netflix Technology Blog original https://netflixtechblog.com/data-mesh-a-data-movement-and-processing-platform-netflix-1288bcab2873

Data Mesh — A Data Movement and Processing Platform @ Netflix

By Bo Lei, Guilherme Pires, James Shao, Kasturi Chatterjee, Sujay Jain, Vlad Sydorenko

Background

Realtime processing technologies (A.K.A stream processing) is one of the key factors that enable Netflix to maintain its leading position in the competition of entertaining our users. Our previous generation of streaming pipeline solution Keystone has a proven track record of serving multiple of our key business needs. However, as we expand our offerings and try out new ideas, there’s a growing need to unlock other emerging use cases that were not yet covered by Keystone. After evaluating the options, the team has decided to create Data Mesh as our next generation data pipeline solution.

Last year we wrote a blog post about how Data Mesh helped our Studio team enable data movement use cases. A year has passed, Data Mesh has reached its first major milestone and its scope keeps increasing. As a growing number of use cases on board to it, we have a lot more to share. We will deliver a series of articles that cover different aspects of Data Mesh and what we have learned from our journey. This article gives an overview of the system. The following ones will dive deeper into different aspects of it.

Data Mesh Overview

A New Definition Of Data Mesh

Previously, we defined Data Mesh as a fully managed, streaming data pipeline product used for enabling Change Data Capture (CDC) use cases. As the system evolves to solve more and more use cases, we have expanded its scope to handle not only the CDC use cases but also more general data movement and processing use cases such that:

  • Events can be sourced from more generic applications (not only databases).
  • The catalog of available DB connectors is growing (CockroachDB, Cassandra for example)
  • More Processing patterns such as filter, projection, union, join, etc.

As a result, today we define Data Mesh as a general purpose data movement and processing platform for moving data between Netflix systems at scale.

Overall Architecture

The Data Mesh system can be divided into the control plane (Data Mesh Controller) and the data plane (Data Mesh Pipeline). The controller receives user requests, deploys and orchestrates pipelines. Once deployed, the pipeline performs the actual heavy lifting data processing work. Provisioning a pipeline involves different resources. The controller delegates the responsibility to the corresponding microservices to manage their life cycle.

Pipelines

A Data Mesh pipeline reads data from various sources, applies transformations on the incoming events and eventually sinks them into the destination data store. A pipeline can be created from the UI or via our declarative API. On the creation/update request the controller figures out the resources associated with the pipeline and calculates the proper configuration for each of them.

Connectors

A source connector is a Data Mesh managed producer. It monitors the source database’s bin log and produces CDC events to the Data Mesh source fronting Kafka topic. It is able to talk to the Data Mesh controller to automatically create/update the sources.

Previously we only had RDS source connectors to listen to MySQL and Postgres using the DBLog library; Now we have added Cockroach DB source connectors and Cassandra source connectors. They use different mechanisms to stream events out of the source databases. We’ll have blog posts deep dive into them.

In addition to managed connectors, application owners can emit events via a common library, which can be used in circumstances where a DB connector is not yet available or there is a preference to emit domain events without coupling with a DB schema.

Sources

Application developers can expose their domain data in a centralized catalog of Sources. This allows data sharing as multiple teams at Netflix may be interested in receiving changes for an entity. In addition, a Source can be defined as a result of a series of processing steps — for example an enriched Movie entity with several dimensions (such as the list of Talents) that further can be indexed to fulfill search use cases.

Processors

A processor is a Flink Job. It contains a reusable unit of data processing logic. It reads events from the upstream transports and applies some business logic to each of them. An intermediate processor writes data to another transport. A sink processor writes data to an external system such as Iceberg, ElasticSearch, or a separate discoverable Kafka topic.

We have provided a Processor SDK to help the advanced users to develop their own processors. Processors developed by Netflix developers outside our team can also be registered to the platform and work with other processors in a pipeline. Once a processor is registered, the platform also automatically sets up a default alert UI and metrics dashboard

Transports

We use Kafka as the transportation layer for the interconnected processors to communicate. The output events of the upstream processor are written to a Kafka topic, and the downstream processors read their input events from there.

Kafka topics can also be shared across pipelines. A topic in pipeline #1 that holds the output of its upstream processor can be used as the source in pipeline #2. We frequently see use cases where some intermediate output data is needed by different consumers. This design enables us to reuse and share data as much as possible. We have also implemented the features to track the data lineage so that our users can have a better picture of the overall data usage.

Schema

Data Mesh enforces schema on all the pipelines, meaning we require all the events passing through the pipelines to conform to a predefined template. We’re using Avro as a shared format for all our schemas, as it’s simple, powerful, and widely adopted by the community..

We make schema as the first class citizen in Data Mesh due to the following reasons:

  • Better data quality: Only events that comply with the schema can be encoded. Gives the consumer more confidence.
  • Finer granularity of data lineage: The platform is able to track how fields are consumed by different consumers and surface it on the UI.
  • Data discovery: Schema describes data sets and enables the users to browse different data sets and find the dataset of interest.

On pipeline creation, each processor in that pipeline needs to define what schema it consumes and produces. The platform handles the schema validation and compatibility check. We have also built automation around handling schema evolution. If the schema is changed at the source, the platform tries to upgrade the consuming pipelines automatically without human intervention.

Future

Data Mesh Initially started as a project to solve our Change Data Capture needs. Over the past year, we have observed an increasing demand for all sorts of needs in other domains such as Machine Learning, Logging, etc. Today, Data Mesh is still in its early stage and there are just so many interesting problems yet to be solved. Below are the highlights of some of the high priority tasks on our roadmap.

Making Data Mesh The Paved Path (Recommended Solution) For Data Movement And Processing

As mentioned above, Data Mesh is meant to be the next generation of Netflix’s real-time data pipeline solution. As of now, we still have several specialized internal systems serving their own use cases. To streamline the offering, it makes sense to gradually migrate those use cases onto Data Mesh. We are currently working hard to make sure that Data Mesh can achieve feature parity to Delta and Keystone. In addition, we also want to add support for more sources and sinks to unlock a wide range of data integration use cases.

More Processing Patterns And Better Efficiency

People use Data Mesh not only to move data. They often also want to process or transform their data along the way. Another high priority task for us is to make more common processing patterns available to our users. Since by default a processor is a Flink job, having each simple processor doing their work in their own Flink jobs can be less efficient. We are also exploring ways to merge multiple processing patterns into one single Flink job.

Broader support for Connectors

We are frequently asked by our users if Data Mesh is able to get data out of datastore X and land it into datastore Y. Today we support certain sources and sinks but it’s far from enough. The demand for more types of connectors is just enormous and we see a big opportunity ahead of us and that’s definitely something we also want to invest on.

Data Mesh is a complex yet powerful system. We believe that as it gains its maturity, it will be instrumental in Netflix’s future success. Again, we are still at the beginning of our journey and we are excited about the upcoming opportunities. In the following months, we’ll publish more articles discussing different aspects of Data Mesh. Please stay tuned!

The Team

Data Mesh wouldn’t be possible without the hard work and great contributions from the team. Special thanks should go to our stunning colleagues:

Bronwyn Dunn, Jordan Hunt, Kevin Zhu, Pradeep Kumar Vikraman, Santosh Kalidindi, Satyajit Thadeshwar, Tom Lee, Wei Liu


Data Mesh — A Data Movement and Processing Platform @ Netflix was originally published in Netflix TechBlog on Medium, where people are continuing the conversation by highlighting and responding to this story.

How ERGO built an on-call support solution in a week

Post Syndicated from Sid Singh original https://aws.amazon.com/blogs/architecture/how-ergo-built-an-on-call-support-solution-in-a-week/

ERGO’s Technology & Services S.A. (ET&S) Cloud Solutions Department is a specialist team of cloud engineers who provide technical support for business owners, project managers, and engineering leads. The support team deals with complex issues, such as failed deployments, security vulnerabilities, environment availability, etc.

When an issue arises, it’s categorized as Priority 1 (P1) or Priority 2 (P2). For urgent P1 incidents, users contact the support team directly via phone. For P2 incidents, the workflow sends an issue description to the support team via SMS.

Originally, the SMS and voice forwarding systems were manually updated every Monday. For SMS, an operator manually updated the phone numbers in the system for the assigned support team members. For voice forwarding, support team members used physical phones, which were handed off from engineer to engineer per the support team roster.

These manual processes were time consuming and occasionally error prone. Additionally, with COVID-19 physical distancing measures in place, handing off physical devices was complicated. To keep up with the increasing number of support cases and the growth of their Cloud Solutions Department, ERGO worked with AWS to modernize and automate their manual workflow. We’ll show you how ERGO implemented a production-ready, on-call support solution with SMS and voice features in just one week using Amazon Connect and Amazon Pinpoint.

Automating the SMS on-call system

Let’s look at how we automated the SMS on-call support system, as shown in Figure 1 and summarized as follows:

  1. We use an open-source orchestration tool, Red Hat Ansible Automation Platform (Ansible), as a frontend to run the template “Assign to On-call SMS”.
  2. The template sets the parameter to a subset of support team members who are assigned to support P1/P2 cases. The assignment is based on the on-call shift schedule.
  3. Next, support team members are subscribed to the Amazon Simple Notification Service (Amazon SNS) topic subscriber’s list using an Ansible playbook.

Now the support team will receive SMS alerts.

Assign to on-call SMS workflow

Figure 1. Assign to on-call SMS workflow

Next, we integrated the SMS workflow with our ZIS IT monitoring tool to capture critical events and forward them via SMS to the support team, as shown in Figure 2:

  1. The Amazon Pinpoint phone number is set as the SMS destination in our monitoring tool.
  2. The monitoring tool then sends the SMS to Amazon Pinpoint, where:
    • We extract the messageBody from the payload that Amazon Pinpoint prepared by sending the message to Amazon SNS “Before Processing Message”, which is subscribed by our AWS Lambda function “Extract messageBody”.
    • The extracted message is then sent to Amazon SNS as “After Processing Message”, which uses the Amazon Pinpoint “Two-way SMS” feature to send the SMS to support team members who are assigned to the Amazon SNS topic.
On-call SMS workflow integration with Amazon Pinpoint

Figure 2. On-call SMS workflow integration with Amazon Pinpoint

Also shown in Figure 2, we track our monthly SMS spending using Amazon CloudWatch. The SMSMonthToDateSpentUSD metric shows the amount spent sending SMS messages during the current month.

Why extract the messageBody before sending the SMS to the support team?

Amazon Pinpoint captures SMS from the monitoring tool in JSON format, which includes additional information, such as the origin and destination numbers, the message ID and related data, as shown in the following example:

{

"originationNumber":"+14255550182",

"destinationNumber":"+12125550101",

"messageKeyword":"JOIN",

"messageBody":"EXAMPLE",

"inboundMessageId":"cae173d2-66b9-564c-8309-21f858e9fb84",

"previousPublishedMessageId":"wJalrXUtnFEMI/K7MDENG/bPxRfiCYEXAMPLEKEY"

}

The support team only needs the messageBody, and the JSON format makes it difficult to read on a mobile phone. Therefore, we use a Lambda function for the “messageBody” extraction.

Automating the voice forwarding system

The other half of our on-call solution is voice forwarding. As mentioned in the introduction, we had a physical phone and updated the call forwarding every Monday. This allowed us to forward calls to a single number, but this system had two main problems: it wasn’t scalable and it was prone to human errors.

In our automated system, shown in Figure 3, all calls to the physical phone are forwarded to Amazon Connect, so we do not need to change the number of the phone.

This is how it’s set up:

  • The assigned phone numbers in Amazon Connect are attached to the Contact Flow “ERGO On-call Forwarding Voice”, which starts at the “Entry point” rectangle on the left side of the diagram.
  • In the next step, “Set logging behavior” captures the calling number. This allows us to see the number to return any missed calls.
  • Finally, the set working queue contains routing profiles (in this case, we use a main line and secondary line). The main line has support team members who are assigned to address P1 cases. The secondary line is for managers who will take the call if the support team members are not available.

When a customer is in a queue, the Amazon Connect contact flow tries to route the call to a support team member. If there’s no answer, the service re-routes the call to the next available support team member. After 30 seconds, if there is no answer on the first line (and no other support team members have become available), the service tries the secondary line.

To set this up:

  • Every support team member requires an Amazon Connect account. You can import their data via CSV to automate provisioning.
  • If a support team member is shown as online but does not answer a call, Amazon Connect changes their status to offline. This way, an Amazon Connect admin can see the time and number of the missed call in the Amazon Connect Real-time metrics reports and can return the call when another team member or supervisor is available.
  • Figure 3 shows how Amazon Connect and CloudWatch monitor contact center health metrics like “MissedCalls” and generate alerts via Amazon Simple Notification Service (SNS) to send notifications via email to ensure calls are returned promptly. For more details on this integration pattern, refer to the Monitor and trigger alerts using Amazon CloudWatch for Amazon Connect blog post.
On-call voice forwarding workflow with Amazon Connect

Figure 3. On-call voice forwarding workflow with Amazon Connect

Lessons learned

After creating an Amazon Connect instance, we claimed a phone number to place or receive calls. Requesting phone numbers from Amazon Connect to serve different customers in different countries was the most time intensive part of the setup. Be aware that some countries have regulatory requirements, and this can increase the time and effort required. For example, requesting a German number and a Polish number will require different documents. To save time, we used international toll-free numbers. This allows us to provide support to people in all other countries without the caller incurring additional charges.

To help you with your implementation, you can find the list of ID requirements by country or AWS Region here and AWS support can provide more information.

Conclusion

Using managed services like Amazon Connect and Amazon Pinpoint allowed us to implement a scalable and pay-as-you-go on-call solution for technical support. The new automated setup is a huge improvement over the previous manual and error-prone workflow and enables us to easily onboard customers from new countries.

Looking ahead, we plan to explore using the Amazon Connect APIs to automate the management of an agent’s online/offline status, as well as building a skills-based routing workflow to accommodate a multi-lingual support team. You can read more about AWS Customer Engagement services here.

How Epos Now modernized their data platform by building an end-to-end data lake with the AWS Data Lab

Post Syndicated from Debadatta Mohapatra original https://aws.amazon.com/blogs/big-data/how-epos-now-modernized-their-data-platform-by-building-an-end-to-end-data-lake-with-the-aws-data-lab/

Epos Now provides point of sale and payment solutions to over 40,000 hospitality and retailers across 71 countries. Their mission is to help businesses of all sizes reach their full potential through the power of cloud technology, with solutions that are affordable, efficient, and accessible. Their solutions allow businesses to leverage actionable insights, manage their business from anywhere, and reach customers both in-store and online.

Epos Now currently provides real-time and near-real-time reports and dashboards to their merchants on top of their operational database (Microsoft SQL Server). With a growing customer base and new data needs, the team started to see some issues in the current platform.

First, they observed performance degradation for serving the reporting requirements from the same OLTP database with the current data model. A few metrics that needed to be delivered in real time (seconds after a transaction was complete) and a few metrics that needed to be reflected in the dashboard in near-real-time (minutes) took several attempts to load in the dashboard.

This started to cause operational issues for their merchants. The end consumers of reports couldn’t access the dashboard in a timely manner.

Cost and scalability also became a major problem because one single database instance was trying to serve many different use cases.

Epos Now needed a strategic solution to address these issues. Additionally, they didn’t have a dedicated data platform for doing machine learning and advanced analytics use cases, so they decided on two parallel strategies to resolve their data problems and better serve merchants:

  • The first was to rearchitect the near-real-time reporting feature by moving it to a dedicated Amazon Aurora PostgreSQL-Compatible Edition database, with a specific reporting data model to serve to end consumers. This will improve performance, uptime, and cost.
  • The second was to build out a new data platform for reporting, dashboards, and advanced analytics. This will enable use cases for internal data analysts and data scientists to experiment and create multiple data products, ultimately exposing these insights to end customers.

In this post, we discuss how Epos Now designed the overall solution with support from the AWS Data Lab. Having developed a strong strategic relationship with AWS over the last 3 years, Epos Now opted to take advantage of the AWS Data lab program to speed up the process of building a reliable, performant, and cost-effective data platform. The AWS Data Lab program offers accelerated, joint-engineering engagements between customers and AWS technical resources to create tangible deliverables that accelerate data and analytics modernization initiatives.

Working with an AWS Data Lab Architect, Epos Now commenced weekly cadence calls to come up with a high-level architecture. After the objective, success criteria, and stretch goals were clearly defined, the final step was to draft a detailed task list for the upcoming 3-day build phase.

Overview of solution

As part of the 3-day build exercise, Epos Now built the following solution with the ongoing support of their AWS Data Lab Architect.

Epos Now Arch Image

The platform consists of an end-to-end data pipeline with three main components:

  • Data lake – As a central source of truth
  • Data warehouse – For analytics and reporting needs
  • Fast access layer – To serve near-real-time reports to merchants

We chose three different storage solutions:

  • Amazon Simple Storage Service (Amazon S3) for raw data landing and a curated data layer to build the foundation of the data lake
  • Amazon Redshift to create a federated data warehouse with conformed dimensions and star schemas for consumption by Microsoft Power BI, running on AWS
  • Aurora PostgreSQL to store all the data for near-real-time reporting as a fast access layer

In the following sections, we go into each component and supporting services in more detail.

Data lake

The first component of the data pipeline involved ingesting the data from an Amazon Managed Streaming for Apache Kafka (Amazon MSK) topic using Amazon MSK Connect to land the data into an S3 bucket (landing zone). The Epos Now team used the Confluent Amazon S3 sink connector to sink the data to Amazon S3. To make the sink process more resilient, Epos Now added the required configuration for dead-letter queues to redirect the bad messages to another topic. The following code is a sample configuration for a dead-letter queue in Amazon MSK Connect:

Because Epos Now was ingesting from multiple data sources, they used Airbyte to transfer the data to a landing zone in batches. A subsequent AWS Glue job reads the data from the landing bucket , performs data transformation, and moves the data to a curated zone of Amazon S3 in optimal format and layout. This curated layer then became the source of truth for all other use cases. Then Epos Now used an AWS Glue crawler to update the AWS Glue Data Catalog. This was augmented by the use of Amazon Athena for doing data analysis. To optimize for cost, Epos Now defined an optimal data retention policy on different layers of the data lake to save money as well as keep the dataset relevant.

Data warehouse

After the data lake foundation was established, Epos Now used a subsequent AWS Glue job to load the data from the S3 curated layer to Amazon Redshift. We used Amazon Redshift to make the data queryable in both Amazon Redshift (internal tables) and Amazon Redshift Spectrum. The team then used dbt as an extract, load, and transform (ELT) engine to create the target data model and store it in target tables and views for internal business intelligence reporting. The Epos Now team wanted to use their SQL knowledge to do all ELT operations in Amazon Redshift, so they chose dbt to perform all the joins, aggregations, and other transformations after the data was loaded into the staging tables in Amazon Redshift. Epos Now is currently using Power BI for reporting, which was migrated to the AWS Cloud and connected to Amazon Redshift clusters running inside Epos Now’s VPC.

Fast access layer

To build the fast access layer to deliver the metrics to Epos Now’s retail and hospitality merchants in near-real time, we decided to create a separate pipeline. This required developing a microservice running a Kafka consumer job to subscribe to the same Kafka topic in an Amazon Elastic Kubernetes Service (Amazon EKS) cluster. The microservice received the messages, conducted the transformations, and wrote the data to a target data model hosted on Aurora PostgreSQL. This data was delivered to the UI layer through an API also hosted on Amazon EKS, exposed through Amazon API Gateway.

Outcome

The Epos Now team is currently building both the fast access layer and a centralized lakehouse architecture-based data platform on Amazon S3 and Amazon Redshift for advanced analytics use cases. The new data platform is best positioned to address scalability issues and support new use cases. The Epos Now team has also started offloading some of the real-time reporting requirements to the new target data model hosted in Aurora. The team has a clear strategy around the choice of different storage solutions for the right access patterns: Amazon S3 stores all the raw data, and Aurora hosts all the metrics to serve real-time and near-real-time reporting requirements. The Epos Now team will also enhance the overall solution by applying data retention policies in different layers of the data platform. This will address the platform cost without losing any historical datasets. The data model and structure (data partitioning, columnar file format) we designed greatly improved query performance and overall platform stability.

Conclusion

Epos Now revolutionized their data analytics capabilities, taking advantage of the breadth and depth of the AWS Cloud. They’re now able to serve insights to internal business users, and scale their data platform in a reliable, performant, and cost-effective manner.

The AWS Data Lab engagement enabled Epos Now to move from idea to proof of concept in 3 days using several previously unfamiliar AWS analytics services, including AWS Glue, Amazon MSK, Amazon Redshift, and Amazon API Gateway.

Epos Now is currently in the process of implementing the full data lake architecture, with a rollout to customers planned for late 2022. Once live, they will deliver on their strategic goal to provide real-time transactional data and put insights directly in the hands of their merchants.


About the Authors

Jason Downing is VP of Data and Insights at Epos Now. He is responsible for the Epos Now data platform and product direction. He specializes in product management across a range of industries, including POS systems, mobile money, payments, and eWallets.

Debadatta Mohapatra is an AWS Data Lab Architect. He has extensive experience across big data, data science, and IoT, across consulting and industrials. He is an advocate of cloud-native data platforms and the value they can drive for customers across industries.

[$] Some 5.19 development statistics

Post Syndicated from original https://lwn.net/Articles/902854/

The 5.19 kernel was released,
after a one-week delay to deal with the fallout from the Retbleed
mitigations, on July 31. By that time, 16,399 commits (15,134
non-merge and 1,265 merges) had found their way into the mainline
repository, making this development cycle the busiest since 5.13 (16,030
non-merge changesets and 1,157 merges). Tradition dictates that now is the time for a look
at where the changes in 5.19 came from, and we’ve learned not to go against
tradition.

The 2022 Linux Plumbers Conference schedule is out

Post Syndicated from original https://lwn.net/Articles/903481/

The 2022 Linux Plumbers Conference (LPC) has announced its schedule. The conference will be held in Dublin, Ireland, September 12-14.

The schedule for when the miniconferences and tracks are going to occur is now posted at: https://lpc.events/event/16/timetable/#all

The runners for the miniconferences will be adding more details to each of their schedules over the coming weeks.

The Linux Plumbers Refereed track schedule and Kernel Summit schedule is now available at: https://lpc.events/event/16/timetable/#all.detailed

The leads for the networking and toolchain tracks will be adding more details to each of their schedules over the coming weeks, as well.

Running Zig with WASI on Cloudflare Workers

Post Syndicated from Daniel Harper original https://blog.cloudflare.com/running-zig-with-wasi-on-cloudflare-workers/

Running Zig with WASI on Cloudflare Workers

Running Zig with WASI on Cloudflare Workers

After the recent announcement regarding WASI support in Workers, I decided to see what it would take to get code written in Zig to run as a Worker, and it turned out to be trivial. This post documents the process I followed as a new user of Zig. It’s so exciting to see how Cloudflare Workers is a polyglot platform allowing you to write programs in the language you love, or the language you’re learning!

Hello, World!

I’m not a Zig expert by any means, and to keep things entirely honest I’ve only just started looking into the language, but we all have to start somewhere. So, if my Zig code isn’t perfect please bear with me. My goal was to build a real, small program using Zig and deploy it on Cloudflare Workers. And to see how fast I can go from a blank screen to production code.

My goal for this wasn’t ambitious, just read some text from stdin and print it to stdout with line numbers, like running cat -n. But it does show just how easy the Workers paradigm is. This Zig program works identically on the command-line on my laptop and as an HTTP API deployed on Cloudflare Workers.

Here’s my code. It reads a line from stdin and outputs the same line prefixed with a line number. It terminates when there’s no more input.

const std = @import("std");

pub fn main() anyerror!void {
	// setup allocator
	var gpa = std.heap.GeneralPurposeAllocator(.{}){};
	defer std.debug.assert(!gpa.deinit());
	const allocator = gpa.allocator();

	// setup streams
	const stdout = std.io.getStdOut().writer();
	const in = std.io.getStdIn();
	var reader = std.io.bufferedReader(in.reader()).reader();

	var counter: u32 = 1;

	// read input line by line
	while (try reader.readUntilDelimiterOrEofAlloc(allocator, '\n', std.math.maxInt(usize))) |line| {
    	    defer allocator.free(line);
    	    try stdout.print("{d}\t{s}\n", .{counter, line});
    	    counter = counter + 1;
	}
}

To build Zig code, you create a build.zig file that defines how to build your project. For this trivial case I just opted to build an executable from the sources

const std = @import("std");

pub fn build(b: *std.build.Builder) void {
	const target = b.standardTargetOptions(.{});
	const mode = b.standardReleaseOptions();

	const exe = b.addExecutable("print-with-line-numbers", "src/main.zig");
	exe.setTarget(target);
	exe.setBuildMode(mode);
	exe.install();
}

By running zig build the compiler will run and output a binary under zig-out/bin

$ zig build

$ ls zig-out/bin
print-with-line-numbers

$ echo "Hello\nWorld" | ./zig-out/bin/print-with-line-numbers
1    Hello
2    World

WASI

The next step is to get this running on Workers, but first I need to compile it into WASM with WASI support.

Thankfully, this comes out of the box with recent versions of Zig, so you can just tell the compiler to build your executable using the wasm32-wasi target, which will produce a file that can be run on any WASI-compatible WebAssembly runtime, such as wasmtime.

This same .wasm file can be run in wasmtime and deployed directly to Cloudflare Workers. This makes building, testing and deploying seamless.

$ zig build -Dtarget=wasm32-wasi

$ ls zig-out/bin
print-with-line-numbers.wasm

$ echo "Hello\nWorld" | wasmtime ./zig-out/bin/print-with-line-numbers.wasm
1    Hello
2    World

Zig on Workers

With our binary ready to go, the last piece is to get it running on Cloudflare Workers using wrangler2. That is as simple as publishing the .wasm file on workers.dev. If you don’t have a workers.dev account, you can follow the tutorial on our getting started guide that will get you from code to deployment within minutes!

In fact, once I signed up for my account, all I needed to do was complete the first two steps, install wrangler and login.

$ npx wrangler@wasm login
Attempting to login via OAuth...
Opening a link in your default browser: https://dash.cloudflare.com/oauth2/auth
Successfully logged in.

Then, I ran the following command to publish my worker:

$ npx wrangler@wasm publish --name print-with-line-numbers --compatibility-date=2022-07-07 zig-out/bin/print-with-line-numbers.wasm
Uploaded print-with-line-numbers (3.04 sec)
Published print-with-line-numbers (6.28 sec)
  print-with-line-numbers.workers.dev

With that step completed, the worker is ready to run and can be invoked by calling the URL printed from the output above.

echo "Hello\nWorld" | curl https://print-with-line-numbers.workers.dev -X POST --data-binary @-
1    Hello
2    World

Success!

Conclusion

What impressed me the most here was just how easy this process was.

First, I had a binary compiled for the architecture of my laptop, then I compiled the code into WebAssembly by just passing a flag to the compiler, and finally I had this running on workers without having to change any code.

Granted, this program was not very complicated and does not do anything other than read from STDIN and write to STDOUT, but it gives me confidence of what is possible, especially as technology like WASI matures.

Shift Left: Secure Your Innovation Pipeline

Post Syndicated from Ryan Blanchard original https://blog.rapid7.com/2022/08/01/shift-left-secure-your-innovation-pipeline/

Shift Left: Secure Your Innovation Pipeline

There’s no shortage of buzzwords in the tech world. Some are purely marketing spin. But others are colloquial ways for the industry to talk about complex topics that have a massive impact on how organizations and teams drive innovation and work more efficiently. Here at Rapid7, we believe the “shift left” movement very much falls in the latter category.

Because we see shifting left as so critical to an effective cloud security strategy, we’re kicking off a new blog series covering how organizations can seamlessly incorporate security best practices and technologies into their existing DevOps workflows — and, of course, how InsightCloudSec and the brilliant team here at Rapid7 can help.

What does “shift left” actually mean?

For those who might not be familiar with the term, “shift left” can be used interchangeably with DevOps methodologies. The idea is to “shift” tasks that have typically been performed by centralized and dedicated operations teams earlier in the software development life cycle (SDLC). In the case of security, this means weaving security guardrails and checks into development, fixing problems at the source rather than waiting to do so upon deployment or production.

Shift Left: Secure Your Innovation Pipeline

Historically, security was centered around applying checks and scanning for known vulnerabilities after software was built as part of the test and release processes. While this is an important step in the cycle, there are many instances in which this is too late to begin thinking about the integrity of your software and supporting infrastructure — particularly as organizations adopt DevOps practices, resources are increasingly provisioned declaratively, and the development cycle becomes a more iterative, continuous process.

Our philosophy on shift left

One of the most commonly cited concerns we hear from organizations attempting to shift left is the potential to create a bottleneck in development, as developers need to complete additional steps to clear compliance and security hurdles. This is a crucial consideration, given that accelerating software development and increasing efficiency is often the driving force behind adopting DevOps practices in the first place. Security must catch up to the pace of development, not slow it down.

Shift left is very much about decentralizing security to match the speed and scale of the cloud, and when done poorly, it can erode trust and be viewed as a gating factor to releasing high-quality code. This is what drives Rapid7’s fundamental belief that in order to effectively shift security left, you need to avoid adding friction into the process, and instead embrace the developer experience and meet devs where they are today.

How do you accomplish this? Here’s a few core concepts that we here at Rapid7 endorse:

Provide real-time feedback with clear remediation guidance

The main goal of DevOps is to accelerate the pace of software development and improve operating efficiency. In order to accomplish this without compromising quality and security, you must make sure that insights derived from your tooling are actionable and made available to the relevant stakeholders in real time. For instance, if an issue is detected in an IaC template, the developer should be immediately notified and provided with step-by-step guidance on how to fix the issue directly in the template itself.

Establish clear and consistent security and compliance standards

It’s important for an organization to have a clear and consistent definition of what “good” looks like. A well-centered definition of security and compliance controls helps establish a common standard for the entire organization, making measurement of compliance and risk easier to establish and report. Working from a single, centrally managed policy set makes it that much easier to ensure that teams are building compliant workloads from the start, and you can limit the time wasted repeatedly fixing issues after they reach production. A common standard for security that everyone is accountable for also establishes trust with the development community.

Integrate seamlessly with existing tool chains and processes

When adding any tools or additional steps into the development life cycle, it is critically important to integrate them with existing tools and processes to avoid adding friction and creating bottlenecks. This means that your security tools must be compatible with existing CI/CD tools (e.g., GitHub, Jenkins, Puppet, etc.) to make the process of scanning resources and remediating issues seamless, and to enable developers to complete their tasks without ever leaving the tools they are most comfortable working with.

Enable automation by shifting security left

Automation can be a powerful tool for teams managing sprawling and complex cloud environments. Shifting security left with IaC scanning allows you to catch faulty source templates before they’re ever used, allowing teams to leverage automation to deploy their cloud infrastructure resources with the confidence that they will align to organizational security standards.

Shifting cloud security left with IaC scanning

Infrastructure as code (IaC) refers to the ability to provision cloud infrastructure resources declaratively, by writing code in the same development environments used to write the software it is intended to support. IaC is a critical component of shifting left, as it empowers developers to write, test, and release software and infrastructure resources programmatically in a highly integrated process. This is typically done through pre-configured templates based on policies determined by operations teams, making development a shared and reproducible process.

When it comes to IaC security, we’re primarily talking about integrating the process of checking IaC templates to be sure that they won’t result in non-compliant infrastructure. But it shouldn’t stop there. In a perfect world, the IaC scanning tool will identify why a given template will be non-compliant, but it should also tell you how to fix it (bonus points if it can fix the problem for you!).

IaC scanning with InsightCloudSec

By this point, it should be clear that we here at Rapid7 strongly believe in incorporating security and compliance as early as possible in the development process, but we know this can be a daunting task. That’s why we built powerful capabilities into the InsightCloudSec platform to make integrating IaC scanning into your development workflows as easy and seamless as possible.

With IaC scanning in InsightCloudSec, your teams can identify and evaluate risk before infrastructure is ever built, stopping non-compliant or misconfigured resources from ever reaching production, and improving efficiency by fixing problems at the source once and for all, rather than repeatedly addressing them in runtime. With out-of-the-box support for popular IaC tools like Terraform and CloudFormation, InsightCloudSec provides teams with a common understanding of good that is consistent throughout the entire development life cycle.

Shifting security left requires consistency

Consistency is critical when shifting left, because if you’re scanning IaC templates with checks against policies that differ from those being applied in production, there’s a high likelihood that after some — likely short — period of time, those policy sets are going to drift, leading to missed vulnerabilities, misconfigurations, and/or non-compliant workloads. That may not seem like the end of the world, but it creates real problems for communicating issues across teams and increases the risk of inconsistent application of policies. When you lack consistency, it creates confusion among your stakeholders and erodes confidence in the effectiveness of your security program.

To address this, InsightCloudSec applies the same exact set of configuration standards and security policies across your entire CI/CD pipeline and even across your various cloud platforms (if your organization is one of the many that employ a hybrid cloud strategy). That means teams using IaC templates to provision infrastructure resources for their cloud-native applications can be confident they are deploying workloads that are in line with existing compliance and security standards — without having to apply a distinct set of checks, or cross-reference them with those being used in production environments.

Sounds amazing, right?! There’s a whole lot more that InsightCloudSec has to offer cloud security teams that we don’t have time to cover in this post, so follow this link if you’d like to learn more.

Additional reading:

NEVER MISS A BLOG

Get the latest stories, expertise, and news about security today.

Using certificate-based authentication for iOS applications with Amazon SNS

Post Syndicated from Sam Dengler original https://aws.amazon.com/blogs/compute/using-certificate-based-authentication-for-ios-applications-with-amazon-sns/

This blog post is written by Yashlin Naidoo, Arnav Thakur, Kim Read, Guilherme Silva.

Amazon SNS enables you to send notifications to a mobile push endpoint using a platform application endpoint by dispatching the notification on your application’s behalf. Push notifications for iOS apps are sent using Apple Push Notification Service (APNs).

To send push notifications using SNS for APNS certificate-based authentication, you must provide a set of credentials for connecting to the Apple Push Notification Service (see prerequisites for push). SNS supports using certificate-based authentication (.p12), in addition to the new token-based authentication (.p8).

Certificate-based authentication uses a provider certificate to establish a secure connection between your provider and APNs. These certificates are tied to a single application and are used to send notifications to this application. This approach can be useful when you haven’t migrated to the new token-based authentication.

For new applications, we recommend using token-based authentication as it provides improved security. It removes the need for yearly renewal of the certificates and can also be shared amongst multiple applications. To learn about how to use token-based authentication, visit Token-Based authentication for iOS applications with Amazon SNS in the AWS Compute Blog.

This blog shows step-by-step instructions on how to build an iOS application. You learn how to create a new certificate from your Apple developer account, and set up a platform application and endpoint in the SNS console. Next, you will learn how to test your application by sending a push notification via SNS to your device. Finally, you view the push notification delivered to your device.

Setting up your iOS application

This section will go over:

  • Creating an iOS application.
  • Creating a .p12 certificate to upload to SNS.

Prerequisites:

Creating an iOS application

  1. Create a new XCode project. Select iOS as the platform.

    New XCode project

    New XCode project

  2. Select your Apple Developer Account team and organization identifier.

    Select your Apple Developer Account team

    Select your Apple Developer Account team

  3. In your project, go to Signing & Capabilities. Under signing, ensure that “Automatically manage signing” is checked and your team is selected.

    Signing & Capabilities

    Signing & Capabilities

  4. To add the push notification capability to your application, select “+” and select Push Notifications.
    Add push notification capability

    Add push notification capability

    This step creates resources on your Apple Developer Account (the App ID and adds Push notification capability to it). You can also verify this in your Apple Developer Account.

  5. Add the following code to AppDelegate.swift:
        import UIKit
        import UserNotifications
    
        @main
        class AppDelegate: UIResponder, UIApplicationDelegate {
    
        func application(_ application: UIApplication, didFinishLaunchingWithOptions launchOptions: [UIApplication.LaunchOptionsKey: Any]?) -> Bool {
        // Override point for customization after application launch
    
        //Call to register for push notifications when launched
        registerForPushNotifications()
    
        return true
        }
    
        // MARK: UISceneSession Lifecycle
    
        func application(_ application: UIApplication, configurationForConnecting connectingSceneSession: UISceneSession, options: UIScene.ConnectionOptions) -> UISceneConfiguration {
        // Called when a new scene session is being created.
        // Use this method to select a configuration to create the new scene with.
        return UISceneConfiguration(name: "Default Configuration", sessionRole: connectingSceneSession.role)
        }
    
        func application(_ application: UIApplication, didDiscardSceneSessions sceneSessions: Set<UISceneSession>) {
        // Called when the user discards a scene session.
        // If any sessions were discarded while the application was not running, this will be called shortly after application:didFinishLaunchingWithOptions.
        // Use this method to release any resources that were specific to the discarded scenes, as they will not return.
        }
    
        func getNotificationSettings() {
        UNUserNotificationCenter.current().getNotificationSettings { settings in
        print("Notification settings: \(settings)")
    
        guard settings.authorizationStatus == .authorized else { return }
        DispatchQueue.main.async {
        UIApplication.shared.registerForRemoteNotifications()
        }
    
        }
        }
    
        func registerForPushNotifications() {
        //1 this handles all notification-related activities in the app including push notifications
        UNUserNotificationCenter.current()
    
        //2 this requests authorization to send the types of notifications specifies in the options
        .requestAuthorization(
        options: [.alert, .sound, .badge]) { [weak self] granted, _ in
        print("Permission granted: \(granted)")
        guard granted else { return }
        self?.getNotificationSettings()
        }
    
        }
    
        func application(
        _ application: UIApplication,
        didRegisterForRemoteNotificationsWithDeviceToken deviceToken: Data
        ) {
        let tokenParts = deviceToken.map { data in String(format: "%02.2hhx", data) }
        let token = tokenParts.joined()
        print("Device Token: \(token)")
        }
    
        func application(
        _ application: UIApplication,
        didFailToRegisterForRemoteNotificationsWithError error: Error
        ) {
        print("Failed to register: \(error)")
        }
    
        }
  6. Build and run the application on an iPhone. Note that the push notification feature does not work with a simulator.
  7. On your phone, select “Allow” when prompted to allow push notifications.

    Allow push notifications

    Allow push notifications

  8. The debugger prints “Permission granted: true” if successful and returns the Device Token.

    Device token

    Device token

You have now configured an iOS application that can receive push notifications. Next, use the application to test sending push notifications with SNS using certificate-based authentication.

Creating a .p12 certificate to upload to SNS

After completing the previous step, you need:

  • An app identifier
  • A certificate signing request (CSR)
  • An SSL certificate

Create an identifier

  1. Log in to your Apple Developer Account.
  2. Choose Certificates, Identifiers & Profiles.
  3. In the Identifiers section, choose the Add button (+).
  4. In the Register a new identifier section, choose App IDs and select Continue.
  5. In the Select a type section, choose App, and select Continue.
  6. For Description, type the application description.
  7. For Bundle ID, use the Bundle ID assigned to your application. You can find this ID under Signing & Capabilities of your application in XCode (see step 3 under “Creating an application”).
  8. Under Capabilities, choose Push Notifications.
  9. Select Continue. In the Confirm your App ID panel, check that all values were entered correctly. The identifier should match your app ID and bundle ID.
  10. Select Register to register the new app ID.

Create a certificate signing request (CSR)

  1. Open Keychain Access located in /Applications/Utilities or search for it on Finder.
  2. Once opened, choose the tab Keychain Access Tab (next to the Apple icon). Navigate to Certificate Assistant and choose Request a Certificate from a Certificate Authority.
  3. Enter the Username, Email Address, Common Name and leave CA Email Address empty.
  4. Choose Saved to disk and choose Continue.

Create a certificate

  1. Log in to your Apple Developer Account.
  2. Choose Certificates, Identifiers & Profiles.
  3. In the Certificate section, select Create new certificate.
  4. Under services, choose your certificate: Apple Push Notification service SSL (Sandbox)/Apple Push Notification service SSL (Sandbox & Production).
  5. Keep Platform as iOS and choose App ID (Identifier) created previously.
  6. Upload the Certificate Signing Request created in the previous step and Download your certificate.

Create .p12 certificate to upload to SNS

  1. Once your certificate.cer file is downloaded (for example, “aps_development.cer”), open it to show in keychain access. Find Apple Development iOS Push Services: (Your Identifier Name/App ID Name) and ensure that the file is placed in the “Login” folder.
  2. Right-click and choose Export as file format .p12 and choose Save. Optionally, set a password.

Creating a new platform application using APNs certificate-based authentication

Prerequisites

To implement APNs certificate-based authentication from SNS, you must have:

  • An Apple Developer Account
  • An iOS mobile application

For creating a new SNS Platform Application that is used to store Push Notification Platform credentials, configurations and related configurations:

  1. Navigate to the SNS Console. Expand the Mobile menu and choose Create platform application.
  2. For the Application name field, enter an application name such as “myfirstiOSapp”. For Push Notification Platform, select Apple iOS/ VoIP/ macOS.

    Create platform application

    Create platform application

  3. Under the Apple Credentials section:
    1. If your application is in development, select the radio button for Used for development in sandbox. If your application is in production, uncheck Used for development in sandbox.
    2. For Push service, choose iOS and for Authentication method, choose Certificate.
    3. Under Certificate, select Choose file to upload the .p12 certificate file.
    4. If you configured a password while creating the certificate, enter this in the Certificate Password field.
    5. Choose Load Credentials from File to extract the Certificate and private key components.
  4. Event Notifications, Delivery Status Logging – Optional: Refer to the guide for enabling Delivery Status logs and the guide to set up Mobile Event related Notifications. More on this step can also be found in the best practices guide.

    Enter Apple credentials

    Enter Apple credentials

  5. Choose Create Platform Application. This creates a certificate-based authentication APNs Platform Application for iOS.

    Create platform application

    Create platform application

Creating a new platform endpoint using APNs token-based authentication

To send Push Notifications using SNS, a platform endpoint resource is created to store the destination address of the corresponding iOS application that is associated with the SNS platform application.

A destination address of a user’s device with the iOS application installed is identified by an unique device token. It is obtained once the app has registered successfully with APNs to receive push notifications. The details of the device token captured in the Platform Endpoint resource along with the configurations in the SNS Platform application are used in conjunction by the service to deliver a push notification message.

In the following steps, you create a new platform endpoint for a destination device that has the iOS application installed and is capable of receiving push notifications.

  1. Open your Platform Application. Choose Create Application Endpoint.

    Application endpoints list

    Application endpoints list

  2. Locate the Device token in the application logs of the iOS app provisioned earlier. Enter it in the Device Token Field.
  3. To store any additional arbitrary data for the endpoint, you can include in the User data field and choose Create application endpoint.

    Create application endpoint

    Create application endpoint

  4. Choose Create application endpoint and the details are shown on the console.

    Application endpoint detail

    Application endpoint detail

Testing a push notification from your device

In this section, you test sending a push notification to your device.

  1. From the SNS console, navigate to your platform endpoint and choose Publish message.
  2. Enter a message to send. This example uses a custom payload that allows you to provide additional APNs headers.

    Publish message

    Publish message

  3. Choose Publish message.
  4. The push notification is delivered to your device.

    Notification

    Notification

Conclusion

Developers send mobile push notifications for APNs certificate-based authentication by using a .p12 certificate to authenticate an Apple device endpoint. Certificate-based authentication ensures a secure connection through TLS (Transport Layer Security). The provider (SNS) initiates the request to APNs and validation from the provider and APNS is required to complete the secure connection.

Certificates expire annually and must be renewed to ensure that SNS can continue to deliver to the endpoint. In this post, you learn how to create an iOS application for APNs certificate-based authentication and integrate it with SNS to send push notifications to your device using a .p12 certificate to authenticate your application with the mobile endpoint.

To learn more about APNs certificate-based authentication with Amazon SNS, visit the Amazon SNS Developer Guide.

For more serverless learning resources, visit Serverless Land.

Security updates for Monday

Post Syndicated from original https://lwn.net/Articles/903455/

Security updates have been issued by Debian (booth, libpgjava, and thunderbird), Fedora (3mux, act, age, antlr4-project, apache-cloudstack-cloudmonkey, apptainer, aquatone, aron, asnip, assetfinder, astral, bettercap, buildah, butane, caddy, cadvisor, cheat, chisel, clash, clipman, commit-stream, containerd, cri-o, darkman, deepin-gir-generator, direnv, dnscrypt-proxy, dnsx, docker-distribution, doctl, douceur, duf, ffuf, fzf, geoipupdate, git-lfs, git-octopus, git-time-metric, glide, gmailctl, gnutls, go-bindata, goaltdns, gobuster, godep, godoctor, godotenv, gojq, golist, goloris, gomtree, google-guest-agent, gotags, gotun, grafana, gron, grpcurl, hakrevdns, hcloud, htmltest, httprobe, hulk, ignition, jid, kata-containers, kiln, kompose, kubernetes, libldb, manifest-tool, mass3, meg, meshbird, micro, mingw-harfbuzz, mingw-poppler, moby-engine, mqttcli, nats-server, nebula, netscanner, oci-seccomp-bpf-hook, ohmybackup, onionscan, open-policy-agent, origin, osbuild-composer, podman-tui, popub, powerline-go, reposurgeon, restic, runc, samba, shellz, shhgit, skopeo, snapd, snowcrash, source-to-image, subfinder, syncthing, sysutil, terrier, thunderbird, tiedot, toolbox, vgrep, vultr, vultr-cli, webanalyze, webkit2gtk3, weldr-client, wgctrl, xe-guest-utilities-latest, xen, xq, yggdrasil, yubihsm-connector, and a vast number of golang packages), Mageia (chromium-browser-stable, firefox, gdk-pixbuf2.0, python-ujson, and webmin), Red Hat (firefox and thunderbird), Slackware (gnutls), and SUSE (chromium, firefox, mozilla-nss, rubygem-tzinfo, samba, and xen).

Ring Gives Videos to Police without a Warrant or User Consent

Post Syndicated from Bruce Schneier original https://www.schneier.com/blog/archives/2022/08/ring-gives-videos-to-police-without-a-warrant-or-user-consent.html

Amazon has revealed that it gives police videos from its Ring doorbells without a warrant and without user consent.

Ring recently revealed how often the answer to that question has been yes. The Amazon company responded to an inquiry from US Senator Ed Markey (D-Mass.), confirming that there have been 11 cases in 2022 where Ring complied with police “emergency” requests. In each case, Ring handed over private recordings, including video and audio, without letting users know that police had access to—and potentially downloaded—their data. This raises many concerns about increased police reliance on private surveillance, a practice that has long gone unregulated.

EFF writes:

Police are not the customers for Ring; the people who buy the devices are the customers. But Amazon’s long-standing relationships with police blur that line. For example, in the past Amazon has given coaching to police to tell residents to install the Ring app and purchase cameras for their homes—­an arrangement that made salespeople out of the police force. The LAPD launched an investigation into how Ring provided free devices to officers when people used their discount codes to purchase cameras.

Ring, like other surveillance companies that sell directly to the general public, continues to provide free services to the police, even though they don’t have to. Ring could build a device, sold straight to residents, that ensures police come to the user’s door if they are interested in footage—­but Ring instead has decided it would rather continue making money from residents while providing services to police.

CNet has a good explainer.

Slashdot thread.

The collective thoughts of the interwebz