Server Backup 101: Choosing a Server Backup Solution

Post Syndicated from Kari Rivas original https://www.backblaze.com/blog/server-backup-101-choosing-a-server-backup-solution/
If you’re in charge of backups for your company, you know backing up your server is a critical task to protect important business data from data disasters like fires, floods, and ransomware attacks. You also likely know that digital transformation is pushing innovation forward with server backup solutions that live in the cloud.

Whether you operate in the cloud, on-premises, or with a hybrid environment, finding a server backup solution that meets your needs helps you keep your data and your business safe and secure.

This guide explains the various server backup solutions available both on-premises and in the cloud, and how to choose the right backup solution for you. Read on to learn more about choosing the right server backup solution for your needs.

On-premises Solutions for Server Backup

On-premises solutions store data on servers in an in-house data center managed and maintained internally. Although there has been a dramatic shift from on-premises to cloud server solutions, many organizations choose to operate their legacy systems on-premises alone or in conjunction with the cloud in a hybrid environment.

LTO/Tape

Linear tape-open (LTO) backup is the process of copying data from primary storage to a tape cartridge. If the hard disk crashes, the tapes will still hold a copy of the data.

Pros:

  • High capacity.
  • Tapes can last a long time.
  • Provides a physical air gap between backups and the network to protect against threats like ransomware.

Cons:

  • Up-front CapEx expense.
  • Tape drives must be monitored and maintained to ensure they are functioning properly.
  • Tapes take up lots of physical space.
  • Tape is susceptible to degradation over time.
  • The process of backing up to tape can be time consuming for high volumes of data.

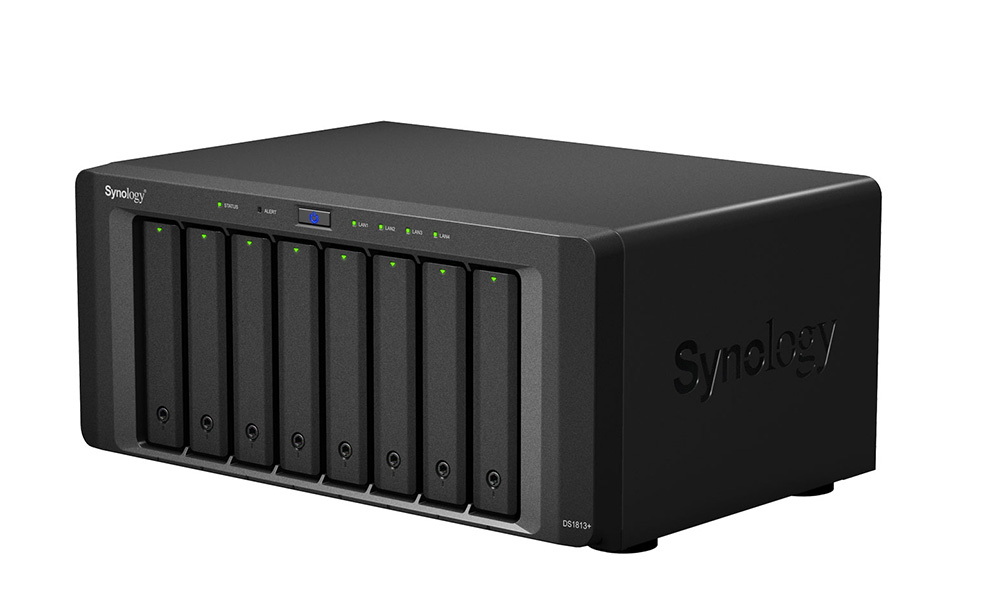
NAS

Network-attached storage (NAS) enables multiple users and devices to store and back up data through a secure server. Anyone connected to a LAN can access the storage through a browser-based utility. It’s essentially an extra network strictly for storing data that users can access via its attached network device.

Pros:

  • Faster to restore files and access backups than tape backups.
  • More digitally intuitive and straightforward to navigate.
  • Comes with built-in backup and sync features.
  • Can connect and back up multiple computers and endpoints via the network.

Cons:

  • Requires physical maintenance and periodic drive replacement.
  • Each appliance has a limited storage capacity.
  • Because it’s connected to your network, it is also vulnerable to network attacks.
Local Server Backup

Putting your backup files on the same server or a storage server is not recommended for business applications. Still, many people choose to organize their backup storage on the same server the data runs on.

Pros:

  • Highly local.
  • Quick and easy to access.

Cons:

  • Generally less secure.
  • Capacity-limited.
  • Susceptible to malware, ransomware, and viruses.

Including these specific backup destinations, there are some pros to using on-premises backup solutions in general. For example, you might still be able to access backup files without an internet connection using on-premises solutions. And you can expect a fast restore if you have large amounts of data to recover.

However, all on-premises backup storage solutions are vulnerable to natural disasters, fires, and water damage despite your best efforts. While some methods like tape are naturally air-gapped, solutions like NAS are not. Even with a layered approach to data protection, NAS leaves a business susceptible to attacks.

Backing Up to Cloud Storage

Many organizations choose a cloud-based server for backup storage instead of or in addition to an on-premises solution (more on using both on-premises and cloud solutions together later) as they continue to integrate modern digital tools. While an on-premises system refers to data hardware and physical storage solutions, cloud storage lives “in the cloud.”

A cloud server is a virtual server that is hosted in a cloud provider’s data center. “The cloud” refers to the virtual servers users access through web browsers, APIs, CLIs, and SaaS applications and the databases that run on the servers themselves.

Because cloud providers manage the server’s physical location and hardware, organizations aren’t responsible for managing costly data centers. Even small businesses that can’t afford internal infrastructure can outsource data management, backup, and cloud storage from providers.

Pros

  • Highly scalable since companies can add as much storage as needed without ever running out of space.
  • Typically far less expensive than on-premises backup solutions because there’s no need to pay for dedicated IT staff, hardware upgrades or repair, or the space and electricity needed to run an on-premises system.
  • Builds resilience from natural disasters with off-site storage.
  • Virtual air-gapped protection may be available.
  • Fast recovery times in most cases.

Cons

  • Cloud storage fees can add up depending on the amount of storage your organization requires and the company you choose. Things like egress fees, minimum retention policies, and complicated pricing tiers can cause headaches later, so much so that there are companies dedicated to helping you decipher your AWS bill, for example.
  • Can require high bandwidth for initial deployment, however solutions like Universal Data Migration are making deployment and migrations easier.
  • Since backups can be accessed via API, they can be vulnerable to attacks without a feature like Object Lock.

It can be tough to choose between cloud storage vs. on-premises storage for backing up critical data. Many companies choose a hybrid cloud backup solution that involves both on-premises and cloud storage backup processes. Cloud backup providers often work with companies that want to build a hybrid cloud environment to run business applications and store data backups in case of a cyber attack, natural disaster, or hardware failure.

If you’re stuck between choosing an on-premises or cloud storage backup solution, a hybrid cloud option might be a good fit.
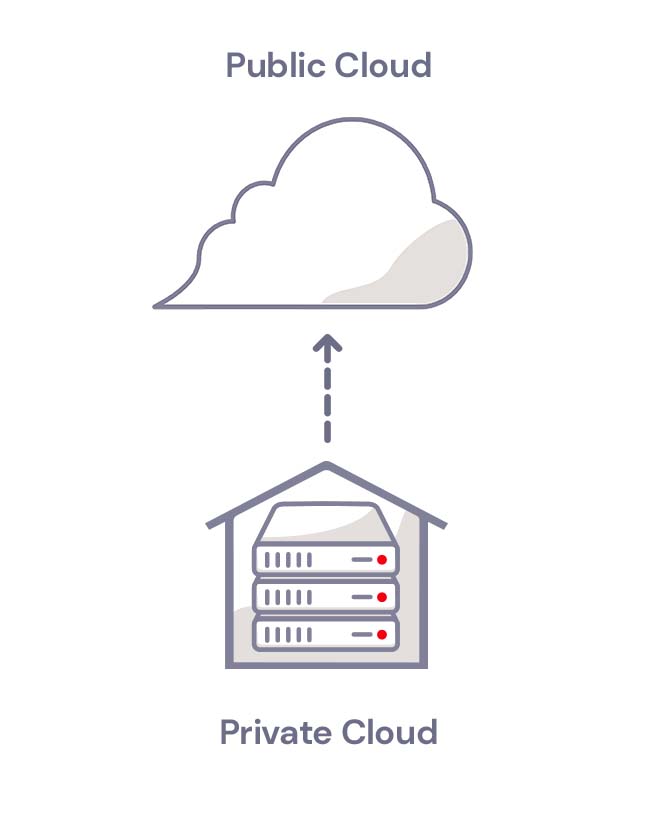
A hybrid cloud strategy combines a private, typically on-premises, cloud with a public cloud.

All-in-one vs. Integrated Solutions

When it comes to cloud backup solutions, there are two main types: all-in-one and integrated solutions.

Let’s talk about the differences between the two:

All-in-one Tools

All-in-one tools are cloud backup solutions that include both the backup application software and the cloud storage where backups will be stored. Instead of purchasing multiple products and deploying them separately, all-in-one tools allow users to deploy cloud storage with backup features together.

Pros:

  • No need for additional software.
  • Simple, out-of-the-box deployment.
  • Creates a seamless native environment.

Cons:

  • Some all-in-one tools sacrifice granularity for convenience, meaning they may not fit every use case.
  • They can be more costly than pairing cloud storage with backup software.

Integrated Solutions

Integrated solutions are pure cloud storage providers that offer cloud storage infrastructure without built-in backup software. An integrated solution means that organizations have to bring their own backup application that integrates with their chosen cloud provider.

Pros:

  • Mix and match your cloud storage and backup vendors to create a tailored server backup solution.
  • More control over your environment.
  • More control over your spending.

Cons:

  • Requires identifying and contracting with more than one provider.
  • Can require more technical expertise than with an all-in-one solution, but many cloud storage providers and backup software providers have existing integrations to make onboarding seamless.

How to Choose a Cloud Storage Solution

Choosing the best cloud storage solution for your organization involves careful consideration. There are several types of solutions available, each with unique capabilities. You don’t need the most expensive solution with bells and whistles. All you need to do is find the solution that fits your business model and future goals.

However, there are five main features that every organization seeking object storage in the cloud should look out for:

Cost

Cost is always a top concern for adopting new processes and tools in any business setting. Before choosing a cloud storage solution, take note of any fees or file size requirements for retention, egress, and data retrieval. Costs can vary significantly between storage providers, so be sure to check pricing details.

Ease-of-use and Onboarding Support

Adopting a new digital tool may also require a bit of a learning curve. Choosing a solution that supports your OS and is easy to use can help speed up the adoption rate. Check to see if there are data transfer options or services that can help you migrate more effectively. Not only should cloud storage be simple to use, but easy to deploy as well.

Security and Recovery Capabilities

Most object storage cloud solutions come with security and recovery capabilities. For example, you may be looking for a provider with Object Lock capabilities to protect data from ransomware or a simple way to implement disaster recovery protocols with a single command. Otherwise, you should check if the security specs meet your needs.

Integrations

All organizations seeking cloud storage solutions need to make sure that they choose a compatible solution with their existing systems and software. For example, if your applications speak the S3 API language, your storage systems must also speak the same language.

Many organizations use software-based backup tools to get things done. To take advantage of the benefits of cloud storage, these digital tools should also integrate with your storage solution. Popular backup solutions such as MSP360 and Veeam are built with native integrations for ease of use.

Support Models

The level of support you want and need should factor into your decision-making when choosing a cloud provider. If you know your team needs fast access to support personnel, make sure the cloud provider you choose offers a support SLA or the opportunity to purchase elevated levels of support.

Questions to Ask Before Deciding on a Cloud Storage Solution

Of course, there are other considerations to take into account. For example, managed service providers will likely need a cloud storage solution to manage multiple servers. Small business owners may only need a set amount of storage for now but with the ability to easily scale with pay-as-you-go pricing as the business grows. IT professionals might be looking for a simplified interface and centralized management to make monitoring and reporting more efficient.

When comparing different cloud solutions for object storage, there are a few more questions to ask before making a purchase:

  • Is there a web-based admin console? A web-based admin console makes it easy to view backups from multiple servers. You can manage all your storage from one single location and download or recover files from anywhere in the world with a network connection.
  • Are there multiple ways to interact with the storage? Does the provider offer different ways to access your data, for example, via a web console, APIs, CLI, etc.? If your infrastructure is configured to work with the S3 API, does the provider offer S3 compatibility?
  • Can you set retention? Some industries are more highly regulated than others. Consider whether your company needs a certain retention policy and ensure that your cloud storage provider doesn’t unnecessarily charge minimum file retention fees.
  • Is there native application support? A native environment can be helpful to back up an Exchange and SQL Server appropriately, especially for team members who are less experienced in cloud storage.
  • What types of restores does it offer? Another crucial factor to consider is how you can recover your data from cloud storage, if necessary.

Making a Buying Decision: The Intangibles

Lastly, don’t just consider the individual software and cloud storage solutions you’re buying. You should also consider the company you’re buying from. It’s worth doing your due diligence when vetting a cloud storage provider. Here are some areas to consider:

Stability

When it comes to crucial business data, you need to choose a company with a long-standing reputation for stability.

Data loss can happen if a not-so-well-known cloud provider suddenly goes down for good. And some lesser-known providers may not offer the same quality of uptime, storage, and other security and customer support options.

Find out how long the company has been providing cloud storage services, and do a little research to find out how popular its cloud services are.

Customers

Next, take a look at the organizations that use their cloud storage backup solutions. Do they work with companies similar to yours? Are there industry-specific features that can boost your business?

Choosing a cloud storage company that can provide the specs that your business requires plays an important role in the overall success of your organization. By looking at the other customers that a cloud storage company works with, you can better understand whether or not the solution will meet your needs.

Reviews

Online reviews are a great way to see how users respond to a cloud storage product’s features and benefits before trying it out yourself.

Many software review websites such as G2, Gartner Peer Insights, and Capterra offer a comprehensive overview of different cloud storage products and reviews from real customers. You can also take a look at the company’s website for case studies with companies like yours.

Values

Another area to investigate when choosing a cloud storage provider is the company values.

Organizations typically work with other companies that mirror their values and enhance their ability to put them into action. Choosing a cloud storage provider with the correct values can help you reach new clients. But choosing a provider with values that don’t align with your organization can turn customers away.

Many tech companies are proud of their values, so it’s easy to get a feel for what they stand for by checking out their social media feeds, about pages, and reviews from people who work there.

Continuous Improvement

An organization’s ability to improve over time shows resiliency, an eye for innovation, and the ability to deliver high-quality products to users like you. You can find out if a cloud storage provider has a good track record for improving and innovating their products by performing a search query for new products and features, new offerings, additional options, and industry recognition.

Keep each of the above factors in mind when choosing a server backup solution for your needs.

How Cloud Storage Can Protect Servers and Critical Business Data

Businesses have already made huge progress in moving to the cloud to enable digital transformations. Cloud-based solutions can help businesses modernize server backup solutions or adopt hybrid cloud strategies. To summarize, here are a few things to remember when considering a cloud storage solution for your server backup needs:

  • Understand the pros and cons of on-premises backup solutions and consider a hybrid cloud approach to storing backups.
  • Evaluate a provider’s cost, security offerings, integrations, and support structure.
  • Consider intangible factors like reputation, reviews, and values.

Have more questions about cloud storage or how to implement cloud backups for your server? Let us know in the comments. Ready to get started? Your first 10GB are free.

The post Server Backup 101: Choosing a Server Backup Solution appeared first on Backblaze Blog | Cloud Storage & Cloud Backup.

How Queen Elizabeth II’s Platinum Jubilee had an impact on the Internet

Post Syndicated from João Tomé original https://blog.cloudflare.com/queens-platinum-jubilee/

How Queen Elizabeth II’s Platinum Jubilee had an impact on the Internet

“I declare before you all that my whole life, whether it be long or short, shall be devoted to your service and the service of our great imperial family to which we all belong.”
Queen Elizabeth II birthday speech, April 21, 1947

How Queen Elizabeth II’s Platinum Jubilee had an impact on the Internet

The rising and setting of the sun has an impact on human behaviour and on Internet trends, and events like this weekend’s celebration of Queen Elizabeth II’s Platinum Jubilee also show up in Internet trends.

When Elizabeth II’s reign started, on February 6, 1952 (the coronation was on June 2, 1953), the Turing machine had already been proposed (1936), and with that the basis for computer science. ARPANET, which became the technical foundation of the Internet, was still a dream that came to fruition in the late 60s — the World Wide Web is from 1989 and in 2014 we celebrated its Silver Jubilee. So, with that in mind, let’s answer the question: did the 2022 celebrations of the first British monarch with a 70th anniversary on the throne have an impact on the UK’s Internet traffic?

First, some details about the Platinum Jubilee. There was a four-day bank holiday (June 2-5) in the UK for the celebration that included parades and pageants, and several ceremonies. There was a Big Jubilee Lunch in many communities on Sunday, June 5, and more than 16,000 street parties (pubs and bars were also allowed to stay open for extra two hours). In events like these, not only there’s a lot to do outside, but also to see on the television and that impacts the Internet — we saw it during the Eurovision 2022 final.

Looking at Cloudflare Radar’s data from the UK, we can see that this past weekend clearly had less Internet traffic compared to recent weekends, so people were less online during the daytime, when the Jubilee was being celebrated. Here’s the chart with the previous four weekends of the UK’s Internet traffic:

How Queen Elizabeth II’s Platinum Jubilee had an impact on the Internet

That lower traffic trend is most clear on Saturday, June 4, at 20:00 local time, when traffic was 23% lower than on the previous Saturday, and on Sunday, June 5, at 15:00, when traffic was 25% lower than on the previous Sunday. The weather was actually sunnier on the previous weekend, May 28-29, but people did seem to have many reasons (related to the Jubilee) to go outside or at least be less online.

Looking at the full picture of when the four-day bank holiday started, Thursday, June 2, 2022, until Sunday, June 5, there’s a clear trend of less traffic through all of those days, which is not unusual, at least for Thursday and Friday, considering that holidays usually have traffic more similar to weekends than weekdays.

How Queen Elizabeth II’s Platinum Jubilee had an impact on the Internet

No surprise, when there’s a holiday, or it’s the weekend people tend to use their mobile devices more to access the Internet, and that was clearly what we saw in the UK since Thursday, June 2, mobile traffic (green line) was always prevalent compared to desktop traffic (blue line) since then.

How Queen Elizabeth II’s Platinum Jubilee had an impact on the Internet

On the weekdays before June 2, we can see that Internet traffic by mobile devices only stands out after 18:00 (before that, with people working, desktop took the lead).

From Canada to New Zealand

There are several other commonwealth countries that also had relevant events to celebrate since June 2 and through the past weekend for the Queen’s Platinum Jubilee. Canada is one with several activities throughout the country, including free admission to museums and historic sites, park parties and concerts.

Related to the Jubilee celebrations or not, Internet traffic in Canada was lower this past weekend than in the previous one. Saturday, June 4, at 22:00 in Toronto traffic was 13% lower than in the previous period, and throughout the day that was also the case. On Sunday, traffic was only lower during daytime, especially around 12:00 in Toronto, when it was 15% lower than in the previous Sunday. That was the time of the Jubilee Pageant, in central London (in the next charts, times are in UTC).​​

How Queen Elizabeth II’s Platinum Jubilee had an impact on the Internet

Something similar can be seen in terms of lower traffic this weekend in Australia:

How Queen Elizabeth II’s Platinum Jubilee had an impact on the Internet

And also New Zealand:

How Queen Elizabeth II’s Platinum Jubilee had an impact on the Internet

Royal family and news websites (Boris Johnson’s no confidence vote included)

Here we’re looking at DNS request trends to get a sense of traffic to Internet properties. First, we can see that websites concerning the UK Royal family and the Jubilee were clearly seeing more traffic after Wednesday, June 1 (the day before the four-day bank holiday). The three biggest spikes were: Wednesday evening, when traffic was 777% higher at 22:00 (compared to the previous week); the next morning (08:00), when it rose 1060%; and on Saturday evening (21:00) it got 1043% more traffic.

How Queen Elizabeth II’s Platinum Jubilee had an impact on the Internet

UK-based news websites (TV broadcasters and newspapers) also covered Queen Elizabeth II’s Platinum Jubilee extensively over the extended weekend. And there are three big highlights/spikes from the past few days regarding media outlets’ websites, but only two seem to be related to the Jubilee or the bank holidays.

How Queen Elizabeth II’s Platinum Jubilee had an impact on the Internet

We can see that the biggest spike in traffic (75% more than the previous period) was the night before the Jubilee four-day bank holiday started. Then, Sunday afternoon when the London Jubilee Pageant was ending, there was another spike (25% higher).

But the day with more sustained traffic from the last 14 days was actually Monday, June 6. That was the day that Boris Johnson, the British prime minister, won a no confidence vote in the UK’s Parliament. There was a clear first spike at around 08:00, when the news that a vote of no confidence would take place on that day broke, and a much bigger one at 21:00 (68% higher), when the final result of the vote was announced.

Social media trends show a similar pattern to Internet traffic in general, but it’s interesting to see that Thursday, June 2, the first day of the extended weekend, was the one of the full 14 days we’re looking at with less DNS traffic to those platforms.

How Queen Elizabeth II’s Platinum Jubilee had an impact on the Internet

Messaging, on the other hand, had consistently much lower traffic during the four-day bank holiday, even compared to the previous weekend. Saturday, June 4, was the day with less messaging DNS traffic, at least of the two weeks period we’re observing. At 11:00 Saturday, traffic was 18% lower than in the previous period, the same level of lower DNS requests at 15:00 and through most of the day.

How Queen Elizabeth II’s Platinum Jubilee had an impact on the Internet

Conclusion: celebrations and events ‘move’ the Internet

When there’s a big country-wide celebration going on, especially one that has a lot of outdoor events and activities, Internet patterns do change. That happens, in this case, for a monarch whose reign began in 1952, when there wasn’t any Internet (it took more than 40 years for the network of networks that can connect us all on Earth to reach its more popular global form).

We have seen something similar, but to a smaller degree, when there are elections going on, like the ones in France, in April, or when deeply impactful events like the war in Ukraine shifted the country’s Internet patterns.

You can keep an eye on these and other trends using Cloudflare Radar.

[$] Rethinking Fedora’s Java packaging

Post Syndicated from original https://lwn.net/Articles/897198/

Linux distributors are famously averse to shipping packages with bundled
libraries; they would rather ship a single version of each library to be
shared by all packages that need it. Many upstream projects, instead, are
fond of bundling (or “vendoring”) libraries; this leads to tension that has
been covered here numerous times in the past (examples:
1,
2
3,
4,
5, …). The recent Fedora discussion on
bundling libraries with its Java implementation would look like just
another in a long series, but it also shines a light on the unique
challenges of shipping Java in a fast-moving community distribution.

A new portal for Project Galileo participants

Post Syndicated from Andie Goodwin original https://blog.cloudflare.com/a-new-portal-for-project-galileo-participants/

A new portal for Project Galileo participants

This post is also available in 日本語, Deutsch, Français, Español and Português.

A new portal for Project Galileo participants

Each anniversary of Project Galileo serves as an impetus for big-picture thinking among the Cloudflare team about where to take the initiative next. For this eighth anniversary, we want to help participants get the most out of their free security and performance services and simplify the onboarding process.

Organizations protected under Galileo are a diverse bunch, with 111 countries represented across 1,900+ web domains. Some of these organizations are very small and sometimes operated solely by volunteers. It is understandable that many do not have IT specialists or other employees with technical knowledge about security and performance capabilities. We strive to give them the tools and training to succeed, and we felt it was imperative to take this effort to a new level.

Introducing the Cloudflare Social Impact Projects Portal

To provide Galileo participants with one place to access resources, configuration tips, product explainers, and more, we built the Cloudflare Social Impact Projects Portal.

The crisis in Ukraine was a key source of inspiration for this endeavor. With overall applications for the project skyrocketing by 177% in March 2022, we were rushing to onboard new participants and get them protected from devastating attacks online. The invasion has sparked conversations among our team about how to effectively communicate the wide variety of products available under the project, get groups onboarded more quickly, and make the process easier for those who speak English as a second language.

With this portal, we hope to accomplish all of these goals across all Cloudflare Impact programs. In addition to Project Galileo, which protects groups that might otherwise be in danger of being silenced by attacks, we also have:

Helping participants on their Cloudflare journey

With the help of numerous volunteers among the Cloudflare team, we are launching the portal with the following resources:

  • New engineer-led video walkthroughs on setting up security and performance tools
  • Quick summaries of technical terms, including DNS lookups, web application firewalls, caching, and Zero Trust
  • Resources for support and troubleshooting

Throughout the portal, we have included links to our Learning Center, developer docs, and Help Center so participants can get user-friendly explanations of terminology and troubleshooting tips.

What’s ahead

Since we started Project Galileo back in 2014, we have routinely added new products and tools to the program as Cloudflare innovates in new areas and as participants’ security, performance, and reliability needs change. We are now working toward adding more Zero Trust capabilities within Project Galileo.

For more information about Project Galileo, check out our other 8th anniversary blog posts:

Security updates for Thursday

Post Syndicated from original https://lwn.net/Articles/897372/

Security updates have been issued by Debian (mailman and python-bottle), Red Hat (java-1.7.1-ibm, java-1.8.0-ibm, subversion:1.14, and xz), Scientific Linux (python-twisted-web), Slackware (httpd), and Ubuntu (ca-certificates, ffmpeg, ghostscript, and varnish).

Smartphones and Civilians in Wartime

Post Syndicated from Bruce Schneier original https://www.schneier.com/blog/archives/2022/06/smartphones-and-civilians-in-wartime.html

Interesting article about civilians using smartphones to assist their militaries in wartime, and how that blurs the important legal distinction between combatants and non-combatants:

The principle of distinction between the two roles is a critical cornerstone of international humanitarian law­—the law of armed conflict, codified by decades of customs and laws such as the Geneva Conventions. Those considered civilians and civilian targets are not to be attacked by military forces; as they are not combatants, they should be spared. At the same time, they also should not act as combatants—­if they do, they may lose this status.

The conundrum, then, is how to classify a civilian who, with the use of their smartphone, potentially becomes an active participant in a military sensor system. (To be clear, solely having the app installed is not sufficient to lose the protected status. What matters is actual usage.) The Additional Protocol I to Geneva Conventions states that civilians enjoy protection from the “dangers arising from military operations unless and for such time as they take a direct part in hostilities.” Legally, if civilians engage in military activity, such as taking part in hostilities by using weapons, they forfeit their protected status, “for such time as they take a direct part in hostilities” that “affect[s] the military operations,” according to the International Committee of the Red Cross, the traditional impartial custodian of International Humanitarian Law. This is the case even if the people in question are not formally members of the armed forces. By losing the status of a civilian, one may become a legitimate military objective, carrying the risk of being directly attacked by military forces.

Handy Tips #31: Detecting invalid metrics with Zabbix validation preprocessing

Post Syndicated from Arturs Lontons original https://blog.zabbix.com/handy-tips-31-detecting-invalid-metrics-with-zabbix-validation-preprocessing/21036/

Monitor and react to unexpected or faulty outputs from your monitoring targets by using Zabbix validation preprocessing.

In case of a failure, some monitoring endpoints like sensors or specific application or OS level counters can start outputting faulty metrics. Such behavior needs to be detected and reacted to as soon as possible.

Use Zabbix preprocessing to validate the collected metrics:

  • Select from and combine multiple preprocessing validation steps
  • Display a custom error message in case of an unexpected metric

  • Discard or change the value in case of an unexpected metric
  • Create an internal action to react to items becoming not supported

Check out the video to learn how to use preprocessing to detect invalid metrics.

Define preprocessing steps and react on invalid metrics:

  1. Navigate to ConfigurationHosts and find your host
  2. Click on the Items button
  3. Find the item for which the preprocessing steps will be defined
  4. Open the item and click on the Preprocessing tab
  5. For our example, we will use the Temperature item
  6. Select the In range preprocessing step
  7. Define the min and max preprocessing parameters
  8. Mark the Custom on fail checkbox
  9. Press the Set error to button and enter your custom error message
  10. Press the Update button
  11. Simulate an invalid metric by sending an out-of-range value to this item
  12. Navigate to ConfigurationHostsYour Host →  Items
  13. Observe the custom error message being displayed next to your item

Tips and best practices
  • Validation preprocessing can check for errors in JSON, XML, or unstructured text with JSONPath, XPath, or Regex
  • User macros and low-level discovery macros can be used to define the In range validation values
  • The Check for not supported value preprocessing step is always executed as the first preprocessing step
  • Internal actions can be used to define action conditions and receive alerts about specific items receiving invalid metrics

The post Handy Tips #31: Detecting invalid metrics with Zabbix validation preprocessing appeared first on Zabbix Blog.

How facial recognition technology keeps you safe

Post Syndicated from Grab Tech original https://engineering.grab.com/facial-recognition

Facial recognition technology is one of the many modern technologies that previously only appeared in science fiction movies. The roots of this technology can be traced back to the 1960s and have since grown dramatically due to the rise of deep learning techniques and accelerated digital transformation in recent years.

In this blog post, we will talk about the various applications of facial recognition technology in Grab, as well as provide details of the technical components that build up this technology.

Application of facial recognition technology  

At Grab, we believe in prevention, protection, and action to create a safer every day for our consumers, partners, and the community as a whole. All selfies collected by Grab are handled according to Grab’s Privacy Policy and securely protected under privacy legislation in the countries in which we operate. We will elaborate in detail in a section further below.

One key incident prevention method is to verify the identity of both our consumers and partners:

  • From the perspective of protecting the safety of passengers, having a reliable driver authentication process can avoid unauthorized people from delivering a ride. This ensures that trips on Grab are only completed by registered licensed driver-partners that have passed our comprehensive background checks.
  • From the perspective of protecting the safety of driver-partners, verifying the identity of new passengers using facial recognition technology helps to deter crimes targeting our driver-partners and make incident investigations easier.


Safety incidents that arise from lack of identity verification

Facial recognition technology is also leveraged to improve Grab digital financial services, particularly in facilitating the “electronic Know Your Customer” (e-KYC) process. KYC is a standard regulatory requirement in the financial services industry to verify the identity of customers, which commonly serves to deter financial crime, such as money laundering.

Traditionally, customers are required to visit a physical counter to verify their government-issued ID as proof of identity. Today, with the widespread use of mobile devices, coupled with the maturity of facial recognition technologies, the process has become much more seamless and can be done entirely digitally.

Figure 1: GrabPay wallet e-KYC regulatory requirements in the Philippines

Overview of facial recognition technology

Figure 2: Face recognition flow

The typical facial recognition pipeline involves multiple stages, which starts with image preprocessing, face anti-spoof, followed by feature extraction, and finally the downstream applications – face verification or face search.

The most common image preprocessing techniques for face recognition tasks are face detection and face alignment. The face detection algorithm locates the face region in an image, and is usually followed by face alignment, which identifies the key facial landmarks (e.g. left eye, right eye, nose, etc.) and transforms them into a standardised coordinate space. Both of these preprocessing steps aim to ensure a consistent quality of input data for downstream applications.

Face anti-spoof refers to the process of ensuring that the user-submitted facial image is legitimate. This is to prevent fraudulent users from stealing identities (impersonating someone else by using a printed photo or replaying videos from mobile screens) or hiding identities (e.g. wearing a mask). The main approach here is to extract low-level spoofing cues, such as the moiré pattern, using various machine learning techniques to determine whether the image is spoofed.

After passing the anti-spoof checks, the user-submitted images are sent for face feature extraction, where important features that can be used to distinguish one person from another are extracted. Ideally, we want the feature extraction model to produce embeddings (i.e. high-dimensional vectors) with small intra-class distance (i.e. faces of the same person) and large inter-class distance (i.e. faces of different people), so that the aforementioned downstream applications (i.e. face verification and face search) become a straightforward task – thresholding the distance between embeddings.

Face verification is one of the key applications of facial recognition and it answers the question, “Is this the same person?”. As previously alluded to, this can be achieved by comparing the distance between embeddings generated from a template image (e.g. government-issued ID or profile picture) and a query image submitted by the user. A short distance indicates that both images belong to the same person, whereas a large distance indicates that these images are taken from different people.

Face search, on the other hand, tackles the question, “Who is this person?”, which can be framed as a vector/embedding similarity search problem. Image embeddings belonging to the same person would be highly similar, thus ranked higher, in search results. This is particularly useful for deterring criminals from re-onboarding to our platform by blocking new selfies that match a criminal profile in our criminal denylist database.

Face anti-spoof

For face anti-spoof, the most common methods used to attack the facial recognition system are screen replay and printed paper. To distinguish these spoof attacks from genuine faces, we need to solve two main challenges.

The first challenge is to obtain enough data of spoof attacks to enable the training of models. The second challenge is to carefully train the model to focus on the subtle differences between spoofed and genuine cases instead of overfitting to other background information.

Figure 3: Original face (left), screen replay attack (middle), synthetic data with a moiré pattern (right)

Source 1

Collecting large volumes of spoof data is naturally hard since spoof cases in product flows are very rare. To overcome this problem, one option is to synthesise large volumes of spoof data instead of collecting the real spoof data. More specifically, we synthesise moiré patterns on genuine face images that we have, and use the synthetic data as the screen replay attack data. This allows our model to use small amounts of real spoof data and sufficiently identify spoofing, while collecting more data to train the model.

Figure 4: Data preparation with patch data

On the other hand, a spoofed face image contains lots of information with subtle spoof cues such as moiré patterns that cannot be detected by the naked eye. As such, it’s important to train the model to identify spoof cues instead of focusing on the possible domain bias between the spoof data and genuine data. To achieve this, we need to change the way we prepare the training data.

Instead of using the entire selfie image as the model input, we firstly detect and crop the face area, then evenly split the cropped face area into several patches. These patches are used as input to train the model. During inference, images are also split into patches the same way and the final result will be the average of outputs from all patches. After this data preprocessing, the patches will contain less global semantic information and more local structure features, making it easier for the model to learn and distinguish spoofed and genuine images.

Face verification

“Data is food for AI.” – Andrew Ng, founder of Google Brain

The key success factors of artificial intelligence (AI) models are undoubtedly driven by the volume and quality of data we hold. At Grab, we have one of the largest and most comprehensive face datasets, covering a wide range of demographic groups in Southeast Asia. This gives us a strong advantage to build a highly robust and unbiased facial recognition model that serves the region better.

As mentioned earlier, all selfies collected by Grab are securely protected under privacy legislation in the countries in which we operate. We take reasonable legal, organisational and technical measures to ensure that your Personal Data is protected, which includes measures to prevent Personal Data from getting lost, or used or accessed in an unauthorised way. We limit access to these Personal Data to our employees on a need to know basis. Those processing any Personal Data will only do so in an authorised manner and are required to treat the information with confidentiality.

Also, selfie data will not be shared with any other parties, including our driver, delivery partners or any other third parties without proper authorisation from the account holder. They are strictly used to improve and enhance our products and services, and not used as a means to collect personal identifiable data. Any disclosure of personal data will be handled in accordance with Grab Privacy Policy.

Figure 5: Semi-Siamese architecture (source)

Other than data, model architecture also plays an important role, especially when handling less common face verification scenarios, such as ”selfie to ID photo” and “selfie to masked selfie” verifications.  

The main challenge of “selfie to ID photo” verification is the shallow nature of the dataset, i.e. a large number of unique identities, but a low number of image samples per identity. This type of dataset lacks representation in intra-class diversity, which would commonly lead to model collapse during model training. Besides, “selfie to ID photo” verification also poses numerous challenges that are different from general facial recognition, such as aging (old ID photo), attrited ID card (normal wear and tear), and domain difference between printed ID photo and real-life selfie photo.

To address these issues, we leveraged a novel training method named semi-Siamese training (SST) 2, which is proposed by Du et al. (2020). The key idea is to enlarge intra-class diversity by ensuring that the backbone Siamese networks have similar parameters, but are not entirely identical, hence the name “semi-Siamese”.

Just like typical Siamese network architecture, feature vectors generated by the subnetworks are compared to compute the loss functions, such as Arc-softmax, Triplet loss, and Large margin cosine loss, all of which aim to reduce intra-class distance while increasing the inter-class distances. With the usage of the semi-Siamese backbone network, intra-class diversity is further promoted as it is guaranteed by the difference between the subnetworks, making the training convergence more stable.

Figure 6: Masked face verification

Another type of face verification problem we need to solve these days is the “selfie to masked selfie” verification. To pass this type of face verification, users are required to take off their masks as previous face verification models are unable to verify people with masks on. However, removing face masks to do face verification is inconvenient and risky in a crowded environment, which is a pain for many of our driver-partners who need to do verification from time to time.

To help ease this issue, we developed a face verification model that can verify people even while they are wearing masks. This is done by adding masked selfies into the training data and training the model with both masked and unmasked selfies. This not only enables the model to perform verification for people with masks on, but also helps to increase the accuracy of verifying those without masks. On top of that, masked selfies act as data augmentation and help to train the model with stronger ability of extracting features from the face.


As previously mentioned, once embeddings are produced by the facial recognition models, face search is fundamentally no different from face verification. Both processes use the distance between embeddings to decide whether the faces belong to the same person. The only difference here is that face search is more computationally expensive, since face verification is a 1-to-1 comparison, whereas face search is a 1-to-N comparison (N=size of the database).

In practice, there are many ways to significantly reduce the complexity of the search algorithm from O(N), such as using Inverted File Index (IVF) and Hierarchical Navigable Small World (HNSW) graphs. Besides, there are also various methods to increase the query speed, such as accelerating the distance computation using GPU, or approximating the distances using compressed vectors. This problem is also commonly known as Approximate Nearest Neighbor (ANN). Some of the great open-sourced vector similarity search libraries that can help to solve this problem are ScaNN3 (by Google), FAISS4(by Facebook), and Annoy (by Spotify).

What’s next?

In summary, facial recognition technology is an effective crime prevention and reduction tool to strengthen the safety of our platform and users. While the enforcement of selfie collection by itself is already a strong deterrent against fraudsters misusing our platform, leveraging facial recognition technology raises the bar by helping us to quickly and accurately identify these offenders.

As technologies advance, face spoofing patterns also evolve. We need to continuously monitor spoofing trends and actively improve our face anti-spoof algorithms to proactively ensure our users’ safety.

With the rapid growth of facial recognition technology, there is also a growing concern regarding data privacy issues. At Grab, consumer privacy and safety remain our top priorities and we continuously look for ways to improve our existing safeguards.

In May 2022, Grab was recognised by the Infocomm Media Development Authority in Singapore for its stringent data protection policies and processes through the award of Data Protection Trustmark (DPTM) certification. This recognition reinforces our belief that we can continue to draw the benefits from facial recognition technology, while avoiding any misuse of it. As the saying goes, “Technology is not inherently good or evil. It’s all about how people choose to use it”.

Join us

Grab is the leading superapp platform in Southeast Asia, providing everyday services that matter to consumers. More than just a ride-hailing and food delivery app, Grab offers a wide range of on-demand services in the region, including mobility, food, package and grocery delivery services, mobile payments, and financial services across 428 cities in eight countries.

Powered by technology and driven by heart, our mission is to drive Southeast Asia forward by creating economic empowerment for everyone. If this mission speaks to you, join our team today!

References

  1. Niu, D., Guo R., and Wang, Y. (2021). Moiré Attack (MA): A New Potential Risk of Screen Photos. Advances in Neural Information Processing Systems. https://papers.nips.cc/paper/2021/hash/db9eeb7e678863649bce209842e0d164-Abstract.html 

  2. Du, H., Shi, H., Liu, Y., Wang, J., Lei, Z., Zeng, D., & Mei, T. (2020). Semi-Siamese Training for Shallow Face Learning. European Conference on Computer Vision, 36–53. Springer. 

  3. Guo, R., Sun, P., Lindgren, E., Geng, Q., Simcha, D., Chern, F., & Kumar, S. (2020). Accelerating Large-Scale Inference with Anisotropic Vector Quantization. International Conference on Machine Learning. https://arxiv.org/abs/1908.10396 

  4. Johnson, J., Douze, M., & Jégou, H. (2019). Billion-scale similarity search with GPUs. IEEE Transactions on Big Data, 7(3), 535–547. 

Considerations for modernizing Microsoft SQL database service with high availability on AWS

Post Syndicated from Lewis Tang original https://aws.amazon.com/blogs/architecture/considerations-for-modernizing-microsoft-sql-database-service-with-high-availability-on-aws/

Many organizations have applications that require Microsoft SQL Server to run relational database workloads: some applications can be proprietary software that the vendor mandates Microsoft SQL Server to run database service; the other applications can be long-standing, home-grown applications that included Microsoft SQL Server when they were initially developed. When organizations migrate applications to AWS, they often start with lift-and-shift approach and run Microsoft SQL database service on Amazon Elastic Compute Cloud (Amazon EC2). The reason could be this is what they are most familiar with.

In this post, I share the architecture options to modernize Microsoft SQL database service and run highly available relational data services on Amazon EC2, Amazon Relational Database Service (Amazon RDS), and Amazon Aurora (Aurora).

Running Microsoft SQL database service on Amazon EC2 with high availability

This option is the least invasive to existing operations models. It gives you a quick start to modernize Microsoft SQL database service by leveraging the AWS Cloud to manage services like physical facilities. The low-level infrastructure operational tasks—such as server rack, stack, and maintenance—are managed by AWS. You have full control of the database and operating-system–level access, so there is a choice of tools to manage the operating system, database software, patches, data replication, backup, and restoration.

You can use any Microsoft SQL Server-supported replication technology with your Microsoft SQL Server database on Amazon EC2 to achieve high availability, data protection, and disaster recovery. Common solutions include log shipping, database mirroring, Always On availability groups, and Always On Failover Cluster Instances.

High availability in a single Region

Figure 1 shows how you can use Microsoft SQL Server on Amazon EC2 across multiple Availability Zones (AZs) within single Region. The interconnects among AZs that are similar to your data center intercommunications are managed by AWS. The primary database is a read-write database, and the secondary database is configured with log shipping, database mirroring, or Always On availability groups for high availability. All the transactional data from the primary database is transferred and can be applied to the secondary database asynchronously for log shipping, and it can either asynchronously or synchronously for Always On availability groups and mirroring.

High availability in a single Region with Microsoft SQL Database Service on Amazon EC2

Figure 1. High availability in a single Region with Microsoft SQL database service on Amazon EC2

High availability across multiple Regions

Figure 2 demonstrates how to configure high availability for Microsoft SQL Server on Amazon EC2 across multiple Regions. A secondary Microsoft SQL Server in a different Region from the primary is configured with log shipping, database mirroring, or Always On availability groups for high availability. The transactional data from primary database is transferred via the fully managed backbone network of AWS across Regions.

High availability across multiple Regions with Microsoft SQL database service on Amazon EC2

Figure 2. High availability across multiple Regions with Microsoft SQL database service on Amazon EC2

Replatforming Microsoft SQL Database Service on Amazon RDS with high availability

Amazon RDS is a managed database service and responsible for most management tasks. It currently supports Multi-AZ deployments for SQL Server using SQL Server Database Mirroring (DBM) or Always On Availability Groups (AGs) as a high-availability, failover solution.

High availability in a single Region

Figure 3 demonstrates the Microsoft SQL database service that is run on Amazon RDS is configured with a multi-AZ deployment model in single region. Multi-AZ deployments provide increased availability, data durability, and fault tolerance for DB instances. In the event of planned database maintenance or unplanned service disruption, Amazon RDS automatically fails-over to the up-to-date secondary DB instance. This functionality lets database operations resume quickly without manual intervention. The primary and standby instances use the same endpoint, whose physical network address transitions to the secondary replica as part of the failover process. You don’t have to reconfigure your application when a failover occurs. Amazon RDS supports multi-AZ deployments for Microsoft SQL Server by using either SQL Server database mirroring or Always On availability groups.

High availability in a single Region with Microsoft SQL database service on Amazon RDS

Figure 3. High availability in a single Region with Microsoft SQL database service on Amazon RDS

High availability across multiple Regions

Figure 4 depicts how you can use AWS Database Migration Service (AWS DMS) to configure continuous replication among Microsoft SQL Database Service on Amazon RDS across multiple Regions. AWS DMS needs Microsoft Change Data Capture to be enabled on the Amazon RDS for the Microsoft SQL Server instance. If problems occur, you can initiate manual failovers and reinstate database services by promoting the Amazon RDS read replica in a different Region.

High availability across multiple Regions with Microsoft SQL database service on Amazon RDS

Figure 4. High availability across multiple Regions with Microsoft SQL database service on Amazon RDS

Refactoring Microsoft SQL database service on Amazon Aurora with high availability

This option helps you to eliminate the cost of SQL database service license. You can run database service on a truly cloud native modern database architecture. You can use AWS Schema Conversion Tool to assist in the assessment and conversion of your database code and storage objects. Any objects that cannot be automatically converted are clearly marked so they can be manually converted to complete the migration.

The Aurora architecture involves separation of storage and compute. Aurora includes some high availability features that apply to the data in your database cluster. The data remains safe even if some or all of the DB instances in the cluster become unavailable. Other high availability features apply to the DB instances. These features help to make sure that one or more DB instances are ready to handle database requests from your application.

High availability in a single Region

Figure 5 demonstrates Aurora stores copies of the data in a database cluster across multiple AZs in single Region. When data is written to the primary DB instance, Aurora synchronously replicates the data across AZs to six storage nodes associated with your cluster volume. Doing so provides data redundancy, eliminates I/O freezes, and minimizes latency spikes during system backups. Running a DB instance with high availability can enhance availability during planned system maintenance, such as database engine updates, and help protect your databases against failure and AZ disruption.

High availability in a single Region with Amazon Aurora

Figure 5. High availability in a single Region with Amazon Aurora

High availability across multiple Regions

Figure 6 depicts how you can set up Aurora global databases for high availability across multiple Regions. An Aurora global database consists of one primary Region where your data is written, and up to five read-only secondary Regions. You issue write operations directly to the primary database cluster in the primary Region. Aurora automatically replicates data to the secondary Regions using dedicated infrastructure, with latency typically under a second.

High availability across multiple Regions with Amazon Aurora global databases

Figure 6. High availability across multiple Regions with Amazon Aurora global databases

Summary

You can choose among the options of Amazon EC2, Amazon RDS, and Amazon Aurora when modernizing SQL database service on AWS. Understanding the features required by business and the scope of service management responsibilities are good starting points. When presented with multiple options that meet with business needs, choose one that will allow more focus on your application, business value-add capabilities, and help you to reduce the services’ “total cost of ownership”.

Build a multilingual dashboard with Amazon Athena and Amazon QuickSight

Post Syndicated from Francesco Marelli original https://aws.amazon.com/blogs/big-data/build-a-multilingual-dashboard-with-amazon-athena-and-amazon-quicksight/

Amazon QuickSight is a serverless business intelligence (BI) service used by organizations of any size to make better data-driven decisions. QuickSight dashboards can also be embedded into SaaS apps and web portals to provide interactive dashboards, natural language query or data analysis capabilities to app users seamlessly. The QuickSight Demo Central contains many dashboards, feature showcase and tips and tricks that you can use; in the QuickSight Embedded Analytics Developer Portal you can find details on how to embed dashboards in your applications.

The QuickSight user interface currently supports 15 languages that you can choose on a per-user basis. The language selected for the user interface localizes all text generated by QuickSight with respect to UI components and isn’t applied to the data displayed in the dashboards.

This post describes how to create multilingual dashboards at the data level by creating new columns that contain the translated text and providing a language selection parameter and associated control to display data in the selected language in a QuickSight dashboard. You can create new columns with the translated text in several ways; in this post we create new columns using Amazon Athena user-defined functions implemented in the GitHub project sample Amazon Athena UDFs for text translation and analytics using Amazon Comprehend and Amazon Translate. This approach makes it easy to automatically create columns with translated text using neural machine translation provided by Amazon Translate.

Solution overview

The following diagram illustrates the architecture of this solution.

Architecture

For this post, we use the sample SaaS-Sales.csv dataset and follow these steps:

  1. Copy the dataset to a bucket in Amazon Simple Storage Service (Amazon S3).
  2. Use Athena to define a database and table to read the CSV file.
  3. Create a new table in Parquet format with the columns with the translated text.
  4. Create a new dataset in QuickSight.
  5. Create the parameter and control to select the language.
  6. Create dynamic multilingual calculated fields.
  7. Create an analysis with calculated multilingual calculated fields.
  8. Publish the multilingual dashboard.
  9. Create parametric headers and titles for visuals for use in an embedded dashboard.

An alternative approach might be to directly upload the CSV dataset to QuickSight and create the new columns with translated text as QuickSight calculated fields, for example using the ifelse() conditional function to directly assign the translated values.

Prerequisites

To follow the steps in this post, you need to have an AWS account with an active QuickSight Standard Edition or Enterprise Edition subscription.

Copy the dataset to a bucket in Amazon S3

Use the AWS Command Line Interface (AWS CLI) to create the S3 bucket qs-ml-blog-data and copy the dataset under the prefix saas-sales in your AWS account. You must follow the bucket naming rules to create your bucket. See the following code:

$ MY_BUCKET=qs-ml-blog-data
$ PREFIX=saas-sales

$ aws s3 mb s3://${MY_BUCKET}/

$ aws s3 cp \
    "s3://ee-assets-prod-us-east-1/modules/337d5d05acc64a6fa37bcba6b921071c/v1/SaaS-Sales.csv" \
    "s3://${MY_BUCKET}/${PREFIX}/SaaS-Sales.csv" 

Define a database and table to read the CSV file

Use the Athena query editor to create the database qs_ml_blog_db:

CREATE DATABASE IF NOT EXISTS qs_ml_blog_db;

Then create the new table qs_ml_blog_db.saas_sales:

CREATE EXTERNAL TABLE IF NOT EXISTS qs_ml_blog_db.saas_sales (
  row_id bigint, 
  order_id string, 
  order_date string, 
  date_key bigint, 
  contact_name string, 
  country_en string, 
  city_en string, 
  region string, 
  subregion string, 
  customer string, 
  customer_id bigint, 
  industry_en string, 
  segment string, 
  product string, 
  license string, 
  sales double, 
  quantity bigint, 
  discount double, 
  profit double)
ROW FORMAT DELIMITED 
  FIELDS TERMINATED BY ',' 
STORED AS INPUTFORMAT 
  'org.apache.hadoop.mapred.TextInputFormat' 
OUTPUTFORMAT 
  'org.apache.hadoop.hive.ql.io.HiveIgnoreKeyTextOutputFormat'
LOCATION
  's3://<MY_BUCKET>/saas-sales/'
TBLPROPERTIES (
  'areColumnsQuoted'='false', 
  'classification'='csv', 
  'columnsOrdered'='true', 
  'compressionType'='none', 
  'delimiter'=',', 
  'skip.header.line.count'='1', 
  'typeOfData'='file')

Create a new table in Parquet format with the columns with the translated text

We want to translate the columns country_en, city_en, and industry_en to German, Spanish, and Italian. To do this in a scalable and flexible way, we use the GitHub project sample Amazon Athena UDFs for text translation and analytics using Amazon Comprehend and Amazon Translate.

After you set up the user-defined functions following the instructions in the GitHub repo, run the following SQL query in Athena to create the new table qs_ml_blog_db.saas_sales_ml with the translated columns using the translate_text user-defined function and some other minor changes:

CREATE TABLE qs_ml_blog_db.saas_sales_ml WITH (
    format = 'PARQUET',
    parquet_compression = 'SNAPPY',
    external_location = 's3://<MY_BUCKET>/saas-sales-ml/'
) AS 
USING EXTERNAL FUNCTION translate_text(text_col VARCHAR, sourcelang VARCHAR, targetlang VARCHAR, terminologyname VARCHAR) RETURNS VARCHAR LAMBDA 'textanalytics-udf'
SELECT 
row_id,
order_id,
date_parse("order_date",'%m/%d/%Y') as order_date,
date_key,
contact_name,
country_en,
translate_text(country_en, 'en', 'de', NULL) as country_de,
translate_text(country_en, 'en', 'es', NULL) as country_es,
translate_text(country_en, 'en', 'it', NULL) as country_it,
city_en,
translate_text(city_en, 'en', 'de', NULL) as city_de,
translate_text(city_en, 'en', 'es', NULL) as city_es,
translate_text(city_en, 'en', 'it', NULL) as city_it,
region,
subregion,
customer,
customer_id,
industry_en,
translate_text(industry_en, 'en', 'de', NULL) as industry_de,
translate_text(industry_en, 'en', 'es', NULL) as industry_es,
translate_text(industry_en, 'en', 'it', NULL) as industry_it,
segment,
product,
license,
sales,
quantity,
discount,
profit
FROM qs_ml_blog_db.saas_sales
;

Run three simple queries, one per column, to check the generation of the new columns with the translation was successful. We include a screenshot after each query showing its results.

SELECT 
distinct(country_en),
country_de,
country_es,
country_it
FROM qs_ml_blog_db.saas_sales_ml 
ORDER BY country_en
limit 10
;

Original and translated values for column Country

SELECT 
distinct(city_en),
city_de,
city_es,
city_it
FROM qs_ml_blog_db.saas_sales_ml 
ORDER BY city_en
limit 10
;

Original and translated values for column City

SELECT 
distinct(industry_en),
industry_de,
industry_es,
industry_it
FROM qs_ml_blog_db.saas_sales_ml 
ORDER BY industry_en
limit 10
;

Original and translated values for column Industry

Now you can use the new table saas_sales_ml as input to create a dataset in QuickSight.

Create a dataset in QuickSight

To create your dataset in QuickSight, complete the following steps:

  1. On the QuickSight console, choose Datasets in the navigation pane.
  2. Choose Create a dataset.
  3. Choose Athena.
  4. For Data source name¸ enter athena_primary.
  5. For Athena workgroup¸ choose primary.
  6. Choose Create data source.
    New Athena data source
  7. Select the saas_sales_ml table previously created and choose Select.
    Choose your table
  8. Choose to import the table to SPICE and choose Visualize to start creating the new dashboard.
    Finish dataset creation

In the analysis section, you receive a message that informs you that the table was successfully imported to SPICE.

SPICE import complete

Create the parameter and control to select the language

To create the parameter and associate the control that you use to select the language for the dashboard, complete the following steps:

  1. In the analysis section, choose Parameters and Create one.
  2. For Name, enter Language.
  3. For Data type, choose String.
  4. For Values, select Single value.
  5. For Static default value, enter English.
  6. Choose Create.
    Create new parameter
  7. To connect the parameter to a control, choose Control.
    Connect parameter to control
  8. For Display name, choose Language.
  9. For Style, choose Dropdown.
  10. For Values, select Specific values.
  11. For Define specific values, enter English, German, Italian, and French (one value per line).
  12. Select Hide Select all option from the control values if the parameter has a default configured.
  13. Choose Add.
    Define control properties

The control is now available, linked to the parameter and displayed in the Controls section of the current sheet in the analysis.

Language control preview

Create dynamic multilingual calculated fields

You’re now ready to create the calculated fields whose value will change based on the currently selected language.

  1. In the menu bar, choose Add and choose Add calculated field.
    Add calculated field
  2. Use the ifelse conditional function to evaluate the value of the Language parameter and select the correct column in the dataset to assign the value to the calculated field.
  3. Create the Country calculated field using the following expression:
    ifelse(
        ${Language} = 'English', {country_en},
        ${Language} = 'German', {country_de},
        ${Language} = 'Italian', {country_it},
        ${Language} = 'Spanish', {country_es},
        {country_en}
    )

  4. Choose Save.
    Calculated field definition in Amazon QuickSight
  5. Repeat the process for the City calculated field:
    ifelse(
        ${Language} = 'English', {city_en},
        ${Language} = 'German', {city_de},
        ${Language} = 'Italian', {city_it},
        ${Language} = 'Spanish', {city_es},
        {city_en}
    )

  6. Repeat the process for the Industry calculated field:
    ifelse(
        ${Language} = 'English', {industry_en},
        ${Language} = 'German', {industry_de},
        ${Language} = 'Italian', {industry_it},
        ${Language} = 'Spanish', {industry_es},
        {industry_en}
    )

The calculated fields are now available and ready to use in the analysis.

Calculated fields available in analysis

Create an analysis with calculated multilingual calculated fields

Create an analysis with two donut charts and a pivot table that use the three multilingual fields. In the subtitle of the visuals, use the string Language: <<$Language>> to display the currently selected language. The following screenshot shows our analysis.

Analysis with Language control - English

If you choose a new language from the Language control, the visuals adapt accordingly. The following screenshot shows the analysis in Italian.

Analysis with Language control - Italian

You’re now ready to publish the analysis as a dashboard.

Publish the multilingual dashboard

In the menu bar, choose Share and Publish dashboard.

Publish dashboard menu

Publish the new dashboard as “Multilingual dashboard,” leave the advanced publish options at their default values, and choose Publish dashboard.

Publish dashboard with name

The dashboard is now ready.

Published dashboard

We can take the multilingual features one step further by embedding the dashboard and controlling the parameters in the external page using the Amazon QuickSight Embedding SDK.

Create parametric headers and titles for visuals for use in an embedded dashboard

When embedding an QuickSight dashboard, the locale and parameters’ values can be set programmatically from JavaScript. This can be useful to set default values and change the settings for localization and the default data language. The following steps show how to use these features by modifying the dashboard we have created so far, embedding it in an HTML page, and using the Amazon QuickSight Embedding SDK to dynamically set the value of parameters used to display titles, legends, headers, and more in translated text. The full code for the HTML page is also provided in the appendix of this post.

Create new parameters for the titles and the headers of the visuals in the analysis, the sheet name, visuals legends, and control labels as per the following table.

Name Data type Values Static default value
city String Single value City
country String Single value Country
donut01title String Single value Sales by Country
donut02title String Single value Quantity by Industry
industry String Single value Industry
Language String Single value English
languagecontrollabel String Single value Language
pivottitle String Single value Sales by Country, City and Industy
sales String Single value Sales
sheet001name String Single value Summary View

The parameters are now available on the Parameters menu.

You can now use the parameters inside each sheet title, visual title, legend title, column header, axis label, and more in your analysis. The following screenshots provide examples that illustrate how to insert these parameters into each title.

First, we insert the sheet name.

Then we add the language control name.

We edit the donut charts’ titles.

Donut chart title

We also add the donut charts’ legend titles.

Donut chart legend title

In the following screenshot, we specify the pivot table row names.

Pivot table row names

We also specify the pivot table column names.

Pivot table column names

Publish the analysis to a new dashboard and follow the steps in the post Embed interactive dashboards in your apps and portals in minutes with Amazon QuickSight’s new 1-click embedding feature to embed the dashboard in an HTML page hosted in your website or web application.

The example HTML page provided in the appendix of this post contains one control to switch among the four languages you created in the dataset in the previous sections with the option to automatically sync the QuickSight UI locale when changing the language, and one control to independently change the UI locale as required.

The following screenshots provide some examples of combinations of data language and QuickSight UI locale.

The following is an example of English data language with the English QuickSight UI locale.

Embedded dashboard with English language and English locale

The following is an example of Italian data language with the synchronized Italian QuickSight UI locale.

Embedded dashboard with Italian language and synced Italian locale

The following screenshot shows German data language with the Japanese QuickSight UI locale.

Embedded dashboard with German language and Japanese locale

Conclusion

This post demonstrated how to automatically translate data using machine learning and build a multilingual dashboard with Athena, QuickSight, and Amazon Translate, and how to add advanced multilingual features with QuickSight embedded dashboards. You can use the same approach to display different values for dimensions as well as metrics depending on the values of one or more parameters.

QuickSight provides a 30-day free trial subscription for four users; you can get started immediately. You can learn more and ask questions about QuickSight in the Amazon QuickSight Community.

Appendix: Embedded dashboard host page

The full code for the HTML page is as follows:

<!DOCTYPE html>
<html>
    <head>
        <title>Amazon QuickSight Multilingual Embedded Dashboard</title>
        <script src="https://unpkg.com/[email protected]/dist/quicksight-embedding-js-sdk.min.js"></script>
        <script type="text/javascript">

            var url = "https://<<YOUR_AMAZON_QUICKSIGHT_REGION>>.quicksight.aws.amazon.com/sn/embed/share/accounts/<<YOUR_AWS_ACCOUNT_ID>>/dashboards/<<DASHBOARD_ID>>?directory_alias=<<YOUR_AMAZON_QUICKSIGHT_ACCOUNT_NAME>>"
            var defaultLanguageOptions = 'en_US'
            var dashboard

            var trns = {
                en_US: {
                    locale: "en-US",
                    language: "English",
                    languagecontrollabel: "Language",
                    sheet001name: "Summary View",
                    sales: "Sales",
                    country: "Country",
                    city: "City",
                    industry: "Industry",
                    quantity: "Quantity",
                    by: "by",
                    and: "and"
                },
                de_DE: {
                    locale: "de-DE",
                    language: "German",
                    languagecontrollabel: "Sprache",
                    sheet001name: "Zusammenfassende Ansicht",
                    sales: "Umsätze",
                    country: "Land",
                    city: "Stadt",
                    industry: "Industrie",
                    quantity: "Anzahl",
                    by: "von",
                    and: "und"
                },
                it_IT: {
                    locale: "it-IT",
                    language: "Italian",
                    languagecontrollabel: "Lingua",
                    sheet001name: "Prospetto Riassuntivo",
                    sales: "Vendite",
                    country: "Paese",
                    city: "Città",
                    industry: "Settore",
                    quantity: "Quantità",
                    by: "per",
                    and: "e"
                },
                es_ES: {
                    locale: "es-ES",
                    language: "Spanish",
                    languagecontrollabel: "Idioma",
                    sheet001name: "Vista de Resumen",
                    sales: "Ventas",
                    country: "Paìs",
                    city: "Ciudad",
                    industry: "Industria",
                    quantity: "Cantidad",
                    by: "por",
                    and: "y"
                }
            }

            function setLanguageParameters(l){

                return {
                            Language: trns[l]['language'],
                            languagecontrollabel: trns[l]['languagecontrollabel'],
                            sheet001name: trns[l]['sheet001name'],
                            donut01title: trns[l]['sales']+" "+trns[l]['by']+" "+trns[l]['country'],
                            donut02title: trns[l]['quantity']+" "+trns[l]['by']+" "+trns[l]['industry'],
                            pivottitle: trns[l]['sales']+" "+trns[l]['by']+" "+trns[l]['country']+", "+trns[l]['city']+" "+trns[l]['and']+" "+trns[l]['industry'],
                            sales: trns[l]['sales'],
                            country: trns[l]['country'],
                            city: trns[l]['city'],
                            industry: trns[l]['industry'],
                        }
            }

            function embedDashboard(lOpts, forceLocale) {

                var languageOptions = defaultLanguageOptions
                if (lOpts) languageOptions = lOpts

                var containerDiv = document.getElementById("embeddingContainer");
                containerDiv.innerHTML = ''

                parameters = setLanguageParameters(languageOptions)

                if(!forceLocale) locale = trns[languageOptions]['locale']
                else locale = forceLocale

                var options = {
                    url: url,
                    container: containerDiv,
                    parameters: parameters,
                    scrolling: "no",
                    height: "AutoFit",
                    loadingHeight: "930px",
                    width: "1024px",
                    locale: locale
                };

                dashboard = QuickSightEmbedding.embedDashboard(options);
            }

            function onLangChange(langSel) {

                var l = langSel.value

                if(!document.getElementById("changeLocale").checked){
                    dashboard.setParameters(setLanguageParameters(l))
                }
                else {
                    var selLocale = document.getElementById("locale")
                    selLocale.value = trns[l]['locale']
                    embedDashboard(l)
                }
            }

            function onLocaleChange(obj) {

                var locl = obj.value
                var lang = document.getElementById("lang").value

                document.getElementById("changeLocale").checked = false
                embedDashboard(lang,locl)

            }

            function onSyncLocaleChange(obj){

                if(obj.checked){
                    var selLocale = document.getElementById('locale')
                    var selLang = document.getElementById('lang').value
                    selLocale.value = trns[selLang]['locale']
                    embedDashboard(selLang, trns[selLang]['locale'])
                }            
            }

        </script>
    </head>

    <body onload="embedDashboard()">

        <div style="text-align: center; width: 1024px;">
            <h2>Amazon QuickSight Multilingual Embedded Dashboard</h2>

            <span>
                <label for="lang">Language</label>
                <select id="lang" name="lang" onchange="onLangChange(this)">
                    <option value="en_US" selected>English</option>
                    <option value="de_DE">German</option>
                    <option value="it_IT">Italian</option>
                    <option value="es_ES">Spanish</option>
                </select>
            </span>

            &nbsp;-&nbsp;
            
            <span>
                <label for="changeLocale">Sync UI Locale with Language</label>
                <input type="checkbox" id="changeLocale" name="changeLocale" onchange="onSyncLocaleChange(this)">
            </span>

            &nbsp;|&nbsp;

            <span>
                <label for="locale">QuickSight UI Locale</label>
                <select id="locale" name="locale" onchange="onLocaleChange(this)">
                    <option value="en-US" selected>English</option>
                    <option value="da-DK">Dansk</option>
                    <option value="de-DE">Deutsch</option>
                    <option value="ja-JP">日本語</option>
                    <option value="es-ES">Español</option>
                    <option value="fr-FR">Français</option>
                    <option value="it-IT">Italiano</option>
                    <option value="nl-NL">Nederlands</option>
                    <option value="nb-NO">Norsk</option>
                    <option value="pt-BR">Português</option>
                    <option value="fi-FI">Suomi</option>
                    <option value="sv-SE">Svenska</option>
                    <option value="ko-KR">한국어</option>
                    <option value="zh-CN">中文 (简体)</option>
                    <option value="zh-TW">中文 (繁體)</option>            
                </select>
            </span>
        </div>

        <div id="embeddingContainer"></div>

    </body>

</html>

About the Author

Author Francesco MarelliFrancesco Marelli is a principal solutions architect at Amazon Web Services. He is specialized in the design and implementation of analytics, data management, and big data systems. Francesco also has a strong experience in systems integration and design and implementation of applications. He is passionate about music, collecting vinyl records, and playing bass.

Use Amazon Cognito to add claims to an identity token for fine-grained authorization

Post Syndicated from Ajit Ambike original https://aws.amazon.com/blogs/security/use-amazon-cognito-to-add-claims-to-an-identity-token-for-fine-grained-authorization/

With Amazon Cognito, you can quickly add user sign-up, sign-in, and access control to your web and mobile applications. After a user signs in successfully, Cognito generates an identity token for user authorization. The service provides a pre token generation trigger, which you can use to customize identity token claims before token generation. In this blog post, we’ll demonstrate how to perform fine-grained authorization, which provides additional details about an authenticated user by using claims that are added to the identity token. The solution uses a pre token generation trigger to add these claims to the identity token.

Scenario

Imagine a web application that is used by a construction company, where engineers log in to review information related to multiple projects. We’ll look at two different ways of designing the architecture for this scenario: a standard design and a more optimized design.

Standard architecture

A sample standard architecture for such an application is shown in Figure 1, with labels for the various workflow steps:

  1. The user interface is implemented by using ReactJS (a JavaScript library for building user interfaces).
  2. The user pool is configured in Amazon Cognito.
  3. The back end is implemented by using Amazon API Gateway.
  4. AWS Lambda functions exist to implement business logic.
  5. The AWS Lambda CheckUserAccess function (5) checks whether the user has authorization to call the AWS Lambda functions (4).
  6. The project information is stored in an Amazon DynamoDB database.
Figure 1: Lambda functions that need the user’s projectID call the GetProjectID Lambda function

Figure 1: Lambda functions that need the user’s projectID call the GetProjectID Lambda function

In this scenario, because the user has access to information from several projects, several backend functions use calls to the CheckUserAccess Lambda function (step 5 in Figure 1) in order to serve the information that was requested. This will result in multiple calls to the function for the same user, which introduces latency into the system.

Optimized architecture

This blog post introduces a new optimized design, shown in Figure 2, which substantially reduces calls to the CheckUserAccess API endpoint:

  1. The user logs in.
  2. Amazon Cognito makes a single call to the PretokenGenerationLambdaFunction-pretokenCognito function.
  3. The PretokenGenerationLambdaFunction-pretokenCognito function queries the Project ID from the DynamoDB table and adds that information to the Identity token.
  4. DynamoDB delivers the query result to the PretokenGenerationLambdaFunction-pretokenCognito function.
  5. This Identity token is passed in the authorization header for making calls to the Amazon API Gateway endpoint.
  6. Information in the identity token claims is used by the Lambda functions that contain business logic, for additional fine-grained authorization. Therefore, the CheckUserAccess function (7) need not be called.

The improved architecture is shown in Figure 2.

Figure 2. Get the projectID and inset it in a custom claim in the Identity token

Figure 2. Get the projectID and inset it in a custom claim in the Identity token

The benefits of this approach are:

  1. The number of calls to get the Project ID from the DynamoDB table are reduced, which in turn reduces overall latency.
  2. The dependency on the CheckUserAccess Lambda function is removed from the business logic. This reduces coupling in the architecture, as depicted in the diagram.

In the code sample provided in this post, the user interface is run locally from the user’s computer, for simplicity.

Code sample

You can download a zip file that contains the code and the AWS CloudFormation template to implement this solution. The code that we provide to illustrate this solution is described in the following sections.

Prerequisites

Before you deploy this solution, you must first do the following:

  1. Download and install Python 3.7 or later.
  2. Download the AWS SDK for Python (Boto3) library by using the following pip command.
    pip install boto3
  3. Install the argparse package by using the following pip command.
    pip install argparse
  4. Install the AWS Command Line Interface (AWS CLI).
  5. Configure the AWS CLI.
  6. Download a code editor for Python. We used Visual Studio Code for this post.
  7. Install Node.js.

Description of infrastructure

The code provided with this post installs the following infrastructure in your AWS account.

Resource Description
Amazon Cognito user pool The users, added by the addUserInfo.py script, are added to this pool. The client ID is used to identify the web client that will connect to the user pool. The user pool domain is used by the web client to request authentication of the user.
Required AWS Identity and Access Management (IAM) roles and policies Policies used for running the Lambda function and connecting to the DynamoDB database.
Lambda function for the pre token generation trigger A Lambda function to add custom claims to the Identity token.
DynamoDB table with user information A sample database to store user information that is specific to the application.

Deploy the solution

In this section, we describe how to deploy the infrastructure, save the trigger configuration, add users to the Cognito user pool, and run the web application.

To deploy the solution infrastructure

  1. Download the zip file to your machine. The readme.md file in the addclaimstoidtoken folder includes a table that describes the key files in the code.
  2. Change the directory to addclaimstoidtoken.
    cd addclaimstoidtoken
  3. Review stackInputs.json. Change the value of the userPoolDomainName parameter to a random unique value of your choice. This example uses pretokendomainname as the Amazon Cognito domain name; you should change it to a unique domain name of your choice.
  4. Deploy the infrastructure by running the following Python script.
    python3 setup_pretoken.py

    After the CloudFormation stack creation is complete, you should see the details of the infrastructure created as depicted in Figure 3.

    Figure 3: Details of infrastructure

    Figure 3: Details of infrastructure

Now you’re ready to add users to your Amazon Cognito user pool.

To add users to your Cognito user pool

  1. To add users to the Cognito user pool and configure the DynamoDB store, run the Python script from the addclaimstoidtoken directory.
    python3 add_user_info.py
  2. This script adds one user. It will prompt you to provide a username, email, and password for the user.

    Note: Because this is sample code, advanced features of Cognito, like multi-factor authentication, are not enabled. We recommend enabling these features for a production application.

    The addUserInfo.py script performs two actions:

    • Adds the user to the Cognito user pool.
      Figure 4: User added to the Cognito user pool

      Figure 4: User added to the Cognito user pool

    • Adds sample data to the DynamoDB table.
      Figure 5: Sample data added to the DynamoDB table named UserInfoTable

      Figure 5: Sample data added to the DynamoDB table named UserInfoTable

Now you’re ready to run the application to verify the custom claim addition.

To run the web application

  1. Change the directory to the pre-token-web-app directory and run the following command.
    cd pre-token-web-app
  2. This directory contains a ReactJS web application that displays details of the identity token. On the terminal, run the following commands to run the ReactJS application.
    npm install
    npm start

    This should open http://localhost:8081 in your default browser window that shows the Login button.

    Figure 6: Browser opens to URL http://localhost:8081

    Figure 6: Browser opens to URL http://localhost:8081

  3. Choose the Login button. After you do so, the Cognito-hosted login screen is displayed. Log in to the website with the user identity you created by using the addUserInfo.py script in step 1 of the To add users to your Cognito user pool procedure.
    Figure 7: Input credentials in the Cognito-hosted login screen

    Figure 7: Input credentials in the Cognito-hosted login screen

  4. When the login is successful, the next screen displays the identity and access tokens in the URL. You can reveal the token details to verify that the custom claim has been added to the token by choosing the Show Token Detail button.
    Figure 8: Token details displayed in the browser

    Figure 8: Token details displayed in the browser

What happened behind the scenes?

In this web application, the following steps happened behind the scenes:

  1. When you ran the npm start command on the terminal command line, that ran the react-scripts start command from package.json. The port number (8081) was configured in the pre-token-web-app/.env file. This opened the web application that was defined in app.js in the default browser at the URL http://localhost:8081.
  2. The Login button is configured to navigate to the URL that was defined in the constants.js file. The constants.js file was generated during the running of the setup_pretoken.py script. This URL points to the Cognito-hosted default login user interface.
  3. When you provided the login information (username and password), Amazon Cognito authenticated the user. Before generating the set of tokens (identity token and access token), Cognito first called the pre-token-generation Lambda trigger. This Lambda function has the code to connect to the DynamoDB database. The Lambda function can then access the project information for the user that is stored in the userInfo table. The Lambda function read this project information and added it to the identity token that was delivered to the web application.

    Lambda function code

    const AWS = require("aws-sdk");
    
    // Create the DynamoDB service object
    var ddb = new AWS.DynamoDB({ apiVersion: "2012-08-10" });
    
    // PretokenGeneration Lambda
    exports.handler = async function (event, context) {
        var eventUserName = "";
        var projects = "";
    
        if (!event.userName) {
            return event;
        }
    
        var params = {
            ExpressionAttributeValues: {
                ":v1": {
                    S: event.userName
                }
            },
            KeyConditionExpression: "userName = :v1",
            ProjectionExpression: "projects",
            TableName: "UserInfoTable"
        };
    
        event.response = {
            "claimsOverrideDetails": {
                "claimsToAddOrOverride": {
                    "userName": event.userName,
                    "projects": null
                },
            }
        };
    
        try {
            let result = await ddb.query(params).promise();
            if (result.Items.length > 0) {
                const projects = result.Items[0]["projects"]["S"];
                console.log("projects = " + projects);
                event.response.claimsOverrideDetails.claimsToAddOrOverride.projects = projects;
            }
        }
        catch (error) {
            console.log(error);
        }
    
        return event;
    };

    The code for the Lambda function is as follows.

  4. After a successful login, Amazon Cognito redirected to the URL that was specified in the App Client Settings section, and added the token to the URL.
  5. The webpage detected the token in the URL and displayed the Show Token Detail button. When you selected the button, the webpage read the token in the URL, decoded the token, and displayed the information in the relevant text boxes.
  6. Notice that the Decoded ID Token box shows the custom claim named projects that displays the projectID that was added by the PretokenGenerationLambdaFunction-pretokenCognito trigger.

How to use the sample code in your application

We recommend that you use this sample code with the following modifications:

  1. The code provided does not implement the API Gateway and Lambda functions that consume the custom claim information. You should implement the necessary Lambda functions and read the custom claim for the event object. This event object is a JSON-formatted object that contains authorization data.
  2. The ReactJS-based user interface should be hosted on an Amazon Simple Storage Service (Amazon S3) bucket.
  3. The projectId of the user is available in the token. Therefore, when the token is passed by the Authorization trigger to the back end, this custom claim information can be used to perform actions specific to the project for that user. For example, getting all of that user’s work items that are related to the project.
  4. Because the token is valid for one hour, the information in the custom claim information is available to the user interface during that time.
  5. You can use the AWS Amplify library to simplify the communication between your web application and Amazon Cognito. AWS Amplify can handle the token retention and refresh token mechanism for the web application. This also removes the need for the token to be displayed in the URL.
  6. If you’re using Amazon Cognito to manage your users and authenticate them, using the Amazon Cognito user pool to control access to your API is easier, because you don’t have to write the authentication code in your authorizer.
  7. If you decide to use Lambda authorizers, note the following important information from the topic Steps to create an API Gateway Lambda authorizer: “In production code, you may need to authenticate the user before granting authorization. If so, you can add authentication logic in the Lambda function as well by calling an authentication provider as directed in the documentation for that provider.”
  8. Lambda authorizer is recommended if the final authorization (not just token validity) decision is made based on custom claims.

Conclusion

In this blog post, we demonstrated how to implement fine-grained authorization based on data stored in the back end, by using claims stored in an identity token that is generated by the Amazon Cognito pre token generation trigger. This solution can help you achieve a reduction in latency and improvement in performance.

For more information on the pre token generation Lambda trigger, refer to the Amazon Cognito Developer Guide.

 
If you have feedback about this post, submit comments in the Comments section below. If you have questions about this post, contact AWS Support.

Want more AWS Security news? Follow us on Twitter.

Ajit Ambike

Ajit Ambike

Ajit Ambike is a Sr. Application Architect at Amazon Web Services. As part of AWS Energy team, he leads the creation of new business capabilities for the customers. Ajit also brings best practices to the customers and partners that accelerate the productivity of their teams.

Zafar Kapadia

Zafar Kapadia

Zafar Kapadia is a Sr. Customer Delivery Architect at AWS. He has over 17 years of IT experience and has worked on several Application Development and Optimization projects. He is also an avid cricketer and plays in various local leagues.

Modernize Your Mainframe Applications & Deploy Them In The Cloud

Post Syndicated from Sébastien Stormacq original https://aws.amazon.com/blogs/aws/modernize-your-mainframe-applications-deploy-them-in-the-cloud/

Today, we are launching AWS Mainframe Modernization service to help you modernize your mainframe applications and deploy them to AWS fully-managed runtime environments. This new service also provides tools and resources to help you plan and implement migration and modernization.

Since the introduction of System/360 on April 7 1964, mainframe computers have enabled many industries to transform themselves. The mainframe has revolutionized the way people buy things, how people book and purchase travel, and how governments manage taxes or deliver social services. Two thirds of the Fortune 100 companies have their core businesses located on a mainframe. And according to a 2018 estimate, $3 trillion ($3 x 10^12) in daily commerce flows through mainframes.

Mainframes are using their very own set of technologies: programming languages such as COBOL, PL/1, and Natural, to name a few, or databases and data files such as VSAM, DB2, IMS DB, or Adabas. They also run “application servers” (or transaction managers as we call them) such as CICS or IMS TM. Recent IBM mainframes also run applications developed in the Java programming language deployed on WebSphere Application Server.

Many of our customers running mainframes told us they want to modernize their mainframe-based applications to take advantage of the AWS cloud. They want to increase their agility and their capacity to innovate, gain access to a growing pool of talents with experience running workloads on AWS, and benefit from the continual AWS trend of improving cost/performance ratio.

Application modernization is a journey composed of four phases:

  • First, you assess the situation. Are you ready to migrate? You define the business case and educate the migration team.
  • Second, you mobilize. You kick off the project, identify applications for a proof of concept, and refine your migration plan and business cases.
  • Third, you migrate and modernize. For each application, you run in-depth discovery, decide on the right application architecture and migration journey, replatform or refactor the code base, and test and deploy to production.
  • Last, you operate and optimize. You monitor deployed applications, manage resources, and ensure that security and compliance are up to date.

AWS Mainframe Modernization helps you during each phase of your journey.

Assess and Mobilize
During the assessment and mobilization phase, you have access to analysis and development tools to discover the scope of your application portfolio and to transform source code as needed. Typically, the service helps you discover the assets of your mainframe applications and identify all the data and other dependencies. We provide you with integrated development environments where you can adapt or refactor your source code, depending on whether you are replatforming or refactoring your applications.

Application Automated Refactoring
You may choose to use the automated refactoring pattern, where mainframe application assets are automatically converted into a modern language and ecosystem. With automated refactoring, AWS Mainframe Modernization uses Blu Age tools to convert your COBOL, PL/1, or JCL code to Java services and scripts. It generates modern code, data access, and data format by implementing patterns and rules to transform screens, indexed files, and batch applications to a modern application stack.

AWS Mainfraime Modernization Refactoring

Application Replatforming
You may also choose to replatform your applications, meaning move them to AWS with minimal changes to the source code. When replatforming, the fully-managed runtime comes preinstalled with the Micro Focus mainframe-compatible components, such as transaction managers, data mapping tools, screen and maps readers, and batch execution environments, allowing you to run your application with minimum changes.

AWS Mainfraime Modernization Replatforming

This blog post can help you learn more about nuances between replatforming and refactoring.

DevOps For Your Mainframe Applications
AWS Mainframe Modernization service provides you with AWS CloudFormation templates to easily create continuous integration and continuous deployment pipelines. It also deploys and configures monitoring services to monitor the managed runtime. This allows you to maintain or continue to evolve your applications once migrated, using best practices from Agile and DevOps methodologies.

Managed Services
AWS Mainframe Modernization takes care of the undifferentiated heavy lifting and provides you with fully managed runtime environments based on 15 years of cloud architecture best practices in terms of security, high availability, scalability, system management, and using infrastructure as code. These are all important for the business-critical applications running on mainframes.

The analysis tools, development tools, and the replatforming or refactoring runtimes come preinstalled and ready to use. But there is much more than preinstalled environments. The service deploys and manages the whole infrastructure for you. It deploys the required network, load balancer, and configure log collection with Amazon CloudWatch, among others. It manages application versioning, deployments, and high availability dependencies. This saves you days of designing, testing, automating, and deploying your own infrastructure.

The fully managed runtime includes extensive automation and managed infrastructure resources that you can operate via the AWS console, the AWS Command Line Interface (CLI), and application programming interfaces (APIs). This removes the burden and undifferentiated heavy lifting of managing a complex infrastructure. It allows you to spend time and focus on innovating and building new capabilities.

Let’s Deploy an App
As usual, I like to show you how it works. I am using a demo banking application. The application has been replatformed and is available as two .zip files. The first one contains the application binaries, and the second one the data files. I uploaded the content of these zipped files to an Amazon Simple Storage Service (Amazon S3) bucket. As part of the prerequisites, I also created a PostgreSQL Aurora database, stored its username and password in AWS Secrets Manager, and I created an encryption key in AWS Key Management Service (KMS).

Sample Banking Application files

Create an Environment
Let’s deploy and run the BankDemo sample application in an AWS Mainframe Modernization managed runtime environment with the Micro Focus runtime engine. For brevity, I highlight only the main steps. The full tutorial is available as part of the service documentation.

I open the AWS Management Console and navigate to AWS Mainframe Modernization. I navigate to Environments and select Create environment.

AWS Mainframe Migration - Create EnvironmentI give the environment a name and select Micro Focus runtime since we are deploying a replatformed application. Then I select Next.

AWS Mainframe Modernization - Create Environment 2In the Specify Configurations section, I leave all the default values: a Standalone runtime environment, the M2.m5.large EC2 instance type, and the default VPC and subnets. Then I select Next.

AWS Mainframe Modernization - Create Environment 3

On the Attach Storage section, I mount an EFS endpoint as /m2/mount/demo. Then I select Next.

AWS Mainframe Modernization - Create Environment 4In the Review and create section, I review my configuration and select Create environment. After a while, the environment status switches to Available.

AWS Mainframe Modernization - environment available

Create an Application
Now that I have an environment, let’s deploy the sample banking application on it. I select the Applications section and select Create application.

AWS Mainframe Modernization - Create ApplicatioI give my application a name, and under Engine type, I select Micro Focus.

AWS Mainframe Modernization - Create Application 2In the Specify resources and configurations section, I enter a JSON definition of my application. The JSON tells the runtime environment where my application’s various files are located and how to access Secrets Manager. You can find a sample JSON file in the tutorial section of the documentation.

AWS Mainframe Modernization - Create Application 3In the last section, I Review and create the application. I select Create application. After a moment, the application becomes available.

AWS Mainframe Modernization - application is availableOnce available, I deploy the application to the environment. I select the AWSNewsBlog-SampleBanking app, then I select the Actions dropdown menu, and I select Deploy application.

AWS Mainframe Modernization - deploy the appAfter a while, the application status changes to Ready.

Import Data sets
The last step before starting the application is to import its data sets. In the navigation pane, I select Applications, then choose AWSNewsBlog-SampleBank. I then select the Data sets tab and select Import. I may either specify the data set configuration values individually using the console or provide the location of an S3 bucket that contains a data set configuration JSON file.

AWS Mainframe Modernization - import data setsI use the JSON file provided by the tutorial in the documentation. Before uploading the JSON file to S3, I replace the $S3_DATASET_PREFIX variable with the actual value of my S3 bucket and prefix. For this example, I use awsnewsblog-samplebank/catalog.

AWS Mainframe Modernization - import data sets 2After a while, the data set status changes to Completed.

My application and its data set are now deployed into the cloud.

Start the Application
The last step is to start the application. I navigate to the Applications section. I then select AWSNewsBlog-SampleBank. In the Actions dropdown menu, I select Start application. After a moment, the application status changes to Running.

AWS Mainframe Modernization - application running

Access the Application
To access the application, I need a 3270 terminal emulator. Depending on your platform, a couple of options are available. I choose to use a web-based TN3270 web-based client provided by Micro Focus and available on the AWS Marketplace. I configure the terminal emulator to point it to the AWS Mainframe Modernization environment endpoint, and I use port 6000.

TN3270 Configuration

Once the session starts, I receive the CICS welcome prompt. I type BANK and press ENTER to start the app. I authenticate with user BA0001 and password A. The main application menu is displayed. I select the first option of the menu and press ENTER.

TN3270 SampleBank demo

Congrats, your replatformed application has been deployed in the cloud and is available through a standard IBM 3270 terminal emulator.

Pricing and Availability
AWS Mainframe Modernization service is available in the following AWS Regions: US East (N. Virginia), US West (Oregon), Asia Pacific (Sydney), Canada (Central), Europe (Frankfurt), Europe (Ireland), and South America (São Paulo).

You only pay for what you use. There are no upfront costs. Third-party license costs are included in the hourly price. Runtime environments for refactored applications, based on Blu Age, start at $2.50/hour. Runtime environments for replatformed applications, based on Micro Focus, start at $5.55/hour. This includes the software licenses (Blu Age or Micro Focus). As usual, AWS Support plans are available. They also cover Blu Age and Micro Focus software.

Committed plans are available for pricing discounts. The pricing details are available on the service pricing page.

And now, go build 😉

— seb

Private Access Tokens: eliminating CAPTCHAs on iPhones and Macs with open standards

Post Syndicated from Reid Tatoris original https://blog.cloudflare.com/eliminating-captchas-on-iphones-and-macs-using-new-standard/

Private Access Tokens: eliminating CAPTCHAs on iPhones and Macs with open standards

Private Access Tokens: eliminating CAPTCHAs on iPhones and Macs with open standards

Today we’re announcing Private Access Tokens, a completely invisible, private way to validate that real users are visiting your site. Visitors using operating systems that support these tokens, including the upcoming versions of macOS or iOS, can now prove they’re human without completing a CAPTCHA or giving up personal data. This will eliminate nearly 100% of CAPTCHAs served to these users.

What does this mean for you?

If you’re an Internet user:

  • We’re making your mobile web experience more pleasant and more private than other networks at the same time.
  • You won’t see a CAPTCHA on a supported iOS or Mac device (other devices coming soon!) accessing the Cloudflare network.

If you’re a web or application developer:

  • Know your user is coming from an authentic device and signed application, verified by the device vendor directly.
  • Validate users without maintaining a cumbersome SDK.

If you’re a Cloudflare customer:

  • You don’t have to do anything!  Cloudflare will automatically ask for and utilize Private Access Tokens
  • Your visitors won’t see a CAPTCHA and we’ll ask for less data from their devices.

Introducing Private Access Tokens

Over the past year, Cloudflare has collaborated with Apple, Google, and other industry leaders to extend the Privacy Pass protocol with support for a new cryptographic token. These tokens simplify application security for developers and security teams, and obsolete legacy, third-party SDK based approaches to determining if a human is using a device. They work for browsers, APIs called by browsers, and APIs called within apps. We call these new tokens Private Access Tokens (PATs). This morning, Apple announced that PATs will be incorporated into iOS 16, iPad 16, and macOS 13, and we expect additional vendors to announce support in the near future.

Cloudflare has already incorporated PATs into our Managed Challenge platform, so any customer using this feature will automatically take advantage of this new technology to improve the browsing experience for supported devices.

Private Access Tokens: eliminating CAPTCHAs on iPhones and Macs with open standards

CAPTCHAs don’t work in mobile environments, PATs remove the need for them

We’ve written numerous times about how CAPTCHAs are a terrible user experience. However, we haven’t discussed specifically how much worse the user experience is on a mobile device. CAPTCHA as a technology was built and optimized for a browser-based world. They are deployed via a widget or iframe that is generally one size fits all, leading to rendering issues, or the input window only being partially visible on a device. The smaller real estate on mobile screens inherently makes the technology less accessible and solving any CAPTCHA more difficult, and the need to render JavaScript and image files slows down image loads while consuming excess customer bandwidth.

Private Access Tokens: eliminating CAPTCHAs on iPhones and Macs with open standards

Usability aside, mobile environments present an additional challenge in that they are increasingly API-driven. CAPTCHAs simply cannot work in an API environment where JavaScript can’t be rendered, or a WebView can’t be called. So, mobile app developers often have no easy option for challenging a user when necessary. They sometimes resort to using a clunky SDK to embed a CAPTCHA directly into an app. This requires work to embed and customize the CAPTCHA, continued maintenance and monitoring, and results in higher abandonment rates. For these reasons, when our customers choose to show a CAPTCHA today, it’s only shown on mobile 20% of the time.

We recently posted about how we used our Managed Challenge platform to reduce our CAPTCHA use by 91%. But because the CAPTCHA experience is so much worse on mobile, we’ve been separately working on ways we can specifically reduce CAPTCHA use on mobile even further.

When sites can’t challenge a visitor, they collect more data

So, you either can’t use CAPTCHA to protect an API, or the UX is too terrible to use on your mobile website. What options are left for confirming whether a visitor is real? A common one is to look at client-specific data, commonly known as fingerprinting.

You could ask for device IMEI and security patch versions, look at screen sizes or fonts, check for the presence of APIs that indicate human behavior, like interactive touch screen events and compare those to expected outcomes for the stated client. However, all of this data collection is expensive and, ultimately, not respectful of the end user. As a company that deeply cares about privacy and helping make the Internet better, we want to use as little data as possible without compromising the security of the services we provide.

Another alternative is to use system-level APIs that offer device validation checks. This includes DeviceCheck on Apple platforms and SafetyNet on Android. Application services can use these client APIs with their own services to assert that the clients they’re communicating with are valid devices. However, adopting these APIs requires both application and server changes, and can be just as difficult to maintain as SDKs.

Private Access Tokens vastly improve privacy by validating without fingerprinting

This is the most powerful aspect of PATs. By partnering with third parties like device manufacturers, who already have the data that would help us validate a device, we are able to abstract portions of the validation process, and confirm data without actually collecting, touching, or storing that data ourselves. Rather than interrogating a device directly, we ask the device vendor to do it for us.

In a traditional website setup, using the most common CAPTCHA provider:

  • The website you visit knows the URL, your IP, and some additional user agent data.
  • The CAPTCHA provider knows what website you visit, your IP, your device information, collects interaction data on the page, AND ties this data back to other sites where Google has seen you. This builds a profile of your browsing activity across both sites and devices, plus how you personally interact with a page.
Private Access Tokens: eliminating CAPTCHAs on iPhones and Macs with open standards

When PATs are used, device data is isolated and explicitly NOT exchanged between the involved parties (the manufacturer and the Cloudflare)

  • The website knows only your URL and IP, which it has to know to make a connection.
  • The device manufacturer (attester) knows only the device data required to attest your device, but can’t tell what website you visited, and doesn’t know your IP.
  • Cloudflare knows the site you visited, but doesn’t know any of your device or interaction information.
Private Access Tokens: eliminating CAPTCHAs on iPhones and Macs with open standards

We don’t actually need or want the underlying data that’s being collected for this process, we just want to verify if a visitor is faking their device or user agent. Private Access Tokens allow us to capture that validation state directly, without needing any of the underlying data. They allow us to be more confident in the authenticity of important signals, without having to look at those signals directly ourselves.

How Private Access Tokens compartmentalize data

With Private Access Tokens, four parties agree to work in concert with a common framework to generate and exchange anonymous, unforgeable tokens. Without all four parties in the process, PATs won’t work.

  1. An Origin. A website, application, or API that receives requests from a client. When a website receives a request to their origin, the origin must know to look for and request a token from the client making the request. For Cloudflare customers, Cloudflare acts as the origin (on behalf of customers) and handles the requesting and processing of tokens.
  2. A Client. Whatever tool the visitor is using to attempt to access the Origin. This will usually be a web browser or mobile application. In our example, let’s say the client is a mobile Safari Browser.
  3. An Attester. The Attester is who the client asks to prove something (i.e that a mobile device has a valid IMEI) before a token can be issued. In our example below, the Attester is Apple, the device vendor. An Issuer. The issuer is the only one in the process that actually generates, or issues, a token. The Attester makes an API call to whatever Issuer the Origin has chosen to trust,  instructing the Issuer to produce a token. In our case, Cloudflare will also be the Issuer.
Private Access Tokens: eliminating CAPTCHAs on iPhones and Macs with open standards

In the example above, a visitor opens the Safari browser on their iPhone and tries to visit example.com.

  1. Since Example uses Cloudflare to host their Origin, Cloudflare will ask the browser for a token.
  2. Safari supports PATs, so it will make an API call to Apple’s Attester, asking them to attest.
  3. The Apple attester will check various device components, confirm they are valid, and then make an API call to the Cloudflare Issuer (since Cloudflare acting as an Origin chooses to use the Cloudflare Issuer).
  4. The Cloudflare Issuer generates a token, sends it to the browser, which in turn sends it to the origin.
  5. Cloudflare then receives the token, and uses it to determine that we don’t need to show this user a CAPTCHA.

This probably sounds a bit complicated, but the best part is that the website took no action in this process. Asking for a token, validation, token generation, passing, all takes place behind the scenes by third parties that are invisible to both the user and the website. By working together, Apple and Cloudflare have just made this request more secure, reduced the data passed back and forth, and prevented a user from having to see a CAPTCHA. And we’ve done it by both collecting and exchanging less user data than we would have in the past.

Most customers won’t have to do anything to utilize Private Access Tokens

To take advantage of PATs, all you have to do is choose Managed Challenge rather than Legacy CAPTCHA as a response option in a Firewall rule. More than 65% of Cloudflare customers are already doing this. Our Managed Challenge platform will automatically ask every request for a token, and when the client is compatible with Private Access Tokens, we’ll receive one. Any of your visitors using an iOS or macOS device will automatically start seeing fewer CAPTCHAs once they’ve upgraded their OS.

This is just step one for us. We are actively working to get other clients and device makers utilizing the PAT framework as well. Any time a new client begins utilizing the PAT framework, traffic coming to your site from that client will automatically start asking for tokens, and your visitors will automatically see fewer CAPTCHAs.

We will be incorporating PATs into other security products very soon. Stay tuned for some announcements in the near future.

AWS MGN Update – Configure DR, Convert CentOS Linux to Rocky Linux, and Convert SUSE Linux Subscription

Post Syndicated from Jeff Barr original https://aws.amazon.com/blogs/aws/aws-mgn-update-configure-dr-convert-centos-linux-to-rocky-linux-and-convert-suse-linux-subscription/

Just about a year ago, Channy showed you How to Use the New AWS Application Migration Server for Lift-and-Shift Migrations. In his post, he introduced AWS Application Migration Service (AWS MGN) and said:

With AWS MGN, you can minimize time-intensive, error-prone manual processes by automatically replicating entire servers and converting your source servers from physical, virtual, or cloud infrastructure to run natively on AWS. The service simplifies your migration by enabling you to use the same automated process for a wide range of applications.

Since launch, we have added agentless replication along with support for Windows 10 and multiple versions of Windows Server (2003, 2008, and 2022). We also expanded into additional regions throughout 2021.

New Post-Launch Actions
As the title of Channy’s post stated, AWS MGN initially supported direct, lift-and-shift migrations. In other words, the selected disk volumes on the source servers were directly copied, bit-for-bit to EBS volumes attached to freshly launched Amazon Elastic Compute Cloud (Amazon EC2) instances.

Today we are adding a set of optional post-launch actions that provide additional support for your migration and modernization efforts. The actions are initiated and managed by the AWS Systems Manager agent, which can be automatically installed as the first post-launch action. We are launching with an initial set of four actions, and plan to add more over time:

Install Agent – This action installs the AWS Systems Manager agent, and is a prerequisite to the other actions.

Disaster Recovery – Installs the AWS Elastic Disaster Recovery Service agent on each server and configures replication to a specified target region.

CentOS Conversion – If the source server is running CentOS, the instances can be migrated to Rocky Linux.

SUSE Subscription Conversion – If the source service is running SUSE Linux via a subscription provided by SUSE, the instance is changed to use an AWS-provided SUSE subscription.

Using Post-Launch Actions
My AWS account has a post-launch settings template that serves as a starting point, and provides the default settings each time I add a new source server. I can use the values from the template as-is, or I can customize them as needed. I open the Application Migration Service Console and click Settings to view and edit my template:

I click Post-launch settings template, and review the default values. Then I click Edit to make changes:

As I noted earlier, the Systems Manager agent executes the other post-launch actions, and is a prerequisite, so I enable it:

Next, I choose to run the post-launch actions on both my test and cutover instances, since I want to test against the final migrated configuration:

I can now configure any or all of the post-launch options, starting with disaster recovery. I check Configure disaster recovery on migrated servers and choose a target region:

Next, I check Convert CentOS to Rocky Linux distribution. This action converts a CentOS 8 distribution to a Rocky Linux 8 distribution:

Moving right along, I check Change SUSE Linux Subscription to AWS provided SUSE Linux subscription, and then click Save template:

To learn more about pricing for the SUSE subscriptions, visit the Amazon EC2 On-Demand Pricing page.

After I have set up my template, I can view and edit the settings for each of my source servers. I simply select the server and choose Edit post-launch settings from the Replication menu:

The post-launch actions will be run at the appropriate time on the test or the cutover instances, per my selections. Any errors that arise during the execution of an action are written to the SSM execution log. I can also examine the Migration dashboard for each source server and review the Post-launch actions:

Available Now
The post-launch actions are available now and you can start using them today in all regions where AWS Application Migration Service (AWS MGN) is supported.

Jeff;

The collective thoughts of the interwebz

By continuing to use the site, you agree to the use of cookies. more information

The cookie settings on this website are set to "allow cookies" to give you the best browsing experience possible. If you continue to use this website without changing your cookie settings or you click "Accept" below then you are consenting to this.

Close