Today, we’re excited to announce our beta of AI Gateway – the portal to making your AI applications more observable, reliable, and scalable.
AI Gateway sits between your application and the AI APIs that your application makes requests to (like OpenAI) – so that we can cache responses, limit and retry requests, and provide analytics to help you monitor and track usage. AI Gateway handles the things that nearly all AI applications need, saving you engineering time, so you can focus on what you're building.
Connecting your app to AI Gateway
It only takes one line of code for developers to get started with Cloudflare’s AI Gateway. All you need to do is replace the URL in your API calls with your unique AI Gateway endpoint. For example, with OpenAI you would define your baseURL as "https://gateway.ai.cloudflare.com/v1/ACCOUNT_TAG/GATEWAY/openai" instead of "https://api.openai.com/v1" – and that’s it. You can keep your tokens in your code environment, and we’ll log the request through AI Gateway before letting it pass through to the final API with your token.
// configuring AI gateway with the dedicated OpenAI endpoint

const openai = new OpenAI({
  apiKey: env.OPENAI_API_KEY,
  baseURL: "https://gateway.ai.cloudflare.com/v1/ACCOUNT_TAG/GATEWAY/openai",
});
We currently support model providers such as OpenAI, Hugging Face, and Replicate with plans to add more in the future. We support all the various endpoints within providers and also response streaming, so everything should work out-of-the-box once you have the gateway configured. The dedicated endpoint for these providers allows you to connect your apps to AI Gateway by changing one line of code, without touching your original payload structure.
We also have a universal endpoint that you can use if you’d like more flexibility with your requests. With the universal endpoint, you have the ability to define fallback models and handle request retries. For example, let’s say a request was made to OpenAI GPT-3, but the API was down – with the universal endpoint, you could define Hugging Face GPT-2 as your fallback model and the gateway can automatically resend that request to Hugging Face. This is really helpful in improving resiliency for your app in cases where you are noticing unusual errors, getting rate limited, or if one bill is getting costly, and you want to diversify to other models. With the universal endpoint, you’ll just need to tweak your payload to specify the provider and endpoint, so we can properly route requests for you. Check out the example request below and the docs for more details on the universal endpoint schema.
# Using the Universal Endpoint to first try OpenAI, then Hugging Face

curl https://gateway.ai.cloudflare.com/v1/ACCOUNT_TAG/GATEWAY  -X POST \
  --header 'Content-Type: application/json' \
  --data '[
  {
    "provider": "openai",
    "endpoint": "chat/completions",
    "headers": {
      "Authorization": "Bearer $OPENAI_TOKEN",
      "Content-Type": "application/json"
    },
    "query": {
      "model": "gpt-3.5-turbo",
      "stream": true,
      "messages": [
        {
          "role": "user",
          "content": "What is Cloudflare?"
        }
      ]
    }
  },
  {
    "provider": "huggingface",
    "endpoint": "gpt2",
    "headers": {
      "Authorization": "Bearer $HF_TOKEN",
      "Content-Type": "application/json"
    },
    "query": {
      "inputs": "What is Cloudflare?"
    }
  },
]'
Gaining visibility into your app’s usage
Now that your app is connected to Cloudflare, we can help you gather analytics and give insight and control on the traffic that is passing through your apps. Regardless of what model or infrastructure you use in the backend, we can help you log requests and analyze data like the number of requests, number of users, cost of running the app, duration of requests, etc. Although these seem like basic analytics that model providers should expose, it’s surprisingly difficult to get visibility into these metrics with the typical model providers. AI Gateway takes it one step further and lets you aggregate analytics across multiple providers too.
Controlling how your app scales
One of the pain points we often hear is how expensive it costs to build and run AI apps. Each API call can be unpredictably expensive and costs can rack up quickly, preventing developers from scaling their apps to their full potential. At the speed that the industry is moving, you don’t want to be limited by your scale and left behind – and that’s where caching and rate limiting can help. We allow developers to cache their API calls so that new requests can be served from our cache rather than the original API – making it cheaper and faster. Rate limiting can also help control costs by throttling the number of requests and preventing excessive or suspicious activity. Developers have full flexibility to define caching and rate limiting rules, so that apps can scale at a sustainable pace of your choosing.
The Workers AI Platform
AI Gateway pairs perfectly with our new Workers AI and Vectorize products, so you can build full-stack AI applications all within the Workers ecosystem. From deploying applications with Workers, running model inference on the edge with Workers AI, storing vector embeddings on Vectorize, to gaining visibility into your applications with AI Gateway – the Workers platform is your one-stop shop to bring your AI applications to life. To learn how to use AI Gateway with Workers AI or the different providers, check out the docs.
Next up: the enterprise use case
We are shipping v1 of AI Gateway with a few core features, but we have plans to expand the product to cover more advanced use cases as well – usage alerts, jailbreak protection, dynamic model routing with A/B testing, and advanced cache rules. But what we’re really excited about are the other ways you can apply AI Gateway…
In the future, we want to develop AI Gateway into a product that helps organizations monitor and observe how their users or employees are using AI. This way, you can flip a switch and have all requests within your network to providers (like OpenAI) pass through Cloudflare first – so that you can log user requests, apply access policies, enable rate limiting and data loss prevention (DLP) strategies. A powerful example: if an employee accidentally pastes an API key to ChatGPT, AI Gateway can be configured to see the outgoing request and redact the API key or block the request entirely, preventing it from ever reaching OpenAI or any end providers. We can also log and alert on suspicious requests, so that organizations can proactively investigate and control certain types of activity. AI Gateway then becomes a really powerful tool for organizations that might be excited about the efficiency that AI unlocks, but hesitant about trusting AI when data privacy and user error are really critical threats. We hope that AI Gateway can alleviate these concerns and make adopting AI tools a lot easier for organizations.
Whether you’re a developer building applications or a company who’s interested in how employees are using AI, our hope is that AI Gateway can help you demystify what’s going on inside your apps – because once you understand how your users are using AI, you can make decisions on how you actually want them to use it. Some of these features are still in development, but we hope this illustrates the power of AI Gateway and our vision for the future.
At Cloudflare, we live and breathe innovation (as you can tell by our Birthday Week announcements!) and the pace of innovation in AI is incredible to witness. We’re thrilled that we can not only help people build and use apps, but actually help accelerate the adoption and development of AI with greater control and visibility. We can’t wait to hear what you build – head to the Cloudflare dashboard to try out AI Gateway and let us know what you think!
Today, we’re excited to announce that we are partnering with Hugging Face to make AI models more accessible and affordable than ever before to developers.
There are three things we look forward to making available to developers over the coming months:
We’re excited to bring serverless GPU models to Hugging Face — no more wrangling infrastructure or paying for unused capacity. Just pick your model, and go;
Bringing popular Hugging Face optimized models to Cloudflare’s model catalog;
Introduce Cloudflare integrations as a part of Hugging Face’s Inference solutions.
Hosting over 500,000 models and serving over one million model downloads a day, Hugging Face is the go-to place for developers to add AI to their applications.
Meanwhile, over the past six years at Cloudflare, our goal has been to make it as easy as possible for developers to bring their ideas and applications to life on our developer platform.
As AI has become a critical part of every application, this partnership has felt like a natural match to put tools in the hands of developers to make deploying AI easy and affordable.
“Hugging Face and Cloudflare both share a deep focus on making the latest AI innovations as accessible and affordable as possible for developers. We’re excited to offer serverless GPU services in partnership with Cloudflare to help developers scale their AI apps from zero to global, with no need to wrangle infrastructure or predict the future needs of your application — just pick your model and deploy.” — Clem Delangue, CEO of Hugging Face.
We’re excited to share what’s to come, so we wanted to give you a sneak peek into what’s ahead.
Hugging Face models at your fingertips
As a developer, when you have an idea, you want to be able to act on it as quickly as possible. Through our partnership, we’re excited to provide you with familiar models, regardless of where you’re getting started.
If you’re using Cloudflare’s developer platform to build applications, we’re excited to bring Hugging Face models into the flow as a native part of the experience. You will soon be able to deploy Hugging Face models, optimized for performance and speed, right from Cloudflare’s dashboard.
Alternatively, if you’re used to perusing and finding your models on Hugging Face, you will soon be able to deploy them directly from the Hugging Face UI directly to Workers AI.
Both of our teams are committed to building the best developer experiences possible, so we look forward to continuing to file away any friction that gets in developers’ ways of building the next big AI idea.
Bringing serverless GPU inference to Hugging Face users
Hugging Face offers multiple inference solutions to serve predictions from the 500,000 models hosted on the platform without managing infrastructure, from the free and rate-limited Inference API, to dedicated infrastructure deployments with Inference Endpoints, and even in-browser edge inference with Transformers.js.
We look forward to working closely with the teams at Hugging Face to enable new experiences powered by Cloudflare: from new serverless GPU inference solutions, to new edge use cases – stay tuned!
See you soon!
We couldn’t wait to share the news with our developers about our partnership, and can’t wait to put these experiences in the hands of developers over the coming months.
Vectorize is our brand-new vector database offering, designed to let you build full-stack, AI-powered applications entirely on Cloudflare’s global network: and you can start building with it right away. Vectorize is in open beta, and is available to any developer using Cloudflare Workers.
You can use Vectorize with Workers AI to power semantic search, classification, recommendation and anomaly detection use-cases directly with Workers, improve the accuracy and context of answers from LLMs (Large Language Models), and/or bring-your-own embeddings from popular platforms, including OpenAI and Cohere.
Visit Vectorize’s developer documentation to get started, or read on if you want to better understand what vector databases do and how Vectorize is different.
Why do I need a vector database?
Machine learning models can’t remember anything: only what they were trained on.
Vector databases are designed to solve this, by capturing how an ML model represents data — including structured and unstructured text, images and audio — and storing it in a way that allows you to compare against future inputs. This allows us to leverage the power of existing machine-learning models and LLMs (Large Language Models) for content they haven’t been trained on: which, given the tremendous cost of training models, turns out to be extremely powerful.
To better illustrate why a vector database like Vectorize is useful, let’s pretend they don’t exist, and see how painful it is to give context to an ML model or LLM for a semantic search or recommendation task. Our goal is to understand what content is similar to our query and return it: based on our own dataset.
Our user query comes in: they’re searching for “how to write to R2 from Cloudflare Workers”
We load up our entire documentation dataset — a thankfully “small” dataset at about 65,000 sentences, or 2.1 GB — and provide it alongside the query from our user. This allows the model to have the context it needs, based on our data.
We wait.
(A long time)
We get our similarity scores back, with the sentences most similar to the user’s query, and then work to map those back to URLs before we return our search results.
… and then another query comes in, and we have to start this all over again.
In practice, this isn’t really possible: we can’t pass that much context in an API call (prompt) to most machine learning models, and even if we could, it’d take tremendous amounts of memory and time to process our dataset over-and-over again.
With a vector database, we don’t have to repeat step 2: we perform it once, or as our dataset updates, and use our vector database to provide a form of long-term memory for our machine learning model. Our workflow looks a little more like this:
We load up our entire documentation dataset, run it through our model, and store the resulting vector embeddings in our vector database (just once).
For each user query (and only the query) we ask the same model and retrieve a vector representation.
We query our vector database with that query vector, which returns the vectors closest to our query vector.
If we looked at these two flows side by side, we can quickly see how inefficient and impractical it is to use our own dataset with an existing model without a vector database:
Using a vector database to help machine learning models remember.
From this simple example, it’s probably starting to make some sense: but you might also be wondering why you need a vector database instead of just a regular database.
Vectors are the model’s representation of an input: how it maps that input to its internal structure, or “features”. Broadly, the more similar vectors are, the more similar the model believes those inputs to be based on how it extracts features from an input.
This is seemingly easy when we look at example vectors of only a handful of dimensions. But with real-world outputs, searching across 10,000 to 250,000 vectors, each potentially 1,536 dimensions wide, is non-trivial. This is where vector databases come in: to make search work at scale, vector databases use a specific class of algorithm, such as k-nearest neighbors (kNN) or other approximate nearest neighbor (ANN) algorithms to determine vector similarity.
And although vector databases are extremely useful when building AI and machine learning powered applications, they’re not only useful in those use-cases: they can be used for a multitude of classification and anomaly detection tasks. Knowing whether a query input is similar — or potentially dissimilar — from other inputs can power content moderation (does this match known-bad content?) and security alerting (have I seen this before?) tasks as well.
Building a recommendation engine with vector search
We built Vectorize to be a powerful partner to Workers AI: enabling you to run vector search tasks as close to users as possible, and without having to think about how to scale it for production.
We’re going to take a real world example — building a (product) recommendation engine for an e-commerce store — and simplify a few things.
Our goal is to show a list of “relevant products” on each product listing page: a perfect use-case for vector search. Our input vectors in the example are placeholders, but in a real world application we would generate them based on product descriptions and/or cart data by passing them through a sentence similarity model (such as Worker’s AI’s text embedding model)
Each vector represents a product across our store, and we associate the URL of the product with it. We could also set the ID of each vector to the product ID: both approaches are valid. Our query — vector search — represents the product description and content for the product user is currently viewing.
Let’s step through what this looks like in code: this example is pulled straight from our developer documentation:
export interface Env {
	// This makes our vector index methods available on env.MY_VECTOR_INDEX.*
	// e.g. env.MY_VECTOR_INDEX.insert() or .query()
	TUTORIAL_INDEX: VectorizeIndex;
}

// Sample vectors: 3 dimensions wide.
//
// Vectors from a machine-learning model are typically ~100 to 1536 dimensions
// wide (or wider still).
const sampleVectors: Array<VectorizeVector> = [
	{ id: '1', values: [32.4, 74.1, 3.2], metadata: { url: '/products/sku/13913913' } },
	{ id: '2', values: [15.1, 19.2, 15.8], metadata: { url: '/products/sku/10148191' } },
	{ id: '3', values: [0.16, 1.2, 3.8], metadata: { url: '/products/sku/97913813' } },
	{ id: '4', values: [75.1, 67.1, 29.9], metadata: { url: '/products/sku/418313' } },
	{ id: '5', values: [58.8, 6.7, 3.4], metadata: { url: '/products/sku/55519183' } },
];

export default {
	async fetch(request: Request, env: Env, ctx: ExecutionContext): Promise<Response> {
		if (new URL(request.url).pathname !== '/') {
			return new Response('', { status: 404 });
		}
		// Insert some sample vectors into our index
		// In a real application, these vectors would be the output of a machine learning (ML) model,
		// such as Workers AI, OpenAI, or Cohere.
		let inserted = await env.TUTORIAL_INDEX.insert(sampleVectors);

		// Log the number of IDs we successfully inserted
		console.info(`inserted ${inserted.count} vectors into the index`);

		// In a real application, we would take a user query - e.g. "durable
		// objects" - and transform it into a vector emebedding first.
		//
		// In our example, we're going to construct a simple vector that should
		// match vector id #5
		let queryVector: Array<number> = [54.8, 5.5, 3.1];

		// Query our index and return the three (topK = 3) most similar vector
		// IDs with their similarity score.
		//
		// By default, vector values are not returned, as in many cases the
		// vectorId and scores are sufficient to map the vector back to the
		// original content it represents.
		let matches = await env.TUTORIAL_INDEX.query(queryVector, { topK: 3, returnVectors: true });

		// We map over our results to find the most similar vector result.
		//
		// Since our index uses the 'cosine' distance metric, scores will range
		// from 1 to -1.  A value of '1' means the vector is the same; the
		// closer to 1, the more similar. Values of -1 (least similar) and 0 (no
		// match).
		// let closestScore = 0;
		// let mostSimilarId = '';
		// matches.matches.map((match) => {
		// 	if (match.score > closestScore) {
		// 		closestScore = match.score;
		// 		mostSimilarId = match.vectorId;
		// 	}
		// });

		return Response.json({
			// This will return the closest vectors: we'll see that the vector
			// with id = 5 has the highest score (closest to 1.0) as the
			// distance between it and our query vector is the smallest.
			// Return the full set of matches so we can see the possible scores.
			matches: matches,
		});
	},
};
The code above is intentionally simple, but illustrates vector search at its core: we insert vectors into our database, and query it for vectors with the smallest distance to our query vector.
Here are the results, with the values included, so we visually observe that our query vector [54.8, 5.5, 3.1] is similar to our highest scoring match: [58.799, 6.699, 3.400] returned from our search. This index uses cosine similarity to calculate the distance between vectors, which means that the closer the score to 1, the more similar a match is to our query vector.
In a real application, we could now quickly return product recommendation URLs based on the most similar products, sorting them by their score (highest to lowest), and increasing the topK value if we want to show more. The metadata stored alongside each vector could also embed a path to an R2 object, a UUID for a row in a D1 database, or a key-value pair from Workers KV.
Workers AI + Vectorize: full stack vector search on Cloudflare
In a real application, we need a machine learning model that can both generate vector embeddings from our original dataset (to seed our database) and quickly turn user queries into vector embeddings too. These need to be from the same model, as each model represents features differently.
Here’s a compact example building an entire end-to-end vector search pipeline on Cloudflare:
import { Ai } from '@cloudflare/ai';
export interface Env {
	TEXT_EMBEDDINGS: VectorizeIndex;
	AI: any;
}
interface EmbeddingResponse {
	shape: number[];
	data: number[][];
}

export default {
	async fetch(request: Request, env: Env, ctx: ExecutionContext): Promise<Response> {
		const ai = new Ai(env.AI);
		let path = new URL(request.url).pathname;
		if (path.startsWith('/favicon')) {
			return new Response('', { status: 404 });
		}

		// We only need to generate vector embeddings just the once (or as our
		// data changes), not on every request
		if (path === '/insert') {
			// In a real-world application, we could read in content from R2 or
			// a SQL database (like D1) and pass it to Workers AI
			const stories = ['This is a story about an orange cloud', 'This is a story about a llama', 'This is a story about a hugging emoji'];
			const modelResp: EmbeddingResponse = await ai.run('@cf/baai/bge-base-en-v1.5', {
				text: stories,
			});

			// We need to convert the vector embeddings into a format Vectorize can accept.
			// Each vector needs an id, a value (the vector) and optional metadata.
			// In a real app, our ID would typicaly be bound to the ID of the source
			// document.
			let vectors: VectorizeVector[] = [];
			let id = 1;
			modelResp.data.forEach((vector) => {
				vectors.push({ id: `${id}`, values: vector });
				id++;
			});

			await env.TEXT_EMBEDDINGS.upsert(vectors);
		}

		// Our query: we expect this to match vector id: 1 in this simple example
		let userQuery = 'orange cloud';
		const queryVector: EmbeddingResponse = await ai.run('@cf/baai/bge-base-en-v1.5', {
			text: [userQuery],
		});

		let matches = await env.TEXT_EMBEDDINGS.query(queryVector.data[0], { topK: 1 });
		return Response.json({
			// We expect vector id: 1 to be our top match with a score of
			// ~0.896888444
			// We are using a cosine distance metric, where the closer to one,
			// the more similar.
			matches: matches,
		});
	},
};
The code above does four things:
It passes the three sentences to Workers AI’s text embedding model (@cf/baai/bge-base-en-v1.5) and retrieves their vector embeddings.
It inserts those vectors into our Vectorize index.
Takes the user query and transforms it into a vector embedding via the same Workers AI model.
Queries our Vectorize index for matches.
This example might look “too” simple, but in a production application, we’d only have to change two things: just insert our vectors once (or periodically via Cron Triggers), and replace our three example sentences with real data stored in R2, a D1 database, or another storage provider.
In fact, this is incredibly similar to how we run Cursor, the AI assistant that can answer questions about Cloudflare Worker: we migrated Cursor to run on Workers AI and Vectorize. We generate text embeddings from our developer documentation using its built-in text embedding model, insert them into a Vectorize index, and transform user queries on the fly via that same model.
BYO embeddings from your favorite AI API
Vectorize isn’t just limited to Workers AI, though: it’s a fully-fledged, standalone vector database.
If you’re already using OpenAI’s Embedding API, Cohere’s multilingual model, or any other embedding API, then you can easily bring-your-own (BYO) vectors to Vectorize.
It works just the same: generate your embeddings, insert them into Vectorize, and pass your queries through the model before you query your index. Vectorize includes a few shortcuts for some of the most popular embedding models.
# Vectorize has ready-to-go presets that set the dimensions and distance metric for popular embeddings models
$ wrangler vectorize create openai-index-example --preset=openai-text-embedding-ada-002
This can be particularly useful if you already have an existing workflow around an existing embeddings API, and/or have validated a specific multimodal or multilingual embeddings model for your use-case.
Making the cost of AI predictable
There’s a tremendous amount of excitement around AI and ML, but there’s also one big concern: that it’s too expensive to experiment with, and hard to predict at scale.
With Vectorize, we wanted to bring a simpler pricing model to vector databases. Have an idea for a proof-of-concept at work? That should fit into our free-tier limits. Scaling up and optimizing your embedding dimensions for performance vs. accuracy? It shouldn’t break the bank.
Importantly, Vectorize aims to be predictable: you don’t need to estimate CPU and memory consumption, which can be hard when you’re just starting out, and made even harder when trying to plan for your peak vs. off-peak hours in production for a brand new use-case. Instead, you’re charged based on the total number of vector dimensions you store, and the number of queries against them each month. It’s our job to take care of scaling up to meet your query patterns.
Here’s the pricing for Vectorize — and if you have a Workers paid plan now, Vectorize is entirely free to use until 2024:
Workers Free (coming soon)
Workers Paid ($5/month)
Queried vector dimensions included
30M total queried dimensions / month
50M total queried dimensions / month
Stored vector dimensions included
5M stored dimensions / month
10M stored dimensions / month
Additional cost
$0.04 / 1M vector dimensions queried or stored
$0.04 / 1M vector dimensions queried or stored
Pricing is based entirely on what you store and query: (total vector dimensions queried + stored) * dimensions_per_vector * price. Query more? Easy to predict. Optimizing for smaller dimensions per vector to improve speed and reduce overall latency? Cost goes down. Have a few indexes for prototyping or experimenting with new use-cases? We don’t charge per-index.
Create as many as you need indexes to prototype new ideas and/or separate production from dev.
As an example: if you load 10,000 Workers AI vectors (384 dimensions each) and make 5,000 queries against your index each day, it’d result in 49 million total vector dimensions queried and still fit into what we include in the Workers Paid plan ($5/month). Better still: we don’t delete your indexes due to inactivity.
Note that while this pricing isn’t final, we expect few changes going forward. We want to avoid the element of surprise: there’s nothing worse than starting to build on a platform and realizing the pricing is untenable after you’ve invested the time writing code, tests and learning the nuances of a technology.
This is also just the beginning of the vector database story for us at Cloudflare. Over the next few weeks and months, we intend to land a new query engine that should further improve query performance, support even larger indexes, introduce sub-index filtering capabilities, increased metadata limits, and per-index analytics.
If you’re looking for inspiration on what to build, see the semantic search tutorial that combines Workers AI and Vectorize for document search, running entirely on Cloudflare. Or an example of how to combine OpenAI and Vectorize to give an LLM more context and dramatically improve the accuracy of its answers.
And if you have questions about how to use Vectorize for our product & engineering teams, or just want to bounce an idea off of other developers building on Workers AI, join the #vectorize and #workers-ai channels on our Developer Discord.
What AI applications can you build with Cloudflare? Instead of us telling you we reached out to a small handful of the numerous AI companies using Cloudflare to learn a bit about what they’re building and how Cloudflare is helping them on their journey.
We heard common themes from these companies about the challenges they face in bringing new products to market in the ever-changing world of AI ranging from training and deploying models, the ethical and moral judgements of AI, gaining the trust of users, and the regulatory landscape. One area that is not a challenge is trusting their AI application infrastructure to Cloudflare.
Azule.ai
Azule, based in Calgary, Canada, was founded to apply the power of AI to streamline and improve ecommerce customer service. It’s an exciting moment that, for the first time ever, we can now dynamically generate, deploy, and test code to meet specific user needs or integrations. This kind of flexibility is crucial to create a tool like Azule that is designed to meet this demand, offering a platform that can handle complex requirements and provide flexible integration options with other tools.
The AI space is evolving quickly and that applies to the rapid evolution of AI agent design patterns. These are essentially frameworks built upon LLM APIs, and they're showing immense potential. Azule effectively allows users to create AI agents which interact with their customers on behalf of their business. It's not just about addressing customer service queries anymore – AI agents can perform significant, ongoing tasks across various industries.
Azule is built entirely on Cloudflare, except for API calls to OpenAI.
The application relies on multiple Developer Platform and Cloudflare products and services. Durable Objects and websockets are used for live chat.
“Durable Objects enabled us to build our MVP faster than we could have on any other platform, thanks to Cloudflare's thoughtful product design.” – Logan Grasby
Other products used by Azule:
Queues for data processing.
R2 for all data storage, including vector storage. Instead of using a vector database service, Azule relies entirely on Cloudflare's R2 and cache API for on-disk vector search.
Workers KV for storing frequently accessed configuration data.
D1 was implemented for their user database.
Constellation (now Workers AI) for various labeling and summarization tasks.
Workers for Platforms allows Azule AI to write and deploy custom features for the users.
Pages for hosting our landing page and marketing content.
Other valuable features used include API shield, email workers, the mail channels integration for email, log push, outbound workers, among others!
“I firmly believe that AI agents are at home on the web. Everything Cloudflare builds has web optimization in mind and so it only makes sense to invest in the platform. By building on Cloudflare, we've made significant cost reductions, particularly by moving all our search solutions to R2. For example, many of our users want to store large datasets on Azule and make them searchable through their agents. Our previous search solutions, based on Pinecone and Milisearch, would have cost thousands of dollars per month to store and search through just one customer's data. With Cloudflare's R2 and cache API, we can now enable our customer's AI agent to comb through large datasets in less than 900ms, at a fraction of the cost.” – Logan Grasby
42able.ai
42able, headquartered in Wales, UK, is at the forefront of AI-driven solutions, dedicated to revolutionizing engagement with business documents. Through cutting-edge technology and innovative strategies, the company seeks to streamline, enhance, and redefine the way businesses interact with their documents.
The modern business landscape is inundated with vast volumes of documents, from contracts and reports to invoices and internal communications. Navigating, understanding, and extracting value from these documents can be time-consuming, error-prone, and often requires significant manual effort.
42able envisions a future where business documents are not just static pieces of information but dynamic assets that businesses can engage with interactively, efficiently, and intelligently.
“Launching an AI product has come with many unique challenges and uncertainties. Users expect AI to be perfect or near-perfect, and are much less forgiving of an AI making an error compared to a human making the same mistake. Decisions about how AI systems should act often involve moral or ethical judgments, which might not be straightforward and can be subject to societal debates. Training and deploying AI models is challenging. Cloudflare's solutions are making it much easier, than managing all the individual parts ourselves.” – James Finney
42able chose Cloudflare for fantastic performance in comparison to other cloud providers, in part due to the no cold boot times, competitive pricing, ease of use, fantastic local development features, and brilliant support. Their development times have decreased through the use of:
Workers for all the APIs and re-occurring cron scripts.
Pages for all application/platform front-end hosting
KV for Angular apps.
R2 to store cached personal user data R2.
General DNS zone management
DDOS protection
DNS management
Turnstile
Zero Trust to secure login pages
They are starting to test with Constellation (now Workers AI) to host some of their models and D1 to support their database needs.
UseChat
UseChat.ai, based in London, UK, supercharges customer support with a ChatGPT powered chatbot that knows your website and everything on it. With a custom ChatGPT chatbot, customers can get instant answers to the most common questions. When a customer needs more support, UseChat.ai will seamlessly hand over from AI to human live chat.
The fully real-time platform was built to take advantage of Workers and Durable Objects from day one. Workers & Durable Objects power the real-time chatbot, integrated with OpenAI ChatGPT API, Queues manages website content crawling, and KV stores crawled website content.
“It wouldn’t have been possible to build and scale our real-time platform as quickly as we did without Workers & Durable Objects. Knowing that a customer can embed our chatbot on their website with millions of visitors, and it will just work lets me sleep sound at night.” – Damien Tanner
Eclipse AI
Eclipse’s mission is to revolutionise the way businesses approach customer feedback. Based in Melbourne, Australia, Eclipse empowers users to make data-driven decisions by leveraging AI for comprehensive customer understanding. If your goals are to; reduce churn, drive growth or improve your customer experience, Eclipse puts the data at your fingertips and provides you actionable insights to drive your business.
Eclipse allows you to unify your Voice of Customer channels (i.e. phone, video calls, emails, support tickets, public reviews and surveys), the platform analyses it at scale and utilises Generative AI to provide key actions specific to your business. Focused on democratising data driven decision-making, Eclipse AI has launched a Freemium model, leveling the playing field for businesses of all sizes to utilise this tech.
“We believe the future of the internet is on the edge and Cloudflare is at the forefront of this revolution with a growing network that covers most major cities around the world. As a startup with limited resources, the Cloudflare developer platform has enabled our dev team to focus on building our product and not be burdened with managing infrastructure. Best of all, it scales automagically with a pay-as-you-go pricing model.” – Saad Irfani
Eclipse AI uses:
Cloudflare Workers for the backend API.
Cloudflare Pages for the frontend to deliver content across hundreds of cities worldwide.
Cloudflare Images to serve cascaded versions of each asset
Cloudflare R2 as the object store.
“As a platform that transcribes video/audio call recordings for VoC analytics, choosing a reliable object-store was an important decision. After the launch of R2 we switched from S3 and noticed a staggering 70% reduction in cost. Overall, we are believers in Cloudflare’s vision and are eagerly awaiting the release of D1 so that our entire stack can be powered by the edge.” – Saad Irfani
Embley
Embley, based in Sierre, Switzerland, is a Marketplace Automation Platform that powers the future of marketplace commerce by enabling businesses to scale better and faster.
The platform combines the most advanced technologies such as Artificial Intelligence and Process Mining to strengthen a fast end-to-end business process automation with products tailored to marketplaces businesses.
Cloudflare powers Embley’s frontend through Cloudflare Pages that serves what they call the “control center” to the users at the edge. The control center is the core of the back-office tools that users use to manage their marketplace operations. The backend is powered by Workers, providing a serverless execution environment, connected to the frontend through the Cloudflare API Gateway.
“The primary reasons for choosing Cloudflare are the powerful serverless products that enable us to run an entire tech stack without having to care about infrastructure. Also, the scalability of Cloudflare’s global network is appealing. Finally, security is embedded into Cloudflare through the Zero Trust platform that enable us to secure both production but also the lower environments including the secured access to internal systems and apps.” – Laurent Christen
Chainfuse
ChainFuse, based in San Francisco, CA, is a multichannel AI platform that assists organizations in collecting and analyzing user feedback on a large scale. Their AI-powered community tool aids support, community, and product teams in garnering valuable insights, facilitating more informed product decisions.
“We have used Google Cloud and AWS, but our experience with Cloudflare has particularly stood out. Since 2016, we have consistently chosen Cloudflare for our projects due to their excellent product range and reliable performance. Saying "it just works" is an understatement.” – Victor Sanchez
ChainFuse relies on Workers for the core of their backend infrastructure and a range of our security solutions to secure their applications and employees. WAF and its vast adaptability is a major defense, blocking an average of 48% of all incoming traffic, effectively weeding out known malicious traffic. Additionally, it employs rate limiting to prevent abuse. API Shield, used in conjunction with WAF, intercepts an average of 1.32% of the incoming traffic that manages to bypass WAF. The Zero Trust Gateway not only secures their employees but also is integrated into their product to prevent end users from exploiting the platform for malicious purposes.
ai.moda
ai.moda, headquartered in Grand Cayman, Cayman Islands, is building multiple AI tools with a focus on helping bridge humans, developers, and machines together. They’re currently building several ChatGPT plugins (such as CVEs and S3 storage), YourCrowd (MTurk compatible API for humans and bots), and Valkyrie (an automated zero-trust hardening for Linux applications and cloud workloads).
Plugins like CVEs by ai.moda bring real-time vulnerability information into ChatGPT.
“By using Workers, we’re able to create SaaS services at a scale and cost that just wouldn’t be possible without. If you want a new ChatGPT plugin, let us know on Friday, and by Monday we can have it developed and shipped in production! The rapid development allowed by Workers is a huge advantage for us.”- David Manouchehri
They chose Cloudflare mainly because of the Workers platform. Being able to deploy new code rapidly globally with a single command has greatly simplified their DevOps needs, and they no longer need to worry about whether they have enough resources to scale up.
ai.moda is a heavy user of Cloudflare Workers, Email Workers, Pages, R2, Durable Objects, Constellation (now Workers AI), Cache API, DMARC management, Access, WAF, logpush, DNS, Health Checks, Zaraz, and D1.
We share the opinion of many of these companies that witnessing the incredible breadth and versatility of AI technology and the impact it has on organizations and people is astonishing, and we can’t wait to see where this technology takes people. If you’re inspired by reading these stories and want to start building, check out the Startup program and our Cloudflare for AI solutions.
If you want to share your story about what you’ve built, reach out to us or join the Developers Discord.
*** Since launching the Launchpad program in 2022, we have showcased a number of exciting startups looking to build the next big application. Whether innovative website designs, content delivery or AI-based features, the internet is waiting for the next big thing.
With that said, we are proud to announce our revamped Built With Workers site, an opportunity to showcase your projects with the developer community. Built With Workers will serve as a public facing repository of full-stack applications running on the Developer Platform to demonstrate how Cloudflare is helping developers build amazing applications.
Whether you're using R2 object storage to store web data, utilizing Workers to manage your application functionality or designing the next big web application UI with Pages, we love seeing what our customers are building!
To showcase your latest and greatest projects featured on Built with Workers, complete and submit our quick form to share your projects or business with us. Share how you're using Cloudflare products to build the application of your dreams or help expand developer knowledge with our developer community.
Cloudflare is officially a teenager. We launched on September 27, 2010. Today we celebrate our thirteenth birthday. As is our tradition, we use the week of our birthday to launch products that we think of as our gift back to the Internet. More on some of the incredible announcements in a second, but we wanted to start by talking about something more fundamental: our identity.
Like many kids, it took us a while to fully understand who we are. We chafed at being put in boxes. People would describe Cloudflare as a security company, and we'd say, "That's not all we do." They'd say we were a network, and we'd object that we were so much more. Worst of all, they'd sometimes call us a "CDN," and we'd remind them that caching is a part of any sensibly designed system, but it shouldn't be a feature unto itself. Thank you very much.
And so, yesterday, the day before our thirteenth birthday, we announced to the world finally what we realized we are: a connectivity cloud.
The connectivity cloud
What does that mean? "Connectivity" means we measure ourselves by connecting people and things together. Our job isn't to be the final destination for your data, but to help it move and flow. Any application, any data, anyone, anywhere, anytime — that's the essence of connectivity, and that’s always been the promise of the Internet.
"Cloud" means the batteries are included. It scales with you. It’s programmable. Has consistent security built in. It’s intelligent and learns from your usage and others' and optimizes for outcomes better than you ever could on your own.
Our connectivity cloud is worth contrasting against some other clouds. The so-called hyperscale public clouds are, in many ways, the opposite. They optimize for hoarding your data. Locking it in. Making it difficult to move. They are captivity clouds. And, while they may be great for some things, their full potential will only truly be unlocked for customers when combined with a connectivity cloud that lets you mix and match the best of each of their features.
Enabling the future
That's what we're seeing from the hottest startups these days. Many of the leading AI companies are using Cloudflare's connectivity cloud to move their training data to wherever there's excess GPU capacity. We estimate that across the AI startup ecosystem, Cloudflare is the most commonly used cloud provider. Because, if you're building the future, you know connectivity and the agility of the cloud are key.
We've spent the last year listening to our AI customers and trying to understand what the future of AI will look like and how we can better help them build it. Today, we're releasing a series of products and features borne of those conversations and opening incredible new opportunities.
The biggest opportunity in AI is inference. Inference is what happens when you type a prompt to write a poem about your love of connectivity clouds into ChatGPT and, seconds later, get a coherent response. Or when you run a search for a picture of your passport on your phone, and it immediately pulls it up.
The models that power those modern miracles take significant time to generate — a process called training. Once trained though, they can have new data fed through them over and over to generate valuable new output.
Where inference happens
Before today, those models could run in two places. The first was the end user's device — like in the case of the search for “passport” in the photos on your phone. When that's possible it's great. It's fast. Your private data stays local. And it works even when there's no network access. But it's also challenging. Models are big and the storage on your phone or other local device is limited. Moreover, putting the fastest GPU resources to process these models in your phone makes the phone expensive and burns precious battery resources.
The alternative has been the centralized public cloud. This is what’s used for a big model like OpenAI’s GPT-4, which runs services like ChatGPT. But that has its own challenges. Today, nearly all the GPU resources for AI are deployed in the US — a fact that rightfully troubles the rest of the world. As AI queries get more personal, sending them all to some centralized cloud is a potential security and data locality disaster waiting to happen. Moreover, it's inherently slow and less efficient and therefore more costly than running the inference locally.
A third place for inference
Running on the device is too small. Running on the centralized public cloud is too far. It’s like the story of “Goldilocks and the Three Bears”: the right answer is somewhere in between. That's why today we're excited to be rolling out modern GPU resources across Cloudflare's global connectivity cloud. The third place for AI inference. Not too small. Not too far. The perfect step in between. By the end of the year, you'll be able to run AI models in more than 100 cities in 40+ countries where Cloudflare operates. By the end of 2024, we plan to have inference-tuned GPUs deployed in nearly every city that makes up Cloudflare's global network and within milliseconds of nearly every device connected to the Internet worldwide.
(A brief shout out for the Cloudflare team members who are, as of this moment, literally dragging suitcases full of NVIDIA GPU cards around the world and installing them in the servers that make up our network worldwide. It takes a lot of atoms to move all the bits that we do, and it takes intrepid people spanning the globe to update our network to facilitate these new capabilities.)
Running AI in a connectivity cloud like Cloudflare gives you the best of both worlds: nearly boundless resources running locally near any device connected to the Internet. And we've made it flexible to run whatever models a developer creates, easy to use without needing a dev ops team, and inexpensive to run where you only pay for when we're doing inference work for you.
To make this tangible, think about a Cloudflare customer like Garmin. They make devices that need to be smart but also affordable and have the longest possible battery life. As explorers rely on them literally to navigate out of harrowing conditions, tradeoffs aren't an option. That's why, when they heard about Cloudflare Workers AI, they immediately knew it was something they needed to try. Here's what Aaron Dearinger, Edge Architect at Garmin International said to us:
"Garmin is alongside our users for all their runs, workouts, and outdoor adventures, and we want to ensure that our watches and devices' power can last weeks and months instead of hours or days. We're excited for Cloudflare's innovations to ensure AI is performant, fast, close to users, and importantly privacy-first. This holds a lot of potential to us as we aim to bring more advanced fitness, wellness, and adventure insights to our users as they explore."
They are one of the limited set of customers we gave an early sneak peek to, all of whom immediately started running off ideas of what they could do next and clamoring to get more access. We feel like we’ve seen it and are here to report: the not-so-distant future is super cool.
The spirit of helping build a better Internet
Over the years we've announced several things on our birthday that have gone on to change the future of the Internet. On our first birthday, we announced an IPv6 gateway that has helped the Internet scale past its early protocol decisions. On our fourth birthday, we announced that we were making encryption free and doubled the size of the encrypted web in a day. On our seventh birthday, we launched the Workers platform that has revolutionized how modern applications are developed. On our eleventh birthday we announced R2 and further freed data from the captivity clouds.
This year, as we celebrate Cloudflare's thirteenth birthday, we set out to have as dramatic an impact on AI development as we have in other areas we've focused on in the past: providing tools that bring affordable, powerful AI inference to anyone, anywhere on Earth.
Closing with a poem
And so, to commemorate that, let's close with a poem about the connectivity cloud. This one was generated using a tiny bit of code and Meta's Llama 2 LLM model running on Cloudflare's Workers AI platform in a data center not far from where we're writing this…
Prompt: “Write a poem that talks about the connectivity cloud and contrast it with the captivity cloud”
The connectivity cloud, a wondrous sight to see, Where data flows and knowledge is set free, A place where minds meet and ideas take flight, A world of endless possibility in sight.
But then there's the captivity cloud, a darker place, Where thoughts are trapped and minds are in disgrace, A prison of the mind, where freedom's lost, A world of endless sorrow and cost.
So let us choose the connectivity cloud, And let our minds be free and allowed, To soar and glide and reach for the sky, And never be held back, but always fly.
Today, Cloudflare’s Workers platform is the place over a million developers come to build sophisticated full-stack applications that previously wouldn’t have been possible.
Of course, Workers didn’t start out that way. It started, on a day like today, as a Birthday Week announcement. It may not have had all the bells and whistles that exist today, but if you got to try Workers when it launched, it conjured this feeling: “this is different, and it’s going to change things”. All of a sudden, going from nothing to a fully scalable, global application took seconds, not hours, days, weeks or even months. It was the beginning of a different way to build applications.
If you’ve played with generative AI over the past few months, you may have had a similar feeling. Surveying a few friends and colleagues, our “aha” moments were all a bit different, but the overarching sentiment across the industry at this moment is unanimous — this is different, and it’s going to change things.
Today, we’re excited to make a series of announcements that we believe will make a similar impact as Workers did in the future of computing. Without burying the lede any further, here they are:
Workers AI (formerly known as Constellation), running on NVIDIA GPUs on Cloudflare’s global network, bringing the serverless model to AI — pay only for what you use, spend less time on infrastructure, and more on your application.
Vectorize, our vector Database, making it easy, fast and affordable to index and store vectors to support use cases that require access not just to running models, but customized data too.
AI Gateway, giving organizations the tools to cache, rate limit and observe their AI deployments regardless of where they’re running.
But that’s not all.
Doing big things is a team sport, and we don’t want to do it alone. Like in so much of what we do, we stand on the shoulders of giants. We’re thrilled to partner with some of the biggest players in the space: NVIDIA, Microsoft, Hugging Face, Databricks, and Meta.
Our announcements today mark just the beginning of Cloudflare’s journey into the AI space, like Workers did six years ago. While we encourage you to dive into each of our announcements (you won’t be disappointed!), we also wanted to take the chance to step back and provide you with a bit of our broader vision for AI, and how these announcements fit into it.
Inference: The future of AI workloads
There are two main processes involved in AI: training and inference.
Training a generative AI model is a long-running (sometimes months-long) compute intensive process, which results in a model. Training workloads are therefore best suited for running in traditional centralized cloud locations. Given the recent challenges in being able to obtain long-running access to GPUs, resulting in companies going multi-cloud, we’ve talked about the ways in which R2 can provide an essential service that eliminates egress fees for the training data to be accessed from any compute cloud. But that’s not what we’re here to talk about today.
While training requires many resources upfront, the much more ubiquitous AI-related compute task is inference. If you’ve recently asked ChatGPT a question, generated an image, translated some text, then you’ve performed an inference task. Since inference is required upon every single invocation (rather than just once), we expect that inference will become the dominant AI-related workload.
If training is best suited for a centralized cloud, then what is the best place for inference?
The network — “just right” for inference
The defining characteristic of inference is that there’s usually a user waiting on the other end of it. That is, it’s a latency sensitive task.
The best place, you might think, for a latency sensitive task is on the device. And it might be in some cases, but there are a few problems. First, hardware on devices is not nearly as powerful. Battery life.
On the other hand, you have centralized cloud compute. Unlike devices, the hardware running in centralized cloud locations has nothing if not horsepower. The problem, of course, is that it’s hundreds of milliseconds away from the user. And sometimes, they’re even across borders, which presents its own set of challenges.
So devices are not yet powerful enough, and centralized cloud is too far away. This makes the network the goldilocks of inference. Not too far, with sufficient compute power — just right.
The first inference cloud, running on Region Earth
One lesson we learned building our developer platform is that running applications at network scale not only helps optimize performance and scale (though obviously that’s a nice benefit!), but even more importantly, creates the right level of abstraction for developers to move fast.
Workers AI for serverless inference
Kicking things off with our announcement of Workers AI, we’re bringing the first truly serverless GPU cloud, to its perfect match — Region Earth. No machine learning expertise, no rummaging for GPUs. Just pick one of our provided models, and go.
We’ve put a lot of thought into designing Workers AI to make the experience of deploying a model as smooth as possible.
And if you’re deploying any models in the year 2023, chances are, one of them is an LLM.
Vectorize for… storing vectors!
To build an end-to-end AI-operated chat bot, you also need a way to present the user with a UI, parse the corpus of information you want to pass it (for example your product catalog), use the model to convert it into embeddings — and store them somewhere. Up until today, we offered the products you needed for the first two, but the latter — storing embeddings — requires a unique solution: a vector database.
Just as when we announced Workers, we soon after announced Workers KV — there’s little you can do with compute, without access to state. The same is true of AI — to build meaningful AI use cases, you need to give AI access to state. This is where a vector database comes into play, and why today we’re also excited to announce Vectorize, our own vector database.
AI Gateway for caching, rate limiting and visibility into your AI deployments
At Cloudflare, when we set out to improve something, the first step is always to measure it — if you can’t measure it, how can you improve it? When we heard about customers struggling to reign in AI deployment costs, we thought about how we would approach it — measure it, then improve it.
Our AI Gateway helps you do both!
Real-time observation capabilities empower proactive management, making it easier to monitor, debug, and fine-tune AI deployments. Leveraging it to cache, rate limit, and monitor AI deployments is essential for optimizing performance and managing costs effectively. By caching frequently used AI responses, it reduces latency and bolsters system reliability, while rate limiting ensures efficient resource allocation, mitigating the challenges of spiraling AI costs.
Collaborating with Meta to bring Llama 2 to our global network
Until recently, the only way to have access to an LLM was through calls to proprietary models. Training LLMs is a serious investment — in time, computing, and financial resources, and thus not something that’s accessible to most developers. Meta’s release of Llama 2, an open-source LLM, has presented an exciting shift, allowing developers to run and deploy their own LLMs. Except of course, one small detail — you still have to have access to a GPU to do so.
By making Llama 2 available as a part of the Workers AI catalog, we look forward to giving every developer access to an LLM — no configuration required.
Having a running model is, of course, just one component of an AI application.
Leveraging the ONNX runtime to make moving between cloud to edge to device seamless for developers
While the edge may be the optimal location for solving many of these problems, we do expect that applications will continue to be deployed at other locations along the spectrum of device, edge and centralized cloud.
Take for example, self-driving cars — when you’re making decisions where every millisecond matters, you need to make these decisions on the device. Inversely, if you’re looking to run hundred-billion parameter versions of models, the centralized cloud is going to be better suited for your workload.
The question then becomes: how do you navigate between these locations smoothly?
Since our initial release of Constellation (now called Workers AI), one technology we were particularly excited by was the ONNX runtime. The ONNX runtime creates a standardized environment for running models, which makes it possible to run various models across different locations.
We already talked about the edge as a great place for running inference itself, but it’s also great as a routing layer to help guide workloads smoothly across all three locations, based on the use case, and what you’re looking to optimize for — be it latency, accuracy, cost, compliance, or privacy.
Partnering with Hugging Face to provide optimized models at your fingertips
There’s nothing of course that can help developers go faster than meeting them where they are, so we are partnering with Hugging Face to bring serverless inference to available models, right where developers explore them.
Partnering with Databricks to make AI models
Together with Databricks, we will be bringing the power of MLflow to data scientists and engineers. MLflow is an open-source platform for managing the end-to-end machine learning lifecycle, and this partnership will make it easier for users to deploy and manage ML models at scale. With this partnership, developers building on Cloudflare Workers AI will be able to leverage MLFlow compatible models for easy deployment into Cloudflare’s global network. Developers can use MLflow to efficiently package, implement, deploy and track a model directly into Cloudflare’s serverless developer platform.
AI that doesn’t keep your CIO or CFO or General Counsel up at night
Things are moving quickly in AI, and it’s important to give developers the tools they need to get moving, but it’s hard to move fast when there are important considerations to worry about. What about compliance, costs, privacy?
Compliance-friendly AI
Much as most of us would prefer not to think about it, AI and data residency are becoming increasingly regulated by governments. With governments requiring that data be processed locally or that their residents’ data be stored in-country, businesses have to think about that in the context of where inference workloads run as well. While with regard to latency, the network edge provides the ability to go as wide as possible. When it comes to compliance, the power of a network that spans 300 cities, and an offering like our Data Localization Suite, we enable the granularity required to keep AI deployments local.
Budget-friendly AI
Talking to many of our friends and colleagues experimenting with AI, one sentiment seems to resonate — AI is expensive. It’s easy to let costs get away before even getting anything into production or realizing value from it. Our intent with our AI platform is to make costs affordable, but perhaps more importantly, only charge you for what you use. Whether you’re using Workers AI directly, or our AI gateway, we want to provide the visibility and tools necessary to prevent AI spend from running away from you.
Privacy-friendly AI
If you’re putting AI front and center of your customer experiences and business operations, you want to be reassured that any data that runs through it is in safe hands. As has always been the case with Cloudflare, we’re taking a privacy-first approach. We can assure our customers that we will not use any customer data passing through Cloudflare for inference to train large language models.
No, but really — we’re just getting started
We're just getting started with AI, folks, and boy, are we in for a wild ride! As we continue to unlock the benefits of this technology, we can't help but feel a sense of awe and wonder at the endless possibilities that lie ahead. From revolutionizing healthcare to transforming the way we work, AI is poised to change the game in ways we never thought possible. So buckle up, folks, because the future of AI is looking brighter than ever – and we can't wait to see what's next!
This wrap up message may have been generated by AI, but the sentiment is genuine — this is just the beginning, and we can’t wait to see what you build.
“Биволъ” участва успешно в двете най-големи в света конференции за разследваща журналистика, организирани от Global Investigative Journalism Network (GIJN) и Organized Crime and Corruption Reporting(OCCRP) в гр. Гьотеборг, Кралство Швеция,…
Both Apple and Google have recently reported critical vulnerabilities in their systems—iOS and Chrome, respectively—that are ultimately the result of the same vulnerability in the libwebp library:
On Thursday, researchers from security firm Rezillion published evidence that they said made it “highly likely” both indeed stemmed from the same bug, specifically in libwebp, the code library that apps, operating systems, and other code libraries incorporate to process WebP images.
Rather than Apple, Google, and Citizen Lab coordinating and accurately reporting the common origin of the vulnerability, they chose to use a separate CVE designation, the researchers said. The researchers concluded that “millions of different applications” would remain vulnerable until they, too, incorporated the libwebp fix. That, in turn, they said, was preventing automated systems that developers use to track known vulnerabilities in their offerings from detecting a critical vulnerability that’s under active exploitation.
CIOs and CITOs know all too well that a smoothly functioning network is the backbone of any business. Your network has to guarantee reliability, performance, and security. An unreliable network, by contrast, means damaged productivity, negative customer perceptions, and haphazard security. The solution is network monitoring, and in this post we’ll explore the reasons why Zabbix is the ideal monitoring solution for any business.
What is network monitoring?
Network monitoring is a critical IT process where all networking components (as well as key performance indicators like CPU utilization and network bandwidth) are constantly monitored to improve performance and eliminate bottlenecks. It provides real-time information that network administrators need to determine whether a network is running optimally.
Why Zabbix?
At Zabbix, we’re here to help you deliver for your customers, flawlessly and without interruptions. Our monitoring solution is 100% open source, available in over 20 languages, and able to collect an unlimited amount of data. Designed with enterprise requirements in mind, Zabbix provides a comprehensive, “single pane of glass” view of any size environment. Put simply, Zabbix allows you to monitor anything – from physical and virtual servers or containers to network infrastructure, applications, and cloud services.
What’s more, we offer a wide variety of additional professional services to go along with our solution, including:
Multiple technical support subscriptions that are tailored to the needs of your business
Certified training programs that are designed to help you master Zabbix under the guidance of top experts
A wide range of professional services, including template building, upgrades, consulting, and more
Keep reading to find out more about the difference Zabbix can make for your business.
The Zabbix advantage
IT teams are under enormous pressure to have their networks functioning perfectly 100% of the time, and with good reason. It’s simply not possible to run a business with a malfunctioning network. Here are 5 key reasons why you need to make network monitoring a top priority, and why Zabbix is the right answer for all of them.
Reliability
A network monitoring solution’s main reason for being is to show whether a device is working or not. Taking a proactive approach to maintaining a healthy network will keep tech support requests and downtime to an absolute minimum. Zabbix makes it easy to do so by automatically detecting problem states in your metric flow. Not only that, but our automated predictive functions can also help you react proactively. They do this by forecasting a value for early alerting and predicting the time left until you reach a problem threshold. Automation then allows you to remove additional inefficiencies.
Visibility
Having complete visibility of all your hardware and software assets allows you to easily monitor the health of your network. Zabbix lets businesses access metrics, issues, reports, and maps with a single click, allowing you to:
Analyze and correlate your metrics with easy-to-read graphs
Track your monitoring targets on an interactive geo-map
Display the statuses of your elements together with real-time data to get a detailed overview of your infrastructure on a Zabbix map
Generate scheduled PDF reports from any Zabbix dashboard
Extend the native Zabbix frontend functionality by developing your own frontend widgets and modules
Performance
By making it easy to monitor anything, Zabbix lets you know which parts of your network are being properly used, overused, or underused. This can help you uncover unnecessary costs that can be eliminated or identify a network component that needs upgrading.
Compliance
Today’s IT teams need to meet strict regulatory and protection standards in increasingly complex networks. Zabbix can spot changes in normal system behavior and unusual data flow. It can then either leverage multiple messaging channels to notify your team about anomalies or simply resolve any issues automatically.
Profitability
Zabbix has an extensive track record of making businesses more productive by saving network management time and lowering operating costs. Servers, for example, are machines that inevitably break down from time to time. Being able to quickly re-launch after a failure has occurred and minimizing the server downtime are vital. By making sure your team is aware of any and all current and impending issues, Zabbix can reduce downtime and increase the productivity and efficiency of your business.
Zabbix across industries
Whatever field you’re in, there’s no substitute for consistent, problem-free service when it comes to gaining the trust and loyalty of customers. Zabbix has an extensive track record of helping clients in multiple industries achieve their goals.
Zabbix for healthcare
A typical hospital relies on tens of thousands of connected devices. Manually checking each one for anomalies simply isn’t practical. Establishing a stable service level is a vital issue in most industries, but in healthcare it’s literally a matter of life and death. With Zabbix, hospital IT teams receive potentially life-saving alerts if anything is out of the ordinary.
What’s more, Zabbix can monitor progress toward expected outcomes, providing up-to-the-minute statistics on data errors or IT system failures. Issues, response times, and potential bottlenecks are displayed in easy-to-read graphs and charts. This allows hospital staff to follow up on the presence or absence of problems.
Zabbix for banking and finance
Financial institutions of all sizes rely on their networks to maintain connectivity and productivity. By processing millions of checks per minute and considering very complex dependencies between different elements of infrastructure, Zabbix allows banks to proactively detect and resolve network problems before they turn into major business disruptions.
Zabbix is also designed to seamlessly connect distributed architecture, including remote offices, branches, and even individual ATMs. Some of our financial industry clients previously used up to 20 different monitoring tools. Each alert sent hundreds of emails to different people, making it impossible to effectively monitor the environment. Naturally, they found Zabbix’s ability to monitor many thousands of devices and “single pane of glass” view to be a significant upgrade.
Zabbix for education
In an age of digital course materials and resources, schools and universities can’t operate without functioning IT infrastructures. Our clients in education typically have heterogeneous infrastructures with thousands of servers and clients. They also possess all kinds of connected devices, dozens of different operating systems, multiple locations, and hundreds of IT staff.
Zabbix has proven itself to be a simple, cost-effective method of monitoring geographically distributed campuses and educational sites. We’ve done this by:
Providing early notification of possible viruses, worms, Trojan horses, and other transmitters of system infection
Monitoring IT systems for intellectual property (IP) protection purposes
Saving human resources by reducing manual work
Zabbix for government
Network monitoring is critical for government agencies, as downtime can bring a halt to vital public services. Our public-sector clients range from city-wide public transportation companies all the way up to entire prefectures. They use Zabbix to monitor the availability of utilities, transport, lighting, and many other public services.
In the process, Zabbix increases the effectiveness of budget expenditures by providing precise and accountable data on how public resources are used. This makes it easier to justify further expenditures. In most business software, agents are required for each monitored host and costs increase in proportion to the number of monitored hosts. By contrast, Zabbix is open source and the software itself is free of charge, resulting in anticipated cost reductions of up to 25% in many cases.
Zabbix for retail
Retail environments increasingly depend on network-connected equipment, particularly when it comes to warehouse monitoring and tracking SKUs (stock keeping units). Zabbix delivers an all-in-one tool to monitor different applications, metrics, processes, and equipment while providing a complete picture about the availability and performance of all the components that make a retail business successful. This makes it possible for retailers to easily automate store openings and closings, monitor cash machines, and keep track of access system log entries.
Not only that, the quantity and quality of information that Zabbix collects makes it easy for retailers to conduct a more accurate analysis of what is happening (or what may happen) and take preventive measures. Our retail clients find that having this level of control over their resources and services increases the confidence of their teams as well as their customers.
Zabbix for telecom
Internet, telephony, and television verticals require availability and consistency. The key to success is providing your services 24/7/365.
Zabbix makes this possible by providing full visibility of all network and customer devices, allowing operators to know of any outage before customers do and take necessary actions. Some of our telecommunications clients are able to effortlessly monitor well over 100,000 devices with a single Zabbix server. This helps them improve the customer experience and driving growth in the process.
Zabbix for aerospace
In the aerospace industry, timely data delivery and issue notification are the keys to safe operations. Aircraft depend on complex electronic systems that can diagnose the slightest deviations and make malfunctions known. Unfortunately, this is often in the form of either an indicator light on an instrument panel or a log message that is accessible only with specialized software or tools.
With Zabbix, all data transfers from the aircraft’s diagnostic system to the responsible employees can happen automatically. Error prioritization and escalation to further levels can also happen automatically if any aircraft has an ongoing issue that remains active for multiple days.
Conclusion
At Zabbix, our goal is a world without interruptions, powered by a world-class universal monitoring solution that’s available and affordable to any business. Our open-source software allows you to monitor your entire IT stack, no matter what size your infrastructure is or where it’s hosted.
That’s why government institutions across the globe as well as some of the world’s largest companies trust us with their network monitoring needs.
Get in touch with us to learn more and get started on the path to maximum efficiency and uptime today!
AWS Lake Formation helps you centrally govern, secure, and globally share data for analytics and machine learning. With Lake Formation, you can manage access control for your data lake data in Amazon Simple Storage Service (Amazon S3) and its metadata in AWS Glue Data Catalog in one place with familiar database-style features. You can use fine-grained data access control to verify that the right users have access to the right data down to the cell level of tables. Lake Formation also makes it simpler to share data internally across your organization and externally. Further, Lake Formation integrates with AWS analytics services such as Amazon Athena, Amazon Redshift Spectrum, Amazon EMR, and AWS Glue ETL for Apache Spark. These services allow querying Lake Formation managed tables, thus helping you extract business insights from the data quickly and securely.
Before the introduction of Lake Formation and its database-style permissions for data lakes, you had to manage access to your data in the data lake and its metadata separately through AWS Identity and Access Management (IAM) policies and S3 bucket policies. With an IAM and Amazon S3 access control mechanism, which is more complex and less granular compared to Lake Formation, you need more time to migrate to Lake Formation because a given database or table in the data lake could have its access controlled by either IAM and S3 policies or Lake Formation policies, but not both. Also, various use cases operate on the data lakes. Migrating all use cases from one permissions model to another in a single step without disruption was challenging for operations teams.
To ease the transition of data lake permissions from an IAM and S3 model to Lake Formation, we’re introducing a hybrid access mode for AWS Glue Data Catalog. Please refer to the What’s New and documentation. This feature lets you secure and access the cataloged data using both Lake Formation permissions and IAM and S3 permissions. Hybrid access mode allows data administrators to onboard Lake Formation permissions selectively and incrementally, focusing on one data lake use case at a time. For example, say you have an existing extract, transform and load (ETL) data pipeline that uses the IAM and S3 policies to manage data access. Now you want to allow your data analysts to explore or query the same data using Amazon Athena. You can grant access to the data analysts using Lake Formation permissions, to include fine-grained controls as needed, without changing access for your ETL data pipelines.
Hybrid access mode allows both permission models to exist for the same database and tables, providing greater flexibility in how you manage user access. While this feature opens two doors for a Data Catalog resource, an IAM user or role can access the resource using only one of the two permissions. After Lake Formation permission is enabled for an IAM principal, authorization is completely managed by Lake Formation and existing IAM and S3 policies are ignored. AWS CloudTrail logs provide the complete details of the Data Catalog resource access in Lake Formation logs and S3 access logs.
In this blog post, we walk you through the instructions to onboard Lake Formation permissions in hybrid access mode for selected users while the database is already accessible to other users through IAM and S3 permissions. We will review the instructions to set-up hybrid access mode within an AWS account and between two accounts.
Scenario 1 – Hybrid access mode within an AWS account
In this scenario, we walk you through the steps to start adding users with Lake Formation permissions for a database in Data Catalog that’s accessed using IAM and S3 policy permissions. For our illustration, we use two personas: Data-Engineer, who has coarse grained permissions using an IAM policy and an S3 bucket policy to run an AWS Glue ETL job and Data-Analyst, whom we will onboard with fine grained Lake Formation permissions to query the database using Amazon Athena.
Scenario 1 is depicted in the diagram shown below, where the Data-Engineer role accesses the database hybridsalesdb using IAM and S3 permissions while Data-Analyst role will access the database using Lake Formation permissions.
Prerequisites
To set up Lake Formation and IAM and S3 permissions for a Data Catalog database with Hybrid access mode, you must have the following prerequisites:
An AWS account that isn’t used for production applications.
Lake Formation already set up in the account and a Lake Formation administrator role or a similar role to follow along with the instructions in this post. For example, we’re using a data lake administrator role called LF-Admin. To learn more about setting up permissions for a data lake administrator role, see Create a data lake administrator.
A sample database in the Data Catalog with a few tables. For example, our sample database is called hybridsalesdb and has a set of eight tables, as shown in the following screenshot. You can use any of your datasets to follow along.
Personas and their IAM policy setup
There are two personas that are IAM roles in the account: Data-Engineer and Data-Analyst. Their IAM policies and access are described as follows.
The following IAM policy on the Data-Engineer role allows access to the database and table metadata in the Data Catalog.
The Data-Engineer also has access to the AWS Glue console using the AWS managed policy arn:aws:iam::aws:policy/AWSGlueConsoleFullAccess and regressive iam:Passrole to run an AWS Glue ETL script as below.
The following policy is also added to the trust policy of the Data-Engineer role to allow AWS Glue to assume the role to run the ETL script on behalf of the role.
Additionally, the Data-Analyst has permissions to write Athena query results to an S3 bucket that isn’t managed by Lake Formation and Athena console full access using the AWS managed policy arn:aws:iam::aws:policy/AmazonAthenaFullAccess.
Set up Lake Formation permissions for Data-Analyst
Complete the following steps to configure your data location in Amazon S3 with Lake Formation in hybrid access mode and grant access to the Data-Analyst role.
Sign in to the AWS Management Console as a Lake Formation administrator role.
Go to Lake Formation.
Select Data lake locations from the left navigation bar under Administration.
Select Register location and provide the Amazon S3 location of your database and tables. Provide an IAM role that has access to the data in the S3 location. For more details see Requirements for roles used to register locations.
Select the Hybrid access mode under Permission mode and choose Register location.
Select Data lake locations under Administration from the left navigation bar. Review that the registered location shows as Hybrid access mode for Permission mode.
Select Databases from Catalog on the left navigation bar. Choose hybridsalesdb. You will select the database that has the data in the S3 location that you registered in the preceding step. From the Actions drop down menu, select Grant.
Select Data-Analyst for IAM users and roles. Under LF-Tags or catalog resources, select Named Data Catalog resources and select hybridsalesdb for Databases.
Under Database permissions, select Describe. Under Hybrid access mode, select the checkbox Make Lake Formation permissions effective immediately. Choose Grant.
Again, select Databases from Catalog on the left navigation bar. Choose hybridsalesdb. Select Grant from the Actions drop down menu.
On the Grant window, select Data-Analyst for IAM users and roles. Under LF-Tags or catalog resources, choose Named Data Catalog resources and select hybridsalesdb for Databases.
Under Tables, select the three tables named hybridcustomer, hybridproduct, and hybridsales_order from the drop down.
Under Table permissions, select Select and Describe permissions for the tables.
Select the checkbox under Hybrid access mode to make the Lake Formation permissions effective immediately.
Choose Grant.
Review the granted permissions by selecting the Data lake permissions under Permissions on the left navigation bar. Filter Data permissions by Principal = Data-Analyst.
On the left navigation bar, select Hybrid access mode. Verify that the opted in Data-Analyst shows up for the hybridsalesdb database and the three tables.
Sign out from the console as the Lake Formation administrator role.
Validating Lake Formation permissions for Data-Analyst
Sign in to the console as Data-Analyst.
Go to the Athena console. If you’re using Athena for the first time, set up the query results location to your S3 bucket as described in Specifying a query result location.
Run preview queries on the table from the Athena query editor.
Validating IAM and S3 permissions for Data-Engineer
Sign out as Data-Analyst and sign back in to the console as Data-Engineer.
Open the AWS Glue console and select ETL jobs from the left navigation bar.
Under Create job, select Spark script editor. Choose Create.
Copy and paste the script into your studio script editor as a new job.
Edit the catalog_id, database, and table_name to suit your sample.
Save and Run your AWS Glue ETL script by providing the IAM role of Data-Engineer to run the job.
After the ETL script succeeds, you can select the output logs link from the Runs tab of the ETL script.
Review the table’s schema, top 20 rows, and the total number of rows and columns from the AWS CloudWatch logs.
Thus, you can add Lake Formation permissions to a new role to access a Data Catalog database without interfering with another role that is accessing the same database through IAM and S3 permissions.
Scenario 2 – Hybrid access mode set up between two AWS accounts
This is a cross-account sharing scenario where a data producer shares a database and its tables to a consumer account. The producer provides full database access for an AWS Glue ETL workload on the consumer account. At the same time, the producer shares a few tables of the same database to the consumer account using Lake Formation. We walk you through how you can use hybrid access mode to support both access methods.
Prerequisites
Cross-account sharing of a database or table location that’s registered in hybrid access mode requires the producer or the grantor account to be in version 4 of cross-account sharing in the catalog setting to grant permissions on the hybrid access mode resource. When moving from version 3 to version 4 of cross-account sharing, existing Lake Formation permissions aren’t affected for database and table locations that are already registered with Lake Formation (Lake Formation mode). For new data set location registration in hybrid access mode and new Lake Formation permissions on this catalog resource, you will need version 4 of cross-account sharing.
The consumer or recipient account can use other versions of cross-account sharing. If your accounts are using version 1 or version 2 of cross-account sharing and if you want to upgrade, follow Updating cross-account data sharing version settings to first upgrade the catalog setting of cross-account sharing to version 3, before upgrading to version 4.
The producer account set up is similar to that of scenario 1 and we discuss the extra steps for scenario 2 in the following section.
Set up in producer account A
The consumer Data-Engineer role is granted Amazon S3 data access using the producer’s S3 bucket policy and Data Catalog access using the producer’s Data Catalog resource policy.
The S3 bucket policy in the producer account follows:
The Data Catalog resource policy in the producer account is shown below. You also need the glue:ShareResource IAM permission for AWS Resource Access Manager (AWS RAM) to enable cross-account sharing.
Setting the cross-account version and registering the S3 bucket
Sign in to the Lake Formation console as an IAM administrator role or a role with IAM permissions to the PutDataLakeSettings() API. Choose the AWS Region where you have your sample data set in an S3 bucket and its corresponding database and tables in the Data Catalog.
Select Data catalog settings from the left navigation bar under Administration. Select Version 4 from the dropdown menu for Cross account version settings. Choose Save. Note: If there are any other accounts in your environment that share catalog resources to your producer account through Lake Formation, upgrading the sharing version might impact them. See <title of documentation page> for more information.
Sign out as IAM administrator and sign back in to the Lake Formation console as a Lake Formation administrator role.
Select Data lake locations from the left navigation bar under Administration.
Select Register location and provide the S3 location of your database and tables.
Choose the Hybrid access mode under Permission mode, and then choose Register location.
Select Data lake locations under Administration from the left navigation bar. Confirm that the registered location shows as Hybrid access mode for Permission mode.
Granting cross-account permissions
The steps to share the database hybridsalesdb to the consumer account are similar to the steps to set up scenario 1.
In the Lake Formation console, select Databases from Catalog on the left navigation bar. Choose hybridsalesdb. Select your database that has the data in the S3 location that you registered previously. From the Actions drop down menu, select Grant.
Select External accounts under Principals and provide the consumer account ID. Select Named catalog resources under LF-Tags or catalog resources. Choose hybridsalesdb for Databases.
Select Describe for Database permissions and for Grantable permissions.
Under Hybrid access mode, select the checkbox for Make Lake Formation permissions effective immediately. Choose Grant.
Note: Selecting the checkbox opts-in the consumer account Lake Formation administrator roles to use Lake Formation permissions without interrupting access to the consumer account’s IAM and S3 access for the same database.
Repeat step 2 up to database selection to grant permission to the consumer account ID for table level permission. Select any three tables from the drop-down menu for table level permission under Tables.
Select Select under Table permissions and Grantable permissions. Select the checkbox for Make Lake Formation permissions effective immediately under Hybrid access mode. Choose Grant.
Select the Data lake permissions on the left navigation bar. Verify the granted permissions to the consumer account.
Select the Hybrid access mode on the left navigation bar. Verify the opted-in resources and principal.
You have now enabled cross-account sharing using Lake Formation permissions without revoking access to the IAMAllowedPrincipal virtual group.
Set up in consumer account B
In scenario 2, the Data-Analyst and Data-Engineer roles are created in the consumer account similar to scenario 1, but these roles access the database and tables shared from the producer account.
In addition to arn:aws:iam::aws:policy/AWSGlueConsoleFullAccess and arn:aws:iam::aws:policy/CloudWatchFullAccess, the Data-Engineer role also has permissions to create and run an Apache Spark job in AWS Glue Studio.
Data-Engineer has the following IAM policy that grants access to the producer account’s S3 bucket, which is registered with Lake Formation in hybrid access mode.
Data-Engineer has the following IAM policy that grants access to the consumer account’s entire Data Catalog and producer account’s database hybridsalesdb and its tables.
The Data-Analyst has the same IAM policies similar to scenario 1, granting basic data lake user permissions. For additional details, see Assign permissions to Lake Formation users.
Accepting AWS RAM invites
Sign in to the Lake Formation console as a Lake Formation administrator role.
Open the AWS RAM console. Select Resource shares from Shared with me on the left navigation bar. You should see two invites from the producer account, one for database level share and one for table level share.
Select each invite, review the producer account ID, and choose Accept resource share.
Granting Lake Formation permissions to Data-Analyst
Open the Lake Formation console. As a Lake Formation administrator, you should see the shared database and tables from the consumer account.
Select Databases from the Data catalog on the left navigation bar. Select the radio button on the database hybridsalesdb and select Create resource link from the Actions drop down menu.
Enter rl_hybridsalesdb as the name for the resource link and leave the rest of the selections as they are. Choose Create.
Select the radio button for rl_hybridsalesdb. Select Grant from the Actions drop down menu.
Grant Describe permissions on the resource link to Data-Analyst.
Again, select the radio button on rl_hybridsalesdb from the Databases under Catalog in the left navigation bar. Select Grant on target from the Actions drop down menu.
Select Data-Analyst for IAM users and roles, keep the already selected database hybridsalesdb.
Select Describe under Database permissions. Select the checkbox for Make Lake Formation permissions effective immediately under Hybrid access mode. Choose Grant.
Select the radio button on rl_hybridsalesdb from Databases under Catalog in the left navigation bar. Select Grant on target from the Actions drop down menu.
Select Data-Analyst for IAM users and roles. Select All tables of the database hybridsalesdb. Select Select under Table permissions.
Select the checkbox for Make Lake Formation permissions effective immediately under Hybrid access mode.
View and verify the permissions granted to Data-Analyst from the Data lake permissions tab on the left navigation bar.
Sign out as Lake Formation administrator role.
Validate Lake Formation permissions as Data-Analyst
Sign back in to the console as Data-Analyst.
Open the Athena console. If you’re using Athena for the first time, set up the query results location to your S3 bucket as described in Specifying a query result location.
In the Query Editor page, under Data, select AWSDataDatalog for Data source. For Tables, select the three dots next to any of the table names. Select Preview Table to run the query.
Sign out as Data-Analyst.
Validate IAM and S3 permissions for Data-Engineer
Sign back in to the console as Data-Engineer.
Using the same steps as scenario 1, verify IAM and S3 access by running the AWS Glue ETL script in AWS Glue Studio.
You’ve added Lake Formation permissions to a new role Data-Analyst, without interrupting existing IAM and S3 access to Data-Engineer for a cross-account sharing use-case.
Clean up
If you’ve used sample datasets from your S3 for this blog post, we recommend removing relevant Lake Formation permissions on your database for the Data-Analyst role and cross-account grants. You can also remove the hybrid access mode opt-in and remove the S3 bucket registration from Lake Formation. After removing all Lake Formation permissions from both the producer and consumer accounts, you can delete the Data-Analyst and Data-Engineer IAM roles.
Considerations
Currently, only a Lake Formation administrator role can opt in other users to use Lake Formation permissions for a resource, since opting in user access using either Lake Formation or IAM and S3 permissions is an administrative task requiring full knowledge of your organizational data access setup. Further, you can grant permissions and opt in at the same time using only the named-resource method and not LF-Tags. If you’re using LF-Tags to grant permissions, we recommend you use the Hybrid access mode option on the left navigation bar to opt in (or the equivalent CreateLakeFormationOptin() API using the AWS SDK or AWS CLI) as a subsequent step after granting permissions.
Conclusion
In this blog post, we went through the steps to set up hybrid access mode for Data Catalog. You learned how to onboard users selectively to the Lake Formation permissions model. The users who had access through IAM and S3 permissions continued to have their access without interruptions. You can use Lake Formation to add fine-grained access to Data Catalog tables to enable your business analysts to query using Amazon Athena and Amazon Redshift Spectrum, while your data scientists can explore the same data using Amazon Sagemaker. Data engineers can continue to use their IAM and S3 permissions on the same data to run workloads using Amazon EMR and AWS Glue. Hybrid access mode for the Data Catalog enables a variety of analytical use-cases for your data without data duplication.
To get started, see the documentation for hybrid access mode. We encourage you to check out the feature and share your feedback in the comments section. We look forward to hearing from you.
About the authors
Aarthi Srinivasan is a Senior Big Data Architect with AWS Lake Formation. She likes building data lake solutions for AWS customers and partners. When not on the keyboard, she explores the latest science and technology trends and spends time with her family.
This post is written by Paras Jain, Senior Technical Account Manager and Curtis Darst, Senior Solutions Architect.
AWS Application Composer allows you to design and build applications visually using 13 AWS CloudFormation resource types. Today, the service expands the support to all available CloudFormation resource types.
Overview
AWS Application Composer provides you with an interactive canvas for visually designing your applications. You use a drag-and-drop interface to create an application design from scratch or import an existing application definition to edit it.
Modern event-driven applications are built on many services. Visualizing an architecture helps you better understand the relationship between those services and identify gaps and areas of improvements.
You can use AWS Application Composer in local sync mode to connect to your local file system. That way your changes are updated to your file system. This way, you can integrate with existing version control systems and development and deployment workflow.
AWS Application Composer provides a drag-and-drop canvas view and a code editor template view. Changes made to one view reflect on the other view. Similarly, changes made in AWS Application Composer are reflected in your local code editor and vice versa.
What is AWS releasing today?
AWS Application Composer already supports 13 serverless resource types. For these resource types, AWS Application Composer provides enhanced component cards.
Enhanced component cards allow you to configure and join components together. Today’s release gives you the ability to drag and drop 1,134 resource types to the canvas and configure these using resource configuration pane.
Designing a scalable and fault tolerant compute stack
For this blog post, you create a fault tolerant compute stack consisting of an ALB, two EC2 instances in two different Availability Zones with automatic scaling capabilities and an RDS instance.
Navigate to the AWS Application Composer service in the AWS Management Console. Create a new project by choosing Create Project.
If you are using one of the browsers that support local sync (Google Chrome and Microsoft Edge at this time), you can connect the project to the local file system and edit using command line interface or integrated development environment. To do so:
Choose Menu, and Local sync.
Select a folder on your file system and allow the necessary permissions from the browser when prompted.
Some components in architecture diagrams, like security groups, can be visualized in the canvas but you don’t necessarily want to represent them as prominent part of architectures. Therefore, for brevity, instead of dragging and dropping, you only configure them in the template mode.
Under the resources pane on the left, enter loadbalancer in the search bar.
Drag and drop AWS::ElasticLoadBalancingV2::LoadBalancer from the resources pane to the canvas.
Repeat these steps for other four resource types. Choose Arrange. Your canvas now appears as follows:
Start configuring the remaining component cards. You can connect two cards visually by connecting the right connection port of one card to the left connection port of another card. At the moment, not all component cards support visual connectivity. For those cards you can establish connectivity using the resource configuration pane. You can also update the template code directly. Either way, the connectivity is reflected in the canvas.
You configure the components in the architecture using the Resource configuration pane. First, configure the Application Load Balancer listener:
Choose the Listener Card in the canvas.
Choose Details.
Paste the following code in the Resource Configuration Section:
This completes the visualization portion of the application architecture. You can export this visualization by using the Export Canvas option in the menu.
Adding observability
After adding the core application components, you now add observability to your application. Observability enables you to collect and analyze important events and metrics for your applications.
To be notified of any changes to the RDS database configuration, use a serverless design pattern to avoid running instances when they are not needed. Conceptually, your observability stack looks like:
There are now two distinct sets of components in the architecture. One set of components comprises the core application while another comprises the observability logic.
AWS Application Composer allows you to organize different components in groups. This allows you and your team to focus on one portion of the architecture at a time. Before adding observability components, first create a group of the existing components.
Select a component card.
While holding the ‘shift’ key, select the other cards. Once all resources are selected, select Group action.
Once the group is created, follow these steps to rename the group.
Select the Group card.
Rename the group to Application Stack.
Choose Save.
Now add the observability components. Repeat the process of searching then dragging and dropping of the following components from the Resources pane to the canvas outside the Application Stack group.
EventBridge Event rule
Lambda Function
SNS Topic
SNS Subscription
Repeat the process for grouping these 4 components in a group with the name Observability.
Some of the components have a small circle on their sides. These are connector ports. A port on the right side of a card indicates an opportunity for the card to invoke another card. A port on the left side indicates an opportunity for a card to be invoked by another card. You can connect two cards by clicking the right port of a card and dragging to the left port of another card.
Create the observability stack by following the following steps:
Connect the right port of EventBridge Event Rule card to the left port of Lambda Function Card. This makes the Lambda function a target for the EventBridge rule.
Connect the right port of the Lambda function to the left port of the SNS topic. This adds the necessary AWS Identity and Management(IAM) permissions policies and environment variable to the Lambda function to provide it the ability to interact with the SNS topic.
Select the EventBridge event rule card and replace the event pattern code in the resource properties pane with the following code. This event pattern monitors the RDS instance for an instance change event and pushes this event to Lambda.
source:
  - aws.rds
detail-type:
  - RDS DB Instance Event
Select the SNS subscription to see the resource configuration pane. Add the following code to the resource configuration. Replace [email protected] with your email address.
Repeat the group creating steps to create an observability group comprising an EventBridge event rule, Lambda function, SNS topic, and SNS subscription. Name the group Observability. Your group appears as follows:
Deploying your AWS Architecture
Before you can provision the resources for your architecture, you must make the configuration changes as per development and deployment best practices for your organization.
For example, you must provide a strong DB password, name the resources as per the naming conventions of your organization. You must also add the Lambda code with your custom logic.
AWS Application Composer provides you the ability to configure each resource via resource configuration panel. This enables you to always stay in-context while creating a complex architecture. You can quickly find the resource you want to edit instead of scrolling through a large template file. If you prefer to edit the template file directly, you can use the Template View of AWS Application Composer.
Alternatively, if you have enabled the local sync, you can edit the file directly in your integrated development environment (IDE) where changes made in AWS Application Composer are saved in real-time. If you have not enabled the local sync, you can export the template using the Save Template File option in the menu. After concluding your changes, you can provision the AWS infrastructure either by using AWS CloudFormation Console or by command line interface.
Pricing
AWS Application Composer does not provision any AWS resources. Using AWS Application Composer to design your application architecture is free. You are only charged when you provision AWS Resources using the template file created by AWS Application Composer.
Conclusion
This blog post shows how to use AWS Application Composer to create and update an application architecture using any of the 1,134 CloudFormation resource types. It covers how to configure local sync mode to integrate the AWS Application to your development workflow. The post demonstrates how to organize your architecture into two distinct groups. Changes made in Canvas view are reflected in the template view and vice versa.
You can now deploy AWS WAF managed rules as part of the Security Automations for AWS WAF solution. In this post, we show you how to get started and set up monitoring for this automated solution with additional recommendations.
This article discusses AWS WAF, a service that assists you in protecting against typical web attacks and bots that might disrupt availability, compromise security, or consume excessive resources. As requests for your websites are received by the underlying service, they’re forwarded to AWS WAF for inspection against your rules. AWS WAF informs the underlying service to either block, allow, or take another configured action when a request fulfills the criteria stated in your rules. AWS WAF is tightly integrated with Amazon CloudFront, Application Load Balancer (ALB), Amazon API Gateway, and AWS AppSync—all of which are routinely used by AWS customers to provide content for their websites and applications.
To provide a simple, purpose-driven deployment approach, our solutions builder teams developed Security Automations for AWS WAF, a solution that can help organizations that don’t have dedicated security teams to quickly deploy an AWS WAF that filters common web-based malicious activity. Security Automations for AWS WAF deploys a set of preconfigured rules to help you protect your applications from common web exploits.
This solution can be installed in your AWS accounts by launching the provided AWS CloudFormation template.
Security Automations for AWS WAF provides the following features and benefits:
Helps secure your web applications with AWS managed rule groups
Provide layer 7 flood protection with a predefined HTTP flood custom rule
Helps block exploitation of vulnerabilities with a predefined scanners and probes custom rule
Detect and deflect intrusion from bots with a honeypot endpoint using a bad bot custom rule
Helps block malicious IP addresses based on AWS and external IP reputation lists
Figure 1: Design overview of the new Security Automations for AWS WAF solution
Getting started
Many customers begin their proofs of concept (POC) by using the AWS Management Console for AWS WAF to set up their very first AWS WAF, but quickly realize the benefits of automation, such as increased productivity, enforcing best practices, avoiding repetition, and so on. Manually managing AWS WAF can be time-consuming, especially if you want to duplicate complicated automations across multiple environments.
You can deploy this solution for new and existing supported AWS WAF resources. The implementation guide discusses architectural considerations, configuration steps, and operational best practices for deploying this solution in the AWS Cloud. It includes links to AWS CloudFormation templates and stacks that launch, configure, and run the AWS security, compute, storage, and other services required to deploy this solution on AWS, using AWS best practices for security and availability.
Before you launch the CloudFormation template, review the architecture and configuration considerations discussed in this guide. The template takes about 15 minutes to deploy and includes three basic steps:
Associate your CloudFront web distributions or ALBs with the web ACL that this solution generates. You can associate as many distributions or load balancers as you want.
Turn on web access logging for your CloudFront web distributions or ALBs, and send the log files to the appropriate Amazon Simple Storage Service (Amazon S3) bucket. Save the logs in a folder matching the user-defined prefix. If no user-defined prefix is used, save the logs to AWSLogs (default log prefix AWSLogs/).
Customize the solution
This solution provides an example of how to use AWS WAF and other services to build security automations on the AWS Cloud. You can download the open source code from GitHub to apply customizations or build your own security automations that fit your needs. The solution builder team is planning to release a Terraform version for this solution in the near future.
Monitor the solution
This solution includes a Service Catalog AppRegistry resource to register the CloudFormation template and underlying resources as an application in both the Service Catalog AppRegistry and Systems Manager Application Manager. You can monitor the costs and operations data in the Systems Manager console, as shown in Figure 2 that follows.
Figure 2: Example of the application view for the Security Automations for AWS WAF stack in Application Manager
CloudWatch dashboards are customizable home pages in the CloudWatch console that you can use to monitor your resources in a single view, including visualizing AWS WAF logs as shown in Figure 3 that follows. The solution creates a simple dashboard that you can customize to monitor additional metrics, alarms and logs. If suspicious activity is reported, you can use the visuals to understand the traffic in more detail and drive incident response actions as needed. From here, you can investigate further by using specific queries with CloudWatch Logs Insights.
Figure 3: Example of an enhanced AWS WAF CloudWatch dashboard that can be built for monitoring your site traffic
Conclusion
In this post, you learned about using the AWS Security Automation template to quickly deploy AWS WAF. If you prefer a simpler solution, we recommend using the one-click CloudFront AWS WAF setup, which offers a simple way to deploy AWS WAF for your CloudFront distribution. By choosing the approach that aligns with your requirements, you can enhance the security of your web applications and safeguard them against potential threats.
The AI boom is clearly upon us, but there are still plenty of questions
swirling around this technology. Some of those questions are legal ones
and there have been lawsuits filed to try to get clarification—and perhaps
monetary damages. Van Lindberg is a lawyer who is well-known in the
open-source world; he came to Open
Source Summit Europe 2023 in Bilbao, Spain to try to put the current
work in AI into its legal context.
The collective thoughts of the interwebz
Manage Consent
To provide the best experiences, we use technologies like cookies to store and/or access device information. Consenting to these technologies will allow us to process data such as browsing behavior or unique IDs on this site. Not consenting or withdrawing consent, may adversely affect certain features and functions.
Functional
Always active
The technical storage or access is strictly necessary for the legitimate purpose of enabling the use of a specific service explicitly requested by the subscriber or user, or for the sole purpose of carrying out the transmission of a communication over an electronic communications network.
Preferences
The technical storage or access is necessary for the legitimate purpose of storing preferences that are not requested by the subscriber or user.
Statistics
The technical storage or access that is used exclusively for statistical purposes.The technical storage or access that is used exclusively for anonymous statistical purposes. Without a subpoena, voluntary compliance on the part of your Internet Service Provider, or additional records from a third party, information stored or retrieved for this purpose alone cannot usually be used to identify you.
Marketing
The technical storage or access is required to create user profiles to send advertising, or to track the user on a website or across several websites for similar marketing purposes.


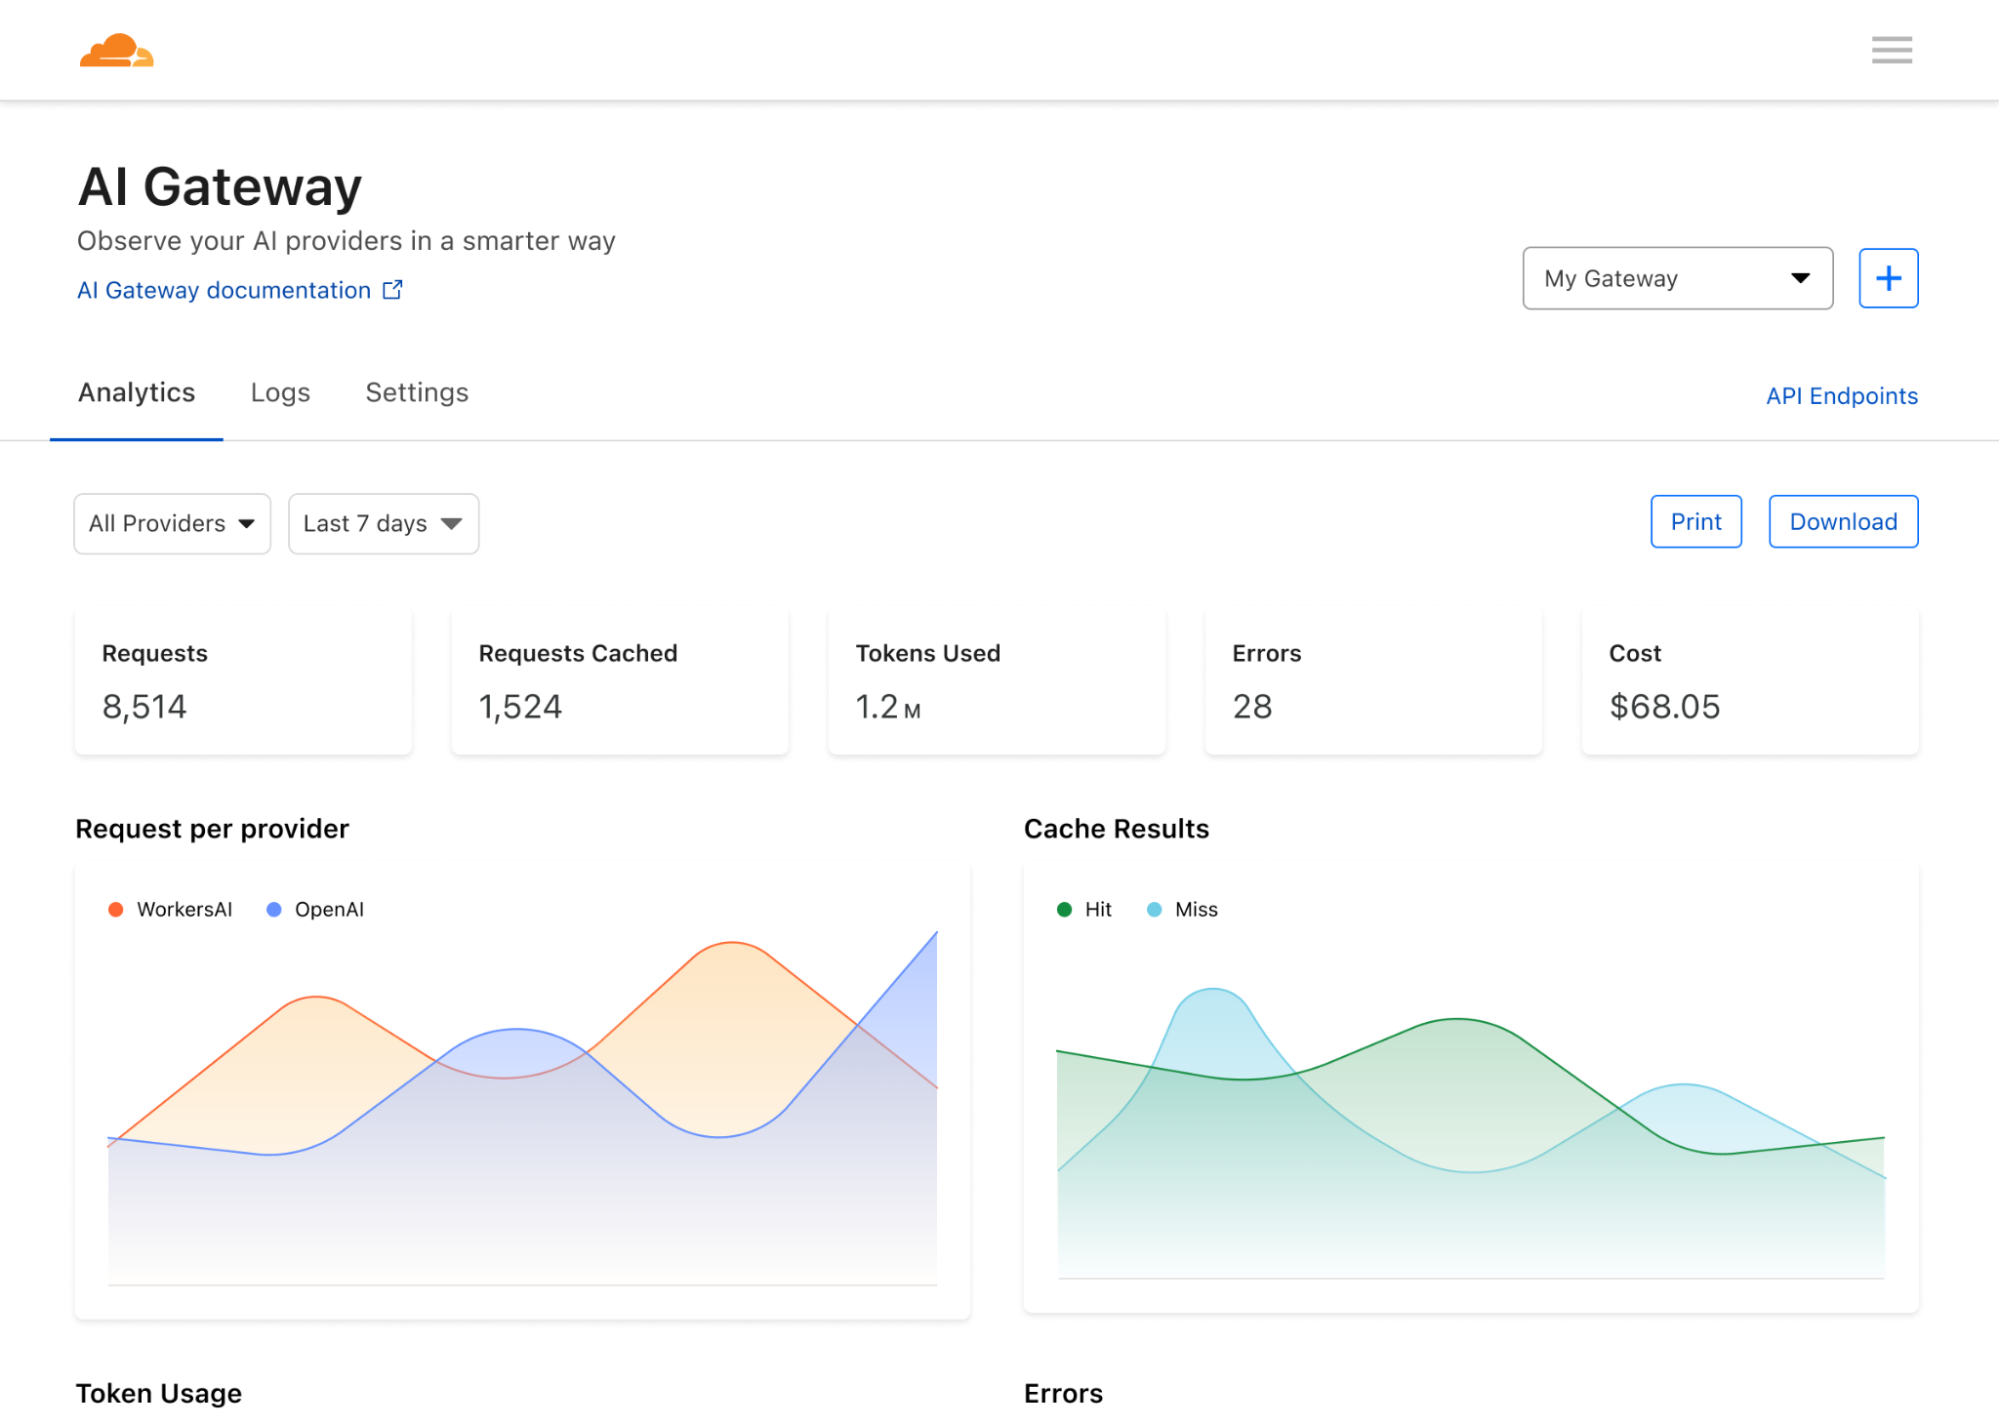
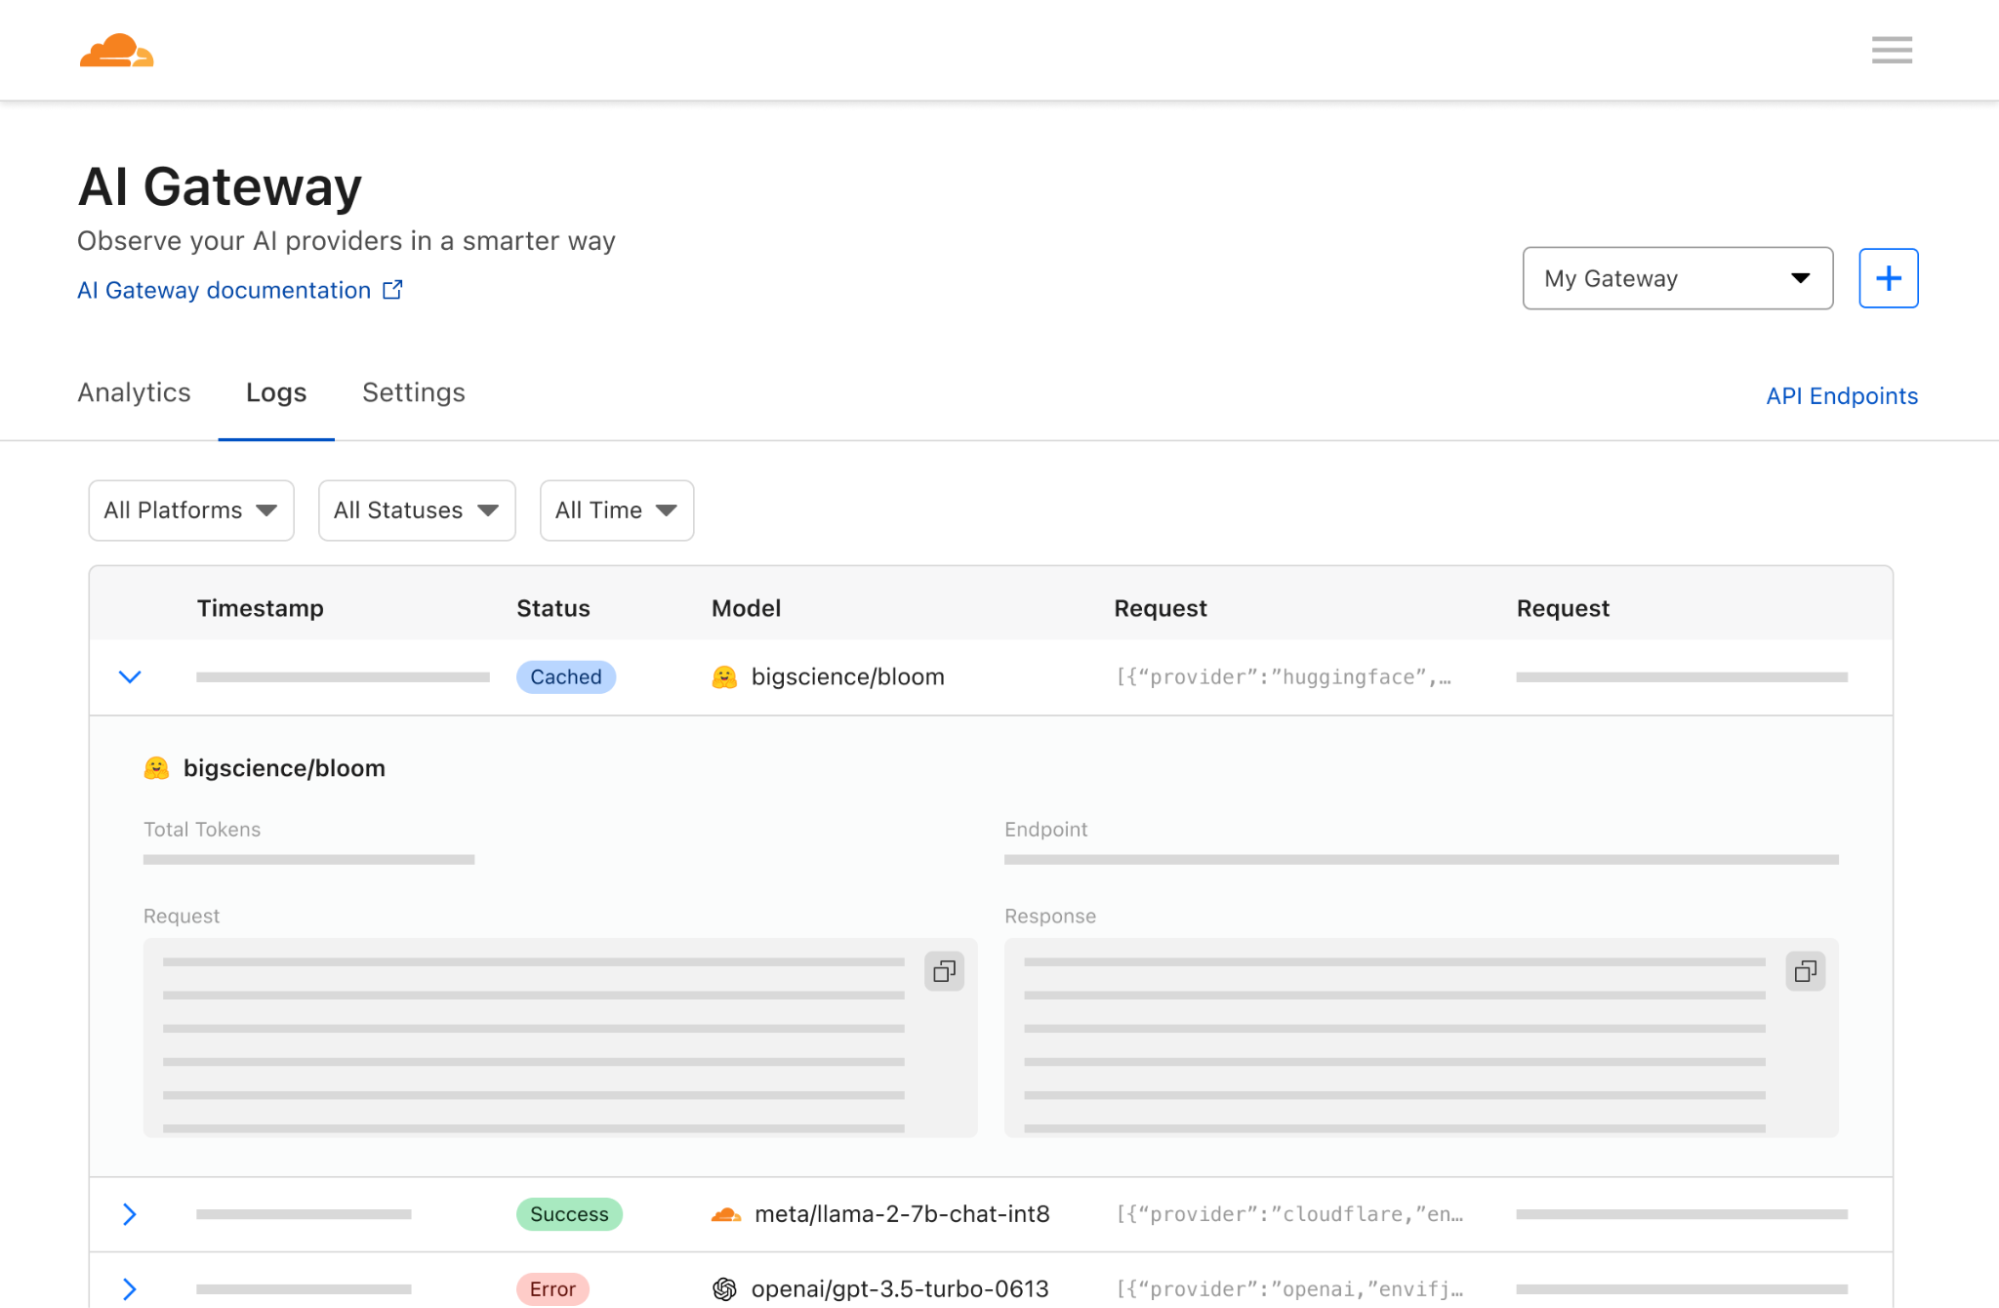


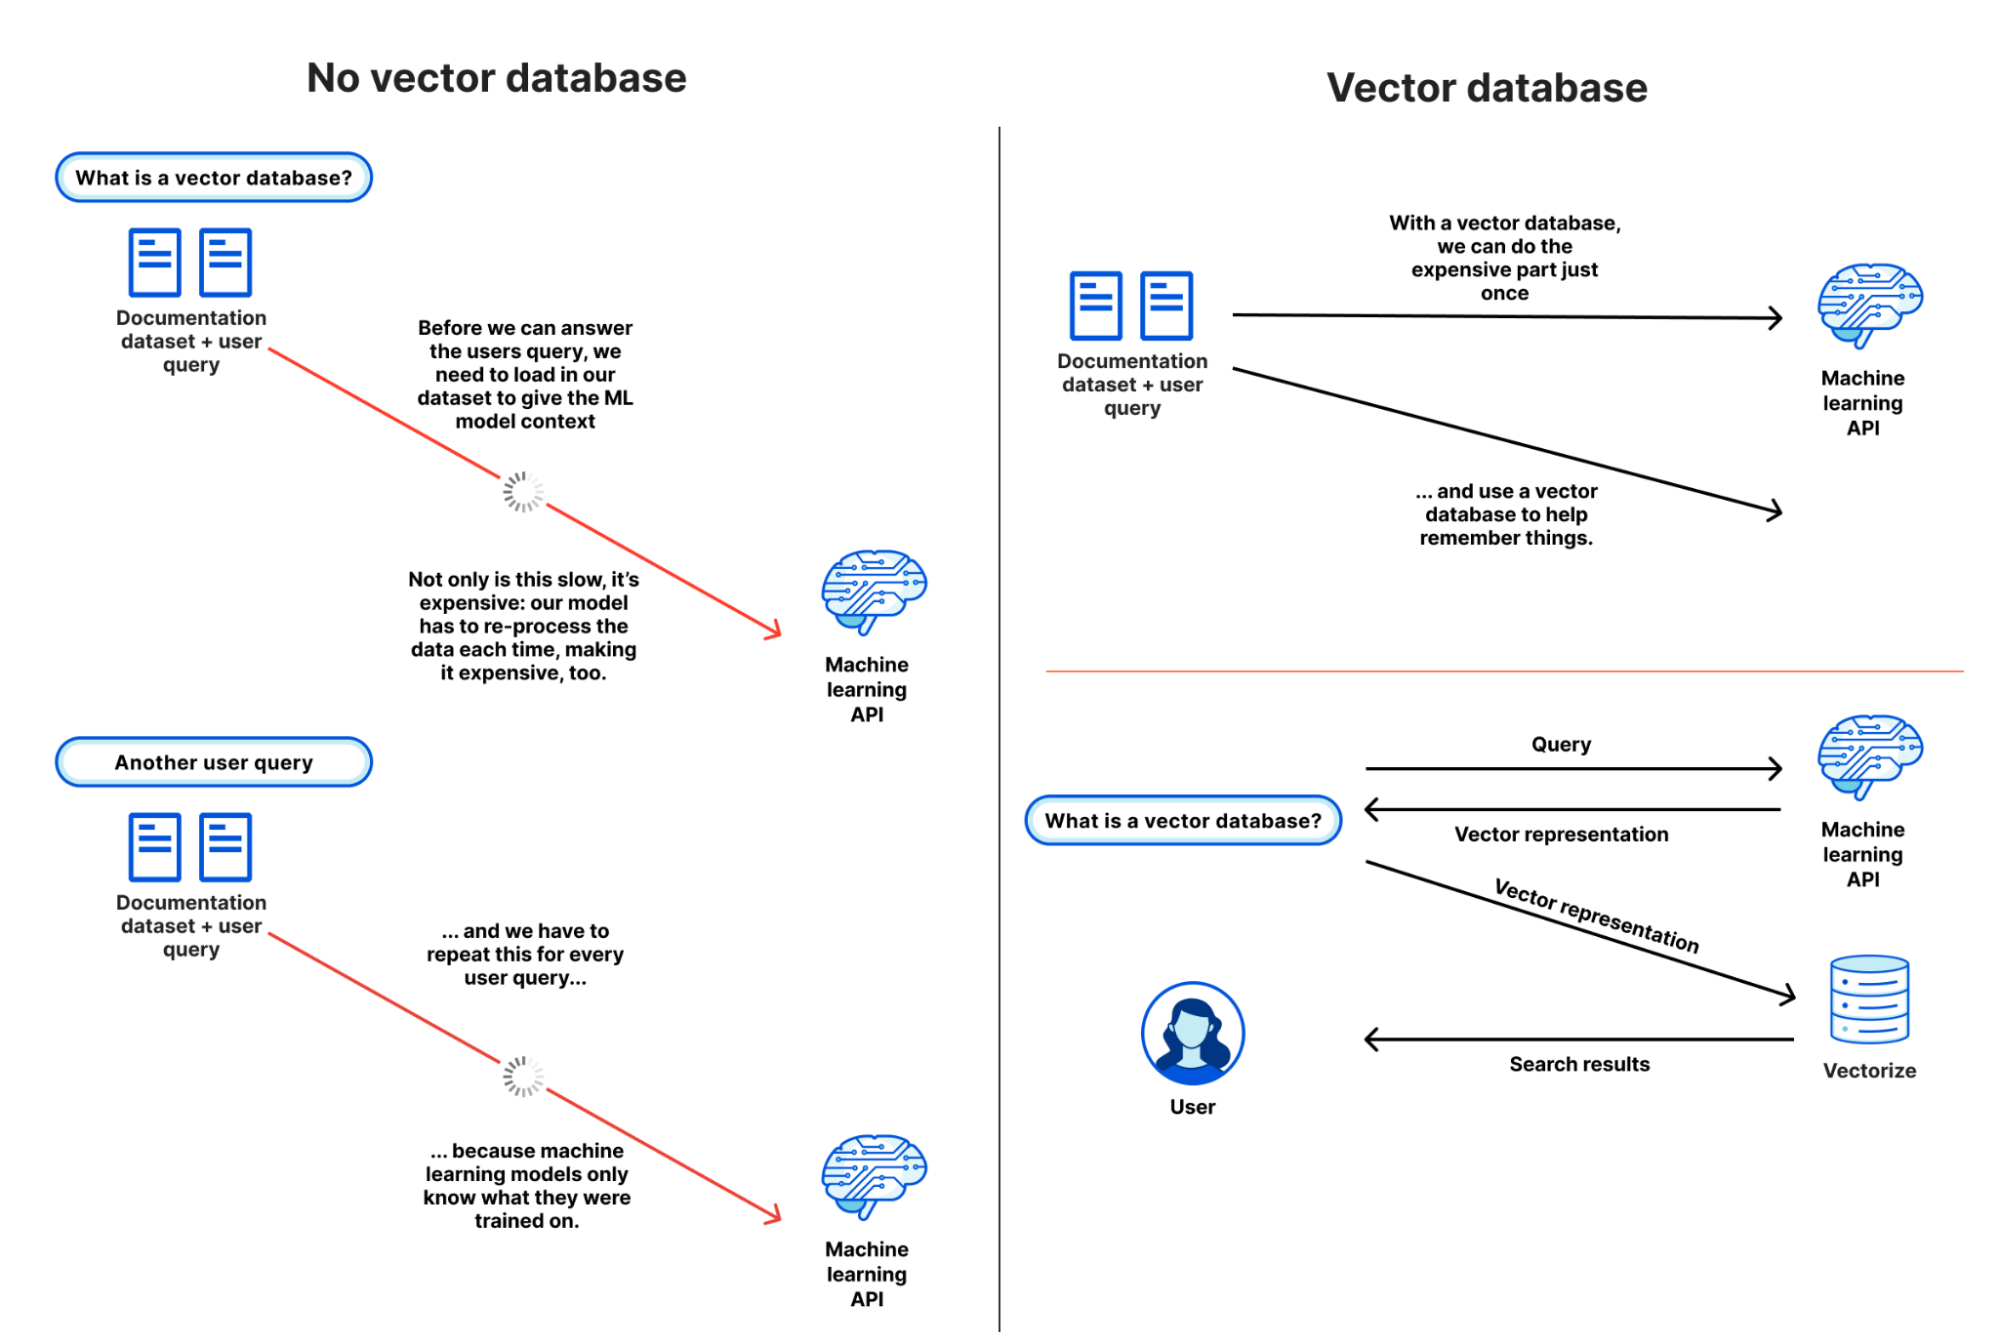


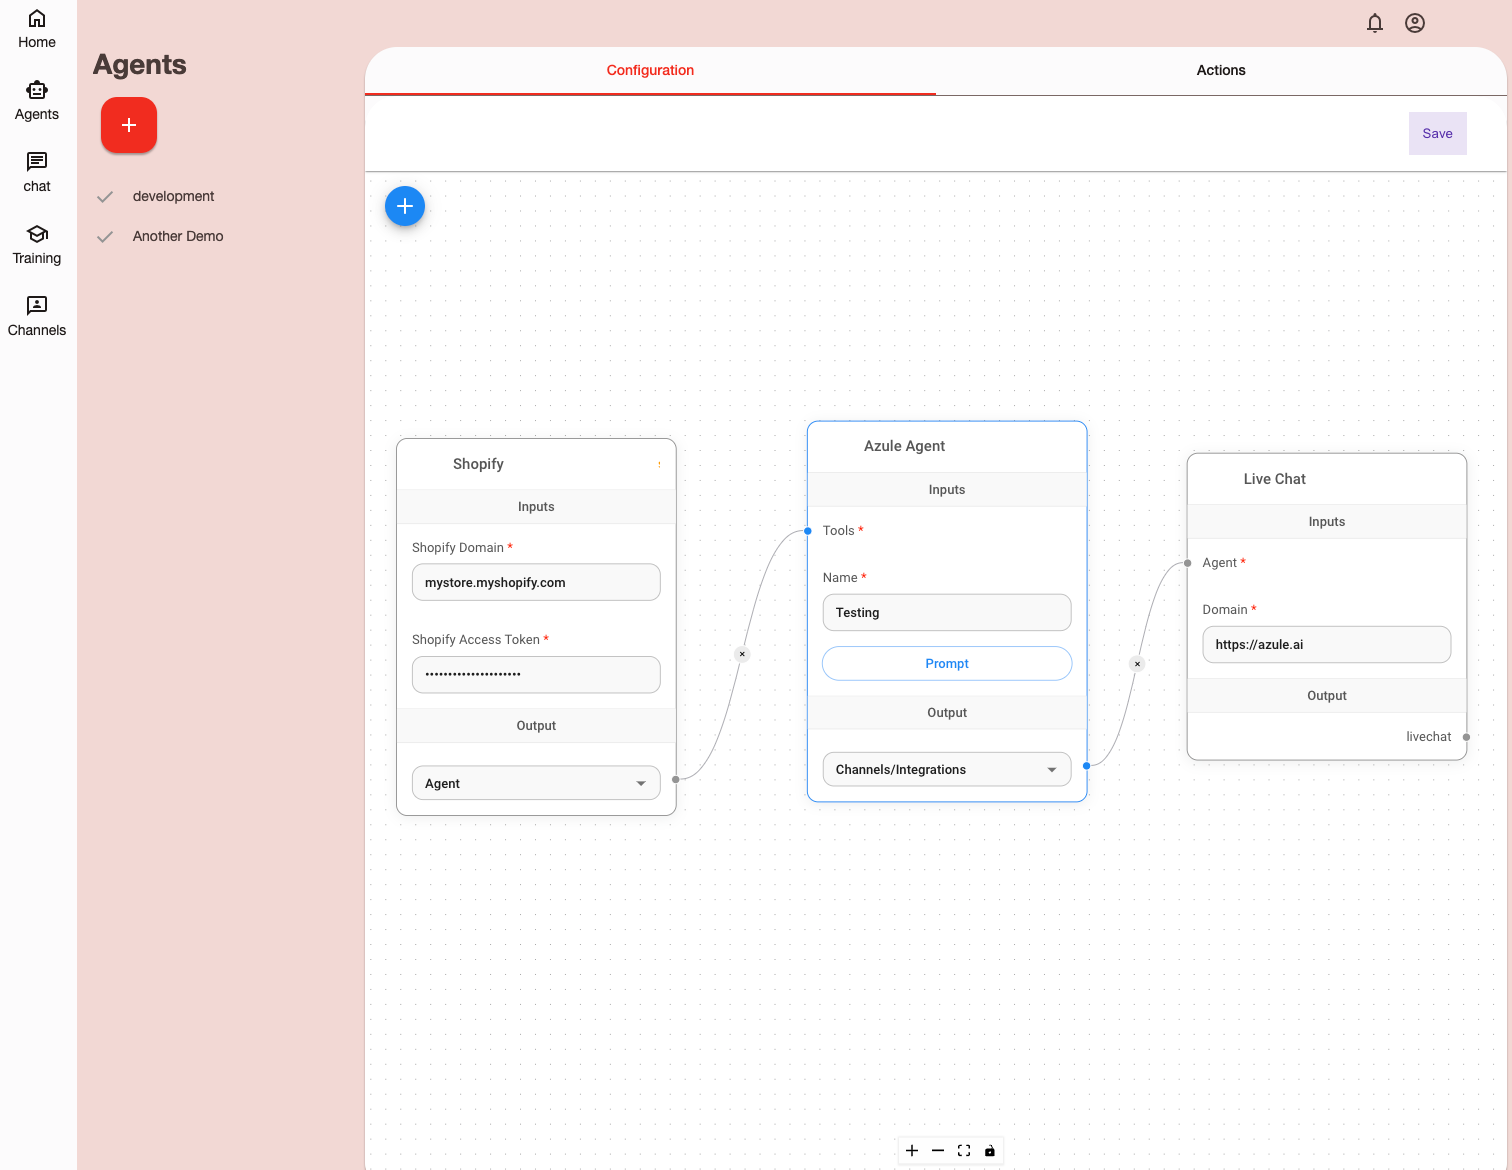
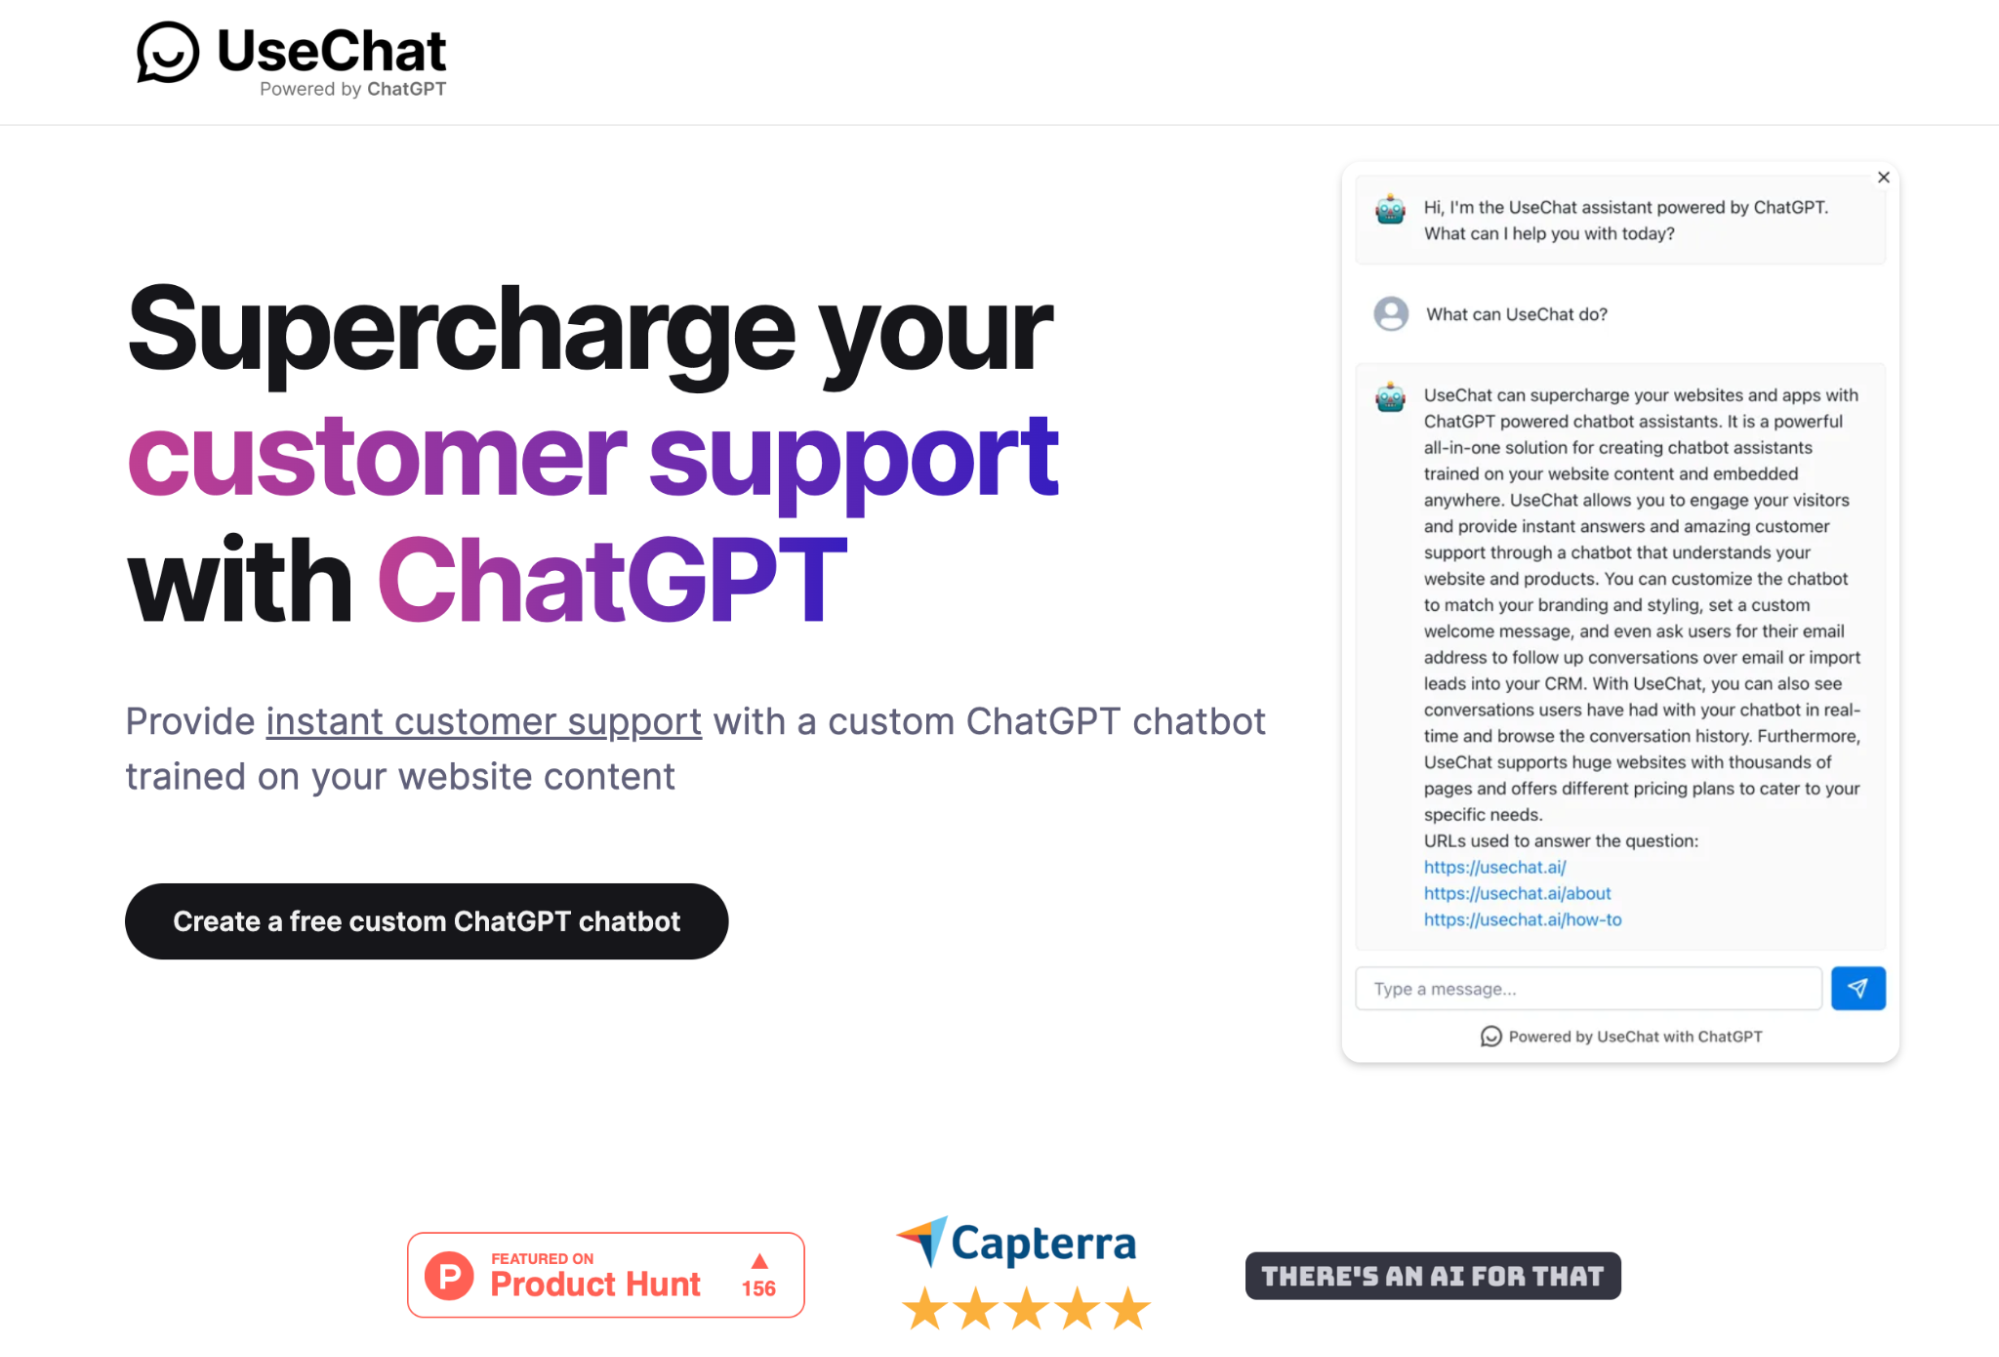
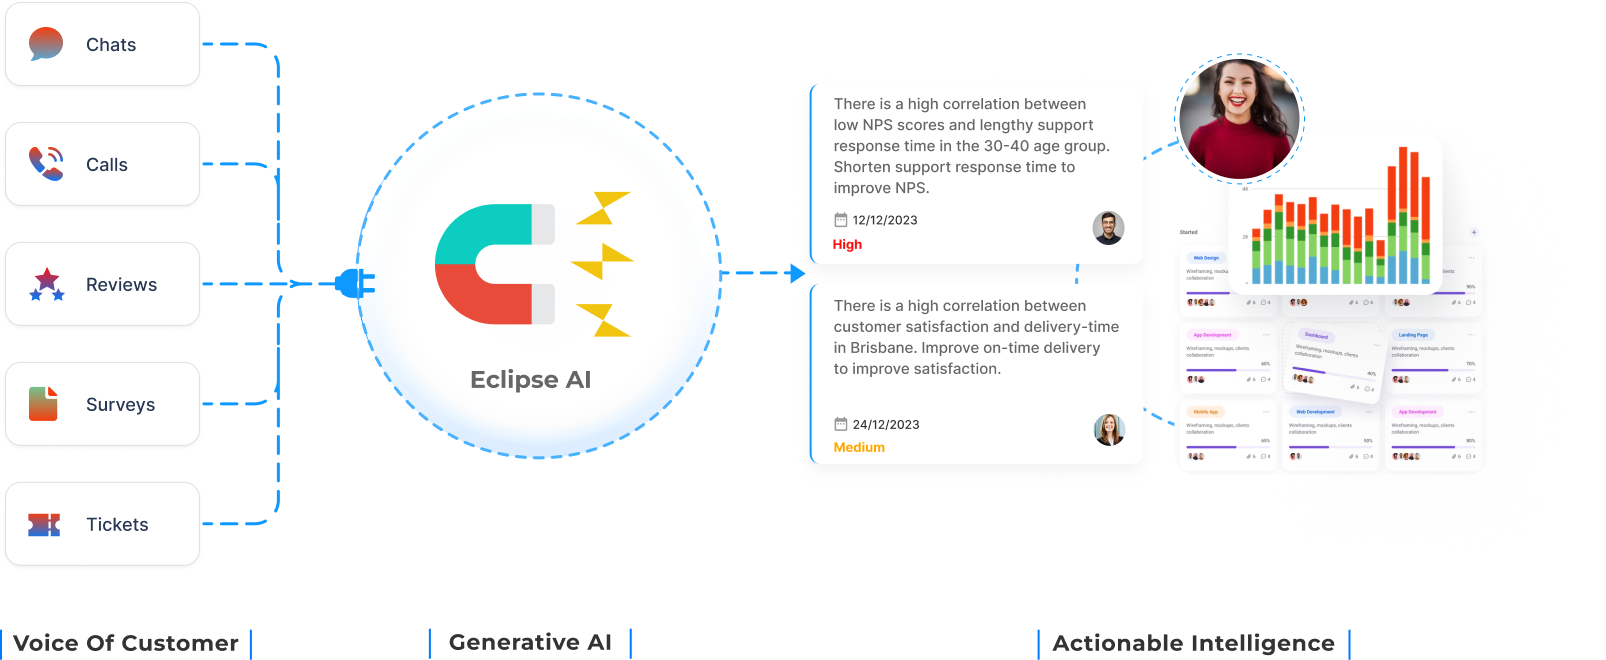

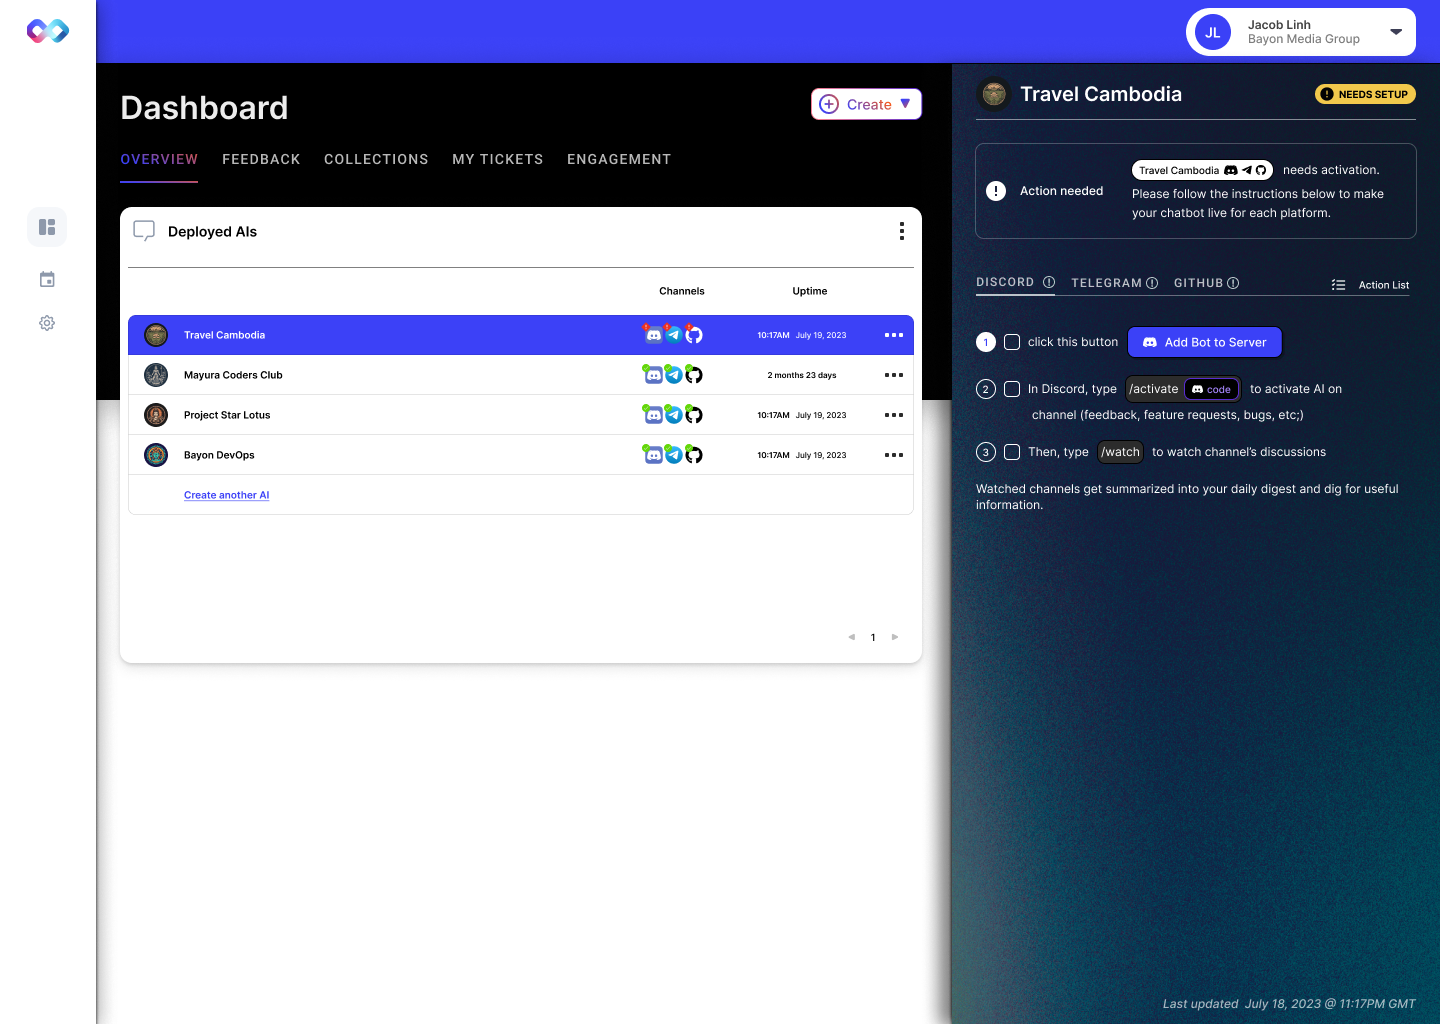
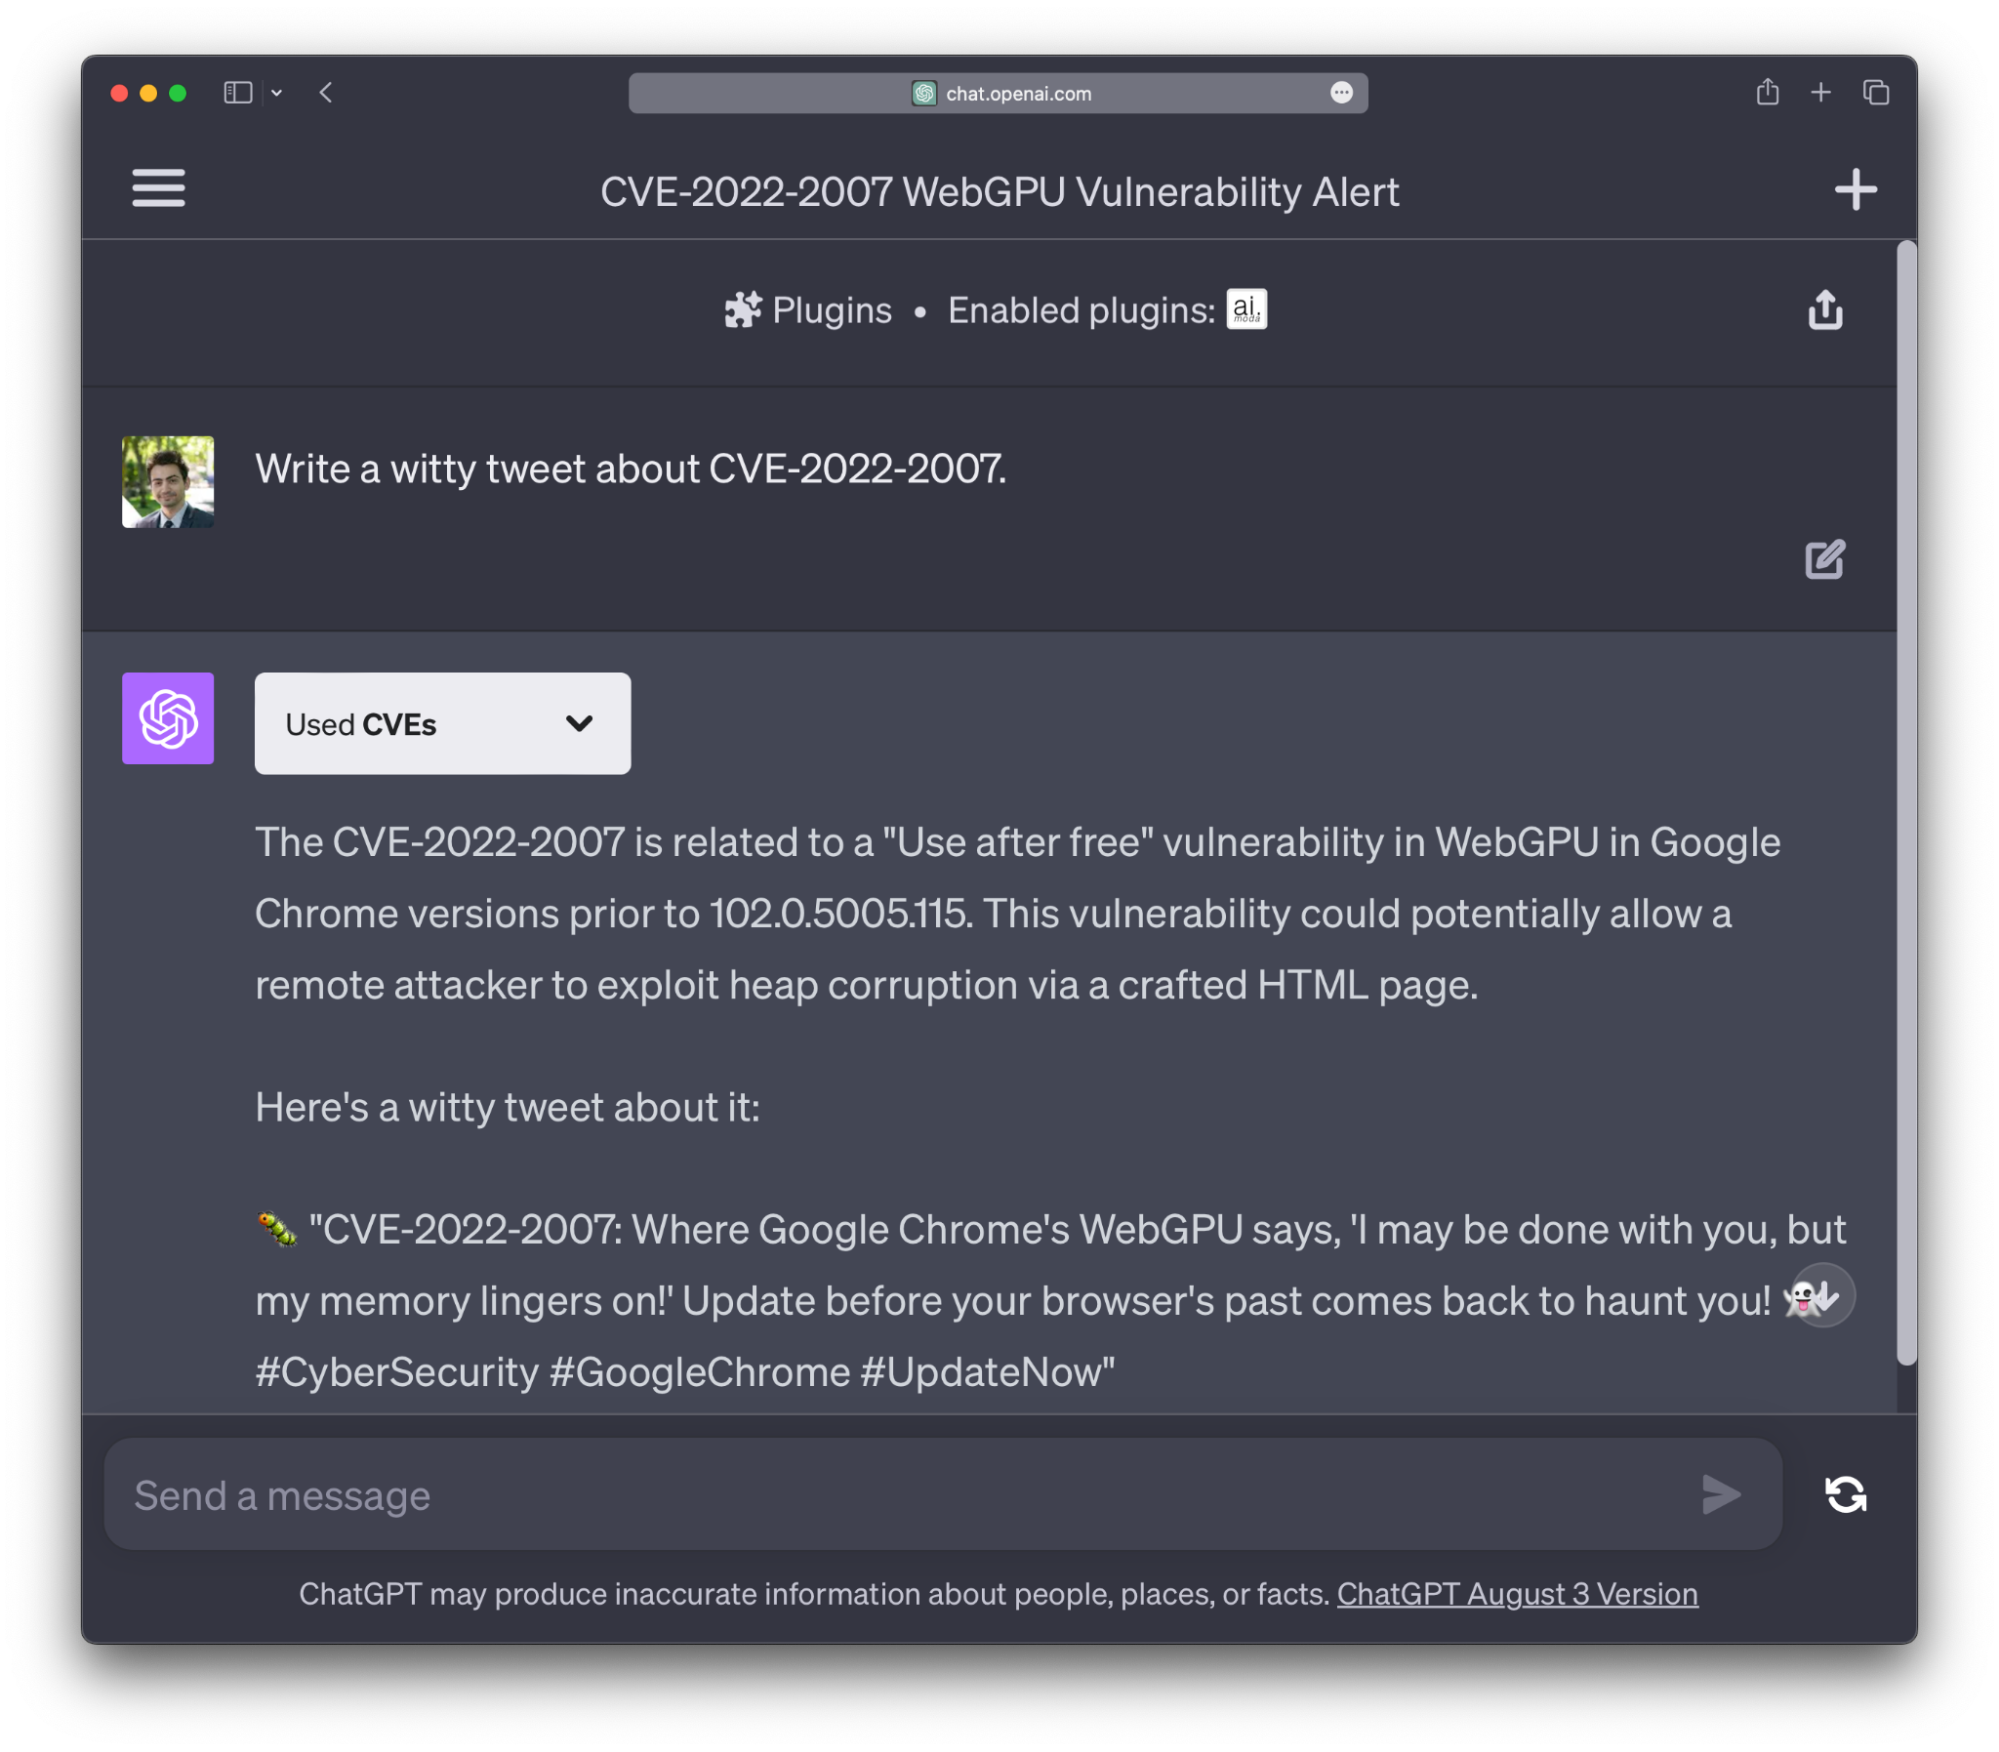


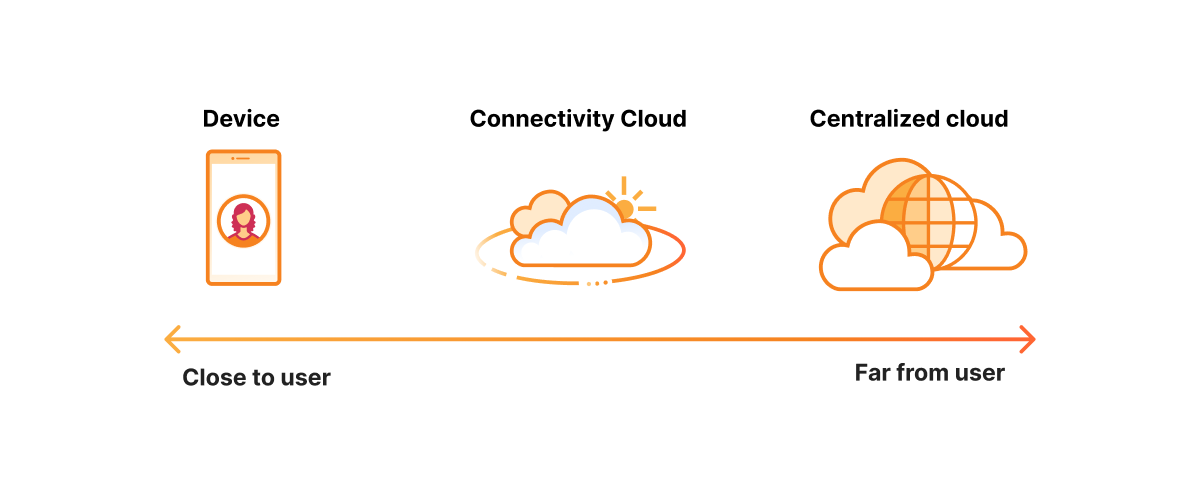


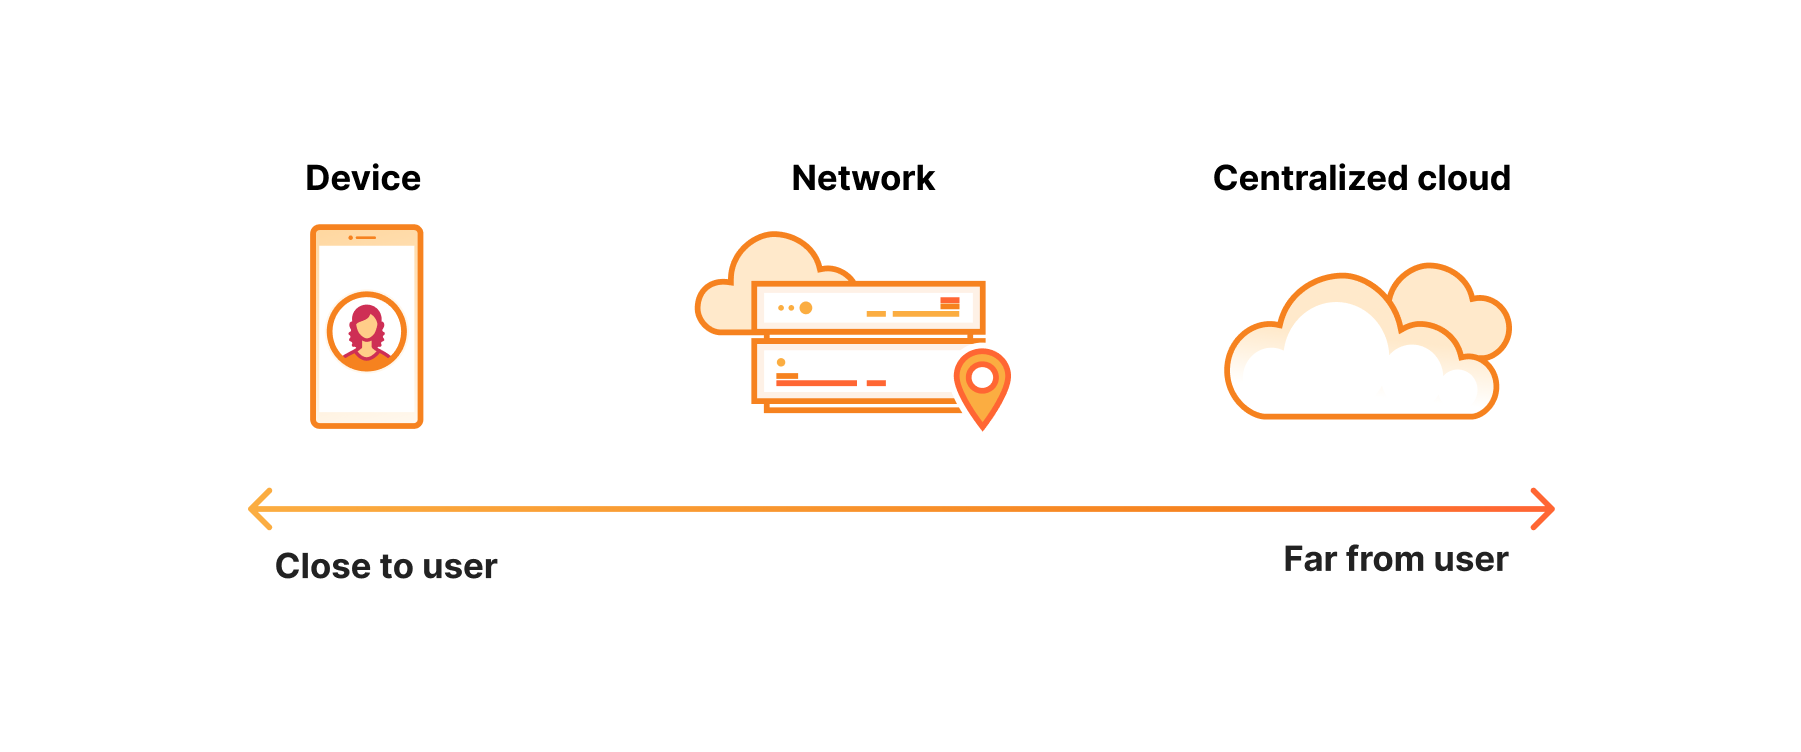


 Aarthi Srinivasan is a Senior Big Data Architect with AWS Lake Formation. She likes building data lake solutions for AWS customers and partners. When not on the keyboard, she explores the latest science and technology trends and spends time with her family.


