Post Syndicated from Deepesh Dhapola original https://aws.amazon.com/blogs/big-data/zeta-reduces-banking-incident-response-time-by-80-with-amazon-opensearch-service-observability/
This is a guest post co-written with Shashidhar Soppin, Manochandra Menni and Anchal Kansal from Zeta.
Zeta is a core banking technology provider that enables banks to rapidly launch extensible banking assets and liability products. Zeta’s primary products are Olympus and Tachyon. Olympus is a platform as a service (PaaS) that simplifies building and operating cloud-native, secure and distributed multi-tenant software as a service (SaaS) products. It blends infrastructure as code and GitOps methodologies for efficient and consistent deployment of SaaS products. Its architecture prioritizes strong tenant isolation, real-time event processing, and comprehensive observability, supporting robust API integrations and seamless deployment. Zeta’s Tachyon is a full-stack, cloud-native, API-first digital-banking SaaS service delivered via Olympus. The banking services of Tachyon include payment engines (for UPI, credit, debit, and prepaid cards), savings & checking account management, etc. Tachyon is a modern debit processing product with personal finance management and card controls. It is designed to increase usage, upsell credit, reduce fraud, and improve customer satisfaction. The Tachyon product offers comprehensive provisioning, payments, and account management APIs and SDKs, enabling seamless integration of financial products into third-party apps without compromising privacy and security. Zeta operates Tachyon as a multi-tenant SaaS product, serving customers who are configured as individual tenants within the system. Zeta’s technology stack is monitored by their Customer Service Navigator product (CSN), which is part of Olympus.
As a global SaaS provider, Zeta needed a solution capable of monitoring tenants, measuring SLAs, meeting local regulatory requirements, and scaling efficiently with both new tenant onboarding and seasonal usage spikes. Zeta sought a cost-effective, scalable system that would provide a unified “single pane of glass” to monitor the application services, cloud infrastructure, open-source components, and third-party products.
Zeta faced a formidable challenge in orchestrating a cohesive monitoring system across a rapidly expanding multi-tenant environment, diverse domains, and numerous tools. As more tenants joined their system, the complexity grew exponentially, making Zeta’s monitoring solution increasingly difficult to maintain. The primary challenge stemmed from fragmented monitoring tools that made it difficult to quickly identify root causes across interconnected systems, leading to prolonged troubleshooting times and potential service degradation. When users reported issues, such as credit card payment problems, Site Reliability Engineering (SRE) team had to navigate through a several disparate monitoring tools and siloed data, and the lack of integrated observability resulted in time-consuming manual correlation efforts. This multi-tenant, multi-solution landscape significantly complicated the ability to maintain consistent monitoring standards and service levels. The challenge was further complicated by the complex regulatory landscape, where global expansion required adherence to diverse local regulations, necessitating a flexible architecture capable of accommodating varying data retention policies and access controls across different jurisdictions. Each new tenant addition multiplied the complexity of balancing the monitoring needs of internal SRE teams and customers, requiring sophisticated data segregation and access management. Additionally, Zeta required comprehensive anomaly detection capabilities across systems, components, infrastructure, and operations, requiring a solution that could scale dynamically while establishing dynamic baselines and identifying subtle patterns that might indicate emerging issues. As the tenant base continued to grow, the need for a unified, scalable monitoring solution that could streamline these processes, enhance operational visibility, and maintain system integrity became critical.
Zeta’s goal was to streamline their processes and enhance operational visibility across the entire technology landscape. By addressing these challenges, Zeta aimed to create a unified observability solution that would significantly improve incident response times, enhance regulatory compliance posture, and ultimately deliver a more reliable and performant service to their global customer base.
In this post we explain how Zeta built a more unified monitoring solution using Amazon OpenSearch Service that improved performance, reduced manual processes, and increased end-user satisfaction. Zeta has achieved over an 80% reduction in mean time to resolution (MTTR), with incident response times decreasing from 30+ minutes to under 5 minutes.
Solution overview
Zeta designed and built an observability system, CSN, to deliver comprehensive visibility across the service environment. CSN is part of the Olympus suite of products. CSN serves as the primary interface for the SRE team, offering real-time service health dashboards, infrastructure monitoring, SLA performance analytics, and an admin panel for user management. The system is equipped with single sign-on (SSO) integration and enforces role-based access control (RBAC) to enable secure, granular access. With CSN, SREs can efficiently monitor system health, receive actionable alerts and warnings, and manage operational workflows across critical services.
CSN is powered by OpenSearch Service to provide an integrated solution for DevOps and Site Reliability Engineers to help identify critical events and issues. Zeta chose OpenSearch Service because it offers a fully managed, open-source search analytics engine that scales effortlessly to handle the increasing number of tenants, associated data growth, and analytics needs. It’s seamless integration with AWS services, robust security features, and support for real-time data ingestion and querying make it ideal for powering the CSN dashboards and analytics workloads. The following diagram illustrates the CSN deployment architecture.
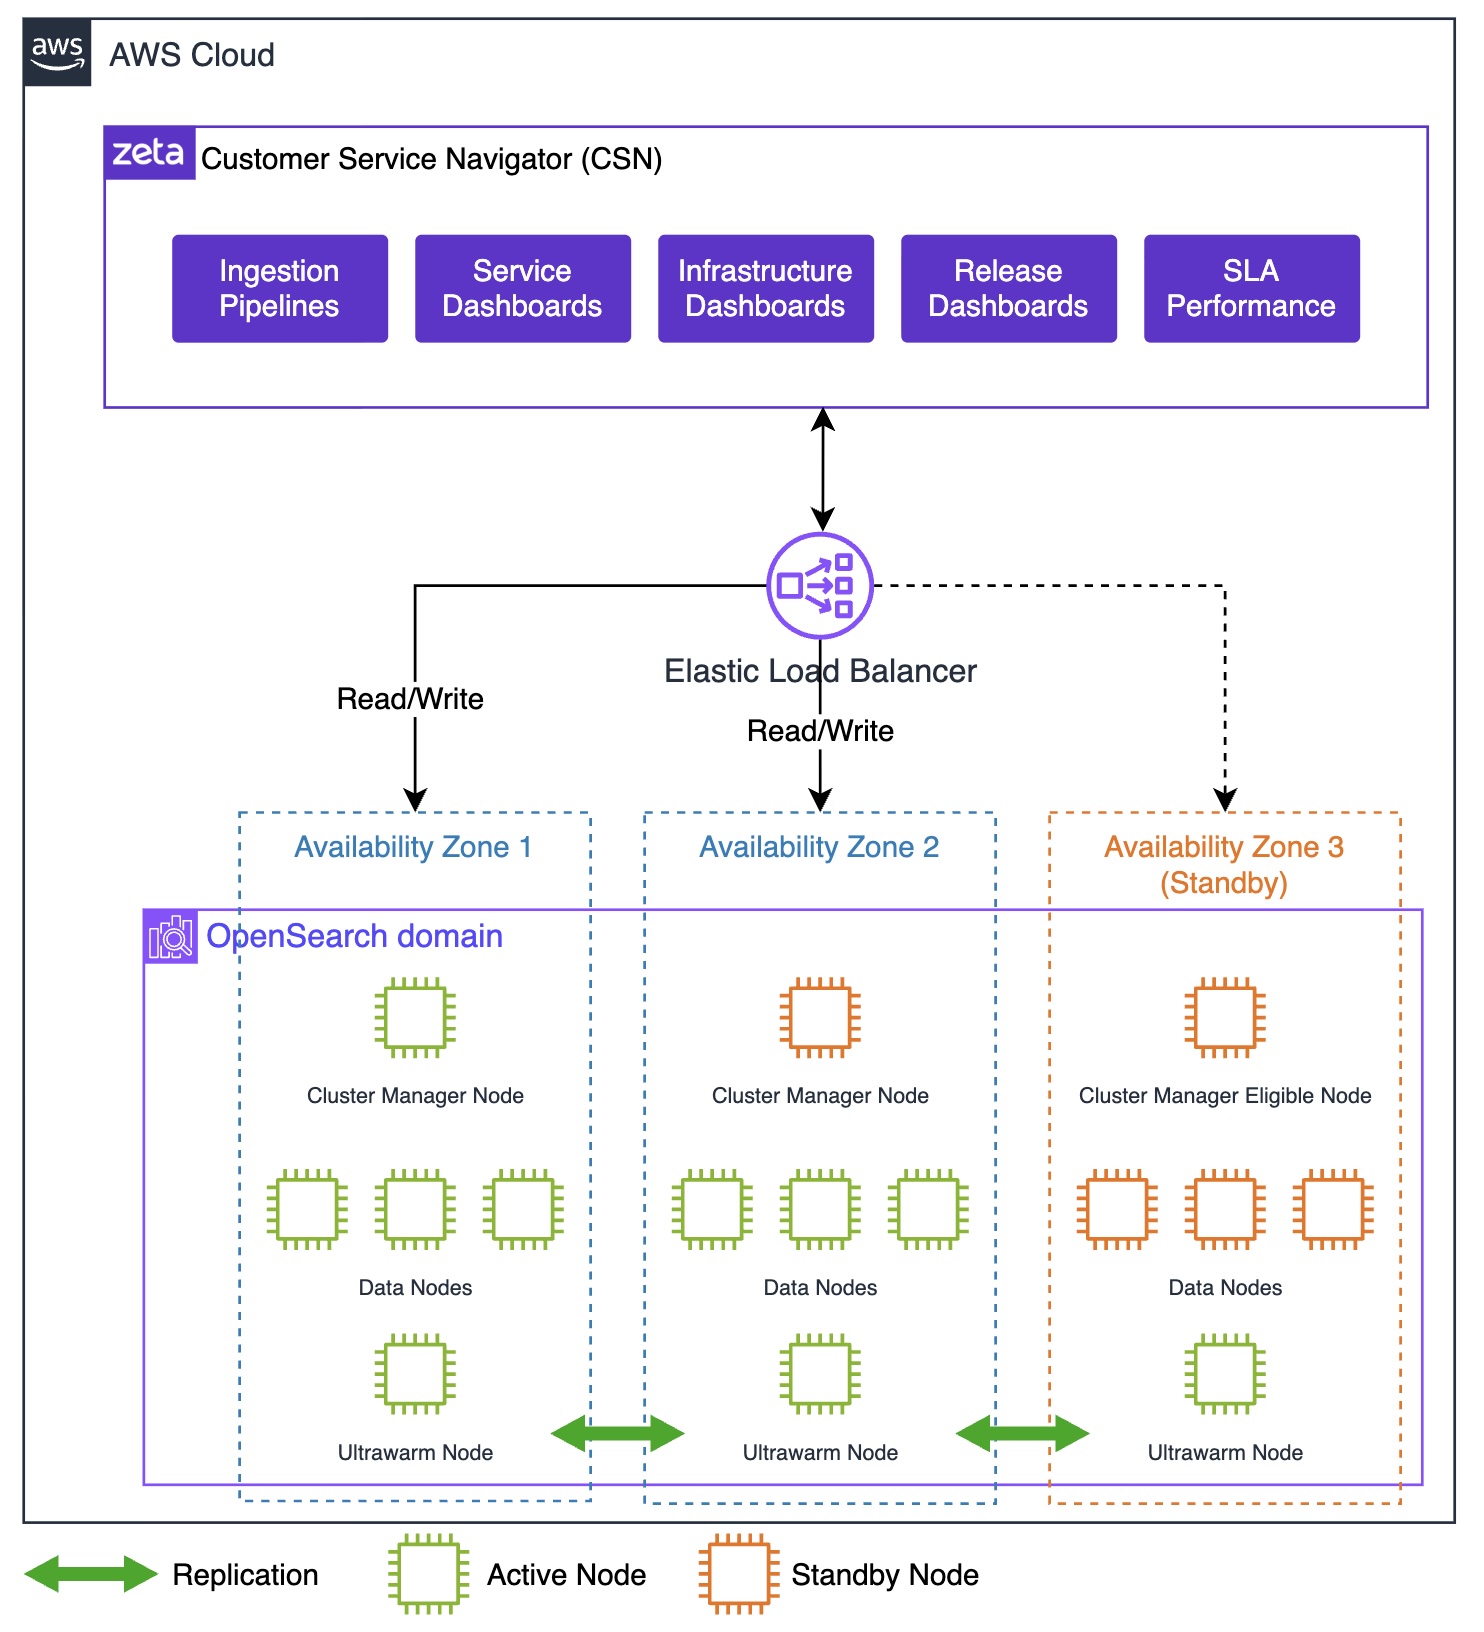
The OpenSearch Service domain uses the Multi-AZ with Standby deployment model, following AWS best practices for high availability and fault tolerance. Nodes—including dedicated cluster manager nodes, data nodes, and UltraWarm nodes—are distributed evenly across three Availability Zones in the same AWS Region. Availability Zones 1 and 2 handle active indexing and search traffic, and Availability Zone 3 contains standby nodes that remain passive during normal operations. If an Availability Zone failure occurs, OpenSearch Service automatically promotes standby nodes to active status, maintaining cluster operations with minimal disruption and no need for data redistribution.
The OpenSearch cluster consists of three dedicated cluster manager nodes and a multiple-of-three data node count to maintain quorum and balanced shard allocation. Each index uses at least two replicas, providing redundant copies of data across the Availability Zones. This Multi-AZ with Standby configuration delivers high resilience and rapid failover, supporting continuous service availability and robust disaster recovery for the observability workloads.
Data collection and ingestion
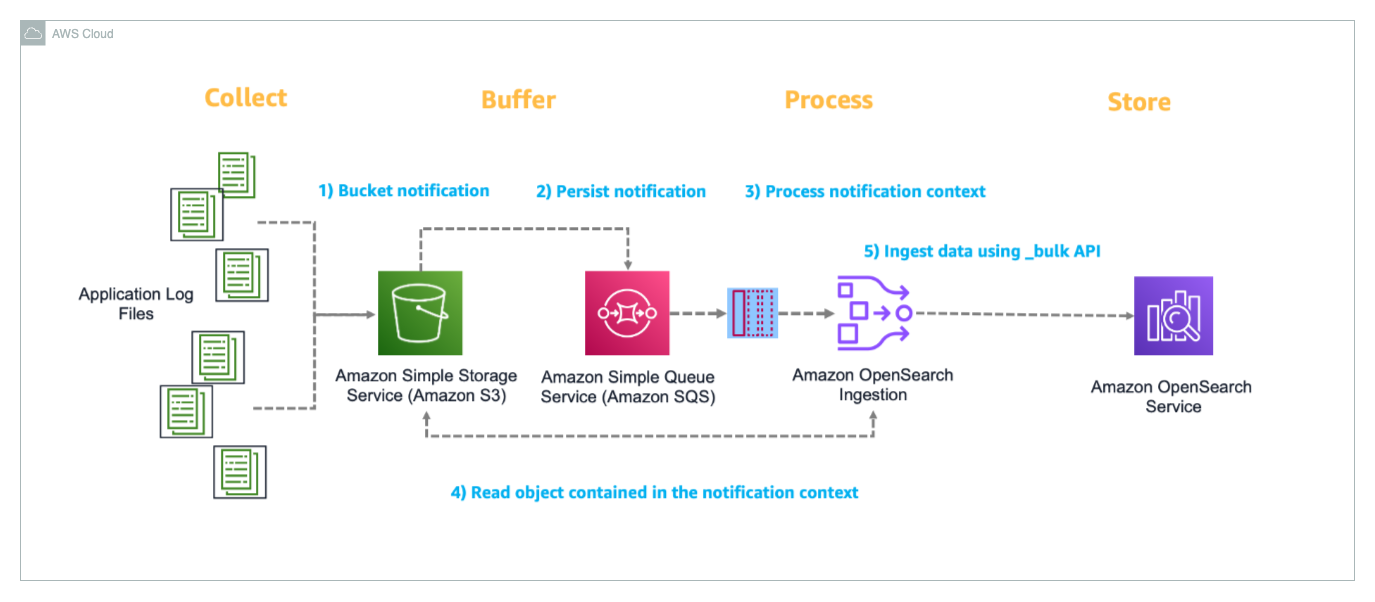
The observability strategy centers on a data collection and ingestion pipeline designed to handle the complexity and scale. The architecture, as shown in the following diagram, addresses three critical data types: AWS resource logs, application logs, and distributed traces, with each data type using tailored collection and processing methods optimized for the workloads.

AWS resource logs collection
The infrastructure spans multiple AWS services including Amazon Elastic Kubernetes Service(Amazon EKS), Amazon Relational Database Service(Amazon RDS), Amazon Redshift, Application Load Balancer, Amazon Managed Streaming for Apache Kafka (Amazon MSK), Amazon Elastic Compute Cloud (Amazon EC2) and more. Zeta uses Amazon CloudWatch Logs as the primary collection point for AWS service logs, which provides native integration with these services.
AWS services send their logs directly to CloudWatch Logs, which are then pulled by Fluentd running on the Amazon EKS cluster for centralized processing. This approach natively captures operational data from the AWS resources, including:
- Database operational logs and audit trails from Amazon RDS instances
- Data warehouse query execution logs from Amazon Redshift
- Application Load Balancer access logs capturing traffic patterns and performance metrics
- Kafka cluster operational logs from Amazon MSK
- AWS API invocation audit trails from AWS CloudTrail
- Container runtime and operating system logs from Amazon EC2
- During the log collection, personally identifiable information (PII) is filtered out. The solution adheres strictly to PCI-DSS guidelines throughout this process.
Zeta used Amazon MSK as a scalable and reliable backbone for collecting and streaming logs from various sources across the AWS resources. Logs are ingested into Amazon MSK, providing a durable and fault-tolerant buffer that decouples log producers from consumers. This architecture enables real-time log streaming and supports advanced processing pipelines before the logs are routed to the OpenSearch Service. By integrating Amazon MSK into the logging workflow, scalability, resilience, and flexibility is improved, so that high log volumes are efficiently managed without impacting downstream systems. This approach, combined with native AWS integrations, minimizes operational complexity and maintains comprehensive, centralized log visibility across the cloud environment.
Fluentd processes these logs and routes them directly to OpenSearch Service, maintaining the benefits of AWS integration while providing centralized accessibility. This centralized logging approach with built-in buffering capabilities reduces the direct load on OpenSearch Service by batching and optimizing log delivery, helping to prevent potential ingestion bottlenecks during high-volume periods. The approach alleviates the need for custom log shipping agents on AWS resources, reducing operational overhead while maintaining comprehensive coverage of the cloud infrastructure.
Application logs processing
For application-level observability, a pipeline using Fluentd is deployed as Kubernetes DaemonSet. Application microservices running on Amazon EKS generate logs that Fluentd DaemonSets collect, parses, and enrich with metadata such as pod names, namespaces, and service identifiers. The processed logs then flow through Amazon MSK for reliable, high-throughput message streaming before final processing by Fluentd and indexing in OpenSearch Service.
This Kafka-based approach provides several advantages:
- Decoupling – This helps producers and consumers to operate independently, so that Zeta can scale ingestion and processing separately based on demand.
- Backpressure handling – Using Kafka’s buffering capabilities, this manages traffic spikes during peak banking hours, absorbing sudden increases in log volume while maintaining system stability during seasonal usage surges.
- Durability of logs – The system maintains logs durably so that no log data is lost during system maintenance or unexpected failures through message persistence.
The logs then pass through a second Fluentd layer for final processing and routing to OpenSearch Service, where they’re indexed across service-specific indexes (app-index, falco-index, kong-index).
Distributed trace collection
To address the challenge of correlating issues across Zeta’s microservices architecture, system uses distributed tracing using Jaeger, an open-source, end-to-end distributed tracing system. Jaeger enables monitoring and troubleshooting transactions in complex distributed systems by tracking requests as they flow through multiple services. The application services and Kong API Gateway are instrumented with Jaeger client libraries that generate trace data including spans, which represent individual operations within a trace. Each span contains metadata such as operation names, start and finish timestamps, tags, and logs that provide context about the operation being performed. The Jaeger Collector aggregates these spans from multiple services, performing validation, indexing, and transformation before forwarding the data.
The traces flow through Amazon MSK for the same reliability benefits as the logging pipeline – providing durability, decoupling, and backpressure handling during high-volume periods. Jaeger Ingester then consumes traces from Amazon MSK and processes them for storage in the jaeger-index within OpenSearch Service.
This data collection and ingestion strategy provides complete end-to-end visibility and builds an observability system that enables SRE teams to monitor, troubleshoot, and optimize the services across the entire technology stack.
Storage tiering
To manage the log, metric, and trace data at scale—about 3TB generated daily—the solution implemented OpenSearch Service storage tiering to balance performance, retention, and cost. Zeta requires near real-time search and retrieval for at least a week, while retaining logs and traces for up to 10 years. Keeping this data in active clusters would impact search performance and significantly increase costs, so the solution uses the OpenSearch Service hot, UltraWarm, and cold storage tiers to optimize the data lifecycle. The following diagram illustrates storage tiering in OpenSearch Service.

Hot storage is used for the most recent and frequently accessed data, supporting real-time indexing and low-latency queries. This tier relies on high-performance storage attached to standard data nodes, making it ideal for powering live dashboards and analytics where speed is critical. The solution uses AWS Graviton 2 powered m6g.4xlarge.search instance types to run the OpenSearch Service domain which provides upto 40% lower cost compared to x86 based instances. Each hot data node has an attached gp3 EBS volume to store indexes. Zeta maintains data in hot storage for 1 week.
UltraWarm storage serves as a cost-effective layer for older, read-only data that is queried less frequently but still needs to remain searchable. UltraWarm nodes use Amazon Simple Storage Service (Amazon S3) as the backing store with an integrated caching mechanism, to retain large volumes of data at a fraction of the cost of hot storage while still supporting interactive queries for historical analysis. Zeta uses ultrawarm1.large.search instance types in the UltraWarm storage tier and maintains data in UltraWarm storage for 15 days.
Cold storage is designed for long-term archival of infrequently accessed or compliance-driven data. Data in cold storage is detached from active compute resources and resides in Amazon S3, incurring minimal cost. When historical data needs to be queried, the indexes are attached to the UltraWarm nodes using OpenSearch API calls. This helps extracting historical data for audits, periodic research or forensic investigations without maintaining active compute for the entire retention period, thereby reducing storage cost.
OpenSearch Service automates index transitions between hot, UltraWarm, and cold storage tiers using Index State Management (ISM) policies. ISM policies specify the conditions and actions for each state, such as transitioning based on index age, size, or document count. When an index qualifies for a transition, ISM jobs—running every 5 to 8 minutes—evaluate the policy and move the index to the next tier. When indexes reach the UltraWarm threshold, they are migrated to UltraWarm nodes backed by Amazon S3, which reduces storage costs while keeping data accessible for queries. After the UltraWarm retention period, ISM archives the indexes to cold storage, detaching them from compute resources but allowing reattachment for future queries or compliance needs. This automated lifecycle management reduces operational overhead, optimizes storage costs, and maintains performance for both recent and historical data.
For observability data, new indexes are created in the hot tier, where they remain for 7 days to support fast ingestion and low-latency queries. After this period, ISM transitions these indexes to UltraWarm storage, where they are retained for an additional 15 days as read-only data, balancing cost with searchability.
Security
Security is the most critical part of the architecture. Zeta’s observability system implements multiple layers of protection for data confidentiality, integrity, and compliance with banking regulations, and is built using a zero-trust approach following the AWS shared responsibility model for OpenSearch Service:
- Infrastructure security: The OpenSearch Service domain is deployed within a virtual private cloud (VPC) with private subnets, isolating it from direct internet access. Security groups enforce restrictive ingress rules, allowing access only from authorized sources. The OpenSearch Service domain uses encryption at rest through AWS Key Management Service (KMS). Data in transit is secured using TLS 1.3 encryption, so that log data, traces, and search queries remain protected during transmission. Service-to-service communication uses AWS Identity and Access Management (IAM) roles and encrypted connections, alleviating the need for hardcoded credentials.
- Access control and authentication: The solution uses Amazon OpenSearch Service fine-grained access control(FGAC) integrated with IAM, where IAM serves as the authentication provider and FGAC handles authorization by mapping IAM roles to OpenSearch backend roles. This approach helps Zeta to control access permissions at the index and document level based on tenant requirements and user responsibilities. The data ingestion pipeline implements end-to-end security with Fluentd authenticating to Amazon MSK using IAM roles over encrypted connections. Amazon MSK clusters use encryption in transit and at rest, protecting log data throughout the streaming pipeline. Kubernetes RBAC policies restrict pod-to-pod communication and limit service account permissions.
- Data privacy and tenant isolation: Each tenants’ data is maintained in logical separation in OpenSearch Service using tenant id. CSN implements tenant-aware authentication and authorization with FGAC, restricting users to their authorized tenants’ dashboards and data. Every API endpoint validates tenant context, so that users can only access data within their authorized scope. Importantly, no customer data is captured in the logs – only system metrics are used to build the monitoring system, adhering to banking security standards and best practices. User actions are audited and logged for compliance purposes, with audit trails maintained according to regulatory requirements.
This security framework enables the observability system meet the security requirements of core banking operations while maintaining operational efficiency and regulatory compliance across global industries.
Customer Service Navigator
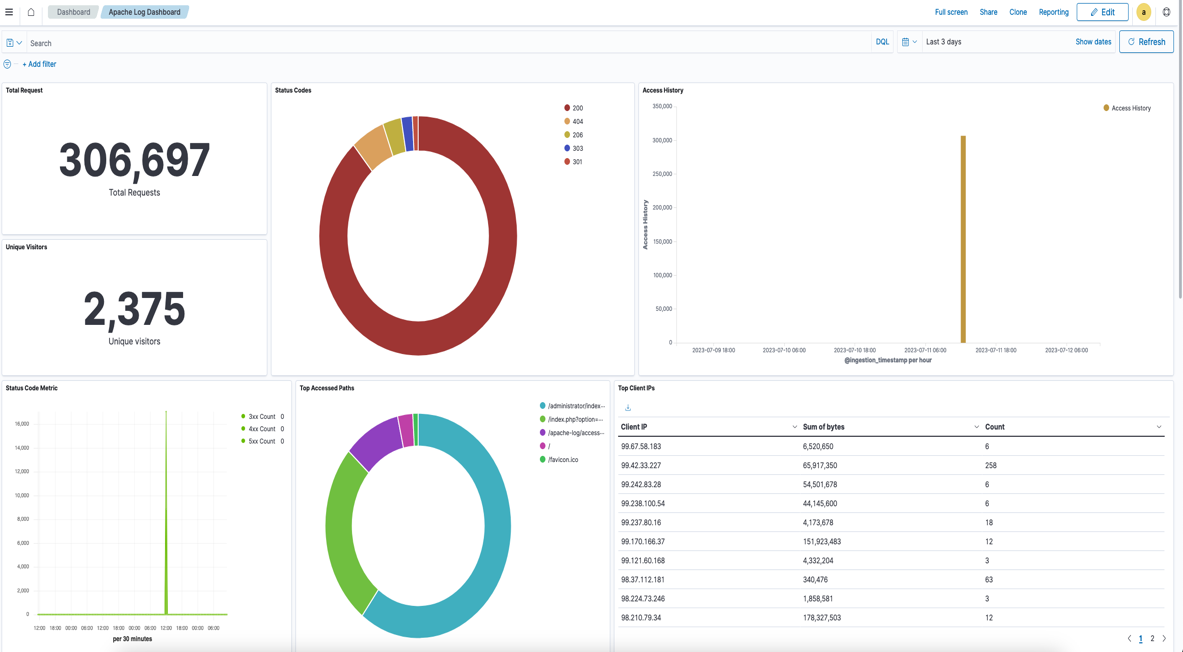
CSN delivers SREs a powerful diagnostics interface engineered for high-efficiency monitoring, deep analysis, and rapid troubleshooting of system performance across distributed environments. The system ingests and processes telemetry data at sub-minute intervals, providing near-real-time metrics, traces, and logs from critical infrastructure components. Actionable, interactive visualizations—such as heatmaps, anomaly graphs, and dependency maps— helps SREs to quickly detect SLO breaches and drill down to granular root causes, often within a few minutes of an incident.
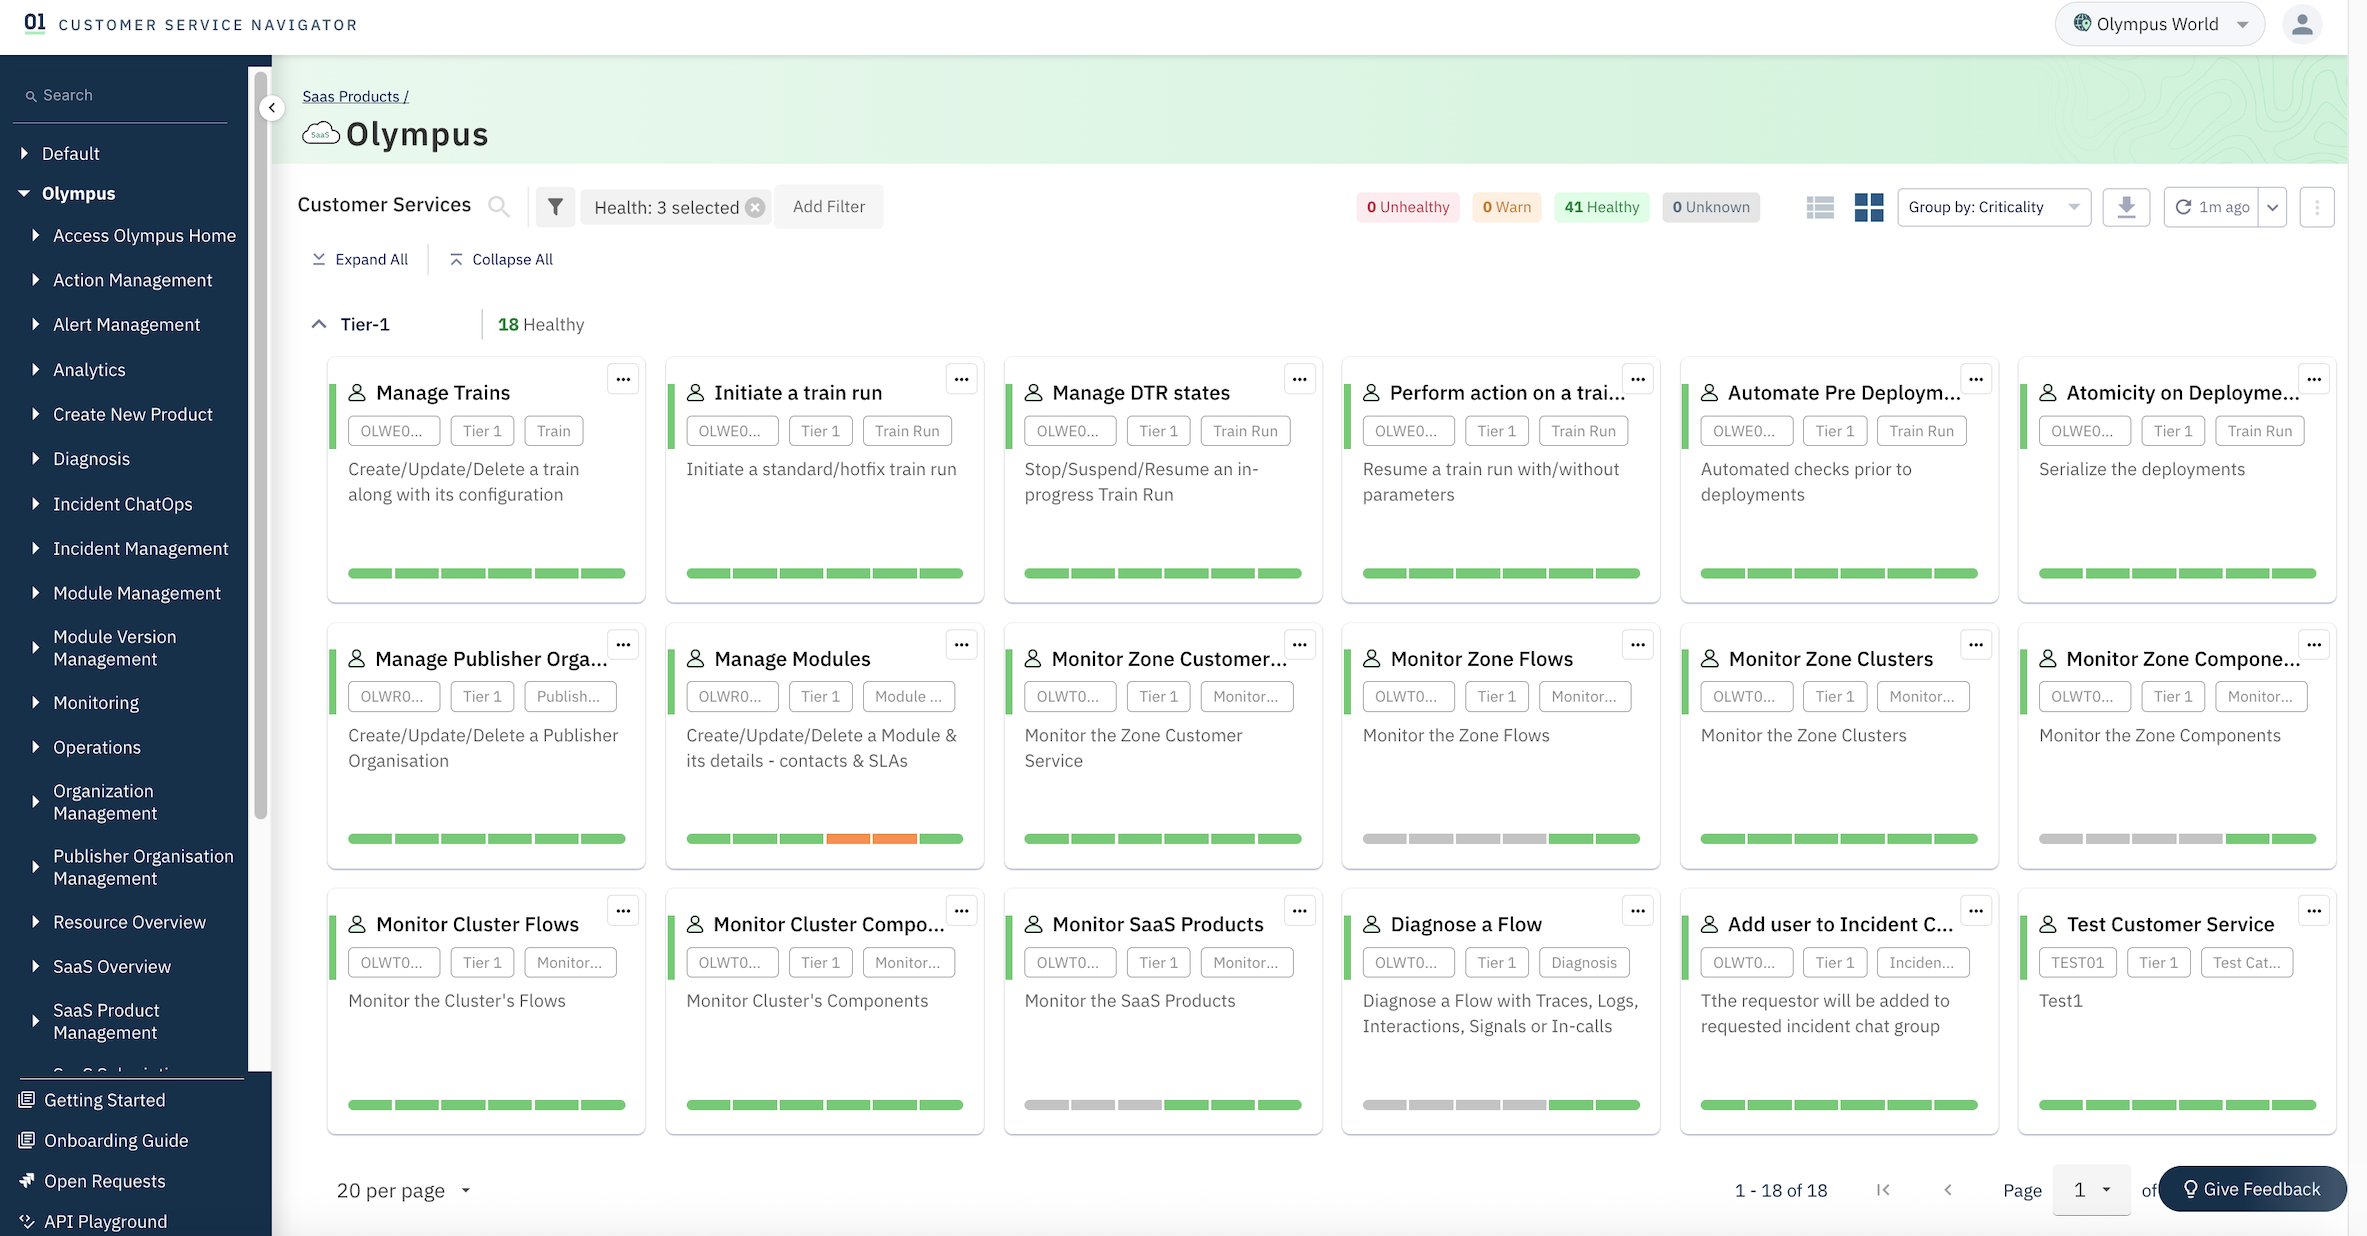
The following screenshot shows an example service health dashboard in CSN for an Olympus tenant.
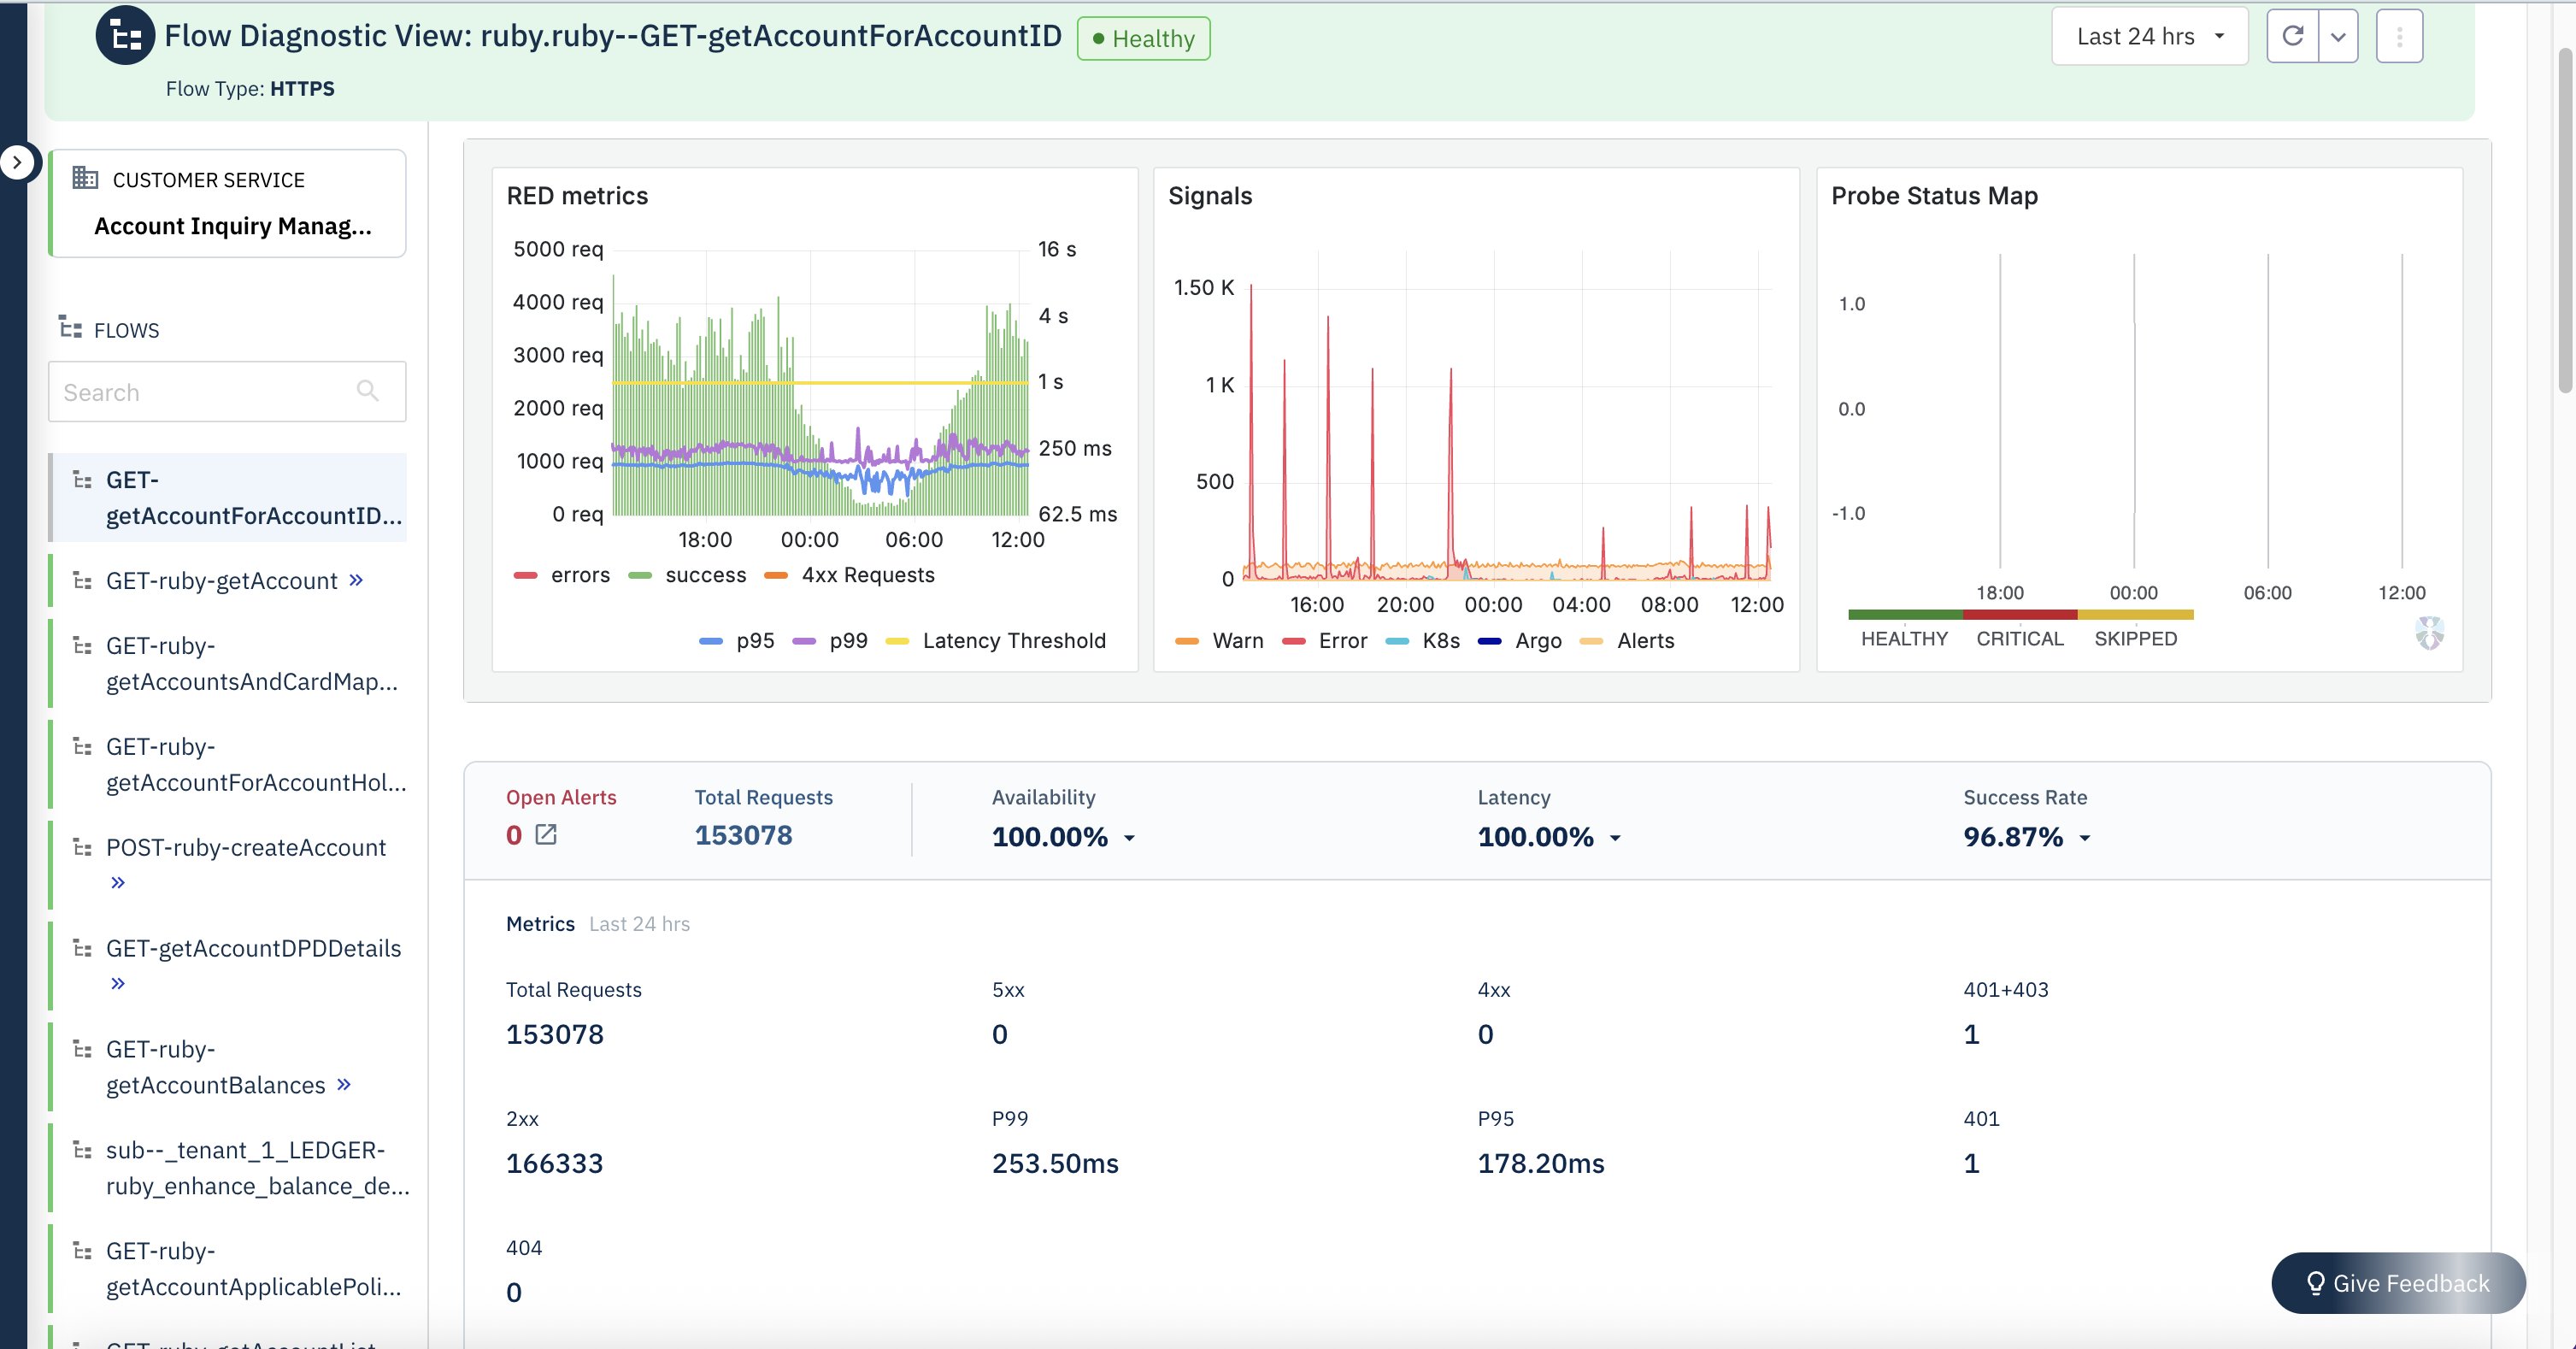
The following screenshot shows an example of the API performance insights dashboard in CSN.
Business and technical benefits
The OpenSearch Service-based CSN System provides the following business and technical benefits:
- Manual effort is reduced through automated Index State Management (ISM) and lifecycle policies, so that Zeta’s teams to focus on innovation
- Automated lifecycle policies facilitate seamless retention and archiving of compliance data, reducing the risk of non-compliance
- The system supports log retention for over 10 years to meet regulatory requirements for Zeta’s banking and financial services customers
- Multiple layers of security—including encryption at rest and in transit, FGAC, and tenant isolation to protect customer data and support Zeta’s zero-trust architecture
- By consolidating logs, traces, and metrics from disparate systems into OpenSearch, SRE teams can correlate events more effectively, thereby reducing troubleshooting efforts and achieving an 80% improvement in MTTR
- Zeta achieved 99.999999999% data durability for archived logs stored in Amazon S3, providing long-term data integrity
- Zstandard compression is being implemented to optimize long-term storage costs
Conclusion
CSN’s advanced correlation engine automatically associates related events across microservices, databases, network layers, and infrastructure, significantly streamlining root cause analysis. Integrated alerting and automated runbooks further reduce response times. Since implementing CSN, Zeta has achieved over an 80% reduction in MTTR, with incident response times decreasing from 30+ minutes to under 5 minutes. The service supports seamless multi-tenant monitoring, processes 3TB of machine-generated data daily, and is architected for petabyte-scale growth. Additionally, CSN helps Zeta meet regulatory requirements for retaining historical logs over several years while keeping storage costs under control. This has substantially improved operational resilience, increased service availability, and empowered teams to proactively resolve issues before they affect end users.
Ready to take your organization’s observability capabilities to the next level? Dive into the technical details of OpenSearch Service in the Amazon OpenSearch Developer Guide. Visit our new migration hub page for more prescriptive guidance on moving your workloads to OpenSearch Service.
About the authors
 Deepesh Dhapola is a Senior Solutions Architect at AWS India, where he architects high-performance, resilient cloud solutions for financial services and fintech organizations. He specializes in using advanced AI technologies—including generative AI, intelligent agents, and the Model Context Protocol (MCP)—to design secure, scalable, and context-aware applications. With deep expertise in machine learning and a keen focus on emerging trends, Deepesh drives digital transformation by integrating cutting-edge AI capabilities to enhance operational efficiency and foster innovation for AWS customers. Beyond his technical pursuits, he enjoys quality time with his family and explores creative culinary techniques.
 Shashidhar (Shashi) Soppin is an accomplished Enterprise Architect and cloud transformation leader with over 24+ years of experience spanning regulated industries and high-growth technology environments. Currently steering strategic initiatives as Lead Architect at Zeta’s CTO office, Shashidhar has helped in building and led world-class engineering teams, driving innovation in cloud, security, and fintech domains. He has architected secure, scalable platforms—scaling user bases by 10x, enabling complex integrations for leading Bank’s migration to Zeta’s platforms, and pioneering Zero Trust frameworks that achieved outstanding regulatory compliance. A results-driven executive and former DMTS at Wipro, Shashidhar holds 25+ granted patents and has delivered multi-million dollar enterprise deals across domains including AI/ML. Renowned as a published author (“Essentials of Deep Learning”), frequent industry speaker, and hands-on innovator, he combines technical expertise with business acumen, propelling organizations toward robust, future-ready cloud ecosystems and operational excellence. Prior to Wipro he worked in IBM-ISL as well.
 Anchal Kansal is a Lead Site Reliability Engineer at Zeta, where she has spent the past four years building and scaling reliable, high-performance systems. With deep expertise in OpenSearch, observability platforms, and large-scale infrastructure, she focuses on ensuring uptime, performance, and operational efficiency. Anchal is passionate about solving complex reliability challenges and sharing practical insights with the engineering community.
 Manochandra (Mano) is the Site Reliability Engineering (SRE) expert at Zeta, specializing in data management-oriented systems. With a deep understanding of large-scale distributed architectures, he has extensive experience designing, deploying, and maintaining resilient, production-grade OpenSearch systems. Mano is known for his proactive approach in optimizing infrastructure reliability and performance, as well as his ability to troubleshoot complex operational challenges. His expertise spans implementing automation, monitoring, and incident management best practices, making him a go-to resource for ensuring service availability and scalability at Zeta.
 Hitesh Subnani is a FSI Solutions Architect at AWS India, where he works with customers to design and build architectures that deliver business value. He specializes in comprehensive observability and analytics systems, enabling organizations to gain deep insights from operational data. With expertise in search and analytics technologies, Hitesh focuses on scalable monitoring systems, real-time dashboards, and compliance-driven architectures for AWS customers in the financial sector.
 Tarun Chakraborty is a Sr. Technical Account Manager (TAM) at AWS India, where he partners with leading banks and fintech organizations to accelerate their cloud transformation journeys. With over 15 years of experience in technology and financial services, he serves as a trusted advisor helping customers leverage AWS’s comprehensive suite of services to drive innovation and achieve their business objectives.


 Himshikha Gupta is a Senior Engineer with Amazon OpenSearch Service. She is excited about scaling challenges with distributed systems. She is an active contributor to OpenSearch, focused on shard management and cluster scalability
 Sooraj Sinha is a software engineer at Amazon, specializing in Amazon OpenSearch Service since 2021. He has worked on multiple core components of OpenSearch, including indexing, cluster management, and cross-cluster replication. His contributions have focused on improving the availability, performance, and durability of OpenSearch.
 Jon Handler is Director of Solutions Architecture for Search Services at Amazon Web Services, based in Palo Alto, CA. Jon works closely with OpenSearch and Amazon OpenSearch Service, providing help and guidance to a broad range of customers who have generative AI, search, and log analytics workloads for OpenSearch. Prior to joining AWS, Jon’s career as a software developer included four years of coding a large-scale, eCommerce search engine. Jon holds a Bachelor of the Arts from the University of Pennsylvania, and a Master of Science and a Ph. D. in Computer Science and Artificial Intelligence from Northwestern University.
 Arjun Kumar Giri is a Principal Engineer at AWS working on the OpenSearch Project. He primarily works on OpenSearch’s artificial intelligence and machine learning (AI/ML) and semantic search features. He is passionate about AI, ML, and building scalable systems.
 Siddhant Gupta is a Senior Product Manager (Technical) at AWS, spearheading AI innovation within the OpenSearch Project from Hyderabad, India. With a deep understanding of artificial intelligence and machine learning, Siddhant architects features that democratize advanced AI capabilities, enabling customers to harness the full potential of AI without requiring extensive technical expertise. His work seamlessly integrates cutting-edge AI technologies into scalable systems, bridging the gap between complex AI models and practical, user-friendly applications.


 Smita Singh is a Senior Solutions Architect at AWS. She focuses on defining technical strategic vision and works on architecture, design, and implementation of modern, scalable platforms for large-scale global enterprises and SaaS providers. She is a data, analytics, and generative AI enthusiast and is passionate about building innovative, highly scalable, resilient, fault-tolerant, self-healing, multi-tenant platform solutions and accelerators.
 Dipayan Sarkar is a Specialist Solutions Architect for Analytics at AWS, where he helps customers modernize their data platform using AWS analytics services. He works with customers to design and build analytics solutions, enabling businesses to make data-driven decisions.

 Ezat Karimi is a Senior Solutions Architect at AWS, based in Austin, TX. Ezat specializes in designing and delivering modernization solutions and strategies for database applications. Working closely with multiple AWS teams, Ezat helps customers migrate their database workloads to the AWS Cloud.


 Tom Burns is a Senior Cloud Support Engineer at AWS and is based in the NYC area. He is a subject matter expert in Amazon OpenSearch Service and engages with customers for critical event troubleshooting and improving the supportability of the service. Outside of work, he enjoys playing with his cats, playing board games with friends, and playing competitive games online.
 Ron Miller is a Solutions Architect based out of NYC, supporting transportation and logistics customers. Ron works closely with AWS’s Data & Analytics specialist organization to promote and support OpenSearch. On the weekend, Ron is a shade tree mechanic and trains to complete triathlons.
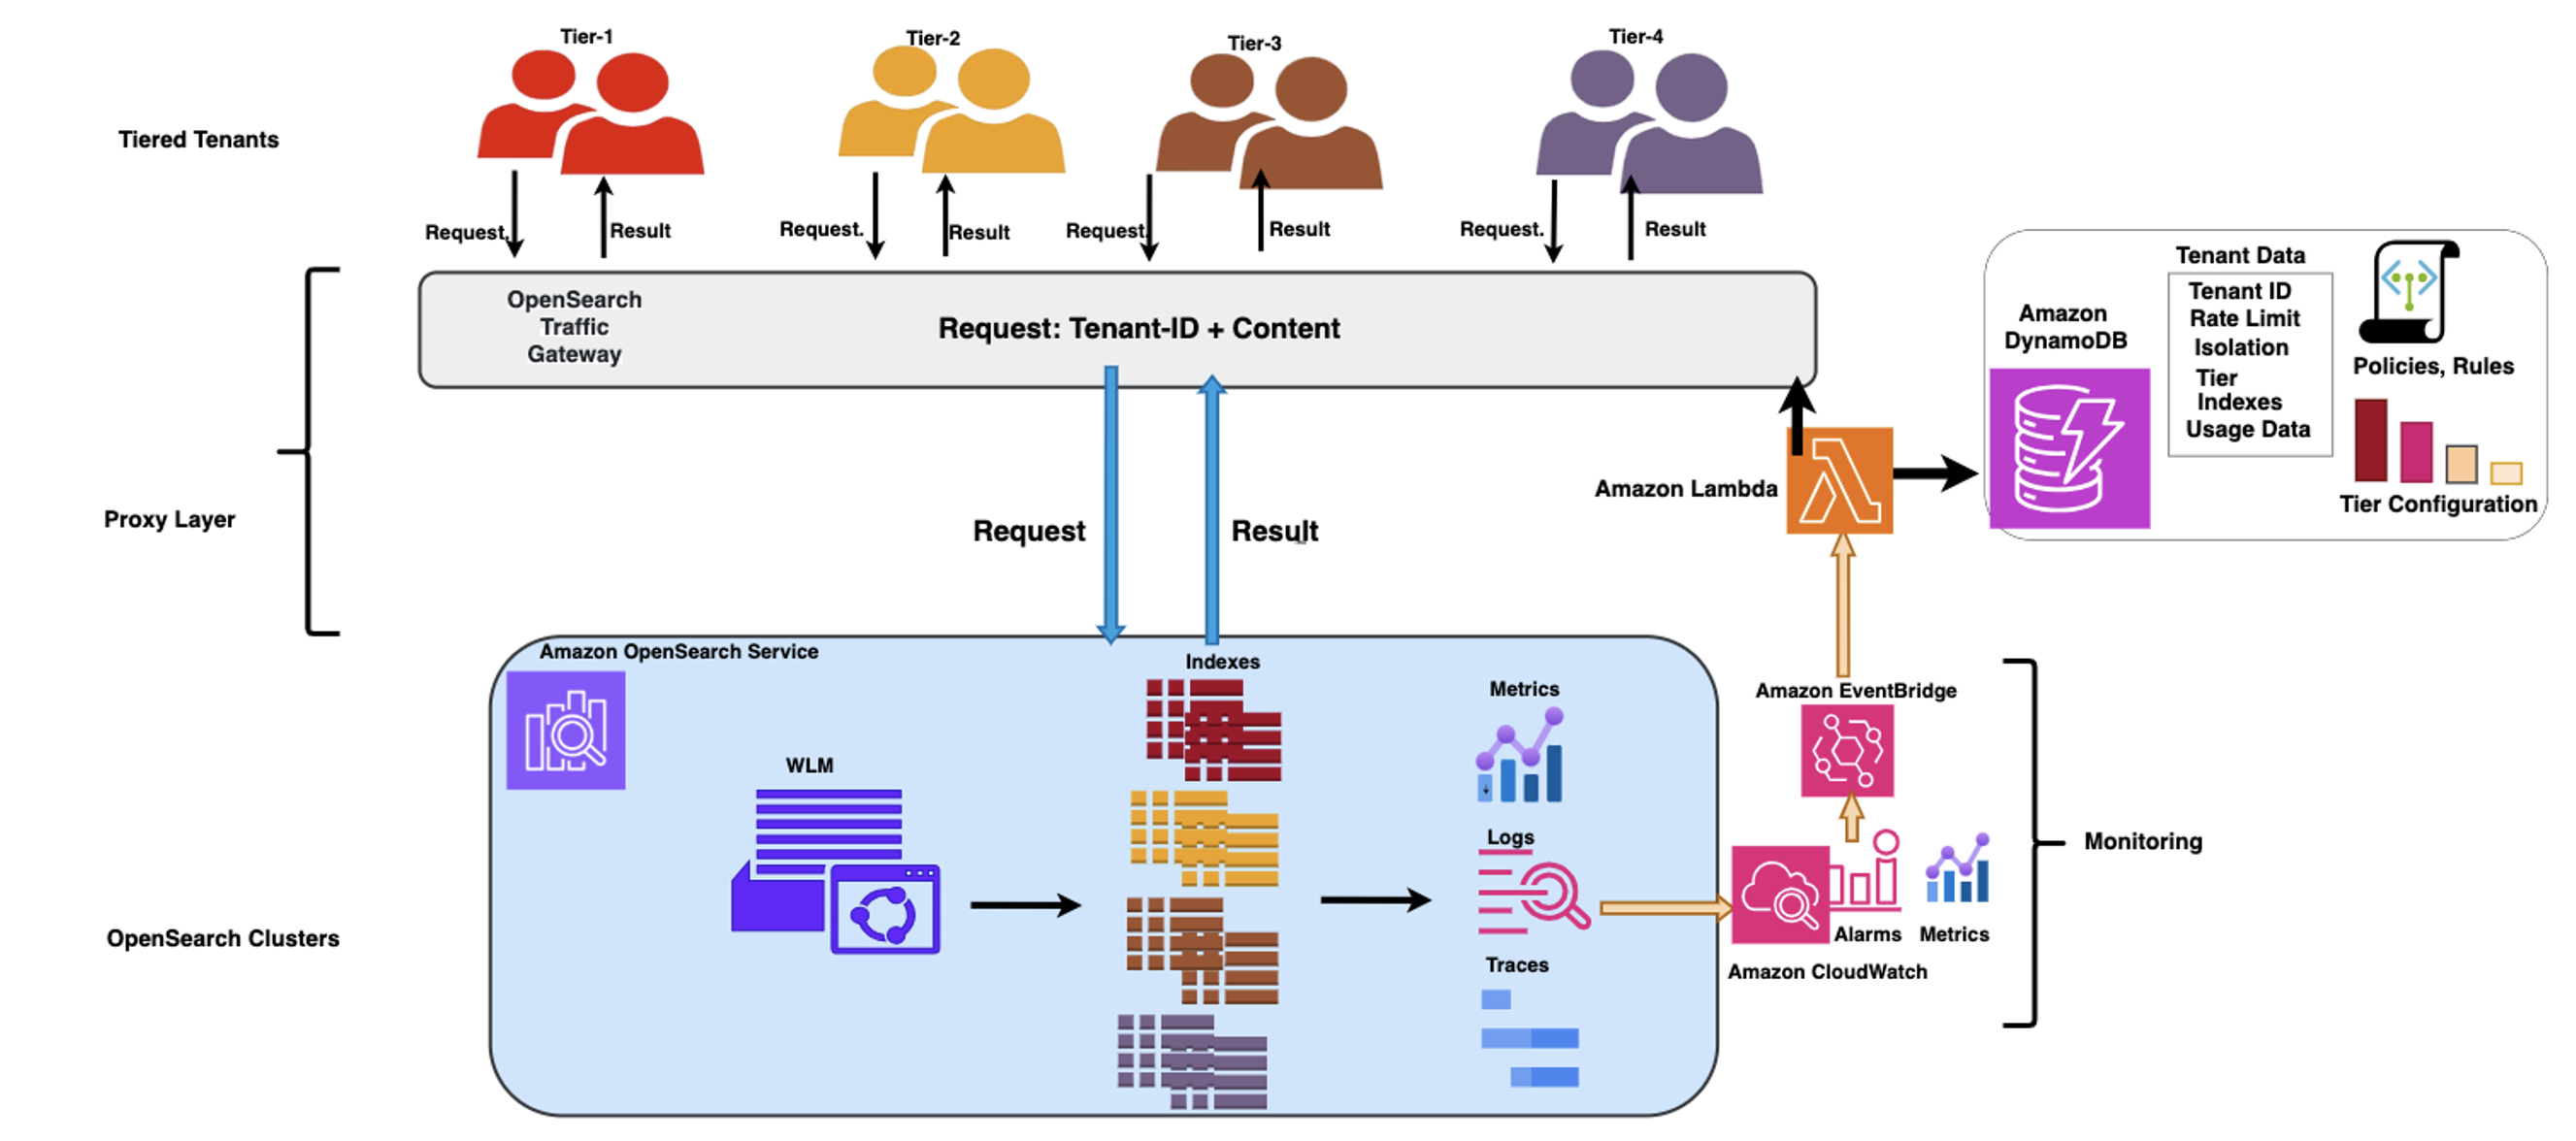

 Mark Twomey is a Senior Solutions Architect at AWS focused on storage and data management. He enjoys working with customers to put their data in the right place, at the right time, for the right cost. Living in Ireland, Mark enjoys walking in the countryside, watching movies, and reading books.
 Sorabh Hamirwasia is a senior software engineer at AWS working on the OpenSearch Project. His primary interest include building cost optimized and performant distributed systems.
 Pallavi Priyadarshini is a Senior Engineering Manager at Amazon OpenSearch Service leading the development of high-performing and scalable technologies for search, security, releases, and dashboards.
 Bobby Mohammed is a Principal Product Manager at AWS leading the Search, GenAI, and Agentic AI product initiatives. Previously, he worked on products across the full lifecycle of machine learning, including data, analytics, and ML features on SageMaker platform, deep learning training and inference products at Intel.


 Michael Torio is an Associate Specialist Solutions Architect at AWS focused on Amazon OpenSearch Service based out of Mountain View, CA. Michael enjoys helping customers leverage cloud technologies to solve their business challenges.
 Arjun Nambiar is a Product Manager with Amazon OpenSearch Service. He focuses on ingestion technologies that enable ingesting data from a wide variety of sources into Amazon OpenSearch Service at scale. Arjun is interested in large-scale distributed systems and cloud-centered technologies, and is based out of Seattle, Washington.


 Bharav Patel is a Specialist Solution Architect, Analytics at Amazon Web Services. He primarily works on Amazon OpenSearch Service and helps customers with key concepts and design principles of running OpenSearch workloads on the cloud. Bharav likes to explore new places and try out different cuisines.
 Imtiaz (Taz) Sayed is the WW Tech Leader for Analytics at AWS. He enjoys engaging with the community on all things data and analytics. He can be reached through
  Chinmayi Narasimhadevara is a Senior Solutions Architect focused on Data Analytics and AI at AWS. She helps customers build advanced, highly scalable, and performant solutions.


 Ido Ziv is a DevOps team leader in Kaltura with over 6 years of experience. His hobbies include sailing and Kubernetes (but not at the same time).
 Roi Gamliel is a Senior Solutions Architect helping startups build on AWS. He is passionate about the OpenSearch Project, helping customers fine-tune their workloads and maximize results.
 Yonatan Dolan is a Principal Analytics Specialist at Amazon Web Services. He is located in Israel and helps customers harness AWS analytical services to use data, gain insights, and derive value.


 Xiaoxue Xu is a Solutions Architect for AWS based in Toronto. She primarily works with financial services customers to help secure their workload and design scalable solutions on the AWS Cloud.
 Simran Singh is a Senior Solutions Architect at AWS. In this role, he assists our large enterprise customers in meeting their key business objectives using AWS. His areas of expertise include artificial intelligence and machine learning, security, and improving the experience of developers building on AWS.
 Shubham Kumar is a Software Development Engineer at Amazon OpenSearch Service, specializing in the security domain. He is passionate about developing robust security features to enhance the protection of customer data and infrastructure.
 Sachet Alva is a Software Development Manager at Amazon OpenSearch Service, overseeing the infrastructure security and custom package initiatives. His team’s innovations contribute to the enhanced security and flexibility of Amazon OpenSearch Service deployments.
 Naveen Negi is a Senior Tech Product Manager for Amazon OpenSearch Service. He works closely with engineering teams and customers to shape the future of OpenSearch Service, making sure it meets evolving security and performance needs.


 Ankush Goyal is a Enterprise Support Lead in AWS Enterprise Support who helps customers streamline their cloud operations on AWS. He is a results-driven IT professional with over 20 years of experience.
 Anvesh Koganti is a Solutions Architect at AWS specializing in Networking. He focuses on helping customers build networking architectures for highly scalable and resilient AWS environments. Outside of work, Anvesh is passionate about consumer technology and enjoys listening to podcasts on tech and business. When disconnecting from the digital world, Anvesh spends time outdoors hiking and biking.
 Salman Ahmed is a Senior Technical Account Manager in AWS Enterprise Support. He specializes in guiding customers through the design, implementation, and support of AWS solutions. Combining his networking expertise with a drive to explore new technologies, he helps organizations successfully navigate their cloud journey. Outside of work, he enjoys photography, traveling, and watching his favorite sports teams.


 Sairam Vangapally is a Data Engineer at Amazon with extensive experience architecting real-time, large-scale data platforms that power critical logistics operations across North America. He has led the design and deployment of end-to-end data pipelines, enabling high-throughput ingestion, transformation, and analytics at scale. He is passionate about building resilient data infrastructure and driving cross-functional collaboration to deliver solutions that accelerate operational insights and business impact.
 Nitin Goyal serves as a Data Engineering Manager in Amazon’s Sort Center organization, where he leads initiatives to optimize operational efficiency across North American facilities. With over nine years of tenure at Amazon spanning multiple teams, he specializes in architecting high-performance data systems, with particular emphasis on real-time streaming pipelines, artificial intelligence, and low-latency solutions. His expertise drives the development of sophisticated operational workflows that enhance sort center productivity and effectiveness.