In today’s increasingly mobile, fast-paced world, it’s no surprise that financial services (finserv) organizations have a massive bullseye on their backs. The amount of personal data they access daily makes them an attractive target for those with malicious intent. In fact, the average cost of a data breach in the financial services sector is $18.9 million, according to data from IBM. With so much at stake, finserv security professionals need to remain vigilant and up-to-date on evolving trends and best practices occurring throughout the sector.
That’s where Anthony Johnson comes in. Johnson is a cloud security expert who has experienced almost every facet of cybersecurity. From being a hands-on red team technician to serving as a Global Chief Information Security Officer (CISO) at JP Morgan Chase, Johnson has seen it all.
We caught up with Johnson to get his take on the latest developments in cloudsec and how these developments are being received within the financial services sector.
What unique challenges or pain points did you/do you encounter as a CISO in finserv?
When I think about the challenges I faced as a CISO in this space, all roads lead back to innovation and the need to move quickly. Business units in financial services are generally expected to move at the speed of consumer demand.
And this need to innovate is different from other industries, adding even more pressure. Consumers demand the latest and greatest technology for convenience and ease of use. They place financial institutions under intense pressure to continuously improve. Financial services organizations will always strive for the latest innovation because they need to in order to compete for consumer attention.
How has finserv security evolved over the last few years as it relates to the cloud?
Many financial services organizations have started utilizing the cloud because it allows them to innovate quickly. But another component of cloud adoption, and specifically cloud security, is managing technical debt.
If you think about the myriad of mergers and acquisitions that have happened in the finserv industry over the past few decades, it’s easy to see how so many organizations have inherited disparate technologies that aren’t fully integrated. There could be some systems that you quite literally cannot turn off without major risk to the entire economy, considering how much financial information flows through those systems on a regular basis. The stakes are high. It’s essential that technology upgrades and security advancements be handled with care.
Despite this, there is still a high volume of outdated technology and many legacy systems still operating – although it’s worth noting that this is different for post-2010 companies that have built everything to truly be ephemeral.
How would you describe the general maturity level with cloud security?
Financial services organizations have to defend every business practice; they can’t just identify one area to go big and win. People want the shiny, new thing that will give them an advantage in the market, so development and innovation have been a high priority over the last year. (See? I mentioned innovation again.)
A major upcoming challenge for finserv organizations and cloud security will be the specific tools they are required to use, and how to leverage them in a way that enables them to still move fast while remaining compliant with industry regulations.
What advice would you give to other CISOs in the finserv industry about cloud security?
I think CISOs in the finserv industry truly need to understand why cloud security is so important. It’s not just about remaining compliant — the scale and speed of the cloud is what makes it so great, but also so dangerous. When you have an automated system, what might at first appear to be a minor disruption can quickly compound. And the cloud makes everything way faster. That’s why hygiene practices are essential. You need to have your house in order.
The best strategy for this is tight asset management. Most organizations don’t actually see their assets expanding. Asset creep is a real problem, especially now. Business users are increasingly technical and can spin up new sets of instances that put the company at risk (think shadow IT). This is quite different from the data centers of the past when unauthorized users weren’t even allowed in the building to plug something in. Bottom line: Security teams need visibility.
How can CISOs mitigate these risks with cloud security going forward?
CISOs who are looking to mature their security strategy will want to start by making distinctions between roles of the security leaders. There are some CISOs who have a governance risk background and others who have technical experience. Understanding your unique skill set is a major part of knowing how to approach the role and hire the right staff for your success. And this extends to identifying and using the best platforms, as well.
Your “supporting cast” of security team members can help you gain big-picture visibility into the cloud. Leaning on their expertise can be invaluable, especially considering that many security leaders do a lot of coaching for regulators to keep them educated in the constant evolution of cloud security. Similar to the need for innovation, it’s worth noting that this need for security knowledge in financial services also differs greatly from the expectations of leaders within retail, hospitality, or manufacturing industries. For example, in those industries, they don’t need to train a regulator on how autoscaling is applicable to cyberspace.
There’s a different expectation in financial services and leaders in this industry need to be aware of that when strategizing growth.
What are your predictions for the future of cloud security?
Right now, organizations in financial services are facing the challenge of having too many tools. Having a larger security budget than other sectors usually means you get one of everything; it’s a real mixed blessing. Finserv has been driving a big integration story about how the tools really work together, so I anticipate we’ll see more large security vendors starting to shift to an integrated approach.
Another trend that’s unique to this industry is the fact that financial services also have investment arms, and we’re seeing these shift the strategy of security leaders, as well. Basically, when a financial services organization invests in a product, it tends to have a trickle-down effect, and the IT security team can find themselves being asked to adopt those new technologies. I think we’ll see more of this over the next year, and IT security teams are going to need to determine how to best implement new solutions in a seamless and effective way.
Security and cloud leaders in financial services need to watch for true innovation in the space and examine how competitors are embracing digital transformation. What does it look like, and what could it mean for you?
Let’s navigate the future of cloud security for finserv together. Learn more here.
Security for Kubernetes might not be quite the same as what you’re used to. In our previous article, we covered why security is so important in both Linux on-premises servers and cloud Kubernetes clusters. We also talked about 3 major aspects of Linux server security — processes, network, and file system — and how they correspond to Kubernetes. So today, we’ll talk more about the security concerns unique to Kubernetes.
Configurations
When trying to secure your infrastructure, you have to start by configuring it well. For example, this might mean disabling all unused features or using allow-policies wherever you can to keep your files, executables, or network available only to the intended entity. Both Linux servers and Kubernetes clusters have known vulnerabilities and recommendations.
The Kubernetes API server is the admin panel, so to speak, of your cluster. In most deployments, this HTTP server is exposed to the internet. This means that a hacker that finds their way to the API server can have full control over your cluster.
Using the most strict authentication and authorization settings is highly recommended to prevent this. If you can set your cluster to private, with access only allowed from an internal network, you can sleep well at night. And just as with with configurations, you should be aware at all times of who (and what) can have access to which resources and operations in your cluster.
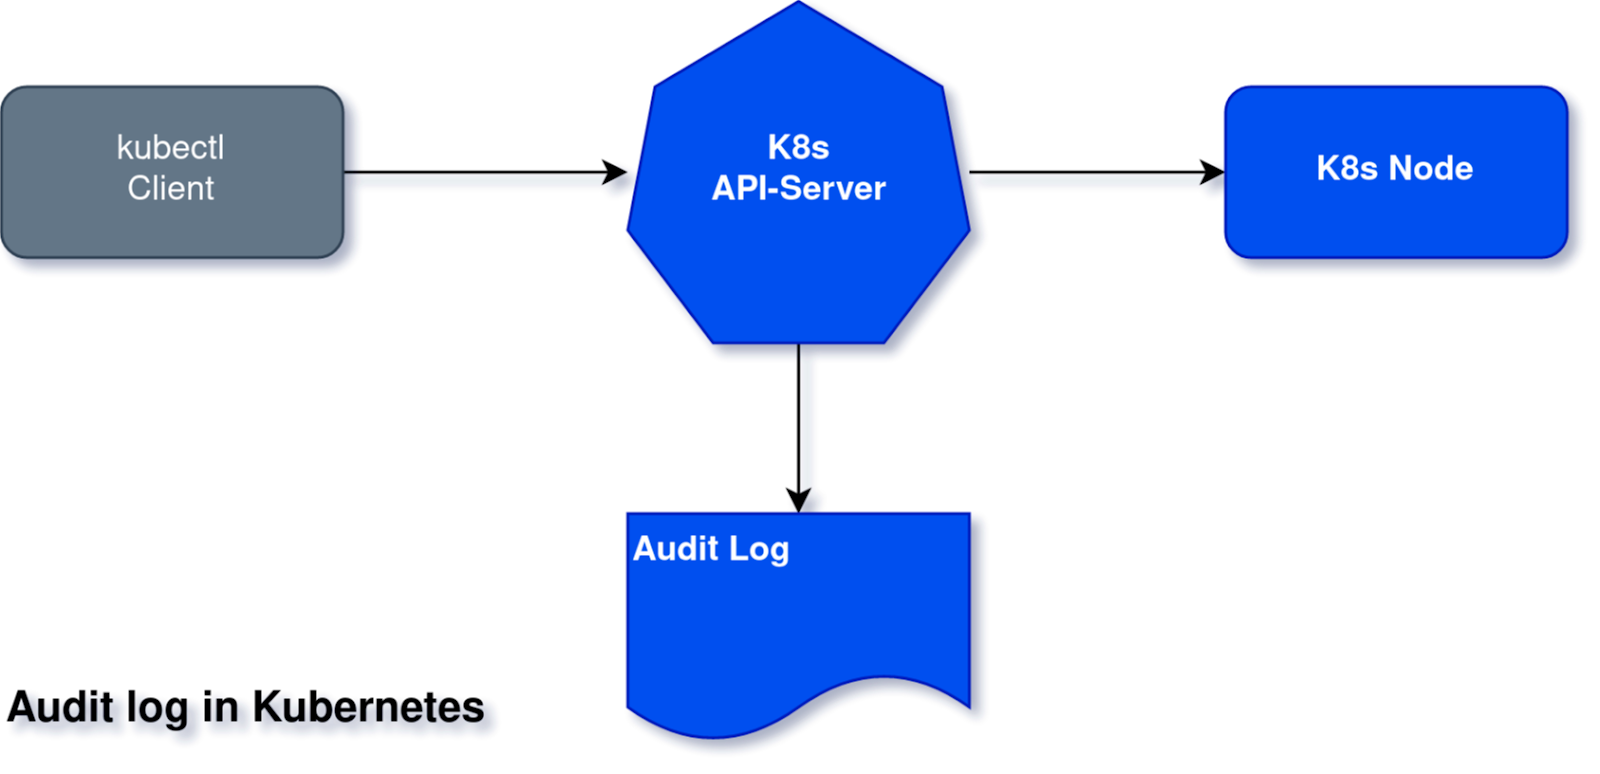
Audit log and other Kubernetes logs
In Kubernetes, there are additional attack vectors using the Kubernetes control plane itself that don’t exist in Linux server security. For example, an attack could call the Kubernetes API to load a new pod you didn’t want.
Kubernetes and cloud providers invest a lot of effort in preventing unauthorized users and machines from doing this. But there is always a chance that one of your employees gets hacked or a badly configured service account has too much power. Kubernetes logs all requests to its audit log so they can be investigated later in case of a breach. Additional logs include the kube-API log or etcd (resources DB) log.
Container runtime
Container runtime is also a unique aspect of Kubernetes security. In Kubernetes, each node is actually a virtual Linux server running a container runtime daemon. A container runtime is responsible for managing the images and running and monitoring the containers, their storage and network provisioning, and more. You might be familiar with Docker as a container runtime. In reality, Docker is a company developing multiple container tools, and their container runtime is named containerd. Other container runtimes for Kubernetes include CRI-O, Rocket, and more.
Apart from a whole Linux server or virtual machine that uses its own single operating system, multiple containers are usually running over multiple operating systems that share the same host kernel. Although the operating systems of the containers are minimal, they may still have security holes. And the more holes the merrier for the attacker! Monitoring the container runtime activity can also yield a lot of information about what is going on in the node — what processes are running inside the container, any internal communication that might escape from network monitoring, the data being collected and created, and so on.
Right tools, lower risks
The unique interfaces and engines of Kubernetes can be an additional exposed surface in terms of security, especially when considering the complexity of the system. However, don’t forget that distribution and containerization add to security and help isolate potential malware.
Kubernetes may come with a few new risks to watch out for, but that’s no reason to be scared off. As long as you know what to look for, security for your Kubernetes clusters doesn’t have to be any harder than it was for your Linux servers. And there’s no need to go it alone — not when you can have handy tools like InsightCloudSec, Rapid7’s cloud-native security platform, at your side.
November 21, 2022: We updated this post to reflect the fact that AWS Secrets Manager now supports rotating secrets as often as every four hours.
AWS Secrets Manager helps you manage, retrieve, and rotate database credentials, API keys, and other secrets throughout their lifecycles. You can specify a rotation window for your secrets, allowing you to rotate secrets during non-critical business hours or scheduled maintenance windows for your application. Secrets Manager now supports rotation of secrets as often as every four hours, on a predefined schedule you can configure to conform to your existing maintenance windows. Previously, you could only specify the rotation interval in days. AWS Secrets Manager would then rotate the secret within the last 24 hours of the scheduled rotation interval. You can rotate your secrets using an AWS Lambda rotation function provided by AWS, or create a custom Lambda rotation function.
With this release, you can now use Secrets Manager to automate the rotation of credentials and access tokens that must be refreshed more than once per day. This enables greater flexibility for common developer workflows through a single managed service. Additionally, you can continue to use integrations with AWS Config and AWS CloudTrail to manage and monitor your secret rotation configurations in accordance with your organization’s security and compliance requirements. Support for secrets rotation as often as every four hours is provided at no additional cost.
Why might you want to rotate secrets more than once a day? Rotating secrets more frequently can provide a number of benefits, including: discouraging the use of hard-coded credentials in your applications, reducing the scope of impact of a stolen credential, or helping you meet organizational requirements around secret rotation.
Hard-coding application secrets is not recommended, because it can increase the risk of credentials being written in logs, or accidentally exposed in code repositories. Using short-lived secrets limits your ability to hard-code credentials in your application. Short-lived secrets are rotated on a frequent basis: for example, every four hours – meaning even a hard-coded credential can only be used for a short period of time before it needs to be refreshed. This also means that if a credential is compromised, the impact is much smaller — the secret is only valid for a short period of time before the secret is rotated.
Secrets Manager supports familiar cron and rate expressions to specify rotation frequency and rotation windows. In this blog post, we will demonstrate how you can configure a secret to be rotated every four hours, how to specify a custom rotation window for your secret using a cron expression, and how you can set up a custom rotation window for existing secrets. This post describes the following processes:
Create a new secret and configure it to rotate every four hours using the schedule expression builder
Set up rotation window by directly specifying a cron expression
Enabling a custom rotation window for an existing secret
Use case 1: Create a new secret and configure it to rotate every four hours using the schedule expression builder
Let’s assume that your organization has a requirement to rotate GitHub credentials every four hours. To meet this requirement, we will create a new secret in Secrets Manager to store the GitHub credentials, and use the schedule expression builder to configure rotation of the secret at a four-hour interval.
The schedule expression builder enables you to configure your rotation window to help you meet your organization’s specific requirements, without requiring knowledge of cron expressions. AWS Secrets Manager also supports directly entering a cron expression to configure the rotation window, which we will demonstrate later in this post.
To create a new secret and configure a four-hour secret rotation schedule
Sign in to the AWS Management Console, and navigate to the Secrets Manager service.
Choose Store a new secret.
Figure 1: Store a secret in AWS Secrets Manager
In the Secret type section, choose Other type of secret.
Figure 2: Choose a secret type in Secrets Manager
In the Key/value pairs section, enter the GitHub credentials that you wish to store.
Select your preferred encryption key to protect the secret, and then choose Next. In this example, we are using an AWS managed key.
Enter a secret name of your choice in the Secret name field. You can optionally provide a Description of the secret, create tags, and add resource permissions to the secret. If desired, you can also replicate the secret to another region to help you meet your organization’s disaster recovery requirements by following the procedure in this blog post.
Choose Next.
Figure 3:Create a secret to store your Git credentials
Turn on Automatic rotation to enable rotation for the secret.
Under Rotation schedule, choose Schedule expression builder.
For Time unit, choose Hours, then enter a value of 4.
Leave the Window duration field blank as the secret is to be rotated every 4 hours.
For this example, keep the Rotate immediately when the secret is stored check box selected to rotate the secret immediately after creation
Figure 4: Enable automatic rotation using the schedule expression builder
Under Rotation function, choose your Lambda rotation function from the drop down menu.
Choose Next.
On the Secret review page, you are provided with an overview of the secret. Review the secret and scroll down to the Rotation schedule section.
Confirm the Rotation schedule and Next rotation date meet your requirements.
Figure 5: Rotation schedule with a summary of the configured custom rotation window
Choose Store secret.
To view the Rotation configuration for the secret, select the secret you created.
On the Secrets details page, scroll down to the Rotation configuration section. The Rotation status is Enabled and the Rotation schedule is rate(4 hours). The name of your Lambdafunctionbeing used for rotation is displayed.
Figure 6: Rotation configuration of your secret
You have now successfully stored a secret using the interactive schedule expression builder. This option provides a simple mechanism to configure rotation windows, and does not require expertise with cron expressions.
In the next example, we will be using the schedule expression option to directly enter a cron expression, to achieve a more complex rotation interval.
Use case 2: Set up a custom rotation window using a cron expression
The procedures described in the next two sections of this blog post require that you complete the following prerequisites:
Configure the Lambda function to connect with the Amazon RDS database and Secrets Manager by following the procedure in this blog post.
Configuring complicated rotation windows for secrets may be more effective using the schedule expression option, rather than the schedule expression builder. The schedule expression option allows you to directly enter a cron expression using a string of six inputs. Directly entering cron expressions provides more flexibility when defining a rotation schedule that is more complex.
Let’s suppose you have another secret in your organization which does not need to be rotated as frequently as others. Consequently, you’ve been asked to set up rotation for every last Sunday of the quarter and during the off-peak hours of 1:00 AM to 4:00 AM UTC to avoid application downtime. Due to the complex nature of the requirements, you will need to use the schedule expression option to write a cron job to achieve your use case.
Cron expressions consist of the following 6 required fields which are separated by a white space; Minutes, Hours, Day of month, Month, Day of week, and Year. Each required field has the following values using the syntax cron(fields).
The , (comma) wildcard includes additional values. In the Month field, JAN,FEB,MAR would include January, February, and March.
–
The – (dash) wildcard specifies ranges. In the Day field, 1-15 would include days 1 through 15 of the specified month.
*
The * (asterisk) wildcard includes all values in the field. In the Month field, * would include every month.
/
The / (forward slash) wildcard specifies increments In the Month field, you could enter 1/3 to specify every 3rd month, starting from January. So 1/3 specifies the January, April, July, Oct.
?
The ? (question mark) wildcard specifies one or another. In the day-of-month field you could enter 7 and then enter ? in the day-of-week field since the 7th of a month could be any day of a given week.
L
The L wildcard in the Day-of-month or Day-of-week fields specifies the last day of the month or week. For example, in the week Sun-Sat, you can state 5L to specify the last Thursday in the month.
#
The # wildcard in the Day-of-week field specifies a certain instance of the specified day of the week within a month. For example, 3#2 would be the second Tuesday of the month: the 3 refers to Tuesday because it is the third day of each week, and the 2 refers to the second day of that type within the month.
Table 2: Description of supported wilds cards for cron expression
As the use case is to setup a custom rotation window for the last Sunday of the quarter from 1:00 AM to 4:00 AM UTC, you’ll need to carry out the following steps:
To deploy the solution
To store a new secret in Secrets Manager repeat steps 1-6 above.
Once you’re on the Secret Rotation section of the Store a new secret screen, click on Automatic rotation to enable rotation for the secret.
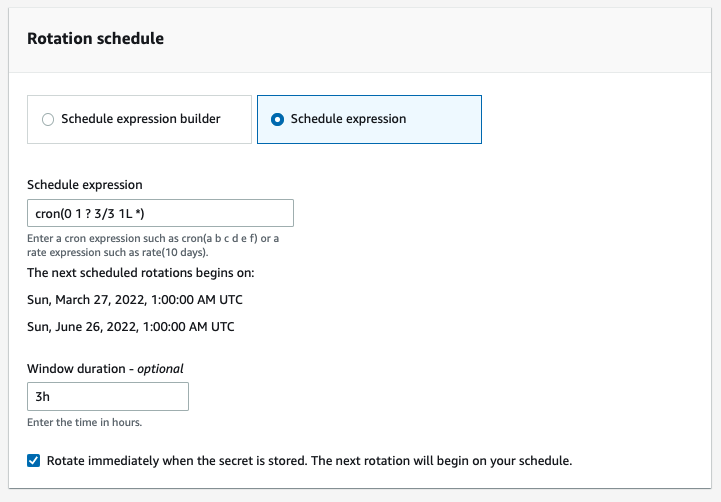
Under Rotation schedule, choose Schedule expression.
In the Schedule expression field box, enter cron(0 1 ? 3/3 1L *).
Fields
Values
Explanation
Minutes
0
The use case does not have a specific minute requirement
Hours
1
Ensures the rotation window starts from 1am UTC
Day-of-month
?
The use case does not require rotation to occur on a specific date in the month
Month
3/3
Sets rotation to occur on the last month in a quarter
Day-of-week
1L
Ensures rotation occurs on the last Sunday of the month
Year
*
Allows the rotation window pattern to be repeated yearly
Table 3: Using cron expressions to achieve your rotation requirements
Figure 7: Enable automatic rotation using the schedule expression
On the Rotation function section choose your Lambda rotation function from the drop down menu.
Choose Next.
On the Secret review page, review the secret and scroll down to the Rotation schedule section. Confirm the Rotation schedule and Next rotation date meets your requirements.
Figure 8: Rotation schedule with a summary of your custom rotation window
Choose Store.
To view the Rotation configuration for this secret, select it from the Secrets page.
On the Secrets details page, scroll down to the Rotation configuration section. The Rotation status is Enabled, the Rotation schedule is cron(0 1 ? 3/3 1L *) and the name of your Lambda function being used for your custom rotation is displayed.
Figure 9: Rotation configuration section with a rotation status of Enabled
Use case 3: Enabling a custom rotation window for an existing secret
If you already use AWS Secrets Manager as a way to store and rotate secrets for your Organization, you might want to take advantage of custom scheduled rotation on existing secrets. For this use case, to meet your business needs the secret must be rotated bi-weekly, every Saturday from 12am to 5am.
To deploy the solution
On the Secrets page of the Secrets Manager console, chose the existing secret you want to configure rotation for.
Scroll down to the Rotation configuration section of the Secret details page, choose Edit rotation.
Figure 10: Rotation configuration section with a rotation status of Disabled
On the Edit rotation configuration pop-up window, turn on Automatic rotation to enable rotation for the secret.
Under Rotation Schedule choose Schedule expression builder, optionally you can use the Schedule expression to create the custom rotation window.
For the Time Unit choose Weeks, then enter a value of 2.
For the Day of week choose Saturday from the drop-down menu.
In the Start time field type 00. This ensures rotation does not start until 00:00 AM UTC.
In the Window duration field type 5h. This provides Secrets Manager with a 5hr period to rotate the secret.
For this example, keep the check box marked to rotate the secret immediately.
Under Rotation function, choose the Lambda function which will be used to rotate the secret.
Choose Save.
On the Secrets details page, scroll down to the Rotation configuration section. The Rotation status is Enabled, the Rotation schedule is cron(0 00 ? * 7#2,7#4 *) and the name of the custom rotation Lambda function is visible.
Figure 12:Rotation configuration section with a rotation status of Enabled
Summary
Regular rotation of secrets is a Secrets Manager best practice that helps you to meet compliance requirements, for example for PCI DSS, which mandates the rotation of application secrets every 90 days, and to improve your security posture for databases and credentials. The ability to rotate secrets as often as every four hours helps you rotate secrets more frequently, and the rotation window feature helps you adhere to rotation best practices while still having the flexibility to choose a rotation window that suits your organizational needs. This allows you to use AWS Secrets Manager as a centralized location to store, retrieve, and rotate your secrets regardless of their lifespan, providing a uniform approach for secrets management. At the same time, the custom rotation window feature alleviates the need for applications to continuously refresh secret caches and manage retries for secrets that were rotated, as rotation will occur during your specified window when the application usage is low.
In this blog post, we showed you how to create a secret and configure the secret to be rotated every four hours using the schedule expression builder. The use case examples show how each feature can be used to achieve different rotation requirements within an organization, including using the schedule expression builder option to create your cron expression, as well as using the schedule expression feature to help meet more specific rotation requirements.
Kubernetes was first presented in 2014, and it almost entirely changed the way technological and even non-tech companies use infrastructure for running their applications. The Kubernetes platform still feels new and exciting — it has awesome features and can fit most use cases.
But hackers find the combination of new technology and user inexperience that’s just right for their malicious activity. Deploying your product on a Kubernetes cluster has a different security cost than on a traditional Linux server.
What are the risks of using Kubernetes?
The risks of a Kubernetes (K8s) deployment are actually the same as in traditional Linux servers. Most of them can be summed up to these 3 targets:
Denial of Service (DoS): These kinds of attacks want your service down. They can be caused in many different ways, including distributed denial of service (DDoS) attacks or SQL injections that erase your databases. As there is no direct profit to the attacker, these attacks are of most interest to malicious groups who disagree with your company values or products, or to your competitors.
Information exfiltration: Another type of attack targets the information you hold. These attacks can collect your information, like your profits, source codes, names of employees, and so on. Or they can collect private data about your customers and users — who they are, their credit card numbers, health state, financial assets, and everything you know about them. None of this is data you want to be known outside the company.
Hardware hijack: A hardware hijack is any type of attack that runs a malicious code on your compute resources and causes them to operate in a way that you did not program or intend them to run. Most of these attacks are related to cryptocurrency. They typically either turn your CPU/GPU to Bitcoin miner or conduct a ransomware attack by encrypting your file system and requesting you to pay ransom (usually in Bitcoin) to unencrypt it. As the important point here for attackers is profit, not the identity of the victim, these attacks usually originate from bots or automatic scripts, rather than with dedicated special operations of malicious groups or individuals.
How can you defend yourself?
Securing deployments and identifying malicious activity on Kubernetes clusters is similar to how it’s done on traditional Linux servers. Most of the differences are in the implementation itself. But there are some distinctions worth mentioning. Let’s focus in on the operating system aspects of security.
Processes and system calls
“The system call is the fundamental interface between an application and the Linux kernel.” —Linux manual page
Linux has over 400 different system calls. These can be used for requesting to read a file, executing another program, sending a network message, and more. As you’ve probably guessed, these operations can be risky when used by unwanted programs.
The Linux Kernel has security mechanisms against malware, but it isn’t fully protected. So system calls may seem legitimate even when they aren’t. Tracking these system calls can give good insight on what a process does. In native Linux, it can be easy to track these down from a single point on the server. However, in K8s Linux nodes, the distribution, dynamics, and containerization makes this mission a very complex task.
Network security
The internet connection is your face for the customers, but it’s also the entry point for various malicious software into your infrastructure. Luckily, the big cloud providers and most of the internet-facing frameworks are well-protected against these attacks. But nothing is 100% safe. Moreover, some of the images you are using may contain security holes themselves. These can cause a malicious program to initiate from inside your cluster.
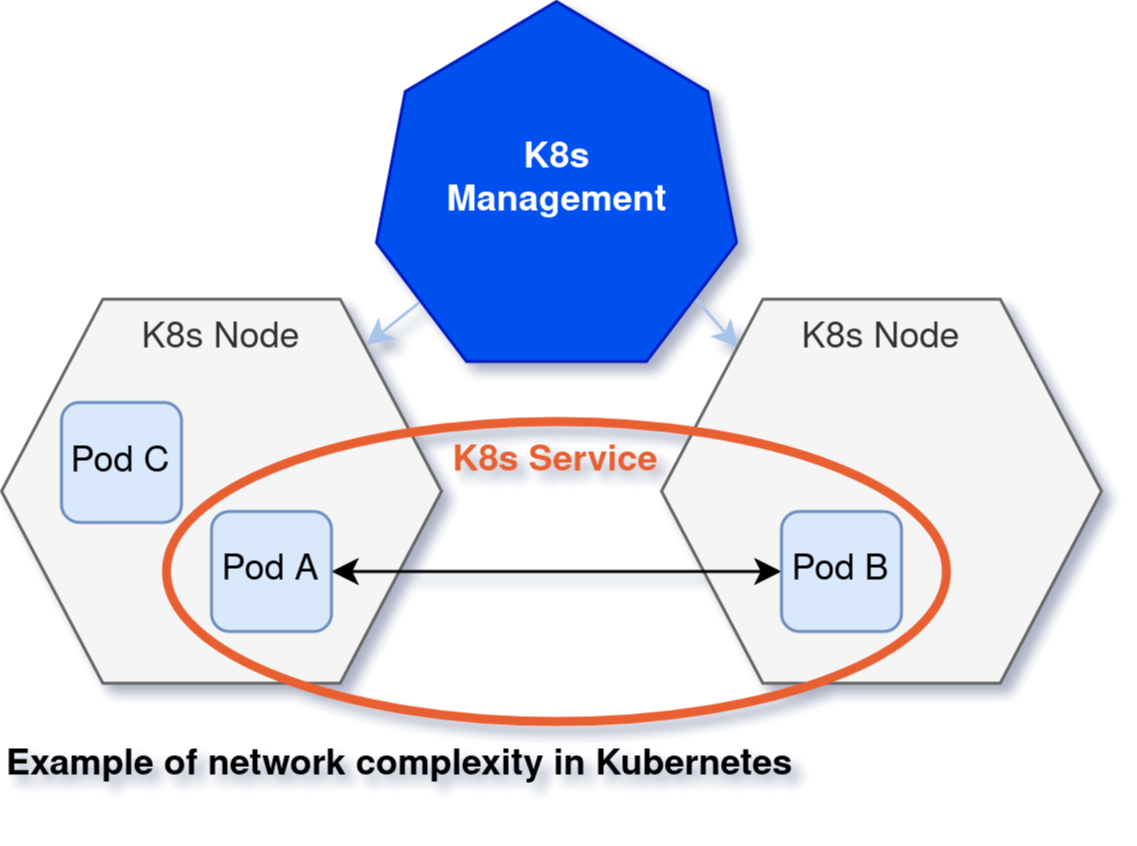
Tracking the network from the inside out can give you a lot of information on malicious activity. But you also have to consider the “east-to-west” traffic inside your infrastructure — the internal communication. In traditional Linux servers and VMs, you know exactly which microservices exist and define firewall services accordingly. However, in Kubernetes, the dynamic nature of the pods and resources makes it hard to track this traffic, so it can be difficult to find the network holes.
File system
It may seem easy to detect new files and file changes in order to determine unwanted changes, but tracking and analyzing your whole file system can be a large, complex task in Linux servers. They can have terabytes of storage, and reading them — especially from a magnetic hard disk — isn’t fast enough to detect malicious activity when it happens. However, the containerization concept of Kubernetes can be to our advantage here, as container images are usually small, lightweight, and repetitive. Looking inside the containers files should have highly expected results.
More to come
This is one of two articles covering the detective resources that can help us identify unwanted activity in your Kubernetes clusters. In this first part, we saw that both Kubernetes and traditional Linux servers have vulnerabilities that originate in the processes, network, or file system. However, there are differences in how to monitor malicious activity in Kubernetes versus Linux. Some vulnerabilities may seem harder to defend in Kubernetes, but most of them are actually easier.
InsightCloudSec, Rapid7’s cloud-native security platform, covers these differences and ensures your on-premises server farm is secured.
The next article will explain further about the unique aspects of Kubernetes security that do not exist in traditional Linux servers. Stay tuned!
When it comes to cloud-native applications, optimal security requires a modern, integrated, and automated approach that starts in development and extends to runtime protection. Cloud workload protection (CWP) helps make that goal possible by bringing major structural changes to software development and enhancing security across all processes.
Assessing workload risk in the cloud
Both the rise of cloud proliferation and the high speed of deployments can make distilling down the necessary cloud security controls an overwhelming challenge. Add to the mix the ever-evolving threat landscape, and the measures you take can literally make or break your cloud deployments, including the security of your workloads.
The increasing distribution and complexity of cloud-native applications across VMs, hosts, Kubernetes, and multiple vendors requires an end-to-end, consistent workload protection platform that unifies both CSPM and CWPP functionalities, thus enabling a holistic approach for protecting valuable assets in the cloud.
How Rapid7 is changing cloud workload protection
In order to get unmanaged risk under control, Rapid7 is on a mission to help drive cloud security forward, both within individual organizations and as an entire industry.
This is why Rapid7 recently introduced InsightCloudSec, an entire division dedicated solely to cloud security and all it encompasses.
In its most recent launch, InsightCloudSec brings forward a series of functionalities that bolsters our ability to help our customers protect their cloud workloads and deployments by providing a fully integrated, cloud-native security solution at scale. These improvements include:
Enhancing risk assessment of Kubernetes and containers
Enabling developers to scan code from the CLI on their machines
Expanding automation based on event-driven detections in multi-cloud environments
Providing unified visibility and robust context across multi-cloud environments
Automating workflows so organizations can gain maximum efficiency
3 keys to consolidating cloud risk assessment
In an effort to help this emerging market become more mainstream and easier to operationalize, we believe there are 3 main things that organizations need to be able to do when it comes to cloud security.
1. Shift left
Prevent problems before they happen by providing a single, consistent set of security checks throughout the CI/CD pipeline to uncover misconfigurations and policy violations without delaying deployment. Not only does this help solve issues at their root cause and prevent them from happening over and over again, but it also makes for a better working relationship between the security team and the DevOps organization that is trying to move fast and innovate. By shifting left, organizations save money, and security teams are able to give developers the information and tools they need to make the right decisions as early as possible, avoiding delays later in the deployment or operationalizing stages of the CI/CD pipeline.
2. Reduce noise
Security teams need more context and simpler insights so they can actually understand the top risks in their environment. By unifying visibility across the entire cloud footprint, normalizing the terminology across each different cloud environment, and then providing rich context about interconnected assets, security teams can vastly simplify risk assessment and decision-making across even the most complex cloud and container environments.
3. Automate workflows
Finally, the ephemeral nature and speed of change in cloud environments has outstripped the human capability to manage and remediate issues manually. This means organizations need to automate DevSecOps best practices by leveraging precise automation that speeds up remediation, reduces busywork, and allows the security team to focus on the bigger picture.
By bringing together enhanced risk assessment of Kubernetes and containers, shifting further left with a CLI integration, and expanding event-based detections into the cloud-native security platform, Rapid7 is making it easier for teams to consolidate visibility and maintain consistent controls across even the most complex cloud environments.
Stay ahead of security in the modern threat landscape by ensuring cloud security as an ongoing process, and reduce your attack surface by building the necessary security measures early in an application’s life cycle.
In 2020, we decided to reinvent how we handle cloud security findings by redefining how we write and respond to cloud detections. We knew that given our scale, we needed to rely heavily on automations and that we needed to build our solutions using battle tested scalable infrastructure.
Introducing Snare
Snare Logo
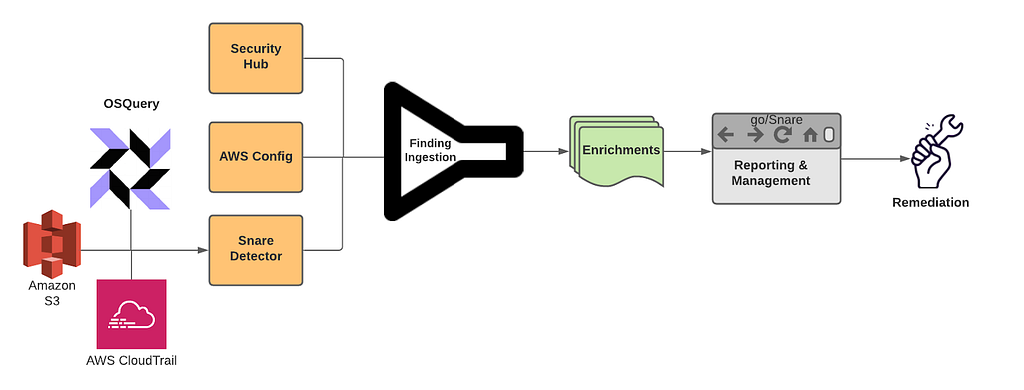
Snare is our Detection, Enrichment, and Response platform for handling cloud security related findings at Netflix. Snare is responsible for receiving millions of records a minute, analyzing, alerting, and responding to them. Snare also provides a space for our security engineers to track what’s going on, drill down into various findings, follow their investigation flow, and ensure that findings are reaching their proper resolution. Snare can be broken down into the following parts: Detection, Enrichment, Reporting & Management, and Remediation.
Snare Finding Lifecycle
Overview
Snare was built from the ground up to be scalable to manage Netflix’s massive scale. We currently process tens of millions of log records every minute and analyze these events to perform in-house custom detections. We collect findings from a number of sources, which includes AWS Security Hub, AWS Config Rules, and our own in-house custom detections. Once ingested, findings are then enriched and processed with additional metadata collected from Netflix’s internal data sources. Finally, findings are checked against suppression rules and routed to our control plane for triaging and remediation.
Where We Are Today
We’ve developed, deployed, and operated Snare for almost a year, and since then, we’ve seen tremendous improvements while handling our cloud security findings. A number of findings are auto remediated, others utilize slack alerts to loop in the oncall to triage via the Snare UI. One major improvement was a direct time savings for our detection squad. Utilizing Snare, we were able to perform more granular tuning and aggregation of findings leading to an average of 73.5% reduction in our false positive finding volume across our ingestion streams. With this additional time, we were able to focus on new detections and new features for Snare.
Speaking of new detections, we’ve more than doubled the number of our in-house detections, and onboarded several detection solutions from security vendors. The Snare framework enables us to write detections quickly and efficiently with all of the plumbing and configurations abstracted away from us. Detection authors only need to be concerned with their actual detection logic, and everything else is handled for them.
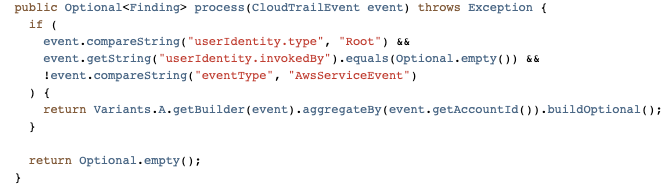
Simple Snare Root User Detection
As for security vendors, we’ve most notably worked with AWS to ensure that services like GuardDuty and Security Hub are first class citizens when it comes to detection sources. Integration with Security Hub was a critical design decision from the start due to the high amount of leverage we get from receiving all of the AWS Security findings in a normalized format and in a centralized location. Security Hub has played an integral role in our platform, and made evaluations of AWS security services and new features easy to try out and adopt. Our plumbing between Security Hub and Snare is managed through AWS Organizations as well as EventBridge rules deployed in every region and account to aid in aggregating all findings into our centralized Snare platform.
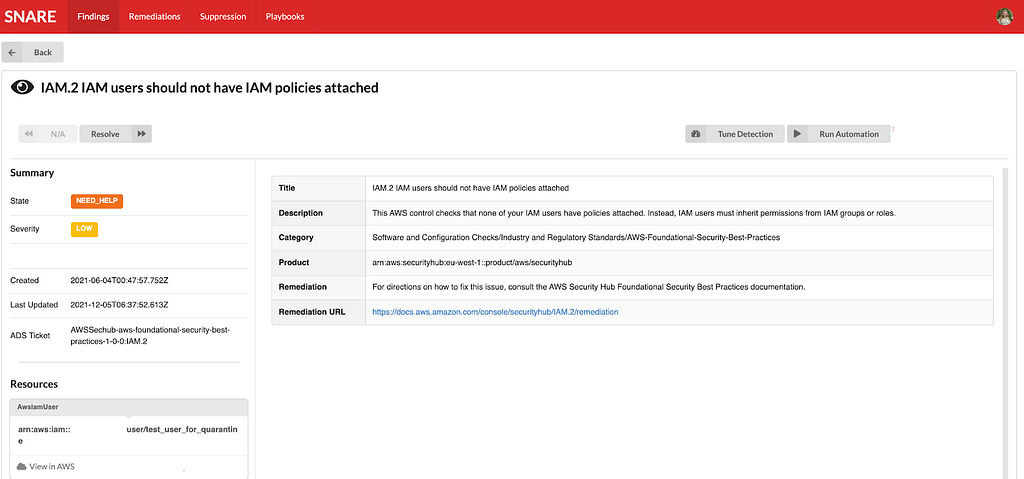
High Level Security Service PlumbingExample AWS Security Finding from our testing/sandbox account In Snare UI
One area that we are investing heavily is our automated remediation potential. We’ve explored a few different options ranging from fully automated remediations, manually triggered remediations, as well as automated playbooks for additional data gathering during incident triage. We decided to employ AWS Step Functions to be our execution environment due to the unique DAGs we could build and the simplistic “wait”/”task token” functionality, which allows us to involve humans when necessary for approval/input.
Building on top of step functions, we created a 4 step remediation process: pre-processing, decision, remediation, and post-processing. Pre/post processing can be used for managing out-of-band resource checks, or any work that needs to be done in order to ensure a successful remediation. The decision step is used to perform a final pre-flight check before remediation. This can involve a human reachout, verifying the resource is still around, etc. The remediation step is where we perform our actual remediation. We’ve been able to use this to a great deal of success with infrastructure-wide misconfigured resources being automatically fixed near real time, and enabling the creation of new fully automated incident response playbooks. We’re still exploring new ways we might be able to use this, and are excited for how we might evolve our approach in the near future.
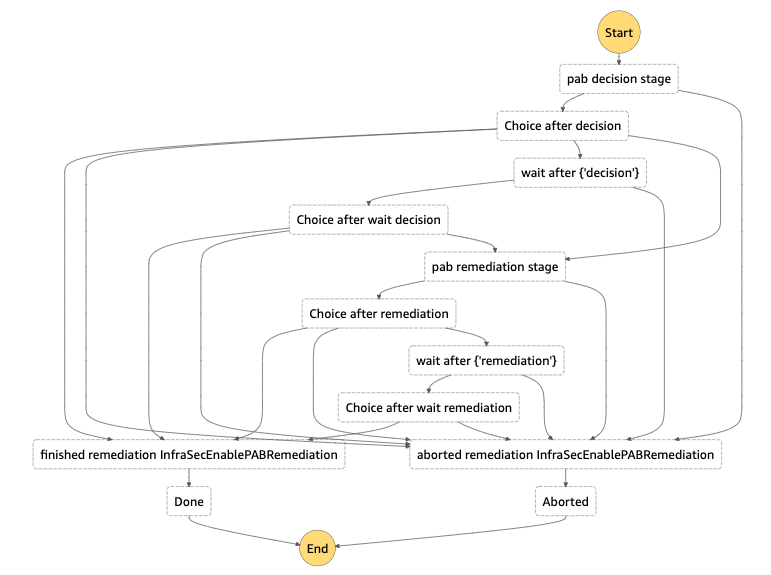
Step Function DAG for S3 Public Access Block Remediation
Diagram from a remediation to enable S3’s public access block on a non-compliant bucket. Each choice stage allows for dynamic routing to a variety of different stages based on the output of the previous function. Wait stages are used when human intervention/approval is needed.
Extensible Learnings
We’ve come a long way in our journey, and we’ve had numerous learning opportunities that we wanted to collect and share. Hopefully, we’ve made the mistakes and learned from those experiences.
Information is Key
Home grown context and metadata streams are invaluable for a detection and response program. By uniting detections and context, you’re able to unlock a new world of possibilities for reducing false positives, creating new detections that rely on business specific context, and help better tailor your severities and automated remediation decisions based on your desired risk appetite. A common theme we’ve often encountered is the need to bring additional context throughout various stages of our pipeline, so make sure to plan for that from the get-go.
Step Functions for Remediations
Step functions provide a highly extensible and unique platform to create remediations. Utilizing the AWS CDK, we were able to build a platform to enable us to easily roll out new remediations. While creating our remediation platform, we explored SSM Automation Runbooks. While SSM Automation Runbooks have great potential for remediating simple issues, we found they weren’t flexible enough to cover a wide spread of our needs, nor did they offer some of the more advanced features we were looking for such as reaching out to humans. Step functions gave us the right amount of flexibility, control, and ease of use in order to be a great asset for the Snare platform.
Closing Thoughts
We’ve come a long way in a year, and we still have a number of interesting things on the horizon. We’re looking at continuing to create new, more advanced features and detections for Snare to reduce cloud security risks in order to keep up with all of the exciting things happening here at Netflix. Make sure to check out some of our other recent blog posts!
Special Thanks
Special thanks to everyone who helped to contribute and provide feedback during the design and implementation of Snare. Notably Shannon Morrison, Sapna Solanki, Jason Schroth from our partner team Detection Engineering, as well as some of the folks from AWS — Prateek Sharma & Ely Kahn. Additional thanks to the rest of our Cloud Infrastructure Security team (Hee Won Kim, Joseph Kjar, Steven Reiling, Patrick Sanders, Srinath Kuruvadi) for their support and help with Snare features, processes, and design decisions!
Snaring the Bad Folks was originally published in Netflix TechBlog on Medium, where people are continuing the conversation by highlighting and responding to this story.
Cloud and container technologies are being increasingly embraced by organizations around the globe because of the efficiency, superior visibility, and control they provide to DevOps and IT teams.
While DevOps teams see the benefits of cloud and container solutions, these tools create a learning curve for their security colleagues. Because of this, security teams often want to slow down adoption while they figure out a strategy for maintaining security and compliance in these new fast-moving environments.
Container and Kubernetes (K8s) environments are already fairly complex as it is, and layering multiple additional security tools into the mix makes it even more challenging from a management perspective. Organizations need to find a way to enable their DevOps teams to move quickly and take advantage of the benefits of containers and K8s, while staying within the parameters the security team needs to maintain compliance with organizational policy.
This challenge goes beyond technology. These teams need to find a solution that allows them to work together well, doesn’t over-complicate their working relationship, and lets both sides get what they want with minimal overhead.
A holistic approach to Kubernetes security
As an open-source container orchestration system for automating deployment, scaling, and management of containerized applications, Kubernetes is extremely powerful. However, organizations must carefully balance their eagerness to embrace the dynamic, self-service nature of Kubernetes with the real-life need to manage and mitigate security and compliance risk.
Rapid7’s recent introduction of InsightCloudSec intelligently unifies both CSPM and CWPP functionalities, thus enabling a holistic approach for protecting valuable assets in the cloud — one that includes Kubernetes and workload security.
In retrospect, 2020 was a tipping point for the Kubernetes community, with a massive increase in adoption across the globe. Many companies, seeking an efficient, cost-effective way to make this huge shift to the cloud, turned to Kubernetes. But this in turn created a growing need to remove Kubernetes security blind spots. For this reason, we’ve introduced Kubernetes Guardrails.
With Kubernetes Security Guardrails, organizations are equipped with a multi-cluster vulnerability scanner that covers rich Kubernetes security best practices and compliance policies, such as CIS Benchmarks. As part of Rapid7’s InsightCloudSec solution, this new capability introduces a platform-based and easy-to-maintain solution for Kubernetes security that is deployed in minutes and is fully streamlined in the Kubernetes pipeline.
Securing Kubernetes with InsightCloudSec
Kubernetes Security Guardrails is the most comprehensive solution for all relevant Kubernetes security requirements, designed from a DevOps perspective with in-depth visibility for security teams.
InsightCloudSec is designed to be an agentless state machine, seamlessly applied to any computing environment — public cloud or private software-defined infrastructure.
InsightCloudSec continually interacts with the APIs to gather information about the state of the hosts and the Kubernetes clusters of interest. These hosts can be GCP, AWS, Azure, or a private data center that can expose infrastructure information via an API.
Integrated within minutes, the Kubernetes Guardrails functionality simplifies the security assessment for the entire Kubernetes environment and the CI/CD pipeline, while also creating baseline profiles for each cluster, and highlighting and scoring security risks, misconfigurations, and hygiene drifts.
Both DevOps and Security teams enjoy the continuous and dynamic analysis of their Kubernetes deployments, all while seamlessly complying with regulatory requirements for Kubernetes.
With Kubernetes Guardrails, Dev teams are able to create a snapshot of cluster risks, delivered with a detailed list of misconfigurations, while detecting real-time hygiene and conformance drifts for deployments running on any cloud environment. Some of the most common use cases include:
Kubernetes vulnerability scanning
Hunting misplaced secrets and excessive secret access
Workload hardening (from pod security to network policies)
Istio security and configuration best practices
Ingress controllers security
Kubernetes API server access privileges
Kubernetes operators best practices
RBAC controls and misconfigurations
Ready to drive cloud security forward?
Rapid7 is proud to introduce a Kubernetes security solution that encapsulates all-in-one capabilities and unmatched coverage for all things Kubernetes.
With a security-first approach and strict compliance adherence, Kubernetes Guardrails enable a better understanding and control over distributed projects, and help organizations maintain smooth business operations.
In case you didn’t hear, Amazon hosted AWS re:Invent in Las Vegas last week. As has come to be expected at the annual mega-event, Amazon made a number of huge announcements and launched a significant number of improvements and brand-new services and settings to enhance their public cloud platform, including an improved version of Amazon Inspector, S3 Object Ownership, Recycle Bin, EBS Archive Mode, and more.
Along with these announcements comes plenty of excitement and fanfare from the developer community who gets to take advantage of the new functionality. And that excitement is warranted. But these announcements also usually come with a hint of hesitation from their colleagues in security, who are responsible for analyzing all of these new services and settings to ensure that they are used properly and don’t introduce unintended consequences to their AWS environment. Yes, security is a factor here, but those unintended consequences also include costs associated with rolling out these new services. Rightfully so: It can often take weeks or months for organizations to vet these services, define governance policies, and actually start taking advantage of them.
But in order to help extinguish some of that announcement-induced anxiety and allow our customers to start taking advantage of these services as quickly as possible, the InsightCloudSec team has worked day and night for the last week to deliver support for a dozen of the new services that AWS rolled out last week.
In all of these cases, InsightCloudSec gathers the data related to these services across all AWS accounts and regions and consolidates it, giving security teams a single place to see all of the information across the entire AWS footprint. In many cases, the support also enhances the services provided by Amazon by providing additional context about the service or the resources associated with it.
Rather than choosing between slowing down innovation or taking on unmitigated risk, our customers will have the ability to take full advantage of each of these services as soon as they are available.
The list of newly supported AWS services and services includes:
Let’s take a look at a few of the most critical services and what they mean for DevOps and Security teams.
The new AWS Inspector
Amazon Inspector is a vulnerability management service that continually scans AWS workloads for software vulnerabilities and unintended network exposure. As an AWS-built service, Amazon Inspector is designed to exchange data and interact with other core AWS services not only to identify potential security findings, but also to automate addressing those findings.
By joining insights from both AWS Inspector and Rapid7, customers benefit from immediate value in the form of multiple enhancements across the board. These include enhanced risk assessment of containers and workloads, unified visibility and control, and robust context across AWS environments.
By consolidating AWS’s vulnerability management solutions with Rapid7’s cloud security capabilities, organizations are enabled with a highly scalable service, equipped with optimized security controls to better handle their most valuable assets.
InsightCloudSec seamlessly complements the new and improved AWS Inspector, allowing customers to leverage enhanced capabilities including:
Identify regions, accounts, and compute instances where AWS Inspector is not enabled, along with a new bot action to turn on the capability across EC2/ECR
Identify compute resources by risk score and/or specific findings
Identify accounts and regions with the highest overall risk
Add Inspector as an agent type so customers can switch to the “Vulnerability View,” which provides a single pane of glass to view and naturally sort assets by risk/severity findings across their entire fleet of accounts
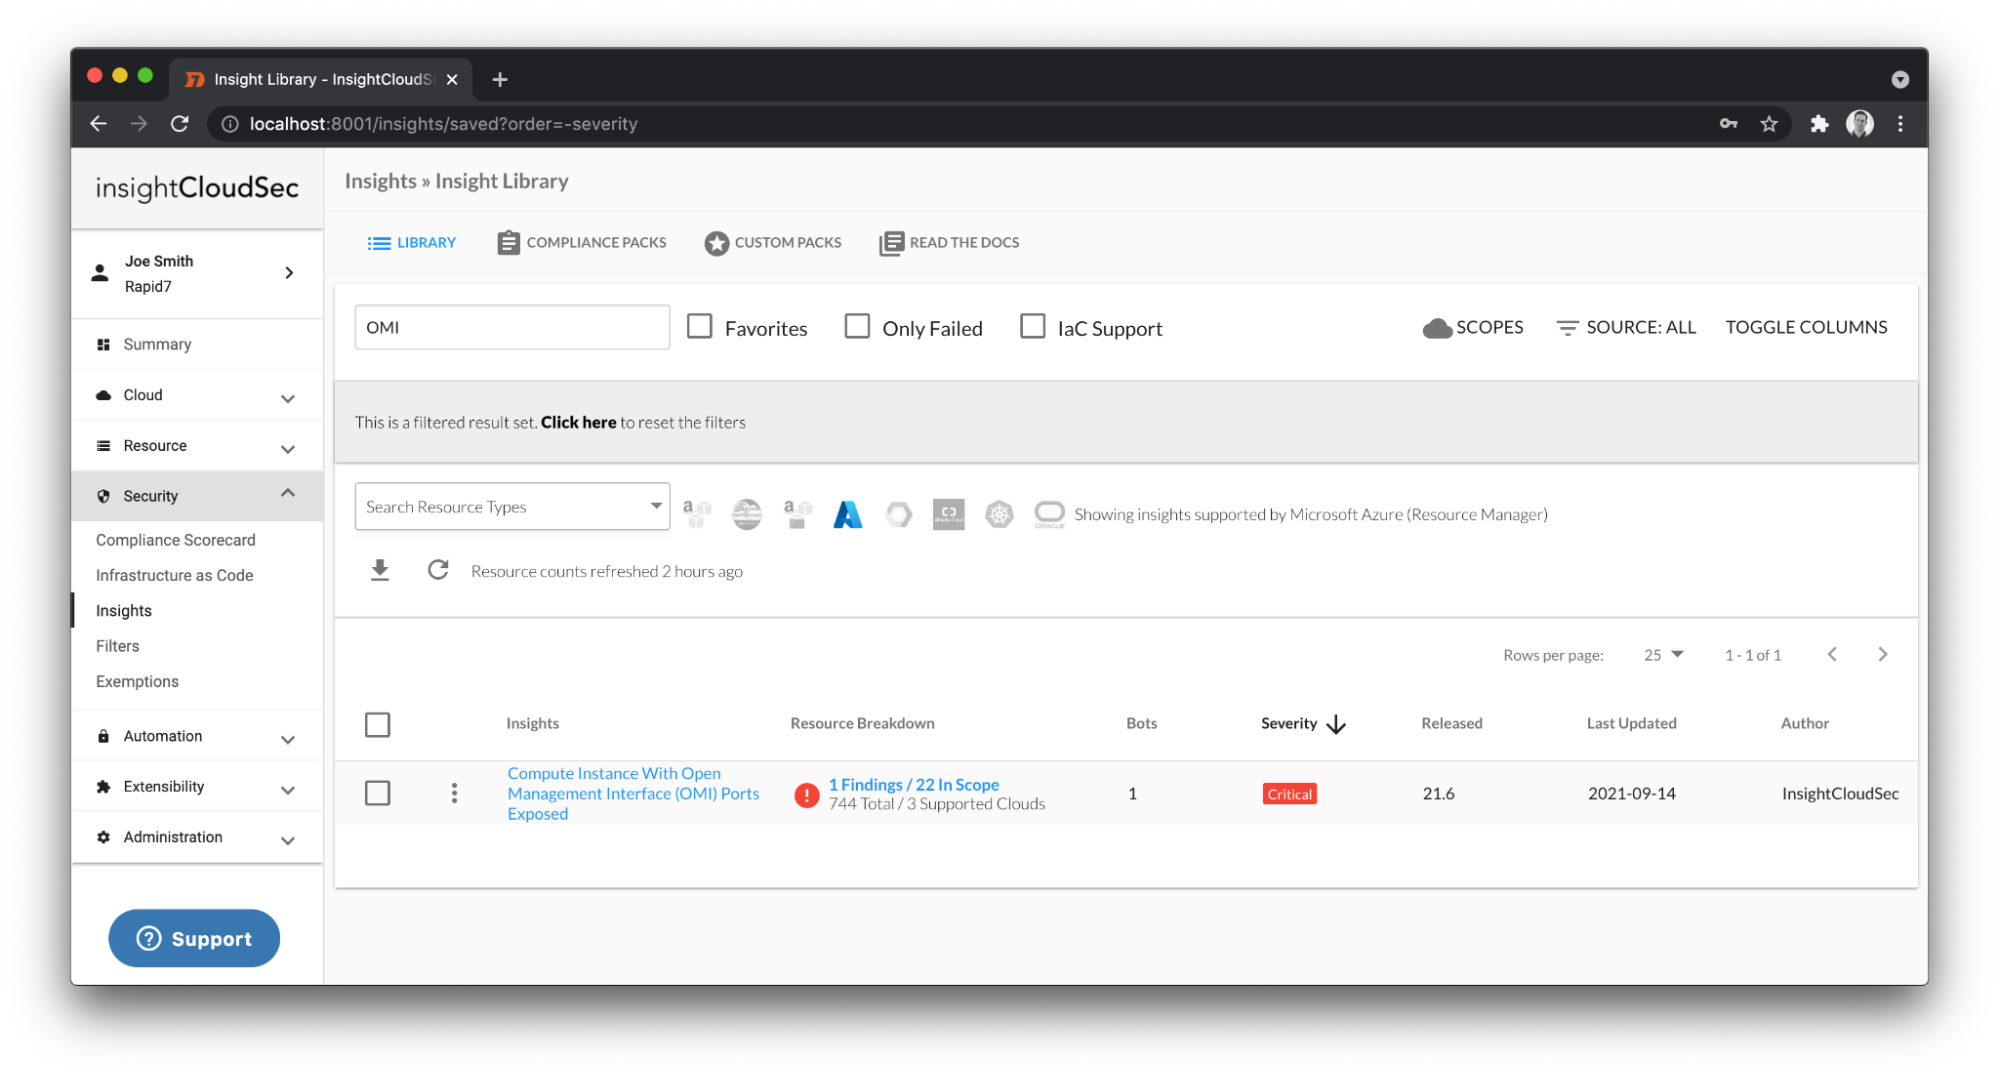
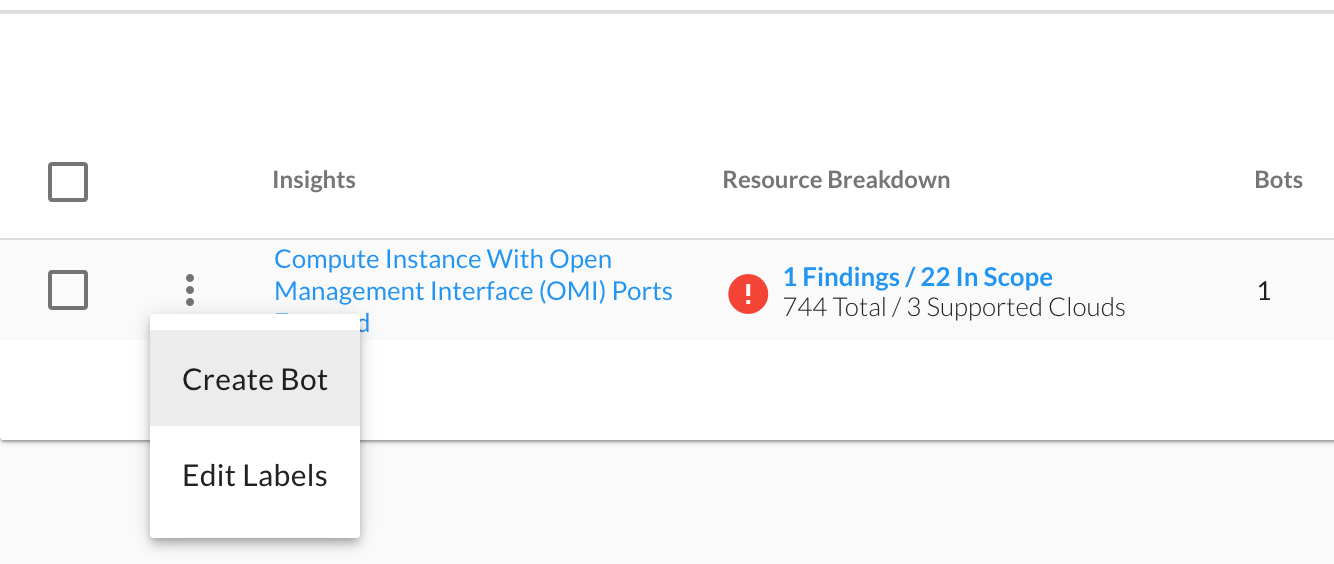
Use Inspector data to enrich existing Insights such as resources on a public subnet, resources with an IAM role attached, etc. to build new Insights (e.g., EC2 instance on a public subnet with a security group exposing SSH that has been identified as high-risk by Inspector)
VPC Network Access Analyzer
Another great new service that Amazon rolled out is the Amazon VPC Network Access Analyzer, which helps their customers identify network configurations that lead to unintended network access. The tool essentially allows you to create a scope or query — for example, you could create a scope to find all web apps that do not use a firewall to access internet resources — then analyze your AWS account against that scope. It then serves up a list of the unexpected network paths between resources defined in the scope.
InsightCloudSec supports this new network analyzer by consuming all findings from the analyses our customers run in their entire AWS environment. This gives cloud security teams a single place to see all results, rather than having to jump from account to account to gather all the information across the entire AWS footprint. It also enriches the data provided by that network analysis with additional context about the resources, such as whether they have misconfigurations or overly permissive IAM policies attached to them, helping the user see the bigger picture and more effectively prioritize their work. Finally, the automation capabilities in InsightCloudSec allow our users to automatically schedule these network scans on a regular basis across target accounts, eliminating all manual effort.
S3 Object Ownership
The sheer scale of S3 makes access management a blind spot for a number of organizations. For years, customers who use S3 have had the ability to set object-level permissions, effectively superseding the access permissions established at the bucket level. While enhancements have been introduced over the years such as Block Public Access, which can help mitigate the chance of objects being made public via direct Access Control Lists (ACLs), not all customers leverage the capability. Amazon has gone a step further by introducing a capability known as S3 Object Ownership, which gives administrators the ability to completely disable object-level ACLs. This setting is now the default value on all newly created S3 buckets, and customers can now migrate their existing S3 buckets to leverage this capability.
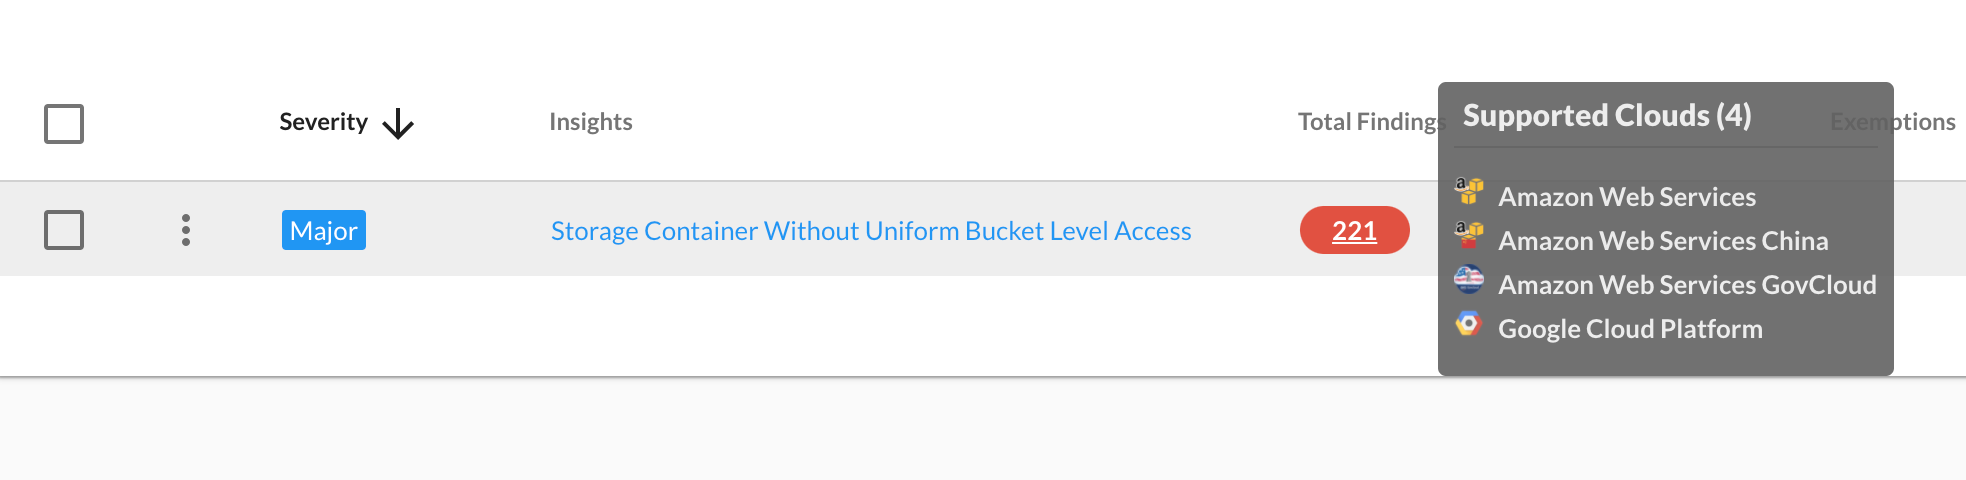
InsightCloudSec now detects the presence of this capability and renders it in the product, as well as through the API response via the `Object Ownership` property. A new filter was created to identify S3 buckets based on the value of this property, and the team has also expanded the core Insight Storage Container Without Uniform Bucket Level Access to work across AWS, AWS GovCloud, and AWS China.
Recycle Bin
Data Lifecycle Management can be challenging as customer cloud footprints grow from dozens of cloud accounts to hundreds or even thousands. At InsightCloudSec we’ve seen customers with millions of EBS Snapshots across their fleet of accounts. While many of our customers have embraced AWS Backup to help centralize their backup and retention management, there’s always concern with the accidental removal of an important snapshot while performing cleanup operations across accounts.
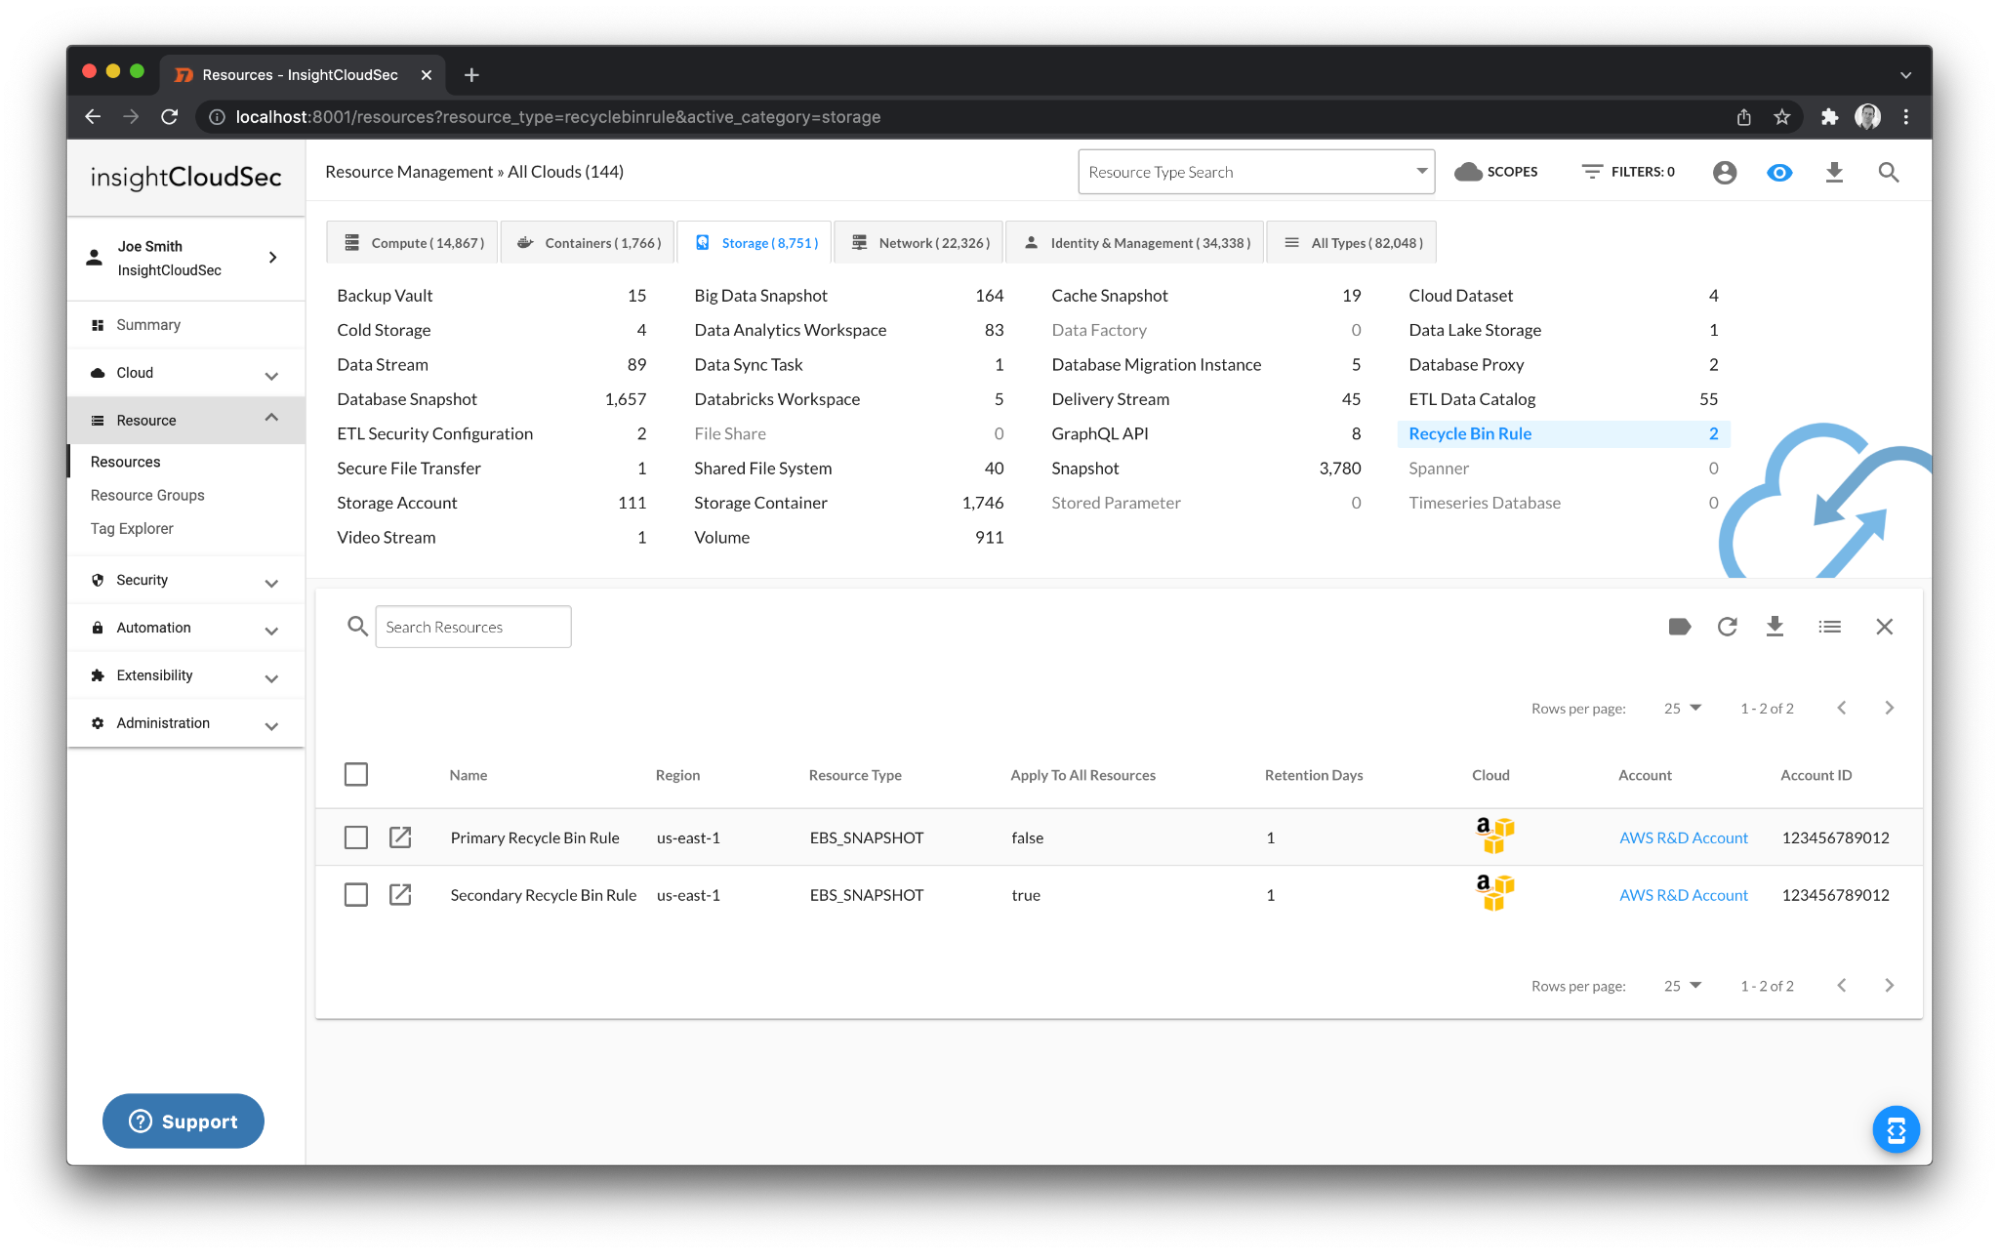
AWS offers a new Recycle Bin service that can be used to reduce the risk of accidental deletion. Think of Recycle Bin in the same way that Recycle Bin operates on your own computer. When enabled, the capability will store snapshots for a period of time defined by the customer and allow them to be recovered. Customers define the length of time they’d like these snapshots to remain in the recycle bin before being permanently deleted.
InsightCloudSec now provides visibility into these Recycle Bin Rules directly within the Resources section of the product. We’ve also included filters to identify accounts/regions where snapshots exist and recycle bin rules are not in place. These filters can help InsightCloudSec customers continue to meet their evolving governance needs.
EBS Snapshot Archive
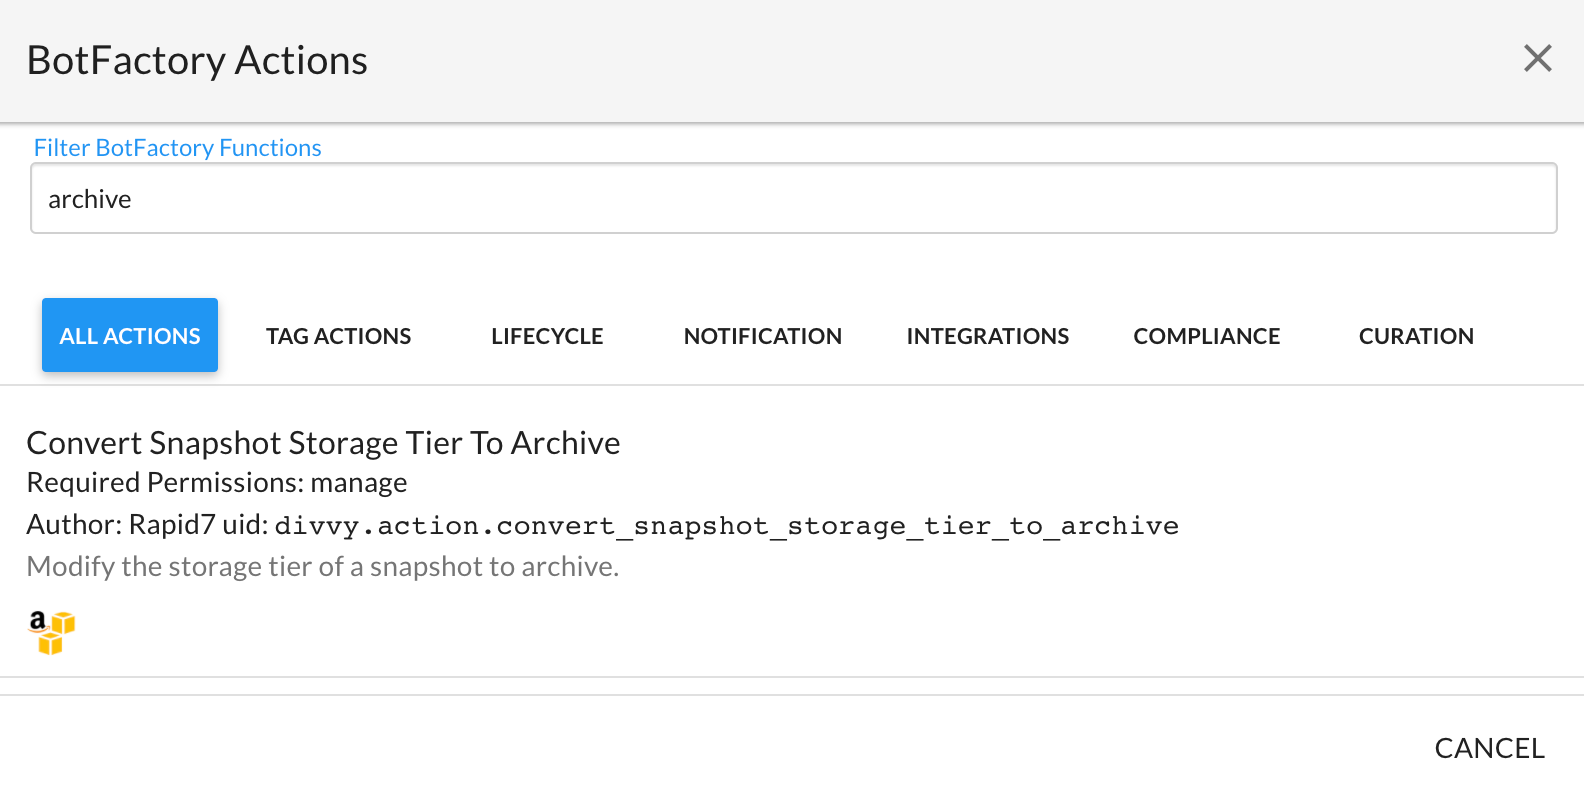
Going beyond Recycle Bin, AWS now offers a new archive mode storage class that, when enabled, can help customers reduce their storage costs. EBS Snapshot Archive is a new storage tier that is up to 75% cheaper than the standard storage tier. Converting to this tier is quite straightforward and can be done via the AWS Console or programmatic API.
To help our customers further reduce spend with this service, we’ve introduced visibility into this storage tier, along with a new filter and Bot action to help customers begin migrating to this new tier where applicable.
More to come
This is one of our team’s favorite weeks each year. It’s always great to see the new capabilities that the teams at Amazon have been hard at work on and how they take in customer feedback to mature their offering. The InsightCloudSec team will be introducing support for a number of these enhancements with our release this week (21.7.3) and will be working closely with our customers to add additional features and capabilities.
NEVER MISS A BLOG
Get the latest stories, expertise, and news about security today.
Are you thinking about cloud security when making your 2022 budget? You should be. Cloud is the key to innovation and business transformation. It can make life so much easier. The cloud enables companies to expand their products or services, rapidly develop new products, and reach new customers. In fact, 70% of companies that have moved to the cloud plan on increasing their budgets in the future.
But the cloud can also bring unwanted problems. Hackers have figured out new creative ways to get to your data, human error causes misconfigurations, and security is often implemented too far down the workflow.
Cloud security is growing
In the recent years, there has been a growing reliance on cloud-based services as more companies have adopted the cloud. According to Rapid7 survey data, 4 out of 5 organizations say cloud adoption was necessary to keep their business competitive. The global cloud security market is estimated to reach $34.8 billion at the end of 2021 and expected to grow 14.2% over the next 5 years.
So, why are companies adopting the cloud?
It saves you money. According to TechnologyAdvice, companies can save an average of 15% on technology costs by moving to the cloud.
You can work on the go. This is a big one, especially during the pandemic. Employees switched to remote work and the cloud enabled a smooth transition.
The cloud adapts to what you want. Want more storage? The cloud can do it. Want to switch to a private network? The cloud can do it.
You don’t want to be featured in the news
Our Rapid7 researchers found 121 publicly reported cloud misconfigurations that resulted in data being exposed. Looking at 2021, we are seeing the same patterns of misconfigured buckets that are exposed online. The median number of files being exposed in a breach was 10 million last year. Those files range from small things like names or ages to more serious data like social security numbers and addresses.
2021 has already seen a couple of mega breaches, one exposing over 12 billion records and another two that exposed over a billion. Polecat, a UK reputation firm, exposed over 12 billion records in March after leaving an Elasticsearch server open with no protection. Cybercrimes and attacks have become more sophisticated and security has been slow to adapt. There is a simple solution to keep this from happening to your company: investing in cloud security. Most misconfigurations are the result of human error, and having cloud security tools in place will help mitigate the risk.
What can cloud security look like for you?
So how can you keep your data safe in the cloud? In 2022 and beyond, effective cloud security relies on three core concepts.
Shift left: Prevent problems before they even happen by implementing security earlier in your workflows. Having a consistent set of security checkpoints early in your pipeline will stop misconfigurations and policy violations before they deploy.
Reduce noise: It’s easy for security professionals to get lost in the noise from constant notifications about tickets being opened and closed or constant alerts that don’t need their attention. Reducing noise means having full visibility into cloud environments.
Automation and remediation: Automation is the key to achieving cloud security at the speed of scale. Having automated security resources prevents human error and catches misconfigurations before they are even noticed. InsightCloudSec provides automation tools such as bots that are customizable to fit your needs.
Cloud is the future of technology, and no one wants to be left behind. Invest in cloud security now to ensure that you aren’t featured in our next misconfigurations report. You don’t have to choose between innovation and security anymore.
Ready or not, the cloud is here. Across the board, an overwhelming majority of organizations recognize the value of the cloud. According to a recent survey conducted by Rapid7, 90% of respondents believe that cloud operations are critical to the competitiveness of their business. Analysts agree — Gartner recently forecasted that by 2026, cloud end-user spending will make up to 45% of overall IT spend.
We’ve established that the industry accepts the shift toward the cloud, so today we’re taking that a step further, specifically looking at attitudes toward automation in cloud security. To set the scene, 86% of respondents to our recent survey say they trust automation in their cloud security at least as much as manual effort by humans. Yet less than half (47%) have actually implemented automation in their cloud security program.
So what gives? Why does this gap exist between trust and actual adoption?
Attitudes toward automation
There’s a variety of factors that impact trust in automation, such as vendor relationships and breach history. For example, when surveying organizations about their trust in automation versus skilled professionals, 18% of those that reported a breach said they don’t trust automation. If you compare this to organizations that did not report a breach, only 14% stated they don’t trust automation. This slight uptick shows that organizations who already suffered a security incident are slightly more gun-shy of implementing automated security solutions as compared to those who didn’t.
Luckily for organizations hesitant to trust automation in the cloud, it is not an all-or-nothing exercise. There are different actions and levels of automation that can be experimented with until greater trust is achieved. For example, organizations can start with a cloud security solution automatically performing only one of monitoring, reporting, or remediation.
However, if you’re looking to benchmark against what other leading companies are doing, 56% of respondents trust automation in their cloud security program to do all three of the above — monitoring, reporting, and remediation.
Looking ahead
This growing level of trust in cloud security automation is reflected in many companies’ future plans as well. Another 25% of organizations are planning on implementing automation into their cloud security program over the next 12 months. Implementation may be lagging behind, but it’s still a goal many organizations are striving for. It’s clear that while trust must continue to be earned, the time is now for automation adoption in order to drive cloud security forward.
If you’re interested in exploring the topic of belief, trust, and reliance on automation, we recommend checking out our new report, Trust in the Cloud. This report covers many data points and survey responses, diving into the gap between automation attitudes and implementation.
In our previous blog on this topic, we discussed some of the considerations when choosing between agent-based and agentless cloud security approaches. The following table provides a summary of these considerations.
Aspect
Agent-based
Agentless
Deployment
– Deployed on every asset independently
– Can add potential friction; may require some special access permissions per asset
– Deployment has to scale up with additional assets
– Can be resource-intensive for the monitored asset
– Deployed externally to assets being monitored, usually at the cluster level
– Relies on the provider’s inherent access role schemes and APIs
– Processing and data collection are independent of assets
– Can be resource-consuming at the provider’s billing level
Monitoring
– Tailored for asset specifications (must be aware of and compatible with OS, kernel, and architecture of the layer in which it operates)
– Can be used over a variety of different cloud providers
– Has access to unexposed asset information, but requires elevated permissions, which may turn into a security consideration of its own
– Has a specific view per monitored asset; higher-level correlation has to be done externally
– Missing or malfunctioning deployment may result in blind spots
– May require different inspection methods for different types of assets
– Agnostic to asset specifications
– Relies on cloud provider’s API and its data collection facilities
– No access to unexposed provider information
– Has a cluster-level view of asset activities, usually from a single collection point; easy to make correlations between different cluster asset activities
– Malfunctioning deployment may result in cluster-level blindness
– Unified access to all asset information via a common API and data collection facility
Enforcement
– Needs an in-band access to medium for taking an action
– May interfere with uncorrelated provider operations
– Integrates to and correlates with provider’s automations and enforcement tools
– Cannot go beyond provider’s limitations
Hybrid approach
Neither the agent-based nor agentless approach is strictly considered better than the other. In some cases, it could be beneficial to join forces and have both flavors of security scooped into the same cone, so each can cover for the shortcomings of its counterpart. For example, agentless solutions are usually shortsighted when it comes to a workload’s confined information, such as the activity of processes executed within the workload space. Therefore, you might choose to augment your agentless solution with an agent-based deployment for this purpose.
As a counter-example, agent-based solutions could be disruptive or resource-consuming for network monitoring tasks. You could instead carry out these tasks over the already existing provider facilities by adding an agentless solution, which could then catch all cluster network activity information within a single collection point.
So, what’s the right answer?
In this post, we have covered some of the key aspects that differentiate agentless and agent-based approaches to cloud security. We can conclude that neither is necessarily preferable over the other, but each can cover the shortcomings of its counterpart, depending on your organization’s needs. Agent-based solutions can potentially provide a more in-depth perspective of a protected asset’s internal activities. Provider-integrated agentless solutions are usually agnostic to the containerized internal activities, but they can excel at a broader scale when making correlations between different sources of information, while still minimizing the friction per asset.
Essentially, there’s no right or wrong answer for cloud security. To keep your assets secure, just pick the approach — or mix of approaches — that makes sense for you and your organization.
NEVER MISS A BLOG
Get the latest stories, expertise, and news about security today.
As public cloud adoption continues to grow year after year, we see more and more enterprises realizing the strategic advantage the cloud can provide to help deliver new and innovative products quicker, roll out new features with ease, and reach new customers. But along with those advantages comes a new level of complexity and risk that organizations need to account for.
Rapid7’s recently released 2021 Cloud Misconfigurations Report revealed that there were 121 publicly reported data exposure events last year that were the result of cloud misconfigurations.
One critical part of preventing these misconfigurations is the strategic, gradual adoption of automated notification and remediation workflows.
The benefits of automation in cloud security
Automation in the cloud is the implementation of tools that take away the responsibility of security from the user and make it automated. These tools can catch and fix misconfigurations before you even realize they were ever there.
Some of the benefits these tools can bring include:
Data breach protection: Despite increased regulations, data breaches continue to grow. Most of these breaches happen when organizations make inadequate or inappropriate investments in cloud security. Now more than ever, companies are under increasing pressure to make appropriate investments to protect customer data as they scale and expand their cloud footprint.
Threat protection: When using cloud services, it’s common to be overwhelmed with the large volume of threat signals you receive from a wide variety of sources. Without being able to decipher the signals from noise, it’s difficult to identify true risk and act on it in a timely fashion.
To deliver threat protection, InsightCloudSec integrates with native cloud service providers’ security platforms (e.g., Amazon GuardDuty) and other partners (e.g., Tenable) for best-in-class, intelligent threat detection that continuously monitors for malicious activity and unauthorized behavior. These services use machine learning, anomaly detection, and integrated threat intelligence to identify and prioritize potential threats. You’ll be able to detect cryptocurrency mining, credential compromise behavior, communication with known command-and-control servers, and API calls from known malicious IP addresses.
While automating every workflow possible isn’t the answer, one thing is clear: Enterprise-scale cloud environments have outstripped the human capacity to manage them manually.
Not only is automation essential for bringing security — it’s a way to cut down the time it would take to fix resources, as compared to a manual approach. Automation greatly reduces the risk of human error in the cloud and allows workflows to include automated security across the board.
How InsightCloudSec provides it
InsightCloudSec comes with an automated program that we call our bots, which allow you to execute actions on resources based on your conditions. Your bot consists of three things: scope, filters, and actions. A single bot can be configured to apply a unified approach to remediation across all clouds, creating a consistent, scalable, and sustainable approach to cloud security.
Scope: The scope chosen by the user determines which resources and places the bot will evaluate. You choose the bounds that the bot is constricted to. An example of a scope would be all of your AWS, GCP, and Azure accounts, looking for the Storage Container resource (e.g., S3 bucket, Blob storage, and Google Cloud storage).
Filters: InsightCloudSec comes with over 800 filters you can choose from. These filters are the condition on which the bot will act. An example of a filter would be Storage Container Public Access, which will evaluate if any of the resources within your scope have public access due to their permission(s) and/or bucket policy.
Actions: Finally, this is what the bot actually does. InsightCloudSec ships with over 100 different actions that you can customize. For example, if you set up a bot could to identify storage containers that are public, the action would be the bot notifying the team and cleaning up the exposed permissions.
Bots offer a unified approach to remediation across all your cloud environments. With InsightCloudSec, you can customize them just how you want it based on the full context of a misconfiguration. Automation with InsightCloudSec is the key to achieving security at the speed of scale.
What common cloud security mistakes are organizations making?
When it comes to securing your cloud assets’ activities at runtime, the first step is deciding how. There are enough possible solutions that you’re likely to find yourself at a crossroads trying to decide between them. The factors that may affect your choice include:
Friction level — How time-consuming or disruptive is it to instrument the solution within the existing environment? What happens to normal operations when the solution malfunctions or becomes misconfigured?
Costs — How much am I going to pay for an effective solution?
Scalability — Would I have to bother with instrumenting this solution over and over again as more assets are being added to my environment (which might have just happened without any intervention)?
Blind spots — What coverage does a single instrumentation provide? Does it cover all an asset’s activities and communications? How is overall visibility impaired when it stops working?
Depth of view — How deep does the inspection go per asset? Is it capable of retrieving all viable information required for detection of vulnerabilities and ongoing malicious activities? Is it sufficient for a reliable detection of behavioral anomalies?
Breadth of view — Do I get the big picture of what is going on? Can suspicious activity be linked to all assets involved? And again, can the solution reliably detect behavioral anomalies?
Forensics — Am I able to keep the data for post-mortem analysis on the crime afterward? Does the solution allow me to make smart conclusions about the next steps for mitigation?
In addition to such questions, there are also practical aspects of your existing cloud platform settings that may affect your selection. For example, working on a serverless setup, in which the hosting instances are completely segregated from your reach, will rule out solutions involving security agents designed to run at underlying host-level scopes.
Agent-based solutions
A solution involving an applied process or a module that resides within the asset’s scope. These kinds of solutions are aware of the hosting platform and are tailored to probe its application, as well as valuable runtime information regarding process activities, incoming or outgoing network traffic of the monitored asset, and possibly other local resources that may play a part in denial-of-service attacks, such as CPU and memory consumption. Along with information access, an agent and its host also share resources. The agent is usually also deployed with privileged access rights (a “let’s run as root” kind of routine) so it can operate at the operating system level and even in the kernel space of its host.
So how does an agent-based solution stack up against the deciding factors we listed earlier?
Friction — Due to the nature of their deployment, agent-based solutions can cause a considerable amount of friction. In the absence of an inherent central management, these solutions are required to expose some APIs, which may be non-trivial to operate in order to control and configure their activation.
Cost — Agent-based deployments are not part of the provider service stack and, as such, are mostly subject to solution vendor licensing fees. These fees can be unrelated to the actual data billing and thus may save on costs in practice.
Scalability — Agent-based solutions are usually bound per specific asset, so they’re required to scale up and down as assets are added or removed. This may incur more resource consumption from the shared resources pool of the assets and agents.
Blind spots — Agents usually operate as a mesh of probes, providing the big picture by correlating their spot coverages, typically within a database and a management application. When a probe goes down, its spot coverage vanishes as well, and the runtime information will be missing for the assets it covers.
Depth of view — Agent-based solutions are tailored tightly to the asset’s platform, which they monitor and secure. As such, they can fish out information an external service would never be able to find from the depths of the operating system, kernel, and other local devices.
Breadth of view — As mentioned, the benefit of providing the overall picture comes from correlating a mesh of agent information within a single point. Agents can’t do this by themselves. It requires the help of external applications and possibly a central database to maintain the findings and make useful links between them.
Forensics — Having a realistic retention policy for findings can play a role in determining how far back to investigate an incident and what conclusions can be drawn about it.
Agentless solutions
Instead of deploying an agent per asset or per subset of assets, agentless solutions are deployed at the cluster or cloud account level. As they live outside of the assets themselves, these kinds of solutions are based on the cloud provider’s native APIs and services. They’re also affected by and confined to the provider’s specified functionality. In this case, the protected assets and the agentless service share no resources, and there’s a strong reliance on the cloud provider role schemes and APIs for accessing valuable information.
Friction — Agentless solutions are provided as part of the official provider services stack. The only effort on the operator’s end is to enable and customize it, and customization can usually be simplified to the default settings for less experienced users. Other aspects of updates and fixes should be seamless as part of the overall provider’s user experience suite.
Costs — The provider’s pricing model may vary, but there’s a trend of billing per data capacity used for tracking, so agentless solutions can become quite an expense for a full-blown active network of assets.
Scalability — Agentless solutions take advantage of centralized services within the provider’s platform. As such, they can scale well, since they aren’t relying on the same resource pool as the assets themselves.
Blind spots — Provider-based solutions aim to deliver the big picture of cloud activity as a whole. In this context, a blind spot would be related to poor depth of view per asset internals, so you might consider blind spots to actually be “blind layers.”
Depth of view — As we’ve discussed, agentless solutions rely mostly on platform data handled by the provider itself, such as the cluster networking and user accounts. This being the case, these solutions are less aware of the containerized internals, such as the processes being executed within the containers.
Breadth of view: Agentless solutions have a cluster-level view of asset activities, usually from a single collection point. This makes it easy to correlate between different cluster assets’ activities.
Forensics: The forensic capabilities of an agentless solution are mostly related to how well the solution is integrated with the data retention facilities of the provider.
So if both approaches have their strengths and weaknesses, which do you choose? Stay tuned for part 2, where we’ll discuss a third option and draw conclusions.
NEVER MISS A BLOG
Get the latest stories, expertise, and news about security today.
The modern world is full of signals. A select few are critically important, others are interesting or informative, and the overwhelming majority are less useful or painfully irrelevant. All of these signals that are neither useful nor relevant are best categorized as noise.
For security professionals, it’s easy to get lost in this noise. Many of them get email, text, or Slack notifications for every helpdesk ticket that is issued, updated, and closed. The average security manager might get hourly, daily, weekly, and monthly reports from a variety of different tools that they and their teams may or may not interact with on a regular basis. And at some point, the thousands of alarms and notifications that these same tools generate on a weekly basis end up causing mind-numbing alert fatigue that bogs down security teams. Research has found that 75% of companies are actually spending more time chasing down false positives than responding to genuine security incidents, TechRepublic reports.
Are these signals important? Maybe. Are they getting to the right people at the right time? Hopefully. But hope is not enough when it comes to cloud security.
Misconfigurations add to the clamor
Our 2021 Cloud Misconfigurations Report confirms that data breaches attributed to cloud misconfigurations are still a significant concern for enterprises across all industries. It’s hard to go a few days without hearing of yet another incident in which the data is breached, leaked, or otherwise mishandled. In fact, according to our data, there are 2.3 data breaches per week… and that number doesn’t include those that aren’t reported.
There are many reasons why cloud misconfigurations remain such a significant problem. One contributing factor that continues to be front and center is the overabundance of noise that comes with the ephemeral, fast-evolving nature of cloud environments. The cadence at which security teams are bombarded with alerts and notifications is overwhelming. Yet these teams are still responsible for ensuring the security of the sensitive data in complex cloud environments.
As stewards of this data, security teams must have a comprehensive cloud security solution that allows them to continuously monitor and react to threats. Security teams are trying to understand the high-priority issues that actually matter, all while keeping up with the fast, continuous pace of innovation. To accomplish this, they must invest in a solution that gets the right signals to the right people at the right time, through the right means.
Many of the tools that enterprises use to be better, faster, and stronger are incredibly powerful, but sometimes this power can create chaos and noise. This is especially true for the many cloud security solution types available today. Almost any cloud security tool should be able to tell you if you have a storage bucket open to the public. But what if that storage bucket is meant to be open? What if it’s in a protected environment? What if your developers have created strategic exemptions to specific rules for a legitimate reason?
At best, the security team receives the alert, investigates it, and then determines that there is no issue. While this is by no means an efficient or scalable approach to handling cloud security incidents, nothing catastrophically bad has happened. There wasn’t an actual data breach, and the developers weren’t impeded by security, since their instance wasn’t shut down automatically.
But there are other, more likely scenarios to consider. For example, what if the security team’s investigation of a harmless exemption diverts their attention from a more critical alert? If the real alert is ignored amid the noise and the threat remains unresolved, the entire organization is at risk. As we know, there are huge repercussions of a data breach — from financial to legal to operational to reputational. In fact, according to the Ponemon Institute, the average cost of a data breach is now up to $4.24 million.
Cutting through to the signal
With this much at stake, security teams can’t become immune to critical alerts or blind to the information that is essential to maintaining continuous cloud security. InsightCloudSec helps reduce noise through its extensibility and the level of granularity through which you can determine the scope of alerts (and actions in response to those alerts).
Unified visibility and terminology
InsightCloudSec sets the noise-reduction table by providing a single source of visibility into cloud environments that spans across AWS, GCP, Microsoft Azure, Alibaba Cloud, Oracle Cloud Infrastructure, and Kubernetes. By offering a standardized asset inventory across cloud service providers, security teams can apply policy and leverage real-time automated remediation consistently.
Curated, context-rich information
We’ve added value to this unified visibility by giving you the ability to finely tune the scope of what information you want to capture through our filters, insights, and exemptions.
Filters
InsightCloudSec filters provide a way to explore your cloud environment and surface problems of interest. You can specify the conditions that InsightCloudSec searches to identify matching resources. Currently, InsightCloudSec offers almost 1,400 out-of-the-box filters, with almost infinite possibilities for customization.
Insights
An InsightCloudSec insight is a check on a specific behavior, condition, or characteristic of a cloud resource. Built from the abundant (and continuously growing!) library of filters, an insight allows you to view all of your clouds and provides an in-depth understanding of your infrastructure’s security, compliance, optimization, or other characteristics that you specify.
Insights can be defined around any individual resource or resource type to identify resources that may need to have limited public accessibility. Insights can focus on specific characteristics or configuration issues, identify a network missing an internet gateway, or identify a database without encryption. As with filters, insights can be customized to fit almost any need.
Exemptions
As with any rule, there are always exceptions… or in this case, exemptions. InsightCloudSec allows you to specify resources that should be exempt from an insight. Exemptions can even be tuned to a specific time period. Using this functionality allows organizations to have a highly curated, context-rich approach to the data, and to notifications about that data.
Get the alerts you want, how and when you want them
InsightCloudSec integrates with SMTP/email, Slack, Microsoft Teams, ServiceNow, PagerDuty, Jira, Jinja2, and more. These integrations empower security teams to specify how they want to receive their alerts to monitor and address problems efficiently and effectively.
For example, let’s say that you only want to receive notifications related to a specific regulation (e.g., PCI-DSS). Through our pack-level notifications, you can send notifications (via email, Slack, etc.) based on a collection of insights that together form the compliance framework. InsightCloudSec offers both out-of-the-box compliance packs and the ability to create custom packs to fit your organization’s specific needs.
The pack-level notification capability includes cadence settings, so you have the ability to send it weekly, daily, or hourly. It allows for the delivery of information around an entire category of insights, enabling organizations to cut down on the noise of individual notifications that might not provide the full context your team needs.
With the persistence of data breaches due to cloud misconfigurations, it is essential for organizations to invest in tools to help them tune into the right information about their complex cloud environments.
Interested in seeing firsthand how InsightCloudSec can reduce noise for your organization? See it in action in our demo.
Kubernetes Role-Based Access Control (RBAC) is a method of regulating access to computer or network resources based on the roles of individual users within your organization. RBAC authorization uses the rbac.authorization.k8s.io API group to drive authorization decisions, allowing you to dynamically configure policies through the Kubernetes API. This is all quite useful, but Kubernetes RBAC is often viewed as complex and not very user-friendly.
Introducing Your Swiss Army Knife for RBAC Controls
InsightCloudSec’s RBAC tool is an all-in-one open-source tool for analyzing Kubernetes RBAC policies and simplifying any complexities associated with Kubernetes RBAC.
InsightCloudSec’s RBAC tool significantly simplifies querying, analyzing, and generating RBAC policies. It is available as a standalone tool or as a kubectl Krew Plugin.
Visualize Cluster RBAC Policies and Usage
A Kubernetes RBAC command can be used to analyze cluster policies and how they are being used and generate a simple relationship graph.
By default, rbac-tool viz will connect to the local cluster (pointed by kubeconfig) and create a RBAC graph of the actively running workload on all namespaces except kube-system.
Examples
# Scan the cluster pointed by the kubeconfig context 'myctx'
rbac-tool viz --cluster-context myctx
# Scan and create a PNG image from the graph
rbac-tool viz --outformat dot --exclude-namespaces=soemns && cat rbac.dot | dot -Tpng > rbac.png && google-chrome rbac.png
Analyze Risky RBAC Permission
The command rbac-tool analysis analyzes RBAC permissions and highlights overly permissive principals, risky permissions, or any specific permissions that are not desired by cluster operators.
The command allows the use of a custom analysis rule set, as well as the ability to define custom exceptions (global and per-rule), and can integrate into deployment tools such as GitOps and automation analysis tasks in order to detect undesired permission changes, unexpected drifts, or risky roles.
Examples
# Analyze the cluster pointed by the kubeconfig context 'myctx' with the internal analysis rule set
rbac-tool analysis --cluster-context myctx
Query Who Can Perform Certain Kubernetes API Actions
The command rbac-tool who-can enables operators to simply query which subjects/principals are allowed to perform a certain action based on the presently configured RBAC policies.
Examples
# Who can read ConfigMap resources
rbac-tool who-can get configmaps
# Who can watch Deployments
rbac-tool who-can watch deployments.apps
# Who can read the Kubernetes API endpoint /apis
rbac-tool who-can get /apis
# Who can read a secret resource by the name some-secret
rbac-tool who-can get secret/some-secret
A Flat and Simple View of RBAC Permissions
The command rbac-tool policy-rules aggregates the policies and relationships from the various RBAC resources, and provides a flat view of the allowed permissions for any given User/ServiceAccount/Group.
Examples
# List policy rules for system unauthenticated group
rbac-tool policy-rules -e '^system:unauth'
Output:
Generate RBAC Policies Easily
Kubernetes RBAC lacks the notion of denying semantics, which means generating an RBAC policy that says “Allow everything except THIS” is not as straightforward as one would imagine.
Here are some examples that capture how rbac-tool generate can help:
Generate a ClusterRole policy that allows users to read everything except secrets and services
Generate a Role policy that allows create, update, get, list (read/write) everything except Secrets, Services, Ingresses, and NetworkPolicies
Generate a Role policy that allows create, update, get, list (read/write) everything except StatefulSets
Command Line Examples
Examples generated against Kubernetes cluster v1.16 deployed using KIND:
# Generate a ClusterRole policy that allows users to read everything except secrets and services
rbac-tool  gen  --deny-resources=secrets.,services. --allowed-verbs=get,list
# Generate a Role policy that allows create, update, get, list (read/write) everything except Secrets, Services, NetworkPolicies in core,Apps and networking.k8s.io API groups
rbac-tool  gen --generated-type=Role --deny-resources=secrets.,services.,networkpolicies.networking.k8s.io --allowed-verbs=* --allowed-groups=,extensions,apps,networking.k8s.i
# Generate a Role policy that allows create, update, get, list (read/write) everything except StatefulSets
rbac-tool  gen --generated-type=Role --deny-resources=apps.statefulsets --allowed-verbs=*
Example output
# Generate a Role policy that allows create, update, get, list (read/write) everything except Secrets, Services, NetworkPolicies in core,Apps & networking.k8s.io API groups
rbac-tool  gen --generated-type=Role --deny-resources=secrets.,services.,networkpolicies.networking.k8s.io --allowed-verbs=* --allowed-groups=,extensions,apps,networking.k8s.io
Output:
Another useful policy generation command is rbac-tool auditgen, which can generate RBAC policy from Kubernetes audit events.
Conclusion
InsightCloudSec’s RBAC tool fills various gaps that exist in the Kubernetes native tools, and addresses common RBAC-related use cases. This RBAC tool is an all-in-one solution that helps practitioners to perform RBAC analysis, querying, and policy curation.
You’ve got your full Swiss army knife now—what are you waiting for?
Check out this link for more information and a step-by-side installation guide.
It’s the cloud’s world now, and we’re all just living in it. The mass migration of organizational infrastructure to the cloud isn’t slowing down any time soon — and really, why would it? Cloud computing has allowed developers to move at vastly greater speeds than ever before. And this in turn lets businesses move at greater speeds than ever before. What could go wrong?
If you’re reading this blog, you probably already know the answer: data security and regulatory compliance. With so much development, testing, and deployment happening all the time, it’s far too easy for infrastructure misconfigurations, compliance violations, or other risks to slip through the cracks.
Right now, these risks are most often found and addressed at runtime, after the proverbial barn door has already been left open and the horses are long gone. It’s obviously not ideal to have developers racing around trying to fix security issues that have already gone live and put the organization at risk. It’s also not all that optimal for those developers to constantly have to drop their current projects to put out security fires.
So our beleaguered security teams are stuck acting as the organizational killjoys constantly pumping the brakes on development, while developers are left unable to take full advantage of the speed cloud offers them. The bottom line: No one’s happy.
The power of infrastructure as code
This, of course, is where our favorite catchy slogan “shift left” comes into play. What organizations need to address all these issues is to shift security left, earlier in the development cycle. This shift allows teams to catch misconfigurations before they go live and expose an organization to risk. In this way, shifting left also keeps security from becoming a bottleneck for development. And it keeps both DevOps and SecOps happy — with their processes and with each other.
So how do you make this rosy picture a reality for yourself and your organization? The key is infrastructure as code (IaC). Traditionally, you would need to create security infrastructure by hand. But the IaC approach replaces manual creation with declarative statements that define the infrastructure needed to run code. Essentially, IaC turns the creation of security infrastructure into a shared, programmatic task within and between teams that can easily be replicated as often as needed.
By evaluating these IaC templates before runtime, developers are empowered to build more secure applications. The IaC templates provide the structure and feedback developers need to understand and resolve risks, and integrate security and compliance into all parts of the CI/CD process. With this, DevOps can become the primary safeguard against misconfigurations and risk without overly disturbing their established workflows.
All in all, IaC helps increase the speed of deployment, reduce misconfiguration and compliance errors, improve the relationship between developers and security, and lower costs.
Getting started with IaC
At this point, you may be thinking, “OK, shifting left with IaC sounds great — but how do I make that happen?”
There’s no one-size-fits-all answer to that question. Not all tools for IaC and shifting cloud security left are created equal. And the type of tool you need will depend on the specific characteristics of your own organization. But if you’re looking to bring the IaC revolution home to your organization, there are a few crucial points to keep in mind.
Make use of both static and dynamic analysis. These are the two main approaches for shifting left using IaC. Static analysis is faster but more limited in scope, whereas dynamic analysis is slower but more accurate, as it analyzes not only the IaC template but any environments or services the template works with. You’ll need access to both approaches to properly safeguard your cloud.
Be sure the cloud security tool you choose supports not only the cloud environment you currently use, but also any you might expand to in the future. Not all tools support all cloud environments. Whatever tool you invest in needs to fit the current state of your organization, without imposing limits on your future growth. This also applies to CI/CD orchestration tools: Any IaC tool you acquire should be compatible with your CI/CD tools, and not all of them will be.
Keep the total number of IaC tools to a minimum. Modern cloud security is complex enough as it is, and excess tools will only multiply the headaches for Dev and SecOps exponentially.
Consider where and how different security policies need to be used. Depending on their nature (say, public vs. private) and the kind of information they hold, different clouds may need different policies. Policies may also need to be enforced differently for different stages of the CI/CD pipeline. You’ll need a tool that’s flexible enough to manage all of these scenarios effectively.
Rapid7’s own cloud security tool, InsightCloudSec, is a fully integrated solution enabling continuous security and compliance for complex, multi-cloud environments. InsightCloudSec allows you to shift cloud security left using IaC, catching and remediating misconfigurations and vulnerabilities before they go live.
With InsightCloudSec, security and compliance in the cloud doesn’t have to slow you down. Learn more here.
On September 14, 2021, security researchers disclosed new vulnerabilities in Microsoft Azure’s implementation of Open Management Interface (OMI), with one critical unauthorized remote code execution vulnerability ranked 9.8 (CVSS 3.0).
OMI is pre-installed into Azure Linux VM instances as the byproduct of enabling certain logging, reporting, and host management options from the cloud provider’s user interface and APIs. OMI is most commonly used to manage desired-state configuration and is the Linux/Unix equivalent of Windows Management Instrumentation and Remote Management (WMI/WinRM). It normally allows administrators to remotely manage the state of systems including logging and configuration settings.
The specific remote code execution OMI vulnerability, nicknamed “OMIGOD,” could allow an attacker to gain remote access to Linux machines hosted on Azure via TCP ports 1270, 5985, and 5986. Once they have remote access, the attacker could theoretically escalate privileges, move laterally across the environment, and remotely execute code as root, allowing them to locate and exfiltrate sensitive data within the Azure environment.
Notably, while the vulnerability does allow for remote code execution (RCE) in the most severe cases, by default these services are firewalled off. Proof-of-concept exploit code is readily available, and exploitation in the wild is likely. As of publication, Shodan shows nearly 2.5 million hosts with the affected ports open to the public internet and at risk, including hosts in the IP space for most cloud providers.
As soon as the vulnerability was announced, our customer success and engineering teams quickly came together to understand how InsightCloudSec— which provides continuous monitoring, reporting, and automated remediation of security issues in public cloud environments — could help our customers identify signs of this vulnerability in their Azure environments and quickly remediate the potential risk.
Identifying Azure’s OMI vulnerability
This morning, just one day after the disclosure of this vulnerability, InsightCloudSec released an update (version 21.6.4) to all customers that includes a pre-built Insight that automatically identifies any Azure Virtual Machines in a running state that have the aforementioned TCP ports exposed to the public internet along with an associated public IP.
While native Microsoft Azure Firewall services should provide a layer of protection against this vulnerability, we strongly encourage customers to leverage this Insight to identify potential attack vectors and remediate accordingly.
As you can see in the screenshot above, InsightCloudSec is now able to easily identify virtual machines across all of your Azure subscriptions from a single view. You can build notification workflows around the findings that this Insight identifies and take corrective action to close this attack vector.
Remediating Azure’s OMI vulnerability
All of our Insights include the ability to enable remediation workflows. This capability is extremely powerful and provides customers with choices of how to remediate across different areas of their cloud footprint. With a few clicks, an automation workflow can be put in place to not only remediate the current findings but also prevent misconfigurations that could be introduced in the future. It does all of this using our near real-time data collection capabilities.
Leveraging the Create Bot option above allows the user to define the scope and desired remediation steps. For this particular issue we recommend that customers use the following workflow:
Flagging the resource as non-compliant
Creating a ticket to have the vulnerability addressed (JIRA, ServiceNow, etc.)
Sending a notification to the resource owner or technical point of contact that manages the Azure subscription (Slack, MS Teams, Email, etc.)
Optional: cleaning up offending security groups by removing the affected ports from their rules
Looking ahead
Misconfigurations and vulnerabilities such as these continue to be one of the most prevalent attack vectors for malicious users to take advantage of. We recently released a Cloud Misconfiguration Report that highlights the risk that cloud misconfigurations pose to organizations.
The rapid innovation of public clouds will continue to require both cloud security vendors and independent security researchers to collaborate and to proactively hunt for security issues and attack vectors across the Cloud Service Provider (CSP) landscape. This won’t be the last issue we see, and it’s a joint effort across all vendors that participate in this exciting space to help our customers consume these public cloud providers with peace of mind.
As these cloud security disclosures continue to increase in frequency, the speed and efficiency at which security teams can remediate the associated vulnerabilities will become absolutely critical to minimizing risk in complex cloud environments. We’re excited that our customers can quickly gain visibility to the parts of their Azure footprint that are susceptible to this vulnerability, and also have the power to continuously remediate the presence of the misconfiguration both now and in the future.
NEVER MISS A BLOG
Get the latest stories, expertise, and news about security today.
In 2017, Netflix Studios was hitting an inflection point from a period of merely rapid growth to the sort of explosive growth that throws “how do we scale?” into every conversation. The vision was to create a “Studio in the Cloud”, with applications supporting every part of the business from pitch to play. The security team was working diligently to support this effort, faced with two apparently contradictory priorities:
1) streamline any security processes so that we could get applications built and deployed to the public internet faster
2) raise the overall security bar so that the accumulated risk of this giant and growing portfolio of newly internet-facing, high-sensitivity assets didn’t exceed its value
The journey to resolve that contradiction has been a collaboration that we’re proud of, and that we think exemplifies how Netflix approaches infrastructure product development and product security partnerships. You’ll hear from two teams here: first Application Security, and then Cloud Gateway.
Julia & Patrick (Netflix Application Security): In deciding how to address this, we focused on two observations. The first was that there were too many security things that each software team needed to think about — things like TLS certificates, authentication, security headers, request logging, rate limiting, among many others. There were security checklists for developers, but they were lengthy and mostly manual, neither of which contributed to the goal of accelerating development. Adding to the complexity, many of the checklist items themselves had a variety of different options to fulfill them (“new apps do this, but legacy apps do that”; “Java apps should use this approach, but Ruby apps should try one of these four things”… yes, there were flowcharts inside checklists. Ouch.). For development teams, just working through the flowcharts of requirements and options was a monumental task. Supporting developers through those checklists for edge cases, and then validating that each team’s choices resulted in an architecture with all the desired security properties, was similarly not scalable for our security engineers.
Our second observation centered on strong authentication as our highest-leverage control. Missing or incomplete authentication in an application was the most critical type of issue we regularly faced, while at the same time, an application that had a bulletproof authentication story was an application we considered to be lower risk. Concepts like Zero Trust, Beyond Corp, and Identity Aware Proxies all seemed to point the same way: there is powerful assurance in making 100% authentication a property of the architecture of the application rather than an implementation detail within an application.
With both of these observations in hand, we looked at the challenge through a lens that we have found incredibly valuable: how do we productize it? Netflix engineers talk a lot about the concept of a “Paved Road”. One especially attractive part of a Paved Road approach for security teams with a large portfolio is that it helps turn lots of questions into a boolean proposition: Instead of “Tell me how your app does this important security thing?”, it’s just “Are you using this paved road product that handles that?”. So, what would a product look like that could tackle most of the security checklist for a team, and that also could give us that architectural property of guaranteed authentication? With these lofty goals in mind, we turned to our central engineering teams to help get us there.
Partnering to Productize Security
Jose & Arthur (Netflix Cloud Gateway): The Cloud Gateway team develops and operates Netflix’s “Front Door”. Historically we have been responsible for connecting, routing, and steering internet traffic from Netflix subscribers to services in the cloud. Our gateways are powered by our flagship open-source technology Zuul. When Netflix Studios and our security partners approached us, the proposal was conceptually simple and a good fit for our modular, filter-based approach. To try it out, we deployed a custom Zuul build (which we named “API Wall” and eventually, more affectionately, “Wall-E”) with a new filter for Netflix’s Single-Sign-On provider, enabled it for all requests, and boom! — an application deployment strategy that guarantees authentication for services behind it.
Killing the Checklist
Once we worked together to integrate our SSO with Wall-E, we had established a pretty exciting pattern of adding security requirements as filters. We thought back to our checklist through the lens of: which of these things are consistent enough across applications to add as a required filter? Our web application firewall (WAF), DDoS prevention, security header validation, and durable logging all fit the bill. One by one, we saw our checklists’ requirements bite the dust, and shift from ‘individual app developer-owned’ to ‘Wall-E owned’ (and consistently implemented!).
By this point, it was clear that we had achieved the vision in the AppSec team’s original request. We eventually were able to add so much security leverage into Wall-E that the bulk of the “going internet-facing” checklist for Studio applications boiled down to one item: Will you use Wall-E?
A small section of our go-external security questionnaire and checklist for studio apps before Wall-E and after Wall-E.
The Early Adopter Challenge
Wall-E’s early adopters were handpicked and nudged along by the Application Security team. Back then, the Cloud Gateway team had to work closely with application developers to provide a seamless migration without disrupting users. These joint efforts took several weeks for both parties. During our initial consultations, it was clear that developers preferred prioritizing product work over security or infrastructure improvements. Our meetings usually ended like this: “Security suggested we talk to you, and we like the idea of improving our security posture, but we have product goals to meet. Let’s talk again next quarter”. These conversations surfaced a couple of problems we knew we had to overcome to address this early adopter challenge:
Setting up Wall-E for an application took too much time and effort, and the hands-on approach would not scale.
Security improvements alone were not enough to drive organic adoption in Netflix’s “context not control” culture.
We were under pressure to improve our adoption numbers and decided to focus first on the setup friction by improving the developer experience and automating the onboarding process.
Scaling With Developer Experience
Developers in the Netflix streaming world compose the customer-facing Netflix experience out of hundreds of microservices, reachable by complex routing rules. On the Netflix Studio side, in Content Engineering, each team develops distinct products with simpler routing needs. To support that much different model, we did another thing that seemed simple at the time but has had an outsized impact over the years: we asked app teams to integrate with us by creating a version-controlled YAML file. Originally this was intended as a simplified and developer-friendly way to help collect domain names and some routing rules into a versionable package, but we quickly realized we had stumbled into a powerful model: we were harvesting developer intent.
An interactive Wall-E configuration wizard, and a concise declarative format for an application’s routing, resource, and authentication decisions
This small change was a kind of magic, and completely flipped our relationship with development teams: since we had a concise, standardized definition of the app they intended to expose, we could proactively automate a lot of the setup. Specify a domain name? Wall-E can ensure that it automagically exists, with DNS and TLS configured correctly. Iterating on this experience eventually led to other intent-based streamlining, like asking about intended user populations and related applications (to select OAuth configs and claims). We could now tell developers that setting up Wall-E would only take a few minutes and that our tooling would automate everything.
Going Faster, Faster
As all of these pieces came together, app teams outside Studio took notice. For a typical paved road application with no unusual security complications, a team could go from “git init” to a production-ready, fully authenticated, internet accessible application in a little less than 10 minutes. The automation of the infrastructure setup, combined with reducing risk enough to streamline security review saves developers days, if not weeks, on each application. Developers didn’t necessarily care that the original motivating factor was about security: what they saw in practice was that apps using Wall-E could get in front of users sooner, and iterate faster.
This created that virtuous cycle that core engineering product teams get incredibly excited about: more users make the amortized platform investment more valuable, but they also bring more ideas and clarity for feature ideas, which in turn attract more users. This set the tone for the next year of development, along two tracks: fixing adoption blockers, and turning more “developer intent” into product features to just handle things for them.
For adoption, both the security team and our team were asking the same question of developers: Is there anything that prevents you from using Wall-E? Each time we got an answer to that question, we tried to figure out how we could address it. Nearly all of the blockers related to systems in which (usually for historical reasons) some application team was solving both authentication and application routing in a custom way. Examples include legacy mTLS and various webhook schemes. With Wall-E as a clear, durable, paved road choice, we finally had enough of a carrot to move these teams away from supporting unique, potentially risky features. The value proposition wasn’t just “let us help you migrate and you’ll only ever have to deal with incoming traffic that is already properly authenticated”, it was also “you can throw away the services and manual processes that handled your custom mechanisms and offload any responsibility for authentication, WAF integration and monitoring, and DDoS protection to the platform”. Overall, we cannot overstate the value of organizationally committing to a single paved road product to handle these kinds of concerns. It creates an amazing clarity and strategic pressure that helps align actual services that teams operate to the charters and expertise that define them. The difference between 2–4 “right-ish” ways and a single paved road one is powerful.
Also, with fewer exceptions and clearer criteria for apps that should adopt this paved road, our AppSec Engineering and User Focused Security Engineering (UFSE) teams could automate security guidance to give more appropriate automated nudges for adoption. Every leader’s security risk dashboard now includes a Wall-E adoption metric, and roughly ⅔ of recommended apps have chosen to adopt it. Wall-E now fronts over 350 applications, and is adding roughly 3 new production applications (mostly internet-facing) per week.
Automated guidance data, showing the percentage of applications recommended to use Wall-E which have taken it up. The jumpiness in the number of apps recommended for adoption is real: as adoption blockers were discovered then eventually solved, and as we standardized guidance across the company, our automated recommendations reflected these developments.
As adoption continued to increase, we looked at various signals of developer intent for good functionality to move from development-team-owned to platform-owned. One particularly pleasing example turned out to be UI hosting: it popped up over and over again as both an awkward exception to our “full authentication” goal, and also oftentimes the only thing that required Single Page App (SPA) UI teams to run actual cloud instances and have to be on-call for infrastructure. This eventually matured into an opinionated, declarative asset service that abstracts static file hosting for application teams: developers get fast static asset deployments, security gets strong guardrails around UI applications, and Netflix overall has fewer cloud instances to manage (and pay for!). Wall-E became a requirement for the best UI developer experience, and that drove even more adoption.
A productized approach also meant that we could efficiently enable lots of complex but “nice to have” features to enhance the developer experience, like Atlas metrics for free, and integration with our request tracing tool, Edgar.
From Product to Platform
You may have noticed a word sneak into the conversation up there… “platform”. Netflix has a Developer Productivity organization: teams dedicated to helping other developers be more effective. A big part of their work is this idea of harvesting developer intent and automating the necessary touchpoints across our systems. As these teams came to see Wall-E as the clear answer for many of their customers, they started integrating their tools to configure Wall-E from the even higher level developer intents they were harvesting. In effect, this moves authentication and traffic routing (and everything else that Wall-E handles) from being a specific product that developers need to think about and make a choice about, to just a fact that developers can trust and generally ignore. In 2019, essentially 100% of the Wall-E app configuration was done manually by developers. In 2021, that interaction has changed dramatically: now more than 50% of app configuration in WallE is done by automated tools (which are acting on higher-level abstractions on behalf of developers).
This scale and standardization again multiplies value: our internal risk quantification forecasts show compelling annualized savings in risk and incident response costs across the Wall-E portfolio. These applications have fewer, less severe, and less exploitable bugs compared to non-Wall-E apps, and we rarely need an urgent response from app owners (we call this not-getting-paged-at-midnight-as-a-service). Developer time saved on initial application setup and unneeded services additionally adds up on the order of team-months of productivity per year.
Looking back to the core need that started us down this road (“streamline any security processes […]” and “raise the overall security bar […]”), Wall-E’s evolution to being part of the platform cements and extends the initial success. Going forward, more and more apps and developers can benefit from these security assurances while needing to think less and less about them. It’s an outcome we’re quite proud of.
Let’s Do More Of That
To briefly recap, here’s a few of the things that we take away from this journey:
If you can do one thing to manage a large product security portfolio, do bulletproof authentication; preferably as a property of the architecture
Security teams and central engineering teams can and should have a collaborative, mutually supportive partnership
“Productizing” a capability (eg: clearly articulated; defined value proposition; branded; measured), even for internal tools, is useful to drive adoption and find further value
A specific product makes the “paved road” clearer; a boolean “uses/doesn’t use” is strongly preferable to various options with subtle caveats
Hitch the security wagon to developer productivity
Harvesting intent is powerful; it lets many teams add value
What’s Next
We see incredible power in this kind of security/infrastructure partnership work, and we’re excited to leverage these wins into our next goal: to truly become an infrastructure-as-service provider by building a full-fledged Gateway API, thereby handing off ownership of the developer experience to our partner teams in the Developer Productivity organization. This will allow us to focus on the challenges that will come on our way to the next milestone: 1000 applications behind Wall-E.
With special thanks to Cloud Gateway and InfoSec team members past and present, especially Sunil Agrawal, Mikey Cohen, Will Rose, Dilip Kancharla, our partners on Studio & Developer Productivity, and the early Wall-E adopters that provided valuable feedback and ideas. And also to Queen for the song references we slipped in; tell us if you find ’em all.
A lot changed in 2020, and the way businesses use the cloud was no exception. According to one study, 90% of organizations plan to increase their use of cloud infrastructure following the COVID-19 pandemic, and 61% are planning to optimize the way they currently use the cloud. The move to the cloud has increased organizations’ ability to innovate, but it’s also significantly impacted security risks.
Cloud misconfigurations have been among the leading sources of attacks and data breaches in recent years. One report found the top causes of cloud misconfigurations were lack of awareness of cloud security and policies, lack of adequate controls and oversight, and the presence of too many APIs and interfaces. As employees started working from home, the problem only got worse. IBM’s 2021 Cost of a Data Breach report found the difference in cost of a data breach involving remote work was 24.2% higher than those involving non-remote work.
What’s causing misconfigurations?
Rapid7 researchers found and studied 121 publicly reported cases of data exposures in 2020 that were directly caused by a misconfiguration in the organization’s cloud environment. The good news is that 62% of these cases were discovered by independent researchers and not hackers. The bad news? There are likely many more data exposures that hackers have found but the impacted organizations still don’t know about.
Here are some of our key findings:
A lot of misconfigurations happen because an organization wants to make access to a resource easier
The top three industries impacted by data exposure incidents were information, entertainment, and healthcare.
AWS S3 and ElasticSearch databases accounted for 45% of the incidents.
On average, there were 10 reported incidents a month across 15 industries.
The median data exposure was 10 million records.
Traditionally, security has been at the end of the cycle, allowing for vulnerabilities to get missed — but we’re here to help. InsightCloudSec is a cloud-native security platform meant to help you shift your cloud security programs left to allow security to become an earlier part of the cycle along with increasing workflow automation and reducing noise in your cloud environment.
Check out our full report that goes deeper into how and why these data breaches are occurring.
When navigating the complexities of the public cloud, it’s easy to get lost in the endless acronyms, industry jargon, and vendor-specific terms. From K8s to IaC to Shift Left, it can be helpful to have a map to navigate the nuances of this emerging segment of the market.
That’s why a few cloud security experts here at Rapid7 created a list of terms that cover the basics — the key terms and concepts that help you continue your journey into cloud security and DevSecOps with clarity and confidence. Here are the most important entries in your cloud security glossary.
Application Program Interface (API): A set of functions and procedures allowing for the creation of applications that can access the features or data of an operating system, application, or other service.
The InsightCloudSec API can be used to create insights and bots, modify compliance packs, and perform other functions outside of the InsightCloudSec user interface.
Cloud Security Posture Management (CSPM): CSPM solutions continuously manage cloud security risk. They detect, log, report, and provide automation to address common issues. These can range from cloud service configurations to security settings and are typically related to governance, compliance, and security for cloud resources.
Cloud Service Provider (CSP): A third-party company that offers a cloud-based platform, infrastructure, application, or storage services. The most popular CSPs are AWS, Azure, Alibaba, and GCP.
Cloud Workload Protection Program (CWPP): CWPPs help organizations protect their capabilities or workloads (applications, resources, etc.) running in a cloud instance.
Container Security: A container represents a software application and may contain all necessary code, run-time, system tools, and libraries needed to run the application. Container hosts can be packed with risk, so properly securing them means maintaining visibility into vulnerabilities associated with their components and layers.
Entitlements: Entitlements, or permissions entitlements, give domain users control over basic users’ and organization admins’ permissions to access certain parts of a tool.
Identity Access Management (IAM): A framework of policies and technologies for ensuring the right users have the appropriate access to technology resources. It’s also known as Cloud Infrastructure Entitlement Management (CIEM), which provides identity and access governance controls with the goal of reducing excessive cloud infrastructure entitlements and streamlining least-privileged access (LPA) protocols across dynamic, distributed cloud environments.
Infrastructure: With respect to cloud computing, infrastructure refers to an enterprise’s entire cloud-based or local collection of resources and services. This term is used synonymously with “cloud footprint.”
Infrastructure as Code (IaC): The process of managing and provisioning computer data centers through machine-readable definition files, rather than physical hardware configuration or interactive configuration tools. With IaC, configuration files contain your infrastructure specifications, making it easier to edit and distribute configurations.
Kubernetes: A portable, extensible open-source platform for deploying, managing, and orchestrating containerized workloads and services at scale.
Least-Privileged Access (LPA): A security and access control concept that gives users the minimum necessary permissions based on the functions required for their particular roles.
Shared Responsibility Model: A framework in cloud computing that defines who is responsible for the security and compliance of each component of the cloud architecture. With on-premise data centers, the responsibility is solely on your organization to manage and maintain security for the entire technology stack, from the physical hardware to the applications and data. Because public cloud computing purposefully abstracts layers of that tech stack, this model acts as an agreement between the CSP and their customer as to who takes on the responsibility of managing and maintaining proper hygiene and security within the cloud infrastructure.
Shift Left: A concept that refers to building security into an earlier stage of the development cycle. Traditionally, security checks occurred at the end of the cycle. By shifting left, organizations can ensure their applications are more secure from the start — and at a much lower cost.
To provide the best experiences, we use technologies like cookies to store and/or access device information. Consenting to these technologies will allow us to process data such as browsing behavior or unique IDs on this site. Not consenting or withdrawing consent, may adversely affect certain features and functions.
Functional
Always active
The technical storage or access is strictly necessary for the legitimate purpose of enabling the use of a specific service explicitly requested by the subscriber or user, or for the sole purpose of carrying out the transmission of a communication over an electronic communications network.
Preferences
The technical storage or access is necessary for the legitimate purpose of storing preferences that are not requested by the subscriber or user.
Statistics
The technical storage or access that is used exclusively for statistical purposes.The technical storage or access that is used exclusively for anonymous statistical purposes. Without a subpoena, voluntary compliance on the part of your Internet Service Provider, or additional records from a third party, information stored or retrieved for this purpose alone cannot usually be used to identify you.
Marketing
The technical storage or access is required to create user profiles to send advertising, or to track the user on a website or across several websites for similar marketing purposes.