Post Syndicated from belaltaher8 original https://github.blog/2024-01-24-how-githubs-developer-experience-team-improved-innerloop-development/
Building confidence in new code before deploying is a crucial part of any good development loop. This is especially challenging when working in a distributed or microservice system with multiple teams operating on different services. This modular team structure gives rise to an important question: how can we provide teams with fast and reliable development cycles when testing and shipping requires them to test inside an ecosystem of other services? Optimizing the solution to this problem greatly improves engineering efficiency and can contribute to more successful outcomes for the organization as a whole.
This problem is one the Developer Experience (DX) team at GitHub grappled with again and again, ultimately delivering a solution we call “Hubber Codespace” (HCS). HCS is a tool that Hubbers (people who work at GitHub) can use to locally stand up the entire distributed GitHub ecosystem in any environment by simply querying an endpoint or adding a couple lines of configuration to their development containers.
In this post, we’ll tell you how we landed on the HCS solution to this common problem over some possible alternatives, and you’ll get a first-hand look at how GitHub’s developer-first mindset helped us deliver the best tool for Hubbers to ship code quickly and safely in our own distributed environment.
One big (un)-happy environment
To understand the problem we were trying to solve, we have to go back in time. There was a point at which GitHub was just a couple teams and a much simpler product. Back then, having a monorepo in which everyone iterated and built confidence in their changes made sense. Splitting responsibilities up across repositories would have added overhead that bogged down early Hubbers. Fast forward to today, and GitHub has grown into a big organization with hundreds of different teams. Now, the balancing act of evaluating between velocity vs. complexity can look very different.
Let’s consider these complexities a bit further. Different services can have entirely different sets of dependencies and even have dependencies on different versions of the same software (for example, one service requires Ruby 2.2 while another requires Ruby 2.4). In smaller collaborative settings, the engineers can easily reconcile these needs. But this complexity grows exponentially as more teams are introduced. Trying to provide a single environment in which these kinds of disparate services can run and interact in development becomes difficult to do. It can result in ad-hoc “hacks” in development loops like deleting a .ruby-version file depending on which service’s development loop you’re working through. These are the kinds of problems that you encounter when trying to work with a monorepo that contains the codebases for a set of disparate services.
So, we decided to design a new solution. Instead of bringing the developers to the ecosystem, what if we brought the ecosystem to the developers?
Enter HCS
This line of thinking led us to build HCS, a Docker-Compose project that does exactly that. In the post “How we build containerized services at GitHub using GitHub,” we detailed how we build containerized services that power microservices on the GitHub.com platform and many internal tools. Our task now was to take these containers and wire them up such that partner teams could spin up a full GitHub ecosystem on demand. This would allow them to test their changes in an integrated environment. Developers could see how their code behaves when introduced to GitHub’s distributed system, rather than only observing it in the isolated environment of the application being developed before deploying within the full system. In this way, developers could gain confidence that the services they were changing behaved correctly when interacting with their up and downstream dependencies.
When considering how to orchestrate all the required containers, a few solutions came to mind: Docker-Compose, an internal tool called Codespace-Compose that allows us to SSH tunnel between multiple codespaces, and Minikube. Any of these three solutions could solve the ecosystem problem and would have unique tradeoffs. Let’s look at some of those tradeoffs now.
Minikube offers a robust Kubernetes architecture, but we had concerns about the overall user experience. We ultimately decided against it as the issues we identified, such as networking complexity and long cycle times, could bog down development speed.
Codespace-Compose allows us to easily connect teams’ everyday development environments, but we reasoned that, since Codespace-Compose is an internal experiment without any SLA, we’d incur a maintenance cost on our own team by adopting this.
Docker-Compose seemed to fit our needs the best. It didn’t incur any additional maintenance burden since it’s publicly available and actively managed. It offers all the same benefits of Minikube without the long cycle time. Most importantly, using Docker in Docker in a codespace, which allows us to create docker containers on a host which is a docker container itself, is a well-paved path that has lots of prior art. Given all these considerations, we decided on orchestrating our containers using Docker-Compose.
After deciding on Docker-Compose as our orchestrator, the next steps were to figure out the interface. Docker-Compose already supplies end users with commands, but we wanted to optimize the UX around HCS. To do this, we built a user-friendly CLI in Golang with parallel versioning to HCS. This abstracted away all the complexity of using the two together. Simply download a specific release version for HCS, get the same version of the CLI binary, and you’re good to go!
CLI and release automation
Ensuring HCS is useful means ensuring a couple of things. One important goal is ease of use. Docker-Compose already offers an interface for end users, but considering some of the built in commands are long and use predictable options, we decided to wrap it in a custom Golang CLI. This abstracted many of the underlying details away, such as static file locations, formatting options, entrypoint commands, etc. to improve end-user experience. The code below shows this by juxtaposing the Docker-Compose commands with their equivalent HCS CLI command.
The following example compares the commands to start up the integrated environment provided by HCS.
# Start using Docker-Compose

docker compose --project-name hcs \
--file /workspaces/hubber-codespace-dist/docker-compose-hcs-actions.yml \
--file /workspaces/hubber-codespace-dist/docker-compose-hcs-base.yml \
--file /workspaces/hubber-codespace-dist/docker-compose-hcs-bg.yml \
--file /workspaces/hubber-codespace-dist/docker-compose-hcs-core.yml \
--file /workspaces/hubber-codespace-dist/docker-compose-hcs-volume.yml \
--file /workspaces/hubber-codespace-dist/docker-compose-hcs-test.yml \
--file /workspaces/hubber-codespace-dist/docker-compose-hcs-vendor.yml \
--profile full up -d --remove-orphans

# Start using CLI

hcs start
This next example compares how to get a shell to run commands from inside the various containers in GitHub’s distributed ecosystem. This allows developers to modularly interact with and make ephemeral changes to the system.
# Run command from inside a container in the system using Docker-Compose

docker compose --project-name hcs exec bash

# Run from inside a container using CLI

hcs shell
This example compares how to check the status of the containers in the project so end-users can easily see the health of the entire system.
# Status using Docker-Compose

docker compose --project-name hcs ps --format json

# Status using CLI

hcs status
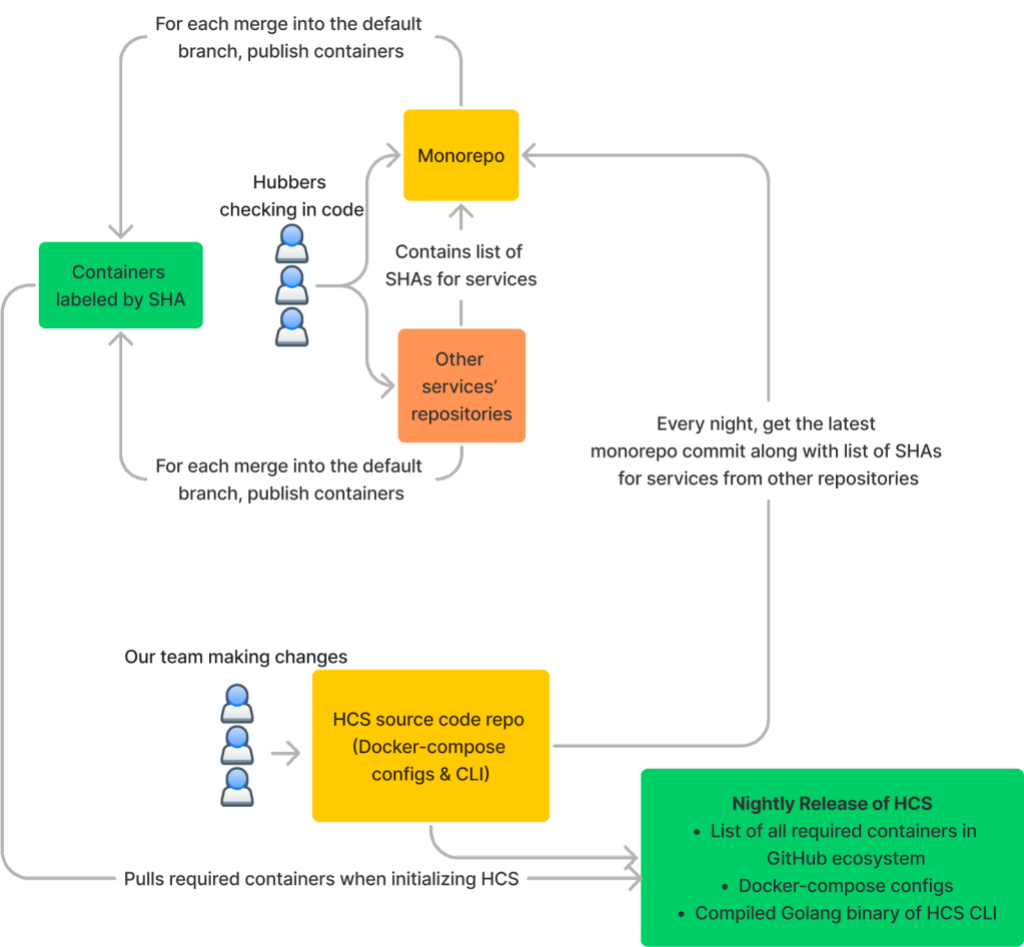
In addition to this easy-to-use and ergonomic CLI, we had to ensure that HCS runs an up-to-date version of the GitHub ecosystem. GitHub is made up of so many different moving pieces that testing new changes on code that’s even a couple days old would not be sufficient to build confidence. When iterating directly on the monorepo, this was a non-issue since folks just fetched the main branch. For HCS, this required us to build automation that cuts releases on a frequent cron schedule. A release of HCS is a software artifact containing the compiled Golang binary for HCS and its CLI that can be pulled using the gh CLI.
The diagram below illustrates how this process works.

End-user experience
Using HCS directly in your codespace
We’ve recently made efforts to push all development at GitHub onto GitHub Codespaces. A codespace is a custom development container, or devcontainer, based on a configuration file in a repository. A repository can have multiple codespaces associated with it as long as each has a unique configuration file. On top of the obvious benefits of having a reproducible environment on demand to develop and iterate in, devcontainers offer features. This abstraction allows developers to easily add software to their environments. HCS is also consumable this way. The code block below shows the couple lines needed to bring this entire ecosystem to a partner team’s preferred environment (that is, their codespace).
{
…
  "features": {
    …
    "ghcr.io/devcontainers/features/github-cli:1": {
      "version": "latest"
    },
    //docker-in-docker required for hcs
    "ghcr.io/devcontainers/features/docker-in-docker:2": {},
    // Include the hubber-codespace feature
    "ghcr.io/github/hubber-codespace/hcs:1": {},
    "ghcr.io/devcontainers/features/go:1": {}
    …
  }
}
Now, teams can perform integration testing against the many other services in GitHub’s ecosystem from directly in the codespace where they were doing local development.
Release binary
Even with the push towards codespaces, not every context that requires an ecosystem will be a devcontainer. In light of this, we also gave end users the option to download the release directly from the GitHub API. The commands to do so can be seen below. With a couple simple commands, Hubbers now have everything they need to bring the entire GitHub ecosystem to whatever environment they want.
gh release download --repo github/hubber-codespace  -p hcs -D /tmp/

chmod +x /tmp/hcs

sudo mv /tmp/hcs /usr/local/bin

hcs init

hcs pull

hcs start
Testimonials
But don’t just take my word for it. Check out what our partner teams have had to say about HCS improving their development loop:
“HCS has improved our dev loop for [our service] by making it simple to test [it] against [the rest of GitHub’s ecosystem]. It’s turned what used to be a number of manual steps to clone our repository into the [monorepo environment] into two simple commands in our own codespace. This has made it much easier to validate our changes without having to deploy to a staging environment.”
“Given that we are a service operating outside GitHub but with a heavy reliance on the services running within GitHub, we’ve had to go through a lot of bells and whistles to ensure we can have a smooth development experience. In my four years working on [our service], HCS has been the most seamless experience in going from a blank devbox to breakpointing live running code for our service.”
Conclusion
Solving the ecosystem problem is always a balancing act. Luckily, thanks to GitHub’s push towards containerization, and tooling such as repository automation and publishing/consuming releases through the GitHub CLI, we were adequately equipped to develop a solution with HCS. Hubbers can now leverage a development loop that allows them to deploy with confidence, having tested their changes within GitHub’s complex multi-service system.
The post How GitHub’s Developer Experience team improved innerloop development appeared first on The GitHub Blog.