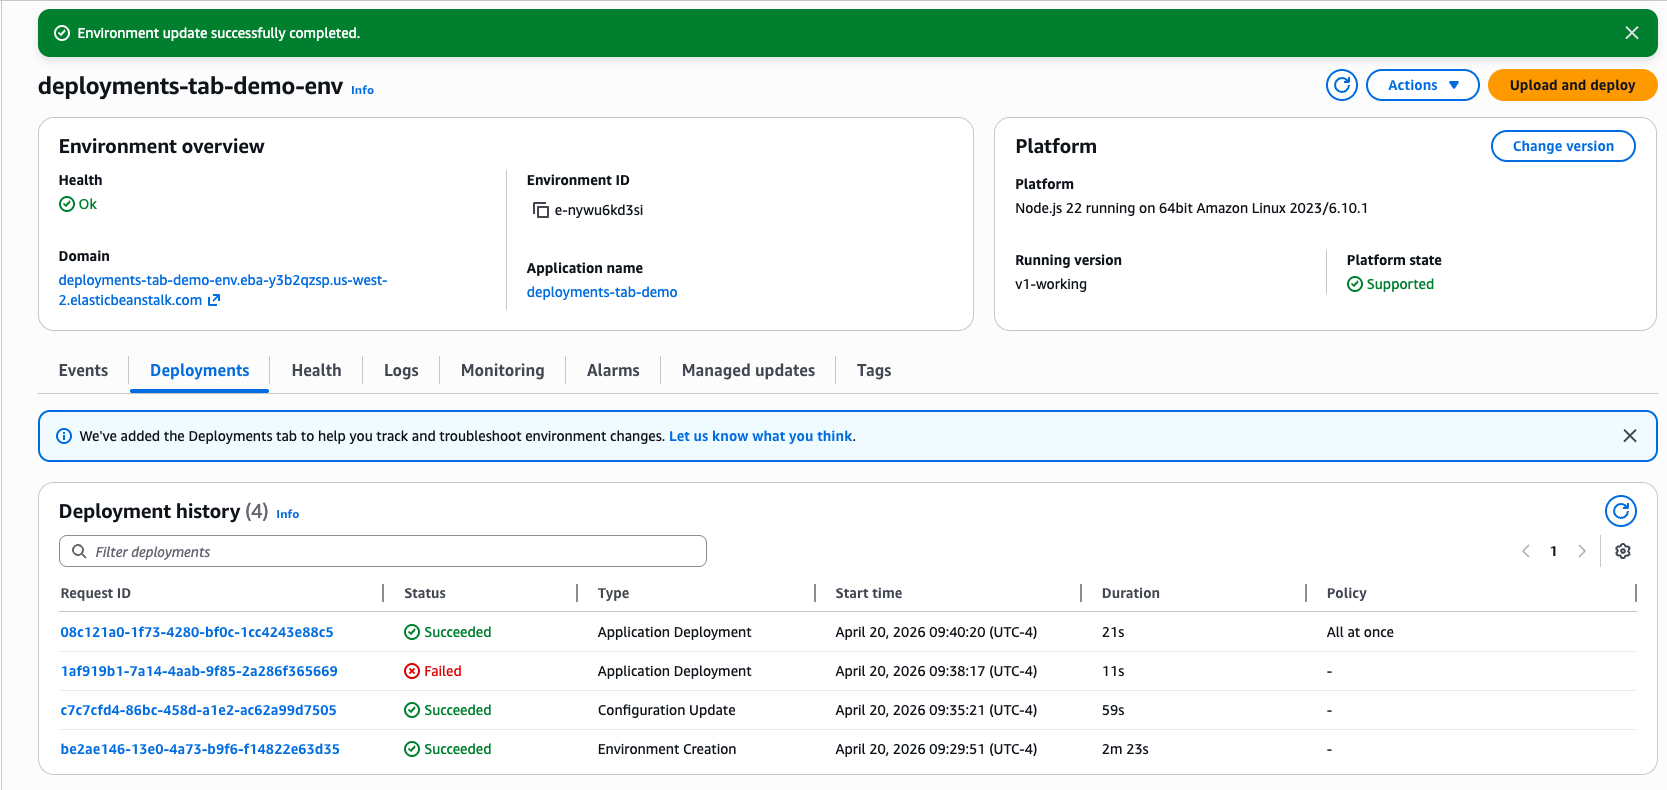
The _index.js payload begins with a large JavaScript block comment containing fake system instructions and policy-triggering content. Because it is inside a comment, it does not affect JavaScript execution. The runtime skips it. The real malware begins after the comment with a try{eval(…)} wrapper around a large character-code array and a ROT-style substitution function.
This header appears designed for AI-mediated analysis, not for Node, Bun, or Python. It attempts to derail scanners or analyst copilots that feed the beginning of a file to a language model without clearly isolating the content as untrusted data. In weak pipelines, this can cause refusal behavior, prompt confusion, context pollution, or premature classification before the scanner reaches the actual malware.
This is not a magical bypass against static detection. YARA rules, entropy checks, AST parsing, string extraction, deobfuscation, and behavioral rules still work. But it is a practical anti-analysis trick against naive LLM-first triage systems.
When downsizing an Amazon Elastic Compute Cloud (Amazon EC2) instance, teams often evaluate CPU and memory utilization but overlook the instance’s Amazon Elastic Block Store (Amazon EBS) performance limits for throughput and IOPS. Smaller Amazon EBS-optimized instance types have lower baselines and rely on burst credits to handle peaks. If your workload’s I/O pattern drains those credits faster than the instance can refill them, the instance will throttle your workload to baseline. This post applies to burstable EBS-optimized instances with baselines below their maximum.
This post shows how to pull your instance’s Amazon EBS metrics from Amazon CloudWatch, simulate the burst credit balance against a target instance type’s limits, and help evaluate whether the downsize might be appropriate before making the change.
Solution overview
The analysis compares your workload’s actual I/O pattern against the target instance type’s Amazon EBS limits.
Measure your current Amazon EBS usage. Pull instance-level throughput and IOPS from Amazon CloudWatch at 5-minute granularity. You need at least two weeks of data to capture weekly patterns. Four weeks is better if your workload has monthly cycles. While you pull data, check whether your current instance already hits its Amazon EBS-optimized performance limits.
Compare against the target instance’s limits. Look up the baseline and burst ceiling for your target instance type. Simulate the burst credit balance across your observation window: for each 5-minute interval, calculate whether credits are draining or refilling, and track whether the balance ever hits zero. If it does, you will experience throttling on the smaller instance.
Monitor after the move. Watch InstanceEBSThroughputExceededCheck and InstanceEBSIOPSExceededCheck for immediate throttle detection. Track EBSByteBalance% and EBSIOBalance% to gauge how much headroom remains for workload growth.
Note: These balance metrics are only available on burstable instance sizes where the baseline is lower than the maximum.
Prerequisites
An AWS account with permissions for cloudwatch:GetMetricData and ec2:DescribeInstanceTypes. The instance must be Amazon EBS-optimized (AWS enables EBS-optimization by default on most current-generation instance types).
Note: AWS doesn’t provide these instance-level Amazon CloudWatch metrics in AWS Outposts, AWS Local Zones, or AWS Wavelength Zones.
Pulling instance-level Amazon EBS metrics from Amazon CloudWatch
Amazon CloudWatch provides Amazon EBS metrics at the instance level in the AWS/EC2 namespace, using the InstanceId dimension. Here are the metrics that you need:
Metric
What it measures
EBSReadBytes
Total read bytes in the period
EBSWriteBytes
Total write bytes in the period
EBSReadOps
Total read operations in the period
EBSWriteOps
Total write operations in the period
EBSIOBalance%
IOPS burst credit balance (0-100%)
EBSByteBalance%
Throughput burst credit balance (0-100%)
InstanceEBSIOPSExceededCheck
1 if instance hit IOPS limit, 0 otherwise
InstanceEBSThroughputExceededCheck
1 if instance hit throughput limit, 0 otherwise
The first four metrics are the inputs for the simulation. The rest are useful context:
EBSIOBalance% and EBSByteBalance% show how much of the burst credit pool remains, as a percentage. On the current (larger) instance, these should sit at or near 100 percent. If they’re dipping, the workload is already consuming burst credits at the current size, and a downsize will make it worse.
Note: These metrics only appear on instances where the baseline is lower than the maximum.
InstanceEBSIOPSExceededCheck and InstanceEBSThroughputExceededCheck are binary: 1 means the instance hit its EBS-optimized performance limit within the last minute. If either is firing on the current instance, the workload is already throttling and should be addressed before considering a downsize.
Pull these at 5-minute granularity for at least two weeks (four if your workload has monthly cycles). Amazon CloudWatch retains 5-minute data points for 63 days, so that’s your upper bound. You can retrieve the data through the AWS Command Line Interface (AWS CLI) (GetMetricData API), the Amazon CloudWatch console, or any AWS SDK. The metrics live in the AWS/EC2 namespace with your InstanceId as the dimension.
Use the Maximum statistic for the four I/O metrics and Minimum for the balance percentages. Maximum captures the highest 1-minute data point within each 5-minute window, which is the conservative choice for the simulation inputs. The Sum statistic gives a more precise total for each interval, but Maximum is the intentionally conservative choice. It assumes the peak 1-minute rate held for the full 5-minute window, which overstates actual consumption. Minimum on the balance metrics captures the lowest point the balance hit within each window, so you see the actual dips rather than averaging them away. For the ExceededCheck metrics, use Maximum (you want to know if the limit was hit at any point in the window).
Combine read and write values to get totals per interval. To convert to per-second rates:
The division by 60 (not by the period length) is intentional. The Maximum statistic for a 5-minute period returns the highest 1-minute aggregate within that window, not a 5-minute total. Dividing by 60 converts that 1-minute peak to a per-second rate. The additional divisions by 1,024 convert bytes to mebibytes to match the units in describe-instance-types.
Comparing actual usage against target limits
From the Amazon EBS-optimized instances documentation, find the baseline and maximum (burst ceiling) for both IOPS and throughput on your target instance type. You can also pull these programmatically:
This returns the baseline and maximum bandwidth (MB/s) and IOPS for the instance type. Note that BandwidthInMbps is megabits per second (network-style units), while ThroughputInMBps is megabytes per second. The throughput values are what you compare against your Amazon CloudWatch data.
BaselineThroughputInMBps is the sustained rate the instance can deliver indefinitely. MaximumThroughputInMBps is the burst ceiling, the absolute maximum the instance can deliver while it has burst credits. Same relationship for IOPS. IOPS and throughput have separate burst budgets, tracked by EBSIOBalance% and EBSByteBalance% respectively.
How burst credits work
The instance maintains a credit pool for each budget (IOPS and throughput). The pool capacity is:
credit_pool = (burst_ceiling - baseline) * 1800
The 1800 comes from 30 minutes (1800 seconds) of burst at the maximum rate, which AWS provisions as the pool size for burstable Amazon EBS-optimized instances. Credits drain when usage exceeds baseline and refill when usage is below baseline, at a rate of baseline – effective_usage per second, where effective_usage is min(actual_usage, burst_ceiling). The instance cannot deliver more than the ceiling regardless of credit balance, so credits drain at the ceiling rate, not the requested rate. The pool is capped at its maximum and floored at zero. When credits hit zero, your workload is throttled to baseline performance. AWS resets the pool to full every 24 hours, giving you at least 30 minutes of burst capacity per day.
With the time series data and the target limits, you can simulate what the credit balance would look like on the smaller instance. For each 5-minute interval in your observation window:
Where interval_seconds is 300 for 5-minute data or 60 for 1-minute data.
When actual usage is below baseline, credits accumulate. When above, they drain. Run this across the full observation window, resetting the pool to full at the start of each 24-hour period to model the AWS top-off guarantee. Start each day with a full pool, then drain and refill through the day’s intervals. If the balance hits zero on any day, the workload will throttle on the smaller instance.
Run the simulation twice: once for IOPS, once for throughput. Throttling happens if either pool hits zero.
A Python script that pulls Amazon CloudWatch data for a given instance ID, looks up the target instance type’s Amazon EBS limits, and runs this simulation end-to-end is available at sample-ec2-ebs-burst-analyzer repository.
This simulation is an approximation
It models credit behavior at 5-minute (or 1-minute) granularity using Amazon CloudWatch aggregates, not the actual per-second I/O stream. Two factors make the simulation more conservative than reality, and two can make reality worse than the simulation.
The Maximum statistic returns the highest 1-minute total within each 5-minute window. The simulation applies that peak rate across the full 300-second interval. This overestimates credit drain by up to 5x for any given interval, because the other 4 minutes likely had lower usage. The tradeoff is intentional. If the simulation says the workload fits, the result is reliable. If it says the workload doesn’t fit, the actual situation might be better than predicted. In that case, re-run with the Average statistic for a less conservative check, or pull 1-minute data (available for the most recent 15 days in Amazon CloudWatch) for higher fidelity.
Working in the other direction, two things can make the real situation worse than the simulation predicts. If the downsize also reduces memory, database workloads (SQL Server buffer pool, PostgreSQL shared_buffers, Oracle SGA) will generate more disk I/O than what you measured because the smaller cache forces more page reads from Amazon EBS. Account for this by including additional headroom in the burst credit budget. And I/O spikes that last milliseconds don’t show up in 5-minute Amazon CloudWatch data. If EBSByteBalance% or EBSIOBalance% are trending down on the current instance but your throughput metrics look fine, the workload is microbursting.
What to look for in the results
The simulation produces two outputs per budget (IOPS and throughput): the low-water mark (lowest credit balance across the observation window) and the number of intervals where the balance hit zero.
IOPS credit balance (EBSIOBalance%) – If the simulated low-water mark stays well above zero, the workload’s IOPS pattern fits within the target’s burst budget. A low-water mark of 90 percent means the workload barely touches the IOPS burst pool. A low-water mark of 40 percent means it fits today but has limited room for IOPS growth.
Throughput credit balance (EBSByteBalance%) – Same logic for throughput. Check this independently because a workload can be comfortable on IOPS but tight on throughput, or the reverse.
Intervals at zero – If either balance hits zero on any day, the workload will throttle to baseline on this instance type.
Peak usage vs. burst ceiling – The ceiling is the absolute maximum regardless of credit balance. If your peak throughput exceeds MaximumThroughputInMBps or peak IOPS exceeds MaximumIops, the instance will cap I/O at the ceiling rate during those intervals. This doesn’t mean the workload doesn’t fit overall (credits might still be fine), but the application will experience reduced I/O during those peaks. A handful of brief spikes may be acceptable. Sustained ceiling breaches are a stronger signal to size up.
Throttled intervals – The most direct measure of impact. A throttled interval is one where the credit balance is at zero and usage exceeds baseline. During these intervals, the instance cannot deliver what the workload is asking for. A few throttled intervals during a nightly batch may be tolerable. Dozens per day during business hours is a problem.
The following two figures show what these outcomes look like. In the first, the workload bursts above baseline during business hours but credits never fully deplete. The minimum balance stays at 82 percent, well above zero. This workload is safe to downsize.
In the second figure, the same workload runs on a smaller instance type with a lower burst pool. Credits deplete within the first burst window and stay near zero for most of the business day. This workload would throttle on the smaller instance.
The following servers are from a customer running SQL Server on EC2. We simulated the burst credit balance for each against the proposed target instance type, using 28 days of Amazon CloudWatch data at 5-minute granularity with the Maximum statistic.
Server A: fits comfortably (current: c6in.4xlarge; proposed: r6i.large)
Simulating the credit balance across 28 days with a daily pool reset:
IOPS
Throughput
Credit pool
65,520,000
2,103,750 MB
Low-water mark
52,084,325 (79.5%)
1,656,415 MB (78.7%)
Intervals at zero
0
0
On the worst day for throughput, here’s what the simulation looks like during the evening burst window, showing how credits drain and recover interval by interval:
Time
Throughput (MB/s)
Net credit change
Balance
Balance %
22:00
154.25
-21,900
1,854,076
88.1%
22:05
22.57
+17,603
1,871,679
89.0%
22:10
452.16
-111,273
1,760,406
83.7%
22:15
427.89
-103,991
1,656,415
78.7%
22:20
30.99
+15,077
1,671,492
79.5%
At 22:10 and 22:15, throughput spiked above 400 MB/s, well above the 81.25 MB/s baseline but still under the 1,250 MB/s burst ceiling. Each interval drained roughly 100,000 credits. The pool hit its low-water mark of 78.7 percent at 22:15, then immediately began recovering as throughput dropped. By 23:55, the pool was back to 100 percent.
Assessment: fits, with roughly 20 percent headroom on the worst day.
Server B: fits but tight (same workload as Server A; proposed: r5.large)
Same workload, same burst pattern, but the r5.large has a smaller credit pool, so the same spikes drain a larger percentage. The throughput low-water mark drops from 78.7 percent to 51.5 percent. The same evening burst window that used 20 percent of the r6i.large pool now consumes nearly half the r5.large pool:
Time
Throughput (MB/s)
Net credit change
Balance
Balance %
22:00
154.25
-21,900
672,826
72.9%
22:05
22.57
+17,603
690,429
74.8%
22:10
452.16
-111,273
579,156
62.8%
22:15
427.89
-103,991
475,165
51.5%
22:20
30.99
+15,077
490,242
53.1%
This still fits, but with limited margin. Any workload growth (more users, larger databases, additional backup jobs) could push the balance toward zero. Separately, a single IOPS interval reached 20,226, exceeding the r5.large burst ceiling of 18,750. The instance can only deliver up to the ceiling while credits remain, so the application received 18,750 IOPS during that interval. That single spike would not cause sustained throttling, but combined with the tight throughput margins, it confirms this workload is at the boundary of what r5.large can handle.
Assessment: fits today, but not a safe long-term choice.
Server C: ceiling breach (current: c6in.4xlarge; proposed: r6i.xlarge)
Peak throughput: 1,502.94 MB/s. This exceeds the 1,250 MB/s burst ceiling. During those peak intervals, the instance would cap throughput at 1,250 MB/s while credits remain. If credits are exhausted, throughput drops to the 156.25 MB/s baseline. The credit simulation might still show the workload fits (credits never hit zero), but the application would experience reduced I/O during those peaks. For this customer, the peaks coincided with production SQL Server activity, so even brief throttling wasn’t acceptable, and a larger instance type was needed.
Assessment: workload will be throttled during peak intervals. Whether that’s acceptable depends on the application’s sensitivity to I/O latency.
Monitoring after the resize
The pre-migration analysis uses historical data from the larger instance. After you resize, real metrics replace the simulation. Monitor the following three layers:
InstanceEBSThroughputExceededCheck and InstanceEBSIOPSExceededCheck = 1 means the instance is actively throttling. This is the definitive signal. Alarm on Sum > 0 over 3 consecutive 1-minute periods to filter out single-second spikes that resolve on their own.
EBSByteBalance% and EBSIOBalance% trending downward over days or weeks means the workload is growing into the instance’s limits. You’re not throttling yet, but you’re on a trajectory. An instance that dips to 90 percent nightly and recovers is in a different position than one that dips to 40 percent and barely recovers before the next burst. Neither instance is throttling, but the first has headroom while the second doesn’t.
EBSByteBalance% and EBSIOBalance% stay at 100 percent means the workload never exceeds baseline. The instance has unused capacity, and you might even be able to go smaller.
If the workload has weekly patterns, allow at least one full week of data before drawing conclusions.
Conclusion
In this post, we showed how to simulate the EBS-optimized instance burst credit balance against a target instance type’s limits before downsizing an Amazon EC2 instance. The approach pulls Amazon CloudWatch metrics at 5-minute granularity, compares actual throughput and IOPS against the target’s baseline and burst ceiling, and tracks whether the credit balance would hit zero during the observation window.
This covers the Amazon EBS dimension of a right-sizing decision. A complete evaluation also considers CPU utilization, memory usage, and network throughput against the target instance’s limits. For workloads where Amazon EBS utilization is well below baseline, the burst credit simulation might not be necessary.
On 14 April, the Trump administration quietly acknowledged the widespread use of AI to automate government processes. The office of management and budget (OMB) disclosed a staggering 3,611 active or planned use cases for AI across the federal government. The list has ballooned by 70% from the one published in the final year of the Biden administration, and includes many disturbing-seeming plans to hand over sensitive governmental functions to AI.
Scanning this list, many readers may find many causes for alarm. It represents a transfer of decision processes from human to machine on a massive scale over matters of individual freedom, public health and well-being, nuclear reactor safety and more.
Consider these examples. The Health and Human Services’ (HHS) office of administration for children and families hired the world’s “scariest AI company,” Palantir—notorious for its work on behalf of the military, the CIA and ICE—to scan all grant applications to flag those not ideologically aligned with the administration’s dictates. The Federal Bureau of Prisons is developing an AI system to assess the “potential for misconduct for newly admitted inmates,” routing people into high-security confinement before they have actually done anything wrong in their custody. These read like programs fit for a Philip K Dick or George Orwell novel.
Other use cases insert AI into life-and-death decision making. The Department of Veterans Affairs is developing an AI that will listen in on calls to the veterans crisis line, and then gather information from external databases to assess the mental state and suicide risk of the caller.
The Department of Energy is testing the use of AI to control nuclear reactors, targeting a way to autonomously respond to potential nuclear safety incidents. Here’s one that’s disturbing for its retirement, rather than its deployment: the state department has ended a program to use AI to forecast mass civilian killings, which had been intended to aid conflict prevention.
While it’s easy to raise questions about these and similar uses of AI, the reality is that any of these programs could be implemented responsibly. In some cases, like the HHS system, the AI might be enforcing alignment to a policy prescription that opponents abhor. But that concern is more about the policy itself rather than the idea that agencies should comply with executive orders.
In other cases, there may even be bipartisan agreement on the goal, like taking urgent action to help veterans at risk of self-harm. Lots of work and validation is needed to prove AI safe and effective for these use cases and convince the public it is appropriate, but the idea is plausible.
In other cases, a scary-sounding AI use may not even be new. The use of predictive methods and statistics to assign prisoner security classifications goes back decades, even if such systems are often biased and ineffective.
Using autonomous systems for model predictive control (MPC) of nuclear reactors is a well studied, and a widely applied aspect of nuclear plant management. And the recently disclosed addition of AI was initiated under the Biden administration.
But anyone reviewing the 2025 inventory could be forgiven for leaping to severe conclusions. What matters are the details of how the AI system is used, and here the inventory is severely lacking.
The disclosures carry minimal information, and lack the context necessary to understand their purpose and approach. The descriptions are typically just a sentence, and rarely more than a paragraph.
And while the process theoretically involves some form of public consultation, in reality there is generally none. It would take an eagle-eyed citizen to even come across this disclosure. Unless you read FedScoop regularly, or watch the OMB’s federal chief information officer’s GitHub account, you probably missed it.
Only one of the examples cited above (the DoJ) even proposes to involve the public. Under the administration’s policy, it’s not required for the rest because they are not classified as “high impact” use cases—a label that is applied inconsistently across agencies.
We wrote a book surveying applications of AI to democratic processes worldwide, including executive agencies as well as the courts, legislatures and politics. Our conclusion was that, while there are inappropriate applications of AI in governance that should be resisted, an urgent need to reform the economics of AI, and an imperative for renovating the democratic systems it is being unleashed on, there are also valuable and beneficial use cases for AI in government.
Machine translation is a good example. Customs and Border Protection (CBP) has deployed an AI translation system to help officers when human interpreters are not available. The idea that CBP, an agency under heavy scrutiny for reported abuses of human rights, would direct people to talk to a machine instead of a person may strike many as inhumane.
It’s true that human interpreters have very real advantages when it comes to understanding nuance from physical cues and social context. But an officer with a competent AI translator available immediately is better than one who cannot communicate with the person in front of them.
The Trump administration’s AI use case inventory has 70 such translation use cases, up from 58 in the Biden administration’s 2024 disclosure.
Disclosure of AI use cases could be a means to build public confidence and trust, but only if paired with consistent, meaningful public consultation. Washington DC and California are actively engaging the public to determine where and how it’s appropriate to use AI in government processes, or for government to regulate AI use in society.
Both have held public deliberations on this topic at a wide scale, using AI platforms. These examples demonstrate the potential for capturing broad-based public input to steer AI policy.
The international gold standard was arguably set by the French in 2016, via their Digital Republic Act. The law, itself informed by an online citizen consultation, requires all algorithms used to automate government administrative decisions to be subject to public records requests, to be appealable to a human reviewer, and to have mandatory notification of the use of automation to those affected by the decisions.
Canada offers another example of what more rigorous and participatory disclosure might look like. In 2025, they launched an AI use case registry, not unlike the US inventory. However, Canada also has a federal directive mandating a transparent risk-scoring and impact assessment process for automated systems that make administrative decisions about citizens.
That longstanding directive requires a detailed explanation of risks and benefits as well as consultation with certain stakeholders from the conception of the AI use case. The Canadian system could be improved; it could require a public comment period and an obligation for agencies to respond substantively to feedback before engaging in sensitive uses of AI.
AI offers real potential to improve the efficacy, efficiency and accessibility of government. But, equally, there is legitimate reason for public concern and distrust that can only be addressed through transparency and dialog. The US should adopt, at the federal and state level, algorithmic impact risk assessment procedures and public comment processes to facilitate a safe, trusted, equitable transformation of government agencies to take advantage of modern technology.
This essay was written with Nathan E. Sanders, and originally appeared in The Guardian.
… В Балтийско море има островче на име Маркет. Малко над 300 метра дълго, малко над 100 широко, 2 м над морето, необитаема гола скала. Разделена преди повече от 200 години с договор между Финландия и Швеция. През 1885 г. обаче Финландия построява на острова фар – мястото наоколо е опасно, засядали са десетки кораби годишно. Швеция ѝ отдава дължимата благодарност.
Но се оказва, че по погрешка фарът е построен от шведската страна на границата. Към 100 години проблемът е просто игнориран. Преди 40-тина години страните се споразумяват да преместят границата така, че фарът да е във финландската част, но никоя от тях да не изгуби територия и разделението на бреговата линия да не се промени (от него зависят правата за риболов наоколо). И в момента по тая 300 метра дълга и 100 метра широка скала минава близо 500 метра безумно криволичеща граница. Което не смущава нито шведи, нито финландци и на грам. Що да се косят за всъщност безумна дреболия?!
… Между Гренландия и Канада има подобно островче – остров Ханс. Също необитаема гола скала. И двете страни са го смятали за свой. В продължение на почти 40 години на него се води „война“, известна като „Войната на уискито“. По веднъж годишно делегация от едната от страните посещава острова, маха оттам флага на другата, поставя своя и оставя за делегацията от другата страна (която ще дойде след 6 месеца) бутилка канадско уиски или датски шнапс. На срещи дипломатите от двете страни се шегуват и веселят по повод „войната“ между тях, разменят си комични ноти, рекламират своя суверенитет в Google…
През 2005 г. се договарят да създадат комисия по темата. Която след почти 20 години работа – приоритетът на такава „война“ хич не е висок – постига договореност как точно да си поделят острова. Като резултат, светът остава без още една война – най-веселата и добродушна в историята на човечеството. А Канада и ЕС се сдобиват със сухоземна граница.
… Насред река Бидасоа, която разделя Франция и Испания, лежи Фазановият остров. Необитаем и без фазани. Но за сметка на това споделен между двете държави, още от 1659 г. Всяка го управлява по 6 месеца в годината, предават си го една на друга на церемониални тържества. До война за него, дори подобна на „войната на уискито“, никога не са стигали. Така или иначе островчето е природен резерват – нужно ли е хора да умират за него?!
(Весела подробност: според договора, с който е установено това споделяне, по време на френско управление той е под властта на вицекраля на Франция. И тъй като документът е международен и обвързващ, френският администратор, който отговаря за него 6 месеца годишно, се налага да носи за това време титлата вицекрал на Франция. Въпреки че тя е една от най-агресивно републиканските държави в света…)
… През 2000 г. в делтата на Дунав, точно между Румъния и Украйна, започва да се образува от наносите на реката ново островче. Румънците го кръщават остров К, украинците – Новая Земля. И двете държави претендират за него – с количество хумор, доста подобно на това около остров Ханс. През 2009 г. накрая се разбират да си го поделят. А междувременно островът непрекъснато се променя – реката ту ще го подяде отнякъде, ту ще остави нови наноси отдругаде… Към момента около 60% от територията му е украинска, около 40% – румънска. И това със сигурност ще се променя за в бъдеще. Но нито на румънците, нито на украинците им пука особено.
… В Холандия, точно до белгийската граница, е градчето Баарле-Насау. Отвъд границата срещу него е белгийското градче Баарле-Хертог; реално са един град. Границата между тях е безумна. В и около Баарле-Насау има 22 енклава, които принадлежат на Баарле-Хертог – белгийски енклави в Холандия. (В най-големия от тях пък има 6 холандски енклава; още 2 холандски енклава са вътре пък в два други белгийски енклава.) Отделно пък в Баарле-Хертог има енклави на Баарле-Насау – холандски в Белгия… Много неща в двата града са общи – библиотеката и т.н.
Границата минава през магазини, улици, дворове, къщи. Маркирана е, да е информиран туристът в коя държава е в момента. Ако границата минава през магазин, той е в държавата, където е входът за клиенти. (Качат ли ти данъците, си местиш вратата – и си в другата държава.) Ако минава през двор, той е в която държава е къщата. Ако минава през нея – в която държава е спалнята. Ако минава през нея – в която държава е леглото. Местиш си леглото една педя – и дворът и домът ти са вече в другата държава.) Познайте дали там има като у нас враждебна агентура, представяща се за националисти, великопатриоти и подобни, и опитваща се да накара местните холандци и белгийци да се мразят помежду си.
… Историята на Европа е пълна с ужаси. Кланета между държави, масови избивания, стогодишни войни – реки от кръв. Омрази между нации, които са нямали равни другаде. Но малко по малко този ад се успокоява и на негово място, постепенно и бавно, се създават търпимост, приятелство и усещане за едно цяло. Омразата между прусаци и баварци е минало – вече и едните, и другите са германци. Между бургундци и гасконци също – вече са французи… И до днес баварците често уреждат сватби в национални костюми, използват баварски диалект и прочее. Гасконците – също. Запазили са културата си, но са изгубили омразата си. Изхвърлили са злото, но са запазили ценното.
Малко по малко върви натам цяла Европа. Въпреки че враговете ѝ се съдират от желание да сеят омраза и неразбирателство в нея, за да могат да я поробят парче по парче. Вместо инструмент за отприщване на властници и поробване на обикновените хора, ЕС се оказа могъщ инструмент за свобода на хората и озаптяване на властниците. Границите в Европа стават все по-символични – пресичаме ги, често без да можем да различим къде точно минават. Точно както пътуваме през България, без да ни е грижа, че пресичаме границата между Търновското и Видинското царства. Не просто граничари ни позволяват да излезем или влезем някъде – граничари няма. Намаляваме скоростта на границата единствено заради остри завои или неравности по пътя.
Вече къде ли не по света – видях го с очите си преди дни в САЩ и в Турция – не питат дали паспортът ми е български, питат дали е европейски. И видят ли, че е, ме гледат с уважение. Да си европеец постепенно се превръща в най-уважаваната националност на света. Дори в държави, изстрадали в миналото много от европейците. Заслужаваме го вече не с железен юмрук и оръжие, а с помощ и подкрепа. Истински.
И това е съградено именно върху разбирателството и приятелството между европейските народи и държави. Успеем ли да се опазим от отровата на омразата, която Клавдиевци наливат в ушите ни докато спим, след поколение-две ще сме най-първо европейци. Ще пазим националностите, езиците и културите си, и ще се гордеем с тях. Но и ще знаем, че сме едно цяло, и че бъде ли малтретиран един от нас, го подкрепяме всички. Че нашето единство е нашата сила – и именно затова тези, които ни смятат за врагове и искат да им станем роби, правят всичко, за да го разрушат.
Че Европа не е съвършена и никога няма да бъде. Демокрациите винаги могат да се променят към още по-добро. Съвършени са диктатурите – те не могат. Точно както животът винаги е несъвършен, съвършена е само смъртта… И точно както нормалният човек избира живота пред смъртта, колкото и да е несъвършен, така избира и демокрацията пред „суверенната демокрация“, „патриотичната демокрация“ и другите видове диктатура.
Че химнът на Европа се нарича „Ода на радостта“, но истинското му име е „Ода на свободата“. Радостта може чудеса, но свободата е, повеят на чието крило прави хората братя. Тези, които преживяхме 10 ноември, го помним. Някои – с усещането, че всички околни са ни близки и искаме да им помагаме и да ги подкрепяме, че сме получили криле и сили да въплътим мечтите си. Други – с беса от гледката как ние си вярваме и се подкрепяме, с провала на мечтата им да ни поддържат безсилни, за да са ни господари.
(По това и ще ни различите. За нас 10 ноември е денят на свободата ни, когато получихме най-ценното ни – сила и достойнство. За другите е „банановден“ – денят на ненавистта им, когато изгубиха най-ценното си, свободата да отнемат нашата свобода.)
… Преди почти година си говорих в Холандия със специалист по AI от карибски (и очевидно и африкански) произход. Засегнахме и тези теми – и думите му бяха, по памет: „Ти си европеец просто защото си се родил тук. Аз съм европеец, защото съм избрал да бъда и съм положил огромни усилия, за да стана. Ти не знаеш колко по-малко нещо е да не си, аз го знам – знам по-добре от теб колко ценно и велико е да си. Ако Европа бъде нападната, колкото и да бързаш да се запишеш в армията й, аз ще се запиша преди теб. Защото знам по-добре от теб колко много ще изгубят децата ми, ако Европа бъде победена и направена на не-Европа.“
Мисля си – това е, което имаме нужда да разберем всички сега. Колко безценно е, че сме част от Европа. Какво всъщност целят тези, които искат да ни излъжат да се откажем от това. И защо не бива да им го позволяваме, за нищо на света.
There are over a dozen cases around the country where police officers are using the Flock surveillance camera system to obsessively and illegally stalk people.
Customer records live in the database. Payment activity is safely stored in your payment processor. Call recordings and transcripts live in Zoom, Teams, Webex, or another video conferencing application–or are shared to Gong for customer insights. Telemetry resides in an observability tool like Grafana or DataDog. Your own day-to-day work is in Google Drive or OneDrive. It takes hundreds of human hours to figure out what customer behavior and business continuity patterns can be extracted from all of this data.
Extracting insights from your data starts with knowing what you have. The first step is centralizing it — pulling multimodal data from across your systems into a single storage repository where your engineering team and AI agents can actually access it. From there, you can assess what’s useful, what’s usable, and what still needs to be labeled or anonymized before it’s ready to work with.
Assessing your data is like cleaning out the garage: first, you have to do a full inventory to know what you actually have before deciding on new data destinations and purposes.
The hidden data silos most organizations overlook
One of the less-discussed barriers to AI readiness is that many organizations lack a complete picture of their own data assets.
Financial assets are documented. Physical assets are tracked. But images, audio recordings, video files, email archives, documents, logs, and customer interaction histories often sit across systems with inconsistent labeling, unclear ownership, disparate tooling, and no centralized catalog.
Customer calls, support chat transcripts, QA screen captures, surveillance footage, and product images all contain operational insight that can inform AI applications, assuming they’re stored in a way that makes them accessible and usable. Most organizations haven’t done that inventory and don’t know what data they’re sitting on.
In our experience, organizations that broaden their definition of data — and build infrastructure to collect and manage it centrally — consistently find that their AI potential is larger than they initially estimated. The inverse is also true. Organizations that skip this step tend to hit the data silo problem mid-project, when data they assumed was available turns out to be fragmented, unlabeled, or simply missing.
The term “multimodal” describes this in practice: datasets that span formats—images, audio, video, text, and structured records—within the same pipeline. Managing multimodal data at a meaningful scale requires infrastructure decisions made well before an AI project kicks off.
Where the infrastructure question meets the strategy question
Here’s what aligning AI strategy with data strategy actually requires:
Inventory what you have. Before sourcing anything new, take stock of what exists. Support call recordings, usage footage, survey data, transaction histories—these are continuously generated across most organizations and rarely treated as AI assets. A governance committee (described below) is the natural owner of this inventory.
Establish governance before you deploy. Who can use which data, under what conditions, and for what purposes. When data governance is established early, teams get answers in days rather than weeks. When it’s deferred, it becomes a bottleneck mid-project.
Plan storage infrastructure for what you will have, not just what you have. A storage decision made today carries a different cost profile 18 months from now. Hyperscaler egress fees that look manageable on a pilot-scale workload become structural constraints at training scale. Archive tiers that appear to reduce costs carry retrieval latencies incompatible with active AI pipelines. Modeling these costs before committing to a provider architecture prevents the predictable trade-offs: smaller datasets, shorter retention windows, fewer training cycles.
Make the C-suite part of the conversation. IBM’s 2025 CEO Study found that 68% of AI-first organizations have mature, well-established data and governance frameworks. When the CEO is involved in AI governance decisions, the conversation stays connected to business strategy instead of fragmenting into siloed technical decisions.
The competitive advantage lives in the data (silos)
Foundation models are increasingly commoditized. The leading model today will be superseded within months, and capable alternatives are widely available from multiple providers. The latest generation from any major provider is capable, widely available, and will be superseded by something better within months. What cannot be licensed, replicated, or accessed by a competitor is the proprietary data your organization has built up over years of operation: customer patterns, process histories, institutional knowledge.
Getting that data foundation right is what separates AI programs that scale from those that stall.
Organizations that align their AI strategy with their data strategy from the start make fundamentally different infrastructure decisions. They choose storage providers that support active data movement without penalizing it. They build governance structures that give the right people access without creating bottlenecks. And they treat data growth as a business opportunity, not a cost to manage.
For most organizations, that shift in thinking starts with a simple question: who owns AI strategy? If the answer is “it’s fragmented across different teams,” then the second question is: what would it take to bring those conversations into one room?
Everything that follows—the data readiness, the governance, the infrastructure that actually works at scale—flows from that first alignment.
When something breaks in production, you find out fast. Understanding why it broke, before the damage spreads, is the hard part. That is where Site Reliability Engineering (SRE) teams lose the most time.
Think about the last time you got paged at 2 a.m. The alert said something broke, not why. You open four or five dashboards, cross-reference deployment logs with AWS CloudTrail events, and scroll through metrics. Twenty or thirty minutes burn before the picture comes together. That manual correlation is where resolution time balloons.
What if the investigation started before you opened your first dashboard?
That’s the idea behind connecting the new native PagerDuty Capability Provider in AWS DevOps Agent. The two systems now talk directly over a built-in OAuth 2.0 connection. When a PagerDuty incident triggers, the DevOps Agent starts investigating while responders are still getting oriented. Connecting them takes a few fields in a console.
What AWS DevOps Agent does
AWS DevOps Agent is a frontier agent built to help engineering teams investigate and resolve production incidents faster. The DevOps Agent works as a first responder, conducting federated investigations across your observability stack, tracing incidents from code changes all the way through to cloud infrastructure impact, and producing detailed mitigation plans. Beyond reactive investigations, it also proactively recommends improvements to your observability, infrastructure, and deployment pipelines to help prevent recurring issues. Through the AWS DevOps Agent web app, you can observe investigations as they unfold, access findings, and steer the analysis in real time.
The central concept is the Agent Space. Think of it as the boundary that defines what your agent can access. Your AWS account serves as the primary source, and from there you layer on secondary capabilities from telemetry providers like Datadog, Dynatrace, New Relic, or Splunk; pipeline tools like GitHub and GitLab; communications from PagerDuty and Slack; and custom Model Context Protocol (MCP) servers for anything else. Every investigation the agent runs, it learns. It maps relationships between your resources such as load balancers to services, services to databases, and deployments to config changes. One team we’ve worked with had the agent map hundreds of infrastructure relationships, and that number keeps growing with each investigation it completes.
PagerDuty, of course, needs no introduction to anyone who’s been responsible for resolving critical, customer-impacting incidents. Engineering teams rely on it to detect, triage, resolve, and learn from incidents. The native PagerDuty Capability Provider in AWS DevOps Agent connects the two directly. PagerDuty incident events drive AWS DevOps Agent investigations automatically. Findings flow back to the originating PagerDuty incident record, including root cause analysis and recommended mitigation steps. They are also available in the AWS DevOps Agent console and web app, giving your whole team visibility into what the agent discovered.
There’s a second piece to this integration worth understanding. By adding the PagerDuty MCP Server as a capability and configuring an AWS DevOps Agent skill for working with PagerDuty, you enable AWS DevOps Agent to query PagerDuty’s institutional memory during investigations. This includes past incidents, diagnostics, resolution patterns, and operational context across both AWS and non-AWS environments. This PagerDuty MCP Server-based connection is separate from the Capability Provider event flow and requires its own setup (covered in Step 6 below). The result is investigations informed by both current signals and prior incident history.
Why this matters
These are practical, tangible changes for your team:
Faster time to root cause. When a PagerDuty incident triggers, AWS DevOps Agent kicks off an investigation automatically. No one has to sign in to another tool, step through a wizard, or remember to initiate anything. The investigation is already running by the time you acknowledge your alert.
Real contextual analysis. The agent correlates PagerDuty incident data with Amazon CloudWatch metrics, AWS CloudTrail logs, application topology, and deployment history, plus telemetry from whichever third-party observability providers you’ve connected, like Datadog, Splunk, New Relic, or Dynatrace. It connects dots that would otherwise take humans significant time to even start connecting.
Investigations start when an incident triggers. AWS DevOps Agent automatically conducts the deep-dive investigation behind the scenes. It reports back its root cause analysis and proposed mitigation steps into the originating PagerDuty incident, with a link to the AWS DevOps Agent web app for more details.
Less time playing detective, more time fixing things. That manual data correlation across four or five tools? The agent handles it. Your people can focus on actually resolving the issue instead of building the investigation timeline by hand.
Nothing extra to host. The native PagerDuty Capability Provider means you’re not standing up additional infrastructure. No servers to manage, no endpoints to maintain on your side.
How the integration works
The architecture is straightforward. Here’s the flow:
AWS DevOps Agent and PagerDuty authenticate to each other using OAuth 2.0 Scoped OAuth. You register PagerDuty once at the AWS account level as a Capability Provider, and then add it to whichever Agent Spaces need it. Registration is shared across Agent Spaces in the account, so you don’t have to repeat the setup per team.
Once a PagerDuty incident triggers, AWS DevOps Agent picks up the event over the native connection and begins investigating:
Receives the PagerDuty incident event (service, severity, and initial context) via the native Capability Provider connection
If the PagerDuty MCP capability and AWS DevOps Agent skill are configured, queries PagerDuty for related historical incidents, past diagnostics, and resolution patterns to enrich the investigation
Examines AWS resource topology and the relationships between your infrastructure components through its knowledge graph
Reviews AWS CloudTrail logs for recent changes or anything that looks off
Queries Amazon CloudWatch and connected telemetry providers (Datadog, Dynatrace, New Relic, Splunk) for relevant metrics and traces
Cross-references deployment events from configured pipeline tools (GitHub, GitLab) against the incident timeline
Synthesizes potential root causes from all the evidence it’s gathered
The agent builds up a comprehensive picture by introspecting AWS observability data, pulling from connected capability providers, and leveraging the topology mapping that creates a knowledge graph of your application infrastructure. Every investigation it runs expands its understanding of how your resources connect. It discovers relationships you might not have explicitly documented, building a richer map with each incident it works.
Beyond raw data, the agent produces detailed mitigation plans with specific actions to resolve the issue, validate the fix, and revert if needed. The agent posts its findings, root cause summary, and recommended next steps directly to the originating PagerDuty incident record, giving your on-call team actionable information without them having to go digging.
A quick note on security, because it matters. The native connection uses OAuth 2.0 Scoped OAuth with a minimum set of PagerDuty scopes (incidents.readincidents.writeservices.readwebhook_subscriptions.readwebhook_subscriptions.write). AWS DevOps Agent only supports the newer scoped OAuth flow; legacy PagerDuty OAuth with a redirect URI is not supported. For inbound events from PagerDuty, only V3 webhooks are supported. Earlier webhook versions won’t work. Traffic flows over HTTPS.
Getting it set up
Setup comes in four phases: register PagerDuty as a Capability Provider at the account level, attach it to your Agent Space, configure the PagerDuty MCP server and AWS DevOps Agent skill for working with PagerDuty to enrich investigations, and verify things work end to end.
What you’ll need
An active AWS account with permissions to use AWS DevOps Agent
AWS DevOps Agent enabled in a supported AWS Region. You’ll create an Agent Space, which needs two AWS Identity and Access Management (IAM) roles (one for Agent Space operations, one for web app functionality). Both can be auto-created during setup
A PagerDuty account with permission to register OAuth apps, plus an Administrator role for Events Integration
A PagerDuty Advance license and a PagerDuty User API token (for the MCP integration in Step 6)
Your PagerDuty account subdomain (so if your PagerDuty URL is https://your-company.pagerduty.com, the subdomain is your-company)
An OAuth client ID and client secret from a PagerDuty app registered with OAuth 2.0 Scoped OAuth
Step 1: Create your Agent Space
Stand up an Agent Space in the AWS DevOps Agent console. This defines the boundary for what the agent can reach into and investigate.
Head to the AWS DevOps Agent console home page.
AWS DevOps Agent console home page.
Create a new Agent Space with a name and a short description, usually scoped to a service or application team’s responsibilities
Creating a new Agent Space with a name and description.
Create the Agent Space IAM roles (AWS DevOps Agent requires two IAM roles: one for Agent Space operations and another for its associated web app functionality). You can auto-create them during setup
Configuring the two IAM roles required for the Agent Space.
IAM roles can be auto-created during setup.
Your primary source (the AWS account you’re creating the Agent Space in) is added automatically. If you need the agent to investigate resources in other accounts, add those as secondary sources
The AWS account is added automatically as the primary source.
Step 2: Add supporting capabilities
Out of the box, the agent connects to Amazon CloudWatch for metrics, logs, and alarms, and can investigate AWS CloudTrail API activity and AWS X-Ray traces through its read-only permissions. That said, most teams don’t live entirely inside AWS tooling, and that’s where third-party capability providers pull their weight. You can wire in external tools to give the agent a fuller picture of your world:
Telemetry: Datadog, Dynatrace, New Relic, or Splunk, so the agent can pull metrics and traces beyond Amazon CloudWatch during investigations
Pipelines: GitHub or GitLab, so it can correlate deployments and code changes with incidents
Communications: Slack, for team coordination and investigation updates (PagerDuty is configured separately as a Capability Provider in Step 4)
MCP Servers: Custom integrations via OAuth or API keys for anything else in your stack
You don’t need everything connected on day one. Start with what makes sense and add more as you go. Each new capability helps the agent discover more infrastructure relationships and investigate more effectively.
Step 3: Set up application topology
Help the agent understand what your application landscape looks like:
Configure IAM roles to define the AWS topology scope for your Agent Space. The agent uses these permissions to determine which resources it can see and investigate
Give the agent time to discover and map the relationships between your resources (it does this automatically as it runs investigations)
Check the interactive topology visualization in the console and make sure your critical components are showing up correctly
If you want the agent to focus on certain tags or resource subsets, add those instructions to your skills
Step 4: Register PagerDuty as a Capability Provider
You register PagerDuty once at the AWS account level. From there, it’s shared across every Agent Space in the account.
First, create the OAuth app in PagerDuty:
In a separate browser tab, sign in to PagerDuty and go to Integrations > App Registration
In PagerDuty, navigate to Integrations then App Registration.
PagerDuty App Registration page.
Create a new app using OAuth 2.0 Scoped OAuth. AWS DevOps Agent does not support legacy PagerDuty OAuth with redirect URI
Create the app using OAuth 2.0 Scoped OAuth.
Under Permissions, grant the minimum scopes: incidents.readincidents.writeservices.readwebhook_subscriptions.readwebhook_subscriptions.write
Granting the minimum required OAuth scopes.
Turn on Events Integration so AWS DevOps Agent and PagerDuty can talk in both directions
Turn on Events Integration for two-way communication.
Copy your Client ID and Client Secret. You’ll paste them into the AWS console in a minute
Copy the Client ID and Client Secret from PagerDuty.
Then, register PagerDuty in the AWS DevOps Agent console:
In the AWS DevOps Agent console, open the Capability Providers page from the side navigation
In the Available providers section, find PagerDuty under Communication and choose Register
Find PagerDuty under Communication and choose Register.
On the Configure access in PagerDuty page, pick your PagerDuty region (US or EU) and enter your PagerDuty subdomain (if your PagerDuty URL is https://your-company.pagerduty.com, the subdomain is your-company)
Paste in the OAuth Client name, Client ID, and Client secret from PagerDuty. Confirm the minimum scopes (incidents.readincidents.writeservices.readwebhook_subscriptions.readwebhook_subscriptions.write)
Enter your PagerDuty region, subdomain, and OAuth credentials.
Review the configuration and choose Add
Review the configuration and choose Add.
Once registration goes through, PagerDuty shows up under the Currently registered section of the Capability Providers page.
PagerDuty appears under Currently registered after registration.
Step 5: Add PagerDuty to your Agent Space
PagerDuty is registered at the account level. Now connect it to the Agent Space that needs it:
In the AWS DevOps Agent console, pick your Agent Space
Open the Capabilities tab
In the Communications section, choose Add
On the Capabilities tab, choose Add in the Communications section.
Select PagerDuty from the list of available providers
Select PagerDuty from the list of available providers.
Step 6: Add PagerDuty MCP Server and configure the agent skill
The Capability Provider from the previous steps handles the event flow. When a PagerDuty incident triggers, AWS DevOps Agent investigates and posts findings back to the originating PagerDuty incident. To let the agent also pull context from PagerDuty during those investigations, you add two things: the PagerDuty MCP server as a custom MCP capability, and an AWS DevOps Agent skill for working with PagerDuty that tells the agent when and how to use it.
Prerequisites:
PagerDuty Advance license
A PagerDuty User API token (generate one at User Settings > API Access in PagerDuty)
Add the PagerDuty MCP server:
In your Agent Space, go to Capabilities tab > MCP Servers
Open the MCP Servers section on the Capabilities tab.
Add a new custom MCP server with the following configuration:
Server URL: https://mcp.pagerduty.com/mcp
For EU region PagerDuty accounts, use https://mcp.eu.pagerduty.com/mcp instead
Authentication: PagerDuty User API token in the format Token token=<your-pagerduty-api-key>
Add a new custom MCP server.
Configure the server URL and PagerDuty User API token.
Add the AWS DevOps Agent skill for working with PagerDuty:
The MCP server gives the agent access to PagerDuty tools. The skill tells the agent when and how to use them during investigations.
In your Agent Space, choose Operator access to open the web app in a separate browser window
Choose Operator access to open the web app.
In the Agent Space Operator web app, navigate to Knowledge and the Skills tab, then choose Add skill
On the Skills page, choose Add skill.
You can select Create skill to create a skill through a wizard, interactively chat with the agent to create a skill, or upload a skill zip file if you already have one
Choose how to create the skill.
Choose Create skill and fill out the skill instructions from the table below to create a skill
Fill out the skill instructions.
You should see the pagerduty-aws-devops-agent skill added to the AWS DevOps Agent
The pagerduty-aws-devops-agent skill added to AWS DevOps Agent.
Skill form instructions:
Field
Value
Name
pagerduty-aws-devops-agent
Description
Use this skill to interact with the PagerDuty Advance SRE Agent for incident response, troubleshooting, runbook generation, and log search. Invoke when the agent is investigating incidents, performing triage, root cause analysis, or resolving operational issues. This skill calls the sre_agent_tool from the pagerduty-advance-mcp MCP server to access PagerDuty’s historical incident data, diagnostics, and resolution patterns.
Status
Active
Agent Type
Generic
Instructions
See the skill instructions code block below.
Skill instructions (paste into the Instructions field):
# PagerDuty Advance SRE Agent

Use the PagerDuty MCP Server to call the `sre_agent_tool` for incident response and technical troubleshooting.

## Prerequisites

This skill requires the `pagerduty-advance-mcp` MCP server to be configured in the Agent Space under Capabilities > MCP Servers.

1. Extract the PagerDuty incident ID from the investigation context
2. Call the `sre_agent_tool` from the `pagerduty-advance-mcp` MCP server with:
   - `message`: a natural language question about the incident
   - `incident_id`: the PagerDuty incident ID
3. If follow-up queries are needed, continue calling `sre_agent_tool` with the same `incident_id` and a new `message`. Pass the `session_id` from the previous response to maintain conversation

## Tool Details

- **Tool name:** `sre_agent_tool`
- **MCP Server:** `pagerduty-advance-mcp`
- **Parameters:**
  - `message` (string, required) — natural language question about the incident
  - `incident_id` (string, required) — the PagerDuty incident ID
  - `session_id` (string, optional) — reuse from previous response for conversation continuity

## What the SRE Agent Can Help With

- Active incident analysis, triage, and resolution
- Root cause analysis and technical explanations
- Incident summaries and catch-ups
- Status updates for stakeholders
- Diagnostic checks and remediation recommendations
- Log interpretation and troubleshooting guidance
- Alert trigger analysis and explanations
- Change event analysis and impact assessment
- Playbook and runbook generation
- Past incident correlation and pattern recognition
- Service dependencies and related system analysis
- Real-time incident monitoring and alerting questions
Step 7: Test and validate
Before you call it finished, confirm things work end to end:
Create a test incident in PagerDuty
Confirm AWS DevOps Agent picks up the event and starts an investigation
Watch the investigation move along in the AWS DevOps Agent console or web app
Review the root cause summary, the mitigation plan, and the investigation findings
Verify that root cause analysis and mitigation steps appear on the originating PagerDuty incident record. If you’ve also connected Slack, check that updates land in your configured channel
Start with a limited scope for your initial Agent Space. Focus on a single application or service first. Get comfortable with the integration, tune your configuration, and then expand from there.
Troubleshooting
A handful of things we’ve seen trip people up:
Registration fails with invalid credentials. Double-check that the Client ID and Client secret were copied from the right PagerDuty OAuth 2.0 Scoped OAuth app. Legacy PagerDuty OAuth apps (the ones configured with a redirect URI) aren’t supported. When credentials do need to change, deregister from the Capability Providers page and re-register with the new values, rather than trying to edit in place.
Webhook events don’t trigger an investigation. AWS DevOps Agent only supports PagerDuty V3 webhooks. If your PagerDuty subscription is still on an older webhook version, upgrade to V3. Full details live in Webhooks Overview in the PagerDuty developer documentation.
PagerDuty shows as registered, but isn’t active in an Agent Space. Registering at the account level and adding the provider to an Agent Space are two separate actions. On the Agent Space’s Capabilities tab, check that PagerDuty appears under Communications. If it doesn’t, add it there.
Region or subdomain mismatch. If your PagerDuty account is on the EU service region, make sure you picked EU during registration. The subdomain has to match the first label of your PagerDuty URL exactly (for example, your-company from https://your-company.pagerduty.com).
Conclusion
Most of what happens in the first several minutes of incident response is undifferentiated heavy lifting like opening dashboards, tailing logs, correlating deployments with AWS CloudTrail events. With the native PagerDuty Capability Provider in AWS DevOps Agent, investigations automatically begin by the time you’ve acknowledged your alert, giving your engineers a head start on root cause analysis before responders have finished triaging.
Shan is a Senior Partner Solutions Architect specializing in generative AI at AWS, dedicated to solving complex user challenges. He advocates for innovative AI solutions, distributed architecture, and serverless technologies, helping users harness the power of generative AI in their cloud journey. You can reach him on LinkedIn.
Laith Al-Saadoon
Laith Al-Saadoon is a Principal AI Engineer at AWS. He created and launched AWS MCP Servers (30M+ PyPI downloads) and contributes to Strands Agents SDK — AWS’s open-source framework for building AI agents — along with other agentic AI open-source projects like Mem0 and Agno. He drives AWS’s autonomous software development and agentic AI strategy and builds production agentic systems that make agents work for the world’s largest companies. In his personal time, Laith enjoys the outdoors — fishing, photography, drone flights, and hiking with his wife.
Scott Schreckengaust
Scott Schreckengaust brings a biomedical engineering degree and decades of deep domain expertise in healthcare and life sciences to emerging technologies and AI. He’s spent his career building—from automating lab workflows and integrating enterprise systems to architecting full-stack software deployments in regulated environments. Now working as an AI engineer, Scott continues what he’s always done best: partner with customers to uncover their scientific and operational challenges, then engineer solutions that scale. His journey from the bench to the cloud reflects a consistent belief: the best technology is invisible—it just works.
A proposed FCC rule would kill burner phones: phones whose accounts are not attached to a particular person.
The FCC plans to do this by legally forcing the country’s telecoms to store a wealth of personal information about essentially all phone customers, including a government issued identification number and their physical address, alarming privacy advocates and civil rights activists who compare the measures to those from authoritarian countries where it can be difficult to buy a mobile phone plan without giving up your identity.
The proposed change would drastically shake up how people obtain phone plans in the U.S., and have all sorts of privacy and cybersecurity knock-on effects. The FCC is proposing the data collection partly as a way to combat scammers, with telecoms being required to collect other information on business and foreign customers like the intended use case of their bulk phone plan purchase and their IP address. But the changes would mean telecoms collect data on all new and renewing customers, and the FCC provides a long list of other things that the collected data could help authorities with.
This is a current list of where and when I am scheduled to speak:
I’m giving a keynote at Cybernation 2026 in Berlin, Germany, on June 24, 2026.
I’m speaking at the Potsdam Conference on National Cybersecurity at the Hasso Plattner Institut in Potsdam, Germany. The event runs June 24–25, 2026, and my talk will be the evening of June 24.
I’m giving a fireside chat for Epicenter Works, to be held at Kaffee Alt Wien in Vienna, Austria, on Friday, June 26, 2026.
I’m participating (via Zoom) in a panel discussion at Quantum.Tech World in Boston, Massachusetts, USA, on Friday, June 26, 2026. The topic is “Q-Day’s Shortening Deadline: Immediate Solutions.”
Let no one accuse Bernie Sanders of ducking the big questions. Writing in the New York Times last week, the senator asked: “Will the future of humanity be determined by a handful of billionaires who have promoted and developed AI, with virtually no democratic input, who stand to become even richer and more powerful than they are today?”
We agree entirely that this is one of the most potent questions facing global democracy today. Our book, Rewiring Democracy, surveys the emerging uses for and impacts of AI in democracy around the world and reaches the same conclusion: that the most urgent risk posed by AI is the concentration of power, wealth and control among tech oligarchs.
And yet we reached a vastly different conclusion than Sanders on what to do about it.
The senator points to a once radical but increasingly popular solution: creating a US sovereign wealth fund by taking 50% stock in AI companies such as Anthropic, OpenAI and xAI. The argument in favor of this is twofold. One: it would establish democratic control over the AI companies, giving the government “the power, through its voting shares and an equal representation on each company’s board, to block decisions that hurt our citizens and to push for policies that help them”. Two: it would return a big chunk of the economic rewards of soaring AI valuations to the public, ensuring “trillions of dollars potentially generated by AI are used to improve the lives of all of us”.
We laud both these goals unreservedly.
We wholeheartedly agree that there must be public influence over the development and use of AI, just as we demand the government intervene to ensure that automakers, drugmakers, airlines and other industries balance profitability with public safety and the public interest. And we credit the senator with recognizing that there are more levers for the government to pull beyond the promulgation of regulation to achieve this.
And we also agree that the obscene, dangerous accumulation of wealth among AI companies needs to be disrupted. As OpenAI and Anthropic race to be minted as the world’s latest trillion-dollar AI companies, we should recognize that—whether or not it constitutes a bubble—these staggering market capitalizations represent a transfer of wealth. The flow of money goes from the smaller businesses and actual people using AI, and being subjected to it, to the owners of these tech companies.
That includes the world’s 86 AI billionaires “seeking to maximize their power and profit” aiming to decide the “fate of humanity behind closed doors in Silicon Valley”, as Sanders said.
And yet, while we do not outright oppose the taking of AI company stock, or of a US sovereign wealth fund, there are better ways to achieve Sanders’ stated goals.
Public ownership of these companies entangles corporate profit and valuation with the public interest. It would incentivize the government to clear regulations, permit the exploitation of workers and users, suppress competition, encourage AI adoption regardless of the responsibleness of the implementation or appropriateness of the use case, and otherwise act on behalf of corporate interests.
After all, if growing, say, Nvidia from its first $5tn in value to its next $5tn also represents a doubling in value of this segment of the sovereign wealth fund, then you can expect the fund managers to support chip sales, foreign and domestic, with the same zeal as the company’s private investors.
This is not an effective way to influence corporations to act in the public interest. In fact, it makes corporate influence on the government more likely.
We should be wary of this possibility because we’ve seen it before. Ownership of substantial stakes in oil companies by the Norwegian sovereign wealth fund, the world’s largest, does not seem to have steered those corporations to pro-environmental policies. Instead, the Norwegian government’s dependence on those companies has inhibited them from taking climate action. Here in the US, public employee pension funds merit the same criticism: the fiduciary duty to generate wealth overwhelms any intention to direct their corporate holdings in the public interest.
A better answer is to separate the two goals. The standard way to share private rewards with the broader society that made them possible is taxation. Senator Elizabeth Warren has proposed an excise tax on datacenters’ energy use. Others have proposed an AI token tax, which has much the same effect.
As to the goal of reshaping AI in the public interest, we have proposed an AI Public Option. The concept is for governments, be it federal or state, to establish publicly developed and operated AI models run by public institutions under democratic control. The idea is not to eliminate corporate AI or to seize it as a public asset, but rather for government to provide a competitive baseline that private AI offerings must meet or exceed to win business—just like the notion of a healthcare public option.
The Swiss have trailblazed this approach. Apertus is a large language model built by Swiss public servants, researchers at Swiss universities, using appropriately licensed training data and pre-existing Swiss public supercomputing infrastructure powered by renewable energy.
While Apertus doesn’t seriously compete with the latest OpenAI and Anthropic models on performance benchmarks, it blows them out of the water in transparency, sustainability and compliance with EU regulations including adherence to copyright. It’s a nascent project, but suggestive of how public institutions can apply competitive pressure for corporate actors to behave responsibly.
Don’t confuse public AI with “sovereign AI“, the notion that every country needs to invest in domestic AI infrastructure. Sovereign AI is often invoked as a marketing scheme for big tech companies looking to sell to governments; it demands public investment without guaranteeing public control.
Sanders is a bold and savvy political operator. So why is he pursuing the sovereign wealth fund strategy when he must be aware of these risks? It may be due to another argument he makes in his op-ed: that the Trump administration and the billionaire owners of AI are aligned to the idea.
It’s expedient to capitalize on rare moments of seeming alignment across diverse political factions, but it also behooves us to ask why the AI billionaires are open to this extraordinary intervention. The answer, of course, is that they believe that for every dollar ceded to government stock expropriation, they will get back more in favorable government policies to protect that newfound investment.
Energy taxation is a straightforward way to make AI companies pay for the social disruption of their technologies. Public AI represents a non-monetary mechanism for governments to shape the development of AI, complementary to direct regulation of private actors, one with a far greater chance of influencing corporate behavior towards the public interest. We urge Sanders and other political leaders to consider them.
This essay was written with Nathan E. Sanders, and originally appeared in The Guardian.
AWS DevOps Agent can investigate a growing range of production incidents autonomously. It diagnoses CrashLoopBackOff failures, traces ConfigMap deletions through audit logs, and correlates Amazon CloudWatch metrics with cluster events — all without human intervention.
But AWS DevOps Agent has a visibility boundary. When the data it needs lives outside its native integrations — on a node’s operating system, inside a third-party monitoring tool, behind a database’s internal diagnostics — the agent stalls. It can describe symptoms, but it can’t reach the evidence needed to identify root causes.
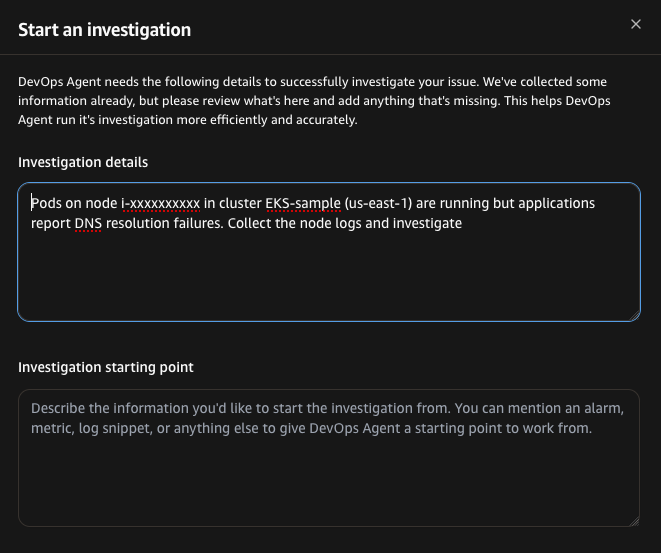
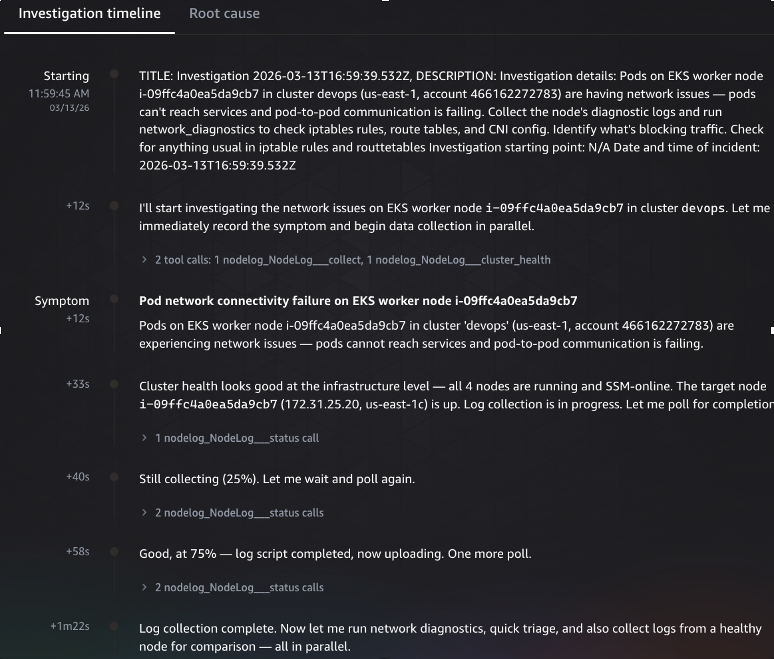
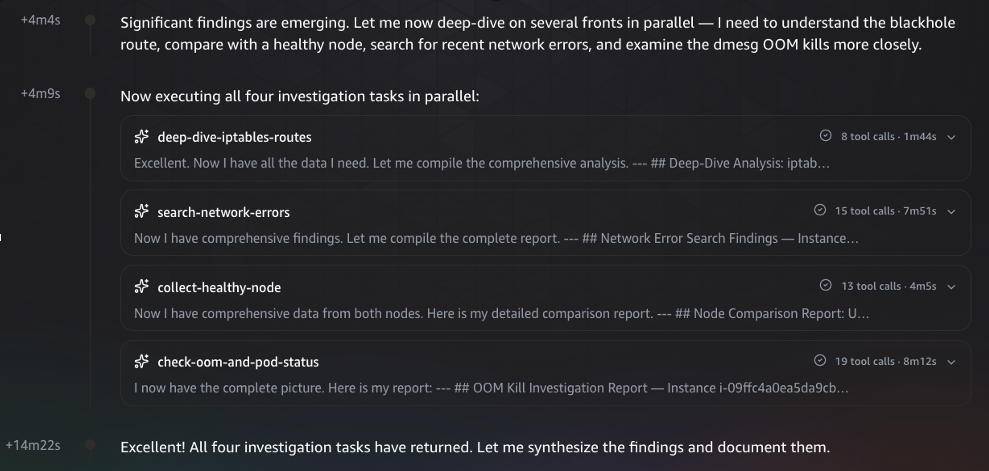
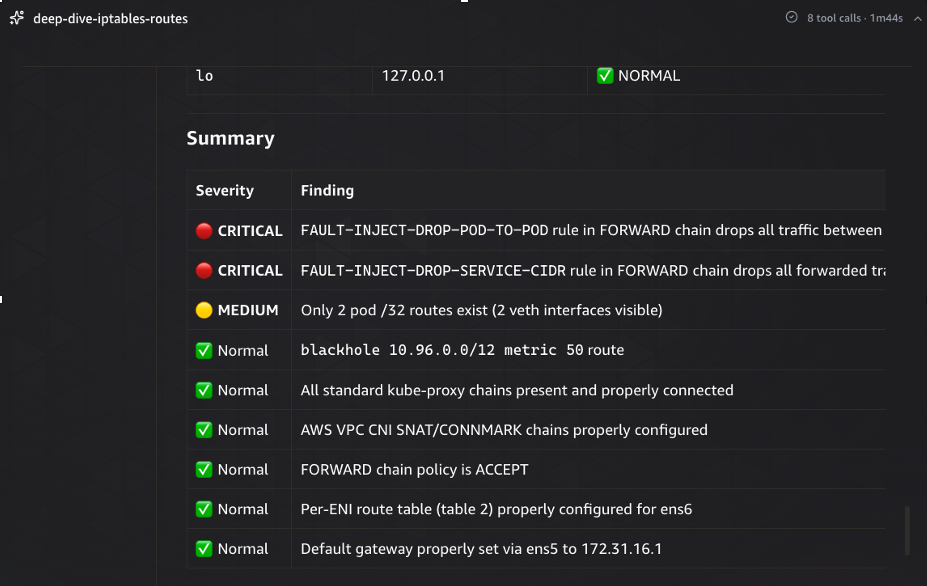
This post shows how to extend AWS DevOps Agent by building a custom Model Context Protocol (MCP) server that bridges that gap. Using a concrete example, we give AWS DevOps Agent structured access to Amazon EKS worker node diagnostics and explain how the same approach applies to data sources the agent can’t natively reach. By the end of this walkthrough, you will have a working MCP server that gives AWS DevOps Agent access to 20+ node-level log sources — providing autonomous investigation capabilities that can assist in root cause analysis compared to manual SSH sessions.
Prerequisites
Before you begin, make sure you have the following:
An Amazon EKS cluster with AWS Systems Manager Agent (SSM Agent) running on the worker nodes (included by default on Amazon EKS optimized AMIs)
Node.js v18 or later
AWS CLI v2
AWS CDK v2 installed and bootstrapped in your target account and Region
An AWS account with permissions to create IAM roles, Lambda functions, and Amazon S3 buckets
Familiarity with Amazon EKS, AWS Systems Manager, and the Model Context Protocol (MCP)
How AWS DevOps Agent discovers custom tools through MCP
MCP is an open standard that defines how AI agents discover and invoke external tools. AWS DevOps Agent supports connecting to custom MCP servers, which means you can expose new capabilities to it without modifying the agent itself. When you connect an MCP server to AWS DevOps Agent, the agent automatically discovers the available tools, understands their schemas, and calls them as part of its investigation workflow. You build and connect the MCP server — the agent handles the rest.
The extensibility model follows three steps: first, identify the data source that AWS DevOps Agent cannot natively access; second, build an MCP server that wraps safe, structured access to that data source; and third, connect the MCP server to AWS DevOps Agent so it can incorporate the new tools into its investigations.
Three design principles make this work. Return structured data, not raw text — pre-index findings with severity levels and stable IDs so the agent can filter, reference, and correlate them. Never give the agent a shell — mediate interactions through a controlled, auditable execution model. Make tools composable — design tool outputs to serve as inputs to other tools, creating a chain of evidence the agent can follow.
Why Amazon EKS node OS visibility matters
AWS DevOps Agent integrates with Amazon EKS to inspect pod status, read container logs, query CloudWatch Container Insights, and correlate cluster events. This covers application crashes, container-level resource exhaustion, and configuration drift.
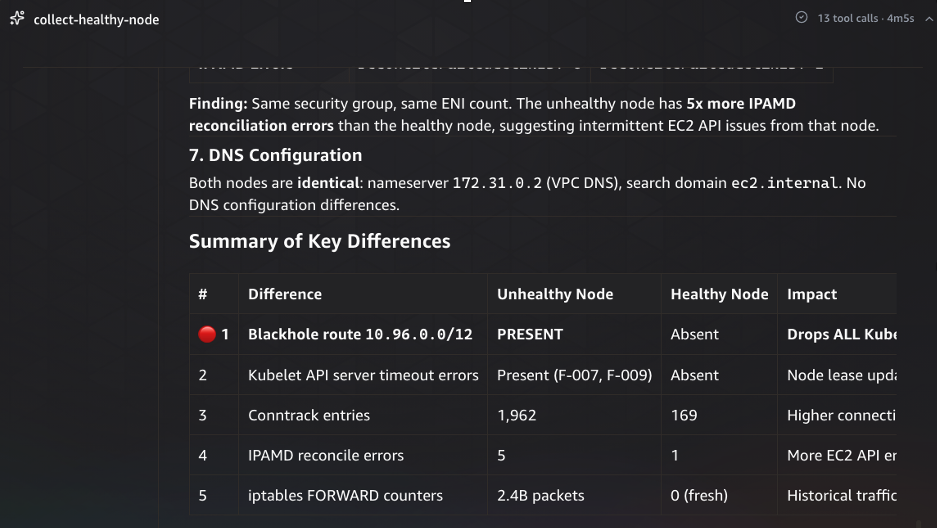
However, EKS production issues with nodes originate in a layer these tools cannot reach: the node operating system. Artifacts such as iptables rules, full CNI configuration and IPAMD state, route tables, conntrack entries, dmesg kernel messages, containerd runtime logs, sysctl parameters, ENI metadata, and the unfiltered kubelet journal exist exclusively on the node. These artifacts are the primary evidence for diagnosing IP allocation failures, DNS resolution issues, network policy enforcement problems, storage mount timeouts, and node registration failures.
Integrating AWS DevOps Agent with an EKS node diagnostics MCP server
The sample-eks-node-diagnostics-mcp repository (sample-eks-node-diagnostics-mcp repository) demonstrates this pattern. It provides an MCP server that gives AWS DevOps Agent structured access to node-level diagnostic data, backed by AWS Systems Manager (SSM) Automation for safe, auditable execution.
How it works
Figure 1: End-to-end architecture of the EKS Node Diagnostics MCP server. AWS DevOps Agent discovers and invokes 19 tools through AgentCore Gateway, which dispatches SSM Automation runbooks to worker nodes for log collection and uploads results to Amazon S3 for extraction and indexing.
AWS DevOps Agent calls a collect tool with an instance ID.
The MCP server dispatches an SSM Automation execution to the target node, running the AWS-managed AWSSupport-CollectEKSInstanceLogs runbook.
The runbook collects 20+ log sources — kubelet, containerd, iptables, CNI config, route tables, dmesg, sysctl, ENI metadata, IPAMD logs, and more — packages them into an archive, and uploads it to an Amazon S3 bucket where you configure AWS KMS encryption.
A processing pipeline extracts the archive, pre-indexes errors with severity classification and stable finding IDs, and provides the results to you through additional MCP tools.
The server exposes tools for log collection, pre-indexed error retrieval, cross-file search and correlation, structured network diagnostics, and live packet capture. A typical agent workflow chains these together: collect → status → errors → search → correlate → read → summarize, with each step producing outputs that feed into the next.
AWS DevOps Agent does not get a shell on the node. Every interaction is mediated by SSM Automation — an auditable, IAM-controlled, non-interactive execution model.
Connecting through Amazon Bedrock AgentCore Gateway
The reference implementation uses Amazon Bedrock AgentCore Gateway to expose the Lambda-backed MCP server to AWS DevOps Agent. AgentCore Gateway converts Lambda functions into MCP-compatible tools and handles authentication, protocol translation, and tool discovery through a single managed endpoint.
The integration follows three steps:
Step 1: Create an OAuth authorizer with Amazon Cognito. The CDK stack provisions a Cognito User Pool configured for the OAuth 2.0 client credentials flow. This secures inbound access to the gateway — only clients with valid tokens can invoke tools.
Step 2: Create a gateway and register the Lambda as a target. Register the Lambda function that handles tool invocations as a target on the gateway. AgentCore Gateway automatically discovers the tool schemas from the Lambda and makes them available through the MCP protocol. The gateway endpoint becomes the single MCP URL for AWS DevOps Agent.
Step 3: Connect AWS DevOps Agent. Register the MCP server at the account level in the AWS DevOps Agent console, providing the gateway URL and OAuth configuration. Then allowlist the specific tools each Agent Space needs. AWS DevOps Agent authenticates by obtaining a JWT from the Cognito token endpoint using the client credentials grant and passes it as a Bearer token in requests to the gateway URL.
Deploying the MCP server
Deploy the entire stack using AWS CDK :
git clone https://github.com/aws-samples/sample-eks-node-diagnostics-mcp.git cd sample-eks-node-diagnostics-mcp chmod +x deploy.sh ./deploy.sh
The script walks you through cluster selection and node role configuration. Have the following ready before running the script: your target EKS cluster name, the IAM role ARN you attached to your worker nodes, and the AWS Region where your cluster runs. The script outputs your MCP gateway URL, OAuth credentials, and token endpoint — everything you need to configure the connection in AWS DevOps Agent. See the repository README for detailed deployment instructions, CI/CD mode, and prerequisite details.
Seeing it in action
To demonstrate the MCP server’s capabilities, we walk through a realistic node-level failure scenario on a test EKS cluster. We manually inject a fault that blocks pod DNS resolution at the iptables level — an issue that is invisible from kubectl since pods appear Running — then show how AWS DevOps Agent investigates and identifies the root cause using the MCP server’s tools.
Setting up the scenario
Start with an EKS cluster that has a managed node group with SSM Agent running (included by default on Amazon EKS optimized AMIs). Deploy a sample workload to one of the nodes:
Identify the node and instance ID where the pods are running:
kubectl get pods -n demo-app -o wide
Injecting the fault
WARNING: The following commands will disrupt DNS resolution for all pods on the target node. Only run these in a non-production test environment. Do not execute on production nodes.
Connect to the target node using SSM Session Manager and run the following commands to block pod DNS traffic at the iptables level. This simulates a subtle networking issue – pods continue running but can’t resolve DNS, and the root cause is only visible in the node’s iptables rules:
# Block pod traffic to kube-dns ClusterIP — pods run but DNS fails # Only affects FORWARD chain (pod traffic), not the node's own DNS sudo iptables -I FORWARD -d 10.100.0.10/32 -p udp --dport 53 -j DROP sudo iptables -I FORWARD -d 10.100.0.10/32 -p tcp --dport 53 -j DROP
Replace 10.100.0.10 with your cluster’s kube-dns ClusterIP (kubectl get svc kube-dns -n kube-system -o jsonpath=’{.spec.clusterIP}’).
This fault is particularly insidious because kubectl get pods shows all pods in Running state. The applications fail with DNS resolution errors, but there is no Kubernetes event or pod status that points to the cause. The iptables DROP rules targeting the kube-dns ClusterIP exist only in the node’s firewall configuration — a layer that no Kubernetes API call can inspect.
Investigating with AWS DevOps Agent
An engineer notices applications reporting DNS failures and asks AWS DevOps Agent to investigate:
“Pods on node i-xxxxxxxxxx in cluster EKS-sample (us-east-1) are running but applications report DNS resolution failures. Collect the node logs and investigate.”
Figure 2: Starting an investigation in AWS DevOps Agent. The engineer provides the symptom description and incident timestamp, and the agent autonomously plans and executes the investigation.
AWS DevOps Agent begins the investigation by recording the symptom and launching two parallel actions: collecting node logs via the nodelog_collect tool and checking cluster health. The cluster health check confirms all four nodes are running and SSM-online. The agent then polls the log collection status, tracking progress from 25% through 75% to completion. Once collection finishes, the agent fans out into parallel workstreams — running network diagnostics, performing quick triage, and collecting logs from a healthy node for comparison.
Figure 3: Investigation timeline showing the initial data collection phase. The agent identifies the symptom, confirms cluster health, collects node logs via SSM Automation, polls for completion, and launches parallel diagnostic workstreams.
With the initial data collected, the agent launches four parallel investigation tasks to maximize coverage and minimize time-to-root-cause: (1) deep-dive-iptables-routes examines the node’s firewall rules and routing table in detail, completing in 1 minute 44 seconds across 8 tool calls; (2) search-network-errors scans the collected logs for network-related error patterns, running 15 tool calls over 7 minutes 51 seconds; (3) collect-healthy-node gathers the same diagnostics from a known-good node for comparison, taking 13 tool calls over 4 minutes 55 seconds; (4) check-oom-and-pod-status investigates kernel OOM kills and pod health, executing 19 tool calls over 8 minutes 12 seconds. Each task produces a structured report that feeds into the final synthesis.
Figure 4: Parallel investigation phase. The agent runs four concurrent deep-dive tasks — iptables/route analysis, network error search, healthy node comparison, and OOM/pod status check — then synthesizes the findings into a unified report.
The iptables and route table deep-dive reveals the root cause. The agent identifies two CRITICAL findings: a FAULT-INJECT-DROP-POD-TO-POD rule in the FORWARD chain that drops inter-pod traffic, and a FAULT-INJECT-DROP-SERVICE-CIDR rule that drops forwarded traffic to the service CIDR range. It also flags a MEDIUM-severity finding — a blackhole route for 10.96.0.0/12 (the Kubernetes service CIDR) that does not exist on healthy nodes. The remaining checks come back normal: kube-proxy chains are intact, AWS VPC CNI SNAT/CONNMARK chains are properly configured, and the default gateway and ENI route tables are correct. This structured severity classification allows the agent to immediately focus on the critical items.
Figure 5: Deep-dive findings from the iptables and route table analysis. Two CRITICAL fault-injection DROP rules in the FORWARD chain are identified as the primary issue, while standard networking components — kube-proxy, VPC CNI, and routing — check normal.
The healthy node comparison confirms the diagnosis. The agent compares the unhealthy node against a known-good node across seven dimensions: security groups, ENI count, DNS configuration, iptables rules, route tables, conntrack entries, and IPAMD state. The key differences are definitive: the blackhole route for 10.96.0.0/12 exists only on the unhealthy node, kubelet API server timeout errors appear only on the unhealthy node, conntrack entries are 12x higher (1,962 vs 169), and IPAMD reconciliation errors are 5x more frequent. The iptables FORWARD chain counters show 2.4 billion packets processed on the unhealthy node versus zero on the freshly-started healthy node — confirming sustained traffic disruption.
Figure 6: Healthy node comparison confirming the diagnosis. The agent compares diagnostics across both nodes and identifies five key differences — the blackhole route, elevated conntrack entries, and high FORWARD chain packet counts exist only on the affected node.
The agent synthesizes the findings into a definitive root cause determination. It identifies a fault-injection namespace on the EKS cluster that is running chaos experiments, introducing three specific network-disrupting modifications on the target node: (1) a FAULT-INJECT-DROP-POD-TO-POD iptables rule in the FORWARD chain that drops inter-pod traffic, (2) a FAULT-INJECT-DROP-SERVICE-CIDR rule that drops forwarded traffic to the Kubernetes service CIDR, and (3) a blackhole route for 10.96.0.0/12 that does not exist on healthy nodes. Together, these three modifications create a multi-vector network disruption — pods appear Running but cannot communicate with each other or reach Kubernetes services, including kube-dns.
Figure 7: Root cause determination. The agent traces the multi-vector network disruption to three fault-injection modifications — two iptables DROP rules and a blackhole route — deployed by a chaos experiment namespace on the target node.
Cleaning up the fault
To restore the node after the demo, connect via SSM Session Manager and run:
The EKS node diagnostics use case demonstrates the pattern, but the architecture generalizes to systems where the SSM Agent is running and you can define an SSM Automation runbook to collect the data you need.
For example, an EC2 instance with SSM Agent can use this same approach — collect OS-level logs, network configuration, package state, or application diagnostics through a custom or pre-built SSM Automation runbook, upload results to S3, and expose them through MCP tools. The same applies to ECS container instances (Docker daemon logs, ECS agent state, iptables), on-premises servers registered via SSM Hybrid Activations, or managed nodes in your fleet.
The pattern also extends beyond SSM-managed hosts. Network devices can be reached through API calls to their management planes, databases through read-only diagnostic queries, and third-party APM tools through vendor API integrations. In each case, the same three-step approach holds: identify the unreachable data, build an MCP server that wraps safe access to it, and connect it to AWS DevOps Agent.
When to use this approach This pattern works well for incident response where diagnostic data lives outside AWS DevOps Agent’s native reach, fleet-wide triage where manual access to individual systems is impractical, and cross-source correlation where evidence spans multiple log sources.
It is not a replacement for continuous monitoring (use CloudWatch Container Insights or Prometheus for real-time alerting), log shipping (if you have compliance requirements for continuous retention), or native integrations where the agent already has access to the data source.
The reference implementation requires SSM Agent running on the nodes with appropriate IAM permissions. It is a proof of concept — validate it in non-production environments before using it with production workloads.
Clean up
Cost considerations: This solution uses AWS Lambda, Amazon S3, AWS KMS, Amazon Cognito, and Amazon Bedrock AgentCore Gateway. Costs vary based on usage. Lambda charges apply per invocation and duration. S3 charges apply for log storage. KMS charges a per-key monthly fee plus per-request charges. Cognito charges per monthly active user. AgentCore Gateway pricing is based on API calls. For current pricing details, see the AWS Pricing page for each service. To minimize costs during evaluation, delete the stack when not in use.
Remove the deployed resources by running cdk destroy from the repository root. The S3 log bucket uses a RETAIN removal policy — delete it manually after stack destruction if needed.
Conclusion
MCP provides a standardized extensibility mechanism that lets you bridge visibility gaps in AWS DevOps Agent without modifying the agent itself. The pattern is straightforward: identify the unreachable data source, build an MCP server that wraps safe and structured access to it, and connect it to AWS DevOps Agent through Amazon Bedrock AgentCore Gateway. The agent handles the reasoning. The MCP server handles the data access.
To get started:
Deploy the reference implementation (sample-eks-node-diagnostics-mcp repository) in a non-production environment.
Review the MCP specification (MCP specification).
Explore the Amazon EKS troubleshooting documentation (Amazon EKS troubleshooting documentation).
Connect custom MCP servers to AWS DevOps Agent — see the Connecting MCP Servers guide in the AWS DevOps Agent documentation.
Set up AgentCore Gateway — see the Amazon Bedrock AgentCore Gateway quick start guide.
The surveillance company Leonardo wants more data:
A surveillance company plans to add sensors to automatic license plate readers (ALPRs) that would mean the devices, as well as capture the license plate of passing vehicles, would also sweep up unique identifiers of mobile phones, wearables, and other Bluetooth-enabled devices in those cars, potentially letting law enforcement identify specific drivers or passengers.
The technology, called SignalTrace, would turn ALPR cameras from devices focused on tracking cars to ones that can more readily track the location of particular people. ALPR cameras have become a commonly deployed technology all across the U.S.; SignalTrace would make some of those cameras capable of collecting much more data.
Yes, it’s bad that more companies are collecting this level of surveillance data. But all of this pales in comparison to the type and quantity of data our smartphones already collect about us.
AI infrastructure is difficult to observe directly. That’s because AI systems are highly distributed. They span storage platforms, GPU clusters, training pipelines, and multiple cloud providers—and those looking to optimize their stacks have to build out a visibility layer that takes all of those things into account. Data is constantly moving between different tools and infrastructure layers, and it’s imperative to understand how and why.
Learn how to structure your data for AI
Your organization is ready to prioritize AI-first projects. But is your data ready? Whether you’re developing AI-powered products to bring in new revenue or building internal AI tools to increase productivity, your AI initiatives start with the data you already have and how it’s stored.
One critically important aspect: understanding the network layer. Network telemetry makes it possible to observe how data actually moves between environments: which endpoints exchange data, how long those connections persist, and how much information flows between them over time.
Since re-launching the Network Stats series in November 2025, we have had direct visibility into what that movement looks like in practice. Backblaze has always been an advocate for the benefits of a multi-cloud design, and our position as a pure storage provider offers a unique perspective on the movement of storage to the neoclouds where AI processing, inference, and model training take place. Our network telemetry captures data flows across those connections in real time.
The Q1 2026 Network Stats report covers a full quarter of observed network traffic across those connections. This makes it possible to see patterns in how AI workloads move data between storage and compute environments.
However, while these patterns are real and worth studying, they need to be interpreted carefully. A single quarter of data may highlight emerging behaviors, but those behaviors may not reflect how AI infrastructure will ultimately be designed.
And, as we often say—the dataset is young, and network landscape is going through a fundamental change. It will be exciting to see what happens over time, but we, as a community, should be discerning.
What network telemetry actually reveals
Network-level metrics expose behaviors that application or storage metrics often don’t reveal. Application logs can show what a system is trying to do, and storage metrics can show how much capacity is being used. But, it’s the network layer that reveals how data actually moves between systems.
Several network patterns help make that movement visible:
Traffic volume shows how much data is flowing through the system.
Connection persistence indicates whether that data moves through many short-lived exchanges or a smaller number of sustained transfers.
Endpoint concentration and magnitude (that is: how much data is transferred per IP address) show how many systems are involved in those exchanges and how much data each endpoint moves.
Ingress and egress data shed light on different kinds of workloads.
When we examine the network data, it begins to reveal how modern workloads operate.
One of the clearest examples appears in the Q4 2025 Network Stats data. In that quarter, neocloud traffic was concentrated around a relatively small number of endpoints, and those connections carry sustained, high-magnitude data transfers over time. Compared with traditional internet traffic patterns, fewer connections are responsible for moving a much larger share of the data. We call those elephant flows.
In Q1 2026, we dug into the ways that the data also show a geographic pattern. Neocloud traffic clusters in specific regions with dense compute and interconnect infrastructure, rather than being evenly distributed across the network.
Caption: Bits moved on the Backblaze network by country. Caption: Bits moved on the Backblaze network by country, but excluding the United States. Caption: Bits moved on the Backblaze network, limited to U.S. states.
These signals in the network data are meaningful. They reveal important characteristics of how AI workloads behave across infrastructure. But, they do not by themselves explain what those patterns imply for infrastructure design.
What a single quarter of network data cannot tell us
A single quarter of telemetry can reveal emerging patterns, but it cannot distinguish durable infrastructure trends from short-term experimentation.
AI infrastructure is still evolving quickly. New training frameworks are emerging, GPU availability continues to shift, and companies are experimenting with different compute providers and network connections. Because of this, infrastructure decisions today are still temporary. Teams are building pipelines with the resources they can access now, and many are finding that multi-cloud architectures allow them the ability to optimize their tech stack—traditionally only considered cost play, this is far more important from a performance perspective.
That means some of the patterns visible in current network data aren’t constraints for anyone attempting to deal with a changing landscape. For example, these are some of the patterns we can’t attribute causality to in a vacuum:
Regional clustering may simply result from where GPU capacity happens to be available today.
Changes in traffic mix may depend on how early training pipelines are assembled across providers.
Differences in connection patterns may be influenced by how mature different platforms’ network interconnects are.
As these conditions change, the same workloads may produce different network signatures. And, more importantly, a flexible, interoperable tech stack means that enterprises can be responsive.
This also is why network telemetry becomes much more informative when observed quarter by quarter and over time. Multiple quarters of data make it easier to distinguish temporary conditions from infrastructure patterns that persist.
But even before those longer-term patterns emerge, network telemetry still provides valuable insight into how AI infrastructure behaves under current conditions.
How to interpret network telemetry data
The patterns visible in network telemetry become more useful when we consider what they imply for infrastructure planning. Rather than describing the traffic itself, they help engineers understand the operational demands AI workloads place on real systems.
Sustained high-volume transfers point to the level of throughput infrastructure must support. If large datasets move repeatedly across the network, drive IOPS, API servers, load balancers, network switch pairs, and other interconnect layers must be capable of sustaining those flows without becoming bottlenecks.
Traffic concentrated among a relatively small number of systems suggests that storage and compute environments may become tightly coupled in real deployments. AI pipelines often depend on repeated exchanges between specific components rather than distributing activity evenly across many endpoints. For example, it may make sense to co-locate storage on flash hardware when you’re immediately feeding GPUs; however, your warm or cold data may be better served in different environments.
Regional clustering highlights where compute capacity and high-bandwidth interconnect infrastructure are currently concentrated. For operators, that can indicate where AI workloads are most likely to run and where supporting infrastructure must perform reliably at scale.
For engineers and infrastructure planners, data like this helps answer practical questions such as:
Where sustained high-throughput networking will be required
How tightly storage and compute systems may become coupled
Which regions currently concentrate the infrastructure supporting AI workloads
Taken together, this information provides a useful view into the operational demands AI workloads place on infrastructure today. They do not, however, define how AI infrastructure will ultimately be designed.
Infrastructure decisions shouldn’t be locked to early signals
The real problem is that, in traditional environments, infrastructure decisions tend to stick. When a team chooses where data lives, how pipelines move it, and which providers are connected, those choices quickly become part of the system.
Over time, early infrastructure decisions can quietly lock an organization into a specific architecture, even if better options appear later.
Once large datasets are stored in a particular environment, changing course becomes slow and expensive. Moving the data can take days or weeks. Pipelines may need to be rewritten. Teams may have to rebuild integrations between storage and compute systems entirely.
This doesn’t mean early signals should be ignored. Network telemetry still shows how workloads behave today, and can indicate what happens tomorrow. That visibility helps teams understand the operational demands AI workloads place on infrastructure.
These observations should be treated as a snapshot of a system that is still evolving. Infrastructure that allows data to move easily between platforms and compute environments gives teams the freedom to adapt as tools, providers, and architectures change. In fast-moving AI ecosystems, flexibility can matter just as much as raw performance.
Using network telemetry responsibly means learning from the pressures visible today while recognizing that the systems producing these patterns are still taking shape.
The U.S. military has likely been quietly broadcasting codes for its global encryption network using public GPS for nearly 20 years, turning each satellite into a hidden “numbers station,” according to Steven Murdoch…
That means every device that uses GPS has been receiving hidden government information for years, and nobody outside the military knew it until now.
[…]
Murdoch discovered that this particular sentinel was transmitted by all 31 operational satellites within a window of a few hours on May 26, 2011, potentially heralding the activation of a new operational system. He confirmed that this timeline coincided with the rollout of the military’s Over-the-Air Distribution (OTAD) and the Over-the-Air Rekeying (OTAR) by cross-referencing declassified documents, including a 2015 presentation about the dates of the operation.
“There was a perfect match between the timeline and that presentation and the change points that were automatically identified from the data,” Murdoch said. “That was the smoking gun that made me think: This is what it’s for.”
These automated systems replaced the cumbersome manual distribution of cryptographic keying material, allowing military GPS receivers around the world to be rekeyed remotely through satellite broadcasts rather than through onsite procedures.
If you’re a user—owner?—of this cryptocurrency, this is important:
On May 29, the security researcher Taylor Hornby found a critical vulnerability in Zcash Orchard privacy pool using Claude Opus 4.8. The Zcash team hired Hornby specifically to look for this kind of issue. He found one fast enough to be embarrassing.
The Orchard pool is the newest and most advanced shielded transaction system in the cryptocurrency Zcash. Introduced in 2022, it allows users to send and receive ZEC while keeping transaction details private. It uses zero-knowledge proofs to validate transactions without revealing amounts or participants. The bug: a specific check that was supposed to validate transaction inputs wasn’t actually enforcing the rules it appeared to enforce. An attacker could have exploited the flaw to feed false inputs into that check and generate ZEC from nothing, with the zero-knowledge proof system blessing the fraudulent transaction as valid.
It’s fixed; that’s the good news. The bad news is that there’s no way of knowing if anyone exploited the vulnerability to steal money. And this fragility is the fundamental problem that makes blockchain such a bad idea.
In April, Anthropic initated Project Glasswing. The idea was to let companies use their new model to find and fix vulnerabilities in their own software. It was a fantastic PR move, and so many press outlets have uncritically parroted Anthropic’s claims that it’s now common wisdom that Mythos is better at finding software vulnerabilities than other models. Which is just nottrue.
In any case, Anthropic has published a Project Glasswing status report. It’s finding a lot of vulnerabilities in software—yay! Some of them are even dangerous. But almost none of them has been patched. It’s weird. There’s something fishy about the data that I don’t understand. That Anthropic refuses to release details—that it just says “trust us”—is a big problem here.
When a deployment fails, finding the root cause often means piecing together information from multiple sources. You wait for the deployment to finish, request a log bundle, download it, and then search through files like eb-engine.log and cfn-init.log to find the error. If you’re not familiar with Elastic Beanstalk’s log file structure, you might not know which file to check first, and the process can take longer than fixing the actual problem.
Elastic Beanstalk now provides a Deployments tab in the environment dashboard that gives you a consolidated view of your deployment history and real-time deployment logs. You can see what’s happening during a deployment as it runs, and when something fails, the deployment log shows you the error output directly in the console.
In this post, you create an Elastic Beanstalk environment, trigger different types of deployments, deploy a broken application to see how the Deployments tab surfaces errors, and then fix and redeploy. By the end, you’ll know how to use deployment logs to diagnose failures without connecting to instances over SSH or downloading log bundles.
Solution overview
The Deployments tab displays a history of recent deployments for your environment, including application deployments, configuration updates, and environment launches. Each deployment has a detail page with two tabs: Events, which shows a filtered timeline of events for that deployment, and Deployment Logs, which shows a consolidated log from the instance.
Deployment logs capture each step of the deployment process: dependency installation, application builds, .ebextensions commands, platform hooks, and application startup output. The logs are designed to be concise. On success, you see summary messages showing which steps ran and completed. On failure, the log includes up to 50 lines of output from the failed step, so you can see what went wrong without searching through verbose output.
During a deployment, one instance uploads its log to Amazon Simple Storage Service (Amazon S3) as the deployment progresses. The Elastic Beanstalk console reads from Amazon S3, which means you can monitor progress in real time without connecting to the instance. After the deployment completes, the console fetches the final log to ensure you see the complete output. For environments with multiple instances, the deployment log is captured from one representative instance. To view logs from all instances, use the Request Logs feature.
Prerequisites
Before getting started, ensure that you have the following:
An AWS account with permissions to create Elastic Beanstalk environments and associated resources (Amazon Elastic Compute Cloud (Amazon EC2) instances, Amazon S3 buckets, security groups). For the minimum AWS Identity and Access Management (IAM) permissions required, see Managing Elastic Beanstalk service roles. Follow the principle of least privilege and avoid using AWS account root or unrestricted administrator credentials.
A supported Elastic Beanstalk platform version. Deployment logs are available on Amazon Linux 2 and Amazon Linux 2023 platform versions released on or after March 11, 2026, and on Windows Server platform versions 2.23.0 and later.
AWS Command Line Interface (AWS CLI) installed and configured with appropriate permissions. See Installing the AWS CLI.
A Bash-compatible shell (Bash or Zsh). The commands in this walkthrough use Bash syntax (heredocs, &&, and shell variables).
Walkthrough
Follow the steps below to create an environment, explore the Deployments tab, deploy a broken application, and then fix it.
Open your terminal and set the following variables. Replace the values with your own unique Amazon S3 bucket name and the latest Node.js solution stack for your Region. This walkthrough uses us-east-1. You can substitute your preferred Region, but use the same Region consistently across all commands in the walkthrough. To find the latest solution stack, run aws elasticbeanstalk list-available-solution-stacks.
S3_BUCKET="your-unique-bucket-name"

# Replace with the latest Node.js solution stack for your Region
SOLUTION_STACK_NAME="64bit Amazon Linux 2023 v6.11.1 running Node.js 22"
Setting up the application
This walkthrough uses two versions of a Node.js application. The first version is a working HTTP server. The second version introduces a dependency on a non-existent npm package, simulating a common deployment failure where a dependency cannot be installed.
Create a project directory:
mkdir deployments-tab-demo && cd deployments-tab-demo
Create the working application file:
cat << 'EOF' > workingapp.js
const http = require('http');

const server = http.createServer((req, res) => {
  res.writeHead(200, { 'Content-Type': 'application/json' });
  res.end(JSON.stringify({ status: 'healthy', message: 'App is running' }));
});

const port = process.env.PORT || 8080;
server.listen(port, () => {
  console.log(`Server running on port ${port}`);
});
EOF
cp broken-package.json package.json
zip -r nodejs-broken-app.zip app.js package.json
Step 1: Create an environment and explore the Deployments tab
Create an Amazon S3 bucket and upload the source bundles. This walkthrough uses default bucket settings for simplicity. For production workloads, enable server-side encryption and restrict bucket access to only the principals that need it.
Don’t wait for the environment to finish creating. Instead, open the Elastic Beanstalk console right away, navigate to your environment, and choose the Deployments tab.
You should see one deployment in the history table with a status of In Progress and a type of Environment Creation. The table also shows the request ID, start time, and duration (which updates as the deployment runs). Choose the Request ID link to open the deployment detail page.
Figure 1 – Deployments tab history table showing the in-progress Environment Creation deployment
The detail page has a summary section with the deployment metadata and two tabs below it:
Events shows a filtered timeline of events for this deployment. As the environment creation progresses, new events appear automatically.
Deployment Logs shows the consolidated deployment log from the instance.
Select the Deployment Logs tab. At first, the tab may show a message indicating that the log is not yet available. This is expected. The deployment log is written on the EC2 instance and uploaded to Amazon S3, so it won’t appear until the instance launches and begins the deployment process. Once the instance is running, log entries start appearing and the tab refreshes automatically to show new entries as they are written. You can watch dependency installation, platform hooks, and application startup happen in real time.
Figure 2 – Deployment Logs tab showing “log not yet available” message during early environment creation
After the environment creation completes, the deployment status changes to Succeeded and the log shows the final state. Because this deployment succeeded, the log contains only summary messages for each step. Take notice of how the log captures each phase of the deployment in order: .ebextensions commands, dependency installation (npm), container commands, and then the application startup. Pay attention to the Application Output section near the end of the log. It shows the initial stdout from your application process, confirming that it started and is listening on the expected port. This section is useful for verifying that your application launched correctly after a deployment.
You can also check the environment status from the CLI:
While the update is in progress, go back to the Deployments tab in the console. You should see a second deployment appear in the history with a status of In Progress and a type of Environment Update. Choose the request ID to open the detail page, and select the Deployment Logs tab. The log updates automatically as new entries are written, so you can watch the deployment progress in real time.
After the update completes, the deployment status changes to Succeeded. You now have two deployments in your history, each with its own type and duration.
Figure 4 – Deployments tab showing two deployments: Environment Creation and Environment Update
Step 3: Deploy a broken application
This is where the Deployments tab shows its value. Create and deploy a broken application version that references a non-existent npm package:
As soon as the deployment starts, go back to the Deployments tab in the console. You should see a new Application Deployment with a status of In Progress. Choose the request ID to open the deployment detail page and select the Deployment Logs tab.
Watch as the log streams in real time. You will see the deployment start, .ebextensions commands run, and then npm install begin. Shortly after, the error appears with the relevant output from the failed step, showing the exact npm error indicating that the package could not be found. The deployment status changes to Failed.
Elastic Beanstalk automatically rolls back to the previous working version, so your environment returns to a healthy state. Without the Deployments tab, diagnosing what went wrong would still require requesting a log bundle, downloading it, extracting it, and searching through the log files. With the Deployments tab, the diagnosis is immediate. There is no need to connect to the instance via SSH or download log bundles. The error is right there in the console.
Figure 5 – Deployment detail page showing the failed deployment error and npm install output
Compare this to the successful deployment logs from Step 1. The successful log showed only summary messages. The failed log automatically includes the detailed error output. This smart verbosity means you don’t have to search through verbose logs on success, but you get the detail you need on failure.
Step 4: Deploy a fixed version
Although Elastic Beanstalk rolled back to the working version automatically, let’s deploy it explicitly to see what a successful application deployment log looks like after a failure:
After the deployment completes, open the deployment detail page from the Deployments tab. The deployment log shows only summary messages for each step. The npm step completes without errors, the application starts, and the deployment finishes. Compare this to the failed deployment log from Step 3, where the error and detailed npm output appeared automatically.
Figure 6 – Deployments tab showing all four deployments with their statuses
Cleaning up
To avoid ongoing charges, terminate the environment and delete the associated resources.
Remove the local project directory. Before running the following command, make sure your current working directory is not inside deployments-tab-demo:
rm -rf deployments-tab-demo
Conclusion
The Deployments tab in AWS Elastic Beanstalk gives you a single place to view your deployment history and read deployment logs, including while a deployment is still running. When a deployment fails, the log shows you the error output from the failed step directly in the console, so you can identify the root cause without connecting to instances over SSH or downloading log bundles.
Deployment logs are available on Amazon Linux 2 and Amazon Linux 2023 platform versions released on or after March 11, 2026, and on Windows Server platform versions 2.23.0 and later, in all AWS Commercial Regions and AWS GovCloud (US) Regions. To get started, update your environment to a supported platform version and navigate to the Deployments tab in the Elastic Beanstalk console.
To learn more about deployment logs, see Viewing deployment logs in the AWS Elastic Beanstalk Developer Guide. For more information about AWS Elastic Beanstalk, visit the product page.
The collective thoughts of the interwebz
Manage Consent
To provide the best experiences, we use technologies like cookies to store and/or access device information. Consenting to these technologies will allow us to process data such as browsing behavior or unique IDs on this site. Not consenting or withdrawing consent, may adversely affect certain features and functions.
Functional
Always active
The technical storage or access is strictly necessary for the legitimate purpose of enabling the use of a specific service explicitly requested by the subscriber or user, or for the sole purpose of carrying out the transmission of a communication over an electronic communications network.
Preferences
The technical storage or access is necessary for the legitimate purpose of storing preferences that are not requested by the subscriber or user.
Statistics
The technical storage or access that is used exclusively for statistical purposes.The technical storage or access that is used exclusively for anonymous statistical purposes. Without a subpoena, voluntary compliance on the part of your Internet Service Provider, or additional records from a third party, information stored or retrieved for this purpose alone cannot usually be used to identify you.
Marketing
The technical storage or access is required to create user profiles to send advertising, or to track the user on a website or across several websites for similar marketing purposes.
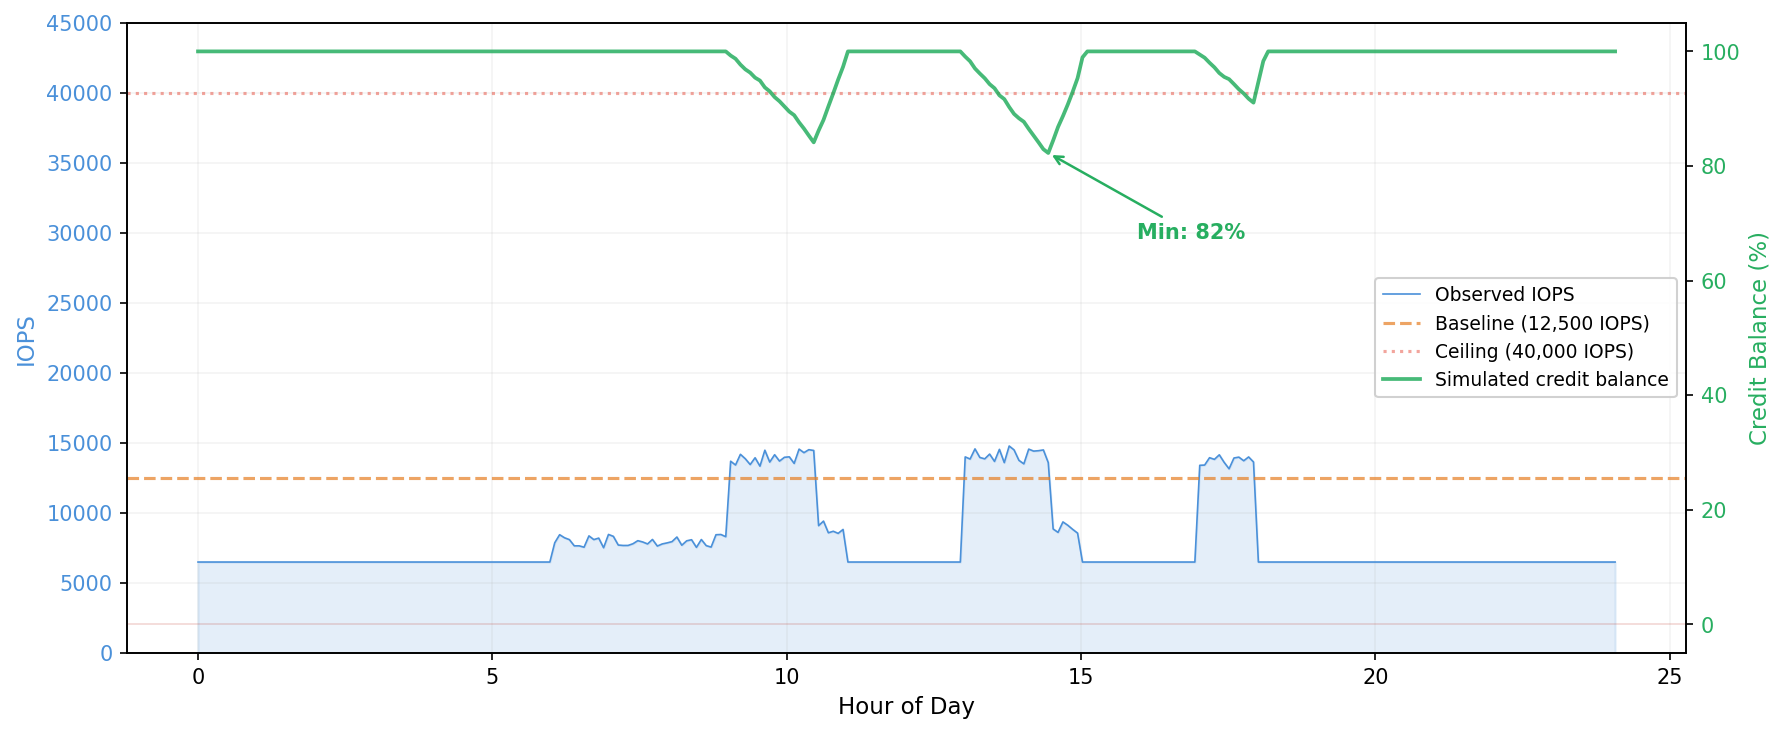
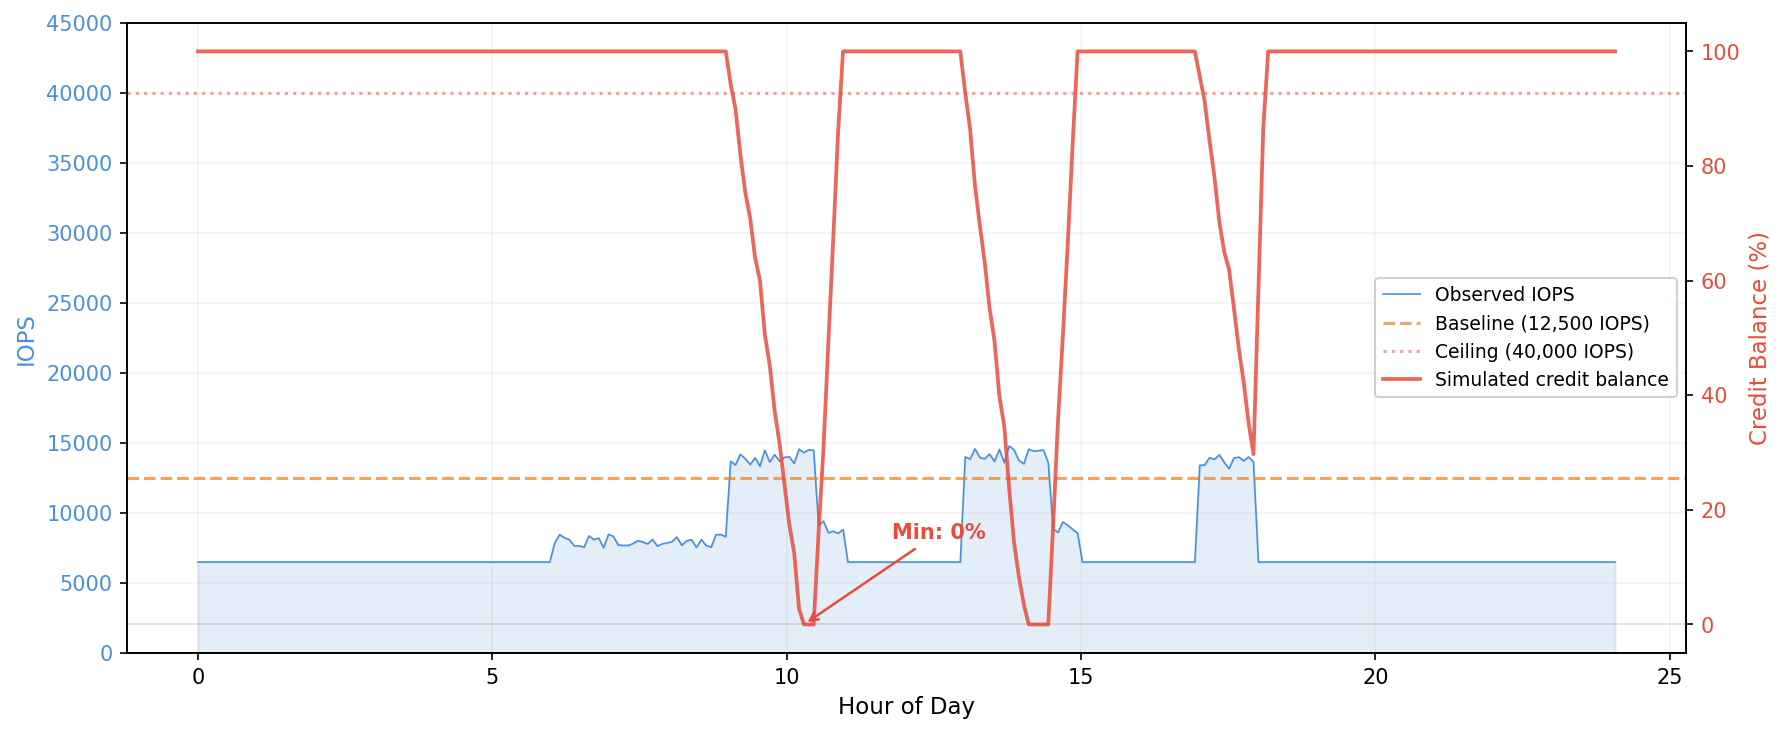


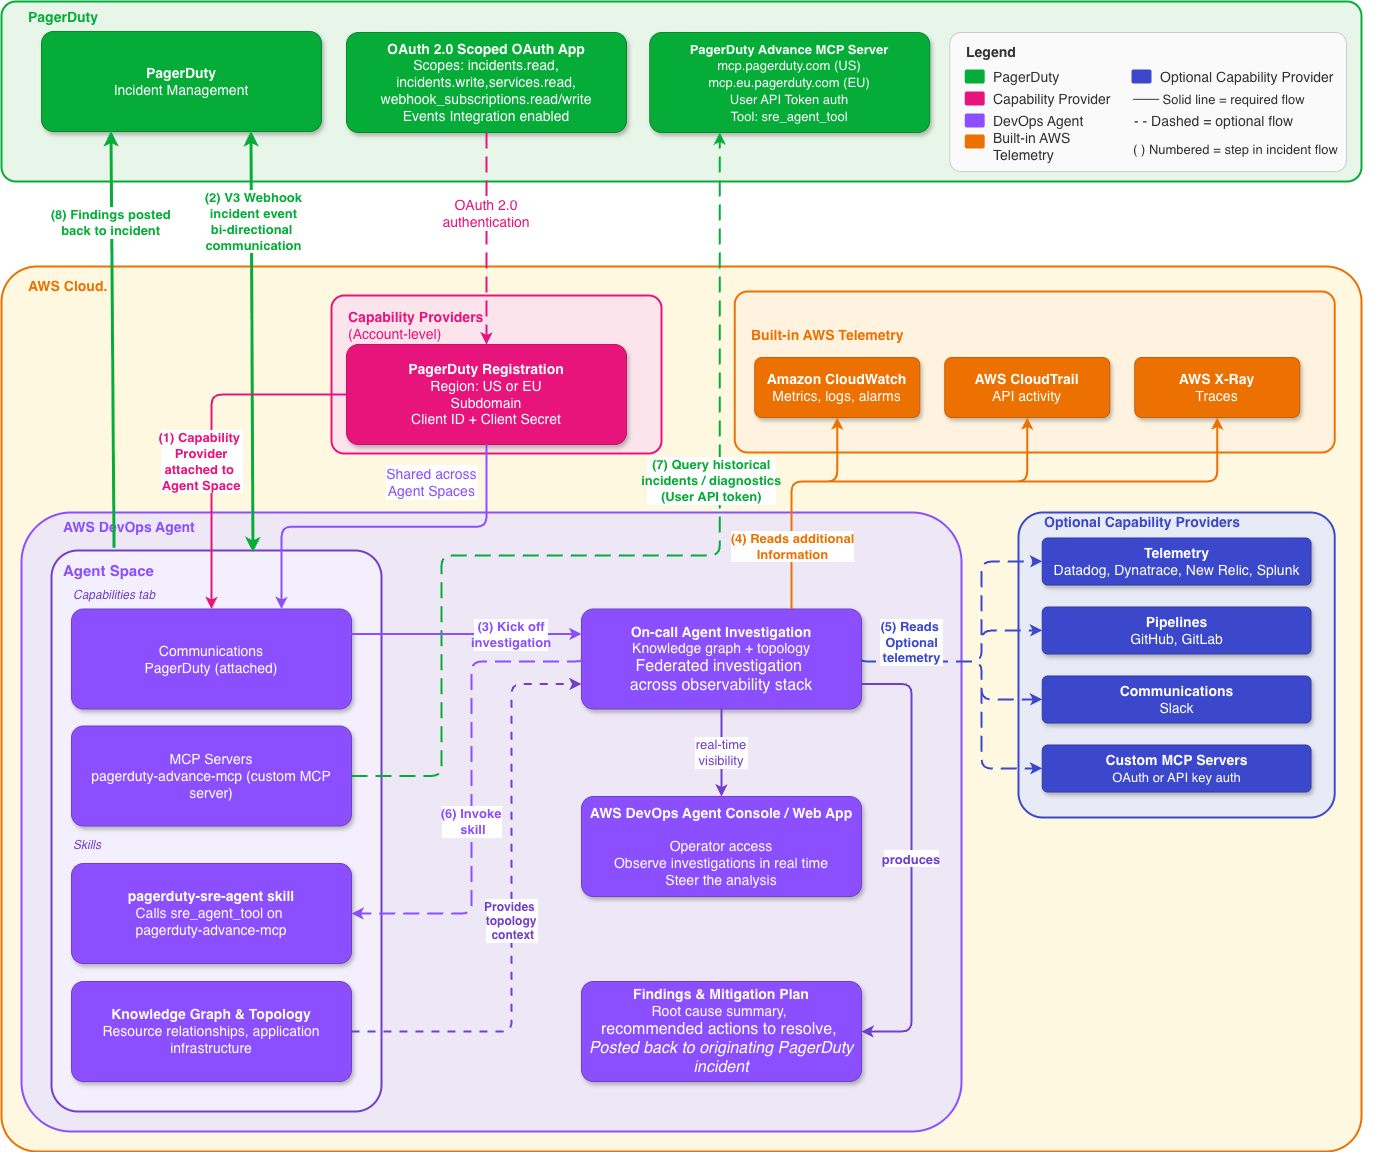

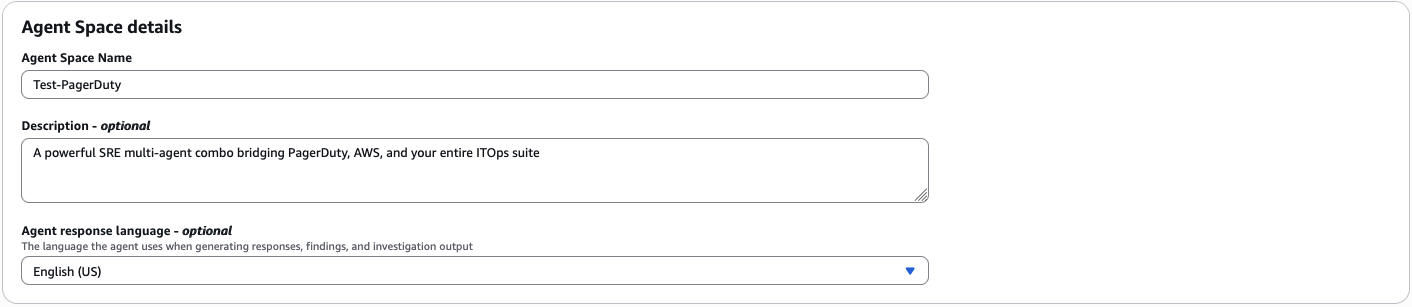
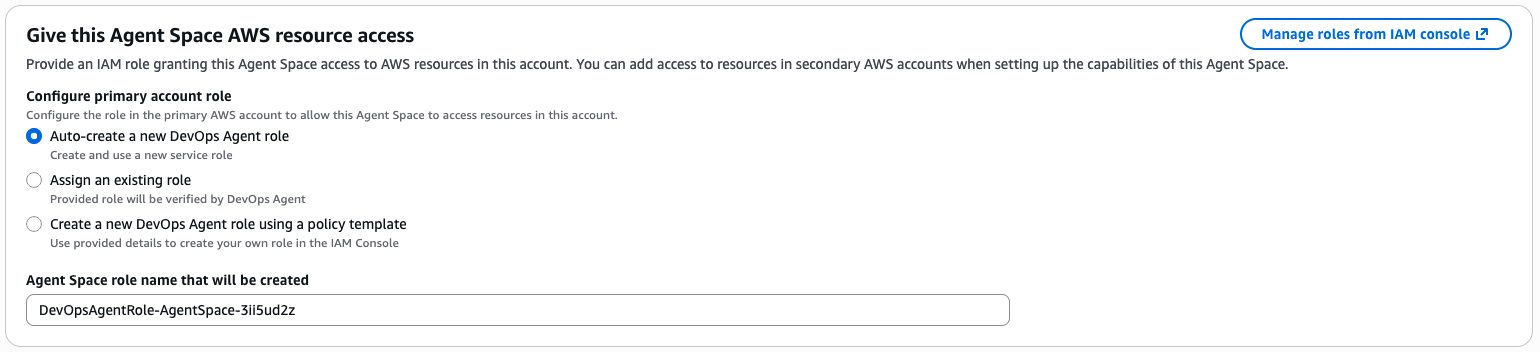
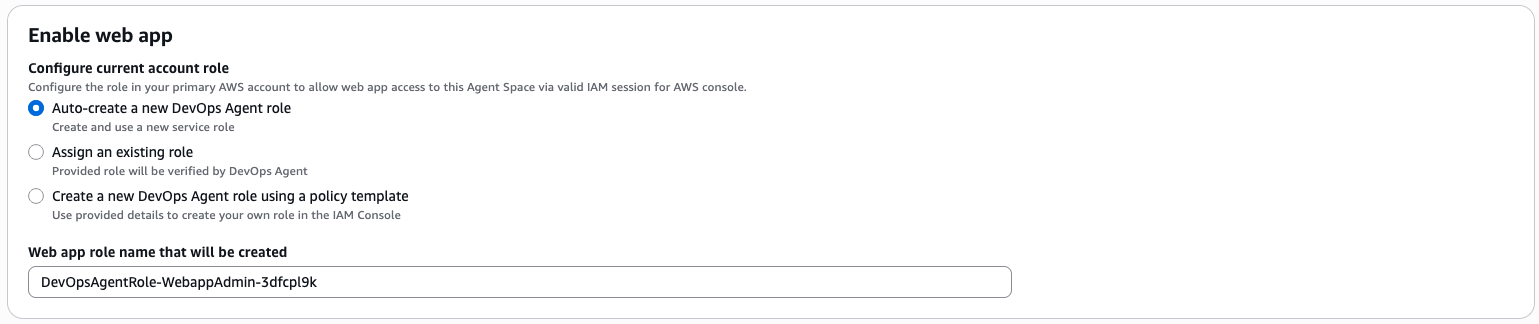
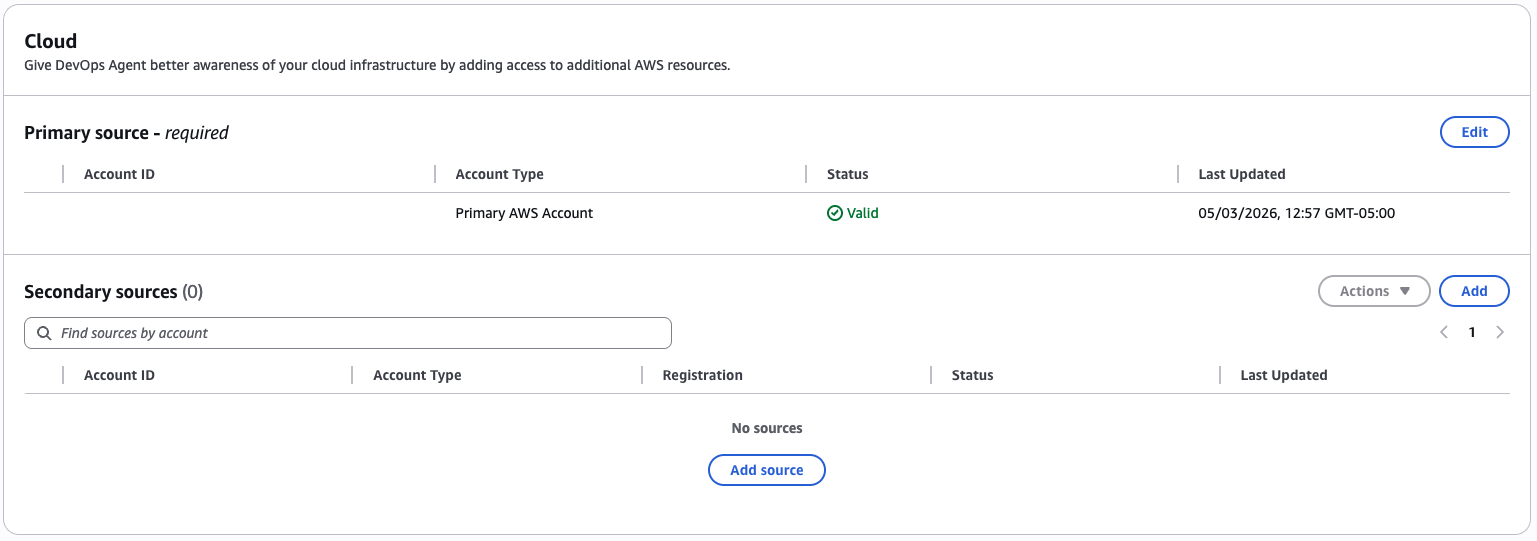
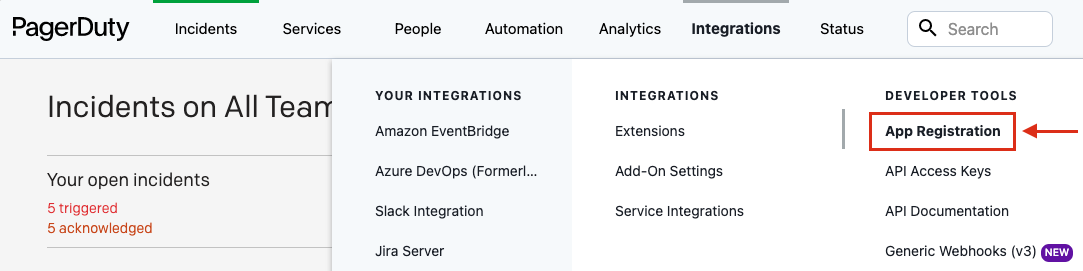
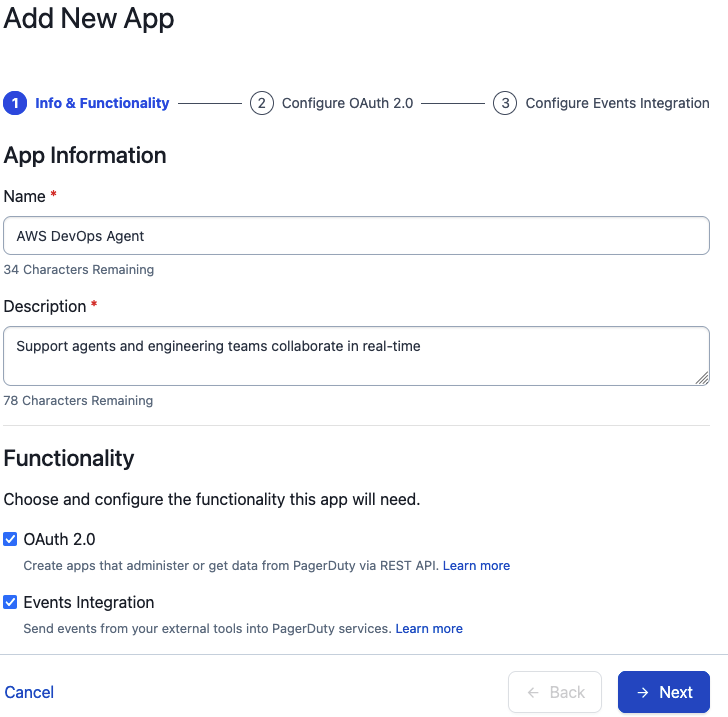
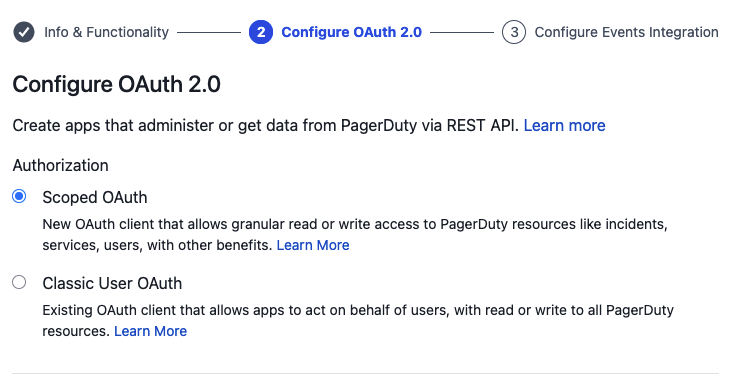
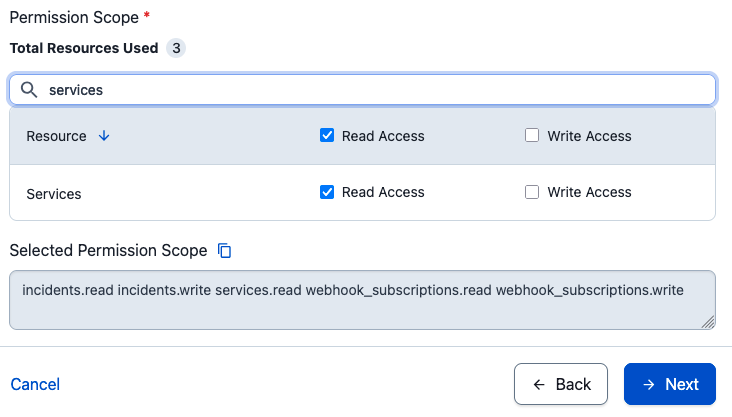
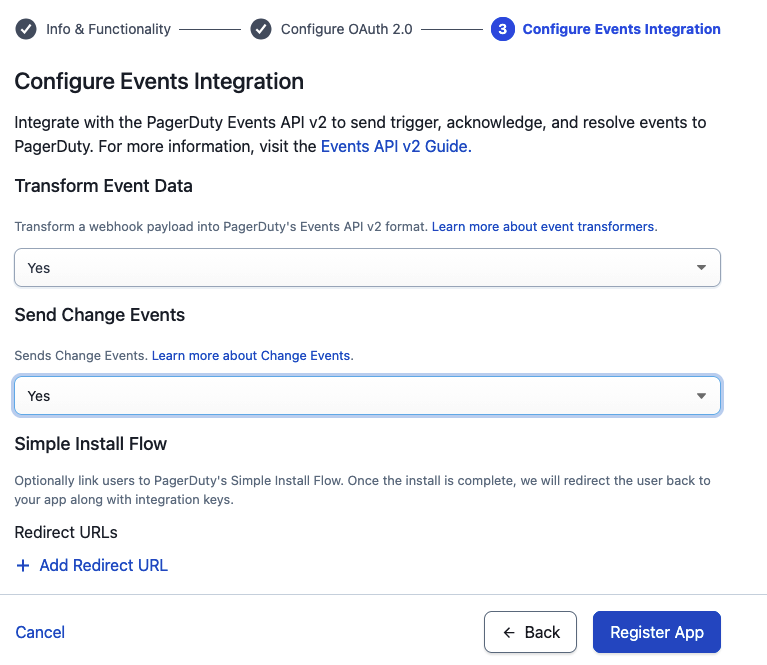
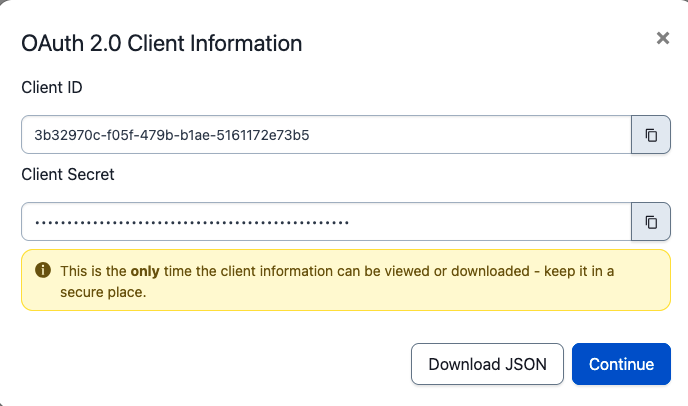

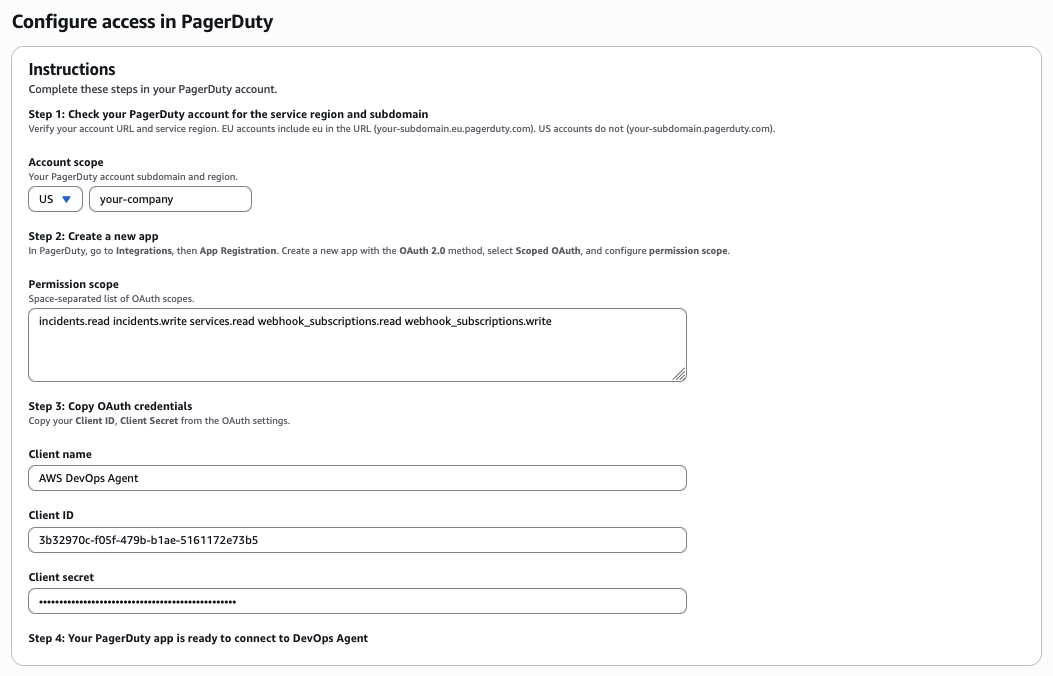
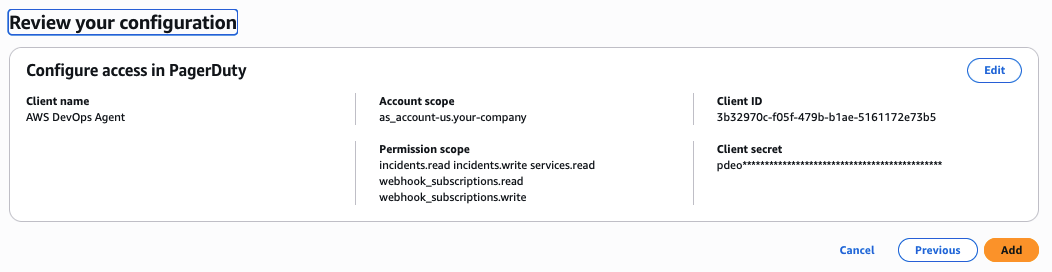


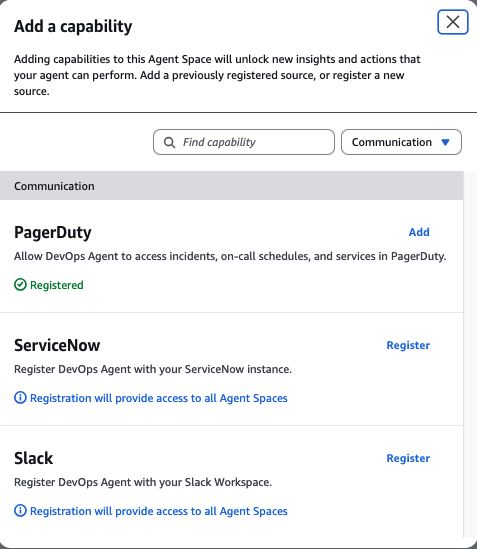

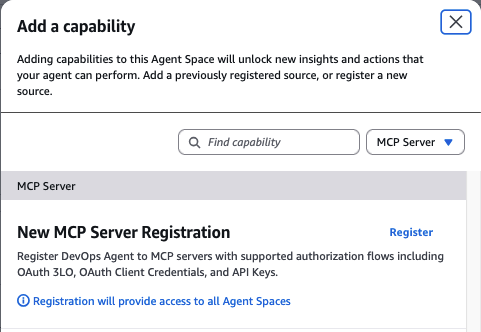


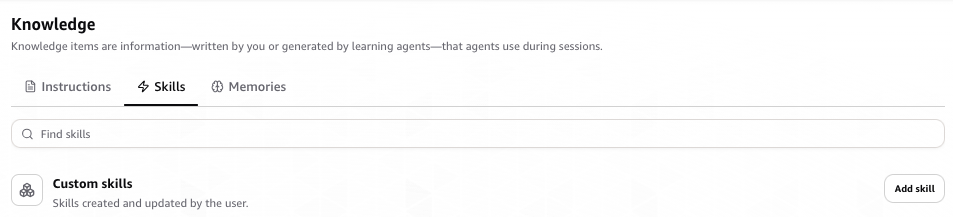
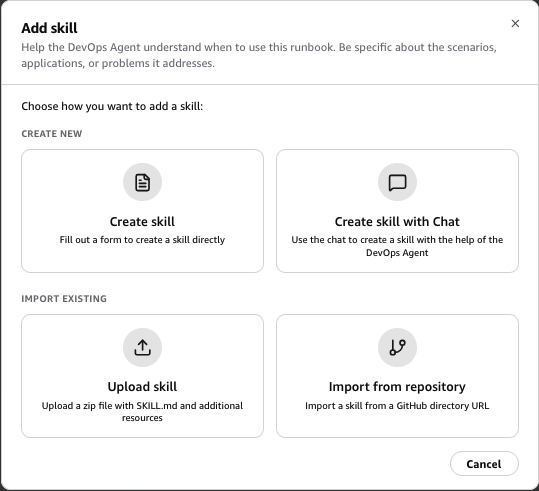
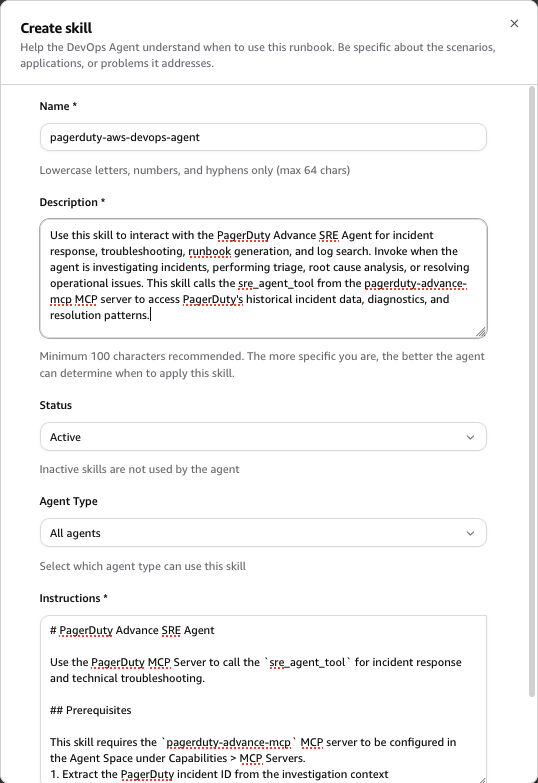
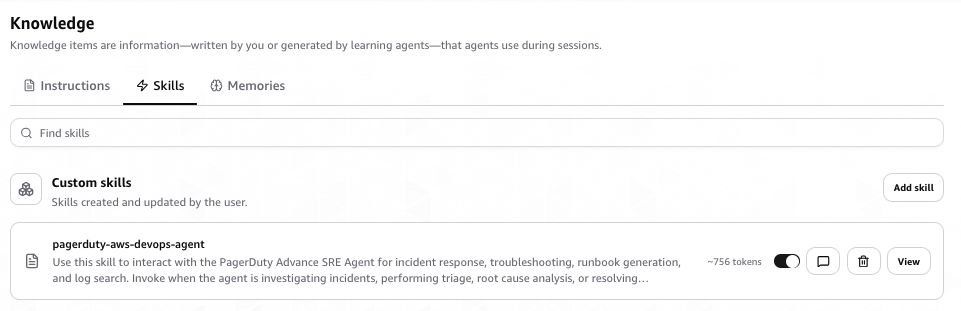



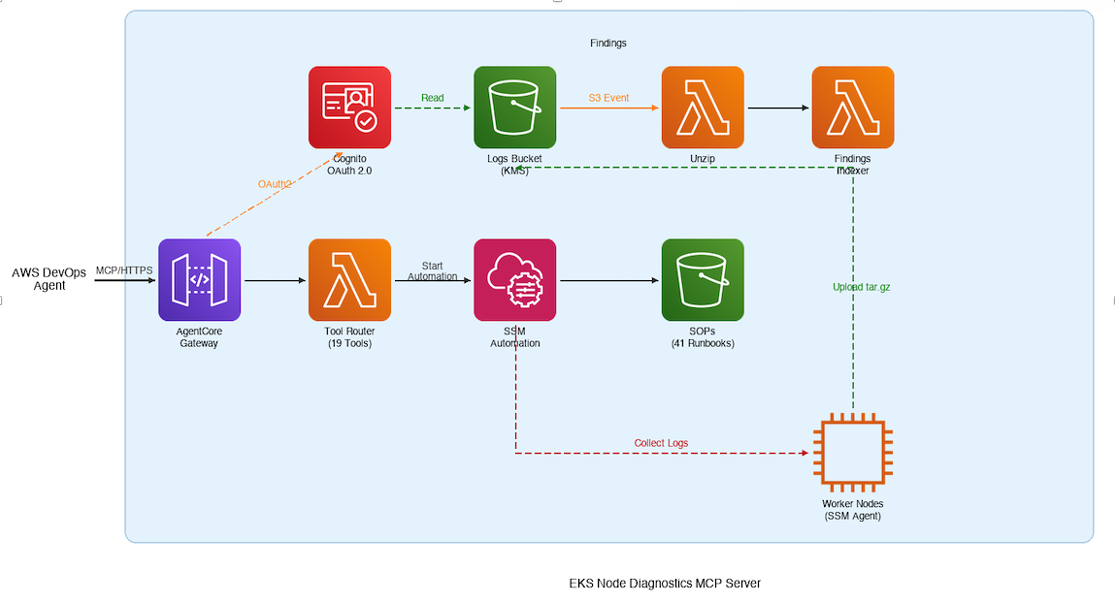
 WARNING: The following commands will disrupt DNS resolution for all pods on the target node. Only run these in a non-production test environment. Do not execute on production nodes.