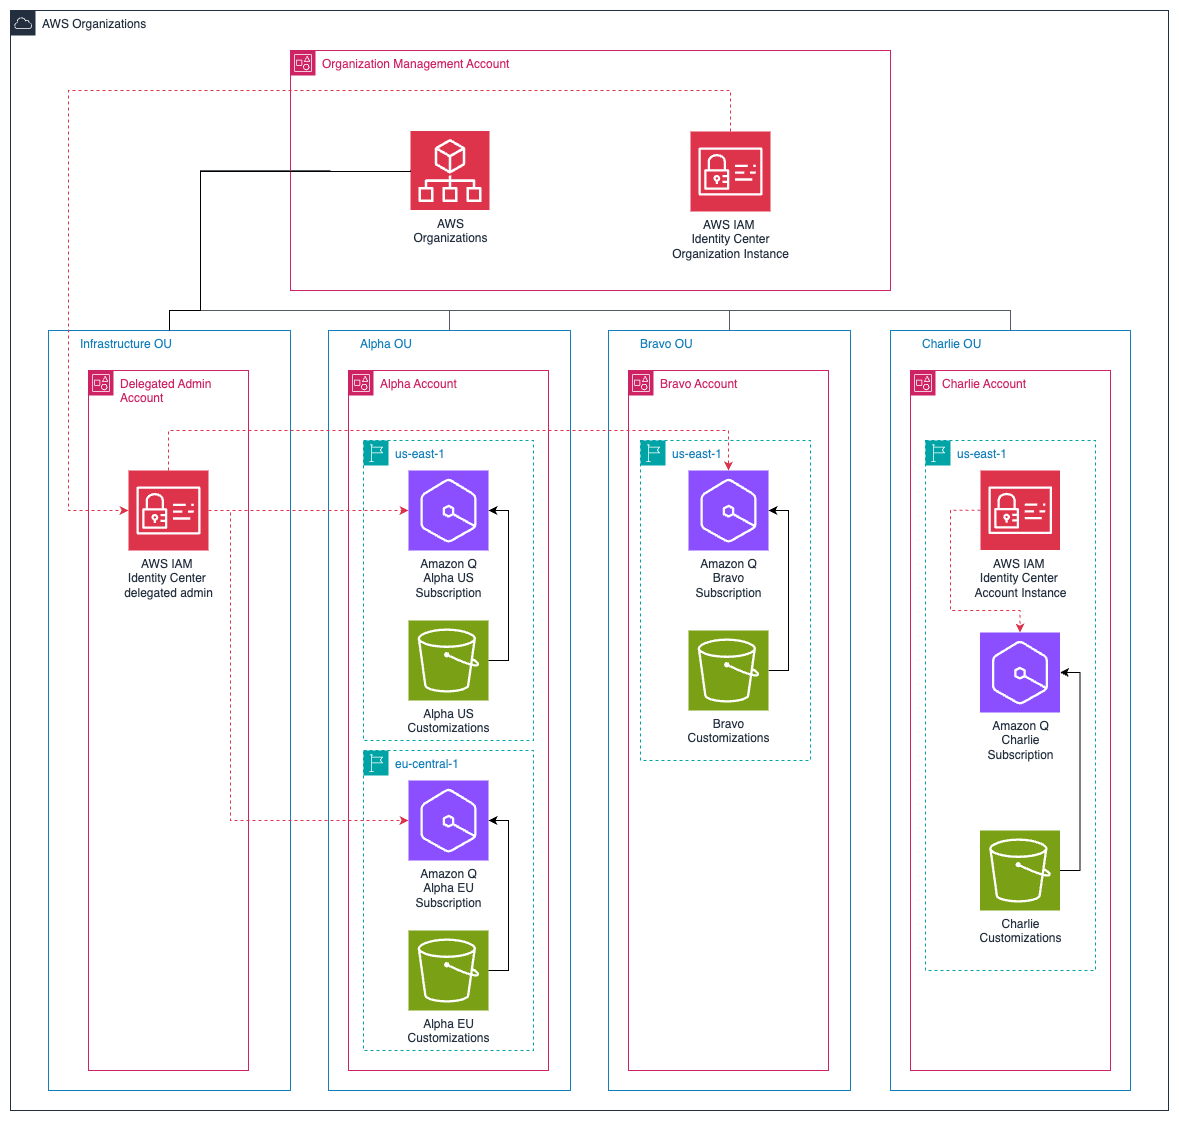
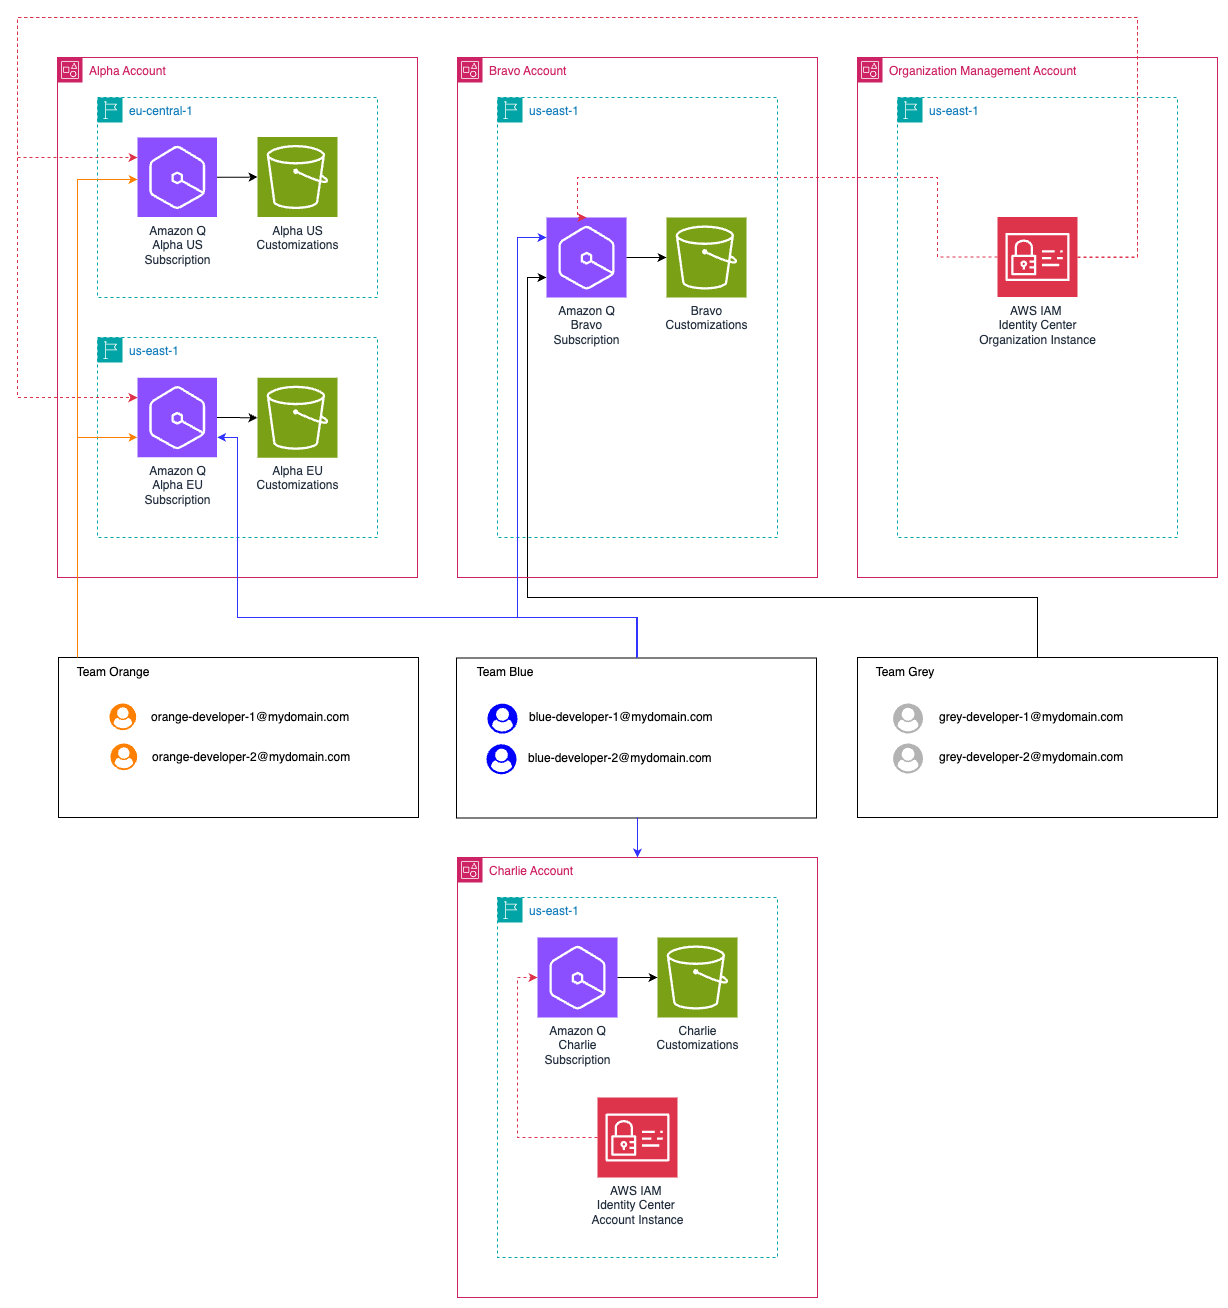
Post Syndicated from Adarsh Suresh original https://aws.amazon.com/blogs/devops/troubleshooting-elastic-beanstalk-environments-with-amazon-q-developer-cli/
Introduction
Developers working with AWS find AWS Elastic Beanstalk to be an invaluable service which makes it straightforward to deploy and run web applications without worrying about the underlying infrastructure. You simply upload your application code, and Elastic Beanstalk automatically handles the details of capacity provisioning, load balancing, scaling, and monitoring, which allows you to focus on writing code.
With the release of the Amazon Q Developer’s new enhanced CLI agent, we’ve already seen how Q CLI can be used to transform the approach to the software development process.
In addition to software development, developers and DevOps teams may spend most of their time on operational tasks such as deploying and testing their code on multiple environments, including troubleshooting any deployment related failures or application health issues. Q CLI’s new agentic features can be used to significantly simplify this process by helping you identify and resolve operational issues in a more efficient manner.
When troubleshooting Elastic Beanstalk environment issues, Q CLI becomes a go-to companion. When environments show degraded health or deployment failures, developers can use Q CLI to quickly investigate without having to navigate through multiple AWS console pages or parse multiple logs manually.
For instance, when facing deployment failures, you can run q chat to start a new conversation and describe the issue. Q CLI can help analyze instance logs, check environment configurations, and identify misconfigurations in applications. It can pull relevant error messages from Elastic Beanstalk logs and suggest specific fixes based on the error patterns it recognizes.
When dealing with health issues, developers can ask Q CLI to check their environment’s status, resource utilization, and recent events. It can identify if an application is experiencing out of memory problems, connectivity issues, or dependency related failures. Q CLI can also examine application logs to find recurring errors that might be causing health degradation.
What developers appreciate most is how Q CLI connects the dots between different AWS services. If an Elastic Beanstalk environment is having issues because of an underlying Amazon VPC configuration issue or Amazon S3 permission issue, Q CLI can identify these connections and provide holistic solutions.
The time savings are significant – what used to take hours of investigation across multiple AWS console pages now takes minutes with targeted Q CLI queries. This has dramatically improved developers’ ability to maintain healthy environments and quickly resolve issues when they arise.
Below, we’ll take you through some examples of how you can use Q CLI to troubleshoot some of the issues that you may face while managing Elastic Beanstalk environments.
Solution Walkthrough
Prerequisites
If you’d like to follow along on your own machine, please make sure you complete the following prerequisites:
- An AWS account with Elastic Beanstalk access
- Basic familiarity with Elastic Beanstalk concepts (environments, applications, deployments)
- AWS CLI installed and configured with appropriate permissions to access Elastic Beanstalk resources, and collect logs
- AWS Q Developer CLI installed and setup
- EB CLI installed and setup (optional)
- Elastic Beanstalk environments created for troubleshooting
Now let’s dive into troubleshooting specific Elastic Beanstalk issues with Q CLI. All the scenarios below were tested with Amazon Q Developer CLI with a Pro tier subscription as it provides higher request limits, but is not required for the purposes of this demo.
Troubleshooting environment health
Let’s consider an Elastic Beanstalk environment running Node.js 22 AL2023, to which we’re going to deploy a new application version. After deploying a new application version to our Node.js based elastic beanstalk environment, we noticed that its health status changed to a “Warning” state with the following message visible in the environment events:
100% of requests failing with HTTP 5xx errors
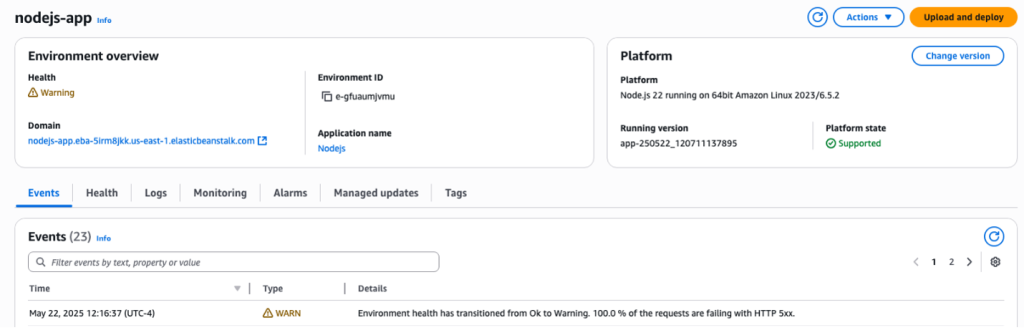
Figure 1. EB Dashboard showing the Warning health state, along with the reason for the health status
This event message could be a result of a number of issues, including but not limited to Nodejs application failures, reverse proxy configuration issues, resource utilization issues etc.
Let’s use Q CLI to help us investigate further. We’ll initiate a new conversation with the agent by running q chat, and ask the following question:
Why is my beanstalk environment nodejs-app in us-east-1 unhealthy? Check the logs if required, and recommend steps to resolve the issue
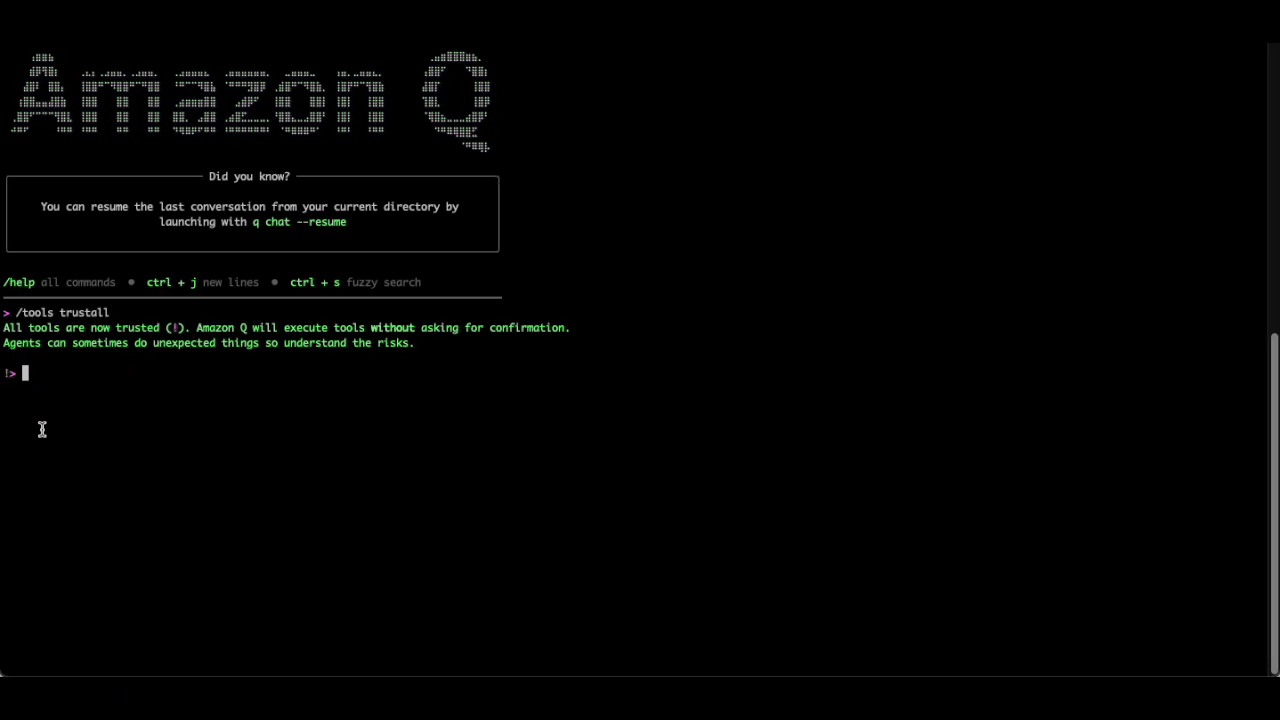
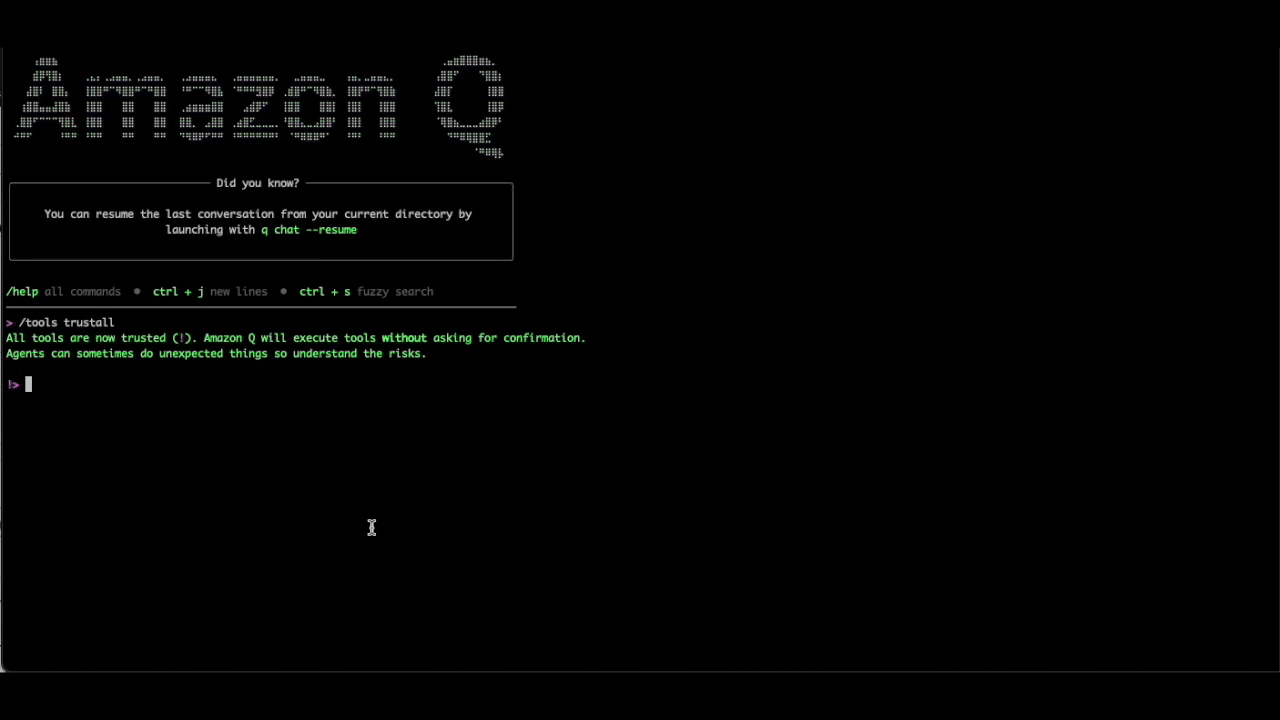
Note that we’ve disabled all confirmations for q chat using the /tools trust-all option as we’re using a development environment, but this is generally not recommended as it can lead to unexpected changes.
As you can see, the Q CLI agent is able to use the AWS CLI tool to describe the environment details, its health status and retrieve the tail logs for further analysis. It then parses through the log file to identify the source of the issue, all without requiring additional prompts.
As we can see from the below image, the Q CLI agent was able to parse the logs and identify that the Nodejs application is running on port 3000, but the Nginx proxy is attempting to establish a connection to the application on port 8080 (which is the default forwarding port for Nodejs based elastic beanstalk environments), resulting in HTTP requests failing with a 502 response.
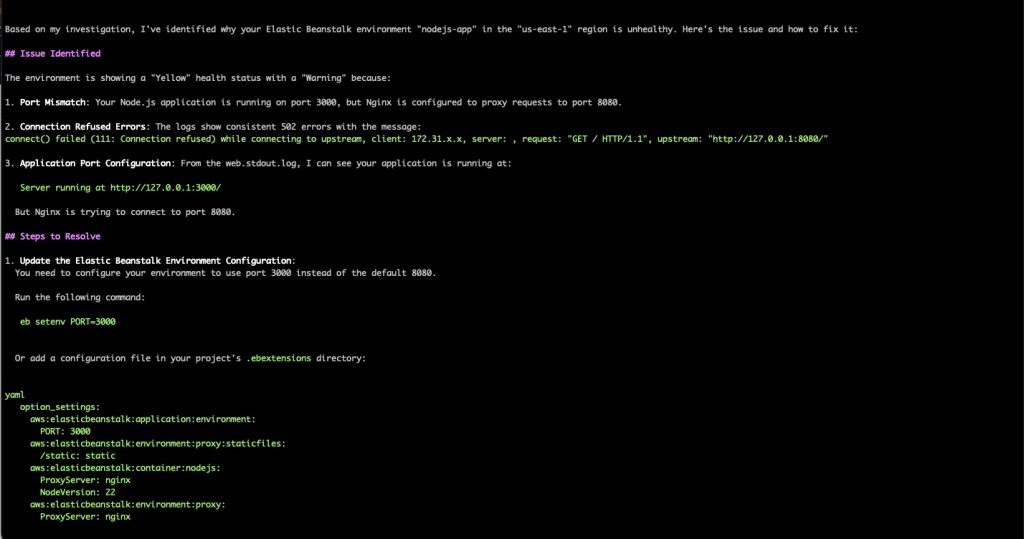
Figure 2. Q CLI solution for port issue
As requested in the prompt, the Q CLI agent also provides multiple ways to implement the recommended solution, along with specific steps or commands for each option. In this specific case, Q CLI correctly advised us to update the elastic beanstalk environment’s configuration to use port 3000 and shared multiple approaches to apply the recommended changes.
Environment creation failures
Here, we’re trying to create a new Elastic Beanstalk environment in a new VPC, but the environment creation fails with the following error message as we can see in the screenshot below:
The EC2 instances failed to communicate with AWS Elastic Beanstalk, either because of configuration problems with the VPC or a failed EC2 instance. Check your VPC configuration and try launching the environment again.
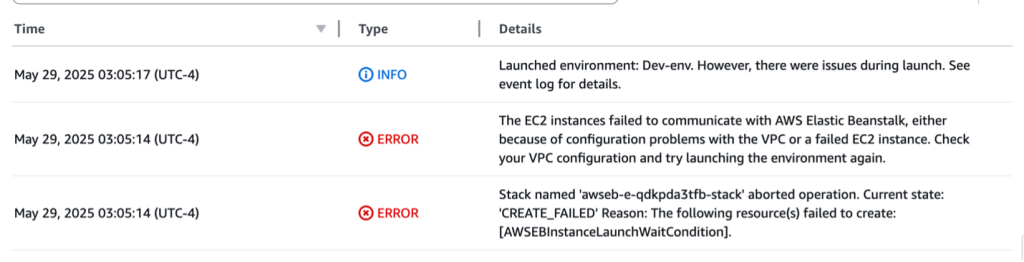
Figure 3. EB events describing the VPC connectivity issue
Now, let’s ask Q CLI to help us investigate this specific issue. We will issue the following prompt to Q CLI with the environment’s name and region, along with the specific error message that is observed:
The beanstalk environment "Dev-env" in the us-west-2 region failed to launch successfully with the following error:

The EC2 instances failed to communicate with AWS Elastic Beanstalk, either because of configuration problems with the VPC or a failed EC2 instance. Check your VPC configuration and try launching the environment again.

Check the environment configuration and recommend steps to resolve the issue.
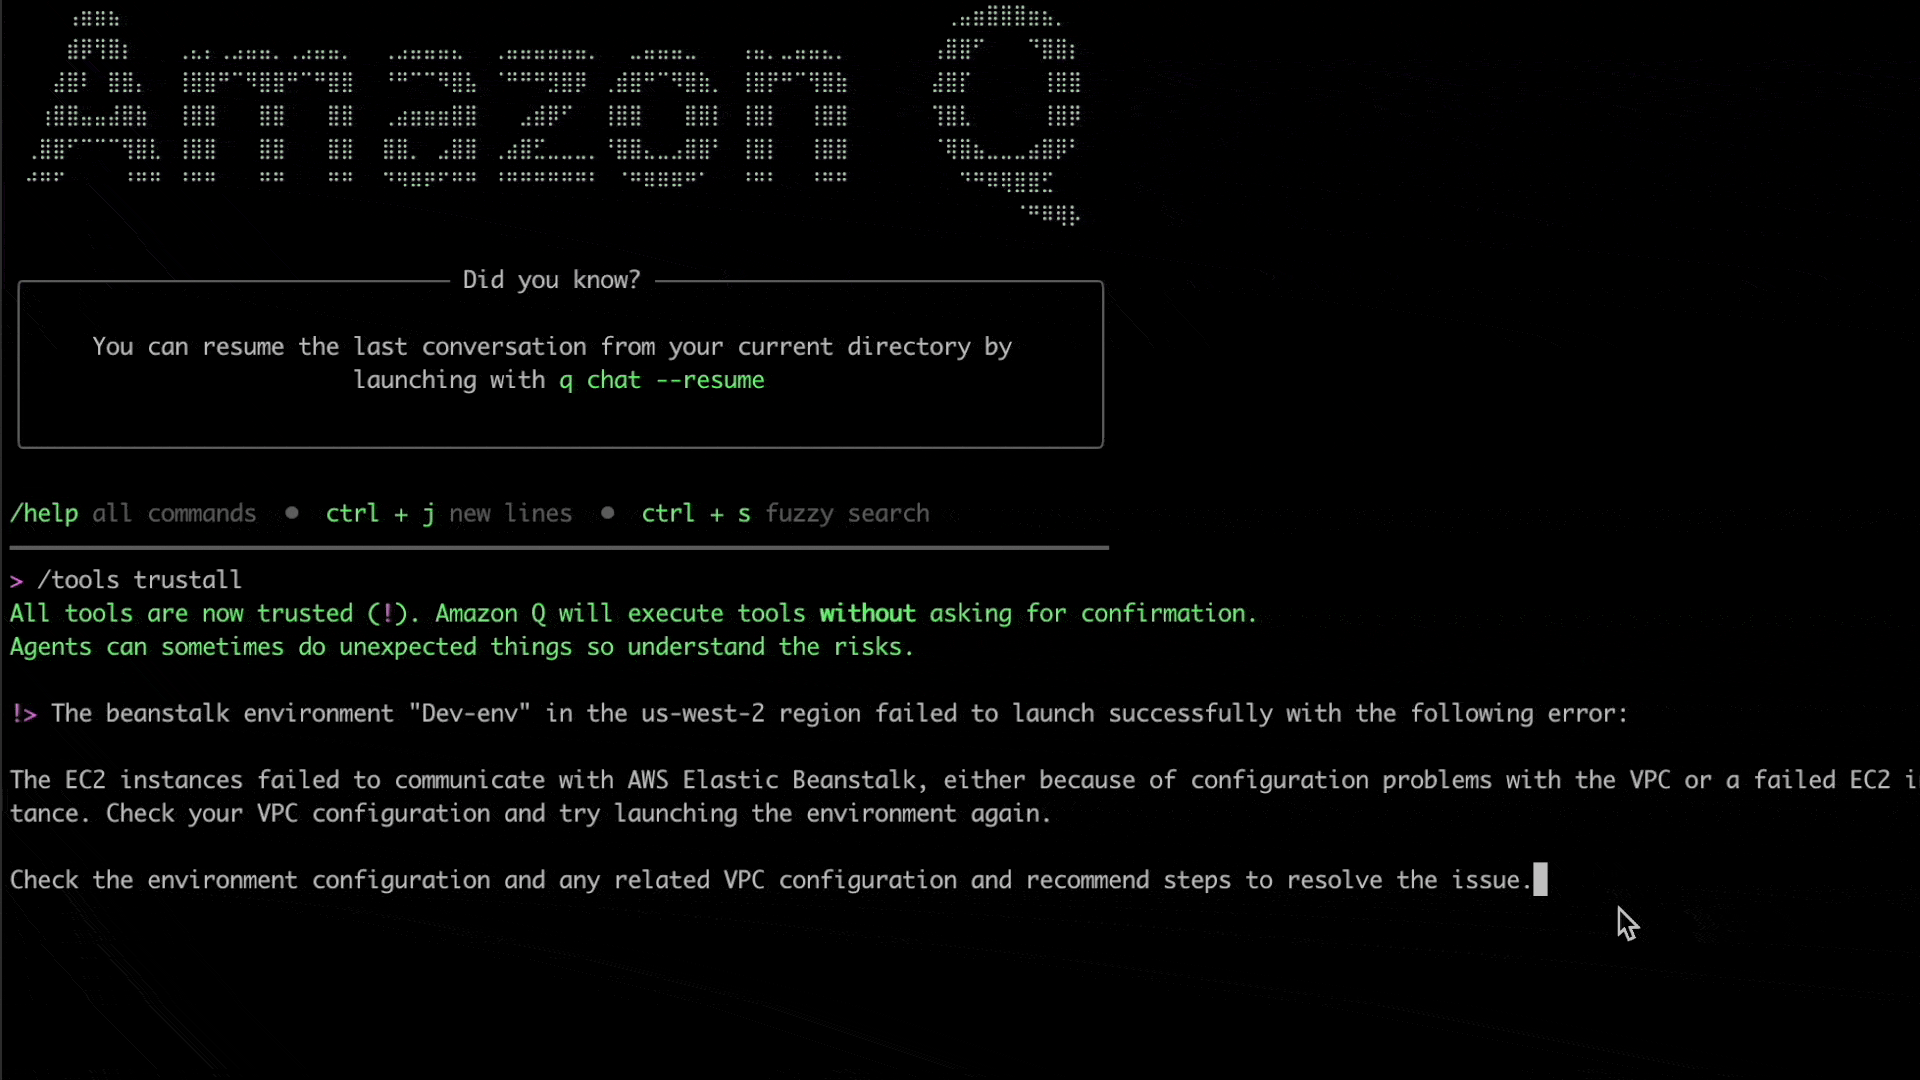
Here, Q CLI is able to use the given context to invoke relevant AWS CLI commands to check and verify the elastic beanstalk environment’s configuration, including its underlying resources such as the VPC, subnets, route table, security groups and related resources.
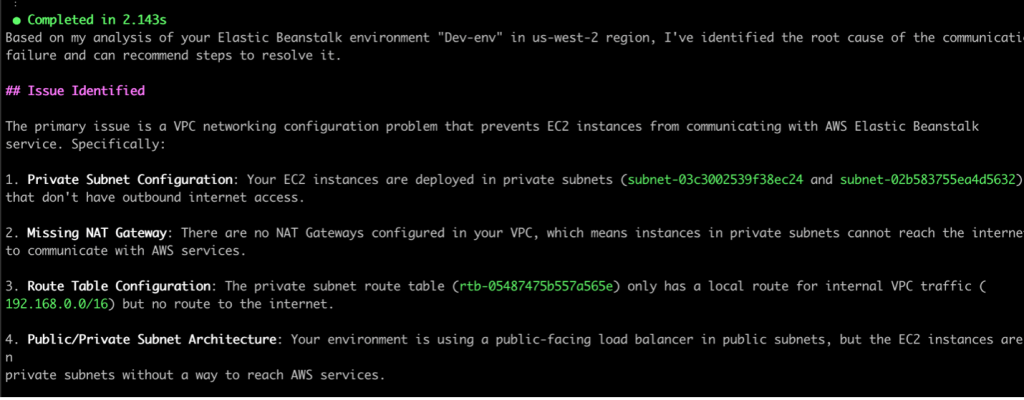
Figure 4. Q CLI identified network configuration issues
After retrieving the required information, Q CLI was able to identify the source of the issue. The subnets configured for the elastic beanstalk environment’s EC2 instances do not have outbound internet access, due to which they are unable to communicate with the AWS service endpoints.
As seen in the following screenshot, Q CLI then goes on to recommend multiple solutions to resolve the issue, specifically highlighting the more secure options recommended for production vs other options that are simpler to manage but may not be as secure.
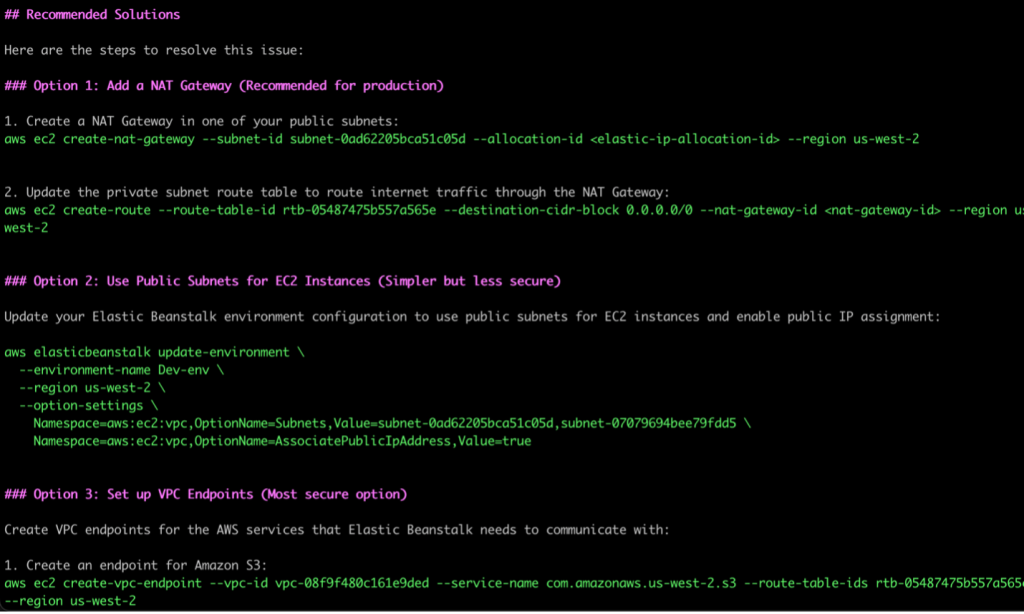
Figure 5. Q CLI solutions for resolving network configuration issues
We can see how using Q CLI here results in significant time saved during troubleshooting as it quickly and efficiently verifies the relevant underlying resource configurations, hence removing the need for the developer to manually identify and check multiple AWS resource configurations.
Command Execution Failures
In this next scenario, we’re attempting to deploy a python application to an elastic beanstalk environment, using a Python 3.13 based solution stack. We noticed that the deployment fails with the following error message, visible in the environment events:
Command failed on instance. Return code: 1 Output: Engine execution has encountered an error.
Let’s ask Q CLI to help us identify and resolve the issue, with the following prompt:
The deployment to the beanstalk environment "modern-python" in the us-east-1 region failed with the error "Command failed on instance". Check the environment details, and logs if required, and recommend steps to resolve the issu
Here, we see how Q CLI can also help with troubleshooting application or dependencies related issues. By checking the environment events and the tail logs, Q CLI was able to identify the source of the deployment failure due to the “Jinja” package that was specified in the requirements.txt file. It correctly advises us to use a newer version of the “Jinja2” package, which is compatible with Python 3.13.
It also goes on to give us recommendations and steps on testing the changes locally before updating the requirements.txt and creating a new application version to be used for the deployment.
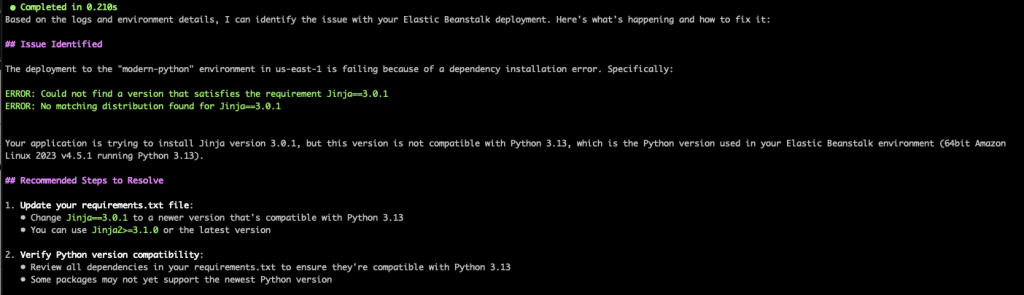
Figure 6. Q CLI identified the reason for command failure and provides solutions
Using EB CLI with Amazon Q Developer CLI
To wrap this up, we will demonstrate the benefits of using Q CLI in your development environment, along with EB CLI.
EB CLI enables developers to deploy applications to Elastic Beanstalk with a simple eb deploy command, handling environment provisioning, artifact packaging, and configuration as code. It integrates with Git for version tracking and supports local testing through eb local run, making it ideal for CI/CD pipelines and iterative development workflows.
In this scenario, we have another application deployment that failed. We will use Q CLI to troubleshoot this issue by initiating a new q chat from the same directory where the application files are located, which also has EB CLI installed and setup using the command eb init.
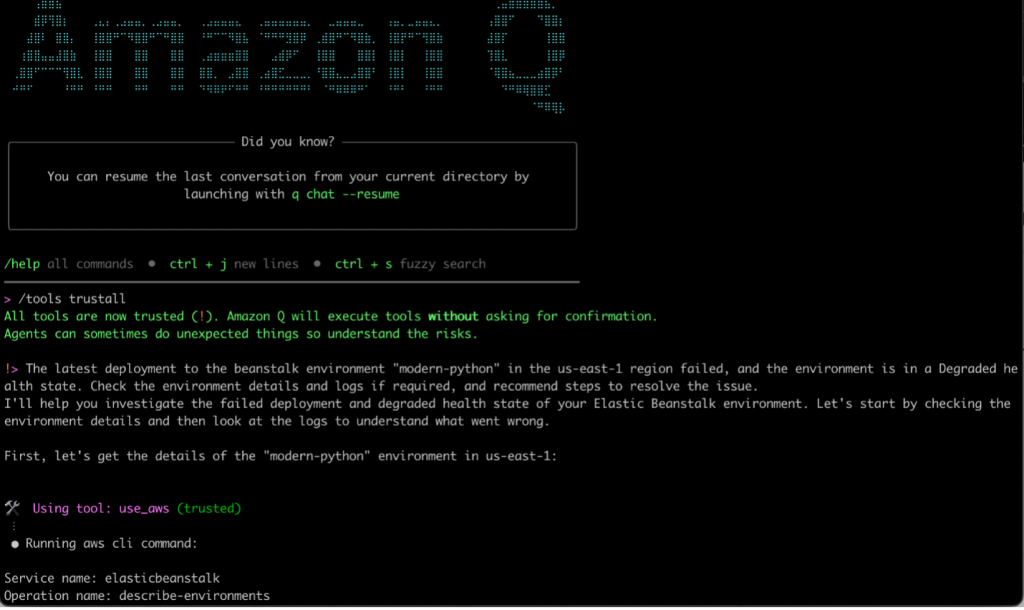
Figure 7. Q CLI prompt to troubleshoot the python deployment issue
As you can see above, we’ve used the following prompt:
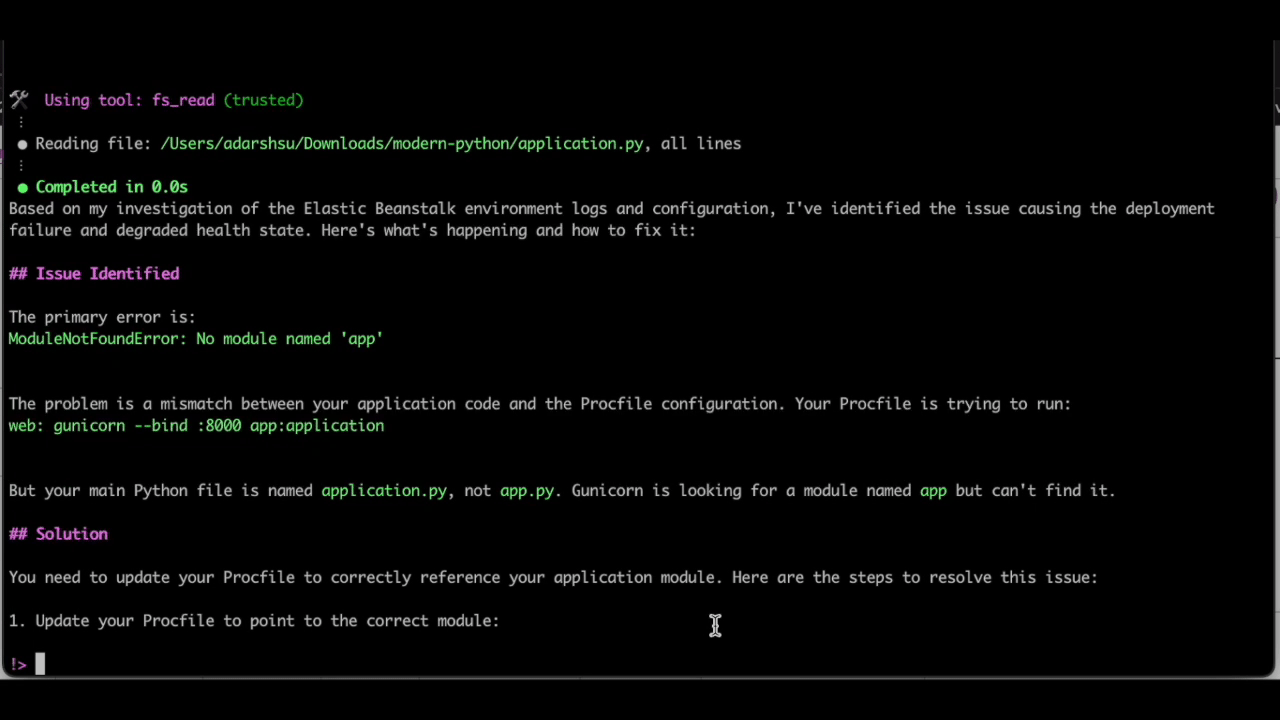
The latest deployment to the beanstalk environment "modern-python" in the us-east-1 region failed, and the environment is in a Degraded health state. Check the environment details and logs if required, and recommend steps to resolve the issue.
Q CLI was able to check the relevant logs and identify the following error causing the deployment failure:
ModuleNotFoundError: no module named ‘app’
Because the q chat conversation was initiated from the directory containing the application files, Q CLI is also able to view my application files, and identify the solution to the problem, suggesting that main python file name is application.py, not app.py, and therefore, the Procfile needs to be updated accordingly.
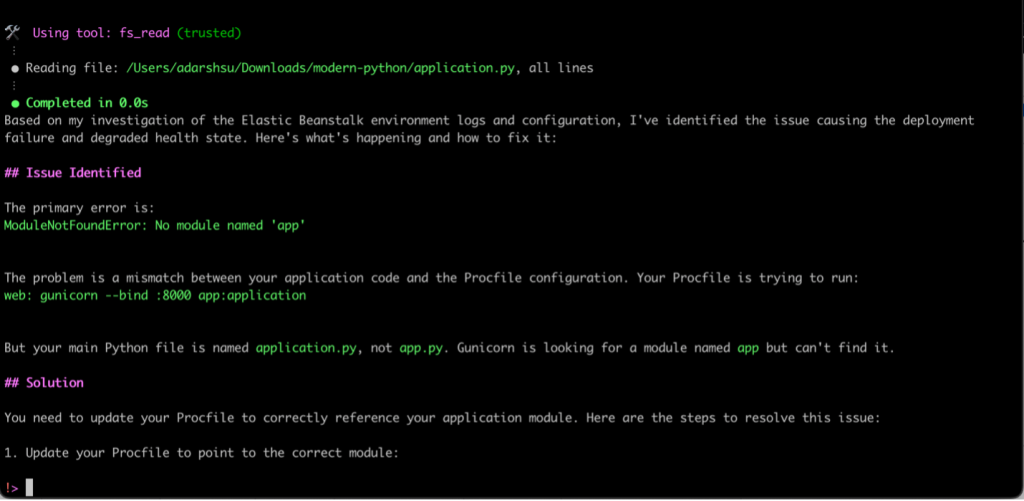
Figure 8. Q CLI identifies the reason for deployment failure, and recommends updating the Procfile
Finally, because we already have EB CLI initiated in this directory with the application files, we can use Q CLI to automatically make the required changes to the Procfile and update the elastic beanstalk environment, all with just the following natural language prompt:
Update the Procfile with the recommended corrections, and deploy to the beanstalk environment
As seen above, Q CLI is able to update the Procfile with the necessary changes and use the eb deploy EB CLI command to deploy the changes to the elastic beanstalk environment.
These examples demonstrate how Amazon Q Developer’s CLI agent supercharges your operational and troubleshooting tasks throughout the entire development process when used in your CLI environment.
Best Practices for Troubleshooting Elastic Beanstalk with Amazon Q Developer CLI
- Be specific in your questions: Include environment name, region, and specific symptoms to help Q CLI provide more targeted assistance.
- Allow Amazon Q to access logs: When prompted, allow Amazon Q to retrieve and analyze logs for more accurate troubleshooting.
- Implement suggested fixes incrementally: If Amazon Q suggests multiple solutions, implement them one at a time to identify which one resolves the issue.
- Use caution with the /tools trust-all flag: This flag bypasses confirmation prompts during the troubleshooting. Review the security considerations and use with caution in production environments.
Cleaning up
If you’ve created any Elastic Beanstalk environments, please terminate them if they’re no longer being used to avoid incurring charges for unused AWS resources.
Conclusion
Amazon Q Developer CLI is a powerful tool for troubleshooting Elastic Beanstalk environments, capable of quickly identifying and helping resolve common issues. By leveraging Q CLI’s ability to analyze logs, check environment status, and provide targeted solutions, you can significantly reduce the time and effort required to troubleshoot Elastic Beanstalk problems.
Try Amazon Q Developer CLI today and see how quickly you can resolve Elastic Beanstalk issues. Transform hours of log parsing and console navigation into minutes of focused problem-solving with Amazon Q Developer CLI. Start with a simple q chat command and let AI-powered assistance transform your operational workflows. Install the CLI agent now and experience firsthand how conversational AI can help you maintain healthier Elastic Beanstalk environments with less effort!
 Never expose your keys publicly!