Backblaze is happy to announce that Marc Suidan has joined our team as Chief Financial Officer (CFO). Marc will lead the financial organization, spearheading overall strategy, forecasting, and reporting.
What Marc brings to the role
Marc comes to Backblaze with 20 years of experience advising and leading companies of all sizes in the technology and media industries, including most recently serving as the CFO of The Beachbody Company (NYSE: BODi). He has also held leadership positions with PricewaterhouseCoopers, McKinsey & Company, and others where he drove growth and innovation.
Marc has deep knowledge and experience strategically guiding companies through financial growth. His expertise and leadership will be a valuable asset as we empower customers to move to an open cloud and to do more with their data.”
—Gleb Budman, CEO and Chairperson of the Board, Backblaze
Marc takes over for Frank Patchel, who will retire from the company in Q3 2024 after leading Backblaze through a successful IPO in 2021 and serving as an integral member of the leadership team in the years since. Thanks to Frank for all his contributions to Backblaze—we wish him well in retirement.
Regarding his new role at Backblaze, Marc said:
I believe that Backblaze is uniquely positioned for success in the cloud services industry and their vision to lead and grow the open cloud ecosystem is what drew me to the company. I’m excited to join Backblaze and lead the financial organization as we continue to drive strong growth, increase profitability, and deliver shareholder value.”
Cloudflare Stream is an end-to-end solution for video encoding, storage, delivery, and playback. Our focus has always been on simplifying all aspects of video for developers. This goal continues to motivate us as we introduce first-class portrait (vertical) video support today. Newly uploaded or ingested portrait videos will now automatically be processed in full HD quality.
Why portrait video
In the past few years, the popularity of portrait video has exploded, motivated by short-form video content applications such as TikTok or YouTube Shorts. However, Cloudflare customers have been confused as to why their portrait videos appear to be lower quality when viewed on portrait-first devices such as smartphones. This is because our video encoding pipeline previously did not support high-quality portrait videos, leading them to be grainy and lower quality. This pain point has now been addressed with the introduction of high-definition portrait video.
The current stream pipeline
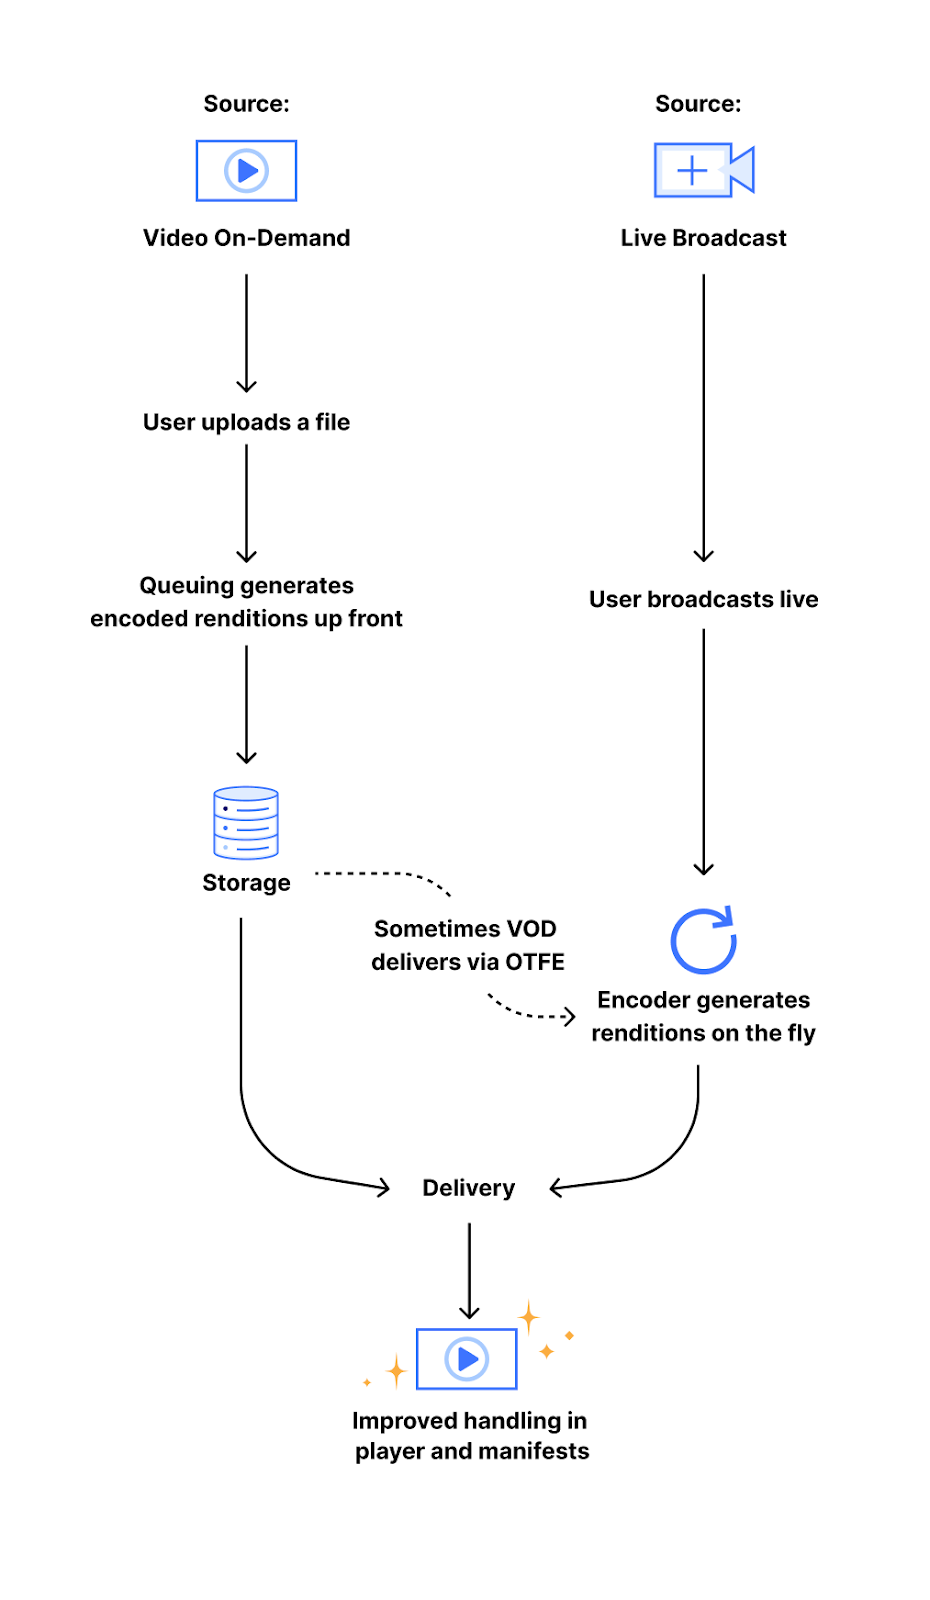
When you upload a video to Stream, it is first encoded into several different “renditions” (sizes or resolutions) before delivery. This is done in order to enable playback in a wide variety of network conditions, as well as to standardize the way a video is experienced. By using these adaptive bitrate renditions, we are able to offer viewers the highest quality streaming experience which fits their network bandwidth, meaning someone watching a video with a slow mobile connection would be served a 240p video (a resolution of 320×240 pixels) and receive the 1080p (a resolution of 1920×1080 pixels) version when they are watching at home on their fiber Internet connection. This encoding pipeline follows one of two different paths:
The first path is our video on-demand (VOD) encoding pipeline, which generates and stores a set of encoded video segments at each of our standard video resolutions. The other path is our on-the-fly encoding (OTFE) pipeline, which uses the same process as Stream Live to generate resolutions upon user request. Both pipelines work with the set of standard resolutions, which are identified through a constrained target (output) height. This means that we encode every rendition to heights of 240 pixels, 360 pixels, etc. up to 1080 pixels.
When originally conceived, this encoding pipeline was not designed with portrait video in mind because portrait video was less common. As a result, portrait videos were encoded with lower quality dimensions that were consistent with landscape video encoding. For example, a portrait HD video would have the dimensions 1920×1080 — scaling that down to the height of a landscape HD video would result in the much smaller output of 1080×606. However, current smartphones all have HD displays, making the discrepancy clear when a portrait video is viewed in portrait mode on a phone. With this new change to our encoding pipeline, all newly uploaded portrait videos will now be automatically encoded with constrained target width, using a new set of standard resolutions for portrait video. These resolutions are the same as the current set of landscape resolutions, but with the dimensions reversed: 240×426 up to 1080×1920.
Technical details
As the Stream intern this summer, I was tasked with this project, as well as the expectation of shipping a long-requested change, by the end of my internship. The first step in implementing this change was to familiarize myself with the complex architecture of Stream’s internal systems. After this, I began brainstorming a few different implementation decisions, like how to consistently track orientation through various stages of the pipeline. Following a group discussion to decide which choices would be the most scalable, least complex, and best for users, it was time to write the technical specification.
Due to the implementation method we chose, making this change involved tracing the life of a video from upload to delivery through both of our encoding pipelines and applying different logic for portrait videos. Previously, all video renditions were identified by their height at each stage of the pipeline, making certain parts of the pipeline completely agnostic to the orientation of a video. With the proposed changes, we would now be using the constraining dimension and orientation to identify a video rendition. Therefore, much of the work involved modifying the different portions of the pipeline to use these new parameters.
The first area of the pipeline to be modified was the Stream API service, which is the process which handles all Stream API calls. The API service enqueues the rendition encoding jobs for a video after it is uploaded, so it was necessary to introduce a new set of renditions designed for portrait videos, and enqueue the corresponding encoding jobs. The queuing system is handled by our in-house queue management system, which handles jobs generically and therefore did not require any changes.
Following this, I tackled the on-the-fly encoding pipeline. The area of interest here was the delivery portion of our pipeline, which generated the set of encoding resolutions to pass on to our on-the-fly encoder. Here I also introduced a new set of portrait renditions and the corresponding logic to encode them for portrait videos. This part of the backend is written and hosted on Cloudflare Workers, which made it very easy and quick to deploy and test changes.
Finally, we wanted to change how we presented these quality levels to users in the Stream built-in player and thought that using the new constrained dimension rather than always showing the height would feel more familiar. For portrait videos, we now display the size of the constraining dimension, which also means quality selection for portrait videos encoded under our old system now more accurately reflects their quality, too. As an example, a 9:16 portrait video would have been encoded to a maximum size of 608×1080 by the previous pipeline. Now, such a rendition will be marked as 608p rather than the full-quality 1080p, which would be a 1080×1920 rendition.
Stream as a whole is built on many of our own Developer Platform products, such as Workers for handling delivery, R2 for rendition storage, Workers AI for automatic captioning, and Durable Objects for bitrate observation, all of which enhance our ability to deploy and ship new updates quickly. Throughout my work on this project, I was able to see all of these pieces in action, as well as gain a new understanding of the powerful tools Cloudflare offers for developers.
Results and findings
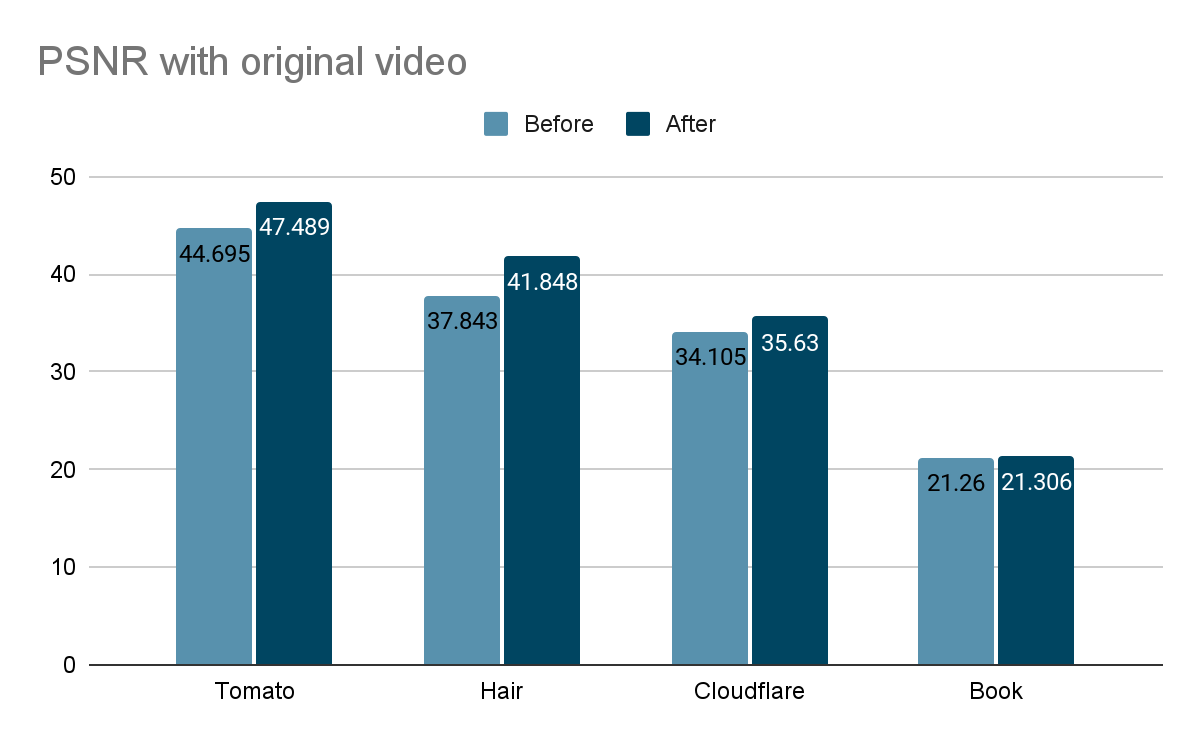
After the change, portrait videos are now encoded to higher resolutions and visibly appear to be higher quality. To confirm these differences, I analyzed the effect of the pipeline change on four different sample videos using the peak-signal-to-noise ratio (PSNR, a mathematical representation of image quality). Since the old pipeline produced lower resolution videos, the comparison here is between an upscaled version of the old pipeline rendition and the current pipeline rendition. In the graph below, higher values reflect higher quality relative to the unencoded original video.
According to this metric, we see an increase in quality from the pipeline changes as high as 8%. However, the quality increase is most noticeable to the human eye in videos that feature fine details or a high amount of movement, which is not always captured in the PSNR. For example, compare a side-by-side of a frame from the book sample video encoded both ways:
The difference between the old and new encodings is most clear when zoomed in:
Maximize the Stream player and look at the quality selector (in the gear menu) to see the new quality level labels – select the highest option to compare. Note the improved sharpness of the text in the book sample as well as the improved detail in the hair and eye shadow of the hair and makeup sample.
Implementation challenges
Due to the complex nature of our encoding pipelines, there were several technical challenges to making a large change like this. Aside from simply uploading videos, many of the features we offer, like downloads or clipping, require tweaking to produce the correct video renditions. This involved modifying many parts of the encoding pipeline to ensure that portrait video logic was handled.
There were also some edge cases which were not caught until after release. One release of this feature contained a bug in the on-the-fly encoding logic which caused a subset of new portrait livestream renditions to have negative bitrates, making them unusable. This was due to an internal representation of video renditions’ constraining dimensions being mistakenly used for bitrate observation. We remedied this by increasing the scope of our end-to-end testing to include more portrait video tests and live recording interaction tests.
Another small bug caused downloading very small videos to sometimes fail. This was because for videos under 240p, our smallest encoding resolution, the non-constraining dimension was not being properly scaled to match the aspect ratio of the video, causing some specific combinations of dimensions to be interpreted as portrait when they should have been landscape, and vice versa. This bug was fixed quickly, but was not initially caught after the release since it required a very specific set of conditions to activate. After this experience, I added a few more unit tests involving small videos.
That’s a wrap
As my internship comes to a close, reflecting on the experience makes me grateful for all the team members who have helped me throughout this time. I am very glad to have shipped this project which addresses a long-standing concern and will have real-world customer impact. Support for high-definition portrait video is now available, and we will continue to make improvements to our video solutions suite. You can see the difference yourself by uploading a portrait video to Stream! Or, perhaps you’d like to help build a better Internet, too — our internship and early talent programs are a great way to jumpstart your own journey.
Sample video acknowledgements: The sample video of the book was created by the Stream Product Manager and shows the opening page of The Strange Wonder of Roots by Evan Griffith (HarperCollins). The hair and makeup fashion video was sourced from Mixkit, a great source of free media for video projects.
As part of Cloudflare’s mission to help build a better Internet, we’re continuously integrating with other networks and service providers, ensuring ease of use for anyone, anywhere, anytime.
Today, we’re excited to announce Cloud Connector – a brand-new way to put Cloudflare in front of popular public cloud services, protecting your assets, accelerating applications, and routing your traffic between multiple cloud providers seamlessly.
Cloud Connector is a natural extension of Cloudflare’s Connectivity Cloud, which aims to simplify and secure the complex web of connections across today’s enterprises. Imagine Origin Rules, but managed by Cloudflare, available for all plans, created with just a few clicks, and working out of the box without the need for additional rules. It allows you to route traffic to different public clouds without complicated workarounds. This means you can now direct specific requests to AWS S3, Google Cloud Storage, Azure Blob Storage, or our own R2, even if these services are not set as the DNS target for your hostname.
Whether you’re an e-commerce site looking to route image traffic to the best-performing cloud storage for faster load times, a media company distributing video content efficiently across various cloud providers, or a developer wanting to simplify backend configurations, Cloud Connector is designed for you. It’s available for all Cloudflare plans, with a particular focus on Free, Pro, and Business customers.
The Host header challenge
Before Cloud Connector, many of our Free, Pro, and Business customers faced a significant challenge: it was not straightforward to route traffic for the same hostname to one or more cloud providers on the backend. Something as simple as directing example.com/images to AWS S3 while keeping the rest of your site served by your origin web servers required multiple non-trivial steps to accomplish. Some users changed their setups, leveraging either Workers, chaining hostnames, or explored putting other service providers in front of their cloud destinations. While functional, this approach added complexity and increased effort, leading to frustration.
Enterprise customers had Host Header and Resolve Override features to manage this, but the security and abuse risks associated with Host Header modification kept these features out of reach for everyone else.
Simplifying multi-cloud routing
Today, we’re excited to unveil Cloud Connector, designed to address these challenges head-on.
Imagine you’re managing a website where images are stored on AWS S3, videos on Google Cloud Storage, and static assets on Azure Blob Storage. Traditionally, routing traffic to these different providers would involve a series of complex steps and configurations. With Cloud Connector, this process is streamlined. You can seamlessly direct traffic for your hostname to multiple origins with just a few clicks. The setup is straightforward and doesn’t require any advanced configurations or additional rules.
For instance, you can now direct example.com/images to a specific R2 bucket in your Cloudflare account effortlessly. This feature, previously exclusive to Enterprise customers, is now available to all users, ensuring that everyone can benefit from simplified cloud routing.
How to configure
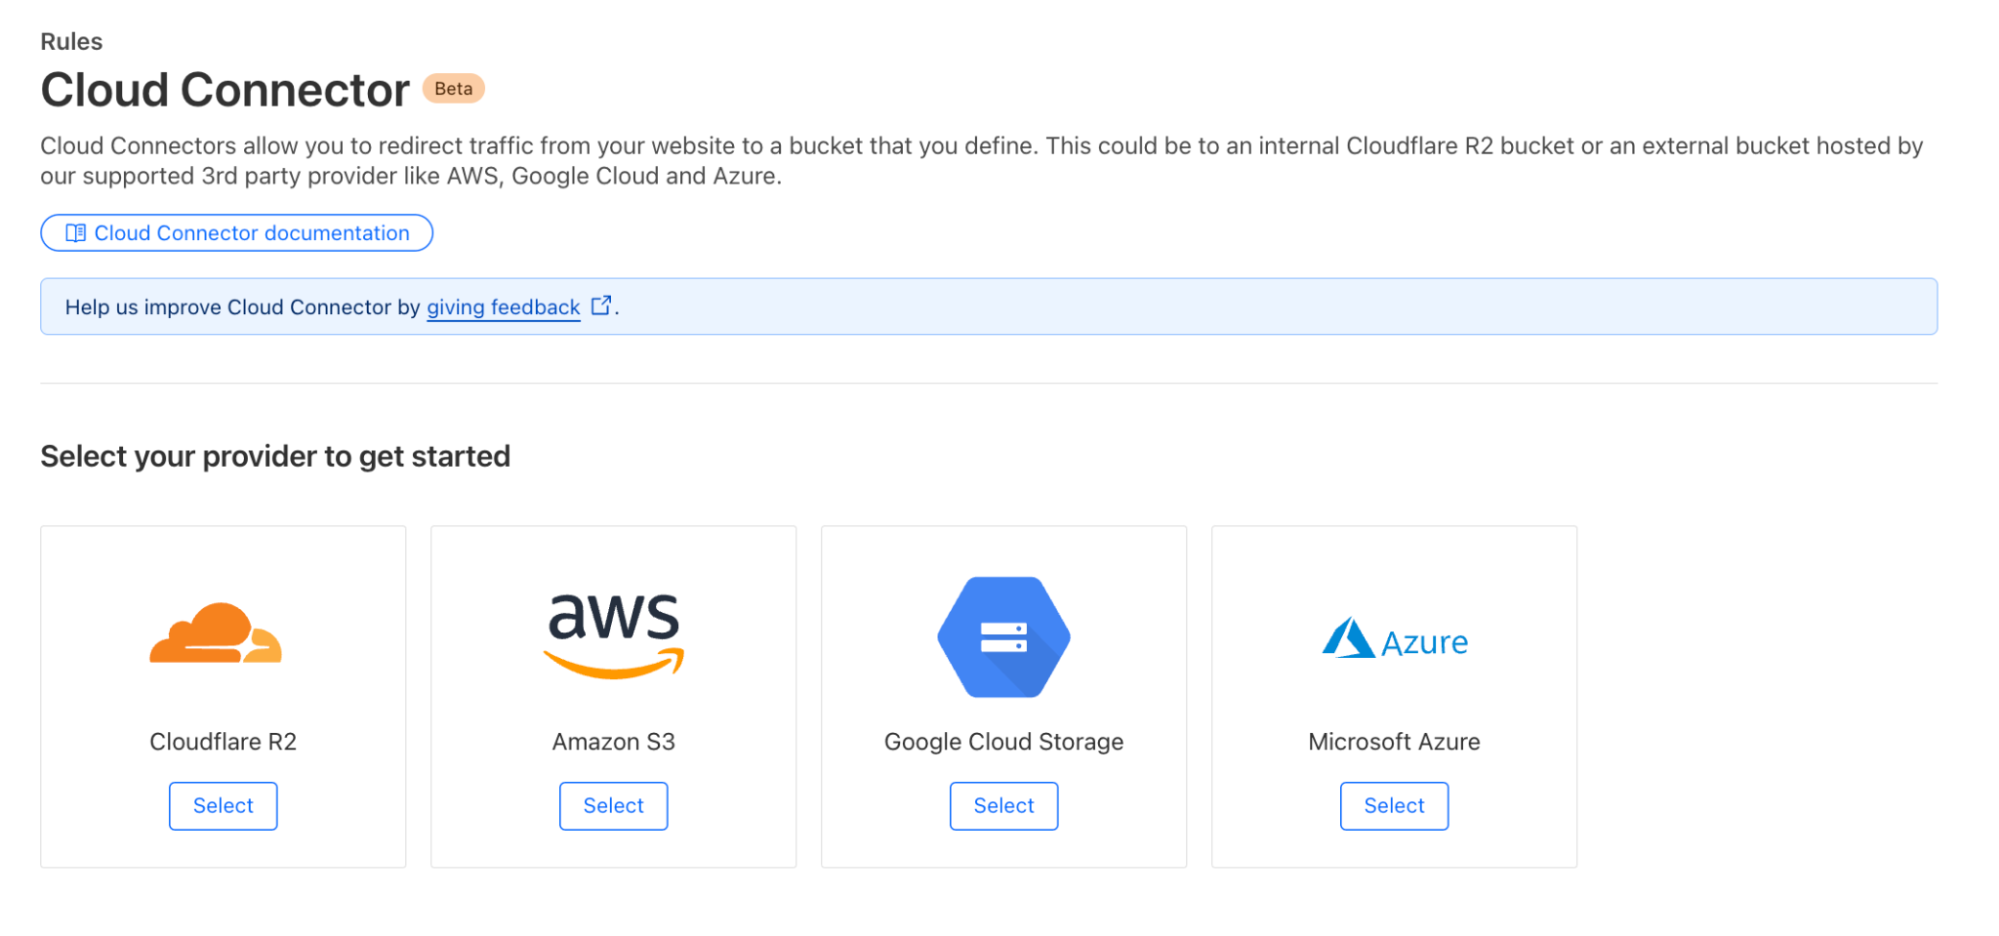
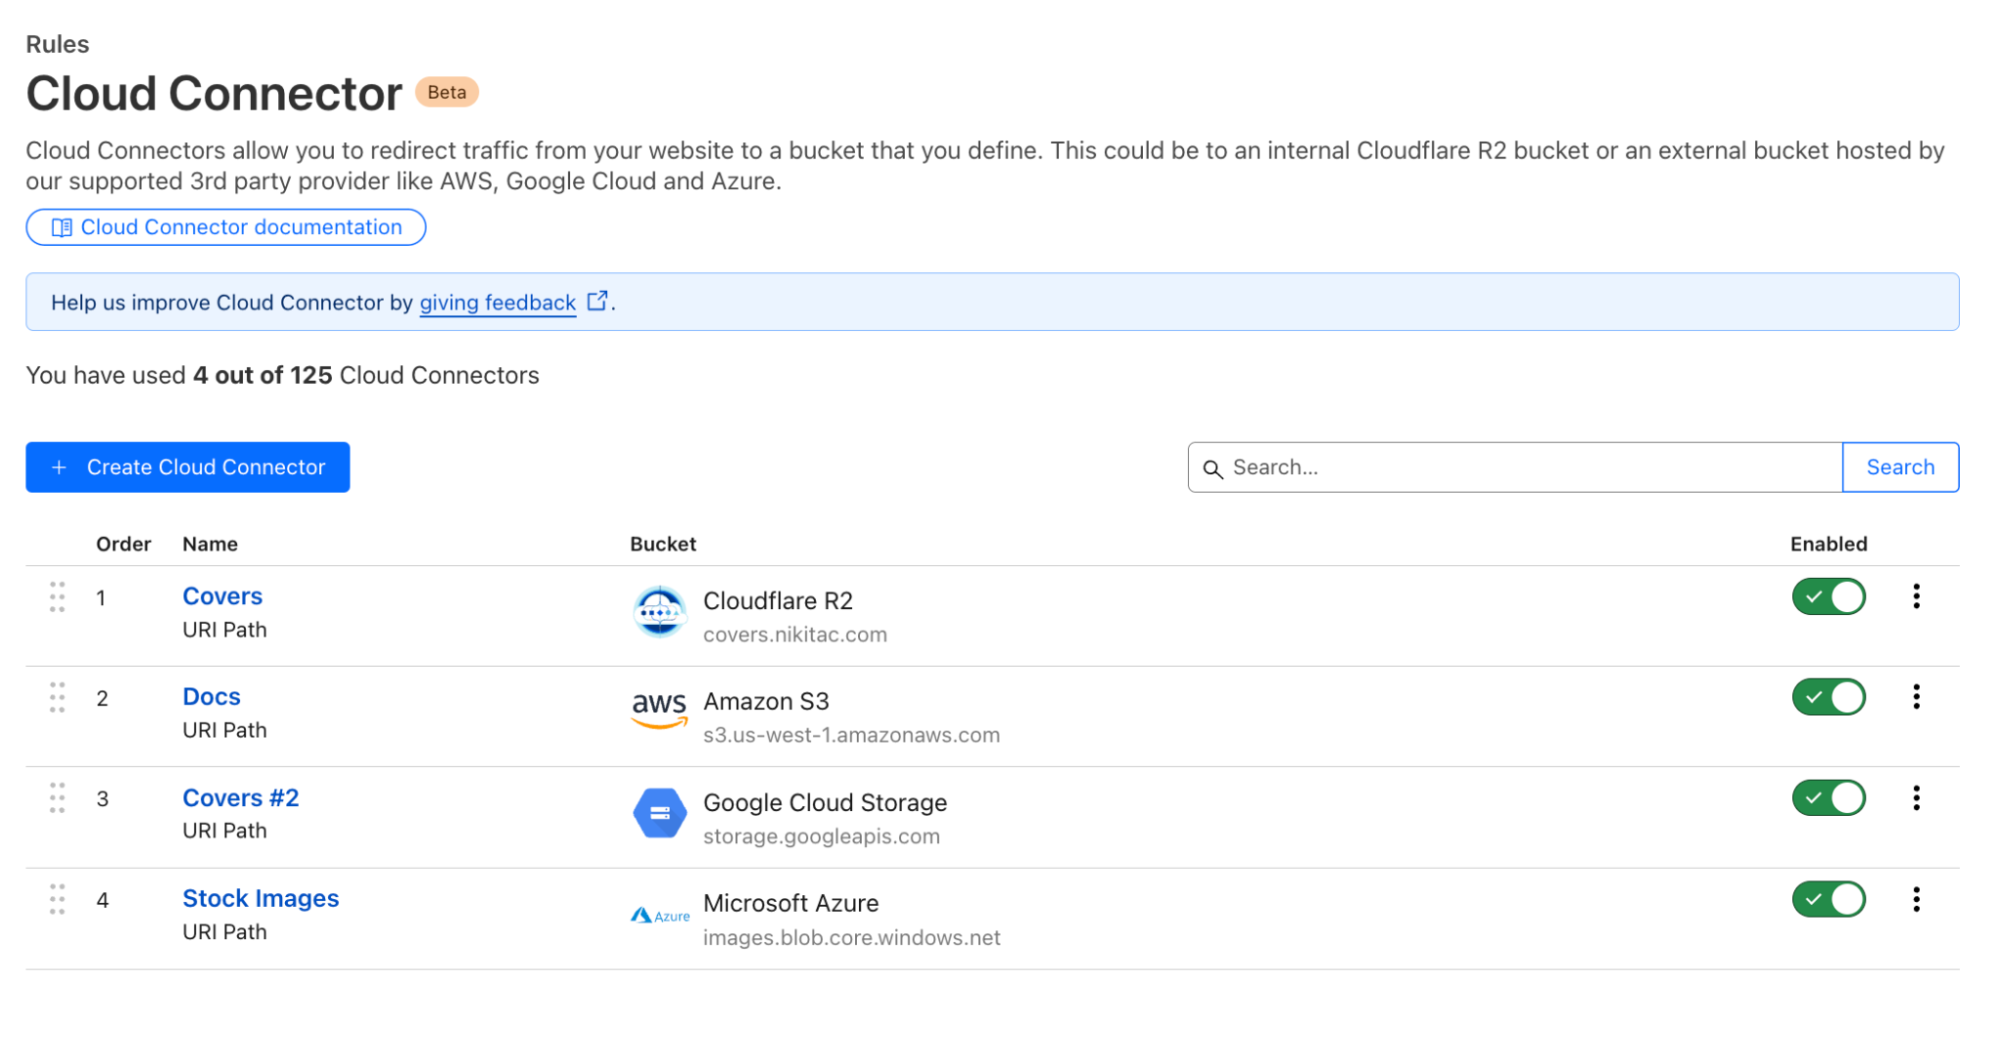
Getting started with Cloud Connector is easy. Navigate to the Rules > Cloud Connector tab in your zone dashboard. From there, select your cloud provider:
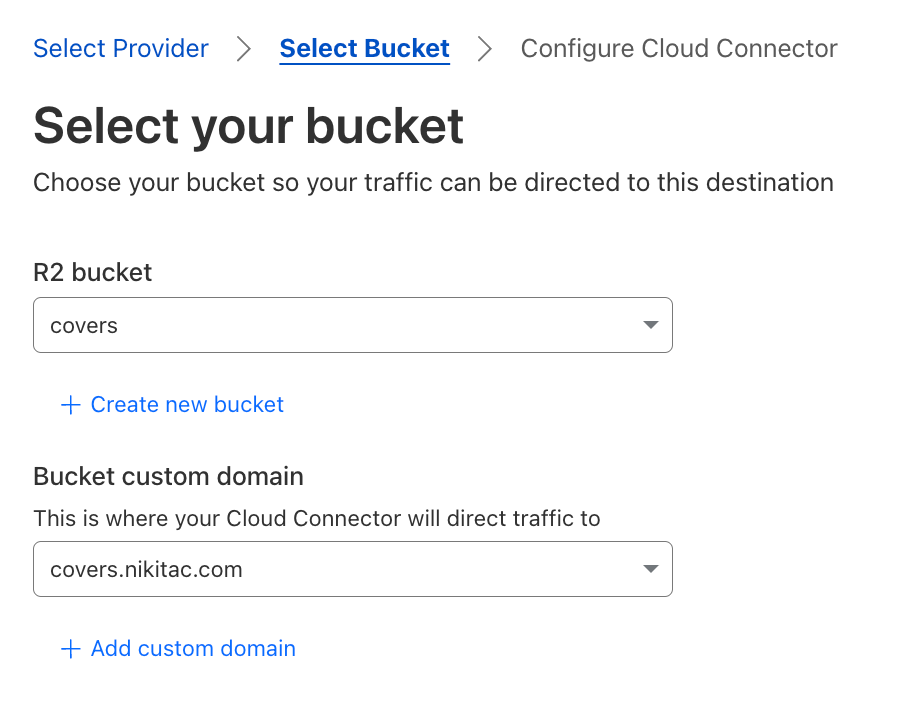
You’ll be presented with an interface where you can configure the destination hostname of your object storage bucket. Ensure that your bucket URL matches the expected schema for your cloud provider, such as .amazonaws.com for AWS S3 or storage.googleapis.com for Google Cloud Storage. In case of R2, your bucket needs to be public and associated with a custom domain:
Once you’ve configured your bucket, the next step is to determine which traffic is routed by Cloud Connector. Using the familiar rule builder interface that powers all our Rules products, you can filter requests based on hostname, URI path, headers, cookies, source IP, AS number, and more.
After configuring, deploy your rule, and it will be immediately effective:
Cloud Connector is intentionally placed at the end of the Ruleset Engine phase sequence to ensure it works out of the box, even if there are active origin or configuration rules with matching criteria.
Cloud Connector simplifies your setup, allowing you to focus on what matters most: delivering a seamless experience for your users. By leveraging Cloudflare’s built-in security, your assets are automatically protected, and direct traffic routing optimizes application performance, accelerating load times and reducing your cloud bandwidth costs.
Behind the scenes: how Cloud Connector works
To build Cloud Connector, we leveraged our powerful, high performance Ruleset Engine and integrated it with various cloud providers, ensuring compatibility and optimal performance. Throughout this process, we were focused on making the setup as intuitive as possible, reducing the need for additional configurations and making it accessible to users of all technical backgrounds.
At its core, Cloud Connector builds on Cloudflare’s existing Ruleset Engine, the same technology that powers Origin Rules. Origin Rules typically operate during the http_request_originphase, where they manage how requests are routed to different origins. A phase, in Cloudflare’s system, represents a specific stage in the life of a request where rulesets can be executed. Each phase has a dedicated purpose, with rules defined at the account and zone levels to control different aspects of a request’s journey through our network.
Phases are essential because they allow us to apply actions at precise points in the request flow. For example, the http_request_origin phase focuses on routing, ensuring that traffic is directed to the correct origin based on the rules you set. By defining specific phases, we can optimize performance and enforce security measures at the right time without overlap or conflicts between different actions.
Rather than creating an entirely new system, we extended the existing “route” action within Ruleset Engine to handle a specific set of pre-approved cloud provider endpoints, such as AWS S3, Google Cloud Storage, Azure Blob Storage, and Cloudflare R2.
To maintain the modularity of our system and avoid introducing product-specific abstractions into our core Ruleset Engine control plane, we developed a thin API translator layer on Workers. This layer acts as an intermediary between the user-facing Cloud Connector API and the underlying Ruleset Engine API.
When a user creates a Cloud Connector rule, it’s translated on the backend into a series of existing Ruleset Engine-based actions. For instance, if a user sets up a rule to route traffic to an AWS S3 bucket, our system translates this into actions that adjust the host header and origin settings to point to the S3 endpoint. This allows a single Cloud Connector rule to be decomposed into multiple rules within a zone’s entry point ruleset.
These rules are processed in reverse order, adhering to a “last rule wins” approach. This ensures that the final matching rule determines the traffic’s routing, preserving the behavior users expect. For example, if traffic is routed to an AWS S3 bucket, the system will first match the traffic based on the URI, then disable SSL if necessary, and finally route to the S3 origin. Once the appropriate rule is matched, a “skip” action is invoked to prevent any further rules from altering the traffic, which prevents unintended behavior like disabling SSL for traffic routed to a different cloud provider.
When users retrieve their Cloud Connector rules, the system reverses this process, reconstructing the original actions from the decomposed rules. This ensures that users see their configurations as they originally defined them, without needing to understand the underlying complexities.
To support Cloud Connector’s unique requirements, we introduced a new request phase, http_request_cloud_connector. As the final request phase, this ensures that Cloud Connector rules have the last say in traffic routing decisions. This priority prevents conflicts with other routing rules, ensuring that traffic is securely and accurately routed according to the user’s intent.
Cloudflare is committed to building Cloudflare products on Cloudflare, leveraging existing technologies while innovating to meet new challenges. By building on Origin Rules and Workers, introducing the http_request_cloud_connector phase, and creating a thin API translation layer, we’ve developed a solution that simplifies multi-cloud routing without compromising on performance or security.
What’s next for Cloud Connector?
The current version of Cloud Connector is just the beginning. Our vision extends far beyond supporting object storage. In the future, we aim to support all kinds of HTTP cloud services, including load balancers, compute services, and more. We want Cloud Connector to be the primary way for Cloudflare users to discover and manage the cloud services they use across multiple providers.
Imagine being able to configure secure traffic routing to any cloud service without having to worry about DNS settings, Host headers, or SSL implementation. Our goal is to make Cloud Connector a comprehensive tool that simplifies the entire process, ensuring that you can focus on what matters most: building and scaling your web applications.
Get started
Cloud Connector is available in beta to all plans and is completely free. The rollout has started this month (August) and will be gradually released to all users throughout 2024. Once rolled out, users will start seeing this new product under the Rules > Cloud Connector tab of their zone dashboard. No beta access registration is required.
Learn more
Learn more about setting up and using Cloud Connector in developer documentation. Share your feedback in community forums – your opinion is invaluable and directly influences our product and design decisions, helping us to make Rules products even better.
Building a resilient cybersecurity culture is crucial in today’s digital landscape. The recent Rapid7 Take Command Summit session titled “Commander in Chief: Enhancing Cybersecurity Culture” offered valuable insights into fostering a strong security mindset within organizations.
Here are three key takeaways from the discussion that every cybersecurity professional should consider.
1. Align Security Objectives with Business Goals: Jaya Baloo, Chief Security Officer at Rapid7, emphasized the importance of aligning security goals with company objectives. “I rarely disjoint what needs to be done for security from the company’s core values and core business.” By integrating security initiatives with overall business goals, organizations can ensure that security measures receive the necessary support and resources.
2. Foster Empathy and Inclusion: Cultivating a cybersecurity culture that values empathy and inclusion is vital. Sofia Dozier, who leads Diversity, Equity, and Inclusion at Rapid7, highlighted the importance of understanding diverse perspectives within the workforce. “Empathy means putting yourself in someone else’s shoes to understand their experience.” By promoting inclusive behaviors, organizations can create a supportive environment where all employees are committed to security.
3. Navigate Complex Regulations with Clarity: A significant challenge for many organizations is navigating the intricate SEC Cybersecurity Disclosure Rules. According to a post summit survey of attendees, 57% of respondents find the complexity and scope of regulations to be the most inhibiting factor in compliance. Baloo stressed the importance of transparency and honesty in security practices, warning against the dangers of “lying by omission” due to fear of repercussions.
Enhancing cybersecurity culture requires aligning security with business goals, fostering empathy and inclusion, and navigating complex regulations transparently. “Culture eats strategy for breakfast,” Baloo said, emphasizing the critical role of a strong security culture in achieving cybersecurity success.
To delve deeper into these strategies and hear more expert insights, click here to watch the full video from Rapid7’s Take Command Summit.
The press is reporting a critical Windows vulnerability affecting IPv6.
As Microsoft explained in its Tuesday advisory, unauthenticated attackers can exploit the flaw remotely in low-complexity attacks by repeatedly sending IPv6 packets that include specially crafted packets.
Microsoft also shared its exploitability assessment for this critical vulnerability, tagging it with an “exploitation more likely” label, which means that threat actors could create exploit code to “consistently exploit the flaw in attacks.”
Details are being withheld at the moment. Microsoft strongly recommends patching now.
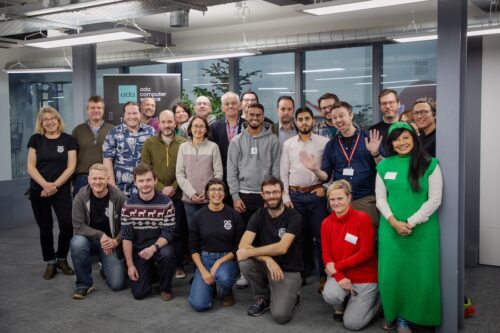
One of our favourite things is sharing the stories of amazing young people, volunteers, and educators who are using their passion for technology to create positive change in the world around them.
Recently, we had the pleasure of speaking with Isabel, a computer science teacher at Barton Peveril Sixth Form College in Eastleigh, England. She told us her fascinating journey from industry to education, along with how she is helping to make the tech space inviting to all.
From industry to the classroom: Isabel’s journey to encourage diversity in tech
Isabel’s path to working in the tech sector started with her early exposure to engineering thanks to her father’s career in telecoms.
“I find this is true for a lot of female engineers my age: you will find that their dad or their uncle was an engineer. I remember that when I made the decision to study engineering, my teachers asked me if I was sure that it was something I wanted to do.”
Isabel pursued a degree in engineering because she loved the technical aspects, and during her studies she found a passion for programming. She went to work as a software engineer in Hampshire, contributing to the development of 3G mobile phone technology.
Despite enjoying her career in tech, Isabel felt a strong pull towards teaching due to her long-standing involvement with youth groups and a desire to give back to the community.
“While I was at university in London, I took part in a scheme where we could go into local primary schools and help with their science teaching. At the time, I just thought this was my way of giving back, I hadn’t really thought of it as a career. But actually, after a while, I thought ‘I’m enjoying this programming, but I really liked helping the young kids as well’.”
The transition wasn’t easy, as Computer Science was not widely taught in schools at the time, but Isabel persevered, teaching IT and Media to her classes as well.
Once Isabel settled into her teaching role, she began thinking about how she could tackle a problem she noticed in the STEM field.
Championing diversity in tech
Having experienced first-hand what it was like to be the only woman in STEM spaces, Isabel’s commitment to diversity in technology is at the core of her teaching philosophy. She works hard to create an inclusive environment and a diversity of opportunities in her classroom, making sure girls feel encouraged to pursue careers in tech through exploring various enrichment activities.
Isabel focuses on enrichment activities that bridge the gap between academic learning and real-world application. She runs various projects and competitions, ensuring a balanced representation of girls in these initiatives, and gives her students the opportunity to participate in programs like the Industrial Cadets, Student Robotics, and Coolest Projects.
Isabel told us that she feels these opportunities provide essential soft skills that are crucial for success in any career.
“The A level environment is so academic; it is heavily focused on working on your own on very abstract topics. Having worked in industry and knowing the need to collaborate, I found that really hard. So I’ve always made sure to do lots of projects with my students where we actually work with real engineers, do real-world projects. I believe strongly in teaching soft skills like team working, project management, and time management.”
Harnessing trusted resources
A key resource in Isabel’s teaching toolkit is the Ada Computer Science platform. She values its reliability and the timely updates to the topics, which are crucial in a rapidly evolving subject like Computer Science.
She said she encourages both her students and fellow teachers, especially those who have retrained in Computer Science, to use the platform as a resource.
“Ada Computer Science is amazing. We know we can rely on saying to the students ‘look on Ada, the information will be correct’ because I trust the people creating the resources. And we even found ourselves as teachers double-checking things on there. We struggle to get Computer science teachers, so actually only two of us are Computer Science teachers, and the other three are Maths teachers we have trained up. To be able to say ‘if you are not sure about something, look on Ada’ is a really nice thing to have.”
The ongoing challenge and hope for the future
Despite her efforts, Isabel acknowledges that progress in getting more girls to pursue tech careers is slow. Many girls still view tech as an uninviting space and feel like they don’t belong when they find themselves as one of a few girls — if not the only one — in a class. But Isabel remains hopeful that continuous exposure and positive experiences can change these perceptions.
“I talk to students who are often the only girl in the class and they find that really hard. So, if at GCSE they are the only girl in the class, they won’t do [the subject] at A level. So, if we leave it until A level, it is almost too late. Because of this, I try as much as I can to get as many girls as possible onto my engineering enrichment projects to show them as many opportunities in engineering as possible early on.”
Her work with organisations like the UK Electronics Skills Foundation reflects her commitment to raising awareness about careers in electronics and engineering. Through her outreach and enrichment projects, Isabel educates younger students about the opportunities in these fields, hoping to inspire more girls to consider them as viable career paths.
Looking ahead
As new technology continues to be built, Isabel recognises the challenges in keeping up with rapid changes, especially with fields like artificial intelligence (AI). She stays updated through continuous learning and collaborating with her peers, and encourages her students to be adaptable and open to new developments. “The world of AI is both exciting and daunting,” she admits. “We need to prepare our students for a future that we can hardly predict.”
Isabel’s dedication to teaching, her advocacy for diversity, and her efforts to provide real-world learning opportunities make her an inspiring educator. Her commitment was recognised by the Era Foundation in 2023: Isabel was named as one of their David Clark Prize recipients. The award recognises those who “have gone above and beyond the curriculum to inspire students and showcase real-world engineering in the classroom”.
Isabel not only imparts technical knowledge — she inspires her students to believe in their potential, encouraging a new generation of diverse tech professionals.
If Isabel’s story has inspired you to encourage the next generation of young tech creators, check out the free teaching and training resources we provide to support your journey.
If you are working in Computer Science teaching for learners age 14 and up, take a look at how Ada Computer Science will support you.
Unlocking the true value of data often gets impeded by siloed information. Traditional data management—wherein each business unit ingests raw data in separate data lakes or warehouses—hinders visibility and cross-functional analysis. A data mesh framework empowers business units with data ownership and facilitates seamless sharing.
However, integrating datasets from different business units can present several challenges. Each business unit exposes data assets with varying formats and granularity levels, and applies different data validation checks. Unifying these necessitates additional data processing, requiring each business unit to provision and maintain a separate data warehouse. This burdens business units focused solely on consuming the curated data for analysis and not concerned with data management tasks, cleansing, or comprehensive data processing.
In this post, we explore a robust architecture pattern of a data sharing mechanism by bridging the gap between data lake and data warehouse using Amazon DataZone and Amazon Redshift.
Solution overview
Amazon DataZone is a data management service that makes it straightforward for business units to catalog, discover, share, and govern their data assets. Business units can curate and expose their readily available domain-specific data products through Amazon DataZone, providing discoverability and controlled access.
Amazon Redshift is a fast, scalable, and fully managed cloud data warehouse that allows you to process and run your complex SQL analytics workloads on structured and semi-structured data. Thousands of customers use Amazon Redshift data sharing to enable instant, granular, and fast data access across Amazon Redshift provisioned clusters and serverless workgroups. This allows you to scale your read and write workloads to thousands of concurrent users without having to move or copy the data. Amazon DataZone natively supports data sharing for Amazon Redshift data assets. With Amazon Redshift Spectrum, you can query the data in your Amazon Simple Storage Service (Amazon S3) data lake using a central AWS Glue metastore from your Redshift data warehouse. This capability extends your petabyte-scale Redshift data warehouse to unbounded data storage limits, which allows you to scale to exabytes of data cost-effectively.
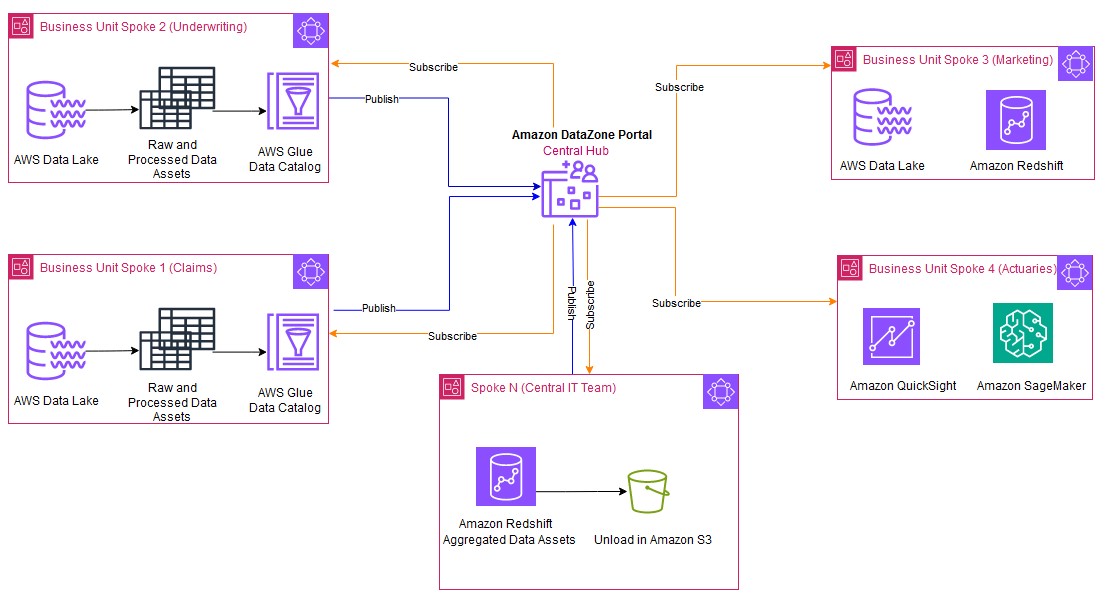
The following figure shows a typical distributed and collaborative architectural pattern implemented using Amazon DataZone. Business units can simply share data and collaborate by publishing and subscribing to the data assets.
The Central IT team (Spoke N) subscribes the data from individual business units and consumes this data using Redshift Spectrum. The Central IT team applies standardization and performs the tasks on the subscribed data such as schema alignment, data validation checks, collating the data, and enrichment by adding additional context or derived attributes to the final data asset. This processed unified data can then persist as a new data asset in Amazon Redshift managed storage to meet the SLA requirements of the business units. The new processed data asset produced by the Central IT team is then published back to Amazon DataZone. With Amazon DataZone, individual business units can discover and directly consume these new data assets, gaining insights to a holistic view of the data (360-degree insights) across the organization.
The Central IT team manages a unified Redshift data warehouse, handling all data integration, processing, and maintenance. Business units access clean, standardized data. To consume the data, they can choose between a provisioned Redshift cluster for consistent high-volume needs or Amazon Redshift Serverless for variable, on-demand analysis. This model enables the units to focus on insights, with costs aligned to actual consumption. This allows the business units to derive value from data without the burden of data management tasks.
This streamlined architecture approach offers several advantages:
Single source of truth – The Central IT team acts as the custodian of the combined and curated data from all business units, thereby providing a unified and consistent dataset. The Central IT team implements data governance practices, providing data quality, security, and compliance with established policies. A centralized data warehouse for processing is often more cost-efficient, and its scalability allows organizations to dynamically adjust their storage needs. Similarly, individual business units produce their own domain-specific data. There are no duplicate data products created by business units or the Central IT team.
Eliminating dependency on business units – Redshift Spectrum uses a metadata layer to directly query the data residing in S3 data lakes, eliminating the need for data copying or relying on individual business units to initiate the copy jobs. This significantly reduces the risk of errors associated with data transfer or movement and data copies.
Eliminating stale data – Avoiding duplication of data also eliminates the risk of stale data existing in multiple locations.
Incremental loading – Because the Central IT team can directly query the data on the data lakes using Redshift Spectrum, they have the flexibility to query only the relevant columns needed for the unified analysis and aggregations. This can be done using mechanisms to detect the incremental data from the data lakes and process only the new or updated data, further optimizing resource utilization.
Federated governance – Amazon DataZone facilitates centralized governance policies, providing consistent data access and security across all business units. Sharing and access controls remain confined within Amazon DataZone.
Enhanced cost appropriation and efficiency – This method confines the cost overhead of processing and integrating the data with the Central IT team. Individual business units can provision the Redshift Serverless data warehouse to solely consume the data. This way, each unit can clearly demarcate the consumption costs and impose limits. Additionally, the Central IT team can choose to apply chargeback mechanisms to each of these units.
In this post, we use a simplified use case, as shown in the following figure, to bridge the gap between data lakes and data warehouses using Redshift Spectrum and Amazon DataZone.
The underwriting business unit curates the data asset using AWS Glue and publishes the data asset Policies in Amazon DataZone. The Central IT team subscribes to the data asset from the underwriting business unit.
We focus on how the Central IT team consumes the subscribed data lake asset from business units using Redshift Spectrum and creates a new unified data asset.
Prerequisites
The following prerequisites must be in place:
AWS accounts – You should have active AWS accounts before you proceed. If you don’t have one, refer to How do I create and activate a new AWS account? In this post, we use three AWS accounts. If you’re new to Amazon DataZone, refer to Getting started.
Amazon Data Zone resources – You need a domain for Amazon DataZone, an Amazon DataZone project, and a new Amazon DataZone environment (with a custom AWS service blueprint).
Data lake asset – The data lake asset Policies from the business units was already onboarded to Amazon DataZone and subscribed by the Central IT team. To understand how to associate multiple accounts and consume the subscribed assets using Amazon Athena, refer to Working with associated accounts to publish and consume data.
Central IT environment – The Central IT team has created an environment called env_central_team and uses an existing AWS Identity and Access Management (IAM) role called custom_role, which grants Amazon DataZone access to AWS services and resources, such as Athena, AWS Glue, and Amazon Redshift, in this environment. To add all the subscribed data assets to a common AWS Glue database, the Central IT team configures a subscription target and uses central_db as the AWS Glue database.
IAM role – Make sure that the IAM role that you want to enable in the Amazon DataZone environment has necessary permissions to your AWS services and resources. The following example policy provides sufficient AWS Lake Formation and AWS Glue permissions to access Redshift Spectrum:
As shown in the following screenshot, the Central IT team has subscribed to the data Policies. The data asset is added to the env_central_team environment. Amazon DataZone will assume the custom_role to help federate the environment user (central_user) to the action link in Athena. The subscribed asset Policies is added to the central_db database. This asset is then queried and consumed using Athena.
The goal of the Central IT team is to consume the subscribed data lake asset Policies with Redshift Spectrum. This data is further processed and curated into the central data warehouse using the Amazon Redshift Query Editor v2 and stored as a single source of truth in Amazon Redshift managed storage. In the following sections, we illustrate how to consume the subscribed data lake asset Policies from Redshift Spectrum without copying the data.
Automatically mount access grants to the Amazon DataZone environment role
Amazon Redshift automatically mounts the AWS Glue Data Catalog in the Central IT Team account as a database and allows it to query the data lake tables with three-part notation. This is available by default with the Admin role.
To grant the required access to the mounted Data Catalog tables for the environment role (custom_role), complete the following steps:
Log in to the Amazon Redshift Query Editor v2 using the Amazon DataZone deep link.
In the Query Editor v2, choose your Redshift Serverless endpoint and choose Edit Connection.
For Authentication, select Federated user.
For Database, enter the database you want to connect to.
Get the current user IAM role as illustrated in the following screenshot.
Connect to Redshift Query Editor v2 using the database user name and password authentication method. For example, connect to dev database using the admin user name and password. Grant usage on the awsdatacatalog database to the environment user role custom_role (replace the value of current_userwith the value you copied):
GRANT USAGE ON DATABASE awsdatacatalog to "IAMR:current_user"
Query using Redshift Spectrum
Using the federated user authentication method, log in to Amazon Redshift. The Central IT team will be able to query the subscribed data asset Policies (table: policy) that was automatically mounted under awsdatacatalog.
Aggregate tables and unify products
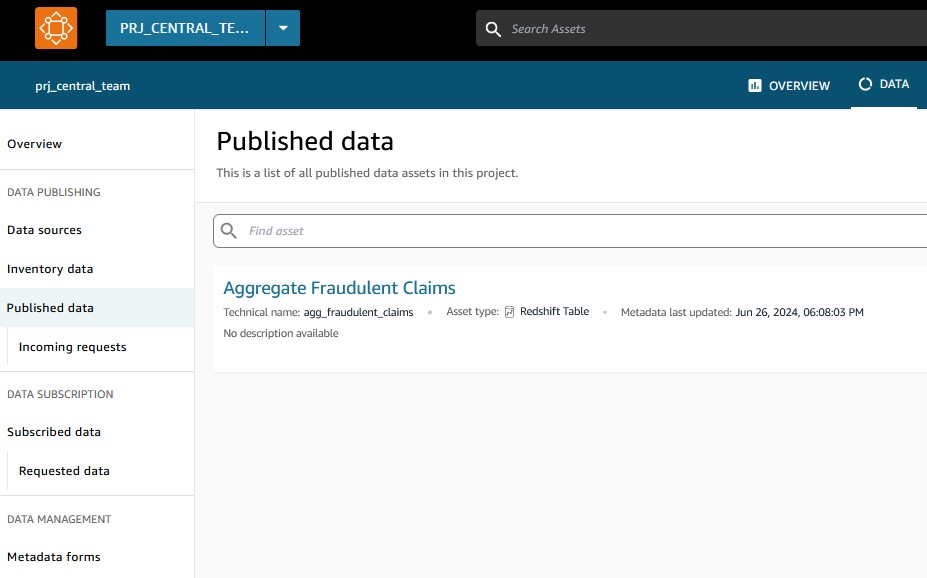
The Central IT team applies the necessary checks and standardization to aggregate and unify the data assets from all business units, bringing them at the same granularity. As shown in the following screenshot, both the Policies and Claims data assets are combined to form a unified aggregate data asset called agg_fraudulent_claims.
These unified data assets are then published back to the Amazon DataZone central hub for business units to consume them.
The Central IT team also unloads the data assets to Amazon S3 so that each business unit has the flexibility to use either a Redshift Serverless data warehouse or Athena to consume the data. Each business unit can now isolate and put limits to the consumption costs on their individual data warehouses.
Because the intention of the Central IT team was to consume data lake assets within a data warehouse, the recommended solution would be to use custom AWS service blueprints and deploy them as part of one environment. In this case, we created one environment (env_central_team) to consume the asset using Athena or Amazon Redshift. This accelerates the development of the data sharing process because the same environment role is used to manage the permissions across multiple analytical engines.
Clean up
To clean up your resources, complete the following steps:
Delete any S3 buckets you created.
On the Amazon DataZone console, delete the projects used in this post. This will delete most project-related objects like data assets and environments.
Delete the Amazon DataZone domain.
On the Lake Formation console, delete the Lake Formation admins registered by Amazon DataZone along with the tables and databases created by Amazon DataZone.
If you used a provisioned Redshift cluster, delete the cluster. If you used Redshift Serverless, delete any tables created as part of this post.
Conclusion
In this post, we explored a pattern of seamless data sharing with data lakes and data warehouses with Amazon DataZone and Redshift Spectrum. We discussed the challenges associated with traditional data management approaches, data silos, and the burden of maintaining individual data warehouses for business units.
In order to curb operating and maintenance costs, we proposed a solution that uses Amazon DataZone as a central hub for data discovery and access control, where business units can readily share their domain-specific data. To consolidate and unify the data from these business units and provide a 360-degree insight, the Central IT team uses Redshift Spectrum to directly query and analyze the data residing in their respective data lakes. This eliminates the need for creating separate data copy jobs and duplication of data residing in multiple places.
The team also takes on the responsibility of bringing all the data assets to the same granularity and process a unified data asset. These combined data products can then be shared through Amazon DataZone to these business units. Business units can only focus on consuming the unified data assets that aren’t specific to their domain. This way, the processing costs can be controlled and tightly monitored across all business units. The Central IT team can also implement chargeback mechanisms based on the consumption of the unified products for each business unit.
To learn more about Amazon DataZone and how to get started, refer to Getting started. Check out the YouTube playlist for some of the latest demos of Amazon DataZone and more information about the capabilities available.
About the Authors
Lakshmi Nair is a Senior Analytics Specialist Solutions Architect at AWS. She specializes in designing advanced analytics systems across industries. She focuses on crafting cloud-based data platforms, enabling real-time streaming, big data processing, and robust data governance.
Srividya Parthasarathy is a Senior Big Data Architect on the AWS Lake Formation team. She enjoys building analytics and data mesh solutions on AWS and sharing them with the community.
Data quality is crucial in data pipelines because it directly impacts the validity of the business insights derived from the data. Today, many organizations use AWS Glue Data Quality to define and enforce data quality rules on their data at rest and in transit. However, one of the most pressing challenges faced by organizations is providing users with visibility into the health and reliability of their data assets. This is particularly crucial in the context of business data catalogs using Amazon DataZone, where users rely on the trustworthiness of the data for informed decision-making. As the data gets updated and refreshed, there is a risk of quality degradation due to upstream processes.
Amazon DataZone is a data management service designed to streamline data discovery, data cataloging, data sharing, and governance. It allows your organization to have a single secure data hub where everyone in the organization can find, access, and collaborate on data across AWS, on premises, and even third-party sources. It simplifies the data access for analysts, engineers, and business users, allowing them to discover, use, and share data seamlessly. Data producers (data owners) can add context and control access through predefined approvals, providing secure and governed data sharing. The following diagram illustrates the Amazon DataZone high-level architecture. To learn more about the core components of Amazon DataZone, refer to Amazon DataZone terminology and concepts.
To address the issue of data quality, Amazon DataZone now integrates directly with AWS Glue Data Quality, allowing you to visualize data quality scores for AWS Glue Data Catalog assets directly within the Amazon DataZone web portal. You can access the insights about data quality scores on various key performance indicators (KPIs) such as data completeness, uniqueness, and accuracy.
By providing a comprehensive view of the data quality validation rules applied on the data asset, you can make informed decisions about the suitability of the specific data assets for their intended use. Amazon DataZone also integrates historical trends of the data quality runs of the asset, giving full visibility and indicating if the quality of the asset improved or degraded over time. With the Amazon DataZone APIs, data owners can integrate data quality rules from third-party systems into a specific data asset. The following screenshot shows an example of data quality insights embedded in the Amazon DataZone business catalog. To learn more, see Amazon DataZone now integrates with AWS Glue Data Quality and external data quality solutions.
In this post, we show how to capture the data quality metrics for data assets produced in Amazon Redshift.
Amazon Redshift is a fast, scalable, and fully managed cloud data warehouse that allows you to process and run your complex SQL analytics workloads on structured and semi-structured data. Amazon DataZone natively supports data sharing for Amazon Redshift data assets.
With Amazon DataZone, the data owner can directly import the technical metadata of a Redshift database table and views to the Amazon DataZone project’s inventory. As these data assets gets imported into Amazon DataZone, it bypasses the AWS Glue Data Catalog, creating a gap in data quality integration. This post proposes a solution to enrich the Amazon Redshift data asset with data quality scores and KPI metrics.
Solution overview
The proposed solution uses AWS Glue Studio to create a visual extract, transform, and load (ETL) pipeline for data quality validation and a custom visual transform to post the data quality results to Amazon DataZone. The following screenshot illustrates this pipeline.
The pipeline starts by establishing a connection directly to Amazon Redshift and then applies necessary data quality rules defined in AWS Glue based on the organization’s business needs. After applying the rules, the pipeline validates the data against those rules. The outcome of the rules is then pushed to Amazon DataZone using a custom visual transform that implements Amazon DataZone APIs.
The custom visual transform in the data pipeline makes the complex logic of Python code reusable so that data engineers can encapsulate this module in their own data pipelines to post the data quality results. The transform can be used independently of the source data being analyzed.
Each business unit can use this solution by retaining complete autonomy in defining and applying their own data quality rules tailored to their specific domain. These rules maintain the accuracy and integrity of their data. The prebuilt custom transform acts as a central component for each of these business units, where they can reuse this module in their domain-specific pipelines, thereby simplifying the integration. To post the domain-specific data quality results using a custom visual transform, each business unit can simply reuse the code libraries and configure parameters such as Amazon DataZone domain, role to assume, and name of the table and schema in Amazon DataZone where the data quality results need to be posted.
In the following sections, we walk through the steps to post the AWS Glue Data Quality score and results for your Redshift table to Amazon DataZone.
IAM role – If you want to follow in your own environment and your Amazon DataZone domain has associated additional producer accounts, make sure that you have an AWS Identity and Access Management (IAM) role in the Amazon DataZone domain account with Amazon DataZone write privileges that your AWS Glue role can assume.
A custom visual transform lets you define, reuse, and share business-specific ETL logic with your teams. Each business unit can apply their own data quality checks relevant to their domain and reuse the custom visual transform to push the data quality result to Amazon DataZone and integrate the data quality metrics with their data assets. This eliminates the risk of inconsistencies that might arise when writing similar logic in different code bases and helps achieve a faster development cycle and improved efficiency.
For the custom transform to work, you need to upload two files to an Amazon Simple Storage Service (Amazon S3) bucket in the same AWS account where you intend to run AWS Glue. Download the following files:
Copy these downloaded files to your AWS Glue assets S3 bucket in the folder transforms (s3://aws-glue-assets–<account id>-<region>/transforms). By default, AWS Glue Studio will read all JSON files from the transforms folder in the same S3 bucket.
In the following sections, we walk you through the steps of building an ETL pipeline for data quality validation using AWS Glue Studio.
Create a new AWS Glue visual ETL job
You can use AWS Glue for Spark to read from and write to tables in Redshift databases. AWS Glue provides built-in support for Amazon Redshift. On the AWS Glue console, choose Author and edit ETL jobs to create a new visual ETL job.
Establish an Amazon Redshift connection
In the job pane, choose Amazon Redshift as the source. For Redshift connection, choose the connection created as prerequisite, then specify the relevant schema and table on which the data quality checks need to be applied.
Apply data quality rules and validation checks on the source
The next step is to add the Evaluate Data Quality node to your visual job editor. This node allows you to define and apply domain-specific data quality rules relevant to your data. After the rules are defined, you can choose to output the data quality results. The outcomes of these rules can be stored in an Amazon S3 location. You can additionally choose to publish the data quality results to Amazon CloudWatch and set alert notifications based on the thresholds.
Preview data quality results
Choosing the data quality results automatically adds the new node ruleOutcomes. The preview of the data quality results from the ruleOutcomes node is illustrated in the following screenshot. The node outputs the data quality results, including the outcomes of each rule and its failure reason.
Post the data quality results to Amazon DataZone
The output of the ruleOutcomes node is then passed to the custom visual transform. After both files are uploaded, the AWS Glue Studio visual editor automatically lists the transform as mentioned in post_dq_results_to_datazone.json (in this case, Datazone DQ Result Sink) among the other transforms. Additionally, AWS Glue Studio will parse the JSON definition file to display the transform metadata such as name, description, and list of parameters. In this case, it lists parameters such as the role to assume, domain ID of the Amazon DataZone domain, and table and schema name of the data asset.
Fill in the parameters:
Role to assume is optional and can be left empty; it’s only needed when your AWS Glue job runs in an associated account
For Domain ID, the ID for your Amazon DataZone domain can be found in the Amazon DataZone portal by choosing the user profile name
Table name and Schema name are the same ones you used when creating the Redshift source transform
Data quality ruleset name is the name you want to give to the ruleset in Amazon DataZone; you could have multiple rulesets for the same table
Max results is the maximum number of Amazon DataZone assets you want the script to return in case multiple matches are available for the same table and schema name
Edit the job details and in the job parameters, add the following key-value pair to import the right version of Boto3 containing the latest Amazon DataZone APIs:
--additional-python-modules
boto3>=1.34.105
Finally, save and run the job.
The implementation logic of inserting the data quality values in Amazon DataZone is mentioned in the post Amazon DataZone now integrates with AWS Glue Data Quality and external data quality solutions . In the post_dq_results_to_datazone.py script, we only adapted the code to extract the metadata from the AWS Glue Evaluate Data Quality transform results, and added methods to find the right DataZone asset based on the table information. You can review the code in the script if you are curious.
After the AWS Glue ETL job run is complete, you can navigate to the Amazon DataZone console and confirm that the data quality information is now displayed on the relevant asset page.
Conclusion
In this post, we demonstrated how you can use the power of AWS Glue Data Quality and Amazon DataZone to implement comprehensive data quality monitoring on your Amazon Redshift data assets. By integrating these two services, you can provide data consumers with valuable insights into the quality and reliability of the data, fostering trust and enabling self-service data discovery and more informed decision-making across your organization.
If you’re looking to enhance the data quality of your Amazon Redshift environment and improve data-driven decision-making, we encourage you to explore the integration of AWS Glue Data Quality and Amazon DataZone, and the new preview for OpenLineage-compatible data lineage visualization in Amazon DataZone. For more information and detailed implementation guidance, refer to the following resources:
Fabrizio Napolitano is a Principal Specialist Solutions Architect for DB and Analytics. He has worked in the analytics space for the last 20 years, and has recently and quite by surprise become a Hockey Dad after moving to Canada.
Lakshmi Nair is a Senior Analytics Specialist Solutions Architect at AWS. She specializes in designing advanced analytics systems across industries. She focuses on crafting cloud-based data platforms, enabling real-time streaming, big data processing, and robust data governance.
Varsha Velagapudi is a Senior Technical Product Manager with Amazon DataZone at AWS. She focuses on improving data discovery and curation required for data analytics. She is passionate about simplifying customers’ AI/ML and analytics journey to help them succeed in their day-to-day tasks. Outside of work, she enjoys nature and outdoor activities, reading, and traveling.
After three rounds of evaluation and analysis, NIST selected four algorithms it will standardize as a result of the PQC Standardization Process. The public-key encapsulation mechanism selected was CRYSTALS-KYBER, along with three digital signature schemes: CRYSTALS-Dilithium, FALCON, and SPHINCS+.
These algorithms are part of three NIST standards that have been finalized:
One – ML-KEM [PDF] (based on CRYSTALS-Kyber) – is intended for general encryption, which protects data as it moves across public networks. The other two –- ML-DSA [PDF] (originally known as CRYSTALS-Dilithium) and SLH-DSA [PDF] (initially submitted as Sphincs+)—secure digital signatures, which are used to authenticate online identity.
A fourth algorithm – FN-DSA [PDF] (originally called FALCON) – is slated for finalization later this year and is also designed for digital signatures.
NIST continued to evaluate two other sets of algorithms that could potentially serve as backup standards in the future.
One of the sets includes three algorithms designed for general encryption – but the technology is based on a different type of math problem than the ML-KEM general-purpose algorithm in today’s finalized standards.
NIST plans to select one or two of these algorithms by the end of 2024.
The kernel’s memory-management developers have been busy in recent times;
it can be hard to keep up with all that has been happening in this core
area. In an attempt to catch up, here is a look at recent work
affecting tiered-memory systems, underutilized huge pages, and duplicated
file data in the Enhanced Read-Only Filesystem (EROFS).
Security updates have been issued by AlmaLinux (container-tools:rhel8), Debian (flatpak), Fedora (389-ds-base, dotnet8.0, and roundcubemail), Red Hat (bind9.16, firefox, python-setuptools, and thunderbird), Slackware (dovecot), SUSE (389-ds, curl, kernel, kernel-firmware, kubernetes1.25, openssl-1_1, openssl-3, python-Pillow, and zziplib), and Ubuntu (busybox, linux-azure, and ruby-rmagick).
Brandon Adkins is the Manager of our Threat Intelligence & Detection Engineering (TIDE) team. His career journey spans a variety of roles and teams where he has been able to showcase his technical skills in security. Since joining Rapid7, he’s had experience as a Penetration Testing Consultant, working with both red and purple teams, and now as a leader with our TIDE team he supports engineers in writing effective detections for products like Insight IDR.
Adkins is no stranger to seeking out and taking on new technical challenges. Before joining Rapid7, he had built a long and successful career, achieving the role of Principal Information Security Analyst.
“I decided to come to Rapid7 because I was at a point in my career where in order to advance further, I was either going to be a people manager, or I would have to look elsewhere,” said Adkins. “At the time, I didn’t feel like I was ready to hang up my hat as an individual contributor. I still felt I had more to offer on the technical side, and didn’t want to be done yet.”
This drive led him to pursue his Offensive Security Certified Professional (OSCP) designation, enabling him to become a Penetration Tester. “I got my notification that I had passed my test the day I had my first interview with Rapid7. So the fact that I got the job really shows how they were willing to take a risk on someone brand new, and invest in my career by giving me that chance.”
When asked what the biggest shift was in coming to Rapid7, he praises the quality and caliber of talent he was exposed to. “In my past role, I was used to being one of the smartest guys in the room. Coming into Rapid7 and seeing the depth of knowledge that is here on the team, and the level of expertise everyone brings, I very quickly realized that there was so much more for me to learn.”
Adkins was inspired by those around him, and his curiosity and desire to keep growing didn’t stay quiet for long. During his time, he moved from red teams to purple teams, and ultimately started to become curious about the detection engineering team who is responsible for ensuring our products are effectively able to identify suspicious behavior.
“I really enjoyed my time as a pen tester. I loved purple teaming because I got to work alongside our customer security teams and help them identify ways to improve.” This collaborative experience and being able to blend his experience from blue and red teaming sparked further curiosity in detection engineering.
“I reached out to a few people and thought my next move might be to join the team as an engineer. When we actually got to talking, it turns out what the team really needed at the time was a manager. I was hesitant at first, but the more that I thought about it the more I thought, ‘I think I can really help make a difference here and do something good.’”
Adkins’ extensive technical background combined with his ability to work collaboratively in a customer-facing capacity ended up being the combination of talent that was needed to help the team work more efficiently. “They already have great people writing code. What they needed, and what I hope to bring, is someone who can speak to the business and advocate for the team, to smooth out any speed bumps, and ultimately clear the way so they can do what they are best at”.
Since taking on his new role in January 2024, the team has grown to be three times the size it was originally. “It’s an exciting time to be part of the team because we are getting the support and investment from the business to continue to iterate and make our products even better.”
As he continues to hire new people into the business, and support existing employees in growing their careers, Adkins says there are two key factors he looks for to spot high-caliber talent – communication skills, and the ability to collaborate. “Technical ability is obviously important, you have to be able to do the work. But beyond that, if we’re looking for someone to step into a more senior role on the team, or evaluate if someone is ready for a promotion, I want to see examples of how they can communicate their ideas and challenges effectively, and how they use the partnerships we have across the business to collaborate and find solutions.”
For the TIDE team, Rapid7’s engineers sit at the intersection of customer feedback, product management, and our security operations center. “At a certain point, we can’t do our jobs well without having a partnership with other teams. We need to know from the SOC team if something isn’t working the way it should be. We want to know from our customers and Customer Advisors what’s working well and what more they’d like to see, and we need to work alongside our product teams and analysts to understand and synthesize data to get a full picture of the customer attack surface.”
For Adkins, his journey in cybersecurity is one that has opened a number of different doors as he’s explored new roles and teams. His expertise and experience has helped support customers around the world in understanding their attack surface and more efficiently protecting their business from bad actors.
When asked what advice he would share for others looking to grow their career, he shared “When you get an opportunity to try something new – especially at Rapid7 – jump at it. Rapid7 hired me as a pen tester with zero pentest experience. Four years later, they took a risk on me again as a people leader with zero previous people leader experience. This is a place where these moves and opportunities are not only available, but are supported by the leadership around you. If you have the fundamental skills necessary and it’s something you’re interested in, there’s a ton of room for you to expand your career.”
The collective thoughts of the interwebz
Manage Consent
To provide the best experiences, we use technologies like cookies to store and/or access device information. Consenting to these technologies will allow us to process data such as browsing behavior or unique IDs on this site. Not consenting or withdrawing consent, may adversely affect certain features and functions.
Functional
Always active
The technical storage or access is strictly necessary for the legitimate purpose of enabling the use of a specific service explicitly requested by the subscriber or user, or for the sole purpose of carrying out the transmission of a communication over an electronic communications network.
Preferences
The technical storage or access is necessary for the legitimate purpose of storing preferences that are not requested by the subscriber or user.
Statistics
The technical storage or access that is used exclusively for statistical purposes.The technical storage or access that is used exclusively for anonymous statistical purposes. Without a subpoena, voluntary compliance on the part of your Internet Service Provider, or additional records from a third party, information stored or retrieved for this purpose alone cannot usually be used to identify you.
Marketing
The technical storage or access is required to create user profiles to send advertising, or to track the user on a website or across several websites for similar marketing purposes.


 Lakshmi Nair is a Senior Analytics Specialist Solutions Architect at AWS. She specializes in designing advanced analytics systems across industries. She focuses on crafting cloud-based data platforms, enabling real-time streaming, big data processing, and robust data governance.
 Srividya Parthasarathy is a Senior Big Data Architect on the AWS Lake Formation team. She enjoys building analytics and data mesh solutions on AWS and sharing them with the community.


 Fabrizio Napolitano is a Principal Specialist Solutions Architect for DB and Analytics. He has worked in the analytics space for the last 20 years, and has recently and quite by surprise become a Hockey Dad after moving to Canada.
 Varsha Velagapudi is a Senior Technical Product Manager with Amazon DataZone at AWS. She focuses on improving data discovery and curation required for data analytics. She is passionate about simplifying customers’ AI/ML and analytics journey to help them succeed in their day-to-day tasks. Outside of work, she enjoys nature and outdoor activities, reading, and traveling.