Post Syndicated from Aaron Klotnia original https://aws.amazon.com/blogs/security/discover-duplicate-aws-config-rules-for-streamlined-compliance/
Amazon Web Services (AWS) customers use various AWS services to migrate, build, and innovate in the AWS Cloud. To align with compliance requirements, customers need to monitor, evaluate, and detect changes made to AWS resources. AWS Config continuously audits, assesses, and evaluates the configurations of your AWS resources.
AWS Config rules continuously evaluate your AWS resource configurations for desired settings. Depending on the rule, AWS Config will evaluate your resources either in response to configuration changes or periodically. AWS Config provides AWS managed rules, which are predefined, customizable rules that are used to evaluate whether your AWS resources comply with common best practices. For example, you could use a managed rule to assess whether your Amazon Elastic Block Store (Amazon EBS) volumes have encryption enabled or whether specific tags are applied to resources. AWS Config rules can be enabled individually or through AWS Config conformance packs, which group rules and remediations together. You also have options for deploying AWS Config rules: AWS Security Hub groups check against rules together as standards, and AWS Control Tower offers controls through the controls library. Many AWS customers use a combination of these tools, which can create duplicate AWS Config rules controls in a single AWS account.
In this post, we introduce our Duplicate Rule Detection tool, built to help customers identify duplicate AWS Config rules and sources. You can assess the results and review opportunities to reduce duplicate evaluations, consolidate rule deployment, and help to optimize your compliance posture.
Solution overview
This serverless solution collects the current active AWS Config rules and identifies duplicates based on identical sources, scopes, input parameters, and states.
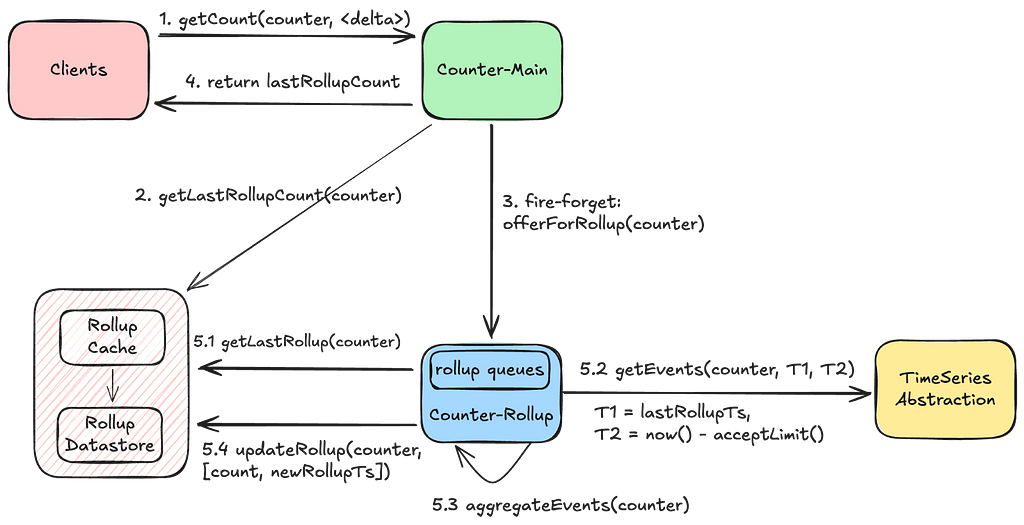
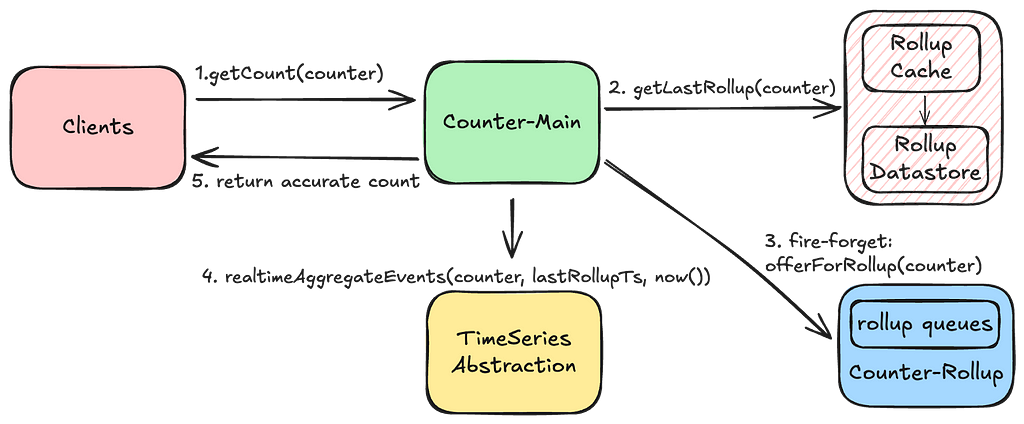
Figure 1 illustrates the solution.
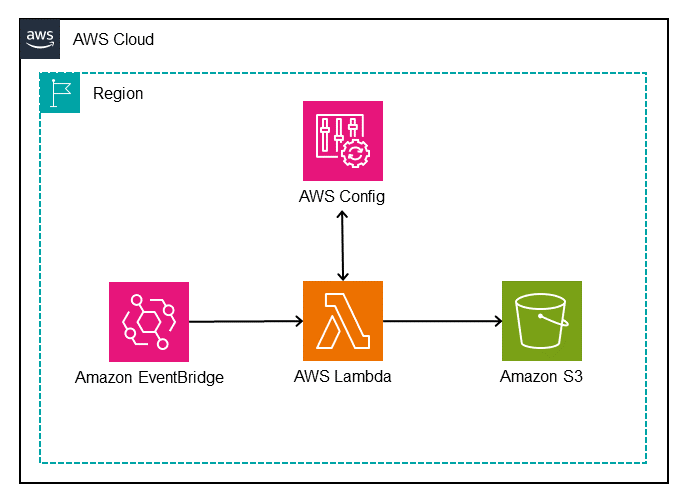
Figure 1: Architectural diagram of the AWS Config Duplicate Rule Detection tool
The architecture shown in Figure 1 uses the following steps:
- An Amazon EventBridge Scheduler triggers an AWS Lambda function.
- The Lambda function completes the following tasks:
- Sends
describe-config-rulesto the AWS Config API, which returns details about the enabled AWS Config rules in the current AWS account and AWS Region. - Iterates through the returned AWS Config rules to determine whether there are duplicate rules. If duplicates rules are found, they’re grouped together in JSON format.
- Writes the output to a time-stamped JSON file and saves it to an Amazon Simple Storage Service (S3) bucket for further analysis.
- Sends
Prerequisites
You will need an AWS account with rules enabled using AWS Config, Security Hub standards, or AWS Control Tower controls. Before getting started, make sure that you also have a basic understanding of the following:
Walkthrough
To demonstrate the tool, use an AWS account that has two AWS Config conformance packs deployed—Operational Best Practices for HIPAA Security and Operational Best Practices for NIST CSF—along with the AWS Foundational Security Best Practices (FSBP) standard in Security Hub.
CloudFormation template review
The AWS CloudFormation template included in this post deploys several components:
DuplicateRuleDetectionLambda– A Lambda function that:- Sends
describe-config-rulesto the AWS Config API to return enabled Config rules. - Queries the returned rules to identify duplicate rules with identical parameters.
- Writes the date-stamped output JSON file to the
DetectionLambdaResultsBucketbucket.
- Sends
DetectionLambdaPolicy– An AWS Identity and Access Management (IAM) policy attached to theDetectionLambdaRolerole that allows access to:- Basic Lambda execution permissions.
config:DescribeConfigRules.s3:PutObjectwith a constraint to only allow on theDetectionLambdaResultsBucketbucket.
DetectionLambdaRole– IAM role with a trust policy to allow only the AWS Lambda service to assume the role.DetectionLambdaResultsBucket– An Amazon S3 bucket for storing the output JSON files written by theDuplicateRuleDetectionLambdafunction.SchedulerForDuplicateRuleDetectionLambda– An EventBridge Scheduler used to trigger theDuplicateRuleDetectionLambdafunction.ScheduleExpression– Property to define when the schedule runs.
IAMRoleforDuplicateRuleDetectionLambdaScheduler– An IAM role forSchedulerForDuplicateRuleDetectionLambdawith an inline IAM policy to allow Lambda invocation.
Deployment
To deploy the solution, follow these steps:
- Download the CloudFormation template or open the template in CloudFormation.
Note: The default frequency of the EventBridge Scheduler is to run on the first day of each month. Update the template CRON expression as needed before creating the stack.
- Sign in to the AWS Management Console and navigate to AWS CloudFormation by using the search feature at the top of the page.
- In the navigation pane, choose Stacks.
- At the top of the Stacks page, choose Create Stack, then select With new resources from the dropdown menu.
- On the Create stack page:
- For Prerequisite – Prepare template, leave the default setting: Template is ready.
- Under Specify template, choose Upload a template file, then select the downloaded
duplicate-rule-detection.yamlfile and choose Open.
- At the bottom of the page, choose Next.
- On the Specify stack details page:
- For Stack name, enter a name for the Stack, for example,
duplicate-detection-rule-stack.
- For Stack name, enter a name for the Stack, for example,
- At the bottom of the page, choose Next.
- On the Configure stack options page:
- (Optional) For Tags, add tags as needed.
- For Permissions, don’t choose a role, CloudFormation uses permissions based on your user credentials.
- For Stack failure options, leave the default option of Roll back all stack resources.
- At the bottom of the page, choose Next.
- On the Review page, review the details of your stack.
- After you review the stack creation settings, choose Create stack to launch your stack.
- From the CloudFormation Stack page, monitor the status of the stack as it updates from
CREATE_IN_PROGRESStoCREATE_COMPLETE. - From the Resources tab, you will see the resources that were created from the template.
Test
Use the following steps to invoke the Lambda function to create a one-time output for testing.
- Sign in to the AWS CloudFormation console using the AWS account from the prerequisites.
- From the navigation pane, choose Stacks and then select the Stack name you used when deploying this solution.
- Choose the Resources tab of the
duplicate-detection-rule-stackand note the name of the Lambda function created for this solution. - Navigate to the Lambda console and choose Functions from the navigation pane.
- Select the function name noted in Step 3.
- From the Code tab, choose Test, which will open a test window, then choose Invoke.
- Navigate to the Amazon S3 console and select the bucket name that was created as part of this solution to see the JSON output created by the Lambda function.
- Select the object created and choose Download to view the output file locally.
Validation
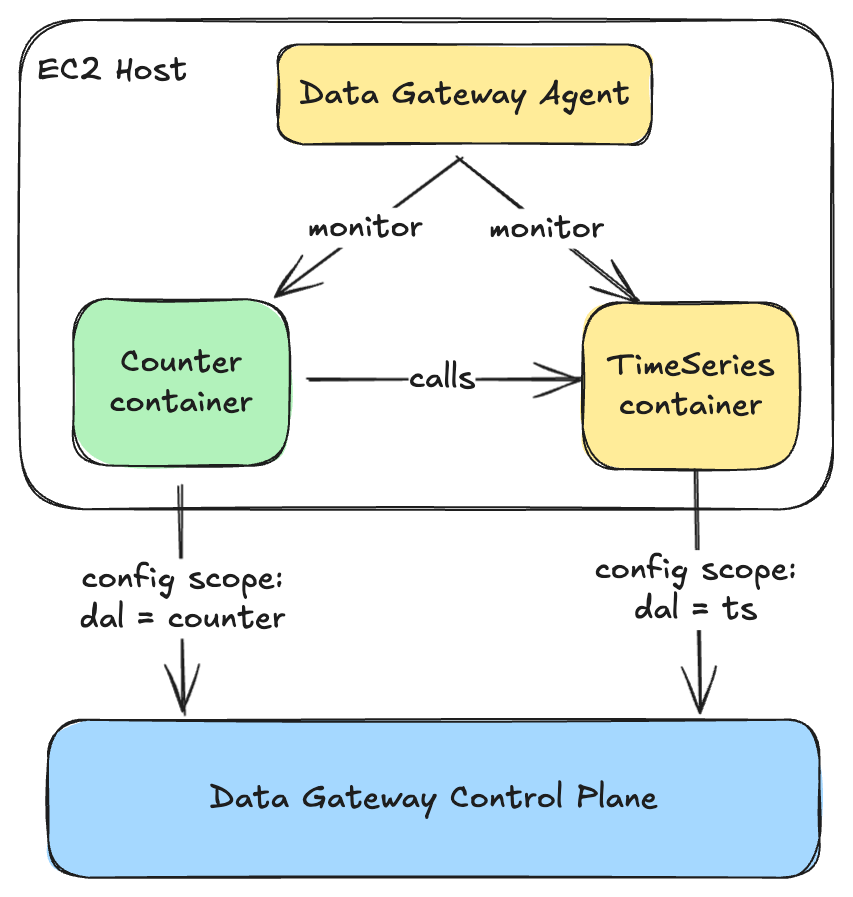
To view the JSON output file and understand the structure, open the downloaded output file with a text editor that supports JSON. Each duplicate rule is presented as a JSON object defined within left ({) and right (}) braces. Matching duplicate rules are grouped together in an array within left ([) and right (]) brackets and separated by commas.
From the sample output that follows, you can see that there are three instances of the same AWS Config managed rule in this account:
- The first two rules are deployed from two different conformance packs and the third rule was created by Security Hub.
- The
SourceIdentifierkey value identifies the managed rule asACCESS_KEYS_ROTATED. - The
CreatedBykey value identifies the service that enabled the rule.
Each rule has the same InputParameters, which is a qualifier for how a duplicate rule is defined.
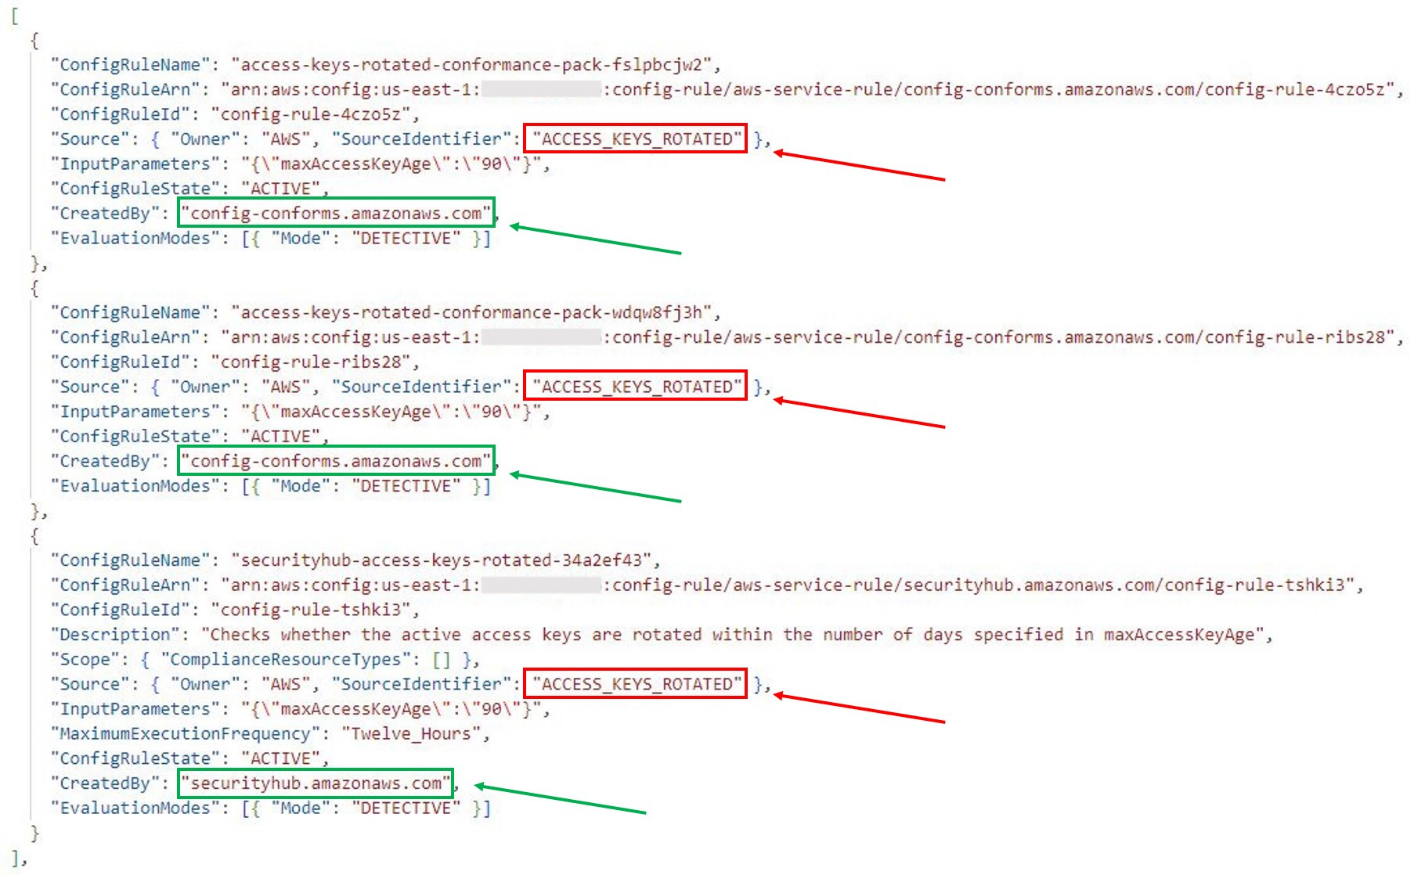
Figure 2: Solution output showing duplicate rules and keys
Now that you’ve identified the duplicate rules, further investigation is needed to identify the specific conformance pack and Security Hub standards that the rules are included in. The ConfigRuleName value is different for each duplicate rule and includes prefixes and suffixes based on how the rule was deployed:
- Rules deployed using conformance packs will include a suffix to the displayed AWS Config rule name (for example,
access-keys-rotated-conformance-pack-a1b2c3d4e). - Rules deployed using Security Hub standards include both a prefix and a suffix to the displayed AWS Config rule name (for example,
securityhub-access-keys-rotated-a1b2c3). - Rules deployed using AWS Control Tower include a prefix to the displayed AWS Config rule name (for example,
AWSControlTower_AWS-GR_EBS_OPTIMIZED_INSTANCE).
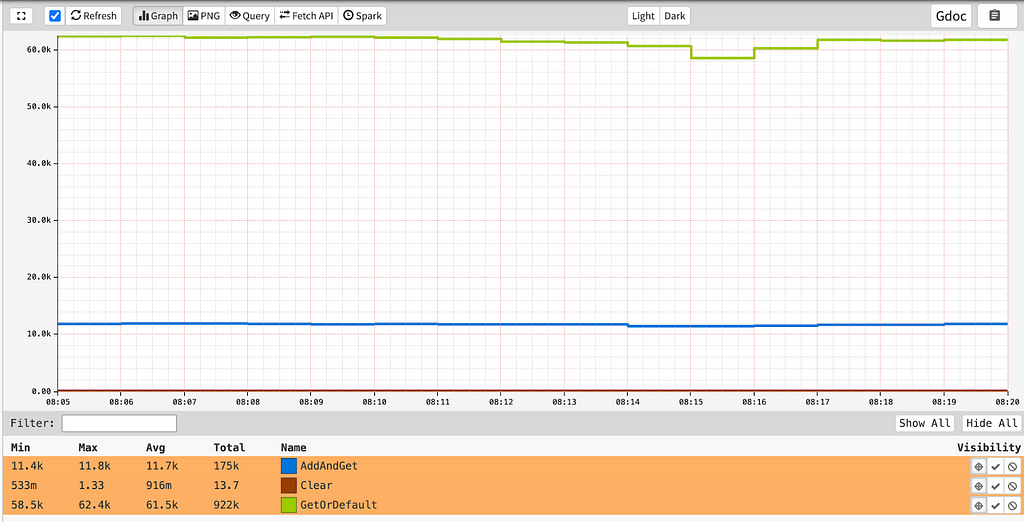
The ConfigRuleName value maps back to the specific conformance pack or Security Hub standard.
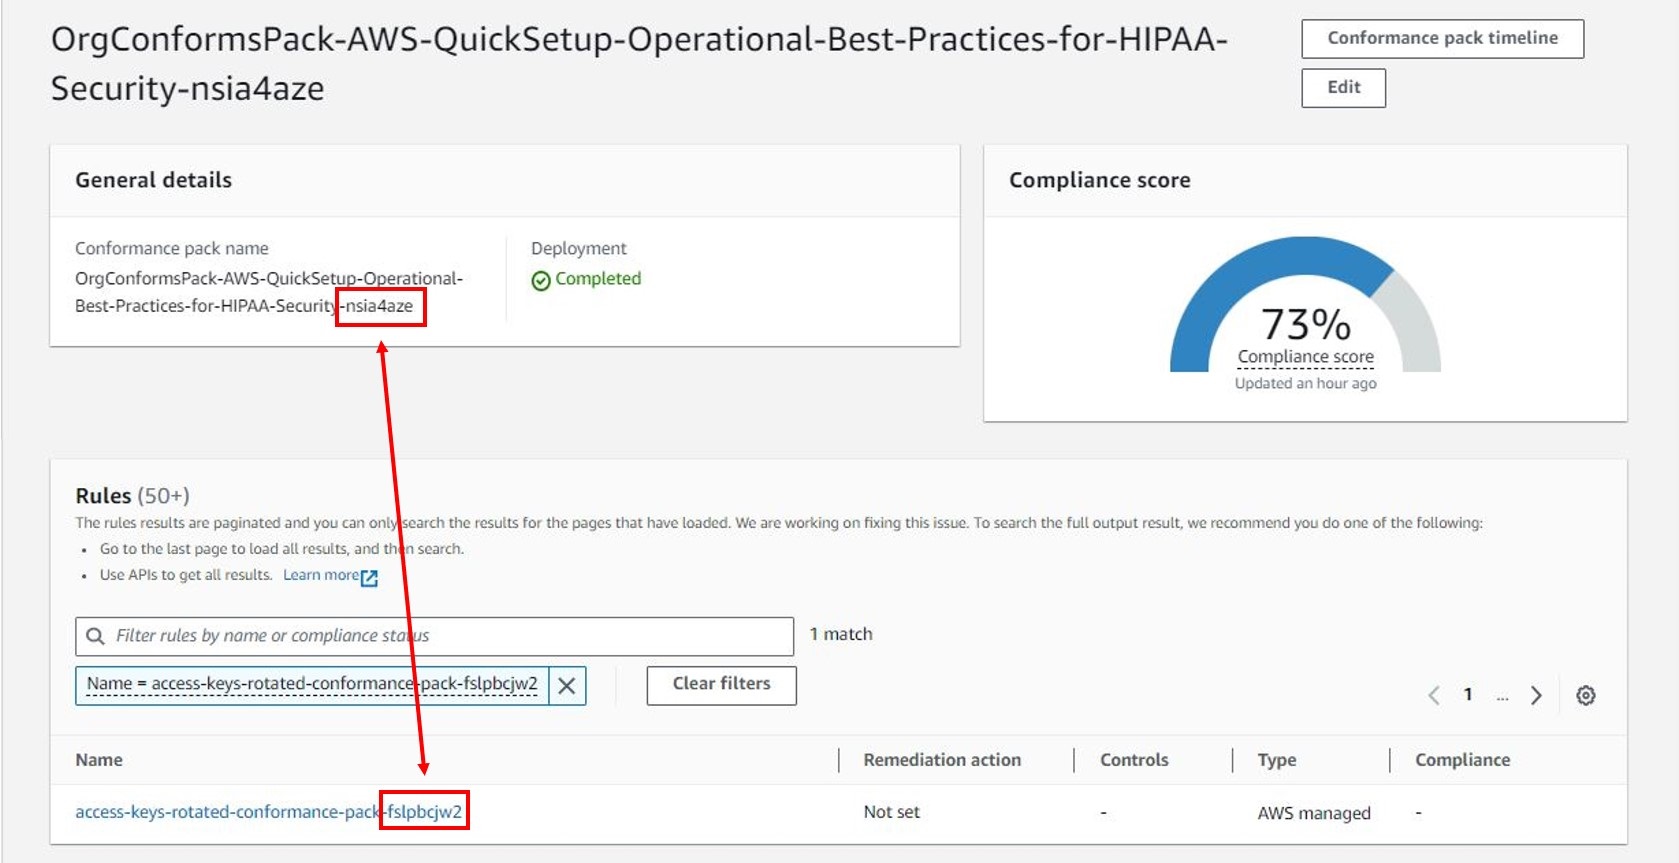
Figure 3: AWS Config conformance pack dashboard showing mapping between a rule and the conformance pack that enabled the rule
To identify which Security Hub standards the rule is enabled with, use the following steps.
- From the AWS Config console, choose Conformance pack from the navigation pane. Select a conformance pack and search the rules by filtering with the
SourceIdentifiervalue from the output file. - Using the AWS Config Developer Guide, search the List of Managed Rules using the
SourceIdentifierand note the Resource Types for the managed rule (for example, AWS::IAM::User). - Use the Security Hub controls reference to search for the AWS service that was included in the Resource Type from the previous step (that is, the IAM controls).
- Search for the corresponding control by using the
SourceIdentifierand note the Control ID (that is,IAM.3). - Sign in to the Security Hub console and choose Controls from the navigation pane. Search for the Control ID by filtering on ID and select the Control Title.
- Choose the Investigate tab and select the Config rule to view the corresponding AWS Config rule.
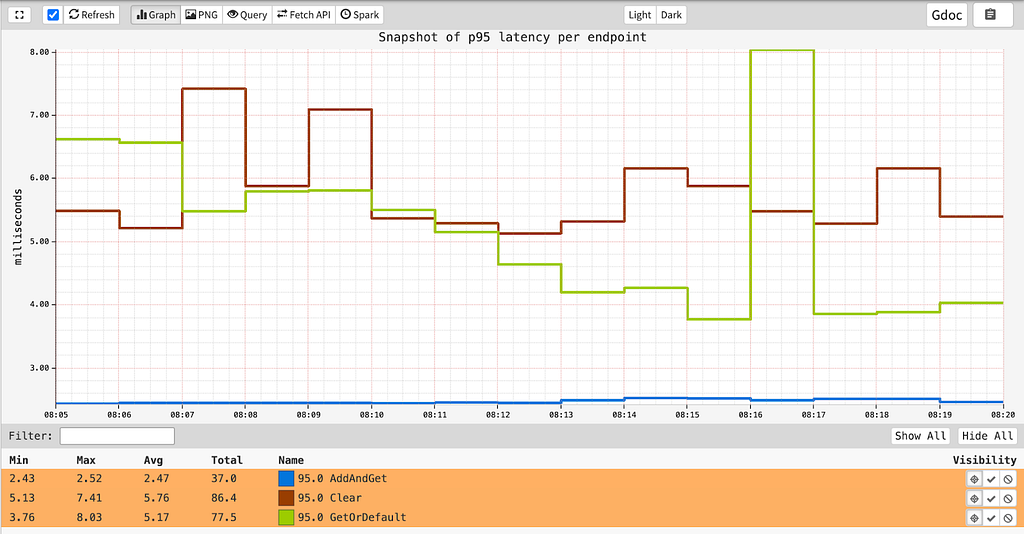
- Select the Standards and requirements tab on the Control page to view the standards that the AWS Config rule is a part of.
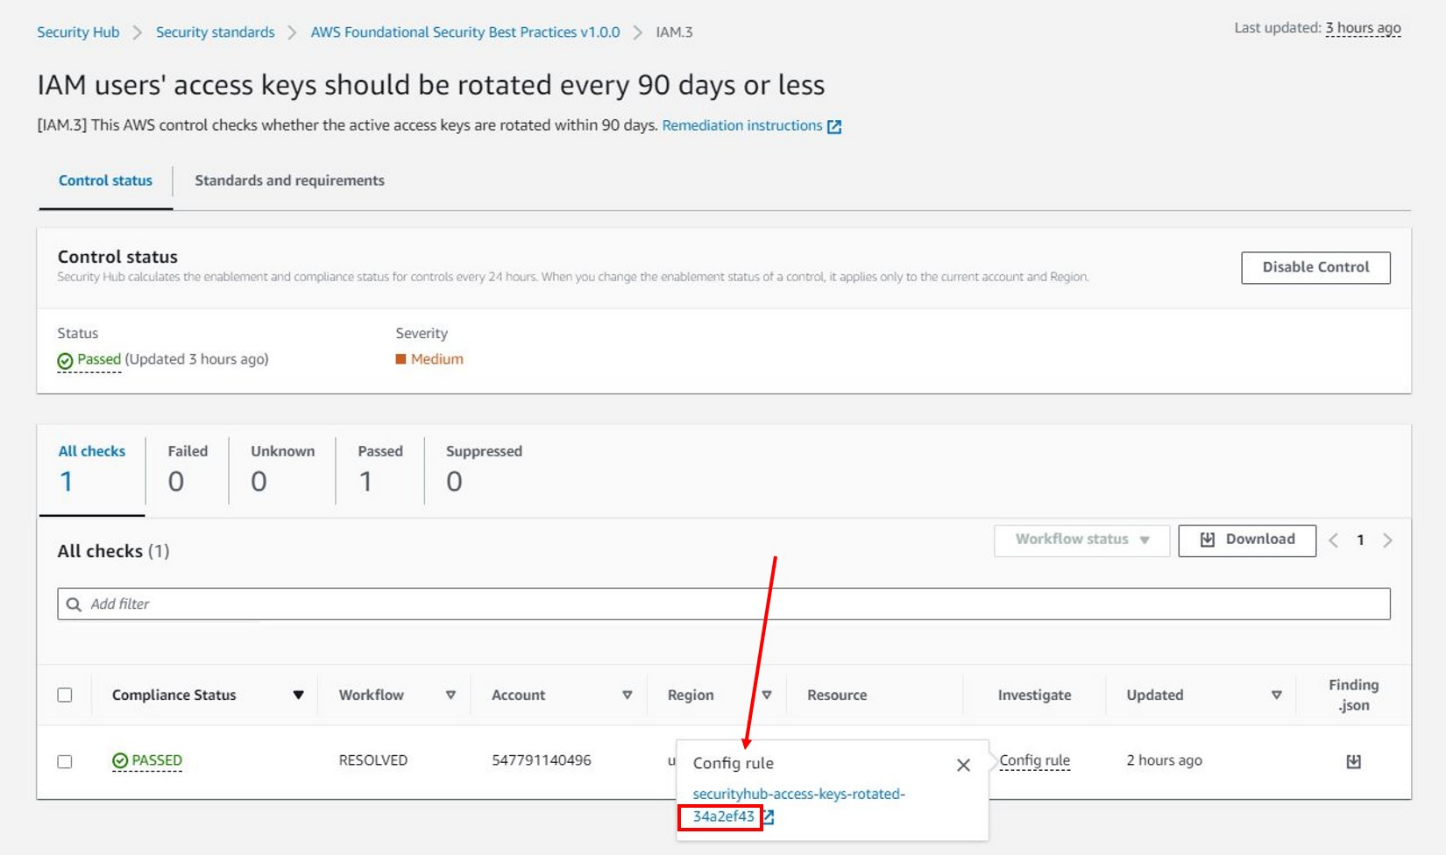
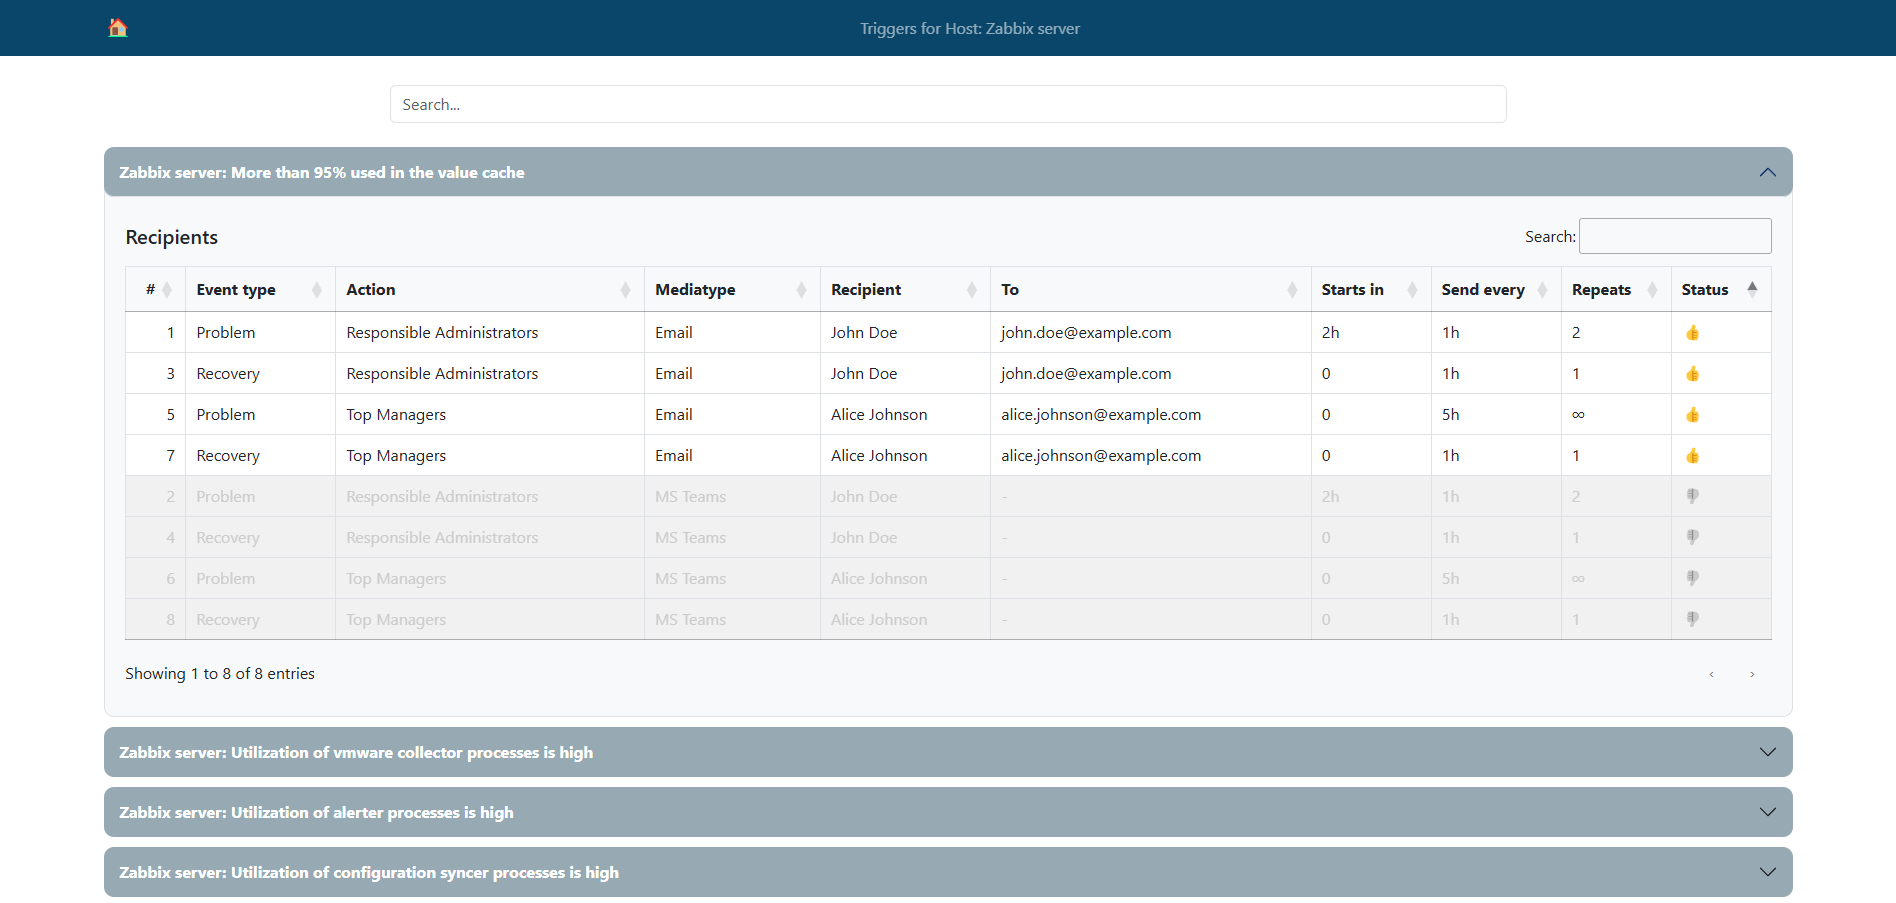
Figure 4: AWS Security Hub dashboard
Duplicate resolution
After the assessment is complete and duplicate rules are identified, you can work to consolidate rules and resolve duplicates.
If the AWS account being evaluated is in AWS Organizations, a delegated administrator account in the organization might be registered to manage specific AWS services, such as AWS Config and Security Hub. Resolution might need to be completed from the delegated administrator account.
Some options you can take to resolve duplicate AWS Config rules include:
- If conformance packs were deployed from AWS Systems Manager Quick Setup, then only sample templates are available, which can’t be modified. Customers can instead create templates for custom conformance packs and deploy them directly from AWS Config.
- If conformance packs were deployed from the AWS Config dashboard and sample templates were used, then customers can create templates for custom conformance packs and deploy them directly from AWS Config.
- If standards are enabled in Security Hub, individual controls can be disabled to help prevent redundancy.
- If controls are deployed from the AWS Control Tower controls library, controls can be enabled or disabled as needed from the AWS Control Tower console or programmatically with supporting APIs.
When deciding on an effective approach to consolidate rules and resolve duplicates, it’s helpful to consider additional capabilities such as visualization and automated remediation:
- AWS Config provides a dashboard to view resources, rules, conformance packs, and their compliance states. You can also configure remediation actions in custom templates to target AWS Systems Manager Automation runbooks that define the actions that Systems Manager performs.
- Security Hub provides a summary dashboard to identify areas of concern, including aggregating findings across an organization. You can customize the dashboard layout, add or remove widgets, and filter the data to focus on areas of particular interest. To configure automated response and remediation, Security Hub automatically sends new findings and updates to existing findings to EventBridge as EventBridge events. Customers can write simple rules to indicate which events and what automated actions to take when an event matches a rule.
- AWS Control Tower provides a console to view control categories, individual controls, and status along with enabled OUs or accounts. Remediation of non-compliant resources is currently not supported through AWS Control Tower.
The best approach for consolidating rules and resolving duplicates is to start with an assessment of the preceding factors and develop a strategy for governance at scale. Security Hub provides a comprehensive view of compliance across an organization by collecting security data across AWS accounts, AWS services, and supported third-party products. Enabling one or more Security Hub standards provides a mechanism to deploy controls without risk of duplication. You can deploy additional controls individually from AWS Config or AWS Control Tower.
Clean up
Use the following steps to remove the resources you created in this walkthrough.
- Sign in to the AWS CloudFormation console and choose Stacks in the navigation pane.
- Select the Stack name you used when deploying this solution.
- Choose the Resources tab of the
duplicate-detection-rule-stackand note the name of the S3 bucket created for this solution. - Navigate to the Amazon S3 console.
- Select the radio button next to the bucket noted in Step 3, choose Empty, and follow the steps to empty the bucket.
- Navigate to the AWS CloudFormation console and choose Stacks from the navigation pane.
- Select the radio button next to the stack name used in the deployment step and choose Delete.
- Choose Delete to confirm that you want to delete the stack.
- From the CloudFormation Stack page, monitor the status of the
duplicate-detection-rule-stackstack as it updates from DELETE_IN_PROGRESS to DELETE_COMPLETE.
Conclusion
For AWS customers, it’s critical to understand the compliance of resources as it relates to specific rules—such as default encryption settings or making sure that network connections are encrypted. You can use detective controls to evaluate the evolving state of your resources on AWS.
AWS Config rules, one type of detective control available on AWS, can be deployed individually or grouped together in AWS Config conformance packs or through Security Hub standards and the AWS Control Tower controls library. However, using more than one of these mechanisms can result in duplicate rules being deployed in an AWS account. This post provides a solution to assess the currently deployed AWS Config rules in a single AWS account and Region to identify when duplicate rules exist. After duplicates have been identified, you can make informed decisions about changes that you can make to consolidate rules and resolve duplicates. This approach will help to optimize your compliance posture by reducing complexity and eliminating unnecessary redundancy.
If you have feedback about this post, submit comments in the Comments section below.


 : Secure Communications Solutions, Q3 2024


 Andrei Maksimov is an AWS Senior Cloud Infrastructure Architect specializing in cloud infrastructure, software development, and DevOps. He designs and implements scalable, secure, and efficient cloud solutions and helps customers optimize their cloud environments. Outside of work, Andrei enjoys participating in hackathons, contributing to open source projects, and exploring the latest advancements in AI. You can connect with him on
  David Zhang is an AWS Data Architect specializing in designing and implementing analytics infrastructure, data management, ETL, and extensive data systems. He helps customers modernize their AWS data platforms. David is also an active speaker at AWS conferences and contributor to AWS conferences, technical content, and open source initiatives. He enjoys playing volleyball, tennis, and weightlifting in his free time. Feel free to connect with him on
  Noritaka Sekiyama is a Principal Big Data Architect on the AWS Glue team. He is responsible for designing AWS features, implementing software artifacts, and helping with customer architectures. In his spare time, he enjoys watching anime on Prime Video. You can connect with him on