Security researcher Simone Margaritelli
has reported a new vulnerability in
CUPS, the software that many Linux systems use to manage printers and print jobs. Margaritelli describes the impact of the attack by saying:
A remote unauthenticated attacker can silently replace existing printers’ (or install new ones) IPP urls with a malicious one, resulting in arbitrary command execution (on the computer) when a print job is started (from that computer).
The vulnerability relies on a few related problems in CUPS libraries and utilities; versions before 2.0.1 or 2.1b1 (depending on the component) may be affected.
In today’s rapidly evolving digital landscape, enterprises across regulated industries face a critical challenge as they navigate their digital transformation journeys: effectively managing and governing data from legacy systems that are being phased out or replaced. This historical data, often containing valuable insights and subject to stringent regulatory requirements, must be preserved and made accessible to authorized users throughout the organization.
Failure to address this issue can lead to significant consequences, including data loss, operational inefficiencies, and potential compliance violations. Moreover, organizations are seeking solutions that not only safeguard this legacy data but also provide seamless access based on existing user entitlements, while maintaining robust audit trails and governance controls. As regulatory scrutiny intensifies and data volumes continue to grow exponentially, enterprises must develop comprehensive strategies to tackle these complex data management and governance challenges, making sure they can use their historical information assets while remaining compliant and agile in an increasingly data-driven business environment.
In this post, we explore a solution using AWS Lake Formation and AWS IAM Identity Center to address the complex challenges of managing and governing legacy data during digital transformation. We demonstrate how enterprises can effectively preserve historical data while enforcing compliance and maintaining user entitlements. This solution enables your organization to maintain robust audit trails, enforce governance controls, and provide secure, role-based access to data.
Solution overview
This is a comprehensive AWS based solution designed to address the complex challenges of managing and governing legacy data during digital transformation.
In this blog post, there are three personas:
Data Lake Administrator (with admin level access)
User Silver from the Data Engineering group
User Lead Auditor from the Auditor group.
You will see how different personas in an organization can access the data without the need to modify their existing enterprise entitlements.
Note: Most of the steps here are performed by Data Lake Administrator, unless specifically mentioned for other federated/user logins. If the text specifies “You” to perform this step, then it assumes that you are a Data Lake administrator with admin level access.
In this solution you move your historical data into Amazon Simple Storage Service (Amazon S3) and apply data governance using Lake Formation. The following diagram illustrates the end-to-end solution.
The workflow steps are as follows:
You will use IAM Identity Center to apply fine-grained access control through permission sets. You can integrate IAM Identity Center with an external corporate identity provider (IdP). In this post, we have used Microsoft Entra ID as an IdP, but you can use another external IdP like Okta.
The data ingestion process is streamlined through a robust pipeline that combines AWS Database Migration service (AWS DMS) for efficient data transfer and AWS Glue for data cleansing and cataloging.
You will use AWS LakeFormation to preserve existing entitlements during the transition. This makes sure the workforce users retain the appropriate access levels in the new data store.
User personas Silver and Lead Auditor can use their existing IdP credentials to securely access the data using Federated access.
For analytics, Amazon Athena provides a serverless query engine, allowing users to effortlessly explore and analyze the ingested data. Athena workgroups further enhance security and governance by isolating users, teams, applications, or workloads into logical groups.
The following sections walk through how to configure access management for two different groups and demonstrate how the groups access data using the permissions granted in Lake Formation.
Prerequisites
To follow along with this post, you should have the following:
Set up IAM Identity Center with Entra ID as an external IdP.
In this post, we use users and groups in Entra ID. We have created two groups: Data Engineering and Auditor. The user Silver belongs to the Data Engineering and Lead Auditor belongs to the Auditor.
Configure identity and access management with IAM Identity Center
Entra ID automatically provisions (synchronizes) the users and groups created in Entra ID into IAM Identity Center. You can validate this by examining the groups listed on the Groups page on the IAM Identity Center console. The following screenshot shows the group Data Engineering, which was created in Entra ID.
If you navigate to the group Data Engineering in IAM Identity Center, you should see the user Silver. Similarly, the group Auditor has the user Lead Auditor.
You now create a permission set, which will align to your workforce job role in IAM Identity Center. This makes sure that your workforce operates within the boundary of the permissions that you have defined for the user.
On the IAM Identity Center console, choose Permission sets in the navigation pane.
Click Create Permission set. Select Custom permission set and then click Next. In the next screen you will need to specify permission set details.
Provide a permission set a name (for this post, Data-Engineer) while keeping rest of the option values to its default selection.
To enhance security controls, attach the inline policy text described here to Data-Engineer permission set, to restrict the users’ access to certain Athena workgroups. This additional layer of access management makes sure that users can only operate within the designated workgroups, preventing unauthorized access to sensitive data or resources.
For this post, we are using separate Athena workgroups for Data Engineering and Auditors. Pick a meaningful workgroup name (for example, Data-Engineer, used in this post) which you will use during the Athena setup. Provide the AWS Region and account number in the following code with the values relevant to your AWS account.
Edit the inline policy for Data-Engineer permission set. Copy and paste the following JSON policy text, replace parameters for the arn as suggested earlier and save the policy.
The preceding inline policy restricts anyone mapped to Data-Engineer permission sets to only the Data-Engineer workgroup in Athena. The users with this permission set will not be able to access any other Athena workgroup.
Next, you assign the Data-Engineer permission set to the Data Engineering group in IAM Identity Center.
Select AWS accounts in the navigation pane and then select the AWS account (for this post, workshopsandbox).
Select Assign users and groups to choose your groups and permission sets. Choose the group Data Engineering from the list of Groups, then select Next. Choose the permission set Data-Engineer from the list of permission sets, then select Next. Finally review and submit.
Follow the previous steps to create another permission set with the name Auditor.
Use an inline policy similar to the preceding one to restrict access to a specific Athena workgroup for Auditor.
Assign the permission set Auditor to the group Auditor.
This completes the first section of the solution. In the next section, we create the data ingestion and processing pipeline.
Create the data ingestion and processing pipeline
In this step, you create a source database and move the data to Amazon S3. Although the enterprise data often resides on premises, for this post, we create an Amazon Relational Database Service (Amazon RDS) for Oracle instance in a separate virtual private cloud (VPC) to mimic the enterprise setup.
Create an RDS for Oracle DB instance and populate it with sample data. For this post, we use the HR schema, which you can find in Oracle Database Sample Schemas.
Create source and target endpoints in AWS DMS:
The source endpoint demo-sourcedb points to the Oracle instance.
The target endpoint demo-targetdb is an Amazon S3 location where the relational database will be stored in Apache Parquet format.
The source database endpoint will have the configurations required to connect to the RDS for Oracle DB instance, as shown in the following screenshot. The target endpoint for the Amazon S3 location will have an S3 bucket name and folder where the relational database will be stored. Additional connection attributes, like DataFormat, can be provided on the Endpoint settings tab. The following screenshot shows the configurations for demo-targetdb. Set the DataFormat to Parquet for the stored data in the S3 bucket. Enterprise users can use Athena to query the data held in Parquet format. Next, you use AWS DMS to transfer the data from the RDS for Oracle instance to Amazon S3. In large organizations, the source database could be located anywhere, including on premises.
On the AWS DMS console, create a replication instance that will connect to the source database and move the data.
You need to carefully select the class of the instance. It should be proportionate to the volume of the data. The following screenshot shows the replication instance used in this post.
Provide the database migration task with the source and target endpoints, which you created in the previous steps.
The following screenshot shows the configuration for the task datamigrationtask.
After you create the migration task, select your task and start the job.
The full data load process will take a few minutes to complete.
You have data available in Parquet format, stored in an S3 bucket. To make this data accessible for analysis by your users, you need to create an AWS Glue crawler. The crawler will automatically crawl and catalog the data stored in your Amazon S3 location, making it available in Lake Formation.
When creating the crawler, specify the S3 location where the data is stored as the data source.
Provide the database name myappdb for the crawler to catalog the data into.
Run the crawler you created.
After the crawler has completed its job, your users will be able to access and analyze the data in the AWS Glue Data Catalog with Lake Formation securing access.
On the Lake Formation console, choose Databases in the navigation pane.
You will find mayappdb in the list of databases.
Configure data lake and entitlement access
With Lake Formation, you can lay the foundation for a robust, secure, and compliant data lake environment. Lake Formation plays a crucial role in our solution by centralizing data access control and preserving existing entitlements during the transition from legacy systems. This powerful service enables you to implement fine-grained permissions, so your workforce users retain appropriate access levels in the new data environment.
On the Lake Formation console, choose Data lake locations in the navigation pane.
Choose Register location to register the Amazon S3 location with Lake Formation so it can access Amazon S3 on your behalf.
For Amazon S3 path, enter your target Amazon S3 location.
For IAM role¸ keep the IAM role as AWSServiceRoleForLakeFormationDataAccess.
For the Permission mode, select Lake Formation option to manage access.
Create an LF-Tag data classification with the following values:
General – To imply that the data is not sensitive in nature.
Restricted – To imply generally sensitive data.
HighlyRestricted – To imply that the data is highly restricted in nature and only accessible to certain job functions.
Navigate to the database myappdb and on the Actions menu, choose Edit LF-Tags to assign an LF-Tag to the database. Choose Save to apply the change.
As shown in the following screenshot, we have assigned the value General to the myappdb database.
The database myappdb has 7 tables. For simplicity, we work with the table jobs in this post. We apply restrictions to the columns of this table so that its data is visible to only the users who are authorized to view the data.
Navigate to the jobs table and choose Edit schema to add LF-Tags at the column level.
Tag the value HighlyRestricted to the two columns min_salary and max_salary.
Choose Save as new version to apply these changes.
The goal is to restrict access to these columns for all users except Auditor.
Choose Databases in the navigation pane.
Select your database and on the Actions menu, choose Grant to provide permissions to your enterprise users.
For IAM users and roles, choose the role created by IAM Identity Center for the group Data Engineer. Choose the IAM role with prefix AWSResrevedSSO_DataEngineer from the list. This role is created as a result of creating permission sets in IAM identity Center.
In the LF-Tags section, select option Resources matched by LF-Tags. The choose Add LF-Tag key-value pair. Provide the LF-Tag key data classification and the values as General and Restricted. This grants the group of users (Data Engineer) to the database myappdb as long as the group is tagged with the values General and Restricted.
In the Database permissions and Table permissions sections, select the specific permissions you want to give to the users in the group Data Engineering. Choose Grant to apply these changes.
Repeat these steps to grant permissions to the role for the group Auditor. In this example, choose IAM role with prefix AWSResrevedSSO_Auditor and give the data classification LF-tag to all possible values.
This grant implies that the personas logging in with the Auditor permission set will have access to the data that is tagged with the values General, Restricted, and Highly Restricted.
You have now completed the third section of the solution. In the next sections, we demonstrate how the users from two different groups—Data Engineer and Auditor—access data using the permissions granted in Lake Formation.
Log in with federated access using Entra ID
Complete the following steps to log in using federated access:
On the IAM Identity Center console, choose Settings in the navigation pane.
Choose your job function Data-Engineer (this is the permission set from IAM Identity Center).
Perform data analytics and run queries in Athena
Athena serves as the final piece in our solution, working with Lake Formation to make sure individual users can only query the datasets they’re entitled to access. By using Athena workgroups, we create dedicated spaces for different user groups or departments, further reinforcing our access controls and maintaining clear boundaries between different data domains.
You can create Athena workgroup by navigating to Amazon Athena in AWS console.
Select Workgroups from left navigation and choose Create Workgroup.
On the next screen, provide workgroup name Data-Engineer and leave other fields as default values.
For the query result configuration, select the S3 location for the Data-Engineer workgroup.
Chose Create workgroup.
Similarly, create a workgroup for Auditors. Choose a separate S3 bucket for Athena Query results for each workgroup. Ensure that the workgroup name matches with the name used in arn string of the inline policy of the permission sets.
In this setup, users can only view and query tables that align with their Lake Formation granted entitlements. This seamless integration of Athena with our broader data governance strategy means that as users explore and analyze data, they’re doing so within the strict confines of their authorized data scope.
This approach not only enhances our security posture but also streamlines the user experience, eliminating the risk of inadvertent access to sensitive information while empowering users to derive insights efficiently from their relevant data subsets.
Let’s explore how Athena provides this powerful, yet tightly controlled, analytical capability to our organization.
When user Silver accesses Athena, they’re redirected to the Athena console. According to the inline policy in the permission set, they have access to the Data-Engineer workgroup only.
After they select the correct workgroup Data-Engineer from the Workgroup drop-down menu and the myapp database, it displays all columns except two columns. The min_sal and max_sal columns that were tagged as HighlyRestricted are not displayed.
This outcome aligns with the permissions granted to the Data-Engineer group in Lake Formation, making sure that sensitive information remains protected.
If you repeat the same steps for federated access and log in as Lead Auditor, you’re similarly redirected to the Athena console. In accordance with the inline policy in the permission set, they have access to the Auditor workgroup only.
When they select the correct workgroup Auditor from the Workgroup dropdown menu and the myappdb database, the job table will display all columns.
This behavior aligns with the permissions granted to the Auditor workgroup in Lake Formation, making sure all information is accessible to the group Auditor.
Enabling users to access only the data they are entitled to based on their existing permissions is a powerful capability. Large organizations often want to store data without having to modify queries or adjust access controls.
This solution enables seamless data access while maintaining data governance standards by allowing users to use their current permissions. The selective accessibility helps balance organizational needs for storage and data compliance. Companies can store data without compromising different environments or sensitive information.
This granular level of access within data stores is a game changer for regulated industries or businesses seeking to manage data responsibly.
Clean up
To clean up the resources that you created for this post and avoid ongoing charges, delete the following:
IAM Identity Center application in Entra ID
IAM Identity Center configurations
RDS for Oracle and DMS replication instances.
Athena workgroups and the query results in Amazon S3
S3 buckets
Conclusion
This AWS powered solution tackles the critical challenges of preserving, safeguarding, and scrutinizing historical data in a scalable and cost-efficient way. The centralized data lake, reinforced by robust access controls and self-service analytics capabilities, empowers organizations to maintain their invaluable data assets while enabling authorized users to extract valuable insights from them.
By harnessing the combined strength of AWS services, this approach addresses key difficulties related to legacy data retention, security, and analysis. The centralized repository, coupled with stringent access management and user-friendly analytics tools, enables enterprises to safeguard their critical information resources while simultaneously empowering sanctioned personnel to derive meaningful intelligence from these data sources.
If your organization grapples with similar obstacles surrounding the preservation and management of data, we encourage you to explore this solution and evaluate how it could potentially benefit your operations.
For more information on Lake Formation and its data governance features, refer to AWS Lake Formation Features.
About the authors
Manjit Chakraborty is a Senior Solutions Architect at AWS. He is a Seasoned & Result driven professional with extensive experience in Financial domain having worked with customers on advising, designing, leading, and implementing core-business enterprise solutions across the globe. In his spare time, Manjit enjoys fishing, practicing martial arts and playing with his daughter.
Neeraj Roy is a Principal Solutions Architect at AWS based out of London. He works with Global Financial Services customers to accelerate their AWS journey. In his spare time, he enjoys reading and spending time with his family.
Evren Sen is a Principal Solutions Architect at AWS, focusing on strategic financial services customers. He helps his customers create Cloud Center of Excellence and design, and deploy solutions on the AWS Cloud. Outside of AWS, Evren enjoys spending time with family and friends, traveling, and cycling.
To celebrate Builder Day 2024, we’re shipping 18 updates inspired by direct feedback from developers building on Cloudflare. Choosing a platform isn’t just about current technologies and services — it’s about betting on a partner that will evolve with your needs as your project grows and the tech landscape shifts. We’re in it for the long haul with you.
Everything in this post is available for you to use today. Keep reading to learn more, and watch the Builder Day Live Stream for demos and more.
Persistent Logs for every Worker
Starting today in open beta, you can automatically retain logs from your Worker, with full search, query, and filtering capabilities available directly within the Cloudflare dashboard. All newly created Workers will have this setting automatically enabled. This marks the first step in the development of our observability platform, following Cloudflare’s acquisition of Baselime.
Getting started is easy – just add two lines to your Worker’s wrangler.toml and redeploy:
[observability]
enabled = true
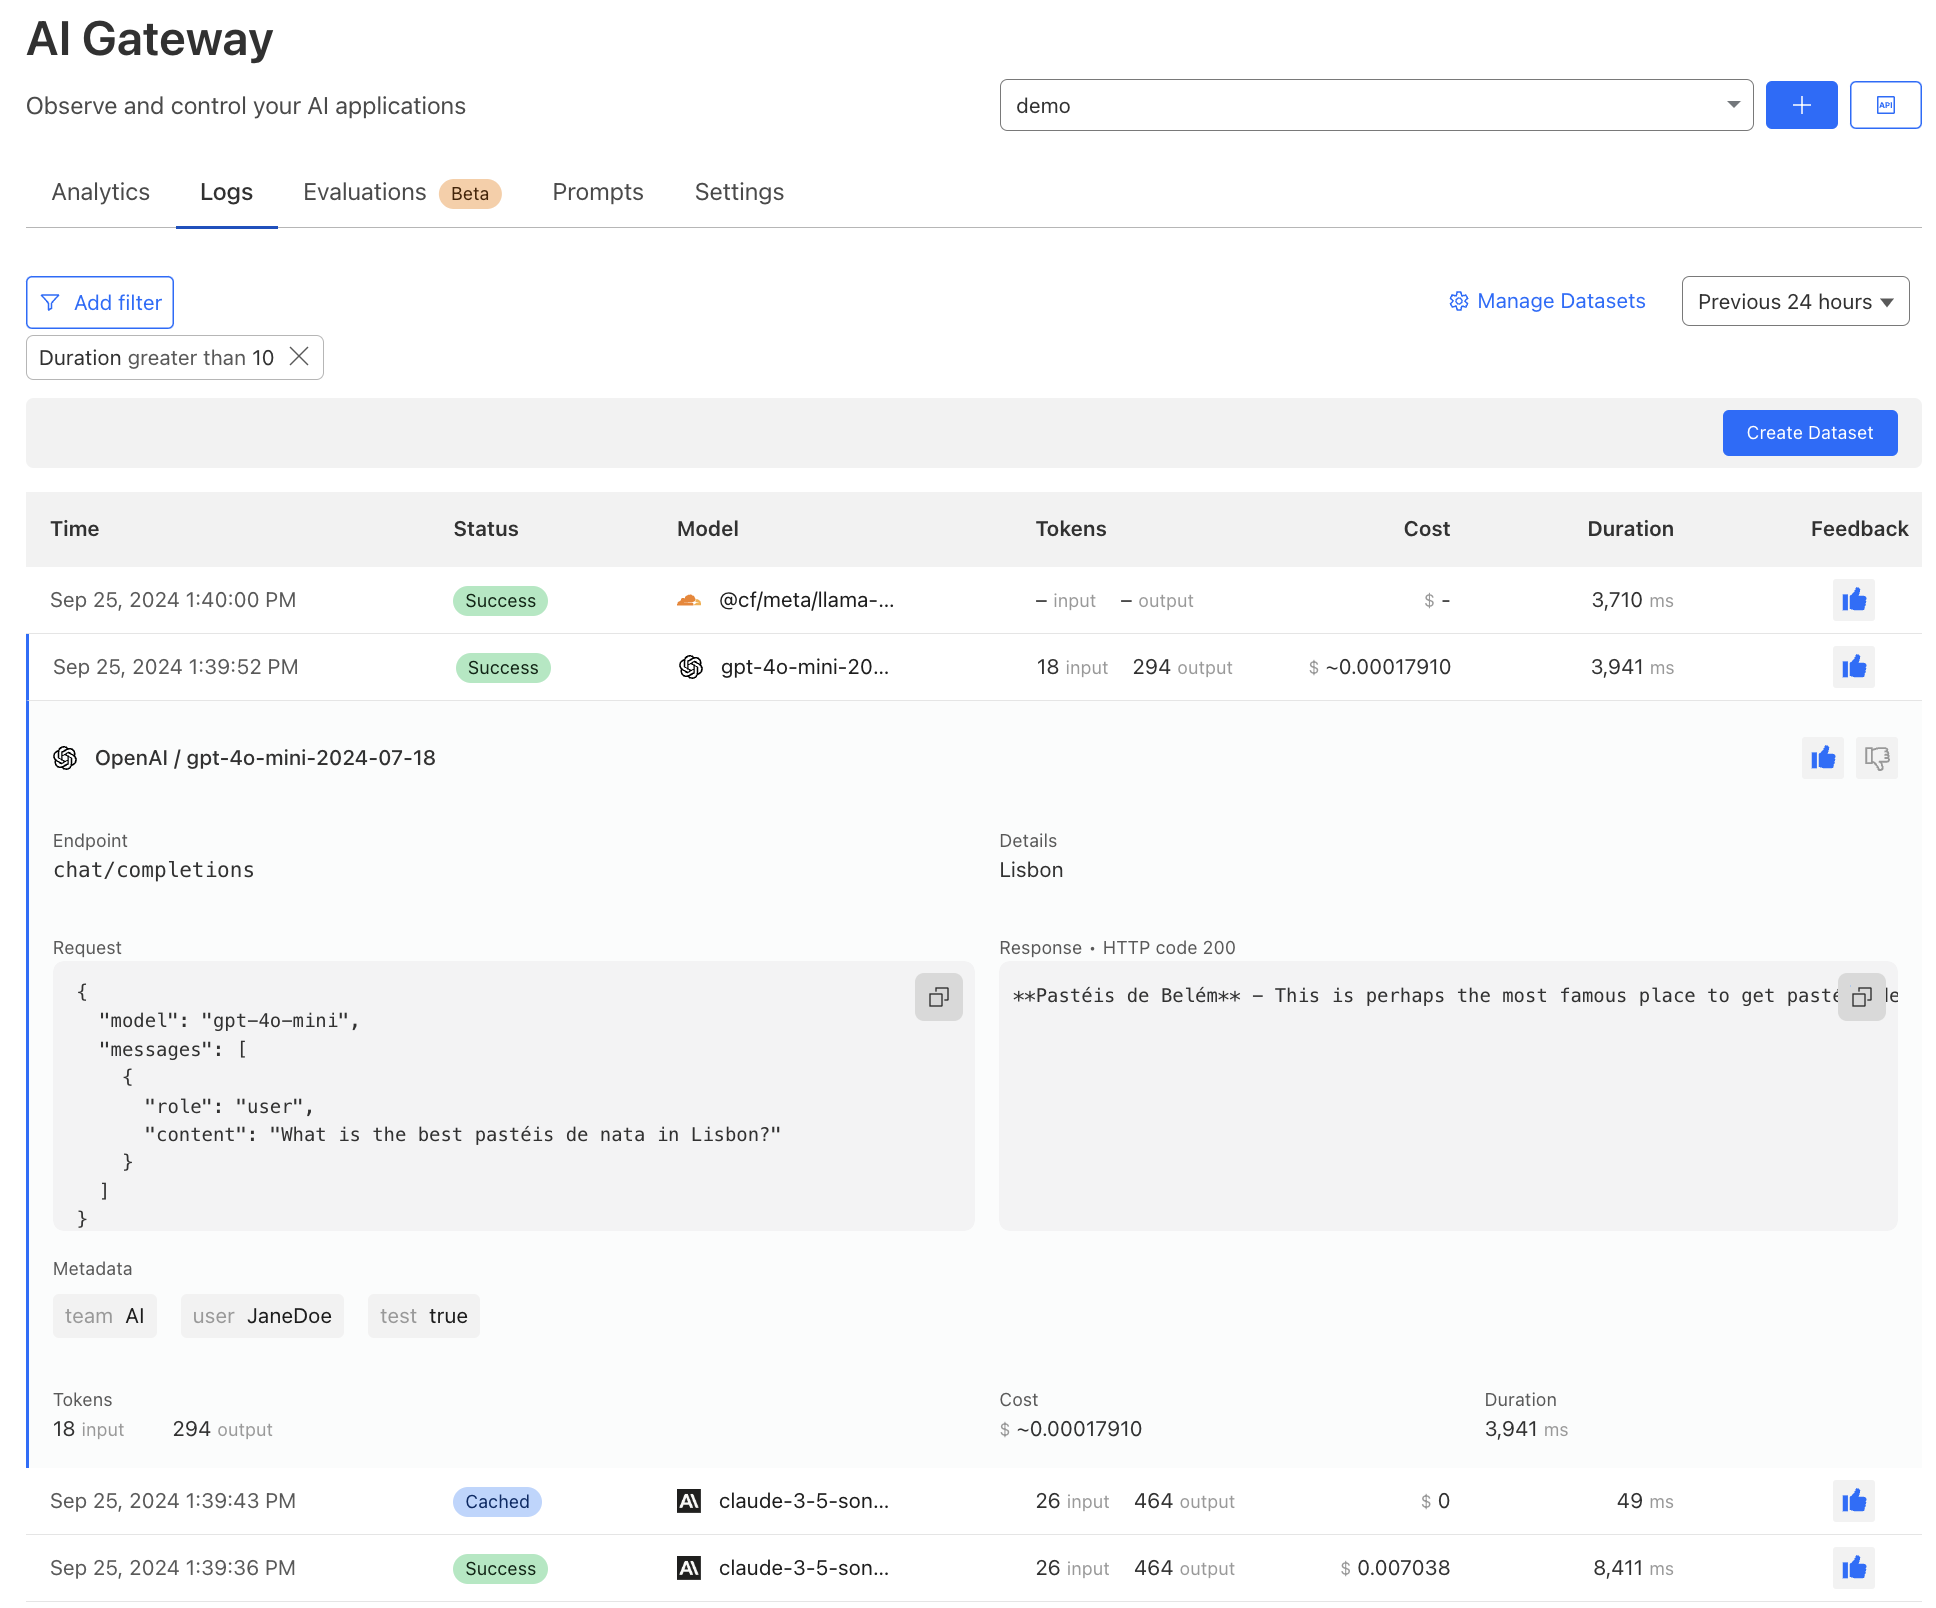
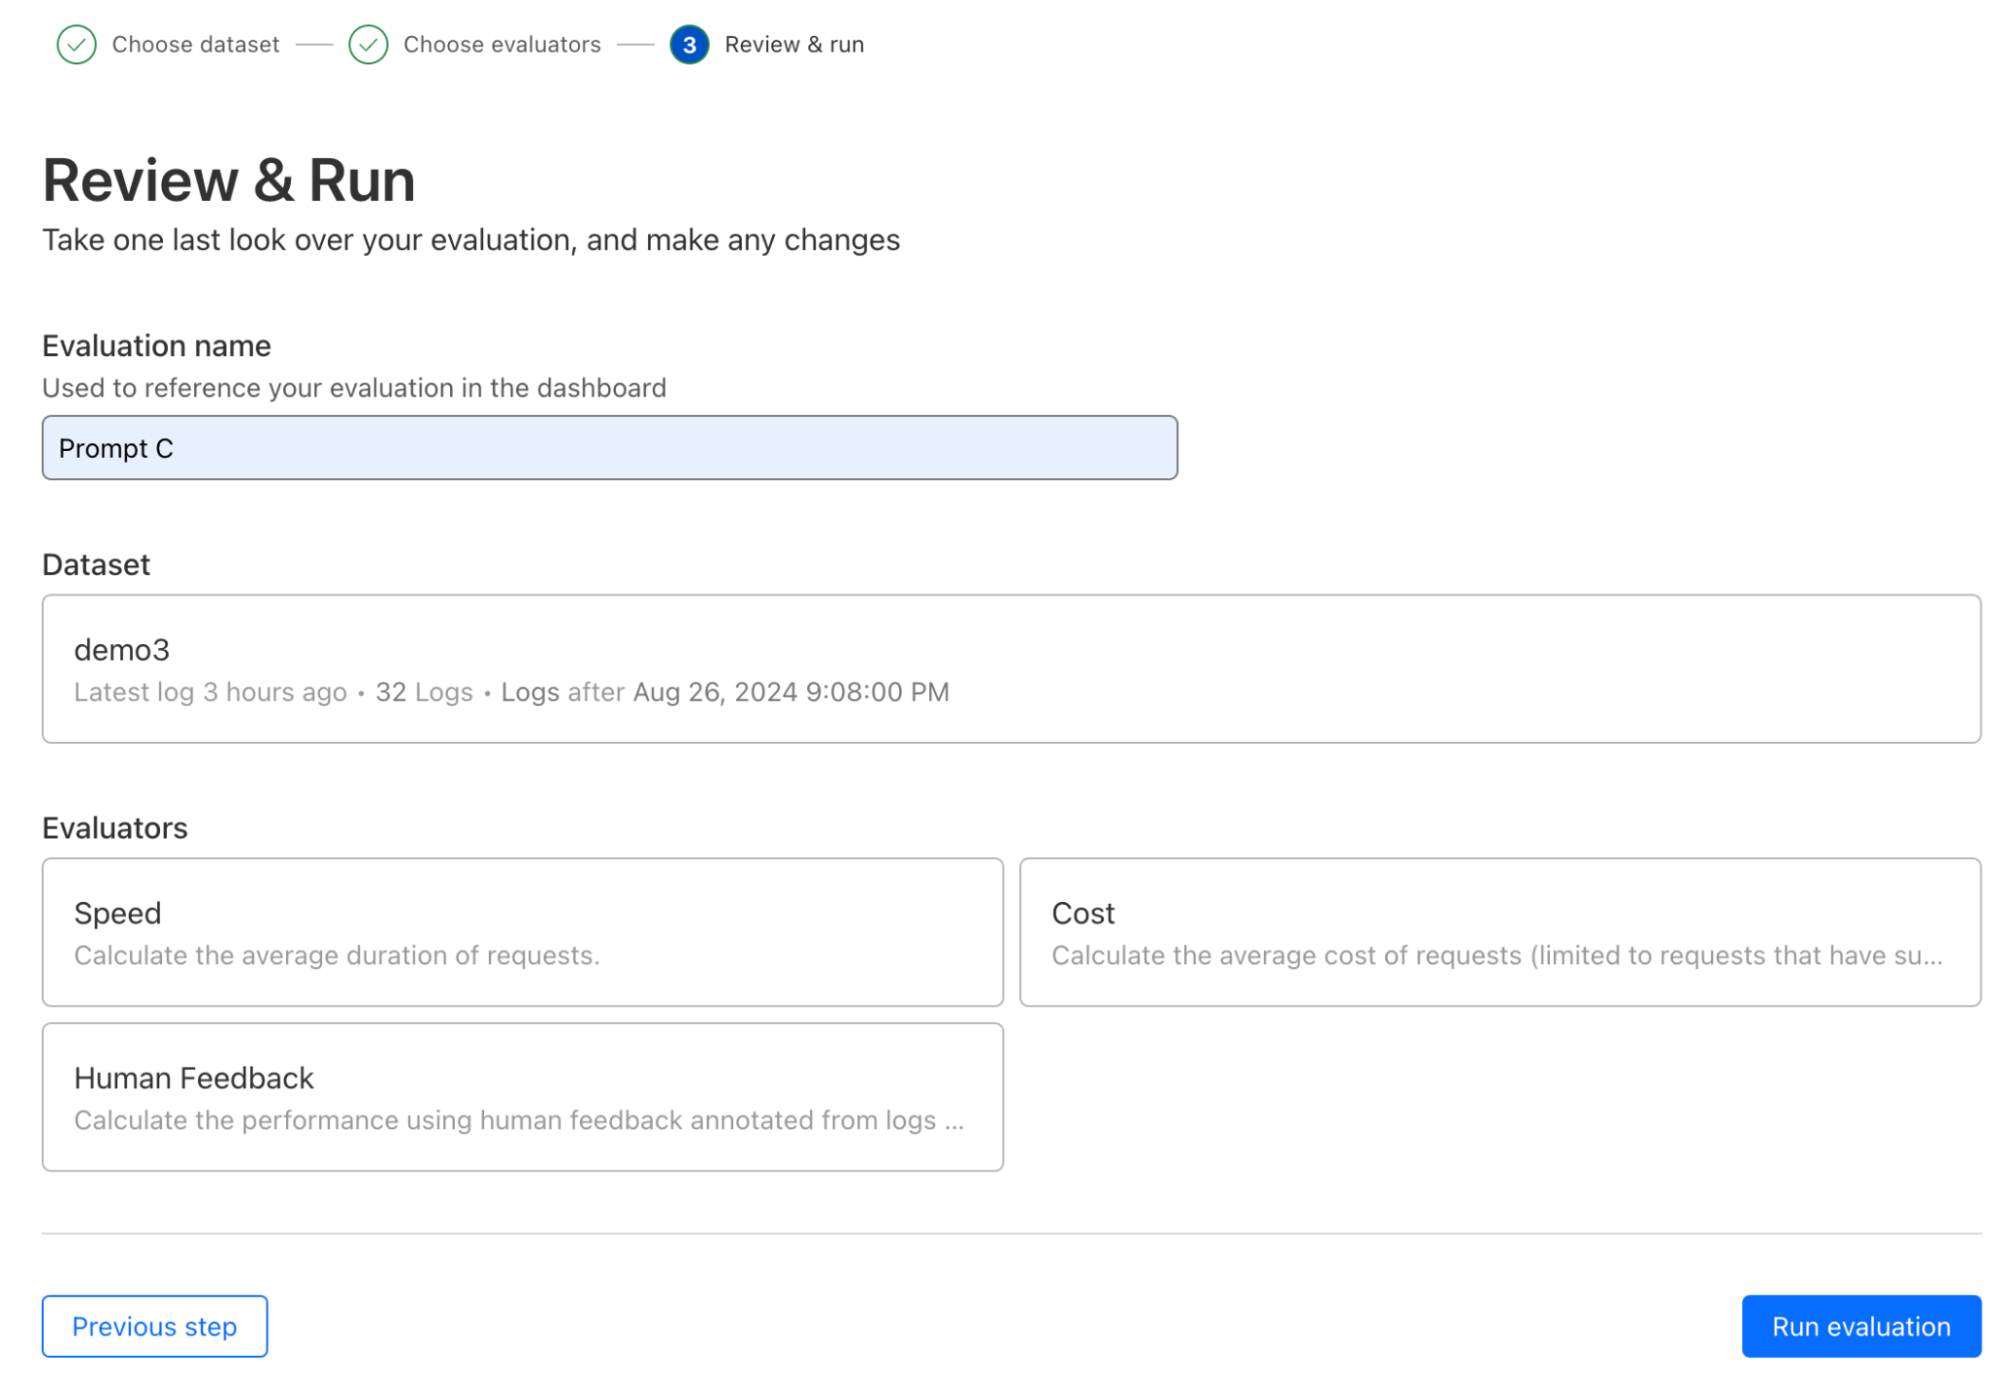
Workers Logs allow you to view all logs emitted from your Worker. When enabled, each console.log message, error, and exception is published as a separate event. Every Worker invocation (i.e. requests, alarms, rpc, etc.) also publishes an enriched execution log that contains invocation metadata. You can view logs in the Logs tab of your Worker in the dashboard, where you can filter on any event field, such as time, error code, message, or your own custom field.
If you’ve ever had to piece together the puzzle of unusual metrics, such as a spike in errors or latency, you know how frustrating it is to connect metrics to traces and logs that often live in independent data silos. Workers Logs is the first piece of a new observability platform we are building that helps you easily correlate telemetry data, and surfaces insights to help you understand. We’ll structure your telemetry data so you have the full context to ask the right questions, and can quickly and easily analyze the behavior of your applications. This is just the beginning for observability tools for Workers. We are already working on automatically emitting distributed traces from Workers, with real time errors and wide, high dimensionality events coming soon as well.
Starting November 1, 2024, Workers Logs will cost $0.60 per million log lines written after the included volume, as shown in the table below. Querying your logs is free. This makes it easy to estimate and forecast your costs — we think you shouldn’t have to calculate the number of ‘Gigabytes Ingested’ to understand what you’ll pay.
Workers Free
Workers Paid
Included Volume
200,000 logs per day
20,000,000 logs per month
Additional Events
N/A
$0.60 per million logs
Retention
3 days
7 days
Try out Workers Logs today. You can learn more from our developer documentation, and give us feedback directly in the #workers-observability channel on Discord.
Connect to private databases from Workers
Starting today, you can now use Hyperdrive, Cloudflare Tunnels and Access together to securely connect to databases that are isolated in a private network.
Hyperdrive enables you to build on Workers with your existing regional databases. It accelerates database queries using Cloudflare’s network, caching data close to end users and pooling connections close to the database. But there’s been a major blocker preventing you from building with Hyperdrive: network isolation.
The majority of databases today aren’t publicly accessible on the Internet. Data is highly sensitive and placing databases within private networks like a virtual private cloud (VPC) keeps data secure. But to date, that has also meant that your data is held captive within your cloud provider, preventing you from building on Workers.
With this update, Hyperdrive makes it possible for you to build full-stack applications on Workers with your existing databases, network-isolated or not. Whether you’re using Amazon RDS, Amazon Aurora, Google Cloud SQL, Azure Database, or any other provider, Hyperdrive can connect to your databases and optimize your database connections to provide the fast performance you’ve come to expect with building on Workers.
Read the developer documentation to learn more about how to opt-in your Workers to try it today. If you encounter any bugs or want to report feedback, open an issue.
Build frontend applications on Workers with Static Asset Hosting
Starting today in open beta, you now can upload and serve HTML, CSS, and client-side JavaScript directly as part of your Worker. This means you can build dynamic, server-side rendered applications on Workers using popular frameworks such as Astro, Remix, Next.js and Svelte (full list here), with more coming soon.
If you’re wondering “What about Pages?” — rest assured, Pages will remain fully supported. We’ve heard from developers that as we’ve added new features to Workers and Pages, the choice of which product to use has become challenging. We’re closing this gap by bringing asset hosting, CI/CD and Preview URLs to Workers this Birthday Week.
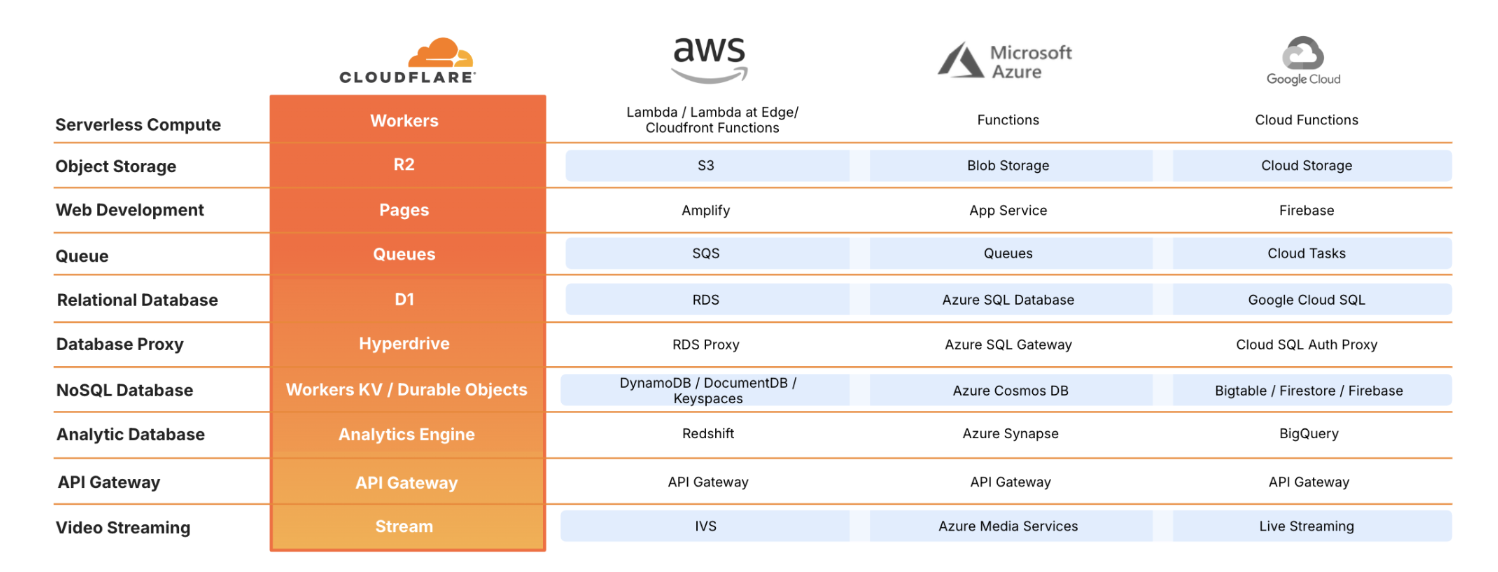
To make the upfront choice Cloudflare Workers and Pages more transparent, we’ve created a compatibility matrix. Looking ahead, we plan to bridge the remaining gaps between Workers and Pages and provide ways to migrate your Pages projects to Workers.
Cloudflare joins OpenNext to deploy Next.js apps to Workers
Cloud providers shouldn’t lock you in. Like cloud compute and storage, open source frameworks should be portable — you should be able to deploy them to different cloud providers. The goal of the OpenNext project is to make sure you can deploy Next.js apps to any cloud platform, originally to AWS, and now Cloudflare. We’re excited to contribute to the OpenNext community, and give developers the freedom to run on the cloud that fits their applications needs (and budget) best.
Continuous Integration & Delivery (CI/CD) with Workers Builds
Now in open beta, you can connect a GitHub or GitLab repository to a Worker, and Cloudflare will automatically build and deploy your changes each time you push a commit. Workers Builds provides an integrated CI/CD workflow you can use to build and deploy everything from full-stack applications built with the most popular frameworks to simple static websites. Just add your build command and let Workers Builds take care of the rest.
While in open beta, Workers Builds is free to use, with a limit of one concurrent build per account, and unlimited build minutes per month. Once Workers Builds is Generally Available in early 2025, you will be billed based on the number of build minutes you use each month, and have a higher number of concurrent builds.
Workers Free
Workers Paid
Build minutes, open beta
Unlimited
Unlimited
Concurrent builds, open beta
1
1
Build minutes, general availability
3,000 minutes included per month
6,000 minutes included per month +$0.005 per additional build minute
Concurrent builds, general availability
1
6
Read the docs to learn more about how to deploy your first project with Workers Builds.
Workers preview URLs
Each newly uploaded version of a Worker now automatically generates a preview URL. Preview URLs make it easier for you to collaborate with your team during development, and can be used to test and identify issues in a preview environment before they are deployed to production.
When you upload a version of your Worker via the Wrangler CLI, Wrangler will display the preview URL once your upload succeeds. You can also find preview URLs for each version of your Worker in the Cloudflare dashboard:
Preview URLs for Workers are similar to Pages preview deployments — they run on your Worker’s workers.dev subdomain and allow you to view changes applied on a new version of your application before the changes are deployed.
Safely release to production with Gradual Deployments
At Developer Week, we launched Gradual Deployments for Workers and Durable Objects to make it safer and easier to deploy changes to your applications. Gradual Deployments is now GA — we have been using it ourselves at Cloudflare for mission-critical services built on Workers since early 2024.
Gradual deployments can help you stay on top of availability SLAs and minimize application downtime by surfacing issues early. Internally at Cloudflare, every single service built on Workers uses gradual deployments to roll out new changes. Each new version gets released in stages —– 0.05%, 0.5%, 3%, 10%, 25%, 50%, 75% and 100% with time to soak between each stage. Throughout the roll-out, we keep an eye on metrics (which are often instrumented with Workers Analytics Engine!) and we roll back if we encounter issues.
Using gradual deployments is as simple as swapping out the wrangler commands, API endpoints, and/or using “Save version” in the code editor that is built into the Workers dashboard. Read the developer documentation to learn more and get started.
Queues is GA, with higher throughput and concurrency limits
Queues let a developer decouple their Workers into event driven services. Producer Workers write events to a Queue, and consumer Workers are invoked to take actions on the events. For example, you can use a Queue to decouple an e-commerce website from a service which sends purchase confirmation emails to users.
Throughput and concurrency limits for Queues are now significantly higher, which means you can push more messages through a Queue, and consume them faster.
Throughput: Each queue can now process 5000 messages per second (previously 400 per second).
Concurrency: Each queue can now have up to 250 concurrent consumers (previously 20 concurrent consumers).
HTTP Pull consumers allow messages to be consumed outside Workers, with zero data egress costs.
Queues can be used by any developer on a Workers Paid plan. Head over to our getting startedguide to start building with Queues.
Event notifications for R2 is now GA
We’re excited to announce that event notifications for R2 is now generally available. Whether it’s kicking off image processing after a user uploads a file or triggering a sync to an external data warehouse when new analytics data is generated, many applications need to be able to reliably respond when events happen. Event notifications for Cloudflare R2 give you the ability to build event-driven applications and workflows that react to changes in your data.
Here’s how it works: When data in your R2 bucket changes, event notifications are sent to your queue. You can consume these notifications with a consumer Worker or pull them over HTTP from outside of Cloudflare Workers.
Since we introduced event notifications in open beta earlier this year, we’ve made significant improvements based on your feedback:
We increased reliability of event notifications with throughput improvements from Queues. R2 event notifications can now scale to thousands of writes per second.
You can now configure event notifications directly from the Cloudflare dashboard (in addition to Wrangler).
You can now set up multiple notification rules for a single queue on a bucket.
Visit our documentation to learn about how to set up event notifications for your R2 buckets.
Removing the serverless microservices tax: No more request fees for Service Bindings and Tail Workers
Earlier this year, we quietly changed Workers pricing to lower your costs. As of July 2024, you are no longer charged for requests between Workers on your account made via Service Bindings, or for invocations of Tail Workers. For example, let’s say you have the following chain of Workers:
Each request from a client results in three Workers invocations. Previously, we charged you for each of these invocations, plus the CPU time for each of these Workers. With this change, we only charge you for the first request from the client, plus the CPU time used by each Worker.
This eliminates the additional cost of breaking a monolithic serverless app into microservices. In 2023, we introduced new pricing based on CPU time, rather than duration, so you don’t have to worry about being billed for time spent waiting on I/O. This includes I/O to other Workers. With this change, you’re only billed for the first request in the chain, eliminating the other additional cost of using multiple Workers.
Image optimization is available to everyone for free — no subscription needed
Starting today, you can use Cloudflare Images for free to optimize your images with up to 5,000 transformations per month.
Large, oversized images can throttle your application speed and page load times. We built Cloudflare Images to let you dynamically optimize images in the correct dimensions and formats for each use case, all while storing only the original image.
In the spirit of Birthday Week, we’re making image optimization available to everyone with a Cloudflare account, no subscription needed. You’ll be able to use Images to transform images that are stored outside of Images, such as in R2.
Transformations are served from your zone through a specially formatted URL with parameters that specify how an image should be optimized. For example, the transformation URL below uses the format parameter to automatically serve the image in the most optimal format for the requesting browser:
This means that the original PNG image may be served as AVIF to one user and WebP to another. Without a subscription, transforming images from remote sources is free up to 5,000 unique transformations per month. Once you exceed this limit, any already cached transformations will continue to be served, but you’ll need a paid Images plan to request new transformations or to purchase storage within Images.
Dive deep into more announcements from Builder Day
We shipped so much that we couldn’t possibly fit it all in one blog post. These posts dive into the technical details of what we’re announcing at Builder Day:
Cloudflare is for builders, and everything we’re announcing at Builder Day, you can start building with right away. We’re now offering $250,000 in credits to use on our Developer Platform to qualified startups, so that you can get going even faster, and become the next company to reach hypergrowth scale with a small team, and not waste time provisioning infrastructure and doing undifferentiated heavy lifting. Focus on shipping, and we’ll take care of the rest.
Software as a Service (SaaS) applications offer a transformative solution for businesses worldwide, delivering on-demand software solutions to a global audience. However, building a successful SaaS platform demands on meticulous architectural planning, especially given the inherent challenges of multi-tenancy. It’s also essential to ensure that each tenant’s data remains isolated and protected from unauthorized access and that multi-tenant systems are cost-optimized and can sustain the scaling of the SaaS business provider.
In this blog post, we will explore some of the key elements and best practices for designing and deploying secure and efficient SaaS systems on AWS.
Cost is a key factor to consider when we design new systems. Multi-tenancy requires teams to think beyond the basics of auto scaling, adopting strategies to allow their architecture to support a complex cost-scaling challenges. In this session, the speaker covers some design patterns for distributed systems to support the continually evolving scale needs of the environment, while optimizing the cost of the infrastructure.
Figure 1. The architectural model chosen for deploying multi-tenant systems—pooled, siloed, or mixed—significantly influences the cost-optimization strategy. Each approach offers distinct trade-offs in terms of resource allocation, scalability, and cost efficiency.
The SaaS Lens for the AWS Well-Architected Framework empowers customers to assess and enhance their cloud-based architectures, fostering a deeper understanding of the business implications of their design choices. By bringing together technical leadership and diverse teams to discuss strategies for improving various aspects of the system, the AWS Well-Architected Framework facilitates collaborative decision-making. Moreover, the AWS account team can provide valuable support in conducting these assessments, offering expert guidance and insights. The AWS SaaS Lens specifically focuses on how to design, deploy, and architect multi-tenant SaaS application workloads within the AWS Cloud.
Figure 2. The microservices running in a multi-tenant environment must be able to reference and apply tenant context within each service. At the same time, it’s also our goal to limit the degree to which developers need to introduce any tenant awareness into their code.
Not every SaaS provider has the luxury of running all the moving parts of their solution within their own infrastructure. SaaS teams might support a range of diverse system models, where architectures might include customer-hosted data, edge deployment for parts of the application, and on-premises components. In this session, you can learn the strategies to support the complexities of this distributed model without undermining the resilience, operational efficiency, and agility goals of your solution. The video covers how this influences the onboarding, deployment, and profile management of the SaaS environment.
Figure 3. In this architectural pattern, tenants are demanding to have the ML workload in their environment. So, the SaaS provider only manages the SaaS control plane where tenants deploy the application plane in their environment, including the ML workload and the necessary components around it.
Containers are frequently employed in multi-tenant SaaS environments to enhance scalability, isolation, and resource efficiency. Developing such systems requires addressing multiple challenges, including tenant isolation, tenant on-boarding, tenant-specific metering, monitoring, and other factors related to multi-tenancy. This session explores how to effectively manage all of these aspects when deploying solutions on AWS Fargate.
Figure 4. Microservices architecture can enhance security isolation by dividing applications into smaller, independent services, reducing the potential impact of a breach.
Serverless helps to create multi-tenant architectures thanks to services like AWS Lambda that isolate your business logic per request, making them the perfect companion to run a SaaS platform. This workshop provides a hands-on introduction to creating serverless multi-tenant SaaS applications, helping you get started and gain practical experience.
Figure 5. This is the high-level architecture of the web application you will use in the AWS Serverless SaaS Workshop. In the labs, you will use this web application to add features that are needed to build this final SaaS application.
Thanks for reading! Multi-tenant SaaS architectures require a careful design of your system. In this post, you have discovered key elements for properly designing your next SaaS workloads. In the next blog, we will talk about modern data architectures.
To revisit any of our previous posts or explore the entire series, visit the Let’s Architect! page.
Danilo Krummrich gave a talk at Kangrejos 2024 focusing on the question of how
the Rust-for-Linux project could improve at getting device and driver
abstractions upstream. As a case study, he used some of his recent work that
attempts to make it possible to write a PCI driver entirely in Rust. There
wasn’t time to go into as much detail as he would have liked, but he did
demonstrate that it is possible to interface with the kernel’s module loader in
a way that is much harder to
screw up than the current standard approach in C.
Organizations are collecting and storing vast amounts of structured and unstructured data like reports, whitepapers, and research documents. By consolidating this information, analysts can discover and integrate data from across the organization, creating valuable data products based on a unified dataset. For many organizations, this centralized data store follows a data lake architecture. Although data lakes provide a centralized repository, making sense of this data and extracting valuable insights can be challenging. End-users often struggle to find relevant information buried within extensive documents housed in data lakes, leading to inefficiencies and missed opportunities.
Surfacing relevant information to end-users in a concise and digestible format is crucial for maximizing the value of data assets. Automatic document summarization, natural language processing (NLP), and data analytics powered by generative AI present innovative solutions to this challenge. By generating concise summaries of large documents, performing sentiment analysis, and identifying patterns and trends, end-users can quickly grasp the essence of the information without the need to sift through vast amounts of raw data, streamlining information consumption and enabling more informed decision-making.
This is where Amazon Bedrock comes into play. Amazon Bedrock is a fully managed service that offers a choice of high-performing foundation models (FMs) from leading AI companies like AI21 Labs, Anthropic, Cohere, Meta, Mistral AI, Stability AI, and Amazon through a single API, along with a broad set of capabilities to build generative AI applications with security, privacy, and responsible AI. This post shows how to integrate Amazon Bedrock with the AWS Serverless Data Analytics Pipeline architecture using Amazon EventBridge, AWS Step Functions, and AWS Lambda to automate a wide range of data enrichment tasks in a cost-effective and scalable manner.
Solution overview
The AWS Serverless Data Analytics Pipeline reference architecture provides a comprehensive, serverless solution for ingesting, processing, and analyzing data. At its core, this architecture features a centralized data lake hosted on Amazon Simple Storage Service (Amazon S3), organized into raw, cleaned, and curated zones. The raw zone stores unmodified data from various ingestion sources, the cleaned zone stores validated and normalized data, and the curated zone contains the final, enriched data products.
Building upon this reference architecture, this solution demonstrates how enterprises can use Amazon Bedrock to enhance their data assets through automated data enrichment. Specifically, it showcases the integration of the powerful FMs available in Amazon Bedrock for generating concise summaries of unstructured documents, enabling end-users to quickly grasp the essence of information without sifting through extensive content.
The enrichment process begins when a document is ingested into the raw zone, invoking an Amazon S3 event that initiates a Step Functions workflow. This serverless workflow orchestrates Lambda functions to extract text from the document based on its file type (text, PDF, Word). A Lambda function then constructs a payload with the document’s content and invokes the Amazon Bedrock Runtime service, using state-of-the-art FMs to generate concise summaries. These summaries, encapsulating key insights, are stored alongside the original content in the curated zone, enriching the organization’s data assets for further analysis, visualization, and informed decision-making. Through this seamless integration of serverless AWS services, enterprises can automate data enrichment, unlocking new possibilities for knowledge extraction from their valuable unstructured data.
The serverless nature of this architecture provides inherent benefits, including automatic scaling, seamless updates and patching, comprehensive monitoring capabilities, and robust security measures, enabling organizations to focus on innovation rather than infrastructure management.
The following diagram illustrates the solution architecture.
Let’s walk through the architecture chronologically for a closer look at each step.
Initiation
The process is initiated when an object is written to the raw zone. In this example, the raw zone is a prefix, but it could also be a bucket. Amazon S3 emits an object created event and matches an EventBridge rule. The event invokes a Step Functions state machine. The state machine runs for each object in parallel, so the architecture scales horizontally.
Workflow
The Step Functions state machine provides a workflow to handle different file types for text summarization. Files are first preprocessed based on the file extension and corresponding Lambda function. Next, the files are processed by another Lambda function that summarizes the preprocessed content. If the file type is not supported, the workflow fails with an error. The workflow consists of the following states:
CheckFileType – The workflow starts with a Choice state that checks the file extension of the uploaded object. Based on the file extension, it routes the workflow to different paths:
If the file extension is .txt, it goes to the IngestTextFile state.
If the file extension is .pdf, it goes to the IngestPDFFile state.
If the file extension is .docx, it goes to the IngestDocFile state.
If the file extension doesn’t match any of these options, it goes to the UnsupportedFileType state and fails with an error.
IngestTextFile, IngestPDFFile, and IngestDocFile – These are Task states that invoke their respective Lambda functions to ingest (or process) the file based on its type. After ingesting the file, the job moves to the SummarizeTextFile state.
SummarizeTextFile – This is another Task state that invokes a Lambda function to summarize the ingested text file. The function takes the source key (object key) and bucket name as input parameters. This is the final state of the workflow.
You can extend this code sample to account for different types of files, including audio, pictures, and video files, by using services like Amazon Transcribe or Amazon Rekognition.
Preprocessing
Lambda enables you to run code without provisioning or managing servers. This solution contains a Lambda function for each file type. These three functions are part of a larger workflow that processes different types of files (Word documents, PDFs, and text files) uploaded to an S3 bucket. The functions are designed to extract text content from these files, handle any encoding issues, and store the extracted text as new text files in the same S3 bucket with a different prefix. The functions are as follows:
Word document processing function:
Downloads a Word document (.docx) file from the S3 bucket
Uses the python-docx library to extract text content from the Word document by iterating over its paragraphs
Stores the extracted text as a new text file (.txt) in the same S3 bucket with a cleaned prefix
PDF processing function:
Downloads a PDF file from the S3 bucket
Uses the PyPDF2 library to extract text content from the PDF by iterating over its pages
Stores the extracted text as a new text file (.txt) in the same S3 bucket with a cleaned prefix
Text file processing function:
Downloads a text file from the S3 bucket
Uses the chardet library to detect the encoding of the text file
Decodes the text content using the detected encoding (or UTF-8 if encoding can’t be detected)
Encodes the decoded text content as UTF-8
Stores the UTF-8 encoded text as a new text file (.txt) in the same S3 bucket with a cleaned prefix
All three functions follow a similar pattern:
Download the source file from the S3 bucket.
Process the file to extract or convert the text content.
Store the extracted and converted text as a new text file in the same S3 bucket with a different prefix.
Return a response indicating the success of the operation and the location of the output text file.
Processing
After the content has been extracted to the cleaned prefix, the Step Functions state machine initiates the Summarize_text Lambda function. This function acts as an orchestrator in a workflow designed to generate summaries for text files stored in an S3 bucket. When it’s invoked by a Step Functions event, the function retrieves the source file’s path and bucket location, reads the text content using the Boto3 library, and generates a concise summary using Anthropic Claude 3 on Amazon Bedrock. After obtaining the summary, the function encapsulates the original text, generated summary, model details, and a timestamp into a JSON file, which is uploaded back to the same S3 bucket with a specified prefix, providing organized storage and accessibility for further processing or analysis.
Summarization
Amazon Bedrock provides a straightforward way to build and scale generative AI applications with FMs. The Lambda function sends the content to Amazon Bedrock with directions to summarize it. The Amazon Bedrock Runtime service plays a crucial role in this use case by enabling the Lambda function to integrate with the Anthropic Claude 3 model seamlessly. The function constructs a JSON payload containing the prompt, which includes a predefined prompt stored in an environment variable and the input text content, along with parameters like maximum tokens to sample, temperature, and top-p. This payload is sent to the Amazon Bedrock Runtime service, which invokes the Anthropic Claude 3 model and generates a concise summary of the input text. The generated summary is then received by the Lambda function and incorporated into the final JSON file.
If you use this solution for your own use case, you can customize the following parameters:
modelId – The model you want Amazon Bedrock to run. We recommend testing your use case and data with different models. Amazon Bedrock has a lot of models to offer, each with their own strengths. Models also vary by context window, which is how much data you can send with a single prompt.
prompt – The prompt that you want Anthropic Claude 3 to complete. Customize the prompt for your use case. You can set the prompt in the initial deployment steps as described in the following section.
max_tokens_to_sample – The maximum number of tokens to generate before stopping. This sample is currently set at 300 to manage cost, but you will likely want to increase it.
Temperature – The amount of randomness injected into the response.
top_p – In nucleus sampling, Anthropic’s Claude 3 computes the cumulative distribution over all the options for each subsequent token in decreasing probability order and cuts it off when it reaches a particular probability specified by top_p.
The best way to determine the best parameters for a specific use case is to prototype and test. Fortunately, this can be a quick process by using the following code example or the Amazon Bedrock console. For more details about models and parameters available, refer to Anthropic Claude Text Completions API.
AWS SAM template
This sample is built and deployed with AWS Serverless Application Model (AWS SAM) to streamline development and deployment. AWS SAM is an open source framework for building serverless applications. It provides shorthand syntax to express functions, APIs, databases, and event source mappings. You define the application you want with just a few lines per resource and model it using YAML. In the following sections, we guide you through the process of a sample deployment using AWS SAM that exemplifies the reference architecture.
Prerequisites
For this walkthrough, you should have the following prerequisites:
This walkthrough uses AWS CloudShell to deploy the solution. CloudShell is a browser-based shell environment provided by AWS that allows you to interact with and manage your AWS resources directly from the AWS Management Console. It offers a pre-authenticated command line interface with popular tools and utilities pre-installed, such as the AWS Command Line Interface (AWS CLI), Python, Node.js, and git. CloudShell eliminates the need to set up and configure your local development environments or manage SSH keys, because it provides secure access to AWS services and resources through a web browser. You can run scripts, run AWS CLI commands, and manage your cloud infrastructure without leaving the AWS console. CloudShell is free to use and comes with 1 GB of persistent storage for each AWS Region, allowing you to store your scripts and configuration files. This tool is particularly useful for quick administrative tasks, troubleshooting, and exploring AWS services without the need for additional setup or local resources.
Complete the following steps to set up the CloudShell environment:
Open the CloudShell console.
If this is your first time using CloudShell, you may see a “Welcome to AWS CloudShell” page.
Choose the option to open an environment in your Region (the Region listed may vary based on your account’s primary Region).
It may take several minutes for the environment to fully initialize if this is your first time using CloudShell.
The display resembles a CLI suitable for deploying AWS SAM sample code.
Download and deploy the solution
This code sample is available on Serverless Land and GitHub. Deploy it according to the directions in the GitHub README on the CloudShell console:
git clone https://github.com/aws-samples/step-functions-workflows-collection

cd step-functions-workflows-collection/s3-sfn-lambda-bedrock

sam build

sam deploy –-guided
For the guided deployment process, use the default values. Also, enter a stack name. AWS SAM will deploy the sample code.
Run the following code to set up the required prefix structure:
bucket=$(aws s3 ls | grep sam-app | cut -f 3 -d ' ') && for each in raw cleaned curated; do aws s3api put-object --bucket $bucket --key $each/; done
The sample application has now been deployed and you’re ready to begin testing.
EventBridge will monitor for new file additions to the raw S3 bucket, invoking the Step Functions workflow.
You can navigate to the Step Functions console and view the state machine. You can observe the status of the job and when it’s complete.
The Step Functions workflow verifies the file type, subsequently invoking the appropriate Lambda function for processing or raising an error if the file type is unsupported. Upon successful content extraction, a second Lambda function is invoked to summarize the content using Amazon Bedrock.
The workflow employs two distinct functions: the first function extracts content from various file types, and the second function processes the extracted information with the assistance of Amazon Bedrock, receiving data from the initial Lambda function.
Upon completion, the processed data is stored back in the curated S3 bucket in JSON format.
The process creates a JSON file with the original_content and summary fields. The following screenshot shows an example of the process using the Containers On AWS whitepaper. Results can vary depending on the large language model (LLM) and prompt strategies selected.
Clean up
To avoid incurring future charges, delete the resources you created. Run sam delete from CloudShell.
Solution benefits
Integrating Amazon Bedrock into the AWS Serverless Data Analytics Pipeline for data enrichment offers numerous benefits that can drive significant value for organizations across various industries:
Scalability – This serverless approach inherently scales resources up or down as data volumes and processing requirements fluctuate, providing optimal performance and cost-efficiency. Organizations can handle spikes in demand seamlessly without manual capacity planning or infrastructure provisioning.
Cost-effectiveness – With the pay-per-use pricing model of AWS serverless services, organizations only pay for the resources consumed during data enrichment. This avoids upfront costs and ongoing maintenance expenses of traditional deployments, resulting in substantial cost savings.
Ease of maintenance – AWS handles the provisioning, scaling, and maintenance of serverless services, reducing operational overhead. Organizations can focus on developing and enhancing data enrichment workflows rather than managing infrastructure.
Across industries, this solution unlocks numerous use cases:
Research and academia – Summarizing research papers, journals, and publications to accelerate literature reviews and knowledge discovery
Legal and compliance – Extracting key information from legal documents, contracts, and regulations to support compliance efforts and risk management
Healthcare – Summarizing medical records, studies, and patient reports for better patient care and informed decision-making by healthcare professionals
Enterprise knowledge management – Enriching internal documents and repositories with summaries, topic modeling, and sentiment analysis to facilitate information sharing and collaboration
Customer experience management – Analyzing customer feedback, reviews, and social media data to identify sentiment, issues, and trends for proactive customer service
Marketing and sales – Summarizing customer data, sales reports, and market analysis to uncover insights, trends, and opportunities for optimized campaigns and strategies
With Amazon Bedrock and the AWS Serverless Data Analytics Pipeline, organizations can unlock their data assets’ potential, driving innovation, enhancing decision-making, and delivering exceptional user experiences across industries.
The serverless nature of the solution provides scalability, cost-effectiveness, and reduced operational overhead, empowering organizations to focus on data-driven innovation and value creation.
Conclusion
Organizations are inundated with vast information buried within documents, reports, and complex datasets. Unlocking the value of these assets requires innovative solutions that transform raw data into actionable insights.
This post demonstrated how to use Amazon Bedrock, a service providing access to state-of-the-art LLMs, within the AWS Serverless Data Analytics Pipeline. By integrating Amazon Bedrock, organizations can automate data enrichment tasks like document summarization, named entity recognition, sentiment analysis, and topic modeling. Because the solution utilizes a serverless approach, it handles fluctuating data volumes without manual capacity planning, paying only for resources consumed during enrichment and avoiding upfront infrastructure costs.
This solution empowers organizations to unlock their data assets’ potential across industries like research, legal, healthcare, enterprise knowledge management, customer experience, and marketing. By providing summaries, extracting insights, and enriching with metadata, you efficiency add innovative features that provide differentiated user experiences.
Explore the AWS Serverless Data Analytics Pipeline reference architecture and take advantage of the power of Amazon Bedrock. By embracing serverless computing and advanced NLP, organizations can transform data lakes into valuable sources of actionable insights.
About the Authors
Dave Horne is a Sr. Solutions Architect supporting Federal System Integrators at AWS. He is based in Washington, DC, and has 15 years of experience building, modernizing, and integrating systems for public sector customers. Outside of work, Dave enjoys playing with his kids, hiking, and watching Penn State football!
Robert Kessler is a Solutions Architect at AWS supporting Federal Partners, with a recent focus on generative AI technologies. Previously, he worked in the satellite communications segment supporting operational infrastructure globally. Robert is an enthusiast of boats and sailing (despite not owning a vessel), and enjoys tackling house projects, playing with his kids, and spending time in the great outdoors.
This release of PostgreSQL adds significant overall performance gains,
including an overhauled memory management implementation for vacuum,
optimizations to storage access and improvements for high concurrency
workloads, speedups in bulk loading and exports, and query execution
improvements for indexes. PostgreSQL 17 has features that benefit
brand new workloads and critical systems alike, such as additions to
the developer experience with the SQL/JSON JSON_TABLE command, and
enhancements to logical replication that simplify management of high
availability workloads and major version upgrades.
LWN recently covered
some of the interesting new features and security enhancements in
PostgreSQL 17.
Ransomware is now a billion dollar industry, and one of the best things any business can do to protect its bottom line is to back up. But, it’s important to remember that backups are only the first step in the process—when you are affected by a ransomware attack, natural disaster, or even human error, you’ll then need to restore.
As your business scales and becomes more complex, so does your backup and restore process. You’ll have more types of data to restore, on more networks and devices, with more people involved at every step of the way.
The best way to make sure your backups are effective? Test them regularly. Let’s talk about why and how.
Good reasons to test your backups
By regularly testing your backups, you can improve your chances of a successful recovery and minimize the impact of data loss. Here are several reasons why regular backup testing is crucial:
Data integrity verification: Testing ensures that your backups are accurate and complete. A failed test might reveal corrupted files or missing data that could lead to significant losses.
Recovery process validation: By simulating the recovery process, you can identify potential bottlenecks or issues in your restoration procedures. This ensures that you can quickly and effectively recover your data in case of a disaster.
Disaster readiness assessment: Regular testing helps you assess your overall disaster recovery plan. It reveals any weaknesses or gaps that need to be addressed to ensure business continuity and to meet recovery time objectives.
Compliance adherence: Many industries have strict data retention and backup requirements. Testing helps you demonstrate compliance with these regulations.
Cyber insurance standards:Cyber insurance adoption is increasingly important for businesses, and many cyber insurance providers focus both on helping their clients prepare for ransomware attacks and recovery after the fact. As a result, many require regular backup verification testing and reporting.
Peace of mind: Knowing that your backups are reliable and tested can provide peace of mind and reduce stress during a crisis.
Early detection of issues: Testing can uncover problems with your backup software, hardware, or processes early on, allowing you to address them before they lead to more significant consequences.
In short, regular backup testing not only confirms that your data is properly backed up, but also ensures that you’re meeting recovery point objectives (RPO), have key features like immutability configured properly, and supports overall business objectives.
Ransomware and backups
In addition to the above reasons, it’s important to note the growing trend for ransomware bad actors to specifically target backups. Veeam’s 2024 Ransomware Trends Report shows that 96% of attacks focus on backup repositories with the bad actors successfully affecting the backups in 76% of cases. Elsewhere, Sophos reports in instances where backups were compromised, ransomware demands doubled, and recovery costs were eight times higher.
How to test your backups
Testing device backups is crucial to ensure data integrity and recoverability in case of loss or damage. Here are some effective methods:
1. Manual restoration tests
Regularly restore files: Select random files from your backup and restore them to a different location. Verify that the restored files are identical to the original files.
Test system restore: If your backup includes system images, periodically restore them to a separate partition or virtual machine to ensure they function correctly.
2. Automated testing tools
Backup software features: Many backup solutions offer built-in testing features. These tools can automatically verify the integrity of your backups and alert you to any issues. Restore services like Cloud Instant Backup Recovery can also provide valuable insight and support before, during, and after ransomware events.
Third-party verification tools: Consider using specialized tools designed for backup verification. These tools can provide more in-depth analysis and reporting.
3. Simulated disaster scenarios
Create a test environment: Set up a simulated disaster environment, such as a corrupted hard drive or a system failure.
Attempt recovery: Try to restore your data from the backup to the simulated environment. This will help you assess the effectiveness of your backup and recovery procedures.
4. Cloud-based backup testing for different recovery scenarios
Restore workstations: If you use cloud backup for your workstations, test restoring your files to a new device. This will show the functionality of the cloud backup service and ensure that your data can be accessed and restored successfully.
Restore server or network data: In addition to endpoints, you’ll also want to restore your servers or networks to different business locations. This lets you pressure test the cost of restores to account for things like hidden fees, and to ensure functions like immutability are properly configured.
5. Regular backup verification
Check file integrity: Regularly verify the integrity of your backup files using checksums or hash functions. This will help detect any corruption or damage that may have occurred.
Review backup logs: Monitor your backup logs for any errors or warnings that might indicate issues with the backup process.
By following these methods, you can ensure that your device backups are reliable and that you can recover your data effectively in case of a disaster.
The human element
Don’t forget that this includes things like establishing where and how you’ll communicate if, for instance, company email is offline. It’s also important to designate incident managers to streamline decision making and ensure that essential personnel have the access and permissions they need.
How cloud storage can help
Store your backup data in readily accessible, hot storage. This minimizes retrieval times during a disaster, enabling faster recovery of critical applications and data.
By implementing a robust backup strategy that incorporates the 3-2-1 backup rule (or, the more robust, and increasingly enterprise standard 3-2-1-1-0 method), immutability, version control, and cloud storage, you can ensure the protection of your critical data against various threats. And, by testing frequently, you can rely on the fact that those backups—and your team—are ready to get your business back online as soon as possible.
The online-privacy-focused Tor
project has announced
that it has “joined forces and merged operations” with the Tails OS Linux distribution.
Countering the threat of global mass surveillance and censorship to a free Internet, Tor and Tails provide essential tools to help people around the world stay safe online. By joining forces, these two privacy advocates will pool their resources to focus on what matters most: ensuring that activists, journalists, other at-risk and everyday users will have access to improved digital security tools.
In late 2023, Tails approached the Tor Project with the idea of merging operations. Tails had outgrown its existing structure. Rather than expanding Tails’s operational capacity on their own and putting more stress on Tails workers, merging with the Tor Project, with its larger and established operational framework, offered a solution. By joining forces, the Tails team can now focus on their core mission of maintaining and improving Tails OS, exploring more and complementary use cases while benefiting from the larger organizational structure of The Tor Project.
The extensible scheduler class (sched_ext)
enables the implementation of CPU schedulers as a set of BPF programs
loaded from user space; it first hit the mailing lists in late 2022.
Sched_ext has engendered its share of controversy since, but is currently
slated to be part of the 6.12 kernel release. At the 2024 Linux Plumbers Conference, the growing
sched_ext community held one of its first public gatherings; sched_ext
would appear to have launched a new burst of creativity in scheduler
design.
On August 20, 2024, we announced the general availability of the new AWS CloudHSMhardware security module (HSM) instance typehsm2m.medium, referred to in this post as hsm2. This new type comes with additional features compared to the previous CloudHSM instance type hsm1.medium (hsm1). The new features include the following:
Support for Federal Information Processing Standard (FIPS) 140-3 Level 3
The ability to run CloudHSM clusters in non-FIPS mode
In this blog post, I walk you through the steps to securely migrate Triple Data Encryption Algorithm (Triple DES or 3DES) keys from your hsm1 CloudHSM cluster to a new hsm2 cluster running in non-FIPS mode, without using backups.
CloudHSM and 3DES keys
On January 1, 2024, the National Institute of Standards and Technology (NIST) withdrew Special Publication 800-67 Revision 2. This means that 3DES is no longer a FIPS-approved block cipher for applying cryptographic protection (that is, encryption, key wrapping, and generation of Message Authentication Codes (MACs)).
For customers that use 3DES keys in their workloads for applying cryptographic protection, AWS recommends that you do the following:
Migrate your 3DES workloads to Advanced Encryption Standard (AES), which is a FIPS-approved, modern symmetric block cipher
If you use 3DES for payment processing, consider migrating your workloads to the AWS Payment Cryptography service
However, if migrating to a different encryption algorithm or cryptography service isn’t feasible and you intend to continue to use 3DES, you can use an hsm2 cluster running in non-FIPS mode to manage your 3DES keys and take advantage of the new hsm2 benefits.
Note that moving to a non-FIPS CloudHSM cluster might change your compliance posture. If a regulatory standard or certification requires you to run FIPS-compliant cryptographic modules, this move might impact you. When you create a non-FIPS cluster, the underlying FIPS-certified HSM will be configured to run in non-FIPS mode. Give careful consideration to these issues before you move to a non-FIPS CloudHSM cluster. For details on what certification and compliance requirements apply to hsm1 and hsm2, see AWS CloudHSM cluster modes and HSM types.
Normally you can migrate keys from an existing CloudHSM cluster to a new one by creating the new cluster from an existing backup. But you cannot migrate keys to a non-FIPS hsm2 cluster by using an hsm1 cluster backup. This is because CloudHSM doesn’t allow you to change compliance modes from FIPS to non-FIPS. However, there is an alternate way to migrate keys between CloudHSM clusters without using backups. In the following solution guidance, I show you how to use an RSA-AES wrap mechanism to migrate keys without exposing the key material in plaintext outside the CloudHSM boundaries. The RSA-AES mechanism provides the benefit of migrating large-sized keys while avoiding the payload size limitation typically associated with asymmetric RSA key pairs.
Solution overview
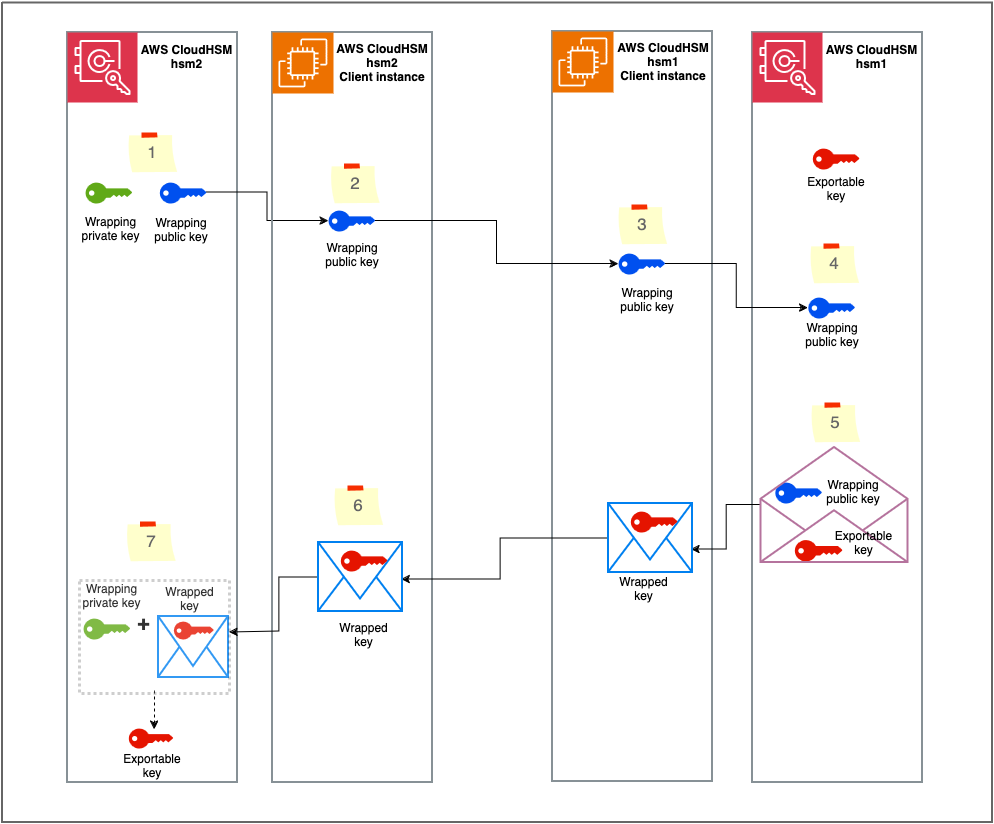
The solution uses CloudHSM CLI to run the key migration commands against the source and target CloudHSM clusters. Figure 1 provides a summary of the steps involved in the solution.
Figure 1: Solution overview
The workflow is as follows:
Generate the RSA wrapping key pair on CloudHSM hsm2.
Export the RSA public key to the hsm2 CloudHSM client instance.
Move the RSA public key to the CloudHSM hsm1 client instance.
Import the RSA public key into CloudHSM hsm1.
Wrap the designated key using the imported RSA public key.
Move the wrapped key to the CloudHSM hsm2 client instance.
Unwrap the key into CloudHSM hsm2 with the RSA private key.
Although the steps in this post are specific to CloudHSM CLI, the same procedure can be used with other CloudHSM SDKs such as the Java Cryptographic Extension (JCE) and the PKCS #11 library. With JCE, the RSAWrappingRunner example code demonstrates how to wrap and unwrap keys by using the RSA-AES mechanism. Similarly, with PKCS #11, the rsa_wrapping.c example code demonstrates how to wrap and unwrap keys by using RSA-AES.
Important considerations
There are a few important things that you need to keep in mind when migrating cryptographic keys:
Exportable keys – This solution only works for exportable keys (keys with the attribute extractable set to “true”). If non-extractable keys need to be migrated, you must rotate them: Generate a new key on the CloudHSM hsm2 cluster, use the old key from hsm1 to decrypt the data, and then use the new key in hsm2 to re-encrypt the data. If possible, use advanced keys like AES for re-encryption.
Key ownership – When a key is migrated to a new cluster, the crypto user who unwraps the key becomes the key owner. You need to have a plan to make sure the appropriate crypto users are migrating keys and the applications that rely on those keys are updated with the right crypto user credentials. You can also share the unwrapped keys with the appropriate crypto users after migration. This helps to prevent the availability of your applications from being impacted due to the key migration. You can use one of the following strategies to manage key ownership during migration:
The recommended strategy is to first create the required crypto users in the hsm2 cluster by using CloudHSM CLI and then use each user to migrate the required keys they currently own in hsm1. You can either create separate wrapping key pairs per crypto user or have one wrapping key pair that is shared with required crypto users to migrate their keys.
Another strategy is to employ one crypto user to migrate the required keys and then share the migrated keys with the appropriate crypto users after migration. Note that shared keys have limitations such that the recipient crypto user cannot modify or share the key.
Key attributes – When a key is migrated, only the attributes that are specified during the unwrap operation are set on the key. Make sure to identify the key attributes from hsm1 and set them on the key when unwrapping to hsm2. Note that some attributes like extractable can only be set while the key is being created or unwrapped, but that others can be set after creation by using the key set-attribute See Key attributes for CloudHSM CLI for a list of attributes and when can they be set. You can use the CloudHSM CLI key list command with the verbose argument to list keys owned by a crypto user, along with the attributes of those keys. Additionally, you can use unwrap templates to specify attributes that must be set while unwrapping. Note that this feature is only supported by the PKCS #11 SDK.
HSM backup – It is recommended to keep a backup of hsm1 until you have confirmed that all the required keys have been migrated to hsm2. You can configure a CloudHSM backup retention policy to manage backups. Note that CloudHSM doesn’t delete a cluster’s last backup. See Configuring AWS CloudHSM backup retention policy for more information. You can also share the CloudHSM backups with other AWS accounts as described in Working with shared backups.
Prerequisites
You need to have the following prerequisites in place to implement the solution:
An active CloudHSM hsm1 cluster with at least one active HSM.
The credentials of crypto users in hsm1 who are the owners of the keys that need to be migrated.
An active CloudHSM hsm2 cluster with at least one active HSM and a valid crypto user As I mentioned in the Key ownership notes, make sure to create crypto users in hsm2 who will own the migrated keys.
A second EC2 instance with CloudHSM CLI installed and configured to connect to the hsm2 cluster. For instructions on how to configure and connect the client instance, see Getting started with AWS CloudHSM.
A list of exportable keys with their attributes that you want to migrate from hsm1. You can use the key list command with the verbose argument to list the keys owned by a crypto user. The output will contain the key attributes, including label, extractable, and key-type. You can also pass the filter argument to the command to list specific keys based on label or key-type, such as 3des. The CloudHSM CLI command to list 3DES keys with their attributes is as follows:
key list --filter attr.key-type=3des --verbose
As I mentioned in the Key attributes note, some attributes like extractable can only be set while the key is being created or unwrapped, but others can be set after creation using the key set-attribute command.
Note the following:
You can configure CloudHSM CLI to connect to multiple clusters. You can use a single EC2 instance with CloudHSM CLI to migrate keys from one cluster to another, provided that you can set up a network path to both clusters from the client instance.
You can run CloudHSM CLI commands using a bash script or similar by running the commands in interactive mode.
Step 1: Generate the RSA wrapping key pair on hsm2
The first step in the solution is to create a wrapping key pair on your new CloudHSM hsm2 cluster by using CloudHSM CLI. The public key from the key pair will be used to wrap and the private key to unwrap. Label the key pair accordingly and note down the labels.
Note: As mentioned in the Key ownership notes, choose an appropriate strategy to migrate the keys. The crypto user who generates the wrapping key pair in this step or with whom this key pair is shared will be required to unwrap the key in the final step.
Run the following key generate-asymmetric-pair rsa command to create an RSA key pair. Make sure to replace <rsa_wrapping_key_label> and <rsa_unwrapping_key_label> with your own labels for the public and private key that are being generated. Note down the public and private key labels because this data is required in the following steps.
Step 2: Export the RSA public key to the hsm2 client instance
In this step, you export the RSA public key from hsm2 to the EC2 instance file system.
To export the RSA public key to the hsm2 client instance:
Run the following key generate-file command to export the RSA public key you created in the previous step. Make sure to replace <file_path> and <rsa_wrapping_key_label> with your own data. You noted down the public key label in the previous step. The exported RSA public key bytes are written in PEM format into the <file_path> you provide.
Step 3: Move the RSA public key to the hsm1 client instance
Now you need to copy the exported public key PEM file from the hsm2 client instance to the hsm1 client instance. You can use your enterprise file transfer solution or secure copy protocol (SCP). However, if you’ve configured CloudHSM CLI to connect to both hsm1 and hsm2 clusters by using the connect to multiple clusters feature, you can skip this step.
Step 4: Import the RSA public key to hsm1
In this step, you import the RSA public key that was copied to the hsm1 client instance into the hsm1 cluster.
On the hsm1 client instance, sign in to CloudHSM CLI as a crypto user. Run the following key import pem command to import the public key. Replace the <file_path> and <rsa_wrapping_key_label> with your own values for the public key PEM file path and label, respectively.
Step 5: Wrap the key using the imported RSA public key
In this step, you wrap the key that you have identified as part of the prerequisites from hsm1. Note that only the crypto user who owns the key can wrap it out. Therefore, you need to sign in to CloudHSM CLI on hsm1 as that crypto user.
Run the following key wrap rsa-aes command to wrap the key out. Make sure to replace <exportable_key_label> and <rsa_wrapping_key_label> with your own values for the label of the key being wrapped out and the wrapping RSA public key, respectively.
The wrapped key data, in binary format, is saved on the file system at the file path specified in the --path argument. Note down the key type of the wrapped key. This value will be required in step 7 while unwrapping.
Step 6: Move the wrapped key to the hsm2 client instance
Copy the wrapped binary key from the hsm1 client instance to the hsm2 client instance using the same method that you used in Step 3. Note down the file path to the copied file.
Step 7: Unwrap the wrapped key to the hsm2 cluster using the RSA private key
In this step, you unwrap the wrapped key into hsm2 using the RSA private key associated with the RSA public key that was used to wrap the key. You noted down the RSA private key label in Step 1 and the key type in Step 5. There are some important points to keep in mind before unwrapping:
The crypto user who created the wrapping key pair in step 1, or with whom the wrapping key pair is shared, must sign in to CloudHSM CLI to run the unwrap command.
As mentioned in the prerequisites section, some of the key attributes can only be set during creation. Make sure you have a list of attributes that you want to set on the key.
Run the following key unwrap rsa-aes command to unwrap the key into hsm2. Make sure to replace these command arguments with your own values:
<key_type_of_wrapped_key>: The key type of the wrapped key, for example, AES, 3DES.
<label_of_unwrapped_key>: The label for the new unwrapped key. Choose an appropriate label to identify the key.
<rsa_unwrapping_key_label>: The RSA private key label from step 1.
<path_to_the_wrapped_binary_file>: The path to the wrapped key binary file from Step 6.
<list_of_attributes_for_unwrapped>: A space-separated list of key attributes in the form KEY_ATTRIBUTE_NAME=KEY_ATTRIBUTE_VALUE for the unwrapped key. This is optional.
(Optional) Step 8: Update the attributes of the unwrapped key
If you didn’t set all the required attributes while unwrapping the key, you can update the key attributes key now by using the key set-attribute command.
Test whether your 3DES key was migrated successfully
In symmetric cryptography, the same key is used for encryption and decryption. 3DES is a symmetric key algorithm. To verify that your migrated 3DES key functions the same in hsm2, you can do the following test:
Encrypt a simple message by using the 3DES key in hsm1 to create ciphertext
Decrypt the ciphertext by using the migrated 3DES key in hsm2 to obtain plaintext
The decrypted plaintext should match the original message.
You can use the CloudHSM JCE or PKCS #11 SDKs to run the test. With JCE, the DESedeECBEncryptDecryptRunner example code demonstrates how to encrypt and decrypt using a 3DES key. Similarly, for PKCS #11, the des_ecb.c example code demonstrates how to encrypt and decrypt using a 3DES key.
Conclusion
In this blog post, you learned how to migrate cryptographic keys from a CloudHSM hsm1 cluster to an hsm2 cluster by using CloudHSM CLI. We recommend that you migrate keys using a backup whenever possible, but you can use the approach described in this post in cases where using a backup isn’t possible.
Although this post focused on migrating keys between CloudHSM hsm1 and hsm2, you can use the same methodology to migrate keys between many AWS CloudHSM cluster pairs. The methodology can also be extended to other CloudHSM SDKs, like JCE and PKCS #11, to automate the migration process.
To migrate keys from on-premises or other non AWS HSMs to AWS CloudHSM, you can also apply the same principle of wrap and unwrap.
If you have feedback about this post, submit comments in the Comments section below. If you have questions about this post, contact AWS Support.
Today, we’re pleased to offer startups up to $250,000 in credits to use on Cloudflare’s Developer Platform. This new credits system will allow you to clearly see usage and associated fees to plan for a predictable future after the $250,000 in credits have been used up or after one year, whichever happens first.
You can see eligibility criteria and apply to the start-up program here.
What can you use the credits for?
Credits can be applied to all Developer Platform products, as well as Argo and Cache Reserve. Moreover, we provide participants with up to three Enterprise-level domains, which includes CDN, DDoS, DNS, WAF, Zero Trust, and other security and performance products that a participant can enable for their website.
Developer tools and building on Cloudflare
You can use credits for Cloudflare Developer Platform products, including those listed in the table below.
Note: credits for the Cloudflare Startup Program apply to Cloudflare products only, this table is illustrative of similar products in the market.
Speed and performance with Cloudflare
We know that founders need all the help they can get when starting their businesses. Beyond the Developer Platform, you can also use the Startup Program for our speed and performance products. Getting customers where they need to go within milliseconds on your website or application is the difference between closing a sale or not. You can test your speed here and learn how to optimize your speed and performance here with solutions like: Images, Argo, and Early Hints.
Security from Cloudflare
But, wait, there’s more: beyond the Developer Platform products and speed tools, you can also use Cloudflare’s many security features through the Startup Program as well. These include Web Application Firewall (WAF), DDoS Alerts, bundled protection plans, and more. The Startup Program also includes Zero Trust solutions. Learn how others are securing their technology and tools with Cloudflare Zero Trust.
For more inspiration, check out our Built with Cloudflare site, which highlights what other startups are building.
Who can use the credits?
Eligibility criteria can be found here and include:
Companies building a software-based product or service
Founded within the last 5 years (2019-2024)
Have between $50,000 - $5,000,000 in funding
Note that for startups who have not yet raised at least $50,000, there may be other opportunities for lower credit amounts. Please apply with the promo code “BOOTSTRAPPED” if you haven’t raised $50,000 yet, but are interested in the Cloudflare Startup Program
Have a LinkedIn profile, valid website, and email address
Bonus criteria that adds to your application: being part of an approved accelerator
What will you build?
We’re excited to see what you will build. Please share what you’re up to with us so that we can help you however it makes sense. If you’re actively using Cloudflare’s Developer Platform, we’d love to hear more about what you’re building and share it on our Built with Cloudflare site.
Are you a startup looking for additional support, resources, or access to funding? Apply for our Workers Launchpad Program! The program runs for a few months, and in addition to the Startup Program, participants get access to hands-on bootcamp sessions, Solutions Architect office hours, introductions to VCs, and the opportunity to present at Demo Day.
Why does Cloudflare support founders and startups?
Founders and developers face enough challenges without having to worry about incurring egregious costs to test technology and start building in the earliest days. You have the world at your fingertips and should be empowered to build and create without limitations. Invest money in your innovation, not in the infrastructure and technology that supports it.
The Startup Program understands this founder experience deeply, as the team is made up of former founders. Cloudflare is committed to programs like this to empower founders building the next big thing. Offering up to $250,000 in credits will allow folks to leverage even more of what we have to offer: a developer experience that removes friction, saves money, and gets applications spun up in hours, not days.
We want to support founders from everywhere on earth.
Birthday Week 2024 marks our first anniversary of Cloudflare’s AI developer products — Workers AI, AI Gateway, and Vectorize. For our first birthday this year, we’re excited to announce powerful new features to elevate the way you build with AI on Cloudflare.
Workers AI is getting a big upgrade, with more powerful GPUs that enable faster inference and bigger models. We’re also expanding our model catalog to be able to dynamically support models that you want to run on us. Finally, we’re saying goodbye to neurons and revamping our pricing model to be simpler and cheaper. On AI Gateway, we’re moving forward on our vision of becoming an ML Ops platform by introducing more powerful logs and human evaluations. Lastly, Vectorize is going GA, with expanded index sizes and faster queries.
Whether you want the fastest inference at the edge, optimized AI workflows, or vector database-powered RAG, we’re excited to help you harness the full potential of AI and get started on building with Cloudflare.
The fast, global AI platform
The first thing that you notice about an application is how fast, or in many cases, how slow it is. This is especially true of AI applications, where the standard today is to wait for a response to be generated.
At Cloudflare, we’re obsessed with improving the performance of applications, and have been doubling down on our commitment to make AI fast. To live up to that commitment, we’re excited to announce that we’ve added even more powerful GPUs across our network to accelerate LLM performance.
In addition to more powerful GPUs, we’ve continued to expand our GPU footprint to get as close to the user as possible, reducing latency even further. Today, we have GPUs in over 180 cities, having doubled our capacity in a year.
Bigger, better, faster
With the introduction of our new, more powerful GPUs, you can now run inference on significantly larger models, including Meta Llama 3.1 70B. Previously, our model catalog was limited to 8B parameter LLMs, but we can now support larger models, faster response times, and larger context windows. This means your applications can handle more complex tasks with greater efficiency.
Model
@cf/meta/Llama-3.2-11B-Vision-Instruct
@cf/meta/Llama-3.2-1B-Instruct
@cf/meta/Llama-3.2-3B-Instruct
@cf/meta/Llama-3.1-8B-Instruct
@cf/meta/Llama-3.1-70B-Instruct
@cf/black-forest-labs/flux-1-schnell
The set of models above are available on our new GPUs at faster speeds. If you’re using Llama 3.1, we’ve already upgraded you to the faster inference – so your applications are automatically sped up! In general, you can expect throughput of 80+ Tokens per Second (TPS) for 8b models and a Time To First Token of 300 ms (depending on where you are in the world).
Our model instances now support larger context windows, like the full 128K context window for Llama 3.1 and 3.2. To give you full visibility into performance, we’ll also be publishing metrics like TTFT, TPS, Context Window, and pricing on models in our catalog, so you know exactly what to expect.
We’re committed to bringing the best of open-source models to our platform, and that includes Meta’s release of the new Llama 3.2 collection of models. As a Meta launch partner, we were excited to have Day 0 support for the 11B vision model, as well as the 1B and 3B text-only model on Workers AI.
For more details on how we made Workers AI fast, take a look at our technical blog post, where we share a novel method for KV cache compression (it’s open-source!), as well as details on speculative decoding, our new hardware design, and more.
Greater model flexibility
With our commitment to helping you run more powerful models faster, we are also expanding the breadth of models you can run on Workers AI with our Run Any* Model feature. Until now, we have manually curated and added only the most popular open source models to Workers AI. Now, we are opening up our catalog to the public, giving you the flexibility to choose from a broader selection of models. We will support models that are compatible with our GPUs and inference stack at the start (hence the asterisk on Run Any* Model). We’re launching this feature in closed beta and if you’d like to try it out, please fill out the form, so we can grant you access to this new feature.
The Workers AI model catalog will now be split into two parts: a static catalog and a dynamic catalog. Models in the static catalog will remain curated by Cloudflare and will include the most popular open source models with guarantees on availability and speed (the models listed above). These models will always be kept warm in our network, ensuring you don’t experience cold starts. The usage and pricing model remains serverless, where you will only be charged for the requests to the model and not the cold start times.
Models that are launched via Run Any* Model will make up the dynamic catalog. If the model is public, users can share an instance of that model. In the future, we will allow users to launch private instances of models as well.
This is just the first step towards running your own custom or private models on Workers AI. While we have already been supporting private models for select customers, we are working on making this capacity available to everyone in the near future.
New Workers AI pricing
We launched Workers AI during Birthday Week 2023 with the concept of “neurons” for pricing. Neurons were intended to simplify the unit of measure across various models on our platform, including text, image, audio, and more. However, over the past year, we have listened to your feedback and heard that neurons were difficult to grasp and challenging to compare with other providers. Additionally, the industry has matured, and new pricing standards have materialized. As such, we’re excited to announce that we will be moving towards unit-based pricing and saying goodbye to neurons.
Moving forward, Workers AI will be priced based on model task, size, and units. LLMs will be priced based on the model size (parameters) and input/output tokens. Image generation models will be priced based on the output image resolution and the number of steps. Embeddings models will be priced based on input tokens. Speech-to-text models will be priced on seconds of audio input.
Model Task
Units
Model Size
Pricing
LLMs (incl. Vision models)
Tokens in/out (blended)
<= 3B parameters
$0.10 per Million Tokens
3.1B – 8B
$0.15 per Million Tokens
8.1B – 20B
$0.20 per Million Tokens
20.1B – 40B
$0.50 per Million Tokens
40.1B+
$0.75 per Million Tokens
Embeddings
Tokens in
<= 150M parameters
$0.008 per Million Tokens
151M+ parameters
$0.015 per Million Tokens
Speech-to-text
Audio seconds in
N/A
$0.0039 per minute of audio input
Image Size
Model Type
Steps
Price
<=256×256
Standard
25
$0.00125 per 25 steps
Fast
5
$0.00025 per 5 steps
<=512×512
Standard
25
$0.0025 per 25 steps
Fast
5
$0.0005 per 5 steps
<=1024×1024
Standard
25
$0.005 per 25 steps
Fast
5
$0.001 per 5 steps
<=2048×2048
Standard
25
$0.01 per 25 steps
Fast
5
$0.002 per 5 steps
We paused graduating models and announcing pricing for beta models over the past few months as we prepared for this new pricing change. We’ll be graduating all models to this new pricing, and billing will take effect on October 1, 2024.
Our free tier has been redone to fit these new metrics, and will include a monthly allotment of usage across all the task types.
Model
Free tier size
Text Generation – LLM
10,000 tokens a day across any model size
Embeddings
10,000 tokens a day across any model size
Images
Sum of 250 steps, up to 1024×1024 resolution
Whisper
10 minutes of audio a day
Optimizing AI workflows with AI Gateway
AI Gateway is designed to help developers and organizations building AI applications better monitor, control, and optimize their AI usage, and thanks to our users, AI Gateway has reached an incredible milestone — over 2 billion requests proxied by September 2024, less than a year after its inception. But we are not stopping there.
Persistent logs (open beta)
Persistent logs allow developers to store and analyze user prompts and model responses for extended periods, up to 10 million logs per gateway. Each request made through AI Gateway will create a log. With a log, you can see details of a request, including timestamp, request status, model, and provider.
We have revamped our logging interface to offer more detailed insights, including cost and duration. Users can now annotate logs with human feedback using thumbs up and thumbs down. Lastly, you can now filter, search, and tag logs with custom metadata to further streamline analysis directly within AI Gateway.
Persistent logs are available to use on all plans, with a free allocation for both free and paid plans. On the Workers Free plan, users can store up to 100,000 logs total across all gateways at no charge. For those needing more storage, upgrading to the Workers Paid plan will give you a higher free allocation — 200,000 logs stored total. Any additional logs beyond those limits will be available at $8 per 100,000 logs stored per month, giving you the flexibility to store logs for your preferred duration and do more with valuable data. Billing for this feature will be implemented when the feature reaches General Availability, and we’ll provide plenty of advance notice.
Workers Free
Workers Paid
Enterprise
Included Volume
100,000 logs stored (total)
200,000 logs stored (total)
Additional Logs
N/A
$8 per 100,000 logs stored per month
Export logs with Logpush
For users looking to export their logs, AI Gateway now supports log export via Logpush. With Logpush, you can automatically push logs out of AI Gateway into your preferred storage provider, including Cloudflare R2, Amazon S3, Google Cloud Storage, and more. This can be especially useful for compliance or advanced analysis outside the platform. Logpush follows its existing pricing model and will be available to all users on a paid plan.
AI evaluations
We are also taking our first step towards comprehensive AI evaluations, starting with evaluation using human in the loop feedback (this is now in open beta). Users can create datasets from logs to score and evaluate model performance, speed, and cost, initially focused on LLMs. Evaluations will allow developers to gain a better understanding of how their application is performing, ensuring better accuracy, reliability, and customer satisfaction. We’ve added support for cost analysis across many new models and providers to enable developers to make informed decisions, including the ability to add custom costs. Future enhancements will include automated scoring using LLMs, comparing performance of multiple models, and prompt evaluations, helping developers make decisions on what is best for their use case and ensuring their applications are both efficient and cost-effective.
Vectorize GA
We’ve completely redesigned Vectorize since our initial announcement in 2023 to better serve customer needs. Vectorize (v2) now supports indexes of up to 5 million vectors (up from 200,000), delivers faster queries (median latency is down 95% from 500 ms to 30 ms), and returns up to 100 results per query (increased from 20). These improvements significantly enhance Vectorize’s capacity, speed, and depth of results.
Note: if you got started on Vectorize before GA, to ease the move from v1 to v2, a migration solution will be available in early Q4 — stay tuned!
New Vectorize pricing
Not only have we improved performance and scalability, but we’ve also made Vectorize one of the most cost-effective options on the market. We’ve reduced query prices by 75% and storage costs by 98%.
New Vectorize pricing
Old Vectorize pricing
Price reduction
Writes
Free
Free
n/a
Query
$.01 per 1 million vector dimensions
$0.04 per 1 million vector dimensions
75%
Storage
$0.05 per 100 million vector dimensions
$4.00 per 100 million vector dimensions
98%
You can learn more about our pricing in the Vectorize docs.
Vectorize free tier
There’s more good news: we’re introducing a free tier to Vectorize to make it easy to experiment with our full AI stack.
The free tier includes:
30 million queried vector dimensions / month
5 million stored vector dimensions / month
How fast is Vectorize?
To measure performance, we conducted benchmarking tests by executing a large number of vector similarity queries as quickly as possible. We measured both request latency and result precision. In this context, precision refers to the proportion of query results that match the known true-closest results for all benchmarked queries. This approach allows us to assess both the speed and accuracy of our vector similarity search capabilities. Here are the following datasets we benchmarked on:
Laion-768-5m-ip: 5 million vectors, 768 dimensions, queried with cosine similarity at a top K of 10
We ran this again skipping the result-refinement pass to return approximate results faster
Benchmark dataset
P50 (ms)
P75 (ms)
P90 (ms)
P95 (ms)
Throughput (RPS)
Precision
dbpedia-openai-1M-1536-angular
31
56
159
380
343
95.4%
Laion-768-5m-ip
81.5
91.7
105
123
623
95.5%
Laion-768-5m-ip w/o refinement
14.7
19.3
24.3
27.3
698
78.9%
These benchmarks were conducted using a standard Vectorize v2 index, queried with a concurrency of 300 via a Cloudflare Worker binding. The reported latencies reflect those observed by the Worker binding querying the Vectorize index on warm caches, simulating the performance of an existing application with sustained usage.
Beyond Vectorize’s fast query speeds, we believe the combination of Vectorize and Workers AI offers an unbeatable solution for delivering optimal AI application experiences. By running Vectorize close to the source of inference and user interaction, rather than combining AI and vector database solutions across providers, we can significantly minimize end-to-end latency.
With these improvements, we’re excited to announce the general availability of the new Vectorize, which is more powerful, faster, and more cost-effective than ever before.
Tying it all together: the AI platform for all your inference needs
Over the past year, we’ve been committed to building powerful AI products that enable users to build on us. While we are making advancements on each of these individual products, our larger vision is to provide a seamless, integrated experience across our portfolio.
With Workers AI and AI Gateway, users can easily enable analytics, logging, caching, and rate limiting to their AI application by connecting to AI Gateway directly through a binding in the Workers AI request. We imagine a future where AI Gateway can not only help you create and save datasets to use for fine-tuning your own models with Workers AI, but also seamlessly redeploy them on the same platform. A great AI experience is not just about speed, but also accuracy. While Workers AI ensures fast performance, using it in combination with AI Gateway allows you to evaluate and optimize that performance by monitoring model accuracy and catching issues, like hallucinations or incorrect formats. With AI Gateway, users can test out whether switching to new models in the Workers AI model catalog will deliver more accurate performance and a better user experience.
In the future, we’ll also be working on tighter integrations between Vectorize and Workers AI, where you can automatically supply context or remember past conversations in an inference call. This cuts down on the orchestration needed to run a RAG application, where we can automatically help you make queries to vector databases.
If we put the three products together, we imagine a world where you can build AI apps with full observability (traces with AI Gateway) and see how the retrieval (Vectorize) and generation (Workers AI) components are working together, enabling you to diagnose issues and improve performance.
This Birthday Week, we’ve been focused on making sure our individual products are best-in-class, but we’re continuing to invest in building a holistic AI platform within our AI portfolio, but also with the larger Developer Platform Products. Our goal is to make sure that Cloudflare is the simplest, fastest, more powerful place for you to build full-stack AI experiences with all the batteries included.
We’re excited for you to try out all these new features! Take a look at our updated developer docs on how to get started and the Cloudflare dashboard to interact with your account.
The collective thoughts of the interwebz
Manage Consent
To provide the best experiences, we use technologies like cookies to store and/or access device information. Consenting to these technologies will allow us to process data such as browsing behavior or unique IDs on this site. Not consenting or withdrawing consent, may adversely affect certain features and functions.
Functional
Always active
The technical storage or access is strictly necessary for the legitimate purpose of enabling the use of a specific service explicitly requested by the subscriber or user, or for the sole purpose of carrying out the transmission of a communication over an electronic communications network.
Preferences
The technical storage or access is necessary for the legitimate purpose of storing preferences that are not requested by the subscriber or user.
Statistics
The technical storage or access that is used exclusively for statistical purposes.The technical storage or access that is used exclusively for anonymous statistical purposes. Without a subpoena, voluntary compliance on the part of your Internet Service Provider, or additional records from a third party, information stored or retrieved for this purpose alone cannot usually be used to identify you.
Marketing
The technical storage or access is required to create user profiles to send advertising, or to track the user on a website or across several websites for similar marketing purposes.


 Manjit Chakraborty is a Senior Solutions Architect at AWS. He is a Seasoned & Result driven professional with extensive experience in Financial domain having worked with customers on advising, designing, leading, and implementing core-business enterprise solutions across the globe. In his spare time, Manjit enjoys fishing, practicing martial arts and playing with his daughter.
 Neeraj Roy is a Principal Solutions Architect at AWS based out of London. He works with Global Financial Services customers to accelerate their AWS journey. In his spare time, he enjoys reading and spending time with his family.
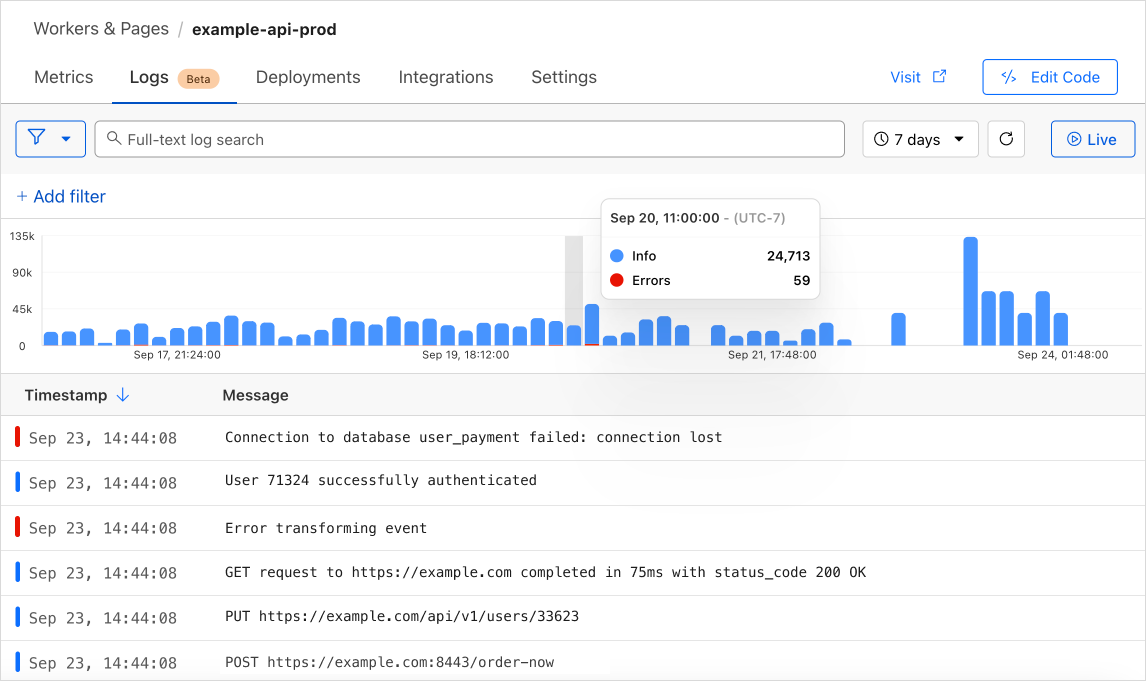
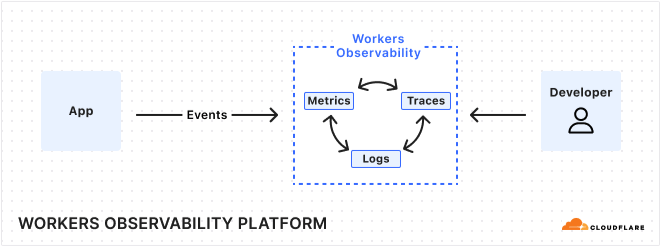
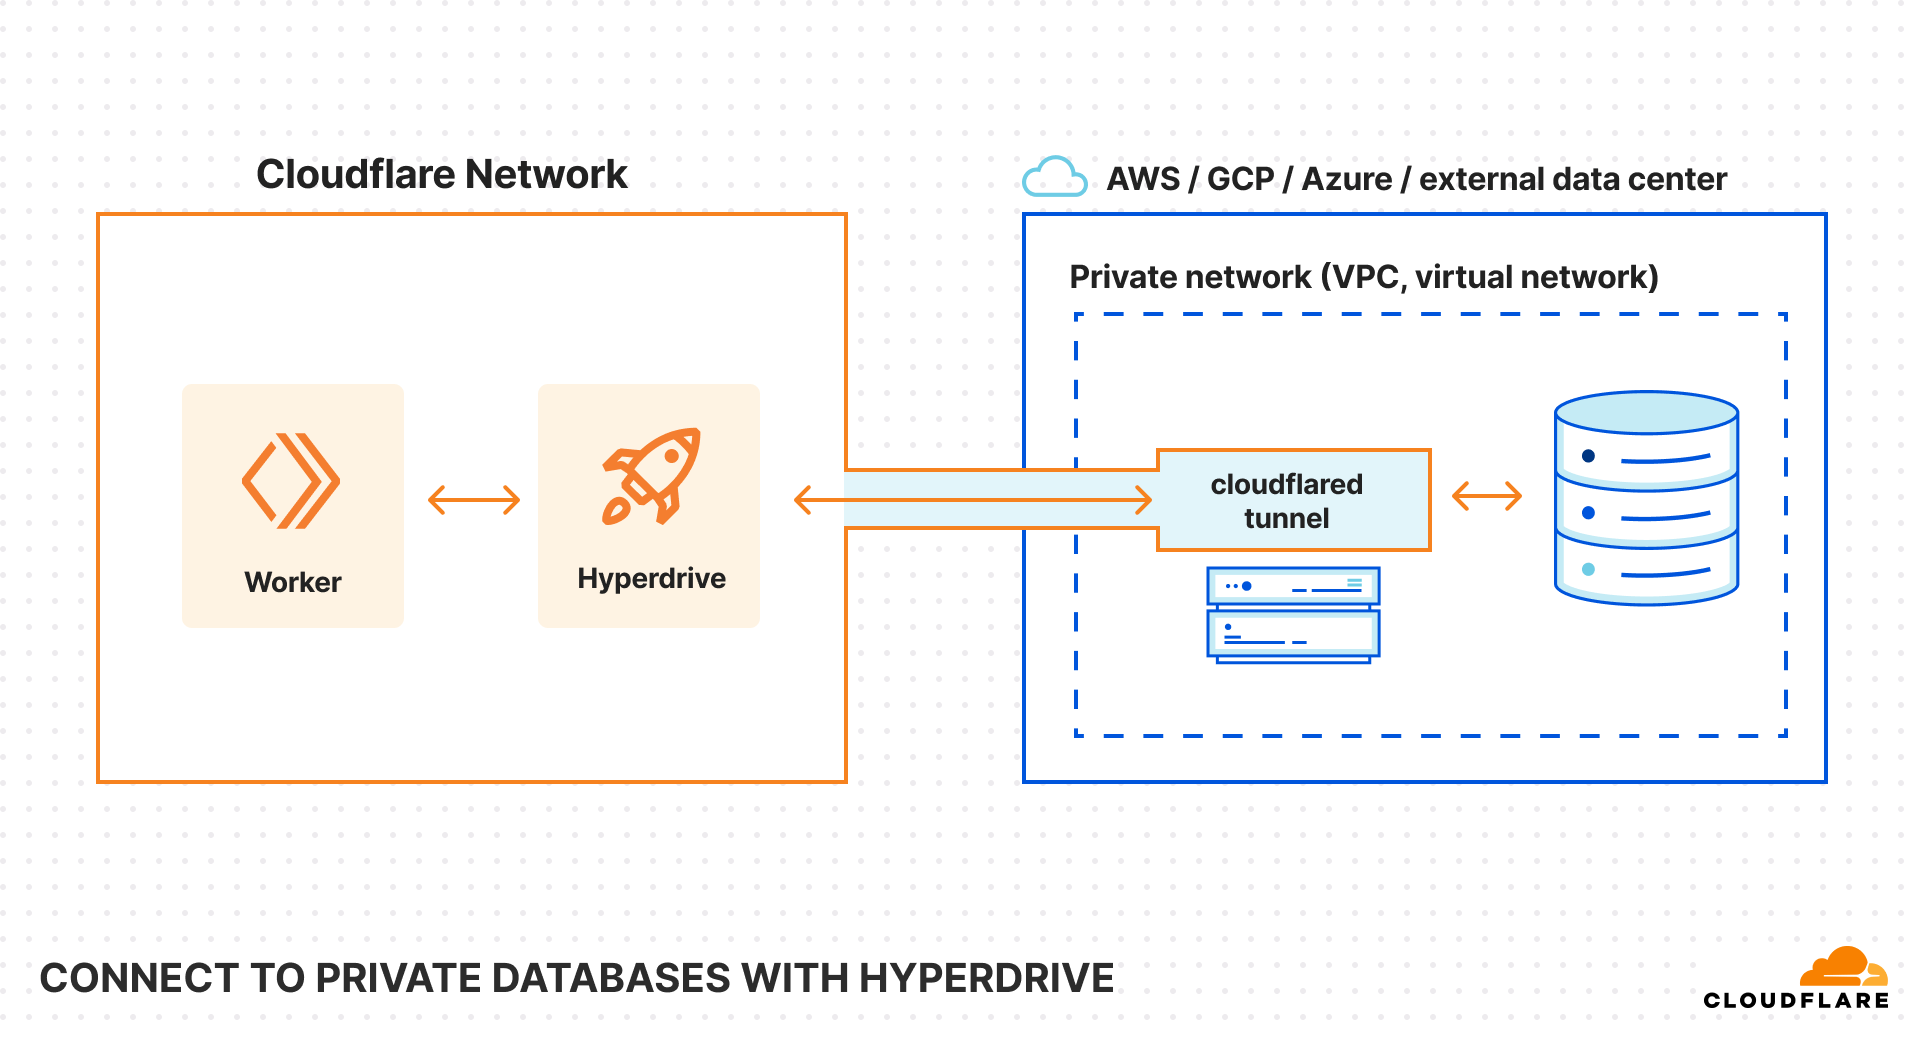
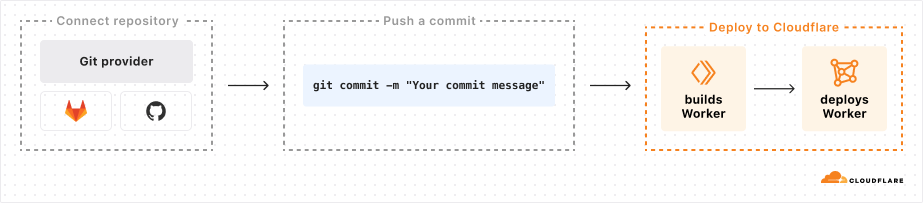
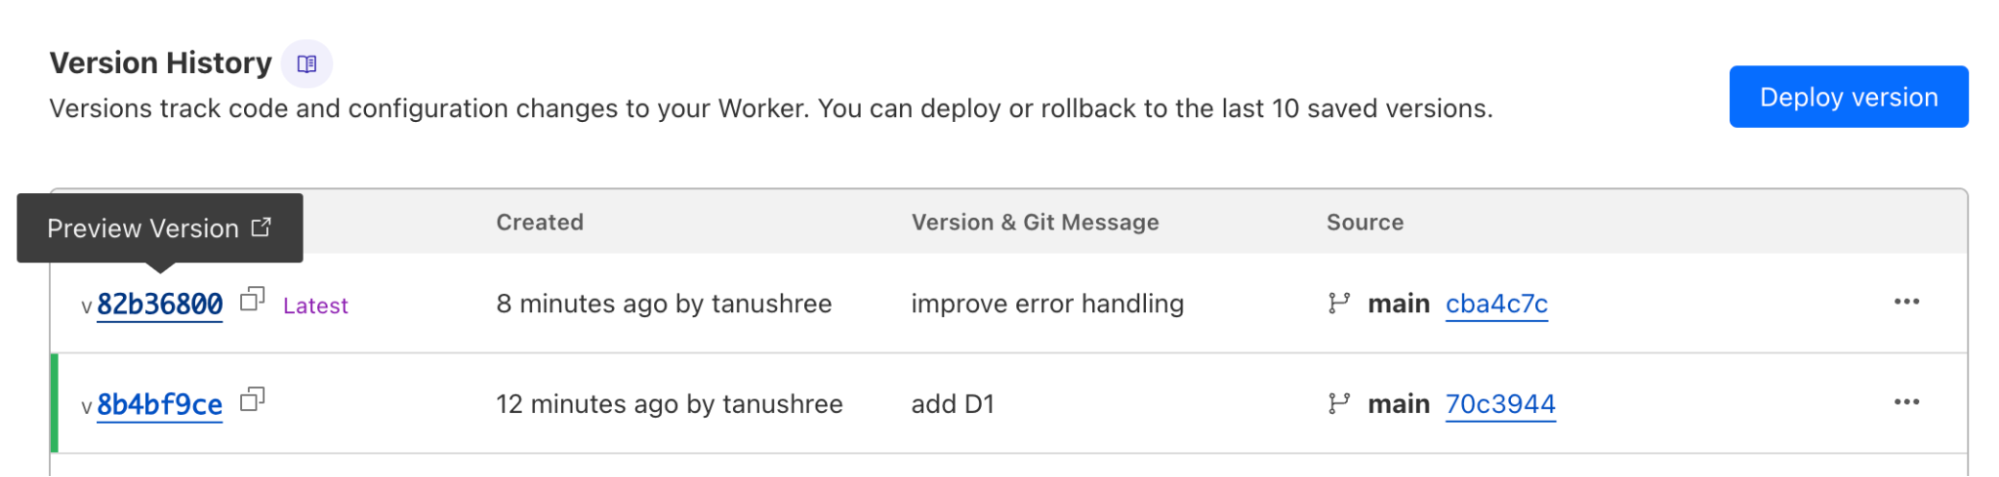
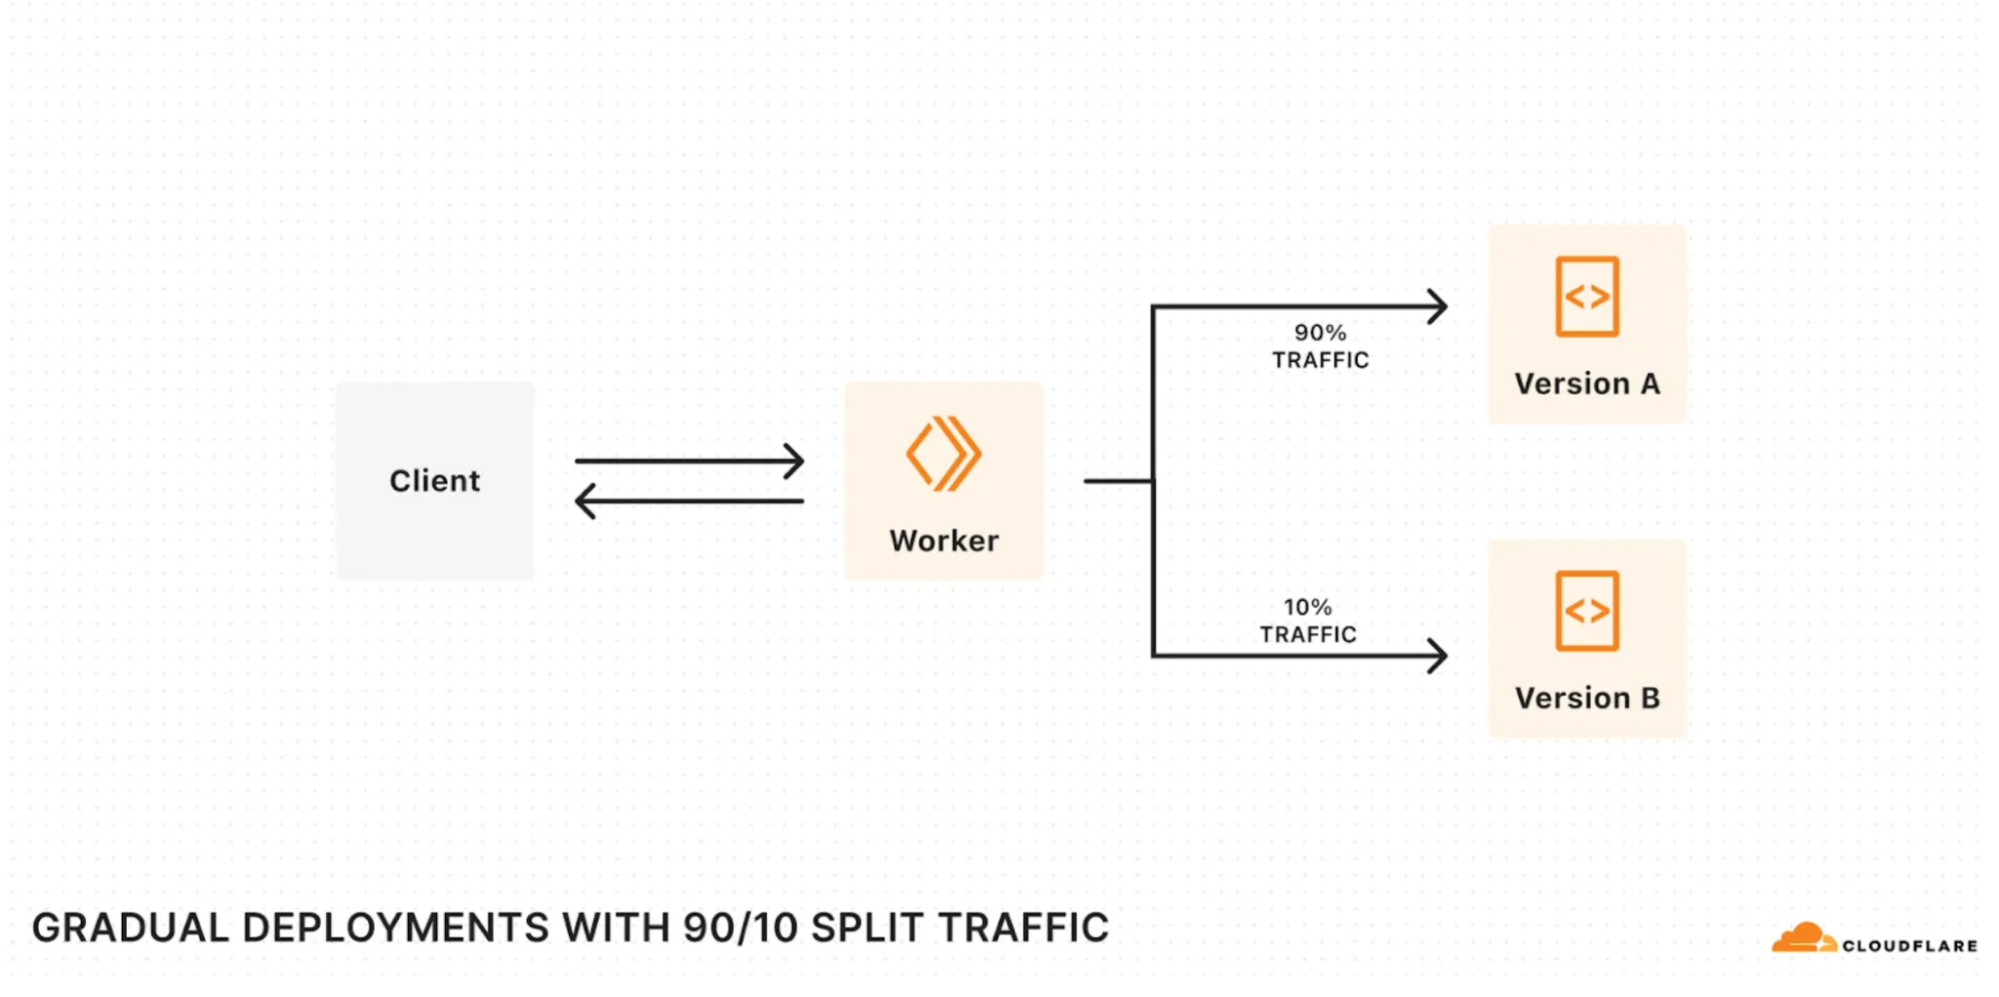
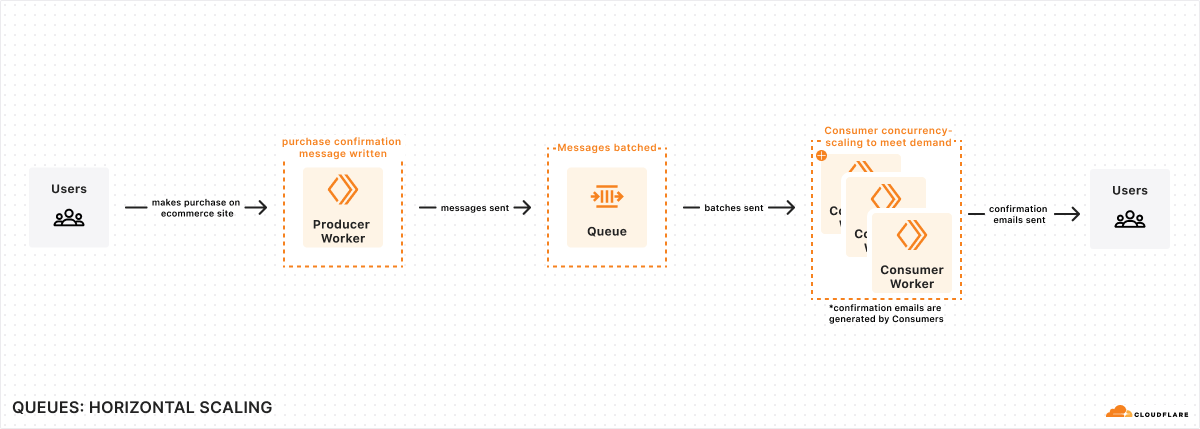
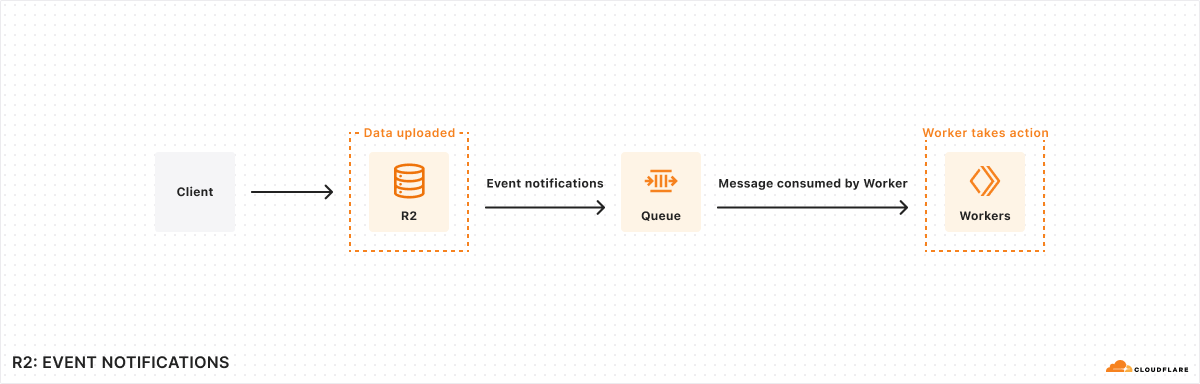
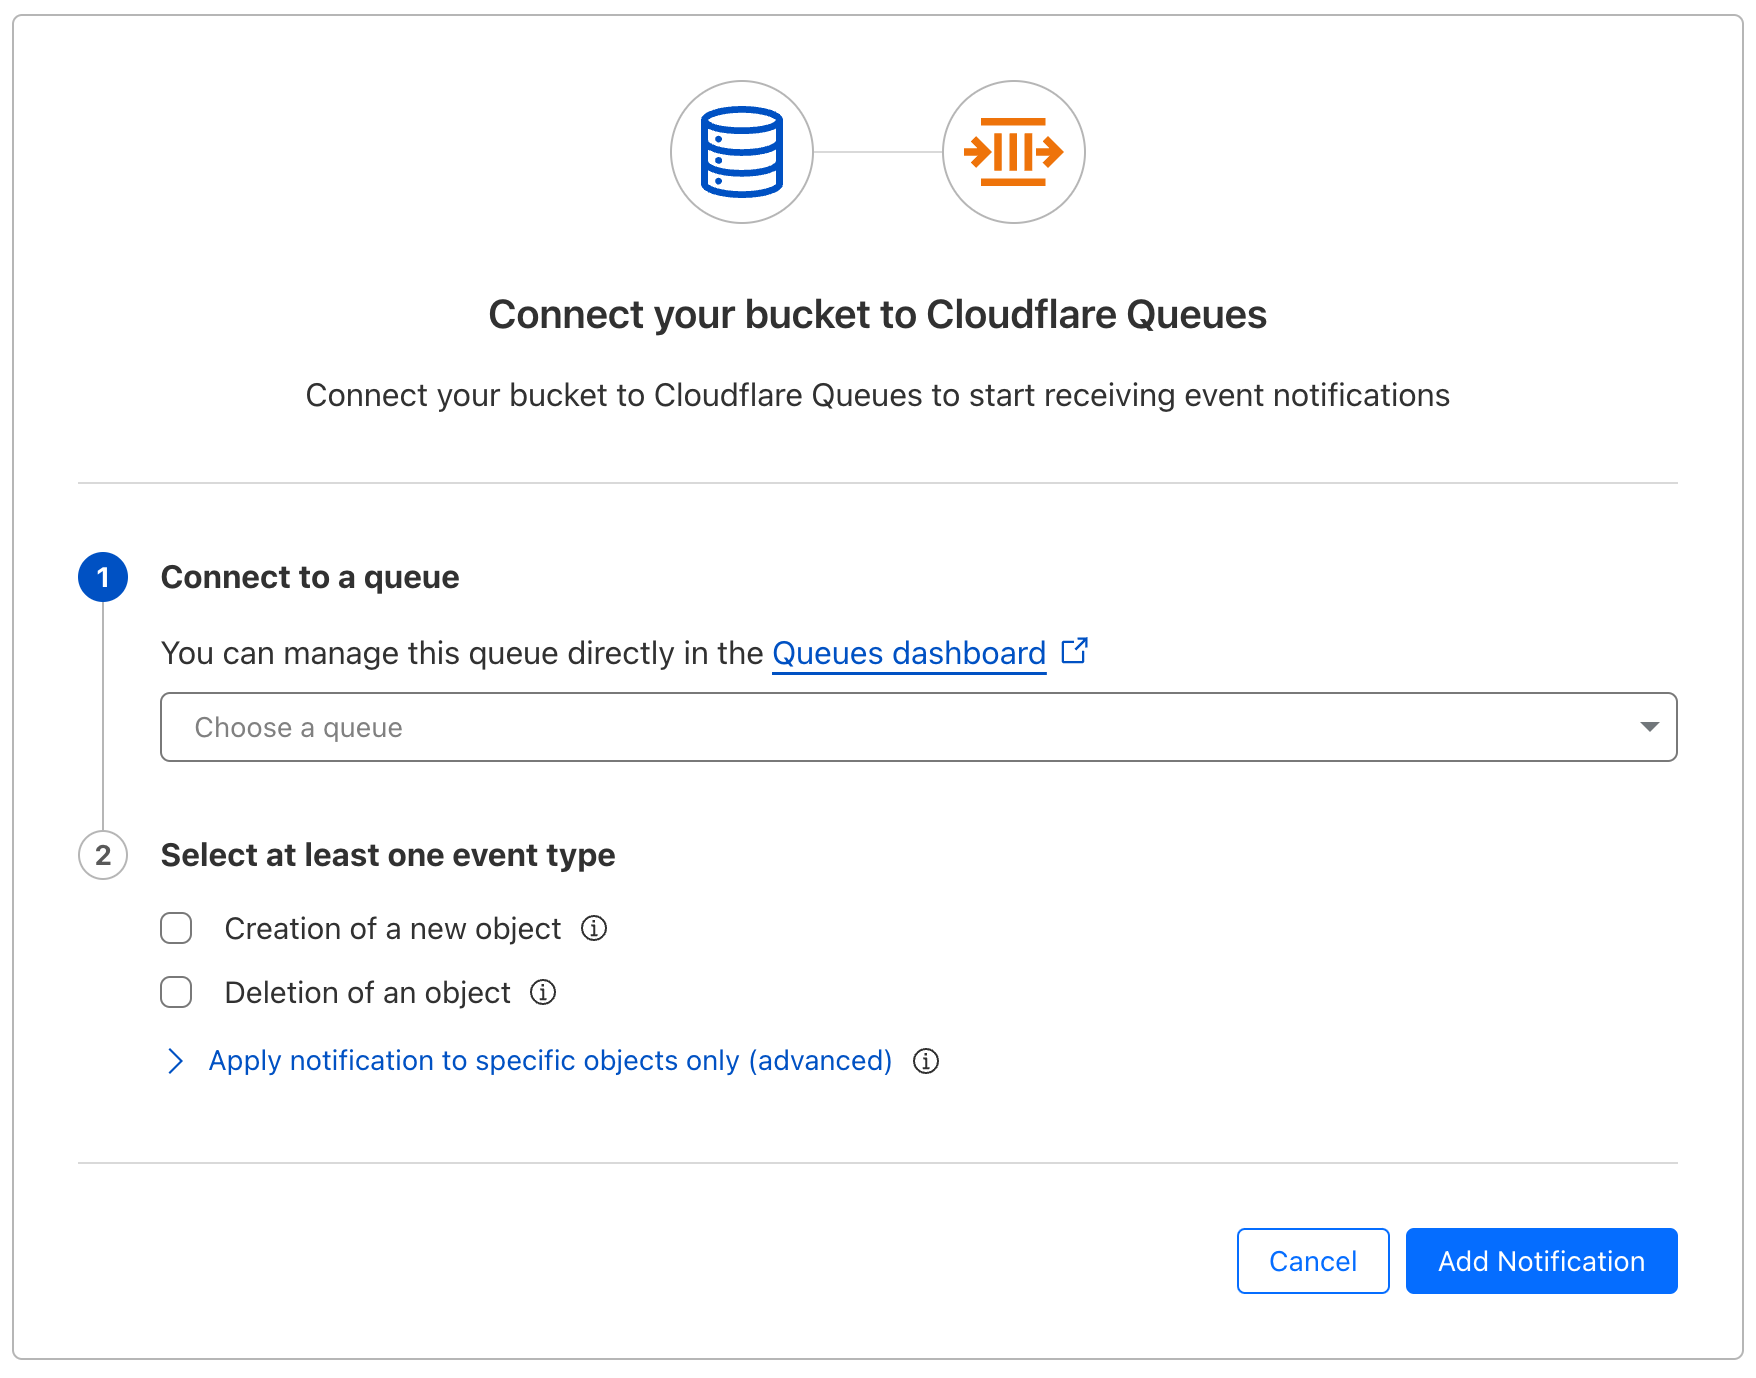
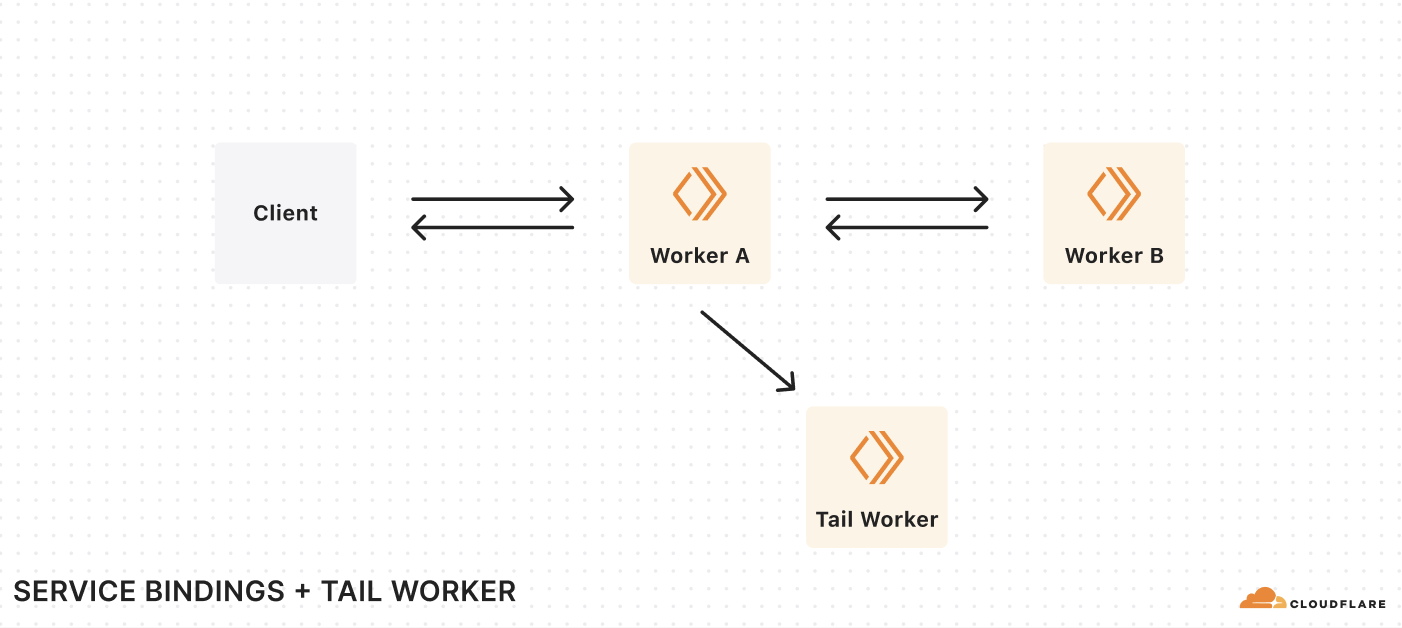
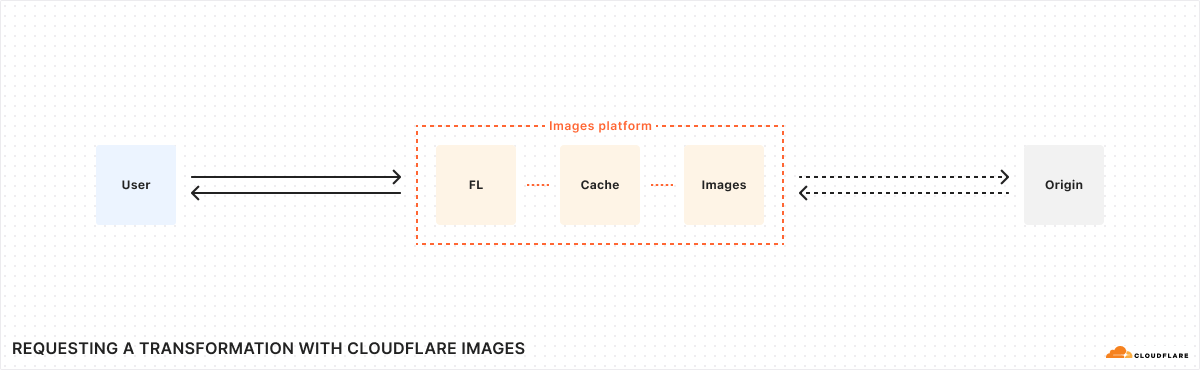


 Dave Horne is a Sr. Solutions Architect supporting Federal System Integrators at AWS. He is based in Washington, DC, and has 15 years of experience building, modernizing, and integrating systems for public sector customers. Outside of work, Dave enjoys playing with his kids, hiking, and watching Penn State football!
 Robert Kessler is a Solutions Architect at AWS supporting Federal Partners, with a recent focus on generative AI technologies. Previously, he worked in the satellite communications segment supporting operational infrastructure globally. Robert is an enthusiast of boats and sailing (despite not owning a vessel), and enjoys tackling house projects, playing with his kids, and spending time in the great outdoors.