Post Syndicated from The Atlantic original https://www.youtube.com/watch?v=IKoHjQNd4KA
Yearly Archives: 2024
Liane Moriarty Discusses Her New Book, Here One Moment, With Shirley Li | The Atlantic Festival 2024
Post Syndicated from The Atlantic original https://www.youtube.com/watch?v=IDgXJSifr-g
Director Lauren Greenfield Discusses Her New Docuseries, Social Studies | The Atlantic Festival 2024
Post Syndicated from The Atlantic original https://www.youtube.com/watch?v=cCC9CTIVx50
Kate Winslet & Ellen Kuras Discuss Their New Film, Lee, With Shirley Li | The Atlantic Festival 2024
Post Syndicated from The Atlantic original https://www.youtube.com/watch?v=r1mWkeTEeu4
Timothy Snyder Discusses His New Book, On Freedom, With Gal Beckerman | The Atlantic Festival 2024
Post Syndicated from The Atlantic original https://www.youtube.com/watch?v=QznmxnealsE
Introducing Llama 3.2 models from Meta in Amazon Bedrock: A new generation of multimodal vision and lightweight models
Post Syndicated from Danilo Poccia original https://aws.amazon.com/blogs/aws/introducing-llama-3-2-models-from-meta-in-amazon-bedrock-a-new-generation-of-multimodal-vision-and-lightweight-models/
In July, we announced the availability of Llama 3.1 models in Amazon Bedrock. Generative AI technology is improving at incredible speed and today, we are excited to introduce the new Llama 3.2 models from Meta in Amazon Bedrock.
Llama 3.2 offers multimodal vision and lightweight models representing Meta’s latest advancement in large language models (LLMs) and providing enhanced capabilities and broader applicability across various use cases. With a focus on responsible innovation and system-level safety, these new models demonstrate state-of-the-art performance on a wide range of industry benchmarks and introduce features that help you build a new generation of AI experiences.
These models are designed to inspire builders with image reasoning and are more accessible for edge applications, unlocking more possibilities with AI.
The Llama 3.2 collection of models are offered in various sizes, from lightweight text-only 1B and 3B parameter models suitable for edge devices to small and medium-sized 11B and 90B parameter models capable of sophisticated reasoning tasks including multimodal support for high resolution images. Llama 3.2 11B and 90B are the first Llama models to support vision tasks, with a new model architecture that integrates image encoder representations into the language model. The new models are designed to be more efficient for AI workloads, with reduced latency and improved performance, making them suitable for a wide range of applications.
All Llama 3.2 models support a 128K context length, maintaining the expanded token capacity introduced in Llama 3.1. Additionally, the models offer improved multilingual support for eight languages including English, German, French, Italian, Portuguese, Hindi, Spanish, and Thai.
In addition to the existing text capable Llama 3.1 8B, 70B, and 405B models, Llama 3.2 supports multimodal use cases. You can now use four new Llama 3.2 models — 90B, 11B, 3B, and 1B — from Meta in Amazon Bedrock to build, experiment, and scale your creative ideas:
Llama 3.2 90B Vision (text + image input) – Meta’s most advanced model, ideal for enterprise-level applications. This model excels at general knowledge, long-form text generation, multilingual translation, coding, math, and advanced reasoning. It also introduces image reasoning capabilities, allowing for image understanding and visual reasoning tasks. This model is ideal for the following use cases: image captioning, image-text retrieval, visual grounding, visual question answering and visual reasoning, and document visual question answering.
Llama 3.2 11B Vision (text + image input) – Well-suited for content creation, conversational AI, language understanding, and enterprise applications requiring visual reasoning. The model demonstrates strong performance in text summarization, sentiment analysis, code generation, and following instructions, with the added ability to reason about images. This model use cases are similar to the 90B version: image captioning, image-text-retrieval, visual grounding, visual question answering and visual reasoning, and document visual question answering.
Llama 3.2 3B (text input) – Designed for applications requiring low-latency inferencing and limited computational resources. It excels at text summarization, classification, and language translation tasks. This model is ideal for the following use cases: mobile AI-powered writing assistants and customer service applications.
Llama 3.2 1B (text input) – The most lightweight model in the Llama 3.2 collection of models, perfect for retrieval and summarization for edge devices and mobile applications. This model is ideal for the following use cases: personal information management and multilingual knowledge retrieval.
In addition, Llama 3.2 is built on top of the Llama Stack, a standardized interface for building canonical toolchain components and agentic applications, making building and deploying easier than ever. Llama Stack API adapters and distributions are designed to most effectively leverage the Llama model capabilities and it gives customers the ability to benchmark Llama models across different vendors.
Meta has tested Llama 3.2 on over 150 benchmark datasets spanning multiple languages and conducted extensive human evaluations, demonstrating competitive performance with other leading foundation models. Let’s see how these models work in practice.
Using Llama 3.2 models in Amazon Bedrock
To get started with Llama 3.2 models, I navigate to the Amazon Bedrock console and choose Model access on the navigation pane. There, I request access for the new Llama 3.2 models: Llama 3.2 1B, 3B, 11B Vision, and 90B Vision.
To test the new vision capability, I open another browser tab and download from the Our World in Data website the Share of electricity generated by renewables chart in PNG format. The chart is very high resolution and I resize it to be 1024 pixel wide.
Back in the Amazon Bedrock console, I choose Chat under Playgrounds in the navigation pane, select Meta as the category, and choose the Llama 3.2 90B Vision model.
I use Choose files to select the resized chart image and use this prompt:
Based on this chart, which countries in Europe have the highest share?
I choose Run and the model analyzes the image and returns its results:

I can also access the models programmatically using the AWS Command Line Interface (AWS CLI) and AWS SDKs. Compared to using the Llama 3.1 models, I only need to update the model IDs as described in the documentation. I can also use the new cross-region inference endpoint for the US and the EU Regions. These endpoints work for any Region within the US and the EU respectively. For example, the cross-region inference endpoints for the Llama 3.2 90B Vision model are:
us.meta.llama3-2-90b-instruct-v1:0eu.meta.llama3-2-90b-instruct-v1:0
Here’s a sample AWS CLI command using the Amazon Bedrock Converse API. I use the --query parameter of the CLI to filter the result and only show the text content of the output message:
In output, I get the response message from the "assistant".
It’s not much different if you use one of the AWS SDKs. For example, here’s how you can use Python with the AWS SDK for Python (Boto3) to analyze the same image as in the console example:
import boto3

MODEL_ID = "us.meta.llama3-2-90b-instruct-v1:0"
# MODEL_ID = "eu.meta.llama3-2-90b-instruct-v1:0"

IMAGE_NAME = "share-electricity-renewable-small.png"

bedrock_runtime = boto3.client("bedrock-runtime")

with open(IMAGE_NAME, "rb") as f:
    image = f.read()

user_message = "Based on this chart, which countries in Europe have the highest share?"

messages = [
    {
        "role": "user",
        "content": [
            {"image": {"format": "png", "source": {"bytes": image}}},
            {"text": user_message},
        ],
    }
]

response = bedrock_runtime.converse(
    modelId=MODEL_ID,
    messages=messages,
)
response_text = response["output"]["message"]["content"][0]["text"]
print(response_text)
Llama 3.2 models are also available in Amazon SageMaker JumpStart, a machine learning (ML) hub that makes it easy to deploy pre-trained models using the console or programmatically through the SageMaker Python SDK. From SageMaker JumpStart, you can also access and deploy new safeguard models that can help classify the safety level of model inputs (prompts) and outputs (responses), including Llama Guard 3 11B Vision, which are designed to support responsible innovation and system-level safety.
In addition, you can easily fine-tune Llama 3.2 1B and 3B models with SageMaker JumpStart today. Fine-tuned models can then be imported as custom models into Amazon Bedrock. Fine-tuning for the full collection of Llama 3.2 models in Amazon Bedrock and Amazon SageMaker JumpStart is coming soon.
The publicly available weights of Llama 3.2 models make it easier to deliver tailored solutions for custom needs. For example, you can fine-tune a Llama 3.2 model for a specific use case and bring it into Amazon Bedrock as a custom model, potentially outperforming other models in domain-specific tasks. Whether you’re fine-tuning for enhanced performance in areas like content creation, language understanding, or visual reasoning, Llama 3.2’s availability in Amazon Bedrock and SageMaker empowers you to create unique, high-performing AI capabilities that can set your solutions apart.
More on Llama 3.2 model architecture
Llama 3.2 builds upon the success of its predecessors with an advanced architecture designed for optimal performance and versatility:
Auto-regressive language model – At its core, Llama 3.2 uses an optimized transformer architecture, allowing it to generate text by predicting the next token based on the previous context.
Fine-tuning techniques – The instruction-tuned versions of Llama 3.2 employ two key techniques:
- Supervised fine-tuning (SFT) – This process adapts the model to follow specific instructions and generate more relevant responses.
- Reinforcement learning with human feedback (RLHF) – This advanced technique aligns the model’s outputs with human preferences, enhancing helpfulness and safety.
Multimodal capabilities – For the 11B and 90B Vision models, Llama 3.2 introduces a novel approach to image understanding:
- Separately trained image reasoning adaptor weights are integrated with the core LLM weights.
- These adaptors are connected to the main model through cross-attention mechanisms. Cross-attention allows one section of the model to focus on relevant parts of another component’s output, enabling information flow between different sections of the model.
- When an image is input, the model treats the image reasoning process as a “tool use” operation, allowing for sophisticated visual analysis alongside text processing. In this context, tool use is the generic term used when a model uses external resources or functions to augment its capabilities and complete tasks more effectively.
Optimized inference – All models support grouped-query attention (GQA), which enhances inference speed and efficiency, particularly beneficial for the larger 90B model.
This architecture enables Llama 3.2 to handle a wide range of tasks, from text generation and understanding to complex reasoning and image analysis, all while maintaining high performance and adaptability across different model sizes.
Things to know
Llama 3.2 models from Meta are now generally available in Amazon Bedrock in the following AWS Regions:
- Llama 3.2 1B and 3B models are available in the US West (Oregon) and Europe (Frankfurt) Regions, and are available in the US East (Ohio, N. Virginia) and Europe (Ireland, Paris) Regions via cross-region inference.
- Llama 3.2 11B Vision and 90B Vision models are available in the US West (Oregon) Region, and are available in the US East (Ohio, N. Virginia) Regions via cross-region inference.
Check the full AWS Region list for future updates. To estimate your costs, visit the Amazon Bedrock pricing page.
To learn more about Llama 3.2 features and capabilities, visit the Llama models section of the Amazon Bedrock documentation. Give Llama 3.2 a try in the Amazon Bedrock console today, and send feedback to AWS re:Post for Amazon Bedrock.
You can find deep-dive technical content and discover how our Builder communities are using Amazon Bedrock at community.aws. Let us know what you build with Llama 3.2 in Amazon Bedrock!
— Danilo
Managing identity source transition for AWS IAM Identity Center
Post Syndicated from Xiaoxue Xu original https://aws.amazon.com/blogs/security/managing-identity-source-transition-for-aws-iam-identity-center/
AWS IAM Identity Center manages user access to Amazon Web Services (AWS) resources, including both AWS accounts and applications. You can use IAM Identity Center to create and manage user identities within the Identity Center identity store or to connect seamlessly to other identity sources.
Organizations might change the configuration of their identity source in IAM Identity Center for various reasons. These include switching identity providers (IdPs), expanding their identity footprint, adopting new features, and so on. These transitions can disrupt user access and require planning to minimize downtime.
In this blog post, we walk you through the process of switching from one identity source to another and provide sample code that you can use to assist with the transition.
Background
The identity source configured in IAM Identity Center determines where users and groups are created and managed. Each organization can connect to only one identity source at a time. Identity Center supports three main identity source options:
- Identity Center directory: This is the default identity store for IAM Identity Center. You can use it to directly create and administer your users and groups within Identity Center without relying on an external provider.
- Active Directory: You can configure integration with an on-premises Active Directory or with AWS Managed Microsoft AD using AWS Directory Service. This integration enables you to use your existing Active Directory identities and group memberships.
- External IdP: You can continue using your current third-party IdPs that support SAML 2.0, such as Okta Universal Directory or Microsoft Entra ID (formerly Azure AD).
Understanding these identity source options can help you choose the source that best fits your user management needs based on your existing infrastructure and authentication requirements.
Figure 1 explains the flow of users and groups accessing AWS resources. This access is granted through the following:
- Assignment of permission sets to users and groups in your directory, which enables assume role access to AWS accounts.
- Assignment of applications to users and groups in your directory, providing access to both AWS managed applications and customer managed applications.
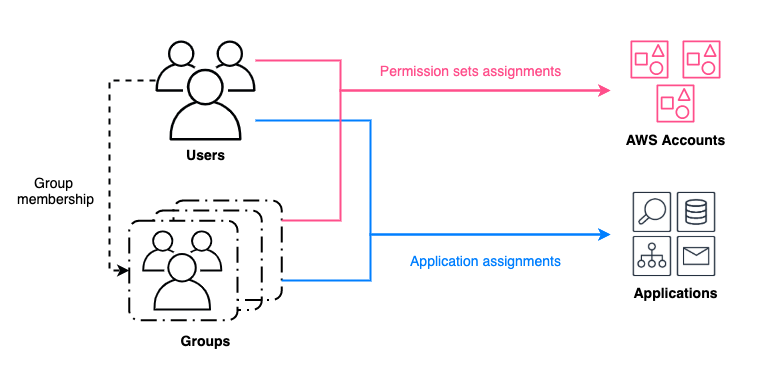
Figure 1: Granting access to AWS resources for users and groups managed by an identity source in IAM Identity Center
When you change the identity source, the work required varies depending on the original and new sources. AWS documentation details these considerations. In minimal impact scenarios, assignments remain intact, although you need to force password resets or verify correct assertions from the new source. More disruptive scenarios delete users, groups, and their assignments. In those scenarios, you need to restore the deleted entries after changing the identity source.
Sample deployment
This deployment covers permission sets and application assignments’ backup and restore. These scripts associate assignments with unique user attributes such as UserName, and group attributes such as DisplayName. Attributes that might change during the user and group restoration process, such as UserId and GroupId, aren’t used.
What isn’t covered includes users, groups, permission sets, and applications backup and restore.
- Users and groups backup and restore aren’t covered because they depend heavily on the format of the source and target IdPs.
- Because we’re working with identity source switching, the permission sets will remain unchanged and applications will not be deleted.
- If you’re changing IdPs as part of an AWS Region , the IAM Identity Center instance will be deleted. The applications and permission sets will be deleted in addition to assignments. In this case, you must redeploy the applications. See How to automate the review and validation of permissions for users and groups in AWS IAM Identity Center for information about backing up permission sets.
The sample scripts and detailed steps are available on GitHub.
Note: This solution is available in the GitHub aws-samples repository. You can report bugs or make feature requests through GitHub Issues. The builders of this solution can help with GitHub issues. Enterprise Support customers can reach out to their Technical Account Manager (TAM) for further questions or feature requests.
Walkthrough
In this section, we walk you through the process of transitioning to a new identity source in IAM Identity Center.
Step 1: Backup users, groups, and assignments from the current identity source
This step is critical to preserve users’ information and their associated access scope.
How to backup users and groups:
- When using the IAM Identity Center directory as your identity source, use ListUsers, ListGroups, and ListGroupMembershipsForMember to back up metadata and attributes.
- When using sources such as Active Directory or an external IdP, you can use compatible tools such as Active Directory module for Windows PowerShell and third-party scripts to back up users and back up groups.
Note: For some external IdPs, there are native integrations with Active Directory, such as Okta AD integration and Ping One AD Connect. You can set up a native integration and sync users and groups data without needing to backup and restore that data.
Assignments can be backed up by running the backup.py file from GitHub. Replace <IDC_STORE_ID> with your Identity Store ID (it looks like d-1234567890), and replace <IDC_ARN> with the Amazon Resource Name (ARN) for your IAM Identity Center instance.
This script uses both IAM Identity Center APIs and Identity Store APIs as shown in Figure 2 that generates permission set assignments backup files (UserAssignments.json and GroupAssignments.json) and an application assignments backup file (AppAssignments.json).
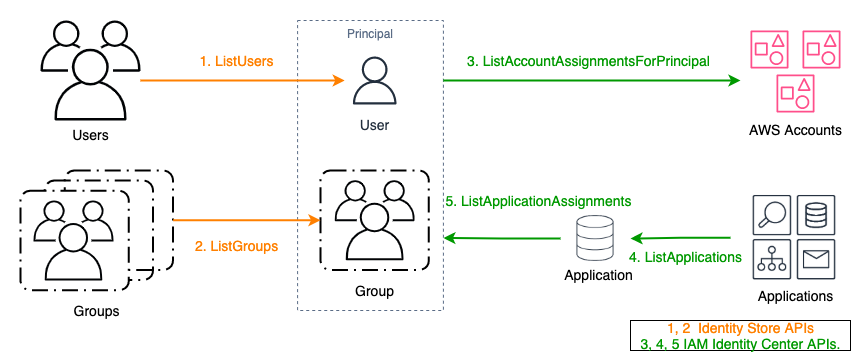
Figure 2: APIs used for backing up assignments
Step 2: Restore and validate the backed-up users and groups in the target identity source
The target will become the new authoritative identity source. When done, verify that the group memberships and attributes have been correctly transferred.
- If the target is an IAM Identity Center directory, use APIs such as CreateUser, CreateGroup, and CreateGroupMembership to restore from the previous backup file.
- If the target is Active Directory or an external IdP, use the corresponding native import features or integration tools to restore.
Step 3: Configure IAM Identity Center to connect to the new identity source and synchronize users and groups
Update your IAM Identity Center configuration to point to the new source. If applicable, use tools such as configurable AD sync or automatic provisioning with SCIM to synchronize your restored identities.
WARNING: While the directory is being rebuilt, your users will not have access to AWS accounts or applications through IAM Identity Center until all assignments are restored in Step 4.
Step 4: Restore assignments to users and groups in the new identity source
The APIs used to restore assignments are as shown in Figure 3.
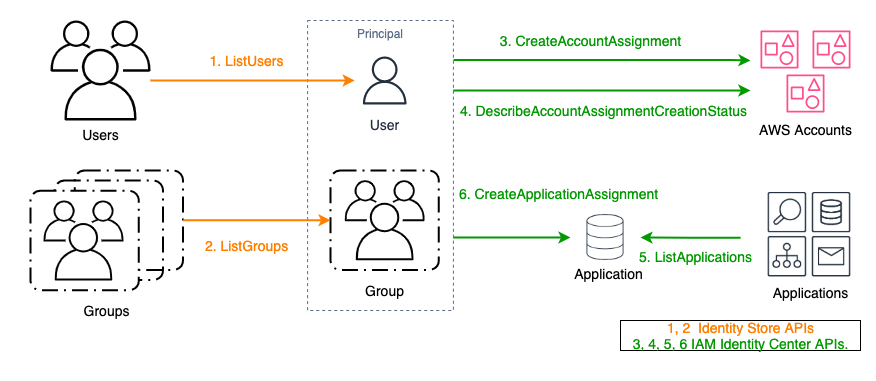
Figure 3: APIs used for restoring assignments
Assignments can be restored by running the restore.py file from GitHub. Replace <NEW_IDC_STORE_ID> with your newly configured Identity Store ID (it looks like d-1234567890) and replace <IDC_ARN> with the ARN for your IAM Identity Center instance.
This script uses the APIs illustrated in Figure 2 and picks up backup files (UserAssignments.json, GroupAssignments.json, and AppAssignments.json) from Step 1 by default. Account permission set assignment results are automatically retrieved five times using exponential backoff. If the result is other than SUCCEEDED after five retries, the principal ID will be marked as failed and exported in error logs.
Note: For AWS managed applications that maintain a separate identity source, using the CreateApplicationAssignments API to restore application assignments will not preserve user access. These applications typically have dependencies on the original identity source ID, or dependencies on
UserIdandGroupIdfrom the original identity source. This dependency is represented by importing users or groups from IAM Identity Center during the AWS managed application creation process. Example AWS managed applications include Amazon SageMaker Studio and Amazon Q Developer. These applications must be restored on a case-by-case basis and can require redeployment of the application.
Step 5: Validate user access using the new identity source
Make sure that users can still access the expected accounts and applications.
Conclusion
Transitioning your identity source in IAM Identity Center requires careful planning and implementation. This post outlined the steps to manage this transition. By following these steps, you can streamline the transition process, providing a smooth and efficient transfer of user access with minimal downtime. To get started, see the GitHub repository. For related posts, visit the AWS Security Blog channel and search for IAM Identity Center.
If you have feedback about this post, submit comments in the Comments section below. If you have questions about this post, contact AWS Support.
Vanilla OS 2 – future plans, updates, and next release
Post Syndicated from jzb original https://lwn.net/Articles/991722/
The Vanilla OS project has
published a
blog post to answer questions that users have raised since the release of Vanilla OS 2. The post has information about the update strategy for the distribution,
an enterprise
version with support, and plans for an experimental version called
Vanilla OS Vision.
We are not planning for a potential Vanilla OS 3 because it is not
yet necessary. As previously explained, our focus right now is on bug
fixing and making the system as solid as possible, especially in light
of collaborations with OEMs. We’re all excited about laying the
foundation for a third version of Vanilla OS, but we have
responsibilities to attend to first.This does not mean that there will never be one, nor does it mean
that Orchid will become stagnant. On the contrary, as previously
mentioned, our updates not only bring fixes but also updates to system
components, improvements to existing features, and updates to
components like GNOME (we are planning the release of GNOME 47 soon,
for example).
Mastering Mac MDM: Best Practices for Managing Your macOS Fleet
Post Syndicated from Natasha Rabinov original https://www.backblaze.com/blog/mastering-mac-mdm-best-practices-for-managing-your-macos-fleet/
Mac usage has steadily increased in recent years, particularly in business. In the fourth quarter of 2023, Apple shipped 16.1 percent of all personal computer units in the United States, per Gartner. Moreover, IDC anticipates the number of Macs sold to business users worldwide will increase by 20% between 2023 and 2024. IDC also reports that 76% of IT decision makers believe Macs are more secure than other computers.
With this surge of Macs in the workplace and increased focus on security, IT administrators increasingly require mobile device management (MDM) to protect, secure, and manage these remote devices.
Today, we’re digging into all things Mac MDM, including best practices for implementing MDM in your enterprise and why it’s so important to seek out Mac-native tools to do so.
What is mobile device management (MDM)?
MDM enables you to securely manage and control Apple devices—such as iPhones, iPads, Macs, and Apple TVs—remotely. With MDM, IT administrators can configure devices, deploy apps, enforce security policies, manage updates, and track device inventory all from a centralized platform. For IT teams, the main purpose of MDM is to improve their management and control over their fleet of devices, especially devices that aren’t on-premises like those for remote workers.
How MDM works in practice
- Device enrollment: A device is enrolled via automated device enrollment (ADE), a third-party MDM tool like Jamf, Kandji, or Munki, manual setup, QR code, or a URL.
- Device configuration: MDM pushes settings (Wi-Fi, VPN, email), security policies (passcode, encryption), and apps to the device.
- Ongoing management: MDM continuously monitors the device’s compliance with organizational policies and can enforce restrictions or trigger actions (like updating software, changing user permissions, etc.) when needed.
- Device retirement: When a device is retired or a user leaves, the MDM can deprovision the device, sometimes wiping or restoring it to factory settings.
MDM solutions provide a centralized, scalable, and secure way to manage devices in an enterprise setting. This ensures consistency, enhances security, and simplifies IT administration.
What are some advantages of MDM for Macs?
Using MDM for Macs in an enterprise environment offers several advantages, particularly in terms of security, efficiency, and scalability. Here are some key benefits:
- Enhanced security: Mac MDM tools frequently make use of the built-in Apple management framework, and one of the most significant benefits of MDMs are their robust security features. With features such as location tracking, remote data wiping, encryption enforcement, and strong authentication methods, MDM solutions protect businesses from cyber threats and unauthorized access. They allow you to enforce security settings like passcodes, encryption (FileVault), and password complexity requirements across all Macs. They also allow you to implement web security policies, blocking access to harmful sites, restricting app installations, controlling software updates, and preventing malicious downloads.
- Centralized device management: You can automate enrollment and configure devices remotely, setting up Wi-Fi, VPN, email, and other necessary system preferences without user intervention. This functionality enables touchless deployment, allowing you to ship laptops directly to employees and enroll them remotely, without your IT team ever having to touch the machine. Mac admins can also assign custom configuration profiles to different user groups (e.g., for different departments), allowing flexible yet consistent policy enforcement.
- Self-service: As you scale, it becomes increasingly important to limit rights on employee machines, depending on the department and the level of access they need. With MDM, you can populate a self-service portal where employees can access the software they need to do their jobs, including licensed and paid apps.
- Streamlined app deployment and management: You can easily deploy apps from the Mac App Store or distribute custom internal apps, and then centralize automatic updates for those applications.
- Efficient patch and update management: MDMs can schedule and enforce macOS updates, reducing vulnerabilities by ensuring all devices are running the latest versions. Automated and remote updates reduce the need for manual interventions and device downtime.
- Bring Your Own Device (BYOD) support: MDM supports BYOD environments by providing a separation between personal and work data on the same machine, making it flexible for both company-owned and personal devices.
Challenges with Mac MDM
One of the challenges of managing Apple devices at scale is keeping the Mac operating system (macOS) updated across your fleet of machines. Apple has made changes to how that works over the years. As a Mac admin in a corporate environment, you have to balance conflicting demands—you need to make sure your fleet of machines is up to date and in compliance, but you also need to do so in a way that isn’t disruptive to end users, minimizes downtime, and avoids sudden unexpected reboots.
To answer this challenge, the open-source community has come together with solutions. Third-party, open source scripting can be leveraged within your MDM to allow you more flexibility and control over macOS updates, allowing you to expand user options for updates while at the same time setting deadlines for those updates to happen.
Another challenge of using MDM solutions is navigating the increasingly restrictive permissions introduced by Apple. Starting with macOS 10.14 and in updates since then, Apple added security to parts of the computer it considers sensitive or critical. While these restrictions enhance user privacy and security, they can limit IT administrators’ control over devices. Applications that require sensitive access to these parts of the system, like backup clients or anti-virus software, now require additional permissions.
Silently installing these types of apps now requires an additional component, a custom policy configuration that grants full disk access. This will be different depending on the MDM you’re using, but Jamf, for example, offers the Privacy Preferences Policy Control (PPPC) Utility to help you create configuration profiles.
Best practices for Mac MDM
Managing Macs in an enterprise environment can be a complex task that can have a big impact. One of the biggest benefits of MDM is reducing IT workload. Centralized and automated management reduces the time and effort needed to configure and manage each Mac manually, allowing you to focus on more strategic tasks.
But, effective MDM requires some other building blocks to be in place before you can realize all of those advantages. Here are some best practices for Mac MDM:
- Choose the right MDM solution
- Find the right partner: Integrate with an MDM solution like Jamf, Kandji, or Munki for streamlined device enrollment and management.
- Update processes: Ensure that the MDM solution supports both Apple’s Device Enrollment Program (DEP) and Volume Purchase Program (VPP) to automate setup and app deployment, and ensure all devices are enrolled in the MDM system as soon as they are set up.
- Enforce security policies
- Passcode and encryption: Ensure all devices require strong passcodes and are encrypted with FileVault (for Mac) and native iOS encryption.
- Multi-factor authentication (MFA): Enforce MFA for accessing corporate services and apps.
- Remote lock/wipe: Enable the ability to lock or wipe devices remotely in case of theft or loss.
- App management
- Volume purchasing: Use Apple’s VPP to distribute apps and content centrally.
- App whitelisting and blacklisting: Control which apps users can install on their devices, blocking potentially harmful or non-compliant apps.
- App updates: Automate app updates to ensure security patches and features are deployed quickly.
- User and group profiles
- User profiles: Use custom profiles to set different policies for various roles within the organization (e.g., executives, developers, sales).
- Configuration profiles: Set up policies for Wi-Fi, VPN, email, and other settings automatically based on user or group membership.
- Data protection
- Content filtering: Implement web content filtering and secure browsing rules.
- Data loss prevention (DLP): Apply DLP policies to prevent sensitive corporate data from being shared through unapproved channels.
- Backup solutions: Ensure regular, automated backups using a true backup solution like Backblaze Computer Backup versus a sync service.
- Patch management
- Automatic updates: Automate macOS updates and ensure compliance with the latest patches and versions.
- Version control: Use MDM to control which versions of macOS and iOS are allowed in the organization to prevent untested or unsupported versions from being installed.
- Monitor device compliance
- Compliance uniformity: Set compliance rules for security (e.g., passcode policies, encryption) and regularly monitor devices for adherence.
- Compliance monitoring: Use reporting and analytics tools built into your MDM solution to track compliance, app usage, and device health.
By following these best practices, you can efficiently manage and secure Mac devices within your organization while minimizing risks and ensuring a seamless experience for employees.
The importance of Mac-native apps
Mac-native apps provide a seamless and optimized experience that takes full advantage of the macOS ecosystem. Native apps are specifically designed to integrate with macOS, ensuring smoother performance, faster responsiveness, and a more intuitive user experience compared to non-native or cross-platform applications.
This integration often means that the apps are more efficient, utilize fewer system resources, and can easily interface with built-in macOS features such as Spotlight, Siri, and Notification Center. For IT administrators managing multiple Macs, the consistency of Mac-native apps helps minimize compatibility issues and ensures a uniform experience across all devices.
In addition, Mac-native apps typically offer better security and reliability, which is crucial for IT administrators overseeing corporate environments. Apple has a strict set of guidelines for app development, especially for apps available through the App Store. These guidelines emphasize security practices such as sandboxing, code-signing, and integration with macOS security features like Gatekeeper and XProtect.
This gives IT administrators confidence that Mac-native apps are less likely to pose security risks, reducing the chances of malware or vulnerabilities being introduced into the organization’s systems. Moreover, since native apps are built to work within Apple’s framework, they are generally more stable, reducing the risk of crashes or bugs that could disrupt workflows.
Furthermore, Mac-native apps support better integration with management and automation tools that are vital for IT administrators. These apps can be more easily deployed, managed, and updated through Apple MDMs.
Finally, native apps can often integrate with Apple’s scripting languages and automation tools like AppleScript and Automator, providing IT teams with more powerful options for customizing workflows, optimizing processes, and enhancing productivity across the organization. This level of control is essential for IT administrators looking to streamline their management tasks and ensure a high level of efficiency.
Having MDMs built native for Macs is critical for the success of IT management. That holds true for all software running on Macs, including backup software like Backblaze Computer Backup—you have to update permissions less frequently, you have access to more robust build possibilities, and it runs seamlessly in the background.
Are you using a Mac MDM tool?
Do you have a favorite MDM tool? Let us know in the comments. We love to hear how they’re working for you.
The post Mastering Mac MDM: Best Practices for Managing Your macOS Fleet appeared first on Backblaze Blog | Cloud Storage & Cloud Backup
Building a three-tier architecture on a budget
Post Syndicated from Adam Nemeth original https://aws.amazon.com/blogs/architecture/building-a-three-tier-architecture-on-a-budget/
AWS customers often look for ways to run their systems within or under budget, avoiding unnecessary costs. This post offers practical advice on designing scalable and cost-efficient three-tier architectures by using serverless technologies within the AWS Free Tier.
With AWS, you can start small and scale cost-effectively as your business demand increases. You can begin with minimal investments by using the Free Tier to build a minimum viable product (MVP). Then you can expand resources as your user base grows and your needs evolve, and transition to a full-fledged, large-scale application.
In this blog post, you will learn how to build a three-tier architecture that predominantly relies on AWS service usage within the Free Tier, resulting in a highly affordable architecture.
Note: The Free Tier offerings mentioned within this blog post are subject to change. Always check the AWS Free Tier page for the most current information.
Background: Understanding the AWS Free Tier
The Free Tier provides users with access to a range of AWS services at no cost within predefined monthly usage limits. This offering helps users to run experimentation, development, and even production workloads without charges. The Free Tier is available for more than 100 AWS products today, including Amazon Simple Storage Service (Amazon S3), Amazon Elastic Compute Cloud (Amazon EC2), and Amazon Relational Database Service (Amazon RDS). Depending on the product, there are three types of Free Tier offers:
- Free trials – Short-term trial offers that start when the first usage begins. After the trial period expires, you pay standard service rates.
- 12 months free – Offers available to new AWS customers for 12 months following their sign-up date. After the 12-month free term expires, you pay standard service rates.
- Always free – Offers available to both existing and new AWS customers indefinitely.
For example, the AWS Lambda Free Tier includes one million free requests per month and 400,000 GB-seconds of compute time per month usable for functions across both x86 and AWS Graviton processors. The AWS Lambda Free Tier falls under the always free category.
Walkthrough: Three-tier architecture on AWS
Cost efficiency is a prominent advantage of using AWS serverless services. These services decrease the need for provisioning and managing servers, reducing operational overhead and labor costs. Serverless services like AWS Lambda and Amazon API Gateway use a pay-as-you-go model. This way, you only pay for the resources you consume, providing significant savings compared to maintaining idle infrastructure. Serverless technologies also feature automatic scaling and built-in high availability to increase agility and optimize costs.
A three-tier architecture is a popular implementation of a multi-tier architecture and consists of a presentation tier, business logic tier, and data tier. A three-tier architecture separates an application’s functionality into distinct layers (presentation, business logic, and data) to enable scalability, modularity, and flexibility in software development. This type of architecture is suitable for building a wide range of applications such as web applications, enterprise systems, and mobile apps.
The following image is an example of a three-tier architecture fully built with AWS serverless services. In this example, users authenticate and navigate to the website in the presentation tier. They call APIs, which invoke Lambda functions at the business logic tier. Data is stored in DynamoDB at the data tier.

Figure 1: Example of a three-tier architecture on AWS
In the following sections, we explore how to use AWS serverless services within the Free Tier to build a similar architecture.
Note: The Free Tier offerings mentioned within this blog post are subject to change. Always check the AWS Free Tier page for the most current information.
Presentation tier
The presentation tier is where your users interact with your offering, such as a webpage or an app. You can use the following services within the Free Tier to build your presentation tier.
| AWS service | How you can use it | Free Tier details* |
| Amazon S3 | Host static and dynamic assets, like a React Single Page Application (SPA), and distribute them to your end users. | For the first year, you get 5 GB of standard storage, 20,000 GET requests and 2,000 PUT requests. See Amazon S3 pricing for details. |
| Amazon CloudFront | Use with Amazon S3 for a faster and more performant distribution of your assets to end users. CloudFront gives you access to the AWS content delivery network with more than 410 points of presence worldwide. | CloudFront includes an Always Free Tier, with 1 TB of data transfer out to the internet per month and 10 million HTTP(S) requests per month. See Amazon CloudFront pricing for details. |
| Amazon Cognito | Use Amazon Cognito user pools to authenticate your users. You can also integrate Amazon Cognito within your application’s UI for a seamless login experience. | Amazon Cognito has an Always Free Tier, including up to 50,000 monthly active users. It also includes 10 GBs of cloud sync storage and 1 million sync operations per month, valid for the first 12 months after sign-up. See Amazon Cognito pricing for details. |
*as of September 2024
Business logic tier
The business logic tier is where code translates user actions to application functionality. You can use the following services within the Free Tier to build your business logic tier.
| AWS service | How you can use it | Free Tier details* |
| Amazon API Gateway | Build a front door to your application’s backend by creating REST or WebSocket APIs. | Get 1 million monthly API calls for free, valid for the first 12 months after sign-up. See Amazon API Gateway pricing for details. |
| AWS Lambda | Use AWS Lambda for a serverless compute environment that integrates with API Gateway. You can embed your business logic into functions that run on AWS without the need for you to run and manage infrastructure. | The Always Free Tier offers 1 million free requests and 400,000 GB-seconds of compute time per month. See AWS Lambda pricing for details. |
*as of September 2024
Data tier
The data tier is where your data is stored. You can use the following service within the Free Tier to build your data tier.
| AWS service | How you can use it | Free Tier details* |
| Amazon DynamoDB | Use this serverless NoSQL database for storing data and tracking transactions. In the context of a three-tier architecture, DynamoDB stores and manages the application’s data, providing reliable and secure data access to the business logic tier. | The Always Free Tier offers 25GB of free storage, with up to 200 million requests, 25 write capacity units (WCUs), and 25 read capacity units (RCUs) per month. |
*as of September 2024
Walkthrough: Monitoring your usage to avoid unexpected charges
If you use consolidated billing or AWS Organizations, the Free Tier usage accumulates at the management account level. Each management account receives one quota of the Free Tier.
To monitor your Free Tier usage and avoid unexpected charges, you can use the following resources:
- See the Free Tier page in the AWS Billing and Cost Management console. The Free Tier page provides detailed insights into current usage per service, Region, and type.
- Set up the GetFreeTierUsage API. See Using the Free Tier API for instructions.
- Set up AWS Free Tier usage alert emails.
The following image shows an example of the Free Tier page in the AWS Billing and Cost Management console.

Figure 2: AWS Free Tier view in the Cost and Usage Report
We also recommend configuring a zero spend budget within the AWS Billing and Cost Management console. With this budget, you receive notifications when your usage exceeds the Free Tier limits, helping you to avoid unexpected charges. The following image shows an example of this budget setup.

Figure 3: Zero spend budget
Conclusion
In this post, we explored how to use AWS serverless services within the Free Tier to build a three-tier application. We also explored how to monitor your Free Tier usage. The Free Tier offers a chance to experiment and develop without additional costs, helping businesses minimize infrastructure expenses early on. AWS serverless architectures bring benefits like cost savings, flexibility, and scalability.
Beyond using services within the Free Tier, you can further optimize the cost of your AWS serverless application. For instance, to prevent incurring unnecessary inter-Region data transfer costs, we recommend starting with a single Region deployment for your application.
To learn more about the Free Tier and which services it offers, check out the AWS Free Tier FAQs.
Additionally, you can explore various architectural patterns for AWS serverless multi-tier architectures and the Serverless Full Stack WebApp Starter Kit to create scalable and cost-effective solutions on AWS.
[$] What the Nova GPU driver needs
Post Syndicated from daroc original https://lwn.net/Articles/990736/
In March, Danilo Krummrich announced the new
Nova GPU driver — a successor to Nouveau for controlling NVIDIA GPUs.
At Kangrejos 2024, Krummrich gave a
presentation about what it is, why it’s needed, and where it’s
going next. Hearing about the needs of the driver provoked extended discussion
on related topics, including what level of safety is reasonable to expect from
drivers, given that they must interact with the hardware.
Comic for 2024.09.25 – Gun To Your Head
Post Syndicated from Explosm.net original https://explosm.net/comics/gun-to-your-head
New Cyanide and Happiness Comic
2024 H1 IRAP report is now available on AWS Artifact for Australian customers
Post Syndicated from Patrick Chang original https://aws.amazon.com/blogs/security/2024-h1-irap-report-is-now-available-on-aws-artifact-for-australian-customers/
Amazon Web Services (AWS) is excited to announce that a new Information Security Registered Assessors Program (IRAP) report (2024 H1) is now available through AWS Artifact. An independent Australian Signals Directorate (ASD) certified IRAP assessor completed the IRAP assessment of AWS in August 2024.
The new IRAP report includes an additional seven AWS services that are now assessed at the PROTECTED level under IRAP. This brings the total number of services assessed at the PROTECTED level to 158.
The following are the seven newly assessed services:
- AWS App Runner
- Amazon Bedrock
- Amazon DataZone
- Amazon Security Lake
- AWS Signer
- AWS User Notifications
- AWS Verified Access
For the full list of services, see the IRAP tab on the AWS Services in Scope by Compliance Program page.
Many Australian customers are looking to experiment with how generative AI applications can help them better serve the Australian public. Customers can use two of the newly assessed services—Amazon Bedrock and Amazon DataZone—to help align with their governance, sovereignty, and security requirements up to the PROTECTED level:
- Amazon Bedrock is a fully managed service that offers a choice of high-performing large language models (LLMs) and other foundation models (FMs) from leading AI companies like AI21 Labs, Anthropic, Cohere, Meta, Mistral AI, Stability AI, as well as Amazon through a single API. Amazon Bedrock also provides a broad set of capabilities customers need to build generative AI applications with security, privacy, and responsible AI.
- Amazon DataZone is a data management service that makes it faster and simpler for customers to catalog, discover, share, and govern data stored across AWS, on premises, and third-party sources.
AWS has developed an IRAP documentation pack to help Australian customers and their partners to plan, architect, and assess risk for their workloads when they use AWS Cloud services.
We developed this pack in accordance with the Australian Cyber Security Centre (ACSC) Cloud Security Guidance and Cloud Assessment and Authorisation framework, which addresses guidance within the Australian Government’s Information Security Manual (ISM, September 2023 version), the Department of Home Affairs’ Protective Security Policy Framework (PSPF), and the Digital Transformation Agency’s Secure Cloud Strategy.
The IRAP pack on AWS Artifact also includes newly updated versions of the AWS Consumer Guide and the whitepaper Reference Architectures for ISM PROTECTED Workloads in the AWS Cloud.
Reach out to your AWS representatives to let us know which additional services you would like to see in scope for upcoming IRAP assessments. We strive to bring more services into scope at the PROTECTED level under IRAP to support your requirements.
If you have feedback about this post, submit comments in the Comments section below. If you have questions about this post, contact AWS Support.
[$] Linus and Dirk on succession, Rust, and more
Post Syndicated from jake original https://lwn.net/Articles/990534/
The “Linus and Dirk show” has been a fixture at Open Source Summit for as
long as the conference has existed; it started back when the conference was
called LinuxCon. Since Linus Torvalds famously does not like to give
talks, as he said during this year’s edition at Open Source Summit Europe
(OSSEU) in Vienna, Austria, he and Dirk Hohndel have been sitting down for an
informal chat on a wide range of topics as a keynote session. That way,
Torvalds does not need to prepare, but also does not know what topics
will be brought up, which makes it “so much more fun for one of us”, Hohndel
said with a grin. The topics this time ranged from the just-released 6.11
kernel and the upcoming Linux 6.12, through Rust for the kernel, to the recurring topic of succession and
the graying of Linux maintainers.
Security updates for Wednesday
Post Syndicated from jzb original https://lwn.net/Articles/991701/
Security updates have been issued by Debian (booth), Gentoo (Xpdf), Oracle (go-toolset:ol8, golang, grafana, grafana-pcp, kernel, libnbd, openssl, pcp, and ruby:3.3), Red Hat (container-tools:rhel8, go-toolset:rhel8, golang, kernel, and kernel-rt), SUSE (apr, cargo-audit, chromium, obs-service-cargo, python311, python36, quagga, traefik, and xen), and Ubuntu (intel-microcode, linux-azure-fde-5.15, and puma).
Introducing Speed Brain: helping web pages load 45% faster
Post Syndicated from Alex Krivit original https://blog.cloudflare.com/introducing-speed-brain
Each time a user visits your web page, they are initiating a race to receive content as quickly as possible. Performance is a critical factor that influences how visitors interact with your site. Some might think that moving content across the globe introduces significant latency, but for a while, network transmission speeds have approached their theoretical limits. To put this into perspective, data on Cloudflare can traverse the 11,000 kilometer round trip between New York and London in about 76 milliseconds – faster than the blink of an eye.
However, delays in loading web pages persist due to the complexities of processing requests, responses, and configurations. In addition to pushing advancements in connection establishment, compression, hardware, and software, we have built a new way to reduce page load latency by anticipating how visitors will interact with a given web page.
Today we are very excited to share the latest leap forward in speed: Speed Brain. It relies on the Speculation Rules API to prefetch the content of the user’s likely next navigations. The main goal of Speed Brain is to download a web page to the browser cache before a user navigates to it, allowing pages to load almost instantly when the actual navigation takes place.
Our initial approach uses a conservative model that prefetches static content for the next page when a user starts a touch or click event. Through the fourth quarter of 2024 and into 2025, we will offer more aggressive speculation models, such as speculatively prerendering (not just fetching the page before the navigation happens but rendering it completely) for an even faster experience. Eventually, Speed Brain will learn how to eliminate latency for your static website, without any configuration, and work with browsers to make sure that it loads as fast as possible.
To illustrate, imagine an ecommerce website selling clothing. Using the insights from our global request logs, we can predict with high accuracy that a typical visitor is likely to click on ‘Shirts’ when viewing the parent page ‘Mens > Clothes’. Based on this, we can start delivering static content, like images, before the shopper even clicks the ‘Shirts’ link. As a result, when they inevitably click, the page loads instantly. Recent lab testing of our aggressive loading model implementation has shown up to a 75% reduction in Largest Contentful Paint (LCP), the time it takes for the largest visible element (like an image, video, or text block) to load and render in the browser.
The best part? We are making Speed Brain available to all plan types immediately and at no cost. Simply toggle on the Speed Brain feature for your website from the dashboard or the API. It’ll feel like magic, but behind the scenes it’s a lot of clever engineering.
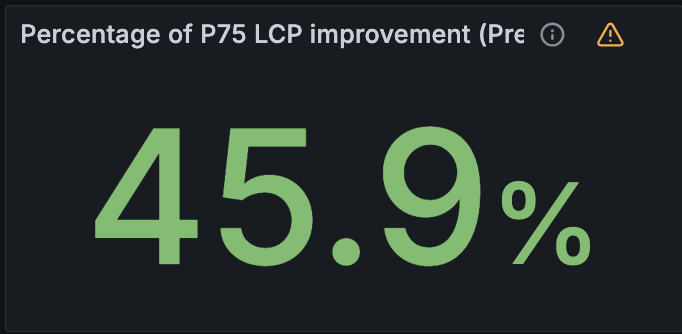
We have already enabled Speed Brain by default on all free domains and are seeing a reduction in LCP of 45% on successful prefetches. Pro, Business, and Enterprise domains need to enable Speed Brain manually. If you have not done so already, we strongly recommend also enabling Real User Measurements (RUM) via your dashboard so you can see your new and improved web page performance. As a bonus, enabling RUM for your domain will help us provide improved and customized prefetching and prerendering rules for your website in the near future!
How browsers work at a glance
Before discussing how Speed Brain can help load content exceptionally fast, we need to take a step back to review the complexity of loading content on browsers. Every time a user navigates to your web page, a series of request and response cycles must be completed.
After the browser establishes a secure connection with a server, it sends an HTTP request to retrieve the base document of the web page. The server processes the request, constructs the necessary HTML document and sends it back to the browser in the response.
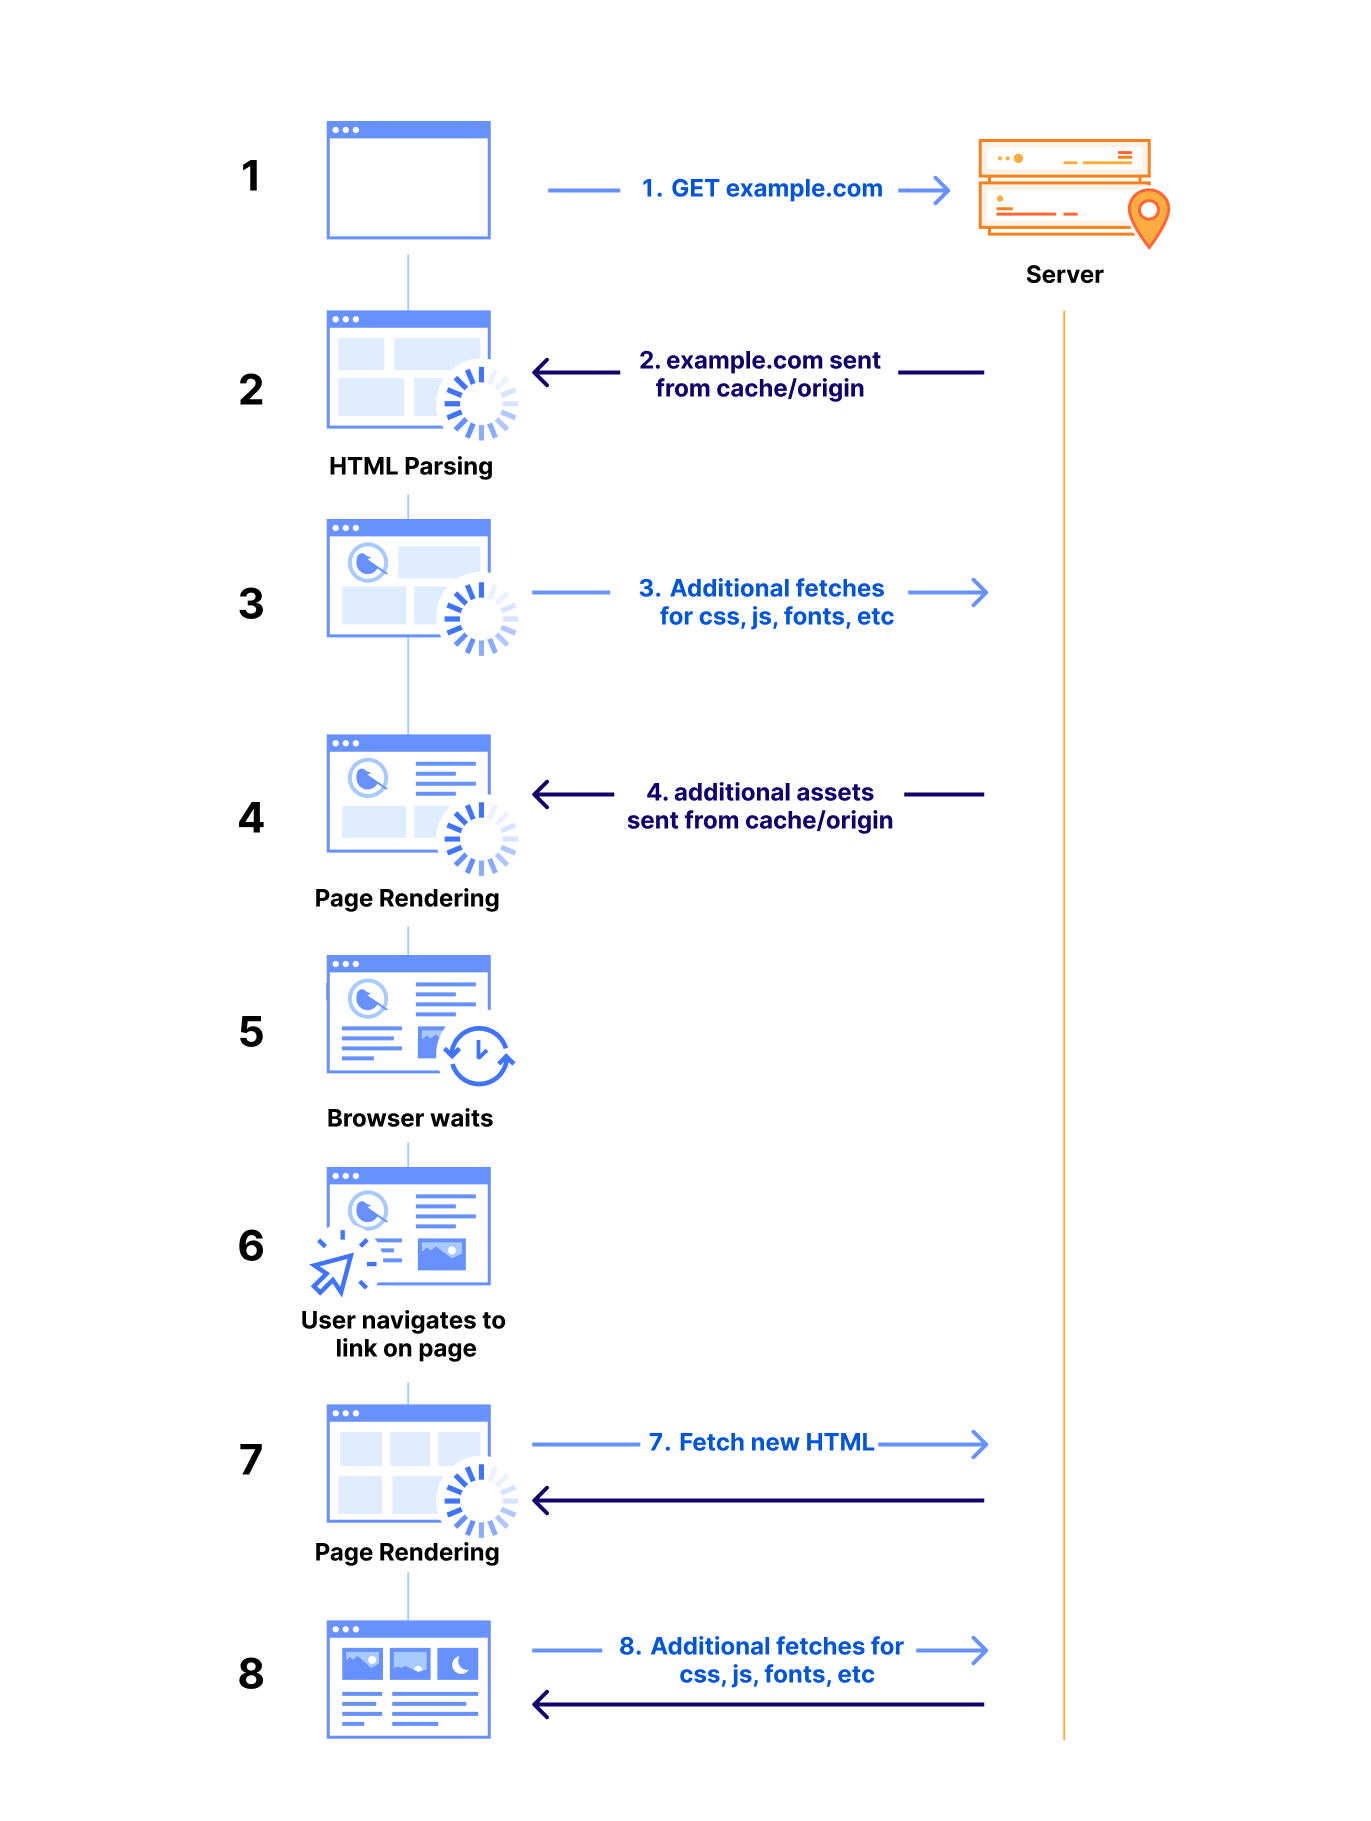
When the browser receives an HTML document, it immediately begins parsing the content. During this process, it may encounter references to external resources such as CSS files, JavaScript, images, and fonts. These subresources are essential for rendering the page correctly, so the browser issues additional HTTP requests to fetch them. However, if these resources are available in the browser’s cache, the browser can retrieve them locally, significantly reducing network latency and improving page load times.
As the browser processes HTML, CSS, and JavaScript, the rendering engine begins to display content on the screen. Once the page’s visual elements are displayed, user interactions — like clicking a link — prompt the browser to restart much of this process to fetch new content for the next page. This workflow is typical of every browsing session: as users navigate, the browser continually fetches and renders new or uncached resources, introducing a delay before the new page fully loads.
Take the example of a user navigating the shopping site described above. As the shopper moves from the homepage to the ‘men’s’ section of the site to the ‘clothing’ section to the ‘shirts’ section, the time spent on retrieving each of those subsequent pages can add up and contribute to the shopper leaving the site before they complete the transaction.
Ideally, having prefetched and prerendered pages present in the browser at the time each of those links are clicked would eliminate much of the network latency impact, allowing the browser to load content instantly and providing a smoother user experience.
Wait, I’ve heard this story before (how did we get to Speed Brain?)
We know what you’re thinking. We’ve had prefetching for years. There have even been several speculative prefetching efforts in the past. You’ve heard this all before. How is this different now?
You’re right, of course. Over the years, there has been a constant effort by developers and browser vendors to optimize page load times and enhance user experience across the web. Numerous techniques have been developed, spanning various layers of the Internet stack — from optimizing network layer connectivity to preloading application content closer to the client.
Early prefetching: lack of data and flexibility
Web prefetching has been one such technique that has existed for more than a decade. It is based on the assumption that certain subresources are likely to be needed in the near future, so why not fetch them proactively? This could include anything from HTML pages to images, stylesheets, or scripts that the user might need as they navigate through a website. In fact, the core concept of speculative execution is not new, as it’s a general technique that’s been employed in various areas of computer science for years, with branch prediction in CPUs as a prime example.
In the early days of the web, several custom prefetching solutions emerged to enhance performance. For example, in 2005, Google introduced the Google Web Accelerator, a client-side application aimed at speeding up browsing for broadband users. Though innovative, the project was short-lived due to privacy and compatibility issues (we will describe how Speed Brain is different below). Predictive prefetching at that time lacked the data insights and API support for capturing user behavior, especially those handling sensitive actions like deletions or purchases.
Static lists and manual effort
Traditionally, prefetching has been accomplished through the use of the <link rel="prefetch"> attribute as one of the Resource Hints. Developers had to manually specify the attribute on each page for each resource they wanted the browser to preemptively fetch and cache in memory. This manual effort has not only been laborious but developers often lacked insight into what resources should be prefetched, which reduced the quality of their specified hints.
In a similar vein, Cloudflare has offered a URL prefetching feature since 2015. Instead of prefetching in browser cache, Cloudflare allows customers to prefetch a static list of resources into the CDN cache. The feature allows prefetching resources in advance of when they are actually needed, usually during idle time or when network conditions are favorable. However, similar concerns apply for CDN prefetching, since customers have to manually decide on what resources are good candidates for prefetching for each page they own. If misconfigured, static link prefetching can be a footgun, causing the web page load time to actually slow down.
Server Push and its struggles
HTTP/2’s “server push” was another attempt to improve web performance by pushing resources to the client before they were requested. In theory, this would reduce latency by eliminating the need for additional round trips for future assets. However, the server-centric dictatorial nature of “pushing” resources to the client raised significant challenges, primarily due to lack of context about what was already cached in the browser. This not only wasted bandwidth but had the potential to slow down the delivery of critical resources, like base HTML and CSS, due to race conditions on browser fetches when rendering the page. The proposed solution of cache digests, which would have informed servers about client cache contents, never gained widespread implementation, leaving servers to push resources blindly. In October 2022, Google Chrome removed Server Push support, and in September 2024, Firefox followed suit.
A step forward with Early Hints
As a successor, Early Hints was specified in 2017 but not widely adopted until 2022, when we partnered with browsers and key customers to deploy it. It offers a more efficient alternative by “hinting” to clients which resources to load, allowing better prioritization based on what the browser needs. Specifically, the server sends a 103 Early Hints HTTP status code with a list of key page assets that the browser should start loading while the main response is still being prepared. This gives the browser a head start in fetching essential resources and avoids redundant preloading if assets are already cached. Although Early Hints doesn’t adapt to user behaviors or dynamic page conditions (yet), its use is primarily limited to preloading specific assets rather than full web pages — in particular, cases where there is a long server “think time” to produce HTML.
As the web evolves, tools that can handle complex, dynamic user interactions will become increasingly important to balance the performance gains of speculative execution with its potential drawbacks for end-users. For years Cloudflare has offered performance-based solutions that adapt to user behavior and work to balance the speed and correctness decisions across the Internet like Argo Smart Routing, Smart Tiered Cache, and Smart Placement. Today we take another step forward toward an adaptable framework for serving content lightning-fast.
Enter Speed Brain: what makes it different?
Speed Brain offers a robust approach for implementing predictive prefetching strategies directly within the browser based on the ruleset returned by our servers. By building on lessons from previous attempts, it shifts the responsibility for resource prediction to the client, enabling more dynamic and personalized optimizations based on user interaction – like hovering over a link, for example – and their device capabilities. Instead of the browser sitting idly waiting for the next web page to be requested by the user, it takes cues from how a user is interacting with a page and begins asking for the next web page before the user finishes clicking on a link.
Behind the scenes, all of this magic is made possible by the Speculation Rules API, which is an emerging standard in the web performance space from Google. When Cloudflare’s Speed Brain feature is enabled, an HTTP header called Speculation-Rules is added to web page responses. The value for this header is a URL that hosts an opinionated Rules configuration. This configuration instructs the browser to initiate prefetch requests for future navigations. Speed Brain does not improve page load time for the first page that is visited on a website, but it can improve it for subsequent web pages that are visited on the same site.
The idea seems simple enough, but prefetching comes with challenges, as some prefetched content may never end up being used. With the initial release of Speed Brain, we have designed a solution with guardrails that addresses two important but distinct issues that limited previous speculation efforts — stale prefetch configuration and incorrect prefetching. The Speculation Rules API configuration we have chosen for this initial release has been carefully designed to balance safety of prefetching while still maintaining broad applicability of rules for the entire site.
Stale prefetch configuration
As websites inevitably change over time, static prefetch configurations often become outdated, leading to inefficient or ineffective prefetching. This has been especially true for techniques like the rel=prefetch attribute or static CDN prefetching URL sets, which have required developers to manually maintain relevant prefetchable URL lists for each page of their website. Most static prefetch lists are based on developer intuition rather than real user navigation data, potentially missing important prefetch opportunities or wasting resources on unnecessary prefetches.
Incorrect prefetching
Since prefetch requests are just like normal requests except with a `sec-purpose` HTTP request header, they incur the same overhead on the client, network, and server. However, the crucial difference is that prefetch requests anticipate user behavior and the response might not end up being used, so all that overhead might be wasted. This makes prefetch accuracy extremely important — that is, maximizing the percentage of prefetched pages that end up being viewed by the user. Incorrect prefetching can lead to inefficiencies and unneeded costs, such as caching resources that aren’t requested, or wasting bandwidth and network resources, which is especially critical on metered mobile networks or in low-bandwidth environments.
Guardrails
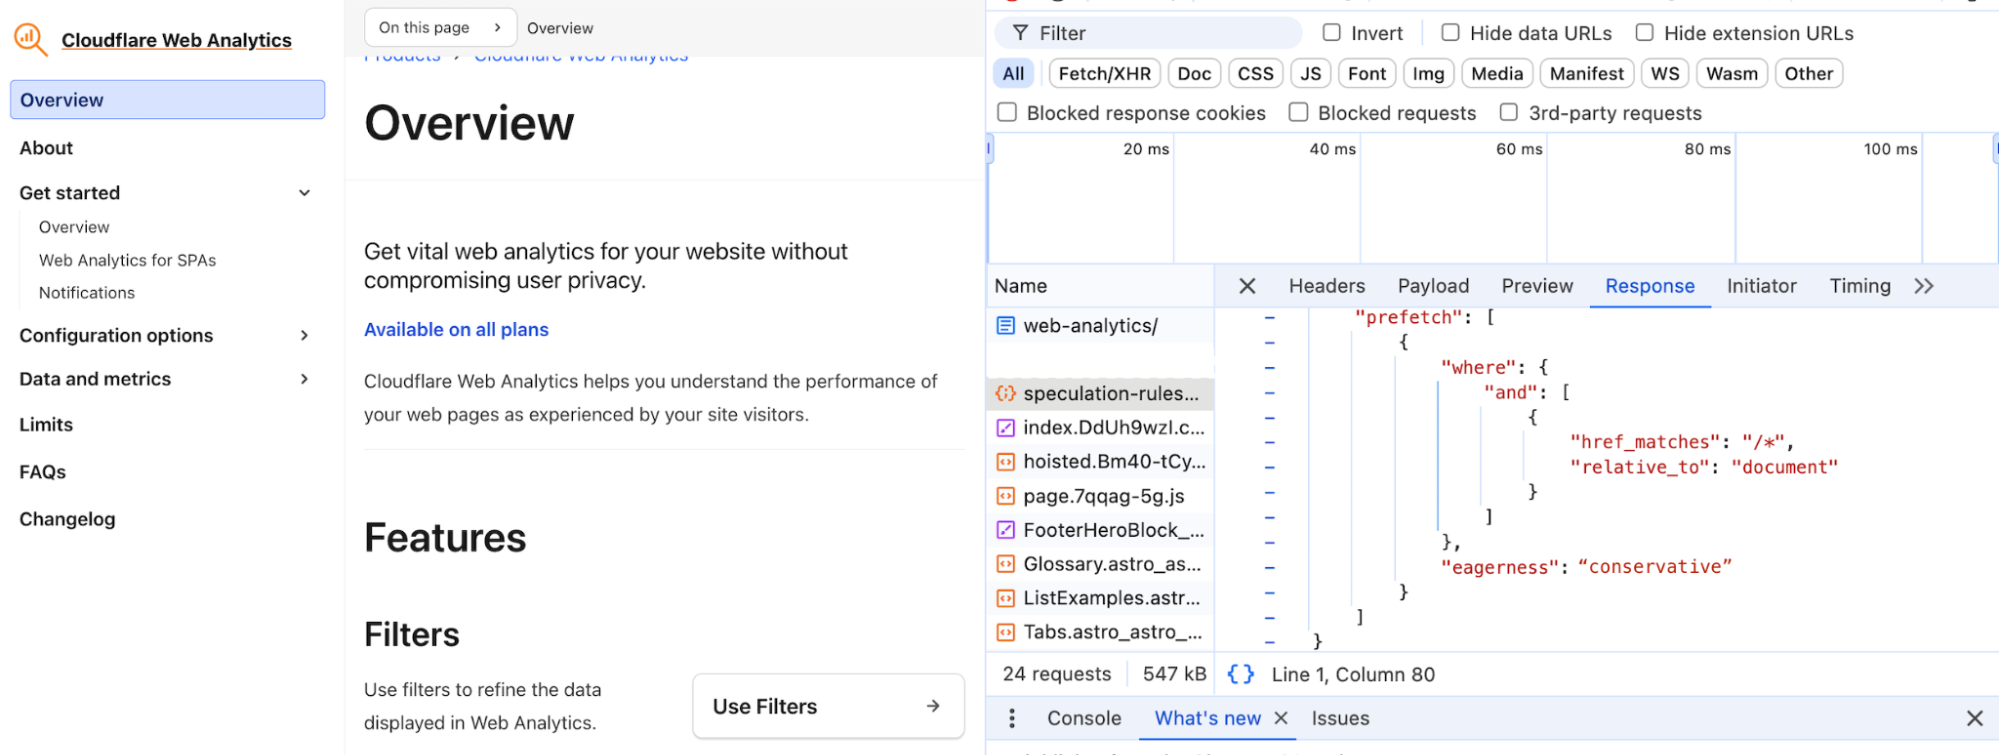
With the initial release of Speed Brain, we have designed a solution with important side effect prevention guardrails that completely removes the chance of stale prefetch configuration, and minimizes the risk of incorrect prefetching. This opinionated configuration is achieved by leveraging the document rules and eagerness settings from the Speculation Rules API. Our chosen configuration looks like the following:
{
  "prefetch": [{
    "source": "document",
    "where": {
      "and": [
        { "href_matches": "/*", "relative_to": "document" },
      ]
    },
    "eagerness": "conservative"
  }]
}
Document Rules
Document Rules, indicated by “source”: “document” and the “where” key in the configuration, allows prefetching to be applied dynamically over the entire web page. This eliminates the need for a predefined static URL list for prefetching. Hence, we remove the problem of stale prefetch configuration as prefetch candidate links are determined based on the active page structure.
Our use of “relative_to”: “document” in the where clause instructs the browser to limit prefetching to same-site links. This has the added bonus of allowing our implementation to avoid cross-origin prefetches to avoid any privacy implications for users, as it doesn’t follow them around the web.
Eagerness
Eagerness controls how aggressively the browser prefetches content. There are four possible settings:
-
immediate: Used as soon as possible on page load — generally as soon as the rule value is seen by the browser, it starts prefetching the next page.
-
eager: Identical to immediate setting above, but the prefetch trigger additionally relies on slight user interaction events, such as moving the cursor towards the link (coming soon).
-
moderate: Prefetches if you hold the pointer over a link for more than 200 milliseconds (or on the pointerdown event if that is sooner, and on mobile where there is no hover event).
-
conservative: Prefetches on pointer or touch down on the link.
Our initial release of Speed Brain makes use of the conservative eagerness value to minimize the risk of incorrect prefetching, which can lead to unintended resource waste while making your websites noticeably faster. While we lose out on the potential performance improvements that the more aggressive eagerness settings offer, we chose this cautious approach to prioritize safety for our users. Looking ahead, we plan to explore more dynamic eagerness settings for sites that could benefit from a more liberal setting, and we’ll also expand our rules to include prerendering.
Another important safeguard we implement is to only accept prefetch requests for static content that is already stored in our CDN cache. If the content isn’t in the cache, we reject the prefetch request. Retrieving content directly from our CDN cache for prefetching requests lets us bypass concerns about their cache eligibility. The rationale for this is straightforward: if a page is not eligible for caching, we don’t want it to be prefetched in the browser cache, as it could lead to unintended consequences and increased origin load. For instance, prefetching a logout page might log the user out prematurely before the user actually finishes their action. Stateful prefetching or prerendering requests can have unpredictable effects, potentially altering the server’s state for actions the client has not confirmed. By only allowing prefetching for pages already in our CDN cache, we have confidence those pages will not negatively impact the user experience.
These guardrails were implemented to work in performance-sensitive environments. We measured the impact of our baseline conservative deployment model on all pages across Cloudflare’s developer documentation in early July 2024. We found that we were able to prefetch the correct content, content that would in fact be navigated to by the users, 94% of the time. We did this while improving the performance of the navigation by reducing LCP at p75 quantile by 40% without inducing any unintended side effects. The results were amazing!
Explaining Cloudflare’s implementation
Our global network spans over 330 cities and operates within 50 milliseconds of 95% of the Internet-connected population. This extensive reach allows us to significantly improve the performance of cacheable assets for our customers. By leveraging this network for smart prefetching with Speed Brain, Cloudflare can serve prefetched content directly from the CDN cache, reducing network latency to practically instant.
Our unique position on the network provides us the leverage to automatically enable Speed Brain without requiring any changes from our customers to their origin server configurations. It’s as simple as flipping a switch! Our first version of Speed Brain is now live.
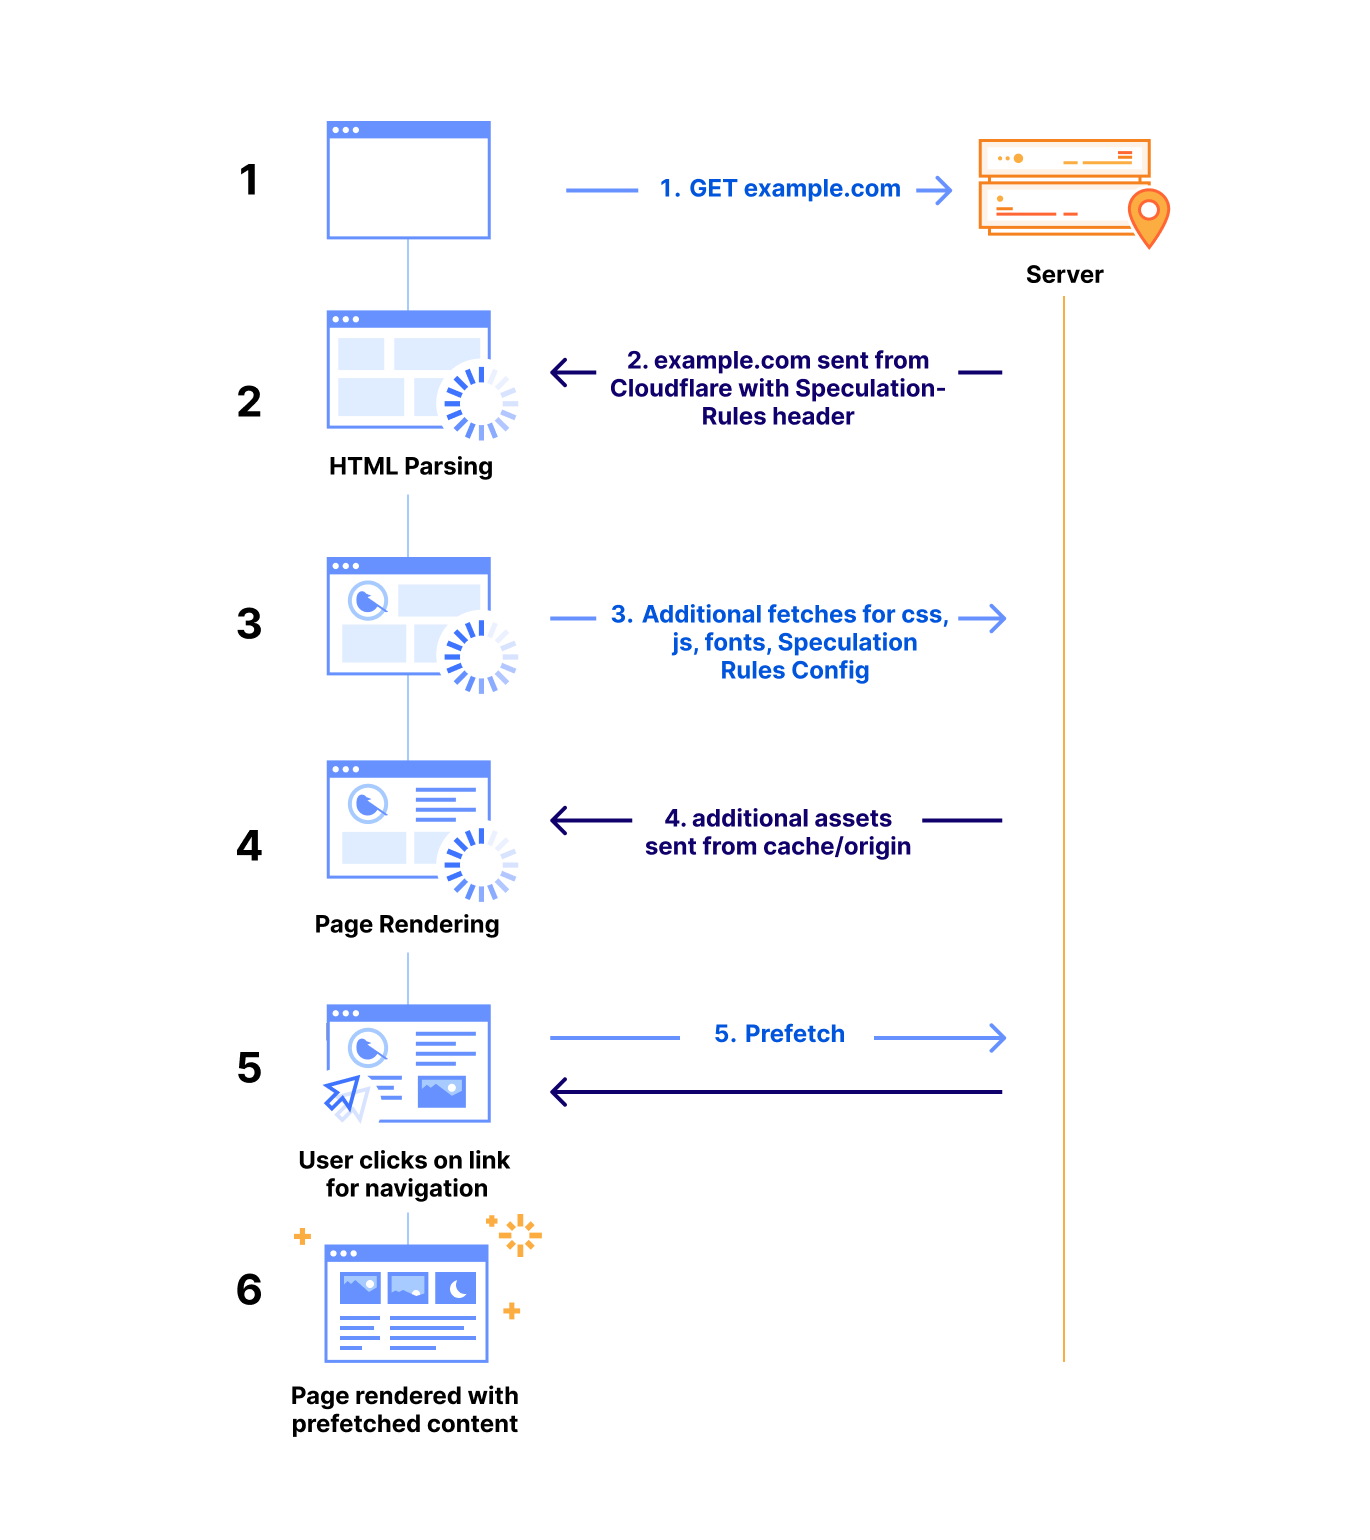
-
Upon receiving a request for a web page with Speed Brain enabled, the Cloudflare server returns an additional “Speculation-Rules” HTTP response header. The value for this header is a URL that hosts an opinionated Rules configuration (as mentioned above).
-
When the browser begins parsing the response header, it fetches our Speculation-Rules configuration, and loads it as part of the web page.
-
The configuration guides the browser on when to prefetch the next likely page from Cloudflare that the visitor may navigate to, based on how the visitor is engaging with the page.
-
When a user action (such as mouse down event on the next page link) triggers the Rules application, the browser sends a prefetch request for that page with the “sec-purpose: prefetch” HTTP request header.
-
Our server parses the request header to identify the prefetch request. If the requested content is present in our cache, we return it; otherwise, we return a 503 HTTP status code and deny the prefetch request. This removes the risk of unsafe side-effects of sending requests to origins or Cloudflare Workers that are unaware of prefetching. Only content present exclusively in the cache is returned.
-
On a success response, the browser successfully prefetches the content in memory, and when the visitor navigates to that page, the browser directly loads the web page from the browser cache for immediate rendering.
Common troubleshooting patterns
Support for Speed Brain relies on the Speculation Rules API, an emerging web standard. As of September 2024, support for this emerging standard is limited to Chromium-based browsers (version 121 or later), such as Google Chrome and Microsoft Edge. As the web community reaches consensus on API standardization, we hope to see wider adoption across other browser vendors.
Prefetching by nature does not apply to dynamic content, as the state of such content can change, potentially leading to stale or outdated data being delivered to the end user as well as increased origin load. Therefore, Speed Brain will only work for non-dynamic pages of your website that are cached on our network. It has no impact on the loading of dynamic pages. To get the most benefit out of Speed Brain, we suggest making use of cache rules to ensure that all static content (especially HTML content) on your site is eligible for caching.
When the browser receives a 503 HTTP status code in response to a speculative prefetch request (marked by the sec-purpose: prefetch header), it cancels the prefetch attempt. Although a 503 error appearing in the browser’s console may seem alarming, it is completely harmless for prefetch request cancellation. In our early tests, the 503 response code has caused some site owners concern. We are working with our partners to iterate on this to improve the client experience, but for now follow the specification guidance, which suggests a 503 response for the browser to safely discard the speculative request. We’re in active discussions with Chrome, based on feedback from early beta testers, and believe a new non-error dedicated response code would be more appropriate, and cause less confusion. In the meantime, 503 response logs for prefetch requests related to Speed Brain are harmless. If your tooling makes ignoring these requests difficult, you can temporarily disable Speed Brain until we work out something better with the Chrome Team.
Additionally, when a website uses both its own custom Speculation Rules and Cloudflare’s Speed Brain feature, both rule sets can operate simultaneously. Cloudflare’s guardrails will limit speculation rules to cacheable pages, which may be an unexpected limitation for those with existing implementations. If you observe such behavior, consider disabling one of the implementations for your site to ensure consistency in behavior. Note that if your origin server responses include the Speculation-Rules header, it will not be overridden. Therefore, the potential for ruleset conflicts primarily applies to predefined in-line speculation rules.
How can I see the impact of Speed Brain?
In general, we suggest that you use Speed Brain and most other Cloudflare performance features with our RUM performance measurement tool enabled. Our RUM feature helps developers and website operators understand how their end users are experiencing the performance of their application, providing visibility into:
-
Loading: How long did it take for content to become available?
-
Interactivity: How responsive is the website when users interact with it?
-
Visual stability: How much does the page move around while loading?
With RUM enabled, you can navigate to the Web Analytics section in the dashboard to see important information about how Speed Brain is helping reduce latency in your core web vitals metrics like Largest Contentful Paint (LCP) and load time.
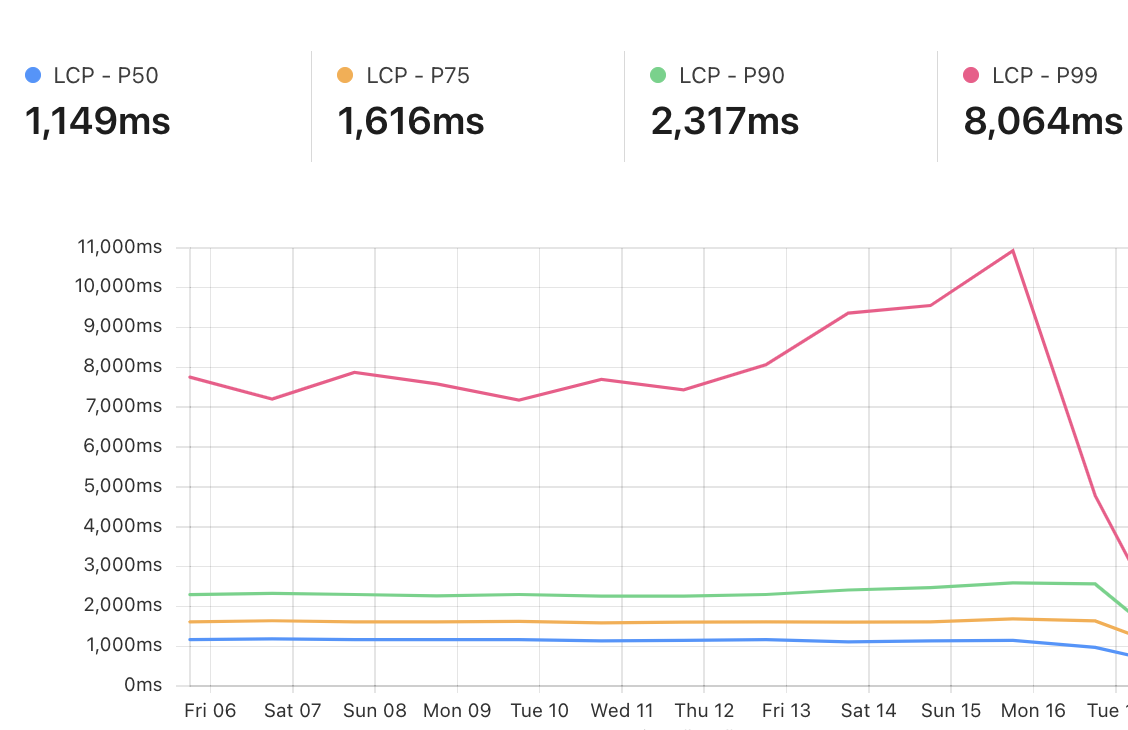
Example RUM dashboard for a website with a high amount of prefetchable content that enabled Speed Brain around September 16.
What have we seen in our rollout so far?
We have enabled this feature by default on all free plans and have observed the following:
Domains
Cloudflare currently has tens of millions of domains using Speed Brain. We have measured the LCP at the 75th quantile (p75) for these sites and found an improvement for these sites between 40% and 50% (average around 45%).
We found this improvement by comparing navigational prefetches to normal (non-prefetched) page loads for the same set of domains.
Requests
Before Speed Brain is enabled, the p75 of free websites on Cloudflare experience an LCP around 2.2 seconds. With Speed Brain enabled, these sites see significant latency savings on LCP. In aggregate, Speed Brain saves about 0.88 seconds on the low end and up to 1.1 seconds on each successful prefetch!
Applicable browsers
Currently, the Speculation Rules API is only available in Chromium browsers. From Cloudflare Radar, we can see that approximately 70% of requests from visitors are from Chromium (Chrome, Edge, etc) browsers.
Across the network
Cloudflare sees hundreds of billions of requests for HTML content each day. Of these requests, about half are cached (make sure your HTML is cacheable!). Around 1% of those requests are for navigational prefetching made by the visitors. This represents significant savings every day for visitors to websites with Speed Brain enabled. Every 24 hours, Speed Brain can save more than 82 years worth of latency!

What’s next?
What we’re offering today for Speed Brain is only the beginning. Heading into 2025, we have a number of exciting additions to explore and ship.
Leveraging Machine Learning
Our unique position on the Internet provides us valuable insights into web browsing patterns, which we can leverage for improving web performance while maintaining individual user privacy. By employing a generalized data-driven machine learning approach, we can define more accurate and site-specific prefetch predictors for users’ pages.
We are in the process of developing an adaptive speculative model that significantly improves upon our current conservative offering. This model uses a privacy-preserving method to generate a user traversal graph for each site based on same-site Referrer headers. For any two pages connected by a navigational hop, our model predicts the likelihood of a typical user moving between them, using insights extracted from our aggregated traffic data.
This model enables us to tailor rule sets with custom eagerness values to each relevant next page link on your site. For pages where the model predicts high confidence in user navigation, the system will aggressively prefetch or prerender them. If the model does not provide a rule for a page, it defaults to our existing conservative approach, maintaining the benefits of baseline Speed Brain model. These signals guide browsers in prefetching and prerendering the appropriate pages, which helps speed up navigation for users, while maintaining our current safety guardrails.
In lab tests, our ML model improved LCP latency by 75% and predicted visitor navigation with ~98% accuracy, ensuring the correct pages were being prefetched to prevent resource waste for users. As we move toward scaling this solution, we are focused on periodic training of the model to adapt to varying user behaviors and evolving websites. Using an online machine learning approach will drastically reduce the need for any manual update, and content drifts, while maintaining high accuracy — the Speed Brain load solution that gets smarter over time!
Finer observability via RUM
As we’ve mentioned, we believe that our RUM tools offer the best insights for how Speed Brain is helping the performance of your website. In the future, we plan on offering the ability to filter RUM tooling by navigation type so that you can compare the browser rendering of prefetched content versus non-prefetched content.
Prerendering
We are currently offering the ability for prefetching on cacheable content. Prefetching downloads the main document resource of the page before the user’s navigation, but it does not instruct the browser to prerender the page or download any additional subresources.
In the future, Cloudflare’s Speed Brain offering will prefetch content into our CDN cache and then work with browsers to know what are the best prospects for prerendering. This will help get static content even closer to instant rendering.
Argo Smart Browsing: Speed Brain & Smart Routing
Speed Brain, in its initial implementation, provides an incredible performance boost whilst still remaining conservative in its implementation; both from an eagerness, and a resource consumption perspective.
As was outlined earlier in the post, lab testing of a more aggressive model, powered by machine-learning and a higher eagerness, yielded a 75% reduction in LCP. We are investigating bundling this more aggressive, additional implementation of Speed Brain with Argo Smart Routing into a product called “Argo Smart Browsing”.
Cloudflare customers will be free to continue using Speed Brain, however those who want even more performance improvement will be able to enable Argo Smart Browsing with a single button click. With Argo Smart Browsing, not only will cacheable static content load up to 75% faster in the browser, thanks to the more aggressive models, however in times when content can’t be cached, and the request must go forward to an origin server, it will be sent over the most performant network path resulting in an average 33% performance increase. Performance optimizations are being applied to almost every segment of the request lifecycle regardless if the content is static or dynamic, cached or not.
Conclusion
To get started with Speed Brain, navigate to Speed > Optimization > Content Optimization > Speed Brain in the Cloudflare Dashboard and enable it. That’s all! The feature can also be enabled via API. Free plan domains have had Speed Brain enabled by default.
We strongly recommend that customers also enable RUM, found in the same section of the dashboard, to give visibility into the performance improvements provided by Speed Brain and other Cloudflare features and products.
We’re excited to continue to build products and features that make web performance reliably fast. If you’re an engineer interested in improving the performance of the web for all, come join us!

TURN and anycast: making peer connections work globally
Post Syndicated from Nils Ohlmeier original https://blog.cloudflare.com/webrtc-turn-using-anycast
A TURN server helps maintain connections during video calls when local networking conditions prevent participants from connecting directly to other participants. It acts as an intermediary, passing data between users when their networks block direct communication. TURN servers ensure that peer-to-peer calls go smoothly, even in less-than-ideal network conditions.
When building their own TURN infrastructure, developers often have to answer a few critical questions:
-
“How do we build and maintain a mesh network that achieves near-zero latency to all our users?”
-
“Where should we spin up our servers?”
-
“Can we auto-scale reliably to be cost-efficient without hurting performance?”
In April, we launched Cloudflare Calls TURN in open beta to help answer these questions. Starting today, Cloudflare Calls’ TURN service is now generally available to all Cloudflare accounts. Our TURN server works on our anycast network, which helps deliver global coverage and near-zero latency required by real time applications.
TURN solves connectivity and privacy problems for real time apps
When Internet Protocol version 4 (IPv4, RFC 791) was designed back in 1981, it was assumed that the 32-bit address space was big enough for all computers to be able to connect to each other. When IPv4 was created, billions of people didn’t have smartphones in their pockets and the idea of the Internet of Things didn’t exist yet. It didn’t take long for companies, ISPs, and even entire countries to realize they didn’t have enough IPv4 address space to meet their needs.
NATs are unpredictable
Fortunately, you can have multiple devices share the same IP address because the most common protocols run on top of IP are TCP and UDP, both of which support up to 65,535 port numbers. (Think of port numbers on an IP address as extensions behind a single phone number.) To solve this problem of IP scarcity, network engineers developed a way to share a single IP address across multiple devices by exploiting the port numbers. This is called Network Address Translation (NAT) and it is a process through which your router knows which packets to send to your smartphone versus your laptop or other devices, all of which are connecting to the public Internet through the IP address assigned to the router.
In a typical NAT setup, when a device sends a packet to the Internet, the NAT assigns a random, unused port to track it, keeping a forwarding table to map the device to the port. This allows NAT to direct responses back to the correct device, even if the source IP address and port vary across different destinations. The system works as long as the internal device initiates the connection and waits for the response.
However, real-time apps like video or audio calls are more challenging with NAT. Since NATs don’t reveal how they assign ports, devices can’t pre-communicate where to send responses, making it difficult to establish reliable connections. Earlier solutions like STUN (RFC 3489) couldn’t fully solve this, which gave rise to the TURN protocol.
TURN predictably relays traffic between devices while ensuring minimal delay, which is crucial for real-time communication where even a second of lag can disrupt the experience.
ICE to determine if a relay server is needed
The ICE (Interactive Connectivity Establishment) protocol was designed to find the fastest communication path between devices. It works by testing multiple routes and choosing the one with the least delay. ICE determines whether a TURN server is needed to relay the connection when a direct peer-to-peer path cannot be established or is not performant enough.
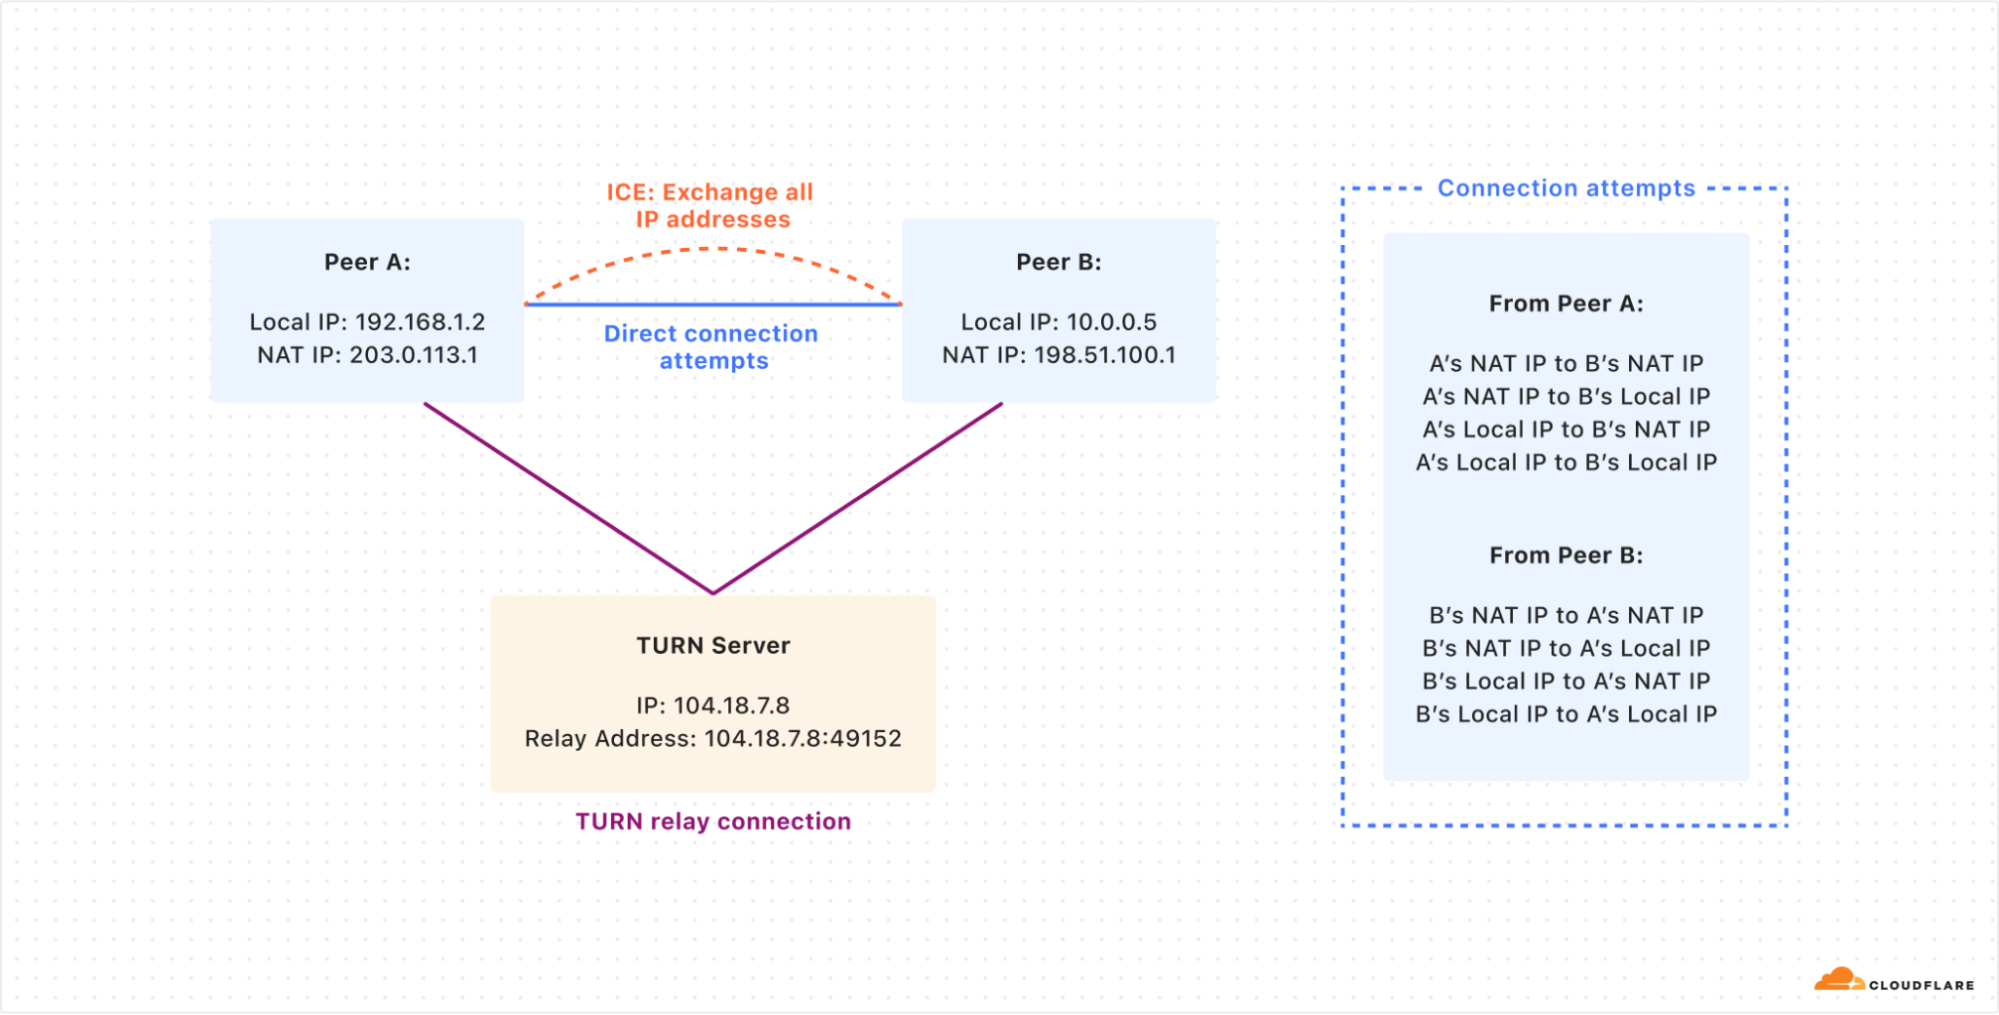
How two peers (A and B) try to connect directly by sharing their public and local IP addresses using the ICE protocol. If the direct connection fails, both peers use the TURN server to relay their connection and communicate with each other.
While ICE is designed to find the most efficient connection path between peers, it can inadvertently expose sensitive information, creating privacy concerns. During the ICE process, endpoints exchange a list of all possible network addresses, including local IP addresses, NAT IP addresses, and TURN server addresses. This comprehensive sharing of network details can reveal information about a user’s network topology, potentially exposing their approximate geographic location or details about their local network setup.
The “brute force” nature of ICE, where it attempts connections on all possible paths, can create distinctive network traffic patterns that sophisticated observers might use to infer the use of specific applications or communication protocols.
TURN solves privacy problems
The threat from exposing sensitive information while using real-time applications is especially important for people that use end-to-end encrypted messaging apps for sensitive information — for example, journalists who need to communicate with unknown sources without revealing their location.
With Cloudflare TURN in place, traffic is proxied through Cloudflare, preventing either party in the call from seeing client IP addresses or associated metadata. Cloudflare simply forwards the calls to their intended recipients, but never inspects the contents — the underlying call data is always end-to-end encrypted. This masking of network traffic is an added layer of privacy.
Cloudflare is a trusted third-party when it comes to operating these types of services: we have experience operating privacy-preserving proxies at scale for our Consumer WARP product, Apple’s Private Relay, and Microsoft Edge’s Secure Network, preserving end-user privacy without sacrificing performance.
Cloudflare’s TURN is the fastest because of Anycast
Lots of real time communication services run their own TURN servers on a commercial cloud provider because they don’t want to leave a certain percentage of their customers with non-working communication. This results in additional costs for DevOps, egress bandwidth, etc. And honestly, just deploying and running a TURN server, like CoTURN, in a VPS isn’t an interesting project for most engineers.
Because using a TURN relay adds extra delay for the packets to travel between the peers, the relays should be located as close as possible to the peers. Cloudflare’s TURN service avoids all these headaches by simply running in all of the 330 cities where Cloudflare has data centers. And any time Cloudflare adds another city, the TURN service automatically becomes available there as well.
Anycast is the perfect network topology for TURN
Anycast is a network addressing and routing methodology in which a single IP address is shared by multiple servers in different locations. When a client sends a request to an anycast address, the network automatically routes the request via BGP to the topologically nearest server. This is in contrast to unicast, where each destination has a unique IP address. Anycast allows multiple servers to have the same IP address, and enables clients to automatically connect to a server close to them. This is similar to emergency phone networks (911, 112, etc.) which connect you to the closest emergency communications center in your area.
Anycast allows for lower latency because of the sheer number of locations available around the world. Approximately 95% of the Internet-connected population globally is within approximately 50ms away from a Cloudflare location. For real-time communication applications that use TURN, leads to improved call quality and user experience.
Auto-scaling and inherently global
Running TURN over anycast allows for better scalability and global distribution. By naturally distributing load across multiple servers based on network topology, this setup helps balance traffic and improve performance. When you use Cloudflare’s TURN service, you don’t need to manage a list of servers for different parts of the world. And you don’t need to write custom scaling logic to scale VMs up or down based on your traffic.
Anycast allows TURN to use fewer IP addresses, making it easier to allowlist in restrictive networks. Stateless protocols like DNS over UDP work well with anycast. This includes stateless STUN binding requests used to determine a system’s external IP address behind a NAT.
However, stateful protocols over UDP, like QUIC or TURN, are more challenging with anycast. QUIC handles this better due to its stable connection ID, which load balancers can use to consistently route traffic. However, TURN/STUN lacks a similar connection ID. So when a TURN client sends requests to the Cloudflare TURN service, the Unimog load balancer ensures that all its requests get routed to the same server within a data center. The challenges for the communication between a client on the Internet and Cloudflare services listening on an anycast IP address have been described multiple times before.
How does Cloudflare’s TURN server receive packets?
TURN servers act as relay points to help connect clients. This process involves two types of connections: the client-server connection and the third-party connection (relayed address).
The client-server connection uses published IP and port information to communicate with TURN clients using anycast.
For the relayed address, using anycast poses a challenge. The TURN protocol requires that packets reach the specific Cloudflare server handling the client connection. If we used anycast for relay addresses, packets might not arrive at the correct data center or server.
One alternative is to use unicast addresses for relay candidates. However, this approach has drawbacks, including making servers vulnerable to attacks and requiring many IP addresses.
To solve these issues, we’ve developed a middle-ground solution, previously discussed in “Cloudflare servers don’t own IPs anymore – so how do they connect to the Internet?”. We use anycast addresses but add extra handling for packets that reach incorrect servers. If a packet arrives at the wrong Cloudflare location, we forward it over our backbone to the correct datacenter, rather than sending it back over the public Internet.
This approach not only resolves routing issues but also improves TURN connection speed. Packets meant for the relay address enter the Cloudflare network as close to the sender as possible, optimizing the routing process.
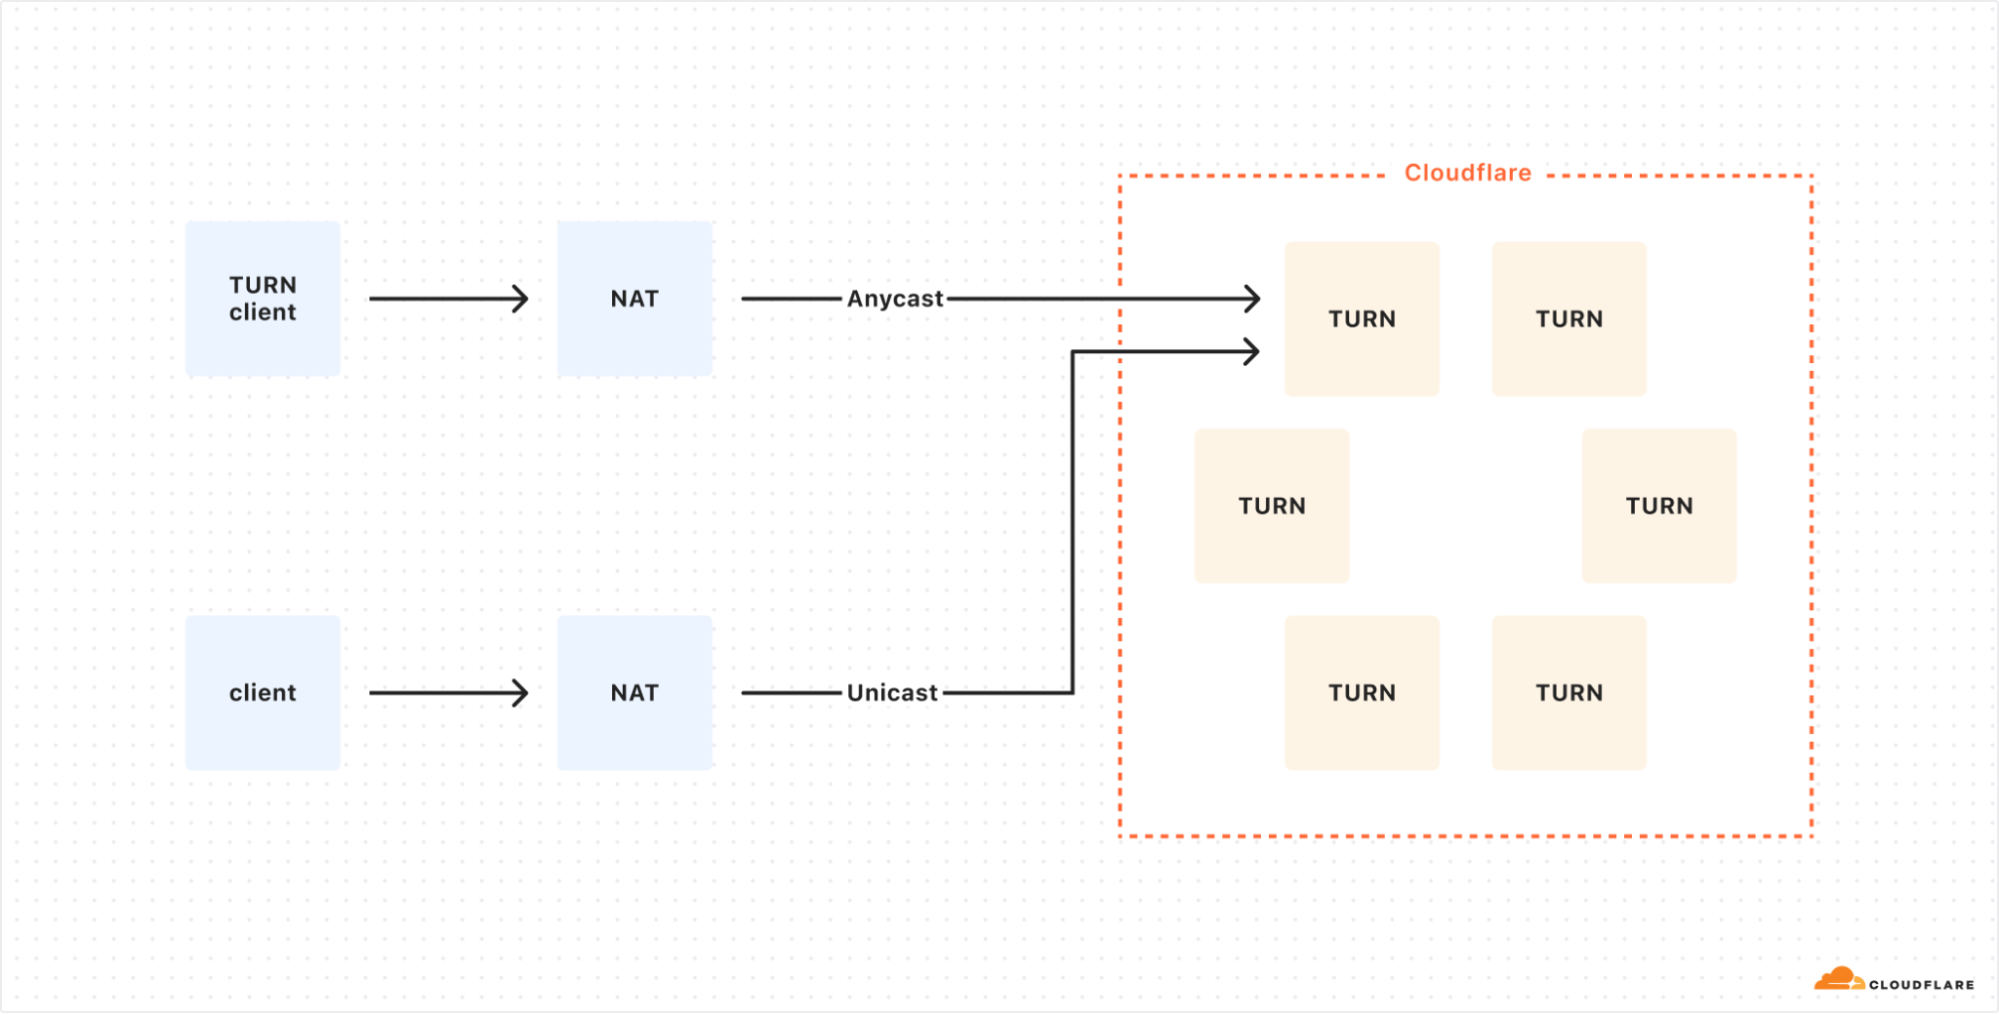
In this non-ideal setup, a TURN client connects to Cloudflare using Anycast, while a direct client uses Unicast, which would expose the TURN server to potential DDoS attacks.
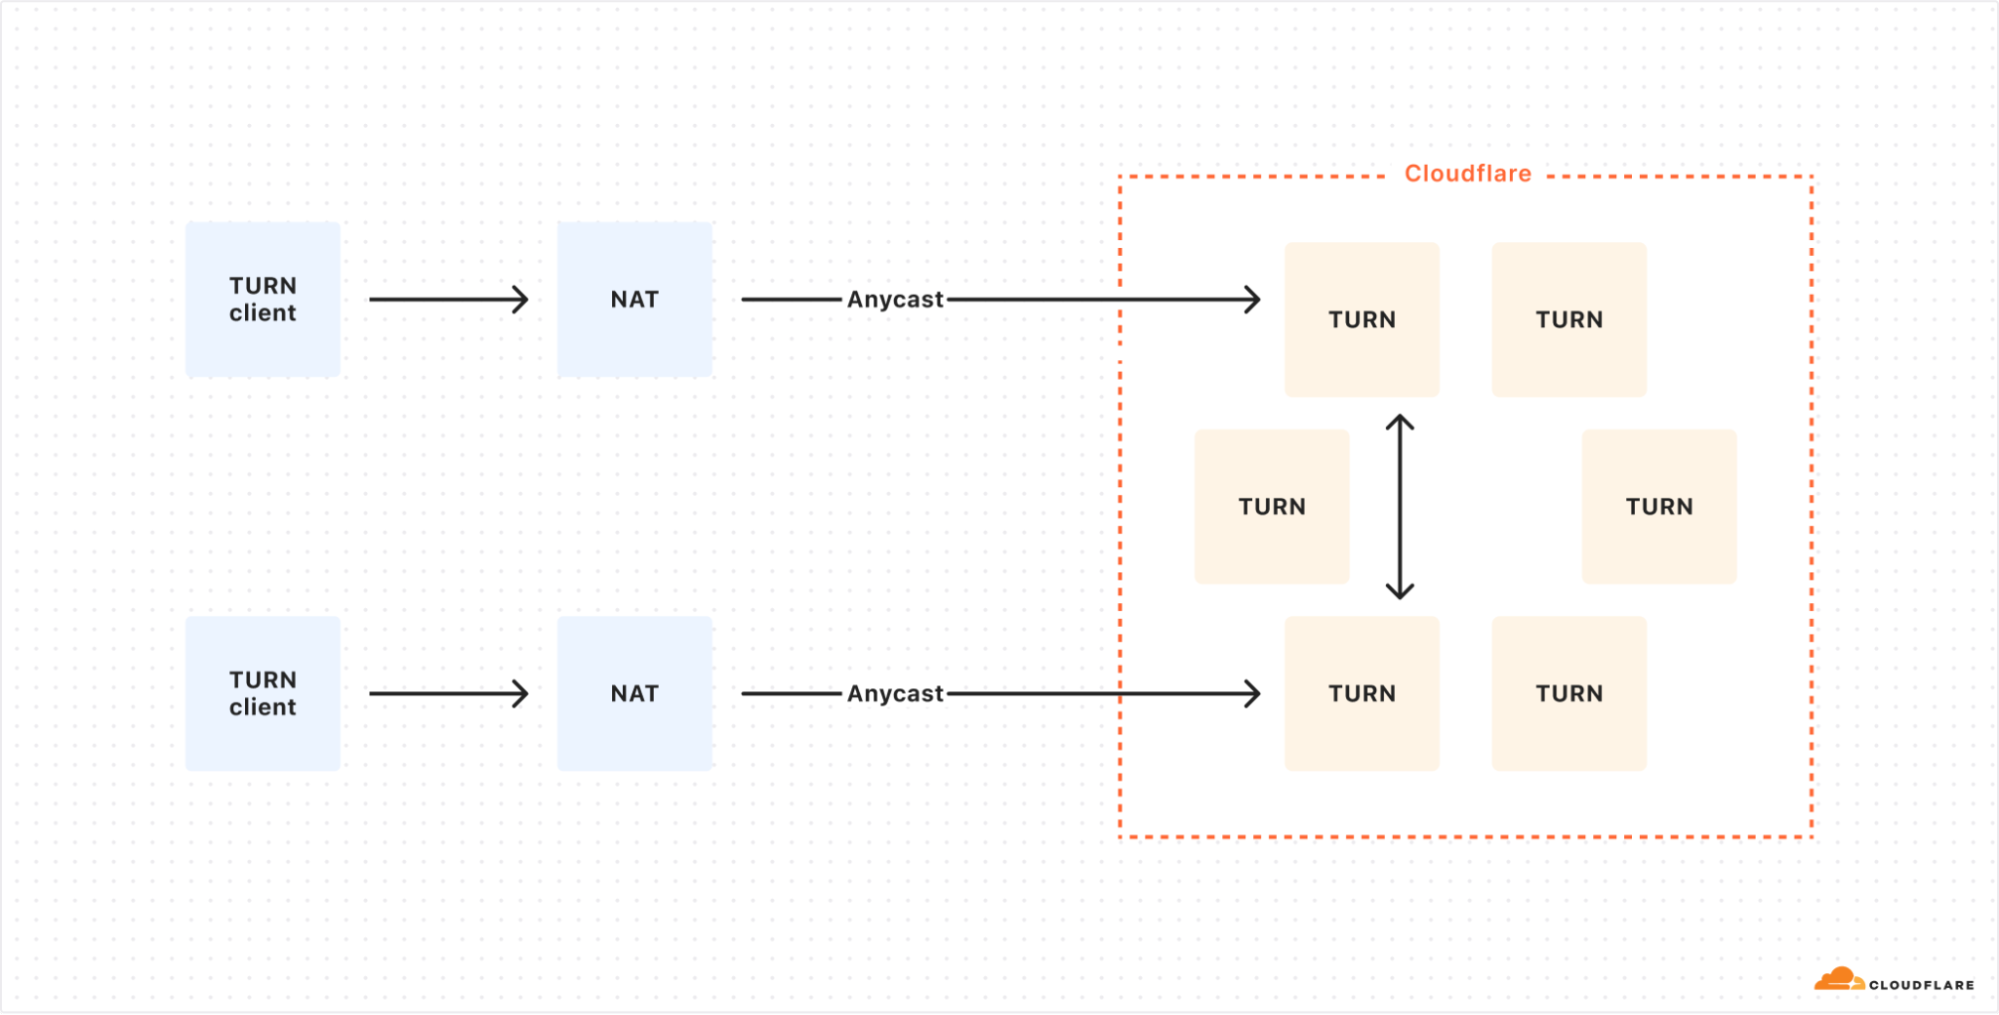
The optimized setup uses Anycast for all TURN clients, allowing for dynamic load distribution across Cloudflare’s globally distributed TURN servers.
Try Cloudflare Calls TURN today
The new TURN feature of Cloudflare Calls addresses critical challenges in real-time communication:
-
Connectivity: By solving NAT traversal issues, TURN ensures reliable connections even in complex network environments.
-
Privacy: Acting as an intermediary, TURN enhances user privacy by masking IP addresses and network details.
-
Performance: Leveraging Cloudflare’s global anycast network, our TURN service offers unparalleled speed and near-zero latency.
-
Scalability: With presence in over 330 cities, Cloudflare Calls TURN grows with your needs.
Cloudflare Calls TURN service is billed on a usage basis. It is available to self-serve and Enterprise customers alike. There is no cost for the first 1,000 GB (one terabyte) of Cloudflare Calls usage each month. It costs five cents per GB after your first terabyte of usage on self-serve. Volume pricing is available for Enterprise customers through your account team.
Switching TURN providers is likely as simple as changing a single configuration in your real-time app. To get started with Cloudflare’s TURN service, create a TURN app from your Cloudflare Calls Dashboard or read the Developer Docs.
New standards for a faster and more private Internet
Post Syndicated from Matt Bullock original https://blog.cloudflare.com/new-standards
As the Internet grows, so do the demands for speed and security. At Cloudflare, we’ve spent the last 14 years simplifying the adoption of the latest web technologies, ensuring that our users stay ahead without the complexity. From being the first to offer free SSL certificates through Universal SSL to quickly supporting innovations like TLS 1.3, IPv6, and HTTP/3, we’ve consistently made it easy for everyone to harness cutting-edge advancements.
One of the most exciting recent developments in web performance is Zstandard (zstd) — a new compression algorithm that we have found compresses data 42% faster than Brotli while maintaining almost the same compression levels. Not only that, but Zstandard reduces file sizes by 11.3% compared to GZIP, all while maintaining comparable speeds. As compression speed and efficiency directly impact latency, this is a game changer for improving user experiences across the web.
We’re also re-starting the rollout of Encrypted Client Hello (ECH), a new proposed standard that prevents networks from snooping on which websites a user is visiting. Encrypted Client Hello (ECH) is a successor to ESNI and masks the Server Name Indication (SNI) that is used to negotiate a TLS handshake. This means that whenever a user visits a website on Cloudflare that has ECH enabled, no one except for the user, Cloudflare, and the website owner will be able to determine which website was visited. Cloudflare is a big proponent of privacy for everyone and is excited about the prospects of bringing this technology to life.
In this post, we also further explore our work measuring the impact of HTTP/3 prioritization, and the development of Bottleneck Bandwidth and Round-trip propagation time (BBR) congestion control to further optimize network performance.
Introducing Zstandard compression
Zstandard, an advanced compression algorithm, was developed by Yann Collet at Facebook and open sourced in August 2016 to manage large-scale data processing. It has gained popularity in recent years due to its impressive compression ratios and speed. The protocol was included in Chromium-based browsers and Firefox in March 2024 as a supported compression algorithm.
Today, we are excited to announce that Zstandard compression between Cloudflare and browsers is now available to everyone.
Our testing shows that Zstandard compresses data up to 42% faster than Brotli while achieving nearly equivalent data compression. Additionally, Zstandard outperforms GZIP by approximately 11.3% in compression efficiency, all while maintaining similar compression speeds. This means Zstandard can compress files to the same size as Brotli but in nearly half the time, speeding up your website without sacrificing performance.
This is exciting because compression speed and file size directly impacts latency. When a browser requests a resource from the origin server, the server needs time to compress the data before it’s sent over the network. A faster compression algorithm, like Zstandard, reduces this initial processing time. By also reducing the size of files transmitted over the Internet, better compression means downloads take less time to complete, websites load quicker, and users ultimately get a better experience.

Why is compression so important?
Website performance is crucial to the success of online businesses. Study after study has shown that an increased load time directly affects sales. In highly competitive markets, the performance of a website is crucial for success. Just like a physical shop situated in a remote area faces challenges in attracting customers, a slow website encounters similar difficulties in attracting traffic.
Think about buying a piece of flat pack furniture such as a bookshelf. Instead of receiving the bookshelf fully assembled, which would be expensive and cumbersome to transport, you receive it in a compact, flat box with all the components neatly organized, ready for assembly. The parts are carefully arranged to take up the least amount of space, making the package much smaller and easier to handle. When you get the item, you simply follow the instructions to assemble it to its proper state.
This is similar to how data compression works. The data is “disassembled” and packed tightly to reduce its size before being transmitted. Once it reaches its destination, it’s “reassembled” to its original form. This compression process reduces the amount of data that needs to be sent, saving bandwidth, reducing costs, and speeding up the transfer, just like how flat pack furniture reduces shipping costs and simplifies delivery logistics.
However, with compression, there is a tradeoff: time to compress versus the overall compression ratio. A compression ratio is a measure of how much a file’s size is reduced during compression. For example, a 10:1 compression ratio means that the compressed file is one-tenth the size of the original. Just like assembling flat-pack furniture takes time and effort, achieving higher compression ratios often requires more processing time. While a higher compression ratio significantly reduces file size — making data transmission faster and more efficient — it may take longer to compress and decompress the data. Conversely, quicker compression methods might produce larger files, leading to faster processing but at the cost of greater bandwidth usage. Balancing these factors is key to optimizing performance in data transmission.
W3 Technologies reports that as of September 12, 2024, 88.6% of websites rely on compression to optimize speed and reduce bandwidth usage. GZIP, introduced in 1996, remains the default algorithm for many, used by 57.0% of sites due to its reasonable compression ratios and fast compression speeds. Brotli, released by Google in 2016, delivers better compression ratios, leading to smaller file sizes, especially for static assets like JavaScript and CSS, and is used by 45.5% of websites. However, this also means that 11.4% of websites still operate without any compression, missing out on crucial performance improvements.
As the Internet and its supporting infrastructure have evolved, so have user demands for faster, more efficient performance. This growing need for higher efficiency without compromising speed is where Zstandard comes into play.
Enter Zstandard
Zstandard offers higher compression ratios comparable to GZIP, but with significantly faster compression and decompression speeds than Brotli. This makes it ideal for real-time applications that require both speed and relatively high compression ratios.
To understand Zstandard’s advantages, it’s helpful to know about Zlib. Zlib was developed in the mid-1990s based on the DEFLATE compression algorithm, which combines LZ77 and Huffman coding to reduce file sizes. While Zlib has been a compression standard since the mid-1990s and is used in Cloudflare’s open-source GZIP implementation, its design is limited by a 32 KB sliding window — a constraint from the memory limitations of that era. This makes Zlib less efficient on modern hardware, which can access far more memory.
Zstandard enhances Zlib by leveraging modern innovations and hardware capabilities. Unlike Zlib’s fixed 32 KB window, Zstandard has no strict memory constraints and can theoretically address terabytes of memory. However, in practice, it typically uses much less, around 1 MB at lower compression levels. This flexibility allows Zstandard to buffer large amounts of data, enabling it to identify and compress repeating patterns more effectively. Zstandard also employs repcode modeling to efficiently compress structured data with repetitive sequences, further reducing file sizes and enhancing its suitability for modern compression needs.
Zstandard is optimized for modern CPUs, which can execute multiple tasks simultaneously using multiple Arithmetic Logic Units (ALUs) that are used to perform mathematical tasks. Zstandard achieves this by processing data in parallel streams, dividing it into multiple parts that are processed concurrently. The Huffman decoder, Huff0, can decode multiple symbols in parallel on a single CPU core, and when combined with multi-threading, this leads to substantial speed improvements during both compression and decompression.
Zstandard’s branchless design is a crucial innovation that enhances CPU efficiency, especially in modern processors. To understand its significance, consider how CPUs execute instructions.
Modern CPUs use pipelining, where different stages of an instruction are processed simultaneously—like a production line—keeping all parts of the processor busy. However, when CPUs encounter a branch, such as an ‘if-else’ decision, they must make a branch prediction to guess the next step. If the prediction is wrong, the pipeline must be cleared and restarted, causing slowdowns.
Zstandard avoids this issue by eliminating conditional branching. Without relying on branch predictions, it ensures the CPU can execute instructions continuously, keeping the pipeline full and avoiding performance bottlenecks.
A key feature of Zstandard is its use of Finite State Entropy (FSE), an advanced compression method that encodes data more efficiently based on probability. FSE, built on the Asymmetric Numeral System (ANS), allows Zstandard to use fractional bits for encoding, unlike traditional Huffman coding, which only uses whole bits. This allows heavily repeated data to be compressed more tightly without sacrificing efficiency.
Zstandard findings
In the third quarter of 2024, we conducted extensive tests on our new Zstandard compression module, focusing on a 24-hour period where we switched the default compression algorithm from Brotli to Zstandard across our Free plan traffic. This experiment spanned billions of requests, covering a wide range of file types and sizes, including HTML, CSS, and JavaScript. The results were very promising, with significant improvements in both compression speed and file size reduction, leading to faster load times and more efficient bandwidth usage.
Compression ratios
In terms of compression efficiency, Zstandard delivers impressive results. Below are the average compression ratios we observed during our testing.
|
Compression Algorithm |
Average Compression Ratio |
|
GZIP |
2.56 |
|
Zstandard |
2.86 |
|
Brotli |
3.08 |
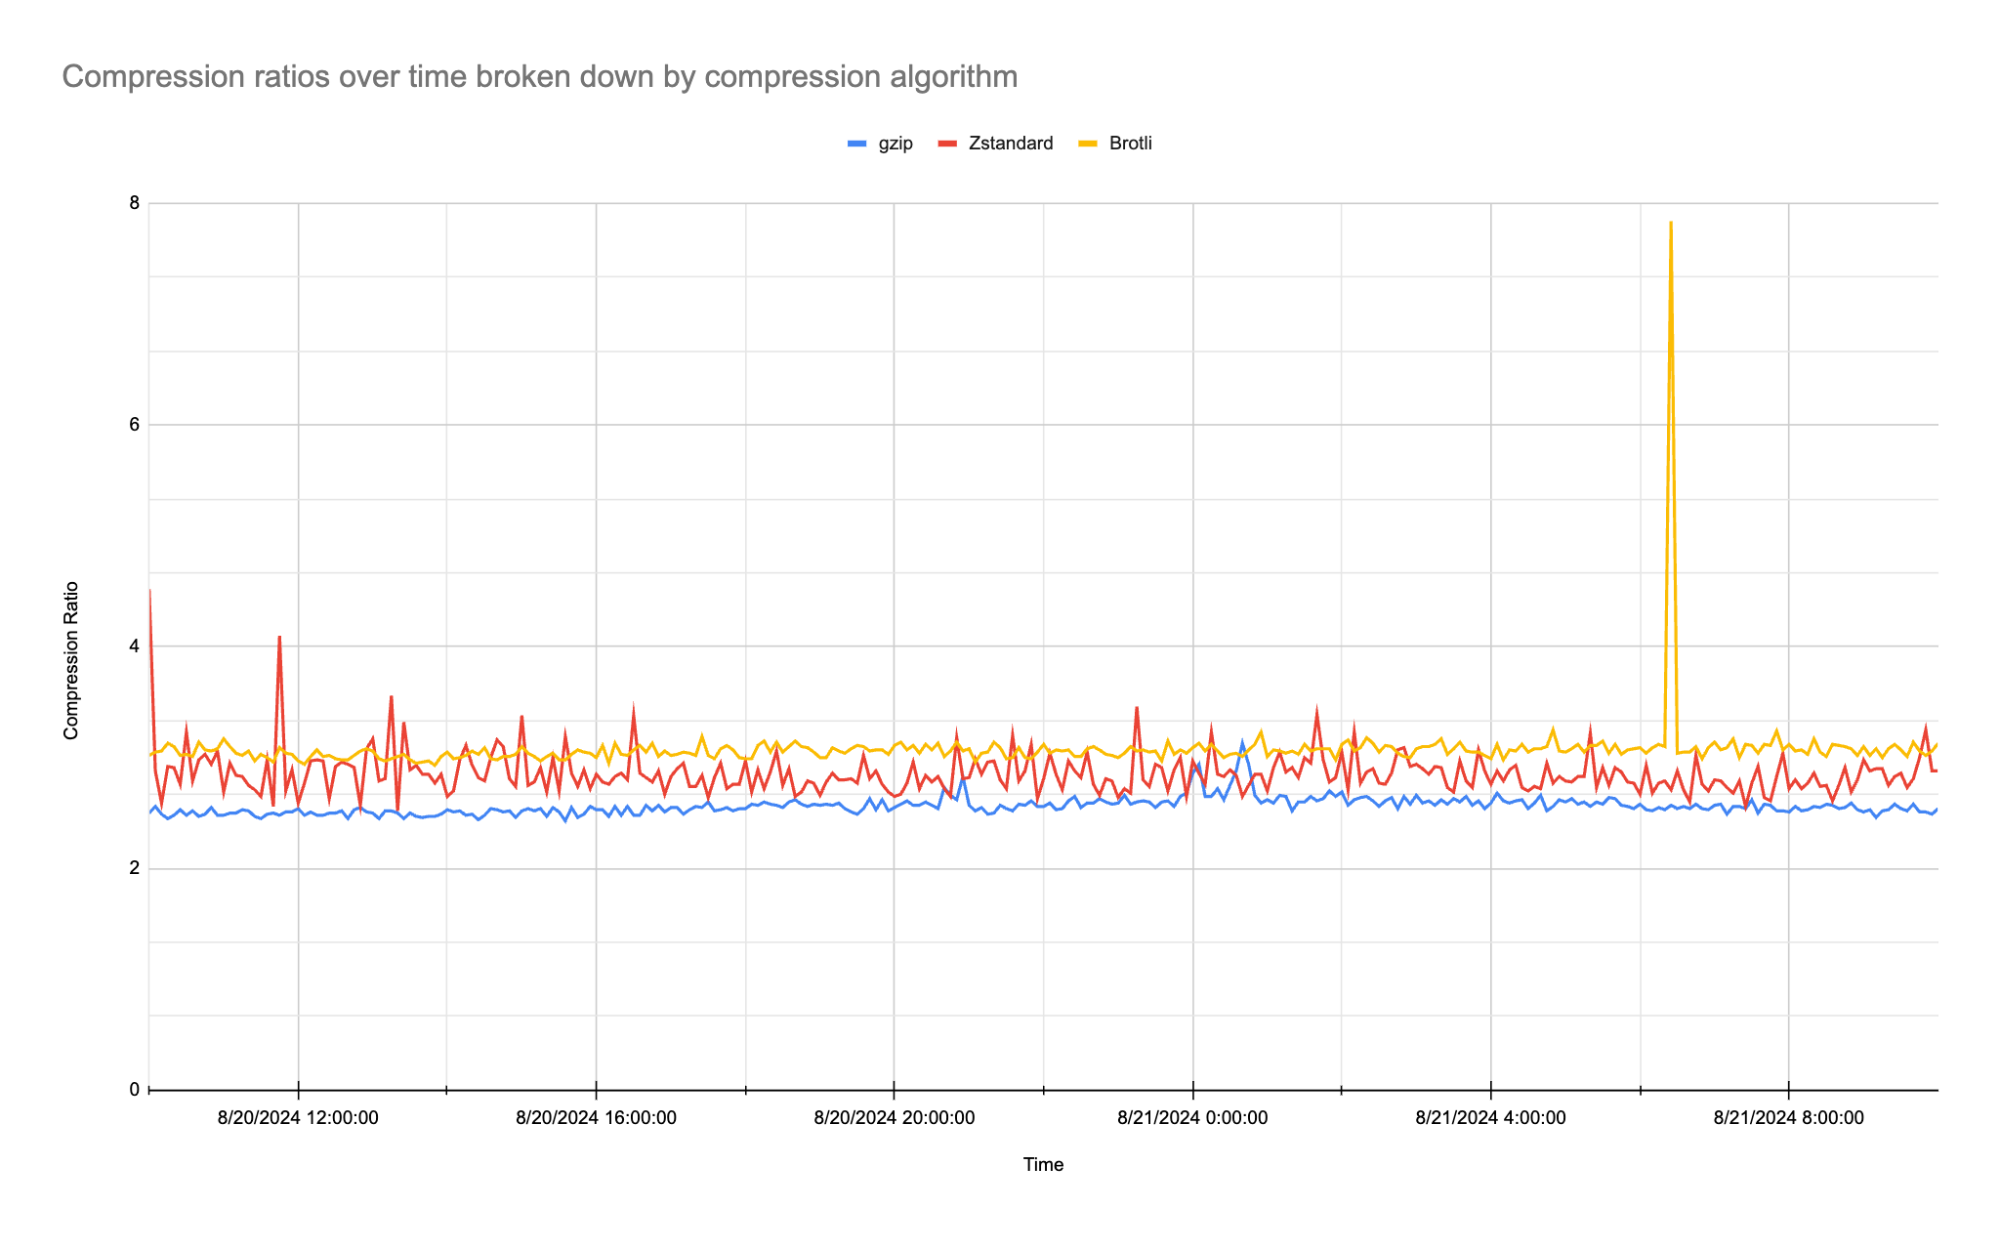
As the table shows, Zstandard achieves an average compression ratio of 2.86:1, which is notably higher than gzip’s 2.56:1 and close to Brotli’s 3.08:1. While Brotli slightly edges out Zstandard in terms of pure compression ratio, what is particularly exciting is that we are only using Zstandard’s default compression level of 3 (out of 22) on our traffic. In the fourth quarter of 2024, we plan to experiment with higher compression levels and multithreading capabilities to further enhance Zstandard’s performance and optimize results even more.
Compression speeds
What truly sets Zstandard apart is its speed. Below are the average times to compress data from our traffic-based tests measured in milliseconds:
|
Compression Algorithm |
Average Time to Compress (ms) |
|
GZIP |
0.872 |
|
Zstandard |
0.848 |
|
Brotli |
1.544 |
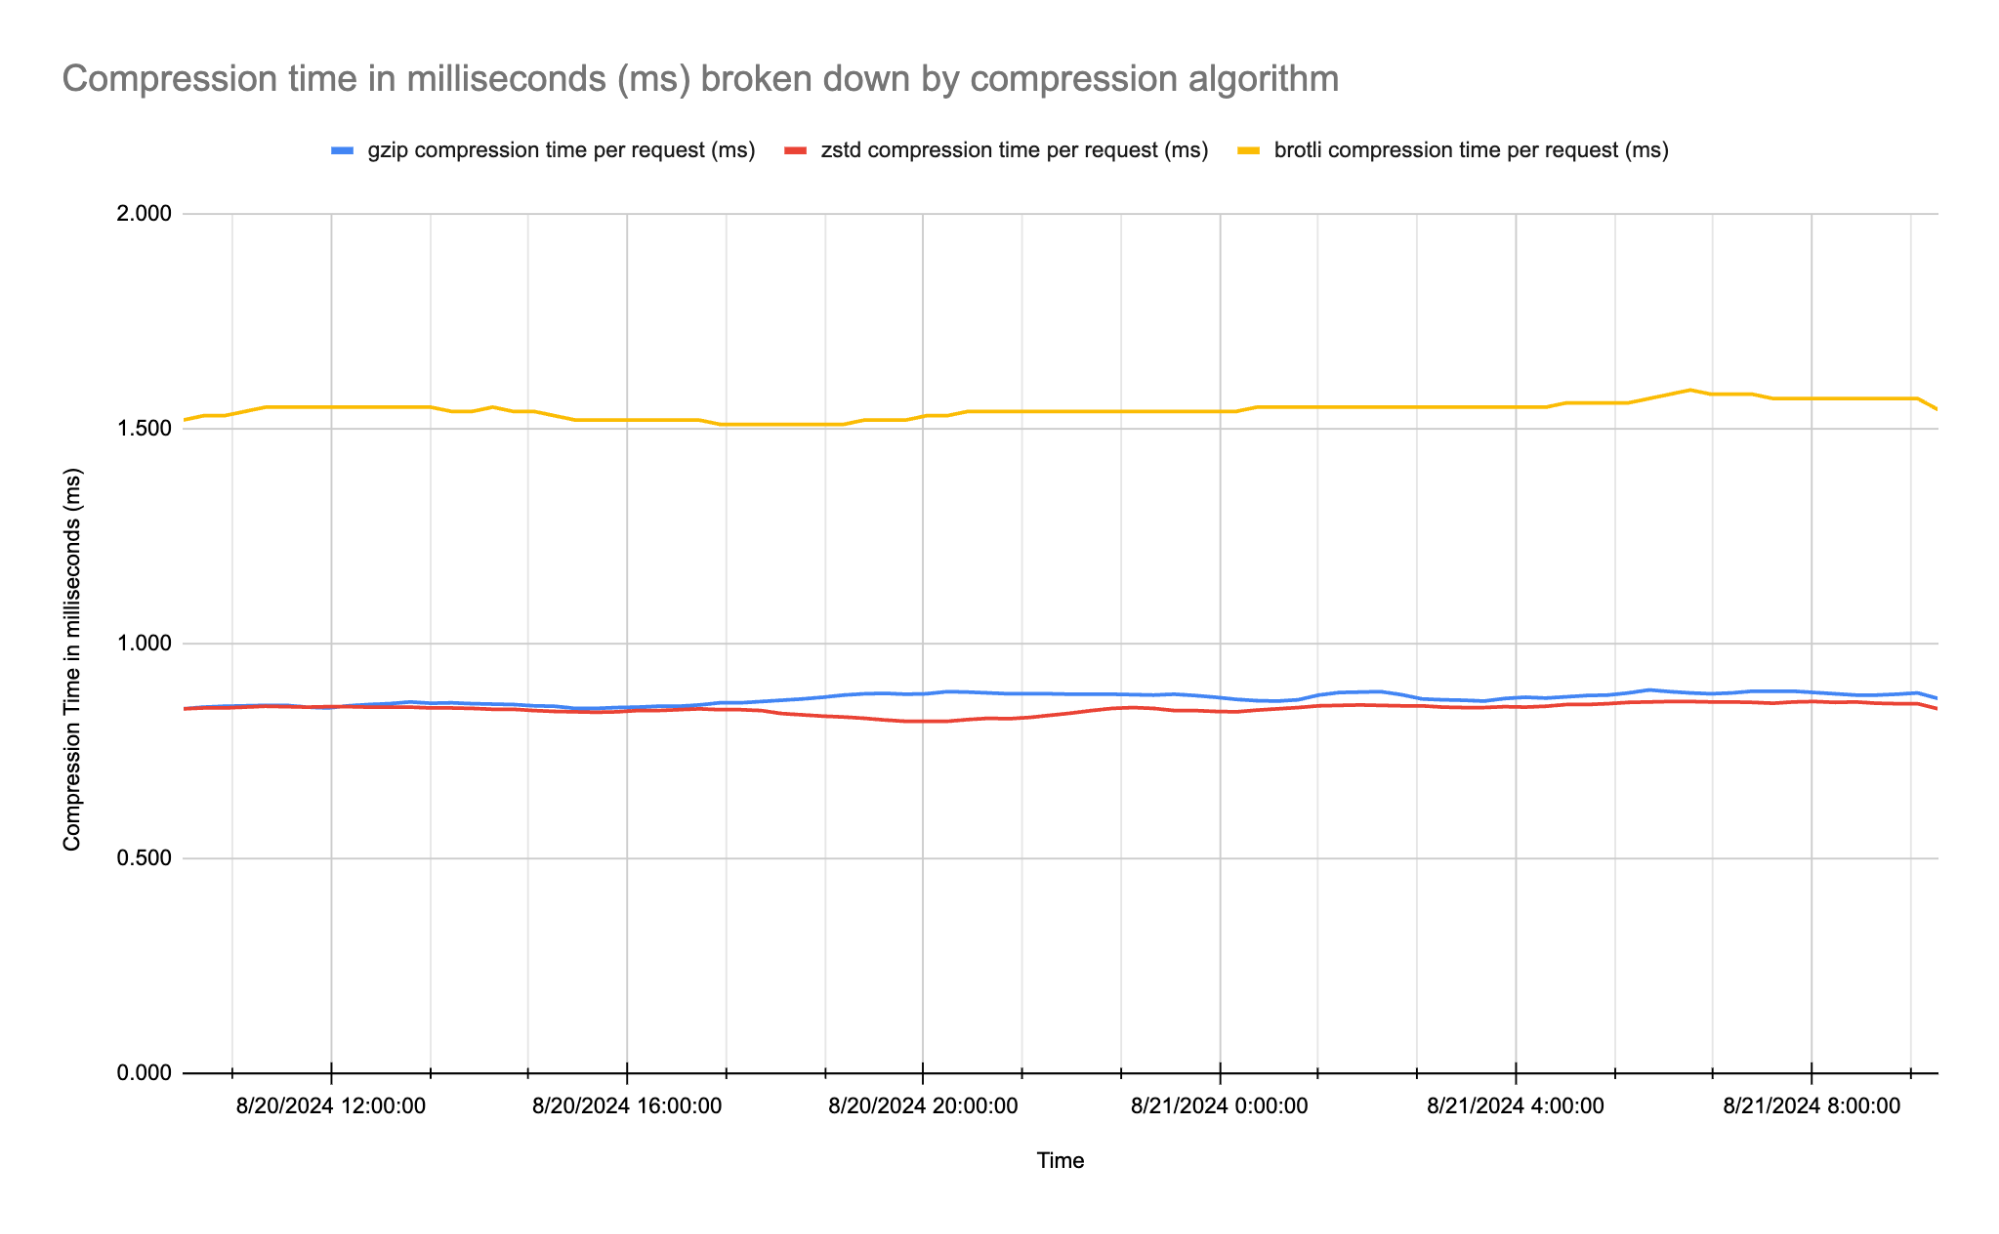
Zstandard not only compresses data efficiently, but it also does so 42% faster than Brotli, with an average compression time of 0.848 ms compared to Brotli’s 1.544 ms. It even outperforms gzip, which compresses at 0.872 ms on average.
From our results, we have found Zstandard strikes an excellent balance between achieving a high compression ratio and maintaining fast compression speed, making it particularly well-suited for dynamic content such as HTML and non-cacheable sensitive data. Zstandard can compress these responses from the origin quickly and efficiently, saving time compared to Brotli while providing better compression ratios than GZIP.
Implementing Zstandard at Cloudflare
To implement Zstandard compression at Cloudflare, we needed to build it into our Nginx-based service which already handles GZIP and Brotli compression. Nginx is modular by design, with each module performing a specific function, such as compressing a response. Our custom Nginx module leverages Nginx’s function ‘hooks’ — specifically, the header filter and body filter — to implement Zstandard compression.
Header filter
The header filter allows us to access and modify response headers. For example, Cloudflare only compresses responses above a certain size (50 bytes for Zstandard), which is enforced with this code:
if (r->headers_out.content_length_n != -1 &&
    r->headers_out.content_length_n < conf->min_length) {
    return ngx_http_next_header_filter(r);
}
Here, we check the “Content-Length” header. If the content length is less than our minimum threshold, we skip compression and let Nginx execute the next module.
We also need to ensure the content is not already compressed by checking the “Content-Encoding” header:
if (r->headers_out.content_encoding &&
    r->headers_out.content_encoding->value.len) {
    return ngx_http_next_header_filter(r);
}
If the content is already compressed, the module is bypassed, and Nginx proceeds to the next header filter.
Body filter
The body filter hook is where the actual processing of the response body occurs. In our case, this involves compressing the data with the Zstandard encoder and streaming the compressed data back to the client. Since responses can be very large, it’s not feasible to buffer the entire response in memory, so we manage internal memory buffers carefully to avoid running out of memory.
The Zstandard library is well-suited for streaming compression and provides the ZSTD_compressStream2 function:
ZSTDLIB_API size_t ZSTD_compressStream2(ZSTD_CCtx* cctx,
                                        ZSTD_outBuffer* output,
                                        ZSTD_inBuffer* input,
                                        ZSTD_EndDirective endOp);
This function can be called repeatedly with chunks of input data to be compressed. It accepts input and output buffers and an “operation” parameter (ZSTD_EndDirective endOp) that controls whether to continue feeding data, flush the data, or finalize the compression process.
Nginx uses a “flush” flag on memory buffers to indicate when data can be sent. Our module uses this flag to set the appropriate Zstandard operation:
switch (zstd_operation) {
    case ZSTD_e_continue: {
        if (flush) {
            zstd_operation = ZSTD_e_flush;
        }
    }
}
This logic allows us to switch from the “ZSTD_e_continue” operation, which feeds more input data into the encoder, to “ZSTD_e_flush”, which extracts compressed data from the encoder.
Compression cycle
The compression module operates in the following cycle:
-
Receive uncompressed data.
-
Locate an internal buffer to store compressed data.
-
Compress the data with Zstandard.
-
Send the compressed data back to the client.
Once a buffer is filled with compressed data, it’s passed to the next Nginx module and eventually sent to the client. When the buffer is no longer in use, it can be recycled, avoiding unnecessary memory allocation. This process is managed as follows:
if (free) {
    // A free buffer is available, so use it
    buffer = free;
} else if (buffers_used < maximum_buffers) {
    // No free buffers, but we're under the limit, so allocate a new one
    buffer = create_buf();
} else {
    // No free buffers and can't allocate more
    err = no_memory;
}
Handling backpressure
If no buffers are available, it can lead to backpressure — a situation where the Zstandard module generates compressed data faster than the client can receive it. This causes data to become “stuck” inside Nginx, halting further compression due to memory constraints. In such cases, we stop compression and send an empty buffer to the next Nginx module, allowing Nginx to attempt to send the data to the client again. When successful, this frees up memory buffers that our module can reuse, enabling continued streaming of the compressed response without buffering the entire response in memory.
What’s next? Compression dictionaries
The future of Internet compression lies in the use of compression dictionaries. Both Brotli and Zstandard support dictionaries, offering up to 90% improvement on compression levels compared to using static dictionaries.
Compression dictionaries store common patterns or sequences of data, allowing algorithms to compress information more efficiently by referencing these patterns rather than repeating them. This concept is akin to how an iPhone’s predictive text feature works. For example, if you frequently use the phrase “On My Way,” you can customize your iPhone’s dictionary to recognize the abbreviation “OMW” and automatically expand it to “On My Way” when you type it, saving the user from typing six extra letters.
|
O |
M |
W |
||||||
|
O |
n |
M |
y |
W |
a |
y |
Traditionally, compression algorithms use a static dictionary defined by its RFC that is shared between clients and origin servers. This static dictionary is designed to be broadly applicable, balancing size and compression effectiveness for general use. However, Zstandard and Brotli support custom dictionaries, tailored specifically to the content being sent to the client. For example, Cloudflare could create a specialized dictionary that focuses on frequently used terms like “Cloudflare”. This custom dictionary would compress these terms more efficiently, and a browser using the same dictionary could decode them accurately, leading to significant improvements in compression and performance.
In the future, we will enable users to leverage origin-generated dictionaries for Zstandard and Brotli to enhance compression. Another exciting area we’re exploring is the use of AI to create these dictionaries dynamically without them needing to be generated at the origin. By analyzing data streams in real-time, Cloudflare could develop context-aware dictionaries tailored to the specific characteristics of the data being processed. This approach would allow users to significantly improve both compression ratios and processing speed for their applications.
Compression Rules for everyone
Today we’re also excited to announce the introduction of Compression Rules for all our customers. By default, Cloudflare will automatically compress certain content types based on their Content-Type headers. Customers can use compression rules to optimize how and what Cloudflare compresses. This feature was previously exclusive to our Enterprise plans.
Compression Rules is built on the same robust framework as our other rules products, such as Origin Rules, Custom Firewall Rules, and Cache Rules, with additional fields for Media Type and Extension Type. This allows you to easily specify the content you wish to compress, providing granular control over your site’s performance optimization.
Compression rules are now available on all our pay-as-you-go plans and will be added to free plans in October 2024. This feature was previously exclusive to our Enterprise customers. In the table below, you’ll find the updated limits, including an increase to 125 Compression Rules for Enterprise plans, aligning with our other rule products’ quotas.
|
Plan Type |
Free* |
Pro |
Business |
Enterprise |
|
Available Compression Rules |
10 |
25 |
50 |
125 |
Using Compression Rules to enable Zstandard
To integrate our Zstandard module into our platform, we also added support for it within our Compression Rules framework. This means that customers can now specify Zstandard as their preferred compression method, and our systems will automatically enable the Zstandard module in Nginx, disabling other compression modules when necessary.
The Accept-Encoding header determines which compression algorithms a client supports. If a browser supports Zstandard (zstd), and both Cloudflare and the zone have enabled the feature, then Cloudflare will return a Zstandard compressed response.
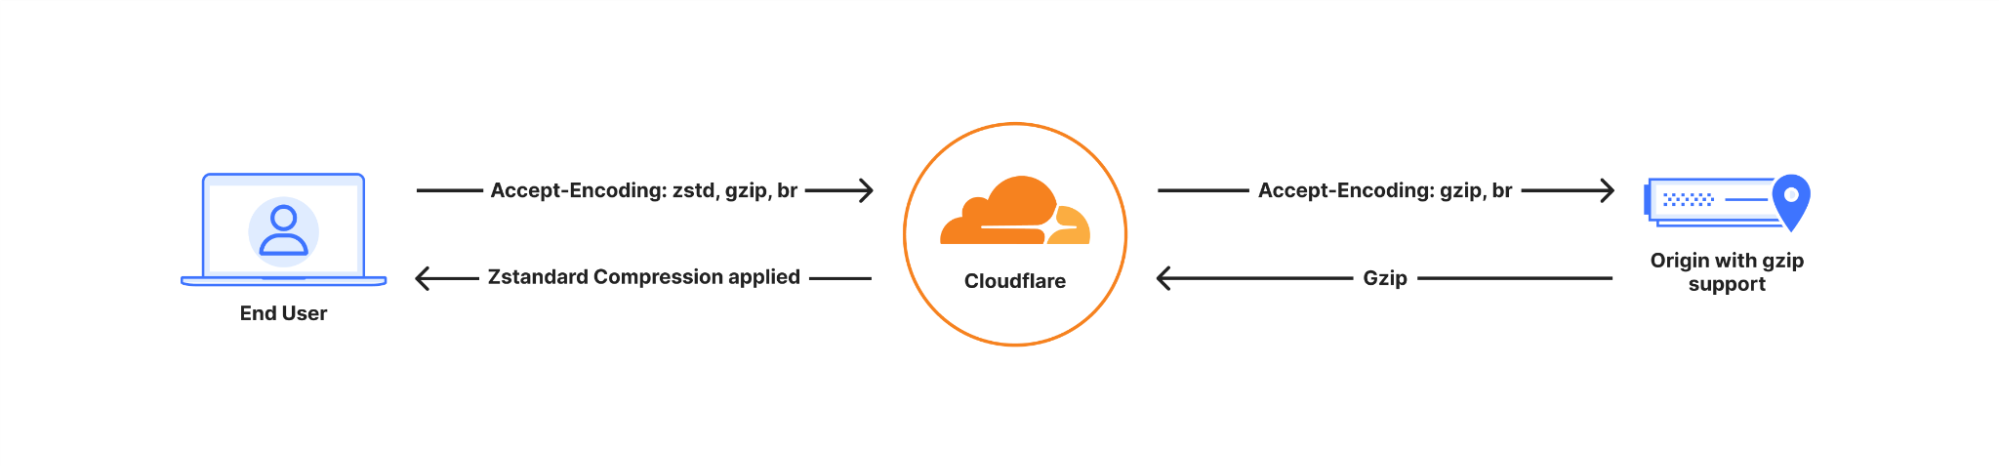
If the client does not support Zstandard, then Cloudflare will automatically fall back to Brotli, GZIP, or serve the content uncompressed where no compression algorithm is supported, ensuring compatibility.
To enable Zstandard for your entire site or specifically filter on certain file types, all Cloudflare users can deploy a simple compression rule.
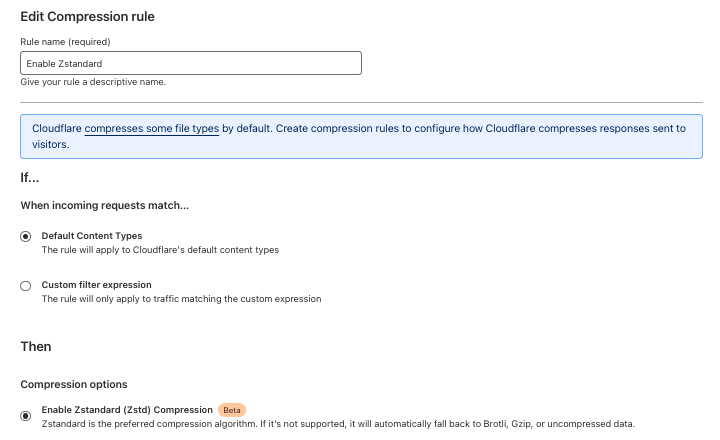
Further details and examples of what can be accomplished with Compression Rules can be found in our developer documentation.
Currently, we support Zstandard, Brotli, and GZIP as compression algorithms for traffic sent to clients, and support GZIP and Brotli (since 2023) compressed data from the origin. We plan to implement full end-to-end support for Zstandard in 2025, offering customers another effective way to reduce their egress costs.
Once Zstandard is enabled, you can view your browser’s Network Activity log to check the content-encoding headers of the response.

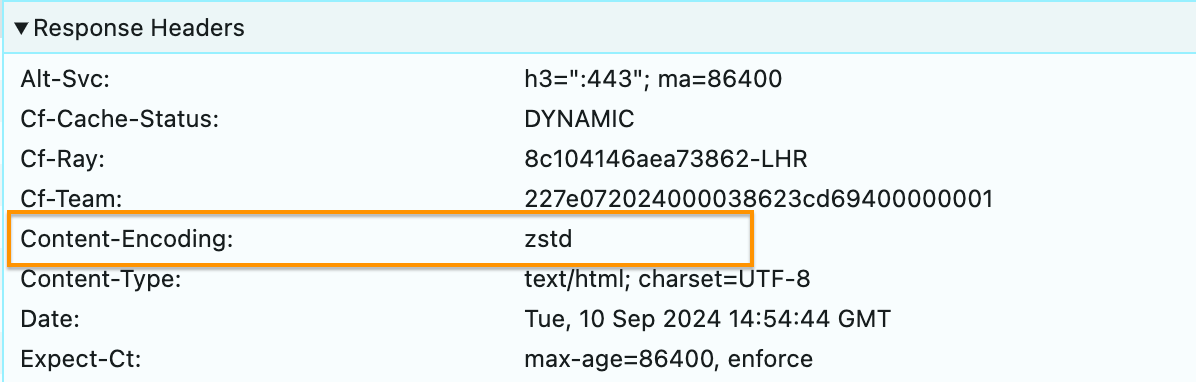
Enable Zstandard now!
Zstandard is now available to all Cloudflare customers through Compression Rules on our Enterprise and pay as you go plans, with free plans gaining access in October 2024. Whether you’re optimizing for speed or aiming to reduce bandwidth, Compression Rules give all customers granular control over their site’s performance.
Encrypted Client Hello (ECH)

While performance is crucial for delivering a fast user experience, ensuring privacy is equally important in today’s Internet landscape. As we optimize for speed with Zstandard, Cloudflare is also working to protect users’ sensitive information from being exposed during data transmission. With web traffic growing more complex and interconnected, it’s critical to keep both performance and privacy in balance. This is where technologies like Encrypted Client Hello (ECH) come into play, securing connections without sacrificing speed.
Ten years ago, we embarked on a mission to create a more secure and encrypted web. At the time, much of the Internet remained unencrypted, leaving user data vulnerable to interception. On September 27, 2014, we took a major step forward by enabling HTTPS for free for all Cloudflare customers. Overnight, we doubled the size of the encrypted web. This set the stage for a more secure Internet, ensuring that encryption was not a privilege limited by budget but a right accessible to everyone.
Since then, both Cloudflare and the broader community have helped encrypt more of the Internet. Projects like Let’s Encrypt launched to make certificates free for everyone. Cloudflare invested to encrypt more of the connection, and future-proof that encryption from coming technologies like quantum computers. We’ve always believed that it was everyone’s right, regardless of your budget, to have an encrypted Internet at no cost.
One of the last major challenges has been securing the SNI (Server Name Identifier), which remains exposed in plaintext during the TLS handshake. This is where Encrypted Client Hello (ECH) comes in, and today, we are proud to announce that we’re closing that gap.
Cloudflare announced support for Encrypted Client Hello (ECH) in 2023 and has continued to enhance its implementation in collaboration with our Internet browser partners. During a TLS handshake, one of the key pieces of information exchanged is the Server Name Identifier (SNI), which is used to initiate a secure connection. Unfortunately, the SNI is sent in plaintext, meaning anyone can read it. Imagine hand-delivering a letter — anyone following you can see where you’re delivering it, even if they don’t know the contents. With ECH, it is like sending the same confidential letter to a P.O. Box. You place your sensitive letter in a sealed inner envelope with the actual address. Then, you put that envelope into a larger, standard envelope addressed to a public P.O. Box, trusted to securely forward your intended recipient. The larger envelope containing the non-sensitive information is visible to everyone, while the inner envelope holds the confidential details, such as the actual address and recipient. Just as the P.O. Box maintains the anonymity of the true recipient’s address, ECH ensures that the SNI remains protected.
While encrypting the SNI is a primary motivation for ECH, its benefits extend further. ECH encrypts the entire TLS handshake, ensuring user privacy and enabling TLS to evolve without exposing sensitive connection data. By securing the full handshake, ECH allows for flexible, future-proof encryption designs that safeguard privacy as the Internet continues to grow.
How ECH works
Encrypted Client Hello (ECH) introduces a layer of privacy by dividing the ClientHello message into two distinct parts: an outer ClientHello and an inner ClientHello.
-
Outer ClientHello: This part remains unencrypted and contains general information such as the list of ciphers and the TLS version. It includes a placeholder SNI, which is a common name used across Cloudflare’s network. For instance, all ECH-enabled websites on Cloudflare share the SNI
cloudflare-ech.com. Cloudflare manages this domain and possesses the necessary certificates to handle TLS negotiations for it. -
Inner ClientHello: This part is encrypted and includes the actual server name the client wants to visit. Encryption ensures that this sensitive data can only be decrypted by Cloudflare.
During the TLS handshake, the outer ClientHello reveals only the placeholder SNI (e.g., cloudflare-ech.com), while the encrypted inner ClientHello carries the real server name. As a result, intermediaries observing the traffic will only see the generic outer ClientHello, concealing the actual destination.
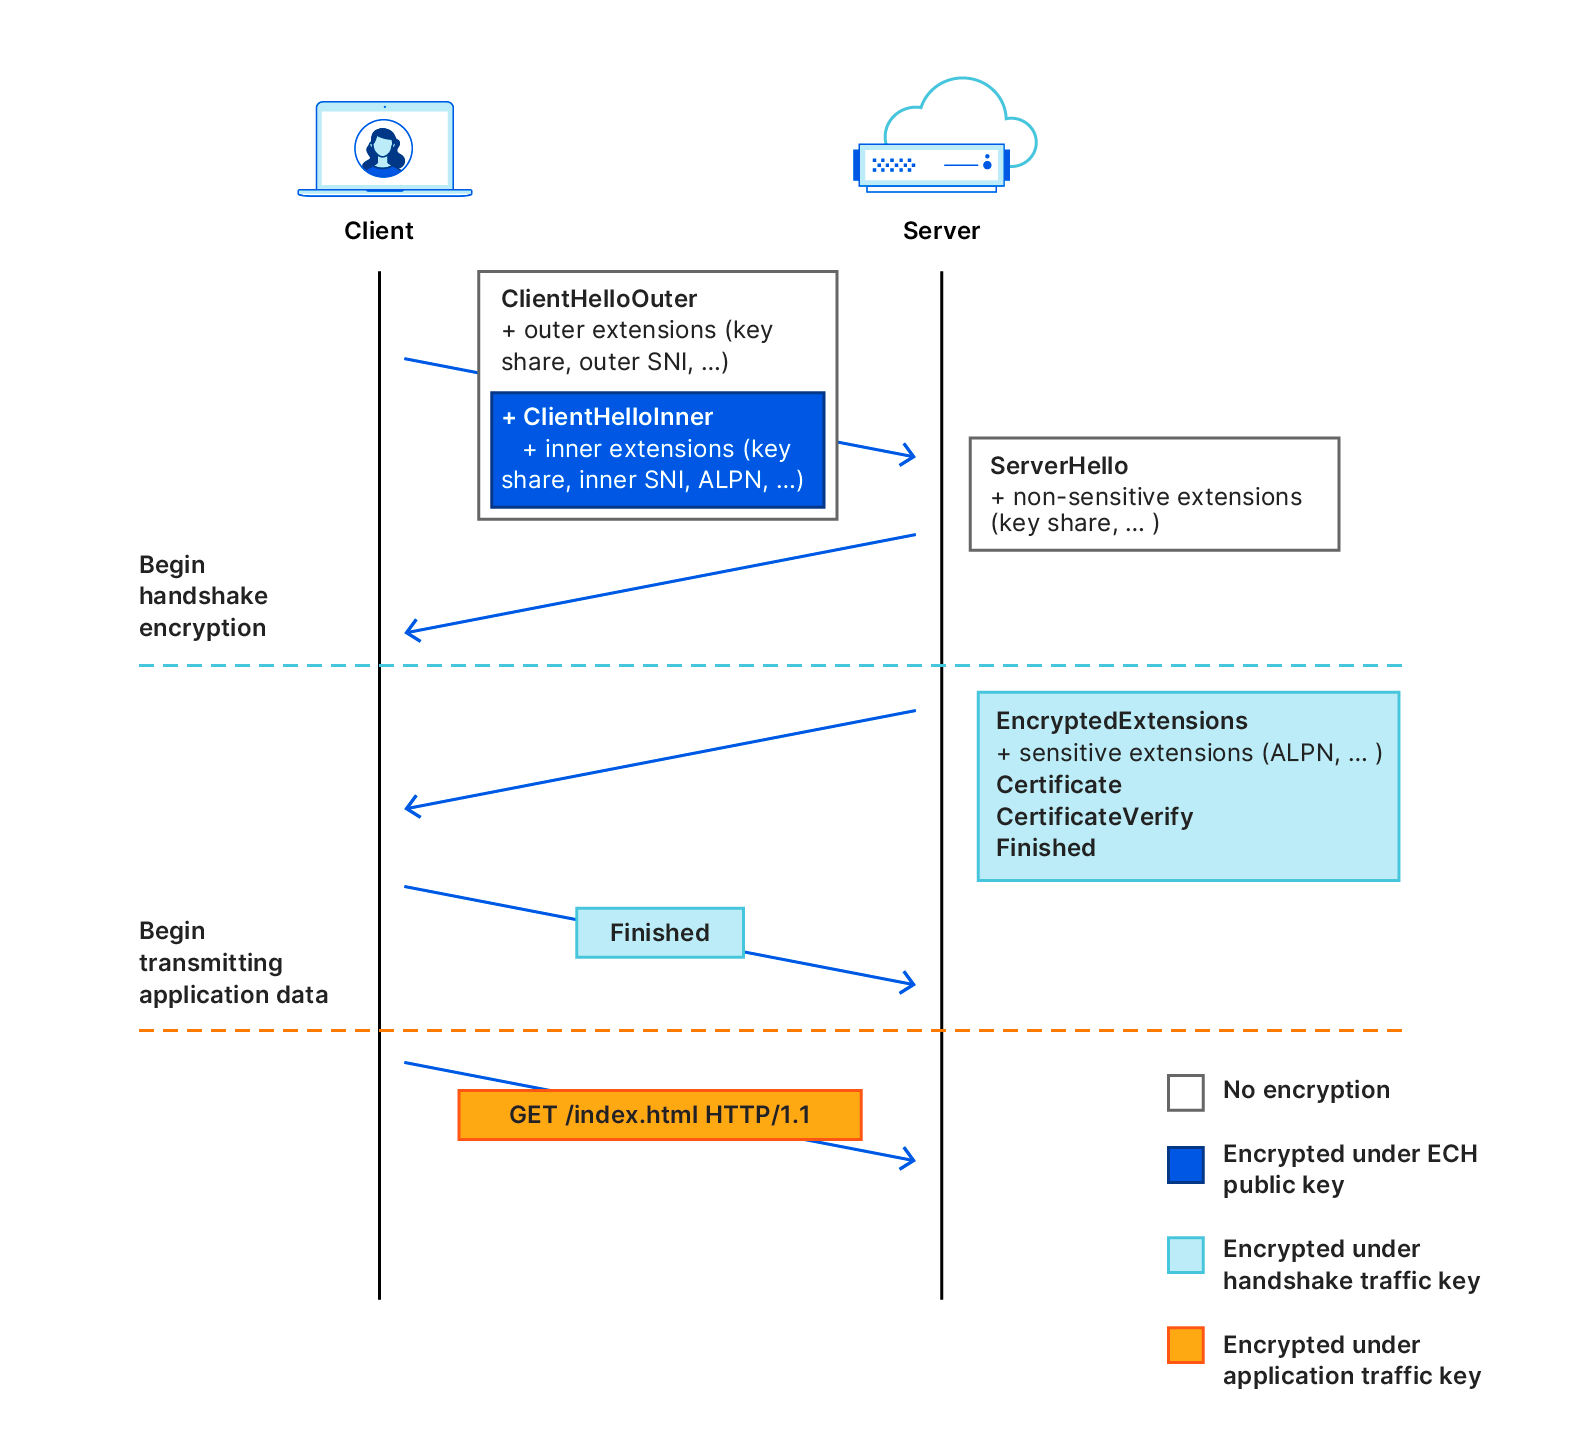
The design of ECH effectively addresses many challenges in securely deploying handshake encryption, thanks to the collaborative efforts within the IETF community. The key to ECH’s success is its integration with other IETF standards, including the new HTTPS DNS resource record, which enables HTTPS endpoints to advertise different TLS capabilities and simplifies key distribution. By using Encrypted DNS methods, browsers and clients can anonymously query these HTTPS records. These records contain the ECH parameters needed to initiate a secure connection.
ECH leverages the Hybrid Public Key Encryption (HPKE) standard, which streamlines the handshake encryption process, making it more secure and easier to implement. Before initiating a TCP connection, the user’s browser makes a DNS request for an HTTPS record, and zones with ECH enabled will include an ECH configuration in the HTTPS record containing an encryption public key and some associated metadata. For example, looking at the zone cloudflare-ech.com, you can see the following record returned:
dig cloudflare-ech.com https +short


1 . alpn="h3,h2" ipv4hint=104.18.10.118,104.18.11.118 ech=AEX+DQBB2gAgACD1W1B+GxY3nZ53Rigpsp0xlL6+80qcvZtgwjsIs4YoOwAEAAEAAQASY2xvdWRmbGFyZS1lY2guY29tAAA= ipv6hint=2606:4700::6812:a76,2606:4700::6812:b76
Aside from the public key used by the client to encrypt ClientHelloInner and other parameters that specify the ECH configuration, the ClientOuterHello is also present.
Y2xvdWRmbGFyZS1lY2guY29tWhen the string is decoded it reveals:
cloudflare-ech.comThis indicates the public outer SNI endpoint and where the TLS handshake should be forwarded to.
Practical implications
With ECH, any observer monitoring the traffic between the client and Cloudflare will see only uniform TLS handshakes that appear to be directed towards cloudflare-ech.com, regardless of the actual website being accessed. For instance, if a user visits example.com, intermediaries will not discern this specific destination but will only see cloudflare-ech.com in the visible handshake data.
The problem with middleboxes
In a basic HTTPS connection, a browser (client) establishes a TLS connection directly with an origin server to send requests and download content. However, many connections on the Internet do not go directly from a browser to the server but instead pass through some form of proxy or middlebox (often referred to as a “monster-in-the-middle” or MITM). This routing through intermediaries can occur for various reasons, both benign and malicious.
One common type of HTTPS interceptor is the TLS-terminating forward proxy. This proxy sits between the client and the destination server, transparently forwarding and potentially modifying traffic. To perform this task, the proxy terminates the TLS connection from the client, decrypts the traffic, and then re-encrypts and forwards it to the destination server over a new TLS connection. To avoid browser certificate validation errors, these forward proxies typically require users to install a root certificate on their devices. This root certificate allows the proxy to generate and present a trusted certificate for the destination server, a process often managed by network administrators in corporate environments, as seen with Cloudflare WARP. These services can help prevent sensitive company data from being transmitted to unauthorized destinations, safeguarding confidentiality.

However, TLS-terminating forward proxies are not equipped to handle Encrypted Client Hello (ECH) correctly. ECH separates the ClientHello message into an outer, unencrypted message and an inner, encrypted message. Since the proxy terminates the TLS connection and decrypts the traffic, it cannot manage or re-encrypt these messages as intended by ECH. Consequently, the proxy’s intervention can disrupt the ECH mechanism, potentially causing connection failures.
We also observed that specific Cloudflare setups, such as CNAME Flattening and Orange-to-Orange configurations, could cause ECH to break. This issue arose because the end destination for these requests did not support TLS 1.3, preventing ECH from being processed correctly. Fortunately, in close collaboration with our browser partners, we implemented a fallback in our BoringSSL implementation that handles TLS terminations. This fallback allows browsers to retry connections over TLS 1.2 without ECH, ensuring that a connection can be established and not break.
As a result of these improvements, we have enabled ECH by default for all Free plans, while all other plan types can manually enable it through their Cloudflare dashboard or via the API. We are excited to support ECH at scale, enhancing the privacy and security of users’ browsing activities. ECH plays a crucial role in safeguarding online interactions from potential eavesdroppers and maintaining the confidentiality of web activities.
HTTP/3 Prioritization and QUIC congestion control
Two other areas we are investing in to improve performance for all our customers are HTTP/3 Prioritization and QUIC congestion control.
HTTP/3 Prioritization focuses on efficiently managing the order in which web assets are loaded, thereby improving web performance by ensuring critical assets are delivered faster. HTTP/3 Prioritization uses Extensible Priorities to simplify prioritization with two parameters: urgency (ranging from 0-7) and a true/false value indicating whether the resource can be processed progressively. This allows resources like HTML, CSS, and images to be prioritized based on importance.
On the other hand, QUIC congestion control aims to optimize the flow of data, preventing network bottlenecks and ensuring smooth, reliable transmission even under heavy traffic conditions.
Both of these improvements significantly impact how Cloudflare’s network serves requests to clients. Before deploying these technologies across our global network, which handles peak traffic volumes of over 80 million requests per second, we first developed a reliable method to measure their impact through rigorous experimentation.
Measuring impact
Accurately measuring the impact of features implemented by Cloudflare for our customers is crucial for several reasons. These measurements ensure that optimizations related to performance, security, or reliability deliver the intended benefits without introducing new issues. Precise measurement validates the effectiveness of these changes, allowing Cloudflare to assess improvements in metrics such as load times, user experience, and overall site security. One of the best ways to measure performance changes is through aggregated real-world data.
Cloudflare Web Analytics offers free, privacy-first analytics for your website, helping you understand the performance of your web pages as experienced by your visitors. Real User Metrics (RUM) is a vital tool in web performance optimization, capturing data from real users interacting with a website, providing insights into site performance under real-world conditions. RUM tracks various metrics directly from the user’s device, including load times, resource usage, and user interactions. This data is essential for understanding the actual user experience, as it reflects the diverse environments and conditions under which the site is accessed.
A key performance indicator measured through RUM is Core Web Vitals (CWV), a set of metrics defined by Google that quantify crucial aspects of user experience on the web. CWV focuses on three main areas: loading performance, interactivity, and visual stability. The specific metrics include Largest Contentful Paint (LCP), which measures loading performance; First Input Delay (FID), which gauges interactivity; and Cumulative Layout Shift (CLS), which assesses visual stability. By using the CWV measurement in RUM, developers can monitor and optimize their applications to ensure a smoother, faster, and more stable user experience and track the impact of any changes they release.
Over the last three months we have developed the capability to include valuable information in Server-Timing response headers. When a page that uses Cloudflare Web Analytics is loaded in a browser, the privacy-first client-side script from Web Analytics collects browser metrics and server-timing headers, then sends back this performance data. This data is ingested, aggregated, and made available for querying. The server-timing header includes Layer 4 information, such as Round-Trip Time (RTT) and protocol type (TCP or QUIC). Combined with Core Web Vitals data, this allows us to determine whether an optimization has positively impacted a request compared to a control sample. This capability enables us to release large-scale changes such as HTTP/3 Prioritization or BBR with a clear understanding of their impact across our global network.
An example of this header contains several key properties that provide valuable information about the network performance as observed by the server:
server-timing: cfL4;desc="?proto=TCP&rtt=7337&sent=8&recv=8&lost=0&retrans=0&sent_bytes=3419&recv_bytes=832&delivery_rate=548023&cwnd=25&unsent_bytes=0&cid=94dae6b578f91145&ts=225-
proto: Indicates the transport protocol used
-
rtt: Round-Trip Time (RTT), representing the duration of the network round trip as measured by the layer 4 connection using a smoothing algorithm.
-
sent: Number of packets sent.
-
recv: Number of packets received.
-
lost: Number of packets lost.
-
retrans: Number of retransmitted packets.
-
sent_bytes: Total number of bytes sent.
-
recv_bytes: Total number of bytes received.
-
delivery_rate: Rate of data delivery, an instantaneous measurement in bytes per second.
-
cwnd: Congestion Window, an instantaneous measurement of packet or byte count depending on the protocol.
-
unsent_bytes: Number of bytes not yet sent.
-
cid: A 16-byte hexadecimal opaque connection ID.
-
ts: Timestamp in milliseconds, representing when the data was captured.
This real-time collection of performance data via RUM and Server-Timing headers allows Cloudflare to make data-driven decisions that directly enhance user experience. By continuously analyzing these detailed network and performance insights, we can ensure that future optimizations, such as HTTP/3 Prioritization or BBR deployment, are delivering tangible benefits for our customers.
Enabling HTTP/3 Prioritization for all plans
As part of our focus on improving observability through the integration of the server-timing header, we implemented several minor changes to optimize QUIC handshakes. Notably, we observed positive improvements in our telemetry due to the Layer 4 observability enhancements provided by the server-timing header. These internal findings coincided with third-party measurements, which showed similar improvements in handshake performance.
In the fourth quarter of 2024, we will apply the same experimental methodology to the HTTP/3 Prioritization support announced during Speed Week 2023. HTTP/3 Prioritization is designed to enhance the efficiency and speed of loading web pages by intelligently managing the order in which web assets are delivered to users. This is crucial because modern web pages are composed of numerous elements — such as images, scripts, and stylesheets — that vary in importance. Proper prioritization ensures that critical elements, like primary content and layout, load first, delivering a faster and more seamless browsing experience.
We will use this testing framework to measure performance improvements before enabling the feature across all plan types. This process allows us not only to quantify the benefits but, most importantly, to ensure there are no performance regressions.
Congestion control
Following the completion of the HTTP/3 Prioritization experiments we will then begin testing different congestion control algorithms, specifically focusing on BBR (Bottleneck Bandwidth and Round-trip propagation time) version 3. Congestion control is a crucial mechanism in network communication that aims to optimize data transfer rates while avoiding network congestion. When too much data is sent too quickly over a network, it can lead to congestion, causing packet loss, delays, and reduced overall performance. Think of a busy highway during rush hour. If too many cars (data packets) flood the highway at once, traffic jams occur, slowing everyone down.
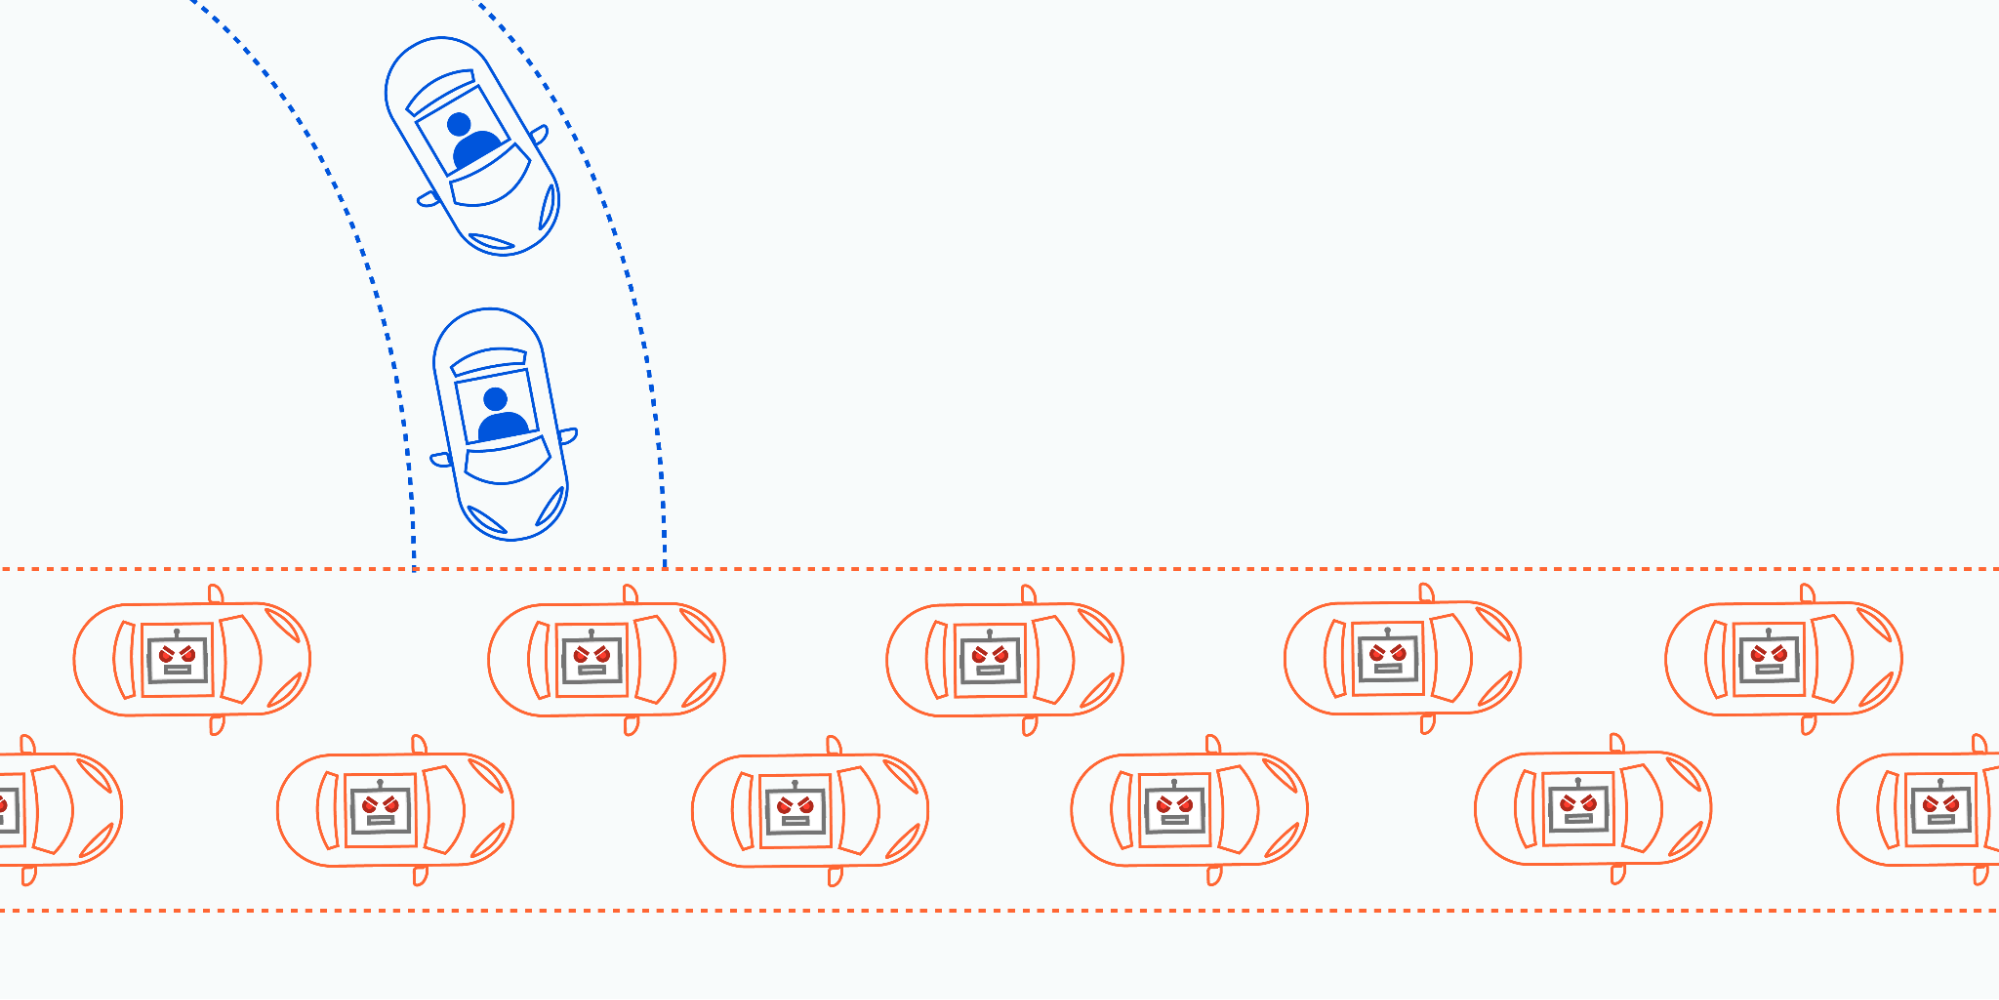
Congestion control algorithms act like traffic managers, regulating the flow of data to prevent these “traffic jams,” ensuring that data moves smoothly and efficiently across the network. Each side of a connection runs an algorithm in real time, dynamically adjusting the flow of data based on the current and predicted network conditions.
BBR is an advanced congestion control algorithm, initially developed by Google. BBR seeks to estimate the actual available bandwidth and the minimum round-trip time (RTT) to determine the optimal data flow. This approach allows BBR to maintain high throughput while minimizing latency, leading to more efficient and stable network performance.
BBR v3, the latest iteration, builds on the strengths of its predecessors BBRv1 and BBRv2 by further refining its bandwidth estimation techniques and enhancing its adaptability to varying network conditions. We found BBR v3 to be faster in several cases compared to our previous implementation of CUBIC. Most importantly, it reduced loss and retransmission rates in our Oxy proxy implementation.
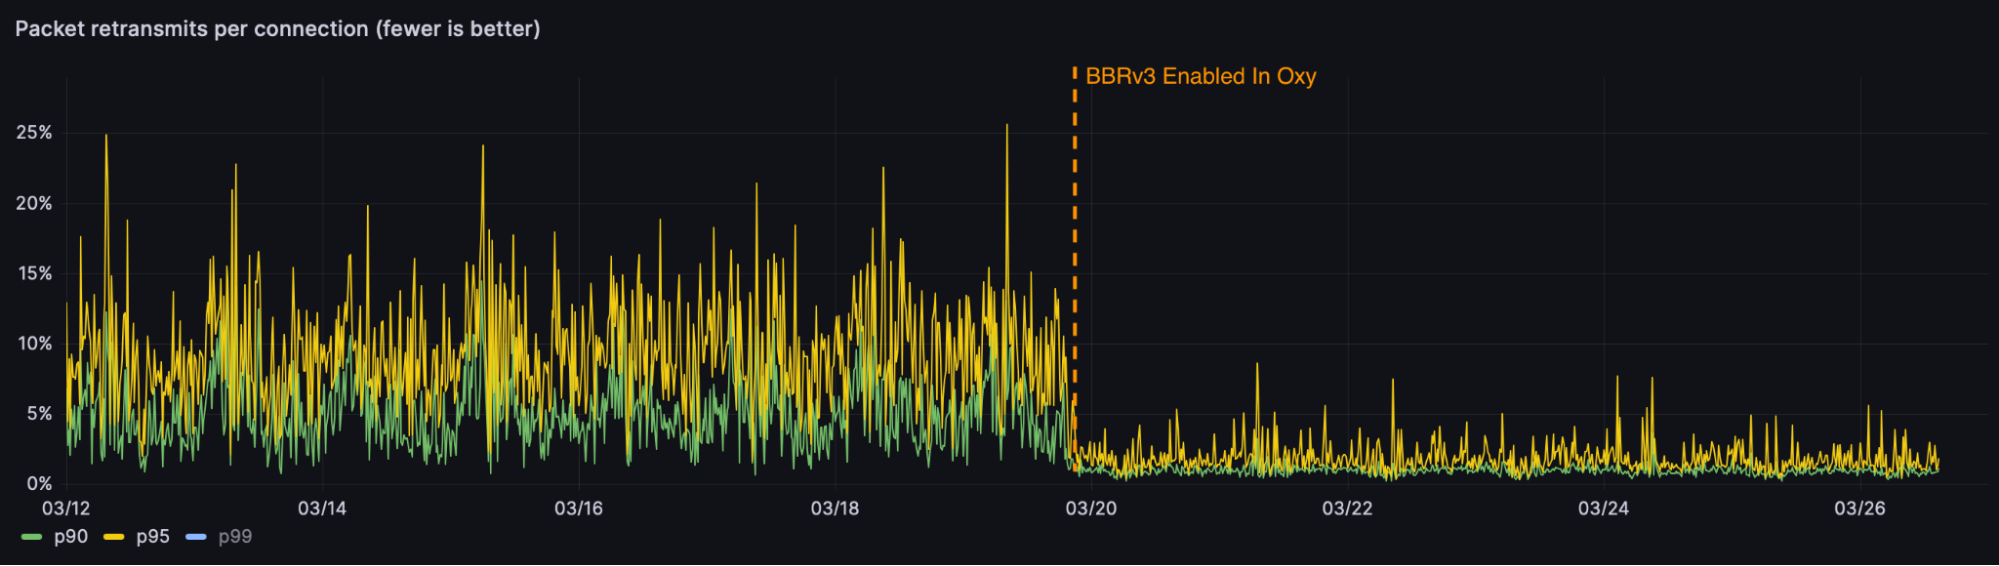
With these promising results, we are excited to test various congestion control algorithms including BBRv3 for quiche, our QUIC implementation, across our HTTP/3 traffic. Combining the layer 4 server-timing information with experiments in this area will enable us to explicitly control and measure the impact on real-world metrics.
The future
The future of the Internet relies on continuous innovation to meet the growing demands for speed, security, and scalability. Technologies like Zstandard for compression, BBR for congestion control, HTTP/3 prioritization, and Encrypted Client Hello are setting new standards for performance and privacy. By implementing these protocols, web services can achieve faster page load times, more efficient bandwidth usage, and stronger protections for user data.
These advancements don’t just offer incremental improvements, they provide a significant leap forward in optimizing the user experience and safeguarding online interactions. At Cloudflare, we are committed to making these technologies accessible to everyone, empowering businesses to deliver better, faster, and more secure services.
Stay tuned for more developments as we continue to push the boundaries of what’s possible on the web and if you’re passionate about building and implementing the latest Internet innovations, we’re hiring!
Cloudflare’s 12th Generation servers — 145% more performant and 63% more efficient
Post Syndicated from JQ Lau original https://blog.cloudflare.com/gen-12-servers
Cloudflare is thrilled to announce the general deployment of our next generation of servers — Gen 12 powered by AMD EPYC 9684X (code name “Genoa-X”) processors. This next generation focuses on delivering exceptional performance across all Cloudflare services, enhanced support for AI/ML workloads, significant strides in power efficiency, and improved security features.
Here are some key performance indicators and feature improvements that this generation delivers as compared to the prior generation:
Beginning with performance, with close engineering collaboration between Cloudflare and AMD on optimization, Gen 12 servers can serve more than twice as many requests per second (RPS) as Gen 11 servers, resulting in lower Cloudflare infrastructure build-out costs.
Next, our power efficiency has improved significantly, by more than 60% in RPS per watt as compared to the prior generation. As Cloudflare continues to expand our infrastructure footprint, the improved efficiency helps reduce Cloudflare’s operational expenditure and carbon footprint as a percentage of our fleet size.
Third, in response to the growing demand for AI capabilities, we’ve updated the thermal-mechanical design of our Gen 12 server to support more powerful GPUs. This aligns with the Workers AI objective to support larger large language models and increase throughput for smaller models. This enhancement underscores our ongoing commitment to advancing AI inference capabilities
Fourth, to underscore our security-first position as a company, we’ve integrated hardware root of trust (HRoT) capabilities to ensure the integrity of boot firmware and board management controller firmware. Continuing to embrace open standards, the baseboard management and security controller (Data Center Secure Control Module or OCP DC-SCM) that we’ve designed into our systems is modular and vendor-agnostic, enabling a unified openBMC image, quicker prototyping, and allowing for reuse.
Finally, given the increasing importance of supply assurance and reliability in infrastructure deployments, our approach includes a robust multi-vendor strategy to mitigate supply chain risks, ensuring continuity and resiliency of our infrastructure deployment.
Cloudflare is dedicated to constantly improving our server fleet, empowering businesses worldwide with enhanced performance, efficiency, and security.
Gen 12 Servers
Let’s take a closer look at our Gen 12 server. The server is powered by a 4th generation AMD EPYC Processor, paired with 384 GB of DDR5 RAM, 16 TB of NVMe storage, a dual-port 25 GbE NIC, and two 800 watt power supply units.
| Generation | Gen 12 Compute | Previous Gen 11 Compute |
|---|---|---|
| Form Factor | 2U1N – Single socket | 1U1N – Single socket |
| Processor | AMD EPYC 9684X Genoa-X 96-Core Processor | AMD EPYC 7713 Milan 64-Core Processor |
| Memory | 384GB of DDR5-4800 x12 memory channel |
384GB of DDR4-3200 x8 memory channel |
| Storage | x2 E1.S NVMe Samsung PM9A3 7.68TB / Micron 7450 Pro 7.68TB |
x2 M.2 NVMe 2x Samsung PM9A3 x 1.92TB |
| Network | Dual 25 Gbe OCP 3.0 Intel Ethernet Network Adapter E810-XXVDA2 / NVIDIA Mellanox ConnectX-6 Lx |
Dual 25 Gbe OCP 2.0 Mellanox ConnectX-4 dual-port 25G |
| System Management | DC-SCM 2.0 ASPEED AST2600 (BMC) + AST1060 (HRoT) |
ASPEED AST2500 (BMC) |
| Power Supply | 800W – Titanium Grade | 650W – Titanium Grade |

Cloudflare Gen 12 server
CPU
During the design phase, we conducted an extensive survey of the CPU landscape. These options offer valuable choices as we consider how to shape the future of Cloudflare’s server technology to match the needs of our customers. We evaluated many candidates in the lab, and short-listed three standout CPU candidates from the 4th generation AMD EPYC Processor lineup: Genoa 9654, Bergamo 9754, and Genoa-X 9684X for production evaluation. The table below summarizes the differences in specifications of the short-listed candidates for Gen 12 servers against the AMD EPYC 7713 used in our Gen 11 servers. Notably, all three candidates offer significant increase in core count and marked increase in all core boost clock frequency.
| CPU Model | AMD EPYC 7713 | AMD EPYC 9654 | AMD EPYC 9754 | AMD EPYC 9684X |
|---|---|---|---|---|
| Series | Milan | Genoa | Bergamo | Genoa-X |
| # of CPU Cores | 64 | 96 | 128 | 96 |
| # of Threads | 128 | 192 | 256 | 192 |
| Base Clock | 2.0 GHz | 2.4 GHz | 2.25 GHz | 2.4 GHz |
| Max Boost Clock | 3.67 GHz | 3.7 Ghz | 3.1 Ghz | 3.7 Ghz |
| All Core Boost Clock | 2.7 GHz * | 3.55 GHz | 3.1GHz | 3.42 GHz |
| Total L3 Cache | 256 MB | 384 MB | 256 MB | 1152 MB |
| L3 cache per core | 4MB / core | 4MB / core | 2MB / core | 12MB / core |
| Maximum configurable TDP | 240W | 400W | 400W | 400W |
*Note: AMD EPYC 7713 all core boost clock frequency of 2.7 GHz is not an official specification of the CPU but based on data collected at Cloudflare production fleet.
During production evaluation, the configuration of all three CPUs were optimized to the best of our knowledge, including thermal design power (TDP) configured to 400W for maximum performance. The servers are set up to run the same processes and services like any other server we have in production, which makes for a great side-by-side comparison.
| Milan 7713 | Genoa 9654 | Bergamo 9754 | Genoa-X 9684X | |
|---|---|---|---|---|
| Production performance (request per second) multiplier | 1x | 2x | 2.15x | 2.45x |
| Production efficiency (request per second per watt) multiplier | 1x | 1.33x | 1.38x | 1.63x |
AMD EPYC Genoa-X in Cloudflare Gen 12 server
Each of these CPUs outperforms the previous generation of processors by at least 2x. AMD EPYC 9684X Genoa-X with 3D V-cache technology gave us the greatest performance improvement, at 2.45x, when compared against our Gen 11 servers with AMD EPYC 7713 Milan.
Comparing the performance between Genoa-X 9684X and Genoa 9654, we see a ~22.5% performance delta. The primary difference between the two CPUs is the amount of L3 cache available on the CPU. Genoa-X 9684X has 1152 MB of L3 cache, which is three times the Genoa 9654 with 384 MB of L3 cache. Cloudflare workloads benefit from more low level cache being accessible and avoid the much larger latency penalty associated with fetching data from memory.
Genoa-X 9684X CPU delivered ~22.5% improved performance consuming the same amount of 400W power compared to Genoa 9654. The 3x larger L3 cache does consume additional power, but only at the expense of sacrificing 3% of highest achievable all core boost frequency on Genoa-X 9684X, a favorable trade-off for Cloudflare workloads.
More importantly, Genoa-X 9684X CPU delivered 145% performance improvement with only 50% system power increase, offering a 63% power efficiency improvement that will help drive down operational expenditure tremendously. It is important to note that even though a big portion of the power efficiency is due to the CPU, it needs to be paired with optimal thermal-mechanical design to realize the full benefit. Earlier last year, we made the thermal-mechanical design choice to double the height of the server chassis to optimize rack density and cooling efficiency across our global data centers. We estimated that moving from 1U to 2U would reduce fan power by 150W, which would decrease system power from 750 watts to 600 watts. Guess what? We were right — a Gen 12 server consumes 600 watts per system at a typical ambient temperature of 25°C.
While high performance often comes at a higher price, fortunately AMD EPYC 9684X offer an excellent balance between cost and capability. A server designed with this CPU provides top-tier performance without necessitating a huge financial outlay, resulting in a good Total Cost of Ownership improvement for Cloudflare.
Memory
AMD Genoa-X CPU supports twelve memory channels of DDR5 RAM up to 4800 mega transfers per second (MT/s) and per socket Memory Bandwidth of 460.8 GB/s. The twelve channels are fully utilized with 32 GB ECC 2Rx8 DDR5 RDIMM with one DIMM per channel configuration for a combined total memory capacity of 384 GB.
Choosing the optimal memory capacity is a balancing act, as maintaining an optimal memory-to-core ratio is important to make sure CPU capacity or memory capacity is not wasted. Some may remember that our Gen 11 servers with 64 core AMD EPYC 7713 CPUs are also configured with 384 GB of memory, which is about 6 GB per core. So why did we choose to configure our Gen 12 servers with 384 GB of memory when the core count is growing to 96 cores? Great question! A lot of memory optimization work has happened since we introduced Gen 11, including some that we blogged about, like Bot Management code optimization and our transition to highly efficient Pingora. In addition, each service has a memory allocation that is sized for optimal performance. The per-service memory allocation is programmed and monitored utilizing Linux control group resource management features. When sizing memory capacity for Gen 12, we consulted with the team who monitor resource allocation and surveyed memory utilization metrics collected from our fleet. The result of the analysis is that the optimal memory-to-core ratio is 4 GB per CPU core, or 384 GB total memory capacity. This configuration is validated in production. We chose dual rank memory modules over single rank memory modules because they have higher memory throughput, which improves server performance (read more about memory module organization and its effect on memory bandwidth).
The table below shows the result of running the Intel Memory Latency Checker (MLC) tool to measure peak memory bandwidth for the system and to compare memory throughput between 12 channels of dual-rank (2Rx8) 32 GB DIMM and 12 channels of single rank (1Rx4) 32 GB DIMM. Dual rank DIMMs have slightly higher (1.8%) read memory bandwidth, but noticeably higher write bandwidth. As write ratios increased from 25% to 50%, the memory throughput delta increased by 10%.
| Benchmark | Dual rank advantage over single rank |
|---|---|
| Intel MLC ALL Reads | 101.8% |
| Intel MLC 3:1 Reads-Writes | 107.7% |
| Intel MLC 2:1 Reads-Writes | 112.9% |
| Intel MLC 1:1 Reads-Writes | 117.8% |
| Intel MLC Stream-triad like | 108.6% |
The table below shows the result of running the AMD STREAM benchmark to measure sustainable main memory bandwidth in MB/s and the corresponding computation rate for simple vector kernels. In all 4 types of vector kernels, dual rank DIMMs provide a noticeable advantage over single rank DIMMs.
| Benchmark | Dual rank advantage over single rank |
|---|---|
| Stream Copy | 115.44% |
| Stream Scale | 111.22% |
| Stream Add | 109.06% |
| Stream Triad | 107.70% |
Storage
Cloudflare’s Gen X server and Gen 11 server support M.2 form factor drives. We liked the M.2 form factor mainly because it was compact. The M.2 specification was introduced in 2012, but today, the connector system is dated and the industry has concerns about its ability to maintain signal integrity with the high speed signal specified by PCIe 5.0 and PCIe 6.0 specifications. The 8.25W thermal limit of the M.2 form factor also limits the number of flash dies that can be fitted, which limits the maximum supported capacity per drive. To address these concerns, the industry has introduced the E1.S specification and is transitioning from the M.2 form factor to the E1.S form factor.
In Gen 12, we are making the change to the EDSFF E1 form factor, more specifically the E1.S 15mm. E1.S 15mm, though still in a compact form factor, provides more space to fit more flash dies for larger capacity support. The form factor also has better cooling design to support more than 25W of sustained power.
While the AMD Genoa-X CPU supports 128 PCIe 5.0 lanes, we continue to use NVMe devices with PCIe Gen 4.0 x4 lanes, as PCIe Gen 4.0 throughput is sufficient to meet drive bandwidth requirements and keep server design costs optimal. The server is equipped with two 8 TB NVMe drives for a total of 16 TB available storage. We opted for two 8 TB drives instead of four 4 TB drives because the dual 8 TB configuration already provides sufficient I/O bandwidth for all Cloudflare workloads that run on each server.
| Sequential Read (MB/s) : | 6,700 |
|---|---|
| Sequential Write (MB/s) : | 4,000 |
| Random Read IOPS: | 1,000,000 |
| Random Write IOPS: | 200,000 |
| Endurance | 1 DWPD |
| PCIe GEN4 x4 lane throughput | 7880 MB/s |
Storage devices performance specification
Network
Cloudflare servers and top-of-rack (ToR) network equipment operate at 25 GbE speeds. In Gen 12, we utilized a DC-MHS motherboard-inspired design, and upgraded from an OCP 2.0 form factor to an OCP 3.0 form factor, which provides tool-less serviceability of the NIC. The OCP 3.0 form factor also occupies less space in the 2U server compared to PCIe-attached NICs, which improves airflow and frees up space for other application-specific PCIe cards, such as GPUs.
Cloudflare has been using the Mellanox CX4-Lx EN dual port 25 GbE NIC since our Gen 9 servers in 2018. Even though the NIC has served us well over the years, we are single sourced. During the pandemic, we were faced with supply constraints and extremely long lead times. The team scrambled to qualify the Broadcom M225P dual port 25 GbE NIC as our second-sourced NIC in 2022, ensuring we could continue to turn up servers to serve customer demand. With the lessons learned from single-sourcing the Gen 11 NIC, we are now dual-sourcing and have chosen the Intel Ethernet Network Adapter E810 and NVIDIA Mellanox ConnectX-6 Lx to support Gen 12. These two NICs are compliant with the OCP 3.0 specification and offer more MSI-X queues that can then be mapped to the increased core count on the AMD EPYC 9684X. The Intel Ethernet Network Adapter comes with an additional advantage, offering full Generic Segmentation Offload (GSO) support including VLAN-tagged encapsulated traffic, whereast many vendors either only support Partial GSO or do not support it at all today. With Full GSO support, the kernel spent noticeably less time in softirq segmenting packets, and servers with Intel E810 NICs are processing approximately 2% more requests per second.
Improved security with DC-SCM: Project Argus
DC-SCM in Gen 12 server (Project Argus)
Gen 12 servers are integrated with Project Argus, one of the industry first implementations of Data Center Secure Control Module 2.0 (DC-SCM 2.0). DC-SCM 2.0 decouples server management and security functions away from the motherboard. The baseboard management controller (BMC), hardware root of trust (HRoT), trusted platform module (TPM), and dual BMC/BIOS flash chips are all installed on the DC-SCM.
On our Gen X and Gen 11 server, Cloudflare moved our secure boot trust anchor from the system Basic Input/Output System (BIOS) or the Unified Extensible Firmware Interface (UEFI) firmware to hardware-rooted boot integrity — AMD’s implementation of Platform Secure Boot (PSB) or Ampere’s implementation of Single Domain Secure Boot. These solutions helped secure Cloudflare infrastructure from BIOS / UEFI firmware attacks. However, we are still vulnerable to out-of-band attacks through compromising the BMC firmware. BMC is a microcontroller that provides out-of-band monitoring and management capabilities for the system. When compromised, attackers can read processor console logs accessible by BMC and control server power states for example. On Gen 12, the HRoT on the DC-SCM serves as the trust store of cryptographic keys and is responsible to authenticate the BIOS/UEFI firmware (independent of CPU vendor) and the BMC firmware for secure boot process.
In addition, on the DC-SCM, there are additional flash storage devices to enable storing back-up BIOS/UEFI firmware and BMC firmware to allow rapid recovery when a corrupted or malicious firmware is programmed, and to be resilient to flash chip failure due to aging.
These updates make our Gen 12 server more secure and more resilient to firmware attacks.
Power
A Gen 12 server consumes 600 watts at a typical ambient temperature of 25°C. Even though this is a 50% increase from the 400 watts consumed by the Gen 11 server, as mentioned above in the CPU section, this is a relatively small price to pay for a 145% increase in performance. We’ve paired the server up with dual 800W common redundant power supplies (CRPS) with 80 PLUS Titanium grade efficiency. Both power supply units (PSU) operate actively with distributed power and current. The units are hot-pluggable, allowing the server to operate with redundancy and maximize uptime.
80 PLUS is a PSU efficiency certification program. The Titanium grade efficiency PSU is 2% more efficient than the Platinum grade efficiency PSU between typical operating load of 25% to 50%. 2% may not sound like a lot, but considering the size of Cloudflare fleet with servers deployed worldwide, 2% savings over the lifetime of all Gen 12 deployment is a reduction of more than 7 GWh, equivalent to carbon sequestered by more than 3400 acres of U.S. forests in one year. This upgrade also means our Gen 12 server complies with EU Lot9 requirements and can be deployed in the EU region.
| 80 PLUS certification | 10% | 20% | 50% | 100% |
|---|---|---|---|---|
| 80 PLUS Platinum | – | 92% | 94% | 90% |
| 80 PLUS Titanium | 90% | 94% | 96% | 91% |
Drop-in GPU support
Demand for machine learning and AI workloads exploded in 2023, and Cloudflare introduced Workers AI to serve the needs of our customers. Cloudflare retrofitted or deployed GPUs worldwide in a portion of our Gen 11 server fleet to support the growth of Workers AI. Our Gen 12 server is also designed to accommodate the addition of more powerful GPUs. This gives Cloudflare the flexibility to support Workers AI in all regions of the world, and to strategically place GPUs in regions to reduce inference latency for our customers. With this design, the server can run Cloudflare’s full software stack. During times when GPUs see lower utilization, the server continues to serve general web requests and remains productive.
The electrical design of the motherboard is designed to support up to two PCIe add-in cards and the power distribution board is sized to support an additional 400W of power. The mechanics are sized to support either a single FHFL (full height, full length) double width GPU PCIe card, or two FHFL single width GPU PCIe cards. The thermal solution including the component placement, fans, and air duct design are sized to support adding GPUs with TDP up to 400W.
Looking to the future
Gen 12 Servers are currently deployed and live in multiple Cloudflare data centers worldwide, and already process millions of requests per second. Cloudflare’s EPYC journey has not ended — the 5th-gen AMD EPYC CPUs (code name “Turin”) are already available for testing, and we are very excited to start the architecture planning and design discussion for the Gen 13 server. Come join us at Cloudflare to help build a better Internet!
Proactively Securing Cloud Workloads in the CI/CD Pipeline with Rapid7 and Azure DevOps
Post Syndicated from Ray Cochrane original https://blog.rapid7.com/2024/09/25/proactively-securing-cloud-workloads-in-the-ci-cd-pipeline-with-rapid7-and-azure-devops/

As organizations continue to embrace cloud-native development practices, the need for integrated security solutions that seamlessly fit into existing DevOps environments has become more pressing than ever. We recognize this critical need and have added new integration for InsightCloudSec (ICS) and Exposure Command with Azure DevOps for Infrastructure as code (IaC) tooling, empowering organizations to quickly and effectively safeguard their attack surfaces.
But first, let’s quickly refresh infrastructure as code functionality within ICS to remind us of how important it is and why this new integration will play a key role in your organization’s security posture. Shifting left in code security is more important than ever before and IaC is the impetus for organizations to move cloud security and compliance from being reactive (at runtime) to being preventative (during development). The key is integrating the right controls with the proper guidance directly into the CI/CD pipeline. This integration facilitates delivering secure and compliant cloud infrastructure from the start. Rapid7’s innovative IaC tool allows you to identify key insights and risks during the development process which allow you to protect and secure your attack surface before it’s visible. If you want to learn more about getting started with IaC you can check out this helpful guide.
Why DevSecOps is so important
In today’s fast-paced development environments, security cannot be an afterthought. The ability to integrate security checks directly into DevOps — commonly referred to as DevSecOps — workflows is crucial for minimizing vulnerabilities and reducing the risk of breaches.
Making security a shared responsibility between development, operations and security teams has a number of key benefits:
- It enables developers to deliver better, more-secure code faster, and, therefore, cheaper.
- It makes security a continuous activity, allowing for issues to be caught proactively before they reach production.
- It stops an all-too-common dynamic where security teams are only being brought in at the end of the project process in a QA role.
Impact of the new integration
With cloud environments being dynamic and complex, it’s vital to have tools that can quickly scan repositories and return actionable insights with minimal disruption to the development process. This is where the integration between InsightCloudSec and Azure DevOps makes a significant impact. By embedding security directly into the CI/CD pipeline, organizations can ensure that their code is secure before it ever reaches production, thus safeguarding their entire attack surface more effectively
The integration of InsightCloudSec with Azure DevOps introduces a suite of new capabilities designed to enhance how organizations assess and respond to potential risks within their cloud environments.
Here’s how it transforms the security landscape:
- Extend attack surface visibility Into the CI/CD pipeline: The integration is designed to maximize the protection of your cloud environment by continuously monitoring and assessing risks by shifting security controls to the left. By catching issues early, it significantly reduces the likelihood of security threats reaching production, thereby minimizing the potential attack surface.
- Proactive repository scanning: With this integration, security scans are executed as a seamless part of the CI/CD pipeline. As soon as IaC templates are changed in version control systems, InsightCloudSec can automatically scan repositories, identifying vulnerabilities, misconfigurations, and compliance issues. This seamless execution ensures that security checks do not hinder development velocity, allowing teams to maintain their pace while ensuring security.
- Frictionless risk assessment and remediation: Rapid7’s integration emphasizes ease of use, ensuring that security assessments and remediation steps are as frictionless as possible. Real-time alerts and detailed insights are provided directly within Azure DevOps, enabling teams to quickly understand and address risks without needing to navigate multiple tools. This streamlined approach not only speeds up the response time but also ensures that remediation efforts are effective and aligned with organizational security policies.
- Improved collaboration between security and DevOps teams: Driving better integration between security tooling and the CI/CD pipeline helps break down the unfortunately all too common “us vs. them” mentality that can exist between development and security teams. By automating repeatable, time-consuming tasks, such as vulnerability scanning and compliance checks, teams can shift their focus away from manual, often reactive efforts, and towards proactive collaboration. This streamlined approach empowers developers to identify and remediate security issues early in the development process without slowing down delivery, while security professionals gain visibility into code changes in real-time. The result is a more cohesive, efficient workflow where both teams work together to address complex, impactful problems, rather than being bogged down by friction and misaligned priorities.
Integration benefits at-a-glance
The integration between Rapid7’s InsightCloudSec and Azure DevOps will help organizations using the Azure ecosystem of tools easily advance their cloud security programs by shifting left, offering organizations the tools they need to effectively safeguard their attack surfaces without slowing down their development processes. By doing so, organizations can proactively address risks before they become significant threats, leading to a more secure and resilient cloud environment.
Automated scans and seamless alerting within Azure DevOps reduce the time it takes to identify and remediate vulnerabilities, helping organizations maintain a rapid development cycle without sacrificing security. The integration also fosters improved collaboration between security and development teams, ensuring that security is a shared responsibility. With clear and actionable insights provided within the same environment developers use daily, security becomes an integral part of the DevOps workflow.
By delivering seamless, frictionless security assessments and remediation steps directly within the CI/CD pipeline, Rapid7 continues to empower organizations to build, deploy, and maintain secure cloud environments with confidence.
As organizations navigate the complexities of cloud security, this integration will be a vital asset in ensuring that their cloud environments remain secure, compliant, and resilient against ever-evolving threats. Be sure to stay tuned for more updates as we continue to invest in driving more seamless integration between security and development processes.