[$] PostgreSQL 19’s “scary patch contest”

Post Syndicated from jzb original https://lwn.net/Articles/1092003/

PostgreSQL 19 was
expected to be released in September, in keeping with the database
project’s longstanding tradition of a major release every year. However,
some late-breaking concerns about several of the features slated for inclusion
has some developers worried about the quality of the release. On August 25, PostgreSQL
contributor Robert Haas sent
an email
with the subject “scary patch contest” about several patches
that have required an unusually large number of bug fixes leading up to the
release, which has raised questions about their readiness for a stable
release. One of the patches has been reverted, but several are still under heavy
revision, and an extra beta release has been slotted in to allow for additional
testing.

Building resilient real-time streaming workers with Amazon DynamoDB leases

Post Syndicated from Siddhesh Tiwari original https://aws.amazon.com/blogs/architecture/building-resilient-real-time-streaming-workers-with-amazon-dynamodb-leases/

Consider a real-time transcription service processing 500 concurrent meetings. Each worker processing these meetings requires a dedicated outbound WebSocket connection to an upstream streaming source. When a single worker fails, it drops 100+ connections, causing 2 to 3 minutes of data loss per connection until operators manually restart services.

Building real-time streaming workers that maintain hundreds of persistent WebSocket connections presents a coordination challenge: when a worker stops unexpectedly, its connections become unmanaged and data stops flowing. Exactly one worker must own each connection, yet workers fail, redeploy, and scale independently. Without a mechanism to track ownership and automatically transfer connections that healthy workers can claim, operators must intervene manually for every failure.

This pattern reduces manual intervention during failures, reduces connection recovery time from minutes to seconds, and helps minimize downtime during deployments without requiring external coordination services.

In this post, you learn how to build a WebSocket fleet management system on Amazon Elastic Container Service (Amazon ECS) and AWS Fargate. Amazon DynamoDB is the primary service that manages distributed lease ownership, coordination, and failover in this solution. For the compute layer, this post uses Amazon ECS on AWS Fargate to run the worker fleet. However, you can adapt this pattern to any compute layer of your choice, such as Amazon Elastic Kubernetes Service (Amazon EKS) or Amazon Elastic Compute Cloud (Amazon EC2) with Auto Scaling groups, without changing the core lease logic. You learn how to implement lease-based ownership with conditional writes, automatic failover through orphan reconciliation, and low downtime deployments through graceful shutdown.

The challenge: managing long-lived WebSocket connections

WebSocket connections are fundamentally different from HTTP requests. An HTTP request arrives, gets processed, and returns a response. The server holds no state between requests. A WebSocket connection, by contrast, is a persistent bidirectional channel. The worker must maintain an open TCP connection, process messages the upstream source sends, and respond to keep-alive pings from the upstream source.

This statefulness introduces several operational challenges:

Worker failures. When a worker process stops unexpectedly or its container terminates, the worker drops its WebSocket connections. The upstream source might buffer data briefly, but without a mechanism to detect the failure and reassign the connection to a healthy worker, the system loses data.

Rolling deployments. ECS rolling deployments terminate old tasks and start new ones. Each terminated task drops its connections. Without coordination, there’s a window where connections have no owner.

Horizontal scaling. Adding workers is straightforward. New tasks start and pick up work. Removing workers is harder. You need to drain connections from departing workers and verify other workers take over before the task exits.

Double-claiming. If two workers both believe they own the same connection, they both attempt to connect to the same upstream source. This can cause duplicate data processing, protocol errors, or connection rejection by the upstream service.

Because the workers are WebSocket clients that initiate outbound connections to upstream sources, you need a coordination mechanism that operates at the application layer rather than the network layer.

Solution overview

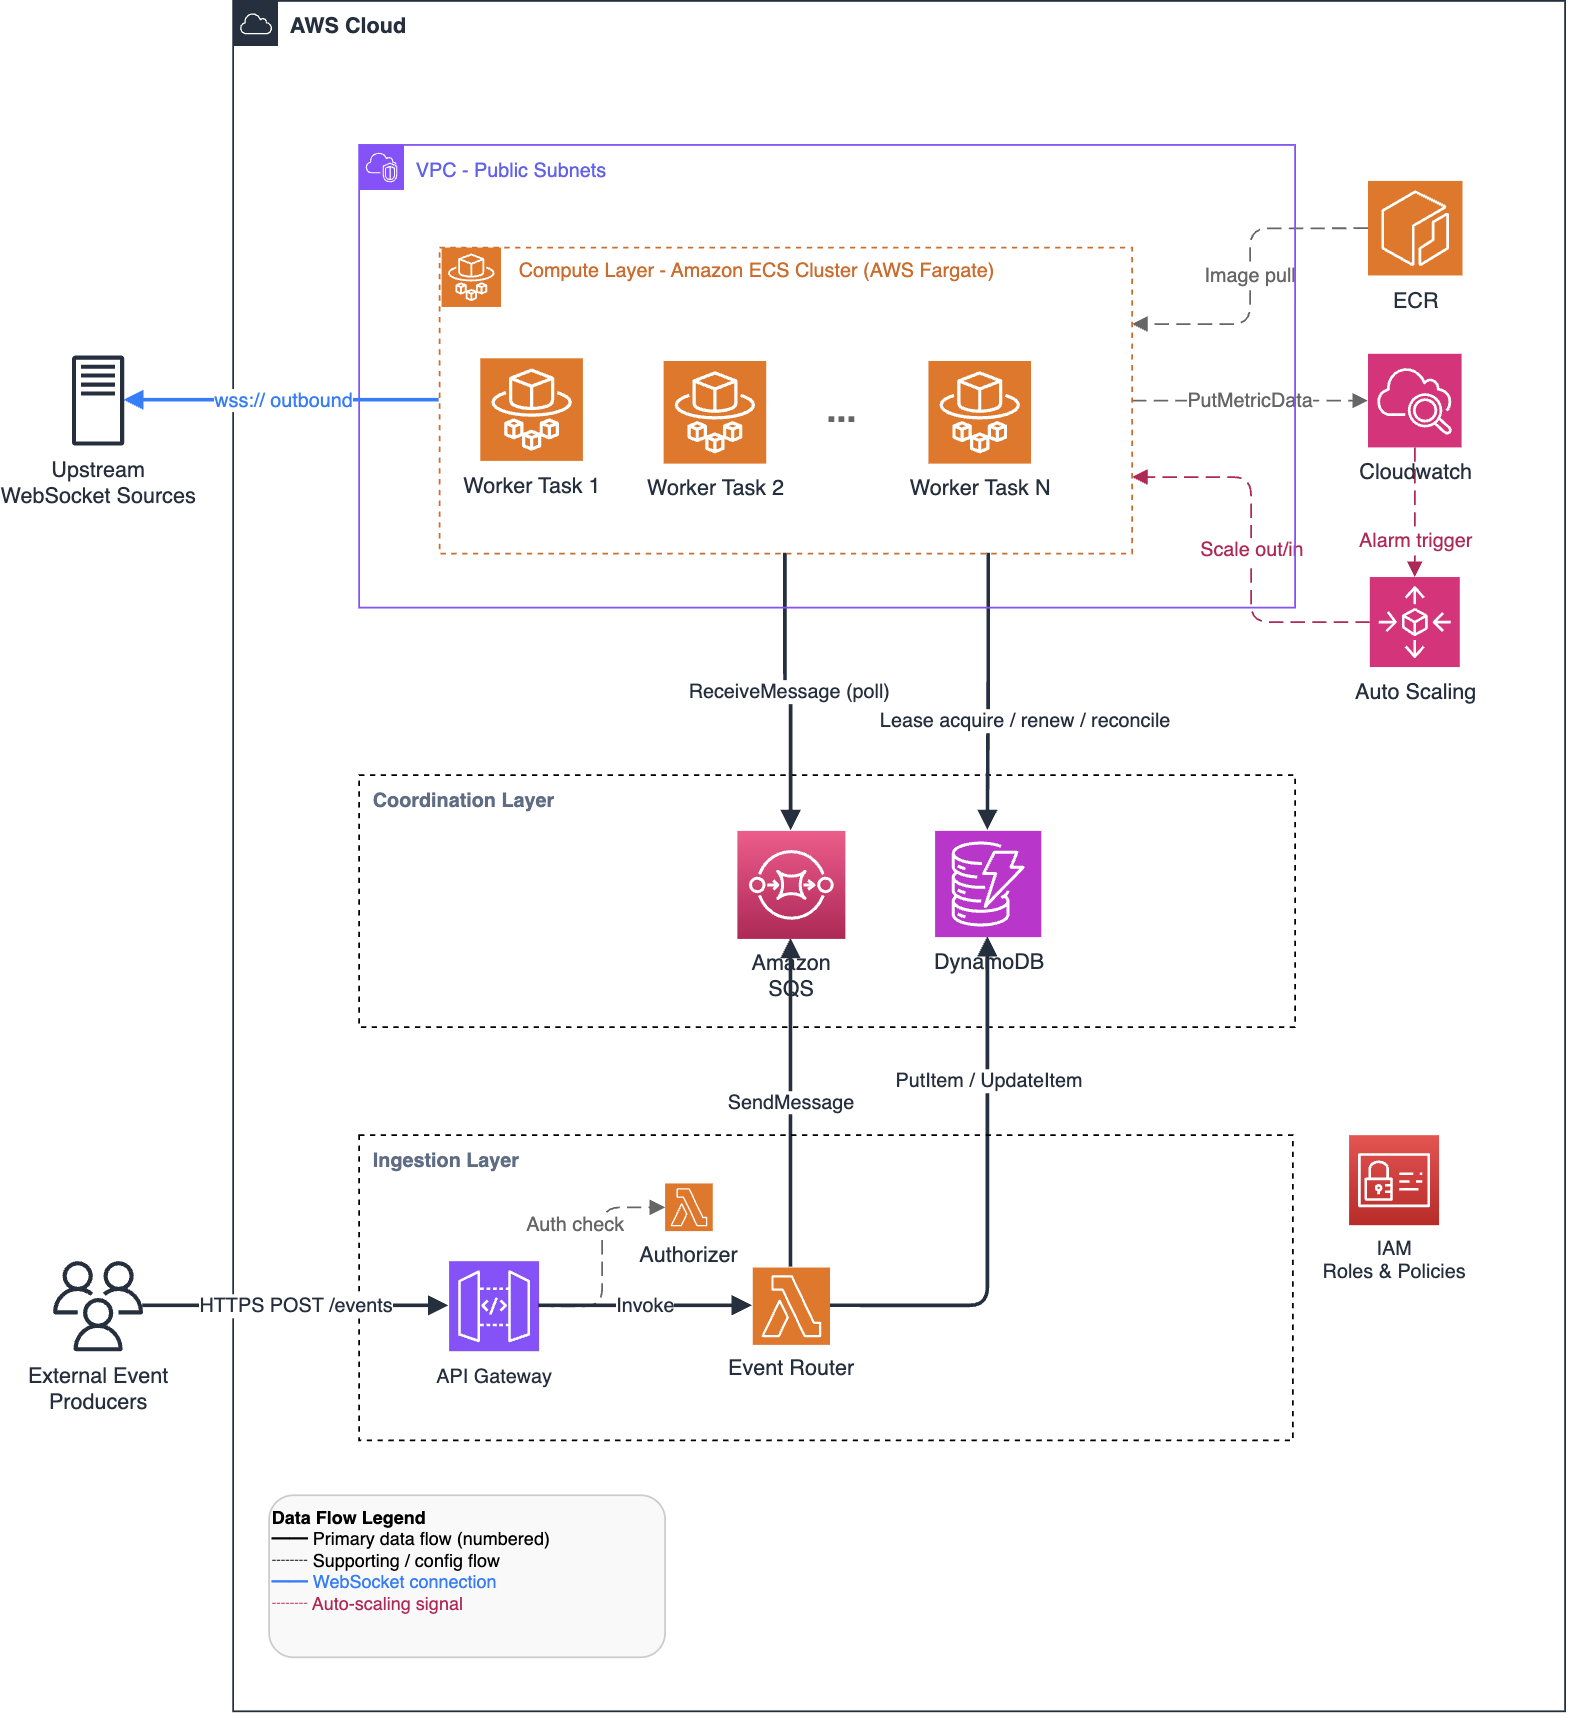
The architecture uses six AWS services to coordinate a fleet of WebSocket workers:

Architecture of the WebSocket fleet: API Gateway and Lambda write events to DynamoDB and SQS, and ECS Fargate workers claim leases and publish metrics to CloudWatch

Figure 1: WebSocket fleet management architecture

  1. Amazon API Gateway: You use this to receive START and STOP events from external systems through a REST API. A START event signals that a new streaming session (for example, a meeting or live feed) has begun and requires a dedicated WebSocket connection. A STOP event signals that the streaming session has ended and the connection should be released.
  2. AWS Lambda (event router): You use this to write connection state to Amazon DynamoDB and enqueue a notification to Amazon Simple Queue Service (Amazon SQS).
  3. Amazon DynamoDB: You use this to store connection state and lease ownership. Conditional writes (atomic operations that succeed only if specified conditions are met) can provide distributed locking capabilities without external coordination services.
  4. Amazon SQS: You use this to distribute work notifications to workers for fast pickup of new connections.
  5. Amazon ECS on AWS Fargate: You use this to run the worker fleet. Each worker polls Amazon SQS, manages WebSocket connections, and renews leases through heartbeats.
  6. Amazon CloudWatch: You use this to collect custom metrics (active connection count) that drive ECS automatic scaling.

The key insight is that DynamoDB conditional writes act as a distributed lock without requiring a separate coordination service. Each connection has a lease: a time-bounded ownership claim. Workers must continuously renew their lease. If a worker stops unexpectedly, the lease expires and another worker takes over.

Why not SQS alone or an existing lock client?

SQS plays an important role in this architecture as a fast notification channel, but it cannot serve as the sole coordination mechanism. SQS is designed for task execution, delivering a unit of work to one consumer. WebSocket connection ownership is not a one-time task. It is a continuous state that must be maintained and renewed for the lifetime of the connection. SQS has no mechanism to track who currently owns a connection, query for connections with no active owner, or represent the domain state (desired_state, ws_url, last_seq) needed to manage a connection. DynamoDB provides all these capabilities through persistent items, conditional writes, and secondary indexes.

The amazon-dynamodb-lock-client library published by AWS implements similar distributed locking primitives on DynamoDB. However, it is designed for Java environments and does not integrate domain-specific connection state into the lock record. This solution is implemented in async Python to match the worker architecture, combines lock ownership and connection metadata in a single DynamoDB item to reduce read operations, and uses a GSI to enable fleet-wide reconciliation queries that a general-purpose lock client does not provide.

The lease pattern

A lease is a row in DynamoDB that tracks who owns a connection and when that ownership expires. The table uses the following schema:

Attribute Type Description
Pk String (Partition Key) Connection ID, for example, CONN#meeting-123
desired_state String STARTED or STOPPED
ws_url String Upstream WebSocket URL to connect to
lease_owner String Worker ID that currently owns this connection
lease_expires_at_ms Number Epoch milliseconds when the lease expires
last_seq Number Last processed sequence number (for resumption)

A global secondary index (GSI), a secondary lookup structure that you can use to query on non-primary-key attributes, on desired_state (partition key) and lease_expires_at_ms (sort key) allows efficient queries for unmanaged connections: those with desired_state = STARTED and an expired lease.

A note on clock accuracy

The lease expiration mechanism relies on epoch millisecond timestamps generated by worker processes using their local system clocks. DynamoDB evaluates lease expiration conditions against the now value supplied by the calling worker, not against a DynamoDB server-side clock. This means all workers must have reasonably synchronized clocks for the lease pattern to behave correctly.

AWS Fargate tasks running in the same AWS region receive clock synchronization through the Amazon Time Sync Service, which keeps clock skew between tasks to within a few milliseconds. This is well within the safety margin provided by the default 20-second lease duration and 5-second heartbeat interval. If you deploy this pattern on compute infrastructure outside of AWS Fargate, verify that NTP synchronization is configured and monitor for clock drift. For environments where clock accuracy cannot be guaranteed, increase the lease duration by the maximum expected clock skew to prevent false lease expirations.

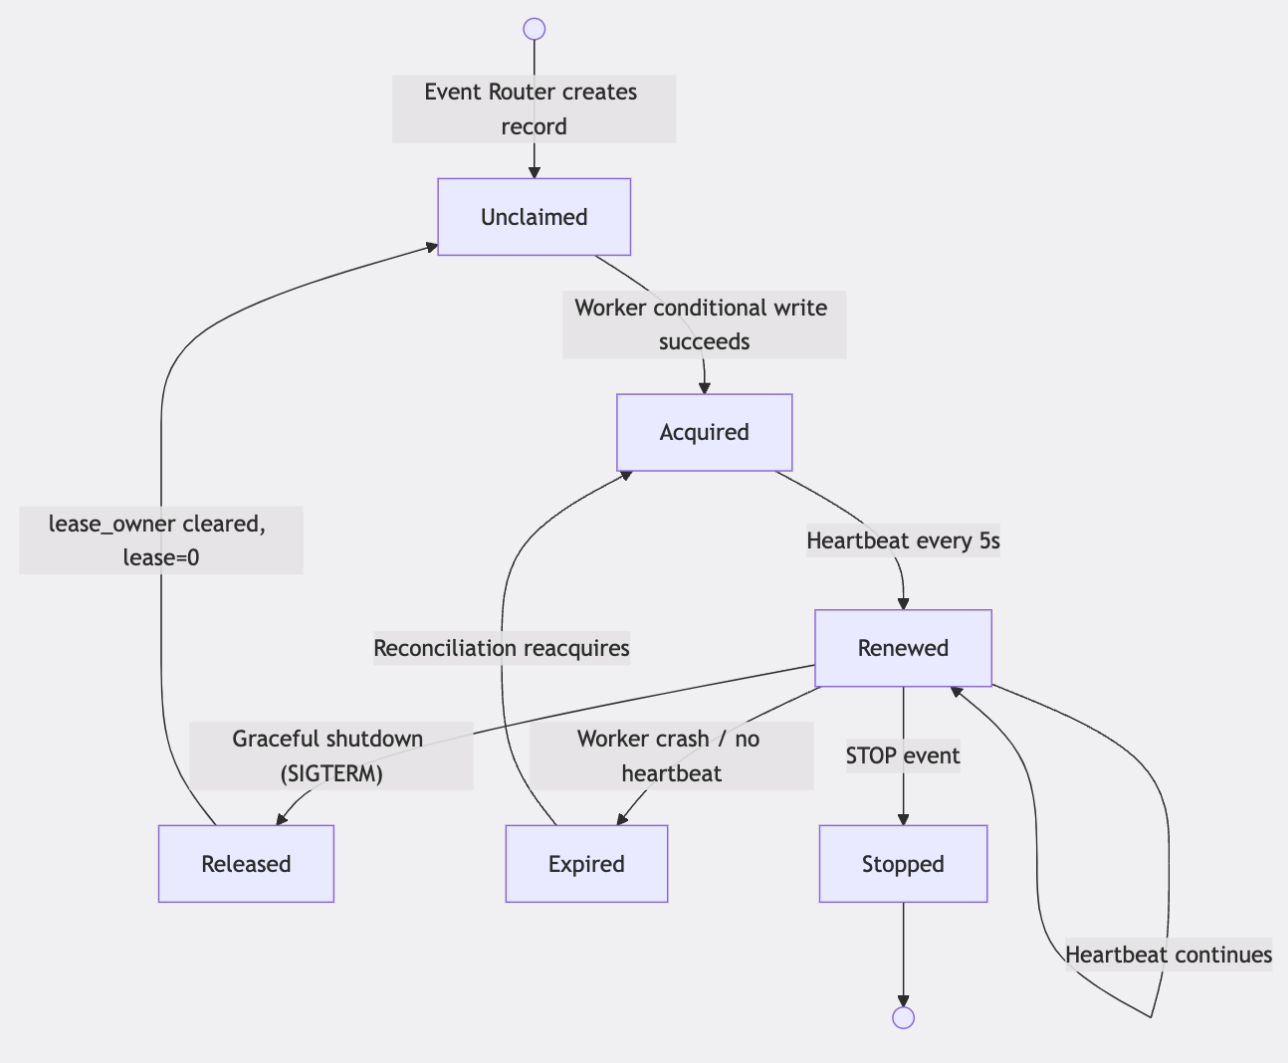
The lease lifecycle has four states. Figure 2 shows the lease state machine.

State machine showing the lease lifecycle transitions between the Acquire, Renew, Release, and Expired states

Figure 2: Lease lifecycle

Acquire

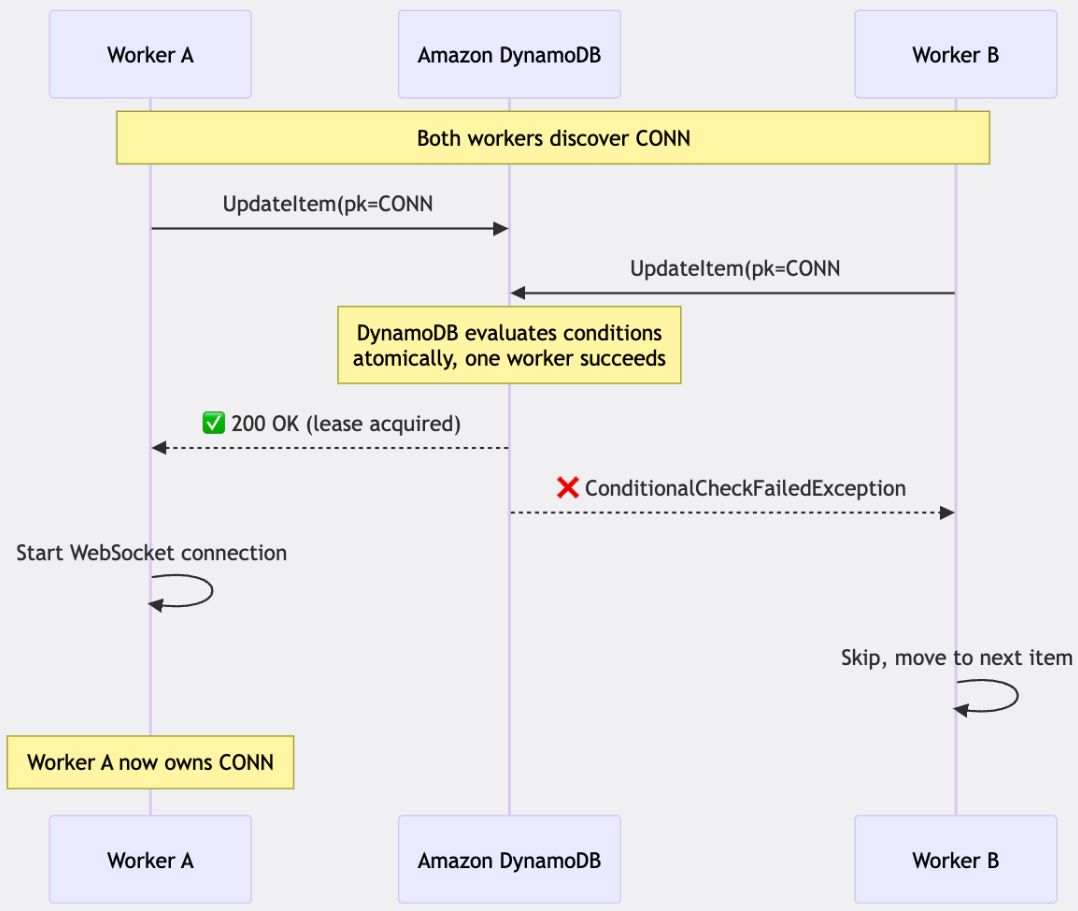
A worker claims a connection by writing its worker ID (lease_owner) and a future expiration timestamp (lease_expires_at_ms) to the DynamoDB lease record. The conditional expression ensures that only one worker can succeed: it checks that either no lease exists yet (attribute_not_exists) or the existing lease has already expired (lease_expires_at_ms < :now). If two workers attempt to acquire the same connection simultaneously, DynamoDB evaluates this condition atomically and only one worker succeeds. The other receives a ConditionalCheckFailedException and gracefully backs off.

The following code example is from the worker application (worker.py), which initializes the Amazon DynamoDB table client, worker ID, and configuration at startup. The complete implementation is available in the GitHub repository.

async def try_acquire_lease(pk: str) -> Optional[dict]:
    """Attempt to acquire lease on a connection."""
    try:
        resp = table.update_item(
            Key={"pk": pk},
            UpdateExpression=(
                "SET lease_owner = :w, "
                "lease_expires_at_ms = :exp, "
                "updated_at_ms = :now"
            ),
            ConditionExpression=(
                "attribute_not_exists(lease_expires_at_ms) "
                "OR lease_expires_at_ms < :now"
            ),
            ExpressionAttributeValues={
                ":w": WORKER_ID,
                ":exp": now_ms() + LEASE_SECONDS * 1000,
                ":now": now_ms(),
            },
            ReturnValues="ALL_NEW",
        )
        return resp["Attributes"]
    except ClientError as e:
        if e.response["Error"]["Code"] == "ConditionalCheckFailedException":
            return None  # Another worker already owns this connection
        raise

The ConditionExpression is the critical piece: it succeeds when the lease does not exist yet (attribute_not_exists) or has already expired (lease_expires_at_ms < :now).

Renew

The owning worker renews its lease every few seconds (the heartbeat). The conditional expression verifies the worker still owns the lease:

async def renew_lease(pk: str) -> bool:
    """Renew lease for owned connection."""
    try:
        table.update_item(
            Key={"pk": pk},
            UpdateExpression=(
                "SET lease_expires_at_ms = :exp, "
                "updated_at_ms = :now"
            ),
            ConditionExpression="lease_owner = :w",
            ExpressionAttributeValues={
                ":w": WORKER_ID,
                ":exp": now_ms() + LEASE_SECONDS * 1000,
                ":now": now_ms(),
            },
        )
        return True
    except ClientError:
        return False  # Lost ownership

If renewal returns False, the worker knows it has lost ownership (perhaps another worker acquired the expired lease) and exits cleanly.

Release

During graceful shutdown, the worker explicitly releases its leases so other workers can acquire them immediately rather than waiting for expiration:

async def release_lease(pk: str):
    """Release lease on connection."""
    try:
        table.update_item(
            Key={"pk": pk},
            UpdateExpression=(
                "SET lease_owner = :empty, "
                "lease_expires_at_ms = :zero"
            ),
            ConditionExpression="lease_owner = :w",
            ExpressionAttributeValues={
                ":w": WORKER_ID,
                ":empty": "",
                ":zero": 0,
            },
        )
    except ClientError:
        pass  # Already released or taken by another worker

Expired

When a worker stops unexpectedly, because of a container crash, network partition, or process failure, it can no longer renew its lease. Unlike graceful shutdown, the worker has no opportunity to explicitly release ownership. The lease remains in DynamoDB with the crashed worker’s lease_owner value, but the lease_expires_at_ms timestamp passes without renewal.

This expired lease represents a connection with no active owner: desired_state remains STARTED (the connection should be active) but no healthy worker is managing it. The connection is now an orphan.

The reconciliation loop detects this condition by querying the GSI for records where desired_state = STARTED and lease_expires_at_ms < now. Any healthy worker that finds such a record can attempt to acquire it using the same conditional write used during initial acquisition. Because lease_expires_at_ms < :now is one of the valid conditions for acquisition, the expired lease is treated identically to an unclaimed one.

The Expired state is transient: it exists between the moment a lease stops being renewed and the moment the reconciliation loop runs and a new worker successfully acquires it. The maximum time a connection spends in the Expired state is bounded by the reconciliation interval (default: 60 seconds).

Technical implementation

The following sections walk through each component of the system, starting with how events enter the pipeline and ending with how the fleet scales.

Event ingestion

When an external system needs to start or stop a streaming connection, it sends an event to the Lambda event router through API Gateway. The Lambda function writes the connection state to DynamoDB and enqueues a notification to SQS:

def handler(event, context):
    payload = json.loads(event.get("body", "{}"))
    event_type = payload["event_type"].upper()
    connection_id = payload["connection_id"]
    pk = f"CONN#{connection_id}"

    if event_type == "START":
        table.put_item(Item={
            "pk": pk,
            "desired_state": "STARTED",
            "ws_url": payload["ws_url"],
            "last_seq": 0,
            "lease_owner": "",
            "lease_expires_at_ms": 0,
            "updated_at_ms": now_ms(),
        })
        sqs.send_message(
            QueueUrl=QUEUE_URL,
            MessageBody=json.dumps({"pk": pk})
        )

    elif event_type == "STOP":
        table.update_item(
            Key={"pk": pk},
            UpdateExpression="SET desired_state = :s, updated_at_ms = :t",
            ExpressionAttributeValues={
                ":s": "STOPPED", ":t": now_ms()
            },
        )

    return {"statusCode": 200, "body": "OK"}

DynamoDB is the source of truth for connection state. Amazon SQS serves as a fast notification channel. When a START event arrives, the SQS message immediately notifies available workers that they can claim a new connection, so workers do not need to wait for the next reconciliation cycle (default: 60 seconds) to discover and acquire the new connection. Without SQS, new connections would only be picked up when the reconciliation loop queries the GSI for unmanaged connections on its next scheduled run.

Worker polling

Each ECS Fargate worker runs a continuous SQS polling loop to pick up new connection notifications. The loop follows four steps before starting a new WebSocket connection:

1. Capacity check

Before accepting any new work, the worker checks whether it has reached its maximum connection limit (MAX_CONNECTIONS). If the worker is at capacity, it pauses for 5 seconds and skips the current polling cycle. This prevents a single worker from being overwhelmed while other workers in the fleet remain underutilized.

2. Deduplication

If the worker already manages the connection referenced in the SQS message (tracked in its local connections dictionary), it deletes the message and moves on. This handles cases where the same connection generates multiple SQS notifications, for example during retries or redeliveries.

3. Lease acquisition before WebSocket start

The SQS message is a hint, not a guarantee of ownership. Before starting a WebSocket connection, the worker must successfully acquire the DynamoDB lease using try_acquire_lease. If another worker has already claimed the connection, try_acquire_lease returns None and this worker skips it. This ensures exactly one worker owns each connection at any time.

4. Task creation

If the lease is acquired and desired_state is STARTED, the worker creates an async task to manage the WebSocket connection. The SQS message is then deleted regardless of whether the lease was acquired, preventing repeated reprocessing of the same notification.

The following code shows the full polling loop implementation:

async def poll_sqs():
    while not shutdown_event.is_set():
        if len(connections) >= MAX_CONNECTIONS:
            await asyncio.sleep(5)
            continue

        resp = await asyncio.to_thread(
            sqs.receive_message,
            QueueUrl=QUEUE_URL,
            MaxNumberOfMessages=1,
            WaitTimeSeconds=10,
            VisibilityTimeout=30,
        )

        for msg in resp.get("Messages", []):
            body = json.loads(msg["Body"])
            pk = body["pk"]

            if pk in connections:
                sqs.delete_message(
                    QueueUrl=QUEUE_URL,
                    ReceiptHandle=msg["ReceiptHandle"]
                )
                continue

            conn_data = await try_acquire_lease(pk)
            if conn_data and conn_data.get("desired_state") == "STARTED":
                asyncio.create_task(
                    manage_websocket(
                        pk, conn_data["ws_url"],
                        conn_data.get("last_seq", 0)
                    )
                )
            sqs.delete_message(
                QueueUrl=QUEUE_URL,
                ReceiptHandle=msg["ReceiptHandle"]
            )

Connection management

Once a worker acquires a lease, it opens a WebSocket connection to the upstream source and runs three concurrent async tasks for the lifetime of that connection. These three tasks work together to keep the connection alive, process incoming data, and detect when the connection should stop.

1. Heartbeat loop

The heartbeat loop calls renew_lease every HEARTBEAT_EVERY seconds. If renewal fails, meaning another worker has taken ownership or the lease record has changed, the loop exits immediately. This is the mechanism by which a worker detects that it has lost ownership of a connection mid-flight.

2. Receive loop

The receive loop processes every incoming message from the upstream WebSocket source. Each message is written to a separate DynamoDB messages table with the connection ID, a timestamp, the message data, and the worker ID. The loop runs continuously until the WebSocket connection closes or an error occurs.

3. Desired state checker

Every 10 seconds, the desired state checker reads the connection record from DynamoDB. If desired_state has been set to STOPPED, meaning an external system sent a STOP event through the API, the loop exits, signaling that this connection should be closed even though the WebSocket itself is still open.

How the three tasks interact

All three tasks run concurrently using asyncio.gather. When any one of the three tasks returns or raises an exception, asyncio.gather completes and execution moves to the finally block. This means a single trigger, lease loss, WebSocket closure, or a STOP event, is sufficient to cleanly end the connection regardless of the state of the other two tasks.

Cleanup

The finally block always runs, regardless of how the connection ended. It releases the DynamoDB lease so other workers can acquire the connection immediately and removes the connection from the worker’s local tracking dictionary.

The following code shows the full connection management implementation:

async def manage_websocket(pk: str, ws_url: str, last_seq: int):
    connections[pk] = {"pk": pk, "ws_url": ws_url, "ws": None}

    try:
        async with websockets.connect(ws_url) as ws:
            connections[pk]["ws"] = ws

            async def heartbeat_loop():
                while not shutdown_event.is_set():
                    await asyncio.sleep(HEARTBEAT_EVERY)
                    if not await renew_lease(pk):
                        print(f"[{pk}] Lost lease, closing")
                        return

            async def receive_loop():
                async for msg in ws:
                    data = json.loads(msg)
                    messages_table.put_item(Item={
                        "pk": pk,
                        "sk": str(now_ms()),
                        "message_data": data.get("data", str(data)),
                        "timestamp_ms": now_ms(),
                        "worker_id": WORKER_ID,
                    })

            async def check_desired_state():
                while not shutdown_event.is_set():
                    await asyncio.sleep(10)
                    resp = table.get_item(Key={"pk": pk})
                    if resp.get("Item", {}).get("desired_state") == "STOPPED":
                        return

            await asyncio.gather(
                heartbeat_loop(),
                receive_loop(),
                check_desired_state()
            )

    except Exception as e:
        print(f"[{pk}] WebSocket error: {e}")
    finally:
        await release_lease(pk)
        connections.pop(pk, None)

Production note: The code samples use print() for clarity. In production, replace these with structured logging (the Python logging module or Amazon CloudWatch Logs) and emit CloudWatch metrics for lease acquisition failures and reconnection events to support operational alerting.

Scaling note: The per-connection check_desired_state() loop shown here works for small fleets. At scale, replace individual GetItem calls with a single centralized loop that uses BatchGetItem to check the state of all active connections in one call, reducing DynamoDB reads from N calls every 10 seconds to 1 batched call.

Orphan reconciliation

The reconciliation loop is the safety net of the system. It runs on every worker periodically, independent of the SQS polling loop. Its sole purpose is to find connections that should be active but have no current owner, and reacquire them.

The loop queries the GSI for all records where desired_state = STARTED and lease_expires_at_ms is less than the current time. These are connections that an external system has requested as active, but whose lease has either never been claimed or has expired without renewal, indicating the previous owner is no longer running.

For each orphaned connection found, the worker calls try_acquire_lease. Because try_acquire_lease uses a DynamoDB conditional write, multiple workers can safely run reconciliation concurrently without risk of double-claiming. Exactly one worker succeeds for each connection. The others receive a ConditionalCheckFailedException and move on.

The reconciliation interval (default: 60 seconds) determines the maximum recovery time for unexpected worker terminations. A worker that crashes without running its graceful shutdown handler leaves its leases to expire naturally after LEASE_SECONDS (default: 20 seconds). The reconciliation loop then picks up those connections within the next 60-second cycle, giving a worst-case recovery time of approximately 80 seconds (20 seconds lease expiry plus up to 60 seconds reconciliation interval).

The following code shows the full implementation:

async def reconcile_orphaned_connections():
    while not shutdown_event.is_set():
        await asyncio.sleep(RECONCILE_EVERY)

        if len(connections) >= MAX_CONNECTIONS:
            continue

        resp = table.query(
            IndexName=GSI_NAME,
            KeyConditionExpression=(
                "desired_state = :state "
                "AND lease_expires_at_ms < :now"
            ),
            ExpressionAttributeValues={
                ":state": "STARTED",
                ":now": now_ms()
            },
            Limit=RECONCILE_PAGE_SIZE,
        )

        for item in resp.get("Items", []):
            pk = item["pk"]
            if pk not in connections and len(connections) < MAX_CONNECTIONS:
                conn_data = await try_acquire_lease(pk)
                if conn_data:
                    asyncio.create_task(
                        manage_websocket(
                            pk, conn_data["ws_url"],
                            conn_data.get("last_seq", 0)
                        )
                    )
Failover sequence in which a crashed worker’s lease expires and another worker reacquires the connection through orphan reconciliation

Figure 3: Automatic failover through orphan reconciliation

Graceful shutdown

When ECS sends a SIGTERM signal during a rolling deployment or scale-in event, the worker has a limited window to clean up before the container is forcibly terminated. Rather than dropping connections abruptly and waiting for leases to expire naturally, the worker performs a coordinated shutdown in three steps.

Step 1: Signal propagation

The signal_handler function sets a shared shutdown_event when SIGTERM is received. This event is checked by every running loop across all active connections. The heartbeat loop, the desired state checker, and the reconciliation loop all exit their while not shutdown_event.is_set() loops as soon as the event is set. No additional per-connection shutdown logic is needed. The shared event propagates the shutdown signal automatically to all concurrent tasks.

Step 2: Parallel cleanup

Rather than closing connections and releasing leases sequentially, which would take longer as the number of active connections grows, the worker closes all WebSocket connections and releases all leases concurrently using asyncio.gather. For a worker managing hundreds of connections, this keeps the total shutdown time roughly constant regardless of connection count.

Step 3: Immediate lease release

During graceful shutdown, the worker sets lease_expires_at_ms = 0 for each released connection. A value of 0 means the lease appears already expired to any worker running a reconciliation query. Other workers in the fleet pick up the released connections on their next reconciliation cycle rather than waiting for the original lease duration (default: 20 seconds) to elapse naturally.

Contrast with unexpected termination

Graceful shutdown is the fast path. When a worker exits cleanly through SIGTERM, connections are available for reacquisition within one reconciliation cycle. When a worker crashes unexpectedly without running the shutdown handler, leases expire naturally after LEASE_SECONDS (default: 20 seconds) and are then picked up by the reconciliation loop. Both paths converge on the same outcome, another worker acquires the connection, but graceful shutdown is significantly faster.

The following code shows the full graceful shutdown implementation:

shutdown_event = asyncio.Event()

def signal_handler(signum, frame):
    shutdown_event.set()

async def graceful_shutdown():
    await shutdown_event.wait()
    tasks = []
    for pk, conn in list(connections.items()):
        if conn.get("ws"):
            tasks.append(conn["ws"].close())
        tasks.append(release_lease(pk))
    await asyncio.gather(*tasks, return_exceptions=True)

Setting shutdown_event causes the heartbeat loops and state checkers to exit their while not shutdown_event.is_set() loops. The graceful_shutdown function then closes the active WebSocket connections and releases its leases in parallel. Released leases have lease_expires_at_ms = 0, which means the reconciliation loop on other workers picks them up on its next cycle rather than waiting for the original lease to expire.

Scaling the fleet

Each worker publishes a custom CloudWatch metric with its active connection count:

async def publish_metrics():
    while not shutdown_event.is_set():
        await asyncio.sleep(30)
        cw.put_metric_data(
            Namespace="WsFleet",
            MetricData=[{
                "MetricName": "ActiveConnections",
                "Value": len(connections),
                "Unit": "Count",
                "Dimensions": [
                    {"Name": "ServiceName", "Value": SERVICE_NAME}
                ],
            }],
        )

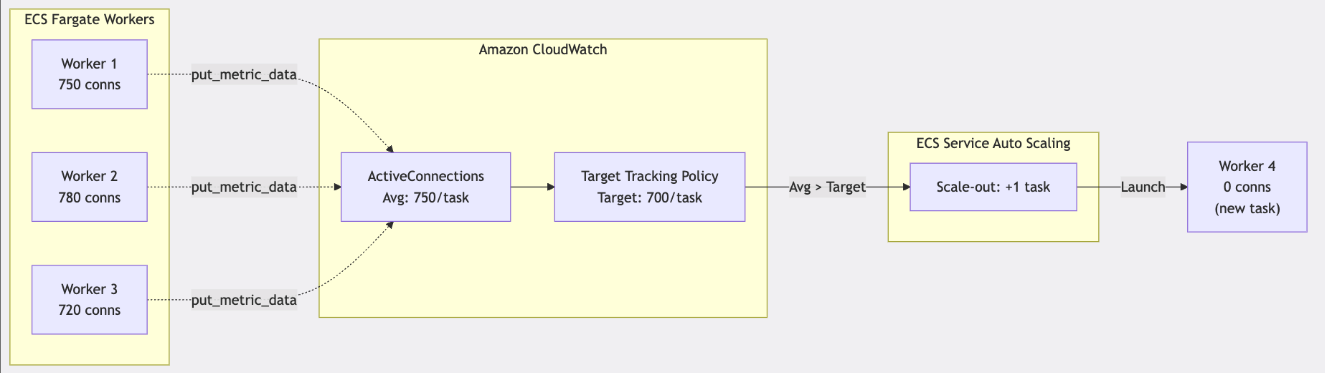
An AWS Application Auto Scaling target tracking policy scales the fleet based on the average ActiveConnections metric across all workers. When the average exceeds the target (for example, 700 connections per task), ECS launches additional tasks. New tasks start their SQS polling and reconciliation loops, picking up new connections and rebalancing the fleet.

Application Auto Scaling adds and removes ECS tasks based on the average ActiveConnections CloudWatch metric across the worker fleet

Figure 4: Automatic scaling based on active connection count

Scale-in is safe because of the lease pattern. When ECS terminates a task, the worker receives SIGTERM, releases its leases, and other workers acquire the freed connections through reconciliation.

Configuration Value Rationale
Lease duration 20 seconds Long enough to survive brief network hiccups, short enough for fast failover
Heartbeat interval 5 seconds Renew well before expiration (4x safety margin)
Reconciliation interval 60 seconds Balance between recovery speed and DynamoDB read cost
Max connections per task 700 Based on memory and CPU profiling per connection
Scale-out cool down 2 minutes Prevent thrashing during traffic spikes
Scale-in cool down 15 minutes Allow connections to stabilize before removing capacity

Tuning guidance. These values represent a starting point. Adjust based on your requirements:

  • Lease duration: Start with 20s. Reduce for faster failover, increase if network hiccups cause false expirations.
  • Heartbeat interval: Keep below lease duration. A 4:1 ratio (lease:heartbeat) gives 4 renewal attempts before expiry.
  • Reconciliation interval: Start with 60s. Reduce for faster recovery from unexpected terminations, increase to lower DynamoDB read cost.
  • Max connections per task: Start with 100 and increase while monitoring memory and CPU utilization in CloudWatch Container Insights. Each WebSocket connection typically consumes 2-5 MB of memory depending on message throughput.

DynamoDB cost considerations

The dominant cost driver in this architecture is heartbeat writes. Each active connection generates one update_item call per heartbeat interval, consuming 1 WCU. At the default 5-second heartbeat interval:

Active connections WCUs/second Approx. monthly cost (on demand) Approx. monthly cost (provisioned)
100 20 ~$65 ~$10
500 100 ~$325 ~$47
2,000 400 ~$1,300 ~$190

For production deployments at sustained high connection counts, use provisioned capacity with Auto Scaling rather than on-demand pricing. Heartbeat writes are predictable and consistent, which makes them well-suited to provisioned throughput. Configure Auto Scaling on your provisioned capacity to track connection count changes as the fleet scales.

To reduce cost, consider the following adjustments:

  1. Increase the heartbeat interval. Doubling the heartbeat interval from 5 seconds to 10 seconds halves WCU consumption. Maintain the 4:1 lease-to-heartbeat ratio by also doubling the lease duration. This increases the failover window proportionally.
  2. Increase the reconciliation interval. Increasing from 60 seconds to 120 seconds halves RCU consumption from reconciliation queries. This slows recovery from unexpected terminations.
  3. Use BatchGetItem for desired state checks. Replace the per-connection get_item calls in the check_desired_state loop with a single BatchGetItem call covering all active connections. This reduces RCU consumption from N reads per cycle to 1 batched read per cycle.

    GSI queries during reconciliation use eventually consistent reads by default, which halves the RCU cost compared to strongly consistent reads. Monitor your GSI read consumption in the DynamoDB console and adjust the reconciliation page size and interval to stay within your cost targets.

Conclusion

Managing long-lived WebSocket connections at scale requires explicit ownership tracking, automatic failover, and coordination across a fleet of workers. This post showed you a pattern that addresses these challenges using DynamoDB conditional writes as a distributed lease mechanism.

Key takeaways:

  • You can use DynamoDB conditional writes for atomic distributed coordination without external lock services. The ConditionExpression on update_item helps confirm one worker owns each connection at a time.
  • The heartbeat and reconciliation pattern handles the full failure spectrum. Lease expiration detects unexpected worker terminations. Graceful shutdown handles rolling deployments. New workers acquire leases and departing workers release them, making scaling safe.
  • This pattern applies to systems that manage long-lived WebSocket connections at scale: real-time transcription, IoT data ingestion, financial feed processing, or live event streaming.

Getting started

The complete implementation, including the worker application, Lambda event router, and Terraform templates for the DynamoDB table, SQS queue, and ECS cluster, is available in the GitHub repository. Follow the instructions in the repository README to deploy the infrastructure and validate the lease lifecycle with a small set of test connections.

For further enhancements, add distributed tracing with AWS X-Ray for end-to-end visibility across workers, and implement reconnection logic with upstream replay or offset-based resumption to handle data gaps between worker failure and recovery.

Further reading
How to migrate from Amazon CloudSearch to Amazon OpenSearch Serverless

Post Syndicated from Prasad Nadig original https://aws.amazon.com/blogs/big-data/how-to-migrate-from-amazon-cloudsearch-to-amazon-opensearch-serverless/

If you run search on Amazon CloudSearch, now is the time to plan your migration to Amazon OpenSearch Serverless. Modern search has moved on to capabilities beyond what CloudSearch provides: semantic and hybrid search, Retrieval Augmented Generation (RAG), and agentic search. OpenSearch Serverless gives you all of these with automatic scaling on a pay-for-what-you-use basis. You don’t need to choose or maintain infrastructure. OpenSearch Serverless maintains the hands-off, operational simplicity of CloudSearch.

This post shows you how to migrate your CloudSearch domain to an Amazon OpenSearch Serverless collection. We walk you through assessing your CloudSearch configuration, creating an OpenSearch Serverless collection with explicit index mappings, converting your documents and queries, configuring security policies, loading your data with Amazon OpenSearch Ingestion, and validating the migration before cutting over.

Key differences to note

Prerequisites

To follow along with this post, you need the following:

  • An AWS account.
  • An existing Amazon CloudSearch domain with indexed data.
  • Source data available in a durable store such as Amazon Simple Storage Service (Amazon S3) or Amazon DynamoDB (CloudSearch doesn’t provide a built-in export or backup feature, so your original source data is required to re-ingest into OpenSearch).
  • AWS Identity and Access Management (IAM) permissions to create and manage Amazon OpenSearch Serverless collections, encryption policies, network policies, and data access policies.
  • An Amazon OpenSearch Ingestion pipeline (or alternative ingestion method) for loading data.

Plan the migration

Planning is where you decide what success means: minimal downtime, no data loss, current functionality preserved, and custom configurations carried over. You don’t need to plan for infrastructure because OpenSearch Serverless provisions and scales compute for you. Your main planning task is to assess your current CloudSearch configuration so you can reproduce its behavior on the target.

Document your existing setup from the Amazon CloudSearch console. Record the current instance type, the partition count, and the replication count. Capture the total document count and overall data size, and record every field definition, including field types and the search, facet, and sort settings for each field. Note any analyzers, synonyms, stopwords, or custom rank expressions. Note whether you use the 2011 or the 2013 CloudSearch API version, because the 2013 API added faceting and filtering features that change how you model the target.

OpenSearch Serverless is the right target for most CloudSearch workloads, but not all of them. If your workload needs very low read-after-write latency (a short refresh interval), tight and predictable query response times, or direct control over instance configuration, choose an Amazon OpenSearch Service managed clusters deployment instead and size it from your workload profile.

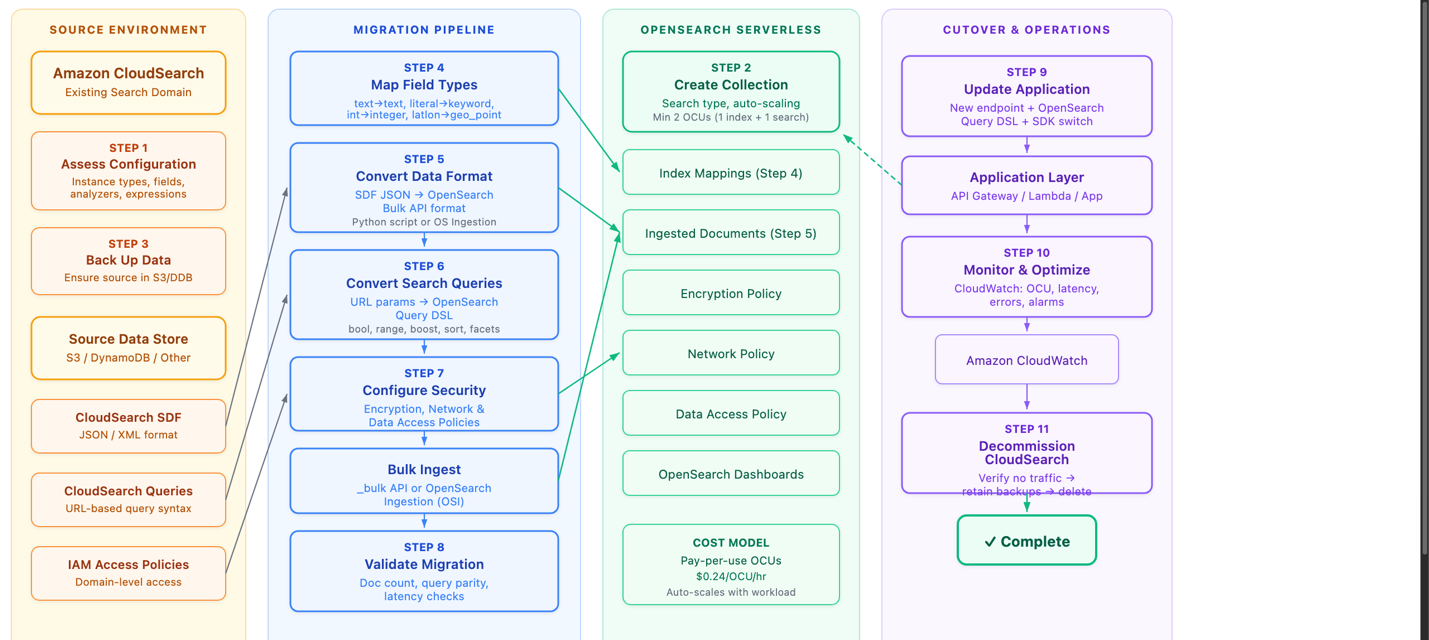
The migration involves four main concerns: your source data format, your queries, your field definitions, and your access policies. Before you plan the details, it helps to see the whole migration at once. The following diagram maps the migration across four phases: your source CloudSearch environment, the migration pipeline that converts and moves your data, the OpenSearch Serverless target, and cutover and operations.

Migration workflow across four phases: source CloudSearch, migration pipeline, OpenSearch Serverless target, and cutover and operations

Figure 1: The migration workflow across four phases

In the source environment, you assess your CloudSearch configuration and back up your source data (Amazon S3, Amazon DynamoDB, or another store). Note the Source Data Format (SDF), the URL-based query syntax, and the IAM access policies you need to carry over. In the migration pipeline, you map field types, convert the data format from CloudSearch JSON to OpenSearch-compatible JSON, convert your queries to the OpenSearch query domain-specific language (DSL), configure security, bulk-ingest the data, and validate the result. The OpenSearch Serverless target holds the collection, index mappings, ingested documents, and the encryption, network, and data access policies, and it scales with your workload on a pay-per-use basis. In cutover and operations, you update your application to the new endpoint and clients, monitor with Amazon CloudWatch, and decommission CloudSearch once no traffic remains.

Model your data in OpenSearch Service

OpenSearch Service uses index mappings to define the fields and data types in an index. Because you know your CloudSearch schema, define the target mapping explicitly when you create the index. Create the index and set its mapping in a single request, and set dynamic to strict so OpenSearch rejects any document that contains a field you did not define. Strict mapping catches schema drift at ingest time, avoiding the default OpenSearch behavior of creating new mappings for undefined fields.

PUT /imdb_movies
{
  "mappings": {
    "dynamic": "strict",
    "properties": {
      "title": {
        "type": "text",
        "fields": {
          "keyword": { "type": "keyword" }
        }
      },
      "genres": { "type": "keyword" },
      "rating": { "type": "float" },
      "release_date": { "type": "date" }
      ...
    }
  }
}

Field type mapping

The following table maps CloudSearch field types to their OpenSearch Service equivalents.

CloudSearch OpenSearch Service equivalent Notes
text text Text is tokenized. Stemming, synonyms, and stopwords apply. Good for matching user terms.
literal keyword Not tokenized. Good for exact-match search.
int integer Use for ranking, faceting, and narrowing.
double float or double .
date date .
boolean boolean .
latlon geo_point .
text-array text OpenSearch handles arrays natively, so map to the base text type.
literal-array keyword OpenSearch handles arrays natively, so map to the base keyword type.
multi-value nested or object .
long long .
binary binary .

Two mapping details deserve attention. First, pick the smallest numeric type that fits your data rather than copying the widths CloudSearch uses. CloudSearch stores integers as 64-bit values, but few datasets hold numbers that large. A long or a double consumes more disk than an integer, a short, or a float with no benefit when the values are small. Evaluate the actual range of each field and choose the narrowest type that holds it. Reserve long for values that genuinely exceed the roughly 2.1 billion ceiling of integer, and use float instead of double unless you need double precision. Smaller types shrink your index and speed up queries.

Second, if you sort or aggregate on a text field, add a keyword sub-field. The preceding example mapping has a keyword subfield for the title field. You access the field using dot notation: title.keyword. OpenSearch doesn’t sort or aggregate analyzed text fields by default.

As noted earlier, if you run several CloudSearch domains, model each one as a separate index within a single OpenSearch Serverless collection to consolidate them.

Move your data

Migrating to OpenSearch Service is a re-ingestion: you convert your source documents and index them into the collection you created. CloudSearch doesn’t provide a built-in backup or snapshot feature. It relies on the documents you send through the indexing process, so before you migrate, make sure your source data is available in a durable store such as Amazon S3, Amazon DynamoDB, or another database.

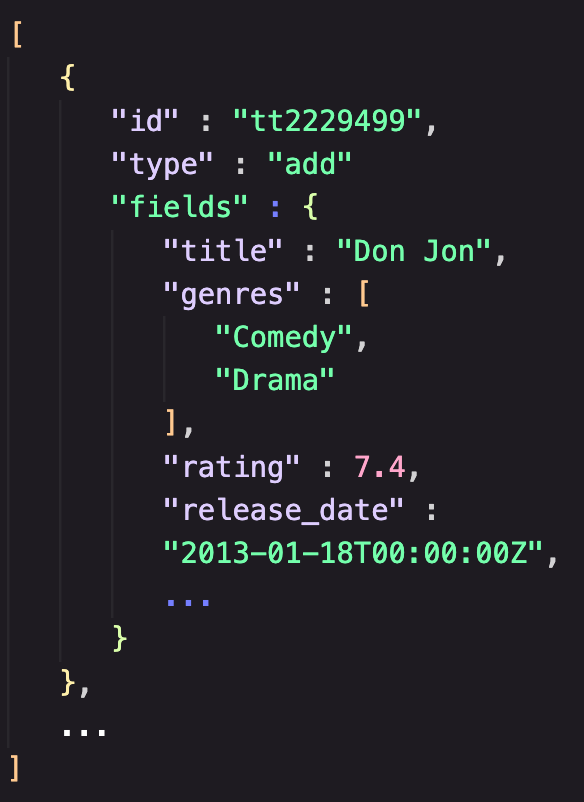
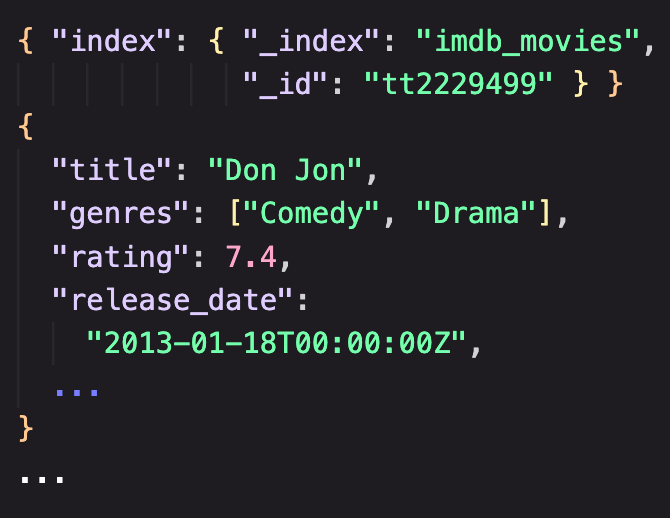
The conversion is a format translation. CloudSearch accepts data in SDF as JSON or XML, where a document batch is a collection of add and delete operations. The JSON that CloudSearch uses differs from the JSON that OpenSearch Service expects, so you must transform each source document into an OpenSearch document whose fields match the index mapping you defined earlier. Handle the same details the mapping calls out: emit each numeric value so it fits the narrow type you chose for its field rather than a wide long or double, format dates to match your date mapping, and drop or rename any field that your strict mapping doesn’t define.

CloudSearch batch format showing add and delete operations in JSON OpenSearch bulk batch format showing index operations in JSON

Figure 2: CloudSearch batch format (left) compared to OpenSearch batch format (right)

You can write a small conversion script. Have the script write its output to an Amazon S3 bucket so the converted documents live in a durable store you can re-ingest from as many times as you need.

With your converted documents in Amazon S3, use Amazon OpenSearch Ingestion to load them. Amazon OpenSearch Ingestion is a feature of Amazon OpenSearch Service that you can use to ingest, filter, transform, enrich, and route data to an Amazon OpenSearch Service domain or an OpenSearch Serverless collection. Configure an OpenSearch Ingestion pipeline with an Amazon S3 source (you can use an OpenSearch Ingestion blueprint to get started) that reads your converted documents. Let its built-in processors apply any final transformation before the pipeline writes to your collection. A managed pipeline reading from Amazon S3 gives you a repeatable, restartable load without operating ingestion infrastructure, which makes it the recommended path for most migrations.

If you prefer to load data directly, OpenSearch Service exposes a REST API, so you can index documents with a standard client such as curl or with the OpenSearch client libraries for many languages. Direct indexing is convenient for a small dataset or a quick test, but an Amazon S3 source with OpenSearch Ingestion is the better choice for a production migration.

Convert your queries

CloudSearch uses a URL-based query format. You pass a query parameter in the URL and submit either a simple string search or a JSON-formatted query. OpenSearch Service uses a REST API and the OpenSearch query DSL in the request body, which gives you compound queries, function scoring, and richer relevance control. You can use generative AI coding assistants to help with this translation. Provide your CloudSearch query patterns, and the model generates the equivalent OpenSearch query DSL, which you then validate against your test cases.

Query syntax changes

CloudSearch appends parameters such as sort to the query URL, while OpenSearch expresses sorting, filtering, and boosting as explicit elements of the request body. For example, a title search for “shakespeare” in CloudSearch looks like the following.

https://my-cloudsearch-domain.us-east-1.cloudsearch.amazonaws.com/2013-01-01/search?q=shakespeare&size=10

The equivalent query in OpenSearch Service uses the query DSL.

GET /imdb_movies/_search
{
  "query": {
    "match": { "title": "shakespeare" }
  }
}

To keep result sets consistent after migration, set the default operator to AND in OpenSearch to match the default query behavior of CloudSearch. The following table shows common CloudSearch query patterns and their OpenSearch Service equivalents, using a sample IMDB movies dataset.

Query type CloudSearch (Lucene syntax) OpenSearch Service query DSL
Compound AND title:"Inception" AND genres:"Sci-Fi" {"query":{"bool":{"must":[{"match":{"title":"Inception"}},{"match":{"genres":"Sci-Fi"}}]}}}
Compound NOT title:"Star Wars" AND NOT genres:"Comedy" {"query":{"bool":{"must":[{"match":{"title":"Star Wars"}}],"must_not":[{"match":{"genres":"Comedy"}}]}}}
Wildcard title:Batman* {"query":{"wildcard":{"title":{"value":"batman*"}}}}
Numeric range rating:[7 TO 9] {"query":{"range":{"rating":{"gte":7,"lte":9}}}}
Date range (after) release_date:[2015-01-01T00:00:00Z TO *] {"query":{"range":{"release_date":{"gte":"2015-01-01T00:00:00Z"}}}}
Boosting title:"The Matrix"^6 OR genres:"Sci-Fi"^4 {"query":{"bool":{"should":[{"query_string":{"query":"title": \"The Matrix\"^6","fields":["title"]}},{"query_string":{"query":"genres:\"Sci-Fi\"^4","fields":["genres"]}}]}}}
Sorting title:"Batman" sort=release_date desc {"query":{"match":{"title":"Batman"}},"sort":[{"release_date":{"order":"desc"}}]}

Sorting and boosting

Boosting is useful when you want certain fields or terms to carry more weight in relevance scoring. A higher boost value means the term contributes more to the score. OpenSearch also supports sorting by _score (relevance), which is the default when you specify no sort. For the full query language, see the OpenSearch query DSL documentation.

Configure security

CloudSearch uses AWS Identity and Access Management policies to control access to its configuration and domain service APIs. You attach user-based policies to an IAM role, user, or group, and the document, search, and suggest actions in those policies control access to the CloudSearch APIs.

OpenSearch Serverless applies security through policies at several layers.

  • Collections: Encrypted at rest by default, using either an AWS owned key or a customer managed key defined in an encryption policy.
  • Network policies: Define whether a collection is reachable privately through a virtual private cloud (VPC) endpoint or over the internet.
  • Data access policies: Control which IAM principals and Security Assertion Markup Language (SAML) identities can create indexes and read or write data in the collection.

Amazon OpenSearch Service provisioned domains also offer fine-grained access control, with role-based access control and security at the index, document, and field level. For OpenSearch Serverless, data access policies provide collection-level and index-level permissions, controlling which IAM principals and SAML identities can create, read, or write data within a collection.

Validate the migration

Validation confirms that the migration is complete and correct before you send production traffic to OpenSearch Serverless. Work through five kinds of validation.

  • Documents: Check your document count. Your OpenSearch Serverless indexes should have the same count as your CloudSearch indexes.
  • Queries: Translate your most important queries and run them manually against your collection. Spot check the output for the presence of important results.
  • Ranking: Check the order of results, especially for queries with custom rank functions or field weighting. Results might not match exactly, so look for anything that’s incorrect.
  • Latency: Ideally you should tee your production traffic to your Serverless collection to get real latency metrics. Worst case, generate at least 100,000 synthetic queries across all your query types and run them. Monitor OpenSearch Compute Unit (OCU) consumption with Amazon CloudWatch to understand your cost profile.

To validate search functionality, run the same query against both systems and compare the results. Reuse the query pairs from the conversion step so you exercise the syntax differences directly. For example, to check a numeric range against the sample IMDB movies dataset, run the following query in CloudSearch.

https://my-cloudsearch-domain.us-east-1.cloudsearch.amazonaws.com/2013-01-01/search?q=rating: [7 TO 9]&size=10

Run the equivalent query DSL against your OpenSearch Serverless collection.

GET /imdb_movies/_search
{
  "query": {
    "range": { "rating": { "gte": 7, "lte": 9 } }
  }
}

Confirm that both queries return the same set of movies. Then repeat the comparison for a query that exercises relevance, such as the boosted query from the conversion step, and confirm the top results appear in the same order.

GET /imdb_movies/_search
{
  "query": {
    "bool": {
      "should": [
        { "match": { "title": { "query": "The Matrix", "boost": 6 } } },
        { "match": { "genres": { "query": "Sci-Fi", "boost": 4 } } }
      ]
    }
  }
}

Cut over and operate

When validation passes, update your application to use the OpenSearch Serverless endpoint and the query DSL, and switch from the CloudSearch SDK to the OpenSearch client libraries. After cutover, confirm that no application still points to a CloudSearch endpoint, retain your source data backups in Amazon S3 for rollback, and then delete the CloudSearch domain.

Operating OpenSearch Serverless in production is lighter than operating a domain, because OpenSearch Serverless scales compute for you and you do not tune shards, instance types, or capacity. Your focus shifts to cost and search quality. Monitor OCU consumption and search latency with Amazon CloudWatch, and set alarms on the thresholds that matter to you. Review OCU usage patterns to understand cost and find optimization opportunities, and set capacity limits on the collection to cap the maximum OCUs it can consume. For guidance, see Managing capacity limits for Amazon OpenSearch Serverless and Monitoring Amazon OpenSearch Serverless.

Cost considerations

With OpenSearch Serverless, you pay only for the compute and storage your workload consumes, and OpenSearch Serverless charges for compute and storage separately. OpenSearch Serverless scales indexing compute and search compute independently, so a write-heavy or a read-heavy workload scales only the dimension it needs, and compute can scale to zero when a collection is idle, in which case you pay only for storage. To share hardware across workloads, place collections in a collection group so they draw from the same compute rather than each provisioning its own. For pricing and unit details, see Amazon OpenSearch Service pricing.

Clean up

Because you’re migrating to OpenSearch Serverless, the resources that you’ve created will likely become your production resources. If not, delete any OpenSearch Serverless collections and S3 buckets you created to avoid incurring ongoing cost.

Conclusion

In this post, you saw how Amazon CloudSearch and Amazon OpenSearch Serverless compare, and how the concepts you rely on in CloudSearch (field types, query syntax, autoscaling, and access control) translate into OpenSearch Service. You assess your CloudSearch configuration, model your data with explicit OpenSearch mappings, move your converted documents into the collection with OpenSearch Ingestion, convert your URL-based queries into the OpenSearch query DSL, configure security, and validate before cutover. OpenSearch Serverless gives you the hands-off operational model you have with CloudSearch, and adds richer query capabilities, granular data access policies, and automatic scaling. To get started, create an OpenSearch Serverless collection on the AWS Management Console and follow the steps in this post.

To learn more, see the following resources:


About the authors

Prasad Nadig

Prasad Nadig

Prasad is a Senior Analytics Specialist Solutions Architect at Amazon Web Services (AWS), specializing in large-scale data analytics and AI. Prasad partners with customers to design, migrate, and modernize their analytics platforms on AWS into scalable, cost-effective solutions, with deep expertise in data lakes, data warehousing, distributed processing, and performance tuning at petabyte scale.

Jon Handler

Jon Handler

Jon is a Senior Principal Solutions Architect for Search Services at Amazon Web Services. Jon works closely with OpenSearch and Amazon OpenSearch Service, providing help and guidance to a broad range of customers who have search and log analytics workloads. Prior to joining AWS, Jon’s career as a software developer included four years of coding a large-scale, eCommerce search engine.

Accelerating Spark queries with Iceberg materialized views

Post Syndicated from Yuzhou Sun original https://aws.amazon.com/blogs/big-data/accelerating-spark-queries-with-iceberg-materialized-views/

In this post, you learn how to reduce Apache Spark query execution time with Apache Iceberg materialized views without changing a single SQL query.

Organizations running analytical workloads on their data lakes often hit a common wall: queries that are slow and costly, yet difficult to rewrite by hand. Multi-table joins, heavy aggregations, and window functions over large fact tables all drive up execution times, but the SQL behind them often can’t be changed. It might come from business intelligence (BI) dashboards, packaged independent software vendor (ISV) applications, or legacy reports, where editing the source introduces regression risk that outweighs the performance gain.

Starting with Amazon EMR 7.12.0 and AWS Glue 5.1, you can accelerate these queries without rewriting them. Automatic query rewrite analyzes the logical plan of each incoming query and compares it against a metadata cache of available MVs. When the optimizer finds a materialized view (MV) that satisfies all or part of a query, it rewrites the plan to read from that MV instead of the base tables. Matches can be structural (aggregations and joins) or exact (more complex patterns like window functions). If no MV matches, the original query runs unchanged with no impact on correctness.

If you have previously tried to speed up slow analytical queries, you might have considered one of the following alternatives. Here is how automatic query rewrite compares:

Query modification approach Stored results Refreshes Modification to existing queries
Standard views in AWS Glue No (re-runs each time) n/a Required
Custom ETL pipeline Yes Manual Required
Hand-rolled rewrite Yes Manual Required
Materialized views with automatic rewrite enabled Yes Automatically through AWS Glue Data Catalog on a schedule when configured Not required when supported

In this post, we:

  • Give a high-level overview of how automatic query rewrite works in Apache Spark.
  • Walk through a concrete example, showing how the same query can benefit from MVs at different levels of coverage.
  • Discuss the trade-offs so you can choose the right MV shape for your workload.

Prerequisites

To use automatic query rewrite with Iceberg materialized views, you need:

  • Amazon EMR release 7.12.0 or later, or AWS Glue 5.1 or later.
  • Source tables in Apache Iceberg or Parquet format, registered in the AWS Glue Data Catalog, in the same AWS Region and account as the materialized view. Parquet source tables are supported for automatic query rewrite starting with Amazon EMR 7.14.0 and AWS Glue 8.1.
  • An Amazon Simple Storage Service (Amazon S3) Tables (a capability of Amazon S3) bucket, or an S3 general purpose bucket, for the materialized view data.
  • Permissions for the definer role. You can use AWS Identity and Access Management (IAM) policies or AWS Lake Formation.
  • Automatic query rewrite turned on in your Spark session: --conf spark.sql.optimizer.answerQueriesWithMVs.enabled=true.
  • For Parquet source tables, set spark.sql.materializedView.v1SourceTables.enabled=true and spark.sql.materializedView.v1ETagVersioning.enabled=true.

For more Spark configurations, see Introducing Apache Iceberg materialized views in AWS Glue Data Catalog.

How it works

Here is how MVs and automatic query rewrite work together:

  • You define a SQL query with aggregations, joins, or filters across your supported source tables.
  • AWS Glue Data Catalog stores the precomputed results as an Apache Iceberg table in your Amazon S3 bucket. You can store it in a general purpose S3 bucket or in Amazon S3 Tables. Any Apache Iceberg-compatible query engine can read the materialized view, including Amazon Athena, Amazon EMR, AWS Glue, Amazon Redshift, and Iceberg-compatible third-party query engines. Automatic query rewrite is available on the AWS optimized Spark runtime in Amazon Athena, Amazon EMR, and AWS Glue. Other engines can query the materialized view directly, but they don’t rewrite queries to use it automatically.
  • Automatic refresh keeps the MV current on a schedule that you define, for example SCHEDULE REFRESH EVERY 1 DAY. You set it at creation time or later with ALTER MATERIALIZED VIEW ... ADD SCHEDULE REFRESH. At that scheduled time, the refresh process checks the current Apache Iceberg snapshot ID or Parquet file ETags and refreshes the MV when it detects source-table changes.
  • Automatic query rewrite redirects matching queries to the MV at query optimization time. Automatic query rewrite in Apache Spark uses two matching strategies:
    • Structural rewrite (adapted from Amazon Redshift) handles an MV defined as a single SELECT-FROM-WHERE-GROUP-BY block over INNER joins. The optimizer can roll up an MV’s aggregates to a coarser grain and pull extra query predicates up onto the MV scan.
    • Exact-match rewrite handles MVs defined as other shapes, such as window functions and outer joins, by matching a canonicalized form of the MV body against subtrees of the query plan.

When the optimizer evaluates a query, it consults a metadata cache of MVs from the configured catalogs and chooses the best match. It also checks MV staleness during optimization. It skips stale MVs, so rewrite won’t return stale results. If no MV matches, the original query runs unchanged.

Note that automatic query rewrite is opt-in: set spark.sql.optimizer.answerQueriesWithMVs.enabled=true when creating the Apache Spark session.

Example: One query with three potential MVs

An MV doesn’t need to cover an entire query to help it. Automatic query rewrite in Apache Spark operates on subtrees: when an MV matches a portion of your query plan, the rewriter substitutes that subtree and lets the rest of the query run on the rewrite output unchanged. The same query can therefore be served by many possible MV designs, each making a different trade-off between per-query speedup, storage cost, and reuse across other queries.

To make this concrete, consider a typical analytics query: Top 100 preferred US customers by total store spending.” It joins fact and dimension tables, applies two selective filters on the customer dimension, aggregates per customer, ranks the result with a window function, and keeps only the top 100:

SELECT c_customer_id, total_revenue, num_transactions, avg_purchase, revenue_rank
FROM (
    SELECT cust.c_customer_id,
        SUM(sales.ss_quantity * sales.ss_sales_price) AS total_revenue,
        COUNT(*) AS num_transactions,
        AVG(sales.ss_quantity * sales.ss_sales_price) AS avg_purchase,
        RANK() OVER (ORDER BY SUM(sales.ss_quantity * sales.ss_sales_price) DESC) AS revenue_rank
    FROM base_catalog.base_db.store_sales sales
    INNER JOIN base_catalog.base_db.customer cust
        ON sales.ss_customer_sk = cust.c_customer_sk
    WHERE cust.c_birth_country = 'UNITED STATES'
        AND cust.c_preferred_cust_flag = 'Y'
    GROUP BY cust.c_customer_id
) ranked
WHERE revenue_rank <= 100
ORDER BY revenue_rank;

Query 1: The original query. Top 100 preferred US customers by total store spending, before any materialized view.

Three MV designs cover progressively more of this query, from a single-table pre-aggregate to the full query body itself:

Tier 1: Pre-aggregate store_sales only, no join, no filter. This tier is a single-table aggregate of store_sales at customer-surrogate-key grain. The query still must join the customer table, apply both filters, re-aggregate at c_customer_id grain, and run the window function.

CREATE MATERIALIZED VIEW mv_catalog.mv_db.customer_tier_1 AS
SELECT ss_customer_sk,
    SUM(ss_quantity * ss_sales_price) AS sum_revenue,
    COUNT(ss_quantity * ss_sales_price) AS count_revenue,
    COUNT(*) AS num
FROM base_catalog.base_db.store_sales
GROUP BY ss_customer_sk;

Tier 1 MV: Single-table pre-aggregate of store_sales by customer surrogate key (no join, no filter).

The following plans compare the original query plan to the rewritten plan:

Window, filter, Sort
+- Aggregate by c_customer_id
:  total_revenue = SUM(ss_quantity * ss_sales_price)
:  num_transactions = COUNT(*)
:  avg_purchase = AVG(ss_quantity * ss_sales_price)
+- Project
   +- Join Inner ON ss_customer_sk = c_customer_sk
      :- BatchScan store_sales <- reads the large store_sales table
      +- Filter c_birth_country='UNITED STATES' AND c_preferred_cust_flag='Y'
         +- BatchScan customer

Plan 1: Original plan. Scans the large store_sales table.

Window, filter, Sort
+- Aggregate by c_customer_id <- rolls up pre-aggregated sums
:  total_revenue = SUM(sum_revenue) <- sum of sum_revenue
:  num_transactions = SUM(num) <- sum of num
:  avg_purchase = SUM(sum_revenue) / SUM(count_revenue) <- sum of sum_revenue / sum of count_revenue
+- Project
   +- Join Inner ON ss_customer_sk = c_customer_sk
      :- BatchScan customer_tier_1 <- reads pre-aggregated MV
      +- Filter c_birth_country='UNITED STATES' AND c_preferred_cust_flag='Y'
         +- BatchScan customer

Plan 2: Rewritten plan (Tier 1). Reads the pre-aggregated customer_tier_1 MV.

Tier 2: Pre-join store_sales x customer, pre-apply one filter (c_preferred_cust_flag = ‘Y’). The middle tier pre-joins both tables and bakes in the preferred-customer filter. The query still must apply the country filter as a residual on the MV scan and run the RANK() window.

CREATE MATERIALIZED VIEW mv_catalog.mv_db.customer_tier_2 AS
SELECT cust.c_customer_id, cust.c_birth_country,
    SUM(sales.ss_quantity * sales.ss_sales_price) AS sum_revenue,
    COUNT(sales.ss_quantity * sales.ss_sales_price) AS count_revenue,
    COUNT(*) AS num
FROM base_catalog.base_db.store_sales sales
INNER JOIN base_catalog.base_db.customer cust
    ON sales.ss_customer_sk = cust.c_customer_sk
WHERE cust.c_preferred_cust_flag = 'Y'
GROUP BY cust.c_customer_id, cust.c_birth_country;

Tier 2 MV: Pre-joins store_sales and customer, with the preferred-customer filter applied.

Rewritten query plan:

Window, filter, Sort
+- Aggregate by c_customer_id <- rolls up pre-aggregated sums
:  total_revenue = SUM(sum_revenue) <- sum of sum_revenue
:  num_transactions = SUM(num) <- sum of num
:  avg_purchase = SUM(sum_revenue) / SUM(count_revenue) <- reads pre-aggregated MV
+- Filter c_birth_country='UNITED STATES' [residual filter on MV scan]
   +- BatchScan customer_tier_2 <- reads pre-aggregated MV

Plan 3: Rewritten plan (Tier 2). Country filter applied as a residual on the MV scan.

Tier 3: Match the entire query, including the window function and top N filter. This is the most specific tier. The MV body is the target query verbatim (minus the top-level ORDER BY, which is meaningless for a stored set). The MV stores the top-ranked rows the query asks for (rank ≤ 100).

CREATE MATERIALIZED VIEW mv_catalog.mv_db.customer_tier_3 AS
SELECT c_customer_id, total_revenue, num_transactions, avg_purchase, revenue_rank
FROM (
    SELECT cust.c_customer_id,
        SUM(sales.ss_quantity * sales.ss_sales_price) AS total_revenue,
        COUNT(*) AS num_transactions,
        AVG(sales.ss_quantity * sales.ss_sales_price) AS avg_purchase,
        RANK() OVER (ORDER BY SUM(sales.ss_quantity * sales.ss_sales_price) DESC) AS revenue_rank
    FROM base_catalog.base_db.store_sales sales
    INNER JOIN base_catalog.base_db.customer cust
        ON sales.ss_customer_sk = cust.c_customer_sk
    WHERE cust.c_birth_country = 'UNITED STATES'
        AND cust.c_preferred_cust_flag = 'Y'
    GROUP BY cust.c_customer_id
) ranked
WHERE revenue_rank <= 100;

Tier 3 MV: Stores the exact ranked output of the query (exact-match path).

This tier exercises the exact-match rewrite path: the rewriter canonicalizes the MV body and matches it against the query’s logical plan.

Rewritten plan:

Sort revenue_rank ASC
+- BatchScan customer_tier_3 <- reads around 100 stored rows

Plan 4: Rewritten plan (Tier 3). Reads around 100 stored rows.

The trade-off

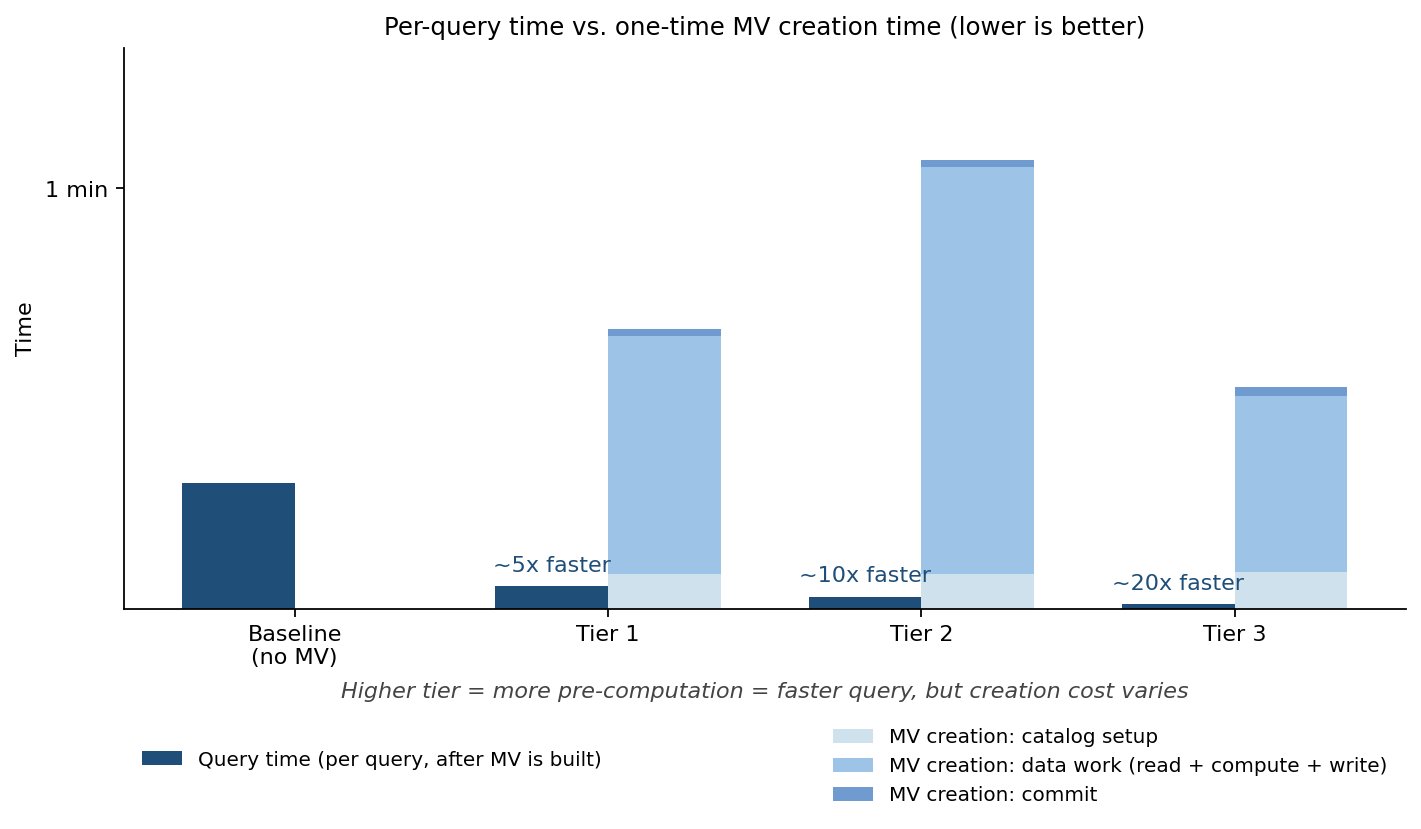
The three tiers trade per-query speedup against reuse and storage. In our testing on TPC-DS 3 TB, we observed the following:

MV design Pre-computed Reuse Per-query speedup MV size
Baseline (no MV) nothing n/a 1x n/a
Tier 1: store_sales agg by customer surrogate key aggregate of all sales per customer broadest: any per-customer aggregation ~5x faster 0.07% of store_sales for TPC-DS 3 TB
Tier 2: store_sales x customer agg, one filter pre-applied join + aggregate, preferred customers only medium: any country filter, preferred customers ~10x faster 0.04% of store_sales for TPC-DS 3 TB
Tier 3: entire query body verbatim (exact-match) exact ranked output of this query narrowest: only this exact query shape 20x+ faster negligible (only 100 rows)

Performance measured on TPC-DS 3 TB. Speedup is the ratio of baseline execution time to MV-accelerated execution time. Results might vary based on data characteristics, cluster size, and query complexity.

In addition, MVs incur additional cost. Each one runs a query against your source tables once and stores the result. The more pre-computation it does (joining more tables, applying more filters), the more time it takes.

The following chart plots per-query speedup and creation time for the three tiers in our testing on TPC-DS 3 TB. Per-query speedup rises steadily, from about 5x at Tier 1 to over 20x at Tier 3. Creation time doesn’t follow the same pattern: it peaks at Tier 2. Tier 2 pre-joins and aggregates all preferred customers across every country, so it materializes the most data work. Tier 3 applies both filters, so it processes far fewer rows and costs less to create.

Chart comparing three materialized view designs. In our testing with TPC-DS 3 TB, we observed per-query speedup rises from about 5x (Tier 1) to over 20x (Tier 3), while creation time peaks at Tier 2, which materializes the most data work. Stacked bars show creation time split into catalog setup, data work, and commit.

Figure 1: Per-query speedup and creation time across the three materialized view tiers, measured on TPC-DS 3 TB

Start by identifying one expensive query that runs repeatedly with stable filters. It is likely a good candidate for an exact-match MV.

Validating automatic query rewrite

To confirm that your query benefited from automatic rewrite:

  1. Query plan inspection: Check the query’s optimized logical plan or physical plan for a leaf scan node referencing the MV (for example, BatchScan mv_catalog.mv_db.your_mv_name). If the MV appears as a scan source, rewrite succeeded.
  2. Log confirmation (Amazon EMR 7.14.0+): Look for INFO-level log entries such as AQMV outcome: rewritten=true, mvs=[mv_name], duration=12ms.
  3. No-rewrite diagnostics (Amazon EMR 7.14.0+): If rewrite didn’t occur, check the MVRewriteMetricsEvent in the Apache Spark Event Log for the specific reason the optimizer skipped the MV.

If you have set spark.sql.optimizer.answerQueriesWithMVs.enabled=true but your query still runs against the base tables, check the following common causes:

  1. Write commands block rewrite by default. INSERT and MERGE statements don’t trigger rewrite. Set spark.sql.optimizer.answerQueriesWithMVs.commandBlockingEnabled=false to turn on rewrite within write command subqueries.
  2. The MV is stale. Rewrite skips the MV when one or more source tables have changed since its last refresh. Wait for the next scheduled refresh, or force an immediate refresh with REFRESH MATERIALIZED VIEW <mv_name>.
  3. Heuristic candidate filtering. The optimizer uses heuristic checks to narrow the set of MV candidates before attempting a full match. In some cases, an MV that could benefit the query might be filtered out early by these heuristics.
  4. Spark version mismatch (Amazon EMR 7.13.0+). Automatic query rewrite skips MVs whose stored IMV_sparkVersion does not match the cluster’s current Apache Spark version. To bypass this check, set spark.sql.materializedView.sparkVersionCompatibilityCheck.enabled=false.
  5. MV metadata cache not loaded. The metadata cache loads lazily during optimization of the first rewritable query in a Spark session. If your critical query fires before the cache is warm, the MV will not be available. Run a small warm-up query (for example, SELECT 1 FROM <some_iceberg_table>) at session start to pay this cost off the critical path.
  6. MV metadata cache memory limit reached. If the cache was disabled or stopped loading MVs because of reaching its memory limit, increase spark.driver.memory.
  7. Too many tables in configured catalogs. If there are many tables or MVs in the configured catalogs, the cache might not finish loading before your query starts. Place MVs in a dedicated catalog, add it to spark.sql.materializedViews.additionalCatalogs, and set spark.sql.materializedViews.scanCurrentCatalog=false to skip scanning the current catalog.
  8. Parquet base tables have additional limitations and configuration requirements. For automatic query rewrite with Parquet base tables, set spark.sql.materializedView.v1SourceTables.enabled=true and spark.sql.materializedView.v1ETagVersioning.enabled=true. Without ETag versioning, Spark can’t determine a usable source-table version and skips the MV. Partitioned Parquet base tables are also subject to additional validation limits.

Performance considerations

Turning on automatic query rewrite has overhead: it introduces trade-offs that might affect some queries negatively:

  1. Optimization overhead. Enabling rewrite adds processing time during query optimization as the optimizer evaluates MV candidates against the query plan. This overhead applies to every query in the session, including those that ultimately don’t match any MV.
  2. Reduced task parallelism. Reading from an MV instead of the original base table might produce fewer tasks or introduce data skew, depending on the MV’s data layout. This reduces parallelism compared to a direct scan of the larger, more evenly distributed source table.

Conclusion

In this post, we showed how automatic query rewrite can accelerate your existing Apache Spark workloads. It uses Apache Iceberg materialized views in the AWS Glue Data Catalog, without changing a single line of SQL. By storing precomputed results as managed Apache Iceberg tables, the AWS Glue Data Catalog lets the Apache Spark optimizer transparently substitute matching query plans. You get the performance benefit of pre-aggregation without the application-level rewiring. BI dashboards, ISV-generated reports, and legacy pipelines all benefit the moment a matching MV exists.

We walked through three MV designs for the same analytical query, each striking a different balance between per-query speedup, storage footprint, and reuse across your workload. As the trade-off table shows, our testing found that a narrow, exact-match MV delivered 20x+ acceleration for a single query shape. A broader pre-aggregate served an entire family of queries at a more modest ~5x gain. The right choice depends on how many queries share the same join-and-aggregate pattern and how frequently your source data changes.

To get started:

  1. Launch an Amazon EMR 7.12.0+ cluster or an AWS Glue 5.1+ job.
  2. Create an MV over your most expensive repeating query using CREATE MATERIALIZED VIEW in the AWS Glue Data Catalog.
  3. Turn on automatic query rewrite by setting spark.sql.optimizer.answerQueriesWithMVs.enabled=true in your Spark session configuration.
  4. Verify the rewrite by inspecting the optimized query plan for an MV scan node, or by checking INFO-level logs on Amazon EMR 7.14.0+.

Queries with multi-table joins, heavy aggregations, or window functions over large fact tables are strong initial candidates. Start with one high-cost, frequently executed query. Validate the speedup, then expand to broader MVs as you identify shared patterns across your workload.

Special thanks to everyone who contributed to the automatic query rewrite feature and this blog: Andre Hernich, Leon Lin, Yiyang Chen, Geeta Krishna Panda, Ashok Chintalapati, Muhammad Malik, Rishabh Bhatia, and Giovanni Fumarola.

References

For more detail, see the following resources:


About the authors

Yuzhou Sun

Yuzhou Sun

Yuzhou is a software development engineer for Open Data Analytics Engines at Amazon Web Services.

Srishti Mittal

Srishti Mittal

Srishti is a product manager for Open Data Analytics Engines at Amazon Web Services.

Kinshuk Pahare

Kinshuk Pahare

Kinshuk serves as Head of Product for Analytics Engines at AWS, where he leads the product teams responsible for Amazon Redshift, AWS Glue, Amazon EMR, and Amazon Athena. With over six years at AWS, he brings deep expertise in building and scaling cloud-native analytics platforms that help organizations unlock the value of their data at any scale.

Henry Laih

Henry Laih

Henry is a software development engineer for Open Data Analytics Engines at Amazon Web Services.

Srikanth Kandula

Srikanth Kandula

Srikanth is an engineer who works in analytics and distributed systems at Amazon Web Services.

Shahryar Baki

Shahryar Baki

Shahryar is a software development engineer for Open Data Analytics Engines at Amazon Web Services.

Every team is a data team — bring Amazon Redshift analytics to ChatGPT Work

Post Syndicated from Naresh Chainani original https://aws.amazon.com/blogs/big-data/every-team-is-a-data-team-bring-amazon-redshift-analytics-to-chatgpt-work/

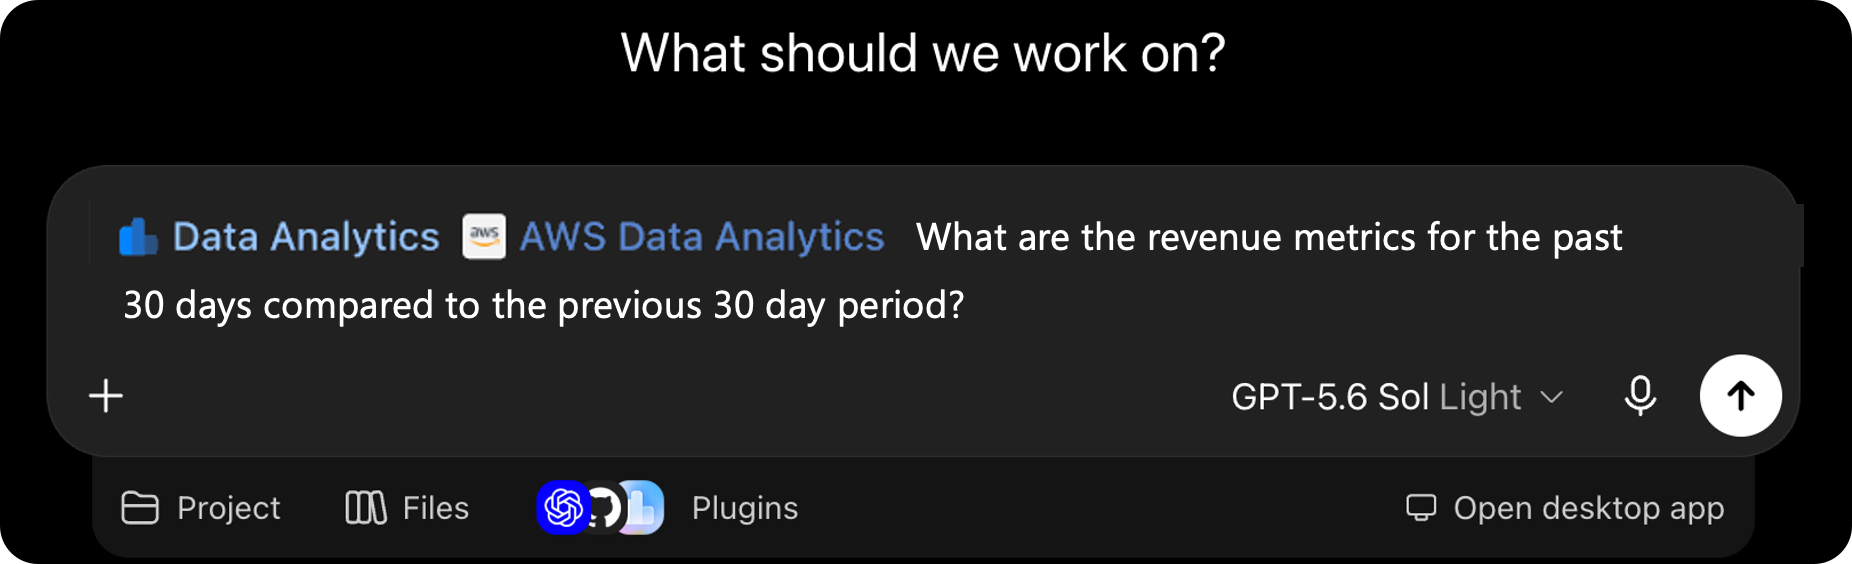
Today, AWS is announcing the AWS Data Analytics plugin for the new Data agent in ChatGPT Work. The plugin helps teams across an organization ask questions in natural language, analyze governed data across their Amazon Redshift data warehouse and data lakes, and create shareable dashboards. All this happens from a conversation in ChatGPT Work.

Tens of thousands of customers choose Amazon Redshift every day to run their most demanding workloads, because it delivers analytics at scale with industry-leading price performance. They love how Amazon Redshift provides access to their data warehouses and data lakes together in one place. Teams can combine curated business data with the broader operational, historical, and third-party data stored in open formats like Apache Iceberg in their data lakes. This gives them a complete picture to make business-critical decisions across their data.

Customers have asked AWS for a way to put that trusted data in the hands of more of their people. That means not only the analysts and engineers who write SQL, but also the sales leaders, operations managers, and finance teams who depend on the results. A sales leader wants to know how the customer pipeline has changed this quarter. An operations manager wants to understand why fulfillment times changed over the past month. That’s why we built the AWS Data Analytics plugin, bringing the power of Amazon Redshift and AWS analytics to ChatGPT Work.

“Business teams can make decisions faster when they can source their own analytics and build the dashboards they need. Our work with AWS gives more people that ability, helping them understand changes in performance and decide where to focus. The AWS Data Analytics plugin connects Amazon Redshift to the Data agent in ChatGPT Work, so employees can analyze trusted company data simply by asking, with their organization’s existing access controls in place.”

— Arpan Shah, General Manager, Technology at OpenAI

The new plugin helps shorten the path from question to decision for everyone. Using the Data agent in ChatGPT Work, employees can explore the data they are authorized to access in Amazon Redshift by asking questions in everyday language. They can then refine the analysis, investigate changes, and turn the results into a dashboard without leaving ChatGPT Work. The plugin works with both Amazon Redshift provisioned clusters and Serverless workgroups. Customers can integrate it into their existing multi-cluster or multi-workgroup environments and benefit from the cost and security controls they’ve already set up.

Consider Maya, a business analyst supporting a revenue operations team. She wants to understand the revenue performance across various segments and regions.

Maya starts by loading the AWS Data Analytics plugin in ChatGPT Work, and then asking:

What are the revenue metrics for the past 30 days compared to the previous 30-day period?

ChatGPT Work conversation asking for revenue metrics over the past 30 days compared to the previous 30-day period

Figure 1: Asking for revenue metrics in ChatGPT Work using the AWS Data Analytics plugin

The plugin translates her question into SQL, or a sequence of queries if needed, and runs them against the relevant data in Amazon Redshift. It returns key revenue performance metrics based on the same curated revenue data that her analytics team maintains.

Table of revenue performance metrics the plugin returned from Amazon Redshift

Figure 2: Revenue performance metrics returned from Amazon Redshift

Maya notices that gross margin is declining and asks a follow-up question:

What is my revenue breakdown by product category and region for the past 90 days?

Revenue results segmented by product category and region for the past 90 days in ChatGPT Work

Figure 3: Revenue breakdown by product category and region for the past 90 days

The plugin carries the context forward, segments the results, and helps Maya understand each segment’s performance for the past 90 days. She can inspect the analysis and ask additional questions to drill down even further to understand why certain regions are lagging or why certain segments are outperforming others.

This conversational workflow doesn’t replace the data models, metric definitions, or governance practices that the analytics team has established. It helps more employees use that data directly, giving analysts more time for high-value work.

The AWS Data Analytics plugin connects ChatGPT Work to Amazon Redshift and uses the context of the connected analytics environment to help answer questions with the Data agent. During a conversation, it can:

  • Discover the schemas, tables, columns, and data types available to the user.
  • Translate a natural-language question into Amazon Redshift SQL.
  • Run the query against the customer’s Amazon Redshift environment.
  • Present the results in a table or concise explanation.
  • Use follow-up questions to filter, compare, or drill into the results.
  • Turn an analysis into an interactive dashboard that teams can share and explore.

Because the analysis runs against the customer’s existing data, teams can continue to use the curated datasets and business definitions they already maintain in Amazon Redshift. Customers whose Amazon Redshift environments query data in both a warehouse and a data lake can also make that data available through the governed datasets exposed to the plugin. The AWS Data Analytics plugin also supports our broader AWS data and analytics services. This includes the ability to work with AWS Glue Data Catalog, Amazon S3 Tables (a capability of Amazon Simple Storage Service (Amazon S3)), Amazon Athena, and vector search on AWS.

Natural-language analytics requires more than passing a prompt to a database. The agent needs to understand SQL specific to Amazon Redshift, discover metadata, choose the right tables and columns, and construct queries that follow service best practices. The plugin was built using Amazon Redshift skills from the Agent Toolkit for AWS. These skills provide tested procedures and service-specific guidance that agents can use when working with Amazon Redshift.

To get started, install the AWS Data Analytics plugin in ChatGPT Work to connect it to Amazon Redshift. Give your teams a conversational path to governed insights across your data warehouse and data lake today.

To learn more, see the following resources:


About the author

Naresh Chainani

Naresh Chainani

Naresh is a Director of Engineering at AWS, where he leads Amazon Redshift, one of the world’s most widely used cloud data warehouses. With over 20 years of experience across IBM and AWS, he is a recognized leader in high-performance database systems, holding more than a dozen patents and numerous publications at top venues including SIGMOD and VLDB. Naresh is passionate about advancing the state of the art in analytics and developing the next generation of engineering talent.

Forever Young. Да поговорим за възхода на „Алтернатива за Германия“

Post Syndicated from Светла Енчева original https://www.toest.bg/forever-young-da-pogovorim-za-vuzhoda-na-alternativa-za-germaniya/

Forever Young. Да поговорим за възхода на „Алтернатива за Германия“

В навечерието на изборите в германската федерална провинция Саксония-Анхалт на 6 септември 2026 г., спечелени от крайнодясната партия „Алтернатива за Германия“ (АзГ), един 42-годишен хит преживя ренесанс. Става въпрос за Forever Young на немската група Alphaville. Няма как да не сте чували тази песен, ако имате съзнателни спомени от 80-те, а е вероятно да ви говори нещо, дори да сте родени по-късно.

Макар привидно да възпява мечтата за вечна младост, песента всъщност е политическа – в нея става дума за превъоръжаването по време на Студената война:

Надяваме се на най-доброто,
но очакваме най-лошото,
ще пуснеш ли бомбата, или не?

Иронично от днешна гледна точка, в песента е цензуриран пасаж, в който става дума за фашизма.

Forever Young се превърна в своеобразен химн на съпротивата срещу АзГ „благодарение“ на недалновидността на организаторите на Фестивала на щастието (Glücksgefühle-Festival) в град Хокенхайм, Баден-Вюртемберг. Те оттеглиха поканата за участие към Alphaville с аргумента, че не искат политически послания на фестивала, а вокалът на групата Мариан Голд е известен с критичното си отношение към АзГ.

В Германия обаче правото на изразяване на демократични ценности се цени високо и за разлика от България, редовно се практикува. Логично, последва скандал. Организаторите се извиниха и „оттеглиха оттеглянето“ на поканата, но Alphaville вече не искаха да се включат.

За сметка на това редица участници изпълниха от сцената на фестивала Forever Young в знак на протест, като не пропуснаха да подчертаят важността на демокрацията. И/или да наругаят АзГ, както направи например мъжки хор от Кьолн.

Какво се случи в Саксония-Анхалт?

Хем беше очаквано, хем настана масова изненада. Така може да се обобщят реакциите по отношение на изборите в Саксония-Анхалт. АзГ получи подкрепата на близо 44% от гласувалите и едва три места я делят от пълно мнозинство в местния парламент. Избирателната активност беше най-високата в тази източногерманска провинция от 1990 г., тоест откакто в нея се провеждат свободни избори – 77,8%. Саксония-Анхалт е провинция с едва около два милиона души население, но отзвукът от резултатите е огромен.

Възходът на крайната десница в Германия – как и защо?

Тайна сбирка на дяснорадикални лидери, на която се е обсъждала „ремиграция“, стана причината за многохилядни протести в Германия. Защо дясната реторика и формации като „Алтернатива за Германия“ стават все по-силни? От Марина Лякова.

Какви са причините за този отзвук? 

За първи път АзГ е толкова близо до вземането на властта, а участието ѝ в управлението би представлявало прекрачване на табу. Победата на крайнодясната формация, макар и в една малка провинция, е в контекста не само на повишаването на подкрепата за партията в цяла Германия. Тя става на фона на възхода на крайнодесните на други места в Европа – примерно, на Марин Льо Пен във Франция. Без да пропускаме немислимата до неотдавна симбиоза между Русия и доскорошния „лидер на демократичния свят“, където по време на втория мандат на Тръмп наблюдаваме антидемократичен завой. И Москва, и Вашингтон изразяват последователна подкрепа за АзГ, а Европа остава все по-самотна в опита си да удържа демократичните ценности.

На всичко отгоре в АзГ съществуват различни фракции, а тази в Саксония-Анхалт е сред най-радикалните от тях. Германските служби квалифицират местната структура на партията като екстремистка организация. А лидера ѝ Улрих Зигмунд вестник Spiegel нарича „най-опасния мъж в Германия“ и пише, че е предводител на дясноекстремистка мрежа, предизвикваща страх дори у ръководството на партията. Същевременно обаче Зигмунд има излъчването на симпатяга, който е близо до хората, и е популярен в социалните мрежи.

А източногерманците, които се чувстват изоставени от системните играчи, като Социалдемократическата партия (СДП) и Християндемократическия съюз (ХДС), имат нужда точно от това – някой да ги чува и да облича неудовлетвореността им в политически послания.

Част от предизборните обещания на АзГ в Саксония-Анхалт са такива, че демократично настроените германци (а и европейци) ги побиват тръпки – например децата с увреждания да не учат с останалите, а да бъдат изпратени в специални училища, нещо като т.нар. училища за бавноразвиващи се, както се наричаха тези учебни заведения по времето на социализма. За децата бежанци също се предвижда да учат отделно от здравите и „нормални“ германчета. За да си знаят, че са в Германия само временно.

Домовете за деца – между институционалното наследство и човешкото лице на грижата

Социалистическото наследство на домовете на деца тегне и днес, когато тези институции са вече уж закрити. Евгения Тонева разказва защо дехуманизиращите нагласи, порядки и стигмата продължават да се възпроизвеждат.

В предизборната програма за ЛГБТИ+ хората се говори като за „отклонения“, които не могат да се възпроизвеждат. Предвижда се изгонване на голяма част от хората с мигрантски произход. А нуждата от работна ръка би се очаквало да се задоволи не с миграция, а с насърчаване на раждаемостта с финансови стимули – мярка с меко казано, спорен ефект.

Дали АзГ ще управлява в Саксония-Анхалт, зависи от това как ще се развият отношенията ѝ с малката партия „Съюз Сара Вагенкнехт“ (ССВ),

която спечели пет места в местния парламент. ССВ е партия, кръстена на председателката ѝ Сара Вагенкнехт и отцепила се от друга партия – „Левицата“. „Левицата“ пък е създадена през 2007 г. от отцепници от СДП и от Партията на социалистическото единство от времето на социализма, тоест БКП-то на ГДР. Въпреки че е против НАТО, критична към ЕС и толерантна към Русия, „Левицата“ застава зад социалнолиберални ценности – човешки права, защита от дискриминация на чужденци, ЛГБТИ+ хора и пр., равенство на половете и т.н.

Партия като „Левицата“ в България нямаме, но Сара Вагенкнехт можем да оприличим на Корнелия Нинова, както и на остатъците от БСП и всичките ѝ производни, включително „Прогресивна България“. „Лявото“ на Вагенкнехт е близо до крайнодясното на АзГ, както Нинова и Костадин Костадинов са си лика-прилика. ССВ е антиимигрантска партия, която недолюбва човешките права и харесва Путин, и затова стана първата партия, готова да подаде ръка на АзГ за съвместно управление. Друг е въпросът дали Улрих Зигмунд ще е склонен на компромиси, каквито изискват коалициите, или ще се опита да предизвика нови избори с цел да вземе цялата власт. Останалите варианти биха били нестабилни опити за правителство на малцинството.

Как е възможно хомосексуална жена да е начело на „Алтернатива за Германия“

В случай че някой се чуди как точно се връзва личността на Алис Вайдел с посоката и позициите на партията ѝ, Светла Енчева дава някои много интересни отговори. И не, „Алтернатива за Германия“ не е германското „Възраждане“, защото радикализацията там върви по съвсем друга линия.

АзГ и Източна Германия

Но да се върнем към историята с Alphaville. Отношението на организаторите на Фестивала на щастието предизвика такова възмущение не на последно място заради културата на паметта, която се възпитава в Западна Германия след Втората световна война. Тя включва съзнание за вината и отговорността за националсоциализма и убеждението, че той не трябва да се допуска никога повече и че колкото по-голяма е опасността, толкова повече и от всяка възможна трибуна трябва да се посочва тя.

ГДР обаче не е минала през подобен процес. Част от идеологията на социалистическите страни е, че те са от „правилната страна на историята“. Осъзнаване и преработване на вина не са нужни – „другите“ са фашисти, „ние“ сме добрите. Ето защо много източногерманци имат чувството, че след Обединението им се натрапва чужда вина. Това е една от причините АзГ, която предлага скъсване с виновното отношение към историята, да вирее по-успешно в източните федерални провинции. Същевременно липсата на имунна система по отношение на националсоциализма е благодатна почва за възраждането му под една или друга форма.

Усещане за онеправданост

Периодът между падането на Берлинската стена и Обединението на Германия е еуфоричен за гражданите на ГДР – те получават свободата да пътуват, да се изразяват, изобщо – да бъдат част от доскоро забранен за тях свят. Освен това Западна Германия е привлекателна и с по-добре развитата си икономика.

Ала когато обединената държава става реалност, еуфорията постепенно отстъпва място на разочарованието. Много хора мигрират в западните провинции, а източните се обезлюдяват. Производството от времето на ГДР се прекратява, а на негово място идват, ако изобщо дойдат, западногермански концерни. Известните от времето на социализма автомобили „Трабант“ и „Вартбург“ например остават в миналото, а в някогашния завод на „Вартбург“ в Айзенах днес се произвежда „Опел“. Към гордостите на ГДР, които вече не се изработват, принадлежат и мотопедите Simson, какъвто демонстративно кара Улрих Зигмунд.

Но не е само индустрията – за източногерманците много от нормите, ценностите и дори немалка част от езика на държавата, от която стават част, са чужди. Уж всички в страната говорят немски, но навлизат нови думи за доскоро несъществували реалности, а езикът, описващ бившата социалистическа реалност, е непонятен за германците на Запад.

Така желаното някога обединение се превръща в усещане за колонизираност – налагане на чужд свят и обезценяване на собственото минало заедно с постиженията и уникалността на всекидневието му.

Между 1995 г. и 2019 г. федералното правителство на Германия и западните провинции отделят общо 238 млрд. евро за източните провинции чрез програма, наречена „Пакт за солидарност“. Първият пакт е до 2004 г. и основната му цел е подобряване на инфраструктурата на територията на бившата ГДР. Вторият е предназначен за компенсиране на трудностите, произтичащи от разделянето на Германия, и за ускоряване на икономическото догонване на западната част от страната.

Всички тези средства обаче не допринасят за премахването на убеждението на голяма част от жителите на източните провинции, че са третирани като втора категория германци. На този фон АзГ обещава да върне достойнството им и предлага визия за миналото и бъдещето на Германия, в която те се припознават. Визия, в която се акцентира върху гордостта и превъзходството, а не върху срама и вината.

Отношение към миграцията

Отрицателното отношение към миграцията, особено от мюсюлмански страни, е основната характеристика на АзГ. Затова на пръв поглед изглежда парадоксално, че партията е толкова популярна точно в източните провинции на Германия. В тях (без да броим столицата Берлин) делът на чужденците и на хората с миграционен произход е значително по-нисък, отколкото в западните. С миграционен произход (това включва чужденци, също хора, получили германско гражданство, както и такива, които може да са родени в Германия, но поне единият от родителите им е от чужбина) е 34,4% от населението в западните провинции, а в източните делът му е почти три пъти по-нисък – 12,1%. Що се отнася конкретно до чужденците (които нямат германско гражданство), в западните провинции делът им е 15,7%, а в източните (без Берлин) – 7,6%, тоест около два пъти по-нисък.

Не е задължително обаче отношението към миграцията да съвпада с реалното ѝ присъствие. В България преди 11 години например, когато „бремето на бежанската вълна“ от Сирия се усещаше като „непосилно“, търсещите закрила бяха малко над 26 000, като по-голямата част от тях не останаха в страната. Но популистки партии насаждаха омраза към бежанците, а хората се страхуваха от тях, понеже не ги познаваха.

Подобна е ситуацията и в източните германски провинции – колкото по-рядко местните хора срещат чужденци, толкова по-чужди са те за тях и толкова по-голяма е вероятността да ги възприемат като опасност и да ги нападат с идеята, че се защитават.

Конкретно в Саксония-Анхалт най-много са чужденците от Украйна (около 36 000) следвани от сирийците (малко над 29 000) и поляците (близо 15 000). Като цяло преобладават чужденци от Източна Европа, включително около 4700 българи и още толкова руснаци. Но АзГ е и против украинските бежанци, а ако плановете на партията за „ремиграция“ се осъществят, е доста вероятно от тях да пострадат и българи.

Случаят Джем (Йоздемир). Защо „Зелените“ победиха в Баден-Вюртемберг

Победата на „Зелените“ изглежда като статистическа грешка – 0,5 пункта пред ХДС. Но е важна, защото зад този резултат стои човек. Джем Йоздемир – син на турски гастарбайтери, „шваба“, както сам се нарича, и попкултурна фигура – се оказа факторът, който преобърна изборите. Как – от Светла Енчева.

Упражнения по демократично безсилие

Докато АзГ в Германия и други антидемократични популисти в Европа набират скорост, европейските институции и партиите, отстояващи принципите на либералната демокрация, реагират със заучена безпомощност.

Първият симптом на тази заучена безпомощност е подчинението пред популистите и убеждението, че ако заприличаме поне малко на тях, ще си запазим демокрацията. Може би сме станали твърде либерални, твърде толерантни, прекалили сме и затова вече не гласуват за нас. Настоящият канцлер на Германия Фридрих Мерц дойде на власт с обещанието за по-твърда ръка, която според него би трябвало да свали подкрепата за АзГ наполовина. Резултатите от изборите в Саксония-Анхалт обаче показват обратното: преполовена е подкрепата за ХДС – партията на Мерц.

Вторият симптом е подценяването и обвиняването на избирателите на популистки партии. Много от тях нямат екстремистки убеждения, но се чувстват изоставени и неразбрани. И когато някой демонстрира, че е на тяхна страна и прехвърля отговорността за неуспехите им върху „другите“, е лесно да му повярват. Когато им се каже „тези са лоши, не гласувайте за тях“, това само ги ожесточава.

Електоралната енигма – защо българите в чужбина гласуват за „Възраждане“

За пореден път след поредните избори се чудим защо българите в чужбина – тази тъй митологизирана група хора – гласуват за „Възраждане“. Марина Лякова прави анализ кои са българите в чужбина, които реално гласуват, и когато го правят, защо вотът им изглежда тъкмо по този начин.

Третият симптом, свързан с предишните два, е, че в настоящия период на тотална несигурност – геополитическа, икономическа, екологична и пр. – демократичният свят като че ли няма вдъхновяващо послание, с което да противостои на популизма. Популистката вълна разполага с конспиративни теории, дезинформационни кампании, инфлуенсъри… Чудовището, родено от симбиозата между ултраконсервативни фундаменталисти и наследството на тоталитарните разузнавателни и репресивни служби, притежава не само умения да влияе, а и много пари да осъществява целите си. И лесно ги постига, защото насреща си има не здрава демократична имунна система, а мрънкане и тюхкане.

Междувременно поколението, което помни Втората световна война, си отива. А с него и демократичният рефлекс „никога повече“. Днес мечтата за бъдещето е мечта за едно идеализирано минало, в което има сигурност и перспективи за всички; в което ние сме си ние – без чужденци, а малцинствата и различните си знаят мястото. Минало, което e forever young.

Водещо изображение: „Синьо небе над Магдебург“, както пише АзГ в страницата си във Facebook броени часове преди излизането на последните изборни резултати. На снимката се вижда и Улрих Зигмунд – лидерът на АзГ в Саксония-Анхалт. Източник: Facebook / AfD

Security updates for Thursday

Post Syndicated from jzb original https://lwn.net/Articles/1093566/

Security updates have been issued by AlmaLinux (389-ds-base, ansible-core, buildah, expat, glib2, gpsd, gpsd-minimal, gzip, kernel, kernel-rt, opentelemetry-collector, osbuild-composer, perl-DBI, python-lxml, python3.12-lxml, qt5-qtbase, thunderbird, valkey, vim, and xz), Debian (pyasn1), Fedora (darktable, freeipa, freerdp2, gdk-pixbuf2, GitPython, libsoup3, openssl, perl-Net-DNS, rust-ppmd-rust, samba, and valkey), Mageia (ceph, firefox, nss, perl-DBI, thunderbird, and wget), Oracle (389-ds-base, buildah, expat, git-lfs, glib2, glibc, gpsd, gpsd-minimal, grafana-pcp, kernel, libssh, nginx, perl-GD, python3.14-cryptography, redis:7, skopeo, thunderbird, valkey, xmlrpc-c, and xz), Slackware (xz), SUSE (bzip2, cpio, curl, dracut, fuse-overlayfs, golang-github-vpenso-prometheus_slurm_exporter, helm, java-1_8_0-ibm, kbfs, kernel, kernel-devel, libopenslide-devel, libsoup, libssh2_org, libusb-1_0, libvirt, libzypp, zypper, mcphost, multipath-tools, NetworkManager, opensc, openssl-3, perl-Net-DNS, python-aiohttp, python-Authlib, python-pip, python-sqlparse, python313-dnspython, python313-idna, rpcbind, sssd, strongswan, systemd, tomcat11, ucode-intel, and wget), and Ubuntu (dotnet8, dotnet10, ffmpeg, flatpak, netty, and perl).

1.1.1.1 now supports post-quantum DNSSEC, all 2,420 bytes of it

Post Syndicated from Sebastiaan Neuteboom original https://blog.cloudflare.com/post-quantum-dnssec-1111/

1.1.1.1 now validates DNSSEC signatures made with ML-DSA-44, a post-quantum signature algorithm standardized by the National Institute of Standards and Technology (NIST). This is a first step toward preparing DNSSEC for a future in which today’s signature algorithms are no longer secure.

Cloudflare plans to achieve full post-quantum security by 2029. Much of the work so far has focused on TLS, but public-key cryptography is used in many other systems, including DNSSEC.

While we began experimenting with post-quantum key agreement in TLS in 2019 and enabled support for all customers in 2022, post-quantum signatures have not yet received comparable testing in DNSSEC. There is also some urgency. Widespread client adoption of post-quantum TLS took years, partly because larger messages exposed assumptions and bugs in existing network software. That experience showed why early large-scale testing matters. We cannot wait until quantum computers become an immediate threat.

The problem is that post-quantum signatures are large. Each ML-DSA-44 signature is 2,420 bytes, exceeding common DNS-over-UDP limits before the response includes anything else. At the same time, zones will need to publish conventional signatures for older resolvers for years, creating a potential downgrade path if not validated correctly. The challenge is carrying these much larger responses reliably, without allowing compatibility with older resolvers to weaken protection for newer ones.

With ML-DSA-44 validation enabled, 1.1.1.1 lets us test both challenges at Internet scale: carrying larger DNS responses and preventing fallback to conventional signatures.

Why post-quantum DNSSEC matters

DNS responses are not authenticated by default. An attacker who can forge a response may be able to redirect users to an address of their choosing. DNSSEC prevents this by signing DNS records. A validating resolver such as 1.1.1.1 follows a chain of signed records from the DNS root to the requested domain, checking that the answer is authentic and has not been modified.

DNSSEC supports multiple signature algorithms, but nearly all of those used today are vulnerable to future quantum computers. RSA and ECDSA rely on mathematical problems that are believed to be infeasible for conventional computers to solve at deployed key sizes. We are preparing for the possibility that in 2030 a sufficiently powerful quantum computer could be built that breaks these keys. An attacker could then recover the corresponding private key and create forged signatures that validators would accept. The attack path is shown below.

Quantum computers capable of carrying out these attacks do not exist today. DNSSEC provides authenticity rather than confidentiality, so it is not subject to “harvest now, decrypt later” attacks. The reason to begin now is that changing DNSSEC requires coordination across authoritative servers, registries, registrars, and validating resolvers. The migration must eventually reach the top of the DNS hierarchy, where a compromised key has the greatest impact. An attacker who recovers a root zone signing key using a quantum computer could forge a validation path to any zone below it: “break once, forge everywhere”. ML-DSA-44 gives that migration a standardized starting point, and supporting it in 1.1.1.1 lets us, and the DNS ecosystem at large, gain operational experience.

Why replacing the algorithm is difficult

DNSSEC was designed to support new algorithms. In principle, supporting ML-DSA-44 means publishing its public key and teaching validators to verify its signatures. In practice, two properties make the transition difficult: the signatures are large, and the old algorithm cannot always be removed safely.

A 2,420-byte signature changes the packet

DNSSEC algorithms commonly used today produce relatively small signatures. ECDSA P-256, for example, produces a 64-byte signature. An ML-DSA-44 signature is 2,420 bytes, almost 38 times larger.

That difference matters because many of the systems that send, carry, and receive DNS messages are sensitive to message size. DNS originally restricted messages sent over UDP to 512 bytes. EDNS(0) later allowed a resolver to advertise the largest UDP response it is willing to accept from a nameserver. Many DNS implementations use a conservative UDP payload limit of 1,232 bytes, chosen to fit within IPv6’s minimum MTU (maximum transmission unit) of 1,280 bytes. More recently, RFC 9715 recommended a maximum of 1,400 bytes for DNS over UDP. An ML-DSA-44 signature exceeds that budget on its own, before accounting for the signed RRset, domain names, DNS headers, and other DNSSEC records. Sending such a response as fragmented UDP is unreliable and should be avoided. Instead, the authoritative server should return a truncated response, prompting the resolver to retry using another transport protocol, usually TCP.

The effect is most visible in DNSKEY responses, which contain the keys a resolver needs to validate the zone. An ML-DSA-44 public key is 1,312 bytes, and the DNSKEY RRset also carries a 2,420-byte signature. ML-DSA-44 cannot fully replace conventional signing algorithms until it is widely supported across the DNS ecosystem, a process likely to take years. Until then, DNSKEY responses may contain both conventional and post-quantum keys and signatures to remain compatible with older validators. Key rollovers can add still more keys, making these responses larger again.

Handling DNS over transports other than UDP is not itself unusual. Cloudflare Radar shows that around 85% of queries to 1.1.1.1 arrive over UDP. The platform behind 1.1.1.1, Big Pineapple, also powers other DNS services, including Gateway DNS. Across all services handled by Big Pineapple, around 60% of queries arrive over UDP. The remaining 40% use transports such as TCP, DNS over TLS (DoT), and DNS over HTTPS (DoH).

Those figures describe how queries reach Cloudflare’s resolver services, not how 1.1.1.1 communicates with authoritative servers. Large ML-DSA-44 responses can still cause additional TCP retries on that side, but handling DNS over transports other than UDP is already a normal part of operating 1.1.1.1 at scale.

Supporting two algorithms introduces a downgrade risk

Replacing an existing DNSSEC algorithm cannot happen all at once. If a zone publishes only ML-DSA-44, resolvers that do not support it cannot validate the zone. The practical migration path is therefore to publish conventional and post-quantum keys and signatures together.

That preserves compatibility, but it does not provide post-quantum security by itself. RFC 6840 specifies that “validators SHOULD accept any single valid path.” This rule lets validators use whichever published algorithm they support.

Once a conventional algorithm such as ECDSA is no longer secure, however, the same behavior creates a downgrade path. An attacker could forge an ECDSA-only answer that a resolver accepts despite supporting ML-DSA-44, as illustrated below.

Preventing this downgrade requires an authenticated signal that a zone should be validated with ML-DSA-44. 1.1.1.1 uses DS records published by the parent zone for this purpose. If the authenticated DS RRset contains a record for a supported post-quantum algorithm, the signal is present.

1.1.1.1 then deliberately applies a more restrictive local validation policy. It requires at least one valid post-quantum validation path; a conventional path is no longer sufficient. If no ML-DSA-44 path validates, validation fails. This is not (yet) normal DNSSEC validation behavior, but RFC 4035 allows local resolver policy to determine whether additional signatures must be checked and how conflicting results are handled.

Conventional signatures can remain available for older resolvers without allowing post-quantum-capable resolvers to fall back to them. The downgrade signal is only post-quantum secure if ML-DSA-44 deployment and downgrade protection extend from the trust anchor through every delegation. Rotating the zone key more frequently does not solve the problem: an attacker can target a vulnerable key anywhere higher in the chain and forge every delegation below it.

The road to post-quantum DNSSEC

Adding a post-quantum algorithm to DNSSEC requires more than standardizing the cryptography. It needs implementations in cryptographic libraries, an IANA-assigned DNSSEC algorithm number, support from authoritative servers and validating resolvers, and adoption throughout the DNS delegation chain. ML-DSA-44 now has the initial prerequisites for deployment. NIST has standardized it, and common cryptographic libraries implement it. Its use in DNSSEC is described in the ML-DSA for DNSSEC Internet-Draft, and IANA recently assigned it DNSSEC algorithm number 18.

Adding ML-DSA-44 validation to resolvers is one of the first deployment steps, but it does not create a complete post-quantum chain of trust. Authoritative servers must sign zones with ML-DSA-44, registrars must accept and submit the corresponding DS records, and registries must publish them in parent zones.

This adoption must extend through every parent zone to the DNS root. The root must adopt ML-DSA-44, and its post-quantum key must become a trust anchor for validating resolvers. Any level without post-quantum protection remains a downgrade point.

There is little value in signing a zone with ML-DSA-44 if no resolver validates its signatures. Enabling ML-DSA-44 validation by default on 1.1.1.1 is therefore an important early step. It lets us measure the operational cost of signature verification, additional bandwidth, and increased TCP use between resolvers and authoritative servers.

As with previous migrations, we will also test real-world deployability using background probes on a small fraction of Cloudflare Challenge Pages. These probes will test whether clients can resolve and reach an ML-DSA-44-signed test domain across real networks. We invite other DNS operators and implementers to begin testing ML-DSA-44 at scale. Together, these measurements will show what adjustments are needed as adoption grows.

What this means for you

If you use 1.1.1.1, you do not need to change anything. ML-DSA-44 validation happens automatically when a zone publishes the necessary DNSSEC records, while existing DNSSEC zones continue to validate as before.

This work covers the resolver side of DNS. Our next step is adding ML-DSA-44 signing support to Cloudflare Authoritative DNS and corresponding DS record support to Cloudflare Registrar, which will be available to all customers for free. That will let us test the complete path, from generating signatures and publishing DNSKEY records to transporting and validating them through 1.1.1.1.

Want to see post-quantum DNSSEC in action… all 2,420 bytes of it? Query our dnstest.dev zone using 1.1.1.1:

You can also use Is your DNS resolver post-quantum ready? to test your current resolver. The community is tracking ML-DSA-44 software support on GitHub.

Вътрешни езикови правила за външна употреба (на ваш риск)

Post Syndicated from original https://www.toest.bg/vutreshni-ezikovi-pravila-za-vunshna-upotreba-na-vash-risk/

Вътрешни езикови правила за външна употреба (на ваш риск)

Редовните читатели на „Тоест“, вярвам, са забелязали, че се стараем да поднасяме не само съдържателни, но и езиково издържани статии. Всеки публикуван материал, след като е бил написан от автора, е минал през ума и очите (а понякога и през сърцето) на поне две инстанции – редактор(ка) и моя милост, коректор(ка). В медията зорко следим текстовете да са съобразени с книжовноезиковите норми. Имаме обаче и някои разминавания, които сме уговорили в нашите Вътрешни правила за стил, граматика, правопис и пунктуация.

Стандарти, кодекси, наръчници

Надали е случайно, че световноизвестни медии и информационни агенции като The Washington Post, The Guardian, Der Spiegel, BBC, Reuters имат редакционни/етични кодекси, в които са заложени основни журналистически стандарти за неутралност, проверка на фактите, етично отношение и т.н. Свой редакционен кодекс има и „Тоест“. С прокламирането на тези стандарти – и с придържането към тях, разбира се – медиите се ангажират да бъдат лоялни към читателите, да им предоставят обективна и достоверна информация, но същевременно улесняват работата в самата редакция, предпазват се от съдебни дела и т.н.

Някои медии си изготвят и собствени езикови правила, скрепени в специални наръчници. Сред най-известните примери са Libro de estilo¹ на испанския El País и Manual of Style and Usage на американския The New York Times, които съдържат стотици страници. С течение на времето тези справочници са станали авторитетни и служат като ръководство за добър стил на много пишещи хора.

Българските медии като че ли са плахи в това отношение и засега освен „Тоест“ ми е известен само още един сайт – „Нула32“, който е заявил публично своята езикова политика.

Тук също може да се запитаме защо е необходимо да има отделни езикови правила, валидни за дадена медия, особено след като разполагаме с подробната кодификация в БЕРОН. Ето го и отговора в синтезиран вид, даден в наръчника на El País:

Наръчникът по стил не е граматика или речник в общоприетия смисъл. Той е вътрешният правилник на редакцията на определено средство за информация, който се опитва да уеднакви изразни системи и форми, така че медията да добие собствен облик и да улесни задачата на читателя.

И така, две са основните причини или по-скоро цели. По-важна ми се струва втората, защото медиите съществуват, за да са посредници² между събитията и читателите. Затова водещо и за авторите, и за редакторите е старанието информацията да се предава максимално точно, ясно и разбираемо за по-широк кръг хора, за да могат те бързо да възприемат прочетеното³. Основното средство за постигане на тази прагматична цел е езикът. А книжовният език с все нормите и правилата си (нека си сложим ръката на сърцето) е малко или много скован. По-точната дума всъщност е ригиден, защото освен „скован“ означава също „неподатлив или трудно податлив на въздействие“ – и ето го, надявам се, нагледно проявен този стремеж да бъдем разбираеми и за онези хора, които не са срещали чуждата дума.

Бързо, скоростно, моментално

Това е повикът на нашето време. Макар да сме декларирали, че журналистиката в „Тоест“ е бавна, сме наясно, че когато са в интернет, повечето читатели включват поне на четвърта скорост, а в много случаи просто сканират текста.

Едно от нашите правила, съдействащи за по-бързото четене, е, че

собствените имена и заглавията, написани с латиница, са в курсив.

Примери има само няколко абзаца по-горе – „Libro de estilo на испанския El País и Manual of Style and Usage на американския The New York Times“. БЕРОН указва в тези случаи да не се използват кавички, защото чуждата азбука разграничава името или заглавието от останалите думи в изречението. В редакцията обаче смятаме, че не е достатъчно, и с курсива сигнализираме, че това е различен код (латински букви) и оригинално име/заглавие.

Въпреки че слятото, полуслятото и разделното писане създават неоправдано много проблеми в реалната езикова практика, ние се придържаме към официалните правила и се разграничаваме от тях само в някои случаи:

1.  Пишем като две думи изразите отгоре надолу, отляво надясно, оттогава досега и под. Според БЕРОН те се пишат като три или четири думи: от горе надолу, от ляво надясно, от тогава до сега. След като читателят е свикнал със слято написаните отгоре, надолу, отляво, надясно, оттогава и досега, когато ги среща употребени поотделно, той би се запитал – и съвсем основателно – защо пък в други изрази се налага да ги разделяме. И защо веднъж ги делим на три думи, а друг път – на четири. Филологическото обяснение сигурно е, че в съчетанието от ляво надясно имаме начална точка и посока (в пространството), а в от тогава до сега – начална и крайна точка (във времето), но уважаеми колеги, постановили тези изключения, наистина ли и в момента продължавате да смятате, че си струват?

2. Пишем винаги страна членка и държава членка, дори и когато се посочва част от коя организация е тя, например:

Позорно е за страна членка на ЕС да подлага руски дисиденти на такъв зловещ кафкиански административен ад.

Според официалните правила страна членка (респ. държава членка), се пише разделно, но ако се добави пояснение – на ЕС, вече членка на ЕС се третира като обособена част и следва да се огради с тире и запетая или с две тирета: Позорно е за страна – членка на ЕС, да подлага… Отново смятаме, че това е ненужно издребняване, защото в резултат текстът се натоварва с препинателни знаци, които по-скоро спъват читателя, отколкото го улесняват при възприемането на информацията. За мен лично обособяването тук изобщо не е задължително.

3. Пишем разделно сложните съществителни с първа част арт – арт инсталация, арт галерия, арт карта, макар че арт не се употребява самостоятелно в българския език и тези думи следва да се пишат слято. Със сигурност четенето се затруднява, когато втората част започва с гласна: артинсталация, артидея, артогледало, затова сме приели разделното писане.

В статиите, публикувани в „Тоест“, се разграничаваме и от официално приетия начин за писане на числителните редни имена с арабски цифри и букви: 1-ви, 2-ри, 3-ти, 4-ти, но 5-и, 6-и и т.н. Правилото и всъщност обяснението на кодификатора е, че се пишат тези „букви от края на числителното редно, които не съвпадат със съответното числително бройно“. Добре, за пет – пети, шест – шести и т.н. това важи, но в един – първи, две – втори, три – трети и четири – четвърти сякаш имаме повече несъвпадащи букви. Ако се придържаме строго към това правило, изобщо не можем да напишем първи и втори с арабски цифри, а 3-ети и 4-върти следва да са в този вид.

Затова сме решили да пишем числителните редни имена винаги с последната сричка от думата след дефиса: 1-ви, 2-ри, 3-ти, 4-ти, 5-ти, 6-ти и т.н. Факт е, че в езиковата практика това е преобладаващият начин и много хора се изненадват, когато разберат, че в детската градина и в училище са изработвали поздравителни картички за празника на мама с грешен (спрямо официалните правила) надпис: Честит 8-ми март!

Критика приемаме аргументирана (ние също имаме аргументи)

Когато обявяваш, че в практиката си се разграничаваш от някои официални правила и следваш свои, трябва да си подготвен за критика. Получавали сме и ние – например за това, че употребяваме глаголните форми на  в състава на учтивата форма в мъжки или в женски род ед.ч., като се съобразяваме с пола на събеседника. В интервютата в „Тоест“ може да срещнете правил сте, бихте искала вместо кодифицираните правили сте, бихте искали.

Официалното правило се нарушава често, особено в устната реч, и е едно от най-разколебаните в българския книжовен език. Важно е, че се нарушава не от необразовани люде, а от хора, които иначе имат сравнително висока езикова култура, включително от журналисти в устни интервюта. Обяснението е във факта, че правилото е извънсистемно – всички други имена и причастия освен миналото свършено деятелно (правили) се употребяват в мъжки или в женски род: любезен/любезна сте, уведомен/уведомена сте. В нашата медия сме решили да бъдем по-близо до съвременната езикова практика.

Срещали сме хапливи забележки и относно предпочитанието ни на каталунски и каталунец пред каталонски и каталонец. В БЕРОН формите са дублетни и дори само това е достатъчно, за да не се налага да влизаме в обяснителен режим. Все пак, избрали сме да пишем Каталуния, а не Каталония, тъй като е по-близо до оригиналното име: Cataluña – на испански; Catalunya – на каталунски. След като сме казали А, е редно да кажем и Б – каталунец и каталунски, за да сме последователни.

Това, че Христо Стоичков и спортните журналисти са популяризирали преди години тези форми, както отбелязват критикуващите, не означава, че трябва да ги отречем тотално. Как да каже човекът каталонски или каталонци, като е живял седем години в столицата на Catalunya и е чувал името на провинцията точно в тази форма? Езикът не е само на високограмотните (за каквито често се имаме) – той е обществено явление, а книжовната му форма следва да зачита реалните езикови употреби все пак.

Медиите по презумпция трябва да са актуални, да са в крак със събитията, проблемите и промените в обществото. На тази актуалност в плана на съдържанието би трябвало да съответства и актуална езикова форма. Книжовният език по природа е консервативен и крета след говоримия – не можем да му се сърдим толкова, но можем да го подсетим, че е време за някакви промени.

В „Тоест“ уважаваме книжовните норми и се придържаме максимално близо до тях. Сами може да прочетете нашите вътрешни правила и да прецените в каква степен ревизираме официалните. Вкопчването в кодификацията обаче и придържането към нея на всяка цена ни прави сковани, по-точно ригидни.

1 Това е заглавието на наръчника, дадено от El País, но копия от него носят и заглавието Manual de estilo.

2 Думата медия води началото си от латинския език, в който едно от значенията на прилагателното medius e „посредничещ“.

3 Естествено, има медии с по-тясна и/или специализирана аудитория.

4 Правилото е формулирано в Нов правописен речник на българския език. София: БАН, Хейзъл, 2002, с. 115, т. 83.11. В следващото хартиено издание – Официален правописен речник на българския език. София: БАН, Просвета, 2012, както и в БЕРОН то липсва; дадени са само примерите 1-ви, 5-и, 5-ия, 5-ият за употребата на дефиса. Дали пък кодификаторът не е решил, че правилото не е издържано, и затова го е спестил?

Езикът може да е вкусен и извън блюдото – онзи, българският език, на който говорим от малки и на който около 24 май се кълнем в обич. А той в същността си е средство за общуване и за да ни служи добре, непрекъснато се променя. Да го погледнем в неговата динамика и да се опитаме да разберем какво става и защо, кои са движещите механизми и как те са свързани с обществените процеси. И тъй като задачата не е лека, ще го правим постепенно – на порции.

Признанието като самопризнание

Post Syndicated from Дарина Сарелска original https://www.toest.bg/priznanieto-kato-samopriznanie/

Това е признание за всички вас. За българските медии, които предоставят територия за многоликото ни общество и възможности за диалог. 

Признанието като самопризнание

С тези думи Кирил Вълчев обясни защо е приел поканата на Илияна Йотова да се кандидатира за неин вицепрезидент. С което стана поредният в списъка с бивши журналисти, пристанали на моментен политически интерес. Бивш, защото през 2021 г. оглави БТА и така излезе от активната журналистика, която допреди това пак съвместяваше с друга професия – освен водещ на „Седмицата“ по Дарик радио беше и юридически консултант на медията (това само по себе си е особен хибрид, но да не придиряме). 

Иначе в кампанията ще си е напълно настоящ шеф на БТА, макар и в неплатен отпуск. Да, точно така, журналистите от БТА ще отразяват „безпристрастно“ и „равноотдалечено“ кампанията на своя началник, който съвсем реално може да се завърне в кабинета си на „Цариградско шосе“, ако „Дондуков“ се окаже негостоприемен. Но отразяването, разбира се, ще е професионално. Все пак няма да ни е за първи път! Пак така професионално преди две години Петър Волгин изкара една кампания в неплатен отпуск, преди да прескочи от журналист на общественото БНР до народен представител на „Възраждане“ в Европарламента. 

„Няма места.“ Журналистиката след журналистите

Ако се чудите какво стана с медиите в България, този текст ви е напълно достатъчен, за да си дадете отговори на много въпроси. А иначе, вие въпроси може и да си задавате, но в много медии у нас вече няма кой да ги задава – гледайте какво нещо… Защо стана така – от Дарина Сарелска.

От Клара Маринова до Антон Хекимян

От 1990 г. до днес поне една дузина разпознаваеми журналисти от БТА, БНТ, БНР, bTV, TV7, Nova и други национални медии преминават в политиката – като депутати, евродепутати, кметове или кандидати за президент. За същото това време доверието на българските граждани в новините чертае последователен и устойчив спад: според последния доклад на Института „Ройтерс“ то пада до рекордно ниските 21%, което е срив от 5 процентни пункта само за година. С това страната ни се нарежда сред държавите с най-ниско доверие в медиите, два пъти по-ниско спрямо средните стойности в глобален мащаб.

Не твърдя, че има причинно-следствена връзка. Но връзка има. И трябва да сме слепи, за да не видим дебелата не-винаги-червена линия, която разделя обществото на себеобслужващи се елити и пренебрегната и подценена публика. Когато аудиторията види „днес си водещ/директор, утре си кандидат на властта“, „днес интервюираш премиера в поза „уж критичен журналист“, а утре се снимаш с него в предизборен клип“ това размива доверието не само в конкретния човек, а в цялата система. 

Защото журналистиката по дефиниция е срещу властта. Не против конкретна партия, а срещу всяка власт. 

Добрата журналистика винаги е критична, проверяваща и възпираща нагона на властта. Когато водещи медийни лица преминават от другата страна на тази желязна завеса, това девалвира освен техните авторитетни имена – най-ценното им, пак по думите на Вълчев, но и самата идея за журналистиката като критичен агент и обществен контрол. 

И нека не се чудим защо тази година социалните мрежи настигнаха телевизиите като предпочитан източник на новини за българите, а догодина се очаква и да ги задминат. С всички мрачни последствия от това под формата на заливаща ни пропаганда, конспиративни теории, поляризация, радикализация и обикновено Дънинг-Крюгер оглупяване. Последствия, които берем къде с наивна детска изненада, къде с високомерната претенция за интелектуално превъзходство.

Но добре ще е следващия път, като се яви някой Тръмп или местен искащ-да-бъде-важен и получи залпова обществена подкрепа само защото „всички други са маскари“, да спрем за малко, преди да отсъдим. Да не бързаме със заключението „Ето, хората са прости“. И да погледнем дали наистина не се препълни с маскари, и то в редиците на елитите: умните, добре артикулираните, медийно симпатичните емблеми на всякакви кръгове, гилдии и общества, брандирани с признание и статус. Натрупали социален капитал под значката „равноотдалечени от всяка власт“ и скочили скоропостижно в листите на точно всяка власт, която ги пожелае.

Краят на журналистиката

Журналистиката губи не само пари и трафик, а и необходимостта да я има. Алгоритми, нюзинфлуенсъри и политици, които вече говорят директно на публиката, променят правилата на играта. Въпросът вече e не дали медиите са в криза, а дали обществото изобщо още иска журналистика. От Дарина Сарелска.

Първата вълна

Моделът „журналисти, преминали под партиен пагон“ не е нов. И не е само наш. Но у нас се вижда ясно в две вълни: първата – в края на 90-те, когато голямата политическа промяна трябва да се захрани с доверието, инвестирано в разпознаваеми лица и имена от единствените дотогава държавни медии, основно БНТ; втората – след 2005 г., когато частните телевизии стават стартова площадка за политически проекти.

В първата вълна се помнят имената на спортната журналистка Клара Маринова, после депутатка от БСП, както и на Асен Агов и Диляна Грозданова. Грозданова успява да сбъдне мечтата на всеки опортюнист и прави завъртане на 360 градуса. Първо взема завоя от емблематично лице на БНТ към политиката като пиар на Стефан Софиянски, влиза и сред учредителите на партията му „Съюз на свободните демократи“; след това застава и на депутатската банка (2001–2005) в редиците на НДСВ, а после се връща в медиите като изпълнителна директорка и водеща на частната TV7, чийто собственик тогава е съпругът ѝ Любомир Павлов. 

Асен Агов пък минава през БТА, БНР и БНТ, където стига до директор на новините, а после и на цялата телевизия след идването на власт на СДС (1992–1993). За да няма никакви съмнения кои са двигателите зад кариерното му развитие, е уволнен веднага след падането на правителството на Филип Димитров и преминава в активна политическа кариера с дълга поредица депутатски мандати от листата на СДС. Години след него този висш пилотаж пробва и Антон Хекимян, но стигна само до поста общински съветник от ГЕРБ в София.

Да, ама не

Единствен Петко Бочаров казва своето прословуто „Да, ама не“ на предложенията за политическа кариера. Дългогодишен журналист в БТА, по-късно зам.-главен редактор, добил популярност през 80-те като лице на предаването „Всяка неделя“, през 1991 г. е предложен за депутат от СДС, но отказва, защото смята депутатстването за несъвместимо с журналистическата си роля. Запомнете това. Защото е 

първият документиран публичен дебат в България за конфликта на интереси между медийна и политическа роля след промените. И първият публичен отказ. Следват тихи отлагания или признателни съглашателства. 

Между другото, Петко Бочаров е сред малкото публични личности с минало на сътрудници на Държавна сигурност, които сами го изваждат на светло, преди то да бъде огласено официално, и се разкайват за това. Изглежда, интегритетът понякога позволява на човек да демонстрира доблестно поведение дори с подобна биография. Обратното обаче също важи: фактът, че името ти никога не е било в архивите на един мракобесен апарат, сам по себе си не те прави по-достоен.

Да не се посочваме!

Властта в България може да се смени, да се прекръсти на „прогресивна“ и да обещае нов обществен договор, но едно остава непроменено – страхът от журналистически въпроси. А когато медиите са заключени в мазето, „демокрацията“ неизбежно започва да си говори сама със себе си. От Дарина Сарелска.

Частните телевизии като политически стартови площадки

Периодът на ширпотребата идва със зората на частните телевизии. Пионери са Волен Сидеров и неговата проруска партия „Атака“, която се ражда като политически проект от едноименното предаване на Сидеров по телевизия СКАТ, а само няколко години по-късно се изкачва до четвърта политическа сила в 40-тото Народно събрание.

Николай Бареков се опитва да повтори модела през 2014 г. След седем години, в които гради образа си в най-гледания сутрешен блок – на bTV, и то в най-силните години на телевизията, за кратко става началник в TV7 на банкера Цветан Василев, който тогава все още е в съдружие с Делян Пеевски. На 25 януари 2014 г. Бареков учредява партия „България без цензура“, с която достига до мандат в европарламента. Бареков е може би най-яркият пример за употребата на медия като политически трамплин. По-късно сам заявява: „Аз помогнах на Пеевски да разврати медиите“ – самопризнание, което независимо от мотивацията илюстрира дълбочината на проблема.

Интересното е, че по пътя си Бареков успява да приласкае и друг влиятелен за времето си телевизионен журналист – Росен Петров, който обръща палачинката на живо в ефира на bTV. По време на интервюто си с политика Бареков в предаването си „Нека говорят“ на 9 февруари 2014 г. водещият Петров подарява на госта си своята офицерска сабя и му се врича във вярност в ефир, като напуска телевизията с изчитане на нарочна декларация, за да се влее в редиците на Барековата партия. Без цензура. Един от най-срамните моменти, записани от камера в най-новата ни телевизионна история, е все още достъпен в интернет, макар и не на страницата на bTV, насладете се. 

Списъкът продължавa с Елена Йончева, Тома Томов, водещите от Nova Калина Крумова (започнала кариерата си от СКАТ) и Цвета Кирилова, Александър Симов и така до Антон Хекимян и Петър Волгин. През 2023 bTV поне от кумова срама изпрати Хекимян на партийна служба, приемайки оставката му с „незабавен ефект“ и демонстрирайки престорена институционална чувствителност към репутационния риск.

За да гаси имиджовия пожар тогава, телевизията обеща външен мониторинг на обективността на новините и актуалните предавания. Не се чу какво е установила тази проверка. Макар другата проверка – публичната, Хекимян системно да не издържаше години преди това, утвърждавайки се като предпочитан интервюиращ на Бойко Борисов, който в най-мрачните времена на брутално политическо превземане на прокуратурата започваше интервютата си с главния прокурор Цацаров с въпроса какво значи името Сотир (значи „спасител“) и с покана да сподели кого последно бил спасил от кабинета си в Съдебната палата. Това само му вдигна цената до шеф на новините и неуспял кандидат-кмет на ГЕРБ. 

И така до днес, когато никой не се скандализира при прескачането на шефовете на медии в политиката. Няма нужда да се правят проверки наужким, нито да се мятат оставки. Просто си пускаш неплатен. Така Кирил Вълчев е и възможен, и направо закономерен кандидат за вицепрезидент, а в инициативните комитети се прескачат журналист през журналиста – от Константин Вълков при Андрей Гюров, до Валерия Велева, Кристина Патрашкова и Явор Дачков при Илияна Йотова. 

Има за всички. Хубаво е, и е готово

Хубавото е, че става видимо. Журналисти с двойно предназначение се самоосветяват, заемайки видими публични позиции. Тази прозрачност, макар да убива доверието в професията, все пак е и малко полезна. Защото вдига завесата пред тези авторитети под прикритие. Разбира се, не бива да сме наивни – със сигурност се отглеждат приемливи фасади от ново поколение. А и границата отдавна е твърде размита. 

Да, между журналистиката и политическата власт трябва да има защитна стена. 

За съжаление, все по-често тя прилича на въртяща се врата. Съвсем нормализирана е вече практиката действащи журналисти да предлагат медийни обучения и консултантски PR услуги – и на корпоративни, и на партийни клиенти. Защо пък да не водят направо и собствените си кампании от студиата на новините!

Къде е границата? 

Журналистите, разбира се, могат и е нормално да бъдат политически хора – с убеждения, с позиция, с обществен ангажимент. Безпристрастността не означава безразличие. Границата минава другаде – 

да не злоупотребяваш с капитала на собственото си доверие. Да не го търгуваш, да не го превръщаш в разменна монета за пост или привилегия. 

Журналистите имат право на гражданска активност, дори и на граждански протест – защото това е лична позиция. Не злоупотреба или тайно превалутирано доверие в полза на кампания или на конкретен политически интерес. Стандартът за конфликт на интереси и недопускане на пристрастност е описан ясно и с примери в принципите на Associated Press – световния аналог на БТА, с който родната агенционна журналистика иначе обича да се сравнява:

От служителите в редакцията се очаква стриктно да избягват всякаква политическа дейност, независимо дали редовно отразяват политика, или не. Те не могат да се кандидатират за политически длъжности или да приемат политически назначения, нито да извършват дейност по връзки с обществеността за политици или техни организации. При никакви обстоятелства не бива да даряват средства на политически организации или за политически кампании. Те трябва да преценяват особено внимателно дали да членуват, или да правят дарения в други организации, които могат да заемат политически позиции.

Дори служителите извън редакцията – разбирайте счетоводители, шофьори и юрисконсулти, трябва да се въздържат от политическа дейност и от дарения, освен ако не получат одобрение от прекия си ръководител. Ограничения има даже за членовете на техните семейства, чиито политически каузи и ангажименти също подлежат на публично деклариране. 

Разбира се, преквалификацията на журналисти в политици не е само роден феномен – справка: от Мусолини, през Уинстън Чърчил, до Борис Джонсън. Но и тук има нюанс и той е в наличието на т.нар. охлаждащ период. 

Има ли кой да ги накаже? За забранителните списъци в bTV и кебапчетата в медиите

Имало едно време един Асен. Вървял, вървял през девет телевизии в десета и попаднал в bTV, където решил, че ще е „яли, пили и се веселили“, докато той каже и само с когото той прецени. Извинявайте, но няма нищо приказно в тази история. От Дарина Сарелска.

Липса на „охлаждащ период“ 

Според етичните стандарти в много страни, когато журналист става политик, се изисква, или поне силно се препоръчва, пауза между двете роли, за да не се компрометира доверието в медиите. Нали заради това доверие се търсят подобни кандидати все пак?! Не е много умно да се реже клонът, на който седиш. 

Така преходът е плавен и бившите журналисти стават политици обикновено след като вече са изградили партийна кариера (говорители, съветници, експерти). Такъв е примерът и на самата Илияна Йотова, която е доста последователна в кариерната си траектория: започва като репортер, налага се като разпознаваемо лице в БНТ, после оставя журналистиката зад гърба си, заема се с комуникациите на БСП, откъдето бавно, полека и отвътре изгражда партийна кариера, за да стигне днес до президент. Това е класическият и по-приемлив път. При Вълчев и при повечето български примери преходът изглежда рязък: от днес за утре. Без междинни стъпки в партийната йерархия или време за хигиенна дистанция. Нещо като да вдигнеш сватба, преди комшиите да са разбрали, че си се развел.

Но да се върнем към (само)признанието на Кирил Вълчев: 

Приемам поканата на президента като признание не за мен, а за БТА – институция на съгласие, на общуване с българите по света, на памет, нещо, от което има нужда в Президентството.

А Илияна Йотова допълва: 

Дълги години имаме обща кауза с господин Вълчев. Работихме заедно за тази кауза – за опазване на българщината, за развитието на българската идентичност, на българския дух, на българската писменост, на буквите.

Да, от такава БТА има нужда Президентството. От такива медии имат нужда всички овластени. Институции на дългогодишното съгласие. Медии, тихи за злоупотребите на властта и споделящи шумно нейните каузи – днес буквите и българщината на „Прогресивна България“, вчера евроатлантизмът ала ГЕРБ и ДПС – Ново начало, утре – каквото нуждата покаже. Стига да е споделена. 

Good night, and good luck, motherf*ckers

Историята на американското предаване „60 минути“ е разказ за механизмите, чрез които се опитомяват медиите. И тези механизми са удивително сходни, независимо от пазара или знамето пред сградата на телевизията. Един текст в стил „Думам ти, дъще, сещай се, журналистическа снахо“ от Дарина Сарелска.

А журналистиката – тя отдавна е пратена в отпуск. Обикновено платен. Така стигаме до реалността, в която нищо не е вярно и всичко е възможно. Времена, в които всеки, който има YouTube канал, се пише журналист. Всеки, който е натрупал два грама доверие като журналист, може да го капитализира за политически пост. Всеки новоизлюпен политик може да привижда в собствените си котерии обществения интерес, обяснявайки ни как „работи за хората“. А пък хората гледат „Ергенът“. Може би там някъде е бъдещият спасител. 

AIs Compress Exploit Timeline

Post Syndicated from Bruce Schneier original https://www.schneier.com/blog/archives/2026/09/ais-compress-exploit-timeline.html

Give an AI agent a mere rumor of an exploit, and it’s enough for them to find it.

What’s worse, I found I could use my own agents to find the exploit just by knowing roughly what it was about and so could have been exploiting it well before the public patch was available! Given that just the rumour of a security issue seems enough to give attackers enough info to find new exploits, we’re going to need to change the way we deal with security responses in open source.

Simon Willison comments:

Anil points out that this rate of discovery appears incompatible with existing open source embargo practices for new issues. If an issue can become an exploit this fast, we need to figure out new processes for keeping our communities safe.

Президентски избори 2026 – заявление за гласуване

Post Syndicated from Боян Юруков original https://yurukov.net/blog/2026/pres2026-zayavlenie/

Тази информация беше изпратена на над 3000 абонирали се за бюлетина на Glasvam.org заедно с новини и полезни съвети за подготовката и провеждането на гласуването в чужбина.


На 25-ти октомври 2026 ще се проведат избори за президент и вицепрезидент. Вече може да подавате заявление за гласуване зад граница. Ще намерите формуляра на страницата на ЦИК. Там може да проверите и дали правилно е записано заявлението ви. Ето няколко важни неща, които трябва да знаете:

  • Крайният срок за подаване е 29-ти септември в полунощ българско време
  • Подаването на заявление за гласуване в секцията най-близо до Вас, ще Ви улесни и ще ускори изборния процес, тъй като ще сте вече вписани в списъците
  • Заявление се подава за всеки вот поотделно. Т.е. не се пренасят от предходни избори
  • Дори да подадете заявление, а се окаже, че на 25-ти октомври сте в България, ще може да гласувате в секцията си по постоянен адрес с попълване на декларация
  • Вече са предварително одобрени 362 места за секции в чужбина, където в последните 5 години е имало поне 100 гласували. Те са в 293 града в 57 държави. Това е значително по-малко от предишни години, тъй като автоматичното одобрение на секции по чл. 14, ал. 2, т. 2 беше ограничено до рамките на Европейския съюз. По-малко е дори от преходните, където бяха силно ограничени секциите в чужбина.
  • За отваряне на секции извън Европейския съюз остава единствено възможността да се съберат поне 40 заявления и след преценка на дипломатическите представителства. През 2026 г. поне отпаднаха ограниченията за броя секции извън ЕС, което засягаше основно Великобритания, Турция и САЩ. Това означава, че подаването на заявление е още по-важно от предходни години.
  • Автоматичното одобрение и събраните заявления не означава, че непременно ще има секции на тези места. Това зависи от възможностите на помещенията и дали има комисии и доброволци към тях. Решението е на ЦИК по препоръка на Външно. Могат да се увеличат шансовете като се подават заявления за тези места и повече хора се включат като членове на комисии и доброволци.
  • На някои места като Германия е нужно да се иска разрешение от местните власти. Това вече би трябвало да се случва предвид предварително одобрените места. Очакваме информация от МВнР
  • Подаването на заявления освен, че подпомага изборния процес, показва и повишен интерес на съгражданите ни в чужбина към вота

В началото на 2026 г. трябваше да се въведе избирателен район Чужбина с 4 депутата, които щяха да представляват единствено българските граждани зад граница. Тази възможност обаче беше отложена отново до януари 2028-ма в последния момент преди парламентарните избори в началото на годината. Повече по темата описах преди предишния вот.

Събирането на заявленията ще може да следите в реално време на картата, както и на подробната таблица. Възможно е автоматичното зареждане на данните да спре заради промени по сайта на ЦИК, каквито случаи имаше в последните години. Ще допълня, ако има промяна.

Customize Amazon API Gateway destinations for execution logs

Post Syndicated from Giedrius Praspaliauskas original https://aws.amazon.com/blogs/compute/customize-amazon-api-gateway-destinations-for-execution-logs/

Amazon API Gateway execution logs help you trace request processing step by step through your REST API stages. They capture authorization results, integration latency, mapping template output, and error details that are otherwise invisible at the API surface. When a production request fails in a way the access log cannot explain, the execution log is usually where you find the explanation.

Until now, execution logs had two constraints. Every log event was truncated at 1 KB, so a request carrying a moderately sized JSON body would exceed that limit and the remainder was dropped. Logs could only go to the auto-managed log group that API Gateway creates for you (API-Gateway-Execution-Logs_{rest-api-id}/{stage_name}).

With Amazon CloudWatch Logs delivery for REST API execution logs, you can now route execution logs to Amazon CloudWatch Logs, Amazon Simple Storage Service (Amazon S3), or Amazon Data Firehose. Log events can be up to 1 MB per entry, and you benefit from vended logs pricing.

In this post, you learn how CloudWatch Logs delivery works with API Gateway execution logs, how to configure it, and what patterns work best for common observability scenarios.

Understanding API Gateway execution logs

API Gateway produces two categories of logs: access logs and execution logs. Access logs record a summary line per request, similar to an HTTP server access log. You configure the format and destination yourself.

Execution logs are different. They capture the internal processing of each request as it moves through the API Gateway pipeline: authorizer evaluation, request validation, integration dispatch, response mapping, and error handling. These logs exist so you can answer questions such as “why did my authorizer reject this token?” or “what did the mapping template produce before it reached my backend integration?”

API Gateway manages execution log creation automatically. When you set loggingLevel to INFO or ERROR in your stage’s method settings, the service writes execution log events to a CloudWatch Logs log group it manages on your behalf. You do not choose the log group name or configure retention directly on it.

The auto-managed model works for many customers but may create friction for teams with specific observability requirements. Compliance frameworks that require logs in S3 with a particular prefix structure need an extra subscription filter and delivery mechanism. Sending execution logs into a security information and event management (SIEM) tool through a Firehose stream requires a forwarding layer.

Configurable log delivery with CloudWatch Logs

CloudWatch Logs delivery separates log routing from log content. Two concepts control the behavior:

DeliverySource is scoped to your API Gateway stage ARN. It defines where logs go. You create a delivery source, then attach one or more delivery destinations (CloudWatch Logs log group, S3 bucket, or Firehose stream).

MethodSettings controls what gets logged. The loggingLevel setting (INFO, ERROR, or OFF) and dataTraceEnabled flag still determine which log events API Gateway produces. These settings work the same way regardless of whether you use the auto-managed log group or CloudWatch Logs delivery.

When you create a delivery using the CloudWatch Logs APIs, CloudWatch Logs activates your log delivery on your API Gateway stage. When you delete the delivery, CloudWatch Logs disables it accordingly. You do not need to flip any flags on the API Gateway side, and the execution logs automatically resume flowing to the auto-managed log group.

Your existing method settings keep their meaning. The loggingLevel and dataTraceEnabled values continue to control log content. If loggingLevel is already INFO or ERROR, creating a delivery redirects those logs to your chosen destination with no further configuration.

The following diagram shows how the pieces fit together.

Diagram showing one API Gateway stage delivery source fanning out to CloudWatch Logs, Amazon S3, and Firehose destinations.

Figure 1 — A single delivery source scoped to an API Gateway stage feeds one or more deliveries, each of which writes to a delivery destination backed by CloudWatch Logs, Amazon S3, or Amazon Data Firehose

The following table summarizes what changes when log delivery is active.

Aspect Standard execution logging Log delivery
Destination Auto-managed CloudWatch Logs log group CloudWatch Logs, Amazon S3, or Firehose
Multi-destination No Yes
Pricing Standard CloudWatch Logs ingestion Vended logs pricing
Log event size Truncated at 1 KB Up to 1 MB
Setup Set loggingLevel in MethodSettings Create delivery through CloudWatch Logs APIs
Teardown Set loggingLevel to OFF Delete delivery

What stays the same

Only execution log routing changes. Access logs continue to flow through accessLogSettings to whatever log group you configure, and unrelated stage features such as AWS X-Ray tracing, detailed CloudWatch metrics, throttling, and caching behave exactly as they did before.

Configuration and integration options

Before you create a delivery, confirm the following requirements:

  • The API Gateway REST API is deployed to a stage.
  • loggingLevel is set to INFO or ERROR in MethodSettings.
  • The account-level CloudWatch Logs IAM role is configured. For setup steps, see Set up CloudWatch logging for REST APIs in API Gateway.
  • For cross-account delivery, the destination has an appropriate resource policy attached through PutDeliveryDestinationPolicy.

Sending logs to a custom CloudWatch Logs log group

The most common starting point is redirecting execution logs to a log group you own. You get direct control over retention policies, metric filters, and subscription filters. The following steps use the AWS Command Line Interface (AWS CLI) with the fictitious REST API ID abc123, stage prod, Region us-east-1, and account 111122223333.

  1. Create a delivery source referencing your stage ARN. The log type for REST API execution logs is EXECUTION_LOGS:
    aws logs put-delivery-source \
        --name my-apigw-execution-logs \
        --resource-arn arn:aws:apigateway:us-east-1:111122223333:/restapis/abc123/stages/prod \
        --log-type EXECUTION_LOGS

  2. Create a delivery destination pointing to your custom (existing) log group, then create the delivery that connects them:
    aws logs put-delivery-destination \
        --name my-execution-log-destination \
        --delivery-destination-configuration \
            destinationResourceArn=arn:aws:logs:us-east-1:111122223333:log-group:/my-api/execution-logs

    aws logs create-delivery \
        --delivery-source-name my-apigw-execution-logs \
        --delivery-destination-arn arn:aws:logs:us-east-1:111122223333:delivery-destination:my-execution-log-destination

  3. Verify that the delivery is active by listing deliveries for the source:
    aws logs describe-deliveries

The response includes the delivery ID, source, and destination ARN after delivery is established. Execution logs flow to /my-api/execution-logs instead of the auto-managed group.

Note: Log delivery adds structured fields (resource_arn, event_timestamp, api_id, stage, resource_path, http_method, and payload) to each event, so a new delivery emits more than your previous logs. To keep the traditional execution log format with nothing extra, set output format and record fields while creating delivery destination and creating delivery:

aws logs put-delivery-destination \
    --output-format "plain" ...

aws logs create-delivery \
    --record-fields "payload" \
    --field-delimiter "" ...

Routing logs to Amazon S3

S3 works well for long-term retention at lower cost, or for feeding logs into analytics tools such as Amazon Athena. The bucket must be in the same region as your API. Create a delivery destination pointing to your bucket:

aws logs put-delivery-destination \
    --name s3-archive-destination \
    --delivery-destination-configuration \
        destinationResourceArn=arn:aws:s3:::amzn-s3-demo-apigw-logs

Then create a delivery using the same source name. CloudWatch Logs delivers the events to your bucket, where you can query them with Athena or catalog them with AWS Glue.

Streaming to Amazon Data Firehose

For real-time analytics pipelines or third-party SIEM integration, Firehose delivery sends execution log events directly to your stream. The setup is identical: create a delivery destination with your Firehose stream ARN, then create a delivery. With direct Firehose delivery, you no longer need to maintain CloudWatch Logs subscription filters and AWS Lambda forwarders to route execution logs to external analytics systems.

Multi-destination delivery and per-destination shaping

A single delivery source supports multiple destinations. You can route the same execution logs to CloudWatch Logs for real-time alerting, S3 for long-term compliance retention, and Firehose for your SIEM, all from one stage. Create additional deliveries using the same delivery source with different destination ARNs.

Each destination receives identical log events. To shape what reaches each destination, apply a CloudWatch Logs subscription filter on the CloudWatch Logs destination. For example, you can forward only ERROR-level events to a Lambda function that pushes alerts to a SIEM, while the same delivery source writes the full event stream to S3 for compliance.

Management console experience

You can also add a log delivery destination in the management console after you enable logging for the stage.

API Gateway console showing the option to add a log delivery destination after logging is enabled for the stage.

You can specify multiple destinations, both in the current or in a different account:

API Gateway console showing multiple delivery destinations configured, including cross-account options.

Keeping existing monitoring intact

If you have dashboards or alarms on the auto-managed log group, use that same log group as one of your delivery destinations. Your existing monitoring keeps working, and you gain the ability to send logs to additional destinations such as S3 or Firehose in parallel.

Best practices

Update dashboards and alarms before enabling log delivery. When you activate log delivery, the auto-managed log group stops receiving logs. Any CloudWatch alarms, dashboards, or Contributor Insights rules pointing to API-Gateway-Execution-Logs_{rest-api-id}/{stage_name} stop working. Migrate these references to your new log group before creating the delivery.

Keep loggingLevel at INFO or ERROR. Log delivery controls routing, not content. If loggingLevel is OFF, no execution log events are produced regardless of whether a delivery exists. Verify your method settings before troubleshooting missing logs.

Treat the 1 MB log event capacity as a security decision, not only a debugging convenience. With dataTraceEnabled set to true, execution logs include complete request and response payloads up to 1 MB. Those payloads might contain personally identifiable information (PII) or other sensitive data. Confirm your log destinations have appropriate access controls, encryption, and retention policies. Mask or filter sensitive fields in mapping templates upstream of logging and enable data tracing selectively per method or only in non-production stages.

Start with a single destination, then expand. Validate that your log group or bucket receives events correctly before adding Firehose or additional destinations.

Log delivery is best-effort. In rare cases, some log events might not be delivered. For audit-critical workloads, build retention and reconciliation that account for occasional missing events rather than treating execution logs as the system of record.

Cleaning up

To avoid ongoing charges from the resources you created while following this post, delete the delivery and then remove the destinations and any example S3 bucket or Data Firehose delivery stream you no longer need. Deleting the delivery returns the stage to standard auto-managed logging.

aws logs delete-delivery --id <delivery-id>

When the delivery is deleted, CloudWatch Logs disables log delivery on the API Gateway stage automatically. The delivery source and delivery destination remain as independent objects. Delete them with delete-delivery-source and delete-delivery-destination if you do not plan to reuse them.

Conclusion

CloudWatch Logs delivery for API Gateway REST API execution logs helps address the 1 KB event truncation and single managed destination constraints. You can now route full execution logs to CloudWatch Logs, Amazon S3, or Amazon Data Firehose, use multiple destinations from a single stage, and pay vended logs pricing.

The feature works alongside existing method settings. No changes to your current logging configuration are required beyond creating the delivery itself.

To get started, refer to Route execution logs with Amazon CloudWatch Logs delivery in the API Gateway documentation. For more about CloudWatch Logs delivery configuration, see Enable logging from AWS services. For pricing details, review the Amazon CloudWatch pricing page. Try it on a test stage and share your experience in the comments.

Introducing Amazon EBS Volume Clones across AWS accounts

Post Syndicated from Channy Yun (윤석찬) original https://aws.amazon.com/blogs/aws/introducing-amazon-ebs-volume-clones-across-aws-accounts/

Last year, we introduced Volume Clones of Amazon Elastic Block Store (Amazon EBS), a new capability that lets you create instant point-in-time copies of your EBS volumes within the same Availability Zone.

Today, we are extending Volume Clones with cross-account copy, so you can create copies of your EBS volumes into other AWS accounts and optionally re-encrypt them with an AWS Key Management Service (AWS KMS) key in the target account.

With this new feature, you can use your latest application data to develop, test, and experiment in a secondary environment, while protecting and isolating the information in the production environment. For example, you can create copies of a production environment to refresh test and development environments set up in separate accounts with the desired EBS encryption.

Copy EBS volumes across AWS accounts in action
To create a copy of an EBS volume across accounts, the owners of the volume can first grant the target account access to their volume in AWS Resource Access Manager (RAM), which provides a way to share resources across AWS accounts or within an AWS Organization. Then, from the target account, they can locate the volume they have access to create a copy of it.

To get started, choose Share volume for the volume you want to share with the target account in the Amazon EBS console.

Share the volume with other AWS accounts by adding it to existing resource shares, or create a new resource share in the AWS RAM console. For more details, refer to the AWS RAM User Guide.

You can now see confirmation that the volume has been shared in the Volume sharing tab of the volume detail page.

A target account must accept the resource share on the RAM console.

Once they accept the resource share, they can see the volumes in the EBS volume page of the target account. Choose Copy volume for any shared volume.

To share and copy EBS volumes across AWS accounts programmatically, including calling APIs and searching documentation, try the AWS MCP Server and plugins with your preferred AI coding tool. To learn more, visit the Amazon EBS User Guide.

Things to know
Let me share some important technical details that I think you’ll find useful.

  • Encryption: You can share unencrypted volumes and volumes encrypted with a customer managed key (CMK). Volumes encrypted with the default AWS managed key (AMK) cannot be shared. When copying a shared volume encrypted with a CMK, the CMK must also be shared with the target account. You can specify a different CMK to re-encrypt the copy in the target account.
  • Monitoring: You can monitor SharedVolumeCopyInitiated through AWS CloudTrail event in your account. You will also receive events in Amazon EventBridge at the start of the copy operation when the state of the copied volume is initializing, and at the end of the operation when the state of the copied volume changes to completed. You can see the shared volume ID, consuming account ID, and event time.
  • Pricing: Once a copy is initiated, you’ll pay a one-time fee based on your volume size, charged to the account where the copy will reside. There’s no cost for sharing EBS volumes through AWS RAM. The copied volume will incur regular EBS volume charges upon creation.
  • Availability Zone: The volume copy must be created in the same Availability Zone as the source volume. Use Availability Zone IDs (such as use1-az1) to identify the same physical location across accounts.

Now available
Cross-account volume clones for Amazon EBS are available in all AWS Regions that support Amazon EBS Volume Clones. For Regional availability and a future roadmap, visit the AWS Capabilities by Region.

Give this feature a try in the Amazon EC2 console today and send feedback to AWS re:Post for Amazon EBS or through your usual AWS Support contacts.

— Channy

The collective thoughts of the interwebz