Rapid7’s Impact from OpenSSL Buffer Overflow Vulnerabilities (CVE-2022-3786 & CVE-2022-3602)

Post Syndicated from Rapid7 original https://blog.rapid7.com/2022/11/11/rapid7s-impact-from-openssl-buffer-overflow-vulnerabilities-cve-2022-3786-cve-2022-3602/

Rapid7’s Impact from OpenSSL Buffer Overflow Vulnerabilities (CVE-2022-3786 & CVE-2022-3602)

As stated in our OpenSSL Buffer Overflow blog post, the CVE-2022-3786 & CVE-2022-3602 vulnerabilities affecting OpenSSL’s 3.0.x versions both rely on a maliciously crafted email address in a certificate. CVE-2022-3786 can overflow an arbitrary number of bytes on the stack with the “.” character (a period), leading to a denial of service, while CVE-2022-3602 allows a crafted email address to overflow exactly four attacker-controlled bytes on the stack. OpenSSL 3.0.7 contains fixes for these vulnerabilities which was released on November 1, 2022.

As part of standard due diligence, Rapid7 evaluates the potential impact of vulnerabilities in its products. This process includes validating the existence of the vulnerable libraries or services, interdependencies, the exploitability of the vulnerability in a given context, and impacts related to applying available patches.

Rapid7’s Insight Agent and Insight Network Sensor were confirmed to be impacted by these vulnerabilities. An Insight Agent fix was released on November 2, 2022 (release version 3.1.10.34) and a Network Sensor fix was released on November 10, 2022 (release version 1.4.0.2). Rapid7’s assessment has found no other impact on our products. Checks for these vulnerabilities have been released within Nexpose and InsightVM.

NSA Over-surveillance

Post Syndicated from Bruce Schneier original https://www.schneier.com/blog/archives/2022/11/nsa-over-surveillance.html

Here in 2022, we have a newly declassified 2016 Inspector General report—”Misuse of Sigint Systems”—about a 2013 NSA program that resulted in the unauthorized (that is, illegal) targeting of Americans.

Given all we learned from Edward Snowden, this feels like a minor coda. There’s nothing really interesting in the IG document, which is heavily redacted.

News story.

EDITED TO ADD (11/14): Non-paywalled copy of the Bloomberg link.

What’s Up, Home? – Measure Real-Time Power Consumption

Post Syndicated from Janne Pikkarainen original https://blog.zabbix.com/whats-up-home-measure-real-time-power-consumption/24479/

Can you monitor Finland’s total real-time power consumption with Zabbix? Of course, you can! By day, I am a monitoring tech lead in a global cyber security company. By night, I monitor my home with Zabbix & Grafana and do some weird experiments with them. Welcome to my blog about this project.

After my speech at the Zabbix Summit 2022, someone asked how deeply my wife is involved with this home monitoring project, and I responded back that she usually gives me ideas by accident. You know, she’s a funny and talkative person up to the point that I call her the comment track or the voice-over of my life, so even as a non-techie, she will for sure give me new ideas.

Well, this time she gave the idea for this post on purpose — now that winter and the dark days & nights are approaching fast, she asked if Zabbix could turn our decorative seasonal lights on and off based on the current electricity price.

Of course, it can! I am anyway already monitoring the current electricity price. But let’s take it further — using Zabbix, we can also check Finland’s current real-time power consumption. It would be kind NOT to turn on the lights even during the cheap hours if our power grid would be near its maximum limit.

Hello, Fingrid

Our electricity network Fingrid offers open data for all kinds of details about our power grid, one of them being the current electricity consumption. Using their services is free, all you need is to create an account to get an API key, so I tried if I can use the API with Zabbix. Well, Zabbix integration was easy, though, due to the time constraints set by our now-10-weeks-old-baby, this current version is a bit of a kludge and not yet finished. But hey, I have this blog to write!

So, after getting my API key, I created a new HTTP agent item to my Zabbix and did parse it with Zabbix JSONPath for the value.

No alt text provided for this image

Why the regular expression? The value was not returned in pure numeric format, and I know it must be just my JSONPath expression that has something wrong, but to get this working today, I just brute-forced the extra characters away. I’ll fix that one day. Maybe. The most important for now is that this works; the values shown are in megawatts.

No alt text provided for this image
What’s next?

Now that the groundwork has been done, albeit in an ugly way, in the near future (when we actually install the seasonal lights), I can start controlling them via smart power sockets and smart lights. Thanks to the total flexibility of Zabbix, I can then create triggers such as turn on seasonal lights if electricity cost is maximum of X EUR/kWh AND Finland’s power grid total consumption is not more than Y MWh AND time of day is something when we would be awake (we would turn the lights off during the graveyard hours in any case).

I have some additional research to do; I’m sure I can find out Finland’s total power grid capacity from somewhere, maybe even via Fingrid API (I first tried it about one hour ago). But, as this winter is going to be totally different than our usual winters, Zabbix can help you in this area, too.

I have been working at Forcepoint since 2014 and just like a small part of Forcepoint’s logo, I’m trying to be green as well. — Janne Pikkarainen

This post was originally published on the author’s LinkedIn account.

The post What’s Up, Home? – Measure Real-Time Power Consumption appeared first on Zabbix Blog.

Десет електронни законопроекта

Post Syndicated from Bozho original https://blog.bozho.net/blog/3975

От началото на 48-мото Народното събрание от Демократична България внесохме няколко законопроекта, които са свързани с електронното управление и информационните технологии. Тук ще направя кратък списък с описание на проектите (ЗИД значи Закона за изменение и допълнение, а ЗД е закон за допълнение):

  1. ЗИД на Закона за електронното управление – този закон го писахме с екипа ми в Министерство на електронното управление. Той урежда мерки по Плана за възстановяване и устойчивост, отпадането на удостоверенията (на които гражданите са куриери в момента) и на задължението за ползване на квалифициран електронен подпис. Въвежда пълна електронизация на регистрите, електронно връчване на актове и фишове, напомняне за изтичащи документи и др.
  2. ЗИД на Закона за движението по пътищата. Първата цел на проекта е да направим стъпки към ограничаване на рецидивистите на пътя. С пълното разбиране, че е нужна пълна реформа на административното наказване, предлагаме две неща: от една страна, задължение за МВР да спира на пътя всички автомобили, чиито собственици имат пет или повече невръчени фиша, а от друга страна задължение за публикуване на индивидуални анонимизирани данни за всички нарушения (което бях поискал от МВР като министър). Така обществото ще следи дали МВР изпълнява задължението си. Втората цел е намаляване на административната тежест и улесняване на добросъвестните водачи. Премахване на всички стикери от предното стъкло, премахване на синия талон и въвеждане на възможност за електронно плащане на фишове, без да ходим до КАТ да ни ги връчат. Затрудняваме редовните нарушители и улесняваме мнозинството добросъвестни. И повишаваме прозрачността на работата на МВР.
  3. ЗД на Закона за обществените поръчки – целта е да се постигне максимална прозрачност и с който да се прекратят схемите с т.нар. „инженеринг“. Въвежда се задължение за публикуване на отворени данни по международен стандарт (Open contracting data standard), публикуване на договорите, които са сключени без проведени процедури (защото са изключения по закон), публикуване на заявки по рамкови договори, както и разкриване на принадлежност към ДС на членове на органите на фирми, които печелят над половин милион от обществени поръчки.
  4. ЗИД на Закона за корпоративното подоходно облагане – въвеждане на електронни ваучери за храна. Нещо толкова просто (на пръв поглед), което се „точи“ като тема от 2015 г, най-накрая намира законодателно изражение
  5. ЗД на Изборния кодекс – предвиждаме достъп до кода без ограничение във времето, публичен план за провеждане на изборите, извадкови проверки и задължително публикуване на криптографска информация. Така ще се елиминират опорките за ‘пипане’ на машини, а процесът ще е по-добре планиран, предвидим и вдъхващ повече доверие.
  6. ЗИД на Гражданския процесуален кодекс – въвежда се електронно заповедно производство, като това е инструмент за облекчаване работата на свръхнатоварените съдилища, за сметка на ненатоварените.
  7. ЗИД на Търговския закон – освен създаване на изцяло нов вид дружество с променлив капитал, подходящ за стартиращи компании, набиращи инвестиции, предвиждаме и отпадане на спесимена на подписа при регистрация на дружество за български граждани (вместо това той да се извлича от МВР).
  8. Закон за защита на лицата, подаващи сигнали или публично оповестяващи информация за нарушения – законопроектът предвижда цялостна уредба на защитата на лицата, подаващи сигнали (whistleblowers), но в конкретния случай на сигнали за корупция, предвиждаме полу-анонимни сигнали – предлагаме сигналите да се анонимизират в момента на подаване по електронен път, с криптографски средства, като антикорупционната комисия да не може да вижда кой е подател, но данните да могат да се деанонимизират от съда, ако е нужно завеждане на дело за вреди.
  9. ЗИД на Закона за юридическите лица с нестопанска цел – предвижда нещо дребно, но улесняващо голям брой неправителствени организации – провеждане на заседания по електронен път на управителните им органи.
  10. ЗД на Закона за електронната търговия – въвеждаме мерки, с които големите онлайн платформи (напр. Фейсбук) да ограничат ефектна на троловете (фалшивите акаунти, които се използват с пропагандна цел), да са по-прозрачни с това кой извършва модерацията и да позволят обжалване на некоректно блокиране на профили. Т.е. на практика увеличаваме защитата на свободата на словото с процес по извънсъдебно обжалване, като същевременно не позволяваме удавянето на свободното слово в море от пропаганда.

Има още много закони, които имат нужда от осъвременяване. Съвесем скоро ще внесем изменения в Кодекса на труда за въвеждане на електронна трудова книжка, например. Но смятам, че с тази законодателна програма, облекчаваме гражданите и бизнеса, модернизираме администрацията и правим разходването на публични средства по-прозрачно.

Материалът Десет електронни законопроекта е публикуван за пръв път на БЛОГодаря.

Войната – продължение на вътрешната политика с други средства

Post Syndicated from Александър Нуцов original https://toest.bg/voynata-produlzhenie-na-vutreshnata-politika/

Путин – това е Русия. Има Путин – има Русия; няма Путин – няма Русия.

Думите са изречени през 2014 г. от водещия идеолог на Кремъл и настоящ председател на руската Дума Вячеслав Володин.

Според руския журналист и опозиционер Михаил Зигар пък Путин „не съществува“. В книгата си „Владимир Путин. Неизбежните войни“ от 2015 г. Зигар проследява част от най-съществените събития от политическата му кариера и влиянието им върху властовата динамика в Русия. Авторът защитава тезата, че различните политически и олигархични кръгове, с които Путин се заобикаля, доизграждат идеите и образа му, проектирайки собствените си политически възгледи върху него.

„Колективният Путин“, както го нарича Зигар, умело лавира между тях. Като наследник на президента Борис Елцин първо попада сред хора от семейството и най-близкото му обкръжение, включително сред олигарси като Борис Березовски, Роман Абрамович и Олег Дерипаска. Избраникът наследява шефа на Елциновата администрация – Александър Волошин, който се превръща и в негов водещ съветник през първите години на управление. Бореща се за вниманието на Путин е и групата на т.нар. силоваци, които се противопоставят на либералните кръгове и контролират силовите структури или важни административни постове – например Игор Сечин и Николай Патрушев. А най-близките му политици днес в лицето на външния министър Сергей Лавров и министъра на отбраната Сергей Шойгу го съпровождат от началните етапи на политическата му кариера в Москва.

Според Зигар Путин има несравнимо индивидуално влияние в процеса по вземане на решения, но те са съобразени с „колективния Путин“, тоест с амалгамата от мнения, влияния и интереси на кръговете около президента. Въпросът дали (не)формалните властови центрове влияят на президента по-скоро хаотично, с оглед на променящите се политически обстоятелства, или той преднамерено ги инструментализира за постигане на определени цели, няма еднозначен отговор. Факт е обаче, че той нееднократно променя възгледите и политиките си, докато съсредоточава властта в собствените си ръце.

Кратка хронология на единовластието

Встъпвайки в длъжност като наследник на Елцин, Путин се сблъсква с Втората чеченска война. Първоначално тя го популяризира сред руското общество, но неблагоприятните последици продължават дълго след края ѝ. На 1 септември 2004 г. терористична група от чеченски сепаратисти щурмува училище в град Беслан, Северна Осетия, вземайки над 1000 заложници, а последвалото масово избиване на цивилни и деца коренно променя руската политическа система.

В отговор на случилото се Путин инициира законови промени, засягащи изборите за губернатори в съставните части на федерацията. От този момент общественото гласуване в съответните юрисдикции е премахнато, а губернаторите се посочват директно от президента, за да бъдат одобрени от местните парламенти впоследствие. Това на практика осигурява на Путин контрол върху Съвета на федерацията (горната камара), докато партията му „Единна Русия“ налага надмощието си в Държавната дума (долната камара).

Втората голяма стъпка към централизация е осъществена през 2007 г. под въздействието на дясната ръка на Путин по онова време – Владислав Сурков. Действащата дотогава смесена избирателна система, според която половината от депутатите в Думата се избират пропорционално, а другата половина – мажоритарно, е отменена. Гласуването оттук нататък ще се извършва на пропорционален принцип и изцяло по партийни листи, което де факто изключва възможността независими кандидати, критични към Кремъл, да влязат в парламента. Заедно с това се ограничава броят на партиите и се затягат критериите за тяхната регистрация, което според Зигар облагодетелства единствено „Единна Русия“.

Третата значима крачка към своеобразно единовластие настъпва през 2020 г., когато Путин инициира промени в Конституцията след провеждане на всеобщ референдум. Президентските мандати на кандидатите се ограничават до максимум два. Уловката тук е, че този закон не влиза в сила за самия Путин, тъй като след одобрението от Конституционния съд досегашните му четири мандата на практика се нулират. Това му позволява да се кандидатира още два пъти и да остане на власт до 2036 г.

Претендентите за поста пък трябва да са живели в Русия през последните 25 години, което лишава много от потенциалните му съперници (като например Алексей Навални) от правото да участват в надпреварата. Освен това президентът получава правото да стартира процедури по освобождаване на конституционни и върховни съдии. В комбинация с увеличените си правомощия да определя и отстранява ръководителите на силовите структури и ключови министри, включително министъра на правосъдието, президентът всъщност налага изключителен контрол и върху съдебната власт. Не на последно място, одобрените промени допускат отхвърляне на решения от международноправен характер, ако според Конституционния съд не съответстват на вътрешноправните норми.

С тези и други по-малки промени през годините – например покачването на необходимия партиен праг за влизане в парламента от 5 на 7% – Путин постепенно си гарантира институционално господство спрямо законодателната, изпълнителната и съдебната власт. Ако към това добавим и безпрекословното влияние върху медийната среда, до избухването на войната в Украйна вътрешнополитическото надмощие на Путин изглежда непоклатимо.

Идеологическа консолидация

За Путин обаче би било много по-трудно да легитимира и осъществи политиката на институционална централизация без идеологическо сплотяване на обществото. За тази цел той използва православието и отношенията си с патриарха на Руската църква – Кирил. Путин превръща православието в национална идеология, отваряйки пространство за реторическо противопоставяне между руснаците и западняците, между руската и западната култура.

Тази логика възпроизвежда антагонистичното разделение от типа „ние срещу тях“ – православните, правоверни и консервативни руснаци срещу неправославните, грешни и либерални западняци. Освен че превръща православието в инструмент за обособяване на руската национална идентичност, Путин го използва за създаване на наднационална връзка между славянските народи, приели православието. Така чрез православието и славянството се създава пропагандната идея за една по-голяма, хомогенна, „братска“ постсъветска общност, доминирана и закриляна от Русия, но застрашена от западния свят.

Същевременно близките до Путин Вячеслав Володин и Николай Патрушев развиват и прилагат концепцията за външния враг, който заплашва не само руската териториална цялост, но и руската (респективно славянската) култура, синтезирана в православието. Тази логика често добива и историческо измерение, според което през цялото си съществуване Русия бива притискана и принуждавана да се защитава, докато разпадът на Съветския съюз се третира като геополитическа катастрофа, причинена от Запада. В този смисъл идеята за „денацификация“ не е просто изобретение за оправдаване на руската агресия в Украйна, а плод на много по-стар наратив за заклеймяване на всичко прозападно и антисъветско като „фашизъм“ или „нацизъм“.

Тази реторика се използва срещу активистите на Оранжевата революция в Украйна. Същото се повтаря и по отношение на Евромайдана след отказа на проруския президент Виктор Янукович да подпише Споразумението за асоцииране на Украйна с Европейския съюз. След падането си от власт самият Янукович определя протестиращите украинци като фашисти и нацисти. Тази линия на политическо говорене се засилва още повече след незаконната анексия на Крим и последвалите събития в Източна Украйна.

Конкретните примери са много – подобна реторика руските власти и медии използват дори по адрес на Естония, която през 2007 г. решава да премести паметника на Бронзовия войник от центъра на Талин във военното си гробище. Погледната от този ъгъл, речта на Путин от 24 февруари т.г. стъпва на процеса на идеологическа консолидация, а „денацификацията“ е просто продължение на масовата руска пропаганда през последните две десетилетия.

Войната в Украйна отразява развитието на вътрешнополитическите процеси във федерацията. Вътрешната и външната политика на Путин са неразривно свързани – войната, физическа и информационна, възпроизвежда процесите на институционална централизация и идеологическо сплотяване около фигурата на президента. Те пък от своя страна улесняват решението за започване на военни действия и необходимата за тази цел вътрешна легитимация, съсредоточавайки властта над политиката и медиите, а следователно и над умовете на гражданите в ръцете на един много тесен кръг от хора.

Подобни порочни модели придобиват внушителна сила, когато международните отношения подхранват несигурността във външната политика чрез добре познатите в научните среди положения на реализма – сфери на влияние, баланс на силите и дилеми на сигурността. Затова е време да повдигнем оставяния дотук на заден план въпрос за следвоенната структура на международните отношения и сигурност. Казано по различен начин: какъв ще бъде светът след войната и в какъв мир искаме да живеем? А това е тема, заслужаваща специално внимание.

Заглавна снимка: Markus Spiske / Unsplash

Източник

Introducing Amazon EventBridge Scheduler

Post Syndicated from Marcia Villalba original https://aws.amazon.com/blogs/compute/introducing-amazon-eventbridge-scheduler/

Today, we are announcing Amazon EventBridge Scheduler. This is a new capability from Amazon EventBridge that allows you to create, run, and manage scheduled tasks at scale. With EventBridge Scheduler, you can schedule one-time or recurrently tens of millions of tasks across many AWS services without provisioning or managing underlying infrastructure.

Previously, many customers used commercial off-the-shelf tools or built their own scheduling capabilities. This can increase application complexity, slow application development, and increase costs, which are magnified at scale. Most of these solutions are limited in what services they can trigger and create complexity in managing concurrency limitations of invoked targets that can affect application performance.

When to use EventBridge Scheduler?

For example, consider a company that develops a task management system. One feature that the application provides is that users can add a reminder for a task and be reminded by email one week before, two days before, or on the day of the task due date. You can automate the creation of all the schedules with EventBridge Scheduler, create the task for each of the reminders, and send it to Amazon SNS to send the notifications.

Or consider a large organization, like a supermarket, with thousands of AWS accounts and tens of thousands of Amazon EC2 instances. These instances are used in different parts of the world during business hours. You want to make sure that all the instances are started before the stores open and terminated after the business hours to reduce costs as much as possible. You can use EventBridge Scheduler to start and stop all the thousands of instances and also respect time zones.

SaaS providers can also benefit from EventBridge Scheduler, as now they can more easily manage all the different scheduled tasks that their customers have. For example, consider a SaaS provider with a subscription model for your customers paying a monthly or annual fee. You want to ensure that their license key is valid until the end of their current billing period. With Scheduler, you can create a schedule that removes the access to the service when the billing period is over, or when the user cancels their subscription. Also, you can create a series of emails that let your customer knows that their license is expiring so they can purchase a renewal. Example using scheduler

Use cases for EventBridge Scheduler are diverse, from simplifying new feature development to improving your infrastructure operations.

How does EventBridge Scheduler work?

With EventBridge Scheduler, you can now create single or recurrent schedules that trigger over 200 services with more than 6,000 APIs. EventBridge Scheduler allows you to configure schedules with a minimum granularity of one minute.

EventBridge Scheduler provides at-least-once event delivery to targets, and you can create schedules that adjust to different delivery patterns by setting the window of delivery, the number of retries, the time for the event to be retained, and the dead letter queue (DLQ). You can learn more about each configuration from the Scheduler User Guide.

  • Time window allows you to start a schedule within a window of time. This means that the scheduled tasks are dispersed across the time window to reduce the impact of multiple requests on downstream services.
  • Maximum retention time of the event is the maximum time to keep an unprocessed event in the scheduler. If the target is not responding during this time, the event is dropped or sent to a DLQ.
  • Retries with exponential backoff help to retry a failed task with delayed attempts. This improves the success of the task when the target is available.
  • A dead letter queue is an Amazon SQS queue where events that failed to get delivered to the target are routed.

By default, EventBridge Scheduler tries to send the event for 24 hours and a maximum of 185 times. You can configure these values. If that fails, the message is dropped, since by default there is not a DLQ configured.

In addition, by default, all events in Scheduler are encrypted with a key that AWS owns and manages. You can also use your own AWS KMS encryption keys.

You can also schedule tasks using Amazon EventBridge rules. But to schedule tasks at scale, EventBridge Scheduler is better suited for this task. The following table shows the main differences between EventBridge Scheduler and EventBridge rules:


Amazon EventBridge Scheduler Amazon EventBridge rules
Quota on schedules 1 million per account 300 rule limit per account per Region
Event invocation throughput Able to support throughput in 1,000s of TPS Because of the schedule limit, you can only have 300 1-minute schedules for max throughput of 5 TPS
Targets Over 270 services and over 6,000 API Actions with AWS SDK targets 20+ targets supported by EventBridge
Time expression and time-zones

at(), cron(), rate()

All time-zones and DST

cron(), rate(), UTC

No support for DST

One-time schedules Yes No
Time window schedules Yes No
Event bus support No event bus is needed Default bus only
Rule quota consumption No. 1 million schedules soft limit Yes, consumes from 2,000 rules per bus

Getting started with EventBridge Scheduler

This walkthrough builds a series of schedules to get started with EventBridge Scheduler. For that, you use the AWS Command Line (AWS CLI) to configure the schedules that send notifications using Amazon SNS.

Prerequisites

Update your AWS CLI to the latest version (v1.27.7).

As a prerequisite, you must create an SNS topic with an email subscription and an AWS IAM role that EventBridge Scheduler can assume to publish messages on your behalf. You can deploy these AWS resources using AWS SAM. Follow the instructions in the README file.

Scheduling a one-time schedule

Once configured, create your first schedule. This is a one-time schedule that publishes an event for the SNS topic you created.

For creating the schedule, run this command in your terminal and replace the schedule expression and time zone with values for your task:

$ aws scheduler create-schedule --name SendEmailOnce \ 
--schedule-expression "at(2022-11-01T11:00:00)" \ 
--schedule-expression-timezone "Europe/Helsinki" \
--flexible-time-window "{\"Mode\": \"OFF\"}" \
--target "{\"Arn\": \"arn:aws:sns:us-east-1:xxx:test-chronos-send-email\", \"RoleArn\": \" arn:aws:iam::xxxx:role/sam_scheduler_role\" }"

Let’s analyze the different parts of this command. The first parameter is the name of the schedule.

In the schedule expression attribute, you can define if the event is a one-time schedule or a recurrent schedule. Because this is a one-time schedule, it uses the at() expression with the date and time you want this schedule to run. Also, you must configure the schedule expression time zone in which this schedule run:

--schedule-expression "at(2022-11-01T11:00:00)" --schedule-expression-timezone "Europe/Helsinki"

Another setting that you can configure is the flexible time window. It’s not used for this example, but if you choose a time window, EventBridge Scheduler invokes the task within that timeframe. This setting helps to distribute the invocations across time and manage the downstream service limits.

--flexible-time-window "{\"Mode\": \"OFF\"}"

Finally, pass the IAM role ARN. This is the role previously created with the AWS SAM template. This role is the one that EventBridge Scheduler assumes when publishing events to SNS and it has permissions to publish messages on that topic.

Finally, you must configure the target. Scheduler comes with predefined targets with simpler APIs, that include actions like putting events for Amazon EventBridge, invoke a Lambda function, send a message to an Amazon SQS queue. For this example, use the universal target, which allows you to invoke almost any AWS services. Learn more about the targets from the User Guide.

--target "{\"Arn\": \"arn:aws:sns:us-east-1:xxx:test-chronos-send-email\", \"RoleArn\": \" arn:aws:iam::xxxx:role/sam_scheduler_role\" }"

Scheduling groups

Scheduling groups help you organize your schedules. Scheduling groups support tags that you can use for cost allocation, access control, and resource organization. When creating a new schedule, you can add it to a scheduling group.

To create a new scheduling group, run:

$ aws scheduler create-schedule-group --name ScheduleGroupTest

Scheduling a recurrent schedule

Now let’s create a recurrent schedule for that scheduling group. This schedule runs every five minutes and publishes a message to the SNS topic you created during the prerequisites.

$ aws scheduler create-schedule --name SendEmailTest \
--group-name ScheduleGroupTest \
--schedule-expression "rate(5minutes)" \
--flexible-time-window "{\"Mode\": \"OFF\"}" \
--target "{\"Arn\": \"arn:aws:sns:us-east-1:xxxx:test-chronos-send-email\", \"RoleArn\": \" arn:aws:iam::xxxx:role/sam_scheduler_role \" }"

Recurrent schedules can be configured with a cron expression or rate expression, to define the frequency that this schedule should be triggered. For scheduling this to run every five minutes, you can use an expression like this one:

--schedule-expression "rate(5minutes)"

Because you have selected the recurring schedule, you can define the timeframe in which this schedule runs. You can optionally choose a start and end date and time for your schedule. If you don’t do it, the schedule starts as soon as you create the task. These times are formatted in the same way as other AWS CLI timestamps.

--start-date "2022-11-01T18:48:00Z" --end-date "2022-11-01T19:00:00Z"

If you run the previous recurrent schedule for some time, and then check Amazon CloudWatch metrics, you find a metric called InvocationAttemptCount, for the schedule invocations that happened within the scheduling group you just created.

You can graph that metric in a dashboard and see how many times this schedule run. Also, you can create alarms to get notified if the number of invocations exceeds a threshold. For example, you can set this threshold to be close to the limits of your downstream service, to prevent reaching those limits.

Graphed metric in dashboard

Cleaning up

Make sure that you delete all the recurrent schedules that you created without an end time.

To check all the schedules that you have configured:

$ aws scheduler list-schedules

To delete a schedule using the AWS CLI:

$ aws scheduler delete-schedule --name <name-of-schedule> --group <name-of-group>

Also delete the CloudFormation stack with the prerequisite infrastructure when you complete this demo, as is defined in the README file of that project.

Conclusion

This blog post introduces the new Amazon EventBridge Scheduler, its use cases and its differences with existing scheduling options. It shows you how to create a new schedule using Amazon EventBridge Scheduler to simplify the creation, execution, and managing of scheduled tasks at scale.

You can get started today with EventBridge Scheduler from the AWS Management Console, AWS CLI, AWS CloudFormation, AWS SDK, and AWS SAM.

For more serverless learning resources, visit Serverless Land.

How Hudl built a cost-optimized AWS Glue pipeline with Apache Hudi datasets

Post Syndicated from Indira Balakrishnan original https://aws.amazon.com/blogs/big-data/how-hudl-built-a-cost-optimized-aws-glue-pipeline-with-apache-hudi-datasets/

This is a guest blog post co-written with Addison Higley and Ramzi Yassine from Hudl.

Hudl Agile Sports Technologies, Inc. is a Lincoln, Nebraska based company that provides tools for coaches and athletes to review game footage and improve individual and team play. Its initial product line served college and professional American football teams. Today, the company provides video services to youth, amateur, and professional teams in American football as well as other sports, including soccer, basketball, volleyball, and lacrosse. It now serves 170,000 teams in 50 different sports around the world. Hudl’s overall goal is to capture and bring value to every moment in sports.

Hudl’s mission is to make every moment in sports count. Hudl does this by expanding access to more moments through video and data and putting those moments in context. Our goal is to increase access by different people and increase context with more data points for every customer we serve. Using data to generate analytics, Hudl is able to turn data into actionable insights, telling powerful stories with video and data.

To best serve our customers and provide the most powerful insights possible, we need to be able to compare large sets of data between different sources. For example, enriching our MongoDB and Amazon DocumentDB (with MongoDB compatibility) data with our application logging data leads to new insights. This requires resilient data pipelines.

In this post, we discuss how Hudl has iterated on one such data pipeline using AWS Glue to improve performance and scalability. We talk about the initial architecture of this pipeline, and some of the limitations associated with this approach. We also discuss how we iterated on that design using Apache Hudi to dramatically improve performance.

Problem statement

A data pipeline that ensures high-quality MongoDB and Amazon DocumentDB statistics data is available in our central data lake, and is a requirement for Hudl to be able to deliver sports analytics. It’s important to maintain the integrity of the data between MongoDB and Amazon DocumentDB transactional data with the data lake capturing changes in near-real time along with upserts to records in the data lake. Because Hudl statistics are backed by MongoDB and Amazon DocumentDB databases, in addition to a broad range of other data sources, it’s important that relevant MongoDB and Amazon DocumentDB data is available in a central data lake where we can run analytics queries to compare statistics data between sources.

Initial design

The following diagram demonstrates the architecture of our initial design.

Intial Ingestion Pipeline Design

Let’s discuss the key AWS services of this architecture:

  • AWS Data Migration Service (AWS DMS) allowed our team to move quickly in delivering this pipeline. AWS DMS gives our team a full snapshot of the data, and also offers ongoing change data capture (CDC). By combining these two datasets, we can ensure our pipeline delivers the latest data.
  • Amazon Simple Storage Service (Amazon S3) is the backbone of Hudl’s data lake because of its durability, scalability, and industry-leading performance.
  • AWS Glue allows us to run our Spark workloads in a serverless fashion, with minimal setup. We chose AWS Glue for its ease of use and speed of development. Additionally, features such as AWS Glue bookmarking simplified our file management logic.
  • Amazon Redshift offers petabyte-scale data warehousing. Amazon Redshift provides consistently fast performance, and easy integrations with our S3 data lake.

The data processing flow includes the following steps:

  1. Amazon DocumentDB holds the Hudl statistics data.
  2. AWS DMS gives us a full export of statistics data from Amazon DocumentDB, and ongoing changes in the same data.
  3. In the S3 Raw Zone, the data is stored in JSON format.
  4. An AWS Glue job merges the initial load of statistics data with the changed statistics data to give a snapshot of statistics data in JSON format for reference, eliminating duplicates.
  5. In the S3 Cleansed Zone, the JSON data is normalized and converted to Parquet format.
  6. AWS Glue uses a COPY command to insert Parquet data into Amazon Redshift consumption base tables.
  7. Amazon Redshift stores the final table for consumption.

The following is a sample code snippet from the AWS Glue job in the initial data pipeline:

from awsglue.context import GlueContext 
from pyspark.sql.session import SparkSession

spark = SparkSession.builder.getOrCreate() 
spark_context = spark.sparkContext 
gc = GlueContext(spark_context)
   full_df = read_full_data()#Load entire dataset from S3 Cleansed Zone


cdc_df = read_cdc_data() # Read new CDC data which represents delta in the source MongoDB/DocumentDB


joined_df = full_df.join(cdc_df, '_id', 'full_outer') #Calculate final snapshot by joining the existing data with delta


result = joined_df.filter((joined_df.Op != 'D') | (joined_df.Op.isNull())) .select(coalesce(cdc_df._doc, full_df._doc).alias('_doc'))

gc.write_dynamic_frame.from_options(frame=DynamicFrame.fromDF(result, gc) , connection_type = "s3", connection_options = {"path": output_path}, format = "parquet", transformation_ctx = "ctx4")

Challenges

Although this initial solution met our need for data quality, we felt there was room for improvement:

  • The pipeline was slow – The pipeline ran slowly (over 2 hours) because for each batch, the whole dataset was compared. Every record had to be compared, flattened, and converted to Parquet, even when only a few records were changed from the previous daily run.
  • The pipeline was expensive – As the data size grew daily, the job duration also grew significantly (especially in step 4). To mitigate the impact, we needed to allocate more AWS Glue DPUs (Data Processing Units) to scale the job, which led to higher cost.
  • The pipeline limited our ability to scale – Hudl’s data has a long history of rapid growth with increasing customers and sporting events. Given this trend, our pipeline needed to run as efficiently as possible to handle only changing datasets to have predictable performance.

New design

The following diagram illustrates our updated pipeline architecture.

Although the overall architecture looks roughly the same, the internal logic in AWS Glue was significantly changed, along with addition of Apache Hudi datasets.

In step 4, AWS Glue now interacts with Apache HUDI datasets in the S3 Cleansed Zone to upsert or delete changed records as identified by AWS DMS CDC. The AWS Glue to Apache Hudi connector helps convert JSON data to Parquet format and upserts into the Apache HUDI dataset. Retaining the full documents in our Apache HUDI dataset allows us to easily make schema changes to our final Amazon Redshift tables without needing to re-export data from our source systems.

The following is a sample code snippet from the new AWS Glue pipeline:

from awsglue.context import GlueContext 
from pyspark.sql.session import SparkSession

spark = SparkSession.builder.getOrCreate() 
spark_context = spark.sparkContext 
gc = GlueContext(spark_context)

upsert_conf = {'className': 'org.apache.hudi', '
hoodie.datasource.hive_sync.use_jdbc': 'false', 
'hoodie.datasource.write.precombine.field': 'write_ts', 
'hoodie.datasource.write.recordkey.field': '_id', 
'hoodie.table.name': 'glue_table', 
'hoodie.consistency.check.enabled': 'true', 
'hoodie.datasource.hive_sync.database': 'glue_database', 'hoodie.datasource.hive_sync.table': 'glue_table', 'hoodie.datasource.hive_sync.enable': 'true', 'hoodie.datasource.hive_sync.support_timestamp': 'true', 'hoodie.datasource.hive_sync.sync_as_datasource': 'false', 
'path': 's3://bucket/prefix/', 'hoodie.compact.inline': 'false', 'hoodie.datasource.hive_sync.partition_extractor_class':'org.apache.hudi.hive.NonPartitionedExtractor, 'hoodie.datasource.write.keygenerator.class': 'org.apache.hudi.keygen.NonpartitionedKeyGenerator', 'hoodie.upsert.shuffle.parallelism': 200, 
'hoodie.datasource.write.operation': 'upsert', 
'hoodie.cleaner.policy': 'KEEP_LATEST_COMMITS', 
'hoodie.cleaner.commits.retained': 10 }

gc.write_dynamic_frame.from_options(frame=DynamicFrame.fromDF(cdc_upserts_df, gc, "cdc_upserts_df"), connection_type="marketplace.spark", connection_options=upsert_conf)

Results

With this new approach using Apache Hudi datasets with AWS Glue deployed after May 2022, the pipeline runtime was predictable and less expensive than the initial approach. Because we only handled new or modified records by eliminating the full outer join over the entire dataset, we saw an 80–90% reduction in runtime for this pipeline, thereby reducing costs by 80–90% compared to the initial approach. The following diagram illustrates our processing time before and after implementing the new pipeline.

Conclusion

With Apache Hudi’s open-source data management framework, we simplified incremental data processing in our AWS Glue data pipeline to manage data changes at the record level in our S3 data lake with CDC from Amazon DocumentDB.

We hope that this post will inspire your organization to build AWS Glue pipelines with Apache Hudi datasets that reduce cost and bring performance improvements using serverless technologies to achieve your business goals.


About the authors

Addison Higley is a Senior Data Engineer at Hudl. He manages over 20 data pipelines to help ensure data is available for analytics so Hudl can deliver insights to customers.

Ramzi Yassine is a Lead Data Engineer at Hudl. He leads the architecture, implementation of Hudl’s data pipelines and data applications, and ensures that our data empowers internal and external analytics.

Swagat Kulkarni is a Senior Solutions Architect at AWS and an AI/ML enthusiast. He is passionate about solving real-world problems for customers with cloud-native services and machine learning. Swagat has over 15 years of experience delivering several digital transformation initiatives for customers across multiple domains, including retail, travel and hospitality, and healthcare. Outside of work, Swagat enjoys travel, reading, and meditating.

Indira Balakrishnan is a Principal Solutions Architect in the AWS Analytics Specialist SA Team. She is passionate about helping customers build cloud-based analytics solutions to solve their business problems using data-driven decisions. Outside of work, she volunteers at her kids’ activities and spends time with her family.

A pair of new LWN site features

Post Syndicated from original https://lwn.net/Articles/914410/

We have finally added a set of dark mode defaults to the customization options for the site for
those who prefer the dark side. Thanks to all the readers who have asked
for this; apologies for taking so long to do it. The defaults seem good,
but we are not dark-mode users, so please let us know if you have
suggestions for improvements.

Another new feature that has been requested for some time is the ability to
receive feature articles via email. These emails are currently available
to subscribers at the “Project Leader” level and higher; interested
subscribers can sign up for the “Features” list on the mailing-lists page.

Detect and block advanced bot traffic

Post Syndicated from Etienne Munnich original https://aws.amazon.com/blogs/security/detect-and-block-advanced-bot-traffic/

Automated scripts, known as bots, can generate significant volumes of traffic to your mobile applications, websites, and APIs. Targeted bots take this a step further by targeting website content, such as product availability or pricing.

Traffic from targeted bots can result in a poor user experience by competing against legitimate user traffic for website access to high-demand inventory, increasing business risk through chargebacks from fraudulent transactions, and increasing infrastructure costs.

In 2021, AWS released AWS WAF Bot Control for Common Bots to help you detect and control common bots. In October 2022, AWS released a new feature—AWS Bot Control for Targeted Bots—that can help you detect and protect against bots that use advanced techniques to actively avoid detection.

In this post, I provide an overview of Bot Control for Targeted Bots and show you how to enable Bot Control to detect and block both common and targeted bots.

Overview of Bot Control for Targeted Bots

Bot Control for Targeted Bots provides sophisticated bot detection and mitigation by creating an intelligent baseline of traffic patterns. Bot Control for Targeted Bots uses browser fingerprinting techniques and client-side JavaScript interrogation methods to help protect your application from advanced bots that mimic human traffic patterns and actively try to evade detection.

Bot Control detects anomalies in usage patterns and provides new flexible mitigation options to isolate bad bots. These options include dynamic rate-limiting, challenge actions, and the ability to block based on labels and confidence scores.

With Bot Control for Targeted Bots, you can use bot protection rules to allow verified common bot traffic and, at the same time, to challenge unwanted advanced bot traffic. You can achieve both tasks from the same configuration page without making application or architectural changes. You can also configure fine-grained rule sets. For example, you can configure blocking actions for high-risk bots while allowing for exceptions for known IP ranges.

This release also introduces token domains, which is the ability to use the same AWS WAF web ACL across multiple domain names and Amazon CloudFront distributions to simplify client-side configuration. For example, you can use token domains to accept tokens that are generated by www.example.com for api.example.com and vice versa. In addition, you can now specify a resource path directly in the managed rule configuration, enabling you to only require a token for API calls, but not for cached, content-like images.

Bot Control for Targeted Bots sends metrics to Amazon CloudWatch to identify application access trends. The metrics include the percentage of human traffic compared to bot traffic and the count of requests for sensitive web pages such as login and checkout pages. Each rule in Bot Control produces a unique label so that you can review CloudWatch metrics and filter logs to understand traffic patterns. By using these mechanisms, you can identify, isolate, and remediate operational issues.

Walkthrough

In this walkthrough, I will show you how to set up Bot Control for Targeted Bots to help protect a CloudFront distribution.

You will set up an AWS WAF web ACL with an AWS Managed Rule for Bot Control for Targeted Bots. The rule detects bots and then decides the appropriate action:

  • Dynamically rate limit verified bots – Based on traffic history, Bot Control creates an intelligent baseline and then applies rate limits to abnormally high volumes.
  • Enable the challenge action – You have a new option, called challenge, along with the already supported options of count, allow, block, and CAPTCHA. The challenge option initiates a process of challenge interstitial, which means that Bot Control provides a challenge to the browser and creates a domain token when the challenge is resolved.

Set up Bot Control for Targeted Bots

In this section, I will show you how to set up Bot Control for Targeted Bots by creating a new web ACL or editing an existing one.

To set up Bot Control for Targeted Bots

  1. Open the AWS WAF console, and then do one of the following:
    • To create a new web ACL, choose Create a new web ACL.
    • To edit an existing web ACL, choose the name of the ACL.
  2. On the Rules tab, for the Add rules drop-down, select Add managed rule groups.
  3. Add a Bot Control rule set to the web ACL. Choose Edit to edit the rule.
  4. For Bot Control inspection level, select the inspection level for Bot Control. For this walkthrough, we chose Targeted to enable Bot Control for Targeted Bots.
    Figure 1: Bot Control – Select inspection level

    Figure 1: Bot Control – Select inspection level

  5. Review and select the actions to be taken on each category of bots detected, and then choose Save rule. In our example, we set allow, challenge, and count rules for the categories, as shown in Figure 2.
    Figure 2: Bot Control – Select actions for each category

    Figure 2: Bot Control – Select actions for each category

    You can select different actions for each category based on your application security needs:

    • Allow: Allows the request to be sent to a protected resource.
    • Block: Blocks the request, returning an HTTP 403 (Forbidden) response.
    • Count: Allows the request to be sent to the protected resource while counting detections. The count shows you bot activity that is occurring without blocking or challenging. When you turn on rules for the first time, this information can help you see what the detections are, before you change the actions.
    • CAPTCHA and Challenge: use CAPTCHA puzzles and silent challenges with tokens to track successful client responses.
  6. In this example you will configure a scope-down statement to apply Bot Control for a given URI path only.

    On the same page in the step above, you can add a scope-down statement to ensure you use and incur Targeted Bots charges for the requests where you need protections. There are more examples of how to use scope-down statements in our documentation.

    Select “Enable scope-down statement” and configure the rule to inspect the URI path as per figure 3.

    Figure 3: Bot Control – Add the scope-down statement

    Figure 3: Bot Control – Add the scope-down statement

  7. To add domain names to be protected, scroll to the bottom of the web ACL and choose Edit. In the Token domain listoptional section, enter the domain name or names to which the token verification applies. Tokens that are generated are valid for these domains.

Create the SDK link for the AWS WAF integration

In this section, I’ll show you how to find the AWS WAF SDK and add it to your application pages.

The token SDK manages the token authorization and includes the tokens in the requests that you send to your protected resources. By adding the SDK link to application pages, you can help ensure that the remote procedure calls by your client contain a valid token.

To add the SDK to your application pages

  1. In the AWS WAF console, in the left navigation pane, choose Application integration SDKs.
  2. Under JavaScript SDK, copy the provided code snippet. This code snippet allows for creation of the cryptographic token in the background when the application loads for the first time, providing a better customer experience.
  3. Add the code snippet to your pages. For example, paste the provided script code within the <head> section of the HTML.

When this integration is in place on your application’s pages, you can add AWS WAF rules in your web ACL to block requests that don’t contain a valid token. Replace the <Web ACL integration URL> with the provided integration URL from the AWS WAF console or copy the script tag from the console:

<script type="text/javascript" src="<Web ACL integration URL>/challenge.js” defer></script>

Figure 4 shows the SDK link for application pages.

Figure 4: Bot Control – Add SDK link to application pages

Figure 4: Bot Control – Add SDK link to application pages

Review metrics

Now that you’ve set up the web ACL and application, you can use the bot visualization dashboard to review bot traffic patterns. Bot rules emit metrics corresponding to their labels, helping you identify which rule within the AWS Managed Rule for Bot Control for Targeted Bots initiated an action. You can also use these labels and rule actions to filter AWS WAF logs so that you can further examine a request.

To view AWS WAF metrics for the distribution

  1. In the AWS WAF console, in the left navigation pane, select Web ACLs.
  2. Select the web ACL that Bot Control is enabled on and then choose the Bot Control tab to view the metrics.
Figure 5: Bot Control – Review web ACL metrics

Figure 5: Bot Control – Review web ACL metrics

Best practices

In this section, I describe best practices for your Bot Control setup.

Set priority ordering of AWS WAF rules to help lower costs

You can set the priority of rule groups in a web ACL such that the order of the rule matches requests more efficiently. AWS WAF will take the action associated to the first rule it matches. If the incoming traffic matches the more wider criteria (such as IPset rules at priority 1), the associated action is taken. That request is never analyzed by the Bot Control rule and hence do not incur the bot control request analysis fees. For example, the following list shows rules ranked in order from highest priority (1) to lowest priority (5):

  1. Use allow and deny lists – provide IP addresses to allow or deny
  2. AWS Managed Rule groups for IP reputation – block bots and other threats
  3. General rate limit – help prevent HTTP flood across the protected resource
  4. AWS WAF Bot Control rule group – scoped-down to exclude static content such as images
  5. Rate limit for login pages – scoped-down for specific URLs and HTTP POST methods

Figure 6 shows the prioritized rules in AWS WAF.

Figure 6: AWS WAF – Web ACL rule order

Figure 6: AWS WAF – Web ACL rule order

Use scope-down statements

You can use scope-down statements to limit the requests evaluated for a rule group. For example, a scope-down statement that excludes checking requests for static assets, such as images for a given URI and HTTP method (GET), can help reduce Bot Control costs.

Block requests without tokens

If a request has a token absent or is rejected, you can block that request. For example, you might want to block requests on login or payment processing pages. To block requests with a missing or rejected token, add a rule to run after the Bot Control rule to block requests matching the labels rejected and absent:

  • awswaf:managed:token:rejected – The request token is present but is either corrupt or has an expired challenge timestamp.
  • awswaf:managed:token:absent – The request doesn’t have a token.

Use SDK integration

After you add the token domains and the provided script to your application pages, you can add a rule to block requests that don’t have a token. Use of the SDK helps AWS WAF verify the client application with silent challenges and provide AWS token acquisition and management. The SDK provides the full functionality of both AWS WAF Bot Control and AWS WAF Fraud Control, reducing the need for multiple SDKs if either or both rule groups are used in the web ACL.

Create CloudWatch alarms

You can add CloudWatch alarms to help you assess whether there is activity outside of the norm for your application. For example, you can monitor for a high number of token-absent metrics for a given time period.

Configure a billing alarm

To help you track costs, you can configure a billing alarm that sends an alert when you have exceeded the threshold for your expected costs.

Pricing and availability

Bot Control for Targeted Bots is available today in AWS Regions where AWS WAF is available, excluding AWS GovCloud (US) and China Regions. For information on pricing, see AWS WAF Pricing.

Conclusion

In this post, you learned how to use Bot Control for Targeted Bots to add visibility into bot activity on your website or applications. With Bot Control for common and targeted bots, you can detect, challenge, and block unwanted bot activity. Because Bot Control is customizable, you can tailor how you address legitimate bots while protecting against bots that use advanced techniques to actively avoid detection. For more information and to get started today, see AWS WAF Bot Control.

 
If you have feedback about this post, submit comments in the Comments section below. If you have questions about this post, contact AWS Support.

Want more AWS Security news? Follow us on Twitter.

Etienne Munnich

Etienne Munnich

Etienne works as an Edge Specialist Solutions Architect, assisting start ups and companies of all sizes across Asia Pacific to improve their web applications performance and security. Based in Sydney, Australia, he has fulfilled many roles in tech, which range from systems integrator to cloud engineer, project manager and now a solutions architect. Follow him on Twitter at @etiennemunnich

5 Compelling Reasons You Should Go IPO

Post Syndicated from original https://www.backblaze.com/blog/5-compelling-reasons-you-should-go-ipo/

We took Backblaze public one year ago tomorrow. Our IPO was a great day and the realization of 14 years of hard work by our team. Since then, we’ve executed on our plans, hit our targets, and continued to grow our team and our revenue. And yet, the markets have been tough sledding. For newly-public tech companies like us, as well as many of our peers, stock values have decreased by ~70% from their peak values last year. It’s hard for shareholders, employees, and the market.

Obviously I wish the last 10 months would have gone differently in the markets, who doesn’t? But when people ask me, (which happens a lot) “Do you still think the IPO was a good idea?” There’s no question in my mind that it was one of the best business decisions we’ve made at Backblaze.

In fact, the more that I think about our experience of taking the company public, the more I believe that the IPO should be part of every entrepreneur and business leader’s consideration set. A perception has developed that there are magical financial benchmarks that forbid some companies from listing, but we went public at a point in the evolution of our business when a lot of experts told us we couldn’t. We may have faced some headwinds others didn’t, but I’m convinced that the IPO isn’t just for folks with over $300m in revenue who’ve raised hundreds of millions of dollars in venture capital.

So, in keeping with our commitment to transparency about our business and some of the interesting, tough, and exciting stuff we’ve been through—long-time readers will remember my blog about almost getting acquired—I’ve decided to write about our IPO journey: What sucked, what didn’t, what shocked us, and what we learned. Along the way, I’ll share everything I can—metrics, worksheets, planning decks, and more. Not because I think we deserve a pat on the back or to celebrate what we did, but for two bigger purposes:

  1. I can remember what it feels like to be an early stage entrepreneur thinking that the only path to making the company you built successful was to seek out restrictive venture funding or seek out an acquisition. I want to offer folks—whether you’re considering starting a business or have already built one with tens of millions in revenue—that there is another path to consider. While doing an IPO isn’t right for everyone, I think considering an IPO, and positioning your business to go that way if the opportunity arises, is sound strategy.
  2. I believe that democratizing the IPO process will be healthier for businesses, markets, and investors. And I’m not the first: Bill Hambrecht is well known for his efforts to open IPOs to broader audiences as he did with companies like Google and Overstock.com. Tech is all about disrupting unnecessary complexity, and going public is more complex than an AWS invoice. In the mid-nineties, there were more than 8,000 publicly traded companies. By this September there were nearly 2,000 fewer companies listed, even after the boom we saw in 2020 and 2021. I don’t think that’s a good thing.

This blog series will be for everyone from those of you dreaming up your first idea, to startups still in stealth mode, to the thousands of companies with revenue in the tens of millions.

And if there’s anything I talk about here that’s confusing or that you want to hear more about, please ask in the comments. I’ll try to cover it in a future post.

Why Listen to Us?

Hot takes on building startups and raising funding are a dime a dozen—so if you’re skeptical, I get it. What we’ll share here is partially based on the experience we had building two prior technology companies, raising multiple rounds of venture capital, and successfully selling them through acquisition. However, more uniquely: We founded and essentially bootstrapped Backblaze all the way up to our IPO (before 2021 we had only taken $3M in outside funding). Even CNBC noted that we took a unique path to market, and yet with $65 million in recurring revenue in 2020, we made a successful public offering and raised over $100M in funding to continue growing our business. We’ve made this journey ourselves, we did it recently, and—in the spirit of transparency—we’re going to share the stories behind it.

Why an IPO Should Be in Your Business Consideration Set

Why should IPO readiness (the process of setting up your business to go public) and actually going public be in your playbook? I’m going to explore this concept deeply over the course of this series, but I’ll pause here to tell you the five most compelling reasons to be IPO ready, along with a few proof points from our own experience.

  • Build to Last: Starting and growing a company is hard. If you’re doing it, it’s probably because you’re passionate about solving some problems in the world. To be successful, you had to care about your vision, your product, your customers, and your team. If your company ends up acquired, the unique entity you created will vaporize. Taking your company public provides a path to building and running the company for the long-term, possibly outliving you.
  • Funding With the Right Strings Attached: Raising funding in an IPO requires selling a portion of your company, just as in any venture funding. The difference, however, is that in an IPO the equity you sell is common shares—everyone gets the same shares on the same terms. In private fund raises, the company sells “preferred shares” to investors which typically come with a variety of special rights giving investors the ability to have extra control over the company, get extra equity in the company, prevent the company from raising money from other investors, and more. Raising funding in an IPO is the ultimate “clean” fundraise.
  • Building a Real Business: If you’re building with an aim to be acquired, it’s nearly impossible to not establish a culture at the company where everyone is focused on “dumping” the business. By aiming for an IPO, it drives the mindset to build for sustainability. You’re more likely to create a business that can achieve profitability, scale, growth, and deliver value over the long haul. Also, going through the actual process of IPO readiness, along with the process of feeding your financials through a meat grinder of ROI modeling and outcome driven planning—both during and after the IPO—means you will position your business for even greater resilience going forward.
  • Credibility: When the five Backblaze founders talked about IPOs back in the day in a tiny apartment in Palo Alto, it felt like we were trying on our dad’s pants. Sure, we knew some companies went public—but it didn’t feel like something that was really accessible (even for a room of people that scaled and sold multiple companies). But we’re not the only people who feel this way: “Public” signals a level of accomplishment and evolution that’s hard to achieve as a private company. Being able to achieve an IPO proves a business’s capacity to operate and excel under intense pressure and scrutiny. And if anyone is uncertain about how we’re doing, they can just go grab the last 10-K to see our results.
  • Liquidity: This one is simple. If you’re not public, you can’t sell your stock on the open market. Once the company is public, you and your employees (and existing shareholders) can sell their shares if they so choose. It also provides the freedom and flexibility for each individual to make that decision on their own. Rather than having to sell the company (wherein usually everyone is forced to sell all their shares), this allows one person to decide to stay “all-in” and keep all their shares, another one to sell theirs, and a third to sell just a few shares.
The team in Times Square.

What’s Next?

If you’re intrigued, this is really only the tip of the iceberg. In future posts, I will dig into everything from the nitty gritty tactics—like how to build a board, how to build a banking syndicate (twice], and how to write an S-1—to the bigger stories—like how years of planning can hinge on a few hours of work, or why “testing the waters” might be better named “getting thrown to the sharks”.

Rest assured: If you think you’re not interested in going public, everything I share will have as much to do with how you build a better business that you can grow over time as it will with the guts of the IPO process. I hope it’s useful, and if there’s anything you hope I’ll address or anything specific that you’d like to learn more about, let me know in the comments.

The post 5 Compelling Reasons You Should Go IPO appeared first on Backblaze Blog | Cloud Storage & Cloud Backup.

Culture Fitness

Post Syndicated from Jake Godgart original https://blog.rapid7.com/2022/11/10/culture-fitness/

Culture Fitness

Have you checked in on the overall health of your team lately?

What would a new hire think of your current team?

Companies all over the world – particularly those of the higher-profile variety – tout their positive cultures and how great it is to be part of the team. This is especially true in the age of social media, when groups and teams within companies frequently post about what they’re doing to make the company a better place to work and move positive initiatives forward. But what a shrewd potential hire should really be looking for is a culture with true depth, not just a social media presence.

The United States Navy is a great practitioner and example of this true depth of culture in the way they recruit for the famed SEAL Team Six. New members aren’t chosen solely on past performance, even if they’re the best of the best. They’re chosen based on performance and their ability to be trusted, with even lower performers sometimes chosen due to the fact they can be trusted more so than others.

If a potential new hire – whose work history indicated high performance and high trust – was on interview number two or three and came in to meet with several members of your current team to get a feel for the overall culture, what would that person think at the conclusion of those meetings? With that consideration in mind, think about the culture of your current team and if it’s an environment that would attract or repel prospective talent.

SOCulture

Working in a SOC is quite different from working in a flower shop. It’s true that there are certain hallmarks of camaraderie that are repeatable across industries. But cybersecurity is different. Practitioners in our industry have an incredible responsibility on their shoulders. Some providers simply alert you to trouble – think of it like a fire department that alerts you that your house is on fire – but the best ones contain the threats. And the best ones are where talent wants to be. So, what are some tangible actions we know will make analysts consider your SOC a great and happy place to work?

  • Engage your team – This doesn’t have to be some sort of program with a name or anything official. Happy hours, coffee breaks, team lunches, conversations; this type of camaraderie may seem obvious, but it’s amazing how quickly team culture can fall by the wayside in favor of simply getting the work done and then going home. Even something like reserving the first 20 minutes of your regular Wednesday all-team check-in to talk about anything other than work can become something memorable your team looks forward to.
  • Put the human above the role – Even while everyone is heads down on an ETR, there’s always time to be motivational, positive, and celebrate the small wins. That doesn’t mean you have to throw a pizza happy hour every time your team does their jobs well, but positive reinforcement is a must. While everyone deserves a fair salary and to be compensated appropriately for their time and doing their job well, there are those talented individuals driven more by recognition for a job well done than by salary. And you don’t want to see those individuals begin to feel like just another cog in the machine – and then eventually leave.    
  • Commit to cybersecurity, not conflict – According to last year’s ESG Research Report, The Life and Times of Cybersecurity Professionals, those professionals find organizations most attractive that are actually committed to cybersecurity. 43% of individuals surveyed for the report stated that the biggest factor determining job satisfaction is business management’s commitment to strong cybersecurity. It’s great if you consider a candidate a strong fit, but how’s your team’s relationships with other teams? Would that candidate see themselves as a fit amongst those dynamics?  
  • Promote a healthy team with a healthy dose of DEI – In that same ESG report, 21% of survey respondents said that one of the biggest ways the cybersecurity skills shortage impacted their team was that their organization tended not to seek out qualified applicants with more diverse backgrounds; they simply wanted what they considered the perfect fit. Diversity, Equity, and Inclusion (DEI) should be something that attracts great talent and that is ultimately reflected in the culture. Candidates should feel they aren’t being sold a “false bill of goods.” Show them that everyone has an equal shot at opportunities, pay, and having a say in the actions of your SOC.

Implement and complement

It’s not an overnight thing to tweak certain aspects of your culture to address issues with your current team, nor is it a fast-ask to to attract great talent and retain them far into the future. Talking to your team, engaging them with tools like surveys and open dialogue can begin to yield an actionable plan that you can take all the way to the job listing and the words you use in it. The key to being successful is to be genuine in your approach to building a culture that is inclusive, engaging, and fun.

The culture fit can also extend to partnerships. If you’re thinking of engaging a managed services partner to help you fill certain holes in the cybersecurity skills gap that may be affecting your own organization, it’s important to thoroughly vet that vendor. Much like partnering with a new hire in the quest to thwart attackers, implementing a long-term partnership with a managed services provider can complement your existing SOC for years to come. But it has to be a good fit: Is the provider dependable? Is there a 24/7 number you can call when you need immediate assistance? Beyond that, do your companies share similar values and ethical concerns?

You can learn more in our new eBook, 13 Tips for Overcoming the Cybersecurity Talent Shortage. It’s a deeper dive into the current cybersecurity skills gap and features steps you can take to address talent shortages. It also considers your current culture and its ability to amplify voices so that, together, you can extinguish the most critical threats.

How SOCAR built a streaming data pipeline to process IoT data for real-time analytics and control

Post Syndicated from DoYeun Kim original https://aws.amazon.com/blogs/big-data/how-socar-built-a-streaming-data-pipeline-to-process-iot-data-for-real-time-analytics-and-control/

SOCAR is the leading Korean mobility company with strong competitiveness in car-sharing. SOCAR has become a comprehensive mobility platform in collaboration with Nine2One, an e-bike sharing service, and Modu Company, an online parking platform. Backed by advanced technology and data, SOCAR solves mobility-related social problems, such as parking difficulties and traffic congestion, and changes the car ownership-oriented mobility habits in Korea.

SOCAR is building a new fleet management system to manage the many actions and processes that must occur in order for fleet vehicles to run on time, within budget, and at maximum efficiency. To achieve this, SOCAR is looking to build a highly scalable data platform using AWS services to collect, process, store, and analyze internet of things (IoT) streaming data from various vehicle devices and historical operational data.

This in-car device data, combined with operational data such as car details and reservation details, will provide a foundation for analytics use cases. For example, SOCAR will be able to notify customers if they have forgotten to turn their headlights off or to schedule a service if a battery is running low. Unfortunately, the previous architecture didn’t enable the enrichment of IoT data with operational data and couldn’t support streaming analytics use cases.

AWS Data Lab offers accelerated, joint-engineering engagements between customers and AWS technical resources to create tangible deliverables that accelerate data and analytics modernization initiatives. The Build Lab is a 2–5-day intensive build with a technical customer team.

In this post, we share how SOCAR engaged the Data Lab program to assist them in building a prototype solution to overcome these challenges, and to build the basis for accelerating their data project.

Use case 1: Streaming data analytics and real-time control

SOCAR wanted to utilize IoT data for a new business initiative. A fleet management system, where data comes from IoT devices in the vehicles, is a key input to drive business decisions and derive insights. This data is captured by AWS IoT and sent to Amazon Managed Streaming for Apache Kafka (Amazon MSK). By joining the IoT data to other operational datasets, including reservations, car information, device information, and others, the solution can support a number of functions across SOCAR’s business.

An example of real-time monitoring is when a customer turns off the car engine and closes the car door, but the headlights are still on. By using IoT data related to the car light, door, and engine, a notification is sent to the customer to inform them that the car headlights should be turned off.

Although this real-time control is important, they also want to collect historical data—both raw and curated data—in Amazon Simple Storage Service (Amazon S3) to support historical analytics and visualizations by using Amazon QuickSight.

Use case 2: Detect table schema change

The first challenge SOCAR faced was existing batch ingestion pipelines that were prone to breaking when schema changes occurred in the source systems. Additionally, these pipelines didn’t deliver data in a way that was easy for business analysts to consume. In order to meet the future data volumes and business requirements, they needed a pattern for the automated monitoring of batch pipelines with notification of schema changes and the ability to continue processing.

The second challenge was related to the complexity of the JSON files being ingested. The existing batch pipelines weren’t flattening the five-level nested structure, which made it difficult for business users and analysts to gain business insights without any effort on their end.

Overview of solution

In this solution, we followed the serverless data architecture to establish a data platform for SOCAR. This serverless architecture allowed SOCAR to run data pipelines continuously and scale automatically with no setup cost and without managing servers.

AWS Glue is used for both the streaming and batch data pipelines. Amazon Kinesis Data Analytics is used to deliver streaming data with subsecond latencies. In terms of storage, data is stored in Amazon S3 for historical data analysis, auditing, and backup. However, when frequent reading of the latest snapshot data is required by multiple users and applications concurrently, the data is stored and read from Amazon DynamoDB tables. DynamoDB is a key-value and document database that can support tables of virtually any size with horizontal scaling.

Let’s discuss the components of the solution in detail before walking through the steps of the entire data flow.

Component 1: Processing IoT streaming data with business data

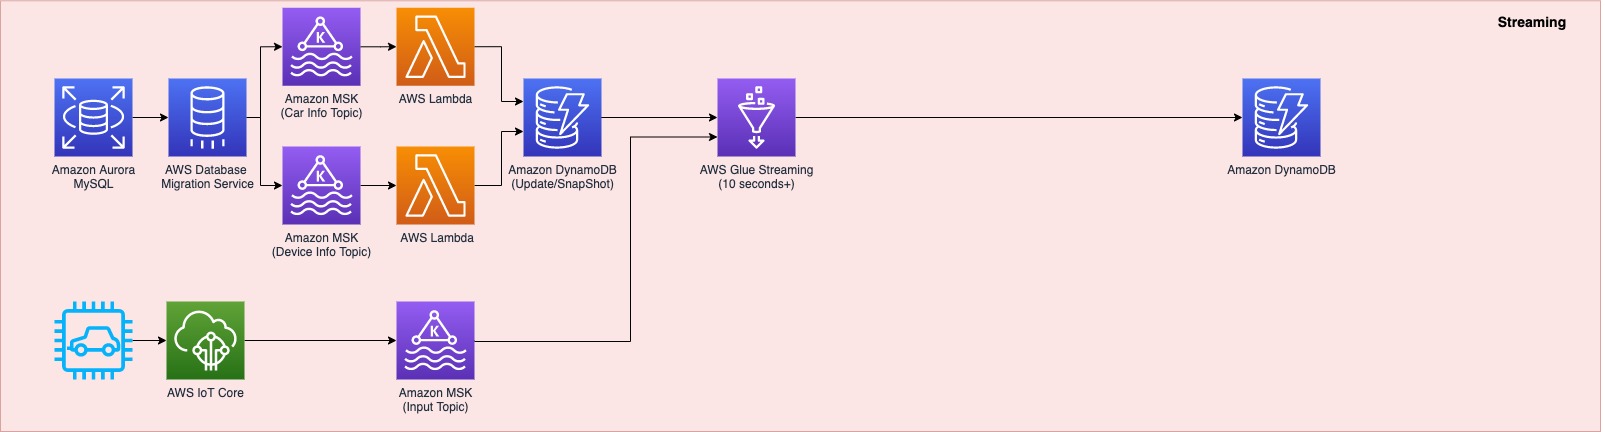
The first data pipeline (see the following diagram) processes IoT streaming data with business data from an Amazon Aurora MySQL-Compatible Edition database.

Whenever a transaction occurs in two tables in the Aurora MySQL database, this transaction is captured as data and then loaded into two MSK topics via AWS Database Management (AWS DMS) tasks. One topic conveys the car information table, and the other topic is for the device information table. This data is loaded into a single DynamoDB table that contains all the attributes (or columns) that exist in the two tables in the Aurora MySQL database, along with a primary key. This single DynamoDB table contains the latest snapshot data from the two DB tables, and is important because it contains the latest information of all the cars and devices for the lookup against the streaming IoT data. If the lookup were done on the database directly with the streaming data, it would impact the production database performance.

When the snapshot is available in DynamoDB, an AWS Glue streaming job runs continuously to collect the IoT data and join it with the latest snapshot data in the DynamoDB table to produce the up-to-date output, which is written into another DynamoDB table.

The up-to-date data in DynamoDB is used for real-time monitoring and control that SOCAR’s Data Analytics team performs for safety maintenance and fleet management. This data is ultimately consumed by a number of apps to perform various business activities, including route optimization, real-time monitoring for oil consumption and temperature, and to identify a driver’s driving pattern, tire wear and defect detection, and real-time car crash notifications.

Component 2: Processing IoT data and visualizing the data in dashboards

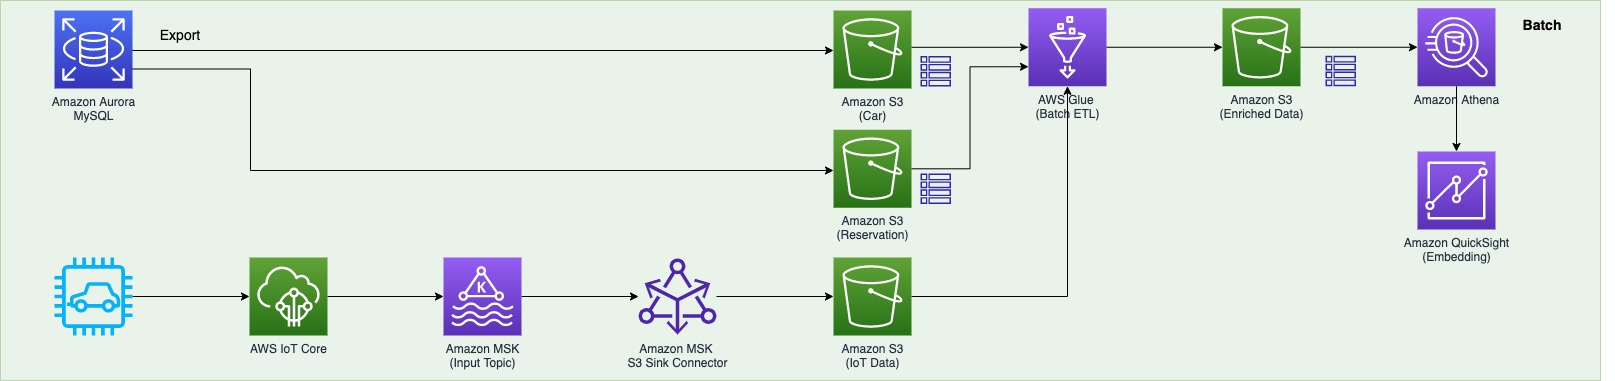
The second data pipeline (see the following diagram) batch processes the IoT data and visualizes it in QuickSight dashboards.

There are two data sources. The first is the Aurora MySQL database. The two database tables are exported into Amazon S3 from the Aurora MySQL cluster and registered in the AWS Glue Data Catalog as tables. The second data source is Amazon MSK, which receives streaming data from AWS IoT Core. This requires you to create a secure AWS Glue connection for an Apache Kafka data stream. SOCAR’s MSK cluster requires SASL_SSL as a security protocol (for more information, refer to Authentication and authorization for Apache Kafka APIs). To create an MSK connection in AWS Glue and set up connectivity, we use the following CLI command:

aws glue create-connection —connection-input
'{"Name":"kafka-connection","Description":"kafka connection example",
"ConnectionType":"KAFKA",
"ConnectionProperties":{
"KAFKA_BOOTSTRAP_SERVERS":"<server-ip-addresses>",
"KAFKA_SSL_ENABLED":"true",
// "KAFKA_CUSTOM_CERT": "s3://bucket/prefix/cert.pem",
"KAFKA_SECURITY_PROTOCOL" : "SASL_SSL",
"KAFKA_SKIP_CUSTOM_CERT_VALIDATION":"false",
"KAFKA_SASL_MECHANISM": "SCRAM-SHA-512",
"KAFKA_SASL_SCRAM_USERNAME": "<username>",
"KAFKA_SASL_SCRAM_PASSWORD: "<password>"
},
"PhysicalConnectionRequirements":
{"SubnetId":"subnet-xxx","SecurityGroupIdList":["sg-xxx"],"AvailabilityZone":"us-east-1a"}}'

Component 3: Real-time control

The third data pipeline processes the streaming IoT data in millisecond latency from Amazon MSK to produce the output in DynamoDB, and sends a notification in real time if any records are identified as an outlier based on business rules.

AWS IoT Core provides integrations with Amazon MSK to set up real-time streaming data pipelines. To do so, complete the following steps:

  1. On the AWS IoT Core console, choose Act in the navigation pane.
  2. Choose Rules, and create a new rule.
  3. For Actions, choose Add action and choose Kafka.
  4. Choose the VPC destination if required.
  5. Specify the Kafka topic.
  6. Specify the TLS bootstrap servers of your Amazon MSK cluster.

You can view the bootstrap server URLs in the client information of your MSK cluster details. The AWS IoT rule was created with the Kafka topic as an action to provide data from AWS IoT Core to Kafka topics.

SOCAR used Amazon Kinesis Data Analytics Studio to analyze streaming data in real time and build stream-processing applications using standard SQL and Python. We created one table from the Kafka topic using the following code:

CREATE TABLE table_name (
column_name1 VARCHAR,
column_name2 VARCHAR(100),
column_name3 VARCHAR,
column_name4 as TO_TIMESTAMP (`time_column`, 'EEE MMM dd HH:mm:ss z yyyy'),
 WATERMARK FOR column AS column -INTERVAL '5' SECOND
)
PARTITIONED BY (column_name5)
WITH (
'connector'= 'kafka',
'topic' = 'topic_name',
'properties.bootstrap.servers' = '<bootstrap servers shown in the MSK client info dialog>',
'format' = 'json',
'properties.group.id' = 'testGroup1',
'scan.startup.mode'= 'earliest-offset'
);

Then we applied a query with business logic to identify a particular set of records that need to be alerted. When this data is loaded back into another Kafka topic, AWS Lambda functions trigger the downstream action: either load the data into a DynamoDB table or send an email notification.

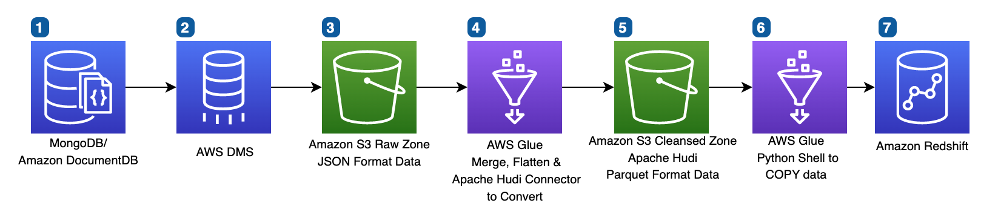
Component 4: Flattening the nested structure JSON and monitoring schema changes

The final data pipeline (see the following diagram) processes complex, semi-structured, and nested JSON files.

This step uses an AWS Glue DynamicFrame to flatten the nested structure and then land the output in Amazon S3. After the data is loaded, it’s scanned by an AWS Glue crawler to update the Data Catalog table and detect any changes in the schema.

Data flow: Putting it all together

The following diagram illustrates our complete data flow with each component.

Let’s walk through the steps of each pipeline.

The first data pipeline (in red) processes the IoT streaming data with the Aurora MySQL business data:

  1. AWS DMS is used for ongoing replication to continuously apply source changes to the target with minimal latency. The source includes two tables in the Aurora MySQL database tables (carinfo and deviceinfo), and each is linked to two MSK topics via AWS DMS tasks.
  2. Amazon MSK triggers a Lambda function, so whenever a topic receives data, a Lambda function runs to load data into DynamoDB table.
  3. There is a single DynamoDB table with columns that exist from the carinfo table and the deviceinfo table of the Aurora MySQL database. This table consists of all the data from two tables and stores the latest data by performing an upsert operation.
  4. An AWS Glue job continuously receives the IoT data and joins it with data in the DynamoDB table to produce the output into another DynamoDB target table.
  5. This target table contains the final data, which includes all the device and car status information from the IoT devices as well as metadata from the Aurora MySQL table.

The second data pipeline (in green) batch processes IoT data to use in dashboards and for visualization:

  1. The car and reservation data (in two DB tables) is exported via a SQL command from the Aurora MySQL database with the output data available in an S3 bucket. The folders that contain data are registered as an S3 location for the AWS Glue crawler and become available via the AWS Glue Data Catalog.
  2. The MSK input topic continuously receives data from AWS IoT. Each car has a number of IoT devices, and each device captures data and sends it to an MSK input topic. The Amazon MSK S3 sink connector is configured to export data from Kafka topics to Amazon S3 in JSON formats. In addition, the S3 connector exports data by guaranteeing exactly-once delivery semantics to consumers of the S3 objects it produces.
  3. The AWS Glue job runs in a daily batch to load the historical IoT data into Amazon S3 and into two tables (refer to step 1) to produce the output data in an Enriched folder in Amazon S3.
  4. Amazon Athena is used to query data from Amazon S3 and make it available as a dataset in QuickSight for visualizing historical data.

The third data pipeline (in blue) processes streaming IoT data from Amazon MSK with millisecond latency to produce the output in DynamoDB and send a notification:

  1. An Amazon Kinesis Data Analytics Studio notebook powered by Apache Zeppelin and Apache Flink is used to build and deploy its output as a Kinesis Data Analytics application. This application loads data from Amazon MSK in real time, and users can apply business logic to select particular events coming from the IoT real-time data, for example, the car engine is off and the doors are closed, but the headlights are still on. The particular event that users want to capture can be sent to another MSK topic (Outlier) via the Kinesis Data Analytics application.
  2. Amazon MSK triggers a Lambda function, so whenever a topic receives data, a Lambda function runs to send an email notification to users that are subscribed to an Amazon Simple Notification Service (Amazon SNS) topic. An email is published using an SNS notification.
  3. The Kinesis Data Analytics application loads data from AWS IoT, applies business logic, and then loads it into another MSK topic (output). Amazon MSK triggers a Lambda function when data is received, which loads data into a DynamoDB Append table.
  4. Amazon Kinesis Data Analytics Studio is used to run SQL commands for ad hoc interactive analysis on streaming data.

The final data pipeline (in yellow) processes complex, semi-structured, and nested JSON files, and sends a notification when a schema evolves.

  1. An AWS Glue job runs and reads the JSON data from Amazon S3 (as a source), applies logic to flatten the nested schema using a DynamicFrame, and pivots out array columns from the flattened frame.
  2. The output is stored in Amazon S3 and is automatically registered to the AWS Glue Data Catalog table.
  3. Whenever there is a new attribute or change in the JSON input data at any level in the nested structure, the new attribute and change are captured in Amazon EventBridge as an event from the AWS Glue Data Catalog. An email notification is published using Amazon SNS.

Conclusion

As a result of the four-day Build Lab, the SOCAR team left with a working prototype that is custom fit to their needs, gaining a clear path to production. The Data Lab allowed the SOCAR team to build a new streaming data pipeline, enrich IoT data with operational data, and enhance the existing data pipeline to process complex nested JSON data. This establishes a baseline architecture to support the new fleet management system beyond the car-sharing business.


About the Authors

DoYeun Kim is the Head of Data Engineering at SOCAR. He is a passionate software engineering professional with 19+ years experience. He leads a team of 10+ engineers who are responsible for the data platform, data warehouse and MLOps engineering, as well as building in-house data products.

SangSu Park is a Lead Data Architect in SOCAR’s cloud DB team. His passion is to keep learning, embrace challenges, and strive for mutual growth through communication. He loves to travel in search of new cities and places.

YoungMin Park is a Lead Architect in SOCAR’s cloud infrastructure team. His philosophy in life is-whatever it may be-to challenge, fail, learn, and share such experiences to build a better tomorrow for the world. He enjoys building expertise in various fields and basketball.

Younggu Yun is a Senior Data Lab Architect at AWS. He works with customers around the APAC region to help them achieve business goals and solve technical problems by providing prescriptive architectural guidance, sharing best practices, and building innovative solutions together. In his free time, his son and he are obsessed with Lego blocks to build creative models.

Vicky Falconer leads the AWS Data Lab program across APAC, offering accelerated joint engineering engagements between teams of customer builders and AWS technical resources to create tangible deliverables that accelerate data analytics modernization and machine learning initiatives.

Introducing the AWS Lambda Telemetry API

Post Syndicated from Julian Wood original https://aws.amazon.com/blogs/compute/introducing-the-aws-lambda-telemetry-api/

This blog post is written by Anton Aleksandrov, Principal Solution Architect and Shridhar Pandey, Senior Product Manager

Today AWS is announcing the AWS Lambda Telemetry API. This provides an easier way to receive enhanced function telemetry directly from the Lambda service and send it to custom destinations. Developers and operators can now more easily monitor and observe their Lambda functions using Lambda extensions from their preferred observability tool providers.

Extensions can use the Lambda Logs API to collect logs generated by the Lambda service and code running in their Lambda function. While the Logs API provides extensions with access to logs, it does not provide a way to collect additional telemetry, such as traces and metrics, which the Lambda service generates during initialization and invocation of your Lambda function.

Previously, observability tools retrieved traces from AWS X-Ray using the AWS X-Ray API or built their own custom tracing libraries to generate traces during Lambda function invocation. Tools required customers to modify AWS Identity and Access Management (IAM) policies to grant access to the traces from X-Ray. This caused additional complexity for tools to collect traces and metrics from multiple sources and introduced latency in seeing Lambda function traces in observability tool dashboards.

The Lambda Telemetry API is a new API that enhances the existing Lambda Logs API functionality. With the new Telemetry API, observability tools can receive function and extension logs, and also events, traces, and metrics directly from within the Lambda service. You do not need to install additional tracing libraries. This reduces latency and simplifies access permissions, as the extension does not require additional access to X-Ray.

Today you can use Telemetry API-enabled extensions to send telemetry data to Coralogix, Datadog, Dynatrace, Lumigo, New Relic, Sedai, Site24x7, Serverless.com, Sumo Logic, Sysdig, Thundra, or your own custom destinations.

Overview

To receive logs, extensions subscribe using the new Lambda Telemetry API.

Lambda Telemetry API

Lambda Telemetry API

The Lambda service then streams the telemetry events directly to the extension. The events include platform events, trace spans, function and extension logs, and additional Lambda platform metrics. The extension can then process, filter, and route them to any preferred destination.

You can add an extension from the tooling provider of your choice to your Lambda function. You can deploy extensions, including ones that use the Telemetry API, as Lambda layers, with the AWS Management Console and AWS Command Line Interface (AWS CLI). You can also use infrastructure as code tools such as AWS CloudFormation, the AWS Serverless Application Model (AWS SAM), Serverless Framework, and Terraform.

Lambda Extensions from the AWS Partner Network (APN) available at launch

Today, you can use Lambda extensions that use Telemetry API from the following Lambda partners:

  • The Coralogix AWS Lambda Telemetry Exporter extension now offers improved monitoring and alerting for Lambda functions by further streamlining collection and correlation of logs, metrics, and traces.
  • The Datadog extension further simplifies how you visualize the impact of cold starts, and monitor and alert on latency, duration, and payload size of your Lambda functions by collecting logs, traces, and real-time metrics from your function in a simple and cost-effective way.
  • Dynatrace now provides a simplified observability configuration for AWS Lambda through a seamless integration. The new solution delivers low-latency telemetry, enables monitoring at scale, and helps reduce monitoring costs for your serverless workloads.
  • The Lumigo lambda-log-shipper extension simplifies aggregating and forwarding Lambda logs to third-party tools. It now also makes it easy for you to detect Lambda function timeouts.
  • The New Relic extension now provides a unified observability view for your Lambda functions with insights that help you better understand and optimize the performance of your functions.
  • Sedai now uses the Telemetry API to help you improve the performance and availability of your Lambda functions by gathering insights about your function and providing recommendations for manual and autonomous remediation in a cost-effective manner.
  • The Site24x7 extension now offers new metrics, which enable you to get deeper insights into the different phases of the Lambda function lifecycle, such as initialization and invocation.
  • Serverless.com now uses the Telemetry API to provide real-time performance details for your Lambda function through the Dev Mode feature of their new Serverless Console V.2 offering, which simplifies debugging in the AWS Cloud.
  • Sumo Logic now makes it easier, faster, and more cost-effective for you to get your mission-critical Lambda function telemetry sent directly to Sumo Logic so you could quickly analyze and remediate errors and exceptions.
  • The Sysdig Monitor extension generates and collects real-time metrics directly from the Lambda platform. The simplified instrumentation offers lower latency, reduced MTTR (mean time to resolution) for critical issues, and cost benefits while monitoring your serverless applications.
  • The Thundra extension enables you to export logs, metrics, and events for Lambda execution environment lifecycle events emitted by the Telemetry API to a destination of your choice such as an S3 bucket, a database, or a monitoring backend.

Seeing example Telemetry API extensions in action

This demo shows an example of using a telemetry extension to receive telemetry, batch, and send it to a desired destination.

To set up the example, visit the GitHub repo for the extension implemented in the language of your choice and follow the instructions in the README.md file.

To configure the batching behavior, which controls when the extension sends the data, set the Lambda environment variable DISPATCH_MIN_BATCH_SIZE. When the extension receives the batch threshold, it POSTs the telemetry events batch to the destination specified in the DISPATCH_POST_URI environment variable.

You can configure an example DISPATCH_POST_URL for the extension to deliver the telemetry data using https://webhook.site/.

Lambda environment variables

Lambda environment variables

Telemetry events for one invoke may be received and processed during the next invocation. Events for the last invoke may be processed during the SHUTDOWN event.

Test and invoke the function from the Lambda console, or AWS CLI. You can see that the webhook receives the telemetry data.

Webhook receiving telemetry data

Webhook receiving telemetry data

You can also view the function and extension logs in CloudWatch Logs. The example extension includes verbose logging to understand the extension lifecycle.

CloudWatch Logs showing extension verbose logging

Sample Telemetry API events

When the extension receives telemetry data, each event contains a JSON dictionary with additional information, such as related metrics or trace spans. The following example shows a function initialization event. You can see that the function initializes with on-demand concurrency. The runtime version is Node.js 14, the initialization is successful, and the initialization duration is 123 milliseconds.

{
  "time": "2022-08-02T12:01:23.521Z",
  "type": "platform.initStart",
  "record": {
    "initializationType": "on-demand",
    "phase":"init",
    "runtimeVersion": "nodejs-14.v3",
    "runtimeVersionArn": "arn"
  }
}

{
  "time": "2022-08-02T12:01:23.521Z",
  "type": "platform.initRuntimeDone",
  "record": {
    "initializationType": "on-demand",
    "status": "success"
  }
}

{
  "time": "2022-08-02T12:01:23.521Z",
  "type": "platform.initReport",
  "record": {
    "initializationType": "on-demand",
    "phase":"init",
    "metrics": {
      "durationMs": 123.0,
    }
  }
}

Function invocation events include the associated requestId and tracing information connecting this invocation with the X-Ray tracing context, and platform spans showing response latency and response duration as well as invocation metrics such as duration in milliseconds.

{
    "time": "2022-08-02T12:01:23.521Z",
    "type": "platform.start",
    "record": {
      "requestId": "e6b761a9-c52d-415d-b040-7ba94b9452f3",
      "version": "$LATEST",
      "tracing": {
        "spanId": "54565fb41ac79632",
        "type": "X-Amzn-Trace-Id",
        "value": "Root=1-62e900b2-710d76f009d6e7785905449a;Parent=0efbd19962d95b05;Sampled=1"
      }
    }
  }
  
  {
    "time": "2022-08-02T12:01:23.521Z",
    "type": "platform.runtimeDone",
    "record": {
      "requestId": "e6b761a9-c52d-415d-b040-7ba94b9452f3",
      "status": "success",
      "tracing": {
        "spanId": "54565fb41ac79632",
        "type": "X-Amzn-Trace-Id",
        "value": "Root=1-62e900b2-710d76f009d6e7785905449a;Parent=0efbd19962d95b05;Sampled=1"
      },
      "spans": [
        {
          "name": "responseLatency", 
          "start": "2022-08-02T12:01:23.521Z",
          "durationMs": 23.02
        },
        {
          "name": "responseDuration", 
          "start": "2022-08-02T12:01:23.521Z",
          "durationMs": 20
        }
      ],
      "metrics": {
        "durationMs": 200.0,
        "producedBytes": 15
      }
    }
  }
  
  {
    "time": "2022-08-02T12:01:23.521Z",
    "type": "platform.report",
    "record": {
      "requestId": "e6b761a9-c52d-415d-b040-7ba94b9452f3",
      "metrics": {
        "durationMs": 220.0,
        "billedDurationMs": 300,
        "memorySizeMB": 128,
        "maxMemoryUsedMB": 90,
        "initDurationMs": 200.0
      },
      "tracing": {
        "spanId": "54565fb41ac79632",
        "type": "X-Amzn-Trace-Id",
        "value": "Root=1-62e900b2-710d76f009d6e7785905449a;Parent=0efbd19962d95b05;Sampled=1"
      }
    }
  }

Building a Telemetry API extension

Lambda extensions run as independent processes in the execution environment and continue to run after the function invocation is fully processed. Because extensions run as separate processes, you can write them in a language different from the function code. We recommend implementing extensions using a compiled language as a self-contained binary. This makes the extension compatible with all the supported runtimes.

Extensions that use the Telemetry API have the following lifecycle.

Telemetry API lifecycle

Telemetry API lifecycle

  1. The extension registers itself using the Lambda Extension API and subscribes to receive INVOKE and SHUTDOWN events. With the Telemetry API, the registration response body contains additional information, such as function name, function version, and account ID.
  2. The extensions start a telemetry listener. This is a local HTTP or TCP endpoint. We recommend using HTTP rather than TCP.
  3. The extensions use the Telemetry API to subscribe to desired telemetry event streams.
  4. The Lambda service POSTs telemetry stream data to your telemetry listener. We recommend batching the telemetry data as it arrives to the listener. You can perform any custom processing on this data and send it on to an S3 bucket, other custom destination, or an external observability service.

See the Telemetry API documentation and sample extensions for additional details.

The Lambda Telemetry API supersedes the Lambda Logs API. While the Logs API remains fully functional, AWS recommends using the Telemetry API. New functionality is only available with the Extensions API. Extensions can only subscribe to either the Logs or Telemetry API. After subscribing to one of them, any attempt to subscribe to the other returns an error.

Mapping Telemetry API schema to OpenTelemetry spans

The Lambda Telemetry API schema is semantically compatible with OpenTelemetry (OTEL). You can use events received from the Telemetry API to build and report OTEL spans. Three Telemetry API lifecycle events represent a single function invocation: start, runtimeDone, and runtimeReport. You should represent this as a single OTEL span. You can add additional details to your spans using information available in runtimeDone events under the event.spans property.

Mapping of Telemetry API events to OTEL spans is described in the Telemetry API documentation.

Metrics and pricing

The Telemetry API introduces new per-invoke metrics to help you understand the impact of extensions on your function’s performance. The metrics are available within the report.runtimeDone event.

  • platform.runtime measures the time taken by the Lambda Runtime to run your function handler code.
  • producedBytes measures the number of bytes returned during the invoke phase.

There are also two new trace spans available within the report.runtimeDone event:

  • responseLatencyMs measures the time taken by the Runtime to send a response.
  • responseDurationMs measures the time taken by the Runtime to finish sending the response from when it starts streaming it.

Extensions using Telemetry API, like other extensions, share the same billing model as Lambda functions. When using Lambda functions with extensions, you pay for requests served, and the combined compute time used to run your code and all extensions, in 1-ms increments. To learn more about the billing for extensions, visit the Lambda pricing page.

Useful links

Conclusion

The Lambda Telemetry API allows you to receive enhanced telemetry data more easily using your preferred monitoring and observability tools. The Telemetry API enhances the functionality of the Logs API to receive logs, metrics, and traces directly from the Lambda service. Developers and operators can send telemetry to destinations without custom libraries, with reduced latency, and simplified permissions.

To see how the Telemetry API works, try the demos in the GitHub repository.

Build your own extensions using the Telemetry API today, or use extensions provided by the Lambda observability partners.

For more serverless learning resources, visit Serverless Land.

An Untrustworthy TLS Certificate in Browsers

Post Syndicated from Bruce Schneier original https://www.schneier.com/blog/archives/2022/11/an-untrustworthy-tls-certificate-in-browsers.html

The major browsers natively trust a whole bunch of certificate authorities, and some of them are really sketchy:

Google’s Chrome, Apple’s Safari, nonprofit Firefox and others allow the company, TrustCor Systems, to act as what’s known as a root certificate authority, a powerful spot in the internet’s infrastructure that guarantees websites are not fake, guiding users to them seamlessly.

The company’s Panamanian registration records show that it has the identical slate of officers, agents and partners as a spyware maker identified this year as an affiliate of Arizona-based Packet Forensics, which public contracting records and company documents show has sold communication interception services to U.S. government agencies for more than a decade.

[…]

In the earlier spyware matter, researchers Joel Reardon of the University of Calgary and Serge Egelman of the University of California at Berkeley found that a Panamanian company, Measurement Systems, had been paying developers to include code in a variety of innocuous apps to record and transmit users’ phone numbers, email addresses and exact locations. They estimated that those apps were downloaded more than 60 million times, including 10 million downloads of Muslim prayer apps.

Measurement Systems’ website was registered by Vostrom Holdings, according to historic domain name records. Vostrom filed papers in 2007 to do business as Packet Forensics, according to Virginia state records. Measurement Systems was registered in Virginia by Saulino, according to another state filing.

More details by Reardon.

Cory Doctorow does a great job explaining the context and the general security issues.

EDITED TO ADD (11/10): Slashdot thread.

[$] Class action against GitHub Copilot

Post Syndicated from original https://lwn.net/Articles/914150/

The GitHub Copilot
offering claims to assist software developers through the application of
machine-learning techniques. Since its inception, Copilot has been
followed by controversies, mostly based on
the extensive use of free software to train the machine-learning engine. The announcement of a
class-action lawsuit against Copilot was thus unsurprising. The lawsuit
raises all of the expected licensing questions and more;
while some in our
community have welcomed this attack against Copilot,
it is not clear that this action will lead to good results.

The collective thoughts of the interwebz