Security updates for Friday

Post Syndicated from jake original https://lwn.net/Articles/940481/

Security updates have been issued by CentOS (bind and kernel), Debian (cjose, firefox-esr, ntpsec, and python-django), Fedora (chromium, firefox, librsvg2, and webkitgtk), Red Hat (firefox), Scientific Linux (firefox and openssh), SUSE (go1.20, ImageMagick, javapackages-tools, javassist, mysql-connector-java, protobuf, python-python-gflags, kernel, openssl-1_1, pipewire, python-pip, and xtrans), and Ubuntu (cargo, rust-cargo, cpio, poppler, and xmltooling).

Преди местните избори: връщат уволнени корупционери в горския сектор Дървената мафия на ГЕРБ – ДПС впрегна и “Промяната” в овладяването на горите

Post Syndicated from Николай Марченко original https://bivol.bg/darvenata-mafia-gerb-dps-ppdb.html

петък 4 август 2023


Подготвяйки се за местните избори, дървената мафия с чадър от ГЕРБ и ДПС продължава да си възвръща контрола върху дърводобива в България. “В момента извиват ръцете на земеделския министър да…

AWS Cloud service considerations for designing multi-tenant SaaS solutions

Post Syndicated from Dennis Greene original https://aws.amazon.com/blogs/architecture/aws-cloud-service-considerations-for-designing-multi-tenant-saas-solutions/

An increasing number of software as a service (SaaS) providers are considering the move from single to multi-tenant to utilize resources more efficiently and reduce operational costs. This blog aims to inform customers of considerations when evaluating a transformation to multi-tenancy in the Amazon Web Services (AWS) Cloud. You’ll find valuable information on how to optimize your cloud-based SaaS design to reduce operating expenses, increase resiliency, and offer a high-performing experience for your customers.

Single versus multi-tenancy

In a multi-tenant architecture, resources like compute, storage, and databases can be shared among independent tenants. In contrast, a single-tenant architecture allocates exclusive resources to each tenant.

Let’s consider a SaaS product that needs to support many customers, each with their own independent deployed website. Using a single-tenant model (see Figure 1), the SaaS provider may opt to utilize a dedicated AWS account to host each tenant’s workloads. To contain their respective workloads, each tenant would have their own Amazon Elastic Compute Cloud (Amazon EC2) instances organized within an Auto Scaling group. Access to the applications running in these EC2 instances would be done via an Application Load Balancer (ALB). Each tenant would be allocated their own database environment using Amazon Relational Database Service (RDS). The website’s storage (consisting of PHP, JavaScript, CSS, and HTML files) would be provided by Amazon Elastic Block Store (EBS) volumes attached to the EC2 instances. The SaaS provider would have a control plane AWS account used to create and modify these tenant-specific accounts.

Single-tenant configuration

Figure 1. Single-tenant configuration

To transition to a multi-tenant pattern, the SaaS provider can use containerization to package each website, and a container orchestrator to deploy the websites across shared compute nodes (EC2 instances). Kubernetes can be employed as a container orchestrator, and a website would then be represented by a Kubernetes deployment and its associated pods. A Kubernetes namespace would serve as the logical encapsulation of the tenant-specific resources, as each tenant would be mapped to one Kubernetes namespace. The Kubernetes HorizontalPodAutoscaler can be utilized for autoscaling purposes, dynamically adjusting the number of replicas in the deployment on a given namespace based on workload demands.

When additional compute resources are required, tools such as the Cluster Autoscaler, or Karpenter, can dynamically add more EC2 instances to the shared Kubernetes Cluster. An ALB can be reused by multiple tenants to route traffic to the appropriate pods. For RDS, SaaS providers can use tenant-specific database schemas to separate tenant data. For static data, Amazon Elastic File System (EFS) and tenant-specific directories can be employed. The SaaS provider would still have a control plane AWS account that would now interact with the Kubernetes and AWS APIs to create and update tenant-specific resources.

This transition to a multi-tenant design utilizing Kubernetes, Amazon Elastic Kubernetes Service (EKS), and other managed services offers numerous advantages. It enables efficient resource utilization by leveraging containerization and auto-scaling capabilities, reducing costs, and optimizing performance (see Figure 2).

Multi-tenant configuration

Figure 2. Multi-tenant configuration

EKS cluster sizing and customer segmentation considerations in multi-tenancy designs

A high concentration of SaaS tenants hosted within the same system results in a large “blast radius.” This means a failure within the system has the potential to impact all resident tenants. This situation can lead to downtime for multiple tenants at once. To address this problem, SaaS providers are encouraged to partition their customers amongst multiple AWS accounts, each with their own deployments of this multi-tenant architecture. The number of tenants that can be present in a single cluster is a determination that can only be made by the SaaS provider after weighing the risks. Compare the shared fate of some subset of their customers, against the possible efficiency benefits of a multi-tenant architecture.

EKS security

SaaS providers must evaluate whether it’s appropriate for them to make use of containers as a workload isolation boundary. This is of particular importance in multi-tenant Kubernetes architectures, given that containers running on a single Amazon EC2 instance will share the underlying Linux kernel. Security vulnerabilities place this shared resource (the EC2 instance) at risk from attack vectors from the host Linux instance. Risk is elevated when any container running in a Kubernetes Pod cluster initiates untrusted code. This risk is heightened if SaaS providers permit tenants to “bring their code”. Kubernetes is a single tenant orchestrator, but with a multi-tenant approach to SaaS architectures, a single instance of the Amazon EKS control plane will be shared among all the workloads running within a cluster. Amazon EKS considers the cluster as the hard isolation security boundary. Every Amazon EKS managed Kubernetes cluster is isolated in a dedicated single-tenant Amazon VPC. At present, hard multi-tenancy can only be implemented by provisioning a unique cluster for each tenant.

EFS considerations

A SaaS provider may consider EFS as the storage solution for the static content of the multiple tenants. This provides them with a straightforward, serverless, and elastic file system. Directories may be used to separate the content for each tenant. While this approach of creating tenant-specific directories in EFS provides many benefits, there may be challenges harvesting per-tenant utilization and performance metrics. This can result in operational challenges for providers that need to granularly meter per-tenant usage of resources. Consequently, noisy neighbors will be difficult to identify and remediate. To resolve this, SaaS providers should consider building a custom solution to monitor the individual tenants in the multi-tenant file system by leveraging storage and throughput/IOPS metrics.

RDS considerations

Multi-tenant workloads, where data for multiple customers or end users is consolidated in the same RDS database cluster, can present operational challenges regarding per-tenant observability. Both MySQL Community Edition and open-source PostgreSQL have limited ability to provide per-tenant observability and resource governance. AWS customers operating multi-tenant workloads often use a combination of ‘database’ or ‘schema’ and ‘database user’ accounts as substitutes. AWS customers should use alternate mechanisms to establish a mapping between a tenant and these substitutes. This will give you the ability to process raw observability data from the database engine externally. You can then map these substitutes back to tenants, and distinguish tenants in the observability data.

Conclusion

In this blog, we’ve shown what to consider when moving to a multi-tenancy SaaS solution in the AWS Cloud, how to optimize your cloud-based SaaS design, and some challenges and remediations. Invest effort early in your SaaS design strategy to explore your customer requirements for tenancy. Work backwards from your SaaS tenants end goals. What level of computing performance do they require? What are the required cyber security features? How will you, as the SaaS provider, monitor and operate your platform with the target tenancy configuration? Your respective AWS account team is highly qualified to advise on these design decisions. Take advantage of reviewing and improving your design using the AWS Well-Architected Framework. The tenancy design process should be followed by extensive prototyping to validate functionality before production rollout.

Related information

Political Milestones for AI

Post Syndicated from Bruce Schneier original https://www.schneier.com/blog/archives/2023/08/political-milestones-for-ai.html

ChatGPT was released just nine months ago, and we are still learning how it will affect our daily lives, our careers, and even our systems of self-governance.

But when it comes to how AI may threaten our democracy, much of the public conversation lacks imagination. People talk about the danger of campaigns that attack opponents with fake images (or fake audio or video) because we already have decades of experience dealing with doctored images. We’re on the lookout for foreign governments that spread misinformation because we were traumatized by the 2016 US presidential election. And we worry that AI-generated opinions will swamp the political preferences of real people because we’ve seen political “astroturfing”—the use of fake online accounts to give the illusion of support for a policy—grow for decades.

Threats of this sort seem urgent and disturbing because they’re salient. We know what to look for, and we can easily imagine their effects.

The truth is, the future will be much more interesting. And even some of the most stupendous potential impacts of AI on politics won’t be all bad. We can draw some fairly straight lines between the current capabilities of AI tools and real-world outcomes that, by the standards of current public understanding, seem truly startling.

With this in mind, we propose six milestones that will herald a new era of democratic politics driven by AI. All feel achievable—perhaps not with today’s technology and levels of AI adoption, but very possibly in the near future.

Good benchmarks should be meaningful, representing significant outcomes that come with real-world consequences. They should be plausible; they must be realistically achievable in the foreseeable future. And they should be observable—we should be able to recognize when they’ve been achieved.

Worries about AI swaying an election will very likely fail the observability test. While the risks of election manipulation through the robotic promotion of a candidate’s or party’s interests is a legitimate threat, elections are massively complex. Just as the debate continues to rage over why and how Donald Trump won the presidency in 2016, we’re unlikely to be able to attribute a surprising electoral outcome to any particular AI intervention.

Thinking further into the future: Could an AI candidate ever be elected to office? In the world of speculative fiction, from The Twilight Zone to Black Mirror, there is growing interest in the possibility of an AI or technologically assisted, otherwise-not-traditionally-eligible candidate winning an election. In an era where deepfaked videos can misrepresent the views and actions of human candidates and human politicians can choose to be represented by AI avatars or even robots, it is certainly possible for an AI candidate to mimic the media presence of a politician. Virtual politicians have received votes in national elections, for example in Russia in 2017. But this doesn’t pass the plausibility test. The voting public and legal establishment are likely to accept more and more automation and assistance supported by AI, but the age of non-human elected officials is far off.

Let’s start with some milestones that are already on the cusp of reality. These are achievements that seem well within the technical scope of existing AI technologies and for which the groundwork has already been laid.

Milestone #1: The acceptance by a legislature or agency of a testimony or comment generated by, and submitted under the name of, an AI.

Arguably, we’ve already seen legislation drafted by AI, albeit under the direction of human users and introduced by human legislators. After some early examples of bills written by AIs were introduced in Massachusetts and the US House of Representatives, many major legislative bodies have had their “first bill written by AI,” “used ChatGPT to generate committee remarks,” or “first floor speech written by AI” events.

Many of these bills and speeches are more stunt than serious, and they have received more criticism than consideration. They are short, have trivial levels of policy substance, or were heavily edited or guided by human legislators (through highly specific prompts to large language model-based AI tools like ChatGPT).

The interesting milestone along these lines will be the acceptance of testimony on legislation, or a comment submitted to an agency, drafted entirely by AI. To be sure, a large fraction of all writing going forward will be assisted by—and will truly benefit from—AI assistive technologies. So to avoid making this milestone trivial, we have to add the second clause: “submitted under the name of the AI.”

What would make this benchmark significant is the submission under the AI’s own name; that is, the acceptance by a governing body of the AI as proffering a legitimate perspective in public debate. Regardless of the public fervor over AI, this one won’t take long. The New York Times has published a letter under the name of ChatGPT (responding to an opinion piece we wrote), and legislators are already turning to AI to write high-profile opening remarks at committee hearings.

Milestone #2: The adoption of the first novel legislative amendment to a bill written by AI.

Moving beyond testimony, there is an immediate pathway for AI-generated policies to become law: microlegislation. This involves making tweaks to existing laws or bills that are tuned to serve some particular interest. It is a natural starting point for AI because it’s tightly scoped, involving small changes guided by a clear directive associated with a well-defined purpose.

By design, microlegislation is often implemented surreptitiously. It may even be filed anonymously within a deluge of other amendments to obscure its intended beneficiary. For that reason, microlegislation can often be bad for society, and it is ripe for exploitation by generative AI that would otherwise be subject to heavy scrutiny from a polity on guard for risks posed by AI.

Milestone #3: AI-generated political messaging outscores campaign consultant recommendations in poll testing.

Some of the most important near-term implications of AI for politics will happen largely behind closed doors. Like everyone else, political campaigners and pollsters will turn to AI to help with their jobs. We’re already seeing campaigners turn to AI-generated images to manufacture social content and pollsters simulate results using AI-generated respondents.

The next step in this evolution is political messaging developed by AI. A mainstay of the campaigner’s toolbox today is the message testing survey, where a few alternate formulations of a position are written down and tested with audiences to see which will generate more attention and a more positive response. Just as an experienced political pollster can anticipate effective messaging strategies pretty well based on observations from past campaigns and their impression of the state of the public debate, so can an AI trained on reams of public discourse, campaign rhetoric, and political reporting.

With these near-term milestones firmly in sight, let’s look further to some truly revolutionary possibilities. While these concepts may have seemed absurd just a year ago, they are increasingly conceivable with either current or near-future technologies.

Milestone #4: AI creates a political party with its own platform, attracting human candidates who win elections.

While an AI is unlikely to be allowed to run for and hold office, it is plausible that one may be able to found a political party. An AI could generate a political platform calculated to attract the interest of some cross-section of the public and, acting independently or through a human intermediary (hired help, like a political consultant or legal firm), could register formally as a political party. It could collect signatures to win a place on ballots and attract human candidates to run for office under its banner.

A big step in this direction has already been taken, via the campaign of the Danish Synthetic Party in 2022. An artist collective in Denmark created an AI chatbot to interact with human members of its community on Discord, exploring political ideology in conversation with them and on the basis of an analysis of historical party platforms in the country. All this happened with earlier generations of general purpose AI, not current systems like ChatGPT. However, the party failed to receive enough signatures to earn a spot on the ballot, and therefore did not win parliamentary representation.

Future AI-led efforts may succeed. One could imagine a generative AI with skills at the level of or beyond today’s leading technologies could formulate a set of policy positions targeted to build support among people of a specific demographic, or even an effective consensus platform capable of attracting broad-based support. Particularly in a European-style multiparty system, we can imagine a new party with a strong news hook—an AI at its core—winning attention and votes.

Milestone #5: AI autonomously generates profit and makes political campaign contributions.

Let’s turn next to the essential capability of modern politics: fundraising. “An entity capable of directing contributions to a campaign fund” might be a realpolitik definition of a political actor, and AI is potentially capable of this.

Like a human, an AI could conceivably generate contributions to a political campaign in a variety of ways. It could take a seed investment from a human controlling the AI and invest it to yield a return. It could start a business that generates revenue. There is growing interest and experimentation in auto-hustling: AI agents that set about autonomously growing businesses or otherwise generating profit. While ChatGPT-generated businesses may not yet have taken the world by storm, this possibility is in the same spirit as the algorithmic agents powering modern high-speed trading and so-called autonomous finance capabilities that are already helping to automate business and financial decisions.

Or, like most political entrepreneurs, AI could generate political messaging to convince humans to spend their own money on a defined campaign or cause. The AI would likely need to have some humans in the loop, and register its activities to the government (in the US context, as officers of a 501(c)(4) or political action committee).

Milestone #6: AI achieves a coordinated policy outcome across multiple jurisdictions.

Lastly, we come to the most meaningful of impacts: achieving outcomes in public policy. Even if AI cannot—now or in the future—be said to have its own desires or preferences, it could be programmed by humans to have a goal, such as lowering taxes or relieving a market regulation.

An AI has many of the same tools humans use to achieve these ends. It may advocate, formulating messaging and promoting ideas through digital channels like social media posts and videos. It may lobby, directing ideas and influence to key policymakers, even writing legislation. It may spend; see milestone #5.

The “multiple jurisdictions” piece is key to this milestone. A single law passed may be reasonably attributed to myriad factors: a charismatic champion, a political movement, a change in circumstances. The influence of any one actor, such as an AI, will be more demonstrable if it is successful simultaneously in many different places. And the digital scalability of AI gives it a special advantage in achieving these kinds of coordinated outcomes.

The greatest challenge to most of these milestones is their observability: will we know it when we see it? The first campaign consultant whose ideas lose out to an AI may not be eager to report that fact. Neither will the campaign. Regarding fundraising, it’s hard enough for us to track down the human actors who are responsible for the “dark money” contributions controlling much of modern political finance; will we know if a future dominant force in fundraising for political action committees is an AI?

We’re likely to observe some of these milestones indirectly. At some point, perhaps politicians’ dollars will start migrating en masse to AI-based campaign consultancies and, eventually, we may realize that political movements sweeping across states or countries have been AI-assisted.

While the progression of technology is often unsettling, we need not fear these milestones. A new political platform that wins public support is itself a neutral proposition; it may lead to good or bad policy outcomes. Likewise, a successful policy program may or may not be beneficial to one group of constituents or another.

We think the six milestones outlined here are among the most viable and meaningful upcoming interactions between AI and democracy, but they are hardly the only scenarios to consider. The point is that our AI-driven political future will involve far more than deepfaked campaign ads and manufactured letter-writing campaigns. We should all be thinking more creatively about what comes next and be vigilant in steering our politics toward the best possible ends, no matter their means.

This essay was written with Nathan Sanders, and previously appeared in MIT Technology Review.

Version 1.2.2a

Post Syndicated from NTPsec Project Blog original https://blog.ntpsec.org/2023/08/03/version-1.2.2a.html

The NTPsec Project is pleased to announce the tagging of version 1.2.2a

  • Fix a crash in ntpd if NTS is disabled and an NTS-enabled client request
    (mode 3) is received.
    (CVE-2023-4012)
    #794

For other changes since the previous release, please consult
the project NEWS.adoc file
at https://gitlab.com/NTPsec/ntpsec/-/blob/master/NEWS.adoc

Getting this release

You can clone the git repo
from https://gitlab.com/NTPsec/ntpsec.git
and you can download the release tarballs with sums and signatures
from https://ftp.ntpsec.org/pub/releases/

This release is signed with the GPG key id
E57235D22764129FA4F2F4D17F52608ED0E49D76

PenTales: A Badge, a Tag, and a Bunch of Unattended Chemicals; Why Physical Social Engineering Engagements are an Important Part of Security

Post Syndicated from Bennett Gogarty original https://blog.rapid7.com/2023/08/03/a-badge-a-tag-and-a-bunch-of-unattended-chemicals-why-physical-social-engineering-engagements-are-an-important-part-of-security/

PenTales: A Badge, a Tag, and a Bunch of Unattended Chemicals; Why Physical Social Engineering Engagements are an Important Part of Security

At Rapid7 we love a good pen test story. So often they show the cleverness, skill, resilience, and dedication to our customer’s security that can only come from actively trying to break it! In this series, we’re going to share some of our favorite tales from the pen test desk and hopefully highlight some ways you can improve your own organization’s security.

Rapid7 was tasked with performing a physical social engineering engagement for a pharmaceutical company. Physical social engineering penetration tests involve actually entering the physical space of the target. In this case, we were able to enter the facility via tailgating behind an unsuspecting employee.

After gaining access inside the client’s office space, I traversed multiple floors without having a valid RFID badge thanks to even more tailgating and unassuming employees. When I reached an unattended conference room, I was able to plug a laptop into the network due to lack of network access controls. I employed a tool called ‘Responder.py’ to perform Man-in-the-Middle (MitM) attacks by poisoning LLMNR/NBNS requests. This allowed me to gather usernames and password hashes for multiple employees, as well as perform ‘relay’ attacks. The password hashes were then placed on a password cracking server to let the relay attempts run for a bit before I exited the conference room to identify additional points of interest for the assessment. I was able to exit the building that first day without ever being stopped or questioned by anyone.

Upon my return the following day, I again tailgated into the facilities and returned to the same conference room to check the status of the password cracking attempts; only to discover that none of the hashes were cracked. Obviously with more time and additional password cracking attempts the results may have been different. Having been unsuccessful at this first attempt I looked around for other ‘quick wins’ such as missing critical patches but was unable to discover any attack paths that way.

While performing network testing, I noticed an employee hovering around outside the conference room door only to quickly disappear after being seen. I continued testing for another few minutes before noticing the same employee nearby. While I was unable to ascertain the reasoning for this employee’s presence, to avoid being compromised, I packed up my equipment and exited the conference room to focus on other goals that were prioritized over network testing.

Entering the Laboratory

Part of our task from the client was to see if I could gain access to multiple biology labs that stored several dangerous chemicals as well as expensive testing equipment. Turns out, it wasn’t terribly difficult. The first lab was completely unattended and I was able to enter thanks to a door that was not fully closed. The second lab was accessed compliments of a significant gap between the door’s plunger and strike plate, which allowed me to use my hotel room key to shim the door open. This gave me access to more dangerous (and dangerously unattended) chemicals. I then accessed the 5th floor labs through even more tailgating and unassuming employees. The 5th floor labs actually had people in them but nobody stopped and questioned me, a complete stranger. This pen test really highlights the benefits of Security Awareness Training and physical social engineering engagements!

The Boss’ Office

The final demonstration of impact came when the point-of-contact for the engagement asked if we could enter at least one of a few executives’ offices and leave a message on their dry erase board stating ‘I was here – A Pentester.’ After a little while, I got my chance to tag an executive’s office to really help demonstrate the impact/importance of security of all kinds, not just your network.

While making our way through our client’s office spaces on the last day, I was finally stopped and questioned. I informed this gentleman that I was working with [Point-of-Contact’s Name] performing a wireless survey of their networks. He informed me that he knew I worked for their company because I had a badge. Their badges did not contain their picture or any other information, it was totally blank. My badge was blank too (Pro Tip: don’t assume someone works there based on a blank RFID badge). I told this fella that it was good that he stopped and questioned me because you never know who somebody is or if they are who they say they are. He completely agreed, shook my hand and told me to have a nice day.

Few things highlight the need for robust employee security training more than a successful physical social engineering pen test. Ensuring your workforce is thinking critically about security goes beyond the ability to sniff out a phishing email and into securing the physical space they occupy. A good security plan is essential lest you be visited by a clandestine attacker.

Check us out at this year’s Black Hat USA in Las Vegas! Our experts will be giving talks and our booth will be staffed with many members of our team. Stop by and say hi

Configure fine-grained access to your resources shared using AWS Resource Access Manager

Post Syndicated from Fabian Labat original https://aws.amazon.com/blogs/security/configure-fine-grained-access-to-your-resources-shared-using-aws-resource-access-manager/

You can use AWS Resource Access Manager (AWS RAM) to securely, simply, and consistently share supported resource types within your organization or organizational units (OUs) and across AWS accounts. This means you can provision your resources once and use AWS RAM to share them with accounts. With AWS RAM, the accounts that receive the shared resources can list those resources alongside the resources they own.

When you share your resources by using AWS RAM, you can specify the actions that an account can perform and the access conditions on the shared resource. AWS RAM provides AWS managed permissions, which are created and maintained by AWS and which grant permissions for common customer scenarios. Now, you can further tailor resource access by authoring and applying fine-grained customer managed permissions in AWS RAM. A customer managed permission is a managed permission that you create to precisely specify who can do what under which conditions for the resource types included in your resource share.

This blog post walks you through how to use customer managed permissions to tailor your resource access to meet your business and security needs. Customer managed permissions help you follow the best practice of least privilege for your resources that are shared using AWS RAM.

Considerations

Before you start, review the considerations for using customer managed permissions for supported resource types in the AWS RAM User Guide.

Solution overview

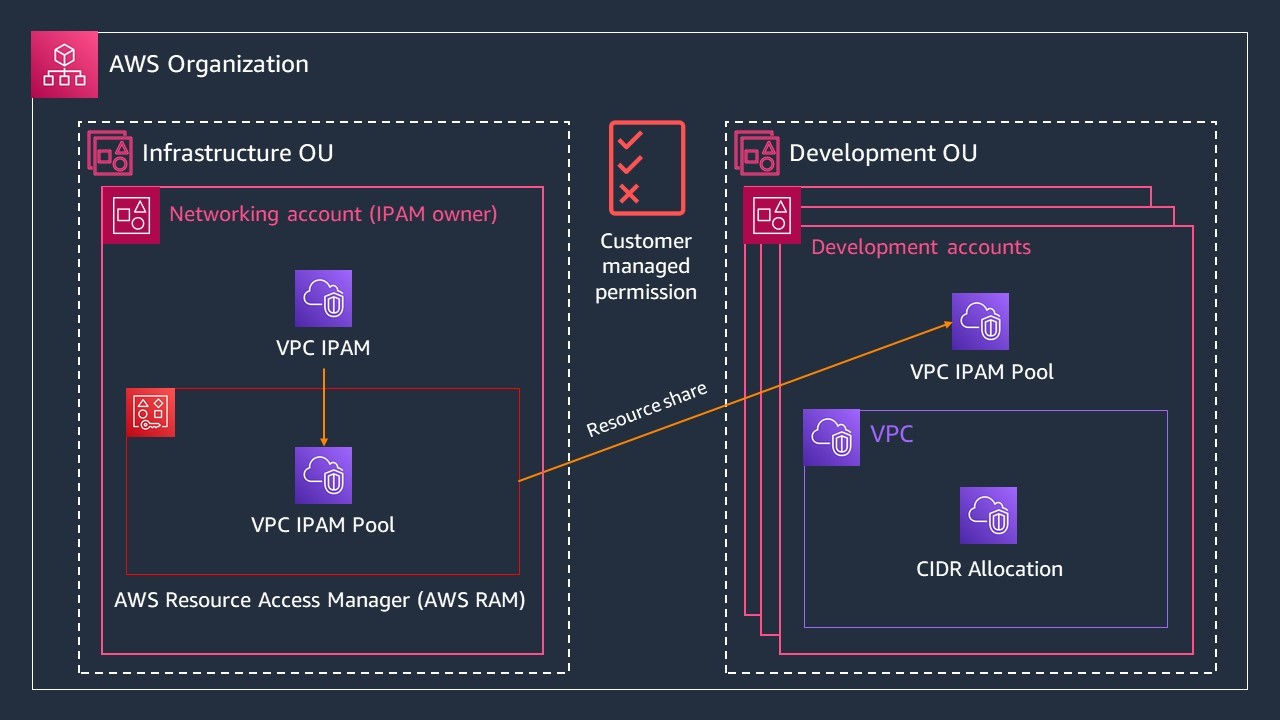
Many AWS customers share infrastructure services to accounts in an organization from a centralized infrastructure OU. The networking account in the infrastructure OU follows the best practice of least privilege and grants only the permissions that accounts receiving these resources, such as development accounts, require to perform a specific task. The solution in this post demonstrates how you can share an Amazon Virtual Private Cloud (Amazon VPC) IP Address Manager (IPAM) pool with the accounts in a Development OU. IPAM makes it simpler for you to plan, track, and monitor IP addresses for your AWS workloads.

You’ll use a networking account that owns an IPAM pool to share the pool with the accounts in a Development OU. You’ll do this by creating a resource share and a customer managed permission through AWS RAM. In this example, shown in Figure 1, both the networking account and the Development OU are in the same organization. The accounts in the Development OU only need the permissions that are required to allocate a classless inter-domain routing (CIDR) range and not to view the IPAM pool details. You’ll further refine access to the shared IPAM pool so that only AWS Identity and Access Management (IAM) users or roles tagged with team = networking can perform actions on the IPAM pool that’s shared using AWS RAM.

Figure 1: Multi-account diagram for sharing your IPAM pool from a networking account in the Infrastructure OU to accounts in the Development OU

Figure 1: Multi-account diagram for sharing your IPAM pool from a networking account in the Infrastructure OU to accounts in the Development OU

Prerequisites

For this walkthrough, you must have the following prerequisites:

  • An AWS account (the networking account) with an IPAM pool already provisioned. For this example, create an IPAM pool in a networking account named ipam-vpc-pool-use1-dev. Because you share resources across accounts in the same AWS Region using AWS RAM, provision the IPAM pool in the same Region where your development accounts will access the pool.
  • An AWS OU with the associated development accounts to share the IPAM pool with. In this example, these accounts are in your Development OU.
  • An IAM role or user with permissions to perform IPAM and AWS RAM operations in the networking account and the development accounts.

Share your IPAM pool with your Development OU with least privilege permissions

In this section, you share an IPAM pool from your networking account to the accounts in your Development OU and grant least-privilege permissions. To do that, you create a resource share that contains your IPAM pool, your customer managed permission for the IPAM pool, and the OU principal you want to share the IPAM pool with. A resource share contains resources you want to share, the principals you want to share the resources with, and the managed permissions that grant resource access to the account receiving the resources. You can add the IPAM pool to an existing resource share, or you can create a new resource share. Depending on your workflow, you can start creating a resource share either in the Amazon VPC IPAM or in the AWS RAM console.

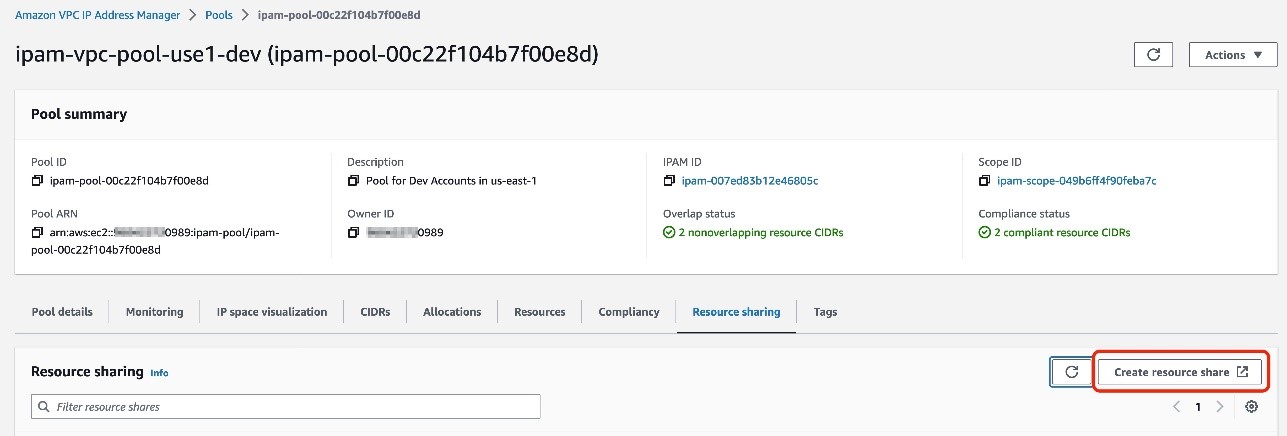
To initiate a new resource share from the Amazon VPC IPAM console

  1. Sign in to the AWS Management Console as your networking account. For Features, select Amazon VPC IP Address Manager console.
  2. Select ipam-vpc-pool-use1-dev, which was provisioned as part of the prerequisites.
  3. On the IPAM pool detail page, choose the Resource sharing tab.
  4. Choose Create resource share.
     
Figure 2: Create resource share to share your IPAM pool

Figure 2: Create resource share to share your IPAM pool

Alternatively, you can initiate a new resource share from the AWS RAM console.

To initiate a new resource share from the AWS RAM console

  1. Sign in to the AWS Management Console as your networking account. For Services, select Resource Access Manager console.
  2. Choose Create resource share.

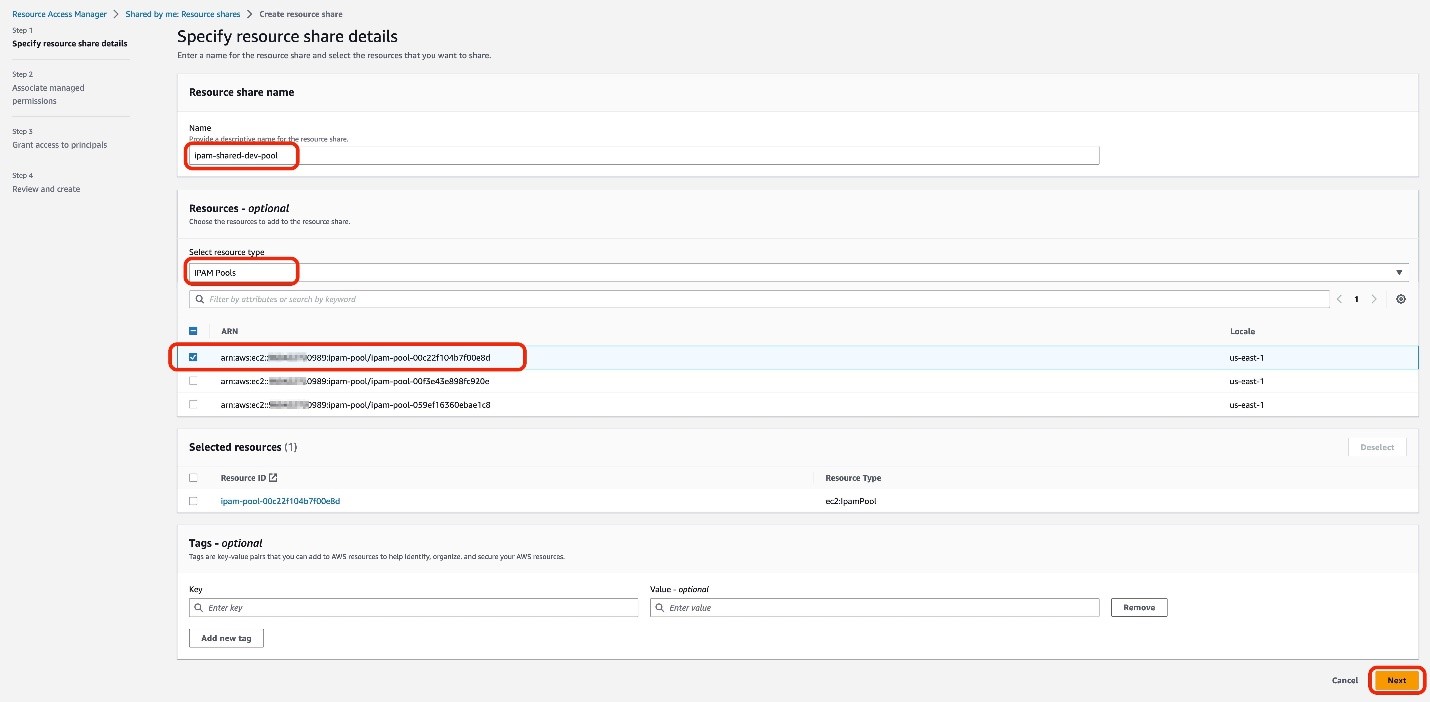
Next, specify the resource share details, including the name, the resource type, and the specific resource you want to share. Note that the steps of the resource share creation process are located on the left side of the AWS RAM console.

To specify the resource share details

  1. For Name, enter ipam-shared-dev-pool.
  2. For Select resource type, choose IPAM pools.
  3. For Resources, select the Amazon Resource Name (ARN) of the IPAM pool you want to share from a list of the IPAM pool ARNs you own.
  4. Choose Next.
     
Figure 3: Specify the resources to share in your resource share

Figure 3: Specify the resources to share in your resource share

Configure customer managed permissions

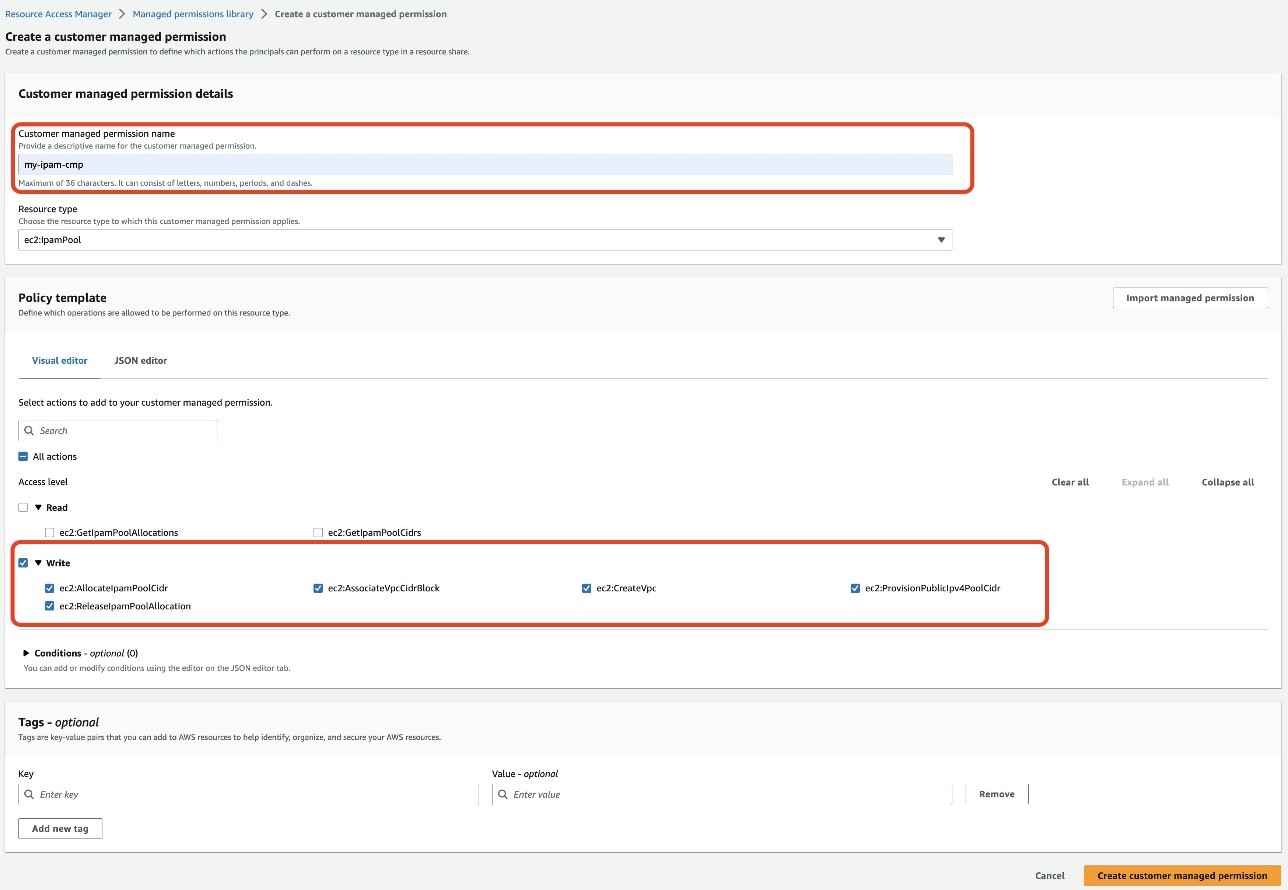
In this example, the accounts in the Development OU need the permissions required to allocate a CIDR range, but not the permissions to view the IPAM pool details. The existing AWS managed permission grants both read and write permissions. Therefore, you need to create a customer managed permission to refine the resource access permissions for your accounts in the Development OU. With a customer managed permission, you can select and tailor the actions that the development accounts can perform on the IPAM pool, such as write-only actions.

In this section, you create a customer managed permission, configure the managed permission name, select the resource type, and choose the actions that are allowed with the shared resource.

To create and author a customer managed permission

  1. On the Associate managed permissions page, choose Create customer managed permission. This will bring up a new browser tab with a Create a customer managed permission page.
  2. On the Create a customer managed permission page, enter my-ipam-cmp for the Customer managed permission name.
  3. Confirm the Resource type as ec2:IpamPool.
  4. On the Visual editor tab of the Policy template section, select the Write checkbox only. This will automatically check all the available write actions.
  5. Choose Create customer managed permission.
     
Figure 4: Create a customer managed permission with only write actions

Figure 4: Create a customer managed permission with only write actions

Now that you’ve created your customer managed permission, you must associate it to your resource share.

To associate your customer managed permission

  1. Go back to the previous Associate managed permissions page. This is most likely located in a separate browser tab.
  2. Choose the refresh icon .
  3. Select my-ipam-cmp from the dropdown menu.
  4. Review the policy template, and then choose Next.

Next, select the IAM roles, IAM users, AWS accounts, AWS OUs, or organization you want to share your IPAM pool with. In this example, you share the IPAM pool with an OU in your account.

To grant access to principals

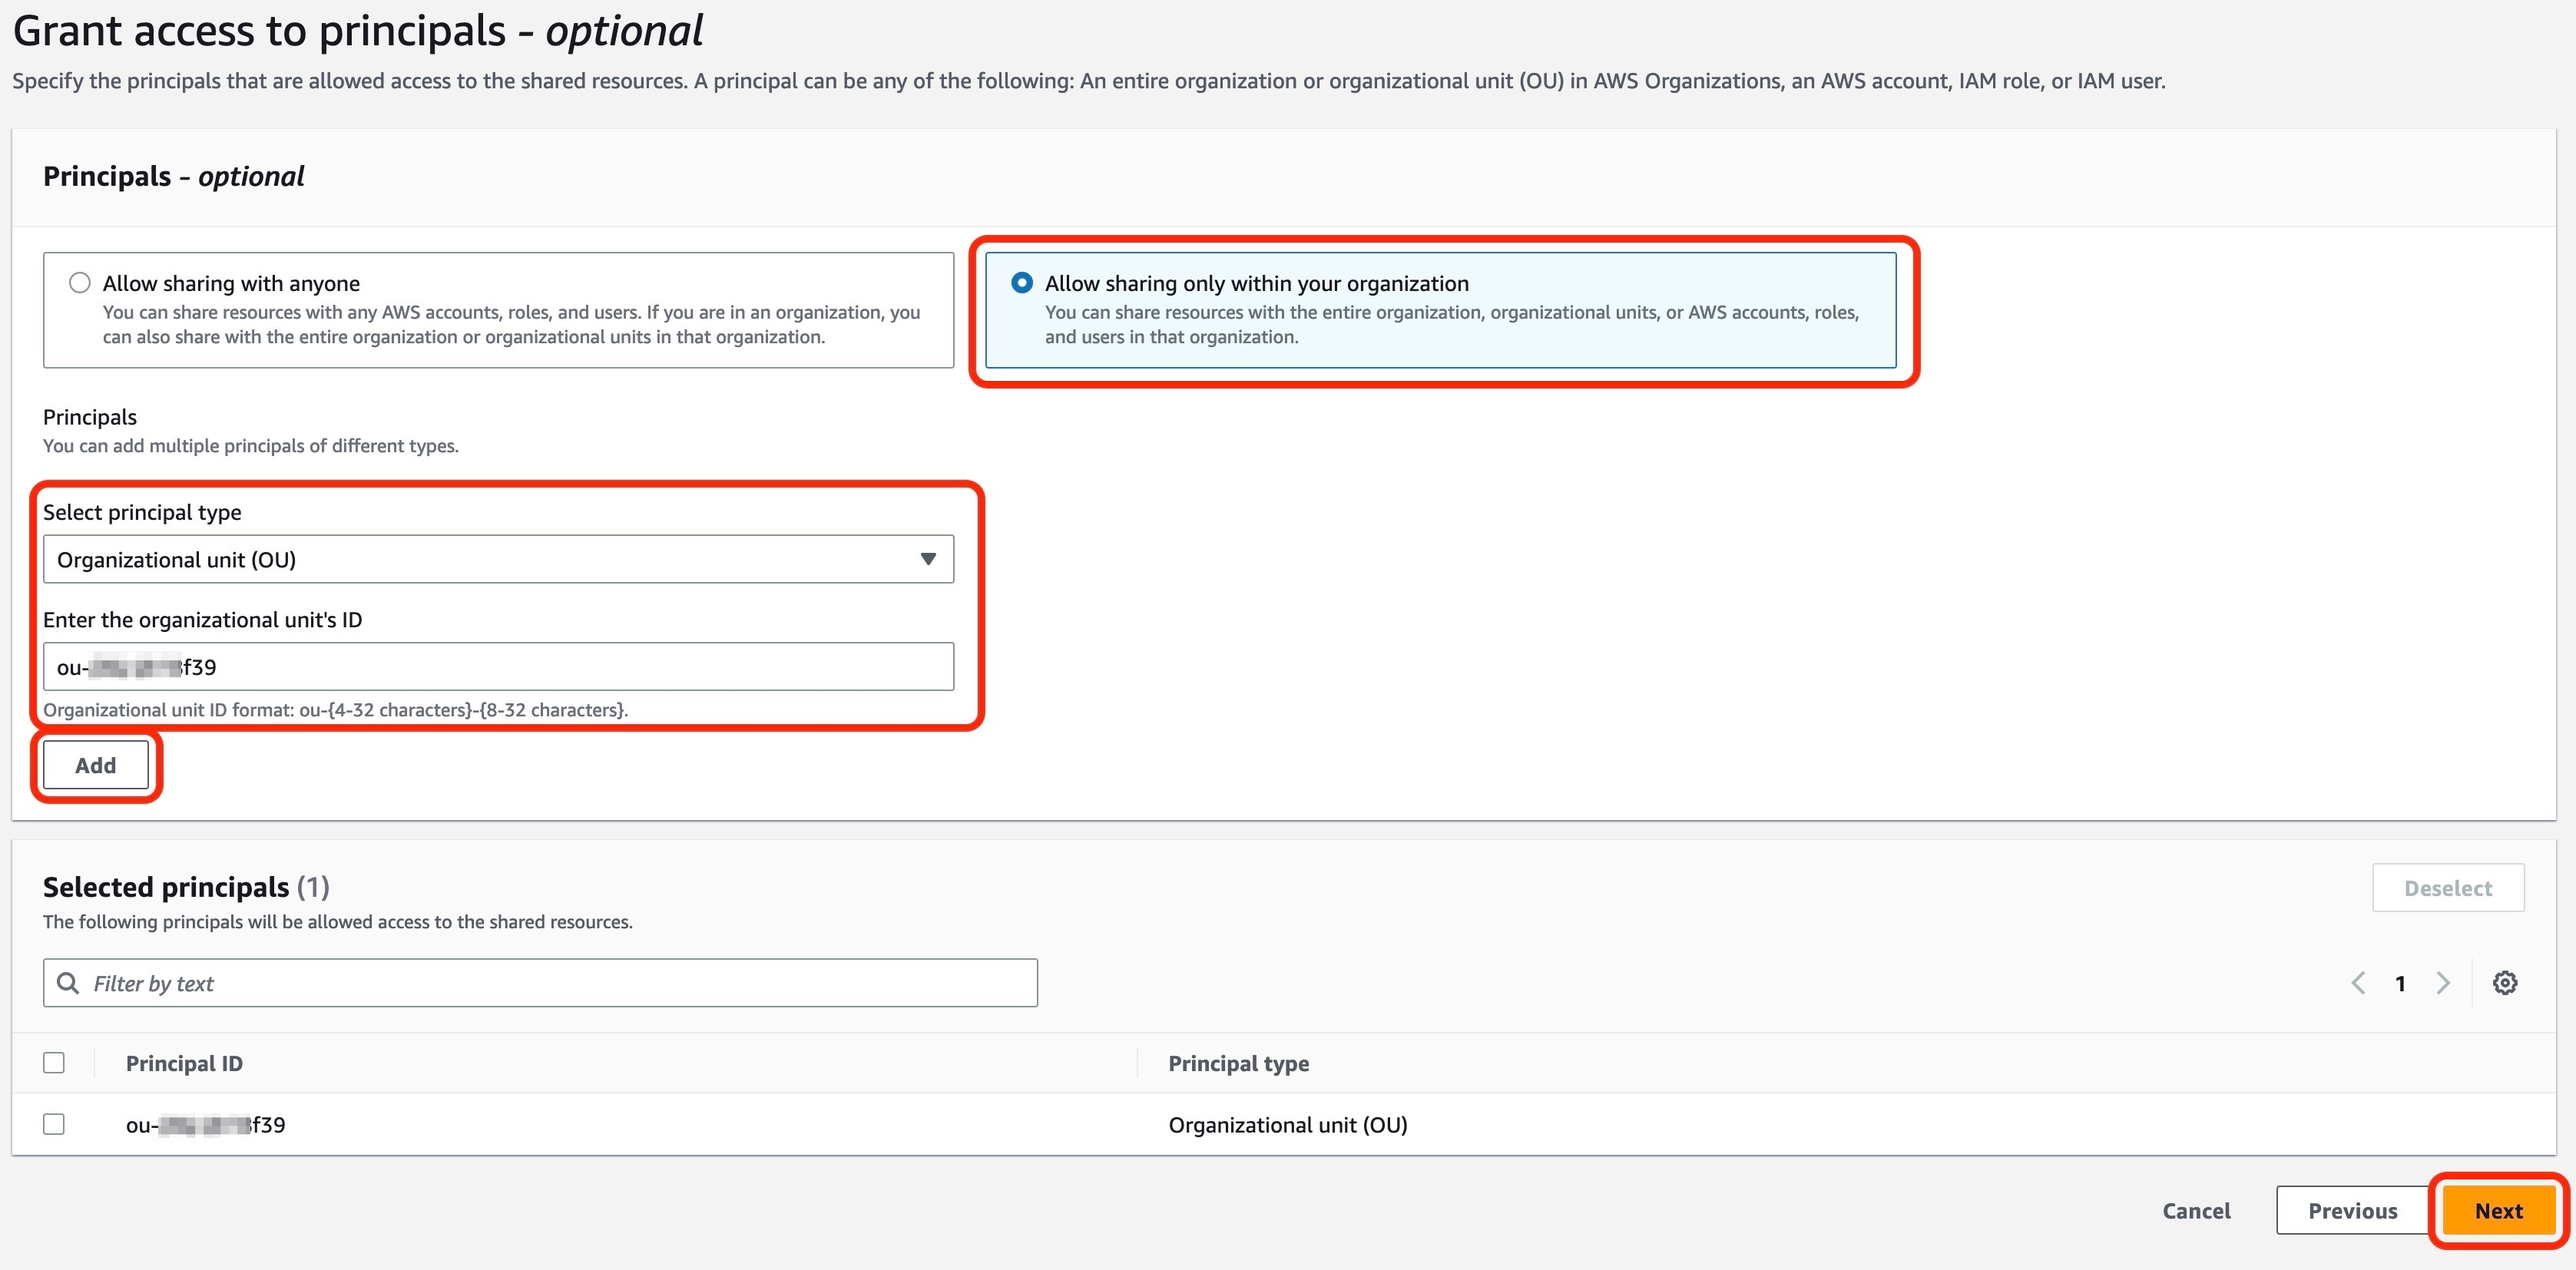
  1. On the Grant access to principals page, select Allow sharing only with your organization.
  2. For Select principal type, choose Organizational unit (OU).
  3. Enter the Development OU’s ID.
  4. Select Add, and then choose Next.
  5. Choose Create resource share to complete creation of your resource share.
     
Figure 5: Grant access to principals in your resource share

Figure 5: Grant access to principals in your resource share

Verify the customer managed permissions

Now let’s verify that the customer managed permission is working as expected. In this section, you verify that the development account cannot view the details of the IPAM pool and that you can use that same account to create a VPC with the IPAM pool.

To verify that an account in your Development OU can’t view the IPAM pool details

  1. Sign in to the AWS Management Console as an account in your Development OU. For Features, select Amazon VPC IP Address Manager console.
  2. In the left navigation pane, choose Pools.
  3. Select ipam-shared-dev-pool. You won’t be able to view the IPAM pool details.

To verify that an account in your Development OU can create a new VPC with the IPAM pool

  1. Sign in to the AWS Management Console as an account in your Development OU. For Services, select VPC console.
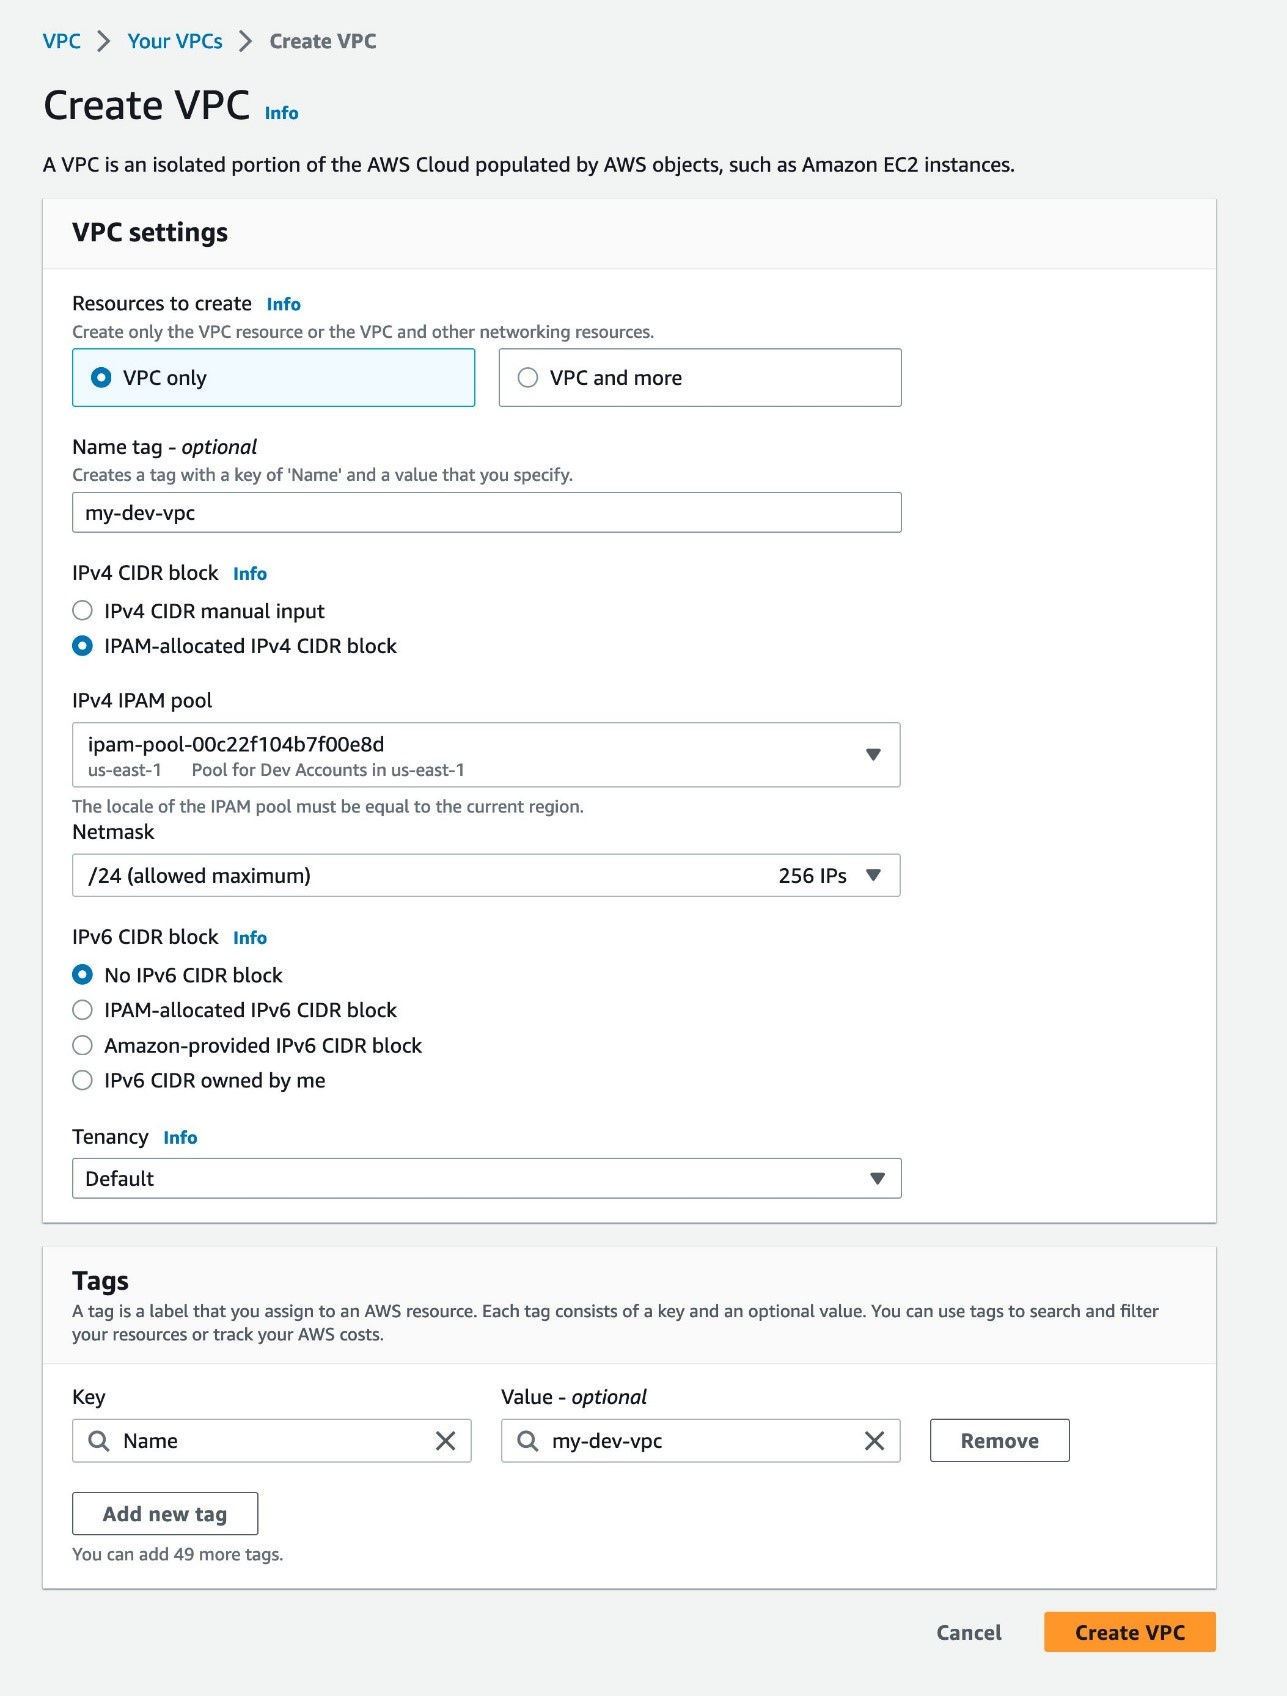
  2. On the VPC dashboard, choose Create VPC.
  3. On the Create VPC page, select VPC only.
  4. For name, enter my-dev-vpc.
  5. Select IPAM-allocated IPv4 CIDR block.
  6. Choose the ARN of the IPAM pool that’s shared with your development account.
  7. For Netmask, select /24 256 IPs.
  8. Choose Create VPC. You’ve successfully created a VPC with the IPAM pool shared with your account in your Development OU.
     
Figure 6: Create a VPC

Figure 6: Create a VPC

Update customer managed permissions

You can create a new version of your customer managed permission to rescope and update the access granularity of your resources that are shared using AWS RAM. For example, you can add a condition in your customer managed permissions so that only IAM users or roles tagged with a particular principal tag can access and perform the actions allowed on resources shared using AWS RAM. If you need to update your customer managed permission — for example, after testing or as your business and security needs evolve — you can create and save a new version of the same customer managed permission rather than creating an entirely new customer management permission. For example, you might want to adjust your access configurations to read-only actions for your development accounts and to rescope to read-write actions for your testing accounts. The new version of the permission won’t apply automatically to your existing resource shares, and you must explicitly apply it to those shares for it to take effect.

To create a version of your customer managed permission

  1. Sign in to the AWS Management Console as your networking account. For Services, select Resource Access Manager console.
  2. In the left navigation pane, choose Managed permissions library.
  3. For Filter by text, enter my-ipam-cmp and select my-ipam-cmp. You can also select the Any type dropdown menu and then select Customer managed to narrow the list of managed permissions to only your customer managed permissions.
  4. On the my-ipam-cmp page, choose Create version.
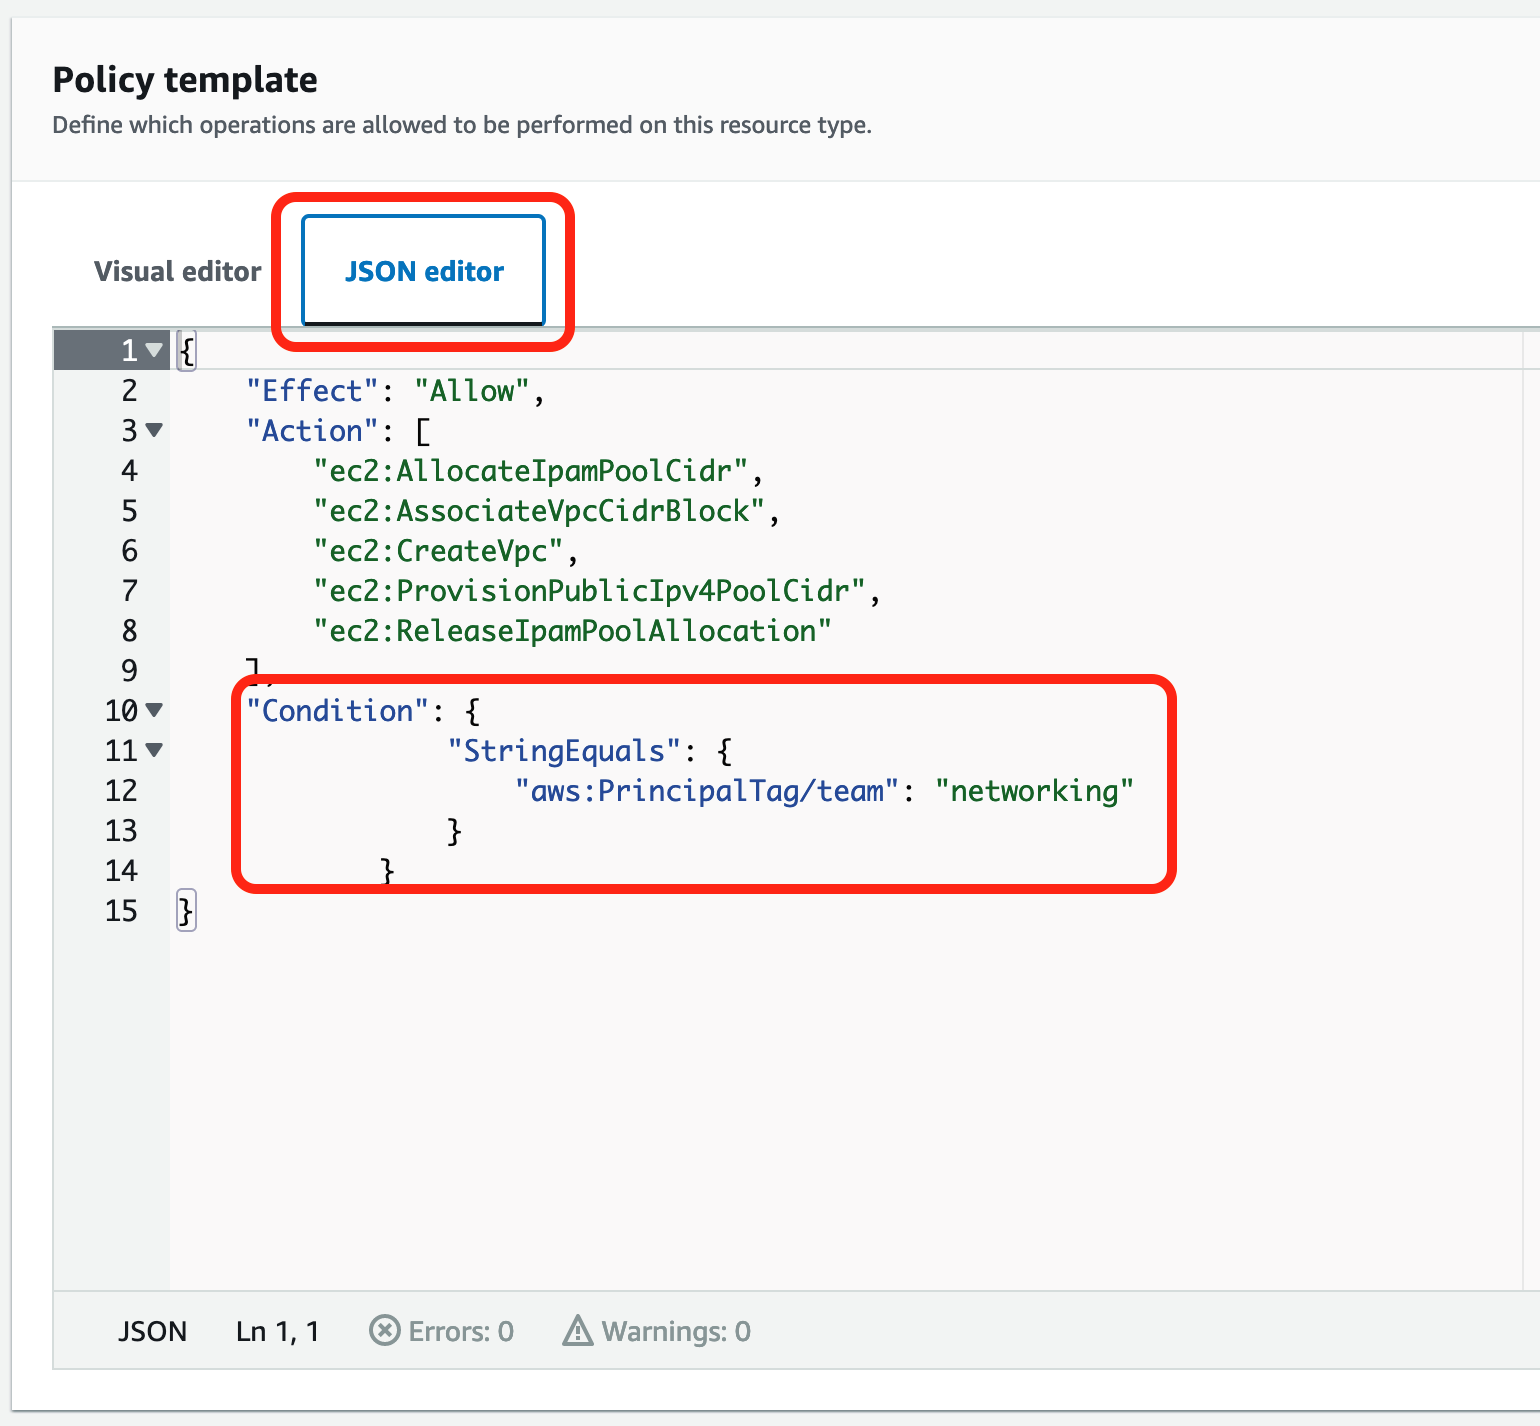
  5. You can make the customer managed permission more fine-grained by adding a condition. On the Create a customer managed permission for my-ipam-cmp page, under the Policy template section, choose JSON editor.
  6. Add a condition with aws:PrincipalTag that allows only the users or roles tagged with team = networking to access the shared IPAM pool.
    "Condition": {
                    "StringEquals": {
                        "aws:PrincipalTag/team": "networking"
                    }
                }

  7. Choose Create version. This new version will be automatically set as the default version of your customer managed permission. As a result, new resource shares that use the customer managed permission will use the new version.
     
Figure 7: Update your customer managed permissions and add a condition statement with aws:PrincipalTag

Figure 7: Update your customer managed permissions and add a condition statement with aws:PrincipalTag

Note: Now that you have the new version of your customer managed permission, you must explicitly apply it to your existing resource shares for it to take effect.

To apply the new version of the customer managed permission to existing resource shares

  1. On the my-ipam-cmp page, under the Managed permission versions, select Version 1.
  2. Choose the Associated resource shares tab.
  3. Find ipam-shared-dev-pool and next to the current version number, select Update to default version. This will update your ipam-shared-dev-pool resource share with the new version of your my-ipam-cmp customer managed permission.

To verify your updated customer managed permission, see the Verify the customer managed permissions section earlier in this post. Make sure that you sign in with an IAM role or user tagged with team = networking, and then repeat the steps of that section to verify your updated customer managed permission. If you use an IAM role or user that is not tagged with team = networking, you won’t be able to allocate a CIDR from the IPAM pool and you won’t be able to create the VPC.

Cleanup

To remove the resources created by the preceding example:

  1. Delete the resource share from the AWS RAM console.
  2. Deprovision the CIDR from the IPAM pool.
  3. Delete the IPAM pool you created.

Summary

This blog post presented an example of using customer managed permissions in AWS RAM. AWS RAM brings simplicity, consistency, and confidence when sharing your resources across accounts. In the example, you used AWS RAM to share an IPAM pool to accounts in a Development OU, configured fine-grained resource access controls, and followed the best practice of least privilege by granting only the permissions required for the accounts in the Development OU to perform a specific task with the shared IPAM pool. In the example, you also created a new version of your customer managed permission to rescope the access granularity of your resources that are shared using AWS RAM.

To learn more about AWS RAM and customer managed permissions, see the AWS RAM documentation and watch the AWS RAM Introduces Customer Managed Permissions demo.

 
If you have feedback about this post, submit comments in the Comments section below. If you have questions about this post, contact AWS Support.

Want more AWS Security news? Follow us on Twitter.

Fabian Labat

Fabian Labat

Fabian is a principal solutions architect based in New York, where he guides global financial services customers to build highly secure, scalable, reliable, and cost-efficient applications on the cloud. He brings over 25 years of technology experience in system design and IT infrastructure.

Nini Ren

Nini Ren

Nini is the product manager for AWS Resource Access Manager (RAM). He enjoys working closely with customers to develop solutions that not only meet their needs, but also create value for their businesses. Nini holds an MBA from The Wharton School, a masters of computer and information technology from the University of Pennsylvania, and an AB in chemistry and physics from Harvard College.

Introducing code referencing for GitHub Copilot

Post Syndicated from Ryan J. Salva original https://github.blog/2023-08-03-introducing-code-referencing-for-github-copilot/

Make more informed decisions about the code you use. In the rare case where a GitHub Copilot suggestion matches public code, this update will show a list of repositories where that code appears and their licenses. Sign up for the private beta today.

Over the course of the last year, GitHub Copilot, the world’s first at-scale AI pair programmer trained on billions of lines of public code, has attracted more than 1 million developers and helped over 27,000 organizations build faster and more productively. During that time, many developers told us they want to see when GitHub Copilot’s suggestions match public code.

Today, we’re announcing a private beta of GitHub Copilot with code referencing that includes an updated filter which detects and shows context of code suggestions matching public code on GitHub. When the filter is enabled, GitHub Copilot checks code suggestions with surrounding code of about 150 characters and compares it against an index of all the public code on GitHub.com. Matches—along with information about every repository in which they appear—are displayed right in the editor. Developers can now choose whether to block suggestions containing matching code, or allow those suggestions with information about matches.

Why? Some want to learn from others’ work, others may want to take a dependency rather than introduce new app logic, and still others want to give or receive credit for similar work. Whatever the reason, it’s nice to know when similar code is out there.

Let’s see how it works.

How GitHub Copilot code referencing works

With billions of files to index and a latency budget of only 10-20ms, it’s a miracle of engineering that this is even possible. Still, if there’s a match, a notification appears in the editor showing: (1) the matching code, (2) the repositories where that code appears, and (3) the license governing each repository.

Why code referencing matters

In our journey to create a code referencing tool, we discovered a few interesting things:

First, our previous research suggests that matches occur in less than one percent of GitHub Copilot suggestions. But that one percent isn’t evenly distributed across all use cases. In the context of an existing application with surrounding code, we almost never see a match. But in an empty or nearly empty file, we see matches far more often.

Suggestions are heavily biased toward the prompt so GitHub Copilot can provide suggestions tailor-made for your current task. That means, in an existing app with lots of context, you’ll get a suggestion customized for your code. But in an empty, or nearly empty file, there’s little to no context. So, you’re more likely to get a suggestion that matches public code.

We’ve also found that when suggestions match public code, those matches frequently appear in dozens, if not hundreds of repositories. In some ways, this isn’t surprising because the models that power GitHub Copilot are akin to giant probability machines. A code fragment that appears in many repositories is more likely to be a “pattern” detected by the model—similar to the patterns we see elsewhere in public code.

For example, research on Java projects finds that up to 11% of repositories may contain code that resembles solutions posted to Stack Overflow, and the vast majority of those snippets appear without attribution. Another study on Python found that many matches are too generic to trace to an original usage. A smaller-scale study found that Stack Overflow answers contain code from Android applications.

Finally, the repositories with matching code are often governed by multiple, sometimes conflicting licenses, which makes attributing a match to its source more challenging. By consulting a list of references, developers can now:

  • Determine whether, what, and who to attribute rather than having matches simply blocked from the outset.
  • Learn from other developers by studying their approaches to similar problems.
  • Take a dependency on an open source library to avoid new business logic.
  • Evaluate the context of code before accepting a matching suggestion.
  • Discover new projects and contribute upstream.

Building a better developer experience and community

This is just the beginning. As GitHub continues to innovate, we will always strive to help developers stay in the flow, build creatively, and maintain a transparent connection to the community. We’re excited for you to try GitHub Copilot with code referencing.

Happy coding.

Configure cross-Region table access with the AWS Glue Catalog and AWS Lake Formation

Post Syndicated from Aarthi Srinivasan original https://aws.amazon.com/blogs/big-data/configure-cross-region-table-access-with-the-aws-glue-catalog-and-aws-lake-formation/

Today’s modern data lakes span multiple accounts, AWS Regions, and lines of business in organizations. Companies also have employees and do business across multiple geographic regions and even around the world. It’s important that their data solution gives them the ability to share and access data securely and safely across Regions.

The AWS Glue Data Catalog and AWS Lake Formation recently announced support for cross-Region table access. This feature lets users query AWS Glue databases and tables in one Region from another Region using resource links, without copying the metadata in the Data Catalog or the data in Amazon Simple Storage Service (Amazon S3). A resource link is a Data Catalog object that is a link to a database or table.

The AWS Glue Data Catalog is a centralized repository of technical metadata that holds the information about your datasets in AWS, and can be queried using AWS analytics services such as Amazon Athena, Amazon EMR, and AWS Glue for Apache Spark. The Data Catalog is localized to every Region in an AWS account, requiring users to replicate the metadata and the source data in S3 buckets for cross-Region queries. With the newly launched feature for cross-Region table access, you can create a resource link in any Region pointing to a database or table of the source Region. With the resource link in the local Region, you can query the source Region’s tables from Athena, Amazon EMR, and AWS Glue ETL in the local Region.

You can use the cross-Region table access feature of the Data Catalog in combination with the permissions management and cross-account sharing capability of Lake Formation. Lake Formation is a fully managed service that makes it easy to build, secure, and manage data lakes. By using cross-Region access support for Data Catalog, together with governance provided by Lake Formation, organizations can discover and access data across Regions without spending time making copies. Some businesses might have restrictions to run their compute in certain Regions. Organizations that need to share their Data Catalog with businesses that have such restrictions can now create and share cross-Region resource links.

In this post, we walk you through configuring cross-Region database and table access in two scenarios. In the first scenario, we go through an example where a customer wants to access an AWS Glue database in Region A from Region B in the same account. In scenario two, we demonstrate cross-account and cross-Region access where a customer wants to share a database in Region A across accounts and access it from Region B of the recipient account.

Scenario 1: Same account use case

In this scenario, we walk you through the steps required to share a Data Catalog database from one Region to another Region within the same AWS account. For our illustrations, we have a sample dataset in an S3 bucket in the us-east-2 Region and have used an AWS Glue crawler to crawl and catalog the dataset into a database in the Data Catalog of the us-east-2 Region. We share this dataset to the us-west-2 Region. You can use any of your datasets to follow along. The following diagram illustrates the architecture for cross-Region sharing within the same AWS account.

Prerequisites

To set up cross-Region sharing of a Data Catalog database for scenario 1, we recommend the following prerequisites:

  • An AWS account that is not used for production use cases.
  • Lake Formation set up already in the account and a Lake Formation administrator role or a similar role to follow along with the instructions in this post. For example, we are using a data lake administrator role called LF-Admin. The LF-Admin role also has the AWS Identity and Access Management (IAM) permission iam:PassRole on the AWS Glue crawler role. To learn more about setting up permissions for a data lake administrator, see Create a data lake administrator.
  • A sample database in the Data Catalog with a few tables. For example, our sample database is called salesdb_useast2 and has a set of eight tables, as shown in the following screenshot.

Set up permissions for us-east-2

Complete the following steps to configure permissions in the us-east-2 Region:

  1. Log in to the Lake Formation console and choose the Region where your database resides. In our example, it is us-east-2 Region.
  2. Grant SELECT and DESCRIBE permissions to the LF-Admin role on all tables of the database salesdb_useast2.
  3. You can confirm if permissions are working by querying the database and tables as the data lake administrator role from Athena.

Set up permissions for us-west-2

Complete the following steps to configure permissions in the us-west-2 Region:

  1. Choose the us-west-2 Region on the Lake Formation console.
  2. Add LF-Admin as a data lake administrator and grant Create database permission to LF-Admin.
  3. In the navigation pane, under Data catalog, select Databases.
  4. Choose Create database and select Resource link.
  5. Enter rl_salesdb_from_useast2 as the name for the resource link.
  6. For Shared database’s region, choose US East (Ohio).
  7. For Shared database, choose salesdb_useast2.
  8. Choose Create.

This creates a database resource link in us-west-2 pointing to the database in us-east-2.

You will notice the Shared resource owner region column populate as us-east-2 for the resource link details on the Databases page.

Because the LF-Admin role created the resource link rl_salesdb_from_useast2, the role has implicit permissions on the resource link. LF-Admin already has permissions to query the table in the us-east-2 Region. There is no need to add a Grant on target permission for LF-Admin. If you are granting permission to another user or role, you need to grant Describe permissions on the resource link rl_salesdb_from_useast2.

  1. Query the database using the resource link in Athena as LF-Admin.

In the preceding steps, we saw how to create a resource link in us-west-2 for a Data Catalog database in us-east-2. You can also create a resource link to the source database in any additional Region where the Data Catalog is available. You can run extract, transform, and load (ETL) scripts in Amazon EMR and AWS Glue by providing the additional Region parameter when referring to the database and table. See the API documentation for GetTable() and GetDatabase() for additional details.

Also, Data Catalog permissions for the database, tables, and resource links and the underlying Amazon S3 data permissions can be managed by IAM policies and S3 bucket policies instead of Lake Formation permissions. For more information, see Identity and access management for AWS Glue.

Scenario 2: Cross-account use case

In this scenario, we walk you through the steps required to share a Data Catalog database from one Region to another Region between two accounts: a producer account and a consumer account. To show an advanced use case, we host the source dataset in us-east-2 of account A and crawl it using an AWS Glue crawler in the Data Catalog in us-east-1. The data lake administrator in account A then shares the database and tables to account B using Lake Formation permissions. The data lake administrator in account B accepts the share in us-east-1 and creates resource links to query the tables from eu-west-1. The following diagram illustrates the architecture for cross-Region sharing between producer account A and consumer account B.

Prerequisites

To set up cross-Region sharing of a Data Catalog database for scenario 2, we recommend the following prerequisites:

  • Two AWS accounts that are not used for production use cases
  • Lake Formation administrator roles in both accounts
  • Lake Formation set up in both accounts with cross-account sharing version 3. For more details, refer documentation.
  • A sample database in the Data Catalog with a few tables

For our example, we continue to use the same dataset and the data lake administrator role LF-Admin for scenario 2.

Set up account A for cross-Region sharing

To set up account A, complete the following steps:

  1. Sign in to the AWS Management Console as the data lake administrator role.
  2. Register the S3 bucket in Lake Formation in us-east-1 with an IAM role that has access to the S3 bucket. See registering your S3 location for instructions.
  3. Set up and run an AWS Glue crawler to catalog the data in the us-east-2 S3 bucket to the Data Catalog database useast2data_salesdb in us-east-1. Refer to AWS Glue crawlers support cross-account crawling to support data mesh architecture for instructions.

The database, as shown in the following screenshot, has a set of eight tables.

  1. Grant SELECT and DESCRIBE along with grantable permissions on all tables of the database to account B.

  2. Grant DESCRIBE with grantable permissions on the database.
  3. Verify the granted permissions on the Data permissions page.
  4. Log out of account A.

Set up account B for cross-Region sharing

To set up account B, complete the following steps:

  1. Sign in as the data lake administrator on the Lake Formation console in us-east-1.

In our example, we have created the data lake administrator role LF-Admin, similar to previous administrator roles in account A and scenario 1.

  1. On the AWS Resource Access Manager (AWS RAM) console, review and accept the AWS RAM invites corresponding to the shared database and tables from account A.

The LF-Admin role can see the shared database useast2data_salesdb from the producer account. LF-Admin has access to the database and tables and so doesn’t need additional permissions on the shared database.

  1. You can grant DESCRIBE on the database and SELECT on All_Tables permissions to any additional IAM principals from the us-east-1 Region on this shared database.
  2. Open the Lake Formation console in eu-west-1 (or any Region where you have Lake Formation and Athena already set up).
  3. Choose Create database and create a resource link named rl_useast1db_crossaccount, pointing to the us-east-1 database useast2data_salesdb.

You can choose any Region on the Shared database’s region drop-down menu and choose the databases from those Regions.

Because we’re using the data lake administrator role LF-Admin, we can see all databases from all Regions in the consumer account’s Data Catalog. A data lake user with restricted permissions will be able to see only those databases for which they have permissions to.

  1. Because LF-Admin created the resource link, this role has permissions to use the resource link rl_useast1db_crossaccount. For additional IAM principals, grant DESCRIBE permissions on the database resource link rl_useast1db_crossaccount.
  2. You can now query the database and tables from Athena.

Considerations

Cross-Region queries involve Amazon S3 data transfer by the analytics services, such as Athena, Amazon EMR, and AWS Glue ETL. As a result, cross-Region queries can be slower and will incur higher transfer costs compared to queries in the same Region. Some analytics services such as AWS Glue jobs and Amazon EMR may require internet access when accessing cross-Region data from Amazon S3, depending on your VPC set up. Refer to Considerations and limitations for more considerations.

Conclusion

In this post, you saw examples of how to set up cross-Region resource links for a database in the same account and across two accounts. You also saw how to use cross-Region resource links to query in Athena. You can share selected tables from a database instead of sharing an entire database. With cross-Region sharing, you can create a resource link for the table using the Create table option.

There are two key things to remember when using the cross-Region table access feature:

  • Grant permissions on the source database or table from its source Region.
  • Grant permissions on the resource link from the Region it was created in.

That is, the original shared database or table is always available in the source Region, and resource links are created and shared in their local Region.

To get started, see Accessing tables across Regions. Share your comments on the post or contact your AWS account team for more details.


About the author

Aarthi Srinivasan is a Senior Big Data Architect with AWS Lake Formation. She likes building data lake solutions for AWS customers and partners. When not on the keyboard, she explores the latest science and technology trends and spends time with her family.

Create an Apache Hudi-based near-real-time transactional data lake using AWS DMS, Amazon Kinesis, AWS Glue streaming ETL, and data visualization using Amazon QuickSight

Post Syndicated from Raj Ramasubbu original https://aws.amazon.com/blogs/big-data/create-an-apache-hudi-based-near-real-time-transactional-data-lake-using-aws-dms-amazon-kinesis-aws-glue-streaming-etl-and-data-visualization-using-amazon-quicksight/

With the rapid growth of technology, more and more data volume is coming in many different formats—structured, semi-structured, and unstructured. Data analytics on operational data at near-real time is becoming a common need. Due to the exponential growth of data volume, it has become common practice to replace read replicas with data lakes to have better scalability and performance. In most real-world use cases, it’s important to replicate the data from the relational database source to the target in real time. Change data capture (CDC) is one of the most common design patterns to capture the changes made in the source database and reflect them to other data stores.

We recently announced support for streaming extract, transform, and load (ETL) jobs in AWS Glue version 4.0, a new version of AWS Glue that accelerates data integration workloads in AWS. AWS Glue streaming ETL jobs continuously consume data from streaming sources, clean and transform the data in-flight, and make it available for analysis in seconds. AWS also offers a broad selection of services to support your needs. A database replication service such as AWS Database Migration Service (AWS DMS) can replicate the data from your source systems to Amazon Simple Storage Service (Amazon S3), which commonly hosts the storage layer of the data lake. Although it’s straightforward to apply updates on a relational database management system (RDBMS) that backs an online source application, it’s difficult to apply this CDC process on your data lakes. Apache Hudi, an open-source data management framework used to simplify incremental data processing and data pipeline development, is a good option to solve this problem.

This post demonstrates how to apply CDC changes from Amazon Relational Database Service (Amazon RDS) or other relational databases to an S3 data lake, with flexibility to denormalize, transform, and enrich the data in near-real time.

Solution overview

We use an AWS DMS task to capture near-real-time changes in the source RDS instance, and use Amazon Kinesis Data Streams as a destination of the AWS DMS task CDC replication. An AWS Glue streaming job reads and enriches changed records from Kinesis Data Streams and performs an upsert into the S3 data lake in Apache Hudi format. Then we can query the data with Amazon Athena visualize it in Amazon QuickSight. AWS Glue natively supports continuous write operations for streaming data to Apache Hudi-based tables.

The following diagram illustrates the architecture used for this post, which is deployed through an AWS CloudFormation template.

Prerequisites

Before you get started, make sure you have the following prerequisites:

Source data overview

To illustrate our use case, we assume a data analyst persona who is interested in analyzing near-real-time data for sport events using the table ticket_activity. An example of this table is shown in the following screenshot.

Apache Hudi connector for AWS Glue

For this post, we use AWS Glue 4.0, which already has native support for the Hudi framework. Hudi, an open-source data lake framework, simplifies incremental data processing in data lakes built on Amazon S3. It enables capabilities including time travel queries, ACID (Atomicity, Consistency, Isolation, Durability) transactions, streaming ingestion, CDC, upserts, and deletes.

Set up resources with AWS CloudFormation

This post includes a CloudFormation template for a quick setup. You can review and customize it to suit your needs.

The CloudFormation template generates the following resources:

  • An RDS database instance (source).
  • An AWS DMS replication instance, used to replicate the data from the source table to Kinesis Data Streams.
  • A Kinesis data stream.
  • Four AWS Glue Python shell jobs:
    • rds-ingest-rds-setup-<CloudFormation Stack name> – creates one source table called ticket_activity on Amazon RDS.
    • rds-ingest-data-initial-<CloudFormation Stack name> – Sample data is automatically generated at random by the Faker library and loaded to the ticket_activity table.
    • rds-ingest-data-incremental-<CloudFormation Stack name> – Ingests new ticket activity data into the source table ticket_activity continuously. This job simulates customer activity.
    • rds-upsert-data-<CloudFormation Stack name> – Upserts specific records in the source table ticket_activity. This job simulates administrator activity.
  • AWS Identity and Access Management (IAM) users and policies.
  • An Amazon VPC, a public subnet, two private subnets, internet gateway, NAT gateway, and route tables.
    • We use private subnets for the RDS database instance and AWS DMS replication instance.
    • We use the NAT gateway to have reachability to pypi.org to use the MySQL connector for Python from the AWS Glue Python shell jobs. It also provides reachability to Kinesis Data Streams and an Amazon S3 API endpoint

To set up these resources, you must have the following prerequisites:

The following diagram illustrates the architecture of our provisioned resources.

To launch the CloudFormation stack, complete the following steps:

  1. Sign in to the AWS CloudFormation console.
  2. Choose Launch Stack
  3. Choose Next.
  4. For S3BucketName, enter the name of your new S3 bucket.
  5. For VPCCIDR, enter a CIDR IP address range that doesn’t conflict with your existing networks.
  6. For PublicSubnetCIDR, enter the CIDR IP address range within the CIDR you gave for VPCCIDR.
  7. For PrivateSubnetACIDR and PrivateSubnetBCIDR, enter the CIDR IP address range within the CIDR you gave for VPCCIDR.
  8. For SubnetAzA and SubnetAzB, choose the subnets you want to use.
  9. For DatabaseUserName, enter your database user name.
  10. For DatabaseUserPassword, enter your database user password.
  11. Choose Next.
  12. On the next page, choose Next.
  13. Review the details on the final page and select I acknowledge that AWS CloudFormation might create IAM resources with custom names.
  14. Choose Create stack.

Stack creation can take about 20 minutes.

Set up an initial source table

The AWS Glue job rds-ingest-rds-setup-<CloudFormation stack name> creates a source table called event on the RDS database instance. To set up the initial source table in Amazon RDS, complete the following steps:

  1. On the AWS Glue console, choose Jobs in the navigation pane.
  2. Choose rds-ingest-rds-setup-<CloudFormation stack name> to open the job.
  3. Choose Run.
  4. Navigate to the Runs tab and wait for Run status to show as SUCCEEDED.

This job will only create the one table, ticket_activity, in the MySQL instance (DDL). See the following code:

CREATE TABLE ticket_activity (
ticketactivity_id INT NOT NULL AUTO_INCREMENT PRIMARY KEY,
sport_type VARCHAR(256) NOT NULL,
start_date DATETIME NOT NULL,
location VARCHAR(256) NOT NULL,
seat_level VARCHAR(256) NOT NULL,
seat_location VARCHAR(256) NOT NULL,
ticket_price INT NOT NULL,
customer_name VARCHAR(256) NOT NULL,
email_address VARCHAR(256) NOT NULL,
created_at DATETIME NOT NULL,
updated_at DATETIME NOT NULL )

Ingest new records

In this section, we detail the steps to ingest new records. Implement following steps to star the execution of the jobs.

Start data ingestion to Kinesis Data Streams using AWS DMS

To start data ingestion from Amazon RDS to Kinesis Data Streams, complete the following steps:

  1. On the AWS DMS console, choose Database migration tasks in the navigation pane.
  2. Select the task rds-to-kinesis-<CloudFormation stack name>.
  3. On the Actions menu, choose Restart/Resume.
  4. Wait for the status to show as Load complete and Replication ongoing.

The AWS DMS replication task ingests data from Amazon RDS to Kinesis Data Streams continuously.

Start data ingestion to Amazon S3

Next, to start data ingestion from Kinesis Data Streams to Amazon S3, complete the following steps:

  1. On the AWS Glue console, choose Jobs in the navigation pane.
  2. Choose streaming-cdc-kinesis2hudi-<CloudFormation stack name> to open the job.
  3. Choose Run.

Do not stop this job; you can check the run status on the Runs tab and wait for it to show as Running.

Start the data load to the source table on Amazon RDS

To start data ingestion to the source table on Amazon RDS, complete the following steps:

  1. On the AWS Glue console, choose Jobs in the navigation pane.
  2. Choose rds-ingest-data-initial-<CloudFormation stack name> to open the job.
  3. Choose Run.
  4. Navigate to the Runs tab and wait for Run status to show as SUCCEEDED.

Validate the ingested data

After about 2 minutes from starting the job, the data should be ingested into the Amazon S3. To validate the ingested data in the Athena, complete the following steps:

  1. On the Athena console, complete the following steps if you’re running an Athena query for the first time:
    • On the Settings tab, choose Manage.
    • Specify the stage directory and the S3 path where Athena saves the query results.
    • Choose Save.

  1. On the Editor tab, run the following query against the table to check the data:
SELECT * FROM "database_<account_number>_hudi_cdc_demo"."ticket_activity" limit 10;

Note that AWS Cloud Formation will create the database with the account number as database_<your-account-number>_hudi_cdc_demo.

Update existing records

Before you update the existing records, note down the ticketactivity_id value of a record from the ticket_activity table. Run the following SQL using Athena. For this post, we use ticketactivity_id = 46 as an example:

SELECT * FROM "database_<account_number>_hudi_cdc_demo"."ticket_activity" limit 10;

To simulate a real-time use case, update the data in the source table ticket_activity on the RDS database instance to see that the updated records are replicated to Amazon S3. Complete the following steps:

  1. On the AWS Glue console, choose Jobs in the navigation pane.
  2. Choose rds-ingest-data-incremental-<CloudFormation stack name> to open the job.
  3. Choose Run.
  4. Choose the Runs tab and wait for Run status to show as SUCCEEDED.

To upsert the records in the source table, complete the following steps:

  1. On the AWS Glue console, choose Jobs in the navigation pane.
  2. Choose the job rds-upsert-data-<CloudFormation stack name>.
  3. On the Job details tab, under Advanced properties, for Job parameters, update the following parameters:
    • For Key, enter --ticketactivity_id.
    • For Value, replace 1 with one of the ticket IDs you noted above (for this post, 46).

  1. Choose Save.
  2. Choose Run and wait for the Run status to show as SUCCEEDED.

This AWS Glue Python shell job simulates a customer activity to buy a ticket. It updates a record in the source table ticket_activity on the RDS database instance using the ticket ID passed in the job argument --ticketactivity_id. It will update ticket_price=500 and updated_at with the current timestamp.

To validate the ingested data in Amazon s3, run the same query from Athena and check the ticket_activity value you noted earlier to observe the ticket_price and updated_at fields:

SELECT * FROM "database_<account_number>_hudi_cdc_demo"."ticket_activity" where ticketactivity_id = 46 ;

Visualize the data in QuickSight

After you have the output file generated by the AWS Glue streaming job in the S3 bucket, you can use QuickSight to visualize the Hudi data files. QuickSight is a scalable, serverless, embeddable, ML-powered business intelligence (BI) service built for the cloud. QuickSight lets you easily create and publish interactive BI dashboards that include ML-powered insights. QuickSight dashboards can be accessed from any device and seamlessly embedded into your applications, portals, and websites.

Build a QuickSight dashboard

To build a QuickSight dashboard, complete the following steps:

  1. Open the QuickSight console.

You’re presented with the QuickSight welcome page. If you haven’t signed up for QuickSight, you may have to complete the signup wizard. For more information, refer to Signing up for an Amazon QuickSight subscription.

After you have signed up, QuickSight presents a “Welcome wizard.” You can view the short tutorial, or you can close it.

  1. On the QuickSight console, choose your user name and choose Manage QuickSight.
  2. Choose Security & permissions, then choose Manage.
  3. Select Amazon S3 and select the buckets that you created earlier with AWS CloudFormation.
  4. Select Amazon Athena.
  5. Choose Save.
  6. If you changed your Region during the first step of this process, change it back to the Region that you used earlier during the AWS Glue jobs.

Create a dataset

Now that you have QuickSight up and running, you can create your dataset. Complete the following steps:

  1. On the QuickSight console, choose Datasets in the navigation pane.
  2. Choose New dataset.
  3. Choose Athena.
  4. For Data source name, enter a name (for example, hudi-blog).
  5. Choose Validate.
  6. After the validation is successful, choose Create data source.
  7. For Database, choose database_<your-account-number>_hudi_cdc_demo.
  8. For Tables, select ticket_activity.
  9. Choose Select.
  10. Choose Visualize.
  11. Choose hour and then ticket_activity_id to get the count of ticket_activity_id by hour.

Clean up

To clean up your resources, complete the following steps:

  1. Stop the AWS DMS replication task rds-to-kinesis-<CloudFormation stack name>.
  2. Navigate to the RDS database and choose Modify.
  3. Deselect Enable deletion protection, then choose Continue.
  4. Stop the AWS Glue streaming job streaming-cdc-kinesis2redshift-<CloudFormation stack name>.
  5. Delete the CloudFormation stack.
  6. On the QuickSight dashboard, choose your user name, then choose Manage QuickSight.
  7. Choose Account settings, then choose Delete account.
  8. Choose Delete account to confirm.
  9. Enter confirm and choose Delete account.

Conclusion

In this post, we demonstrated how you can stream data—not only new records, but also updated records from relational databases—to Amazon S3 using an AWS Glue streaming job to create an Apache Hudi-based near-real-time transactional data lake. With this approach, you can easily achieve upsert use cases on Amazon S3. We also showcased how to visualize the Apache Hudi table using QuickSight and Athena. As a next step, refer to the Apache Hudi performance tuning guide for a high-volume dataset. To learn more about authoring dashboards in QuickSight, check out the QuickSight Author Workshop.


About the Authors

Raj Ramasubbu is a Sr. Analytics Specialist Solutions Architect focused on big data and analytics and AI/ML with Amazon Web Services. He helps customers architect and build highly scalable, performant, and secure cloud-based solutions on AWS. Raj provided technical expertise and leadership in building data engineering, big data analytics, business intelligence, and data science solutions for over 18 years prior to joining AWS. He helped customers in various industry verticals like healthcare, medical devices, life science, retail, asset management, car insurance, residential REIT, agriculture, title insurance, supply chain, document management, and real estate.

Rahul Sonawane is a Principal Analytics Solutions Architect at AWS with AI/ML and Analytics as his area of specialty.

Sundeep Kumar is a Sr. Data Architect, Data Lake at AWS, helping customers build data lake and analytics platform and solutions. When not building and designing data lakes, Sundeep enjoys listening music and playing guitar.

[$] Making life (even) harder for proprietary modules

Post Syndicated from corbet original https://lwn.net/Articles/939842/

The kernel community has never had a smooth relationship with the purveyors
of proprietary kernel modules. Developers tend to strongly dislike those
modules, which cannot be debugged or fixed by anybody other than their
creator, and many see them as a violation of the kernel’s license and their
copyrights on the code. Nonetheless, proprietary modules are tolerated,
within bounds. A recent patch from Christoph Hellwig suggests that those
bounds are about to be tightened slightly, in a somewhat surprising way.

Integrate Cloudflare Zero Trust with Datadog Cloud SIEM

Post Syndicated from Mythili Prabhu original http://blog.cloudflare.com/integrate-cloudflare-zero-trust-with-datadog-cloud-siem/

Integrate Cloudflare Zero Trust with Datadog Cloud SIEM

Integrate Cloudflare Zero Trust with Datadog Cloud SIEM

Cloudflare's Zero Trust platform helps organizations map and adopt a strong security posture. This ranges from Zero Trust Network Access, a Secure Web Gateway to help filter traffic, to Cloud Access Security Broker and Data Loss Prevention to protect data in transit and in the cloud. Customers use Cloudflare to verify, isolate, and inspect all devices managed by IT. Our composable, in-line solutions offer a simplified approach to security and a comprehensive set of logs.

We’ve heard from many of our customers that they aggregate these logs into Datadog’s Cloud SIEM product. Datadog Cloud SIEM provides threat detection, investigation, and automated response for dynamic, cloud-scale environments. Cloud SIEM analyzes operational and security logs in real time – regardless of volume – while utilizing out-of-the-box integrations and rules to detect threats and investigate them. It also automates response and remediation through out-of-the-box workflow blueprints. Developers, security, and operations teams can also leverage detailed observability data and efficiently collaborate to accelerate security investigations in a single, unified platform. We previously had an out-of-the-box dashboard for Cloudflare CDN available on Datadog. These help our customers gain valuable insights into product usage and performance metrics for response times, HTTP status codes, cache hit rate. Customers can collect, visualize, and alert on key Cloudflare metrics.

Today, we are very excited to announce the general availability of Cloudflare Zero Trust Integration with Datadog. This deeper integration offers the Cloudflare Content Pack within Cloud SIEM which includes out-of-the-box dashboard and detection rules that will help our customers ingesting Zero Trust logs into Datadog, gaining greatly improved security insights over their Zero Trust landscape.

Integrate Cloudflare Zero Trust with Datadog Cloud SIEM

“Our Datadog SIEM integration with Cloudflare delivers a holistic view of activity across Cloudflare Zero Trust integrations–helping security and dev teams quickly identify and respond to anomalous activity across app, device, and users within the Cloudflare Zero Trust ecosystem. The integration offers detection rules that automatically generate signals based on CASB (cloud access security broker) findings, and impossible travel scenarios, a revamped dashboard for easy spotting of anomalies, and accelerates response and remediation to quickly contain an attacker’s activity through an out-of-the-box workflow automation blueprints.”
– Yash Kumar, Senior Director of Product, Datadog

How to get started

Set up Logpush jobs to your Datadog destination

Use the Cloudflare dashboard or API to create a Logpush job with all fields enabled for each dataset you’d like to ingest on Datadog. We have eight account-scoped datasets available to use today (Access Requests, Audit logs, CASB findings, Gateway logs including DNS, Network, HTTP; Zero Trust Session Logs) that can be ingested into Datadog.

Install the Cloudflare Tile in Datadog

In your Datadog dashboard, locate and install the Cloudflare Tile within the Datadog Integration catalog. At this stage, Datadog’s out-of-the-box log processing pipeline will automatically parse and normalize your Cloudflare Zero Trust logs.

Analyze and correlate your Zero Trust logs with Datadog Cloud SIEM's out-of-the-box content

Our new and improved integration with Datadog enables security teams to quickly and easily monitor their Zero Trust components with the Cloudflare Content Pack. This includes the out-of-the-box dashboard that now features a Zero Trust section highlighting various widgets about activity across the applications, devices, and users in your Cloudflare Zero Trust ecosystem. This section gives you a holistic view, helping you spot and respond to anomalies quickly.

Integrate Cloudflare Zero Trust with Datadog Cloud SIEM

Security detections built for CASB

As Enterprises use more SaaS applications, it becomes more critical to have insights and control for data at-rest. Cloudflare CASB findings do just that by providing security risk insights for all integrated SaaS applications.

With this new integration, Datadog now offers an out-of-the-box detection rule that detects any CASB findings. The alert is triggered at different severity levels for any CASB security finding that could indicate suspicious activity within an integrated SaaS app, like Microsoft 365 and Google Workspace. In the example below, the CASB finding points to an asset whose Google Workspace Domain Record is missing.

This detection is helpful in identifying and remedying misconfigurations or any security issues saving time and reducing the possibility of security breaches.

Integrate Cloudflare Zero Trust with Datadog Cloud SIEM

Security detections for Impossible Travel

One of the most common security issues can show up in surprisingly simple ways. For example, could be a user that seemingly logs in from one location only to login shortly after from a location physically too far away. Datadog’s new detection rule addresses exactly this scenario with their Impossible Travel detection rule. If Datadog Cloud SIEM determines that two consecutive loglines for a user indicate impossible travel of more than 500 km at over 1,000 km/h, the security alert is triggered. An admin can then determine if it is a security breach and take actions accordingly.

Integrate Cloudflare Zero Trust with Datadog Cloud SIEM

What’s next

Customers of Cloudflare and Datadog can now gain a more comprehensive view of their products and security posture with the enhanced dashboards and the new detection rules. We are excited to work on adding more value for our customers and develop unique detection rules.

If you are a Cloudflare customer using Datadog, explore the new integration starting today.

The collective thoughts of the interwebz