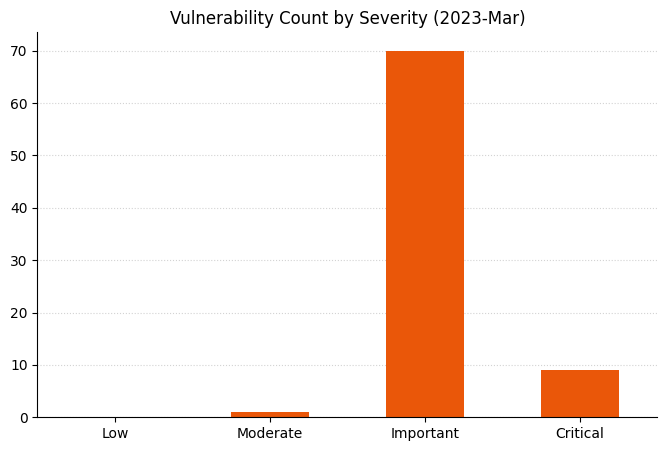
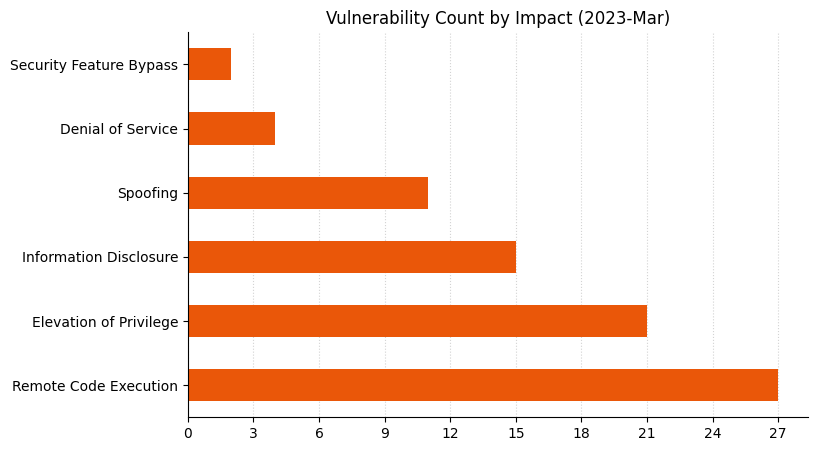
Security updates for Wednesday

Post Syndicated from original https://lwn.net/Articles/926205/

Security updates have been issued by Debian (node-sqlite3 and qemu), Fedora (libmemcached-awesome, manifest-tool, sudo, and vim), Red Hat (gnutls, kernel, kernel-rt, lua, and openssl), Slackware (mozilla), SUSE (amanda, firefox, go1.19, go1.20, jakarta-commons-fileupload, java-1_8_0-openjdk, nodejs18, peazip, perl-Net-Server, python, python-cryptography, python-Django, python3, rubygem-rack, and xorg-x11-server), and Ubuntu (ipython, linux-ibm, linux-ibm-5.4, and linux-kvm).

Announcing WAF Attack Score Lite and Security Analytics for business customers

Post Syndicated from Radwa Radwan original https://blog.cloudflare.com/waf-attack-score-for-business-plan/

Announcing WAF Attack Score Lite and Security Analytics for business customers

Announcing WAF Attack Score Lite and Security Analytics for business customers

In December 2022 we announced the general availability of the WAF Attack Score. The initial release was for our Enterprise customers, but we always had the belief that this product should be enabled for more users. Today we’re announcing “WAF Attack Score Lite” and “Security Analytics” for our Business plan customers.

Looking back on “What is WAF Attack Score and Security Analytics?”

Vulnerabilities on the Internet appear almost on a daily basis. The CVE (common vulnerabilities and exposures) program has a list with over 197,000 records to track disclosed vulnerabilities.

That makes it really hard for web application owners to harden and update their system regularly, especially when we talk about critical libraries and the exploitation damage that can happen in case of information leak. That’s why web application owners tend to use WAFs (Web Application Firewalls) to protect their online presence.

Most WAFs use signature-based detections, which are rules created based on specific attacks that we know about. The signature-based method is very fast, has a low rate of false positives (these are the requests that are categorized as attack when they are actually legitimate), and is very efficient with most of the attack categories we know. However, they sometimes have a blind spot when a new attack happens, often called zero-day attacks. As soon as a new vulnerability is found, our security analysts take fast action to stop it in a matter of hours and update the WAF Managed Rules, yet we want to protect our customers during this time as well.

This is the main reason Cloudflare created a complementary feature to the WAF managed rules: a smart machine learning layer to help detect unknown attacks, and protect customers even during the time gap until rules are updated.

Early detection + Powerful mitigation = Safer Internet

Announcing WAF Attack Score Lite and Security Analytics for business customers

The performance of any machine learning drastically depends on the data it was trained on. Our machine learning uses a supervised model that was trained over hundreds of millions of requests generated by WAF Managed Rules, data varies between clean and malicious, some were blended with fuzzy techniques to enable catching similar patterns as covered in our blog “Improving the accuracy of our machine learning WAF”. At the moment, there are three types of attacks our machine learning model is optimized to find: SQL Injection (SQLi), Cross Site Scripting (XSS), and a wide range of Remote Code Execution (RCE) attacks such as shell injection, PHP injection, Apache Struts type compromises, Apache log4j, and similar attacks that result in RCE.

And the reason why we started with them is based on Cloudflare’s Application Security Report. These categories represent more than 24% of the mitigated layer 7 attacks over the last year in our WAF, therefore more prone to exploitations.

In the full Enterprise WAF Attack Score version we offer more granularity on the attack categories and we provide scores for each class where they can be configured freely per domain.

WAF Attack Score Lite Features for Business Plan

WAF Attack Score Lite and the Security Analytics view offer three main functions:

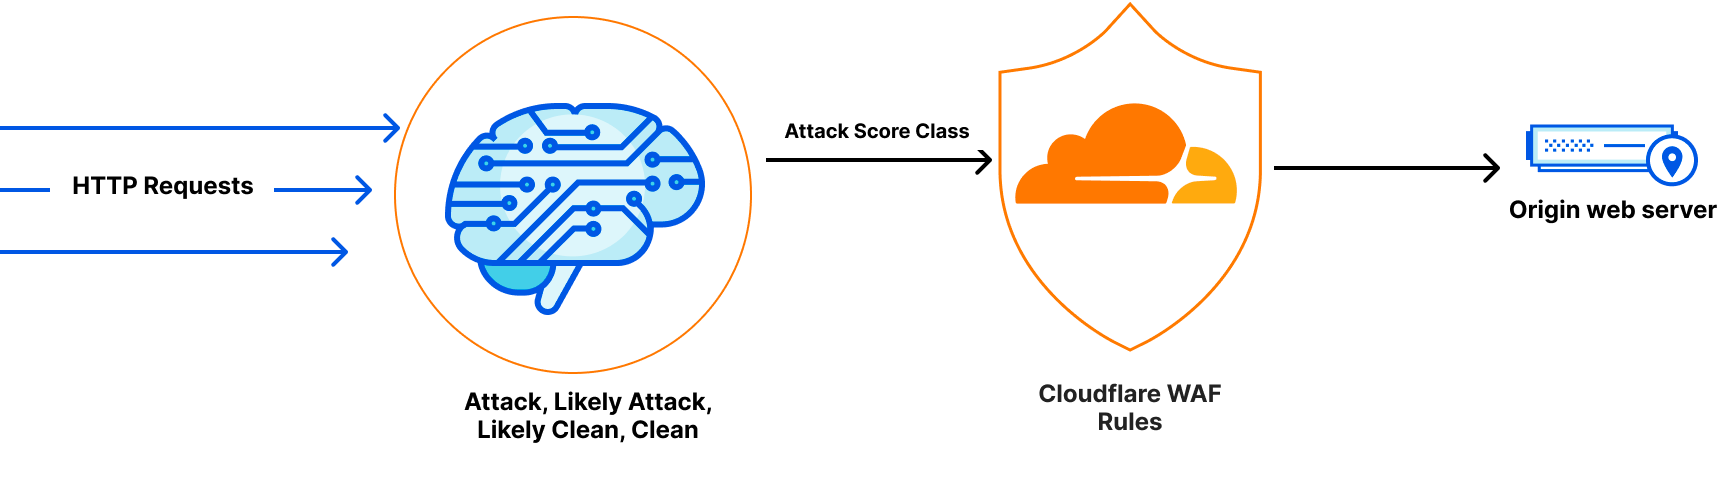
1- Attack detection: This happens through inspecting every incoming HTTP request, bucketing or classifying the requests into 4 types: Attacks, Likely Attacks, Likely Clean and Clean. At the moment there are three types of attacks our machine learning model is optimized to find: SQL Injection (SQLi), Cross Site Scripting (XSS), and a wide range of Remote Code Execution (RCE) attacks.

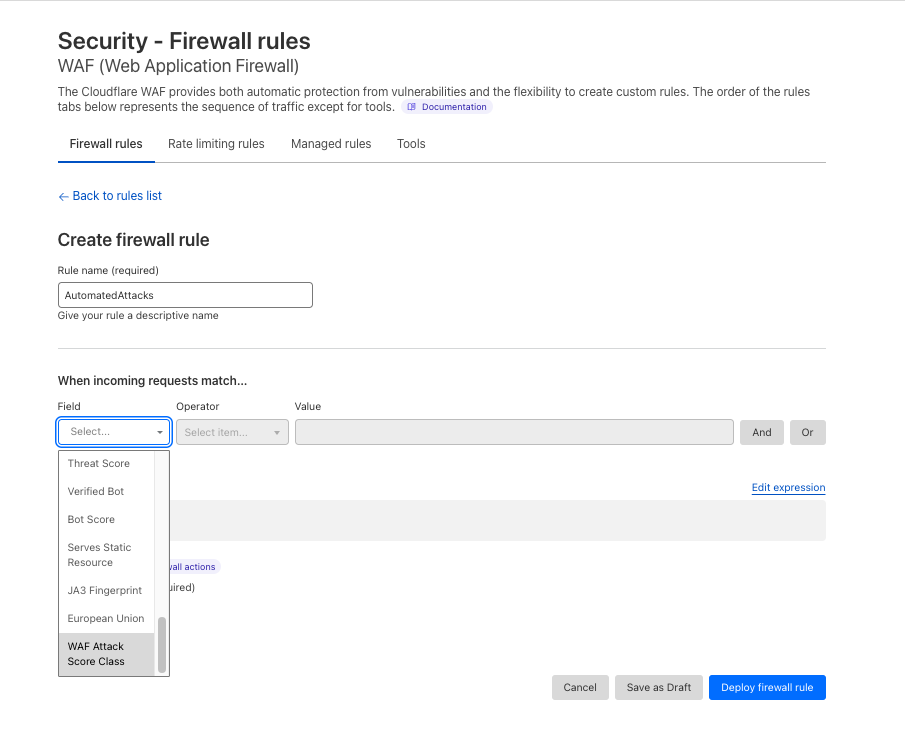
2- Attack mitigation: The ability to create WAF Custom Rules or WAF Rate Limiting Rules to mitigate requests. We’re exposing a new field cf.waf.score.class that  has preset values: attack, likely_attack, likely_clean and clean. customers can use this field in rules expressions and apply needed actions.

Announcing WAF Attack Score Lite and Security Analytics for business customers

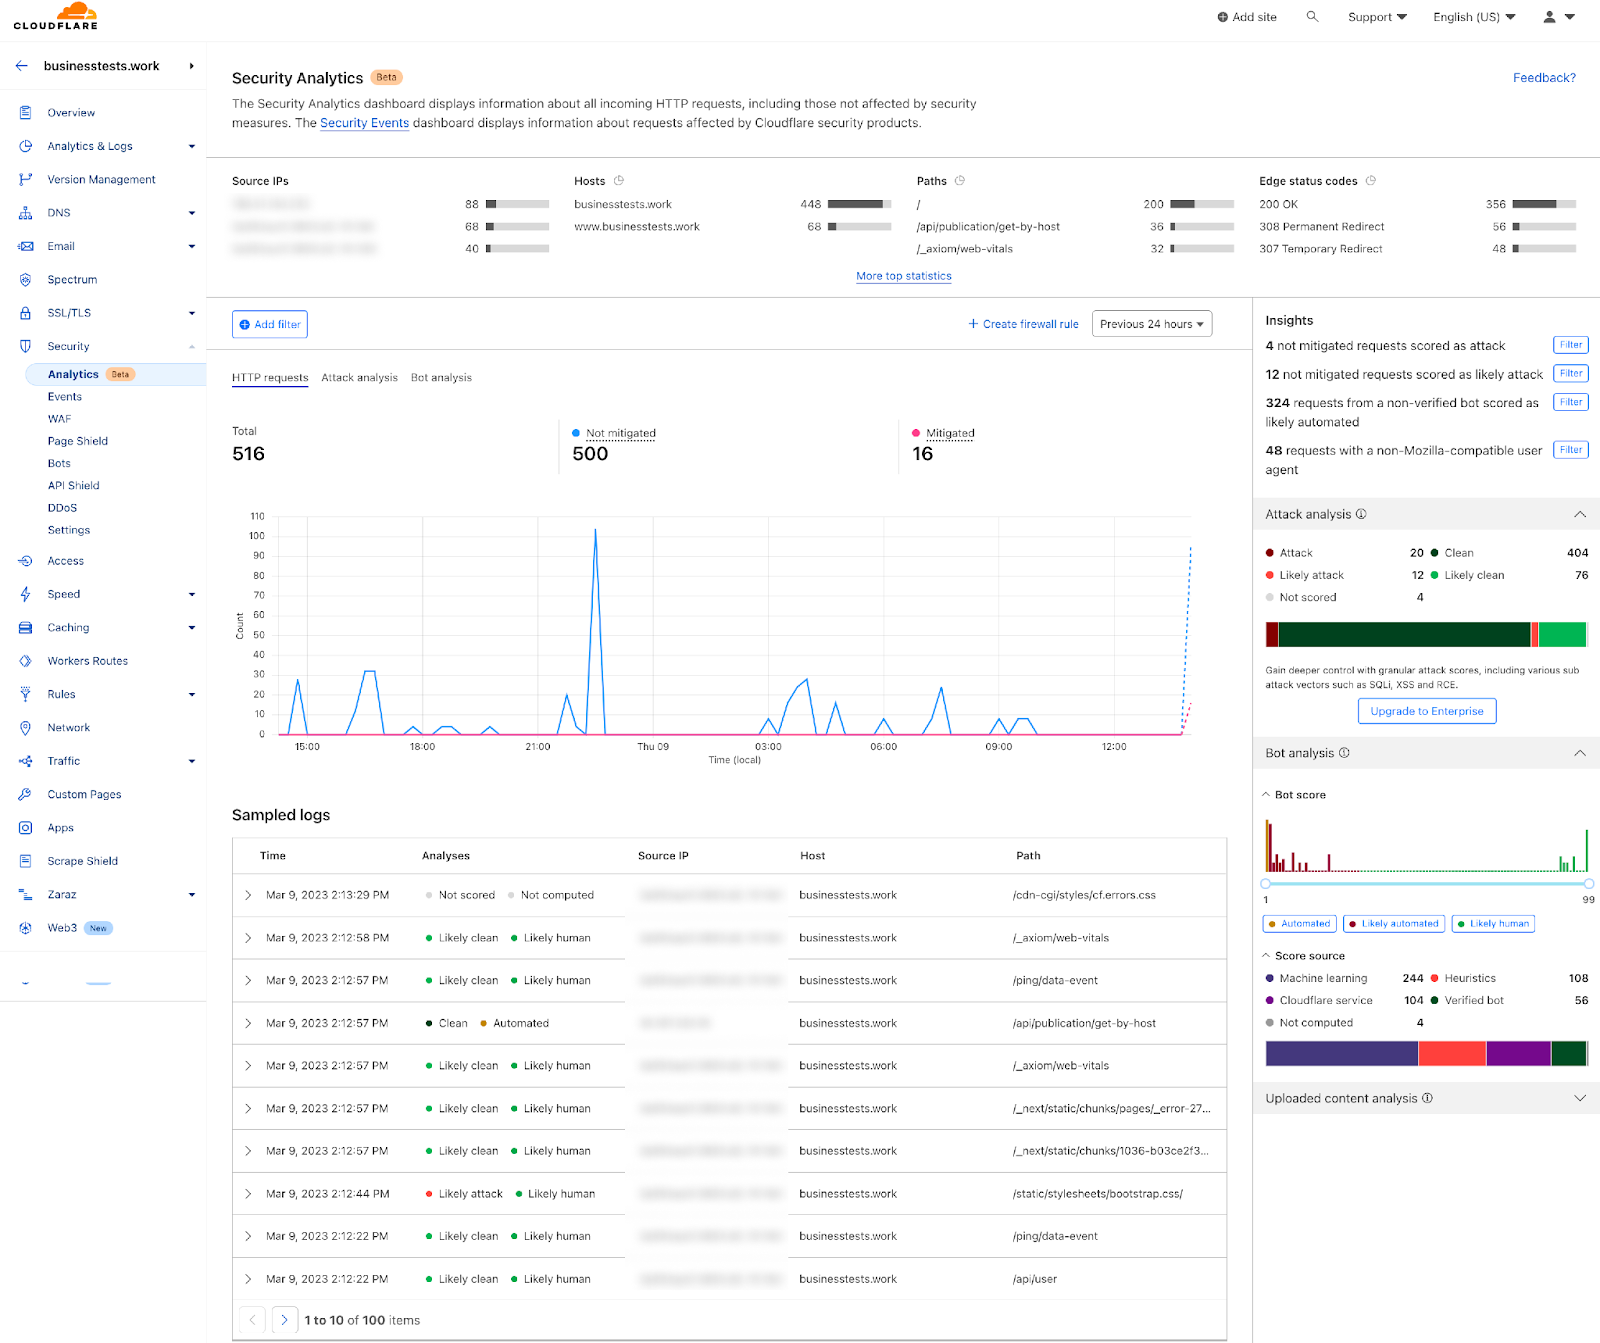
3- Visibility over your entire traffic: Security Analytics is a new dashboard currently in beta. It provides a comprehensive view across all your HTTP traffic, which displays all requests whether they match rules or not. Security Analytics is a great tool for investigating false negatives and hardening your security configurations. Security Events is still available in (Security > Events) and Security Analytics is available in a separate tab (Security > Analytics).

Announcing WAF Attack Score Lite and Security Analytics for business customers

Deployment and configuration

In order to enable WAF Attack Score Lite and Security Analytics, you don’t need to take any action. The HTTP machine learning inspection rollout will start today, and Security Analytics will appear automatically to all Business plan customers by the time the rollout is completed in the upcoming weeks.

It’s worth mentioning that having the detection on and viewing the attack analysis in Security Analytics does not mean you’re blocking traffic. It only offers insights and provides the freedom to create rules and mitigate the desired requests. Creating a rule to block or challenge bad traffic is needed to take effect.

A common use case

Consider an attacker executing an attack using automated web requests to manipulate or disrupt web applications. One of the best ways to identify this type of traffic and mitigate these requests is by combining bot score with WAF Attack Score.

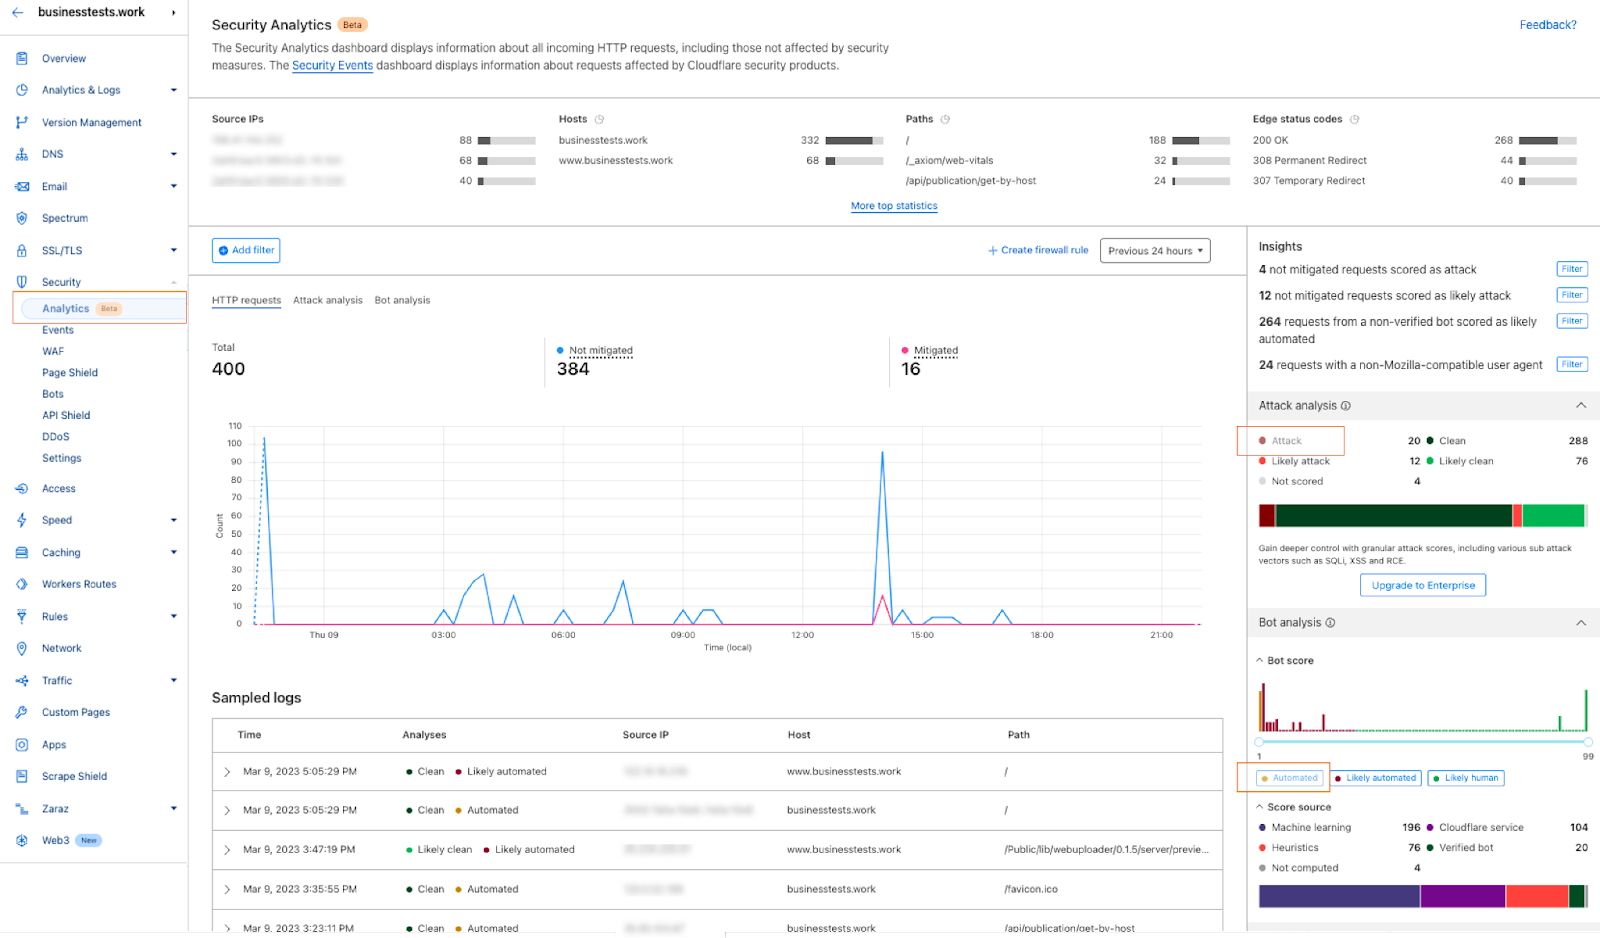
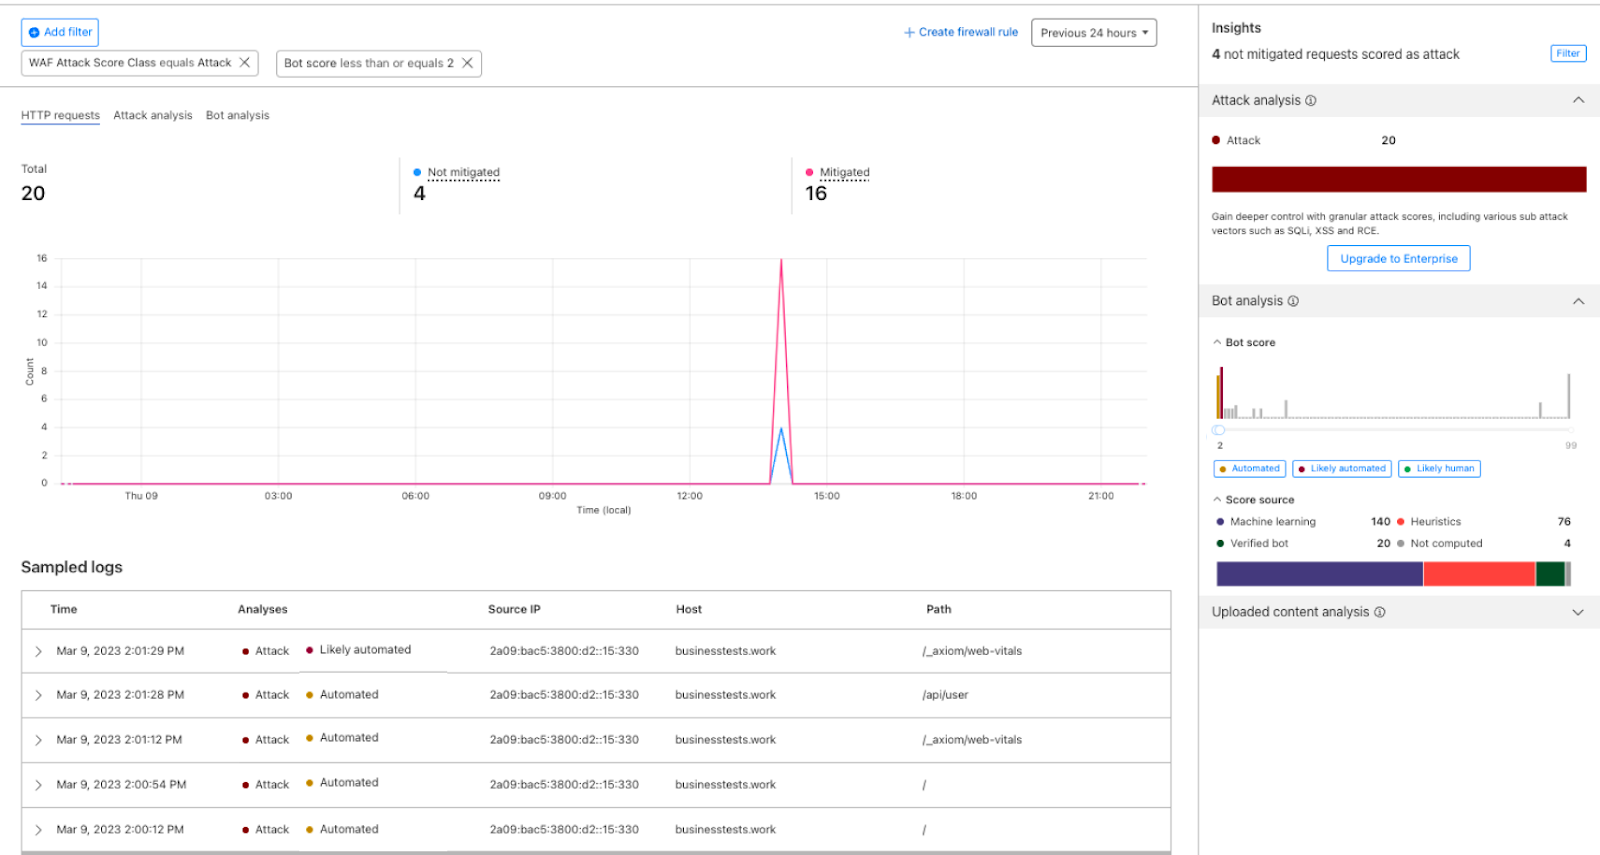
1- Go to the Security Analytics dashboard under Security > Analytics. On the right-hand side the Attack Analysis indicates the attack class. In this case, I can select “Attack” to apply a single filter, or use the quick filters under Insights to propagate multiple filters at once. In addition to the attack class, I can also select the Bot “Automated” filter.

Announcing WAF Attack Score Lite and Security Analytics for business customers

2- After filtering, Security Analytics provides the capability of scrolling down to see the logs and validate the results:

Announcing WAF Attack Score Lite and Security Analytics for business customers

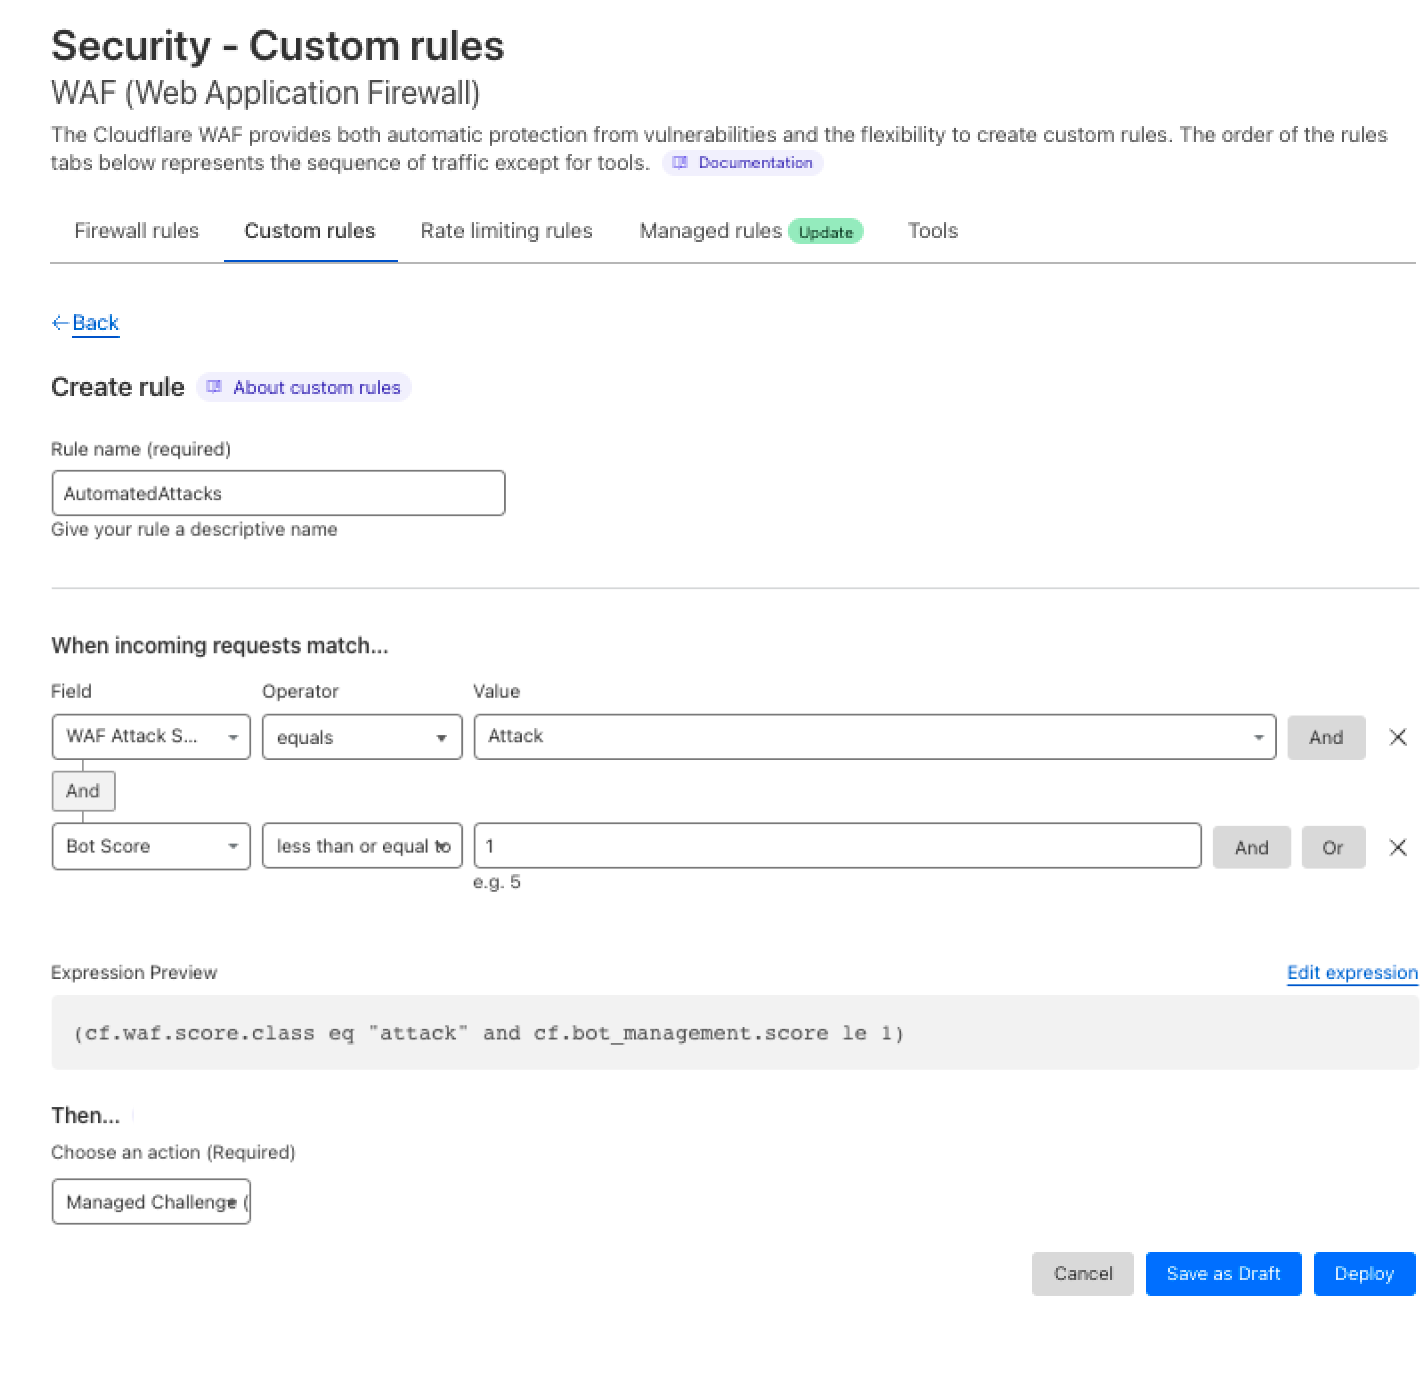
3- Once the selected requests are confirmed, I can select the Create WAF Custom Rules option which will direct me to the Security Events with the pre-assigned filters to deploy a rule. In this case, I want to challenge the requests matched by the rule:

Announcing WAF Attack Score Lite and Security Analytics for business customers

And voila! You have a new rule that challenges traffic matching any automated attack variation.

Next steps

We have been working hard to provide maximum security and visibility for all our customers. This is only one step on this road! We will keep adding more product-focused analytics, and providing additional security against unknown attacks. Try it out, create a rule, and don’t hesitate to contact our sales team if you need the full version of WAF Attack Score.

Analyze any URL safely using the Cloudflare Radar URL Scanner

Post Syndicated from Stanley Chiang original https://blog.cloudflare.com/radar-url-scanner-early-access/

Analyze any URL safely using the Cloudflare Radar URL Scanner

Analyze any URL safely using the Cloudflare Radar URL Scanner

One of the first steps in an information security investigation is to gather as much context as possible. But compiling that information can become a sprawling task.

Cloudflare is excited to announce early access to a new, free tool — the Radar URL Scanner. Provide us a URL, and our scanner will compile a report containing a myriad of technical details: a phishing scan, SSL certificate data, HTTP request and response data, page performance data, DNS records, whether cookies are set to secure and HttpOnly, what technologies and libraries the page uses, and more.

Analyze any URL safely using the Cloudflare Radar URL Scanner

Let’s walk through a report on John Graham-Cumming’s blog as an example. Conveniently, all reports generated will be publicly accessible.

The first page is the summary tab, and you’ll see we’ve broken all the available data into the following categories: Security, Cookies, Network, Technology, DOM, and Performance. It’s a lot of content so we will jump through some highlights.

In the Summary tab itself, you’ll notice the submitted URL was https://blog.jgc.org. If we had received a URL short link, the scanner would have followed the redirects and generated a report for the final URL.

Analyze any URL safely using the Cloudflare Radar URL Scanner

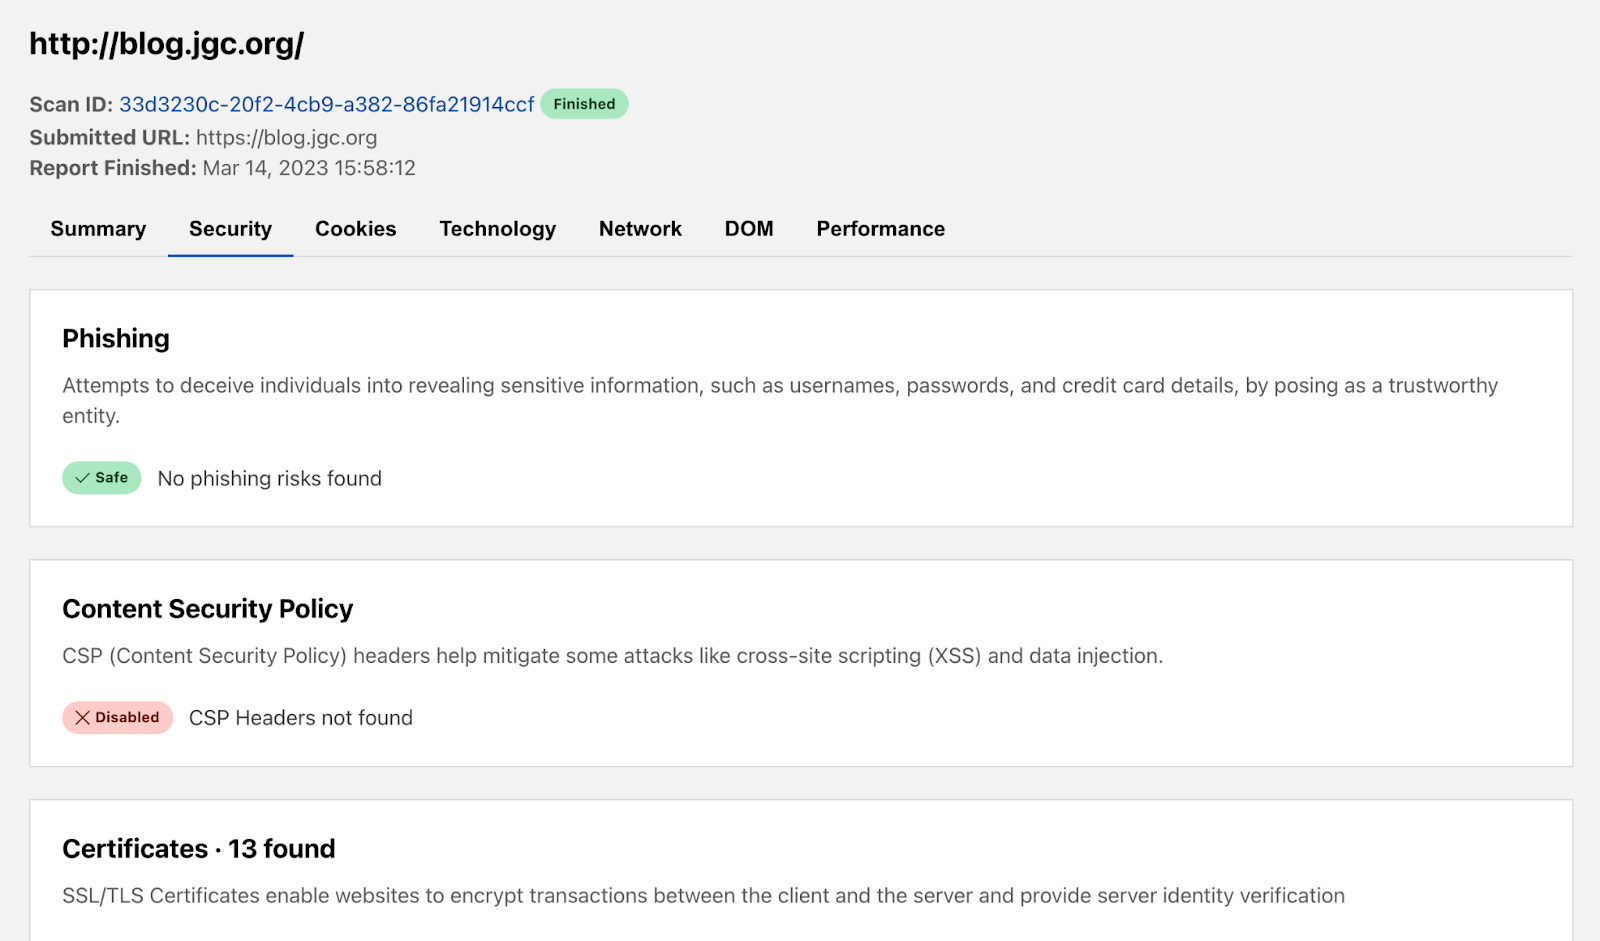
The Security tab presents information to help determine whether a page is safe to visit with a phishing and certificates section. In our blog example, the report confirms the link we provided is not a phishing link, but there could easily be phishing scams trying to harvest personal information. We’re excited to enable wider access to our security infrastructure with this free tool.

Analyze any URL safely using the Cloudflare Radar URL Scanner

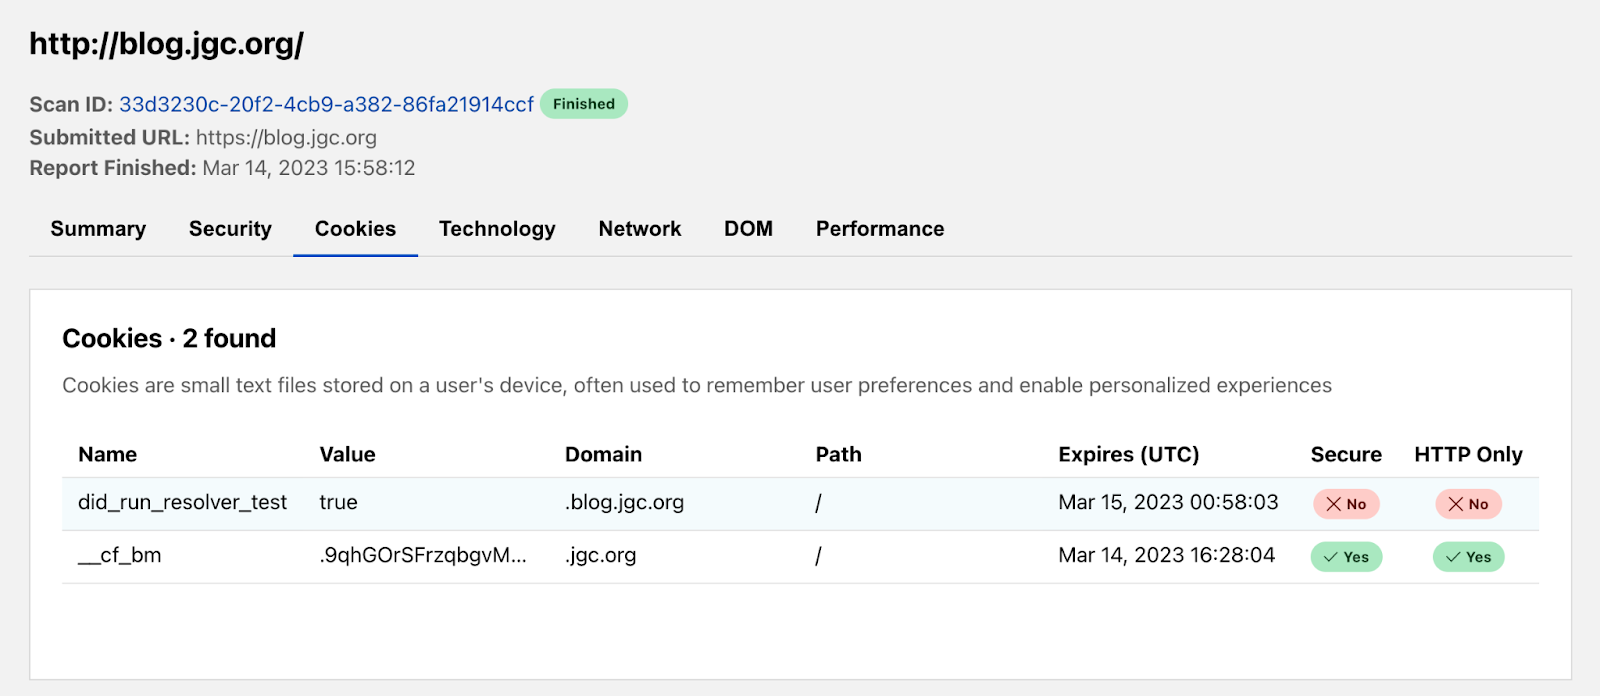
The Cookies tab can indicate how privacy friendly a website is to its users. We show all the cookies set and their attribute values to do this. In this report, the blog loaded 2 cookies. There’s the Secure flag. You’ll want that set to true as often as possible because this means the cookie may only be transmitted over HTTPS, preventing it from being observed by unauthorized parties. Additionally, cookies set to HttpOnly will be inaccessible to the JavaScript API, potentially mitigating XSS attacks from third-party scripts.

Analyze any URL safely using the Cloudflare Radar URL Scanner

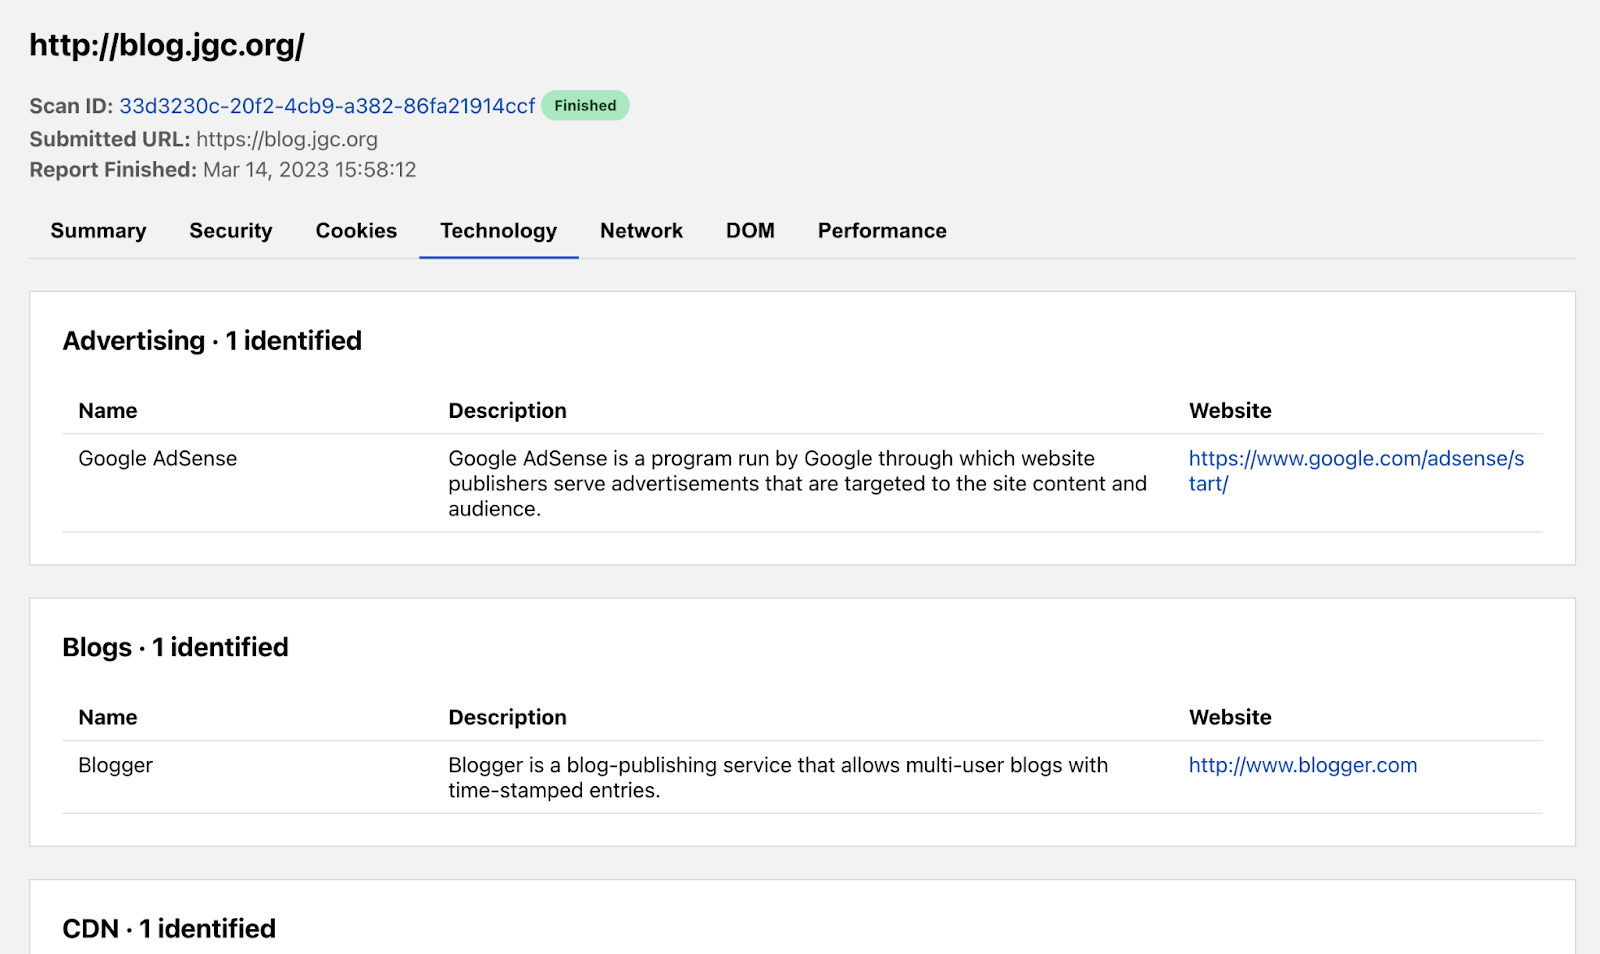
The Technology tab enumerates the technologies, frameworks, libraries, etc that are used to power the page being scanned. Understanding the technology stack of a page can be very useful for when there are outages in a particular service, when exploits in popular libraries are discovered, or simply to understand what tools are most popular in the industry. John’s blog appears to use 7 different technologies including Google AdSense, Blogger, and Cloudflare.

Analyze any URL safely using the Cloudflare Radar URL Scanner

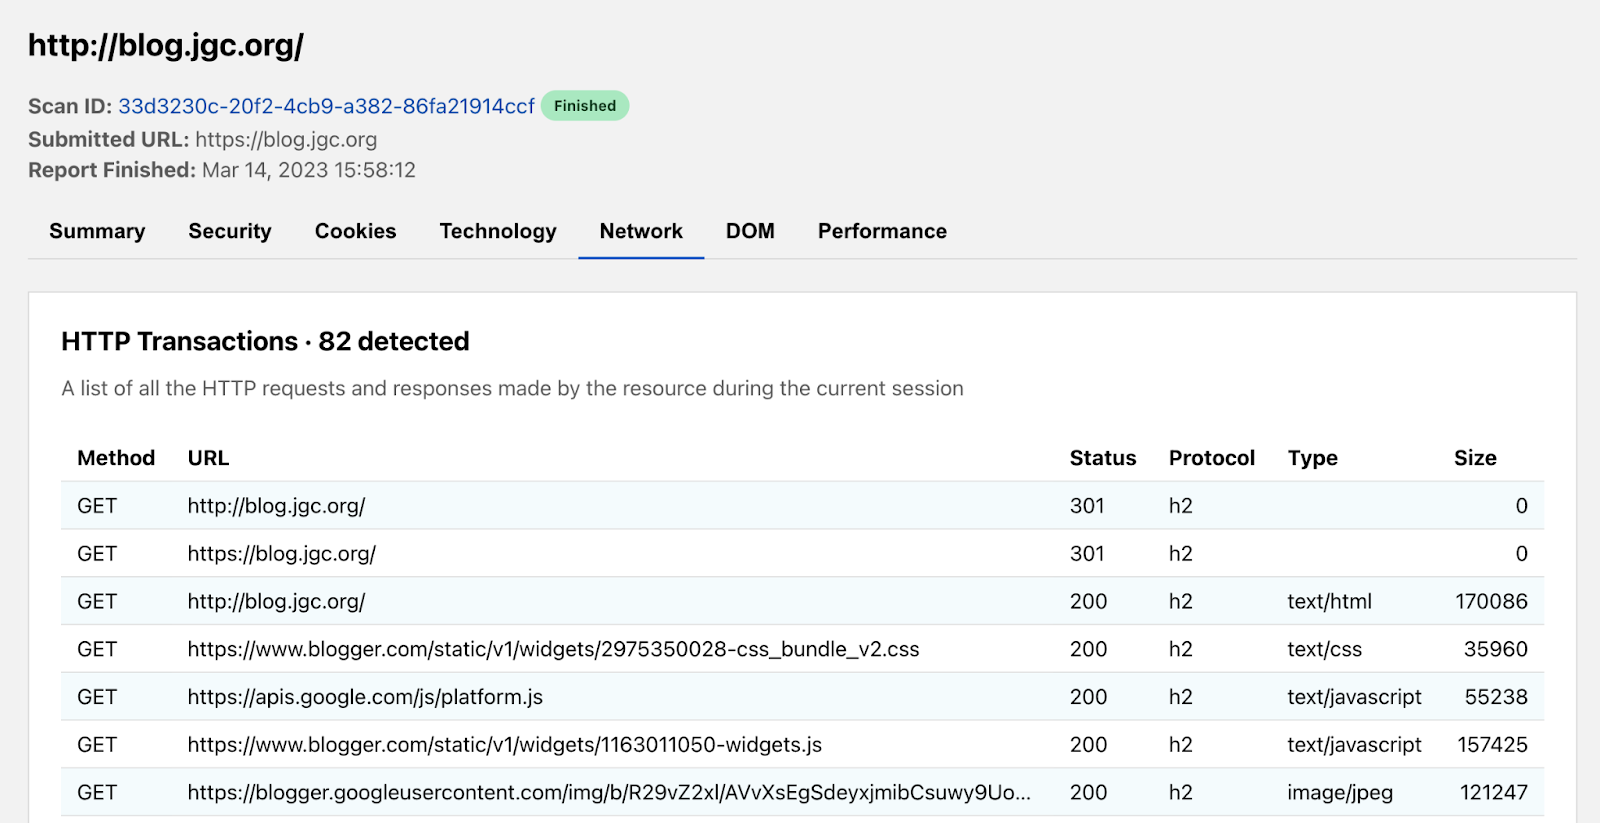
The Network tab shows all the HTTP transactions that occur on the page as well as the hostname’s associated DNS records. HTTP transactions are the requests and responses the page makes to load all its content. This tells engineers where the website is going to load its content. Our report of John’s blog shows a total of 82 requests.

Analyze any URL safely using the Cloudflare Radar URL Scanner

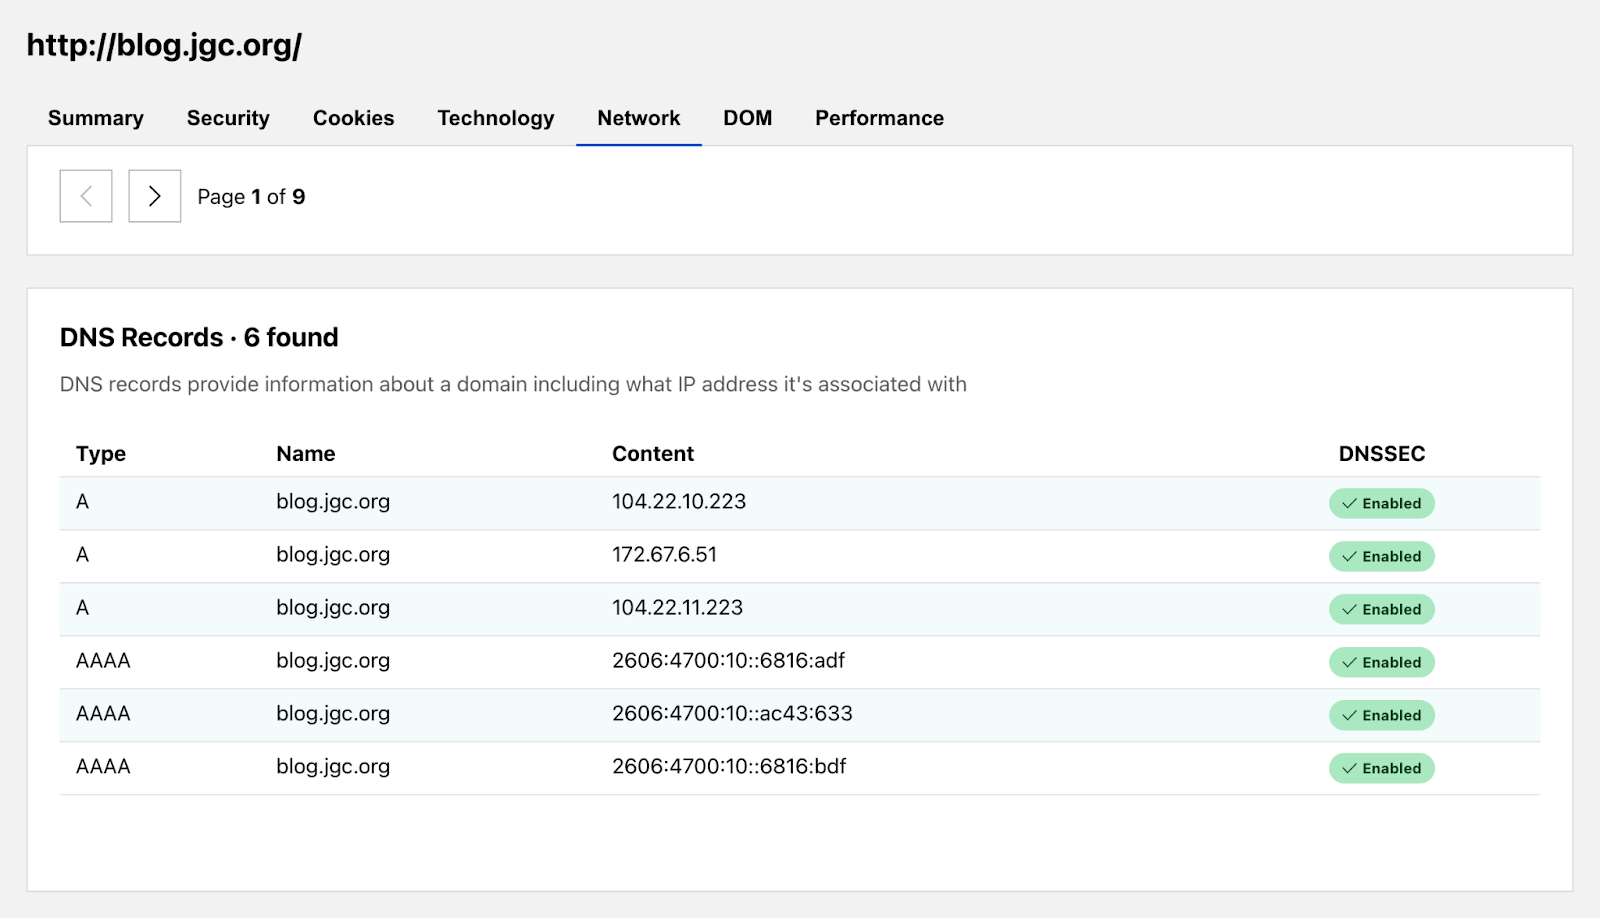
The tab also contains DNS records which are a great way to understand more about the fundamentals of the page. And of course, we at Cloudflare are big advocates for enabling DNSSEC.

Analyze any URL safely using the Cloudflare Radar URL Scanner

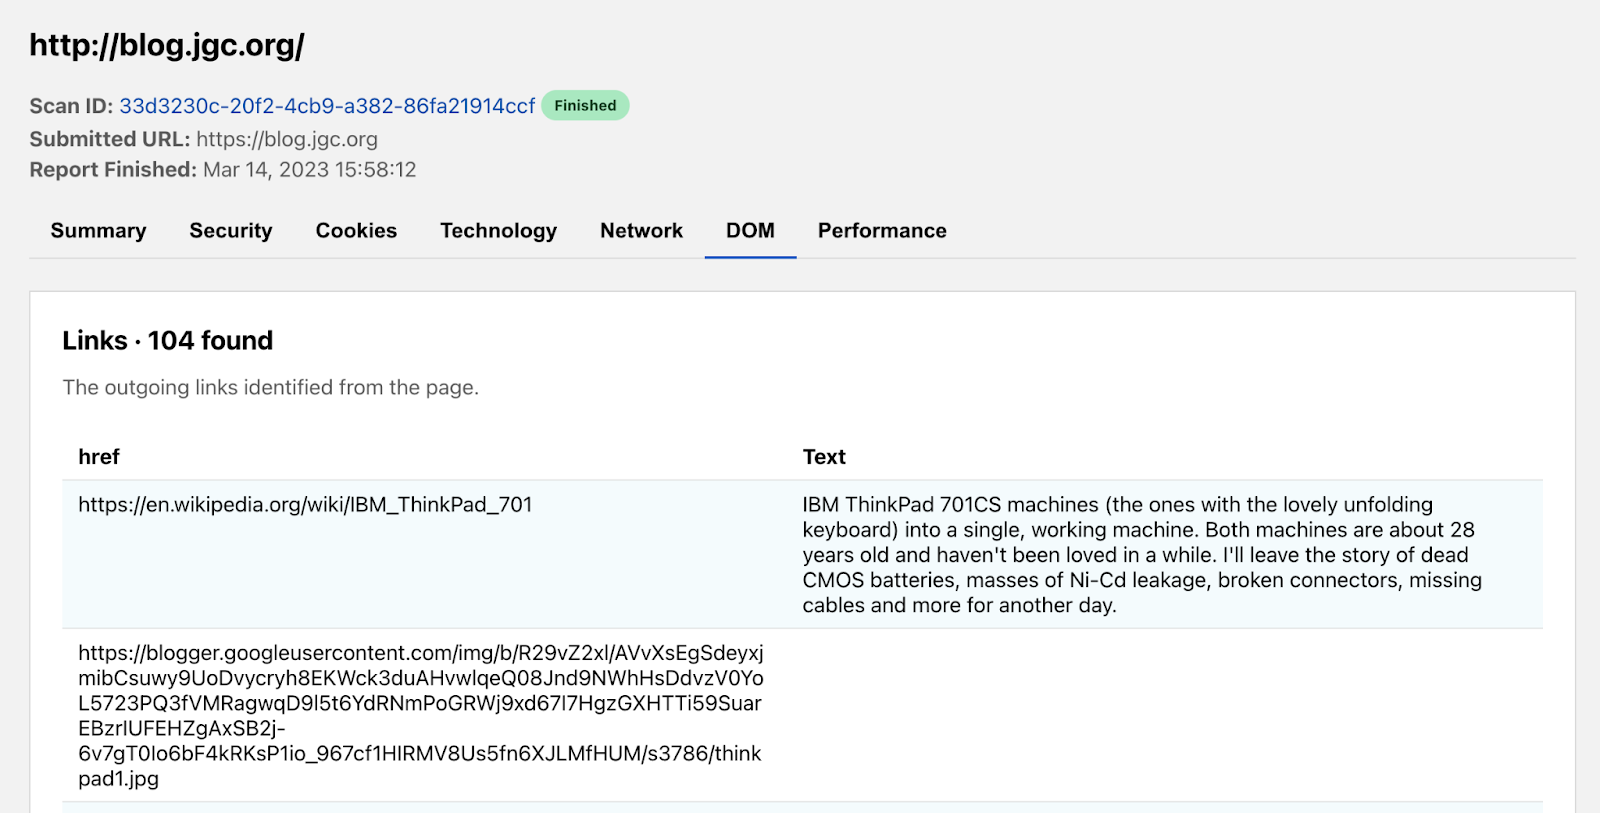
The DOM (Document Object Model) tab conveniently collates common information you may be looking for from within the page. We grouped together lists of all hyperlinks and global JavaScript variables. Additionally, we provide the raw HTML of the page for you to further analyze. Our report shows the blog’s landing page has 104 hyperlinks going off to other websites.

Analyze any URL safely using the Cloudflare Radar URL Scanner

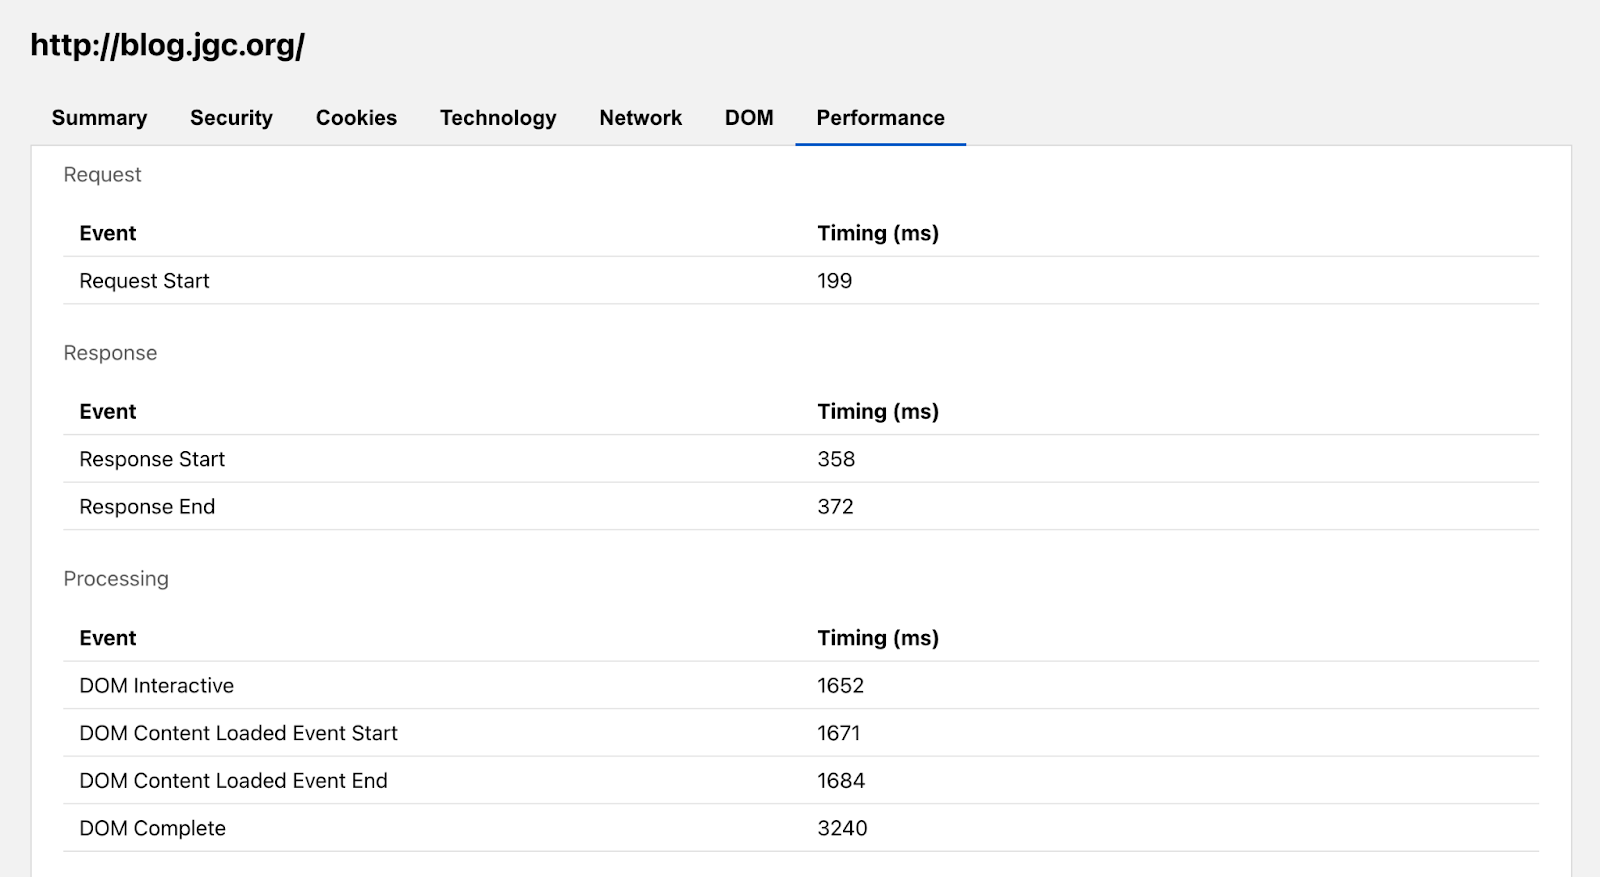
The Performance tab presents a breakdown of the time it takes for the website to load. It’s not enough for a page to be secure for users. It must also be usable, and load speeds are a big factor in the overall experience. That’s why we’ve also included Performance Navigation Timing metrics alongside our more security and privacy oriented tabs.

Analyze any URL safely using the Cloudflare Radar URL Scanner

Under the hood, one of the great things about this tool is that the underlying scanning technology uses Cloudflare’s homegrown Workers Browser Rendering API to run all our headless scans. You can follow that link to join the waitlist and try it out for yourself.

In the future, we envision adding features to our scanner to complement the ones from this launch: API endpoints so you don’t need to rely on a GUI, private scans for more sensitive or recurring reports, and also security recommendations with integrations with the Cloudflare Security Center. And since this is a Radar product, not only can users expect the data generated to further enhance our security threat modeling, they can also look forward to us providing back insights and visualizations from the aggregate trends we observe.

The Radar URL Scanner tool’s journey to helping make the Internet more transparent and secure has only just begun, but we’re excited for you all to try it out here. If you have any questions or would like to discuss enterprise level features on your wishlist, feel free to reach out via Twitter at @CloudflareRadar or email us at [email protected].

Using the power of Cloudflare’s global network to detect malicious domains using machine learning

Post Syndicated from Jesse Kipp original https://blog.cloudflare.com/threat-detection-machine-learning-models/

Using the power of Cloudflare’s global network to detect malicious domains using machine learning

Using the power of Cloudflare’s global network to detect malicious domains using machine learning

Cloudflare secures outbound Internet traffic for thousands of organizations every day, protecting users, devices, and data from threats like ransomware and phishing. One way we do this is by intelligently classifying what Internet destinations are risky using the domain name system (DNS). DNS is essential to Internet navigation because it enables users to look up addresses using human-friendly names, like cloudflare.com. For websites, this means translating a domain name into the IP address of the server that can deliver the content for that site.

However, attackers can exploit the DNS system itself, and often use techniques to evade detection and control using domain names that look like random strings. In this blog, we will discuss two techniques threat actors use – DNS tunneling and domain generation algorithms – and explain how Cloudflare uses machine learning to detect them.

Domain Generation Algorithm (DGA)

Most websites don’t change their domain name very often. This is the point after all, having a stable human-friendly name to be able to connect to a resource on the Internet. However, as a side-effect stable domain names become a point of control, allowing network administrators to use restrictions on domain names to enforce policies, for example blocking access to malicious websites. Cloudflare Gateway – our secure web gateway service for threat defense – makes this easy to do by allowing administrators to block risky and suspicious domains based on integrated threat intelligence.

But what if instead of using a stable domain name, an attacker targeting your users generated random domain names to communicate with, making it more difficult to know in advance what domains to block? This is the idea of Domain Generation Algorithm domains (MITRE ATT&CK technique T1568.002).

After initial installation, malware reaches out to a command-and-control server to receive further instructions, this is called “command and control” (MITRE ATT&CK tactic TA0011). The attacker may send instructions to perform such actions as gathering and transmitting information about the infected device, downloading additional stages of malware, stealing credentials and private data and sending it to the server, or operating as a bot within a network to perform denial-of-service attacks. Using a domain generation algorithm to frequently generate random domain names to communicate with for command and control gives malware a way to bypass blocks on fixed domains or IP addresses. Each day the malware generates a random set of domain names. To rendezvous with the malware, the attacker registers one of these domain names and awaits communication from the infected device.

Speed in identifying these domains is important to disrupting an attack. Because the domains rotate each day, by the time the malicious disposition of a domain propagates through the cybersecurity community, the malware may have rotated to a new domain name. However, the random nature of these domain names (they are literally a random string of letters!) also gives us an opportunity to detect them using machine learning.

The machine learning model

To identify DGA domains,  we trained a model that extends a pre-trained transformers-based neural network. Transformers-based neural networks are the state-of-the-art technique in natural language processing, and underlie large language models and services like ChatGPT. They are trained by using adjacent words and context around a word or character to “learn” what is likely to come next.

Domain names largely contain words and abbreviations that are meaningful in human language. Looking at the top domains on Cloudflare Radar, we see that they are largely composed of words and common abbreviations, “face” and “book” for example, or “cloud” and “flare”. This makes the knowledge of human language encoded in transformer models a powerful tool for detecting random domain names.

For DGA models, we curated ground truth data that consisted of domain names observed from Cloudflare’s 1.1.1.1 DNS resolver for the negative class, and we used domain names from known domain generation algorithms for the positive class (all uses of DNS resolver data is completed in accordance with our privacy commitments).

Our final training set contained over 250,000 domain names, and was weighted to include more negative (not DGA domains) than positive cases. We trained three different versions of the model with different architectures: LSTM (Long Short-Term Memory Neural Network), LightGBM (binary classification), and a transformer-based model. We selected the transformer based model based on it having the highest accuracy and F1 score (the F1 score is a measure of model fit that penalizes having very different precision and recall, on an imbalanced data set the highest accuracy model might be the one that predicts everything either true or false, not what we want!), with an accuracy of over 99% on the test data.

To compute the score for a new domain never seen before by the model, the domain name is tokenized (i.e. broken up into individual components, in this case characters), and the sequence of characters are passed to the model. The transformers Python package from Hugging Face makes it easy to use these types of models for a variety of applications. The library supports summarization, question answering, translation, text generation, classification, and more. In this case we use sequence classification, together with a model that was customized for this task. The output of the model is a score indicating the chance that the domain was generated by a domain generation algorithm. If the score is over our threshold, we label the domain and a domain generation algorithm domain.

Deployment

The expansive view of domain names Cloudflare has from our 1.1.1.1 resolver means we can quickly observe DGA domains after they become active. We process all DNS query names that successfully resolve using this model, so a single successful resolution of the domain name anywhere in Cloudflare’s public resolver network can be detected.

From the queries observed on 1.1.1.1, we filter down first to new and newly seen domain names. We then apply our DGA classifier to the new and newly seen domain names, allowing us to detect activated command and control domains as soon as they are observed anywhere in the world by the 1.1.1.1 resolver.

Using the power of Cloudflare’s global network to detect malicious domains using machine learning

DNS Tunneling detection

In issuing commands or extracting data from an installed piece of malware, attackers seek to avoid detection. One way to send data and bypass traditional detection methods is to encode data within another protocol. When the attacker controls the authoritative name server for a domain, information can be encoded as DNS queries and responses. Instead of making a DNS query for a simple domain name, such as www.cloudflare.com, and getting a response like 104.16.124.96, attackers can send and receive long DNS queries and responses that contain encoded data.

Here is an example query made by an application performing DNS tunneling (query shortened and partially redacted):

3rroeuvx6bkvfwq7dvruh7adpxzmm3zfyi244myk4gmswch4lcwmkvtqq2cryyi.qrsptavsqmschy2zeghydiff4ogvcacaabc3mpya2baacabqtqcaa2iaaaaocjb.br1ns.example.com

The response data to a query like the one above can vary in length based on the response record type the server uses and the recursive DNS resolvers in the path. Generally, it is at most 255 characters per response record and looks like a random string of characters.

TXT jdqjtv64k2w4iudbe6b7t2abgubis

This ability to take an arbitrary set of bytes and send it to the server as a DNS query and receive a response in the answer data creates a bi-directional communication channel that can be used to transmit any data. The malware running on the infected host encodes the data it wants to transmit as a DNS query name and the infected host sends the DNS query to its resolver.

Since this query is not a true hostname, but actually encodes some data the malware wishes to transmit, the query is very likely to be unique, and is passed on to the authoritative DNS server for that domain.

The authoritative DNS server decodes the query back into the original data, and if necessary can transmit it elsewhere on the Internet. Responses go back the other direction, the response data is encoded as a query response (for example a TXT record) and sent back to the malware running on the infected host.

Using the power of Cloudflare’s global network to detect malicious domains using machine learning

One challenge with identifying this type of traffic, however, is that there are also many benign applications that use the DNS system to encode or transmit data as well. An example of a query that was classified as not DNS tunneling:

00641f74-8518-4f03-adc2-792a34ea2612.bbbb.example.com

As humans, we can see that the leading portion of this DNS query is a UUID. Queries like this are often used by security and monitoring applications and network appliances to check in. The leading portion of the query might be the unique id of the device or installation that is performing the check-in.

During the research and training phase our researchers identified a wide variety of different applications that use a large number of random looking DNS queries. Some examples of this include subdomains of content delivery networks, video streaming, advertising and tracking, security appliances, as well as DNS tunneling. Our researchers investigated and labeled many of these domains, and while doing so, identified features that can be used to distinguish between benign applications and true DNS tunneling.

The model

For this application, we trained a two-stage model. The first stage makes quick yes/no decisions about whether the domain might be a DNS tunneling domain. The second stage of the model makes finer-grained distinctions between legitimate domains that have large numbers of subdomains, such as security appliances or AV false-positive control, and malicious DNS tunneling.

The first stage is a gradient boosted decision tree that gives us an initial classification based on minimal information. A decision tree model is like playing 20 questions – each layer of the decision tree asks a yes or no question, which gets you closer to the final answer. Decision tree models are good at both predicting binary yes/no results as well as incorporating binary or nominal attributes into a prediction, and are fast and lightweight to execute, making them a good fit for this application. Gradient boosting is a reliable technique for training models that is particularly good at combining several attributes with weak predictive power into a strong predictor. It can be used to train multiple types of models including decision trees as well as numeric predictions.

If the first stage classifies the domain as “yes, potential DNS tunneling”, it is checked against the second stage, which incorporates data observed from Cloudflare’s 1.1.1.1 DNS resolver. This second model is a neural network model and refines the categorization of the first, in order to distinguish legitimate applications.

In this model, the neural network takes 28 features as input and classifies the domain into one of 17 applications, such as DNS tunneling, IT appliance beacons, or email delivery and spam related. Figure 2 shows a diagram generated from the popular Python software package Keras showing the layers of this neural network. We see the 28 input features at the top layer and at the bottom layer, the 17 output values indicating the prediction value for each type of application. This neural network is very small, having about 2,000 individual weights that can be set during the training process. In the next section we will see an example of a model that is based on a state-of-the-art pretrained model from a model family that has tens to hundreds of millions of predefined weights.

Using the power of Cloudflare’s global network to detect malicious domains using machine learning
Fig. 2, The keras.utils.plot_model() function draws a diagram of the neural network layers.

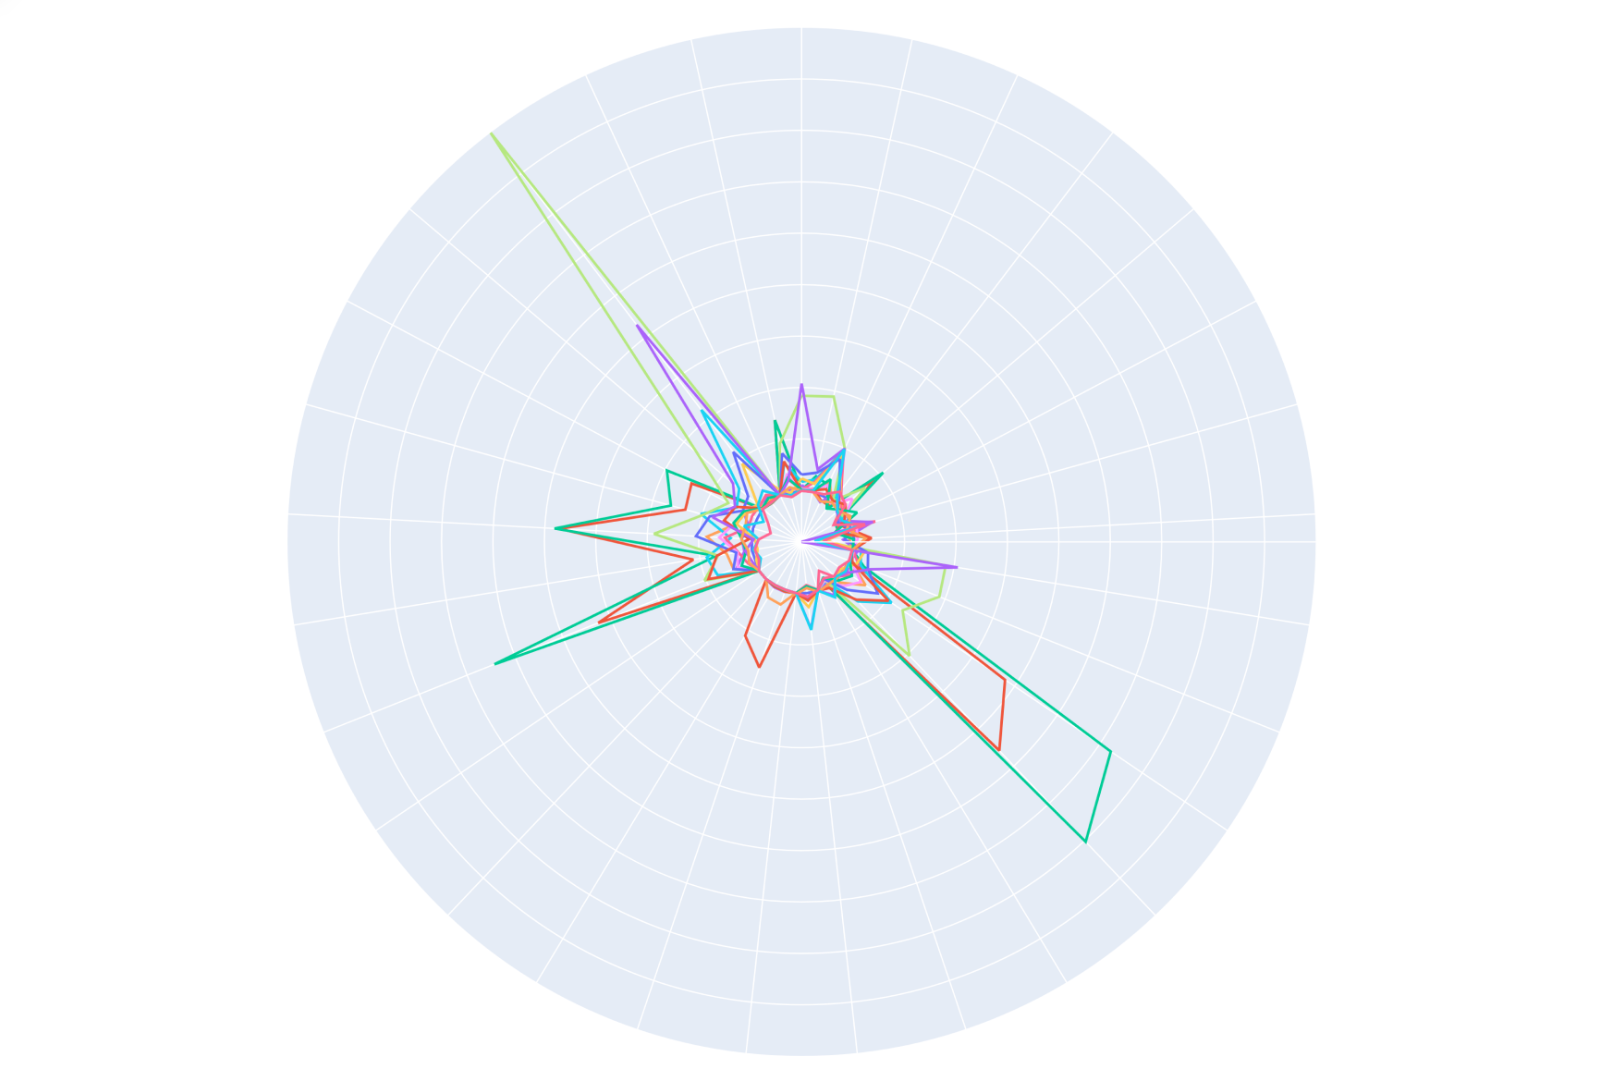
Figure 3 shows a plot of the feature values of the applications we are trying to distinguish in polar coordinates. Each color is the feature values of all the domains the model classified as a single type of application over a sample period. The position around the circle (theta) is the feature, and the distance from the center (rho) is the value of that feature. We can see how many of the applications have similar feature values.

When we observe a new domain and compute its feature values, our model uses those feature values to give us a prediction about which application the new domain resembles. As mentioned, the neural network has 28 inputs each of which is the value for a single feature and 17 outputs. The 17 output values represent the prediction that the domain is each of those 17 different types of applications, with malicious DNS tunneling being one of the 17 outputs. The job of the model is to convert the sometimes small differences between the feature values into a prediction. If the value of the malicious DNS tunneling output of the neural network is higher than the other outputs, the domain is labeled as a security threat.

Using the power of Cloudflare’s global network to detect malicious domains using machine learning
Fig. 3, Domains containing high-entropy DNS subdomains, visualized as feature plots. Each section around the circumference of the plot represents a different feature of the observed DNS queries. The distance from the center represents the value of that feature. Each color line is a distinct application, and machine learning helps us distinguish between these and classify them.

Deployment

For the DNS tunneling model, our system consumes the logs from our secure web gateway service. The first stage model is applied to all DNS queries. Domains that are flagged as possible DNS tunneling are then sent to the second stage where the prediction is refined using additional features.

Using the power of Cloudflare’s global network to detect malicious domains using machine learning

Looking forward: combining machine learning with human expertise

In September 2022, Cloudflare announced the general availability of our threat operations and research team, Cloudforce One, which allows our in-house experts to share insights directly with customers. Layering this human element on top of the ML models that we have already developed helps Cloudflare deliver additional protection threat protection for our customers, as we plan to explain in the next article in this blog series.

Until then, click here to create a free account, with no time limit for up to 50 users, and point just your DNS traffic, or all traffic (layers 4 to 7), to Cloudflare to protect your team, devices, and data with machine learning-driven threat defense.

Detecting API abuse automatically using sequence analysis

Post Syndicated from John Cosgrove original https://blog.cloudflare.com/api-sequence-analytics/

Detecting API abuse automatically using sequence analysis

Detecting API abuse automatically using sequence analysis

Today, we’re announcing Cloudflare Sequence Analytics for APIs. Using Sequence Analytics, Customers subscribed to API Gateway can view the most important sequences of API requests to their endpoints. This new feature helps customers to apply protection to the most important endpoints first.

What is a sequence? It is simply a time-ordered list of HTTP API requests made by a specific visitor as they browse a website, use a mobile app, or interact with a B2B partner via API. For example, a portion of a sequence made during a bank funds transfer could look like:

Order Method Path Description
1 GET /api/v1/users/{user_id}/accounts user_id is the active user
2 GET /api/v1/accounts/{account_id}/balance account_id is one of the user’s accounts
3 GET /api/v1/accounts/{account_id}/balance account_id is a different account belonging to the user
4 POST /api/v1/transferFunds Containing a request body detailing an account to transfer funds from, an account to transfer funds to, and an amount of money to transfer

Why is it important to pay attention to sequences for API security? If the above API received requests for POST /api/v1/transferFunds without any of the prior requests, it would seem suspicious. Think about it: how would the API client know what the relevant account IDs are without listing them for the user? How would the API client know how much money is available to transfer? While this example may be obvious, the sheer number of API requests to any given production API can make it hard for human analysts to spot suspicious usage.

In security, one approach to defending against an untold number of threats that are impossible to screen by a team of humans is to create a positive security model. Instead of trying to block everything that could potentially be a threat, you allow all known good or benign traffic and block everything else by default.

Customers could already create positive security models with API Gateway in two main areas: volumetric abuse protection and schema validation. Sequences will form the third pillar of a positive security model for API traffic. API Gateway will be able to enforce the precedence of endpoints in any given API sequence. By establishing precedence within an API sequence, API Gateway will log or block any traffic that doesn’t match expectations, reducing abusive traffic.

Detecting abuse by sequence

When attackers attempt to exfiltrate data in an abusive way, they rarely follow the patterns of expected API traffic. Attacks often use special software to ‘fuzz’ the API, sending several requests with different request parameters hoping to find unexpected responses from the API indicating opportunities to exfiltrate data. Attackers can also manually send requests to APIs that attempt to trick the API in performing unauthorized actions, like granting an attacker elevated privileges or access to data through a Broken Object Level Authentication attack. Protecting APIs with rate limits is a common best practice; however, in both of the above examples attackers may deliberately execute request sequences slowly, in an attempt to thwart volumetric abuse detection.

Think of the sequence of requests above again, but this time imagine an attacker copying the legitimate funds transfer request and modifying the request payload in an attempt to trick the system:

Order Method Path Description
1 GET /api/v1/users/{user_id}/accounts user_id is the active user
2 GET /api/v1/accounts/{account_id}/balance account_id is one of the user’s accounts
3 GET /api/v1/accounts/{account_id}/balance account_id is a different account belonging to the user
4 POST /api/v1/transferFunds Containing a request body detailing an account to transfer funds from, an account to transfer funds to, and an amount of money to transfer
… attacker copies the request to a debugging tool like Postman …
5 POST /api/v1/transferFunds Attacker has modified the POST body to try and trick the API
6 POST /api/v1/transferFunds A further modified POST body to try and trick the API
7 POST /api/v1/transferFunds Another, further modified POST body to try and trick the API

If the customer knew beforehand that the funds transfer endpoint was critical to protect and only occurred once during a sequence, they could write a rule to ensure that it was never called twice in a row and a GET /balance always preceded a POST /transferFunds. But without prior knowledge of which endpoint sequences are critical to protect, how would the customer know which rules to define? A low rate limit is too risky, since an API user might legitimately have a few funds transfer requests to perform in a short amount of time. In the present reality there are few tools to prevent this type of abuse, and most customers are left with reactive efforts to clean up abuse with their application teams and fraud departments after it’s happened.

Ultimately, we believe that providing our customers with the ability to define positive security models on API request sequences requires a three-pronged approach:

  1. Sequence Analytics: Determining which sequences of API requests occurred and when, as well as summarizing the data into readily understandable form.
  2. Sequence Abuse Detection: Identifying which sequences of API requests are likely of benign or malicious origin.
  3. Sequence Mitigation: Identifying relevant rules on sequences of API requests for deciding which traffic to allow or block.

Challenges of sequence creation

Sequence Analytics presents some difficult technical challenges, because sessions may be long-lived and may consist of many requests. As a result, it is not sufficient to define sequences by session identifier alone. Instead, it was necessary for us to develop a solution capable of automatically identifying multiple sequences which occur within a given session. Additionally, since important sequences are not necessarily characterized by volume alone and the set of possible sequences is large, it was necessary to develop a solution capable of identifying important sequences, as opposed to simply surfacing frequent sequences.

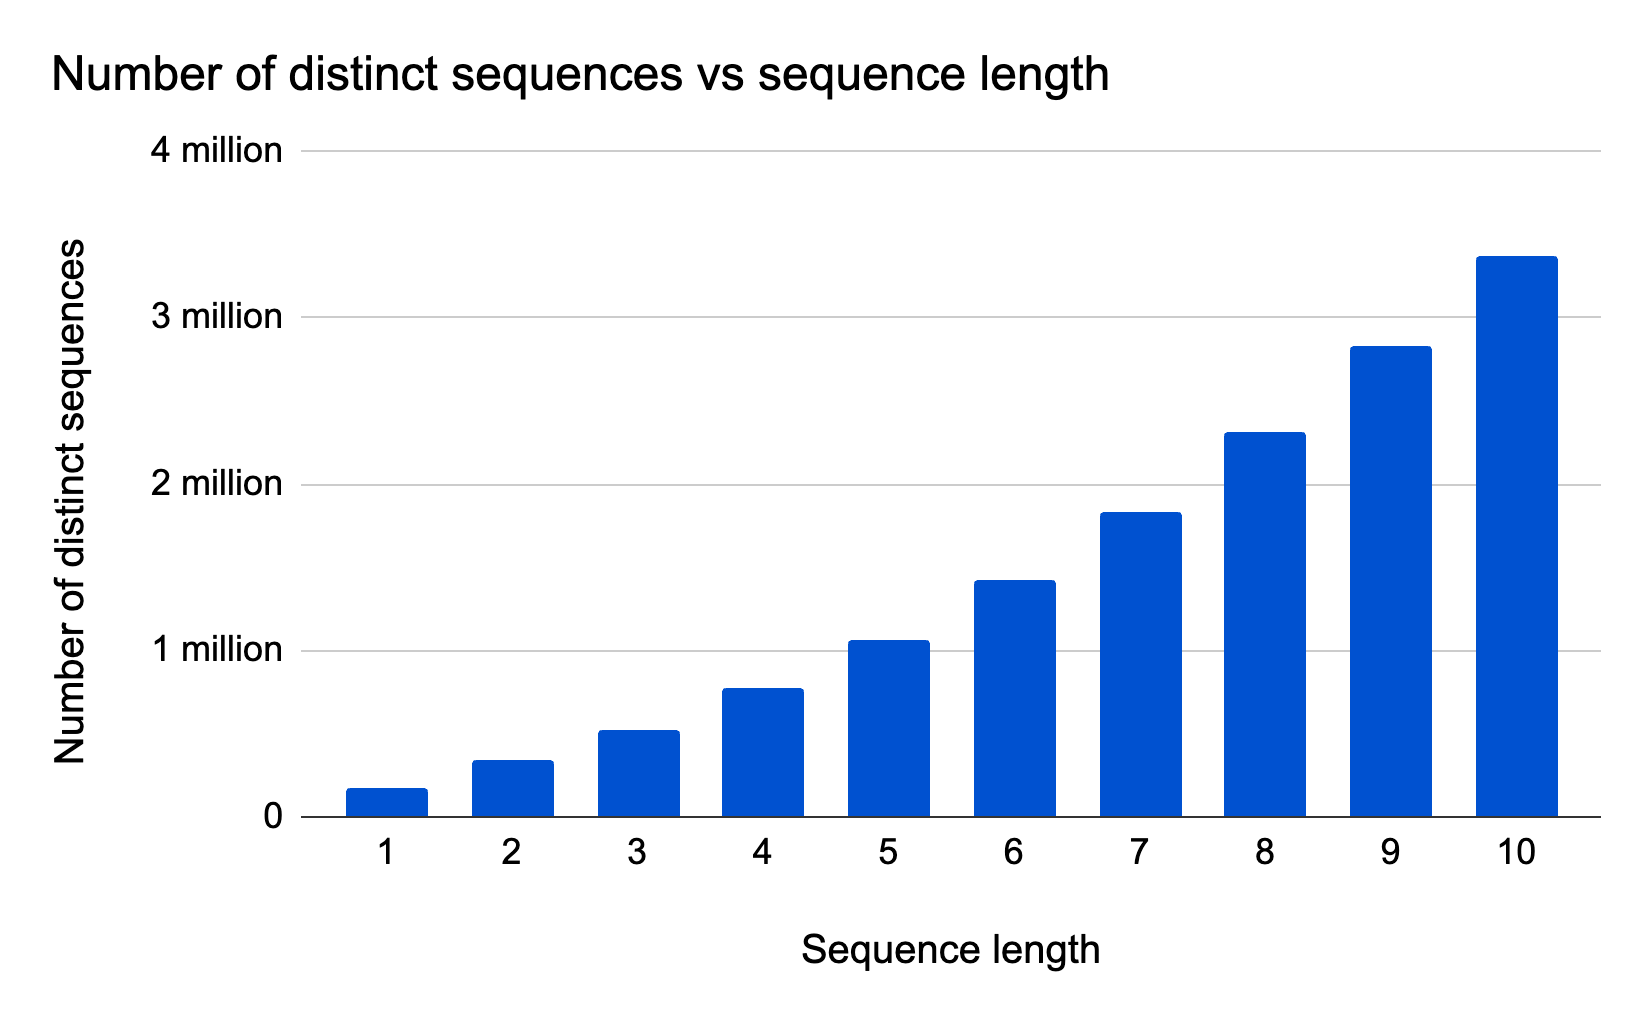
To help illustrate these challenges for the example of api.cloudflare.com, we can group API requests by session and plot the number of distinct sequences versus sequence length:

Detecting API abuse automatically using sequence analysis

The plot is based on a one hour snapshot comprising approximately 88,000 sessions and 300 million API requests, with 302 distinct API endpoints. We process the data by applying a fixed-length sliding window to each session, then we count the total number of different fixed-length sequences (‘n-grams’) that we observe as a result of applying the sliding window. The plot displays results for a window size (‘n-gram length’) varying between 1 and 10 requests. Based on the plot, we observe a large number of possible sequences which grows with sequence length: As we increase the sliding window size, we see an increasingly large amount of different sequences in the sample. The smooth trend can be explained by the fact that we apply a sliding window (sessions may themselves contain many sequences) in combination with many long sessions relative to the sequence length.

Given the large number of possible sequences, trying to find abusive sequences is a ‘needles in a haystack’ situation.

Introducing Sequence Analytics

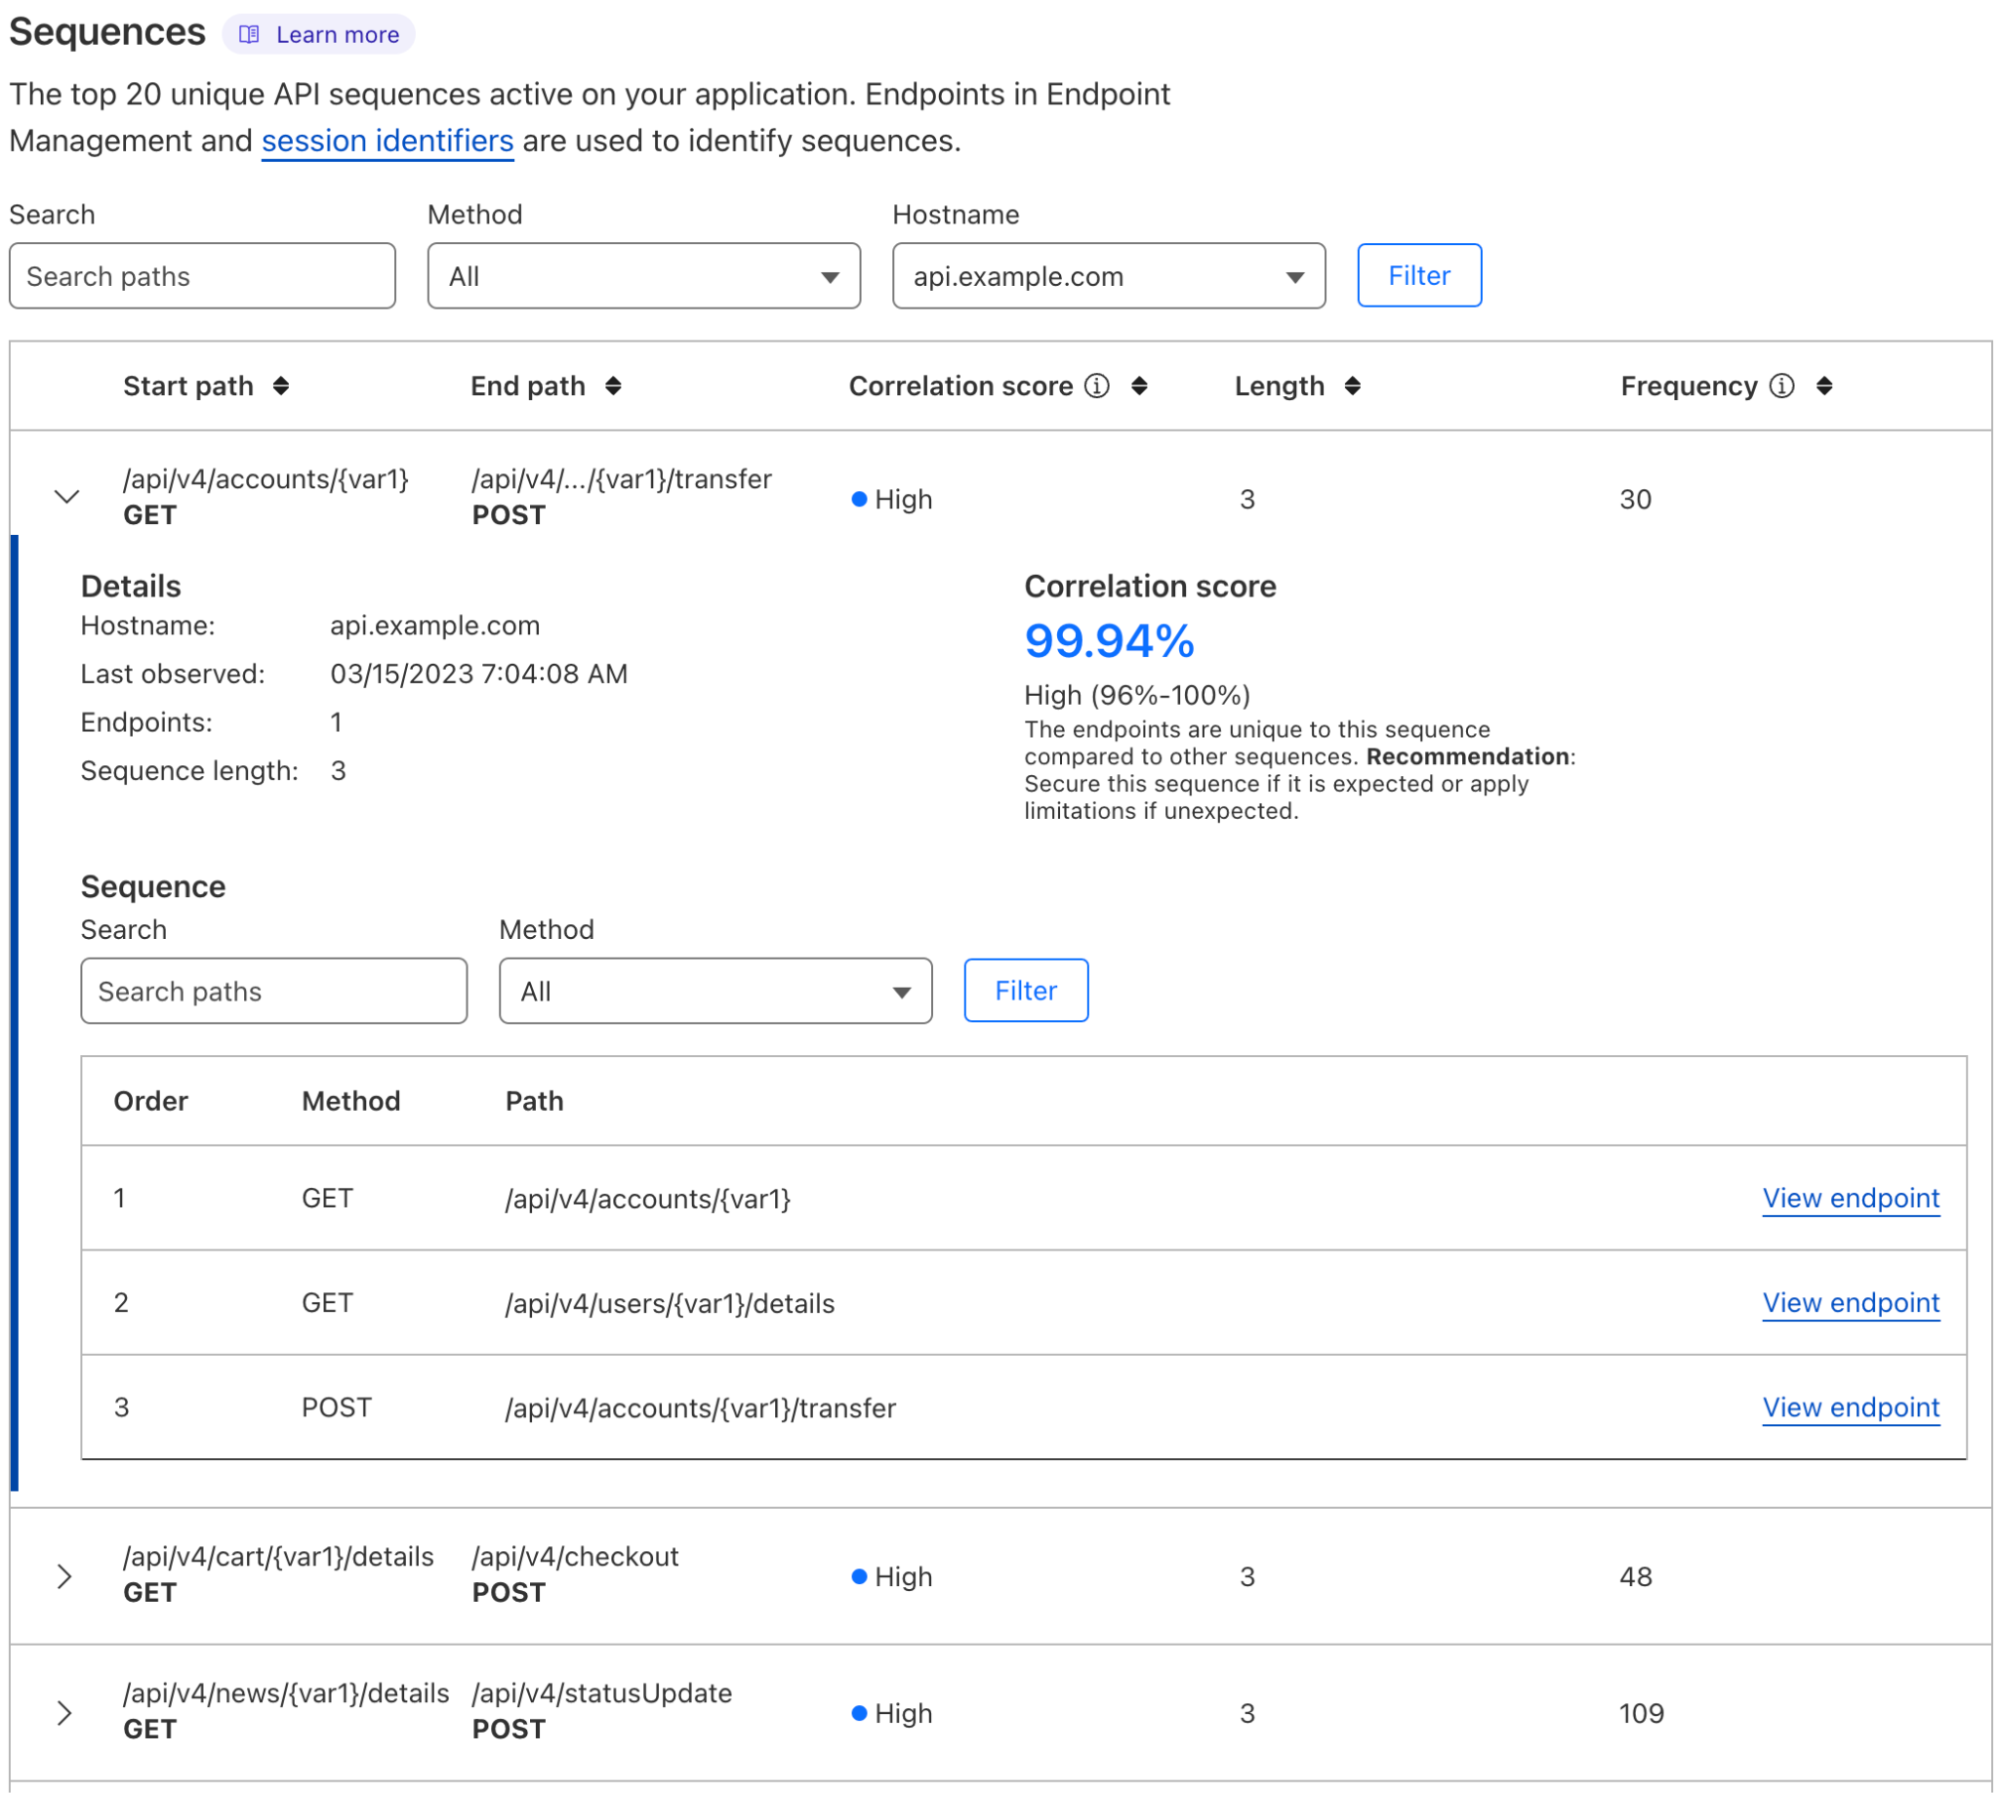
Here is a screenshot from the API Gateway dashboard highlighting Sequence Analytics:

Detecting API abuse automatically using sequence analysis

Let’s break down the new functionality seen in the screenshot.

API Gateway intelligently determines sequences of requests made by your API consumers using the methods described earlier in this article. API Gateway scores sequences by a metric we call Correlation Score. Sequence Analytics displays the top 20 sequences by highest correlation score, and we refer to these as your most important sequences. High-importance sequences contain API requests which are likely to occur together in order.

You should inspect each of your sequences to understand their correlation scores. High correlation score sequences may consist of rarely used endpoints (potentially anomalous user behavior) as well as commonly used endpoints (likely benign user behavior). Since the endpoints found in these sequences commonly occur together, they represent true usage patterns of your API. You should apply all possible API Gateway protections to these endpoints (rate limiting suggestions, Schema Validation, JWT Validation, and mTLS) and check their specific endpoint order with your development team.

We know customers want to explicitly set allowable behavior on their APIs beyond the active protections offered by API Gateway today. Coming soon, we’re releasing sequence precedence rules and enabling the ability to block requests based on those rules. The new sequence precedence rules will allow customers to specify the exact order of allowable API requests, bringing yet another way of establishing a positive security model to protect your API against unknown threats.

How to get started

All API Gateway customers now have access to Sequence Analytics. Navigate to a zone in the Cloudflare dashboard, then click the Security tab > API Gateway tab > Sequences tab. You’ll see the most important sequences that your API consumers request.

Pro, Biz, and Enterprise customers that haven’t purchased API Gateway can get started by enabling the API Gateway trial inside the Cloudflare Dashboard or contacting their account manager.

What’s next

Sequence-based detection is a powerful and unique capability that unlocks many new opportunities to identify and stop attacks. As we fine-tune the methods of identifying these sequences and shipping them to our global network, we will release custom sequence matching and real-time mitigation features at a future date. We will also ensure you have the actionable intelligence to take back to your team on who the API users were that attempted to request sequences that don’t match your policy.

Automatically discovering API endpoints and generating schemas using machine learning

Post Syndicated from John Cosgrove original https://blog.cloudflare.com/ml-api-discovery-and-schema-learning/

Automatically discovering API endpoints and generating schemas using machine learning

Automatically discovering API endpoints and generating schemas using machine learning

Cloudflare now automatically discovers all API endpoints and learns API schemas for all of our API Gateway customers. Customers can use these new features to enforce a positive security model on their API endpoints even if they have little-to-no information about their existing APIs today.

The first step in securing your APIs is knowing your API hostnames and endpoints. We often hear that customers are forced to start their API cataloging and management efforts with something along the lines of “we email around a spreadsheet and ask developers to list all their endpoints”.

Can you imagine the problems with this approach? Maybe you have seen them first hand. The “email and ask” approach creates a point-in-time inventory that is likely to change with the next code release. It relies on tribal knowledge that may disappear with people leaving the organization. Last but not least, it is susceptible to human error.

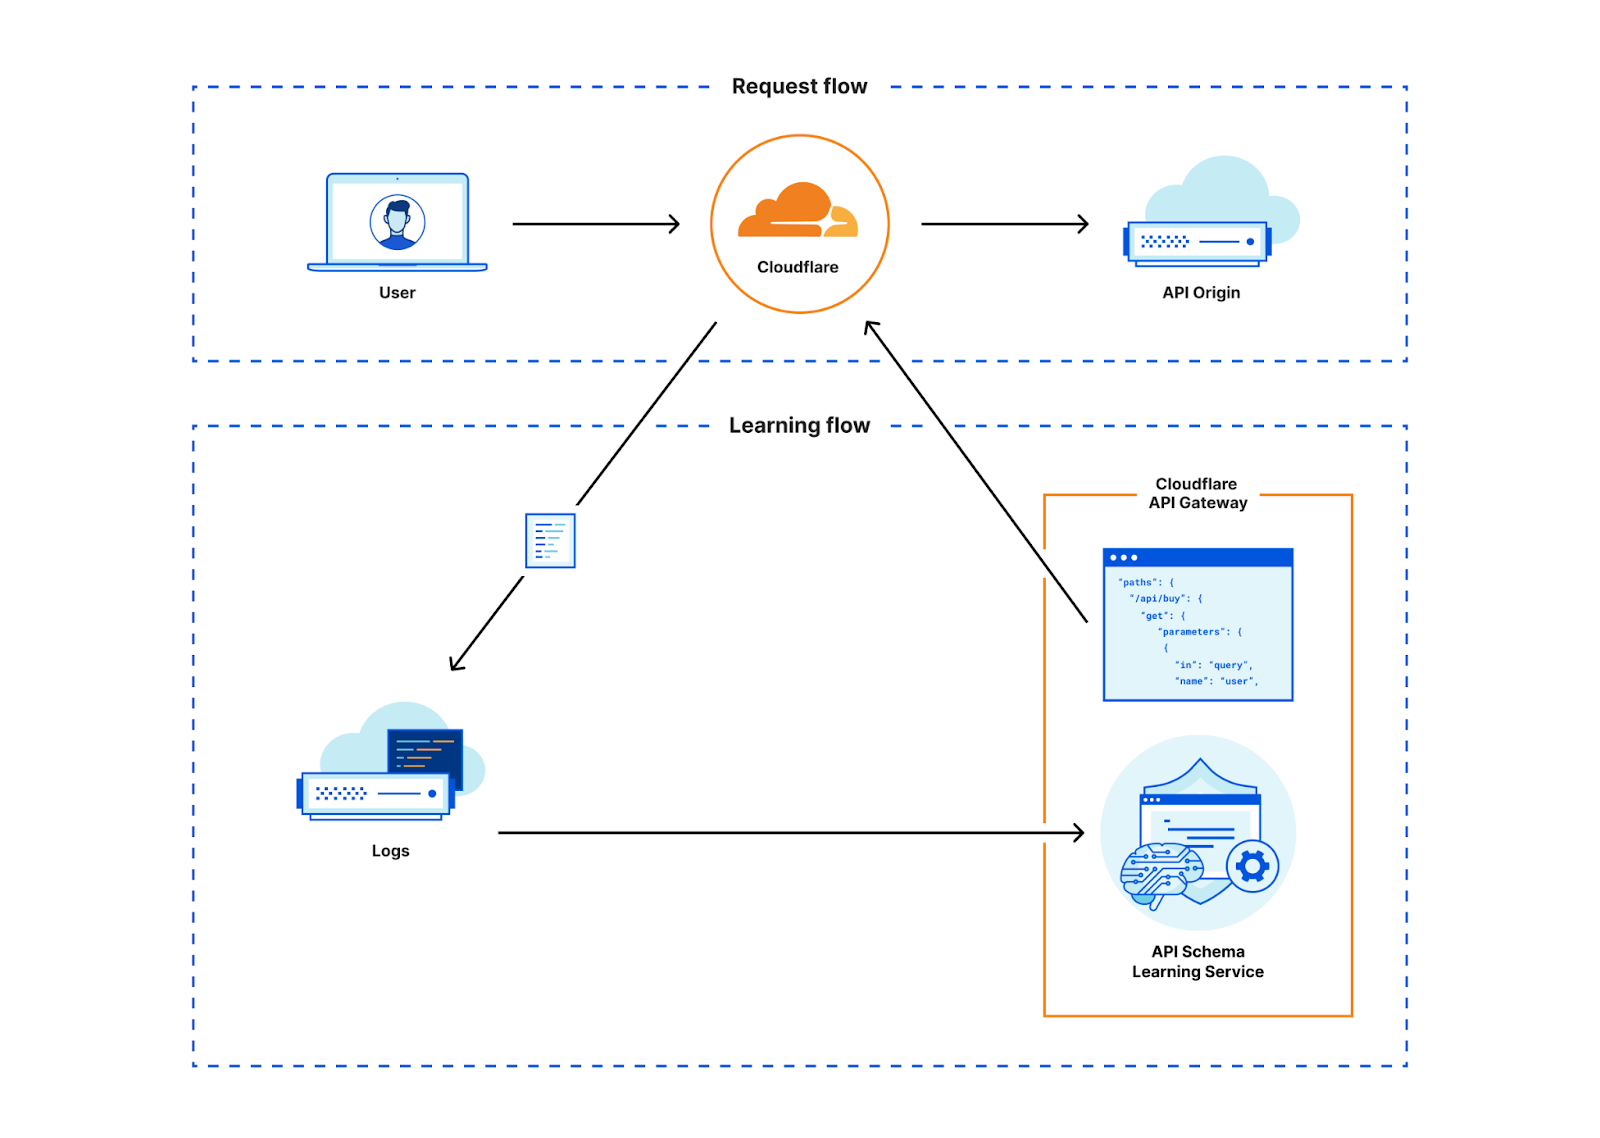
Even if you had an accurate API inventory collected by group effort, validating that API was being used as intended by enforcing an API schema would require even more collective knowledge to build that schema. Now, API Gateway’s new API Discovery and Schema Learning features combine to automatically protect APIs across the Cloudflare global network and remove the need for manual API discovery and schema building.

API Gateway discovers and protects APIs

API Gateway discovers APIs through a feature called API Discovery. Previously, API Discovery used customer-specific session identifiers (HTTP headers or cookies) to identify API endpoints and display their analytics to our customers.

Doing discovery in this way worked, but it presented three drawbacks:

  1. Customers had to know which header or cookie they used in order to delineate sessions. While session identifiers are common, finding the proper token to use can take time.
  2. Needing a session identifier for API Discovery precluded us from monitoring and reporting on completely unauthenticated APIs. Customers today still want visibility into session-less traffic to ensure all API endpoints are documented and that abuse is at a minimum.
  3. Once the session identifier was input into the dashboard, customers had to wait up to 24 hours for the Discovery process to complete. Nobody likes to wait.

While this approach had drawbacks, we knew we could quickly deliver value to customers by starting with a session-based product. As we gained customers and passed more traffic through the system, we knew our new labeled data would be extremely useful to further build out our product. If we could train a machine learning model with our existing API metadata and the new labeled data, we would no longer need a session identifier to pinpoint which endpoints were for APIs. So we decided to build this new approach.

We took what we learned from the session identifier-based data and built a machine learning model to uncover all API traffic to a domain, regardless of session identifier. With our new Machine Learning-based API Discovery, Cloudflare continually discovers all API traffic routed through our network without any prerequisite customer input. With this release, API Gateway customers will be able to get started with API Discovery faster than ever, and they’ll uncover unauthenticated APIs that they could not discover before.

Session identifiers are still important to API Gateway, as they form the basis of our volumetric abuse prevention rate limits as well as our Sequence Analytics. See more about how the new approach performs in the “How it works” section below.

API Protection starting from nothing

Now that you’ve found new APIs using API Discovery, how do you protect them? To defend against attacks, API developers must know exactly how they expect their APIs to be used. Luckily, developers can programmatically generate an API schema file which codifies acceptable input to an API and upload that into API Gateway’s Schema Validation.

However, we already talked about how many customers can’t find their APIs as fast as their developers build them. When they do find APIs, it’s very difficult to accurately build a unique OpenAPI schema for each of potentially hundreds of API endpoints, given that security teams seldom see more than the HTTP request method and path in their logs.

When we looked at API Gateway’s usage patterns, we saw that customers would discover APIs but almost never enforce a schema. When we ask them ‘why not?’ the answer was simple: “Even when I know an API exists, it takes so much time to track down who owns each API so that they can provide a schema. I have trouble prioritizing those tasks higher than other must-do security items.” The lack of time and expertise was the biggest gap in our customers enabling protections.

So we decided to close that gap. We found that the same learning process we used to discover API endpoints could then be applied to endpoints once they were discovered in order to automatically learn a schema. Using this method we can now generate an OpenAPI formatted schema for every single endpoint we discover, in real time. We call this new feature Schema Learning. Customers can then upload that Cloudflare-generated schema into Schema Validation to enforce a positive security model.

Automatically discovering API endpoints and generating schemas using machine learning

How it works

Machine learning-based API discovery

With RESTful APIs, requests are made up of different HTTP methods and paths. Take for example the Cloudflare API. You’ll notice a common trend with the paths that might make requests to this API stand out amongst requests to this blog: API requests all start with /client/v4 and continue with the service name, a unique identifier, and sometimes service feature names and further identifiers.

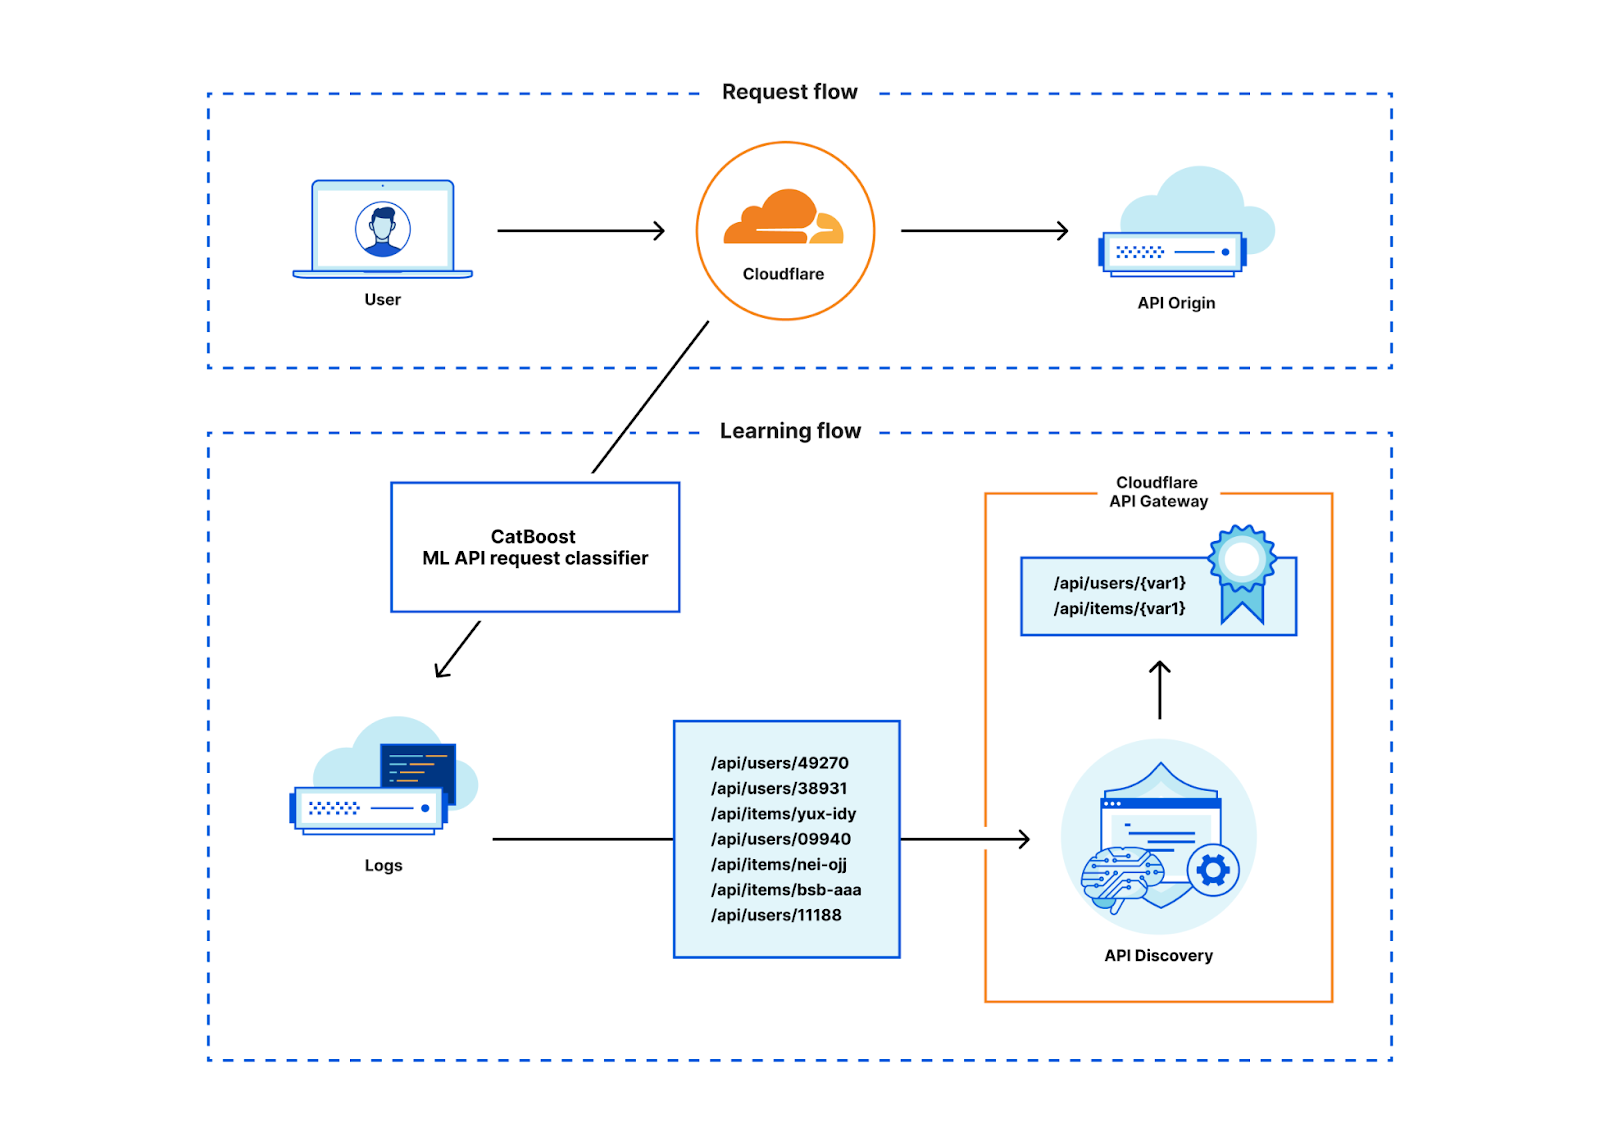
How could we easily identify API requests? At first glance, these requests seem easy to programmatically discover with a heuristic like “path starts with /client”, but the core of our new Discovery contains a machine-learned model that powers a classifier that scores HTTP transactions. If API paths are so structured, why does one need machine-learning for this and can’t one just use some simple heuristic?

The answer boils down to the question: what actually constitutes an API request and how does it differ from a non-API request? Let’s look at two examples.

Like the Cloudflare API, many of our customers’ APIs follow patterns such as prefixing the path of their API request with an “api” identifier and a version, for example:  /api/v2/user/7f577081-7003-451e-9abe-eb2e8a0f103d.

So just looking for “api” or a version in the path is already a pretty good heuristic that tells us this is very likely part of an API, but it is unfortunately not always as easy.

Let’s consider two further examples, /users/7f577081-7003-451e-9abe-eb2e8a0f103d.jpg and /users/7f577081-7003-451e-9abe-eb2e8a0f103d, both just differ in a .jpg extension. The first path could just be a static resource like the thumbnail of a user. The second path does not give us a lot of clues just from the path alone.

Manually crafting such heuristics quickly becomes difficult. While humans are great at finding patterns, building heuristics is challenging considering the scale of the data that Cloudflare sees each day. As such, we use machine learning to automatically derive these heuristics such that we know that they are reproducible and adhere to a certain accuracy.

Input to the training are features of HTTP request/response samples such as the content-type or file extension that we collected through the session identifiers-based Discovery mentioned earlier. Unfortunately, not everything that we have in this data is clearly an API. Additionally, we also need samples that represent non-API traffic. As such, we started out with the session-identifier Discovery data, manually cleaned it up and derived further samples of non-API traffic. We took great care in trying to not overfit the model to the data. That is, we want that the model generalizes beyond the training data.

Automatically discovering API endpoints and generating schemas using machine learning

To train the model, we’ve used the CatBoost library for which we already have a good chunk of expertise as it also powers our Bot Management ML-models. In a simplification, one can regard the resulting model as a flow chart that tells us which conditions we should check after another, for example: if the path contains “api” then also check if there is no file extension and so forth. At the end of this flowchart is a score that tells us the likelihood that a HTTP transaction belongs to an API.

Given the trained model, we can thus input features of HTTP request/responses that run through the Cloudflare network and calculate the likelihood that this HTTP transaction belongs to an API or not. Feature extraction and model scoring is done in Rust and takes only a couple of microseconds on our global network. Since Discovery sources data from our powerful data pipeline, it is not actually necessary to score each transaction. We can reduce the load on our servers by only scoring those transactions that we know will end up in our data pipeline to begin with thus saving CPU time and allowing the feature to be cost effective.

With the classification results in our data pipeline, we can use the same API Discovery mechanism that we’ve been using for the session identifier-based discovery. This existing system works great and allows us to reuse code efficiently. It also aided us when comparing our results with the session identifier-based Discovery, as the systems are directly comparable.

For API Discovery results to be useful, Discovery’s first task is to simplify the unique paths we see into variables. We’ve talked about this before. It is not trivial to deduce the various different identifier schemes that we see across the global network, especially when sites use custom identifiers beyond a straightforward GUID or integer format. API Discovery aptly normalizes paths containing variables with the help of a few different variable classifiers and supervised learning.

Only after normalizing paths are the Discovery results ready for our users to use in a straightforward fashion.

The results: hundreds of found endpoints per customer

So, how does ML Discovery compare to the session identifier-based Discovery which relies on headers or cookies to tag API traffic?

Our expectation is that it detects a very similar set of endpoints. However, in our data we knew there would be two gaps. First, we sometimes see that customers are not able to cleanly dissect only API traffic using session identifiers. When this happens, Discovery surfaces non-API traffic. Second, since we required session identifiers in the first version of API Discovery, endpoints that are not part of a session (e.g. login endpoints or unauthenticated endpoints) were conceptually not discoverable.

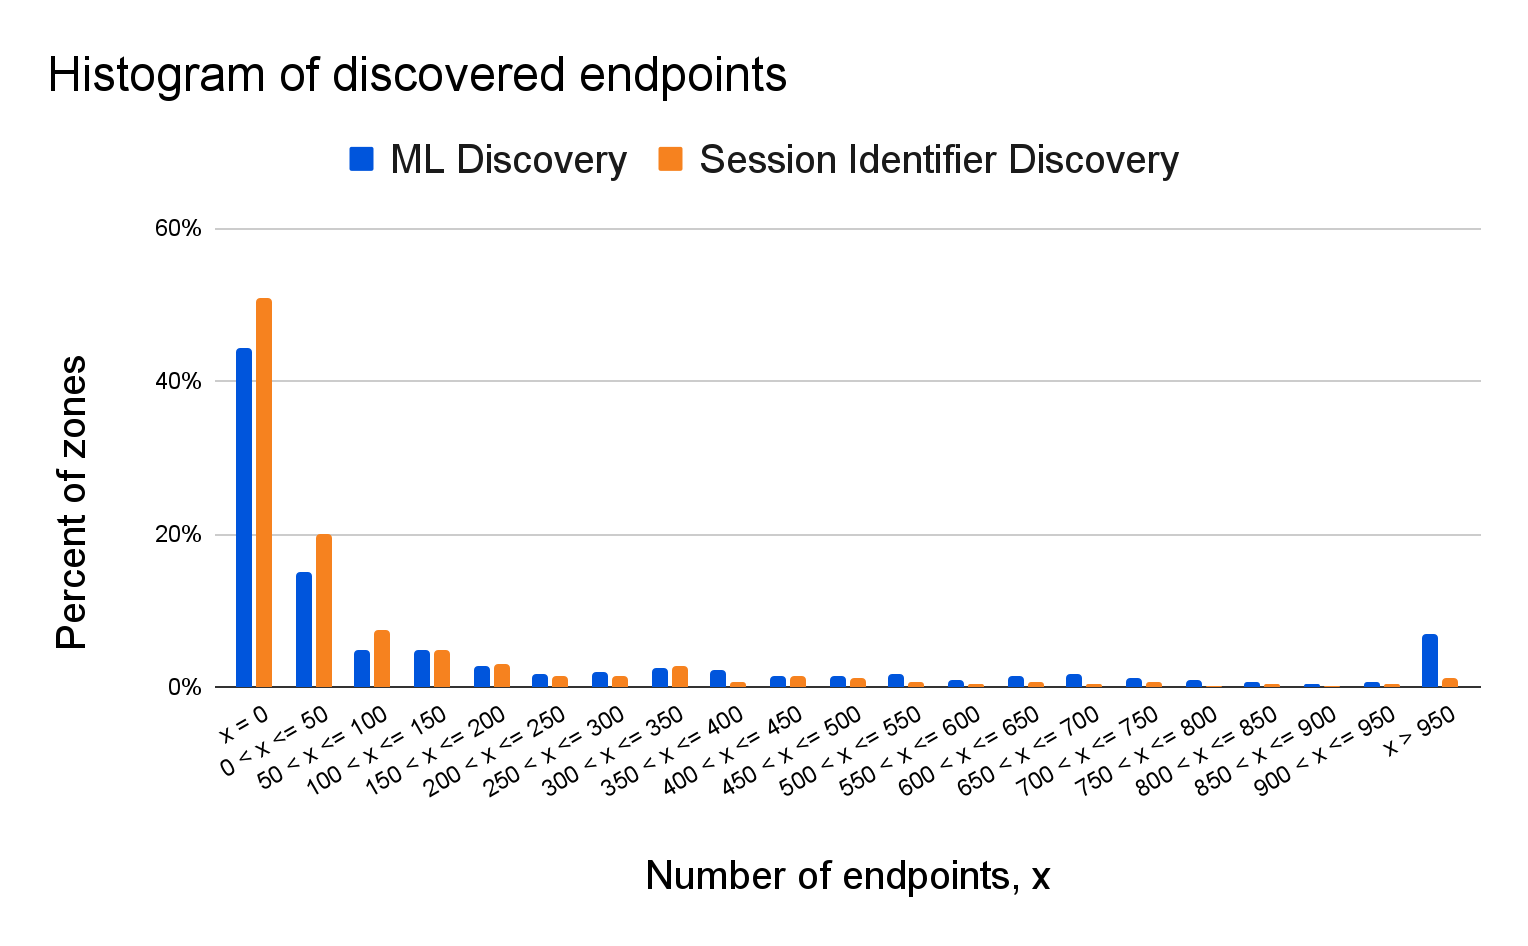
The following graph shows a histogram of the number of endpoints detected on customer domains for both discovery variants.

Automatically discovering API endpoints and generating schemas using machine learning

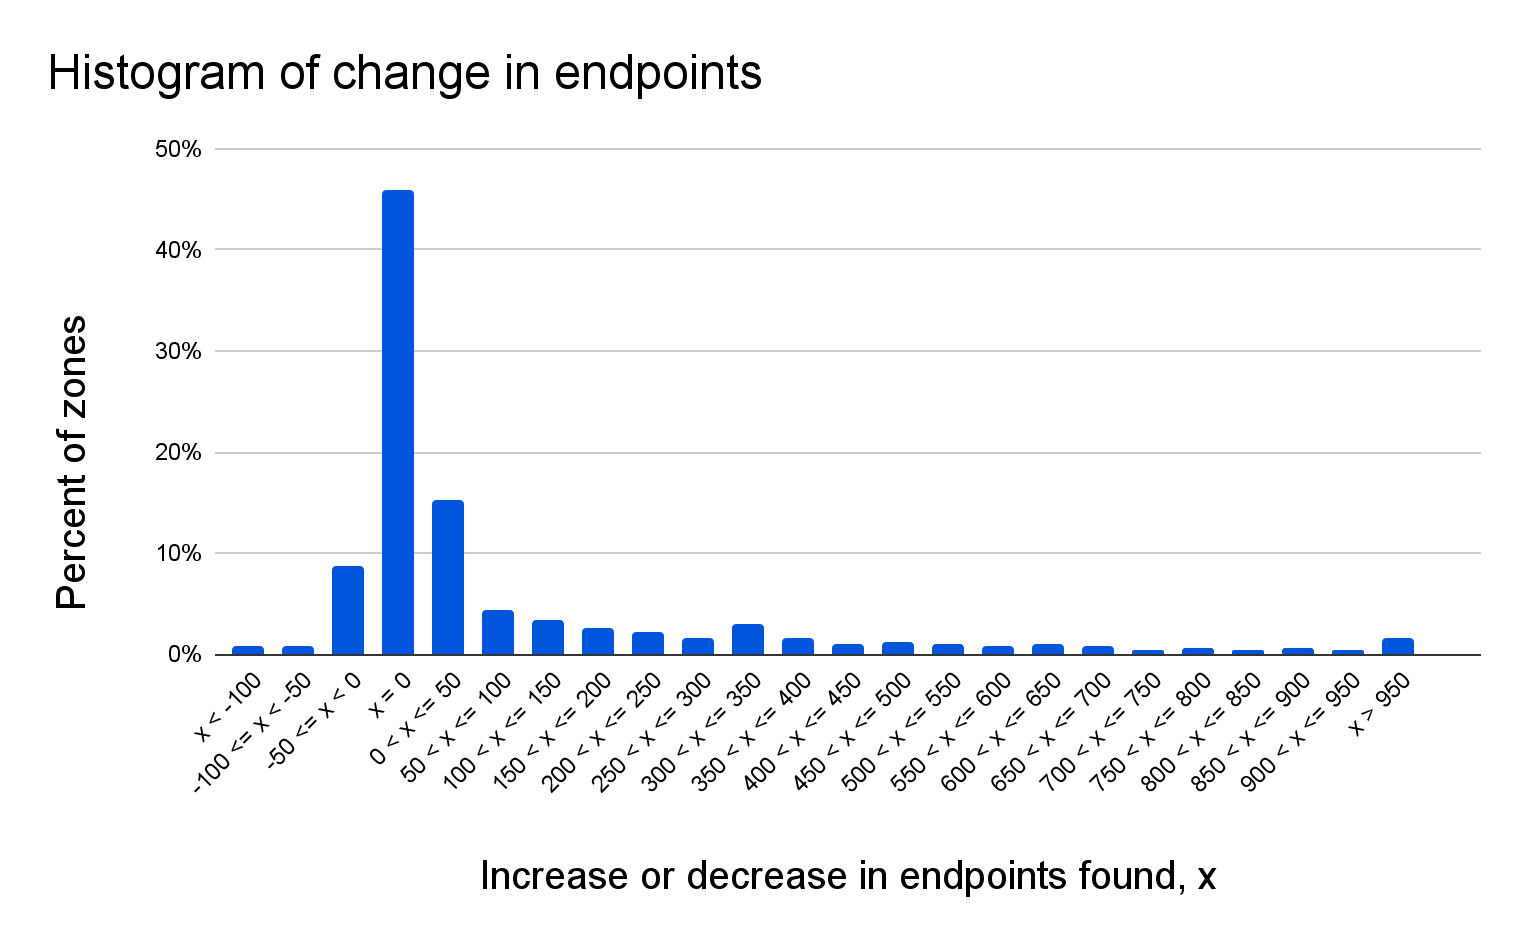
From a bird’s eye perspective, the results look very similar, which is a good indicator that ML Discovery performs as it is supposed to. There are some differences already visible in this plot, which is also expected since we’ll also discover endpoints that are conceptually not discoverable with just a session identifier. In fact, if we take a closer look at a domain-by-domain comparison we see that there is no change for roughly ~46% of the domains. The next graph compares the difference (by percent of endpoints) between session-based and ML-based discovery:

Automatically discovering API endpoints and generating schemas using machine learning

For ~15% of the domains, we see an increase in endpoints between 1 and 50, and for ~9%, we see a similar reduction. For ~28% of the domains, we find more than 50 additional endpoints.

These results highlight that ML Discovery is able to surface additional endpoints that have previously been flying under the radar, and thus expands the set tools API Gateway offers to help bring order to your API landscape.

On-the-fly API protection through API schema learning

With API Discovery taken care of, how can a practitioner protect the newly discovered endpoints? We already looked at the API request metadata, so now let’s look at the API request body. The compilation of all expected formats for all API endpoints of an API is known as an API schema. API Gateway’s Schema Validation is a great way to protect against OWASP Top 10 API attacks, ensuring the body, path, and query string of a request contains the expected information for that API endpoint in an expected format. But what if you don’t know the expected format?

Even if the schema of a specific API is not known to a customer, the clients using this API will have been programmed to mostly send requests that conform to this unknown schema (or they would not be able to successfully query the endpoint). Schema Learning makes use of this fact and will look at successful requests to this API to reconstruct the input schema automatically for the customer. As an example, an API might expect the user-ID parameter in a request to have the form id12345-a. Even if this expectation is not explicitly stated, clients that want to have a successful interaction with the API will send user-IDs in this format.

Schema Learning first identifies all recent successful requests to an API-endpoint, and then parses the different input parameters for each request according to their position and type. After parsing all requests, Schema Learning looks at the different input values for each position and identifies which characteristics they have in common. After verifying that all observed requests share these commonalities, Schema Learning creates an input schema that restricts input to comply with these commonalities and that can directly be used for Schema Validation.

To allow for more accurate input schemas, Schema Learning identifies when a parameter can receive different types of input. Let’s say you wanted to write an OpenAPIv3 schema file and manually observe in a small sample of requests that a query parameter is a unix timestamp. You write an API schema that forces that query parameter to be an integer greater than the start of last year’s unix epoch. If your API also allowed that parameter in ISO 8601 format, your new rule would create false positives when the differently formatted (yet valid) parameter hit the API. Schema Learning automatically does all this heavy lifting for you and catches what manual inspection can’t.

To prevent false positives, Schema Learning performs a statistical test on the distribution of these values and only writes the schema when the distribution is bounded with high confidence.

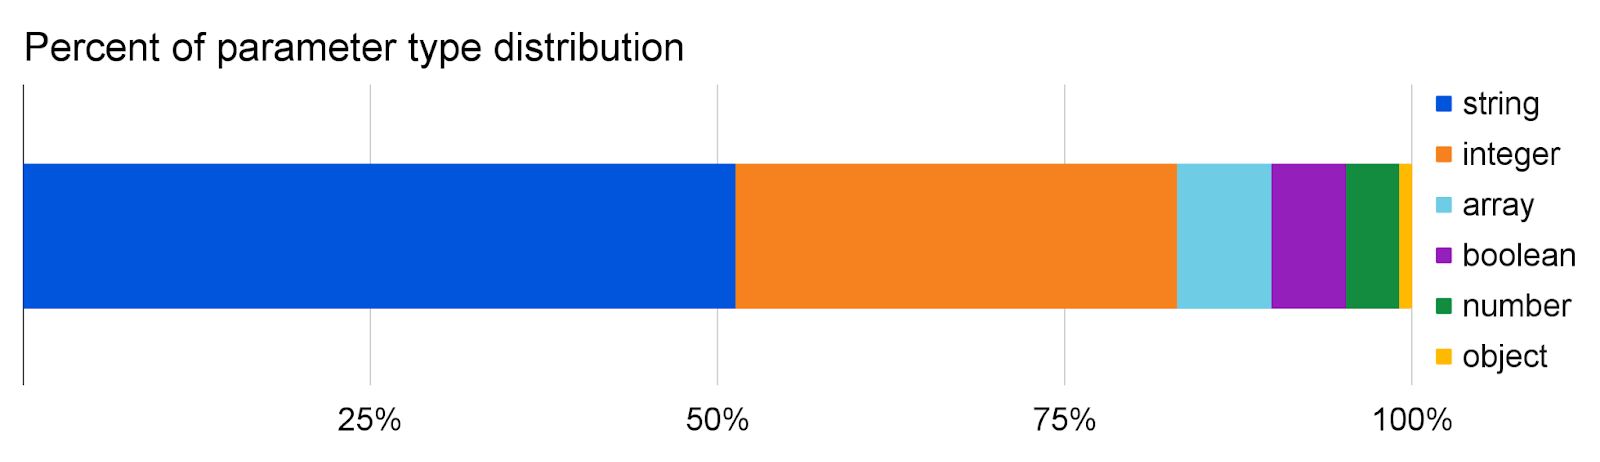
So how well does it work? Below are some statistics about the parameter types and values we see:

Automatically discovering API endpoints and generating schemas using machine learning

Parameter learning classifies slightly more than half of all parameters as strings, followed by integers which make up almost a third. The remaining 17% are made up of arrays, booleans, and number (float) parameters, while object parameters are seen more rarely in the path and query.

Automatically discovering API endpoints and generating schemas using machine learning

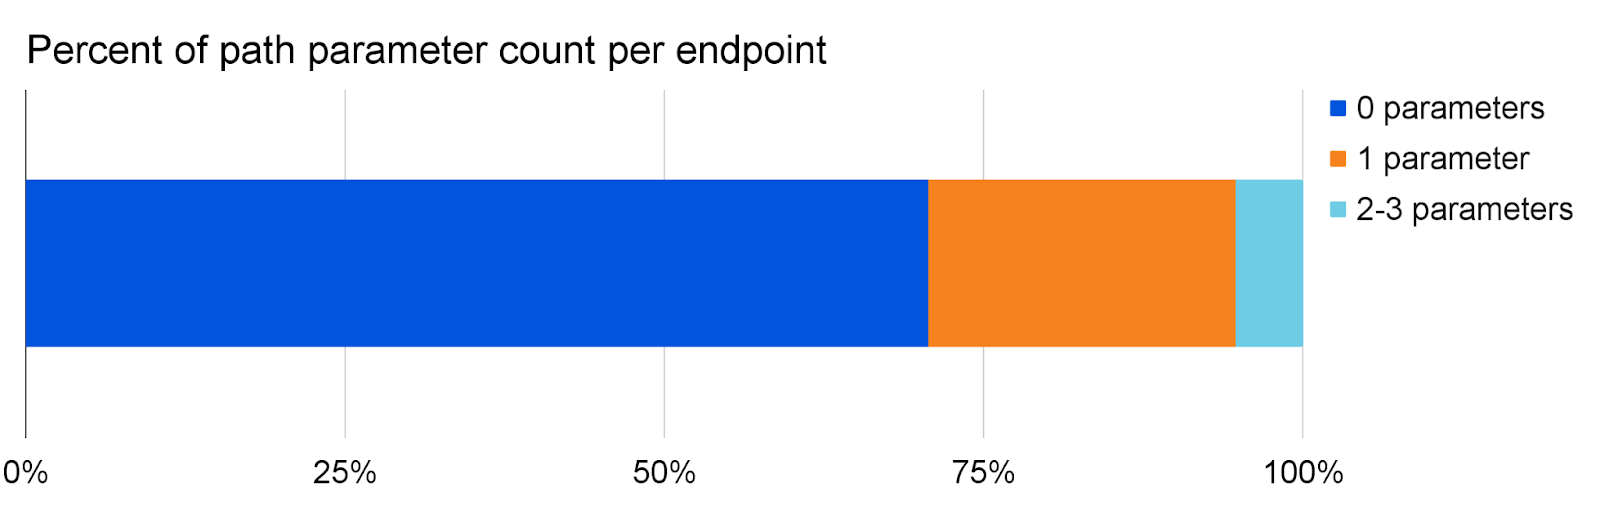
The number of parameters in the path is usually very low, with 94% of all endpoints seeing at most one parameter in their path.

Automatically discovering API endpoints and generating schemas using machine learning

For the query, we do see a lot more parameters, sometimes reaching 50 different parameters for one endpoint!

Parameter learning is able to estimate numeric constraints with 99.9% confidence for the majority of parameters observed. These constraints can either be a maximum/minimum on the value, length, or size of the parameter, or a limited set of unique values that a parameter has to take.

Protect your APIs in minutes

Starting today, all API Gateway customers can now discover and protect APIs in just a few clicks, even if you’re starting with no previous information. In the Cloudflare dash, click into API Gateway and on to the Discovery tab to observe your discovered endpoints. These endpoints will be immediately available with no action required from you. Then, add relevant endpoints from Discovery into Endpoint Management. Schema Learning runs automatically for all endpoints added to Endpoint Management. After 24 hours, export your learned schema and upload it into Schema Validation.

Pro, Biz, and Enterprise customers that haven’t purchased API Gateway can get started by enabling the API Gateway trial inside the Cloudflare Dashboard or contacting their account manager.

What’s next

We plan to enhance Schema Learning by supporting more learned parameters in more formats, like POST body parameters with both JSON and URL-encoded formats as well as header and cookie schemas. In the future, Schema Learning will also notify customers when it detects changes in the identified API schema and present a refreshed schema.

We’d like to hear your feedback on these new features. Please direct your feedback to your account team so that we can prioritize the right areas of improvement. We look forward to hearing from you!

Announcing Cloudflare Fraud Detection

Post Syndicated from Adam Martinetti original https://blog.cloudflare.com/cloudflare-fraud-detection/

Announcing Cloudflare Fraud Detection

Announcing Cloudflare Fraud Detection

The world changed when the COVID-19 pandemic began. Everything moved online to a much greater degree: school, work, and, surprisingly, fraud. Although some degree of online fraud has existed for decades, the Federal Trade Commission reported consumers lost almost $8.8 billion in fraud in 2022 (an over 400% increase since 2019) and the continuation of a disturbing trend. People continue to spend more time alone than ever before, and that time alone makes them not just more targeted, but also more vulnerable to fraud. Companies are falling victim to these trends just as much as individuals: according to PWC’s Global Economic Crime and Fraud Survey, more than half of companies with at least $10 billion in revenue experienced some sort of digital fraud.

This is a familiar story in the world of bot attacks. Cloudflare Bot Management helps customers identify the automated tools behind online fraud, but it’s important to note that not all fraud is committed by bots. If the target is valuable enough, bad actors will contract out the exploitation of online applications to real people. Security teams need to look at more than just bots to better secure online applications and tackle modern, online fraud.

Today, we’re excited to announce Cloudflare Fraud Detection. Fraud Detection will give you precise, easy to use tools that can be deployed in seconds to any website on the Cloudflare network to help detect and categorize fraud. For every type of fraud we detect on your website, you will be able to choose the behavior that makes the most sense to you. While some customers will want to block fraudulent traffic at our edge, other customers may want to pass this information in headers to build integrations with their own app, or use our Cloudflare Workers platform to direct high risk users to load an alternate online experience with fewer capabilities.

The online fraud experience today

When we talk to organizations impacted by sophisticated, online fraud, the first thing we hear from frustrated security teams is that they know what they could do to stop fraud in a vacuum: they’ve proposed requiring email verification on signup, enforcing two-factor authentication for all logins, or blocking online purchases from anonymizing VPNs or countries they repeatedly see a disproportionately high number of charge-backs from. While all of these measures would undoubtedly reduce fraud, they would also make the user experience worse. The fear for every company is that a bad UX will mean slower adoption and less revenue, and that’s too steep a price to pay for most run-of-the-mill online fraud.

For those who’ve chosen to preserve that frictionless user experience and bear the cost of fraud, we see two big impacts: higher infrastructure costs and less efficient employees. Bad actors that abuse account creation endpoints or service availability endpoints often do so with floods of highly distributed HTTP requests, quickly moving through residential proxies to pass under IP based rate limiting rules. Without a way to identify fraudulent traffic with certainty, companies are forced to scale up their infrastructure to be able to serve new peaks in request traffic, even when they know the majority of this traffic is illegitimate. Engineering and Trust and Safety Teams suddenly have a whole new set of responsibilities: regularly banning IP addresses that will probably never be used again, routinely purging fraudulent data from over capacity databases, and even sometimes becoming de-facto fraud investigators. As a result, the organization incurs greater costs without any greater value to their customers.

Reduce modern fraud without hurting UX

Organizations have told us loud and clear that an effective fraud management solution needs to reliably stop bad actors before they can create fraudulent accounts, use stolen credit cards, or steal customer data all the while ensuring a frictionless user experience for real users. We are building novel and highly accurate detections, solving for the four common fraud types we hear the most demand for from businesses around the world:

  • Fake Account Creation: Bad actors signing up for many different accounts to gain access to promotional rewards, or more resources than a single user should have access to.
  • Account Takeover: Gaining unauthorized access to legitimate accounts, by means such as using stolen username and password combinations from other websites, guessing weak passwords, or abusing account recovery mechanisms.
  • Card Testing and Fraudulent Transactions: Testing the validity of stolen credit card details or using those same details to purchase goods or services.
  • Expediting: Obtaining limited availability goods or services by circumventing the normal user flow to complete orders more quickly than should be possible.

In order to trust your fraud management solution, organizations have to understand the decisions or predictions behind the detection of fraud. This is referred to as explainability. For example, it’s not enough to know a signup attempt was flagged as fraud. You need to know, for example, if a signup is fraudulent, exactly what field supplied by the user led us to think this was an issue, why it was an issue, and if it was part of a larger pattern. We will pass along this level of detail when we detect fraud so you can ensure we are only keeping the bad actors out.

Every business that deals with modern, online fraud has a different idea of what risks are acceptable, and a different preference for dealing with fraud once it’s been identified. To give customers maximum flexibility, we’re building Cloudflare’s fraud detection signals to be used individually, or combined with other Cloudflare security products in whichever way best fits each customer’s risk profile and use case, all while using the familiar Cloudflare Firewall Rules interface. Templated rules and suggestions will be available to provide guidance and help customers become familiar with the new features, but each customer will have the option of fully customizing how they want to protect each internet application. Customers can either block, rate-limit, or challenge requests at the edge, or send those signals upstream in request headers, to trigger custom in-application behavior.

Cloudflare provides application performance and security services to millions of sites, and we see 45 million HTTP requests per second on average. The massive diversity and volume of this traffic puts us in a unique position to analyze and defeat online fraud. Cloudflare Bot Management is already built to run our Machine Learning model that detects automated traffic on every request we see. To better tackle more challenging use cases like online fraud, we made our lightning fast Machine Learning even more performant. The typical Machine Learning model now executes in under 0.2 milliseconds, giving us the architecture we need to run multiple specific Machine Learning models in parallel without slowing down content delivery.

Stopping fake account creation and adding to Cloudflare’s defense in depth

Announcing Cloudflare Fraud Detection

The first problem our customers asked us to tackle is detecting fake account creation. Cloudflare is perfectly positioned to solve this because we see more account creation pages than anyone else. Using sampled fake account attack data from our customers, we started looking at signup submission data, and how threat intelligence curated by our Cloudforce One team might be helpful. We found that the data used in our Cloudflare One products was already able to identify 72% of fake accounts based on the signup details supplied by the bad actor, such as the email address or the domain they’re using in the attack. We are continuing to add more sources of threat intelligence data specific to fake accounts to get this number close to 100%. On top of these threat intelligence based rules, we are also training new machine learning models on this data as well, that will spot trends like popular fraud domains based on intelligence from the millions of domains we see across the Cloudflare network.

Making fraud inefficient by expediting detection

The second problem customers asked us to prioritize is expediting. As a reminder, expediting means visiting a succession of web pages faster than would be possible for a normal user, and sometimes skipping ahead in the order of web pages in order to efficiently exploit a resource.

For instance, let’s say that you have an Account Recovery page that is being spammed by a sophisticated group of bad actors, looking for vulnerable users they can steal reset tokens for. In this case, the fraudsters have access to a large number of valid email addresses and they’re testing which of these addresses may be used at your website. To prevent your account recovery process from being abused, we need to ensure that no single person can move through the account recovery process faster, or in a different order than a real person would.

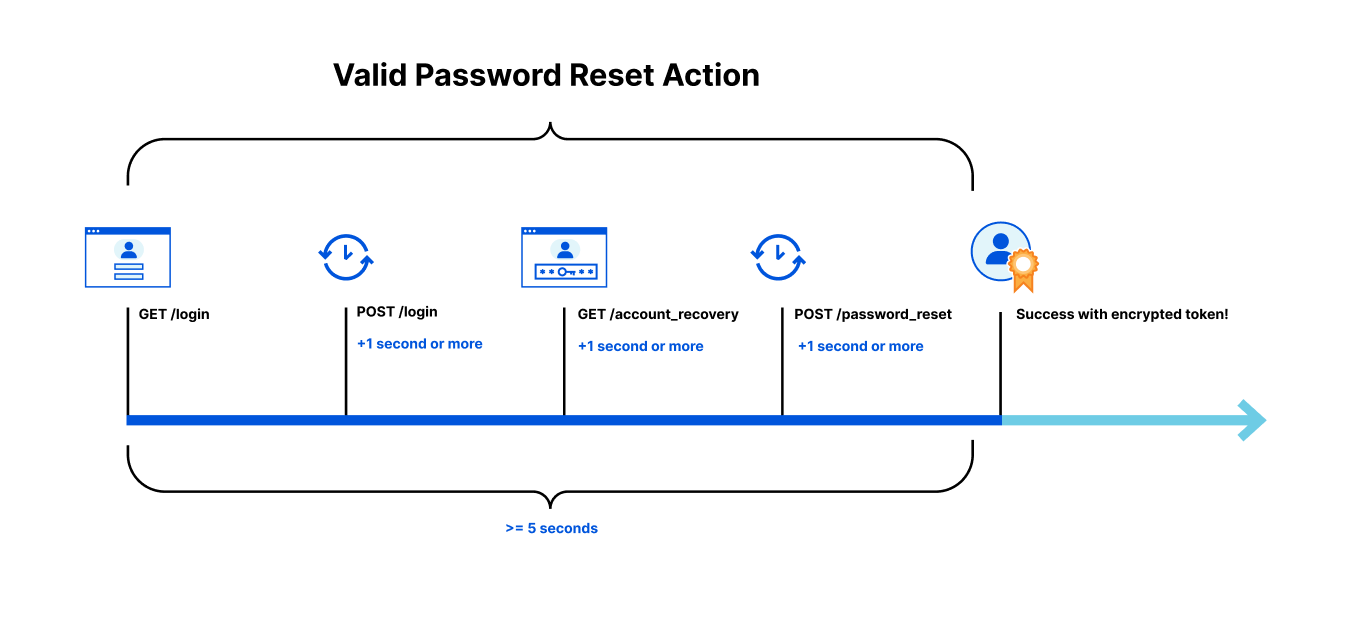
In order to complete a valid password reset action on your site, you may know that a user should have made:

  • A GET request to render your login page
  • A POST request to the login page (at least one second after receiving the login page HTML)
  • A GET request to render the Account Recovery page (at least one second after receiving the POST response)
  • A POST request to the password reset page (at least one second after receiving the Account Recovery page HTML)
  • Taken a total time of less than 5 seconds to complete the process

To solve this, we will rely on encrypted data stored by the user in a token to help us determine if the user has visited all the necessary pages needed in a reasonable amount of time to be performing sensitive actions on your site. If your account recovery process is being abused, the encrypted token we supply acts as a VIP pass, allowing only authorized users to successfully complete the password recovery process. Without a pass indicating the user has gone through the normal recovery flow in the correct order and time, they are denied entry to complete a password recovery. By forcing the bad actor to behave the same as a legitimate user, we make their task of checking which of their compromised email addresses might be registered at your site an impossibly slow process, forcing them to move on to other targets.

Announcing Cloudflare Fraud Detection

These are just two of the first techniques we use to identify and block fraud. We are also building Account Takeover and Carding Abuse detections that we will be talking about in the future on this blog. As online fraud continues to evolve, we will continue to build new and unique detections, leveraging Cloudflare’s unique position to help keep the internet safe.

Where do I sign up?

Cloudflare’s mission is to help build a better Internet, and that includes dealing with the evolution of modern online fraud. If you’re spending hours cleaning up after fraud, or are tired of paying to serve web traffic to bad actors, you can join in the Cloudflare Fraud Detection Early Access in the second half of 2023 by submitting your contact information here. Early Access customers can opt in to providing training data sets right away, making our models more effective for their use cases. You’ll also get test access to our newest models, and future fraud protection features as soon as they roll out.

Announcing Cloudflare Fraud Detection

Just-in-Time user provisioning explained

Post Syndicated from Evgeny Yurchenko original https://blog.zabbix.com/just-in-time-user-provisioning-explained/25515/

Zabbix 6.4 finally brings a very much waited feature called “Just-In-Time user provisioning”. Zabbix “What’s new in 6.4” LDAP/SAML user provisioning paragraph is very brief and can not (not that I am saying it should) deliver any excitement about this new really game changing feature. This blog post was born to address two points:

  • explain in more details why it is “game changing” feature
  • configuration of this feature is very flexible and as it often happens flexibility brings complexity and sometimes confusion about how to actually not only get it working but also to get the most of this feature

NOTE: I am talking about LDAP in this blog post but SAML works exactly the same way so you can easily apply this article to SAML JIT user provisioning configuration.

Old times (before 6.4)

Let’s do a quick reminder how it worked before Zabbix 6.4:Obvious problem here is that a User must be pre-created in Zabbix to be able to log in using LDAP. The database user records do not have any fields noticing that the user will be authenticated via LDAP, it’s just users’ passwords stored in the database are ignored, instead, Zabbix goes to an LDAP server to verify whether:

  • a user with a given username exists
  • user provided the correct password

no other attributes configured for the user on the LDAP server side are taken into account.

So when Zabbix is used by many users and groups, user management becomes not a very trivial task as new people join different teams (or leave).

Zabbix 6.4 with JIT user provisioning enabled

Now let’s take a look at what is happening in Zabbix 6.4 (very simplified picture). The picture depicts what happens when memberOf method is selected for Group Configuration (more on that later):Now when Zabbix gets a username and password from the Login form it goes to the LDAP server and gets all the information available for this user including his/her LDAP groups membership and e-mail address. Obviously, it gets all that only if the correct (from LDAP server perspective) username and password were provided. Then Zabbix goes through pre-configured mapping that defines users from which LDAP group goes to which Zabbix user group. If at least one match is found then a user is created in the Zabbix database belonging to a Zabbix user group and having a Zabbix user role according to configured “match”. So far sounds pretty simple, right? Now let’s go into detail about how all this should be configured.

LDAP server data

To experiment with the feature I built a Docker container which is a fully functional LDAP server with some pre-configured data, you can easily spin it up using this image. Start the container this way:

docker run -p 3389:389 -p 6636:636 --name openldap-server --detach bgmot42/openldap-server:0.1.1

To visually see LDAP server data (and add your own configuration like users and groups) you can start this standard container

docker run -p 8081:80 -p 4443:443 --name phpldapadmin --hostname phpldapadmin --link openldap-server:ldap-host --env PHPLDAPADMIN_LDAP_HOSTS=ldap-host --detach osixia/phpldapadmin:0.9.0

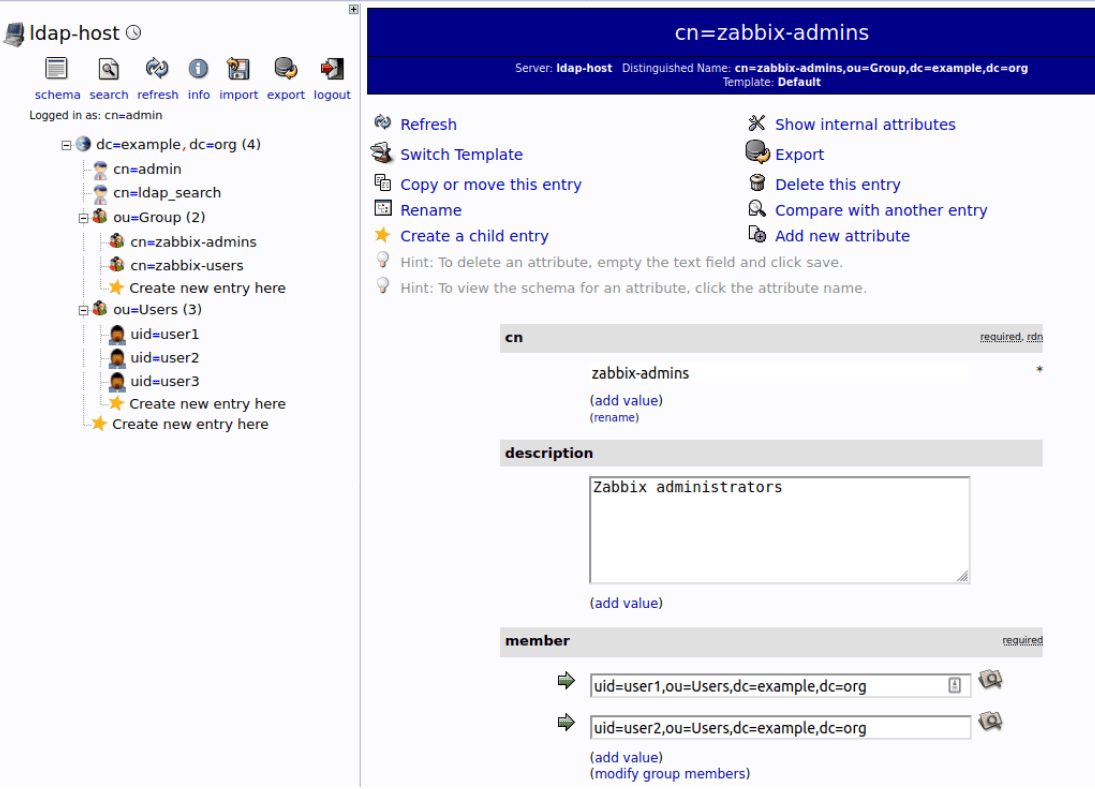
Now you can access this LDAP server via https://<ip_address>:4443 (or any other port you configure to access this Docker container), click Login, enter “cn=admin,dc=example,dc=org” in Login DN field and “password” in Password field, click Authenticate. You should see the following structure of the LDAP server (picture shows ‘zabbix-admins’ group configuration):All users in this container for convenience are configured with “password” word as their passwords.

General LDAP authentication configuration in Zabbix

No surprises here, you need to enable LDAP authentication, just a couple of additions here:

  • You must provide Deprovisioned users group. This group must be literally “disabled” otherwise you won’t be able to select it here. This is the Zabbix user group where all “de-provisioned” users will be put into so effectively will get disabled from accessing Zabbix.
  • Enable JIT provisioing check-box which obviously needs to be checked for this feature to work.

And again already familiar interface to configure a LDAP server and search parameters, however, this picture depicts how we actually fill in these parameters according to data in our LDAP server:

“Special” Distinguished Name (DN) cn=ldap_search,dc=example,dc=org is used for searching, i.e. Zabbix uses this DN to connect to LDAP server and of course when you connect to LDAP server you need to be authenticated – this is why you need to provide Bind password. This DN should have access to a sub-tree in LDAP data hierarchy where all your users are configured. In our case all the users configured “under” ou-Users,dc=example,dc=org, this DN is called base DN and used by Zabbix as so to say “starting point” to start searching.
Note: technically it is possible to bind to LDAP server anonymously, without providing a password but this is a huge breach in security as the whole users sub-tree becomes available for anonymous (unauthenticated) search, i.e. effectively exposed to any LDAP client that can connect to LDAP server over TCP. The LDAP server we deployed previously in Docker container does not provide this functionality.

Group configuration method “memberOf”

All users in our LDAP server have memberOf attribute which defines what LDAP groups every user belongs to, e.g. if you perform a LDAP query for user1 user you’ll get that its memberOf attribute has this value:
memberOf: cn=zabbix-admins,ou=Group,dc=example,dc=org
Note, that your real LDAP server can have totally different LDAP attribute that provides users’ group membership, and of course, you can easily configure what attribute to use when searching for user’s LDAP groups by putting it into User group membership attribute field:

In the picture above we are telling Zabbix to use memberOf attribute to extract DN defining user’s group membership (in this case it is cn=zabbix-admins,out=Group,dc=example,dc=org) and take only cn attribute from that DN (in this case it is zabbix-admins) to use in searching for a match in User group mapping rules. Then we define as many mapping rules as we want. In the picture above we have two rules:

  • All users belonging to zabbix-users LDAP group will be created in Zabbix as members of Zabbix users group with User role
  • All users belonging to zabbix-admins LDAP group will be created in Zabbix as members of Zabbix administrators group with Super admin role

Group configuration method “groupOfNames”

There is another method of finding users’ group membership called “groupOfNames” it is not as efficient as “memberOf” method but can provide much more flexibility if needed. Here Zabbix is not querying LDAP server for a user instead it is searching for LDAP groups based on a given criterion (filter). It’s easier to explain with pictures depicting an example:

Firstly we define LDAP “sub-tree” where Zabbix will be searching for LDAP groups – note ou=Group,dc=example,dc=org in Group base DN field. Then in the field Group name attribute field we what attribute to use when we search in mapping rules (in this case we take cn, i.e. only zabbix-admins from full DN cn=zabbix-admins,ou=Group,dc=example,dc=org). Each LDAP group in our LDAP server has member attribute that has all users that belong to this LDAP group (look at the right picture) so we put member in Group member attribute field. Each user’s DN will help us construct Group filter field. Now pay attention: Reference attribute field defines what LDAP user’s attribute Zabbix will use in the Group filter, i.e. %{ref} will be replaced with the value of this attribute (here we are talking about the user’s attributes – we already authenticated this user, i.e. got all its attributes from LDAP server). To sum up what I’ve said above Zabbix

  1. Authenticate the user with entered Username and Password against LDAP server getting all user’s LDAP attributes
  2. Uses Reference attribute and Group filter fields to construct a filter (when user1 logs in the filter will be (member=uid=user1,ou=Users,dc=example,dc=org)
  3. Performs LDAP query to get all LDAP groups with member attribute (configured in Group member attribute field) containing constructed in step 2 filter
  4. Goes through all LDAP groups received in step 3 and picks cn attribute (configured in Group name attribute field) and finds a match in User group mapping rules

Looks a bit complicated but all you really need to know is the structure of your LDAP data.

Demo time

Finally let’s see what happens when user1 belonging to zabbix-admins LDAP group and user3 belonging to zabbix-users LDAP group log in:

That’s it. Happy JIT user provisioning!

Женска приказка за стълбата към стъкления таван

Post Syndicated from Светла Енчева original https://www.toest.bg/zhenska-prikazka-za-stulbata-kum-stukleniya-tavan/

Женска приказка за стълбата към стъкления таван

В България правата на жените са тема почти само на 8 март. И то ако успеят да си намерят място сред клишетата за дами, майки, нежност и цветя. На 9 март проблемите на жените не изчезват. Не изчезват и потребностите им. Тъкмо на тях е посветен докладът „Гласовете на жените в България“, върху който работих няколко месеца[1]. Той се основава на 42 биографични интервюта с жени от различни градове в страната (без София). Макар това да не е в стила на подобни доклади, исках да оставя жените да говорят със собствените си гласове, вместо да изземвам думата им, и го изпъстрих с цитати. В биографичните разкази се откроиха много теми и подтеми. От тях сега ще разкажа за

стереотипите и неравенството на жените на работното място.

Според анализ на „Евростат“, публикуван в навечерието на 8 март, България е на второ място в ЕС по дял на жените, заемащи мениджърски позиции (49% при средно 37% за ЕС). Тези данни обаче не дават яснота за какви мениджърски позиции става дума – и големите компании, и кварталните фризьорски салончета са „в един кюп“. В същото време страната ни е сред последните пет държави с най-голям дял на жените в управителните съвети на фирми (19% при средно 28%). Кварталното фризьорско салонче няма управителен съвет, сещате се.

На самия 8 март излезе и доклад на Института за пазарна икономика (ИПИ) за жените на пазара на труда в България, който се основава на данни на Националния статистически институт от последното преброяване на населението. Основното му заключение е, че заетостта на жените у нас е по-висока от тази на мъжете, но пък заплащането, което получават, е по-ниско. В сферите на информационните технологии, преработващата промишленост, културата, спорта и развлеченията жените получават с над 30% по-малко от мъжете.

Тъкмо 30% се споменават и в едно от биографичните интервюта. Респондентката разказва за сестра си, която е дипломирана програмистка:

„Заедно с гаджето ѝ завършиха тази специалност. Но тя завърши с по-висок успех. Тогава фирми започваха да се оглеждат и да си избират студенти. Поканиха ги на интервю и двамата. Един след друг, но на нея ѝ предложиха 30% по-ниска заплата. И тя попитала: „Какво?!“ Отговорът бил: „Ами ти си още малка, още не ги мислиш тези неща, но ще имаш семейство, деца, те ще се разболяват, ще искаш болнични.“ Тя казала: „Ама вие сериозно ли?! Вижте ми дипломата, вижте му дипломата!“ Те ѝ отговорили, че след време може да помислят за повишение. Тя им казала: „Няма как след време да мислите и да вземате решение! Или започваме наравно, или аз не започвам!“ Tе казали: „Това са условията за Вас.“ Тя си казала: „Ха, така ли, програмист! Не! Отивам и завършвам едни финанси.“ Та тя е с магистратура финанси и си работи това – счетоводител.“

Това беше кратък поглед към описаната от ИПИ реалност, но като свалим макроикономическите „очила“ и се вгледаме в индивидуалните биографии. Ето и историите на няколко от 42-те жени, разказали за живота си в интервютата, за които споменах.

Петя, която не се качва на стълбата

Петя (имената са измислени, защото интервютата са анонимни) е на 50 години. В училище много ѝ върви математиката, а литературата, която окачествява като „размисли и страсти“, не я привлича. Освен това я бива в техническите неща: „Обичам да ръчкам, обичам да гледам как се поправят […] бушони. Не мога да кажа, че успявам да поправям бойлер, но и аз там с мъжете да ръчкам. Ремонтирам, скоро си поправих врътката на мивката, просто ми е в кръвта – обичам да поправям нещо, да се занимавам.“

Петя се дипломира като инженер в областта на енергетиката. След завършването започва да си търси работа с увереността, че специалността ѝ е хубава и може да постъпи на добро място, но удря на камък – никъде не я назначават. Постепенно тя си дава сметка, че така се случва не само защото за този сектор си трябват връзки, каквито тя няма, а и защото е жена:

Как си представяш ти една жена да се качи на стълба и да оправя, а всички работници да гледат отдолу?

Затова Петя решава да се преквалифицира и се отдава на силно феминизирана професия, в която, макар понякога също да е нужна стълба, мъжете не биха се чувствали унижени от позицията ѝ – завършва магистратура по библиотекознание и става библиотекарка. Взела си е „урок“ и не си позволява да доминира над мъжете и в интимните си отношения. Затова крие от тях, че обича да „ръчка“ и да поправя: „Тука си мълча, аз не бързам да се издавам какво мога. Правя се на домакиня, даже и сега не показвам всичките си заложби. […] Като си разбира човекът, го оставям, не казвам „Чакай аз да ти покажа“ […]. Аз си знам, че мога, не обичам да се изтъквам, оставям мъжа.“

Нели, която се отказва от кариерата си

36-годишната Нели завършва архитектура и за разлика от Петя, успява да си намери работа по специалността. Но забелязва, че в професията ѝ жените често са пренебрегвани. Сеща се само за една жена, която е спечелила голям проект – в повечето случаи все мъже ги „обират“. А шефът ѝ демонстрира пренебрежение към качествата ѝ:

„И аз направих някакъв коментар, че някаква вентилация не е съобразена, че може по-добре да се случи. Гледах да не съм много остра, нали, все пак, колега, въпреки че беше много зле, […] и той ми каза: „Ти как си позволяваш да говориш така? Как можеш да имаш забележки? Този архитект е утвърден, с 30-годишен стаж.“ И аз бях в тотален шок. Казах: „То, нали, и аз имам 13 години стаж като архитект.“

На Нели ѝ прави впечатление, че и в други случаи директорът дава приоритет на мъжете: „Например идва човек, който ще прави мебелите, и директорът ми го представя: „Този еди-кой си майстор се занимава с бутикови интериори, с не знам си какво“, ама го представя така, както според мен няма да представи жена.“

Съпругът на Нели не е властна натура и охотно я оставя да взема повечето решения. Като архитектка тя печели повече от него. Той няма и професионални амбиции: „Но той пък не иска да се развива. […] Израснал е в семейство, в което баща му и майка му никога не са работили за други хора. Те винаги са имали бизнеси, и то бизнеси, които не са развивали.“

Нели посещава психотерапевтка, на която има доверие и която смята, че проблемите на клиентката ѝ се дължат на това, че тя не се държи така, както изисква стереотипната роля на жената в семейството, т.е. с мъжа ѝ „са объркали ролите“. Според нея Нели отдава твърде голямо значение на материалната страна на живота: „По това работихме с психоложката, тя го хвана – че аз всъщност много мисля за парите и за материалните неща и щастието ми няма да дойде оттам.“

Какво прави Нели в опит да се справи с психическите си проблеми? Напуска работа и така не само се отказва от професията, която обича, но и губи доходите, на които в голяма степен разчита семейството ѝ с две малки деца: „Миналия септември напуснах работа… И си казах, че ще пробвам да правя нещо сама, пък каквото стане; че ще преодолея това, че няма да имам финансова сигурност. Много ми е трудно, ама…“

Поли, която не става водеща в столична телевизия

Поли е на 44 години. През живота си е работила различни неща, но основно е журналистка. Съпругът ѝ също е журналист. На въпроса на интервюиращата дали е била дискриминирана, защото е жена, първоначално отговаря отрицателно: „Усещала съм някакво пренебрежително отношение, защото съм била репортерка и съм била още младо момиче, пък съм си говорила с някакви директори по времето на комунизма, които вече са 60-годишни мъже с положение, пък аз отивам и ги питам като някаква муха досадна, но мисля, че това не е било, защото съм момиче, а защото съм била малка.“

В следващия момент Поли се сеща, че всъщност е била дискриминирана, и разказва една случка. В един период тя остава без работа, с две малки деца. С мъжа ѝ решават да опитат да се преместят в София, където биха имали повече шансове, и пращат автобиографиите си в няколко софийски медии. В една столична телевизия работи нейна близка приятелка, но въпреки приятелството тя ѝ казва: „Слушай какво, независимо от това, че ти работиш с два езика, […] че си била на по-високи позиции от мъжа ти, ние ще вземем него, защото ни трябва мъж.“

Поли не може да разбере защо мъжът ѝ би бил предпочетен за работата, и иска обяснение: „И аз казах: „Защо?! Защото изглежда по-авторитетно в [такъв тип] телевизия? А? Чакай малко! Той, освен че е хубав, […] прилично изглеждащ и че е мъж, няма никакво предимство пред мен! Аз имам по-високо образование от неговото, била съм на по-високи позиции, аз говоря повече езици, аз съм по-организирана!“ Отговорът беше: „Ами, сори, майка, т’ва е, имаме доверие на мъже.“

Макар журналистиката в България да е силно феминизирана професия, в нея има сфери, които се смятат за „запазена територия“ за мъжете, и точно в една такава е имала „дързостта“ да кандидатства Поли. Тя не може да се примири с това положение и да жертва амбициите си:

„Не мога да си позволя така аз! Той наистина щеше да взема много пари, едни много, много добри пари, ама… Не мога да си позволя аз да чакам, ти да изкарваш целия семеен бюджет, пък аз да работя нещо си, ’щото така сме решили. ’Ми няма да стане!“

От солидарност с нея мъжът ѝ отказва да постъпи на мястото, за което тя е кандидатствала. Двамата се отказват да си търсят работа в София.

Ева, която не се предава

25-годишната Ева не се плаши от труда. Работи от 16-годишна, за да се опита да компенсира липсата на материалния стандарт, който демонстрират съучениците ѝ от езиковата гимназия. Настоящия си съпруг среща на 17 години, на 19 забременява, но това не я спира:

Всички очакваха, че ще прекъсна работа, образование, бях записала да уча бакалавърска степен „Маркетинг мениджмънт“ задочно, но не прекъснах – продължих да си работя, да уча. Работих до десетия ден, преди да родя, започнах да работя 15 дни след раждането – от вкъщи.

Пред Ева не стои дилемата „работата или детето“: „С бебето бяхме като скачени съдове, партньори. Ходехме навсякъде заедно, вършехме всичко заедно. Като цяло, намерихме перфектния баланс.“

Затова и Ева не може да се примири с дискриминацията на жените с деца при наемане на работа, каквато самата тя е преживявала нееднократно и за случаи на каквато е чела в социалните мрежи: „Забелязах в много групи във Facebook, където майките комуникират […], че много жени [остават] безработни в момента, в който се разбере, че имат бебе или имат планове да имат бебе. Същото беше, докато търсех работа. […] Те вече изпадат в ужас: „Тя е млада ще иска второ дете, нека да наемем мъж, който по-добре ще се справи в такива ситуации, който има жена, която да гледа детето. Той няма да се занимава.“ Получих много откази именно по тази причина. […] Всичко вървеше добре, докато не започнаха въпросите за семейното положение, децата. Вече усетих как тонът се промени […] – „има класация, ти оставаш висяща“. Почти във всеки случай позицията ти я взема жена, която няма деца. Една позната кандидатства – без деца, без мъж, съответно си взе позицията.“

Ева е ставала обект на дискриминационно отношение при кандидатстване за работа не само защото е майка, а и просто защото е жена: „На интервюто очаквах, че ще присъства един човек. В един момент ме оградиха четирима мъже, интервюто продължи два часа и половина – кръстосан разпит с четиримата, много неприятно. Но имаше по-провокативни, по-увъртени въпроси. Усещаш, че те оглеждат, че те преценяват. По-нататък попитах единия защо не се получи филмът. Той ми каза, че съм жена – затова. […] Бях получила коментар от типа на: „Мъжете сме акули, а жените не сте готови още за това, не сте достатъчно дорасли да сте агресивни в битките, както сме мъжете.“ Абсолютно сексистки коментари. Не разбирам логиката, но няма значение.“

Тя „не цепи басма“ никому, отстоява правата си, не оставя подобно отношение да я смачка, колкото и често да ѝ се случва, и е наясно с потребностите си: „Като жена, личност, имам нужда от толеранс и разбиране от страна на работодателите и да не ни делят.“

Личните истории и статистиката

Докато Петя и Нели, всяка посвоему, по-скоро се примиряват със стереотипите по отношение на жените, Поли и Ева не се предават и изискват да бъдат признавани за равни с мъжете на работното място. Няма да е честно обаче да упрекваме нито първите две, че са се подчинили на патриархалните порядки, нито вторите, че са твърде „устати“ и не са склонни да правят компромиси. И техните истории, и тези на останалите 38 жени имат нужда преди всичко от разбиране. Това са жени от различни поколения и населени места, отраснали в различна среда и с различни биографии.

Личните истории на тези жени хвърлят светлина върху ситуацията на жените на пазара на труда в България, каквато статистиката и представителните изследвания не са в състояние да предоставят. А зад числата и процентите стоят конкретни човешки същества. Стои и определена култура, по силата на която едни неща се смятат за приемливи, а други – недотам. Затова и статистическите данни за една или друга държава може да имат много различно съдържание.

Ето защо второто място на България за жените на мениджърски позиции не влиза в противоречие със „стъкления таван“, в който много от тях си блъскат главите, опитвайки да се изкачат по стълбата на професията. А понякога „таванът“ е даже преди стълбата.


[1] Докладът е резултат от проект „Изследване на нуждите и проблемите на жените в България“ на Фондация „Екатерина Каравелова“ и се финансира от „Фонд Активни граждани България“, а финансовата подкрепа е предоставена от Исландия, Лихтенщайн и Норвегия по линия на Финансовия механизъм на ЕИП. Настоящата статия изразява моята позиция, която може да не отразява официалното становище на възложителите.


Patch Tuesday – March 2023

Post Syndicated from Adam Barnett original https://blog.rapid7.com/2023/03/14/patch-tuesday-march-2023/

Patch Tuesday - March 2023

Microsoft is offering fixes for 101 security issues for March 2023 Patch Tuesday, including two zero-day vulnerabilities; the most interesting of the two zero-day vulnerabilities is a flaw in Outlook which allows an attacker to authenticate against arbitrary remote resources as another user.
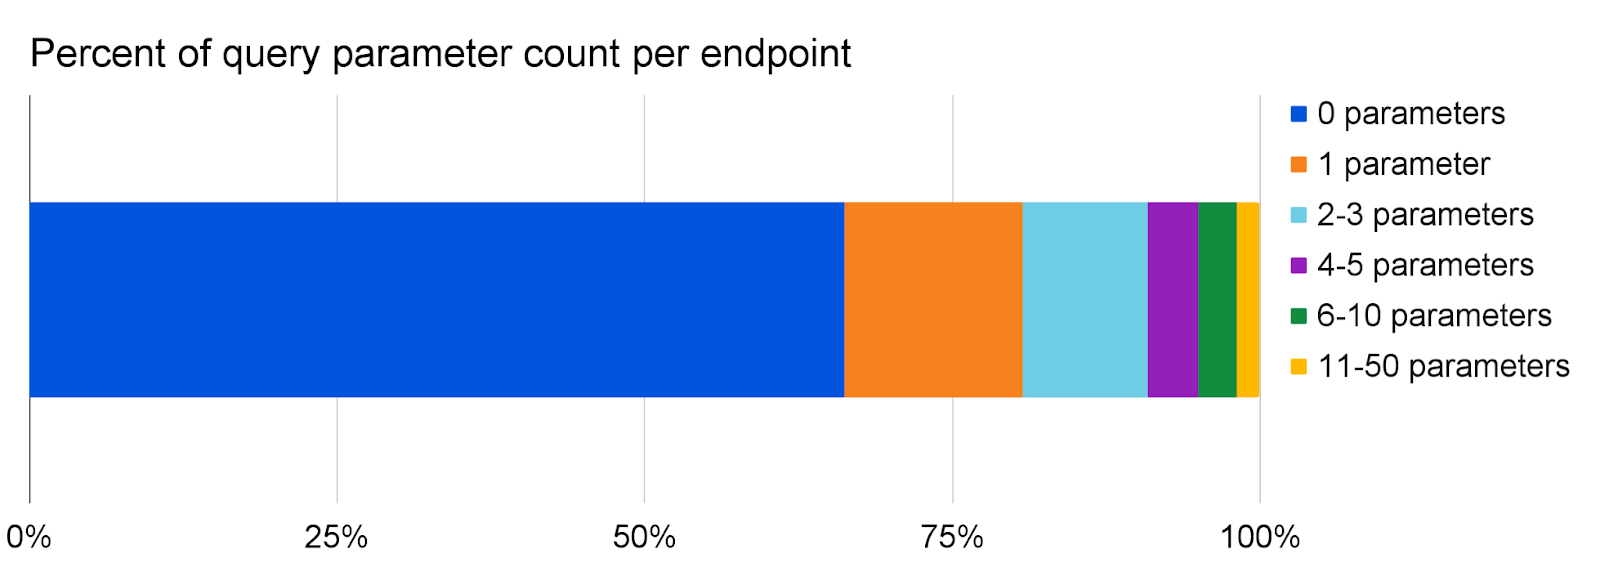
CVE-2023-23397 describes a Critical Elevation of Privilege vulnerability affecting Outlook for Windows, which is concerning for several reasons. Microsoft has detected in-the-wild exploitation by a Russia-based threat actor targeting government, military, and critical infrastructure targets in Europe.

An attacker could use a specially-crafted email to cause Outlook to send NTLM authentication messages to an attacker-controlled SMB share, and can then use that information to authenticate against other services offering NTLM authentication. Given the network attack vector, the ubiquity of SMB shares, and the lack of user interaction required, an attacker with a suitable existing foothold on a network may well consider this vulnerability a prime candidate for lateral movement.

The vulnerability was discovered by Microsoft Threat Intelligence, who have published a Microsoft Security Research Center blog post describing the issue in detail, and which provides a Microsoft script and accompanying documentation to detect if an asset has been compromised using CVE-2023-23397.

Current self-hosted versions of Outlook – including Microsoft 365 Apps for Enterprise – are vulnerable to CVE-2023-23397, but Microsoft-hosted online services (e.g., Microsoft 365) are not vulnerable. Microsoft has calculated a CVSSv3 base score of 9.8.

The other zero-day vulnerability this month, CVE-2023-24880, describes a Security Feature Bypass in Windows SmartScreen, which is part of Microsoft’s slate of endpoint protection offerings. A specially crafted file could avoid receiving Mark of the Web and thus dodge the enhanced scrutiny usually applied to files downloaded from the internet.

Although Microsoft has detected in-the-wild exploitation, and functional exploit code is publicly available, Microsoft has marked CVE-2023-24880 as Moderate severity – the only one this month – and assessed it with a relatively low CVSSv3 score of 5.4; the low impact ratings and requirement for user interaction contribute to the lower scoring. This vulnerability thus has the unusual distinction of being both an exploited-in-the-wild zero-day vulnerability and also the lowest-ranked vulnerability on Microsoft’s severity scale in this month’s Patch Tuesday. Only more recent versions of Windows are affected: Windows 10 and 11, as well as Server 2016 onwards.

A further five critical Remote Code Execution (RCE) vulnerabilities are patched this month in Windows low-level components. Three of these are assessed as Exploitation More Likely, and most of them affect a wide range of Windows versions, with the exception of CVE-2023-23392 which affects only Windows 11 and Windows Server 2022. Only assets where HTTP/3 has been enabled are potentially vulnerable – it is disabled by default – yet Microsoft still assesses this vulnerability as Exploitation More Likely, perhaps because HTTP endpoints are typically accessible.

CVE-2023-21708 is a Remote Procedure Call (RPC) vulnerability with a base CVSSv3 of 9.8. Microsoft recommends blocking TCP port 135 at the perimeter as a mitigation; given the perennial nature of RPC vulnerabilities, defenders will know that this has always been good advice.

Another veteran class of vulnerability makes a return this month: CVE-2023-23415 describes an attack involving a fragmented packet inside the header of another ICMP packet. Insufficient validation of ICMP packets has been a source of vulnerabilities since the dawn of time; the original and still-infamous Ping of Death vulnerability, which affected a wide range of vendors and operating systems, was one of the first vulnerabilities ever to be assigned a CVE, way back in 1999.

Rounding out the remaining Critical RCE vulnerabilities this month are a malicious certificate attack leading to Arbitrary Code Execution (ACE), and an attack against Windows Remote Access Server (RAS) which happily requires the attacker to win a race condition and is thus harder to exploit.

Microsoft has addressed two related vulnerabilities introduced via the Trusted Platform Module (TPM) 2.0 reference implementation code published by the Trusted Computing Group industry alliance. CVE-2023-1017 is an out-of-bounds write, and CVE-2023-1018 is an out-of-bounds read. Both may be triggered without elevated privileges, and may allow an attacker to access or modify highly-privileged information inside the TPM itself. Defenders managing non-Microsoft assets should note that a wide range of vendors including widely used Linux distros are also affected by this pair of vulnerabilities.

Admins who still remember the aptly-named PrintNightmare vulnerability from the summer of 2021 may well raise a wary eyebrow at this month’s batch of 18 fixes for the Microsoft PostScript and PCL6 Class Printer Driver, but there’s no sign that any of these are cause for the same level of concern, not least because there has been no known public disclosure prior to Microsoft releasing patches.

Azure administrators who update their Service Fabric Cluster manually should note that CVE-2023-23383 describes a spoofing vulnerability in the web management client where a user clicking a suitably-crafted malicious link could unwittingly execute actions against the remote cluster. Azure estates with automatic upgrades enabled are already protected.

Summary charts

Patch Tuesday - March 2023
Lots of Important vulnerabilities

Patch Tuesday - March 2023
Remote Code Execution and Elevation of Privilege vulnerabilities remain a key focus

Patch Tuesday - March 2023
As always, vulnerability count is not necessarily a proxy for risk or exposure
Patch Tuesday - March 2023
Printer drivers and Microsoft Dynamics received a significant number of fixes

Summary tables

Apps vulnerabilities

CVE Title Exploited? Publicly disclosed? CVSSv3 base score
CVE-2023-24890 Microsoft OneDrive for iOS Security Feature Bypass Vulnerability No No 6.5

Azure vulnerabilities

CVE Title Exploited? Publicly disclosed? CVSSv3 base score
CVE-2023-23383 Service Fabric Explorer Spoofing Vulnerability No No 8.2
CVE-2023-23408 Azure Apache Ambari Spoofing Vulnerability No No 4.5

Browser vulnerabilities

CVE Title Exploited? Publicly disclosed? CVSSv3 base score
CVE-2023-24892 Microsoft Edge (Chromium-based) Webview2 Spoofing Vulnerability No No 7.1
CVE-2023-1236 Chromium: CVE-2023-1236 Inappropriate implementation in Internals No No N/A
CVE-2023-1235 Chromium: CVE-2023-1235 Type Confusion in DevTools No No N/A
CVE-2023-1234 Chromium: CVE-2023-1234 Inappropriate implementation in Intents No No N/A
CVE-2023-1233 Chromium: CVE-2023-1233 Insufficient policy enforcement in Resource Timing No No N/A
CVE-2023-1232 Chromium: CVE-2023-1232 Insufficient policy enforcement in Resource Timing No No N/A
CVE-2023-1231 Chromium: CVE-2023-1231 Inappropriate implementation in Autofill No No N/A
CVE-2023-1230 Chromium: CVE-2023-1230 Inappropriate implementation in WebApp Installs No No N/A
CVE-2023-1229 Chromium: CVE-2023-1229 Inappropriate implementation in Permission prompts No No N/A
CVE-2023-1228 Chromium: CVE-2023-1228 Insufficient policy enforcement in Intents No No N/A
CVE-2023-1224 Chromium: CVE-2023-1224 Insufficient policy enforcement in Web Payments API No No N/A
CVE-2023-1223 Chromium: CVE-2023-1223 Insufficient policy enforcement in Autofill No No N/A
CVE-2023-1222 Chromium: CVE-2023-1222 Heap buffer overflow in Web Audio API No No N/A
CVE-2023-1221 Chromium: CVE-2023-1221 Insufficient policy enforcement in Extensions API No No N/A
CVE-2023-1220 Chromium: CVE-2023-1220 Heap buffer overflow in UMA No No N/A
CVE-2023-1219 Chromium: CVE-2023-1219 Heap buffer overflow in Metrics No No N/A
CVE-2023-1218 Chromium: CVE-2023-1218 Use after free in WebRTC No No N/A
CVE-2023-1217 Chromium: CVE-2023-1217 Stack buffer overflow in Crash reporting No No N/A
CVE-2023-1216 Chromium: CVE-2023-1216 Use after free in DevTools No No N/A
CVE-2023-1215 Chromium: CVE-2023-1215 Type Confusion in CSS No No N/A
CVE-2023-1214 Chromium: CVE-2023-1214 Type Confusion in V8 No No N/A
CVE-2023-1213 Chromium: CVE-2023-1213 Use after free in Swiftshader No No N/A

Developer Tools vulnerabilities

CVE Title Exploited? Publicly disclosed? CVSSv3 base score
CVE-2023-23946 GitHub: CVE-2023-23946 mingit Remote Code Execution Vulnerability No No N/A
CVE-2023-23618 GitHub: CVE-2023-23618 Git for Windows Remote Code Execution Vulnerability No No N/A
CVE-2023-22743 GitHub: CVE-2023-22743 Git for Windows Installer Elevation of Privilege Vulnerability No No N/A
CVE-2023-22490 GitHub: CVE-2023-22490 mingit Information Disclosure Vulnerability No No N/A

ESU Windows vulnerabilities

CVE Title Exploited? Publicly disclosed? CVSSv3 base score
CVE-2023-21708 Remote Procedure Call Runtime Remote Code Execution Vulnerability No No 9.8
CVE-2023-23415 Internet Control Message Protocol (ICMP) Remote Code Execution Vulnerability No No 9.8
CVE-2023-23405 Remote Procedure Call Runtime Remote Code Execution Vulnerability No No 8.1
CVE-2023-24908 Remote Procedure Call Runtime Remote Code Execution Vulnerability No No 8.1
CVE-2023-24869 Remote Procedure Call Runtime Remote Code Execution Vulnerability No No 8.1
CVE-2023-23401 Windows Media Remote Code Execution Vulnerability No No 7.8
CVE-2023-23402 Windows Media Remote Code Execution Vulnerability No No 7.8
CVE-2023-23420 Windows Kernel Elevation of Privilege Vulnerability No No 7.8
CVE-2023-23421 Windows Kernel Elevation of Privilege Vulnerability No No 7.8
CVE-2023-23422 Windows Kernel Elevation of Privilege Vulnerability No No 7.8
CVE-2023-23423 Windows Kernel Elevation of Privilege Vulnerability No No 7.8
CVE-2023-23410 Windows HTTP.sys Elevation of Privilege Vulnerability No No 7.8
CVE-2023-23407 Windows Point-to-Point Protocol over Ethernet (PPPoE) Remote Code Execution Vulnerability No No 7.1
CVE-2023-23414 Windows Point-to-Point Protocol over Ethernet (PPPoE) Remote Code Execution Vulnerability No No 7.1
CVE-2023-23385 Windows Point-to-Point Protocol over Ethernet (PPPoE) Elevation of Privilege Vulnerability No No 7
CVE-2023-24861 Windows Graphics Component Elevation of Privilege Vulnerability No No 7
CVE-2023-24862 Windows Secure Channel Denial of Service Vulnerability No No 5.5
CVE-2023-23394 Client Server Run-Time Subsystem (CSRSS) Information Disclosure Vulnerability No No 5.5
CVE-2023-23409 Client Server Run-Time Subsystem (CSRSS) Information Disclosure Vulnerability No No 5.5

Microsoft Dynamics vulnerabilities

CVE Title Exploited? Publicly disclosed? CVSSv3 base score
CVE-2023-24922 Microsoft Dynamics 365 Information Disclosure Vulnerability No No 6.5
CVE-2023-24919 Microsoft Dynamics 365 (on-premises) Cross-site Scripting Vulnerability No No 5.4
CVE-2023-24879 Microsoft Dynamics 365 (on-premises) Cross-site Scripting Vulnerability No No 5.4
CVE-2023-24920 Microsoft Dynamics 365 (on-premises) Cross-site Scripting Vulnerability No No 5.4
CVE-2023-24891 Microsoft Dynamics 365 (on-premises) Cross-site Scripting Vulnerability No No 5.4
CVE-2023-24921 Microsoft Dynamics 365 (on-premises) Cross-site Scripting Vulnerability No No 4.1

Microsoft Office vulnerabilities

CVE Title Exploited? Publicly disclosed? CVSSv3 base score
CVE-2023-23397 Microsoft Outlook Elevation of Privilege Vulnerability Yes No 9.8
CVE-2023-24930 Microsoft OneDrive for MacOS Elevation of Privilege Vulnerability No No 7.8
CVE-2023-23399 Microsoft Excel Remote Code Execution Vulnerability No No 7.8
CVE-2023-23398 Microsoft Excel Spoofing Vulnerability No No 7.1
CVE-2023-23396 Microsoft Excel Denial of Service Vulnerability No No 6.5
CVE-2023-23391 Office for Android Spoofing Vulnerability No No 5.5
CVE-2023-24923 Microsoft OneDrive for Android Information Disclosure Vulnerability No No 5.5
CVE-2023-24882 Microsoft OneDrive for Android Information Disclosure Vulnerability No No 5.5
CVE-2023-23395 Microsoft SharePoint Server Spoofing Vulnerability No No 3.1

Microsoft Office ESU Windows vulnerabilities

CVE Title Exploited? Publicly disclosed? CVSSv3 base score
CVE-2023-24910 Windows Graphics Component Elevation of Privilege Vulnerability No No 7.8

System Center vulnerabilities

CVE Title Exploited? Publicly disclosed? CVSSv3 base score
CVE-2023-23389 Microsoft Defender Elevation of Privilege Vulnerability No No 6.3

Windows vulnerabilities

CVE Title Exploited? Publicly disclosed? CVSSv3 base score
CVE-2023-23392 HTTP Protocol Stack Remote Code Execution Vulnerability No No 9.8
CVE-2023-24871 Windows Bluetooth Service Remote Code Execution Vulnerability No No 8.8
CVE-2023-23388 Windows Bluetooth Driver Elevation of Privilege Vulnerability No No 8.8
CVE-2023-23403 Microsoft PostScript and PCL6 Class Printer Driver Remote Code Execution Vulnerability No No 8.8
CVE-2023-23406 Microsoft PostScript and PCL6 Class Printer Driver Remote Code Execution Vulnerability No No 8.8
CVE-2023-23413 Microsoft PostScript and PCL6 Class Printer Driver Remote Code Execution Vulnerability No No 8.8
CVE-2023-24867 Microsoft PostScript and PCL6 Class Printer Driver Remote Code Execution Vulnerability No No 8.8
CVE-2023-24907 Microsoft PostScript and PCL6 Class Printer Driver Remote Code Execution Vulnerability No No 8.8
CVE-2023-24868 Microsoft PostScript and PCL6 Class Printer Driver Remote Code Execution Vulnerability No No 8.8
CVE-2023-24909 Microsoft PostScript and PCL6 Class Printer Driver Remote Code Execution Vulnerability No No 8.8
CVE-2023-24872 Microsoft PostScript and PCL6 Class Printer Driver Remote Code Execution Vulnerability No No 8.8
CVE-2023-24913 Microsoft PostScript and PCL6 Class Printer Driver Remote Code Execution Vulnerability No No 8.8
CVE-2023-24876 Microsoft PostScript and PCL6 Class Printer Driver Remote Code Execution Vulnerability No No 8.8
CVE-2023-24864 Microsoft PostScript and PCL6 Class Printer Driver Elevation of Privilege Vulnerability No No 8.8
CVE-2023-1018 CERT/CC: CVE-2023-1018 TPM2.0 Module Library Elevation of Privilege Vulnerability No No 8.8
CVE-2023-1017 CERT/CC: CVE-2023-1017 TPM2.0 Module Library Elevation of Privilege Vulnerability No No 8.8
CVE-2023-23416 Windows Cryptographic Services Remote Code Execution Vulnerability No No 8.4
CVE-2023-23404 Windows Point-to-Point Tunneling Protocol Remote Code Execution Vulnerability No No 8.1
CVE-2023-23418 Windows Resilient File System (ReFS) Elevation of Privilege Vulnerability No No 7.8
CVE-2023-23419 Windows Resilient File System (ReFS) Elevation of Privilege Vulnerability No No 7.8
CVE-2023-23417 Windows Partition Management Driver Elevation of Privilege Vulnerability No No 7.8
CVE-2023-23412 Windows Accounts Picture Elevation of Privilege Vulnerability No No 7.8
CVE-2023-24859 Windows Internet Key Exchange (IKE) Extension Denial of Service Vulnerability No No 7.5
CVE-2023-23400 Windows DNS Server Remote Code Execution Vulnerability No No 7.2
CVE-2023-23393 Windows BrokerInfrastructure Service Elevation of Privilege Vulnerability No No 7
CVE-2023-23411 Windows Hyper-V Denial of Service Vulnerability No No 6.5
CVE-2023-24856 Microsoft PostScript and PCL6 Class Printer Driver Information Disclosure Vulnerability No No 6.5
CVE-2023-24857 Microsoft PostScript and PCL6 Class Printer Driver Information Disclosure Vulnerability No No 6.5
CVE-2023-24858 Microsoft PostScript and PCL6 Class Printer Driver Information Disclosure Vulnerability No No 6.5
CVE-2023-24863 Microsoft PostScript and PCL6 Class Printer Driver Information Disclosure Vulnerability No No 6.5
CVE-2023-24865 Microsoft PostScript and PCL6 Class Printer Driver Information Disclosure Vulnerability No No 6.5
CVE-2023-24866 Microsoft PostScript and PCL6 Class Printer Driver Information Disclosure Vulnerability No No 6.5
CVE-2023-24906 Microsoft PostScript and PCL6 Class Printer Driver Information Disclosure Vulnerability No No 6.5
CVE-2023-24870 Microsoft PostScript and PCL6 Class Printer Driver Information Disclosure Vulnerability No No 6.5
CVE-2023-24911 Microsoft PostScript and PCL6 Class Printer Driver Information Disclosure Vulnerability No No 6.5
CVE-2023-24880 Windows SmartScreen Security Feature Bypass Vulnerability Yes Yes 5.4

Note that Microsoft has not provided CVSSv3 scores for vulnerabilities in Chromium, which is an open-source software consumed by Microsoft Edge. Chrome, rather than Microsoft, is the assigning CNA for Chromium vulnerabilities. Microsoft documents this class of vulnerability in the Security Upgrade Guide to announce that the latest version of Microsoft Edge (Chromium-based) is no longer vulnerable.

How sophisticated scammers and phishers are preying on customers of Silicon Valley Bank

Post Syndicated from Shalabh Mohan original https://blog.cloudflare.com/how-sophisticated-scammers-and-phishers-are-preying-on-customers-of-silicon-valley-bank/

How sophisticated scammers and phishers are preying on customers of Silicon Valley Bank

How sophisticated scammers and phishers are preying on customers of Silicon Valley Bank

By now, the news about what happened at Silicon Valley Bank (SVB) leading up to its collapse and takeover by the US Federal Government is well known. The rapid speed with which the collapse took place was surprising to many and the impact on organizations, both large and small, is expected to last a while.

Unfortunately, where everyone sees a tragic situation, threat actors see opportunity. We have seen this time and again – in order to breach trust and trick unsuspecting victims, threat actors overwhelmingly use topical events as lures. These follow the news cycle or known high profile events (The Super Bowl, March Madness, Tax Day, Black Friday sales, COVID-19, and on and on), since there is a greater likelihood of users falling for messages referencing what’s top of mind at any given moment.

The SVB news cycle makes for a similarly compelling topical event that threat actors can take advantage of; and it’s crucial that organizations bolster their awareness campaigns and technical controls to help counter the eventual use of these tactics in upcoming attacks. It’s tragic that even as the FDIC is guaranteeing that SVB customers’ money is safe, bad actors are attempting to steal that very money!

Preemptive action

In anticipation of future phishing attacks taking advantage of the SVB brand, Cloudforce One (Cloudflare’s threat operations and research team) significantly increased our brand monitoring focused on SVB’s digital presence starting March 10, 2023 and launched several additional detection modules to spot SVB-themed phishing campaigns. All of our customers taking advantage of our various phishing protection services automatically get the benefit of these new models.

Here’s an actual example of a real campaign involving SVB that’s happening since the bank was taken over by the FDIC.

KYC phish – DocuSign-themed SVB campaign

A frequent tactic used by threat actors is to mimic ongoing KYC (Know Your Customer) efforts that banks routinely perform to validate details about their clients. This is intended to protect financial institutions against fraud, money laundering and financial crime, amongst other things.

On March 14, 2023, Cloudflare detected a large KYC phishing campaign leveraging the SVB brand in a DocuSign themed template. This campaign targeted Cloudflare and almost all industry verticals. Within the first few hours of the campaign, we detected 79 examples targeting different individuals in multiple organizations. Cloudflare is publishing one specific example of this campaign along with the tactics and observables seen to help customers be aware and vigilant of this activity.

Campaign Details

The phishing attack shown below targeted Matthew Prince, Founder & CEO of Cloudflare on March 14, 2023. It included HTML code that contains an initial link and a complex redirect chain that is four-deep. The chain begins when the user clicks the ‘Review Documents’ link. It takes the user to a trackable analytic link run by Sizmek by Amazon Advertising Server bs[.]serving-sys[.]com. The link then further redirects the user to a Google Firebase Application hosted on the domain na2signing[.]web[.]app. The na2signing[.]web[.]app HTML subsequently redirects the user to a WordPress site which is running yet another redirector at eaglelodgealaska[.]com. After this final redirect, the user is sent to an attacker-controlled docusigning[.]kirklandellis[.]net website.

How sophisticated scammers and phishers are preying on customers of Silicon Valley Bank

Campaign Timeline

2023-03-14T12:05:28Z		First Observed SVB DoucSign Campaign Launched
2023-03-14T15:25:26Z		Last Observed SVB DoucSign Campaign Launched

A look at the HTML file Google Firebase application (na2signing[.]web[.]app)

The included HTML file in the attack sends the user to a WordPress instance that has recursive redirection capability. As of this writing, we are not sure if this specific WordPress installation has been compromised or a plugin was installed to open this redirect location.

<html dir="ltr" class="" lang="en"><head>
    <title>Sign in to your account</title>
    
    <script type="text/javascript">
    window.onload = function() {
        function Redirect (url){
            window.location.href = url;
        }
        var urlParams = new URLSearchParams(window.location.href);
        var e = window.location.href;
        
       
        Redirect("https://eaglelodgealaska[.]com/wp-header.php?url="+e);
    }
</script>

Indicators of Compromise

na2signing[.]web[.]app	Malicious Google Cloudbase Application.
eaglelodgealaska[.]com	Possibly compromised WordPress website or an open redirect.

*[.]kirklandellis[.]net		Attacker Controlled Application running on at least docusigning[.]kirklandellis[.]net.

Recommendations

  1. Cloudflare Email Security customers can determine if they have received this campaign in their dashboard with the following search terms:

    SH_6a73a08e46058f0ff78784f63927446d875e7e045ef46a3cb7fc00eb8840f6f0

    Customers can also track IOCs related to this campaign through our Threat Indicators API. Any updated IOCs will be continually pushed to the relevant API endpoints.

  2. Ensure that you have appropriate DMARC policy enforcement for inbound messages. Cloudflare recommends [p = quarantine] for any DMARC failures on incoming messages at a minimum. SVB’s DMARC records [v=DMARC1; p=reject; pct=100] explicitly state rejecting any messages that impersonate their brand and are not being sent from SVB’s list of designated and verified senders. Cloudflare Email Security customers will automatically get this enforcement based on SVB’s published DMARC records. For other domains, or to apply broader DMARC based policies on all inbound messages, Cloudflare recommends adhering to ‘Enhanced Sender Verification’ policies across all inbound emails within their Cloudflare Area 1 dashboard.

  3. Cloudflare Gateway customers are automatically protected against these malicious URLs and domains. Customers can check their logs for these specific IOCs to determine if their organization had any traffic to these sites.

  4. Work with your phishing awareness and training providers to deploy SVB-themed phishing simulations for your end users, if they haven’t done so already.

  5. Encourage your end users to be vigilant about any ACH (Automated Clearing House) or SWIFT (Society for Worldwide Interbank Financial Telecommunication) related messages. ACH & SWIFT are systems which financial institutions use for electronic funds transfers between entities. Given its large scale prevalence, ACH & SWIFT phish are frequent tactics leveraged by threat actors to redirect payments to themselves. While we haven’t seen any large scale ACH campaigns utilizing the SVB brand over the past few days, it doesn’t mean they are not being planned or are imminent. Here are a few example subject lines to be aware of, that we have seen in similar payment fraud campaigns:

    “We’ve changed our bank details”
    “Updated Bank Account Information”
    “YOUR URGENT ACTION IS NEEDED –
    Important – Bank account details change”
    “Important – Bank account details change”
    “Financial Institution Change Notice”

  6. Stay vigilant against look-alike or cousin domains that could pop up in your email and web traffic associated with SVB. Cloudflare customers have in-built new domain controls within their email & web traffic which would prevent anomalous activity coming from these new domains from getting through.

  7. Ensure any public facing web applications are always patched to the latest versions and run a modern Web Application Firewall service in front of your applications. The campaign mentioned above took advantage of WordPress, which is frequently used by threat actors for their phishing sites. If you’re using the Cloudflare WAF, you can be automatically protected from third party CVEs before you even know about them. Having an effective WAF is critical to preventing threat actors from taking over your public Web presence and using it as part of a phishing campaign, SVB-themed or otherwise.

Staying ahead

Cloudforce One (Cloudflare’s threat operations team) proactively monitors emerging campaigns in their formative stages and publishes advisories and detection model updates to ensure our customers are protected. While this specific campaign is focused on SVB, the tactics seen are no different to other similar campaigns that our global network sees every day and automatically stops them before it impacts our customers.

Having a blend of strong technical controls across multiple communication channels along with a trained and vigilant workforce that is aware of the dangers posed by digital communications is crucial to stopping these attacks from going through.

Learn more about how Cloudflare can help in your own journey towards comprehensive phishing protection by using our Zero Trust services and reach out for a complimentary assessment today.

Role-based access control in Amazon OpenSearch Service via SAML integration with AWS IAM Identity Center

Post Syndicated from Scott Chang original https://aws.amazon.com/blogs/big-data/role-based-access-control-in-amazon-opensearch-service-via-saml-integration-with-aws-iam-identity-center/

Amazon OpenSearch Service is a managed service that makes it simple to secure, deploy, and operate OpenSearch clusters at scale in the AWS Cloud. AWS IAM Identity Center (successor to AWS Single Sign-On) helps you securely create or connect your workforce identities and manage their access centrally across AWS accounts and applications. To build a strong least-privilege security posture, customers also wanted fine-grained access control to manage dashboard permission by user role. In this post, we demonstrate a step-by-step procedure to implement IAM Identity Center to OpenSearch Service via native SAML integration, and configure role-based access control in OpenSearch Dashboards by using group attributes in IAM Identity Center. You can follow the steps in this post to achieve both authentication and authorization for OpenSearch Service based on the groups configured in IAM Identity Center.

Solution overview

Let’s review how to map users and groups in IAM Identity Center to OpenSearch Service security roles. Backend roles in OpenSearch Service are used to map external identities or attributes of workgroups to pre-defined OpenSearch Service security roles.

The following diagram shows the solution architecture. Create two groups, assign a user to each group and edit attribute mappings in IAM Identity Center. If you have integrated IAM Identity Center with your Identity Provider (IdP), you can use existing users and groups mapped to your IdP for this test. The solution uses two roles: all_access for administrators, and alerting_full_access for developers who are only allowed to manage OpenSearch Service alerts. You can set up backend role mapping in OpenSearch Dashboards by group ID. Based on the following diagram, you can map the role all_access to the group Admin, and alerting_full_access to Developer. User janedoe is in the group Admin, and user johnstiles is in the group Developer.

Then you will log in as each user to verify the access control by looking at the different dashboard views.

Let’s get started!

Prerequisites

Complete the following prerequisite steps:

  1. Have an AWS account.
  2. Have an Amazon OpenSearch Service domain.
  3. Enable IAM Identity Center in the same Region as the OpenSearch Service domain.
  4. Test your users in IAM Identity Center (to create users, refer to Add users).

Enable SAML in Amazon OpenSearch Service and copy SAML parameters

To configure SAML in OpenSearch Service, complete the following steps:

  1. On the OpenSearch Service console, choose Domains in the navigation pane.
  2. Choose your domain.
  3. On the Security configuration tab, confirm that Fine-grained access control is enabled.
  4. On the Actions menu, choose Edit security configuration.
  5. Select Enable SAML authentication.

You can also configure SAML during domain creation if you are creating a new OpenSearch domain. For more information, refer to SAML authentication for OpenSearch Dashboards.

  1. Copy the values for Service provider entity ID and IdP-Initiated SSO URL.

Create a SAML application in IAM Identity Center

To create a SAML application in IAM Identity Center, complete the following steps:

  1. On the IAM Identity Center console, choose Applications in the navigation pane.
  2. Choose Add application.
  3. Select Add customer SAML 2.0 application, then choose Next.
  4. Enter your application name for Display name.
  5. Under IAM Identity Center metadata, choose Download to download the SAML metadata file.
  6. Under Application metadata, select Manually type your metadata values.
  7. For Application ACS URL, enter the IdP-initiated URL you copied earlier.
  8. For Application SAML audience, enter the service provider entity ID you copied earlier.
  9. Choose Submit.
  10. On the Actions menu, choose Edit attribute mappings.
  11. Create attributes and map the following values:
    1. Subject map to ${user:email}, the format is emailAddress.
    2. Role map to ${user:groups}, the format is unspecified.
  12. Choose Save changes.
  13. On the IAM Identity Center console, choose Groups in the navigation pane.
  14. Create two groups: Developer and Admin.
  15. Assign user janedoe to the group Admin.
  16. Assign user johnstiles to the group Developer.
  17. Open the Admin group and copy the group ID.

Finish SAML configuration and map the SAML primary backend role

To complete your SAML configuration and map the SAML primary backend role, complete the following steps:

  1. On the OpenSearch Service console, choose Domains in the navigation pane.
  2. Open your domain and choose Edit security configuration.
  3. Under SAML authentication for OpenSearch Dashboards/Kibana, for Import IdP metadata, choose Import from XML file.
  4. Upload the IdP metadata downloaded from the IAM Identity Center metadata file.

The IdP entity ID will be auto populated.

  1. Under SAML master backend role, enter the group ID of the Admin group you copied earlier.
  2. For Roles key, enter Role for the SAML assertion.

This is because we defined and mapped Role to ${user:groups} as a SAML attribute in IAM Identity Center.

  1. Choose Save changes.

Configure backend role mapping for the Developer group

You have completely integrated IAM Identity Center with OpenSearch Service and mapped the Admin group as the primary role (all_access) in OpenSearch Service. Now you will log in to OpenSearch Dashboards as Admin and configure mapping for the Developer group.

There are two ways to log in to OpenSearch Dashboards:

  • OpenSearch Dashboards URL – On the OpenSearch Service console, navigate to your domain and choose the Dashboards URL under General Information. (For example, https://opensearch-domain-name-random-keys.us-west-2.es.amazonaws.com/_dashboards)
  • AWS access portal URL – On the IAM Identity Center console, choose Dashboard in the navigation pane and choose the access portal URL under Settings summary. (For example, https://d-1234567abc.awsapps.com/start)

Complete the following steps:

  1. Log in as the user in the Admin group (janedoe).
  2. Choose the tile for your OpenSearch Service application to be redirected to OpenSearch Dashboards.
  3. Choose the menu icon, then choose Security, Roles.
  4. Choose the alerting_full_access role and on the Mapped users tab, choose Manage mapping.
  5. For Backend roles, enter the group ID of Developer.
  6. Choose Map to apply the change.

Now you have successfully mapped the Developer group to the alerting_full_access role in OpenSearch Service.

Verify permissions

To verify permissions, complete the following steps:

  1. Log out of the Admin account in OpenSearch Service as log in as a Developer user.
  2. Choose the OpenSearch Service application tile to be redirected to OpenSearch Dashboards.

You can see there are only alerting related features available on the drop-down menu. This Developer user can’t see all of the Admin features, such as Security.

Clean up

After you test the solution, remember to delete all of the resources you created to avoid incurring future charges:

  1. Delete your Amazon OpenSearch Service domain.
  2. Delete the SAML application, users, and groups in IAM Identity Center.

Conclusion

In the post, we walked through a solution of how to map roles in Amazon OpenSearch Service to groups in IAM Identity Center by using SAML attributes to achieve role-based access control for accessing OpenSearch Dashboards. We connected IAM Identity Center users to OpenSearch Dashboards, and also mapped predefined OpenSearch Service security roles to IAM Identity Center groups based on group attributes. This makes it easier to manage permissions without updating the mapping when new users belonging to the same workgroup want to log in to OpenSearch Dashboards. You can follow the same procedure to provide fine-grained access to workgroups based on team functions or compliance requirements.


About the Authors

Scott Chang is a Solution Architecture at AWS based in San Francisco. He has over 14 years of hands-on experience in Networking also familiar with Security and Site Reliability Engineering. He works with one of major strategic customers in west region to design highly scalable, innovative and secure cloud solutions.

Muthu Pitchaimani is a Search Specialist with Amazon OpenSearch service. He builds large scale search applications and solutions. Muthu is interested in the topics of networking and security and is based out of Austin, Texas

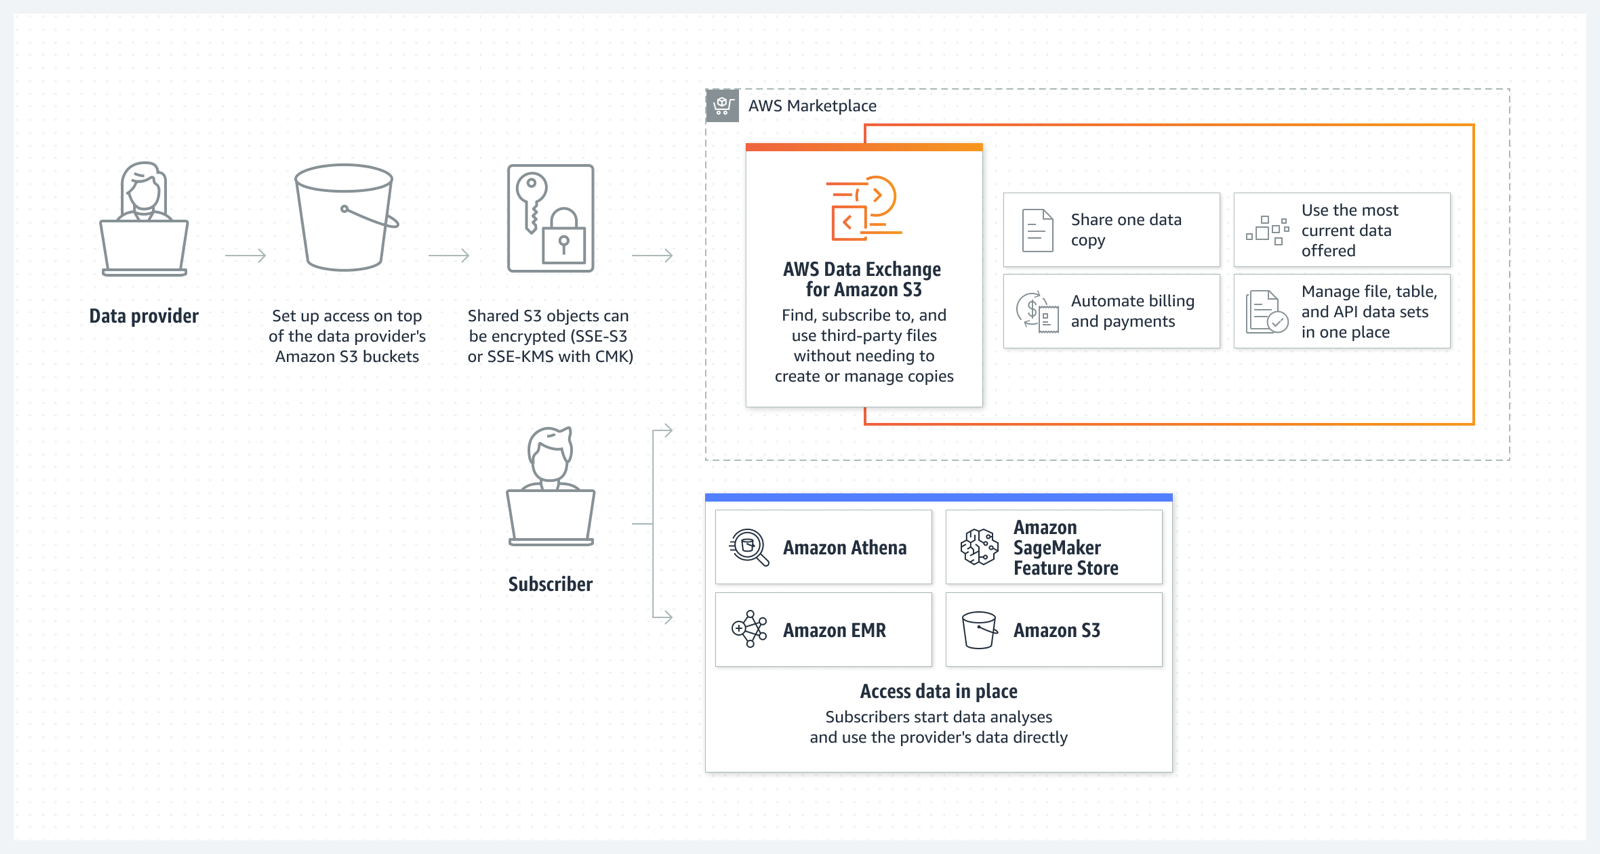
Celebrate Amazon S3’s 17th birthday at AWS Pi Day 2023

Post Syndicated from Sébastien Stormacq original https://aws.amazon.com/blogs/aws/celebrate-amazon-s3s-17th-birthday-at-aws-pi-day-2023/

AWS Pi Day 2023 is live today starting at 13:00 PDT; join us on the AWS on Air channel on Twitch.

On this day 17 years ago, we launched a very simple object storage service. It allowed developers to create, list, and delete private storage spaces (known as buckets), upload and download files, and manage their access permissions. The service was available only through a REST and SOAP API. It was designed to provide highly durable data storage with 99.999999999 percent data durability (that’s 11 nines!).

Fast forward to 2023, Amazon Simple Storage Service (Amazon S3) holds more than 280 trillion objects and averages over 100 million requests per second. To protect data integrity, Amazon S3 performs over four billion checksum computations per second. Over the years, we added many capabilities, such as a range of storage classes, to store your colder data cost effectively. Every day, you restore on average more than 1 petabyte from the S3 Glacier Flexible Retrieval and S3 Glacier Deep Archive storage classes. Since launch, you have saved $1 billion from using Amazon S3 Intelligent-Tiering. In 2015, we added the possibility of replicating your data across Regions. Every week, Amazon S3 Replication moves more than 100 petabytes of data. Amazon S3 is also at the core of hundreds of thousands of data lakes. It also has become a critical component of a growing ecosystem of serverless applications. Every day, Amazon S3 sends over 125 billion event notifications to serverless applications. Altogether, Amazon S3 is helping people around the world securely store and extract value from their data.

AWS Pi Day 2023 Small

To celebrate Amazon S3‘s birthday AWS is hosting the AWS Pi Day event for the third consecutive year. This live online event starts at 13:00 PDT today (March 14, 2023) on the AWS On Air channel on Twitch and will feature four hours of fresh educational content from AWS experts. We will discuss not only Amazon S3 best practices, we will also dive into the latest innovations across AWS data services, from storage to analytics and AI/ML. Tune in to learn how to get the most out of your data by making it more secure, available, accessible, and connected, and to help you respond to rapid growth and changing demand. You will also learn how to optimize your data costs, automate your cost savings, eliminate operational complexity, and get new insights from your data. Have a look at the full agenda on the registration page.

At AWS, we innovate on your behalf. During the last few weeks, we announced a 99.99 percent SLA for Amazon MemoryDB for Redis, enhanced I/O multiplexing for Amazon ElastiCache for Redis, and encryption by default for new objects on Amazon S3.

But we are not stopping there, and today we take the occasion of this celebration to announce seven new capabilities across our data services.

Mountpoint for Amazon S3 (alpha release): an open-source file client for Amazon S3
Mountpoint for Amazon S3 is an open-source file client for Amazon S3 that you can install on your compute instance. It translates local file storage API calls to REST API calls on objects in Amazon S3. When using Mountpoint for Amazon S3, data lake applications that access objects using file APIs can achieve high single-instance transfer rates, saving on compute costs.

You can get started with Mountpoint for Amazon S3 by mounting an Amazon S3 bucket at a local mount point on your compute instance. Once mounted, applications read objects as files available locally. Mountpoint for Amazon S3 supports sequential and random read operations on existing S3 objects. It is available to download for Linux operating systems as an alpha release and is not yet intended for production workloads. Instead, we want to collect your feedback early and incorporate your input into the design and implementation. To get started, visit the Mountpoint for Amazon S3 GitHub repo, read the technical launch blog, and share your feedback.

Now Generally Available: AWS Data Exchange for Amazon S3
AWS Data Exchange for Amazon S3 enables you to easily find, subscribe to, and use third-party data files for faster time to insight, storage cost optimization, simplified data licensing management, and more. Data Exchange subscribers can directly use files from data providers’ Amazon S3 buckets for their analysis with AWS services without needing to create or manage copies to their account. Data providers can license in-place access to data hosted in their Amazon S3 buckets.

To learn more about how data providers can simplify and scale access management to multiple data subscribers, you can read this blog.

AWS Data Exchange for S3

Amazon S3 Multi-Region Access Points now support replicated datasets that span multiple AWS accounts
We launched Amazon S3 Multi-Region Access Points in September 2021. We added failover control in November 2022. Amazon S3 Multi-Region Access Points now support datasets that are replicated across multiple AWS accounts. Cross-account Multi-Region Access Points simplify object storage access for applications that span both AWS Regions and accounts, avoiding the need for complex request routing logic in your application. They provide a single global endpoint for your multi-Region applications and dynamically route S3 requests based on policies that you define. This helps you to easily implement multi-Region resilience, latency-based routing, and active/passive failover, even when your data is stored in multiple AWS accounts.

You can learn more about S3 Multi-Region Access Points on the Amazon S3 FAQs.

Aliases for S3 Object Lambda Access Points as CloudFront origin
Amazon S3 Object Lambda, launched in March 2021, lets you add your own code to S3 GET, HEAD, and LIST API requests to modify data as it is returned to an application. With today’s launch of aliases for S3 Object Lambda Access Points any application that requires an S3 bucket name can easily present different views of data depending on the requester. You can now use an S3 Object Lambda Access Point alias as an origin for your Amazon CloudFront distribution to modify the data requested. For example, you can dynamically transform an image depending on the device that a user is visiting from, such as a desktop or a smartphone.

If you want to learn more, my colleague Danilo wrote a blog post with more details and code examples.

Simplify private connectivity from on-premises networks
Amazon Virtual Private Cloud (Amazon VPC) interface endpoints for Amazon S3 now offer private DNS options that can help you more easily route Amazon S3 requests to the lowest-cost endpoint in your VPC. With private DNS for Amazon S3, your on-premises applications can use AWS PrivateLink to access Amazon S3 over an interface endpoint, while requests from your in-VPC applications access Amazon S3 using gateway endpoints. Routing requests like this helps you take advantage of the lowest-cost private network path without having to make code or configuration changes to your clients.

S3 private connectivity

You can learn more on the AWS PrivateLink for Amazon S3 documentation.

Local Amazon S3 Replication on Outposts
Amazon S3 on Outposts now supports S3 replication on Outposts. This extends S3’s fully managed approach to replication to S3 on Outposts buckets. It helps you meet your data residency and data redundancy requirements. With local S3 Replication on Outposts, you can create and configure replication rules to automatically replicate your S3 objects to another Outpost or to another bucket on the same Outpost. During replication, your S3 on Outposts objects are always sent over your local gateway, and objects do not travel back to the AWS Region. S3 Replication on Outposts provides an easy and flexible way to automatically replicate data within a specific data perimeter to address your data redundancy and compliance requirements.

Amazon OpenSearch Security Analytics
The new Amazon OpenSearch Service’s security analytics capability enables your Security Operations (SecOps) teams to detect potential threats quickly while having the tools to help with security investigations on historical data—all with lower data storage costs. Like many other advanced capabilities of Amazon OpenSearch Service, there is no additional charge for security analytics.

You can learn more about Amazon OpenSearch security analytics by reading this blog post.

Join Us Online Today
You will learn more about these launches and about AWS data services in general. We have also prepared some live demos. We designed the AWS Pi Day event for system administrators, engineers, developers, and architects. Our sessions will bring you the latest and greatest information on storage, security, backup, archiving, training and certification, and more.

And to dive deeper, get Pi Day started early by attending AWS Innovate: Data and AI/ML Edition to learn about cutting-edge machine learning tools, strategies for building future-proof applications, and making data-driven decisions for your organization. Don’t miss Swami Sivasubramanian‘s keynote, starting at 9:00 PDT.

Join us today on the AWS Pi Day live stream. Kevin Miller, VP and GM of Amazon S3, will kick off the event with a keynote at 13:00 PDT.

See you there!

— seb

Microsoft Defender for Cloud Management Port Exposure Confusion

Post Syndicated from Tod Beardsley original https://blog.rapid7.com/2023/03/14/microsoft-defender-for-cloud-management-port-exposure-confusion/

Microsoft Defender for Cloud Management Port Exposure Confusion

Prior to March 9, 2023, Microsoft Defender for Cloud incorrectly marked some Azure virtual machines as having secured management ports including SSH (port 22/TCP), RDP (port 3389/TCP) and WINRM (port 5985/TCP), when in fact one or more of these ports were exposed to the internet. This occured when the Network Security Group (NSG) associated with the virtual machine contained a rule that allowed access to one of these ports from the IPv4 range “0.0.0.0/0”. Defender for Cloud would only detect an open management port if the source in the port rule is set to the literal alias of “Any”. Although the CIDR-notated network of "/0" is often treated as synonymous with "Any," they are not equivalent in Defender for Cloud’s logic.

Note that as of this writing, the same issue appears when using the IPv6 range “::/0” as a synonym for "any" and Microsoft has not yet fixed this version of the vulnerability.

Product Description

Microsoft Defender for Cloud is a cloud security posture management (CSPM) solution that provides several security capabilities, including the ability to detect misconfigurations in Azure and multi-cloud environments. Defender for Cloud is described in detail at the vendor’s website.

Security groups are a concept that exists in both Azure and Amazon Web Services (AWS) cloud environments. Similar to a firewall, a security group allows you to create rules that limit what IP addresses/ranges can access which ports on one or more virtual machines in the cloud environment.

Credit

This issue was discovered by Aaron Sawitsky, Senior Manager for Cloud Product Integrations at Rapid7. It is being disclosed in accordance with Rapid7’s vulnerability disclosure policy.

Exploitation

If an Azure Virtual Machine is associated with a Network Security Group with “management ports” such as RDP (Remote Desktop Protocol on port 3389/TCP) or SSH (Secure Shell protocol on port 22/TCP) exposed to the "Any" pseudo-class for "Source," Microsoft Defender for Cloud will create a security recommendation to highlight that the management port is open to the internet, which allows an administrator to easily recognize that there is a virtual machine in their environment with one or more over-exposed server management ports.

However, prior to March 9th, if the Network Security Group was instead configured such that a “management port” like RDP or SSH was exposed to “0.0.0.0/0,” as a source (which is the entire IPv4 range of all possible addresses) no security recommendation was created and the configuration was incorrectly marked as “Healthy.”

The effect is demonstrated in the screenshots below:

Microsoft Defender for Cloud Management Port Exposure Confusion

Because of this network scope confusion, Azure users can easily and accidentally expose management ports to the entire internet and evade detection by Defender for Cloud.

We suspect that other Defender for Cloud features that check for the "any-ness" of ingress tests are similarly affected, but we have not comprehensively tested for other manifestations of this issue.

Impact

We can imagine two cases where this unexpected behavior in Defender for Cloud could be useful for attackers. First, it’s likely that administrators are unaware of any practical semantic difference between "Any" and "0.0.0.0/0" or “::/0” since these terms are often used interchangeably in other networking products, most notably, as when configuring AWS Security Groups. As a result, this misconfiguration could be accidentally applied by a legitimate administrator, but remain undetected by the person or process responsible for monitoring Defender for Cloud security recommendations. This is the most likely scenario most administrators will face.

More maliciously, an attacker who has already compromised a virtual Azure-hosted machine could leverage this confusion to avoid post-exploit detection by the Defender for Cloud. This makes repeated, post-exploit access from several different sources much easier for more sophisticated attackers. In this case, the "attacker" will often be an insider who is merely subverting their own IT security organization for ostensibly virtuous, just-get-it-done reasons, such as testing a configuration in production, but forgetting to re-limit the exposure.

Note that more exotic combinations of subnets could be used to achieve the same effect; for example, an administrator could define "0.0.0.0/1" and "128.0.0.1/1" which would have exactly the same effect as one "0.0.0.0/0" source rule. Or, even more cleverly, define a set of subnets that adds up to "almost any," which would be good enough for a thoughtful attacker to ensure continued, un-alerted exposure. However, this kind of configuration is extremely unlikely to be implemented by accident (as described in the first case), and thus, is almost certainly beyond the reasonable scope of the Defender for Cloud use case. After all, Defender for Cloud is designed to catch common misconfigurations, and not necessarily an intentionally confusing configuration.

Remediation

Since Defender for Cloud is a cloud-based solution, users should not have to do anything special to enjoy the benefits of Microsoft’s update. With that said, customers should remember that the update has not resolved the issue when using the IPV6 range ::/0 as a synonym for “any.” As a result, customers should search their Azure environments for any Security Groups configured to allow ingress from a source of “::/0” and seriously consider reconfiguring these rules to be more restrictive. In addition, customers should regularly subject their cloud infrastructure to auditing and penetration tests to verify that their CSPM is actually catching common misconfigurations. We have already validated that this issue does not impact Rapid7’s InsightCloudSec CSPM solution. In addition, Defender for Cloud customers who have previously used the "/0" CIDR notation in their security group rules should review access logs to ensure that malicious actors were not evading the presumed detection capabilities provided by Defender for Cloud.

Disclosure Timeline

January 2023: Issue discovered by Rapid7 cloud security researcher Aaron Sawitsky
Wed, Jan 11, 2023: Initial disclosure to Microsoft
Thu, Jan 12, 2023: Details explained further and validated by the vendor
Mon, Feb 6, 2023: Fix planned by the vendor
Thu, Mar 9, 2023: Fix for "0.0.0.0/0" confirmed by Rapid7
Tue, Mar 14, 2023: This disclosure

Upcoming Speaking Engagements

Post Syndicated from Schneier.com Webmaster original https://www.schneier.com/blog/archives/2023/03/upcoming-speaking-engagements-28.html

This is a current list of where and when I am scheduled to speak:

  • I’m speaking on “How to Reclaim Power in the Digital World” at EPFL in Lausanne, Switzerland, on Thursday, March 16, 2023, at 5:30 PM CET.
  • I’ll be discussing my new book A Hacker’s Mind: How the Powerful Bend Society’s Rules at Harvard Science Center in Cambridge, Massachusetts, USA, on Friday, March 31, 2023, at 6:00 PM EDT.
  • I’ll be discussing my book A Hacker’s Mind with Julia Angwin at the Ford Foundation Center for Social Justice in New York City, on Thursday, April 6, 2023, at 6:30 PM EDT. Register here
  • I’m speaking at IT-S Now 2023 in Vienna, Austria, on June 2, 2023, at 8:30 AM CEST.

The list is maintained on this page.

Identify and remediate security threats to your business using security analytics with Amazon OpenSearch Service

Post Syndicated from Kevin Fallis original https://aws.amazon.com/blogs/big-data/identify-and-remediate-security-threats-to-your-business-using-security-analytics-with-amazon-opensearch-service/

Recently, one of the largest wireless carriers in North America revealed that hackers compromised a database of its customer information through unauthorized use of an API and acquired the personal details of millions of individuals, including names, addresses, phone numbers, and account numbers. Once identified, the company halted the malicious activity. However, investigations indicated that the data breach likely occurred months prior to being detected.

With the ever-increasing volume of data that organizations store in the cloud, malicious threats to their business sensitive data and resources will continue to grow alongside their online activity. Adversaries, also known as attackers, continue to use a variety of techniques to breach an organization’s security and compromise their systems, which can cause significant financial losses or damage to reputation or have legal consequences for the affected organization. To mitigate the damage caused, it is critically important for organizations to protect themselves by implementing various security measures and deploying tools to detect and respond to security threats. By being proactive, organizations can significantly reduce the risk of being victimized by cyber adversaries.

Amazon OpenSearch Service is a fully managed and scalable log analytics framework that you can use to ingest, store, and visualize data. You can use OpenSearch Service for a diverse set of data workloads including healthcare data, financial transactions information, application performance data, observability data, and much more. This managed service is valued for its ingest performance, scalability, low query latency, and its ability to analyze large datasets.

Security analytics with OpenSearch Service

Today, OpenSearch Service announces OpenSearch-powered security analytics, which includes features to monitor, analyze, and respond to potential security threats to your critical infrastructure. In this post, we discuss these new features and how to identify and remediate security threats.

Security analytics provide real-time visibility into potential threats across your infrastructure, enabling you to respond to security incidents quickly, thereby reducing the impact of any security breaches. It can also help you meet regulatory compliance requirements and improve your overall security posture.

Security analytics with OpenSearch is designed to gain visibility into a company’s infrastructure, monitor for anomalous activity, help detect potential security threats in real time, and trigger alerts to pre-configured destinations. You can monitor for malicious activity from your security event logs by continuously evaluating out-of-the-box security rules, and review auto generated security findings to aid your investigation. In addition, security analytics can generate automated alerts and send to a preconfigured destination of your choice such as Slack or email.

Security analytics is powered by the open-source OpenSearch project and deployed on OpenSearch Service with OpenSearch version 2.5 or higher. It includes the following key features:

  • Out-of-the-box support for over 2,200 open-source Sigma security rules
  • Support for log sources such as Windows, NetFlow, AWS CloudTrail, DNS, AD/LDAP, and more
  • Detectors that auto generate findings based on the Sigma rules
  • Automated alerts sent to preconfigured destinations
  • A rules editor to create new custom rules or modify existing rules
  • Visualizations to summarize findings and alerts trends

Sigma rules

Sigma is a generic signature format, expressed using YAML (yet another markup language), to describe significant events that occur in your logs in a simple and straightforward way. The format is portable across different SIEM implementations and fosters a community of threat hunters, so that you don’t have to reinvent the wheel if you change your SIEM implementation.

An example of a simple rule to detect the run of C:\Windows\System32\rundll32.exe, one of the most commonly used methods for launching malicious code on a Windows platform, could be the following YAML configuration:

title: Rundll32 execution
description: Detects a rundll32.exe execution
references:
      - https://attack.mitre.org/techniques/T1218/011/
author: Captain Threathunter
date: 2023/03/05
logsource:
    category: process_creation
    product: windows
detection:
    selection:
        winlog-event_data-ProcessName: 'C:\Windows\System32\rundll32.exe'
    condition: selection
level: high
status: test

After you import this rule into the security analytics rules repository and enable it with your detector, it auto generates a security finding when the preceding condition matches an incoming event log.

Security analytics components and concepts

The security analytics offering includes a number of tools and features elemental to its operation. The major components that comprise the plugin are summarized in the following sections.

Log types

OpenSearch supports several types of logs and provides out-of-the-box mappings for each. The log type is specified during the creation of a detector and includes the ability to customize field mappings for that detector. For a log type selected in a detector, security analytics automatically enables a relevant set of rules that run at the configured interval.

Detectors

Detectors are core components that you configure to identify a range of cybersecurity threats for a log type, across your data indexes. Detectors use custom rules and pre-packaged Sigma rules to evaluate events occurring in the system, automatically generating security findings from these events.

Rules

Rules, or threat detection rules, define the conditions applied to ingested log data to identify a security event. Security analytics provides prepackaged, open-source Sigma rules to detect common threats from your logs. Security analytics also supports importing, creating, and customizing rules to meet your requirements. Many rules are also mapped to an ever-growing knowledge base of adversary tactics and techniques maintained by the MITRE ATT&CK organization. You can take advantage of these options using either OpenSearch Dashboards or the APIs.

Findings

Findings are generated every time a detector matches a rule with a log event. Findings don’t necessarily point to imminent threats within the system, but they isolate an event of interest. Because they represent the result of a specific matched condition in a detector rule, findings include a unique combination of select rules, a log type, and a rule severity.

Alerts

When defining a detector, you can specify one or more conditions that trigger an alert. When an event triggers an alert, the system sends a notification to a preferred channel, such as Slack or email. The alert can be triggered when the detector matches one or multiple rules. You can also create a notification message with a customized subject line and message body.

Taking the tool for a test drive

With an understanding of these fundamental concepts, let’s navigate to the security analytics interface in OpenSearch Dashboards. Security analytics also provides a robust set of configuration APIs.

Overview page

After you have logged in to OpenSearch Dashboards and navigate to the security analytics overview page, you’re presented with the current state of the detectors you are monitoring. You can see a summary view comprised of multiple visualizations. The following chart, for example, shows the findings and alerts trend for various log types over a given period of time.

As you scroll down on the summary page, you can review your most recent findings and alerts.

Additionally, you can see a distribution of the most frequently triggered rules across all the active detectors. This can help you detect and investigate different types of malicious activities across log types.

Finally, you can view the status of configured detectors. From this panel, you can also navigate to the create detector workflow.

Creating a detector

In the previous section, we reviewed the overview page. Now, let’s walkthrough the create detector workflow. One of the best things about security analytics are the prepackaged rules. You don’t have to write your own. You can use the prepackaged rules to get up and running quickly! In the following example, we show you how to create a detector with prepackaged rules for your Windows logs.

  1. In the Dashboards navigation pane, under Security Analytics, choose Detectors.
  2. Choose Create Detector to create a new detector.
    1. First, give it a name and a data source to query. The data source can be a pattern or specific index.
    2. When you select a Log type, all matching rules are automatically loaded and enabled by default. In this example, we select Windows logs to help narrow the set of rules applied to this detector. As an optional step, you can choose to selectively enable or disable one or more rules. See an example rules selection panel below.
    3. Specify a schedule to run the rules and select Next.
    4. Configure any necessary field mappings per your rule.
      You have two field mapping sections to optionally review. Default mapped fields provide pre-configured field mappings for the specific log type and enabled rules; you can skip this section unless you need to change the mappings. Additional mappings can be configured in the Pending field mappings section.
  3. Configure the alerts.
    The final step of setting up a detector is to configure the alerts and review your configuration. Note that each detector can generate multiple findings or alerts, and you have the option to customize the alert destination based on a rule match criterion such as severity, tags etc. In this example, we show you how to match a single rule that monitors a password dump to a host file system (QuarksPwDumps Dump File) and send the alert to a destination of your choice.

    1. First, define the name of the alert.
    2. Set up the criticality based on configurations in the rule and select the tags.
    3. Give the alert a severity and select a channel.
      If you need to create a new channel, there is a breadcrumb that sends you to the Notifications feature. You can create additional channels needed.
    4. Review the configuration and Create the detector. Once the detector is active, any time a rule is matched for your incoming logs, it will automatically generate a security finding and alert (if configured).

Configuring custom rules

One of the key capabilities of security analytics is defining custom rules and being able to import rules created by others such as a community of threat hunters.  As mentioned before, security analytics includes over 2200 rules out of the box.  In some cases, you may want to create your own rules.  If you navigate to the Rules page, you have the option to create your own rule.

The rules editor allows you to provide a custom rule that it will automatically validate. Once created, the rule is included in the rules library, helping you to customize your threat hunting needs.

Conclusion

Many organizations struggle with the high cost of commercial alternatives and are required to duplicate their data across multiple systems that generate specific insights. OpenSearch Service security analytics provides an open-source alternative to businesses that seek to reduce the cost of their security products. There is no additional charge for security analytics, and you can customize it to meet the security requirements of your organization. With simple workflows and prepackaged security content, security analytics enables your security teams to detect potential threats quickly while providing the tools to help with security investigations.

To get started, create or upgrade your existing Amazon OpenSearch Service domain to OpenSearch version 2.5. To learn more about security analytics, see documentation.


About the Authors

Kevin Fallis (@AWSCodeWarrior) is an Principal AWS Specialist Search Solutions Architect.  His passion at AWS is to help customers leverage the correct mix of AWS services to achieve success for their business goals. His after-work activities include family, DIY projects, carpentry, playing drums, and all things music.

Jimish Shah is a Senior Product Manager at AWS with 15+ years of experience bringing products to market in log analytics, cybersecurity, and IP video streaming. He’s passionate about launching products that offer delightful customer experiences, and solve complex customer problems. In his free time, he enjoys exploring cafes, hiking, and taking long walks

The collective thoughts of the interwebz