Security updates have been issued by Debian (sphinxsearch), Fedora (chromium and vim), Red Hat (rh-nodejs14-nodejs and rh-nodejs14-nodejs-nodemon), and Ubuntu (apache2 and webkit2gtk).
In July 2021, I launched Miniflare 1.0, a fun, full-featured, fully-local simulator for Workers, on the Cloudflare Workers Discord server. What began as a pull request to the cloudflare-worker-local project has now become an official Cloudflare project and a core part of the Workers ecosystem, being integrated into wrangler 2.0. Today, I’m thrilled to announce the release of the next major version: a more modular, lightweight, and accurate Miniflare 2.0. 🔥
Background: Why Miniflare was created
At the end of 2020, I started to build my first Workers app. Initially I used the then recently released wrangler dev, but found it was taking a few seconds before changes were reflected. While this was still impressive considering it was running on the Workers runtime, I was using Vite to develop the frontend, so I knew a significantly faster developer experience was possible.
I then found cloudflare-worker-local and cloudworker, which were local Workers simulators, but didn’t have support for newer features like Workers Sites. I wanted a magical simulator that would just work ✨ in existing projects, focusing on the developer experience, and — by the reception of Miniflare 1.0 — I wasn’t the only one.
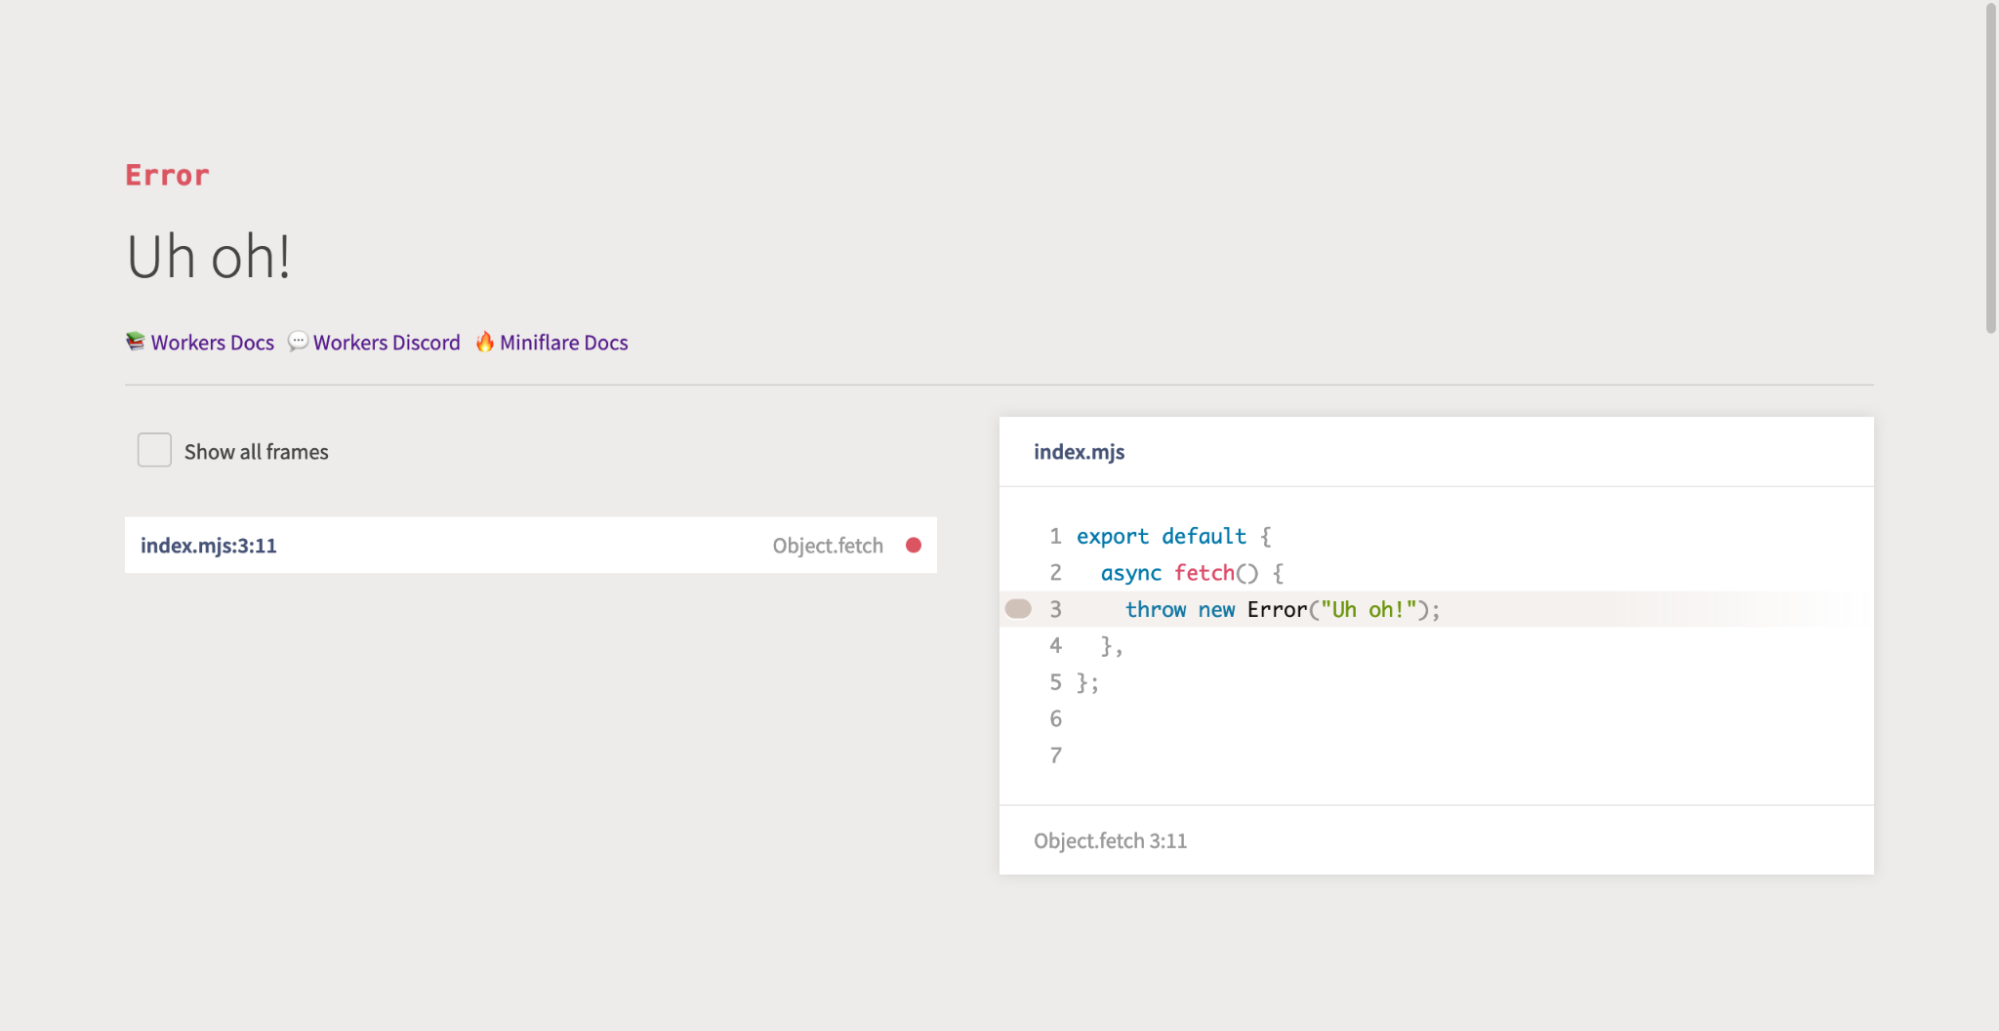
Miniflare 1.0 brought near instant reloads, source map support (so you could see where errors were thrown), cleaner logs (no more { unknown object }s or massive JSON stack traces), a pretty error page that highlighted the cause of the error, step-through debugger support, and more.
Pretty-error page powered by `youch`
The next iteration: What’s new in version 2
In the relatively short time since the launch of Miniflare 1.0 in July, Workers as a platform has improved dramatically. Durable Objects now have input and output gates for ensuring consistency without explicit transactions, Workers has compatibility dates allowing developers to opt-into backwards-incompatible fixes, and you can now write Workers using JavaScript modules.
Miniflare 2 supports all these features and has been completely redesigned with three primary design goals:
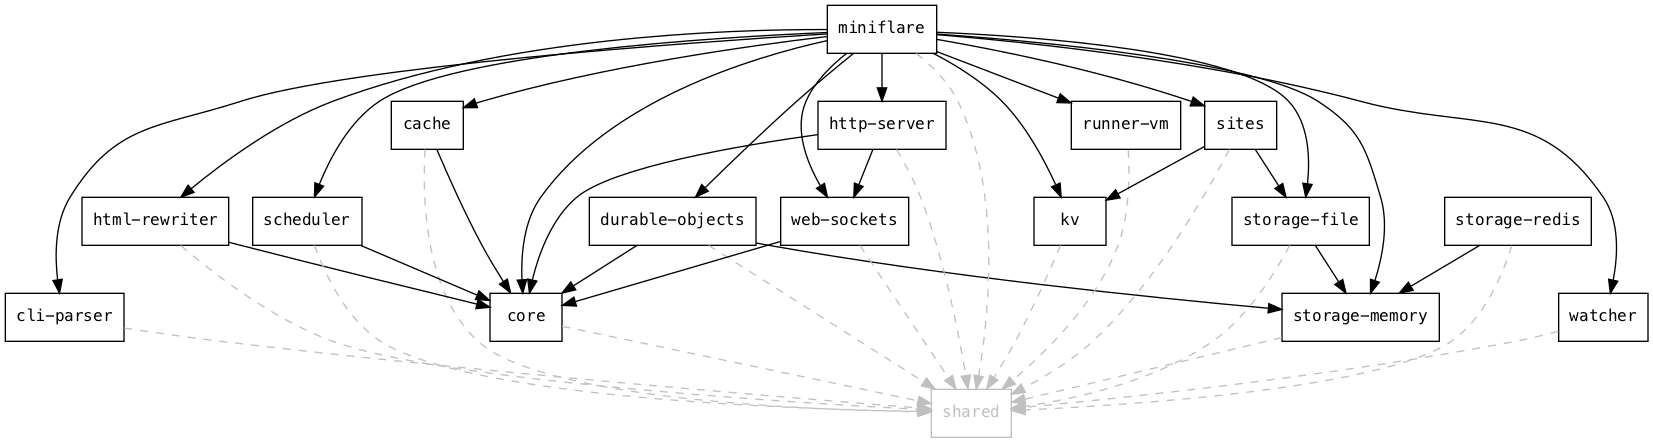
Modular: Miniflare 2 splits Workers components (KV, Durable Objects, etc.) into separate packages (@miniflare/kv, @miniflare/durable-objects, etc.) that you can import on their own for testing. This will also make it easier to add support for new, unreleased features like R2 Storage.
Lightweight: Miniflare 1 included 122 third-party packages with a total install size of 88.3MB. Miniflare 2 reduces this to 23 packages and 6MB by leveraging features included with Node.js 16.
Accurate: Miniflare 2 replicates the quirks and thrown errors of the real Workers runtime, so you’ll know before you deploy if things are going to break. Of course, wrangler dev will always be the most accurate preview, running on the real edge with real data, but Miniflare 2 is really close!
It also adds a new live-reload feature and first-class support for testing with Jest for an even more enjoyable developer experience.
Getting started with local development
As mentioned in the introduction, Miniflare 2.0 is now integrated into wrangler 2.0, so you just need to run npx wrangler@beta dev --local to start a fully-local Worker development server or npx wrangler@beta pages dev to start a Cloudflare Pages Functions server. Make sure you’ve got the latest release of Node.js installed.
However, if you’re using Wrangler 1 or want to customize your local environment, you can install Miniflare standalone. If you’ve got an existing worker with a wrangler.toml file, just run npx miniflare --live-reload to start a live-reloading development server. Miniflare will automatically load configuration like KV namespaces or Durable Object bindings from your wrangler.toml file and secrets from a .env file.
Miniflare is highly configurable. For example, if you want to persist KV data between restarts, include the --kv-persist flag. See the Miniflare docs or run npx miniflare --help for many more options, like running multiple workers or starting an HTTPS server.
If you’ve got a scheduled event handler, you can manually trigger it by visiting http://localhost:8787/cdn-cgi/mf/scheduled in your browser.
Testing for Workers with Jest
Jest is one of the most popular JavaScript testing frameworks, so it made sense to add first-class support for it. Miniflare 2.0 includes a custom test environment that gives your tests access to Workers runtime APIs.
For example, suppose we have the following worker, written using JavaScript modules, that stores the number of times each URL is visited in Workers KV:
Aside: Workers KV is not designed for counters as it’s eventually consistent. In a real worker, you should use Durable Objects. This is just a simple example.
// src/index.mjs
export async function increment(namespace, key) {
  // Get the current count from KV
  const currentValue = await namespace.get(key);
  // Increment the count, defaulting it to 0
  const newValue = parseInt(currentValue ?? "0") + 1;
  // Store and return the new count
  await namespace.put(key, newValue.toString());
  return newValue;
}

export default {
  async fetch(request, env, ctx) {
    // Use the pathname for a key
    const url = new URL(request.url);
    const key = url.pathname;
    // Increment the key
    const value = await increment(env.COUNTER_NAMESPACE, key);
    // Return the new incremented count
    return new Response(`count for ${key} is now ${value}`);
  },
};
# wrangler.toml
kv_namespaces = [
  { binding = "COUNTER_NAMESPACE", id = "..." }
]

[build.upload]
format = "modules"
dist = "src"
main = "./index.mjs"
…we can write unit tests like so:
// test/index.spec.mjs
import worker, { increment } from "../src/index.mjs";

// When using `format = "modules"`, bindings are included in the `env` parameter,
// which we don't have access to in tests. Miniflare therefore provides a custom
// global method to access these.
const { COUNTER_NAMESPACE } = getMiniflareBindings();

test("should increment the count", async () => {
  // Seed the KV namespace
  await COUNTER_NAMESPACE.put("a", "3");

  // Perform the increment
  const newValue = await increment(COUNTER_NAMESPACE, "a");
  const storedValue = await COUNTER_NAMESPACE.get("a");

  // Check the return value of increment
  expect(newValue).toBe(4);
  // Check increment had the side effect of updating KV
  expect(storedValue).toBe("4");
});

test("should return new count", async () => {
  // Note we're using Worker APIs in our test, without importing anything extra
  const request = new Request("http://localhost/a");
  const response = await worker.fetch(request, { COUNTER_NAMESPACE });

  // Each test gets its own isolated storage environment, so the changes to "a"
  // are *undone* automatically. This means at the start of this test, "a"
  // wasn't in COUNTER_NAMESPACE, so it defaulted to 0, and the count is now 1.
  expect(await response.text()).toBe("count for /a is now 1");
});
// jest.config.js
const { defaults } = require("jest-config");

module.exports = {
  testEnvironment: "miniflare", // ✨
  // Tell Jest to look for tests in .mjs files too
  testMatch: [
    "**/__tests__/**/*.?(m)[jt]s?(x)",
    "**/?(*.)+(spec|test).?(m)[tj]s?(x)",
  ],
  moduleFileExtensions: ["mjs", ...defaults.moduleFileExtensions],
};
…and run them with:
# Install dependencies
$ npm install -D jest jest-environment-miniflare
# Run tests with experimental ES modules support
$ NODE_OPTIONS=--experimental-vm-modules npx jest
For more details about the custom test environment and isolated storage, see the Miniflare docs or this example project that also uses TypeScript and Durable Objects.
Not using Jest? Miniflare lets you write your own integration tests with vanilla Node.js or any other test framework. For an example using AVA, see the Miniflare docs or this repository.
How Miniflare works
Let’s now dig deeper into how some interesting parts of Miniflare work.
Miniflare is powered by Node.js, a JavaScript runtime built on Chrome’s V8 JavaScript engine. V8 is the same engine that powers the Cloudflare Workers runtime, but Node and Workers implement different runtime APIs on top of it. To ensure Node’s APIs aren’t visible to users’ worker code and to inject Workers’ APIs, Miniflare uses the Node.js vm module. This lets you run arbitrary code in a custom V8 context.
A core part of Workers are the Request and Response classes. Miniflare gets these from undici, a project written by the Node team to bring fetch to Node. For service workers, we also need a way to addEventListeners and dispatch events using the EventTarget API, which was added in Node 15.
With that we can build a mini-miniflare:
import vm from "vm";
import { Request, Response } from "undici";

// An instance of this class will become the global scope of our Worker,
// extending EventTarget for addEventListener and dispatchEvent
class ServiceWorkerGlobalScope extends EventTarget {
  constructor() {
    super();

    // Add Worker runtime APIs
    this.Request = Request;
    this.Response = Response;

    // Make sure this is bound correctly when EventTarget methods are called
    this.addEventListener = this.addEventListener.bind(this);
    this.removeEventListener = this.removeEventListener.bind(this);
    this.dispatchEvent = this.dispatchEvent.bind(this);
  }
}

// An instance of this class will be passed as the event parameter to "fetch"
// event listeners
class FetchEvent extends Event {
  constructor(type, init) {
    super(type);
    this.request = init.request;
  }

  respondWith(response) {
    this.response = response;
  }
}

// Create a V8 context to run user code in
const globalScope = new ServiceWorkerGlobalScope();
const context = vm.createContext(globalScope);

// Example user worker code, this could be loaded from the file system
const workerCode = `
addEventListener("fetch", (event) => {
  event.respondWith(new Response("Hello mini-miniflare!"));
})
`;
const script = new vm.Script(workerCode);

// Run the user's code, registering the "fetch" event listener
script.runInContext(context);

// Create an example request, this could come from an incoming HTTP request
const request = new Request("http://localhost:8787/");
const event = new FetchEvent("fetch", { request });

// Dispatch the event and log the response
globalScope.dispatchEvent(event);
console.log(await event.response.text()); // Hello mini-miniflare!
Plugins
Dependency graph of the Miniflare monorepo.
There are a lot of Workers runtime APIs, so adding and configuring them all manually as above would be tedious. Therefore, Miniflare 2 has a plugin system that allows each package to export globals and bindings to be included in the sandbox. Options have annotations describing their type, CLI flag, and where to find them in Wrangler configuration files:
@Option({
  // Define type for runtime validation of the CLI flag
  type: OptionType.ARRAY,
  // Use --kv instead of auto-generated --kv-namespace for the CLI flag
  name: "kv",
  // Define -k as an alias
  alias: "k",
  // Displayed in --help
  description: "KV namespace to bind",
  // Where to find this option in wrangler.toml
  fromWrangler: (config) => config.kv_namespaces?.map(({ binding }) => binding),
})
kvNamespaces?: string[];
Durable Objects
Before input and output gates were added, you usually needed to use the transaction() method to ensure consistency:
async function incrementCount() {
  let value;
  await this.storage.transaction(async (txn) => {
    value = await txn.get("count");
    await txn.put("count", value + 1);
  });
  return value;
}
Miniflare implements this using optimistic-concurrency control (OCC). However, input and output gates are now available, so to avoid race conditions when simulating newly-written Durable Object code, Miniflare 2 needed to implement them.
Input gates: While a storage operation is executing, no events shall be delivered to the object except for storage completion events. Any other events will be deferred until such a time as the object is no longer executing JavaScript code and is no longer waiting for any storage operations. We say that these events are waiting for the "input gate" to open.
…we can see input gates need to have two methods, one for closing the gate while a storage operation is running and one for waiting until the input gate is open:
class InputGate {
  async runWithClosed<T>(closure: () => Promise<T>): Promise<T> {
    // 1. Close the input gate
    // 2. Run the closure and store the result
    // 3. Open the input gate
    // 4. Return the result
  }

  async waitForOpen(): Promise<void> {
    // 1. Check if the input gate is open
    // 2. If it is, return
    // 3. Otherwise, wait until it is
  }
}
Each Durable Object has its own InputGate. In the storage implementation, we call runWithClosed to defer other events until the storage operation completes:
class DurableObjectStorage {
  async get<Value>(key: string): Promise<Value | undefined> {
    return this.inputGate.runWithClosed(() => {
      // Get key from storage
    });
  }
}
…and whenever we’re ready to deliver another event, we call waitForOpen:
import { fetch as baseFetch } from "undici";

async function fetch(input, init) {
  const response = await baseFetch(input, init);
  await inputGate.waitForOpen();
  return response;
}
You may have noticed a problem here. Where does inputGate come from in fetch? We only have one global scope for the entire Worker and all its Durable Objects, so we can’t have a fetch per Durable Object InputGate. We also can’t ask the user to pass it around as another parameter to all functions that need it. We need some way of storing it in a context that’s passed around automatically between potentially async functions. For this, we can use another lesser-known Node module, async_hooks, which includes the AsyncLocalStorage class:
import { AsyncLocalStorage } from "async_hooks";

const inputGateStorage = new AsyncLocalStorage<InputGate>();

const inputGate = new InputGate();
await inputGateStorage.run(inputGate, async () => {
  // This closure will run in an async context with inputGate
  await fetch("https://example.com");
});

async function fetch(input: RequestInfo, init: RequestInit): Promise<Response> {
  const response = await baseFetch(input, init);
  // Get the input gate in the current async context
  const inputGate = inputGateStorage.getStore();
  await inputGate.waitForOpen();
  return response;
}
Durable Objects also include a blockConcurrencyWhile(closure) method that defers events until the closure completes. This is exactly the runWithClosed() method:
blockConcurrencyWhile closes the input gate, but fetch won’t return until the input gate is open, so we’re deadlocked! To fix this, we need to make InputGates nested:
class InputGate {
  constructor(private parent?: InputGate) {}

  async runWithClosed<T>(closure: () => Promise<T>): Promise<T> {
    // 1. Close the input gate, *and any parents*
    // 2. *Create a new child input gate with this as its parent*
    const childInputGate = new InputGate(this);
    // 3. Run the closure, *under the child input gate's context*
    // 4. Open the input gate, *and any parents*
    // 5. Return the result
  }
}
Now the input gate outside of blockConcurrencyWhile will be closed, so fetches to the Durable Object will be deferred, but the input gate inside the closure will be open, so the fetch can return.
This glosses over some details, but you can check out the gates implementation for additional context and comments. 🙂
HTMLRewriter
HTMLRewriter is another novel class that allows parsing and transforming HTML streams. In the edge Workers runtime, it’s powered by C-bindings to the lol-html Rust library. Luckily, Ivan Nikulin built WebAssembly bindings for this, so we’re able to use the same library in Node.js.
However, these were missing support for async handlers that allow you to access external resources when rewriting:
The WebAssembly bindings Rust code includes something like:
macro_rules! make_handler {
  ($handler:ident, $JsArgType:ident, $this:ident) => {
    move |arg: &mut _| {
      // `js_arg` here is the `node` parameter from above
      let js_arg = JsValue::from(arg);
      // $handler here is the `element` method from above
      match $handler.call1(&$this, &js_arg) {
        Ok(res) => {
          // Check if this is an async handler
          if let Some(promise) = res.dyn_ref::<JsPromise>() {
            await_promise(promise);
          }
          Ok(())
        }
        Err(e) => ...,
      }
    }
  };
}
The key thing to note here is that the Rust move |...| { ... } closure is synchronous, but handlers can be asynchronous. This is like trying to await a Promise in a non-async function.
To solve this, we use the Asyncify feature of Binaryen, a set of tools for working with WebAssembly modules. Whenever we call await_promise, Asyncify unwinds the current WebAssembly stack into some temporary storage. Then in JavaScript, we await the Promise. Finally, we rewind the stack from the temporary storage to the previous state and continue rewriting where we left off.
As mentioned earlier, Miniflare is now included in wrangler 2.0. Try it out and let us know what you think!
I’d like to thank everyone on the Workers team at Cloudflare for building such an amazing platform and supportive community. Special thanks to anyone who’s contributed to Miniflare, opened issues, given suggestions, or asked questions in the Discord server.
Maybe now I can finish off my original workers project… 😅
Zabbix 6.0 LTS comes packed with many new integrations and templates. As the total number of templates and integrations grows, we plan to make major improvements to our template repository. This will greatly improve the workflow of developing a new community template, submitting template pull requests, following the development process of a template, and much more.
By definition, integrations are connections between systems and applications that work together as a whole to share information and data. In Zabbix, we separate integrations into two types:
Out-of-the-box templates
Templates contain items, triggers, graphs, and other entities that allow you to monitor any device, service, application, and other monitoring endpoints.
Webhook integrations
Webhooks allow you to send the information from Zabbix to any sort of 3rd party system like ITSM or messaging applications.
Where to find the latest integrations?
If you’re installing a fresh Zabbix instance, it will come pre-packaged with the latest set of official templates and webhooks. If you wish to download and import the integrations manually, you can find them in:
What are the benefits of using the official Zabbix integrations for you as a Zabbix user?
Monitor your endpoints in a tested and optimized manner
Monitor a large variety of 3rd party systems
Official templates come with a guarantee of quality and official support
Official templates provide quick deployment of monitoring logic for your monitoring endpoints
Having supported integrations can also be important from the standpoint of a vendor. Having an official Zabbix integration can providemultiple benefits for vendors:
Supported vendors get the ability to engage the Zabbix community
Collaborate with Zabbix and receive additional recognition
Provide higher quality monitoring support by collaborating in the development of the integration
Set higher monitoring standards for your product
Improve your public image
What if I wish to request a new official integration?
There are multiple ways how you can approach a scenario when there is no official integration for a specific product:
Our first step in developing a new template is prioritizing which template should we tackle first. This includes looking at the current IT landscape and deciding which of the components are vastly considered as Essential services. Then, we look at the community requests and the number of votes behind each request. We also continuously work on improving the existing templates and evaluating the priority of the requested improvements. There is also the option to sponsor an integration by contacting our Sales department.
After we prioritize our list, we proceed to development – we do research, talk to community experts, create focus groups and proceed with the development. Once the development is finished, we proceed with validation – this includes internal reviews from the Integrations team as well as giving our colleagues from the Support team the chance to take a look at the newly developed template. Community feedback is also important for us – the feedback regarding the template can be left either in the comments under the specific feature request or in our Suggestions and Feedback forum section.
Community templates
While we pride ourselves on the rapid growth of our integrations team and the pace at which we have been delivering new official templates and integrations, we, of course, can’t instantly develop a template for every vendor and device out there. This is where our community has been of great help to us.
Moving from share.zabbix.com
Previously, if you were to find Zabbix lacking a template or an integration that you require, you would visit share.zabbix.com and look for a community solution to your problem. At this point, we have decided to migrate away from share.zabbix.com since, over the years, we have found it lacking in multiple aspects:
The website was hard to navigate
The underlying platform was outdated
Once uploaded, the templates were rarely maintained
It was hard to collaborate on templates
Lacking standardization – each template could use different naming conventions or metric collection approaches
Zombie templates – templates developed for old versions but never updated along the way.
Community template repository
The new go-to place for community templates will be our Community template repository. The repository will serve as a platform for collaboration. Once uploaded, the templates can be maintained by either the original developer or other community members. The platform will be moderated by the Integrations team, who will also provide feedback on the community templates to ensure a higher quality of the templates and additional validation. The documentation will also be generated for the community templates, containing the contents of each template – this way, you can have a transparent look at the template before downloading it.
The process
Let’s go through the whole process of developing and maintaining a community template.
1. Collaborate
For existing templates – you can start a discussion on Github issues to discuss issues or potential improvements on the template.
You can create a new bug report related to the template
For older community templates – you will be able to take over the maintenance of this template and continue improving it down the line
Develop and publish a new template or an integration
When it comes to community development, Zabbix does provide an official set of guidelines that the developers can follow to ensure that the template uses the official best practice conventions and approaches:
Naming conventions for templates and template entities
A set of best practices helps the community developers to simplify the decision making regarding best template and integration development approaches
Practical and ethical framework for template and integration development
This enables the community developers to follow the same set of development guidelines as the official Zabbix Integrations team
2. Pull request
Once you have decided to make a new integration or modify an existing integration, create a pull request describing the proposed changes and be ready to participate in a discussion related to the proposed set of changes. We will review and moderate the discussion and assist you in ensuring a smooth template development process.
3. Validation
The validation process consists of two parts. First, we will review if the template is valid, can be imported in Zabbix, and is usable by our community members. Next, the Integrations team will check if the template is developed according to the Zabbix standard and suggest any necessary changes.
4. Merge
If the validation process has been passed, we will accept the pull request and merge the integration into the repository. Afterward, the readme file for the integration will be generated. Finally, the template will be added to the template directory, and it will be available for everyone to see and download.
The Templates directory will have a similar structure to what you are used to in share.zabbix.com, so you should feel right at home here. We tried to check and migrate each and every valid template, but if you don’t find your template in the list – simply submit a pull request to us, and we will review it.
The generated Readme file will contain a list of entities included in the template – such as User macros, Template linkages, Discovery rules, Items, and more.
Where can I find the repository?
The Zabbix community template repository can be found in https://github.com/zabbix/community-templates. All you need to participate is a Github account and the willingness to participate in the integration development process.
To report an issue with the template repository or the official integrations, feel free to use our support portal: https://support.zabbix.com/
To report a bug – open a ZBX ticket
To suggest an improvement – open a ZBXNEXT ticket
For any discussions related to the Zabbix integrations, you can use (but are not limited to) the following channels:
Q: What is the workflow for our users that wish for Zabbix to develop new integration for a specific product?
A: We’re actively listening to our community. The best way to voice your request is to look for an existing feature request on https://support.zabbix.com/ and vote on it. If there is no such feature request – feel free to create it and vote on it. Thirdly, you can always contact our sales department and use our integration services to have the required template developed for you.
Q: Where can I see which integrations are currently developed or scheduled for the next release?
A: You can track the development process of a template by following the particular feature request in our support portal. You can also take a look at the official Zabbix roadmap and see what features, fixes, and integrations are currently scheduled for the upcoming Zabbix versions.
В края на миналата година Издателство за поезия „ДА“ публикува сборника „Смъртта още празнува живота“ с избрани стихове на германската поетеса Нели Закс. По този повод с нейния преводач на български Любомир Илиев разговаря Зорница Христова.
В интервюто си за „Култура“ казваш, че Целан не e„от твоята вакса“ и затова не би го превеждал. Какво в Нели Закс усети „свое“?
Въпросното интервю (което всъщност ме запозна с Марин Бодаков) е от 2006 г. и е логично оттогава нещо в представите ми за Паул Целан и Нели Закс да се е променило. Основното обаче остава: двамата са духовни сродници, изпитват на собствения си гръб ужасите на Холокоста и са най-ярките изобличители на „дванайсетте кафяви години“ в поезията. Но и съществено се различават.
Докато у Целан надделява отчаянието, с течение на времето прераснало в параноя (казвал ми го е синът му Ерик, на когото няма как да не вярвам, включително защото е изумително точно копие на баща си!), поезията на Нели Закс, без в никакъв случай да е оптимистична или жизнеутвърждаваща, гледа напред. Колкото и да прелива от страдания и жертви, тази поезия в никакъв случай не е неврастенична – тя не позволява на отчаянието да се превърне в отрицание. За Закс нещата никога не се свеждат до користно самодоволство, у нея липсва и каквото и да било желание за възмездие, макар че обстоятелствата биха я оправдали. Напротив, тя настойчиво призовава „преследваните да не станат преследвачи“. Занимава я друго, далеч по-съществено: как да постъпим с човека, забравил човешкото у себе си, какво да правим с ръцете, създадени за щедрост, а използвани като инструмент за убийство.
Самият аз се прекланям пред Паул Целан, но не крия, че Нели Закс ми е по-близка. А и за разлика от Целан, за когото у нас се знае далеч повече благодарение на многото опити за превод (някои доста добри, други – не съвсем, трети – направо катастрофални), името на Нели Закс – тя също е превеждана, но по-рядко, и поезията ѝ така и не успява да остави съществена следа на българска почва – е известно предимно на статистиците, водещи на отчет лауреатите на Нобелова награда за литература (тя я получава през 1966 г.). Това също натежа в решението ми да я преведа на български.
Смяташ ли, че това я прави по-общочовешка, по-преводима за непреживелите травма?
Несъмнено. И я прави далеч по-малко енигматична, отколкото изглежда на пръв поглед. Да вземем само мотива на всемирното бягство в поезията ѝ: трагическият герой на Нели Закс е едновременно и жертва, и пророк, но пророкът у нея не е някаква изключителна личност. Всеки бежанец е пророк, а всеки човек и на Земята, и във Вселената, е бежанец. Така в поезията на Нели Закс се трансформира библейското изгонване от Рая. Раят е родината, а родината е рай. И това не се поддава на промяна, където и да се намира човек – неслучайно думата „копнеж“ е сред най-често срещаните в стихотворенията ѝ. Това прави нейната поезия особено актуална в наши дни. Бягството е безкрайно и заразително, понеже никой не иска да се вслуша в бежанците – човешкото ухо, уви, е „обрасло с коприва“.
Прочее, най-синтезирано го е казал Ингвар Андершон в словото си при връчването ѝ на Нобеловата литературна награда: „Нели Закс е вестителка на утехата, насочена към всички онези, които изпитват отчаяние от превратностите на човешката съдба.“
И все пак ми е интересно и обратното на общочовешкото, това, което е собствено еврейско и насочено главно към „своите“. Които току-що са преживели колективна травма. Опитвам се да си представя такава поезия след Батак, да речем, предупреждаваща своите да не станат преследвачи. Дали си полюбопитствал как я четат в Израел?
В Израел я ценят много високо. Нещо повече (знам го от първа ръка): когато в началото на 1967 г. Гюнтер Грас иска да посети Израел, негодуванието там е голямо – пропастта между двете страни е още твърде дълбока. Затова и му отказват официално. Намесва се Нели Закс, която пише писмо до Кнесета именно в смисъла на помирението; в крайна сметка Грас заминава за Израел със съгласието на Кнесета.
А това „преследваните да не станат преследвачи“ как се чете?
В същия смисъл: да не забравяме миналото, но да гледаме напред и заедно да изграждаме бъдещето, вместо да прилагаме първобитното правило „око за око, зъб за зъб“.
Да, имах предвид дали има хора, които го съпоставят с военната политика на Израел.
Не съм срещал подобни съпоставки. Но когато през 2012 г. Грас написа стихотворението си „Това, което трябва да се каже“, в което описва Израел като заплаха за световния мир, се надигна старата вълна от негодувание. Не помогнаха уверенията на Грас, че има предвид само правителството на Нетаняху, че не иска нищо друго, освен Израел да живее в мир със съседите си – писателят беше обявен за „персона нон грата“. Е, след година почина, така че забраната да влиза в Израел не бе осъществена на практика.
А всъщност Гюнтер Грас и Нели Закс приятели ли бяха? Много се впечатлих от твоя разказкак той те е запознал с нейната поезия – „и това, което не разбирам, е голямо“.
Онова, което ми е казвал Грас, е напълно достоверно и всъщност една от причините дълго да не смея да я пипна (докато не се намериха Марин и Силвия [Чолева от Издателство за поезия „Да“ – б.р.]…). Но на въпроса ти: Нели Закс не е имала никакви приятели, поне не в обичайния смисъл на думата. За приятелка, доста по-възрастна от нея, смята само Селма Лагерльоф, която така и не вижда след над три десетилетия кореспонденция (Лагерльоф умира месеци преди пристигането на Закс в Швеция). Вглъбена до саможивост, тя изобщо няма отношение към съвременната ѝ литература. За събрат по дух и съдба смята – с основание – Паул Целан, дори го посещава в Париж, но в характерите на двамата явно има непреодолими различия: той гледа назад, тя – напред. Колкото до Грас, поне на две места пътищата им се преплитат. За второто ти казах – застъпничеството на Закс пред Кнесета, довело до разрешението Грас да посети Израел. Първото също е любопитно: като виден член на легендарната „Група 47“, Грас несъмнено има принос през 1967 г. тази група да направи своето „изнесено“ заседание не някъде в Германия, а в Стокхолм в чест на Нели Закс. Не знам подробности, не знам дори дали е присъствала. Малко по-късно групата се разпада.
Всъщност общуването и с Целан, и със Селма Лагерльоф е кореспондентско. А какво според теб я свързва с Лагерльоф, виждаш ли връзка между поезията ѝ и „Сага за Йоста Берлинг“ например? Наскоро у нас излезе „Коларят на смъртта“ – но цялата концепция ми се струва тотално различна. Греша ли?
Не съм чел „Коларят на смъртта“, но си представи уединено живеещото берлинско момиче и наплашената млада жена, която – прехласната именно по „Йоста Берлинг“ – има нужда да сподели с някого мислите си. Признавам, че и при най-дълбоко взиране не откривам литературни влияния от Лагерльоф върху творчеството на Закс (впрочем колкото до първите ѝ стихотворения, посветени на природата, цветенцата, тревичките и т.н., на зряла възраст тя дълго не ще да признае авторството им). Закс вижда в Лагерльоф почти единствената възможност за човешко общуване.
Връщам се към Грас: и от малкото казано от мен за него личи недвусмислено, че високо я ценеше и безкрайно я уважаваше.
С какво помогна четенето на Мартин Бубер за превода ти?
Би било несериозно да претендирам за дълбоки познания за Мартин Бубер, то не би отговаряло и на истината. Но след прочита на стихотворенията на Закс и тяхното тълкуване от именити специалисти ми стана ясно, че без навлизане в хасидизма много неща ще си останат непонятни за мен. Не че разбрах всичко от разсъжденията му, но те наистина ми помогнаха да разшифровам пасажи и цели стихотворения на Закс, които до този момент ми бяха истинска загадка и отчаяно си блъсках главата да ги разтълкувам. А незаобиколим фактор в хасидизма е именно Мартин Бубер, който силно влияе върху израстването на Закс като поетеса. Защото Бубер е известен преди всичко със своята философия на диалога, определяна още като форма на религиозен екзистенциализъм. Тъкмо идеята за диалог е ключова в поезията на Нели Закс.
А според теб възможно ли е такова нещо като колективен диалог – защото у Закс пеят хорове.
Закс следва доста отблизо учението на Бубер, а поне според него явно е възможно: неговата философия на диалога разграничава между отношенията Аз–Ти и Аз–То. Първото е отношението между две личности, второто – между личността и всичко, което е извън нея: света, вещите и др. Това, разбира се, не създава буквална представа за „колективен диалог“, но в творчеството на Закс именно въображаемите хорове я съдържат в себе си.
Има ли нещо в българската литературна традиция, с което може да се свърже този тип диалог? В чий български език чувстваше опора?
Ето тук вече окончателно ще се изложа: поради сравнително слабото познаване на българската литература трябва доста да се поровя, за да ти отговоря. Доколкото хасидизмът е част от мистицизма, ми се ще да спомена Дънов може би – но това по отношение на Бубер, за когото всичко опира до личната връзка с Бог. А иначе, по отношение на Нели Закс, и двамата със Силвия провидяхме – независимо един от друг! – мотиви, срещани у Илко Димитров например.
Финален въпрос – имам два екземпляра от „Смъртта още празнува живота“, искам да подаря единия на приятел тук, в България. На какъв човек ще ми препоръчаш да я дам?
На човек, който е съгласен голямата поезия да го стисне трайно за гърлото.
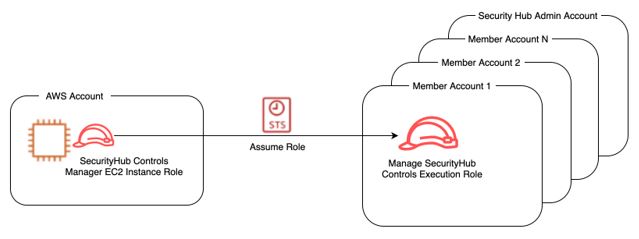
In this blog post, you’ll learn about an automated process for disabling or enabling selected AWS Security Hub controls across multiple accounts and multiple regions. You may already know how to disable Security Hub controls through the Security Hub console, or using the Security Hub update-standards-control API. However, these methods work on a per account and per region basis. If you want to tune your posture by disabling some controls across multiple accounts, this automated approach makes it easier.
The update Security Hub controls script provided in this post uses cross account access to disable or enable several controls across multiple accounts and multiple Regions on an ad hoc basis, without having to maintain resources in each Region. These accounts can be individual accounts where Security Hub is managed independently per account, part of a Security Hub administrator setup, or a combination of these. You will need to execute this script in newly added AWS accounts again to keep the controls status consistent for new accounts.
This blog also describes an alternative solution which automates updating Security Hub controls on a schedule for any new AWS accounts that are added, and keeps the control status in member accounts consistent with the controls status in the Security Hub administrator account. The alternate solution will only work if you use Security Hub administrator setup, and must be deployed on a per Region basis.
Why disable controls?
Security Hub generates findings from continuous checks against a set of rules from supported security standards. These checks provide a readiness score and identify specific accounts and resources that require attention.
It can be useful to turn off security checks for controls that are not relevant to your environment. Disabling irrelevant controls makes it easier to identify the important findings that you can take action on.
Reasons to disable controls
There are several reasons you may choose to disable controls:
Controls for unused services
Controls using global resources
Controls with compensating controls
Unused services
If you are not using the specific AWS service for which a control is enabled, you may want to disable controls that have periodic checks associated with that service.
Note: Periodic checks run automatically every 12 hours, whereas change-triggered checks run when the associated resource changes state. Change-triggered checks do not run if the associated in scope resource does not exist, so you do not have to disable controls that explicitly use change-triggered checks.
For example, SageMaker.1 is a control that has a periodic check and is part of the AWS Foundational Security Best Practices standard. If you do not use Amazon SageMaker in your environment, you can disable this check temporarily. If you disable an unused check and later start using the service in the future, you must enable the check again. You should perform regular analysis of services in use across your AWS Accounts.
Global resources
Global resources, such as AWS Identity and Access Management (IAM), generate findings in each region where you have Security Hub enabled. To focus only on meaningful findings, you can disable controls for global resources in all but one Region. You will have to align the desired region to be the same Region in AWS Config where global recording is enabled. A list of all such controls for each standard are as follows:
You may want to disable a Security Hub control for which a compensating control is in place. For example, the AWS Foundational Security Best Practices control CloudTrail.5 checks to see if AWS CloudTrail is configured to send logs to Amazon CloudWatch logs. You can disable this check if you are sending CloudTrail to another destination, such as Amazon Simple Storage Service (Amazon S3) or partner tools such as a SIEM solution. Another example is CIS 3.x controls. GuardDuty can be considered a compensating control instead of CloudWatch alarms for CIS 3.1, 3.2, 3.3, 3.4, 3.5, 3.6, 3.7, 3.8, 3.9, 3.10, 3.11, 3.12, 3.13, and 3.14
Solution overview:
The update Security Hub controls script shown below is written in Python. It uses AWS SDK for Python (Boto3) to assume a cross account IAM role in the accounts passed in the script, and uses the update-standards-control Security Hub API to enable or disable controls. You must deploy this solution in a single AWS Region.
We will review the prerequisites in the next section to understand the requirements for successfully using this solution. We will then walk through the instructions for deploying this automation through an Amazon Elastic Compute Cloud (Amazon EC2) instance along with examples of how to use the script.
Note: You can also use your local machine (customer device) or AWS Cloudshell if you meet the prerequisites described below.
Prerequisites:
The update Security Hub controls script shown below requires:
An IAM role for cross-account access. You should have an IAM principal able to assume an IAM role in accounts where Security Hub controls needs to be disabled or enabled. This role should have securityhub:UpdateStandardsControlpermission.
Note: If you used the Security Hub multiaccount scripts from awslabs to enable Security Hub for multiple accounts you can use the role provided in the repository for the purpose of this blog as it has the necessary permissions.
Let’s review the arguments the script uses to run successfully. There are both required arguments and optional arguments:
Required arguments
–input-file Path to a CSV file containing a list of the 12 digit AWS account IDs whose controls you want to disable or enable. If you are using Security Hub administrator account, use the list-members API to generate a list of all accounts where security hub is enabled. Store this list in a CSV file, one account ID per line.
–assume-role Role name of the execution role in each account. This role should have the securityhub:UpdateStandardsControl permission. If you will be using the sample execution role CloudFormation provided in Part B—Execution role, the name of this role is ManageSecurityHubControlsExecutionRole.
–regions Comma separated list of Regions to update SecurityHub controls. Do not add any spaces after each comma. Specify ALL to consider all Regions where Security Hub is available. If you list a Region where you have not enabled Security Hub, the script will skip this Region and log the failure.
The script works with one Security Hub Standard at a time. For example, you can only disable AFSBP controls in the first run of the script. If you want to disable multiple controls across AFSBP and CIS standards you must run the script twice, once for AFSBP and once for CIS controls.
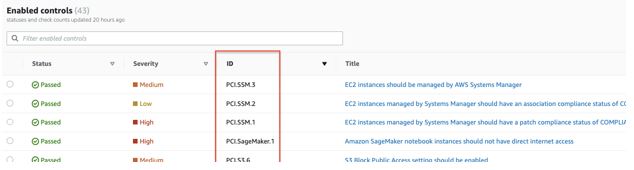
–control-id-list Comma separated list of controls, example for CIS, enter – (1.1,1.2) or for PCIDSS enter – (PCI.AutoScaling.1,PCI.CloudTrail.4)
Do not add any spaces after each comma. Control IDs can be found from the Security Hub console: Security Standards > View results > ID column in the enabled controls table. You can also find the control IDs in the Security Hub controls documentation for each standard.
Figure 1: Sample Control IDs of PCI security standards shown in console
–control-action For enabling controls use ENABLED; for disabling controls use DISABLED.
–disabled-reason Reason for disabling the controls. This text will appear in the Security Hub console for the disabled controls, it is used to understand why the control is disabled for reviews in the future. If your script uses different reasons for disabling controls, you need to run the script multiple times, once for each disable reason. This argument is NOT required (or used) for enabling controls.
Optional arguments
-h, –help shows the help message and exit
–profile If this argument is not given, the default profile will be used. Use this argument to parse the named profile. The credentials in this profile should have permissions to assume the execution role in each account.
Solution deployment
We are using an Amazon EC2 instance with Amazon Linux 2 (AL2) to run this automation. We will create the instance role for the EC2 in Part A, create the execution role in Part B, and launch the EC2 instance to run the Update Security Hub controls script in Part C.
Note: For the purpose of this blog, we will be creating the EC2 instance and the instance role in the Security Hub administrator account, however this is not a requirement. If you have existing cross account roles with the necessary permissions, you can use these existing roles as well.
This role should have permission to assume (sts:AssumeRole) the execution role described in Part B.
Figure 2: Amazon EC2 Instance role assumes cross account IAM role
A sample policy for this role is provided below. This policy limits the Security Hub controls manager EC2 role to assume only a specific execution role in the downstream accounts:
Copy the sample policy shown above and paste it into your new policy in the JSON editor. The resource in the policy is the execution role, as will be described in Part B—Execution role below.
Note: If you are using an existing role as the execution role, rather than creating a new role as shown in Steps 1-4, then you will need to change the resource section of the sample code in Figure 2 to use the ARN of the existing execution role.
In the IAM console, Create an IAM role for EC2 and name it SHControlsManagerEC2. Assign the following policies:
The SHAssumeRolePolicy policy you created in step 2.
The AmazonSSMManagedInstanceCore managed policy for managing the instance using AWS Systems Manager.
The AWSSecurityHubReadOnlyAccess managed policy for allowing read only access to Security Hub.
Figure 3: IAM policies attached to Amazon EC2 Instance role
When you are finished creating the role, note the Amazon Resource Name (ARN) – you will be using it in Part B. The ARN will look like Figure 4: arn:aws:iam::111111222222:role/SHControlsManagerEC2
Figure 4: ARN of the Amazon EC2 instance role
Part B–Execution role
The execution role must be created in all accounts where you will be disabling or enabling controls. This role should have securityhub:UpdateStandardsControl permission. The execution role trust relationship should allow the Security Hub controls manager role to assume the execution role.
Important: The name of the execution role must be identical in each account (including the Security Hub administrator account), otherwise the script will NOT work.
If you are using AWS Organizations, you can use CloudFormation StackSets to deploy this execution role easily across all of your accounts. The stack set runs across the organization at the root or organizational units (OUs) level of your choice. The CloudFormation will use the ARN you noted from Security Hub controls manager EC2 role as a parameter.
Sample execution role policy
A sample policy for the execution role is provided below:
Enter a stack name, update description as needed and then under parameters enter the ARN of the Security Hub controls manager EC2 role used in step 5 of Part A–Security Hub controls manager EC2 role, then choose Next.
Figure 6: AWS CloudFormation StackSet parameters for creating cross account IAM role
(Optional) On the Configure StackSet options page, go to Tags and add tags to identify and organize your stack set.
Figure 7: Optionally define tags for the stacks created using AWS CloudFormation StackSet
On the Set deployment options page, select the desired Region. Since the resource being created is IAM, you will only need to specify one Region. Choose Next.
Figure 8: Specify target regions where the CloudFormation stacks need to be created
Review the definition and select I acknowledge that AWS CloudFormation might create IAM resources. Choose Submit.
You can monitor the creation of the stack set from the Operations tab to ensure that deployment is successful.
Note: StackSets does not deploy stack instances to the organization’s management account, even if the management account is in your organization or in an OU in your organization. You will need to create the execution role manually in the organization management account.
Part C–Launch EC2
We will be using a t2.micro EC2 instance with Amazon Linux 2 (AL2) image which comes preinstalled with AWS CLI and Python. This instance size and image are free tier eligible.
To launch the EC2 instance for executing securityhub-updatecontrols-script
Launch EC2 instance in the Security Hub administrator account in a single Region. You can use any Region.
Note: You will need to allow outbound internet access to systems manager endpoints for session manager to work. See session manager documentation for more information.
On the next page, choose Connect again.
Figure 10: Connect to Amazon EC2 instance
A new window with session manager will open.
Set the working directory to home directory.
cd /home/ssm-user
Install Git:
sudo yum install git
Clone the UpdateSecurityHubControls code repository.
Let’s assume you have Config global recording enabled in us-east-1 and want to disable controls associated with global resources (IAM.1, IAM.2, IAM.3, IAM.4, IAM.5, IAM.6, IAM.7) for AWS Foundational Security Best Practices standard in Regions us-west-1, us-east-2 in all accounts. The name of our execution role in all accounts is ManageSecurityHubControlsExecutionRole
Change to the correct directory $ cd SecurityHub-Multiaccount-UpdateControls
Create a file with the list of account IDs. This is passed with the input-file argument. $ nano accounts.csv
Enter account IDs one account per line, then save the file.
Figure 11: CSV file with AWS account IDs
Run the script:
 python SH-UpdateControls.py \
--input-file accounts.csv \
--assume-role ManageSecurityHubControlsExecutionRole \
--regions us-east-2,us-west-1 \
--standard AFSBP \
--control-id-list IAM.1,IAM.2,IAM.3,IAM.4,IAM.5,IAM.6,IAM.7 \
--control-action DISABLED \
--disabled-reason 'Disabling IAM checks in all regions except for us-east-1, as global recording is enabled in us-east-1'
As the script runs, it generates a summary of disabled controls. If there are failures, the reason for failures will be listed in the summary. A log file is also saved in the directory with execution logs.
Figure 12: Execution Summary showing successful updates and failure information
Example 2–Enabling Controls
Let’s say you have disabled Control IDs PCI.CodeBuild.1 and PCI.CodeBuild.2 from the PCI standard in your accounts, as in the past, you did not use AWS CodeBuild in your PCI environment.
After a recent architecture review, you decided to begin using CodeBuild in your accounts in us-west-1, eu-west-1, ap-southeast-1. The name of our execution role in all accounts is ManageSecurityHubControlsExecutionRole.
Confirm you have completed all steps in part C.
Change to the correct directory. $ cd SecurityHub-Multiaccount-UpdateControls
Create a file with the list of account IDs. This will be passed with the input-file argument. $ nano accounts.csv Enter account IDs one account per line, then save the file.
As the script runs, it generates a summary of enabled controls. If there are failures the reason for failures will be listed in the summary A log file is also saved in the directory with execution logs.
Consider a case where new member accounts are being added to the Security Hub administrator of the organization. In such a scenario, you would have to disable the controls manually, or by re-running the update Security Hub controls script in each new account.
Figure 15: High level architecture
This alternative solution addresses this problem by automating the process with AWS Step Functions and a scheduled EventBridge event. A state machine is triggered every 24 hours, which updates the status of the standard controls in all AWS accounts registered as members in the Security Hub administrator account. This solution maintains a list of account IDs within a DynamoDB table, for which exceptions can be made. For details on how to deploy and use this solution, refer to this GitHub repository. This alternative solution and the update SecurityHub controls script are independent of each other.
Conclusion
In this blog, you learned some of the reasons you might disable Security Hub controls. We showed how the controls can quickly be disabled or enabled using the update Security Hub controls script provided. This script will save you time if you want to update controls across multiple accounts and multiple Regions on an as needed basis.
We also introduced an alternative solution which uses AWS Step Functions and a scheduled CloudWatch event to update Security Hub controls in new accounts on a regular basis. You could use either of the two solutions depending on the scenario.
If you have feedback about this post, submit comments in the Comments section below. If you have trouble with the scripts, please open an issue in GitHub.
If you have feedback about this post, submit comments in the Comments section below.
Want more AWS Security news? Follow us on Twitter.
More context and customization around detections and investigations, expanded dashboard capabilities, and more.
This post offers a closer look at some of the recent releases in InsightIDR, our extended detection and response (XDR) solution, from Q4 2021. Over the past quarter, we delivered updates to help you make more informed decisions, accelerate your time to respond, and customize your detections and investigations. Here’s a rundown of the highlights.
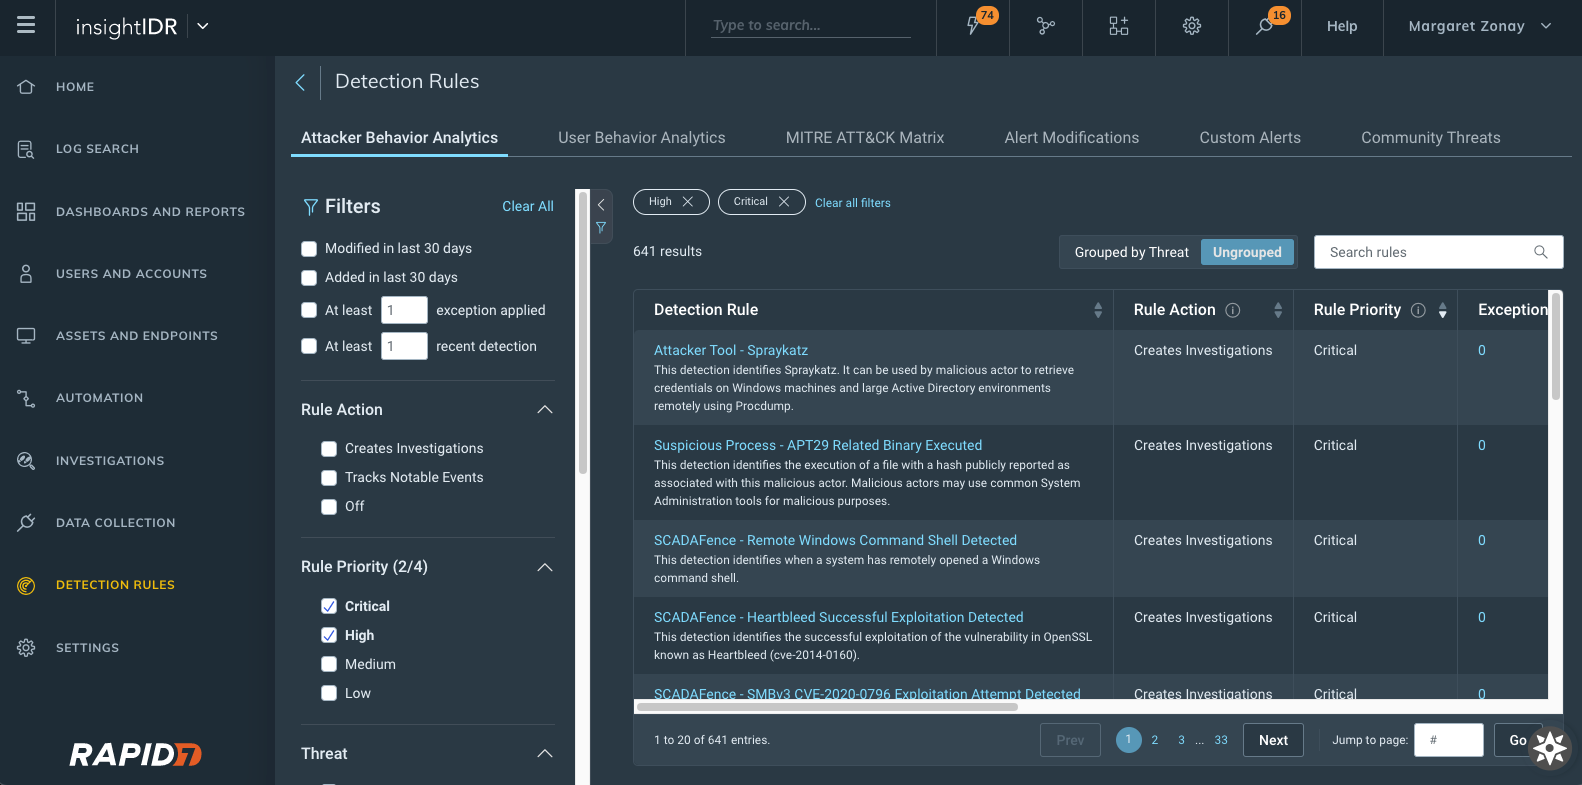
More customization options for your detection rules
InsightIDR provides a highly curated detections library, vetted by the security and operations center (SOC) experts on our managed detection and response (MDR) team — but we know some teams may want the ability to fine tune these even further. In our Q3 wrap-up, we highlighted our new detection rules management experience. This quarter, we’ve made even more strides in leveling up our capabilities around detections to help you make more informed decisions and accelerate your time to respond.
Attacker Behavior Analytics Detection Rules viewed and sorted by rule priority
New detection rules management interface: With this new interface, you can see a priority field for each detection provided by InsightIDR with new actions available.
Change priority of detections and exceptions that are set to Creates Investigation as the Rule Action.
View and sort on priority from the main detection management screen.
More details on our detection rules experience can be found in our help docs, here.
Customizable priorities for UBA detection rules and custom alerts: Customers can now associate a rule priority (Critical, High, Medium, or Low) for all of their UBA and custom alert detection rules. The priority is subsequently applied to investigations created by a detection rule.
A simplified way to create exceptions: We added a new section to detection rule details within “create exception” to better inform on which data to write exceptions against. This will show up to the 5 most recent matches associated with that said detection rule — so now, when you go to write exceptions, you have all the information you may need all within one window.
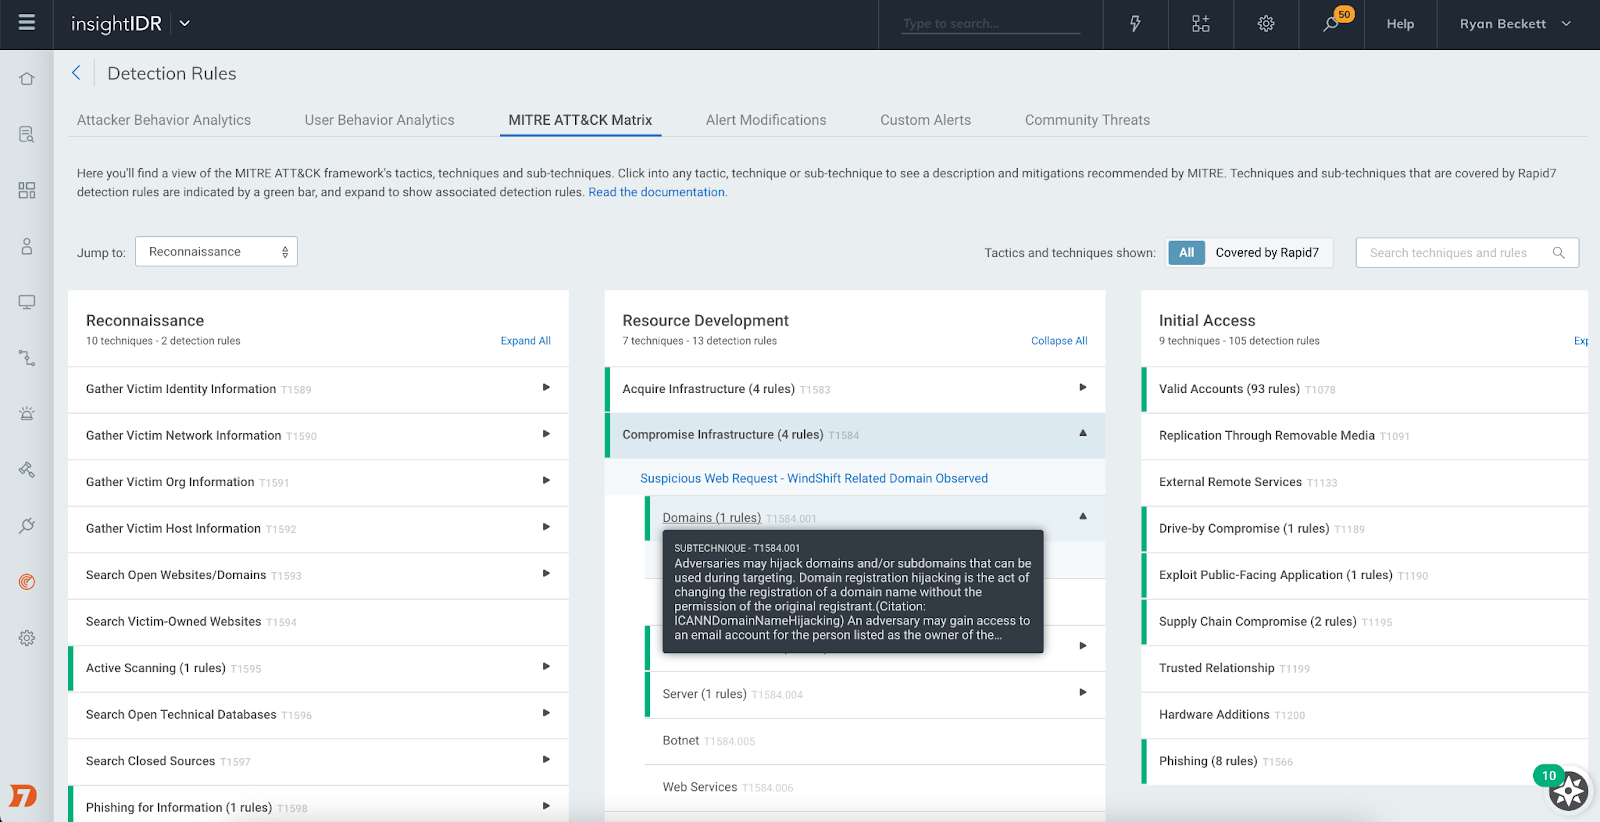
MITRE ATT&CK Matrix for detection rules
This new view maps detection rules to MITRE tactics and techniques commonly used by attackers. The view lets you see where you have coverage with Rapid7’s out-of-the-box detection rules for common attacker use cases and dig into each rule to understand the nature of that detection.
MITRE ATT&CK Matrix within Detection Rules
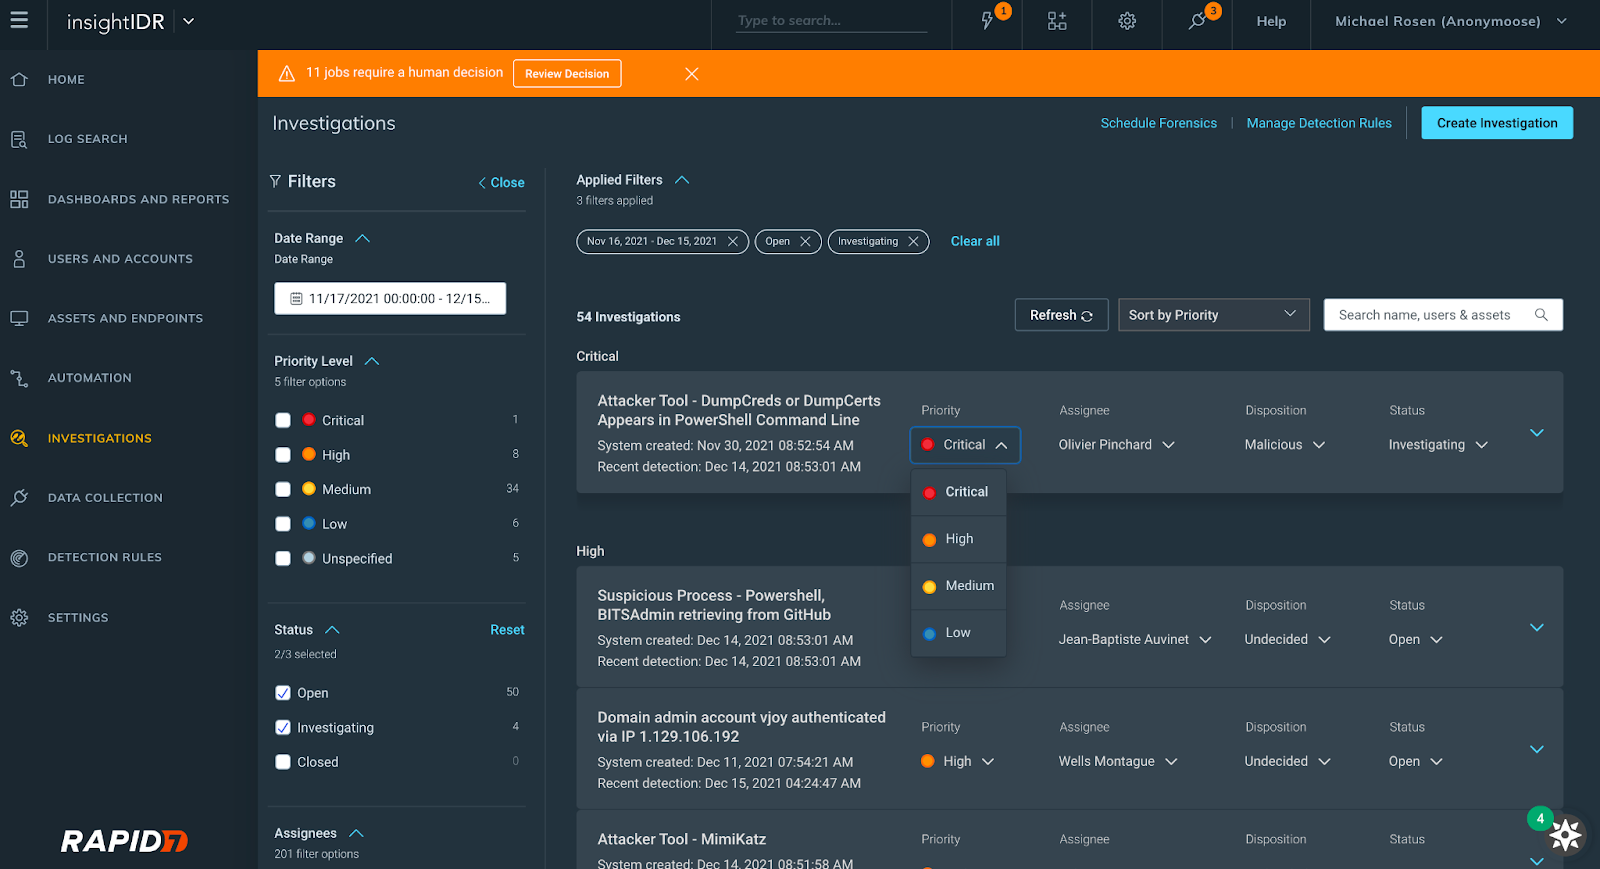
Investigation Management reimagined
At Rapid7, we know how limited a security analyst’s time is, so we reconfigured our Investigation Management experience to help our users improve the speed and quality of their decision-making when it comes to investigations. Here’s what you can expect:
A revamped user interface with expandable cards displaying investigation information
The ability to view, set, and update the priority, status, or disposition of an investigation
Filtering by the following fields: date range, assignee, status, priority level
New investigations interface
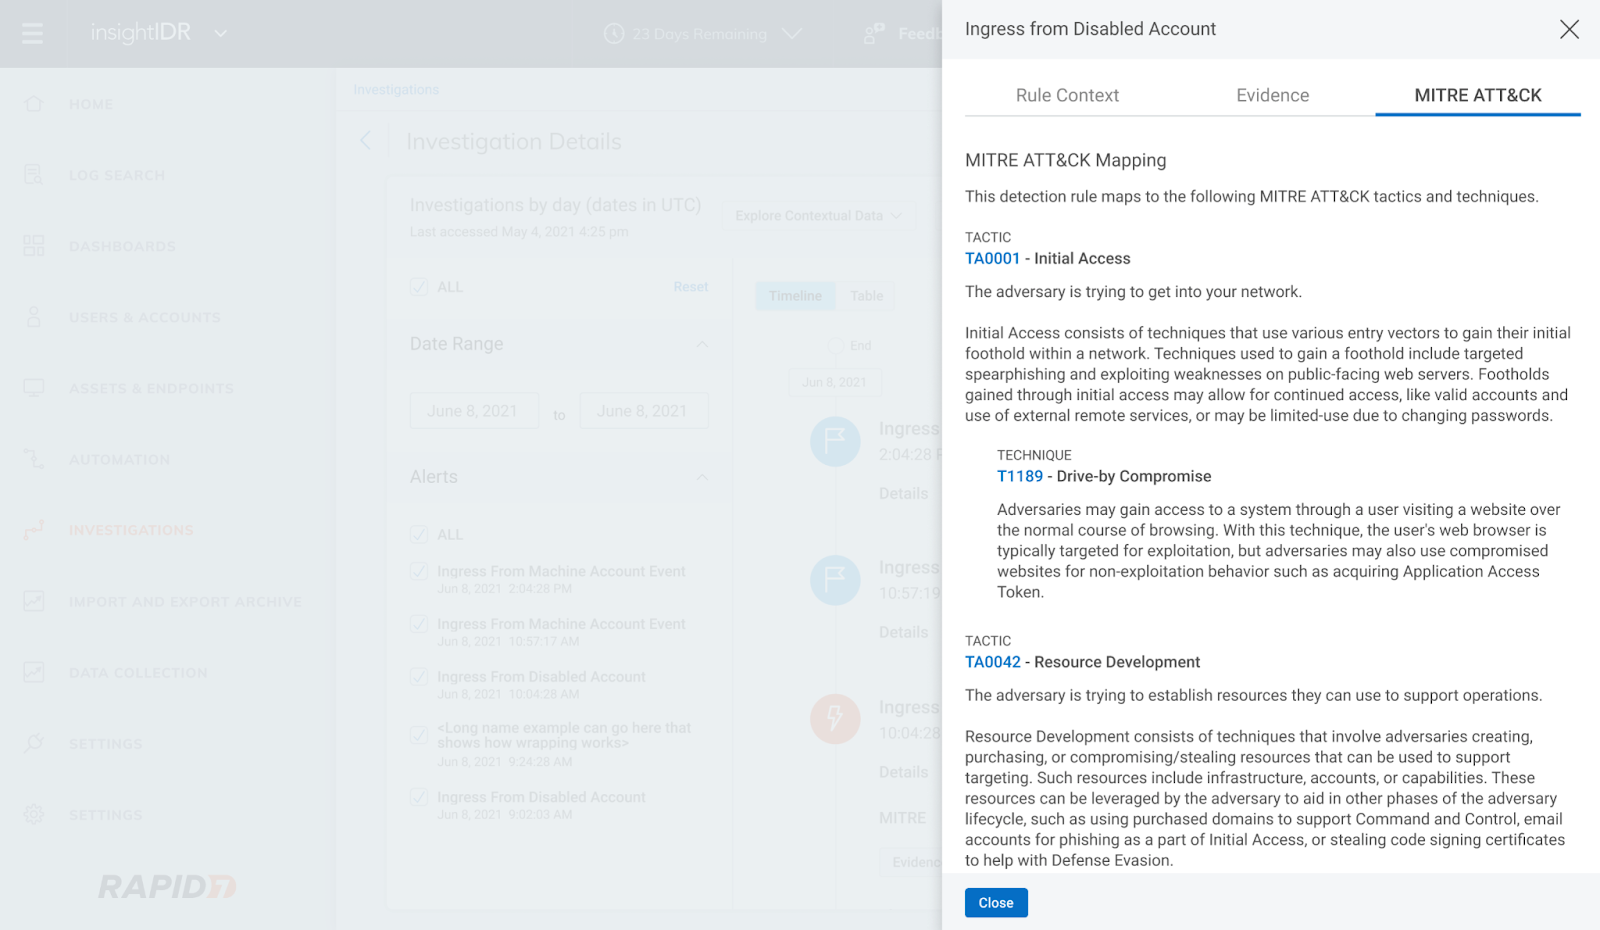
We also introduced MITRE-driven insights in Investigations. Now, you can click into the new MITRE ATT&CK tab of the Evidence panel in Investigation to see descriptions of each tactic, technique, and sub-technique curated by MITRE and link out to attack.mitre.org for more information.
MITRE ATT&CK tab within Investigations Evidence panel
Rapid7’s ongoing emergent threat response to Log4Shell
Like the rest of the security community, we have been internally responding to the critical remote code execution vulnerability in Apache’s Log4j Java library (a.k.a. Log4Shell).
Through continuous collaboration and ongoing threat landscape monitoring, our Incident Response, Threat Intelligence and Detection Engineering, and MDR teams are working together to provide product coverage for the latest techniques being used by malicious actors. You can see updates on our InsightIDR and MDR detection coverage here and in-product.
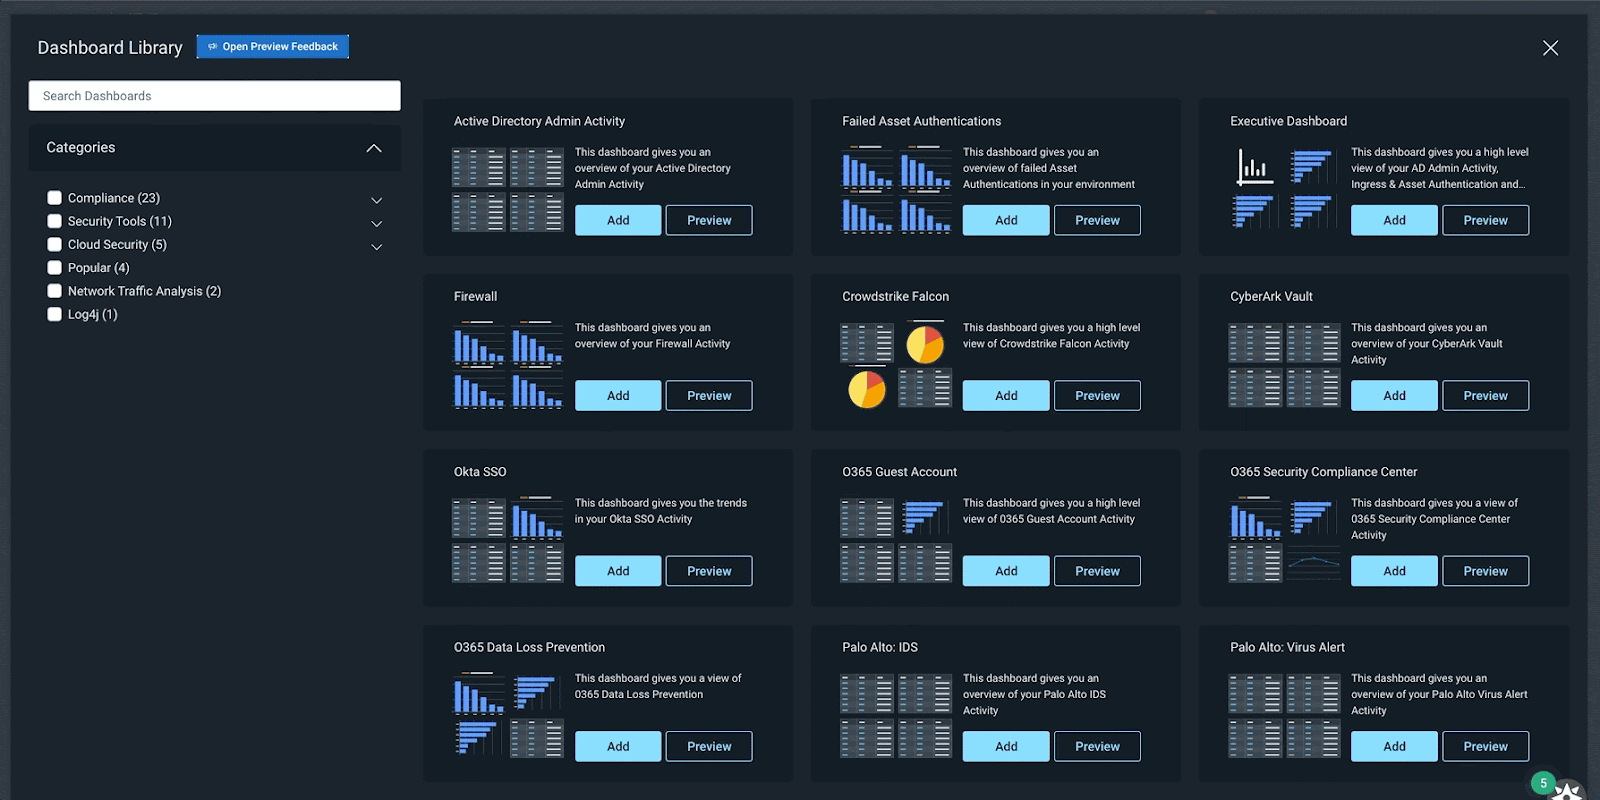
A continually expanding library of pre-built dashboards
InsightIDR’s Dashboard Library has a growing repository of pre-built dashboards to save you time and eliminate the need for you to build them from scratch. In Q4, we released 15 new pre-built dashboards covering:
Compliance (PCI, HIPAA, ISO)
General Security (Firewall, Asset Authentication)
Security Tools (Okta, Palo Alto, Crowdstrike)
Enhanced Network Traffic Analysis
Cloud Security
Dashboard Library in InsightIDR
Additional dashboard and reporting updates
Updates to dashboard filtering: Dashboard Filtering gives users the ability to further query LEQL statements and the data across all the cards in their dashboard. Customers can now populate the dashboard filter with Saved Queries from Log Search, as well as save a filter to a dashboard, eliminating the need to rebuild it every session.
Chart captions: We’ve added the ability for users to write plain text captions on charts to provide extra context about a visualization.
Multi-group-by queries and drill-in functionality: We’ve enabled Multi-group-by queries (already being used in Log search) so that customers can leverage these in their dashboards and create cards with layered data that they can drill in and out of.
Updates to Log Search and Event Sources
We recently introduced Rapid7 Resource Names (RRN), which are unique identifiers added to users, assets, and accounts in log search. An RRN serves as a unique identifier for platform resources at Rapid7. This unique identifier will stay consistent with the resource regardless of any number of names/labels associated with the resource.
In log search, an “R7_context” object has been added for log sets that have an attributed user, asset, account, or local accounts. Within the “R7_context” object, you will see any applicable RRNs appended. You can utilize the RRN as a search in log search or in the global search (which will link to users and accounts or assets and endpoints pages) to assist with more reliable searches for investigation processes.
New “r7_context” Rapid7 Resource Name (RRN) data in Log Search
Event source updates
Log Line Attribution for Palo Alto Firewall & VPN, Proofpoint TAP, Fortinet Fortigate: When setting up an event source you now have an option to leverage information directly present in source log lines, rather than relying solely on InsightIDR’s traditional attribution engine.
Cylance Protect Cloud event source: You can configure CylancePROTECT cloud to send detection events to InsightIDR to generate virus infection and third-party alerts.
InsightIDR Event Source listings available in the Rapid7 Extensions Hub: Easily access all InsightIDR event source related content in a centralized location.
Updates to Network Traffic Analysis capabilities
Insight Network Sensor optimized for 10Gbs+ deployments: We have introduced a range of performance upgrades that make high-speed traffic analysis more accessible using off-the-shelf hardware, so you’re able to gain east-west and north-south traffic visibility within physical, virtual and cloud based networks. If you want to take full advantage of these updates check out the updated sensor requirements here.
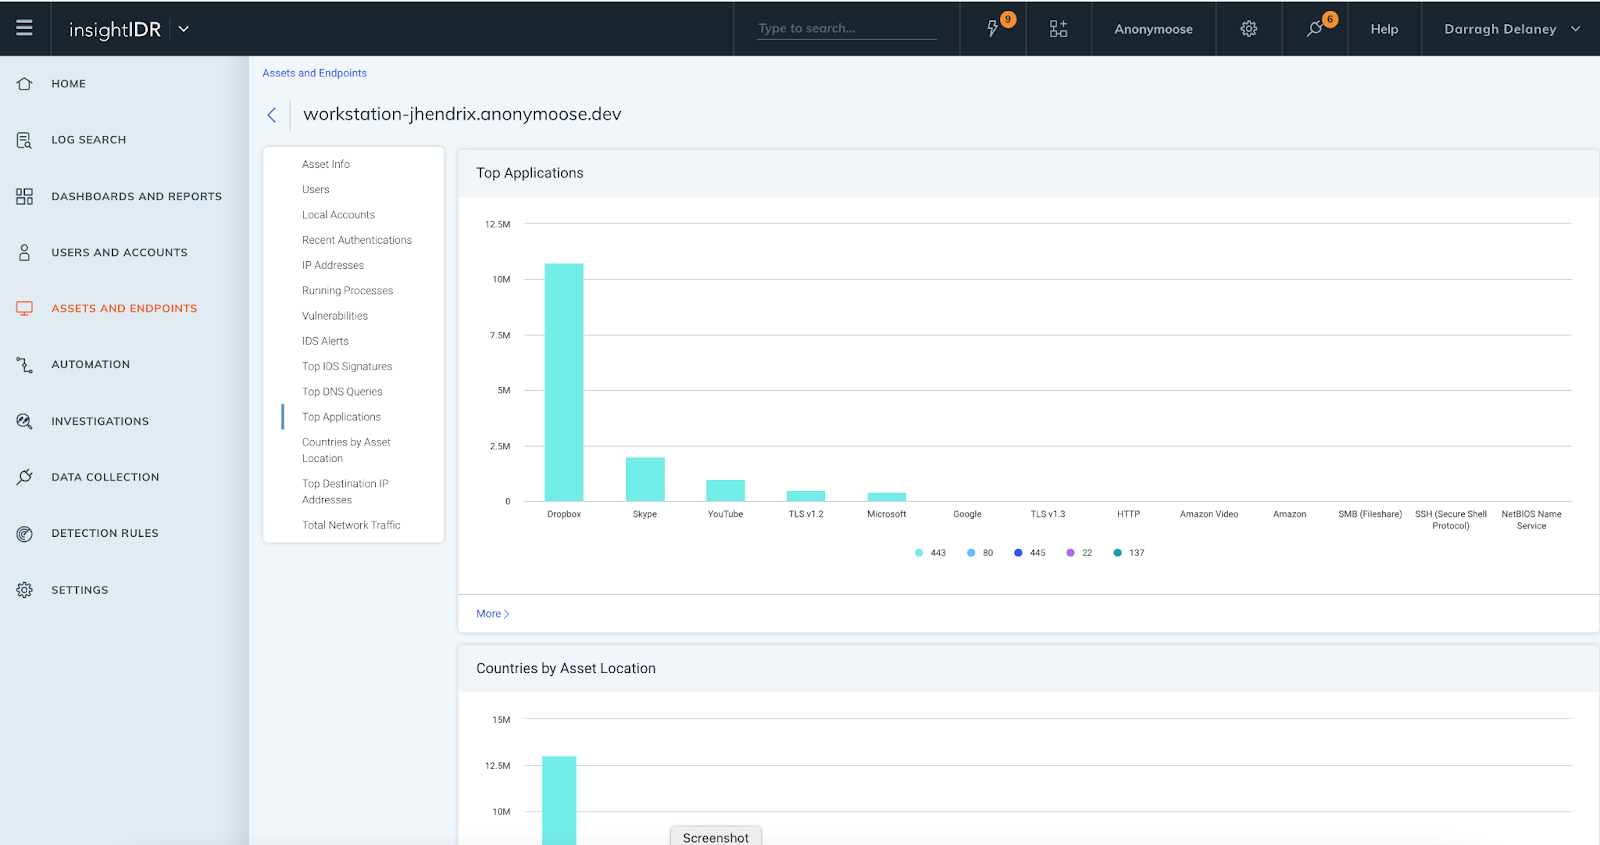
InsightIDR Asset Page Updates: We have introduced additional data elements and visuals to the Assets page. This delivers greater context for investigations and enables faster troubleshooting, as assets and user information is in one location. All customers have access to:
Top IDS events triggered by asset
Top DNS queries
For customers with Insight Network Sensors and ENTA, these additional elements are available:
Top Applications
Countries by Asset Location
Top Destination IP Addresses
Stay tuned!
As always, we’re continuing to work on exciting product enhancements and releases throughout the year. Keep an eye on our blog and release notes as we continue to highlight the latest in detection and response at Rapid7.
This post is written by Dan Fox, Principal Specialist Solutions Architect, Serverless.
AWS Lambda now enables the use of ECMAScript (ES) modules in Node.js 14 runtimes. This feature allows Lambda customers to use dependency libraries that are configured as ES modules, or to designate their own function code as an ES module. It provides customers the benefits of ES module features like import/export operators, language-level support for modules, strict mode by default, and improved static analysis and tree shaking. ES modules also enable top-level await, a feature that can lower cold start latency when used with Provisioned Concurrency.
This blog post shows how to use ES modules in a Lambda function. It also provides guidance on how to use top-level await with Provisioned Concurrency to improve cold start performance for latency sensitive workloads.
Designating a function handler as an ES module
You may designate function code as an ES module in one of two ways. The first way is to specify the “type” in the function’s package.json file. By setting the type to “module”, you designate all “.js” files in the package to be treated as ES modules. Set the “type” as “commonjs” to specify the package contents explicitly as CommonJS modules:
// package.json
{
  "name": "ec-module-example",
  "type": "module",
  "description": "This package will be treated as an ES module.",
  "version": "1.0",
  "main": "index.js",
  "author": "Dan Fox",
  "license": "ISC"
}

// index.js – this file will inherit the type from
// package.json and be treated as an ES module.

import { double } from './lib.mjs';

export const handler = async () => {
    let result = double(6); // 12
    return result;
};

// lib.mjs

export function double(x) {
    return x + x;
}
The second way to designate a function as either an ES module or a CommonJS module is by using the file name extension. File name extensions override the package type directive.
File names ending in .cjs are always treated as CommonJS modules. File names ending in .mjs are always treated as ES modules. File names ending in .js inherit their type from the package. You may mix ES modules and CommonJS modules within the same package. Packages are designated as CommonJS by default:
// this file is named index.mjs – it will always be treated as an ES module
import { square } from './lib.mjs';

export async function handler() {
    let result = square(6); // 36
    return result;
};

// lib.mjs
export function square(x) {
    return x * x;
}
Understanding Provisioned Concurrency
When a Lambda function scales out, the process of allocating and initializing new runtime environments may increase latency for end users. Provisioned Concurrency gives customers more control over cold start performance by enabling them to create runtime environments in advance.
In addition to creating execution environments, Provisioned Concurrency also performs initialization tasks defined by customers. Customer initialization code performs a variety of tasks including importing libraries and dependencies, retrieving secrets and configurations, and initializing connections to other services. According to an AWS analysis of Lambda service usage, customer initialization code is the largest contributor to cold start latency.
Provisioned Concurrency runs both environment setup and customer initialization code. This enables runtime environments to be ready to respond to invocations with low latency and reduces the impact of cold starts for end users.
Reviewing the Node.js event loop
Node.js has an event loop that causes it to behave differently than other runtimes. Specifically, it uses a non-blocking input/output model that supports asynchronous operations. This model enables it to perform efficiently in most cases.
For example, if a Node.js function makes a network call, that request may be designated as an asynchronous operation and placed into a callback queue. The function may continue to process other operations within the main call stack without getting blocked by waiting for the network call to return. Once the network call is returned, the callback is run and then removed from the callback queue.
This non-blocking model affects the Lambda execution environment lifecycle. Asynchronous functions written in the initialization block of a Node.js Lambda function may not complete before handler invocation. In fact, it is possible for function handlers to be invoked with open items remaining in the callback queue.
Typically, JavaScript developers use the await keyword to instruct a function to block and force it to complete before moving on to the next step. However, await is not permitted in the initialization block of a CommonJS JavaScript function. This behavior limits the amount of asynchronous initialization code that can be run by Provisioned Concurrency before the invocation cycle.
Improving cold start performance with top-level await
With ES modules, developers may use top-level await within their functions. This allows developers to use the await keyword in the top level of the file. With this feature, Node.js functions may now complete asynchronous initialization code before handler invocations. This maximizes the effectiveness of Provisioned Concurrency as a mechanism for limiting cold start latency.
Consider a Lambda function that retrieves a parameter from the AWS Systems Manager Parameter Store. Previously, using CommonJS syntax, you place the await operator in the body of the handler function:
When you designate code as an ES module, you can use the await keyword at the top level of the code. As a result, the code that makes a request to the AWS Systems Manager Parameter Store now completes before the first invocation:
// method2 – ES module

// ES module import syntax
import { SSMClient, GetParameterCommand } from "@aws-sdk/client-ssm";

const ssmClient = new SSMClient();
const input = { "Name": "/configItem" }
const command = new GetParameterCommand(input);
const parameter = await ssmClient.send(command); // top-level await

export async function handler() {
    const response = {
        statusCode: 200,
        "body": parameter.Parameter.Value
    };
    return response;
};
With on-demand concurrency, an end user is unlikely to see much difference between these two methods. But when you run these functions using Provisioned Concurrency, you may see performance improvements. Using top-level await, Provisioned Concurrency fetches the parameter during its startup period instead of during the handler invocation. This reduces the duration of the handler execution and improves end user response latency for cold invokes.
Performing benchmark testing
You can perform benchmark tests to measure the impact of top level await. I have created a project that contains two Lambda functions, one that contains an ES module and one that contains a CommonJS module.
Both functions are configured to respond to a single API Gateway endpoint. Both functions retrieve a parameter from AWS Systems Manager Parameter Store and are configured to use Provisioned Concurrency. The ES module uses top-level await to retrieve the parameter. The CommonJS function awaits the parameter retrieval in the handler.
From a terminal window, clone the git repo: git clone https://github.com/aws-samples/aws-lambda-es-module-performance-benchmark
Change directory: cd ./aws-lambda-es-module-performance-benchmark
Build the application: sam build
Deploy the application to your AWS account: sam deploy --guided
Take note of the API Gateway URL in the Outputs section.
This post uses a popular open source tool Artillery to provide load testing. To perform load tests:
Open config.yaml document in the /load_test directory and replace the target string with the URL of the API Gateway: target: “Put API Gateway url string here”
From a terminal window, navigate to the /load_test directory: cd load_test
Download and install dependencies: npm install
Begin load test for the CommonJS function. ./test_commonjs.sh
Begin load test for ES module function. ./test_esmodule.sh
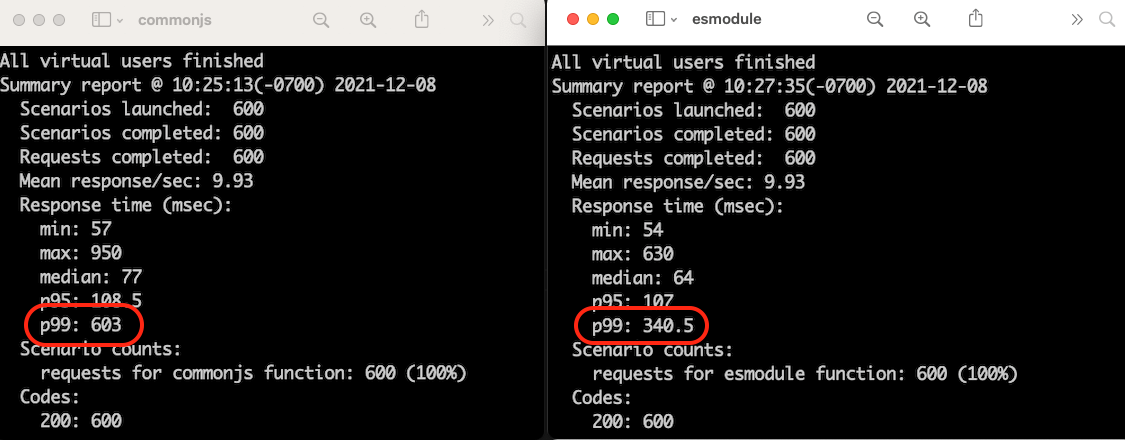
Reviewing the results
Here is a side-by-side comparison of the results of two load tests of 600 requests each. The left shows the results for the CommonJS module and the right shows the results for the ES module. The p99 response time reflects the cold start durations when the Lambda service scales up the function due to load. The p99 for the CommonJS module is 603 ms while the p99 for the ES module is 340.5 ms, a performance improvement of 43.5% (262.5 ms) for the p99 of this comparison load test.
Cleaning up
To delete the sample application, use the latest version of the AWS SAM CLI and run:
sam delete
Conclusion
Lambda functions now support ES modules in Node.js 14.x runtimes. ES modules support await at the top-level of function code. Using top-level await maximizes the effectiveness of Provisioned Concurrency and can reduce the latency experienced by end users during cold starts.
This post demonstrates a sample application that can be used to perform benchmark tests that measure the impact of top-level await.
The Unix signal
interface is complex and hard to work with; some developers
have argued that its design is
“unfixable”. So when Walt Drummond proposed
increasing the number of signals that Linux systems could manage, eyebrows
could be observed at increased altitude across the Internet. The proposed
increase seems unlikely to happen, but the underlying goal — to support a
decades-old feature from other operating systems — may yet become a
reality.
Many of our customers are standardizing Kubernetes as their compute infrastructure platform for cloud and on-premises applications. Amazon EKS makes it easy to deploy containerized workloads. It provides highly available clusters and automates tasks such as patching, node provisioning, and updates.
Kubernetes uses a flat networking model that requires each pod to receive an IP address. This simplified approach enables low-friction porting of applications from virtual machines to containers but requires a significant number of IP addresses that many private VPC IPv4 networks are not equipped to handle. Some cluster administrators work around this IPv4 space limitation by installing container network plugins (CNI) that virtualize IP addresses a layer above the VPC, but this architecture limits an administrator’s ability to effectively observe and troubleshoot applications and has a negative impact on network performance at scale. Further, to communicate with internet services outside the VPC, traffic from IPv4 pods is routed through multiple network hops before reaching its destination, which adds latency and puts a strain on network engineering teams who need to maintain complex routing setups.
To avoid IP address exhaustion, minimize latency at scale, and simplify routing configuration, the solution is to use IPv6 address space.
IPv6 is not new. In 1996, I bought my first book on “IPng, Internet Protocol Next Generation”, as it was called 25 years ago. It provides a 64-bit address space, allowing 3.4 x 10^38 possible IP addresses for our devices, servers, or containers. We could assign an IPv6 address to every atom on the surface of the planet and still have enough addresses left to do another 100-plus Earths.
There are a few advantages to using Amazon EKS clusters with an IPv6 network. First, you can run more pods on one single host or subnet without the risk of exhausting all available IPv4 addresses available in your VPC. Second, it allows for lower-latency communications with other IPv6 services, running on-premises, on AWS, or on the internet, by avoiding an extra NAT hop. Third, it relieves network engineers of the burden of maintaining complex routing configurations.
Kubernetes cluster administrators can focus on migrating and scaling applications without spending efforts working around IPv4 limits. Finally, pod networking is configured so that the pods can communicate with IPv4-based applications outside the cluster, allowing you to adopt the benefits of IPv6 on Amazon EKS without requiring that all dependent services deployed across your organization are first migrated to IPv6.
As usual, I built a short demo to show you how it works.
How It Works Before I get started, I create an IPv6 VPC. I use this CDK script to create an IPv6-enabled VPC in a few minutes (thank you Angus Lees for the code). Just install CDK v2 (npm install -g aws-cdk@next) and deploy the stack (cdk bootstrap && cdk deploy).
When the VPC with IPv6 is created, I use the console to configure auto-assignment of IPv6 addresses to resources deployed in the public subnets (I do this for each public subnet).
I take note of the subnet IDs created by the CDK script above (they are listed in the output of the script) and define a couple of variables I’ll use throughout the demo. I also create a cluster IAM role and a node IAM role, as described in the Amazon EKS documentation. When you already have clusters deployed, these two roles exist already.
Once the node group is created, I see two EC2 instances in the console. I use the AWS Command Line Interface (CLI) to verify that the instances received an IPv6 address:
kubectl create namespace aws-news-blog
namespace/aws-news-blog created

# sample-service.yml is available at https://docs.aws.amazon.com/eks/latest/userguide/sample-deployment.html
kubectl apply -f  sample-service.yml
service/my-service created
deployment.apps/my-deployment created

kubectl get pods -n aws-news-blog -o wide
NAME                             READY   STATUS    RESTARTS   AGE   IP                           NODE                                       NOMINATED NODE   READINESS GATES
my-deployment-5dd5dfd6b9-7rllg   1/1     Running   0          17m   2600:0000:0000:0000:405b::2   ip-10-0-1-217.us-west-2.compute.internal   <none>           <none>
my-deployment-5dd5dfd6b9-h6mrt   1/1     Running   0          17m   2600:0000:0000:0000:46f9::    ip-10-0-0-108.us-west-2.compute.internal   <none>           <none>
my-deployment-5dd5dfd6b9-mrkfv   1/1     Running   0          17m   2600:0000:0000:0000:46f9::1   ip-10-0-0-108.us-west-2.compute.internal   <none>           <none>
I take note of the IPv6 address of my pods, and try to connect it from my laptop. As my awesome service provider doesn’t provide me with an IPv6 at home yet, the connection fails. This is expected as the pods do not have an IPv4 address at all. Notice the -g option telling curl to not consider : in the IP address as the separator for the port number and -6 to tell curl to connect through IPv6 only (required when you provide curl with a DNS hostname).
curl -g -6 http://\[2600:0000:0000:35000000:46f9::1\]
curl: (7) Couldn't connect to server
To test IPv6 connectivity, I start a dual stack (IPv4 and IPv6) EC2 instance in the same VPC as the cluster. I SSH connect to the instance and try the curl command again. I see I receive the default HTML page served by nginx. IPv6 connectivity to the pod works!
curl -g -6 http://\[2600:0000:0000:35000000:46f9::1\]
<!DOCTYPE html>
<html>
<head>
<title>Welcome to nginx!</title>

... redacted for brevity ...

<p><em>Thank you for using nginx.</em></p>
</body>
</html>
If it does not work for you, verify the security group for the cluster EC2 nodes and be sure it has a rule allowing incoming connections on port TCP 80 from ::/0.
A Few Things to Remember Before I wrap up, I’d like to answer some frequent questions received from customers who have already experimented with this new capability:
IPv6 is enabled by the same VPC CNI Kubernetes plugin as the one you are using for IPv4 today. The plugin is automatically configured for IPv4 or IPv6, depending on the pod networking choice you make when you create your cluster.
IPv6 support is turned on only at cluster creation time. As of today, you can not migrate a cluster from IPv4 to IPv6. If you have an existing cluster you want to migrate, you may have to redeploy the workload to a new IPv6-based cluster and progressively migrate traffic from the IPv4 to the IPv6 cluster, such as described in this technical note.
The wonderful thing about technology is that it’s always changing. This, of course, is also the frustrating thing about technology. We think we understand it, or at least have a basic grasp of it, and then the rules get completely rewritten. What seemed simple and straightforward is suddenly a morass of technical terms and jargon. Such is the case with cloud concepts.
If you’re looking for a data storage solution, it’s sometimes helpful to revisit the fundamentals to ensure you find the solution that works best for you. Today, we’re sharing a few helpful guidelines to cut through any confusion around the public cloud, including how it’s different from a private cloud, when it makes sense to use one or both, and how to go about choosing a cloud provider.
What Is the Public Cloud?
Essentially, public cloud storage operates like a self-storage unit, only one that holds your personal files instead of old lamps that you’re sure you’re going to donate or part with in a garage sale someday. The difference being (apart, obviously, from cloud storage being virtual) that cloud storage lets you pay as you go, so you only pay for the amount of storage you need.
In researching public cloud storage, you may come across other data storage terms such as “private cloud” and “on-premises.” We’ll briefly define these terms to help you navigate the options available to you.
Private cloud. As the name implies, a private cloud is similar to a public cloud, but specifically designed for a single user or business. Think of a private cloud like one of those restaurant booths that’s permanently reserved for a VIP—no other customer can use that space. As a result, private cloud services can be more expensive than public clouds. Private clouds are typically, but not always, on-premises. Some companies choose to outsource their private cloud infrastructure to a data center, but the key defining factor is that the servers and network are dedicated to one company or “tenant” rather than shared with other tenants as in a public cloud.
On-premises data storage. Before cloud services were created, many organizations stored their data in corporate data centers built on location or “on-premises.” Since these facilities are owned and controlled by the company that built them, they offer a very high level of security. On-premises data storage is also sometimes referred to as a private cloud, but private clouds don’t necessarily have to be on-premises anymore—they can be anywhere as long as they’re dedicated to one tenant.
There are several advantages to using a public cloud service for data storage. You generally only pay for the storage you use. Unlike an on-premises data center, there are usually no significant up-front costs to purchase hardware and plan for ongoing administration. In addition, a public cloud data storage solution does not take up physical space in your office.
Private Cloud vs. Public Cloud: When Does It Make Sense to Use Them?
To help you decide between public vs. private cloud data storage, let’s recap the critical differences first. A public cloud service is usually open to any customer, while a private cloud is dedicated to select users. In addition, a private cloud service is usually operated on-premises.
There are three significant differences between private cloud and public cloud.
Tenancy. A private cloud is dedicated to one tenant whereas a public cloud is open to many tenants. In a public cloud, tenants share the same physical hardware resources as other tenants, and their individual instances are virtually separated so that one tenant can’t access another’s data.
Approach to security. A private cloud is dedicated exclusively to your needs. You own and manage it. As such, you have more control over the physical security of your servers as well as your private networks. In a public cloud, you trust the provider to handle some of the security for you.
Affordability. A public cloud service is defined to achieve mass economies of scale in order to offer affordable prices. A private cloud requires up-front investment in hardware and networking equipment and ongoing maintenance and upgrade costs.
Ultimately, it comes down to the solution that best fits your company’s needs for privacy and security balanced against your budgetary constraints. The benefit of a private cloud is more important in some industries than others. For example, in instances where there might be national security concerns—like national defense or government contractors—or a greater need for privacy like healthcare or financial services, a firm may opt to use a private cloud service located on-site for certain sensitive data.
Sometimes, however, your needs will extend beyond simply using either a private or a public cloud service. When that happens, you need a hybrid cloud.
Hybrid Cloud: When Does It Make Sense to Use Both?
As we noted, depending on your data storage needs and industry, you may decide to use a mix of public cloud and private cloud providers, otherwise known as a hybrid cloud. For example, in data-heavy industries like media and entertainment, a hybrid cloud approach offers a powerful solution. Using a hybrid solution means staff have fast access to large files for day-to-day work on a private, on-premises cloud, combined with scalable, affordable storage in a public cloud for archives and remote collaboration. Similarly, in industries that handle sensitive data, a private cloud could be used to have more control over security, while less sensitive data could be stored in a more affordable public cloud.
Using a combination of public cloud and private cloud data storage gives you the best of both worlds. Private, on-premises storage provides greater ease of access to files and enhanced security, but with the financial trade-off of fixed costs for maintenance and IT assistance. Public storage is more affordable and makes sharing files with outside vendors, subcontractors, and clients simpler.
How to Compare Public Cloud Providers
If you’ve decided a public cloud or a hybrid cloud approach is right for you, your next step is choosing a cloud provider as your trusted partner. As you evaluate different cloud providers, it is helpful to use some standard criteria to measure each provider. Use the following points of comparison to inform your selection process.
Ease of use. As with most technology, the more customization you need, the less user-friendly your cloud storage is generally going to be. The end goal of cloud storage is to make your life easier, and if you’re having to stack new skill sets just to make it work, then you’ve officially moved beyond “easy.”
Customer support. The insufferable thing about tech headaches is that they have no respect for your schedule. As such, it’s important to check the support package offered by the provider. How easy is it to reach an actual person, not a bot or autoresponder? Will they be able to respond to issues that may arise from your particular setup? The wrong answer could be costly.
Data egress. Check the costs and speed of data egress if and when you need to pull all of your data out from the cloud provider. You don’t want to feel locked into a cloud provider because they charge high data transfer fees.
Pricing tiers. There is no one-size-fits-all solution when it comes to cloud storage, so make sure you’re not throwing money out the window. Or, into the cloud. Double check that you won’t get locked into a price structure that charges for storage you don’t need. Keep an eye out for things like minimum retention requirements where you’re essentially charged for deleted data for a period of time after you delete it.
Security. Lost or compromised data goes far beyond a mere inconvenience. In the worst-case scenario, it can represent a serious security breach and possible legal issue. Some cloud providers offer more security features than others. For example, check if the provider offers Object Lock, a feature that prevents data from being modified, copied, encrypted, changed, or deleted during a set period of time. If a bad actor somehow got access to your account, they wouldn’t be able to tamper with your data. (Even you can’t modify it before the lock period ends!)
Assess Public Cloud Storage for Your Organization
Cloud computing has had a transformative impact on the way we do business. Between the cost savings and the flexibility it gives us in handling our data, it can play a tremendous role in your company’s growth. Now that you’ve learned the basics of public cloud data storage and how it can potentially impact your business, you can make a more informed decision about how you set up your infrastructure and manage your company’s important data.
Are you using a private cloud, a public cloud, or some combination of the two? Let us know in the comments. We’d love to hear how it’s going.
Another AWS re:Invent is in the books! We were so pleased to be able to host live in Las Vegas again this year. And we were also thrilled to be able to host a large virtual audience. If you weren’t able to participate live, you can now view some of the security sessions by visiting the AWS Events Channel on YouTube and checking out the AWS re:Invent 2021 Breakout Sessions for Security playlist. The following is a list of some of the security-focused sessions you’ll find on the playlist:
In this session, Stephen Schmidt, Chief Information Security Officer at AWS, addresses best practices for security in the cloud, feature updates, and how AWS handles security internally. Discover the potential future of tooling for security, identity, privacy, and compliance.
How do AWS security services work together and how do you deploy them? The new AWS Security Reference Architecture (AWS SRA) provides prescriptive guidance for deploying the full complement of AWS security services in a multi-account environment. AWS SRA describes and demonstrates how security services should be deployed and managed, the security objectives they serve, and how they interact with one another. In this session, learn about these assets, the AWS SRA team’s design decisions, and guidelines for how to use AWS SRA for your security designs. Discover an authoritative reference to help you design and implement your own security architecture on AWS.
In this session, hear from the odd couple of AWS security on how to build diverse teams and develop proactive security cultures. Jenny Brinkley, Director of AWS Security, and Eric Brandwine, VP and Distinguished Engineer for AWS Security, provide best practices for and insights into the mechanisms applied to the AWS Security organization. Learn how to not only scale your programs, but also drive real business change.
In this session, learn to proactively monitor, identify, and protect data to help maintain security and compliance with low operational investment. Panasonic Avionics shares their robust security solution for migrating to Amazon S3 to reduce data center costs by more than 85 percent while remaining secure and compliant with comprehensive industry regulations. Discover best practices for deploying layered security to monitor data using Amazon Macie, learn how to detect threats using Amazon GuardDuty, and consider how automating responses can help protect your data and meet your compliance requirements. Explore how you can use AWS Security Hub as a central monitoring and posture-management control point.
In this session, learn how you can use automated application layer 7 (L7) DDoS mitigations with AWS Shield Advanced to protect your web applications. You can now use on AWS Shield Advanced to automatically recommend AWS WAF rules in response to an L7 DDoS event instead of manually crafting an AWS WAF rule to isolate the malicious traffic, evaluating the rule’s effectiveness, and then deploying it throughout your environment. AWS Shield Advanced is effective at alerting application owners when spikes in traffic may impact the availability of applications. Now, AWS Shield Advanced can automatically detect and mitigate L7 traffic anomalies that risk impacting application availability and responsiveness.
Every day AWS works with organizations and regulators to host some of the most sensitive workloads in industry and government. In this session, hear how AWS secures data even from trusted AWS operators and services. Learn about the AWS Nitro System and how it provides confidential computing and a trusted execution environment. Also, learn about the cryptographic chains of custody that are built into the AWS Identity and Access Management service, including how encryption is used to provide defense in depth and why AWS focuses on verified isolation and customer transparency.
Ransomware is not specific to the cloud—in fact, AWS can provide increased visibility and control over your security posture against malware. In this session, learn ways that enterprises can empower and even inoculate themselves against malware, including ransomware. From IAM policies and the principle of least privilege to AWS services like Amazon GuardDuty, AWS Security Hub for actionable insights, and CloudEndure Disaster Recovery and AWS Backup for retention and recovery, this session provides clarity into tools and approaches that can help you feel confident in your security posture against current malware.
In this session, learn how to use your network perimeter as a straightforward defensive perimeter around your data in the cloud. VPC endpoints were first introduced for Amazon S3 in 2015 and have since incorporated many improvements, enhancements, and expansions. They enable you to lock your data into your networks as well as assert network-wide security invariants. This session provides practical guidance on what you can do with VPC endpoints and details how to configure them as part of your data perimeter strategy.
Are you looking for tips and tools for applying least privilege permissions for your users and workloads? Love demonstrations and useful examples? In this session, explore advanced skills to use on your journey to apply least privilege permissions in AWS Identity and Access Management (IAM) by granting the right access to the right identities under the right conditions. For each stage of the permissions lifecycle, learn how to look at IAM policy specifics and use IAM Access Analyzer to set, verify, and refine fine-grained permissions. Get a review of the foundations of permissions in AWS and dive into conditions, tags, and cross-account access.
If watching these sessions has you thinking about your next hands-on learning opportunity with AWS Security, we invite you to save the date for AWS re:Inforce 2022. AWS re:Inforce, our learning conference focused on cloud security, compliance, identity, and privacy, will be held June 28-29, 2022 in Houston, Texas. We hope to see you there!
If you have feedback about this post, submit comments in the Comments section below.
Want more AWS Security news? Follow us on Twitter.
As we walk through the doorway of 2022, it’s hard not to wish at least some among us had the gift of cosmic foresight. Many (most?) of the questions we thought in 2021 that we’d have answered by this point — chief among them, when will COVID finally leave us alone??? — still seem to elude us.
In keeping with our yearlytradition, we sat down with some experts at Rapid7 and across the industry to get their 2022 cybersecurity predictions. Here’s a look at what those in the know — some of them under the guise of clever fortune-teller names — think we’ll be talking about in the year to come.
Rob la Mystique (a.k.a. Robert Graham, CEO of Errata Security)
My third eye tells me that ransomware will become state-sponsored. Governments will notice the successful actors in their countries, and rather than shut them down, they’ll seek to co-opt their activities. In other words, pirates will be coopted into privateers.
Fahmida Y. Rashid, award-winning infosec journalist
I think we will see some surprising consolidation — some giant merger that’s going to dwarf even the ones we’ve seen so far. There’s still going to be insane venture funding rounds (like Transmit Security’s Series A) for security startups. But I think my prediction is that we are going to see the pendulum swing back from tools that do one thing well to large suites/integrated platforms that do all kinds of things, so the whole buying landscape is going to get even more murky and confusing.
Tod Beardsley, Director of Research at Rapid7
In 2022, managed service providers (MSPs) will continue to be in the hot seat as intermediary targets for ransomware gangs. The efficacy of hitting MSPs was proven out in 2021, and even small, regional MSPs will need to stay on their toes with patches and two-factor authentication everywhere to avoid getting exploited and phished by attackers who are targeting their downstream customers.
As cryptocurrency valuations continue to separate themselves from any realistic evidence of value, we will see more and more exchanges and clearinghouses get compromised, resulting in heists of millions of dollars’ worth of crypto — especially among off-shore exchanges.
Cyber-Zoltar the Blockchain Seer (a.k.a. Philip Amann, Head of Strategy at the European Cybercrime Center)
Ransomware will continue to dominate and proliferate with cybercriminals further moving toward a more calculated target selection. As is evidenced by several high-profile ransomware attacks, this has created a global cybersecurity risk that goes beyond the financial impact of these attacks. This will continue to be supported by a professional underground economy that provides the necessary tools and services.
We also expect investment fraud, BEC and CEO fraud to continue to cause disruptive losses and also a significant increase in mobile malware. The response to these threats will require us to further strengthen collaboration among law enforcement, industry, the CSIRT community, and academia globally with a view to collectively increasing cybersecurity, safety, and resilience.
Bob Rudis, Chief Security Data Scientist at Rapid7
The 2022 US election season will drive multiple (some impactful) cyberattacks on candidate/party technical and campaign logistics infrastructure and data from US-based sources.
Meanwhile, as companies accelerate toward a higher office-vs.-remote work ratio, initial access brokers will take advantage of the mobility (and weaknesses) in BYOD endpoints to gain footholds and refresh credentials and PII data stores. Multiple, major breaches will be reported.
In addition, the adoption of Software Bill of Materials (SBOM) will be astonishingly fast (in the US) toward the latter half of the year, heralding a new era of better third-party risk management and overall organizational safety and resilience.
Erick Galinkin, Principal Artificial Intelligence Researcher at Rapid7
Ransomware will continue to be a huge threat and will draw even more attention in 2022. While we should keep an eye out for potential attempts to disrupt a major US government agency, the revenue lost from ransomware will still be an order of magnitude less than business email compromise.
The media world and the security world will do their gnashing of teeth and rending of garments over deepfakes ahead of the 2022 midterms, but AI-powered disinformation will continue to be a mostly hypothetical threat.
Madame Bell LaPadula (a.k.a. Wendy Nather, Head of Advisory CISOs at Cisco)
On the heels of more visibility in supply chain security, and against the backdrop of steady disruption from ransomware, the security industry will have to face another maturity touchstone. It’s not enough simply to provide more transparency and share more data: what else do we owe one another in this broad ecosystem? SBOMs are the new shiny, but we will have to take many more steps together to improve our common, global defense.
Harley Geiger, Senior Director of Public Policy at Rapid7
State and federal agencies will step up their enforcement of existing cybersecurity regulations. This includes the SEC’s enforcement of required disclosures related to cybersecurity, DOJ’s enforcement of federal contractor cybersecurity requirements, and California’s enforcement of the CCPA.
But while regulators may issue new cybersecurity rules for the private sector under existing authorities, Congress will delay creating new federal authorities due to the midterm election year and the recent passage of large spending and incident reporting bills. Divisive items like federal privacy legislation are unlikely to pass. However, there will be plenty of hearings, press releases, and tweets expressing concern for ongoing cybersecurity threats!
NEVER MISS A BLOG
Get the latest stories, expertise, and news about security today.
This post was co-written by Martin Stamm, Principal Expert SW Architecture at Continental Automotive, Andreas Falkenberg, Senior Consultant at AWS Professional Services, Daniel Krumpholz, Engagement Manager at AWS Professional Services, David Crescence, Sr. Engagement Manager at AWS, and Junjie Tang, Principal Consultant at AWS Professional Services.
Automakers are embarking on a digital transformation journey to become more agile, efficient, and innovative. As part of this transformation, Continental created Continental Automotive Edge (CAEdge) – a modular multi-tenant hardware and software framework that connects the vehicle to the cloud. Continental collaborated with Amazon Web Services (AWS) to develop and scale this framework.
At this AWS re:Invent session, Continental and AWS demonstrated the new and transformative vehicle architectures and software built with CAEdge. These will provide future vehicle manufacturers, Original equipment manufacturers (OEMs) and partners with a multi-tenant development environment for software-intensive vehicle architectures. These can be used to implement software, sensor and big data solutions in a fraction of the development time needed before. As a result, vehicle software can be developed and tested more efficiently, then securely and rolled out directly to vehicles. The framework is already being tested in an automotive manufacturer’s series development.
Addressing core automotive industry pain points
Continental, OEMs and other major Tier 1 companies are required to quickly adapt to new technology requirements without knowing capacity or scaling needs, while at the same time staying ahead of the market. Developers are facing several challenges, in particular the processing of huge amounts of data. For example, a single test vehicle for AV/ADAS generates 20 – 100 TB of data per day. The handling of these data sets and the time to availability in distributed sites can cause major delays in development cycles. Delays are also experienced by developers due to the high numbers of test cases in simulation and validation. In an on-premises environment, this poses significant costs and scaling challenges to provide the required capacity.
The pace of the required transformation to becoming a software-centric organization is creating new challenges and opportunities like:
Current electronic architectures are decentralized, expensive, and complex to develop therefore difficult to maintain and extend.
Vehicle and cloud converge require new software (SW)-defined architectures, integration and operations competencies.
Digital Lifecycle Management enables new business models, go- to-market strategies and partnerships.
In addition to the distribution of huge datasets and distributed work setups is a need for cutting edge security technologies. Encryption at transfer/rest, data residency laws, and secure developer access are common security challenges and are addressed using CAEdge technology.
In this blog post, we describe how to build a secure multi-tenant AWS environment that forms the foundation for CAEdge. We discuss how AWS is helping Continental build the base infrastructure that allows for fast onboarding of OEMs, partners and suppliers through a highly automated process. Development activities can start within hours, instead of days or weeks; with a bootstrapped development environment for software-intensive vehicle architectures. This is all while meeting the strictest security and compliance requirements.
Overview of the CAEdge Framework
The following diagram gives an overview of the CAEdge Framework:
Figure 1 – Architecture Diagram showing the CAEdge Framework
The framework is based on the following modular building blocks:
Scalable Compute Platform – High Performance, embedded computer with automotive software stack and connection to the AWS cloud.
Cloud – Cloud services for developers and end-users.
DevOps Workbench – Toolchain for software development and maintenance covering the entire software lifecycle.
The building blocks of the framework are defined by clear API operations and can be integrated easily for various use cases, such as different middleware or CI / CD pipelines.
Overview of the CAEdge Multi-Tenant Framework
Continentals’ core architecture and terminology for a vehicle software development framework include:
CAEdge Framework as an Isolated AWS Organization – Continental’s CAEdge framework runs in a dedicated AWS Organization. Only CAEdge-related workloads are hosted in this AWS Organization. This ensures separation from any other workloads outside of the CAEdge context. The CAEdge framework provides multiple central security, access management, and orchestration services to its users.
Isolated Tenants – The framework is fully tenant-aware. A tenant is an isolated entity that represents an OEM, OEM sub-division, partner, or supplier. A key feature of this system is to ensure complete isolation from one tenant to another. We use a defense-in-depth security approach to ensure tenant separation.
Tenant-Owned Resources and Services – Each tenant has a dedicated set of resources and services that can be consumed and used by all tenant users and services. Tenant-owned resources and services include, but are not limited to:
Dedicated, tenant-specific data lake,
Tenant specific logging, monitoring, and operations,
Tenant-specific UI.
Projects – Each tenant can host an arbitrary number of projects with 1-N users assigned to them. A project is a high-level construct with the goal to create a unique product or service, such as a new “Door Lock” system software. The term project is used in a broad scope. Anything can be classified as a project.
Workbenches – A project consists of 1-N well-defined workbenches. A workbench represents a fully configured development environment of a specific “Workbench Type”. For example, a workbench of type “Simulation” allows for configuration and execution of Simulation Jobs based on drive data. Each workbench is implemented via a well-defined number of AWS Accounts, which is called an AWS Account Set.
An AWS Account Set always includes at least a Toolchain Account, Dev Account, QA Account and Prod Account. All AWS Accounts are baselined with IAM resources, security services and potentially workbench specific blueprints so development can start quickly for the end-user.
The following diagram illustrates the high-level architecture:
With the core architecture and terminology defined, let’s look at the implementation details of the architecture that was described in the preceding image.
Isolated Tenants – Achieving a High Degree of Separation
To achieve a multi-tenant environment, we followed a multi-layered security hardening approach:
Tenant Separation on AWS Account Level: Starting at the AWS Account level, we used individual AWS Accounts where possible. An AWS account can never be assigned to more than one tenant. The functional scope of an AWS Account is kept as small as possible. This increases the number of total AWS Accounts, but significantly reduces the blast radius in case of any breach or incident. Just to give an example:
Each Dev, QA, and Prod Stage of a Workbench is its own AWS Account. No AWS Account ever combines multiple stages at once.
Each CAEdge tenant-owned data lake consists of multiple AWS Accounts. A data lake also requires updates as time passes. To allow for side-effect free and well tested updates of the data lake-infrastructure, each tenant comes with a Dev, QA, and Prod data lake.
Tenant Separation via a well-defined Organizational Unit (OU) structure and Service Control Policies (SCP): Each Tenant gets assigned a dedicated OU structure with multiple sub-OUs. This allows for tenant-specific security hardening on SCP-level and potential custom security hardening, in case dedicated tenants have specific security requirements. The SCPs are designed in such a way to allow for a maximum degree of freedom for the individual AWS Account user; while at the same time protecting the integrity of CAEdge and while staying compliant and secure according to specific requirements.
Tenant Separation through an AWS Account Metadata-Layer and automated IAM assignments: The CAedge framework uses a central Amazon DynamoDB database that maps AWS Accounts to Tenants and stores any other Metadata in the Context of an AWS Account. This includes including the Account Owner, Account Type, and Cost-related information. With this database, we can query AWS Accounts based on specific Tenants, Projects, and Workbenches. Furthermore, this forms the foundation of a fully automated permission and AWS Account access-management capability that enforces any Tenant, Project and Workbench boundary.
Tenant Separation Security Controls via AWS Security Services: On top of the standard AWS security services, such as AWS GuardDuty, AWS Config, AWS Inspector and AWS SecurityHub, we use IAM Access Analyzer in combination with our DynamoDB Account Metadata Store to detect the creation of any cross-account permissions that span outside of the AWS Organization, or that may have Cross-Tenant implications.
Automated creation and management of Tenant-Owned Resources and Services, Projects and Workbenches
CAEdge follows the “Everything-as-an-API Approach” and is designed as a fully open platform on the internet. All key features are exposed via a secured, public API. This includes the creation of Projects, Workbenches, and AWS Accounts including the management of access rights in a self-service manner for authorized users, as well as any updates affecting subsequent long-term management. This can only be achieved through a very high degree of automation.
We architect the following services to achieve this high degree of automation:
AWS Control Tower – An AWS managed service for account creation and OU assignment.
AWS Deployment Framework (AWS ADF) – an extensive and flexible framework to manage and deploy resources across multiple AWS Accounts and Regions within an AWS Organization. We use ADF to baseline all accounts with the resources required. This includes all security services, default IAM Roles, network related resources, such as VPCs and DNS and any other resources specific to the AWS Account type.
AWS Single Sign-On (AWS SSO) – A central IAM solution to control access to AWS Accounts. AWS SSO assignments are fully automated based on our defined access patterns using our custom Dispatch application and an extended version of the AWS SSO Enterprise solution.
AWS DynamoDB – A fully managed NoSQL database service for storing tenant, project and AWS Account data. Including information related to ownership, cost management, access management.
Dispatch CAEdge Web Application – A fully serverless web application that exposes functionality to end-users via API calls. It handles authentication, authorization, and provides business logic in the form of AWS Lambda functions to orchestrate all of the aforementioned services.
The following diagram provides a high-level overview of the automation mechanism at the platform level:
Figure 3 – High-level overview of the automation mechanism
With this solution in place, Continental enables OEMs, suppliers, and other partners to spin up developer workbenches in a tenant context within minutes; thereby reducing the setup time from weeks to minutes using a self-service approach.
Conclusion
In this post, we showed how Continental built a secure multi-tenant platform that serves as the scalable foundation for software-intensive, vehicle-related workloads. For other organizations experiencing challenges when transforming into a software-centric organization, this solution eases the onboarding process so developers can start building within hours instead of months.
This post is written by Matthew Nightingale, Associate Solutions Architect.
Traditional methods of performing address validation on geospatial datasets can be expensive and time consuming. Using Amazon Location Service with AWS Lambda in a serverless data processing pipeline, you may achieve significant performance improvements and cost savings on address validation jobs that use geospatial data.
This blog contains a deployable AWS Serverless Application Model (AWS SAM) template. It also uses sample data sourced from publicly available datasets that you can deploy and use to test the application. This blog offers a starting point to build out a serverless address validation pipeline in your own AWS account.
Overview
This application implements a serverless scatter/gather architecture using Lambda and Amazon S3, performing address validation with the Amazon Location Service. An S3 PUT event triggers each Lambda function to run data processing jobs along each step of the pipeline.
To test the application, a user uploads a .CSV file to S3. This dataset is labeled with fields that are recognized by the 2waygeocoder Lambda function. The application returns a processed dataset to S3 appended with location information from the Amazon Location Places API.
The Scatter Lambda function takes a dataset from the S3 bucket labeled input and splits it into equally sized shards.
The Process Lambda function takes each shard from the pre-processed bucket. It performs address validation in parallel with a 2waygeocoder function calling the Amazon Location Service Places API.
The Gather Lambda function takes each shard from the post-processed bucket. It appends the data into a complete dataset with additional address information.
Amazon Location Service
Amazon Location Service sources high-quality geospatial data from HERE and ESRI to support searches by using a place index resource.
With the Amazon Locations Places API, you can convert addresses and other textual queries into geographic coordinates (also known as geocoding). You can also convert geographic positions into addresses and place descriptions (known as reverse geocoding).
The example application includes a 2waygeocoder capable of both geocoding and reverse geocoding. The next section shows examples of the call and response from the Amazon Location Places API for both geocoding and reverse geocoding.
Response = location.search_place_index_for_text(
	IndexName = ‘explore.place’
###index is created using Amazon Location service
	Text = “Boston, MA”)
location_response = Reponse[“Results”]
print(location_response)
Example response:
Example reverse-geocoding with Amazon Location Service
Response = location.search_place_index_for_position(
	IndexName = ‘explore.place’
###index is created using Amazon Location service
	Position = “-71.056739, 42.358660”))
location_response = Reponse[“Results”]
print(location_response)
Example response:
Design considerations
Processing data with Lambda in parallel using a serverless scatter/gather pipeline helps provide performance efficiency at lower cost. To provide even greater performance, you can optimize your Lambda configuration for higher throughput. There are several strategies you can implement to do this and a key few topics to keep in mind.
Increase the allocated memory for your Lambda function
The simplest way to increase throughput is to increase the allocated memory of the Lambda function.
Faster Lambda functions can process more data and increase throughput. This works even if a Lambda function’s memory utilization is low. This is because increasing memory also increases vCPUs in proportion to the amount configured. Each function supports up to 10 GB of memory and you can access up to six vCPUs per function.
To see the average cost and execution speed for each memory configuration, the Lambda Power Tuning tool helps to visualize the tradeoffs.
Optimize shard size
Another method for increasing performance in a serverless scatter/gather architecture is to optimize the total number of shards created by the scatter function. Increasing the total number of shards consequently reduces the size of any single shard, allowing Lambda to process each shard faster.
When scaling with Lambda, one instance of a function handles one request at a time. When the number of requests increases, Lambda creates more instances of the function to process traffic. Because S3 invokes Lambda asynchronously, there is an internal queue buffering requests between the event source and the Lambda service.
In a serverless scatter/gather architecture, having more shards results in more concurrent invocations of the process Lambda function. For more information about scaling and concurrency with Lambda, see this blog post. Increasing concurrency with Lambda can lead to API request throttling.
Consider API request throttling with your concurrent Lambda functions
In a serverless scatter/gather architecture, the rate at which your code calls APIs increases by a factor equal to the number of concurrent Lambda functions. This means API request limits can quickly be exceeded. You must consider Service Quotas and API request limits when trying to increase the performance of your serverless scatter/gather architecture.
For example, the Amazon Location Places APIs called in the processing function of this application has a default limit of 50 API requests per second. The 2waygeocoder calls on average about 12 APIs per second. Splitting the application into more than four shards may cause API throttling exception errors in this case. Requests to increase Service Quotas can be made through your AWS account.
Deploying the solution
You need the following perquisites to deploy the example application:
Clone the repository and download the sample source code to your environment where AWS SAM is installed: git clone https://github.com/aws-samples/amazon-location-service-serverless-address-validation
Change into the project directory containing the template.yaml file: cd ~/environment/amazon-location-service-serverless-address-validation
Build the application using AWS SAM: sam build
Deploy the application to your account using AWS SAM. Be sure to follow proper S3 naming conventions providing globally unique names for S3 buckets: sam deploy --guided
Testing the application
Testing geocoding
To test the application, download the dataset that is linked in Testing the Application section of the GitHub repository. These tests demonstrate both the geocoding and reverse-geocoding capabilities of the application.
First, test the geocoding capabilities. You perform address validation on the City of Hartford Business Listing dataset linked in the GitHub repository. The dataset contains a listing of all the active businesses registered in the city Hartford, CT, and each business address. The GitHub repo links to an external website where you can download the dataset.
Download the .csv version of the City of Hartford Business Listing dataset. The link is found in the Testing the Application section of the README file on GitHub.
Open the file locally to explore its contents.
Ensure that the .csv file contains columns labeled as “Address”, “City”, and “State”. The 2waygeocoder deployed as part of the AWS SAM template recognizes these columns to perform geocoding.
Before testing the application’s geocoding capabilities, explore the pricing of Amazon Location Service. In order to save money, you can trim the length of the dataset for testing by removing rows. Once the dataset is trimmed to a desired length, navigate to S3 in the AWS Management Console.
Upload the dataset to the S3 bucket labeled “input”. This triggers the scatter function.
Navigate to the S3 bucket labeled “raw” to view the shards of your dataset created by the scatter function.
Navigate to Lambda and select the 2waygeocoder function to view the CloudWatch Logs to see any information that is returned by the function code in near-real-time.
Once the data is processed, navigate to the S3 bucket labeled “destination” to view the complete processed dataset that is created by the gather function. It may take several minutes for your dataset to finish processing.
Congratulations! You have successfully geocoded a dataset using Amazon Location Service with a serverless address validation pipeline.
Testing reverse-geocoding
Next, test the reverse-geocoding capabilities of the application. You perform address validation on the Miami Housing Dataset linked in the GitHub repository. This dataset contains information on 13,932 single-family homes sold in Miami. The repo links to an external website where you can download the dataset.
Download the zip file containing the .csv version of the dataset from . The link is found in the Testing the Application section of the README file on GitHub.
Open the file locally to explore its contents.
Ensure the .csv file contains columns A and B labeled “Latitude” and “Longitude”. You must edit these column headers to match the correct format that is recognized by the 2waygeocoder to perform reverse-geocoding. Only the “L” should be capitalized.
To minimize cost, trim the length of the dataset for testing by removing rows. At the full size of ~13,933 rows, the dataset takes approx. 5 minutes to process.
Once the dataset is trimmed to a desired length and both column A and B are labeled as “Latitude” and “Longitude” respectively, navigate to S3 in the AWS Management Console, and upload the dataset to your S3 bucket labeled “Input”.
Navigate to the S3 bucket labeled “raw” to view the shards of your dataset.
Navigate to Lambda and select the 2waygeocoder function to view the CloudWatch Logs to see any information that is returned by the function code in near-real-time.
Navigate to the S3 bucket labeled “destination” to view the complete processed dataset that is created by the gather function. It may take several minutes for your dataset to finish processing.
Congratulations! You have successfully reverse-geocoded a dataset with Amazon Location Service using a serverless scatter/gather pipeline. You can move on to the conclusion, or continue to test the geocoding capabilities of the application with additional datasets.
Next steps
To get started testing your own datasets, use the AWS SAM template from GitHub deployed as part of this blog. Ensure that the labels in your dataset are labeled to match the constructs used in this blog post. The 2waygeocoder recognizes columns labeled “Latitude” and “Longitude” to perform reverse-geocoding, and “Address”, “City”, and “State” to perform geocoding.
Now that the data has been geocoded by Amazon Location Service and is in S3, you can use Amazon QuickSight geospatial charts to quickly and easily create interactive charts. For information on how to create a Dataset in QuickSight using Amazon S3 Files, check out the QuickSight User Guide.
Below is an example using QuickSight Geospatial charts to map the Miami housing dataset. The map shows average sale price by zipcode:
This example uses QuickSight geospatial charts to map the City of Hartford Business dataset. The map shows DBA (doing business as) by latitude and longitude:
Conclusion
This blog post performs address validation with the Amazon Location Service, demonstrating both geocoding and reverse geocoding capabilities.
Using a serverless architecture with S3 and Lambda, you can achieve both cost optimization and performance improvement compared with traditional methods of address validation. Using this application, your organization can better understand and harness geospatial data.
For more serverless learning resources, visit Serverless Land.
Prevent receiving a flood of unwanted alerts and receive only the most critical notifications by defining trigger dependencies.
Every IT infrastructure has multiple elements, failure of which can cause a cascading set of problems across the particular infrastructure segment. It is important to prevent an unwanted alert storm and highlight only the root cause problem within the problem chain.
Define trigger dependencies to prevent alert storms:
Only the most critical problems will be displayed in Zabbix
Dependent triggers will not generate problems until the parent trigger is in an OK state
Each trigger can have multiple trigger dependencies
Trigger dependencies can be defined between triggers on different hosts
Check out the video to learn how to define trigger dependencies.
How to define a trigger dependency:
Navigate to Configuration → Hosts
Find the host for which you will define the trigger dependency
Click on the triggers button next to the host
Open the trigger for which you will define the dependency
Click on the Dependencies tab
Click add and select the host containing the parent trigger
Select the trigger on which the current trigger will depend on
If required, add more trigger dependencies
Click the Update button
Simulate a problem to test the dependency
Navigate to Monitoring → Problems and observe the trigger dependency behavior
Tips and best practices:
The dependent trigger will only be re-evaluated once the related item receives new metrics
Trigger dependency may be added between host triggers as long as it wouldn’t result in a circular dependency
A trigger dependency chain between multiple hosts can be created
Zabbix will not execute actions for the dependent trigger if the parent trigger is in a problem state
To provide the best experiences, we use technologies like cookies to store and/or access device information. Consenting to these technologies will allow us to process data such as browsing behavior or unique IDs on this site. Not consenting or withdrawing consent, may adversely affect certain features and functions.
Functional
Always active
The technical storage or access is strictly necessary for the legitimate purpose of enabling the use of a specific service explicitly requested by the subscriber or user, or for the sole purpose of carrying out the transmission of a communication over an electronic communications network.
Preferences
The technical storage or access is necessary for the legitimate purpose of storing preferences that are not requested by the subscriber or user.
Statistics
The technical storage or access that is used exclusively for statistical purposes.The technical storage or access that is used exclusively for anonymous statistical purposes. Without a subpoena, voluntary compliance on the part of your Internet Service Provider, or additional records from a third party, information stored or retrieved for this purpose alone cannot usually be used to identify you.
Marketing
The technical storage or access is required to create user profiles to send advertising, or to track the user on a website or across several websites for similar marketing purposes.