Performance isolation in a multi-tenant database environment

Post Syndicated from Justin Kwan original https://blog.cloudflare.com/performance-isolation-in-a-multi-tenant-database-environment/
Performance isolation in a multi-tenant database environment

Performance isolation in a multi-tenant database environment

Operating at Cloudflare scale means that across the technology stack we spend a great deal of time handling different load conditions. In this blog post we talk about how we solved performance difficulties with our Postgres clusters. These clusters support a large number of tenants and highly variable load conditions leading to the need to isolate activity to prevent tenants taking too much time from others. Welcome to real-world, large database cluster management!

As an intern at Cloudflare I got to work on improving how our database clusters behave under load and open source the resulting code.

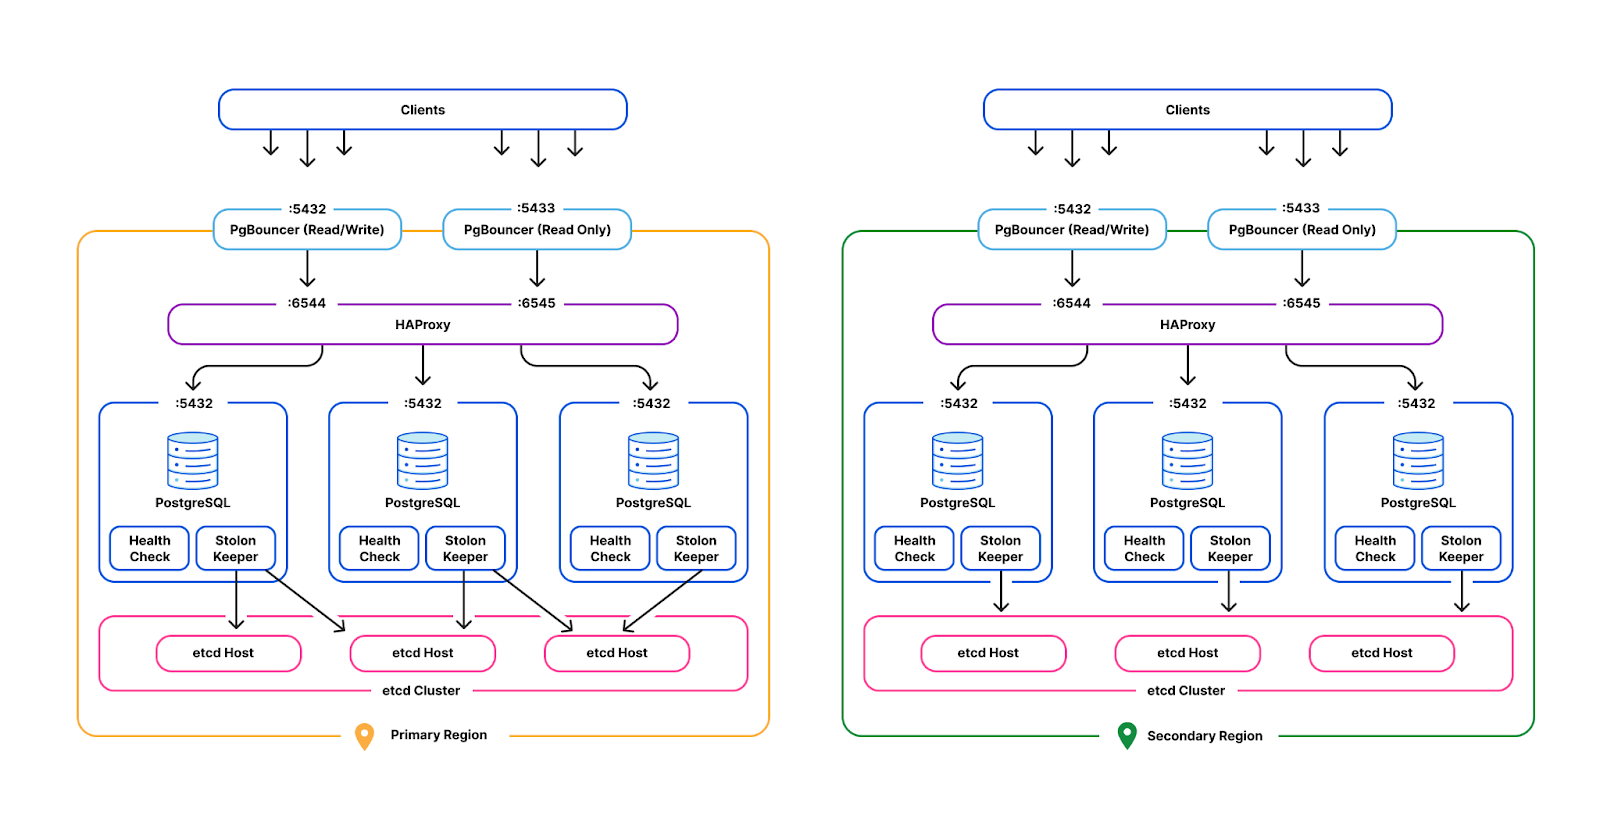
Cloudflare operates production Postgres clusters across multiple regions in data centers. Some of our earliest service offerings, such as our DNS Resolver, Firewall, and DDoS Protection, depend on our Postgres clusters’ high availability for OLTP workloads. The high availability cluster manager, Stolon, is employed across all clusters to independently control and replicate data across Postgres instances and elect Postgres leaders and failover under high load scenarios.

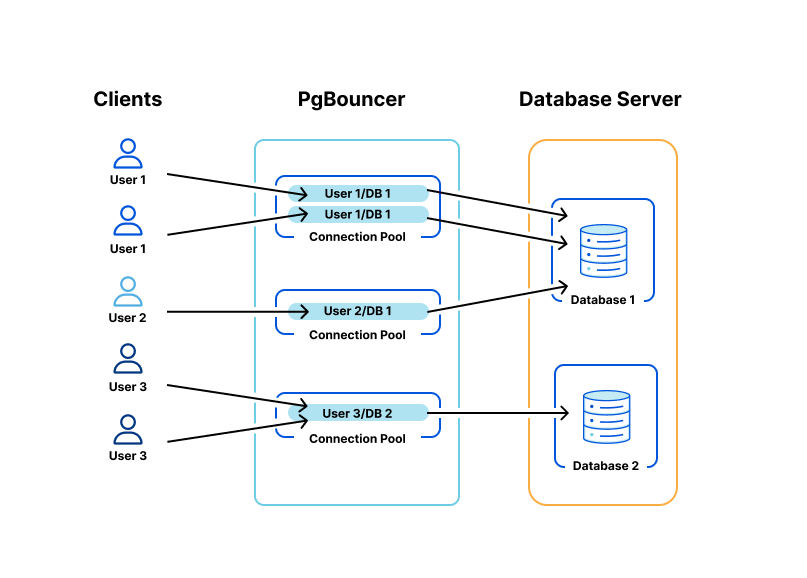
PgBouncer and HAProxy act as the gateway layer in each cluster. Each tenant acquires client-side connections from PgBouncer instead of Postgres directly. PgBouncer holds a pool of maximum server-side connections to Postgres, allocating those across multiple tenants to prevent Postgres connection starvation. From here, PgBouncer forwards queries to HAProxy, which load balances across Postgres primary and read replicas.

Problem

Our multi-tenant Postgres instances operate on bare metal servers in non-containerized environments. Each backend application service is considered a single tenant, where they may use one of multiple Postgres roles. Due to each cluster serving multiple tenants, all tenants share and contend for available system resources such as CPU time, memory, disk IO on each cluster machine, as well as finite database resources such as server-side Postgres connections and table locks. Each tenant has a unique workload that varies in system level resource consumption, making it impossible to enforce throttling using a global value.

This has become problematic in production affecting neighboring tenants:

  • Throughput. A tenant may issue a burst of transactions, starving shared resources from other tenants and degrading their performance.
  • Latency: A single tenant may issue very long or expensive queries, often concurrently, such as large table scans for ETL extraction or queries with lengthy table locks.

Both of these scenarios can result in degraded query execution for neighboring tenants. Their transactions may hang or take significantly longer to execute (higher latency) due to either reduced CPU share time, or slower disk IO operations due to many seeks from misbehaving tenant(s). Moreover, other tenants may be blocked from acquiring database connections from the database proxy level (PgBouncer) due to existing ones being held during long and expensive queries.

Previous solution

When database cluster load significantly increases, finding which tenants are responsible is the first challenge. Some techniques include searching through all tenants’ previous queries under typical system load and determining whether any new expensive queries have been introduced under the Postgres’ pg_stat_activity view.

Database concurrency throttling

Once the misbehaving tenants are identified, Postgres server-side connection limits are manually enforced using the Postgres query.

ALTER USER "some_bad-user" WITH CONNECTION LIMIT 123;

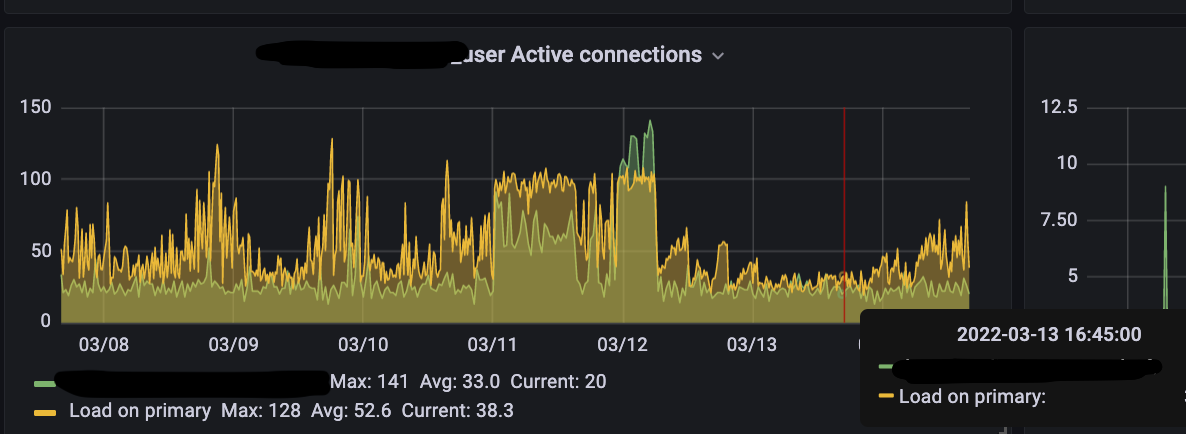
This essentially restricts or “squeezes” the concurrent throughput for a single user, where each tenant will only be able to exhaust their share of connections.

Manual concurrency (connection) throttling has shown improvements in shedding load in Postgres during high production workloads:
Performance isolation in a multi-tenant database environment

While we have seen success with this approach, it is not perfect and is horribly manual. It also suffers from the following:

  • Postgres does not immediately kill existing tenant connections when a new user limit is set; the user may continue to issue bursty or expensive queries.
  • Tenants may still issue very expensive, resource intensive queries (affecting neighboring tenants) even if their concurrency (connection pool size) is reduced.
  • Manually applying connection limits against a misbehaving tenant is toil; an SRE could be paged to physically apply the new limit at any time of the day.
  • Manually analyzing and detecting misbehaving tenants based on queries can be time-consuming and stressful especially during an incident, requiring production SQL analysis experience.
  • Additionally, applying new throttling limits per user/pool, such as the allocated connection count, can be arbitrary and experimental while requiring extensive understanding of tenant workloads.
  • Oftentimes, Postgres may be under so much load that it begins to hang (CPU starvation). SREs may be unable to manually throttle tenants through native interfaces once a high load situation occurs.

New solution

Gateway concurrency throttling

Typically, the system level resource consumption of a query is difficult to control and isolate once submitted to the server or database system for execution. However, a common approach is to intercept and throttle connections or queries at the gateway layer, controlling per user/pool traffic characteristics based on system resource consumption.

We have implemented connection throttling at our database proxy server/connection pooler, PgBouncer. Previously, PgBouncer’s user level connection limits would not kill existing connections, but only prevent exceeding it. We now support the ability to throttle and kill existing connections owned by each user or each user’s connection pool statically via configuration or at runtime via new administrative commands.

PgBouncer Configuration
[users]
dns_service_user = max_user_connections=60
firewall_service_user = max_user_connections=80
[pools]
user1.database1 = pool_size=90
PgBouncer Runtime Commands
SET USER dns_service_user = ‘max_user_connections=40’;
SET POOL dns_service_user.dns_db = ‘pool_size=30’;

This required major bug fixes, refactoring and implementation work in our fork of PgBouncer. We’ve also raised multiple pull requests to contribute all of our features to PgBouncer open source. To read about all of our work in PgBouncer, read this blog.

These new features now allow for faster and more granular “load shedding” against a misbehaving tenant’s concurrency (connection pool, user and database pair), while enabling stricter performance isolation.

Future solutions

We are continuing to build infrastructure components that monitor per-tenant resource consumption and detect which tenants are misbehaving based on system resource indicators against historical baselines. We aim to automate connection and query throttling against tenants using these new administrative commands.

We are also experimenting with various automated approaches to enforce strict tenant performance isolation.

Congestion avoidance

An adaptation of the TCP Vegas congestion avoidance algorithm can be employed to adaptively estimate and enforce each tenant’s optimal concurrency while still maintaining low latency and high throughput for neighboring tenants. This approach does not require resource consumption profiling, manual threshold tuning, knowledge of underlying system hardware, or expensive computation.

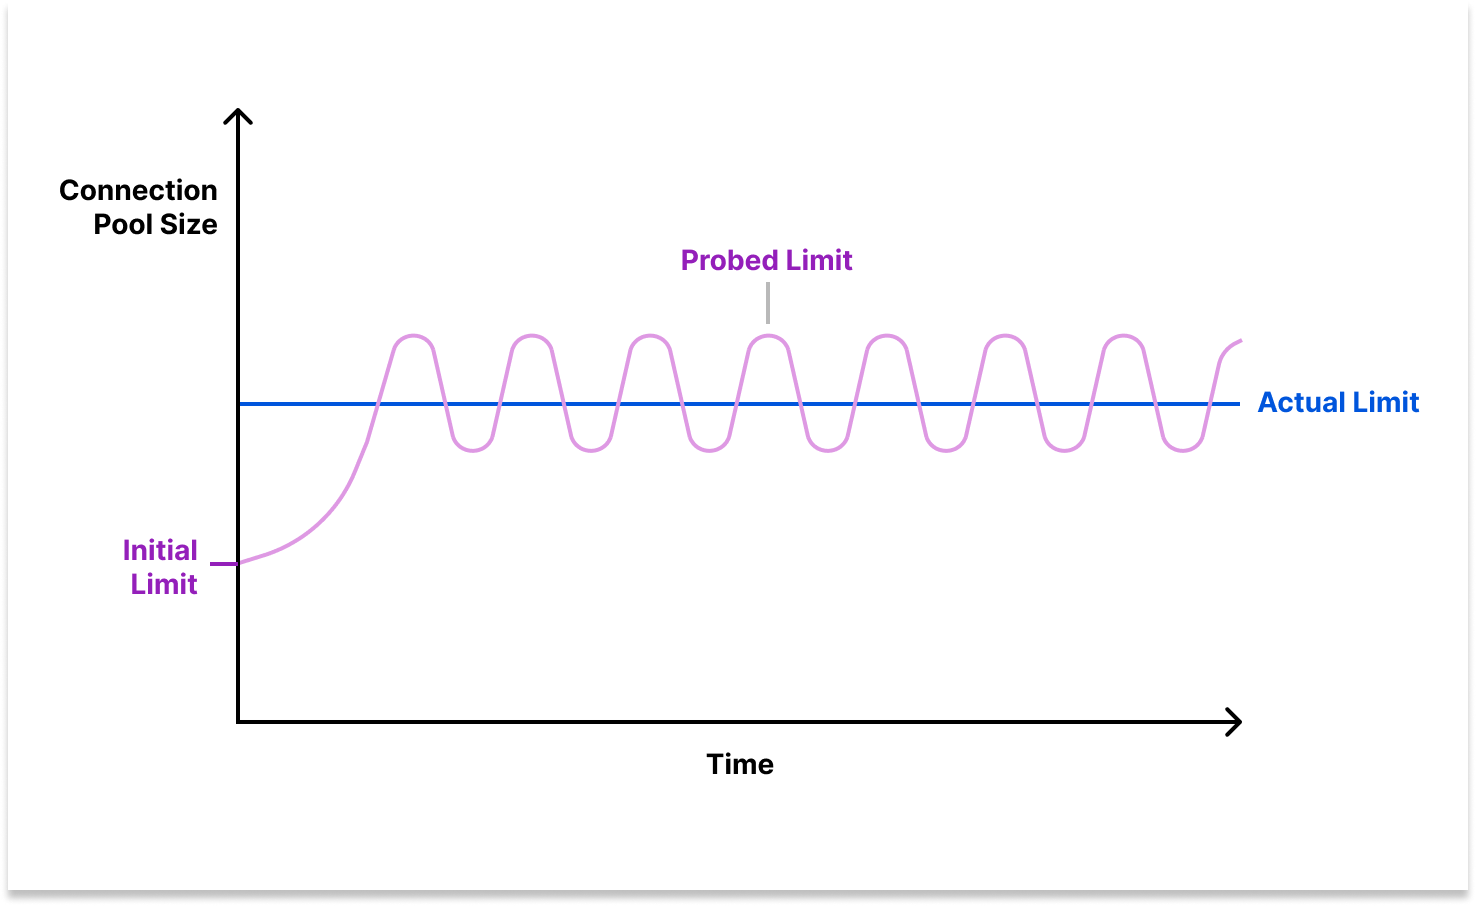
Traditionally, TCP Vegas converges to the initially unknown and optimal congestion window (max packets that can be sent concurrently). In the same spirit, we can treat the unknown congestion window as the optimal concurrency or connection pool size for database queries. At the gateway layer, PgBouncer, each tenant will begin with a small connection pool size, while we dynamically sample each tenant’s transaction’s round trip time (RTT) against Postgres. We gradually increase the connection pool size (congestion window) of a tenant so long as their transaction RTTs do not deteriorate.

Performance isolation in a multi-tenant database environment

When a tenant’s sampled transaction latency increases, the formula’s minimum by sampled request latency ratio will decrease, naturally reducing the tenant’s available concurrency which reduces database load.
Performance isolation in a multi-tenant database environment

Essentially, this algorithm will “back off” when observing high query latencies as the indicator of high database load, regardless of whether the latency is due to CPU time or disk/network IO blocking, etc. This formula will converge to find the optimal concurrency limit (connection pool size) since the latency ratio always converges to 0 with sufficiently large sample request latencies. The square root of the current tenant pool size is chosen as a constant request “burst” headroom because of its fast growth and being relatively large for small pool sizes (when latencies are low) but converges when the pool size is reduced (when latencies are high).

Rather than reactively shedding load, congestion avoidance preventatively or “smoothly” throttles traffic before load induced performance degradation becomes an issue. This algorithm aims to prevent database server resource starvation which causes other queries to hang.

Theoretically, if one tenant misbehaves and causes load induced latency for others, this TCP congestion algorithm may incorrectly blindly throttle all tenants. Hence why it may be necessary to apply this adaptive throttling only against tenants with high CPU to latency correlation when the system performance is degrading.

Tenant resource quotas

Configurable resource quotas can be introduced per each tenant. Upstream application service tenants are restricted to their allocated share of resources expressed as CPU % utilized per second and max memory. If a tenant overuses their share, the database gateway (PgBouncer) should throttle their concurrency, queries per second and ingress bytes to force consumption within their allocated slice.

Resource throttling a tenant must not “spillover” or affect other tenants accessing the same cluster. This could otherwise reduce the availability of other customer-facing applications and violate SLO (service-level objectives). Resource restriction must be isolated to each tenant.

If traffic is low against Postgres instances, tenants should be permitted to exceed their allocation limit. However, when load against the cluster degrades the entire performance of the system (latency), the tenant’s limit must be re-enforced at the gateway layer, PgBouncer. We can make deductions around the health of the entire database server based on indicators such as average query latency’s rate of change against a predefined threshold. All tenants should agree that a surplus in resource consumption may result in query throttling of any pattern.

Each tenant has a unique and variable workload, which may degrade multi tenant performance at any time. Quick detection requires profiling the baseline resource consumption of each tenant’s (or tenant’s connection pooled) workload against each local Postgres server (backend pids) in near real-time. From here, we can correlate the “baseline” traffic characteristics with system level resource consumption per database instance.

Taking an average or generalizing statistical measures across distributed nodes (each tenant’s resource consumption on Postgres instances in this case) can be inaccurate due to high variance in traffic against leader vs replica instances. This would lead to faulty throttling decisions applied against users. For instance, we should not throttle a user’s concurrency on an idle read replica even if the user consumes excessive resources on the primary database instance. It is preferable to capture tenant consumption on a per Postgres instance level, and enforce throttling per instance rather than across the entire cluster.

Multivariable regression can be employed to model the relationship between independent variables (concurrency, queries per second, ingested bytes) against the dependent variables (system level resource consumption). We can calculate and enforce the optimal independent variables per tenant under high load scenarios. To account for workload changes, regression adaptability vs accuracy will need to be tuned by adjusting the sliding window size (amount of time to retain profiled data points) when capturing workload consumption.

Gateway query queuing

User queries can be prioritized for submission to Postgres at the gateway layer (PgBouncer). Within a one or multiple global priority queues, query submissions by all tenants are ordered based on the current resource consumption of the tenant’s connection pool or the tenant itself. Alternatively, ordering can be based on each query’s historical resource consumption, where each query is independently profiled. Based on changes in tenant resource consumption captured from each Postgres instance’s server, all queued queries can be reordered every time the scheduler forwards a query to be submitted.

To prevent priority queue starvation (one tenant’s query is at the end of the queue and is never executed), the gateway level query queuing can be configured to only enable when there is peak load/traffic against the Postgres instance. Or, the time of enqueueing a query can be factored into the priority ordering.
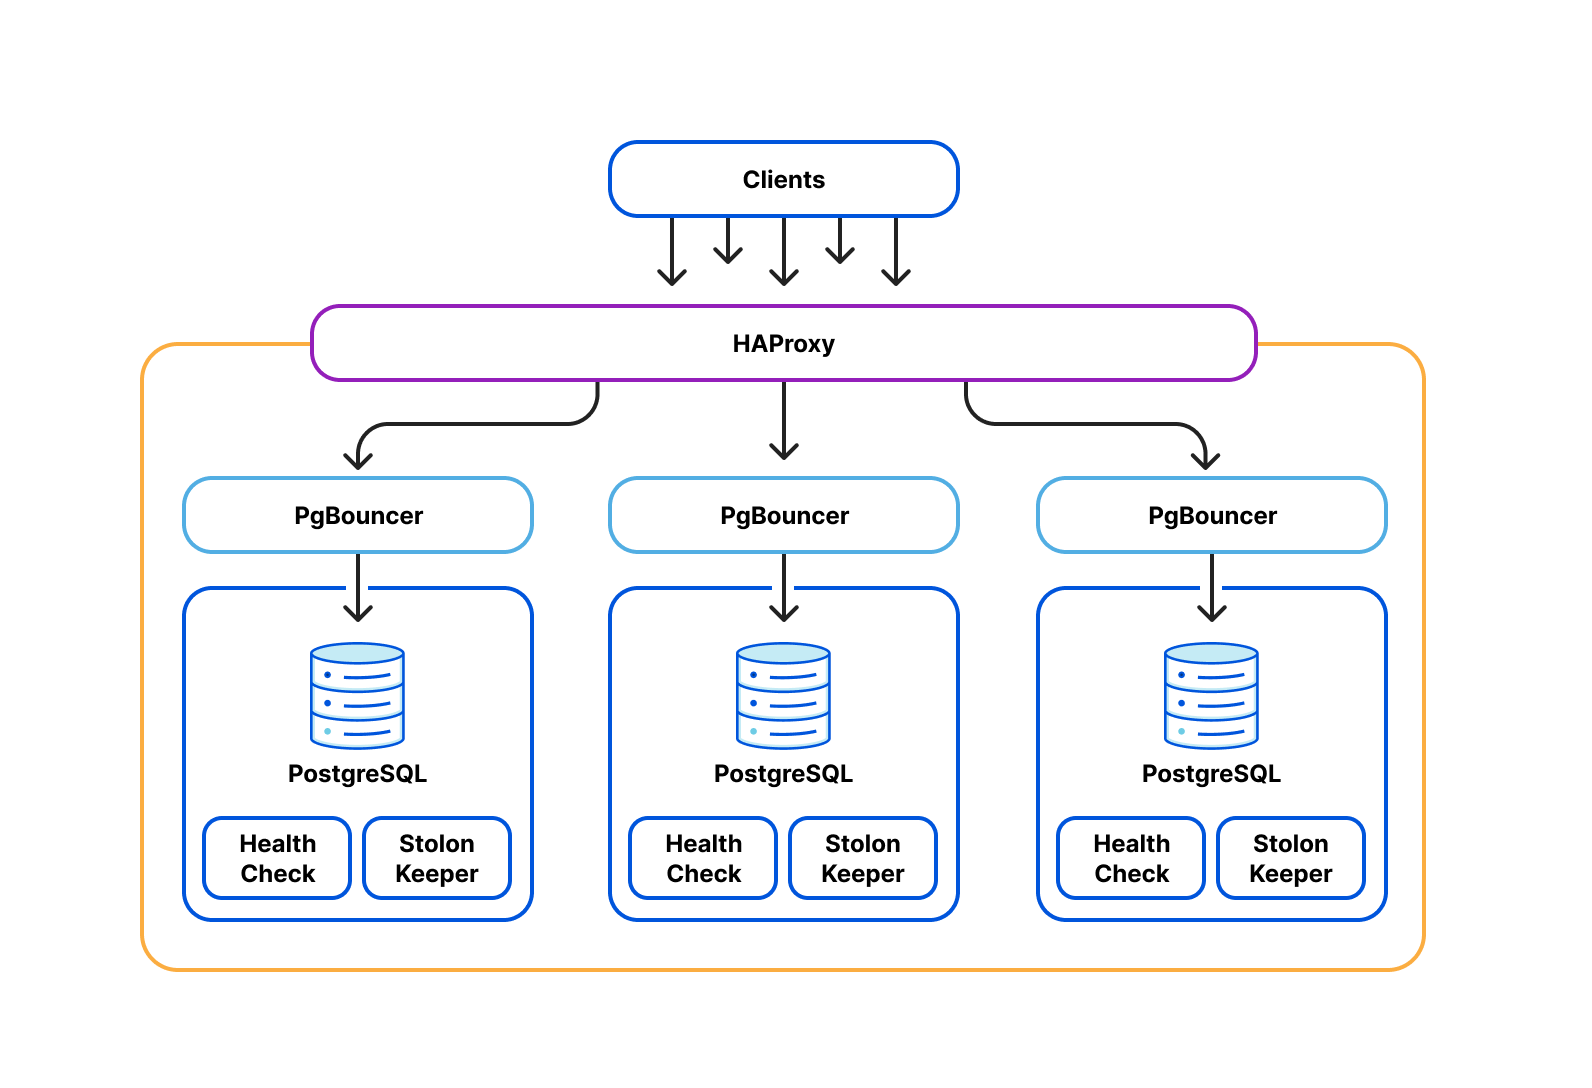
Performance isolation in a multi-tenant database environment

This approach would isolate tenant performance by allowing non-offending tenants to continue reserving connections and executing queries (such as critical health monitoring queries). Higher latency would only be observed from the tenants that are utilizing more resources (from many/expensive transactions). This approach is straightforward to understand, generic in application (can queue transactions based on other input metrics), and non-destructive as it does not kill client/server connections, and should only drop queries when the in-memory priority queue reaches capacity.

Conclusion

Performance isolation in our multi-tenant storage environment continues to be a very interesting challenge that touches areas including OS resource management, database internals, queueing theory, congestion algorithms and even statistics. We’d love to hear how the community has tackled the “noisy neighbor” problem by isolating tenant performance at scale!


[$] Toward a better definition for i_version

Post Syndicated from original https://lwn.net/Articles/905931/

Filesystems maintain a lot of metadata about the files they hold; most of
this metadata is for consumption by user space. Some metadata, though,
stays buried within the filesystem and is not visible outside of the
kernel. Once such
piece of metadata is the file version count, known as i_version.
Current efforts to change how i_version is managed — and to make
it visible to user space — have engendered a debate on what
i_version actually means and what its behavior should be.

Open sourcing our fork of PgBouncer

Post Syndicated from Justin Kwan original https://blog.cloudflare.com/open-sourcing-our-fork-of-pgbouncer/

Open sourcing our fork of PgBouncer

Open sourcing our fork of PgBouncer

Cloudflare operates highly available Postgres production clusters across multiple data centers, supporting the transactional workloads of our core service offerings such as our DNS Resolver, Firewall, and DDoS Protection.

Multiple PgBouncer instances sit at the front of the gateway layer per each cluster, acting as a TCP proxy that provides Postgres connection pooling. PgBouncer’s pooling enables upstream applications to connect to Postgres, without having to constantly open and close connections (expensive) at the database level, while also reducing the number of Postgres connections used. Each tenant acquires client-side connections from PgBouncer instead of Postgres directly.

Open sourcing our fork of PgBouncer

PgBouncer will hold a pool of maximum server-side connections to Postgres, allocating those across multiple tenants to prevent Postgres connection starvation. From here, PgBouncer will forward backend queries to HAProxy, which load balances across Postgres primary and read replicas.

As an intern at Cloudflare I got to work on improving how our database clusters behave under load and open source the resulting code.

We run our Postgres infrastructure in non-containerized, bare metal environments which consequently leads to multitenant resource contention between Postgres users. To enforce stricter tenant performance isolation at the database level (CPU time utilized, memory consumption, disk IO operations), we’d like to configure and enforce connection limits per user and connection pool at PgBouncer.

To do that we had to add features and fix bugs in PgBouncer. Rather than continue to maintain a private fork we are open sourcing our code for others to use.

Authentication Rejection

The PgBouncer connection pooler offers options to enforce server connection pool size limits (effective concurrency) per user via static configuration. However, an authentication bug upstream prevented these features from correctly working when Postgres was set to use HBA authentication. Administrators who sensibly use server-side authentication could not take advantage of these user-level features.

This ongoing issue has also been experienced by others in the open-source community:

https://github.com/pgbouncer/pgbouncer/issues/484
https://github.com/pgbouncer/pgbouncer/issues/596

Root Cause

PgBouncer needs a Postgres user’s password when proxying submitted queries from client connection to a Postgres server connection. PgBouncer will fetch a user’s Postgres password defined in userlist.txt (auth_file) when a user first logs in to compare against the provided password. However, if the user is not defined in userlist.txt, Pgbouncer will fetch their password from the Postgres pg_shadow system view for comparison. This password will be used when PgBouncer subsequently forwards queries from this user to Postgres. The same applies when Postgres is configured to use HBA authentication.

Following serious debugging efforts and time spent in GDB, we found that multiple user objects are typically created for a single real user: via configuration loading from the [users] section and upon the user’s first login. In PgBouncer, any users requiring a shadow auth query would be stored under their respective database struct instance, whereas any user with a password defined in userlist.txt would be stored globally. Because the non-authenticated user already existed in memory after being parsed from the [users] section, PgBouncer assumed that the user was defined in userlist.txt, where the shadow authentication query could be skipped. It would not bother to fetch and set the user’s password upon first login, resulting in an empty user password. This is why subsequent queries submitted by the user would be rejected with authentication failure at Postgres.

To solve this, we simplified the code to globally store all users in one place rather than store different types of users (requiring different methods of authentication) in a disaggregated fashion per database or globally. Also, rather than assuming a user is authenticated if they merely exist, we keep track of whether the user requires authentication via auth query or from fetching their password from userlist.txt. This depends on how they were created.

We saw the value in troubleshooting and fixing these issues; it would unlock an entire class of features in PgBouncer for our use cases, while benefiting many in the open-source community.

New Features

We’ve also done work to implement and support additional features in PgBouncer to enforce stricter tenant performance isolation.

Previously, PgBouncer would only prevent tenants from exceeding preconfigured limits, not particularly helpful when it’s too late and a user is misbehaving or already has too many connections. PgBouncer now supports enforcing or shrinking per user connection pool limits at runtime, where it is most critically needed to throttle tenants who are issuing a burst of expensive queries, or are hogging connections from other tenants. We’ve also implemented new administrative commands to throttle the maximum connections per user or per pool at runtime.

PgBouncer also now supports statically configuring and dynamically enforcing connection limits per connection pool. This feature is extremely important in order to granularly throttle a tenant’s misbehaving connection pool without throttling and reducing availability on its other non-misbehaving pools.

PgBouncer Configuration
[users]
dns_service_user = max_user_connections=60
firewall_service_user = max_user_connections=80
[pools]
user1.database1 = pool_size=90
PgBouncer Runtime Commands
SET USER dns_service_user = ‘max_user_connections=40’;
SET POOL dns_service_user.dns_db = ‘pool_size=30’;

These new features required major refactoring around how PgBouncer stores users, databases weakly referenced and stored passwords of different users, and how we enforce killing server side connections while still in use.

Conclusion

We are committed to improving PgBouncer in open source and contributing all of our features to benefit the wider community. If you are interested, please consider contributing to our open source PgBouncer fork. After all, it is the community that makes PgBouncer possible!

Security updates for Friday

Post Syndicated from original https://lwn.net/Articles/906232/

Security updates have been issued by Debian (zlib), Fedora (dotnet3.1, firefox, java-1.8.0-openjdk-aarch32, thunderbird, and zlib), Mageia (canna, chromium-browser-stable, dovecot, firefox/nss, freeciv, freetype2, gnutls, kernel, kernel-linus, kicad, ldb/samba/sssd, libgsasl, microcode, nodejs, rsync, thunderbird, and unbound), Oracle (php:7.4 and systemd), Scientific Linux (firefox, rsync, systemd, and thunderbird), Slackware (vim), and SUSE (bluez, gstreamer-plugins-good, java-1_7_1-ibm, java-1_8_0-ibm, kernel, libcroco, postgresql10, postgresql13, python-lxml, and webkit2gtk3).

A multi-dimensional approach helps you proactively prepare for failures, Part 2: Infrastructure layer

Post Syndicated from Piyali Kamra original https://aws.amazon.com/blogs/architecture/a-multi-dimensional-approach-helps-you-proactively-prepare-for-failures-part-2-infrastructure-layer/

Distributed applications resiliency is a cumulative resiliency of applications, infrastructure, and operational processes. Part 1 of this series explored application layer resiliency. In Part 2, we discuss how using Amazon Web Services (AWS) managed services, redundancy, high availability, and infrastructure failover patterns based on recovery time and point objectives (RTO and RPO, respectively) can help in building more resilient infrastructures.

Pattern 1: Recognize high impact/likelihood infrastructure failures

To ensure cloud infrastructure resilience, we need to understand the likelihood and impact of various infrastructure failures, so we can mitigate them. Figure 1 illustrates that most of the failures with high likelihood happen because of operator error or poor deployments.

Automated testing, automated deployments, and solid design patterns can mitigate these failures. There could be datacenter failures—like whole rack failures—but deploying applications using auto scaling and multi-availability zone (multi-AZ) deployment, plus resilient AWS cloud native services, can mitigate the impact.

Likelihood and impact of failure events

Figure 1. Likelihood and impact of failure events

As demonstrated in the Figure 1, infrastructure resiliency is a combination of high availability (HA) and disaster recovery (DR). HA involves increasing the availability of the system by implementing redundancy among the application components and removing single points of failure.

Application layer decisions, like creating stateless applications, make it simpler to implement HA at the infrastructure layer by allowing it to scale using Auto Scaling groups and distributing the redundant applications across multiple AZs.

Pattern 2: Understanding and controlling infrastructure failures

Building a resilient infrastructure requires understanding which infrastructure failures are under control and which ones are not, as demonstrated in Figure 2.

These insights allow us to automate the detection of failures, control them, and employ pro-active patterns, such as static stability, to mitigate the need to scale up the infrastructure by over-provisioning it in advance.

Proactively designing systems in the event of failure

Figure 2. Proactively designing systems in the event of failure

The infrastructure decisions under our control that can increase the infrastructure resiliency of our system, include:

  • AWS services have control and data planes designed for minimum blast radius. Data planes typically have higher availability design goals than control planes and are usually less complex. When implementing recovery or mitigation responses to events that can affect resiliency, using control plane operations can lower the overall resiliency of your architectures. For example, Amazon Route 53 (Route 53) has a data plane designed for a 100% availability SLA. A good fail-over mechanism should rely on the data plane and not the control plane, as explained in Creating Disaster Recovery Mechanisms Using Amazon Route 53.
  • Understanding networking design and routes implemented in a virtual private cloud (VPC) are critical when testing the flow of traffic in our application. Understanding the flow of traffic helps us design better applications and see how one component failure can affect overall ingress/egress traffic. To achieve better network resiliency, it’s important to implement a good subnet strategy and manage our IP addresses to avoid fail-over issues and asymmetric routing in hybrid architectures. Use IP address management tools for established subnet strategies and routing decisions.
  • When designing VPCs and AZs, understanding the service limits, deploying independent routing tables and components in each zone increases availability. For example, highly available NAT gateways are preferred over NAT instances, as noted in the comparison provided in the Amazon VPC documentation.

Pattern 3: Considering different ways of increasing HA at the infrastructure layer

As already detailed, infrastructure resiliency = HA + DR.

Different ways by which system availability can be increased include:

  • Building for redundancy: Redundancy is the duplication of application components to increase the overall availability of the distributed system. After following application layer best practices, we can build auto healing mechanisms at the infrastructure layer.

We can take advantage of auto scaling features and use Amazon CloudWatch metrics and alarms to set up auto scaling triggers and deploy redundant copies of our applications across multiple AZs. This protects workloads from AZ failures, as shown in Figure 3.

Redundancy increases availability

Figure 3. Redundancy increases availability

  • Auto scale your infrastructure: When there are AZ failures, infrastructure auto scaling maintains the desired number of redundant components, which helps maintain the base level application throughput. This way, HA system and manage costs are maintained. Auto scaling uses metrics to scale in and out, appropriately, as shown in Figure 4.
How auto scaling improves availability

Figure 4. How auto scaling improves availability

  • Implement resilient network connectivity patterns: While building highly resilient distributed systems, network access to AWS infrastructure also needs to be highly resilient. While deploying hybrid applications, the capacity needed for hybrid applications to communicate with their cloud native application counterparts is an important consideration in designing the network access using AWS Direct Connect or VPNs.

Testing failover and fallback scenarios helps validate that network paths operate as expected and routes fail over as expected to meet RTO objectives. As the number of connection points between the data center and AWS VPCs increases, a hub and spoke configuration provided by the Direct Connect gateway and transit gateways simplify network topology, testing, and fail over. For more information, visit the AWS Direct Connect Resiliency Recommendations.

  • Whenever possible, use the AWS networking backbone to increase security, resiliency, and lower cost. AWS PrivateLink provides secure access to AWS services and exposes the application’s functionalities and APIs to other business units or partner accounts hosted on AWS.
  • Security appliances need to be set up in HA configuration, so that even if one AZ is unavailable, security inspection can be taken over by the redundant appliances in the other AZs.
  • Think ahead about DNS resolution: DNS is a critical infrastructure component; hybrid DNS resolution should be designed carefully with Route 53 HA inbound and outbound resolver endpoints instead of using self-managed proxies.

Implement a good strategy to share DNS resolver rules across AWS accounts and VPC’s with Resource Access Manager. Network failover tests are an important part of Disaster Recovery and Business Continuity Plans. To learn more, visit Set up integrated DNS resolution for hybrid networks in Amazon Route 53.

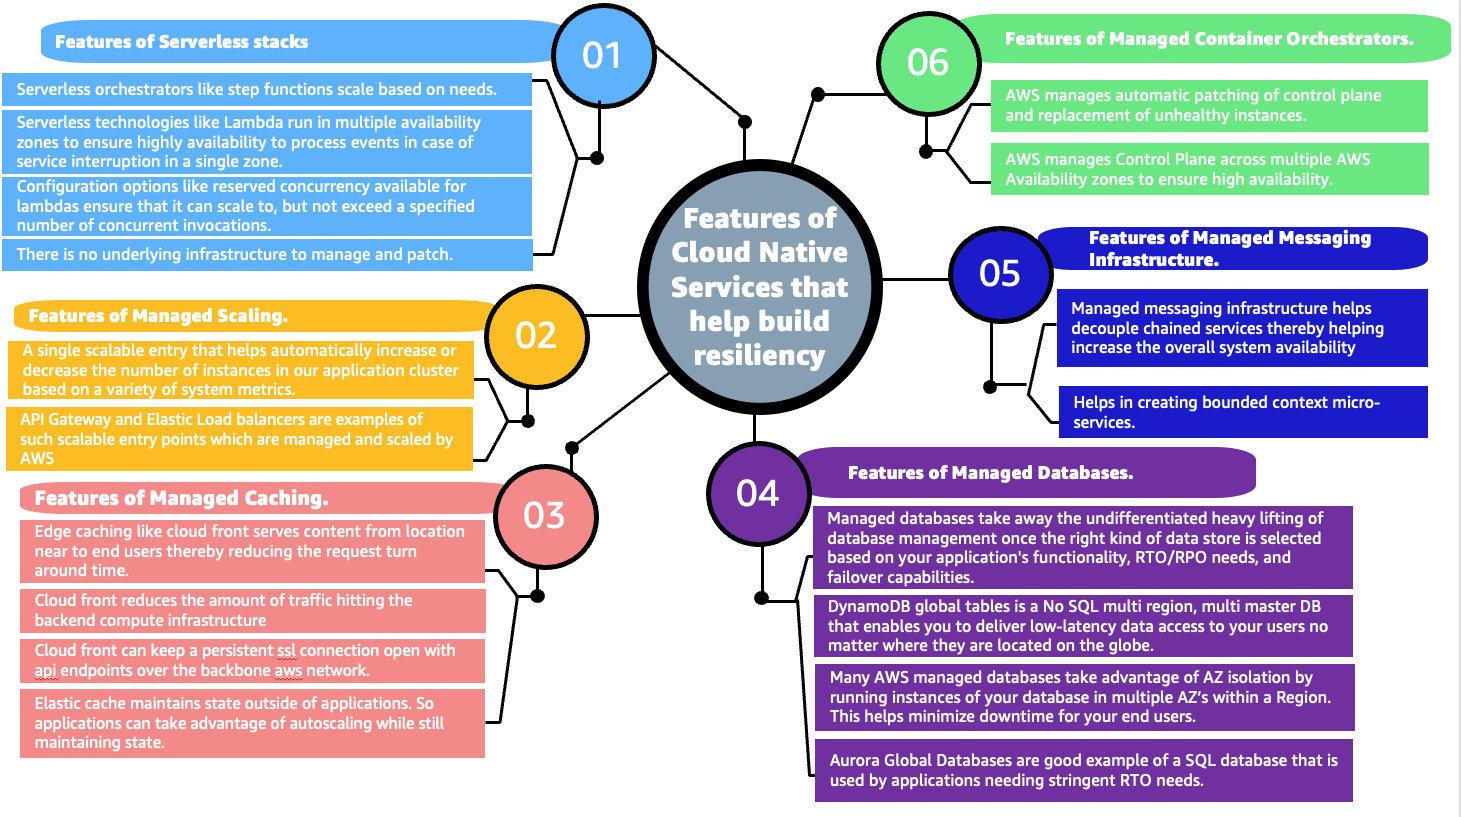
Additionally, ELB uses health checks to make sure that requests will route to another component if the underlying traffic application component fails. This improves the distributed system’s availability, as it is the cumulative availability of all different layers in our system. Figure 5 details advantages of some AWS managed services.

AWS managed services help in building resilient infrastructures (click the image to enlarge)

Figure 5. AWS managed services help in building resilient infrastructures (click the image to enlarge)

Pattern 4: Use RTO and RPO requirements to determine the correct failover strategy for your application

Capture RTO and RPO requirements early on to determine solid failover strategies (Figure 6). Disaster recovery strategies within AWS range from low cost and complexity (like backup and restore), to more complex strategies when lower values of RTO and RPO are required.

In pilot light and warm standby, only the primary region receives traffic. Pilot light only critical infrastructure components run in the backup region. Automation is used to check failures in the primary region using health checks and other metrics.

When health checks fail, use a combination of auto scaling groups, automation, and Infrastructure as Code (IaC) for quick deployment of other infrastructure components.

Note: This strategy depends on control plane availability in the secondary region for deploying the resources; keep this point in mind if you don’t have compute pre-provisioned in the secondary region. Carefully consider the business requirements and a distributed system’s application-level characteristics before deciding on a failover strategy. To understand all the factors and complexities involved in each of these disaster recovery strategies refer to disaster recovery options in the cloud.

Relationship between RTO, RPO, cost, data loss, and length of service interruption

Figure 6. Relationship between RTO, RPO, cost, data loss, and length of service interruption

Conclusion

In Part 2 of this series, we discovered that infrastructure resiliency is a combination of HA and DR. It is important to consider likelihood and impact of different failure events on availability requirements. Building in application layer resiliency patterns (Part 1 of this series), along with early discovery of the RTO/RPO requirements, as well as operational and process resiliency of an organization helps in choosing the right managed services and putting in place the appropriate failover strategies for distributed systems.

It’s important to differentiate between normal and abnormal load threshold for applications in order to put automation, alerts, and alarms in place. This allows us to auto scale our infrastructure for normal expected load, plus implement corrective action and automation to root out issues in case of abnormal load. Use IaC for quick failover and test failover processes.

Stay tuned for Part 3, in which we discuss operational resiliency!

Incident Reporting Regulations Summary and Chart

Post Syndicated from Harley Geiger original https://blog.rapid7.com/2022/08/26/incident-reporting-regulations-summary-and-chart/

Incident Reporting Regulations Summary and Chart

A growing number of regulations require organizations to report significant cybersecurity incidents. We’ve created a chart that summarizes 11 proposed and current cyber incident reporting regulations and breaks down their common elements, such as who must report, what cyber incidents must be reported, the deadline for reporting, and more.

Incident Reporting Regulations Summary and Chart
Download the chart now

This chart is intended as an educational tool to enhance the security community’s awareness of upcoming public policy actions, and provide a big picture look at how the incident reporting regulatory environment is unfolding. Please note, this chart is not comprehensive (there are even more incident reporting regulations out there!) and is only current as of August 8, 2022. Many of the regulations are subject to change.

This summary is for educational purposes only and nothing in this summary is intended as, or constitutes, legal advice.

Peter Woolverton led the research and initial drafting of this chart.

NEVER MISS A BLOG

Get the latest stories, expertise, and news about security today.

Additional reading:

Security and Cheap Complexity

Post Syndicated from Bruce Schneier original https://www.schneier.com/blog/archives/2022/08/security-and-cheap-complexity.html

I’ve been saying that complexity is the worst enemy of security for a long time now. (Here’s me in 1999.) And it’s been true for a long time.

In 2018, Thomas Dullien of Google’s Project Zero talked about “cheap complexity.” Andrew Appel summarizes:

The anomaly of cheap complexity. For most of human history, a more complex device was more expensive to build than a simpler device. This is not the case in modern computing. It is often more cost-effective to take a very complicated device, and make it simulate simplicity, than to make a simpler device. This is because of economies of scale: complex general-purpose CPUs are cheap. On the other hand, custom-designed, simpler, application-specific devices, which could in principle be much more secure, are very expensive.

This is driven by two fundamental principles in computing: Universal computation, meaning that any computer can simulate any other; and Moore’s law, predicting that each year the number of transistors on a chip will grow exponentially. ARM Cortex-M0 CPUs cost pennies, though they are more powerful than some supercomputers of the 20th century.

The same is true in the software layers. A (huge and complex) general-purpose operating system is free, but a simpler, custom-designed, perhaps more secure OS would be very expensive to build. Or as Dullien asks, “How did this research code someone wrote in two weeks 20 years ago end up in a billion devices?”

This is correct. Today, it’s easier to build complex systems than it is to build simple ones. As recently as twenty years ago, if you wanted to build a refrigerator you would create custom refrigerator controller hardware and embedded software. Today, you just grab some standard microcontroller off the shelf and write a software application for it. And that microcontroller already comes with an IP stack, a microphone, a video port, Bluetooth, and a whole lot more. And since those features are there, engineers use them.

What’s Up, Home? – Record Your Roomba Dance

Post Syndicated from Janne Pikkarainen original https://blog.zabbix.com/whats-up-home-record-your-roomba-dance/22943/

Can you monitor your several-year-old dumb Roomba iRobot vacuum cleaner with Zabbix? Of course, you can!

By day, I am a monitoring technical lead in a global cyber security company. By night, I monitor my home with Zabbix & Grafana and make weird experiments with them. Welcome to my weekly blog about this project.

This post is a tad bit shorter than usual, as my summer vacation was looming and I had much other fish to fry before that. However, my motivation for this post came from guests visiting us at our home that weekend, so doing the hoovering and stuff was a reasonable thing to do.

Monitor your robot vacuum cleaner with Zabbix

So, I just did put our Roomba to do some initial cleaning. While doing so, I attached the RuuviTag I used in my last post to our Roomba, and of course, did so by using the gorgeously ugly brown tape to secure Ruuvi’s trip.

As RuuviTag has acceleration sensors, it may be possible to record Roomba’s movements by using Ruuvi. Does it work? Of course, it does.

See, it works!

This is so far my most rushed blog entry, as I literally started this experiment in about 30 minutes. The RuuviTag was already configured to my Zabbix, as it’s the same one that is/was measuring if our dog Lily is in her bed.

However, Lily’s presence was detected by utilizing Ruuvi’s temperature sensor. This Roomba experiment is done by checking the readings from RuuviTag acceleration sensors. See, it works!

From the graph we can clearly see 1) the moment I did transfer RuuviTag from Lily’s bed to Roomba and 2) Roomba’s movement.

So, from these graphs, I can then see for how long Roomba was doing its stuff.

But why?

OK, this is a stupid example, but in the real world, there would be more practical applications for this kind of monitoring. For example, monitor something that should NOT be moving (maybe a grill in your backyard or a safe at work), and if it starts moving, immediately suspect that something is wrong. Or, monitor something that should be in the constant move (conveyor belt?) but is not, and alert accordingly.

I have been working at Forcepoint since 2014 and adding more data points to monitoring is still fascinating. — Janne Pikkarainen

This post was originally published on the author’s LinkedIn account.

The post What’s Up, Home? – Record Your Roomba Dance appeared first on Zabbix Blog.

Repair cafés in computing education | Hello World #19

Post Syndicated from Katharine Childs original https://www.raspberrypi.org/blog/repair-cafes-computing-education-hello-world-19/

Many technology items are disposed of each year, either because they are broken, are no longer needed, or have been upgraded. Researchers from Germany have identified this as an opportunity to develop a scheme of work for Computing, while at the same time highlighting the importance of sustainability in hardware and software use. They hypothesised that by repairing defective devices, students would come to understand better how these devices work, and therefore meet some of the goals of their curriculum.

A smartphone with the back cover taken off so it can be repaired.

The research team visited three schools in Germany to deliver Computing lessons based around the concept of a repair café, where defective items are repaired or restored rather than thrown away. This idea was translated into a series of lessons about using and repairing smartphones. Learners first of all explored the materials used in smartphones and reflected on their personal use of these devices. They then spent time moving around three repair workstations, examining broken smartphones and looking at how they could be repaired or repurposed. Finally, learners reflected on their own ecological footprint and what they had learnt about digital hardware and software.

An educational repair café

In the classroom, repair workstations were set up for three different categories of activity: fixing cable breaks, fixing display breaks, and tinkering to upcycle devices. Each workstation had a mentor to support learners in investigating faults themselves by using the question prompt, “Why isn’t this feature or device working?” At the display breaks and cable breaks workstations, a mentor was on hand to provide guidance with further questions about the hardware and software used to make the smartphone work. On the other hand, the tinkering workstation offered a more open-ended approach, asking learners to think about how a smartphone could be upcycled to be used for a different purpose, such as a bicycle computer. It was interesting to note that students visited each of the three workstations equally.

Two girls solder physical computing components in a workshop.
Getting hands-on with hardware through physical computing activities can be very engaging for learners.

The feedback from the participants showed there had been a positive impact in prompting learners to think about the sustainability of their smartphone use. Working with items that were already broken also gave them confidence to explore how to repair the technology. This is a different type of experience from other Computing lessons, in which devices such as laptops or tablets are provided and are expected to be carefully looked after. The researchers also asked learners to complete a questionnaire two weeks after the lessons, and this showed that 10 of the 67 participants had gone on to repair another smartphone after taking part in the lessons.

Links to computing education

The project drew on a theory called duality reconstruction that has been developed by a researcher called Carsten Schulte. This theory argues that in computing education, it is equally important to teach learners about the function of a digital device as about the structure. For example, in the repair café lessons, learners discovered more about the role that smartphones play in society, as well as experimenting with broken smartphones to find out how they work. This brought a socio-technical perspective to the lessons that helped make the interaction between the technology and society more visible.

A young girl solders something at a worktop while a man looks over her shoulder.
It’s important to make sure young people know how to work safely with electronic and physical computing components.

Using this approach in the Computing classroom may seem counter-intuitive when compared to the approach of splitting the curriculum into topics and teaching each topic sequentially. However, the findings from this project suggest that learners understand better how smartphones work when they also think about how they are manufactured and used. Including societal implications of computing can provide learners with useful contexts about how computing is used in real-world problem-solving, and can also help to increase learners’ motivation for studying the subject.

Working together

The final aspect of this research project looked at collaborative problem-solving. The lessons were structured to include time for group work and group discussion, to acknowledge and leverage the range of experiences among learners. At the workstations, learners formed small groups to carry out repairs. The paper doesn’t mention whether these groups were self-selecting or assigned, but the researchers did carry out observations of group behaviours in order to evaluate whether the collaboration was effective. In the findings, the ideal group size for the repair workstation activity was either two or three learners working together. The researchers noticed that in groups of four or more learners, at least one learner would become disinterested and disengaged. Some groups were also observed taking part in work that wasn’t related to the task, and although no further details are given about the nature of this, it is possible that the groups became distracted.

The findings from this project suggest that learners understand better how smartphones work when they also think about how they are manufactured and used.

Further investigation into effective pedagogies to set group size expectations and maintain task focus would be helpful to make sure the lessons met their learning objectives. This research was conducted as a case study in a small number of schools, and the results indicate that this approach may be more widely helpful. Details about the study can be found in the researchers’ paper (in German).

Repair café start-up tips

If you’re thinking about setting up a repair café in your school to promote sustainable computing, either as a formal or informal learning activity, here are ideas on where to begin:

  • Connect with a network of repair cafés in your region; a great place to start is repaircafe.org
  • Ask for volunteers from your local community to act as mentors
  • Use video tutorials to learn about common faults and how to fix them
  • Value upcycling as much as repair — both lead to more sustainable uses of digital devices
  • Look for opportunities to solve problems in groups and promote teamwork

Discover more in Hello World

This article is from our free computing education magazine Hello World. Every issue is written by educators for educators and packed with resources, ideas, and insights to inspire your learners and your own classroom practice.

Cover of issue 19 of Hello World magazine.

For more about computing education in the context of sustainability, climate change, and environmental impact, download issue 19 of Hello World, which focuses on these topics.

You can subscribe to Hello World for free to never miss a digital issue, and if you’re an educator in the UK, a print subscription will get you free print copies in the post.

PS If you’re interested in facilitating productive classroom discussions with your learners about ethical, legal, cultural, and environmental concerns surrounding computer science, take a look at our free online course ‘Impacts of Technology: How To Lead Classroom Discussions’.

The post Repair cafés in computing education | Hello World #19 appeared first on Raspberry Pi.

Къща На Село – какво ни очаква след покупката

Post Syndicated from VassilKendov original http://kendov.com/village_house_how_to/

Откакто се роди вторият ми син, ремонтирам вилата. Ще рече 11 години вече. Строена е когато аз съм се родил, в най-голения недоимък на материали.

Между другото винаги съм се питал, как така при този недоимък по време на комунизма, се построиха всички тези вили? Всеки имаше вила и апартамент. Но това е тема на друг разговор. Днес ще се концентрирам върху точно тези имоти, които копуваме на село и ползваме като вили, проблемите с тях и решенията.

Миналата седмица, покрай оранжерията, прегледах тефтера. Давал съм между 3000 и 7000 на година за ремонт и поддръжка на имота.
Имайте предвид, че повечето неща си ги правя сам и това е стойността само на метриалите. А защо си ги правя сам ли?

НЯМА МАЙСТОРИ

Коагато купиш къща на село, неминуемо започваш ремонти. Ако имаш вътрешна баня и тоалетна си късметлия. Това обаче е рядкост. Повечето стари къщи на село или изобщо нямат баня и тоалетна, или те са външни. За състоянието им изобщо няма да говорим. В 21-ви век да дадеш пари за къща и да ходиш вън до тоалетната си е доста неудобно.
Това значи ремонт и то не малък. Започва се с търсене на майстори, които всички знаем, че бяха кът. Вече не е съвсем така, но за малки поръчки трудно се съгласяват да идват в отдалечени села и винаги си на края ан сезона. Опивали са се да ми казват, че ще дойдат Ноември, а селото е на 1120 метра надмоска височина. Представете си какво е Ноември и как се лепят плочки на тераса при 0 градуса.
С две думи майсторите не искат малки поръчки в отдалечени места.

МАТЕРИАЛИТЕ

Всичко се доставя от близкия град. Това усложнява и оскъпява още нещата, защото ставате зависим и от още един човек с транспорт. Повярвайте ми не всичко можете да съберете в личния си автомобил.

ДОКУМЕНТИТЕ ПРИ ПОКУПКА

Много рядко можете да намерите имот с изрядни документи. Обикновено на село всеки е строил и достроявал както му падне. А за наследниците да не говорим. Като прави проверка на собствеността на такива имоти за да ги подготвим за продажба се виждаме в чудо. На последната сделка бяхме 12 човека при нотариуса. Някои чакаха отвън.
В тази връзка не се заблуждавайте, че ще купите имот без да позлвате услугите на адвокат – няма да стане!

Текста продължава след формата за среща

За срещи и консултации по банкови неволи, моля използвайте посочената форма.

[contact-form-7]

ИНСТАЛАЦИИТЕ

Няма къща на село, която да няма нужда от преправяне на електроинсталациите и ВиК-то. Това са друг вид майстори от тези които ще Ви правят конструктивните ремонти, но все пак са майстори.

ВРЕМЕТО

Най-трудно е да се отдели време. Ако си мислите, че ще оставите ключовете на майсторите и като дойдете всичко ще е наред, ще бъдете много неприятно изненадани. Спестете си нервите и отделете време да сте там, когато са и масторите. Знам, че е скъпо, но пак е по-добре. Иначе ще правите всичко по 2 пъти.

ОТОПЛЕНИЕТО

В повечето селски къщи отоплението е решено на дърва. Тази година и те са на двойна цена. По-добре е да се отоплявате на ток, но пък електропреносната мрежа в селата не е най-издържливата. Както казахме и инсталацията най-вероятно е стара, та не се знае дали ще стане на ток.
Локалното парно с котел май си остава най-изгодния начин за отопление на селска къща, но изграждането му е скъпо. Пеигответе около 8-10000 лева, ако не го правите сами.

НАПРАВИ СИ САМ

Това не е за всеки, но пък е евтино. Винаги съм предпочитал да си купя някой инструмент и да човъркам нещо, вместо да стоя да гледам майстора и да се ядосвам я за качество, я за мудност.
Но както казах това не е за всеки, макар да е евтино. При мен межу 3000 и 7000 лева на година, в зависимост от проектите които съм подхванал.

ЦЕНАТА НА ИМОТА

Това е най забавната част. Много обичам като дойдат при мен клиенти и кажат че купуват нещо, без да са си направили сметката. За д ане ви отегчавам, но да си знаете, че всяка стара къща на секло над 500EUR на м2 си е „набутка”, просто защото това е цената на новото строителство. Всеки се захласва по сглобяеми къщи, но малко хора си правят таква. Аз обаче имам и такава и Ви казвам, че струва толкова и се изпълнява за 2-3 месеца.
Ако няма да живеете постоянно в нея е идеална. Пак има майстори, но са само 2-3 месеца. После получавате нещо ново и точно според Вашите изисквания.
Моята сглобяема къща я строи Ники (това не е вилата, а друга къща). Определено съм доволен. Ако Ви трябват координати – пишете ми ще Ви пратя.
В една стара къща никога не можеш да сметнеш колко ще са ремонтите. Постоянно изкачат разни неща. Гарантирам ви, че в следващите поне 5 години ще подчините съботите и неделите си на ремонти и майстори по старата селска къща. Имам вече над 5 клиента, които след покупка просто я бутнаха и постоиха нова. По-изгодно им излезе.

ПОДДРЪЖКАТА

Всички имаме хубави спомени при баба на село. Хубава храна, подредени градинки, цветенца и окосени ливадки. Е да ама сега за това ще трябва да се грижим ние и то от 50-150км разстояние. Отиваме там събота и неделя и бързаме да окосим, засадим, оплевим, нацепим дървата, евентуално нещо змнина… С две думи понеделник отиваме на работа пребити, просто защото баба и дядо са живели там постоянно, а ние всичко трябва да свършим за 2 дни. Определено е доста натоварващо да постигнем за децата си този стандарт и тези спомени, които преди са ни били осигурени от баба и дядо.

РЕШЕНИЕТО на проблемите

Преди вскичко запомнете – ПОВЕЧЕ ОТ 500 EUR на квадрат за стара къша на село НЕ!!! Новото е на тази цена, а бътането на старата къща и извозването е между 10 000 и 15 000 лева, колкото може би е и цената на парцела.

Ако искате да е евтино, трябва да си го правите сами!

Ако имате майстори, трябва и Вие да сте там!

Не правете компромис с проверката на имота при покупка!

Не правете много екстри – оранжерии, градинки, детски къщи, фурни, джакузита, навеси… всичко изисква време, пари и нерви. Живейте си живота на зелената морава!

Ако информацията Ви е била полезна, моля споделете статията във ФБ и се абонирайте за канала в Youtube – https://www.youtube.com/channel/UChh1cOXj_FpK8D8C0tV9GKg

Васил Кендов
www.Draftis.com – кредитни консултанти

The post Къща На Село – какво ни очаква след покупката appeared first on Kendov.com.

How to centralize findings and automate deletion for unused IAM roles

Post Syndicated from Hong Pham original https://aws.amazon.com/blogs/security/how-to-centralize-findings-and-automate-deletion-for-unused-iam-roles/

Maintaining AWS Identity and Access Management (IAM) resources is similar to keeping your garden healthy over time. Having visibility into your IAM resources, especially the resources that are no longer used, is important to keep your AWS environment secure. Proactively detecting and responding to unused IAM roles helps you prevent unauthorized entities from gaining access to your AWS resources. In this post, I will show you how to apply resource tags on IAM roles and deploy serverless technologies on AWS to detect unused IAM roles and to require the owner of the IAM role (identified through tags) to take action.

You can use this solution to check for unused IAM roles in a standalone AWS account. As you grow your workloads in the cloud, you can run this solution for multiple AWS accounts by using AWS Organizations. In this solution, you use AWS Control Tower to create an AWS Organizations organization with a Security organizational unit (OU), and a Security account in this OU. In this blog post, you deploy the solution in the Security account belonging to a Security OU of an organization.

For more information and recommended best practices, see the blog post Managing the multi-account environment using AWS Organizations and AWS Control Tower. Following this best practice, you can create a Security OU, in which you provision one or more Security and Audit accounts that are dedicated for security automation and audit activities on behalf of the entire organization.

Solution architecture

The architecture diagram in Figure 1 demonstrates the solution workflow.

Figure 1: Solution workflow for standalone account or member account of an AWS Organization.

Figure 1: Solution workflow for standalone account or member account of an AWS Organization.

The solution is triggered periodically by an Amazon EventBridge scheduled rule and invokes a series of actions. You specify the frequency (in number of days) when you create the EventBridge rule. There are two options to run this solution, based on the needs of your organization.

Option 1: For a standalone account

Choose this option if you would like to check for unused IAM roles in a single AWS account. This AWS account might or might not belong to an organization or OU. In this blog post, I refer to this account as the standalone account.

Prerequisites

  1. You need an AWS account specifically for security automation. For this blog post, I refer to this account as the standalone Security account.
  2. You should deploy the solution to the standalone Security account, which has appropriate admin permission to audit other accounts and manage security automation.
  3. Because this solution uses AWS CloudFormation StackSets, you need to grant self-managed permissions to create stack sets in standalone accounts. Specifically, you need to establish a trust relationship between the standalone Security account and the standalone account by creating the AWSCloudFormationStackSetAdministrationRole IAM role in the standalone Security account, and the AWSCloudFormationStackSetExecutionRole IAM role in the standalone account.
  4. You need to have AWS Security Hub enabled in your standalone Security account, and you need to deploy the solution in the same AWS Region as your Security Hub dashboard.
  5. You need a tagging enforcement in place for IAM roles. This solution uses an IAM tag key Owner to identify the email address of the owner. The value of this tag key should be the email address associated with the owner of the IAM role. If the Owner tag isn’t available, the notification email is sent to the email address that you provided in the parameter ITSecurityEmail when you provisioned the CloudFormation stack.
  6. This solution uses Amazon Simple Email Service (Amazon SES) to send emails to the owner of the IAM roles. The destination address needs to be verified with Amazon SES. With Amazon SES, you can verify identity at the individual email address or at the domain level.

An EventBridge rule triggers the AWS Lambda function LambdaCheckIAMRole in the standalone Security account. The LambdaCheckIAMRolefunction assumes a role in the standalone account. This role is named after the Cloudformation stack name that you specify when you provision the solution. Then LambdaCheckIAMRole calls the IAM API action GetAccountAuthorizationDetails to get the list of IAM roles in the standalone account, and parses the data type RoleLastUsed to retrieve the date, time, and the Region in which the roles were last used. If the last time value is not available, the IAM role is skipped. Based on the CloudFormation parameter MaxDaysForLastUsed that you provide, LambdaCheckIAMRole determines if the last time used is greater than the MaxDaysForLastUsed value. LambdaCheckIAMRole also extracts tags associated with the IAM roles, and retrieves the email address of the IAM role owner from the value of the tag key Owner. If there is no Owner tag, then LambdaCheckIAMRole sends an email to a default email address provided by you from the CloudFormation parameter ITSecurityEmail.

Option 2: For all member accounts that belong to an organization or an OU

Choose this option if you want to check for unused IAM roles in every member account that belongs to an AWS Organizations organization or OU.

Prerequisites

  1. You need to have an AWS Organizations organization with a dedicated Security account that belongs to a Security OU. For this blog post, I refer to this account as the Security account.
  2. You should deploy the solution to the Security account that has appropriate admin permission to audit other accounts and to manage security automation.
  3. Because this solution uses CloudFormation StackSets to create stack sets in member accounts of the organization or OU that you specify, the Security account in the Security OU needs to be granted CloudFormation delegated admin permission to create AWS resources in this solution.
  4. You need Security Hub enabled in your Security account, and you need to deploy the solution in the same Region as your Security Hub dashboard.
  5. You need tagging enforcement in place for IAM roles. This solution uses the IAM tag key Owner to identify the owner email address. The value of this tag key should be the email address associated with the owner of the IAM role. If the Owner tag isn’t available, the notification email will be sent to the email address that you provided in the parameter ITSecurityEmail when you provisioned the CloudFormation stack.
  6. This solution uses Amazon SES to send emails to the owner of the IAM roles. The destination address needs to be verified with Amazon SES. With Amazon SES, you can verify identity at the individual email address or at the domain level.

An EventBridge rule triggers the Lambda function LambdaGetAccounts in the Security account to collect the account IDs of member accounts that belong to the organization or OU. LambdaGetAccounts sends those account IDs to an SNS topic. Each account ID invokes the Lambda function LambdaCheckIAMRole once.

Similar to the process for Option 1, LambdaCheckIAMRole in the Security account assumes a role in the member account(s) of the organization or OU, and checks the last time that IAM roles in the account were used.

In both options, if an IAM role is not currently used, the function LambdaCheckIAMRole generates a Security Hub finding, and performs BatchImportFindings for all findings to Security Hub in the Security account. At the same time, the Lambda function starts an AWS Step Functions state machine execution. Each execution is for an unused IAM role following this naming convention:
[target-account-id]-[unused IAM role name]-[time the execution created in Unix format]

You should avoid running this solution against special IAM roles, such as a break-glass role or a disaster recovery role. In the CloudFormation parameter RolePatternAllowedlist, you can provide a list of role name patterns to skip the check.

Use a Step Functions state machine to process approval

Figure 2 shows the state machine workflow for owner approval.

Figure 2: Owner approval state machine workflow

Figure 2: Owner approval state machine workflow

After the solution identifies an unused IAM role, it creates a Step Functions state machine execution. Figure 2 demonstrates the workflow of the execution. After the execution starts, the first Lambda task NotifyOwner (powered by the Lambda function NotifyOwnerFunction) sends an email to notify the IAM role owner. This is a callback task that pauses the execution until a taskToken is returned. The maximum pause for a callback task is 1 year. The execution waits until the owner responds with a decision to delete or keep the role, which is captured by a private API endpoint in Amazon API Gateway. You can configure a timeout to avoid waiting for callback task execution.

With a private API endpoint, you can build a REST API that is only accessible within your Amazon Virtual Private Cloud (Amazon VPC), or within your internal network connected to your VPC. Using a private API endpoint will prevent anyone from outside of your internal network from selecting this link and deleting the role. You can implement authentication and authorization with API Gateway to make sure that only the appropriate owner can delete a role.

If the owner denies role deletion, then the role remains intact until the next automation cycle runs, and the state machine execution stops immediately with a Fail status. If the owner approves role deletion, the next Lambda task Approve (powered by the function ApproveFunction) checks again if the role is not currently used. If the role isn’t in use, the Lambda task Approve attaches an IAM policy DenyAllCheckUnusedIAMRoleSolution to deny the role to perform any actions, and waits for 30 days. During this wait time, you can restore the IAM role by removing the IAM policy DenyAllCheckUnusedIAMRoleSolution from the role. The Step Functions state machine execution for this role is still in progress until the wait time expires.

After the wait time expires, the state machine execution invokes the Validate task. The Lambda function ValidateFunction checks again if the role is not in use after the amount of time calculated by adding MaxDaysForLastUsed and the preceding wait time. It also checks if the IAM policy DenyAllCheckUnusedIAMRoleSolution is attached to the role. If both of these conditions are true, the Lambda function follows a process to detach the IAM policies and delete the role permanently. The role can’t be recovered after deletion.

Note: To restore a role that has been marked for deletion, detach the DenyAll IAM policy from the role.

To deploy the solution using the AWS CLI

  1. Clone git repo from AWS Samples to get source code and CloudFormation templates.
    git clone https://github.com/aws-samples/aws-blog-automate-iam-role-deletion 
    cd /aws-blog-automate-iam-role-deletion

  2. Run the AWS CLI command below to upload CloudFormation templates and Lambda code to a S3 bucket in the Security Account. The S3 bucket needs to be in the same Region where you will deploy the solution.
    • To deploy the solution for a single account, use the following commands. Be sure to replace <YOUR_BUCKET_NAME> and <PATH_TO_UPLOAD_CODE> with your own values.
      #Deploy solution for a single target AWS Account
      aws cloudformation package \
      --template-file solution_scope_account.yml \
      --s3-bucket <YOUR_BUCKET_NAME> \
      --s3-prefix <PATH_TO_UPLOAD_CODE> \
      --output-template-file solution_scope_account.template

    • To deploy the solution for an organization or OU, use the following commands. Be sure to replace <YOUR_BUCKET_NAME> and <PATH_TO_UPLOAD_CODE> with your own values.
      #Deploy solution for an Organization/OU
      aws cloudformation package \
      --template-file solution_scope_organization.yml \
      --s3-bucket <YOUR_BUCKET_NAME> \
      --s3-prefix <PATH_TO_UPLOAD_CODE> \
      --output-template-file solution_scope_organization.template

  3. Validate the template generated by the CloudFormation package.
    • To validate the solution for a single account, use the following commands.
      #Deploy solution for a single target AWS Account
      aws cloudformation validate-template —template-body file://solution_scope_account.template

    • To validate the solution for an organization or OU, use the following commands.
      #Deploy solution for an Organization/OU
      aws cloudformation validate-template —template-body file://solution_scope_organization.template

  4. Deploy the solution in the same Region that you use for Security Hub. The stack takes 30 minutes to complete deployment.
    • To deploy the solution for a single account, use the following commands. Be sure to replace all of the placeholders with your own values.
      #Deploy solution for a single target AWS Account
      aws cloudformation deploy \
      --template-file solution_scope_account.template \
      --stack-name <UNIQUE_STACK_NAME> \
      --region <REGION> \
      --capabilities CAPABILITY_NAMED_IAM CAPABILITY_AUTO_EXPAND \
      --parameter-overrides AccountId='<STANDALONE ACCOUNT ID>' \
      Frequency=<DAYS> MaxDaysForLastUsed=<DAYS> \
      ITSecurityEmail='<YOUR IT TEAM EMAIL>' \
      RolePatternAllowedlist='<ALLOWED PATTERN>'

    • To deploy the solution for an organization, run the following commands to create CloudFormation stack in the Security Account of the organization.
      #Deploy solution for an Organization
      aws cloudformation deploy \
      --template-file solution_scope_organization.template \
      --stack-name <UNIQUE_STACK_NAME> \
      --region <REGION> \
      --capabilities CAPABILITY_NAMED_IAM CAPABILITY_AUTO_EXPAND \
      --parameter-overrides Scope=Organization \
      OrganizationId='<o-12345abcde>' \
      OrgRootId='<r-1234>'  \
      Frequency=<DAYS> MaxDaysForLastUsed=<DAYS> \
      ITSecurityEmail='<[email protected]>' \
      RolePatternAllowedlist='<ALLOWED PATTERN>'

    • To deploy the solution for an OU, run the following commands to create CloudFormation stack in the Security Account of the organization.
      #Deploy solution for an OU
      aws cloudformation deploy \
      --template-file solution_scope_organization.template \
      --stack-name <UNIQUE_STACK_NAME> \
      --region <REGION> \
      --capabilities CAPABILITY_NAMED_IAM CAPABILITY_AUTO_EXPAND \
      --parameter-overrides Scope=OrganizationalUnit \
      OrganizationId='<o-12345abcde>' \
      OrganizationalUnitId='<ou-1234-1234abcd>'  \
      Frequency=<DAYS> MaxDaysForLastUsed=<DAYS> \
      ITSecurityEmail=’<[email protected]>’ \
      RolePatternAllowedlist=’<ALLOWED PATTERN>’

Test the solution

The solution is triggered by an EventBridge scheduled rule, so it doesn’t perform the checks immediately. To test the solution right away after the CloudFormation stacks are successfully created, follow these steps.

To manually trigger the automation for a single account

  1. Navigate to the AWS Lambda console and choose the function
    <CloudFormation stackname>-LambdaCheckIAMRole.
  2. Choose Test.
  3. Choose New event.
  4. For Name, enter a name for the event, and provide the current time in UTC Date Time format YYYY-MM-DDTHH:MM:SSZ. For example {“time”: “2022-01-22T04:36:52Z”}. The Lambda function uses this value to calculate how much time has passed since the last time that a role was used. Figure 5 shows an example of configuring a test event.
    Figure 5: Configure test event for standalone account

    Figure 5: Configure test event for standalone account

  5. Choose Test.

To manually trigger the automation for an organization or OU

  1. Choose the function
    [CloudFormation stackname]-LambdaGetAccounts.
  2. Choose Test.
  3. Choose New event.
  4. For Name, enter a name for the event. Leave the default values for the remaining fields.
  5. Choose Test.

Respond to unused IAM roles

After you’ve triggered the Lambda function, the automation runs the necessary checks. For each unused IAM role, it creates a Step Functions state machine execution.

To see the list of Step Functions state machine executions

  1. Navigate to the AWS Step Functions console.
  2. Choose state machine [CloudFormation stackname]OnwerApprovalStateMachine.
  3. Under the Executions tab, you will see the list of executions in running state following this naming convention: [target-account-id]-[unused IAM role name]-[time the execution created in Unix format]. Figure 6 shows an example list of executions.
    Figure 6: Each unused IAM role generates an execution in the Step Functions state machine

    Figure 6: Each unused IAM role generates an execution in the Step Functions state machine

Each execution sends out an email notification to the IAM role owner (if available through the Owner tag) or to the IT security email address that you provided in the CloudFormation stack parameter ITSecurityEmail. The email content is:

Subject: Please take action on this unused IAM Role
 
Hello!
 
This IAM Role arn:aws:iam::<AWS account>:role/<role name> is not in use for
more than 60 days.
 
Can you please delete the role by following this link: Approve link
 
Or keep this role by following this link: Deny Link

In the email, the Approve link and Deny link is the hyperlink to a private API endpoint with a parameter taskToken. If you try to access these links publicly, they won’t work. When you access the link, the taskToken is provided to the private API endpoint, which updates the Step Functions state machine.

To test the approval action using an API Gateway test

  1. Navigate to the AWS Step Functions console. Under State machines, choose the state machine that has the name [CloudFormation stackname]OwnerApprovalStateMachine
  2. On the Executions tab, there is a list of executions. Each execution represents a workflow for one IAM role, as shown in Figure 6. Choose the execution name that includes the IAM role name in the email that you received earlier.
  3. Scroll down to Execution event history.
  4. Expand the Step Notify Owner, enter TaskScheduled, find the item taskToken, and copy its value to a notepad, as shown in Figure 7.
    Figure 7: Retrieve taskToken from execution

    Figure 7: Retrieve taskToken from execution

  5. Navigate to the API Gateway console.
  6. Choose the API that has a name similar to [CloudFormation stackname]-PrivateAPIGW-[unique string]-ApprovalEndpoint.
  7. Choose which action to test: Deny or Approve.
    • To test the Deny action, under /deny resource, choose the GET method.
    • To test the Approve action, under /approve resource, choose the GET method.
  8. Choose Test.
  9. Under Query Strings, enter taskToken= and paste the taskToken you copied earlier from the state machine execution. Figure 8 shows how to pass the taskToken to API Gateway.
    Figure 8: Provide taskToken to API Gateway Method

    Figure 8: Provide taskToken to API Gateway Method

  10. Choose Test. After you test, the state machine resumes the workflow and finishes the automation. You won’t be able to change the action.
  11. Navigate to the AWS Step Functions console. Choose the state machine and go to the state machine execution.
    1. If you choose to deny the role deletion, the execution immediately stops as Fail.
    2. If you choose to approve the role deletion, the execution moves to the Wait task. This task removes IAM policies associated to the role and waits for a period of time before moving to the next task. By default, the wait time is 30 days. To change this number, go to the Lambda function [CloudFormation stackname]ApproveFunction, and update the variable wait_time_stamp.
    3. After the waiting period expires, the state machine triggers the Validate task to do a final validation on the role before deleting it. If the Validate task decides that the role is being used, it leaves the role intact. Otherwise, it deletes the role permanently.

Conclusion

In this blog post, you learned how serverless services such as Lambda, Step Functions, and API Gateway can work together to build security automation. We recommend testing this solution as a starting point. Then, you can build more features on top of the sample code and templates to customize it to perform checks, following guidance from your IT security team.

Here are a few suggestions that you can take to extend this solution.

  • This solution uses a private API Gateway to handle the approval response from the IAM role owner. You need to establish private connectivity between your internal network and AWS to invoke a private API Gateway. For instructions, see How to invoke a private API.
  • Add a mechanism to control access to API Gateway by using endpoint policies for interface VPC endpoints.
  • Archive the Security Hub finding after the IAM role is deleted using the AWS CLI or AWS Console.
  • Use a Step Functions state machine for other automation that needs human approval.
  • Add the capability to report on IAM roles that were skipped due to the absence of RoleLastUsed information.

 
If you have feedback about this post, submit comments in the Comments section below. If you have questions about this post, contact AWS Support.

Want more AWS Security news? Follow us on Twitter.

Hong Pham

Hong Pham

Hong is a Senior Solutions Architect at AWS. For more than five years, she has helped many customers from start-ups to enterprises in different industries to adopt Cloud Computing. She was born in Vietnam and currently lives in Seattle, Washington.

Announcing the latest AWS Heroes – August 2022

Post Syndicated from Ross Barich original https://aws.amazon.com/blogs/aws/announcing-the-latest-aws-heroes-august-2022/

The global AWS community is filled with passionate builders, eager to learn and explore ways to build better and faster on AWS. Within the AWS community, a select few individuals truly go above and beyond to share their knowledge and inspire others through content creation, event organization, open source contributions, and more. These community leaders are called AWS Heroes, and today we are thrilled to recognize the latest cohort:

Alexey Grigorev – Berlin, Germany

Machine Learning Hero Alexey Grigorev works as a principal data scientist at OLX and he runs DataTalks.Club, a community of 20,000+ data enthusiasts. He has written a few books about machine learning. One of them is Machine Learning Bookcamp, a book for software engineers who want to get into machine learning. A big fan of serverless and AWS Lambda, Alexey likes teaching how to use Lambda and other AWS services for Machine Learning model deployment. He lives in Berlin with his wife and son.

Allen Helton – McKinney, USA

Serverless Hero Allen Helton is a Cloud Architect at Tyler Technologies with a sharp focus on serverless-first development. He has been working in tech since 2012, after graduating with a B.S. in Software Engineering from the University of Texas at Dallas. Allen writes extensively about serverless on his blog Ready, Set, Cloud, where he shares everything from reference architectures to enterprise level production readiness tips. He also regularly engages on serverless topics on Twitter.

Liz Fong-Jones – Vancouver, Canada / Sydney, Australia

Community Hero Liz Fong-Jones is a developer advocate, labor and ethics organizer, and Site Reliability Engineer (SRE) with 17+ years of experience. She is an advocate at Honeycomb for the SRE and Observability communities. She led implementation of Service-Level Objectives and adoption of Graviton2/Graviton3 at Honeycomb, and co-authored Observability Engineering. She has served on the OpenTelemetry governance committee and on the SREcon steering committee. She lives in Vancouver, BC with her wife Elly, partners, and a Samoyed/Golden Retriever mix, and in Sydney, NSW. She plays classical piano, leads an EVE Online alliance, and advocates for transgender rights.

Scott Hsieh – New Taipei City, Taiwan

Data Hero Scott Hsieh, also known as Shu-Jeng Hsieh, is a Data Architect at 104 Corporation. He has been sharing content on dev.to and Medium for nearly 2 years and has spoken at 6 events including AWS Summit Taiwan, re:Invent re:Cap, and DevAx::Alliance, mostly on data topics. He became an AWS Community Builder in the end of 2020 and achieved 10 AWS certifications within 1.5 years. Additionally, Scott has created 5 CDK constructs for 5 programming languages which in total are approaching 100K downloads. He is active in the AWS User Group Taiwan Facebook group, and enjoys helping people to grasp AWS services with ease and learning from experts across different fields.


If you’d like to learn more about the new Heroes, or connect with a Hero near you, please visit the AWS Heroes website or browse the AWS Heroes Content Library.

— Ross

Deep dives & how the Internet works

Post Syndicated from João Tomé original https://blog.cloudflare.com/deep-dives-how-the-internet-works/

Deep dives & how the Internet works

Deep dives & how the Internet works

When August comes, for many, at least in the Northern Hemisphere, it’s time to enjoy summer and/or vacations. Here are some deep dive reading suggestions from our Cloudflare Blog for any time, weather or time of the year. There’s also some reading material on how the Internet works, and a glimpse into our history.

To create the list (that goes beyond 2022), initially we asked inside the company for favorite blog posts. Many explained how a particular blog post made them want to work at Cloudflare (including some of those who have been at the company for many years). And then, we also heard from readers by asking the question on our Twitter account: “What’s your favorite blog post from the Cloudflare Blog and why?”

In early July (thinking of the July 4 US holiday) we did a sum up where some of the more recent blog posts were referenced. We’ve added a few to that list:

  • Eliminating CAPTCHAs on iPhones and Macs (✍️)
    How it works using open standards. On this topic, you can also read the detailed blog post from our research team, from 2021: Humanity wastes about 500 years per day on CAPTCHAs. It’s time to end this madness.
  • Optimizing TCP for high WAN throughput while preserving low latency (✍️)
    If you like networks, this is an in depth look of how we tune TCP parameters for low latency and high throughput.
  • Live-patching the Linux kernel (✍️)
    A detail focused blog focused on using eBPF. Code, Makefiles and more within.
  • Early Hints in the real world (✍️)  
    In depth data about it where we show how much faster the web is with it (in a Cloudflare, Google, and Shopify partnership).
  • Internet Explorer, we hardly knew ye (✍️)
    A look at the demise of Internet Explorer and the rise of the Edge browser (after Microsoft announced the end-of-life for IE).
  • When the window is not fully open, your TCP stack is doing more than you think (✍️)
    A recent deep dive shows how Linux manages TCP receive buffers and windows, and how to tune the TCP connection for the best speed. Similar blogs are: How to stop running out of ephemeral ports and start to love long-lived connections; Everything you ever wanted to know about UDP sockets but were afraid to ask.
  • How Ramadan shows up in Internet trends (✍️)
    What happens to the Internet traffic in countries where many observe Ramadan? Depending on the country, there are clear shifts and changing patterns in Internet use, particularly before dawn and after sunset. This is all coming from our Radar platform. We can see many human trends, from a relevant outage in a country (here’s the list of Q2 2022 disruptions), to events like elections, the Eurovision, the ‘Jubilee’ celebration or the James Webb Telescope pictures revelation.

2022, research focused

  • Hertzbleed attack (✍️)  
    A deep explainer where we compare a runner in a long distance race with how CPU frequency scaling leads to a nasty side channel affecting cryptographic algorithms. Don’t be confused with the older and impactful Heartbleed.
  • Future-proofing SaltStack (✍️)  
    A chronicle of our path of making the SaltStack system quantum-secure. In an extra post-quantum blog post, we highlight how we are preparing the Internet and our infrastructure for the arrival of quantum computers.
  • Unlocking QUIC’s proxying potential with MASQUE (✍️)
    A deep dive into QUIC transport protocol and a good up to date way to know more about it (related: HTTP usage trends).
  • HPKE: Standardizing public-key encryption (finally!) (✍️)  
    Two research groups have finally published the next reusable, and future-proof generation of (hybrid) public-key encryption (PKE) for Internet protocols and applications: Hybrid Public Key Encryption (HPKE).
  • Sizing Up Post-Quantum Signatures (✍️)  
    This blog (followed by this deep dive one that includes quotes from Ancient Greece) was highlighted by a reader as “life changing”. It shows the peculiar relationship between PQC (post-quantum cryptography) signatures and TLS (Transport Layer Security) size and connection quality. It’s research about how quantum computers could unlock the next age of innovation, and will break the majority of the cryptography used to protect our web browsing (more on that below). But it is also about how to make a website really fast.

If you like Twitter threads, here is a recent one from our Head of Cloudflare Research, Nick Sullivan, that explains in simple terms the way privacy on the Internet works and challenges in protecting it now and for the future.

This month we also did a full reading list/guide with our blog posts about all sorts of attacks (from DDoS to phishing, malware or ransomware) and how to stay protected in 2022.

How does it (the Internet) work

  • Cloudflare’s view of the Rogers Communications outage in Canada (✍️ 2022)
    One of the largest ISPs in Canada, Rogers Communications, had a huge outage on July 8, 2022, that lasted for more than 17 hours. From our view of the Internet, we show why we concluded it seemed caused by an internal error and how the Internet, being a network of networks, all bound together by BGP, was related to the disruption.
  • Understanding how Facebook disappeared from the Internet (✍️ 2021).
    “Facebook can’t be down, can it?”, we thought, for a second, on October 4, 2021. It was, and we had a deep dive about it, where BGP was also ‘king’.

Albert Einstein’s special theory of relativity famously dictates that no known object can travel faster than the speed of light in vacuum, which is 299,792 km/s.

  • Welcome to Speed Week and a Waitless Internet (✍️ 2021).
    There’s no object, as far as we, humans, know, that is faster than the speed of light. In this blog post you’ll get a sense of the physical limits of Internet speeds (“the speed of light is really slow”). How it all works through electrons through wires, lasers blasting data down fiber optic cables, and how building a waitless Internet is hard.
    We go on to explain the factors that go into building our fast global network: bandwidth, latency, reliability, caching, cryptography, DNS, preloading, cold starts, and more; and how Cloudflare zeroes in on the most powerful number there is: zero. And here’s a challenge, there are a few movies, books, board game references hidden in the post for you to find.

“People ask me to predict the future, when all I want to do is prevent it. Better yet, build it. Predicting the future is much too easy, anyway. You look at the people around you, the street you stand on, the visible air you breathe, and predict more of the same. To hell with more. I want better.”
— Ray Bradbury, from Beyond 1984: The People Machines

  • Securing the post-quantum world (✍️ 2020).
    This one is more about the future of the Internet. We have many post-quantum related posts, including the recent standardization one (‘NIST’s pleasant post-quantum surprise’), but here you have an easy-to-understand explanation of a complex but crucial for the future of the Internet topic. More on those challenges and opportunities in 2022 here.
    The sum up is: “Quantum computers are coming that will have the ability to break the cryptographic mechanisms we rely on to secure modern communications, but there is hope”. For a quantum computing starting point, check: The Quantum Menace.
  • SAD DNS Explained (✍️ 2020).
    A 2020 attack against the Domain Name System (DNS) called SAD DNS (Side channel AttackeD DNS) leveraged features of the networking stack in modern operating systems. It’s a good excuse to explain how the DNS protocol and spoofing work, and how the industry can prevent it — another post expands on improving DNS privacy with Oblivious DoH in 1.1.1.1.
  • Privacy needs to be built into the Internet (✍️ 2020)
    A bit of history is always interesting and of value (at least for me). To launch one of our Privacy Weeks, in 2020, here’s a general view to the three different phases of the Internet. Until the 1990s the race was for connectivity. With the introduction of SSL in 1994, the Internet moved to a second phase where security became paramount (it helped create the dotcom rush and the secure, online world we live in today). Now, it’s all about the Phase 3 of the Internet we’re helping to build: always on, always secure, always private.
  • 50 Years of The Internet. Work in Progress to a Better Internet (✍️ 2019)
    In 2019, we were celebrating 50 years from when the very first network packet took flight from the Los Angeles campus at UCLA to the Stanford Research Institute (SRI) building in Palo Alto. Those two California sites had kicked-off the world of packet networking, on the ARPANET, and of the modern Internet as we use and know it today. Here we go through some Internet history.
    This reminds me of this December 2021 conversation about how the Web began, 30 years earlier. Cloudflare CTO John Graham-Cumming meets Dr. Ben Segal, early Internet pioneer and CERN’s first official TCP/IP Coordinator, and Francois Fluckiger, director of the CERN School of Computing. Here, we learn how the World Wide Web became an open source project.
  • Welcome to Crypto Week (✍️ 2018).
    If you want to know why cryptography is so important for the Internet, here’s a good place to start. The Internet, with all of its marvels in connecting people and ideas, needs an upgrade, and one of the tools that can make things better is cryptography. There’s also a more mathematical privacy pass protocol related perspective (that is the basis of the work to eliminate CAPTCHAs).
  • Why TLS 1.3 isn’t in browsers yet (✍️ 2017).
    It’s all about: “Upgrading a security protocol in an ecosystem as complex as the Internet is difficult. You need to update clients and servers and make sure everything in between continues to work correctly. The Internet is in the middle of such an upgrade right now.” More on that from 2021 here: Handshake Encryption: Endgame (an ECH update).
  • How to build your own public key infrastructure (✍️ 2015).
    A way of getting to know how a major part of securing a network as geographically diverse as Cloudflare’s is protecting data as it travels between datacenters. “Great security architecture requires a defense system with multiple layers of protection”. From the same year, here’s something about digital signatures being the bedrock of trust.
  • A (Relatively Easy To Understand) Primer on Elliptic Curve Cryptography (✍️ 2013).
    Also thinking of how the Internet will continue to work for years to come, here’s a very complex topic made simple about one of the most powerful but least understood types of cryptography in wide use.
  • Why Google Went Offline Today and a Bit about How the Internet Works (✍️ 2012).
    We had several similar blog posts over the years, but this 10-year old one from Tom Paseka set the tone on how we could give a good technical explanation for something that was impacting so many. Here ​​Internet routing, route leakages are discussed and it all ends on a relevant note: “Just another day in our ongoing efforts to #savetheweb.” Quoting from someone in the company for nine years: “This blog was the one that first got me interested in Cloudflare”.

Again, if you like Twitter threads, this recent Nick Sullivan one starts with an announcement (Cloudflare now allows experiments with post-quantum cryptography) and goes on explaining what some of the more relevant Internet acronyms mean. Example: TLS, or Transport Layer Security, it’s the ubiquitous encryption and authentication protocol that protects web requests online.

Blast from the past (some history)

A few also recently referenced blog posts from the past, some more technical than others.

  • Introducing DNS Resolver, 1.1.1.1 (not a joke) (✍️ 2018).
    The first consumer-focused service Cloudflare has ever released, our DNS resolver, 1.1.1.1 — a recursive DNS service — was launched on April 1, 2018, and this is the technical explanation. With this offering, we started fixing the foundation of the Internet by building a faster, more secure and privacy-centric public DNS resolver. And, just this month, we’ve added privacy proofed features (a geolocation accuracy “pizza test” included).
  • Cloudflare goes InterPlanetary – Introducing Cloudflare’s IPFS Gateway (✍️ 2018).
    We introduced Cloudflare’s IPFS Gateway, an easy way to access content from the InterPlanetary File System (IPFS). This served as the platform for many new, at the time, highly-reliable and security-enhanced web applications. It was the first product to be released as part of our Distributed Web Gateway project and is a different perspective from the traditional web.
    IPFS is a peer-to-peer file system composed of thousands of computers around the world, each of which stores files on behalf of the network. And, yes, it can be used as a method for a possible Mars (Moon, etc.) Internet in the future. About that, the same goes for code that will need to be running on Mars, something we mention about Workers here.
  • LavaRand in Production: The Nitty-Gritty Technical Details (✍️ 2017).
    Our lava lamps wall in the San Francisco office is much more than a wall of lava lamps (the YouTuber Tom Scott did a 2017 video about it) and in this blog we explain the in-depth look at the technical details (there’s a less technical one on how randomness in cryptography works).
  • Introducing Cloudflare Workers (✍️ 2017).
    There are several announcements each year, but this blog (associated with the explanation, Code Everywhere: Why We Built Cloudflare Workers) was referenced this week by some as one of those with a clear impact. It was when we started making Cloudflare’s network programmable. In 2018, Workers was available to everyone and, in 2019, we registered the trademark for The Network is the Computer®, to encompass how Cloudflare is using its network to pave the way for the future of the Internet.
  • What’s the story behind the names of CloudFlare’s name servers? (✍️ 2013)
    Another one referenced this week is the answer to the question we got often back in 2013: what the names of our nameservers mean. Here’s the story — there’s even an Apple co-founder Steve Wozniak tribute.

Visualize Amazon S3 data using Amazon Athena and Amazon Managed Grafana

Post Syndicated from Pedro Sola Pimentel original https://aws.amazon.com/blogs/big-data/visualize-amazon-s3-data-using-amazon-athena-and-amazon-managed-grafana/

Grafana is a popular open-source analytics platform that you can employ to create, explore, and share your data through flexible dashboards. Its use cases include application and IoT device monitoring, and visualization of operational and business data, among others. You can create your dashboard with your own datasets or publicly available datasets related to your industry.

In November 2021, the AWS team together with Grafana Labs announced the Amazon Athena data source plugin for Grafana. The feature allows you to visualize information on a Grafana dashboard using data stored in Amazon Simple Storage Service (Amazon S3) buckets, with help from Amazon Athena, a serverless interactive query service. In addition, you can provision Grafana dashboards using Amazon Managed Grafana, a fully managed service for open-source Grafana and Enterprise Grafana.

In this post, we show how you can create and configure a dashboard in Amazon Managed Grafana that queries data stored on Amazon S3 using Athena.

Solution overview

The following diagram is the architecture of the solution.

Architecture diagram

The solution is comprised of a Grafana dashboard, created in Amazon Managed Grafana, populated with data queried using Athena. Athena runs queries against data stored in Amazon S3 using standard SQL. Athena integrates with the AWS Glue Data Catalog, a metadata store for data in Amazon S3, which includes information such as the table schema.

To implement this solution, you complete the following high-level steps:

  1. Create and configure an Athena workgroup.
  2. Configure the dataset in Athena.
  3. Create and configure a Grafana workspace.
  4. Create a Grafana dashboard.

Create and configure an Athena workgroup

By default, the AWS Identity and Access Management (IAM) role used by Amazon Managed Grafana has the AmazonGrafanaAthenaAccess IAM policy attached. This policy gives the Grafana workspace access to query all Athena databases and tables. More importantly, it gives the service access to read data written to S3 buckets with the prefix grafana-athena-query-results-. In order for Grafana to be able to read the Athena query results, you have two options:

In this post, we go with the first option. To do that, complete the following steps:

  1. Create an S3 bucket named grafana-athena-query-results-<name>. Replace <name> with a unique name of your choice.
  2. On the Athena console, choose Workgroups in the navigation pane.
  3. Choose Create workgroup.
  4. Under Workgroup name, enter a unique name of your choice.
  5. For Query result configuration, choose Browse S3.
  6. Select the bucket you created and choose Choose.
  7. For Tags, choose Add new tag.
  8. Add a tag with the key GrafanaDataSource and the value true.
  9. Choose Create workgroup.

It’s important that you add the tag described in steps 7–8. If the tag isn’t present, the workgroup won’t be accessible by Amazon Managed Grafana.

For more information about the Athena query results location, refer to Working with query results, recent queries, and output files.

Configure the dataset in Athena

For this post, we use the NOAA Global Historical Climatology Network Daily (GHCN-D) dataset, from the National Oceanic and Atmospheric Administration (NOAA) agency. The dataset is available in the Registry of Open Data on AWS, a registry that exists to help people discover and share datasets.

The GHCN-D dataset contains meteorological elements such as daily maximum and minimum temperatures. It’s a composite of climate records from numerous locations—some locations contain more than 175 years recorded.

The GHCN-D data is in CSV format and is stored in a public S3 bucket (s3://noaa-ghcn-pds/). You access the data through Athena. To start using Athena, you need to create a database:

  1. On the Athena console, choose Query editor in the navigation pane.
  2. Choose the workgroup, created in the previous step, on the top right menu.
  3. To create a database named mydatabase, enter the following statement:
CREATE DATABASE mydatabase
  1. Choose Run.
  2. From the Database list on the left, choose mydatabase to make it your current database.

Now that you have a database, you can create a table in the AWS Glue Data Catalog to start querying the GHCN-D dataset.

  1. In the Athena query editor, run the following query:
CREATE EXTERNAL TABLE `noaa_ghcn_pds`(
  `id` string, 
  `year_date` string, 
  `element` string, 
  `data_value` string, 
  `m_flag` string, 
  `q_flag` string, 
  `s_flag` string, 
  `obs_time` string
)
ROW FORMAT SERDE 
  'org.apache.hadoop.hive.serde2.OpenCSVSerde' 
WITH SERDEPROPERTIES ('separatorChar'=',')
STORED AS INPUTFORMAT 'org.apache.hadoop.mapred.TextInputFormat' 
OUTPUTFORMAT 'org.apache.hadoop.hive.ql.io.HiveIgnoreKeyTextOutputFormat'
LOCATION 's3://noaa-ghcn-pds/csv/'
TBLPROPERTIES ('classification'='csv')

After that, the table noaa_ghcn_pds should appear under the list of tables for your database. In the preceding statement, we define columns based on the GHCN-D data structure. For a full description of the variables and data structure, refer to the dataset’s readme file.

With the database and the table configured, you can start running SQL queries against the entire dataset. For the purpose of this post, you create a second table containing a subset of the data: the maximum temperatures of one weather station located in Retiro Park (or simply El Retiro), one of the largest parks of the city of Madrid, Spain. The identification of the station is SP000003195 and the element of interest is TMAX.

  1. Run the following statement on the Athena console to create the second table:
CREATE TABLE madrid_tmax WITH (format = 'PARQUET') AS
SELECT CAST(data_value AS real) / 10 AS t_max,
  CAST(
    SUBSTR(year_date, 1, 4) || '-' || SUBSTR(year_date, 5, 2) || '-' || SUBSTR(year_date, 7, 2) AS date
  ) AS iso_date
FROM "noaa_ghcn_pds"
WHERE id = 'SP000003195'
  AND element = 'TMAX'

After that, the table madrid_tmax should appear under the list of tables for your database. Note that in the preceding statement, the temperature value is divided by 10. That’s because temperatures are originally recorded in tenths of Celsius degrees. We also adjust the date format. Both adjustments make the consumption of the data easier.

Unlike the noaa_ghcn_pds table, the madrid_tmax table isn’t linked with the original dataset. That means its data won’t reflect updates made to the GHCN-D dataset. Instead, it holds a snapshot of the moment of its creation. That may not be ideal in certain scenarios, but is acceptable here.

Create and configure a Grafana workspace

The next step is to provision and configure a Grafana workspace and assign a user to the workspace.

Create your workspace

In this post, we use the AWS Single Sign-On (AWS SSO) option to set up the users. You can skip this step if you already have a Grafana workspace.

  1. On the Amazon Managed Grafana console, choose Create Workspace.
  2. Give your workspace a name, and optionally a description.
  3. Choose Next.
  4. Select AWS IAM Identity Center (successor to AWS SSO).
  5. For Permission type, choose Service Managed and choose Next.
  6. For Account access, select Current account.
  7. For Data sources, select Amazon Athena and choose Next.
  8. Review the details and choose Create workspace.

This starts the creation of the Grafana workspace.

Create a user and assign it to the workspace

The last step of the configuration is to create a user to access the Grafana dashboard. Complete the following steps:

  1. Create a user for your AWS SSO identity store if you don’t have one already.
  2. On the Amazon Managed Grafana console, choose All workspaces in the navigation pane.
  3. Choose your Grafana workspace to open the workspace details.
  4. On the Authentication tab, choose Assign new user or group.
  5. Select the user you created and choose Assign users and groups.
  6. Change the user type by selecting the user and on the Action menu, choose Make admin.

Create a Grafana dashboard

Now that you have Athena and Amazon Managed Grafana configured, create a Grafana dashboard with data fetched from Amazon S3 using Athena. Complete the following steps:

  1. On the Amazon Managed Grafana console, choose All workspaces in the navigation pane.
  2. Choose the Grafana workspace URL link.
  3. Log in with the user you assigned in the previous step.
  4. In the navigation pane, choose the lower AWS icon (there are two) and then choose Athena on the AWS services tab.
  5. Choose the Region, database, and workgroup used previously, then choose Add 1 data source.
  6. Under Provisioned data sources, choose Go to settings on the newly created data source.
  7. Select Default and then choose Save & test.
  8. In the navigation pane, hover over the plus sign and then choose Dashboard to create a new dashboard.
  9. Choose Add a new panel.
  10. In the query pane, enter the following query:
select iso_date as time, t_max from madrid_tmax where $__dateFilter(iso_date) order by iso_date
  1. Choose Apply.
  2. Change the time range on the top right corner.

For example, if you change to Last 2 years, you should see something similar to the following screenshot.

Temperature visualization

Now that you’re able to populate your Grafana dashboard with data fetched from Amazon S3 using Athena, you can experiment with different visualizations and configurations. Grafana provides lots of options, and you can adjust your dashboard to your preferences, as shown in the following example screenshot of daily maximum temperatures.

Temperature visualization - colorful

As you can see in this visualization, Madrid can get really hot on the summer!

For more information on how to customize Grafana visualizations, refer to Visualization panels.

Clean up

If you followed the instructions in this post in your own AWS account, don’t forget to clean up the created resources to avoid further charges.

Conclusion

In this post, you learned how to use Amazon Managed Grafana in conjunction with Athena to query data stored in an S3 bucket. As an example, we used a subset of the GHCN-D dataset, available in the Registry of Open Data on AWS.

Check out Amazon Managed Grafana and start creating other dashboards using your own data or other publicly available datasets stored in Amazon S3.


About the authors

Pedro Pimentel is a Prototyping Architect working on the AWS Cloud Engineering and Prototyping team, based in Brazil. He works with AWS customers to innovate using new technologies and services. In his spare time, Pedro enjoys traveling and cycling.

Rafael Werneck is a Senior Prototyping Architect at AWS Cloud Engineering and Prototyping, based in Brazil. Previously, he worked as a Software Development Engineer on Amazon.com.br and Amazon RDS Performance Insights.

New Powered by QuickSight program helps AWS partners embed interactive analytics in applications to enable data-driven experiences

Post Syndicated from Rich Russell original https://aws.amazon.com/blogs/big-data/new-powered-by-quicksight-program-helps-aws-partners-embed-interactive-analytics-in-applications-to-enable-data-driven-experiences/

Applications today generate enormous amounts of data. This provides an incredible opportunity for independent software vendors (ISV) to deliver business intelligence (BI) offerings as a part of their application, providing visuals, dashboards, and self-service capabilities to customers. These insights are crucial for data-driven decision-making for end-users of these apps, especially if surfaced in the moments that matter and in formats that are easily understood.

Amazon QuickSight provides the keys for ISVs in the software as a service (SaaS) space to unlock the potential of your data by offering the technology to deliver out-of-the-box analytics, driving stickier experiences for customers that lead to higher revenues. To support our partners further, we are excited to announce the Powered by QuickSight program, which includes technical build, go-to-market (GTM), and sales support for ISVs to embed and monetize their data.

About the Powered by QuickSight program

Building upon the Powered by Amazon Redshift program announced in July 2022, the Powered by QuickSight program extends the available benefits and funding to partners using more of the AWS Data and Analytics stack to include Amazon’s BI offering QuickSight. ISVs can embed the powerful analytics and BI capabilities of QuickSight, such as visuals, dashboards, natural language querying, and authoring insights, into applications to enable data-driven experiences for millions of users, joining customers such as the NFL, 3M, Bolt, Tealium, and Extensiv, whose apps are powered by QuickSight.

The benefits available from the Powered by QuickSight program include:

  • Private strategy and development support – Connect with AWS industry experts in one-on-one sessions focused on a customized evaluation of revenue-generating offerings. Analyze your offering relevance by industry, location, and size.
  • Rapid proof of concept – Take advantage of QuickSight product managers, solution architects, specialists, and AWS Data Labs to develop a minimum viable product (MVP) for your selected use case. Where appropriate, AWS will lead a Data-Driven Everything (D2E) workshop to quickly identify proofs of concept for priority use cases.
  • Product technical assistance – Have access to product engineering, architecture, specialists, and support teams for integration, product development, best practices, roadmaps, and post-sales support.
  • Joint Powered by QuickSight launch package – Take advantage of joint PR, AWS website listing, and featured blog posts and social media. You also have access to a joint webinar deck, solution brief, case study, landing page, and social media banners.

Additional benefits:

  • Listed internally as a qualified partner to engage with field teams in respective regions
  • Annual planning session to identify AWS Marketplace solutions to be listed
  • Annual funding for AWS Partner Marketing funds to support development of lead generation or thought leadership highlighting your solution (incremental to existing Marketing Development Funds)

“AWS has been a natural home for builders, with the widest range of services available to support applications across use cases. We see an increasing trend of builders needing more powerful analytical capabilities within their applications,” says Tracy Daugherty, General Manager of Amazon QuickSight.

“With QuickSight, we have a powerful set of analytics capabilities that are easy to embed in applications. The Powered by QuickSight program combines these capabilities with training, enablement, and go-to-market support activities to help developers and ISVs provide differentiated data-driven experiences that scale to all of their users.”

ISVs that are registered with the AWS Partner Network (APN) and interested in joining the program can complete the registration form for an exploratory session to deep dive into their data monetization strategy.

To get started, register now. Once registered, a member of the AWS team will contact you with next steps.

About QuickSight

With QuickSight, ISVs can easily embed interactive visuals and dashboards, natural language querying (NLQ), or the complete BI-authoring experience seamlessly in your applications, enabling end-users to gain insights right when and where they matter. Additionally, QuickSight capabilities such as custom branded email reports and advanced machine learning (ML) capabilities (such as forecasting and anomaly detection) enable you to differentiate your applications and enhance your end-user experience, without the heavy lifting involved in building such capabilities from scratch.

Application users can now dive deep into data insights without leaving their application, with interactive dashboards that offer drill-down, interactive filtering, and export options. Embedded visuals and dashboards are refreshed automatically when the data is updated, with options of direct query to data sources such as (but not limited to) Amazon Redshift or Snowflake, or fast performance with the QuickSight SPICE in-memory data store. You can now quickly bring value to your applications by using the Powered by QuickSight program, creating data-driven experiences for users, and using joint GTM channels to grow their business.

The following screenshots are just a few examples of the interactive dashboards you can create with QuickSight.

Success stories from ISV partners in the program

ISV partners in the Powered by QuickSight program have the following to say.

Extensiv

“Amazon QuickSight enabled us to delight our customers by replacing a non-interactive native dashboard with an engaging QuickSight embedded dashboard. We quickly scaled to 4,600 daily viewers with strong engagement and extremely positive feedback. Our user sentiment score went from 14% on the old dashboard to 83% on the QuickSight dashboard, over the same period,” says Brian Sevy, Senior Product Manager at Extensiv.

“Extensiv has seen great value in the technical support provided through the Powered by QuickSight program. We look forward to leveraging the GTM benefits offered in the Powered by QuickSight program as we as we continue to expand our solution offerings.”

Convoy

“Visibility and transparency are critical to solving modern supply chain challenges. Convoy collects over 1,000 data points on every shipment; however, the complexity of this data can be difficult to curate and present in a way that freight shippers can act on,” says Dorothy Li, CTO of Convoy.

“QuickSight allowed our team to build an interactive shipment and facility insights dashboard in weeks to visualize more than 40 key data points—all on demand and in real time. This has helped us strengthen our partnership with shippers by giving them visibility into opportunities that save both time and costs.”

Trakstar

“Companies struggle with trying to organize and visualize their HR data in meaningful ways. Trakstar equips HR leaders who now have a ‘seat at the table’ with board-ready reporting and expertly designed people analytics dashboards embedded directly into the product experience that help guide future business decisions. By partnering with AWS and leveraging QuickSight, we can focus on what HR leaders need next and trust QuickSight to deliver interactive, ML-driven visualizations with high performance at scale,” says Brian Kasen, Dir. Business Intelligence at Trakstar.

“Trakstar is excited to be Powered by QuickSight and empower business and HR leaders with state-of-the-art capabilities to make smarter decisions to attract, retain, and engage their workforce.”

ConexEd

“At ConexEd, we strive to make students successful by providing tools and accessibility to school staff. School administrators usually struggle to get meaningful data that help them make informed decisions to further support students. To close this gap, we had to invest more than half of our development team’s time to create initial reports and keep building on these as we launch new features instead of focusing on building critical features for the business,” says Michael Gorham, co-founder and CTO of ConexEd.

“Now with embedded dashboards powered by QuickSight, not only can ConexEd’s development team focus all its energies on creating competitive features, but also the reporting and data visualization are now features our customers can control and customize. QuickSight features such as drill-down filtering, predictive forecasting, and aggregation insights have given us the competitive edge that our customers expect from a modern, cloud-based solution.”

Syniti

“Embedding Amazon QuickSight dashboards into our applications was a no-brainer to meet our goal. With QuickSight, we are able to build data rich dashboards easily and embed these in our applications quickly. Different personas from the same enterprise get insights that matter to them, cutting out any noise,” says Tyler Warden, SVP of Product and Engineering at Syniti.

“Partnering with QuickSight has made it easy for us to bring rich insights to our enterprise customers and help us grow.”

Next steps

To learn more about the Powered by QuickSight program, visit QuickSight. If you’re interested in learning more about how your company can use QuickSight, you can meet us in person at a Powered by QuickSight roadshow at one of four locations: New York on September 7, Chicago on September 13, San Francisco on September 15 , and London on October 4.


About the authors

Rich Russell is the global Head for QuickSight GTM at Amazon Web Services (AWS) and senior global sales and partner leader with extensive experience in establishing and building revenue generating Go-To-Market (GTM) strategies through sales, strategic partnerships, ISVs and global alliance programs. Specializing in helping companies drive growth through leveraging sales and partners while focusing on what’s most important, the customer. Rich resides in Utah, with his wife and 5 boys where they love to spend time in the great outdoors.

Kareem Syed-Mohammed is a Product Manager at Amazon QuickSight. He focuses on embedded analytics, APIs, and developer experience. Prior to QuickSight he has been with AWS Marketplace and Amazon retail as a PM. Kareem started his career as a developer and then PM for call center technologies, Local Expert and Ads for Expedia. He worked as a consultant with McKinsey and Company for a short while.

New — Fine-Grained Visual Embedding Powered by Amazon QuickSight

Post Syndicated from Donnie Prakoso original https://aws.amazon.com/blogs/aws/new-fine-grained-visual-embedding-powered-by-amazon-quicksight/

Today, we are announcing a new feature, Fine-Grained Visual Embedding Powered by Amazon QuickSight. With this feature, individual visualizations from Amazon QuickSight dashboards can now be embedded in high-traffic webpages and applications. Additionally, this feature enables you to provide rich insights for your end-users where they need them the most, without server or software setup or infrastructure management.

This is a quick preview of this new feature:

Quick Preview of Fine-Grained Visual Embedding Powered by Amazon QuickSight

Quick Preview: Fine-Grained Visual Embedding Powered by Amazon QuickSight

New Feature: Fine-Grained Visual Embedding

Amazon QuickSight is a cloud-based embeddable and ML-powered business intelligence (BI) service that delivers interactive data visualizations, analysis, and reporting to enable data-driven decision-making within the organization and with the end user, without servers to manage.

Amazon QuickSight supports embedded analytics, a feature that enables you to incorporate branded analytics into internal portals or public sites. Customers can easily embed interactive dashboards, natural language querying (NLQ), or the complete BI-authoring experience seamlessly in their applications. This provides convenience for your end users to simplify the process of data-informed decisions.

Our customers want to be able to embed visuals from various dashboards into their applications and websites in order to bring forth deeply integrated data-driven experiences to enhance end user experiences. Previously, customers needed to build, scale, and maintain generation layer and charting libraries to embed individual visualizations.

With Fine-Grained Visual Embedding Powered by Amazon QuickSight, developers and ISVs now have the ability to embed any visuals from dashboards into their applications using APIs. As for enterprises, they can embed visuals into their internal sites using 1-Click Embedding. For end-users, Fine-Grained Visual Embedding provides a seamless and integrated experience to access a variety of key data visuals to get insights.

Here’s an example view where we can embed a visual using this feature in a sample web application page:

Sample Web App with a Visual

Sample Web App with a Visual

The embedded visuals are automatically updated when the source data changes or when the visual is updated. Embedded visuals scale automatically without the need to manage servers from your end and are optimized for high performance on high-traffic pages.

Get Started with Fine-Grained Visual Embedding

There are two ways to use Fine-Grained Visual Embedding, with 1-Click Embedding or using QuickSight APIs to generate the embed URL. The 1-Click Embedding feature makes it easy for nontechnical users to generate embed code that can be inserted directly into internal portals or public sites. Using APIs, ISVs and developers can embed rich visuals in their applications. Furthermore, with row-level security, data access is secured enabling users to access only their data.

To start using this feature, let’s turn to the Amazon QuickSight dashboard. Here, I already have a dashboard using a dataset that you can follow from the Create an Amazon QuickSight dashboard using sample data documentation.

Amazon QuickSight Dashboard Using Sample Data

Amazon QuickSight Dashboard Using Sample Data

Using 1-Click Embedding to Generate Embed Code

Amazon QuickSight supports 1-Click Embedding—a feature that allows you to get the embed code without any development efforts. There are two types of 1-Click Embedding: 1) 1-Click Enterprise Embedding and 2) 1-Click Public Embedding. With enterprise embedding, it allows you to enable access to the dashboard with registered users in your account. In public embedding, you can enable access to the dashboards for anyone.

To get the embed code via 1-Click Embedding, you can select the visual you want to embed, then select Menu Options and choose Embed visual.

Select "Embed visual" from Menu Options

Select Embed visual from Menu Options

Once you select Embed visual, you will get a new menu on the right side, which contains the details of the visual you selected.

Copy "Embed code"

Copy the Embed code

The Embed code section contains iframe code that you can insert into your application, portal, or website. Domains hosting these embedded visuals must be on an allow list, which you can learn more about on the Allow listing static domains page. This is a sample display of how the embed code is rendered:

Sample Display of Fine-Grained Visual Embedding Powered by Amazon QuickSight

Sample Display of Fine-Grained Visual Embedding Powered by Amazon QuickSight

When there is a change in the visual source within Amazon QuickSight, it will also be reflected within the web app or app where you embed your visuals. In addition, embedded visuals from QuickSight will automatically scale as traffic on the website grows.

From a customer’s perspective, 1-Click Embedding will help customers provide key data visuals from various dashboards in Amazon QuickSight for end users anywhere on their websites without requiring technical skills.

Programmatically Generate Embed URL

In addition to the 1-Click Embedding, you can also perform visual embedding through the API. To perform visual embedding through the API, you can use AWS CLI or SDK to call the API GenerateEmbedUrlForAnonymousUser or GenerateEmbedUrlForRegisteredUser.

You can use the GenerateEmbedUrlForAnonymousUser API to embed visuals in your applications for your users without provisioning them in Amazon QuickSight.

You can also use GenerateEmbedUrlForRegisteredUser API to embed visuals in your application for your users that are provisioned in Amazon QuickSight.

The API works by passing the ExperienceConfiguration parameter in DashboardVisual with the properties below:

{
    'DashboardId':'<DASHBOARD_ID>',  
    'SheetId':'<SHEET_ID>',  
    'VisualId':'<VISUAL_ID>'  
}

Then, to get the IDs for Dashboard, Sheet, and Visual, you can find the value of these properties under IDs for Developers menu section for the visual you selected.

IDs for Developers

IDs for Developers

Using CLI to Generate Embed URL

After collecting all the required IDs, we can pass them as parameters. Here’s an example API command to generate an embed URL:

aws quicksight generate-embed-url-for-anonymous-user \  
    --aws-account-id <ACCOUNT_ID> \  
    --session-lifetime-in-minutes 15 \          
    --authorized-resource-arns “<DASHBOARD_ARN>”           
    --namespace default           
    --experience-configuration '{"DashboardVisual": \
        {
            "InitialDashboardVisualId": \
            {  
                    "DashboardId”:”<DASHBOARD_ID>”,  \
                    "SheetId”:”<SHEET_ID>”,  \
                    "VisualId”:”<VISUAL_ID”  \
            }  
        }}'  

If the request is successful, you will get the following response. You can then use the EmbedUrl property within your web or application.

{  
    "Status": 200,  
    "EmbedUrl": “<EMBED_URL>”,  
    "RequestId": “<REQUEST_ID>”,  
    "AnonymousUserArn": “<ARN>”  
}

Using SDK to Generate Embed URL

In addition to the AWS CLI, generating embed URLs can also be done using the AWS SDK. Here’s an example in Python:

response = client.generate_embed_url_for_anonymous_user(  
    AwsAccountId='123456789012',  
    SessionLifetimeInMinutes=15,  
    Namespace='default',  
    AuthorizedResourceArns=[  
        '<DASHBOARD_ARN>',  
    ],  
    ExperienceConfiguration={  
        'DashboardVisual': {  
            'InitialDashboardVisualId': {  
                'DashboardId':'<DASHBOARD_ID>',  
                'SheetId':'<SHEET_ID>',  
                'VisualId':'<VISUAL_ID>'  
            }  
        }  
    },  
    AllowedDomains=[  
        'https://YOUR-DOMAIN.com',  
    ]  
)  

With API, you have the flexibility to configure allowed domains at runtime. From the example above, you can pass your domains in AllowedDomains property.

When the request is successful, the API will return a successful response, along with a URL from Visual Embedding that can be inserted into external web apps. Example response as below:

{
    "Status": 200,  
    "EmbedUrl":"<EMBED_URL>",  
    "RequestId": "<REQUEST_ID>”
}  

Using the API approach gives developers the flexibility to programmatically generate embed URLs. Developers can specify the access for visuals for nonregistered and registered users in Amazon QuickSight.

Demo

To see Fine-Grained Visual Embedding Powered by Amazon QuickSight in action, have a look at this demo:

Pricing and Availability

You can use this new feature, Fine-Grained Visual Embedding in Amazon QuickSight Enterprise Edition, in all supported Regions. For more detailed information, please visit the documentation page.

Happy building,

— Donnie

[The Lost Bots] S02E03: Browser-in-Browser Attacks — Don’t Get (Cat)-Phished

Post Syndicated from Rapid7 original https://blog.rapid7.com/2022/08/25/the-lost-bots-s02e03-browser-in-browser-attacks-dont-get-cat-phished/

[The Lost Bots] S02E03: Browser-in-Browser Attacks — Don't Get (Cat)-Phished

Welcome back to The Lost Bots! In our latest episode, we’re talking about phishing attacks — but not your standard run-of-the-mill version. Instead, we’re focusing on a new technique known as browser-in-browser attacks, unpacking what it means and how it should factor into your organization’s security strategy.

Our hosts Jeffrey Gardner, Detection and Response Practice Advisor, and Stephen Davis, Lead D&R Sales Technical Advisor, highlight the telltale signs of browser-in-browser attacks you should look out for as you’re carrying out your day-to-day work and life on the internet. They also discuss how to set up user behavior analytics rules in your SIEM that will help you detect this type of threat, as well as how to make end-user training more effective.

Check back with us on Thursday, September 29, for the next Lost Bots installment!

Additional reading:

NEVER MISS A BLOG

Get the latest stories, expertise, and news about security today.

The collective thoughts of the interwebz