Post Syndicated from The History Guy: History Deserves to Be Remembered original https://www.youtube.com/watch?v=7-ZOzoVJGLA
Време ни е за проглеждане
Post Syndicated from Светла Енчева original https://toest.bg/vreme-ni-e-za-proglezhdane/
Ако не ви харесват позициите на партия „Възраждане“ за COVID-19, ваксините и зелените сертификати, тя има и други. До този извод може да стигне човек, в случай че се опита да разбере срещу какво всъщност беше протестът на партията на Костадин Костадинов пред парламента на 12 януари т.г.
От „Възраждане“ обявяват пандемията за измама. Според Костадинов става въпрос просто за „сезонен грип“, а ваксините той обяви от парламентарната трибуна за „експериментални субстанции“. Както обаче установи разследване на Мария Цънцарова, излъчено по bTV, поне четирима от 13-те депутати от партията са ваксинирани срещу вируса. Включително секретарят на парламентарната група Николай Дренчев, който нарича ваксините „експериментална течност“ и цитира Атанас Мангъров, че ако не му опрат пистолет в челото, няма да се ваксинира. След като става ясно, че са разкрити, ваксинираните депутати от „Възраждане“ се оправдават, че семействата им са ги принудили да го направят или че са искали да защитят близките си.
Очевидно според тях близките заслужават защита, но гражданите – не.
В опит да излезе от тази конфузна ситуация, Костадинов обяви ваксинирането за нещо в сферата на личния живот – „въпрос на грижа за личното здраве и личната хигиена“, като къпането и рязането на ноктите. От което могат да се направят два извода – че или според председателя на „Възраждане“ е в реда на нещата депутатите от партията му да ходят на работа понамирисващи и с неизрязани нокти, или смята ваксините за необходимост, каквато е и личната хигиена. Хигиената впрочем прекрасно илюстрира как понякога частното е и публично. Поради което и имунизирането не е единствено въпрос на личен избор, доколкото засяга цялото общество.
Репортажът на Цънцарова беше излъчен в навечерието на протест, организиран от „Възраждане“, срещу зелените сертификати и всички мерки за ограничаване на пандемията. От парламентарната трибуна Костадинов в пряк текст плашеше как симпатизантите на партията му ще нахлуят в парламента, агитирайки ги по този начин да осъществят римейк на щурма на последователите на Доналд Тръмп в Капитолия от 6 януари 2021 г. Ако цитираме известната фраза на Карл Маркс обаче,
този път историята се повтори като фарс.
Протестът се случи в деня, в който регистрираните заразени у нас за първи път от началото на пандемията надминаха 7000 души. Платени от „Възраждане“ автобуси докараха демонстранти от цялата страна, които, както може да се очаква, бяха без маски. В интерес на истината, много от представителите на силите на реда, охраняващи протеста, също не носеха маски.
Самият Костадинов не можа да присъства на „щурма“, с който плашеше от седмици, тъй като се оказа в карантина, окачествена от него като „домашен арест“. Това стана, след като на участниците в Консултативния съвет за национална сигурност при президента, сред които беше и Костадинов, им бе предписано да се самоизолират поради положителния тест за коронавирус на председателя на Народното събрание Никола Минчев. Лидерът на „Възраждане“ заподозря в това пъклен план, чиято единствена цел е да не бъде допуснат лично той на протеста.
На площада ритуално беше обесена… маска.
Звучаха възрожденски песни, тъпани, народна музика и химнът на България. Докато едни протестиращи казваха, че не са против ваксините, а против сертификатите и мерките, други повтаряха конспиративната теория за връзката между имунизирането и 5G. Много от плакатите и скандиранията всъщност „разбиваха отворена врата“. „Няма да позволим децата ни да бъдат насилствено ваксинирани!“, „Не на задължителното ваксиниране!“, чуваше се от протеста, а в същото време ваксините са доброволни и няма планове да престанат да бъдат такива. Гневни родители настояваха децата им да ходят на училище. Понастоящем обаче всички деца ходят на училище, освен карантинираните и онези, които поради желанието на родителите си се обучават онлайн.
Използването на децата като аргумент беше част от стратегията на „удряне на чувства“ – поради липса на сериозни рационални аргументи. Един от плакатите гласеше „Те убиват и вашите деца“, от което не става ясно нито кои са „те“, нито как точно убиват децата. Жена, представила се за майка, крещеше: „Господа полицаи, питам – имате ли сърца?“ Патриотичната реторика също се целеше в чувствата на аудиторията, с възгласи за „народа“, „суверена“, против „разделянето на българи срещу българи“.
Според протестиращите обаче журналистите явно не са българи.
С това може да се обясни агресията към присъстващите екипи на някои медии. Видимо уплашените репортерки на bTV и „Нова телевизия“ бяха многократно блъскани, а множеството скандираше: „bTV – фалшиви новини“ (вероятно заради репортажа на Мария Цънцарова за ваксинираните депутати от „Възраждане“, в който нямаше нищо фалшиво).
На два пъти демонстранти се опитаха да щурмуват сградата на Народното събрание, но без успех, въпреки че силите на реда бяха без щитове, каски и палки и изглежда, бяха инструктирани да избягват всякакво насилие. Липсваха и огражденията, познати от предишни протести, така че участници в „щурма“ успяха да се промъкнат до самия вход на сградата, гледката пред който може да се обобщи с перифраза на известната реплика от филма „Опасен чар“ – „протестиращ, полицай, протестиращ, полицай“.
След като до множеството стигна известният от часове факт, че парламентът на практика е празен, част от демонстрантите се насочиха към Министерството на здравеопазването, където техни представители проведоха безсмислен разговор със здравната министърка, тъй като исканията им бяха по дефиниция неосъществими. Така протестът се разпръсна и утихна, след което участниците бяха извозени до родните им места.
Ако след всички лозунги и декларации не успявате да схванете какво точно искат от „Възраждане“ и как си представят осъществяването му, проблемът не е „във вашия телевизор“. Като всяка екстремистка партия „Възраждане“ е развила своеобразен „новговор“ (по Джордж Оруел),
използвайки речника на либералната демокрация, която отрича.
Говори се например против „нарушаването на човешките права“, а както крайнодесните, така и крайнолевите партии (в известен смисъл „Възраждане“ може да се причисли и към двете) смятат човешките права за „либерална измислица“. Призовава се за защита от „дискриминацията“, а в същото време се отрича правото на съществуване на цели групи от населението, като ромите и ЛГБТИ хората например. Мерките за ограничаване на вируса се обявяват за „фашизъм“, а „Възраждане“ си е в много отношения неонацистка партия.
Впрочем известно е, че самият Костадинов не е против масовото ваксиниране – през 2017 г. се изказва остро срещу антиваксърството, наричайки го „новото Средновековие“. Недоволството срещу мерките за ограничаване на пандемията беше използвано, за да си осигури партията му парламентарно участие – така, както се използва от много националпопулистки партии по света. По принцип те боготворят реда и дисциплината, но това не им пречи понякога да „обърнат палачинката“ и да почнат да призовават за свобода и човешки права. Ами да – редът и дисциплината са винаги за другите, а свободата и правата – за своите.
Като наблюдаваме превъплъщенията на Костадинов и партията му, е лесно да разберем, че реториката срещу ограничаването на пандемията е само междинна спирка по пътя към властта – след антиромските изблици, кампаниите срещу учебници по родинознание, ЛГБТИ хората и какво ли още не. Тепърва ще има нови поводи за обществено недоволство, които да бъдат яхнати. Или да бъдат произведени единствено за да се яхнат.
Междувременно към деня на протеста на „Възраждане“ пред парламента
починалите от COVID-19 у нас са 31 761 – или един на всеки 205 души,
като имаме предвид последните данни на НСИ за населението на страната ни. При това става дума за жертвите на вируса по официални данни, без да броим недиагностицираните, както и починалите от усложнения, след като системата ги е отчела като „излекувани“. България е на второ място в света след Перу по смъртност от ковид – с 4635 жертви на един милион.
Толкова за „правото на живот“. Затова ни е време не за „Възраждане“, а за проглеждане.
Заглавна снимка: Стопкадър от видеоклип на Кирил Владимиров в YouTube
Using EM Waves to Detect Malware
Post Syndicated from Bruce Schneier original https://www.schneier.com/blog/archives/2022/01/using-em-waves-to-detect-malware.html
I don’t even know what I think about this. Researchers have developed a malware detection system that uses EM waves: “Obfuscation Revealed: Leveraging Electromagnetic Signals for Obfuscated Malware Classification.”
Abstract: The Internet of Things (IoT) is constituted of devices that are exponentially growing in number and in complexity. They use numerous customized firmware and hardware, without taking into consideration security issues, which make them a target for cybercriminals, especially malware authors.
We will present a novel approach of using side channel information to identify the kinds of threats that are targeting the device. Using our approach, a malware analyst is able to obtain precise knowledge about malware type and identity, even in the presence of obfuscation techniques which may prevent static or symbolic binary analysis. We recorded 100,000 measurement traces from an IoT device infected by various in-the-wild malware samples and realistic benign activity. Our method does not require any modification on the target device. Thus, it can be deployed independently from the resources available without any overhead. Moreover, our approach has the advantage that it can hardly be detected and evaded by the malware authors. In our experiments, we were able to predict three generic malware types (and one benign class) with an accuracy of 99.82%. Even more, our results show that we are able to classify altered malware samples with unseen obfuscation techniques during the training phase, and to determine what kind of obfuscations were applied to the binary, which makes our approach particularly useful for malware analysts.
This seems impossible. It’s research, not a commercial product. But it’s fascinating if true.
Auto-Diagnosis and Remediation in Netflix Data Platform
Post Syndicated from Netflix Technology Blog original https://netflixtechblog.com/auto-diagnosis-and-remediation-in-netflix-data-platform-5bcc52d853d1
By Vikram Srivastava and Marcelo Mayworm
Netflix has one of the most complex data platforms in the cloud on which our data scientists and engineers run batch and streaming workloads. As our subscribers grow worldwide and Netflix enters the world of gaming, the number of batch workflows and real-time data pipelines increases rapidly. The data platform is built on top of several distributed systems, and due to the inherent nature of these systems, it is inevitable that these workloads run into failures periodically. Troubleshooting these problems is not a trivial task and requires collecting logs and metrics from several different systems and analyzing them to identify the root cause. At our scale, even a tiny percentage of disrupted workloads can generate a substantial operational support burden for the data platform team when troubleshooting involves manual steps. And we can’t discount the productivity impact it causes on data platform users.
It motivates us to be proactive in detecting and handling failed workloads in our production environment, avoiding interruptions that could slow down our teams. We have been working on an auto-diagnosis and remediation system called Pensive in the data platform to address these concerns. With the goal of troubleshooting failing and slow workloads and remediating them without human intervention wherever possible. As our platform continues to grow and different scenarios and issues can disrupt the workloads, Pensive has to be proactive in detecting broad problems at the platform level in real-time and diagnosing the impact across the workloads.
Pensive infrastructure comprises two separate systems to support batch and streaming workloads. This blog will explore these two systems and how they perform auto-diagnosis and remediation across our Big Data Platform and Real-time infrastructure.
Batch Pensive
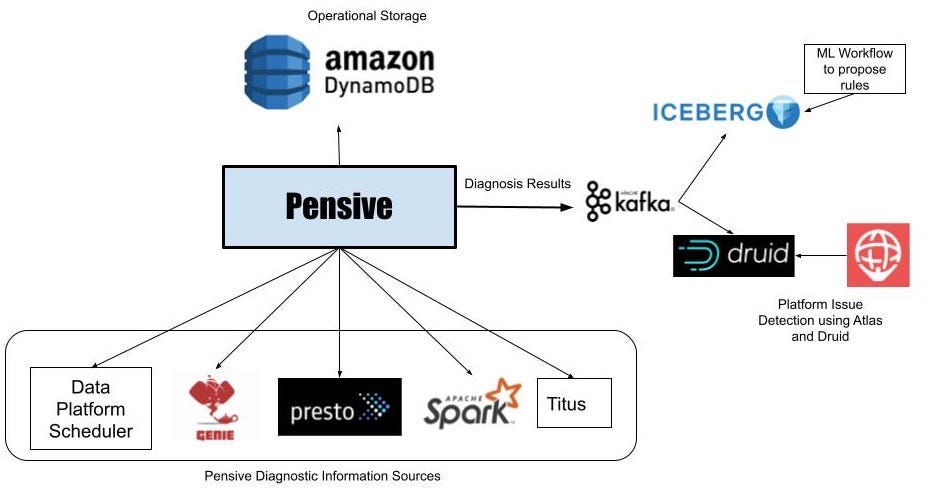
Batch workflows in the data platform run using a Scheduler service that launches containers on the Netflix container management platform called Titus to run workflow steps. These steps launch jobs on clusters running Apache Spark and Presto via Genie. If a workflow step fails, Scheduler asks Pensive to diagnose the step’s error. Pensive collects logs for the failed jobs launched by the step from the relevant data platform components and then extracts the stack traces. Pensive relies on a regular expression based rules engine that has been curated over time. The rules encode information about whether an error is due to a platform issue or a user bug and whether the error is transient or not. If a regular expression from one of the rules matches, then Pensive returns information about that error to the Scheduler. If the error is transient, Scheduler will retry that step with exponential backoff a few more times.
The most critical part of Pensive is the set of rules used to classify an error. We need to evolve them as the platform evolves to ensure that the percentage of errors that Pensive cannot classify remains low. Initially, the rules were added on an ad-hoc basis as requests came in from platform component owners and users. We have now moved to a more systematic approach where unknown errors are fed into a Machine Learning process that performs clustering to propose new regular expressions for commonly occurring errors. We take the proposals to platform component owners to then come up with the classification of the error source and whether it is of transitory nature. In the future, we are looking to automate this process.
Detection of Platform-wide Issues
Pensive does error classification on individual workflow step failures, but by doing real-time analytics on the errors detected by Pensive using Apache Kafka and Apache Druid, we can quickly identify platform issues affecting many workflows. Once the individual diagnoses get stored in a Druid table, our monitoring and alerting system called Atlas does aggregations every minute and sends out alerts if there is a sudden increase in the number of failures due to platform errors. This has led to a dramatic reduction in the time it takes to detect issues in hardware or bugs in recently rolled out data platform software.
Streaming Pensive
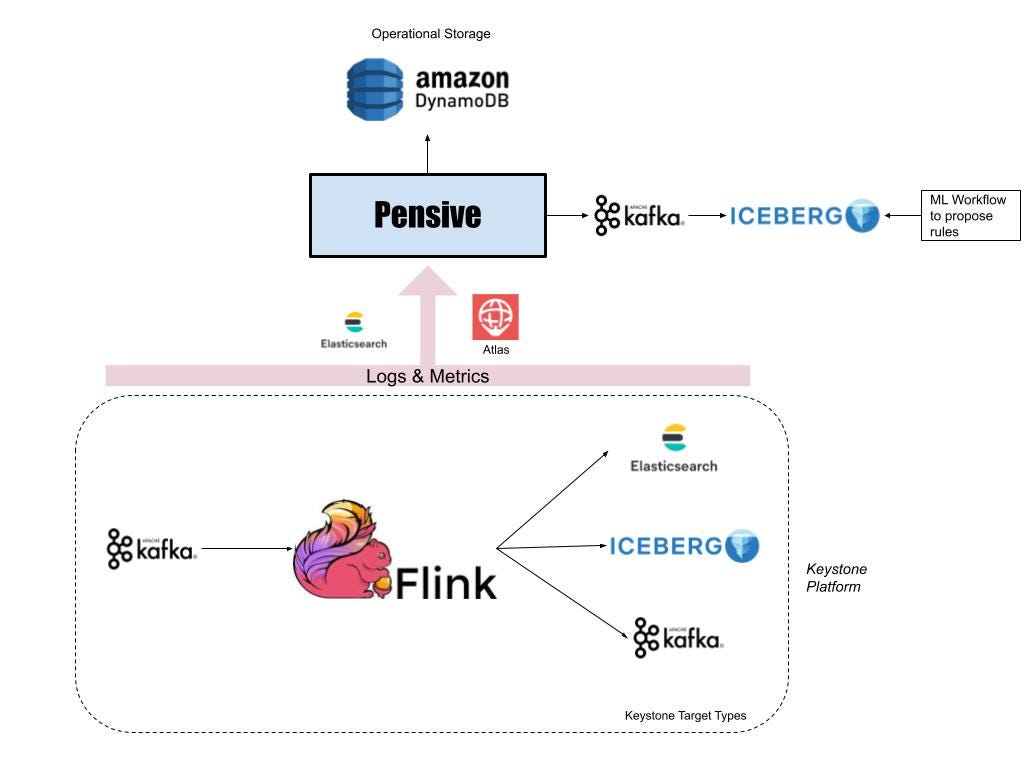
Apache Flink powers real-time stream processing jobs in the Netflix data platform. And most of the Flink jobs run under a managed platform called Keystone, which abstracts out the underlying Flink job details and allows users to consume data from Apache Kafka streams and publish them to different data stores like Elasticsearch and Apache Iceberg on AWS S3.
Since the data platform manages keystone pipelines, users expect platform issues to be detected and remediated by the Keystone team without any involvement from their end. Furthermore, data in Kafka streams have a finite retention period, which adds time pressure for resolving the issues to avoid data loss.
For every Flink job running as part of a Keystone pipeline, we monitor the metric indicating how far the Flink consumer lags behind the Kafka producer. If it crosses a threshold, Atlas sends a notification to Streaming Pensive.
Like its batch counterpart, Streaming Pensive also has a rules engine to diagnose errors. However, in addition to logs, Streaming Pensive also has rules for checking various metric values for multiple components in the Keystone pipeline. The issue may occur in the source Kafka stream, the main Flink job, or the sinks to which the Flink job is writing data. Streaming Pensive diagnoses it and tries to remediate the issue automatically when it happens. Some examples where we are able to auto-remediate are:
- If Streaming Pensive finds that one or more Flink Task Managers are going out of memory, it can redeploy the Flink cluster with more Task Managers.
- If Streaming Pensive finds that there is an unexpected increase in the rate of incoming messages on the source Kafka cluster, it can increase the topic retention size and period so that we don’t lose any data while the consumer is lagging. If the spike goes away after some time, Streaming Pensive can revert the retention changes. Otherwise, it will page the job owner to investigate if there is a bug causing the increased rate or if the consumers need to be reconfigured to handle the higher rate.
Even though we have a high success rate, there are still occasions where automation is not possible. If manual intervention is required, Streaming Pensive will page the relevant component team to take timely action to resolve the issue.
What’s Next?
Pensive has had a significant impact on the operability of the Netflix data platform. And helped engineering teams lower the burden of operations work, freeing them to tackle more critical and challenging problems. But our job is nowhere near done. We have a long roadmap ahead of us. Some of the features and expansions we have planned are:
- Batch Pensive is currently diagnosing failed jobs only, and we want to increase the scope into optimization to determine why jobs have become slow.
- Auto-configure batch workflows so that they finish successfully or become faster and use fewer resources when possible. One example where it can dramatically help is Spark jobs, where memory tuning is a significant challenge.
- Expand Pensive with Machine Learning classifiers.
- The streaming platform recently added Data Mesh, and we need to expand Streaming Pensive to cover that.
Acknowledgments
This work could not have been completed without the help of the Big Data Compute and the Real-time Data Infrastructure teams within the Netflix data platform. They have been great partners for us as we work on improving the Pensive infrastructure.

Auto-Diagnosis and Remediation in Netflix Data Platform was originally published in Netflix TechBlog on Medium, where people are continuing the conversation by highlighting and responding to this story.
Spinthariscope
Post Syndicated from original https://xkcd.com/2568/

Backtest trading strategies with Amazon Kinesis Data Streams long-term retention and Amazon SageMaker
Post Syndicated from Sachin Thakkar original https://aws.amazon.com/blogs/big-data/backtest-trading-strategies-with-amazon-kinesis-data-streams-long-term-retention-and-amazon-sagemaker/
Real-time insight is critical when it comes to building trading strategies. Any delay in data insight can cost lot of money to the traders. Often, you need to look at historical market trends to predict future trading pattern and make the right bid. More the historical data you analyze, better trading prediction you get. Back tracking streaming data can be tricky as it requires sophisticated storage and analysis mechanisms.
Amazon Kinesis Data Streams allows our customer to store streaming data for up to one year. Amazon Kinesis Data Streams Long Term Retention (LTR) of streaming data enables to use the same platform for both real-time and older data retained in Amazon Kinesis Data Streams. For example, one can train machine learning algorithms for financial trading, marketing personalization, and recommendation models without moving the data into a different data store or writing a new application. Customers can also satisfy certain data retention regulations, including under HIPAA and FedRAMP, using long term retention. This thus simplifies the data ingestion architecture for our trading use case we will discuss in this post.
In the post Building algorithmic trading strategies with Amazon SageMaker, we demonstrated how to backtest trading strategies with Amazon SageMaker with historical stock price data stored in Amazon Simple Storage Service (Amazon S3). In this post, we expand this solution for streaming data and describe how to use Amazon Kinesis.
In addition, we want to use Amazon SageMaker automatic tuning to find the optimal configuration for a moving average crossover strategy. In this strategy, two moving averages for a slow and a fast time period are calculated, and a trade is executed when a crossover happens. If the fast moving average crosses above the slow moving average, the strategy places a long trade, otherwise the strategy goes short. We find the optimal period length for these moving averages by running multiple backtests with different lengths over a historical dataset.
Finally, we run the optimal configuration for this moving average crossover strategy over a different test dataset and analyze the performance results. If the performance measured in profit and loss (P&L) is positive for the test period, we can consider this trading strategy for a forward test.
To show you how easy and quick it is to get started on AWS, we provide a one-click deployment for an extensible trading backtesting solution that uses Kinesis long-term retention for streaming data.
Solution overview
We use Kinesis Data Streams to store real-time streaming as well as historical market data. We use Jupyter notebooks as our central interface for exploring and backtesting new trading strategies. SageMaker allows you to set up Jupyter notebooks and integrate them with AWS CodeCommit to store different versions of strategies and share them with other team members.
We use Amazon S3 to store model artifacts and backtesting results.
For our trading strategies, we create Docker containers that contain the required libraries for backtesting and the strategy itself. These containers follow the SageMaker Docker container structure in order to run them inside of SageMaker. For more information about the structure of SageMaker containers, see Using the SageMaker Training and Inference Toolkits.
The following diagram illustrates this architecture.

We run the data preparation step from a SageMaker notebook. This copies the historical market data to the S3 bucket.
We use AWS Data Migration Service (AWS DMS) to load the market data to the data stream. The
SageMaker notebook connects with Kinesis Data Streams and runs the trading strategy algorithm via a SageMaker training job. The algorithm uses part of the data for training to find the optimal strategy configuration.
Finally, we run the trading strategy using the previously determined configuration on a test dataset.
Prerequisites
Before getting started, we set up our resources. In this post, we use the us-east-2 Region as an example.
- Deploy the AWS resources using the provided AWS CloudFormation template.

- For Stack name, enter a name for your stack.
- Provide an existing S3 bucket name to store the historical market data.

The data is loaded in Kinesis Data Streams from this S3 bucket. Your bucket needs to be in same Region where your stack is set up.

- Accept all the defaults and choose Next.
- Acknowledge that AWS CloudFormation might create AWS Identity and Access Management (IAM) resources with custom names.
- Choose Create stack.

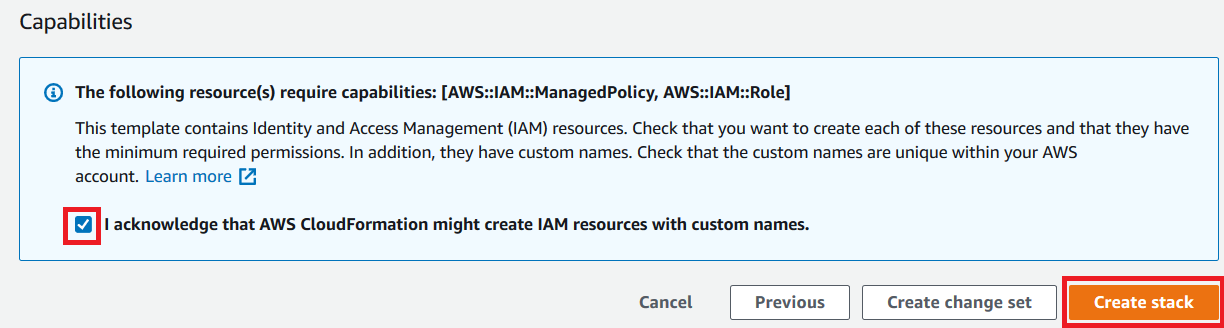
This creates all the required resources.
Data load to Kinesis Data Streams
To perform the data load, complete the following steps:
- On the SageMaker console, under Notebook in the navigation pane, choose Notebook instances.
- Locate the notebook instance
AlgorithmicTradingInstance-*. - Choose Open Jupyter for this instance.

- Go to the
algorithmic-trading->4_Kinesisfolder and choose Strategy_Kinesis_EMA_HPO.pynb.

You now run the data preparation step in the notebook.
- Load the dataset.


Specify the existing bucket where test data is stored. Make sure that the test bucket is in the same Region where you set up the stack.
- Run all the steps in the notebook until Step 2 Data Preparation.
- On the AWS DMS console, choose Database migration tasks.
- Select the AWS DMS task
dmsreplicationtask-*. - On the Actions menu, choose Restart/Resume.
This starts the data load from the S3 bucket to the data stream.

Wait until the replication task shows the status Load complete.

- Continue the steps in the Jupyter notebook.

Read data from Kinesis long-term retention
We read daily open, high, low, close price, and volume data from the stream’s long-term retention with the AWS SDK for Python (Boto3).
Although we don’t use enhanced fan-out (EFO) in this post, it may be advisable to do so an existing application is already reading from the stream. That way this backtesting app doesn’t interfere with the existing application.

You can visualize your data, as shown in the following screenshot.

Define your trading strategy
In this step, we define our moving average crossover trading strategy.

Build a Docker image
We build our backtesting job as a Docker image and push it to Amazon ECR.

Hyperparameter optimization with SageMaker on training data
For the moving average crossover trading strategy, we want to find the optimal fast period and slow period of this strategy, and we provide a range of days to search for.

We use profit and loss (P&L) of the strategy as the metric to find optimized hyperparameters.
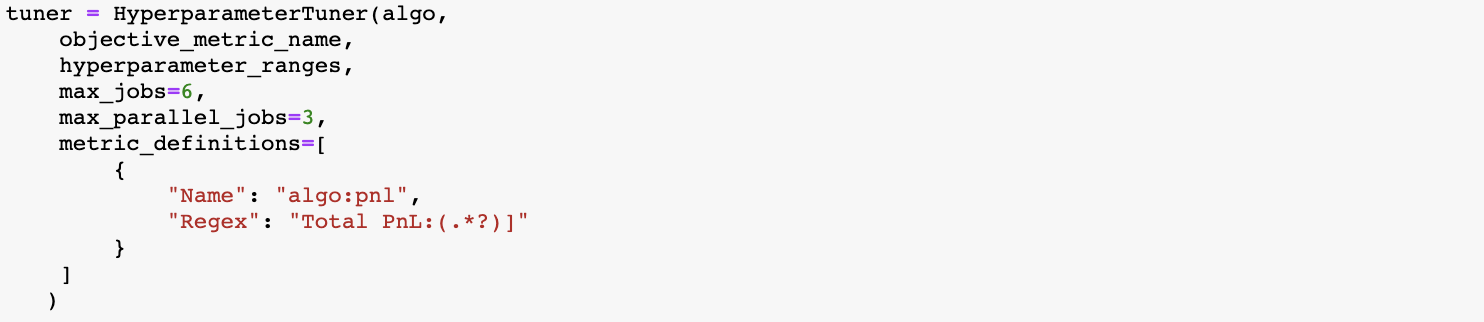
You can see the tuning job recommended a value of 7 and 21 days for the fast and slow period for this trading strategy given the training dataset.

Run the strategy with optimal hyperparameters on test data
We now run this strategy with optimal hyperparameters on the test data.


When the job is complete, the performance results are stored in Amazon S3, and you can review the performance metrics in a chart and analyze the buy and sell orders for your strategy.

Conclusion
In this post, we described how to use the Kinesis Data Streams long-term retention feature to store the historical stock price data and how to use streaming data for backtesting of a trading strategy with SageMaker.
Long-term retention of streaming data enables you to use the same platform for both real-time and older data retained in Kinesis Data Streams. This allows you to use this data stream for financial use cases like backtesting or for machine learning without moving the data into a different data store or writing a new application. You can also satisfy certain data retention regulations, including under HIPAA and FedRAMP, using long-term retention. For more information, see Amazon Kinesis Data Streams enables data stream retention up to one year.
Risk disclaimer
This post is for educational purposes only and past trading performance does not guarantee future performance.
About the Authors
 Sachin Thakkar is a Senior Solutions Architect at Amazon Web Services, working with a leading Global System Integrator (GSI). He brings over 22 years of experience as an IT Architect and as Technology Consultant for large institutions. His focus area is on Data & Analytics. Sachin provides architectural guidance and supports the GSI partner in building strategic industry solutions on AWS
 Amogh Gaikwad is a Solutions Developer in the Prototyping Team. He specializes in machine learning and analytics and has extensive experience developing ML models in real-world environments and integrating AI/ML and other AWS services into large-scale production applications. Before joining Amazon, he worked as a software developer, developing enterprise applications focusing on Enterprise Resource Planning (ERP) and Supply Chain Management (SCM). Amogh has received his master’s in Computer Science specializing in Big Data Analytics and Machine Learning.
 Dhiraj Thakur is a Solutions Architect with Amazon Web Services. He works with AWS customers and partners to provide guidance on enterprise cloud adoption, migration and strategy. He is passionate about technology and enjoys building and experimenting in Analytics and AI/ML space.
 Oliver Steffmann is an Enterprise Solutions Architect at AWS based in New York. He brings over 18 years of experience as IT Architect, Software Development Manager, and as Management Consultant for international financial institutions. During his time as a consultant, he leveraged his extensive knowledge of Big Data, Machine Learning and cloud technologies to help his customers get their digital transformation off the ground. Before that he was the head of municipal trading technology at a tier-one investment bank in New York and started his career in his own startup in Germany.
Evaluating MDR Vendors: A Pocket Buyer’s Guide
Post Syndicated from Mikayla Wyman original https://blog.rapid7.com/2022/01/13/evaluating-mdr-vendors-a-pocket-buyers-guide/

Cyberthreats are now the No. 1 source of stress among CEOs, with 71% of respondents to PwC’s 2021 CEO Study reporting they are “extremely concerned” about the issue. At the same time, the cybersecurity skills gap continues to grow, with 95% of security pros saying the shortage of talent in their field hasn’t improved. So while the seriousness of the problem has increased, the availability of in-house resources to adequately address it has not — particularly when it comes to finding talent with the specialized skills in detection and response.
These trends have led many organizations to partner with managed detection and response (MDR) service providers to address resource and skills gap challenges and build a strong competency to find and stop attackers in their environment.
By instantly extending your internal team’s capabilities with detection and response experts, MDR services can provide you the confidence that your environment is protected at all times.
And for those that struggle to build a fully staffed security operations center (SOC) with the right headcount, technology, and process to be effective — all while staying under a tight budget — MDR may provide a cost-effective method to quickly stand up a complete detection and response program.
In our 2022 MDR Buyer’s Guide, we outline the core capabilities that provide the foundation for evaluating MDR vendors. They include:
- 24×7 SOC team with expert analysts
- Extended detection and response (XDR) technology
- Strategic guidance and collaboration
- Threat hunting
- Managed response
- Digital forensics and incident/breach response (DFIR)
- Automation
- A simple, predictable pricing
- SLA delivery standards
If you’re looking for a deep dive into each of these criteria, download the full guide!
In this post, we’ll streamline the discussion into 4 big-picture questions, providing you a quick-reference guide to use in the early stages of your MDR vendor selection journey, as you begin to identify your needs and narrow down your options.
1. Is this partner simply an outsourced SOC, or can they help us advance our overall security program?
An MDR provider is not just a vendor but a partner — and people are the foundation of any great partnership. You’ll want to ensure you ask the right questions regarding who will be servicing your organization and how, including:
- How many MDR SOC analysts will be monitoring my environment 24×7?
- What’s the experience level of the MDR SOC team we’ll be working with?
- What is the average tenure and attrition rate of the team?
- Will your partner suggest operational and strategic guidance to improve your program based on real-time threat monitoring and proactive threat hunting?
- Is there someone who will be our Security Advisor that we meet with regularly?
- What is the customer experience like when I need to connect with the MDR team?
2. Do they have the right tools at their disposal?
MDR combines real-time threat monitoring across the most critical elements of your IT environment — endpoints, network, users, and cloud sources. And in case you haven’t noticed, those environments are becoming increasingly complex. The cloud is enabling rapid scaling, and threats can come from virtually anywhere.
To carry out their duties well in this context, MDR providers need to be using the right XDR technology for complete visibility and coverage. Here are some questions to ask that can help you get a better sense of how the MDR vendors you’re considering approach their technology implementation — and how that affects you as the customer.
- Is the MDR SOC team using multiple third-party solutions, or a technology built by an embedded engineering team?
- How do you detect threats that bypass preventative controls?
- Will I have full access to your back-end technology? If not, will you provide self-service log search and dashboards?
- Does the SOC perform proactive threat hunts on top of the real-time detections?
- Will we have the ability to add SOAR automation capabilities to expedite the remediation process?
3. Can they pair insight with action?
The last thing you want to hear from an MDR provider is, “Hey, we found this threat — now you have to go fix it.” The vendors you’re considering should have a managed response approach to effectively curb attacks after detection.
To understand when and how vendors will respond to threats they detect, start with these key questions:
- What types of managed response actions will the MDR SOC advisors take?
- In what instances will the MDR service take response action on our behalf?
- Will I have the opportunity to deny the containment response if I don’t want the SOC team to take action?
4. Does the service scale to our needs and budget?
Even if an MDR vendor sounds great on paper across all of these points, that doesn’t necessarily mean they’re right for you. After all, you wouldn’t buy a two-seater car as your primary vehicle for a family of four. It’s critical to evaluate your MDR provider on the axes of your program maturity and desired security outcomes — both as it is now and for your goals for the future. Here are a few questions that will help you get a sense of whether an MDR vendor’s service and pricing structure fits your organization’s requirements.
- How is the MDR service priced?
- In the event of a breach, does MDR include DFIR as you’d get if you had an incident response retainer?
- Are there data allotment or retention limitations?
- What is your mean time to detect (MTTD) and mean time to respond (MTTR)?
These kinds of questions should help point you in the right direction in your initial conversations with potential MDR vendors. As you begin to make more fine-tuned decisions, you’ll want to have a few more detailed questions to ask — which means understanding the ins and outs of the MDR landscape a little more fully.
Check out our full MDR Buyer’s Guide for 2022 to help you navigate your choices with confidence and clarity.
How Experian uses Amazon SageMaker to Deliver Affordability Verification
Post Syndicated from Haresh Nandwani original https://aws.amazon.com/blogs/architecture/how-experian-uses-amazon-sagemaker-to-deliver-affordability-verification/
Financial Service (FS) providers must identify patterns and signals in a customer’s financial behavior to provide deeper, up-to-the-minute, insight into their affordability and credit risk. FS providers use these insights to improve decision making and customer management capabilities. Machine learning (ML) models and algorithms play a significant role in automating, categorising, and deriving insights from bank transaction data.
Experian publishes Categorisation-as-a-Service (CaaS) ML models that automate analysis of bank and credit card transactions, to be deployed in Amazon SageMaker. Driven by a suite of Experian proprietary algorithms, these models categorise a customer’s bank or credit card transactions into one of over 180 different income and expenditure categories. The service turns these categorised transactions into a set of summarised insights that can help a business better understand their customer and make more informed decisions. These insights provide a detailed picture of a customer’s financial circumstances and resilience by looking at verified income, expenditure, and credit behavior.
This blog demonstrates how financial service providers can introduce affordability verification and categorisation into their digital journeys by deploying Experian CaaS ML models on SageMaker. You don’t need significant ML knowledge to start using Amazon SageMaker and Experian CaaS.
Affordability verification and data categorisation in digital journeys
Product onboarding journeys are increasingly digital. Most financial service providers expect most of these journeys to initiate and complete online. An example journey would be consumers looking to apply for credit with their existing FS provider. These journeys typically involve FS providers performing affordability verification to ensure consumers are offered products they can afford. FS providers can now use Experian CaaS ML models available via AWS Marketplace to generate real-time financial insights and affordability verification for their customers.
Figure 1 depicts a typical digital journey for consumers applying for credit.

Figure 1. Customer journey for consumers applying for credit
- Data categorisation for transactional data. Existing transactional data for current consumers is typically sourced from on-premises data sources into a data lake in the cloud. It is then prepared and transformed for processing and analytics. This analysis is done based on the FS provider’s existing consent in compliance with relevant data protection laws. Additional transaction information for other accounts not held by the lender can be sourced from Open Banking and categorised separately.
- Store categorised transactions. Background processes run a SageMaker batch transform job using the Experian CaaS Data Categorisation model to categorise this transactional data.
- Consumer applies for credit. Consumers use the FS providers’ existing front-end web, mobile, or any other digital channel to apply for credit.
- FS provider retrieves up-to-date insights. Insights are generated in real time using the Experian CaaS insights model deployed as endpoints in SageMaker and returned to the consumer-facing digital channel.
- FS provider makes credit decision. The channel app consolidates these insights to decide on product eligibility and drive customer journeys.
Deploying and publishing Experian CaaS ML models to Amazon SageMaker
Figure 2 demonstrates the technical solution for the customer journey described in the preceding section.

Figure 2. Credit application – technical solution using Amazon SageMaker and Experian CaaS ML models
- Financial Service providers can use AWS Data Migration Service (AWS DMS) to replicate transactional data from their on-premises systems such as their core banking systems to Amazon S3. Customers can source this transactional data into a highly available and scalable data lake solution on AWS. Refer to AWS DMS documentation for technical details on supported database sources.
- FS providers can use AWS Glue, a serverless data integration service, to cleanse, prepare, and transform the transactional data into formats supported by the Experian CaaS ML models.
- FS providers can subscribe and download CaaS ML models built for SageMaker from the AWS Marketplace.
- These models can be deployed to SageMaker hosting services as a SageMaker endpoint for real-time inference. Endpoints are fully managed by AWS, and can be set up to scale on demand and deployed in a Multi-AZ model for resilience. FS providers can use Amazon API Gateway and AWS Lambda to make these endpoints available to their consumer-facing applications.
- SageMaker also supports a batch transform mode for ML models, which in this scenario will be used to precategorise transactional data. This mode is also useful for use cases that require nearly continuous and regular analysis such as a regular anti-fraud assessment.
- Consumer requests for a financial product such as a credit card on an FS provider’s digital channels.
- These requests invoke SageMaker endpoints, which use Experian CaaS models to derive real-time insights.
- These insights are used to further drive the customer’s product journey. CaaS models are pre-trained and can return insights within the latency requirements of most real-time digital journeys.
Security and compliance using CaaS
AWS Marketplace models are scanned by AWS for common vulnerabilities and exposures (CVE). CVE is a list of publicly known information about security vulnerability and exposure. For details on infrastructure security applied by SageMaker, see Infrastructure Security in Amazon SageMaker.
Data security is a key concern for FS providers and sharing of data externally is challenging from a security and compliance perspective. The CaaS deployment model described here helps address these challenges as data owned by the FS provider remains within their control domain and AWS account. There is no requirement for this data to be shared with Experian. This means the customer’s personal financial information is retained by the FS provider. FS providers cannot access the model code as it is running in a locked SageMaker environment.
AWS Marketplace models such as the Experian CaaS ML models are deployed in a network isolation mode. This ensures that the models cannot make any outbound network calls, even to other AWS services such as Amazon S3. SageMaker still performs download and upload operations against Amazon S3 in isolation from the model.
Implementing upgrades to CaaS ML models
ML model upgrades can be performed in place in Amazon SageMaker as vendors release newer versions of their models in AWS Marketplace. Endpoints can be set up in a blue/green deployment pattern to ensure that upgrades do not impact consumers and be safely rolled back with no business interruptions.
Conclusion
Automated categorisation of bank transaction data is now being used by FS providers as they start to realise the benefits it can bring to their business. This is being driven in part by the advent of Open Banking. Many FS providers have increased confidence in the accuracy and performance of automated categorisation engines. Suppliers such as Experian are providing transparency around their methodologies used to categorise data, which is also encouraging adoption.
In this blog, we covered how FS providers can introduce automated categorisation of data and affordability identification capabilities into their digital journeys. This can be done quickly and without significant in-house ML skills, using Amazon SageMaker and Experian CaaS ML models. SageMaker endpoints and batch transform capabilities enable the deployment of a highly scalable, secure, and extensible ML infrastructure with minimal development and operational effort.
Experian’s CaaS is available for use via the AWS Marketplace.
Let’s Be Honest—Retention Minimums Are Delete Penalties
Post Syndicated from Jeremy Milk original https://www.backblaze.com/blog/lets-be-honest-retention-minimums-are-delete-penalties/

People often think of “retention” as a good thing when it comes to cloud and object storage—after all, the point of storing data is to retain it. But retention’s only a good thing when you actually want to retain data—that nuance is sometimes hidden from people, and yes, I say hidden intentionally.
A number of cloud storage providers from big to small are doing their best to hide the darker side of retention—retention minimums. They loudly promote attractive storage tier rates while making little mention of their data retention minimums that allow them to charge those rates for as many as 90 or 180 days after bytes uploaded have been deleted.
We don’t believe in charging you for data you deleted. Today, we’re explaining more about what that means for you, and highlighting some real-world stories of discovering these hidden fees.
Our Stance on Retention Minimums aka Delete Penalties
First, let’s call retention minimums what they really are: delete penalties. We stand against delete penalties. We don’t charge them. We see them as the enemy of every use case in which data is intentionally replaced or deprecated in hours, days, or weeks instead of months. Delete penalties go against agility and flexibility. We also think it’s despicable when a vendor shouts about how they don’t charge fees for things like data egress, while quietly padding their topline with hidden retention penalties.
At Backblaze, our pricing has nothing to hide. When you delete data, you stop paying for it within the hour. End of story.
Retention Minimums: The Fine Print or the Finer Print
Obviously, cloud providers aren’t going to advertise that they charge you for deleted data, but some are more transparent than others. AWS with its S3 Glacier services, for example, at least acknowledges these products are meant primarily for longer term storage. They disclose minimum retention details in the footnotes on their pricing page—the information is less prominent, but to their credit, it’s disclosed on the page. It may seem unusual for us to praise AWS, but by comparison, they’re actually a lesser evil in this regard.
Others? Let’s just say you really need a magnifying glass to dig through the fine print. Their minimum retention requirements are buried deep in their terms of service or FAQs. Unless you have an eagle eye and/or click through many pages of their website, you’re left to find out just how much you’re paying for deleted data when you get your bill. What’s more, the disappointment and disillusionment from budget surprises like that can turn people off from the many gains they can derive from leveraging cloud storage.
Delete Penalties in the Wild: Testimonials
Here’s what we’ve heard from folks who experienced delete penalties for themselves…
“Initially, I was worried about egress, so I went with [name redacted]. But I was misled. My egress was nominal. Meanwhile, I found that one-third or more of my bill was for backup I had deleted. That’s not how I want to do business.”
—MSP Leader
“I looked at an up-and-coming provider called [name redacted] because their whole thing is they’ve got great prices. I soured on them when I realized that they don’t really tell you that they bill you for a minimum of 90 days of object duration. There’s little I need to store for 90 days for my application. All of my cursory research seemed okay, and the pricing calculator on the pricing page made no mention of any of this. I’m not a fan of using a vendor that buries something that important.”
—Brian, Software Developer
“We got burned by [name redacted] with regard to their deletion and how we do our backups. I deleted data off their system, and they’re billing me for data they’re not storing? And what’s more, they’re irritated by the fact that their hard drives had to delete data? I don’t understand that level of…I’m not even going to say the word, but it’s just stupid.”
—Joe Valentine, Software Engineer II, Webjogger
Delete the Delete Penalties
To be sure, compared to the high costs of on-premises infrastructure, cloud storage delete penalties may go unnoticed or be characterized as a cost of saving money. But that’s exactly what companies who levy these penalties want you to think. Don’t let them misrepresent their true costs or mislead you. It’s not right. It’s not aligned with their messaging. It’s not what you deserve. And it’s not going to support your business growth especially when fees add up fast for many terabytes and petabytes.
It’s time to delete the delete penalties. Full stop.
If you’ve been hit with unexpected penalties after deleting data, share your experience below with the broader community or reach out to us to learn more about how you can eliminate them.
The post Let’s Be Honest—Retention Minimums Are Delete Penalties appeared first on Backblaze Blog | Cloud Storage & Cloud Backup.
[$] The first half of the 5.17 merge window
Post Syndicated from original https://lwn.net/Articles/880909/rss
As of this writing, just short of 7,000 non-merge commits have been pulled
into the mainline kernel repository for the 5.17 release. The changes
pulled thus far bring new features across the kernel; read on for a summary
of what has been merged during the first half of the 5.17 merge window.
Using Foreign Nationals to Bypass US Surveillance Restrictions
Post Syndicated from Bruce Schneier original https://www.schneier.com/blog/archives/2022/01/using-foreign-nationals-to-bypass-us-surveillance-restrictions.html
Remember when the US and Australian police surreptitiously owned and operated the encrypted cell phone app ANOM? They arrested 800 people in 2021 based on that operation.
New documents received by Motherboard show that over 100 of those phones were shipped to users in the US, far more than previously believed.
What’s most interesting to me about this new information is how the US used the Australians to get around domestic spying laws:
For legal reasons, the FBI did not monitor outgoing messages from Anom devices determined to be inside the U.S. Instead, the Australian Federal Police (AFP) monitored them on behalf of the FBI, according to previously published court records. In those court records unsealed shortly before the announcement of the Anom operation, FBI Special Agent Nicholas Cheviron wrote that the FBI received Anom user data three times a week, which contained the messages of all of the users of Anom with some exceptions, including “the messages of approximately 15 Anom users in the U.S. sent to any other Anom device.”
[…]
Stewart Baker, partner at Steptoe & Johnson LLP, and Bryce Klehm, associate editor of Lawfare, previously wrote that “The ‘threat to life; standard echoes the provision of U.S. law that allows communications providers to share user data with law enforcement without legal process under 18 U.S.C. § 2702. Whether the AFP was relying on this provision of U.S. law or a more general moral imperative to take action to prevent imminent threats is not clear.” That section of law discusses the voluntary disclosure of customer communications or records.
When asked about the practice of Australian law enforcement monitoring devices inside the U.S. on behalf of the FBI, Senator Ron Wyden told Motherboard in a statement “Multiple intelligence community officials have confirmed to me, in writing, that intelligence agencies cannot ask foreign partners to conduct surveillance that the U.S. would be legally prohibited from doing itself. The FBI should follow this same standard. Allegations that the FBI outsourced warrantless surveillance of Americans to a foreign government raise troubling questions about the Justice Department’s oversight of these practices.”
I and others have long suspected that the NSA uses foreign nationals to get around restrictions that prevent it from spying on Americans. It is interesting to see the FBI using the same trick.
A Quick Look at CES 2022
Post Syndicated from Deral Heiland original https://blog.rapid7.com/2022/01/13/a-quick-look-at-ces-2022/

The first thing I noticed about CES this year was COVID’s impact on the event, which was more than just attendance size. A large amount of the technology focused on sanitation, everything from using light to sanitize surfaces on point-of-sale systems to hand-washing stations.
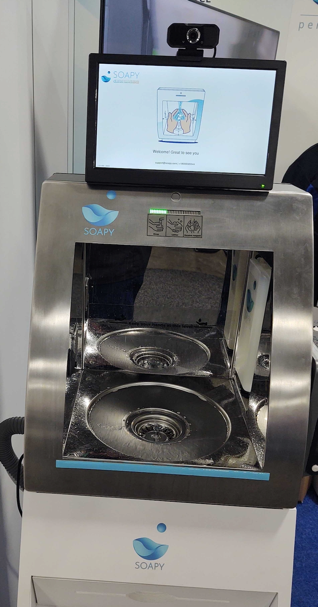
When I attend events such as this, which are not 100% security-related, I still approach them with a very strong security mindset and take the opportunity to talk to many of the vendors about the subject of security within their products. This often has mixed results, with many of those working the booths at CES having more focused knowledge on product functionality and capabilities, not technical questions related to product security. This year was no different, but I still had fun talking about security with many of those working their product booth, and as usual, I had some great conversations.
For example, I love when I see a product that typically wouldn’t be considered smart technology, but then see that it has been retrofitted with some level of smart tech to expand its usefulness, like a toothbrush. This year, I headed right to those booths and started asking security questions, and I was surprised at the responses I got, even though security was not their area of expertise as, say, an oral hygienist. They were still interested in talking about security and made every effort to either answer my question or find the answer. They also were quick to start asking me questions around what they should be concerned with and how would products like theirs be properly tested.
A healthy curiosity
Moving on from there, as usual, I encountered wearable smart technology, which has always been a big item at CES. Going beyond the typical devices to track your steps, smartwatches continue to be improved with a focus on monitoring key health stats including blood pressure, oxygen levels, heart rate, EKG, and even blood sugar levels for diabetics.
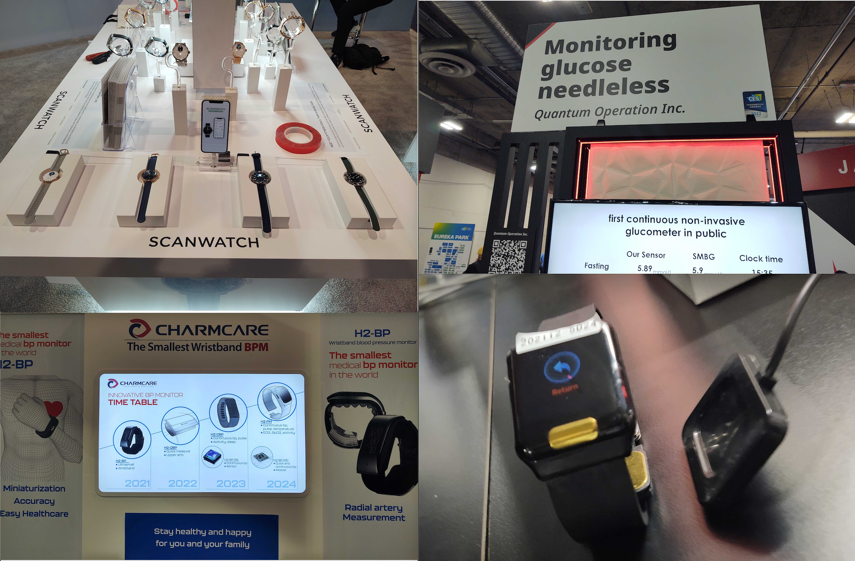
At Abbott’s booth, which had several products including the Libre Freestyle for monitoring blood glucose level, which is a product I use. Abbott is releasing a new sensor for this product that has a much smaller profile, and I’m looking forward to that. Since they had no live demos of their currently marketed Libre FreeStyle product, I volunteered to demo my unit for another CES attendee.

One of the Abbott booth employees asked me why I still use their handheld unit and haven’t switched to their mobile application, which was perfect timing for me to start talking security. During the conversation, I told them that I hadn’t personally tested their mobile application and regularly avoid placing apps on my phone that I haven’t security-tested. They all chimed in and recommended that I test their mobile application and let them know if it has any issues that they need to fix. So, I guess I need to add that to my to-do list.
Facing the future
Next, I encountered the typical facial recognition systems we regularly see at CES — but now, they all appear to be able to measure body temperatures and identify you despite wearing a mask. Of course, they also now support contract tracing to help identify if you’ve encountered someone who is COVID-positive. Also, many companies have made their devices more friendly by enabling them to automatically greet you at the door.
Personally, I always have reservations when it comes to facial recognition systems. Don’t get me wrong: I get the value they can bring. But sadly, in the long haul, I expect the data gathered will end up being misused, just like data gathered using other methods. Someone will find a way to commoditize this data if they aren’t already.

Charged up
Another area I expected to see at CES was electric-vehicle (EV) technology, and I wasn’t disappointed. Some may think I’m weird, but my focus wasn’t necessarily on the expensive cars and flying vehicles, although they’re very interesting — it was the charging stations.
With US plans to deploy charging stations across the nation, there’s a large marketplace to support public and home charging systems, and there were many solutions of this kind on display at CES. Several of the vendors indicated they were looking to snap up some of that market share and were actively working to have their products certified in the US.
With EV chargers most likely all being connected or potentially having the ability to impact the electric grid in various ways, I think security should play a big role in their design and deployment, and I took the opportunity to have some security discussions with several vendors. One vendor specifically designed and produced only EV charging hardware, not the software, and had staff at the event who could engage comfortably on the subject of security. Even though this organization hadn’t yet conducted any independent security testing on their product, they understood the value of doing so and asked a number of questions, including details on the processes and methodologies.

Robots: Convenient or creepy?
What would CES be if we didn’t take a quick look at robot technology?
Like many, I’m intrigued and freaked out by robots at the same time. The first ones to look at were the service robots, which are less creepy than others and could be very useful in activities like delivering parts on a shop floor or serving up refreshments at a party.
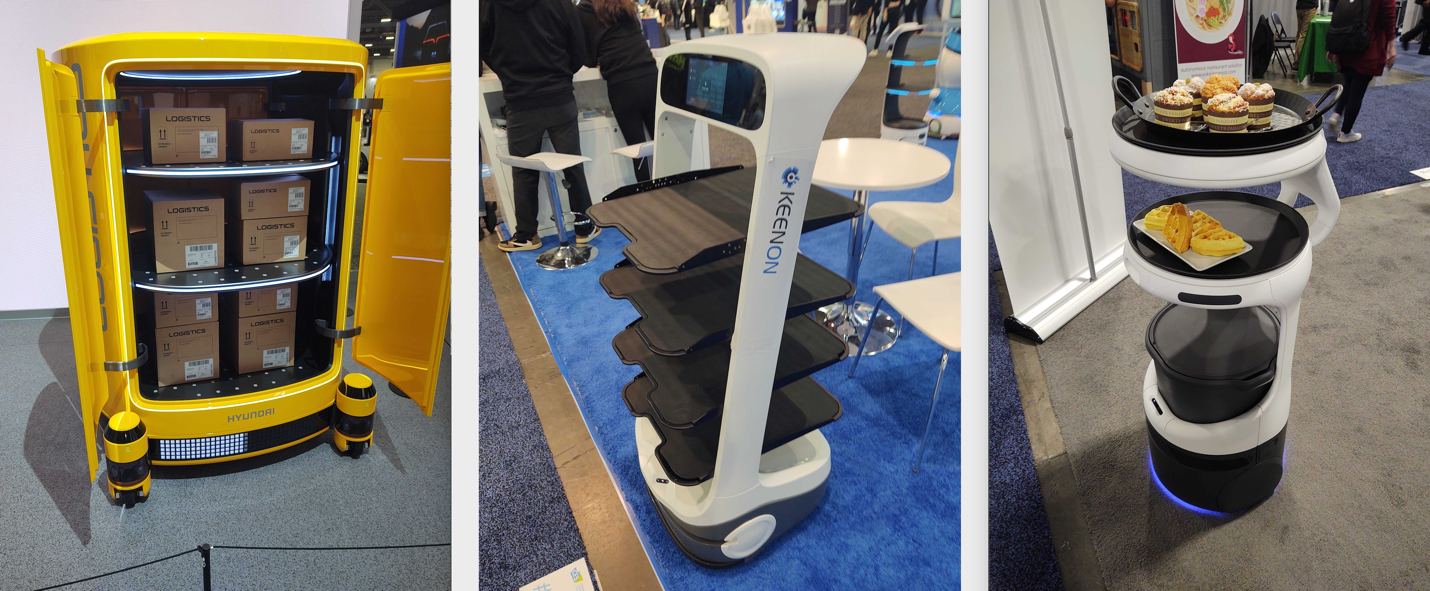
The convenience of using robots for these tasks is great, and I look forward to seeing this play out some day at a party I am attending. Although, with the typical crowds I run with, I expect everyone will be trying to hack on it and paying very little attention to the food it’s serving.
Finally, I looked at the creepier side of robots. The UK pavilion had a robot that was able to have lifelike facial and hand gestures. I found these features to be very impressive. If this tech could be built to be mobile and handle human interactions, I would say we have advanced to a new level, but I expect this is only mimicking these features, and we still have further to go before we will be living the Jetsons.

Also, Boston Dynamics and Hyundai were at CES. Their advanced robotics work always impresses and also scares me a little, and I’m not alone. My only disappointment was that I couldn’t get into the live demo of the technology. I waited in line, but the interest in the live show was high, and space was limited.
With advancements in robotics like these, we must all give this some deep consideration and answer the questions: What will this tech be used for? And how can we properly secure it? Because if it’s misused or not properly secured, it can lead to issues we never want to deal with. With that said, this robot tech is amazing, and I expect it can be a real game-changer in a number of positive areas.

Amcrest 4K 8MP IP Camera Review – Better than the 5MP?
Post Syndicated from digiblurDIY original https://www.youtube.com/watch?v=j7SK0A355u0
Security updates for Thursday
Post Syndicated from original https://lwn.net/Articles/881303/rss
Security updates have been issued by Debian (epiphany-browser, lxml, and roundcube), Fedora (gegl04, mingw-harfbuzz, and mod_auth_mellon), openSUSE (openexr and python39-pip), Oracle (firefox and thunderbird), Red Hat (firefox and thunderbird), SUSE (apache2, openexr, python36-pip, and python39-pip), and Ubuntu (apache-log4j1.2, ghostscript, linux, linux-gcp, linux-gcp-5.4, linux-hwe-5.4, and systemd).
Handy Tips #20: Agentless metric collection with SSH checks
Post Syndicated from Arturs Lontons original https://blog.zabbix.com/handy-tips-20-agentless-metric-collection-with-ssh-checks/18795/
The post Handy Tips #20: Agentless metric collection with SSH checks appeared first on Zabbix Blog.
New free resources for young people to create 3D worlds with code in Unity
Post Syndicated from Janina Ander original https://www.raspberrypi.org/blog/free-resources-unity-game-development-3d-worlds/
Today we’re releasing an exciting new path of projects for young people who want to create 3D worlds, stories, and games. We’ve partnered with Unity to offer any young person, anywhere, the opportunity to take their first steps in creating virtual worlds using real-time 3D.

The Unity Charitable Fund, a fund of the Tides Foundation, has awarded us a generous grant for $50,000 to help underrepresented youth learn to use Unity, upleveling their skills for future career success.
Create a world, don’t just explore it
Our new path of six projects for Unity is a learning journey for young people who have some experience of text-based programming and now want to try out building digital 3D creations.
Unity is the world’s leading platform for creating and operating real-time 3D and is hugely popular for creating 3D video games and virtual, interactive worlds and stories. The best thing about it for young people? While professional developers use Unity to create well-known games such as Pokémon Brilliant Diamond and Shining Pearl and Among Us, it is also free for anyone to use.

Young people who learn to use Unity can do more and more complex things with it as they gain experience. Many successful indie games have been made in Unity — maybe a young person you know will create the next indie game sensation!
For young people, our new project path is the ideal introduction to Unity. The new project path:
- Is for learners who have already coded some projects in Python or another text-based language.
- Introduces the Unity software and how to write code for it in the programming language C# (pronounced ‘cee sharp’).
- Guides learners to create a 3D role playing game or interactive story that they can tailor to suit their imaginations. Learners gain more and more independence with each project in the path.
- Covers common elements such as non-playable characters, mini games, and bonuses.

After young people have completed the path, they’ll have:
- Created their very own 3D video game or interactive story they can share with their friends and family.
- Gained familiarity with key functions of Unity.
- Built the independence and confidence to explore Unity further and create more advanced games and 3D worlds.
Young people gain real-world skills while creating worlds in Unity
Since Unity is a platform used by professional digital creators, young people who follow our new Unity path gain real-world skills that are sought after in the tech sector. While they learn to express their creativity with Unity, young people improve their coding and problem-solving skills and feel empowered because they get to use their imagination to bring their ideas to life.

“Providing opportunities for underrepresented youth to learn critical tech skills is essential to Unity Social Impact’s mission,” said Jessica Lindl, Vice President, Social Impact at Unity. “We’re thrilled that the Raspberry Pi Foundation’s Unity path will allow thousands of student learners to take part in game design in an accessible way, setting them up for future career success.”
What you need to support young people with Unity Real-Time 3D
The project path includes instructions for how to download and install all the necessary software to start creating with Unity.
Before they can start, young people will need to:
- Have access to a computer with enough processing power (find out more from Unity directly)
- Have downloaded and installed Unity Hub, from where they need to install Unity Editor and Visual Studio Community Edition
For club volunteers who support young people attending Code Clubs and CoderDojos with the new path, we are going to run two free online workshops in February. During the workshops, volunteers will be introduced to the path and the software setup, and we’ll try out Unity together. Keep your eyes on the CoderDojo and Code Club blogs for details!

Club volunteers, if your participants are creating Blender projects, they can import these into Unity too.
Young people can share their Unity creations with the world through Coolest Projects
It’s really exciting for us that we can bring this new project path to young people who dream about creating interactive 3D worlds. We hope to see many of their creations in this year’s Coolest Projects Global, our free online tech showcase for young creators all over the world!
The post New free resources for young people to create 3D worlds with code in Unity appeared first on Raspberry Pi.
[$] LWN.net Weekly Edition for January 13, 2022
Post Syndicated from original https://lwn.net/Articles/880576/rss
The LWN.net Weekly Edition for January 13, 2022 is available.
Top 10 security best practices for securing backups in AWS
Post Syndicated from Ibukun Oyewumi original https://aws.amazon.com/blogs/security/top-10-security-best-practices-for-securing-backups-in-aws/
Security is a shared responsibility between AWS and the customer. Customers have asked for ways to secure their backups in AWS. This post will guide you through a curated list of the top ten security best practices to secure your backup data and operations in AWS. While this blog post focuses on backup data and operations in AWS Backup service, the recommended security best practices can be leveraged by organizations that utilize other backup solutions, such as backup tools from the AWS Marketplace.
Since security practices constantly evolve to mitigate new risks, it’s important that you conduct regular risk assessments to determine the applicability of security controls, and implement multiple layers of controls to mitigate risks to your data.
#1 – Implement a backup strategy
A comprehensive backup strategy is an essential part of an organization’s data protection plan to withstand, recover, and reduce any impact that might be sustained due to a security event. You should create an extensive backup strategy that defines which data must be backed up, how often data must be backed up, and monitoring of backup and recovery tasks. When you develop a comprehensive strategy for backing up and restoring data, you should first identify interruptions that may occur, and their potential business impact.
Your objective should be building a recovery strategy that brings your workload back up or avoids downtime within the acceptable Recovery Time Objective (RTO) and Recovery Point Objective (RPO). RTO is the acceptable delay between the interruption of service and restoration of service, and RPO is the acceptable amount of time since the last data recovery point. You should consider a granular backup strategy that includes all of the following: continuous backup cadence, Point-in-Time Recovery (PITR), file-level recovery, application data–level recovery, volume-level recovery, instance-level recovery, etc.
A well-designed backup strategy should include actions that can protect and recover your resources from ransomware, with detailed recovery requirements for your applications and their data dependencies. For example, while you establish preventive and detective controls to mitigate the risk of ransomware, you should also design the appropriate level of granularity for cross-region and/or cross-account copy and restore patterns, to ensure that administrators do not restore corrupt backup data in the event of a security event.
In some industries, when developing a backup strategy, you must also consider the regulations for data retention requirements. You should make sure your backup strategy is designed with the necessary retention requirements (per data classification level and/or resource type) sufficient to meet your regulatory needs.
Consult your security compliance teams to validate whether your backup resources and operations should be included or segmented from the scope of your compliance programs. In my experience as a PCI DSS Qualified Security Assessor (QSA), I’ve seen successful/more mature customers include backup and recovery as critical parts of their security program. This helps them understand where data is across their environment and appropriately define compliance scope.
Refer to Backup and Recovery Approaches Using AWS and the Reliability Pillar of the AWS Well-Architected Framework for architectural best practices for designing and operating reliable, secure, efficient, and cost-effective workloads in the cloud.
#2 – Incorporate backup in DR and BCP
Disaster recovery (DR) is the process of preparing, responding, and recovering from a disaster. It is an important part of your resiliency strategy, and concerns how your workload responds when a disaster strikes. A disaster could be a technical failure, human action, or natural event. A Business Continuity Plan (BCP) outlines how an organization intends to continue normal business operations during an unplanned disruption.
Your disaster recovery plan should be a subset of your organization’s business continuity plan (BCP) and you should incorporate AWS Backup procedures in your enterprise business continuity plan. For example, a security event that affects production data might require you to invoke a disaster recovery plan that fails over to backup data from another AWS Region. You should ensure that your employees are familiar with and have practiced using AWS Backup along with your organizational procedures, so that if disaster strikes, your organization can continue its normal operations with little or no service disruption.
#3 – Automate backup operations
Organizations should configure their backup plans and resource assignments to reflect their enterprise data protection policies. Automating and deploying backup policies or organization-wide backup plans allows you to standardize and scale your backup strategy. You can leverage AWS Organizations to centrally automate backup policies to implement, configure, manage, and govern backup activity across supported AWS resources by scheduling backup operations.
You should consider implementing infrastructure as code (IaC) and event-driven architecture as essential parts of your digital transformation and backup strategy, to improve productivity and govern infrastructure operations across multi-account environments. Automating backups allows you to reduce manual overhead from time-consuming configuration of your backups, minimizes the risk for errors, provides visibility on drift detection, and enhances backup policy compliance across multiple AWS workloads or accounts.
Implementing backup policies as code can help you meet data protection regulations, by configuring different requirements for your resource types, scaling your enterprise data protection strategy, and implementing lifecycle rules to specify how long before a recovery point either transitions to cold storage or is deleted, which can help optimize your costs.
When automating your backup operations, you can scale resource assignment options using AWS Tags and Resource IDs to automatically identify the AWS resources that store data for your business-critical applications and protect your data using immutable backups. This can help you prioritize security controls, such as access permissions and backup plans or policies.
#4 – Implement access control mechanisms
When thinking about security in the cloud, your foundational strategy should begin with a strong identity foundation to ensure a user has the right permissions to access data. Appropriate authentication and authorization can mitigate the risk of security events. The shared responsibility model requires AWS customers to implement access control policies. You can use AWS Identity and Access Management (IAM) service to create and manage access policies at scale.
When configuring access rights and permissions, you should implement the principle of least privilege by ensuring each user or system accessing your backup data or Vault is only given the permissions necessary to fulfill their job duties. Using AWS Backup, you should implement access control policies by setting access policies on backup vaults to protect your cloud workloads.
For example, implementing access control policies allows you to grant users access to create backup plans and on-demand backups, but still limit their ability to delete recovery points once they’ve been created. Using vault access policies, you can share a destination backup vault with a source AWS Account, user, or IAM role, as required by your business needs. Access policy can also allow you to share a backup vault with one or multiple accounts, or with your entire organization in AWS Organizations.
As you scale your workloads or migrate into AWS, you may need to centrally manage permissions to your backup vaults and operations. You should use service control policies (SCPs) to implement centralized control over the maximum available permissions for all accounts in your organization. This offers defense in depth, and ensures your users stay within the defined access control guidelines. To learn more, read how you can secure your AWS Backup data and operations using service control policies (SCPs).
To mitigate security risks such as unintended access to your backup resources and data, use AWS IAM Access Analyzer to identify any AWS Backup IAM role shared with an external entity such as AWS account, a root user, an IAM user or role, a federated user, an AWS service, an anonymous user, or other entity that you can use to create a filter.
#5 – Encrypt backup data and vault
Organizations increasingly need to improve their data security strategy, and may be required to meet data protection regulations as they scale in the cloud. The correct implementation of encryption methods can provide an additional layer of protection above foundational access control mechanisms providing a mitigation if your primary access control policies fail.
For example, if you configure overly permissive access control policies on your Backup data, your key management system or process can mitigate the maximum impact of a security event, since there are separate authorization mechanisms to access your data and encryption key which means that the backup data is only viewable as cipher text.
To get the most from AWS cloud encryption, you should encrypt data both in transit and at rest. To protect data in transit, AWS uses published API calls to access AWS Backup through the network using Transport Layer Security (TLS) protocol to provide encryption between you, your application and the Backup service. To protect data at rest, AWS offers cloud-native options of using AWS Key Managed System (KMS) or AWS CloudHSM which leverages Advanced Encryption Standard (AES) with 256-bit keys (AES-256), a strong industry-adopted algorithm for encrypting data. You should evaluate your data governance and regulatory requirements, and select the appropriate encryption service to encrypt your cloud data and backup vaults.
Encryption configuration differs depending on the resource type and backup operations across accounts or Regions. Certain resource types support the ability to encrypt your backups using a separate encryption key from the key used to encrypt the source resource. Since you are responsible for managing access controls to determine who can access your Backup data or vault encryption keys and under which conditions, you should use the policy language offered by AWS KMS to define access controls on keys. You can also use AWS Backup Audit Manager to confirm that your backup is properly encrypted.
To learn more, refer to the documentation on encryption for backups and backup copies.
AWS KMS multi-Region keys allows you to replicate keys from one Region into another. Multi-Region keys are designed to simplify encryption management when your encrypted data has to be copied into other Regions for disaster recovery. You should evaluate the need to implement multi-region KMS keys as part of your overall backup strategy.
#6 – Safeguard backups using immutable storage
Immutable storage allows organizations to write data in a Write Once Read Many (WORM) state. While in a WORM state, data can be written one time, read and used as often as needed after it has been committed or written to the storage medium. Immutable storage ensures data integrity is maintained and provides protection against deletes, overwrites, inadvertent and unauthorized access, ransomware compromise etc. Immutable storage offers an efficient mechanism to address potential security events with real impacts on your business operations.
Immutable storage can be used for better governance when paired with strong SCP restrictions, or can be used in a compliance WORM mode when the letter of the law (such as a legal hold) requires access to immutable data.
You can maintain data availability and integrity with AWS Backup Vault Lock to protect your backups* such that unauthorized entities cannot erase, alter or corrupt your customer or business data during the required retention period. AWS Backup Vault Lock helps you meet your organization’s data protection policies by preventing deletions by privileged users (including the AWS account root user), changes to your backup lifecycle settings, and updates that alter your defined retention period.
AWS Backup Vault Lock ensures immutability and adds an additional layer of defense that protects backups (recovery points) in your Backup Vaults, especially in highly- regulated industries with stringent integrity needs for backups and archives. AWS Backup Vault Lock makes sure your data is preserved along with a backup to recover from in case of unintended or malicious actions.
*The feature has not yet been assessed for compliance with the Securities and Exchange Commission (SEC) rule 17a-4(f) and the Commodity Futures Trading Commission (CFTC) in regulation 17 C.F.R. 1.31(b)-(c).
#7 – Implement backup monitoring and alerting
Backup jobs can fail. A failed job, such as backup, restore, or copy task, may have impact on subsequent steps in a process. When the initial backup job fails, there’s a high probability that other succeeding tasks will also fail. In such a scenario, you can best understand the course of events through monitoring and notification.
Enabling and configuring notifications to generate emails to monitor AWS Backup jobs gives you awareness of your backup activities, ensures you meet critical service-level agreements (SLAs), enhances your business-as-usual monitoring, and helps you meet compliance obligations. You can implement backup monitoring for your workloads by integrating AWS Backup with other AWS services and ticketing systems to perform automated investigation and escalation flows.
For example, use Amazon CloudWatch to track metrics, create alarms, and view dashboards, Amazon EventBridge to monitor AWS Backup processes and events, AWS CloudTrail to monitor AWS Backup API calls with detailed information on the time, source IP, users, and accounts making those calls, and Amazon Simple Notification Service (Amazon SNS) to subscribe to AWS Backup-related topics such as backup, restore, and copy events. Monitoring and alerting can provide organizational awareness for your backup jobs, which helps you respond to backup failures.
You can use AWS Backup Audit Manager to automatically generate evidence of your daily backup audit reports per account and Region. You can also scale your backup monitoring across multiple accounts by using a set of automation templates and dashboards (known as the backup observer solution) to obtain aggregated daily cross-account multi-Region AWS Backup reporting.
#8 – Audit backup configuration
Organizations should audit the compliance of AWS Backup policies against defined controls such as defined backup frequency. You should continuously and automatically track your backup activity and generate automatic reports to find and investigate backup operations or resources which are not compliant with your business requirements.
AWS Backup Audit Manager provides built-in, customizable, compliance controls that align with your business compliance and regulatory requirements. AWS Backup Audit Manager provides five backup governance control templates, including backup resources protected by backup plans, backup plan with a minimum frequency and minimum retention, etc. If you leverage infrastructure-as-code automation, you can use AWS Backup Audit Manager with AWS CloudFormation.
AWS Security Hub provides you with a comprehensive view of your security state in AWS and helps you check your environment against security best practices and industry standards such as AWS Foundational Security Best Practices controls. If you leverage AWS Security Hub within your cloud environment, we recommend you enable the AWS Foundational Security Best Practices, as it includes detective controls that can help with securing backups in AWS. The detective controls in AWS Backup Audit Manager and Security Hub are also mostly available as AWS managed rules in AWS Config.
#9 – Test data recovery capabilities
Ideally, any data stored as a backup must be able to be successfully restored when required. Your backup strategy must include testing your backups. A backup strategy is not effective if backed up data cannot be restored. You should regularly test your ability to find certain recovery points and restore them. While AWS Backup automatically copies tags from the resources it protects to the recovery points, tags are not copied from recovery points to the corresponding restored resources. To scale your inventory management and locate recovery points, you should consider retaining your tags on resources created by AWS Backup restore jobs, using AWS Backup events to trigger a tag replication process.
You can start your data recovery workflow by establishing data recovery patterns and then regularly test them. You should create a simple and repeatable process that allows you to perform continuous data recovery testing to increase confidence in your ability to recover backup data. For example, you can create a pattern to test a cross-account, cross-region restore operation from a central DR backup vault encrypted with a customer-managed KMS key to a source account backup vault encrypted with a different customer-managed KMS key.
If you don’t frequently test such restore operations, you may find that your assumptions on KMS encryption for cross-account, cross-region operations are incorrect. Oftentimes, the only backup recovery pattern that actually works is the path you test frequently. Through routine testing of supported backup resource types, you can spot early warnings that could potentially cause future disturbances and loss of critical data. If possible, maintain a limited but feasible number of recovery paths and patterns to prevent wasted storage space, optimize costs, and save time. It’s easier to fix the problem when a recovery test fails than losing valuable or critical data.
#10 – Incorporate backup in incident response plan
Security Incident Response Simulations (SIRS) are internal events that provide a structured opportunity to practice your incident response plan and procedures during a realistic scenario. It’s valuable to test your backup data and operations in creative SIRS activities to test yourself against the unexpected. This helps you validate your organizational readiness and develop comfort with the rare and unexpected. Your simulations must be realistic, and should involve cross-functional organizational teams required to respond to events.
Start with basic and easy simulation exercises, and work towards a full, complex event. For example, you can build a realistic model that consists of an Amazon Virtual Private Cloud and associated resources that simulate inadvertent overexposure of information or a potential data breach due to changes to policies and access control lists. Document lessons learned to evaluate how well your incident response plan worked, and to identify improvements that need to be made to future response procedures.
You can use AWS Backup to set up automated instance-level backups as AMIs and volume-level backups as snapshots across multiple AWS accounts. This can help your incident response team enhance their forensic process such as automated forensic disk collection, by providing a restore point that could reduce the scope and impact of potential security events such as ransomware.
Conclusion
In this blog post, I showed you the top ten security best practices and controls to protect your backup data in AWS. I encourage you to use these best practices to design and implement a backup and recovery strategy and architecture with multiple layers of controls that scales and achieves your business needs. To learn more about AWS Backup, refer to the AWS Backup documentation.
If you have feedback about this post, submit comments in the Comments section below. If you have questions about this post, start a new thread on the AWS Backup forum or contact AWS Support.
Further reading
Additional resources to consider:
Prescriptive Guidance: Backup and recovery approaches on AWS
Blog: Automate centralized backup at scale across AWS services using AWS Backup
Blog: Disaster Recovery (DR) Architecture on AWS, Part I: Strategies for Recovery in the Cloud
Blog: The importance of encryption and how AWS can help
Blog: Enhance the security posture of your backups with AWS Backup Vault Lock
Blog: Monitor, Evaluate, and Demonstrate Backup Compliance with AWS Backup Audit Manager
Blog: Create and share encrypted backups across accounts and Regions using AWS Backup
Blog: Simplify auditing your data protection policies with AWS Backup Audit Manager
Blog: Managing access to backups using service control policies with AWS Backup
Blog: Obtain aggregated daily cross-account multi-Region AWS Backup reporting
Want more AWS Security news? Follow us on Twitter.
[$] Relocating Fedora’s RPM database
Post Syndicated from original https://lwn.net/Articles/881107/rss
The deadlines
for various kinds of Fedora 36 change proposals have mostly passed at
this point, which led to something of a flurry of postings to the
distribution’s devel mailing list over the last month. One of those, for a seemingly fairly
innocuous relocation of the RPM database from /var to
/usr, came in right at the buzzer for system-wide changes on
December 29. There were, of course, other things going on around that
time, holidays, vacations, and so forth, so the discussion was relatively
muted until recently. Proponents have a number of reasons why they would like
to see the move, but there is resistance, as well, that is due, at least in part, to the
longstanding “tradition” of the location for the database.
Dynamically personalize your in-product user experience using Amazon Pinpoint in-app messaging
Post Syndicated from Pavlos Ioannou Katidis original https://aws.amazon.com/blogs/messaging-and-targeting/dynamically-personalize-your-in-product-user-experience-using-amazon-pinpoint-in-app-messaging/
Many businesses today struggle to align out-of-product messaging through channels such as email and SMS, with in-product messaging shown when a users is within a mobile or web application. Customers will present one message to a user through a targeted email, but once a user visits the application they are presented with different messaging. This creates confusion for the user, and reduces the chances of them performing a high-value action such as a purchasing a discounted product. Customers can get around this by hard coding certain messages into their application, however this is time consuming for development teams, and slower to implement as it requires a new release of a mobile or web client.
Amazon Pinpoint in-app messaging allows customers to create, target and display in-product messages to users dynamically without the need to update client-side code after initial implementation. This allows a non-technical persona such as a marketer to modify the application experience and target user messaging independently of a development team. This also allows the in-product messaging to share the user targeting as the out-of-app messaging. This creates consistent user messaging, and increases the chance a user performs a high value action.
The blog outlines how to create in-app endpoints, segments, and campaigns. Then how to fetch in-app messages, implement simple logic to control message prioritization, message caps, and to listen for events in order to show the message at the desired moment.
Solution Overview
Assume you are a retailer and want to display a banner with a promotion to all customers with a recent purchase over $500 when they launch the application. To deliver the above experience using the in-app messaging channel, you will need to create a dynamic customer segment where User.UserAttribute.LastPurchaseValue > $500, design an in-app message template with a call-to-action to claim the promotion, and create an in-app campaign. The in-app campaign will be triggered based on the customer event app_launch and only for customers who belong to the dynamic segment created above. To render the message and send in-app message engagement events back to Amazon Pinpoint, you will need to go through an one time setup that is explained in a later section of this blog. Monitor your in-app campaign performance across different metrics, using the Amazon Pinpoint campaign analytics dashboard.
In-app channel implementation can differ depending the use case and requirements. The creation of customer segments, message templates and campaigns can be done either via the Amazon Pinpoint console or programmatically using Amazon Pinpoint APIs. The in-app messages retrieval, rendering and recording of engagement events can either be build and managed from you or use AWS Amplify.

In the following sections you will be introduced to the seven components of the in-app channel and how they operate together:
- Step 1: Creating in-app endpoints & segment
- Step 2: Creating an in-app message template
- Step 3: Creating an in-app campaign
- Step 4: Querying available in-app messages for an Amazon Pinpoint customer
- Step 5: Rendering in-app messages
- Step 6: Recording in-app events
- Step 7: In-app message display logic using SessionCap, DailyCap, TotalCap
Prerequisites
For this blog post, you should have the following prerequisites:
- An AWS account
- An Amazon Pinpoint project
- Access to AWS CloudShell
Step 1: Creating an Amazon Pinpoint customer segment
In Amazon Pinpoint, users can have one or more endpoints. An endpoint describes a unique address, such as an email or mobile number. Similar to other Amazon Pinpoint channels, you need to create or import in-app endpoints with Channel = IN_APP. To retrieve in-app messages for a user, you have to use their IN_APP endpoint id. Note that the Address is not a required field for in-app and can be left blank.
- Copy the text below and save it as CSV in your computer
Id,ChannelType,Address,User.UserId,OptOut 111,IN_APP,123,userid1,NONE - Navigate to the Amazon Pinpoint console
- Select the Amazon Pinpoint project that you want to set up the in-app channel
- Navigate to the Segments’ section
- Choose Import a segment
- Select Upload files from your computer as Import method
- Select Choose files and find the CSV file you created in step 1
- Choose Create segment
- Navigate to AWS Cloudshell console and wait till the terminal loads
- Replace <Application id> with your Amazon Pinpoint application id in the following command aws pinpoint get-endpoint –application-id <Application id> —endpoint-id 111
- Execute the command in step 10 by pasting it in the AWS CloudShell terminal and press Enter. You should be able to see a response similar to the one below

Step 2: Creating an in-app Message Template
In-app message templates contain a variety of fields with some of them offering the option to choose from pre-defined values such as Header alignment and others in a form of free text such as Message. The end result is a banner that includes a Header, Message, Image, Button(s) and Custom data with all of them being fully customizable. While building an in-app template, you can preview the banner across Phone, Tablet and Browser. This preview is for reference purposes only as the rendering can vary according to the end user’s device as well as your preference on how to render it.
Note: The message template for in-app currently doesn’t support message helpers for personalization but it is a feature the Amazon Pinpoint product team is exploring.
- Navigate to Message templates
- Select Create template and choose In-app messaging as Channel
- Type my_first_in-app_message_template as Template name
- Complete the section, as per your message requirements

- Select Create

Step 3: Creating an in-app Campaign
A campaign is a messaging initiative that engages a specific audience segment. A campaign sends tailored messages according to a schedule or customer event that you define.
- Navigate to your Amazon Pinpoint project and select Campaigns and Create a campaign
- Type my_first_in-app_campaign as Campaign name
- Select Standard campaign as Campaign type and In-app messaging as Channel
- Select Very important for Set prioritization. This configuration is specific to the in-app channel and it helps you identify the most important in-app message for an endpoint
- Select Next and choose the segment in-app-segment from the dropdown. This should be an imported segment that you created in Step 1: Creating an Amazon Pinpoint customer segment. The Segment estimate should show 1 endpoints
- Select Next and choose the in-app message template with the name my_first_in-app_message_template, then select Next
- An in-app campaign needs to have a Trigger event, which will determine when the in-app message will be displayed. You can add event Attributes and/or Metrics to make it more specific. To learn how to record events with Amazon Pinpoint visit Reporting events in your application. If you currently do not record any events in your Amazon Pinpoint project type test_event as Trigger events
- Select Start and End date and time for Campaign dates. Note that in-app campaigns need to start at least 15 minutes later from the time of publishing
- In the Edit campaign settings section you will find the fields, which specify the Maximum number of session messages viewed per endpoint (SessionCap), Maximum number of daily messages viewed per endpoint (DailyCap) and Maximum number of messages viewed per endpoint (TotalCap). These values indicate how many times the in-app message can be displayed to the customer for that in-app campaign within a session, day and in total respectively. In all three campaign setting fields enter the number 10 and select Override project-level setting where applicable Set prioritization, Trigger events and Caps are part of the in-app message payload that you receive when calling Amazon Pinpoint’s In-app messages REST API operation. You will use this information to decide whether to render or not that in-app message.
- Select Next scroll down and select Launch campaign
Step 4: Querying available in-app messages for an Amazon Pinpoint customer
To retrieve in-app messages for an Amazon Pinpoint customer, you will need to have their IN_APP endpoint id and either use the In-app messages REST API operation, one of the AWS SDKs that support Amazon Pinpoint, AWS Command Line Interface or AWS Amplify.
Note: AWS Amplify manages on your behalf the in-app messages request, rendering and tracking, thus if you are using AWS Amplify for Amazon Pinpoint in-app channel the steps below are not required.
In the request body you need to specify the IN_APP endpoint id. If there are any available in-app messages for that endpoint id, the response will contain a JSON object with the top ten active in-app messages based on their priority (the ten in app message response is a hard limit). Loop through the in-app messages and identify the one that meets the criteria based on the Trigger event and Prioritization.
- Navigate to the AWS CloudShell console
- Replace <Application id> with your Amazon Pinpoint application id in the following command aws pinpoint get-in-app-messages –application-id <Application id> —endpoint-id 111
- Execute the command in step 2 by pasting it in the AWS CloudShell terminal and press Enter. You should be able to see a response similar to the one below

The response should contain only one in-app campaign. You can see all the in-app message template data and campaign configuration are present in the response.
Note: Campaigns that have passed their end date, or have reached their daily or total cap limit won’t show in the response. In case the response contains more than one in app message with the same priority and they both haven’t exceeded their caps, you can use the in-app campaign start date to evaluate which one to display.
It is recommended to retrieve the in-app messages once per session and store them locally. That way in every event the customer triggers in your mobile / web app you would check against the in-app messages stored locally instead of performing additional calls to Amazon Pinpoint. This approach decreases the in-app channel cost as you pay per request.
You can perform the operation of retrieving in-app messages for an Amazon Pinpoint customer either client side or server side. Server side can be implemented using the architecture illustrated below, which utilizes Amazon API Gateway and AWS Lambda creating a development framework agnostic approach. Furthermore Amazon API Gateway is offering a great variety of authentication and authorization mechanisms.
The server side architecture depicted below doesn’t cover the use case for offline customers. If this is a requirement then it is recommend to store in-app messages and fetch them locally when the device doesn’t have internet connectivity. Once the device is connected back to the internet you can retrospectively send any in-app related events.
Note: If you are using AWS Amplify, it will retry to publish customer offline events that occurred once the device gets back online.

Step 5: Rendering in-app messages
Render the in-app messages yourself based on the in-app message API response or use AWS Amplify which will render it on your behalf. AWS Amplify allows you to provide your own In-App Messaging UI component to override the default Amplify provided UI.
Step 6: Recording in-app events
Measuring in-app campaigns’ performance is based on four metrics:
- Message displayed: a message has been displayed to an end user
- Message dismissed: a user has dismissed a message
- Message clicked: a user has clicked through a message
- Any event type: Any event that a user can trigger on the mobile or web app
Fire the above events either from client or server side as Amazon Pinpoint custom events. Amazon Pinpoint custom events can be recorded using put_events REST API operation or AWS SDKs that support Amazon Pinpoint.
Note: If you are using AWS Amplify, the in-app events will be recorded automatically
To have these events recorded under Amazon Pinpoint Campaign deliver metrics dashboard, you have to use the following EventType names:
- Message displayed: _inapp.message_displayed
- Message dismissed: _inapp.message_dismissed
- Message clicked: _inapp.message_clicked
- Any event type: No specific name is required

In addition to the EventType, a few other fields are required in order to attribute these events to the correct in-app campaign. Within the event attributes’ object of the request payload, the fields campaign_id and delivery_type must be provided. Campaign_id should match the InApp campaign_id, while the delivery_type should be IN_APP_MESSAGE. Additionally, the treatment_id is necessary if you are running an A/B test.
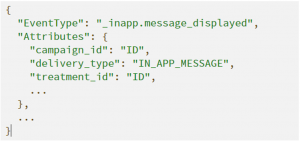
Note: If you do not use the above event names and attributes, you won’t see any events under Campaign delivery metrics and Campaign engagement rates on the Amazon Pinpoint console.
Step 7: In-app message display logic using SessionCap, DailyCap and TotalCap
Message display logic refers to the logic that stores and assesses the number of times a user has seen / interacted with the in-app message. Amazon Pinpoint calculates the DailyCap & TotalCap as long as you record the _inapp.message_displayed event or using AWS Amplify. For the SessionCap event you need to count the _inapp.message_displayed locally on your mobile / web application unless you are using AWS Amplify.
Note: When retrieving the in-app messages from Amazon Pinpoint, the payload contains the remaining number of times you can display the in-app message daily & total.
Conclusion
This post walks you through how to configure Amazon Pinpoint to send in-app messages to your customers when browsing your mobile / web application. Using this Amazon Pinpoint channel, you can now:
- Create in-app segments, message templates and campaigns
- Retrieve in-app messages per user
- Render in-app messages
- Record customer engagement data with the in-app message
Related links
To learn more about the technologies or features used to create this solution, explore the following pages: