A December to Remember — Or, How We Improved InsightAppSec in Q4 in the Midst of Log4Shell

Post Syndicated from Tom Caiazza original https://blog.rapid7.com/2022/01/12/a-december-to-remember-or-how-we-improved-insightappsec-in-q4-in-the-midst-of-log4shell/

A December to Remember — Or, How We Improved InsightAppSec in Q4 in the Midst of Log4Shell

Ho, ho, holy cow — what a wild way to wrap up the year that was. Thousands of flights were cancelled during Christmas week, nearly every holiday party became a super-spreader event, and we lost a legend in Betty White. In our neck of the woods, Log4Shell has been dominating the conversation for nearly the entire holiday season. But now that much of the initial fervor has passed, we wanted to take a moment to recap some of InsightAppSec and tCell’s Q4 highlights and give us all a little much-deserved break from the madness.

RBAC

It may not seem like much, but remote-based access control — or RBAC— is a game-changer for many teams looking to streamline their access to InsightAppSec. Essentially, we make it super simple to configure access to the platform perfectly for every member of your team, create tiers of accessibility for different job roles, and ensure everyone has exactly what they need to do their jobs on day one.

Included is a new pre-built remediator role, which was designed to only show developers what they need in order to address a that vulnerability. They can drill into it, see reference details and remediation steps, and replay the attack in their dev or staging environments, all in an easy, navigable interface. This new role helps prevent the back-and-forth between security and development passing vulnerability details.

The key to our new feature is scalability. Regardless of whether you have a team of 10 or a team of 1,000, each group will only have the permissions they need to view the data you want them to see — all without the back-and-forth that comes with creating permissions ad hoc. It’s a time-saver, for sure, but it can also reduce headaches and make costly mistakes far less likely. If you want to learn more check out our blog post on the subject (it’s got a cute Goldilocks theme — you’ll get the drift).

ServiceNow

Oh, yeah, we’re fully integrated with ServiceNow. It’s just a leader in IT service management, and InsightAppSec is fully integrated, working seamlessly, and available in the ServiceNow app store for, like, zero dollars. No biggie.

This integration offers a lot of great features that will save your team time and effort, improving everything from visibility, to prioritization, to remediation. In fact, remediation will happen even faster than it already does with updates automatically happening across both ServiceNow and InsightAppSec tickets. And it’s so simple and quick to install, you’ll be benefiting from it in minutes. Oh, and did we mention zero dollars?

Log4Shell

OK, break’s over. Yes, we made many improvements to InsightAppSec this quarter, but we would be remiss if we didn’t mention the ones we made for Log4Shell. The big one is a new InsightAppSec default attack template for Out of Band Injection specific to Log4Shell attacks. Attack templates are InsightAppSec’s bread and butter, testing every part of your application against known attack vectors. With this feature, we have an attack template that can automate a sophisticated attack by simulating an attacker on your website and injects code in your application. If the code is vulnerable, it calls a Log4j function to send a JNDI call to a Rapid7 server validating the exploitability of the application. This helps you identify and prioritize Log4Shell vulnerabilities before they become real threats.

For even more flexibility, we’ve added an attack module that actually does the out-of-band Log4Shell attack during testing. You can easily select this in the Log4Shell attack template, but you can can also create a custom template and add the new Log4Shell attack module to that.

We’ve also improved tCell’s ability to protect against Log4Shell attacks. We launched a new app firewall protection specifically for Log4Shell attacks. The new firewall lets our customers know if their apps have been attacked through the Log4Shell vulnerability and drill down to specifics on the attack. We’ve also created a default pattern that allows you to block well known Log4Shell patterns and as more become known, we will continue our updates.

Even more

While these were just a few of the major improvements we made to InsightAppSec and tCell this quarter, there were certainly a host of minor ones that are sure to make the platform easier and more efficient. They include custom NGINX builds and support for .Net 6.0 for tCell, Archiving Scan Targets, and customizing executive reports for InsightAppSec, among others.

Those are the highlights from the fourth quarter of 2021 from here in InsightAppSec-land. We’re well on our way to making Q1 2022 even better for our customers, though we can’t do anything about those flight cancellations. And while we’re at it, someone check on Keith Richards.

NEVER MISS A BLOG

Get the latest stories, expertise, and news about security today.

Configure AWS SSO ABAC for EC2 instances and Systems Manager Session Manager

Post Syndicated from Rodrigo Ferroni original https://aws.amazon.com/blogs/security/configure-aws-sso-abac-for-ec2-instances-and-systems-manager-session-manager/

In this blog post, I show you how to configure AWS Single Sign-On to define attribute-based access control (ABAC) permissions to manage Amazon Elastic Compute Cloud (Amazon EC2) instances and AWS Systems Manager Session Manager for federated users. This combination allows you to control access to specific Amazon EC2 instances based on users’ attributes. I show you how defined AWS SSO identity source attributes like login and department can be used, and how custom attributes like SSMSessionRunAs can be used to pass these attributes into Amazon Web Services (AWS) from an external identity provider (IdP) using  SAML 2.0 assertion.

AWS SSO added support for ABAC to enable you to create fine-grained permissions for your workforce in AWS using user attributes. Using user attributes as tags in AWS helps you simplify the process of creating fine-grained permissions in AWS and enables you to ensure that your workforce has access only to the AWS resources with matching tags.

The new feature works with any supported AWS SSO identity source. This post walks you through the steps to enable attributes for access control, create permission sets and manage assignments when using a supported external IdP as your identity source.

Solution overview

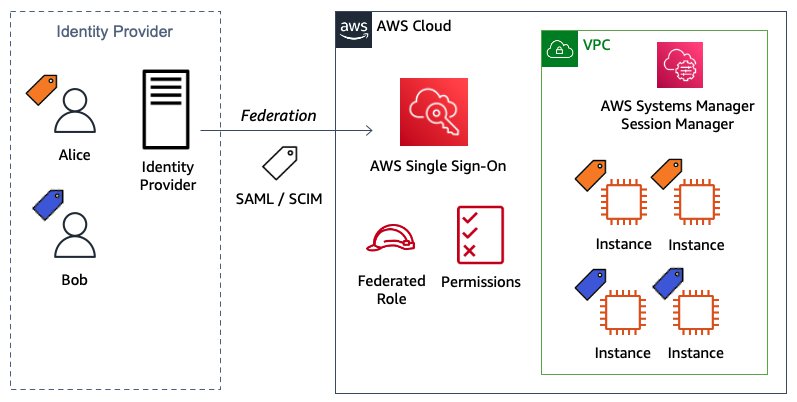
The following architecture diagram—Figure 1—presents an overview of the solution.

Figure 1: Solution architecture diagram

Figure 1: Solution architecture diagram

In the example in Figure 1, Alice and Bob are users who each have the attributes
login
, department, and SSMSessionRunAs. These attributes are created and updated in the external directory—Okta in this example—under those users’ profiles. The first two attributes are automatically synchronized by using System for Cross-domain Identity Management (SCIM) protocol between AWS SSO and Okta and configured within AWS SSO settings. The third custom attribute is passed directly from Okta into the AWS accounts as a new SAML assertion.

Both users are using the same AWS SSO custom permission set that allows them to launch a new Amazon EC2 instance with proper tags enforcement. Based on those tags, they can start, stop, and restart the EC2 instance if they are in the same department, and to terminate it if they are the owner. Also, they can connect using Session Manager if they’re in the same department. Users can sign in to those instances using the Linux OS user defined in the attribute SSMSessionRunAs.

Prerequisites

To perform the steps to use AWS SSO attributes for ABAC, you must already have deployed AWS SSO for your AWS Organizations and have connected with an external identity source using SAML and SCIM protocols. For more information, see Checklist: Configuring ABAC in AWS using AWS SSO.

You need two test users for implementing and testing the solution. You can use two existing users, or create new users named Alice and Bob to match the solution and testing described in the following sections.

Implement the solution

The basic steps to implement the solution are:

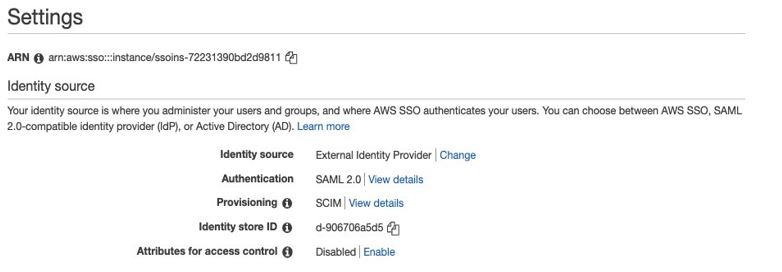
  1. Confirm in AWS SSO settings that you have defined an external IdP, authentication via SAML 2.0, and provisioning via SCIM protocol.
  2. Enable attributes for access control and define the two supported attributes: login and department.
  3. Create a new user attribute in the Okta Directory.
  4. Edit and confirm the users’ attributes defined in the Okta Directory profile.
  5. Configure the SAML attribute statement in the Okta AWS SSO application.
  6. Create a new permission set using an ABAC policy.
  7. Create an AWS account assignment to the users using the permission set created in the previous step.

Confirm AWS SSO configuration

In this first step, you confirm that AWS SSO has been properly configured. Go to AWS SSO console SSO settings to check that the configuration of your identity source, authentication, and provisioning is as follows:

Identity source: External Identity Provider
Authentication: SAML 2.0
Provisioning: SCIM

  1. Confirm authentication is working as expected, by going to your user portal URL in a new browser instance (to ensure your user authentication doesn’t overwrite your existing authentication). The user portal offers a single place to access all the assigned AWS accounts, roles, and applications. For example, it should look like https://exampledomain.awsapps.com/start. Once you access it, the process automatically redirects the request to your external provider for authentication, and then returns the user to the AWS SSO user portal.
  2. To confirm provisioning, go to the AWS SSO console and choose Users from the right panel. You should see your Okta users assigned to the AWS SSO application being synchronized by SCIM protocol. Select any user to see the Created by SCIM and Updated by SCIM information for that user.

Enable AWS SSO attributes for access control

In this step, you enable ABAC and then configure AWS SSO attributes. This solution uses the Attributes for access control page in the AWS Management Console to enter the key and value pairs.

To enable attributes for access control

  1. Open the AWS SSO console.
  2. Choose Settings.
  3. On the Settings page, under Identity source, next to Attributes for access control, select Enable. As shown in Figure 2.
Figure 2: Attributes for access control settings (enable ABAC)

Figure 2: Attributes for access control settings (enable ABAC)

Once ABAC is enabled, you can select the attributes to be synchronized. For this use case, select login and department.

To select your attributes using the AWS SSO console

  1. Open the AWS SSO console.
  2. Choose Settings.
  3. On the Settings page, under Identity source, next to Attributes for access control, choose View details.
  4. On the Attributes for access control page, notice the Key and Value columns. This is where you will be mapping the attribute from your identity source to an attribute that AWS SSO passes as a session tag. Set the first key and value pair by entering login as the key and ${path:userName} as the value. Set the second key and value pair to department and ${path:enterprise.department}. The settings are shown in Figure 3 below.

    Figure 3: Map attributes using the Attributes for access control page

    Figure 3: Map attributes using the Attributes for access control page

  5. Choose Save changes.

Create a new attribute in Okta Directory

In this third step, you create the new custom attribute SSMSessionRunAs.

To create a new user attribute

  1. Open the Okta console.
  2. Under Directory, choose Profile Editor.
  3. Choose Edit Profile for Okta User (default).
  4. Under Attributes, choose Add Attribute as follows:
    Data type: Select String
    Display Name: Enter SSMSessionRunAs
    Variable Name: Enter SSMSessionRunAs
    Attribute Length: Select Less than and enter 10 (max).
  5. Choose Save.

Edit and confirm users’ attributes defined in Okta Directory profile

Now that you have the new attribute SSMSessionRunAs created, go to the users’ profiles to enter the Department and SSMSessionRunAs values for both users.

To edit and confirm users’ attributes

  1. Open the Okta console.
  2. Under Directory, choose People.
  3. Select user Bob.
  4. Under Profile tab choose Edit as follows:

    For the key Department, enter blue as the value.

    For the key SSMSessionRunAs, enter bob as the value.

  5. Choose Save.
  6. Repeat steps 1 through 5 for Alice. For the key Department, enter amber as the value and for SSMSessionRunAs, enter alice as the value.
  7. Confirm that the attributes of both users are defined in the external directory as follows:Username (login): [email protected]
    First name (firstName): Bob
    Last name (lastName): Rodriguez
    Display name (displayName): Bob
    Department (department): blue
    SSMSessionRunAs (SSMSessionRunAs): bob

    Username (login): [email protected]
    First name (firstName): Alice
    Last name (lastName): Rosalez
    Display name (displayName): Alice
    Department (department): amber
    SSMSessionRunAs (SSMSessionRunAs): alice

Configure SAML attribute statement in Okta AWS SSO application

The attribute SSMSessionRunAs isn’t available as an attribute within AWS SSO. However, you can include it by defining SAML attribute statements, which are inserted into the SAML assertions.

To create a new SAML attribute

  1. Open the Okta Application console.
  2. Choose AWS Single Sign-on application.
  3. On the Sign On tab, choose Edit Settings.
  4. Under SAML 2.0 Attributes Statements enter the following:
    • For Name, enter https://aws.amazon.com/SAML/Attributes/AccessControl:SSMSessionRunAs
    • For Name format, select URI Reference
    • For Value, enter user.SSMSessionRunAs
  5. Choose Save.

Create a new permission set using an ABAC policy

In this step, you create a permissions policy that determines who can access your AWS resources based on the configured attribute value. When you enable ABAC and specify attributes, AWS SSO passes the attribute value of the authenticated user into AWS Identity and Access Management (IAM) for use in policy evaluation.

To create a permission set

  1. Open the AWS SSO console.
  2. Choose AWS accounts.
  3. Select the Permission sets tab.
  4. Choose Create permission set.
  5. On the Create new permission set page, choose Create a custom permission set.
    1. Choose Next: Details.
    2. Under Create a custom permission set, enter a name that will identify this permission set in AWS SSO. This name will also appear as an IAM role in the user portal for any users who have access to it. For this solution, name it myCustomPermissionSetEC2SSM.
    3. Choose Create a custom permissions policy and paste in the following ABAC policy document:
      {
        "Version": "2012-10-17",
        "Statement": [
          {
            "Sid": "AllowDescribeList",
            "Action": [
              "ec2:Describe*",
              "ssm:Describe*",
              "ssm:Get*",
              "ssm:List*",
              "iam:ListInstanceProfiles",
              "cloudwatch:DescribeAlarms"
            ],
            "Effect": "Allow",
            "Resource": "*"
          },
          {
            "Sid": "AllowRunInstancesResources",
            "Effect": "Allow",
            "Action": "ec2:RunInstances",
            "Resource": [
              "arn:aws:ec2:*::image/*",
              "arn:aws:ec2:*::snapshot/*",
              "arn:aws:ec2:*:*:subnet/*",
              "arn:aws:ec2:*:*:key-pair/*",
              "arn:aws:ec2:*:*:security-group/*",
              "arn:aws:ec2:*:*:network-interface/*"
            ]
          },
          {
            "Sid": "AllowRunInstancesConditions",
            "Effect": "Allow",
            "Action": "ec2:RunInstances",
            "Resource": [
              "arn:aws:ec2:*:*:instance/*",
              "arn:aws:ec2:*:*:volume/*",
              "arn:aws:ec2:*:*:network-interface/*"
            ],
            "Condition": {
              "StringLike": {
                "aws:RequestTag/Name": "*"
              },
              "StringEquals": {
                "aws:RequestTag/Owner": "${aws:PrincipalTag/login}",
                "aws:RequestTag/Department": "${aws:PrincipalTag/department}"
              },
              "ForAllValues:StringEquals": {
                "aws:TagKeys": [
                  "Name",
                  "Owner",
                  "Department"
                ]
              }
            }
          },
          {
            "Sid": "AllowCreateTagsOnRunInstance",
            "Effect": "Allow",
            "Action": "ec2:CreateTags",
            "Resource": [
              "arn:aws:ec2:*:*:volume/*",
              "arn:aws:ec2:*:*:instance/*",
              "arn:aws:ec2:*:*:network-interface/*"
            ],
            "Condition": {
              "StringEquals": {
                "ec2:CreateAction": "RunInstances"
              }
            }
          },
          {
            "Sid": "AllowPassRoleSpecificRole",
            "Effect": "Allow",
            "Action": "iam:PassRole",
            "Resource": "arn:aws:iam::*:role/EC2UbuntuSSMRole"
          },
          {
            "Sid": "AllowEC2ActionsConditions",
            "Effect": "Allow",
            "Action": [
              "ec2:StartInstances",
              "ec2:StopInstances",
              "ec2:RebootInstances"
            ],
            "Resource": "*",
            "Condition": {
              "StringEquals": {
                "ec2:ResourceTag/Department": "${aws:PrincipalTag/department}"
              }
            }
          },
          {
            "Sid": "AllowTerminateConditions",
            "Effect": "Allow",
            "Action": [
              "ec2:TerminateInstances"
            ],
            "Resource": "*",
            "Condition": {
              "StringEquals": {
                "ec2:ResourceTag/Owner": "${aws:PrincipalTag/login}"
              }
            }
          },
          {
            "Sid": "AllowStartSessionConditions",
            "Effect": "Allow",
            "Action": [
              "ssm:StartSession"
            ],
            "Resource": "*",
            "Condition": {
              "StringEquals": {
                "ssm:resourceTag/Department": "${aws:PrincipalTag/department}"
              }
            }
          },
          {
            "Sid": "AllowTerminateSessionConditions",
            "Effect": "Allow",
            "Action": [
              "ssm:TerminateSession"
            ],
            "Resource": [
              "arn:aws:ssm:*:*:session/${aws:PrincipalTag/login}-*"
            ]
          }
        ]
      }
      

    4. Choose Next: Tags.
    5. Review the selections you made, and then choose Create.

The policy described above uses SAML session tags for the ABAC to define permissions based on attributes. These attributes are the tags passed in the AssumeRoleWithSAML operation when the SAML-based federation occurs.

A combination of global (aws:TagKeys, aws:PrincipalTag, aws:RequestTag) and service (ec2:ResourceTag, ec2:CreateAction, ssm:resourceTag) condition keys is used to assign the permissions.

To learn more about AWS global and service conditions keys, see AWS global condition context keys and The condition keys table for AWS services.

Assign users to an AWS account

In this step, you use the permission set created in the previous step to assign access to the users for a specified AWS account.

To assign access to users

  1. Open the AWS SSO console.
  2. Choose AWS accounts.
  3. Under the AWS organization tab, in the list of AWS accounts, select one or more accounts to which you want to assign access.
  4. Choose Assign users.
  5. On the Select users or groups page, select both test users from the list of users as shown in Figure 4.

    Note: You can use the search box to look for specific users.

    Figure 4: Select users to assign to AWS accounts

    Figure 4: Select users to assign to AWS accounts

  6. Choose Next: Permission sets.
  7. On the Select permission sets page, select the permission sets that you created in step 5 to apply to the users from the table as shown in Figure 5.

    Figure 5: Select permissions sets

    Figure 5: Select permissions sets

  8. Choose Finish to start the configuration of your AWS account. When configuration is complete, a message is displayed stating that you have successfully configured your AWS account as shown in Figure 6.

    Figure 6: Confirmation that configuration is complete

    Figure 6: Confirmation that configuration is complete

Test the solution

Now that you have everything in place, let’s test the solution. To test the solution, you’ll log in to AWS SSO, access the AWS account and check the event logs, and test the Amazon EC2 operations.

Log in to AWS SSO as Bob through your external IdP

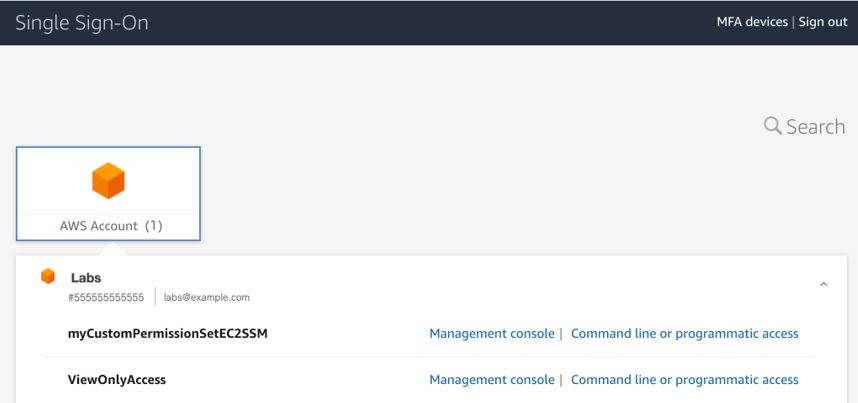
Enter the user portal URL in a browser window and log in to AWS SSO as Bob. AWS SSO redirects to the external provider for the log in process. After successful authentication, the external provider redirects to the AWS SSO portal, which shows you a list of the AWS accounts that you have access to. In this case, Bob has access to one AWS account as shown in Figure 7.

Figure 7: AWS SSO showing AWS accounts that the user has access to

Figure 7: AWS SSO showing AWS accounts that the user has access to

Access the AWS account using the permission set and confirm the event logs

Select the Management console link for the AWS account that has the myCustomPermissionSetEC2SSM permission set that you created earlier. This action federates into the AWS account and is logged in to AWS CloudTrail with the API AssumeRoleWithSAML. To confirm that the SAML session tags are being passed in the session, look at the API event log in the CloudTrail Event history console. In the following example, you can check the principalTags keys and their values under requestParameters.

{
     "eventVersion": "1.08",
     "userIdentity": {
          "type": "SAMLUser",
          "principalId": "d/UbWH0ijLBmlakaboZwi5CA/30=:[email protected]",
          "userName": "[email protected]",
          "identityProvider": "d/UbWH0ijLBmlakaboZwi5CA/30="
},
     "eventTime": "2021-05-13T16:08:48Z",
     "eventSource": "sts.amazonaws.com",
     "eventName": "AssumeRoleWithSAML",
     ...
     "requestParameters": {
        "sAMLAssertionID": "_5072d119-64f5-4341-aeed-30d9b7c24b5b",
        "roleSessionName": "[email protected]",
        "principalTags": {
            "SSMSessionRunAs": "bob",
            "department": "blue",
            "login": "[email protected]"
        },
        "durationSeconds": 3600,
        "roleArn": "arn:aws:iam::555555555555:role/aws-reserved/sso.amazonaws.com/AWSReservedSSO_myCustomPermissionSetEC2SSM_9e80ec498218bbea",
        "principalArn": "arn:aws:iam::555555555555:saml-provider/AWSSSO_5f872b6782a0507a_DO_NOT_DELETE"
    },
     "responseElements": {
     ...

Test EC2 operations

  1. Open the Amazon EC2 console:
    For this example, when opening the Amazon EC2 console there are already three running EC2 instances to test the ABAC policy that have been created with proper tags explained in the following step. From the top menu, you can also confirm the federated login AWSReservedSSO_myCustomPermissionSetEC2SSM_9e80ec498218bbea/[email protected] that represents the AWS SSO managed role and the user as shown in Figure 8.

    Figure 8: EC2 instances and user information

    Figure 8: EC2 instances and user information

  2. Launch a new EC2 instance:
    Start testing the ABAC policy by launching a new EC2 instance. This action is authorized only when you fill in the three required tags: Name, Owner, and Department.

    1. From the Amazon EC2 console, choose Launch Instances.
    2. Set the AMI, for this example select an Ubuntu-based OS.
    3. Set the Instance Type, a t2.micro will work.
    4. Configure the EC2 instance. Choose an IAM role to allow Systems Manager to manage the new EC2 instance. In this case, you have to create the IAM role EC2UbuntuSSMRole with the AWS managed policy AmazonEC2RoleforSSM attached in advanced with proper IAM permissions since the user Bob is not allow to do so. Then, you must use the user data to create the OS Ubuntu user—Bob—that you need to log in to the EC2 instance by using Session Manager. You can copy and paste the following to create the user “Bob”:#!/bin/bash
      sudo useradd -m bob
    5. Add storage using the default settings.
    6. Add tags. From the ABAC policy previously created, you can confirm that tag key Name can be anything as the condition StringLike is indicated with a wildcard (*). The tag keys Owner and Department have to match the principal session tags passed through federation. In this case, enter [email protected] as the key Owner, and enter blue as the Department, as shown in Figure 9.

      Figure 9: EC2 tags describing key value pairs

      Figure 9: EC2 tags describing key value pairs

    7. Configure security groups. When configuring security groups, you can choose an existing security group that doesn’t allow any inbound traffic to the SSH port. Since when using Session Manager you connect to the EC2 instance through an API that is going to be an outbound connection. This way you can safely leave the security group inbound rules close.
    8. Review and launch. It will ask you about selecting or creating a key pair. You don’t need one, because you’re using Session Manager. Proceed without selecting or creating a new SSH key pair. When launching the EC2 instance with the correct tag keys and values, you get the success message shown in Figure 10.
      Figure 10: EC2 success message launching an instance with the correct tags

      Figure 10: EC2 success message launching an instance with the correct tags

      If there are any missing tag keys or the values aren’t correct, the action will be denied as shown in Figure 11. For more information, you can decode the authorization error message using the API DecodeAuthorizationMessage.

      Figure 11: EC2 failed message launching an instance with incorrect tags

      Figure 11: EC2 failed message launching an instance with incorrect tags

  3. Stop, reboot, and terminate EC2 instances.
    The next tests are to be stop, reboot, and terminate the EC2 instances. In the ABAC policy you defined that only users who have the same department value as the resource can perform the first two actions. You can terminate and EC2 instance only if you are an owner. To stop, reboot, and terminate instances, open the EC2 Console, choose Instances, and select the instance you want to affect. Choose Instance state and choose the action you want to test: Stop instance, Reboot instance or Terminate instance.

    Trying to stop the EC2 instance amber-instance where Department is amber is shown in Figure 12.

    Figure 12: EC2 console showing how to stop an instance

    Figure 12: EC2 console showing how to stop an instance

    The action should fail as shown in Figure 13.

    Figure 13: EC2 instance failure message stopping an instance with wrong tags

    Figure 13: EC2 instance failure message stopping an instance with wrong tags

    Only when the department value of the EC2 instance is blue is it possible to stop or reboot the instance as shown in Figure 14.

    Figure 14: EC2 success message stopping an instance with correct tags

    Figure 14: EC2 success message stopping an instance with correct tags

    Only when the owner who launched the EC2 instance matches with the federated login is it possible to terminate the instance. Trying to terminate an EC2 instance that was launched by anyone other than the owner will lead to a failed action as shown in Figure 15.

    Figure 15: EC2 failed message terminating an instance with incorrect tags

    Figure 15: EC2 failed message terminating an instance with incorrect tags

  4. Try to modify tags. Because ABAC policies rely on tags, you cannot modify tags after the resources have been created. This is set in the ABAC policy statement AllowCreateTagsOnRunInstance in Create a new permission set using an ABAC policy. If you try to modify any tag keys or values on existing resources, the changes will be denied. For example, if you try to modify the owner of a tag on an existing EC2 instance, you get the “Failed to update tags” error message as shown in Figure 16.

    Figure 16: Failed message when attempting to modify tags

    Figure 16: Failed message when attempting to modify tags

  5. Connect to the EC2 instance using Session Manager.
    1. Test logging in to the EC2 instance by choosing the new instance and choosing Connect as shown in Figure 17.

      Figure 17: EC2 console selecting an instance to connect

      Figure 17: EC2 console selecting an instance to connect

    2.  Then choose the Session Manager tab and choose Connect as shown in Figure 18.
      Figure 18: EC2 console selecting Session Manager to connect

      Figure 18: EC2 console selecting Session Manager to connect

      This will open a new tab in the browser redirecting to a Systems Manager session where you can confirm that the Ubuntu OS user is Bob as shown in Figure 19.

      Figure 19: Systems Manager session started confirming Ubunto OS user

      Figure 19: Systems Manager session started confirming Ubunto OS user

      Note: By default, sessions are launched using the credentials of a system-generated account named ssm-user that is created on a managed instance. However, you can instead launch sessions using any OS user by enabling the run as feature in SSM. To learn more about this, see Enable run as support for Linux and macOS instances in the Systems Manager Session Manager user guide.

    3. Performing the same action in an EC2 instance with a different Department tag will lead to a denied action as shown in Figure 20. This is because the ABAC policy allows the StartSession action only when the Department key matches the Department value in the EC2 instance.

      Figure 20: Systems Manager StartSession failed message

      Figure 20: Systems Manager StartSession failed message

Conclusion

In this blog post, you learned how to use AWS SSO with the two methods of passing attributes to AWS account using session tags for ABAC. You also learned how to build policies with tags as conditions to simplify and reuse custom permission sets. You have seen working examples with services like EC2, and Systems Manager Session Manager. To learn more about ABAC policies, SAML session tags, and how to pass session tags in federation, see IAM tutorial: Use SAML session tags for ABAC and Passing session tags using AssumeRoleWithSAML.

If you have feedback about this post, submit comments in the Comments section below.

Want more AWS Security news? Follow us on Twitter.

Author

Rodrigo Ferroni

Rodrigo Ferroni is a senior Security Specialist at AWS Enterprise Support. He is certified in CISSP, AWS Security Specialist, and AWS Solutions Architect Associate. He enjoys helping customers to continue adopting AWS security services to improve their security posture in the cloud. Outside of work, he loves to travel as much as he can. In every winter he enjoys snowboarding with his friends.

Creating a Multi-Region Application with AWS Services – Part 2, Data and Replication

Post Syndicated from Joe Chapman original https://aws.amazon.com/blogs/architecture/creating-a-multi-region-application-with-aws-services-part-2-data-and-replication/

In Part 1 of this blog series, we looked at how to use AWS compute, networking, and security services to create a foundation for a multi-Region application.

Data is at the center of many applications. In this post, Part 2, we will look at AWS data services that offer native features to help get your data where it needs to be.

In Part 3, we’ll look at AWS application management and monitoring services to help you build, monitor, and maintain a multi-Region application.

Considerations with replicating data

Data replication across the AWS network can happen quickly, but we are still limited by the speed of light. For this reason, data consistency must be considered when building a multi-Region application. Generally speaking, the longer a physical distance is, the longer it will take the data to get there.

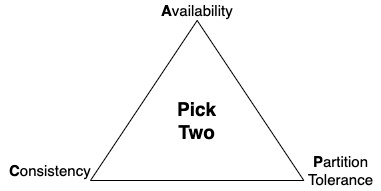
When building a distributed system, consider the consistency, availability, partition tolerance (CAP) theorem. This theorem states that an application can only pick 2 out of the 3, and tradeoffs should be considered.

  • Consistency – all clients always have the same view of data
  • Availability – all clients can always read and write data
  • Partition Tolerance – the system will continue to work despite physical partitions

CAP diagram

Achieving consistency and availability is common for single-Region applications. For example, when an application connects to a single in-Region database. However, this becomes more difficult with multi-Region applications due to the latency added by transferring data over long distances. For this reason, highly distributed systems will typically follow an eventual consistency approach, favoring availability and partition tolerance.

Replicating objects and files

To ensure objects are in multiple Regions, Amazon Simple Storage Service (Amazon S3) can be set up to replicate objects across AWS Regions automatically with one-way or two-way replication. A subset of objects in an S3 bucket can be replicated with S3 replication rules. If low replication lag is critical, S3 Replication Time Control can help meet requirements by replicating 99.99% of objects within 15 minutes, and most within seconds. To monitor the replication status of objects, Amazon S3 events and metrics will track replication and can send an alert if there’s an issue.

Traditionally, each S3 bucket has its own single, Regional endpoint. To simplify connecting to and managing multiple endpoints, S3 Multi-Region Access Points create a single global endpoint spanning multiple S3 buckets in different Regions. When applications connect to this endpoint, it will route over the AWS network using AWS Global Accelerator to the bucket with the lowest latency. Failover routing is also automatically handled if the connectivity or availability to a bucket changes.

For files stored outside of Amazon S3, AWS DataSync simplifies, automates, and accelerates moving file data across Regions and accounts. It supports homogeneous and heterogeneous file migrations across Elastic File System (Amazon EFS), Amazon FSx, AWS Snowcone, and Amazon S3. It can even be used to sync on-premises files stored on NFS, SMB, HDFS, and self-managed object storage to AWS for hybrid architectures.

File and object replication should be expected to be eventually consistent. The rate at which a given dataset can transfer is a function of the amount of data, I/O bandwidth, network bandwidth, and network conditions.

Copying backups

Scheduled backups can be set up with AWS Backup, which automates backups of your data to meet business requirements. Backup plans can automate copying backups to one or more AWS Regions or accounts. A growing number of services are supported, and this can be especially useful for services that don’t offer real-time replication to another Region such as Amazon Elastic Block Store (Amazon EBS) and Amazon Neptune.

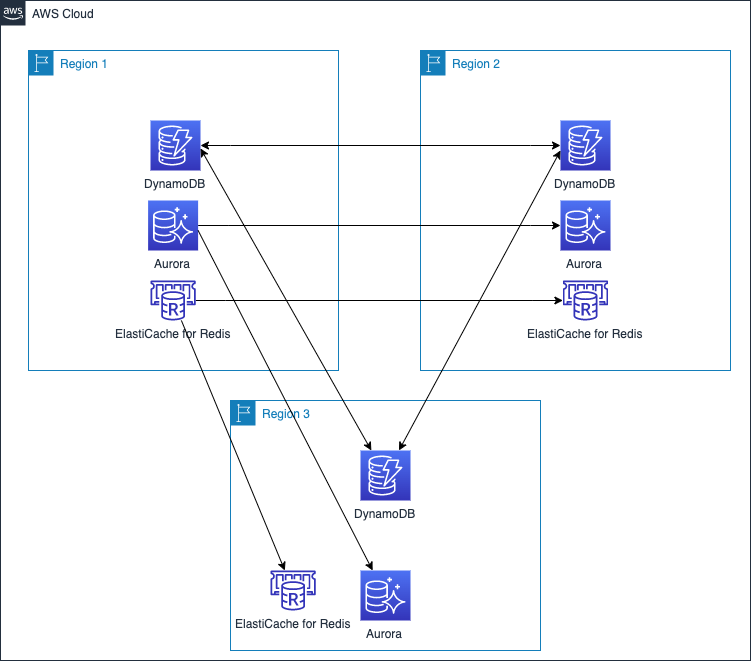
Figure 1 shows how these data transfer services can be combined for each resource.

Storage replication services

Figure 1. Storage replication services

Spanning non-relational databases across Regions

Amazon DynamoDB global tables provide multi-Region and multi-writer features to help you build global applications at scale. A DynamoDB global table is the only AWS managed offering that allows for multiple active writers in a multi-Region topology (active-active and multi-Region). This allows for applications to read and write in the Region closest to them, with changes automatically replicated to other Regions.

Global reads and fast recovery for Amazon DocumentDB (with MongoDB compatibility) can be achieved with global clusters. These clusters have a primary Region that handles write operations. Dedicated storage-based replication infrastructure enables low-latency global reads with a lag of typically less than one second.

Keeping in-memory caches warm with the same data across Regions can be critical to maintain application performance. Amazon ElastiCache for Redis offers global datastore to create a fully managed, fast, reliable, and secure cross-Region replica for Redis caches and databases. With global datastore, writes occurring in one Region can be read from up to two other cross-Region replica clusters – eliminating the need to write to multiple caches to keep them warm.

Spanning relational databases across Regions

For applications that require a relational data model, Amazon Aurora global database provides for scaling of database reads across Regions in Aurora PostgreSQL-compatible and MySQL-compatible editions. Dedicated replication infrastructure utilizes physical replication to achieve consistently low replication lag that outperforms the built-in logical replication database engines offer, as shown in Figure 2.

SysBench OLTP (write-only) stepped every 600 seconds on R4.16xlarge

Figure 2. SysBench OLTP (write-only) stepped every 600 seconds on R4.16xlarge

With Aurora global database, one primary Region is designated as the writer, and secondary Regions are dedicated to reads. Aurora MySQL supports write forwarding, which forwards write requests from a secondary Region to the primary Region to simplify logic in application code. Failover testing can happen by utilizing managed planned failover, which will change the active write cluster to another Region while keeping the replication topology intact. All databases discussed in this post employ eventual consistency when used across Regions, but Aurora PostgreSQL has an option to set the maximum a replica lag allowed with managed recovery point objective (managed RPO).

Logical replication, which utilizes a database engine’s built-in replication technology, can be set up for Amazon Relational Database Service (Amazon RDS) for MariaDB, MySQL, Oracle, PostgreSQL, and Aurora databases. A cross-Region read replica will receive these changes from the writer in the primary Region. For applications built on RDS for Microsoft SQL Server, cross-Region replication can be achieved by utilizing the AWS Database Migration Service. Cross-Region replicas allow for quicker local reads and can reduce data loss and recovery times in the case of a disaster by being promoted to a standalone instance.

For situations where a longer RPO and recovery time objective (RTO) are acceptable, backups can be copied across Regions. This is true for all of the relational and non-relational databases mentioned in this post, except for ElastiCache for Redis. Amazon Redshift can also automatically do this for your data warehouse. Backup copy times will vary depending on size and change rates.

A purpose-built database strategy offers many benefits, Figure 3 forms a purpose-built global database architecture.

Purpose-built global database architecture

Figure 3. Purpose-built global database architecture

Summary

Data is at the center of almost every application. In this post, we reviewed AWS services that offer cross-Region data replication to get your data where it needs to be quickly. Whether you need faster local reads, an active-active database, or simply need your data durably stored in a second Region, we have a solution for you. In the 3rd and final post of this series, we’ll cover application management and monitoring features.

Ready to get started? We’ve chosen some AWS Solutions, AWS Blogs, and Well-Architected labs to help you!

Related posts

Build event-driven data quality pipelines with AWS Glue DataBrew

Post Syndicated from Laith Al-Saadoon original https://aws.amazon.com/blogs/big-data/build-event-driven-data-quality-pipelines-with-aws-glue-databrew/

Businesses collect more and more data every day to drive processes like decision-making, reporting, and machine learning (ML). Before cleaning and transforming your data, you need to determine whether it’s fit for use. Incorrect, missing, or malformed data can have large impacts on downstream analytics and ML processes. Performing data quality checks helps identify issues earlier in your workflow so you can resolve them faster. Additionally, doing these checks using an event-based architecture helps you reduce manual touchpoints and scale with growing amounts of data.

AWS Glue DataBrew is a visual data preparation tool that makes it easy to find data quality statistics such as duplicate values, missing values, and outliers in your data. You can also set up data quality rules in DataBrew to perform conditional checks based on your unique business needs. For example, a manufacturer might need to ensure that there are no duplicate values specifically in a Part ID column, or a healthcare provider might check that values in an SSN column are a certain length. After you create and validate these rules with DataBrew, you can use Amazon EventBridge, AWS Step Functions, AWS Lambda, and Amazon Simple Notification Service (Amazon SNS) to create an automated workflow and send a notification when a rule fails a validation check.

In this post, we walk you through the end-to-end workflow and how to implement this solution. This post includes a step-by-step tutorial, an AWS Serverless Application Model (AWS SAM) template, and example code that you can use to deploy the application in your own AWS environment.

Solution overview

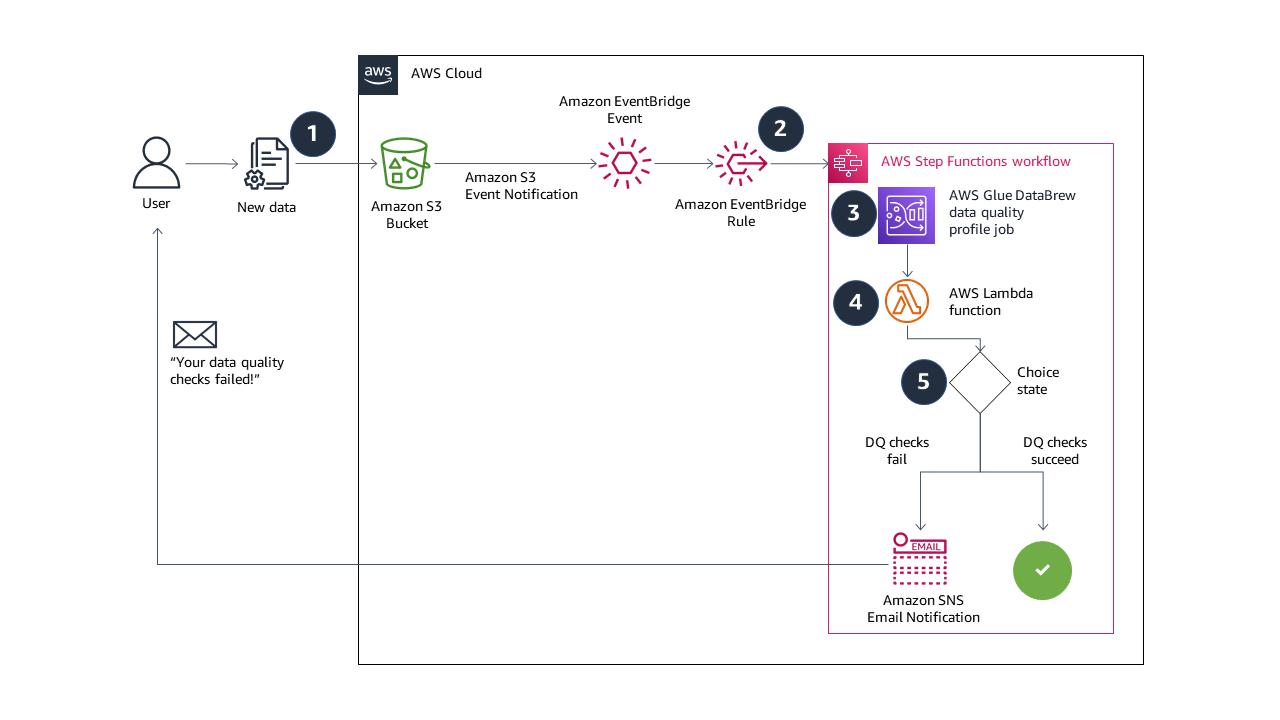
The solution in this post combines serverless AWS services to build a completely automated, end-to-end event-driven pipeline for data quality validation. The following diagram illustrates our solution architecture.

The solution workflow contains the following steps:

  1. When you upload new data to your Amazon Simple Storage Service (Amazon S3) bucket, events are sent to EventBridge.
  2. An EventBridge rule triggers a Step Functions state machine to run.
  3. The state machine starts a DataBrew profile job, configured with a data quality ruleset and rules. If you’re considering building a similar solution, the DataBrew profile job output location and the source data S3 buckets should be unique. This prevents recursive job runs. We deploy our resources with an AWS CloudFormation template, which creates unique S3 buckets.
  4. A Lambda function reads the data quality results from Amazon S3, and returns a Boolean response into the state machine. The function returns false if one or more rules in the ruleset fail, and returns true if all rules succeed.
  5. If the Boolean response is false, the state machine sends an email notification with Amazon SNS and the state machine ends in a failed status. If the Boolean response is true, the state machine ends in a succeed status. You can also extend the solution in this step to run other tasks on success or failure. For example, if all the rules succeed, you can send an EventBridge message to trigger another transformation job in DataBrew.

In this post, you use AWS CloudFormation to deploy a fully functioning demo of the event-driven data quality validation solution. You test the solution by uploading a valid comma-separated values (CSV) file to Amazon S3, followed by an invalid CSV file.

The steps are as follows:

  1. Launch a CloudFormation stack to deploy the solution resources.
  2. Test the solution:
    1. Upload a valid CSV file to Amazon S3 and observe the data quality validation and Step Functions state machine succeed.
    2. Upload an invalid CSV file to Amazon S3 and observe the data quality validation and Step Functions state machine fail, and receive an email notification from Amazon SNS.

All the sample code can be found in the GitHub repository.

Prerequisites

For this walkthrough, you should have the following prerequisites:

Deploy the solution resources using AWS CloudFormation

You use a CloudFormation stack to deploy the resources needed for the event-driven data quality validation solution. The stack includes an example dataset and ruleset in DataBrew.

  1. Sign in to your AWS account and then choose Launch Stack:
  2. On the Quick create stack page, for EmailAddress, enter a valid email address for Amazon SNS email notifications.
  3. Leave the remaining options set to the defaults.
  4. Select the acknowledgement check boxes.
  5. Choose Create stack.

The CloudFormation stack takes about 5 minutes to reach CREATE_COMPLETE status.

  1. Check the inbox of the email address you provided and accept the SNS subscription.

You need to review and accept the subscription confirmation in order to demonstrate the email notification feature at the end of the walkthrough.

On the Outputs tab of the stack, you can find the URLs to browse the DataBrew and Step Functions resources that the template created. Also note the completed AWS CLI commands you use in later steps.

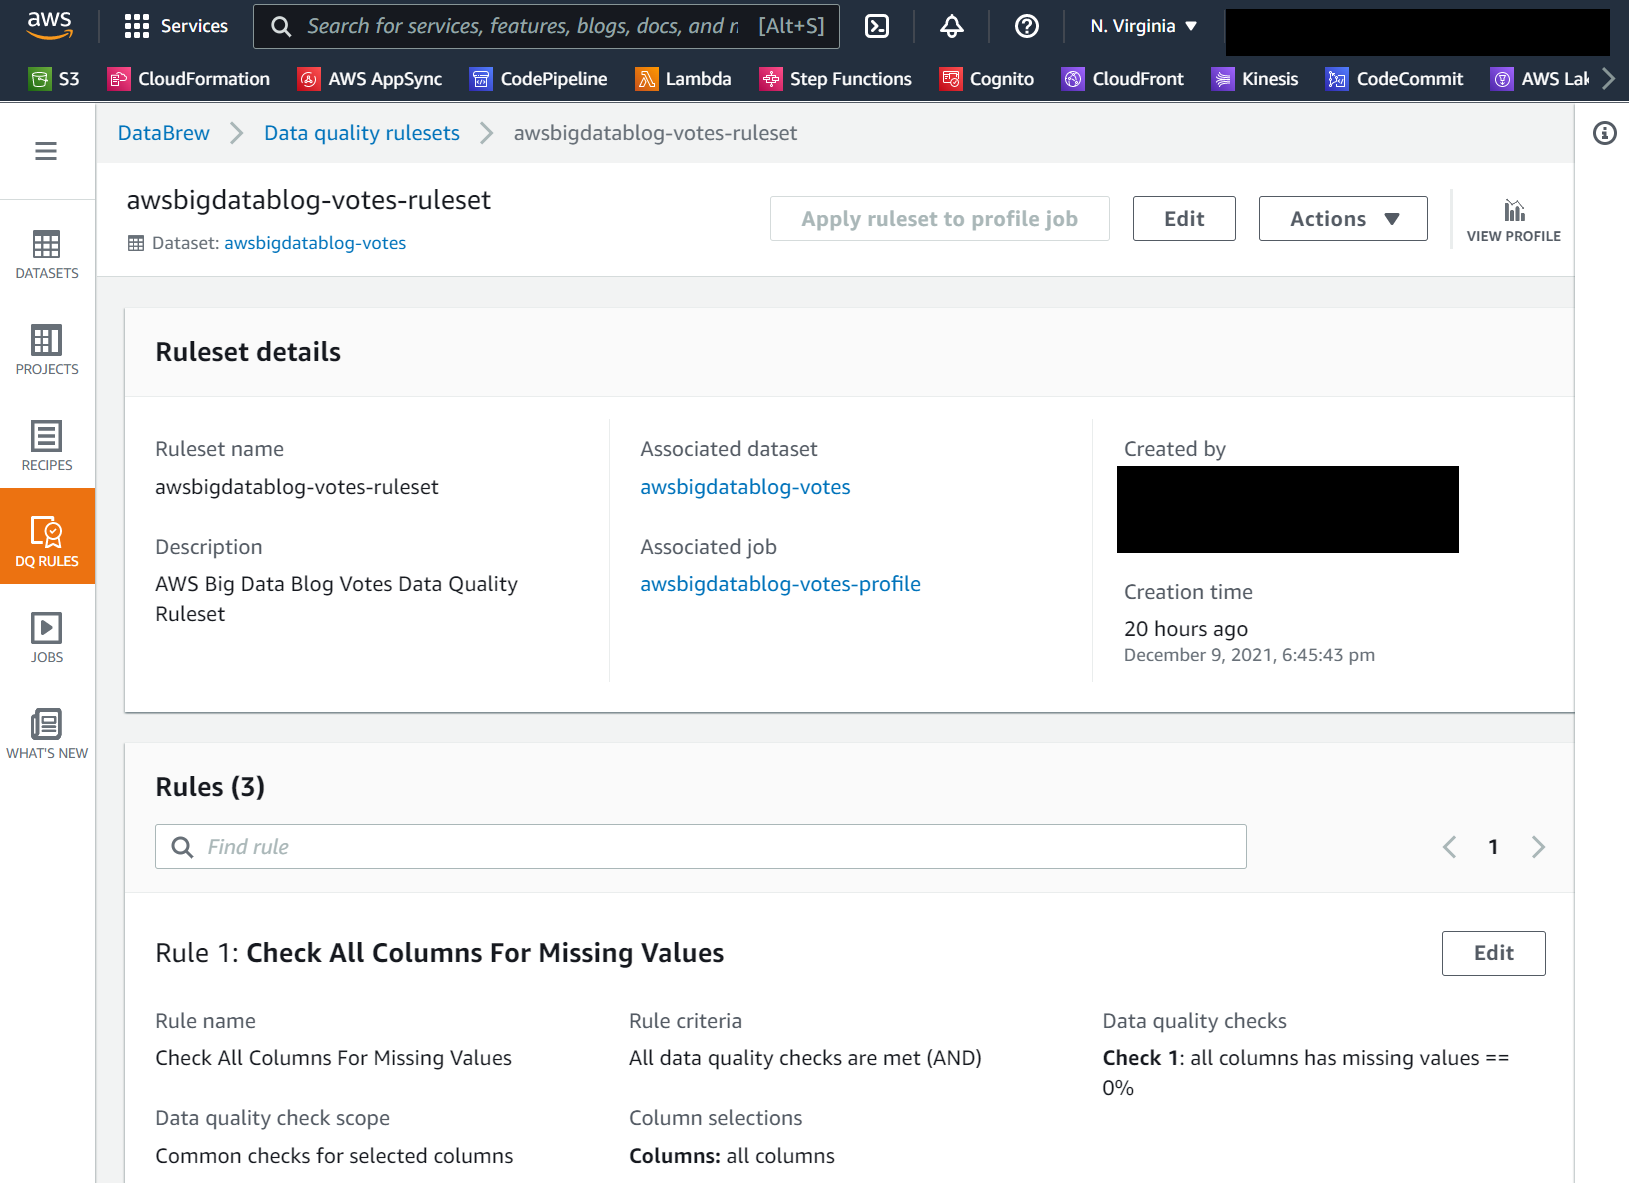
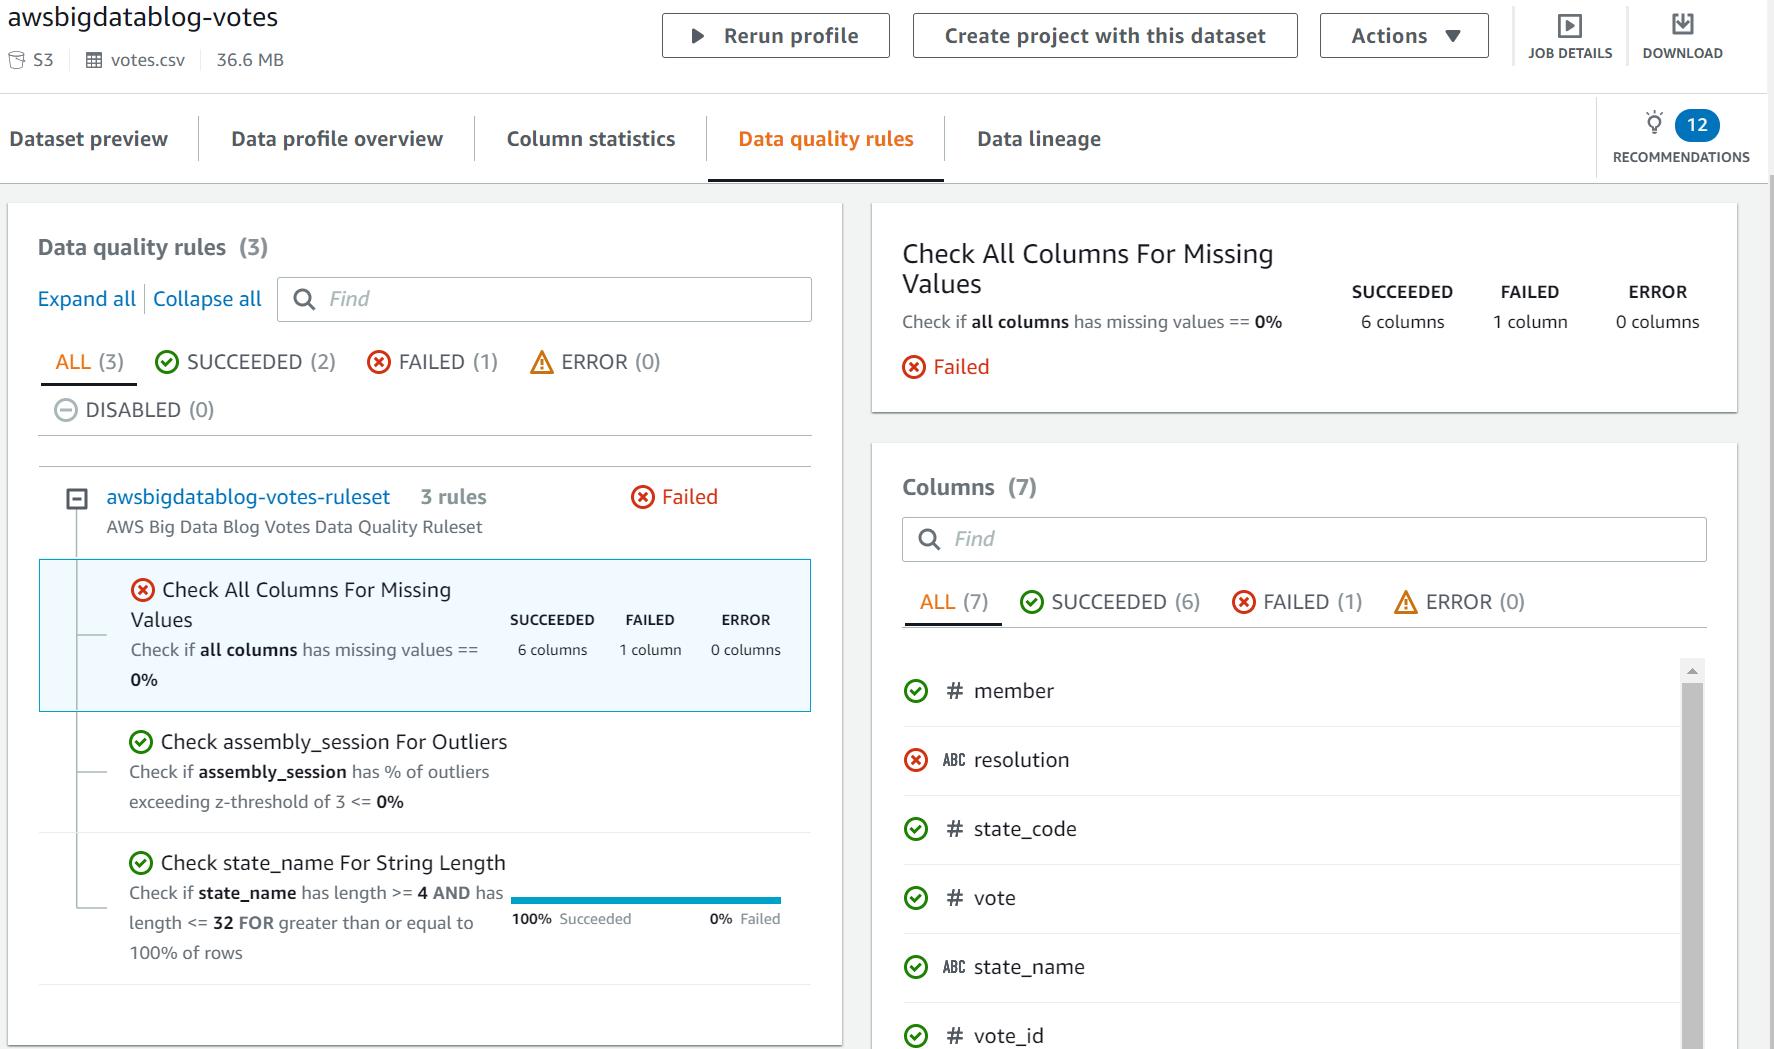
If you choose the AWSGlueDataBrewRuleset value link, you should see the ruleset details page, as in the following screenshot. In this walkthrough, we create a data quality ruleset with three rules that check for missing values, outliers, and string length.

Test the solution

In the following steps, you use the AWS CLI to upload correct and incorrect versions of the CSV file to test the event-driven data quality validation solution.

  1. Open a terminal or command line prompt and use the AWS CLI to download sample data. Use the command from the CloudFormation stack output with the key name CommandToDownloadTestData:
    aws s3 cp s3://<your_bucket>/artifacts/BDB-1942/votes.csv

  2. Use the AWS CLI again to upload the unchanged CSV file to your S3 bucket. Replace the string <your_bucket> with your bucket name, or copy and paste the command provided to you from the CloudFormation template output:
    aws s3 cp votes.csv s3://<your_bucket>/artifacts/BDB-1942/votes.csv

  3. On the Step Functions console, locate the state machine created by the CloudFormation template.

You can find a URL in the CloudFormation outputs noted earlier.

  1. On the Executions tab, you should see a new run of the state machine.
  2. Choose the run’s URL to view the state machine graph and monitor its progress.

The following image shows the workflow of our state machine.

To demonstrate a data quality rule’s failure, you make at least one edit to the votes.csv file.

  1. Open the file in your preferred text editor or spreadsheet tool, and delete just one cell.

In the following screenshots, I use the GNU nano editor on Linux. You can also use a spreadsheet editor to delete a cell. This causes the “Check All Columns For Missing Values” rule to fail.

The following screenshot shows the CSV file before modification.

The following screenshot shows the changed CSV file.

  1. Save the edited votes.csv file and return to your command prompt or terminal.
  2. Use the AWS CLI to upload the file to your S3 bucket one more time. You use the same command as before:
    aws s3 cp votes.csv s3://<your_bucket>/artifacts/BDB-1942/votes.csv

  3. On the Step Functions console, navigate to the latest state machine run to monitor it.

The data quality validation fails, triggering an SNS email notification and the failure of the overall state machine’s run.

The following image shows the workflow of the failed state machine.

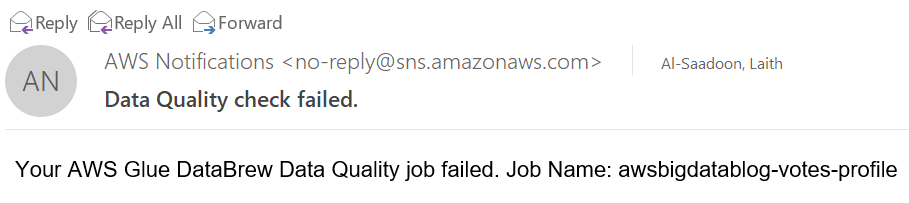
The following screenshot shows an example of the SNS email.

  1. You can investigate the rule failure on the DataBrew console by choosing the AWSGlueDataBrewProfileResults value in the CloudFormation stack outputs.

Clean up

To avoid incurring future charges, delete the resources. On the AWS CloudFormation console, delete the stack named AWSBigDataBlogDataBrewDQSample.

Conclusion

In this post, you learned how to build automated, event-driven data quality validation pipelines. With DataBrew, you can define data quality rules, thresholds, and rulesets for your business and technical requirements. Step Functions, EventBridge, and Amazon SNS allow you to build complex pipelines with customizable error handling and alerting tailored to your needs.

You can learn more about this solution and the source code by visiting the GitHub repository. To learn more about DataBrew data quality rules, visit AWS Glue DataBrew now allows customers to create data quality rules to define and validate their business requirements or refer to Validating data quality in AWS Glue DataBrew.


About the Authors

Laith Al-Saadoon is a Principal Prototyping Architect on the Envision Engineering team. He builds prototypes and solutions using AI, machine learning, IoT & edge computing, streaming analytics, robotics, and spatial computing to solve real-world customer problems. In his free time, Laith enjoys outdoor activities such as photography, drone flights, hiking, and paintballing.

Gordon Burgess is a Senior Product Manager with AWS Glue DataBrew. He is passionate about helping customers discover insights from their data, and focuses on building user experiences and rich functionality for analytics products. Outside of work, Gordon enjoys reading, coffee, and building computers.

How we ship GitHub Mobile every week

Post Syndicated from Taehun Kim original https://github.blog/2022-01-12-how-we-ship-github-mobile-every-week/

Every week, the GitHub Mobile team updates the GitHub Mobile apps on both iOS and Android with new features, bug fixes and improvements. Shipping a mobile app is not an easy task. Before a build goes out to our users’ hands, we must make sure the end result is properly built, all written tests are passed, and any critical issues are captured by testing. Also, we compose release notes with changes since our last update. All of these tasks can be quite time-consuming.

Since we’re a small team, repeating this release process every week would mean less time spent writing code or building new features. In order to focus on product development, we use a number of tools to automate the release process. In this post, I’ll share how we automate the build release process by using the iOS pipeline as an example.

A release candidate build is ready to go out to our beta users when these criteria are met:

  • A branch is created for addressing any hot fixes needed for the release candidate
  • The build is generated with a proper version number and uploaded to TestFlight
  • All unit and snapshot tests have passed
  • An issue is created to track the release process
  • Release notes are ready

GitHub provides great tools for continuous integration and delivery. We primarily use GitHub Actions to automate most of the steps to meet our criteria, plus some additional tools like fastlane.

Workflow visualized on GitHub.com
Steps to release a build. The icon on the top right of each step indicates if the step is executed automatically by an action or manually.
Steps to release a build. The icon on the top right of each step indicates if the step is executed by an action or a human engineer.

The figure above illustrates the entire process of making a build ready to ship. The gray steps are automated by GitHub Actions, while the blue steps are manually processed by our team. As you can see in the figure, most of the steps are automated. Only the final steps, like merging release-related changes or finalizing an app submission, require human interactions. We manually write release notes because humans are still better than machines at writing prose, but the materials are prepared by the automation, so the writing itself is not very time-consuming.

Let’s dive into some of the details.

Build and release

First, my team needs to generate an app binary for any given build. We define a job, which contains multiple steps for generating a build, going through the test cases, archiving, and uploading to TestFlight. We create a dedicated branch for each version we ship, so that we can go back and cherry-pick any changes we want to include. GitHub Actions has a great community support, and there are tons of open source actions we can use. For example, the peterjgrainger/action-create-branch action makes it easy to create a new release branch.

Once the branch has been created, we run fastlane to build, test, archive, and upload. In order to code-sign the binary and upload it to TestFlight, our action will need certificates and credentials to run these secure and authenticated commands. Those credentials are stored in GitHub Secrets, and they can be easily passed into an action without revealing them to would-be attackers.

Issue creation

Once a build is created and uploaded to TestFlight, we kick off another job. This one creates a GitHub issue to track any paperwork or manual processes needed in order to distribute the build. The issue serves as a playbook containing all steps to get the build out to our users including verification of release marketing materials, pre-launch manual tests, and even sharing the status with the team. By following this playbook, a release captain does not need to remember the steps, and any new folks can become a release captain with little training. The issue creation is easily done with GitHub CLI by adding a shell command in the GitHub Actions workflow YAML file, such as gh issue create -t {title} -b {body} -a {assignees} -l {labels}. Also, there are a number of open source actions like JasonEtco/create-an-issue, which makes it easy to create an issue with a template.

We manage the release engineer rotation with PagerDuty. In order to fetch the next release engineer via PagerDuty API, we also utilize open source actions, such as JamesIves/fetch-api-data-action. The release captain is then assigned to the issue so that we all know who is responsible for the release.

A sneak peak of a release tracking issue. Each step is described with a lot of details, so that one can just follow the instruction.

Release notes

With another parallel job, we prepare materials to compose release notes. Using fastlane, we collect all commits that have been pushed since the last release (alternatively, you can try another automation recently added to GitHub). The change logs are raw records of all commits and pull requests, meaning that this text alone is not suitable for release notes for our users. Thus, we create a text file with those raw change logs in our repo, and open a pull request where we can compose customer-friendly release notes. Opening a pull request is pretty easy with GitHub CLI. Adding a shell command, gh pr create -t {title} -b {body} -a {assignees}, -r {reviewers} -l {labels}, will automatically create a pull request as part of the job. An open source action such as peter-evans/create-pull-request is also useful to open a pull request.

We retrieve the next release engineer (the same way we retrieve one when creating an issue) and assign the engineer to the pull request. Once the engineer has finished writing customer-friendly release notes and another teammate has reviewed the change logs, we merge the pull request to store it in our repository.

Version number management

We have another parallel job for managing the build version numbers. Once a release candidate is created, we bump the version number in main so that everyone can begin with the next ship cycle. To prevent any errors, we do not push any code changes into main directly. Instead, a pull request to increment the version number update is opened by an action. The version update is done with small Bash and Ruby scripts, and the pull request is created via the same method we use for release notes.

Timeline for a build release. Once a build is created by the actions, it goes out to the public after a week of beta testing.

The figure above illustrates a timeline for a build release. The four jobs described, along with all of their steps, are defined in one single YAML file that defines a GitHub Actions workflow. The workflow is kicked off every Saturday morning so that the release engineer has all the materials when Monday rolls around. On Monday morning, the engineer ticks off all the steps described in the issue created by the workflow, sending the build out to our TestFlight beta users and then finally submitting to the build for App Store review. During the week, we monitor how beta testing is going. If we find a critical issue from the build, we fix it in main, cherry-pick the fix into the release branch, and upload another build. We have another GitHub Actions workflow that automates this additional build process, which is triggered whenever we push a code change into the release branch.

If the beta metrics for the week look good, with no crashes or regressions, we finally release the build on the App Store, a week after it began beta testing. In this way, our customers get solid GitHub Mobile updates every week.

🎉 Conclusion

In this post, I described how we ship GitHub Mobile apps every week with build release pipelines implemented using GitHub Actions. The community support for GitHub Actions is amazing, and there are so many powerful open source actions that you can use right away. If you want to have your own custom action and workflow, it is also quite easy to create one and re-use it across repositories or projects. With our release pipeline greatly improved by the automations powered by GitHub Actions, we have more time and focus for product development and spend less time waiting for Xcode to compile. By automating our release process and running it via GitHub Actions and GitHub Issues, it’s a lot easier to get new teammates onboarded as release engineers and shipping their new features to the App Store every week.

I hope this post helps people who wants to build solid CI/CD pipelines with GitHub tools. To learn more about automating your release process with GitHub Actions, check out the following resources:

IPython 8.0 released

Post Syndicated from original https://lwn.net/Articles/881158/rss

Version
8.0
of the IPython read-eval-print-loop implementation for Python is
out.

This major release comes with many improvements to the existing
codebase and several new features. These new features are code
reformatting with Black in the CLI, ghost suggestions, and better
tracebacks which highlight the error node, thus making complex
expressions easier to debug.

A New AWS Console Home Experience

Post Syndicated from Sébastien Stormacq original https://aws.amazon.com/blogs/aws/a-new-aws-console-home-experience/

If you are reading this blog, there is a high chance you frequently use the AWS Management Console. I taught AWS classes for years. During classes, students’ first hands-on experience with the AWS Cloud happened on the console, and I bet yours did too.

Until today, the home page of the console showed your most recently used services and a set of static links organized in sections, such as Getting Started with AWS, Build a Solution, or Explore AWS with links to training courses. However, we learned from our data that their usage is very different depending on your profile. You also told us it is cumbersome and time-consuming to navigate to different parts of the console to get an overview of important information for you.

We listened to your feedback, and I’m happy to announce a redesigned home page for the AWS Management Console. This new home page experience includes dynamic content, can be customized, and includes data from multiple AWS Regions.

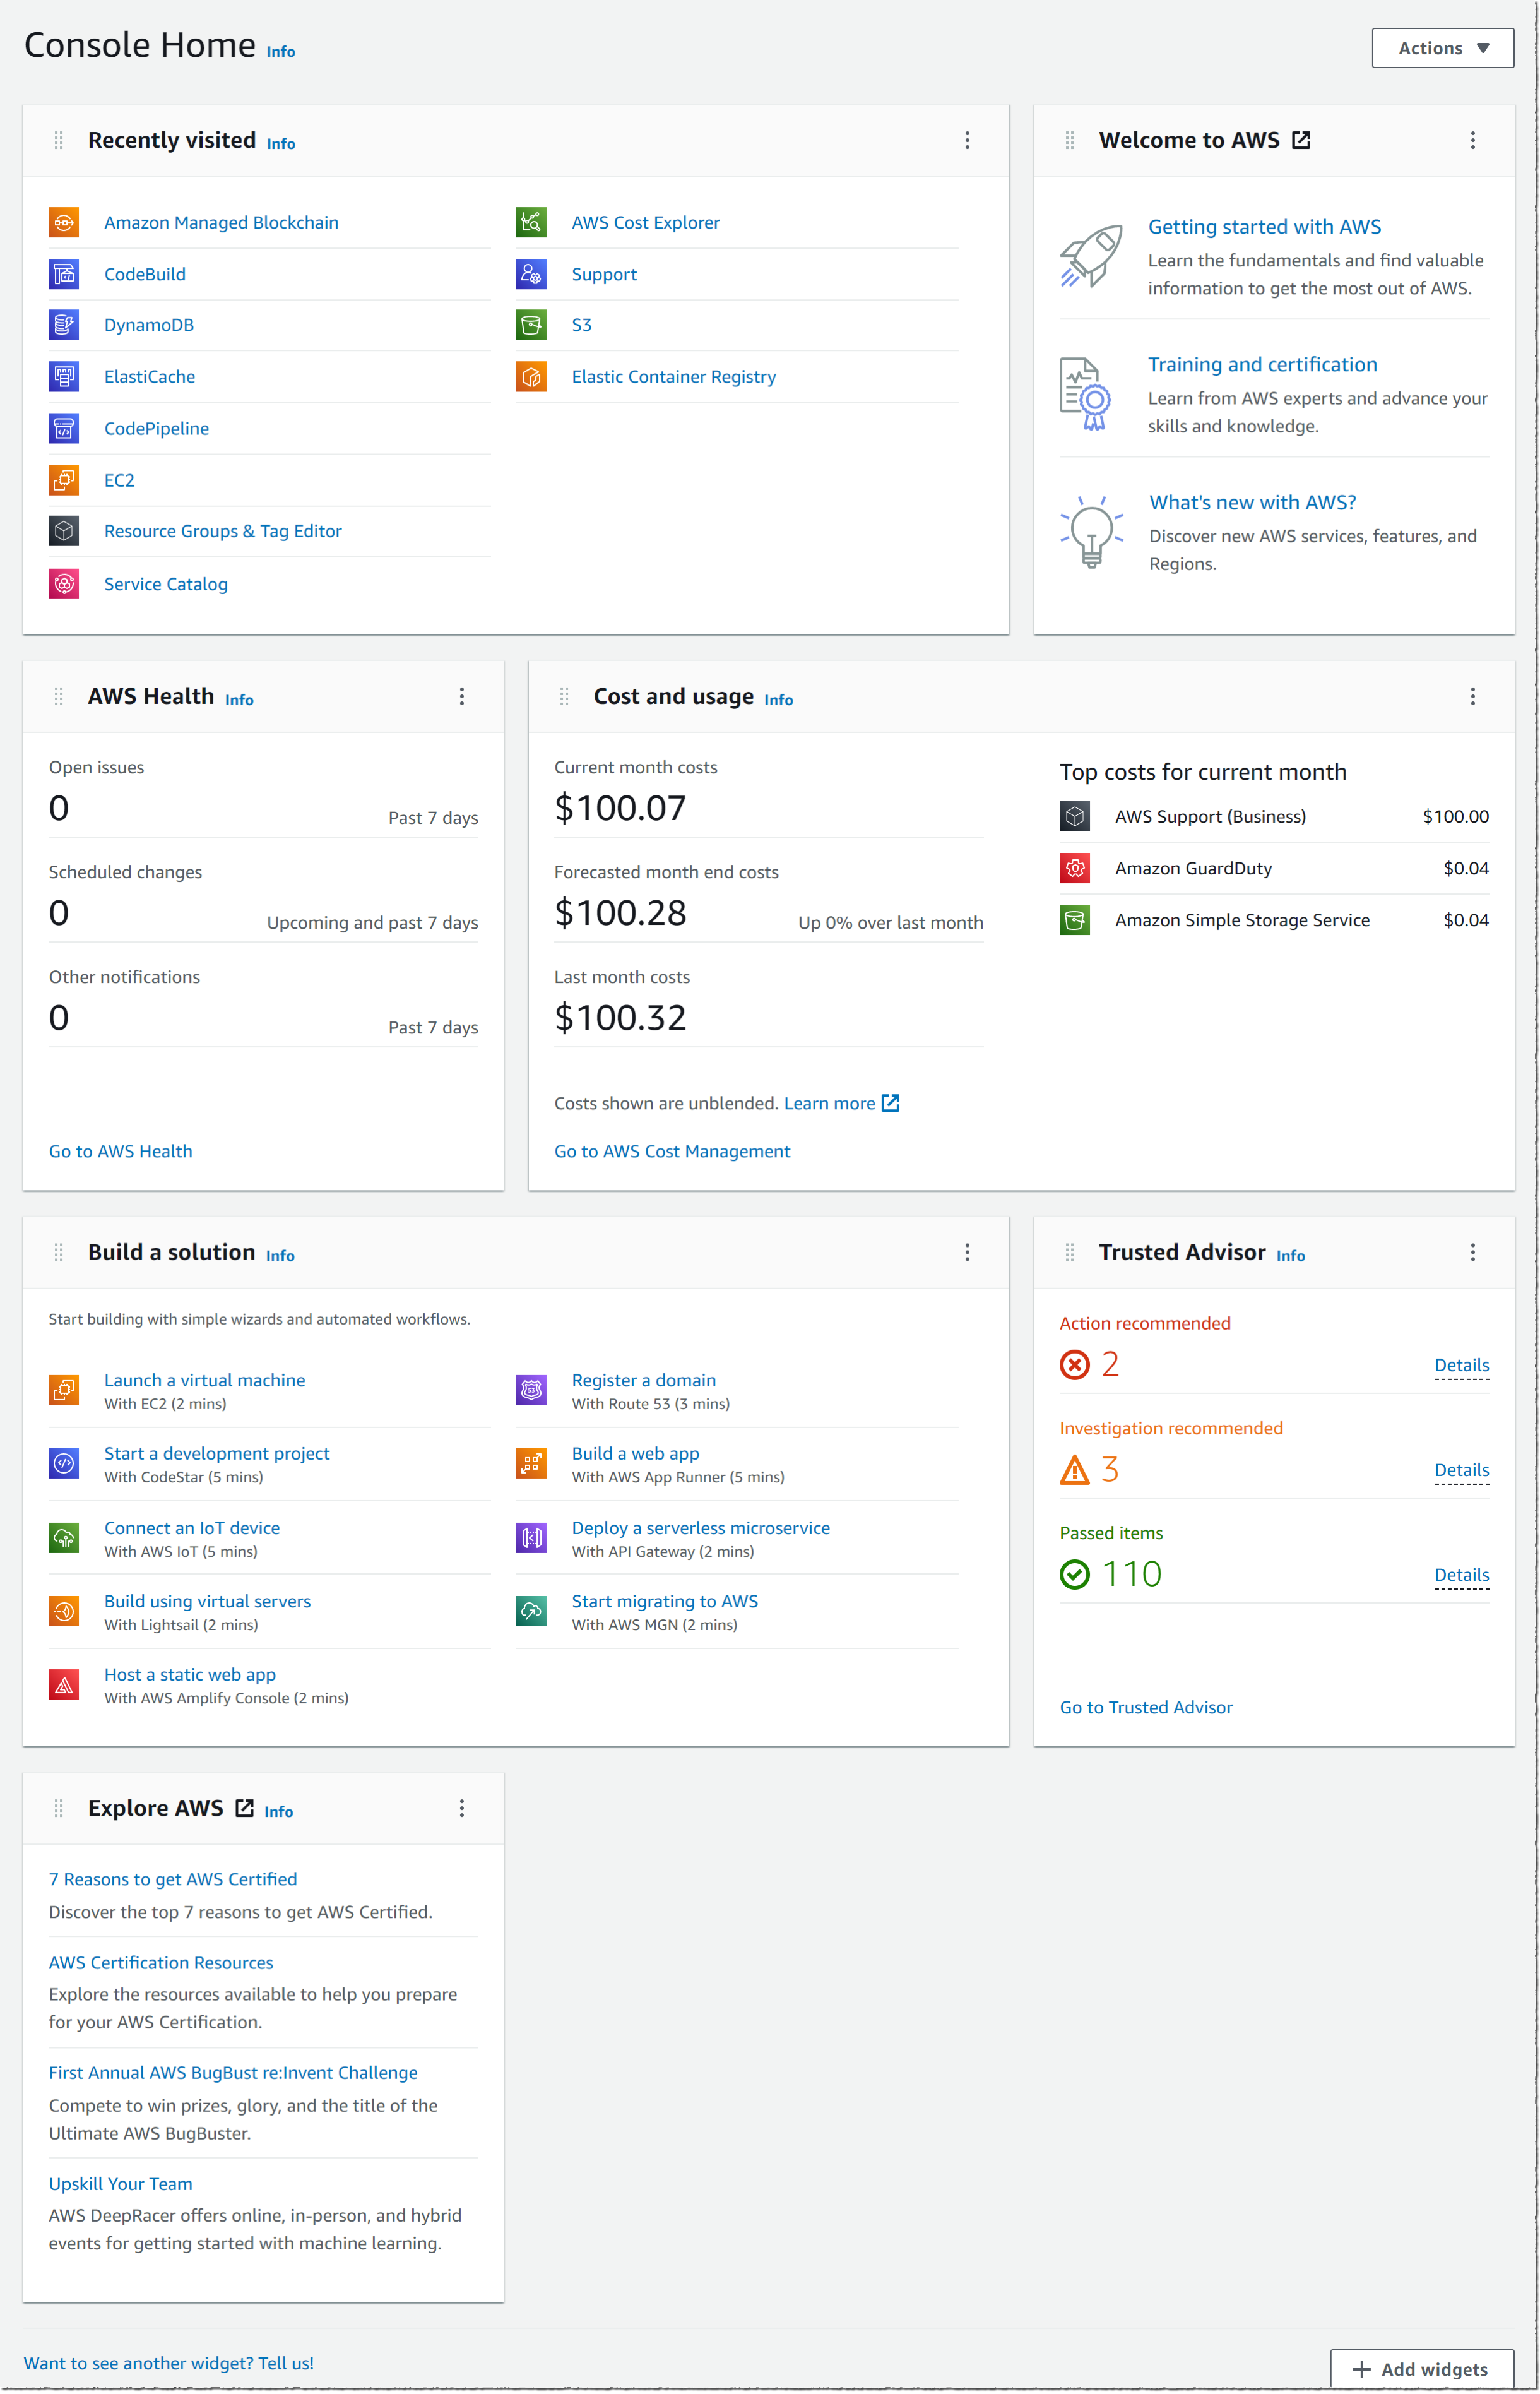
The screenshot below shows the default view of this new console home page:

New console default layout

New console homepage action

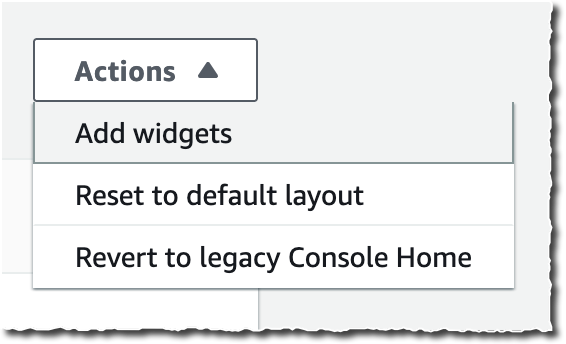
The new Console Home is made of widgets. I may choose which widget to display on the page and where to include it. I may use the actions in the Actions drop down to customize my home page.

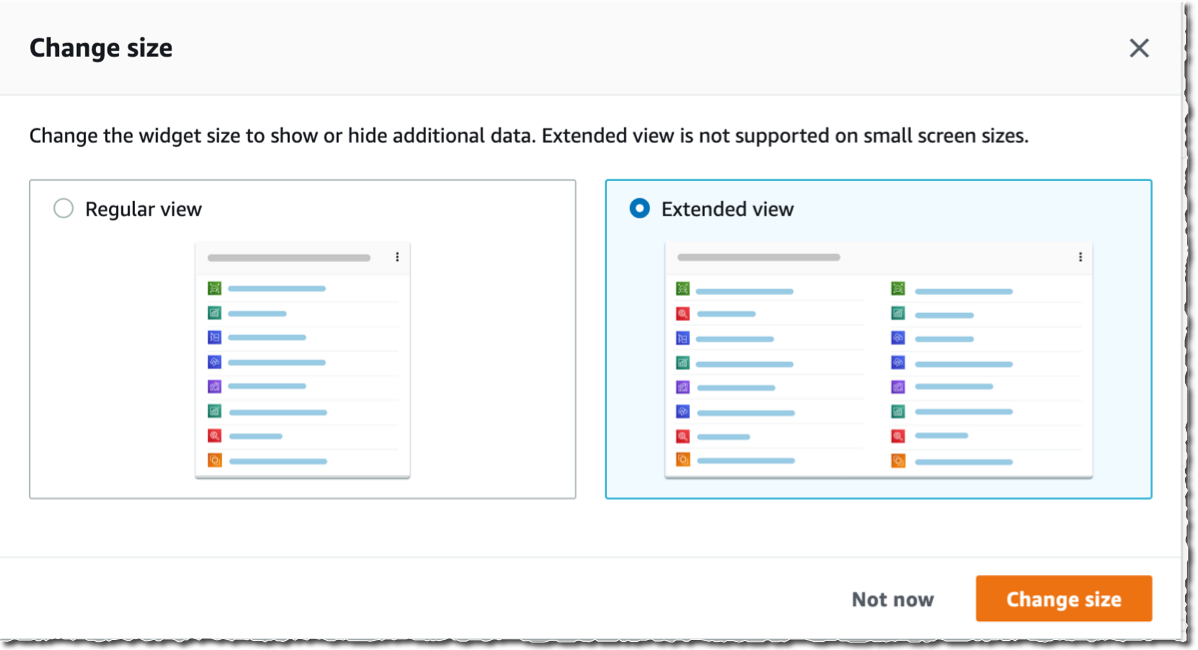
I may move and arrange widgets on the home page to organize the content as I want. When I click on the three little dots on the widget title bar, I may choose to remove the widget or resize it. I have the choice between Regular view and Extended view.

New console resize widget

At launch, the console provides eight widgets, and we will add more over time. Three widgets provide me with static links to learn how to build a solution or to explore AWS (Welcome to AWS, Build a Solution and Explore AWS). The other five are dynamic; their content depends on the usage of AWS by my applications and infrastructure:

  • AWS Health: this widget provides information on important events and changes
  • Cost and usage: this widget provides an overview of service costs, with a break down per AWS service.
  • Favorites: this widget shows a list of services that I have bookmarked
  • Recently visited: this widget provides the list of top recently visited services
  • Trusted Advisor: this widget provides recommendations to follow AWS best practices

AWS News Console List of widgets

As usual, we pay attention to the importance of not disturbing existing workflows and habits. You can use the new Console Home after opt-in. You can revert back to the old console home with a simple click.

This new Console Home is the first step to bring you more relevant content on this very first page you see every day. Stay tuned for more.

The new Console Home is available today in all AWS Regions at no additional cost. Go and customize your console homepage today.

— seb

Announcing Kubernetes Backup and Ransomware Protection via Kasten and Backblaze

Post Syndicated from Natasha Rabinov original https://www.backblaze.com/blog/announcing-kubernetes-backup-and-ransomware-protection-via-kasten-and-backblaze/

According to the Cloud Native Computing Foundation’s annual survey, Kubernetes use in production has increased 300% since 2016 to 83% of respondents. There’s no doubt that a fundamental shift has taken place over the past few years—applications are being deployed in container environments and those deployments are being managed by Kubernetes.

But customers that are deploying Kubernetes environments need a new tool to protect all of that data. Purpose-built for Kubernetes, Kasten by Veeam is that tool.

Now, through a new partnership, joint Kasten and Backblaze customers will be able to name Backblaze B2 Cloud Storage as a storage destination where they can store and protect copies of their applications affordably.

This partnership enables developers to:

  • Back up and restore production stateful Kubernetes applications.
  • Safeguard application data from ransomware encryption with Object Lock for immutability.
  • Support regulatory compliance and corporate disaster recovery mandates.

“Kubernetes containers are the standard for many organizations building, deploying, and scaling applications with portability and efficiency. Backblaze and Kasten together offer a compelling solution to support these organizations’ business continuity needs with set-and-forget-it ease and cost effectiveness.”
—Nilay Patel, VP of Sales and Partnerships, Backblaze

The joint solution is fully scalable at enterprise grade. What’s more, organizations only pay for storage used, with no data retention penalties for deleting past backups.

About Kasten

Owned by Veeam, Kasten is an award-winning market leader in Kubernetes backup. Their product was built natively for containers, and the software-only solution runs directly on your cluster within its own namespace.

Together, Kasten and Backblaze provide a simple, seamless integration for shared customers, focusing on ease of use.

“Backup and protection are paramount in a world in which data is everything and cyberattacks continue to rise. The Backblaze-Kasten partnership offers the application protection and disaster recovery support companies seek, with flexibility and freedom to choose their preferred storage partner.”
—Gaurav Rishi, VP of Product, Kasten by Veeam

How to Get Started With Backblaze B2 + Kasten

After creating your Backblaze B2 account, check out our Quickstart Guide for Kasten K10 and Backblaze B2 to create a Kasten namespace in your cluster and configure Backblaze B2 as a storage destination.

Customers can test the Kasten solution for free with clusters made up of 10 nodes or less. And Backblaze covers the first 10GB stored.

Data Protection That Scales With You

Kubernetes was built to provide scalability, giving businesses the flexibility to manage and optimize resources. Through this partnership, customers now have storage that matches that flexibility in Backblaze B2. With Backblaze, customers are able to scale their application backups as their applications scale.

Interested in learning more? Join us for a webinar on February 2, 2022 at 10 a.m. PST to discover how to add seamless ransomware protection to your Kubernetes environments—stay tuned for more details and a link to register. Or, if you are ready to future-proof your application, click here to get started today.

The post Announcing Kubernetes Backup and Ransomware Protection via Kasten and Backblaze appeared first on Backblaze Blog | Cloud Storage & Cloud Backup.

Malcolm: Prevent Trojan Source attacks with GCC 12

Post Syndicated from original https://lwn.net/Articles/881145/rss

David Malcolm describes
some GCC improvements
to defend against bidirectional-text attacks in
source code.

My colleague Marek Polacek and I implemented a new warning for GCC
12, -Wbidi-chars, for detecting Trojan Source attacks involving
Unicode control characters. Marek implemented the guts of the
warning, but when I tried it out on the examples provided by the
Trojan Source researchers, I found I had trouble understanding the
initial results—precisely because of the obfuscation itself.

So for GCC 12, I’ve added a new flag to GCC diagnostics, indicating
that the diagnostic itself relates to source code encoding. When
any such diagnostic is printed, GCC will now escape non-ASCII
characters in the source code.

Security updates for Wednesday

Post Syndicated from original https://lwn.net/Articles/881144/rss

Security updates have been issued by Debian (cfrpki, gdal, and lighttpd), Fedora (perl-CPAN and roundcubemail), Mageia (firefox), openSUSE (jawn, kernel, and thunderbird), Oracle (kernel, openssl, and webkitgtk4), Red Hat (cpio, idm:DL1, kernel, kernel-rt, openssl, virt:av and virt-devel:av, webkit2gtk3, and webkitgtk4), Scientific Linux (openssl and webkitgtk4), SUSE (kernel and thunderbird), and Ubuntu (apache-log4j2, ghostscript, and lxml).

Demystifying XDR: How Humans and Machines Join Forces in Threat Response

Post Syndicated from Jesse Mack original https://blog.rapid7.com/2022/01/12/demystifying-xdr-how-humans-and-machines-join-forces-in-threat-response/

Demystifying XDR: How Humans and Machines Join Forces in Threat Response

In our first post on demystifying the concepts and practices behind extended detection and response (XDR) technology, Forrester analyst Allie Mellen joined Sam Adams, Rapid7’s VP for Detection and Response, to outline the basic framework for XDR and highlight the key outcomes it can help security teams achieve. One of the core components of XDR is that it expands the sources of telemetry available to security operations center (SOC) teams so they have richer, more complete data to help them detect and respond to threats.

That raises the question: How do SOC analysts keep productivity high while sifting through huge volumes of data?

Automation is one of the key ways SOC teams make their processes more efficient as they identify the most relevant threats and initiate the right responses. But automation can’t do everything an analyst can, and finding the right balance between machine learning and human know-how is an essential part of a successful XDR implementation.

Become the bridge

As Sam pointed out in his discussion with Allie, the security analyst acts as a bridge between what the data is saying and what the right course of action is in response to it.

“I got the alert, and you know, that’s not the hard part anymore,” he said. “The hard part is responding to the alert and figuring out what to do with that alert – and really, what the impact is on my company.”

For Allie, XDR helps analysts find a balance between security and productivity, but not by leaning too heavily on automation. In fact, she suggested we’ve had a “misplaced hope” for what machine learning can help us accomplish. Instead, it’s about setting up automation that augments the analysts’ work by helping them ask the right questions up front — and get to the answers faster.


Demystifying XDR: How Humans and Machines Join Forces in Threat Response

The expert and the end user

In addition, automation can’t always tell us who the expert actually is about a particular security event. Sam gave the example of a suspicious login from Bermuda: After receiving that alert, it’s actually no longer the analyst who’s the expert on that incident, but the end user who was involved. The logical next step is to pick up the phone or send an email and ask that user, “Are you in Bermuda?” — and that takes a human touch rather than an automated action.

“We assume we can get everything we need from the tools,” Allie pointed out, “and they abstract us away from the rest of the enterprise in that way. But it can be just as easy as turning to the person next to you and saying, ‘Hey, did you log into this?'”

Allie went on to note that this is one of the main reasons why it’s so important to foster a security culture throughout the whole business. When you build connections between the security team and individuals from other parts of the organization, and keep that rapport strong over time, SOC analysts can get many of the answers they need from their peers in other departments — and get to the answers much more quickly and accurately than a machine ever could.

Culture is a uniquely human thing, one that machines can never replicate or replace — and security culture is no exception. XDR broadens the data and tools that SOC teams can use to help them protect the organization, but even the best technology is no replacement for an educated team of end users who know how to implement security best practices, not to mention the sharp insights of seasoned SOC analysts. The real magic happens when all these elements, human and automated, work together — and in an XDR model, automation fills the gaps instead of taking center stage.

Want more XDR insights from our conversation with Allie? Check out the full talk.

Faking an iPhone Reboot

Post Syndicated from Bruce Schneier original https://www.schneier.com/blog/archives/2022/01/faking-an-iphone-reboot.html

Researchers have figured how how to intercept and fake an iPhone reboot:

We’ll dissect the iOS system and show how it’s possible to alter a shutdown event, tricking a user that got infected into thinking that the phone has been powered off, but in fact, it’s still running. The “NoReboot” approach simulates a real shutdown. The user cannot feel a difference between a real shutdown and a “fake shutdown.” There is no user-interface or any button feedback until the user turns the phone back “on.”

It’s a complicated hack, but it works.

Uses are obvious:

Historically, when malware infects an iOS device, it can be removed simply by restarting the device, which clears the malware from memory.

However, this technique hooks the shutdown and reboot routines to prevent them from ever happening, allowing malware to achieve persistence as the device is never actually turned off.

I see this as another manifestation of the security problems that stem from all controls becoming software controls. Back when the physical buttons actually did things — like turn the power, the Wi-Fi, or the camera on and off — you could actually know that something was on or off. Now that software controls those functions, you can never be sure.

Мястото на децата в пандемичните решения на възрастните

Post Syndicated from Надежда Цекулова original https://toest.bg/myastoto-na-detsata-v-pandemichnite-resheniya-na-vuzrastnite/

Годината започна с ръст на отчетените случаи на заразени със SARS-CoV-2 и с констатацията, че вариантът Омикрон вече е в България. Трето поред правителство (технически погледнато – дори четвърто, тъй като служебното реализира два поредни мандата) е изправено пред необходимостта да предприеме някакви действия, с които да намали цената на поредната епидемична вълна, изразена както в човешки жертви или дългосрочни последици за здравето на гражданите, така и в икономически загуби и социални щети.

По време на последната есенна вълна на пандемията в България се открои ясен политически наратив, свързан с ролята на децата. Той беше провокиран от повишеното напрежение както у родителите, така и у голяма част от самите деца, които в последните 20 месеца понесоха несъразмерни ограничения в усилията за контрол над епидемичните пикове. И макар от лятото да се повтаряше като мантра, че присъственото обучение е приоритет, че няма да допуснем отново училищата да са затворени, а заведенията да работят, и че децата са най-важни, през първите три месеца и половина от тази учебна година учениците в началния етап прекараха три, а по-големите – шест седмици у дома с обяснението, че обществото ни няма друг избор. Но дали тази аргументация е поне близо до истината?

Агресивното настояване за отмяна на всякакви мерки е базирано почти изцяло на фалшиви новини и конспиративни вярвания. Обратната теза, която поставя децата на фокус като разпространители на вируса и като потенциално рискова група, по-скоро спекулира с интерпретацията на доказаните от науката факти. И двете групи обаче използват децата като инструмент в опит да постигнат по-силно влияние на тезите си, да емоционализират посланията си и да улеснят възприемането на тези послания от широк кръг възрастни – баби, дядовци, родители, учители и др. Липсата на достатъчно добре комуникирана, базирана на наука официална позиция, която да балансира тези крайности, доведе до силно обществено противопоставяне, а най-добрият интерес на децата остана встрани като една неприпозната, неизговорена и ненужна тема.

У нас през изминалите две години не се формира обществен или дори само политически консенсус по нито един от въпросите за пандемията и управлението ѝ в национален мащаб. Това се отнася и до темите, свързани с децата – какви са рисковете за тях и каква е ролята им в процесите на разпространение и овладяване на заболяването.

Как боледуват децата

Когато в края на зимата на 2020 г. пандемията от COVID-19 удари Европа, в момент на несигурност, повсеместен локдаун, ужасяващи новини за рекордна смъртност и препълнени болници в много страни по света единственият светъл лъч беше ключовото към онзи момент наблюдение на китайските учени – децата боледуват по-рядко, по-леко и загиват от COVID-19 в много редки случаи. Макар някои от първоначалните хипотези за вируса SARS-CoV-2 да се развиха и промениха напълно, две години и хиляди страници научни трудове по-късно този извод в голяма степен се препотвърждава, включително и по отношение на актуалния в момента вариант Омикрон. Поради много силната му заразност обаче – особено сред неваксинирани групи, към които със сигурност се причисляват децата – тревогата у някои експерти остава.

В Съединените щати, където вълната вече е в активната си фаза, точно преди Нова година беше отчетен ръст на хоспитализациите на деца с коронавирусна инфекция. Няколко щата съобщиха за увеличение с около 50% на педиатричните приеми за COVID-19 през декември. Въпреки този ръст предварителните данни показват, че и при варианта Омикрон повечето от заразените деца боледуват леко.

Съвсем скорошно проучване, което все още не е преминало през научна проверка (т.нар. peer-review), обобщава данни от Южна Африка. От близо 6300 регистрирани случая, при 462 е имало нужда от болнично лечение. Изследователите получават подробни данни за 139 хоспитализирани деца под 13 години. От тях 31 са се нуждаели от кислородно лечение, седем – от апаратна вентилация, а четири са починали поради сложни съпътстващи патологии. Всички деца и по-голямата част от родителите, за които има налични данни, са били неваксинирани. Най-честите симптоми, отвеждащи децата в болница, са затруднения при дишането и дехидратация, съпътствани от висока температура, кашлица, повръщане и диария, цитира се в доклада на учените.

Друг въпрос, който буди тревога, засяга постковид синдрома и продължителния ковид. Специалисти от различни държави признават, че данните за отражението на тези състояния върху децата засега са много по-малко, отколкото при възрастните. Проучване в Англия, макар също още непреминало през научна проверка, сочи, че между 16 и 30% от изследваните деца на възраст от 11 до 17 години, прекарали COVID-19 с някаква клинична изява, страдат повече от три месеца от уморяемост, главоболие, задъхване или друг, неопределен дискомфорт. Друго изследване показва много по-малък дял на засегнатите от продължителни симптоми – между 2 и 4%. Както в тези, така и в други изследвания в сферата обаче се подчертава, че изводите са ограничени и е нужна повече и по-активна научна работа.

У нас картината с детската заболеваемост също е неясна. Официалната статистика сочи, че до момента около 42 000 лица под 19 години са регистрирани като боледували от COVID-19. Предполага се обаче, че значителен дял от боледуващите деца не са били тествани в лаборатория и са останали „скрити“ за системата. Начинът, по който у нас се събира и обработва здравна информация, допълнително затруднява проследяването на статистиките за тежко боледуващите и починали вследствие на заболяването. В началото на януари 2021 г. Министерството на здравеопазването подаде информация за пет деца, починали от COVID-19 през 2020 г. Половин година по-късно Националният статистически институт удвои този брой, отчитайки 11 случая на починали от коронавирусно заболяване на възраст от 0 до 19 години. Според портала за отворени данни пък за целия период на качване на информация от юни 2020 г. до момента починалите от COVID-19 под 19-годишна възраст са 24, от които 8 – през 2020 г.

Практиката на педиатрите, лекуващи COVID-19 и други респираторни инфекции у нас, потвърждава напълно научните хипотези за нисък дял на тежко боледуващи деца. „В педиатричните отделения не е имало натоварване от деца с коронавирусна инфекция. Ние знаем какво се случва при грип – години наред сме имали недостиг на легла във всички болници при грипна епидемия. При COVID-19 до момента не сме наблюдавали такова нещо, не очаквам да се случи и с настоящия вариант“, коментира доц. Рада Маркова, педиатър и детски пулмолог. Според нея и при настоящата вълна сред децата ще има много заболели, но те ще могат да се лекуват в домашни условия.

Ролята на децата и училищата в разпространението на COVID-19 – и изборът на България

„Нямаме друг избор.“ Така накратко може да се обобщи аргументацията, с която няколко пъти поред децата бяха изпратени в дистанционно обучение, извънкласните занимания и алтернативните им форми на обучение бяха затворени, а спортът беше достъпен в най-добрия случай само за картотекираните спортисти под 18-годишна възраст.

Този подход противоречеше на всички препоръки за действие, издавани от световни организации в хода на кризата. Още на 15 април 2020 г. Европейската комисия публикува Пътна карта, в която беше посочено, че училищата следва да бъдат последните институции, които се затварят, и първите, които отварят врати за присъствена работа. На 8 юли 2021 г. Европейският център за контрол на заболяванията (ECDC) публикува актуализиран технически доклад относно COVID-19 при децата и ролята на училищата при разпространението на коронавируса. Основна препоръка на Центъра отново бе до решение за затваряне на училища да се прибягва само в краен случай, тъй като вредите от него надвишават ползите. В свое становище, актуализирано през декември 2021 г. и резюмиращо проучвания на работата на училищата в условията на COVID-19, Американските центрове за контрол на заболяванията (CDC) потвърждават, че „когато стратегиите за превенция се комбинират и прилагат правилно, предаването на вируса в училищата може да бъде ограничено“.

По данни на ЮНЕСКО, у нас училищата са били напълно или частично затворени в продължение на 47 седмици в периода от началото на пандемията до края на декември 2021 г. Това означава, че голяма част от учениците над 10-годишна възраст са посещавали присъствено училище по-малко от 1/3 от учебното време в този период, разпростиращ се в общо три учебни години.

България, разбира се, не е единствената държава, която прави компромис с децата. В Европейския съюз в сходно положение са учениците в Чехия (46 седмици), Полша (43) и Латвия (49). На обратния полюс са Хърватия, Испания и Франция, където учениците са били по домовете си съответно 10, 12 и 15 седмици за целия период на пандемията. Разликите в тези периоди, както и разминаването между препоръките и действията на правителствата, показват ясно, че избор за това каква роля да бъде отредена на децата в управлението на пандемията, всъщност има. Той обаче се определя от политическите, обществените и личните приоритети на възрастните.

… характеристиката на вируса е такава, че той до голяма степен щади младите хора, там тежко протичане е по-скоро изключение. Усилията ни са насочени те да пазят по-възрастните си роднини. Но ако тия по-възрастни роднини сами не се пазят, ако хората се събират в затворени помещения, ако не се ползват стриктно лични предпазни средства, целият ефект ще бъде изконсумиран.

Думите са казани още през юли 2020 г. от главния държавен здравен инспектор доц. Ангел Кунчев. Година и половина по-късно към това обобщение може да се добави и готовността (или липсата ѝ) на възрастните у нас да се ваксинират. Доц. Рада Маркова обяснява: „Ваксинацията трябва да бъде поголовен ангажимент на възрастното население, тъй като за нас, възрастните, тази болест е опасна и носи сериозни последици. А у нас ваксинационното покритие сред възрастните е незадоволително. И това ще се види ясно отново в рамките на идните две седмици.“

Децата и ваксините срещу COVID-19

По данни на Министерството на здравеопазването към 29 декември 2021 г., у нас с една доза от ваксините срещу COVID-19 са имунизирани 259 деца на възраст между 5 и 11 години включително, а 20 805 – между 12 и 17 години включително. От втората група със завършен имунизационен цикъл са 17 856 деца.

Твърдението, че ваксините срещу COVID-19 са „експериментални течности“ с несигурни дългосрочни ефекти, е може би най-популярната теза на дезинформацията по темата. Това твърдение отдавна е детайлно опровергано от експертите по безопасност на лекарствата. По отношение на имунизирането на деца от 5 до 11 години обаче педиатрите все още изразяват резерви. Според медиците решението „за“ или „против“ ваксинация трябва да се съобрази и с тежестта на заболяването в дадената възрастова група, а за здравите деца има много малък риск да развият тежък COVID-19.

„Децата трябва да бъдат ваксинирани, ако са със сериозни хронични заболявания или с наднормено тегло“, смята доц. Рада Маркова. Сходна теза споделя и проф. Пенка Переновска, която е главен координатор на Експертния съвет по педиатрия към Министерството на здравеопазването. Тя съветва родителите на собствените си пациенти от рискови групи да ги ваксинират. По думите ѝ, препоръките на Съвета в този дух са подготвени и изпратени в МЗ и се очаква съвсем скоро да бъдат публикувани. Това би трябвало да уеднакви подхода към ваксиниране на децата според тяхната възраст (над 12 или между 5 и 11 години) или според здравословното им състояние (има ли повишен риск от тежък COVID-19, или не). В момента, поради липсата на такава препоръка, практиките се разминават – докато в едни имунизационни пунктове децата се ваксинират само срещу подпис на един родител, в други се изисква писмено становище от личния педиатър, препоръчващо или разрешаващо ваксинацията.

Мнението на Европейската лекарствена агенция е, че предимствата от поставянето на ваксина срещу COVID-19 и при по-малките деца надвишават рисковете, особено при тези, чието здравословно състояние предполага по-висок риск от тежко протичане на коронавирусната инфекция. То се базира на проучването на производителя на единствената засега одобрена ваксина за деца под 11 години сред близо 2000 деца, които не са се срещали с вируса. От 1305 ваксинирани 3 са развили COVID-19 впоследствие след заразяване. За сравнение – в групата, получила плацебо, от 663 деца са се разболели 16. Нежеланите реакции, установени в рамките на изпитването, са същите, които са наблюдавани и във възрастовата група от 16 до 25 години – болка и зачервяване на мястото на убождането, главоболие, мускулни болки и отпадналост. Те обичайно отшумяват до 48 часа.

Очаква се до февруари да се появят допълнителни данни за това как по-малките понасят ваксинирането, тъй като редица държави започнаха да ваксинират децата още през есента и вече има поставени милиони дози при най-ниската разрешена възрастова група.

Избор в бъдещо време

В момента ваксинацията е една от възможностите децата в районите с висок брой заболели от COVID-19 да ходят на училище, наред с доказано преболедуване или ежеседмично тестване с неинвазивен, бърз антигенен тест.

Последните публично обявени данни от Министерството на образованието и науката сочат, че към 14 декември 2021 г. около 20% от учениците в страната продължават да се обучават дистанционно, а след зимната ваканция този дял е намалял на 12%. Въпреки това десетки хиляди деца остават у дома по решение на родителите си: някои – защото се страхуват от COVID-19, други – защото се страхуват от тестовете, ваксините и мерките като цяло.

Междувременно в аналитичен доклад относно образователните пропуски и неравенства, причинени от пандемията, се твърди, че „колкото по-продължителен е периодът на дистанционно обучение, толкова по-големи са очакваните обучителни дефицити“. България е една от държавите с най-остър проблем по отношение на натрупаните дефицити и разширяващите се образователни неравенства. В анализ на МОН, изготвен след края на предходната учебна година, също се акцентира върху този проблем, като се посочва, че обучението от разстояние в електронна среда вече е довело до риск от отпадане от образование на 25% от учениците.

През есента УНИЦЕФ публикува мащабно изследване, с което алармира за влошеното психично здраве на децата в хода на пандемията. Организацията показва и икономическия ефект от този проблем – пропуснатите ползи за икономиката заради психични разстройства сред младите хора се оценяват на почти 390 млрд. долара на година.

Всички тези рискове в момента са предимно проблем на самите деца и на техните родители. Последствията обаче ще се носят от цялото общество в бъдеще с неопределен хоризонт, което придава огромна тежест на избора ни как да говорим и какви решения да вземем за децата и пандемията днес.

Заглавна илюстрация: © Пеню Кирацов
„Тоест“ е официален партньор за публикуването на материалите от поредицата „Хроники на инфодемията“, реализирана от АЕЖ-България съвместно с Фондация „Фридрих Науман“.

Източник

„Февруари“: Лято в дълбините на зимата

Post Syndicated from Зорница Христова original https://toest.bg/february-movie-review/

Остригана детска главица. Куче. Оскъден интериор. Реплики от по две думи. Баир, овце, дядо. Оскъдни диалози. Защо не ме викна? Спеше.

Сушена риба се върти в кадър. Овце. Река. Птица. Пръчка. Разходка по обяд. Изоставена къшла. Паяжини, светлина. Страх. И изотникъде – статуя. На момче с паница храна и орел.

Чакаш действието да се разрази. Не се разразява. Оскъден диалог. Знаеш ли какво видях? Казах ли ти да не ходиш там. Статуята изчезва.


Кадър от филма „Февруари“ © Waterfront Film & Koro Films

Първата част на „Февруари“ напомня за иранското кино, за децата във филмите на Киаростами и Маджиди. Малкият Лъчезар Димитров играе естествено, приглушено и изразително. Христо Димитров – Хиндо („Мера според мера“) звучи и изглежда като непроницаемите старци по селата, когато са заети с работа. Какво влиза на мястото на почти липсващите реплики? Звуците – удар на пръчка в клон, звук на вода, крясък на птица. Операторският поглед, който е погледът на детето.

Втора част. Служба. Започва със сватбата, през чиито ритуални движения героят минава като през строева подготовка. Като че ли не забелязва разлика между едното и другото. Прави каквото трябва да прави. Не го оставя да ангажира съзнанието му, което е сякаш погълнато от своята сетивност. Оставено на себе си, то иска просто да гледа и да слуша гларусите. Порасналият Петър (Кольо Добрев) не иска да ги изучава, не иска да става биолог, не иска да става и офицер, въпреки че му предлагат, не иска да взема никакви решения да променя живота си. Иска просто да го живее.

В казармената част е второто възможно пропукване на света му – след статуята в къшлата. Негов аскер аркадаш решава да му прочете стихотворение. В сюжетен план това стои леко немотивирано, не става ясно защо точно на него (не е показал никаква склонност), гласът на четящия е от малкото неорганични неща във филма. Стихотворението обаче („Кост от глухарче“ на Борис Христов) е само по себе си толкова силно и органично свързано с темата на филма, че бързо прощаваш. А е свързано, защото четенето му не води до никакъв обрат, също както статуята в първата част – Петър вижда нещо отвъд своя си живот, забелязва го, но не тръгва към него. По средата на стихотворението започва да чува само близкия гларус.


Третата част. Старостта, уязвимостта. Тук за първи път се намесва глас зад кадър, който чете откъс от „Лято“ на Камю и вади на повърхността темата на филма. Може би някой по-ригиден съдник би казал, че не трябва да се обяснява, след като е показано, да не се подценява зрителят и прочее. На мен, честно казано, ми беше приятно да слушам този текст, докато гледам каруцата през замръзналото поле. Иван Налбантов в ролята на остарелия Петър е почти реплика на Христо Димитров като дядото – но реплика омекотена, чувствителна, макар и също тъй мълчалива. Или може би просто все още сме в сетивността на героя, както не сме били в сетивността на дядото. Интересуват ни примерно затоплената на печката тухла и топлината, която тя отдава на премръзналите нозе.

Въпросът за музиката във филм, който разказва за един непропусклив за изкуството свят, е много интересен. Ако в предишния филм на Камен Калев „Източни пиеси“ музиката на Андрония Попова е съзвучна с героите, то тук чудният саундтрак на Петър Дундаков обгръща героя, без да го докосва. Не говори на него, разказва за него: примерно когато той се върти в снежната буря и ѝ се наслаждава, и насладата му напомня на нас и на режисьора за английски барок, за Пърсел, да речем – но не и на самия герой. Самият той предпочита шума от камъче по заледена река.

„Февруари“ е филм, способен да достави удоволствие. То не идва пряко нито от хубавата му направа, нито от майсторството на участниците, нито дори от странджанската природа. Радостта, която носи, е чисто носталгична: типажът на Петър е всъщност добре познат, но малко познаван; почти всеки има в семейните албуми по някоя остригана главица с такова изражение – и обичта, която усещаш на излизане от киното, е обич към конкретни хора. И това е повече от достатъчно.


Кадър от филма „Февруари“ © Waterfront Film & Koro Films
Заглавна снимка: Кадър от филма „Февруари“ на режисьора Камен Калев © Waterfront Film & Koro Films

Източник

The collective thoughts of the interwebz