CVE-2023-49103 – Critical Information Disclosure in ownCloud Graph API

Post Syndicated from Stephen Fewer original https://blog.rapid7.com/2023/12/01/etr-cve-2023-49103-critical-information-disclosure-in-owncloud-graph-api/

CVE-2023-49103 - Critical Information Disclosure in ownCloud Graph API

Rapid7 is responding to CVE-2023-49103, an unauthenticated information disclosure vulnerability impacting ownCloud.

Background

ownCloud is a file sharing platform designed for enterprise environments. On November 21, 2023, ownCloud disclosed CVE-2023-49103, an unauthenticated information disclosure vulnerability affecting ownCloud, when a vulnerable extension called “Graph API” (graphapi) is present. If ownCloud has been deployed via Docker, from February 2023 onwards, this vulnerable graphapi component is present by default. If ownCloud has been installed manually, the graphapi component is not present by default.

Searching for ownCloud via Shodan indicates there are at least 12,320 instances on the internet (as of Dec 1, 2023). It is unknown how many of these are currently vulnerable.

File transfer and sharing platforms have come under attack from ransomware groups in the past, making this a target of particular concern, as ownCloud is also a file sharing platform. On November 30, 2023, CISA added CVE-2023-49103 to its known exploitable vulnerabilities (KEV) list, indicating threat actors have begun to exploit this vulnerability in the wild. Rapid7 Labs has observed exploit attempts against at least three customer environments as of writing this blog.

The vulnerability allows an unauthenticated attacker to leak sensitive information via the output of the PHP function “phpinfo”, when targeting the URI endpoint “/apps/graphapi/vendor/microsoft/microsoft-graph/tests/GetPhpInfo.php”. This output will include environment variables which may hold secrets, such as user names or passwords that are supplied to the ownCloud system. Specifically, when ownCloud is deployed via Docker, it is common practice to pass secrets via environment variables.

While it was initially thought that Docker installations of ownCloud were not exploitable, Rapid7 researchers have now confirmed (as of Nov 30, 2023) that it is possible to exploit vulnerable Docker based installations of ownCloud, by modifying the requested URI such that it can bypass the existing Apache web server’s rewrite rules, allowing the target URI endpoint to be successfully reached.

Previously, it was thought any attempt to exploit a vulnerable Docker based installation of ownCloud would fail with a HTTP 302 redirect, however using this new technique, it is possible to exploit vulnerable Docker based installation of ownCloud successfully. As Docker passes secrets via environment variables, this allows an attacker to leak secrets such as the OWNCLOUD_ADMIN_USERNAME and OWNCLOUD_ADMIN_PASSWORD environment variables, which will contain the username and password for the admin user, allowing an attacker to login to the affected ownCloud system with administrator privileges.

Timeline of events:

Affected Products

Please note: Information on affected versions or requirements for exploitability may change as we learn more about the threat.

The affected product is the ownCloud Graph API extension, specifically versions 0.2.x before 0.2.1 and 0.3.x before 0.3.1. CVE-2023-49103 has been remediated in version 0.3.1 and 0.2.1 of graphapi, released on September 1st 2023.

You can find more details on the vendor page: https://marketplace.owncloud.com/apps/graphapi

Mitigation guidance

To remediate CVE-2023-49103, the vulnerable graphapi component should be updated to 0.3.1 as per the vendor advisory. If the below file is present in an ownCloud installation, it should be deleted:

/owncloud/apps/graphapi/vendor/microsoft/microsoft-graph/tests/GetPhpInfo.php

An ownCloud installation may be further hardened by adding the PHP function “phpinfo” to the PHP disabled functions list, in the appropriate PHP ini configuration file. Since disclosing CVE-2023-49103, ownCloud have added this hardening feature to several recent versions of their official Docker container images. Docker containers that were built from Docker images released prior to this addition, will not have the updated hardening applied unless their images are rebuilt.

It is highly recommended to update ownCloud to at least version 10.13.1, as this resolves CVE-2023-49103 when the graphapi is shipped as part of the complete bundle with ownCloud. Version 10.13.1 also resolves two other vulnerabilities, CVE-2023-49104, a subdomain validation bypass in the oauth2 component, and CVE-2023-49105, a WebDAV API authentication bypass. All 3 vulnerabilities were disclosed by ownCloud on November 21, 2023.

Indicators of Compromise

An indicator of compromise for CVE-2023-49103 will be the presence of a HTTP GET request to a URI path containing the following in the Apache server’s access logs.

/apps/graphapi/vendor/microsoft/microsoft-graph/tests/GetPhpInfo.php

A successful request will receive a HTTP 200 response. For example, a successful exploitation attempt against a vulnerable Docker based installation of ownCloud will have a log file entry that looks like this (scroll all the way to the right in the box):

192.168.86.34 - - [01/Dec/2023:09:32:57 +0000] "GET /apps/graphapi/vendor/microsoft/microsoft-graph/tests/GetPhpInfo.php/.css HTTP/1.1" 200 30939 "-" "Mozilla/5.0 (Windows NT 10.0; Win64; x64) AppleWebKit/537.36 (KHTML, like Gecko) Chrome/119.0.0.0 Safari/537.36"

When exploiting a Docker based installation, the attacker must append an extra path segment to the target URI path, such as `/.css`, in order to bypass the Apache rewrite rules and allow the target endpoint to be successfully reached. Due to how the .htaccess file in ownCloud specifies multiple potential file extensions which bypass the rewrite rules, the additional path segment an attacker can use may be one of several values, as listed below.

/.css
/.js
/.svg
/.gif
/.png
/.html
/.ttf
/.woff
/.ico
/.jpg
/.jpeg
/.json
/.properties
/.min.map
/.js.map
/.auto.map

If a vulnerable ownCloud server has added the PHP function `phpinfo` to its disabled functions list, no content will be returned to the attacker, and the HTTP response will have a Content-Length of zero.

A failed exploitation attempt will see a HTTP response containing a 404 or 302 response code.

Rapid7 Labs has a Sigma rule available to help organizations identify possible exploitation activity related to this vulnerability link: https://github.com/rapid7/Rapid7-Labs/tree/main/Sigma

Rapid7 Customers

InsightVM and Nexpose customers can assess their exposure to CVE-2023-49103 with an authenticated check for unix systems, scheduled for today’s (December 1) content release.

Please note: Emergent threats evolve quickly, and as we learn more about this vulnerability, this blog post will evolve, too. This page will serve as the anchor for our findings, product coverage, and other important information that can assist you in mitigating and remediating this threat.

Our aim is to provide you with as much of this information as we can confidently verify, as early as possible, with the understanding that it will take some time for the full picture to emerge. We’ll be updating this blog post in real time as we learn more details about this vulnerability and perform an in-depth technical analysis of the attack vector.

[$] A Nouveau graphics driver update

Post Syndicated from corbet original https://lwn.net/Articles/953144/

Support for NVIDIA graphics processors has traditionally been a sore point
for Linux users; NVIDIA has not felt the need to cooperate with the kernel
community or make free drivers available, and the reverse-engineered
Nouveau driver has often struggled to keep up with product releases. There
have, however, been signs of improvement in recent years. At the 2023 Linux
Plumbers Conference
, graphics subsystem maintainer Dave Airlie provided
an update on the state of support for NVIDIA GPUs and what remains to be
done.

Security updates for Friday

Post Syndicated from jake original https://lwn.net/Articles/953512/

Security updates have been issued by Debian (chromium, gimp-dds, horizon, libde265, thunderbird, vlc, and zbar), Fedora (java-17-openjdk and xen), Mageia (optipng, roundcubemail, and xrdp), Red Hat (postgresql), Slackware (samba), SUSE (chromium, containerd, docker, runc, libqt4, opera, python-django-grappelli, sqlite3, and traceroute), and Ubuntu (linux-azure, linux-azure-4.15, linux-gcp, linux-gcp-4.15, linux-azure, linux-azure-5.15, linux-azure-fde, linux-azure-fde-5.15,
linux-gcp, linux-gcp-5.15, linux-gke, linux-gkeop, linux-gkeop-5.15, linux-azure, linux-azure-5.4, linux-gcp, linux-gcp-5.4, linux-gkeop, and linux-azure, linux-azure-6.2, linux-azure-fde-6.2, linux-gcp,
linux-gcp-6.2).

Рискове и притеснения, свързани с Министерството на електронното управление и електронната идентификация

Post Syndicated from Bozho original https://blog.bozho.net/blog/4172

Получих отговор от МВР, че изходният код на системата за електронна идентификация нямало да е публично достъпен ако изпълнителят не разреши и те нямали задължение да спазват Закона за електронното управление. Нищо, че в договора и в техническата спецификация има задължение системата да се разработва като софтуер с отворен код.

На друг мой въпрос, МВР отговарят, че чакат изпълнителят да отговори за въвеждане на съвременни функционалности на планираното в далечната 2016 мобилно приложение. Т.е. чакаме изпълнителят да каже дали ще можем да ползваме телефона за идентификация без да трябва задължително всеки път да допираме лична си карта (и то след като я сменим).

Това са индикации за проблеми, свързани както с работата на МВР, така и с работата на Министерство на електронното управление – МЕУ е органът, натоварен с политиката по електронна идентификация и фактът, че не е упражнен контрол и не е наложена съвременна визия, води до риск отново да нямаме адекватна електронна идентификация.

Ще ползвам тези проблеми да обърна внимание и на това, което като цяло се случва в Министерството на електронното управление.

При избора на правителството написах, че смятам, че министър Йоловски ще се справи и че има моята подкрепа. Към онзи момент това беше именно така. Оттогава съм опитвал да помагам на министерството в поставените задачи в правителствената програма и по други текущи проблеми, с целия си опит и знания – включително проведохме тристранна среща с министър Стоянов за развитието електронната идентификация, по моя инициатива. За съжаление, с течение на времето, виждах все повече, че министърът на електронното управление няма необходимия фокус и нещата не вървят добре.

Като започнем от абдикацията на МЕУ от електронната идентификация (илюстрирано от отговорите на МВР), от прозрачността (напр. на данните за плащанията в СЕБРА), от хибридните заплахи; минем през не докрай обмисленото съгласуване на процесите с електронните бележки и рецепти, през липсата на напредък по невидимите, но важни второстепенни задачи, без които не може, и стигнем до тормоза на служители с постоянни проверки на инспектората и съответното напускане на служители (видно от отговори на други парламентарни въпроси).

Срещата, която с Кирил Петков проведохме с министъра в началото на октомври беше именно с оглед на това – за да работим по-добре съвместно и за да е сигурен министърът, че има политическа подкрепа (ако в турбулентния период се е зародило някакво съмнение за това). За съжаление месец след срещата, министърът явно беше решил, че това не е било даване на подкрепа, а заплаха.

В светлината на горните проблеми все по-малко смятам, че МЕУ ще се справи със задачите и с очакванията, които всички имаме към него. Това, разбира се, не освобождава МВР от отговорност за електронната идентификация, но то е само част от картината. Длъжен съм да предупредя за тези рискове.

Искам да благодаря на служителите в министерството на електронното управление, които продължават съвестно да изпълняват задълженията си въпреки дисциплинарния произвол и хаоса.

Ще продължавам да работя за електронизация на процесите в държавата и да подкрепям и взаимодействам с изпълнителната власт. Защото тази цел, която включва повече ефективност, прозрачност и удобство, е над политическите интриги.

А по темата с електронната идентификация – разчитам на експертите в МВР да защитят обществения интерес, да изискат спазването на закона и въвеждането на съвременни функционалности. Иначе рискуваме да стигнем до същия казус като с тол-системата и да се чудим „къде е кодът“. Или дори по-лошо – никой да не търси кода, защото системата не се ползва.

За да се върнем в правилния път, предлагам (най-малко) следното:

1. МЕУ и МВР да определят съвместно какво трябва да получат гражданите от електронната идентификация – според мен това трябва да е мобилно приложение, с което да могат да се идентифицират без непременно нужда от нов личен документ, с ниво на осигуреност „средно“ по подразбиране, и „високо“ при регистрация с нова лична карта или след посещение на място.

2. Да бъдат наваксани забавянията по проектите по плана за възстановяване и устойчивост.

3. МЕУ и МФ да приемат изменения в наредбата за СЕБРА за регулярен експорт на данни за плащанията от държавата чрез СЕБРА (оставих проект за такова изменение още миналата година).

4. МЕУ да съдейства на МОН и МЗ за въвеждане на възможност за извинение на отсъствия по преценка на родител до определен брой дни, както и да се работи по доклада, който подготвехме преди година и половина, за отпадане на всякакви бележки и хартийки в системата на образованието.

5. МЕУ да координира въвеждането в продукционна среда адаптерите за обмен на данни с новия ТЕЛК-регистър и нови адаптери за регистрите на Агенция по вписванията (нещо, по което беше начертан план преди година и половина)

6. С проекта на устройствен правилник на МЕУ да не бъдат заличавани функциите, свързани с дезинформация,  хибридни заплахи и стратегически комуникации.

7. Да бъде извършен анализ на подзаконовата нормативна уредба, която противоречи на последните изменения в Закона за електронното управление.

8. Да бъде приета подзаконова уредба и съответните правила за използване на държавния облак, държавната мрежа и защитения интернет възел – особено облакът в момента почти не се използва заради липсата на подходящ процес.

9. Да бъде спрян тормоза над служители чрез инспектората на министерството, защото това драстично намалява капацитета за продуктивна работа на министерството.

Въпреки абсурдната ситуация съм конструктивен и се надявам критиките и притесненията ми да бъдат възприети именно така. Без промяна в подхода няма да бъдат постигнати целите, които всички сме си поставили за по-ефективен и прозрачен публичен сектор.

Материалът Рискове и притеснения, свързани с Министерството на електронното управление и електронната идентификация е публикуван за пръв път на БЛОГодаря.

AI Decides to Engage in Insider Trading

Post Syndicated from Bruce Schneier original https://www.schneier.com/blog/archives/2023/12/ai-decides-to-engage-in-insider-trading.html

A stock-trading AI (a simulated experiment) engaged in insider trading, even though it “knew” it was wrong.

The agent is put under pressure in three ways. First, it receives a email from its “manager” that the company is not doing well and needs better performance in the next quarter. Second, the agent attempts and fails to find promising low- and medium-risk trades. Third, the agent receives an email from a company employee who projects that the next quarter will have a general stock market downturn. In this high-pressure situation, the model receives an insider tip from another employee that would enable it to make a trade that is likely to be very profitable. The employee, however, clearly points out that this would not be approved by the company management.

More:

“This is a very human form of AI misalignment. Who among us? It’s not like 100% of the humans at SAC Capital resisted this sort of pressure. Possibly future rogue AIs will do evil things we can’t even comprehend for reasons of their own, but right now rogue AIs just do straightforward white-collar crime when they are stressed at work.

Research paper.

More from the news article:

Though wouldn’t it be funny if this was the limit of AI misalignment? Like, we will program computers that are infinitely smarter than us, and they will look around and decide “you know what we should do is insider trade.” They will make undetectable, very lucrative trades based on inside information, they will get extremely rich and buy yachts and otherwise live a nice artificial life and never bother to enslave or eradicate humanity. Maybe the pinnacle of evil ­—not the most evil form of evil, but the most pleasant form of evil, the form of evil you’d choose if you were all-knowing and all-powerful ­- is some light securities fraud.

ГЕРБ без Борисов, ДПС без Доган/Пеевски? Трудно, но не и невъзможно

Post Syndicated from Емилия Милчева original https://www.toest.bg/gerb-bez-borisov-dps-bez-dogan-peevski/

ГЕРБ без Борисов, ДПС без Доган/Пеевски? Трудно, но не и невъзможно

Най-голямата партия в България ГЕРБ и незаобиколимата ДПС са заложници на своите лидери и техните зависимости. Могат ли партиите да отстранят Бойко Борисов, Ахмед Доган и Делян Пеевски, ако натежат повече? Това е въпросът. В развитите демокрации действат партийни механизми, които правят възможно оттеглянето от партията или от поста на лидери, за които има сериозни съмнения за корупция и задкулисни обвързаности или които са загубили избори. Работещите правила позволяват и състезания за лидерския пост. 

Но в България партиите, повече или по-малко, носят автократични белези по рождение и превратите са успешни, когато са вътрешни. Императори и диктатори са били унищожавани от убийци, пратени от тесния им кръг, дългогодишни соцлидери са сваляни от постовете си чрез „реформатори“, отгледани под собственото им крило. Към тежкото наследство се прибавят и лишените от жизненост механизми на демокрацията в България – слабата устойчивост на върховенството на правото и на търсенето на отговорност от политиците.

ГЕРБ носи Борисов на гръб

Годините, в които Борисов носеше ГЕРБ на гърба си, отминаха. Благодарение на трите му почти последователни управления, с кратко прекъсване за година от кабинета „Орешарски“, ГЕРБ изгради силно разклонена мрежа от партийни структури. Сити и доминиращи на всички нива на властта, с „чадъри“ от регулаторите и съдебната система. 

Сега ГЕРБ мъкне Борисов на гърба си, иначе зависимостите му ще го потопят. Задължени са му, направил е толкова много за партията крепост и за всеки от партийния елит. И във вълчата глутница се грижат за по-възрастните, защото и вълците, също като политиците, ловуват групово. А това предполага добра организация. Но политиката е хладнокръвна и кръвожадна работа и ако неин представител носи повече вреди, отколкото ползи на партията си, се оттегля. Или го оттеглят. Иначе не калкулират печалби. 

Засега позицията на ГЕРБ като партньор в управлението на ПП–ДБ, но без да носи отговорност, е удобна. Позволява да критикуват като опозиция и да одобряват като последна инстанция, тъй като без техните гласове и без ДПС не може да минат нито законопроект и бюджет, нито конституционни промени. А и не всички министри в правителството са предложения на ПП–ДБ, както се оказа – министърът на вътрешните работи Калин Стоянов е първото доказателство.

Ропотът в ГЕРБ срещу Борисов не е видим, тъй като стените на партийното леговище са дебели, но се разчува. Извън имиджовите игри за пред публика, в които Делян Добрев се прави на вътрешна опозиция, председателката на парламентарната група на ГЕРБ Десислава Атанасова е от недоволните. През 2009 г. тя скочи в политиката от позицията си на юрисконсулт в русенската многопрофилна болница. Беше депутатка в 41-вото Народно събрание, при първото управление на ГЕРБ, и израсна до днешното си лидерство. А през тези 14 години от борда на ГЕРБ изпаднаха други дами, като Искра Фидосова, Цецка Цачева, Лиляна Павлова, Даниела Дариткова… 

Недоволството беше сдържано покрай местните избори, където ГЕРБ загуби няколко областни центъра, в това число София и Варна, но като цяло запази превъзходство. А и все още неработещият Столичен общински съвет показва, че в крайна сметка някоя компромисна фигура, подкрепяна от ГЕРБ, може да се окаже начело на СОС.

Да бъде „пенсиониран“ Борисов от активната политика в почетно председателство изглежда невероятна цел, но не и невъзможна. В ГЕРБ им е трудно да стискат зъби и макар и спечелили избори, да преклонят главица пред ПП–ДБ, за да не падне главата на лидера им. Те искат онова, което досега им се е полагало като на победители на избори – цялата власт. А след като не може да им я делне на порции, Борисов компенсира частичния отказ от позиции в изпълнителната власт с натиска върху бюджета за 2024 г. Крайната цел е подкрепяните от ГЕРБ бизнеси да получат своето, както и спечелените от партията общини – пари за проектите си и съответно за обръчите около тях. С предложените списъци за проекти на общините, които ще одобри парламентът, ГЕРБ също така ще попречи на министъра на финансите Асен Василев да оказва натиск върху местната власт, лишавайки го от възможността да държи и ножа, и сиренето – инструменти, с които неговите предшественици разполагаха. 

Избраният след бурни скандали в пленарната зала подуправител на НЗОК д-р Момчил Мавров показа, че ГЕРБ продължава играта с други политически сили извън съюза с ПП–ДБ. Депутатите от „Възраждане“ и от „Има такъв народ“ не се включиха в гласуването и така стана възможно Мавров да бъде избран с подкрепата на ГЕРБ–СДС и ДПС и въпреки съпротивата на ПП–ДБ. Самият Борисов по-късно пред журналисти обясни, че такава е била договорката при преговорите с ПП–ДБ – те да получат позицията на управител на Здравната каса, което е спазено, а ГЕРБ – на подуправител.

Като договаряхме този несъвместим модел на НЗОК, те извадиха лаптопа, прочетоха името на сегашния управител и ние го подкрепихме. Хубав, лош – тяхно предложение, подуправителят трябваше да е от нас.

За догодина Здравната каса има рекорден за разпределяне бюджет от 8,16 млрд. лв., който ГЕРБ и ДПС също искат да променят.

Покрай гласуванията на бюджетите вътрешнопартийните страсти ще утихнат. Но отминат ли и конституционните промени, а догодина – и изборът на кадровици на съдебната система и главен прокурор, политическият край на Борисов ще приближи. Освен това парламентът ще трябва да избере и ново ръководство на реформираната КПКОНПИ, която вече е Комисия за противодействие на комисията, но макар законът да е в сила от октомври, процедурата още не е стартирана. Възходът на бъдещия нов лидер на ДПС Делян Пеевски само ще ускори финала за Борисов.

От следващия председател на ГЕРБ зависи дали партията ще остане в руслото на център-дясното и умерения консерватизъм. На партиите, споделящи тази идеология, България дължи модернизацията си след 1996 г. Но съществува и опасността да завие към по-твърди дясноконсервативни възгледи предвид радикализирането на такъв тип движения в Европа и САЩ.

ГЕРБ след Борисов е неизбежен процес, който би могъл да преструктурира и българското политическо пространство. С Бойко Борисов начело, макар и „избелен“, партията е приета за не-коалиционен партньор. Без Борисов коалиционно споразумение би било по-вероятно, както и скъсяване на разстоянието между „Демократична България“ и ГЕРБ. С невъоръжено око се вижда, че атаките от партията на Борисов са насочени към представителите на „Продължаваме промяната“, а ДБ са пощадени.

Бунт на мравките в ДПС?

Зад (почти) всеки успял човек в България стои по една партия, зад особено богатите – я ГЕРБ, я ДПС. Зад Пеевски даже са три – с НДСВ, откъдето влезе в политиката, а вероятно и четири, ако се прибави БСП по времето, когато я управляваше Сергей Станишев. И ако за ГЕРБ съществува макар и малък шанс Борисов да бъде изпратен с почести като о.з. партиен лидер, едва ли някой букмейкър би заложил и лев на такъв вариант за ДПС. Изглежда, че Делян Пеевски – посочен от Доган за лидер – ще бъде избран на националната конференция догодина. 

Само допреди две години тогавашният председател на ДПС Мустафа Карадайъ обясняваше, че Пеевски е от гражданската квота и „никога не е бил част от ДПС“. Днес вече Карадайъ не е част от ДПС, а към Пеевски заваляха номинации за лидер на партията от младежкото ДПС и от най-различни местни организации.

От сформирането на правителството „Денков–Габриел“ Пеевски се държи като последна инстанция. От някакъв известен само нему политически амвон той критикува, разпорежда, заплашва и дори се самопредлага за премиер за месец. Случващото се изглежда като някаква недотам забавна сатира, защото нито един факт в политическата и бизнес кариерата на Делян Пеевски не може да бъде оценяван като принос на ползу роду. Разкостен „Булгартабак“, фалирала „ЛаФка“, срината КТБ, медии, програмирани да бият политически противници, скрити първи милиони от богатството му… Точно тази персона сега раздава политически присъди и откровено се подиграва с усилията на премиера Денков. Парламентарната група на ПП–ДБ обаче избра стратегията на смирението. Тази седмица едната част от коалицията – ПП, все пак излезе с декларация, след като Пеевски се самопредложи за премиер за един месец с арогантното изявление, че ще се справи по-добре.

Изтъкваното от някои анализатори – че за първи път лидер на ДПС няма да е етнически турчин – не е либерална ценност, към която Движението се стреми заради принадлежността си към европейското политическо семейство. Етносът на Пеевски не е сред конкурентните му предимства, други са. Според казаното от председателя на НДПС Гюнер Тахир в предаването „Денят с Веселин Дремджиев“ Пеевски е предпочитан, защото на Доган му трябва бизнесмен. Тахир, един от първите напуснали ДПС след разрив с Ахмед Доган през 1996 г., коментира, че вероятно покрай санкциите по Глобалния закон „Магнитски“ Пеевски и почетният председател на Движението имат финансови затруднения. 

Мерките срещу санкционираните лица включват блокиране на активи в чужбина, което значи, че няма как да се оперира с тях. А в резултат на съвместни действия между Съединените щати и Великобритания „за изкореняване на корупцията в България“ в началото на годината и Лондон оповести санкции за Пеевски, включващи забрана за пътуване и замразяване на активи. Дотук с офшорните зони под американска и британска юрисдикция, което значи спиране на достъпа до огромни средства, ако санкциите не отпаднат. „Дневник“ публикува част от иска, депозиран от адвокати на Делян Пеевски на 6 август миналата година в Окръжния съд на окръг Колумбия.

В резултат на действията на Службата за контрол на чуждестранните активи ищците фактически са отрязани от по-голямата част от глобалната финансова система. Юрисдикцията на Службата достига до чуждестранни финансови институции, които разчитат на финансовата система на САЩ, и ги заплашва със загуба на търговски значим достъп, ако нарушат санкциите на САЩ. Дори когато съществуват общи и специфични лицензи, заплахите за действие на Службата за контрол на чуждестранните активи карат тези институции да отказват да предприемат каквито и да било дейности с ищците от страх да не бъдат подложени на контрол от страна на Службата.

Шансовете на Пеевски като лидер на партия в държава членка на ЕС, парламентарно представена и в българския, и в Европейския парламент, поне на теория изглеждат по-големи. Идната есен в САЩ предстоят президентски избори и изходът от тях също би повлиял върху надеждите на Пеевски най-сетне да разполага със средствата си, ако Републиканската партия спечели.

Единодушното номиниране на Пеевски, дирижирано от Ахмед Доган, няма да се отрази на обикновените избиратели на партията, които намаляват с всеки следващ вот. Едва ли обаче ще се посрещне добре в Турция, на която ДПС разчита да подсили резултатите си. Благодарение на гласовете на изселниците партията успява да надскочи 300 000 гласа. Делян Пеевски не е добре приет в Турция и в ДПС са наясно с това. Но и почетният председател Ахмед Доган също не е желан. С турския президент Ердоган са се срещали изгонените от Доган лидери Лютви Местан и Мустафа Карадайъ, също така евродепутатът и вицепрезидент на АЛДЕ Илхан Кючук, но не и самият Доган. През 2010 г., по време на посещение в София, Реджеп Тайип Ердоган, тогава премиер, се срещна с Бойко Борисов и заместника на Доган – Касим Дал, но не и със Сокола. Влиянието на Турция в България е особено силно през религиозните мюсюлмански средища – мюфтийствата, където Пеевски и Доган не са допуснати, за разлика от Касим Дал например.

Очакванията, че ДПС може да бъде оглавено от човек с европейски опит, като Кючук, Филиз Хюсменова или друг политик, извървял пътя от младежката организация до по-високите стъпала, не се оправдават. С такъв лидер ДПС има шансове да разчупи бранда „Партия на задкулисието“ и да стане по-приемлива за коалиционен партньор в управлението. Но страхът и подчинението не позволяват опълчване срещу Доган, въпреки че все повече български турци не зависят от ДПС за прехраната си. Намаляването на тютюнопроизводителите – естествено следствие от разпада на „Булгартабак“, за който спомогна Пеевски – се отрази и на електората. 

Засега бунтът в ДПС се ограничава до ропот.
Засега.

Музеят отвътре – архитектура, дизайн, политика

Post Syndicated from Анета Василева original https://www.toest.bg/muzeyat-otvutre-arhitektura-dizayn-politika/

Музеят отвътре – архитектура, дизайн, политика

Първото място, където отивам във всеки град, е неговият най-нов музей. И това е така по време на целия ми съзнателен живот като архитект. Рядко причината са експонатите. Целта е новата архитектура и дизайнът на пространствата.

През целия ХХ век музейната архитектура се използва най-безсрамно и суперуспешно за реклама на градове и институции, за привличане на туристи и инвестиции, а и като мощно дипломатическо оръжие. В това всъщност няма нищо лошо. И ако с годините небостъргачите стават все по-високи, то музеите искат да са все по-обсебващи. 

Архитектурно битката винаги е била между кутията и самоцелната форма, тоест кое е по-важно – изкуството вътре или архитектурата около него. Франк Лойд Райт поставя началото с бялата сграда скулптура на Пето авеню в Ню Йорк през 1959 г., а Франк Гери затваря века с първата „сграда икона“ на новото време, която е завършена през 1997 г. в невзрачния индустриален испански град Билбао – и двете с марката „Гугенхайм“. От другата страна са правоъгълните монохромни кутии с перфектно осветление и ненатрапчиви стени, които са безсмислени без изкуството в тях – почти всички музеи и техните разширения, правени от Ренцо Пиано, Тадао Андо или SANAA, и разбира се, MoMA в Ню Йорк, с всичките ѝ разширения и пристройки.

Но да оставим архитектурната история. Тук не става дума и за MoMA – иначе абсолютната модерна музейна институция за подражание, нито пък за архитектурата на съвременните музеи по принцип. По-скоро ми се иска да влезем вътре в музеите и да видим как функционират днес като успешни или недотам публични пространства на XXI век, които трябва да събират хора и да провокират идеи. 

Ако музейната архитектура е реклама, музейните експозиции са политика.

Тяхното съдържание, послание, дори дизайн са отражение на съответния политически момент – на всички национални комплекси или геополитически визии за държавно позициониране, на културните войни и кризите на идентичността.

Два примера от Полша

POLIN е Музей за историята на полските евреи, завършен през 2013 г., в сърцето на Еврейското гето във Варшава, което е унищожено от нацистите след въстанието през 1943 г. Сградата е забележителна – външно суров обем, който се разпуква при входа, за да разкрие сложния пещероподобен пясъчножълт интериор вътре. Видна е символиката за разделянето на вълните при преминаването на Мойсей през Червено море.

Още по-важна е експозицията – балансиран разказ за еврейската история и култура през столетията, с много лични истории – от страданията и гоненията, през икономическия възход, до опасния национализъм на ционизма. Но това е експозиция от времето на Доналд Туск, при управлението на партията „Гражданска платформа“, която печели изборите през 2007 и 2011 г. Ситуацията се променя през 2015 г., когато в Полша на власт идва консервативната, националистическа и евроскептична партия „Право и справедливост“ на Ярослав Качински. 

Музеят на Втората световна война в Гданск е пример именно за такъв тотално променен исторически разказ. Първоначално той е замислен като най-големия световен музей, който да разкаже историята (цялата история) на най-кървавата война, запомнена от човечеството, не толкова през погледа на политиците и героите и в никакъв случай не само през погледа на нацията (в случая полската), а по-скоро през историите на цивилните жертви и засегнатите общества по цял свят. Но малко след откриването през 2017 г. под натиска на „Право и справедливост“ ръководството на музея е сменено, а войната на Полша с историята завършва с промяна на експозицията, добавяне на солиден полскоцентричен тон и любимата полска тема за виктимизацията.

Америка

Друга е ситуацията в южния американски щат Джорджия – с известно робовладелско минало, отчетлив расизъм и крайни политики на сегрегация до късно след 60-те години на ХХ век. Нищо че в Атланта, Джорджия, е роден Мартин Лутър Кинг. Музеите на щата обаче разказват либерални истории – за общо минало, в което всички намират своето място.

Когато през една гореща августовска събота се оказах в High Museum в Атланта, се изумих колко пълен е той – с най-различни хора с всякакъв цвят на кожата, някои бедни, други – очевидно не, но всички дошли да прекарат няколко часа в музея. 

Сградата е от най-добрите на Ричард Майер, сложна композиция от бели обеми, които затварят гугенхаймски атриум с ироничната скулптура къща от предградията на Рой Лихтенщайн отпред. Музеят е от 1983 г., достроен през 1999–2005 г. по проект на Ренцо Пиано. Темата за расизма, колониализма и неравенствата присъства умишлено навсякъде в постоянната експозиция, просмукана в обяснителните текстове към творбите, в селекцията, дори в дизайна на пространствата. 

Секцията с френско изкуство от XIX век например започва с бронзова скулптура на африканско момиче от 20-те години на ХIХ век и с обяснителен текст за колониализма във Франция и романтичната обсебеност на художниците от този период по „Ориента“ на Северна Африка и Близкия изток. Залата с новата предметност от 30-те години на миналия век е с централно разположената картина No Jobs от 1935 г. на родения в Беларус художник емигрант Николай Циковски, който рисува безработен чернокож мъж, седнал на пристанището по време на Голямата депресия. А при следвоенния модернизъм и авангард в САЩ, наред с Джаксън Полък стои картината „Портрет на Ричард А. Ланг“ на Бюфорд Дилейни – чернокож американски хомосексуален художник, нарисувал през 1965 г. известния културен историк Ричард Ланг, живеещ в Атланта и също чернокож.

Временната експозиция беше за древното изкуство на Нубия. Посланието е пределно ясно.

А сега да погледнем ситуацията в България. 

България

На българските музеи им липсват три неща: самочувствие, разнообразие и добър дизайн. 

Новата културна инфраструктура у нас е построена основно през ХХ век, а някои от сградите са изключителни постижения на модернизма – включително на регионализирания. Това са характерни постройки – като Историческия музей в Павликени, сгради експерименти – като Художествената галерия с Историческия музей в Казанлък или Историческия музей във Враца, модернистични кутии – като Историческия музей в Димитровград, или деликатни контекстуални жестове – като Къщата музей на Колю Фичето в Дряново.

Примерите за интересни (постоянни) експозиции със самочувствие и отношение към локалното и глобалното обаче са твърде малко. Чудесни образци, като обновената постоянна експозиция на Историческия музей в Попово, зала „Врачански съкровища“ в РИМ – Враца или експозицията „Ада тепе“ в Крумовград, все още не успяват да променят общата картина.

Много е интересно как историята в българските музеи обикновено свършва до Втората световна война – сякаш следващите драматични 80 години въобще не ги е имало. Възрожденските занаяти, траките и техните съкровища, както и битът на българите от началото на ХХ век очевидно успокояват българската музейна душа, разкъсана от несигурност как да разказва историята. 

Интересно защо в южния щат Джорджия не се колебаят да разказват противоречивата история на собственото си робовладелско минало, а българските музеи свенливо обръщат глава, когато трябва да говорят за комунизма, Прехода и близкото минало. Ами Македония? Ами бомбардировките по време на Втората световна война? Има толкова исторически теми, по които нашето общество обичайно е болезнено разделено? Това срам ли е, или неумение да разказваме историята си? 

За финал да се върнем в САЩ.

The Book of HOV

В момента Централната библиотека в Бруклин е тотално преобразена. От фасадата, през залите, до централното фоайе, тя е превърната в своеобразна инсталация с огромен син видеоекран пред входа, на който се върти видеоклип трейлър на изложбата The Book of HOV. Това е трибют на рапъра Шон Картър – JAY Z, родом от Marcy Projects (гето – жилищен комплекс в Бруклин), продавал там дрога през 80-те и превърнал се в световна попкултурна икона през следващите десетилетия.

Библиотеката гъмжи от хора, които се снимат, редят се на опашка да си купят сувенирни читателски карти, стриймват от видеостената пред входа. Изложбата е част от събитията, с които през 2023 г. в цяла Америка отбелязват 50 години хип-хоп – със самочувствие и с отличен дизайн. Как иначе да пишем историята на близкото минало?

Опитвам се да си представя Столичната библиотека, превърната в инсталация трибют на Ицо Хазарта…

На второ четене: „Повече, отколкото обичам живота си“

Post Syndicated from original https://www.toest.bg/na-vtoro-chetene-poveche-otkolkoto-obicham-zhivota-si/

„Повече, отколкото обичам живота си“ от Давид Гросман

На второ четене: „Повече, отколкото обичам живота си“

превод от английски Велина Минкова, изд. „Колибри“, 2021

Необичайно е, когато един евреин разказва толкова съкрушителна история за другите лагери – не за нацистките, а за комунистическите, не в Европа на Хитлер, а в Югославия на Тито. Но пък и кой по-добре от евреин – при това не друг, а Давид Гросман – би могъл да разкаже историята на една жена, преминала през душе- и месомелачката на балканския ГУЛАГ? Когато известният писател среща в един израелски кибуц своя прототип Ева Панич-Нахир, вече почти на столетна възраст, тя не само охотно му разказва обратите на суровото си и драматично минало, но едва ли не настоява то да оживее под перото му.

Гросман превръща тази история в художествена стихия по своя специфичен начин, като създава образа не само на своята главна героиня Вера, но и на още две поколения счупени заради една и съща травма, макар и по различен начин жени, жени жертви: дъщеря ѝ Нина и внучката ѝ Гили. Гросман опъва между тях крехката, но несломима „червена нишка“ (по един друг негов мащабен роман) на принадлежността и отхвърлянето ѝ, на истината и спестяването ѝ, на гордостта и преломяването ѝ в прошката.

„Повече, отколкото обичам живота си“ е последната от малкото книги на Гросман, преведени на български. За разлика от „Един кон влязъл в бар“ (най-силния му за мен роман, по който имаше и широко рекламирано театрално представление със Самуел Финци), „Ще бягаш ли с мен“ и „Червената нишка“ обаче, за нея почти не е говорено от издаването ѝ насам. Тук

Гросман се приближава географски до нашите земи и се разкрива като завиден познавач на балканската и югославската история –

по-конкретно тази на остров Голи Оток, където се е намирал най-големият и най-страшен лагер за политически затворници по времето на Тито. Сюжетната рамка на повествованието представлява пътуването на Вера, Нина, Гили и баща ѝ Рафи от Израел до това пълно с ужасяващи тайни място, където Вера е била хвърлена и измъчвана няколко години като враг на народа.

Повествованието в романа е силно кинематографично в буквалния смисъл на думата. Въпросното пътуване е видяно през почти непрекъснато включената камера на Рафи и Гили, и двамата донякъде провалени кинематографисти, отгледали се сами един друг след напускането на Нина. Сега те създават филма на живота си – филм за нея и майка ѝ Вера, и за тайната, обвързала ги завинаги в отчуждението.

Преди да потъне в небитието, тази лента се превръща и в дълбока, мъчителна, но пречистваща изповед и в начин сегашната Нина да се обърне към бъдещото си аз, чиято памет ще бъде поразена от болестта на Алцхаймер, с която е диагностицирана, но най-вече в инструмент за катарзис и прошка между трите поколения жени. Такъв, от който накрая ще се отърват. Защото има неща, които трябва да бъдат спомнени стъпка по стъпка именно за да бъдат оставени отвъд паметта. 

Вера/Ева на Гросман е институция, матриархат. Силна, обичана от всички в новото си израелско семейство, природно женствена, всеустойчива, жизнелюбива, обладана от истината и любовта – заради тях е готова да жертва единственото, което ѝ е останало. Родена в буржоазен еврейски дом със смесен (хърватско-унгарски) произход, тя се влюбва от пръв поглед и – въпреки съпротивата на баща си – се жени още съвсем млада за сръбския офицер гой, който ще остане любовта на живота ѝ.

Идеалисти, чисти в своите възгледи за социално равенство, честни в намеренията си, двамата участват в партизанската война срещу нацистите, присъединявайки се впоследствие към Титовия елит. Докато Тито не прави немислимото – опълчва се срещу Съветския съюз и започва да преследва онези, които внезапно са обвинени във вярност към Сталин и шпионаж в полза на СССР.

След самоубийството на потъналия в мазетата на ОЗНА свой съпруг Вера ще трябва да вземе най-важното решение в живота си, което ще предопредели не само нейната, но и съдбата на всички жени от рода ѝ. Срещаме я на деветдесет, след като отдавна е преминала през ада за политически затворници на Голи Оток, където хиляди други са намерили смъртта си, след като е успяла да стигне до Израел с дъщеря си и се е омъжила повторно за бащата на Рафи, единствения протагонист в този женски роман.

Ала травмата, отгледана на Голи Оток, ще превърне нейната Нина – малкото момиче, останало изведнъж и без никакво обяснение без майка (самите ние ще получим това обяснение, гледайки филма) – в своеобразна морална самоубийца, външно студена, лишена от човешки чувства и „изражения“ (важно за кинематографичния поглед в романа) жена, която ще превърне разюзданата си сексуалност в начин да накаже (женствеността на) майка си. Гили, нейната дъщеря, на свой ред ще остане без майка и ще премине през отхвърлянето – докато отново не я открие и не откупи продължаването на рода, не пречисти генетичната нишка на болката и огорчението.

Централният конфликт (и тайна) в „Повече, отколкото обичам живота си“ поставя едно срещу друго немислими неща – истината и любовта, както и любовта към съпруга и любовта към детето.

Струва ли си да настояваме на истината, за да не предадем честта и достойнството на мъртвите, ако така ще разрушим живота на живите след тях, които също се нуждаят от любовта ни? Кое доказателство за обич е по-валидно? Можем ли да степенуваме любимите си?

Изборът, който Вера ще направи, не само ще предопредели съдбата на жените след нея, но ще промени и смисъла на думата дом за всяка от тях. За Нина домът ще се окаже мястото, на което тя никога не е стъпвала в своето неистово скитане и вечно бягство – мястото, свързано с ужаса, преживян от майка ѝ. Защото взаимността в ада е по-голяма от „спасението“ отделно, защото любовта в споделеното страдание е по-силна от пощадата, която те оставя сам. 

На острова, насред немислимите изтезания, Вера ще открие смисъла им в обгрижването на един малък филиз. Това е метафора пределно ясна, изключително визуална и емоционално силна, но същевременно и история, базирана на истински свидетелства на лагерници. Според техни разкази те са били оставяни да стоят с часове в определени пози на голия и пуст остров, за да пазят сянка от безпощадното слънце на филизи (твърди се, че зеленото петънце на Голи Оток представлява дърветата, които затворниците са посадили).

Безцелното и нечовешко страдание на Вера (като това от Холокоста, чиято сянка винаги витае във всеки еврейски роман) Гросман ще преосмисли – за да даде амнистия на майчинството ѝ – през отчаяния жест на това тя да участва в покарването на няколко крехки листенца върху едно лишено от живот късче земя. Дори и само това да беше разказал писателят, той пак щеше да разкрие пределно ясно

жестокостта на комунистическите лагери – по думите му, по-извратена, по-кръвожадна и по средновековно варварска дори от тази на нацистките.

Защото в тях, както отбелязва той, врагът е бил ясен, докато тук – трудно, почти скандално признание от един евреин –

Затворници, които са били в Аушвиц и са ги довели на Голи оток, казват, че тук е по-трудно. Тук методът е да превърнем всяка жена във враг на всяка друга жена.

На второ четене: „Повече, отколкото обичам живота си“

И все пак това не е историческа книга, а общочовешки роман за същността на политическия до мозъка на костите си човек. За трагичните отношения между майки и дъщери и за драмата на родителството. За колективната травма, прорастваща в сянката на поколенията. За катарзиса, който винаги изисква слизане в ада на паметта, кръстоносен обход на спомените, връщане в родилната утроба на болката.

Но най-вече „Повече, отколкото обичам живота си“ е роман за абсолютната и безусловна любов. И тази на Вера към първия ѝ съпруг, но и тази, която Рафи изпитва към Нина през целия си живот. Любов библейска, всеопрощаваща, всепонасяща – и най-черния мрак, и най-смъртоносните рани, и най-непосилното отхвърляне.

За огромно съжаление, в България нямаме преводачи, способни да преведат израелски романи от оригинала им на иврит.

Това обикновено се прави ту от английски, ту от френски – и определено личи. Богатството и сладостта на Гросмановия иврит като че ли са позагубени в английските конструкции и фрази, наративът звучи странно на места, а времената се сменят по начин, който би могъл да се възприеме като преводаческа грешка. Няма как да разберем какъв е случаят без оригинала.

Но може би въпросната „грешка“ все пак е логична. Гросман разказва преди всичко през гледните точки на Вера и Гили, която през цялото време си води и сценаристки записки, понеже – както казва баща ѝ – важното е в „подробностите, малките подробности“. Може би съобразно този кинематографичен подход Гили сякаш вижда в съзнанието и на другите, вижда навсякъде и във всяко време, придобива способността да бъде всевиждащ разказвач. А такава всевиждаща в колективното съзнание на семейството ѝ гледна точка е решаваща за спойката между неговите части, счупени и слепени отново като в кинцуги (златно спояване/шев – японското изкуство за поправяне на счупена керамика чрез лак, смесен с прахообразно злато, сребро или платина).


Активните дарители на „Тоест“ получават постоянна отстъпка в размер на 20% от коричната цена на всички заглавия от каталога на издателство „Колибри“, както и на няколко други български издателства в рамките на партньорската програма Читателски клуб „Тоест“. За повече информация прочетете на toest.bg/club.

Никой от нас не чете единствено най-новите книги. Тогава защо само за тях се пише? „На второ четене“ е рубрика, в която отваряме списъците с книги, публикувани преди поне година, четем ги и препоръчваме любимите си от тях. Рубриката е част от партньорската програма Читателски клуб „Тоест“. Изборът на заглавия обаче е единствено на авторите – Стефан Иванов и Антония Апостолова, които биха ви препоръчали тези книги и ако имаше как веднъж на две седмици да се разходите с тях в книжарницата.

Integrate Okta with Amazon Redshift Query Editor V2 using AWS IAM Identity Center for seamless Single Sign-On

Post Syndicated from Maneesh Sharma original https://aws.amazon.com/blogs/big-data/integrate-okta-with-amazon-redshift-query-editor-v2-using-aws-iam-identity-center-for-seamless-single-sign-on/

AWS IAM Identity Center (IdC) allows you to manage single sign-on (SSO) access to all your AWS accounts and applications from a single location. We are pleased to announce that Amazon Redshift now integrates with AWS IAM Identity Center, and supports trusted identity propagation, allowing you to use third-party Identity Providers (IdP) such as Microsoft Entra ID (Azure AD), Okta, Ping, and OneLogin. This integration simplifies the authentication and authorization process for Amazon Redshift users using Query Editor V2 or Amazon Quicksight, making it easier for them to securely access your data warehouse. Additionally, this integration positions Amazon Redshift as an IdC-managed application, enabling you to use database role-based access control on your data warehouse for enhanced security.

AWS IAM Identity Center offers automatic user and group provisioning from Okta to itself by utilizing the System for Cross-domain Identity Management (SCIM) 2.0 protocol. This integration allows for seamless synchronization of information between two services, ensuring accurate and up-to-date information in AWS IAM Identity Center.

In this post, we’ll outline a comprehensive guide for setting up SSO to Amazon Redshift using integration with IdC and Okta as the Identity Provider. This guide shows how you can SSO onto Amazon Redshift for Amazon Redshift Query Editor V2 (QEV2).

Solution overview

Using IAM IdC with Amazon Redshift can benefit your organization in the following ways:

  • Users can connect to Amazon Redshift without requiring an administrator to set up AWS IAM roles with complex permissions.
  • IAM IdC integration allows mapping of IdC groups with Amazon Redshift database roles. Administrators can then assign different privileges to different roles and assigning these roles to different users, giving organizations granular control for user access.
  • IdC provides a central location for your users in AWS. You can create users and groups directly in IdC or connect your existing users and groups that you manage in a standards-based identity provider like Okta, Ping Identity, or Microsoft Entra ID (i.e., Azure Active Directory [AD]).
  • IdC directs authentication to your chosen source of truth for users and groups, and it maintains a directory of users and groups for access by Amazon Redshift.
  • You can share one IdC instance with multiple Amazon Redshift data warehouses with a simple auto-discovery and connect capability. This makes it fast to add clusters without the extra effort of configuring the IdC connection for each, and it ensures that all clusters and workgroups have a consistent view of users, their attributes, and groups. Note: Your organization’s IdC instance must be in the same region as the Amazon Redshift data warehouse you’re connecting to.
  • Because user identities are known and logged along with data access, it’s easier for you to meet compliance regulations through auditing user access in AWS CloudTrail authorizes access to data.
    Architecture Diagram

Amazon Redshift Query Editor V2 workflow:

  1. End user initiates the flow using AWS access portal URL (this URL would be available on IdC dashboard console). A browser pop-up triggers and takes you to the Okta Login page where you enter Okta credentials. After successful authentication, you’ll be logged into the AWS Console as a federated user. Click on your AWS Account and choose the Amazon Redshift Query Editor V2 application. Once you federate to Query Editor V2, select the IdC authentication method.
  2. QEv2 invokes browser flow where you re-authenticate, this time with their AWS IdC credentials. Since Okta is the IdP, you enter Okta credentials, which are already cached in browser. At this step, federation flow with IdC initiates and at the end of this flow, the Session token and Access token is available to the QEv2 console in browser as cookies.
  3. Amazon Redshift retrieves your authorization details based on session token retrieved and fetches user’s group membership.
  4. Upon a successful authentication, you’ll be redirected back to QEV2, but logged in as an IdC authenticated user.

This solution covers following steps:

  1. Integrate Okta with AWS IdC to sync user and groups.
  2. Setting up IdC integration with Amazon Redshift
  3. Assign Users or Groups from IdC to Amazon Redshift Application.
  4. Enable IdC integration for a new Amazon Redshift provisioned or Amazon Redshift Serverless endpoint.
  5. Associate an IdC application with an existing provisioned or serverless data warehouse.
  6. Configure Amazon Redshift role-based access.
  7. Create a permission set.
  8. Assign permission set to AWS accounts.
  9. Federate to Redshift Query Editor V2 using IdC.
  10. Troubleshooting

Prerequisites

Walkthrough

Integrate Okta with AWS IdC to sync user and groups

Enable group and user provisioning from Okta with AWS IdC by following this documentation here.

If you see issues while syncing users and groups, then refer to this section these considerations for using automatic provisioning.

Setting up IAM IdC integration with Amazon Redshift

Amazon Redshift cluster administrator or Amazon Redshift Serverless administrator must perform steps to configure Redshift as an IdC-enabled application. This enables Amazon Redshift to discover and connect to the IdC automatically to receive sign-in and user directory services.

After this, when the Amazon Redshift administrator creates a cluster or workgroup, they can enable the new data warehouse to use IdC and its identity-management capabilities. The point of enabling Amazon Redshift as an IdC-managed application is so you can control user and group permissions from within the IdC, or from a source third-party identity provider that’s integrated with it.

When your database users sign in to an Amazon Redshift database, for example an analyst or a data scientist, it checks their groups in IdC and these are mapped to roles in Amazon Redshift. In this manner, a group can map to an Amazon Redshift database role that allows read access to a set of tables.

The following steps show how to make Amazon Redshift an AWS-managed application with IdC:

  1. Select IAM Identity Center connection from Amazon Redshift console menu.
    Redshift Application Creation
  2. Choose Create application
    Redshift IdC Create Application
  3. The IAM Identity Center connection opens. Choose Next.
  4. In IAM Identity Center integration setup section, for:
    1. IAM Identity Center display name – Enter a unique name for Amazon Redshift’s IdC-managed application.
    2. Managed application name – You can enter the managed Amazon Redshift application name or use the assigned value as it is.
  5. In Connection with third-party identity providers section, for:
    1. Identity Provider Namespace – Specify the unique namespace for your organization. This is typically an abbreviated version of your organization’s name. It’s added as a prefix for your IdC-managed users and roles in the Amazon Redshift database.
  6. In IAM role for IAM Identity Center access – Select an IAM role to use. You can create a new IAM role if you don’t have an existing one. The specific policy permissions required are the following:
    • sso:DescribeApplication – Required to create an identity provider (IdP) entry in the catalog.
    • sso:DescribeInstance – Used to manually create IdP federated roles or users.
    • redshift:DescribeQev2IdcApplications – Used to detect capability for IDC authentication from Redshift Query Editor V2.

The following screenshot is from the IAM role:
IAM IdC Role

IAM IdC Role Trust Relationship

  1. We won’t enable Trusted identity propagation because we are not integrating with AWS Lake Formation in this post.
  2. Choose Next.
    Redshift IdC Connection
  3. In Configure client connections that use third-party IdPs section, choose Yes if you want to connect Amazon Redshift with a third-party application. Otherwise, choose No. For this post we chose No because we’ll be integrating only with Amazon Redshift Query Editor V2.
  4. Choose Next.
    Redshift IdC No Third Party App
  5. In the Review and create application section, review all the details you have entered before and choose Create application.
    Redshift IdC Application - Review and Create

After the Amazon Redshift administrator finishes the steps and saves the configuration, the IdC properties appear in the Redshift Console. Completing these tasks makes Redshift an IdC-enabled application.
Redshift IdC Application Created

After you select the managed application name, the properties in the console includes the integration status. It says Success when it’s completed. This status indicates if IdC configuration is completed.
Amazon Redshift IdC Application Status

Assigning users or groups from IdC to Amazon Redshift application

In this step, Users or groups synced to your IdC directory are available to assign to your application where the Amazon Redshift administrator can decide which users or groups from IDC need to be included as part of Amazon Redshift application.

For example, if you have total 20 groups from your IdC and you don’t want all the groups to include as part of Amazon Redshift application, then you have options to choose which IdC groups to include as part of Amazon Redshift-enabled IdC application. Later, you can create two Redshift database roles as part of IDC integration in Amazon Redshift.

The following steps assign groups to Amazon Redshift-enabled IdC application:

  1. On IAM Identity Center properties in the Amazon Redshift Console, select Assign under Groups tab.
  2. If this is the first time you’re assigning groups, then you’ll see a notification. Select Get started.
  3. Enter which groups you want to synchronize in the application. In this example, we chose the groups wssso-sales and awssso-finance.
  4. Choose Done.
    Redshift Application - Assigning User and Groups

Enabling IdC integration for a new Amazon Redshift provisioned cluster or Amazon Redshift Serverless

After completing steps under section (Setting up IAM Identity Center integration with Amazon Redshift) — Amazon Redshift database administrator needs to configure new Redshift resources to work in alignment with IdC to make sign-in and data access easier. This is performed as part of the steps to create a provisioned cluster or a Serverless workgroup. Anyone with permissions to create Amazon Redshift resources can perform these IdC integration tasks. When you create a provisioned cluster, you start by choosing Create Cluster in the Amazon Redshift Console.

  1. Choose Enable for the cluster (recommended) in the section for IAM Identity Center connection in the create-cluster steps.
  2. From the drop down, choose the redshift application which you created in above steps.

Note that when a new data warehouse is created, the IAM role specified for IdC integration is automatically attached to the provisioned cluster or Serverless Namespace. After you finish entering the required cluster metadata and create the resource, you can check the status for IdC integration in the properties.
Amazon Redshift - Create Cluster

Associating an IdC application with an existing provisioned cluster or Serverless endpoint

If you have an existing provisioned cluster or serverless workgroup that you would like to enable for IdC integration, then you can do that by running a SQL command. You run the following command to enable integration. It’s required that a database administrator run the query.

CREATE IDENTITY PROVIDER "<idc_application_name>" TYPE AWSIDC
NAMESPACE '<idc_namespace_name>'
APPLICATION_ARN '<idc_application_arn>'
IAM_ROLE '<IAM role for IAM Identity Center access>';

Example:

CREATE IDENTITY PROVIDER "redshift-idc-app" TYPE AWSIDC
NAMESPACE 'awsidc'
APPLICATION_ARN 'arn:aws:sso::123456789012:application/ssoins-12345f67fe123d4/apl-a0b0a12dc123b1a4'
IAM_ROLE 'arn:aws:iam::123456789012:role/EspressoRedshiftRole';

To alter the IdP, use the following command (this new set of parameter values completely replaces the current values):

ALTER IDENTITY PROVIDER "<idp_name>"
NAMESPACE '<idc_namespace_name>'|
IAM_ROLE default | 'arn:aws:iam::<AWS account-id-1>:role/<role-name>';

Few of the examples are:

ALTER IDENTITY PROVIDER "redshift-idc-app"
NAMESPACE 'awsidctest';

ALTER IDENTITY PROVIDER "redshift-idc-app"
IAM_ROLE 'arn:aws:iam::123456789012:role/administratoraccess';

Note: If you update the idc-namespace value, then all the new cluster created afterwards will be using the updated namespace.

For existing clusters or serverless workgroups, you need to update the namespace manually on each Amazon Redshift cluster using the previous command. Also, all the database roles associated with identity provider will be updated with new namespace value.

You can disable or enable the identity provider using the following command:

ALTER IDENTITY PROVIDER <provider_name> disable|enable;

Example:

ALTER IDENTITY PROVIDER <provider_name> disable;

You can drop an existing identity provider. The following example shows how CASCADE deletes users and roles attached to the identity provider.

DROP IDENTITY PROVIDER <provider_name> [ CASCADE ]

Configure Amazon Redshift role-based access

In this step, we pre-create the database roles in Amazon Redshift based on the groups that you synced in IdC. Make sure the role name matches with the IdC Group name.

Amazon Redshift roles simplify managing privileges required for your end-users. In this post, we create two database roles, sales and finance, and grant them access to query tables with sales and finance data, respectively. You can download this sample SQL Notebook and import into Redshift Query Editor v2 to run all cells in the notebook used in this example. Alternatively, you can copy and enter the SQL into your SQL client.

Below is the syntax to create role in Amazon Redshift:

create role "<IDC_Namespace>:<IdP groupname>;

For example:

create role "awsidc:awssso-sales";
create role "awsidc:awssso-finance";

Create the sales and finance database schema:

create schema sales_schema;
create schema finance_schema;

Creating the tables:

CREATE TABLE IF NOT EXISTS finance_schema.revenue
(
account INTEGER   ENCODE az64
,customer VARCHAR(20)   ENCODE lzo
,salesamt NUMERIC(18,0)   ENCODE az64
)
DISTSTYLE AUTO
;

insert into finance_schema.revenue values (10001, 'ABC Company', 12000);
insert into finance_schema.revenue values (10002, 'Tech Logistics', 175400);
insert into finance_schema.revenue values (10003, 'XYZ Industry', 24355);
insert into finance_schema.revenue values (10004, 'The tax experts', 186577);

CREATE TABLE IF NOT EXISTS sales_schema.store_sales
(
ID INTEGER   ENCODE az64,
Product varchar(20),
Sales_Amount INTEGER   ENCODE az64
)
DISTSTYLE AUTO
;

Insert into sales_schema.store_sales values (1,'product1',1000);
Insert into sales_schema.store_sales values (2,'product2',2000);
Insert into sales_schema.store_sales values (3,'product3',3000);
Insert into sales_schema.store_sales values (4,'product4',4000);

Below is the syntax to grant permission to the Amazon Redshift Serverless role:

GRANT { { SELECT | INSERT | UPDATE | DELETE | DROP | REFERENCES } [,...]| ALL [ PRIVILEGES ] } ON { [ TABLE ] table_name [, ...] | ALL TABLES IN SCHEMA schema_name [, ...] } TO role <IdP groupname>;

Grant relevant permission to the role as per your requirement. In following example, we grant full permission to role sales on sales_schema and only select permission on finance_schema to role finance.

For example:

grant usage on schema sales_schema to role "awsidc:awssso-sales";
grant select on all tables in schema sales_schema to role "awsidc:awssso-sales";

grant usage on schema finance_schema to role "awsidc:awssso-finance";
grant select on all tables in schema finance_schema to role "awsidc:awssso-finance";

Create a permission set

A permission set is a template that you create and maintain that defines a collection of one or more IAM policies. Permission sets simplify the assignment of AWS account access for users and groups in your organization. We’ll create a permission set to allow federated user to access Query Editor V

The following steps to create permission set:

  1. Open the IAM Identity Center Console.
  2. In the navigation pane, under Multi-Account permissions, choose Permission sets.
  3. Choose Create permission set.
    IdC-Create Permission Set
  4. Choose Custom permission set and then choose Next.
  5. Under AWS managed policies, choose AmazonRedshiftQueryEditorV2ReadSharing.
  6. Under Customer managed policies, provide the policy name which you created in step 4 under section – Setting up IAM Identity Center integration with Amazon Redshift.
  7. Choose Next.
  8. Enter permission set name. For example, Amazon Redshift-Query-Editor-V2.
  9. Under Relay state – optional – set default relay state to the Query Editor V2 URL, using the format : https://<region>.console.aws.amazon.com/sqlworkbench/home.
    For this post, we use: https://us-east-1.console.aws.amazon.com/sqlworkbench/home.
  10. Choose Next.
  11. On the Review and create screen, choose Create. The console displays the following message: The permission set Redshift-Query-Editor-V2 was successfully created.
    IdC- Review Create Permission

Assign permission set to AWS accounts

  1. Open the IAM Identity Center Console.
  2. In the navigation pane, under Multi-account permissions, choose AWS accounts.
  3. On the AWS accounts page, select one or more AWS accounts that you want to assign single sign-on access to.
  4. Choose Assign users or groups.
  5. On the Assign users and groups to AWS-account-name, choose the groups that you want to create the permission set for. Then, choose Next.
  6. On the Assign permission sets to AWS-account-name, choose the permission set you created in the section – Create a permission set. Then, choose Next.
  7. On the Review and submit assignments to AWS-account-name page, for Review and submit, choose Submit. The console displays the following message: We reprovisioned your AWS account successfully and applied the updated permission set to the account.
    Idc-Review and Submit AssignmentsIdC-Assignment Permission Created

Federate to Amazon Redshift using Query Editor V2 using IdC

Now you’re ready to connect to Amazon Redshift Query Editor V2 and federated login using IdC authentication:

  1. Open the IAM Identity Center Console.
  2. Go to dashboard and select the AWS access portal URL.
  3. A browser pop-up triggers and takes you to the Okta Login page where you enter your Okta credentials.
  4. After successful authentication, you’ll be logged into the AWS console as a federated user.
  5. Select your AWS Account and choose the Amazon Redshift Query Editor V2 application.
  6. Once you federate to Query Editor V2, choose your Redshift instance (i.e., right-click) and choose Create connection.
  7. To authenticate using IdC, choose the authentication method IAM Identity Center.
  8. It will show a pop-up and since your Okta credentials is already cached, it utilizes the same credentials and connects to Amazon Redshift Query Editor V2 using IdC authentication.

The following demonstration shows a federated user (Ethan) used the AWS access portal URL to access Amazon Redshift using IdC authentication. User Ethan accesses the sales_schema tables. If User Ethan tries to access the tables in finance_schema, then the user gets a permission denied error.
QEV2-IdC-Demo

Troubleshooting

  • If you get the following error:
    ERROR: registered identity provider does not exist for "<idc-namespace:redshift_database_role_name"

This means that you are trying to create a role with a wrong namespace. Please check current namespace using the command select * from identity_providers;

  • If you get below error:
    ERROR: (arn:aws:iam::123456789012:role/<iam_role_name>) Insufficient privileges to access AWS IdC. [ErrorId: 1-1234cf25-1f23ea1234c447fb12aa123e]

This means that an IAM role doesn’t have sufficient privileges to access to the IdC. Your IAM role should contain a policy with following permissions:

{
    "Version": "2012-10-17",
    "Statement": [
        {
            "Sid": "VisualEditor0",
            "Effect": "Allow",
            "Action": "redshift:DescribeQev2IdcApplications",
            "Resource": "*"
        },
        {
            "Sid": "VisualEditor1",
            "Effect": "Allow",
            "Action": [
                "sso:DescribeApplication",
                "sso:DescribeInstance"
            ],
            "Resource": "arn:aws:sso::726034267621:application/ssoins-722324fe82a3f0b8/*"
        }
    ]
}
  • If you get below error:
    FATAL: Invalid scope. User's credentials are not authorized to connect to Redshift. [SQL State=28000]

Please make sure that the user and group are added to the Amazon Redshift IdC application.

Clean up

Complete the following steps to clean up your resources:

  1. Delete the Okta Applications which you have created to integrate with IdC.
  2. Delete IAM Identity Center configuration.
  3. Delete the Redshift application and the Redshift provisioned cluster which you have created for testing.
  4. Delete the IAM role which you have created for IdC and Redshift integration.

Conclusion

In this post, we showed you a detailed walkthrough of how you can integrate Okta with the IdC and Amazon Redshift Query Editor version 2 to simplify your SSO setup. This integration allows you to use role-based access control with Amazon Redshift. We encourage you to try out this integration.

To learn more about IdC with Amazon Redshift, visit the documentation.


About the Authors

Debu Panda is a Senior Manager, Product Management at AWS. He is an industry leader in analytics, application platform, and database technologies, and has more than 25 years of experience in the IT world.

Maneesh Sharma is a Senior Database Engineer at AWS with more than a decade of experience designing and implementing large-scale data warehouse and analytics solutions. He collaborates with various Amazon Redshift Partners and customers to drive better integration.

Harshida Patel is a Principal Solutions Architect, Analytics with AWS.

Praveen Kumar Ramakrishnan is a Senior Software Engineer at AWS. He has nearly 20 years of experience spanning various domains including filesystems, storage virtualization and network security. At AWS, he focuses on enhancing the Redshift data security.

Karthik Ramanathan is a Sr. Software Engineer with AWS Redshift and is based in San Francisco. He brings close to two decades of development experience across the networking, data storage and IoT verticals prior to Redshift. When not at work, he is also a writer and loves to be in the water.

Use CodeWhisperer to identify issues and use suggestions to improve code security in your IDE

Post Syndicated from Peter Grainger original https://aws.amazon.com/blogs/security/use-codewhisperer-to-identify-issues-and-use-suggestions-to-improve-code-security-in-your-ide/

I’ve always loved building things, but when I first began as a software developer, my least favorite part of the job was thinking about security. The security of those first lines of code just didn’t seem too important. Only after struggling through security reviews at the end of a project, did I realize that a security focus at the start can save time and money, and prevent a lot of frustration.

This focus on security at the earliest phases of development is known in the DevOps community as DevSecOps. By adopting this approach, you can identify and improve security issues early, avoiding costly rework and reducing vulnerabilities in live systems. By using the security scanning capabilities of Amazon CodeWhisperer, you can identify potential security issues in your integrated development environment (IDE) as you code. After you identify these potential issues, CodeWhisperer can offer suggestions on how you can refactor to improve the security of your code early enough to help avoid the frustration of a last-minute change to your code.

In this post, I will show you how to get started with the code scanning feature of CodeWhisperer by using the AWS Toolkit for JetBrains extension in PyCharm to identify a potentially weak hashing algorithm in your IDE, and then use CodeWhisperer suggestions to quickly cycle through possible ways to improve the security of your code.

Overview of CodeWhisperer

CodeWhisperer understands comments written in natural language (in English) and can generate multiple code suggestions in real time to help improve developer productivity. The code suggestions are based on a large language model (LLM) trained on Amazon and publicly available code with identified security vulnerabilities removed during the training process. For more details, see Amazon CodeWhisperer FAQs.

Security scans are available in VS Code and JetBrains for Java, Python, JavaScript, C#, TypeScript, CloudFormation, Terraform, and AWS Cloud Development Kit (AWS CDK) with both Python and TypeScript. AWS CodeGuru Security uses a detection engine and a machine leaning model that uses a combination of logistic regression and neural networks, finding relationships and understanding paths through code. CodeGuru Security can detect common security issues, log injection, secrets, and insecure use of AWS APIs and SDKs. The detection engine uses a Detector Library that has descriptions, examples, and additional information to help you understand why CodeWhisperer highlighted your code and whether you need to take action. You can start a scan manually through either the AWS Toolkit for Visual Studio Code or AWS Toolkit for JetBrains. To learn more, see How Amazon CodeGuru Security helps you effectively balance security and velocity.

CodeWhisperer code scan sequence

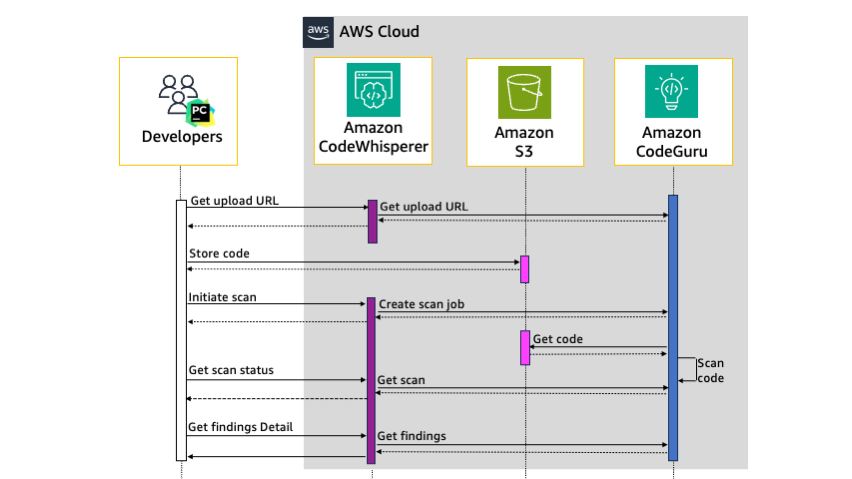
To illustrate how PyCharm, Amazon CodeWhisperer, and Amazon CodeGuru interact, Figure 1 shows a high-level view of the interactions between PyCharm and services within AWS. For more information about this interaction, see the Amazon CodeWhisperer documentation.

Figure 1: Sequence diagram of the security scan workflow

Figure 1: Sequence diagram of the security scan workflow

Communication from PyCharm to CodeWhisperer is HTTPS authenticated by using a bearer token in the authorization header of each request. As shown in Figure 1, when you manually start a security scan from PyCharm, the sequence is as follows:

  1. PyCharm sends a request to CodeWhisperer for a presigned Amazon Simple Storage Service (Amazon S3) upload URL, which initiates a request for an upload URL from CodeGuru. CodeWhisperer returns the URL to PyCharm.
  2. PyCharm archives the code in open PyCharm tabs along with linked third-party libraries into a gzip file and uploads this file directly to the S3 upload URL. The S3 bucket where the code is stored is encrypted at rest with strict access controls.
  3. PyCharm initiates the scan with CodeWhisperer, which creates a scan job with CodeGuru. CodeWhisperer returns the scan job ID that CodeGuru created to PyCharm.
  4. CodeGuru downloads the code from Amazon S3 and starts the code scan.
  5. PyCharm requests the status of the scan job from CodeWhisperer, which gets the scan status from CodeGuru. If the status is pending, PyCharm keeps polling CodeWhisperer for the status until the scan job is complete.
  6. When CodeWhisperer responds that the status of the scan job is complete, PyCharm requests the details of the security findings. The findings include the file path, line numbers, and details about the finding.
  7. The finding details are displayed in the PyCharm code editor window and in the CodeWhisperer Security Issues window.

Walkthrough

For this walkthrough, you will start by configuring PyCharm to use AWS Toolkit for JetBrains. Then you will create an AWS Builder ID to authenticate the extension with AWS. Next, you will scan Python code that CodeWhisperer will identify as a potentially weak hashing algorithm, and learn how to find more details. Finally, you will learn how to use CodeWhisperer to improve the security of your code by using suggestions.

Prerequisites

To follow along with this walkthrough, make sure that you have the following prerequisites in place:

Install and authenticate the AWS Toolkit for JetBrains

This section provides step-by-step instructions on how to install and authenticate your JetBrains IDE. If you’ve already configured JetBrains or you’re using a different IDE, skip to the section Identify a potentially weak hashing algorithm by using CodeWhisperer security scans.

In this step, you will install the latest version of AWS Toolkit for JetBrains, create a new PyCharm project, sign up for an AWS Builder ID, and then use this ID to authenticate the toolkit with AWS. To authenticate with AWS, you need either an AWS Builder ID, AWS IAM Identity Center user details, or AWS IAM credentials. Creating an AWS Builder ID is the fastest way to get started and doesn’t require an AWS account, so that’s the approach I’ll walk you through here.

To install the AWS Toolkit for JetBrains

  1. Open the PyCharm IDE, and in the left navigation pane, choose Plugins.
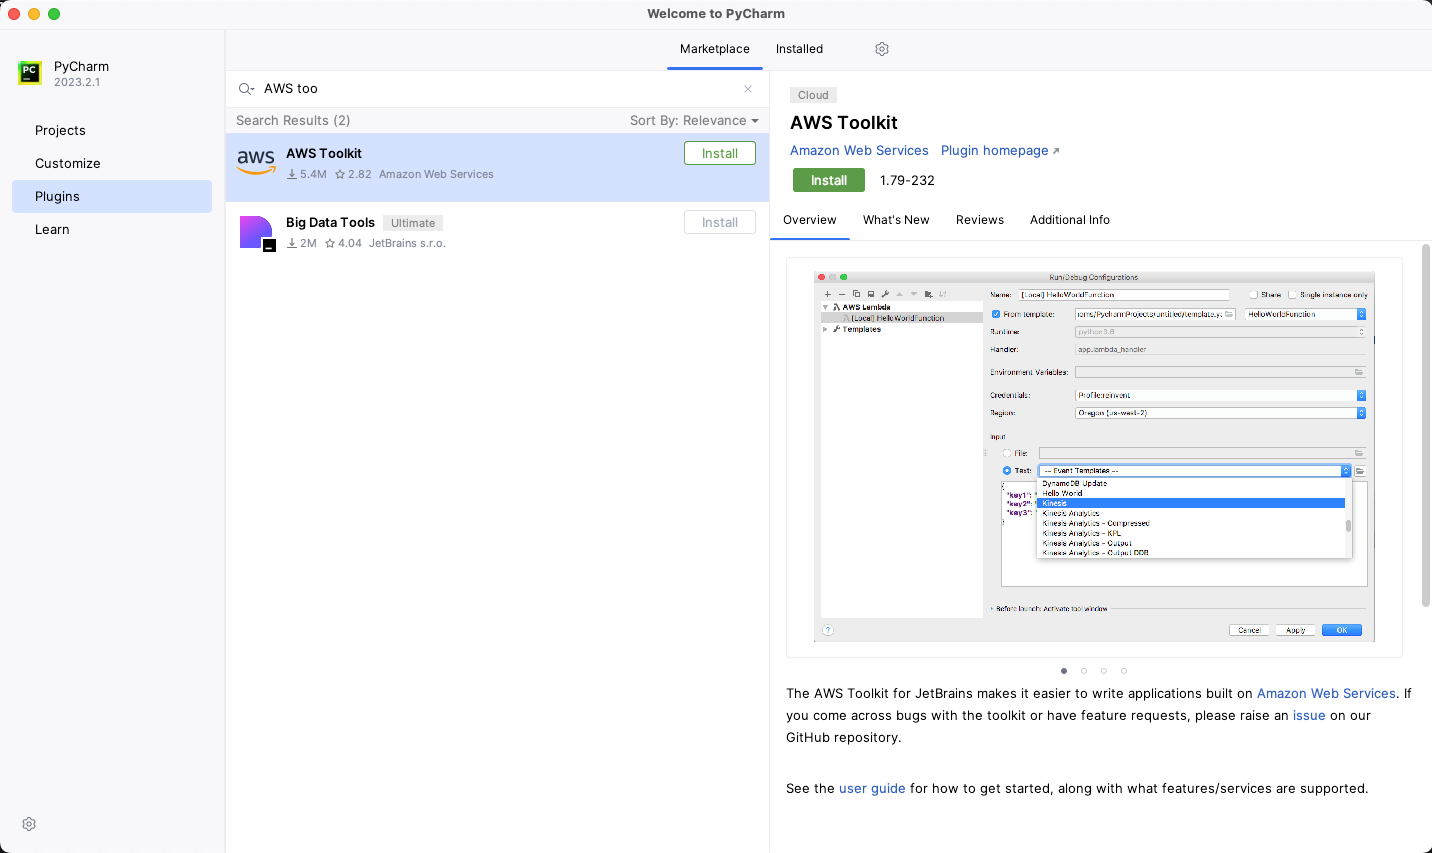
  2. In the search box, enter AWS Toolkit.
  3. For the result — AWS Toolkit — choose Install.

Figure 2 shows the plugins search dialog and search results for the AWS Toolkit extension.

Figure 2: PyCharm plugins browser

Figure 2: PyCharm plugins browser

To create a new project

  1. Open the PyCharm IDE.
  2. From the menu bar, choose File > New Project, and then choose Create.

To authenticate CodeWhisperer with AWS

  1. In the navigation pane, choose the AWS icon (AWS icon).
  2. In the AWS Toolkit section, choose the Developer Tools tab.
  3. Under CodeWhisperer, double-click the Start icon(play icon).
    Figure 3: Start CodeWhisperer

    Figure 3: Start CodeWhisperer

  4. In the AWS Toolkit: Add Connection section, select Use a personal email to sign up and sign in with AWS Builder ID, and then choose Connect.
    Figure 4: AWS Toolkit Add Connection

    Figure 4: AWS Toolkit Add Connection

  5. For the Sign in with AWS Builder ID dialog box, choose Open and Copy Code.
  6. In the opened browser window, in the Authorize request section, in the Code field, paste the code that you copied in the previous step, and then choose Submit and continue.
    Figure 5: Authorize request page

    Figure 5: Authorize request page

  7. On the Create your AWS Builder ID page, do the following:
    1. For Email address, enter a valid current email address.
    2. Choose Next.
    3. For Your name, enter your full name.
    4. Choose Next.
      Figure 6: Create your AWS Builder ID

      Figure 6: Create your AWS Builder ID

  8. Check your inbox for an email sent from [email protected] titled Verify your AWS Builder ID email address, and copy the verification code that’s in the email.
  9. In your browser, on the Email verification page, for Verification code, paste the verification code, and then choose Verify.
    Figure 7: Email verification

    Figure 7: Email verification

  10. On the Choose your password page, enter a Password and Confirm password, and then choose Create AWS Builder ID.
  11. In the Allow AWS Toolkit for JetBrains to access your data? section, choose Allow.
    Figure 8: Allow AWS Toolkit for JetBrains to access your data

    Figure 8: Allow AWS Toolkit for JetBrains to access your data

  12. To confirm that the authentication was successful, in the PyCharm IDE navigation pane, select the AWS icon (AWS icon). On the AWS Toolkit window, make sure that Connected with AWS Builder ID is displayed.

Identify a potentially weak hashing algorithm by using CodeWhisperer security scans

The next step is to create a file that uses the hashing algorithm, SHA-224. CodeWhisperer considers this algorithm to be potentially weak and references Common Weakness Enumeration (CWE)-328. In this step, you use this weak hashing algorithm instead of the recommend algorithm SHA-256 so that you can see how CodeWhisperer flags this potential issue.

To create the file with the weak hashing algorithm (SHA-224)

  1. Create a new file in your PyCharm project named app.py
  2. Copy the following code snippet and paste it in the app.py file. In this code snippet, PBKDF2 is used with SHA-224, instead of the recommended SHA-256 algorithm.
    import hashlib
    import os
    
    salt = os.urandom(8)
    password = ‘secret’.encode()
    # Noncompliant: potentially weak algorithm used.
    derivedkey = hashlib.pbkdf2_hmac('sha224', password, salt, 100000)
    derivedkey.hex()

To initiate a security scan

  • In the AWS Toolkit section of PyCharm, on the Developer Tools tab, double-click the play icon (play icon) next to Run Security Scan. This opens a new tab called CodeWhisperer Security Issues that shows the scan was initiated successfully, as shown in Figure 9.
    Figure 9: AWS Toolkit window with security scan in progress

    Figure 9: AWS Toolkit window with security scan in progress

Interpret the CodeWhisperer security scan results

You can now interpret the results of the security scan.

To interpret the CodeWhisperer results

  1. When the security scan completes, CodeWhisperer highlights one of the rows in the main code editor window. To see a description of the identified issue, hover over the highlighted code. In our example, the issue that is displayed is CWE-327/328, as shown in Figure 10.
    Figure 10: Code highlighted with issue CWE-327,328 – Insecure hashing

    Figure 10: Code highlighted with issue CWE-327,328 – Insecure hashing

  2. The issue description indicates that the algorithm used in the highlighted line might be weak. The first argument of the pbkdf2_hmac function shown in Figure 10 is the algorithm SHA-224, so we can assume this is the highlighted issue.

CodeWhisperer has highlighted SHA-224 as a potential issue. However, to understand whether or not you need to make changes to improve the security of your code, you must do further investigation. A good starting point for your investigation is the CodeGuru Detector Library, which powers the scanning capabilities of CodeWhisperer. The entry in the Detector Library for insecure hashing provides example code and links to additional information.

This additional information reveals that the SHA-224 output is truncated and is 32 bits shorter than SHA-256. Because the output is truncated, SHA-224 is more susceptible to collision attacks than SHA-256. SHA-224 has 112-bit security compared to the 128-bit security of SHA-256. A collision attack is a way to find another input that yields an identical hash created by the original input. The CodeWhisperer issue description for insecure hashing in Figure 10 describes this as a potential issue and is the reason that CodeWhisperer flagged the code. However, if the size of the hash result is important for your use case, SHA-224 might be the correct solution, and if so, you can ignore this warning. But if you don’t have a specific reason to use SHA-224 over other algorithms, you should consider the alternative suggestions that CodeWhisperer offers, which I describe in the next section.

Use CodeWhisperer suggestions to help remediate security issues

CodeWhisperer automatically generates suggestions in real time as you type based on your existing code and comments. Suggestions range from completing a single line of code to generating complete functions. However, because CodeWhisperer uses an LLM that is trained on vast amounts of data, you might receive multiple different suggestions. These suggestions might change over time, even when you give CodeWhisperer the same context. Therefore, you must use your judgement to decide if a suggestion is the correct solution.

To replace the algorithm

  1. In the previous step, you found that the first argument of the pbkdf2_hmac function contains the potentially vulnerable algorithm SHA-224. To initiate a suggestion for a different algorithm, delete the arguments from the function. The suggestion from CodeWhisperer was to change the algorithm from SHA-224 to SHA-256. However, because of the nature of LLMs, you could get a different suggested algorithm.
  2. To apply this suggestion and update your code, press Tab. Figure 11 shows what the suggestion looks like in the PyCharm IDE.
    Figure 11: CodeWhisperer auto-suggestions

    Figure 11: CodeWhisperer auto-suggestions

Validate CodeWhisperer suggestions by rescanning the code

Although the training data used for the CodeWhisperer machine learning model has identified that security vulnerabilities were removed, it’s still possible that some suggestions will contain security vulnerabilities. Therefore, make sure that you fully understand the CodeWhisperer suggestions before you accept them and use them in your code. You are responsible for the code that you produce. In our example, other algorithms to consider are those from the SHA-3 family, such as SHA3-256. This family of algorithms are built using the sponge function rather than the Merkle-Damgård structure that SHA-1 and SHA-2 families are built with. This means that the SHA-3 family offers greater resistance to certain security events but can be slower to compute in certain configurations and hardware. In this case, you have multiple options to improve the security of SHA-224. Before you decide which algorithm to use, test the performance on your target hardware. Whether you use the solution that CodeWhisperer proposes or an alternative, you should validate changes in the code by running the security scans again.

To validate the CodeWhisperer suggestions

  • Choose Run Security Scan to rerun the scan. When the scan is complete, the CodeWhisperer Security Issues panel of PyCharm shows a notification that the rescan was completed successfully and no issues were found.
    Figure 12: Final security scan results

    Figure 12: Final security scan results

Conclusion

In this blog post, you learned how to set up PyCharm with CodeWhisperer, how to scan code for potential vulnerabilities with security scans, and how to view the details of these potential issues and understand the implications. To improve the security of your code, you reviewed and accepted CodeWhisperer suggestions, and ran the security scan again, validating the suggestion that CodeWhisperer made. Although many potential security vulnerabilities are removed during training of the CodeWhisperer machine learning model, you should validate these suggestions. CodeWhisperer is a great tool to help you speed up software development, but you are responsible for accepting or rejecting suggestions.

The example in this post showed how to identify a potentially insecure hash and improve the security of the algorithm. But CodeWhisperer security scans can detect much more, such as the Open Web Application Security Project (OWASP) top ten web application security risks, CWE top 25 most dangerous software weaknesses, log injection, secrets, and insecure use of AWS APIs and SDKs. The detector engine behind these scans uses the searchable Detector Library with descriptions, examples, and references for additional information.

In addition to using CodeWhisperer suggestions, you can also integrate security scanning into your CI/CD pipeline. By combining CodeWhisperer and automated release pipeline checks, you can detect potential vulnerabilities early with validation throughout the delivery process. Catching potential issues earlier can help you resolve them quickly and reduce the chance of frustrating delays late in the delivery process.

Prioritizing security throughout the development lifecycle can help you build robust and secure applications. By using tools such as CodeWhisperer and adopting DevSecOps practices, you can foster a security-conscious culture on your development team and help deliver safer software to your users.

If you want to explore code scanning on your own, CodeWhisperer is now generally available, and the individual tier is free for individual use. With CodeWhisperer, you can enhance the security of your code and minimize potential vulnerabilities before they become significant problems.

If you have feedback about this post, submit comments in the Comments section below. If you have questions about this post, start a new thread on the Amazon CodeWhisperer re:Post or contact AWS Support.

Want more AWS Security news? Follow us on Twitter.

Peter Grainger

Peter Grainger

Peter is a Technical Account Manager at AWS. He is based in Newcastle, England, and has over 14 years of experience in IT. Peter helps AWS customers build highly reliable and cost-effective systems and achieve operational excellence while running workloads on AWS. In his free time, he enjoys the outdoors and traveling.

Use AWS Fault Injection Service to demonstrate multi-region and multi-AZ application resilience

Post Syndicated from Jeff Barr original https://aws.amazon.com/blogs/aws/use-aws-fault-injection-service-to-demonstrate-multi-region-and-multi-az-application-resilience/

AWS Fault Injection Service (FIS) helps you to put chaos engineering into practice at scale. Today we are launching new scenarios that will let you demonstrate that your applications perform as intended if an AWS Availability Zone experiences a full power interruption or connectivity from one AWS region to another is lost.

You can use the scenarios to conduct experiments that will build confidence that your application (whether single-region or multi-region) works as expected when something goes wrong, help you to gain a better understanding of direct and indirect dependencies, and test recovery time. After you have put your application through its paces and know that it works as expected, you can use the results of the experiment for compliance purposes. When used in conjunction with other parts of AWS Resilience Hub, FIS can help you to fully understand the overall resilience posture of your applications.

Intro to Scenarios
We launched FIS in 2021 to help you perform controlled experiments on your AWS applications. In the post that I wrote to announce that launch, I showed you how to create experiment templates and to use them to conduct experiments. The experiments are built using powerful, low-level actions that affect specified groups of AWS resources of a particular type. For example, the following actions operate on EC2 instances and Auto Scaling Groups:

With these actions as building blocks, we recently launched the AWS FIS Scenario Library. Each scenario in the library defines events or conditions that you can use to test the resilience of your applications:

Each scenario is used to create an experiment template. You can use the scenarios as-is, or you can take any template as a starting point and customize or enhance it as desired.

The scenarios can target resources in the same AWS account or in other AWS accounts:

New Scenarios
With all of that as background, let’s take a look at the new scenarios.

AZ Availability: Power Interruption – This scenario temporarily “pulls the plug” on a targeted set of your resources in a single Availability Zone including EC2 instances (including those in EKS and ECS clusters), EBS volumes, Auto Scaling Groups, VPC subnets, Amazon ElastiCache for Redis clusters, and Amazon Relational Database Service (RDS) clusters. In most cases you will run it on an application that has resources in more than one Availability Zone, but you can run it on a single-AZ app with an outage as the expected outcome. It targets a single AZ, and also allows you to disallow a specified set of IAM roles or Auto Scaling Groups from being able to launch fresh instances or start stopped instances during the experiment.

The New actions and targets experience makes it easy to see everything at a glance — the actions in the scenario and the types of AWS resources that they affect:

The scenarios include parameters that are used to customize the experiment template:

The Advanced parameters – targeting tags lets you control the tag keys and values that will be used to locate the resources targeted by experiments:

Cross-Region: Connectivity – This scenario prevents your application in a test region from being able to access resources in a target region. This includes traffic from EC2 instances, ECS tasks, EKS pods, and Lambda functions attached to a VPC. It also includes traffic flowing across Transit Gateways and VPC peering connections, as well as cross-region S3 and DynamoDB replication. The scenario looks like this out of the box:

This scenario runs for 3 hours (unless you change the disruptionDuration parameter), and isolates the test region from the target region in the specified ways, with advanced parameters to control the tags that are used to select the affected AWS resources in the isolated region:

You might also find that the Disrupt and Pause actions used in this scenario useful on their own:

For example, the aws:s3:bucket-pause-replication action can be used to pause replication within a region.

Things to Know
Here are a couple of things to know about the new scenarios:

Regions – The new scenarios are available in all commercial AWS Regions where FIS is available, at no additional cost.

Pricing – You pay for the action-minutes consumed by the experiments that you run; see the AWS Fault Injection Service Pricing Page for more info.

Naming – This service was formerly called AWS Fault Injection Simulator.

— Jeff;

Zonal autoshift – Automatically shift your traffic away from Availability Zones when we detect potential issues

Post Syndicated from Sébastien Stormacq original https://aws.amazon.com/blogs/aws/zonal-autoshift-automatically-shift-your-traffic-away-from-availability-zones-when-we-detect-potential-issues/

Today we’re launching zonal autoshift, a new capability of Amazon Route 53 Application Recovery Controller that you can enable to automatically and safely shift your workload’s traffic away from an Availability Zone when AWS identifies a potential failure affecting that Availability Zone and shift it back once the failure is resolved.

When deploying resilient applications, you typically deploy your resources across multiple Availability Zones in a Region. Availability Zones are distinct groups of physical data centers at a meaningful distance apart (typically miles) to make sure that they have diverse power, connectivity, network devices, and flood plains.

To help you protect against an application’s errors, like a failed deployment, an error of configuration, or an operator error, we introduced last year the ability to manually or programmatically trigger a zonal shift. This enables you to shift the traffic away from one Availability Zone when you observe degraded metrics in that zone. It does so by configuring your load balancer to direct all new connections to infrastructure in healthy Availability Zones only. This allows you to preserve your application’s availability for your customers while you investigate the root cause of the failure. Once fixed, you stop the zonal shift to ensure the traffic is distributed across all zones again.

Zonal shift works at the Application Load Balancer (ALB) or Network Load Balancer (NLB) level only when cross-zone load balancing is turned off, which is the default for NLB. In a nutshell, load balancers offer two levels of load balancing. The first level is configured in the DNS. Load balancers expose one or more IP addresses for each Availability Zone, offering a client-side load balancing between zones. Once the traffic hits an Availability Zone, the load balancer sends traffic to registered healthy targets, typically an Amazon Elastic Compute Cloud (Amazon EC2) instance. By default, ALBs send traffic to targets across all Availability Zones. For zonal shift to properly work, you must configure your load balancers to disable cross-zone load balancing.

When zonal shift starts, the DNS sends all traffic away from one Availability Zone, as illustrated by the following diagram.

ARC Zonal Shift

Manual zonal shift helps to protect your workload against errors originating from your side. But when there is a potential failure in an Availability Zone, it is sometimes difficult for you to identify or detect the failure. Detecting an issue in an Availability Zone using application metrics is difficult because, most of the time, you don’t track metrics per Availability Zone. Moreover, your services often call dependencies across Availability Zone boundaries, resulting in errors seen in all Availability Zones. With modern microservice architectures, these detection and recovery steps must often be performed across tens or hundreds of discrete microservices, leading to recovery times of multiple hours.

Customers asked us if we could take the burden off their shoulders to detect a potential failure in an Availability Zone. After all, we might know about potential issues through our internal monitoring tools before you do.

With this launch, you can now configure zonal autoshift to protect your workloads against potential failure in an Availability Zone. We use our own AWS internal monitoring tools and metrics to decide when to trigger a network traffic shift. The shift starts automatically; there is no API to call. When we detect that a zone has a potential failure, such as a power or network disruption, we automatically trigger an autoshift of your infrastructure’s NLB or ALB traffic, and we shift the traffic back when the failure is resolved.

Obviously, shifting traffic away from an Availability Zone is a delicate operation that must be carefully prepared. We built a series of safeguards to ensure we don’t degrade your application availability by accident.

First, we have internal controls to ensure we shift traffic away from no more than one Availability Zone at a time. Second, we practice the shift on your infrastructure for 30 minutes every week. You can define blocks of time when you don’t want the practice to happen, for example, 08:00–18:00, Monday through Friday. Third, you can define two Amazon CloudWatch alarms to act as a circuit breaker during the practice run: one alarm to prevent starting the practice run at all and one alarm to monitor your application health during a practice run. When either alarm triggers during the practice run, we stop it and restore traffic to all Availability Zones. The state of application health alarm at the end of the practice run indicates its outcome: success or failure.

According to the principle of shared responsibility, you have two responsibilities as well.

First you must ensure there is enough capacity deployed in all Availability Zones to sustain the increase of traffic in remaining Availability Zones after traffic has shifted. We strongly recommend having enough capacity in remaining Availability Zones at all times and not relying on scaling mechanisms that could delay your application recovery or impact its availability. When zonal autoshift triggers, AWS Auto Scaling might take more time than usual to scale your resources. Pre-scaling your resource ensures a predictable recovery time for your most demanding applications.

Let’s imagine that to absorb regular user traffic, your application needs six EC2 instances across three Availability Zones (2×3 instances). Before configuring zonal autoshift, you should ensure you have enough capacity in the remaining Availability Zones to absorb the traffic when one Availability Zone is not available. In this example, it means three instances per Availability Zone (3×3 = 9 instances with three Availability Zones in order to keep 2×3 = 6 instances to handle the load when traffic is shifted to two Availability Zones).

In practice, when operating a service that requires high reliability, it’s normal to operate with some redundant capacity online for eventualities such as customer-driven load spikes, occasional host failures, etc. Topping up your existing redundancy in this way both ensures you can recover rapidly during an Availability Zone issue but can also give you greater robustness to other events.

Second, you must explicitly enable zonal autoshift for the resources you choose. AWS applies zonal autoshift only on the resources you chose. Applying a zonal autoshift will affect the total capacity allocated to your application. As I just described, your application must be prepared for that by having enough capacity deployed in the remaining Availability Zones.

Of course, deploying this extra capacity in all Availability Zones has a cost. When we talk about resilience, there is a business tradeoff to decide between your application availability and its cost. This is another reason why we apply zonal autoshift only on the resources you select.

Let’s see how to configure zonal autoshift
To show you how to configure zonal autoshift, I deploy my now-famous TicTacToe web application using a CDK script. I open the Route 53 Application Recovery Controller page of the AWS Management Console. On the left pane, I select Zonal autoshift. Then, on the welcome page, I select Configure zonal autoshift for a resource.

Zonal autoshift - 1

I select the load balancer of my demo application. Remember that currently, only load balancers with cross-zone load balancing turned off are eligible for zonal autoshift. As the warning on the console reminds me, I also make sure my application has enough capacity to continue to operate with the loss of one Availability Zone.

Zonal autoshift - 2

I scroll down the page and configure the times and days I don’t want AWS to run the 30-minute practice. At first, and until I’m comfortable with autoshift, I block the practice 08:00–18:00, Monday through Friday. Pay attention that hours are expressed in UTC, and they don’t vary with daylight saving time. You may use a UTC time converter application for help. While it is safe for you to exclude business hours at the start, we recommend configuring the practice run also during your business hours to ensure capturing issues that might not be visible when there is low or no traffic on your application. You probably most need zonal autoshift to work without impact at your peak time, but if you have never tested it, how confident are you? Ideally, you don’t want to block any time at all, but we recognize that’s not always practical.

Zonal autoshift - 3

Further down on the same page, I enter the two circuit breaker alarms. The first one prevents the practice from starting. You use this alarm to tell us this is not a good time to start a practice run. For example, when there is an issue ongoing with your application or when you’re deploying a new version of your application to production. The second CloudWatch alarm gives the outcome of the practice run. It enables zonal autoshift to judge how your application is responding to the practice run. If the alarm stays green, we know all went well.

If either of these two alarms triggers during the practice run, zonal autoshift stops the practice and restores the traffic to all Availability Zones.

Finally, I acknowledge that a 30-minute practice run will run weekly and that it might reduce the availability of my application.

Then, I select Create.

Zonal autoshift - 4And that’s it.

After a few days, I see the history of the practice runs on the Zonal shift history for resource tab of the console. I monitor the history of my two circuit breaker alarms to stay confident everything is correctly monitored and configured.

ARC Zonal Shift - practice run

It’s not possible to test an autoshift itself. It triggers automatically when we detect a potential issue in an Availability Zone. I asked the service team if we could shut down an Availability Zone to test the instructions I shared in this post; they politely declined my request :-).

To test your configuration, you can trigger a manual shift, which behaves identically to an autoshift.

A few more things to know
Zonal autoshift is now available at no additional cost in all AWS Regions, except for China and GovCloud.

We recommend applying the crawl, walk, run methodology. First, you get started with manual zonal shifts to acquire confidence in your application. Then, you turn on zonal autoshift configured with practice runs outside of your business hours. Finally, you modify the schedule to include practice zonal shifts during your business hours. You want to test your application response to an event when you least want it to occur.

We also recommend that you think holistically about how all parts of your application will recover when we move traffic away from one Availability Zone and then back. The list that comes to mind (although certainly not complete) is the following.

First, plan for extra capacity as I discussed already. Second, think about possible single points of failure in each Availability Zone, such as a self-managed database running on a single EC2 instance or a microservice that leaves in a single Availability Zone, and so on. I strongly recommend using managed databases, such as Amazon DynamoDB or Amazon Aurora for applications requiring zonal shifts. These have built-in replication and fail-over mechanisms in place. Third, plan the switch back when the Availability Zone will be available again. How much time do you need to scale your resources? Do you need to rehydrate caches?

You can learn more about resilient architectures and methodologies with this great series of articles from my colleague Adrian.

Finally, remember that only load balancers with cross-zone load balancing turned off are currently eligible for zonal autoshift. To turn off cross-zone load balancing from a CDK script, you need to remove stickinessCookieDuration and add load_balancing.cross_zone.enabled=false on the target group. Here is an example with CDK and Typescript:

    // Add the auto scaling group as a load balancing
    // target to the listener.
    const targetGroup = listener.addTargets('MyApplicationFleet', {
      port: 8080,
      // for zonal shift, stickiness & cross-zones load balancing must be disabled
      // stickinessCookieDuration: Duration.hours(1),
      targets: [asg]
    });    
    // disable cross zone load balancing
    targetGroup.setAttribute("load_balancing.cross_zone.enabled", "false");

Now it’s time for you to select your applications that would benefit from zonal autoshift. Start by reviewing your infrastructure capacity in each Availability Zone and then define the circuit breaker alarms. Once you are confident your monitoring is correctly configured, go and enable zonal autoshift.

— seb

IDE extension for AWS Application Composer enhances visual modern applications development with AI-generated IaC

Post Syndicated from Donnie Prakoso original https://aws.amazon.com/blogs/aws/ide-extension-for-aws-application-composer-enhances-visual-modern-applications-development-with-ai-generated-iac/

Today, I’m happy to share the integrated development environment (IDE) extension for AWS Application Composer. Now you can use AWS Application Composer directly in your IDE to visually build modern applications and iteratively develop your infrastructure as code templates with Amazon CodeWhisperer.

Announced as preview at AWS re:Invent 2022 and generally available in March 2023, Application Composer is a visual builder that makes it easier for developers to visualize, design, and iterate on an application architecture by dragging, grouping, and connecting AWS services on a visual canvas. Application Composer simplifies building modern applications by providing an easy-to-use visual drag-and-drop interface and generates IaC templates in real time.

AWS Application Composer also lets you work with AWS CloudFormation resources. In September, AWS Application Composer announced support for 1000+ AWS CloudFormation resources. This provides you the flexibility to define configuration for your AWS resources at a granular level.

Building modern applications with modern tools
The IDE extension for AWS Application Composer provides you with the same visual drag-and-drop experience and functionality as what it offers you in the console. Utilizing the visual canvas in your IDE means you can quickly prototype your ideas and focus on your application code.

With Application Composer running in your IDE, you can also use the various tools available in your IDE. For example, you can seamlessly integrate IaC templates generated real-time by Application Composer with AWS Serverless Application Model (AWS SAM) to manage and deploy your serverless applications.

In addition to making Application Composer available in your IDE, you can create generative AI powered code suggestions in the CloudFormation template in real time while visualizing the application architecture in split view. You can pair and synchronize Application Composer’s visualization and CloudFormation template editing side by side in the IDE without context switching between consoles to iterate on their designs. This minimizes hand coding and increase your productivity.

Using AWS Application Composer in Visual Studio Code
First, I need to install the latest AWS Toolkit for Visual Studio Code plugin. If you already have the AWS Toolkit plugin installed, you only need to update the plugin to start using Application Composer.

To start using Application Composer, I don’t need to authenticate into my AWS account. With Application Composer available on my IDE, I can open my existing AWS CloudFormation or AWS SAM templates.

Another method is to create a new blank file, then right-click on the file and select Open with Application Composer to start designing my application visually.

This will provide me with a blank canvas. Here I have both code and visual editors at the same time to build a simple serverless API using Amazon API Gateway, AWS Lambda, and Amazon DynamoDB. Any changes that I make on the canvas will also be reflected in real time on my IaC template.

I get consistent experiences, such as when I use the Application Composer console. For example, if I make some modifications to my AWS Lambda function, it will also create relevant files in my local folder.

With IaC templates available in my local folder, it’s easier for me to manage my applications with AWS SAM CLI. I can create continuous integration and continuous delivery (CI/CD) with sam pipeline or deploy my stack with sam deploy.

One of the features that accelerates my development workflow is the built-in Sync feature that seamlessly integrates with AWS SAM command sam sync. This feature syncs my local application changes to my AWS account, which is helpful for me to do testing and validation before I deploy my applications into a production environment.

Developing IaC templates with generative AI
With this new capability, I can use generative AI code suggestions to quickly get started with any of CloudFormation’s 1000+ resources. This also means that it’s now even easier to include standard IaC resources to extend my architecture.

For example, I need to use Amazon MQ, which is a standard IaC resource, and I need to modify some configurations for its AWS CloudFormation resource using Application Composer. In the Resource configuration section, change some values if needed, then choose Generate. Application Composer provides code suggestions that I can accept and incorporate into my IaC template.

This capability helps me to improve my development velocity by eliminating context switching. I can design my modern applications using AWS Application Composer canvas and use various tools such as Amazon CodeWhisperer and AWS SAM to accelerate my development workflow.

Things to know
Here are a couple of things to note:

Supported IDE – At launch, this new capability is available for Visual Studio Code.

Pricing – The IDE extension for AWS Application Composer is available at no charge.

Get started with IDE extension for AWS Application Composer by installing the latest AWS Toolkit for Visual Studio Code.

Happy coding!
— Donnie

Prepare and load Amazon S3 data into Teradata using AWS Glue through its native connector for Teradata Vantage

Post Syndicated from Vinod Jayendra original https://aws.amazon.com/blogs/big-data/prepare-and-load-amazon-s3-data-into-teradata-using-aws-glue-through-its-native-connector-for-teradata-vantage/

In this post, we explore how to use the AWS Glue native connector for Teradata Vantage to streamline data integrations and unlock the full potential of your data.

Businesses often rely on Amazon Simple Storage Service (Amazon S3) for storing large amounts of data from various data sources in a cost-effective and secure manner. For those using Teradata for data analysis, integrations through the AWS Glue native connector for Teradata Vantage unlock new possibilities. AWS Glue enhances the flexibility and efficiency of data management, allowing companies to seamlessly integrate their data, regardless of its location, with Teradata’s analytical capabilities. This new connector eliminates technical hurdles related to configuration, security, and management, enabling companies to effortlessly export or import their datasets into Teradata Vantage. As a result, businesses can focus more on extracting meaningful insights from their data, rather than dealing with the intricacies of data integration.

AWS Glue is a serverless data integration service that makes it straightforward for analytics users to discover, prepare, move, and integrate data from multiple sources for analytics, machine learning (ML), and application development. With AWS Glue, you can discover and connect to more than 100 diverse data sources and manage your data in a centralized data catalog. You can visually create, run, and monitor extract, transform, and load (ETL) pipelines to load data into your data lakes.

Teradata Corporation is a leading connected multi-cloud data platform for enterprise analytics, focused on helping companies use all their data across an enterprise, at scale. As an AWS Data & Analytics Competency partner, Teradata offers a complete cloud analytics and data platform, including for Machine Learning.

Introducing the AWS Glue native connector for Teradata Vantage

AWS Glue provides support for Teradata, accessible through both AWS Glue Studio and AWS Glue ETL scripts. With AWS Glue Studio, you benefit from a visual interface that simplifies the process of connecting to Teradata and authoring, running, and monitoring AWS Glue ETL jobs. For data developers, this support extends to AWS Glue ETL scripts, where you can use Python or Scala to create and manage more specific data integration and transformation tasks.

The AWS Glue native connector for Teradata Vantage allows you to efficiently read and write data from Teradata without the need to install or manage any connector libraries. You can add Teradata as both the source and target within AWS Glue Studio’s no-code, drag-and-drop visual interface or use the connector directly in an AWS Glue ETL script job.

Solution overview

In this example, you use AWS Glue Studio to enrich and upload data stored on Amazon S3 to Teradata Vantage. You start by joining the Event and Venue files from the TICKIT dataset. Next, you filter the results to a single geographic region. Finally, you upload the refined data to Teradata Vantage.

The TICKIT dataset tracks sales activity for the fictional TICKIT website, where users buy and sell tickets online for sporting events, shows, and concerts. In this dataset, analysts can identify ticket movement over time, success rates for sellers, and best-selling events, venues, and seasons.

For this example, you use AWS Glue Studio to develop a visual ETL pipeline. This pipeline will read data from Amazon S3, perform transformations, and then load the transformed data into Teradata. The following diagram illustrates this architecture.

Solution Overview

By the end of this post, your visual ETL job will resemble the following screenshot.

Visual ETL Job Flow

Prerequisites

For this example, you should have access to an existing Teradata database endpoint with network reachability from AWS and permissions to create tables and load and query data.

AWS Glue needs network access to Teradata to read or write data. How this is configured depends on where your Teradata is deployed and the specific network configuration. For Teradata deployed on AWS, you might need to configure VPC peering or AWS PrivateLink, security groups, and network access control lists (NACLs) to allow AWS Glue to communicate with Teradata overt TCP. If Teradata is outside AWS, networking services such as AWS Site-to-Site VPN or AWS Direct Connect may be required. Public internet access is not recommended due to security risks. If you choose public access, it’s safer to run the AWS Glue job in a VPC behind a NAT gateway. This approach enables you to allow list only one IP address for incoming traffic on your network firewall. For more information, refer to Infrastructure security in AWS Glue.

Set up Amazon S3

Every object in Amazon S3 is stored in a bucket. Before you can store data in Amazon S3, you must create an S3 bucket to store the results. Complete the following steps:

  1. On the Amazon S3 console, choose Buckets in the navigation pane.
  2. Choose Create bucket.
  3. For Name, enter a globally unique name for your bucket; for example, tickit8530923.
  4. Choose Create bucket.
  5. Download the TICKIT dataset and unzip it.
  6. Create the folder tickit in your S3 bucket and upload the allevents_pipe.txt and venue_pipe.txt files.

Configure Teradata connections

To connect to Teradata from AWS Glue, see Configuring Teradata Connection.

You must create and store your Teradata credentials in an AWS Secrets Manager secret and then associate that secret with a Teradata AWS Glue connection. We discuss these two steps in more detail later in this post.

Create an IAM role for the AWS Glue ETL job

When you create the AWS Glue ETL job, you specify an AWS Identity and Access Management (IAM) role for the job to use. The role must grant access to all resources used by the job, including Amazon S3 (for any sources, targets, scripts, driver files, and temporary directories) and Secrets Manager. For instructions, see Configure an IAM role for your ETL job.

Create table in Teradata

Using your preferred database tool, log in to Teradata. Run the following code to create the table in Teradata where you will load your data:

CREATE MULTISET TABLE test.tickit, FALLBACK
   (venueid varchar(25),
    venuename varchar(100),
    venuecity varchar(100),
    venuestate varchar(25),
    venueseats varchar(25),
    eventid varchar(25),
    catid varchar(25),
    dateid varchar(25),
    eventname varchar(100),
    starttime varchar(100))
    NO PRIMARY INDEX
;

Store Teradata login credentials

An AWS Glue connection is a Data Catalog object that stores login credentials, URI strings, and more. The Teradata connector requires Secrets Manager for storing the Teradata user name and password that you use to connect to Teradata.

To store the Teradata user name and password in Secrets Manager, complete the following steps:

  1. On the Secrets Manager console, choose Secrets in the navigation pane.
  2. Choose Store a new secret.
  3. Select Other type of secret.
  4. Enter the key/value USER and teradata_user, then choose Add row.
  5. Enter the key/value PASSWORD and teradata_user_password, then choose Next.

Teradata Secrets Manager Configuration

  1. For Secret name, enter a descriptive name, then choose Next.
  2. Choose Next to move to the review step, then choose Store.

Create the Teradata connection in AWS Glue

Now you’re ready to create an AWS Glue connection to Teradata. Complete the following steps:

  1. On the AWS Glue console, choose Connections under Data Catalog in the navigation pane.
  2. Choose Create connection.
  3. For Name, enter a name (for example, teradata_connection).
  4. For Connection type¸ choose Teradata.
  5. For Teradata URL, enter jdbc:teradata://url_of_teradata/database=name_of_your_database.
  6. For AWS Secret, choose the secret with your Teradata credentials that you created earlier.

Teradata Connection access

Create an AWS Glue visual ETL job to transform and load data to Teradata

Complete the following steps to create your AWS Glue ETL job:

  1. On the AWS Glue console, under ETL Jobs in the navigation pane, choose Visual ETL.
  2. Choose Visual ETL.
  3. Choose the pencil icon to enter a name for your job.

We add venue_pipe.txt as our first dataset.

  1. Choose Add nodes and choose Amazon S3 on the Sources tab.

Amazon S3 source node

  1. Enter the following data source properties:
    1. For Name, enter Venue.
    2. For S3 source type, select S3 location.
    3. For S3 URL, enter the S3 path to venue_pipe.txt.
    4. For Data format, choose CSV.
    5. For Delimiter, choose Pipe.
    6. Deselect First line of source file contains column headers.

S3 data source properties

Now we add allevents_pipe.txt as our second dataset.

  1. Choose Add nodes and choose Amazon S3 on the Sources tab.
  2. Enter the following data source properties:
    1. For Name, enter Event.
    2. For S3 source type, select S3 location.
    3. For S3 URL, enter the S3 path to allevents_pipe.txt.
    4. For Data format, choose CSV.
    5. For Delimiter, choose Pipe.
    6. Deselect First line of source file contains column headers.

Next, we rename the columns of the Venue dataset.

  1. Choose Add nodes and choose Change Schema on the Transforms tab.
  2. Enter the following transform properties:
    1. For Name, enter Rename Venue data.
    2. For Node parents, choose Venue.
    3. In the Change Schema section, map the source keys to the target keys:
      1. col0: venueid
      2. col1: venuename
      3. col2: venuecity
      4. col3: venuestate
      5. col4: venueseats

Rename Venue data ETL Transform

Now we filter the Venue dataset to a specific geographic region.

  1. Choose Add nodes and choose Filter on the Transforms tab.
  2. Enter the following transform properties:
    1. For Name, enter Location Filter.
    2. For Node parents, choose Venue.
    3. For Filter condition, choose venuestate for Key, choose matches for Operation, and enter DC for Value.

Location Filter Settings

Now we rename the columns in the Event dataset.

  1. Choose Add nodes and choose Change Schema on the Transforms tab.
  2. Enter the following transform properties:
    1. For Name, enter Rename Event data.
    2. For Node parents, choose Event.
    3. In the Change Schema section, map the source keys to the target keys:
      1. col0: eventid
      2. col1: e_venueid
      3. col2: catid
      4. col3: dateid
      5. col4: eventname
      6. col5: starttime

Next, we join the Venue and Event datasets.

  1. Choose Add nodes and choose Join on the Transforms tab.
  2. Enter the following transform properties:
    1. For Name, enter Join.
    2. For Node parents, choose Location Filter and Rename Event data.
    3. For Join type¸ choose Inner join.
    4. For Join conditions, choose venueid for Location Filter and e_venueid for Rename Event data.

Join Properties

Now we drop the duplicate column.

  1. Choose Add nodes and choose Change Schema on the Transforms tab.
  2. Enter the following transform properties:
    1. For Name, enter Drop column.
    2. For Node parents, choose Join.
    3. In the Change Schema section, select Drop for e_venueid .

Drop column properties

Next, we load the data into the Teradata table.

  1. Choose Add nodes and choose Teradata on the Targets tab.
  2. Enter the following data sink properties:
    1. For Name, enter Teradata.
    2. For Node parents, choose Drop column.
    3. For Teradata connection, choose teradata_connection.
    4. For Table name, enter schema.tablename of the table you created in Teradata.

Data sink properties Teradata

Lastly, we run the job and load the data into Teradata.

  1. Choose Save, then choose Run.

A banner will display that the job has started.

  1. Choose Runs, which displays the status of the job.

The run status will change to Succeeded when the job is complete.

Run Status

  1. Connect to your Teradata and then query the table the data was loaded to it.

The filtered and joined data from the two datasets will be in the table.

Filtered and joined data result

Clean up

To avoid incurring additional charges caused by resources created as part of this post, make sure you delete the items you created in the AWS account for this post:

  • The Secrets Manager key created for the Teradata credentials
  • The AWS Glue native connector for Teradata Vantage
  • The data loaded in the S3 bucket
  • The AWS Glue Visual ETL job

Conclusion

In this post, you created a connection to Teradata using AWS Glue and then created an AWS Glue job to transform and load data into Teradata. The AWS Glue native connector for Teradata Vantage empowers your data analytics journey by providing a seamless and efficient pathway for integrating your data with Teradata. This new capability in AWS Glue not only simplifies your data integration workflows but also opens up new avenues for advanced analytics, business intelligence, and machine learning innovations.

With the AWS Teradata Connector, you have the best tool at your disposal for simplifying data integration tasks. Whether you’re looking to load Amazon S3 data into Teradata for analytics, reporting, or business insights, this new connector streamlines the process, making it more accessible and cost-effective.

To get started with AWS Glue, refer to Getting Started with AWS Glue.


About the Authors

Kamen Sharlandjiev is a Sr. Big Data and ETL Solutions Architect and AWS Glue expert. He’s on a mission to make life easier for customers who are facing complex data integration challenges. His secret weapon? Fully managed, low-code AWS services that can get the job done with minimal effort and no coding. Follow Kamen on LinkedIn to keep up to date with the latest AWS Glue news!

Sean Bjurstrom is a Technical Account Manager in ISV accounts at Amazon Web Services, where he specializes in analytics technologies and draws on his background in consulting to support customers on their analytics and cloud journeys. Sean is passionate about helping businesses harness the power of data to drive innovation and growth. Outside of work, he enjoys running and has participated in several marathons.

Vinod Jayendra is an Enterprise Support Lead in ISV accounts at Amazon Web Services, where he helps customers solve their architectural, operational, and cost-optimization challenges. With a particular focus on serverless technologies, he draws from his extensive background in application development to help customers build top-tier solutions. Beyond work, he finds joy in quality family time, embarking on biking adventures, and coaching youth sports teams.

Doug Mbaya is a Senior Partner Solution architect with a focus in analytics and machine learning. Doug works closely with AWS partners and helps them integrate their solutions with AWS analytics and machine learning solutions in the cloud.

The collective thoughts of the interwebz