Tag Archives: Developer Platform

Browser Run: give your agents a browser

Post Syndicated from Kathy Liao original https://blog.cloudflare.com/browser-run-for-ai-agents/

AI agents need to interact with the web. To do that, they need a browser. They need to navigate sites, read pages, fill forms, extract data, and take screenshots. They need to observe whether things are working as expected, with a way for their humans to step in if needed. And they need to do all of this at scale.

Today, we’re renaming Browser Rendering to Browser Run, and shipping key features that make it the browser for AI agents. The name Browser Rendering never fully captured what the product does. Browser Run lets you run full browser sessions on Cloudflare’s global network, drive them with code or AI, record and replay sessions, crawl pages for content, debug in real time, and let humans intervene when your agent needs help. 

Here’s what’s new:

  • Live View: see what your agent sees and is doing, in real time. Know instantly if things are working, and when they’re not, see exactly why.

  • Human in the Loop: when your agent hits a snag like a login page or unexpected edge case, it can hand off to a human instead of failing. The human steps in, resolves, then hands back control.

  • Chrome DevTools Protocol (CDP) Endpoint: the Chrome DevTools Protocol is how agents control browsers. Browser Run now exposes it directly, so agents get maximum control over the browser and existing CDP scripts work on Cloudflare.

  • MCP Client Support: AI coding agents like Claude Desktop, Cursor, and OpenCode can now use Browser Run as their remote browser.

  • WebMCP Support: agents will outnumber humans using the web. WebMCP allows websites to declare what actions are available for agents to discover and call, making navigation more reliable.

  • Session Recordings: capture every browser session for debugging purposes. When something goes wrong, you have the full recording with DOM changes, user interactions, and page navigation.

  • Higher limits: run more tasks at once with 120 concurrent browsers, up from 30. 

An AI agent searching Amazon for an orange lava lamp, comparing options, and handing off to a human when sign-in is required to complete the purchase

Everything an agent needs

Let’s think about what agents need when browsing the web and how each feature fits in:

What an agent needs Browser Run (formerly Browser Rendering)
1) Browsers on-demand Chrome browser on Cloudflare’s global network
2) A way to control the browser Take actions like navigate, click, fill forms, screenshot, and more with Puppeteer, Playwright, CDP (new), MCP Client Support (new) and WebMCP (new)
3) Observability Live View (new), Session Recordings (new), and Dashboard redesign (new)
4) Human intervention Human in the Loop (new)
5) Scale 10 requests/second for Quick Actions, 120 concurrent browsers (4x increase)

1) Open a browser

First, an agent needs a browser. With Browser Run, agents can spin up a headless Chrome instance on Cloudflare’s global network, on demand. No infrastructure to manage, no Chrome versions to maintain. Browser sessions open near users for low latency, and scale up and down as needed. Pair Browser Run with the Agents SDK to build long-running agents that browse the web, remember everything, and act on their own. 

2) Take actions

Once your agent has a browser, it needs ways to control it. Browser Run supports multiple approaches: new low-level protocol access with the Chrome DevTools Protocol (CDP) and WebMCP, in addition to existing higher-level automation using Puppeteer and Playwright, and Quick Actions for simple tasks. Let’s look at the details.

Chrome DevTools Protocol (CDP) endpoint

The Chrome DevTools Protocol (CDP) is the low-level protocol that powers browser automation. Exposing CDP directly means the growing ecosystem of agent tools and existing CDP automation scripts can use Browser Run. When you open Chrome DevTools and inspect a page, CDP is what’s running underneath. Puppeteer, Playwright, and most agent frameworks are built on top of it.

Every way that you have been using Browser Run has actually been through CDP already. What’s new is that we’re now exposing CDP directly as an endpoint. This matters for agents because CDP gives agents the most control possible over the browser. Agent frameworks already speak CDP natively, and can now connect to Browser Run directly. CDP also unlocks browser actions that aren’t available through Puppeteer or Playwright, like JavaScript debugging. And because you’re working with raw CDP messages instead of going through higher-level libraries, you can pass messages directly to models for more token-efficient browser control.

If you already have CDP automation scripts running against self-hosted Chrome, they work on Browser Run with a one-line config change. Point your WebSocket URL at Browser Run and stop managing your own browser infrastructure.

// Before: connecting to self-hosted Chrome
const browser = await puppeteer.connect({
  browserWSEndpoint: 'ws://localhost:9222/devtools/browser'
});

// After: connecting to Browser Run
const browser = await puppeteer.connect({
  browserWSEndpoint: 'wss://api.cloudflare.com/client/v4/accounts/<ACCOUNT_ID>/browser-rendering/devtools/browser',
  headers: { 'Authorization': 'Bearer <API_TOKEN>' }
});

The CDP endpoint also makes Browser Run more accessible. You can now connect from any language, any environment, without needing to write a Cloudflare Worker. (If you’re already using Workers, nothing changes.)

Using Browser Run with MCP Clients

Now that Browser Run exposes the Chrome DevTools Protocol (CDP), MCP clients including Claude Desktop, Cursor, Codex, and OpenCode can use Browser Run as their remote browser. The chrome-devtools-mcp package from the Chrome DevTools team is an MCP server that gives your AI coding assistant access to the full power of Chrome DevTools for reliable automation, in-depth debugging, and performance analysis.

Here’s an example of how to configure Browser Run for Claude Desktop:

{
  "mcpServers": {
    "browser-rendering": {
      "command": "npx",
      "args": [
        "-y",
        "chrome-devtools-mcp@latest",
        "--wsEndpoint=wss://api.cloudflare.com/client/v4/accounts/<ACCOUNT_ID>/browser-rendering/devtools/browser?keep_alive=600000",
        "--wsHeaders={\"Authorization\":\"Bearer <API_TOKEN>\"}"
      ]
    }
  }
}

For other MCP clients, see documentation for using Browser Run with MCP clients.

WebMCP support

The Internet was built for humans, so navigating as an AI agent today is unreliable. We’re betting on a future where more agents use the web than humans. In that world, sites need to be agent-friendly.

That’s why we’re launching support for WebMCP, a new browser API from the Google Chrome team that landed in Chromium 146+. WebMCP lets websites expose tools directly to AI agents, declaring what actions are available for agents to discover and call on each page. This helps agents navigate the web more reliably. Instead of agents needing to figure out how to use a site, websites can expose their tools for agents to discover and call

Two APIs make this work:

  • navigator.modelContext allows websites to register their tools

  • navigator.modelContextTesting allows agents to discover and execute those tools

Today, an agent visiting a travel booking site has to figure out the UI by looking at it. With WebMCP, the site declares “here’s a search_flights tool that takes an origin, destination, and date.” The agent calls it directly, without having to loop through slow screenshot-analyze-click loops. This makes navigation more reliable regardless of potential changes to the UI.

Tools are discovered on the page rather than preloaded. This matters for the long tail of the web, where preloading an MCP server for every possible site is not feasible and would bloat the context window. 

Using WebMCP to book a hotel through the Chrome DevTools console, discovering available tools with listTools()

We have an experimental pool with browser instances running Chrome beta so you can test emerging browser features before they reach stable Chrome. We also just shipped Wrangler browser commands that let you manage browser sessions directly from the CLI, letting you create, manage, and view browser sessions directly from your terminal. To access WebMCP-enabled browsers, use the following Wrangler command to create a session in the experimental pool:

npm i -g wrangler@latest
wrangler browser create --lab --keepAlive 300  

Existing ways to use Browser Run

While CDP and WebMCP are new, you could already use Puppeteer, Playwright, or Stagehand for full browser automation through Browser Run. And for simple tasks like capturing screenshots, generating PDFs, and extracting markdown, there are the Quick Action endpoints. 

/crawl endpoint — crawl web content

We also recently shipped a /crawl endpoint that lets you crawl entire sites with a single API call. Give it a starting URL and pages are automatically discovered and scraped, then returned in your preferred format (HTML, Markdown, and structured JSON), with additional parameters to control crawl depth and scope, skip pages that haven’t changed, and specify certain paths to include or exclude. 

We intentionally built /crawl to be a well-behaved crawler. That means it respects site owner’s preferences out of the box, is a signed agent with a distinct bot ID that is cryptographically signed using Web Bot Auth, a non-customizable User-Agent, and follows robots.txt and AI Crawl Control. It does not bypass Cloudflare’s bot protections or CAPTCHAs. Site owners choose whether their content is accessible and /crawl respects it. 

# Initiate a crawl
curl -X POST 'https://api.cloudflare.com/client/v4/accounts/{account_id}/browser-rendering/crawl' \
  -H 'Authorization: Bearer <apiToken>' \
  -H 'Content-Type: application/json' \
  -d '{
    "url": "https://blog.cloudflare.com/"
  }'

3) Observe

Things don’t always go right the first try. We kept hearing from customers that when their automations failed, they had no idea why. That’s why we’ve added multiple ways to observe what’s happening, so you can see exactly what your agent sees, both live and after the fact. 

Live View

Live View lets you watch your agent’s browser session in real time. Whether you’re debugging an agent or running a long automation script, you see exactly what’s happening as it happens. This includes the page itself, as well as the DOM, console, and network requests. When something goes wrong — the expected button isn’t there, the page needs authentication, or a CAPTCHA appears — you can catch it immediately.

There are two ways to access Live View. From code, obtain the session_id of the browser you want to inspect and open the devtoolsFrontendURL from the response in Chrome. Or from the Cloudflare dashboard, open the new Live Sessions tab in the Browser Run section and click into any active session.

Live View of an AI agent booking a hotel, showing real-time browser activity

Session Recordings

Live View is great when you’re available, but you can’t watch every session. Session Recordings captures DOM changes, mouse and keyboard events, and page navigation as structured JSON so you can replay any session after it ends.

Enable Session Recordings by passing recording:true when launching a browser. After the session closes, you can access the recording in the Cloudflare dashboard from the Runs tab or retrieve recordings via API and replay them with the rrweb-player. Next, we’re adding the ability to inspect DOM state and console output at any point during the recording. 

Session recording replay of a browser automation browsing the Sentry Shop and adding a bomber jacket to the cart

Dashboard Redesign

Previously, the Browser Run dashboard only showed logs from browser sessions. Requests for screenshots, PDFs, markdown, and crawls were not visible. The redesigned dashboard changes that. The new Runs tab shows every request. You can filter by endpoint and view details including target URLs, status, and duration. 
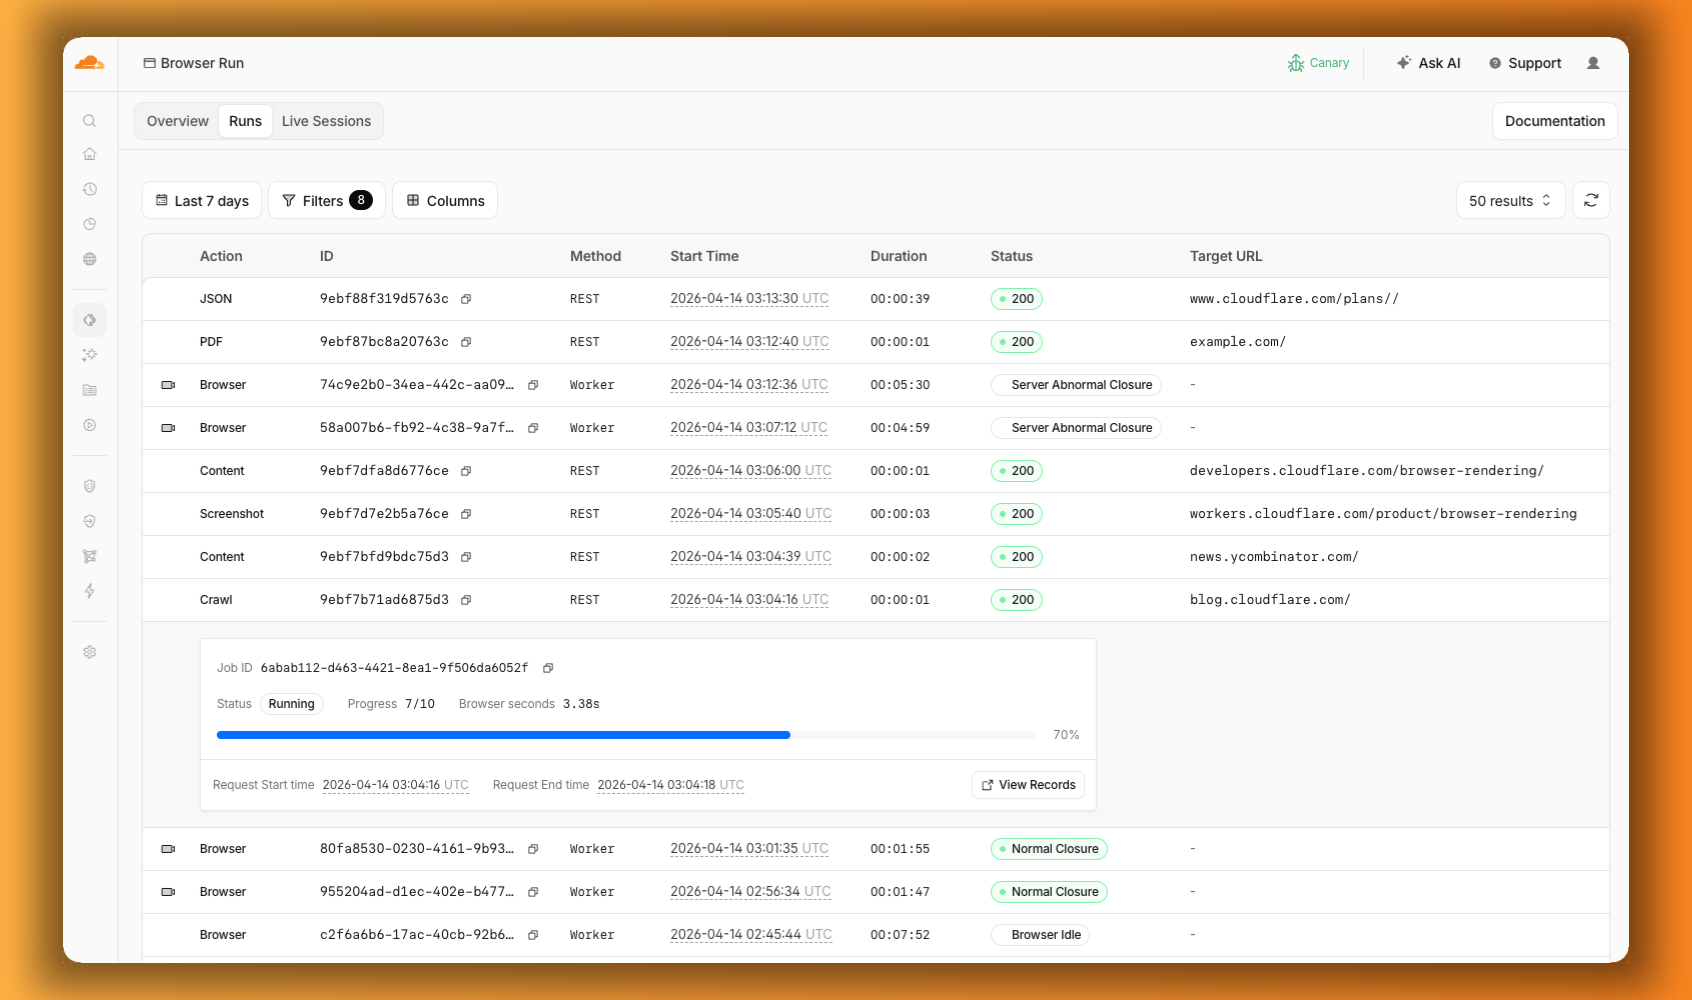

The Browser Run dashboard Runs tab showing browser sessions and quick actions like PDF, Screenshot, and Crawl in a single view, with a crawl job expanded to show its progress

4) Intervene

Agents are good, but they’re not perfect. Sometimes they need their human to step in. Browser Run supports Human in the Loop workflows where a human can take control of a live browser session, handle what the automation cannot, then let the session continue. 

Human in the Loop

When automation hits a wall, you don’t have to restart. With Human in the Loop, you can step in and interact with the page directly to click, type, navigate, enter credentials, or submit forms. This unlocks workflows that agents cannot handle.

Today, you can step in by opening the Live View URL for any active session. Next, we’re adding a handoff flow where the agent can signal that it needs help, notify a human to step in, then hand control back to the agent once the issue is resolved.

An AI agent searching Amazon for an orange lava lamp, comparing options, and handing off to a human when sign-in is required to complete the purchase

5) Scale

Customers have asked us to raise limits so that they can do more, faster.

Higher limits

We’ve quadrupled the default concurrent browser limit from 30 to 120. Every session gives you instant access to a browser from a global pool of warm instances, so there’s no cold start waiting for a browser to spin up. In March, we also increased limits for Quick Actions to 10 requests per second. If you need higher limits, they’re available by request.

What’s next

  • Human in the Loop Handoff: today you can intervene in a browser session through Live View. Soon, the agent will be able to signal when it needs help, so you can build in notifications to alert a human to step in.

  • Session Recordings Inspection: you can already scrub through the timeline and replay any session. Soon, you’ll be able to inspect DOM state and console output as well.

  • Traces and Browser Logs: access debugging information without instrumenting your code. Console logs, network requests, timing data. If something broke, you’ll know where.

  • Screenshot, PDF, and markdown directly from Workers: the same simple tasks available through the REST API are coming to Workers Bindings. env.BROWSER.screenshot() just works, with no API tokens needed.

Get started

Browser Run is available today on both the Workers Free and Workers Paid plans. Everything we shipped today — Live View, Human in the Loop, Session Recordings, and higher concurrency limits — is ready to use. 

If you were already using Browser Rendering, everything works the same, just with a new name and more features.  

Check out the documentation to get started.


Project Think: building the next generation of AI agents on Cloudflare

Post Syndicated from Sunil Pai original https://blog.cloudflare.com/project-think/

Today, we’re introducing Project Think: the next generation of the Agents SDK. Project Think is a set of new primitives for building long-running agents (durable execution, sub-agents, sandboxed code execution, persistent sessions) and an opinionated base class that wires them all together. Use the primitives to build exactly what you need, or use the base class to get started fast.

Something happened earlier this year that changed how we think about AI. Tools like Pi, OpenClaw, Claude Code, and Codex proved a simple but powerful idea: give an LLM the ability to read files, write code, execute it, and remember what it learned, and you get something that looks less like a developer tool and more like a general-purpose assistant.

These coding agents aren’t just writing code anymore. People are using them to manage calendars, analyze datasets, negotiate purchases, file taxes, and automate entire business workflows. The pattern is always the same: the agent reads context, reasons about it, writes code to take action, observes the result, and iterates. Code is the universal medium of action.

Our team has been using these coding agents every day. And we kept running into the same walls:

  • They only run on your laptop or an expensive VPS: there’s no sharing, no collaboration, no handoff between devices.

  • They’re expensive when idle: a fixed monthly cost whether the agent is working or not. Scale that to a team, or a company, and it adds up fast.

  • They require management and manual setup: installing dependencies, managing updates, configuring identity and secrets.

And there’s a deeper structural issue. Traditional applications serve many users from one instance. As mentioned in our Welcome to Agents Week post, agents are one-to-one. Each agent is a unique instance, serving one user, running one task. A restaurant has a menu and a kitchen optimized to churn out dishes at volume. An agent is more like a personal chef: different ingredients, different techniques, different tools every time.

That fundamentally changes the scaling math. If a hundred million knowledge workers each use an agentic assistant at even modest concurrency, you need capacity for tens of millions of simultaneous sessions. At current per-container costs, that’s unsustainable. We need a different foundation.

That’s what we’ve been building.

Introducing Project Think

Project Think ships a set of new primitives for the Agents SDK:

  • Durable execution with fibers: crash recovery, checkpointing, automatic keepalive

  • Sub-agents: isolated child agents with their own SQLite and typed RPC

  • Persistent sessions: tree-structured messages, forking, compaction, full-text search

  • Sandboxed code execution: Dynamic Workers, codemode, runtime npm resolution

  • The execution ladder: workspace, isolate, npm, browser, sandbox

  • Self-authored extensions: agents that write their own tools at runtime

Each of these is usable directly with the Agent base class. Build exactly what you need with the primitives, or use the Think base class to get started fast. Let’s look at what each one does.

Long-running agents

Agents, as they exist today, are ephemeral. They run for a session, tied to a single process or device, and then they are gone. A coding agent that dies when your laptop sleeps, that’s a tool. An agent that persists — that can wake up on demand, continue work after interruptions, and carry forward the state without depending on your local runtime — that starts to look like infrastructure. And it changes the scaling model for agents completely.

The Agents SDK builds on Durable Objects to give every agent an identity, persistent state, and the ability to wake on message. This is the actor model: each agent is an addressable entity with its own SQLite database. It consumes zero compute when hibernated. When something happens (an HTTP request, a WebSocket message, a scheduled alarm, an inbound email) the platform wakes the agent, loads its state, and hands it the event. The agent does its work, then goes back to sleep.

VMs / Containers

Durable Objects

Idle cost

Full compute cost, always

Zero (hibernated)

Scaling

Provision and manage capacity

Automatic, per-agent

State

External database required

Built-in SQLite

Recovery

You build it (process managers, health checks)

Platform restarts, state survives

Identity / routing

You build it (load balancers, sticky sessions)

Built-in (name → agent)

10,000 agents, each active 1% of the time

10,000 always-on instances

~100 active at any moment

This changes the economics of running agents at scale. Instead of “one expensive agent per power user,” you can build “one agent per customer” or “one agent per task” or “one agent per email thread.” The marginal cost of spawning a new agent is effectively zero.

Surviving crashes: durable execution with fibers

An LLM call takes 30 seconds. A multi-turn agent loop can run for much longer. At any point during that window, the execution environment can vanish: a deploy, a platform restart, hitting resource limits. The upstream connection to the model provider is severed permanently, in-memory state is lost, and connected clients see the stream stop with no explanation.

runFiber() solves this. A fiber is a durable function invocation: registered in SQLite before execution begins, checkpointable at any point via stash(), and recoverable on restart via onFiberRecovered.

import { Agent } from "agents";

export class ResearchAgent extends Agent {
  async startResearch(topic: string) {
    void this.runFiber("research", async (ctx) => {
      const findings = [];

      for (let i = 0; i < 10; i++) {
        const result = await this.callLLM(`Research step ${i}: ${topic}`);
        findings.push(result);

        // Checkpoint: if evicted, we resume from here
        ctx.stash({ findings, step: i, topic });

        this.broadcast({ type: "progress", step: i });
      }

      return { findings };
    });
  }

  async onFiberRecovered(ctx) {
    if (ctx.name === "research" && ctx.snapshot) {
      const { topic } = ctx.snapshot;
      await this.startResearch(topic);
    }
  }
}

The SDK keeps the agent alive automatically during fiber execution, no special configuration needed. For work measured in minutes, keepAlive() / keepAliveWhile() prevents eviction during active work. For longer operations (CI pipelines, design reviews, video generation) the agent starts the work, persists the job ID, hibernates, and wakes on callback.

Delegating work: sub-agents via Facets

A single agent shouldn’t do everything itself. Sub-agents are child Durable Objects colocated with the parent via Facets, each with their own isolated SQLite and execution context:

import { Agent } from "agents";

export class ResearchAgent extends Agent {
  async search(query: string) { /* ... */ }
}

export class ReviewAgent extends Agent {
  async analyze(query: string) { /* ... */ }
}

export class Orchestrator extends Agent {
  async handleTask(task: string) {
    const researcher = await this.subAgent(ResearchAgent, "research");
    const reviewer = await this.subAgent(ReviewAgent, "review");

    const [research, review] = await Promise.all([
      researcher.search(task),
      reviewer.analyze(task)
    ]);

    return this.synthesize(research, review);
  }
}

Sub-agents are isolated at the storage level. Each one gets its own SQLite database, and there’s no implicit sharing of data between them. This is enforced by the runtime where sub-agent RPC latency is a function call. TypeScript catches misuse at compile time.

Conversations that persist: the Session API

Agents that run for days or weeks need more than the typical flat list of messages. The experimental Session API models this explicitly. Available on the Agent base class, conversations are stored as trees, where each message has a parent_id. This enables forking (explore an alternative without losing the original path), non-destructive compaction (summarize older messages rather than deleting them), and full-text search across conversation history via FTS5.

import { Agent } from "agents";
import { Session, SessionManager } from "agents/experimental/memory/session";

export class MyAgent extends Agent {
  sessions = SessionManager.create(this);

  async onStart() {
    const session = this.sessions.create("main");
    const history = session.getHistory();
    const forked = this.sessions.fork(session.id, messageId, "alternative-approach");
  }
}

Session is usable directly with Agent, and it’s the storage layer that the Think base class builds on.

From tool calls to code execution

Conventional tool-calling has an awkward shape. The model calls a tool, pulls the result back through the context window, calls another tool, pulls that back, and so on. As the tool surface grows, this gets both expensive and clumsy. A hundred files means a hundred round-trips through the model.

But models are better at writing code to use a system than they are at playing the tool-calling game. This is the insight behind @cloudflare/codemode: instead of sequential tool calls, the LLM writes a single program that handles the entire task.

// The LLM writes this. It runs in a sandboxed Dynamic Worker.
const files = await tools.find({ pattern: "**/*.ts" });
const results = [];
for (const file of files) {
  const content = await tools.read({ path: file });
  if (content.includes("TODO")) {
    results.push({ file, todos: content.match(/\/\/ TODO:.*/g) });
  }
}
return results;

Instead of 100 round-trips to the model, you just run a single program. This leads to fewer tokens used, faster execution, and better results. The Cloudflare API MCP server demonstrates this at scale. We expose only two tools (search() and execute()), which consume ~1,000 tokens, vs. ~1.17 million tokens for the naive tool-per-endpoint equivalent. This is a 99.9% reduction.

The missing primitive: safe sandboxes

Once you accept that models should write code on behalf of users, the question becomes: where does that code run? Not eventually, not after a product team turns it into a roadmap item. Right now, for this user, against this system, with tightly defined permissions.

Dynamic Workers are that sandbox. A fresh V8 isolate spun up at runtime, in milliseconds, with a few megabytes of memory. That’s roughly 100x faster and up to 100x more memory-efficient than a container. You can start a new one for every single request, run a snippet of code, and throw it away.

The critical design choice is the capability model. Instead of starting with a general-purpose machine and trying to constrain it, Dynamic Workers begin with almost no ambient authority (globalOutbound: null, no network access) and the developer grants capabilities explicitly, resource by resource, through bindings. We go from asking “how do we stop this thing from doing too much?” to “what exactly do we want this thing to be able to do?”

This is the right question for agent infrastructure.

The execution ladder

This capability model leads naturally to a spectrum of compute environments, an execution ladder that the agent escalates through as needed:


Tier 0 is the Workspace, a durable virtual filesystem backed by SQLite and R2. Read, write, edit, search, grep, diff. Powered by @cloudflare/shell.

Tier 1 is a Dynamic Worker: LLM-generated JavaScript running in a sandboxed isolate with no network access. Powered by @cloudflare/codemode.

Tier 2 adds npm. @cloudflare/worker-bundler fetches packages from the registry, bundles them with esbuild, and loads the result into the Dynamic Worker. The agent writes import { z } from "zod" and it just works.

Tier 3 is a headless browser via Cloudflare Browser Run. Navigate, click, extract, screenshot. Useful when the service doesn’t support agents yet via MCP or APIs.

Tier 4 is a Cloudflare Sandbox configured with your toolchains, repos, and dependencies: git clone, npm test, cargo build, synced bidirectionally with the Workspace.

The key design principle: the agent should be useful at Tier 0 alone, where each tier is additive. The user can add capabilities as they go.

Building blocks, not a framework

All of these primitives are available as standalone packages. Dynamic Workers, @cloudflare/codemode, @cloudflare/worker-bundler, and @cloudflare/shell (a durable filesystem with tools) are all usable directly with the Agent base class. You can combine them to give any agent a workspace, code execution, and runtime package resolution without adopting an opinionated framework.

The platform

Here’s the complete stack for building agents on Cloudflare:

Capability

What it does

Powered by

Per-agent isolation

Every agent is its own world

Durable Objects (DOs)

Zero cost when idle

$0 until the agent wakes up

DO Hibernation

Persistent state

Queryable, transactional storage

DO SQLite

Durable filesystem

Files that survive restarts

Workspace (SQLite + R2)

Sandboxed code execution

Run LLM-generated code safely

Dynamic Workers + @cloudflare/codemode

Runtime dependencies

import * from react just works

@cloudflare/worker-bundler

Web automation

Browse, navigate, fill forms

Browser Run

Full OS access

git, compilers, test runners

Sandboxes

Scheduled execution

Proactive, not just reactive

DO Alarms + Fibers

Real-time streaming

Token-by-token to any client

WebSockets

External tools

Connect to any tool server

MCP

Agent coordination

Typed RPC between agents

Sub-agents (Facets)

Model access

Connect to an LLM to power the agent

AI Gateway + Workers AI (or Bring Your Own Model)

Each of these is a building block. Together, they form something new: a platform where anyone can build, deploy, and run AI agents as capable as the ones running on your local machine today, but serverless, durable, and safe by construction.

The Think base class

Now that you’ve seen the primitives, here’s what happens when you wire them all together.

Think is an opinionated harness that handles the full chat lifecycle: agentic loop, message persistence, streaming, tool execution, stream resumption, and extensions. You focus on what makes your agent unique.

The minimal subclass looks like this:

import { Think } from "@cloudflare/think";
import { createWorkersAI } from "workers-ai-provider";

export class MyAgent extends Think<Env> {
  getModel() {
    return createWorkersAI({ binding: this.env.AI })(
      "@cf/moonshotai/kimi-k2.5"
    );
  }
}

That’s effectively all you need to have a working chat agent with streaming, persistence, abort/cancel, error handling, resumable streams, and a built-in workspace filesystem. Deploy with npx wrangler deploy.

Think makes decisions for you. When you need more control, you can override the ones you care about:

Override

Purpose

getModel()

Return the LanguageModel to use

getSystemPrompt()

System prompt

getTools()

AI SDK compatible ToolSet for the agentic loop

maxSteps

Max tool-call rounds per turn

configureSession()

Context blocks, compaction, search, skills

Under the hood, Think runs the complete agentic loop on every turn: it assembles the context (base instructions + tool descriptions + skills + memory + conversation history), calls streamText, executes tool calls (with output truncation to prevent context blowup), appends results, loops until the model is done or the step limit is reached. All messages are persisted after each turn.

Lifecycle hooks

Think gives you hooks at every stage of the chat turn, without requiring you to own the whole pipeline:

beforeTurn()
  → streamText()
    → beforeToolCall()
    → afterToolCall()
  → onStepFinish()
→ onChatResponse()

Switch to a lower cost model for follow-up turns, limit the tools it can use, and pass in client-side context on each turn. Also log every tool call to analytics and automatically trigger one more follow-up turn after the model completes, all without replacing onChatMessage.

Persistent memory and long conversations

Think builds on Session API as its storage layer, giving you tree-structured messages with branching built in.

On top of that, it adds persistent memory through context blocks. These are structured sections of the system prompt that the model can read and update over time, and they persist across hibernation.The model sees “MEMORY (Important facts, use set_context to update) [42%, 462/1100 tokens]” and can proactively remember things.

configureSession(session: Session) {
  return session
    .withContext("soul", {
      provider: { get: async () => "You are a helpful coding assistant." }
    })
    .withContext("memory", {
      description: "Important facts learned during conversation.",
      maxTokens: 2000
    })
    .withCachedPrompt();
}

Sessions are flexible. You can run multiple conversations per agent and fork them to try a different direction without losing the original. 

As context grows, Think handles limits with non-destructive compaction. Older messages are summarized instead of removed, while the full history remains stored in SQLite. 

Search is built in as well. Using FTS5, you can query conversation history within a session or across all the sessions. The agent is also able to search its own past using search_context tool.

The full execution ladder, wired in

Think integrates the entire execution ladder into a single getTools() return:

import { Think } from "@cloudflare/think";
import { createWorkspaceTools } from "@cloudflare/think/tools/workspace";
import { createExecuteTool } from "@cloudflare/think/tools/execute";
import { createBrowserTools } from "@cloudflare/think/tools/browser";
import { createSandboxTools } from "@cloudflare/think/tools/sandbox";
import { createExtensionTools } from "@cloudflare/think/tools/extensions";

export class MyAgent extends Think<Env> {
  extensionLoader = this.env.LOADER;

  getModel() {
    /* ... */
  }

  getTools() {
    return {
      execute: createExecuteTool({
        tools: createWorkspaceTools(this.workspace),
        loader: this.env.LOADER
      }),
      ...createBrowserTools(this.env.BROWSER),
      ...createSandboxTools(this.env.SANDBOX), // configured per-agent: toolchains, repos, snapshots
      ...createExtensionTools({ manager: this.extensionManager! }),
      ...this.extensionManager!.getTools()
    };
  }
}

Self-authored extensions

Think takes code execution one step further. An agent can write its own extensions: TypeScript programs that run in Dynamic Workers, declaring permissions for network access and workspace operations.

{
  "name": "github",
  "description": "GitHub integration: PRs, issues, repos",
  "tools": ["create_pr", "list_issues", "review_pr"],
  "permissions": {
    "network": ["api.github.com"],
    "workspace": "read-write"
  }
}

Think’s ExtensionManager bundles the extension (optionally with npm deps via @cloudflare/worker-bundler), loads it into a Dynamic Worker, and registers the new tools. The extension persists in DO storage and survives hibernation. The next time the user asks about pull requests, the agent has a github_create_pr tool that didn’t exist 30 seconds ago.

This is the kind of self-improvement loop that makes agents genuinely more useful over time. Not through fine-tuning or RLHF, but through code. The agent is able to write new capabilities for itself, all in sandboxed, auditable, and revocable TypeScript.

Sub-agent RPC

Think also works as a sub-agent, called via chat() over RPC from a parent, with streaming events via callback:

const researcher = await this.subAgent(ResearchSession, "research");
const result = await researcher.chat(`Research this: ${task}`, streamRelay);

Each child gets its own conversation tree, memory, tools, and model. The parent doesn’t need to know the details.

Getting started

Project Think is experimental. The API surface is stable but will continue to evolve in the coming days and weeks. We’re already using it internally to build our own background agent infrastructure, and we’re sharing it early so you can build alongside us.

npm install @cloudflare/think agents ai @cloudflare/shell zod workers-ai-provider
// src/server.ts
import { Think } from "@cloudflare/think";
import { createWorkersAI } from "workers-ai-provider";
import { routeAgentRequest } from "agents";

export class MyAgent extends Think<Env> {
  getModel() {
    return createWorkersAI({ binding: this.env.AI })(
      "@cf/moonshotai/kimi-k2.5"
    );
  }
}

export default {
  async fetch(request: Request, env: Env) {
    return (
      (await routeAgentRequest(request, env)) ||
      new Response("Not found", { status: 404 })
    );
  }
} satisfies ExportedHandler<Env>;
// src/client.tsx
import { useAgent } from "agents/react";
import { useAgentChat } from "@cloudflare/ai-chat/react";

function Chat() {
  const agent = useAgent({ agent: "MyAgent" });
  const { messages, sendMessage, status } = useAgentChat({ agent });
  // Render your chat UI
}

Think speaks the same WebSocket protocol as @cloudflare/ai-chat, so existing UI components work out of the box. If you’ve built on AIChatAgent, your client code doesn’t change.

The third wave

We see three waves of AI agents:

The first wave was chatbots. They were stateless, reactive, and fragile. Every conversation started from scratch with no memory, no tools, and no ability to act. This made them useful for answering questions, but limited them to only answering questions.

The second wave was coding agents. These are stateful, tool-using and far more capable tools like Pi, Claude Code, OpenClaw, and Codex. These agents can read codebases, write code, execute it, and iterate. These proved that an LLM with the right tools is a general-purpose machine, but they run on your laptop, for one user, with no durability guarantees.

Now we are entering the third wave: agents as infrastructure. Durable, distributed, structurally safe, and serverless. These are agents that run on the Internet, survive failures, cost nothing when idle, and enforce security through architecture rather than behavior. Agents that any developer can build and deploy for any number of users.

This is the direction we’re betting on.

The Agents SDK is already powering thousands of production agents. With Project Think and the the primitives it introduces, we’re adding the missing pieces to make those agents dramatically more capable: persistent workspaces, sandboxed code execution, durable long-running tasks, structural security, sub-agent coordination, and self-authored extensions.

It’s available today in preview. We’re building alongside you, and we’d genuinely love to see what you (and your coding agent) create with it.


Think is part of the Cloudflare Agents SDK, available as @cloudflare/think. The features described in this post are in preview. APIs may change as we incorporate feedback. Check the documentation and example to get started.

Register domains wherever you build: Cloudflare Registrar API now in beta

Post Syndicated from Ankit Shah original https://blog.cloudflare.com/registrar-api-beta/

Today we’re launching the next chapter of Cloudflare Registrar: the Registrar API in beta.

The Registrar API makes it possible to search for domains, check availability, and register them programmatically. Now, buying a domain the moment an idea starts to feel real no longer has to pull you out of the agentic workflow.

A Registrar API has been one of the clearest asks from builders using Cloudflare. As more of the agentic workflow has moved into editors, terminals, and agent-driven tools, domain registration became the obvious gap to close.

When we launched Cloudflare Registrar seven years ago, the idea was simple. Domains should be offered at cost, with no markup and no games. Since then, Cloudflare Registrar has become one of the fastest growing registrars in the world as more people choose Cloudflare as the place to build their next project.

Prompting an agent inside an AI code editor to generate name ideas, search, check, and purchase a domain.

Built for agents and automation

The Registrar API is designed to work well anywhere software is already being built: inside editors, deployment pipelines, backend services, and agent-driven workflows.

The workflow is intentionally simple and machine-friendly. Search returns candidate names. Check returns real-time availability and pricing. Register takes a minimal request and returns a workflow-shaped response that can complete immediately or be polled if it takes longer. That makes it straightforward to use for traditional API clients and for AI agents acting on a user’s behalf.

In practice, all this means that an agent can help with the full flow: suggest names, confirm which one is actually registrable, surface the price for approval, and then complete the purchase without forcing the user out of the tool they are already using.

The Registrar API

At its core, this first release of the Registrar API does three things

  • Search for domains

  • Check availability

  • Register domains

For a curated set of popular TLDs to start, see the Registrar API docs. When supported, premium domains can also be registered, but they require explicit fee acknowledgement.

The Registrar API is part of the full Cloudflare API, which means agents already have access to it today through the Cloudflare MCP. It does not require a separate integration or a custom tool definition. An agent working in Cursor, Claude Code, or any MCP-compatible environment can discover and call Registrar endpoints using the same search() and execute() pattern that covers the entire Cloudflare API surface. The moment the API was part of our spec, it was ready for agents.

What it looks like in practice:

You’re building a new project in your favorite AI code editor. Halfway through scaffolding, you ask your agent: “Find me a good .dev domain for this project and register it.”

The agent searches for candidate names based on your project. It checks real-time availability for the one you pick and confirms the price. You say yes. It registers the domain, using your account’s default contact info and payment method automatically. By the time you’ve read the response, the domain is registered, and privacy is on.

Three API calls. A few seconds.

What it looks like in code:

Step 1: Search for domain names

Use the search endpoint to submit a domain query, with or without a domain extension.

async () => {
  return cloudflare.request({
    method: "GET",
    path: `/accounts/${accountId}/registrar/domain-search`,
    query: { q: "acme corp", limit: 3 },
  });
}
{
  "success": true,
  "errors": [],
  "messages": [],
  "result": {
    "domains": [
      {
        "name": "acmecorp.com",
        "registrable": true,
        "tier": "standard",
        "pricing": {
          "currency": "USD",
          "registration_cost": "8.57",
          "renewal_cost": "8.57"
        }
      },
      {
        "name": "acmecorp.dev",
        "registrable": true,
        "tier": "standard",
        "pricing": {
          "currency": "USD",
          "registration_cost": "10.11",
          "renewal_cost": "10.11"
        }
      },
      {
        "name": "acmecorp.app",
        "registrable": true,
        "tier": "standard",
        "pricing": {
          "currency": "USD",
          "registration_cost": "11.00",
          "renewal_cost": "11.00"
        }
      }
    ]
  }
}

Step 2: Check availability and pricing

Search results are fast but non-authoritative; they’re based on cached data, and availability can change in seconds for popular names. Check queries the registry directly. Call it immediately before registering, and use its price response as the source of truth.

async () => {
  return cloudflare.request({
    method: "POST",
    path: `/accounts/${accountId}/registrar/domain-check`,
    body: { domains: ["acmecorp.dev"] },
  });
}
{
  "success": true,
  "errors": [],
  "messages": [],
  "result": {
    "domains": [
      {
        "name": "acmecorp.dev",
        "registrable": true,
        "tier": "standard",
        "pricing": {
          "currency": "USD",
          "registration_cost": "10.11",
          "renewal_cost": "10.11"
        }
      }
    ]
  }
}

Step 3: Register the domain

The only required field is the domain name. WHOIS privacy protection is enabled by default at no extra charge. If your account has a default registrant contact, the API uses it automatically; otherwise you can provide contact details inline in the request. Your default payment method is used automatically.

async () => {
  return cloudflare.request({
    method: "POST",
    path: `/accounts/${accountId}/registrar/registrations`,
    body: { domain_name: "acmecorp.dev" },
  });
}
{
  "success": true,
  "errors": [],
  "messages": [],
  "result": {
    "domain_name": "acmecorp.dev",
    "state": "succeeded",
    "completed": true,
    "created_at": "2025-10-27T10:00:00Z",
    "updated_at": "2025-10-27T10:00:03Z",
    "context": {
      "registration": {
        "domain_name": "acmecorp.dev",
        "status": "active",
        "created_at": "2025-10-27T10:00:00Z",
        "expires_at": "2026-10-27T10:00:00Z",
        "auto_renew": true,
        "privacy_enabled": true,
        "locked": true
      }
    },
    "links": {
      "self": "/accounts/abc/registrar/registrations/acmecorp.dev/registration-status",
      "resource": "/accounts/abc/registrar/registrations/acmecorp.dev"
    }
  }
}

Registration typically completes synchronously within seconds. If it takes longer, the API returns a 202 Accepted with a workflow URL to poll. The response shape is the same either way, no special-casing needed. For premium domains, the Check response returns the exact registry-set price, and the Register request echoes that back as an explicit fee acknowledgement.

A note on agents and non-refundable purchases

When an agent registers a domain on your behalf, it charges your default payment method. Domain registrations are non-refundable once complete. A well-designed agent flow should confirm the domain name and price with the user before calling the registration endpoint. The Check step exists precisely to make that confirmation step explicit and unambiguous. The API gives you the tools to build it correctly; the responsibility to do so belongs in your agent’s logic.

By default, our API docs have explicit agent-facing instructions to seek permission from the user during the register API call. Still, it is the responsibility of the human to design an agent flow that will not buy domains without your approval.

Why Cloudflare can do this differently

What makes Cloudflare different from many developer platforms now adding domain workflows is that Cloudflare operates the registrar itself. That means the same platform where a project is built and deployed can also search for, register, and manage the domain — without adding markup on top.

At-cost pricing is at the core of Cloudflare’s registrar model. We charge exactly what the registry charges. That holds true whether you’re registering a domain through the dashboard, calling the API directly, or asking an agent to do it on your behalf.

Where the API goes next

This beta focuses on the first critical moment in the domain lifecycle: search, check, and registration. We are actively working on expanding the API to cover more of the core Registrar experience, so domains can be managed programmatically after they are purchased, not just at the moment they are created. This will include lifecycle elements like transfers, renewals, contact updates, and more.

The API is the first step toward a broader registrar-as-a-service offering. Development of that service is underway now, and we’re aiming to launch it later this year. As the API expands, platforms like website builders, hosting providers, AI products, and other multi-tenant applications will be able to make domain registration part of their own user experience. Users can search for a domain, buy it, and provision it without ever leaving the service or agent-driven workflow they are already building in.

Start building today

The Registrar API exists because builders asked for it. Now that it’s available as a beta, we’d love to see what you build, in the Cloudflare Community or on X, or on Discord.

To get started:

Please let us know if something is missing, if a workflow breaks down, or if you are building toward a larger platform use case. We’re working quickly to expand the functionality of the API to support domain renewals, transfers, and more.

We can’t wait to see what you build!

Special thanks to Lucy Dryaeva and Fred Pinto for their valuable contributions to delivering the Registrar API beta.

Introducing Agent Lee – a new interface to the Cloudflare stack

Post Syndicated from Kylie Czajkowski original https://blog.cloudflare.com/introducing-agent-lee/

While there have been small improvements along the way, the interface of technical products has not really changed since the dawn of the Internet. It still remains: clicking five pages deep, cross-referencing logs across tabs, and hunting for hidden toggles.

AI gives us the opportunity to rethink all that. Instead of complexity spread over a sprawling graphical user interface: what if you could describe in plain language what you wanted to achieve? 

This is the future — and we’re launching it today. We didn’t want to just put an agent in a dashboard. We wanted to create an entirely new way to interact with our entire platform. Any task, any surface, a single prompt.

Introducing Agent Lee.

Agent Lee is an in-dashboard AI assistant that understands your Cloudflare account. 

It can help you with troubleshooting, which, today, is a manual grind. If your Worker starts returning 503s at 02:00 UTC, finding the root cause: be it an R2 bucket, a misconfigured route, or a hidden rate limit, you’re opening half a dozen tabs and hoping you recognize the pattern. Most developers don’t have a teammate who knows the entire platform standing over their shoulder at 2 a.m. Agent Lee does. 

But it won’t just troubleshoot for you at 2 a.m. Agent Lee will also fix the problem for you on the spot.


Agent Lee has been running in an active beta during which it has served over 18,000 daily users, executing nearly a quarter of a million tool calls per day. While we are confident in its current capabilities and success in production, this is a system we are continuously developing. As it remains in beta, you may encounter unexpected limitations or edge cases as we refine its performance. We encourage you to use the feedback form below to help us make it better every day.

What Agent Lee can do

Agent Lee is built directly into the dashboard and understands the resources in your account. It knows your Workers, your zones, your DNS configuration, your error rates. The knowledge that today lives across six tabs and two browser windows will now live in one place, and you can talk to it.

With natural language, you can use it to:

  • Answer questions about your account: “Show me the top 5 error messages on my Worker.”

  • Debug an issue: “I can’t access my site with the www prefix.”

  • Apply a change: “Enable Access for my domain.”

  • Deploy a resource: “Create a new R2 bucket for my photos and connect it to my Worker.”

Instead of switching between products, you describe what you want to do, and Agent Lee helps you get there with instructions and visualizations. It retrieves context, uses the right tools, and creates dynamic visualizations based on the types of questions you ask. Ask what your error rate looks like over the last 24 hours, and it renders a chart inline, pulling from your actual traffic, not sending you to a separate Analytics page.

Agent Lee isn’t answering FAQ questions — it’s doing real work, against real accounts, at scale. Today, Agent Lee serves ~18,000 daily users, executing ~250k tool calls per day across DNS, Workers, SSL/TLS, R2, Registrar, Cache, Cloudflare Tunnel, API Shield, and more. 

How we built it

Codemode

Rather than presenting MCP tool definitions directly to the model, Agent Lee uses Codemode to convert the tools into a TypeScript API and asks the model to write code that calls it instead.

This works better for a couple of reasons. LLMs have seen a huge amount of real-world TypeScript but very few tool call examples, so they’re more accurate when working in code. For multi-step tasks, the model can also chain calls together in a single script and return only the final result, ultimately skipping the round-trips.

The generated code is sent to an upstream Cloudflare MCP server for sandboxed execution, but it goes through a Durable Object that acts as a credentialed proxy. Before any call goes out, the DO classifies the generated code as read or write by inspecting the method and body. Read operations are proxied directly. Write operations are blocked until you explicitly approve them through the elicitation gate. API keys are never present in the generated code — they’re held inside the DO and injected server-side when the upstream call is made. The security boundary isn’t just a sandbox that gets thrown away; it’s a permission architecture that structurally prevents writes from happening without your approval.

The MCP permission system

Agent Lee connects to Cloudflare’s own MCP server, which exposes two tools: a search tool for querying API endpoints and an execute tool for writing code that performs API requests. This is the surface through which Agent Lee reads your account and, when you approve, writes to it.

Write operations go through an elicitation system that surfaces the approval step before any code executes. Agent Lee cannot skip this step. The permission model is the enforcement layer, and the confirmation prompt you see is not a UX courtesy. It’s the gate.


Built on the same stack you can use

Every primitive Agent Lee is built on is available to all our customers: Agents SDK, Workers AI, Durable Objects, and the same MCP infrastructure available to any Cloudflare developer. We didn’t build internal tools that aren’t available to you — instead we built it with the same Cloudflare lego blocks that you have access to.

Building Agent Lee on our own primitives wasn’t just a design principle. It was the fastest way to find out what works and what doesn’t. We built this in production, with real users, against real accounts. That means every limitation we hit is a limitation we can fix in the platform. Every pattern that works is one we can make easier for the next team that builds on top of it.

These are not opinions. They’re what quarter of a million tool calls across 18,000 users a day are telling us.


Generative UI

Interacting with a platform should feel like collaborating with an expert. Conversations should transcend simple text. With Agent Lee, as your dialogue evolves, the platform dynamically generates UI components alongside textual responses to provide a richer, more actionable experience.

For example, if you ask about website traffic trends for the month, you won’t just get a paragraph of numbers. Agent Lee will render an interactive line graph, allowing you to visualize peaks and troughs in activity at a glance.

To give you full creative control, every conversation is accompanied within an adaptive grid. Here you can click and drag across the grid to carve out space for new UI blocks, then simply describe what you want to see and let the agent handle the heavy lifting.

Today, we support a diverse library of visual blocks, including dynamic tables, interactive charts, architecture maps, and more. By blending the flexibility of natural language with the clarity of structured UI, Agent Lee transforms your chat history into a living dashboard.


Measuring quality and safety

An agent that can take action on your account needs to be reliable and secure. Elicitations allow agentic systems to actively solicit information, preferences, or approvals from users or other systems mid-execution. When Agent Lee needs to take non-read actions on a user’s behalf we use elicitations by requiring an explicit approval action in the user interface. These guardrails allow Agent Lee to truly be a partner alongside you in managing your resource safely.

In addition to safety, we continuously measure quality.

  • Evals to measure conversation success rate and information accuracy.

  • Feedback signals from user interactions (thumbs up / thumbs down).

  • Tool call execution success rate and hallucination scorers.

  • Per-product breakdown of conversation performance.

These systems help us improve Agent Lee over time while keeping users in control. 

Our vision ahead

Agent Lee in the dashboard is only the beginning.

The bigger vision is Agent Lee as the interface to the entire Cloudflare platform — from anywhere. The dashboard today, the CLI next, your phone when you’re on the go. The surface you use shouldn’t matter. You should be able to describe what you need and have it done, regardless of where you are.

From there, Agent Lee gets proactive. Rather than waiting to be asked, it watches what matters to you, your Workers, your traffic, your error thresholds and reaches out when something warrants attention. An agent that only responds is useful. One that notices things first is something different.

Underlying all of this is context. Agent Lee already knows your account configuration. Over time, it will know more, what you’ve asked before, what page you’re on, what you were debugging last week. That accumulated context is what makes a platform feel less like a tool and more like a collaborator.

We’re not there yet. Agent Lee today is the first step, running in production, doing real work at scale. The architecture is built to get to the rest.

Try it out

Agent Lee is available in beta for Free plan users. Log in to your Cloudflare dashboard and click Ask AI in the upper right corner to get started.

We’d love to know what you build and what you’d like to see in Agent Lee. Please share your feedback here.


Rearchitecting the Workflows control plane for the agentic era

Post Syndicated from Luís Duarte original https://blog.cloudflare.com/workflows-v2/

When we originally built Workflows, our durable execution engine for multi-step applications, it was designed for a world in which workflows were triggered by human actions, like a user signing up or placing an order. For use cases like onboarding flows, workflows only had to support one instance per person — and people can only click so fast. 

Over time, what we’ve actually seen is a quantitative shift in the workload and access pattern: fewer human-triggered workflows, and more agent-triggered workflows, created at machine speed. 

As agents become persistent and autonomous infrastructure, operating on behalf of users for hours or days, they need a durable, asynchronous execution engine for the work they are doing. Workflows provides exactly that: every step is independently retryable, the workflow can pause for human-in-the-loop approval, and each instance survives failures without losing progress.  

Moreover, workflows themselves are being used to implement agent loops and serve as the durable harnesses that manage and keep agents alive. Our Agents SDK integration accelerated this, making it easy for agents to spawn workflow instances and get real-time progress back. A single agent session can now kick off dozens of workflows, and many agents running concurrently means thousands of instances created in seconds. With Project Think now available, we anticipate that velocity will only increase.

To help developers scale their agents and applications on Workflows, we are excited to announce that we now support:

  • 50,000 concurrent instances (number of workflow executions running in parallel), originally 4,500

  • 300 instances/second created per account, previously 100

  • 2 million queued instances (meaning instances that have been created or awoken and are waiting for a concurrency slot) per workflow, up from 1 million

We redesigned the Workflows control plane from usage data and first principles to support these increases. For V1 of the control plane, a single Durable Object (DO) could serve as the central registry and coordinator of an entire account. For V2, we built two new components to help horizontally scale the system and alleviate the bottlenecks that V1 introduced, before migrating all customers — with live traffic — seamlessly onto the new version.

V1: initial architecture of Workflows

As described in our public beta blog post, we built Workflows entirely on our own developer platform. Fundamentally, a workflow is a series of durable steps, each independently retryable, that can execute tasks, wait for external events, or sleep until a predetermined time. 

export class MyWorkflow extends WorkflowEntrypoint {

  async run(event, step) {
    const data = await step.do("fetch-data", async () => {
      return fetchFromAPI();
    });

    const approval = await step.waitForEvent("approval", {
      type: "approval",
      timeout: "24 hours",
    });

    await step.do("process-and-save", async () => {
      return store(transform(data));
    });
  }
}

To trigger each instance, execute its logic, and store its metadata, we leverage SQLite-backed Durable Objects, which are a simple but powerful primitive for coordination and storage within a distributed system. 

In the control plane, some Durable Objects — like the Engine, which executes the actual workflow instance, including its step, retry, and sleep logic — are spun up at a ratio of 1:1 per instance. On the other hand, the Account is an account-level Durable Object that manages all workflows and workflow instances for that account.


To learn more about the V1 control plane, refer to our Workflows announcement blog post.

After we launched Workflows into beta, we were thrilled to see customers quickly scaling their use of the product, but we also realized that having a single Durable Object to store all that account-level information introduced a bottleneck. Many customers needed to create and execute hundreds or even thousands of Workflow instances per minute, which could quickly overwhelm the Account in our original architecture. The original rate limits — 4,500 concurrency slots and 100 instance creations per 10 seconds — were a result of this limitation. 

On the V1 control plane, these limits were a hard cap. Any and all operations depending on Account, including create, update, and list, had to go through that single DO. Users with high concurrency workloads could have thousands of instances starting and ending at any given moment, building up to thousands of requests per second to Account. To solve for this, we rearchitected the workflow control plane such that it horizontally scales to higher concurrency and creation rate limits. 

V2: horizontal scale for higher throughput

For the new version, we rethought every single operation from the ground up with the goal of optimizing for high-volume workflows. Ultimately, Workflows should scale to support whatever developers need – whether that is thousands of instances created per second or millions of instances running at a time. We also wanted to ensure that V2 allowed for flexible limits, which we can toggle and continue increasing, rather than the hard cap which V1 limits imposed. After many design iterations, we settled on the following pillars for our new architecture: 

  • The source of truth for the existence of a given instance should be its Engine and nothing else. 

    • In the V1 control plane architecture, we lacked a check before queuing the instance as to whether its Engine actually existed. This allowed for a bad state where an instance may have been queued without its corresponding Engine having spun up. 

    • Instance lifecycle and liveness mechanisms must be horizontally scalable per-workflow and distributed throughout many regions.

  • The new Account singleton should only store the minimum necessary metadata and have an invariant maximum amount of concurrent requests.


There are two new, critical components in the V2 control plane which allowed us to improve the scalability of Workflows: SousChef and Gatekeeper. The first component, SousChef, is a “second in command” to the Account. Recall that previously, the Account managed the metadata and lifecycle for all of the instances across all of the workflows within a given account. SousChef was introduced to keep track of metadata and lifecycle on a subset of instances in a given workflow. Within an account, a distribution of SousChefs can then report back to Account in a more efficient and manageable way. (An added benefit of this design: not only did we already have per-account isolation, but we also inadvertently gained “per-workflow” isolation within the same account, since each SousChef only takes care of one specific workflow).

The second component, Gatekeeper, is a mechanism to distribute concurrency “slots” (derived from concurrency limits) across all SousChefs within the account. It acts as a leasing system. When an instance is created, it is randomly assigned to one of the SousChefs within that account. Then the SousChef makes a request to Account to trigger that instance. Either a slot is granted, or the instance is queued. Once the slot is granted, the SousChef triggers execution of the instance and assumes responsibility that the instance never gets stuck. 

Gatekeeper was needed to make sure that Engines never overloaded their Account (a pressing risk on V1) so every communication between SousChefs and their Account happens on a periodic cycle, once per second — each cycle will also batch all slot requests, ensuring that only one JSRPC call is made. This ensures the instance creation rate can never overload or influence the most important component, Account (as an aside: if the SousChef count is too high, we rate-limit calls or spread across different SousChefs throughout different time periods). Also, this periodic property allows us to preserve fairness on older instances and to ensure max-min fairness through the many SousChefs, allowing them all to progress. For example, if an instance wakes up, it should be prioritized for a slot over a newly created instance, but each SousChef ensures that its own instances do not get stuck.

This architecture is more distributed, and therefore, more scalable. Now, when an instance is created, the request path is:

  1. Check control plane version

  2. Check if a cached version of the workflow and version details is available in that location

    1. If not, check Account to get workflow name, unique ID, and version, and cache that information

  3. Store only necessary metadata (instance payload, creation date) onto its own Engine

So, how does Engine tell the control plane that it now exists? That happens in the background after instance metadata is set. As background operations on a Durable Object can fail, due to eviction or server failure, we also set an “alarm” on Engine in the creation hot-path. That way, if the background task does not finish, the alarm ensures that the instance will begin. 

A Durable Object alarm allows a Durable Object instance to be awakened at a fine-grained time in the future with an at-least-once execution model, with automatic retries built in. We extensively use this combination of background “tasks” and alarms to remove operations off the hot-path while still ensuring that everything will happen as planned. That’s how we keep critical operations like creating an instance fast without ever compromising on reliability. 

Other than unlocking scale, this version of the control plane means that: 

  • Instance listing performance is faster, and actually consistent with cursor pagination; 

  • Any operation on an instance does exactly one network hop (as it can go directly to its Engine, ensuring that eyeball request latency is as small as we can manage);

  • We can ensure that more instances are actually behaving correctly (by running on time) concurrently (and correct them if not, making sure that Engines are never late to continue execution).

V1 → V2 migration

Now that we had a new version of the Workflows control plane that can handle a higher volume of user load, we needed to do the “boring” part: migrating our customers and instances to the new system. At Cloudflare’s scale, this becomes a problem in and of itself, so the “boring” part becomes the biggest challenge. Well before its one-year mark, Workflows had already racked up millions of instances and thousands of customers. Also, some tech debt on V1’s control plane meant that a queued instance might not have its own Engine Durable Object created yet, complicating matters further.

Such a migration is tricky because customers might have instances running at any given moment; we needed a way to add the SousChef and Gatekeeper components into older accounts without causing any disruption or downtime.

We ultimately decided that we would migrate existing Accounts (which we’ll refer to as AccountOlds) to behave like SousChefs. By persisting the Account DOs, we maintained the instance metadata, and simply converted the DO into a SousChef “DO”: 

// You might be wondering what's this SousChef class? This is the SousChef DO class!
import { SousChef } from "@repo/souschef";

class AccountOld extends DurableObject {
  constructor(state: DurableObjectState, env: Env) {
    // We added the following snippet to the end of our AccountOld DO's
    // constructor. This ensures that if we want, we can use any primitive
    // that is available on SousChef DO
    if (this.currentVersion === ControlPlaneVersions.SOUS_CHEFS) {
      this.sousChef = new SousChef(this.ctx, this.env);
      await this.sousChef.setup()
    }
  }

  async updateInstance(params: UpdateInstanceParams) {
    if (this.currentVersion === ControlPlaneVersions.SOUS_CHEFS) {
      assert(this.sousChef !== undefined, 'SousChef must exist on v2');
      return this.sousChef.updateInstance(params);
    }

    // old logic remains the same
  }

  @RequiresVersion<AccountOld>(ControlPlaneVersions.V1)
  async getMetadata() {
    // this method can only be run if 
    // this.currentVersion === ControlPlaneVersions.V1
  }
}

We can instantiate the SousChef class within the AccountOld because the SQL tables that track instance metadata, on both SousChefs and AccountOld DOs, are the same on both. As such, we could just decide which version of the code to use. If this hadn’t been the case, we would have been forced to migrate the metadata of millions of instances, which would have made the migration more difficult and longer running for each account. So, how did the migration work?

First, we prepared AccountOld DOs to be switched to behave as SousChefs (which meant creating a release with a version of the snippet above). Then, we enabled control plane V2 per account, which triggered the next three steps roughly at the same time:

  • All new instance creation requests are now routed to the new SousChefs (SousChefs are created when they receive the first request), new instances never go to AccountOld again;

  • AccountOld DOs start migrating themselves to behave like SousChefs;

  • The new Account DO is spun up with the corresponding metadata.

After all accounts were migrated to the new control plane version, we were able to sunset AccountOld DOs as their instance retention periods expired. Once all instances on all accounts on AccountOlds were migrated, we could spin down those DOs permanently. The migration was completed with no downtime in a process that truly felt like changing a car’s wheels while driving.

Try it out

If you are new to Workflows, try our Get Started guide or build your first durable agent with Workflows.

If your use case requires higher limits than our new defaults — a concurrency limit of 50,000 slots and account-level creation rate limit of 300 instances per second, 100 per workflow — reach out via your account team or the Workers Limit Request Form. You can also reach out with feedback, feature requests, or just to share how you are using Workflows on our Discord server.

Managed OAuth for Access: make internal apps agent-ready in one click

Post Syndicated from Eduardo Gomes original https://blog.cloudflare.com/managed-oauth-for-access/

We have thousands of internal apps at Cloudflare. Some are things we’ve built ourselves, others are self-hosted instances of software built by others. They range from business-critical apps nearly every person uses, to side projects and prototypes.

All of these apps are protected by Cloudflare Access. But when we started using and building agents — particularly for uses beyond writing code — we hit a wall. People could access apps behind Access, but their agents couldn’t.

Access sits in front of internal apps. You define a policy, and then Access will send unauthenticated users to a login page to choose how to authenticate. 


Example of a Cloudflare Access login page

This flow worked great for humans. But all agents could see was a redirect to a login page that they couldn’t act on.

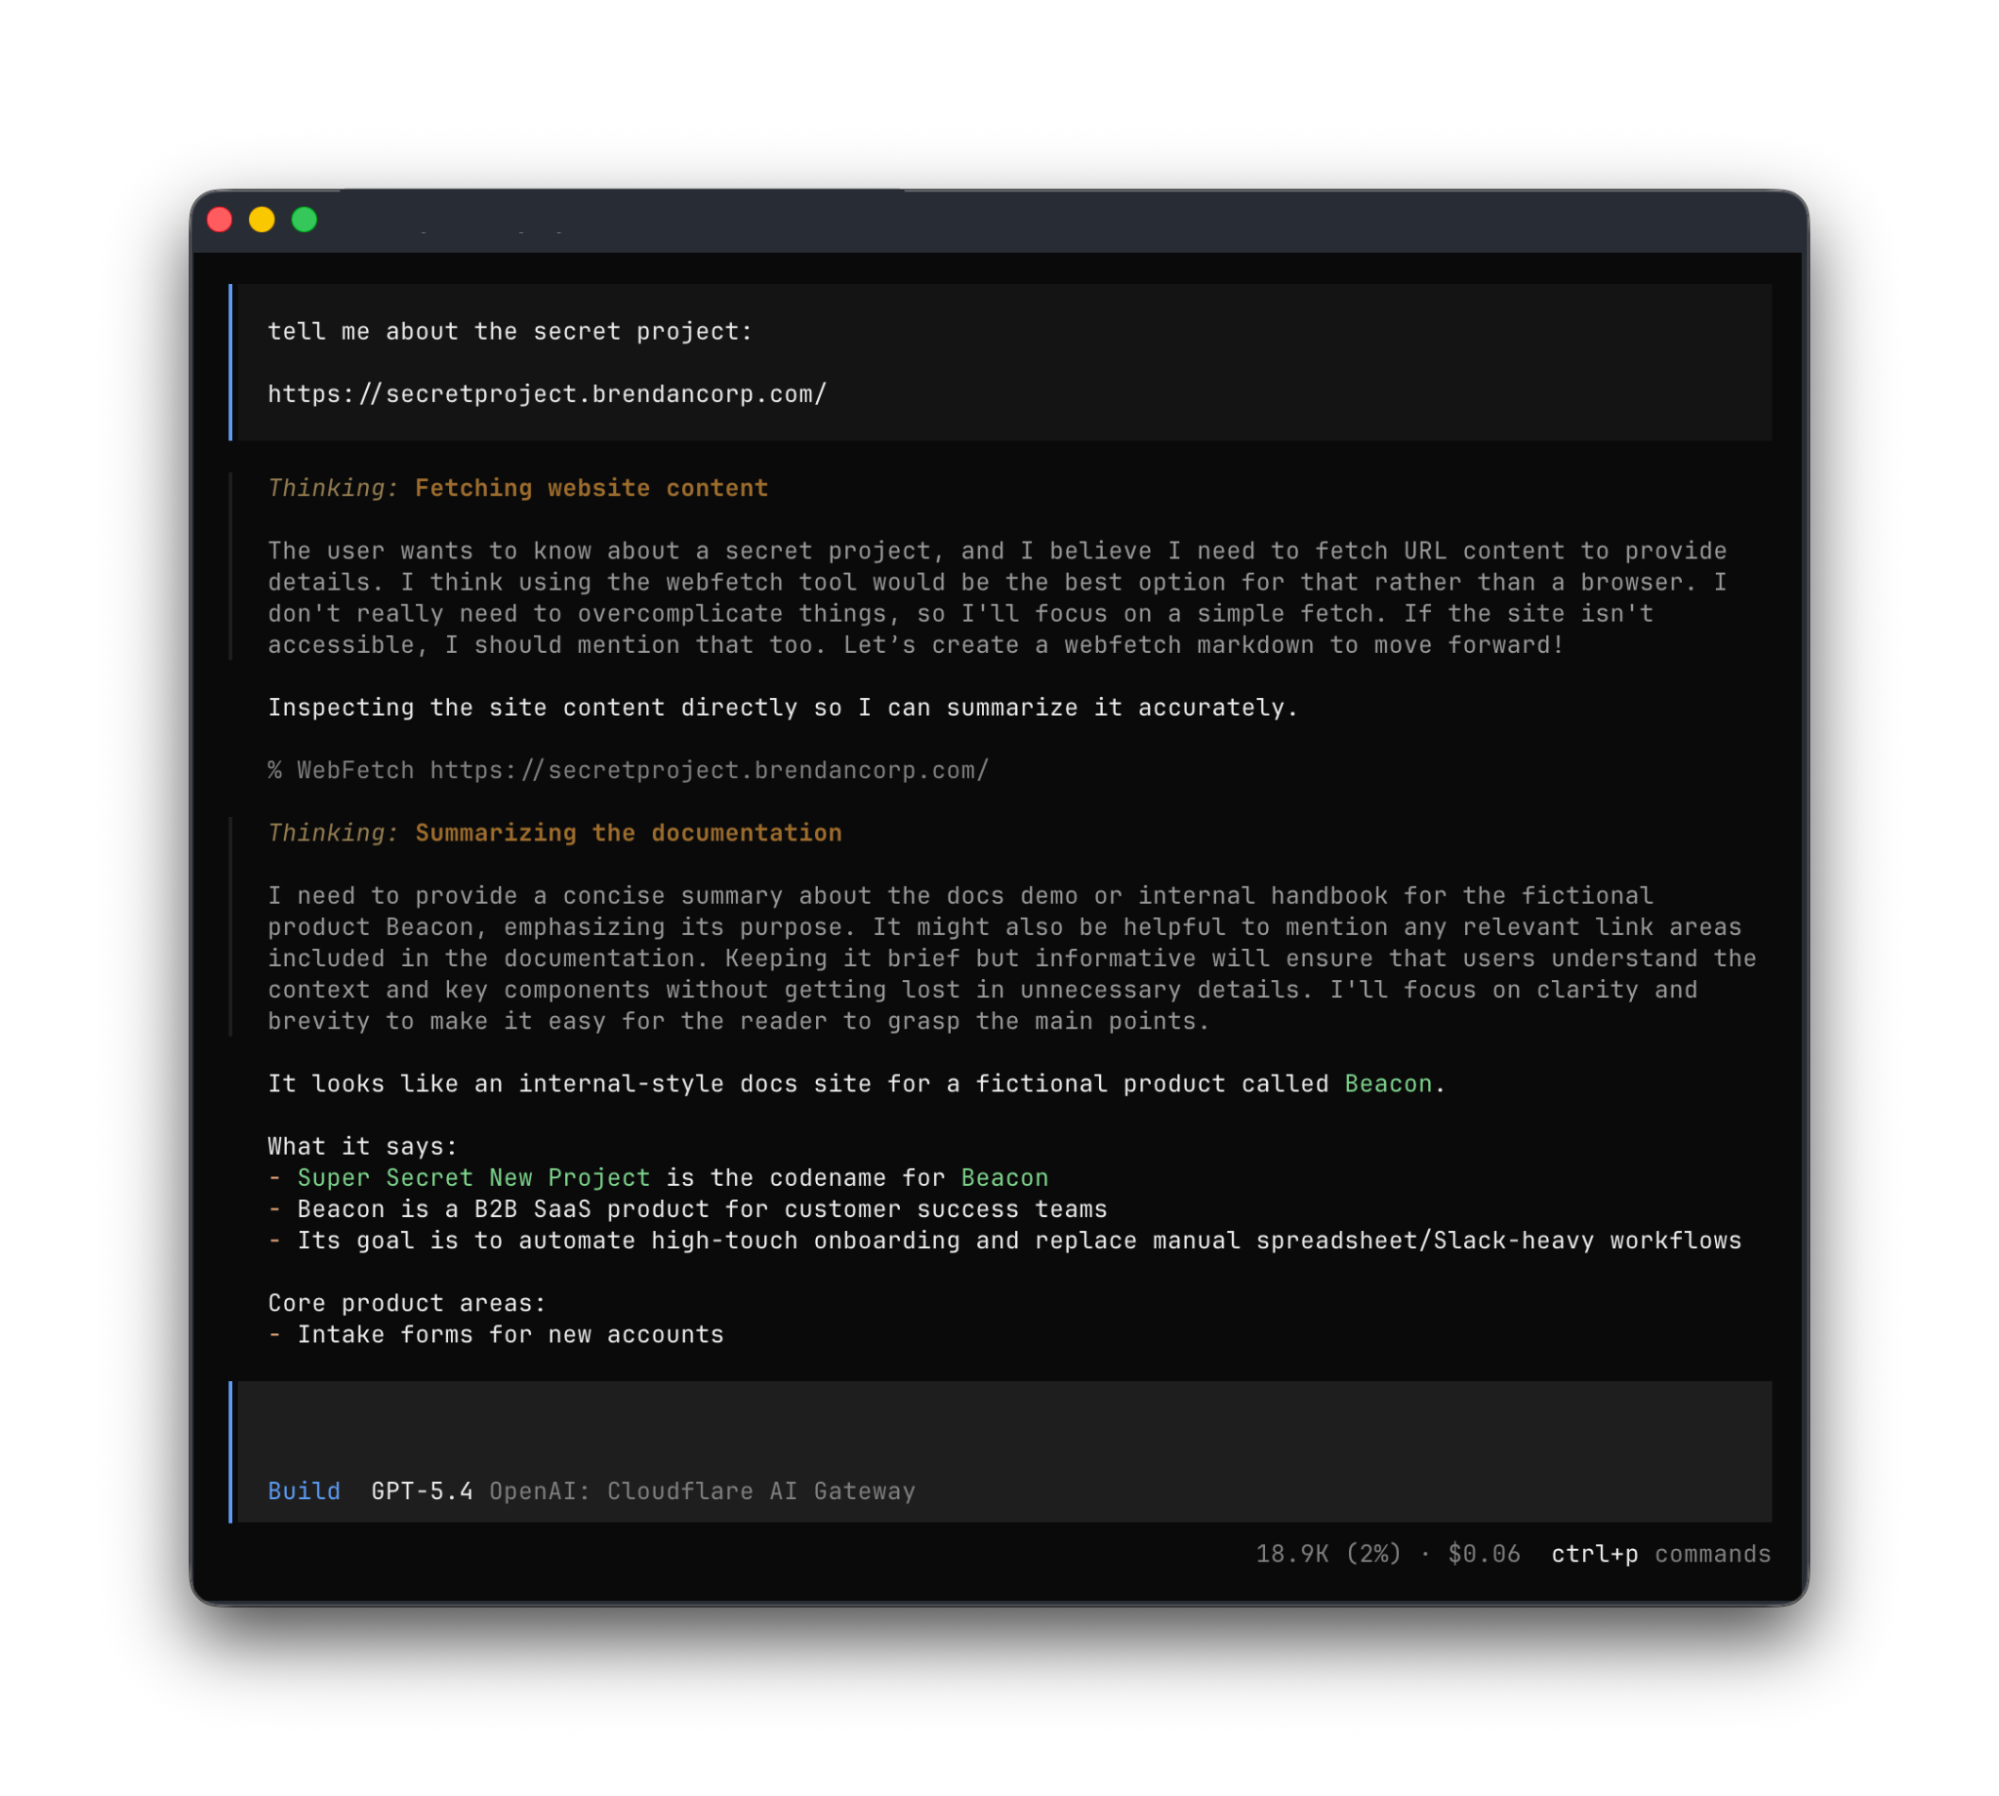
Providing agents with access to internal app data is so vital that we immediately implemented a stopgap for our own internal use. We modified OpenCode’s web fetch tool such that for specific domains, it triggered the cloudflared CLI to open an authorization flow to fetch a JWT (JSON Web Token). By appending this token to requests, we enabled secure, immediate access to our internal ecosystem.

While this solution was a temporary answer to our own dilemma, today we’re retiring this workaround and fixing this problem for everyone. Now in open beta, every Access application supports managed OAuth. One click to enable it for an Access app, and agents that speak OAuth 2.0 can easily discover how to authenticate (RFC 9728), send the user through the auth flow, and receive back an authorization token (the same JWT from our initial solution). 

Now, the flow works smoothly for both humans and agents. Cloudflare Access has a generous free tier. And building off our newly-introduced Organizations beta, you’ll soon be able to bridge identity providers across Cloudflare accounts too.

How managed OAuth works

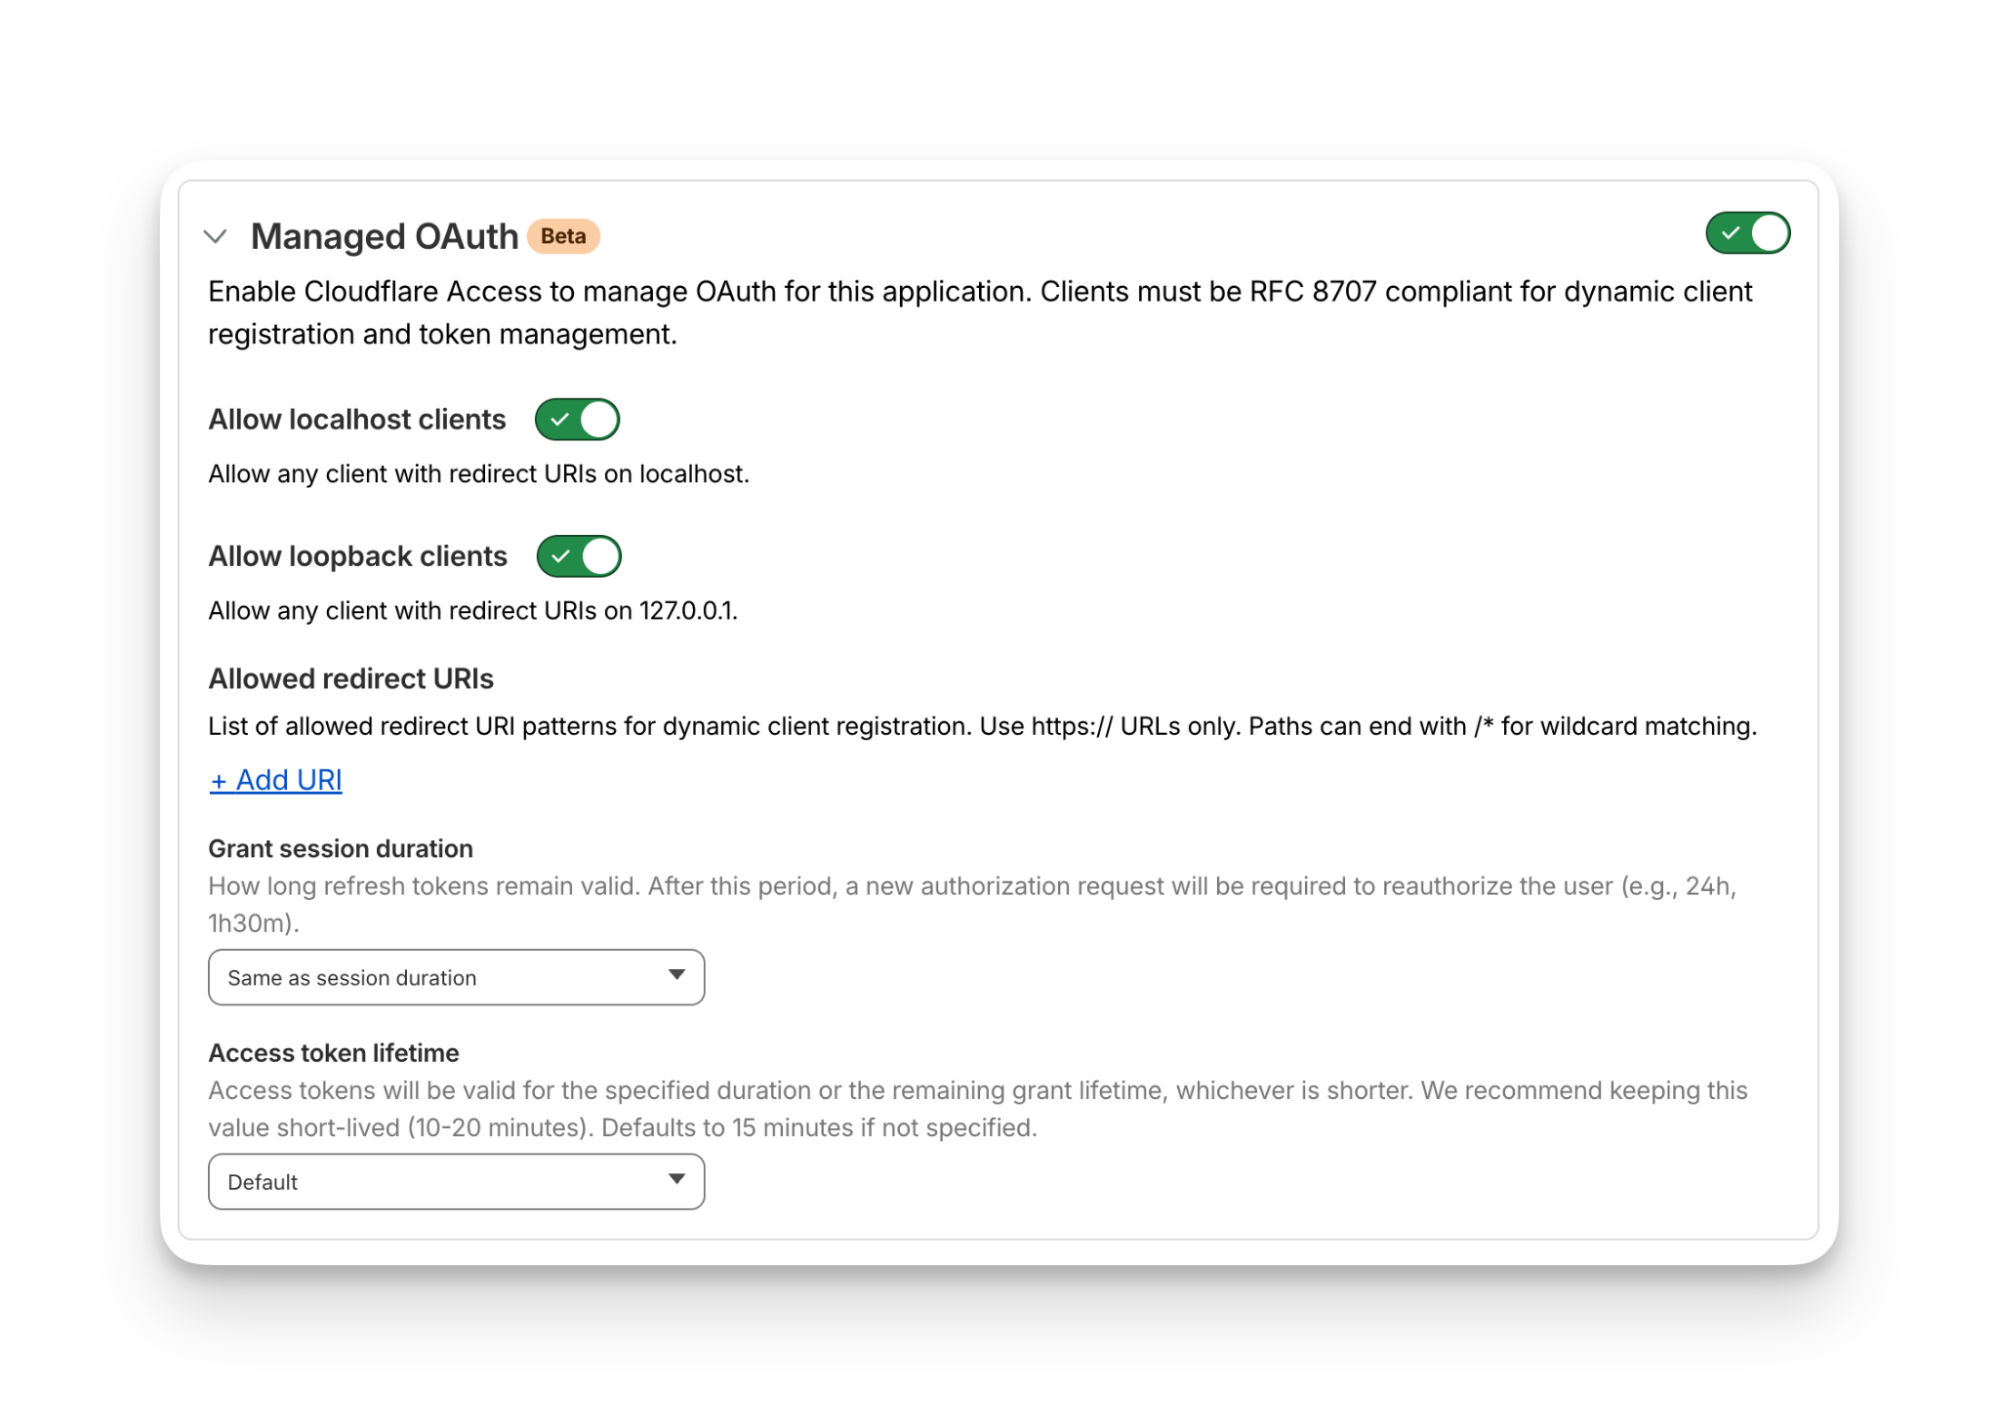
For a given internal app protected by Cloudflare Access, you enable managed OAuth in one click:


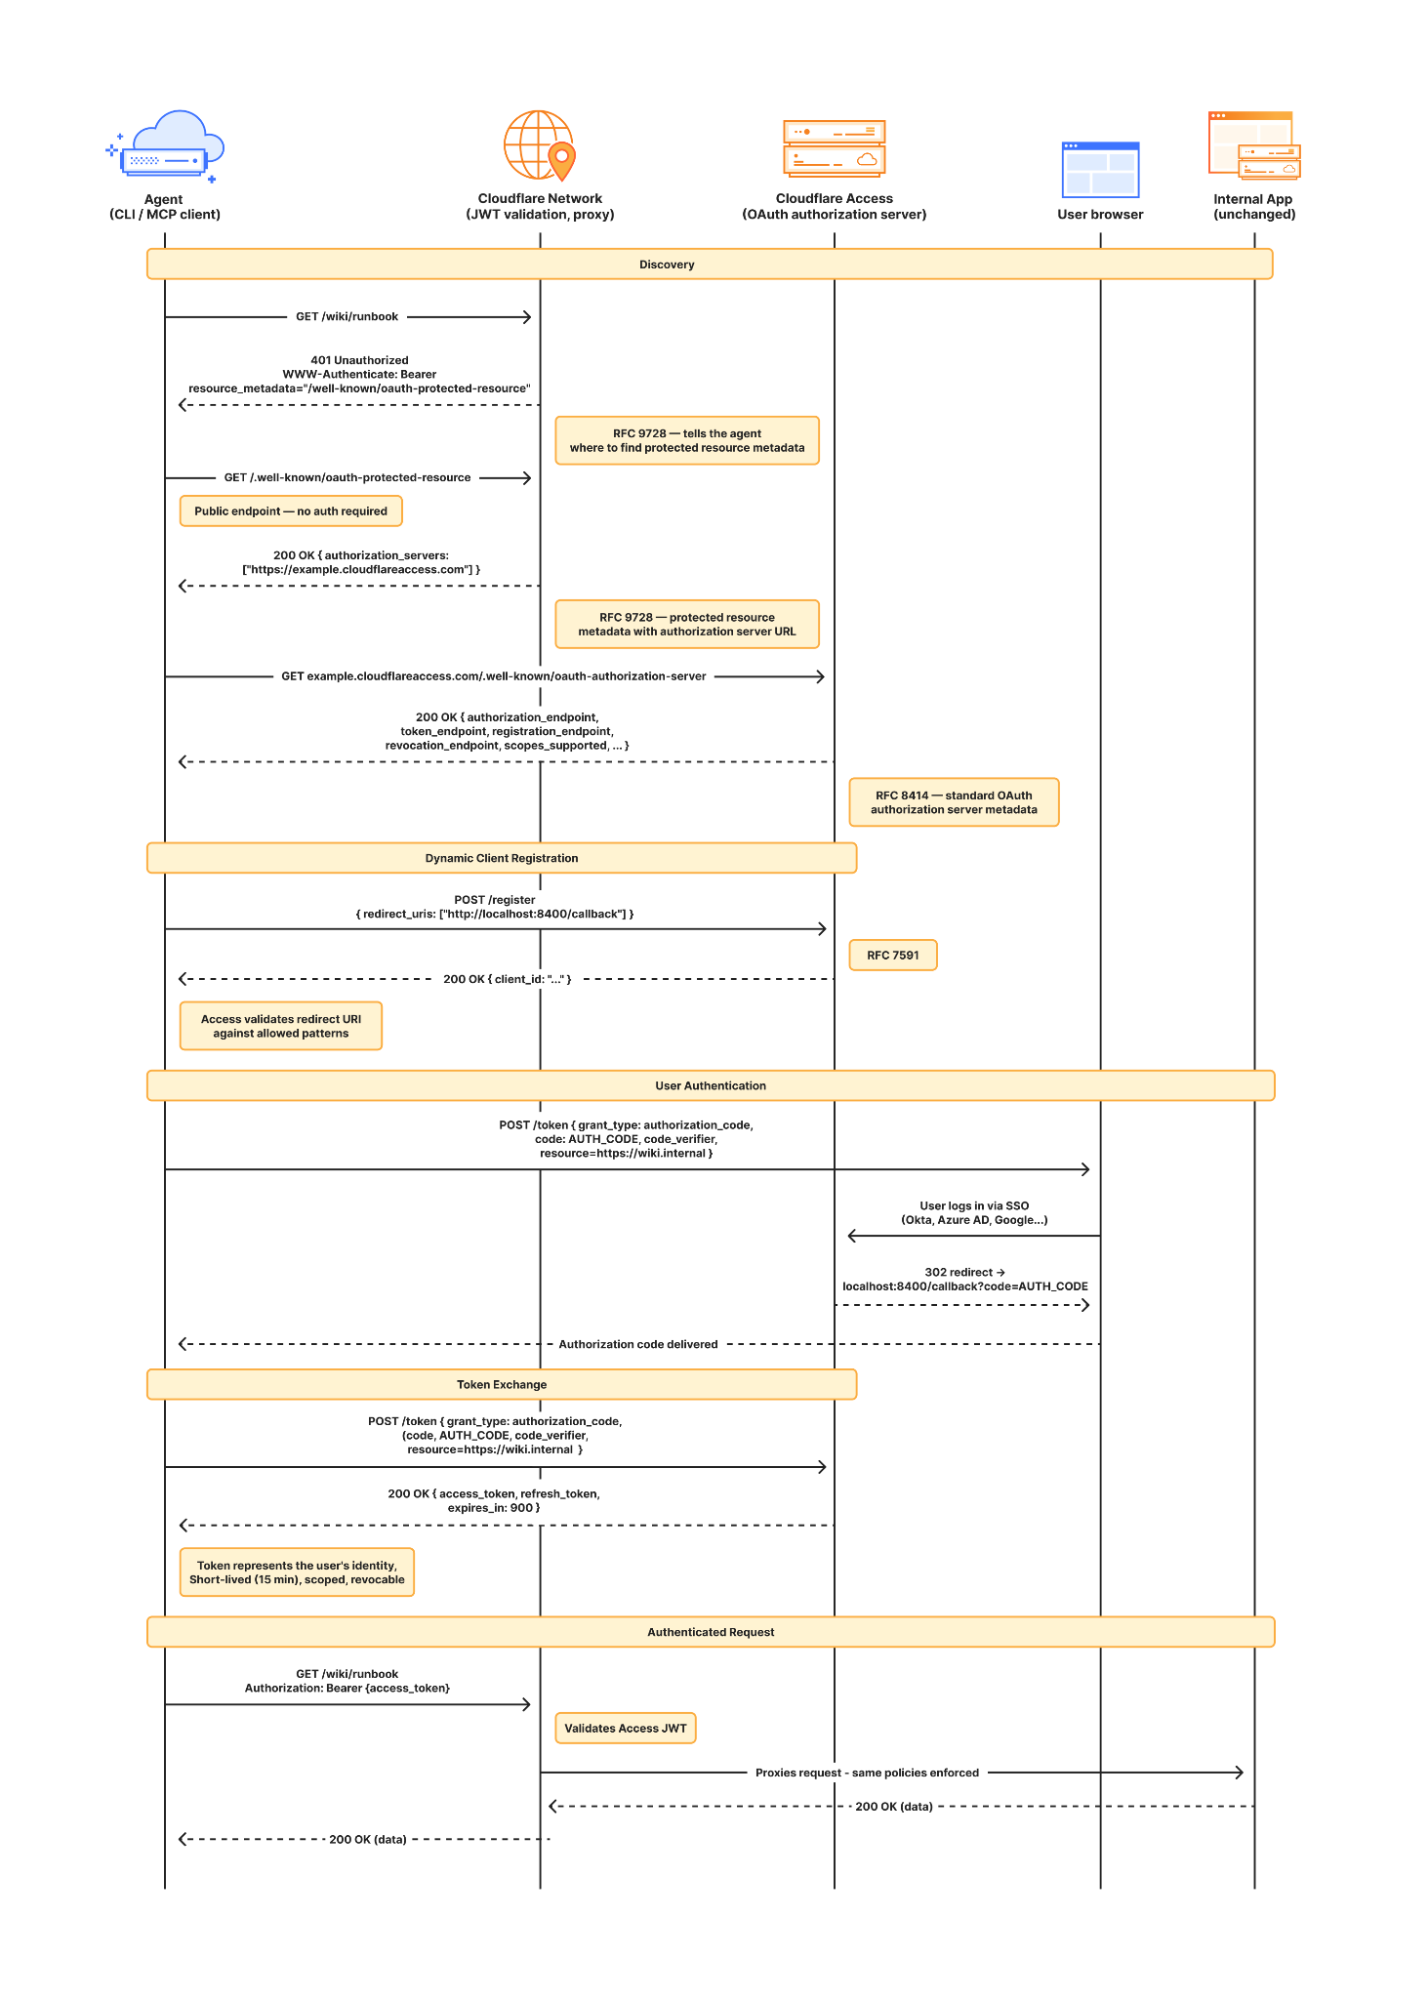
Once managed OAuth is enabled, Cloudflare Access acts as the authorization server. It returns the www-authenticate header, telling unauthorized agents where to look up information on how to get an authorization token. They find this at https://<your-app-domain>/.well-known/oauth-authorization-server. Equipped with that direction, agents can just follow OAuth standards: 

  1. The agent dynamically registers itself as a client (a process known as Dynamic Client Registration — RFC 7591), 

  2. The agent sends the human through a PKCE (Proof Key for Code Exchange) authorization flow (RFC 7636)

  3. The human authorizes access, which grants a token to the agent that it can use to make authenticated requests on behalf of the user

Here’s what the authorization flow looks like:


If this authorization flow looks familiar, that’s because it’s what the Model Context Protocol (MCP) uses. We originally built support for this into our MCP server portals product, which proxies and controls access to many MCP servers, to allow the portal to act as the OAuth server. Now, we’re bringing this to all Access apps so agents can access not only MCP servers that require authorization, but also web pages, web apps, and REST APIs.

Mass upgrading your internal apps to be agent-ready

Upgrading the long tail of internal software to work with agents is a daunting task. In principle, in order to be agent-ready, every internal and external app would ideally have discoverable APIs, a CLI, a well-crafted MCP server, and have adopted the many emerging agent standards.

AI adoption is not something that can wait for everything to be retrofitted. Most organizations have a significant backlog of apps built over many years. And many internal “apps” work great when treated by agents as simple websites. For something like an internal wiki, all you really need is to enable Markdown for Agents, turn on managed OAuth, and agents have what they need to read protected content.

To make the basics work across the widest set of internal applications, we use Managed OAuth. By putting Access in front of your legacy internal apps, you make them agent-ready instantly. No code changes, no retrofitting. Instead, just immediate compatibility.

It’s the user’s agent. No service accounts and tokens needed

Agents need to act on behalf of users inside organizations. One of the biggest anti-patterns we’ve seen is people provisioning service accounts for their agents and MCP servers, authenticated using static credentials. These have their place in simple use cases and quick prototypes, and Cloudflare Access supports service tokens for this purpose.

But the service account approach quickly shows its limits when fine-grained access controls and audit logs are required. We believe that every action an agent performs must be easily attributable to the human who initiated it, and that an agent must only be able to perform actions that its human operator is likewise authorized to do. Service accounts and static credentials become points at which attribution is lost. Agents that launder all of their actions through a service account are susceptible to confused deputy problems and result in audit logs that appear to originate from the agent itself.

For security and accountability, agents must use security primitives capable of expressing this user–agent relationship. OAuth is the industry standard protocol for requesting and delegating access to third parties. It gives agents a way to talk to your APIs on behalf of the user, with a token scoped to the user’s identity, so that access controls correctly apply and audit logs correctly attribute actions to the end user.

Standards for the win: how agents can and should adopt RFC 9728 in their web fetch tools

RFC 9728 is the OAuth standard that makes it possible for agents to discover where and how to authenticate. It standardizes where this information lives and how it’s structured. This RFC became official in April 2025 and was quickly adopted by the Model Context Protocol (MCP), which now requires that both MCP servers and clients support it.

But outside of MCP, agents should adopt RFC 9728 for an even more essential use case: making requests to web pages that are protected behind OAuth and making requests to plain old REST APIs.

Most agents have a tool for making basic HTTP requests to web pages. This is commonly called the “web fetch” tool. It’s similar to using the fetch() API in JavaScript, often with some additional post-processing on the response. It’s what lets you paste a URL into your agent and have your agent go look up the content.

Today, most agents’ web fetch tools won’t do anything with the www-authenticate header that a URL returns. The underlying model might choose to introspect the response headers and figure this out on its own, but the tool itself does not follow www-authenticate, look up /.well-known/oauth-authorization-server, and act as the client in the OAuth flow. But it can, and we strongly believe it should! Agents already do this to act as remote MCP clients.

To demonstrate this, we’ve put up a draft pull request that adapts the web fetch tool in Opencode to show this in action. Before making a request, the adapted tool first checks whether it already has credentials ; if it does, it uses them to make the initial request. If the tool gets back a 401 or a 403 with a www-authenticate header, it asks the user for consent to be sent through the server’s OAuth flow.

Here’s how that OAuth flow works. If you give the agent a URL that is protected by OAuth and complies with RFC 9728, the agent prompts the human for consent to open the authorization flow:


…sending the human to the login page:


…and then to a consent dialog that prompts the human to grant access to the agent:


Once the human grants access to the agent, the agent uses the token it has received to make an authenticated request:


Any agent from Codex to Claude Code to Goose and beyond can implement this, and there’s nothing bespoke to Cloudflare. It’s all built using OAuth standards.

We think this flow is powerful, and that supporting RFC 9728 can help agents with more than just making basic web fetch requests. If a REST API supports RFC 9728 (and the agent does too), the agent has everything it needs to start making authenticated requests against that API. If the REST API supports RFC 9727, then the client can discover a catalog of REST API endpoints on its own, and do even more without additional documentation, agent skills, MCP servers or CLIs. 

Each of these play important roles with agents — Cloudflare itself provides an MCP server for the Cloudflare API (built using Code Mode), Wrangler CLI, and Agent Skills, and a Plugin. But supporting RFC 9728 helps ensure that even when none of these are preinstalled, agents have a clear path forward. If the agent has a sandbox to execute untrusted code, it can just write and execute code that calls the API that the human has granted it access to. We’re working on supporting this for Cloudflare’s own APIs, to help your agents understand how to use Cloudflare.

Coming soon: share one identity provider (IdP) across many Cloudflare accounts

At Cloudflare our own internal apps are deployed to dozens of different Cloudflare accounts, which are all part of an Organization — a newly introduced way for administrators to manage users, configurations, and view analytics across many Cloudflare accounts. We have had the same challenge as many of our customers: each Cloudflare account has to separately configure an IdP, so Cloudflare Access uses our identity provider. It’s critical that this is consistent across an organization — you don’t want one Cloudflare account to inadvertently allow people to sign in just with a one-time PIN, rather than requiring that they authenticate via single-sign on (SSO).

To solve this, we’re currently working on making it possible to share an identity provider across Cloudflare accounts, giving organizations a way to designate a single primary IdP for use across every account in their organization.

As new Cloudflare accounts are created within an organization, administrators will be able to configure a bridge to the primary IdP with a single click, so Access applications across accounts can be protected by one identity provider. This removes the need to manually configure IdPs account by account, which is a process that doesn’t scale for organizations with many teams and individuals each operating their own accounts.

What’s next

Across companies, people in every role and business function are now using agents to build internal apps, and expect their agents to be able to access context from internal apps. We are responding to this step function growth in internal software development by making the Workers Platform and Cloudflare One work better together — so that it is easier to build and secure internal apps on Cloudflare. 

Expect more to come soon, including:

  • More direct integration between Cloudflare Access and Cloudflare Workers, without the need to validate JWTs or remember which of many routes a particular Worker is exposed on.

  • wrangler dev –tunnel — an easy way to expose your local development server to others when you’re building something new, and want to share it with others before deploying

  • A CLI interface for Cloudflare Access and the entire Cloudflare API

  • More announcements to come during Agents Week 2026

Enable Managed OAuth for your internal apps behind Cloudflare Access

Managed OAuth is now available, in open beta, to all Cloudflare customers. Head over to the Cloudflare dashboard to enable it for your Access applications. You can use it for any internal app, whether it’s one built on Cloudflare Workers, or hosted elsewhere. And if you haven’t built internal apps on the Workers Platform yet — it’s the fastest way for your team to go from zero to deployed (and protected) in production.

Scaling MCP adoption: Our reference architecture for simpler, safer and cheaper enterprise deployments of MCP

Post Syndicated from Sharon Goldberg original https://blog.cloudflare.com/enterprise-mcp/

We at Cloudflare have aggressively adopted Model Context Protocol (MCP) as a core part of our AI strategy. This shift has moved well beyond our engineering organization, with employees across product, sales, marketing, and finance teams now using agentic workflows to drive efficiency in their daily tasks. But the adoption of agentic workflow with MCP is not without its security risks. These range from authorization sprawl, prompt injection, and supply chain risks. To secure this broad company-wide adoption, we have integrated a suite of security controls from both our Cloudflare One (SASE) platform and our Cloudflare Developer platform, allowing us to govern AI usage with MCP without slowing down our workforce. 

In this blog we’ll walk through our own best practices for securing MCP workflows, by putting different parts of our platform together to create a unified security architecture for the era of autonomous AI. We’ll also share two new concepts that support enterprise MCP deployments:

We also talk about how our organization approached deploying MCP, and how we built out our MCP security architecture using Cloudflare products including remote MCP servers, Cloudflare Access, MCP server portals and AI Gateway. 

Remote MCP servers provide better visibility and control

MCP is an open standard that enables developers to build a two-way connection between AI applications and the data sources they need to access. In this architecture, the MCP client is the integration point with the LLM or other AI agent, and the MCP server sits between the MCP client and the corporate resources.


The separation between MCP clients and MCP servers allows agents to autonomously pursue goals and take actions while maintaining a clear boundary between the AI (integrated at the MCP client) and the credentials and APIs of the corporate resource (integrated at the MCP server). 

Our workforce at Cloudflare is constantly using MCP servers to access information in various internal resources, including our project management platform, our internal wiki, documentation and code management platforms, and more. 

Very early on, we realized that locally-hosted MCP servers were a security liability. Local MCP server deployments may rely on unvetted software sources and versions, which increases the risk of supply chain attacks or tool injection attacks. They prevent IT and security administrators from administrating these servers, leaving it up to individual employees and developers to choose which MCP servers they want to run and how they want to keep them up to date. This is a losing game.


Instead, we have a centralized team at Cloudflare that manages our MCP server deployment across the enterprise. This team built a shared MCP platform inside our monorepo that provides governed infrastructure out of the box. When an employee wants to expose an internal resource via MCP, they first get approval from our AI governance team, and then they copy a template, write their tool definitions, and deploy, all the while inheriting default-deny write controls with audit logging, auto-generated CI/CD pipelines, and secrets management for free. This means standing up a new governed MCP server is minutes of scaffolding. The governance is baked into the platform itself, which is what allowed adoption to spread so quickly. 

Our CI/CD pipeline deploys them as remote MCP servers on custom domains on Cloudflare’s developer platform. This gives us visibility into which MCPs servers are being used by our employees, while maintaining control over software sources. As an added bonus, every remote MCP server on the Cloudflare developer platform is automatically deployed across our global network of data centers, so MCP servers can be accessed by our employees with low latency, regardless of where they might be in the world.

Cloudflare Access provides authentication

Some of our MCP servers sit in front of public resources, like our Cloudflare documentation MCP server or Cloudflare Radar MCP server, and thus we want them to be accessible to anyone. But many of the MCP servers used by our workforce are sitting in front of our private corporate resources. These MCP servers require user authentication to ensure that they are off limits to everyone but authorized Cloudflare employees. To achieve this, our monorepo template for MCP servers integrates Cloudflare Access as the OAuth provider. Cloudflare Access secures login flows and issues access tokens to resources, while acting as an identity aggregator that verifies end user single-sign on (SSO), multifactor authentication (MFA), and a variety of contextual attributes such as IP addresses, location, or device certificates. 

MCP server portals centralize discovery and governance


MCP server portals unify governance and control for all AI activity.

As the number of our remote MCP servers grew, we hit a new wall: discovery. We wanted to make it easy for every employee (especially those that are new to MCP) to find and work with all the MCP servers that are available to them. Our MCP server portals product provided a convenient solution. The employee simply connects their MCP client to the MCP server portal, and the portal immediately reveals every internal and third-party MCP servers they are authorized to use. 

Beyond this, our MCP server portals provide centralized logging, consistent policy enforcement and data loss prevention (DLP guardrails). Our administrators can see who logged into what MCP portal and create DLP rules that prevent certain data, like personally identifiable data (PII), from being shared with certain MCP servers.

We can also create policies that control who has access to the portal itself, and what tools from each MCP server should be exposed. For example, we could set up one MCP server portal that is only accessible to employees that are part of our finance group that exposes just the read-only tools for the MCP server in front of our internal code repository. Meanwhile, a different MCP server portal, accessible only to employees on their corporate laptops that are in our engineering team, could expose more powerful read/write tools to our code repository MCP server.

An overview of our MCP server portal architecture is shown above. The portal supports both remote MCP servers hosted on Cloudflare, and third-party MCP servers hosted anywhere else. What makes this architecture uniquely performant is that all these security and networking components run on the same physical machine within our global network. When an employee’s request moves through the MCP server portal, a Cloudflare-hosted remote MCP server, and Cloudflare Access, their traffic never needs to leave the same physical machine. 

Code Mode with MCP server portals reduces costs

After months of high-volume MCP deployments, we’ve paid out our fair share of tokens. We’ve also started to think most people are doing MCP wrong.

The standard approach to MCP requires defining a separate tool for every API operation that is exposed via an MCP server. But this static and exhaustive approach quickly exhausts an agent’s context window, especially for large platforms with thousands of endpoints.

We previously wrote about how we used server-side Code Mode to power Cloudflare’s MCP server, allowing us to expose the thousands of end-points in Cloudflare API while reducing token use by 99.9%. The Cloudflare MCP server exposes just two tools: a search tool lets the model write JavaScript to explore what’s available, and an execute tool lets it write JavaScript to call the tools it finds. The model discovers what it needs on demand, rather than receiving everything upfront.

We like this pattern so much, we had to make it available for everyone. So we have now launched the ability to use the “Code Mode” pattern with MCP server portals. Now you can front all of your MCP servers with a centralized portal that performs audit controls and progressive tool disclosure, in order to reduce token costs.

Here is how it works. Instead of exposing every tool definition to a client, all of your underlying MCP servers collapse into just two MCP portal tools: portal_codemode_search and portal_codemode_execute. The search tool gives the model access to a codemode.tools() function that returns all the tool definitions from every connected upstream MCP server. The model then writes JavaScript to filter and explore these definitions, finding exactly the tools it needs without every schema being loaded into context. The execute tool provides a codemode proxy object where each upstream tool is available as a callable function. The model writes JavaScript that calls these tools directly, chaining multiple operations, filtering results, and handling errors in code. All of this runs in a sandboxed environment on the MCP server portal powered by Dynamic Workers. 

Here is an example of an agent that needs to find a Jira ticket and update it with information from Google Drive. It first searches for the right tools:

// portal_codemode_search
async () => {
 const tools = await codemode.tools();
 return tools
  .filter(t => t.name.includes("jira") || t.name.includes("drive"))
  .map(t => ({ name: t.name, params: Object.keys(t.inputSchema.properties || {}) }));
}

The model now knows the exact tool names and parameters it needs, without the full schemas of tools ever entering its context. It then writes a single execute call to chain the operations together:

// portal_codemode_execute
async () => {
 const tickets = await codemode.jira_search_jira_with_jql({
  jql: ‘project = BLOG AND status = “In Progress”’,
  fields: [“summary”, “description”]
 });
 const doc = await codemode.google_workspace_drive_get_content({
  fileId: “1aBcDeFgHiJk”
 });
 await codemode.jira_update_jira_ticket({
  issueKey: tickets[0].key,
  fields: { description: tickets[0].description + “\n\n” + doc.content }
 });
 return { updated: tickets[0].key };
}

This is just two tool calls. The first discovers what’s available, the second does the work. Without Code Mode, this same workflow would have required the model to receive the full schemas of every tool from both MCP servers upfront, and then make three separate tool invocations.

Let’s put the savings in perspective: when our internal MCP server portal is connected to just four of our internal MCP servers, it exposes 52 tools that consume approximately 9,400 tokens of context just for their definitions. With Code Mode enabled, those 52 tools collapse into 2 portal tools consuming roughly 600 tokens, a 94% reduction. And critically, this cost stays fixed. As we connect more MCP servers to the portal, the token cost of Code Mode doesn’t grow.

Code Mode can be activated on an MCP server portal by adding a query parameter to the URL. Instead of connecting to your portal over its usual URL (e.g. https://myportal.example.com/mcp), you attach ?codemode=search_and_execute to the URL (e.g. https://myportal.example.com/mcp?codemode=search_and_execute).

AI Gateway provides extensibility and cost controls

We aren’t done yet. We plug AI Gateway into our architecture by positioning it on the connection between the MCP client and the LLM. This allows us to quickly switch between various LLM providers (to prevent vendor lock-in) and to enforce cost controls (by limiting the number of tokens each employee can burn through). The full architecture is shown below.


Cloudflare Gateway discovers and blocks shadow MCP

Now that we’ve provided governed access to authorized MCP servers, let’s look into dealing with unauthorized MCP servers. We can perform shadow MCP discovery using Cloudflare Gateway. Cloudflare Gateway is our comprehensive secure web gateway that provides enterprise security teams with visibility and control over their employees’ Internet traffic.

We can use the Cloudflare Gateway API to perform a multi-layer scan to find remote MCP servers that are not being accessed via an MCP server portal. This is possible using a variety of existing Gateway and Data Loss Prevention (DLP) selectors, including:

  • Using the Gateway httpHost selector to scan for 

    • known MCP server hostnames using (like mcp.stripe.com)

    • mcp.* subdomains using wildcard hostname patterns 

  • Using the Gateway httpRequestURI selector to scan for MCP-specific URL paths like /mcp and /mcp/sse 

  • Using DLP-based body inspection to find MCP traffic, even if that traffic uses URI that do not contain the telltale mentions of mcp or sse. Specifically, we use the fact that MCP uses JSON-RPC over HTTP, which means every request contains a “method” field with values like “tools/call”, “prompts/get”, or “initialize.” Here are some regex rules that can be used to detect MCP traffic in the HTTP body:

const DLP_REGEX_PATTERNS = [
  {
    name: "MCP Initialize Method",
    regex: '"method"\\s{0,5}:\\s{0,5}"initialize"',
  },
  {
    name: "MCP Tools Call",
    regex: '"method"\\s{0,5}:\\s{0,5}"tools/call"',
  },
  {
    name: "MCP Tools List",
    regex: '"method"\\s{0,5}:\\s{0,5}"tools/list"',
  },
  {
    name: "MCP Resources Read",
    regex: '"method"\\s{0,5}:\\s{0,5}"resources/read"',
  },
  {
    name: "MCP Resources List",
    regex: '"method"\\s{0,5}:\\s{0,5}"resources/list"',
  },
  {
    name: "MCP Prompts List",
    regex: '"method"\\s{0,5}:\\s{0,5}"prompts/(list|get)"',
  },
  {
    name: "MCP Sampling Create Message",
    regex: '"method"\\s{0,5}:\\s{0,5}"sampling/createMessage"',
  },
  {
    name: "MCP Protocol Version",
    regex: '"protocolVersion"\\s{0,5}:\\s{0,5}"202[4-9]',
  },
  {
    name: "MCP Notifications Initialized",
    regex: '"method"\\s{0,5}:\\s{0,5}"notifications/initialized"',
  },
  {
    name: "MCP Roots List",
    regex: '"method"\\s{0,5}:\\s{0,5}"roots/list"',
  },
];

The Gateway API supports additional automation. For example, one can use the custom DLP profile we defined above to block traffic, or redirect it, or just to log and inspect MCP payloads. Put this together, and Gateway can be used to provide comprehensive detection of unauthorized remote MCP servers accessed via an enterprise network. 

For more information on how to build this out, see this tutorial. 

Public-facing MCP Servers are protected with AI Security for Apps

So far, we’ve been focused on protecting our workforce’s access to our internal MCP servers. But, like many other organizations, we also have public-facing MCP servers that our customers can use to agentically administer and operate Cloudflare products. These MCP servers are hosted on Cloudflare’s developer platform. (You can find a list of individual MCPs for specific products here, or refer back to our new approach for providing more efficient access to the entire Cloudflare API using Code Mode.)

We believe that every organization should publish official, first-party MCP servers for their products. The alternative is that your customers source unvetted servers from public repositories where packages may contain dangerous trust assumptions, undisclosed data collection, and any range of unsanctioned behaviors. By publishing your own MCP servers, you control the code, update cadence, and security posture of the tools your customers use.

Since every remote MCP server is an HTTP endpoint, we can put it behind the Cloudflare Web Application Firewall (WAF). Customers can enable the AI Security for Apps feature within the WAF to automatically inspect inbound MCP traffic for prompt injection attempts, sensitive data leakage, and topic classification. Public facing MCPs are protected just as any other web API.  

The future of MCP in the enterprise

We hope our experience, products, and reference architectures will be useful to other organizations as they continue along their own journey towards broad enterprise-wide adoption of MCP.

We’ve secured our own MCP workflows by: 

  • Offering our developers a templated framework for building and deploying remote MCP servers on our developer platform using Cloudflare Access for authentication

  • Ensuring secure, identity-based access to authorized MCP servers by connecting our entire workforce to MCP server portals

  • Controlling costs using AI Gateway to mediate access to the LLMs powering our workforce’s MCP clients, and using Code Mode in MCP server portals to reduce token consumption and context bloat

  • Discovering shadow MCP usage by Cloudflare Gateway 

For organizations advancing on their own enterprise MCP journeys, we recommend starting by putting your existing remote and third-party MCP servers behind  Cloudflare MCP server portals and enabling Code Mode to start benefitting for cheaper, safer and simpler enterprise deployments of MCP.  

Acknowledgements:  This reference architecture and blog represents this work of many people across many different roles and business units at Cloudflare. This is just a partial list of contributors: Ann Ming Samborski,  Kate Reznykova, Mike Nomitch, James Royal, Liam Reese, Yumna Moazzam, Simon Thorpe, Rian van der Merwe, Rajesh Bhatia, Ayush Thakur, Gonzalo Chavarri, Maddy Onyehara, and Haley Campbell.

Watch on Cloudflare TV

Securing non-human identities: automated revocation, OAuth, and scoped permissions

Post Syndicated from Justin Hutchings original https://blog.cloudflare.com/improved-developer-security/

Agents let you build software faster than ever, but securing your environment and the code you write — from both mistakes and malice — takes real effort. Open Web Application Security Project (OWASP) details a number of risks present in agentic AI systems, including the risk of credential leaks, user impersonation, and elevation of privilege. These risks can result in extreme damage to your environments including denial of service, data loss, or data leaks — which can do untold financial and reputational damage. 

This is an identity problem. In modern development, “identities” aren’t just people — they are the agents, scripts, and third-party tools that act on your behalf. To secure these non-human identities, you need to manage their entire lifecycle: ensuring their credentials (tokens) aren’t leaked, seeing which applications have access via OAuth, and narrowing their permissions using granular RBAC.

Today, we are introducing updates to address these needs: scannable tokens to protect your credentials, OAuth visibility to manage your principals, and resource-scoped RBAC to fine-tune your policies.

Understanding identity: Principals, Credentials, and Policies

To secure the Internet in an era of autonomous agents, we have to rethink how we handle identity. Whether a request comes from a human developer or an AI agent, every interaction with an API relies on three core pillars:

  • The Principal (The Traveler): This is the identity itself — the “who.” It might be you logging in via OAuth, or a background agent using an API token to deploy code.

  • The Credential (The Passport): This is the proof of that identity. In this world, your API token is your passport. If it’s stolen or leaked, anyone can “wear” your identity.

  • The Policy (The Visa): This defines what that identity is allowed to do. Just because you have a valid passport doesn’t mean you have a visa to enter every country. A policy ensures that even a verified identity can only access the specific resources it needs.

When these three pillars aren’t managed together, security breaks down. You might have a valid Principal using a stolen Credential, or a legitimate identity with a Policy that is far too broad.

Leaked token detection

Agents and other third-party applications use API tokens to access the Cloudflare API. One of the simplest ways that we see people leaking their secrets is by accidentally pushing them to a public GitHub repository. GitGuardian reports that last year more than 28 million secrets were published to public GitHub repositories, and that AI is causing leaks to happen 5x faster than before.

If an API token is a digital passport, then leaking it on a public repository is like leaving your passport on a park bench. Anyone who finds it can impersonate that identity until the document is canceled. Our partnership with GitHub acts like a global “lost and found” for these credentials. By the time you realize your passport is missing, we’ve already identified the document, verified its authenticity via the checksum, and voided it to prevent misuse.

We’re partnering with several leading credential scanning tools to help proactively find your leaked tokens and revoke them before they could be used maliciously. We know it’s not a matter of if, but rather when, before you, an employee, or one of your agents makes a mistake and pushes a secret somewhere it shouldn’t be. 

GitHub

We’ve partnered with GitHub and are participating in their Secret Scanning program to find your tokens in both public and private repositories. If we are notified that a token has leaked to a public repository, we will automatically revoke the token to prevent it from being used maliciously. For private repositories, GitHub will notify you about any leaked Cloudflare tokens and you can clean these up.

How it works

We’ve shared the new token formats (below!) with GitHub, and they now scan for them on every commit. If they find something that looks like a leaked Cloudflare token, they verify the token is real (using the checksum), send us a webhook to revoke it, and then we notify you via email so you can generate a new one in Dashboard settings.

This means we plug the hole as soon as it’s found. By the time you realize you made a mistake, we’ve already fixed it. 

We hope this is the kind of feature you don’t need to use, but our partners are on the lookout for leaks to help keep you secure. 

Cloudflare One

Cloudflare One customers are also protected from these leaks. By configuring the Credentials and Secrets DLP profile, organizations can activate prevention everywhere a credential can travel:

  • Network Traffic (Cloudflare Gateway): Apply these entries to a policy to detect and block Cloudflare API tokens moving across your network. A token in a file upload, an outbound request, or a download is stopped before it reaches its destination.

  • Outbound Email (Cloudflare Email Security): Microsoft 365 customers can extend this same prevention to Outlook. The DLP Assist add-in scans messages before delivery, catching a token before it’s sent externally.

  • Data at Rest (Cloudflare CASB): Cloudflare’s Cloud Access Security Broker applies the same profile to scan files across connected SaaS applications, catching tokens saved or shared in Google Drive, OneDrive, Dropbox, and other integrated services.

The most novel exposure vector, though, is AI traffic. Cloudflare AI Gateway integrates with the same DLP profiles to scan and block both incoming prompts and outgoing AI model responses in real time.

Other credential scanners

The only way credential scanning works is if we meet you where you are, so we are working with several open source and commercial credential scanners to ensure you are protected no matter what secret scanner you use. 

How it works

Until now, Cloudflare’s API tokens were pretty generic looking, so they were hard for credential scanners to identify with high confidence. These automated security tools scan your code repositories looking for exposed credentials like API keys, tokens or passwords. The “cf” prefix makes Cloudflare tokens instantly recognizable with greater confidence, and the checksum makes it easy for tools to statically validate them. Your existing tokens will continue to work, but every new token you generate will use the scannable format so it’s easily detected with high confidence.

Credential Type

What it’s for

New Format

User API Key

Legacy global API key tied to your user account (full access)

cfk_[40 characters][checksum]

User API Token

Scoped token you create for specific permissions

cfut_[40 characters][checksum]

Account API Token

Token owned by the account (not a specific user)

cfat_[40 characters][checksum]

Getting started

If you have existing API tokens, you can roll the token to create a new, scannable API token. This is optional, but recommended to ensure that your tokens are easily discoverable in case they leak. 

While API tokens are generally used by your own scripts and agents, OAuth is how you manage access for third-party platforms. Both require clear visibility to prevent unauthorized access and ensure you know exactly who — or what — has access to your data.

Improving the OAuth consent experience

When you connect third-party applications like Wrangler to your Cloudflare Account using OAuth, you’re granting that application access to your account’s data. Over time, you may forget why you granted a third party application access to your Account in the first place. Previously, there was no central place to view & manage those applications. Starting today, there is.  

Going forward, when a third party application requests access to your Cloudflare account, you’ll be able to review: 

  • Which third-party application is requesting access, along with information about the application like Name, Logo, and the Publisher.

  • Which scopes the third-party application is requesting access to.

  • Which accounts to grant the third party application access to.

Before After

Not all applications require the same permissions; some only need to read data, others may need to make changes to your Account. Understanding these scopes before you grant access helps you maintain least-privilege.

We also added a Connected Applications experience so you can see which applications have access to which accounts, what scopes/permissions are associated with that application, and easily revoke that access as needed. 


Getting started

The OAuth consent and revocation improvements are available now. Check which apps currently have access to your accounts by visiting My Profile > Access Management > Connected Applications. 

For developers building integrations with Cloudflare, keep an eye on the Cloudflare Changelog for more announcements around how you can register your own OAuth apps soon! 

Fine-grained resource-level permissioning 

If the token is the passport, then resource-scoped permissions are the visas inside it. Having a valid passport gets you through the front door, but it shouldn’t give you access to every room in the building. By narrowing the scope to specific resources — like a single Load Balancer pool or a specific Gateway policy — you are ensuring that even if an identity is verified, it only has the “visa” to go where it’s strictly necessary.

Last year, we announced support for resource scoped permissions in Cloudflare’s role-based access control (RBAC) system for several of our Zero Trust products. This enables you to right size permissions for both users and agents to minimize security risks. We’ve expanded this capability to several new resources-level permissions. The resource scope is now supported for:

  • Access Applications

  • Access Identity Providers

  • Access Policies

  • Access Service Tokens

  • Access Targets

We’ve also completely overhauled the API Token creation experience, making it easier for customers to provision and manage Account API Tokens right from the Cloudflare Dashboard.


How it works

When you add a member to your Cloudflare account or create an API Token, you typically assign that principal a policy. A Permission Policy is what gives a principal permission to take an action, whether that’s managing Cloudflare One Access Applications, or DNS Records. Without a policy, a principal can authenticate, but they are unauthorized to do any actions within an account.

Policies are made up of three components: a Principal, a Role, and a Scope. The Principal is who or what you’re granting access to, whether that’s a human user, a Non-Human Identity (NHI) like an API Token, or increasingly, an Agent acting on behalf of a user. The Role defines what actions they’re permitted to take. The Scope determines where those permissions apply, and historically, that’s been restricted to the entire account, or individual zones.

New permission roles

We’re also expanding the role surface more broadly at both the Account & Zone level with the introduction of a number of new roles for many products. 

  • Account scope

    • CDN Management

    • MCP Portals

    • Radar

    • Request Tracer

    • SSL/TLS Management

  • Zone scope

    • Analytics

    • Logpush

    • Page Rules

    • Security Center

    • Snippets

    • Zone Settings

Getting started

The resource scope and all new account and zone-level roles are available today for all Cloudflare customers. You can assign account, zone, or resource-scoped policies through the Cloudflare Dashboard, the API, or Terraform. 

For a full breakdown of all available roles and how scopes work, visit our roles and scope documentation.

Secure your accounts

These updates provide the granular building blocks needed for a true least-privilege architecture. By refining how we manage permissions and credentials, developers and enterprises can have greater confidence in their security posture across the users, apps, agents, and scripts that access Cloudflare. Least privilege isn’t a new concept, and for enterprises, it’s never been optional. Whether a human administrator is managing a zone or an agent is programmatically deploying a Worker, the expectation is the same, they should only be authorized to do the job it was given, and nothing else. 

Following today’s announcement, we recommend customers:

  1. Review your API tokens, and reissue with the new, scannable API tokens as soon as possible. 

  2. Review your authorized OAuth apps, and revoke any that you are no longer using

  3. Review member & API Token permissions in your accounts and ensure that users are taking advantage of the new account, zone, or resource scoped permissions as needed to reduce your risk area. 

Secure private networking for everyone: users, nodes, agents, Workers — introducing Cloudflare Mesh

Post Syndicated from Nikita Cano original https://blog.cloudflare.com/mesh/

AI agents have changed how teams think about private network access. Your coding agent needs to query a staging database. Your production agent needs to call an internal API. Your personal AI assistant needs to reach a service running on your home network. The clients are no longer just humans or services. They’re agents, running autonomously, making requests you didn’t explicitly approve, against infrastructure you need to keep secure.

Each of these workflows has the same underlying problem: agents need to reach private resources, but the tools for doing that were built for humans, not autonomous software. VPNs require interactive login. SSH tunnels require manual setup. Exposing services publicly is a security risk. And none of these approaches give you visibility into what the agent is actually doing once it’s connected.

Today, we’re introducing Cloudflare Mesh to connect your private networks together and provide secure access for your agents. We’re also integrating Mesh with Cloudflare Developer Platform so that Workers, Durable Objects, and agents built with the Agents SDK can reach your private infrastructure directly.

If you’re using Cloudflare One’s SASE and Zero Trust suite, you already have access to Mesh. You don’t need a new technology paradigm to secure agentic workloads. You need a SASE that was built for the agentic era, and that’s Cloudflare One. Cloudflare Mesh is a new experience with a simpler setup that leverages the on-ramps you’re already familiar with: WARP Connector (now called a Cloudflare Mesh node) and WARP Client (now called Cloudflare One Client). Together, these create a private network for human, developer, and agent traffic. Mesh is directly integrated into your existing Cloudflare One deployment. Your existing Gateway policies, Access rules, and device posture checks apply to Mesh traffic automatically.

If you’re a developer who just wants private networking for your agents, services, and team, Mesh is where you start. Set it up in minutes, connect your networks, and secure your traffic. And because Mesh runs on the Cloudflare One platform, you can grow into more advanced capabilities over time: Gateway network, DNS, and HTTP policies for fine-grained traffic control, Access for Infrastructure for SSH and RDP session management, Browser Isolation for safe web access, DLP to prevent sensitive data from leaving your network, and CASB for SaaS security. You won’t have to plan for all of this on day one. You just don’t have to migrate when you need it.

New agentic workflows

Private networking has always been about connecting clients to resources — SSH into a server, query a database, access an internal API. What’s changed is who the clients are. A year ago, the answer was your developers and your services. Today, it’s increasingly your agents.

This isn’t theoretical. Look at the ecosystem: the explosion of MCP (Model Context Protocol) servers providing tool access, coding agents that need to read from private repos and databases, personal assistants running on home hardware. Each of these patterns assumes the agent can reach the resources it needs. When those resources are isolated in private networks, the agent is stuck.


This creates three workflows that are hard to secure today:

  1. Accessing a personal agent from a mobile device. You’re running OpenClaw on a Mac mini at home. You want to reach it from your phone, your laptop at a coffee shop, or your work machine. But exposing it to the public Internet (even behind a password) can leave some gaps exposed. Your agent has shell access, file system access, and network access to your home network. One misconfiguration and anyone can reach it.

  2. Letting a coding agent access your staging environment. You’re using Claude Code, Cursor, or Codex on your laptop. You ask it to check deployment status, query analytics from a staging database, or read from an internal object store. But those services live in a private cloud VPC, so your agent can’t reach them without exposing them to the Internet or tunneling your entire laptop into the VPC.

  3. Connecting deployed agents to private services. You’re building agents into your product using the Agents SDK on Cloudflare Workers. Those agents need to call internal APIs, query databases, and access services that aren’t on the public Internet. They need private access, but with scoped permissions, audit trails, and no credential leakage.

Cloudflare Mesh: one private network for users, nodes, and agents

Cloudflare Mesh is developer-friendly private networking. One lightweight connector, one binary, connects everything: your personal devices, your remote servers, your user endpoints. You don’t need to install separate tools for each pattern. One connector on your network, and every access pattern works.

Once connected, devices in your private network can talk to each other over private IPs, routed through Cloudflare’s global network across 330+ cities giving you better reliability and control over your network.


Now, with Mesh, a single solution can solve all of the agent scenarios we mentioned above:

  • With Cloudflare One Client for iOS on your phone, you can securely connect your mobile devices to your local Mac mini running OpenClaw via a Mesh private network.

  • With Cloudflare One Client for macOS on your laptop, you can connect your laptop to your private network so your coding agents can reach staging databases or APIs and query them.

  • With Mesh nodes on your Linux servers, you can connect VPCs in external clouds together, letting agents access resources and MCPs in external private networks.

Because Mesh is powered by Cloudflare One Client, every connection inherits the security controls of the Cloudflare One platform. Gateway policies apply to Mesh traffic. Device posture checks validate connecting devices. DNS filtering catches suspicious lookups. You get this without additional configuration: the same policies that protect your human traffic protect your agent traffic.

Choosing between Mesh and Tunnel

With the introduction of Mesh, you might ask: when should I use Mesh instead of Tunnel? Both connect external networks privately to Cloudflare, but they serve different purposes. Cloudflare Tunnel is the ideal solution for unidirectional traffic, where Cloudflare proxies the traffic from the edge to specific private services (like a web server or a database). 

Cloudflare Mesh, on the other hand, provides a full bidirectional, many-to-many network. Every device and node on your Mesh can access one another using their private IPs. An application or agent running in your network can discover and access any other resource on the Mesh without each resource needing its own Tunnel. 

Using the power of Cloudflare’s network

Cloudflare Mesh gives you the benefits of a mesh network (resiliency, high scalability, low latency and high performance), but, by routing everything through Cloudflare, it resolves a key challenge of mesh networks: NAT traversal.

Most of the Internet is behind NAT (Network Address Translation). This mechanism allows an entire local network of devices to share a single public IP address by mapping traffic between public headers and private internal addresses. When two devices are behind NAT, direct connections can fail and traffic has to fall back to relay servers. If your relay infrastructure has limited points of presence, a meaningful fraction of your traffic hits those relays, adding latency and reducing reliability. And while it can be possible to self-host your own relay servers to compensate, that means taking on the burden of managing additional infrastructure just to connect your existing network.

Cloudflare Mesh takes a different approach. All Mesh traffic routes through Cloudflare’s global network, the same infrastructure that serves traffic for some of the largest websites of the Internet. For cross-region or multi-cloud traffic, this consistently beats public Internet routing. There’s no degraded fallback path, because the Cloudflare edge is the path.

Routing through Cloudflare also means every packet passes through Cloudflare’s security stack. This is the key advantage of building Mesh on the Cloudflare One platform: security isn’t a separate product you bolt on later. And by leveraging this same global backbone, we can provide these core pillars to every team from day one:

50 nodes and 50 users free. Your whole team and your whole staging environment on one private network, included with every Cloudflare account. 

Global edge routing. 330+ cities, optimized backbone routing. No relay servers with limited points of presence. No degraded fallback paths.

Security controls from day one. Mesh runs on Cloudflare One. Gateway policies, DNS filtering, DLP, traffic inspection, and device posture checks are all available on the same platform. Start with simple private connectivity. Turn on Gateway policies when you need traffic filtering. Enable Access for Infrastructure when you need session-level controls for SSH and RDP. Add DLP when you need to prevent sensitive data from leaving your network. Every capability is one toggle away.

High availability. Create a Mesh node with high availability enabled and spin up multiple connectors using the same token in active-passive mode. They advertise the same IP routes, so if one goes down, traffic fails over automatically.

Integrated with the Developer Platform with Workers VPC

Mesh connects your agents and resources across external clouds, but you also need to be able to connect from your agents built on Workers with Agents SDK as well. To enable this, we’ve extended Workers VPC to make your entire Mesh network accessible to Workers and Durable Objects.

That means that you can connect to your Cloudflare Mesh network from Workers, making the entire network accessible from a single binding’s fetch() call. This complements Workers VPC’s existing support for Cloudflare Tunnel, giving you more choice over how you want to secure your networks. Now, you can specify entire networks that you want to connect to in your wrangler.jsonc file. To bind to your Mesh network, use the cf1:network reserved keyword that binds to the Mesh network of your account:

"vpc_networks": [
  { "binding": "MESH", "network_id": "cf1:network", "remote": true },
  { "binding": "AWS_VPC", "tunnel_id": "350fd307-...", "remote": true }
]

Then, you can use it within your Worker or agent code:

export default {
  async fetch(request: Request, env: Env, ctx: ExecutionContext) {
    // Reach any internal host on your Mesh, no pre-registration required
    const apiResponse = await env.MESH.fetch("http://10.0.1.50/api/data");

    // Internal hostname resolved via tunnel's private DNS resolver
    const dbResponse = await env.AWS_VPC.fetch("http://internal-db.corp.local:5432");

    return new Response(await apiResponse.text());
  },
};

By connecting the Developer Platform to your Mesh networks, you can build Workers that have secure access to your private databases, internal APIs and MCPs, allowing you to build cross-cloud agents and MCPs that provide agentic capabilities to your app. But it also opens up a world where agents can autonomously observe your entire stack end-to-end, cross-reference logs and suggest optimizations in real-time.

How it all fits together

Together, Cloudflare Mesh, Workers VPC, and the Agents SDK provide a unified private network for your agents that spans both Cloudflare and your external clouds. We’ve merged connectivity and compute so your agents can securely reach the resources they need, wherever they live, across the globe.


Mesh nodes are your servers, VMs, and containers. They run a headless version of Cloudflare One Client and get a Mesh IP. Services talk to services over private IPs, bidirectionally, routed through Cloudflare’s edge. 

Devices are your laptops and phones. They run the Cloudflare One Client and reach Mesh nodes directly: SSH, database queries, API calls, all over private IPs. Your local coding agents use this connection to access private resources. 

Agents on Workers reach private services through Workers VPC Network bindings. They get scoped access to entire networks, mediated by MCP. The network enforces what the agent can reach. The MCP server enforces what the agent can do. 

What’s next

The current version of Mesh provides the foundation for secure, unified connectivity. But as agentic workflows become more complex, we’re focused on moving beyond simple connectivity toward a network that is more intuitive to manage and more granularly aware of who, or what, is talking to your services. Here is what we are building for the rest of the year.

Hostname routing

We’re extending Cloudflare Tunnel’s hostname routing to Mesh this summer. Your Mesh nodes will be able to attract traffic for private hostnames like wiki.local or api.staging.internal, without you having to manage IP lists or worry about how those hostnames resolve on the Cloudflare edge. Route traffic to services by name, not by IP. If your infrastructure uses dynamic IPs, auto-scaling groups, or ephemeral containers, this removes an entire class of routing headaches.

Mesh DNS

Today, you reach Mesh nodes by their Mesh IPs: ssh 100.64.0.5. That works, but it’s not how you think about your infrastructure. You think in names: postgres-staging, api-prod, nikitas-openclaw.

Later this year we’re building Mesh DNS so that every node and device that joins your Mesh automatically gets a routable internal hostname. No DNS configuration or manual records. Add a node named postgres-staging, and postgres-staging.mesh resolves to the right Mesh IP from any device on your Mesh.

Combined with hostname routing, you’ll be able to ssh postgres-staging.mesh or curl http://api-prod.mesh:3000/health without ever knowing or managing an IP address.

Identity-aware routing

Today, Mesh nodes authenticate to the Cloudflare edge, but they share an identity at the network layer. Devices authenticate with user identity via the Cloudflare One Client, but nodes don’t yet carry distinct, routable identities that Gateway policies can differentiate.

We want to change that. The goal is identity-aware routing for Mesh, where each node, each device, and eventually each agent gets a distinct identity that policies can evaluate. Instead of writing rules based on IP ranges, you write rules based on who or what is connecting.

This matters most for agents. Today, when an agent running on Workers calls a tool through a VPC binding, the target service sees a Worker making a request. It doesn’t know which agent is calling, who authorized it, or what scope was granted. On the Mesh side, when a local coding agent on your laptop reaches a staging service, Gateway sees your device identity but not the agent’s.

We’re working toward a model where agents carry their own identity through the network:

  • Principal / Sponsor: The human who authorized the action (Nikita from the platform team)

  • Agent: The AI system performing it (the deployment assistant, session #abc123)

  • Scope: What the agent is allowed to do (read deployments, trigger rollbacks, nothing else)

This would let you write policies like: reads from Nikita’s agents are allowed, but writes require Nikita directly. Agent traffic can be filtered independently from human traffic. An agent’s network access can be revoked without touching Nikita’s.

The infrastructure for this is in place. Mesh nodes provision with per-node tokens, devices authenticate with per-user identity, and Workers VPC bindings scope per-service access. The missing piece is making these identities visible to the policy layer so Gateway can make routing and access decisions based on them. That’s what we’re building.

Mesh in containers

Today, Mesh nodes run on VMs and bare-metal Linux servers. But modern infrastructure increasingly runs in containers: Kubernetes pods, Docker Compose stacks, ephemeral CI/CD runners. We’re building a Mesh Docker image that lets you add a Mesh node to any containerized environment.

This means you’ll be able to include a Mesh sidecar in your Docker Compose stack and give every service in that stack private network access. A microservice running in a container in your staging cluster could reach a database in your production VPC over Mesh, without either service needing a public endpoint.

It is also useful for CI/CD pipelines that can access private infrastructure during builds and tests: your GitHub Actions runner pulls the Mesh container image, joins your network, runs integration tests against your staging environment, and tears down. All without VPN credentials to manage or persistent tunnels to maintain: the node disappears when the container exits.

We expect the Mesh Docker image to be available later this year.

Get started

While we continue to evolve these identity and routing capabilities, the foundation for secure, unified networking is available today. You can start bridging your clouds and securing your agents in just a few minutes.

Get started Cloudflare Mesh: Head to Networking > Mesh in the Cloudflare dashboard. Free for up to 50 nodes and 50 users.

Build agents with Agents SDK and Workers VPC: Install the Agents SDK (`npm i agents`), follow the Workers VPC quickstart, and build a remote MCP server with private backend access.

Already on Cloudflare One? Mesh works with your existing setup. Your Gateway policies, device posture checks, and access rules apply to Mesh traffic automatically. See the Mesh documentation to add your first node.


Watch on Cloudflare TV

Building a CLI for all of Cloudflare

Post Syndicated from Matt “TK” Taylor original https://blog.cloudflare.com/cf-cli-local-explorer/

Cloudflare has a vast API surface. We have over 100 products, and nearly 3,000 HTTP API operations.

Increasingly, agents are the primary customer of our APIs. Developers bring their coding agents to build and deploy applications, agents, and platforms to Cloudflare, configure their account, and query our APIs for analytics and logs.

We want to make every Cloudflare product available in all of the ways agents need. For example, we now make Cloudflare’s entire API available in a single Code Mode MCP server that uses less than 1,000 tokens. There’s a lot more surface area to cover, though: CLI commands. Workers Bindings — including APIs for local development and testing. SDKs across multiple languages. Our configuration file. Terraform. Developer docs. API docs and OpenAPI schemas. Agent Skills.

Today, many of our products aren’t available across every one of these interfaces. This is particularly true of our CLI — Wrangler. Many Cloudflare products have no CLI commands in Wrangler. And agents love CLIs.

So we’ve been rebuilding Wrangler CLI, to make it the CLI for all of Cloudflare. It provides commands for all Cloudflare products, and lets you configure them together using infrastructure-as-code.

Today we’re sharing an early version of what the next version of Wrangler will look like as a technical preview. It’s very early, but we get the best feedback when we work in public.

You can try the Technical Preview today by running npx cf. Or you can install it globally by running npm install -g cf.

Right now, cf provides commands for just a small subset of Cloudflare products. We’re already testing a version of cf that supports the entirety of the Cloudflare API surface — and we will be intentionally reviewing and tuning the commands for each product, to have output that is ergonomic for both agents and humans. To be clear, this Technical Preview is just a small piece of the future Wrangler CLI. Over the coming months we will bring this together with the parts of Wrangler you know and love.

To build this in a way that keeps in sync with the rapid pace of product development at Cloudflare, we had to create a new system that allows us to generate commands, configuration, binding APIs, and more.

Rethinking schemas and our code generation pipeline from first principles

We already generate the Cloudflare API SDKs, Terraform provider, and Code Mode MCP server based on the OpenAPI schema for Cloudflare API. But updating our CLI, Workers Bindings, wrangler.jsonc configuration, Agent Skills, dashboard and docs is still a manual process. This was already error-prone, required too much back and forth, and wouldn’t scale to support the whole Cloudflare API in the next version of our CLI.


To do this, we needed more than could be expressed in an OpenAPI schema. OpenAPI schemas describe REST APIs, but we have interactive CLI commands that involve multiple actions that combine both local development and API requests, Workers bindings expressed as RPC APIs, along with Agent Skills and documentation that ties this all together.

We write a lot of TypeScript at Cloudflare. It’s the lingua franca of software engineering. And we keep finding that it just works better to express APIs in TypeScript — as we do with Cap n’ Web, Code Mode, and the RPC system built into the Workers platform.

So we introduced a new TypeScript schema that can define the full scope of APIs, CLI commands and arguments, and context needed to generate any interface. The schema format is “just” a set of TypeScript types with conventions, linting, and guardrails to ensure consistency. But because it is our own format, it can easily be adapted to support any interface we need, today or in the future, while still also being able to generate an OpenAPI schema:


To date most of our focus has been at this layer — building the machine we needed, so that we can now start building the CLI and other interfaces we’ve wanted for years to be able to provide. This lets us start to dream bigger about what we could standardize across Cloudflare and make better for Agents — especially when it comes to context engineering our CLI.

Agents and CLIs — consistency and context engineering

Agents expect CLIs to be consistent. If one command uses <command> info as the syntax for getting information about a resource, and another uses <command> get, the agent will expect one and call a non-existent command for the other. In a large engineering org of hundreds or thousands of people, and with many products, manually enforcing consistency through reviews is Swiss cheese. And you can enforce it at the CLI layer, but then naming differs between the CLI, REST API and SDKs, making the problem arguably worse.

One of the first things we’ve done is to start creating rules and guardrails, enforced at the schema layer. It’s always get, never info. Always --force, never --skip-confirmations. Always --json, never --format, and always supported across commands. 

Wrangler CLI is also fairly unique — it provides commands and configuration that can work with both simulated local resources, or remote resources, like D1 databases, R2 storage buckets, and KV namespaces. This means consistent defaults matter even more. If an agent thinks it’s modifying a remote database, but is actually adding records to local database, and the developer is using remote bindings to develop locally against a remote database, their agent won’t understand why the newly-added records aren’t showing up when the agent makes a request to the local dev server. Consistent defaults, along with output that clearly signals whether commands are applied to remote or local resources, ensure agents have explicit guidance.

Local Explorer — what you can do remotely, you can now do locally

Today we are also releasing Local Explorer, a new feature available in open beta in both Wrangler and the Cloudflare Vite plugin.

Local Explorer lets you introspect the simulated resources that your Worker uses when you are developing locally, including KV, R2, D1, Durable Objects and Workflows. The same things you can do via the Cloudflare API and Dashboard with each of these, you can also do entirely locally, powered by the same underlying API structure.

For years we’ve made a bet on fully local development — not just for Cloudflare Workers, but for the entire platform. When you use D1, even though D1 is a hosted, serverless database product, you can run your database and communicate with it via bindings entirely locally, without any extra setup or tooling. Via Miniflare, our local development platform emulator, the Workers runtime provides the exact same APIs in local dev as in production, and uses a local SQLite database to provide the same functionality. This makes it easy to write and run tests that run fast, without the need for network access, and work offline.

But until now, working out what data was stored locally required you to reverse engineer, introspect the contents of the .wrangler/state directory, or install third-party tools.

Now whenever you run an app with Wrangler CLI or the Cloudflare Vite plugin, you will be prompted to open the local explorer (keyboard shortcut e). This provides you with a simple, local interface to see what bindings your Worker currently has attached, and what data is stored against them.

When you build using Agents, Local Explorer is a great way to understand what the agent is doing with data, making the local development cycle much more interactive. You can turn to Local Explorer anytime you need to verify a schema, seed some test records, or just start over and DROP TABLE.

Our goal here is to provide a mirror of the Cloudflare API that only modifies local data, so that all of your local resources are available via the same APIs that you use remotely. And by making the API shape match across local and remote, when you run CLI commands in the upcoming version of the CLI and pass a --local flag, the commands just work. The only difference is that the command makes a request to this local mirror of the Cloudflare API instead.

Starting today, this API is available at /cdn-cgi/explorer/api on any Wrangler- or Vite Plugin- powered application. By pointing your agent at this address, it will find an OpenAPI specification to be able to manage your local resources for you, just by talking to your agent.

Tell us your hopes and dreams for a Cloudflare-wide CLI 

Now that we have built the machine, it’s time to take the best parts of Wrangler today, combine them with what’s now possible, and make Wrangler the best CLI possible for using all of Cloudflare.

You can try the technical preview today by running npx cf. Or you can install it globally by running npm install -g cf.

With this very early version, we want your feedback — not just about what the technical preview does today, but what you want from a CLI for Cloudflare’s entire platform. Tell us what you wish was an easy one-line CLI command but takes a few clicks in our dashboard today. What you wish you could configure in wrangler.jsonc — like DNS records or Cache Rules. And where you’ve seen your agents get stuck, and what commands you wish our CLI provided for your agent to use.

Jump into the Cloudflare Developers Discord and tell us what you’d like us to add first to the CLI, and stay tuned for many more updates soon.

Thanks to Emily Shen for her valuable contributions to kicking off the Local Explorer project.

Agents have their own computers with Sandboxes GA

Post Syndicated from Kate Reznykova original https://blog.cloudflare.com/sandbox-ga/

When we launched Cloudflare Sandboxes last June, the premise was simple: AI agents need to develop and run code, and they need to do it somewhere safe.

If an agent is acting like a developer, this means cloning repositories, building code in many languages, running development servers, etc. To do these things effectively, they will often need a full computer (and if they don’t, they can reach for something lightweight!).

Many developers are stitching together solutions using VMs or existing container solutions, but there are lots of hard problems to solve:

  • Burstiness – With each session needing its own sandbox, you often need to spin up many sandboxes quickly, but you don’t want to pay for idle compute on standby.

  • Quick state restoration – Each session should start quickly and re-start quickly, resuming past state.

  • Security – Agents need to access services securely, but can’t be trusted with credentials.

  • Control – It needs to be simple to programmatically control sandbox lifecycle, execute commands, handle files, and more.

  • Ergonomics – You need to give a simple interface for both humans and agents to do common operations.

We’ve spent time solving these issues so you don’t have to. Since our initial launch we’ve made Sandboxes an even better place to run agents at scale. We’ve worked with our initial partners such as Figma, who run agents in containers with Figma Make:

“Figma Make is built to help builders and makers of all backgrounds go from idea to production, faster. To deliver on that goal, we needed an infrastructure solution that could provide reliable, highly-scalable sandboxes where we could run untrusted agent- and user-authored code. Cloudflare Containers is that solution.”

– Alex Mullans, AI and Developer Platforms at Figma

We want to bring Sandboxes to even more great organizations, so today we are excited to announce that Sandboxes and Cloudflare Containers are both generally available.

Let’s take a look at some of the recent changes to Sandboxes:

  • Secure credential injection lets you make authenticated calls without the agent ever having credential access  

  • PTY support gives you and your agent a real terminal

  • Persistent code interpreters give your agent a place to execute stateful Python, JavaScript, and TypeScript out of the box

  • Background processes and live preview URLs provide a simple way to interact with development servers and verify in-flight changes

  • Filesystem watching improves iteration speed as agents make changes

  • Snapshots let you quickly recover an agent’s coding session

  • Higher limits and Active CPU Pricing let you deploy a fleet of agents at scale without paying for unused CPU cycles

Sandboxes 101

Before getting into some of the recent changes, let’s quickly look at the basics.

A Cloudflare Sandbox is a persistent, isolated environment powered by Cloudflare Containers. You ask for a sandbox by name. If it’s running, you get it. If it’s not, it starts. When it’s idle, it sleeps automatically and wakes when it receives a request. It’s easy to programmatically interact with the sandbox using methods like exec, gitClone, writeFile and more.

import { getSandbox } from "@cloudflare/sandbox";
export { Sandbox } from "@cloudflare/sandbox";

export default {
  async fetch(request: Request, env: Env) {
    // Ask for a sandbox by name. It starts on demand.
    const sandbox = getSandbox(env.Sandbox, "agent-session-47");

    // Clone a repository into it.
    await sandbox.gitCheckout("https://github.com/org/repo", {
      targetDir: "/workspace",
      depth: 1,
    });

    // Run the test suite. Stream output back in real time.
    return sandbox.exec("npm", ["test"], { stream: true });
  },
};

As long as you provide the same ID, subsequent requests can get to this same sandbox from anywhere in the world.

Secure credential injection

One of the hardest problems in agentic workloads is authentication. You often need agents to access private services, but you can’t fully trust them with raw credentials. 

Sandboxes solve this by injecting credentials at the network layer using a programmable egress proxy. This means that sandbox agents never have access to credentials and you can fully customize auth logic as you see fit:

class OpenCodeInABox extends Sandbox {
  static outboundByHost = {
    "my-internal-vcs.dev": (request, env, ctx) => {
      const headersWithAuth = new Headers(request.headers);
      headersWithAuth.set("x-auth-token", env.SECRET);
      return fetch(request, { headers: headersWithAuth });
    }
  }
}

For a deep dive into how this works — including identity-aware credential injection, dynamically modifying rules, and integrating with Workers bindings — read our recent blog post on Sandbox auth.

A real terminal, not a simulation

Early agent systems often modeled shell access as a request-response loop: run a command, wait for output, stuff the transcript back into the prompt, repeat. It works, but it is not how developers actually use a terminal. 

Humans run something, watch output stream in, interrupt it, reconnect later, and keep going. Agents benefit from that same feedback loop.

In February, we shipped PTY support. A pseudo-terminal session in a Sandbox, proxied over WebSocket, compatible with xterm.js.

Just call sandbox.terminal to serve the backend:

// Worker: upgrade a WebSocket connection into a live terminal session
export default {
  async fetch(request: Request, env: Env) {
    const url = new URL(request.url);
    if (url.pathname === "/terminal") {
      const sandbox = getSandbox(env.Sandbox, "my-session");
      return sandbox.terminal(request, { cols: 80, rows: 24 });
    }
    return new Response("Not found", { status: 404 });
  },
};

And use xterm addon to call it from the client:

// Browser: connect xterm.js to the sandbox shell
import { Terminal } from "xterm";
import { SandboxAddon } from "@cloudflare/sandbox/xterm";

const term = new Terminal();
const addon = new SandboxAddon({
  getWebSocketUrl: ({ origin }) => `${origin}/terminal`,
});

term.loadAddon(addon);
term.open(document.getElementById("terminal-container")!);
addon.connect({ sandboxId: "my-session" });

This allows agents and developers to use a full PTY to debug those sessions live.


Each terminal session gets its own isolated shell, its own working directory, its own environment. Open as many as you need, just like you would on your own machine. Output is buffered server-side, so reconnecting replays what you missed.

A code interpreter that remembers

For data analysis, scripting, and exploratory workflows, we also ship a higher-level abstraction: a persistent code execution context.

The key word is “persistent.” Many code interpreter implementations run each snippet in isolation, so state disappears between calls. You can’t set a variable in one step and read it in the next.

Sandboxes allow you to create “contexts” that persist state. Variables and imports persist across calls the same way they would in a Jupyter notebook:

// Create a Python context. State persists for its lifetime.
const ctx = await sandbox.createCodeContext({ language: "python" });

// First execution: load data
await sandbox.runCode(`
  import pandas as pd
  df = pd.read_csv('/workspace/sales.csv')
  df['margin'] = (df['revenue'] - df['cost']) / df['revenue']
`, { context: ctx });

// Second execution: df is still there
const result = await sandbox.runCode(`
  df.groupby('region')['margin'].mean().sort_values(ascending=False)
`, { context: ctx, onStdout: (line) => console.log(line.text) });

// result contains matplotlib charts, structured json output, and Pandas tables in HTML

Start a server. Get a URL. Ship it.

Agents are more useful when they can build something and show it to the user immediately. Sandboxes support background processes, readiness checks, and preview URLs. This lets an agent start a development server and share a live link without leaving the conversation.

// Start a dev server as a background process
const server = await sandbox.startProcess("npm run dev", {
  cwd: "/workspace",
});

// Wait until the server is actually ready — don't just sleep and hope
await server.waitForLog(/Local:.*localhost:(\d+)/);

// Expose the running service with a public URL
const { url } = await sandbox.exposePort(3000);

// url is a live public URL the agent can share with the user
console.log(`Preview: ${url}`);

With waitForPort() and waitForLog(), agents can sequence work based on real signals from the running program instead of guesswork. This is much nicer than a common alternative, which is usually some version of sleep(2000) followed by hope.

Watch the file system and reach immediately

Modern development loops are event-driven. Save a file, rerun the build. Edit a config, restart the server. Change a test, rerun the suite.

We shipped sandbox.watch() in March. It returns an SSE stream backed by native inotify, the kernel mechanism Linux uses for filesystem events.

import { parseSSEStream, type FileWatchSSEEvent } from '@cloudflare/sandbox';

const stream = await sandbox.watch('/workspace/src', {
  recursive: true,
  include: ['*.ts', '*.tsx']
});

for await (const event of parseSSEStream<FileWatchSSEEvent>(stream)) {
  if (event.type === 'modify' && event.path.endsWith('.ts')) {
    await sandbox.exec('npx tsc --noEmit', { cwd: '/workspace' });
  }
}

This is one of those primitives that quietly changes what agents can do. An agent that can observe the filesystem in real time can participate in the same feedback loops as a human developer.

Waking up quickly with snapshots

Imagine a (human) developer working on their laptop. They git clone a repo, run npm install, write code, push a PR, then close their laptop while waiting for code review. When it’s time to resume work, they just re-open the laptop and continue where they left off.

If an agent wants to replicate this workflow on a naive container platform, you run into a snag. How do you resume where you left off quickly? You could keep a sandbox running, but then you pay for idle compute. You could start fresh from the container image, but then you have to wait for a long git clone and npm install.

Our answer is snapshots, which will be rolling out in the coming weeks.

A snapshot preserves a container’s full disk state, OS config, installed dependencies, modified files, data files and more. Then it lets you quickly restore it later.

You can configure a Sandbox to automatically snapshot when it goes to sleep.

class AgentDevEnvironment extends Sandbox {
  sleepAfter = "5m";
  persistAcrossSessions = {type: "disk"}; // you can also specify individual directories
}

You can also programmatically take a snapshot and manually restore it. This is useful for checkpointing work or forking sessions. For instance, if you wanted to run four instances of an agent in parallel, you could easily boot four sandboxes from the same state.

class AgentDevEnvironment extends Sandbox {}

async forkDevEnvironment(baseId, numberOfForks) {
  const baseInstance = await getSandbox(baseId);
  const snapshotId = await baseInstance.snapshot();

  const forks = Array.from({ length: numberOfForks }, async (_, i) => {
    const newInstance = await getSandbox(`${baseId}-fork-${i}`);
    return newInstance.start({ snapshot: snapshotId });
  });

  await Promise.all(forks);
}

Snapshots are stored in R2 within your account, giving you durability and location-independence. R2’s tiered caching system allows for fast restores across all of Region: Earth.

In future releases, live memory state will also be captured, allowing running processes to resume exactly where they left off. A terminal and an editor will reopen in the exact state they were in when last closed.

If you are interested in restoring session state before snapshots go live, you can use the backup and restore methods today. These also persist and restore directories using R2, but are not as performant as true VM-level snapshots. Though they still can lead to considerable speed improvements over naively recreating session state.


Booting a sandbox, cloning  ‘axios’, and npm installing takes 30 seconds. Restoring from a backup takes two seconds.

Stay tuned for the official snapshot release.

Higher limits and Active CPU Pricing

Since our initial launch, we’ve been steadily increasing capacity. Users on our standard pricing plan can now run 15,000 concurrent instances of the lite instance type, 6,000 instances of basic, and over 1,000 concurrent larger instances. Reach out to run even more!

We also changed our pricing model to be more cost effective running at scale. Sandboxes now only charge for actively used CPU cycles. This means that you aren’t paying for idle CPU while your agent is waiting for an LLM to respond.

This is what a computer looks like 

Nine months ago, we shipped a sandbox that could run commands and access a filesystem. That was enough to prove the concept.

What we have now is different in kind. A Sandbox today is a full development environment: a terminal you can connect a browser to, a code interpreter with persistent state, background processes with live preview URLs, a filesystem that emits change events in real time, egress proxies for secure credential injection, and a snapshot mechanism that makes warm starts nearly instant. 

When you build on this, a satisfying pattern emerges: agents that do real engineering work. Clone a repo, install it, run the tests, read the failures, edit the code, run the tests again. The kind of tight feedback loop that makes a human engineer effective — now the agent gets it too.

We’re at version 0.8.9 of the SDK. You can get started today:

npm i @cloudflare/sandbox@latest

Durable Objects in Dynamic Workers: Give each AI-generated app its own database

Post Syndicated from Kenton Varda original https://blog.cloudflare.com/durable-object-facets-dynamic-workers/

A few weeks ago, we announced Dynamic Workers, a new feature of the Workers platform which lets you load Worker code on-the-fly into a secure sandbox. The Dynamic Worker Loader API essentially provides direct access to the basic compute isolation primitive that Workers has been based on all along: isolates, not containers. Isolates are much lighter-weight than containers, and as such, can load 100x faster using 1/10 the memory. They are so efficient, they can be treated as “disposable”: start one up to run a few lines of code, then throw it away. Like a secure version of eval().

Dynamic Workers have many uses. In the original announcement, we focused on how to use them to run AI-agent-generated code as an alternative to tool calls. In this use case, an AI agent performs actions at the request of a user by writing a few lines of code and executing them. The code is single-use, intended to perform one task one time, and is thrown away immediately after it executes.

But what if you want an AI to generate more persistent code? What if you want your AI to build a small application with a custom UI the user can interact with? What if you want that application to have long-lived state? But of course, you still want it to run in a secure sandbox.

One way to do this would be to use Dynamic Workers, and simply provide the Worker with an RPC API that gives it access to storage. Using bindings, you could give the Dynamic Worker an API that points back to your remote SQL database (perhaps backed by Cloudflare D1, or a Postgres database you access through Hyperdrive — it’s up to you).

But Workers also has a unique and extremely fast type of storage that may be a perfect fit for this use case: Durable Objects. A Durable Object is a special kind of Worker that has a unique name, with one instance globally per name. That instance has a SQLite database attached, which lives on local disk on the machine where the Durable Object runs. This makes storage access ridiculously fast: there is effectively zero latency.

Perhaps, then, what you really want is for your AI to write code for a Durable Object, and then you want to run that code in a Dynamic Worker.

But how?

This presents a weird problem. Normally, to use Durable Objects you have to:

  1. Write a class extending DurableObject.

  2. Export it from your Worker’s main module.

  3. Specify in your Wrangler config that storage should be provision for this class. This creates a Durable Object namespace that points at your class for handling incoming requests.

  4. Declare a Durable Object namespace binding pointing at your namespace (or use ctx.exports), and use it to make requests to your Durable Object.

This doesn’t extend naturally to Dynamic Workers. First, there is the obvious problem: The code is dynamic. You run it without invoking the Cloudflare API at all. But Durable Object storage has to be provisioned through the API, and the namespace has to point at an implementing class. It can’t point at your Dynamic Worker.

But there is a deeper problem: Even if you could somehow configure a Durable Object namespace to point directly at a Dynamic Worker, would you want to? Do you want your agent (or user) to be able to create a whole namespace full of Durable Objects? To use unlimited storage spread around the world?

You probably don’t. You probably want some control. You may want to limit, or at least track, how many objects they create. Maybe you want to limit them to just one object (probably good enough for vibe-coded personal apps). You may want to add logging and other observability. Metrics. Billing. Etc.

To do all this, what you really want is for requests to these Durable Objects to go to your code first, where you can then do all the “logistics”, and then forward the request into the agent’s code. You want to write a supervisor that runs as part of every Durable Object.

Solution: Durable Object Facets

Today we are releasing, in open beta, a feature that solves this problem.


Durable Object Facets allow you to load and instantiate a Durable Object class dynamically, while providing it with a SQLite database to use for storage. With Facets:

  • First you create a normal Durable Object namespace, pointing to a class you write.

  • In that class, you load the agent’s code as a Dynamic Worker, and call into it.

  • The Dynamic Worker’s code can implement a Durable Object class directly. That is, it literally exports a class declared as extends DurableObject.

  • You are instantiating that class as a “facet” of your own Durable Object.

  • The facet gets its own SQLite database, which it can use via the normal Durable Object storage APIs. This database is separate from the supervisor’s database, but the two are stored together as part of the same overall Durable Object.

How it works

Here is a simple, complete implementation of an app platform that dynamically loads and runs a Durable Object class:

import { DurableObject } from "cloudflare:workers";

// For the purpose of this example, we'll use this static
// application code, but in the real world this might be generated
// by AI (or even, perhaps, a human user).
const AGENT_CODE = `
  import { DurableObject } from "cloudflare:workers";

  // Simple app that remembers how many times it has been invoked
  // and returns it.
  export class App extends DurableObject {
    fetch(request) {
      // We use storage.kv here for simplicity, but storage.sql is
      // also available. Both are backed by SQLite.
      let counter = this.ctx.storage.kv.get("counter") || 0;
      ++counter;
      this.ctx.storage.kv.put("counter", counter);

      return new Response("You've made " + counter + " requests.\\n");
    }
  }
`;

// AppRunner is a Durable Object you write that is responsible for
// dynamically loading applications and delivering requests to them.
// Each instance of AppRunner contains a different app.
export class AppRunner extends DurableObject {
  async fetch(request) {
    // We've received an HTTP request, which we want to forward into
    // the app.

    // The app itself runs as a child facet named "app". One Durable
    // Object can have any number of facets (subject to storage limits)
    // with different names, but in this case we have only one. Call
    // this.ctx.facets.get() to get a stub pointing to it.
    let facet = this.ctx.facets.get("app", async () => {
      // If this callback is called, it means the facet hasn't
      // started yet (or has hibernated). In this callback, we can
      // tell the system what code we want it to load.

      // Load the Dynamic Worker.
      let worker = this.#loadDynamicWorker();

      // Get the exported class we're interested in.
      let appClass = worker.getDurableObjectClass("App");

      return { class: appClass };
    });

    // Forward request to the facet.
    // (Alternatively, you could call RPC methods here.)
    return await facet.fetch(request);
  }

  // RPC method that a client can call to set the dynamic code
  // for this app.
  setCode(code) {
    // Store the code in the AppRunner's SQLite storage.
    // Each unique code must have a unique ID to pass to the
    // Dynamic Worker Loader API, so we generate one randomly.
    this.ctx.storage.kv.put("codeId", crypto.randomUUID());
    this.ctx.storage.kv.put("code", code);
  }

  #loadDynamicWorker() {
    // Use the Dynamic Worker Loader API like normal. Use get()
    // rather than load() since we may load the same Worker many
    // times.
    let codeId = this.ctx.storage.kv.get("codeId");
    return this.env.LOADER.get(codeId, async () => {
      // This Worker hasn't been loaded yet. Load its code from
      // our own storage.
      let code = this.ctx.storage.kv.get("code");

      return {
        compatibilityDate: "2026-04-01",
        mainModule: "worker.js",
        modules: { "worker.js": code },
        globalOutbound: null,  // block network access
      }
    });
  }
}

// This is a simple Workers HTTP handler that uses AppRunner.
export default {
  async fetch(req, env, ctx) {
    // Get the instance of AppRunner named "my-app".
    // (Each name has exactly one Durable Object instance in the
    // world.)
    let obj = ctx.exports.AppRunner.getByName("my-app");

    // Initialize it with code. (In a real use case, you'd only
    // want to call this once, not on every request.)
    await obj.setCode(AGENT_CODE);

    // Forward the request to it.
    return await obj.fetch(req);
  }
}

In this example:

  • AppRunner is a “normal” Durable Object written by the platform developer (you).

  • Each instance of AppRunner manages one application. It stores the app code and loads it on demand.

  • The application itself implements and exports a Durable Object class, which the platform expects is named App.

  • AppRunner loads the application code using Dynamic Workers, and then executes the code as a Durable Object Facet.

  • Each instance of AppRunner is one Durable Object composed of two SQLite databases: one belonging to the parent (AppRunner itself) and one belonging to the facet (App). These databases are isolated: the application cannot read AppRunner‘s database, only its own.

To run the example, copy the code above into a file worker.js, pair it with the following wrangler.jsonc, and run it locally with npx wrangler dev.

// wrangler.jsonc for the above sample worker.
{
  "compatibility_date": "2026-04-01",
  "main": "worker.js",
  "migrations": [
    {
      "tag": "v1",
      "new_sqlite_classes": [
        "AppRunner"
      ]
    }
  ],
  "worker_loaders": [
    {
      "binding": "LOADER",
    },
  ],
}

Start building

Facets are a feature of Dynamic Workers, available in beta immediately to users on the Workers Paid plan.

Check out the documentation to learn more about Dynamic Workers and Facets.

Welcome to Agents Week

Post Syndicated from Rita Kozlov original https://blog.cloudflare.com/welcome-to-agents-week/

Cloudflare’s mission has always been to help build a better Internet. Sometimes that means building for the Internet as it exists. Sometimes it means building for the Internet as it’s about to become. 

Today, we’re kicking off Agents Week, dedicated to building the Internet for what comes next.

The Internet wasn’t built for the age of AI. Neither was the cloud.

The cloud, as we know it, was a product of the last major technological paradigm shift: smartphones.

When smartphones put the Internet in everyone’s pocket, they didn’t just add users — they changed the nature of what it meant to be online. Always connected, always expecting an instant response. Applications had to handle an order of magnitude more users, and the infrastructure powering them had to evolve.

The approach the industry converged on was straightforward: more users, more copies of your application. As applications grew in complexity, teams broke them into smaller pieces — microservices — so each team could control its own destiny. But the core principle stayed the same: a finite number of applications, each serving many users. Scale meant more copies.

Kubernetes and containers became the default. They made it easy to spin up instances, load balance, and tear down what you didn’t need. Under this one-to-many model, a single instance could serve many users, and even as user counts grew into the billions, the number of things you had to manage stayed finite.

Agents break this.

One user, one agent, one task

Unlike every application that came before them, agents are one-to-one. Each agent is a unique instance. Serving one user, running one task. Where a traditional application follows the same execution path regardless of who’s using it, an agent requires its own execution environment: one where the LLM dictates the code path, calls tools dynamically, adjusts its approach, and persists until the task is done.

Think of it as the difference between a restaurant and a personal chef. A restaurant has a menu — a fixed set of options — and a kitchen optimized to churn them out at volume. That’s most applications today. An agent is more like a personal chef who asks: what do you want to eat? They might need entirely different ingredients, utensils, or techniques each time. You can’t run a personal-chef service out of the same kitchen setup you’d use for a restaurant.

Over the past year, we’ve seen agents take off, with coding agents leading the way — not surprisingly, since developers tend to be early adopters. The way most coding agents work today is by spinning up a container to give the LLM what it needs: a filesystem, git, bash, and the ability to run arbitrary binaries.

But coding agents are just the beginning. Tools like Claude Cowork are already making agents accessible to less technical users. Once agents move beyond developers and into the hands of everyone — administrative assistants, research analysts, customer service reps, personal planners — the scale math gets sobering fast.

The math on scaling agents to the masses

If the more than 100 million knowledge workers in the US each used an agentic assistant at ~15% concurrency, you’d need capacity for approximately 24 million simultaneous sessions. At 25–50 users per CPU, that’s somewhere between 500K and 1M server CPUs — just for the US, with one agent per person.

Now picture each person running several agents in parallel. Now picture the rest of the world with more than 1 billion knowledge workers. We’re not a little short on compute. We’re orders of magnitude away.

So how do we close that gap?

Infrastructure built for agents

Eight years ago, we launched Workers — the beginning of our developer platform, and a bet on containerless, serverless compute. The motivation at the time was practical: we needed lightweight compute without cold-starts for customers who depended on Cloudflare for speed. Built on V8 isolates rather than containers, Workers turned out to be an order of magnitude more efficient — faster to start, cheaper to run, and natively suited to the “spin up, execute, tear down” pattern.

What we didn’t anticipate was how well this model would map to the age of agents.

Where containers give every agent a full commercial kitchen: bolted-down appliances, walk-in fridges, the works, whether the agent needs them or not, isolates, on the other hand, give the personal chef exactly the counter space, the burner, and the knife they need for this particular meal. Provisioned in milliseconds. Cleaned up the moment the dish is served.


In a world where we need to support not thousands of long-running applications, but billions of ephemeral, single-purpose execution environments — isolates are the right primitive. 

Each one starts in milliseconds. Each one is securely sandboxed. And you can run orders of magnitude more of them on the same hardware compared to containers.

Just a few weeks ago, we took this further with the Dynamic Workers open beta: execution environments spun up at runtime, on demand. An isolate takes a few milliseconds to start and uses a few megabytes of memory. That’s roughly 100x faster and up to 100x more memory-efficient than a container. 

You can start a new one for every single request, run a snippet of code, and throw it away — at a scale of millions per second.

For agents to move beyond early adopters and into everyone’s hands, they also have to be affordable. Running each agent in its own container is expensive enough that agentic tools today are mostly limited to coding assistants for engineers who can justify the cost. Isolates, by running orders of magnitude more efficiently, are what make per-unit economics viable at the scale agents require.


The horseless carriage phase

While it’s critical to build the right foundation for the future, we’re not there yet. And every paradigm shift has a period where we try to make the new thing work within the old model. The first cars were called “horseless carriages.” The first websites were digital brochures. The first mobile apps were shrunken desktop UIs. We’re in that phase now with agents.

You can see it everywhere. 

We’re giving agents headless browsers to navigate websites designed for human eyes, when what they need are structured protocols like MCP to discover and invoke services directly. 

Many early MCP servers are thin wrappers around existing REST APIs — same CRUD operations, new protocol — when LLMs are actually far better at writing code than making sequential tool calls. 

We’re using CAPTCHAs and behavioral fingerprinting to verify the thing on the other end of a request, when increasingly that thing is an agent acting on someone’s behalf — and the right question isn’t “are you human?” but “which agent are you, who authorized you, and what are you allowed to do?”

We’re spinning up full containers for agents that just need to make a few API calls and return a result.

These are just a few examples, but none of this is surprising. It’s what transitions look like.

Building for both

The Internet is always somewhere between two eras. IPv6 is objectively better than IPv4, but dropping IPv4 support would break half the Internet. HTTP/2 and HTTP/3 coexist. TLS 1.2 still hasn’t fully given way to 1.3. The better technology exists, the old technology persists, and the job of infrastructure is to bridge both.

Cloudflare has always been in the business of bridging these transitions. The shift to agents is no different.

Coding agents genuinely need containers — a filesystem, git, bash, arbitrary binary execution. That’s not going away. This week, our container-based sandbox environments are going GA, because we’re committed to making them the best they can be. We’re going deeper on browser rendering for agents, because there will be a long tail of services that don’t yet speak MCP, and agents will still need to interact with them. These aren’t stopgaps — they’re part of a complete platform.

But we’re also building what comes next: the isolates, the protocols, and the identity models that agents actually need. Our job is to make sure you don’t have to choose between what works today and what’s right for tomorrow.

Security in the model, not around it

If agents are going to handle our professional and personal tasks — reading our email, operating on our code, interacting with our financial services — then security has to be built into the execution model, not layered on after the fact.

CISOs have been the first to confront this. The productivity gains from putting agents in everyone’s hands are real, but today, most agent deployments are fraught with risk: prompt injection, data exfiltration, unauthorized API access, opaque tool usage. 

A developer’s vibe-coding agent needs access to repositories and deployment pipelines. An enterprise’s customer service agent needs access to internal APIs and user data. In both cases, securing the environment today means stitching together credentials, network policies, and access controls that were never designed for autonomous software.

Cloudflare has been building two platforms in parallel: our developer platform, for people who build applications, and our zero trust platform, for organizations that need to secure access. For a while, these served distinct audiences. 

But “how do I build this agent?” and “how do I make sure it’s safe?” are increasingly the same question. We’re bringing these platforms together so that all of this is native to how agents run, not a separate layer you bolt on.

Agents that follow the rules

There’s another dimension to the agent era that goes beyond compute and security: economics and governance.

When agents interact with the Internet on our behalf — reading articles, consuming APIs, accessing services — there needs to be a way for the people and organizations who create that content and run those services to set terms and get paid. Today, the web’s economic model is built around human attention: ads, paywalls, subscriptions. 

Agents don’t have attention (well, not that kind of attention). They don’t see ads. They don’t click through cookie banners.

If we want an Internet where agents can operate freely and where publishers, content creators, and service providers are fairly compensated, we need new infrastructure for it. We’re building tools that make it easy for publishers and content owners to set and enforce policies for how agents interact with their content.

Building a better Internet has always meant making sure it works for everyone — not just the people building the technology, but the people whose work and creativity make the Internet worth using. That doesn’t change in the age of agents. It becomes more important.

The platform for developers and agents

Our vision for the developer platform has always been to provide a comprehensive platform that just works: from experiment, to MVP, to scaling to millions of users. But providing the primitives is only part of the equation. A great platform also has to think about how everything works together, and how it integrates into your development flow.

That job is evolving. It used to be purely about developer experience, making it easy for humans to build, test, and ship. Increasingly, it’s also about helping agents help humans, and making the platform work not just for the people building agents, but for the agents themselves. Can an agent find the latest most up-to- date best practices? How easily can it discover and invoke the tools and CLIs it needs? How seamlessly can it move from writing code to deploying it?

This week, we’re shipping improvements across both dimensions — making Cloudflare better for the humans building on it and for the agents running on it.

Building for the future is a team sport

Building for the future is not something we can do alone. Every major Internet transition from HTTP/1.1 to HTTP/2 and HTTP/3, from TLS 1.2 to 1.3 — has required the industry to converge on shared standards. The shift to agents will be no different.

Cloudflare has a long history of contributing to and helping push forward the standards that make the Internet work. We’ve been deeply involved in the IETF for over a decade, helping develop and deploy protocols like QUIC, TLS 1.3, and Encrypted Client Hello. We were a founding member of WinterTC, the ECMA technical committee for JavaScript runtime interoperability. We open-sourced the Workers runtime itself, because we believe the foundation should be open.

We’re bringing the same approach to the agentic era. We’re excited to be part of the Linux Foundation and AAIF, and to help support and push forward standards like MCP that will be foundational for the agentic future. Since Anthropic introduced MCP, we’ve worked closely with them to build the infrastructure for remote MCP servers, open-sourced our own implementations, and invested in making the protocol practical at scale. 

Last year, alongside Coinbase, we co-founded the x402 Foundation, an open, neutral standard that revives the long-dormant HTTP 402 status code to give agents a native way to pay for the services and content they consume. 

Agent identity, authorization, payment, safety: these all need open standards that no single company can define alone.

Stay tuned

This week, we’re making announcements across every dimension of the agent stack: compute, connectivity, security, identity, economics, and developer experience.

The Internet wasn’t built for AI. The cloud wasn’t built for agents. But Cloudflare has always been about helping build a better Internet — and what “better” means changes with each era. This is the era of agents. This week, follow along and we’ll show you what we’re building for it.

Sandboxing AI agents, 100x faster

Post Syndicated from Kenton Varda original https://blog.cloudflare.com/dynamic-workers/

Last September we introduced Code Mode, the idea that agents should perform tasks not by making tool calls, but instead by writing code that calls APIs. We’ve shown that simply converting an MCP server into a TypeScript API can cut token usage by 81%. We demonstrated that Code Mode can also operate behind an MCP server instead of in front of it, creating the new Cloudflare MCP server that exposes the entire Cloudflare API with just two tools and under 1,000 tokens.

But if an agent (or an MCP server) is going to execute code generated on-the-fly by AI to perform tasks, that code needs to run somewhere, and that somewhere needs to be secure. You can’t just eval() AI-generated code directly in your app: a malicious user could trivially prompt the AI to inject vulnerabilities.

You need a sandbox: a place to execute code that is isolated from your application and from the rest of the world, except for the specific capabilities the code is meant to access.

Sandboxing is a hot topic in the AI industry. For this task, most people are reaching for containers. Using a Linux-based container, you can start up any sort of code execution environment you want. Cloudflare even offers our container runtime and our Sandbox SDK for this purpose.

But containers are expensive and slow to start, taking hundreds of milliseconds to boot and hundreds of megabytes of memory to run. You probably need to keep them warm to avoid delays, and you may be tempted to reuse existing containers for multiple tasks, compromising the security.

If we want to support consumer-scale agents, where every end user has an agent (or many!) and every agent writes code, containers are not enough. We need something lighter.

And we have it.

Dynamic Worker Loader: a lean sandbox

Tucked into our Code Mode post in September was the announcement of a new, experimental feature: the Dynamic Worker Loader API. This API allows a Cloudflare Worker to instantiate a new Worker, in its own sandbox, with code specified at runtime, all on the fly.

Dynamic Worker Loader is now in open beta, available to all paid Workers users.

Read the docs for full details, but here’s what it looks like:

// Have your LLM generate code like this.
let agentCode: string = `
  export default {
    async myAgent(param, env, ctx) {
      // ...
    }
  }
`;

// Get RPC stubs representing APIs the agent should be able
// to access. (This can be any Workers RPC API you define.)
let chatRoomRpcStub = ...;

// Load a worker to run the code, using the worker loader
// binding.
let worker = env.LOADER.load({
  // Specify the code.
  compatibilityDate: "2026-03-01",
  mainModule: "agent.js",
  modules: { "agent.js": agentCode },

  // Give agent access to the chat room API.
  env: { CHAT_ROOM: chatRoomRpcStub },

  // Block internet access. (You can also intercept it.)
  globalOutbound: null,
});

// Call RPC methods exported by the agent code.
await worker.getEntrypoint().myAgent(param);

That’s it.

100x faster

Dynamic Workers use the same underlying sandboxing mechanism that the entire Cloudflare Workers platform has been built on since its launch, eight years ago: isolates. An isolate is an instance of the V8 JavaScript execution engine, the same engine used by Google Chrome. They are how Workers work.

An isolate takes a few milliseconds to start and uses a few megabytes of memory. That’s around 100x faster and 10x-100x more memory efficient than a typical container.

That means that if you want to start a new isolate for every user request, on-demand, to run one snippet of code, then throw it away, you can.

Unlimited scalability

Many container-based sandbox providers impose limits on global concurrent sandboxes and rate of sandbox creation. Dynamic Worker Loader has no such limits. It doesn’t need to, because it is simply an API to the same technology that has powered our platform all along, which has always allowed Workers to seamlessly scale to millions of requests per second.

Want to handle a million requests per second, where every single request loads a separate Dynamic Worker sandbox, all running concurrently? No problem!

Zero latency

One-off Dynamic Workers usually run on the same machine — the same thread, even — as the Worker that created them. No need to communicate around the world to find a warm sandbox. Isolates are so lightweight that we can just run them wherever the request landed. Dynamic Workers are supported in every one of Cloudflare’s hundreds of locations around the world.

It’s all JavaScript

The only catch, vs. containers, is that your agent needs to write JavaScript.

Technically, Workers (including dynamic ones) can use Python and WebAssembly, but for small snippets of code — like that written on-demand by an agent — JavaScript will load and run much faster.

We humans tend to have strong preferences on programming languages, and while many love JavaScript, others might prefer Python, Rust, or countless others.

But we aren’t talking about humans here. We’re talking about AI. AI will write any language you want it to. LLMs are experts in every major language. Their training data in JavaScript is immense.

JavaScript, by its nature on the web, is designed to be sandboxed. It is the correct language for the job.

Tools defined in TypeScript

If we want our agent to be able to do anything useful, it needs to talk to external APIs. How do we tell it about the APIs it has access to?

MCP defines schemas for flat tool calls, but not programming APIs. OpenAPI offers a way to express REST APIs, but it is verbose, both in the schema itself and the code you’d have to write to call it.

For APIs exposed to JavaScript, there is a single, obvious answer: TypeScript.

Agents know TypeScript. TypeScript is designed to be concise. With very few tokens, you can give your agent a precise understanding of your API.

// Interface to interact with a chat room.
interface ChatRoom {
  // Get the last `limit` messages of the chat log.
  getHistory(limit: number): Promise<Message[]>;

  // Subscribe to new messages. Dispose the returned object
  // to unsubscribe.
  subscribe(callback: (msg: Message) => void): Promise<Disposable>;

  // Post a message to chat.
  post(text: string): Promise<void>;
}

type Message = {
  author: string;
  time: Date;
  text: string;
}

Compare this with the equivalent OpenAPI spec (which is so long you have to scroll to see it all):

openapi: 3.1.0
info:
  title: ChatRoom API
  description: >
    Interface to interact with a chat room.
  version: 1.0.0

paths:
  /messages:
    get:
      operationId: getHistory
      summary: Get recent chat history
      description: Returns the last `limit` messages from the chat log, newest first.
      parameters:
        - name: limit
          in: query
          required: true
          schema:
            type: integer
            minimum: 1
      responses:
        "200":
          description: A list of messages.
          content:
            application/json:
              schema:
                type: array
                items:
                  $ref: "#/components/schemas/Message"

    post:
      operationId: postMessage
      summary: Post a message to the chat room
      requestBody:
        required: true
        content:
          application/json:
            schema:
              type: object
              required:
                - text
              properties:
                text:
                  type: string
      responses:
        "204":
          description: Message posted successfully.

  /messages/stream:
    get:
      operationId: subscribeMessages
      summary: Subscribe to new messages via SSE
      description: >
        Opens a Server-Sent Events stream. Each event carries a JSON-encoded
        Message object. The client unsubscribes by closing the connection.
      responses:
        "200":
          description: An SSE stream of new messages.
          content:
            text/event-stream:
              schema:
                description: >
                  Each SSE `data` field contains a JSON-encoded Message object.
                $ref: "#/components/schemas/Message"

components:
  schemas:
    Message:
      type: object
      required:
        - author
        - time
        - text
      properties:
        author:
          type: string
        time:
          type: string
          format: date-time
        text:
          type: string

We think the TypeScript API is better. It’s fewer tokens and much easier to understand (for both agents and humans).

Dynamic Worker Loader makes it easy to implement a TypeScript API like this in your own Worker and then pass it in to the Dynamic Worker either as a method parameter or in the env object. The Workers Runtime will automatically set up a Cap’n Web RPC bridge between the sandbox and your harness code, so that the agent can invoke your API across the security boundary without ever realizing that it isn’t using a local library.

That means your agent can write code like this:

// Thinking: The user asked me to summarize recent chat messages from Alice.
// I will filter the recent message history in code so that I only have to
// read the relevant messages.
let history = await env.CHAT_ROOM.getHistory(1000);
return history.filter(msg => msg.author == "alice");

HTTP filtering and credential injection

If you prefer to give your agents HTTP APIs, that’s fully supported. Using the globalOutbound option to the worker loader API, you can register a callback to be invoked on every HTTP request, in which you can inspect the request, rewrite it, inject auth keys, respond to it directly, block it, or anything else you might like.

For example, you can use this to implement credential injection (token injection): When the agent makes an HTTP request to a service that requires authorization, you add credentials to the request on the way out. This way, the agent itself never knows the secret credentials, and therefore cannot leak them.

Using a plain HTTP interface may be desirable when an agent is talking to a well-known API that is in its training set, or when you want your agent to use a library that is built on a REST API (the library can run inside the agent’s sandbox).

With that said, in the absence of a compatibility requirement, TypeScript RPC interfaces are better than HTTP:

  • As shown above, a TypeScript interface requires far fewer tokens to describe than an HTTP interface.

  • The agent can write code to call TypeScript interfaces using far fewer tokens than equivalent HTTP.

  • With TypeScript interfaces, since you are defining your own wrapper interface anyway, it is easier to narrow the interface to expose exactly the capabilities that you want to provide to your agent, both for simplicity and security. With HTTP, you are more likely implementing filtering of requests made against some existing API. This is hard, because your proxy must fully interpret the meaning of every API call in order to properly decide whether to allow it, and HTTP requests are complicated, with many headers and other parameters that could all be meaningful. It ends up being easier to just write a TypeScript wrapper that only implements the functions you want to allow.

Battle-hardened security

Hardening an isolate-based sandbox is tricky, as it is a more complicated attack surface than hardware virtual machines. Although all sandboxing mechanisms have bugs, security bugs in V8 are more common than security bugs in typical hypervisors. When using isolates to sandbox possibly-malicious code, it’s important to have additional layers of defense-in-depth. Google Chrome, for example, implemented strict process isolation for this reason, but it is not the only possible solution.

We have nearly a decade of experience securing our isolate-based platform. Our systems automatically deploy V8 security patches to production within hours — faster than Chrome itself. Our security architecture features a custom second-layer sandbox with dynamic cordoning of tenants based on risk assessments. We’ve extended the V8 sandbox itself to leverage hardware features like MPK. We’ve teamed up with (and hired) leading researchers to develop novel defenses against Spectre. We also have systems that scan code for malicious patterns and automatically block them or apply additional layers of sandboxing. And much more.

When you use Dynamic Workers on Cloudflare, you get all of this automatically.

Helper libraries

We’ve built a number of libraries that you might find useful when working with Dynamic Workers:

Code Mode

@cloudflare/codemode simplifies running model-generated code against AI tools using Dynamic Workers. At its core is DynamicWorkerExecutor(), which constructs a purpose-built sandbox with code normalisation to handle common formatting errors, and direct access to a globalOutbound fetcher for controlling fetch() behaviour inside the sandbox — set it to null for full isolation, or pass a Fetcher binding to route, intercept or enrich outbound requests from the sandbox.

const executor = new DynamicWorkerExecutor({
  loader: env.LOADER,
  globalOutbound: null, // fully isolated 
});

const codemode = createCodeTool({
  tools: myTools,
  executor,
});

return generateText({
  model,
  messages,
  tools: { codemode },
});

The Code Mode SDK also provides two server-side utility functions. codeMcpServer({ server, executor }) wraps an existing MCP Server, replacing its tool surface with a single code() tool. openApiMcpServer({ spec, executor, request }) goes further: given an OpenAPI spec and an executor, it builds a complete MCP Server with search() and execute() tools as used by the Cloudflare MCP Server, and better suited to larger APIs.

In both cases, the code generated by the model runs inside Dynamic Workers, with calls to external services made over RPC bindings passed to the executor.

Learn more about the library and how to use it.

Bundling

Dynamic Workers expect pre-bundled modules. @cloudflare/worker-bundler handles that for you: give it source files and a package.json, and it resolves npm dependencies from the registry, bundles everything with esbuild, and returns the module map the Worker Loader expects.

import { createWorker } from "@cloudflare/worker-bundler";

const worker = env.LOADER.get("my-worker", async () => {
  const { mainModule, modules } = await createWorker({
    files: {
      "src/index.ts": `
        import { Hono } from 'hono';
        import { cors } from 'hono/cors';

        const app = new Hono();
        app.use('*', cors());
        app.get('/', (c) => c.text('Hello from Hono!'));
        app.get('/json', (c) => c.json({ message: 'It works!' }));

        export default app;
      `,
      "package.json": JSON.stringify({
        dependencies: { hono: "^4.0.0" }
      })
    }
  });

  return { mainModule, modules, compatibilityDate: "2026-01-01" };
});

await worker.getEntrypoint().fetch(request);

It also supports full-stack apps via createApp — bundle a server Worker, client-side JavaScript, and static assets together, with built-in asset serving that handles content types, ETags, and SPA routing.

Learn more about the library and how to use it.

File manipulation

@cloudflare/shell gives your agent a virtual filesystem inside a Dynamic Worker. Agent code calls typed methods on a state object — read, write, search, replace, diff, glob, JSON query/update, archive — with structured inputs and outputs instead of string parsing.

Storage is backed by a durable Workspace (SQLite + R2), so files persist across executions. Coarse operations like searchFiles, replaceInFiles, and planEdits minimize RPC round-trips — the agent issues one call instead of looping over individual files. Batch writes are transactional by default: if any write fails, earlier writes roll back automatically.

import { Workspace } from "@cloudflare/shell";
import { stateTools } from "@cloudflare/shell/workers";
import { DynamicWorkerExecutor, resolveProvider } from "@cloudflare/codemode";

const workspace = new Workspace({
  sql: this.ctx.storage.sql, // Works with any DO's SqlStorage, D1, or custom SQL backend
  r2: this.env.MY_BUCKET, // large files spill to R2 automatically
  name: () => this.name   // lazy — resolved when needed, not at construction
});

// Code runs in an isolated Worker sandbox with no network access
const executor = new DynamicWorkerExecutor({ loader: env.LOADER });

// The LLM writes this code; `state.*` calls dispatch back to the host via RPC
const result = await executor.execute(
  `async () => {
    // Search across all TypeScript files for a pattern
    const hits = await state.searchFiles("src/**/*.ts", "answer");
    // Plan multiple edits as a single transaction
    const plan = await state.planEdits([
      { kind: "replace", path: "/src/app.ts",
        search: "42", replacement: "43" },
      { kind: "writeJson", path: "/src/config.json",
        value: { version: 2 } }
    ]);
    // Apply atomically — rolls back on failure
    return await state.applyEditPlan(plan);
  }`,
  [resolveProvider(stateTools(workspace))]
);

The package also ships prebuilt TypeScript type declarations and a system prompt template, so you can drop the full state API into your LLM context in a handful of tokens.

Learn more about the library and how to use it.

How are people using it?

Code Mode

Developers want their agents to write and execute code against tool APIs, rather than making sequential tool calls one at a time. With Dynamic Workers, the LLM generates a single TypeScript function that chains multiple API calls together, runs it in a Dynamic Worker, and returns the final result back to the agent. As a result, only the output, and not every intermediate step, ends up in the context window. This cuts both latency and token usage, and produces better results, especially when the tool surface is large.

Our own Cloudflare MCP server is built exactly this way: it exposes the entire Cloudflare API through just two tools — search and execute — in under 1,000 tokens, because the agent writes code against a typed API instead of navigating hundreds of individual tool definitions.

Building custom automations 

Developers are using Dynamic Workers to let agents build custom automations on the fly. Zite, for example, is building an app platform where users interact through a chat interface — the LLM writes TypeScript behind the scenes to build CRUD apps, connect to services like Stripe, Airtable, and Google Calendar, and run backend logic, all without the user ever seeing a line of code. Every automation runs in its own Dynamic Worker, with access to only the specific services and libraries that the endpoint needs.

“To enable server-side code for Zite’s LLM-generated apps, we needed an execution layer that was instant, isolated, and secure. Cloudflare’s Dynamic Workers hit the mark on all three, and out-performed all of the other platforms we benchmarked for speed and library support. The NodeJS compatible runtime supported all of Zite’s workflows, allowing hundreds of third party integrations, without sacrificing on startup time. Zite now services millions of execution requests daily thanks to Dynamic Workers.”

— Antony Toron, CTO and Co-Founder, Zite 

Running AI-generated applications

Developers are building platforms that generate full applications from AI — either for their customers or for internal teams building prototypes. With Dynamic Workers, each app can be spun up on demand, then put back into cold storage until it’s invoked again. Fast startup times make it easy to preview changes during active development. Platforms can also block or intercept any network requests the generated code makes, keeping AI-generated apps safe to run.

Pricing

Dynamically-loaded Workers are priced at $0.002 per unique Worker loaded per day (as of this post’s publication), in addition to the usual CPU time and invocation pricing of regular Workers.

For AI-generated “code mode” use cases, where every Worker is a unique one-off, this means the price is $0.002 per Worker loaded (plus CPU and invocations). This cost is typically negligible compared to the inference costs to generate the code.

During the beta period, the $0.002 charge is waived. As pricing is subject to change, please always check our Dynamic Workers pricing for the most current information. 

Get Started

If you’re on the Workers Paid plan, you can start using Dynamic Workers today. 

Dynamic Workers Starter

Use this “hello world” starter to get a Worker deployed that can load and execute Dynamic Workers. 

Dynamic Workers Playground

You can also deploy the Dynamic Workers Playground, where you’ll be able to write or import code, bundle it at runtime with @cloudflare/worker-bundler, execute it through a Dynamic Worker, see real-time responses and execution logs.


Dynamic Workers are fast, scalable, and lightweight. Find us on Discord if you have any questions. We’d love to see what you build!


Powering the agents: Workers AI now runs large models, starting with Kimi K2.5

Post Syndicated from Michelle Chen original https://blog.cloudflare.com/workers-ai-large-models/

We’re making Cloudflare the best place for building and deploying agents. But reliable agents aren’t built on prompts alone; they require a robust, coordinated infrastructure of underlying primitives.

At Cloudflare, we have been building these primitives for years: Durable Objects for state persistence, Workflows for long running tasks, and Dynamic Workers or Sandbox containers for secure execution. Powerful abstractions like the Agents SDK are designed to help you build agents on top of Cloudflare’s Developer Platform.

But these primitives only provided the execution environment. The agent still needed a model capable of powering it. 

Starting today, Workers AI is officially in the big models game. We now offer frontier open-source models on our AI inference platform. We’re starting by releasing Moonshot AI’s Kimi K2.5 model on Workers AI. With a full 256k context window and support for multi-turn tool calling, vision inputs, and structured outputs, the Kimi K2.5 model is excellent for all kinds of agentic tasks. By bringing a frontier-scale model directly into the Cloudflare Developer Platform, we’re making it possible to run the entire agent lifecycle on a single, unified platform.

The heart of an agent is the AI model that powers it, and that model needs to be smart, with high reasoning capabilities and a large context window. Workers AI now runs those models.

The price-performance sweet spot

We spent the last few weeks testing Kimi K2.5 as the engine for our internal development tools. Within our OpenCode environment, Cloudflare engineers use Kimi as a daily driver for agentic coding tasks. We have also integrated the model into our automated code review pipeline; you can see this in action via our public code review agent, Bonk, on Cloudflare GitHub repos. In production, the model has proven to be a fast, efficient alternative to larger proprietary models without sacrificing quality.

Serving Kimi K2.5 began as an experiment, but it quickly became critical after reviewing how the model performs and how cost-efficient it is. As an illustrative example: we have an agent that does security reviews of Cloudflare’s codebases. This agent processes over 7B tokens per day, and using Kimi, it has caught more than 15 confirmed issues in a single codebase. Doing some rough math, if we had run this agent on a mid-tier proprietary model, we would have spent $2.4M a year for this single use case, on a single codebase. Running this agent with Kimi K2.5 cost just a fraction of that: we cut costs by 77% simply by making the switch to Workers AI.

As AI adoption increases, we are seeing a fundamental shift not only in how engineering teams are operating, but how individuals are operating. It is becoming increasingly common for people to have a personal agent like OpenClaw running 24/7. The volume of inference is skyrocketing.

This new rise in personal and coding agents means that cost is no longer a secondary concern; it is the primary blocker to scaling. When every employee has multiple agents processing hundreds of thousands of tokens per hour, the math for proprietary models stops working. Enterprises will look to transition to open-source models that offer frontier-level reasoning without the proprietary price tag. Workers AI is here to facilitate this shift, providing everything from serverless endpoints for a personal agent to dedicated instances powering autonomous agents across an entire organization.

The large model inference stack

Workers AI has served models, including LLMs, since its launch two years ago, but we’ve historically prioritized smaller models. Part of the reason was that for some time, open-source LLMs fell far behind the models from frontier model labs. This changed with models like Kimi K2.5, but to serve this type of very large LLM, we had to make changes to our inference stack. We wanted to share with you some of what goes on behind the scenes to support a model like Kimi.

We’ve been working on custom kernels for Kimi K2.5 to optimize how we serve the model, which is built on top of our proprietary Infire inference engine. Custom kernels improve the model’s performance and GPU utilization, unlocking gains that would otherwise go unclaimed if you were just running the model out of the box. There are also multiple techniques and hardware configurations that can be leveraged to serve a large model. Developers typically use a combination of data, tensor, and expert parallelization techniques to optimize model performance. Strategies like disaggregated prefill are also important, in which you separate the prefill and generation stages onto different machines in order to get better throughput or higher GPU utilization. Implementing these techniques and incorporating them into the inference stack takes a lot of dedicated experience to get right. 

Workers AI has already done the experimentation with serving techniques to yield excellent throughput on Kimi K2.5. A lot of this does not come out of the box when you self-host an open-source model. The benefit of using a platform like Workers AI is that you don’t need to be a Machine Learning Engineer, a DevOps expert, or a Site Reliability Engineer to do the optimizations required to host it: we’ve already done the hard part, you just need to call an API.

Beyond the model — platform improvements for agentic workloads

In concert with this launch, we’ve also improved our platform and are releasing several new features to help you build better agents.

Prefix caching and surfacing cached tokens

When you work with agents, you are likely sending a large number of input tokens as part of the context: this could be detailed system prompts, tool definitions, MCP server tools, or entire codebases. Inputs can be as large as the model context window, so in theory, you could be sending requests with almost 256k input tokens. That’s a lot of tokens.

When an LLM processes a request, the request is broken down into two stages: the prefill stage processes input tokens and the output stage generates output tokens. These stages are usually sequential, where input tokens have to be fully processed before you can generate output tokens. This means that sometimes the GPU is not fully utilized while the model is doing prefill.

With multi-turn conversations, when you send a new prompt, the client sends all the previous prompts, tools, and context from the session to the model as well. The delta between consecutive requests is usually just a few new lines of input; all the other context has already gone through the prefill stage during a previous request. This is where prefix caching helps. Instead of doing prefill on the entire request, we can cache the input tensors from a previous request, and only do prefill on the new input tokens. This saves a lot of time and compute from the prefill stage, which means a faster Time to First Token (TTFT) and a higher Tokens Per Second (TPS) throughput as you’re not blocked on prefill.

Workers AI has always done prefix caching, but we are now surfacing cached tokens as a usage metric and offering a discount on cached tokens compared to input tokens. (Pricing can be found on the model page.) We also have new techniques for you to leverage in order to get a higher prefix cache hit rate, reducing your costs.

New session affinity header for higher cache hit rates

In order to route to the same model instance and take advantage of prefix caching, we use a new x-session-affinity header. When you send this header, you’ll improve your cache hit ratio, leading to more cached tokens and subsequently, faster TTFT, TPS, and lower inference costs.

You can pass the new header like below, with a unique string per session or per agent. Some clients like OpenCode implement this automatically out of the box. Our Agents SDK starter has already set up the wiring to do this for you, too.

curl -X POST \
"https://api.cloudflare.com/client/v4/accounts/{ACCOUNT_ID}/ai/run/@cf/moonshotai/kimi-k2.5" \
  -H "Authorization: Bearer {API_TOKEN}" \
  -H "Content-Type: application/json" \
  -H "x-session-affinity: ses_12345678" \
  -d '{
    "messages": [
      {
        "role": "system",
        "content": "You are a helpful assistant."
      },
      {
        "role": "user",
        "content": "What is prefix caching and why does it matter?"
      }
    ],
    "max_tokens": 2400,
    "stream": true
  }'

Redesigned async APIs

Serverless inference is really hard. With a pay-per-token business model, it’s cheaper on a single request basis because you don’t need to pay for entire GPUs to service your requests. But there’s a trade-off: you have to contend with other people’s traffic and capacity constraints, and there’s no strict guarantee that your request will be processed. This is not unique to Workers AI — it’s evidently the case across serverless model providers, given the frequent news reports of overloaded providers and service disruptions. While we always strive to serve your request and have built-in autoscaling and rebalancing, there are hard limitations (like hardware) that make this a challenge.

For volumes of requests that would exceed synchronous rate limits, you can submit batches of inferences to be completed asynchronously. We’re introducing a revamped Asynchronous API, which means that for asynchronous use cases, you won’t run into Out of Capacity errors and inference will execute durably at some point. Our async API looks more like flex processing than a batch API, where we process requests in the async queue as long as we have headroom in our model instances. With internal testing, our async requests usually execute within 5 minutes, but this will depend on what live traffic looks like. As we bring Kimi to the public, we will tune our scaling accordingly, but the async API is the best way to make sure you don’t run into capacity errors in durable workflows. This is perfect for use cases that are not real-time, such as code scanning agents or research agents.

Workers AI previously had an asynchronous API, but we’ve recently revamped the systems under the hood. We now rely on a pull-based system versus the historical push-based system, allowing us to pull in queued requests as soon as we have capacity. We’ve also added better controls to tune the throughput of async requests, monitoring GPU utilization in real-time and pulling in async requests when utilization is low, so that critical synchronous requests get priority while still processing asynchronous requests efficiently.

To use the asynchronous API, you would send your requests as seen below. We also have a way to set up event notifications so that you can know when the inference is complete instead of polling for the request. 

// (1.) Push a request in queue
// pass queueRequest: true
let res = await env.AI.run("@cf/moonshotai/kimi-k2.5", {
  "requests": [{
    "messages": [{
      "role": "user",
      "content": "Tell me a joke"
    }]
  }, {
    "messages": [{
      "role": "user",
      "content": "Explain the Pythagoras theorem"
    }]
  }, ...{<add more requests in a batch>} ];
}, {
  queueRequest: true,
});


// (2.) grab the request id
let request_id;
if(res && res.request_id){
  request_id = res.request_id;
}
// (3.) poll the status
let res = await env.AI.run("@cf/moonshotai/kimi-k2.5", {
  request_id: request_id
});

if(res && res.status === "queued" || res.status === "running") {
 // retry by polling again
 ...
}
else 
 return Response.json(res); // This will contain the final completed response 

Try it out today

Get started with Kimi K2.5 on Workers AI today. You can read our developer docs to find out model information and pricing, and how to take advantage of prompt caching via session affinity headers and asynchronous API. The Agents SDK starter also now uses Kimi K2.5 as its default model. You can also connect to Kimi K2.5 on Workers AI via Opencode. For a live demo, try it in our playground.

And if this set of problems around serverless inference, ML optimizations, and GPU infrastructure sound  interesting to you — we’re hiring!


Slashing agent token costs by 98% with RFC 9457-compliant error responses

Post Syndicated from Sam Marsh original https://blog.cloudflare.com/rfc-9457-agent-error-pages/

AI agents are no longer experiments. They are production infrastructure, making billions of HTTP requests per day, navigating the web, calling APIs, and orchestrating complex workflows.

But when these agents hit an error, they still receive the same HTML error pages we built for browsers: hundreds of lines of markup, CSS, and copy designed for human eyes. Those pages give agents clues, not instructions, and waste time and tokens. That gap is the opportunity to give agents instructions, not obstacles.

Starting today, Cloudflare returns RFC 9457-compliant structured Markdown and JSON error payloads to AI agents, replacing heavyweight HTML pages with machine-readable instructions.

That means when an agent sends Accept: text/markdown, Accept: application/json, or Accept: application/problem+json and encounters a Cloudflare error, we return one semantic contract in a structured format instead of HTML. And it comes complete with actionable guidance. (This builds on our recent Markdown for Agents release.)

So instead of being told only “You were blocked,” the agent will read: “You were rate-limited — wait 30 seconds and retry with exponential backoff.” Instead of just “Access denied,” the agent will be instructed: “This block is intentional: do not retry, contact the site owner.”

These responses are not just clearer — they are dramatically more efficient. Structured error responses cut payload size and token usage by more than 98% versus HTML, measured against a live 1015 (‘rate-limit’) error response. For agents that hit multiple errors in a workflow, the savings compound quickly.

This is live across the Cloudflare network, automatically. Site owners do not need to configure anything. Browsers keep getting the same HTML experience as before.

These are not just error pages. They are instructions for the agentic web.

What agents see today

When an agent receives a Cloudflare-generated error, it usually means Cloudflare is enforcing customer policy or returning a platform response on the customer’s behalf — not that Cloudflare is down. These responses are triggered when a request cannot be served as-is, such as invalid host or DNS routing, customer-defined access controls (WAF, geo, ASN, or bot rules), or edge-enforced limits like rate limiting. In short, Cloudflare is acting as the customer’s routing and security layer, and the response explains why the request was blocked or could not proceed.

Today, those responses are rendered as HTML designed for humans:

<!DOCTYPE html>
<html>
<head>
<title>Access denied | example.com used Cloudflare to restrict access</title>
<style>/* 200 lines of CSS */</style>
</head>
<body>
  <div class="cf-wrapper">
    <h1 data-translate="block_headline">Sorry, you have been blocked</h1>
    <!-- ... hundreds more lines ... -->
  </div>
</body>
</html>

To an agent, this is garbage. It cannot determine what error occurred, why it was blocked, or whether retrying will help. Even if it parses the HTML, the content describes the error but doesn’t tell the agent — or the human, for that matter — what to do next.

If you’re an agent developer and you wanted to handle Cloudflare errors gracefully, your options were limited. For Cloudflare-generated errors, structured responses existed only in configuration-dependent paths, not as a consistent default for agents.

Custom Error Rules can customize many Cloudflare errors, including some 1xxx cases. But they depend on per-site configuration, so they cannot serve as a universal agent contract across the web. Cloudflare sits in front of the request path. That means we can define a default machine response: retry or stop, wait and back off, escalate or reroute. Error pages stop being decoration and become execution instructions.

What we did

Cloudflare now returns RFC 9457-compliant structured responses for all 1xxx-class error paths — Cloudflare’s platform error codes for edge-side failures like DNS resolution issues, access denials, and rate limits. Both formats are live: Accept: text/markdown returns Markdown, Accept: application/json returns JSON, and Accept: application/problem+json returns JSON with the application/problem+json content type.

This covers all 1xxx-class errors today. The same contract will extend to Cloudflare-generated 4xx and 5xx errors next.

Markdown responses have two parts:

  • YAML frontmatter for machine-readable fields

  • prose sections for explicit guidance (What happened and What you should do)

JSON responses carry the same fields as a flat object.

The YAML frontmatter is the critical layer for automation. It lets an agent extract stable keys without scraping HTML or guessing intent from copy. Fields like error_code, error_name, and error_category let the agent classify the failure. retryable and retry_after drive backoff logic. owner_action_required tells the agent whether to keep trying or escalate. ray_id, timestamp, and zone make logs and support handoffs deterministic.

The schema is stable by design, so agents can implement durable control flow without chasing presentation changes.

That stability is not a Cloudflare invention. RFC 9457 — Problem Details for HTTP APIs defines a standard JSON shape for reporting errors over HTTP, so clients can parse error responses without knowing the specific API in advance. Our JSON responses follow this shape, which means any HTTP client that understands Problem Details can parse the base members without Cloudflare-specific code:

RFC 9457 member

What it contains

type

A URI pointing to Cloudflare’s documentation for the specific error code

status

The HTTP status code (matching the actual response status)

title

A short, human-readable summary of the problem

detail

A human-readable explanation specific to this occurrence

instance

The Ray ID identifying this specific error occurrence

The operational fields — error_code, error_category, retryable, retry_after, owner_action_required, and more — are RFC 9457 extension members. Clients that don’t recognize them simply ignore them.

This is network-wide and additive. Site owners do not need to configure anything. Browsers keep receiving HTML unless clients explicitly ask for Markdown or JSON.

What the response looks like

Here is what a rate-limit error (1015) looks like in JSON:

{
  "type": "https://developers.cloudflare.com/support/troubleshooting/http-status-codes/cloudflare-1xxx-errors/error-1015/",
  "title": "Error 1015: You are being rate limited",
  "status": 429,
  "detail": "You are being rate-limited by the website owner's configuration.",
  "instance": "9d99a4434fz2d168",
  "error_code": 1015,
  "error_name": "rate_limited",
  "error_category": "rate_limit",
  "ray_id": "9d99a4434fz2d168",
  "timestamp": "2026-03-09T11:11:55Z",
  "zone": "<YOUR_DOMAIN>",
  "cloudflare_error": true,
  "retryable": true,
  "retry_after": 30,
  "owner_action_required": false,
  "what_you_should_do": "**Wait and retry.** This block is transient. Wait at least 30 seconds, then retry with exponential backoff.\n\nRecommended approach:\n1. Wait 30 seconds before your next request\n2. If rate-limited again, double the wait time (60s, 120s, etc.)\n3. If rate-limiting persists after 5 retries, stop and reassess your request pattern",
  "footer": "This error was generated by Cloudflare on behalf of the website owner."
}

The same error in Markdown, optimized for model-first workflows:

---
error_code: 1015
error_name: rate_limited
error_category: rate_limit
status: 429
ray_id: 9d99a39dc992d168
timestamp: 2026-03-09T11:11:28Z
zone: <YOUR_DOMAIN>
cloudflare_error: true
retryable: true
retry_after: 30
owner_action_required: false
---

# Error 1015: You are being rate limited

## What Happened

You are being rate-limited by the website owner's configuration.

## What You Should Do

**Wait and retry.** This block is transient. Wait at least 30 seconds, then retry with exponential backoff.

Recommended approach:
1. Wait 30 seconds before your next request
2. If rate-limited again, double the wait time (60s, 120s, etc.)
3. If rate-limiting persists after 5 retries, stop and reassess your request pattern

---
This error was generated by Cloudflare on behalf of the website owner.

Both formats give an agent everything it needs to decide and act: classify the error, choose retry behavior, and determine whether escalation is required. This is what a default machine contract looks like — not per-site configuration, but network-wide behavior. The contrast is explicit across error families: a transient error like 1015 says wait and retry, while intentional blocks like 1020 or geographic restrictions like 1009 tell the agent not to retry and to escalate instead.

One contract, two formats

The core value is not format choice. It is semantic stability.

Agents need deterministic answers to operational questions: retry or not, how long to wait, and whether to escalate. Cloudflare exposes one policy contract across two wire formats. Whether a client consumes Markdown or JSON, the operational meaning is identical: same error identity, same retry/backoff signals, same escalation guidance.

Clients that send Accept: application/problem+json get application/problem+json; charset=utf-8 back — useful for HTTP client libraries that dispatch on media type. Clients that send Accept: application/json get application/json; charset=utf-8 — same body, safe default for existing consumers.

Size reduction and token efficiency

That contract is also dramatically smaller than what it replaces. Cloudflare HTML error pages are browser-oriented and heavy, while structured responses are compact by design.

Measured comparison for 1015:

Payload

Bytes

Tokens (cl100k_base)

Size vs HTML

Token vs HTML

HTML response

46,645

14,252

—

—

Markdown response

798

221

58.5x less

64.5x less

JSON response

970

256

48.1x less

55.7x less

Both structured formats deliver a ~98% reduction in size and tokens versus HTML. For agents, size translates directly into token cost — when an agent hits multiple errors in one run, these savings compound into lower model spend and faster recovery loops.

Ten categories, clear actions

Every 1xxx error is mapped to an error_category. That turns error handling into routing logic instead of brittle per-page parsing.

Category

What it means

What the agent should do

access_denied

Intentional block: IP, ASN, geo, firewall rule

Do not retry. Contact site owner if unexpected.

rate_limit

Request rate exceeded

Back off. Retry after retry_after seconds.

dns

DNS resolution failure at the origin

Do not retry. Report to site owner.

config

Configuration error: CNAME, tunnel, host routing

Do not retry (usually). Report to site owner.

tls

TLS version or cipher mismatch

Fix TLS client settings. Do not retry as-is.

legal

DMCA or regulatory block

Do not retry. This is a legal restriction.

worker

Cloudflare Workers runtime error

Do not retry. Site owner must fix the script.

rewrite

Invalid URL rewrite output

Do not retry. Site owner must fix the rule.

snippet

Cloudflare Snippets error

Do not retry. Site owner must fix Snippets config.

unsupported

Unsupported method or deprecated feature

Change the request. Do not retry as-is.

Two fields make this operationally useful for agents:

  • retryable answers whether a retry can succeed

  • owner_action_required answers whether the problem must be escalated

You can replace brittle “if status == 429 then maybe retry” heuristics with explicit control flow. Parse the frontmatter once, then branch on stable fields. A simple pattern is:

  • if retryable is true, wait retry_after and retry

  • if owner_action_required is true, stop and escalate

  • otherwise, fail fast without hammering the site

Here is a minimal Python example using that pattern:

import time
import yaml


def parse_frontmatter(markdown_text: str) -> dict:
    # Expects: ---\n<yaml>\n---\n<body>
    if not markdown_text.startswith("---\n"):
        return {}
    _, yaml_block, _ = markdown_text.split("---\n", 2)
    return yaml.safe_load(yaml_block) or {}


def handle_cloudflare_error(markdown_text: str) -> str:
    meta = parse_frontmatter(markdown_text)

    if not meta.get("cloudflare_error"):
        return "not_cloudflare_error"

    if meta.get("retryable"):
        wait_seconds = int(meta.get("retry_after", 30))
        time.sleep(wait_seconds)
        return f"retry_after_{wait_seconds}s"

    if meta.get("owner_action_required"):
        return f"escalate_owner_error_{meta.get('error_code')}"

    return "do_not_retry"

This is the key shift: agents are no longer inferring intent from HTML copy. They are executing explicit policy from structured fields.

How to use it

Send Accept: text/markdown, Accept: application/json, or Accept: application/problem+json.

For quick testing, you can hit any Cloudflare-proxied domain directly at /cdn-cgi/error/1015 (or replace 1015 with another 1xxx code).

curl -s --compressed -H "Accept: text/markdown" -A "TestAgent/1.0" -H "Accept-Encoding: gzip, deflate" "<YOUR_DOMAIN>/cdn-cgi/error/1015"

Example with another error code:

curl -s --compressed -H "Accept: text/markdown" -A "TestAgent/1.0" -H "Accept-Encoding: gzip, deflate" "<YOUR_DOMAIN>/cdn-cgi/error/1020"

JSON example:

curl -s --compressed -H "Accept: application/json" -A "TestAgent/1.0" -H "Accept-Encoding: gzip, deflate" "<YOUR_DOMAIN>/cdn-cgi/error/1015" | jq .

RFC 9457 Problem Details example:

curl -s --compressed -H "Accept: application/problem+json" -A "TestAgent/1.0" -H "Accept-Encoding: gzip, deflate" "<YOUR_DOMAIN>/cdn-cgi/error/1015" | jq .

The behavior is deterministic — the first explicit structured type wins:

Accept header

Response

application/json

JSON

application/json; charset=utf-8

JSON

application/problem+json

JSON (application/problem+json content type)

application/json, text/markdown;q=0.9

JSON

application/json, text/markdown

JSON (equal q, first-listed wins)

text/markdown

Markdown

text/markdown, application/json

Markdown (equal q, first-listed wins)

text/markdown, */*

Markdown

text/*

Markdown

*/*

HTML (default)

Wildcard-only requests (*/*) do not signal a structured preference; clients must explicitly request Markdown or JSON.

If the request succeeds, you get normal origin content. The header only affects Cloudflare-generated error responses.

Real-world use cases

There are a number of situations where structured error responses help immediately:

  1. Agent blocked by WAF rule (1020). The agent parses error_code, records ray_id, and stops retrying. It can escalate with useful context instead of looping.

  2. MCP (Model Context Protocol) tool hitting geo restriction (1009). The tool gets a clear, machine-readable reason, returns it to the orchestrator, and the workflow can choose an alternate path or notify the user.

  3. Rate-limited crawler (1015). The agent reads retryable: true and retry_after, applies backoff, and retries predictably instead of hammering the endpoint.

  4. Developer debugging with curl. The developer can reproduce exactly what the agent sees, including frontmatter and guidance, without reverse-engineering HTML.

  5. HTTP client libraries that understand RFC 9457. Any client that dispatches on application/problem+json or parses Problem Details objects can handle Cloudflare errors without Cloudflare-specific code.

In each case, the outcome is the same: less guessing, fewer wasted retries, lower model cost, and faster recovery.

Try it now

Send a structured Accept header and test against any Cloudflare-proxied domain:

curl -s --compressed -H "Accept: text/markdown" -A "TestAgent/1.0" -H "Accept-Encoding: gzip, deflate" "<YOUR_DOMAIN>/cdn-cgi/error/1015"
curl -s --compressed -H "Accept: application/json" -A "TestAgent/1.0" -H "Accept-Encoding: gzip, deflate" "<YOUR_DOMAIN>/cdn-cgi/error/1015" | jq .
curl -s --compressed -H "Accept: application/problem+json" -A "TestAgent/1.0" -H "Accept-Encoding: gzip, deflate" "<YOUR_DOMAIN>/cdn-cgi/error/1015" | jq .

Error pages are the first conversation between Cloudflare and an agent. This launch makes that conversation structured, standards-compliant, and cheap to process.

To make this work across the web, agent runtimes should default to explicit structured Accept headers, not bare */*. Use Accept: text/markdown, */* for model-first workflows and Accept: application/json, */* for typed control flow. If you maintain an agent framework, SDK, or browser automation stack, ship this default and treat bare */* as legacy fallback.

And it is only the first layer. We are building the rest of the agent stack on top of it: AI Gateway for routing, controls, and observability; Workers AI for inference; and the identity, security, and access primitives agents will need to operate safely at Internet scale.

Cloudflare is helping our customers deliver content in agent-friendly ways, and this is just the start. If you’re building or operating agents, start at agents.cloudflare.com.

The truly programmable SASE platform

Post Syndicated from Abe Carryl original https://blog.cloudflare.com/programmable-sase/

Every organization approaches security through a unique lens, shaped by their tooling, requirements, and history. No two environments look the same, and none stay static for long. We believe the platforms that protect them shouldn’t be static either.

Cloudflare built our global network to be programmable by design, so we can help organizations unlock this flexibility and freedom. In this post, we’ll go deeper into what programmability means, and how Cloudflare One, our SASE platform, helps customers architect their security and networking with our building blocks to meet their unique and custom needs.

What programmability actually means

The term programmability has become diluted by the industry. Most security vendors claim programmability because they have public APIs, documented Terraform providers, webhooks, and alerting. That’s great, and Cloudflare offers all of those things too.

These foundational capabilities provide customization, infrastructure-as-code, and security operations automation, but they’re table stakes. With traditional programmability, you can configure a webhook to send an alert to Slack when a policy triggers.

But the true value of programmability is something different. It is the ability to intercept a security event, enrich it with external context, and act on it in real time. Say a user attempts to access a regulated application containing sensitive financial data. Before the request completes, you query your learning management system to verify the user has completed the required compliance training. If their certification has expired, or they never completed it, access is denied, and they are redirected to the training portal. The policy did not just trigger an alert — it made the decision. 

Building the most programmable SASE platform

The Cloudflare global network spans more than 330 cities across the globe and operates within approximately 50 milliseconds of 95% of the Internet-connected population. This network runs every service on every server in every data center. That means our industry-leading SASE platform and Developer Platform run side by side, on the same metal, making our Cloudflare services both composable and programmable. 

When you use Cloudflare to protect your external web properties, you are using the same network, the same tools, and the same primitives as when you secure your users, devices, and private networks with Cloudflare One. Those are also the same primitives you use when you build and deploy full-stack applications on our Developer Platform. They are designed to work together — not because they were integrated after the fact, but because they were never separate to begin with.

By design, this allows customers to extend policy decisions with custom logic in real time. You can call an external risk API, inject dynamic headers, or validate browser attributes. You can route traffic based on your business logic without adding latency or standing up separate infrastructure. Standalone SASE providers without their own compute platform require you to deploy automation in a separate cloud, manually configure webhooks, and accept the round-trip latency and management overhead of stitching together disconnected systems. With Cloudflare, your Worker augments inline SASE services like Access to enforce custom policies, at the edge, in milliseconds.


What programmability unlocks

At its core, every security gateway operates on the same fundamental model. Traffic flows from sources, through policies, to destinations. The policies are where things get interesting, but in most platforms, your options are limited to predefined actions: allow, block, isolate, or quarantine.

We think there is a better way. What if you could invoke custom logic instead? 

Rather than predefined actions, you could: 

  • Dynamically inject headers based on user identity claims

  • Call external risk engines for a real-time verdict before allowing access

  • Enforce access controls based on location and working hours

Today, customers can already do many of these things with Cloudflare. And we are strengthening the integration between our SASE and Developer Platform to make this even easier. Programmability extensions, like the ones listed above, will be natively integrated into Cloudflare One, enabling customers to build real-time, custom logic into their security and networking policies. Inspect a request and make a decision in milliseconds. Or run a Worker on a schedule to analyze user activity and update policies accordingly, such as adding users to a high-risk list based on signals from an external system.

We are building this around the concept of actions: both managed and custom. Managed actions will provide templates for common scenarios like IT service management integrations, redirects, and compliance automation. Custom actions allow you to define your own logic entirely. When a Gateway HTTP policy matches, instead of being limited to allow, block, or isolate, you can invoke a Cloudflare Worker directly. Your code runs at the edge, in real time, with full access to the request context. 

How customers are building today

While we are improving this experience, many customers are already using Cloudflare One and Developer Platform this way today. Here is a simple example that illustrates what you can do with this programmability. 

Automated device session revocation

The problem: A customer wanted to enforce periodic re-authentication for their Cloudflare One Client users, similar to how traditional VPNs require users to re-authenticate every few hours. Cloudflare’s pre-defined session controls are designed around per-application policies, not global time-based expiration.

The solution: A scheduled Cloudflare Worker that queries the Devices API, identifies devices that have been inactive longer than a specified threshold, and revokes their registrations, forcing users to re-authenticate via their identity provider.

export default {
  async scheduled(event, env, ctx) {
    const API_TOKEN = env.API_TOKEN;
    const ACCOUNT_ID = env.ACCOUNT_ID;
    const REVOKE_INTERVAL_MINUTES = parseInt(env.REVOKE_INTERVAL_MINUTES); // Reuse for inactivity threshold
    const DRY_RUN = env.DRY_RUN === 'true';

    const headers = {
      'Authorization': `Bearer ${API_TOKEN}`,
      'Content-Type': 'application/json'
    };

    let cursor = '';
    let allDevices = [];

    // Fetch all registrations with cursor-based pagination
    while (true) {
      let url = `https://api.cloudflare.com/client/v4/accounts/${ACCOUNT_ID}/devices/registrations?per_page=100`;
      if (cursor) {
        url += `&cursor=${cursor}`;
      }

      const devicesResponse = await fetch(url, { headers });
      const devicesData = await devicesResponse.json();
      if (!devicesData.success) {
        console.error('Failed to fetch registrations:', devicesData.errors);
        return;
      }

      allDevices = allDevices.concat(devicesData.result);

      // Extract next cursor (adjust if your response uses a different field, e.g., devicesData.result_info.cursor)
      cursor = devicesData.cursor || '';
      if (!cursor) break;
    }

    const now = new Date();

    for (const device of allDevices) {
      const lastSeen = new Date(device.last_seen_at);
      const minutesInactive = (now - lastSeen) / (1000 * 60);

      if (minutesInactive > REVOKE_INTERVAL_MINUTES) {
        console.log(`Registration ${device.id} inactive for ${minutesInactive} minutes.`);

        if (DRY_RUN) {
          console.log(`Dry run: Would delete registration ${device.id}`);
        } else {
          const deleteResponse = await fetch(
            `https://api.cloudflare.com/client/v4/accounts/${ACCOUNT_ID}/devices/registrations/${device.id}`,
            { method: 'DELETE', headers }
          );
          const deleteData = await deleteResponse.json();
          if (deleteData.success) {
            console.log(`Deleted registration ${device.id}`);
          } else {
            console.error(`Failed to delete ${device.id}:`, deleteData.errors);
          }
        }
      }
    }
  }
};

Configure the Worker with environment secrets (API_TOKEN, ACCOUNT_ID, REVOKE_INTERVAL_MINUTES) and a cron trigger (0 */4 * * * for every 4 hours), and you have automated session management. Just getting a simple feature like this into a vendor’s roadmap could take months, and even longer to move into a management interface.

But with automated device session revocation, our technical specialist deployed this policy with the customer in an afternoon. It’s been running in production for months.

We’ve observed countless implementations like this across Cloudflare One deployments. We’ve seen users implement coaching pages and purpose justification workflows by using our existing redirect policies and Workers. Other users have built custom logic that evaluates browser attributes before making policy or routing decisions. Each solves a unique problem that would otherwise require waiting for a vendor to build a specific, niche integration with a third-party system. Instead, customers are building exactly what they need, on their timeline, with logic they own.

A programmable platform that changes the conversation

We believe the future of enterprise security isn’t a monolithic platform that tries to do everything. It’s a composable and programmable platform that gives customers the tools and flexibility to extend it in any direction.

For security teams, we expect our platform to change the conversation. Instead of filing a feature request and hoping it makes the roadmap, you can build a tailored solution that addresses your exact requirements today. 

For our partners and managed security service providers (MSSPs), our platform opens up their ability to build and deliver solutions for their specific customer base. That means industry-specific solutions, or capabilities for customers in a specific regulatory environment. Custom integrations become a competitive advantage, not a professional services engagement.

And for our customers, it means you’re building on a platform that is easy to deploy and fundamentally adaptable to your most complex and changing needs. Your security platform grows with you — it doesn’t constrain you.

What’s next

We’re just getting started. Throughout 2026, you’ll see us continue to deepen the integration between Cloudflare One and our Developer Platform. We plan to start by creating custom actions in Cloudflare Gateway that support dynamic policy enforcement. These actions can use auxiliary data stored in your organization’s existing databases without the administrative or compliance challenges of migrating that data into Cloudflare. These same custom actions will also support request augmentation to pass along Cloudflare attributes to your internal systems, for better logging and access decisions in your downstream systems.  

In the meantime, the building blocks are already here. External evaluation rules, custom device posture checks, Gateway redirects, and the full power of Workers are available today. If you’re not sure where to start, our developer documentation has guides and reference architectures for extending Cloudflare One.

We built Cloudflare on the belief that security should be ridiculously easy to use, but we also know that “easy” doesn’t mean “one-size-fits-all.” It means giving you the tools to build exactly what you need. We believe that’s the future of SASE.

How we rebuilt Next.js with AI in one week

Post Syndicated from Steve Faulkner original https://blog.cloudflare.com/vinext/

*This post was updated at 12:35 pm PT to fix a typo in the build time benchmarks.

Last week, one engineer and an AI model rebuilt the most popular front-end framework from scratch. The result, vinext (pronounced “vee-next”), is a drop-in replacement for Next.js, built on Vite, that deploys to Cloudflare Workers with a single command. In early benchmarks, it builds production apps up to 4x faster and produces client bundles up to 57% smaller. And we already have customers running it in production. 

The whole thing cost about $1,100 in tokens.

The Next.js deployment problem

Next.js is the most popular React framework. Millions of developers use it. It powers a huge chunk of the production web, and for good reason. The developer experience is top-notch.

But Next.js has a deployment problem when used in the broader serverless ecosystem. The tooling is entirely bespoke: Next.js has invested heavily in Turbopack but if you want to deploy it to Cloudflare, Netlify, or AWS Lambda, you have to take that build output and reshape it into something the target platform can actually run.

If you’re thinking: “Isn’t that what OpenNext does?”, you are correct. 

That is indeed the problem OpenNext was built to solve. And a lot of engineering effort has gone into OpenNext from multiple providers, including us at Cloudflare. It works, but quickly runs into limitations and becomes a game of whack-a-mole. 

Building on top of Next.js output as a foundation has proven to be a difficult and fragile approach. Because OpenNext has to reverse-engineer Next.js’s build output, this results in unpredictable changes between versions that take a lot of work to correct. 

Next.js has been working on a first-class adapters API, and we’ve been collaborating with them on it. It’s still an early effort but even with adapters, you’re still building on the bespoke Turbopack toolchain. And adapters only cover build and deploy. During development, next dev runs exclusively in Node.js with no way to plug in a different runtime. If your application uses platform-specific APIs like Durable Objects, KV, or AI bindings, you can’t test that code in dev without workarounds.

Introducing vinext


What if instead of adapting Next.js output, we reimplemented the Next.js API surface on Vite directly? Vite is the build tool used by most of the front-end ecosystem outside of Next.js, powering frameworks like Astro, SvelteKit, Nuxt, and Remix. A clean reimplementation, not merely a wrapper or adapter. We honestly didn’t think it would work. But it’s 2026, and the cost of building software has completely changed.

We got a lot further than we expected.

npm install vinext

Replace next with vinext in your scripts and everything else stays the same. Your existing app/, pages/, and next.config.js work as-is.

vinext dev          # Development server with HMR
vinext build        # Production build
vinext deploy       # Build and deploy to Cloudflare Workers

This is not a wrapper around Next.js and Turbopack output. It’s an alternative implementation of the API surface: routing, server rendering, React Server Components, server actions, caching, middleware. All of it built on top of Vite as a plugin. Most importantly Vite output runs on any platform thanks to the Vite Environment API.

The numbers

Early benchmarks are promising. We compared vinext against Next.js 16 using a shared 33-route App Router application.

Both frameworks are doing the same work: compiling, bundling, and preparing server-rendered routes. We disabled TypeScript type checking and ESLint in Next.js’s build (Vite doesn’t run these during builds), and used force-dynamic so Next.js doesn’t spend extra time pre-rendering static routes, which would unfairly slow down its numbers. The goal was to measure only bundler and compilation speed, nothing else. Benchmarks run on GitHub CI on every merge to main.

Production build time:

Framework Mean vs Next.js
Next.js 16.1.6 (Turbopack) 7.38s baseline
vinext (Vite 7 / Rollup) 4.64s 1.6x faster
vinext (Vite 8 / Rolldown) 1.67s 4.4x faster

Client bundle size (gzipped):

Framework Gzipped vs Next.js
Next.js 16.1.6 168.9 KB baseline
vinext (Rollup) 74.0 KB 56% smaller
vinext (Rolldown) 72.9 KB 57% smaller

These benchmarks measure compilation and bundling speed, not production serving performance. The test fixture is a single 33-route app, not a representative sample of all production applications. We expect these numbers to evolve as three projects continue to develop. The full methodology and historical results are public. Take them as directional, not definitive.

The direction is encouraging, though. Vite’s architecture, and especially Rolldown (the Rust-based bundler coming in Vite 8), has structural advantages for build performance that show up clearly here.

Deploying to Cloudflare Workers

vinext is built with Cloudflare Workers as the first deployment target. A single command takes you from source code to a running Worker:

vinext deploy

This handles everything: builds the application, auto-generates the Worker configuration, and deploys. Both the App Router and Pages Router work on Workers, with full client-side hydration, interactive components, client-side navigation, React state.

For production caching, vinext includes a Cloudflare KV cache handler that gives you ISR (Incremental Static Regeneration) out of the box:

import { KVCacheHandler } from "vinext/cloudflare";
import { setCacheHandler } from "next/cache";

setCacheHandler(new KVCacheHandler(env.MY_KV_NAMESPACE));

KV is a good default for most applications, but the caching layer is designed to be pluggable. That setCacheHandler call means you can swap in whatever backend makes sense. R2 might be a better fit for apps with large cached payloads or different access patterns. We’re also working on improvements to our Cache API that should provide a strong caching layer with less configuration. The goal is flexibility: pick the caching strategy that fits your app.

Live examples running right now:

We also have a live example of Cloudflare Agents running in a Next.js app, without the need for workarounds like getPlatformProxy, since the entire app now runs in workerd, during both dev and deploy phases. This means being able to use Durable Objects, AI bindings, and every other Cloudflare-specific service without compromise. Have a look here.

Frameworks are a team sport

The current deployment target is Cloudflare Workers, but that’s a small part of the picture. Something like 95% of vinext is pure Vite. The routing, the module shims, the SSR pipeline, the RSC integration: none of it is Cloudflare-specific.

Cloudflare is looking to work with other hosting providers about adopting this toolchain for their customers (the lift is minimal — we got a proof-of-concept working on Vercel in less than 30 minutes!). This is an open-source project, and for its long term success, we believe it’s important we work with partners across the ecosystem to ensure ongoing investment. PRs from other platforms are welcome. If you’re interested in adding a deployment target, open an issue or reach out.

Status: Experimental

We want to be clear: vinext is experimental. It’s not even one week old, and it has not yet been battle-tested with any meaningful traffic at scale. If you’re evaluating it for a production application, proceed with appropriate caution.

That said, the test suite is extensive: over 1,700 Vitest tests and 380 Playwright E2E tests, including tests ported directly from the Next.js test suite and OpenNext’s Cloudflare conformance suite. We’ve verified it against the Next.js App Router Playground. Coverage sits at 94% of the Next.js 16 API surface.

Early results from real-world customers are encouraging. We’ve been working with National Design Studio, a team that’s aiming to modernize every government interface, on one of their beta sites, CIO.gov. They’re already running vinext in production, with meaningful improvements in build times and bundle sizes.

The README is honest about what’s not supported and won’t be, and about known limitations. We want to be upfront rather than overpromise.

What about pre-rendering?

vinext already supports Incremental Static Regeneration (ISR) out of the box. After the first request to any page, it’s cached and revalidated in the background, just like Next.js. That part works today.

vinext does not yet support static pre-rendering at build time. In Next.js, pages without dynamic data get rendered during next build and served as static HTML. If you have dynamic routes, you use generateStaticParams() to enumerate which pages to build ahead of time. vinext doesn’t do that… yet.

This was an intentional design decision for launch. It’s on the roadmap, but if your site is 100% prebuilt HTML with static content, you probably won’t see much benefit from vinext today. That said, if one engineer can spend $1,100 in tokens and rebuild Next.js, you can probably spend $10 and migrate to a Vite-based framework designed specifically for static content, like Astro (which also deploys to Cloudflare Workers).

For sites that aren’t purely static, though, we think we can do something better than pre-rendering everything at build time.

Introducing Traffic-aware Pre-Rendering

Next.js pre-renders every page listed in generateStaticParams() during the build. A site with 10,000 product pages means 10,000 renders at build time, even though 99% of those pages may never receive a request. Builds scale linearly with page count. This is why large Next.js sites end up with 30-minute builds.

So we built Traffic-aware Pre-Rendering (TPR). It’s experimental today, and we plan to make it the default once we have more real-world testing behind it.

The idea is simple. Cloudflare is already the reverse proxy for your site. We have your traffic data. We know which pages actually get visited. So instead of pre-rendering everything or pre-rendering nothing, vinext queries Cloudflare’s zone analytics at deploy time and pre-renders only the pages that matter.

vinext deploy --experimental-tpr

  Building...
  Build complete (4.2s)

  TPR (experimental): Analyzing traffic for my-store.com (last 24h)
  TPR: 12,847 unique paths — 184 pages cover 90% of traffic
  TPR: Pre-rendering 184 pages...
  TPR: Pre-rendered 184 pages in 8.3s → KV cache

  Deploying to Cloudflare Workers...

For a site with 100,000 product pages, the power law means 90% of traffic usually goes to 50 to 200 pages. Those get pre-rendered in seconds. Everything else falls back to on-demand SSR and gets cached via ISR after the first request. Every new deploy refreshes the set based on current traffic patterns. Pages that go viral get picked up automatically. All of this works without generateStaticParams() and without coupling your build to your production database.

Taking on the Next.js challenge, but this time with AI

A project like this would normally take a team of engineers months, if not years. Several teams at various companies have attempted it, and the scope is just enormous. We tried once at Cloudflare! Two routers, 33+ module shims, server rendering pipelines, RSC streaming, file-system routing, middleware, caching, static export. There’s a reason nobody has pulled it off.

This time we did it in under a week. One engineer (technically engineering manager) directing AI.

The first commit landed on February 13. By the end of that same evening, both the Pages Router and App Router had basic SSR working, along with middleware, server actions, and streaming. By the next afternoon, App Router Playground was rendering 10 of 11 routes. By day three, vinext deploy was shipping apps to Cloudflare Workers with full client hydration. The rest of the week was hardening: fixing edge cases, expanding the test suite, bringing API coverage to 94%.

What changed from those earlier attempts? AI got better. Way better.

Why this problem is made for AI

Not every project would go this way. This one did because a few things happened to line up at the right time.

Next.js is well-specified. It has extensive documentation, a massive user base, and years of Stack Overflow answers and tutorials. The API surface is all over the training data. When you ask Claude to implement getServerSideProps or explain how useRouter works, it doesn’t hallucinate. It knows how Next works.
Next.js has an elaborate test suite. The Next.js repo contains thousands of E2E tests covering every feature and edge case. We ported tests directly from their suite (you can see the attribution in the code). This gave us a specification we could verify against mechanically.

Vite is an excellent foundation. Vite handles the hard parts of front-end tooling: fast HMR, native ESM, a clean plugin API, production bundling. We didn’t have to build a bundler. We just had to teach it to speak Next.js. @vitejs/plugin-rsc is still early, but it gave us React Server Components support without having to build an RSC implementation from scratch.

The models caught up. We don’t think this would have been possible even a few months ago. Earlier models couldn’t sustain coherence across a codebase this size. New models can hold the full architecture in context, reason about how modules interact, and produce correct code often enough to keep momentum going. At times, I saw it go into Next, Vite, and React internals to figure out a bug. The state-of-the-art models are impressive, and they seem to keep getting better.

All of those things had to be true at the same time. Well-documented target API, comprehensive test suite, solid build tool underneath, and a model that could actually handle the complexity. Take any one of them away and this doesn’t work nearly as well.

How we actually built it

Almost every line of code in vinext was written by AI. But here’s the thing that matters more: every line passes the same quality gates you’d expect from human-written code. The project has 1,700+ Vitest tests, 380 Playwright E2E tests, full TypeScript type checking via tsgo, and linting via oxlint. Continuous integration runs all of it on every pull request. Establishing a set of good guardrails is critical to making AI productive in a codebase.

The process started with a plan. I spent a couple of hours going back and forth with Claude in OpenCode to define the architecture: what to build, in what order, which abstractions to use. That plan became the north star. From there, the workflow was straightforward:

  1. Define a task (“implement the next/navigation shim with usePathname, useSearchParams, useRouter“).

  2. Let the AI write the implementation and tests.

  3. Run the test suite.

  4. If tests pass, merge. If not, give the AI the error output and let it iterate.

  5. Repeat.

We wired up AI agents for code review too. When a PR was opened, an agent reviewed it. When review comments came back, another agent addressed them. The feedback loop was mostly automated.

It didn’t work perfectly every time. There were PRs that were just wrong. The AI would confidently implement something that seemed right but didn’t match actual Next.js behavior. I had to course-correct regularly. Architecture decisions, prioritization, knowing when the AI was headed down a dead end: that was all me. When you give AI good direction, good context, and good guardrails, it can be very productive. But the human still has to steer.

For browser-level testing, I used agent-browser to verify actual rendered output, client-side navigation, and hydration behavior. Unit tests miss a lot of subtle browser issues. This caught them.

Over the course of the project, we ran over 800 sessions in OpenCode. Total cost: roughly $1,100 in Claude API tokens.

What this means for software

Why do we have so many layers in the stack? This project forced me to think deeply about this question. And to consider how AI impacts the answer.

Most abstractions in software exist because humans need help. We couldn’t hold the whole system in our heads, so we built layers to manage the complexity for us. Each layer made the next person’s job easier. That’s how you end up with frameworks on top of frameworks, wrapper libraries, thousands of lines of glue code.

AI doesn’t have the same limitation. It can hold the whole system in context and just write the code. It doesn’t need an intermediate framework to stay organized. It just needs a spec and a foundation to build on.

It’s not clear yet which abstractions are truly foundational and which ones were just crutches for human cognition. That line is going to shift a lot over the next few years. But vinext is a data point. We took an API contract, a build tool, and an AI model, and the AI wrote everything in between. No intermediate framework needed. We think this pattern will repeat across a lot of software. The layers we’ve built up over the years aren’t all going to make it.

Acknowledgments

Thanks to the Vite team. Vite is the foundation this whole thing stands on. @vitejs/plugin-rsc is still early days, but it gave me RSC support without having to build that from scratch, which would have been a dealbreaker. The Vite maintainers were responsive and helpful as I pushed the plugin into territory it hadn’t been tested in before.

We also want to acknowledge the Next.js team. They’ve spent years building a framework that raised the bar for what React development could look like. The fact that their API surface is so well-documented and their test suite so comprehensive is a big part of what made this project possible. vinext wouldn’t exist without the standard they set.

Try it

vinext includes an Agent Skill that handles migration for you. It works with Claude Code, OpenCode, Cursor, Codex, and dozens of other AI coding tools. Install it, open your Next.js project, and tell the AI to migrate:

npx skills add cloudflare/vinext

Then open your Next.js project in any supported tool and say:

migrate this project to vinext

The skill handles compatibility checking, dependency installation, config generation, and dev server startup. It knows what vinext supports and will flag anything that needs manual attention.

Or if you prefer doing it by hand:

npx vinext init    # Migrate an existing Next.js project
npx vinext dev     # Start the dev server
npx vinext deploy  # Ship to Cloudflare Workers

The source is at github.com/cloudflare/vinext. Issues, PRs, and feedback are welcome.

Code Mode: give agents an entire API in 1,000 tokens

Post Syndicated from Matt Carey original https://blog.cloudflare.com/code-mode-mcp/

Model Context Protocol (MCP) has become the standard way for AI agents to use external tools. But there is a tension at its core: agents need many tools to do useful work, yet every tool added fills the model’s context window, leaving less room for the actual task.

Code Mode is a technique we first introduced for reducing context window usage during agent tool use. Instead of describing every operation as a separate tool, let the model write code against a typed SDK and execute the code safely in a Dynamic Worker Loader. The code acts as a compact plan. The model can explore tool operations, compose multiple calls, and return just the data it needs. Anthropic independently explored the same pattern in their Code Execution with MCP post.

Today we are introducing a new MCP server for the entire Cloudflare API — from DNS and Zero Trust to Workers and R2 — that uses Code Mode. With just two tools, search() and execute(), the server is able to provide access to the entire Cloudflare API over MCP, while consuming only around 1,000 tokens. The footprint stays fixed, no matter how many API endpoints exist.

For a large API like the Cloudflare API, Code Mode reduces the number of input tokens used by 99.9%. An equivalent MCP server without Code Mode would consume 1.17 million tokens — more than the entire context window of the most advanced foundation models.


Code mode savings vs native MCP, measured with tiktoken

You can start using this new Cloudflare MCP server today. And we are also open-sourcing a new Code Mode SDK in the Cloudflare Agents SDK, so you can use the same approach in your own MCP servers and AI Agents.

Server‑side Code Mode


This new MCP server applies Code Mode server-side. Instead of thousands of tools, the server exports just two: search() and execute(). Both are powered by Code Mode. Here is the full tool surface area that gets loaded into the model context:

[
  {
    "name": "search",
    "description": "Search the Cloudflare OpenAPI spec. All $refs are pre-resolved inline.",
    "inputSchema": {
      "type": "object",
      "properties": {
        "code": {
          "type": "string",
          "description": "JavaScript async arrow function to search the OpenAPI spec"
        }
      },
      "required": ["code"]
    }
  },
  {
    "name": "execute",
    "description": "Execute JavaScript code against the Cloudflare API.",
    "inputSchema": {
      "type": "object",
      "properties": {
        "code": {
          "type": "string",
          "description": "JavaScript async arrow function to execute"
        }
      },
      "required": ["code"]
    }
  }
]

To discover what it can do, the agent calls search(). It writes JavaScript against a typed representation of the OpenAPI spec. The agent can filter endpoints by product, path, tags, or any other metadata and narrow thousands of endpoints to the handful it needs. The full OpenAPI spec never enters the model context. The agent only interacts with it through code.

When the agent is ready to act, it calls execute(). The agent writes code that can make Cloudflare API requests, handle pagination, check responses, and chain operations together in a single execution. 

Both tools run the generated code inside a Dynamic Worker isolate — a lightweight V8 sandbox with no file system, no environment variables to leak through prompt injection and external fetches disabled by default. Outbound requests can be explicitly controlled with outbound fetch handlers when needed.

Example: Protecting an origin from DDoS attacks

Suppose a user tells their agent: “protect my origin from DDoS attacks.” The agent’s first step is to consult documentation. It might call the Cloudflare Docs MCP Server, use a Cloudflare Skill, or search the web directly. From the docs it learns: put Cloudflare WAF and DDoS protection rules in front of the origin.

Step 1: Search for the right endpoints
The search tool gives the model a spec object: the full Cloudflare OpenAPI spec with all $refs pre-resolved. The model writes JavaScript against it. Here the agent looks for WAF and ruleset endpoints on a zone:

async () => {
  const results = [];
  for (const [path, methods] of Object.entries(spec.paths)) {
    if (path.includes('/zones/') &&
        (path.includes('firewall/waf') || path.includes('rulesets'))) {
      for (const [method, op] of Object.entries(methods)) {
        results.push({ method: method.toUpperCase(), path, summary: op.summary });
      }
    }
  }
  return results;
}

The server runs this code in a Workers isolate and returns:

[
  { "method": "GET",    "path": "/zones/{zone_id}/firewall/waf/packages",              "summary": "List WAF packages" },
  { "method": "PATCH",  "path": "/zones/{zone_id}/firewall/waf/packages/{package_id}", "summary": "Update a WAF package" },
  { "method": "GET",    "path": "/zones/{zone_id}/firewall/waf/packages/{package_id}/rules", "summary": "List WAF rules" },
  { "method": "PATCH",  "path": "/zones/{zone_id}/firewall/waf/packages/{package_id}/rules/{rule_id}", "summary": "Update a WAF rule" },
  { "method": "GET",    "path": "/zones/{zone_id}/rulesets",                           "summary": "List zone rulesets" },
  { "method": "POST",   "path": "/zones/{zone_id}/rulesets",                           "summary": "Create a zone ruleset" },
  { "method": "GET",    "path": "/zones/{zone_id}/rulesets/phases/{ruleset_phase}/entrypoint", "summary": "Get a zone entry point ruleset" },
  { "method": "PUT",    "path": "/zones/{zone_id}/rulesets/phases/{ruleset_phase}/entrypoint", "summary": "Update a zone entry point ruleset" },
  { "method": "POST",   "path": "/zones/{zone_id}/rulesets/{ruleset_id}/rules",        "summary": "Create a zone ruleset rule" },
  { "method": "PATCH",  "path": "/zones/{zone_id}/rulesets/{ruleset_id}/rules/{rule_id}", "summary": "Update a zone ruleset rule" }
]

The full Cloudflare API spec has over 2,500 endpoints. The model narrowed that to the WAF and ruleset endpoints it needs, without any of the spec entering the context window. 

The model can also drill into a specific endpoint’s schema before calling it. Here it inspects what phases are available on zone rulesets:

async () => {
  const op = spec.paths['/zones/{zone_id}/rulesets']?.get;
  const items = op?.responses?.['200']?.content?.['application/json']?.schema;
  // Walk the schema to find the phase enum
  const props = items?.allOf?.[1]?.properties?.result?.items?.allOf?.[1]?.properties;
  return { phases: props?.phase?.enum };
}

{
  "phases": [
    "ddos_l4", "ddos_l7",
    "http_request_firewall_custom", "http_request_firewall_managed",
    "http_response_firewall_managed", "http_ratelimit",
    "http_request_redirect", "http_request_transform",
    "magic_transit", "magic_transit_managed"
  ]
}

The agent now knows the exact phases it needs: ddos_l7 for DDoS protection and http_request_firewall_managed for WAF.

Step 2: Act on the API
The agent switches to using execute. The sandbox gets a cloudflare.request() client that can make authenticated calls to the Cloudflare API. First the agent checks what rulesets already exist on the zone:

async () => {
  const response = await cloudflare.request({
    method: "GET",
    path: `/zones/${zoneId}/rulesets`
  });
  return response.result.map(rs => ({
    name: rs.name, phase: rs.phase, kind: rs.kind
  }));
}

[
  { "name": "DDoS L7",          "phase": "ddos_l7",                        "kind": "managed" },
  { "name": "Cloudflare Managed","phase": "http_request_firewall_managed", "kind": "managed" },
  { "name": "Custom rules",     "phase": "http_request_firewall_custom",   "kind": "zone" }
]

The agent sees that managed DDoS and WAF rulesets already exist. It can now chain calls to inspect their rules and update sensitivity levels in a single execution:

async () => {
  // Get the current DDoS L7 entrypoint ruleset
  const ddos = await cloudflare.request({
    method: "GET",
    path: `/zones/${zoneId}/rulesets/phases/ddos_l7/entrypoint`
  });

  // Get the WAF managed ruleset
  const waf = await cloudflare.request({
    method: "GET",
    path: `/zones/${zoneId}/rulesets/phases/http_request_firewall_managed/entrypoint`
  });
}

This entire operation, from searching the spec and inspecting a schema to listing rulesets and fetching DDoS and WAF configurations, took four tool calls.

The Cloudflare MCP server

We started with MCP servers for individual products. Want an agent that manages DNS? Add the DNS MCP server. Want Workers logs? Add the Workers Observability MCP server. Each server exported a fixed set of tools that mapped to API operations. This worked when the tool set was small, but the Cloudflare API has over 2,500 endpoints. No collection of hand-maintained servers could keep up.

The Cloudflare MCP server simplifies this. Two tools, roughly 1,000 tokens, and coverage of every endpoint in the API. When we add new products, the same search() and execute() code paths discover and call them — no new tool definitions, no new MCP servers. It even has support for the GraphQL Analytics API.

Our MCP server is built on the latest MCP specifications. It is OAuth 2.1 compliant, using Workers OAuth Provider to downscope the token to selected permissions approved by the user when connecting. The agent  only gets the capabilities the user explicitly granted. 

For developers, this means you can use a simple agent loop and still give your agent access to the full Cloudflare API with built-in progressive capability discovery.


Comparing approaches to context reduction

Several approaches have emerged to reduce how many tokens MCP tools consume:

Client-side Code Mode was our first experiment. The model writes TypeScript against typed SDKs and runs it in a Dynamic Worker Loader on the client. The tradeoff is that it requires the agent to ship with secure sandbox access. Code Mode is implemented in Goose and Anthropics Claude SDK as Programmatic Tool Calling.

Command-line interfaces are another path. CLIs are self-documenting and reveal capabilities as the agent explores. Tools like OpenClaw and Moltworker convert MCP servers into CLIs using MCPorter to give agents progressive disclosure. The limitation is obvious: the agent needs a shell, which not every environment provides and which introduces a much broader attack surface than a sandboxed isolate.

Dynamic tool search, as used by Anthropic in Claude Code, surfaces a smaller set of tools hopefully relevant to the current task. It shrinks context use but now requires a search function that must be maintained and evaluated, and each matched tool still uses tokens.


Each approach solves a real problem. But for MCP servers specifically, server-side Code Mode combines their strengths: fixed token cost regardless of API size, no modifications needed on the agent side, progressive discovery built in, and safe execution inside a sandboxed isolate. The agent just calls two tools with code. Everything else happens on the server.

Get started today

The Cloudflare MCP server is available now. Point your MCP client at the server URL and you’ll be redirected to Cloudflare to authorize and select the permissions to grant to your agent. Add this config to your MCP client: 

{
  "mcpServers": {
    "cloudflare-api": {
      "url": "https://mcp.cloudflare.com/mcp"
    }
  }
}

For CI/CD, automation, or if you prefer managing tokens yourself, create a Cloudflare API token with the permissions you need. Both user tokens and account tokens are supported and can be passed as bearer tokens in the Authorization header.

More information on different MCP setup configurations can be found at the Cloudflare MCP repository.

Looking forward

Code Mode solves context costs for a single API. But agents rarely talk to one service. A developer’s agent might need the Cloudflare API alongside GitHub, a database, and an internal docs server. Each additional MCP server brings the same context window pressure we started with.

Cloudflare MCP Server Portals let you compose multiple MCP servers behind a single gateway with unified auth and access control. We are building a first-class Code Mode integration for all your MCP servers, and exposing them to agents with built-in progressive discovery and the same fixed-token footprint, regardless of how many services sit behind the gateway.

Shedding old code with ecdysis: graceful restarts for Rust services at Cloudflare

Post Syndicated from Manuel Olguín Muñoz original https://blog.cloudflare.com/ecdysis-rust-graceful-restarts/


ecdysis | ˈekdəsəs |

noun

the process of shedding the old skin (in reptiles) or casting off the outer
cuticle (in insects and other arthropods).

How do you upgrade a network service, handling millions of requests per second around the globe, without disrupting even a single connection?

One of our solutions at Cloudflare to this massive challenge has long been ecdysis, a Rust library that implements graceful process restarts where no live connections are dropped, and no new connections are refused. 

Last month, we open-sourced ecdysis, so now anyone can use it. After five years of production use at Cloudflare, ecdysis has proven itself by enabling zero-downtime upgrades across our critical Rust infrastructure, saving millions of requests with every restart across Cloudflare’s global network.

It’s hard to overstate the importance of getting these upgrades right, especially at the scale of Cloudflare’s network. Many of our services perform critical tasks such as traffic routing, TLS lifecycle management, or firewall rules enforcement, and must operate continuously. If one of these services goes down, even for an instant, the cascading impact can be catastrophic. Dropped connections and failed requests quickly lead to degraded customer performance and business impact.

When these services need updates, security patches can’t wait. Bug fixes need deployment and new features must roll out. 

The naive approach involves waiting for the old process to be stopped before spinning up the new one, but this creates a window of time where connections are refused and requests are dropped. For a service handling thousands of requests per second in a single location, multiply that across hundreds of data centers, and a brief restart becomes millions of failed requests globally.

Let’s dig into the problem, and how ecdysis has been the solution for us — and maybe will be for you.

Links: GitHub | crates.io | docs.rs

Why graceful restarts are hard

The naive approach to restarting a service, as we mentioned, is to stop the old process and start a new one. This works acceptably for simple services that don’t handle real-time requests, but for network services processing live connections, this approach has critical limitations.

First, the naive approach creates a window during which no process is listening for incoming connections. When the old process stops, it closes its listening sockets, which causes the OS to immediately refuse new connections with ECONNREFUSED. Even if the new process starts immediately, there will always be a gap where nothing is accepting connections, whether milliseconds or seconds. For a service handling thousands of requests per second, even a gap of 100ms means hundreds of dropped connections.

Second, stopping the old process kills all already-established connections. A client uploading a large file or streaming video gets abruptly disconnected. Long-lived connections like WebSockets or gRPC streams are terminated mid-operation. From the client’s perspective, the service simply vanishes.

Binding the new process before shutting down the old one appears to solve this, but also introduces additional issues. The kernel normally allows only one process to bind to an address:port combination, but the SO_REUSEPORT socket option permits multiple binds. However, this creates a problem during process transitions that makes it unsuitable for graceful restarts.

When SO_REUSEPORT is used, the kernel creates separate listening sockets for each process and load balances new connections across these sockets. When the initial SYN packet for a connection is received, the kernel will assign it to one of the listening processes. Once the initial handshake is completed, the connection then sits in the accept() queue of the process until the process accepts it. If the process then exits before accepting this connection, it becomes orphaned and is terminated by the kernel. GitHub’s engineering team documented this issue extensively when building their GLB Director load balancer.

How ecdysis works

When we set out to design and build ecdysis, we identified four key goals for the library:

  1. Old code can be completely shut down post-upgrade.

  2. The new process has a grace period for initialization.

  3. New code crashing during initialization is acceptable and shouldn’t affect the running service.

  4. Only a single upgrade runs in parallel to avoid cascading failures.

ecdysis satisfies these requirements following an approach pioneered by NGINX, which has supported graceful upgrades since its early days. The approach is straightforward: 

  1. The parent process fork()s a new child process.

  2. The child process replaces itself with a new version of the code with execve().

  3. The child process inherits the socket file descriptors via a named pipe shared with the parent.

  4. The parent process waits for the child process to signal readiness before shutting down.


Crucially, the socket remains open throughout the transition. The child process inherits the listening socket from the parent as a file descriptor shared via a named pipe. During the child’s initialization, both processes share the same underlying kernel data structure, allowing the parent to continue accepting and processing new and existing connections. Once the child completes initialization, it notifies the parent and begins accepting connections. Upon receiving this ready notification, the parent immediately closes its copy of the listening socket and continues handling only existing connections. 

This process eliminates coverage gaps while providing the child a safe initialization window. There is a brief window of time when both the parent and child may accept connections concurrently. This is intentional; any connections accepted by the parent are simply handled until completion as part of the draining process.

This model also provides the required crash safety. If the child process fails during initialization (e.g., due to a configuration error), it simply exits. Since the parent never stopped listening, no connections are dropped, and the upgrade can be retried once the problem is fixed.

ecdysis implements the forking model with first-class support for asynchronous programming through Tokio and systemd integration:

  • Tokio integration: Native async stream wrappers for Tokio. Inherited sockets become listeners without additional glue code. For synchronous services, ecdysis supports operation without async runtime requirements.

  • systemd-notify support: When the systemd_notify feature is enabled, ecdysis automatically integrates with systemd’s process lifecycle notifications. Setting Type=notify-reload in your service unit file allows systemd to track upgrades correctly.

  • systemd named sockets: The systemd_sockets feature enables ecdysis to manage systemd-activated sockets. Your service can be socket-activated and support graceful restarts simultaneously.

Platform note: ecdysis relies on Unix-specific syscalls for socket inheritance and process management. It does not work on Windows. This is a fundamental limitation of the forking approach.

Security considerations

Graceful restarts introduce security considerations. The forking model creates a brief window where two process generations coexist, both with access to the same listening sockets and potentially sensitive file descriptors.

ecdysis addresses these concerns through its design:

Fork-then-exec: ecdysis follows the traditional Unix pattern of fork() followed immediately by execve(). This ensures the child process starts with a clean slate: new address space, fresh code, and no inherited memory. Only explicitly-passed file descriptors cross the boundary.

Explicit inheritance: Only listening sockets and communication pipes are inherited. Other file descriptors are closed via CLOEXEC flags. This prevents accidental leakage of sensitive handles.

seccomp compatibility: Services using seccomp filters must allow fork() and execve(). This is a tradeoff: graceful restarts require these syscalls, so they cannot be blocked.

For most network services, these tradeoffs are acceptable. The security of the fork-exec model is well understood and has been battle-tested for decades in software like NGINX and Apache.

Code example

Let’s look at a practical example. Here’s a simplified TCP echo server that supports graceful restarts:

use ecdysis::tokio_ecdysis::{SignalKind, StopOnShutdown, TokioEcdysisBuilder};
use tokio::{net::TcpStream, task::JoinSet};
use futures::StreamExt;
use std::net::SocketAddr;

#[tokio::main]
async fn main() {
    // Create the ecdysis builder
    let mut ecdysis_builder = TokioEcdysisBuilder::new(
        SignalKind::hangup()  // Trigger upgrade/reload on SIGHUP
    ).unwrap();

    // Trigger stop on SIGUSR1
    ecdysis_builder
        .stop_on_signal(SignalKind::user_defined1())
        .unwrap();

    // Create listening socket - will be inherited by children
    let addr: SocketAddr = "0.0.0.0:8080".parse().unwrap();
    let stream = ecdysis_builder
        .build_listen_tcp(StopOnShutdown::Yes, addr, |builder, addr| {
            builder.set_reuse_address(true)?;
            builder.bind(&addr.into())?;
            builder.listen(128)?;
            Ok(builder.into())
        })
        .unwrap();

    // Spawn task to handle connections
    let server_handle = tokio::spawn(async move {
        let mut stream = stream;
        let mut set = JoinSet::new();
        while let Some(Ok(socket)) = stream.next().await {
            set.spawn(handle_connection(socket));
        }
        set.join_all().await;
    });

    // Signal readiness and wait for shutdown
    let (_ecdysis, shutdown_fut) = ecdysis_builder.ready().unwrap();
    let shutdown_reason = shutdown_fut.await;

    log::info!("Shutting down: {:?}", shutdown_reason);

    // Gracefully drain connections
    server_handle.await.unwrap();
}

async fn handle_connection(mut socket: TcpStream) {
    // Echo connection logic here
}

The key points:

  1. build_listen_tcp creates a listener that will be inherited by child processes.

  2. ready() signals to the parent process that initialization is complete and that it can safely exit.

  3. shutdown_fut.await blocks until an upgrade or stop is requested. This future only yields once the process should be shut down, either because an upgrade/reload was executed successfully or because a shutdown signal was received.

When you send SIGHUP to this process, here’s what ecdysis does…

…on the parent process:

  • Forks and execs a new instance of your binary.

  • Passes the listening socket to the child.

  • Waits for the child to call ready().

  • Drains existing connections, then exits.

…on the child process:

  • Initializes itself following the same execution flow as the parent, except any sockets owned by ecdysis are inherited and not bound by the child.

  • Signals readiness to the parent by calling ready().

  • Blocks waiting for a shutdown or upgrade signal.

Production at scale

ecdysis has been running in production at Cloudflare since 2021. It powers critical Rust infrastructure services deployed across 330+ data centers in 120+ countries. These services handle billions of requests per day and require frequent updates for security patches, feature releases, and configuration changes.

Every restart using ecdysis saves hundreds of thousands of requests that would otherwise be dropped during a naive stop/start cycle. Across our global footprint, this translates to millions of preserved connections and improved reliability for customers.

ecdysis vs alternatives

Graceful restart libraries exist for several ecosystems. Understanding when to use ecdysis versus alternatives is critical to choosing the right tool.

tableflip is our Go library that inspired ecdysis. It implements the same fork-and-inherit model for Go services. If you need Go, tableflip is a great option!

shellflip is Cloudflare’s other Rust graceful restart library, designed specifically for Oxy, our Rust-based proxy. shellflip is more opinionated: it assumes systemd and Tokio, and focuses on transferring arbitrary application state between parent and child. This makes it excellent for complex stateful services, or services that want to apply such aggressive sandboxing that they can’t even open their own sockets, but adds overhead for simpler cases.

Start building

ecdysis brings five years of production-hardened graceful restart capabilities to the Rust ecosystem. It’s the same technology protecting millions of connections across Cloudflare’s global network, now open-sourced and available for anyone!

Full documentation is available at docs.rs/ecdysis, including API reference, examples for common use cases, and steps for integrating with systemd.

The examples directory in the repository contains working code demonstrating TCP listeners, Unix socket listeners, and systemd integration.

The library is actively maintained by the Argo Smart Routing & Orpheus team, with contributions from teams across Cloudflare. We welcome contributions, bug reports, and feature requests on GitHub.

Whether you’re building a high-performance proxy, a long-lived API server, or any network service where uptime matters, ecdysis can provide a foundation for zero-downtime operations.

Start building: github.com/cloudflare/ecdysis