The way content and businesses are discovered online is changing rapidly. In the past, traffic originated from traditional search engines, and SEO determined who got found first. Now the traffic is increasingly coming from AI crawlers and agents that demand structured data within the often-unstructured Web that was built for humans.
As a business, to continue to stay ahead, now is the time to consider not just human visitors, or traditional wisdom for SEO-optimization, but start to treat agents as first-class citizens.
Why markdown is important
Feeding raw HTML to an AI is like paying by the word to read packaging instead of the letter inside. A simple ## About Us on a page in markdown costs roughly 3 tokens; its HTML equivalent – <h2 class="section-title" id="about">About Us</h2> – burns 12-15, and that’s before you account for the <div> wrappers, nav bars, and script tags that pad every real web page and have zero semantic value.
This blog post you’re reading takes 16,180 tokens in HTML and 3,150 tokens when converted to markdown. That’s a 80% reduction in token usage.
Markdown has quickly become the lingua franca for agents and AI systems as a whole. The format’s explicit structure makes it ideal for AI processing, ultimately resulting in better results while minimizing token waste.
The problem is that the Web is made of HTML, not markdown, and page weight has been steadily increasing over the years, making pages hard to parse. For agents, their goal is to filter out all non-essential elements and scan the relevant content.
The conversion of HTML to markdown is now a common step for any AI pipeline. Still, this process is far from ideal: it wastes computation, adds costs and processing complexity, and above all, it may not be how the content creator intended their content to be used in the first place.
What if AI agents could bypass the complexities of intent analysis and document conversion, and instead receive structured markdown directly from the source?
Convert HTML to markdown, automatically
Cloudflare’s network now supports real-time content conversion at the source, for enabled zones using content negotiation headers. Now when AI systems request pages from any website that uses Cloudflare and has Markdown for Agents enabled, they can express the preference for text/markdown in the request. Our network will automatically and efficiently convert the HTML to markdown, when possible, on the fly.
Here’s how it works. To fetch the markdown version of any page from a zone with Markdown for Agents enabled, the client needs to add the Accept negotiation header with text/markdownas one of the options. Cloudflare will detect this, fetch the original HTML version from the origin, and convert it to markdown before serving it to the client.
Here’s a curl example with the Accept negotiation header requesting a page from our developer documentation:
We already see some of the most popular coding agents today – like Claude Code and OpenCode – send these accept headers with their requests for content. Now, the response to this request is formatted in markdown. It’s that simple.
HTTP/2 200
date: Wed, 11 Feb 2026 11:44:48 GMT
content-type: text/markdown; charset=utf-8
content-length: 2899
vary: accept
x-markdown-tokens: 725
content-signal: ai-train=yes, search=yes, ai-input=yes

---
title: Markdown for Agents · Cloudflare Agents docs
---

## What is Markdown for Agents

The ability to parse and convert HTML to Markdown has become foundational for AI.
...
Note that we include an x-markdown-tokens header with the converted response that indicates the estimated number of tokens in the markdown document. You can use this value in your flow, for example to calculate the size of a context window or to decide on your chunking strategy.
Here’s a diagram of how it works:
Content Signals Policy
During our last Birthday Week, Cloudflare announced Content Signals — a framework that allows anyone to express their preferences for how their content can be used after it has been accessed.
When you return markdown, you want to make sure your content is being used by the Agent or AI crawler. That’s why Markdown for Agents converted responses include the Content-Signal: ai-train=yes, search=yes, ai-input=yes header signaling that indicates content can be used for AI Training, Search results and AI Input, which includes agentic use. Markdown for Agents will provide options to define custom Content Signal policies in the future.
Check our dedicated Content Signals page for more information on this framework.
Try it with the Cloudflare Blog & Developer Documentation
We enabled this feature in our Developer Documentation and our Blog, inviting all AI crawlers and agents to consume our content using markdown instead of HTML.
Try it out now by requesting this blog with Accept: text/markdown.
---
description: The way content is discovered online is shifting, from traditional search engines to AI agents that need structured data from a Web built for humans. It’s time to consider not just human visitors, but start to treat agents as first-class citizens. Markdown for Agents automatically converts any HTML page requested from our network to markdown.
title: Introducing Markdown for Agents
image: https://blog.cloudflare.com/images/markdown-for-agents.png
---

# Introducing Markdown for Agents

The way content and businesses are discovered online is changing rapidly. In the past, traffic originated from traditional search engines and SEO determined who got found first. Now the traffic is increasingly coming from AI crawlers and agents that demand structured data within the often-unstructured Web that was built for humans.

...
Other ways to convert to Markdown
If you’re building AI systems that require arbitrary document conversion from outside Cloudflare or Markdown for Agents is not available from the content source, we provide other ways to convert documents to Markdown for your applications:
Workers AI AI.toMarkdown() supports multiple document types, not just HTML, and summarization.
Browser Rendering /markdown REST API supports markdown conversion if you need to render a dynamic page or application in a real browser before converting it.
Tracking markdown usage
Anticipating a shift in how AI systems browse the Web, Cloudflare Radar now includes content type insights for AI bot and crawler traffic, both globally on the AI Insights page and in the individual bot information pages.
The new content_type dimension and filter shows the distribution of content types returned to AI agents and crawlers, grouped by MIME type category.
You can also see the requests for markdown filtered by a specific agent or crawler. Here are the requests that return markdown to OAI-Searchbot, the crawler used by OpenAI to power ChatGPT’s search:
This new data will allow us to track the evolution of how AI bots, crawlers, and agents are consuming Web content over time. As always, everything on Radar is freely accessible via the public APIs and the Data Explorer.
Start using today
To enable Markdown for Agents for your zone, log into the Cloudflare dashboard, select your account, select the zone, look for Quick Actions and toggle the Markdown for Agents button to enable. This feature is available today in Beta at no cost for Pro, Business and Enterprise plans, as well as SSL for SaaS customers.
You can find more information about Markdown for Agents on our Developer Docs. We welcome your feedback as we continue to refine and enhance this feature. We’re curious to see how AI crawlers and agents navigate and adapt to the unstructured nature of the Web as it evolves.
Today, we’re introducing a new Worker template for Vertical Microfrontends (VMFE). This template allows you to map multiple independent Cloudflare Workers to a single domain, enabling teams to work in complete silos — shipping marketing, docs, and dashboards independently — while presenting a single, seamless application to the user.
Most microfrontend architectures are “horizontal”, meaning different parts of a single page are fetched from different services. Vertical microfrontends take a different approach by splitting the application by URL path. In this model, a team owning the `/blog` path doesn’t just own a component; they own the entire vertical stack for that route – framework, library choice, CI/CD and more. Owning the entire stack of a path, or set of paths, allows teams to have true ownership of their work and ship with confidence.
Teams face problems as they grow, where different frameworks serve varying use cases. A marketing website could be better utilized with Astro, for example, while a dashboard might be better with React. Or say you have a monolithic code base where many teams ship as a collective. An update to add new features from several teams can get frustratingly rolled back because a single team introduced a regression. How do we solve the problem of obscuring the technical implementation details away from the user and letting teams ship a cohesive user experience with full autonomy and control of their domains?
Vertical microfrontends can be the answer. Let’s dive in and explore how they solve developer pain points together.
What are vertical microfrontends?
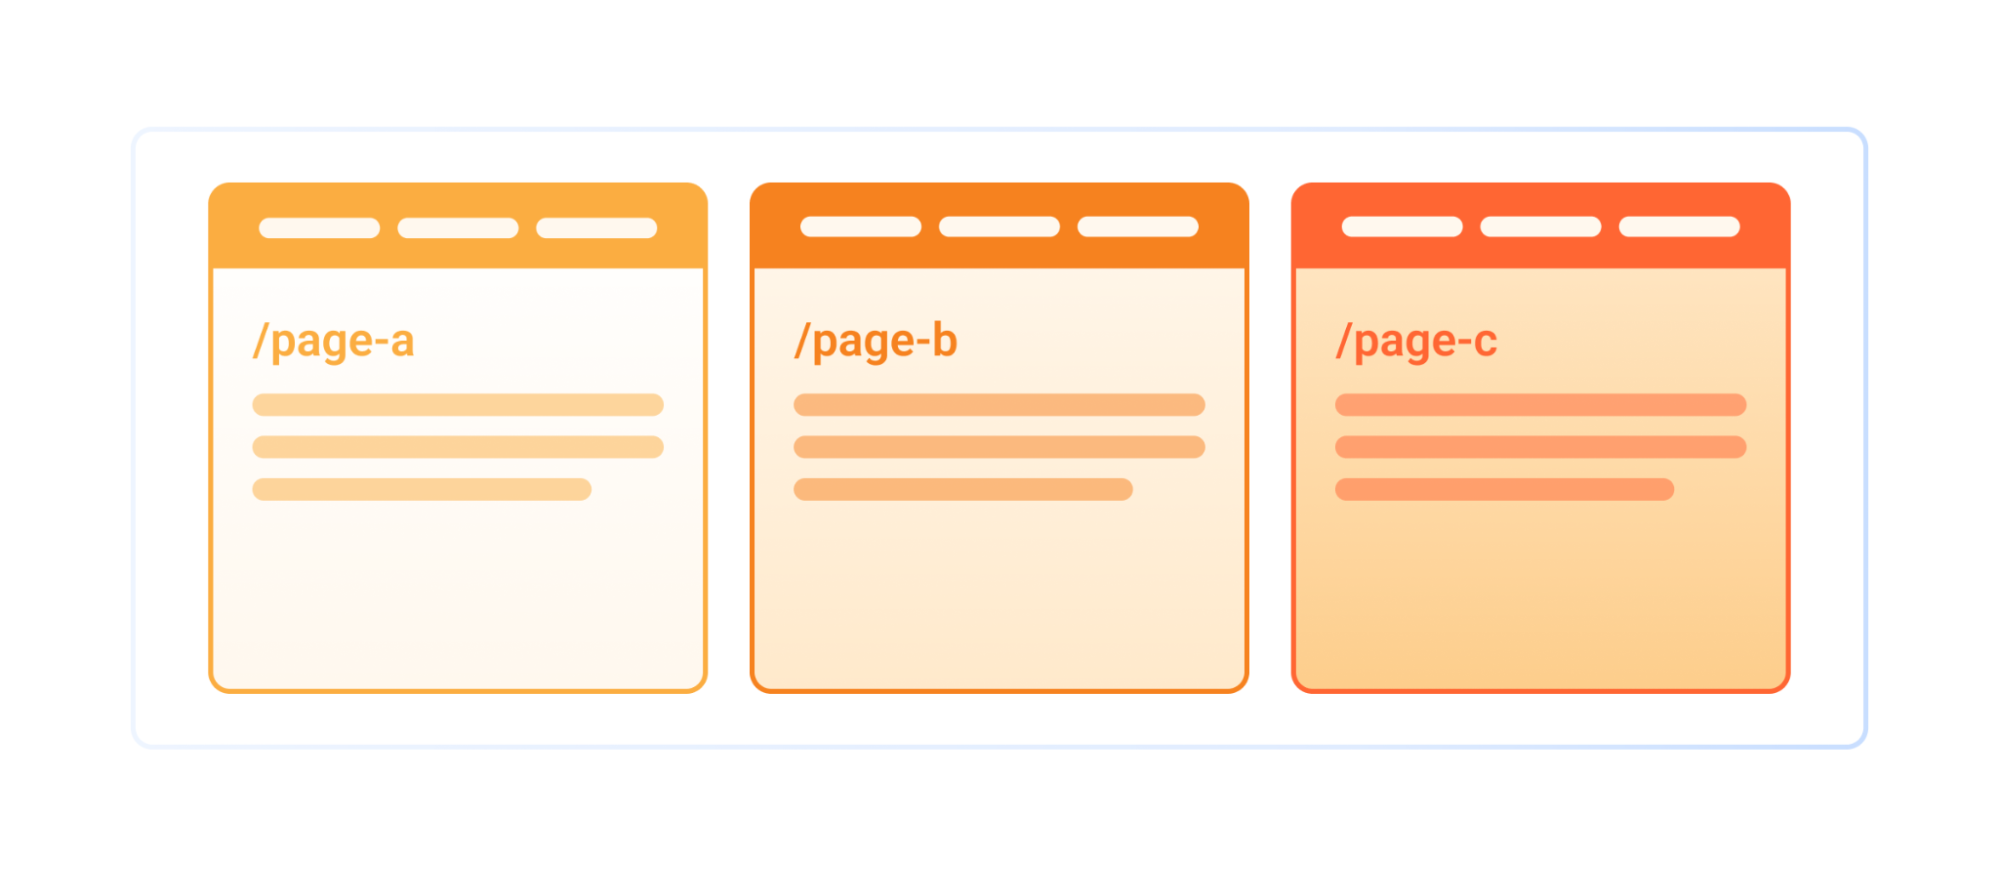
A vertical microfrontend is an architectural pattern where a single independent team owns an entire slice of the application’s functionality, from the user interface all the way down to the CI/CD pipeline. These slices are defined by paths on a domain where you can associate individual Workers with specific paths:
We could take it a step further and focus on more granular sub-path Worker associations, too, such as a dashboard. Within a dashboard, you likely segment out various features or products by adding depth to your URL path (e.g. /dash/product-a) and navigating between two products could mean two entirely different code bases.
Now with vertical microfrontends, we could also have the following:
Each of the above paths are their own frontend project with zero shared code between them. The product-a and product-b routes map to separately deployed frontend applications that have their own frameworks, libraries, CI/CD pipelines defined and owned by their own teams. FINALLY.
You can now own your own code from end to end. But now we need to find a way to stitch these separate projects together, and even more so, make them feel as if they are a unified experience.
We experience this pain point ourselves here at Cloudflare, as the dashboard has many individual teams owning their own products. Teams must contend with the fact that changes made outside their control impact how users experience their product.
Internally, we are now using a similar strategy for our own dashboard. When users navigate from the core dashboard into our ZeroTrust product, in reality they are two entirely separate projects and the user is simply being routed to that project by its path /:accountId/one.
Visually unified experiences
Stitching these individual projects together to make them feel like a unified experience isn’t as difficult as you might think: It only takes a few lines of CSS magic. What we absolutely do not want to happen is to leak our implementation details and internal decisions to our users. If we fail to make this user experience feel like one cohesive frontend, then we’ve done a grave injustice to our users.
To accomplish this sleight of hand, let us take a little trip in understanding how view transitions and document preloading come into play.
View transitions
When we want to seamlessly navigate between two distinct pages while making it feel smooth to the end user, view transitions are quite useful. Defining specific DOM elements on our page to stick around until the next page is visible, and defining how any changes are handled, make for quite the powerful quilt-stitching tool for multi-page applications.
There may be, however, instances where making the various vertical microfrontends feel different is more than acceptable. Perhaps our marketing website, documentation, and dashboard are each uniquely defined, for instance. A user would not expect all three of those to feel cohesive as you navigate between the three parts. But… if you decide to introduce vertical slices to an individual experience such as the dashboard (e.g. /dash/product-a & /dash/product-b), then users should never know they are two different repositories/workers/projects underneath.
Okay, enough talk — let’s get to work. I mentioned it was low-effort to make two separate projects feel as if they were one to a user, and if you have yet to hear about CSS View Transitions then I’m about to blow your mind.
What if I told you that you could make animated transitions between different views — single-page app (SPA) or multi-page app (MPA) — feel as if they were one? Before any view transitions are added, if we navigate between pages owned by two different Workers, the interstitial loading state would be the white blank screen in our browser for some few hundred milliseconds until the full next page began rendering. Pages would not feel cohesive, and it certainly would not feel like a single-page application.
Appears as multiple navigation elements between each site.
If we want elements to stick around, rather than seeing a white blank page, we can achieve that by defining CSS View Transitions. With the code below, we’re telling our current document page that when a view transition event is about to happen, keep the nav DOM element on the screen, and if any delta in appearance exists between our existing page and our destination page, then we’ll animate that with an ease-in-out transition.
All of a sudden, two different Workers feel like one.
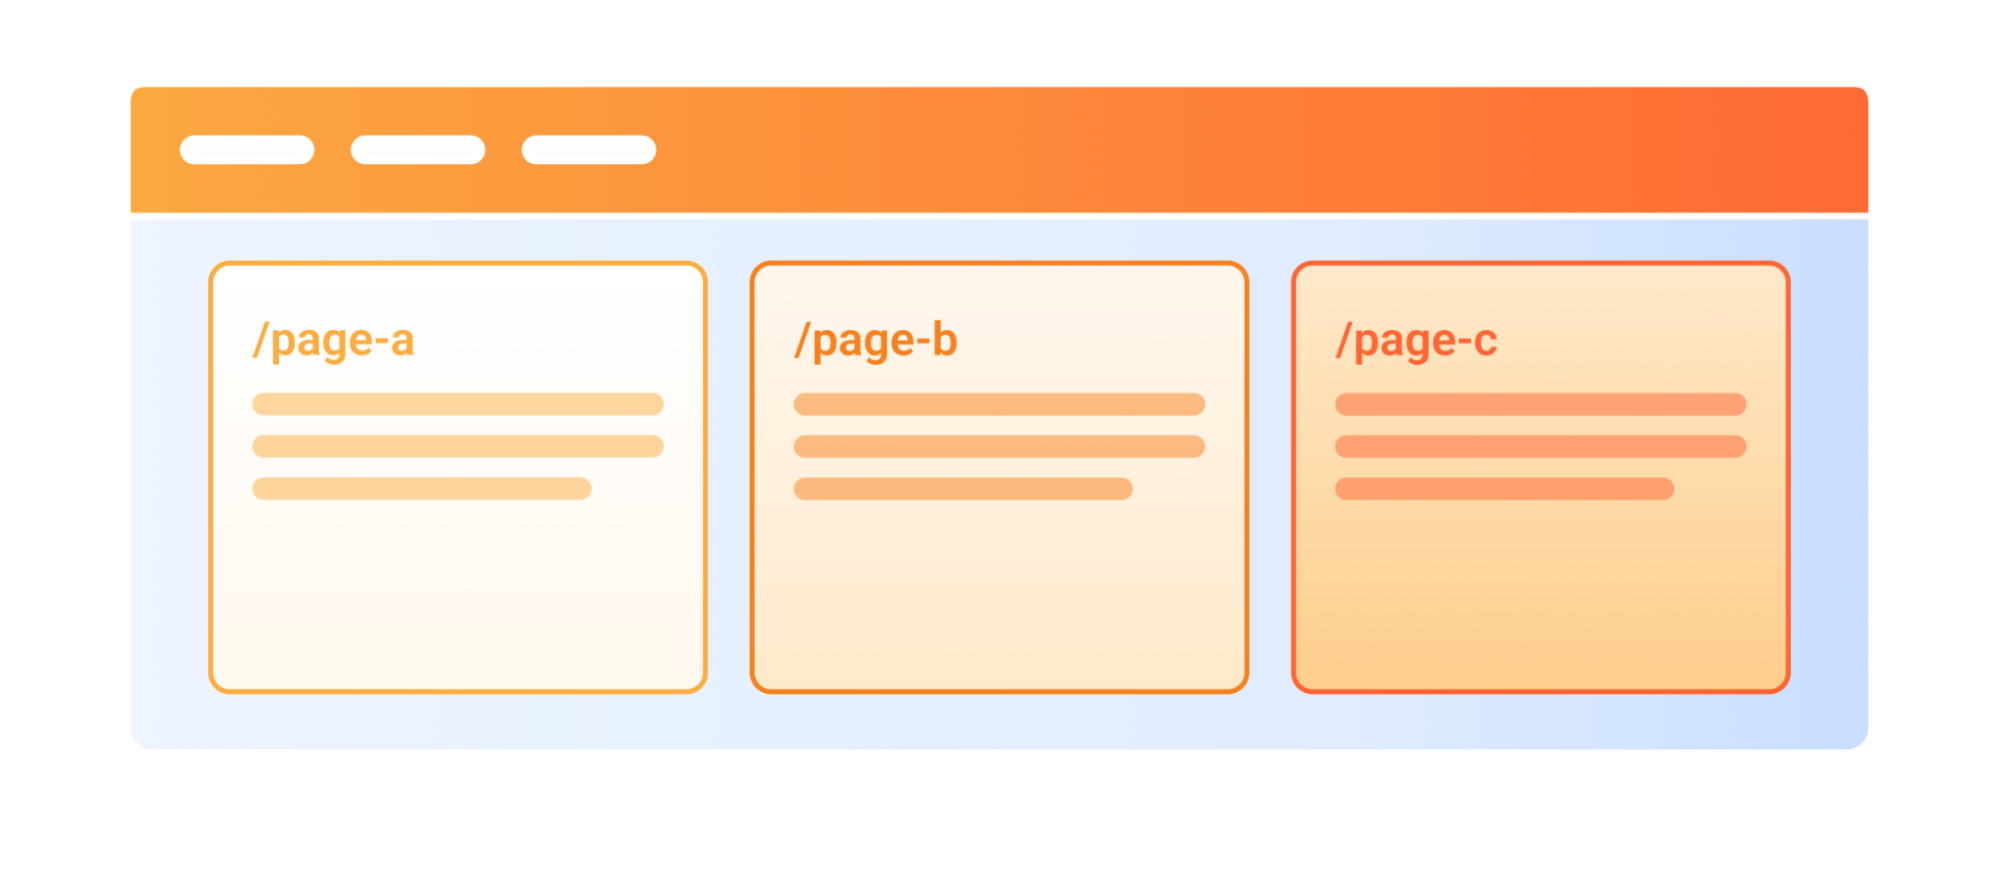
Appears as a single navigation element between three distinct sites.
Preloading
Transitioning between two pages makes it look seamless — and we also want it to feel as instant as a client-side SPA. While currently Firefox and Safari do not support Speculation Rules, Chrome/Edge/Opera do support the more recent newcomer. The speculation rules API is designed to improve performance for future navigations, particularly for document URLs, making multi-page applications feel more like single-page applications.
Breaking it down into code, what we need to define is a script rule in a specific format that tells the supporting browsers how to prefetch the other vertical slices that are connected to our web application — likely linked through some shared navigation.
With that, our application prefetches our other microfrontends and holds them in our in-memory cache, so if we were to navigate to those pages it would feel nearly instant.
You likely won’t require this for clearly discernible vertical slices (marketing, docs, dashboard) because users would expect a slight load between them. However, it is highly encouraged to use when vertical slices are defined within a specific visible experience (e.g. within dashboard pages).
Between View Transitions and Speculation Rules, we are able to tie together entirely different code repositories to feel as if they were served from a single-page application. Wild if you ask me.
Zero-config request routing
Now we need a mechanism to host multiple applications, and a method to stitch them together as requests stream in. Defining a single Cloudflare Worker as the “Router” allows a single logical point (at the edge) to handle network requests and then forward them to whichever vertical microfrontend is responsible for that URL path. Plus it doesn’t hurt that then we can map a single domain to that router Worker and the rest “just works.”
Service bindings
If you have yet to explore Cloudflare Worker service bindings, then it is worth taking a moment to do so.
Service bindings allow one Worker to call into another, without going through a publicly-accessible URL. A Service binding allows Worker A to call a method on Worker B, or to forward a request from Worker A to Worker. Breaking it down further, the Router Worker can call into each vertical microfrontend Worker that has been defined (e.g. marketing, docs, dashboard), assuming each of them were Cloudflare Workers.
Why is this important? This is precisely the mechanism that “stitches” these vertical slices together. We’ll dig into how the request routing is handling the traffic split in the next section. But to define each of these microfrontends, we’ll need to update our Router Worker’s wrangler definition, so it knows which frontends it’s allowed to call into.
Our above sample definition is defined in our Router Worker, which then tells us that we are permitted to make requests into three separate additional Workers (marketing, docs, and dash). Granting permissions is as simple as that, but let’s tumble into some of the more complex logic with request routing and HTML rewriting network responses.
Request routing
With knowledge of the various other Workers we are able to call into if needed, now we need some logic in place to know where to direct network requests when. Since the Router Worker is assigned to our custom domain, all incoming requests hit it first at the network edge. It then determines which Worker should handle the request and manages the resulting response.
The first step is to map URL paths to associated Workers. When a certain request URL is received, we need to know where it needs to be forwarded. We do this by defining rules. While we support wildcard routes, dynamic paths, and parameter constraints, we are going to stay focused on the basics — literal path prefixes — as it illustrates the point more clearly.
Each of the above paths need to be mapped to an actual Worker (see our wrangler definition for services in the section above). For our Router Worker, we define an additional variable with the following data, so we can know which paths should map to which service bindings. We now know where to route users as requests come in! Define a wrangler variable with the name ROUTES and the following contents:
Let’s envision a user visiting our website path /docs/installation. Under the hood, what happens is the request first reaches our Router Worker which is in charge of understanding what URL paths map to which individual Workers. It understands that the /docs path prefix is mapped to our DOCS service binding which referencing our wrangler file points us at our worker_docs project. Our Router Worker, knowing that /docs is defined as a vertical microfrontend route, removes the /docs prefix from the path and forwards the request to our worker_docs Worker to handle the request and then finally returns whatever response we get.
Why does it drop the /docs path, though? This was an implementation detail choice that was made so that when the Worker is accessed via the Router Worker, it can clean up the URL to handle the request as if it were called from outside our Router Worker. Like any Cloudflare Worker, our worker_docs service might have its own individual URL where it can be accessed. We decided we wanted that service URL to continue to work independently. When it’s attached to our new Router Worker, it would automatically handle removing the prefix, so the service could be accessible from its own defined URL or through our Router Worker… either place, doesn’t matter.
HTMLRewriter
Splitting our various frontend services with URL paths (e.g. /docs or /dash) makes it easy for us to forward a request, but when our response contains HTML that doesn’t know it’s being reverse proxied through a path component… well, that causes problems.
Say our documentation website has an image tag in the response <img src="./logo.png" />. If our user was visiting this page at https://website.com/docs/, then loading the logo.png file would likely fail because our /docs path is somewhat artificially defined only by our Router Worker.
Only when our services are accessed through our Router Worker do we need to do some HTML rewriting of absolute paths so our returned browser response references valid assets. In practice what happens is that when a request passes through our Router Worker, we pass the request to the correct Service Binding, and we receive the response from that. Before we pass that back to the client, we have an opportunity to rewrite the DOM — so where we see absolute paths, we go ahead and prepend that with the proxied path. Where previously our HTML was returning our image tag with <img src="./logo.png" /> we now modify it before returning to the client browser to <img src="./docs/logo.png" />.
Let’s return for a moment to the magic of CSS view transitions and document preloading. We could of course manually place that code into our projects and have it work, but this Router Worker will automatically handle that logic for us by also using HTMLRewriter.
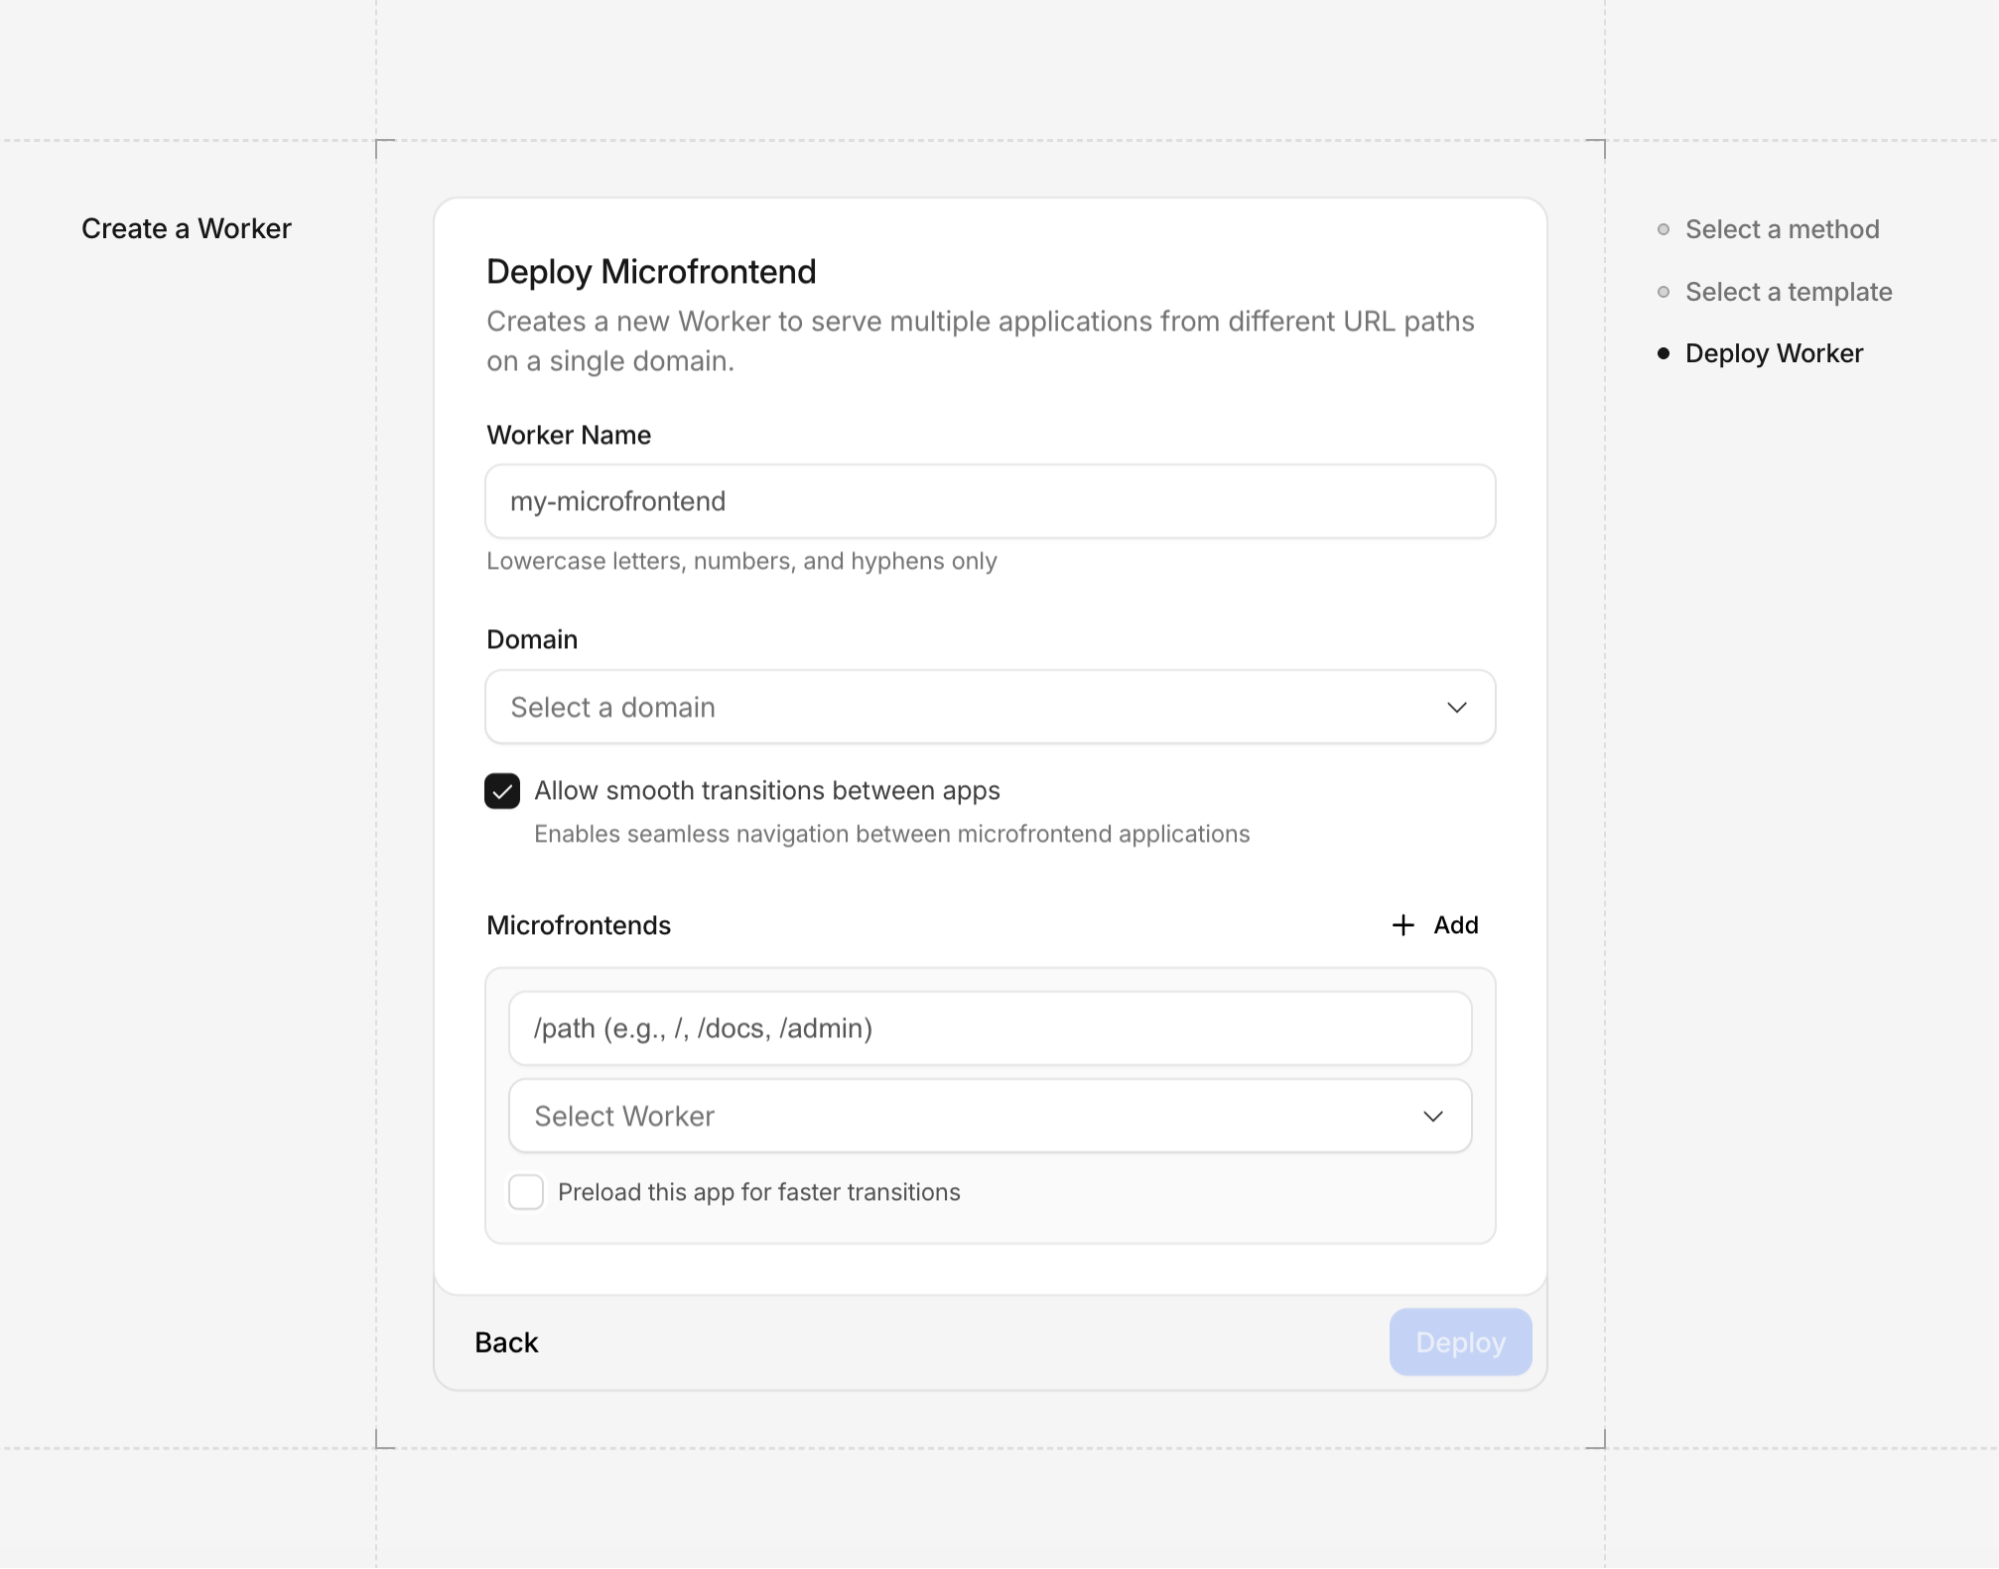
In your Router Worker ROUTES variable, if you set smoothTransitions to true at the root level, then the CSS transition views code will be added automatically. Additionally, if you set the preload key within a route to true, then the script code speculation rules for that route will automatically be added as well.
You can start building with the Vertical Microfrontend template today.
Visit the Cloudflare Dashboard deeplink here or go to “Workers & Pages” and click the “Create application” button to get started. From there, click “Select a template” and then “Create microfrontend” and you can begin configuring your setup.
Check out the documentation to see how to map your existing Workers and enable View Transitions. We can’t wait to see what complex, multi-team applications you build on the edge!
Matrix is the gold standard for decentralized, end-to-end encrypted communication. It powers government messaging systems, open-source communities, and privacy-focused organizations worldwide.
For the individual developer, however, the appeal is often closer to home: bridging fragmented chat networks (like Discord and Slack) into a single inbox, or simply ensuring your conversation history lives on infrastructure you control. Functionally, Matrix operates as a decentralized, eventually consistent state machine. Instead of a central server pushing updates, homeservers exchange signed JSON events over HTTP, using a conflict resolution algorithm to merge these streams into a unified view of the room’s history.
But there is a “tax” to running it Traditionally, operating a Matrix homeserver has meant accepting a heavy operational burden. You aren’t just installing software; you are becoming a system administrator. You have to provision virtual private servers (VPS), tune PostgreSQL for heavy write loads, manage Redis for caching, configure reverse proxies, and handle rotation for TLS certificates. It’s a stateful, heavy beast that demands to be fed time and money, whether you are sending one message a day or one million.
We wanted to see if we could eliminate that tax entirely.
Spoiler: We could. In this post, we’ll explain how we ported a complete Matrix homeserver to Cloudflare Workers. The result is a serverless architecture where operations disappear, costs scale to zero when idle, and every connection is protected by post-quantum cryptography by default. You can view the source code and deploy your own instance directly from GitHub.
From Tuwunel to Workers
Our starting point was Tuwunel, a Rust-based Matrix homeserver designed for traditional deployments. PostgreSQL for persistence, Redis for caching, filesystem for media. Porting it to Workers meant questioning every storage assumption we’d taken for granted.
The good news: Rust compiles to WebAssembly, and the core Matrix protocol logic — event authorization, room state resolution, cryptographic verification — translated directly. The workers-rs crate bridges the gap to Cloudflare’s runtime.
The challenge was storage. Traditional homeservers assume strong consistency via a central SQL database. Cloudflare offers a powerful alternative: Durable Objects. This primitive gives us the strong consistency and atomicity required for Matrix state resolution, while still allowing the application to run at the edge.
Here’s how the mapping worked out:
From monolith to serverless
Moving to Cloudflare Workers brings several advantages for a developer: simple deployment, lower costs, low latency, and built-in security.
Easy deployment: A traditional Matrix deployment requires server provisioning, PostgreSQL administration, Redis cluster management, TLS certificate renewal, load balancer configuration, monitoring infrastructure, and on-call rotations.
With Workers, deployment is wrangler deploy. We handle TLS, load balancing, DDoS protection, and global distribution. So there’s no server to patch, no database to vacuum, or certificates to renew.
Usage-based costs: Traditional homeservers cost money whether anyone is using them or not. A small community server handling a few hundred requests per day still requires a typical VPS costing around $20/month running 24/7.
Workers pricing is request-based, so low-traffic homeservers cost just pennies. When usage spikes during active conversations, you pay for what you use. When everyone goes to sleep, costs drop toward zero.
Lower latency globally: A traditional Matrix homeserver in us-east-1 adds 200ms+ latency for users in Asia or Europe. Every sync request, message sent, and typing indicator go round-trip to a single region.
Workers, meanwhile, run in 300+ locations worldwide. When a user in Tokyo sends a message, the Worker executes in Tokyo.
Built-in security: Matrix homeservers can be high-value targets: They handle encrypted communications, store message history, and authenticate users. Traditional deployments require careful hardening: firewall configuration, rate limiting, DDoS mitigation, WAF rules, IP reputation filtering.
We provide all of this by default. The Worker never sees attack traffic, because we filter it first. For a solo developer or small team, achieving this level of hardening on a Linux VPS is a full-time job. On Workers, it is the baseline environment.
An adversary captures your encrypted TLS traffic today and stores it. Years from now, when quantum computers can break classical key exchange algorithms, they decrypt everything retroactively. For a messaging platform handling sensitive communications, this isn’t theoretical. Government agencies and well-funded adversaries are already stockpiling encrypted traffic.
Fortunately, we didn’t have to protect against this by ourselves. Cloudflare deployed post-quantum hybrid key agreement across all TLS 1.3 connections in October 2022. Every connection to our Worker automatically negotiates X25519MLKEM768 — a hybrid combining classical X25519 with ML-KEM, the post-quantum algorithm standardized by NIST.
Classical cryptography relies on mathematical problems that are hard for traditional computers but trivial for quantum computers running Shor’s algorithm. ML-KEM is based on lattice problems that remain hard even for quantum computers. The hybrid approach means both algorithms must fail for the connection to be compromised.
Following a message through the system
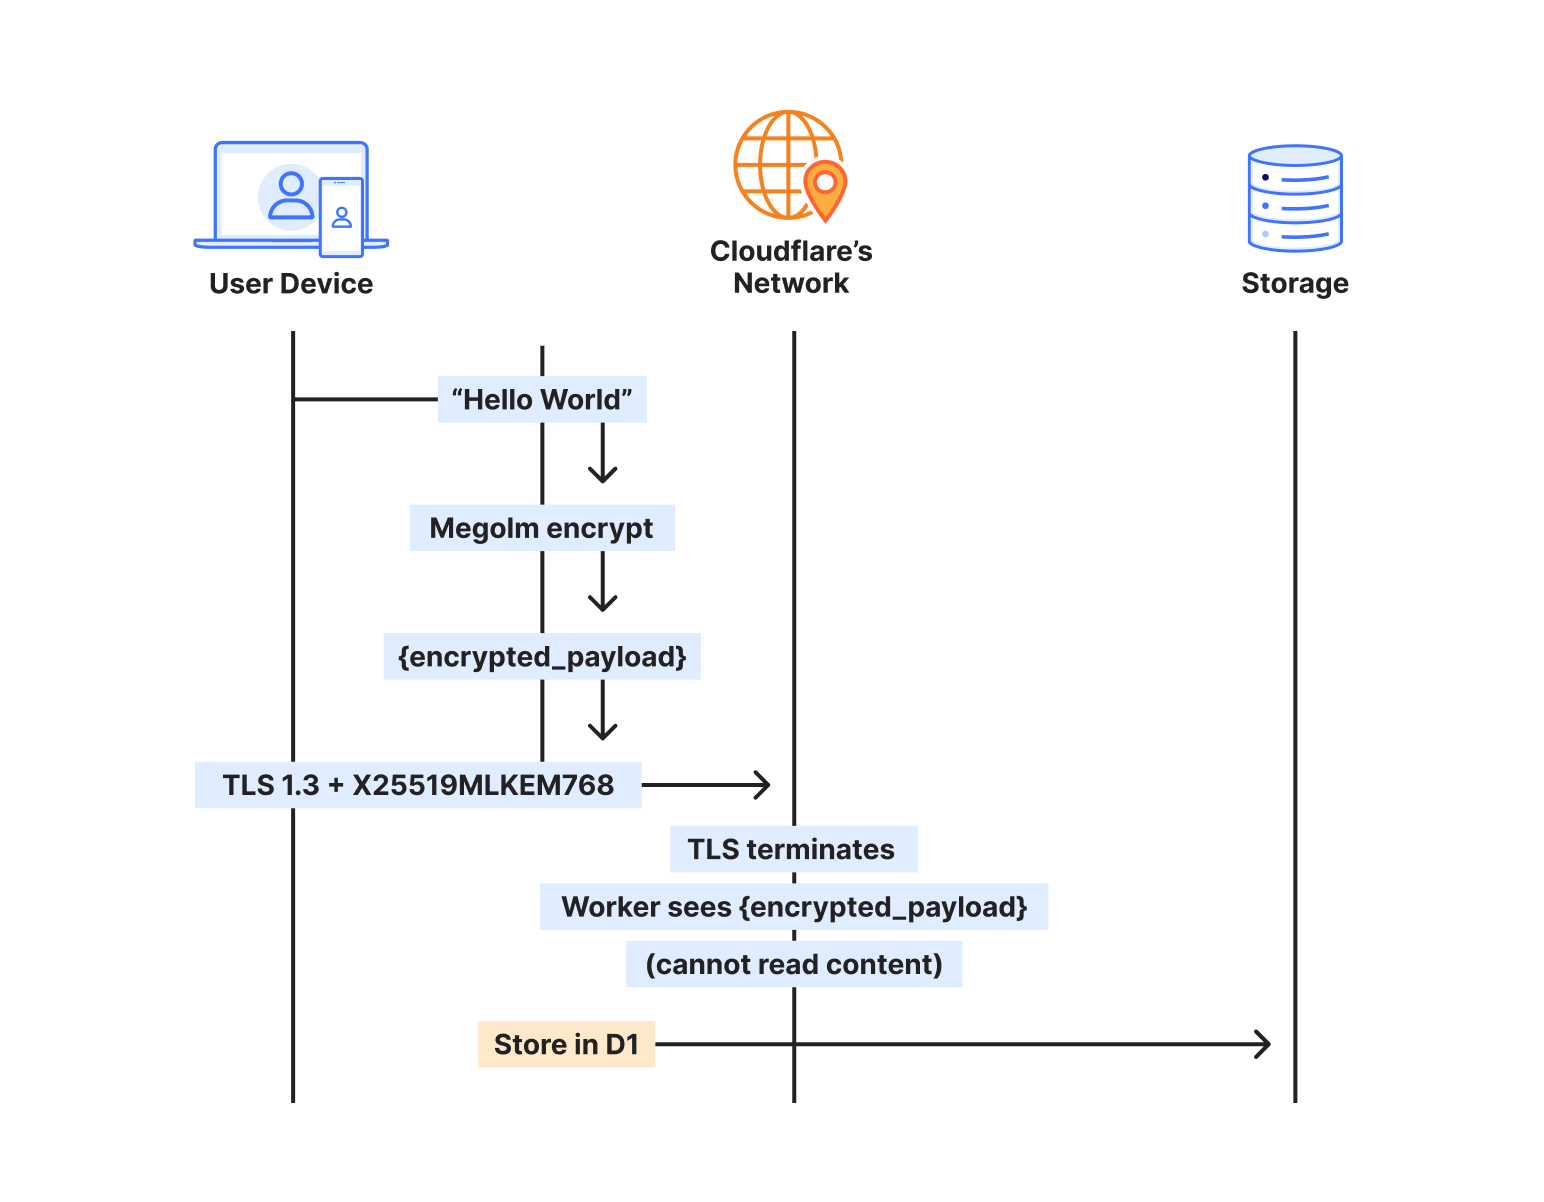
Understanding where encryption happens matters for security architecture. When someone sends a message through our homeserver, here’s the actual path:
The sender’s client takes the plaintext message and encrypts it with Megolm — Matrix’s end-to-end encryption. This encrypted payload then gets wrapped in TLS for transport. On Cloudflare, that TLS connection uses X25519MLKEM768, making it quantum-resistant.
The Worker terminates TLS, but what it receives is still encrypted — the Megolm ciphertext. We store that ciphertext in D1, index it by room and timestamp, and deliver it to recipients. But we never see the plaintext. The message “Hello, world” exists only on the sender’s device and the recipient’s device.
When the recipient syncs, the process reverses. They receive the encrypted payload over another quantum-resistant TLS connection, then decrypt locally with their Megolm session keys.
Two layers, independent protection
This creates defense in depth through two encryption layers that operate independently:
The transport layer (TLS) protects data in transit. It’s encrypted at the client and decrypted at the Cloudflare edge. With X25519MLKEM768, this layer is now post-quantum.
The application layer (Megolm E2EE) protects message content. It’s encrypted on the sender’s device and decrypted only on recipient devices. This uses classical Curve25519 cryptography.
Here’s why this architecture matters: Even if Matrix E2EE is eventually broken by quantum computers, the message content was never transmitted in a quantum-vulnerable form. The TLS layer that carried the E2EE ciphertext was itself post-quantum secured.
The post-quantum TLS acts as a quantum-resistant envelope around everything, including the classical E2EE layer. This buys time for the Matrix protocol to migrate to post-quantum E2EE algorithms without leaving current communications vulnerable to harvest-now-decrypt-later attacks.
Who sees what
Any Matrix homeserver operator — whether running Synapse on a VPS or this implementation on Workers — can see metadata: which rooms exist, who’s in them, when messages were sent. This is inherent to operating the server. You’re the operator; you control the infrastructure.
What no one in the infrastructure chain can see: message content. The E2EE payload is encrypted on sender devices before it ever hits the network. Cloudflare terminates TLS and passes requests to your Worker, but both see only Megolm ciphertext. Media in encrypted rooms is encrypted client-side before upload. Private keys never leave user devices.
The server processes ciphertext, not conversations. That’s true whether you’re self-hosting on bare metal or running on Workers.
What traditional deployments would need
Achieving post-quantum TLS on a traditional Matrix deployment would require upgrading OpenSSL or BoringSSL to a version supporting ML-KEM, configuring cipher suite preferences correctly, testing client compatibility across all Matrix apps, monitoring for TLS negotiation failures, staying current as PQC standards evolve, and handling clients that don’t support PQC gracefully.
With Workers, it’s automatic. Chrome, Firefox, and Edge all support X25519MLKEM768. Mobile apps using platform TLS stacks inherit this support. The security posture improves as Cloudflare’s PQC deployment expands — no action required on our part.
The storage architecture that made it work
The key insight from porting Tuwunel was that different data needs different consistency guarantees. We use each Cloudflare primitive for what it does best.
D1 for the data model
D1 stores everything that needs to survive restarts and support queries: users, rooms, events, device keys. Over 25 tables covering the full Matrix data model.
CREATE TABLE events (
	event_id TEXT PRIMARY KEY,
	room_id TEXT NOT NULL,
	sender TEXT NOT NULL,
	event_type TEXT NOT NULL,
	state_key TEXT,
	content TEXT NOT NULL,
	origin_server_ts INTEGER NOT NULL,
	depth INTEGER NOT NULL
);
D1’s SQLite foundation meant we could port Tuwunel’s queries with minimal changes. Joins, indexes, and aggregations work as expected.
We learned one hard lesson: D1’s eventual consistency breaks foreign key constraints. A write to rooms might not be visible when a subsequent write to events checks the foreign key — different replicas, different views of the world. We removed all foreign keys and enforce referential integrity in application code.
KV for ephemeral state
OAuth authorization codes live for 10 minutes. Refresh tokens last for a session. None of this needs SQL — it needs fast key-value access with automatic expiration.
// Store OAuth code with 10-minute TTL
kv.put(&format!("oauth_code:{}", code), &token_data)?
	.expiration_ttl(600)
	.execute()
	.await?;
KV’s global distribution means OAuth flows work fast regardless of where users are located.
R2 for media
Matrix media maps directly to R2. Upload an image, get back a content-addressed URL. Egress is free, which matters for a protocol where clients frequently download the same avatars and images.
Durable Objects for atomicity
Some operations can’t tolerate eventual consistency. When a client claims a one-time encryption key, that key must be atomically removed. If two clients claim the same key, encrypted session establishment fails.
Durable Objects provide single-threaded, strongly consistent storage:
#[durable_object]
pub struct UserKeysObject {
	state: State,
	env: Env,
}

impl UserKeysObject {
	async fn claim_otk(&self, algorithm: &str) -> Result<Option<Key>> {
    	// Atomic within single DO - no race conditions possible
    	let mut keys: Vec<Key> = self.state.storage()
        	.get("one_time_keys")
        	.await
        	.ok()
        	.flatten()
        	.unwrap_or_default();

    	if let Some(idx) = keys.iter().position(|k| k.algorithm == algorithm) {
        	let key = keys.remove(idx);
        	self.state.storage().put("one_time_keys", &keys).await?;
        	return Ok(Some(key));
    	}
    	Ok(None)
	}
}
We use UserKeysObject for E2EE key management, RoomObject for real-time room events like typing indicators and read receipts, and UserSyncObject for to-device message queues. The rest flows through D1.
Complete E2EE, complete OAuth
End-to-end encryption is non-negotiable for secure communications. Our implementation supports the full Matrix E2EE stack: device keys, cross-signing keys, one-time keys, fallback keys, key backup, and dehydrated devices.
Modern Matrix clients use OAuth 2.0/OIDC instead of legacy password flows. We implemented a complete OAuth provider: dynamic client registration, PKCE authorization, RS256-signed JWT tokens, token refresh with rotation, and standard OIDC discovery endpoints.
Point Element or any Matrix client at the domain, and it discovers everything automatically.
Sliding Sync for mobile
Traditional Matrix sync transfers megabytes of data on initial connection — every room, every state event, recent timeline for each. This destroys mobile battery and data plans.
Sliding Sync lets clients request exactly what they need. Instead of downloading everything, clients get the 20 most recent rooms with minimal state. As users scroll, they request more ranges. The server tracks position and sends only deltas.
Combined with edge execution, mobile clients can connect and render their room list in under 500ms — even on slow networks.
The comparison
For a homeserver serving a small team:
Traditional (VPS)
Workers
Monthly cost (idle)
$20-50
<$1
Monthly cost (active)
$20-50
$3-10
Global latency
100-300ms
20-50ms
Time to deploy
Hours
Seconds
Maintenance
Weekly
None
DDoS protection
Additional cost
Included
Post-quantum TLS
Complex setup
Automatic
*Based on public rates and metrics published by DigitalOcean, AWS Lightsail, and Linode as of January 15, 2026.
The economics improve further at scale. Traditional deployments require capacity planning and over-provisioning. Workers scale automatically.
The future of decentralized protocols
When we started this project, the goal was simply to see if the pieces would fit. Could a protocol as complex and stateful as Matrix — designed for heavy iron and persistent file systems — actually run on an ephemeral, serverless edge?
The answer is yes, but the implication is bigger than just Matrix.
By mapping traditional stateful components to Cloudflare’s primitives — Postgres to D1, Redis to KV, mutexes to Durable Objects — we proved that complex applications don’t need complex infrastructure. We stripped away the operating system, the database management, and the network configuration, leaving only the application logic and the data itself.
This architecture shifts the paradigm for self-hosting. It turns “running a server” from a chore into a utility. You get the sovereignty of owning your data without the burden of owning the infrastructure.
Matrix on Workers runs in production today, handling real encrypted communications for our team. It is fast, it is cheap, and it is arguably one of the most secure ways to deploy a homeserver today.
Ready to build secure, real-time applications on Workers? Get started withCloudflare Workers and exploreDurable Objects for your own stateful edge applications. Join ourDiscord community to connect with other developers building at the edge.
The Astro Technology Company, creators of the Astro web framework, is joining Cloudflare.
Astro is the web framework for building fast, content-driven websites. Over the past few years, we’ve seen an incredibly diverse range of developers and companies use Astro to build for the web. This ranges from established brands like Porsche and IKEA, to fast-growing AI companies like Opencode and OpenAI. Platforms that are built on Cloudflare, like Webflow Cloud and Wix Vibe, have chosen Astro to power the websites their customers build and deploy to their own platforms. At Cloudflare, we use Astro, too — for our developer docs, website, landing pages, and more. Astro is used almost everywhere there is content on the Internet.
By joining forces with the Astro team, we are doubling down on making Astro the best framework for content-driven websites for many years to come. The best version of Astro — Astro 6 — is just around the corner, bringing a redesigned development server powered by Vite. The first public beta release of Astro 6 is now available, with GA coming in the weeks ahead.
We are excited to share this news and even more thrilled for what it means for developers building with Astro. If you haven’t yet tried Astro — give it a spin and run npm create astro@latest.
What this means for Astro
Astro will remain open source, MIT-licensed, and open to contributions, with a public roadmap and open governance. All full-time employees of The Astro Technology Company are now employees of Cloudflare, and will continue to work on Astro. We’re committed to Astro’s long-term success and eager to keep building.
Astro wouldn’t be what it is today without an incredibly strong community of open-source contributors. Cloudflare is also committed to continuing to support open-source contributions, via the Astro Ecosystem Fund, alongside industry partners including Webflow, Netlify, Wix, Sentry, Stainless and many more.
From day one, Astro has been a bet on the web and portability: Astro is built to run anywhere, across clouds and platforms. Nothing changes about that. You can deploy Astro to any platform or cloud, and we’re committed to supporting Astro developers everywhere.
There are many web frameworks out there — so why are developers choosing Astro?
Astro has been growing rapidly:
Why? Many web frameworks have come and gone trying to be everything to everyone, aiming to serve the needs of both content-driven websites and web applications.
The key to Astro’s success: Instead of trying to serve every use case, Astro has stayed focused on five design principles. Astro is…
Content-driven: Astro was designed to showcase your content.
Server-first: Websites run faster when they render HTML on the server.
Fast by default: It should be impossible to build a slow website in Astro.
Easy to use: You don’t need to be an expert to build something with Astro.
Developer-focused: You should have the resources you need to be successful.
Astro’s Islands Architecture is a core part of what makes all of this possible. The majority of each page can be fast, static HTML — fast and simple to build by default, oriented around rendering content. And when you need it, you can render a specific part of a page as a client island, using any client UI framework. You can even mix and match multiple frameworks on the same page, whether that’s React.js, Vue, Svelte, Solid, or anything else:
Bringing back the joy in building websites
The more Astro and Cloudflare started talking, the clearer it became how much we have in common. Cloudflare’s mission is to help build a better Internet — and part of that is to help build a faster Internet. Almost all of us grew up building websites, and we want a world where people have fun building things on the Internet, where anyone can publish to a site that is truly their own.
When Astro first launched in 2021, it had become painful to build great websites — it felt like a fight with build tools and frameworks. It sounds strange to say it, with the coding agents and powerful LLMs of 2026, but in 2021 it was very hard to build an excellent and fast website without being a domain expert in JavaScript build tooling. So much has gotten better, both because of Astro and in the broader frontend ecosystem, that we take this almost for granted today.
The Astro project has spent the past five years working to simplify web development. So as LLMs, then vibe coding, and now true coding agents have come along and made it possible for truly anyone to build — Astro provided a foundation that was simple and fast by default. We’ve all seen how much better and faster agents get when building off the right foundation, in a well-structured codebase. More and more, we’ve seen both builders and platforms choose Astro as that foundation.
We’ve seen this most clearly through the platforms that both Cloudflare and Astro serve, that extend Cloudflare to their own customers in creative ways using Cloudflare for Platforms, and have chosen Astro as the framework that their customers build on.
When you deploy to Webflow Cloud, your Astro site just works and is deployed across Cloudflare’s network. When you start a new project with Wix Vibe, behind the scenes you’re creating an Astro site, running on Cloudflare. And when you generate a developer docs site using Stainless, that generates an Astro project, running on Cloudflare, powered by Starlight — a framework built on Astro.
Each of these platforms is built for a different audience. But what they have in common — beyond their use of Cloudflare and Astro — is they make it fun to create and publish content to the Internet. In a world where everyone can be both a builder and content creator, we think there are still so many more platforms to build and people to reach.
Astro 6 — new local dev server, powered by Vite
Astro 6 is coming, and the first open beta release is now available. To be one of the first to try it out, run:
npm create astro@latest -- --ref next
Or to upgrade your existing Astro app, run:
npx @astrojs/upgrade beta
Astro 6 brings a brand new development server, built on the Vite Environments API, that runs your code locally using the same runtime that you deploy to. This means that when you run astro dev with the Cloudflare Vite plugin, your code runs in workerd, the open-source Cloudflare Workers runtime, and can use Durable Objects, D1, KV, Agents and more. This isn’t just a Cloudflare feature: Any JavaScript runtime with a plugin that uses the Vite Environments API can benefit from this new support, and ensure local dev runs in the same environment, with the same runtime APIs as production.
Live Content Collections in Astro are also stable in Astro 6 and out of beta. These content collections let you update data in real time, without requiring a rebuild of your site. This makes it easy to bring in content that changes often, such as the current inventory in a storefront, while still benefitting from the built-in validation and caching that come with Astro’s existing support for content collections.
There’s more to Astro 6, including Astro’s most upvoted feature request — first-class support for Content Security Policy (CSP) — as well as simpler APIs, an upgrade to Zod 4, and more.
Doubling down on Astro
We’re thrilled to welcome the Astro team to Cloudflare. We’re excited to keep building, keep shipping, and keep making Astro the best way to build content-driven sites. We’re already thinking about what comes next beyond V6, and we’d love to hear from you.
To keep up with the latest, follow the Astro blog and join the Astro Discord. Tell us what you’re building!
Today, we’re excited to share that Cloudflare has acquired Human Native, a UK-based AI data marketplace specializing in transforming multimedia content into searchable and useful data.
Human Native x Cloudflare
The Human Native team has spent the past few years focused on helping AI developers create better AI through licensed data. Their technology helps publishers and developers turn messy, unstructured content into something that can be understood, licensed and ultimately valued. They have approached data not as something to be scraped, but as an asset class that deserves structure, transparency and respect.
Access to high-quality data can lead to better technical performance. One of Human Native’s customers, a prominent UK video AI company, threw away their existing training data after achieving superior results with data sourced through Human Native. Going forward they are only training on fully licensed, reputably sourced, high-quality content.
This gives a preview of what the economic model of the Internet can be in the age of generative AI: better AI built on better data, with fair control, compensation and credit for creators.
The Internet needs new economic models
For the last 30 years, the open Internet has been based on a fundamental value exchange: creators create content, aggregators (such as search engines or social media) send traffic. Creators can monetize that traffic through advertisements, subscriptions or direct support. This is the economic loop that has powered the explosive growth of the Internet.
But it’s under real strain.
Crawl-to-referral ratios are skyrocketing, with 10s of thousands of AI and bot crawls per real human visitor, andit’s unclear how multipurpose crawlers are using the content they access.
The community of creators who publish on the Internet is a diverse group: news publishers, content creators, financial professionals, technology companies, aggregators and more. But they have one thing in common: They want to decide how their content is used by AI systems.
Cloudflare’s work in building AI Crawl Control and Pay Per Crawl is predicated on a simple philosophy: Content owners should get to decide how and when their content is accessed by others. Many of our customers want to optimize their brand and content to make sure it is in every training data set and shows up in every new search; others want to have more control and only allow access if there is direct compensation.
Our tools like AI Search, AI Crawl Control and Pay Per Crawl can help, wherever you land in that equation. The important thing is that the content owner gets to decide.
New tools for AI developers
With the Human Native team joining Cloudflare, we are accelerating our work in helping customers transform their content to be easily accessed and understood by AI bots and agents in addition to their traditional human audiences.
Crawling is complex, expensive in terms of engineering and compute to process the content, and has no guarantees of quality control. A crawled index can contain duplicates, spam, illegal material and many more headaches. Developers are left with messy, unstructured data.
We recently announced our work in building the AI Index, a powerful new way for both foundation model companies and agents to access content at scale.
Instead of sending crawlers blindly and repeatedly across the open Internet, AI developers will be able to connect via a pub/sub model: participating websites will expose structured updates whenever their content changes, and developers will be able to subscribe to receive those updates in real time.
This opens up new avenues for content creators to experiment with new business models.
Building the foundation for these new business models
Cloudflare is investing heavily in creating the foundations for these new business models, starting with x402.
We recently announced that we are creating the x402 Foundation, in partnership with Coinbase, to enable machine-to-machine transactions for digital resources.
Payments on the web have historically been designed for humans. We browse a merchant’s website, show intent by adding items to a cart, and confirm our intent to purchase by putting in our credit card information and clicking “Pay.” But what if you want to enable direct transactions between automated systems? We need protocols to allow machine-to-machine transactions.
Together, Human Native and Cloudflare will accelerate our work in building the basis of these new economic models for the Internet.
What’s next
The Internet works best when it is open, fair, and independently sustainable. We’re excited to welcome the Human Native team to Cloudflare, and even more excited about what we will build together to improve the foundations of the Internet in the age of AI.
We have some big news to share today: Replicate, the leading platform for running AI models, is joining Cloudflare.
We first started talking to Replicate because we shared a lot in common beyond just a passion for bright color palettes. Our mission for Cloudflare’s Workers developer platform has been to make building and deploying full-stack applications as easy as possible. Meanwhile, Replicate has been on a similar mission to make deploying AI models as easy as writing a single line of code. And we realized we could build something even better together by integrating the Replicate platform into Cloudflare directly.
We are excited to share this news and even more excited for what it will mean for customers. Bringing Replicate’s tools into Cloudflare will continue to make our Developer Platform the best place on the Internet to build and deploy any AI or agentic workflow.
What does this mean for you?
Before we spend more time talking about the future of AI, we want to answer the questions that are top of mind for Replicate and Cloudflare users. In short:
For existing Replicate users: Your APIs and workflows will continue to work without interruption. You will soon benefit from the added performance and reliability of Cloudflare’s global network.
For existing Workers AI users: Get ready for a massive expansion of the model catalog and the new ability to run fine-tunes and custom models directly on Workers AI.
Now – let’s get back into why we’re so excited about our joint future.
The AI Revolution was not televised, but it started with open source
Before AI was AI, and the subject of every conversation, it was known for decades as “machine learning”. It was a specialized, almost academic field. Progress was steady but siloed, with breakthroughs happening inside a few large, well-funded research labs. The models were monolithic, the data was proprietary, and the tools were inaccessible to most developers. Everything changed when the culture of open-source collaboration — the same force that built the modern Internet — collided with machine learning, as researchers and companies began publishing not just their papers, but their model weights and code.
This ignited an incredible explosion of innovation. The pace of change in just the past few years has been staggering; what was state-of-the-art 18 months ago (or sometimes it feels like just days ago) is now the baseline. This acceleration is most visible in generative AI.
We went from uncanny, blurry curiosities to photorealistic image generation in what felt like the blink of an eye. Open source models like Stable Diffusion unlocked immediate creativity for developers, and that was just the beginning. If you take a look at Replicate’s model catalog today, you’ll see thousands of image models of almost every flavor, each iterating on the previous.
This happened not just with image models, but video, audio, language models and more….
But this incredible, community-driven progress creates a massive practical challenge: How do you actually run these models? Every new model has different dependencies, requires specific GPU hardware (and enough of it), and needs a complex serving infrastructure to scale. Developers found themselves spending more time fighting with CUDA drivers and requirements.txt files than actually building their applications.
This is exactly the problem Replicate solved. They built a platform that abstracts away all that complexity (using their open-source tool Cog to package models into standard, reproducible containers), letting any developer or data scientist run even the most complex open-source models with a simple API call.
Today, Replicate’s catalog spans more than 50,000 open-source models and fine-tuned models. While open source unlocked so many possibilities, Replicate’s toolset goes beyond that to make it possible for developers to access any models they need in one place. Period. With their marketplace, they also offer seamless access to leading proprietary models like GPT-5 and Claude Sonnet, all through the same unified API.
What’s worth noting is that Replicate didn’t just build an inference service; they built a community. So much innovation happens through being inspired by what others are doing, iterating on it, and making it better. Replicate has become the definitive hub for developers to discover, share, fine-tune, and experiment with the latest models in a public playground.
Stronger together: the AI catalog meets the AI cloud
Coming back to the Workers Platform mission: Our goal all along has been to enable developers to build full-stack applications without having to burden themselves with infrastructure. And while that hasn’t changed, AI has changed the requirements of applications.
The types of applications developers are building are changing — three years ago, no one was building agents or creating AI-generated launch videos. Today they are. As a result, what they need and expect from the cloud, or the AI cloud, has changed too.
To meet the needs of developers, Cloudflare has been building the foundational pillars of the AI Cloud, designed to run inference at the edge, close to users. This isn’t just one product, but an entire stack:
Workers AI: Serverless GPU inference on our global network.
AI Gateway: A control plane for caching, rate-limiting, and observing any AI API.
Data Stack: Including Vectorize (our vector database) and R2 (for model and data storage).
Orchestration: Tools like AI Search (formerly Autorag), Agents, and Workflows to build complex, multi-step applications.
Foundation: All built on our core developer platform of Workers, Durable Objects, and the rest of our stack.
As we’ve been helping developers scale up their applications, Replicate has been on a similar mission — to make deploying AI models as easy as deploying code. This is where it all comes together. Replicate brings one of the industry’s largest and most vibrant model catalog and developer community. Cloudflare brings an incredibly performant global network and serverless inference platform. Together, we can deliver the best of both worlds: the most comprehensive selection of models, runnable on a fast, reliable, and affordable inference platform.
Our shared vision
For the community: the hub for AI exploration
The ability to share models, publish fine-tunes, collect stars, and experiment in the playground is the heart of the Replicate community. We will continue to invest in and grow this as the premier destination for AI discovery and experimentation, now supercharged by Cloudflare’s global network for an even faster, more responsive experience for everyone.
The future of inference: one platform, all models
Our vision is to bring the best of both platforms together. We will bring the entire Replicate catalog — all 50,000+ models and fine-tunes — to Workers AI. This gives you the ultimate choice: run models in Replicate’s flexible environment or on Cloudflare’s serverless platform, all from one place.
But we’re not just expanding the catalog. We are thrilled to announce that we will be bringing fine-tuning capabilities to Workers AI, powered by Replicate’s deep expertise. We are also making Workers AI more flexible than ever. Soon, you’ll be able to bring your own custom models to our network. We’ll leverage Replicate’s expertise with Cog to make this process seamless, reproducible, and easy.
The AI Cloud: more than just inference
Running a model is just one piece of the puzzle. The real magic happens when you connect AI to your entire application. Imagine what you can build when Replicate’s massive catalog is deeply integrated with the entire Cloudflare developer platform: run a model and store the results directly in R2 or Vectorize; trigger inference from a Worker or Queue; use Durable Objects to manage state for an AI agent; or build real-time generative UI with WebRTC and WebSockets.
To manage all this, we will integrate our unified inference platform deeply with the AI Gateway, giving you a single control plane for observability, prompt management, A/B testing, and cost analytics across all your models, whether they’re running on Cloudflare, Replicate, or any other provider.
Welcome to the team!
We are incredibly excited to welcome the Replicate team to Cloudflare. Their passion for the developer community and their expertise in the AI ecosystem are unmatched. We can’t wait to build the future of AI together.
Cloudflare Workflows is our take on “Durable Execution.” They provide a serverless engine, powered by the Cloudflare Developer Platform, for building long-running, multi-step applications that persist through failures. When Workflows became generally available earlier this year, they allowed developers to orchestrate complex processes that would be difficult or impossible to manage with traditional stateless functions. Workflows handle state, retries, and long waits, allowing you to focus on your business logic.
However, complex orchestrations require robust testing to be reliable. To date, testing Workflows was a black-box process. Although you could test if a Workflow instance reached completion through an await to its status, there was no visibility into the intermediate steps. This made debugging really difficult. Did the payment processing step succeed? Did the confirmation email step receive the correct data? You couldn’t be sure without inspecting external systems or logs.
Why was this necessary?
As developers ourselves, we understand the need to ensure reliable code, and we heard your feedback loud and clear: the developer experience for testing Workflows needed to be better.
The black box nature of testing was one part of the problem. Beyond that, though, the limited testing offered came at a high cost. If you added a workflow to your project, even if you weren’t testing the workflow directly, you were required to disable isolated storage because we couldn’t guarantee isolation between tests. Isolated storage is a vitest-pool-workers feature to guarantee that each test runs in a clean, predictable environment, free from the side effects of other tests. Being forced to have it disabled meant that state could leak between tests, leading to flaky, unpredictable, and hard-to-debug failures.
This created a difficult choice for developers building complex applications. If your project used Workers, Durable Objects, and R2 alongside Workflows, you had to either abandon isolated testing for your entire project or skip testing. This friction resulted in a poor testing experience, which in turn discouraged the adoption of Workflows. Solving this wasn’t just an improvement, it was a critical step in making Workflows part of any well-tested Cloudflare application.
Introducing isolated testing for Workflows
We’re introducing a new set of APIs that enable comprehensive, granular, and isolated testing for your Workflows, all running locally and offline with vitest-pool-workers, our testing framework that supports running tests in the Workers runtime workerd. This enables fast, reliable, and cheap test runs that don’t depend on a network connection.
They are available through the cloudflare:test module, with @cloudflare/vitest-pool-workers version 0.9.0 and above. The new test module provides two primary functions to introspect your Workflows:
introspectWorkflowInstance: useful for unit tests with known instance IDs
introspectWorkflow: useful for integration tests where IDs are typically generated dynamically.
Let’s walk through a practical example.
A practical example: testing a blog moderation workflow
Imagine a simple Workflow for moderating a blog. When a user submits a comment, the Workflow requests a review from workers-ai. Based on the violation score returned, it then waits for a moderator to approve or deny the comment. If approved, it calls a step.do to publish the comment via an external API.
Testing this without our new APIs would be impossible. You’d have no direct way to simulate the step’s outcomes and simulate the moderator’s approval. Now, you can mock everything.
Here’s the test code using introspectWorkflowInstance with a known instance ID:
This test mocks the outcomes of steps that require external API calls, such as the ‘AI content scan’, which calls Workers AI, and the ‘publish comment’ step, which calls an external blog API.
If the instance ID is not known, because you are either making a worker request that starts one/multiple Workflow instances with random generated ids, you can call introspectWorkflow(env.MY_WORKFLOW). Here’s the test code for that scenario, where only one Workflow instance is created:
Notice how in both examples we’re calling the introspectors with await using – this is the Explicit Resource Management syntax from modern JavaScript. It is crucial here because when the introspector objects go out of scope at the end of the test, its disposal method is automatically called. This is how we ensure each test works with its own isolated storage.
The modify and modifyAll functions are the gateway to controlling instances. Inside its callback, you get access to a modifier object with methods to inject behavior such as mocking step outcomes, events and disabling sleeps.
To understand the solution, you first need to understand the local architecture. When you run wrangler dev, your Workflows are powered by Miniflare, a simulator for testing Cloudflare Workers, and workerd. Each running workflow instance is backed by its own SQLite Durable Object, which we call the “Engine DO”. This Engine DO is responsible for executing steps, persisting state, and managing the instance’s lifecycle. It lives inside the local isolated Workers runtime.
Meanwhile, the Vitest test runner is a separate Node.js process living outside of workerd. This is why we have a Vitest custom pool that allows tests to run inside workerd called vitest-pool-workers. Vitest-pool-workers has a Runner Worker, which is a worker to run the tests with bindings to everything specified in the user wrangler.json file. This worker has access to the APIs under the “cloudflare:test” module. It communicates with Node.js through a special DO called Runner Object via WebSocket/RPC.
The first approach we considered was to use the test runner worker. In its current state, Runner worker has access to Workflow bindings from Workflows defined on the wrangler file. We considered also binding each Workflow’s Engine DO namespace to this runner worker. This would give vitest-pool-workers direct access to the Engine DOs where it would be possible to directly call Engine methods.
While promising, this approach would have required undesirable changes to the core of Miniflare and vitest-pool-workers, making it too invasive for this single feature.
Firstly, we would have needed to add a new unsafe field to Miniflare’s Durable Objects. Its sole purpose would be to specify the service name of our Engines, preventing Miniflare from applying its default user prefix which would otherwise prevent the Durable Objects from being found.
Secondly, vitest-pool-workers would have been forced to bind every Engine DO from the Workflows in the project to its runner, even those not being tested. This would introduce unwanted bindings into the test environment, requiring an additional cleanup to ensure they were not exposed to the user’s tests env.
The breakthrough
The solution is a combination of privileged local-only APIs and Remote Procedure Calls (RPC).
First, we added a set of unsafe functions to the local implementation of the Workflows binding, functions that are not available in the production environment. They act as a controlled access point, accessible from the test environment, allowing the test runner to get a stub to a specific Engine DO by providing its instance ID.
Once the test runner has this stub, it uses RPC to call specific, trusted methods on the Engine DO via a special RpcTarget called WorkflowInstanceModifier. Any class that extends RpcTarget has its objects replaced by a stub. Calling a method on this stub, in turn, makes an RPC back to the original object.
This simpler approach is far less invasive because it’s confined to the Workflows environment, which also ensures any future feature changes are safely isolated.
Introspecting Workflows with unknown IDs
When creating Workflows instances (either by create() or createBatch()) developers can provide a specific ID or have it automatically generated for them. This ID identifies the Workflow instance and is then used to create the associated Engine DO ID.
The logical starting point for implementation was introspectWorkflowInstance(binding, instanceID), as the instance ID is known in advance. This allows us to generate the Engine DO ID required to identify the engine associated with that Workflow instance.
But often, one part of your application (like an HTTP endpoint) will create a Workflow instance with a randomly generated ID. How can we introspect an instance when we don’t know its ID until after it’s created?
The answer was to use a powerful feature of JavaScript: Proxy objects.
When you use introspectWorkflow(binding), we wrap the Workflow binding in a Proxy. This proxy non-destructively intercepts all calls to the binding, specifically looking for .create() and .createBatch(). When your test triggers a workflow creation, the proxy inspects the call. It captures the instance ID — either one you provided or the random one generated — and immediately sets up the introspection on that ID, applying all the modifications you defined in the modifyAll call. The original creation call then proceeds as normal.
env[workflow] = new Proxy(env[workflow], {
  get(target, prop) {
    if (prop === "create") {
      return new Proxy(target.create, {
        async apply(_fn, _this, [opts = {}]) {

          // 1. Ensure an ID exists
          const optsWithId = "id" in opts ? opts : { id: crypto.randomUUID(), ...opts };

          // 2. Apply test modifications before creation
          await introspectAndModifyInstance(optsWithId.id);

          // 3. Call the original 'create' method
          return target.create(optsWithId);
        },
      });
    }

    // Same logic for createBatch()
  }
}
When the await using block from introspectWorkflow() finishes, or the dispose() method is called at the end of the test, the introspector is disposed of, and the proxy is removed, leaving the binding in its original state. It’s a low-impact approach that prioritizes developer experience and long-term maintainability.
Get started with testing Workflows
Ready to add tests to your Workflows? Here’s how to get started:
Update your dependencies: Make sure you are using @cloudflare/vitest-pool-workers version 0.9.0 or newer. Run the following command in your project: npm install @cloudflare/vitest-pool-workers@latest
Start writing tests: Import introspectWorkflowInstance or introspectWorkflow from cloudflare:test in your test files and use the patterns shown in this post to mock, control, and assert on your Workflow’s behavior. Also check out the official API reference.
In early September 2025, attackers used a phishing email to compromise one or more trusted maintainer accounts on npm. They used this to publish malicious releases of 18 widely used npm packages (for example chalk, debug, ansi-styles) that account for more than 2 billion downloads per week. Websites and applications that used these compromised packages were vulnerable to hackers stealing crypto assets (“crypto stealing” or “wallet draining”) from end users. In addition, compromised packages could also modify other packages owned by the same maintainers (using stolen npm tokens) and included code to steal developer tokens for CI/CD pipelines and cloud accounts.
As it relates to end users of your applications, the good news is that Cloudflare Page Shield, our client-side security offering will detect compromised JavaScript libraries and prevent crypto-stealing. More importantly, given the AI powering Cloudflare’s detection solutions, customers are protected from similar attacks in the future, as we explain below.
Excerpt from the injected malicious payload, along with the rest of the innocuous normal code.Among other things, the payload replaces legitimate crypto addresses with attacker’s addresses (for multiple currencies, including bitcoin, ethereum, solana).
Finding needles in a 3.5 billion script haystack
Everyday, Cloudflare Page Shield assesses 3.5 billion scripts per day or 40,000 scripts per second. Of these, less than 0.3% are malicious, based on our machine learning (ML)-based malicious script detection. As explained in a prior blog post, we preprocess JavaScript code into an Abstract Syntax Tree to train a message-passing graph convolutional network (MPGCN) that classifies a given JavaScript file as either malicious or benign.
The intuition behind using a graph-based model is to use both the structure (e.g. function calling, assertions) and code text to learn hacker patterns. For example, in the npm compromise, the malicious code injected in compromised packages uses code obfuscation and also modifies code entry points for crypto wallet interfaces, such as Ethereum’s window.ethereum, to swap payment destinations to accounts in the attacker’s control. Crucially, rather than engineering such behaviors as features, the model learns to distinguish between good and bad code purely from structure and syntax. As a result, it is resilient to techniques used not just in the npm compromise but also future compromise techniques.
Our ML model outputs the probability that a script is malicious which is then transformed into a score ranging from 1 to 99, with low scores indicating likely malicious and high scores indicating benign scripts. Importantly, like many Cloudflare ML models, inferencing happens in under 0.3 seconds.
Model Evaluation
Since the initial launch, our JavaScript classifiers are constantly being evolved to optimize model evaluation metrics, in this case, F1 measure. Our current metrics are
Metric
Latest: Version 2.7
Improvement over prior version
Precision
98%
5%
Recall
90%
233%
F1
94%
123%
Some of the improvements were accomplished through:
More training examples, curated from a combination of open source datasets, security partners, and labeling of Cloudflare traffic
Better training examples, for instance, by removing samples with pure comments in them or scripts with nearly equal structure
Better training set stratification, so that training, validation and test sets all have similar distribution of classes of interest
Tweaking the evaluation criteria to maximize recall with 99% precision
Given the confusion matrix, we should expect about 2 false positives per second, if we assume ~0.3% of the 40,000 scripts per second are flagged as malicious. We employ multiple LLMs alongside expert human security analysts to review such scripts around the clock. Most False Positives we encounter in this way are rather challenging. For example, scripts that read all form inputs except credit card numbers (e.g. reject input values that test true using the Luhn algorithm), injecting dynamic scripts, heavy user tracking, heavy deobfuscation, etc. User tracking scripts often exhibit a combination of these behaviors, and the only reliable way to distinguish truly malicious payloads is by assessing the trustworthiness of their connected domains. We feed all newly labeled scripts back into our ML training (& testing) pipeline.
Most importantly, we verified that Cloudflare Page Shield would have successfully detected all 18 compromised npm packages as malicious (a novel attack, thus, not in the training data)..
Planned improvements
Static script analysis has proven effective and is sometimes the only viable approach (e.g., for npm packages). To address more challenging cases, we are enhancing our ML signals with contextual data including script URLs, page hosts, and connected domains. Modern Agentic AI approaches can wrap JavaScript runtimes as tools in an overall AI workflow. Then, they can enable a hybrid approach that combines static and dynamic analysis techniques to tackle challenging false positive scenarios, such as user tracking scripts.
In the npm attack, we did not see any activity in the Cloudflare network related to this compromise among Page Shield users, though for other exploits, we catch its traffic within minutes. In this case, patches of the compromised npm packages were released in 2 hours or less, and given that the infected payloads had to be built into end user facing applications for end user impact, we suspect that our customers dodged the proverbial bullet. That said, had traffic gotten through, Page Shield was already equipped to detect and block this threat.
Also make sure to consult our Page Shield Script detection to find malicious packages. Consult the Connections tab within Page Shield to view suspicious connections made by your applications.
Several scripts are marked as malicious.
Several connections are marked as malicious.
And be sure to complete the following steps:
Audit your dependency tree for recently published versions (check package-lock.json / npm ls) and look for versions published around early–mid September 2025 of widely used packages.
Rotate any credentials that may have been exposed to your build environment.
Revoke and reissue CI/CD tokens and service keys that might have been used in build pipelines (GitHub Actions, npm tokens, cloud credentials).
Pin dependencies to known-good versions (or use lockfiles), and consider using a package allowlist / verified publisher features from your registry provider.
Scan build logs and repos for suspicious commits/GitHub Actions changes and remove any unknown webhooks or workflows.
While vigilance is key, automated defenses provide a crucial layer of protection against fast-moving supply chain attacks. Interested in better understanding your client-side supply chain? Sign up for our free, custom Client-Side Risk Assessment.
The era of agentic commerce is coming, and it brings with it significant new challenges for security. That’s why Cloudflare is partnering with Visa and Mastercard to help secure automated commerce as AI agents search, compare, and purchase on behalf of consumers.
Through our collaboration, Visa developed the Trusted Agent Protocol and Mastercard developed Agent Pay to help merchants distinguish legitimate, approved agents from malicious bots. Both Trusted Agent Protocol and Agent Pay leverage Web Bot Auth as the agent authentication layer to allow networks like Cloudflare to verify traffic from AI shopping agents that register with a payment network.
The challenges with agentic commerce
Agentic commerce is commerce driven by AI agents. As AI agents execute more transactions, merchants need to protect themselves and maintain trust with their customers. Merchants are beginning to see the promise of agentic commerce but face significant challenges:
How can they distinguish a helpful, approved AI shopping agent from a malicious bot or web crawler?
Is the agent representing a known, repeat customer or someone entirely new?
Are there particular instructions the consumer gave to their agent that the merchant should respect?
We are working with Visa and Mastercard, two of the most trusted consumer brands in payments, to address each of these challenges.
Web Bot Auth is the foundation to securing agentic commerce
In May, we shared a new proposal called Web Bot Auth to cryptographically authenticate agent traffic. Historically, agent traffic has been classified using the user agent and IP address. However, these fields can be spoofed, leading to inaccurate classifications and bot mitigations can be applied inaccurately. Web Bot Auth allows an agent to provide a stable identifier by using HTTP Message Signatures with public key cryptography.
As we spent time collaborating with the teams at Visa and Mastercard, we found that we could leverage Web Bot Auth as the foundation to ensure that each commerce agent request was verifiable, time-based, and non-replayable.
Visa’s Trusted Agent Protocol and Mastercard’s Agent Pay present three key solutions for merchants to manage agentic commerce transactions. First, merchants can identify a registered agent and distinguish whether a particular interaction is intended to browse or to pay. Last, merchants can indicate to agents how a payment is expected, whether that is through a network token, browser-use guest checkout, or a micropayment.
This allows merchants that integrate with these protocols to instantly recognize a trusted agent during two key interactions: the initial browsing phase to determine product details and final costs, and the final payment interaction to complete a purchase. Ultimately, this provides merchants with the tools to verify these signatures, identify trusted interactions, and securely manage how these agents can interact with their site.
How it works: leveraging HTTP message signatures
To make this work, an ecosystem of participants need to be on the same page. It all starts with agentdevelopers, who build the agents to shop on behalf of consumers. These agents then interact with merchants, who need a reliable way to assess the request is made on behalf of consumers. Merchants rely on networks like Cloudflare to verify the agent’s cryptographic signatures and ensure the interaction is legitimate. Finally, there are payment networks like Visa and Mastercard, who can link cardholder identity to agentic commerce transactions, helping ensure that transactions are verifiable and accountable.
When developing their protocols, Visa and Mastercard needed a secure way to authenticate each agent developer and securely transmit information from the agent to the merchant’s website. That’s where we came in and worked with their teams to build upon Web Bot Auth. Web Bot Auth proposals specify how developers of bots and agents can attach their cryptographic signatures in HTTP requests by using HTTP Message Signatures.
Both Visa and Mastercard protocols require agents to register and have their public keys (referenced as the keyid in the Signature-Input header) in a well-known directory, allowing merchants and networks to fetch the keys to validate these HTTP message signatures. To start, Visa and Mastercard will be hosting their own directories for Visa-registered and Mastercard-registered agents, respectively
The newly created agents then communicate their registration, identity, and payment details with the merchant using these HTTP Message Signatures. Both protocols build on Web Bot Auth by introducing a new tag that agents must supply in the Signature-Input header, which indicates whether the agent is browsing or purchasing. Merchants can use the tag to determine whether to interact with the agent. Agents must also include the nonce field, a unique sequence included in the signature, to provide protection against replay attacks.
An agent visiting a merchant’s website to browse a catalog would include an HTTP Message Signature in their request to verify their agent is authorized to browse the merchant’s storefront on behalf of a specific Visa cardholder:
Trusted Agent Protocol and Agent Pay are designed for merchants to benefit from its validation mechanisms without changing their infrastructure. Instead, merchants can set the rules for agent interactions on their site and rely upon Cloudflare as the validator. For these requests, Cloudflare will run the following checks:
Confirm the presence of the Signature-Input and Signature headers.
Pull the keyid from the Signature-Input. If Cloudflare has not previously retrieved and cached the key, fetch it from the public key directory.
Confirm the current time falls between the created and expires timestamps.
Check nonce uniqueness in the cache. By checking if a nonce has been recently used, Cloudflare can reject reused or expired signatures, ensuring the request is not a malicious copy of a prior, legitimate interaction.
Check the validity of the tag, as defined by the protocol. If the agent is browsing, the tag should be agent-browser-auth. If the agent is paying, the tag should be agent-payer-auth.
We recently introduced support for x402 transactions into Cloudflare’s Agent SDK, allowing anyone building an agent to easily transact using the new x402 protocol. We will similarly be working with Visa and Mastercard over the coming months to bring support for their protocols directly to the Agents SDK. This will allow developers to manage their registered agent’s private keys and to easily create the correct HTTP message signatures to authorize their agent to browse and transact on a merchant website.
Conceptually, the requests in a Cloudflare Worker would look something like this:
/**
 * Pseudocode example of a Cloudflare Worker acting as a trusted agent.
 * This version explicitly illustrates the signing logic to show the core flow.
 */


// Helper function to encapsulate the signing protocol logic.
async function createSignatureHeaders(targetUrl, credentials) {
    // Internally, this function would perform the detailed cryptographic steps:
    // 1. Generate timestamps and a unique nonce.
    // 2. Construct the 'Signature-Input' header string with all required parameters.
    // 3. Build the canonical 'Signature Base' string according to the spec.
    // 4. Use the private key to sign the base string.
    // 5. Return the fully formed 'Signature-Input' and 'Signature' headers.

    const signedHeaders = new Headers();

    signedHeaders.set('Signature-Input', 'sig2=(...); keyid="..."; ...');
    signedHeaders.set('Signature', 'sig2=:...');
    return signedHeaders;
}


export default {
    async fetch(request, env) {
        // 1. Load the final API endpoint and private signing credentials.
        const targetUrl = new URL(request.url).searchParams.get('target');
        const credentials = {
            privateKey: env.PAYMENT_NETWORK_PRIVATE_KEY,
            keyId: env.PAYMENT_NETWORK_KEY_ID
        };


        // 2. Generate the required signature headers using the helper.
        const signatureHeaders = await createSignatureHeaders(targetUrl, credentials);


        // 3. Attach the newly created signature headers to the request for authentication.
        const signedRequestHeaders = new Headers(request.headers);
        signedRequestHeaders.set('Host', new URL(targetUrl).hostname);
        signedRequestHeaders.set('Signature-Input', signatureHeaders.get('Signature-Input'));
        signedRequestHeaders.set('Signature', signatureHeaders.get('Signature'));


       // 4. Forward the fully signed request to the protected API.
        return fetch(targetUrl, { headers: signedRequestHeaders });
    },
};
We’ll also be creating new managed rulesets for our customers that make it easy to allow agents that are using the Trusted Agent Protocol or Agent Pay. You might want to disallow most automated traffic to your storefront but not miss out on revenue opportunities from agents authorized to make a purchase on behalf of a cardholder. A managed rule would make this straightforward to implement. As the website owner, you could enable a managed rule that automatically allows all trusted agents registered with Visa or Mastercard to come to your site, passing your other bot protection & WAF rules.
These will continue to evolve, and we will incorporate feedback to ensure that agent registration and validation works seamlessly across all networks and aligns with the Web Bot Auth proposal. American Express will also be leveraging Web Bot Auth as the foundation to their agentic commerce offering.
On October 4, independent developer Theo Browne published a series of benchmarks designed to compare server-side JavaScript execution speed between Cloudflare Workers and Vercel, a competing compute platform built on AWS Lambda. The initial results showed Cloudflare Workers performing worse than Node.js on Vercel at a variety of CPU-intensive tasks, by a factor of as much as 3.5x.
We were surprised by the results. The benchmarks were designed to compare JavaScript execution speed in a CPU-intensive workload that never waits on external services. But, Cloudflare Workers and Node.js both use the same underlying JavaScript engine: V8, the open source engine from Google Chrome. Hence, one would expect the benchmarks to be executing essentially identical code in each environment. Physical CPUs can vary in performance, but modern server CPUs do not vary by anywhere near 3.5x.
On investigation, we discovered a wide range of small problems that contributed to the disparity, ranging from some bad tuning in our infrastructure, to differences between the JavaScript libraries used on each platform, to some issues with the test itself. We spent the week working on many of these problems, which means over the past week Workers got better and faster for all of our customers. We even fixed some problems that affect other compute providers but not us, such as an issue that made trigonometry functions much slower on Vercel. This post will dig into all the gory details.
It’s important to note that the original benchmark was not representative of billable CPU usage on Cloudflare, nor did the issues involved impact most typical workloads. Most of the disparity was an artifact of the specific benchmark methodology. Read on to understand why.
With our fixes, the results now look much more like we’d expect:
There is still work to do, but we’re happy to say that after these changes, Cloudflare now performs on par with Vercel in every benchmark case except the one based on Next.js. On that benchmark, the gap has closed considerably, and we expect to be able to eliminate it with further improvements detailed later in this post.
We are grateful to Theo for highlighting areas where we could make improvements, which will now benefit all our customers, and even many who aren’t our customers.
Our benchmark methodology
We wanted to run Theo’s test with no major design changes, in order to keep numbers comparable. Benchmark cases are nearly identical to Theo’s original test but we made a couple changes in how we ran the test, in the hopes of making the results more accurate:
Theo ran the test client on a laptop connected by a Webpass internet connection in San Francisco, against Vercel instances running in its sfo1 region. In order to make our results easier to reproduce, we chose instead to run our test client directly in AWS’s us-east-1 datacenter, invoking Vercel instances running in its iad1 region (which we understand to be in the same building). We felt this would minimize any impact from network latency. Because of this, Vercel’s numbers are slightly better in our results than they were in Theo’s.
We chose to use Vercel instances with 1 vCPU instead of 2. All of the benchmarks are single-threaded workloads, meaning they cannot take advantage of a second CPU anyway. Vercel’s CTO, Malte Ubl, had stated publicly on X that using single-CPU instances would make no difference in this test, and indeed, we found this to be correct. Using 1 vCPU makes it easier to reason about pricing, since both Vercel and Cloudflare charge for CPU time ($0.128/hr for Vercel in iad1, and $0.072/hr for Cloudflare globally).
Theo’s benchmarks covered a variety of frameworks, making it clear that no single JavaScript library could be at fault for the general problem. Clearly, we needed to look first at the Workers Runtime itself. And so we did, and we found two problems – not bugs, but tuning and heuristic choices which interacted poorly with the benchmarks as written.
Sharding and warm isolate routing: A problem of scheduling, not CPU speed
Over the last year we shipped smarter routing that sends traffic to warm isolates more often. That cuts cold starts for large apps, which matters for frameworks with heavy initialization requirements like Next.js. The original policy optimized for latency and throughput across billions of requests, but was less optimal for heavily CPU-bound workloads for the same reason that such workloads cause performance issues in other platforms like Node.js: When the CPU is busy computing an expensive operation for one request, other requests sent to the same isolate must wait for it to finish before they can proceed.
The system uses heuristics to detect when requests are getting blocked behind each other, and automatically spin up more isolates to compensate. However, these heuristics are not precise, and the particular workload generated by Theo’s tests – in which a burst of expensive traffic would come from a single client – played poorly with our existing algorithm. As a result, the benchmarks showed much higher latency (and variability in latency) than would normally be expected.
It’s important to understand that, as a result of this problem, the benchmark was not really measuring CPU time. Pricing on the Workers platform is based on CPU time – that is, time spent actually executing JavaScript code, as opposed to time waiting for things. Time spent waiting for the isolate to become available makes the request take longer, but is not billed as CPU time against the waiting request. So, this problem would not have affected your bill.
After analyzing the benchmarks, we updated the algorithm to detect sustained CPU-heavy work earlier, then bias traffic so that new isolates spin up faster. The result is that Workers can more effectively and efficiently autoscale when different workloads are applied. I/O-bound workloads coalesce into individual already warm isolates while CPU-bound are directed so that they do not block each other. This change has already been rolled out globally and is enabled automatically for everyone. It should be pretty clear from the graph when the change was rolled out:
V8 garbage collector tuning
While this scheduling issue accounted for the majority of the disparity in the benchmark, we did find a minor issue affecting code execution performance during our testing.
The range of issues that we uncovered in the framework code in these benchmarks repeatedly pointed at garbage collection and memory management issues as being key contributors to the results. But, we would expect these to be an issue with the same frameworks running in Node.js as well. To see exactly what was going on differently with Workers and why it was causing such a significant degradation in performance, we had to look inwards at our own memory management configuration.
The V8 garbage collector has a huge number of knobs that can be tuned that directly impact performance. One of these is the size of the “young generation”. This is where newly created objects go initially. It’s a memory area that’s less compact, but optimized for short-lived objects. When objects have bounced around the “young space” for a few generations they get moved to the old space, which is more compact, but requires more CPU to reclaim.
V8 allows the embedding runtime to tune the size of the young generation. And it turns out, we had done so. Way back in June of 2017, just two months after the Workers project kicked off, we – or specifically, I, Kenton, as I was the only engineer on the project at the time – had configured this value according to V8’s recommendations at the time for environments with 512MB of memory or less. Since Workers defaults to a limit of 128MB per isolate, this seemed appropriate.
V8’s entire garbage collector has changed dramatically since 2017. When analyzing the benchmarks, it became apparent that the setting which made sense in 2017 no longer made sense in 2025, and we were now limiting V8’s young space too rigidly. Our configuration was causing V8’s garbage collection to work harder and more frequently than it otherwise needed to. As a result, we have backed off on the manual tuning and now allow V8 to pick its young space size more freely, based on its internal heuristics. This is already live on Cloudflare Workers, and it has given an approximately 25% boost to the benchmarks with only a small increase in memory usage. Of course, the benchmarks are not the only Workers that benefit: all Workers should now be faster. That said, for most Workers the difference has been much smaller.
Tuning OpenNext for performance
The platform changes solved most of the problem. Following the changes, our testing showed we were now even on all of the benchmarks save one: Next.js.
Next.js is a popular web application framework which, historically, has not had built-in support for hosting on a wide range of platforms. Recently, a project called OpenNext has arisen to fill the gap, making Next.js work well on many platforms, including Cloudflare. On investigation, we found several missing optimizations and other opportunities to improve performance, explaining much of why the benchmark performed poorly on Workers.
Unnecessary allocations and copies
When profiling the benchmark code, we noticed that garbage collection was dominating the timeline. From 10-25% of the request processing time was being spent reclaiming memory.
So we dug in and discovered that OpenNext, and in some cases Next.js and React itself, will often create unnecessary copies of internal data buffers at some of the worst times during the handling of the process. For instance, there’s one pipeThrough() operation in the rendering pipeline that we saw creating no less than 50 2048-byte Buffer instances, whether they are actually used or not.
We further discovered that on every request, the Cloudflare OpenNext adapter has been needlessly copying every chunk of streamed output data as it’s passed out of the renderer and into the Workers runtime to return to users. Given this benchmark returns a 5 MB result on every request, that’s a lot of data being copied!
In other places, we found that arrays of internal Buffer instances were being copied and concatenated using Buffer.concat for no other reason than to get the total number of bytes in the collection. That is, we spotted code of the form getBody().length. The function getBody() would concatenate a large number of buffers into a single buffer and return it, without storing the buffer anywhere. So, all that work was being done just to read the overall length. Obviously this was not intended, and fixing it was an easy win.
We’ve started opening a series of pull requests in OpenNext to fix these issues, and others in hot paths, removing some unnecessary allocations and copies:
We’re not done. We intend to keep iterating through OpenNext code, making improvements wherever they’re needed – not only in the parts that run on Workers. Many of these improvements apply to other OpenNext platforms. The shared goal of OpenNext is to make NextJS as fast as possible regardless of where you choose to run your code.
Inefficient Streams Adapters
Much of the Next.js code was written to use Node.js’s APIs for byte streams. Workers, however, prefers the web-standard Streams API, and uses it to represent HTTP request and response bodies. This necessitates using adapters to convert between the two APIs. When investigating the performance bottlenecks, we found a number of examples where inefficient streams adapters are being needlessly applied. For example:
res.getBody() was performing a Buffer.concat(chunks) to copy accumulated chunks of data into a new Buffer, which was then passed as an iterable into a Node.js stream.Readable that was then wrapped by an adapter that returns a ReadableStream. While these utilities do serve a useful purpose, this becomes a data buffering nightmare since both Node.js streams and Web streams each apply their own internal buffers! Instead we can simply do:
const stream = ReadableStream.from(chunks);
This returns a ReadableStream directly from the accumulated chunks without additional copies, extraneous buffering, or passing everything through inefficient adaptation layers.
In other places we see that Next.js and React make extensive use of ReadableStream to pass bytes through, but the streams being created are value-oriented rather than byte-oriented! For example,
const readable = new ReadableStream({
  pull(controller) {
    controller.enqueue(chunks.shift());
    if (chunks.length === 0) {
      controller.close();
    }
});  // Default highWaterMark is 1!
Seems perfectly reasonable. However, there’s an issue here. If the chunks are Buffer or Uint8Array instances, every instance ends up being a separate read by default. So if the chunk is only a single byte, or 1000 bytes, that’s still always two reads. By converting this to a byte stream with a reasonable high water mark, we can make it possible to read this stream much more efficiently:
Now, the stream can be read as a stream of bytes rather than a stream of distinct JavaScript values, and the individual chunks can be coalesced internally into 4096 byte chunks, making it possible to optimize the reads much more efficiently. Rather than reading each individual enqueued chunk one at a time, the ReadableStream will proactively call pull() repeatedly until the highWaterMark is reached. Reads then do not have to ask the stream for one chunk of data at a time.
While it would be best for the rendering pipeline to be using byte streams and paying attention to back pressure signals more, our implementation can still be tuned to better handle cases like this.
The bottom line? We’ve got some work to do! There are a number of improvements to make in the implementation of OpenNext and the adapters that allow it to work on Cloudflare that we will continue to investigate and iterate on. We’ve made a handful of these fixes already and we’re already seeing improvements. Soon we also plan to start submitting patches to Next.js and React to make further improvements upstream that will ideally benefit the entire ecosystem.
JSON parsing
Aside from buffer allocations and streams, one additional item stood out like a sore thumb in the profiles: JSON.parse() with a reviver function. This is used in both React and Next.js and in our profiling this was significantly slower than it should be. We built a microbenchmark and found that JSON.parse with a reviver argument recently got even slower when the standard added a third argument to the reviver callback to provide access to the JSON source context.
For those unfamiliar with the reviver function, it allows an application to effectively customize how JSON is parsed. But it has drawbacks. The function gets called on every key-value pair included in the JSON structure, including every individual element of an Array that gets serialized. In Theo’s NextJS benchmark, in any single request, it ends up being called well over 100,000 times!
Even though this problem affects all platforms, not just ours, we decided that we weren’t just going to accept it. After all, we have contributors to V8 on the Workers runtime team! We’ve upstreamed a V8 patch that can speed up JSON.parse() with revivers by roughly 33 percent. That should be in V8 starting with version 14.3 (Chrome 143) and can help everyone using V8, not just Cloudflare: Node.js, Chrome, Deno, the entire ecosystem. If you are not using Cloudflare Workers or didn’t change the syntax of your reviver you are currently suffering under the red performance bar.
We will continue to work with framework authors to reduce overhead in hot paths. Some changes belong in the frameworks, some belong in the engine, some in our platform.
Node.js’s trigonometry problem
We are engineers, and we like to solve engineering problems — whether our own, or for the broader community.
Theo’s benchmarks were actually posted in response to a different benchmark by another author which compared Cloudflare Workers against Vercel. The original benchmark focused on calling trigonometry functions (e.g. sine and cosine) in a tight loop. In this benchmark, Cloudflare Workers performed 3x faster than Node.js running on Vercel.
The author of the original benchmark offered this as evidence that Cloudflare Workers are just faster. Theo disagreed, and so did we. We expect to be faster, but not by 3x! We don’t implement math functions ourselves; these come with V8. We weren’t happy to just accept the win, so we dug in.
It turns out that Node.js is not using the latest, fastest path for these functions. Node.js can be built with either the clang or gcc compilers, and is written to support a broader range of operating systems and architectures than Workers. This means that Node.js’ compilation often ends up using a lowest-common denominator for some things in order to provide support for the broadest range of platforms. V8 includes a compile-time flag that, in some configurations, allows it to use a faster implementation of the trig functions. In Workers, mostly by coincidence, that flag is enabled by default. In Node.js, it is not. We’ve opened a pull request to enable the flag in Node.js so that everyone benefits, at least on platforms where it can be supported.
Assuming that lands, and once AWS Lambda and Vercel are able to pick it up, we expect this specific gap to go away, making these operations faster for everyone. This change won’t benefit our customers, since Cloudflare Workers already uses the faster trig functions, but a bug is a bug and we like making everything faster.
Benchmarks are hard
Even the best benchmarks have bias and tradeoffs. It’s difficult to create a benchmark that is truly representative of real-world performance, and all too easy to misinterpret the results of benchmarks that are not. We particularly liked Planetscale’s take on this subject.
These specific CPU-bound tests are not an ideal choice to represent web applications. Theo even notes this in his video. Most real-world applications on Workers and Vercel are bound by databases, downstream services, network, and page size. End user experience is what matters. CPU is one piece of that picture. That said, if a benchmark shows us slower, we take it seriously.
While the benchmarks helped us find and fix many real problems, we also found a few problems with the benchmarks themselves, which contributed to the apparent disparity in speed:
Running locally
The benchmark is designed to be run on your laptop, from which it hits Cloudflare’s and Vercel’s servers over the Internet. It makes the assumption that latency observed from the client is a close enough approximation of server-side CPU time. The reasons are fair: As Theo notes, Cloudflare does not permit an application to measure its own CPU time, in order to prevent timing side channel attacks. Actual CPU time can be seen in logs after the fact, but gathering those may be a lot of work. It’s just easier to measure time from the client.
However, as Cloudflare and Vercel are hosted from different data centers, the network latency to each can be a factor in the benchmark, and this can skew the results. Typically, this effect will favor Cloudflare, because Cloudflare can run your Worker in locations spread across 330+ cities worldwide, and will tend to choose the closest one to you. Vercel, on the other hand, usually places compute in a central location, so latency will vary depending on your distance from that location.
For our own testing, to minimize this effect, we ran the benchmark client from a VM on AWS located in the same data center as our Vercel instances. Since Cloudflare is well-connected to every AWS location, we think this should have eliminated network latency from the picture. We chose AWS’s us-east-1 / Vercel’s iad1 for our test as it is widely seen as the default choice; any other choice could draw questions about cherry-picking.
Not all CPUs are equal
Cloudflare’s servers aren’t all identical. Although we refresh them aggressively, there will always be multiple generations of hardware in production at any particular time. Currently, this includes generations 10, 11, and 12 of our server hardware.
Other cloud providers are no different. No cloud provider simply throws away all their old servers every time a new version becomes available.
Of course, newer CPUs run faster, even for single-threaded workloads. The differences are not as large as they used to be 20-30 years ago, but they are not nothing. As such, an application may get (a little bit) lucky or unlucky depending on what machine it is assigned to.
In cloud environments, even identical CPUs can yield different performance depending on circumstances, due to multitenancy. The server your application is assigned to is running many others as well. In AWS Lambda, a server may be running hundreds of applications; in Cloudflare, with our ultra-efficient runtime, a server may be running thousands. These “noisy neighbors” won’t share the same CPU core as your app, but they may share other resources, such as memory bandwidth. As a result, performance can vary.
It’s important to note that these problems create correlated noise. That is, if you run the test again, the application is likely to remain assigned to the same machines as before – this is true of both Cloudflare and Vercel. So, this noise cannot be corrected by simply running more iterations. To correct for this type of noise on Cloudflare, one would need to initiate requests from a variety of geographic locations, in order to hit different Cloudflare data centers and therefore different machines. But, that is admittedly a lot of work. (We are not familiar with how best to get an application to switch machines on Vercel.)
A Next.js config bug
The Cloudflare version of the NextJS benchmark was not configured to use force-dynamic while the Vercel version was. This triggered curious behavior. Our understanding is that pages which are not “dynamic” should normally be rendered statically at build time. With OpenNext, however, it appears the pages are still rendered dynamically, but if multiple requests for the same page are received at the same time, OpenNext will only invoke the rendering once. Before we made the changes to fix our scheduling algorithm to avoid sending too many requests to the same isolate, this behavior may have somewhat counteracted that problem. Theo reports that he had disabled force-dynamic in the Cloudflare version specifically for this reason: with it on, our results were so bad as to appear outright broken, so he intentionally turned it off.
Ironically, though, once we fixed the scheduling issue, using “static” rendering (i.e. not enabling force-dynamic) hurt Cloudflare’s performance for other reasons. It seems that when OpenNext renders a “cacheable” page, streaming of the response body is inhibited. This interacted poorly with a property of the benchmark client: it measured time-to-first-byte (TTFB), rather than total request/response time. When running in dynamic mode – as the test did on Vercel – the first byte would be returned to the client before the full page had been rendered. The rest of the rendering would happen as bytes streamed out. But with OpenNext in non-dynamic mode, the entire payload was rendered into a giant buffer upfront, before any bytes were returned to the client.
Due to the TTFB behavior of the benchmark client, in dynamic mode, the benchmark actually does not measure the time needed to fully render the page. We became suspicious when we noticed that Vercel’s observability tools indicated more CPU time had been spent than the benchmark itself had reported.
One option would have been to change the benchmarks to use TTLB instead – that is, wait until the last byte is received before stopping the timer. However, this would make the benchmark even more affected by network differences: The responses are quite large, ranging from 2MB to 15MB, and so the results could vary depending on the bandwidth to the provider. Indeed, this would tend to favor Cloudflare, but as the point of the test is to measure CPU speed, not bandwidth, it would be an unfair advantage.
Once we changed the Cloudflare version of the test to use force-dynamic as well, matching the Vercel version, the streaming behavior then matched, making the request fair. This means that neither version is actually measuring the cost of rendering the full page to HTML, but at least they are now measuring the same thing.
As a side note, the original behavior allowed us to spot that OpenNext has a couple of performance bottlenecks in its implementation of the composable cache it uses to deduplicate rendering requests. While fixes to these aren’t going to impact the numbers for this particular set of benchmarks, we’re working on improving those pieces also.
A React SSR config bug
The React SSR benchmark contained a more basic configuration error. React inspects the environment variable NODE_ENV to decide whether the environment is “production” or a development environment. Many Node.js-based environments, including Vercel, set this variable automatically in production. Many frameworks, such as OpenNext, automatically set this variable for Workers in production as well. However, the React SSR benchmark was written against lower-level React APIs, not using any framework. In this case, the NODE_ENV variable wasn’t being set at all.
And, unfortunately, when NODE_ENV is not set, React defaults to “dev mode”, a mode that contains extra debugging checks and is therefore much slower than production mode. As a result, the numbers for Workers were much worse than they should have been.
Arguably, it may make sense for Workers to set this variable automatically for all deployed workers, particularly when Node.js compatibility is enabled. We are looking into doing this in the future, but for now we’ve updated the test to set it directly.
What we’re going to do next
Our improvements to the Workers Runtime are already live for all workers, so you do not need to change anything. Many apps will already see faster, steadier tail latency on compute heavy routes with less jitter during bursts. In places where garbage collection improved, some workloads will also use fewer billed CPU seconds.
We also sent Theo a pull request to update OpenNext with our improvements there, and with other test fixes.
But we’re far from done. We still have work to do to close the gap between OpenNext and Next.js on Vercel – but given the other benchmark results, it’s clear we can get there. We also have plans for further improvements to our scheduling algorithm, so that requests almost never block each other. We will continue to improve V8, and even Node.js – the Workers team employs multiple core contributors to each project. Our approach is simple: improve open source infrastructure so that everyone gets faster, then make sure our platform makes the most of those improvements.
And, obviously, we’ll be writing more benchmarks, to make sure we’re catching these kinds of issues ourselves in the future. If you have a benchmark that shows Workers being slower, send it to us with a repro. We will profile it, fix what we can upstream, and share back what we learn!
Cloudflare launched fifteen years ago with a mission to help build a better Internet. Over that time the Internet has changed and so has what it needs from teams like ours. In this year’s Founder’s Letter, Matthew and Michelle discussed the role we have played in the evolution of the Internet, from helping encryption grow from 10% to 95% of Internet traffic to more recent challenges like how people consume content.
This year’s themes focused on helping prepare the Internet for a new model of monetization that encourages great content to be published, fostering more opportunities to build community both inside and outside of Cloudflare, and evergreen missions like making more features available to everyone and constantly improving the speed and security of what we offer.
We shipped a lot of new things this year. In case you missed the dozens of blog posts, here is a breakdown of everything we announced during Birthday Week 2025.
To support a diverse and open Internet, we are now sponsoring Ladybird (an independent browser) and Omarchy (an open-source Linux distribution and developer environment).
We are opening our office doors in four major cities (San Francisco, Austin, London, and Lisbon) as free hubs for startups to collaborate and connect with the builder community.
We are removing cost as a barrier for the next generation by giving students with .edu emails 12 months of free access to our paid developer platform features.
We are partnering with Coinbase to create the x402 Foundation, encouraging the adoption of the x402 protocol to allow clients and services to exchange value on the web using a common language
Our Automatic SSL/TLS system has upgraded over 6 million domains to more secure encryption modes by default and will soon automatically enable post-quantum connections.
We made our CSAM Scanning Tool easier to adopt by removing the need to create and provide unique credentials, helping more site owners protect their platforms.
Updates across Workers and beyond for a more powerful developer platform – such as support for larger and more concurrent Container images, support for external models from OpenAI and Anthropic in AI Search (previously AutoRAG), and more.
A deep-dive into how we’ve hardened the Workers runtime with new defense-in-depth security measures, including V8 sandboxes and hardware-assisted memory protection keys.
We announced the Cloudflare Email Service private beta, allowing developers to reliably send and receive transactional emails directly from Cloudflare Workers.
The TCP Connection Time (Trimean) graph shows that we are the fastest TCP connection time in 40% of measured ISPs – and the fastest across the top networks.
We are using our network’s vast performance data to tune congestion control algorithms, improving speeds by an average of 10% for QUIC traffic.
Come build with us!
Helping build a better Internet has always been about more than just technology. Like the announcements about interns or working together in our offices, the community of people behind helping build a better Internet matters to its future. This week, we rolled out our most ambitious set of initiatives ever to support the builders, founders, and students who are creating the future.
For founders and startups, we are thrilled to welcome Cohort #6 to the Workers Launchpad, our accelerator program that gives early-stage companies the resources they need to scale. But we’re not stopping there. We’re opening our doors, literally, by launching new physical hubs for startups in our San Francisco, Austin, London, and Lisbon offices. These spaces will provide access to mentorship, resources, and a community of fellow builders.
We’re also investing in the next generation of talent. We announced free access to the Cloudflare developer platform for all students, giving them the tools to learn and experiment without limits. To provide a path from the classroom to the industry, we also announced our goal to hire 1,111 interns in 2026 — our biggest commitment yet to fostering future tech leaders.
And because a better Internet is for everyone, we’re extending our support to non-profits and public-interest organizations, offering them free access to our production-grade developer tools, so they can focus on their missions.
Whether you’re a founder with a big idea, a student just getting started, or a team working for a cause you believe in, we want to help you succeed.
Until next year
Thank you to our customers, our community, and the millions of developers who trust us to help them build, secure, and accelerate the Internet. Your curiosity and feedback drive our innovation.
It’s been an incredible 15 years. And as always, we’re just getting started!
When you build on Cloudflare, we consider it our job to do the heavy lifting for you. That’s been true since we introduced Cloudflare Workers in 2017, when we first provided a runtime for you where you could just focus on building.
That commitment is still true today, and many of today’s announcements are focused on just that — removing friction where possible to free you up to build something great.
There are only so many blog posts we can write (and that you can read)! We have been busy on a much longer list of new improvements, and many of them we’ve been rolling out consistently over the course of the year. Today’s announcement breaks down all the new capabilities in detail, in one single post. The features being released today include:
Resize, clip and reformat video files on-demand with Media Transformations — now GA
Alongside that, we’re constantly adding new building blocks, to make sure you have all the tools you need to build what you set out to. Those launches (that also went out today, but require a bit more explanation) include:
Deploy your own AI vibe coding platform to Cloudflare with VibeSDK
AI Search (formerly AutoRAG) — now with More Models To Choose From
AutoRAG is now AI Search! The new name marks a new and bigger mission: to make world-class search infrastructure available to every developer and business. AI Search is no longer just about retrieval for LLM apps: it’s about giving you a fast, flexible index for your content that is ready to power any AI experience. With recent additions like NLWeb support, we are expanding beyond simple retrieval to provide a foundation for top quality search experiences that are open and built for the future of the web.
With AI Search you can now use models from different providers like OpenAI and Anthropic. Last month during AI Week we announced BYO Provider Keys for AI Gateway. That capability now extends to AI Search. By attaching your keys to the AI Gateway linked to your AI Search instance, you can use many more models for both embedding and inference.
Once configured, your AI Search instance will be able to reference models available through your AI Gateway when making a /ai-search request:
export default {
  async fetch(request, env) {

    // Query your AI Search instance with a natural language question to an OpenAI model
    const result = await env.AI.autorag("my-ai-search").aiSearch({
      query: "What's new for Cloudflare Birthday Week?",
      model: "openai/gpt-5"
    });

    // Return only the generated answer as plain text
    return new Response(result.response, {
      headers: { "Content-Type": "text/plain" },
    });
  },
};
In the coming weeks we will also roll out updates to align the APIs with the new name. The existing APIs will continue to be supported for the time being. Stay tuned to the AI Search Changelog and Discord for more updates!
Connect to production services and resources from local development with Remote Bindings — now GA
Remote bindings for local development are generally available, supported in Wrangler v4.37.0, the Cloudflare Vite plugin, and the @cloudflare/vitest-pool-workers package. Remote bindings are bindings that are configured to connect to a deployed resource on your Cloudflare account instead of the locally simulated resource.
For example, here’s how you can instruct Wrangler or Vite to send all requests to env.MY_BUCKET to hit the real, deployed R2 bucket instead of a locally simulated one:
With the above configuration, all requests to env.MY_BUCKET will be proxied to the remote resource, but the Worker code will still execute locally. This means you get all the benefits of local development like faster execution times – without having to seed local databases with data.
You can pair remote bindings with environments, so that you can use staging data during local development and leave production data untouched.
For example, here’s how you could point Wrangler or Vite to send all requests to env.MY_BUCKET to staging-storage-bucket when you run wrangler dev --env staging (CLOUDFLARE_ENV=staging vite dev if using Vite).
With these changes, Workers become even more powerful and easier to adopt, regardless of where you’re coming from. The APIs that you are familiar with are there, and more packages you need will just work.
Larger Container instances, more concurrent instances
Cloudflare Containers now has higher limits on concurrent instances and an upcoming new, larger instance type.
Previously you could run 50 instances of the dev instance type or 25 instances of the basic instance type concurrently. Now you can run concurrent containers with up to 400 GiB of memory, 100 vCPUs, and 2 TB of disk. This allows you to run up to 1000 dev instances or 400 basic instances concurrently. Enterprise customers can push far beyond these limits — contact us if you need more. If you are using Containers to power your app and it goes viral, you’ll have the ability to scale on Cloudflare.
Cloudflare Containers also now has a new instance type coming soon — standard-2 which includes 8 GiB of memory, 1 vCPU, and 12 GB of disk. This new instance type is an ideal default for workloads that need more resources, from AI Sandboxes to data processing jobs.
Workers Builds provides more disk and CPU — and is now GA
This year, we are excited to announce that Workers Builds is now Generally Available. Here’s what’s new:
Increased disk space for all plans: We’ve increased the disk size from 8 GB to 20 GB for both free and paid plans, giving you more space for your projects and dependencies
More compute for paid plans: We’ve doubled the CPU power for paid plans from 2 vCPU to 4 vCPU, making your builds significantly faster
Faster single-core and multi-core performance: To ensure consistent, high performance builds, we now run your builds on the fastest available CPUs at the time your build runs
A more consistent look and feel for the Cloudflare dashboard
Durable Objects, R2, and Workers now all have a more consistent look with the rest of our developer platform. As you explore these pages you’ll find that things should load faster, feel smoother and are easier to use.
Across storage products, you can now customize the table that lists the resources on your account, choose which data you want to see, sort by any column, and hide columns you don’t need. In the Workers and Pages dashboard, we’ve reduced clutter and have modernized the design to make it faster for you to get the data you need.
And when you create a new Pipeline or a Hyperdrive configuration, you’ll find a new interface that helps you get started and guides you through each step.
This work is ongoing, and we’re excited to continue improving with the help of your feedback, so keep it coming!
Resize, clip and reformat video files on-demand with Media Transformations — now GA
In March 2025 we announced Media Transformations in open beta, which brings the magic of Image transformations to short-form video files — including video files stored outside of Cloudflare. Since then, we have increased input and output limits, and added support for audio-only extraction. Media Transformations is now generally available.
Media Transformations is ideal if you have a large existing volume of short videos, such as generative AI output, e-commerce product videos, social media clips, or short marketing content. Content like this should be fetched from your existing storage like R2 or S3 directly, optimized by Cloudflare quickly, and delivered efficiently as small MP4 files or used to extract still images and audio.
https://example.com/cdn-cgi/media/<OPTIONS>/<SOURCE-VIDEO>
EXAMPLE, RESIZE:
EXAMPLE, STILL THUMBNAIL:
https://example.com/cdn-cgi/media/mode=frame,time=3s,width=120,height=120,fit=cover/https://pub-d9fcbc1abcd244c1821f38b99017347f.r2.dev/aus-mobile.mp4
Media Transformations includes a free tier available to all customers and is included with Media Platform subscriptions. Check out the transform videos documentation for all the latest, then enable transformations for your zone today!
Infrequent Access in R2 is now GA
R2 Infrequent Access is now generally available. Last year, we introduced the Infrequent Access storage class designed for data that doesn’t need to be accessed frequently. It’s a great fit for use cases including long-tail user content, logs, or data backups.
Since launch, Infrequent Access has been proven in production by our customers running these types of workloads at scale. The results confirmed our goal: a storage class that reduces storage costs while maintaining performance and durability.
Pricing is simple. You pay less on data storage, while data retrievals are billed per GB to reflect the additional compute required to serve data from underlying storage optimized for less frequent access. And as with all of R2, there are no egress fees, so you don’t pay for the bandwidth to move data out.
Here’s how you can upload an object to R2 infrequent access class via Workers:
export default {
  async fetch(request, env) {

    // Upload the incoming request body to R2 in Infrequent Access class
    await env.MY_BUCKET.put("my-object", request.body, {
      storageClass: "InfrequentAccess",
    });

    return new Response("Object uploaded to Infrequent Access!", {
      headers: { "Content-Type": "text/plain" },
    });
  },
};
You can also monitor your Infrequent Access vs. Standard storage usage directly in your R2 dashboard for each bucket. Get started with R2 today!
Playwright in Browser Rendering is now GA
We’re excited to announce three updates to Browser Rendering:
Our support for Playwright is now Generally Available, giving developers the stability and confidence to run critical browser tasks.
We’re introducing support for Stagehand, enabling developers to build AI agents using natural language, powered by Cloudflare Workers AI.
Finally, to help developers scale, we are tripling limits for paid plans, with more increases to come.
The browser is no longer only used by humans. AI agents need to be able to reliably navigate browsers in the same way a human would, whether that’s booking flights, filling in customer info, or scraping structured data. Playwright gives AI agents the ability to interact with web pages and perform complex tasks on behalf of humans. However, running browsers at scale is a significant infrastructure challenge. Cloudflare Browser Rendering solves this by providing headless browsers on-demand. By moving Playwright support to Generally Available, and now synced with the latest version v1.55, customers have a production-ready foundation to build reliable, scalable applications on.
To help AI agents better navigate the web, we’re introducing support for Stagehand, an open source browser automation framework. Rather than dictating exact steps or specifying selectors, Stagehand enables developers to build more reliably and flexibly by combining code with natural-language instructions powered by AI. This makes it possible for AI agents to navigate and adapt if a website changes – just like a human would.
To get started with Playwright and Stagehand, check our changelog with code examples and more.
Imagine you have an idea for an AI application that you’re really excited about — but the cost of GPU time and complex infrastructure stops you in your tracks before you even write a line of code. This is the problem founders everywhere face: balancing high infrastructure costs with the need to innovate and scale quickly.
Our startup programs remove those barriers, so founders can focus on what matters the most: building products, finding customers, and growing a business. Cloudflare for Startups launched in 2018 to provide enterprise-level application security and performance services to growing startups. As we built out our Developer Platform, we pivoted last year to offer founders up to $250,000 in cloud credits to build on our Developer Platform for up to one year.
During Birthday Week 2022, we announced our Cloudflare Workers Launchpad Program with an initial $1.25 billion in potential funding for startups building on Cloudflare Workers, made possible through partnerships with 26 leading venture capital (VC) firms. Within months, we expanded VC-backed funding to $2 billion.
Since 2022, we’ve welcomed 145 startups from 23 countries. These startups are solving problems across verticals such as AI and machine learning, developer tools, 3D design, cloud infrastructure, data tools, ad tech, media, logistics, finance, and other industries. We’re especially proud of the female founder representation in recent cohorts — with nearly a third of companies in Cohort #5 run by a female founder.
Participants engaged in bootcamp sessions with Cloudflare leadership and product teams, covering key topics like product pricing and scaling sales. Startups received hands-on design support from our Solutions Architecture team, empowering these builders to build and scale their full-stack applications on the Cloudflare network. We facilitate countless introductions across the VC network, and are happy to see funding and M&A activity as these startups scale. Cloudflare also identified direct opportunities and acquired Nefeli Networks (Cohort #2) and Outerbase (Cohort #4).
Check out what Launchpad alumni have to say about their experience in the program:
Langbase (Cohort #3) Ship hyper-personalized AI apps to any LLM, any data, any developer in seconds
“For Langbase, the best part about Workers Launchpad was the incredible support from Cloudflare’s internal teams. It wasn’t just about access to infrastructure; it was the hands-on migration help, rapid feedback loops, and genuine partnership from engineers, product folks, and the broader Cloudflare community. That human support empowered us to iterate faster, solve hard problems, and truly feel like we were building something impactful together.
Langbase has quickly become one of the most powerful serverless AI clouds for building and deploying AI agents. We process 700 TB of agent memory and 1.2 billion AI agent runs a month. Langbase is an agent lab, and we’ve also launched a coding agent called Command.new, an “agent of agents” that can take your prompts and turn them into production-ready agents by provisioning infrastructure and writing the agent’s code in TypeScript.
My advice for anyone joining future Workers Launchpad cohorts is to use every resource offered. Engage deeply with the Cloudflare teams, ask for feedback early and often, and be open to sharing your challenges and wins, especially in the Discord community, which is super helpful. Cloudflare listens closely to participant feedback and genuinely wants to help startups succeed. Treat it as a two-way conversation and a collaborative growth opportunity. This mindset is what unlocks the real power of the program.”
-Ahmad Awais, Founder & CEO of Langbase
Sherpo.io (Cohort #4) AI-first no-code platform to build and sell digital content
“Since joining Cohort #4, we’ve exited closed beta and expanded our product suite for content creators. Today, more than 3,000 creators worldwide power their digital product stores with Sherpo, while we continue building and scaling.
We learned as much from fellow startups as from Cloudflare during office hours and sessions, and we got to meet incredible people along the way, including Cloudflare’s CSO, Stephanie Cohen.
For anyone joining, attend every session, listen closely, and ask questions—they’re incredibly valuable. Building on Workers has given us a real advantage, and the team’s pace of innovation only compounds it.”
Tightknit AI (Cohort #4) Embedded community engagement platform built for SaaS
“Beyond the cloud credits that Launchpad provided us to play with every Cloudflare product, the most important aspect of the program we found was our ability to access (and even contribute) to the product roadmap. We were able to connect with product managers and solutions architects that have helped us take our work to the next level.
We’ve recently passed half a million users on the platform and have started to close not just the top Saas businesses in the world, but the top AI companies in the world, including Clay, Gamma, Lindy, beehiiv, Amplitude, Mixpanel, and so many more. The best part is that 100% of application logic is still powered by Cloudflare!
The biggest piece of advice for anyone starting the cohort is attend office hours as much as you can. I can’t tell you how many times we were able to unblock ourselves or even provide real product feedback/bug reports. It was amazing to meet the rest of the cohort and solve problems together that ordinary Cloudflare developers just do not face. So my advice is don’t miss the office hours. They were by far the most valuable part of our experience.”
Render Better (Cohort #4) Increase e-commerce revenue by automatically optimizing your site speed
“My favorite part of the Launchpad was the community and the leaders who brought us together. The startup and product teams provided expert advice on both business and technical questions through meetings, 1-on-1s, and Discord. Many of them were former founders, so they understood what we were going through and helped us get what we needed. They were crucial in helping us get unstuck, whether we were using obscure Cloudflare features or needed connections to the right people.
I met a lot of great founders who are on the same journey and face the same struggles. Watching them grow was motivating and gave us a morale boost to keep up the fast pace a startup needs.
Since Launchpad, Render Better has scaled to 60 automated site speed optimizations, helping e-commerce sites convert 20% higher powered by Cloudflare Workers. Our growth accelerated after the program, and we’re now optimizing traffic for some of the biggest e-commerce brands like PSD, Polywood, and Self-Portrait. Render Better now processes 5 billion requests each month, made possible by Cloudflare’s global edge network and Workers platform.
Launchpad is truly just that: Cloudflare gives you the resources and attention to help you grow from an idea into something big. Build fast and take as much advantage of the fuel they give you to fly your startup rocket!”
-James Koshigoe, Founder & CEO of Render Better
Launchpad is growing into more than just a program. It is a community of builders and innovators showing what is possible with Cloudflare’s network behind them. With that foundation, we are excited to introduce the next group of entrepreneurs taking the stage in Cohort #6.
Introducing Cohort #6
Before introducing Cohort #6, we want to give one last shout out to Cohort #5. As Launchpad alumni, we cannot wait to see what you achieve. If you didn’t get a chance to check out Cohort #5’s demo day, watch the recording here.
With that, help us give a warm welcome to the participants of Workers Launchpad Cohort #6:
We’re excited to see what Cohort #6 accomplishes. Follow @CloudflareDev on X and join our Developer Discord to stay updated on their progress. If you’re a startup interested in joining Workers Launchpad, applications for Cohort #7 are now open.
Allow us to introduce Cap’n Web, an RPC protocol and implementation in pure TypeScript.
Cap’n Web is a spiritual sibling to Cap’n Proto, an RPC protocol I (Kenton) created a decade ago, but designed to play nice in the web stack. That means:
Like Cap’n Proto, it is an object-capability protocol. (“Cap’n” is short for “capabilities and”.) We’ll get into this more below, but it’s incredibly powerful.
Cap’n Web is more expressive than almost every other RPC system, because it implements an object-capability RPC model. That means it:
Supports bidirectional calling. The client can call the server, and the server can also call the client.
Supports passing functions by reference: If you pass a function over RPC, the recipient receives a “stub”. When they call the stub, they actually make an RPC back to you, invoking the function where it was created. This is how bidirectional calling happens: the client passes a callback to the server, and then the server can call it later.
Similarly, supports passing objects by reference: If a class extends the special marker type RpcTarget, then instances of that class are passed by reference, with method calls calling back to the location where the object was created.
Supports promise pipelining. When you start an RPC, you get back a promise. Instead of awaiting it, you can immediately use the promise in dependent RPCs, thus performing a chain of calls in a single network round trip.
Supports capability-based security patterns.
In short, Cap’n Web lets you design RPC interfaces the way you’d design regular JavaScript APIs – while still acknowledging and compensating for network latency.
The best part is, Cap’n Web is absolutely trivial to set up.
A client looks like this:
import { newWebSocketRpcSession } from "capnweb";

// One-line setup.
let api = newWebSocketRpcSession("wss://example.com/api");

// Call a method on the server!
let result = await api.hello("World");

console.log(result);
And here’s a complete Cloudflare Worker implementing an RPC server:
import { RpcTarget, newWorkersRpcResponse } from "capnweb";

// This is the server implementation.
class MyApiServer extends RpcTarget {
  hello(name) {
    return `Hello, ${name}!`
  }
}

// Standard Workers HTTP handler.
export default {
  fetch(request, env, ctx) {
    // Parse URL for routing.
    let url = new URL(request.url);

    // Serve API at `/api`.
    if (url.pathname === "/api") {
      return newWorkersRpcResponse(request, new MyApiServer());
    }

    // You could serve other endpoints here...
    return new Response("Not found", {status: 404});
  }
}
That’s it. That’s the app.
You can add more methods to MyApiServer, and call them from the client.
You can have the client pass a callback function to the server, and then the server can just call it.
You can define a TypeScript interface for your API, and easily apply it to the client and server.
It just works.
Why RPC? (And what is RPC anyway?)
Remote Procedure Calls (RPC) are a way of expressing communications between two programs over a network. Without RPC, you might communicate using a protocol like HTTP. With HTTP, though, you must format and parse your communications as an HTTP request and response, perhaps designed in REST style. RPC systems try to make communications look like a regular function call instead, as if you were calling a library rather than a remote service. The RPC system provides a “stub” object on the client side which stands in for the real server-side object. When a method is called on the stub, the RPC system figures out how to serialize and transmit the parameters to the server, invoke the method on the server, and then transmit the return value back.
The merits of RPC have been subject to a great deal of debate. RPC is often accused of committing many of the fallacies of distributed computing.
But this reputation is outdated. When RPC was first invented some 40 years ago, async programming barely existed. We did not have Promises, much less async and await. Early RPC was synchronous: calls would block the calling thread waiting for a reply. At best, latency made the program slow. At worst, network failures would hang or crash the program. No wonder it was deemed “broken”.
Things are different today. We have Promise and async and await, and we can throw exceptions on network failures. We even understand how RPCs can be pipelined so that a chain of calls takes only one network round trip. Many large distributed systems you likely use every day are built on RPC. It works.
The fact is, RPC fits the programming model we’re used to. Every programmer is trained to think in terms of APIs composed of function calls, not in terms of byte stream protocols nor even REST. Using RPC frees you from the need to constantly translate between mental models, allowing you to move faster.
When should you use Cap’n Web?
Cap’n Web is useful anywhere where you have two JavaScript applications speaking to each other over a network, including client-to-server and microservice-to-microservice scenarios. However, it is particularly well-suited to interactive web applications with real-time collaborative features, as well as modeling interactions over complex security boundaries.
Cap’n Web is still new and experimental, so for now, a willingness to live on the cutting edge may also be required!
Features, features, features…
Here’s some more things you can do with Cap’n Web.
HTTP batch mode
Sometimes a WebSocket connection is a bit too heavyweight. What if you just want to make a quick one-time batch of calls, but don’t need an ongoing connection?
For that, Cap’n Web supports HTTP batch mode:
import { newHttpBatchRpcSession } from "capnweb";

let batch = newHttpBatchRpcSession("https://example.com/api");

let result = await batch.hello("World");

console.log(result);
(The server is exactly the same as before.)
Note that once you’ve awaited an RPC in the batch, the batch is done, and all the remote references received through it become broken. To make more calls, you need to start over with a new batch. However, you can make multiple calls in a single batch:
let batch = newHttpBatchRpcSession("https://example.com/api");

// We can call make multiple calls, as long as we await them all at once.
let promise1 = batch.hello("Alice");
let promise2 = batch.hello("Bob");

let [result1, result2] = await Promise.all([promise1, promise2]);

console.log(result1);
console.log(result2);
And that brings us to another feature…
Chained calls (Promise Pipelining)
Here’s where things get magical.
In both batch mode and WebSocket mode, you can make a call that depends on the result of another call, without waiting for the first call to finish. In batch mode, that means you can, in a single batch, call a method, then use its result in another call. The entire batch still requires only one network round trip.
let namePromise = batch.getMyName();
let result = await batch.hello(namePromise);

console.log(result);
Notice the initial call to getMyName() returned a promise, but we used the promise itself as the input to hello(), without awaiting it first. With Cap’n Web, this just works: The client sends a message to the server saying: “Please insert the result of the first call into the parameters of the second.”
Or perhaps the first call returns an object with methods. You can call the methods immediately, without awaiting the first promise, like:
let batch = newHttpBatchRpcSession("https://example.com/api");

// Authencitate the API key, returning a Session object.
let sessionPromise = batch.authenticate(apiKey);

// Get the user's name.
let name = await sessionPromise.whoami();

console.log(name);
This works because the promise returned by a Cap’n Web call is not a regular promise. Instead, it’s a JavaScript Proxy object. Any methods you call on it are interpreted as speculative method calls on the eventual result. These calls are sent to the server immediately, telling the server: “When you finish the call I sent earlier, call this method on what it returns.”
Did you spot the security?
This last example shows an important security pattern enabled by Cap’n Web’s object-capability model.
When we call the authenticate() method, after it has verified the provided API key, it returns an authenticated session object. The client can then make further RPCs on the session object to perform operations that require authorization as that user. The server code might look like this:
class MyApiServer extends RpcTarget {
  authenticate(apiKey) {
    let username = await checkApiKey(apiKey);
    return new AuthenticatedSession(username);
  }
}

class AuthenticatedSession extends RpcTarget {
  constructor(username) {
    super();
    this.username = username;
  }

  whoami() {
    return this.username;
  }

  // ...other methods requiring auth...
}
Here’s what makes this work: It is impossible for the client to “forge” a session object. The only way to get one is to call authenticate(), and have it return successfully.
In most RPC systems, it is not possible for one RPC to return a stub pointing at a new RPC object in this way. Instead, all functions are top-level, and can be called by anyone. In such a traditional RPC system, it would be necessary to pass the API key again to every function call, and check it again on the server each time. Or, you’d need to do authorization outside of the RPC system entirely.
This is a common pain point for WebSockets in particular. Due to the design of the web APIs for WebSocket, you generally cannot use headers nor cookies to authorize them. Instead, authorization must happen in-band, by sending a message over the WebSocket itself. But this can be annoying for RPC protocols, as it means the authentication message is “special” and changes the state of the connection itself, affecting later calls. This breaks the abstraction.
The authenticate() pattern shown above neatly makes authentication fit naturally into the RPC abstraction. It’s even type-safe: you can’t possibly forget to authenticate before calling a method requiring auth, because you wouldn’t have an object on which to make the call. Speaking of type-safety…
TypeScript
If you use TypeScript, Cap’n Web plays nicely with it. You can declare your RPC API once as a TypeScript interface, implement in on the server, and call it on the client:
// Shared interface declaration:
interface MyApi {
  hello(name: string): Promise<string>;
}

// On the client:
let api: RpcStub<MyApi> = newWebSocketRpcSession("wss://example.com/api");

// On the server:
class MyApiServer extends RpcTarget implements MyApi {
  hello(name) {
    return `Hello, ${name}!`
  }
}
Now you get end-to-end type checking, auto-completed method names, and so on.
Note that, as always with TypeScript, no type checks occur at runtime. The RPC system itself does not prevent a malicious client from calling an RPC with parameters of the wrong type. This is, of course, not a problem unique to Cap’n Web – JSON-based APIs have always had this problem. You may wish to use a runtime type-checking system like Zod to solve this. (Meanwhile, we hope to add type checking based directly on TypeScript types in the future.)
An alternative to GraphQL?
If you’ve used GraphQL before, you might notice some similarities. One benefit of GraphQL was to solve the “waterfall” problem of traditional REST APIs by allowing clients to ask for multiple pieces of data in one query. For example, instead of making three sequential HTTP calls:
GET /user
GET /user/friends
GET /user/friends/photos
…you can write one GraphQL query to fetch it all at once.
That’s a big improvement over REST, but GraphQL comes with its own tradeoffs:
New language and tooling. You have to adopt GraphQL’s schema language, servers, and client libraries. If your team is all-in on JavaScript, that’s a lot of extra machinery.
Limited composability. GraphQL queries are declarative, which makes them great for fetching data, but awkward for chaining operations or mutations. For example, you can’t easily say: “create a user, then immediately use that new user object to make a friend request, all-in-one round trip.”
Different abstraction model. GraphQL doesn’t look or feel like the JavaScript APIs you already know. You’re learning a new mental model rather than extending the one you use every day.
How Cap’n Web goes further
Cap’n Web solves the waterfall problem without introducing a new language or ecosystem. It’s just JavaScript. Because Cap’n Web supports promise pipelining and object references, you can write code that looks like this:
let user = api.createUser({ name: "Alice" });
let friendRequest = await user.sendFriendRequest("Bob");
What happens under the hood? Both calls are pipelined into a single network round trip:
Create the user.
Take the result of that call (a new User object).
Immediately invoke sendFriendRequest() on that object.
All of this is expressed naturally in JavaScript, with no schemas, query languages, or special tooling required. You just call methods and pass objects around, like you would in any other JavaScript code.
In other words, GraphQL gave us a way to flatten REST’s waterfalls. Cap’n Web lets us go even further: it gives you the power to model complex interactions exactly the way you would in a normal program, with no impedance mismatch.
But how do we solve arrays?
With everything we’ve presented so far, there’s a critical missing piece to seriously consider Cap’n Web as an alternative to GraphQL: handling lists. Often, GraphQL is used to say: “Perform this query, and then, for every result, perform this other query.” For example: “List the user’s friends, and then for each one, fetch their profile photo.”
In short, we need an array.map() operation that can be performed without adding a round trip.
Cap’n Proto, historically, has never supported such a thing.
But with Cap’n Web, we’ve solved it. You can do:
let user = api.authenticate(token);

// Get the user's list of friends (an array).
let friendsPromise = user.listFriends();

// Do a .map() to annotate each friend record with their photo.
// This operates on the *promise* for the friends list, so does not
// add a round trip.
// (wait WHAT!?!?)
let friendsWithPhotos = friendsPromise.map(friend => {
  return {friend, photo: api.getUserPhoto(friend.id))};
}

// Await the friends list with attached photos -- one round trip!
let results = await friendsWithPhotos;
Wait… How!?
.map() takes a callback function, which needs to be applied to each element in the array. As we described earlier, normally when you pass a function to an RPC, the function is passed “by reference”, meaning that the remote side receives a stub, where calling that stub makes an RPC back to the client where the function was created.
But that is NOT what is happening here. That would defeat the purpose: we don’t want the server to have to round-trip to the client to process every member of the array. We want the server to just apply the transformation server-side.
To that end, .map() is special. It does not send JavaScript code to the server, but it does send something like “code”, restricted to a domain-specific, non-Turing-complete language. The “code” is a list of instructions that the server should carry out for each member of the array. In this case, the instructions are:
Invoke api.getUserPhoto(friend.id).
Return an object {friend, photo}, where friend is the original array element and photo is the result of step 1.
But the application code just specified a JavaScript method. How on Earth could we convert this into the narrow DSL?
The answer is record-replay: On the client side, we execute the callback once, passing in a special placeholder value. The parameter behaves like an RPC promise. However, the callback is required to be synchronous, so it cannot actually await this promise. The only thing it can do is use promise pipelining to make pipelined calls. These calls are intercepted by the implementation and recorded as instructions, which can then be sent to the server, where they can be replayed as needed.
And because the recording is based on promise pipelining, which is what the RPC protocol itself is designed to represent, it turns out that the “DSL” used to represent “instructions” for the map function is just the RPC protocol itself. 🤯
Implementation details
JSON-based serialization
Cap’n Web’s underlying protocol is based on JSON – but with a preprocessing step to handle special types. Arrays are treated as “escape sequences” that let us encode other values. For example, JSON does not have an encoding for Date objects, but Cap’n Web does. You might see a message that looks like this:
To encode a literal array, we simply double-wrap it in []:
{
  names: [["Alice", "Bob", "Carol"]]
}
In other words, an array with just one element which is itself an array, evaluates to the inner array literally. An array whose first element is a type name, evaluates to an instance of that type, where the remaining elements are parameters to the type.
Note that only a fixed set of types are supported: essentially, “structured clonable” types, and RPC stub types.
On top of this basic encoding, we define an RPC protocol inspired by Cap’n Proto – but greatly simplified.
RPC protocol
Since Cap’n Web is a symmetric protocol, there is no well-defined “client” or “server” at the protocol level. There are just two parties exchanging messages across a connection. Every kind of interaction can happen in either direction.
In order to make it easier to describe these interactions, I will refer to the two parties as “Alice” and “Bob”.
Alice and Bob start the connection by establishing some sort of bidirectional message stream. This may be a WebSocket, but Cap’n Web also allows applications to define their own transports. Each message in the stream is JSON-encoded, as described earlier.
Alice and Bob each maintain some state about the connection. In particular, each maintains an “export table”, describing all the pass-by-reference objects they have exposed to the other side, and an “import table”, describing the references they have received. Alice’s exports correspond to Bob’s imports, and vice versa. Each entry in the export table has a signed integer ID, which is used to reference it. You can think of these IDs like file descriptors in a POSIX system. Unlike file descriptors, though, IDs can be negative, and an ID is never reused over the lifetime of a connection.
At the start of the connection, Alice and Bob each populate their export tables with a single entry, numbered zero, representing their “main” interfaces. Typically, when one side is acting as the “server”, they will export their main public RPC interface as ID zero, whereas the “client” will export an empty interface. However, this is up to the application: either side can export whatever they want.
From there, new exports are added in two ways:
When Alice sends a message to Bob that contains within it an object or function reference, Alice adds the target object to her export table. IDs assigned in this case are always negative, starting from -1 and counting downwards.
Alice can send a “push” message to Bob to request that Bob add a value to his export table. The “push” message contains an expression which Bob evaluates, exporting the result. Usually, the expression describes a method call on one of Bob’s existing exports – this is how an RPC is made. Each “push” is assigned a positive ID on the export table, starting from 1 and counting upwards. Since positive IDs are only assigned as a result of pushes, Alice can predict the ID of each push she makes, and can immediately use that ID in subsequent messages. This is how promise pipelining is achieved.
After sending a push message, Alice can subsequently send a “pull” message, which tells Bob that once he is done evaluating the “push”, he should proactively serialize the result and send it back to Alice, as a “resolve” (or “reject”) message. However, this is optional: Alice may not actually care to receive the return value of an RPC, if Alice only wants to use it in promise pipelining. In fact, the Cap’n Web implementation will only send a “pull” message if the application has actually awaited the returned promise.
Putting it together, a code sequence like this:
{
  names: [["Alice", "Bob", "Carol"]]
}
Might produce a message exchange like this:
// Call api.getByName(). `api` is the server's main export, so has export ID 0.
-> ["push", ["pipeline", 0, "getMyName", []]
// Call api.hello(namePromise). `namePromise` refers to the result of the first push,
// so has ID 1.
-> ["push", ["pipeline", 0, "hello", [["pipeline", 1]]]]
// Ask that the result of the second push be proactively serialized and returned.
-> ["pull", 2]
// Server responds.
<- ["resolve", 2, "Hello, Alice!"]
Cap’n Web is new and still highly experimental. There may be bugs to shake out. But, we’re already using it today. Cap’n Web is the basis of the recently-launched “remote bindings” feature in Wrangler, allowing a local test instance of workerd to speak RPC to services in production. We’ve also begun to experiment with it in various frontend applications – expect more blog posts on this in the future.
In any case, Cap’n Web is open source, and you can start using it in your own projects now.
I can recall countless late nights as a student spent building out ideas that felt like breakthroughs. My own thesis had significant costs associated with the tools and computational resources I needed. The reality for students is that turning ideas into working applications often requires production-grade tools, and having to pay for them can stop a great project before it even starts. We don’t think that cost should stand in the way of building out your ideas.
Cloudflare’s Developer Platform already makes it easy for anyone to go from idea to launch. It gives you all the tools you need in one place to work on that class project, build out your portfolio, and create full-stack applications. We want students to be able to use these tools without worrying about the cost, so starting today, students at least 18 years old in the United States with a verified .edu email can receive 12 months of free access to Cloudflare’s developer features. This is the first step for Cloudflare for Students, and we plan to continue expanding our support for the next generation of builders.
What’s included
12 months of our paid developer features plan at no upfront cost
Eligible student accounts will receive increased usage allotments for our developer features compared to our free plan. That includes Workers, Pages Functions, KV, Containers, Vectorize, Hyperdrive, Durable Objects, Workers Logpush, and Queues. With these, you can build everything from APIs and full-stack apps to data pipelines and websites.
After 12 months, you can easily renew your subscription by upgrading to our Workers Paid plan. If you choose not to, your account will automatically revert to the free plan, and you won’t be charged.
Here’s a look at the increased usage allotments students can receive today. Above those free allotments, our standard usage rates will apply.
You’ll also have access to a dedicated Discord channel just for students. We want to see what you’re building! This is a place to connect with peers, get support, and share ideas in a community of student developers.
What others have built with Cloudflare’s Developer Platform
Curious about what’s possible with Cloudflare’s developer features? Here are some projects from our community:
Adventure is a text-based adventure game running on Cloudflare Workers that uses Workers AI to generate the stories with the @cf/google/gemma-3-12b-it model.
The project’s developer chose Workers AI with the OpenNext adapter because it made deployment simple and handled scaling automatically. It uses the Workers Paid plan mainly to enable Workers Logpush and get access to detailed logs for better monitoring and analysis.
When a new game starts, the server gives the AI a custom prompt to set the scene and explain how the adventure should work. From there, each time the player makes a choice, their story history is sent back to the server, which asks the AI to continue the narrative, allowing the story to evolve dynamically based on the player’s choices.
The code below shows how this logic is implemented:
"use server";
import { getCloudflareContext } from "@opennextjs/cloudflare";

async function prime(env: CloudflareEnv) {
  const id = Math.floor(Math.random() * 1000000);//unique ID for each game run
  const messages = [
    {
      role: "user",
      content:
        `The user is playing a text-based adventure game. Each game is different, this is game ${id}. Your first job is to create a short background story in 3-4 sentences. Scenarios may include interesting locations such as jungles, deserts, caves.
        After the first message, each of your messages will be responses to the user interaction. State three short options (A, B, C). The user responses will be the chosen action. Your responses should end by asking the user about their choice.
        Your message will be shown to the user directly, so avoid "Certainly", "Great", "Let's get started", and other filler content, and avoid bringing up technical details such as "this is game #id".
        The games should have a win condition that is actually feasible given the story, and if the player loses, the message should end with "Try again.".
        `,
    },
  ];
  //Call Workers AI to generate the first response (story intro)
  const { response } = await env.AI.run("@cf/google/gemma-3-12b-it", { messages });

  return [
    ...messages,
    { role: "assistant", content: response }
  ];
}

/**
 * Main server action for the adventure game.
 * If no input yet, it primes the game with the opening story
 * If there is input, it continues the story based on the full history
 * Uses getCloudflareContext from @opennextjs/cloudflare to access env.
 */
export async function adventureAction(input: any[]) {
  let { env } = await getCloudflareContext({ async: true });

  return input.length === 0
  ? await prime(env)
  : [...input,
      { role: "assistant", content: (await env.AI.run("@cf/google/gemma-3-12b-it", { messages: input })).response }
  ];
}
DNS over Discord is a bot that lets you run DNS lookups right inside Discord. Instead of switching to a terminal or online tool, you can use simple slash commands to check records like A, AAAA, MX, TXT, and more.
The developer behind the project chose Cloudflare Workers because it’s a great platform for running small JavaScript apps that handle requests, which made it a good fit for Discord’s slash commands. Since every command translates into a request and the bot sees a lot of traffic, the free tier wasn’t enough, so it now runs on Workers Paid to keep up reliably without hitting request limits.
In this project, the Worker checks if the request is a Discord interaction, and if so, it sends it to the right command (e.g., /dig, /multi-dig, etc.), using a handler that calls out to a custom framework for Discord slash commands. If it’s not from Discord, it can also serve routes like the privacy page or terms of service.
Here’s what that looks like in code:
export default {
  // Process all requests to the Worker
  fetch: async (request, env, ctx) => {
    try {
      // Include the env in the context we pass to the handler
      ctx.env = env;

      // Check if it's a Discord interaction (or a health check)
      const resp = await handler(request, ctx);
      if (resp) return resp;

      // Otherwise, process the request
      const url = new URL(request.url);

      if (request.method === 'GET' && url.pathname === '/privacy')
        return new textResponse(Privacy);

      if (request.method === 'GET' && url.pathname === '/terms')
        return new textResponse(Terms);

      // Fallback if nothing matches
      return new textResponse(null, { status: 404 });
    } catch (err) {
      // Log any errors
      captureException(err);

      // Re-throw the error
      throw err;
    }
  },
};
placeholders.dev is a service that generates placeholder images, making it easy for developers to prototype and scaffold websites without dealing with hosting or asset management. Users can generate placeholders instantly with a simple URL, such as: https://images.placeholders.dev/350x150
Since placeholders are typically used in early development, speed and consistency matter, and images need to load instantly so the workflow isn’t interrupted. Running on Cloudflare Workers makes the service fast and consistent no matter where developers are.
This project uses the Workers Paid plan because it regularly exceeds the free-tier limits on requests and compute time. The Worker below shows the core of how the service works. When a request comes in, it looks at the URL path (like /300x150) to determine the size of the placeholder, applies some defaults for style, and then returns an SVG image on the fly.
Check out Built With Workers to see what other developers are building with our developer platform.
How do I get started?
This offering is available to United States students at least 18 years old with a verified .edu billing email address.
Based on when your account was created, you can redeem this offer either by signing up for a free Cloudflare account with your .edu email or by filling out a form to request access for your existing .edu account. Just make sure your verified .edu email address is your billing email address.
Fill out our form and a member of our team will help you get access
Note: in order to receive the credit, your verified .edu email address needs to be your billing email address
Expanding Cloudflare for Students coverage
While our first offering is primarily for institutions in the US, we’re working on expanding support for our students in other countries and plan to add additional higher education domain names after launch. If you’re at an educational institution outside of the United States, please reach out to us and apply for your educational/academic domain to be added. We’ll let you know as soon as it becomes available in your region. Check our Cloudflare for Students page for updates and keep an eye out for emails if you have an account with a newly supported domain.
Whether you’re gearing up for your first hackathon, launching a side project, or looking to build the next big thing, you can get started today with free access and join a global developer community already building on Cloudflare.
Cloudflare’s offices bring together builders in some of the world’s most popular technology hubs. We have a long history of using those spaces for one-off events and meet ups over the last fifteen years, but we want to do more. Starting in 2026, we plan to open the doors of our offices routinely to startups and builders from outside of our team who need the space to collaborate, meet new people, or just type away at a keyboard in a new (and beautiful) location.
What are our offices meant to be?
Prior to 2020, we expected essentially every team member of Cloudflare to be present in one of our offices five days a week. That worked well for us and helped facilitate the launch of dozens of technologies as well as a community and culture that defined who we are.
Like every other team on the planet, the COVID pandemic forced us to revisit that approach. We used the time to think about what our offices could be, in a world where not every team member showed up every day of the week. While we decided we would be open to remote and hybrid work, we still felt like some of our best work was done in person together. The goal became building spaces that encouraged team members to be present.
Several hard hats and a few leases later, we’ve created a network of offices around the world designed to evolve with the way people work. These spaces aren’t just places to sit — they’re environments that empower people to do their best work — whether that means quiet focus, creative problem-solving, or lively collaboration. From a library tucked into a quiet zone in our waterfront Lisbon office, to the high-ceilinged collaboration areas in the heart of Austin, each office reflects our belief that great spaces support diverse working styles and help teams thrive together.
Our offices are meant to connect our teams, and we believe that by opening our doors to the wider community, we can foster even more innovation and help new companies collaborate better. Cloudflare has always been a hub for builders, and now we’re making that commitment official by welcoming startups into our physical spaces.
Why make them even more open to the community?
Our spaces have served as hosts to community events since the earliest days of Cloudflare. We have brought together just about every group from hackathons to language meet-ups to university orientation sessions. Cloudflare exists to help build a better Internet and in many cases a better digital environment starts with relationships built in a real life environment.
One of the most common pieces of feedback we have received in the last few years after hosting these events is “I really miss connecting with people like this.” And we hear that most often from small teams in the earliest stages of their journey. In the last few years as the start-ups we support with our platform increasingly begin remote-first and only open dedicated spaces in later stages of their growth.
We know that building a company can be a lonely path. We have helped over the last several years by providing a robust free plan and a comprehensive start-up program, but we think we can do more.
Cloudflare’s network supports a significant percentage of the Internet and, as you would expect, the Internet follows the sun. More people use it during the daytime than at night, meaning our data center utilization peaks in specific times of the day. We take advantage of that pattern to run services that are less latency-sensitive in regions overnight.
Our physical locations follow a similar pattern. Utilization resembles a bell curve with Tuesdays, Wednesdays, and Thursdays seeing a lot of traffic while Mondays and Fridays tend to be quieter. Like our CPUs at night, we think we can use that excess capacity to help build a better Internet by giving builders a space to congregate and helping our team connect with more of our users.
How will this work?
Beginning in January of 2026, we plan to make our office locations available to a capped number of external visitors as all-day coworking spaces on select days of each week. We will provide a registration process (more on that below) and set some ground rules. To start, we plan to expand this offering to San Francisco, Austin, London, and Lisbon.
When external visitors arrive, they’ll have access to our common spaces to bring together their teams or just get some work done by themselves. No mandatory talks or obligations. Just fantastic working spaces available to use at no cost.
How can you participate?
We will provide more details in the next few weeks, but the general structure will be based on the following steps.
Enroll in the Cloudflare for Startups Program. Bonus if you are a Workers Launchpad participant or alumni.
Sit tight for now. We will email participating Startup Program customers first to participate with a form requesting office access.
Once the form is filled out, a member of our team will reach out after. If you want to get a head start, fill out the form here.
We plan to roll this out on a cohort basis. Once approved and all requirements are met, register your visit (and that of any additional team members) at least three business days prior to the date requested.
Respect our working spaces as you would your own.
What’s next?
We hope to expand to other locations in the future. Want to get to the front of the line? Sign up for our Startup program here today and we will reach out to Startup Program participants before we roll out the program.
At Cloudflare, we believe that helping build a better Internet means encouraging a healthy ecosystem of options for how people can connect safely and quickly to the resources they need. Sometimes that means we tackle immense, Internet-scale problems with established partners. And sometimes that means we support and partner with fantastic open teams taking big bets on the next generation of tools.
To that end, today we are excited to announce our support of two independent, open source projects: Ladybird, an ambitious project to build a completely independent browser from the ground up, and Omarchy, an opinionated Arch Linux setup for developers.
Two open source projects strengthening the open Internet
Cloudflare has a long history of supporting open-source software – both through our own projects shared with the community and external projects that we support. We see our sponsorship of Ladybird and Omarchy as a natural extension of these efforts in a moment where energy for a diverse ecosystem is needed more than ever.
Ladybird, a new and independent browser
Most of us spend a significant amount of time using a web browser – in fact, you’re probably using one to read this blog! The beauty of browsers is that they help users experience the open Internet, giving you access to everything from the largest news publications in the world to a tiny website hosted on a Raspberry Pi.
Unlike dedicated apps, browsers reduce the barriers to building an audience for new services and communities on the Internet. If you are launching something new, you can offer it through a browser in a world where most people have absolutely zero desire to install an app just to try something out. Browsers help encourage competition and new ideas on the open web.
While the openness of how browsers work has led to an explosive growth of services on the Internet, browsers themselves have consolidated to a tiny handful of viable options. There’s a high probability you’re reading this on a Chromium-based browser, like Google’s Chrome, along with about 65% of users on the Internet. However, that consolidation has also scared off new entrants in the space. If all browsers ship on the same operating systems, powered by the same underlying technology, we lose out on potential privacy, security and performance innovations that could benefit developers and everyday Internet users.
A screenshot of Cloudflare Workers developer docs in Ladybird
This is where Ladybird comes in: it’s not Chromium based – everything is built from scratch. The Ladybird project has two main components: LibWeb, a brand-new rendering engine, and LibJS, a brand-new JavaScript engine with its own parser, interpreter, and bytecode execution engine.
Building an engine that can correctly and securely render the modern web is a monumental task that requires deep technical expertise and navigating decades of specifications governed by standards bodies like the W3C and WHATWG. And because Ladybird implements these standards directly, it also stress-tests them in practice. Along the way, the project has found, reported, and sometimes fixed countless issues in the specifications themselves, contributions that strengthen the entire web platform for developers, browser vendors, and anyone who may attempt to build a browser in the future.
Whether to build something from scratch or not is a perennial source of debate between software engineers, but absent the pressures of revenue or special interests, we’re excited about the ways Ladybird will prioritize privacy, performance, and security, potentially in novel ways that will influence the entire ecosystem.
A screenshot of the Omarchy development environment
Omarchy, an independent development environment
Developers deserve choice, too. Beyond the browser, a developer’s operating system and environment is where they spend a ton of time – and where a few big players have become the dominant choice. Omarchy challenges this by providing a complete, opinionated Arch Linux distribution that transforms a bare installation into a modern development workstation that developers are excited about.
Perfecting one’s development environment can be a career-long art, but learning how to do so shouldn’t be a barrier to beginning to code. The beauty of Omarchy is that it makes Linux approachable to more developers by doing most of the setup for them, making it look good, and then making it configurable. Omarchy provides most of the tools developers need – like Neovim, Docker, and Git – out of the box, and tons of other features.
At its core, Omarchy embraces Linux for all of its complexity and configurability, and makes a version of it that is accessible and fun to use for developers that don’t have a deep background in operating systems. Projects like this ensure that a powerful, independent Linux desktop remains a compelling choice for people building the next generation of applications and Internet infrastructure.
Our support comes with no strings attached
We want to be very clear here: we are supporting these projects because we believe the Internet can be better if these projects, and more like them, succeed. No requirement to use our technology stack or any arrangement like that. We are happy to partner with great teams like Ladybird and Omarchy simply because we believe that our missions have real overlap.
Notes from the teams
Ladybird is still in its early days, with an alpha release planned for 2026, but we encourage anyone who is interested to consider contributing to the open source codebase as they prepare for launch.
“Cloudflare knows what it means to build critical web infrastructure on the server side. With Ladybird, we’re tackling the near-monoculture on the client side, because we believe it needs multiple implementations to stay healthy, and we’re extremely thankful for their support in that mission.”
– Andreas Kling, Founder, Ladybird
Omarchy 3.0 was released just last week with faster installation and increased Macbook compatibility, so if you’ve been Linux-curious for a while now, we encourage you to try it out!
“Cloudflare’s support of Omarchy has ensured we have the fastest ISO and package delivery from wherever you are in the world. Without a need to manually configure mirrors or deal with torrents. The combo of a super CDN, great R2 storage, and the best DDoS shield in the business has been a huge help for the project.”
– David Heinemeier Hansson, Creator of Omarchy and Ruby on Rails
A better Internet is one where people have more choice in how they browse and develop new software. We’re incredibly excited about the potential of Ladybird, Omarchy, and other audacious projects that support a free and open Internet.
Last week, we wrote about face cropping for Images, which runs an open-source face detection model in Workers AI to automatically crop images of people at scale.
It wasn’t too long ago when deploying AI workloads was prohibitively complex. Real-time inference previously required specialized (and costly) hardware, and we didn’t always have standard abstractions for deployment. We also didn’t always have Workers AI to enable developers — including ourselves — to ship AI features without this additional overhead.
And whether you’re skeptical or celebratory of AI, you’ve likely seen its explosive progression. New benchmark-breaking computational models are released every week. We now expect a fairly high degree of accuracy — the more important differentiators are how well a model fits within a product’s infrastructure and what developers do with its predictions.
This week, we’re introducing background removal for Images. This feature runs a dichotomous image segmentation model on Workers AI to isolate subjects in an image from their backgrounds. We took a controlled, deliberate approach to testing models for efficiency and accuracy.
Here’s how we evaluated various image segmentation models to develop background removal.
A primer on image segmentation
In computer vision, image segmentation is the process of splitting an image into meaningful parts.
Segmentation models produce a mask that assigns each pixel to a specific category. This differs from detection models, which don’t classify every pixel but instead mark regions of interest. A face detection model, such as the one that informs face cropping, draws bounding boxes based on where it thinks there are faces. (If you’re curious, our post on face cropping discusses how we use these bounding boxes to perform crop and zoom operations.)
Salient object detection is a type of segmentation that highlights the parts of an image that most stand out. Most salient detection models create a binary mask that categorizes the most prominent (or salient) pixels as the “foreground” and all other pixels as the “background”. In contrast, a multi-class mask considers the broader context and labels each pixel as one of several possible classes, like “dog” or “chair”. These multi-class masks are the basis of content analysis models, which distinguish which pixels belong to specific objects or types of objects.
In this photograph of my dog, a detection model predicts that a bounding box contains a dog; a segmentation model predicts that some pixels belong to a dog, while all other pixels don’t.
For our use case, we needed a model that could produce a soft saliency mask, which predicts how strongly each pixel belongs to either the foreground (objects of interest) or the background. That is, each pixel is assigned a value on a scale of 0–255, where 0 is completely transparent and 255 is fully opaque. Most background pixels are labeled at (or near) 0; foreground pixels may vary in opacity, depending on its degree of saliency.
In principle, a background removal feature must be able to accurately predict saliency across a broad range of contexts. For example, e-commerce and retail vendors want to display all products on a uniform, white background; in creative and image editing applications, developers want to enable users to create stickers and cutouts from uploaded content, including images of people or avatars.
In our research, we focused primarily on the following four image segmentation models:
U2-Net (U Square Net): Trained on the largest saliency dataset (DUST-TR) of 10,553 images, which were then horizontally flipped to reach a total of 21,106 training images.
IS-Net (Intermediate Supervision Network): A novel, two-step approach from the same authors of U2-Net; this model produces cleaner boundaries for images with noisy, cluttered backgrounds.
BiRefNet (Bilateral Reference Network): Specifically designed to segment complex and high-resolution images with accuracy by checking that the small details match the big picture.
Different scales of information allow computational models to build a holistic view of an image. Global context considers the overall shape of objects and how areas of pixels relate to the entire image, while local context traces fine details like edges, corners, and textures. If local context focuses on the trees and their leaves, then global context represents the entire forest.
U2-Net extracts information using a multi-scale approach, where it analyzes an image at different zoom levels, then combines its predictions in a single step. The model analyzes global and local context at the same time, so it works well on images with multiple objects of varying sizes.
IS-Net introduces a new, two-step strategy called intermediate supervision. First, the model separates the foreground from the background, identifying potential areas that likely belong to objects of interest — all other pixels are labeled as the background. Second, it refines the boundaries of the highlighted objects to produce a final pixel-level mask.
The initial suppression of the background results in cleaner, more precise edges, as the segmentation focuses only on the highlighted objects of interest and is less likely to mistakenly include background pixels in the final mask. This model especially excels when dealing with complex images with cluttered backgrounds.
Both models output their predictions in a single direction for scale. U2-Net interprets the global and local context in one pass, while Is-Net begins with the global context, then focuses on the local context.
In contrast, BiRefNet refines its predictions over multiple passes, moving in both contextual directions. Like Is-Net, it initially creates a map that roughly highlights the salient object, then traces the finer details. However, BiRefNet moves from global to local context, then from local context back to global. In other words, after refining the edges of the object, it feeds the output back to the large-scale view. This way, the model can check that the small-scale details align with the broader image structure, providing higher accuracy on high-resolution images.
U2-Net, IS-Net, and BiRefNet are exclusively saliency detection models, producing masks that distinguish foreground pixels from background pixels. However, SAM was designed to be more extensible and general; its primary goal is to segment any object based on specified inputs, not only salient objects. This means that the model can also be used to create multi-class masks that label various objects within an image, even if they aren’t the primary focus of an image.
How we measure segmentation accuracy
In most saliency datasets, the actual location of the object is known as the ground-truth area. These regions are typically defined by human annotators, who manually trace objects of interest in each image. This provides a reliable reference to evaluate model predictions.
Each model outputs a predicted area (where it thinks the foreground pixels are), which can be compared against the ground-truth area (where the foreground pixels actually are).
Models are evaluated for segmentation accuracy based on common metrics like Intersection over Union, Dice coefficient, and pixel accuracy. Each score takes a slightly different approach to quantify the alignment between the predicted and ground-truth areas (“P” and “G”, respectively, in the formulas below).
Intersection over Union
Intersection over Union (IoU), also called the Jaccard index, measures how well the predicted area matches the true object. That is, it counts the number of foreground pixels that are shared in both the predicted and ground-truth masks. Mathematically, IoU is written as:
Jaccard formula
The formula divides the intersection (P∩G), or the pixels where the predicted and ground-truth areas overlap, by the union (P∪G), or the total area of pixels that belong to either area, counting the overlapping pixels only once.
IoU produces a score between 0 and 1. A higher value indicates a closer overlap between the predicted and ground-truth areas. A perfect match, although rare, would score 1, while a smaller overlapping area brings the score closer to 0.
Dice coefficient
The Dice coefficient, also called the Sørensen–Dice index, similarly compares how well the model’s prediction matches reality, but is much more forgiving than the IoU score. It gives more weight to the shared pixels between the predicted and actual foreground, even if the areas differ in size. Mathematically, the Dice coefficient is written as:
Sørensen–Dice formula
The formula divides twice the intersection (P∩G) by the sum of pixels in both predicted and ground-truth areas (P+G), counting any overlapping pixels twice.
Like IoU, the Dice coefficient also produces a value between 0 and 1, indicating a more accurate match as it approaches 1.
Pixel accuracy
Pixel accuracy measures the percentage of pixels that were correctly labeled as either the foreground or the background. Mathematically, pixel accuracy is written as:
Pixel accuracy formula
The formula divides the number of correctly predicted pixels by the total number of pixels in the image.
The total area of correctly predicted pixels is the sum of foreground and background pixels that accurately match the ground-truth areas.
The correctly predicted foreground is the intersection of the predicted and ground-truth areas (P∩G). The inverse of the predicted area (P’, or 1–P) represents the pixels that the model identifies as the background; the inverse of the ground-truth area (G’, or 1–G) represents the actual boundaries of the background. When these two inverted areas overlap (P’∩G’, or (1–P)∩(1–G)), this intersection is the correctly predicted background.
Interpreting the metrics
Of the three metrics, IoU is the most conservative measure of segmentation accuracy. Small mistakes, such as including extra background pixels in the predicted foreground, reduce the score noticeably. This metric is most valuable for applications that require precise boundaries, such as autonomous driving systems.
Meanwhile, the Dice coefficient rewards the overlapping pixels more heavily, and subsequently tends to be higher than the IoU score for the same prediction. In model evaluations, this metric is favored over IoU when it’s more important to capture the object than to penalize mistakes. For example, in medical imaging, the risk of missing a true positive substantially outweighs the inconvenience of flagging a false positive.
In the context of background removal, we biased toward the IoU score and Dice coefficient over pixel accuracy. Pixel accuracy can be misleading, especially when processing an image where background pixels comprise the majority of pixels.
For example, consider an image with 900 background pixels and 100 foreground pixels. A model that correctly predicts only 5 foreground pixels — 5% of all foreground pixels — will score deceptively high in pixel accuracy. Intuitively, we’d likely say that this model performed poorly. However, assuming all 900 background pixels were correctly predicted, the model maintains 90.5% pixel accuracy, despite missing the subject almost entirely.
Pixels, predictions, and patterns
To determine the most suitable model for the Images API, we performed a series of tests using the open-source rembg library, which combines all relevant models in a single interface.
Each model was tasked with outputting a prediction mask to label foreground versus background pixels. We pulled images from two saliency datasets: Humans contains over 7,000 images of people with varying skin tones, clothing, and hairstyles, while DIS5K (version 1.5) spans a vast range of objects and scenes. If a model contained variants that were pre-trained on specific types of segmentation (e.g. clothes, humans), then we repeated the tests for the generalized model and each variant.
Our experiments were executed on a GPU with 23 GB VRAM to mirror realistic hardware constraints, similar to the environment where we already run a face detection model. We also replicated the same tests on a larger GPU instance with 94 GB VRAM; this served as an upper-bound reference point to benchmark potential speed gains if additional compute were available. Cloudflare typically reserves larger GPUs for more compute-intensive AI workloads — we viewed these tests more as an exploration for comparison than as a production scenario.
During our analysis, we started to see key trends emerge:
On the smaller GPU, inference times were generally faster for lightweight models like U2-Net (176 MB) and Is-Net (179 MB). The average speed across both datasets were 307 milliseconds for U2-Net and 351 milliseconds for Is-Net. On the opposite end, BiRefNet (973 MB) had noticeably slower output times, averaging 821 milliseconds across its two generalized variants.
BiRefNet ran 2.4 times faster on the larger GPU, reducing its average inference time to 351 milliseconds — comparable to the other models, despite its larger size. In contrast, the lighter models did not show any notable speed gain with additional compute, suggesting that scaling hardware configurations primarily benefits heavier models. In Appendix 1 (“Inference Time in Milliseconds”), we compare speed across models and GPU instances.
We also observed distinct patterns when comparing model performance across the two saliency datasets. Most notably, all models ran faster on the Humans dataset, where images of people tend to be single-subject and relatively uniform. The DIS5K dataset, in contrast, includes images with higher complexity — that is, images with more objects, cluttered backgrounds, or multiple objects of varying scales.
Slower predictions suggest a relationship between visual complexity and the computation needed to identify the important parts of an image. In other words, datasets with simpler, well-separated objects can be analyzed more quickly, while complex scenes require more computation to generate accurate masks.
Similarly, complexity challenges accuracy as much as it does efficiency. In our tests, all models demonstrated higher segmentation accuracy with the Humans dataset. In Appendix 2 (“Measures of Model Accuracy”), we present our results for segmentation accuracy across both datasets.
Specialized variants scored slightly higher in accuracy compared to their generalized counterparts. But in broad, practical applications, selecting a specialized model for every input isn’t realistic, at least for our initial beta version. We favored general-purpose models that can produce accurate predictions without prior classification. For this reason, we excluded SAM — while powerful in its intended use cases, SAM is designed to work with additional inputs. On unprompted segmentation tasks, it produced lower accuracy scores (and much higher inference times) amongst the models we tested.
All BiRefNet variants showed greater accuracy compared to other models. The generalized variants (-general and -dis) were just as accurate as its more specialized variants like -portrait. The birefnet-general variant, in particular, achieved a high IoU score of 0.87 and Dice coefficient of 0.92, averaged across both datasets.
In contrast, the generalized U2-Net model showed high accuracy on the Humans dataset, reaching an IoU score of 0.89 and a Dice coefficient of 0.94, but received a low IoU score of 0.39 and Dice coefficient of 0.52 on the DIS5K dataset. The isnet-general-use model performed substantially better, obtaining an average IoU score of 0.82 and Dice coefficient of 0.89 across both datasets.
We observed whether models could interpret both the global and local context of an image. In some scenarios, the U2-Net and Is-Net models captured the overall gist of an image, but couldn’t accurately trace fine edges. We designed one test around measuring how well each model could isolate bicycle wheels; for variety, we included images across both interior and exterior backgrounds. Lower scoring models, while correctly labeling the area surrounding the wheel, struggled with the pixels between the thin spokes and produced prediction masks that included these background pixels.
In other scenarios, the models showed the opposite limitation: they produced masks with clean edges, but failed to identify the focus of the image. We ran another test using a photograph of a gray T-shirt against black gym flooring. Both generalized U2-Net and Is-Net models labeled only the logo as the salient object, creating a mask that omitted the rest of the shirt entirely.
Meanwhile, the BiRefNet model achieved high accuracy across both types of tests. Its architecture passes information bidirectionally, allowing details at the pixel level to be informed by the larger scene (and vice versa). In practice, this means that BiRefNet interprets how fine-grained edges fit into the broader object. For our beta version, we opted to use the BiRefNet model to drive decisions for background removal.
Unlike lower scoring models, the BiRefNet model understood that the entire shirt is the true subject of the image.
Use the segment parameter when optimizing an image through a specially-formatted Images URL or a worker, and Cloudflare will isolate the subject of your image and convert the background into transparent pixels. This can be combined with other optimization operations, as shown in the transformation URL below:
You can also use background removal when overlaying images through the draw() command, like in the image below. Here, we isolate the subjects of multiple images, then overlay them on a background image.
Background removal is another step in our ongoing effort to enable developers to build interactive and imaginative products. These features are an iterative process, and we’ll continue to refine our approach even further. We’re looking forward to sharing our progress with you.
Read more about applying background removal in our documentation.
When we first launched Workers AI, we made a bet that AI models would get faster and smaller. We built our infrastructure around this hypothesis, adding specialized GPUs to our datacenters around the world that can serve inference to users as fast as possible. We created our platform to be as general as possible, but we also identified niche use cases that fit our infrastructure well, such as low-latency image generation or real-time audio voice agents. To lean in on those use cases, we’re bringing on some new models that will help make it easier to develop for these applications.
Today, we’re excited to announce that we are expanding our model catalog to include closed-source partner models that fit this use case. We’ve partnered with Leonardo.Ai and Deepgram to bring their latest and greatest models to Workers AI, hosted on Cloudflare’s infrastructure. Leonardo and Deepgram both have models with a great speed-to-performance ratio that suit the infrastructure of Workers AI. We’re starting off with these great partners — but expect to expand our catalog to other partner models as well.
The benefits of using these models on Workers AI is that we don’t only have a standalone inference service, we also have an entire suite of Developer products that allow you to build whole applications around AI. If you’re building an image generation platform, you could use Workers to host the application logic, Workers AI to generate the images, R2 for storage, and Images for serving and transforming media. If you’re building Realtime voice agents, we offer WebRTC and WebSocket support via Workers, speech-to-text, text-to-speech, and turn detection models via Workers AI, and an orchestration layer via Cloudflare Realtime. All in all, we want to lean into use cases that we think Cloudflare has a unique advantage in, with developer tools to back it up, and make it all available so that you can build the best AI applications on top of our holistic Developer Platform.
Leonardo Models
Leonardo.Ai is a generative AI media lab that trains their own models and hosts a platform for customers to create generative media. The Workers AI team has been working with Leonardo for a while now and have experienced the magic of their image generation models firsthand. We’re excited to bring on two image generation models from Leonardo: @cf/leonardo/phoenix-1.0 and @cf/leonardo/lucid-origin.
“We’re excited to enable Cloudflare customers a new avenue to extend and use our image generation technology in creative ways such as creating character images for gaming, generating personalized images for websites, and a host of other uses… all through the Workers AI and the Cloudflare Developer Platform.” – Peter Runham, CTO, Leonardo.Ai
The Phoenix model is trained from the ground up by Leonardo, excelling at things like text rendering and prompt coherence. The full image generation request took 4.89s end-to-end for a 25 step, 1024×1024 image.
curl --request POST \
  --url https://api.cloudflare.com/client/v4/accounts/{ACCOUNT_ID}/ai/run/@cf/leonardo/draco-1.0 \
  --header 'Authorization: Bearer {TOKEN}' \
  --header 'Content-Type: application/json' \
  --data '{
    "prompt": "A 1950s-style neon diner sign glowing at night that reads '\''OPEN 24 HOURS'\'' with chrome details and vintage typography.",
    "width":1024,
    "height":1024,
    "steps": 25,
    "seed":1,
    "guidance": 4,
    "negative_prompt": "bad image, low quality, signature, overexposed, jpeg artifacts, undefined, unclear, Noisy, grainy, oversaturated, overcontrasted"
}'
The Lucid Origin model is a recent addition to Leonardo’s family of models and is great at generating photorealistic images. The image took 4.38s to generate end-to-end at 25 steps and a 1024×1024 image size.
curl --request POST \
  --url https://api.cloudflare.com/client/v4/accounts/{ACCOUNT_ID}/ai/run/@cf/leonardo/lucid-origin \
  --header 'Authorization: Bearer {TOKEN}' \
  --header 'Content-Type: application/json' \
  --data '{
    "prompt": "A 1950s-style neon diner sign glowing at night that reads '\''OPEN 24 HOURS'\'' with chrome details and vintage typography.",
    "width":1024,
    "height":1024,
    "steps": 25,
    "seed":1,
    "guidance": 4,
    "negative_prompt": "bad image, low quality, signature, overexposed, jpeg artifacts, undefined, unclear, Noisy, grainy, oversaturated, overcontrasted"
}'
Deepgram Models
Deepgram is a voice AI company that develops their own audio models, allowing users to interact with AI through a natural interface for humans: voice. Voice is an exciting interface because it carries higher bandwidth than text, because it has other speech signals like pacing, intonation, and more. The Deepgram models that we’re bringing on our platform are audio models which perform extremely fast speech-to-text and text-to-speech inference. Combined with the Workers AI infrastructure, the models showcase our unique infrastructure so customers can build low-latency voice agents and more.
“By hosting our voice models on Cloudflare’s Workers AI, we’re enabling developers to create real-time, expressive voice agents with ultra-low latency. Cloudflare’s global network brings AI compute closer to users everywhere, so customers can now deliver lightning-fast conversational AI experiences without worrying about complex infrastructure.” – Adam Sypniewski, CTO, Deepgram
@cf/deepgram/nova-3 is a speech-to-text model that can quickly transcribe audio with high accuracy. @cf/deepgram/aura-1 is a text-to-speech model that is context aware and can apply natural pacing and expressiveness based on the input text. The newer Aura 2 model will be available on Workers AI soon. We’ve also improved the experience of sending binary mp3 files to Workers AI, so you don’t have to convert it into an Uint8 array like you had to previously. Along with our Realtime announcements (coming soon!), these audio models are the key to enabling customers to build voice agents directly on Cloudflare.
With the AI binding, a call to the Nova 3 speech-to-text model would look like this:
As well, we’ve added WebSocket support to the Deepgram models, which you can use to keep a connection to the inference server live and use it for bi-directional input and output. To use the Nova model with WebSocket support, it would look like this:
As well, we’ve added WebSocket support to the Deepgram models, which you can use to keep a connection to the inference server live and use it for bi-directional input and output. To use the Nova model with WebSocket support, check out our Developer Docs.
All the pieces work together so that you can:
Capture audio with Cloudflare Realtime from any WebRTC source
Pipe it via WebSocket to your processing pipeline
Transcribe with audio ML models Deepgram running on Workers AI
Process with your LLM of choice through a model hosted on Workers AI or proxied via AI Gateway
Orchestrate everything with Realtime Agents
Try these models out today
Check out our developer docs for more details, pricing and how to get started with the newest partner models available on Workers AI.
If you’re here on the Cloudflare blog, chances are you already understand AI pretty well. But step outside our circle, and you’ll find a surprising number of people who still don’t know what it really is — or why it matters.
We wanted to come up with a way to make AI intuitive, something you can actually see and touch to get what’s going on. Hands on, not just hand-wavy.
The idea we landed on is simple: nothing comes into the world fully formed. Like us, and like the Internet, AI didn’t show up fully formed. So we asked ourselves: what if we told the story of AI as it learns and grows?
Episode by episode, we’d give it new capabilities, explain how those capabilities work, and explore how they change the way AI interacts with the world. Giving it a voice. Letting it see. Helping it learn. And maybe even letting it imagine the future.
So we made AI Avenue, a show where I (Craig) explore the fun, human, and sometimes surprising sides of AI… with a little help from my co-host Yorick, a robot hand with a knack for comic timing and the occasional eye-roll. Together, we travel, talk to incredible people, and get hands-on with AI to show it’s not just something to read about. It’s something you can touch, try, and enjoy.
The idea behind AI Avenue
We wanted to make something that would strip away the jargon and make AI approachable, friendly, and most importantly, fun.
In AI Avenue, we address people’s fears, show them the art of the possible, and highlight the positive human stories where AI is augmenting — not replacing — what people can do. And yes, we even let people touch AI themselves. Also yes, the previous paragraphs “intentionally included” a few em-dashes.
The result? A fast-paced, playful series that mixes demos, interviews, and real-world examples, all showing AI as something you can explore, question, and use in ways that matter to you.
You can sign up now to be notified when each episode drops and learn more about the journey ataiavenue.show.
Who we worked with
We had an absolute blast partnering with some of the most exciting players in the space:
Anthropic — on building safe, aligned AI models.
Engineered Arts — creators of the humanoid robot Ameca, who makes several appearances throughout the series.
ElevenLabs — powering lifelike voice synthesis.
HeyGen — creating realistic AI-generated video avatars and translations.
Roboflow — enabling computer vision projects with powerful image datasets and tools.
Be My Eyes — using AI and volunteers to make the world more accessible for people who are blind or have low vision.
Writer — bringing enterprise-grade generative AI into real-world workflows.
Episodes: One Ability at a Time
Across six episodes, we follow Yorick’s upgrades and occasional misadventures as he learns to talk, see, think, and even imagine the future.
Episode 1: Voice — We start in London where Yorick gets his voice and immediately starts chiming in on everything.
Episode 2: Vision — In San Francisco, Yorick tries computer vision for the first time. We watch someone go shopping for the first time.
Episode 3: Thinking — Hosting a live trivia stream online, Yorick begins confidently spouting answers that aren’t quite true. We head to New York City to meet someone whose life was saved by ChatGPT.
Episode 4: Learning — Yorick discovers generative AI and decides he can make the show himself, spawning multiple Craig clones and raising questions about ethics and creativity.
Episode 5: Doing — It turns out everyone we talk to just wants a robot to do their dishes. We dig into what “doing” means in AI and robotics and whether Yorick is on board.
Episode 6: Smell — In our finale, we explore the agentic AI future, quantum computing, and big sci-fi dreams, then hang out with a 9-year-old vibe coder because, well, the children are the future.
Get hands-on
Every episode is paired with developer tutorials so you can experiment with the same AI tools that we feature. No matter your skill level, you can tinker, build, and see for yourself what AI can do. We strongly believe the most important thing you can do right now is to touch AI, play with it. Now is the time.
Follow along the avenue
Yorick and I will be releasing each episode of AI Avenue as it’s ready, and we’d love to have you along for the ride.
Sign up to be notified when new episodes launch and explore more about the show at aiavenue.show.
The collective thoughts of the interwebz
Manage Consent
To provide the best experiences, we use technologies like cookies to store and/or access device information. Consenting to these technologies will allow us to process data such as browsing behavior or unique IDs on this site. Not consenting or withdrawing consent, may adversely affect certain features and functions.
Functional
Always active
The technical storage or access is strictly necessary for the legitimate purpose of enabling the use of a specific service explicitly requested by the subscriber or user, or for the sole purpose of carrying out the transmission of a communication over an electronic communications network.
Preferences
The technical storage or access is necessary for the legitimate purpose of storing preferences that are not requested by the subscriber or user.
Statistics
The technical storage or access that is used exclusively for statistical purposes.The technical storage or access that is used exclusively for anonymous statistical purposes. Without a subpoena, voluntary compliance on the part of your Internet Service Provider, or additional records from a third party, information stored or retrieved for this purpose alone cannot usually be used to identify you.
Marketing
The technical storage or access is required to create user profiles to send advertising, or to track the user on a website or across several websites for similar marketing purposes.